user's guide - gallagher & robertson as
TRANSCRIPT

http
://w
ww
.glin
k.co
m/g
link/
TM
GLINR
G&
KPROFESSIONAL EDITION ENTERPRISE EDITIONUser's
Guide
G A L L A G H E R R O B E R T S O N
G&R

Microsoft, Windows, MS are registered trademarks of Microsoft Corp. IBM and PC are registered trademarks of IBM Corp.
Glink Enterprise Edition, version 7.2 Glink Professional Edition, version 7.2
© Gallagher & Robertson A/S 1987-2003 All Rights Reserved
GALLAGHER & ROBERTSON A/S, Kongens gate 23, N- 0153 Oslo, Norway Tel: +47 23357800 • Fax: +47 23357801
www: http://www.gar.no/ e-mail: [email protected]
G&R
Contents
Contents ................................................................................................ i
Introduction ........................................................................................ 1 Warranty..................................................................................................................... 3 Support ....................................................................................................................... 3
Using the emulator.............................................................................. 5 Starting Glink for Windows ....................................................................................... 5 Command line ............................................................................................................ 6
Basic command line options ........................................................................... 6 Default command line options ........................................................................ 9
GLINK.INI file.......................................................................................... 9 GLWINOPT environment variable ........................................................... 9
Command line file (.glink) ............................................................................ 10 Configuration file: /C .................................................................................... 11 Configuration directory: /CD ........................................................................ 11 Input script parameter: /I ............................................................................... 11 Language key: /L .......................................................................................... 12 Name for status line: /N ................................................................................ 12 Script directory: /O........................................................................................ 12 User script directory: /OU............................................................................. 12 Dial directory name: /P ................................................................................. 13 Rows on screen: /Rnn ................................................................................... 13 72-line scroll mode: /R72.............................................................................. 13 Startup script: /S............................................................................................ 14 User directory: /U.......................................................................................... 14 Password for dial directory: /V ..................................................................... 15 No modem initialize: /X................................................................................ 15
Basic usage............................................................................................................... 16 Windows specifics ........................................................................................ 16
Summary of available keyboard functions ............................................................... 17 IBM 3270/5250 keyboard ............................................................................. 22
Local keyboard entry................................................................................................ 24 Using the mouse ....................................................................................................... 25 VIP edit mode........................................................................................................... 27
Glink User’s Guide Contents i

G&R
The dial directory ..................................................................................................... 29 Entering data into the directory..................................................................... 30 Calling a single system.................................................................................. 33 Calling marked numbers ............................................................................... 33 Calling a group of numbers........................................................................... 34 Calling a number manually ........................................................................... 34 Calling a non-data number ............................................................................ 35 Dial directory codes ...................................................................................... 35 Dial directory abbreviations.......................................................................... 36 Finding a particular entry.............................................................................. 37 Sorting the directory...................................................................................... 37 Dial directory passwords............................................................................... 38 Login name ................................................................................................... 39 Initialize statistics.......................................................................................... 40 Printing the directory .................................................................................... 40 Moving to another dial directory................................................................... 40 Dial directory functions ................................................................................ 40 Telephone exchanges .................................................................................... 42
The file display......................................................................................................... 43 The file display menu bar.............................................................................. 44
File........................................................................................................... 44 Edit .......................................................................................................... 44 Move........................................................................................................ 45 Options .................................................................................................... 45 Commands............................................................................................... 45
The scrollback buffer ............................................................................................... 47 Searching for a text ....................................................................................... 48 Saving scrollback to file................................................................................ 48 Marking a portion of the buffer..................................................................... 48 Transmitting a marked block ........................................................................ 49
Example 1................................................................................................ 49 Example 2................................................................................................ 50
Saving a marked block to file........................................................................ 50 Mailing a marked block ................................................................................ 50 Scrollback buffer bookmarks ........................................................................ 51 Additional functions...................................................................................... 51 Leaving the scrollback function .................................................................... 52
User toggles.............................................................................................................. 52 Auto Line Feed ............................................................................................. 53 Auto Wrapping.............................................................................................. 53 Automatic Tabbing ....................................................................................... 53 Cursor Application mode .............................................................................. 53 Echoplex ....................................................................................................... 54
ii Contents Glink User’s Guide
G&R
Font ............................................................................................................... 54 Graphics mode .............................................................................................. 54 Insert mode.................................................................................................... 54 Keyboard Lock.............................................................................................. 55 Local mode.................................................................................................... 55 Move Del to BS............................................................................................. 55 Roll Mode ..................................................................................................... 55 Screen Width................................................................................................. 55 Space Suppression ........................................................................................ 56 Typeahead mode ........................................................................................... 56 VT100 keypad mode..................................................................................... 56 VIP mode ...................................................................................................... 56
Dumping the screen to your printer.......................................................................... 58 Dumping the screen to file ....................................................................................... 58 Capturing data from the host to a file....................................................................... 58 Local clear screen..................................................................................................... 59 ANSI chat mode ....................................................................................................... 59 The ASCII Table ...................................................................................................... 60 The call timer............................................................................................................ 60 The 'send name' and 'send password' keys ............................................................... 61 Dumping the line buffer ........................................................................................... 61 Leaving the emulator................................................................................................ 62 The status line........................................................................................................... 63
The status bar ................................................................................................ 64 Resetting error status..................................................................................... 65
Emulations......................................................................................... 67 General ..................................................................................................................... 67 Bull emulations......................................................................................................... 67
DKU emulations ........................................................................................... 67 VIP emulations.............................................................................................. 67
IBM emulations........................................................................................................ 68 VT and ANSI emulations ......................................................................................... 68 Minitel and Prestel emulations ................................................................................. 68
Minitel (Teletel) emulation ........................................................................... 68 Prestel (Viewdata) emulation........................................................................ 70
File transfer ....................................................................................... 71 General ..................................................................................................................... 71 ASCII transfers......................................................................................................... 73
ASCII Capture .............................................................................................. 74 ASCII Upload ............................................................................................... 74
Kermit transfers........................................................................................................ 75
Glink User’s Guide Contents iii

G&R
Kermit server operations ............................................................................... 76 Bull Kermit (FTRAN)................................................................................... 77
FTRAN on DPS8000............................................................................... 77 FTRAN on DPS7000............................................................................... 80 GKERM on DPS6000 ............................................................................. 81
Kermit and VAX/VMS ................................................................................. 87 Kermit and file names ................................................................................... 88
Xmodem and related file transfers ........................................................................... 90 Zmodem transfers..................................................................................................... 91 CompuServe transfers .............................................................................................. 92 IND$FILE transfers.................................................................................................. 93
Frequently-asked questions ............................................................. 97
Command list (VIP)........................................................................ 101 VIP commands (Mnemonic sort) ........................................................................... 101 VIP commands (ASCII sort) .................................................................................. 108 VIP attribute commands......................................................................................... 115
Command list (ANSI/VT102) ........................................................ 117 ANSI commands (mnemonic sort) ......................................................................... 118 ANSI commands (ASCII sort) ............................................................................... 123 ANSI attribute commands ...................................................................................... 128 ANSI mode commands .......................................................................................... 130
Command extensions...................................................................... 131
TSM8/TCS forms............................................................................ 137 TSM8 (local forms) ................................................................................................ 137 TCS (local forms)................................................................................................... 141
Overview..................................................................................................... 141 Addressing .................................................................................................. 141 Commands .................................................................................................. 141
Acknowledgments ................................................................................. 142 Form and dataset names ........................................................................ 143
Specific commands ..................................................................................... 143 Store form.............................................................................................. 143 Delete form............................................................................................ 143 Delete dataset ........................................................................................ 144 Read dataset list..................................................................................... 144 Read form list ........................................................................................ 144 Display form.......................................................................................... 144
iv Contents Glink User’s Guide
G&R
Error messages ............................................................................................ 145 Example ...................................................................................................... 145
GLLAY : keyboard layout............................................................. 149 Overview ................................................................................................................ 149 Starting GLLAY..................................................................................................... 149 Which keys can be defined..................................................................................... 150 Defining a key ........................................................................................................ 150
Assign to single character ........................................................................... 152 Assign to ESC sequence ............................................................................. 152 Assign to CSI sequence............................................................................... 152 Assign to internal function.......................................................................... 152 Assign to ANSI function key ...................................................................... 152 Assign to ANSI mode set............................................................................ 153 Assign to ANSI mode reset......................................................................... 153 Assign to VIP scroll function (VIP mode).................................................. 153 Assign to VT320 function key (ANSI/VT modes) ..................................... 153 Assign to ND-Notis key (VT modes only) ................................................. 154 Assign to IBM function key (IBM3270/5250/3151) .................................. 154 Remove assignment for this key ................................................................. 154 Assign to macro .......................................................................................... 155 Leave assignment asis ................................................................................. 155
Producing documentation of your layout ............................................................... 156 Finishing with GLLAY .......................................................................................... 156 Macro definitions ................................................................................................... 157 Internal functions.................................................................................................... 157
Insert toggle........................................................................................... 158 Inline macro........................................................................................... 158 Show Files ............................................................................................. 158 Toggle Local mode................................................................................ 158 Print Screen ........................................................................................... 158 Help Menu............................................................................................. 158 Program Info Menu ............................................................................... 158 Setup Menu............................................................................................ 158 File Transfer .......................................................................................... 158 Terminate emulator ............................................................................... 158 Send Break ............................................................................................ 159 Show line buffer .................................................................................... 159 Capture ASCII Data .............................................................................. 159 Screen dump .......................................................................................... 159 Toggles Menu........................................................................................ 159 Start a script........................................................................................... 159 Dial a number ........................................................................................ 159
Glink User’s Guide Contents v

G&R
Display scrollback ................................................................................. 159 Save in scrollback.................................................................................. 159 Hang up line .......................................................................................... 159 Exec inline macro .................................................................................. 160 ASCII table............................................................................................ 160 Kermit Server ........................................................................................ 160 Call timer ............................................................................................... 160 Send password....................................................................................... 160 Local screen clear .................................................................................. 160 Chat mode toggle................................................................................... 160 Send login name .................................................................................... 160 132 cols swap key.................................................................................. 160 Connect menu........................................................................................ 160 Restart Comms ...................................................................................... 161 Send a file.............................................................................................. 161 Receive a file ......................................................................................... 161 Reset error ............................................................................................. 161 TX-Edit back ......................................................................................... 161 TX-Edit forward .................................................................................... 161 Enter TX-Edit mode .............................................................................. 161 Windows Copy...................................................................................... 161 Windows Paste ...................................................................................... 161 Windows Paste/xmt ............................................................................... 162 Windows Paste/snd................................................................................ 162 Kill host sessions ................................................................................... 162 Edit recall buffer.................................................................................... 162 Print variables........................................................................................ 162
Possible pitfalls ...................................................................................................... 162
Character equivalents .................................................................... 163 PC Codepage 437 - English ................................................................................... 165 PC Codepage 850 - Multilingual............................................................................ 166 PC Codepage 865 - Nordic..................................................................................... 167 Windows ANSI character set ................................................................................. 168 DEC multinational character set............................................................................. 169 EBCDIC character set ............................................................................................ 170
Error texts ....................................................................................... 171 NetBIOS error codes .............................................................................................. 205 Windows Sockets error codes ................................................................................ 206 Microsoft TCP/IP / 3+Open socket error codes ..................................................... 208
vi Contents Glink User’s Guide

G&R
Glink User’s Guide Contents vii


G&R
Introduction Glink is a terminal emulator designed for general-purpose communications work. Glink, Professional Edition and Glink, Enterprise Edition are Window 32-bit versions, supporting all the current versions of Windows and Windows NT. Windows 16-bit, DOS, MAC and Java versions of Glink are also available as separate packages.
Glink supports a subset of the ANSI 3.64 standard, and for work in VT environments, a separate VT102 mode is supplied for VT52, VT100, VT220, VT320, VT340 and VT420 support. Additional modes available are emulation of Prestel and Minitel terminals, IBM 3270, 3151 and 5250 emulation, and for the specific needs of the Bull user, there are VIP7301, VIP7800, VIP7700, DKU7107 and DKU7102 emulation modes. For more details refer to the Emulations section.
Glink also provides extensive support for the various asynchronous, synchronous and network communications server solutions available on the market today. Amongst the main TCP/IP protocols, Glink supports Telnet, Rlogin, TNVIP, TN3270, TN3270E and TN5250. DSA, ISO/DSA or RFC1006 connections may be obtained via the G&R Host Links products Ggate or LDSA. X.25 and TGX support in available via Atlantis, Cirel or Eicon cards or gateways. Dial-up or direct connections are also provided. For a full list of the supported communications interfaces and protocols, refer to the Communications interfaces section in the corresponding Glink Administrator’s guide.
The emulator has built-in Kermit transfer functionality. All of the standard and Bull specific improvements to this protocol are supported. This includes sliding windows, long packets, all the Bull derivations such as GKRM, FTRAN. Additional facilities are provided for making file transfers using either plain text transfers or the Xmodem, Ymodem and Zmodem protocols and most normal variants of these (batch, Telink, etc). CompuServe B protocol is supported in automatic mode. IND$FILE is supported for IBM 3270 connections.
Other functions provided by the emulator include:
• Command access - both locally and under host control
Glink User’s Guide Introduction 1

G&R
• Script language - over two hundred commands for automating often-used procedures or providing automatic login facilities
• LAN and WAN support • Full-function dialling directory - for use with smart modems (Hayes-
compatible) • Macro keys - may be configured dynamically • Capture and print functions • Utilities for redesigning the keyboard layout to your own personal
requirements • Scrollback buffer which keeps up to 32766 pages of information in
memory; cut, paste and edit functions • File utilities - functions for accessing and manipulating local files and
directories • Online ASCII table both for PC and host character sets • All parameters and options are immediately reconfigurable through
easy-to-use menus. • Context switching and local forms control • Programmable interface to the emulator for application programs • External Script extension DLL support • DDE and OLE Automation support • UVTI and HLLAPI DLL support • Windows sockets • Telephony API
2 Introduction Glink User’s Guide

G&R
Warranty While Gallagher & Robertson A/S have made every effort to ensure that this software package should function as described, no warranty of any kind, express or implied, is made by us. Gallagher & Robertson A/S shall not be liable for any damages, direct, indirect, special, or consequential arising from a failure of this program to operate in the manner desired by the user. Gallagher & Robertson A/S shall not be liable for any damage to data or property that may be caused directly or indirectly by the use of this program. In no event will Gallagher & Robertson A/S be liable to you for any damages, including lost profits, savings or other incidental or consequential damages arising from your use or inability to use the program, or for any claim by any other party. Any dispute arising in connection with this warranty will be settled under Norwegian law.
Gallagher & Robertson A/S confirm their intention that the software should function as described, and will make all reasonable efforts to ensure that errors in the software reported in writing to our office in Oslo be corrected in future releases of the software.
Gallagher & Robertson A/S grant you as a registered user of Glink a licence to use the software and to make those copies you deem necessary for your own security. The package itself remains the property of Gallagher & Robertson A/S and we expect you to take all reasonable precautions to ensure that illegal copies are not made by a third party.
Support Support is available from your local supplier rather than from Gallagher & Robertson A/S. For information about support numbers check the information screen in the program itself. This screen can be displayed using the Help / About Glink key.
Glink User’s Guide Introduction 3


G&R
Using the emulator
Starting Glink for Windows Glink for Windows is started in the normal way by double-clicking the Glink icon on your desktop (or by positioning yourself on the Glink icon and pressing ENTER).
The initial screen shown will depend upon which options you have chosen in your configuration, but will normally be a 'welcome' screen providing general information about the program:
Options are provided to enable you to suppress this menu, and also (for those using a modem) to present the dial directory as soon as the emulator is started up.
Note that if you have any problems or questions about the software, then relevant information will be provided if you select About Glink from Help in the Glink menu bar.
Glink User’s Guide Using the emulator 5
G&R
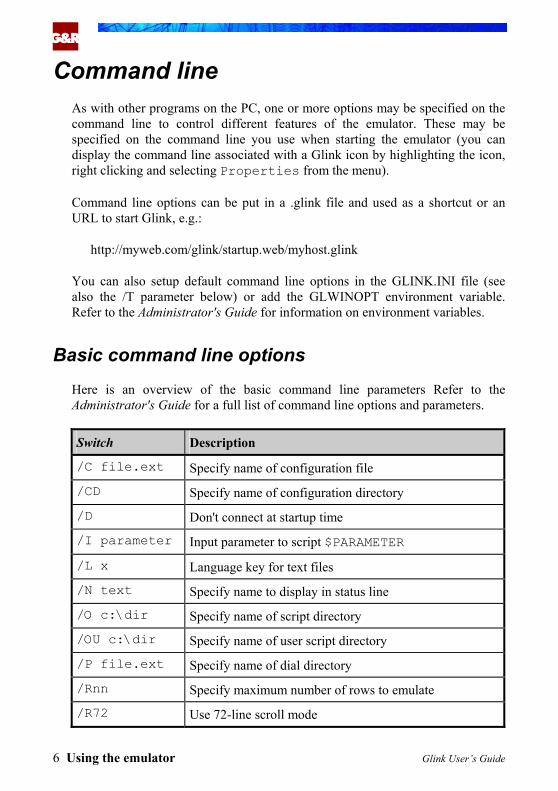
Command line As with other programs on the PC, one or more options may be specified on the command line to control different features of the emulator. These may be specified on the command line you use when starting the emulator (you can display the command line associated with a Glink icon by highlighting the icon, right clicking and selecting Properties from the menu).
Command line options can be put in a .glink file and used as a shortcut or an URL to start Glink, e.g.:
http://myweb.com/glink/startup.web/myhost.glink
You can also setup default command line options in the GLINK.INI file (see also the /T parameter below) or add the GLWINOPT environment variable. Refer to the Administrator's Guide for information on environment variables.
Basic command line options Here is an overview of the basic command line parameters Refer to the Administrator's Guide for a full list of command line options and parameters.
Switch Description
/C file.ext Specify name of configuration file
/CD Specify name of configuration directory
/D Don't connect at startup time
/I parameter Input parameter to script $PARAMETER
/L x Language key for text files
/N text Specify name to display in status line
/O c:\dir Specify name of script directory
/OU c:\dir Specify name of user script directory
/P file.ext Specify name of dial directory
/Rnn Specify maximum number of rows to emulate
/R72 Use 72-line scroll mode
6 Using the emulator Glink User’s Guide

G&R
Switch Description
/S script.scr
Specify name of startup script
/U c:\dir Specify name of user file directory
/V password Specify password for dial directory
/X Don't initialize modem
We will here deal with some of the more important of these in detail.
If you wish to keep your 'own' files separate from the standard files delivered with the emulator then this may be specified with the /U command line option. Starting GLINK with the command:
GL /U C:\GLUSE
for example, would tell GLINK that your 'user' files should be kept in the C:\GLUSE directory. This may be useful either simply because it allows you to keep your user files separate from the standard software, or because more than one person is sharing the same copy of the program and you wish to use multiple 'user directories'. The files affected by this parameter are the following:
GLWINC.DEF The configuration file GLINK.PHO The dial directory
If a user directory is specified then keyboard (GLWINK.*) and layout (GLWINL.*) files may reside either in the standard GLINK directory or in the user directory. If a file exists in both then the file from the user directory will be used.
Additionally, if the help files are not found in the GLINK directory then the program will also search for them in this 'user' directory.
If you are using the alternate configuration file possibility then you may start the emulator using the /C parameter followed by a string of from 1 to 3 characters: this is the extension to add to 'GLWINC.' to produce the name of the particular configuration file you wish to run from. For example, to use GLWINC.CNX as your configuration file you would start the emulator with:
GL /C CNX
Glink User’s Guide Using the emulator 7

G&R
If you wish you may specify a complete file name. For example:
GL /C GLWINC.CNX
(This also applies to the other options described further on in this section).
Another parameter allows you to insert an identifying text into the status line. This may be useful if you are running more than one copy of the emulator and need some way of seeing which one you are using easily. To use this option, start the emulator with (for example):
GL /N UNIX-host
A further parameter allows you to automatically start a script as soon as the emulator comes up. This parameter looks like:
GL /S Start.scrgl
where START.SCRGL is the name of the script file to execute. You may also use the /O parameter to specify a script directory that will be searched whenever a script cannot be found in the current directory. An alternate dial directory may be specified with the /P command line parameter.
More than one option may be specified in the same command line; and the order in which they are specified makes no difference (unless you specify the same option twice with different arguments, in which case the last value specified will be used). For example:
GL /S "GCOS 8.scrgl" /C CN1
Options using arguments requiring embedded spaces may use single apostrophes (') or quotes (") to mark the beginning and end of the argument. If the argument itself requires arguments, for example the /S option might need script parameters to be entered this way:
GL.EXE /S "'Connect to Host.scrgl' par1 par2 par3"
Then use single apostrophes (') inside the quotes (") for this purpose.
8 Using the emulator Glink User’s Guide

G&R
The command line also interprets environment variables using the standard %VARIABLE% syntax. As different Windows platforms and networks use different environment variables for the users logon name, Glink accepts $USER$ and $USERNAME$ in the same way as the NETSETUP program does, e.g.:
GL /U H:\$USER$\MYFILES /OU %TEMP%
Glink accepts $GLINK$ for the GLINK directory, e.g.:
GL /CD http://myhost.com/glink/config /U $GLINK$ /C myconfig
The above example would allow GLHOST.INI to be picked up from the URL and any changes would be saved and merged in from a local copy in the users GLINK directory. The config file would be picked up from the URL config directory.
Default command line options Rather than always start your copy of GLINK with:
GL /U C:\MYFILES
You can configure default command line option in the GLINK.INI file or set the GLWINOPT environment variable.
GLINK.INI file The GLINK.INI file should reside in the Glink directory. You could create a GLINK.INI file and set default parameters by including a line like
[options] default=/U C:\MYFILES
Glink will first look for the file in the Glink directory, then the Windows directory.
GLWINOPT environment variable The GLWINOPT environment variable may be used to preset any or all of the above command line options. You could include the command:
Glink User’s Guide Using the emulator 9

G&R
SET GLWINOPT=/U C:\MYFILES
in your User or System environment and configure the Glink icon properties no parameters at all. Options specified on the command line or in the GLINK.INI will always override options set in the GLWINOPT variable.
Command line file (.glink) Command line options can be put in a .glink file and used as a shortcut to start Glink, e.g:
c:\glwin\demo\glink\startup\dku7107_to_tp8test.glink
If the command line file is put on a web server, then you can also start Glink from a web page, e.g.:
http://myweb.com/glink/startup.web/dku7107_to_tp8test.glink
This is the basis of web-controlled Glink.
The .glink file extension is registered in the workstation’s registry when the Glink downloadable package is installed. It is registered in a similar way to say a .doc file. When you click on it, Windows opens the associated program and passes the file as a command line parameter.
The .glink file is registered as being a valid file type that can be received from a web server. The web server is configured to tell the browser that the MIME file type of the .glink file is ”application/x-glink”. When executed, it will start Glink with the following command line
gl.exe /COMMAND dku7107_to_tp8test.glink
Typically the command line file will contain references to directories or files on the web-server:
/CD http://myweb.com/glink/config /O http://myweb.com/glink/script /C glwinc.dku7107_to_tp8test
10 Using the emulator Glink User’s Guide

G&R
When Glink starts up and recognizes a file located on the web-server, it connects to the web server, downloads it to the users temp directory and loads the file locally. The download of a remote file will only be done the first time, thereafter it will be read directly from the temp directory. When the user exits Glink, all the temporary files are removed. The whole operation is done completely transparently to the user.
Configuration file: /C The Glink configuration file has a default name of GLWINC.DEF. The /C option allows you to select one of several alternate configuration files. In the same way as for the /A option, you may either specify just the extension to use, or the complete filename. For example:
/C MOD Configuration file is GLWINC.MOD /C GLCONF.1 Configuration file is GLCONF.1
Configuration files are stored on the Glink 'user' directory (see the /U command line option).
Configuration directory: /CD The Glink configuration directory is normally the same as the Glink directory. If this option is used, then Glink searches for configuration files in this directory rather than the Glink directory before looking in the Glink 'user' directory. (see the /U command line option). This option may be useful in web controlled Glink environments where the main configuration files are on the web server, but the user may have some local configuration files such as a merged GLHOST.INI file.
GL /CD http://myhost.com/glink/config /U $GLINK$
Input script parameter: /I This parameter is used to specify an initial script parameter which will be avail-able to the first script file to be run after the emulator is started. More details are available in the Script Reference Manual.
Glink User’s Guide Using the emulator 11
G&R
Language key: /L The language key specifies an alternate set of files to use for support of a diffe-rent operating language. The following files must be available for such support to function correctly (x here is the language code specified after the /L parameter):
GLlx.DLL
For more information about the /L parameter, refer to the Administrator's Guide.
Name for status line: /N This parameter allows you to insert an identifying text into the status line. This may be useful if you are running more than one copy of the emulator and need some way of seeing which one you are using easily.
To use this option, start the emulator with (for example):
GL /N VAX-host
This is the same option as is set with the script NAME command.
Script directory: /O The /O parameter specifies the 'script directory', which will be searched when-ever a script cannot be found in the current directory. For example:
GL /O F:\SCRIPTS
See the Script Reference Manual for a complete description of the script language.
User script directory: /OU The /OU parameter specifies the 'user script directory', which will be searched before the normal script directory (set with /O above) whenever a script cannot be found in the current directory. For example:
12 Using the emulator Glink User’s Guide
G&R
GL /OU C:\MYSCRIPTS
Dial directory name: /P The Glink dial directory has a default name of GLINK.PHO. If you wish to use an alternate dial directory, then you can use the /P parameter. You can specify either just a file extension (in which case it will automatically be prefixed with GLINK.) or the full name:
/P PH2 Dial directory is GLINK.PH2 /P GLPHONE.DIR Dial directory is GLPHONE.DIR
The dial directory is stored on the Glink 'user' directory (see the /U command line option).
Rows on screen: /Rnn This parameter allows you to specify the maximum number of rows you wish to be able to emulate on-screen. A minimum of 34 rows will always be supported, but use of the /Rnn parameter can allow up to 99 rows on the emulation screen. Changes to the number of lines shown on the screen can be made both under host control and by use of the SET SCREEN LENGTH script command. Note however that if you wish 72-line scroll mode to be used in the VIP7800 emulation then you must use /R72 rather than any other value.
72-line scroll mode: /R72 This parameter specifies that you wish 72-line scroll mode to be active for the VIP7800 emulation. If /R72 is not specified then only the normal 24-line emulation will be available. Note that 72-line scroll mode will only be active if the window resizing option (in Settings / Screen /Window attributes) is set to 'change displayed area'.
The scrolling functions on the real terminals consist of Next Segment and Previous Segment, which move a full screen at a time through the 72-line data space, and Scroll Up and Scroll Down, which move one line at a time. The equivalent commands in Glink are implemented as a combination of the ALT key and functions on the extra keypad between the main keyboard and the numeric keypad. The actual keys are as follows:
Glink User’s Guide Using the emulator 13
G&R
ALT+END Next Segment ALT+HOME Previous Segment ALT+PAGEUP Scroll Down ALT+PAGEDOWN Scroll Up
The real terminal has only one scrolling function, where the cursor follows along with the scrolling. Glink has additional scrolling functions that leave the actual cursor in place. These let you inspect the rest of the form without moving the 'real' cursor from its present position, and the screen will scroll automatically back to the cursor position as soon as data is entered. This functionality is supplied on the ALT+UP ARROW and ALT+DOWN ARROW keys (the arrow keys on the extra cursor pad, not in the numeric keypad).
Startup script: /S This parameter allows you to automatically start a script file as soon as the emulator comes up. For example:
GL /S START.SCR
would run the script file START.SCR at startup time. See the Script Reference Manual for a complete description of the script language.
User directory: /U The user directory is an important concept in a multi-user environment. It may also be found useful if you wish to keep your 'own' files separate from the standard files delivered with the emulator, or have more than one user sharing a single computer. The directory is specified with /U as follows:
GL /U C:\GLUSE
The above command would tell Glink that 'user' files should be kept in the C:\GLUSE directory. Files affected by this parameter are the following:
Configuration files (default GLINK.CNF/GLWINC.DEF) Dial directories (default GLINK.PHO) Appointment files (default GLINK.APP)
14 Using the emulator Glink User’s Guide

G&R
If a user directory is specified then keyboard transliteration (GLINK.K* / GLWINK.*) and keyboard layout (GLINK.L* / GLWINL.*) files may reside either in the standard Glink config directory (/CD) or in the user directory. If one of these files exists in both directories then the user directory takes precedence.
Additionally, if the help files are not found in the Glink directory then the program will also search for them in this 'user' directory.
Password for dial directory: /V This parameter lets you specify the password for the dial directory directly from the command line, thus avoiding the password question that would otherwise be asked when the dial directory is called up. This may be found useful in the case where you want to run an unattended job with a password-protected dial directory (but be aware that this compromises security somewhat).
No modem initialize: /X If the /X parameter is specified, then the modem will not be initialized at startup time. This can be used in the case where you have exited from Glink altogether but still have an active modem connection (where initializing the modem would almost certainly cause the connection to be dropped).
Glink User’s Guide Using the emulator 15

G&R
Basic usage You may, in general, use the emulator the way you would use a 'normal' terminal. Some special considerations apply, however, because of the additional functions supplied by the emulator and because of the differences in the keyboard. The PC keyboard does not supply a line feed or transmit key. These have been assigned to the 'Grey/-' and 'Grey/+' keys on the PC. You will find these next to the numeric keypad at the right-hand side of the PC keyboard.
Windows specifics You interact with Glink by using your mouse and the Glink menu bar in a the same manner you would with other Windows applications. Some of the functions are available from the keyboard, but all functionality is available by making selections from the menu bar in 'point-and-click' operations.
There is an extensive on-line help facility, accessible in either of two ways. You can select a field, check box or radio button on the screen and press F1 to receive a help message specific to the selection. You can also select Help from the Glink menu bar and search through an index of help topics.
16 Using the emulator Glink User’s Guide

G&R
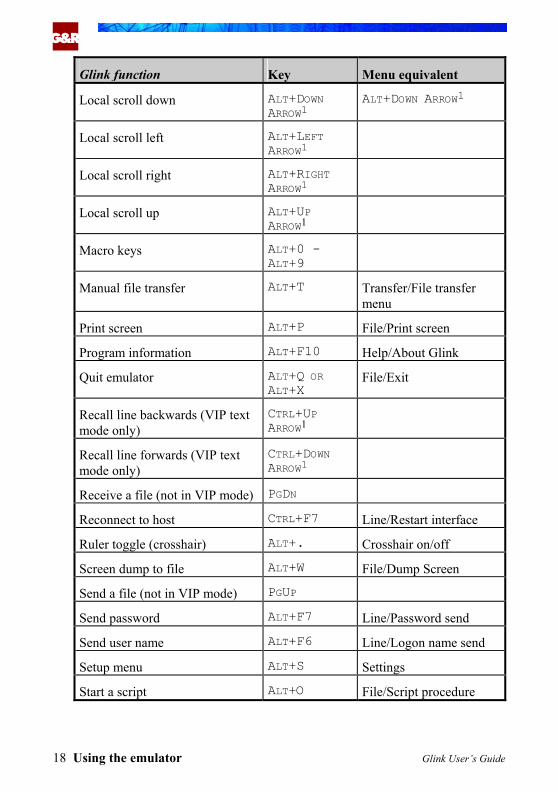
Summary of available keyboard func-tions
The following table shows the Glink function, the keystrokes that you use to call the function, and the menu path to use from the Glink menu bar. While you can perform most functions using your keyboard, it is more likely that you will be using your mouse to select from Glink's menu bar.
Glink function Key Menu equivalent
ASCII capture ALT+V File/Capture
ASCII table ALT+F9 Help/Character tables
Connection menu CTRL+F6 Line/Connect menu
Call timer ALT+F8 Line/Time online
Chat mode (ANSI/VT102 only)
ALT+F4 Edit/Chat mode
Clear screen locally ALT+F3 Edit/Clear screen
Define inline macro on/off ALT+M Edit/Define inline macro
Dial directory ALT+N Line/Directory
Minimize Glink ALT+D
Enter edit mode (VIP text mode only)
ALT+ENTER1
Execute inline macro ALT+E Edit/Execute inline macro
File window ALT+F File/File Display
Hang up (disconnect) ALT+Y Line/Hangup line
Help menu ALT+H Help
Host name select (DEC LAT) CTRL+F6 Line/Connect menu
Kermit server menu ALT+Z Transfer/Kermit server mode
Line buffer display ALT+F5 Line/Line buffer
Glink User’s Guide Using the emulator 17
G&R
Glink function Key Menu equivalent
Local scroll down ALT+DOWN ARROW1
ALT+DOWN ARROW1
Local scroll left ALT+LEFT ARROW1
Local scroll right ALT+RIGHT ARROW1
Local scroll up ALT+UP ARROW1
Macro keys ALT+0 - ALT+9
Manual file transfer ALT+T Transfer/File transfer menu
Print screen ALT+P File/Print screen
Program information ALT+F10 Help/About Glink
Quit emulator ALT+Q OR ALT+X
File/Exit
Recall line backwards (VIP text mode only)
CTRL+UP ARROW1
Recall line forwards (VIP text mode only)
CTRL+DOWN ARROW1
Receive a file (not in VIP mode) PGDN
Reconnect to host CTRL+F7 Line/Restart interface
Ruler toggle (crosshair) ALT+. Crosshair on/off
Screen dump to file ALT+W File/Dump Screen
Send a file (not in VIP mode) PGUP
Send password ALT+F7 Line/Password send
Send user name ALT+F6 Line/Logon name send
Setup menu ALT+S Settings
Start a script ALT+O File/Script procedure
18 Using the emulator Glink User’s Guide

G&R
Glink function Key Menu equivalent
Switch left/right in 132-col CTRL+RIGHT ARROW
Toggle menu ALT+U Settings/Toggles
Scrollback buffer CTRL+PGUP Edit/Scrollback
Save page in scrollback buffer CTRL+PGDN Edit/Dump to scrollback
X.25 PAD command menu CTRL+F6 Line/Connect menu
Glink User’s Guide Using the emulator 19

G&R
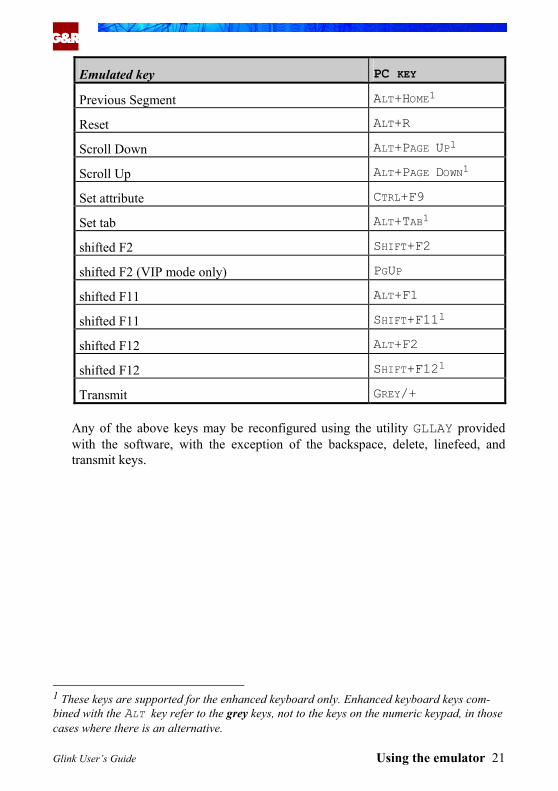
Emulated key PC KEY
Backspace (ASCII 08 character) BACKSPACE
Break ALT+B
Clear CTRL+HOME
Clear Tab CTRL+TAB1
Del (ASCII 7F character) CTRL+DEL
Delete attribute CTRL+F10
Delete character DEL
Delete line ALT+K
Erase to end of line END
Erase to end of page CTRL+END
F2 F2
F2 (VIP mode only) PGDN
F11 CTRL+F1
F11 F111
F12 CTRL+F2
F12 F121
Home HOME
Home KEYPAD/51
Initialize ALT+I
Insert line ALT+J
Insert mode INS
Line Feed GREY/-
Local ALT+L
Next Segment ALT+END1
NUL CTRL+2
20 Using the emulator Glink User’s Guide
G&R
Emulated key PC KEY
Previous Segment ALT+HOME1
Reset ALT+R
Scroll Down ALT+PAGE UP1
Scroll Up ALT+PAGE DOWN1
Set attribute CTRL+F9
Set tab ALT+TAB1
shifted F2 SHIFT+F2
shifted F2 (VIP mode only) PGUP
shifted F11 ALT+F1
shifted F11 SHIFT+F111
shifted F12 ALT+F2
shifted F12 SHIFT+F121
Transmit GREY/+
Any of the above keys may be reconfigured using the utility GLLAY provided with the software, with the exception of the backspace, delete, linefeed, and transmit keys.
1 These keys are supported for the enhanced keyboard only. Enhanced keyboard keys com-bined with the ALT key refer to the grey keys, not to the keys on the numeric keypad, in those cases where there is an alternative.
Glink User’s Guide Using the emulator 21

G&R
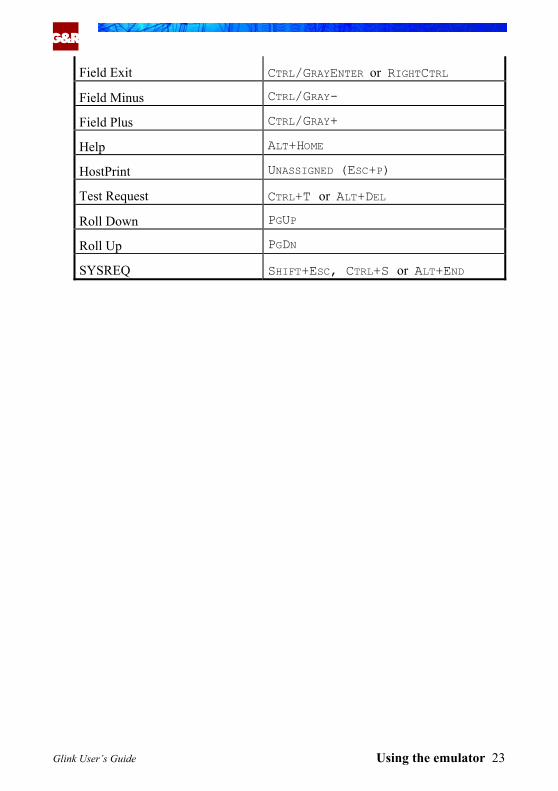
IBM 3270/5250 keyboard
Emulated key PC key
Backspace BACKSPACE
Backtab SHIFT+TAB
Clear PAUSE or CTRL+HOME
Delete character DEL
Dup CTRL+D
Enter/New line GREY/- (also ENTER if option not set)
Erase input CTRL+END
Erase to end of field END
Home HOME
Insert mode toggle INS
PF1 to PF12 F1 to F12
PF13 to PF24 SHIFT+F1 to SHIFT+F12
Reset LEFT CTRL or SCROLL LOCK
Send RIGHT CTRL OR GREY/+ (also ENTER if option set)
Tab TAB
3270-specific keys
Alpha override CTRL+A
Break (ATTN) ESC or ALT+B
Cursor select CTRL+C
Field mark CTRL+F
PA1 to PA3 CTRL+F1 to CTRL+F3
SYSREQ SHIFT+ESC or CTRL+S
5250-specific keys
Break (ATTN) ESC, ALT+B or BREAK
22 Using the emulator Glink User’s Guide
G&R
Field Exit CTRL/GRAYENTER or RIGHTCTRL
Field Minus CTRL/GRAY-
Field Plus CTRL/GRAY+
Help ALT+HOME
HostPrint UNASSIGNED (ESC+P)
Test Request CTRL+T or ALT+DEL
Roll Down PGUP
Roll Up PGDN
SYSREQ SHIFT+ESC, CTRL+S or ALT+END
Glink User’s Guide Using the emulator 23

G&R
Local keyboard entry The previous summaries apply to keys that may be used when running as a terminal. Note that in several cases, such as when you are asked for the name of a file, or filling out a field in your appointments book, then the LOCAL editing keys apply to entering data in the field concerned. Here is a summary of the keys that you may use to enter data into such fields:
PC key Action
HOME moves to the first character of the field
END moves to the character after the last
LEFT ARROW moves one character to the left
RIGHT ARROW moves one character to the right
UP ARROW moves to previous field in multiple-choice menus
DOWN ARROW moves to next field in multiple-choice menus
INS toggles 'insert mode'
DEL deletes the character under the cursor
BACKSPACE deletes the character to the left of the cursor
CTRL+END deletes the field from the current position
F1 provides context-sensitive help
F3 gets back the last value you entered in a field
ENTER exits, entering the value into the field
ESC exits without entering a value
These keys apply whenever the emulator asks you for data locally, in one of its popup windows on the screen.
24 Using the emulator Glink User’s Guide

G&R
Using the mouse Use of the mouse in parts of the screen other than the main emulator window follows normal Windows usage for resizing and moving the Glink window, selecting menu options, and the like. Information about this type of function is available in your standard Windows manuals and help files.
Use of the mouse in the emulator window also follows normal practice, but we shall here summarize some of the important differences and a number of additional functions that are slightly 'non-standard'.
Moving the cursor is done by left-clicking the location to which you wish to move. Note that this functionality is only available for those emulations where the cursor may be freely moved locally, usually those operating in TEXT or FORM mode.
Marking of an area of text on the screen is done by pressing the left mouse button at the start of the area to be marked and keeping it pressed while moving the mouse to the other end of the area to be marked. Then release the left mouse button. Depending on the setting you have chosen for 'mark rectangles' in the Edit menu either a rectangular area will be marked, or all text between the starting and ending position on a line by line basis. If you wish to mark using the other style of marking, you may either change the setting of this option or hold down the CTRL key when you press the left mouse button.
Extending the marked area on the screen is done by pressing the SHIFT key when you press the left mouse button. The start of the previous mark is remembered and you may now choose a different endpoint.
Marking a single word or filename is done by double-clicking the word you wish to mark. Wrapping will occur if the word extends to the next line, however, a CR/LF will still be inserted in the normal way at the end of the line when the text is copied to the clipboard.
Removing a mark is done by clicking just once anywhere in the window.
Using the right-hand mouse button in the main emulator and scrollback windows provides the most-often used functions in a floating menu.
The middle mouse button (or mouse wheel) is used to gain direct access to the scrollback window, and your mouse wheel may be used in the normal way to scroll that window.
Glink User’s Guide Using the emulator 25

G&R
Any of these functions may be disabled if a script that traps mouse actions is running.
The floating menu which is displayed when clicking the right-hand mouse button in Glink's main or scrollback windows, contains some frequently used commands plus a few extra commands which are only enabled when there is a marked area. These commands are:
Print marked prints the marked area
The print is done in the same way as the Print screen command.
Mail marked e-mails the marked area.
This command uses MAPI to display your e-mail system. The marked area will be used as the text of your message. If Glink is unable to load the MAPI modules, then this option will remain disabled.
Process marked executes the associated application
A Process marked option allows you to execute the associated application if it is a file name, or start your Web browser if it is a URL. You can use the double clicking functionality mentioned above to automatically select a word or filename. The marked area will be treated as a contiguous string. All leading and trailing spaces will be removed as will any superfluous quotes and brackets.
You may add you own favourites to this floating menu by using the CONTEXT script command. You can use the script command to send a macro, perform a Glink menu command or simply execute a script, for example:
CONTEXT MAIN ADD "=perform copy;perform pxmt" "Copy and xmit"
The main Glink windows floating menu also allows you to move the cursor to the mouse location.
Move cursor moves the cursor to the mouse position
This option is only enabled if the current emulation mode supports moving the cursor to any part of the screen. The only supported modes are FORM, TEXT and TX-RET mode.
26 Using the emulator Glink User’s Guide

G&R
VIP edit mode Glink supports a form of command recall when running in VIP TEXT mode with the TX-RET (Transmit on return) option selected. All messages sent in this mode are logged in a 'history buffer' unless they are longer than 255 characters, in which case they are not saved. Invocation of edit mode using the default key-board layout is done with one of the following keys:
CTRL+PAGEUP move back in history buffer CTRL+PAGEDOWN move forward in history buffer ALT+ENTER invoke edit mode on current line being typed
These three keys are configurable with the GLLAY utility. Entering CTRL+PAGEUP or CTRL+PAGEDOWN with typed data will confine recall to those commands starting with the typed data (case-insensitive comparison). Recall of previously entered commands (or use of the ALT+ENTER key to invoke edit mode directly) takes the emulator into 'edit mode'. In 'edit mode' the normal emulation for the keyboard is suspended in order to allow you to make any necessary modifications to the command before sending it to the host.
You may also edit the contents of the history buffer at any time using either the Edit/Edit recall buffer command in the main menu, or by pressing the F1 key any time you are actually working in edit mode. You may edit anything you choose, including copying and pasting. You will also be positioned at the command where you left the caret on exiting the edit window.
Glink User’s Guide Using the emulator 27

G&R
Once you are in edit mode, the following keys are active:
Edit key Action
ALPHANUMERIC KEYS typed data inserted into the current line, moving the cursor forward
ESC clears current command and turns off edit mode
ENTER or GREY+ sends current command after moving cursor to the end of the command
LEFT ARROW moves one character to the left unless at start
RIGHT ARROW moves one character to the right unless at end
HOME moves to start of command
END moves to end of command
CTRL+LEFT moves back one word
CTRL+RIGHT moves forward one word
BACKSPACE deletes the character behind the cursor
CTRL+BACKSPACE deletes from the start of the word to the cursor
DEL deletes the character under the cursor
CTRL+DEL deletes from the cursor to the end of the word
CTRL+END deletes from the cursor to the end of the command
CTRL+HOME deletes from the start of the command to cursor
UP or CTRL+UP recalls previous command from the history buffer
DOWN or CTRL+DOWN recalls the next command from the history buffer
ALT+HOME moves to beginning of history buffer
ALT+END moves to end of history buffer
F1 invokes editor for history buffer
28 Using the emulator Glink User’s Guide

G&R
The dial directory Glink provides a dial directory that can automate most of your telephone calls for you, if you are using a 'smart modem' for your communications work. If you do not have such a modem, then this section is probably not for you, although you may use some of the functions provided nonetheless.
Functions supported by the dial directory include:
• multiple directories with up to 999 entries in each • password protection for the entire directory • automatic call of any number in the directory • manual dial to a number not in the directory • attached scripts provide auto login function • automatic redial to systems that are busy • automatic logging of date and time of last call • automatic logging of date and time of last attempted call • automatic logging of total number of calls to each system • logging of duration of call and total time used • periodic totals for time used and number of calls • optional log file records each call as it is made • user defined comment for each system shown on-screen • configuration of alternate number if main number is busy • configuration of host type in detail • configuration of line parameters for each host • circular dial queue to dial through selected hosts • configuration of password for each host to use in script • dial entries may be called in from scripts • packing, rearranging and sorting functions built in • flexible formatting of directory to printer • full support for international dial codes
To view the dial directory, press the ALT+N key or select Line/Directory from the Glink menu bar. If this is the first time you are using the function, you will see a blank page in that you as yet have no entries in the directory. Note that if you wish the emulator to start up in the dial directory there is a setup option provided for you to specify this.
Glink User’s Guide Using the emulator 29

G&R
A typical dial directory screen might look like this, once you have entered some telephone numbers:
You may move around the dial directory using the up and down arrow keys, and also the PGUP and PGDN keys. In that more information is stored about each system than can be displayed comfortably on a single page, the left and right arrow keys provide you with a choice of four different sets of data about each system. Press the ESC key or click on the 'Exit' button to remove the dial directory window.
Entering data into the directory To enter a system into the directory, click on the 'Setup entry' button in the dial directory window. You are provided with a window where you can enter the relevant data for a particular host system.
You position yourself on the item you wish to enter or change using the mouse or the up and down arrow keys.
An explanation of how the different fields are used follows in the table below.
Field name Description
30 Using the emulator Glink User’s Guide

G&R
Field name Description
Host name The name you wish to use for this system, and which will appear in the dial directory. In addition, this name will appear in the status line while you are connected to the system if you have selected that particular option in the setup menus.
Phone number The number to call for this system (alternatively a net-work address).
Alternative number
An alternative number to use if the call on the phone number first number fails for any reason. May be left blank.
Group (Dialling group)
Systems may be grouped using this option by clicking on the 'Group' radio button, and then click on the 'Call' button.
Baud rate (Line speed)
Line speed at which this system runs. If you leave this option set at 'default' the system will use the speed con-figured in the communications setup menu; otherwise the program will set the port to this speed before contacting the host system.
Parity Parity setting for this system.
Strip parity on input
Corresponds to the option in the comms setup.
Comms port Which communications port you wish to use. If you only have one communications port you are using with Glink, just leave this option set to the default.
Script name The name of a script file to use for automatic login to this system. May be left blank.
Login name User name for this system. This may be called from a script file using the $LOGIN variable, used interactively with by selecting Line/Logon name send from the Glink menu bar.
Glink User’s Guide Using the emulator 31

G&R
Field name Description
Password Password for this system that may be called from a script file using the $PASSWORD variable, or used interactively either by selecting Line/Password send from the Glink menu bar or by pressing ALT+F7 while logged on. The actual password is not shown unless you are posi-tioned on this field. This allows you to edit the other options without necessarily disclosing your password to onlookers.
Host mode ANSI, VT102/220, VIP, IBM 3270, Prestel, Minitel mode, depending on the host you are logging into.
Eight-bit host Specify depending upon whether this host can use ex-tended ASCII or not.
Keyboard Which keyboard transliteration to use for this host.
Layout (F-key definition)
Alternative keyboard layout for this host.
Move Del to BS Corresponds to toggle (setup option).
Default protocol May be set to override the default file transfer protocol defined in file transfer setup.
Extra modem command
If you need to send an additional command to the modem before contacting this system, enter the command here. This can be used for example to select MNP or not depending upon whether this is implemented on the system you are calling.
Comments Here you may enter any data you wish. This will be shown on the screen for this system under the normal entry. May be left blank.
32 Using the emulator Glink User’s Guide

G&R
Calling a single system To make a call, select the system you wish to call and press the ENTER key.
Clicking on the 'Call' button has the same effect as pressing ENTER. Make sure that the 'Current' radio button is selected if you are only calling a single system.
A window will open showing you the most relevant information about the com-puter you are calling to, and will also provide you with continuous information about the progress of the call.
You may abandon the call at any time by pressing the ESC key or clicking on the 'Cancel' button.
If the call is unsuccessful for some reason (for example, if the telephone number is busy), then the emulator will pause for a predefined time (see the section on Setup), and redial the number. This process will be repeated until a connection is made or until the process is terminated manually.
When the connection has been made, the windows will disappear and you will be in contact with the system. If you have specified a script in connection with this entry in the dial directory, then this will be started automatically for you. Also several of the emulator options are reset to their default values (for example insert and graphics mode).
You can 'put away' the dial window by clicking on the minimize button. The window will shrink down to an icon, and signal you visually (and possibly audibly) when the connection has been made. A setup option is also provided to tell Glink that you wish the emulator to pop up from the minimized state if you would rather be warned in a slightly more noticeable way.
Calling marked numbers If you wish to call more than one system, any or all of which may be difficult to reach, you can use the circular dial function to do this. You must first 'mark' the systems you wish to call.
You mark the systems by selecting them in the list box containing the systems you have configured. From the dial directory's Edit menu, you can select Mark all entries or Unmark all entries.
Glink User’s Guide Using the emulator 33

G&R
When you are ready to dial, select the 'Marked' radio button and then click on the 'Call' button. The emulator dials through the marked systems, one at a time, until one of the systems has been reached. At this time the mark is removed for that system, so when you have finished working with the system you reached, you will only have to repeat the call operation to redial the remaining systems in the 'queue'.
Calling a group of numbers If there are particular groups of systems for which you will often need the circular redial function, then you should define a 'dial group' using the option provided in each dial directory entry.
To start a group dial, select the 'Group' radio button in the call box, and click on the 'Call' button. You will be asked for the identifying letter(s) for the group(s) to which you wish to dial.
In the same way as for calling marked systems, the first system reached will be removed from the list, so you can continue calling the other members of the group. The group dial function works by comparing the letters you specify when calling the function to the letters specified in each entry. Any entry that contains any letter in common with the specified set of letters will be included in the group. Each such entry will be marked (any systems not matching will be unmarked). Once this has been done, the call is processed in exactly the same way as when you mark systems manually and use the function for calling marked numbers.
Calling a number manually If you have a number you wish to dial once only and don't want to enter it in the dial directory, select the 'Manual' radio button and click on the 'Call' button. A small window will open allowing you to enter the number you wish to dial. The rest of the call will proceed in the same as way as when placing a call to an entry in the dial directory, with the exception that Glink will use whatever parameters you currently are using.
34 Using the emulator Glink User’s Guide

G&R
Calling a non-data number The dial directory may also be used to place normal 'voice' calls if you have a telephone apparatus connected to your modem. To do this, simply dial the number in the normal way. As soon as the text 'Waiting for connect' appears, lift your telephone receiver and press ESC to disconnect Glink from the line. This applies only if you have not set the 'simple dial' option. If you have, then you must wait for the dial operation to finish, either by listening through the modem loudspeaker or by just guessing.
Dial directory codes The emulator supports use of configurable dial codes with the User/Codes selection from the dial directory menu bar. This is of use for those who will move from one calling area to another and wish to use the same dial directory without having to change the numbers that have been defined there.
The way this function works is that you may define one or more 'abbreviations' and 'equivalents' in the Dial codes screen. Every time you dial a number, this list is checked (from top to bottom). If the beginning of the number you are about to dial matches the abbreviation then that abbreviation will be replaced by its defined equivalent. An example will make this clearer. In the United States (international code 1) you dial numbers abroad by first using 011 and then the country code. Internally in the USA, you must also add a leading 1 in front of the area code when calling outside your own area, while numbers that are local may be used with no prefix at all. Let's assume that you live in Los Angeles (area code 213) and are setting up three numbers, one in Norway (international code 47), one in Los Angeles, and one in Miami (area code 305). You would set up the following in your dial codes:
Glink User’s Guide Using the emulator 35

G&R
All numbers you add to the dial directory may now be specified in 'international' format. In other words, a number in Los Angeles would be defined as '+1 213 852 1234' rather than just '852 1234' (which is what you would actually dial). Using this convention, you can see that the first rule will replace the '+1' with '1', and the third rule will then remove the '1213' that results from this replacement (spaces are not counted during the comparison). If you should dial a number abroad, then the leading plus sign will just get replaced by the international dial code, while other numbers in the USA will receive an extra '1' at the front, just as we needed.
If you now should want to use your dial directory in Miami, the only change you have to make (assuming that you have coded all your telephone numbers correctly) will be to change the third rule so as to remove '1305' instead of removing '1213'. Should you wish to use your dial directory in another country altogether, it's almost as simple; rule number one would be changed to reflect the country code for the country you are in, rule number two to give the local code specifying international access, and rule number three to strip the local area code.
Dial directory abbreviations Besides providing dial code conversion as described above (which is basically designed to allow you to configure telephone numbers in such a way as to allow you to use your dial directory irrespective of where you are calling from simply by modifying entries in the Dial codes screen), Glink provides you with up to 6 abbreviations that can be used with the numbers configured in the dial directory. These abbreviations are configured not in the dial directory itself, but in the Settings/Modem/Strings menu.
The abbreviations are defined on the letters A to F, and up to 24 characters may be defined on each. The resulting 'telephone' number will also be passed through any options configured in the Dial codes screen described above; this is done after any abbreviations have been processed. In contrast to the Dial codes options, these dial abbreviations may be used anywhere inside the telephone number configured in the dial directory, not just at the start of the string.
36 Using the emulator Glink User’s Guide
G&R
Dial abbreviations may be found useful in many different circumstances. An example would be use of a credit card number or 'password' that has to be typed in after the phone number and is needed for more than one system (or results in a telephone number that is too long to insert in the normal slot provided in the dial directory; while the numbers and abbreviations themselves are limited to 24 characters, the resulting number that is actually used to dial with may be anything up 60 characters in length). Another use related to the Dial code option could be an abbreviation for your local area code if you are using 'complete' telephone numbers so as to make your dial directory portable. Referring to the example given for the Dial code screen, if your local code was in fact '+1 213' then you could define the A abbreviation as '+1 213' and enter local numbers in the form 'A123 4567'. In that dial code expansion is performed after abbreviation expansion then this will still work even when you dial from another area.
Expansion of abbreviations is performed from left to right inside the number and is not recursive. In other words, if an abbreviation contains a letter cor-responding to another abbreviation then that letter will not be expanded. This is done so that the default abbreviations will leave any of the letters A to F unchanged in that some modems provide extra functions inside a dial string that use one of these letters. If your modem does this then you will want to leave the abbreviation corresponding to that particular letter set to the default value of translating the letter to itself.
Finding a particular entry If your dial directory grows large, then it may be difficult to locate the entry you are looking for. Glink provides a simple searching function to deal with this problem. Press CTRL+SHIFT+F and a window will appear asking you what you wish to search for. Enter any string here and Glink will search for the first system which contains this string anywhere in the host name (the search is case independent). If this was not the entry you were looking for, then press ALT+F again and the next entry containing the given string will be shown.
Sorting the directory Any portion of the dial directory may be sorted on one of several criteria. To call the sorting function by selecting File/Sort directory from the Dial directory menu bar. A 'sort window' will appear:
Glink User’s Guide Using the emulator 37

G&R
Options in this menu may be selected by pressing the first letter of the option in the menu, by using up and down arrow to select in the bottom half, or by using left and right arrow to select in the top half. Pressing ESC terminates the sort function with no action, while pressing ENTER will start the sort with the options currently highlighted.
Sorting may be done in normal or reverse order, and using the host name, the telephone number or the usage count for the systems being sorted. Either the entire directory may be sorted (this is the default) or a section of the directory, specified by entering the numbers of the first and last entries to sort.
Use of the sort function on various groups with various criteria can make your dial directory easier to use; experiment with the functions to see which arrange-ment works best for you. For example, you could start by sorting the entire directory descending on usage count so as to get your 10 most often used num-bers onto the first page of the directory. Follow this by sorting all except the first ten on telephone number to separate out international calls, and then sort alpha-betically inside each of the domestic and international groups.
Dial directory passwords In that the dial directory contains valuable information, such as login names and passwords, you may wish to protect the directory with a separate password. To use this function, select User/Password from the Dial directory menu bar.
The system will ask you for the password you wish to use (twice to be absolutely certain that you don't make a typing error) and this will then have to be supplied later when the dial directory is used. The password itself is only stored in encrypted form; this means that if you should lose the password then you will not be able to use your dial directory.
38 Using the emulator Glink User’s Guide

G&R
SAVE THE PASSWORD IN A SAFE PLACE!
The encryption is such that we will not be able to retrieve your dial directory data if the password is lost. When the password has been accepted, all login names and passwords in the dial directory will also be encrypted, and there is intentionally no function provided that will decrypt these without the original password. An option in the modem setup menu does allow you to disable the password checking - in this case you will be allowed to use the directory but your passwords and login names will be irretrievably lost!
Another option in the modem setup menu allows you to specify whether or not you wish to have to specify the password every time the dial directory is used or just at the start of each Glink session. The default is to only ask for the password the first time that you use the dial directory in a given session. However, if you are in the habit of leaving your terminal unattended while Glink is still running, you may wish to have the added security that this option provides.
You may change your password at a later time simply by using the Password function again. In this case, the emulator will ask you to confirm your original password first.
If you use a script to log into your host machine, then the login names and passwords will be available to the script through the built-in $LOGIN and $PASSWORD variables. This helps ensure that you never leave your passwords available in clear-text on your hard disk.
Note also that when you are viewing the main dial directory and have selected the page containing passwords, then the passwords will NOT be shown unless you specifically ask for this. You can select User/Password visibility from the Dial directory menu bar to toggle password visibility in this screen.
Login name The login name default is a 'general' login name for the entire directory. This name will be used for all dial directory entries that do not have a separate name specified for them. The Login name screen is available when you select User/Login name default from the Dial directory menu bar.
Glink User’s Guide Using the emulator 39
G&R
Initialize statistics The emulator keeps track of several statistics about each entry in the dial directory. This includes number of calls and time logged on, amongst other data. These particular statistics are also collected as periodic totals (you may see these by clicking the 'Display' button). To start a new 'period' select File/Initialize statistics from the Dial directory menu bar. This will reset the periodic total for every entry in the directory (while preserving the accumulated total, of course).
Printing the directory The dial directory may be sent to your printer with the ALT+P key (or by selecting File/Print directory from the Dial directory menu bar under Windows). When you use the print function, you will see a list of the various pieces of information that you may print out, together with the normal width of the field. Select the items you wish to include in the printout, selecting them in the order (left to right) you wish them to appear. Adjust the default field width for any of the fields by pressing the 'Wider' and 'Narrower' buttons. When you are ready to print click on the 'Print' button. ESC will exit from the print menu without printing, in the normal way. The configured codes (or files) from the printer setup menu will be sent before and after the data sent to the printer.
Moving to another dial directory You may if you wish use multiple dial directories (see the command line /P switch; this allows you to select a particular directory other than the default 'GLINK.PHO' when you start up). To switch to another directory while using Glink simply use the dial directory ALT+J function, which will ask you for the name of the directory you wish to switch to.
Dial directory functions Several keys are provided to enable you to organize your directory in the exact way you wish. When using these functions, remember that if you have used the 'DIAL n' syntax in any scripts then the scripts may have to be updated to reflect the changed positions of entries that may have been moved.
40 Using the emulator Glink User’s Guide
G&R
• The ALT+M key lets you move an entry to any other unoccupied position in the directory. The previous position is left empty. Under Windows, this is accomplished by selecting Edit/Cut entry from the Dial directory menu bar, followed by Edit/Paste entry.
• The ALT+C key lets you copy an entry to any other unoccupied position in the directory. The previous position is not changed. This is useful if you wish to use an entry as a basis for making a new entry. Statistical information in the copy is zeroed. Under Windows, this is accomplished by selecting Edit/Copy entry from the Dial directory menu bar, followed by Edit/Paste entry.
• The ALT+O key lets you open a space at the current position in the dial directory. The current entry and all entries below it are moved down until an empty entry is found. Under Windows, this is accomplished by selecting Edit/Open space from the Dial directory menu bar.
• The ALT+U key allows you to 'close up' a space in the dial directory. This key may only be used when you are pointing at an empty position that is immediately followed by an occupied position. The occupied position and all occupied positions following it until the next following vacant position are all moved up one position. Under Windows, this is accomplished by selecting Edit/Close up space from the Dial directory menu bar.
• The ALT+K key will compress your directory into the minimum space by moving up all entries to fill unoccupied positions. Under Windows, this is accomplished by selecting File/Pack directory from the Dial directory menu bar.
• The DEL key deletes the entry to which you are pointing. NOTE that if you delete an entry by accident, you may retrieve it simply by pressing the DEL key once more. Under Windows, this is accomplished by selecting Edit/Cut entry from the Dial directory menu bar. (To retrieve an accidentally deleted entry, select Edit/Paste entry before cutting or copying anything else.)
• The F10 key provides a help page summarizing the keys you have available in the dial directory. Under Windows, select Help from the Dial directory menu bar.
Glink User’s Guide Using the emulator 41

G&R
Telephone exchanges One of the more difficult things to get working with a PC and modem is to dial through a telephone exchange. Typical problems that arise are the inability of the exchange to handle tone dialling, and failure of the modem to recognize either the local or the main dial tone. Such problems are best resolved by experimenting manually with dial commands. Your modem manual will explain in detail what the various commands do. Some things to try are:
• ATDT0Wnnnnnn dial zero, wait for new tone • ATDP0Wnnnnnn dial zero (pulse), wait for new tone • ATDT0,,,,nnnnnn dial zero, wait two seconds • ATDP0,,,,nnnnnn dial zero (pulse), wait two seconds
If none of these work then the modem may not be recognizing the first dial tone. Check your modem manual to see which command is needed to set 'blind dial' (i.e. wait for a predefined period and then dial anyway). On most modems, this will be an ATXn command, where n varies from modem to modem.
If you needed an Xn command then you should add the appropriate command to your modem initialization string (modem strings menu in the setup, add the Xn to the end of the string that is there already). In any case, when you have found out which of the above dial commands work for you then you should include the correct string (the part before the number 'nnnnnn') as your 'dial string' in the modem strings menu.
42 Using the emulator Glink User’s Guide

G&R
The file display Selecting Files/File display from the Glink menu bar provides you with a standard dialog showing the files in your current PC directory. This may be useful either for positioning yourself correctly in the file system preparatory to file transfers, or for performing basic file operations without the need of switching to a separate window.
To customize your own file lister, editor, or print programs onto the 'commands' menu, you may specify these as command line options (or better, as options in the GLWINOPT environment variable). The options /FL, /FE, and /FP respec-tively specify the names of your own favourite programs for each of these purposes. If your file lister were called 'showfile', your editor 'editfile', and your print spooler 'spool' you would use the following options when starting the program:
/FL showfile /FE editfile /FP spool
Double-clicking files in the file display will perform whatever action has been associated with the file type (as in the File Manager). If there is no association then the configured list program will be called.
Glink User’s Guide Using the emulator 43

G&R
The file display menu bar The file display menu bar contains six selections: File, Edit, Move, Options, Commands, and Help.
File The following selections are available when you select File from the File display menu bar:
Copy file(s) Copies one or many files into one or many file(s) or into a named directory. To copy one or more files, you first mark (or select) the file(s) to copy.
Move file(s) Moves files from one directory to another on the same drive. Works like copy.
Rename file Renames the selected file or directory.
Erase file(s) Erases one or multiple files or directories.
Print file(s) Prints the file(s) you have selected using the program configured with the /FP option. If /FP was not used, the file will be printed using the configured printer options.
Printer setup Allows you to choose which printer to use.
Attributes Allows you to view and/or change the attributes for the selected file. Refer to your DOS manual for the meaning of the file attributes.
New directory Creates a new directory with the pathname you specify.
Edit The following selections are available when you select Edit from the File display menu bar:
Mark all files Sets marks on all filenames in the current direc-tory.
44 Using the emulator Glink User’s Guide

G&R
Unmark all files Removes all marks in the current directory.
Move The following selections are available when you select Move from the File display menu bar:
Home directory Jump back to the directory you were in when you entered the file display.
Script directory Jump directly to the script directory (defined with the /O command line parameter).
User script directory Jump directly to the user script directory (the one defined with the /OU command line parameter).
Options The following selection is available when you select Options from the File display menu bar:
Show hidden files Check this item if you want hidden files to be included in the display.
Commands The following selections are available when you select Commands from the File display menu bar:
List file List the selected file using the program configured with the /FL command line option (NOTEPAD is the default).
Edit file Edit the selected file using the program configured with the /FE command line option (NOTEPAD is the default).
Glink User’s Guide Using the emulator 45

G&R
Execute file Run the selected program. If the program is not an executable file, the option is unavailable. If the program is executable, you will be prompted for optional parameters before the program starts.
Command Run a program of your choice. You can enter a complete command line, and may insert the name of the file to which you are pointing by using a percent sign (%) in the command line.
46 Using the emulator Glink User’s Guide

G&R
The scrollback buffer The scrollback buffer is a device for saving data that has 'disappeared' from your screen. Normally this applies to data that has been 'scrolled' off the top of your screen (hence the name 'scrollback') when new lines appear at the bottom. You may also optionally add the entire current page on your screen to the scrollback buffer by pressing the CTRL+PGDN key at any time. This may be useful if you are talking to a 'page' oriented system or forms package. Optionally, using the confi-guration menus, you may also tell the emulator to save data from the current screen whenever the screen is cleared by the host machine.
The text is saved in memory as a continuous buffer. The amount of data that may be placed there is determined by a setting in the setup menus, and is five pages of data in the delivered version of the emulator. However, depending upon how much memory you have available, you may configure up to 32766 pages for your scrollback buffer.
Note that every time a new line is inserted into the scrollback, a line will 'fall off' from the beginning of the buffer.
To inspect or manipulate the scrollback buffer, press the CTRL+PGUP key (or select the ScrollBack option under the Edit selection on the Glink menu bar). This will show you the most recent data that has been inserted there. A help menu is available as usual by pressing F1 or by selecting Help from the Glink menu bar. Using help will remind you of which functions you now may use, and how to use them. The first (and easiest) functions to use are those which simply move around the buffer. You can use the mouse of the following key assignments.
UP ARROW moves back one line DOWN ARROW moves forward one line PGUP moves back one page PGDN moves forward one page HOME moves to the first page END moves to the last page
Glink User’s Guide Using the emulator 47

G&R
Searching for a text You select the Search option from the Scrollback window menu bar. In the Search screen you specify the string to search for, the direction of the search (up or down) and whether the search is case-sensitive. When you have finished, click on the 'Search' button, or return to the Scrollback window by clicking on 'Cancel'. Click on the 'Search' button again to continue the search.
Saving scrollback to file Two functions are provided to allow you to write parts of the buffer to a file, for working with later. File/Save page from the Scrollback menu bar will save the current page you are viewing. File/Save All from the Scrollback menu bar will save the entire contents of the buffer. In both cases, a window will pop up asking you for the name of the file to save to. The file is saved as a standard text file that may be processed by most programs and editors. Any data already on the file is preserved, thus allowing you to perform multiple saves to the same file by repeated use of these functions.
Marking a portion of the buffer Several of the more advanced functions described below work on a selected, or 'marked', portion of the scrollback buffer. In order to use these functions, you must know how to 'mark' the piece of the buffer you wish to use.
When you call up one of these functions, a 'cursor' will appear in the scrollback screen (it will usually appear in the top left-hand corner). You may position the cursor with any of the positioning keys mentioned previously, and in addition may use the left and right arrow keys. If you try to move the cursor out of the current screen, then the emulator will move through the buffer in order to keep the cursor inside the current page being viewed. The emulator also provides 'wraparound' in the horizontal direction, so moving left out of the first column will take you to the last column directly.
48 Using the emulator Glink User’s Guide

G&R
The piece that you mark will be a rectangular 'box' which may be any size you like, up to and including the entire scrollback buffer. To start marking, simply move the cursor to the top left hand corner of the box you want, and press the ENTER key. When you continue moving the cursor, you will find that it leaves a 'trail' behind it, showing you which area is the one you currently are marking. Just move the cursor to the bottom right-hand corner of the box (at which point you should see the exact portion you intend to mark highlighted for you), and press ENTER again. At this point, the emulator will perform whichever function it is you required.
If at any point you change your mind and don't wish to mark anything (or decide to mark something else) then just press the ESC key, and you will be back in the normal scrollback mode.
Under Windows, you will probably be marking text using your mouse. In this case, you point the mouse arrow where you want to begin marking and press the left mouse button. Keeping the left button pressed, move the mouse pointer to the end of the text block you are marking. Release the left button. You can choose to mark all text from the starting position to the ending position (line-by-line) or mark a rectangular area beginning at the start point (Edit/Mark rectangles from either the Glink menu bar or the Scrollback menu bar). If you prefer to use the keyboard to mark text, select Edit/Mark from either the Glink menu bar or the Scrollback menu bar.
Transmitting a marked block This function allows you to do an immediate transfer of data from your scroll-back buffer to the host. (Note that the data transfer is effected by using the Windows Clipboard.) The transfer follows the rules for ASCII transfer described in the File transfer chapter on page 71, and all setup options that have been set for this type of transfer will apply. As soon as you have marked the block in the way described earlier, the transfer will start.
This function can be useful in many different situations, and is best illustrated with a couple of practical examples.
Example 1 You are using Glink on a dial-up line and are in the middle of entering a message when the connection fails. You have the message you wrote there on your screen, but without the scrollback buffer you would have to log in again and rewrite the whole message. Proceed as follows:
Glink User’s Guide Using the emulator 49
G&R
1. Log back on to the system.
2. Proceed just as if you were going to type the message again.
3. When you get to the point where you would normally type the message, press CTRL+PGUP.
Mark the piece of message you have already written in the scrollback and copy it to the Clipboard, either with the menu option or by pressing CTRL+INS. Select either Edit/Send or Edit/Transmit from the Scrollback menu bar to send the marked text to the host.
Example 2 You are using Glink to access a database that has just presented you with a very interesting page of data. You would like to send this as part of a message to a friend you know would like to see the data. However, some of the data is confi-dential and you do not have the time to start editing a save of that particular screen and learning about ASCII transfers. Proceed as follows:
1. Log into your mail system.
2. Start entering the message to your friend.
3. When you get to the point where you want to insert the data, press CTRL+PGUP.
Mark the relevant piece of text in the scrollback buffer and copy it to the Clipboard, either with the menu option or by pressing CTRL+INS. Select either Edit/Send or Edit/Transmit from the Scrollback menu bar to send the marked text to the host.
Saving a marked block to file Mark the text that you wish to save and select File/Save marked from the Scrollback menu bar.
Mailing a marked block If your PC is configured to use a MAPI compliant mail system, you may use the File/Mail marked option from the Scrollback menu bar. This option is only enabled once and area of the Scrollback buffer has been marked. When selected, this option will initiate your mail system’s Send dialog box with the marked area pre-included in the message text.
50 Using the emulator Glink User’s Guide
G&R
Scrollback buffer bookmarks The scrollback buffer allows you to set up to ten 'bookmarks' so that you may remember a particular page and skip back to it quickly. To set a bookmark, you may press either CTRL or SHIFT together with any of the keys 0 to 9 (on the main keyboard). This will set a bookmark at the current position to which you may jump at a later time by pressing the appropriate number key (without CTRL or SHIFT). You may also jump to a bookmark by selecting the equivalent option in the Scrollback menu bar.
If you press CTRL rather than SHIFT when setting the bookmark, a dialog box is displayed that allows you to enter a name for the bookmark (up to 12 characters in length). This name will be displayed in the menu next to the bookmark number.
Finally, if a line associated with a bookmark scrolls out of the top of the scrollback buffer, the bookmark is deleted.
Additional functions You can print the contents of the entire scrollback buffer, of the displayed page or of a marked block in the scrollback buffer. These three functions are available when you select File from the Scrollback menu bar.
You can also paste or insert the contents of the Clipboard into the main emulation screen. The effects of this vary depending on which emulation mode you are in. Both of these functions are available when you select Edit from the Scrollback menu bar.
An additional function in the Edit menu allows you to delete marked lines from the scrollback buffer. If only part of a line is marked the entire line will still be removed. If lines that are marked are actually in the current screen you will not be able to delete them until they have scrolled off.
Glink User’s Guide Using the emulator 51
G&R
Leaving the scrollback function To leave the scrollback display and return to the normal editing screen, just select File/Exit from the Scrollback menu bar. If you are running in VIP TEXT mode you may, however, wish to exit from the scrollback to normal emulation mode but leave the particular scrollback page you were looking at on the screen; a special function is provided for this, Edit/Mark current page followed by Edit/Insert on main screen. You may also minimize the Scrollback screen to an icon by clicking on the 'minimize' button. Double-clicking the icon will restore the screen. Alternatively, you may simply leave the scrollback screen visible and return to the emulator window by clicking on it.
User toggles Some of the more commonly used 'switches' are directly accessible via their own menu. Many of these are accessible from other keys and menus, but it's easier to have one place to go to toggle these switches. In addition, several of the 'main' functions (for example, those on the setup menus) can result in the transmission of codes to the host. The toggle menu will only set the corresponding function locally, which may often be what is required. Note that changes that you make in the Toggles screen are only in effect for the current Glink session (or until you change them again). In other words, changes to the Toggle switches do not affect your startup options. The Toggle screen is called up by selecting Settings/Toggles from the Glink menu bar.
To change the setting of one of the options listed on the Toggles screen, select the option and change the value. When you are satisfied with your choice, return to the emulator. There is online help explaining the use of each of these options: press F1 for context-sensitive help or select Help from the Glink menu bar.
The actual menu presented will contain only those toggles that are relevant for the current emulation mode.
The following explains the switches that you can toggle using the Toggles screen.
52 Using the emulator Glink User’s Guide
G&R
Auto Line Feed This option controls the current setting of the Auto Line Feed option. When it's selected, Glink will append a linefeed character to each incoming CR character; this should be used in situations where you see data coming from the host being written repeatedly in the same line of the screen. The opposite also applies; if output from the host is displayed with double spacing this may well be because this option has been selected when it should not have been. The initial setting for this option is controlled by the emulator settings menu item for Auto Linefeed In.
Auto Wrapping This option controls whether or not the emulator should 'wrap' data ('wrapping' means that the emulator skips to the next line when the current line fills up).
Automatic Tabbing This option controls automatic tabbing in VIP7700 and VIP7800 forms. When it's selected, each time the last character of a variable field on the screen is filled out, the cursor will move automatically to the first character of the next field. If the option is not selected then the cursor will remain in the position immediately following the variable field when the last character is typed. The option may be selected permanently using the auto tabbing option in the VIP emulation options menu.
Cursor Application mode Cursor application mode affects the codes sent by the cursor keys when the program is emulating a VT102/220 terminal. In some circumstances a host machine may assume a different setting for this mode to the one currently active, in which case this option allows you to switch to the correct mode.
Glink User’s Guide Using the emulator 53
G&R
Echoplex The echoplex setting controls whether or not the characters you type at the keyboard are displayed on the screen by the emulator. Many asynchronous host machines work in 'echoplex' mode, which means that data you type in is first sent to the host machine, and then the host machine sends the characters that should be displayed on the screen back to you. Not until the characters have made the round trip will you see the data you have typed in (this normally happens so fast that most of the time you don't notice this going on).
If everything you type appears doubled, then you probably have the echoplex setting off, and it should be on. If you don't see what you are typing at all, on the other hand, one possible explanation could be that you have the echoplex setting turned on when it should be off.
The initial setting of the echoplex option is controlled by an option in the emulator setup menu.
Font This selection allows you to choose a different display font. The font used initially by Glink is set using the Window attributes setup menu.
Graphics mode Normally graphics mode is controlled completely by the host machine to which you are connected. It can sometimes happen that the setting gets out of synchro-nization, resulting in a display consisting of graphic characters instead of text. One time this often happens is when you are using a noisy telephone line, or as you disconnect from a dial-up line. This option allows you to reset a graphics mode that has been set erroneously.
Insert mode Insert mode controls whether or not characters you type (or that are sent by the host) are inserted into the displayed text, or overwrite the displayed text. Insert mode may also be controlled using the INSERT key.
54 Using the emulator Glink User’s Guide
G&R
Keyboard Lock The host machine may choose to prevent you from using the keyboard while data is being sent to the screen, to ensure that you don't destroy the formatting of the screen. The host will also normally unlock your keyboard afterwards, but this may not happen for various reasons. This option allows you to manually unlock your keyboard in order that you may continue.
Local mode This option toggles local mode. When the program operates in local mode, nothing you type will be sent to the host machine, and all incoming host data discarded.
Move Del to BS This option allows you to move the delete function onto the BACKSPACE key, for those host machines that use DEL as a backspace function. This is the same function that can be chosen at startup time using the option in the keyboard option setup menu, and that can be set for each host in the dial directory.
Roll Mode This setting controls whether or not the emulator should operate in roll mode, scrolling the screen as new lines are received. Normally you will be in roll mode except when working with a host application using full-screen menus, and will be able to retrieve data that has scrolled off the screen using the scrollback buffer.
The initial setting of the roll mode option is controlled by the option in the emu-lation setup menu.
Screen Width This option lets you choose between screen widths of 40, 80 and 132 columns (normally the choice of emulation mode will set this correctly for you).
Glink User’s Guide Using the emulator 55

G&R
Space Suppression This controls the setting of the VIP space suppression state, which decides whether spaces at the ends of lines should be sent to the host. This is normally set by the host machine to which you are connected. The initial setting for space suppression is controlled by an option in the emulation setup menu.
Typeahead mode This controls the current setting for typeahead mode, which is explained in more detail in the Administrator's Guide under the description of how to set the initial state of the option. Typeahead mode is only available under the VIP emulation's TEXT and TX-RET modes.
VT100 keypad mode VT100 keypad mode affects the codes sent by the keys on the numeric keypad when the program is emulating a VT102/220 terminal. In some circumstances a host machine may assume a different setting for this mode to the one currently active, in which case this option allows you to switch to the correct mode.
VIP mode This controls the current mode of the VIP emulation. As with many of the other options in the toggles screen, this is normally controlled by the host machine, but is provided here for convenience. In VIP7700 mode, there are only two choices, text mode and forms mode. In VIP7800 mode there are more.
CHAR mode means that data is sent to the host character by character and simultaneously displayed on the local screen.
ECHO mode means that data is sent to the host character by character, but not displayed on the local screen (it will normally be displayed by the host).
TEXT mode means that data is just displayed on the local screen, and not trans-mitted until you press the transmit key (normally this will be the GREY/+ key). You may edit the data locally before transmitting it.
56 Using the emulator Glink User’s Guide
G&R
TX-RET mode is the same as TEXT mode, except that you press the Enter key to send the data, and the data is sent to the host with a CR delimiter instead of the ETX delimiter used in TEXT mode.
FORMS mode is used when the host displays a formatted screen. You may only enter data in designated fields, and move from field to field using the TAB and BACKTAB (SHIFT+TAB) keys. The contents of the form are sent to the host when you press the TRANSMIT key.
Glink User’s Guide Using the emulator 57
G&R
Dumping the screen to your printer You may dump the present screen image to your local printer at any time by pressing the 'print screen' key, ALT+P, or by selecting File/Print screen from the Glink menu bar. The options that you specified for the 'screen dump to file' will of course also apply here. Note that this function will not dump the bottom (status) line of the screen to the printer, in contrast to the standard screen printing function.
Dumping the screen to file You may dump the present screen image to a local file on your PC at any time by pressing the 'write screen' key, ALT+W, or by selecting File/Dump screen from the Glink menu bar. A small window will open on your screen to ask you for the name of the file upon which the screen image is to be written. If this file already exists then the image will be appended to the end of the file; otherwise, a new file will be created. One of two different formats may be used, the default where the dump will simply consist of one line for each line of the screen with a (CR) (LF) record separator at the end of each line, and another basically the same but starting with a form feed (hex 0C) character and with trailing blank lines suppressed. This format can be useful if the dump is going to be copied directly to your printer. You can choose which format to use in the general setup menu.
Capturing data from the host to a file You may at any time turn on and off the 'data capture' function by pressing the 'data capture' key, ALT+V, or selecting File/Capture from the Glink menu bar. While capturing data, the emulator will write all data characters coming from the line not only to your screen, but also to a capture file. When you start the capture function, you will be asked for the name of the capture file. If the file exists already then the data will be appended at the end of the file, leaving whatever data is already there intact, this allows you to save several pieces of data to the same file.
58 Using the emulator Glink User’s Guide

G&R
While you are capturing data, you will be reminded of this in the status line at the bottom of the screen. Pressing ALT+V again (or by clicking File/Capture from the menu bar) stops the capture function. Stopping and starting may be repeated as many times as is needed. Note that only ASCII characters are dumped to the file. Control sequences are suppressed, except for the HT character and the LF character (which will start a new line on the capture file; however see the 'Capture delimiter' option in the file transfer setup menu).
Note also that you may produce a printer log of your session by turning on the capture function and specifying a file name of 'PRN'. ALT+V will then have the effect of turning the printer log on and off.
Local clear screen The ALT+F3 key (or Edit/Clear screen) will clear the screen on your PC immediately. This is NOT the same as the 'emulator' clear screen key, which sends the 'clear screen' control sequence to the host machine. The clear screen function only has a local effect and does not send any data to the host machine.
ANSI chat mode The ALT+F4 key (in Windows, the chat mode option is available by selecting Line from the Glink menu bar or by pressing CTRL+SHIFT+F4) is only effective when used under ANSI or VT102/220 emulation modes, In VIP mode it will have no effect. Pressing the key (or selecting the menu option) will provide you with a 'split-screen' mode, where data that you type will be shown on the bottom half of the screen and data received from the host machine will be displayed in the upper half of the screen. This mode should only be used when the person at the other end of the line is using an equivalent software solution. To exit chat mode, just press ALT+F4 or toggle the menu option off again. In this case you may wish to press ALT+F3 afterwards to 'clean up' the screen, but the screen contents will otherwise be left as they are so as to let you copy anything you wish to save from the current screen.
Glink User’s Guide Using the emulator 59
G&R
The ASCII Table The ALT+F9 key provides you with a useful reference table, showing you the entire ASCII character set. This table is also available by selecting Help/Character tables from the Glink menu bar. Click on the relevant button to step through the character set shown in decimal or in hexadecimal, and as seen by both your PC and from the host machine. The host character set shown will depend upon what you have selected for your keyboard file; when you look at the host table the currently active keyboard file will be displayed in the title line.
If you wish to enter a character that's not on your keyboard then there are two ways to do it. First, you can look at the character in the decimal display for the PC and note the corresponding decimal code. When you are back in the emulator, press (but don't release) the ALT key, and type first a zero, and then the decimal number you noted on the numeric keypad. Only when you have typed the entire number should you release the ALT key.
Alternatively, you can just select the character you need and press ENTER (or click the left mouse button). A line will appear on the screen with the character you wish to enter. This process may be repeated as often as you like, and charac-ters that are available directly from the keyboard may be inserted in the string to be sent just by putting the cursor in the appropriate place and typing them. Characters entered unintentionally may be deleted using the backspace key.
If you have entered any such characters, then the entire string shown will be sent when you exit from the ASCII table window by clicking on the 'OK' button or by pressing the ENTER key.
Returning to the emulator (without sending any string of characters that may have been selected) is accomplished using the ESC key or by clicking on the 'Cancel' button.
The call timer The ALT+F8 key is provided for those using a dial-up modem; it provides you with the elapsed time since the last time you made a call using the dial directory. Remove the window with the ESC key. Pressing the ENTER key while the window is up will reset the timer to zero. This option is available by selecting Line/Time online from the Glink menu bar.
60 Using the emulator Glink User’s Guide
G&R
The 'send name' and 'send password' keys
The Send name function (ALT+F6 key, or Line/Logon name send from the Glink menu bar) sends the current user name as defined by the dial directory. This is the user name defined in the last entry you used, or if none was defined there then the 'default' user name specified with the dial directory ALT+L function. You would normally send this using a login script, but ALT+F6 gives you the additional possibility of sending the name manually.
The Send password function (ALT+F7 key, or Line/Password send from the Glink menu bar) sends the currently defined password from the last used dial directory entry. This would also normally be sent by your login script, but can be useful to have on the keyboard, especially if changing your password on the host; most host machines will ask for your old password in this case. Perform this task in the following order: call up the change password function on the host and press ALT+F7 when asked for your old password. At this point enter the dial directory and modify the password that is defined there for this particular host. Exit from the dial directory and use ALT+F7 (which will now send the new password) to provide the host with the changed password. If the host asks twice, simply use ALT+F7 twice.
Dumping the line buffer To assist programmers in debugging problems with command sequences received from the line, the ALT+F5 key allows you to inspect the contents of the line buffer. You can also display the line buffer by selecting Line/Line buffer from the Glink menu bar. From the Line Buffer window you can select 'Normal' (compressed) or 'Expanded'. Click on the 'Dump' button to dump the contents to a file.
For debugging of more complex control sequences sent from the host, you should use the built-in debugging mode. Simply toggle the File/Debug mode selection in the Glink menu bar. This will provide you with extensive debugging information in a separate window.
Glink User’s Guide Using the emulator 61
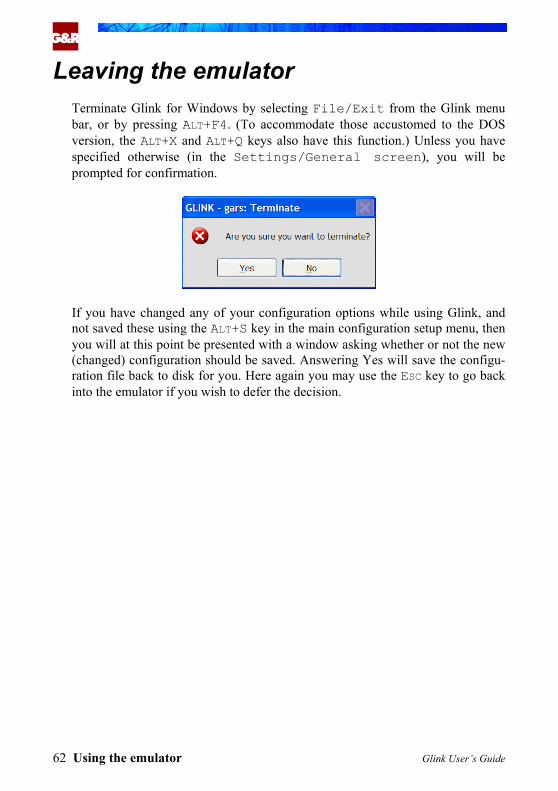
G&R
Leaving the emulator Terminate Glink for Windows by selecting File/Exit from the Glink menu bar, or by pressing ALT+F4. (To accommodate those accustomed to the DOS version, the ALT+X and ALT+Q keys also have this function.) Unless you have specified otherwise (in the Settings/General screen), you will be prompted for confirmation.
If you have changed any of your configuration options while using Glink, and not saved these using the ALT+S key in the main configuration setup menu, then you will at this point be presented with a window asking whether or not the new (changed) configuration should be saved. Answering Yes will save the configu-ration file back to disk for you. Here again you may use the ESC key to go back into the emulator if you wish to defer the decision.
62 Using the emulator Glink User’s Guide

G&R
The status line While you are running the emulator, the current status of a number of useful items of information is kept in the bottom line (line 25) of your screen. These are things like the emulation mode, graphics mode, insert mode, auto-lf status and so on. The emulator also displays CAPS if the CAPSLOCK key is active and NUML if the NUMLOCK key is active. A time-of-day clock is displayed in the status line (unless this has been disabled in the screen setup menu), also the current row and column for the cursor position (at the very end of the line). The small indicator to the left of the row and column display shows the status of your communications line. A small circle (degree sign) shows DSR active, a small block shows DCD active, and a large block shows both active.
The exact layout of the status line is described in the table below.
Col. Contents
01-16 Glink version or error indication
17-21 ECHO/CHAR/TEXT/TXRT/FORM depending on mode
22-28 INSERT if set
29-33 ROLL if set
34-39 LOCAL if in local mode or system ID
40-48 GRAPHICS if in graphics mode
49-56 AUTO-LF if in auto-lf mode
57-61 CAPS when caps lock set
62-66 NUML when numlock set
74-76 row indicator
78-80 column indicator
Columns 17 to 39 apply only if the option to provide the host name to which you are currently connected (see the configuration section) has not been enabled. If it has then the host name will appear in these positions.
Glink User’s Guide Using the emulator 63
G&R
The status line may also be used at times to provide information about the status of the program; in particular use of DEBUG, ASCII capture, printer logging and the like.
The status bar An extra status line is provided underneath the main window (unless it has been disabled with a setup option). This provides several additional items of information that are not always available on the real terminal. The full list of fields implemented in the extra status bar is as follows:
• Error message, message from host or message from modem • Current host name • Currently executing script • Debug status • Capture status • Print log status • System ID (set with script NAME command) • Remote time of day (if enabled by host) • Time of day • Printer session / output waiting for timeout indicator • Line status indicator
The printer icon shows whether a printer session is active for Ggate connections, and is also animated if there is printer output waiting for a timeout to occur (in which case you may force immediate printer output by left-clicking the icon).
The line status indicator shows the current state as follows:
Red Offline (no signals on serial interface) Green Online (DSR and DCD signals on serial interface) White DSR signal only on serial interface Black DCD signal only on serial interface Yellow Waiting for typeahead Dark yellow Waiting in a script
64 Using the emulator Glink User’s Guide

G&R
Resetting error status If the emulator should encounter an error in the data coming from the line, or find an error in a field you have typed into a form, an error message will be displayed at the start of the status line. In contrast to the standard terminal, the display of this message will not prevent you typing. However, it will not be reset until you do so manually, or until the host sends a reset sequence. To manually reset the error status select Edit/Clear Error from the Glink menu bar, or press the SCROLLLOCK key.
Note that there is an option in the general setup menu to disable the use of error messages. If this option is turned on then you will have no need to reset error status.
Glink User’s Guide Using the emulator 65


G&R
Emulations
General Glink supports a subset of the ANSI 3.64 standard, and for work in VT environments, a separate VT102 mode is supplied for VT52, VT100, VT220, VT320, VT340 and VT420 support. Additional modes available are emulation of Prestel and Minitel terminals, IBM 3270, 3151 and 5250 emulation, and for the specific needs of the Bull user, there are VIP7301, VIP7800, VIP7700, DKU7107 and DKU7102 emulation modes.
Bull emulations
DKU emulations Support is provided both for the synchronous (DKU7107, DKU7211) and asynchronous (DKU7102) models of the Bull Questar terminal series, and an additional VIP7700 mode for applications requiring exact compatibility with the older terminal models.
VIP emulations Glink supports all functions of the 7301 and 7800 series of terminals for Bull users, including the word processing mode of the 7301 terminals and the text and form modes of the 7800 terminals. Glink has additional support for compatibility with the HDS/BDS-2 or 8301 series of terminals (the ANSI mode provided is compatible with the ANSI option provided by the HDS/BDS terminal). The emulator supports all national character sets and in addition will support either the international DO11/DSA156 character set, or the internal IBM-PC character set. Seven-colour attributes in VIP mode may be used compatibly with other PC emulators supplied by Bull, also via the CAT colour attribute command. In ANSI mode colours are supported using the normal ISO 6429 standard.
Glink User’s Guide Using the emulator 67
G&R
IBM emulations The IBM 3270 emulation may be used for IBM mainframe connections using the standard TN3270 or TN3270E protocol over TCP/IP or using Ggate/DSA connections via Bull’s front-end DSA/SNA gateway. The 5250 emulation supports TN5250 and may be used to connect to AS400 or the 3151 emulation for asynchronous connections.
VT and ANSI emulations For general-purpose usage, the ANSI mode of the emulator will tackle most of the systems you are likely to encounter. This includes most services available over packet-switched networks, and also most bulletin board systems. For those running on hosts that require more specific emulation (VAX, UNIX machines) the VT102 mode is usually needed. This emulation is a fairly complete subset of the VT340 model, and covers the VT52, VT100, VT220, VT320 and VT420 command including 132-column mode and a Regis graphics subset.
Minitel and Prestel emulations
Minitel (Teletel) emulation The Minitel terminal has a number of extra keys that do not exist on the PC keyboard, and for that reason, while you are in Minitel mode these functions have been made available both on the function keys F1 to F9 and on the keys most closely corresponding to the equivalent Minitel functions. If you are planning to make extensive use of the Minitel emulation you will probably find it convenient to make yourself a 'keyboard' overlay over the function key equivalents to help you remember keys that are seldom used. The following equivalents have been used:
68 Using the emulator Glink User’s Guide

G&R
Key Function key Function
Enter F1 Send (Envoi) PgUp F2 Return (Retour) Ins F3 Repeat (Répétition) F10 F4 Help (Guide) Del F5 Cancel (Annulation) Home F6 Index (Sommaire) Backspace F7 Correct (Correction) PgDn F8 Continue (Suite) Ctrl/End F9 Disconnect (Fin/Connection)
When you run in Minitel mode, the capture function works in a slightly different way in comparison with the normal capture. This has been done because Minitel applications are in general 'screen-oriented' rather than 'line-oriented', and the contents of a normal capture file will in general be less than useful. Rather than capture data as it comes over the line, therefore, Glink will perform the equi-valent of a screen dump each time you use one of the function keys above, with the exception of the Repeat, Cancel and Correct keys.
Glink User’s Guide Using the emulator 69
G&R
Prestel (Viewdata) emulation Use of Prestel mode should be reasonably straightforward. However, there is one small addition to the standard emulator functionality that is intended to make it easier to use in practice, and that is that the F1, F2 and F3 keys have been reprogrammed to send '*', '_', and '#' respectively. As you probably know, the sequence '*123_' (sometimes '*123#') to pick up screen 123 is extensively used inside Prestel systems. In Glink, this sequence becomes F1 "123" F2 (or F1 "123" F3), making it considerably easier to type.
70 Using the emulator Glink User’s Guide

G&R
File transfer
General File transfers are used for transferring data from your PC to the host machine you are working with, or alternatively from the host machine to your PC. They may also be used to transfer data from one PC to another. There are several ways of doing this; the method used is called the file transfer 'protocol'.
The emulator supports many different file transfer protocols — ASCII (text transfer), Kermit (both text and binary), IND$FILE, Xmodem (using either checksum or CRC protocols), Ymodem, Ymodem batch, Zmodem, Modem7, and Telink. Protocols from Xmodem onwards may only be used on systems that run the line at 8 bits no parity, and will therefore not be usable on systems running 7 bits even parity, which will have to run using Kermit. Many of these protocols will require some preliminary setup of transfer parameters in the setup menus; see the Administrator's Guide for a discussion of these.
An ASCII file transfer consists of sending or receiving the file one line at a time and simply 'recording' the result. The Kermit protocol is a transfer protocol designed at Columbia University that allows you to transfer any kind of file between any two machines that have implemented the protocol. It provides extensive error checking facilities that make it extremely resilient, even on very bad lines.
The IND$FILE transfer protocol is specific to the IBM environment and is only available under the IBM3270 emulation.
The Xmodem protocol is a direct binary transfer of a file image and can therefore only be used on a connection to an 8-bit system. It was originally designed by Ward Christensen (and is often also called the Christensen protocol). Error checking is provided, but not as extensively as in Kermit.
Glink User’s Guide File transfer 71
G&R
The remaining protocols are developments and improvements to the original Xmodem protocol. Ymodem, more properly termed Xmodem-1K, is more or less the same as Xmodem, except that blocks of 1024 characters are sent instead of the 128 used by Xmodem. It should therefore only be used on a good communications line; otherwise, the cost of retransmitting a block becomes too high. Ymodem batch (or 'true' Ymodem) is an extension to the Ymodem protocol that also transfers the file name and exact file size (both Xmodem and Ymodem add extra bytes at the end of files that have been transferred with these protocols). Ymodem-G is yet another version of the same thing, but can only be used on communications lines that are guaranteed error-free, either because you are using a modem with error correction or because you have a directly connected machine. Ymodem-G does no error checking at all, and therefore requires not only that the communications line be error-free but also that you have a reliable communications interface in the PC. This is often not the case at high speeds unless you are using a LAN interface or have a serial port that uses a modern 'buffered' interface like the NEC16550. See the communications setup documentation in the Administrator's Guide for further information about such interfaces. Zmodem, if it's available on your host, is even faster than Ymodem, especially over packet networks, as it uses the same 'windowing' technique as Kermit can, but does not have so many overhead characters in its protocol.
All file transfers may be started automatically by the host. For a list of the com-mand sequences refer to the Command extensions appendix in this guide, on page 131. Where the host has not had this facility added, file transfers must be started manually (once the transfer has been started at the other end). This is done by selecting Transfers/File transfer menu from the Glink menu bar.
From the File transfer menu, you should now select the direction and type of transfer you wish to perform.
Initially the options are set to Receive and ASCII (text), but once they are moved to another pair of options, they will remain there until moved. This will help you to perform repeated file transfers where the same option is to be used each time.
If you decide not to perform the transfer after all, you may return to the emulator simply by pressing the ESC key. Otherwise, if you wish to continue with the transfer, press ENTER and in most cases you will see a file name window open on the screen.
72 File transfer Glink User’s Guide
G&R
Note that this window will not appear in those cases where you are receiving a file from the host at the other end and the transfer protocol itself can send the file name. This is the case for all protocols with the exception of ASCII, Xmodem, and Ymodem.
Here you may enter the name of the file you wish to send or receive. All normal editing keys may be used to edit the name. If you decide at this point not to con-tinue after all, note that you may exit back to the emulator using the ESC key from this window as well. Normally a file name will be displayed in the window for you to edit. The emulator will in many cases 'guess' the correct name for you from the commands you have typed while communicating with the host machine.
If you are not sure of the name of the file, then clicking on the 'File selector' button will give you a window containing the names of all files in your current directory. Select the file and press ENTER; the name of the file you selected will be entered into the file name window automatically for you. If you do not wish to choose a name then you may simply press ESC to exit from the directory window. For more information about using the 'files' window, see the discussion earlier in this guide.
If you are sending a file to the host, the emulator will first check that the file exists. If it does not then an error message will be issued and you will be given a chance to retype the file name. Alternatively, you may type ESC to return to the emulator.
If you are receiving a file then the emulator will check to make sure that the file does not exist. If it does then you will be asked whether you wish to overwrite the existing file. If you answer No, you will be allowed to choose another file name.
ASCII transfers ASCII transfers are pure text transfers between you and the host machine. When you send a file, the contents of the file are sent to the host machine just as though you had typed the file in yourself. When you receive a file, you will get on the file more or less what you see on your screen. Any transliteration you may have specified will be active during ASCII transfers. This will ensure that the characters the host thinks it is sending or receiving will be the correct ones relative to your PC.
Glink User’s Guide File transfer 73

G&R
ASCII Capture ASCII capture means that any data sent from the host will not only be displayed on your screen but also written to a file on your PC. The status line will remind you that at any time you wish to stop the writing of data to this file you may use the ALT+V key to turn off the function. Once you have started the transfer and specified a file name, you may use the ALT+V function as often as you wish to turn the recording of data on and off. You may even use the function without entering the file transfer menu at all; in this case the program will ask you for the name of the capture file the first time you use the ALT+V key. Starting the ASCII capture via the file transfer menu will start a new 'capture' file (the normal system of asking you whether you want to overwrite the file applies); using the ALT+V function will simply append the data to the file already started.
While doing an ASCII capture, only ASCII characters are written to the file. Control sequences are suppressed, except for the HT character and the LF character (which will start a new line on the capture file; however see the 'Capture delimiter' option in the file transfer setup menu).
ASCII Upload ASCII upload sends the contents of a PC file to the host. The transmit option of the edit menu also starts an ASCII upload to transmit the contents of the clipboard. Before using upload for a file or the clipboard, you should study the options available to you in the file transfer setup menus. The defaults that are set up the first time you use the emulator may not always work.
The host may need a short pause after each character (character pacing) because it cannot handle a continuous stream of characters. Some hosts will need a short pause after each line (line pacing) because they need time to handle a line of data. Host editors may request each new line by sending a 'prompt' character that you must wait for. All of these may be configured in the file transfer setup menus.
While the upload is taking place, you have some control over what is happening from the keyboard. Any time you wish the upload to be aborted, you may press the ESC key in which case you will be returned to normal emulation mode. Any other key you press will also be sent to the host machine; this is most useful in the case where the upload is stopped because it has not received the 'prompt' character you specified.
74 File transfer Glink User’s Guide

G&R
Kermit transfers The built-in Kermit is especially designed to facilitate transfer of data between mini and mainframe machines and the PC. It supports all the standard Kermit features defined in the June 1986 protocol definition from Columbia University, including 8th bit quoting (to enable you to transfer binary data over a 7-bit line), data compression, sliding windows, and long packets.
Users of Bull machines in the GCOS6, GCOS7 and GCOS8 series have a number of extra options open to them. Please consult the DPS6000 Kermit appendix on page 81 for more information about the G&R GKERM program for GCOS6, or refer to later sections of this chapter describing FTRAN usage on GCOS7 and GCOS8.
Text transfers should be used in all but special cases; the binary transfer would be used for example to backup or distribute PC software using the mainframe machine.
Normally, when using Kermit, you will have to start the Kermit on the host machine first. Consult your host's manual or help files to find out how to do this. When the host Kermit is ready to send or receive then you start the Glink Kermit program by selecting Transfers/File transfer menu from the Glink menu bar. If the direction of the transfer is Host-->PC then you will not need to specify a file name, as you will already have done this when starting the Kermit on the other machine. If sending a file then the name is specified in the file name window as shown above.
However you start the Kermit, a file transfer window will open. This indicates to you which options for the transfer are being used; the size of the file being trans-ferred; what the effective transfer rate for the portion of the file that has already been sent is (in characters per second); how much has been transferred; how long the transfer has taken so far; and how long we expect the complete transfer will take (this estimate is revised automatically at periodic intervals throughout the transfer). A bar at the bottom of the file transfer window shows visually the amount of the file that has been transferred as well. This will always be shown in the case where you are transmitting a file to the host, but not always when you are receiving a file - this will depend upon how 'good' the host Kermit is.
Four of these numbers - bytes, records and packets transferred, and the retry count - will often appear as two separate numbers. The first of these applies to the file currently being transferred, while the second refers to the entire transfer.
Glink User’s Guide File transfer 75
G&R
While the transfer is running, you may force a 'retry' (send the current packet again or ask for the current packet again) if the transfer appears to have stopped. Do this by pressing the ENTER key. Note that if you need to do this often then other problems may be involved, usually the inability of the connection to handle either windowing or long packets - adjustment of these parameters in the Kermit setup menu may be advisable.
You may also terminate the transfer at any time by pressing the ESC key. This will tell Kermit to try to terminate the transfer in an 'orderly' fashion - note that this may take a few seconds to negotiate with the other machine involved.
Kermit server operations Those who need server-type Kermit operations are provided with the 'Kermit server' key: ALT+Z. A window opens on the screen showing the list of available options. This screen can also be displayed by selecting Transfers/Kermit server mode from the Glink menu bar.
Firstly, an option is provided to operate Glink as a Kermit server. Advanced functions are not provided; the only commands supported from the remote com-puter are send, receive, finish and logout. The server may be terminated locally by pressing the ESC key.
In the same way, the other options should only be used when there is a remote Kermit server at the other end of the line. THIS SERVER MUST BE STARTED FIRST! Again, send and receive of files, finish and logout are the only options supported.
Normally, the sequence of operations you will use when operating via a server will be first to start the server at the other end, taking up the Kermit server menu in Glink, sending and receiving a number of files, and then logging out the server. Note that if you have used the ALT+Z menu to transfer at least one file, and ESCAPE out of the menu without logging out of the server at the other end, the server logout will be performed for you automatically.
This menu should only be used if you have some experience in dealing with Kermit operating in server mode.
76 File transfer Glink User’s Guide
G&R
Bull Kermit (FTRAN) Bull hosts use a modified Kermit protocol, normally called FTRAN, but found on some systems as the 'PC' command. The general information about Kermit transfers still applies, and here we will confine ourselves to considering the differences between using this protocol and a more normal Kermit.
One major difference is that FTRAN transfers are 'host-initiated'. In other words, you do not need to start the transfer manually with ALT+T in Glink. Entering the host command will start a dialog between Glink and the host machine and you will receive prompts locally if they are required. The actual details of starting the transfer depend on the type of host machine; here we will consider the two main machine lines.
FTRAN on DPS8000 The FTRAN command on GCOS8 is used inside Time-Sharing (TSS) and may on some systems be called PC rather than FTRAN. In the following, we will be assuming that the FTRAN/PC command on your system is a reasonably new version; this applies in particular if you wish to transfer multiple files in the same transfer. Send the PC or FTRAN command by itself to check the version number of the program. If you receive a display that only identifies the software with a version similar to '8EC2.0' then you will need to contact Bull for an upgraded version. Versions that support transfer of multiple files will identify themselves with a date rather than a version number. In addition, earlier versions of FTRAN support only the FTRAN PC7800 command and not the 'send' or 'get' commands described below.
There are two main ways to use FTRAN. You may use either the command line interface where all parameters are specified in the command you type in, or the 'prompted' interface where you fill out the necessary information in input boxes on the screen. Using the command line, you may send a file to the host using the following syntax:
ftran get pc-name [host-name]
Both the PC filename and the optional host filename may be full pathnames if required. If a full pathname is not specified then the current directory will be assumed at each end. Additionally, if the PC file is not specified as a full pathname and the file does not exist in the current directory, then Glink will check to see if the file exists in the directory specified in the file transfer setup as the 'upload directory', sending the file from there if it's found.
Glink User’s Guide File transfer 77

G&R
Multiple files may also be sent to the host. This may be done either using 'wildcards', for example:
ftran get *.bat
which will send all files with an extension of 'bat' to the host, or using a text file containing a list of files to be sent, one filename per line, prepared using a standard text editor. If this file was called 'FILE.LST', for example, then you could send all files specified in that file using the command:
ftran get @FILE.LST
Note the commercial at (@) character used to prefix the file name in the com-mand; this tells Glink that the file is a list of files rather than the name of the file to be sent.
The examples above assume that the file to be transferred is a text file. Binary files may be transferred in exactly the same way, but you should add ',i' after the file name. For example:
ftran get binary.exe,i
will transfer the file 'binary.exe' in binary mode instead of text mode.
Sending files from the host using the command line is done in much the same way:
ftran send host-name [pc-name]
Here the name of the file on the PC is optional. The name of the file on the host will be used if it's not specified. If you have specified a download directory in the file transfer setup menu, that's where the file will be placed. This also applies if you do specify a filename without at the same time specifying a full path for the PC name.
In the same way as for transferring files from the PC to the host, you may here specify wildcards in the name you specify for the host file in order to transfer multiple files in the same transfer, and should use ',i' after the file name if you wish to use binary mode for the transfer.
The 'prompted' interface for FTRAN is invoked using the command:
ftran pc7800
78 File transfer Glink User’s Guide

G&R
When this command is entered, a menu similar to the ALT+T menu described above will appear. Here you may choose both the direction of the transfer and the type of transfer (text or binary). Note that when you are using the prompted interface you should NOT add the ',i' to specify binary mode for the transfer; you specify the mode by selecting the correct option from the menu.
When you have selected the direction of the transfer and the transfer type, Glink will ask for the name of the file to be transferred. If you are sending from the host to the PC, this will be the name of the host file; if you are sending from the PC to the host then it will be the name of the PC file. After this you will be asked for the name of the destination file, unless you used wildcards in the name of the source file, in which case it will be assumed that the names of the different files to be transferred will be kept as they are. The same applies if you use a file list (in the same way as for the command line method), using a filename prefixed with a commercial at (@) character.
An additional method for transferring a file or selection of files from the PC is available in this case. When asked for the name of the PC file, you may click on the 'File selector' button to view a window containing the names of all files in your current directory. Select a file from this window and press the ENTER key. You may also mark several files (using the space key) before pressing ENTER. In this case, Glink will prepare the file list for you, and insert the name of that list file into the file name prompt in the correct format. The list of files will be placed on the file FILES.GLK in the Glink 'user' directory.
Some general points about GCOS8 file transfers: if you are transferring binary files with newer versions of the host software then an alternative binary encoding method (DPS8 data compression) is available, which in most cases will be superior to the standard Kermit encoding (for random binary data the overhead is reduced from 75% to 33%). This must be enabled with the corresponding option in the Kermit setup option. The default value for this option is ON, but in that the option should be OFF in other situations (notably when doing GCOS7 file transfers), if you are not sure about its setting, then it should be checked before transferring large binary files.
Glink User’s Guide File transfer 79
G&R
If you have a communications line of reasonable quality, you should also use 'long packets', also enabled with an option in the Kermit setup menu. The optimum length of packet will depend upon just how good the communications line is (the longer the packet size, the more time will be lost if retransmission should be necessary). Many of the communications interfaces supported by Glink may, however, be considered error-free for all practical purposes, and the packet length option should be set at its maximum value in these cases. Older versions of the FTRAN host software are somewhat limited with regard to packet length, while newer ones may be run with 512-byte packets (PC to host) and with 8000-byte packets (host to PC).
FTRAN on DPS7000 This software does not provide as many options as does the GCOS8 version of the same thing. The command you use to start a file transfer on GCOS7 is roughly equivalent to the FTRAN PC7800 command described above for GCOS8, but is slightly different:
FTRAN MICROSYS
Use of this command is not permitted unless you have logged into the host application (for example IOF) via the MML system - a typical login would therefore be done as follows:
$*$CN <parameters, depending on connect method> READY MICROFIT M: CN IOF;
Once you are logged into IOF, you may use the FTRAN MICROSYS command to initiate file transfers. These will provide you with the same menus as you would receive when connected to a GCOS8 system. Note, however, the following limitations of FTRAN on GCOS7 as compared with the equivalent software on GCOS8:
• Wildcards are NOT permitted. They are not supported by the GCOS7 software.
• You should NOT set the packet size to over 1000 characters; the GCOS7 software will accept the packet size but does not in fact handle it correctly.
80 File transfer Glink User’s Guide
G&R
• You MUST disable the DPS8 data compression option in the Kermit setup menu; the GCOS7 software does not handle this negotiation correctly.
GKERM on DPS6000
The built-in Kermit is especially designed to facilitate transfer of data between the DPS6000 and the PC, when cooperating with the equivalent Kermit, GKERM, supporting the same extended set of functions for the DPS6000. When working together with Glink's Kermit, GKERM can assume total control of the transfer, which may therefore be done using a single DPS6000 command with no other form of intervention from the user. The most commonly used commands are the following:
• Text file PC to DPS6000 GKERM RG pcfile.txt • Binary file PC to DPS6000 GKERM RGB pcfile.bin • Text file DPS6000 to PC GKERM SG dps6file.txt • Binary file DPS6000 to PC GKERM SGB dps6file.bin
Text transfers should be used in all but special cases; the binary transfer is used, for example, to backup or distribute PC software using the DPS6000 (or con-versely to backup or distribute DPS6000 software using the PC).
The 'G' option should be used whenever you are using Glink together with the DPS6000 GKERM. In fact, using Server6, you normally will not even have to type the command - it will be preconfigured for you on one of your GARDIR user keys. For example, to configure the key 'K' to send the file to which are pointing to the PC using a text transfer you would include the following line in your DIRUSE file:
K>Transfer text file to PC>***GKERM SG %
Pointing at the file and pressing K is now all you have to do to transfer the file to your PC.
To function correctly on your DPS6000 the following files MUST be present on the directory >SYSLIB1:
GKERM GLINE GL_ATD
Glink User’s Guide File transfer 81

G&R
In addition, these modules must have been 'installed' on your system using the INSTALL.EC utility delivered on your installation diskette.
The general format of the GKERM command on the DPS6000 is as follows:
GKERM xyz filename
where xyz are single character options, and filename is the name of the file to be sent or received. When receiving a file the filename need not be specified, unless you are using the G option for Server6, in which case you must. A special format of the filename, '*I', however, allows you to specify that the user be asked interactively to specify the filename. This interface is especially useful in that the user may in this case select the file name from Glink's standard file display by pressing F10 while positioned in the filename entry box in the normal way. If you wish to limit the files that are displayed in response to the user request to a certain subset of files, you may specify wildcards in addition to the '*I'. For example, to receive a file that you already know has an extension of '. TX', but where the user is to select just one of these, you could use the command:
GKERM rg *I*.TX
The following options are available:
Option Description R receive a file S send a file M run in server mode A ASCII mode (default) B Binary mode C Cobol mode 0 (zero) do not use sliding windows 1 use primary line 8 use eight-bit transmission D log session to screen E extended transfer DPS6000 -> PC -> DPS6000 G Server6 mode L log session on KERMIT.LOG N No CRLF delimiters
82 File transfer Glink User’s Guide

G&R
Option Description O send logout, not finish, to server P provide log information for primary line U terminate with real abort reason code when failed V other Kermit is a server W use sliding windows (default) X disable use of long packets Y use extra padding after CR Z 'extra slow' option > handle long logical records ^x use special control character as start of packet ! delete file on PC when successfully received
You must always specify at least R, S or M (the M option is not relevant when running Glink). The G option tells GKERM that you are running on the Glink software and that it may start Kermit automatically for you; this means that you don't have to go through the ALT+T sequence, etc.
When you send a file from the DPS6000, you may specify a full pathname for the DPS6000 file you wish to send to the PC. Only the last component (the file name) will be given to the PC and the file will be stored under this name in your current directory. If you are not in the correct directory then you may simply use the ALT+F file display to select the correct directory on the PC before doing the transfer. You may also use star-name conventions for the filename in order to transfer a batch of files (this applies in both directions).
When you receive a file from the PC using the G option, you also specify the name of the PC file you wish to receive on the DPS6000. This may also be a fully qualified pathname - however, if you are using a full pathname you should probably enclose it in single quote characters to avoid wrong interpretation of the string by the DPS6000 command parser. For example:
GKERM RG 'D:\DIR01\FILE004'
The C option is an alternative to the standard A and B options. This tells GKERM that the transfer is to be treated as a binary transfer (no transliteration of text for example) but that files are to be handled logical record by logical record rather than read physically. This option is especially useful for transferring data files which must be preserved transparently through the transfer but which must nonetheless be stored as sequential files on the DPS6000.
Glink User’s Guide File transfer 83

G&R
The 0 (zero) option indicates that sliding windows should not be used. In some cases, the use of windowing may cause excessive retransmissions; in such a case specifying the zero option may help, although it will inevitably slow the transfer down somewhat.
The 1 option is designed for usage with applications software that controls the communications line directly and is not applicable to PC usage of the Kermit.
The 8 option enables 8-bit transmissions. Normally the DPS6000 Kermit will assume that you are using a 7-bit, even parity connection and will therefore use 8-bit quoting to allow transmission of real binary data. If you are connected on an 8-bit no parity line (or if GKERM is being used in the X.25 environment; again, not relevant to PC usage) then the 8 option may be specified. (GKERM will, in fact, usually detect the 8-bit connection, but this option will tell GKERM that the line is 8-bit if all else fails.)
The D option displays all packets to the screen as they are sent or received by the DPS6000. This option is intended for usage in the X.25 environment and must not be used when running from a PC.
The E option is an extension of the G option. The file will first be transferred from the DPS6000 to the PC (using the same automatic startup feature as does the G option). If the transfer is successful, the single command
KUTIL filename
(where filename is the name of the file just transferred) will be executed on the PC. KUTIL will normally be a user-written program or .BAT file written specifically to handle files transferred in this way. When the KUTIL command on the PC terminates, the file will be transferred back to the DPS6000.
The G option is mentioned above and enables the auto up/download feature of the emulator.
The L option allows logging of all packets sent each way to a file called KERMIT.LOG in the DPS6000 working directory. This option may be found useful for debugging problems that may occur.
84 File transfer Glink User’s Guide
G&R
The N option for text transfers (types A and C) tells GKERM not to add a CRLF delimiter between each record as it is transmitted to the PC. Used on a transfer towards the DPS6000, this option will tell GKERM that each logical record on the DPS6000 should be filled to the predefined logical record size of the file, rather than splitting the records at the CRLF delimiter sent by the PC.
The O option overrides the normal 'finish' command sent when talking to another Kermit operating in server mode. If the O option is used, then GKERM will send a 'logout' command instead. This will normally terminate the session with the other machine.
The P option provides on-screen information about the progress of the file transfer when the GKERM is connected to the 'primary' line using the 1 option.
The U option tells GKERM to terminate with the correct return code in the case of a failed transfer. Normally a failed transfer will return -1, indicating that the error has already been reported, but the U option may be found useful for better control of transfers started from EC files or from your own programs if you need to have more information about the specific error condition.
The V option is used when the Kermit at the other end is a Kermit 'server'. This is not relevant for DPS6000/Glink transfers.
The W option enables use of sliding windows on the DPS6000 Kermit. This is, in fact, the default for GKERM (see the zero option). In earlier versions of GKERM, W had to be specified separately and was not recommended; improvements in the GL_ATD program have made this more reliable.
The X option disables use of long packets. Long packets will in any case not be used unless you have enabled their use via the Kermit setup menu. Using long packets allows much more data to be sent in a single transmission and can significantly improve your throughput on a good connection. If you are getting excessive retransmissions when using long packets you can either reset the option in the Kermit menu, or use the X option for the present transmission only.
The Y option tells GKERM that additional 'padding' characters should be used at the end of each packet. This may be found necessary when connecting to hosts that have problems 'turning around' the communications line.
Glink User’s Guide File transfer 85

G&R
The Z option should only be used in exceptional circumstances, and only for transfers towards the DPS6000. It slows the sending of characters from the DPS6000 down to just a few characters per second. This is for hosts that have extreme difficulty reading data over an asynchronous line.
The > option allows you to transfer files that contain long logical records. The maximum logical record size that will be handled will be 1024 rather than the normal 256.
The ^x option allows you to override the normal SOH character used to start the Kermit packets. The character is specified in the same way as described elsewhere in this guide, with an alphabetic character taken from the corres-ponding position in the ASCII table to the control character needed. For example, a US character would be specified as ^_.
The ! option tells a GKERM that is sending a file to Glink that the file on the PC should be deleted at the start of the transfer. Use of this option will override the setting of the 'file overwrite' option in the Glink file transfer setup menu. Used on a transfer from the PC to the DPS6000, it tells GKERM that the file on the PC should be deleted after it has been successfully transferred to the DPS6000.
86 File transfer Glink User’s Guide

G&R
Kermit and VAX/VMS Kermit for VAX/VMS is Copyright (C) Trustees of Columbia University in the City of New York and can be collected from there (if not available on a local bulletin board system). The following Glink script will help you in installing Kermit on a VAX that does not already have a file transfer program installed.
* This routine uploads two text files: * VMSDEH.MAR * VMSMIT.HEX * from the working directory on your PC to your own * working directory on a VAX host. * * Thereafter it builds KERMIT.EXE - and you should * be able to use the command: * RUN KERMIT on key Ctrl-F10 retu * First send vmsdeh.mar sndl "deletexx/noconf vmsdeh.mar;*" sndl "edit/tpu vmsdeh.mar" rece "[End of file]" set ASCII lpace 1 putf ASCII "vmsdeh.mar" sndl "^Z"; rece "$" * Then send vmsmit.hex sndl "deletexx/noconf vmsmit.hex;*" sndl "edit/tpu vmsmit.hex" rece "[End of file]" putf ASCII "vmsmit.hex" sndl "^Z"; rece "$" :BuildKermit sndl "macro vmsdeh" rece "$"; sndl "link vmsdeh" rece "$"; sndl "run vmsdeh" rece "type the file name"; sndl "vmsmit.hex" rece "$"; sndl "rename vmsmit.exe Kermit.exe" retu
Glink User’s Guide File transfer 87
G&R
With the current version of Kermit for VAX/VMS (3.3.126), you may run with 'long packets'. The following parameters, either entered interactively or perma-nently put into the KERMIT.INI file should give you improved throughput:
set send packet_length 1000 set receive packet_length 1000
If you are using the LAT interface and the PathWorks 4.0 option, you may find that you have to reduce the last parameter to 250 to avoid timing problems with the DEC host software.
Kermit and file names When you receive a file using Kermit, most of the time the host will specify a name that's usable on the PC. This is not always the case however, and some-times a host will provide a name that is not legal on the PC. Glink will attempt to convert the name provided by the host into something that is acceptable for the PC, and at the same time preserves as much information as possible from the name specified by the host.
The translation done by Glink is quite restrictive and will, amongst other things, remove foreign-language characters and override use of absolute pathnames (for the PC) if the host should specify one. If you know that the host is going to provide exact names for the PC target file (possibly including a full pathname) you should set the option in the Kermit setup menu for suppression of file name translation. In this case, Glink will pass the name specified by the host on to PC unchanged.
If you are letting Glink perform file name conversion then it may be useful to know some details of how this conversion is performed (especially if you need to know in advance what a particular filename will be converted to).
First Glink will strip off the last part of the name specified by the host. Only alphabetics, numerics, dollar, hyphen, underline, period, comma and semicolon will be considered for this part of the scan. As soon as a character is encountered that is not one of those specified (working from right to left in the file name) then the rest of the name will be discarded. Note that this will remove any drive and directory specification provided by the host, if present.
Next, if a comma or semicolon is present in what's left, the part of the name from (and including) the first comma or semicolon will be discarded, this time working from left to right.
88 File transfer Glink User’s Guide
G&R
The remaining name is then inspected; all periods except for the last one will be replaced with an underline character. If no periods were found in the name at all and the length of the name is more than eight characters, the part after the first eight characters will be checked. The last occurrence of hyphen, underline, or dollar will in this case be replaced with a period to mark an 'extension'. If none of these are found there, on the other hand, a period will be inserted after the eighth character of the name instead.
The resulting name should now have at most one period in it, and the name we are left with will be used. The first eight characters before the period and the first three after give the DOS 8.3 filename format.
In some circumstances with particularly strange host names, the above algorithm can result in a null file name. In this case, the file will be saved locally using 'KERMIT' as the name of the file.
In any case, assuming that a full pathname is not being used, if a download directory has been specified in the file transfer setup menu, then this will be used to place the file. If no download directory has been specified then the file will be placed in the current directory.
Some examples of file renaming using the above algorithm:
C:\DIR1\DIR2\FILE1 becomes FILE1 AB910101XYZ becomes AB910101.XYZ FILE.ABC.123 becomes FILE_ABC.123 DISPLAYWRITE;4 becomes DISPLAYW.RIT FILE1-100-123-456 becomes FILE1-10.456
Glink User’s Guide File transfer 89

G&R
Xmodem and related file transfers The Xmodem family of protocols is supported for convenience when using the emulator to access 'foreign' systems that do not have Kermit. You will usually find that any system that does not support Kermit does at least have this possi-bility. These protocols may only be used when you are running with the parity set to 'no parity', otherwise errors will occur.
If the connection to the host is 'noisy', you should choose the Xmodem option, as this uses smaller blocks and is less prone to get line 'hits'. If the line is a good one then you should use Ymodem, or Ymodem-batch if available, as these are faster than Xmodem. As mentioned before, if the line is 'perfect', in other words you are using error-correcting modems or have a direct connection, then Ymodem-G is the protocol to choose. Note also that if you do have a reasonably good line and you are using 8-bit no parity to connect then you should choose one of these protocols in preference to Kermit, as they are a good deal faster in most typical cases.
If you are using Xmodem or Ymodem to transfer a file, then use of wildcards to transfer a group of files is not permitted. However, the other protocols in the family do support this, so when you are sending files you may specify file names with wildcards or use the file display to mark a group of files to be sent in the same way as described for the Kermit transfer.
90 File transfer Glink User’s Guide

G&R
Zmodem transfers The emulator also supports the Zmodem protocol, which in general will be the fastest file transfer option if it's available on the system to which you are con-nected. This protocol uses a 'streaming' technique, which means that the contents of the file being transferred are sent continuously without waiting for acknow-ledgements from the host machine. The receiving Zmodem program will only reply if there has been a problem with the received data (note that this means that Zmodem can only run on full duplex connections).
If you are running on a UNIX system, you will probably find that your basic software installation does not include Zmodem software. Public domain versions are available via anonymous ftp from many Internet sites and you would be well advised to collect one of these.
If you are running in ANSI or VT102/220 mode, Zmodem downloads are detected automatically by the emulator. Just start the transfer on the host side and the Glink side of the transfer will start up with no need for user intervention. If you are connected to a system that uses the standard 'rz' command for receiving files then uploads are also automatic if you start them at the command prompt and wish to use default options for the transfer.
Zmodem may be run in both ASCII and binary modes. In binary mode, the file will be transferred with no conversion of any kind. In text mode the character set will be converted (if necessary) and line breaks changed to those appropriate for the receiving end of the transfer.
Zmodem will also provide recovery for failed transfers. If a Zmodem transfer fails (for example because the connection was lost) then you can turn on the option for 'crash recovery' and restart the transfer. Glink will check that the portion of the file already received matches and continue the transfer from the point at which it was interrupted.
Glink User’s Guide File transfer 91

G&R
CompuServe transfers CompuServe has defined its own file transfer protocol, the B protocol. This exists in three forms - the old B protocol, the Quick-B protocol, and the B+ protocol. Glink supports all three of these when running in ANSI or VT102/220 mode. In that such file transfers are always started automatically from the CompuServe host, the B protocol does not appear in the normal file transfer menu. Also, the control sequences that are used by CompuServe to initiate the transfer may have a different meaning on other types of host machine. You must therefore enable CompuServe protocol specifically when you are intending to use it. This is done in one of two places. You can enable the protocol in general by selecting it as your default transfer protocol in the file transfer menu in setup (this is not recommended). Alternatively, you can enable it specifically for CompuServe by selecting B protocol as the default transfer protocol for the dialling entry you will use to contact CompuServe (recommended).
When using CompuServe, choose Quick-B protocol rather than the normal B protocol when asked. The Quick-B protocol is much faster, especially over packet switched networks.
92 File transfer Glink User’s Guide
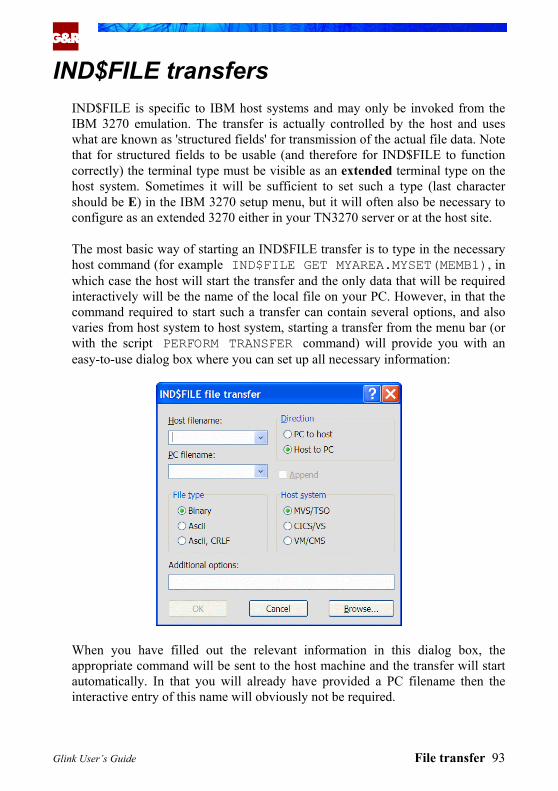
G&R
IND$FILE transfers IND$FILE is specific to IBM host systems and may only be invoked from the IBM 3270 emulation. The transfer is actually controlled by the host and uses what are known as 'structured fields' for transmission of the actual file data. Note that for structured fields to be usable (and therefore for IND$FILE to function correctly) the terminal type must be visible as an extended terminal type on the host system. Sometimes it will be sufficient to set such a type (last character should be E) in the IBM 3270 setup menu, but it will often also be necessary to configure as an extended 3270 either in your TN3270 server or at the host site.
The most basic way of starting an IND$FILE transfer is to type in the necessary host command (for example IND$FILE GET MYAREA.MYSET(MEMB1), in which case the host will start the transfer and the only data that will be required interactively will be the name of the local file on your PC. However, in that the command required to start such a transfer can contain several options, and also varies from host system to host system, starting a transfer from the menu bar (or with the script PERFORM TRANSFER command) will provide you with an easy-to-use dialog box where you can set up all necessary information:
When you have filled out the relevant information in this dialog box, the appropriate command will be sent to the host machine and the transfer will start automatically. In that you will already have provided a PC filename then the interactive entry of this name will obviously not be required.
Glink User’s Guide File transfer 93

G&R
The 'file type' specified in this dialog box does not influence local processing in Glink except that national language transliteration will be applied for ASCII files. It does however affect the host view of the file; 'binary' specifies that the images on the host and PC should be exactly the same, while ASCII implies a transliteration from EBCDIC on the host to ASCII on the PC. ASCII, CRLF implies additionally that record separators in the host file should be equivalent to CRLF delimiters in the PC file. Remember that because a command is sent to the host as a result of filling out the dialog box, you must always position yourself in a host menu where such a command is valid. Otherwise, you will just see an error message come back from the host.
For reference purposes, here is a list of the various commands that will be sent to the host as a result of the different combinations of options that may be chosen in the IND$FILE dialog box:
Direction File type Host Command MVS/TSO IND$FILE PUT hostfile
Binary CICS/VS IND$FILE PUT hostfile (BINARY
VM/CMS IND$FILE PUT hostfile (RECFM F
MVS/TSO IND$FILE PUT hostfile ASCII
PC to host ASCII CICS/VS IND$FILE PUT hostfile (ASCII
VM/CMS IND$FILE PUT hostfile (ASCII
MVS/TSO IND$FILE PUT hostfile ASCII CRLF
ASCII, CRLF CICS/VS IND$FILE PUT hostfile (ASCII CRLF
VM/CMS IND$FILE PUT hostfile (ASCII CRLF
MVS/TSO IND$FILE GET hostfile
Binary CICS/VS IND$FILE GET hostfile (BINARY
VM/CMS IND$FILE GET hostfile (
MVS/TSO IND$FILE GET hostfile ASCII
Host to PC ASCII CICS/VS IND$FILE GET hostfile (ASCII
VM/CMS IND$FILE GET hostfile (ASCII
MVS/TSO IND$FILE GET hostfile ASCII CRLF
ASCII, CRLF CICS/VS IND$FILE GET hostfile (ASCII CRLF
M/CMS IND$FILE GET hostfile (ASCII CRLF
94 File transfer Glink User’s Guide

G&R
Glink User’s Guide File transfer 95


G&R
Frequently-asked questions — When I start Glink it appears to hang with a message saying 'Initializing modem'?
Assuming that you have a modem, then this probably means that there is some-thing wrong with the modem initialization string. Press ESC to get rid of the window and note what you have in the modem init string. Try typing the com-mand manually and see if you receive an 'OK' message back from your modem. If you don't then consult your modem manual to discover which part of the string is causing problems.
— Where is the 'Line-feed' key?
It is on the GREY/- key at the right-hand side of your keyboard. The GREY/+ key next to it is the TRANSMIT key, by the way.
— I don't get any colour menus at all when I run the emulator on G&R Server6. What's wrong?
You must use the correct device driver on the DPS6000, and it has probably not been configured correctly. You can start it yourself by executing the command:
GVIDEO -OFF;GVIDEO -DEV LINK -EC
Alternatively, you can simply reconfigure your ENQ string to '730G'. This will automatically be recognized by Server6.
— When I type the codes for my country's national characters I get square brackets on my screen. How can I get the correct characters?
Enable the keyboard file appropriate to your country using the Keyboard file option in the emulator setup menu. You are using the seven-bit national charac-ters on your keyboard and these must be converted to the correct display charac-ters.
Glink User’s Guide Frequently asked questions 97

G&R
— When I type the codes for my country's national characters I get the right characters. But when I look at data typed in on other terminals I get the square brackets. How can I get both types of data to look correct?
Same as the previous answer. The national keyboard file for your country will solve the problem, although the recommended way of running is to use the cor-rect characters consistently. If you are running Server6 you may also press the CTRL+F key until you reach the language of your choice and let Server6 take care of the correct translation.
— My country's national characters appear on my screen as graphics and Greek characters when I'm reading data sent by other users. And strange things happen when I try to use the national characters from my own keyboard...
This sounds as though you are using the KPC keyboard and should be using KUS (KN2 or KML in Norway). If you are talking to a VAX or DPS6000 then it's almost certainly the case.
— National characters sent by the BBS I'm talking to seem to mostly disappear or give peculiar results on my screen, even though things I type myself look OK?
Probably the opposite case to the previous question - you are most likely on a system where you should be using KPC but have set up with one of the ISO key-boards. Also make sure that you are set up for 8bit no parity and have set the host mode to eight-bit as well, in that most BBS systems use these settings.
— When I run Kermit the transfer stops after a few blocks when I'm sending files up to the DPS6000, and after about 30 blocks when receiving files. What's wrong?
You probably need to set the 'host quote' option in the Kermit setup menu. Alter-natively, you may have set the host quote option when you should not have done. See the relevant portion of this documentation.
— When I run FTRAN on GCOS8 using another communications package the transfers go much faster than with Glink. Why is Glink so slow?
98 Frequently asked questions Glink User’s Guide

G&R
Check that you have turned on the 'long packets' option in the Kermit transfer setup menu. Also, be sure that you have specified a reasonably large packet size (unless you are using a noisy dial-up line). Recommended packet size for older versions of FTRAN is 1000 bytes, for newer versions we recommend 1980 bytes, and that you set the option in the Kermit setup menu to override the host packet size. On a very good line, when transferring files from GCOS8 to the PC, set the packet size to 4000 or more. Also make sure that the option for 'DPS8 compression' is turned on for newer versions of FTRAN on GCOS8 and OFF for all other versions of FTRAN.
— When I run Kermit I always get several retries when the transfer starts up. Is there something wrong with my communications line?
No. Rather than wait for the line to time out, the emulator always starts off with a retransmission. This allows the transfer to start up immediately rather than have to be 'pushed'. So the retransmissions at the start of the transfer are perfectly normal.
— When I transfer a file from the DPS6000 to my PC the file transfer stops before all the data has been transferred.
The status window shows the size of the file as it exists on the DPS6000. In general the file will require less space on the PC as the format of the file is different. The entire contents have been transferred nonetheless, so long as the transfer terminates normally.
— How can I transfer my pseudographic drawings between TED and my PC editor?
Just transfer the file. Glink will take care of the graphics for you. And Server6 will be able to print them on your printer.
— Sometimes when I dial up the DPS6000 from a remote location with my 'smart' modem I have to wait for over 30 seconds after getting connected before I see the login message. Why does it take so long?
The first thing the DPS6000 does when you dial in is to ask the terminal to identify itself. When using a smart modem with auto speed detection and speed conversion it can happen that the first few characters to be sent to you get 'lost'. In this case you have to wait for the DPS6000 to ask again; this usually takes about 30 seconds from the initial enquiry.
Glink User’s Guide Frequently asked questions 99

G&R
— When I transfer a file from my PC to the DPS6000 I can't read the file into TED, and GARDIR says that it's a 'program' file.
Always use ASCII transfers for text files. If you use binary transfer the file will be sent up as an image of the PC file. DPS6000 programs can't read this format. On the other hand if you are just using the transfer to use the DPS6000 as a backing store for your PC files, then its perfectly OK to do a binary transfer; when you send the file back (also using binary transfer) it will look OK again.
— When I start up Glink nothing happens at all; I can't seem to get into contact with the host machine, or even type any characters.
Try using ALT+L to go into local mode. If you now can type data and see it on the screen, then you have a communications problem; if you still cannot see the data you are typing then you have an incompatibility problem (your PC is not a 'close' compatible). With communications problems, you should recheck your cabling; this is the most common reason for not being able to communicate. There is a possibility that lack of ability to communicate may also be caused by 'incompatibility'. Any case of suspected incompatibility should be reported back to us; we may be able to help.
— When I use the ASCII capture function I don't seem to be getting the correct data. The lines are not divided up properly, and some lines are even repeated.
The ASCII capture function can only work correctly when the host machine is sending 'line-at-a-time' output. If you run a product that runs in full-screen mode then updates will be made using control sequences, and not necessarily sequenti-ally down the screen. For this type of application use the screen dump function and capture the 'screens' of information you are interested in. If you are using GARPAD for X.25 communications the easiest way out of the problem is to use GARPAD's log function and transfer the log to your PC with Kermit at the end of your session if necessary. If you must capture directly to your PC then use a 'non-screen' product like PADCON instead.
— In VIP mode, the Del key does not act like the delete character key on my 7800 terminal.
The DEL key defaults to the same function as was assigned to the DEL key on a 7200 terminal. The delete character key is by default placed on CTRL+LEFT ARROW, but may be moved using the GLLAY utility described in the GLLAY : keyboard layout appendix on page 149.
100 Frequently asked questions Glink User’s Guide

G&R
Command list (VIP) This is a list of the commands currently supported by the emulator when running in VIP mode. For a full explanation of each command, refer to the documentation for the VIP7301 or HDS/BDS-2 terminals.
VIP commands (Mnemonic sort)
Mnemonic code
VIP commands Mnemonic sort
ASCII sequence
Hexadecimal sequence
ALT Alternate shift - -
APC Aux port connect esc a 1B 61
APD Aux port disconnect esc b 1B 62
ATR Attribute esc s a 1B 73 a
AUTO LF Auto line feed - -
BEL Bell bel 07
BLD Bell disable esc g 1B 67
BLE Bell enable esc h 1B 68
BRK Break - -
BS Back space bs 08
CAPS LOCK
Caps lock - -
CAT Colour attribute esc [ nnn v 1B 5B nnn 76
CBT Cursor back tab esc [ Z 1B 5B 5A
CLR Clear esc ` 1B 60
CPB Cursor pos binary esc f c r 1B 66 c r
CPD Cursor pos decimal esc [ rrrccc f 1B 5B rrrccc 66
Glink User’s Guide VIP command list 101
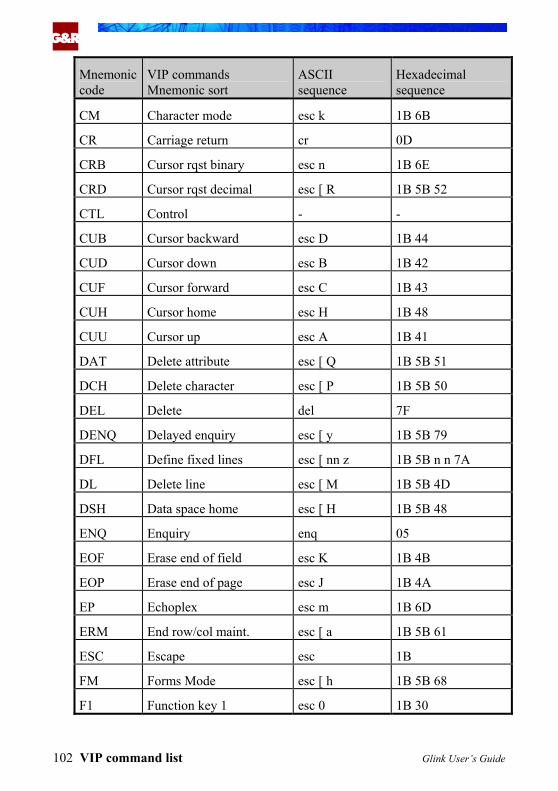
G&R
Mnemonic code
VIP commands Mnemonic sort
ASCII sequence
Hexadecimal sequence
CM Character mode esc k 1B 6B
CR Carriage return cr 0D
CRB Cursor rqst binary esc n 1B 6E
CRD Cursor rqst decimal esc [ R 1B 5B 52
CTL Control - -
CUB Cursor backward esc D 1B 44
CUD Cursor down esc B 1B 42
CUF Cursor forward esc C 1B 43
CUH Cursor home esc H 1B 48
CUU Cursor up esc A 1B 41
DAT Delete attribute esc [ Q 1B 5B 51
DCH Delete character esc [ P 1B 5B 50
DEL Delete del 7F
DENQ Delayed enquiry esc [ y 1B 5B 79
DFL Define fixed lines esc [ nn z 1B 5B n n 7A
DL Delete line esc [ M 1B 5B 4D
DSH Data space home esc [ H 1B 5B 48
ENQ Enquiry enq 05
EOF Erase end of field esc K 1B 4B
EOP Erase end of page esc J 1B 4A
EP Echoplex esc m 1B 6D
ERM End row/col maint. esc [ a 1B 5B 61
ESC Escape esc 1B
FM Forms Mode esc [ h 1B 5B 68
F1 Function key 1 esc 0 1B 30
102 VIP command list Glink User’s Guide
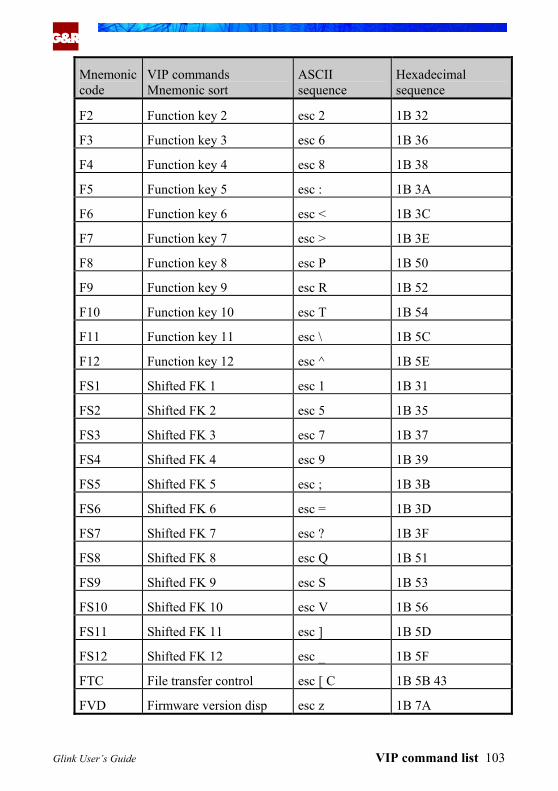
G&R
Mnemonic code
VIP commands Mnemonic sort
ASCII sequence
Hexadecimal sequence
F2 Function key 2 esc 2 1B 32
F3 Function key 3 esc 6 1B 36
F4 Function key 4 esc 8 1B 38
F5 Function key 5 esc : 1B 3A
F6 Function key 6 esc < 1B 3C
F7 Function key 7 esc > 1B 3E
F8 Function key 8 esc P 1B 50
F9 Function key 9 esc R 1B 52
F10 Function key 10 esc T 1B 54
F11 Function key 11 esc \ 1B 5C
F12 Function key 12 esc ^ 1B 5E
FS1 Shifted FK 1 esc 1 1B 31
FS2 Shifted FK 2 esc 5 1B 35
FS3 Shifted FK 3 esc 7 1B 37
FS4 Shifted FK 4 esc 9 1B 39
FS5 Shifted FK 5 esc ; 1B 3B
FS6 Shifted FK 6 esc = 1B 3D
FS7 Shifted FK 7 esc ? 1B 3F
FS8 Shifted FK 8 esc Q 1B 51
FS9 Shifted FK 9 esc S 1B 53
FS10 Shifted FK 10 esc V 1B 56
FS11 Shifted FK 11 esc ] 1B 5D
FS12 Shifted FK 12 esc _ 1B 5F
FTC File transfer control esc [ C 1B 5B 43
FVD Firmware version disp esc z 1B 7A
Glink User’s Guide VIP command list 103

G&R
Mnemonic code
VIP commands Mnemonic sort
ASCII sequence
Hexadecimal sequence
HT Horizontal tab ht 09
IL Insert line esc [ L 1B 5B 4C
IM Insert mode esc [ I 1B 5B 49
IMR Insert mode reset esc [ J 1B 5B 4A
KBL Keyboard lock esc [ X 1B 5B 58
KBU Keyboard unlock esc [ W 1B 5B 57
KIR Keyboard ID reqst esc [ 1B 5B 7B
LCL Local - -
LF Line feed lf 0A
LGR Line graphics reset esc F 1B 46
LGS Line graphics set esc G 1B 47
MC Media copy esc i 1B 69
MLL Maint. line lock esc 1B 7D
MLS Maint. line set esc ~ 1B 7E
NEP Non-echoplex esc l 1B 6C
NOP No operation esc [ x 1B 5B 78
NSEG Next segment esc [ 2 s 1B 5B 32 73
NUML Numeric lock - -
PCC Print control character esc [ = c p 1B 5B c 70
PDENQ Printer delayed enquiry esc [ 9 p 1B 5B 39 70
PDS Print data space esc [ 0 p 1B 5B 30 70
PDT Print data terminator esc [ < p 1B 5B 3C 70
PENQ Printer enquiry esc [ 8 p 1B 5B 38 70
PHD Print host data esc [ 3 p 1B 5B 33 70
PKL Print key lock esc [ ; 1 p 1B 5B 3B 31 70
104 VIP command list Glink User’s Guide
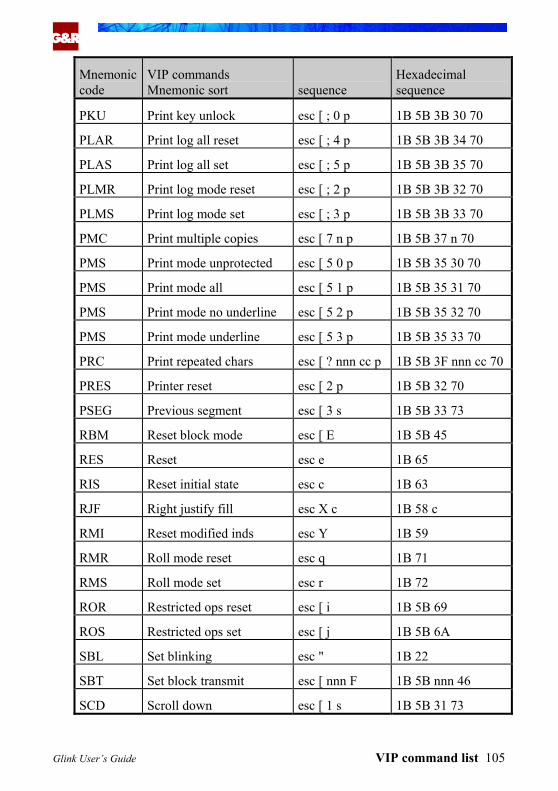
G&R
Mnemonic code
ASCII sequence
Hexadecimal sequence
VIP commands Mnemonic sort
PKU Print key unlock esc [ ; 0 p 1B 5B 3B 30 70
PLAR Print log all reset esc [ ; 4 p 1B 5B 3B 34 70
PLAS Print log all set esc [ ; 5 p 1B 5B 3B 35 70
PLMR Print log mode reset esc [ ; 2 p 1B 5B 3B 32 70
PLMS Print log mode set esc [ ; 3 p 1B 5B 3B 33 70
PMC Print multiple copies esc [ 7 n p 1B 5B 37 n 70
PMS Print mode unprotected esc [ 5 0 p 1B 5B 35 30 70
PMS Print mode all esc [ 5 1 p 1B 5B 35 31 70
PMS Print mode no underline esc [ 5 2 p 1B 5B 35 32 70
PMS Print mode underline esc [ 5 3 p 1B 5B 35 33 70
PRC Print repeated chars esc [ ? nnn cc p 1B 5B 3F nnn cc 70
PRES Printer reset esc [ 2 p 1B 5B 32 70
PSEG Previous segment esc [ 3 s 1B 5B 33 73
RBM Reset block mode esc [ E 1B 5B 45
RES Reset esc e 1B 65
RIS Reset initial state esc c 1B 63
RJF Right justify fill esc X c 1B 58 c
RMI Reset modified inds esc Y 1B 59
RMR Roll mode reset esc q 1B 71
RMS Roll mode set esc r 1B 72
ROR Restricted ops reset esc [ i 1B 5B 69
ROS Restricted ops set esc [ j 1B 5B 6A
SBL Set blinking esc " 1B 22
SBT Set block transmit esc [ nnn F 1B 5B nnn 46
SCD Scroll down esc [ 1 s 1B 5B 31 73
Glink User’s Guide VIP command list 105

G&R
Mnemonic code
VIP commands Mnemonic sort
ASCII sequence
Hexadecimal sequence
SCU Scroll up esc [ 0 s 1B 5B 30 73
SHI Set high intensity esc 3 1B 33
SHIFT Shift - -
SIN Set invisible esc @ 1B 40
SLC Set lower case esc [ n 1B 5B 6E
SLI Set low intensity esc 4 1B 34
SLL System line lock esc O 1B 4F
SLR System line reset esc v 1B 76
SLS System line set esc w 1B 77
SM64 Set Mode ANSI esc [ 5 q 1B 5B 35 71
SM73 Set Mode 7300 esc [ 3 q 1B 5B 33 71
SM77 Set Mode 7700 esc [ 2 q 1B 5B 32 71
SM78 Set Mode 7800 esc [ 1 q 1B 5B 31 71
SM83 Set Mode 8300 esc [ 4 q 1B 5B 34 71
SRC Save row/col position esc [ O 1B 5B 4F
SRL Scroll left esc [ b 1B 5B 62
SRM Start row/col maint. esc [ Y 1B 5B 59
SRR Scroll right esc [ c 1B 5B 63
SS2 Single shift 2 ss2 19
SSR Space suppress reset esc [ d 1B 5B 64
SSS Space suppress set esc [ e 1B 5B 65
STP Set transmit pointer esc M 1B 4D
SUC Set upper case esc [ m 1B 5B 6D
SWP Set window position esc [ rrrccc ~ 1B 5B rrrccc 7E
TBC Tab clear esc [ g 1B 5B 67
106 VIP command list Glink User’s Guide
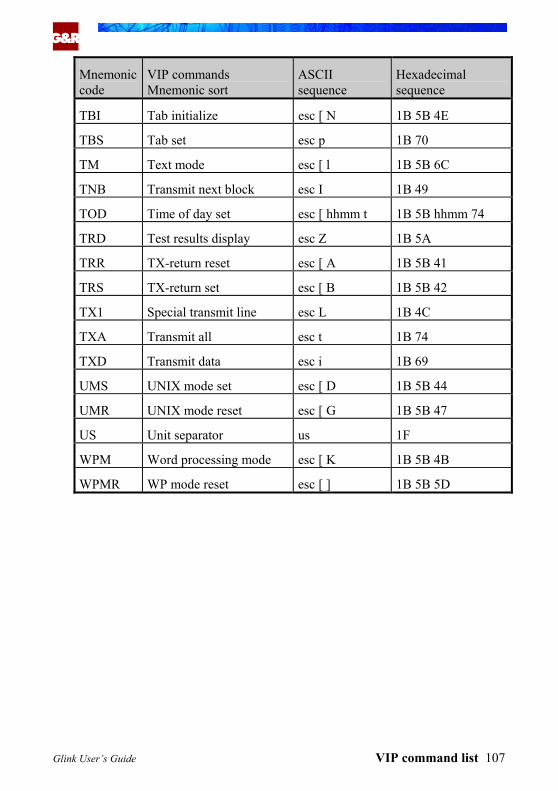
G&R
Mnemonic code
VIP commands Mnemonic sort
ASCII sequence
Hexadecimal sequence
TBI Tab initialize esc [ N 1B 5B 4E
TBS Tab set esc p 1B 70
TM Text mode esc [ l 1B 5B 6C
TNB Transmit next block esc I 1B 49
TOD Time of day set esc [ hhmm t 1B 5B hhmm 74
TRD Test results display esc Z 1B 5A
TRR TX-return reset esc [ A 1B 5B 41
TRS TX-return set esc [ B 1B 5B 42
TX1 Special transmit line esc L 1B 4C
TXA Transmit all esc t 1B 74
TXD Transmit data esc i 1B 69
UMS UNIX mode set esc [ D 1B 5B 44
UMR UNIX mode reset esc [ G 1B 5B 47
US Unit separator us 1F
WPM Word processing mode esc [ K 1B 5B 4B
WPMR WP mode reset esc [ ] 1B 5B 5D
Glink User’s Guide VIP command list 107
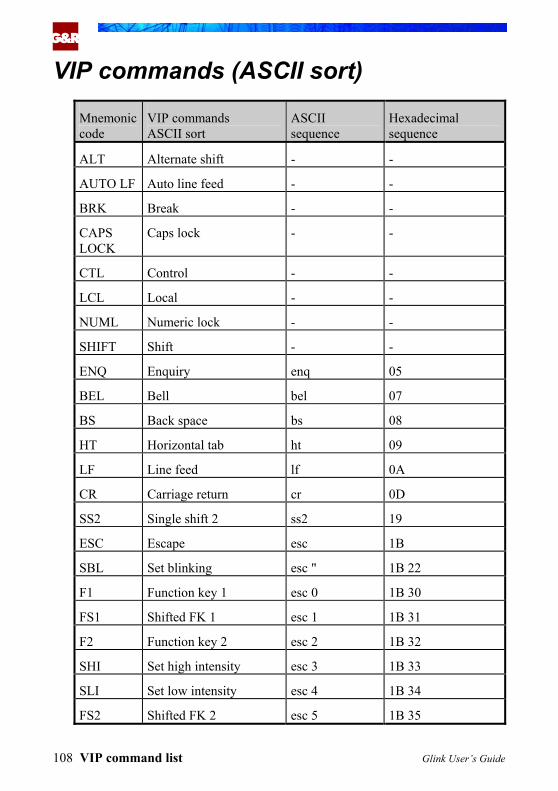
G&R
VIP commands (ASCII sort)
Mnemonic code
VIP commands ASCII sort
ASCII sequence
Hexadecimal sequence
ALT Alternate shift - -
AUTO LF Auto line feed - -
BRK Break - -
CAPS LOCK
Caps lock - -
CTL Control - -
LCL Local - -
NUML Numeric lock - -
SHIFT Shift - -
ENQ Enquiry enq 05
BEL Bell bel 07
BS Back space bs 08
HT Horizontal tab ht 09
LF Line feed lf 0A
CR Carriage return cr 0D
SS2 Single shift 2 ss2 19
ESC Escape esc 1B
SBL Set blinking esc " 1B 22
F1 Function key 1 esc 0 1B 30
FS1 Shifted FK 1 esc 1 1B 31
F2 Function key 2 esc 2 1B 32
SHI Set high intensity esc 3 1B 33
SLI Set low intensity esc 4 1B 34
FS2 Shifted FK 2 esc 5 1B 35
108 VIP command list Glink User’s Guide
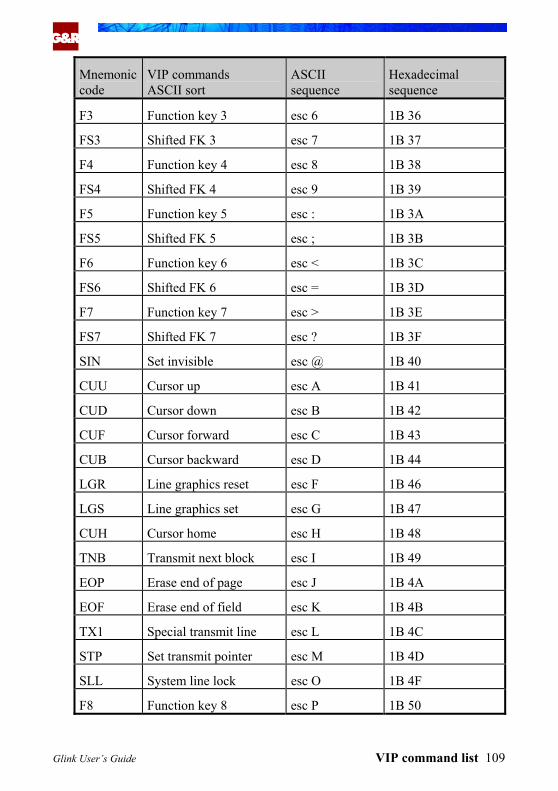
G&R
Mnemonic code
VIP commands ASCII sort
ASCII sequence
Hexadecimal sequence
F3 Function key 3 esc 6 1B 36
FS3 Shifted FK 3 esc 7 1B 37
F4 Function key 4 esc 8 1B 38
FS4 Shifted FK 4 esc 9 1B 39
F5 Function key 5 esc : 1B 3A
FS5 Shifted FK 5 esc ; 1B 3B
F6 Function key 6 esc < 1B 3C
FS6 Shifted FK 6 esc = 1B 3D
F7 Function key 7 esc > 1B 3E
FS7 Shifted FK 7 esc ? 1B 3F
SIN Set invisible esc @ 1B 40
CUU Cursor up esc A 1B 41
CUD Cursor down esc B 1B 42
CUF Cursor forward esc C 1B 43
CUB Cursor backward esc D 1B 44
LGR Line graphics reset esc F 1B 46
LGS Line graphics set esc G 1B 47
CUH Cursor home esc H 1B 48
TNB Transmit next block esc I 1B 49
EOP Erase end of page esc J 1B 4A
EOF Erase end of field esc K 1B 4B
TX1 Special transmit line esc L 1B 4C
STP Set transmit pointer esc M 1B 4D
SLL System line lock esc O 1B 4F
F8 Function key 8 esc P 1B 50
Glink User’s Guide VIP command list 109

G&R
Mnemonic code
VIP commands ASCII sort
ASCII sequence
Hexadecimal sequence
FS8 Shifted FK 8 esc Q 1B 51
F9 Function key 9 esc R 1B 52
FS9 Shifted FK 9 esc S 1B 53
F10 Function key 10 esc T 1B 54
FS10 Shifted FK 10 esc V 1B 56
RJF Right justify fill esc X c 1B 58 c
RMI Reset modified inds esc Y 1B 59
TRD Test results display esc Z 1B 5A
TRR TX-return reset esc [ A 1B 5B 41
TRS TX-return set esc [ B 1B 5B 42
FTC File transfer control esc [ C 1B 5B 43
UMS UNIX mode set esc [ D 1B 5B 44
RBM Reset block mode esc [ E 1B 5B 45
SBT Set block transmit esc [ nnn F 1B 5B nnn 46
UMR UNIX mode reset esc [ G 1B 5B 47
DSH Data space home esc [ H 1B 5B 48
IM Insert mode esc [ I 1B 5B 49
IMR Insert mode reset esc [ J 1B 5B 4A
WPM Word processing mode esc [ K 1B 5B 4B
IL Insert line esc [ L 1B 5B 4C
DL Delete line esc [ M 1B 5B 4D
TBI Tab initialize esc [ N 1B 5B 4E
SRC Save row/col position esc [ O 1B 5B 4F
DCH Delete character esc [ P 1B 5B 50
DAT Delete attribute esc [ Q 1B 5B 51
110 VIP command list Glink User’s Guide

G&R
Mnemonic code
VIP commands ASCII sort
ASCII sequence
Hexadecimal sequence
CRD Cursor rqst decimal esc [ R 1B 5B 52
KBU Keyboard unlock esc [ W 1B 5B 57
KBL Keyboard lock esc [ X 1B 5B 58
SRM Start row/col maint. esc [ Y 1B 5B 59
CBT Cursor back tab esc [ Z 1B 5B 5A
WPMR WP mode reset esc [ ] 1B 5B 5D
ERM End row/col maint. esc [ a 1B 5B 61
SRL Scroll left esc [ b 1B 5B 62
SRR Scroll right esc [ c 1B 5B 63
SSR Space suppress reset esc [ d 1B 5B 64
SSS Space suppress set esc [ e 1B 5B 65
CPD Cursor pos decimal esc [ rrrccc f 1B 5B rrrccc 66
TBC Tab clear esc [ g 1B 5B 67
FM Forms Mode esc [ h 1B 5B 68
ROR Restricted ops reset esc [ i 1B 5B 69
ROS Restricted ops set esc [ j 1B 5B 6A
TM Text mode esc [ l 1B 5B 6C
SUC Set upper case esc [ m 1B 5B 6D
SLC Set lower case esc [ n 1B 5B 6E
PDS Print data space esc [ 0 p 1B 5B 30 70
PRES Printer reset esc [ 2 p 1B 5B 32 70
PHD Print host data esc [ 3 p 1B 5B 33 70
PMS Print mode unprotect esc [ 5 0 p 1B 5B 35 30 70
PMS Print mode all esc [ 5 1 p 1B 5B 35 31 70
PMS Print mode no underline esc [ 5 2 p 1B 5B 35 32 70
Glink User’s Guide VIP command list 111
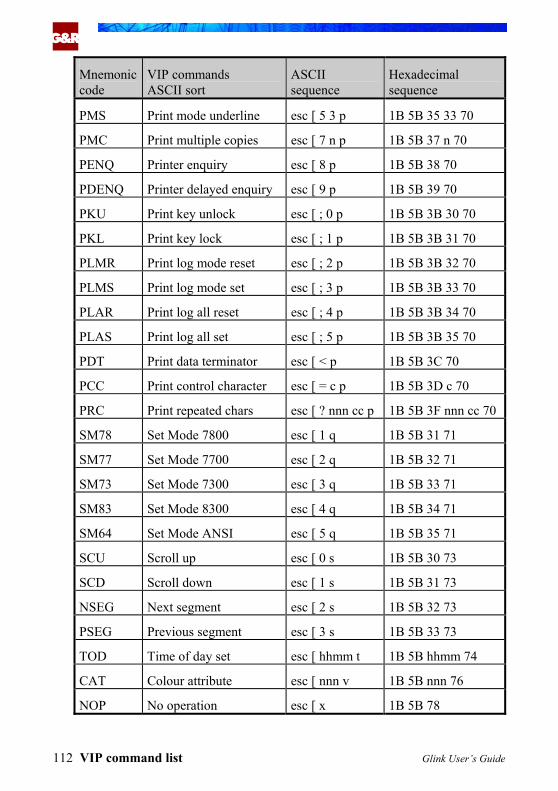
G&R
Mnemonic code
VIP commands ASCII sort
ASCII sequence
Hexadecimal sequence
PMS Print mode underline esc [ 5 3 p 1B 5B 35 33 70
PMC Print multiple copies esc [ 7 n p 1B 5B 37 n 70
PENQ Printer enquiry esc [ 8 p 1B 5B 38 70
PDENQ Printer delayed enquiry esc [ 9 p 1B 5B 39 70
PKU Print key unlock esc [ ; 0 p 1B 5B 3B 30 70
PKL Print key lock esc [ ; 1 p 1B 5B 3B 31 70
PLMR Print log mode reset esc [ ; 2 p 1B 5B 3B 32 70
PLMS Print log mode set esc [ ; 3 p 1B 5B 3B 33 70
PLAR Print log all reset esc [ ; 4 p 1B 5B 3B 34 70
PLAS Print log all set esc [ ; 5 p 1B 5B 3B 35 70
PDT Print data terminator esc [ < p 1B 5B 3C 70
PCC Print control character esc [ = c p 1B 5B 3D c 70
PRC Print repeated chars esc [ ? nnn cc p 1B 5B 3F nnn cc 70
SM78 Set Mode 7800 esc [ 1 q 1B 5B 31 71
SM77 Set Mode 7700 esc [ 2 q 1B 5B 32 71
SM73 Set Mode 7300 esc [ 3 q 1B 5B 33 71
SM83 Set Mode 8300 esc [ 4 q 1B 5B 34 71
SM64 Set Mode ANSI esc [ 5 q 1B 5B 35 71
SCU Scroll up esc [ 0 s 1B 5B 30 73
SCD Scroll down esc [ 1 s 1B 5B 31 73
NSEG Next segment esc [ 2 s 1B 5B 32 73
PSEG Previous segment esc [ 3 s 1B 5B 33 73
TOD Time of day set esc [ hhmm t 1B 5B hhmm 74
CAT Colour attribute esc [ nnn v 1B 5B nnn 76
NOP No operation esc [ x 1B 5B 78
112 VIP command list Glink User’s Guide
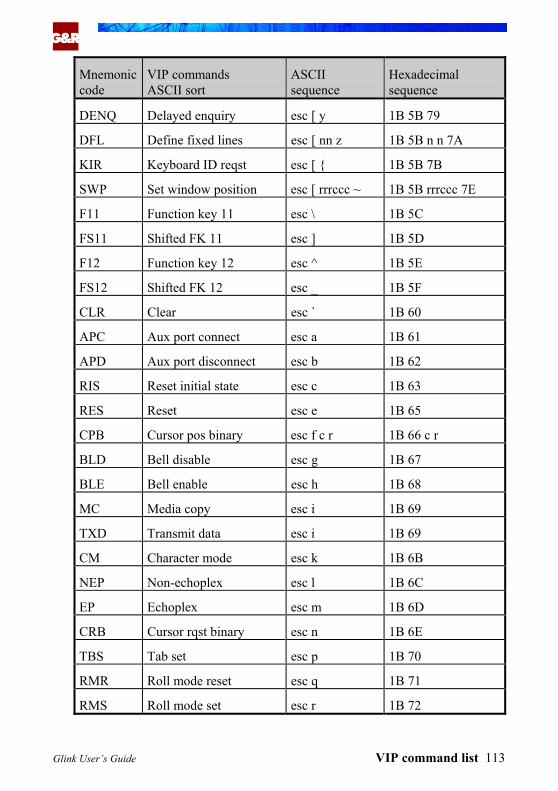
G&R
Mnemonic code
VIP commands ASCII sort
ASCII sequence
Hexadecimal sequence
DENQ Delayed enquiry esc [ y 1B 5B 79
DFL Define fixed lines esc [ nn z 1B 5B n n 7A
KIR Keyboard ID reqst esc [ 1B 5B 7B
SWP Set window position esc [ rrrccc ~ 1B 5B rrrccc 7E
F11 Function key 11 esc \ 1B 5C
FS11 Shifted FK 11 esc ] 1B 5D
F12 Function key 12 esc ^ 1B 5E
FS12 Shifted FK 12 esc _ 1B 5F
CLR Clear esc ` 1B 60
APC Aux port connect esc a 1B 61
APD Aux port disconnect esc b 1B 62
RIS Reset initial state esc c 1B 63
RES Reset esc e 1B 65
CPB Cursor pos binary esc f c r 1B 66 c r
BLD Bell disable esc g 1B 67
BLE Bell enable esc h 1B 68
MC Media copy esc i 1B 69
TXD Transmit data esc i 1B 69
CM Character mode esc k 1B 6B
NEP Non-echoplex esc l 1B 6C
EP Echoplex esc m 1B 6D
CRB Cursor rqst binary esc n 1B 6E
TBS Tab set esc p 1B 70
RMR Roll mode reset esc q 1B 71
RMS Roll mode set esc r 1B 72
Glink User’s Guide VIP command list 113

G&R
Mnemonic code
VIP commands ASCII sort
ASCII sequence
Hexadecimal sequence
ATR Attribute esc s a 1B 73 a
TXA Transmit all esc t 1B 74
SLR System line reset esc v 1B 76
SLS System line set esc w 1B 77
FVD Firmware version disp esc z 1B 7A
MLL Maint. line lock esc 1B 7D
MLS Maint. line set esc ~ 1B 7E
US Unit separator us 1F
DEL Delete del 7F
114 VIP command list Glink User’s Guide
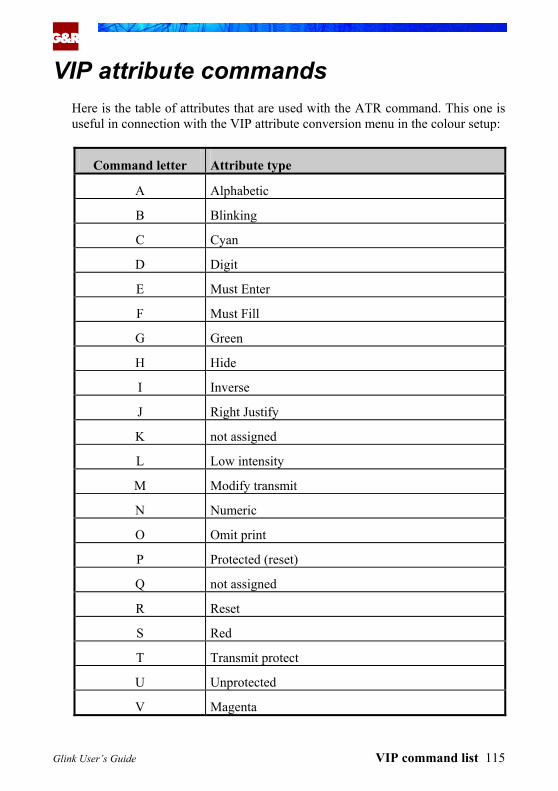
G&R
VIP attribute commands Here is the table of attributes that are used with the ATR command. This one is useful in connection with the VIP attribute conversion menu in the colour setup:
Command letter Attribute type
A Alphabetic
B Blinking
C Cyan
D Digit
E Must Enter
F Must Fill
G Green
H Hide
I Inverse
J Right Justify
K not assigned
L Low intensity
M Modify transmit
N Numeric
O Omit print
P Protected (reset)
Q not assigned
R Reset
S Red
T Transmit protect
U Unprotected
V Magenta
Glink User’s Guide VIP command list 115
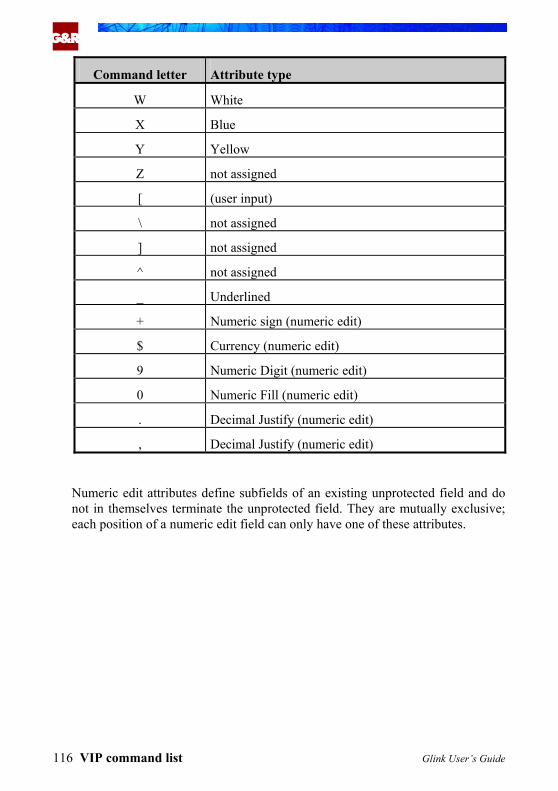
G&R
Command letter Attribute type
W White
X Blue
Y Yellow
Z not assigned
[ (user input)
\ not assigned
] not assigned
^ not assigned
_ Underlined
+ Numeric sign (numeric edit)
$ Currency (numeric edit)
9 Numeric Digit (numeric edit)
0 Numeric Fill (numeric edit)
. Decimal Justify (numeric edit)
, Decimal Justify (numeric edit)
Numeric edit attributes define subfields of an existing unprotected field and do not in themselves terminate the unprotected field. They are mutually exclusive; each position of a numeric edit field can only have one of these attributes.
116 VIP command list Glink User’s Guide

G&R
Command list (ANSI/VT102) The keyboard of the VT102 and later models of this terminal differs in several ways from the PC keyboard. Users of 'real' VT102 and VT220 host applications will need to know where the various keys on the VT102/220 terminals may be found on their PC.
One thing to note is 'application keypad' mode. The keys on the numeric keypad perform this function in Glink. However, in that these keys have to 'double up' as arrow keys on older PC keyboards, the numeric keypad will only operate in application keypad mode when NumLock is on. Without NumLock, the keys will operate normally. This applies only to the 'white' keys on the keypad, as these are the ones that have a dual purpose - the 'grey' keys will work in application keypad mode irrespective of the NumLock setting.
Number keys on the keypad send the equivalent codes. The Del key sends the code for (period) irrespective of whether the key is labelled with period or comma (this is to keep the layout as close as possible to the real terminal). Grey minus sends the code for minus, while grey plus sends the remaining code, which is for a (comma) on the actual terminal. In that many PCs don't have an ENTER key on the numeric keypad, the application keypad ENTER code may be sent using CTRL+ENTER. If you have an enhanced keyboard, then you don't need the CTRL+ENTER method; the keypad enter will function correctly.
The codes for PF1-PF4 are assigned to the function keys F1 through F4. If you are using an application that uses VT320 function keys F6 through F20, you will find F6 to F10 on the appropriate keys, while the codes for F11 through F20 are generated by pressing shift and a function key, e.g., F13 may be generated with SHIFT+F3.
This is a list of the commands currently supported by the emulator when running in ANSI/VT102 modes. For a full explanation of each command refer to the documentation for the VT102 terminal - this list is only intended as a rough guide.
Glink User’s Guide ANSI command list 117

G&R
ANSI commands (mnemonic sort)
Mnemonic code
ANSI/VT102 commands Sorted by mnemonics
ASCII sequence
Hexadecimal sequence
AK-0 App keypad 0 esc O p 1B 4F 70
AK-1 App keypad 1 esc O q 1B 4F 71
AK-2 App keypad 2 esc O r 1B 4F 72
AK-3 App keypad 3 esc O s 1B 4F 73
AK-4 App keypad 4 esc O t 1B 4F 74
AK-5 App keypad 5 esc O u 1B 4F 75
AK-6 App keypad 6 esc O v 1B 4F 76
AK-7 App keypad 7 esc O w 1B 4F 77
AK-8 App keypad 8 esc O x 1B 4F 78
AK-9 App keypad 9 esc O y 1B 4F 79
AK-(-) App keypad minus esc O m 1B 4F 6D
AK-(,) App keypad comma esc O l 1B 4F 6C
AK-(.) App keypad period esc O n 1B 4F 6E
AK-CR App keypad Enter esc O M 1B 4F 4D
ALN Screen alignment esc # 8 1B 23 38
ALT Alternate shift - -
BEL Bell bel 07
BRK Break - -
BS Back space bs 08
CAN Cancel can 18
CAPS LOCK Caps lock - -
CBT Cursor back tab esc [ Z 1B 5B 5A
CNL Cursor Next Line (SCO) esc [ E 1B 5B 45
CPL Cursor Previous Line (SCO) esc [ F 1B 5B 46
118 ANSI command list Glink User’s Guide

G&R
Mnemonic code
ANSI/VT102 commands Sorted by mnemonics
ASCII sequence
Hexadecimal sequence
CR Carriage return cr 0D
CSI Control Seq Intro esc [ 1B 5B
CTL Control - -
CUB Cursor backward esc [ D 1B 5B 44
CUD Cursor down esc [ B 1B 5B 42
CUF Cursor forward esc [ C 1B 5B 43
CUP Cursor position esc [ H 1B 5B 48
CUU Cursor up esc [ A 1B 5B 41
DA Device attributes esc Z 1B 5A
DA Device attributes esc [ c 1B 5B 63
DCH Delete character esc [ P 1B 5B 50
DCS Device control string esc P 1B 50
DEL Delete del 7F
DHL Double height, top esc # 3 1B 23 33
DHL Double height, bottom esc # 4 1B 23 34
DL Delete line esc [ M 1B 5B 4D
DLE Data link escape dle 10
DMI Disable manual input esc ` 1B 60
DSR Device status esc [ n 1B 5B 6E
DWL Double width esc # 6 1B 23 36
EA Erase area esc [ O 1B 5B 4F
ECH Erase character esc [ X 1B 5B 58
ED Erase data esc [ J 1B 5B 4A
EL Erase line esc [ K 1B 5B 4B
EMI Enable manual input esc b 1B 62
Glink User’s Guide ANSI command list 119
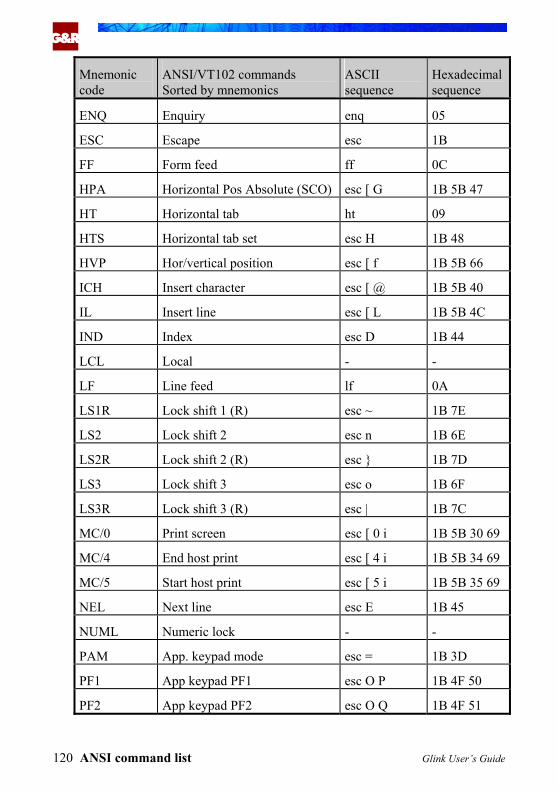
G&R
Mnemonic code
ANSI/VT102 commands Sorted by mnemonics
ASCII sequence
Hexadecimal sequence
ENQ Enquiry enq 05
ESC Escape esc 1B
FF Form feed ff 0C
HPA Horizontal Pos Absolute (SCO) esc [ G 1B 5B 47
HT Horizontal tab ht 09
HTS Horizontal tab set esc H 1B 48
HVP Hor/vertical position esc [ f 1B 5B 66
ICH Insert character esc [ @ 1B 5B 40
IL Insert line esc [ L 1B 5B 4C
IND Index esc D 1B 44
LCL Local - -
LF Line feed lf 0A
LS1R Lock shift 1 (R) esc ~ 1B 7E
LS2 Lock shift 2 esc n 1B 6E
LS2R Lock shift 2 (R) esc 1B 7D
LS3 Lock shift 3 esc o 1B 6F
LS3R Lock shift 3 (R) esc | 1B 7C
MC/0 Print screen esc [ 0 i 1B 5B 30 69
MC/4 End host print esc [ 4 i 1B 5B 34 69
MC/5 Start host print esc [ 5 i 1B 5B 35 69
NEL Next line esc E 1B 45
NUML Numeric lock - -
PAM App. keypad mode esc = 1B 3D
PF1 App keypad PF1 esc O P 1B 4F 50
PF2 App keypad PF2 esc O Q 1B 4F 51
120 ANSI command list Glink User’s Guide

G&R
Mnemonic code
ANSI/VT102 commands Sorted by mnemonics
ASCII sequence
Hexadecimal sequence
PF3 App keypad PF3 esc O R 1B 4F 52
PF4 App keypad PF4 esc O S 1B 4F 53
PNM Num. keypad mode esc > 1B 3E
RC Restore cursor esc 8 1B 38
RC Restore cursor esc [ u 1B 5B 75
RI Reverse Index esc M 1B 4D
RIS Terminal reset esc c 1B 63
RM Reset mode esc [ l 1B 5B 6C
SHIFT Shift - -
S7C Select 7bit ctrls esc sp F 1B 20 46
S8C Select 8bit ctrls esc sp G 1B 20 47
SC Save cursor esc 7 1B 37
SC Save cursor esc [ s 1B 5B 73
SCR Scrolling region esc [ r 1B 5B 72
SCS-0 Select G0 set (94) esc ( x 1B 28 xx
SCS-1 Select G1 set (94) esc ) x 1B 29 xx
SCS-1A Select G1 set (96) esc - x 1B 2D xx
SCS-2 Select G2 set (94) esc * x 1B 2A xx
SCS-2A Select G2 set (96) esc . x 1B 2E xx
SCS-3 Select G3 set (94) esc + x 1B 2B xx
SCS-3A Select G3 set (96) esc / x 1B 2F xx
SD Scroll Down (SCO ANSI) esc [ T 1B 5B 54
SGR Set graphic rendition esc [ m 1B 5B 6D
SI Shift in si 0F
SM Set mode esc [ h 1B 5B 68
Glink User’s Guide ANSI command list 121
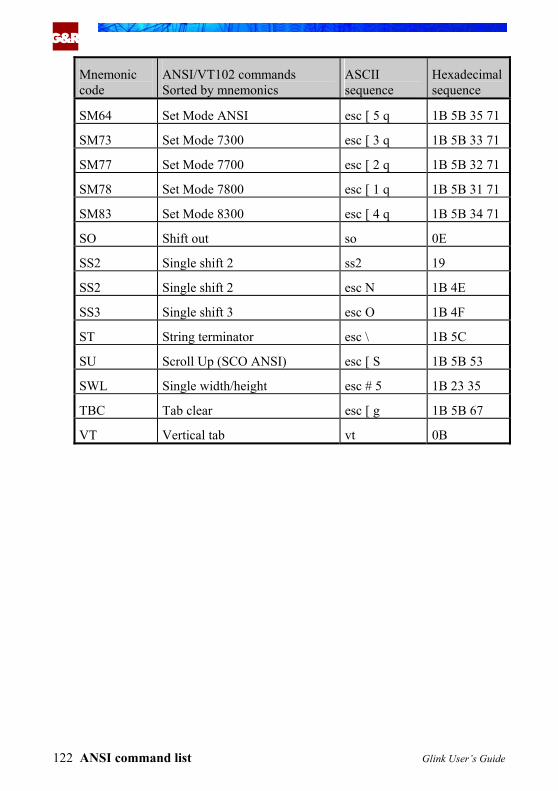
G&R
Mnemonic code
ANSI/VT102 commands Sorted by mnemonics
ASCII sequence
Hexadecimal sequence
SM64 Set Mode ANSI esc [ 5 q 1B 5B 35 71
SM73 Set Mode 7300 esc [ 3 q 1B 5B 33 71
SM77 Set Mode 7700 esc [ 2 q 1B 5B 32 71
SM78 Set Mode 7800 esc [ 1 q 1B 5B 31 71
SM83 Set Mode 8300 esc [ 4 q 1B 5B 34 71
SO Shift out so 0E
SS2 Single shift 2 ss2 19
SS2 Single shift 2 esc N 1B 4E
SS3 Single shift 3 esc O 1B 4F
ST String terminator esc \ 1B 5C
SU Scroll Up (SCO ANSI) esc [ S 1B 5B 53
SWL Single width/height esc # 5 1B 23 35
TBC Tab clear esc [ g 1B 5B 67
VT Vertical tab vt 0B
122 ANSI command list Glink User’s Guide

G&R
ANSI commands (ASCII sort)
Mnemonic code
ANSI/VT102 commands Sorted by ASCII value
ASCII sequence
Hexadecimal sequence
ALT Alternate shift - -
BRK Break - -
CAPS LOCK Caps lock - -
CTL Control - -
LCL Local - -
NUML Numeric lock - -
SHIFT Shift - -
ENQ Enquiry enq 05
BEL Bell bel 07
BS Back space bs 08
HT Horizontal tab ht 09
LF Line feed lf 0A
VT Vertical tab vt 0B
FF Form feed ff 0C
CR Carriage return cr 0D
SO Shift out so 0E
SI Shift in si 0F
DLE Data link escape dle 10
CAN Cancel can 18
SS2 Single shift 2 ss2 19
ESC Escape esc 1B
S7C Select 7bit ctrls esc sp F 1B 20 46
S8C Select 8bit ctrls esc sp G 1B 20 47
DHL Double height, top esc # 3 1B 23 33
Glink User’s Guide ANSI command list 123
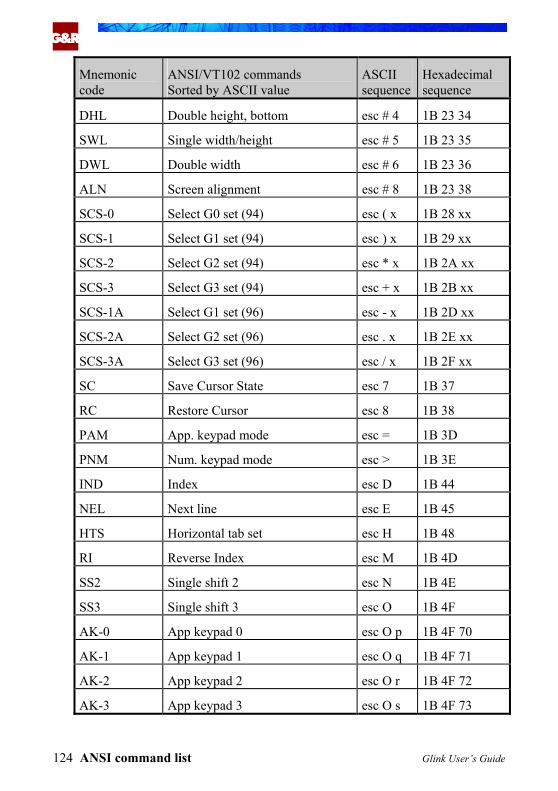
G&R
Mnemonic code
ANSI/VT102 commands Sorted by ASCII value
ASCII sequence
Hexadecimal sequence
DHL Double height, bottom esc # 4 1B 23 34
SWL Single width/height esc # 5 1B 23 35
DWL Double width esc # 6 1B 23 36
ALN Screen alignment esc # 8 1B 23 38
SCS-0 Select G0 set (94) esc ( x 1B 28 xx
SCS-1 Select G1 set (94) esc ) x 1B 29 xx
SCS-2 Select G2 set (94) esc * x 1B 2A xx
SCS-3 Select G3 set (94) esc + x 1B 2B xx
SCS-1A Select G1 set (96) esc - x 1B 2D xx
SCS-2A Select G2 set (96) esc . x 1B 2E xx
SCS-3A Select G3 set (96) esc / x 1B 2F xx
SC Save Cursor State esc 7 1B 37
RC Restore Cursor esc 8 1B 38
PAM App. keypad mode esc = 1B 3D
PNM Num. keypad mode esc > 1B 3E
IND Index esc D 1B 44
NEL Next line esc E 1B 45
HTS Horizontal tab set esc H 1B 48
RI Reverse Index esc M 1B 4D
SS2 Single shift 2 esc N 1B 4E
SS3 Single shift 3 esc O 1B 4F
AK-0 App keypad 0 esc O p 1B 4F 70
AK-1 App keypad 1 esc O q 1B 4F 71
AK-2 App keypad 2 esc O r 1B 4F 72
AK-3 App keypad 3 esc O s 1B 4F 73
124 ANSI command list Glink User’s Guide
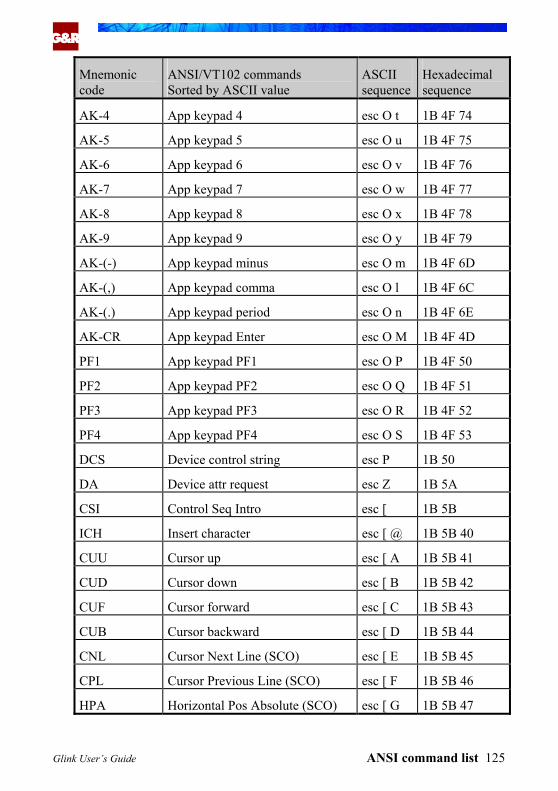
G&R
Mnemonic code
ANSI/VT102 commands Sorted by ASCII value
ASCII sequence
Hexadecimal sequence
AK-4 App keypad 4 esc O t 1B 4F 74
AK-5 App keypad 5 esc O u 1B 4F 75
AK-6 App keypad 6 esc O v 1B 4F 76
AK-7 App keypad 7 esc O w 1B 4F 77
AK-8 App keypad 8 esc O x 1B 4F 78
AK-9 App keypad 9 esc O y 1B 4F 79
AK-(-) App keypad minus esc O m 1B 4F 6D
AK-(,) App keypad comma esc O l 1B 4F 6C
AK-(.) App keypad period esc O n 1B 4F 6E
AK-CR App keypad Enter esc O M 1B 4F 4D
PF1 App keypad PF1 esc O P 1B 4F 50
PF2 App keypad PF2 esc O Q 1B 4F 51
PF3 App keypad PF3 esc O R 1B 4F 52
PF4 App keypad PF4 esc O S 1B 4F 53
DCS Device control string esc P 1B 50
DA Device attr request esc Z 1B 5A
CSI Control Seq Intro esc [ 1B 5B
ICH Insert character esc [ @ 1B 5B 40
CUU Cursor up esc [ A 1B 5B 41
CUD Cursor down esc [ B 1B 5B 42
CUF Cursor forward esc [ C 1B 5B 43
CUB Cursor backward esc [ D 1B 5B 44
CNL Cursor Next Line (SCO) esc [ E 1B 5B 45
CPL Cursor Previous Line (SCO) esc [ F 1B 5B 46
HPA Horizontal Pos Absolute (SCO) esc [ G 1B 5B 47
Glink User’s Guide ANSI command list 125

G&R
Mnemonic code
ANSI/VT102 commands Sorted by ASCII value
ASCII sequence
Hexadecimal sequence
CUP Cursor position 1B 5B 48
ED Erase data 1B 5B 4A
EL Erase line 1B 5B 4B
IL Insert line 1B 5B 4C
DL Delete line 1B 5B 4D
EA Erase area 1B 5B 4F
DCH Delete character 1B 5B 50
SU Scroll Up (SCO ANSI) 1B 5B 53
SD Scroll Down (SCO ANSI) 1B 5B 54
ECH Erase character 1B 5B 58
CBT Cursor back tab 1B 5B 5A
DA Device attributes 1B 5B 63
HVP Hor/vertical position 1B 5B 66
TBC Tab clear 1B 5B 67
SM Set mode 1B 5B 68
MC/0 Print screen 1B 5B 30 69
MC/4 End host print 1B 5B 34 69
MC/5 Start host print 1B 5B 35 69
RM Reset mode 1B 5B 6C
SGR Set graphic rendition 1B 5B 6D
DSR Device status 1B 5B 6E
SM78 Set Mode 7800 1B 5B 31 71
SM77 Set Mode 7700 1B 5B 32 71
SM73 Set Mode 7300 1B 5B 33 71
SM83 Set Mode 8300 1B 5B 34 71
esc [ H
esc [ J
esc [ K
esc [ L
esc [ M
esc [ O
esc [ P
esc [ S
esc [ T
esc [ X
esc [ Z
esc [ c
esc [ f
esc [ g
esc [ h
esc [ 0 i
esc [ 4 i
esc [ 5 i
esc [ l
esc [ m
esc [ n
esc [ 1 q
esc [ 2 q
esc [ 3 q
esc [ 4 q
126 ANSI command list Glink User’s Guide

G&R
Mnemonic code
ANSI/VT102 commands Sorted by ASCII value
ASCII sequence
Hexadecimal sequence
SM64 Set Mode ANSI 1B 5B 35 71
SCR Scrolling region 1B 5B 72
SC Save cursor 1B 5B 73
RC Restore cursor 1B 5B 75
SGR Set graphic rendition 1B 5B 6D
ST String terminator 1B 5C
DMI Disable manual input 1B 60
EMI Enable manual input 1B 62
RIS Terminal reset 1B 63
LS2 Lock shift 2 1B 6E
LS3 Lock shift 3 1B 6F
LS3R Lock shift 3 (R) 1B 7C
LS2R Lock shift 2 (R) 1B 7D
LS1R Lock shift 1 (R) 1B 7E
DEL Delete 7F
esc [ 5 q
esc [ r
esc [ s
esc [ u
esc [ m
esc \
esc `
esc b
esc c
esc n
esc o
esc |
esc
esc ~
del
Glink User’s Guide ANSI command list 127

G&R
ANSI attribute commands
Parameter Attribute type
0
1 Bold
Low intensity
4 Underline
5 Blinking
6
7 Inverse
Concealed
10 Graphics off
12 Graphics on
21
22 End low intensity
End underline
25 End blinking
26 End blinking
27
28 End concealed
Black foreground
31 Red foreground
32 Green foreground
33
34 Blue foreground
Magenta foreground
Here is the table of attributes that are used with the SGR command:
Reset
2
Blinking
8
End bold
24
End inverse
30
Yellow foreground
35
128 ANSI command list Glink User’s Guide
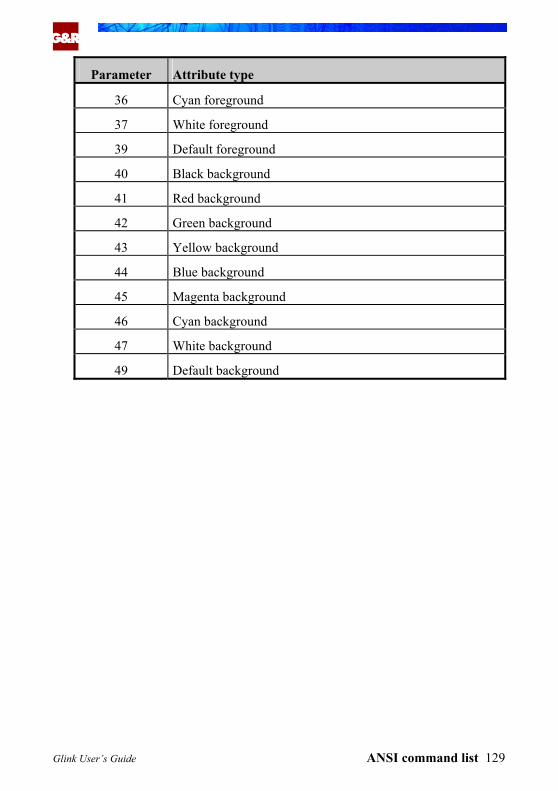
G&R
Parameter Attribute type
36 Cyan foreground
37 White foreground
39
40 Black background
Red background
42 Green background
43 Yellow background
44
45 Magenta background
Cyan background
47 White background
49 Default background
Default foreground
41
Blue background
46
Glink User’s Guide ANSI command list 129

G&R
ANSI mode commands Here is the table of modes that are used with the SM/RM commands:
Parameter Attribute type
?1 Cursor key mode
2 Keyboard lock
?3 132 columns
4 Insert mode
?5 Inverted screen
?6 Origin mode
?7 Autowrap
12 Echoplex
20 Auto LF
?25 Text cursor enable
?32 32-line mode
?33 33-line mode
?40 25-line mode
?42 National mode
130 ANSI command list Glink User’s Guide

G&R
Command extensions Glink supports a series of extensions to the standard command set, which are de-signed to allow the host to control some of the functions in Glink from a remote location. These commands are supported on all the different emulations provided by the emulator.
Each command sequence is written as a VIP NOP command, with different parameter numbers. In other words, they are sent as the sequence:
ESC [ <n> x 1B 5B <n> 78
Some of the commands require an alphanumeric string in order to perform their function, and a special form of the command is provided to do this (the string should always be sent before calling the function in question):
ESC [ 1 7 x <alphanumeric string> CR
The following sequences are supported (the <delim> below will usually be a <CR> character, except when executing in VIP text or forms mode, in which case an <ETX> character will be sent instead):
Sequence Description
ESC [ 1 1 x Sets following Kermit transfer to BINARY
ESC [ 1 2 x Sets following Kermit transfer to TEXT
ESC [ 1 5 x Start Kermit PC -> Kermit server
*ESC [ 1 8 x Start Kermit PC -> host
ESC [ 1 9 x Start Kermit host -> PC
*ESC [ 2 8 x Start Xmodem PC -> host
*ESC [ 2 9 x Start Xmodem host -> PC
*ESC [ 3 8 x Start Ymodem PC -> host
*ESC [ 3 9 x Start Ymodem host -> PC
Glink User’s Guide Command extensions 131
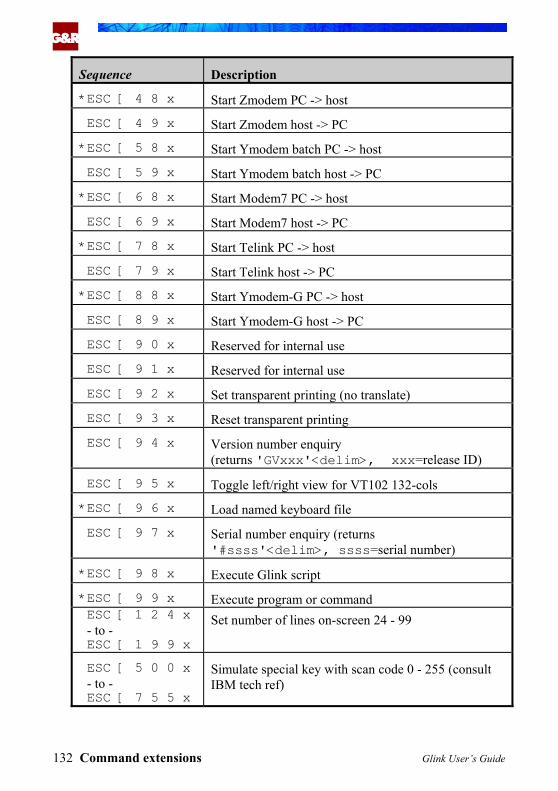
G&R
Sequence Description
*ESC [ 4 8 x Start Zmodem PC -> host
ESC [ 4 9 x Start Zmodem host -> PC
*ESC [ 5 8 x Start Ymodem batch PC -> host
ESC [ 5 9 x Start Ymodem batch host -> PC
*ESC [ 6 8 x Start Modem7 PC -> host
ESC [ 6 9 x Start Modem7 host -> PC
*ESC [ 7 8 x Start Telink PC -> host
ESC [ 7 9 x Start Telink host -> PC
*ESC [ 8 8 x Start Ymodem-G PC -> host
ESC [ 8 9 x Start Ymodem-G host -> PC
ESC [ 9 0 x Reserved for internal use
ESC [ 9 1 x Reserved for internal use
ESC [ 9 2 x Set transparent printing (no translate)
ESC [ 9 3 x Reset transparent printing
ESC [ 9 4 x Version number enquiry (returns 'GVxxx'<delim>, xxx=release ID)
ESC [ 9 5 x Toggle left/right view for VT102 132-cols
*ESC [ 9 6 x Load named keyboard file
ESC [ 9 7 x Serial number enquiry (returns '#ssss'<delim>, ssss=serial number)
*ESC [ 9 8 x Execute Glink script
*ESC [ 9 9 x Execute program or command ESC [ 1 2 4 x - to - ESC [ 1 9 9 x
Set number of lines on-screen 24 - 99
ESC [ 5 0 0 x - to - ESC [ 7 5 5 x
Simulate special key with scan code 0 - 255 (consult IBM tech ref)
132 Command extensions Glink User’s Guide

G&R
Sequence Description
ESC [ 9 4 8 x Terminate, but check with user if this would have happened on a user close command
ESC [ 9 4 9 x Terminate, do not check with user
*ESC [ 9 5 0 x Display message in status line (message is removed at next user keystroke)
*ESC [ 9 5 1 x Display message in status line (message not removed until ESC [ 9 5 2 x sequence is sent from host)
ESC [ 9 5 2 x Remove message from status line (sent using the ESC [ 9 5 1 x sequence)
*ESC [ 9 5 3 x Display message in a window and wait for user key-stroke
*ESC [ 9 5 4 x Display message in a window asking for user input. User input is returned to host with CR or ETX termi-nator
ESC [ 9 5 5 x Enable lock on transmit
ESC [ 9 5 6 x Disable lock on transmit
ESC [ 9 6 0 x Set line cursor
ESC [ 9 6 1 x Set blink cursor
ESC [ 9 6 2 x Set block cursor
ESC [ 9 7 1 x Execute a TX-RET style return
ESC [ 9 7 4 x End printing and flush output
ESC [ 9 7 5 x Enquiry for current emulation mode (returns GInnn where nnn is the correct value to insert into the switch mode commands below)
ESC [ 9 7 6 x Start print data
ESC [ 9 7 7 x Stop print data
ESC [ 9 7 8 x Start printer spooling
ESC [ 9 7 9 x End printer spooling (enclose print blocks between these two commands for correct network spool)
Glink User’s Guide Command extensions 133
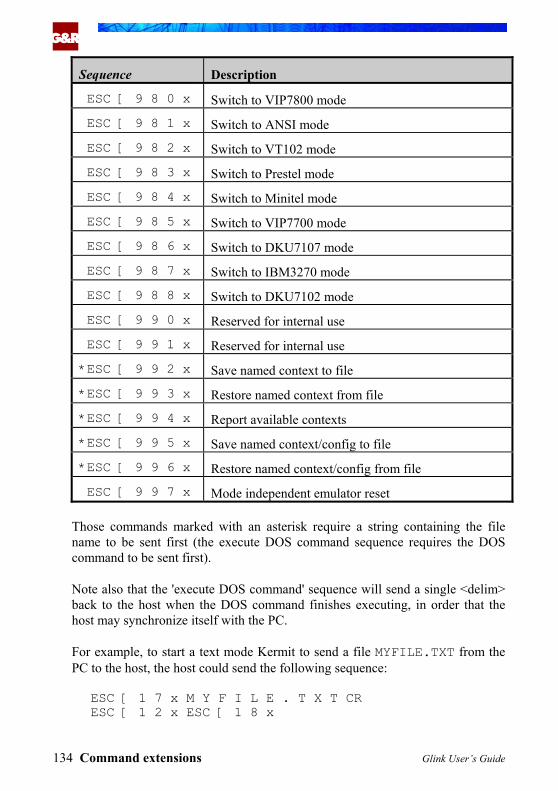
G&R
Sequence Description
ESC [ 9 8 0 x Switch to VIP7800 mode
ESC [ 9 8 1 x Switch to ANSI mode
ESC [ 9 8 2 x Switch to VT102 mode
ESC [ 9 8 3 x Switch to Prestel mode
ESC [ 9 8 4 x Switch to Minitel mode
ESC [ 9 8 5 x Switch to VIP7700 mode
ESC [ 9 8 6 x Switch to DKU7107 mode
ESC [ 9 8 7 x Switch to IBM3270 mode
ESC [ 9 8 8 x Switch to DKU7102 mode
ESC [ 9 9 0 x Reserved for internal use
ESC [ 9 9 1 x Reserved for internal use
*ESC [ 9 9 2 x Save named context to file
*ESC [ 9 9 3 x Restore named context from file
*ESC [ 9 9 4 x Report available contexts
*ESC [ 9 9 5 x Save named context/config to file
*ESC [ 9 9 6 x Restore named context/config from file
ESC [ 9 9 7 x Mode independent emulator reset
Those commands marked with an asterisk require a string containing the file name to be sent first (the execute DOS command sequence requires the DOS command to be sent first).
Note also that the 'execute DOS command' sequence will send a single <delim> back to the host when the DOS command finishes executing, in order that the host may synchronize itself with the PC.
For example, to start a text mode Kermit to send a file MYFILE.TXT from the PC to the host, the host could send the following sequence:
ESC [ 1 7 x M Y F I L E . T X T CR ESC [ 1 2 x ESC [ 1 8 x
134 Command extensions Glink User’s Guide
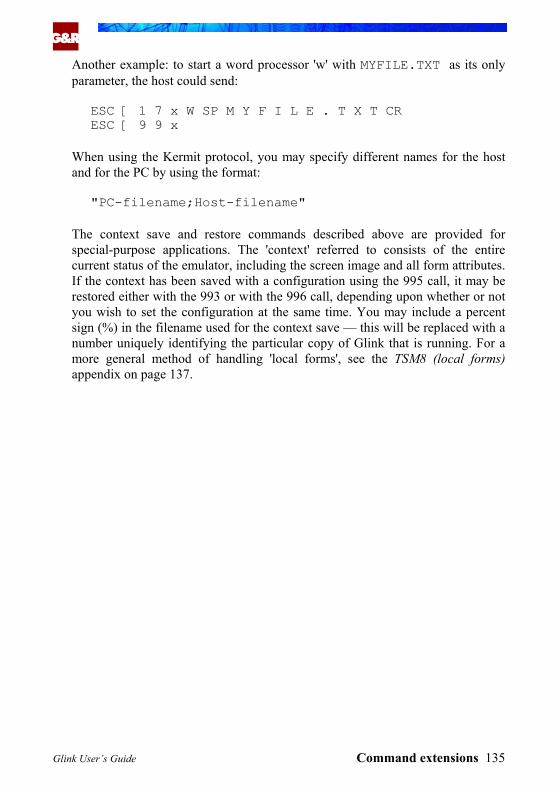
G&R
Another example: to start a word processor 'w' with MYFILE.TXT as its only parameter, the host could send:
ESC [ 1 7 x W SP M Y F I L E . T X T CR ESC [ 9 9 x
When using the Kermit protocol, you may specify different names for the host and for the PC by using the format:
"PC-filename;Host-filename"
The context save and restore commands described above are provided for special-purpose applications. The 'context' referred to consists of the entire current status of the emulator, including the screen image and all form attributes. If the context has been saved with a configuration using the 995 call, it may be restored either with the 993 or with the 996 call, depending upon whether or not you wish to set the configuration at the same time. You may include a percent sign (%) in the filename used for the context save — this will be replaced with a number uniquely identifying the particular copy of Glink that is running. For a more general method of handling 'local forms', see the TSM8 (local forms) appendix on page 137.
Glink User’s Guide Command extensions 135

G&R
136 Command extensions Glink User’s Guide
G&R
TSM8/TCS forms GLINK provides support for local VIP forms using the TSM8 standard or local DKU forms using the TCS local forms standard. Both these standards allow any form (or in fact any sequence of host commands) to be stored locally on the workstation (or on a file server that may be accessed from the workstation). Facilities are provided for version control, multiple applications, enquiry as to form presence, and multiple languages -- in short everything you need to use local forms while retaining full host control.
TSM8 (local forms) From the user point of view, very little preconfiguration is required. An option in the VIP emulator setup (TSM8 enable) must be turned on, and the option imme-diately following (TSM8 forms directory) must be filled out with a valid path-name to a directory (which will be created if necessary). All local forms will be stored under this root directory. In general, the host will supply a subdirectory name under which the actual forms will be stored in order to isolate one appli-cation from another. An optional secondary forms directory may be specified as a reserve path for forms storage.
Once this has been done, all that's necessary is to log into a TSM8 application. Glink lets the host application know that it's TSM8 enabled by changing the fourth character of the enquiry reply string to 'R'. You may also need to ensure that the host has the terminal configured as a TSM terminal. As forms are acces-sed on the host, they will be stored locally, and the next time the same form is accessed it will be loaded from the local copy. If the host version of the form should be updated at some point the local copy will be updated automatically with no user intervention required.
If you have been using the TSM8R product for local forms functionality, note that the SET FORMS statement in your AUTOEXEC.BAT file that was used by that program is not required by Glink.
Glink User’s Guide TSM8 remote forms 137

G&R
A brief summary of the commands used for TSM8 forms control follows:
<esc>[800C Sets TSM mode <esc>[801C Sets TSS mode <esc>[802C<d> Sets TSM command delimiter the
default is *) <esc>[808C<string><d> Sets TSM application subdirectory <esc>[809C Resets TSM application subdirectory <esc>[810C<formname><d> Requests TSM form load <esc>[811C<formname><d> Requests TSM form store <esc>[812C Marker command
The 'delimiter', shown as <d> above, is used to mark the end of form and directory names. The default is '*' but this may be overridden by the host using the command provided. Also, the following may be sent by Glink back to the host:
<esc>[810Y<form><etx> ACK for form (TSS mode only) <esc>810N<form><etx> NAK (form invalid or non-existent)
It is not our purpose here to give an exhaustive description of the technical side of the TSM8 procedures, but a brief description of how these commands are used follows.
First, the functionality operates in two different modes, TSS and TSM mode (set with the appropriate command). There are some basic differences between TSS and TSM mode:
• In TSS mode, an ACK is always sent as a response to a form load request. In TSM mode, no ACK is sent. Also, any NAK is delayed until the variable contents of the form have been sent (these are discarded). This means that some unnecessary data is sent the first time the form is loaded, but that TSM mode in general works faster than TSS mode.
• TSM mode provides language support for forms. Form names in TSS mode use the entire extension for the forms version number, while in TSM mode only the first two positions of the extension are used, the last position being reserved for an optional language key.
• TSS mode does not check validity of forms. TSM mode uses a checksum included after the forms data both to check that a form has been transmit-ted intact across the communications link, and that the local copy of the form has not been corrupted.
138 TSM8 remote forms Glink User’s Guide
G&R
As you can see from this, TSM mode is the preferred method of operation.
Forms are always stored somewhere in the directory you have specified as the TSM forms directory in the VIP emulator setup menu. If the host specifies nothing else then the forms will be stored in the directory itself but more normal-ly, the host will set the name of an application subdirectory using the command provided for this. This directory will be created by Glink as needed. The forms themselves will then be loaded from and stored to this subdirectory. The names of the forms consist of two parts, the name of the form itself and the version/ language code. In TSS mode, this could be for example 'MYFORM.123' (version 123 of 'MYFORM'), while in TSM mode you would see 'MYFORM.12' (default version of 'MYFORM', version 12) or 'MYFORM.12F' (French-language version of 'MYFORM', version 12). When a request for a particular form is received by Glink and the version number requested is not the same as the version number of that form stored locally, then the local copy (or copies, if there are copies with the same version but different languages) will be deleted before the new form is stored.
Loading a form from the host is done by sending the form load request; this consists of the load form command, which in TSM mode will also be followed by any variable data, and a 'mark' command. If the form does not exist, Glink will respond with a NAK when the mark command is received, and will have discarded all data between the load form request and the mark command.
Storing a form from the host is done by sending first the store form request, then the data associated with the form, terminated with a mark command and finally a checksum calculated from the data just sent. No ACK or NAK command is sent at this point, in that the next load request will fail in any case and trigger a new store sequence.
Glink User’s Guide TSM8 remote forms 139

G&R
A typical sequence in TSM mode may make things clearer:
<esc>[800C (set TSM mode) <esc>[802C| (set delimiter to '|') <esc>[808CAPPDIR| (set application directory to APPDIR) <esc>[810CMYFORM.02| (request for MYFORM.02) (variable data) (variable data always sent) <esc>[812C (marker at end of data) (Glink sends
<esc>[810CNMYFORM<etx> to signal that the form was not found) <esc>[811CMYFORM.02| (request for form store)(fixed data) (the
form itself) <esc>[812C<c> (end of form mark and checksum) (variable
data) <esc>[812C (end of variable data) ... <esc>[810CMYFORM.02| (new request for MYFORM.02) (variable
data) (variable data always sent) <esc>[812C (marker at end of data, this time the form
was loaded, no NAK is sent)
140 TSM8 remote forms Glink User’s Guide
G&R
TCS (local forms) From the user point of view, very little preconfiguration is required. An option in the DKU emulator setup (TCS enable) must be turned on, and the option imme-diately following (TCS forms directory) must be filled out with a valid pathname to a directory (which will be created if necessary). All local forms will be stored under this root directory. In general, the host will supply a subdirectory name under which the actual forms will be stored in order to isolate one application from another.
Overview This section provides as detailed information as should be required to implement the TCS local forms facility in a terminal application. It does not pretend to be a complete specification, and contains only such material as is applicable to Glink.
Addressing Forms are manipulated using messages addressed to the terminal (0x60) address. In the TCS itself, messages other than a direct screen display can be addressed to the cluster as a whole (thus storing a form that subsequently may be used by any screen in the cluster, for example). This type of functionality is not provided in Glink.
Commands The following basic commands are provided. All commands are identified by two characters at the start of the message (immediately following the <STX> character).
Create form <esc>W Delete form or dataset <esc>Q Read catalogue <esc>V Display form <esc>B or <esc>C
Glink User’s Guide TSM8 remote forms 141

G&R
Acknowledgments Glink supports only 'Logical acknowledgement'. The 'Simple acknowledgement' scheme uses status messages that are part of the polled VIP protocol, and these are not useful in other environments where the VIP status messages are not visible to the host application. 'Logical acknowledgements' are application level messages, which can be received and acted on by the host. The logical messages are regarded as equivalent to the ACK, NAK and PGOF status messages used in the simple acknowledgement scheme.
All commands, with the exception of a successful form display via the <esc>B command, are answered with a positive or negative logical acknowledgement. This is done in the form of an empty message with the acknowledgement code in the first function code (FC1). The values for FC1 are chosen at configuration time on the TCS and can be configured in Glink via the CFIX script command. The values normally chosen are:
'a' (0x61) is equivalent to an ACK, and signifies correct completion of the command
'b' (0x62) is equivalent to a PGOF (Page Overflow) and signifies a logical error (logical NAK). In older TCS applications, this was defaulted to ‘`’ (0x60).There is an option in the DKU emulator setup (TCS logical NAK) to modify this value, or use the script command CFIX 3070 $60.
'c' (0x63) is equivalent to a NAK and signifies a physical error accessing the disk (physical NAK).
Physical errors reading or writing the disk do not occur in practice. This leaves us with the following two hex messages, where the entire VIP header is shown for completeness:
"ACK" 01 60 00 61 20 02 03 "NAK" 01 60 00 62 20 02 03 or 01 60 00 63 20 02 03
The "NAK" above is the logical equivalent of the PGOF, see the Error messages below for possible reasons.
142 TSM8 remote forms Glink User’s Guide
G&R
Form and dataset names Forms on the TCS are stored in a forms directory that consists of datasets, each dataset comprising up to 14 forms. A dataset must be specified, either explicitly:
<dataset name>,<form name>
or implicitly:
<form name>
in which case the dataset name used in the previous command is used (if none have been used then the current command is in error). We suggest that this model be mapped into a directory structure on the local file system, with the dataset name mapping to a subdirectory of the forms directory and the form name to a file name under this. Forms must be stored as a sequence of host data, and must also preserve the function codes sent with the original defining message. Both form and dataset names are limited to a maximum of eight characters.
Specific commands Commands are started with the <esc> character (0x1B) and are terminated by either the <etx> (0x03) or <etb> (0x17) character.
Store form HOST: <esc>W[dataset,]formname<sp><form text><etx> PC: ACK/NAK
The dataset is created automatically if it does not already exist. If the form exists already then the command is rejected. Normally a delete form message will be sent immediately prior to the store form command for exactly this reason. Function codes sent with this message are stored along with the form (in Glink in the first two characters of the file on disk).
Delete form HOST: <esc>Q[dataset,]formname<etx> PC: ACK/NAK
If the form deleted is the last form in the current dataset then the dataset is also deleted.
Glink User’s Guide TSM8 remote forms 143

G&R
Delete dataset HOST: <esc>Qdataset,$ALL<etx> PC: ACK/NAK
The dataset and all forms it contains are deleted.
Read dataset list
HOST: <esc>VINX1<etx> PC: INX1<sp><dataset1><dataset2>...<datasetn><etx>
Dataset names are sent as 8-character fixed length strings, space-filled.
Read form list HOST: <esc>V[dataset,]CAT<etx> PC: <dataset><form1><form2>..<formN><etx> (or NAK)
Dataset and form names are sent as 8-character fixed length strings, space-filled.
Display form Format 1: HOST: <esc>B[dataset,]formname<sp><text><etx> PC: normal formatted reply (or NAK) Format 2: HOST: <esc>C[dataset,]formname<sp><text><etx> PC: ACK/NAK
The specified form is displayed (if possible, otherwise a NAK is sent). In the case of the <esc> B command, the form is ready for entry, for <esc>C an ack-nowledgement is returned to the host. Function codes are set from the stored copy of the form.
144 TSM8 remote forms Glink User’s Guide

G&R
Error messages The following error messages may be displayed in the status line as the result of execution errors (others may be found on the real TCS but should not be applic-able to an emulated environment):
TCS: COMMAND ERROR The command could not be interpreted. TCS: UNKNOWN DATASET A dataset name is required but has not been defined, either explicitly or
implicitly. TCS: FORM ALREADY EXISTS An attempt was made to create a form that already exists. TCS: UNKNOWN FORM The form specified does not exist.
Example The following sequence is the one most often seen in practice:
1. Host deletes form description (so as not to receive an error when storing it):
Host to PC 01 60 00 20 20 02 1B 51 44 42 30 31 2C 4B 41 30 30 31 32 20 03 (Note: trailing space after form name, not required by spec but seen in real traces) PC to Host 01 60 00 61 20 02 03 (ACK, could be NAK if form was not in catalog)
2. Host stores new version of this form:
Host to PC 01 60 00 20 20 02 1B 57 44 42 30 31 2C 4B 41 30 30 31 32 20 1B 4E 0C 44 41 54 45 03 (Note: dataset name is not required, it could have been inherited from the de-lete command. The trailing space after the form name is however required, to separate the name from the actual data. The data here is intentionally not realistic...) PC to Host
Glink User’s Guide TSM8 remote forms 145

G&R
01 60 00 61 20 02 03 (ACK)
3. Host requests form and adds variable data to it:
Host to PC 01 60 00 20 20 02 1B 42 44 42 30 31 2C 4B 41 30 30 31 32 20 44 41 54 45 03 (Note: dataset name is not required here either. The trailing space after the form name is required, to separate the name from the actual (unrealistic) data). PC to Host 01 60 00 20 20 02 52 45 50 4C 59 03 (in other words, normal data)
146 TSM8 remote forms Glink User’s Guide

G&R
Glink User’s Guide TSM8 remote forms 147

G&R
GLLAY : keyboard layout
Overview GLLAY is a standalone utility that allows you to redefine the assigned escape sequences and functions for the various keys on the PC keyboard. The results of the redefinition are stored in a keyboard layout file, which is then loaded into Glink at run time.
GLLAY is a Win32 Console program. The default output file for GLLAY is GLWINL.DEF and this corresponds with the default keyboard layout file loaded by Glink. On exit you wil be asked to confirm the name of the output file, replying no allows you to create a file of a different name.
Several of the ALT+key combinations are not available under Windows. For example, ALT+TAB is used by Windows for task switching, and ALT+L accesses the 'Line' item in the Glink menu bar.
Keys that conflict with Windows usage may still be defined using the ALT+key combination in GLLAY. However, access to a key thus defined from the Win-dows versions of the emulator is only possible using the CTRL+SHIFT alias. For example, to toggle local mode (by default this function is assigned to ALT+L) from the Windows versions of the emulator you may use CTRL+SHIFT+L.
Starting GLLAY GLLAY is started from from the Glink icon folder, but starting it from the DOS prompt with the command GLLAY, will allow you to optionally specify the name of an existing keyboard layout file. If this is not supplied then the program will default to GLWINL.DEF. If no filename is specified on the command line and the default file is not found, then GLLAY will load the default keyboard layout definition.
GLLAY maintains six totally separate keyboard definitions. Which definition will be used when running the emulator depends upon which emulation mode you are using. The three definitions are:
Glink User’s Guide GLLAY keyboard layout 149
G&R
VIP applies to VIP7700 and VIP7800 modes ANSI applies to ANSI mode VT102 applies to VT102/VT220 mode DKU applies to DKU7107 and DKU7102 modes IBM3270/5250 applies to IBM3270 and IBM5250 mode IBM3151 applies to IBM3151 mode
For Prestel and Minitel modes the ANSI keyboard will apply, except in the case of the fixed key definitions for these modes that are hard-coded in the emulator.
To switch between the six definitions while defining keys with GLLAY use the TAB key. The current definition is shown at the top left of your screen.
Which keys can be defined GLLAY will let you define any 'special key' or key combination on the keyboard. This means that there are two types of keys that cannot be redefined. Firstly, with the exception of the ENTER, RETURN and TAB keys, you may not redefine keys which send an ASCII character, and secondly you may not redefine keys (or combinations of keys) that are not recognized as a valid keystroke by the built-in BIOS routines in your computer. Although this may seem an unreasonable restriction to some, it's done this way so as to maintain maximum compatibility with all types of keyboard, both foreign language keyboards and custom keyboards.
Note that if you are using an enhanced keyboard, then there are a number of keys that are duplicated on the keyboard. These are treated as two separate keys by GLLAY in most cases. So if you wish to redefine a key like HOME or UP ARROW and need to have the definition active for both versions of the key then you will need to define the key twice. This applies only to the unshifted keys - when they are combined with CTRL the two keys are treated equivalently (because this is the way the BIOS routines treat them). Use of such keys in combination with the ALT key is in any case only available on the 'new' grey keys in the function and cursor keypads.
Defining a key To define what should happen when a particular key or key combination is pres-sed, simply press the key(s). A menu will appear detailing the various options that are available:
150 GLLAY keyboard layout Glink User’s Guide
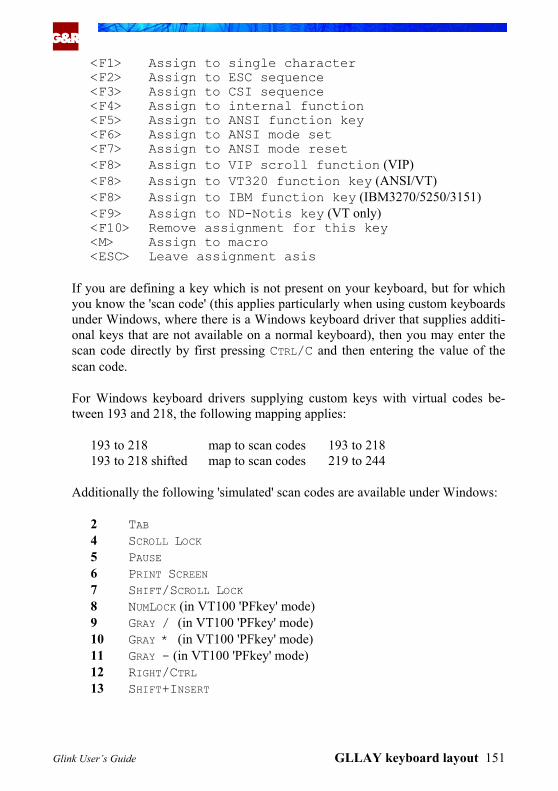
G&R
<F1> Assign to single character <F2> Assign to ESC sequence <F3> Assign to CSI sequence <F4> Assign to internal function <F5> Assign to ANSI function key <F6> Assign to ANSI mode set <F7> Assign to ANSI mode reset <F8> Assign to VIP scroll function (VIP) <F8> Assign to VT320 function key (ANSI/VT) <F8> Assign to IBM function key (IBM3270/5250/3151) <F9> Assign to ND-Notis key (VT only) <F10> Remove assignment for this key <M> Assign to macro <ESC> Leave assignment asis
If you are defining a key which is not present on your keyboard, but for which you know the 'scan code' (this applies particularly when using custom keyboards under Windows, where there is a Windows keyboard driver that supplies additi-onal keys that are not available on a normal keyboard), then you may enter the scan code directly by first pressing CTRL/C and then entering the value of the scan code.
For Windows keyboard drivers supplying custom keys with virtual codes be-tween 193 and 218, the following mapping applies:
193 to 218 map to scan codes 193 to 218 193 to 218 shifted map to scan codes 219 to 244
Additionally the following 'simulated' scan codes are available under Windows:
2 TAB 4 SCROLL LOCK 5 PAUSE 6 PRINT SCREEN 7 SHIFT/SCROLL LOCK 8 NUMLOCK (in VT100 'PFkey' mode) 9 GRAY / (in VT100 'PFkey' mode) 10 GRAY * (in VT100 'PFkey' mode) 11 GRAY - (in VT100 'PFkey' mode) 12 RIGHT/CTRL 13 SHIFT+INSERT
Glink User’s Guide GLLAY keyboard layout 151

G&R
Assign to single character Choose this option when you wish the key to produce a single character.
Range: [0x00-0xFF]
Assign to ESC sequence Choose this option when you wish the key to produce an escape followed by any single character.
Range: 0x1B [0x00-0xFF]
Assign to CSI sequence Choose this option when you wish the key to produce a three-character sequence (two characters if using VT220 mode with eight-bit controls) where the initial character(s) are a CSI.
Range: 0x1B 0x5B [0x00-0xFF] or: 0x9B [0x00-0xFF]
Assign to internal function Choose this option when you wish to assign the key to one of the internal func-tions of the emulator. These are described in greater detail later in this documen-tation, starting on page 157.
Assign to ANSI function key Choose this option when you wish the key to produce a three-character sequence (two characters if using VT220 mode with eight-bit controls) where the initial character(s) are the <esc>O function key code.
Range: 0x1B 0x4F [0x00-0xFF] or: 0x8F [0x00-0xFF]
152 GLLAY keyboard layout Glink User’s Guide

G&R
Assign to ANSI mode set Choose this option when you wish the key to produce a multi-character sequence corresponding to a 'mode set' command. The value entered in association with this command will be converted to a decimal ASCII number when used.
Range: 0x1B 0x5B ['0'-'255'] 0x68 or: 0x9B ['0'-'255'] 0x68
Assign to ANSI mode reset Choose this option when you wish the key to produce a multi-character sequence corresponding to a 'mode reset' command. The value entered in association with this command will be converted to a decimal ASCII number when used.
Range: 0x1B 0x5B ['0'-'255'] 0x6C or: 0x9B ['0'-'255'] 0x6C
Assign to VIP scroll function (VIP mode) Choose this option when you wish the key to produce a four character VIP scrol-ling command.
Range: 0x1B 0x5B [0x00-0xFF] 0x73
Assign to VT320 function key (ANSI/VT modes) Choose this option when you wish the key to produce a multi-character sequence of the type sent by the function keys on the VT320 terminal. The value entered in association with this command will be converted to a decimal ASCII number when used.
Range: 0x1B 0x5B ['0'-'255] 0x7E or: 0x9B ['0'-'255'] 0x7E
Glink User’s Guide GLLAY keyboard layout 153

G&R
Assign to ND-Notis key (VT modes only) Choose this option when you wish the key to produce a sequence of the type used for Tandberg emulations (US followed by a single character).
Range: 0x1F [0x00-0xFF]
Assign to IBM function key (IBM3270/5250/3151) Choose this option when you wish the key to produce a special IBM key. You will be offered a list of keys to choose from, depending on the selected emulation mode:
<F1-F12> Assign to F1-F12 <SF1-SF12> Assign to F13-F24 <ESC> Leave assignment asis
Additional IBM3151 keys: <CSF1-CSF12> Assign to F25-F36
Additional IBM5250 keys: <PgUp> Assign to Roll Down <PgDn> Assign to Roll Up <A> Assign to Attn <S> Assign to SysReq <H> Assign to Help <T> Assign to TestReq <X> Assign to FieldExit <+> Assign to Field+ <-> Assign to Field-
To select one of these options, simply press the key indicated on the left-hand side, or press Escape to not make any changes at all
Remove assignment for this key Choose this option when the key is to have no effect.
154 GLLAY keyboard layout Glink User’s Guide

G&R
Assign to macro Choose this option when you wish to assign the key to one of the 64 macros available in the Glink configuration file. This is also the option you should choose when the sequence you wish to define is not covered by any of the pre-defined possibilities. See the section on macro definitions for more information.
Leave assignment asis Choose this option when you wish to leave the current assignment unchanged.
Glink User’s Guide GLLAY keyboard layout 155

G&R
Producing documentation of your lay-out
You can produce a text file detailing the changes you have made to the keyboard layout by pressing CTRL/P inside GLLAY. This will provide you with a text file GLLAY.TXT (in the current working directory) containing a complete list of all available keys and what has been assigned to each. Keys that have been modified in relation to the standard keyboard will be marked with an asterisk (*).
Finishing with GLLAY When you have finished defining the changes you wish to make for the keyboard layout, press the ESC key. If you have in fact made no changes then GLLAY will just terminate, but otherwise you will be asked whether you wish to save the changes to file. At this point, pressing Esc will return you to GLLAY, while answering N will exit without saving. If you answer Y then you will be asked whether or not you wish to save the definitions back to the file from which they were originally loaded (or the default name if you had no initial layout file). If that's what you want then answer Y, otherwise answer N and you will be prompted for a file name for storing the keyboard layout just defined.
When specifying a new file name, remember the conventions used by Glink when loading keyboard layouts. Two directories may be used to store layout definitions:
• The Glink 'user' directory, specified with /U in either the command line or in the GLWINOPT environment variable.
• The Glink directory containing GL.EXE.
You must save the definition back to one of these two directories in order for Glink to be able to locate the file.
Additionally, you should adhere to the conventional naming for keyboard layout files, use GLWINL.xxx (xxx = any three characters).
Remember also that you need to load the keyboard layout into the emulator, either by specifying it in the keyboard setup menu, in the dial directory entry for the specific host, or by using the script LAYOUT command to load the definition directly.
156 GLLAY keyboard layout Glink User’s Guide

G&R
Macro definitions Glink provides for up to 64 separate macro definitions. You will find a complete description of the syntax used for these elsewhere in this documentation. Macros allow you to define any sequence of characters you wish, and may also be used to execute script commands and script files, and thus provide you with greater flexibility than is available through the predefined sequences configurable with GLLAY. The macro definitions themselves are part of the Glink configuration and are defined using the setup menus inside the emulator itself. Macros 0-9 are preassigned to the ALT+0 to ALT+9 keys. The remaining 54 macros must be allocated to relevant keys using GLLAY if they are to be available from the keyboard.
Note also that the last 15 macros (numbered 49 to 63) are used to store UDK (User Defined Keys) sent by the host if you are running the VT220 emulation. This means that if your host is sending such definitions then you should avoid using these macros for your own definitions. Additionally, if you wish to be able to use some or all of the UDK definitions then you will need to allocate them to appropriate keys using GLLAY.
As an example, let's assume that we want the F1 key to write the string 'John Doe'. Inside GLLAY we'll first select the appropriate emulator mode (these steps will need to be repeated if the definition is to apply to all modes) using the TAB key. Then we press F1, the key we wish to redefine. In that we are going to be using a macro, we press M for macro. We can select any macro number we wish at this point, but we'll avoid macros 0 to 9 in that they are useful to have available inside Glink (because they are preallocated on the default keyboard). So we'll pick number 10. The keyboard layout can now be saved in the appropriate file, and loaded as the Glink layout when running the emulator. You now need to define the macro itself, so you enter the Glink setup menus and select the keyboard macro option. Under macro 10 you enter the string 'John Doe' and save the configuration back to disk. Pressing F1 should now produce 'John Doe' on your screen.
Internal functions This list provides only a brief description of each of the available functions; you will find a more complete description of each of these elsewhere in the documentation.
Glink User’s Guide GLLAY keyboard layout 157
G&R
Insert toggle Toggles insert mode. Default assignment is the INS key.
Inline macro Start/stop definition of 'on the fly' macro. Default assignment is ALT+M.
Show Files Enter the file display. Default assignment is ALT+F (in Windows, available as CTRL+SHIFT+F).
Toggle Local mode Go in and out of local mode. Default assignment is ALT+L (in Windows, avail-able as CTRL+SHIFT+L).
Print Screen Print the current emulator screen. Default assignment is ALT+P.
Help Menu Show the current help menu. Default assignment is ALT+H.
Program Info Menu Show the program information screen. Default assignment is ALT+F10.
Setup Menu Enter the system setup menu. Default assignment is ALT+S.
File Transfer Start a file transfer. Default assignment is ALT+T (in Windows, available as CTRL+SHIFT+T).
Terminate emulator Leave the emulator. Default assignments are ALT+Q and ALT+X (in Windows, also available as ALT+F4).
158 GLLAY keyboard layout Glink User’s Guide
G&R
Send Break Send a break signal to the host. Default assignment is ALT+B (in Windows, also available on SCROLL LOCK).
Show line buffer Show the current contents of the line buffer. Default assignment is ALT+F5.
Capture ASCII Data Start or stop capture of data from the line. Default assignment is ALT+V.
Screen dump Dump the current screen to file. Default assignment is ALT+W.
Toggles Menu Show the emulator toggles menu. Default assignment is ALT+U.
Start a script Select a script file for execution. Default assignment is ALT+O.
Dial a number Enter the dial directory. Default assignment is ALT+N.
Display scrollback Show the scrollback buffer. Default assignment is CTRL+PGUP.
Save in scrollback Save the current page into the scrollback buffer. Default assignment is CTRL+PGDN.
Hang up line Hang up the current connection. Default assignment is ALT+Y.
Glink User’s Guide GLLAY keyboard layout 159
G&R
Exec inline macro Execute the current 'on the fly' macro. Default assignment is ALT+E (in Windows, available as CTRL+SHIFT+E).
ASCII table Show the available character set (local or remote). Default assignment is ALT+F9.
Kermit Server Enter Kermit Server mode. Default assignment is ALT+Z.
Call timer Inspect the call timer. Default assignment is ALT+F8.
Send password Send the currently defined password. Default assignment is ALT+F7.
Local screen clear Clear the emulator screen. Default assignment is ALT+F3.
Chat mode toggle Enter or exit ANSI chat mode. Default assignment is ALT+F4 (in Windows, available as CTRL+SHIFT+F4).
Send login name Send the currently defined user name. Default assignment is ALT+F6.
132 cols swap key Swap between left and right sides of 132 column-mode screen displayed on 80-column screen. Default assignment is CTRL+RIGHT ARROW.
Connect menu Displays the Connect menu if the communications interface supports it. If the line is connected, then the interface Command menu will be displayed if supported. Default assignment is CTRL+F6.
160 GLLAY keyboard layout Glink User’s Guide

G&R
Restart Comms Restart the communications interface, disconnecting first if necessary. Default assignment is CTRL+F7.
Send a file Transmit a file to the host. Default assignment is PGUP (not assigned in VIP mode).
Receive a file Receive a file from the host. Default assignment is PGDN (not assigned in VIP mode).
Reset error Reset any error indication. Default assignment is ALT+R (in Windows also available on SCROLL LOCK).
TX-Edit back Perform command recall looking backwards in the history buffer (VIP text modes only). Default assignment is CTRL+UP ARROW.
TX-Edit forward Perform command recall looking forwards in the history buffer (VIP text modes only). Default assignment is CTRL+DOWN ARROW.
Enter TX-Edit mode Enter 'edit mode' for the line currently being entered (VIP text modes only). Default assignment is ALT+ENTER.
Windows Copy Equivalent to the copy option in the Windows edit menu. Default assignment is CTRL+INSERT.
Windows Paste Equivalent to the paste option in the Windows edit menu. Default assignment is SHIFT+INSERT.
Glink User’s Guide GLLAY keyboard layout 161
G&R
Windows Paste/xmt Equivalent to the transmit option in the Windows edit menu. Default assignment is SHIFT+INSERT.
Windows Paste/snd Equivalent to the send option in the Windows edit menu. Default assignment is SHIFT+INSERT.
Kill host sessions Kills all previous G&R DSA and DIWS sessions (‘Ggate’).
Edit recall buffer Brings up the window used for editing the command history,
Print variables Prints only the variable fields in the current screen.
Possible pitfalls If your definition doesn't seem to be working there are several possible expla-nations:
• You forgot to save the definition back to disk when you exited from GLLAY.
• You saved the keyboard layout into a different directory than that used by Glink (Glink inspects first the user directory and then the Glink directory when looking for keyboard layout files).
• You saved the keyboard layout correctly but are not loading it into Glink via the option in the keyboard setup menu. Remember that Glink uses file names in the form GLWINL.xxx.
• You defined the key correctly but not for the emulation mode you are using in Glink.
162 GLLAY keyboard layout Glink User’s Guide

G&R
Character equivalents Hex Octal ASCII Glink representations
00 000 NUL ^@ ^#000 ^&000 ^$00
01 001 SOH ^A ^#001 ^&001 ^$01
02 002 STX ^B ^#002 ^&002 ^$02
03 003 ETX ^C ^#003 ^&003 ^$03
04 004 EOT ^D ^#004 ^&004 ^$04
05 005 ENQ ^E ^#005 ^&005 ^$05
06 006 ACK ^F ^#006 ^&006 ^$06
07 007 BEL ^G ^#007 ^&007 ^$07
08 010 BS ^H ^#008 ^&010 ^$08
09 011 HT ^I ^#009 ^&011 ^$09
0A 012 LF ^J ^#010 ^&012 ^$0A
0B 013 VT ^K ^#011 ^&013 ^$0B
0C 014 FF ^L ^#012 ^&014 ^$0C
0D 015 CR ^M ^#013 ^&015 ^$0D
0E 016 SO ^N ^#014 ^&016 ^$0E
0F 017 SI ^O ^#015 ^&017 ^$0F
10 020 DLE ^P ^#016 ^&020 ^$10
11 021 DC1 ^Q ^#017 ^&021 ^$11
12 022 DC2 ^R ^#018 ^&022 ^$12
13 023 DC3 ^S ^#019 ^&023 ^$13
14 024 DC4 ^T ^#020 ^&024 ^$14
15 025 NAK ^U ^#021 ^&025 ^$15
Glink User’s Guide Character equivalents 163

G&R
Hex Octal ASCII Glink representations
16 026 SYN ^V ^#022 ^&026 ^$16
17 027 ETB ^W ^#023 ^&027 ^$17
18 030 CAN ^X ^#024 ^&030 ^$18
19 031 EM ^Y ^#025 ^&031 ^$19
1A 032 SUB ^Z ^#026 ^&032 ^$1A
1B 033 ESC ^[ ^#027 ^&033 ^$1B
1C 034 FS ^\ ^#028 ^&034 ^$1C
1D 035 GS ^] ^#029 ^&035 ^$1D
1E 036 RS ^> ^#030 ^&036 ^$1E
1F 037 US ^_ ^#031 ^&037 ^$1F
40 100 @ @ ^#064 ^&100 ^$40
5C 134 \ \ ^#092 ^&134 ^$5C
5E 136 ^ ^^ ^#094 ^&136 ^$5E
7F 177 DEL ^#127 ^&177 ^$7F
Special-purpose escape sequences
^*scriptname Invoke a script in a macro ^*=command Invoke script command in a macro ^! Send current message delimiter (CR,EOT or ETX) ^#ddd Decimal specification for characters ^&ooo Octal specification for characters ^$hh Hex specification for characters
164 Character equivalents Glink User’s Guide
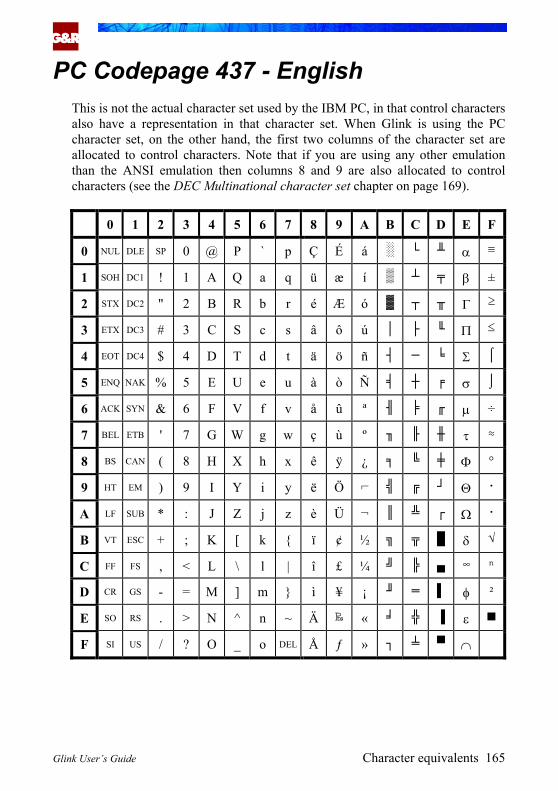
G&R
PC Codepage 437 - English This is not the actual character set used by the IBM PC, in that control characters also have a representation in that character set. When Glink is using the PC character set, on the other hand, the first two columns of the character set are allocated to control characters. Note that if you are using any other emulation than the ANSI emulation then columns 8 and 9 are also allocated to control characters (see the DEC Multinational character set chapter on page 169).
0 1 2 3 4 5 6 7 8 9 A B C D E F
0 NUL DLE SP 0 @ P ` p Ç É á α ≡
1 SOH DC1 ! 1 A Q a q ü æ β í ±
2 STX DC2 " 2 B R b r é Æ ó Γ ≥
3 ETX DC3 # 3 C S c s â ô ú Π ≤
4 EOT DC4 $ 4 D T d t ä ö ñ Σ ⌠
5 ENQ NAK % 5 E U e u à ò Ñ σ ⌡
ACK SYN & 6 F V f v å û ª µ ÷
7 BEL ETB ' 7 G W g w ç ù º τ ≈
8 BS CAN ( 8 H X h x ê ÿ ¿ Φ °
9 HT EM ) 9 I Y i y ë Ö Θ ·
A LF SUB * : J Z j z è Ü ¬ Ω ·
VT ESC + ; K [ k ï ½ δ √
C FF FS , < L \ l | î £ ¼ ∞ ⁿ
D CR GS - = φ M ] m ì ¥ ¡ ²
SO RS > N n ~ ₧ «
SI US ? O o DEL »
6
B ¢
E . ^ Ä ε
F / _ Å ƒ ∩
Glink User’s Guide Character equivalents 165
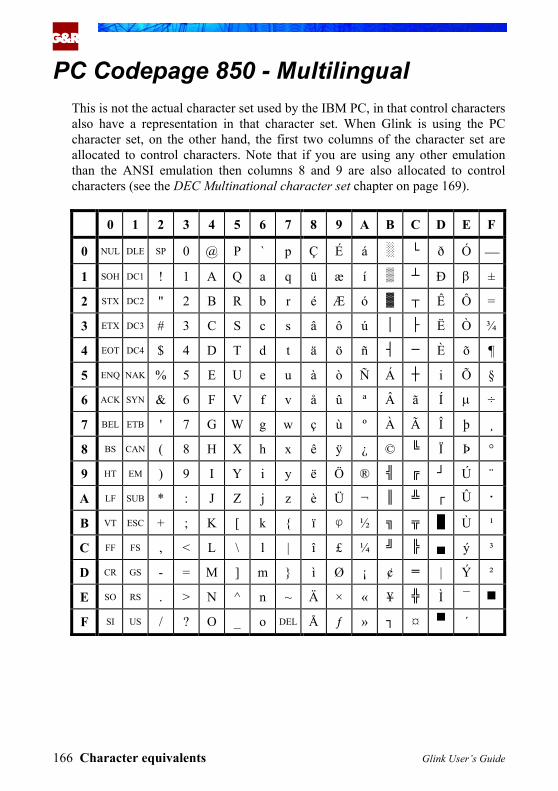
G&R
PC Codepage 850 - Multilingual This is not the actual character set used by the IBM PC, in that control characters also have a representation in that character set. When Glink is using the PC character set, on the other hand, the first two columns of the character set are allocated to control characters. Note that if you are using any other emulation than the ANSI emulation then columns 8 and 9 are also allocated to control characters (see the DEC Multinational character set chapter on page 169).
2 5 8 B 0 1 3 4 6 7 9 A C D E F
0 NUL DLE SP 0 @ P ` p Ç É á ð Ó
1 SOH DC1 ! 1 A Q a q ü æ í Ð β ±
2 STX DC2 " 2 B R b r é Æ ó Ê Ô =
3 ETX DC3 # 3 C S c s â ô ú Ë Ò ¾
4 EOT DC4 $ 4 D T d t ä ö ñ È õ ¶
5 ENQ NAK % 5 E U e u à ò Ñ Á i Õ §
6 ACK SYN & 6 F V f v å û ª Â ã Í µ ÷
7 BEL ETB º ¸ ' 7 G W g w ç ù À Ã Î þ
8 BS CAN ( 8 H X h x ê ÿ ¿ © Ï Þ °
9 HT EM ) 9 I Y i y ë Ö ® Ú ¨
A LF SUB * : J Z j z è Ü ¬ Û ·
B VT ESC + ; K [ k ï φ ½ Ù ¹
C FF FS , < L \ l | î £ ¼ ý ³
D CR GS - = M ] m ì Ø ¡ ¢ | Ý ²
E SO RS . > N ^ n ~ Ä × « ¥ Ì ¯
F SI US / ? O _ o DEL Å ƒ » ¤ ´
166 Character equivalents Glink User’s Guide

G&R
PC Codepage 865 - Nordic This is not the actual character set used by the IBM PC, in that control characters also have a representation in that character set. When Glink is using the PC character set, on the other hand, the first two columns of the character set are allocated to control characters. Note that if you are using any other emulation than the ANSI emulation then columns 8 and 9 are also allocated to control characters (see the DEC Multinational character set chapter on page 169).
0 F 1 2 3 4 5 6 7 8 9 A B C D E
0 NUL DLE SP 0 @ P ` p Ç É á α ≡
1 SOH DC1 ! 1 A Q a q ü æ í β ±
2 STX DC2 " 2 B R b r é Æ ó Γ ≥
3 ETX DC3 # 3 C S c s â ô ú Π ≤
4 EOT DC4 $ 4 D T d t ä ö ñ Σ ⌠
5 ENQ NAK % 5 E U e u à ò Ñ σ ⌡
ACK SYN & 6 F V f v å û ª µ ÷
7 BEL ETB ' 7 G W g w ç ù º τ ≈
8 BS CAN ( 8 H X h x ê ÿ ¿ Φ °
9 HT EM ) 9 I Y i y ë Ö Θ ·
A LF SUB * : J Z j z è Ü ¬ Ω ·
B VT ESC + ; K [ k ï ø ½ δ √
C FF FS , < L \ l | î £ ¼ ∞ ⁿ
D CR GS - = M ] m ì Ø ¡ φ ²
E SO RS . > N ^ n ~ Ä ₧ « ε
F SI US / ? O _ o DEL Å ƒ ¤ ∩
6
Glink User’s Guide Character equivalents 167

G&R
Windows ANSI character set As with the DOS character sets, the first two columns of the character set are allocated to control characters. Windows also reserves columns 8 and 9 (with some few exceptions) and Glink uses these two columns in its built-in fonts to provide extra characters that are needed to display special characters when the host is using a different character set. Note that these are not available directly under any emulation other than the ANSI emulation in that these two columns are reserved for usage as control characters.
0 1 2 3 4 5 6 7 8 9 A B C D E F
0 NUL DLE SP 0 @ P ` p º À Ð à ð
1 SOH DC1 ! 1 A Q a q ‘ ¡ ± Á Ñ á ñ
2 STX DC2 " 2 B R b r ’ ¢ ² Â Ò â ò
3 ETX DC3 # 3 C S c s £ ³ Ã Ó ã ó
4 EOT DC4 $ 4 D T d t ¤ ´ Ä Ô ä ô
5 ENQ NAK % 5 E U e u ≠ ¥ µ õ Å Õ å
6 ACK SYN & 6 v ÆF V f | ¶ Ö æ ö BEL ETB ' 7 W g w Ç × ÷
8 BS CAN h ¸ ( 8 H X x ⌠ ¨ È Ø è ø
9 HT EM ) 9 Ù I Y i y ⌡ © ¹ É é ù
A LF SUB Z ª * : J j z ° Ê Ú ê ú
B VT ESC + ; K [ k « » Ë Û ë û
C FF FS , < L \ l | ƒ ¬ ¼ Ì Ü ì ü
D CR GS - = M ] m ₧ ½ Í Ý í ý
E SO RS . > N ^ n ~ √ ® ¾ Î Þ î þ
F SI US / ? O _ o DEL ¿ Ï ß ï ÿ
7 G · § · ç
168 Character equivalents Glink User’s Guide

G&R
DEC multinational character set This is the normal character set used both by the BDS/HDS and by VT102/220 terminals (there are some minor divergences but none that make a real difference in practice). The eight-bit control characters in this table apply to the VT102/220 emulation only.
0 1 2 3 4 5 6 7 8 9 A B C D E F
0 NUL DLE SP 0 @ P ‘ p DCS ° À Ð à ð
1 SOH DC1 ! 1 A Q a q PU1 ¡ ± Á Ñ á ñ
2 STX DC2 " 2 B R b r PU2 ¢ ² Â Ò â ò
3 ETX DC3 # 3 C S c s STS £ ³ Ã Ó ã ó
4 EOT DC4 $ 4 D T d t IND CRH ¤ ´ Ä Ô ä ô
5 ENQ NAK % 5 E U e u NEL MW ¥ µ Å Õ å õ
6 ACK SYN & 6 F V f v SSA SPA | ¶ Æ Ö æ ö
7 BEL ETB ' 7 G W g w ESA EPA § · Ç × ç ÷
8 BS CAN ( 8 H X h x HTS ¨ ¸ È Ø è ø
9 HT EM ) 9 I Y i y HTJ © ¹ É Ù é ù
A LF SUB * : J Z j z VTS ª º Ê Ú ê ú
B VT ESC + ; K [ k PLD CSI « » Ë Û ë û
C FF FS , < L \ l | PLU ST ¬ ¼ Ì Ü ì ü
D CR GS - = M ] m RI OSC ½ Í Ý í ý
E SO RS . > N ^ n ~ SS2 PM ® ¾ Î Þ î þ
F SI US / ? O _ o DEL SS3 APC ¿ Ï ß ï ÿ
Glink User’s Guide Character equivalents 169
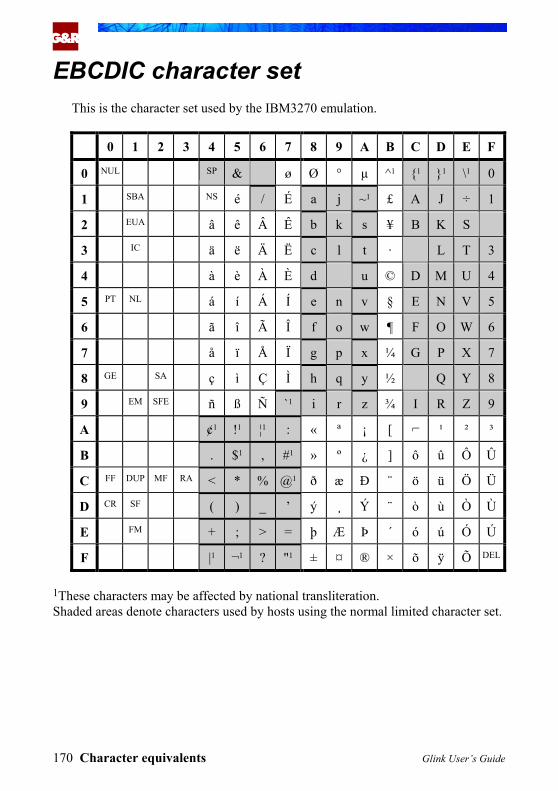
G&R
EBCDIC character set This is the character set used by the IBM3270 emulation.
0 1 2 3 4 5 6 7 8 9 A B C D E F
0 NUL SP - ø Ø ° µ ^1 1 1 \1 0
1 SBA NS é / É a j ~1 £ A J ÷ 1 EUA â ê Â Ê b k s ¥ B K 2
3 IC ä ë Ä Ë c l t C L T 3
4 à è À È m u © D M U 4
5 PT NL á í Á Í e n v § E N V 5
6 ã î Ã Î f o w ¶ F O W 6 å ï Å Ï g p x ¼ G P X 7
8 GE SA ç ì Ç Ì h q y H Q Y 8
9 EM SFE ñ ß Ñ `1 i r z ¾ I R Z 9
A ¢1 !1 ¦1 : « ª ¡ [ ¹ ² ³
B . $1 , #1 » º ¿ ] ô û Ô Û
C FF DUP MF RA < * % @1 ð æ Ð ¨ ö ü Ö Ü
D CR SF ( ) _ ’ ý ¸ Ý ¨ ò ù Ò Ù
E FM + ; > = þ Æ Þ ´ ó ú Ó Ú
F |1 ¬1 ? "1 ± ¤ ® × õ ÿ Õ DEL
&
2 S
·
d
7
½
1These characters may be affected by national transliteration. Shaded areas denote characters used by hosts using the normal limited character set.
170 Character equivalents Glink User’s Guide

G&R
Error texts [90] Aborted by Operator. Class: File transfer Cause: This message is displayed in the file transfer window when the transfer
is aborted manually. Action: None.
Access denied! Class: General Cause: You have attempted to run an application from a file to which you do
not have access, either because the file is in use by another user or be-cause you have insufficient file system privileges to use the file.
Action: Check that you have sufficient privileges - if you do then wait until the application becomes available. On some systems setting the file attribute to 'read only' may be necessary if an application is to run simultaneously on different machines.
[5] Access to file denied. Class: File transfer Cause: You have attempted to transfer a file to which you do not have access,
either because the file is in use by another user or because you have in-sufficient file system privileges to use the file.
Action: Check that you have sufficient privileges - if you do then wait until the file becomes available.
ALPHA FIELD Class: Emulation Cause: You have attempted to enter non-alphabetic data into a field that has
been defined by the host as one in which only alphabetic characters may be entered. Alphabetic characters are defined as the characters A-Z, a-z, period, comma, hyphen and space.
Action: Enter valid data in the field.
Glink User’s Guide Error texts 171
G&R
ALPHA/DIGIT Class: Emulation Cause: You have attempted to enter non-alphabetic/digit data into a field that
has been defined by the host as one in which only alphabetic characters and digits may be entered. Alphabetic characters are defined as the characters A-Z, a-z, period, comma, hyphen and space. Digits are defined as the characters 0-9.
-
Action: Enter valid data in the field.
ALPHA/NUMERIC Class: Emulation Cause: You have attempted to enter non-alphanumeric data into a field that has
been defined by the host as one in which only alphanumeric characters may be entered. Alphanumeric characters are defined as the characters A-Z, a-z, 0-9, period, comma, hyphen, plus, and space.
Action: Enter valid data in the field.
BAD ADDRESS Class: Communication Cause: The name of the server to which you are trying to connect has been spe-
cified in a format unacceptable to the underlying communications soft-ware. IP addresses for example must be specified as a.b.c.d where a, b, c, and d are numbers between zero and 255. For non-TCP/IP interfaces consult the appropriate documentation supplied with your workstation software.
Action: Correct the network address and reconnect.
Bad checksum. Class: File transfer Cause: A block was transferred incorrectly in the current file transfer. This is
detected automatically by the file transfer protocol, and the block is re-transmitted until it is transferred correctly, so there will be no error in the file that is stored on disk.
Action: None necessary.
Bad CRC check. Class: File transfer Cause: A block was transferred incorrectly in the current file transfer. This is
detected automatically by the file transfer protocol, and the block is re-transmitted until it is transferred correctly, so there will be no error in the file that is stored on disk.
Action: None necessary.
172 Error texts Glink User’s Guide
G&R
Bad default parameters Class: Communications Cause: The communications port has not been set up correctly in your WIN.INI
or SYSTEM.INI file. Action: Correct the error in your configuration and restart Windows.
[94] Bad or unknown packet. Class: File transfer Cause: A block was not recognized or was incorrectly transferred in the current
file transfer. This is detected automatically by the file transfer protocol, and appropriate action will be taken. So long as the transfer terminates normally, the file that is stored on disk will be correct (if the error is un-recoverable the transfer will be terminated prematurely with an error status).
Action: None necessary.
Bad Port ID Class: Communications Cause: You tried to connect to a communications port that has not been confi-
gured for Windows. Action: Make sure that all parameters for the communications port have been
configured correctly in your SYSTEM.INI file.
Bad sequence number. Class: File transfer Cause: A block was transferred incorrectly in the current file transfer. The
transfer must be terminated prematurely in that the file transfer protocol is unable to recover from this type of error.
Action: Retry the transfer (preferably with a different protocol if one is available).
Block nesting error Class: Script language Cause: A group directive in a dialog box group (or HGROUP or VGROUP) is
incorrectly placed, or an IF statement block has not been terminated in-side a SWITCH/ENDSWITCH pair.
Action: Correct and retry.
Glink User’s Guide Error texts 173
G&R
Block synchronization error. Class: File transfer Cause: A block was transferred incorrectly in the current file transfer. The
transfer must be terminated prematurely in that the file transfer protocol is unable to recover from this type of error.
Action: Retry the transfer (preferably with a different protocol if one is available).
BUFFER OVERFLOW Class: Communications Cause: The buffer used to hold data coming from the line was not large enough
and data has been lost. This is related to Glink not being able to process the data fast enough, or possibly because you performed some time-consuming operation that did not allow Glink to process data.
Action: Increase the buffer size set up in the communications options dialog box. Ensure that both your modem (or host connection) and Glink are set up with appropriate flow control options. Adjust the 'threshold' para-meters so as to allow Glink to process data more efficiently. If all else fails reduce the line speed (or buy a faster PC!).
Can't copy this file! Class: File display Cause: The file you asked to be copied in the file window was not accessible
for some reason. Action: Check that you have access to the file and that it's not in use by another
user.
Can't erase this file! Class: File display Cause: The file you asked to be erased in the file window was not accessible
for some reason. Action: Check that you have access to the file and that it's not in use by another
user.
Can't move this file! Class: File display Cause: The file you asked to be moved in the file window could not be moved
for some reason. Note that you will never be allowed to move a file across drives or to a filename that already exists.
Action: Use the copy function instead of the move function.
174 Error texts Glink User’s Guide
G&R
Cannot connect to COM port! Class: Communications Cause: Glink was unable to connect to the communications port. This could
either be because the port does not exist, or because another application is using it in another window.
Action: Check that the port is correctly configured and is not being used by a DOS application.
[0] Cannot open file. Class: File transfer Cause: The local file could not be opened for some reason. Action: Check that the file to be transferred exists and that you have access to it.
Cannot open output file. Class: File transfer Cause: The file to which you are receiving cannot be accessed or created. The
most common cause of this error is specification of a 'download direc-tory' that does not exist.
Action: Check that the download directory (if any) is correctly specified, and that you have write access to the area in which the file is to be written.
Cannot write object file! Class: Script language Cause: The script OBJECT statement was used to specify an output file for the
compiled script. This file either has been incorrectly declared or could not be written to.
Action: Correct and retry.
Communications buffer too small Class: Communication Cause: The communications interface was unable to allocate the required
minimum amount of memory. This will usually only be seen when running interfaces that require use of conventional memory (memory in the first physical 1Mb) to communicate with software loaded before Win-dows is started.
-
Action: Close one or more of the other applications you are running and retry. If this does not help, contact your system administrator; your machine probably needs to be reconfigured so as to either provide more conventional memory for Windows use or so as to reduce memory requirements for the communications interface.
Glink User’s Guide Error texts 175

G&R
Connection refused by host Class: Communication Cause: The host machine could not accept your call. The server software for
the port to which you are trying to connect is either not running or is already handling the maximum number of connections it supports.
-
-
Action: Wait and retry the connection later.
Connection to host timed out Class: Communication Cause: The host machine did not answer your call. This can be for a variety of
reasons, but usually is because (a) the host machine is down, (b) the server software is not running, (c) the network is unable to provide a connection to that host or (d) a filter between you and the host is pre-venting you from reaching that host. Unfortunately the communications interface does not provide more specific information about which of these is actually causing the problem.
Action: If you are running a TCP/IP interface, use the 'ping' utility to check that the host machine is actually alive.
DATA OVERFLOW Class: Emulation Cause: The application attempted to move past the end of the screen and the
emulation is not set to 'roll mode' and therefore cannot scroll. Action: Set the emulation to roll mode using the toggles menu. Some
applications that switch between text and forms mode without resetting the roll mode state may also require use of the sticky roll mode option.
DATA OVERRUN Class: Communication Cause: The communications interface has reported loss of an incoming data
character. The causes of this type of error are usually fairly technical in nature and are discussed at length in the description of the serial port interface elsewhere in this documentation.
Action: Discussed in the referenced documentation.
[19] Device is write protected. Class: File transfer Cause: The file you are receiving could not be written because the media you
have specified is write-protected. Action: Remove the write protection, or specify a different download path, and
retry.
176 Error texts Glink User’s Guide
G&R
Device not open Class: Communications Cause: This error should never occur. Action: Report the problem to your Glink support organization.
[21] Device not ready. Class: File transfer Cause: The file you are attempting to receive could not be written because the
device is not able to access its media. Action: If you are receiving a file to diskette make sure there is a diskette in the
drive. If you are receiving to your hard disk then it probably needs checking and/or repairing.
DIGIT FIELD Class: Emulation Cause: You have attempted to write non-digit data into a forms mode field.
Such fields may only contain the digits 0-9 or space characters. Action: Enter valid data.
Disconnected by host Class: Communication Cause: The host machine has sent a normal disconnect command. Action: None (if you were not expecting to be disconnected you may need to
check with your system administrator as to why the disconnect command was sent).
Disconnected by user Class: Communications Cause: You selected the Line/Stop option or were running a script that discon-
nected you from the host machine intentionally. Action: None Duplicate label. Class: Script language Cause: You have used the same name (remembering that only the first 8 char
acters are significant) for two labels in the same script. -
Action: Correct and retry.
Glink User’s Guide Error texts 177

G&R
#ELSE with no matching #IFDEF Class: Script language Cause: An #ELSE statement must be paired with a preceding #IFDEF (or
#IFNDEF) statement. Action: Correct and retry.
END OF FIELD Class: Emulation Cause: You have attempted to enter data past the end of a forms mode field. Action: If you would prefer the emulator to skip to the next field (rather than
wait for you to press the TAB key) when you have filled a variable field, set the automatic tabbing option in the setup menu (to set the option permanently) or the equivalent toggle.
END OF FORM Class: Emulation Cause: You have attempted to tab past the last field in the form. Action: None ENDBUILD with no corresponding BUILDMENU Class: Script language Cause: The script BUILDMENU and ENDBUILD commands must always be
paired. Action: Correct and retry.
#ENDIF with no matching #IFDEF Class: Script language Cause: An #ENDIF statement must be paired with a preceding #IFDEF (or
#IFNDEF) statement. Action: Correct and retry.
Endswitch/endwhile statement missing Class: Script language Cause: The end of the script file was reached without finding an ENDSWITCH
statement to terminate an outstanding SWITCH statement (or the same situation exists with an unmatched WHILE statement).
Action: Correct and retry.
178 Error texts Glink User’s Guide
G&R
ENTRY REQUIRED Class: Emulation Cause: You have not entered data in the current field and the host application
has defined that data must be entered there. Action: Enter data in this field.
Error in linkage to external routine Class: Script language Cause: You have used an external script reference that could not be resolved. If
the error occurs when the script is compiled this means that the external library used an incorrect designation for an input or output parameter. If the error occurs during script execution it means that the referenced DLL procedure is no longer available.
Action: Correct and retry.
Error reading disk file! Class: Script language Cause: An error occurred when a script command attempted to use one of the
file input commands. This usually will only caused by a damaged or de-fective disk or diskette.
Action: Restore the file and retry.
[27] Error reading file. Class: File transfer Cause: An error occurred while attempting to read a file that is to be trans-
ferred. This will usually only occur when the file itself is damaged in some way.
Action: Restore the file from backup and retry.
Error sending modem command: <command> Class: Communication Cause: The command displayed was not accepted by your modem. Action: In the modem strings menu, correct the string that was in error. If
necessary send the modem command in separate pieces to discover which of the commands in the string is not being accepted.
Glink User’s Guide Error texts 179

G&R
[84] Error writing file. Class: File transfer Cause: An error occurred while attempting to write a file that is being received.
This will usually only occur when the disk is damaged in some way or the disk becomes full while the transfer is in progress.
Action: If the disk is full, free disk space by releasing files and retry. Otherwise repair and/or replace the disk.
Error writing to disk! Class: Script language Cause: An error occurred when a script command attempted to write to a file
using one of the file output commands. This will usually only occur when the disk is damaged in some way or the disk becomes full while the script is executing.
Action: If the disk is full, free disk space by releasing files and retry. Otherwise repair and/or replace the disk.
Error writing to file. Class: File transfer Cause: An error occurred while attempting to write a file that is being received.
This will usually only occur when the disk is damaged in some way or the disk becomes full while the transfer is in progress.
Action: If the disk is full, free disk space by releasing files and retry. Otherwise repair and/or replace the disk.
Expected a numeric value. Class: Script language Cause: The script command you executed requires a numeric parameter. Action: Correct and retry.
External verb not in library Class: Script language Cause: You have used an external reference in the script that was not found in
the external DLL. Action: Correct and retry File is not open for input. Class: Script language Cause: The script you are running has attempted to read from a file that has not
been opened for input operations. Action: Correct and retry.
180 Error texts Glink User’s Guide

G&R
File is not open for output. Class: Script language Cause: The script you are running has attempted to write to a file that as not
been opened for output operations. Action: Correct and retry.
File is READ ONLY! Class: File display Cause: The file you are trying to overwrite is set to READ ONLY. Action: Change the file attribute with the File/Attributes menu item if you
actually intend to overwrite the file.
File name missing Class: Script language Cause: You attempted to run a script file without specifying the name of the
file to run. Action: Specify a name for the script.
[2] File not found. Class: File transfer Cause: The file you are trying to transfer does not exist. Action: Specify a valid file name for the transfer.
File or path not found! Class: General Cause: The file or directory you specified does not exist. Action: Specify a valid pathname.
FILL REQUIRED Class: Emulation Cause: The host application has defined this field as a field that must be filled
completely when data is entered there. Action: Fill the field completely.
FORM: NO FOLD Class: Emulation Cause: You have pressed the 'fold line' key while in forms mode. Folding is
only supported in text mode. Action: None.
Glink User’s Guide Error texts 181
G&R
FORM: NO PASTE Class: Emulation Cause: You have pressed the 'paste' key while in forms mode. Pasting (of the
emulator variety, not the Windows variety) is not supported in forms mode.
Action: None.
FORM: NO TAB SET Class: Emulation Cause: You have pressed the 'tab set' key while in forms mode. Tab setting is
not supported in forms mode. Action: None.
FORM: NO UNFOLD Class: Emulation Cause: You have pressed the 'unfold line' key while in forms mode. This func-
tion is not supported in forms mode. Action: None.
FRAMING ERROR Class: Communication Cause: The communications driver has reported an error in the incoming data.
This is usually something caused by line noise on a dialup line, but may also occur if you are not configured at the same speed as is actually be-ing used on the line.
Action: Check that your line speed is set correctly. If necessary redial to get a better line.
Function not implemented in this version Class: General Cause: You have invoked a function that is only implemented in the DOS ver-
sion of the emulator, or one that is not included with the version of the emulator you are running.
Action: None.
182 Error texts Glink User’s Guide
G&R
General Protection fault Class: Application Cause: The program has attempted to access an invalid memory address, or
perform some other illegal action. Action: This is almost certainly being caused either by a program error in Glink,
a program error in one of the libraries being used by Glink, or by a bug in Windows itself. You should always report such errors. If they are reported with GL.EXE as the offending program then the fault should be reported to your Glink support apparatus; if they are reported with the name of a third-party DLL (for example WINSOCK.DLL) as the offending program then the report should be made to the relevant software supplier.
When reporting errors of this type to your Glink software support appa-ratus, the following material will be needed:
1. A DRWATSON.LOG dump describing the details of the problem. 2. Your AUTOEXEC.BAT, CONFIG.SYS, SYSTEM.INI and
WIN.INI files. 3. Your Glink configuration file (usually GLWINC.DEF). 4. A text description of the actions leading up to the error situation.
It will facilitate the support process if you can pack all of the above files into some kind of archive format (for example ZIP or LZH). If you do so remember to use a binary transfer when passing over the files!
Gpipe error: <error text> Class: Communications Cause: The logical connection between Glink and the LDSA line module has
been broken (usually because of an unexpected error in that module). Action: Reconnect. If the error situation persists then check with your comms
support department.
Host address not specified Class: Communication Cause: You have attempted to connect to a host, but no host name or address
has been specified. Action: Specify a host name or address. The name of the field for this in the
configuration setup will vary depending upon the interface you are using, and may be called IP address, Host INSID, Host name, Async server name, GLNET gateway, Net name/id or NCU address.
Glink User’s Guide Error texts 183

G&R
Host is unreachable Class: Communication Cause: The network software has reported that the host machine to which you
are attempting to connect cannot be reached (the error is no more spe-cific than that unfortunately).
Action: Contact your system administrator if the condition persists.
Host machine is down Class: Communication Cause: The network software has reported that the host machine to which you
are trying to connect is not running. Action: Retry the connect later. Contact your system administrator if the
condition persists.
Host not found Class: Communication Cause: The network software has reported that it cannot find the host machine
to which you are trying to connect. This is most likely because a name server cannot be found.
Action: If you have used a symbolic name in the IP address, try with a numeric IP address instead.
Incorrect format for OLE named parameter Class: Script language Cause: You have used a syntactically incorrect format when using an OLE verb
that uses named parameters. Check the documentation of the OLE verb for a description of acceptable formats.
Action: Correct and retry.
Incorrect format for OLE type declaration Class: Script language Cause: You have used a syntactically incorrect format when using an OLE verb
that uses typed parameters. Check the documentation of the OLE verb for a description of acceptable formats.
Action: Correct and retry.
Increase max script variables to run this Class: Script language Cause: This message should not be seen when running Glink for Windows. Action: Contact your vendor.
184 Error texts Glink User’s Guide

G&R
[91] Initial packet cannot be sent. Class: File transfer Cause: The file transfer protocol was unable to negotiate with the host. This
may either be because the file transfer has not been initiated correctly at the host side or because there is some problem with the connection that prevents the necessary negotiation from taking place.
Action: If you are sure that the host file transfer is operational, ensure that you are using the correct type of transfer for the interface you are using.
[93] Initial packet not received. Class: File transfer Cause: The file transfer protocol was unable to negotiate with the host. This
may either be because the file transfer has not been initiated correctly at the host side or because there is some problem with the connection that prevents the necessary negotiation from taking place.
Action: If you are sure that the host file transfer is operational, ensure that you are using the correct type of transfer for the interface you are using.
Input file cannot be opened. Class: File transfer Cause: The file you have tried to send to the host machine is non-existent or
inaccessible. Action: Check that the file you have specified exists, that you have access to it,
and that the file is not being used by another user.
Invalid block header. Class: File transfer Cause: A block was transferred incorrectly in the current file transfer. This is
detected automatically by the file transfer protocol, and the block is re-transmitted until it is transferred correctly, so there will be no error in the file that is stored on disk.
Action: None necessary.
Invalid byte size Class: Communications Cause: The driver for the serial port you are using does not support the byte
size and parity you selected in the communications setup menu. Action: Select a parity and byte size that's supported by the driver.
Glink User’s Guide Error texts 185

G&R
INVALID COMMAND Class: Emulation Cause: The host machine sent an emulator command that could not be inter-
preted. Action: Verify that you are using the correct emulation mode for the application
you are running. Repeat the operation that caused the error message and if you get the same error report the problem to those responsible for the application. If you don't get the error the second time then you are possibly losing input data (most commonly because of problems with the serial port).
Invalid configuration file - configuration not loaded! Class: General Cause: You have specified a configuration file that has invalid or damaged
contents. Glink cannot use the file. Action: Use a valid configuration file.
[15] Invalid drive specification. Class: File transfer Cause: You have specified a non-existent disk drive in the file name you used
for the file transfer. Action: Correct the file name and retry.
Invalid key name Class: Script language Cause: The script you have attempted to execute specified an invalid key name
in the KEYS (or similar) command. Action: Correct and retry.
Invalid or missing external DLL Class: Script language Cause: You have used a reference to an external routine in a file that either
does not exist or does not meet the criteria for such files (usually because it does not contain one of the two required entry points).
-
Action: Ensure that the DLL is correctly coded and that it's placed in the same directory as the GL.EXE program file.
Keyboard file not found. Class: Script language Cause: The KEYBOARD script command specified the name of a keyboard
file that does not exist. Action: Correct and retry.
186 Error texts Glink User’s Guide

G&R
!label not supported Class: Script language Cause: You may only CALL another script directly at a label if that script is
available in source form. Action: Use the source form of the script you are calling.
LAST LN: NO FOLD Class: Emulation Cause: You tried to use the 'fold line' key while positioned in the last line of the
screen. Action: Use the erase to end of line key in this situation.
LAST LN: NO UNFOLD Class: Emulation Cause: You tried to use the 'unfold line' while positioned in the last line of the
screen. Action: None - it can't be done! [90] Line disconnected. Class: File transfer Cause: The file transfer failed because contact was lost with the host machine. Action: Reconnect and retry.
LINE ERROR Class: Communication Cause: On those interfaces using a physical network card the specified port ad-
dress is incorrect. For network interfaces there is an error in the network connection.
Action: Specify the correct physical port address or check that the network connection is properly set up.
[92] Max retry count exceeded. Class: File transfer Cause: The file transfer you were running failed because more than the config-
ured maximum permissible number of errors occurred. Action: Check that all file transfer parameters are set correctly and that you
have a good connection before retrying.
Glink User’s Guide Error texts 187

G&R
Maximum macro buffer size (650 chars) exceeded. Class: General Cause: The total number of characters used in keyboard macros must not ex-
ceed 650. Action: For long macros use script files with the ^*scriptfile syntax.
Maximum script file size (63Kb) exceeded. Class: Script language Cause: Source script files may not be larger than 63Kb. Action: Split the script into more than one piece, using either the INCLUDE
statement to insert one piece inside the other, or CALL to transfer control between the separate pieces.
Menu too large Class: Script language Cause: The script being run attempted to specify more than the maximum of 22
items in a single menu. Action: Correct and retry.
Menus nested too deep Class: Script language Cause: You have nested BUILDMENU or MENU statements to more than the
maximum level of 10. This error can also occur in some cases where there is not enough memory to allocate dynamic structures.
Action: Correct and retry.
Missing DLL Class: Communication Cause: You have chosen one of the interfaces that require the presence of a
DLL delivered with the Glink software, but the DLL is not present in the same directory as the GL.EXE program file.
Action: Ensure that the software has been installed correctly.
Missing ENDDBOX statement Class: Script language Cause: All DBOX script statements must be matched with a terminating
ENDDBOX. Action: Correct and retry.
188 Error texts Glink User’s Guide

G&R
Missing #ENDIF Class: Script language Cause: All #IFDEF and #IFNDEF script statements must be matched with a
terminating #ENDIF. Action: Correct and retry.
Missing ENDIF statement Class: Script language Cause: All script IF ... BEGIN constructs must be matched with a terminating
ENDIF. Action: Correct and retry.
Missing ENDLIST statement Class: Script language Cause: All script LIST statements (inside a DBOX control description) must be
matched with a terminating ENDLIST. Action: Correct and retry.
Missing parenthesis Class: Script language Cause: Left and right parentheses must match in script commands. Action: Correct and retry.
Modem not replying to command: <command> Class: Communication Cause: The command displayed was not recognized by your modem. Action: In the modem strings menu, correct the string that was in error. For
most modems, this error will usually mean that you omitted to add the normal 'AT' command prefix.
More memory needed to compile this script. Class: Script language Cause: There was not enough memory available to compile the script. Action: Terminate one or more applications and retry.
More than 100 labels. Class: Script language Cause: The script you attempted to run defined more than the maximum of 100
labels. Action: Split the script into more than one script file.
Glink User’s Guide Error texts 189
G&R
Named OLE parameters must be specified last! Class: Script language Cause: You may mix positional and named parameters in the same OLE com-
mand, but if you do then you must specify all positional parameters first.
Action: Declare parameters in the correct order.
NAK received Class: File transfer Cause: The host machine found an error in data sent from Glink, most probably
because the data was corrupted somewhere between you and the host, but possibly also because your file transfer setup is not correct for the host to which you are connected, or because the network path you are using does not support the file transfer type you are using.
Action: None if the message is sporadic, the file transfer protocol will correct this type of error. If the error is repeated and leads to failure of the transfer, make sure that your communications setup and connection are able to support the type of transfer you are attempting to perform.
NET ERROR Class: Communications Cause: An unexpected error condition prevented you from logging into the
server, or disconnected you from an active session. Action: Try to reconnect. If this fails then check with your system administrator
to ensure that the server is running correctly and that there is not a network problem.
NET FAILURE Class: Communications Cause: A serious network error either prevented you from connecting to the
host, or caused an active session to be disconnected. Action: Check that your LAN connection and software setup is intact. If you
can't find the problem then contact your system administrator.
NetBIOS error number 00NN Class: Communication Cause: Normal NetBIOS errors are translated by the emulator into something
meaningful for the typical user. More obscure errors are reported using this message which includes the actual NetBIOS error code.
Action: Consult the list of NetBIOS error codes provided at the end of this section for more specific information about the cause of the error.
190 Error texts Glink User’s Guide

G&R
NetBIOS not loaded Class: Communication Cause: The communications interface you have chosen requires the NetBIOS
interface to be present, and it is not. Action: Choose a more appropriate communications interface. On some
common setups use NET START NETBEUI in your AUTOEXEC.BAT file rather than NET START WORKSTATION.
No active IF statement Class: Script language
Cause: The script command CXRESTORE was used without a corresponding CXSAVE having been executed.
Cause: Either the script ELSE or ENDIF statement was used with no matching prior IF statement.
Action: Correct and retry.
No contexts to restore! Class: Script language
Action: Correct and retry.
No external libraries found Class: Script language Cause: You have tried to run a script that uses external references but there are
no external libraries available. Action: Ensure that the required external library is present in the same directory
as the GL.EXE program file.
No fields selected! Class: General Cause: You asked for the dial directory to be printed without specifying any
fields to print. Action: Select at least one field for printing.
No matching names found! Class: File transfer Cause: You have specified files to transfer using wildcard characters ('?' and/or
'*') but no files matching your specification were found. Action: Correct the file specification and retry.
Glink User’s Guide Error texts 191
G&R
No memory for queues Class: Communications Cause: Windows was unable to allocate memory for the serial port driver. Action: Free up memory by closing some other application and retry.
No memory for scrollback buffer! Class: General Cause: Memory could not be allocated for the scrollback buffer, and the scroll-
back function has therefore been disabled. Action: Terminate one or more applications and restart the emulator.
No pattern set. Class: Script language Cause: The script you are running has used the MATCH statement when no
patterns have been defined, or a WHEN or IF command has referred to an undefined pattern.
Action: Correct and retry.
No printer configured, please check your printer setup Class: Printer Cause: This message may appear if you have not configured a Windows printer
in the Glink printer options. Action: Select a printer in the Glink printer options and resave your Glink
configuration.
NO SESSIONS Class: Communication Cause: The communications interface cannot provide any more connections to
the host. Action: Log out of one of your own connections if you already are connected,
otherwise wait for other users to log out and retry.
NO UNPROTECT FLD Class: Emulation Cause: You have pressed a key in forms mode which attempts to position you
in the form, but no variable fields have been defined by the host. Action: None.
192 Error texts Glink User’s Guide
G&R
Not enough memory! Class: General Cause: There is not enough memory available to start the application you tried
to execute, or to run the script you tried to start. Action: Terminate one or more applications and retry.
Not enough memory to save context! Class: Script language Cause: The script you are running has attempted to save its context using the
script CXSAVE command, and there was not enough memory available to complete the operation.
Action: Terminate one or more active applications and retry.
Not enough OLE parameters Class: Script language Cause: The OLE verb you are using requires more parameters than you have
provided. Action: Correct and retry.
NUMERIC FIELD Class: Emulation Cause: You have attempted to write non-numeric data into a forms mode field
that has been defined by the host as accepting numeric data only. Nu-meric characters are defined as the characters 0-9, period, comma, hy-phen, plus, and space.
Action: Enter valid data.
OLE: <message text> Class: Script language Cause: The OLE verb you attempted to execute was rejected by the target ob-
ject for the reason shown in the message text. Action: Correct and retry.
OLE not supported in 16-bit Class: Script language Cause: The OLE script command is only supported in the 32-bit version of the
software. Action: Upgrade and retry.
Glink User’s Guide Error texts 193
G&R
OLE object does not exist Class: Script language Cause: The OLE object you have referenced has not been initialized with an
OLE CREATE or OLE CONNECT script command (or that command failed).
Action: Correct and retry, or add code checking for success of the OLE command that created the object.
Cause: The host application has sent more than a full page of data. The emula-tor pauses at this point and waits for you to press a key before continu-ing so that you may read the data already received.
OLE object exists already Class: Script language Cause: The OLE object you have tried to initialize with an OLE CREATE or
OLE CONNECT script command is already active. Action: Correct and retry.
Operator retry. Class: File transfer Cause: This message is displayed when a retransmission is forced by local ac-
tion with the mouse or keyboard. Action: None necessary.
Other side timed out. Class: File transfer Cause: No valid data was received from the host inside the configured timeout
time. The file transfer protocol will ask for the data to be retransmitted. Action: None, assuming the file transfer terminates normally.
Page overflow: press a key Class: Emulation
Action: Press a key when you are ready to continue.
194 Error texts Glink User’s Guide
G&R
PARITY ERROR Class: Communications Cause: Parity checking has been enabled and a character was received with
invalid parity. This is caused either by line noise or is a result of selecting the wrong parity in your communications setup. It may also be seen at disconnect time if stray line noise is received before the line actually disconnects, and is in such cases normal.
Action: Make sure that you have selected the correct parity setting for the host to which you are connecting. If this is correct and the problem still persists with no apparent ill effects then you may suppress the message with the option provided.
[3] Path not found. Class: File transfer Cause: The directory you specified for the current file transfer does not exist
(this may be the download directory if you have configured one). Action: Create the directory or specify a valid directory.
Physical channel not configured Class: Communications Cause: The physical channel you selected in the communications setup menu
has not been configured or is not present. Action: Select a valid physical channel.
Port in use by another application! Class: Communications
-
Cause: The serial port is being used by another application. Action: Close the application that s using the serial port and restart the interface
with Line/Restart or CTRL+F7.
Print error! Class: Printing Cause: An error was reported from the printer when using the 'direct' print in
terface. Action: Fix the printer problem before continuing.
Printer does not support Windows (text) printing Class: Printing Cause: Your Windows printer does not support sending data directly to it. Action: Select the preferred 'Window (GUI)' printing in the Glink printer,
otherwise upgrade your printer driver if newer versions support direct passthrough printing.
Glink User’s Guide Error texts 195
G&R
PROTECTED FIELD Class: Emulation Cause: You attempted to enter data into, or modify existing data in a field that
has been defined by the host application as protected. Action: Move to an unprotected field with the TAB key before entering data.
Rejected by host; code XXXX
-
Action: Recompile the script with the new version of Glink.
Class: Communication Cause: This is a general error message that is provided whenever an unusual
error code is reported by the communications software being used. The code shown is the code provided by the underlying software, and is dis-played in hexadecimal. Note that for X.25 interfaces this will often cor-respond to the clearing cause and diagnostics values. For the widely used Windows sockets and Microsoft/3+Open interfaces we provide complete tables of possible error codes at the end of this section. For other interfaces your network supplier should be able to provide you with an exhaustive list.
Action: If you receive the same code many times in a 'normal' situation, please ensure that information about which code you receive, which interface you are using, and what error condition was actually observed is passed to Gallagher & Robertson so that a translation of that particular code may be provided in a later release of the software.
Retry maximum exceeded. Class: File transfer Cause: The file transfer you were running failed because more than the config-
ured maximum permissible number of errors occurred. Action: Check that all file transfer parameters are set correctly and that you
have a good connection before retrying.
Script file not found. Class: Script language Cause: You attempted to run a script using a filename that does not exist. Action: Specify a valid file name when starting a script.
Script must be recompiled! Class: Script language Cause: You attempted to run a compiled script that was prepared with an ear
lier version of the software which is not compatible with the current version.
196 Error texts Glink User’s Guide
G&R
Script too large. Class: Script language Cause: The script you attempted to run requires more than the maximum com-
piled size of 32K (when taking into account memory used by scripts that are already running).
Action: Make sure that you are not running a background script that is no longer required. Otherwise reduce the size of the script you are running by reorganizing into separate CALLed components.
SERVER MISSING Class: Communications Cause: The server to which you were trying to connect is not available. This
may be either because it is not running or because it's being used on be-half of another user.
Action: Try again later. If you are still unable to connect, check with your system administrator to ensure that the server is running correctly.
Server not responding Class: Communications Cause: The server to which you were trying to connect is not responding to
calls. This may be because it is not running, because it's being used on behalf of another user, or has some kind of software problem.
Action: Try again later. If you are still unable to connect, check with your system administrator to ensure that the server is running correctly.
SIGN (+,-) ONLY Class: Emulation Cause: You have attempted to enter data into a field that has been defined by
the host as a 'sign' field. Such fields may only contain plus or minus. Action: Enter valid data.
Glink User’s Guide Error texts 197

G&R
Stack overflow. Class: Script language Cause: You have used the GOSUB command without returning properly, or
have nested GOSUB and/or CALL commands to a level of more than the maximum supported (20 levels).
Action: Check that all routines that you call with GOSUB return properly through a RETURN command. The most common cause of this error message is use of GOTO to return to main level in a routine that is called repeatedly. Note also the $LEVEL internal variable that can be used to help debug this kind of problem, and the RETCALL and POPUP commands that can be used to help avoid some of the problems you may meet in practical script programming.
START OF FORM Class: Emulation Cause: You have attempted to back-tab from the first field in the form. Action: None.
Switch/while statement missing Class: Script language Cause: An ENDSWITCH or ENDWHILE statement was encountered in a
script procedure with no introductory SWITCH or WHILE command. Action: Correct and retry.
Target entry not empty! Class: Dial directory Cause: You have attempted to paste a dial entry into a dial directory location
that is not blank. Action: Paste into an empty location and then clear the desired target location
with Edit/Cut. Repeat the paste operation.
TCS: Bad form directory Class: General Cause: The host application has sent a DKU local form request, but the config-
ured form directory is non-existent or inaccessible. Action: Ensure that the form directory has been correctly configured and that
the directory is accessible.
198 Error texts Glink User’s Guide
G&R
TCS: Command error Class: General Cause: The host application has sent a DKU local forms command that is syn-
tactically incorrect. Action: Correct the host application TCS: Form already exists Class: General Cause: The host application is attempting to store a new form but a copy of the
form is already stored. Action: Correct the host application to delete the form before storing a new
copy.
TCS: I/O error reading form Class: General Cause: The host application has made a local form request but there was an er-
ror reading the form from the disk. Action: Delete the form and request a new copy from the host.
TCS: Needs TCS enable in DKU setup Class: General Cause: The host has sent a TCS local forms command but Glink was unable to
satisfy the request. You must enter the setup menu for the DKU emulation, enable TCS and enter the name of the forms directory you wish to use for saving local forms.
TCS: Not enough memory Class: General Cause: The host application sent a local form request but there was not enough
memory to complete the read operation. Action: Close one or more applications and retry.
TCS: Unknown dataset Class: General Cause: The host application sent a request for a dataset that was not available in
the local forms directory. Action: Perform the host procedure defined in your application for collecting a
new copy of a form in this dataset from the host.
Glink User’s Guide Error texts 199

G&R
TCS: Unknown form Class: General Cause: The host application sent a request for a form that was not available in
the local forms directory. Action: Perform the host procedure defined in your application for collecting a
new copy of the form.
Too many external DLLs in use Class: Script language Cause: The script suite you are running references more external libraries than
the maximum number (5 generic and 5 specific) that is supported by the script language.
Action: Merge one or more of the libraries into a single DLL.
Too many IF statements Class: Script language Cause: The script you attempted to run has IF statements nested to a level of
more than the maximum of 50. This will usually be a case of a large number of missing ENDIF statements rather than actually exceeding the maximum allowed value.
Action: Correct and retry.
Too many LISTs in dialog box Class: Script language Cause: The script DBOX supports a maximum of 5 list boxes inside a single
dialog box. Action: Correct and retry.
Too many menu items! Class: Script language Cause: You have either tried to define more than 255 items inside a script
DBOX statement, or more than 50 additional menu items with the ADDMENU statement.
Action: Correct and retry.
Too many nested switches/whiles Class: Script language Cause: SWITCH and WHILE statements may not be nested to a depth of more
than 20 levels. Action: Correct and retry.
200 Error texts Glink User’s Guide

G&R
Too many OLE parameters Class: Script language Cause: The OLE verb you are using does not support the number of parameters
you have supplied. Action: Correct and retry.
Too many simultaneous OLE objects Class: Script language
Cause: This message is displayed when a file transfer is terminated manually.
Cause: The script language allows up to nine simultaneous active objects. You must free one of them before you can create another.
Action: Correct and retry.
Transfer cancelled. Class: File transfer
Action: None.
Transport service not loaded Class: Communication Cause: This error is specific to the Atlantis interfaces and means that you are
attempting to access a transport service which is not provided by the server (for example connecting to a Bull interface on a server that only provides X.25 transport services).
Action: Reconfigure the server software.
TSM8/invalid form Class: General Cause: An invalid local form was discovered in your TSM8 forms directory. Action: None, the host machine will send the form again automatically.
Unable to execute associated application: <command> Class: General Cause: The Process marked command was unable to find an associated applica-
tion for the marked text, or an error occurred trying to execute it. Action: Check that the command is correct and that you have marked the correct
area of the screen. Check that that you have configured an associated application in your system. Try executing the <command> directly from the Windows 'Run' menu.
Glink User’s Guide Error texts 201

G&R
Unable to use the printer, please check your printer setup
Class: Printer
Cause: An unexpected error occurred when Glink attempted to communicate with the serial port.
Cause: This message may appear if you have configured your Windows printer in the Glink printer options "Printer selection" as "Permanent", and is no longer available or is not responding.
Action: Check that the printer you have selected in the Glink printer options is still functional and available. If not, select another printer and resave your Glink configuration or use the "Current" or "Session" printer selection options.
Undefined error opening comms port! Class: Communications
Action: This error should never occur in normal usage, but may be seen if you are using a custom serial port driver. In this case, you need to report the error to the vendor.
Undefined label Class: Script language Cause: You have attempted to run a script file that references a label that has
not been defined. Action: Correct and retry.
Unknown host name Class: Communication Cause: The host name you wish to connect to is not known to the system (or
the name server being used by the system). Action: Check that the host name is correct. If it is and you still see this error
message, use the numeric IP address for the host rather than the symbolic name.
Unrecognized ON/RESET option. Class: Script language Cause: The option specified in the ON or RESET statement displayed may not
be used. Action: Correct and retry.
202 Error texts Glink User’s Guide

G&R
Unrecognized or missing keyword. Class: Script language
Action: Correct script and re-execute.
Cause: A word in the script statement displayed is misspelt or misplaced. Action: Correct and retry.
Unsupported baud rate Class: Communications Cause: The driver for the serial port you are using does not support the baud
rate you selected in the communications setup menu. Action: Select a baud rate that's supported by the driver.
VALIDATION ERROR Class: Script language Cause: Not used Action: None Value of numeric parameter out of range. Class: Script language Cause: A numeric variable number, pattern number, or constant was outside the
allowed range of values.
Variable has already been used in another control Class: Script language Cause: The same variable number was used in two different controls in a script
DBOX statement. Action: Correct script and re-execute.
VIP NUMERIC ONLY Class: Emulation Cause: You have attempted to enter non-numeric data into a field that has been
defined by the host as 'VIP numeric'. Only characters in columns 2 and 3 of the ASCII table (press ALT+F9 and select hexadecimal mode) may be entered in such fields.
Action: Enter valid data.
Glink User’s Guide Error texts 203

G&R
Workstation software not loaded Class: Communications Cause: Some part of the software required to run this interface is not present. If
the part in question is a DLL then a separate error message naming the missing DLL has already been provided.
Action: Check your software setup against the information provided with your networking software and make sure that all necessary components have been loaded. In the case of a missing DLL, ensure that the DLL is available to Windows (in the Windows directory or somewhere on the PATH). If you are using Windows Sockets, make sure that the correct version of WINSOCK.DLL is being used.
You are not connected Class: Communications Cause: You tried to transmit data, but are not connected to any host machine. Action: Connect to a host first, for example by pressing Ctrl/F7.
You may only use up to 20 patterns Class: Script language Cause: A maximum of 20 patterns may be used in a script. Action: Correct script and re-execute.
204 Error texts Glink User’s Guide

G&R
NetBIOS error codes 01 Illegal buffer length 03 Invalid command 05 Command timed out 06 Message incomplete 07 Data for one or more SEND.No.ACK was not received 08 Illegal local session number 09 No resource available 0A Session closed 0B Command cancelled
22 Too many commands outstanding
0D Duplicate name in local name table 0E Name table full 0F Name has active session but is now de-registered 11 Local session table full 12 Session open rejected 13 Illegal name number 14 Cannot find name called or remote computer is busy 15 Name not found or cannot specify "*" or 00H 16 Name in use on remote computer 17 Name deleted 18 Session ended abnormally 19 Name conflict detected 1A Incompatible remote device 21 Interface busy
23 Invalid Number in NCB_LANA_NUM field 24 Command completed while cancel occurring 26 Command not valid to cancel 30 Name defined by another environment, choose another name 34 Environment not defined, RESET must be issued 35 Required OS resources exhausted, retry later 36 Maximum applications exceeded 37 No service access points(SAPs) available for NetBIOS 38 Requested resource(s) not available 39 Invalid NCB address or length does not fit in segment 3A RESET may not be issued from a NetBIOS adapter appendage 3B Invalid NCB_DD_ID value 3C NetBIOS attempted to lock user storage and the lock failed 3F NetBIOS Device Driver open error 40-4E Unusual network condition, retry later 50-FE Adapter malfunction, retry later
Glink User’s Guide Error texts 205

G&R
Windows Sockets error codes Code Hex Name Description 10004 2714 WSAEINTR The (blocking) call was canceled via
WSACancelBlockingCall() 10009 2719 WSAEBADF The socket descriptor is not valid. 10013 271D WSAEACCES Permission denied for socket operation 10014 271E WSAEFAULT An invalid argument was supplied to Windows Sockets. 10022 2726 WSAEINVAL An invalid call was made to the Windows Sockets API. 10024 2728 WSAEMFILE No more socket descriptors are available. 10035 2733 WSAEWOULDBLOCK The socket is marked as non-blocking and no connections
are present to be accepted. 10036 2734 WSAEINPROGRESS A blocking Windows Sockets call is in progress. 10037 2735 WSAEALREADY The asynchronous routine being canceled has already
completed. 10038 2736 WSAENOTSOCK The descriptor is not a socket. 10039 2737 WSAEDESTADDRREQ A destination address is required. 10040 2738 WSAEMSGSIZE The datagram was too large to fit into the specified buffer
and was truncated. 10041 2739 WSAEPROTOTYPE The specified protocol is the wrong type for this socket. 10042 273A WSAENOPROTOOPT The option is unknown or unsupported. 10043 273B WSAEPROTONOSUPPORT The specified protocol is not supported. 10044 273C WSAESOCKTNOSUPPORT The specified socket type is not supported in this address
family. 10045 273D WSAEOPNOTSUPP The referenced socket is not a type that supports connection-
oriented service. 10046 273E WSAEPFNOSUPPORT The protocol has not been configured on this system. 10047 273F WSAEAFNOSUPPORT The specified address family is not supported by this
protocol. 10048 2740 WSAEADDRINUSE The specified address is already in use. 10049 2741 WSAEADDRNOTAVAIL The specified address is not available from the local
machine. 10050 2742 WSAENETDOWN The Windows Sockets implementation has detected that the
network subsystem has failed. Usually displayed by Glink as 'NET FAILURE'.
10051 2743 WSAENETUNREACH The network address can't be reached from this host. There is probably a problem in the way you have set up TCP/IP routing for your PC (most likely you have not defined a default router).
10052 2744 WSAENETRESET The connection must be reset because the host machine crashed or rebooted.
10053 2745 WSAECONNABORTED The connection has been closed, probably due to a data transmission error or protocol error.
10054 2746 WSAECONNRESET A existing connection was forcibly closed by the remote host. This normally results if the application on the remote host is suddenly stopped or the host is rebooted.
WSAENOBUFS 10056 2748 WSAEISCONN The socket is already connected. 10057 2749 WSAENOTCONN The socket is not connected.
10055 2747 Not enough buffers available, or too many connections.
206 Error texts Glink User’s Guide
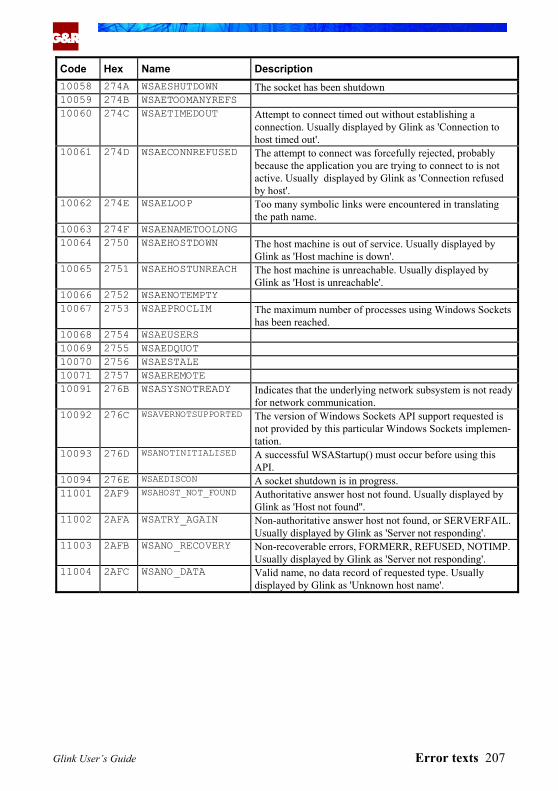
G&R
Code Hex Name Description 10058 The socket has been shutdown 274A WSAESHUTDOWN 10059 274B WSAETOOMANYREFS 10060 274C WSAETIMEDOUT Attempt to connect timed out without establishing a
connection. Usually displayed by Glink as 'Connection to host timed out'.
274D WSAECONNREFUSED
10062 274E WSAELOOP Too many symbolic links were encountered in translating the path name.
10063 274F WSAENAMETOOLONG 10064 2750 WSAEHOSTDOWN The host machine is out of service. Usually displayed by
Glink as 'Host machine is down'. 10065 2751 WSAEHOSTUNREACH The host machine is unreachable. Usually displayed by
Glink as 'Host is unreachable'. 10066 2752 WSAENOTEMPTY 10067 2753 WSAEPROCLIM The maximum number of processes using Windows Sockets
has been reached. 10068 2754 WSAEUSERS 10069 2755 WSAEDQUOT 10070 2756 WSAESTALE 10071 2757 WSAEREMOTE 10091 276B WSASYSNOTREADY Indicates that the underlying network subsystem is not ready
for network communication. 10092 276C WSAVERNOTSUPPORTED The version of Windows Sockets API support requested is
not provided by this particular Windows Sockets implemen-tation.
10093 276D WSANOTINITIALISED A successful WSAStartup() must occur before using this API.
10094 276E WSAEDISCON A socket shutdown is in progress. 11001 2AF9 WSAHOST_NOT_FOUND Authoritative answer host not found. Usually displayed by
Glink as 'Host not found''. 11002 2AFA WSATRY_AGAIN Non-authoritative answer host not found, or SERVERFAIL.
Usually displayed by Glink as 'Server not responding'. 11003 2AFB WSANO_RECOVERY Non-recoverable errors, FORMERR, REFUSED, NOTIMP.
Usually displayed by Glink as 'Server not responding'. 11004 2AFC WSANO_DATA Valid name, no data record of requested type. Usually
displayed by Glink as 'Unknown host name'.
10061 The attempt to connect was forcefully rejected, probably because the application you are trying to connect to is not active. Usually displayed by Glink as 'Connection refused by host'.
Glink User’s Guide Error texts 207
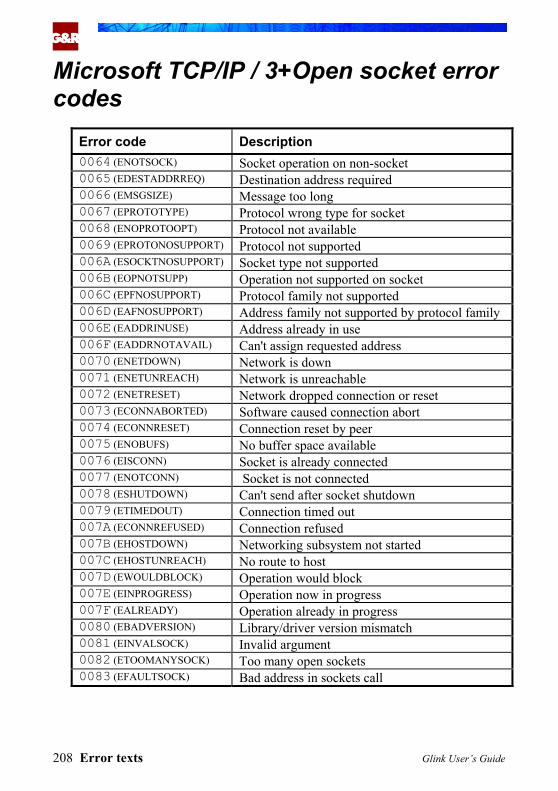
G&R
Microsoft TCP/IP / 3+Open socket error codes
Error code Description 0064 (ENOTSOCK) Socket operation on non-socket 0065 (EDESTADDRREQ) Destination address required 0066 (EMSGSIZE) Message too long 0067 (EPROTOTYPE) Protocol wrong type for socket 0068 (ENOPROTOOPT) Protocol not available
Protocol not supported 006A (ESOCKTNOSUPPORT) Socket type not supported 006B (EOPNOTSUPP) Operation not supported on socket 006C (EPFNOSUPPORT) Protocol family not supported 006D (EAFNOSUPPORT) Address family not supported by protocol family 006E (EADDRINUSE) Address already in use 006F (EADDRNOTAVAIL) Can't assign requested address 0070 (ENETDOWN) Network is down 0071 (ENETUNREACH) Network is unreachable 0072 (ENETRESET) Network dropped connection or reset
Software caused connection abort 0074 (ECONNRESET) Connection reset by peer 0075 (ENOBUFS) No buffer space available 0076 (EISCONN) Socket is already connected 0077 (ENOTCONN) Socket is not connected
Can't send after socket shutdown 0079 (ETIMEDOUT) Connection timed out 007A (ECONNREFUSED) Connection refused 007B (EHOSTDOWN) Networking subsystem not started 007C (EHOSTUNREACH) No route to host 007D (EWOULDBLOCK) Operation would block 007E (EINPROGRESS) Operation now in progress 007F (EALREADY) Operation already in progress 0080 (EBADVERSION) Library/driver version mismatch 0081 (EINVALSOCK) Invalid argument 0082 (ETOOMANYSOCK) Too many open sockets 0083 (EFAULTSOCK) Bad address in sockets call
0069 (EPROTONOSUPPORT)
0073 (ECONNABORTED)
0078 (ESHUTDOWN)
208 Error texts Glink User’s Guide