tiger prism user guide
TRANSCRIPT

Tiger Prism User GuideRelease 2018.R2

Copyright © Tiger Communications plc [Internal]
2 Tiger Prism User Guide - Release 2018.R2
Table of Contents
2
Introduction 8
Overview 8
Tiger Prism 8
Navigating Tiger Prism 9
The Prism Portal 11
My Settings and Themes 12
Search / Create / Restore 13
Search 13
Restore 15
Alerts 16
Overview 16
Editing Alerts 18
Creating Alerts 22
Analytics 23
Overview 23
Training Tutorial 23
Legs 24
Export to csv 28
Export to Excel 28
Export 29
Save as Widget 30
Cube Seizures 31
Fixed Charges 32
Prism Usage 33
Collection 34
Sample Queries 34
Aggregated Queries 39
Filter Types 40

Copyright © Tiger Communications plc [Internal]
3 Tiger Prism User Guide - Release 2018.R2 Tiger Prism User Guide - Release 2018.R2
Call Tariffs 42
Overview 42
Call Categories 43
Carriers 44
Charge Bands 45
Dialling Codes 46
Taxes 47
Creating a new Tax record 47
Destination Sets 48
Cisco WebEx 50
Overview 50
Search 52
Party Mapping 54
Dashboards 55
Reports 60
Exports 65
Analytics 66
Dashboards 67
Overview 67
Training Tutorial 67
Profiles 67
Traffic 85
UC Adoption 92
Usage 99
Data Privacy 101
Overview 101
Settings 101
Account Management 102
Search 102
History 105
3

Copyright © Tiger Communications plc [Internal]
4 Tiger Prism User Guide - Release 2018.R2
Directory 106
Overview 106
Screen Explanation 106
Create Nodes 108
Assignments 110
Editing Entries 113
Child Item Pane 114
Data Privacy 114
Directory Search 115
Overview 115
Training Tutorial 115
Adjusting Views 116
Exports 117
Overview 117
Configuring Exports 117
Microsoft 365 118
Overview 118
Search 120
Party Mapping 121
Dashboards 122
Reports 129
Analytics 133
4

Copyright © Tiger Communications plc [Internal]
5 Tiger Prism User Guide - Release 2018.R2 Tiger Prism User Guide - Release 2018.R2
Network 135
Overview 135
Training Tutorial 135
End Points 136
End Point Products 137
Channels 137
Channel Products 138
Channel Groups 138
Channel Group Products 139
Groups 139
Tenants 140
CDR Sources 141
CDR Source Products 142
Voicemail 142
IP Addresses 143
Device Types 144
Locations 145
Location Types 146
Equipment Custom Fields 147
Fixed Charges 148
Reports 152
Overview 152
Management Reports 153
Traffic Reports 156
Detail Reports 157
Incoming Reports 157
Usage Reports 159
User Adoption Reports 161
Fixed Charges 162
5

Copyright © Tiger Communications plc [Internal]
6 Tiger Prism User Guide - Release 2018.R2
Scheduler 163
Overview 163
All jobs 163
Report Jobs 167
Database Jobs 168
System Health Jobs 168
Widget Jobs 169
Export Jobs 169
Creating or editing a job 170
Batch Scheduling 177
FTP Addresses 178
Locations 179
Security 180
Overview 180
Training Tutorial 180
People 181
Titles 183
Roles 184
Tree Groups 186
Report Groups 187
Export Groups 188
Widget Groups 189
Create Widget Group 190
Party Custom Fields 190
System Settings 191
Overview 191
Settings 191
Announcements 195
Licence 196
6

Copyright © Tiger Communications plc [Internal]
7 Tiger Prism User Guide - Release 2018.R2 Tiger Prism User Guide - Release 2018.R2
Telephony 198
Overview 198
ASR Records 198
Call Access Codes 200
Client Codes 200
View My Activity 203
Overview 203
Training Tutorial 203
My Calls 204
Office 365 207
Skype for Business 209
WebEx Meetings 211
7
Copyright © Tiger Communications plc [Internal]
8 Tiger Prism User Guide - Release 2018.R2 8
IntroductionOverviewTiger Prism is a web-based Call Management system, which allows users to access a range of configuration and reporting utilities.
Once your system is configured, you will be able to start reporting by either running a pre-defined, or custom-built range of reports, using the Analytics tool or the Dashboards to get an overview of activity. Run Reports manually from within the system, or schedule them to generate automatically.
Prism also provides functionality to maintain and view the configured Directory, allowing users (depending on their permissions) to view details of various departments and their extensions.
All areas of the Prism system are easily accessible from the Tiger Modules area – once logged in, the user is only a couple of clicks away from all areas of the system, and the data linked to it. The Tiger Dashboard is the centre-piece of this functionality – a user can rapidly select a period of data, and assess its features, sort, and filter specific data, and generate a report on it.
The full guide will provide an end-to-end review of Prism, giving both an overview, and detailed explanation of how to make use of the functionality. This section introduces some controls that are common to several modules, and explains how to configure your own Prism Portal to suit your use.
Tiger PrismNavigate to the Prism portal, and depending on your logon type, you will either be logged in automatically using your Windows credentials, or you will need to enter the Username and Password details supplied by your System Administrator. See the Security - People section, which details sign-in options.
When you are logged in, your username is shown at the top of the screen.

Copyright © Tiger Communications plc [Internal]
9 Tiger Prism User Guide - Release 2018.R2 Tiger Prism User Guide - Release 2018.R2
Navigating Tiger PrismThe Prism interface has been broken down into modules for easy navigation and use. You may have access to some, or all of these, depending on your user rights. After logging into Prism, you will be presented with the home page as shown below:
Drag the ‘header’ (e.g. Dashboards and Reports, above) to reposition all tiles beneath it, or drag individual tiles to move them to the desired position. Resize the tiles as desired, as the tile layout can be reset, locked, or unlocked from the Portal menu.
9

Copyright © Tiger Communications plc [Internal]
10 Tiger Prism User Guide - Release 2018.R2
From the home page, access each area by clicking the relevant module icon (tile). Once in the system, there are two ways to navigate within Prism. Do this either via the tiles on the home page, or from the Modules menu at the top right of the screen.
Clicking the Prism logo at the top left of the screen will take you back to the home page. You can open multiple modules by right-clicking, and opening a new tab or window.
As you use Prism, the last few tiles you have access will show in the most recent modules menu. This is available as a separate menu on the home page, or at the top of the modules menu from all other Prism pages.
10

Copyright © Tiger Communications plc [Internal]
11 Tiger Prism User Guide - Release 2018.R2 Tiger Prism User Guide - Release 2018.R2
The Prism Portal
AlertsSet up alerts to notify you of important events, such as when thresholds are exceeded, or specific call conditions are met.
AnalyticsA powerful, flexible reporting tool, allowing for the interrogation of call information. It can quickly and simply find individual calls, or be used to build up aggregated data sets.
Call TariffsThis module contains the tariff structures for call-costing and billing. Here, tariff rates can be imported, manually created, and manipulated.
Cisco WebExUse this module to view, analyse, and extract WebEx meeting data, including duration, attendee, and host information.
DashboardsDashboards allow immediate visualisation of data, presenting an array of valuable statistics for expense monitoring, user adoption, response levels, gateway capacity, and more.
Data PrivacyThis module grants Data Protection Officers and their teams the ability to anonymise users and their data to comply with the GDPR Right to Erasure.
DirectoryPrism Directory provides a centralised area for the user to search and amend entries, with multiple tree views.
Directory SearchAllows a rapid search and export of End Point and user assignment in Prism’s Directory trees.
ExportsThe Exports module allows for custom SQL scripts, created by Tiger, enabling the end user to export the required data. Please contact your account manager if a custom script is required.
11
Microsoft 365Use this module to view, analyse, and extract email and Skype for Business activity.
NetworkPrism will store any new phones, channel groups, and channels. You can assign tariffs and charging methods within this area. Data privacy and digit-masking can also be applied here.
ReportsThe Reports module contains a comprehensive suite of templates for common reporting scenarios.
SchedulerThis module is used for both user and system task scheduling. Reports, widgets, and system jobs are set to run on a regular basis here.
SecuritySecurity mode is used to create people, roles, tree groups, report groups, title, and party custom fields.
System SettingsThis area contains the system configuration settings. Here, you will find SMTP server and top-level settings, which can be overridden at multiple levels.
TelephonyAccess codes are added to calls to specify call routing. The Telephony module enables the user to remove routing codes from dialled strings, as well as assign specific carriers to specific access codes.
View My ActivityView My Activity allows employees to access their individual communications information. It also enables businesses to recharge users for their personal calls.

Copyright © Tiger Communications plc [Internal]
12 Tiger Prism User Guide - Release 2018.R2
My Settings and ThemesNavigate to the drop-down options within the login area. Here, you can personalise the appearance of your Prism session by selecting a Theme.
Click ‘My Settings’
Language settings: This setting allows you to change the language used by the Prism system. Select from the drop-down list. More languages can be applied where required. Please contact your Tiger Account Manager for more information.
Password: If you have a Tiger authenticated account, you can change your password here. Note: Only available (if not controlled by Windows authentication) for Tiger authenticated accounts.
Time Zone: This will be used to time shift all calls to your time zone. This can be overridden at reporting level.
Max number of most recent modules: Controls the number of items shown above the full Module selection menu.
12

Copyright © Tiger Communications plc [Internal]
13 Tiger Prism User Guide - Release 2018.R2 Tiger Prism User Guide - Release 2018.R2
Search / Create / RestoreThroughout Prism, most configuration functions take place through a common interface. In this manual, wherever you see the options to ‘Search / Create / Restore’, you can refer to the information below as a guide. The specific functionality for the module is explained in separate sections within this manual.
Below is an example ‘Search / Create / Restore’ menu contained within Prism. To expose these options, click on the top-level menu name. Using the example below, the ‘Channel Groups’ menu has been expanded within the Network Module to show the options within it. You can then click to ‘Search’, ‘Create’, or ‘Restore’.
SearchClicking ‘Search’ displays a table of the current configuration in the right-hand window. Clicking on the title of any column cycles the sorting between ascending, descending, and off. Headings can be dragged to a new position to change column ordering. Columns can be resized to your preferences.
The footer of the page shows the number of items per page, configurable up to 250, with page scrolling options. The current page number and total number of pages are also displayed here.
Additional options contained at the footer of the page enable the bulk clearing of filters, ability to show / hide columns, reset the column selection to the default, and also to refresh the data.
Filter the results using the Filters button .
13

Copyright © Tiger Communications plc [Internal]
14 Tiger Prism User Guide - Release 2018.R2
From here, you can limit the displayed items within the table, and search accurately for the items you want to see. First, choose the type of filtering required. These are context-sensitive, so use the drop-down list to select the options for the data type. Click ‘Filter’ to apply the setting, and click ‘Clear’ to close the Filter box if no longer required.
An active filter is shown with a highlight over the ‘Filter’ button . You can have multiple filters active at the same time.
The table can be sorted by any column, and columns can be re-ordered by dragging and dropping to reposition.
Clear an individual filter by clicking on the ‘Filter’ button for the column, and clicking ‘Clear’.
Clear all filters by clicking on the ‘Clear Filters’ button in the bottom right of the screen.
Other buttons in this area include individual column selection , reset columns to default , and refresh .
The ‘Create’ button in the top right of the screen will allow you to add a new entry, without having to go to the Create menu. It will open the same screen as if you had clicked Create.
From the Search screen, click the ‘Show / Hide Columns’ button in the very first column of the table against the row you wish to view. This will open the detail view. The row item details will vary greatly, depending on the nature of the record being viewed.
14

Copyright © Tiger Communications plc [Internal]
15 Tiger Prism User Guide - Release 2018.R2 Tiger Prism User Guide - Release 2018.R2
Copyright © Tiger Communications plc [Internal]
15 Tiger Prism User Guide - Release 2018.R2
In the top right-hand corner of these screens are various buttons. The options will differ, depending on the module you are using. There are others, but the most common of these are:
Edit: Open the page for amendment. Remember to save any changes you make.
Delete: Move the selected item to the recycle bin. You will be asked to confirm your deletion, and a message will come up in the bottom right-hand corner of the screen to confirm the deletion has been successful.
Back: Return to the previous page without saving your changes.
Clear: Return the fields to default settings.
CreateClick ‘Create’ to be presented with a set of fields relevant to the item you are creating.
Most fields are self-explanatory, but will be explained in more detail later in this manual within the relevant section.
The ‘Save’ button is in the top right of this screen. Use the ‘Clear’ button if you wish to clear the contents of all fields.
RestoreClicking ‘Restore’ lists any items that have previously been deleted. All the standard search filtering works in this window, so you can easily find the item you wish to restore.
Click on the ‘Show / Hide Columns’ button to the left of the item you wish to restore, and this will open the item into a window, similar to the create window one. However, this one will say Deleted at the top of the page.
Click on the ‘Restore’ button at the top right-hand corner of this page to restore the item.
A message will come up in the bottom right-hand side of the window to confirm the restore has been successful. You will now be able to see this item in the search window, and edit it if required.
15

Copyright © Tiger Communications plc [Internal]
16 Tiger Prism User Guide - Release 2018.R2 16
AlertsOverviewTiger Prism Alerts enables you to receive notifications of events based on widgets. For example, you can schedule an Alert to confirm when a call threshold has been reached, or a set of criteria has been met. Use Alerts to ensure you never lose sight of your business’ activity.

Copyright © Tiger Communications plc [Internal]
17 Tiger Prism User Guide - Release 2018.R2 Tiger Prism User Guide - Release 2018.R2
The Calendar view shows a timeline depicting existing Alert jobs, and can display a day, a week, or a month at a time.
The Search function lists all Alerts applicable to the user.
Export the list to Excel, by clicking the ‘Export to Excel’ button on the right of the screen.
The status of the job is easily identified by the RAG indicator, where red is a failure, amber is awaiting, and green is OK.
When a job fails, the status will be highlighted by a red Status indicator, and the Status Name of ‘Unresolved Errors’. Once the problem has been resolved, these errors need to be cleared.
Click on the relevant job to see the details, and then click on the ‘Handled’ icon to acknowledge the error state.
The Search list also confirms the job name, priority, associated Widget name, whether or not the Alert is scheduled, the from and to date / time, and last / next execution date / time, as well as many other optional columns. Select to show or hide columns of information, using the ‘Show / Hide Columns’ button at the bottom of the screen.
Click on the ‘Details’ button to view details of the individual Alert job.
In the detail view, you can view and amend the Alert settings, delete, suspend, or execute the job using the options at the top of the screen.
This view enables you to see the details of the Alert, what it does, when it runs, delivery and failure message settings, and information about each execution of the Alert job. Each area is handled within a separate tab.
17

Copyright © Tiger Communications plc [Internal]
18 Tiger Prism User Guide - Release 2018.R2
Editing AlertsExisting Alerts can be amended to change their settings. This will bring up a wizard with the details populated.
ScheduleThis tab confirms the schedule, to which the Alert job will run. A graphical presentation of the next 5 scheduled executions gives a quick view of the settings.
Target DataTarget Data displays details on what data is being interrogated for the Alert. A graphical presentation of the Target Data gives a quick view of the settings.
18

Copyright © Tiger Communications plc [Internal]
19 Tiger Prism User Guide - Release 2018.R2 Tiger Prism User Guide - Release 2018.R2
Success NotificationThe notification method, mail recipients, subject, and body text of the success confirmation are defined here. The Success Notification will be generated when the Alert job has been executed, and when the specific triggers within the widget are met.
Failure NotificationThe notification method, mail recipients, subject, and body text of the failure confirmation are defined here. The Failure Notification will be generated when the Alert job has not been executed. The reasons can be found in the ‘Error’ tab on the specific execution record.
19

Copyright © Tiger Communications plc [Internal]
20 Tiger Prism User Guide - Release 2018.R2
Delivery OptionsDefine whether the Alert output is archived, and if so, the maximum number to be retained.
Set the maximum number of rows in the body of the email message, so that any output equal to or less than this number will be included in the body of the email, rather than as an attachment.
Define whether the output file is emailed. The Alert will be attached to the Success Notification, unless the amount of data meets the setting for rows included in the email body text.
Define the naming convention for the File name, which will be the email attachment, using the options within the dropdown menu for File Name Template. Access the options, by clicking the ‘Ellipsis’ button to the right. You can apply multiple options to create the required file name. The tags can be supplemented with, or replaced by free text.
20

Copyright © Tiger Communications plc [Internal]
21 Tiger Prism User Guide - Release 2018.R2 Tiger Prism User Guide - Release 2018.R2
Copyright © Tiger Communications plc [Internal]
21 Tiger Prism User Guide - Alerts Module - Release 2018.R2
SummaryThe Summary page gives a complete overview of the Alert job settings.
Note: Before you can modify any field, you must first click on the ‘Edit’ button from the top of the screen.
Create Alert JobAdd a new Alert, by clicking the ‘Create’ button .
Move through each tab of information using the ‘Left / Right Arrows’ , or by clicking on each individual tab.
Note: Remember to save your changes, by clicking the ‘Save’ button .
21

Copyright © Tiger Communications plc [Internal]
22 Tiger Prism User Guide - Release 2018.R2
Copyright © Tiger Communications plc [Internal]
22 Tiger Prism User Guide - Release 2018.R2
Creating AlertsSelecting to create a new Alert job triggers a wizard, which will guide you through every step of the set-up process. This is mostly the same as the editing wizard detailed above, with some extra steps at the beginning.
Data sourceEither select from an existing widget already created in the widgets module, or create a widget within the wizard and select the appropriate radio button.
DefinitionIf you have selected to ‘create a new Alert job’, based upon new settings, you will need to define the Alert content, by creating the query within this page. Contents and functionality work in the same way as Analytics / Widgets creation. If you have selected to use an existing widget, these fields will already be populated with that widget’s configuration.
NameGive the Alert job a name, set the priority, and add a brief description to summarise the purpose of the Alert. The Schedule, Target Data, Success Notification, Failure Notification, Delivery Options, and Summary tabs all work in the same manner as they do when viewing, or amending existing Alert jobs (See previous pages for details).
22

Copyright © Tiger Communications plc [Internal]
23 Tiger Prism User Guide - Release 2018.R2 Tiger Prism User Guide - Release 2018.R2 23
AnalyticsOverviewThe Analytics module gives users a powerful, flexible reporting tool for call information interrogation within all recorded CDR.
To access the Analytics module, either click the Analytics tile on the home page, or click the modules drop-down list, and select Analytics.
Once in the Analytics interface, you will be presented with several options on the left. Depending on your level of access, you will see the Search menu, the Widget Groups that you have access to, and the Import Widget menu.
Click ‘Search’, and select Leg, Cube Seizure, Fixed Charge, Prism usage, or Collection analysis.
Training Tutorial
There is an Analytics video tutorial associated with this module. The tutorial introduces you to Legs, and how they are used within Tiger Prism. In this video, you will learn how to select Columns, filter data through the use of boolean options and parentheses, drill into calls, and how to use Measures to create widgets.

Copyright © Tiger Communications plc [Internal]
24 Tiger Prism User Guide - Release 2018.R2
LegsThe Legs option allows you to build up a picture of anything from individual Call Legs, to trend analysis over any period.
Having clicked ‘Legs’, the main screen is populated with a set of default fields in the columns section. Items placed in this area will appear as columns in the results. Select from the numerous options for Dimensions (data facets) and Measures (quantification and calculation).
To add a field, click on the required item, and drag it into the columns area.
To remove a field, click the ‘X’ to the left of the field name.
To remove all fields from the columns section, click the ‘X’ on the far right.
24

Copyright © Tiger Communications plc [Internal]
25 Tiger Prism User Guide - Release 2018.R2 Tiger Prism User Guide - Release 2018.R2
Measures can have calculations applied within the columns area. Click on a Measure to see the available options:
Drag fields from the columns area into the filters section to apply filtering to the results.
Click on the field to access the filtering options relevant to it.
25

Copyright © Tiger Communications plc [Internal]
26 Tiger Prism User Guide - Release 2018.R2
Applying filtering to Measures will present various mathematical options:
The inclusion of more than one filter will insert a Boolean function defaulting to ‘and’, but allowing use of ‘or’ depending on the requirements of the filter: Click on ‘and’ to change it to ‘or’ (See Sample Queries for more details).
Create more complicated filters with the addition of brackets:
Hover over the ‘Information’ icon to see applied filter details:
26

Copyright © Tiger Communications plc [Internal]
27 Tiger Prism User Guide - Release 2018.R2 Tiger Prism User Guide - Release 2018.R2
Apply Group Filters to aggregate the results, and filter them. Drag Measures from the columns area to the Group Filters section in order to apply filtering to the results. In this way you can, for instance, group the results to show the Base Cost sum, where the value is greater than £50.00.
Click on the Measure to open up the filtering options relevant to it.
The inclusion of more than one filter will insert a Boolean function defaulting to ‘and’, but allowing use of ‘or’ depending on the requirements of the filter: Click on ‘and’ to change it to ‘or’. Having confirmed the contents of the columns, along with any filtering, select the Tree, and either Quick or Specific Dates. Generate the results, by clicking the ‘Retrieve’ button .
At the bottom left of the results table, you can toggle through the pages, and set the quantity of items per page to display. The bottom right of the screen confirms the total number of items in the current view.
27

Copyright © Tiger Communications plc [Internal]
28 Tiger Prism User Guide - Release 2018.R2
Having produced your result set, there are several actions that are available, via the icons at the top of the screen:
‘Create a Widget Job from this widget definition…’Click on the ‘Calendar’ button to schedule the widget to run to specific settings. You will be required to confirm your selection:
A new screen will appear at the start of the wizard-driven ‘Create’ process. Follow each step, as detailed in the Scheduler section of the manual.
‘Create an Alert Job from this widget definition...’Click on the ‘Alert’ button to enable the widget to be used to flag the specified conditions. You will be required to confirm your selection:
A new screen will appear at the start of the wizard-driven ‘Create’ process. Follow each step, as detailed in the Alerts section of this document.
Note: Alerting functionality is available as a licensed module.
Export to csvClick on the ‘Export to csv’ button to export the Widget results to csv format.
Export to ExcelClick on the ‘Export to Excel’ button to export the widget results to Excel.
28

Copyright © Tiger Communications plc [Internal]
29 Tiger Prism User Guide - Release 2018.R2 Tiger Prism User Guide - Release 2018.R2
ExportThe ability to export Widget code, and re-import it within Prism gives users the ability to share widgets, supporting the creation of them.
Use this function to duplicate widgets, wherever you need to create another that is similar. Follow the instructions below for ‘Save as Widget’. It enables Tiger Support to provide assistance, wherever required under the terms of your support contact.
Click on the ‘Export’ button to export the widget query. The export can be pasted into an external document, e.g. Notepad++, and can then be imported using the ‘Import a Widget’ option.
Use Ctrl + C to copy the selected text.
Use Ctrl + V to paste the widget query into the import form, and select ‘Confirm’ to open the Analytics window with your imported settings, and all available options.
29

Copyright © Tiger Communications plc [Internal]
30 Tiger Prism User Guide - Release 2018.R2
Save as WidgetClick on the ‘Save’ button to save the query as a widget.
A new form will open within, which you can assign a name to the widget.
Depending on your access rights, coupled with your Role’s widget settings, you need to save the widget with visibility:
Just for me: The widget will only be visible to your login.
To my widget group: The widget will be visible to everyone within the widget group, to which you are assigned.
To the following widget groups: The widget will be visible to everyone within the selected widget groups. Click on the radio button to enable the options.
Widget Group access is defined within People / Roles, and dictates whether the access is read-only, read and write, or full (See the Create Roles section for more details).
30

Copyright © Tiger Communications plc [Internal]
31 Tiger Prism User Guide - Release 2018.R2 Tiger Prism User Guide - Release 2018.R2
Cube SeizuresThe Cube Seizures option allows you to analyse a fixed period, ‘bin’ of data, and is therefore useful for repeat, snapshot analysis, and to monitor call concurrency.
When you select ‘Cube Seizures’, you are presented with a default set of fields, which return some basic information about the call data.
On the right-hand side of the screen is a list of all available data fields that can be used to show extra information, or refine the query by filtering. The list is separated into 2 types of information:
Dimensions: Dimension data is anything that cannot be measured, e.g. dates, keys, groups, etc. Within the list, each Dimension group can be expanded to reveal the individual options.
Measures: Measures are numeric data attributes, which can be used in mathematical calculations, e.g. costs, duration, ring-time.
31

Copyright © Tiger Communications plc [Internal]
32 Tiger Prism User Guide - Release 2018.R2
Fixed ChargesThis options allows for the interrogation of the various fixed debits and credits that have been applied to products in the Prism system. When you select ‘Fixed Charges’, you are presented with a default set of fields that return some basic information about the charges, and credits applied through the system.
On the right-hand side of the screen is a list of all available data fields, which can be used to show extra information, or refine the query by filtering. The list is separated into 2 types of information:
Dimensions: Dimension data is anything that cannot be measured, e.g. dates, keys, groups, etc. Within the list, each Dimension group can be expanded to reveal the individual options.
Measures: Measures are numeric data attributes, which can be used in mathematical calculations, e.g. costs, duration, ring-time.
32

Copyright © Tiger Communications plc [Internal]
33 Tiger Prism User Guide - Release 2018.R2 Tiger Prism User Guide - Release 2018.R2
Prism UsageUsing Analytics, you can view Prism usage for each user to monitor adoption and usage. This functionality offers system audit, and enables housekeeping of user accounts.
When you select ‘Prism usage’, you are presented with a default set of fields that return some basic information about the charges, and credits applied through the system.
On the right-hand side of the screen is a list of all available data fields, which can be used to show extra information or refine the query by filtering. The list is separated into 2 types of information:
Dimensions: Dimension data is anything that cannot be measured, e.g. dates, keys, groups, etc. Within the list, each Dimension group can be expanded to reveal the individual options.
Measures: Measures are numeric data attributes, which can be used in mathematical calculations, e.g. costs, duration, ring-time.
33

Copyright © Tiger Communications plc [Internal]
34 Tiger Prism User Guide - Release 2018.R2
Having set any filtering, and chosen the Tree and required dates, click the ‘Retrieve’ button . The inclusion of more than one filter will require you to specify ‘and’ and / or ‘or’ operators to define how the filtering should work (See Sample Queries for more details). Based on the default Dimensions for Prism usage analysis, the output confirms the Party name, module, and resource, as well as the action performed within it. The date and time the action took place is also recorded.
CollectionAnalytics of pre-warehouse collection information is primarily an engineering tool. It allows partially processed data to be analysed, before being committed to the warehouse database. Engineers will use this to ensure, for example, that data manipulation is working correctly – stripping access codes from dialled numbers, or inserting digits to ensure correct costing.
Under normal circumstances, very little or no information will be available in this tool, as certain services have to be stopped to keep records part processed.
Sample QueriesDrag and drop Dimensions and Measures from the Fields list to the report columns and filters as required. If you know the name of a field, you can also type this into the ‘Columns’ or ‘Filters’ section. Prism will anticipate what you type, and display options for you to select. In this way, you can adjust the default output selection, or create a new bespoke report.
Click the ‘Retrieve’ button to generate the report, using your selected criteria field from the report criteria. To remove any Dimensions and Measures, click the cross on the left.
34

Copyright © Tiger Communications plc [Internal]
35 Tiger Prism User Guide - Release 2018.R2 Tiger Prism User Guide - Release 2018.R2
Below the Columns section, you can enter report filters. This area is blank when you begin, but nearly any available column can also be used to filter the calls displayed in the results.
The fields are added and removed from the filter box in exactly the same manner as the Columns, but once selected, they can be used to narrow down the results of the search. Simply click on a filter field, and the filtering options for that field will be displayed. These will vary widely, depending on the type of field you have selected. More examples of filter types can be found towards the end of this section.
35

Copyright © Tiger Communications plc [Internal]
36 Tiger Prism User Guide - Release 2018.R2
At any stage, you can check a summary of the current filtering, by hovering the mouse over the ‘Information’ icon next to ‘Filters’.
The inclusion of more than one filter will insert a Boolean function defaulting to ‘and’, but allowing use of ‘or’ depending on the requirements of the filter: Click on ‘and’ to change it to ‘or’.
Apply Group Filters to aggregate the results. Drag Measures from the columns area to the Group Filters section, in order to apply filtering to the results.
Click the Measure to open the filtering options relevant to it.
The inclusion of more than one filter will insert a Boolean function defaulting to ‘and’, but allowing use of ‘or’ depending on the requirements of the filter: Click on ‘and’ to change it to ‘or’.
Data in the columns section will appear as report output, while the filters enable you to manipulate what data is processed, and how it is handled. For example:
Note: You can add as many filters as you like to the search.
36

Copyright © Tiger Communications plc [Internal]
37 Tiger Prism User Guide - Release 2018.R2 Tiger Prism User Guide - Release 2018.R2
If you want to set the selection back to the default columns, click the ‘Reset Columns’ button .
Define the date range for the search.
Use Quick dates to select from a range of preset options, including Today, Yesterday, This week, Last week, or a specific month. Alternatively, you can select Specific Dates and times.
Simply click the ‘Calendar’ and / or ‘Time’ buttons to alter the dates and times, or just type directly into the boxes.
After the date range is selected, click the ‘Retrieve’ button to generate your results.
By default, the results are shown 50 records at a time, with multiple pages of results accessed at the bottom of the page.
37

Copyright © Tiger Communications plc [Internal]
38 Tiger Prism User Guide - Release 2018.R2
The number of records on each page can be adjusted here, as can the columns that are included in the output.
The choice of fields is defined by those selected in the columns field, as detailed above.
Click the ‘Details’ button to the left of a record you wish to drill-down into to open a new display. A new tab will open for the call:
This function is not available when data has been aggregated.
Select the leg of the call to look at, and the details will be displayed in the section below. Beyond the initial summary, the detail for individual categories can also be selected.
Only fields with valid information will be populated in the detail section, for example:
If you have set up a search, and will want to use its criteria again (column and filter selections), then from the listing page, you can save the search as a widget with the ‘Save’ button (See the section Save as Widget for details).
38

Copyright © Tiger Communications plc [Internal]
39 Tiger Prism User Guide - Release 2018.R2 Tiger Prism User Guide - Release 2018.R2
Aggregated QueriesAnalytics can go beyond a simple filtered list of call legs, allowing for analysis of the data in a number of ways.
Most Dimensions can be used to group records, while Measures can have a variety of functions performed on them within those groups.
It is recommended that all columns are cleared before beginning an aggregated report, and to build them up slowly until you get the required result-set. All Dimensions included will act to group the call legs, so the key is to keep it simple, and use as few objects as possible. It is worth building up the query slowly, and generating results as you build it, to ensure it returns the desired result.
To generate aggregated data, add one or more Dimensions, and one or more Measures to the columns section. Click the Measure, and you will be presented with a selection of mathematical functions: Value, Average, Count, Maximum, Minimum, Standard Deviation, Standard Deviation Population, Sum, Variance, and Variance Population. In the example below, the Dimension ‘Call Direction’ is used, along with the sum of the Measure ‘Talk Time’, to display a total talk time for each direction.
More Dimensions can be included to increase the granularity of the report, more Measures can give extra information, and filtering can be applied to the results as normal. The example below is limited by filtering to calling digits starting with 25, and grouped by both the calling party and call direction. Note that nearly any Measure can be used for a count value.
39

Copyright © Tiger Communications plc [Internal]
40 Tiger Prism User Guide - Release 2018.R2
Copyright © Tiger Communications plc [Internal]
40 Tiger Prism User Guide - Release 2018.R2
Filter TypesThere are a variety of options when filtering.
The options for filtering Measures are numeric calculations. You can use the raw value, or a calculated value (e.g. average) as the filter.
You can also choose the threshold type, for example, equal to, greater than, or between. For the majority of simple searches, you will only need the value. However, when using aggregated result sets, the mathematical functions will allow you to remove outlying data points or focus on specific areas.
When dealing with filtering on Dimensions, the filtering options will vary depending on the field that you are using. Some fields need full or partial strings. These can make use of regular wildcards, the definition of which can be checked at the time by clicking the wild cards link, which will appear whenever they are appropriate to use.
Examples of these fields are Calling or Called digits. You can add multiple entries to the filter by selecting specific details from a list, or by adding multiple records. The example below will include all 020 numbers called, but exclude calls to the specific dialled digits entered.
40

Copyright © Tiger Communications plc [Internal]
41 Tiger Prism User Guide - Release 2018.R2 Tiger Prism User Guide - Release 2018.R2
Copyright © Tiger Communications plc [Internal]
41 Tiger Prism User Guide - Release 2018.R2
Text filtering options generally allow you to specify free text, and the filter allows for a variety of searches for exact or partial values.
The options are: Contains, Does not contain, Equals, Does not equal, Begins with, Ends with, Is in, and Is not in. You can only enter one value per Dimension in the search.
Time / date fields have a range of filtering options. Simply choose one, and enter the appropriate date. If you choose ‘Between’, a second date selection is made available. There are also two special options: ‘Has a value’ and ‘Does not have a value’. These do not require any specific entries, as they simply select records with populated, or unpopulated fields as appropriate.
Numeric fields work in a very similar way to the date / time selections.
Certain Dimensions have specific options. For example, Call Direction shows only the four call directions, with include / exclude sliders against each, as shown below. Call Outcome has a similar set of options, as pictured earlier in this section.
Finally, there are a few Dimensions that have basic Yes / No options. These simply show a tick box when added to the filter line, for example, ‘Is operator assisted’ from the flags category of Dimensions.
41

Copyright © Tiger Communications plc [Internal]
42 Tiger Prism User Guide - Release 2018.R2 42
Call TariffsOverviewTo access the Call Tariffs module, either click the Call Tariffs tile on the home page, or click the Modules drop-down, and select Call Tariffs. Any queries relating to the addition or amendment of Tariff records should be directed to your Tiger Account Manager.
Once in the Interface, and depending on your access rights, you will be able to view, add, amend, and delete Fixed Charges and Tax configurations.

Copyright © Tiger Communications plc [Internal]
43 Tiger Prism User Guide - Release 2018.R2 Tiger Prism User Guide - Release 2018.R2
Call CategoriesThese define the Call Categories, in which calls are broken down e.g. Local, National, International, Mobile, etc. for reporting purposes. Click Call Categories on the left, and the current entries will be displayed.
Please note that these would normally be added / maintained by the automatic process of importing Tariffs, but it is possible to add and make changes here if needed.
Click the ‘Export’ button to export the list to csv, or Excel.
Click the ‘Add’ button to add a new Call Category. A new row is inserted. Add a name and unique short code, and then click the ‘Tick’ to save.
Click the ‘Edit’ button against the corresponding entry to edit a Call Category. Click the ‘Delete’ button against the corresponding entry to delete a Call Category.
Note: Only user-defined Call Categories can be edited, or deleted.
Call Categories are assigned to dialling codes in other areas of this module, which will be covered later in this section.
43

Copyright © Tiger Communications plc [Internal]
44 Tiger Prism User Guide - Release 2018.R2
CarriersThis lists any Carriers that have been added to the system, i.e. BT, Virgin Media or Private, etc.
TariffsSets of Tariffs that have been set up on the system are shown here. For example, BT 2-year 10K, Virgin Media, and Orange. Any Tariffs in here can then be applied to Channel Groups, Departments, Extensions, etc. ‘Tariffs’ detail the Currency, default band, whether the prices include tax, and whether the Tariff is the default for the system.
Tariffs are generally imported from a Tariff file created by Tiger, although the ability to create a Tariff manually is available here. ‘Import’ is an extra item available under the Tariff menu item. Click ‘Import’, and then ‘Select import file’ to browse to the Tariff file. The Tariff will be uploaded, scanned, and a summary presented.
Check the Loading Errors tab for any issues the scan has picked up before you import the file. Some of these may be warnings about duplicate entries, etc. If there are no errors, click the ‘Import Tariff’ button in the bottom right-hand corner of the screen to complete the import.
You will be presented with an ‘Additional Information’ window, where you can set the Country and Currency for the Tariff, along with a rate of tax if ‘Includes tax’ is set to Yes.
A message will appear to inform you when the import has been successful. Click on the ‘Continue’ button, and your Tariff will show in the Search window.
44
Copyright © Tiger Communications plc [Internal]
45 Tiger Prism User Guide - Release 2018.R2 Tiger Prism User Guide - Release 2018.R2
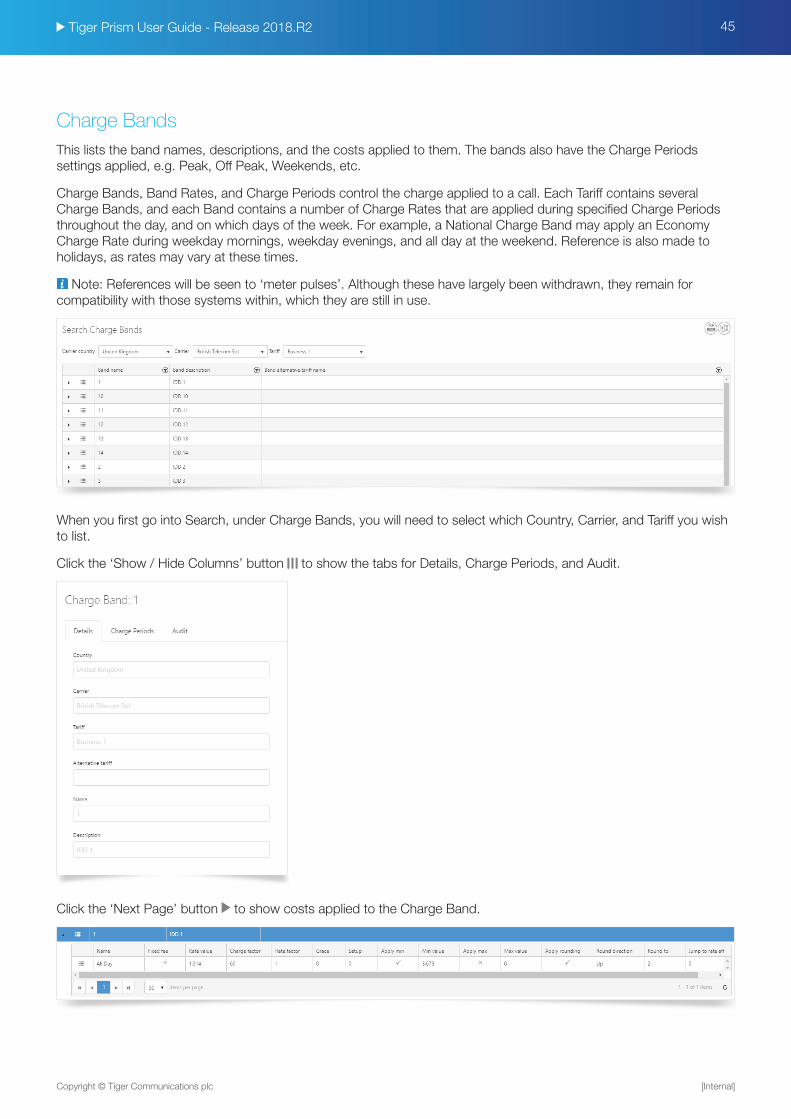
Charge BandsThis lists the band names, descriptions, and the costs applied to them. The bands also have the Charge Periods settings applied, e.g. Peak, Off Peak, Weekends, etc.
Charge Bands, Band Rates, and Charge Periods control the charge applied to a call. Each Tariff contains several Charge Bands, and each Band contains a number of Charge Rates that are applied during specified Charge Periods throughout the day, and on which days of the week. For example, a National Charge Band may apply an Economy Charge Rate during weekday mornings, weekday evenings, and all day at the weekend. Reference is also made to holidays, as rates may vary at these times.
Note: References will be seen to ‘meter pulses’. Although these have largely been withdrawn, they remain for compatibility with those systems within, which they are still in use.
When you first go into Search, under Charge Bands, you will need to select which Country, Carrier, and Tariff you wish to list.
Click the ‘Show / Hide Columns’ button to show the tabs for Details, Charge Periods, and Audit.
Click the ‘Next Page’ button to show costs applied to the Charge Band.
45

Copyright © Tiger Communications plc [Internal]
46 Tiger Prism User Guide - Release 2018.R2
All charges are entered as a minor Currency decimal - Click the ‘Details’ button , and this will bring up a new window with all rate fields showing.
Commonly charges are applied on a per second basis, or to the next whole minute. The configuration further allows any rounding to be adjusted, Call Setup Charge, Minimum Call Charge, and Maximum Charges to be added, as well as subsequent rates. Currently these settings can only be defined by the Tariff import, and are not available for editing within the UI.
Dialling CodesThe Dialling Codes section displays dial codes (also known as area codes, or STD’s) for a selected Tariff. For example, national towns, international numbers by country, mobile number ranges, international mobile number ranges, service numbers, and directory enquiries. Each Tariff has its own dialling code table.
Dialling Codes will be imported by the Tariff. The details for each Dialling Code, and their associated costs can be viewed in exactly the same way as Charge Bands.
46

Copyright © Tiger Communications plc [Internal]
47 Tiger Prism User Guide - Release 2018.R2 Tiger Prism User Guide - Release 2018.R2
TaxesView, add, or amend tax rates in this area.
Creating a new Tax recordComplete the following fields:
Country: Where the Tax rate is based.
Tax Code: This needs to be a unique code, e.g. VAT.
Name: Description of the Tax Code, e.g. Value Added Tax.
Tax Rate: The percentage value to determine the tax rate.
Save the record, by clicking on the ‘Save’ button.
47

Copyright © Tiger Communications plc [Internal]
48 Tiger Prism User Guide - Release 2018.R2
Destination SetsDestination Sets allow you to define custom labels for dialled numbers, so that Reports or Analytics show specific results when those numbers call, or are dialled. For example, you can add individual mobile numbers labelled with their users. Destination Sets have no effect on the costing of calls.
CreateTo create a Destination Set, choose search, and then click the ‘Create’ button . Give the Set a name and description, and click ‘Save’.
EditTo edit an existing Destination Set, click the ‘Details’ button to the set’s left. Once you have created or selected the Set, you will see the details page.
The details tab shows the name and description, as well as how many Tariffs the Set is assigned to. The destinations tab is where you review, or add the numbers and labels to the Set.
There are two options available to populate the set; manually or by csv import.
Manual populationClick the ‘Create’ button to insert a new entry, then enter the digits and label, and click the ‘Tick’ to confirm.
Once an entry is in, you can edit or delete it with the controls to the right of the row.
48

Copyright © Tiger Communications plc [Internal]
49 Tiger Prism User Guide - Release 2018.R2 Tiger Prism User Guide - Release 2018.R2
Copyright © Tiger Communications plc [Internal]
49 Tiger Prism User Guide - Release 2018.R2
Import from csvTo import digits, you need two fields of data.
Digits must match the dial plan being used, and must not contain any duplicates.
Description should contain no more than 50 characters. If commas are present, you must quote delimit, as shown below. A header is required for the two fields ‘Digits’ and ‘Label’, as without an accurate header, the import will fail.
Example import file:
Digits, Label
07714451431, Ed Deal Mobile
07801762202, “Jan Johns, Mobile”
Once you have imported, you must associate the Destination Set with a Tariff. Go to Tariffs – Search, and edit the Tariff you wish to assign the Destination Set, and select it from the drop down menu.
49

Copyright © Tiger Communications plc [Internal]
50 Tiger Prism User Guide - Release 2018.R2
Cisco WebExOverviewThe Cisco WebEx module opens with a tiled Dashboard, showing basic usage of various functions over a configurable date range.
50

Copyright © Tiger Communications plc [Internal]
51 Tiger Prism User Guide - Release 2018.R2 Tiger Prism User Guide - Release 2018.R2
There are fifteen tiles available currently, and you can configure what ones appear on the Dashboard through the Tiles dropdown menu.
The module has six main sections beyond the Dashboard:
Search
Party Mapping
WebEx Meetings Dashboards
WebEx Meetings Reports
WebEx Meetings Exports
WebEx Meetings Analytics
51

Copyright © Tiger Communications plc [Internal]
52 Tiger Prism User Guide - Release 2018.R2
SearchThere are three searches available in the WebEx module.
MeetingsThe first shows all meetings for the chosen date range (1):
There is a large choice of available fields to add to the Search (2), and the results can be filtered (3), and then exported (4) once set up. Controls to navigate the results, clear filters, refresh the display, and choose Columns to display or hide are shown at the bottom (5).
52

Copyright © Tiger Communications plc [Internal]
53 Tiger Prism User Guide - Release 2018.R2 Tiger Prism User Guide - Release 2018.R2
HostsThe second Search displays all hosts used in Meetings.
Various details about the accounts can be displayed by the columns available (1), each of which can be filtered (2). Once the Search is complete, it can be exported (3). Controls to navigate the results, clear filters, refresh the display, and choose Columns to display or hide are shown at the bottom (4).
AttendeesThe third search displays all attendees registered on meetings. The Columns can be adjusted and filtered just like the previous searches, and the results exported.
53

Copyright © Tiger Communications plc [Internal]
54 Tiger Prism User Guide - Release 2018.R2
Party MappingThe party mapping tool allows review and assignment of Prism users to WebEx accounts.
Find the WebEx id or hostname in the left-hand columns (1) to see what Prism party (2) is currently mapped to it. Select a WebEx hostname (3) to see the details of what Prism account(s) it has been assigned to over time (4).
If a WebEx hostname does not have an assigned Prism party name (5), you can choose one by clicking the ‘Create’ button (6). This opens the Host Party Mapping tool.
The tool lists all people from the Prism directory, and can be filtered using the ‘Filter’ buttons along the header row (1). When the correct user has been found, select the date and time that the mapping should take place from, using the Calendar controls (2). Finally, click ‘Add Mapping’ to confirm.
54

Copyright © Tiger Communications plc [Internal]
55 Tiger Prism User Guide - Release 2018.R2 Tiger Prism User Guide - Release 2018.R2
DashboardsSummaryThe summary dashboard consists of five graphs, which provide an overview of meeting statistics for the date range selected.
Totals: Bar graph showing the number of meetings and attendees per day / month, depending on the date range run.
Durations: Bar graph showing the total durations for meetings and attendees per day / month, depending on the date range run.
Call totals: Pie chart displaying the categories of calls, and their proportions.
Call minutes: Pie chart showing the total minutes for each call type, in or out of a meeting.
Host activity: Line graph showing registered hosts and active hosts per day / month, depending on the date range run.
55

Copyright © Tiger Communications plc [Internal]
56 Tiger Prism User Guide - Release 2018.R2
Organizational adoptionThis dashboard helps to identify what Prism Organizations are using WebEx hosts, and whether there are unassigned hosts in use that should be assigned to Prism parties.
You can select the Directory tree to use (1), and then select an individual node in that tree to populate the Dashboard from (2).
56

Copyright © Tiger Communications plc [Internal]
57 Tiger Prism User Guide - Release 2018.R2 Tiger Prism User Guide - Release 2018.R2
External EngagementThe external engagement dashboard gives an overview of the users and domains who have joined WebEx sessions.
The Dashboard can be organised to show either the domain, or the Email of the users that have joined sessions, whilst the date range can be selected, either by simple period selection, or by defining a start and end date.
There are four graphs on the Dashboard, which are all line graphs of the Top x variety.
Total Meetings / Attendees: Shows the top x meetings / attendees broken down by month / day (depending on date range)
Meeting / Attendee Durations: Shows the top x meetings / attendees by duration, broken down by month / day (depending on date range).
Totals: Shows the top x total attendees, or meetings by number.
Durations: Shows the top x total attendees, or meetings by total duration.
Host OverviewThe Host Overview is non-configurable, apart from the date range, and shows the number and total durations by host account.
57

Copyright © Tiger Communications plc [Internal]
58 Tiger Prism User Guide - Release 2018.R2
Host ProfileThe Host Profile displays the detail for each host, e.g. the individual meeting information for the specified period.
58

Copyright © Tiger Communications plc [Internal]
59 Tiger Prism User Guide - Release 2018.R2 Tiger Prism User Guide - Release 2018.R2
Client AgentThe Client Agent Dashboard consists of two graphs, showing the total number and duration of sessions against the clients used for those meetings. Each vertical bar graph has a line for percentages showing as well.
Dashboards can support multiple Profiles per user, accessible through the Profile controls.
When you have configured a Dashboard, press ‘Save’ (1) to retain that profile. Click the ‘Create New’ button (2) to make and name a new profile.
When you have multiple profiles configured, use the dropdown (3) to select the profile to use, then the ‘Refresh’ button (4) to update the detail shown.
To delete a profile when it is no longer required, click ‘Delete’ (5).
59

Copyright © Tiger Communications plc [Internal]
60 Tiger Prism User Guide - Release 2018.R2
ReportsGeneral InformationAll of the available reports use similar controls to govern what is covered in terms of scope and date range.
The date range can be selected from a simple selection (1) (today, this week, last month, etc), or a customised start and end date and time (2). A time zone can be specified if required (3).
Once everything is selected, click the ‘Generate’ button (4).
If you are happy with the report parameters, you can then schedule it to run for a particular date, or regularly by clicking the ‘Schedule’ button (5). See the Scheduler section for more details.
Any parameters specific to individual reports will be covered in their section.
All the reports share a control bar, shown below.
1: Page navigation, which shows current and total pages along with controls to go forwards, backward, and to the beginning and end of the report.
2: Print preview is on by default, but can be turned off to show the whole report, without needing to go from page to page.
3: Export, with currently supported options being Adobe, csv, xls, and rich text formats.
4: Print.
5: Zoom controls, zoom in, zoom out, and fit page / page width to display.
60

Copyright © Tiger Communications plc [Internal]
61 Tiger Prism User Guide - Release 2018.R2 Tiger Prism User Guide - Release 2018.R2
SummaryThe Summary Report has two pages. The first shows the number of meetings, number of participants, total duration of meetings, and total participation duration in graphical form.
The second page shows the types and durations of calls in and out of sessions, and the host details (total and active over the time period).
61

Copyright © Tiger Communications plc [Internal]
62 Tiger Prism User Guide - Release 2018.R2
Organizational adoptionThe Organizational Adoption report details on which areas of the company are making use of WebEx accounts.
The Report has one further parameter to use, which is a Directory node selector.
When selected, this allows a choice of Directory tree (1), and then there are options to search for (2), and (if necessary) to select a single node in the tree to report on (3).
The first page of the Report shows the usage (in number of sessions and total duration) of WebEx hosts, based on the Prism party names that have been mapped to them.
62

Copyright © Tiger Communications plc [Internal]
63 Tiger Prism User Guide - Release 2018.R2 Tiger Prism User Guide - Release 2018.R2
The second page shows the total usage and duration ratios for each mapped host party.
External engagementThe external engagement report shows what external parties are attending sessions hosted by your licences.
Extra parameters for this report are:
Group by: Domain or email.
Order by: Meeting duration or attendee duration.
Top X: Number of items to include on each graph.
The first page of the Report shows the total meetings and attendees:
63
Copyright © Tiger Communications plc [Internal]
64 Tiger Prism User Guide - Release 2018.R2
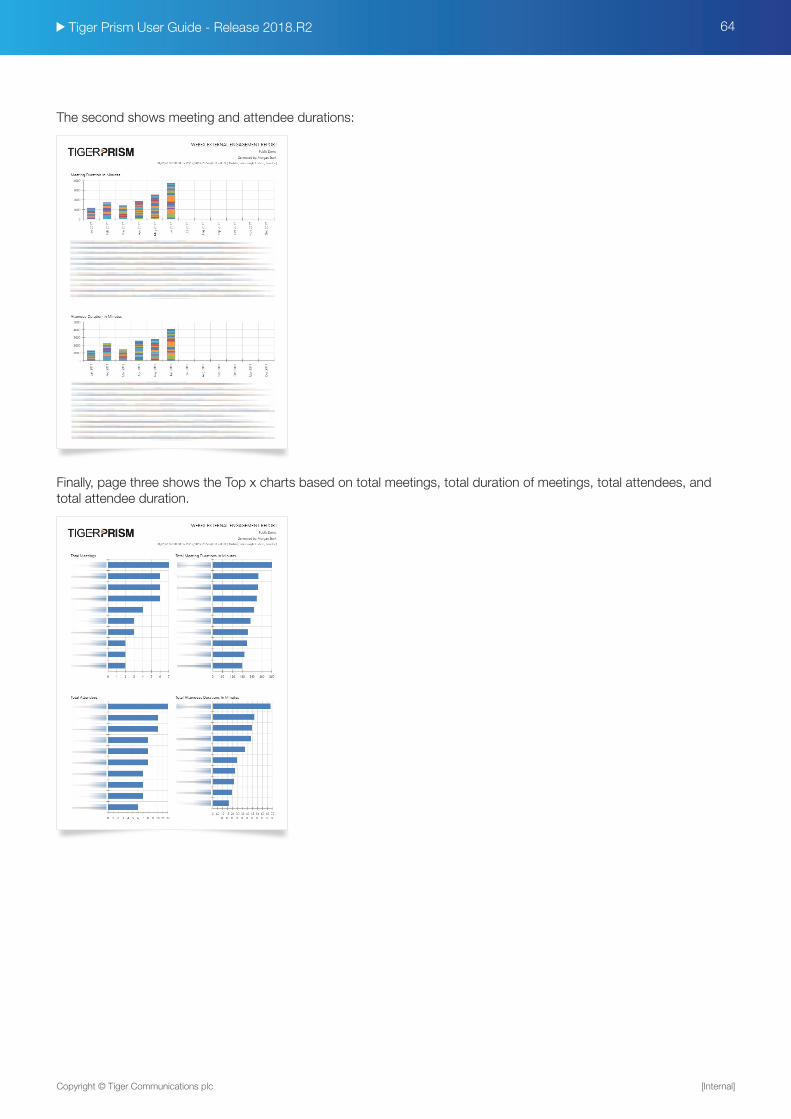
The second shows meeting and attendee durations:
Finally, page three shows the Top x charts based on total meetings, total duration of meetings, total attendees, and total attendee duration.
64

Copyright © Tiger Communications plc [Internal]
65 Tiger Prism User Guide - Release 2018.R2 Tiger Prism User Guide - Release 2018.R2
Client agentThe client agent report shows the usage of each client in number of sessions and duration of sessions. Both in bar chart and percentage line graph format.
ExportsThe WebEx module provides a set of Exports, which cover most of the Dashboard and Report contents. The parameters for each Export are the same as for their respective report (see the Exports section). The exports can be scheduled in the same way as reports, or can be manually executed and exported to Excel or csv format outputs.
Currently the following exports are available:
65

Copyright © Tiger Communications plc [Internal]
66 Tiger Prism User Guide - Release 2018.R2
Copyright © Tiger Communications plc [Internal]
66 Tiger Prism User Guide - Release 2018.R2
AnalyticsThe final section in Cisco WebEx is Analytics. For full Analytics functionality, please see the Analytics module. WebEx widgets can be saved, exported, scheduled, and used for Alerts in the same way as normal Prism widgets.
WebEx meetingsQueries generate information on individual meetings. This can simply display individual meetings, or can be aggregated to display grouped information about accounts.
66
To find out more about the Tiger Solution go to www.tigercomms.com

Copyright © Tiger Communications plc [Internal]
67 Tiger Prism User Guide - Release 2018.R2 Tiger Prism User Guide - Release 2018.R2 67
DashboardsOverviewTo access the Dashboards module, either click the Dashboards tile on the home page, or click the Modules drop-down, and select Dashboards.
Once in the Dashboard Interface, and depending on your access rights, you will be able to view and interact with a range of options. Click Dashboards to open the menu and select the one you want to use. Each of the predefined Dashboards is described briefly in the sections below.
Training TutorialThere is a Dashboards video tutorial associated with this module. The tutorial introduces you to Legs, and how they are used within Tiger Prism. In this video, you will learn how to select columns, filter data through the use of boolean options and parentheses, drill into calls, and how to use Measures to create widgets.
ProfilesDashboards can support multiple Profiles per user, accessible through the Profile controls.
When you have configured a Dashboard, press ‘Save’ (1) to retain that profile. Click the ‘Create New’ button (2) to make and name a new profile. When you have multiple profiles configured, use the dropdown (3) to select the profile to use, then the ‘Refresh’ button (4) to update the detail shown.
To delete a profile when it is no longer required, click ‘Delete’ (5).

Copyright © Tiger Communications plc [Internal]
68 Tiger Prism User Guide - Release 2018.R2
ManagementCall Volumes
The Call Volume Dashboard consists of five individual displays. The data in each area is based on the selections made at the top of the screen. When you first open this dashboard, you will need to make some selections before the displays will show any data.
68

Copyright © Tiger Communications plc [Internal]
69 Tiger Prism User Guide - Release 2018.R2 Tiger Prism User Guide - Release 2018.R2
Select Directory ItemsYou will need to select a Directory tree. Once the tree is defined, you can select the parties that you want to track on the Dashboard (See the section Directory for more information).
These can be anywhere from the whole estate, down to a single person. Click ‘Select directory items’, and drag individual entries into the selection area on the right. Remove individual entries from here, by clicking the cross on the row.
Select all child entries, e.g. add an entire department in one action, by clicking the Cog to the right of it. You can then remove individual items from the selection area if necessary.
Note: Directory items will need to be defined for inclusion in each separate Dashboard.
When you have finished, click Select or Cancel if you wish to discard the selections.
69

Copyright © Tiger Communications plc [Internal]
70 Tiger Prism User Guide - Release 2018.R2
Search Directory ItemsLocate specific directory items by using the Search function. Enter the search criteria, and click the magnifying glass icon .
The number of results is confirmed, and you can navigate to each using the arrow keys.
Once you have located the required entry, drag it from the Directory tree, and drop it into the selection area on the right.
The next selection is for the date range to show in the displays. By default, Prism will show the current day’s data, allowing for real time updating (You can change this if required).
The default date selection method is Quick dates, which allows you to select from predefined periods, e.g. previous month, year to date, etc.
70

Copyright © Tiger Communications plc [Internal]
71 Tiger Prism User Guide - Release 2018.R2 Tiger Prism User Guide - Release 2018.R2
Alternatively, you can select Specific dates, and configure the range through the calendar controls.
Once you have selected the directory tree, parties and dates, click the ‘Refresh’ button to update all displays.
The line graph breaks down the data by direction, and can show Volume, Duration or Cost. The legend on the right also acts as a direction selection. Clicking on the Call direction will select / deselect that direction on the graph. Deselected directions are show in grey.
Hovering over a point on the graph will show a numerical value for each enabled direction for that point.
The Bar charts show outgoing and incoming call volumes broken down by appropriate period, depending on the date range applied.
Hovering over a bar will display the numerical value for it.
71

Copyright © Tiger Communications plc [Internal]
72 Tiger Prism User Guide - Release 2018.R2
The fourth display shows a traffic analysis of outgoing calls, breaking them down by Cost Category. The tables can be sorted by any column, and the columns can be dragged to reposition. The Outgoing Call Destination Table breaks down the calls by the Costing Category, e.g. Local, National, etc.
You can show / hide the columns shown in the display, by using the ‘Show / Hide Columns’ button below the table.
The final display on this Dashboard shows response statistics on incoming calls. The tables can be sorted by any column, and the columns can be dragged to reposition. You can show / hide the columns shown in the display, by using the same button mentioned previously.
Mobile BillThe Mobile Bill dashboard presents five interactive displays of data, giving an overview of all mobile traffic. All elements within this Dashboard are affected by the controls at the top, allowing a more focused examination of the data.
Adjust the settings at the top of the page to meet your requirements. Select the relevant Directory(ies) and Call parties. Select the media types you wish to report against, and set the dates as required.
72

Copyright © Tiger Communications plc [Internal]
73 Tiger Prism User Guide - Release 2018.R2 Tiger Prism User Guide - Release 2018.R2
Select Directory ItemsYou will need to select a Directory tree. Once the tree is defined, you can select the parties that you want to track on the Dashboard (See the Directory section for more information).
These can be anywhere from the whole estate, down to a single person. Click ‘Select directory items’ and drag individual entries into the selection area on the right. Remove individual entries from here, by clicking the cross on the row.
Select all child entries, e.g. add an entire department in one action, by clicking the Cog to the right of it. You can then remove individual items from the selection area if necessary.
Note: Directory items will need to be defined for inclusion in each separate Dashboard.
When you have finished, click Select or Cancel if you wish to discard the selections.
Search Directory ItemsLocate specific directory items by using the search function. Enter the search criteria and click the magnifying glass icon .
The number of results is confirmed, and you can navigate to each using the arrow keys.
Once you have located the required entry, drag it from the Directory tree and drop it into the selection area on the right.
73

Copyright © Tiger Communications plc [Internal]
74 Tiger Prism User Guide - Release 2018.R2
Use the switches to select / deselect the desired Media Types to include in your output.
Having set your criteria, click the ‘Refresh’ button to generate the output.
Click on the ‘Collapse’ icon to hide / show ‘time line’, metrics graphs.
The table on the left shows the selected Directory items and lists summary information for calls, total bandwidth, and voice cost. The table can be sorted by any column, and columns can be re-ordered by dragging and dropping to reposition.
The ‘Details for Party’ table is dynamically updated to show data for the highlighted Directory item in the corresponding table to the left of it. For each Media type, the table displays totals for Count, Duration, Bandwidth, Cost, Roaming cost, Voice cost, and Data cost. The table can be sorted by any column, and can be re-ordered by dragging and dropping to reposition.
There are two tabs containing graphs at the bottom of the dashboard. These display either voice and messaging metrics or data metrics, and are dynamically updated to show data for the highlighted Directory item in the corresponding table to the left of it.
74

Copyright © Tiger Communications plc [Internal]
75 Tiger Prism User Guide - Release 2018.R2 Tiger Prism User Guide - Release 2018.R2
The graph ‘Media type - voice and messaging metrics for party’ breaks down the data by Speech, SMS, or MMS, and can show Volume, Duration, or Cost.
Click on a Media type to include / exclude it from the graph. The deselected items will be greyed-out in the list.
Hover over any point on the graph to see more details.
The graph ‘Media type - data metrics’ displays information for data use, showing Volume, Duration, Cost, or Band-width. Select from the different measures available for each graph to change the presented in formation.
75

Copyright © Tiger Communications plc [Internal]
76 Tiger Prism User Guide - Release 2018.R2
Team PerformanceThe Team Performance Dashboard has been created to display inbound and outbound Call Traffic. Generate statistics based on entire departments, or individuals within a departments to see their performance.
Use the Directory items ‘picker’ to drag People, Departments, etc, from the left to the right side of the screen for inclusion in the results set.
Click on the Cog to the right of the relevant item to ‘Select all children’. In this way, you can easily select larger groups, and remove individuals from the list thereafter.
Note: It is not currently possible to bulk remove once the records have been added to the selection.
76

Copyright © Tiger Communications plc [Internal]
77 Tiger Prism User Guide - Release 2018.R2 Tiger Prism User Guide - Release 2018.R2
The Team Performance Dashboard displays total calls per Party, the % answered, and average talk time of Outgoing Calls. Details for each party are displayed in the corresponding tiles to the right, with full call information shown in the table below. All results are based on the options selected at the top of the screen for CDR source, tree and Directory items against the dates / times specified.
77

Copyright © Tiger Communications plc [Internal]
78 Tiger Prism User Guide - Release 2018.R2
IncomingHunt GroupsThe Hunt Group Dashboard presents four interactive displays of data giving a summary of Traffic, based on selected Hunt Group(s) using the controls at the top of the display.
Select ‘Specific hunt groups’ if you wish to interrogate just one hunt group.
Select the date range to be shown in the displays. By default, Prism will show the current day’s data, allowing for real time updating. This can be changed if required.
The default date selection method is Quick dates. This allows you to select from predefined periods, e.g. Previous month, year to date, etc.
Alternatively, you can select Specific dates, and configure the range through the calendar controls.
The line graph breaks down the data to show numbers of Calls, Answered, Unanswered, and Average Response. The legend on the right also acts as a display selection. Clicking on one of the options in the legend will select / deselect it on the graph. De-selected directions are show in grey. Hovering the mouse over a point will show details for that point.
78

Copyright © Tiger Communications plc [Internal]
79 Tiger Prism User Guide - Release 2018.R2 Tiger Prism User Guide - Release 2018.R2
The table of data shows the Hunt Group name, description, number of calls for the specified period, along with % answered. The columns within this table can be re-ordered by dragging and dropping to reposition.
The row of seven tiles displays Total Calls, Answered calls, Average answer response time, Unanswered calls, % unanswered, Average unanswered response time and Unanswered > 30 seconds. The data presented here corresponds with the highlighted Hunt Group in the table to the left.
79

Copyright © Tiger Communications plc [Internal]
80 Tiger Prism User Guide - Release 2018.R2
The grid below the tiles shows detail based on the highlighted tile. The columns within this grid can be re-ordered by dragging and dropping to reposition.
The contents within each column can be filtered.
Incoming PerformanceThe Incoming Performance Dashboard presents four interactive displays of data, giving an overview of Incoming Call statistics. All elements are affected by the controls at the top of the dashboard, to allow a more focused examination of the data.
Select Directory ItemsYou will need to select a Directory tree. Once the tree is defined, you can select the parties that you want to track on the Dashboard (See the Directory section for more information).
80

Copyright © Tiger Communications plc [Internal]
81 Tiger Prism User Guide - Release 2018.R2 Tiger Prism User Guide - Release 2018.R2
These can be anywhere from the whole estate, down to a single person. Click ‘Select directory items’ and drag individual entries into the selection area on the right. Remove individual entries from here, by clicking the cross on the row.
Select all child entries, e.g. add an entire department in one action ,by clicking the Cog to the right of it. You can then remove individual items from the selection area if necessary.
Note: Directory items will need to be defined for inclusion in each separate Dashboard.
When you have finished, click Select or Cancel if you wish to discard the selections.
Search Directory ItemsLocate specific directory items by using the search function. Enter the search criteria, and click the magnifying glass icon .
81

Copyright © Tiger Communications plc [Internal]
82 Tiger Prism User Guide - Release 2018.R2
The number of results is confirmed, and you can navigate to each using the arrow keys. Once you have located the required entry, drag it from the Directory tree and drop it into the selection area on the right.
Select the date period to be shown in the displays. By default, Prism will show the current day’s data, allowing for real-time updating. The default date selection method is Quick dates, which allows you to select from predefined periods, e.g. Previous month, year to date, etc.
Alternatively, you can select Specific dates, and configure the range through the calendar controls.
The line graph breaks down the number of Incoming calls, showing the total number of calls, Answered, Unanswered, and the average response time. Each data type can be switched on or off from the legend.
The table displays the data by Directory item, based on the selection made at the top of the Dashboard.
The columns within this table can be re-ordered by dragging and dropping to reposition.
82

Copyright © Tiger Communications plc [Internal]
83 Tiger Prism User Guide - Release 2018.R2 Tiger Prism User Guide - Release 2018.R2
The row of seven tiles displays quantities for ‘Total Calls’, ‘Answered Calls’, ‘Average answer response time’, ‘Unanswered calls’, ‘% Unanswered’, ‘Average unanswered response time’, and ‘Unanswered > 30 seconds’. These tiles display data, based on the Directory item highlighted in the table to the left.
The grid below the tiles shows individual Call leg detail, based on the highlighted tile above. The columns within this grid can be re-ordered by dragging and dropping to reposition.
The contents within each column can be filtered.
83

Copyright © Tiger Communications plc [Internal]
84 Tiger Prism User Guide - Release 2018.R2
The bottom of this grid allows selection of the pages of data, and confirms the number of items shown per page, as well as the total number of items.
The icons at the bottom of the page allow you to clear any filters that have been applied, show / hide columns within the table, reset the columns, and refresh the data.
Adjust the number of rows per page, using the drop-down selection.
84

Copyright © Tiger Communications plc [Internal]
85 Tiger Prism User Guide - Release 2018.R2 Tiger Prism User Guide - Release 2018.R2
TrafficChannel Group UtilisationThe Channel Group Utilisation Dashboard presents five interactive displays, giving a summary per Channel Group, and showing concurrent calls during the selected period, along with modelled bandwidth, and the count of the calls.
All Elements within this dashboard are affected by the controls at the top, allowing a more focused examination of the data.
Clicking the ‘Select channel groups’ button will open a display of your CDR sources, and the channel groups assigned to them. Simply tick the groups that you want to see analysed on the Dashboard. The next selection is for the date period to show in the displays. By default, Prism will show the current day’s data, allowing for real time updating (You can change this if required).
85

Copyright © Tiger Communications plc [Internal]
86 Tiger Prism User Guide - Release 2018.R2
The default date selection method is Quick dates, allowing you to select from predefined periods, e.g. previous month, year to date, etc.
Alternatively, you can select Specific dates, and configure the range through the calendar controls.
Once you have selected the tree, parties, and dates, click the ‘Refresh’ button to update all displays.
The line graph breaks down the data by Call direction for the Channel Groups selected. The legend on the right also acts as a direction selection. Clicking on the Call Direction will select / deselect that direction on the graph. De-selected directions show in grey.
Hovering over a point on the graph with your mouse will display a numerical value for that point.
86

Copyright © Tiger Communications plc [Internal]
87 Tiger Prism User Guide - Release 2018.R2 Tiger Prism User Guide - Release 2018.R2
The final part makes up the majority of the page. The table on the left of the Dashboard displays detailed information for each of the selected Channel Groups.
Selecting a channel group in this box will populate the charts and tables to the right.
There are 3 predefined displays:
The first is a selection of dials showing a simple Call Count, per direction.
The second is a graph showing one of the following values: Utilization, Maximum Concurrent Calls, Maximum Concurrent Duration, and Concurrent Minimum or Concurrent Average. Select the value to use on the drop-down control above the graph.
87

Copyright © Tiger Communications plc [Internal]
88 Tiger Prism User Guide - Release 2018.R2
The final item is a chart showing Utilisation statistics, broken into timeslots throughout the day. You can select what days of the week are to be included along the top of the chart, and use the drop-down box above the chart to select the granularity of the time slot, anywhere from 15 minutes, to months at a time. The data can be filtered by days of the week, allowing out-of-hours / business closures to be excluded.
Channel Group HeatmapThe Channel Group Heatmap presents call information, based on the controls selected at the top, allowing for detailed examination of the data.
The grid of data seizures shows one block per selected channel group, the size of which varies depending on the number of calls represented. Select Channel Groups, and either Quick or Specific date ranges. Select to use one of the Measures from the list; Worst Percentage Utilisation, Concurrent Maximum, Duration at Maximum Concurrent, Concurrent Minimum, Concurrent Average, and Maximum Peg Count (15 Min period), and then limit the results to either 5, 10, 20, 50, 100, or All.
88

Copyright © Tiger Communications plc [Internal]
89 Tiger Prism User Guide - Release 2018.R2 Tiger Prism User Guide - Release 2018.R2
Clicking on any data block will trigger a new display, showing a more detailed analysis of that Channel Group.
Using the different options for Measures, data is presented in a line graph.
Click on the points within the graph to view the specific data seizure, e.g. from months to days, and from days to quarter hour seizures.
89

Copyright © Tiger Communications plc [Internal]
90 Tiger Prism User Guide - Release 2018.R2
Summary data is displayed in a table below the graph.
Click on a point in the graph where the display is quarter-hourly.
Summary data is displayed in a table below the graph.
90

Copyright © Tiger Communications plc [Internal]
91 Tiger Prism User Guide - Release 2018.R2 Tiger Prism User Guide - Release 2018.R2
Drill down further, and a new display is opened showing a horizontal bar chart. The view can be incremented by +15, or –15 minutes.
Seizure Details can be further interrogated by going to the Seizure Details tab. Click on the bar you wish to view details on.
The option to ‘Show Leg’ will open a new screen within, which you can see the individual details for the Call leg. Alternatively, within the Calls tab, click the ‘Details’ button on the left to view details.
91

Copyright © Tiger Communications plc [Internal]
92 Tiger Prism User Guide - Release 2018.R2
UC AdoptionThe UC Adoption Dashboard enables display and interrogation of data for the entire organisation, presenting two sections of data for Device and Media type. Data is presented for a specified period, and all elements are affected by the controls at the top of the Dashboard.
Select CDR source(s), Tree level, and Directory items as normal.
Device types will be available for inclusion, based on what is defined in the Network module.
Media types will be available for inclusion, based on what is contained within the CDR.
Period: Adjust this setting to define the number of minutes, hours, days, weeks, months, or years of data to show in the information box.
Select the date and time for the period to begin using the ‘from’ field within the information box. The range will be automatically calculated, based on the top-level Period setting.
Having entered the periodicity, i.e. daily, weekly, monthly, etc. the information block will report this amount of data, from the start date specified within it.
92

Copyright © Tiger Communications plc [Internal]
93 Tiger Prism User Guide - Release 2018.R2 Tiger Prism User Guide - Release 2018.R2
You can then add additional blocks, by clicking the ‘Create’ button in the top right corner of the Dashboard.
Additional information blocks will use the same periodicity, starting from the next available date / time, e.g. if info block 1 contains one week, starting 01 October, the addition of a second block will have a start date one week later.
Subsequent blocks can be added, allowing up to a maximum of 4 in total, using the same logic.
Remove unwanted information blocks by clicking the cross symbol in the top right corner of the information block.
Results are PBX-specific, and Prism can only present data that is available to it within the CDR
The information block presents Device Type metrics and Media Type usage in the form of a graph, and a corresponding table of data.
Device Type metrics graphical information can be presented as Volume, Duration, or Number of Unique Devices.Clicking on one of the options in the legend will select / deselect it on the graph. De-selected directions show in grey.
Hover over any point on the graph to see specific details.
Below the graph is a table displaying the data in a fixed format.
The Total Count column shows the total number of legs.
Total unique devices are the number of devices that make up the number of legs.
Total duration is the total duration for all legs made by all devices.
% of total duration column shows the percentage of the total duration attributed to the device type shown.
93

Copyright © Tiger Communications plc [Internal]
94 Tiger Prism User Guide - Release 2018.R2
Media Type Usage graphical information can be presented as Volume, Duration, or Bandwidth. Clicking on one of the options in the legend will select / deselect it on the graph. De-selected directions show in grey.
Hover over any point on the graph to see specific details.
Below the graph is a table displaying the data in a fixed format.
The Total Count column shows the total number of legs.
The Total Incoming Count column shows the total number of inbound legs.
The Total Outgoing Count column shows the total number of outbound legs.
The Total Duration column shows the total duration for all media types
The % of total duration column shows the percentage of the total duration taken up by each media type
The Total Bandwidth column shows total bandwidth usage.
The inclusion of additional information blocks will highlight differences between each one, enabling comparisons within the data tables. Where there are two information blocks, the differences between each are highlighted by use of colour coding, where green denotes an increase, and red confirms a decrease based on the other period.
94

Copyright © Tiger Communications plc [Internal]
95 Tiger Prism User Guide - Release 2018.R2 Tiger Prism User Guide - Release 2018.R2
In the example below (left image), you can see that for the first period, row 1 / column 1, the Total count is 261 call legs, which represents a 1086.4% increase on the second period, (right image), row 1 / column 1, where the Total count is 22 call legs. The 22 call legs represent a 91.6% decrease, when compared with the period shown in the first image.
Where three or four blocks are in use, there is also a number denoting to which block the information comparison relates. In this way, you can see that in Block 1, the Total Count of Cisco Jabber legs is 14050% higher than it is for Block 2, and 6975% higher than it is for Block 3.
Information Block #1
Information Block #2
Information Block #3
The facility to compare periods is a useful tool for management statistics.
95

Copyright © Tiger Communications plc [Internal]
96 Tiger Prism User Guide - Release 2018.R2
Copyright © Tiger Communications plc [Internal]
96 Tiger Prism User Guide - Release 2018.R1
By default, the Dashboard will retain your last session, so that when you log in again, you will be presented with your last saved data selection. You can then simply refresh Block 1, which will refresh the data in any other information blocks.
Data in this area can be validated against the User Adoption Report, as well as with use of Analytics.
UC Organisational AdoptionUC Organisational Adoption looks at the organisation, broken down to whichever level you require, based on your Directory structure, typically enabling inter-department comparisons. With this, you can see which area of your business is making best use of certain devices. A useful tool to aid decision-making, and the measurement of usage.
Drag items from the Directory to see them in the output. Remove unwanted items from the selection, by clicking the cross to the right of it.
96

Copyright © Tiger Communications plc [Internal]
97 Tiger Prism User Guide - Release 2018.R2 Tiger Prism User Guide - Release 2018.R2
Device Type and Media Type metrics are presented in graphical and tabular formats, based on the selections made in the controls at the top of the Dashboard.
The top of the Dashboard presents two graphs for Device Type and Media Type metrics.
The Device Type metrics graph can display Volume, Duration, or Number of Unique Devices. Clicking on one of the options in the legend will select / deselect it on the graph. De-selected directions show in grey. Hovering the mouse over a point will show details for that point.
97

Copyright © Tiger Communications plc [Internal]
98 Tiger Prism User Guide - Release 2018.R2
The Media Type metrics graph can display Volume, Duration, or Bandwidth, with the same functionality as the Device Type metrics graph.
Positioned below the Device Type metrics graph is a table showing details for each Directory item. One row for each item shows the following information:
Total count: Number of devices used by the associated directory item.
Hardware %: Hardware percentage of total count.
Software %: Software percentage of total count.
Unknown %: Percentage of total count for which devices are not defined within Prism.
The columns within the table can be re-ordered by dragging and dropping to reposition.
Results are PBX-specific, and Prism can only present data that is available to it within the CDR.
Two displays of data, accessed via tab headers, are situated to the right of the data table. The information within these displays directly relates to the selected Directory item in the table.
98

Copyright © Tiger Communications plc [Internal]
99 Tiger Prism User Guide - Release 2018.R2 Tiger Prism User Guide - Release 2018.R2
Copyright © Tiger Communications plc [Internal]
99 Tiger Prism User Guide - Release 2018.R2
UsageTop ‘x’ End PointsThe Top ‘x’ End Points Dashboard presents three interactive displays of data, giving an overview of Call information, including on the top ‘x’ results, where ‘x’ is a number selected from the drop-down options. Elements are also affected by the controls at the top of the Dashboard to allow a more focused examination of the data.
Three graphs separate the measures, of Volume, Duration, and Cost, based on the End Point selected from the top ‘x’ results to the left.
You will need to select a Directory tree (see the Directory section for details on Trees). Once the tree is defined, you can select the parties that you want to track on the Dashboard. These can be anywhere from the whole estate down to a single person. Click on Select parties to see the tree in full, and tick the box next to any parties you want to include in the reports. When you have finished, click Select or Cancel if you wish to discard the selections.
The next selection is for the date range to show in the displays. By default, Prism will show the current day’s data, allowing for real time updating, but you can change this if required.
The default date selection method is Quick dates, allowing you to select from predefined periods, e.g. previous month, year to date, etc.
Alternatively, you can select Specific dates, and configure the range through the calendar controls.
Once you have selected the tree, parties, and dates, click the ‘Refresh’ button to update all displays.
The line graph at the top of the page breaks down the data by direction, and can show Volume, Duration, or Cost. Clicking on one of the options in the legend will select / deselect it on the graph. De-selected directions show in grey. Hovering the mouse over a point will show details for that point.
99

Copyright © Tiger Communications plc [Internal]
100 Tiger Prism User Guide - Release 2018.R2
Copyright © Tiger Communications plc [Internal]
100 Tiger Prism User Guide - Release 2018.R2
The second section shows you the top ‘x’ phones within the party selections. You can specify the number of extensions to be displayed by using the first drop-down, and selecting from 8, 12, 16, or 24 records, and the measure by which they are ordered with the second one, selecting from Volume, Duration, and Cost.
The third section presents a separate line graph for each of the measures, Volume, Duration, and Cost based on the criteria selected at the top of the dashboard, and colour-coded to differentiate between the call categories of Outgoing, Incoming, Internal, and Tandem. Hovering the mouse over a bar section will show the numerical value of that section.
Clicking on any of the end-points in the horizontal bar chart will produce the Volume, Duration, and Cost detail specific to it.
100

Copyright © Tiger Communications plc [Internal]
101 Tiger Prism User Guide - Release 2018.R2 Tiger Prism User Guide - Release 2018.R2 101
Data PrivacyOverviewPrism uses a combination of deletion and anonymisation to fulfil the Right to Erasure requirement of Regulation (EU) 2016/679 (General Data Protection Regulation), through the Data Privacy module.
The initial Data Privacy user can only be assigned by a Tiger engineer, but Tiger’s engineering account does not have access to the module itself. This means that Erasure requests can only be fulfilled by nominated Data Protection representatives of the data controller. Once a Data Privacy user has been configured, that user can assign access to others in the company as required.
SettingsEach Data Privacy user needs to configure their settings before using the module.
The notification email will be used to confirm actions (if requested at the time), and the two switches control whether Directory information and Collaboration data are retained or removed. This will almost certainly be directed by company policy, as this information is almost always covered by legitimate interest.

Copyright © Tiger Communications plc [Internal]
102 Tiger Prism User Guide - Release 2018.R2
Account ManagementThe account management screen displays all users who currently have the right to use the Data Privacy module, along with the period of access, and who granted the access (1).
You can add more users (2), remove existing ones (3), use the Rights history tab to look at users who have been removed, or whose permission has expired (3). Finally, the list can be exported either as a xlsx or csv file (4).
SearchThe search function displays all people configured in the Security module, regardless of whether they have Prism accounts.
Filter the list to find the user requesting erasure (1), then click the ‘Details’ button (1) next to their name.
102

Copyright © Tiger Communications plc [Internal]
103 Tiger Prism User Guide - Release 2018.R2 Tiger Prism User Guide - Release 2018.R2
This brings up the standard Person interface from the Security – People section.
From here, you can proceed to the erasure function (1) or return to the People list (2).
Manage Data PrivacyWhen you click the ‘Data Privacy’ button against a user, you proceed into data privacy management. This wizard walks you through the various sections that hold personal data for the user. This allows you to see what exactly will be removed at the end of the process. Please note that the Data Privacy user’s settings will dictate what can be erased during this process.
103

Copyright © Tiger Communications plc [Internal]
104 Tiger Prism User Guide - Release 2018.R2
Party details include the Name, Email, User Name, and Custom Field information stored about the user. If the person has a Prism account, this will be removed as well.
Trees allows you to see the person’s position in any directory trees on the system.
Equipment details any assigned equipment currently assigned. This will not be removed, as it forms part of the call and Charge History for the department. The user assignment however, will be permanently anonymised. The Collaborations step allows you to choose which of the Collaboration tools to remove User Data from. The Scheduler step displays any jobs owned by, or subscribed to by the user.
The Summary step shows detail of the deletions chosen, and has the first confirmation step (1). Until that is set to Yes, the Delete control (2) is inactive. There is an option to print the summary, if external proof or auditing is required.
104

Copyright © Tiger Communications plc [Internal]
105 Tiger Prism User Guide - Release 2018.R2 Tiger Prism User Guide - Release 2018.R2
Copyright © Tiger Communications plc [Internal]
105 Tiger Prism User Guide - Release 2018.R2
On clicking Delete, a second confirmation box appears. You must type the name of the user to be deleted exactly to proceed.
Once you have typed the name, the ‘Start’ button becomes available. On clicking that, the final confirmation and option to see the summary shows. Either option will result in continuing the deletion, which after a delay will display a confirmation message.
HistoryThe history section shows limited detail about the deletions that have occurred.
This is the only place that the user’s name will still appear (unless you have chosen not to process certain data sets), and serves as proof that the right to erasure request has been processed.
105

Copyright © Tiger Communications plc [Internal]
106 Tiger Prism User Guide - Release 2018.R2 106
DirectoryOverviewTo access the Directory module, either click on the Directory tile on the home page, or click on the Modules drop down, and select Directory. Once in the Directory Module, dependant on your user rights, you will be able to view, add, edit, and remove items in the Tree structure. This section of the document will guide you through several areas of creating and maintaining the Tree structures.
Note: If your installation uses the Directory Integration module for populating your Tree(s), you will only use the Directory module for reference of the integrated Tree(s). Changes and updates will need to be made to the external source.
Screen ExplanationThe Directory screen is split into 4 sections.
The Menu Bar (1)
The Tree Pane (2)
The Child Items Pane (3)
The Details Pane (4)
From the Menu Bar, the Tree list allows the user to switch between different configured Trees.

Copyright © Tiger Communications plc [Internal]
107 Tiger Prism User Guide - Release 2018.R2 Tiger Prism User Guide - Release 2018.R2
The ‘Create Tree’ button allows for the creation of a new Tree. Enter the new Tree name, and click Create or Cancel as required.
Note: It is only possible to create a Tree with a unique name. Previously deleted Tree names cannot be used as they still contain history, and may be restored. System Administrators can control the maximum number of allowed trees through System Settings.
The ‘Edit Tree’ button allows for the updating of an existing Tree name. Edit the Tree name, and click Save or Cancel as required.
The ‘Delete Tree’ button allows for the removal of an existing Tree. In the Confirm Delete window, click Confirm or Cancel as required.
The ‘Include Deleted’ button allows for the inclusion of previously deleted Trees in the Tree drop down list. When active, all previously deleted Trees will become visible within the Tree drop down list.
The ‘Restore Tree’ button allows for the restoration of previously deleted Trees within the Tree drop down list. When a previously deleted Tree is selected from the Tree drop down list, this icon will become active, and allow the restoration of the selected Tree. A confirmation window will appear, and you are prompted to click Confirm to restore the Tree.
The Search option allows you to focus the search across all items or a particular group, for example, Organizations, People, etc. Type your search criteria into the white text box, and click on the ‘Search’ button, or the ‘Clear’ button to clear the box.
These buttons allow for Cut, Copy, Paste, and Clear clipboard operations on items selected in the Child Items Pane.
Note: See section below for an overview of Copy and Move operations.
The Tree pane will display the Tree structure chosen from the Tree drop down list. The Tree can contain a number of levels, e.g., Company, Division, Department, Teams, and also People.
107

Copyright © Tiger Communications plc [Internal]
108 Tiger Prism User Guide - Release 2018.R2
Create NodesFrom within this pane, you can create an organization or a person. To do this, click on the Cog against the required parent item, choose Add, then Organization or Person. This will open a new window.
Add OrganizationIf you choose to add an Organization:
Select the appropriate Type from the drop-down selection.
Digit Masking allows a number of digits to be masked for any dialled number / CLI for privacy reasons.
Use the drop-down arrow to select a Cost Carrier already set up on the system.
Use the drop-down arrow to select a Cost Tariff already set up on the system.
Use the drop-down arrow to select a Bill Carrier already set up on the system.
Use the drop-down arrow to select a Bill Tariff already set up on the system.
There are up to 8 customisable fields, for which titles need to be configured in the Setup—System menu. These fields are free text.
Click Create once completed.
108

Copyright © Tiger Communications plc [Internal]
109 Tiger Prism User Guide - Release 2018.R2 Tiger Prism User Guide - Release 2018.R2
Add PersonIf you choose to add a Person, you will be presented with a list of Persons already added to the system. You can either select the Person item(s) you wish to import, and choose the ‘Add Selected’ button, or click on the ‘Add New Person’ button if one does not already exist on the system. If the Person has not been created yet, this can be done in the Security module, or use the Add New Person option in the bottom left of the window.
Select the Person item(s), and click the ‘Add Selected’ button.
The new Person item(s) will now appear in both the Tree Pane and Child Items Pane.
Note: A Person can only appear in any Tree once. An action that would result in a duplicate will fail.
109

Copyright © Tiger Communications plc [Internal]
110 Tiger Prism User Guide - Release 2018.R2
AssignmentsAssign End PointClick on the Cog against a Person, and choose Assign Equipment and End Point.
The Assign End Point window will allow you to select an End Point to be assigned to the Person.
Note: you can add more than one End Point to a Person.
Product
Whether Digit masking applies
Region
CDR source
Whether it is ex-Directory
Cost carrier
Tenant
Type
Cost tariff
End Point number
Operator Position
Bill carrier
Description
Country
Bill tariff
Serial number
Location
Custom Fields 1 - 9
110

Copyright © Tiger Communications plc [Internal]
111 Tiger Prism User Guide - Release 2018.R2 Tiger Prism User Guide - Release 2018.R2
Assign Existing End PointSelect the End Point numbers you wish to assign, and click ‘Next’.
Click ‘Assign’.
Assign New End PointIf the Phone has not yet been created select ‘New’ from the Assign options. Complete each field to define:
111

Copyright © Tiger Communications plc [Internal]
112 Tiger Prism User Guide - Release 2018.R2
The End Point will now be assigned to the Person in the Tree, but will not appear in the Tree Pane. End Points are only visible in the Child Items Pane on the right.
Ad hoc ChargesTo apply a one-off credit or debit to an item, choose Raise credit note or raise debit note from the Cog .
Complete the form with the details required, including the date that the note should apply on.
For more details on Fixed Charges, see the Network section of the manual.
112

Copyright © Tiger Communications plc [Internal]
113 Tiger Prism User Guide - Release 2018.R2 Tiger Prism User Guide - Release 2018.R2
Copyright © Tiger Communications plc [Internal]
113 Tiger Prism User Guide - Release 2018.R2
DNIS AssignmentsTo apply DNIS numbers to an Organization, click on the Cog against the item, and choose DNIS assignments.
You can define DNIS numbers in the Telephony module, or you can add new ones through the assignment dialogue here.
Editing EntriesEditing items in the Tree ViewTo edit the properties of an Organization or Person, click on the Cog against the item, and choose the Edit option. An Edit window will open. Click the Save option or Cancel to discard any changes you have made.
Move an Organization or PersonClick the Cog against the Organization (or Person) you wish to move, and choose the Cut option. Navigate to the location you wish to move the Organization (or Person) to, select the Cog against the Organization (or Person) you wish the items to sit below, and choose Paste. A Confirm Move window will appear asking you to confirm your action.
Note: You may also move items within the Tree Pane, by dragging and dropping them.
Copy an Organization or PersonClick the Cog against the Organization or Person you wish to copy, choose the Copy option. Navigate to the location you wish to copy the Organization or Person to, select the Cog against the Organization or Person you wish the items to sit below, and choose Paste. A confirm copy window will appear asking you to confirm your action.
Note: A Person or an assigned End Point may only appear in a Tree once. Any action that would result in a duplicate will fail.
Remove an Organization or PersonTo remove an Organization or Person from the Tree, click on the Cog against the Organization, or Person you wish to remove, and choose the Remove option. A message will appear asking you to confirm the action.
113

Copyright © Tiger Communications plc [Internal]
114 Tiger Prism User Guide - Release 2018.R2
Copyright © Tiger Communications plc [Internal]
114 Tiger Prism User Guide - Release 2018.R2
Child Item PaneThe Child Items pane displays the child items of the currently selected Item in the Tree pane. From the Child Items pane, you can Edit the Item, Move, Copy, and Remove, using the Cog against the Item in the same way as the tree pane.
Use the ‘Show / Hide Columns’ button to select what columns of data to display / hide within the Child items window.
Data PrivacyIf you have the correct access rights, the option to initiate anonymisation for a Person through the Data Privacy module is on the Cog menu .
114

Copyright © Tiger Communications plc [Internal]
115 Tiger Prism User Guide - Release 2018.R2 Tiger Prism User Guide - Release 2018.R2 115
Directory SearchOverviewThe Directory Search module allows an easy way to look up Organizations, Users, and End Points. There are two views available; one shows the results by End Point, and the other by the Directory tree selected for the search.
By End Point View
By Directory View
Training TutorialThere is a Directory Search video tutorial associated with this module. This tutorial introduces you to the Directory Search module within Tiger Prism. In this video, you will learn how to interrogate any Trees in your Directory, as well as export any items selected within them, via csv or Excel.

Copyright © Tiger Communications plc [Internal]
116 Tiger Prism User Guide - Release 2018.R2
Copyright © Tiger Communications plc [Internal]
116 Tiger Prism User Guide - Release 2018.R2
Adjusting ViewsExports are set up very much like Reports. Both views can be adjusted by adding or removing columns, using the control below the results.
There are lots of available columns, including custom information on Users and End Points, as well as individual Directory levels (departments) labelled as “Level x part name”.
Each view can be filtered in three ways. The first is to choose the Directory tree used for the search itself from the drop down list at the top of the screen (1). The search box at the top (2) allows a global search of the selected tree, showing results from all fields that contain the string search for. Finally, each included column can filtered individually (3). The filters are context sensitive, as some fields have specific matches only. Most however, have a standard set of string filter terms.
When you have narrowed down the search fully, you can export the results either to csv, or Excel format files from the controls at the top right of the screen.
116

Copyright © Tiger Communications plc [Internal]
117 Tiger Prism User Guide - Release 2018.R2 Tiger Prism User Guide - Release 2018.R2
Copyright © Tiger Communications plc [Internal]
117 Tiger Prism User Guide - Release 2018.R2 117
ExportsOverviewAll reports available in the Prism Reports module are now available. These exports are designed to include additional fields supporting the use of pivot tables, and are not formatted reports.
Configuring ExportsExports are set up very much like reports.
The list of available exports is shown on the left (1). The details of the script (before execution) or the results are shown in the middle (2), and the parameters specific to the export are on the right (3). All details found in the Reports manual regarding parameters and report purposes apply to the corresponding Exports as well.
Note: Custom exports can be designed to meet specific requirements. Contact your own system administrator, or your Tiger account manager for more details.

Copyright © Tiger Communications plc [Internal]
118 Tiger Prism User Guide - Release 2018.R2 118
Microsoft 365OverviewThe Microsoft 365 module opens with a tiled Dashboard, showing basic usage of various functions over a configurable date range.

Copyright © Tiger Communications plc [Internal]
119 Tiger Prism User Guide - Release 2018.R2 Tiger Prism User Guide - Release 2018.R2
There are thirteen tiles available currently, and you can configure what ones appear on the Dashboard, through the Tiles dropdown menu.
The module has four main sections beyond the Dashboard:
Search
Party Mapping
Office 365
Skype for Business
119

Copyright © Tiger Communications plc [Internal]
120 Tiger Prism User Guide - Release 2018.R2
SearchThe Search function allows you to locate users to view their Office 365 account details:
And from there the Prism details, if the user is held in a Prism directory tree:
If the user is in the Directory tree, but has not been mapped automatically, you can force a mapping from here (1). See the next section for details of O365 to Prism account mapping.
120

Copyright © Tiger Communications plc [Internal]
121 Tiger Prism User Guide - Release 2018.R2 Tiger Prism User Guide - Release 2018.R2
Party MappingThe party mapping tool allows for the review, and assignment of Prism users to Microsoft 365 accounts:
Find the Microsoft 365 account name on the left-hand column (1) to see which Prism party (2) it is currently mapped to it. Select an Office user (3) to see the details of what Prism account(s) it has been assigned to over time (4).
If an Microsoft 365 account does not have an assigned Prism party name (5), you can choose one, by clicking the ‘Create’ button (6). This opens the Add Microsoft 365 User Party Mapping tool.
The tool lists all people from the Prism directory, which can be filtered using the ‘Filter’ buttons along the header row (1). When the correct user has been found, select the date and time that the mapping should take place from, using the calendar controls (2). Finally, click Add Mapping to confirm.
121

Copyright © Tiger Communications plc [Internal]
122 Tiger Prism User Guide - Release 2018.R2
The remaining two sections comprise of Dashboards, Reports, and Analytics for each of Office 365 and Skype for Business. As the controls for these are consistent, this manual will cover both types of Dashboard, Reports, and Analytics together.
DashboardsGeneral InformationPrism can display more detailed Dashboards for Outlook and Skype, than the front page to the module.
All of the available Dashboards use similar controls to govern what is covered in terms of scope and date range.
You can choose from any Directory trees (1) that you have access to. Within the tree chosen, you can select individual organizations and users (2) to make up the Dashboard results. The date range can be selected from a simple selection (today, this week, last month etc), or a customised start and end date and time (3 and 4).
Once everything is selected, click the ‘Retrieve’ button (5).
122

Copyright © Tiger Communications plc [Internal]
123 Tiger Prism User Guide - Release 2018.R2 Tiger Prism User Guide - Release 2018.R2
Where directory items need to be selected, the button will open a selection dialogue using the tree selected in (1) above.
Find the entries by opening the tree up (1), or by using the Search function (2). Drag organisations or people to the right (3), or click the Cog (4) to select all child items of the chosen parent. Previously selected items can be removed or located in the tree with the controls against each one (5).
Once you have configured Trees and Directory items, you may wish to retain the configuration for future viewing.Dashboards can support multiple Profiles per user, which are accessible through the Profile controls.
When you have configured a Dashboard, press save (1) to retain that profile. Click the create new button (2) to make and name a new profile. When you have multiple profiles configured, use the dropdown (3) to select the profile to use, then the refresh button (4) to update the detail shown. To delete a profile when it is no longer required, click ‘Delete’ (5).
123

Copyright © Tiger Communications plc [Internal]
124 Tiger Prism User Guide - Release 2018.R2
Email ActivityThe email activity Dashboard monitors messages sent, received, and read across the organizations and people selected in the directory.
The graph (1) can show two interpretations of the information selected by the dropdown (2).
Activity: Shows how many messages are being sent, received, and read throughout the period.
Users: Shows how many users are sending, receiving, or reading mails across the period.
Types of email can be displayed or hidden on the graph, the legend forms the controls (3).
The details section (4) does not change with the graph, and shows the users and their statistics. All columns can be filtered with the ‘Filter’ buttons . Controls to navigate the results, clear filters, refresh the display, and choose Columns to display or hide are shown at the bottom (5).
124

Copyright © Tiger Communications plc [Internal]
125 Tiger Prism User Guide - Release 2018.R2 Tiger Prism User Guide - Release 2018.R2
Email app usageThe Email app usage Dashboard displays what Email clients and apps are being used to receive, read, and send emails by the organizations and people selected in the Directory.
The graph (1) can show three interpretations of the information selected by the dropdown (2).
Users: Shows how many users are using each app for mail throughout the period.
Apps: Shows the number of unique users for each app in use across the period.
Versions: Where possible, this shows a further app breakdown, including the version of the app used.
Individual apps can be displayed or hidden on the Users graph, and the legend forms the controls (3).
The details section (4) does not change with the graph, and shows the users and their statistics. All columns can be filtered with the ‘Filter’ buttons . Controls to navigate the results, clear filters, refresh the display, and choose Columns to display or hide are shown at the bottom (5).
125

Copyright © Tiger Communications plc [Internal]
126 Tiger Prism User Guide - Release 2018.R2
Mailbox UsageThis Dashboard monitors the size and current status of user mailboxes.
Note: The mailbox usage Dashboard does not use Directory selection controls, as all users are listed.
The graph (1) can show three interpretations of the information, selected by the dropdown (2).
Mailbox: Shows how many mailboxes there are, and how many are active at each point throughout the period.
Storage: Shows the volume of storage used in total.
Quota: Shows the current number of users by quota status.
Total mailboxes and active mailboxes can be displayed, or hidden on the mailbox graph. Additionally, the legend forms the controls (3).
The details section (4) does not change with the graph, and shows the users and their statistics. All columns can be filtered with the ‘Filter’ buttons . Controls to navigate the results, clear filters, refresh the display, and choose Columns to display or hide are shown at the bottom (5).
126

Copyright © Tiger Communications plc [Internal]
127 Tiger Prism User Guide - Release 2018.R2 Tiger Prism User Guide - Release 2018.R2
Skype for Business activityThis Dashboard details the volume of use for each type of activity available through Skype for Business.
The graph (1) can show two interpretations of the information, selected by the dropdown (2).
Activity: Shows the volume each type of activity over the date range.
Users: Shows how many users used the various features throughout the period.
Types of activity can be displayed, or hidden on the graph. Additionally, the legend forms the controls (3).
The details section (4) does not change with the graph, and shows the users and their statistics. All columns can be filtered with the ‘Filter’ buttons . Controls to navigate the results, clear filters, refresh the display, and choose Columns to display or hide are shown at the bottom (5).
127

Copyright © Tiger Communications plc [Internal]
128 Tiger Prism User Guide - Release 2018.R2
Skype for Business Device usageThe S4B Device usage Dashboard displays what apps and clients are being used by users for Skype activities.
The graph (1) can show two interpretations of the information, selected by the dropdown (2).
Users: Shows the number of users for each Device type over the date range.
Distribution: Shows how many users used each Device type in total over the date range selected.
Types of device can be displayed or hidden on the Users graph, the legend forms the controls (3).
The details section (4) does not change with the graph, and shows the users and their statistics. All columns can be filtered with the ‘Filter’ buttons . Controls to navigate the results, clear filters, refresh the display, and choose Columns to display or hide are shown at the bottom (5).
128

Copyright © Tiger Communications plc [Internal]
129 Tiger Prism User Guide - Release 2018.R2 Tiger Prism User Guide - Release 2018.R2
ReportsGeneral InformationAll of the available reports use similar controls to govern what is covered in terms of scope and date range.
The Directory items button (1) allows you to choose individual organizations and users in trees that you have access to. The date range can be selected from a simple selection (2) (today, this week, last month etc), or a customised start and end date and time (3).
Once everything is selected, click the ‘Generate’ button (4).
If you are happy with the report parameters, you can then schedule it to run for a particular date, or regularly by clicking the ‘Schedule’ button (5) (See the Scheduler section for more details).
129

Copyright © Tiger Communications plc [Internal]
130 Tiger Prism User Guide - Release 2018.R2
Where Directory items need to be selected, the button will open a selection dialogue.
Find the entries by opening the tree up (1), or by using the Search function (2). Drag organisations or people to the right (2), or click the Cog (4) to select all child items of the chosen parent. Previously selected items can be removed or located in the tree with the controls against each one (5).
130

Copyright © Tiger Communications plc [Internal]
131 Tiger Prism User Guide - Release 2018.R2 Tiger Prism User Guide - Release 2018.R2
Outlook email activityThis report gives a two part output. The first section has two graphs showing the numbers of actions, and numbers of users by type:
The second section shows a breakdown per included user:
131

Copyright © Tiger Communications plc [Internal]
132 Tiger Prism User Guide - Release 2018.R2
Skype for Business activityThis report gives a two part output. The first section has two graphs showing the numbers of activities, and numbers of users by type:
The second section shows a breakdown per included user:
132
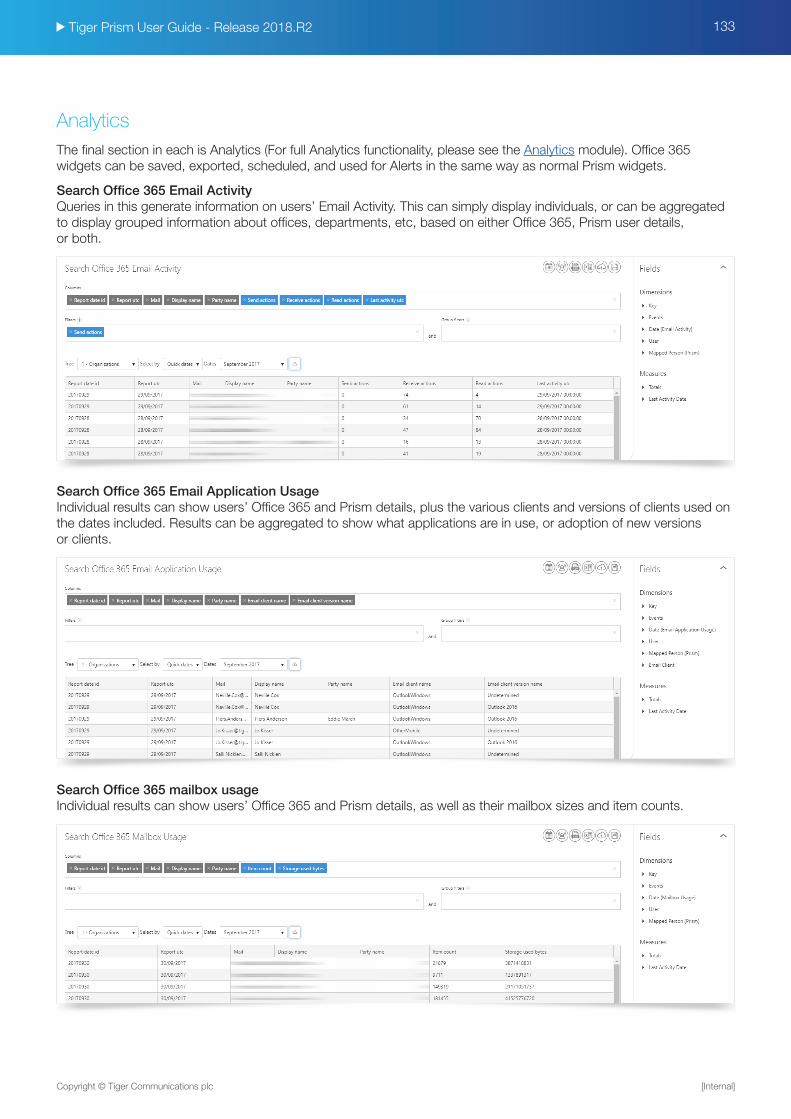
Copyright © Tiger Communications plc [Internal]
133 Tiger Prism User Guide - Release 2018.R2 Tiger Prism User Guide - Release 2018.R2
AnalyticsThe final section in each is Analytics (For full Analytics functionality, please see the Analytics module). Office 365 widgets can be saved, exported, scheduled, and used for Alerts in the same way as normal Prism widgets.
Search Office 365 Email ActivityQueries in this generate information on users’ Email Activity. This can simply display individuals, or can be aggregated to display grouped information about offices, departments, etc, based on either Office 365, Prism user details, or both.
Search Office 365 Email Application UsageIndividual results can show users’ Office 365 and Prism details, plus the various clients and versions of clients used on the dates included. Results can be aggregated to show what applications are in use, or adoption of new versions or clients.
Search Office 365 mailbox usageIndividual results can show users’ Office 365 and Prism details, as well as their mailbox sizes and item counts.
133

Copyright © Tiger Communications plc [Internal]
134 Tiger Prism User Guide - Release 2018.R2
Search Skype for Business activityIndividual results can show users’ Office 365 and Prism details, as well as detailed information about the sessions that have been organised and participated in. Aggregated results can show adoption and usage of various Skype activities.
Search Skype for Business device usageIndividual results can show users’ Office 365 and Prism details, as well as information about the devices used.
134

Copyright © Tiger Communications plc [Internal]
135 Tiger Prism User Guide - Release 2018.R2 Tiger Prism User Guide - Release 2018.R2 135
NetworkOverviewTo access the Network Module, either click the Network tile on the home page, or click the Modules drop down, and select Network. Once in the Network Interface, depending on your user rights, you will be presented with several options on the left.
Training Tutorial
There is a Network video tutorial associated with this module. The tutorial introduces you to Legs, and how they are used within Tiger Prism. In this video, you will learn how to select columns, filter data through the use of boolean options and parentheses, drill into calls, and how to use Measures to create widgets.

Copyright © Tiger Communications plc [Internal]
136 Tiger Prism User Guide - Release 2018.R2
End PointsThe End Points section of the Network module allows users to look up, or add to the list of End Points configured for the system. Administrators will need to populate this section with all the End Point devices that are connected to the CDR sources.
Note: If your directory is updated automatically from AD or a similar system, you will not be able to make changes to this area.
Create End Point
Once you have completed the relevant details, you need to click on the ‘Save’ button . Click on the ‘Clear’ button to clear all fields.
Click on the ‘Details’ button to view the properties, delete, or look at the audit trail of an End Point. The new End Point details will now be presented. The Audit tab and the options at the top right of the interface will update to allow you to either Edit or Delete the End Point.
Note: When in editing mode, you will be able to access all fields apart from the CDR Source and the End Point number itself.
Use the Save, Clear, or start-over buttons if any changes are made.
The Audit Tab allows you to see when the Phone was created, by whom, and when it was last modified.
Product: Select from the product types defined in the End Point Products section.
CDR Sources: A drop down box that offers a list of available CDR sources. You need to select the correct one for the phone you are creating.
Tenant: This will only be relevant if the CDR Source is tenanted.
End Point number: The phone number / extension number in the correct format, in which the CDR source will be sending.
Description: A description can be added to the phone, i.e. “Meeting Room Floor 1”.
Serial Number: You can place the serial number of the physical device, i.e. “Mobile IMEI Number”.
Has Digit Masking: Digit masking allows you to mask digits at phone level for CLI on in and outbound calls.
Is Ex-Directory: Yes, if you do not want this phone to appear in Directory Enquiries searches.
Type: Extension, Mobile, User, URI are the four types that can be applied to the End Point.
Operator Position: Where you have operator positions on the PABX output, you will need to label them with the correct position.
Country: You can assign the physical country the phone is located in.
Location: You can assign the physical location / city the phone is located in.
Region: The region will be assigned automatically, based on the country specified.
Cost Carrier: If you want to apply a specific cost carrier to a phone, this will supersede any other tariffs set on the system. However, you will need to apply a cost tariff.
Cost Tariff: You can pick the cost tariff you wish to apply to the extension.
Bill Carrier: If you want to apply a specific bill carrier to a phone, this will supersede any other tariffs set on the system, but you will need to apply a bill tariff.
Bill Tariff: You can pick the bill tariff you wish to apply to the extension.
Custom Fields: There are up to eight customisable fields that need to first be configured in the Equipment Custom Fields section.
136

Copyright © Tiger Communications plc [Internal]
137 Tiger Prism User Guide - Release 2018.R2 Tiger Prism User Guide - Release 2018.R2
End Point ProductsDefine End Point products for selection when creating new End Point records. Add a name, description, and stock number of each record. The End Point product page is also where you can define fixed charges to be applied on a one off or scheduled basis. Please see the Fixed Charges section at the end of this module.
ChannelsThe Channels section of the Network module allows users to look up, or add to the list of Channels configured in the system. Administrators will need to populate this section with all Channels and Gateways contained within the PABX telephony estate.
Note: The system can be configured to auto-learn Channels and Channel Groups, so this area may already be populated.
Note: Any changes made in the sections below will override the settings made in Channel Groups.
Create ChannelWhen you click ‘Create’ in this area, a new window will open with the following boxes available for completion:
Once you have filled in the details, you need to click on the ‘Save’ button . Click on the ‘Clear’ button to clear all fields.
Click on the ‘Details’ button to view the properties, delete, or look at the audit trail of a Channel. The new Channel details will now be presented. Options at the top right of the interface will also change to allow you to either Edit, or Delete the Channel. When in editing mode, you will be able to access all fields apart from the CDR source and the Channel Group.
Use the Save, or start-over option if any changes are made.
The Audit Tab allows you to see when the Channel was created, by whom and, when it was last modified.
Product: Select from the product types defined in the Channel Products section.
CDR Sources: Define what CDR source the channel belongs to.
Channel Group: Specify a Channel Group in which the channel sits, using the dropdown selection.
Channel Number: Specify the Channel Number.
Description: A free-text description can be added to the channel, e.g. “Line 25 to Remote office”.
Serial Number: Enter the serial number of the physical device, e.g. “S/N:050505005”.
Has Digit Masking: Digit masking digits to be masked at channel level.
Line Type: Only ever changed if the line type differs from the Channel Group. Overrides Channel Group setting.
Duration Type: Only ever changed if the line type differs from the Channel Group. Overrides Channel Group setting.
Cost Method: Only ever changed if the line type differs from the Channel Group. Overrides Channel Group setting.
Country: Assign the physical country the channel is located in.
Location: Assign the physical location / city the channel is located in.
Region: The region will be assigned automatically, based on the Country specified.
Cost Carrier: Apply a specific cost carrier to a channel. This will supersede any tariffs set at CDR source level, but will also require a cost tariff.
Cost Tariff: Assign a cost tariff to the channel.
Bill Carrier: Apply a specific bill carrier to a channel. This will supersede any tariffs set at CDR source level, but will also require a bill tariff.
Bill Tariff: Assign a bill tariff to the extension.
Custom Fields: There are up to eight customisable fields, which need to first be configured in the Equipment Custom Fields section.
137

Copyright © Tiger Communications plc [Internal]
138 Tiger Prism User Guide - Release 2018.R2
Channel ProductsDefine Channel Products for selection, when creating new channel records. Add a name, description, and stock number for each record.
The Channel Product page is also where you can define Fixed Charges to be applied on a one off or scheduled basis. Please see the Fixed Charges section at the end of this module
Channel GroupsThe Channel Group section of the Network module allows users to look up, or add to the list of Channel Groups configured to use in the system. Administrators will need to populate this section with all Groups / Gateways contained within the PABX telephony estate. It is important that the Channel Groups are set correctly for billing and reporting purposes.
Note: The system can be configured to auto-learn Channels and Channel Groups, so this area may already be populated with Channel Groups.
Note: Any changes made in the sections below will override the settings made in the CDR Source level, except for CDR Source.
Create Channel GroupWhen you click Create in this area, a new window will open with the following boxes available for completion:
138
Product: Select from the channel groups defined in the Channel Group Products section.
CDR Sources: Define which CDR source the Channel Group belongs to.
Name: Add the channel group name.
Description: A description can be added to the Channel Group, i.e. “ISDN 30”.
Signal Type: Specify if the line is Analogue or Digital.
Serial Number: Enter the serial number of the physical device, i.e. “ISDN 30 Main Group”.
Has Digit Masking: Digit masking allows you to mask digits at Channel Group level.
Line Type: This section should only ever be changed if the line type differs from the Channels.
Duration Type: This section should only ever be changed if the line type differs from the CDR source.
Cost Method: This section should only ever be changed if the line type differs from the CDR source.
Device: It is important to put the exact name that the Channel Group will have in the CDR source. This will be for example, Lync Pools, or Cisco Gateway device name.
Country: Assign the physical country the Channel Group is located in.
Location: Assign the physical location / city the Channel Group is located in.
Cost Carrier: If you apply a specific cost carrier to a Channel Group, this will supersede any other tariffs set on the CDR source, but you will need to apply a cost tariff.
Cost Tariff: You can pick the cost tariff you wish to apply to the Channel Group.
Bill Carrier: If you apply a specific bill carrier to a Channel Group, this will supersede any other tariffs set on the CDR source. However, you will need to apply a bill tariff.
Bill Tariff: You can pick the bill tariff you wish to apply to the extension.
Available Channels: Specify how many concurrent channels / calls are available on the Channel Group. This information will be used for concurrency reports.
Bandwidth: The bandwidth availability set in KBs for the gateway.
Custom Fields: There are up to eight customisable fields, which need to be configured in the Equipment Custom Fields section first.

Copyright © Tiger Communications plc [Internal]
139 Tiger Prism User Guide - Release 2018.R2 Tiger Prism User Guide - Release 2018.R2
Once you have filled in the details, you need to click on the ‘Save’ button . Click on the ‘Clear’ button to clear all fields.
Click on the ‘Details’ button to view the properties, delete, or look at the audit trail of a Channel. The new Channel Group details will now be presented. Options at the top-right of the interface will also change to allow you to either Edit, or Delete the Channel. When in editing mode, you will be able to access all fields apart from the CDR Source and the Channel Group.
Use the Save or start-over option if any changes are made.
The Audit Tab allows you to see when the Channel was created, by who, and when it was last modified.
Channel Group ProductsDefine channel group products for selection when creating new channel group records. Add a name, description, and stock number for each record.
The channel group product page is also where you can define fixed charges to be applied on a one off or scheduled basis. Please see the Fixed Charges section at the end of this module
GroupsThe Groups section of the Network module allows users to look up, or add to the list of Groups configured for use in the system. Administrators will need to populate this section with the Telephony Groups that are configured on the CDR sources. A Group can either be a Hunt, Queue, Operator or Pickup. In a tenanted situation, you will need to apply the tenant to the group.
Create GroupWhen you click Create in this area, a new window will open with the following boxes available for completion:
CDR source: Select the CDR source you wish to apply the Group to.
Tenant: The Tenant, if the group is used on more than one tenant. If not, leave blank.
Name: Either the Group number, or Group URL.
Label: Free text for the description.
Type: Select either a Hunt, Queue, Operator, or Pickup.
Once you have filled in the details, you need to click on the ‘Save’ button . Click on the ‘Clear’ button to clear all fields.
Note: Tiger will automatically add groups detected in CDR. These groups will need to be classified by a user before they are usable in Dashboards.
Click on the ‘Details’ button to view the properties, delete, or look at the audit trail of a Group.
The new Group details will now be presented. Options at the top-right of the interface will also change to allow you to either Edit, or Delete the Group.
Use the Save, or start-over option if any changes are made.
The Audit Tab allows you to see when the Group was created, by who, and when it was last modified.
139

Copyright © Tiger Communications plc [Internal]
140 Tiger Prism User Guide - Release 2018.R2
TenantsThe Tenants section of the Network module allows users to look up, or add to the list of Tenants configured for use in the system. Administrators will need to populate this section with the Tenant names configured on the CDR source. Once the Tenants are created, you need to go back to the End Point section, and apply the Tenant to the relevant End Points.
Changes to this area of the system should only be made by an experienced user.
Create TenantWhen you click ‘Create’ in this area, a new window will open with the following boxes available for completion:
CDR source: Select the CDR source you wish to apply the Tenant to.
Name: This is the tenant label that has been assigned in the configuration of the CDR Source.
Label: Free text for the description of the tenanted customer.
Once you have filled in the details, you need to click on the ‘Save’ button . Click on the ‘Clear’ button to clear all fields.
Click on the ‘Details’ button to view the properties, delete, or look at the audit trail of a Tenant. The new tenant details will now be presented. You will also notice an Audit tab and options at the top-right of the interface will also change to allow you to either Edit, or Delete the Tenant.
Use the Save, or start-over option if any changes are made.
The Audit Tab allows you to see when the Tenant was created, by who, and when it was last modified.
140

Copyright © Tiger Communications plc [Internal]
141 Tiger Prism User Guide - Release 2018.R2 Tiger Prism User Guide - Release 2018.R2
CDR SourcesThe CDR Sources section of the Network module allows users to look up, or add to the list of CDR Sources configured in the system. Administrators will need to populate this section with all relevant information about the CDR Source (PBX / Switch). This information is used by the switch module to process the CDR information.
Changes to this area of the system should only be made by an experienced user.
Create CDR SourceWhen you click on create in this area, a new window will open with the following boxes available for completion:
141
Product: Select from the CDR sources defined in the CDR Source Products section.
Name: The CDR Source name that will be selectable throughout Prism.
Code: The switch interface ID that integrates the input code from the CDR source to the collection application.
Description: Free text field for a description for the CDR Source.
Serial Number: Serial Number of the CDR Source is optional, which can also be used for a description or ID.
Has digit masking: Mask the digits for any dialled number / CLI based upon your masking rule, which can be set at multiple levels.
Type: Choose between PABX / VoIP or Mobile Provider.
Duration Type: A CDR Source can use a specific Duration Type. If the system is digital, use ‘True connection time’, but if the CDR source is analogue, use ‘Off-Hook to On-Hook’.
Cost Method: A CDR Source can use a specific costing method.
Country: Assign the physical country the CDR Source is located in.
Location: Assign the physical location / city the CDR Source is located in.
Region: The region will be assigned automatically, based on the Country specified.
Cost Carrier: If you apply a specific cost carrier to the CDR Source, this is the default of all other tariffs set on the system, but you will also need to apply a cost tariff.
Cost Tariff: You can pick the cost tariff you wish to apply to the CDR Source.
Bill Carrier: If you apply a specific bill carrier to the CDR Source, this is the default of all other tariffs set on the system. However, you will also need to apply a bill tariff.
Bill Tariff: You can pick the bill tariff you wish to apply to the CDR Source.
Maximum Valid Call Duration: Sets a specific maximum duration, where a call’s length can be considered as a valid call. Set in hh:mm, anything greater than this will be flagged as invalid.
Maximum Valid Call Cost: Sets a maximum specific monetary value, where the calls cost can be considered as a valid call. If set to 0.00, it will not be applied.
Channel Group Length: Sets the Channel Group length. This only needs to be changed from its default of 3, whenever the CDR source’s group length is greater than 3. If you do not know the length, leave as 3.
Channel Length: Sets the Channel Group length. This only needs to be changed from its default of 3, when the CDR source’s group length is greater than 3. If you do not know the length leave as 3.
Algorithm Digit Dial time (milliseconds): If the system is an analogue system, and has been selected in duration type, you can place a milli-second time per dialled digit to be removed from the final duration.
Algorithm Ring Time (Seconds): If the system is an analogue system, and has been selected in duration type, you can define how many seconds to be removed from the final ring time, for a general ring time.
Maximum End Point Length: Set the maximum number of digits allowed for an End Point number that will automatically be created by Prism.
Custom Fields: There are up to eight customisable fields. The titles need to first be configured in the Equipment Custom Fields section.

Copyright © Tiger Communications plc [Internal]
142 Tiger Prism User Guide - Release 2018.R2
Once you have filled in the details, you need to click on the ‘Save’ button . Click on the ‘Clear’ button to clear all fields.
Click on the ‘Details’ button to view the properties, delete, or look at the audit trail of a CDR source.
The new CDR source details will now be presented. Options at the top-right of the interface will also change to allow you to either Edit, or Delete the CDR source.
Use the Save, or start-over option if any changes are made.
The Audit Tab allows you to see when the CDR source was created, by who, and when it was last modified.
CDR Source ProductsDefine CDR source products for selection when creating new CDR source records. Add a name, description and stock number for each record.
The CDR Source product page is also where you can define fixed charges to be applied on a one off, or scheduled basis. Please see the Fixed Charges section at the end of this module.
VoicemailThe voicemail section allows configuration of voicemail port ranges for each CDR Source on the system.
Click the ‘Create’ button to add a new range, then complete the fields as required:
CDR source: Select the CDR source that the range applies to. Leave blank to apply to all.
Description: Add a description for the range.
From: First port in the range.
To: Last port in the range. Leave blank if “From” refers to the only port.
Threshold: Call duration (in seconds) after which, the caller is determined to have left a message.
Existing records can be edited or deleted with the controls.
The second tab displays deleted ranges, which can be restored if needed.
142

Copyright © Tiger Communications plc [Internal]
143 Tiger Prism User Guide - Release 2018.R2 Tiger Prism User Guide - Release 2018.R2
IP AddressesThis section allows a way of labelling physical devices, giving the ability to run reports on physical sites, rather than extension numbers or logins.
Register IP AddressesTo create a new IP Address entry, click on the Create Menu item down the left-hand side and the right-hand screen will display boxes that need completing.
IP Address Type: Select from a drop-down box with the options of IPV4 or IPV6 addressing.
Country: Select the Country of origin for the IP address. Your default Country will automatically populate the Locations field, which will contain a list of pre-defined locations.
Single or Range: A single IP address, or multiple IP addresses can be added. i.e. ‘192.168.0.1 – 99’ will create 99 IP’s from 192.168.0.1 – 192.168.0.99. Select from the relevant radio button.
Preserve Existing Locations or Overwrite Existing Locations.
143

Copyright © Tiger Communications plc [Internal]
144 Tiger Prism User Guide - Release 2018.R2
Device TypesDevice types are defined and maintained in this area for use in other modules within Prism. The device type format is supplied within the raw data supplied by the CDR source, and will be displayed as ‘unknown’ until defined in this area.
SearchUse the ‘Search’ function to view existing Device types.
Create Device TypeDefine the Device type, select the Category as software or hardware, and add the format. The format of the device type needs to be set as a regular expression. Please contact the support team for more information.
Device types are PBX-specific and Prism can only present data that is available to it within the CDR
144

Copyright © Tiger Communications plc [Internal]
145 Tiger Prism User Guide - Release 2018.R2 Tiger Prism User Guide - Release 2018.R2
LocationsThe Locations section of the Network module allows users to look up, or add to the list of locations configured in the system. Administrators will need to populate this section with all physical locations, where there are CDR sources, Channel Groups or End Points, as well as all CDR source countries and local areas for those countries. This section then links in with the carriers to ensure costing is correct, and affects time shifting of calls, where UTC time is presented by the CDR source.
Create LocationsWhen you click ‘Create’ in this area, a new window will open with the following boxes available for completion:
Country: Select the correct country for your location from the drop-down selection.
Name: Name of the location, e.g. Bournemouth.
Location type: Select the type of location, from the options defined in Location Types, e.g. Branch, Headquarters, Site, etc.
Region: Select the region appropriate to the Country of the Location. Regions are defined separately within the Locations menu.
Area Code: The area code (STD code) for the above- named Location, i.e. 01202.
Latitude: Latitude of site (optional).
Longitude: Longitude of site (optional).
Time Zone: Time Zone of the site, drop down box. Time zone is important for time shifting calls into their correct time for local offices.
145

Copyright © Tiger Communications plc [Internal]
146 Tiger Prism User Guide - Release 2018.R2
Once you have filled in the details, you need to click on the ‘Save’ button . Click on the ‘Clear’ button to clear all fields.
Click on the ‘Details’ button to view the properties, delete or look at the audit trail of a Location.
The new location details will now be presented. Options at the top-right of the interface will also change to allow you to either Edit, or Delete the Location.
Use the Save, or start-over option if any changes are made.
The Audit Tab allows you to see when the Location was created, by whom and, when it was last modified.
Location TypesView and define Location types here.
You can see the number of times each Location type has been used, and whether these are user-defined or not. Pre-defined types cannot be edited or deleted.
Create Location TypesUse the ‘Create’ button to add a new Location type. Add the new Location name, and press enter to create the record.
Use the ‘Export to Excel’ button to export the list to Excel.
146

Copyright © Tiger Communications plc [Internal]
147 Tiger Prism User Guide - Release 2018.R2 Tiger Prism User Guide - Release 2018.R2
Equipment Custom FieldsThe Equipment Custom Field section of the Network module allows users to configure Equipment Custom Fields for CDR Source, Channel, Channel Group and End Point. Each section has eight customisable fields. These customisable fields can be used to generate details within Analytics, or through the API interface.
Editing Custom FieldsClick on the tab of the custom field group you wish to edit, i.e. CDR Source, Channel, Channel group or End Point. To enter the Field descriptions into text area, first click on the ‘Edit’ button .
To make the custom field viewable, you need to click on the ‘Hide / Show’ icon , then click into the white box, and type any free text. Once you have completed naming all the fields you require, use the ‘Save’ button .
You can re-order the fields by dragging and dropping the fields in the order required. Use the ‘Drag and Drop’ button to do this.
147

Copyright © Tiger Communications plc [Internal]
148 Tiger Prism User Guide - Release 2018.R2
Fixed ChargesEach of the product pages has a fixed charges section in two parts at the lower part of the screen.
The left-hand box contains a list of the currently available defined Fixed Charges for the Product selected (1), while the right hand side (2) shows the detail of the Fixed Charge currently selected (3). You can also display deleted Fixed Charges (4).
Create a Fixed ChargeTo Create a new Fixed Charge for the Product, click the ‘Edit’ button . This launches a wizard to collect the details.
The first step is Definition:
Name: A label for the Fixed Charge.
Description: Allows for a detailed description of the Charge.
Tariff: Is this Charge applied to the Cost or the Bill value.
Currency: Which currency the rate is applied in. Appropriate conversion rates should be entered in Prism’s configuration if this is a new currency.
Transaction type: Debit or Credit.
Rate: The amount of the charge, per application.
Rate includes tax: Yes or no. Determines whether the taxes defined in Tax 1 and 2 are already included in the defined rate.
Tax 1 and 2: Pick one or two defined taxes to apply to this Fixed Charge.
148

Copyright © Tiger Communications plc [Internal]
149 Tiger Prism User Guide - Release 2018.R2 Tiger Prism User Guide - Release 2018.R2
Click the ‘Next’ button to proceed to the Schedule step
Set the job to run forever, once when assigned to a product, once on a particular date, a specified number of times or until a specific date.
Set the time zone.
Set the start date / time for the schedule to run the transaction and the periodicity, i.e. every day, every 2 weeks, once per year etc.
Specify which days of the week for the transactions to be applied, if required.
149

Copyright © Tiger Communications plc [Internal]
150 Tiger Prism User Guide - Release 2018.R2
The calendar below the options will reflect the building schedule, once finished click the ‘Next’ button to progress to the Rules step.
Charge Method: In arrears to bill for after service / use; In advance to bill before service / use.
Share Rule: If the equipment is assigned to more than one person or organization, the Fixed Charge can be set to work in three ways:
Full: all parties are charged the full amount for the period
Apportioned: Parties are charged the full period amount between them, split according to the ratio of their assigned time.
Assigned: Parties are charged for only the time within the period that each was assigned the equipment or service.
As an example, in a 30 day month, party A is assigned Gizmo for 10 days and party B is assigned Gizmo for 5 days. Gizmo comes with a fixed monthly charge of £100.
Share Rule: Full – Both parties are charged £100.
Share Rule: Apportioned – The Charge must total £100. Party A had Gizmo for twice as long as party B, so they are charged £66.67 and £33.33 respectively.
Share Rule: Assigned – Party A was assigned Gizmo for 10 of 30 days, so is charged 10 / 30 x 100 = £33.33. Party B was assigned Gizmo for 5 of 30 days, so is charged 5 / 30 x 100 = £16.67
Finally, if the share rule was not set to Full, the overlap rule must be defined. This determines which party should pay the charge for the day of a changeover of assignment. The options are:
First Party: The party which started the day with the equipment / service pays for the day.
Last Party: The party which ends the day with the equipment / service pays for the day.
Equal Split: The day’s charge is split 50% / 50% between first and last parties.
Note: If a piece of equipment changes assignment more than once in a day, only the first and last parties will share that day’s charge.
If the charge method is set as “In Advance”, then only Share Rule: Full, and Overlap Rule: All are available.
150

Copyright © Tiger Communications plc [Internal]
151 Tiger Prism User Guide - Release 2018.R2 Tiger Prism User Guide - Release 2018.R2
Copyright © Tiger Communications plc [Internal]
151 Tiger Prism User Guide - Release 2018.R2
Finally click the ‘Next’ button once more to see the summary of the new Fixed Charge.
If the details are correct, click the ‘Save’ button to save the Fixed Charge. This will apply to all products of the type that the Fixed Charge was defined against.
If you need to Edit or Delete a Charge, use the controls next to it in the table.
Ad hoc debits and credits are applied within the Directory module.
151

Copyright © Tiger Communications plc [Internal]
152 Tiger Prism User Guide - Release 2018.R2 152
ReportsOverviewTo access the Reports Module, either click the Reports tile on the home page, or click the Modules drop down and select Reports. The Reports Module allows Prism users to manually generate their own reports on demand, and export them to their desired format.
For each of the available reports, the Parameters are set using the options on the right of the screen. Select the required settings, then generate the report. Report Parameters vary slightly depending on the chosen report, but the options include:
Date/time from
Date/time to
Week Days
Time Zone
Time from
Time to
CDR Sources
Channel Groups
Media Types
Client Code digits
Use Charge Party
Directory Items
Device Categories
Equipment Locations
Device Types
Top ‘x’
Call Outcomes
Call Directions
Sort Direction
Show End Points
Include Call Details
Note: All Prism reports can be set to run to a defined schedule (see the Scheduler section), and both manual and scheduled reports can be exported to PDF, csv, Excel, or Rich Text format.

Copyright © Tiger Communications plc [Internal]
153 Tiger Prism User Guide - Release 2018.R2 Tiger Prism User Guide - Release 2018.R2
Management ReportsManagement SummaryThe Management Summary report gives a high-level overview of performance, by presenting 3 levels of chart and graphical information. The output is affected by the Parameter settings to the right of the screen. The first section presents Call Information data within a table, with totals at the bottom of each column.
Below this, Pie Charts demonstrate Outgoing Call Distribution and Call Direction Distribution for a pictorial representation of the table data.
The second page of the report presents 3 tables of data for the Top Dialled Numbers by Calls, by Talk Time and by Cost. The number of records within each section corresponds with the Top X setting selected within the report Parameters section.
The final section of the Management Summary report shows performance detail.
The table at the top displays Answer Performance broken down into Answered and Unanswered Calls, with totals at the bottom of each column.
Bar charts give a graphical representation of the data, based on the Number of Answered Calls and Number of Unanswered Calls.
A line graph shows Average Call Answer Times.
153

Copyright © Tiger Communications plc [Internal]
154 Tiger Prism User Guide - Release 2018.R2
Departmental Call SummaryThe Departmental Call Summary gives a simple table output showing Calls, Cost, and Duration. The data can be reported for any level within the Directory, giving the ability to drill-down. Figures are totalled on the final page, and the output is affected by the Parameter settings to the right of the screen.
Departmental Cost SummaryThe Departmental Cost Summary gives a simple table output, showing the average cost, call type, and totals. The data can be reported for any level within the Directory, giving the ability to drill-down. Figures are totalled on the final page, and the output is affected by the Parameter settings to the right of the screen.
Departmental Usage SummaryThe Departmental Usage Summary gives a simple table output, showing data for Incoming Internal and External, Outgoing Internal and External calls, and Totals. The data can be reported for any level within the Directory, giving the ability to drill-down. Figures are totalled on the final page, and the output is affected by the Parameter settings to the right of the screen.
Departmental Mobile SummaryThe Departmental Mobile Summary gives a simple table output, showing data for mobile calls broken down to Non-Roaming and Roaming, and based on the usage type. The data can be reported for any level within the Directory, giving the ability to drill-down. Figures are totalled on the final page. The output is affected by the Parameter settings to the right of the screen.
154

Copyright © Tiger Communications plc [Internal]
155 Tiger Prism User Guide - Release 2018.R2 Tiger Prism User Guide - Release 2018.R2
Outgoing Traffic AnalysisThe Outgoing Traffic Analysis displays data in two different graphs. A pie-chart shows Outgoing Traffic volumes broken down by call type. A bar-chart presents data for the Outgoing Traffic cost for each call category. The output is affected by the Parameter settings to the right of the screen.
Unknown PhonesThe Unknown Phones report lists phones, which are not currently configured in the directory tree chosen from the Parameters section to the right of the screen. Sort the data by number of Calls, Cost, or Duration. The output is affected by the Parameter settings to the right of the screen.
Zero Usage PhonesThe Zero Usage report lists phones, which are configured in the selected tree, but which have been unused for the reporting period. The output is affected by the Parameter settings to the right of the screen.
155

Copyright © Tiger Communications plc [Internal]
156 Tiger Prism User Guide - Release 2018.R2
Unassigned Client CodesThis report displays any client codes that have been output within Call records, but which have not been assigned to a client in Prism’s Telephony module.
Client Code SummaryThe Client Code summary displays a summary for each End Point used by a client, along with a total for the client across all used End Points.
Traffic ReportsChannel Group UtilisationThe Channel Group Utilisation report lists information about the Channel Groups requested within the report criteria, including the number of available channels within the group, maximum number of concurrent calls, time spent at maximum capacity, and bandwidth. The output is affected by the Parameter settings to the right of the screen.
156

Copyright © Tiger Communications plc [Internal]
157 Tiger Prism User Guide - Release 2018.R2 Tiger Prism User Guide - Release 2018.R2
Detail ReportsCall InformationThe Call Information report provides detailed listing of calls, based on the selected criteria. The output is affected by the Parameter settings to the right of the screen. These include the ability to report the Top ‘x’ results, specify call outcomes, initiating, and terminating reasons.
Incoming ReportsDepartmental ResponsesThe Departmental Responses report provides Call detail for each selected Department, showing response time levels for answered calls, as well as those that are unanswered or busy. The output is affected by the Parameter settings to the right of the screen. These include the ability to report the Top ‘x’ results, and options for sorting the output, by Department, Total Calls, Answered Calls, Busy, or Unanswered calls.
Departmental Response SummaryThe Departmental response summary give users a way to display the overall response levels across the whole system, or any part of it, down to individual users or End Points if necessary.
157

Copyright © Tiger Communications plc [Internal]
158 Tiger Prism User Guide - Release 2018.R2
End Point ResponsesThe Phone Responses report provides Call detail within all selected departments, showing response time levels for answered calls, and unanswered calls. The output is affected by the Parameter settings to the right of the screen. These include the ability to report the Top ‘x’ results and options for sorting the output by Phone, Party, Department, Unanswered Calls, Answered Calls, or Average Response Time.
First Point of Answer Target Response AnalysisFirst Point of Answer reports only show calls against groups and parties, which are the initial answering point for a call, as subsequent transfers, conferences, etc, are disregarded. This gives a good representation of how long external callers have to wait before they get through. The target response analysis shows calls against a configured target answer time, and allows exclusion of calls that were abandoned before users had a chance to answer.
End Point Answer Performance ReportThis report displays call answer information, identifying the internal number dialled and the End Point, which answered (or missed) the call eventually. This could be due to pickup, hunt group action, redirection, or similar.
158

Copyright © Tiger Communications plc [Internal]
159 Tiger Prism User Guide - Release 2018.R2 Tiger Prism User Guide - Release 2018.R2
Usage ReportsEnd Point Usage AnalysisThe End Point usage analysis report displays a one-line summary of every selected End Point, including an answered / unanswered analysis, and a breakdown of outgoing Traffic Call Category.
High / Low Dialled NumbersThe High / Low Dialled Numbers report shows information on calls to individual dialled numbers. The output is affected by the Parameter settings to the right of the screen. These include the ability to report the Top ‘x’ results and options for sorting the output by Call Volume, Cost or Duration.
159

Copyright © Tiger Communications plc [Internal]
160 Tiger Prism User Guide - Release 2018.R2
High / Low CLI’sThe High / Low CLI report shows caller information by dialling number, where provided. The output is affected by the Parameter settings to the right of the screen. These include the ability to report the Top ‘x’ results, and options for sorting the output by Call volume, Answered Calls, Unanswered Calls, or Duration.
High / Low End PointsThe High / Low Phones report shows levels of usage on individual phones. The output is affected by the Parameter settings to the right of the screen. These include the ability to report the Top ‘x’ results, and options for sorting the output by Calls, Cost, or Duration.
High / Low PeopleThe High / Low Phones report shows phone usage by user. The output is affected by the Parameter settings to the right of the screen. These include the ability to report the Top ‘x’ results, and options for sorting the output by Calls, Cost, or Duration.
160

Copyright © Tiger Communications plc [Internal]
161 Tiger Prism User Guide - Release 2018.R2 Tiger Prism User Guide - Release 2018.R2
User Adoption ReportsMedia and Device AnalysisThe Media and Device Analysis report presents one page for each media type or device defined. A pie-chart shows percentage usage for each type. A table presents the data, and a line chart plots the usage statistics. The output is affected by the Parameter settings to the right of the screen.
Media Analysis
Device Analysis
161

Copyright © Tiger Communications plc [Internal]
162 Tiger Prism User Guide - Release 2018.R2
Copyright © Tiger Communications plc [Internal]
162 Tiger Prism User Guide - Release 2018.R2
Fixed ChargesDepartmental Call Fixed Charge SummaryThe Departmental Call Fixed Charge Summary shows the selected departments, and a total Fixed Charge and call cost for each. The report can generate a single line top level output, or can show all people and End Points in the Organization.
Departmental Cost Fixed Charge SummaryThe Departmental Cost Fixed Charge Summary shows the selected departments, and a breakdown of outgoing Traffic categories, as well as a total Fixed Charge for each party. The report can generate a single line top level output, or can show all people and End Points in the Organization.
EngineeringActive End PointsThe Active End Points report shows a count of all end points that have made, or received calls over the period, regardless of whether or not they are assigned to a user or tree.
162

Copyright © Tiger Communications plc [Internal]
163 Tiger Prism User Guide - Release 2018.R2 Tiger Prism User Guide - Release 2018.R2 163
SchedulerOverviewThe Scheduler enables automation of Reports, Jobs and Widgets. You can create, modify, and maintain all jobs within this module.
All jobsAll Jobs Calendar ViewThis is an overview of all jobs that are set up in Prism, grouped by type.
Filter the list by Job type or user (Party name), or search for specific jobs by name.
The weight of the line in the chart indicates the estimated run time of the report. Hover over any item to see more details.

Copyright © Tiger Communications plc [Internal]
164 Tiger Prism User Guide - Release 2018.R2
Click ‘View Job Details’ to drill down to the report detail. From here, you can see full report attributes, distribution, and audit information.
The options at the top of the screen allow you to:
Suspend the report job.
Execute the report job immediately.
Edit the report job.
Delete the report job.
Mark as resolved.
Go back to the previous page.
The top of the page confirms the Report name, job priority, and description. The job priority dictates the Report processing order when more than one report is set to run at same time.
Emergency Only – Reports set to this will run in a separate thread, and are therefore unaffected by the priority settings of Low, Medium or High.
A series of tabs confirm the Report job settings, which can be viewed or edited as required.
164

Copyright © Tiger Communications plc [Internal]
165 Tiger Prism User Guide - Release 2018.R2 Tiger Prism User Guide - Release 2018.R2
Alternatively, upon entering the Scheduler module, select the type of job you wish to view from Report Jobs, Database Jobs, System Health Jobs, Widget Jobs, or Export Jobs. You are then presented with the Search, Create, and Restore options, as well as the Calendar view for the specific job type selected. The search and subsequent selection of a job will present the same fields and options as available, via the All Jobs Calendar job detail view.
ExecutionsWith the Delivery Options setting ‘File is archived’ set to ‘Yes’, all records will be stored in Executions. The ‘Archive Size Limit’ defines the number of file attachments to retain. Stored previously executed jobs can be viewed, and the Report output can be opened. Queued jobs are also shown here.
Click on any row to see details of the job, along with the output that was produced (where relevant).
165

Copyright © Tiger Communications plc [Internal]
166 Tiger Prism User Guide - Release 2018.R2
The status of the job is easily identified by the RAG indicator, where red is a failure, amber is awaiting and green is OK.
When a job fails, the status will be highlighted by a red Status indicator, and the Status Name of ‘Unresolved Errors’. Once the problem has been resolved, these errors need to be cleared. Click on the relevant job to see the details, and then click on the ‘Handled’ icon to acknowledge the error state.
The ‘Error’ tab will confirm any errors that occurred during the execution of that particular job.
The Deliveries tab confirms the delivery details for the job.
The columns within the view can be re-ordered, by dragging and dropping to reposition. The contents within each column can be filtered.
The bottom of the screen confirms the number of items per page to be shown, along with page forward / back first /last page directional arrows.
166

Copyright © Tiger Communications plc [Internal]
167 Tiger Prism User Guide - Release 2018.R2 Tiger Prism User Guide - Release 2018.R2
To the bottom right of the screen are icons, which allow you to clear any filters that have been applied, show and hide columns within the current view, and refresh the view.
See more details for errors and deliveries by clicking the ‘Details’ button .
AuditThe Audit tab confirms basic information about who created the report, when it was created (UTC), the last modified date (UTC), and last modified by username.
Report JobsAll scheduled report jobs can be viewed within the All Jobs Calendar View, along with all other scheduled jobs. To view Report Jobs in isolation, go to Report Jobs -> Calendar View. View, amend, add, and search for jobs, as per the All Jobs Calendar functionality detailed at the start of this section.
Creating a new Report job uses a wizard to guide you through the set-up of each report job detail tab.
167

Copyright © Tiger Communications plc [Internal]
168 Tiger Prism User Guide - Release 2018.R2
Database Jobs The Tiger engineer will have set up Db jobs at the time of installing your software. These should not be changed
without direct authorisation by Tiger.
All scheduled database jobs can be viewed within the All Jobs Calendar View, along with all other scheduled jobs. To view Database Jobs in isolation, go to Database Jobs -> Calendar View. View, amend, add, and search for jobs as per the All Jobs Calendar functionality detailed at the start of this section.
Creating a new Database job uses a wizard to guide you through the set-up of each Database job detail tab.
System Health JobsAll scheduled System Health jobs can be viewed within the All Jobs Calendar View, along with all other scheduled jobs. To view System Health Jobs in isolation, go to System Health Jobs -> Calendar View. View, amend, add, and search for jobs as per the All Jobs Calendar functionality detailed at the start of this section.
Creating a new System Health job uses a wizard to guide you through the set-up of each System Health job detail tab.
168

Copyright © Tiger Communications plc [Internal]
169 Tiger Prism User Guide - Release 2018.R2 Tiger Prism User Guide - Release 2018.R2
Widget JobsAll scheduled Widget jobs can be viewed within the All Jobs Calendar View, along with all other scheduled jobs. To view Widget Jobs in isolation, go to Widget Jobs -> Calendar View. View, amend, add, and search for jobs as per the All Jobs Calendar functionality detailed at the start of this section.
Creating a new Widget job uses a wizard to guide you through the set-up of each Widget job detail tab.
Export JobsAll scheduled Export jobs can be viewed within the All Jobs Calendar View, along with all other scheduled jobs. To view Export Jobs in isolation, go to Export Jobs -> Calendar View. View, amend, add, and search for jobs as per the All Jobs Calendar functionality detailed at the start of this section.
Creating a new Export job uses a wizard to guide you through the set-up of each Export job detail tab.
169

Copyright © Tiger Communications plc [Internal]
170 Tiger Prism User Guide - Release 2018.R2
Creating or editing a jobThe scheduling settings are defined here, allowing you to specify how the job will run. For the example here, a Report job has been chosen. Other types of scheduled job will differ slightly in their parameters.
Either creating or editing a job will bring up the scheduling wizard, although some parameters of jobs are locked after initial creation.
Report/DefineStart by defining the job by choosing the type of report.
NameThe next step is to give the report a easily identifiable name, assign it a priority, and add a description if needed.
170

Copyright © Tiger Communications plc [Internal]
171 Tiger Prism User Guide - Release 2018.R2 Tiger Prism User Guide - Release 2018.R2
Schedule
Set the job to run forever, once only, a specified number of times, or until a specific date.
Set the time zone, the number of times for the Report to repeat for example only run 3 times.
Set the start date / time for the schedule to run the Report, and the execution details, e.g. every day, every 30 minutes, every 2 weeks, etc.
Specify days of the week for the Report to run (optional if running daily).
Note: The Schedule settings above define when the report should run, and NOT the data to include within it.
171

Copyright © Tiger Communications plc [Internal]
172 Tiger Prism User Guide - Release 2018.R2
The display at the bottom of the screen is an interactive chart, showing a sample of the scheduled executions, based on the settings applied above.
Within this area, you can drag left or right to move back, or forward in the timeline, or use your mouse-wheel to zoom in / out from years, to months, to weeks, days, and hours
Target DataNext is Target data, specify the period for the report to process, for example, 1 day, where the offset is 0 = yesterday.
Note: The offset setting 0 uses the current time-period as selected for example:
Monthly with offset 0 = current month
Monthly with offset -1 – previous complete month
172

Copyright © Tiger Communications plc [Internal]
173 Tiger Prism User Guide - Release 2018.R2 Tiger Prism User Guide - Release 2018.R2
Customise the from and to settings to set the reported period. Use the fields that are presented upon clicking ‘Customise’ the start and end of the (x) period’. A sample of the target data settings is displayed below.
Below is a more complicated target period. A 1 hour period is specified for reporting, where the start time is customised to be 1 minute past the hour, and the end time is set as 3 minutes past the hour. The sample confirmation text shows that the Report will produce data for 2 November 00:01hrs to 2 November 01:02:59hrs
173

Copyright © Tiger Communications plc [Internal]
174 Tiger Prism User Guide - Release 2018.R2
ParametersAny parameters appropriate to the job are visible, and can be modified or set here.
Apply other report criteria such as time and date ranges, selection of CDR sources, Directory items, call attributes, etc.
Apply a Week Days filter to specify inclusion of specific, or all days of the week.
174

Copyright © Tiger Communications plc [Internal]
175 Tiger Prism User Guide - Release 2018.R2 Tiger Prism User Guide - Release 2018.R2
Success NotificationThis area defines the Report sending details by either Email or FTP. There is a tab for each, enabling view or amendment of settings.
Enter Email recipient addresses, separated with a semi-colon. The importance level for the message is set using the switch control.
Formatting options are available within the tool-bar above the Email body text. Enter the message that will accompany the Report when it is emailed to the recipients.
Note: Email subject and message are mandatory.
Note: Where no calls are found for the output, a blank report will be sent within the template.
Failure NotificationSet a failure notification to be sent in the event of a technical failure.
175

Copyright © Tiger Communications plc [Internal]
176 Tiger Prism User Guide - Release 2018.R2
Delivery OptionsThese settings relate to the distribution and archiving of scheduled reports.
The switch option defines whether the report is archived or not. If set to ‘Yes’, the automated report version is listed in the Executions section, and is available to open and view.
Define the ‘Archive size limit’. This will set the number of Reports to retain for access within Executions.
The setting, ‘Limit the rows in the message body of an email to a maximum of’, shows a preview of a defined number of rows in the body of the email.
‘File is emailed’ set this switch to attach the Report to the email notification.
Define the naming convention for the File name that will be the email attachment, using the options within the dropdown menu for File Name Template. Access the options, by clicking the ‘Elipsis’ button to the right. You can select multiple options to create the required file name. Alternatively, enter free text into this field.
Finally, set the ‘Report Format’, using the dropdown list.
176

Copyright © Tiger Communications plc [Internal]
177 Tiger Prism User Guide - Release 2018.R2 Tiger Prism User Guide - Release 2018.R2
SummaryThe Summary page presents a single view of the scheduled job, including all settings and definitions.
Batch SchedulingThis reporting mechanism is available for certain reports only. There is an extra step added to the scheduling wizard to create a batch email template, and to allow selection of the Directory items to be run in the batch report.
If selected, the following parameters step included a selection process for the Directory items that are to have their own Report jobs.
The reports use emails taken from the tree level, or they can be added during Report configuration / editing. Updates to the Directory do not update the reports’ email configurations, as these must be updated manually in the Scheduler.
Once the Report has begun to produce outputs, selecting the ‘it’ in Schedule’s search shows the individual split out results under each execution.
177

Copyright © Tiger Communications plc [Internal]
178 Tiger Prism User Guide - Release 2018.R2
FTP AddressesWhere FTP is used as an output delivery mechanism, Administrators can add the details of each FTP server, login credentials, etc. for selection when setting up scheduled jobs. To create an entry, click Create.
Label: Give the entry an easily identifiable name.
Address: Enter the FTP server name or IP address.
Port: Add the port.
Username: The username needed to log into the FTP server.
Password: The password needed to log into the FTP server.
Overwrites existing file: Tick this box if you only wish to keep one copy of the report.
Directory: Enter the name of the directory path that PRISM will use to place the reports in.
178

Copyright © Tiger Communications plc [Internal]
179 Tiger Prism User Guide - Release 2018.R2 Tiger Prism User Guide - Release 2018.R2
Copyright © Tiger Communications plc [Internal]
179 Tiger Prism User Guide - Release 2018.R2
LocationsWhen a server share is used as an output delivery mechanism, Administrators can add the details of share for selection when setting up scheduled jobs. To create an entry, click Create.
Label: Give the entry an easily identifiable name.
Path: Enter the path to the server share. This must be in a UNC format.
Overwrites existing file: Whether or not Prism will write over a file with the same name, name templates can include dates and times, so this may not be a problem. In some cases however, you may simply want the most recent file in a location. If this is set to No and a file already exists, the file will be left in place, and a delivery error will be raised for the job.
179

Copyright © Tiger Communications plc [Internal]
180 Tiger Prism User Guide - Release 2018.R2 180
SecurityOverviewTo access the Security Module, either click the Security tile on the home page, or click the Modules drop down and select Security.
The Security Module allows you to view, create, and modify People, Roles, Tree Groups, Report Groups, Widget Groups, and Party Custom Fields.
Training Tutorial
There is an Security video tutorial associated with this module. This tutorial will give you an overview of the Security module in Tiger Prism. In this video, you will learn how to assign and specify what modules a user has access to, as well as their permissions and access to specific Trees.

Copyright © Tiger Communications plc [Internal]
181 Tiger Prism User Guide - Release 2018.R2 Tiger Prism User Guide - Release 2018.R2
PeopleThe People section of the Security module allows users to look up, or add to the list of People already configured on the system. Administrators can populate this, either manually through the interface, or automatically from internal / external sources, e.g. from a flat file, or Active Directory (AD).
Create PeopleTo create an entry, click the ‘Create’ button at the top-right of the page, or click the Create option from the menu on the left of the screen.
The Create Person page is opened for completion.
Title: Select from the available options, as defined in the ‘Titles’ section.
Complete: The first name, middle name, and last name of the person.
Party Name: Party name is automatically populated using first name / last name, as entered in the fields above.
Job Title: Add a job title.
Email: Add an email address.
Cost Carrier: If you apply a specific cost carrier to a person, this will supersede any other tariffs set on the system, but you will also need to apply a cost tariff.
Cost Tariff: Select the cost tariff you wish to apply.
Bill Carrier: If you apply a specific bill carrier to a person, this will supersede any other tariffs set on the system, but you will also need to apply a bill tariff.
Bill Tariff: Select the bill tariff you wish to apply.
Type: Define the record type as Employee or Contact.
Has Digit masking: No by default. Yes will change the last four digits displayed on any called digits that this person has dialled.
There are up to eight customisable fields where you can enter information, but they need first to be configured. If you wish to add a description against the field, this can be done in the Party Custom Fields section. Once you have filled in the details, you need to click on the ‘Save’ button . Click on the ‘Clear’ button to clear all fields.
181

Copyright © Tiger Communications plc [Internal]
182 Tiger Prism User Guide - Release 2018.R2
To view the properties, delete, or look at the audit trail of a Person, click on the ‘Details’ button in the Search section. The person’s details will now be presented along with a tab for Account, Audit and Activity.
Account: Use this area to create a username for the person to be able to log into the Prism portal. If there is no Username configured, you will be presented with a blank screen showing the ‘Create’ button . Click here to Add, and you will be presented with a new set of fields for completion.
Sign-In Type: Select from the following options:
Local: A user / password combination within the Prism system, where authentication is verified against the Prism database.
Windows: Where Active Directory is integrated with Prism, the user details stored in the system are those held in AD as domain / SAM account name.
Shibboleth: Similar to Active Directory, but the website is authenticated by an external source. The external source authenticates the user, and these details are then passed on to the Prism system to verify the user. With Active Directory / Shibboleth, no password details are stored within the Prism system. The web servers do not redirect the client to the Prism portal pages if the client has not been authenticated.
Username: Free text to create a username for the user to use each time they log in. Where local authentication is not being used, the username must be accurate.
Password: Create a password for the user. The password must contain at least a lowercase, an uppercase, and a digit. The password will not be visible once created. Once the user has been created, there will be an “overwrite password” button, so the password can be changed by an administrator if the password is forgotten.
Has API access: Yes or No selection as to whether this user has API access – for later releases of Prism.
Role: Select from a drop-down list of Roles created later in this section.
Tree Group: Select from a drop-down list of Tree Groups created later in this section.
Report Group: Select from a drop-down list of Report Groups created later in this section.
Language: Select from a drop-down list of available languages.
Time Zone: Select from a drop-down list of available time zones. All Time Zones should be available in this drop-down list. Contact Tiger Support in case of any omissions
Audit: This tab shows an audit of the creation / modification of the user, etc.
Activity: This tab shows the user’s activity within Prism.
From the options at the top right of this menu, the ‘Unlock’ button will allow you to either Edit, or unlock the Person if they have locked themselves out by entering wrong credentials too many times, or if you wish to lock their account.
182

Copyright © Tiger Communications plc [Internal]
183 Tiger Prism User Guide - Release 2018.R2 Tiger Prism User Guide - Release 2018.R2
TitlesThis section allows Administrators to configure Titles, which can then be used to assign to People from the drop-down menu when creating or updating them.
Create TitleClick the ‘Create’ button to add a new Title to the list.
A new row will appear at the top of the list, where you will be asked to enter in the Title Name and will mark the title User defined.
Once you have entered the name of the Title, you can choose to save it by pressing ‘Enter’.
The ‘Edit’ and ‘Delete’ buttons will be highlighted and available to use if the Title is user-defined. If you choose to delete Titles, you will be presented with a confirmation window before removing it, but the deletion will not be allowed if the Title is assigned to any People.
183

Copyright © Tiger Communications plc [Internal]
184 Tiger Prism User Guide - Release 2018.R2
RolesThe Roles section allows Administrators to use and create different Roles, depending on what they want people to have access to once they log in. This gives Administrators the ability to provide different levels of restricted access for different type of users.
Default configured Roles can be found by going into the Search area and using the drop-down menu. These will show as (User defined: No, Users: X). The X will be the number of users allocated to that role. These roles cannot be edited, or deleted. Any user-configured roles will show as (User Defined: Yes, Users: X).
Create RolesCreate a new Role, by clicking the ‘Create’ button in the top right corner of the screen. When creating a new Role, the Administrator must enter the Role name, and then choose the access levels for each Prism Module and sub-section. Having added the Role name, you can set all access to ‘none’ or ‘full’, by using the options:
Authorisation levels range from some sections having only No Access or Full Access, and other sections having No Access, Read Only, and Read and Write Access where it applies.
184

Copyright © Tiger Communications plc [Internal]
185 Tiger Prism User Guide - Release 2018.R2 Tiger Prism User Guide - Release 2018.R2
You will need to go into each drop down box, and select the appropriate level for the role you are creating. All boxes will default to “No access” when creating a new role.
Delete RolesThe ‘Delete’ button will only appear in the top right-hand corner if the role is user-defined.
Clicking on the ‘Delete’ button will open a confirmation window before completing the deletion process. Please note, you can only delete roles when their number of users is zero. If a role is assigned to any users, you will not be able to delete it. You will need to assign a different role to the users if you wish to remove it from the system, as it will display an error message.
185

Copyright © Tiger Communications plc [Internal]
186 Tiger Prism User Guide - Release 2018.R2
Tree GroupsThe Tree Group section allows Administrators to view the currently configured Tree Groups from the drop-down list, and to create new Tree Groups, based on configured Tree Structures in the system. These can then be applied to Accounts.
By default, there is a Tree Administrator with full access, which is “User Defined = No”. This cannot be amended or deleted from the system. If you have any custom Tree Groups, they will also appear, but as “User Defined = Yes”. You can amend and delete from this section.
Create Tree GroupsTo create a new Tree Group, click on the ‘Create’ menu button.
Enter the Tree Group Name, and choose which Tree the Group will be applicable to from the drop-down box. The available directory structure for the Tree you have selected is displayed. Tree Groups are used to define the areas within Directory trees, which users are allowed to view, modify, and / or delete. Access rights can be defined for organisations and people.
To select an area that will be available to this Tree Group, select the Cog , which then expands the options (as shown) to set for that branch, and any sub-branches.
A User with no CDR access will NOT be able to run reports against these items, so you need to enable these appropriately. The Disallow CDR is only applicable when you have Allowed CDR access to an item in this list, so it remains greyed-out if they do not have CDR access.
Once you have completed the details, you need to click on the ‘Save’ button . Click on the ‘Clear’ button to clear all fields.
The ‘Delete’ button will only appear if you have a Tree Group that is User defined: Yes.
Note: If a Tree is synchronised, then users are unable to make changes regardless of access rights.
Note: Deleting a Tree Group will open a confirmation window before completing the deletion process. Tree Groups that have been assigned to users will not be able to be deleted, so you will need to assign a different Tree Group if you wish to remove it from the system, as it will display an error message.
186

Copyright © Tiger Communications plc [Internal]
187 Tiger Prism User Guide - Release 2018.R2 Tiger Prism User Guide - Release 2018.R2
Report GroupsThe Report Group section allows Administrators to view the current configured Report Groups from the drop-down list, and create new Report Groups, based on the accessibility of particular reports types, which can then be applied to Accounts.
By default, there is a Report Administrator group with Full Access. This has the setting “User Defined = No”, which means it cannot be amended, or deleted from the system. If you have any custom Report Groups, they will be displayed as “User Defined = Yes”, and these can be amended and deleted within this section.
Create Report GroupsTo create a new Report Group, click on the ‘Create’ menu button, and enter the Report Group Name.
187

Copyright © Tiger Communications plc [Internal]
188 Tiger Prism User Guide - Release 2018.R2
All Reports will default to ‘Not Accessible’. The only other option is Accessible, which means the users assigned to this Report Group will see that Report in their menu choices within the Reporting module.
Click on the ‘Clear’ button to clear all fields.
The ‘Delete’ button will only appear if you have a Report Group, which is User defined: Yes. The ‘Edit’ button will only appear if you have a Report Group, which is User defined: Yes
Note: Deleting a Report Group will open a confirmation window, before completing the deletion process. Report Groups that have been assigned to users will not be able to be deleted, so you will need to assign a different Report Group if you wish to remove it from the system, as it will display an error message.
Export GroupsExport Groups are used to make Export outputs available to certain users. Each export currently available on the system (the in Exports section) can be made individually available, or not, to Export Groups. User defined groups can be created to tailor users’ access to the data with their requirements.
188

Copyright © Tiger Communications plc [Internal]
189 Tiger Prism User Guide - Release 2018.R2 Tiger Prism User Guide - Release 2018.R2
Widget GroupsWidget Groups can be created to restrict users to certain widgets. This coupled with the access levels granted within their Role definition ensure the user will be able to view and edit only those widgets, to which you require them to have access. Read Only, Read and Write, and Full Access options within the Role definition facilitate the following when used with a Widget Group:
Read Only AccessA role containing ‘Read Only’ access to Widget Groups will be able to:
View the widgets contained within the group
Execute the widgets contained within the group
Export data returned by the widgets within the group
Read and Write AccessA role containing ‘Read and Write’ access to Widget Groups will be able to:
View the widgets contained within the group
Execute the widgets contained within the group
Export data returned by the widgets within the group
Create widgets and save as My Widgets
Full AccessA role containing ‘Full Access’ to Widget Groups will be able to:
View all widgets
Execute all widgets
Export data returned by any widget
Create widgets and save to My Widgets, the Widget Group to which the user belongs, or any of the available Widget Groups
189

Copyright © Tiger Communications plc [Internal]
190 Tiger Prism User Guide - Release 2018.R2
Copyright © Tiger Communications plc [Internal]
190 Tiger Prism User Guide - Release 2018.R2
Create Widget GroupCreate a new Widget Group by clicking Create from the menu options.
Enter a name for your Widget Group, and select the widgets you wish to include within the group.
Remember to save the new Widget Group by clicking the ‘Save’ button .
Party Custom FieldsThe Party Custom Fields give you the ability to configure Party Custom Fields, which can be used to enter additional information against an Organization or Person, with each section having up to eight Configurable fields to display.
To give the configurable field a new name, first click on the ‘Edit’ button .
Type into the boxes the name you want to give to the configurable field. This is free text.
The visibility setting allows you to define whether the configurable field is visible in the appropriate areas. Click on the ‘Drag and Drop’ button to change the order of the items in the list.
Once you have filled in the details, you must click on the ‘Save’ button .
Click on the ‘Clear’ button to clear your changes.
Click on the ‘Back’ button to cancel your changes, and take you back to the front screen.
190
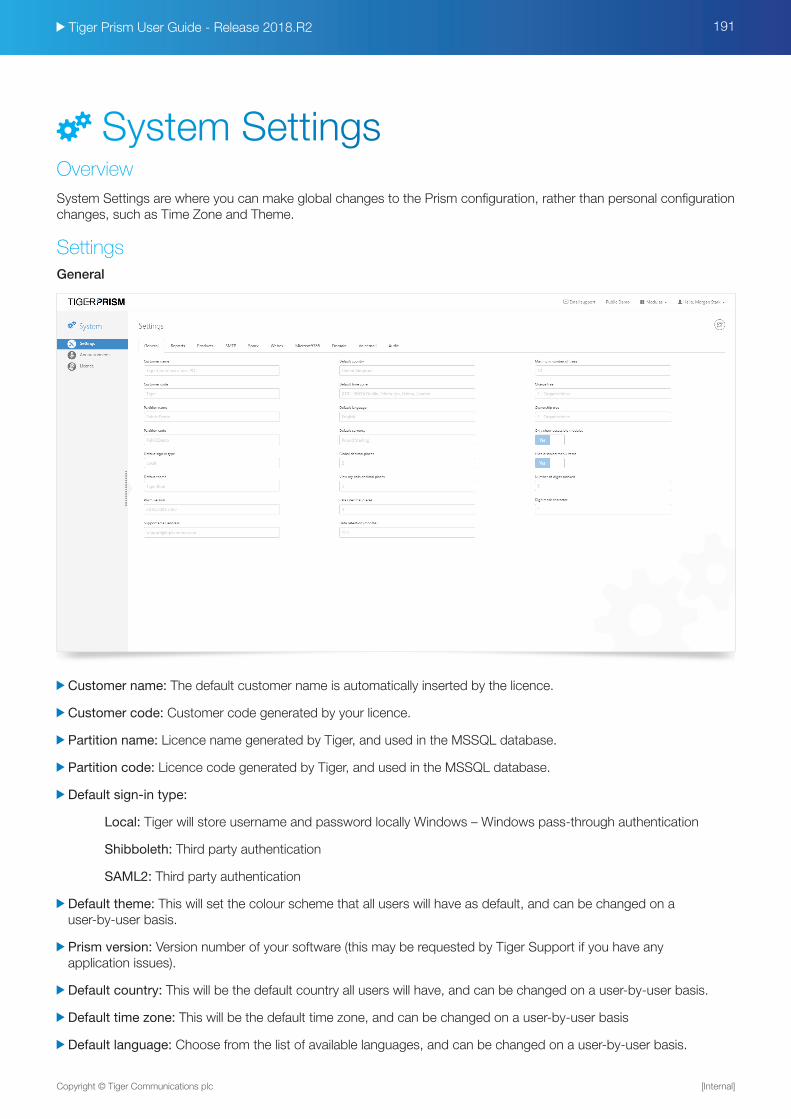
Copyright © Tiger Communications plc [Internal]
191 Tiger Prism User Guide - Release 2018.R2 Tiger Prism User Guide - Release 2018.R2 191
System SettingsOverviewSystem Settings are where you can make global changes to the Prism configuration, rather than personal configuration changes, such as Time Zone and Theme.
SettingsGeneral
Customer name: The default customer name is automatically inserted by the licence.
Customer code: Customer code generated by your licence.
Partition name: Licence name generated by Tiger, and used in the MSSQL database.
Partition code: Licence code generated by Tiger, and used in the MSSQL database.
Default sign-in type:
Local: Tiger will store username and password locally Windows – Windows pass-through authentication
Shibboleth: Third party authentication
SAML2: Third party authentication
Default theme: This will set the colour scheme that all users will have as default, and can be changed on a user-by-user basis.
Prism version: Version number of your software (this may be requested by Tiger Support if you have any application issues).
Default country: This will be the default country all users will have, and can be changed on a user-by-user basis.
Default time zone: This will be the default time zone, and can be changed on a user-by-user basis
Default language: Choose from the list of available languages, and can be changed on a user-by-user basis.

Copyright © Tiger Communications plc [Internal]
192 Tiger Prism User Guide - Release 2018.R2
Default currency: The default currency that will be displayed throughout the portal and on reports. Local currency can be displayed in Analytics and Reports. This cannot be changed, so please contact Tiger Support if the company’s default currency changes.
Global Decimal Places: The number of decimal places displayed across the Prism system.
View My Calls Decimal Places: The number of decimal places displayed within the VMC module.
Rates Decimal Places: The number of decimal places shown in Fixed charges.
Data retention (months): The relative number of months to be kept when data retention housekeeping jobs are configured and run.
Support Email Address: Add an email address here to allow direct messages to the designated helpdesk mailbox within your Organisation.
Maximum number of trees: Specifies the maximum number of Trees that can be created in the Directory module (Tiger recommends a maximum of 10 trees).
Charge tree: The Default Tree that the business would like to use as the charging structure for all billing reports.
Ownership tree: The Tree that Security will use for specifying ownership and access levels. This can be the same as the Charge Tree.
Only show accessible modules: Use the slider to enable display of modules, to which you do not have access, based on your system privileges.
Hide disabled menu items: Use the slider to enable display of modules, for which you are not licensed.
Number of digits masked: Where digit masking is in use, this setting defines the number of digits to be hidden.
Digit mask character: Where digit masking is in use, this setting defines the character to use in place of the aforementioned number of digits.
ReportsReports can be configured with a partition name and a footer message, allowing for Company and copyright or confidentiality markings. This configuration is global, so will affect all users and reports. Click the edit button (1) to adjust the displayed details.
ProductsCDR Source, Channel Group, Channel and End Point product defaults are held here, based on what those items defined within the Network module.
192

Copyright © Tiger Communications plc [Internal]
193 Tiger Prism User Guide - Release 2018.R2 Tiger Prism User Guide - Release 2018.R2
SMTPThe SMTP tab defines the settings used by Prism when handling email. This applies to all traffic from the application, including scheduled jobs and alerts.
Address: The mail server address.
Port: SMTP port number.
Encryption enabled: Required if the mailing server has SSL encryption.
Username: SMTP username if authentication is required from the SMTP server.
Password: SMTP password if authentication is required from the SMTP server.
Fallback email address: Define an address for use, where one is not available for the user.
Fallback display name: The default display name associated with the fallback email address.
Override email address: All emails will come from the address set here, overriding any other settings. Where no override email address is specified here, emailed documents will come from the address of the user account which creates the job / report.
Override display name: The default display name that you would like all emails to come from, when a name is not specified on a scheduled email job.
WebExWebEx settings are required for use with the WebEx module and define the URI for which you wish to capture data.
Enter the URI, your partner ID, Site name,
WebEx ID, and password here before using the module.
193

Copyright © Tiger Communications plc [Internal]
194 Tiger Prism User Guide - Release 2018.R2
Microsoft 365Microsoft 365 settings are required for use with the O365 module.
Enter the Client ID, Client Secret, and Domain before using the module.
DomainWhen collecting data this is used as a reference as to whether a user party is internal or external to the system. Only internal users can be mapped as Prism parties. Currently, this only applies to the WebEx module.
VoicemailIt is possible to flag voicemail calls as missed calls within Prism. Use the slider to set the call treatment.
AuditAudit information relating to the creation and modification of the settings within this area.
194

Copyright © Tiger Communications plc [Internal]
195 Tiger Prism User Guide - Release 2018.R2 Tiger Prism User Guide - Release 2018.R2
AnnouncementsLet Prism users know about scheduled maintenance or news, by using system Announcements.
Navigate to System / Announcements to see the complete list of Announcements.
Use the slider to select visibility of current, or all Announcements.
Create a new Announcement, by clicking the ‘Create’ button on the right of the screen.
Add the message text into the box, and set the start and end date and time. Click the Tick to save the record or click the cross to discard it.
When a user logs in within the validity dates of the message, a pop-up Announcements box will be shown containing the message text. Acknowledging the Announcement will ensure the message does not pop up on subsequent logins for that user. The Announcements pop-up will contain all valid messages, until they are acknowledged by the user.
195

Copyright © Tiger Communications plc [Internal]
196 Tiger Prism User Guide - Release 2018.R2
LicenceThis tab shows details of how your Prism system is licensed. For each module, you can see the number of licences used against the number purchased. This area will also display where licence limits have been exceeded. This area cannot be modified and is simply for information purposes.
Customer Name: The name associated with the Prism account.
Partition Code: The name of the partition.
CDR Source Count: The number of CDR sources from, which Tiger Prism is populated.
End Point Count: The number of End Points that utilise the CDR sources licensed to use Prism.
Is API Licensed: A slider to define whether or not an APi is available.
Is Directory Integration Licensed: A slider to define whether or not Tiger DI is available.
The Module licences confirm the areas, to which you have access and the number of licences available, versus those already in use.
Note: Where you exceed the limit of any of your licences, the Prism theme will be changed to red to alert administrators. The exceeding of licences does not prevent use of the system, but will need to be addressed before any additional items can be added to the system, relative to the licence in question. For example, exceeding your CDR source licence limit will prevent further sources from being added. Upon discovering that you have hit or exceeded your licence limit in any area, please contact Tiger Support or your Tiger Account Manager.
196

Copyright © Tiger Communications plc [Internal]
197 Tiger Prism User Guide - Release 2018.R2 Tiger Prism User Guide - Release 2018.R2
Copyright © Tiger Communications plc [Internal]
197 Tiger Prism User Guide - Release 2018.R2
Update LicenceThe application of licences is a simple upload, following provision of the licence key from your Account Manager, or Tiger Support.
Open the licence.txt file using Notepad / Notepad++
Copy and paste the licence key to your local clipboard. Navigate to System / Licence in the Prism portal.
Click the Export button in the top right corner of the screen to Update Licence, to open the ’Upload Licence’ page.
Paste the licence key into this area and click confirm. Your licence will be updated immediately, and the refreshed display will confirm this.
197

Copyright © Tiger Communications plc [Internal]
198 Tiger Prism User Guide - Release 2018.R2 198
TelephonyOverviewTo access the Telephony Module, either click the Telephony tile on the home page, or click the Modules drop down and select Telephony.
The Telephony module allows the user to remove routing codes from dialled strings if necessary, as well as assign specific carriers to specific access codes.
ASR RecordsAccess, Search, and Replace (ASR) allows the user to configure the system to replace the access code, dialled digits, and trunk number of a call when the existing values match some combination of trunk number, dialled digits, and access code. In addition, the carrier used to cost calls can be forced, provided the carrier has not been previously specified.
Warning: Replacing fields with other values permanently changes the contents of the call record. Replacements made during data collection cannot be repeated during a re-cost.

Copyright © Tiger Communications plc [Internal]
199 Tiger Prism User Guide - Release 2018.R2 Tiger Prism User Guide - Release 2018.R2
To create a new ASR entry, click on the ‘Create Menu’ option down the left-hand side, and the right-hand screen will display boxes that need completing – as below:
199
CDR Source Equipment: specifies the switch code. An exact match must be specified if there is no ‘All CDR Sources’ available.
Process Order: specifies the order in which the records in this table are applied, going by the Lowest first.
Party Role Name: specifies whether to look at the incoming or outgoing part of the call from the drop-down list. Calling and Called will check against both the Calling and Called parties. Calling, i.e. CLI on incoming calls. Called, i.e. STD on outgoing calls.
Access Code Match: specifies the access code. A partial match is allowed. A ‘NULL’ matches anything.
Access Code Replace: specifies what characters will be placed in the access code field when the rules are met. A NULL will not change the access code.
Digits Match: specifies the dialled digits. A partial match is allowed. A ‘NULL’ matches anything. You need to use the wild card to match anything starting with a number or ‘?’ as a wildcard for a specific character, i.e. ‘141*’ will match anything starting with 141, or ‘118???’ will look for any 6-digit number starting with 118.
Digits Replace: will add to the beginning of the existing dialled digits, after removing the digits specified in the ‘No. Of Digits To Replace’. A NULL will not replace digits.
Carrier: specifies which carrier to use, provided the carrier has not been previously specified.
Tariff: specifies which Tariff to use, provided the carrier has not been previously specified.
Action: specifies whether to continue the procedure after a match has been found.
Stop - Once it matches the string, it will not attempt to match another ASR.
Continue - It will continue through the Process order to see if it matches another ASR and apply any subsequent changes.
Start from the Beginning - It will complete its current set of rules, then go back to the first ID and attempt to match again through the list (Please be careful when doing this on calls with 9, as if you have a call to 999, then it can remove all digits).
Used In Re-cost: specifies whether to use this when running Re-cost. If set to ‘No’, it will not be used. ‘Yes’ will force it to be used in the re-costing engine.
Routing Digits: specifies the Routing Digits. A partial match is allowed. A ‘NULL’ matches anything. (Routing digits will not be applicable on all CDR sources).

Copyright © Tiger Communications plc [Internal]
200 Tiger Prism User Guide - Release 2018.R2
Call Access CodesThe Call Access section allows users to look up, add, amend, and delete configured Call Access Codes in the system. A Call Access Code allows the re-assignment of the carrier and / or tariff, depending on the access code presented within the CDR record or the access code manipulation within ASR. This occurs at the start of the Costing Process.
To create a new Call Access Code entry, click on the ‘Create Menu’ option down the left-hand side, and the right-hand screen will display boxes that need completing – as below:
Client CodesThis section allows the definition of Clients and Client codes, and the assignment of one to the other.
SearchSearch in this section shows all the defined client codes.
This list can be filtered and exported (1) to xlsx or csv format. You can select an individual code (2) to view or edit the details, or to assign the code to a client. Finally, there is a button to add a new code (3).
200
CDR Source: specifies the switch code. An exact match must be specified, there is no ‘All CDR Sources’ available.
Call Access Code: enter in the Access code, which appears within the CDR data.
Description: free text, which can be used as an alternative STD name in reports.
Cost Carrier: select the Cost Carrier (Optional).
Cost Tariff: select the Cost Tariff you require to be used (Optional).
Bill Carrier: select the Bill Carrier Group (Optional).
Bill Tariff: select the Bill Tariff you require to be used. (Optional).
Display as STD: Tick to enable the ‘Description’ to be used as the STD code in reports.

Copyright © Tiger Communications plc [Internal]
201 Tiger Prism User Guide - Release 2018.R2 Tiger Prism User Guide - Release 2018.R2
Create / Edit Client CodeSearch in this section shows all the defined client codes.
Code: This must match the code output in CDR, to allow Prism to correctly associate calls with their client codes.
Description: Free text to identify the code.
Default markup: factor to multiply the original cost of the call. This value will only be apparent on Client Code reports.
When editing an existing record, only the Code field cannot be changed.
Assigning Codes to ClientsYou can assign clients codes to clients, either on creation or during editing. A code can only be assigned to one client at a time, but you can build a history to track which client a code was assigned to at any specific date and time.
To create or select a Client, click the browse button (1). Enter the date range that the client is to be assigned for (2), both start and end dates are required. You can also add past or future Client assignments to the code (3). When complete, save the code (4).
201

Copyright © Tiger Communications plc [Internal]
202 Tiger Prism User Guide - Release 2018.R2
Copyright © Tiger Communications plc [Internal]
202 Tiger Prism User Guide - Release 2018.R2
DNISPrism can track DNIS assignments to Organizations in the Directory trees. The actual assignment is done through the Directory module.
202

Copyright © Tiger Communications plc [Internal]
203 Tiger Prism User Guide - Release 2018.R2 Tiger Prism User Guide - Release 2018.R2 203
View My ActivityOverviewTo access the View My Activity Module, either click the View My Activity tile on the home page, or click the Modules drop-down, and select View My Activity.
Note: Digit-masking settings do not affect number visibility within View My Activity.
This module consists of two parts:
Activity
Phone Book
Activities are broken down into several sections, dictated by the licenses on the system, including:
My Calls
Office 365
Skype for Business
WebEx Meetings
Training Tutorial
There is a View My Activity video tutorial (titled as View My Calls) associated with this module. The tutorial introduces you to Legs, and how they are used within Tiger Prism. In this video, you will learn how to select columns, filter data through the use of boolean options and parentheses, drill into calls, and how to use Measures to create widgets.

Copyright © Tiger Communications plc [Internal]
204 Tiger Prism User Guide - Release 2018.R2
My CallsThis page allows employees to access their personal telephony information.
The module defaults to showing all End Points assigned to the user who is logged in. If there is more than one item in the list, choose to report on all of them or remove unwanted End Points, by clicking the ‘X’ beside each one.
Having removed an End Point from those displayed in the ‘My Phones’ field, click into the field to see all available End Points. Add additional End Points by clicking on the relevant entry.
Select the dates to view, and then click the ‘Refresh’ button .
To select the dates that you wish to see call records for, choose either ‘Quick dates’ and select from the list of predefined date options, or choose ‘Specific dates’, which will allow you to select dates from a calendar.
204

Copyright © Tiger Communications plc [Internal]
205 Tiger Prism User Guide - Release 2018.R2 Tiger Prism User Guide - Release 2018.R2
Call detail is presented within a simple graph, enabling a quick overview of activity.
Call information is colour-coded within the graph to show the direction, and you can view calls by volume, duration or cost, by selecting the relevant measure.
The second tab on the graph switches the display to show a summary table of the values for call totals, durations, and costs for each end point selected.
205

Copyright © Tiger Communications plc [Internal]
206 Tiger Prism User Guide - Release 2018.R2
Copyright © Tiger Communications plc [Internal]
206 Tiger Prism User Guide - Release 2018.R2
Below the graph, each call is itemised within a table.
Displayed columns can be shown or hidden, using the buttons at the bottom.
Columns can be dragged and dropped to reorder, and the data within each column can be sorted by clicking the column heading, or filtered using the ‘Filter’ button within each column heading (See the Analytics section for detailed filtering information).
The Filter options are then displayed.
The bottom of the screen confirms the total number of pages of output, and provides navigation through the pages. You can set the number of items displayed per page.
The bottom right of the screen contains a ‘Clear Filters’ button, along with the column settings and refresh buttons.
206

Copyright © Tiger Communications plc [Internal]
207 Tiger Prism User Guide - Release 2018.R2 Tiger Prism User Guide - Release 2018.R2
Office 365The O365 section displays the user’s email activity.
You can switch between quick date selection and custom date range selection with the drop down (1). The range is then selected to the right (2). To update the page after selecting new dates, click the ‘Refresh’ button (3).
The graph (4) displays the emails sent, received, and read on the O365 account for the user, each category can be switched on or off with the legend controls (5).
The details pane (6) shows daily breakdowns for each category.
207

Copyright © Tiger Communications plc [Internal]
208 Tiger Prism User Guide - Release 2018.R2
Displayed columns can be shown or hidden using the buttons at the bottom of the screen.
Columns can be dragged and dropped to reorder, and the data within each column can be sorted, by clicking the column heading, or filtered using the ‘Filter’ icon within each column heading (See the Analytics section for detailed filtering information).
Filter options are then displayed.
The bottom of the screen confirms the total number of pages of output, and provides navigation through the pages. You can set the number of items displayed per page.
The bottom right of the screen contains a ‘Clear Filters’ button , along with the column settings and refresh buttons.
208

Copyright © Tiger Communications plc [Internal]
209 Tiger Prism User Guide - Release 2018.R2 Tiger Prism User Guide - Release 2018.R2
Skype for BusinessThe Skype section displays the user’s Skype activity.
The first control (1) allows you to define which measures to display on the graph below.
You can switch between quick date selection and custom date range selection with the drop down (2). The range is then selected to the right (3). To update the page after selecting new dates, click the ‘Refresh’ button (4). The graph (5) shows the details of the measures selected and each measure can be switched on or off with the legend controls (6).
The details pane (7) shows daily breakdowns for each available measure.
209

Copyright © Tiger Communications plc [Internal]
210 Tiger Prism User Guide - Release 2018.R2
Displayed columns can be shown or hidden using the buttons at the bottom of the screen.
Columns can be dragged and dropped to reorder, and the data within each column can be sorted, by clicking the column heading, or filtered using the ‘Filter’ icon within each column heading (See the Analytics section for detailed filtering information).
Filter options are then displayed.
The bottom of the screen confirms the total number of pages of output, and provides navigation through the pages. You can set the number of items displayed per page.
The bottom right of the screen contains a ‘Clear Filters’ button , along with the column settings and refresh buttons.
210

Copyright © Tiger Communications plc [Internal]
211 Tiger Prism User Guide - Release 2018.R2 Tiger Prism User Guide - Release 2018.R2
Copyright © Tiger Communications plc 07/11/2018_0064 [Internal]
211 Tiger Prism User Guide - Release 2018.R2
WebEx Meetings
The WebEx section displays summary information on meetings that the user has attended or hosted including meeting numbers, durations, call numbers, call durations, and host activity.
My Phone Book
The phone book allows users to set up both commonly used and personal numbers (1), for easy distinction in the My Calls section. Each of these numbers can be labelled (2), which will then show on the My Calls page, and can be marked as a personal number (3) either for incoming, outgoing or both directions (4). This allows for the recharging of personal calls.
To find out more about the Tiger Solution go to www.tigercomms.com
211