student e-value reference guide
TRANSCRIPT

Student E-Value
Reference Guide
Christopher Vaughan
E-Value Database Management Specialist
(This guide has been adapted from the E-Value User Guide)
E*Value Quick Start
Questions RE: E-Value can be submitted to Christopher Vaughan [email protected].
Open your browser from an Internet-connected computer. Into the Address space, type:
https://www.e-value.net
To log in, type in your login name and password, then click the "Login" button. If you do not
have your login name or password, click “Forgot Password” and type your e-mail address into
the space provided click the "Request Password" button. E*Value will send your login name
and password to the e-mail address entered, provided it matches one within E*Value.
To change your password, click on the "My Profile Icon". Type in your new password. Click
the "Change Password" button. Passwords should be at least 6 characters in length and no
longer than 10 and can be made up of a combination of letters and numbers. Passwords are
not case sensitive.
To complete an evaluation, click on the Evaluation icon and then the "Pending" option Your
evaluations are grouped by activity with your oldest evaluations listed first.
Next, click on the "Edit Evaluation" link next to an evaluation. You may be required to
complete the oldest evaluations first. If so, newer evaluations will remain in queue until your
older ones are completed.
To save an evaluation, click on the "Save for Later" button at the bottom of the evaluation.
This will save the answers but will not leave the evaluation in a pending state. You may come
back to this evaluation later to make modifications before submitting it.
To submit a completed evaluation, click on the "Submit" button at the bottom of the
evaluation. If you have not answered mandatory questions, E*Value will let you know and will
highlight the incomplete mandatory questions in red. Once submitted, an evaluation can no
longer be edited.
To log out of E*Value, click the "Log Out" icon in the upper left hand corner of the screen.
E-Value Student Evaluation Solicitation Process by Course:
Medicine 2 or Ambulatory Medicine: Clerkship Coordinator will solicit ALL student evaluations there is no action required by the student
Family Medicine: Clerkship Coordinator will solicit ALL student evaluations there is no action required by the student
Geriatrics: Clerkship Coordinator will solicit ALL student evaluations there is no action required by the student
Medicine 1: Students are required to solicit evaluations of who they worked with at the end of the shift/rotation using the Who Did You Work With (WDYWW) tool described below
Neurology: Students are required to solicit evaluations of who they worked with at the end of the shift/rotation using the Who Did You Work With (WDYWW) tool described below
Obstetrics and Gynecology: Coordinator will schedule evaluations for the student’s continuity provider and small group leader. Students will be required to solicit 2 additional evaluations using the Who Did You Work With (WDYWW) tool described below
Pediatrics: Students are required to solicit evaluations of who they worked with at the end of the shift/rotation using the Who Did You Work With (WDYWW) tool described below
Psychiatry: Coordinator will solicit ALL student evaluations this is no action required by the student
Radiology: Coordinator will solicit ALL student evaluations this is no action required by the student
General Surgery: Paper evaluations will be solicited by the coordinator for ALL students and entered into E-Value by the coordinator on behalf of the preceptor
Surgical Subspecialty: Paper evaluations will be solicited by the coordinator for ALL students and entered into E-Value by the coordinator on behalf of the preceptor
*Please Note: Some sites still are using paper evaluations to complete this process. Please confirm with the clerkship coordinator which sites these are.
E-Value Instructions for Students
In order to ensure that we obtain a fair and representative picture of your clinical performance,
you may be required to obtain a clinical evaluation at the end of your shift/rotation. Towards
the end of your shift/rotation, please let your primary preceptor for the shift know that you will
be requesting an evaluation for the shift/rotation. Your team leader/attending will typically be
the one to evaluate you, but you may request an evaluation from your attending or from
another team member if you worked closely with this person during the shift/rotation.
Evaluations by off-service rotators (ie, medicine residents, ob-gyn interns, etc) should be
avoided if at all possible.
You will request evaluations through E-Value (www.e-value.net), using the “Who Did You Work
With” function. This function will allow you to select the name of your preceptor9s) for the
shift, and will generate a form for you to complete about your preceptor’s teaching skills, and
one for him or her to complete about your clinical performance.
By you requesting your evaluations in E-value it is the most effective mean we have of tracking
who you worked with and when. Failure to generate evaluations may result in grade penalty,
requirement for additional clinical shifts, or in extreme cases even failure of the clerkship.
If you encounter technical problems with E-value, please notify Christopher Vaughan
([email protected]) immediately.
Here are the steps to follow in order to generate and fill out an evaluation.
1. Log onto evalue (if you have forgotten your log-in please go to E-Value and click the Log-
In icon and forgot password and follow the steps).
2. Click the EVALUATIONS ICON
3. Click On the Fly
4. Evaluation Type: Who Did You Work With?
5. Who – Don’t worry about this step – it’s automatic
6. Activity Site – Choose BMC, ETC.
7. Time Frame – Choose Block Dates that you were involved in.
8. Click next - Who do you work with Evaluation will appear!
9. Complete this evaluation by choosing whom you worked with – your choices include the
names of current attending physicians, fellows and residents.
Here are the steps to view/complete pending evaluations:
1. Click the EVALUATIONS ICON
2. Click Evaluations: Pending
3. A list of all queued evaluations will appear.
4. Find and complete the evaluation for your attending physician or resident preceptor
(100% completion is expected as a measure of professionalism).
In certain circumstances, paper evaluations may be necessary. If there are technical
difficulties with the E-Value system, if you work with an off-service preceptor or a preceptor
who is for some reason not in the system, or if your preceptor simply prefers a paper
evaluation, this is okay. Instructions for paper evaluations:
Paper versions of the evaluation forms are available on Blackboard – print out the preceptor evaluation and complete it, then print out the daily shift evaluation and give it to your preceptor.
For all paper evaluation forms, please print your name, the date, and your evaluator’s name legibly on the evaluation form. This is critical – we can’t give you credit for an evaluation if we can’t read your name on it.
You must notify the clerkship coordinator via email of all outstanding paper evaluations. If your preceptor fails to complete the evaluation form, you will not be held responsible. If, however, you fail to let us know that you have requested the evaluation, you will be held responsible, and it will be as though you never worked the shift.
Ideally, your preceptor will complete the evaluation and return it to you before the end of your shift. If this does not occur, that is okay – as long as you notify the clerkship coordinator as above, we will take responsibility for tracking down the evaluation from this point.
Paper evaluation data will be entered into E-Value and will be visible there along with electronic evaluations at the end of the clerkship
Student Responsibilities:
The importance of requesting evaluations cannot be overemphasized. You are expected to
request an evaluation for each and every shift/rotation (depending on clerkship), and
failure to do so will result in the imposition of grade penalties, up to or including failure of
the rotation in extreme cases. There must be a record of each and every evaluation
requested, either through E-Value, or through a personal email to the clerkship coordinator
in the case of paper evaluations. You are ultimately responsible for ensuring that you
request an evaluation for each shift – we have no way of recreating your schedule and
figuring out who you worked with after the fact.
Our Responsibilities:
While it is our clear expectation that students will request evaluations for all shifts worked,
and generate a record of all evaluations requested, we do understand that the student is
not responsible for whether the preceptor completes the evaluation. We will never
penalize a student for a preceptor’s delinquency, provided there is appropriate record that
the evaluation was requested (via E-Value or email).
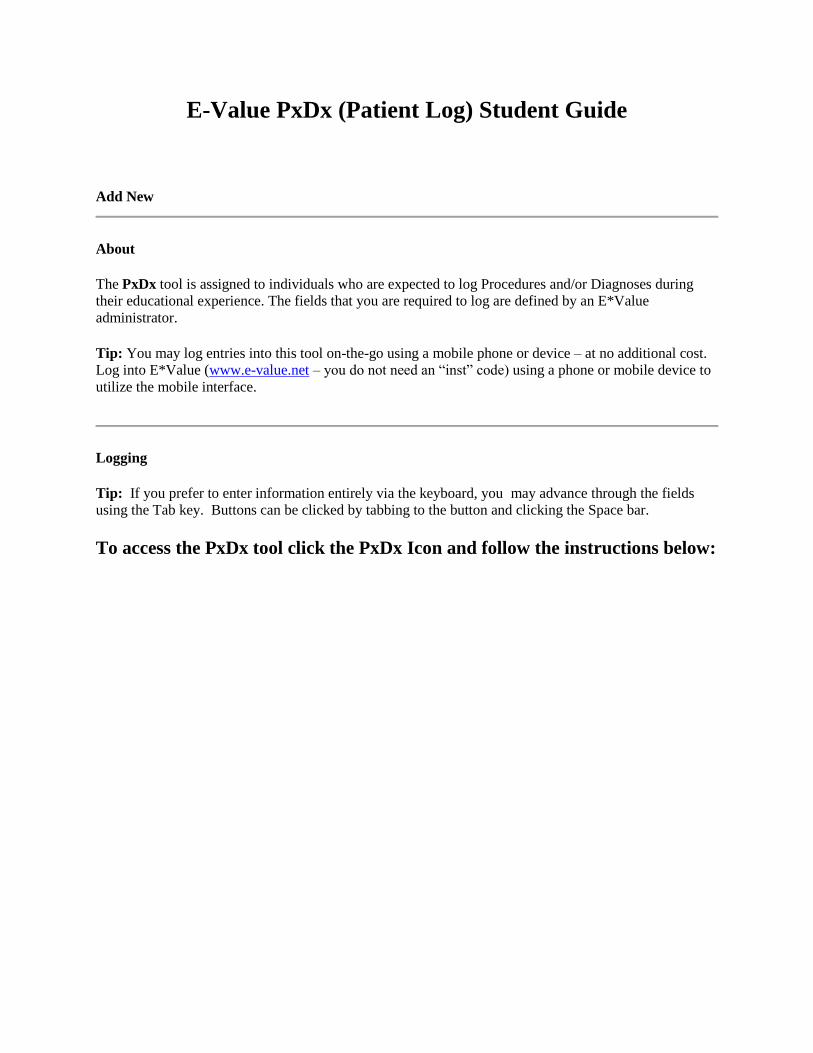
E-Value PxDx (Patient Log) Student Guide
Add New
About
The PxDx tool is assigned to individuals who are expected to log Procedures and/or Diagnoses during
their educational experience. The fields that you are required to log are defined by an E*Value
administrator.
Tip: You may log entries into this tool on-the-go using a mobile phone or device – at no additional cost.
Log into E*Value (www.e-value.net – you do not need an “inst” code) using a phone or mobile device to
utilize the mobile interface.
Logging
Tip: If you prefer to enter information entirely via the keyboard, you may advance through the fields
using the Tab key. Buttons can be clicked by tabbing to the button and clicking the Space bar.
To access the PxDx tool click the PxDx Icon and follow the instructions below:
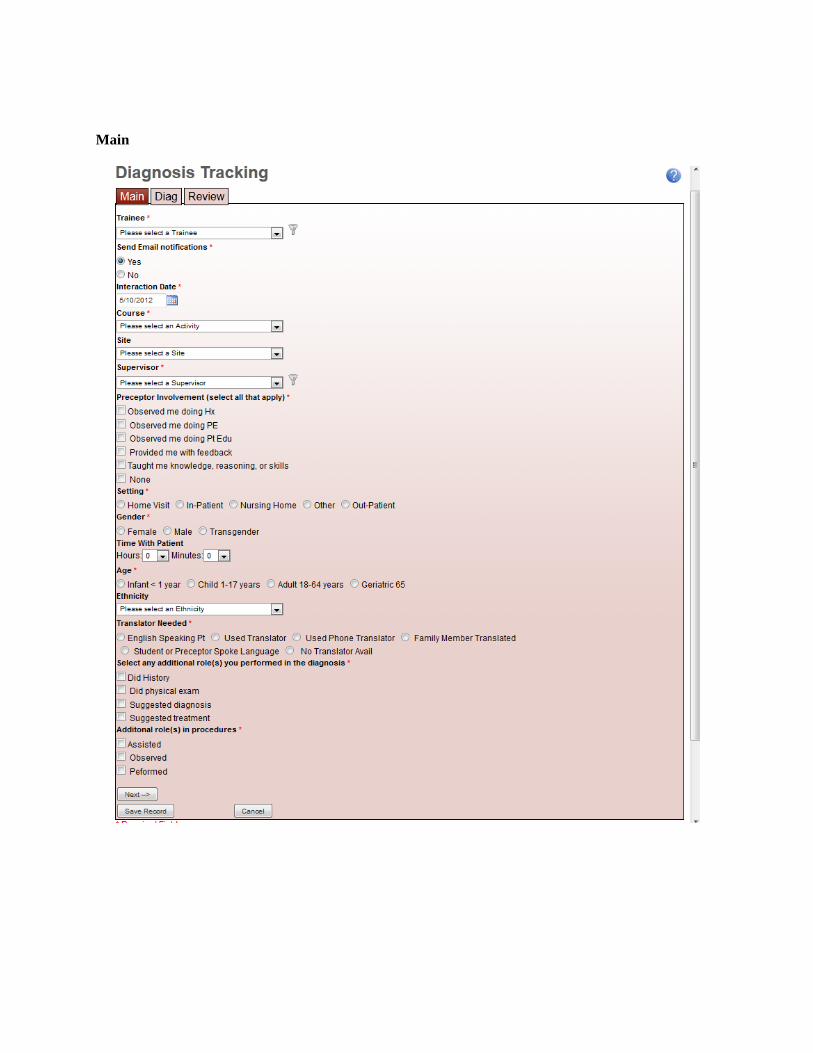
Main
Interaction Date: Enter the date of the procedure or diagnosis. Please note, you may be
prevented from logging interactions that occurred after a certain threshold, for example those that
occurred 60 days or more in the past.
Course: Select the course involved in this interaction.
Site: Select the name of the site where the transaction took place from the drop-down menu. To
filter the list of sites in the drop-down menu, enter all or part of the site name in the Site Filter
text field and select the Filter Site button.
Supervisor: Select the name of the supervisor for the interaction you are logging from the drop-
down menu. To filter the list of supervisors in the drop-down menu, enter all or part of the
supervisor’s name in the Supervisor Filter text field and select the Filter Supervisor button.
Preceptor Involvement: Select the level of involvement of your preceptor during the visit.
Setting: Select the setting in which you saw the patient
Gender: Select the patient’s gender.
Time With Patient: Use the Hours and Minutes drop-down fields to indicate the overall time
that was spent with the patient for this interaction. The total time will be recorded for each
procedure and diagnosis logged.
Age: Select the patient’s age range from the drop-down menu options.
Ethnicity: Select the patient’s ethnicity from the buttons provided.
Translator Needed: Select the appropriate option for the level of involvement of a translator
during your visit.
Select any additional role(s) you performed in the diagnosis: Select any additional role(s) in
determining the diagnosis that you may have participated in during the visit.
Additional Role(s) in procedures: Select any additional role(s) that you were involved in for
any procedures that may have occurred during the visit.
After you have made your selections for the Main tab, click Next button to advance to the next tab. The
Save Record button cannot be used until a diagnosis or procedure has been added. Your selections will
be maintained as you advance through the tabs.
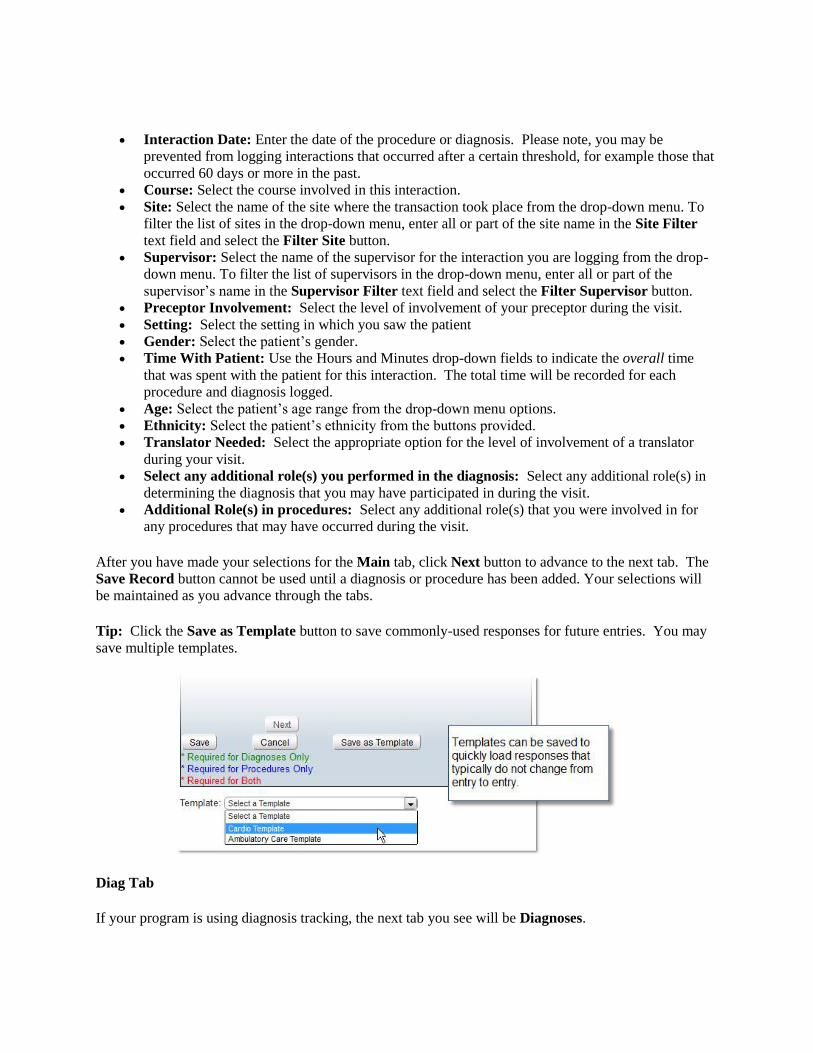
Tip: Click the Save as Template button to save commonly-used responses for future entries. You may
save multiple templates.
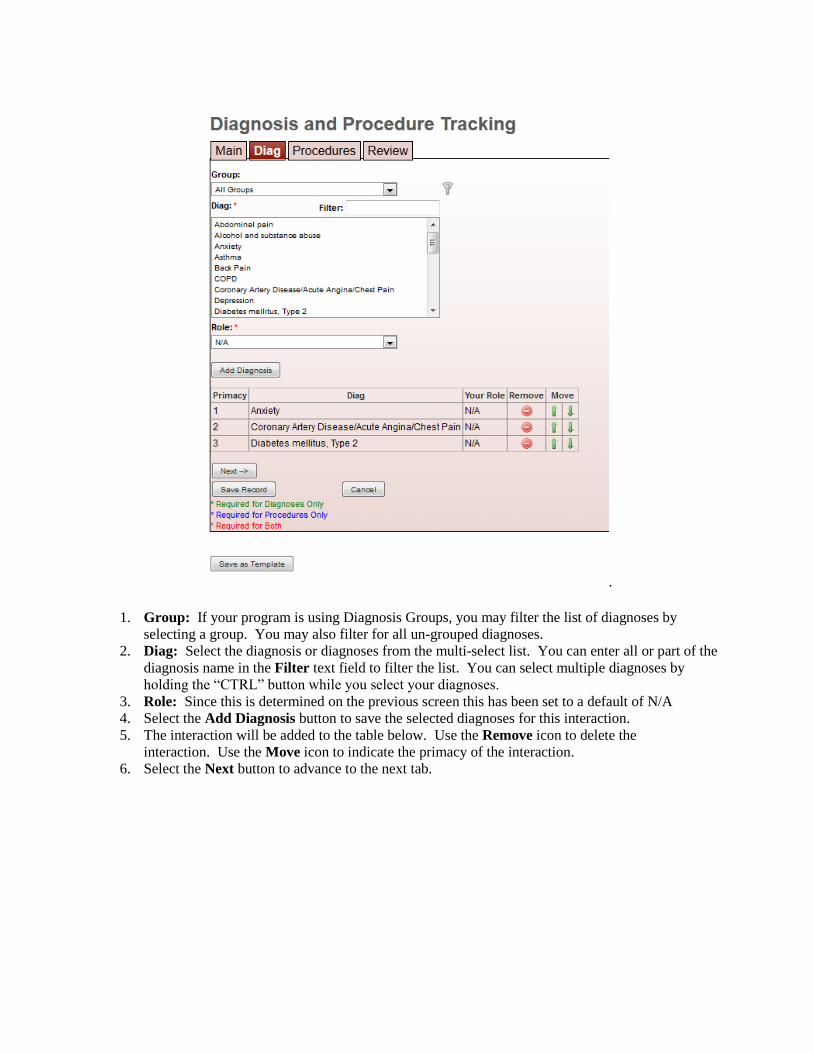
Diag Tab
If your program is using diagnosis tracking, the next tab you see will be Diagnoses.
.
1. Group: If your program is using Diagnosis Groups, you may filter the list of diagnoses by
selecting a group. You may also filter for all un-grouped diagnoses.
2. Diag: Select the diagnosis or diagnoses from the multi-select list. You can enter all or part of the
diagnosis name in the Filter text field to filter the list. You can select multiple diagnoses by
holding the “CTRL” button while you select your diagnoses.
3. Role: Since this is determined on the previous screen this has been set to a default of N/A
4. Select the Add Diagnosis button to save the selected diagnoses for this interaction.
5. The interaction will be added to the table below. Use the Remove icon to delete the
interaction. Use the Move icon to indicate the primacy of the interaction.
6. Select the Next button to advance to the next tab.
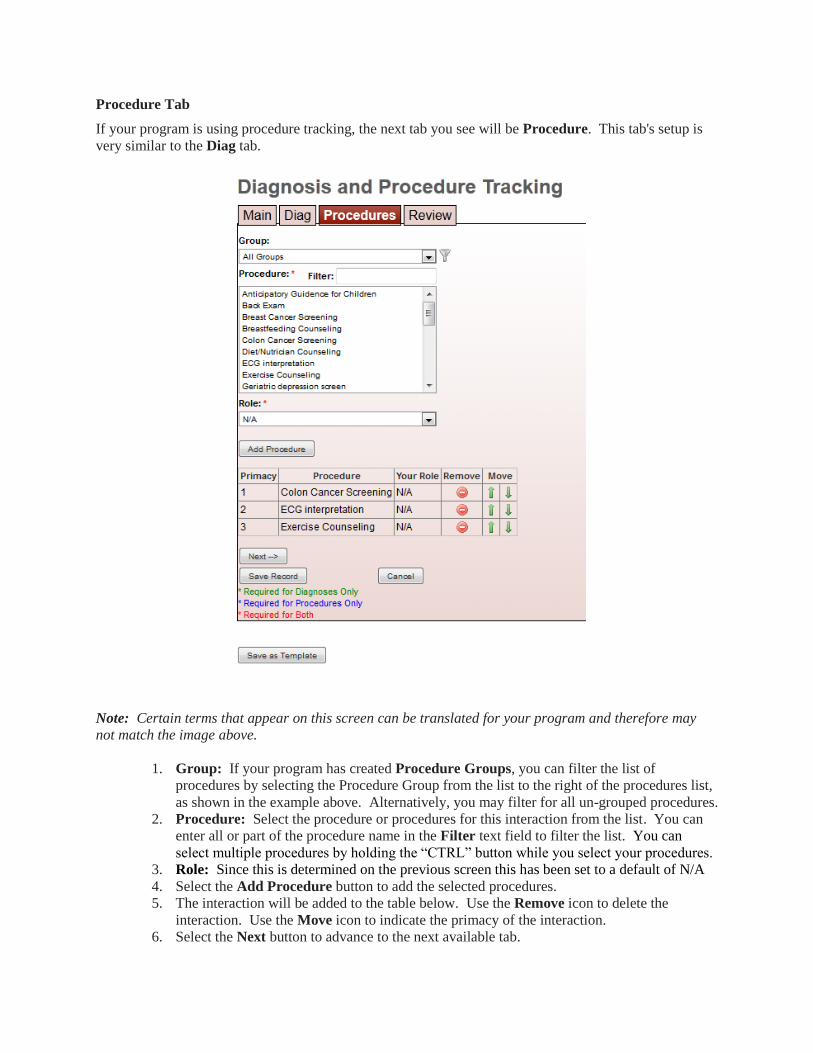
Procedure Tab
If your program is using procedure tracking, the next tab you see will be Procedure. This tab's setup is
very similar to the Diag tab.
Note: Certain terms that appear on this screen can be translated for your program and therefore may
not match the image above.
1. Group: If your program has created Procedure Groups, you can filter the list of
procedures by selecting the Procedure Group from the list to the right of the procedures list,
as shown in the example above. Alternatively, you may filter for all un-grouped procedures.
2. Procedure: Select the procedure or procedures for this interaction from the list. You can
enter all or part of the procedure name in the Filter text field to filter the list. You can
select multiple procedures by holding the “CTRL” button while you select your procedures.
3. Role: Since this is determined on the previous screen this has been set to a default of N/A
4. Select the Add Procedure button to add the selected procedures.
5. The interaction will be added to the table below. Use the Remove icon to delete the
interaction. Use the Move icon to indicate the primacy of the interaction.
6. Select the Next button to advance to the next available tab.
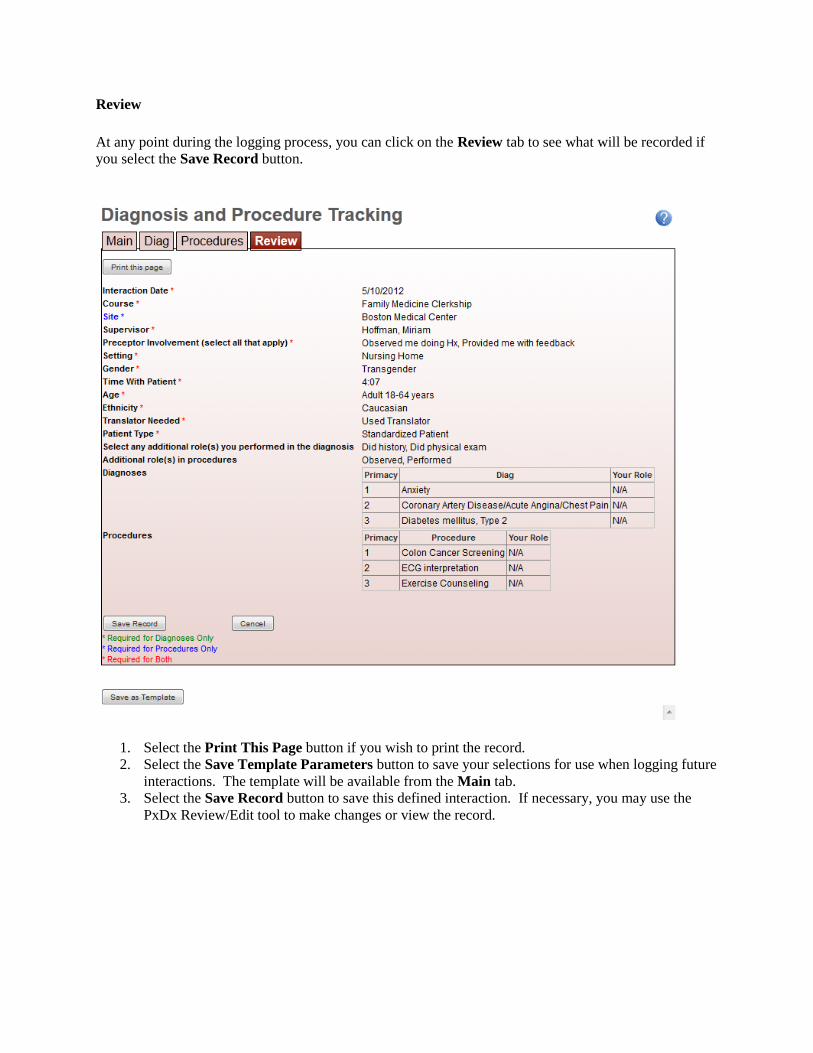
Review
At any point during the logging process, you can click on the Review tab to see what will be recorded if
you select the Save Record button.
1. Select the Print This Page button if you wish to print the record.
2. Select the Save Template Parameters button to save your selections for use when logging future
interactions. The template will be available from the Main tab.
3. Select the Save Record button to save this defined interaction. If necessary, you may use the
PxDx Review/Edit tool to make changes or view the record.
Procedure Log
About
Use this report to search for PxDx Log entries by Site, Course, Trainee, Procedure, Trainee Role,
Supervisor, Confirmation Status, Patient ID, or Patient Age Group. The report can display log
entries for one trainee at a time. Access to trainee log entries will be based on Role and program
configuration.
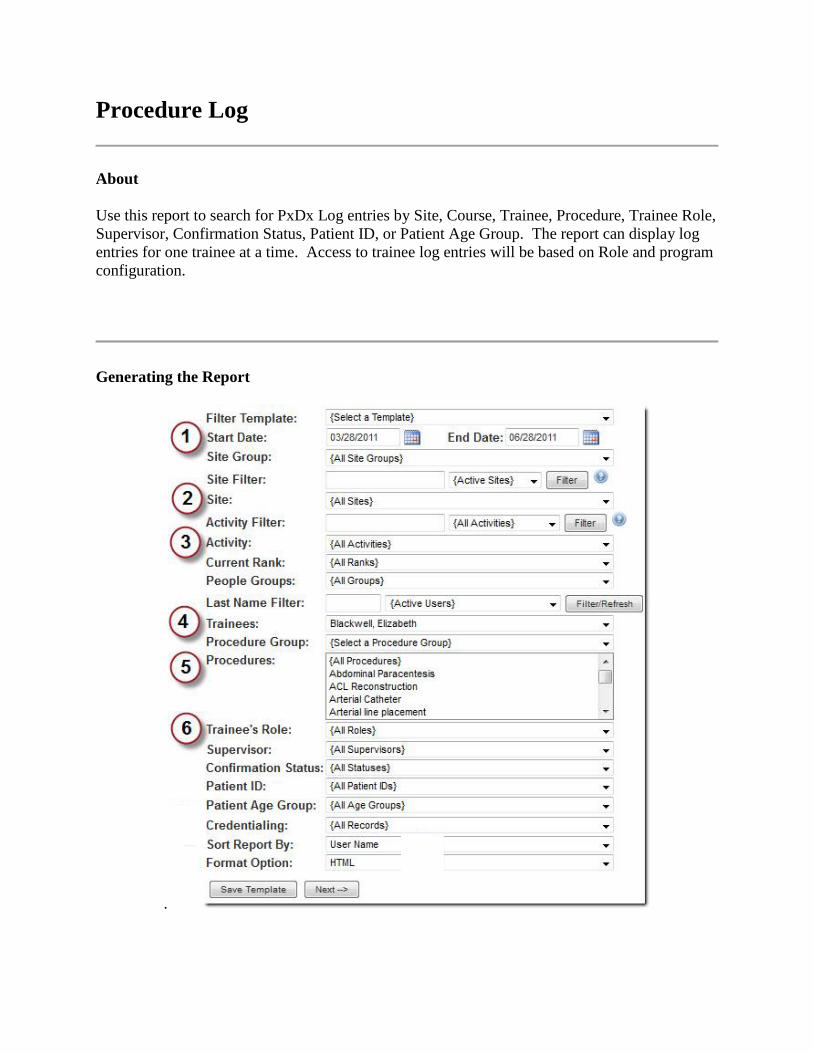
Generating the Report
.
Step 1
Start and End Date: Select the date range for the entries to be included in the report. Please note, these dates refer to the interaction date logged for the entry, not the date that the entry was logged.
Step 2:
Site: You can choose to view entries logged at a particular site or at sites included in a particular Site Group. You may also filter the Site list by name or active/inactive status.
Step 3:
Course: You can choose to view entries logged for a particular course or courses included in a particular Course Group. You may also filter the Course list by name or active/inactive status.
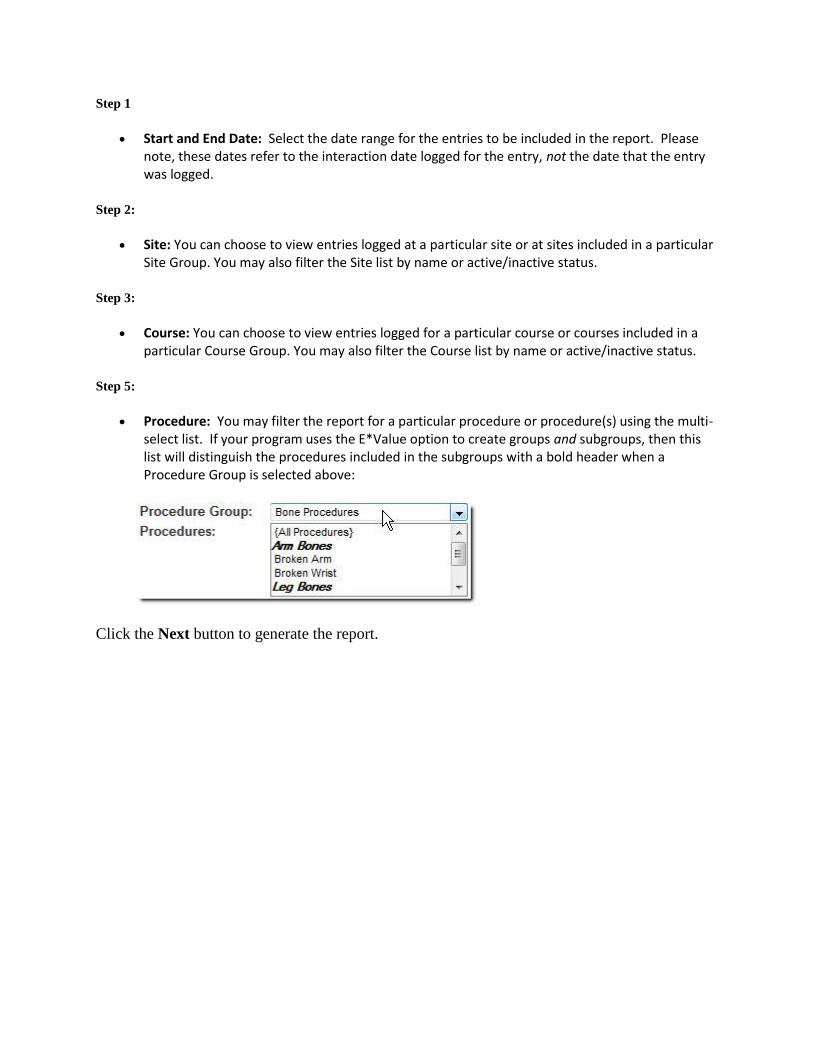
Step 5:
Procedure: You may filter the report for a particular procedure or procedure(s) using the multi-select list. If your program uses the E*Value option to create groups and subgroups, then this list will distinguish the procedures included in the subgroups with a bold header when a Procedure Group is selected above:
Click the Next button to generate the report.