spring xd guide
TRANSCRIPT

Spring XD Guide
1.3.2.RELEASE
Mark Fisher , Mark Pollack , David Turanski , Gunnar Hillert , Eric Bottard , Patrick Peralta, Gary Russell ,Ilayaperumal Gopinathan , Jennifer Hickey , Michael Minella , Luke Taylor , Thomas Risberg , Glenn
Renfro , Janne Valkealahti , Thomas Darimont , Dave Syer , Jon Brisbin , Andy Clement , Marius Bogoevici

Copyright © 2013-2015 Pivotal Software Inc.

Spring XD Guide
1.3.2.RELEASE Spring XD iii
Table of Contents
I. Reference Guide ..................................................................................................................... 11. Introduction .................................................................................................................... 2
1.1. Overview ............................................................................................................. 22. Getting Started ............................................................................................................... 3
2.1. Requirements ...................................................................................................... 32.2. Download Spring XD ........................................................................................... 32.3. Install Spring XD ................................................................................................. 32.4. Start the Runtime and the XD Shell ...................................................................... 32.5. Create a Stream ................................................................................................. 42.6. Explore Spring XD ............................................................................................... 52.7. OSX Homebrew installation .................................................................................. 52.8. RedHat/CentOS Installation .................................................................................. 52.9. Running in Distributed Mode ................................................................................ 5
Introduction ........................................................................................................ 5XD CommandLine Options ......................................................................... 6
Setting up a RDBMS .......................................................................................... 7Setting up ZooKeeper ........................................................................................ 8Setting up Redis ................................................................................................ 9
Installing Redis .......................................................................................... 9Troubleshooting .......................................................................................... 9Starting Redis .......................................................................................... 10
Using RabbitMQ ............................................................................................... 10Installing RabbitMQ .................................................................................. 10Launching RabbitMQ ................................................................................ 10
Starting Spring XD in Distributed Mode ............................................................. 11Choosing a Transport ............................................................................... 11Choosing an Analytics provider ................................................................. 11Other Options .......................................................................................... 12
Using Hadoop .................................................................................................. 12XD-Shell in Distributed Mode ............................................................................ 12
2.10. Running on YARN ........................................................................................... 13Introduction ...................................................................................................... 13What do you need? .......................................................................................... 13Download Spring XD on YARN binaries ............................................................ 13Configure your deployment ............................................................................... 13
XD options ............................................................................................... 14Hadoop settings ....................................................................................... 14Zookeeper settings ................................................................................... 14Transport options ..................................................................................... 15JDBC datasource properties ..................................................................... 15XD Admin port ......................................................................................... 15
Adding custom modules ................................................................................... 15Customizing module configurations ................................................................... 16Modify container logging ................................................................................... 16Control XD YARN application lifecycle ............................................................... 16
Push the Spring XD application binaries and config to HDFS ....................... 16List installed application versions ............................................................... 16

Spring XD Guide
1.3.2.RELEASE Spring XD iv
Submit the Spring XD YARN application .................................................... 16Check the status of YARN apps ................................................................ 16Kill application .......................................................................................... 17Using a built-in shell ................................................................................. 17
Connect xd-shell to YARN runtime managed admins .......................................... 17Configuring YARN memory reservations ............................................................ 17Working with container groups .......................................................................... 19
List existing groups .................................................................................. 19Get status of a group ............................................................................... 20Control group state ................................................................................... 20Modify group configuration ........................................................................ 20Create a new group ................................................................................. 21Destroy a group ....................................................................................... 22Built-in group configurations ...................................................................... 22
Configuration examples .................................................................................... 23Run containers on a specific hosts ............................................................ 23Run admins on a specific racks ................................................................ 23Disable default admin and container groups ............................................... 23
xd-yarn command synopsis ............................................................................ 23Introduction to YARN resource allocation ........................................................... 26
3. Application Configuration .............................................................................................. 273.1. Introduction ....................................................................................................... 273.2. Server Configuration .......................................................................................... 27
Profile support .................................................................................................. 27Database Configuration .................................................................................... 28
HSQLDB .................................................................................................. 28MySQL .................................................................................................... 29PostgreSQL ............................................................................................. 29Oracle database ....................................................................................... 29
Redis ............................................................................................................... 30RabbitMQ ......................................................................................................... 30Kafka ............................................................................................................... 33Admin Server HTTP Port .................................................................................. 35Management Port ............................................................................................. 35Admin Server Security ...................................................................................... 36
Enabling HTTPS ...................................................................................... 36Enabling authentication ............................................................................. 36Customizing authorization ......................................................................... 39
Cross-origin resource sharing (CORS) ............................................................... 41Local transport ................................................................................................. 41Serialization ..................................................................................................... 42
3.3. Module Configuration ......................................................................................... 42Profiles ............................................................................................................ 43Batch Jobs or modules accessing JDBC ........................................................... 44
3.4. Encrypted Properties ......................................................................................... 444. DSL Guide ................................................................................................................... 45
4.1. Introduction ....................................................................................................... 454.2. Pipes and filters ................................................................................................ 454.3. Module parameters ............................................................................................ 454.4. Named channels ............................................................................................... 45

Spring XD Guide
1.3.2.RELEASE Spring XD v
4.5. Labels ............................................................................................................... 464.6. Single quotes, Double quotes, Escaping ............................................................. 46
Spring Shell ..................................................................................................... 47XD Syntax ....................................................................................................... 47SpEL syntax and SpEL literals .......................................................................... 48Putting it all together ........................................................................................ 48
4.7. Introduction ....................................................................................................... 49Using the Shell ................................................................................................ 49Tab completion for Job and Stream DSL definitions ............................................ 51Executing a script ............................................................................................. 51Single quotes, Double quotes, Escaping ............................................................ 52
5. Admin UI ..................................................................................................................... 535.1. Introduction ....................................................................................................... 535.2. Containers ......................................................................................................... 535.3. Streams ............................................................................................................ 545.4. Jobs .................................................................................................................. 55
Modules ........................................................................................................... 55List available batch job modules ................................................................ 55Create a Job Definition from a selected Job Module ................................... 56View Job Module Details .......................................................................... 57
List job definitions ............................................................................................ 57List job deployments ......................................................................................... 58
Launching a batch Job ............................................................................. 59Schedule Batch Job Execution .................................................................. 61
Job Deployment Details .................................................................................... 61List job executions ............................................................................................ 62
Job execution details ................................................................................ 65Step execution details .............................................................................. 66Step execution history .............................................................................. 69
5.5. Analytics ........................................................................................................... 696. Architecture .................................................................................................................. 72
6.1. Introduction ....................................................................................................... 72Runtime Architecture ........................................................................................ 72
DIRT Runtime .......................................................................................... 72Support for other distributed runtimes ........................................................ 73
Single Node Runtime ........................................................................................ 73Admin Server Architecture ................................................................................ 74Container Server Architecture ........................................................................... 74Streams ........................................................................................................... 75Stream Deployment .......................................................................................... 77
6.2. Jobs .................................................................................................................. 816.3. Taps ................................................................................................................. 81
7. Distributed Runtime ...................................................................................................... 827.1. Introduction ....................................................................................................... 827.2. Configuring Spring XD for High Availabilty(HA) .................................................... 827.3. ZooKeeper Overview ......................................................................................... 827.4. The Admin Server Internals ................................................................................ 85
Example ........................................................................................................... 867.5. Module Deployment ........................................................................................... 89
Example: Automatic Redeployment ................................................................... 90

Spring XD Guide
1.3.2.RELEASE Spring XD vi
8. Batch Jobs ................................................................................................................... 928.1. Introduction ....................................................................................................... 928.2. Workflow ........................................................................................................... 928.3. Features ............................................................................................................ 938.4. The Lifecycle of a Job in Spring XD ................................................................... 94
Register a Job Module ..................................................................................... 94Create a Job Definition ..................................................................................... 94Deploy the Job ................................................................................................. 94Launch a Job ................................................................................................... 94Job Execution .................................................................................................. 94Un-deploy a Job ............................................................................................... 94Destroy a Job Definition ................................................................................... 94Creating Jobs - Additional Options .................................................................... 95
8.5. Deployment manifest support for job ................................................................... 958.6. Launching a job ................................................................................................. 96
Ad-hoc ............................................................................................................. 96Launch the Batch using Cron-Trigger ................................................................ 96Launch the Batch using a Fixed-Delay-Trigger ................................................... 97Launch job as a part of event flow .................................................................... 97
8.7. Retrieve job notifications .................................................................................... 97To receive aggregated events ........................................................................... 97To receive job execution events ........................................................................ 98To receive step execution events ...................................................................... 98To receive item, skip and chunk events ............................................................. 99To disable the default listeners ......................................................................... 99To select specific listeners ................................................................................ 99
8.8. Removing Batch Jobs ........................................................................................ 999. Streams ..................................................................................................................... 100
9.1. Introduction ..................................................................................................... 1009.2. Creating a Simple Stream ................................................................................ 1009.3. Deleting a Stream ............................................................................................ 1019.4. Deploying and Undeploying Streams ................................................................. 1019.5. Other Source and Sink Types .......................................................................... 1019.6. Simple Stream Processing ............................................................................... 1029.7. DSL Syntax ..................................................................................................... 1029.8. Advanced Features .......................................................................................... 1029.9. Module Labels ................................................................................................. 103
10. Modules ................................................................................................................... 10410.1. Introduction .................................................................................................... 10410.2. Available Modules .......................................................................................... 104
Modules Included with Spring XD .................................................................... 10410.3. Creating a Module ......................................................................................... 105
Stream Modules ............................................................................................. 105Module Packaging .......................................................................................... 105Creating a Module Project .............................................................................. 107Module dependency management ................................................................... 107
Porting to another Spring XD version ....................................................... 107Building with Maven ........................................................................................ 108Building with Gradle ........................................................................................ 109Testing a Module Project ................................................................................ 110

Spring XD Guide
1.3.2.RELEASE Spring XD vii
10.4. Registering a Module ..................................................................................... 110The Module Registry ...................................................................................... 111Custom Module Registry ................................................................................. 111Replicating Module Registry ............................................................................ 112
10.5. Module Class Loading .................................................................................... 112Dynamic Module ClassLoader ......................................................................... 113
10.6. Module Options ............................................................................................. 114Placeholders available to all modules .............................................................. 115How module options are resolved ................................................................... 116
10.7. Composing Modules ....................................................................................... 117Working with Composite Modules .................................................................... 117
10.8. Getting Information about Modules .................................................................. 11911. Sources .................................................................................................................... 121
11.1. File ................................................................................................................ 122File with options ............................................................................................. 122
11.2. FTP ............................................................................................................... 123Options .......................................................................................................... 123
11.3. GemFire Continuous Query (gemfire-cq) ..................................................... 124Options .......................................................................................................... 124
11.4. GemFire Source (gemfire) ........................................................................... 125Options .......................................................................................................... 125Example ......................................................................................................... 126Launching the XD GemFire Server .................................................................. 127
11.5. HTTP ............................................................................................................ 127HTTP with options .......................................................................................... 128
11.6. JDBC Source (jdbc) ..................................................................................... 12911.7. JMS .............................................................................................................. 132
JMS with Options ........................................................................................... 13211.8. Kafka ............................................................................................................ 13311.9. Mail ............................................................................................................... 13511.10. MongoDB Source (mongodb) ........................................................................ 13711.11. MQTT .......................................................................................................... 138
Options .......................................................................................................... 13811.12. RabbitMQ .................................................................................................... 139
RabbitMQ with Options ................................................................................... 139A Note About Retry ........................................................................................ 141
11.13. Reactor IP (reactor-ip) ............................................................................ 14111.14. SFTP ........................................................................................................... 142
Options .......................................................................................................... 14211.15. Stdout Capture ............................................................................................. 14311.16. Syslog ......................................................................................................... 14411.17. Tail .............................................................................................................. 145
Tail with options ............................................................................................. 145Tail Status Events .......................................................................................... 146
11.18. TCP ............................................................................................................ 146TCP with options ............................................................................................ 147Available Decoders ......................................................................................... 147Examples ....................................................................................................... 148Binary Data Example ...................................................................................... 149
11.19. TCP Client (tcp-client) ............................................................................ 149

Spring XD Guide
1.3.2.RELEASE Spring XD viii
TCP Client options ......................................................................................... 149Implementing a simple conversation ................................................................ 150
11.20. Time ............................................................................................................ 15111.21. Trigger Source (trigger) ............................................................................ 15111.22. Twitter Search (twittersearch) ................................................................. 15211.23. Twitter Stream (twitterstream) ................................................................ 153
12. Processors ............................................................................................................... 15512.1. Aggregator ..................................................................................................... 15512.2. Filter .............................................................................................................. 157
Filter with SpEL expression ............................................................................. 157Filter using jsonPath evaluation ....................................................................... 157Filter with Groovy Script .................................................................................. 158
12.3. Header Enricher (header-enricher) ............................................................ 15912.4. HTTP Client (http-client) .......................................................................... 16012.5. JSON to Tuple (json-to-tuple) .................................................................. 16112.6. Object to JSON (object-to-json) ............................................................... 16112.7. Script ............................................................................................................ 16212.8. Shell .............................................................................................................. 16212.9. Splitter ........................................................................................................... 164
Extract the value of a specific field .................................................................. 16512.10. Transform .................................................................................................... 165
Transform with SpEL expression ..................................................................... 165Transform with Groovy Script .......................................................................... 165
13. Sinks ........................................................................................................................ 16713.1. Dynamic Router (router) .............................................................................. 167
SpEL-based Routing ....................................................................................... 168Groovy-based Routing .................................................................................... 168Options .......................................................................................................... 169
13.2. File Sink (file) ............................................................................................. 170File with Options ............................................................................................ 170
13.3. FTP Sink (ftp) .............................................................................................. 171FTP with Options ............................................................................................ 171
13.4. GemFire Server ............................................................................................. 172Launching the XD GemFire Server .................................................................. 173Gemfire sinks ................................................................................................. 173Example ......................................................................................................... 174
13.5. GPFDIST ....................................................................................................... 174Example usage .............................................................................................. 175Performance Notes ......................................................................................... 176Implementation Notes ..................................................................................... 176GPFDIST with Options .................................................................................... 176
13.6. Cassandra ..................................................................................................... 17813.7. Hadoop (HDFS) (hdfs) .................................................................................. 180
HDFS with Options ......................................................................................... 184Partition Path Expression ................................................................................ 185
Accessing Properties .............................................................................. 185Custom Methods .................................................................................... 185
13.8. HDFS Dataset (Avro/Parquet) (hdfs-dataset) .............................................. 188HDFS Dataset with Options ............................................................................ 189
About null values .................................................................................... 189

Spring XD Guide
1.3.2.RELEASE Spring XD ix
About partitionPath ................................................................................. 18913.9. JDBC ............................................................................................................ 190
JDBC with Options ......................................................................................... 19113.10. Kafka Sink (kafka) ...................................................................................... 19313.11. Log .............................................................................................................. 19513.12. Mail ............................................................................................................. 19613.13. Mongo ......................................................................................................... 19713.14. MQTT Sink (mqtt) ....................................................................................... 197
Options .......................................................................................................... 19713.15. Null Sink (null) .......................................................................................... 19813.16. RabbitMQ .................................................................................................... 199
RabbitMQ with Options ................................................................................... 19913.17. Redis ........................................................................................................... 200
Options .......................................................................................................... 20113.18. Shell Sink (shell) ....................................................................................... 20213.19. Splunk Server (splunk) ............................................................................... 203
Splunk sinks ................................................................................................... 203How To Setup Splunk for TCP Input ................................................................ 203Example ......................................................................................................... 204
13.20. TCP Sink (tcp) ........................................................................................... 204TCP with Options ........................................................................................... 204Available Encoders ......................................................................................... 205An Additional Example .................................................................................... 205
14. Counters and Gauges ............................................................................................... 20714.1. Counter ......................................................................................................... 20714.2. Field Value Counter (field-value-counter) ............................................... 20814.3. Aggregate Counter (aggregate-counter) .................................................... 20914.4. Gauge ........................................................................................................... 210
Simple Tap Example ...................................................................................... 21014.5. Rich Gauge (rich-gauge) ............................................................................ 210
Simple Tap Example ...................................................................................... 211Stock Price Example ...................................................................................... 211Improved Stock Price Example ........................................................................ 212
14.6. Accessing Analytics Data over the RESTful API ............................................... 21215. Jobs ......................................................................................................................... 215
15.1. Import CSV Files to HDFS (filepollhdfs) ................................................... 21515.2. Import CSV Files to JDBC (filejdbc) ........................................................... 21615.3. Import FTP to HDFS (ftphdfs) ..................................................................... 21915.4. Running gpload as a batch job (gpload) ........................................................ 22015.5. Export HDFS to JDBC (hdfsjdbc) ................................................................ 22115.6. Export HDFS to MongoDB (hdfsmongodb) ..................................................... 22415.7. Import JDBC to HDFS (jdbchdfs) ................................................................. 22515.8. Running Spark application as a batch job (sparkapp) ..................................... 22915.9. Running Sqoop as a batch job (sqoop) .......................................................... 230
Using Sqoop’s metastore ................................................................................ 233Options for Sqoop job ..................................................................................... 234
16. Taps ........................................................................................................................ 23516.1. Introduction .................................................................................................... 235
Example ......................................................................................................... 235Example - tap after a processor has been applied ............................................ 235

Spring XD Guide
1.3.2.RELEASE Spring XD x
Example - using a label .................................................................................. 23516.2. Tap Lifecycle ................................................................................................. 236
17. Analytics .................................................................................................................. 23717.1. Introduction .................................................................................................... 23717.2. Predictive analytics ........................................................................................ 23717.3. Analytical Models ........................................................................................... 238
Modeling and Evaluation ................................................................................. 238Modeling ........................................................................................................ 238Evaluation ...................................................................................................... 241Model Selection .............................................................................................. 242
17.4. Counters and Gauges included with Spring XD ................................................ 24318. Tuples ...................................................................................................................... 244
18.1. Introduction .................................................................................................... 244Creating a Tuple ............................................................................................ 244Getting Tuple values ....................................................................................... 245Using SpEL expressions to filter a tuple ........................................................... 246Gradle Dependencies ..................................................................................... 247
19. Type Conversion ...................................................................................................... 24819.1. Introduction .................................................................................................... 24819.2. MIME types ................................................................................................... 24819.3. Stream Definition Examples ............................................................................ 24819.4. POJO to JSON .............................................................................................. 248
JSON to Tuple ............................................................................................... 249Java Serialization ........................................................................................... 249
19.5. MIME types and Java types ........................................................................... 249Caveats ......................................................................................................... 250
II. Developing Modules and Extensions ................................................................................... 25120. Creating a Source Module ........................................................................................ 252
20.1. Introduction .................................................................................................... 25220.2. Create the module Application Context file ...................................................... 25220.3. Create a Module Project ................................................................................ 253
Create a Spring Integration test ....................................................................... 253Create an in-container test .............................................................................. 254
20.4. Install the Module .......................................................................................... 25520.5. Test the source module .................................................................................. 256
21. Creating a Data Stream Processor ............................................................................ 25721.1. Introduction .................................................................................................... 25721.2. Reactor Streams ............................................................................................ 25721.3. RxJava Streams ............................................................................................ 258
Scheduling ..................................................................................................... 26121.4. Spark streaming ............................................................................................. 261
Writing a spark streaming module ................................................................... 262How this works ............................................................................................... 263Failover and recovery ..................................................................................... 264Module Type Conversion ................................................................................ 264XD processor module examples ...................................................................... 265
22. XD sink module example .......................................................................................... 26723. Creating a Processor Module .................................................................................... 270
23.1. Introduction .................................................................................................... 27023.2. Write the Transformer Code ........................................................................... 270

Spring XD Guide
1.3.2.RELEASE Spring XD xi
23.3. Create the module Application Context File ..................................................... 27023.4. Write a Test .................................................................................................. 27223.5. Register the Module ....................................................................................... 27423.6. Test the custom module in the Spring XD runtime: ........................................... 274
24. Creating a Sink Module ............................................................................................ 27524.1. Introduction .................................................................................................... 27524.2. Create the module Application Context ............................................................ 27524.3. Create a module project ................................................................................. 276
Create the Spring integration test .................................................................... 276Run the test ................................................................................................... 277Test the Module Options ................................................................................. 277
24.4. Install the module .......................................................................................... 27824.5. Test the module ............................................................................................. 278
25. Creating a Job Module ............................................................................................. 28025.1. Introduction .................................................................................................... 28025.2. Developing your Job ...................................................................................... 28025.3. Creating a Simple Job .................................................................................... 280
Create a Module Project ................................................................................. 280Create the Spring Batch Job Definition ............................................................ 280Write the Tasklet ............................................................................................ 281Package and install the Module: ...................................................................... 283Run the job .................................................................................................... 283
25.4. Creating a read-write processing Job .............................................................. 28325.5. Orchestrating Hadoop Jobs ............................................................................ 284
26. Creating a Python Module ......................................................................................... 28526.1. Introduction .................................................................................................... 285
27. Providing Module Options Metadata .......................................................................... 28727.1. Introduction .................................................................................................... 28727.2. Using the "Simple" approach .......................................................................... 287
Declaring and documenting an option .............................................................. 287Advertising default values ............................................................................... 288Exposing the option type ................................................................................ 288
27.3. Using the "POJO" approach ........................................................................... 288Declaring options to the module ...................................................................... 289Exposing values to the context ........................................................................ 289Providing defaults ........................................................................................... 289Encapsulating options ..................................................................................... 289Using profiles ................................................................................................. 290Using validation .............................................................................................. 290
27.4. Metadata style remarks .................................................................................. 29028. Extending Spring XD ................................................................................................ 291
28.1. Introduction .................................................................................................... 29128.2. Spring XD Application Contexts ...................................................................... 29128.3. Plugin Architecture ......................................................................................... 29328.4. How to Add a Spring bean to the XD Container ............................................... 29328.5. Providing A new Type Converter .................................................................... 29428.6. Adding a New Data Transport ........................................................................ 296
29. Optimizing Serialization ............................................................................................. 29729.1. Introduction .................................................................................................... 29729.2. Serialization Performance ............................................................................... 297

Spring XD Guide
1.3.2.RELEASE Spring XD xii
29.3. Serialization in XD ......................................................................................... 29729.4. Customizing Kryo ........................................................................................... 297
Disabling References ...................................................................................... 298Registering a Custom Kryo Serializer in XD ..................................................... 298Implementing KryoSerializable ......................................................................... 299Using DefaultSerializer Annotation ................................................................... 300Replacing PojoCodec ..................................................................................... 300
29.5. Benchmarking ................................................................................................ 30030. Samples ................................................................................................................... 302
30.1. Syslog ingestion into HDFS ............................................................................ 302A sample configuration using syslog-ng ........................................................... 302
III. Configuration Guidelines .................................................................................................... 30431. Overview .................................................................................................................. 30532. Deployment .............................................................................................................. 306
32.1. Introduction .................................................................................................... 30632.2. Deployment Manifest ...................................................................................... 306
Deployment Properties .................................................................................... 307Spring XD Shell interaction ..................................................................... 307General Properties .................................................................................. 308Bus Properties ........................................................................................ 308Stream Partitioning ................................................................................. 310Direct Binding ......................................................................................... 311
32.3. Deployment States ......................................................................................... 313Example ......................................................................................................... 314
32.4. Container Attributes ....................................................................................... 314Groups ........................................................................................................... 314IP Address ..................................................................................................... 314Hostname ....................................................................................................... 315
32.5. Stream Deployment Examples ........................................................................ 31532.6. Partitioned Stream Deployment Examples ....................................................... 316
Using SpEL Expressions ................................................................................. 31632.7. Direct Binding Deployment Examples .............................................................. 31732.8. Troubleshooting ............................................................................................. 318
ZooKeeper disconnects ................................................................................... 318Debugging Slowness ...................................................................................... 319File Descriptors and limit violation ................................................................... 319
33. Message Bus Configuration ....................................................................................... 32033.1. Introduction .................................................................................................... 32033.2. Rabbit Message Bus High Availability (HA) Configuration ................................. 320
Introduction .................................................................................................... 320Connection Management and HA Queues ....................................................... 320
33.3. Error Handling (Message Delivery Failures) ..................................................... 320RabbitMQ Message Bus ................................................................................. 320Redis Message Bus ........................................................................................ 322
33.4. Rabbit Message Bus Secure Sockets Layer (SSL) ........................................... 32333.5. Rabbit Message Bus Batching and Compression ............................................. 32333.6. Removing RabbitMQ MessageBus Resources ................................................. 32433.7. Kafka Message Bus Partition Control .............................................................. 324
Controlling the partition count of a transport topic ............................................. 324IV. Administration ................................................................................................................... 326

Spring XD Guide
1.3.2.RELEASE Spring XD xiii
34. Monitoring and Management ..................................................................................... 32734.1. Monitoring XD Admin, Container and Single-node servers ................................ 327
To enable boot provided management endpoints over HTTP ............................. 327To enable the container shutdown operation in the UI ....................................... 327To disable boot endpoints over HTTP .............................................................. 327
34.2. Management over JMX .................................................................................. 328Monitoring deployed modules in XD container .................................................. 328Streams ......................................................................................................... 328Jobs ............................................................................................................... 328
34.3. Using Jolokia to access JMX over http ............................................................ 32835. REST API ................................................................................................................ 330
35.1. Introduction .................................................................................................... 33035.2. XD Resources ............................................................................................... 33035.3. Stream Definitions .......................................................................................... 33135.4. Stream Deployments ...................................................................................... 33135.5. Job Definitions ............................................................................................... 33235.6. Job Deployments ........................................................................................... 33235.7. Batch Job Configurations ............................................................................... 33235.8. Batch Job Executions ..................................................................................... 33335.9. Batch Job Instances ....................................................................................... 33335.10. Module Definitions ........................................................................................ 33435.11. Deployed Modules ....................................................................................... 33435.12. Containers ................................................................................................... 33435.13. Counters ...................................................................................................... 33535.14. Field Value Counters .................................................................................... 33535.15. Aggregate Counters ..................................................................................... 33535.16. Gauges ........................................................................................................ 33635.17. Rich Gauges ................................................................................................ 33635.18. Tab Completions .......................................................................................... 336
36. JAVA API ................................................................................................................. 33736.1. Introduction .................................................................................................... 337
Required Libraries .......................................................................................... 337Sample Usage ................................................................................................ 337
V. Appendices ........................................................................................................................ 338A. Installing Hadoop ....................................................................................................... 339
A.1. Installing Hadoop ............................................................................................. 339Download ....................................................................................................... 339Java Setup ..................................................................................................... 339Setup SSH ..................................................................................................... 340Setting the Namenode Port ............................................................................. 340Further Configuration File Changes ................................................................. 341
A.2. Running Hadoop ............................................................................................. 341B. Building Spring XD ..................................................................................................... 343
B.1. Instructions ..................................................................................................... 343B.2. IDE support ..................................................................................................... 343
C. Using MQTT Modules ................................................................................................ 344C.1. Introduction ..................................................................................................... 344
Setting up MQTT on RabbitMQ ....................................................................... 344Rabbit MQTT Plugin settings .......................................................................... 345MQTT Source ................................................................................................ 345

Spring XD Guide
1.3.2.RELEASE Spring XD xiv
Example 1: Using defaults ...................................................................... 345Example 2: Monitoring different topics. ..................................................... 346
MQTT Sink .................................................................................................... 346Example 1: Using defaults ...................................................................... 346
D. XD Shell Command Reference ................................................................................... 348D.1. Configuration Commands ................................................................................. 348
admin config info ............................................................................................ 348admin config server ........................................................................................ 348admin config timezone list ............................................................................... 348admin config timezone set .............................................................................. 348
D.2. Runtime Commands ........................................................................................ 348runtime containers .......................................................................................... 348runtime modules ............................................................................................. 349
D.3. Stream Commands ......................................................................................... 349stream all destroy ........................................................................................... 349stream all undeploy ........................................................................................ 349stream create ................................................................................................. 349stream deploy ................................................................................................ 349stream destroy ............................................................................................... 350stream list ...................................................................................................... 350stream undeploy ............................................................................................. 350
D.4. Job Commands ............................................................................................... 350job all destroy ................................................................................................ 350job all undeploy .............................................................................................. 350job create ....................................................................................................... 350job deploy ...................................................................................................... 351job destroy ..................................................................................................... 351job execution all stop ...................................................................................... 351job execution display ...................................................................................... 351job execution list ............................................................................................ 351job execution restart ....................................................................................... 352job execution step display ............................................................................... 352job execution step list ..................................................................................... 352job execution step progress ............................................................................ 352job execution stop .......................................................................................... 352job instance display ........................................................................................ 352job launch ...................................................................................................... 353job list ............................................................................................................ 353job undeploy .................................................................................................. 353
D.5. Module Commands ......................................................................................... 353module compose ............................................................................................ 353module delete ................................................................................................ 353module info .................................................................................................... 354module list ..................................................................................................... 354module upload ................................................................................................ 354
D.6. Metrics Commands ......................................................................................... 354counter delete ................................................................................................ 354counter display ............................................................................................... 355counter list ..................................................................................................... 355field-value-counter delete ................................................................................ 355
Spring XD Guide
1.3.2.RELEASE Spring XD xv
field-value-counter display ............................................................................... 355field-value-counter list ..................................................................................... 355aggregate-counter delete ................................................................................ 355aggregate-counter display ............................................................................... 356aggregate-counter list ..................................................................................... 356gauge delete .................................................................................................. 356gauge display ................................................................................................. 356gauge list ....................................................................................................... 357rich-gauge delete ............................................................................................ 357rich-gauge display .......................................................................................... 357rich-gauge list ................................................................................................. 357
D.7. Http Commands .............................................................................................. 357http get .......................................................................................................... 357http post ........................................................................................................ 357
D.8. Hadoop Configuration Commands .................................................................... 358hadoop config fs ............................................................................................. 358hadoop config info .......................................................................................... 358hadoop config load ......................................................................................... 358hadoop config props get ................................................................................. 358hadoop config props list .................................................................................. 358hadoop config props set ................................................................................. 358
D.9. Hadoop FileSystem Commands ....................................................................... 359hadoop fs cat ................................................................................................. 359hadoop fs chgrp ............................................................................................. 359hadoop fs chmod ............................................................................................ 359hadoop fs chown ............................................................................................ 359hadoop fs copyFromLocal ............................................................................... 360hadoop fs copyMergeToLocal ......................................................................... 360hadoop fs copyToLocal ................................................................................... 360hadoop fs count ............................................................................................. 360hadoop fs cp .................................................................................................. 361hadoop fs du .................................................................................................. 361hadoop fs expunge ......................................................................................... 361hadoop fs get ................................................................................................. 361hadoop fs ls ................................................................................................... 362hadoop fs mkdir ............................................................................................. 362hadoop fs moveFromLocal .............................................................................. 362hadoop fs mv ................................................................................................. 362hadoop fs put ................................................................................................. 362hadoop fs rm .................................................................................................. 363hadoop fs setrep ............................................................................................ 363hadoop fs tail ................................................................................................. 363hadoop fs text ................................................................................................ 363hadoop fs touchz ............................................................................................ 364
E. Connecting to Kerberized Hadoop ............................................................................... 365E.1. Spring XD Admin and Container ...................................................................... 365E.2. Spring Shell .................................................................................................... 365E.3. Setting Principals ............................................................................................. 366E.4. Automatic Login .............................................................................................. 366
F. Modules-Project-Migration ........................................................................................... 367

Spring XD Guide
1.3.2.RELEASE Spring XD xvi
F.1. Introduction ..................................................................................................... 367Updating your Maven Project .......................................................................... 367
Cleaning up ............................................................................................ 367Updating your POM file ........................................................................... 367
Updating your Gradle Project .......................................................................... 369Building the Module Project ............................................................................ 371
Maven .................................................................................................... 371Gradle .................................................................................................... 371
Updating Configurations .................................................................................. 371Registering the module ................................................................................... 372
G. Composed Jobs ......................................................................................................... 373G.1. DSL Components ............................................................................................ 373
Conditional Execution ..................................................................................... 373Transitions ..................................................................................................... 374
Keywords ............................................................................................... 376Split ............................................................................................................... 380
Parenthesis ............................................................................................ 381G.2. Composed Job Parameters ............................................................................. 383G.3. Considerations ................................................................................................ 385

Part I. Reference Guide

Spring XD Guide
1.3.2.RELEASE Spring XD 2
1. Introduction
1.1 Overview
Spring XD is a unified, distributed, and extensible service for data ingestion, real time analytics, batchprocessing, and data export. The Spring XD project is an open source Apache 2 License licencedproject whose goal is to tackle big data complexity. Much of the complexity in building real-world bigdata applications is related to integrating many disparate systems into one cohesive solution across arange of use-cases. Common use-cases encountered in creating a comprehensive big data solution are
• High throughput distributed data ingestion from a variety of input sources into big data store such asHDFS or Splunk
• Real-time analytics at ingestion time, e.g. gathering metrics and counting values.
• Workflow management via batch jobs. The jobs combine interactions with standard enterprisesystems (e.g. RDBMS) as well as Hadoop operations (e.g. MapReduce, HDFS, Pig, Hive or HBase).
• High throughput data export, e.g. from HDFS to a RDBMS or NoSQL database.
The Spring XD project aims to provide a one stop shop solution for these use-cases.

Spring XD Guide
1.3.2.RELEASE Spring XD 3
2. Getting Started
2.1 Requirements
To get started, make sure your system has as a minimum Java JDK 7 or newer installed. Java JDK7 is recommended.
2.2 Download Spring XD
To download the current GA release, you can download the distribution spring-xd-1.3.2.RELEASE-dist.zip and its accompanying documentation.
If you want to try out the latest build of Spring XD, You can download the snapshot distribution from thespring snapshots repository. You can also build the project from source if you wish. The wiki contentshould also be kept up to date with the current snapshot so if you are reading this on the github website,things may have changed since the last stable release.
Unzip the distribution which will unpack to a single installation directory. All the commands below areexecuted from this directory, so change into it before proceeding.
$ cd spring-xd-1.3.2.RELEASE
2.3 Install Spring XD
Spring XD can be run in two different modes. There’s a single-node runtime option for testing anddevelopment, and there’s a distributed runtime which supports distribution of processing tasks acrossmultiple nodes. This document will get you up and running quickly with a single-node runtime. SeeRunning Distributed Mode for details on setting up a distributed runtime.
You can also install Spring XD using homebrew on OSX and RPM on RedHat/CentOS.
2.4 Start the Runtime and the XD Shell
The single node option is the easiest to get started with. It runs everything you need in a single process.To start it, you just need to cd to the xd directory and run the following command
xd/bin>$ ./xd-singlenode
In a separate terminal, cd into the shell directory and start the XD shell, which you can use to issuecommands.
shell/bin>$ ./xd-shell
_____ __ _______
/ ___| (-) \ \ / / _ \
\ `--. _ __ _ __ _ _ __ __ _ \ V /| | | |
`--. \ '_ \| '__| | '_ \ / _` | / ^ \| | | |
/\__/ / |_) | | | | | | | (_| | / / \ \ |/ /
\____/| .__/|_| |_|_| |_|\__, | \/ \/___/
| | __/ |
|_| |___/
eXtreme Data
1.3.2.RELEASE | Admin Server Target: http://localhost:9393
Welcome to the Spring XD shell. For assistance hit TAB or type "help".
xd:>

Spring XD Guide
1.3.2.RELEASE Spring XD 4
The shell is a more user-friendly front end to the REST API which Spring XD exposes to clients. TheURL of the currently targeted Spring XD server is shown at startup.
Note
If the server could not be reached, the prompt will read
server-unknown:>
You can then use the admin config server <url> to attempt to reconnect to the adminREST endpoint once you’ve figured out what went wrong:
admin config server http://localhost:9393
You should now be able to start using Spring XD.
Tip
Spring XD uses ZooKeeper internally which typically runs as an external process. XD singlenoderuns with an embedded ZooKeeper server and assigns a random available port. This keeps thingsvery simple. However if you already have a ZooKeeper ensemble set up and want to connect toit, you can edit xd/config/servers.yml:
#Zookeeper properties
# client connect string: host1:port1,host2:port2,...,hostN:portN
zk:
client:
connect: localhost:2181
Also, sometimes it is useful in troubleshooting to connect the ZooKeeper CLI to the embeddedserver. The assigned server port is listed in the console log, but you can also set the port directly bysetting the property zk.embedded.server.port in servers.yml or set JAVA_OPTS beforestarting xd-singlenode.
$export JAVA_OPTS=-Dzk.embedded.server.port=<port>
2.5 Create a Stream
In Spring XD, a basic stream defines the ingestion of event driven data from a source to a sink thatpasses through any number of processors. You can create a new stream by issuing a stream createcommand from the XD shell. Stream definitions are built from a simple DSL. For example, execute:
xd:> stream create --name ticktock --definition "time | log" --deploy
This defines a stream named ticktock based off the DSL expression time | log. The DSL usesthe "pipe" symbol |, to connect a source to a sink. The stream server finds the time and log definitionsin the modules directory and uses them to setup the stream. In this simple example, the time sourcesimply sends the current time as a message each second, and the log sink outputs it using the loggingframework at the WARN logging level. Since the --deploy flag was provided, this stream will bedeployed immediately. In the console where you started the server, you will see log output similar tothat listed below

Spring XD Guide
1.3.2.RELEASE Spring XD 5
13:09:53,812 INFO http-bio-8080-exec-1 module.SimpleModule:109 - started module: Module [name=log,
type=sink]
13:09:53,813 INFO http-bio-8080-exec-1 module.ModuleDeployer:111 - launched sink module: ticktock:log:1
13:09:53,911 INFO http-bio-8080-exec-1 module.SimpleModule:109 - started module: Module [name=time,
type=source]
13:09:53,912 INFO http-bio-8080-exec-1 module.ModuleDeployer:111 - launched source module:
ticktock:time:0
13:09:53,945 WARN task-scheduler-1 logger.ticktock:141 - 2013-06-11 13:09:53
13:09:54,948 WARN task-scheduler-1 logger.ticktock:141 - 2013-06-11 13:09:54
13:09:55,949 WARN task-scheduler-2 logger.ticktock:141 - 2013-06-11 13:09:55
To stop the stream, and remove the definition completely, you can use the stream destroy command:
xd:>stream destroy --name ticktock
It is also possible to stop and restart the stream instead, using the undeploy and deploy commands.The shell supports command completion so you can hit the tab key to see which commands and optionsare available.
2.6 Explore Spring XD
Learn about the modules available in Spring XD in the Sources, Processors, and Sinks sections of thedocumentation.
Don’t see what you’re looking for? Create a custom module: source, processor or sink (and then considercontributing it back to Spring XD).
Want to add some analytics to your stream? Check out the Taps and Analytics sections.
2.7 OSX Homebrew installation
If you are on a Mac and using homebrew, all you need to do to install Spring XD is:
$ brew tap pivotal/tap
$ brew install springxd
Homebrew will install springxd to /usr/local/bin. Now you can jump straight into using SpringXD:
$ xd-singlenode
Brew install also allows you to run Spring XD in distributed mode on you OSx. See Running DistributedMode for details on setting up a distributed runtime.
2.8 RedHat/CentOS Installation
If you are using RHEL or CentOS v. 6.x you can install Spring XD using our RPM package. See thewiki page for instructions.
2.9 Running in Distributed Mode
Introduction
The Spring XD distributed runtime (DIRT) supports distribution of processing tasks across multiplenodes. See Getting Started for information on running Spring XD as a single node.
The XD distributed runtime architecture consists of the following distributed components:

Spring XD Guide
1.3.2.RELEASE Spring XD 6
• Admin - Manages Stream and Job deployments and other end user operations and provides RESTservices to access runtime state, system metrics, and analytics
• Container - Hosts deployed Modules (stream processing tasks) and batch jobs
• ZooKeeper - Provides all runtime information for the XD cluster. Tracks running containers, in whichcontainers modules and jobs are deployed, stream definitions, deployment manifests, and the like,see XD Distributed Runtime for an overview on how XD uses ZooKeeper.
• Spring Batch Job Repository Database - An RDBMS is required for jobs. The XD distribution comeswith HSQLDB, but this is not appropriate for a production installation. XD supports any JDBCcompliant database.
• A Message Broker - Used for data transport. XD data transport is designed to be pluggable. CurrentlyXD supports Rabbit MQ and Redis for messaging during stream and job processing, and Kafka formessaging during stream processing only. Please note that support for job processing using Kafkaas transport is not currently available. A production installation must configure one of these transportoptions.
• Analytics Repository - XD currently uses Redis to store the counters and gauges provided Analytics
In addition, XD provides a Command Line Interface (CLI), XD Shell as well as a web application, XD-UI to interact with the XD runtime.
XD CommandLine Options
The XD distribution provides shell scripts to start its runtime components under the xd directory of theXD installation:

Spring XD Guide
1.3.2.RELEASE Spring XD 7
Whether you are running _xd-admin, xd-container or even xd-singlenode you can always get help bytyping the command followed by --help. For example:
xd/bin/xd-admin --help
_____ __ _______
/ ___| (-) \ \ / / _ \
\ `--. _ __ _ __ _ _ __ __ _ \ V /| | | |
`--. \ '_ \| '__| | '_ \ / _` | / ^ \| | | |
/\__/ / |_) | | | | | | | (_| | / / \ \ |/ /
\____/| .__/|_| |_|_| |_|\__, | \/ \/___/
| | __/ |
|_| |___/
1.3.2.RELEASE eXtreme Data
Started : AdminServerApplication
Documentation: https://github.com/spring-projects/spring-xd/wiki
Usage:
--analytics [redis] : How to persist analytics such as counters and gauges
--help (-?, -h) : Show this help screen
--httpPort <httpPort> : Http port for the REST API server
--mgmtPort <mgmtPort> : The port for the management server
xd-admin command line args:
• analytics - The data store that will be used to store the analytics data. The default is redis
• help - Displays help for the command args. Help information may be accessed with a -? or -h.
• httpPort - The http port for the REST API server. Defaults to 9393.
• mgmtPort - The port for the management server. Defaults to the admin server port.
Also, note that it is recommended to use fixed http port for XDAdmin(s). This makes it easy to knowthe admin server addresses the REST clients (shell, webUI) can point to. If a random port is chosen(with server.port or $PORT set to 0), then one needs to go through the log and find which port adminserver’s tomcat starts at.
xd-container command line args:
• analytics - How to persist analytics such as counters and gauges. The default is redis
• groups - The assigned group membership for this container as a comma delimited list
• hadoopDistro - The Hadoop distribution to be used for HDFS access. HDFS is not available if not set.
• help - Displays help for the command args. Help information may be accessed with a -? or -h.
• mgmtPort - The port for the management server. Defaults to the container server port.
Setting up a RDBMS
The distributed runtime requires an RDBMS. The XD distrubution comes with an HSQLDB in memorydatabase for testing purposes, but an alternate is expected. To start HSQLDB:
$ cd hsqldb/bin
$ ./hsqldb-server
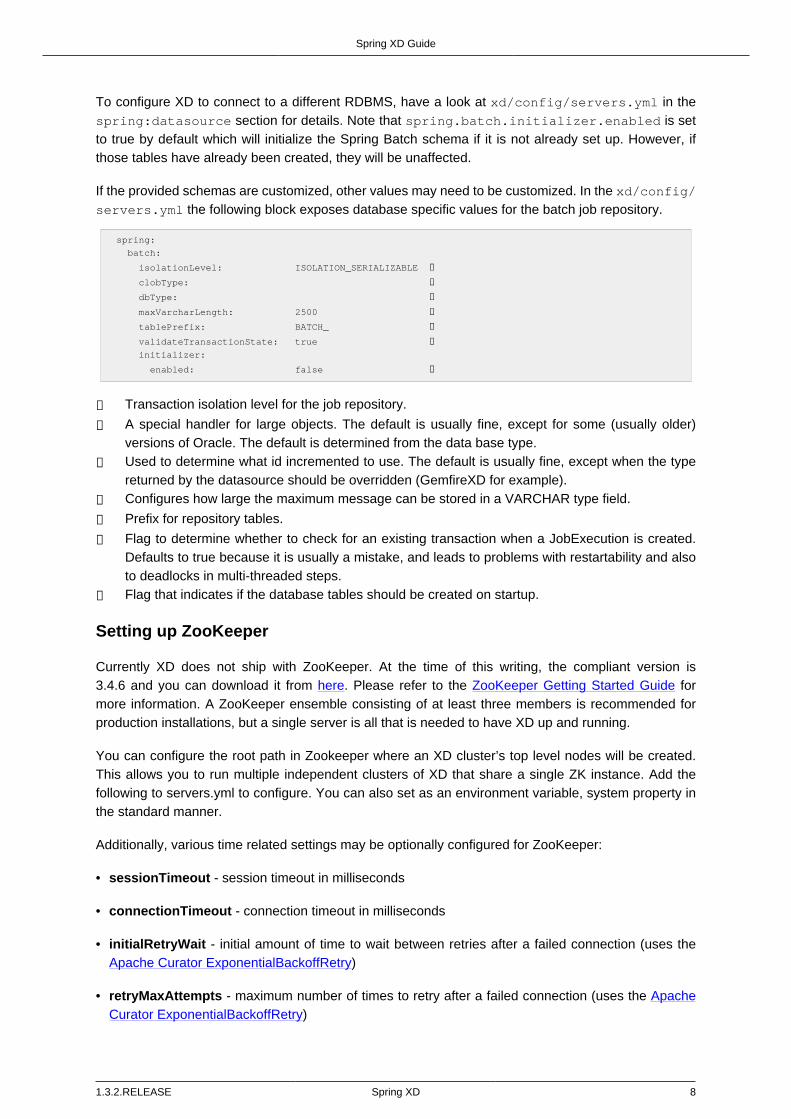
Spring XD Guide
1.3.2.RELEASE Spring XD 8
To configure XD to connect to a different RDBMS, have a look at xd/config/servers.yml in thespring:datasource section for details. Note that spring.batch.initializer.enabled is setto true by default which will initialize the Spring Batch schema if it is not already set up. However, ifthose tables have already been created, they will be unaffected.
If the provided schemas are customized, other values may need to be customized. In the xd/config/servers.yml the following block exposes database specific values for the batch job repository.
spring:
batch:
isolationLevel: ISOLATION_SERIALIZABLE ❶
clobType: ❷
dbType: ❸
maxVarcharLength: 2500 ❹
tablePrefix: BATCH_ ❺
validateTransactionState: true ❻
initializer:
enabled: false ❼
❶ Transaction isolation level for the job repository.
❷ A special handler for large objects. The default is usually fine, except for some (usually older)versions of Oracle. The default is determined from the data base type.
❸ Used to determine what id incremented to use. The default is usually fine, except when the typereturned by the datasource should be overridden (GemfireXD for example).
❹ Configures how large the maximum message can be stored in a VARCHAR type field.
❺ Prefix for repository tables.
❻ Flag to determine whether to check for an existing transaction when a JobExecution is created.Defaults to true because it is usually a mistake, and leads to problems with restartability and alsoto deadlocks in multi-threaded steps.
❼ Flag that indicates if the database tables should be created on startup.
Setting up ZooKeeper
Currently XD does not ship with ZooKeeper. At the time of this writing, the compliant version is3.4.6 and you can download it from here. Please refer to the ZooKeeper Getting Started Guide formore information. A ZooKeeper ensemble consisting of at least three members is recommended forproduction installations, but a single server is all that is needed to have XD up and running.
You can configure the root path in Zookeeper where an XD cluster’s top level nodes will be created.This allows you to run multiple independent clusters of XD that share a single ZK instance. Add thefollowing to servers.yml to configure. You can also set as an environment variable, system property inthe standard manner.
Additionally, various time related settings may be optionally configured for ZooKeeper:
• sessionTimeout - session timeout in milliseconds
• connectionTimeout - connection timeout in milliseconds
• initialRetryWait - initial amount of time to wait between retries after a failed connection (uses theApache Curator ExponentialBackoffRetry)
• retryMaxAttempts - maximum number of times to retry after a failed connection (uses the ApacheCurator ExponentialBackoffRetry)

Spring XD Guide
1.3.2.RELEASE Spring XD 9
zk:
namespace: xd
client:
connect: localhost:2181
sessionTimeout: 60000
connectionTimeout: 30000
initialRetryWait: 1000
retryMaxAttempts: 3
Setting up Redis
Redis is the default transport when running in distributed mode.
Installing Redis
If you already have a running instance of Redis it can be used for Spring XD. By default Spring XDwill try to use a Redis instance running on localhost using port 6379. You can change that in theservers.yml file residing in the config/ directory.
If you don’t have a pre-existing installation of Redis, you can use the Spring XD provided instance (ForLinux and Mac) which is included in the .zip download. If you are installing using brew or rpm you shouldinstall Redis using those installers or download the source tarball and compile Redis yourself. If youused the .zip download then inside the Spring XD installation directory (spring-xd) do:
$ cd redis/bin
$ ./install-redis
This will compile the Redis source tar and add the Redis executables under redis/bin:
• redis-check-dump
• redis-sentinel
• redis-benchmark
• redis-cli
• redis-server
You are now ready to start Redis by executing
$ ./redis-server
Tip
For further information on installing Redis in general, please checkout the Redis Quick Start guide.If you are using Mac OS, you can also install Redis via Homebrew
Troubleshooting
Redis on Windows
Presently, Spring XD does not ship Windows binaries for Redis (See XD-151). However, Microsoft isactively working on supporting Redis on Windows. You can download Windows Redis binaries from:
https://github.com/MSOpenTech/redis/tree/2.6/bin/release
Redis is not running
If you try to run Spring XD and Redis is NOT running, you will see the following exception:

Spring XD Guide
1.3.2.RELEASE Spring XD 10
11:26:37,830 ERROR main launcher.RedisContainerLauncher:85 - Unable to connect to Redis on
localhost:6379; nested exception is com.lambdaworks.redis.RedisException: Unable to connect
Redis does not seem to be running. Did you install and start Redis? Please see the Getting Started
section of the guide for instructions.
Starting Redis
$ redis-server
You should see something like this:
11655:C 08 Jun 14:45:04.167 # Warning: no config file specified, using the default config. In order to
specify a config file use ./redis-server /path/to/redis.conf
_._
_.-``__ ''-._
_.-`` `. `_. ''-._ Redis 3.0.1 (bddc928a/0) 64 bit
.-`` .-```. ```\/ _.,_ ''-._
( ' , .-` | `, ) Running in standalone mode
|`-._`-...-` __...-.``-._|'` _.-'| Port: 6379
| `-._ `._ / _.-' | PID: 11655
`-._ `-._ `-./ _.-' _.-'
|`-._`-._ `-.__.-' _.-'_.-'|
| `-._`-._ _.-'_.-' | http://redis.io
`-._ `-._`-.__.-'_.-' _.-'
|`-._`-._ `-.__.-' _.-'_.-'|
| `-._`-._ _.-'_.-' |
`-._ `-._`-.__.-'_.-' _.-'
`-._ `-.__.-' _.-'
`-._ _.-'
`-.__.-'
11655:M 08 Jun 14:45:04.169 # Server started, Redis version 3.0.1
11655:M 08 Jun 14:45:04.169 * DB loaded from disk: 0.000 seconds
11655:M 08 Jun 14:45:04.169 * The server is now ready to accept connections on port 6379
Using RabbitMQ
Installing RabbitMQ
If you already have a running instance of RabbitMQ it can be used for Spring XD. By default Spring XDwill try to use a Rabbit instance running on localhost using port 5672. The default account credentialsof guest/guest are assumed. You can change that in the servers.yml file residing in the config/directory.
If you don’t have a RabbitMQ installation already, head over to http://www.rabbitmq.com and follow theinstructions. Packages are provided for Windows, Mac and various flavor of unix/linux.
Launching RabbitMQ
Start the RabbitMQ broker by running the rabbitmq-server script:
$ rabbitmq-server
You should see something similar to this:
RabbitMQ 3.3.0. Copyright (C) 2007-2013 GoPivotal, Inc.
## ## Licensed under the MPL. See http://www.rabbitmq.com/
## ##
########## Logs: /usr/local/var/log/rabbitmq/[email protected]
###### ## /usr/local/var/log/rabbitmq/[email protected]
##########
Starting broker... completed with 10 plugins.

Spring XD Guide
1.3.2.RELEASE Spring XD 11
Starting Spring XD in Distributed Mode
Spring XD consists of two servers
• XDAdmin - controls deployment of modules into containers
• XDContainer - executes modules
You can start the xd-container and xd-admin servers individually as follows:
xd/bin>$ ./xd-admin
xd/bin>$ ./xd-container
Choosing a Transport
Spring XD uses data transport for sending data from the output of one module to the input of the nextmodule. In general, this requires remote transport between container nodes. The Admin server alsouses the data bus to launch batch jobs by sending a message to the job’s launch channel. Since thesame transport must be shared by the Admin and all Containers, the transport configuration is centrallyconfigured in xd/config/servers.yml. The default transport is redis. Open servers.yml with a text editorand you will see the transport configuration near the top. To change the transport, you can uncommentthis section and change the transport to rabbit or any other supported transport. Any changes to thetransport configuration must be replicated to every XD node in the cluster.
Note
XD singlenode also supports a --transport command line argument, useful for testing streamsunder alternate transports.
#xd:
# transport: redis
Note
If you have multiple XD instances running share a single RabbitMQ server for transport,you may encounter issues if each system contains streams of the same name.We recommend using a different RabbitMQ virtual host for each system. Update thespring.rabbitmq.virtual_host property in $XD_HOME/config/servers.yml to pointXD at the correct virtual host.
Choosing an Analytics provider
By default, the xd-container will store Analytics data in redis. At the time of writing, this is the onlysupported option (when running in distributed mode). Use the --analytics option to specify anotherbacking store for Analytics data.
xd/bin>$ ./xd-container --analytics redis
You can configure the following settings for redis analytics

Spring XD Guide
1.3.2.RELEASE Spring XD 12
xd:
analytics:
redis:
backOffInitialInterval: 1000 ❶
backOffMaxInterval: 10000 ❷
backOffMultiplier: 2.0 ❸
maxAttempts: 3 ❹
❶ The time in milliseconds before retrying a failed redis operation
❷ The maximum time (ms) to wait between retries
❸ The back off multiplier (previous interval x multiplier = next interval)
❹ The maximum number of retry attempts
Other Options
There are additional configuration options available for these scripts:
To specify the location of the Spring XD install other than the default configured in the script
export XD_HOME=<Specific XD install directory>
To specify the http port of the XDAdmin server,
xd/bin>$ ./xd-admin --httpPort <httpPort>
The XDContainer nodes by default start up with server.port 0 (which means they will scan for an availableHTTP port). You can disable the HTTP endpoints for the XDContainer by setting server.port=-1. Notethat in this case HTTP source support will not work in a PaaS environment because typically it wouldrequire XD to bind to a specific port. Both the XDAdmin and XDContainer processes bind to server.port$PORT (i.e. an environment variable if one is available, as is typical in a PaaS).
Using Hadoop
Spring XD supports the following Hadoop distributions:
• hadoop27 - Apache Hadoop 2.7.1 (default)
• phd21 - Pivotal HD 2.1 and 2.0
• phd30 - Pivotal HD 3.0
• cdh5 - Cloudera CDH 5.3.0
• hdp22 - Hortonworks Data Platform 2.2
To specify the distribution libraries to use for Hadoop client connections, use the option--hadoopDistro for the xd-container and xd-shell commands:
xd/bin>$ ./xd-shell --hadoopDistro <distribution>
xd/bin>$ ./xd-admin
xd/bin>$ ./xd-container --hadoopDistro <distribution>
Pass in the --help option to see other configuration properties.
XD-Shell in Distributed Mode
If you wish to use a XD-Shell that is on a different machine than where you deployed your admin server.
1) Open your shell

Spring XD Guide
1.3.2.RELEASE Spring XD 13
shell/bin>$ ./xd-shell
2) From the xd shell use the "admin config server" command i.e.
admin config server <yourhost>:9393
2.10 Running on YARN
Introduction
The Spring XD distributed runtime (DIRT) supports distribution of processing tasks across multiplenodes. See Running Distributed Mode for information on running Spring XD in distributed mode. Oneoption is to run these nodes on a Hadoop YARN cluster rather than on VMs or physical servers managedby you.
What do you need?
To begin with, you need to have access to a Hadoop cluster running a version based on ApacheHadoop version 2. This includes Apache Hadoop 2.7.1, Pivotal HD 2.1 or 3.0, Hortonworks HDP 2.3and Cloudera CDH5.
Important
Running YARN on some Ubuntu distributions and Mac OS X has shown to have issues whenYARN applications are killed. It seems that the kill command doesn’t always succesfully killthe corresponding OS process and you end up with application processes still running. SeeHADOOP-9752 for more details.
You need a supported transport, see Running Distributed Mode for installation of Redis or Rabbit MQ.Spring XD on YARN currently uses Redis as the default data transport.
You also need Zookeeper running. If your Hadoop cluster doesn’t have Zookeeper installed you needto install and run it specifically for Spring XD. See the Setting up ZooKeeper section of the "RunningDistributed Mode" chapter.
Lastly, you need an RDBMs to support batch jobs and JDBC operations.
Download Spring XD on YARN binaries
In addition to the regular spring-xd-<version>-dist.zip files we also distribute a zip file thatincludes all you need to deploy on YARN. The name of this zip file is spring-xd-<version>-yarn.zip. You can download the zip file for the current release from Spring release repo or a milestonebuild from the Spring milestone repo. Unzip the downloaded file and you should see a spring-xd-<version>-yarn directory.
Configure your deployment
Configuration options are contained in a config/servers.yml file in the Spring XD YARN installdirectory. You need to configure the hadoop settings, the transport choice plus redis/rabbit settings, thezookeeper settings and the JDBC datasource properties.
Depending on the distribution used you might need to change the siteYarnAppClasspath andsiteMapreduceAppClasspath. We have provided basic settings for the supported distros, you justneed to uncomment the ones for the distro you use.

Spring XD Guide
1.3.2.RELEASE Spring XD 14
These are the settings used for Hadoop 2.7.1:
spring:
yarn:
siteYarnAppClasspath: "$HADOOP_CONF_DIR,$HADOOP_COMMON_HOME/share/hadoop/common/*,
$HADOOP_COMMON_HOME/share/hadoop/common/lib/*,$HADOOP_HDFS_HOME/share/hadoop/hdfs/*,$HADOOP_HDFS_HOME/
share/hadoop/hdfs/lib/*,$HADOOP_YARN_HOME/share/hadoop/yarn/*,$HADOOP_YARN_HOME/share/hadoop/yarn/lib/*"
siteMapreduceAppClasspath: "$HADOOP_MAPRED_HOME/share/hadoop/mapreduce/*,$HADOOP_MAPRED_HOME/
share/hadoop/mapreduce/lib/*"
XD options
For Spring XD you need to define how many admin servers and containers you need using propertiesspring.xd.adminServers and spring.xd.containers respectively. You also need to definethe HDFS location using property spring.yarn.applicationDir where the Spring XD binary andconfig files will be stored.
spring:
xd:
appmasterMemory: 512M
adminServers: 1
adminMemory: 512M
adminLocality: false
containers: 3
containerMemory: 512M
containerLocality: false
container:
groups: yarn
yarn:
applicationDir: /xd/app/
More about memory settings in above configuration, see section the section called “Configuring YARNmemory reservations”.
Hadoop settings
You need to specify the host where the YARN Resource Manager is runningusing spring.hadoop.resourceManagerHost as well as the HDFS URL usingspring.hadoop.fsUri.
# Hadoop properties
spring:
hadoop:
fsUri: hdfs://localhost:8020
resourceManagerHost: localhost
config:
topology.script.file.name: /path/to/topology-script.sh
Note
Setting hadoop topology.script.file.name property is mandatory if more sophisticatedcontainer placement is used to allocate XD admins or containers from a spesific hosts or racks.If this property is not set to match a one used in a hadoop cluster, allocations using hosts andracks will simply fail.
Zookeeper settings
You should specify the Zookeeper connection settings

Spring XD Guide
1.3.2.RELEASE Spring XD 15
#Zookeeper properties
#client connect string: host1:port1,host2:port2,...,hostN:portN
zk:
client:
connect: localhost:2181
Transport options
You should choose either redis (default) or rabbit as the transport and include the host and port inthe properties for the choice you made.
# Transport used
transport: redis
# Redis properties
spring:
redis:
port: 6379
host: localhost
JDBC datasource properties
You should specify the JDBC connection properties based on the RDBMs that you use for the batchjobs and JDBC sink
#Config for use with MySQL - uncomment and edit with relevant values for your environment
spring:
datasource:
url: jdbc:mysql://yourDBhost:3306/yourDB
username: yourUsername
password: yourPassword
driverClassName: com.mysql.jdbc.Driver
XD Admin port
On default the property server.port which defines the used port for embedded server is set to 9393but it can be overridden by changing the value in servers.yml.
#Port that admin-ui is listening on
#server:
# port: 9393
On YARN it is recommended that you simply set the port to 0 meaning that server will automaticallychoose a random port. This is advisable simply because it will prevent port collission which are usually alittle difficult to track down from a cluster. See more instructions in the section the section called “Connectxd-shell to YARN runtime managed admins” for how to connect xd-shell to admins managed by YARN.
#Port that admin-ui is listening on
server:
port: 0
Adding custom modules
The recommended approach for custom modules is to define the module registry location as a directoryin HDFS. This will allow the most flexibility and the modules will automatically be available to all XDcontainers running in the Hadoop cluster. The xd.customModule.home property is by default setto the value ${spring.hadoop.fsUri}/xd/yarn/custom-modules for YARN deployments. Thiscan be modified, but we recommend keeping it to a location on HDFS within the same Hadoop cluster.

Spring XD Guide
1.3.2.RELEASE Spring XD 16
xd:
customModule:
home: ${spring.hadoop.fsUri}/xd/yarn/custom-modules
See the Modules section for more on custom modules.
Customizing module configurations
The configurations for all standard XD modules can be customized by modifying the file modules.ymlin the config directory and then adding it to the modules-config.zip archive in the same directory.
You can run the following command from the config directory to achieve this:
jar -uf modules-config.zip modules.yml
Modify container logging
Logging configuration for XD admins and containers are defined in files config/xd-admin-logger.properties and config/xd-container-logger.properties respectively. These twofiles are copied over to hdfs during the deployment. If you want to modify logging configuration eithermodify source files and do a deployment again or modify files in hdfs directly.
Control XD YARN application lifecycle
Change current directory to be the directory that was unzipped spring-xd-<version>-yarn. Toread about runtime configuration and more sophisticated features see section the section called“Working with container groups”.
Push the Spring XD application binaries and config to HDFS
Run the command
$ bin/xd-yarn push
New version installed
List installed application versions
Run the command
$ bin/xd-yarn pushed
NAME PATH
---- --------------------
app hdfs://node1:8020/xd
Submit the Spring XD YARN application
Run the command
$ bin/xd-yarn submit
New instance submitted with id application_1420911708637_0001
Check the status of YARN apps
You can use the regular yarn command to check the status. Simply run:

Spring XD Guide
1.3.2.RELEASE Spring XD 17
$ bin/xd-yarn submitted
APPLICATION ID USER NAME QUEUE TYPE STARTTIME FINISHTIME STATE
FINALSTATUS ORIGINAL TRACKING URL
------------------------------ ------------ ------ ------- ---- -------------- ----------
------- ----------- ---------------------------
application_1420911708637_0001 jvalkealahti xd-app default XD 09/01/15 14:25 N/A
RUNNING UNDEFINED http://172.16.101.106:49792
You should see one application running named xd-app.
Note
Pay attention to APPLICATION ID listed in output because that is an id used in most of thecontrol commands to communicate to a specific application instance. For example you may havemultiple XD YARN runtime instances running.
Kill application
Application can be killed using a kill command.
$ bin/xd-yarn kill -a application_1420905836797_0001
Kill request for application_1420905836797_0001 sent
Using a built-in shell
To get a better and faster command usage a build-in shell can be used to run control commands:
$ bin/xd-yarn shell
Spring YARN Cli (v2.1.0.M3)
Hit TAB to complete. Type 'help' and hit RETURN for help, and 'exit' to quit.
$
clear clustercreate clusterdestroy clusterinfo clustermodify
clustersinfo clusterstart clusterstop exit help
kill prompt pushed submit submitted
$
Connect xd-shell to YARN runtime managed admins
XD admins will register its runtime information into zookeeper and you can use the admininfocommand to query this information:
$ bin/xd-yarn admininfo
Admins: [http://hadoop.localdomain:43740]
Then connect xd-shell to this instance:
server-unknown:>admin config server --uri http://hadoop.localdomain:43740
Successfully targeted http://hadoop.localdomain:43740
xd:>runtime containers
Container Id Host IP Address PID Groups Custom
Attributes
------------------------------------ ----------------- -------------- ----- ------
--------------------------------------------------
6324a9ae-205b-44b9-b851-f0edd7245286 node2.localdomain 172.16.101.102 12284 yarn
{virtualCores=1, memory=512, managementPort=54694}
Configuring YARN memory reservations
YARN Nodemanager is continously tracking how much memory is used by individual YARN containers.If containers are using more memory than what the configuration allows, containers are simply killed by

Spring XD Guide
1.3.2.RELEASE Spring XD 18
a Nodemanager. Application master controlling the app lifecycle is given a little more freedom meaningthat Nodemanager is not that aggressive when making a desicion when a container should be killed.
Lets take a quick look of memory related settings in YARN cluster and in YARN applications. Below xmlconfig is what a default vanilla Apache Hadoop uses for memory related settings. Other distributionsmay have different defaults.
yarn-site.xml.
<configuration>
<property>
<name>yarn.nodemanager.pmem-check-enabled</name>
<value>true</value>
</property>
<property>
<name>yarn.nodemanager.vmem-check-enabled</name>
<value>true</value>
</property>
<property>
<name>yarn.nodemanager.vmem-pmem-ratio</name>
<value>2.1</value>
</property>
<property>
<name>yarn.scheduler.minimum-allocation-mb</name>
<value>1024</value>
</property>
<property>
<name>yarn.scheduler.maximum-allocation-mb</name>
<value>8192</value>
</property>
<property>
<name>yarn.nodemanager.resource.memory-mb</name>
<value>8192</value>
</property>
</configuration>
yarn.nodemanager.pmem-check-enabledEnables a check for physical memory of a process. This check if enabled is directly tracking amountof memory requested for a YARN container.
yarn.nodemanager.vmem-check-enabledEnables a check for virtual memory of a process. This setting is one which is usually causingcontainers of a custom YARN applications to get killed by a node manager. Usually the actual ratiobetween physical and virtual memory is higher than a default 2.1 or bugs in a OS is causing wrongcalculation of a used virtual memory.
yarn.nodemanager.vmem-pmem-ratioDefines a ratio of allowed virtual memory compared to physical memory. This ratio simply defineshow much virtual memory a process can use but the actual tracked size is always calculated froma physical memory limit.
yarn.scheduler.minimum-allocation-mbDefines a minimum allocated memory for container.
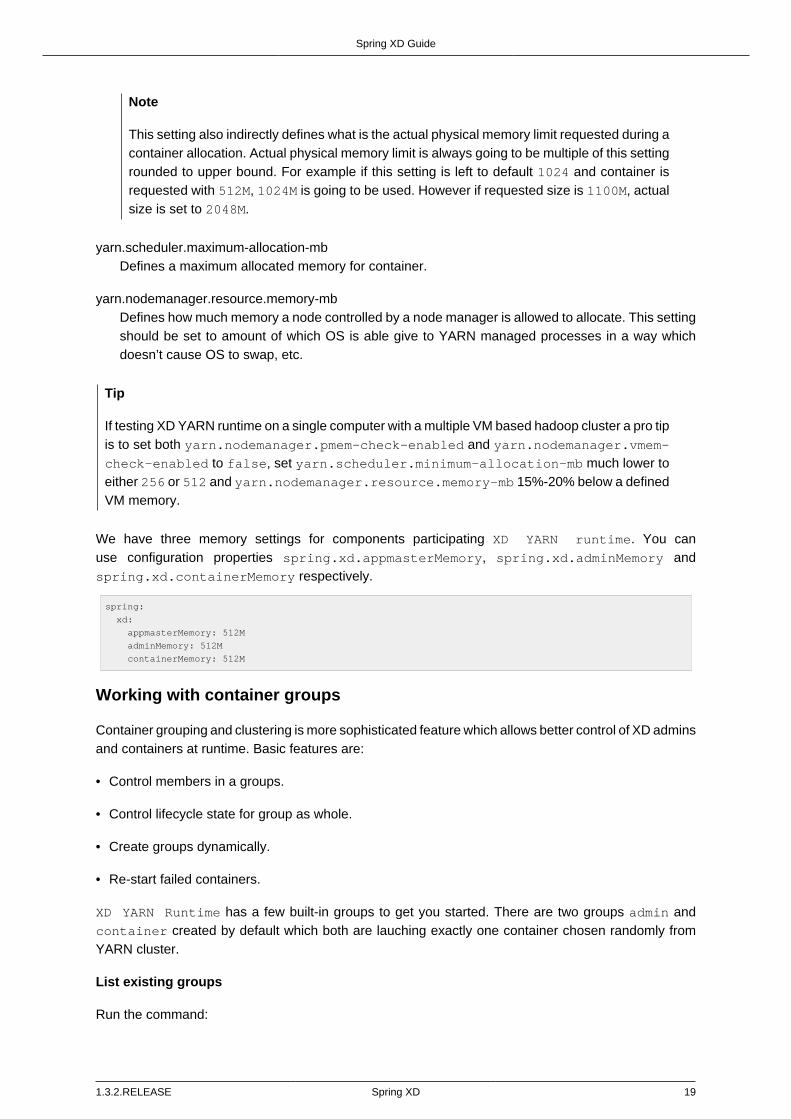
Spring XD Guide
1.3.2.RELEASE Spring XD 19
Note
This setting also indirectly defines what is the actual physical memory limit requested during acontainer allocation. Actual physical memory limit is always going to be multiple of this settingrounded to upper bound. For example if this setting is left to default 1024 and container isrequested with 512M, 1024M is going to be used. However if requested size is 1100M, actualsize is set to 2048M.
yarn.scheduler.maximum-allocation-mbDefines a maximum allocated memory for container.
yarn.nodemanager.resource.memory-mbDefines how much memory a node controlled by a node manager is allowed to allocate. This settingshould be set to amount of which OS is able give to YARN managed processes in a way whichdoesn’t cause OS to swap, etc.
Tip
If testing XD YARN runtime on a single computer with a multiple VM based hadoop cluster a pro tipis to set both yarn.nodemanager.pmem-check-enabled and yarn.nodemanager.vmem-check-enabled to false, set yarn.scheduler.minimum-allocation-mb much lower toeither 256 or 512 and yarn.nodemanager.resource.memory-mb 15%-20% below a definedVM memory.
We have three memory settings for components participating XD YARN runtime. You canuse configuration properties spring.xd.appmasterMemory, spring.xd.adminMemory andspring.xd.containerMemory respectively.
spring:
xd:
appmasterMemory: 512M
adminMemory: 512M
containerMemory: 512M
Working with container groups
Container grouping and clustering is more sophisticated feature which allows better control of XD adminsand containers at runtime. Basic features are:
• Control members in a groups.
• Control lifecycle state for group as whole.
• Create groups dynamically.
• Re-start failed containers.
XD YARN Runtime has a few built-in groups to get you started. There are two groups admin andcontainer created by default which both are lauching exactly one container chosen randomly fromYARN cluster.
List existing groups
Run the command:
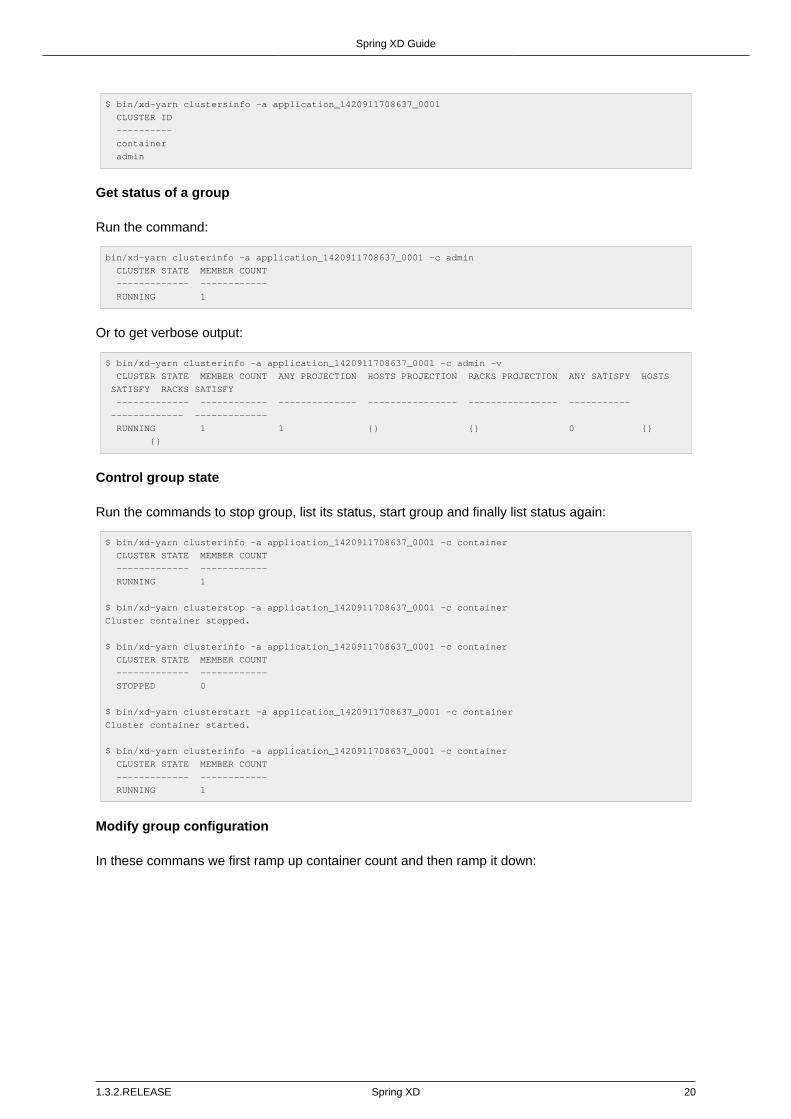
Spring XD Guide
1.3.2.RELEASE Spring XD 20
$ bin/xd-yarn clustersinfo -a application_1420911708637_0001
CLUSTER ID
----------
container
admin
Get status of a group
Run the command:
bin/xd-yarn clusterinfo -a application_1420911708637_0001 -c admin
CLUSTER STATE MEMBER COUNT
------------- ------------
RUNNING 1
Or to get verbose output:
$ bin/xd-yarn clusterinfo -a application_1420911708637_0001 -c admin -v
CLUSTER STATE MEMBER COUNT ANY PROJECTION HOSTS PROJECTION RACKS PROJECTION ANY SATISFY HOSTS
SATISFY RACKS SATISFY
------------- ------------ -------------- ---------------- ---------------- -----------
------------- -------------
RUNNING 1 1 {} {} 0 {}
{}
Control group state
Run the commands to stop group, list its status, start group and finally list status again:
$ bin/xd-yarn clusterinfo -a application_1420911708637_0001 -c container
CLUSTER STATE MEMBER COUNT
------------- ------------
RUNNING 1
$ bin/xd-yarn clusterstop -a application_1420911708637_0001 -c container
Cluster container stopped.
$ bin/xd-yarn clusterinfo -a application_1420911708637_0001 -c container
CLUSTER STATE MEMBER COUNT
------------- ------------
STOPPED 0
$ bin/xd-yarn clusterstart -a application_1420911708637_0001 -c container
Cluster container started.
$ bin/xd-yarn clusterinfo -a application_1420911708637_0001 -c container
CLUSTER STATE MEMBER COUNT
------------- ------------
RUNNING 1
Modify group configuration
In these commans we first ramp up container count and then ramp it down:

Spring XD Guide
1.3.2.RELEASE Spring XD 21
18:19 $ bin/xd-yarn clusterinfo -a application_1420911708637_0001 -c container
CLUSTER STATE MEMBER COUNT
------------- ------------
RUNNING 1
$ bin/xd-yarn clustermodify -a application_1420911708637_0001 -c container -w 3
Cluster container modified.
$ bin/xd-yarn clusterinfo -a application_1420911708637_0001 -c container
CLUSTER STATE MEMBER COUNT
------------- ------------
RUNNING 3
$ bin/xd-yarn clustermodify -a application_1420911708637_0001 -c container -w 2
Cluster container modified.
$ bin/xd-yarn clusterinfo -a application_1420911708637_0001 -c container
CLUSTER STATE MEMBER COUNT
------------- ------------
RUNNING 2
Note
In above example we used option -w which is a shortcut for defining YARN allocation which usesa wildcard requests allowing containers to be requested from any host.
Create a new group
When you want to create a new group that is because you need to add new XD admin or container nodesto a current system with a different settings. These setting usually differ by a colocation of containers.More about built-in group configuration refer to section the section called “Built-in group configurations”.
Run the command:
$ bin/xd-yarn clustercreate -a application_1420911708637_0001 -c custom -i container-nolocality-template
-p default -w 2
Cluster custom created.
$ bin/xd-yarn clusterinfo -a application_1420911708637_0001 -c custom
CLUSTER STATE MEMBER COUNT
------------- ------------
INITIAL 0
$ bin/xd-yarn clusterstart -a application_1420911708637_0001 -c custom
Cluster custom started.
$ bin/xd-yarn clusterinfo -a application_1420911708637_0001 -c custom
CLUSTER STATE MEMBER COUNT
------------- ------------
RUNNING 2
To create group with two containers on node5 and one on node6 run command:
$ bin/xd-yarn clustercreate -a application_1420911708637_0001 -c custom -i container-locality-template -
p default -y "{hosts:{node6: 1,node5: 2}}"
Cluster custom created.
$ bin/xd-yarn -a application_1420911708637_0001 -c custom -v
CLUSTER STATE MEMBER COUNT ANY PROJECTION HOSTS PROJECTION RACKS PROJECTION ANY SATISFY HOSTS
SATISFY RACKS SATISFY
------------- ------------ -------------- ------------------ ---------------- -----------
------------------ -------------
INITIAL 0 0 {node5=2, node6=1} {} 0
{node5=2, node6=1} {}

Spring XD Guide
1.3.2.RELEASE Spring XD 22
Destroy a group
Run the commands:
$ bin/xd-yarn clustersinfo -a application_1420911708637_0001
CLUSTER ID
----------
container
admin
$ bin/xd-yarn clusterinfo -a application_1420911708637_0001 -c container
CLUSTER STATE MEMBER COUNT
------------- ------------
RUNNING 1
$ bin/xd-yarn clusterstop -a application_1420911708637_0001 -c container
Cluster container stopped.
$ bin/xd-yarn clusterinfo -a application_1420911708637_0001 -c container
CLUSTER STATE MEMBER COUNT
------------- ------------
STOPPED 0
$ bin/xd-yarn clusterdestroy -a application_1420911708637_0001 -c container
Cluster container destroyed.
$ bin/xd-yarn clustersinfo -a application_1420911708637_0001
CLUSTER ID
----------
admin
Note
Group can only destroyed if its status is STOPPED or INITIAL.
Built-in group configurations
Few groups are already defined where admin and container are enabled automatically. Other groupsare disabled and thus working as a blueprints which can be used to create groups manually.
adminDefault group definition for XD admins.
containerDefault group definition for XD containers.
admin-nolocality-templateBlueprint with relax localization. Use this to create a groups if you plan to use any matching.
admin-locality-templateBlueprint with no relax localization. Use this to create a groups if you plan to use hosts or racksmatching.
container-nolocality-templateBlueprint with relax localization. Use this to create a groups if you plan to use any matching.
container-locality-templateBlueprint with no relax localization. Use this to create a groups if you plan to use hosts or racksmatching.

Spring XD Guide
1.3.2.RELEASE Spring XD 23
Configuration examples
This section contains examples of usual use cases for custom configurations.
Run containers on a specific hosts
Below configuration sets default XD container to exist on node1 and node2.
xd:
containerLocality: true
spring:
yarn:
appmaster:
containercluster:
clusters:
container:
projection:
data: {any: 0, hosts: {node1: 1, node2: 1}}
Run admins on a specific racks
Below configuration sets default XD admins to exist on /rack1 and /rack2.
xd:
adminLocality: true
spring:
yarn:
appmaster:
containercluster:
clusters:
admin:
projection:
data: {any: 0, racks: {/rack1: 1, /rack2: 1}}
Disable default admin and container groups
Existing built-in groups admin and container can be disabled by setting their projection types to null.
spring:
yarn:
appmaster:
containercluster:
clusters:
admin:
projection:
type: null
container:
projection:
type: null
xd-yarn command synopsis
push
xd-yarn push - Push new application version
usage: xd-yarn push [options]
Option Description
------ -----------
-v, --application-version Application version (default: app)
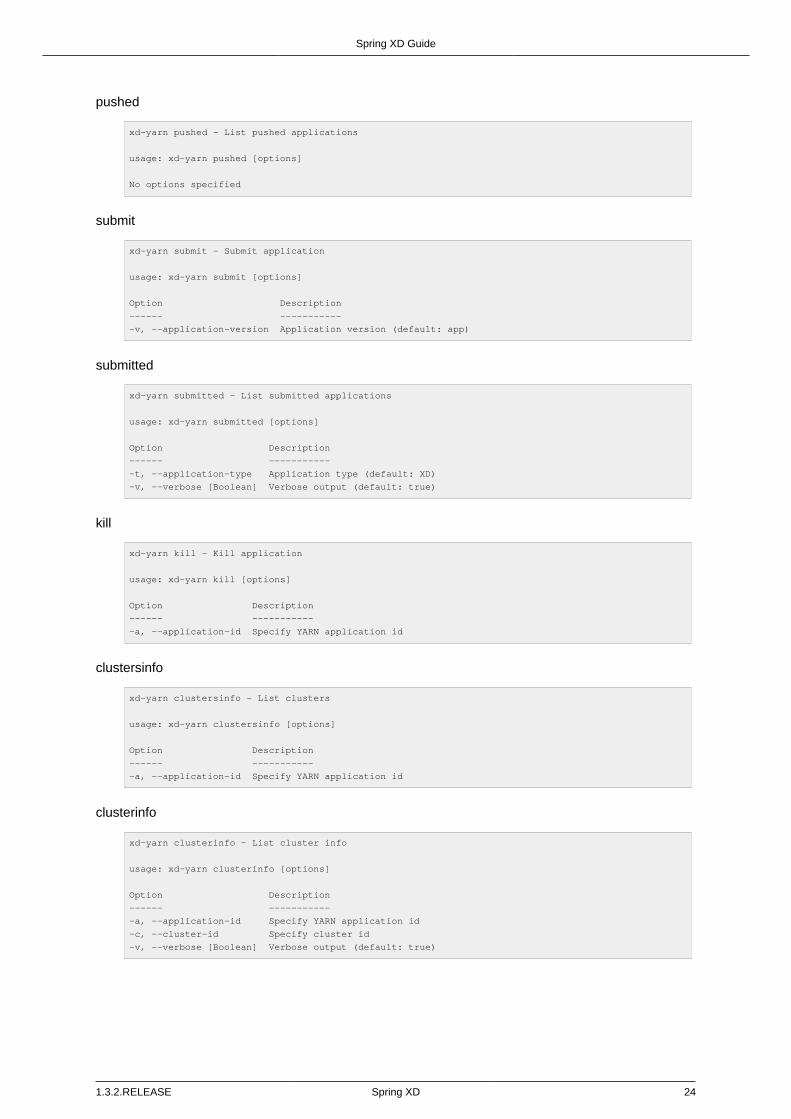
Spring XD Guide
1.3.2.RELEASE Spring XD 24
pushed
xd-yarn pushed - List pushed applications
usage: xd-yarn pushed [options]
No options specified
submit
xd-yarn submit - Submit application
usage: xd-yarn submit [options]
Option Description
------ -----------
-v, --application-version Application version (default: app)
submitted
xd-yarn submitted - List submitted applications
usage: xd-yarn submitted [options]
Option Description
------ -----------
-t, --application-type Application type (default: XD)
-v, --verbose [Boolean] Verbose output (default: true)
kill
xd-yarn kill - Kill application
usage: xd-yarn kill [options]
Option Description
------ -----------
-a, --application-id Specify YARN application id
clustersinfo
xd-yarn clustersinfo - List clusters
usage: xd-yarn clustersinfo [options]
Option Description
------ -----------
-a, --application-id Specify YARN application id
clusterinfo
xd-yarn clusterinfo - List cluster info
usage: xd-yarn clusterinfo [options]
Option Description
------ -----------
-a, --application-id Specify YARN application id
-c, --cluster-id Specify cluster id
-v, --verbose [Boolean] Verbose output (default: true)

Spring XD Guide
1.3.2.RELEASE Spring XD 25
clustercreate
xd-yarn clustercreate - Create cluster
usage: xd-yarn clustercreate [options]
Option Description
------ -----------
-a, --application-id Specify YARN application id
-c, --cluster-id Specify cluster id
-g, --container-groups Container groups
-h, --projection-hosts Projection hosts counts
-i, --cluster-def Specify cluster def id
-p, --projection-type Projection type
-r, --projection-racks Projection racks counts
-w, --projection-any Projection any count
-y, --projection-data Raw projection data
clusterdestroy
xd-yarn clusterdestroy - Destroy cluster
usage: xd-yarn clusterdestroy [options]
Option Description
------ -----------
-a, --application-id Specify YARN application id
-c, --cluster-id Specify cluster id
clustermodify
xd-yarn clustermodify - Modify cluster
usage: xd-yarn clustermodify [options]
Option Description
------ -----------
-a, --application-id Specify YARN application id
-c, --cluster-id Specify cluster id
-h, --projection-hosts Projection hosts counts
-r, --projection-racks Projection racks counts
-w, --projection-any Projection any count
-y, --projection-data Raw projection data
clusterstart
xd-yarn clusterstart - Start cluster
usage: xd-yarn clusterstart [options]
Option Description
------ -----------
-a, --application-id Specify YARN application id
-c, --cluster-id Specify cluster id
clusterstop
xd-yarn clusterstop - Stop cluster
usage: xd-yarn clusterstop [options]
Option Description
------ -----------
-a, --application-id Specify YARN application id
-c, --cluster-id Specify cluster id
Spring XD Guide
1.3.2.RELEASE Spring XD 26
Introduction to YARN resource allocation
This section describes some background of how YARN resource allocation works, what are thelimitations of it and more importantly how it reflects into XD YARN runtime.
Note
More detailed info of resource allocation can be found from a Spring for Apache Hadoopreference documentation.
YARN as having a strong roots from original MapReduce framework is imposing relatively strangeconcepts of where containers are about to be executed. In a MapReduce world every map and reducetasks are executed in its own container where colocation is usually determined by a physical locationof a HDFS file block map or reduce tasks are accessing. This is introducing a concepts of allocatingcontainers on any hosts, specific hosts or specific racks. Usually YARN is trying to place containeras close as possible to a physical location to minimize network IO so i.e. if host cannot be chosen, rackis chosen instead assuming a whole rack is connected together with a fast switch.
For custom YARN applications like XD YARN runtime this doesn’t necessarily make that much sensebecause we’re not hard-tied to HDFS file blocks. What makes sense is that we can still place containerson different racks to get better high availability in case whole rack goes down or if specific containersneeds to exist on specific hosts to access either custom physical or network resources. Good exampleof having a need to execute something on a specific host is either a disk access or outbound internetaccess if cluster is highly secured.
One other YARN resource allocation concept worth mentioning is relaxation of container locality. Thissimply means that if resources are requested from hosts or racks, YARN will relax those requests ifresources cannot be allocated immediately. Turning relax flag off guarantees that containers will beallocated from hosts or racks. Though these requests will then wait forever if allocation cannot be done.

Spring XD Guide
1.3.2.RELEASE Spring XD 27
3. Application Configuration
3.1 Introduction
There are two main parts of Spring XD that can be configured, servers and modules.
The servers (xd-singlenode, xd-admin, xd-container) are Spring Boot applications and areconfigured as described in the Spring Boot Reference documentation. In the most simple casethis means editing values in the YAML based configuration file servers.yml. The values in thisconfiguration file will overwrite the values in the default application.yml file that is embedded in the XD jar.
Note
The use of YAML is an alternative to using property files. YAML is a superset of JSON, and assuch is a very convenient format for specifying hierarchical configuration data.
For modules, each module has its own configuration file located in its own directory, for examplesource/http/http.properties. Shared configuration values for modules can be placed in acommon modules.yml file.
For both server and module configuration, you can have environment specific settings through the useof application profiles and the ability to override values in files by setting OS environment variables.
In this section we will walk though how to configure servers and modules.
3.2 Server Configuration
The startup scripts for xd-singlenode, xd-admin, and xd-container will by default look for thefile $XD_HOME\config\servers.yml as a source of externalized configuration information.
The location and name of this resourse can be changed by using the environment variablesXD_CONFIG_LOCATION and XD_CONFIG_NAME. The start up script takes the value of theseenvironment variables to set the Spring Boot properties spring.config.location andspring.config.name. Note, that for XD_CONFIG_LOCATION you can reference any SpringResource implementation, most commonly denoted using the prefixes classpath:, file: andhttp:.
It is common to keep your server configuration separate form the installation directory of XD itself. Todo this, here is an example environment variable setting
export XD_CONFIG_LOCATION=file:/xd/config/
export XD_CONFIG_NAME=region1-servers
Note: the file path separator ("/") at the end of XD_CONFIG_LOCATION is necessary.
Profile support
Profiles provide a way to segregate parts of your application configuration and change their availabilityand/or values based on the environment. This lets you have different configuration settings for qa andprod environments and to easily switch between them.
To activate a profile, set the OS environment variable SPRING_PROFILES_ACTIVE to acomma delimited list of profile names. The server looks to load profile specific variants of the

Spring XD Guide
1.3.2.RELEASE Spring XD 28
servers.yml file based on the naming convention servers-{profile}.yml. For example, ifSPRING_PROFILES_ACTIVE=prod the following files would be searched for in the following order.
1. XD_CONFIG_LOCATION/servers-prod.yml
2. XD_CONFIG_LOCATION/servers.yml
You may also put multiple profile specific configuration in a single servers.yml file by using the keyspring.profiles in different sections of the configuration file. See Multi-profile YAML documentsfor more information.
Database Configuration
Spring XD saves the state of the batch job workflows in a relational database. When running xd-singlenode an embedded HSQLDB database instance is started automatically. When running indistributed mode a standalone HSQLDB instance can be used. A startup script hsqldb-server isprovided in the installation directory under the folder hsqldb/bin. It is recommended to use HSQLDBonly for development and learning.
When deploying in a production environment, you will need to select another database. Spring XD isprimarily tested on HSQLDB, MySql and Postgres but Apache Derby and Oracle are supported as well.All batch workflow tables are automatically created, if they do not exist, when you use HSQLDB, MySQL,Postgres, Apache Derby or Oracle. The JDBC driver jars for HSQLDB and Postgres are already on theXD classpath. If you use MySQL, Apache Derby or Oracle for your batch repository database, then youwould need to copy the corresponding JDBC jar into the lib directory under $XD_HOME ($XD_HOME/lib) before starting Spring XD.
Note
If you access any database other than HSQLDB or Postgres in a stream module then the JDBCdriver jar for that database needs to be present in the $XD_HOME/lib directory.
The provided configuration file servers.yml located in $XD_HOME/config has commented outconfiguration for some commonly used databases. You can use these as a basis to support yourdatabase environment. XD also utilizes the Tomcat jdbc connection pool and these settings can beconfigured in the servers.yml.
Note
Until full schema support is added for Sybase and other databases, you will need to put a .jar filein the xd/lib directory that contains the equivalent functionality as these DDL scripts.
Note
There was a schema change in version 1.0 RC1. Use or adapt the the sample migration classto update your schema.
HSQLDB
When in distributed mode and you want to use HSQLDB, you need to change the value ofspring.datasource properties. As an example,

Spring XD Guide
1.3.2.RELEASE Spring XD 29
hsql:
server:
host: localhost
port: 9102
dbname: xdjob
spring:
datasource:
url: jdbc:hsqldb:hsql://${hsql.server.host:localhost}:${hsql.server.port:9101}/
${hsql.server.dbname:xdjob};sql.enforce_strict_size=true;hsqldb.tx=mvcc
username: sa
password:
driverClassName: org.hsqldb.jdbc.JDBCDriver
The properties under hsql.server are substituted in the spring.datasource.url propertyvalue. This lets you create short variants of existing Spring Boot properties. Using this style,you can override the value of these configuration variables by setting an OS environmentvariable, such as xd_server_host. Alternatively, you can not use any placeholders and setspring.datasource.url directly to known values.
MySQL
When in distributed mode and you want to use MySQL, you need to change the value ofspring.datasource.* properties. As an example,
spring:
datasource:
url: jdbc:mysql://yourDBhost:3306/yourDB
username: yourUsername
password: yourPassword
driverClassName: com.mysql.jdbc.Driver
To override these settings set an OS environment variable such as spring_datasource_url to thevalue you require.
PostgreSQL
When in distributed mode and you want to use PostgreSQL, you need to change the value ofspring.datasource.* properties. As an example,
spring:
datasource:
url: jdbc:postgresql://yourDBhost:5432/yourDB
username: yourUsername
password: yourPassword
driverClassName: org.postgresql.Driver
To override these settings set an OS environment variable such as spring_datasource_url to thevalue you require.
Oracle database
When in distributed mode and you want to use Oracle database, you need to change the value ofspring.datasource.* properties. As an example,
spring:
datasource:
url: jdbc:oracle:thin:@//yourDBhost:1521/yourDB
username: scott
password: tiger
driverClassName: oracle.jdbc.driver.OracleDriver
validationQuery: select 1 from dual

Spring XD Guide
1.3.2.RELEASE Spring XD 30
To override these settings set an OS environment variable such as spring_datasource_url to thevalue you require.
Redis
If you want to use Redis for analytics or data transport you should set the host and port of the Redisserver.
spring:
redis:
port: 6379
host: localhost
pool:
maxIdle: 8 # max idle connections in the pool
minIdle: 0 # min idle connections in the pool
maxActive: -1 # no limit to the number of active connections
maxWait: 30000 # time limit to get a connection - only applies if maxActive is finite
To override these settings set an OS environment variable such as spring_redis_port to the valueyou require.
You can also configure redis to use Sentinel.
spring:
redis:
port: 6379
host: host1
pool:
maxIdle: 8 # max idle connections in the pool
minIdle: 0 # min idle connections in the pool
maxActive: -1 # no limit to the number of active connections
maxWait: 30000 # time limit to get a connection - only applies if maxActive is finite
sentinel:
master: mymaster
nodes: host2:26379,host3:26380,host4:26381
In addition, the following default settings for the redis message bus can be modified in servers.yml…
redis:
headers: ❶
default:
backOffInitialInterval: 1000 ❷
backOffMaxInterval: 10000 ❸
backOffMultiplier: 2.0 ❹
concurrency: 1 ❺
maxAttempts: 32 ❻
❶ comma-delimited list of additional (string-valued) header names to transport
❷ The time in milliseconds before retrying a failed message delivery
❸ The maximum time (ms) to wait between retries
❹ The back off multiplier (previous interval x multiplier = next interval)
❺ The minimum number of consumer threads receiving messages for a module
❻ The maximum number of delivery attempts
RabbitMQ
If you want to use RabbitMQ as a data transport use the following configuration settings

Spring XD Guide
1.3.2.RELEASE Spring XD 31
spring:
rabbitmq:
addresses: localhost:5672 ❶
adminAddresses: http://localhost:15672 ❷
nodes: rabbit@localhost ❸
username: guest ❹
password: guest ❺
virtual_host: / ❻
useSSL: false ❼
sslProperties: ❽
ssl: ❾
keyStore:
keyStorePassphrase:
trustStore:
trustStorePassphrase:
channelCacheSize: 100 ❿
❶ A comma-separated list of RabbitMQ server addresses (a single entry when not clustering).
❷ A comma-separated list of RabbitMQ management plugin URLs - only used when nodes containsmore than one entry. Entries in this list must correspond to the corresponding entry in addresses.
❸ A comma-separated list of RabbitMQ node names; when more than one entry, used to locate theserver address where a queue is located. Entries in this list must correspond to the correspondingentry in addresses.
❹ The user name.
❺ The password.
❻ The virtual host.
❼ True to use SSL for the AMQP protocol.
❽ The location of the SSL properties file, when certificate exchange is used.
❾ Discrete SSL configuration properties as an alternative to a properties file.
❿ The channel cache size, this should be set to a large enough value to avoid opening/closingchannels at a high rate. Examine the channel creation via the RabbitMQ Admin UI to determinea suitable value. Defaults to 100.
To override these settings set an OS environment variable such as spring_rabbitmq_host to thevalue you require.
See Message Bus regarding SSL configuration.
When configuring a clustered environment, with High Availability Queues, it is possible to configurethe bus so that it consumes from the node where the queue is located. This is facilitated by theLocalizedQueueConnectionFactory which determines the node for a queue. To enable thisfeature, add the list of nodes to the spring.rabbitmq.nodes property. These nodes correspondto the broker addresses in the corresponding place in the spring.rabbitmq.addresses property.The size of these lists must be identical (when the nodes property has more than one entry). Thespring.rabbitmq.adminAddresses property contains the corresponding URLs for the admins onthose same nodes. Again, the property list must be the same length.
In addition, the following default settings for the rabbit message bus can be modified in servers.yml…
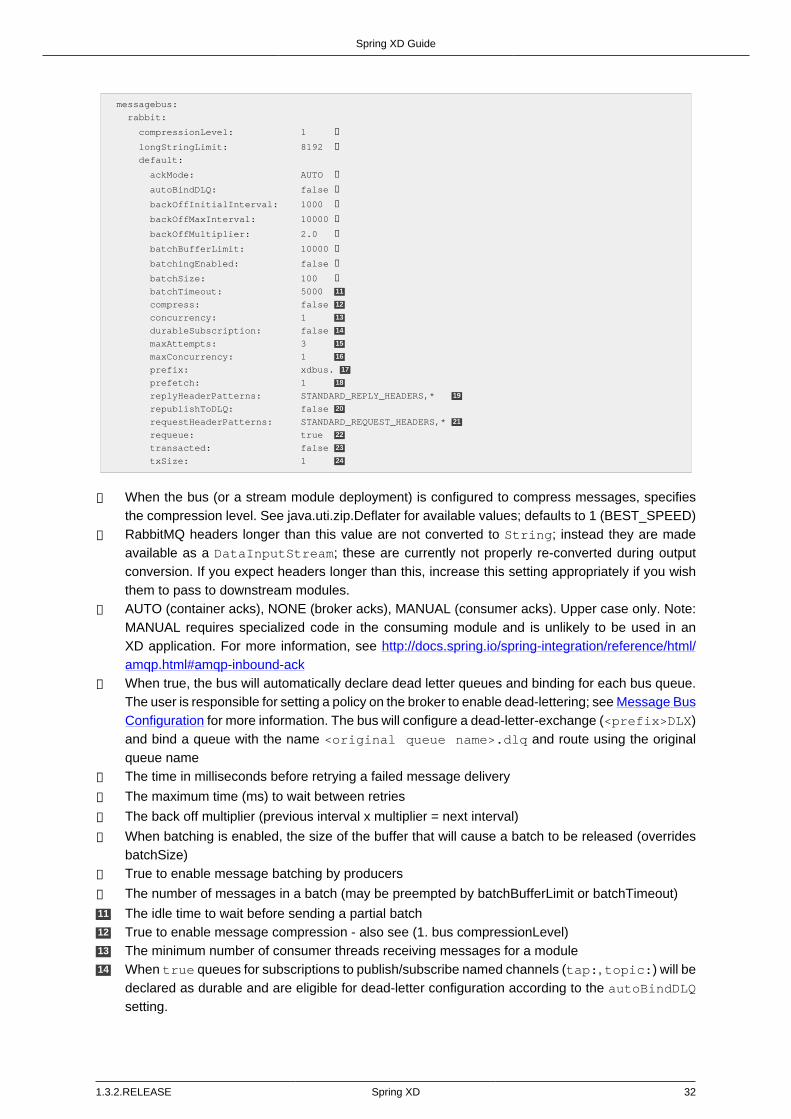
Spring XD Guide
1.3.2.RELEASE Spring XD 32
messagebus:
rabbit:
compressionLevel: 1 ❶
longStringLimit: 8192 ❷
default:
ackMode: AUTO ❸
autoBindDLQ: false ❹
backOffInitialInterval: 1000 ❺
backOffMaxInterval: 10000 ❻
backOffMultiplier: 2.0 ❼
batchBufferLimit: 10000 ❽
batchingEnabled: false ❾
batchSize: 100 ❿
batchTimeout: 5000 11
compress: false 12
concurrency: 1 13
durableSubscription: false 14
maxAttempts: 3 15
maxConcurrency: 1 16
prefix: xdbus. 17
prefetch: 1 18
replyHeaderPatterns: STANDARD_REPLY_HEADERS,* 19
republishToDLQ: false 20
requestHeaderPatterns: STANDARD_REQUEST_HEADERS,* 21
requeue: true 22
transacted: false 23
txSize: 1 24
❶ When the bus (or a stream module deployment) is configured to compress messages, specifiesthe compression level. See java.uti.zip.Deflater for available values; defaults to 1 (BEST_SPEED)
❷ RabbitMQ headers longer than this value are not converted to String; instead they are madeavailable as a DataInputStream; these are currently not properly re-converted during outputconversion. If you expect headers longer than this, increase this setting appropriately if you wishthem to pass to downstream modules.
❸ AUTO (container acks), NONE (broker acks), MANUAL (consumer acks). Upper case only. Note:MANUAL requires specialized code in the consuming module and is unlikely to be used in anXD application. For more information, see http://docs.spring.io/spring-integration/reference/html/amqp.html#amqp-inbound-ack
❹ When true, the bus will automatically declare dead letter queues and binding for each bus queue.The user is responsible for setting a policy on the broker to enable dead-lettering; see Message BusConfiguration for more information. The bus will configure a dead-letter-exchange (<prefix>DLX)and bind a queue with the name <original queue name>.dlq and route using the originalqueue name
❺ The time in milliseconds before retrying a failed message delivery
❻ The maximum time (ms) to wait between retries
❼ The back off multiplier (previous interval x multiplier = next interval)
❽ When batching is enabled, the size of the buffer that will cause a batch to be released (overridesbatchSize)
❾ True to enable message batching by producers
❿ The number of messages in a batch (may be preempted by batchBufferLimit or batchTimeout)11 The idle time to wait before sending a partial batch12 True to enable message compression - also see (1. bus compressionLevel)13 The minimum number of consumer threads receiving messages for a module14 When true queues for subscriptions to publish/subscribe named channels (tap:, topic:) will be
declared as durable and are eligible for dead-letter configuration according to the autoBindDLQsetting.

Spring XD Guide
1.3.2.RELEASE Spring XD 33
15 The maximum number of delivery attempts. Setting this to 1 disables the retry mechanism andrequeue must be set to false if you wish failed messages to be rejected or routed to a DLQ.Otherwise deliveries will be attempted repeatedly, with no termination. Also see republishToDLQ
16 The maximum number of consumer threads receiving messages for a module17 A prefix applied to all queues, exchanges so that policies (HA etc) can be applied18 The number of messages to prefetch for each consumer19 Determines which reply headers will be transported20 By default, failed messages after retries are exhausted are rejected. If a dead-letter queue (DLQ) is
configured, rabbitmq will route the failed message (unchanged) to the DLQ. Setting this property totrue instructs the bus to republish failed messages to the DLQ, with additional headers, includingthe exception message and stack trace from the cause of the final failure. Note that the republishwill occur even if maxAttempts is only set to 1. Also see autoBindDLQ
21 Determines which request headers will be transported22 Whether rejected messages will be requeued by default23 Whether the channel is to be transacted24 The number of messages to process between acks (when ack mode is AUTO).
Kafka
If you want to use Kafka as a data transport, the following connection settings, as well as defaults forthe kafka message bus can be modified in servers.yml. Starting with release 1.2, Spring XD onlysupports Kafka 0.8.2 or higher.
Note
To ensure the proper functioning of the Kafka Message Bus, you must eanble log cleaning in yourKafka configuration. This is set using the configuration variable log.cleaner.enable=true.See the Kafka documentation for additional configuration options for log cleaning.
Note
At this time, the Kafka message bus does not support job processing.
Note
The Kafka message bus does not support count=0 for module deployments, and therefore, itdoes not support direct binding of modules. This feature will be available in a future release. Inthe meantime, if direct communication between modules is necessary for Kafka deployments,composite modules should be used instead.

Spring XD Guide
1.3.2.RELEASE Spring XD 34
messagebus:
kafka:
# connection properties
brokers: localhost:9092 ❶
zkAddress: localhost:2181 ❷
socketBufferSize: 2097152 ❸
# operating mode
mode: embeddedHeaders ❹
offsetManagement: kafkaTopic ❺
headers:
# comma-delimited list of additional header names to transport ❻
# offset topic settings
offsetStoreTopic: SpringXdOffsets ❼
offsetStoreSegmentSize: 25000000 ❽
offsetStoreRetentionTime: 60000 ❾
offsetStoreRequiredAcks: 1 ❿
offsetStoreMaxFetchSize: 1048576 11
offsetStoreBatchBytes: 16384 12
offsetStoreBatchTime: 1000 13
offsetUpdateTimeWindow: 10000 14
offsetUpdateCount: 0 15
offsetUpdateShutdownTimeout: 2000 16
# defaults for the bus
default:
batchSize: 16384 17
batchTimeout: 0 18
replicationFactor: 1 19
concurrency: 1 20
requiredAcks: 1 21
compressionCodec: none 22
queueSize: 8192 23
maxWait: 100 24
fetchSize: 1048576 25
minPartitionCount: 1 26
syncProducer: false 27
syncProducerTimeout: 5000 28
❶ A list of Kafka broker addresses, for sending messages
❷ A list of ZooKeeper addresses, for receiving messages
❸ The size of the socket buffer, for the consumer
❹ How the bus handles headers and serialization: embeddedHeaders supports Spring Integrationheader embedding and bus-managed serialization based on embedded content type headers,whereas raw mode will operate only with byte array data, will not embed headers and will leavethe handling of serialization to the user.
❺ Where the bus stores offsets: kafkaTopic is similar to pre-1.3 behaviour of using a dedicatedKafka topic, and kafkaNative relies on the native topic-based Kafka offset storage supportcompatible with Kafka 0.8.2 and later.
❻ A list of custom headers to be transported by the bus.
❼ The name of the topic where the Kafka Message Bus will store offsets (must be a compacted topic- Spring XD will attempt to create a compacted topic by default).
❽ The segment size for the offset topic if offsetManagement is kafkaTopic.
❾ The retention time for the offset topic if offsetManagement is kafkaTopic.
❿ The number of required acks for the offset topic if offsetManagement is kafkaTopic.11 The maximum fetch size when reading from the offset topic if offsetManagement is
kafkaTopic.12 The batch size (in bytes) for the producers writing to the offset topic if offsetManagement is
kafkaTopic.13 Upper bound for the offset topic producer delay for batching

Spring XD Guide
1.3.2.RELEASE Spring XD 35
14 The frequency (in milliseconds) with which offsets are saved (mutually exclusive withoffsetUpdateCount)
15 The frequency (in message counts) with which offsets are saved (mutually exclusive withoffsetUpdateTimeWindow)
16 The timeout for shutting down offset management and ensuring that the latest offset updates havebeen pushed.
17 The amount of data (in bytes) that the producer will try to buffer before sending data to brokers.18 Timeout (in milliseconds) for batching data on the producer side. A value of zero (default) means
that data will be sent out immediately as available.19 The replication factor of the topics created by the message bus. At least as many brokers must be
in the cluster when the topic is being created.20 The maximum number of consumer threads receiving messages for a module. The total number of
threads actively consuming partitions across all the instances of a specific module cannot be largerthan the partition count of a transport topic - therefore, if such a situation occurs, some modulesinstances will, in fact, use less consumer threads.
21 The number of required acks when producing messages, i.e. how many brokers have committeddata to the logs and acknowledged this to the leader. Special values are -1, meaning all in-syncreplicas, and 0 indicating that no acks are necessary.
22 Enables compression for the bus and sets the compression codec.23 The maximum size of the internal message queue (in messages), per consumer processing thread.
It must be a power of 2.24 The maximum amount of time that the consumers will wait to fetch data from a broker (if less than
fetchSize is available)25 The maximum amount of data that the consumers will try to fetch, per broker, in one polling cycle.26 The minimum number of partitions that will be used by a bus topic.27 When true, a synchronous producer is used28 If <27> is true, set the timeout to wait for Kafka delivery (in ms). Is # 0, wait forever.
Admin Server HTTP Port
The default HTTP port of the xd-admin server is 9393. To change the value use the followingconfiguration setting
server:
port: 9876
Management Port
The XD servers provide general health and JMX exported management endpoints via Jolokia.
By default the management and health endpoints are available on port 9393. To change the value ofthe port use the following configuration setting to servers.yml.
management:
port: 9876
You can also disable http management endpoints by setting the port value to -1.
By default JMX MBeans are exported. You can disable JMX by setting spring.jmx.enabled=false.
The section on Monitoring and management over HTTP provides details on how to configure theseendpoint.

Spring XD Guide
1.3.2.RELEASE Spring XD 36
Admin Server Security
By default, the Spring XD admin server is unsecured and runs on an unencrypted HTTP connection.You can secure your administration REST endpoints, as well as the Admin UI by enabling HTTPS andrequiring clients to authenticate.
Enabling HTTPS
By default, the administration, management, and health endpoints, as well as the Admin UI useHTTP as a transport. You can switch to HTTPS easily, by adding a certificate to your configuration inservers.yml
spring:
profiles: admin ❶
server:
ssl:
key-alias: yourKeyAlias ❷
key-store: path/to/keystore ❸
key-store-password: yourKeyStorePassword ❹
key-password: yourKeyPassword ❺
trust-store: path/to/trust-store ❻
trust-store-password: yourTrustStorePassword ❼
❶ The settings are applicable only to the admin server (regardless whether it’s started in single-nodemode or as a separate instance).
❷ The alias (or name) under which the key is stored in the keystore.
❸ The path to the keystore file. Classpath resources may also be specified, by using the classpathprefix: classpath:path/to/keystore
❹ The password of the keystore.
❺ The password of the key.
❻ The path to the truststore file. Classpath resources may also be specified, by using the classpathprefix: classpath:path/to/trust-store
❼ The password of the trust store.
Note
If HTTPS is enabled, it will completely replace HTTP as the protocol over which the RESTendpoints and the Admin UI interact. Plain HTTP requests will fail - therefore, make sure that youconfigure your Shell accordingly.
Enabling authentication
By default, the REST endpoints (administration, management and health), as well as the Admin UI donot require authenticated access. By turning on authentication on the admin server:
• the REST endpoints will require Basic authentication for access;
• the Admin UI will be accessible after signing in through a web form.
Note
When authentication is set up, it is strongly recommended to enable HTTPS as well, especiallyin production environments.
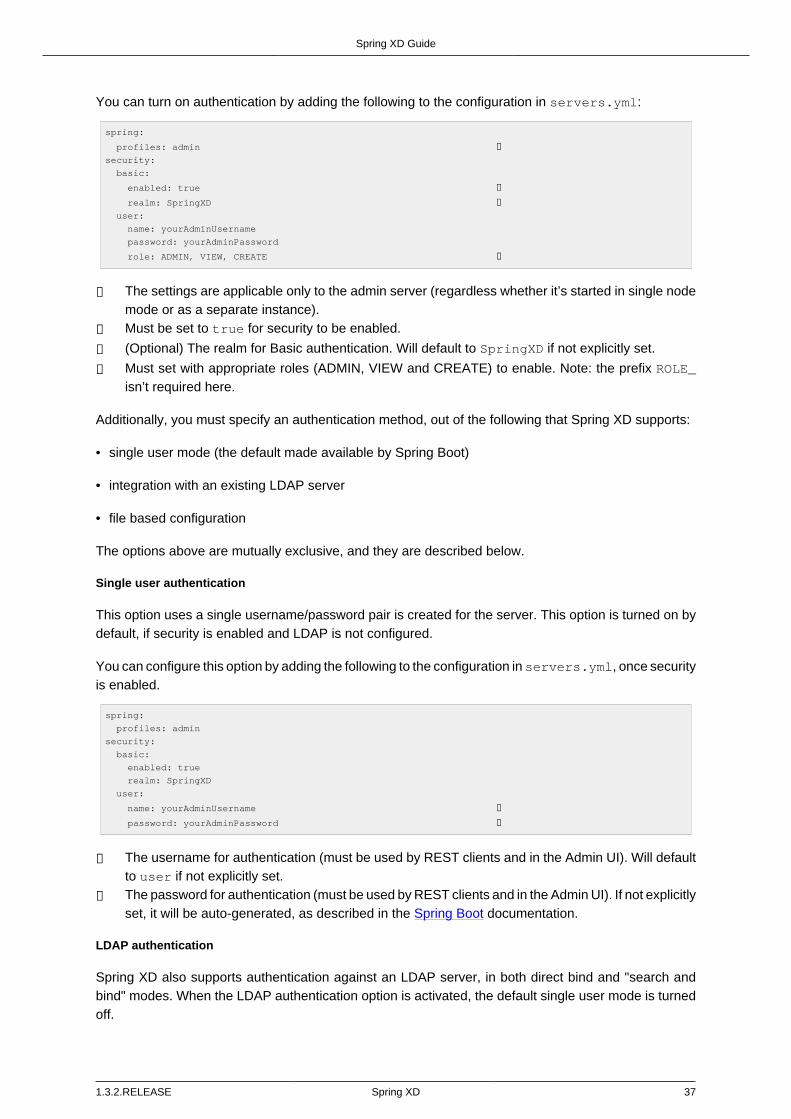
Spring XD Guide
1.3.2.RELEASE Spring XD 37
You can turn on authentication by adding the following to the configuration in servers.yml:
spring:
profiles: admin ❶
security:
basic:
enabled: true ❷
realm: SpringXD ❸
user:
name: yourAdminUsername
password: yourAdminPassword
role: ADMIN, VIEW, CREATE ❹
❶ The settings are applicable only to the admin server (regardless whether it’s started in single nodemode or as a separate instance).
❷ Must be set to true for security to be enabled.
❸ (Optional) The realm for Basic authentication. Will default to SpringXD if not explicitly set.
❹ Must set with appropriate roles (ADMIN, VIEW and CREATE) to enable. Note: the prefix ROLE_isn’t required here.
Additionally, you must specify an authentication method, out of the following that Spring XD supports:
• single user mode (the default made available by Spring Boot)
• integration with an existing LDAP server
• file based configuration
The options above are mutually exclusive, and they are described below.
Single user authentication
This option uses a single username/password pair is created for the server. This option is turned on bydefault, if security is enabled and LDAP is not configured.
You can configure this option by adding the following to the configuration in servers.yml, once securityis enabled.
spring:
profiles: admin
security:
basic:
enabled: true
realm: SpringXD
user:
name: yourAdminUsername ❶
password: yourAdminPassword ❷
❶ The username for authentication (must be used by REST clients and in the Admin UI). Will defaultto user if not explicitly set.
❷ The password for authentication (must be used by REST clients and in the Admin UI). If not explicitlyset, it will be auto-generated, as described in the Spring Boot documentation.
LDAP authentication
Spring XD also supports authentication against an LDAP server, in both direct bind and "search andbind" modes. When the LDAP authentication option is activated, the default single user mode is turnedoff.
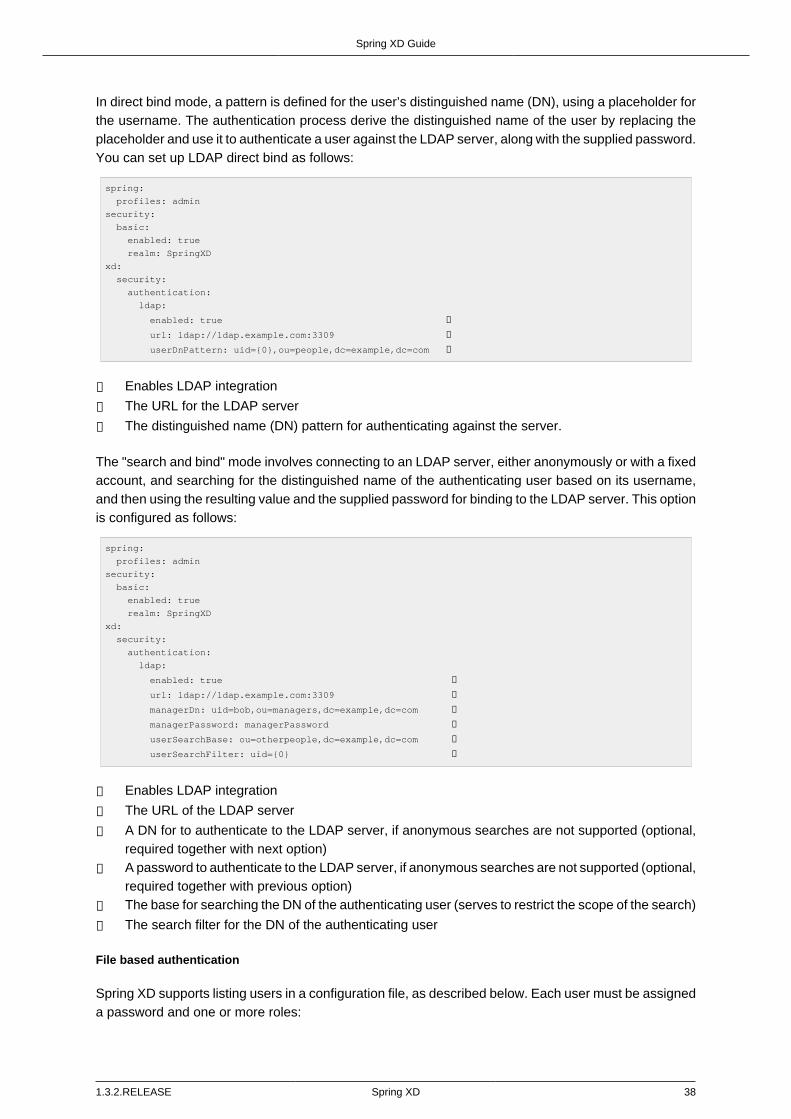
Spring XD Guide
1.3.2.RELEASE Spring XD 38
In direct bind mode, a pattern is defined for the user’s distinguished name (DN), using a placeholder forthe username. The authentication process derive the distinguished name of the user by replacing theplaceholder and use it to authenticate a user against the LDAP server, along with the supplied password.You can set up LDAP direct bind as follows:
spring:
profiles: admin
security:
basic:
enabled: true
realm: SpringXD
xd:
security:
authentication:
ldap:
enabled: true ❶
url: ldap://ldap.example.com:3309 ❷
userDnPattern: uid={0},ou=people,dc=example,dc=com ❸
❶ Enables LDAP integration
❷ The URL for the LDAP server
❸ The distinguished name (DN) pattern for authenticating against the server.
The "search and bind" mode involves connecting to an LDAP server, either anonymously or with a fixedaccount, and searching for the distinguished name of the authenticating user based on its username,and then using the resulting value and the supplied password for binding to the LDAP server. This optionis configured as follows:
spring:
profiles: admin
security:
basic:
enabled: true
realm: SpringXD
xd:
security:
authentication:
ldap:
enabled: true ❶
url: ldap://ldap.example.com:3309 ❷
managerDn: uid=bob,ou=managers,dc=example,dc=com ❸
managerPassword: managerPassword ❹
userSearchBase: ou=otherpeople,dc=example,dc=com ❺
userSearchFilter: uid={0} ❻
❶ Enables LDAP integration
❷ The URL of the LDAP server
❸ A DN for to authenticate to the LDAP server, if anonymous searches are not supported (optional,required together with next option)
❹ A password to authenticate to the LDAP server, if anonymous searches are not supported (optional,required together with previous option)
❺ The base for searching the DN of the authenticating user (serves to restrict the scope of the search)
❻ The search filter for the DN of the authenticating user
File based authentication
Spring XD supports listing users in a configuration file, as described below. Each user must be assigneda password and one or more roles:

Spring XD Guide
1.3.2.RELEASE Spring XD 39
spring:
profiles: admin
security:
basic:
enabled: true
realm: SpringXD
xd:
security:
authentication:
file:
enabled: true ❶
users: ❷
bob: bobspassword, ROLE_VIEW ❸
alice: alicepwd, ROLE_ADMIN
❶ Enables file based integration
❷ This is a yaml map of username to (password and roles)
❸ Each map "value" is made of a password and one or more roles, comma separated
Customizing authorization
All of the above deals with authentication, i.e. how to assess the identity of the user. Irrespective of theoption chosen, you can also customize authorization i.e. who can do what.
The default scheme uses three roles to protect the REST endpoints that Spring XD exposes:
• ROLE_VIEW for anything that relates to retrieving state
• ROLE_CREATE for anything that involves creating, deleting or mutating the state of the system
• ROLE_ADMIN for boot management endpoints.
All of those defaults are written out in application.yml, which you can choose to override viaservers.yml. This takes the form of a YAML list (as some rules may have precedence over others)and so you’ll need to copy/paste the whole list and tailor it to your needs (as there is no way to mergelists). Always refer to your version of application.yml, as the snippet reproduced below may beoutdated. The default rules are as such:

Spring XD Guide
1.3.2.RELEASE Spring XD 40
security:
authorization:
rules:
# Streams
- GET /streams/definitions => hasRole('ROLE_VIEW')
- DELETE /streams/definitions => hasRole('ROLE_CREATE')
- GET /streams/definitions/* => hasRole('ROLE_VIEW')
- POST /streams/definitions => hasRole('ROLE_CREATE')
- DELETE /streams/definitions/* => hasRole('ROLE_CREATE')
# Stream Deployments
- GET /streams/deployments/ => hasRole('ROLE_VIEW')
- DELETE /streams/deployments/ => hasRole('ROLE_CREATE')
- GET /streams/deployments/* => hasRole('ROLE_VIEW')
- POST /streams/deployments/* => hasRole('ROLE_CREATE')
- DELETE /streams/deployments/* => hasRole('ROLE_CREATE')
# Job Definitions
- GET /jobs/definitions => hasRole('ROLE_VIEW')
- DELETE /jobs/definitions => hasRole('ROLE_CREATE')
- GET /jobs/definitions/* => hasRole('ROLE_VIEW')
- POST /jobs/definitions => hasRole('ROLE_CREATE')
- DELETE /jobs/definitions/* => hasRole('ROLE_CREATE')
# Job Deployments
- GET /jobs/deployments/ => hasRole('ROLE_VIEW')
- DELETE /jobs/deployments/ => hasRole('ROLE_CREATE')
- GET /jobs/deployments/* => hasRole('ROLE_VIEW')
- POST /jobs/deployments/* => hasRole('ROLE_CREATE')
- DELETE /jobs/deployments/* => hasRole('ROLE_CREATE')
# Batch Job Configurations
- GET /jobs/configurations => hasRole('ROLE_VIEW')
- GET /jobs/configurations/* => hasRole('ROLE_VIEW')
# Batch Job Executions
- GET /jobs/executions => hasRole('ROLE_VIEW')
- PUT /jobs/executions?stop=true => hasRole('ROLE_CREATE')
- GET /jobs/executions?jobname=* => hasRole('ROLE_VIEW')
- POST /jobs/executions?jobname=* => hasRole('ROLE_CREATE')
- GET /jobs/executions/* => hasRole('ROLE_VIEW')
- PUT /jobs/executions/*?restart=true => hasRole('ROLE_CREATE')
- PUT /jobs/executions/*?stop=true => hasRole('ROLE_CREATE')
- GET /jobs/executions/*/steps => hasRole('ROLE_VIEW')
- GET /jobs/executions/*/steps/* => hasRole('ROLE_VIEW')
- GET /jobs/executions/*/steps/*/progress => hasRole('ROLE_VIEW')
# Batch Job Instances
- GET /jobs/instances?jobname=* => hasRole('ROLE_VIEW')
- GET /jobs/instances/* => hasRole('ROLE_VIEW')
# Module Definitions
- GET /modules => hasRole('ROLE_VIEW')
- POST /modules => hasRole('ROLE_CREATE')
- GET /modules/*/* => hasRole('ROLE_VIEW')
- DELETE /modules/*/* => hasRole('ROLE_CREATE')
# Deployed Modules
- GET /runtime/modules => hasRole('ROLE_VIEW')
# Containers
- GET /runtime/containers => hasRole('ROLE_VIEW')
# Counters
- GET /metrics/counters => hasRole('ROLE_VIEW')
- GET /metrics/counters/* => hasRole('ROLE_VIEW')
- DELETE /metrics/counters/* => hasRole('ROLE_CREATE')
# Field Value Counters
- GET /metrics/field-value-counters => hasRole('ROLE_VIEW')
- GET /metrics/field-value-counters/* => hasRole('ROLE_VIEW')
- DELETE /metrics/field-value-counters/* => hasRole('ROLE_CREATE')
# Aggregate Counters
- GET /metrics/aggregate-counters => hasRole('ROLE_VIEW')
- GET /metrics/aggregate-counters/* => hasRole('ROLE_VIEW')
- DELETE /metrics/aggregate-counters/* => hasRole('ROLE_CREATE')
# Gauges
- GET /metrics/gauges => hasRole('ROLE_VIEW')
- GET /metrics/gauges/* => hasRole('ROLE_VIEW')
- DELETE /metrics/gauges/* => hasRole('ROLE_CREATE')
# Rich Gauges
- GET /metrics/rich-gauges => hasRole('ROLE_VIEW')
- GET /metrics/rich-gauges/* => hasRole('ROLE_VIEW')
- DELETE /metrics/rich-gauges/* => hasRole('ROLE_CREATE')
# Tab Completions
- GET /completions/stream?start=* => hasRole('ROLE_VIEW')
- GET /completions/job?start=* => hasRole('ROLE_VIEW')
- GET /completions/module?start=* => hasRole('ROLE_VIEW')
# Boot Endpoints
- GET /management/** => hasRole('ROLE_ADMIN')

Spring XD Guide
1.3.2.RELEASE Spring XD 41
The format of each line is the following:
HTTP_METHOD URL_PATTERN '=>' SECURITY_ATTRIBUTE
where
• HTTP_METHOD is one http method, capital case
• URL_PATTERN is an Ant style URL pattern
• SECURITY_ATTRIBUTE is a SpEL expression (see http://docs.spring.io/spring-security/site/docs/4.0.0.M2/reference/htmlsingle/#el-access)
• each of those separated by one or several blank characters (spaces, tabs, etc.)
Be mindful that the above is indeed a YAML list, not a map (thus the use of - dashes at the start of eachline) that lives under the security.authorization.rules key.
Cross-origin resource sharing (CORS)
Cross-origin resource sharing (CORS) is a mechanism that allows restricted resources(e.g. fonts) on a web page to be requested from another domain outside the domainfrom which the resource originated.
— Wikipedia https://en.wikipedia.org/wiki/Cross-origin_resource_sharing
We do set a default value of http://localhost:9889 in the internal application.yml file that isembedded inside the Spring XD jars.
application.yml.
xd:
…
ui:
…
allow_origin: "http://localhost:9889"
…
In order to customize this, set the xd.ui.allow_origin property in your server.yml file for theadmin server profile by adding the following section:
server.yml.
---
spring:
profiles: admin
xd:
ui:
allow_origin: "*"
---
For example, if you set the value to "*" (asterisk), Spring XD should accept requests from any domain.Please make sure to wrap the asterisk with double quotes.
Under the hood the value will set the CORS Access-Control-Allow-Origin header in theAccessControlInterceptor via the RestConfiguration class.
Local transport
Local transport uses a QueueChannel to pass data between modules. There are a few properties youcan configure on the QueueChannel

Spring XD Guide
1.3.2.RELEASE Spring XD 42
• xd.local.transport.named.queueSize - The capacity of the queue, the default value isInteger.MAX_VALUE
• xd.local.transport.named.polling - Messages that are buffered in a QueueChannel needto be polled to be consumed. This property controls the fixed rate at which polling occurs. The defaultvalue is 1000 ms.
Serialization
Serialization is used by remote transport. Please see the section on Optimizing Serialization for adetailed discussion of configuration options.
3.3 Module Configuration
Modules are configured by placing property files in a nested directory structure based on their typeand name. The root of the nested directory structure is by default XD_HOME/config/modules. Thislocation can be customized by setting the OS environment variable XD_MODULE_CONFIG_LOCATION,similar to how the environment variable XD_CONFIG_LOCATION is used for configuring the server. IfXD_MODULE_CONFIG_LOCATION is set explicitly, then it is necessary to add the file path separator("/") at the end of the path.
Note
If XD_MODULE_CONFIG_LOCATION is set to use explicit location, make sure to copy entiredirectory structure from the default module config location xd/config/modules into thenew module config location. The XD_MODULE_CONFIG_LOCATION can reference any SpringResource implementation, most commonly denoted using the prefixes classpath:, file: andhttp:.
As an example, if you wanted to configure the twittersearch module, you would create a file
XD_MODULE_CONFIG_LOCATION\source\twittersearch\twittersearch.properties
and the contents of that file would be property names such as consumerKey and consumerSecret.
Note
You do not need to prefix these property names with a source.twittersearch prefix.
You can override the values in the module property file in various ways. The following sources ofproperties are considered in the following order.
1. Properties specified in the stream or job DSL definition
2. Java System Properties (e.g. source.http.port=9454)
3. OS environment variables. (e.g. source_http_port=9454)
4. XD_MODULE_CONFIG_LOCATION\<type>\<name>\<name>.properties (including profilevariants)
5. Default values specified in module metadata (if available).

Spring XD Guide
1.3.2.RELEASE Spring XD 43
Values in XD_MODULE_CONFIG_LOCATION\<type>\<name>\<name>.properties can beproperty placeholder references to keys defined in another resource location. By default the resource isthe file XD_MODULE_CONFIG_LOCATION\modules.yml. You can customize the name of the resourceby using setting the OS environment variable XD_MODULE_CONFIG_NAME before running a serverstartup script.
The modules.yml file can be used to specify the values of keys that should be shared acrossdifferent modules. For example, it is common to use the same twitter developer credentials in both thetwittersearch and twitterstream modules. To avoid repeating the same credentials in two property files,you can use the following setup.
modules.yml contains
sharedConsumerKey: alsdjfqwopieur
sharedConsumerSecret: pqwieouralsdjkqwpo
sharedAccessToken: llixzchvpiawued
sharedAccessTokenSecret: ewoqirudhdsldke
and XD_MODULE_CONFIG_LOCATION\source\twitterstream\twitterstream.properties
contains
consumerKey=${sharedConsumerKey}
consumerSecret=${sharedConsumerSecret}
accessToken=${sharedAccessToken}
accessTokenSecret=${sharedAccessTokenSecret}
and XD_MODULE_CONFIG_LOCATION\source\twittersearch\twittersearch.properties
contains
consumerKey=${sharedConsumerKey}
consumerSecret=${sharedConsumerSecret}
Profiles
When resolving property file names, the server will look to load profile specific variants based on thenaming convention <name>-{profile}.properties. For example, if given the OS environmentvariable spring_profiles_active=default,qa the following configuration file names for thetwittersearch module would be searched in this order
1. XD_MODULE_CONFIG_LOCATION\source\twittersearch\twittersearch.properties
2. XD_MODULE_CONFIG_LOCATION\source\twittersearch\twittersearch-default.properties
3. XD_MODULE_CONFIG_LOCATION\source\twittersearch\twittersearch-qa.properties
Also, the shared module configuration file is refernced using profile variants, so given theOS environment variable spring_profiles_active=default,qa the following shared moduleconfiguration files would be searched for in this order
1. XD_MODULE_CONFIG_LOCATION\modules.yml
2. XD_MODULE_CONFIG_LOCATION\modules-default.yml
3. XD_MODULE_CONFIG_LOCATION\modules-qa.yml
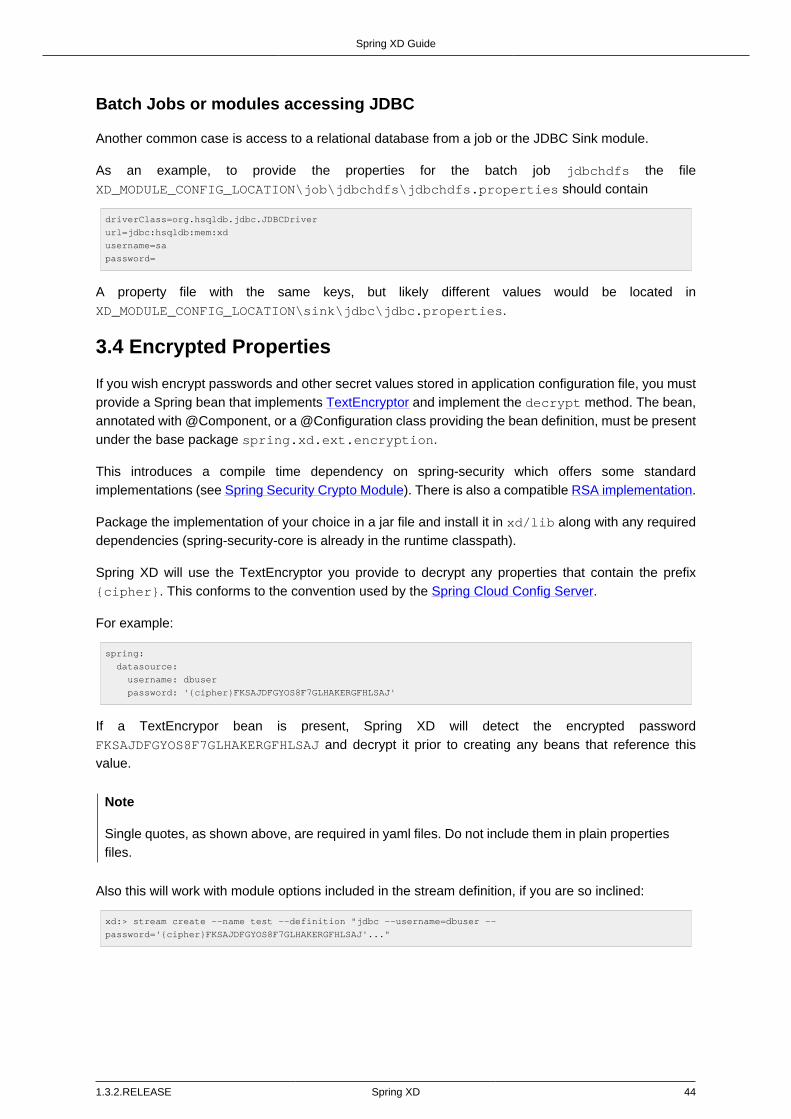
Spring XD Guide
1.3.2.RELEASE Spring XD 44
Batch Jobs or modules accessing JDBC
Another common case is access to a relational database from a job or the JDBC Sink module.
As an example, to provide the properties for the batch job jdbchdfs the fileXD_MODULE_CONFIG_LOCATION\job\jdbchdfs\jdbchdfs.properties should contain
driverClass=org.hsqldb.jdbc.JDBCDriver
url=jdbc:hsqldb:mem:xd
username=sa
password=
A property file with the same keys, but likely different values would be located inXD_MODULE_CONFIG_LOCATION\sink\jdbc\jdbc.properties.
3.4 Encrypted Properties
If you wish encrypt passwords and other secret values stored in application configuration file, you mustprovide a Spring bean that implements TextEncryptor and implement the decrypt method. The bean,annotated with @Component, or a @Configuration class providing the bean definition, must be presentunder the base package spring.xd.ext.encryption.
This introduces a compile time dependency on spring-security which offers some standardimplementations (see Spring Security Crypto Module). There is also a compatible RSA implementation.
Package the implementation of your choice in a jar file and install it in xd/lib along with any requireddependencies (spring-security-core is already in the runtime classpath).
Spring XD will use the TextEncryptor you provide to decrypt any properties that contain the prefix{cipher}. This conforms to the convention used by the Spring Cloud Config Server.
For example:
spring:
datasource:
username: dbuser
password: '{cipher}FKSAJDFGYOS8F7GLHAKERGFHLSAJ'
If a TextEncrypor bean is present, Spring XD will detect the encrypted passwordFKSAJDFGYOS8F7GLHAKERGFHLSAJ and decrypt it prior to creating any beans that reference thisvalue.
Note
Single quotes, as shown above, are required in yaml files. Do not include them in plain propertiesfiles.
Also this will work with module options included in the stream definition, if you are so inclined:
xd:> stream create --name test --definition "jdbc --username=dbuser --
password='{cipher}FKSAJDFGYOS8F7GLHAKERGFHLSAJ'..."

Spring XD Guide
1.3.2.RELEASE Spring XD 45
4. DSL Guide
4.1 Introduction
Spring XD provides a DSL for defining a stream. Over time the DSL is likely to evolve significantly as itgains the ability to define more and more sophisticated streams as well as the steps of a batch job.
4.2 Pipes and filters
A simple linear stream consists of a sequence of modules. Typically an Input Source, (optional)Processing Steps, and an Output Sink. As a simple example consider the collection of data from anHTTP Source writing to a File Sink. Using the DSL the stream description is:
http | file
A stream that involves some processing:
http | filter | transform | file
The modules in a stream definition are connected together using the pipe symbol |.
4.3 Module parameters
Each module may take parameters. The parameters supported by a module are defined by the moduleimplementation. As an example the http source module exposes port setting which allows the dataingestion port to be changed from the default value.
http --port=1337
It is only necessary to quote parameter values if they contain spaces or the | character. Here thetransform processor module is being passed a SpEL expression that will be applied to any data itencounters:
transform --expression='new StringBuilder(payload).reverse()'
If the parameter value needs to embed a single quote, use two single quotes:
// Query is: Select * from /Customers where name='Smith'
scan --query='Select * from /Customers where name=''Smith'''
4.4 Named channels
Instead of a source or sink it is possible to use a named channel. Normally the modules in a stream areconnected by anonymous internal channels (represented by the pipes), but by using explicitly namedchannels it becomes possible to construct more sophisticated flows. In keeping with the unix theme,sourcing/sinking data from/to a particular channel uses the > character. A named channel is specifiedby using a channel type, followed by a : followed by a name. The channel types available are:
queue - this type of channel has point-to-point (p2p) semantics
topic - this type of channel has pub/sub semantics
Here is an example that shows how you can use a named channel to share a data pipeline driven bydifferent input sources.

Spring XD Guide
1.3.2.RELEASE Spring XD 46
queue:foo > file
http > queue:foo
time > queue:foo
Now if you post data to the http source, you will see that data intermingled with the time value in the file.
The opposite case, the fanout of a message to multiple streams, is planned for a future release. However,taps are a specialization of named channels that do allow publishing data to multiple sinks. For example:
tap:stream:mystream > file
tap:stream:mystream > log
Once data is received on mystream, it will be written to both file and log.
Support for routing messages to different streams based on message content is also planned for afuture release.
4.5 Labels
Labels provide a means to alias or group modules. Labels are simply a name followed by a : Whenused as an alias a label can provide a more descriptive name for a particular configuration of a moduleand possibly something easier to refer to in other streams.
mystream = http | obfuscator: transform --expression=payload.replaceAll('password','*') | file
Labels are especially useful (and required) for disambiguating when multiple modules of the same nameare used:
mystream = http | uppercaser: transform --expression=payload.toUpperCase() | exclaimer: transform --
expression=payload+'!' | file
Refer to this section of the Taps chapter to see how labels facilitate the creation of taps in these caseswhere a stream contains ambiguous modules.
4.6 Single quotes, Double quotes, Escaping
Spring XD is a complex runtime that involves a lot of systems when you look at the complete picture.There is a Spring Shell based client that talks to the admin that is responsible for parsing. In turn,modules may themselves rely on embedded languages (like the Spring Expression Language) toaccomplish their behavior.
Those three components (shell, XD parser and SpEL) have rules about how they handle quotes and howsyntax escaping works, and when stacked with each other, confusion may arise. This section explainsthe rules that apply and provides examples to the most common situations.
It’s not always that complicated
This section focuses on the most complicated cases, when all 3 layers are involved. Of course, ifyou don’t use the XD shell (for example if you’re using the REST API directly) or if module optionvalues are not SpEL expressions, then escaping rules can be much simpler

Spring XD Guide
1.3.2.RELEASE Spring XD 47
Spring Shell
Arguably, the most complex component when it comes to quotes is the shell. The rules can be laid outquite simply, though:
• a shell command is made of keys (--foo) and corresponding values. There is a special, key-lessmapping though, see below
• a value can not normally contain spaces, as space is the default delimiter for commands
• spaces can be added though, by surrounding the value with quotes (either single ['] or double ["]quotes)
• if surrounded with quotes, a value can embed a literal quote of the same kind by prefixing it with abackslash (\)
• Other escapes are available, such as \t, \n, \r, \f and unicode escapes of the form \uxxxx
• Lastly, the key-less mapping is handled in a special way in the sense that if does not need quotingto contain spaces
For example, the XD shell supports the ! command to execute native shell commands. The ! acceptsa single, key-less argument. This is why the following works:
xd:>! rm foo
The argument here is the whole rm foo string, which is passed as is to the underlying shell.
As another example, the following commands are strictly equivalent, and the argument value is foo(without the quotes):
xd:>stream destroy foo
xd:>stream destroy --name foo
xd:>stream destroy "foo"
xd:>stream destroy --name "foo"
XD Syntax
At the XD parser level (that is, inside the body of a stream or job definition) the rules are the following:
• option values are normally parsed until the first space character
• they can be made of literal strings though, surrounded by single or double quotes
• To embed such a quote, use two consecutive quotes of the desired kind
As such, the values of the --expression option to the filter module are semantically equivalent inthe following examples:
filter --expression=payload>5
filter --expression="payload>5"
filter --expression='payload>5'
filter --expression='payload > 5'
Arguably, the last one is more readable. It is made possible thanks to the surrounding quotes. The actualexpression is payload > 5 (without quotes).
Now, let’s imagine we want to test against string messages. If we’d like to compare the payload to theSpEL literal string, "foo", this is how we could do:
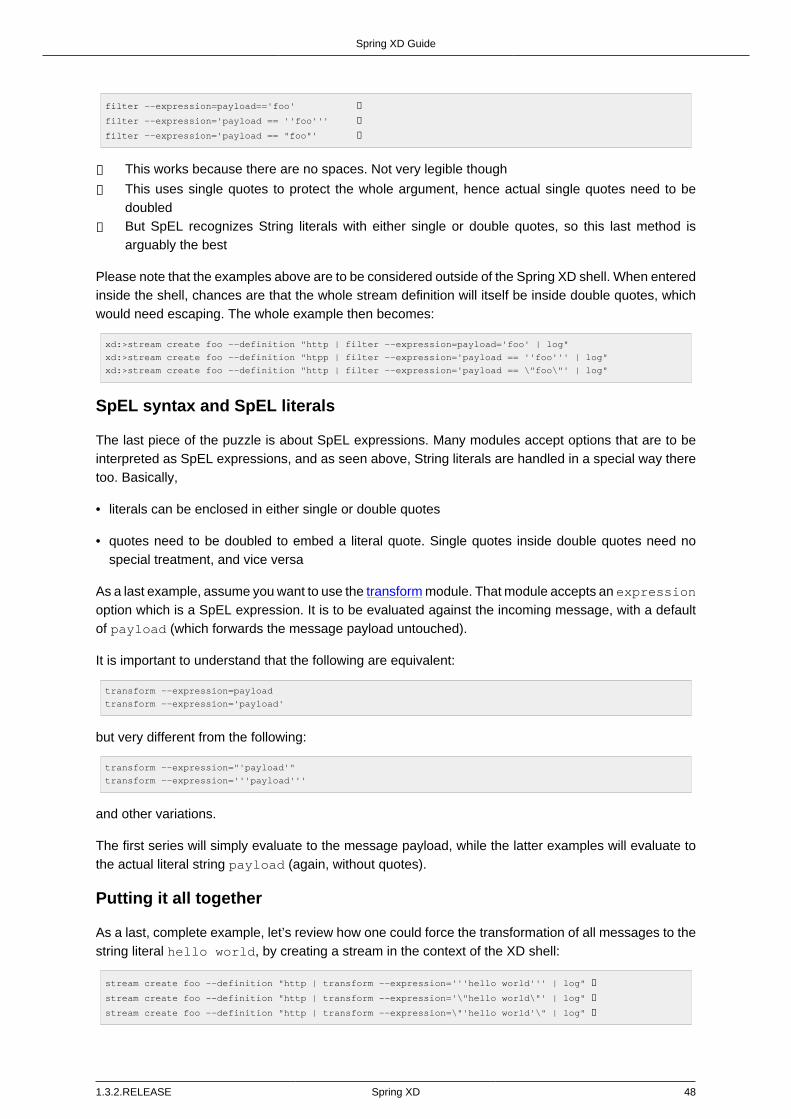
Spring XD Guide
1.3.2.RELEASE Spring XD 48
filter --expression=payload=='foo' ❶
filter --expression='payload == ''foo''' ❷
filter --expression='payload == "foo"' ❸
❶ This works because there are no spaces. Not very legible though
❷ This uses single quotes to protect the whole argument, hence actual single quotes need to bedoubled
❸ But SpEL recognizes String literals with either single or double quotes, so this last method isarguably the best
Please note that the examples above are to be considered outside of the Spring XD shell. When enteredinside the shell, chances are that the whole stream definition will itself be inside double quotes, whichwould need escaping. The whole example then becomes:
xd:>stream create foo --definition "http | filter --expression=payload='foo' | log"
xd:>stream create foo --definition "htpp | filter --expression='payload == ''foo''' | log"
xd:>stream create foo --definition "http | filter --expression='payload == \"foo\"' | log"
SpEL syntax and SpEL literals
The last piece of the puzzle is about SpEL expressions. Many modules accept options that are to beinterpreted as SpEL expressions, and as seen above, String literals are handled in a special way theretoo. Basically,
• literals can be enclosed in either single or double quotes
• quotes need to be doubled to embed a literal quote. Single quotes inside double quotes need nospecial treatment, and vice versa
As a last example, assume you want to use the transform module. That module accepts an expressionoption which is a SpEL expression. It is to be evaluated against the incoming message, with a defaultof payload (which forwards the message payload untouched).
It is important to understand that the following are equivalent:
transform --expression=payload
transform --expression='payload'
but very different from the following:
transform --expression="'payload'"
transform --expression='''payload'''
and other variations.
The first series will simply evaluate to the message payload, while the latter examples will evaluate tothe actual literal string payload (again, without quotes).
Putting it all together
As a last, complete example, let’s review how one could force the transformation of all messages to thestring literal hello world, by creating a stream in the context of the XD shell:
stream create foo --definition "http | transform --expression='''hello world''' | log" ❶
stream create foo --definition "http | transform --expression='\"hello world\"' | log" ❷
stream create foo --definition "http | transform --expression=\"'hello world'\" | log" ❸

Spring XD Guide
1.3.2.RELEASE Spring XD 49
❶ This uses single quotes around the string (at the XD parser level), but they need to be doubledbecause we’re inside a string literal (very first single quote after the equals sign)
❷❸ use single and double quotes respectively to encompass the whole string at the XD parser level.Hence, the other kind of quote can be used inside the string. The whole thing is inside the --definition argument to the shell though, which uses double quotes. So double quotes areescaped (at the shell level) == Interactive Shell
4.7 Introduction
Spring XD includes an interactive shell that you can use create, deploy, destroy and query streams andjobs. There are also commands to help with common tasks such as interacting with HDFS, the UNIXshell, and sending HTTP requests. In this section we will introduce the main commands and featuresof the shell.
Using the Shell
When you start the shell you can type help to show all the commands that are available. Note, that sincethe XD shell is based on Spring Shell you can contribute you own commands into the shell. The generalgroups of commands are related to the management of
• Modules
• Streams
• Jobs
• Analytics (Counters, Aggregate Counters, Gauges, etc.)
• HDFS
For example to see what modules are available issue the command
xd:>module list
Tip
The list of all Spring XD specific commands can be found in the Shell Reference
The shell also provides extensive command completion capabilities. For example, if you type mod andhit TAB, you will be presented with all the matching commands.
xd:>module
module compose module delete module display module info
module list
Note
Tab completion works for module options as well as for the DSL used within the --definitionoption for stream and module commands.
The command module list shows all the modules available
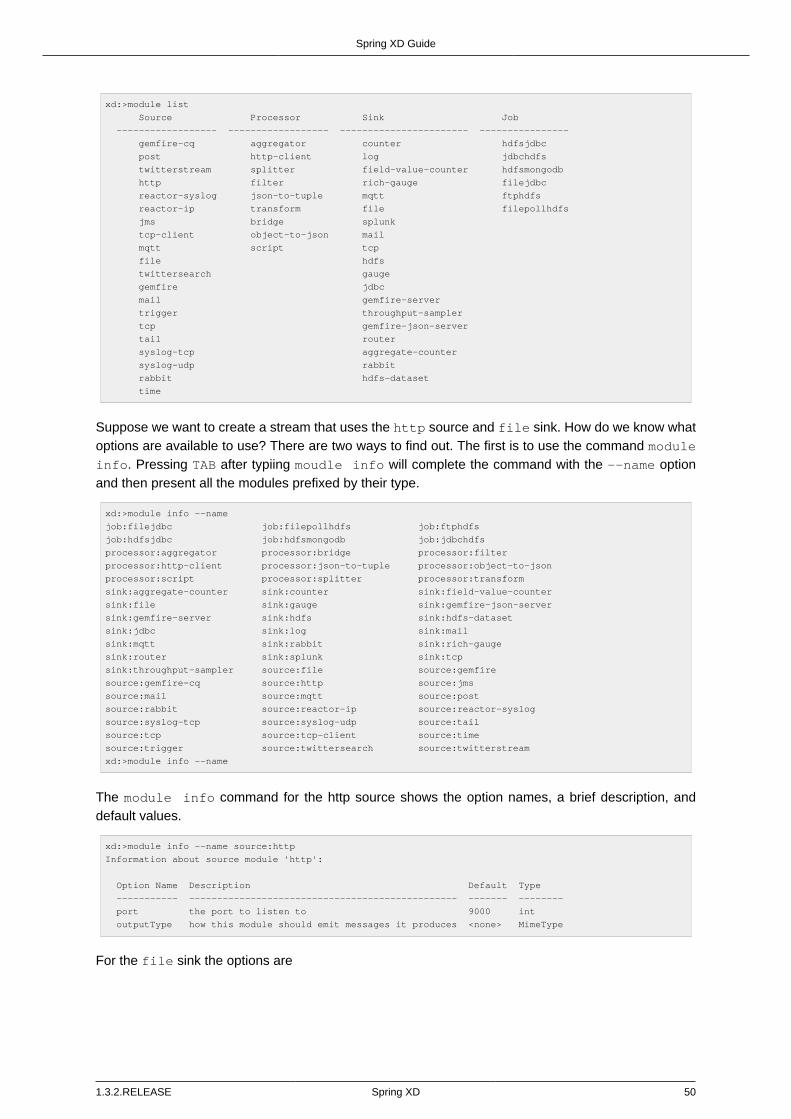
Spring XD Guide
1.3.2.RELEASE Spring XD 50
xd:>module list
Source Processor Sink Job
------------------ ------------------ ----------------------- ----------------
gemfire-cq aggregator counter hdfsjdbc
post http-client log jdbchdfs
twitterstream splitter field-value-counter hdfsmongodb
http filter rich-gauge filejdbc
reactor-syslog json-to-tuple mqtt ftphdfs
reactor-ip transform file filepollhdfs
jms bridge splunk
tcp-client object-to-json mail
mqtt script tcp
file hdfs
twittersearch gauge
gemfire jdbc
mail gemfire-server
trigger throughput-sampler
tcp gemfire-json-server
tail router
syslog-tcp aggregate-counter
syslog-udp rabbit
rabbit hdfs-dataset
time
Suppose we want to create a stream that uses the http source and file sink. How do we know whatoptions are available to use? There are two ways to find out. The first is to use the command moduleinfo. Pressing TAB after typiing moudle info will complete the command with the --name optionand then present all the modules prefixed by their type.
xd:>module info --name
job:filejdbc job:filepollhdfs job:ftphdfs
job:hdfsjdbc job:hdfsmongodb job:jdbchdfs
processor:aggregator processor:bridge processor:filter
processor:http-client processor:json-to-tuple processor:object-to-json
processor:script processor:splitter processor:transform
sink:aggregate-counter sink:counter sink:field-value-counter
sink:file sink:gauge sink:gemfire-json-server
sink:gemfire-server sink:hdfs sink:hdfs-dataset
sink:jdbc sink:log sink:mail
sink:mqtt sink:rabbit sink:rich-gauge
sink:router sink:splunk sink:tcp
sink:throughput-sampler source:file source:gemfire
source:gemfire-cq source:http source:jms
source:mail source:mqtt source:post
source:rabbit source:reactor-ip source:reactor-syslog
source:syslog-tcp source:syslog-udp source:tail
source:tcp source:tcp-client source:time
source:trigger source:twittersearch source:twitterstream
xd:>module info --name
The module info command for the http source shows the option names, a brief description, anddefault values.
xd:>module info --name source:http
Information about source module 'http':
Option Name Description Default Type
----------- ------------------------------------------------ ------- --------
port the port to listen to 9000 int
outputType how this module should emit messages it produces <none> MimeType
For the file sink the options are

Spring XD Guide
1.3.2.RELEASE Spring XD 51
xd:>module info --name sink:file
Information about sink module 'file':
Option Name Description Default
Type
----------- ----------------------------------------------------------------- -----------------
--------
binary if false, will append a newline character at the end of each line false
boolean
charset the charset to use when writing a String payload UTF-8
String
dir the directory in which files will be created /tmp/xd/output/
String
mode what to do if the file already exists APPEND
Mode
name filename pattern to use ${xd.stream.name}
String
suffix filename extension to use <none>
String
inputType how this module should interpret messages it consumes <none>
MimeType
Note that the default value ${xd.stream.name} will be resolved to the name of the stream thatcontains the module.
Tab completion for Job and Stream DSL definitions
When creating a stream defintion tab completion after --definition will enable you to see all theoptions that are available for a given module as well as a list of candidate modules for the subsequentmodule in the stream. For example, hitting TAB after http as shown below
xd:>stream create --name test --definition "http
http --outputType= http --port= http | aggregate-counter http | aggregator
http | bridge http | counter http | field-value-counter http | file
http | filter http | gauge http | gemfire-json-server http | gemfire-
server
http | hdfs http | hdfs-dataset http | http-client http | jdbc
http | json-to-tuple http | log http | mail http | mqtt
http | object-to-json http | rabbit http | rich-gauge http | router
http | script http | splitter http | splunk http | tcp
http | throughput-sampler http | transform
shows the options outputType and port in addition to any processors and sinks. Hitting TAB afterentering -- after the http module will provide a list of only the http options
xd:>stream create --name test --definition "http --
http --outputType= http --port=
Entering the port number and also the pipel | symbol and hitting tab will show completions for candidateprocessor and sink modules. The same process of tab completion for module options applies to eachmodule in the chain.
Executing a script
You can execute a script by either passing in the --cmdfile argument when starting the shell or byexecuting the script command inside the shell. When using scripts it is common to add commentsusing either // or ; characters at the start of the line for one line comments or use /* and */ formultiline comments

Spring XD Guide
1.3.2.RELEASE Spring XD 52
Single quotes, Double quotes, Escaping
There are often three layers of parsing when passing entering commands to the shell. The shellparses the command to recognize -- options, inside the body of a stream/job definition the values areparsed until the first space character, and inside some command options SpEL is used (e.g. router).Understanding the interaction between these layers can cause some confusion. The DSL Guide sectionon quotes and escaping will help you if you run into any issues.

Spring XD Guide
1.3.2.RELEASE Spring XD 53
5. Admin UI
5.1 Introduction
Spring XD provides a browser-based GUI which currently has 4 sections:
• Containers Provides the XD cluster view with the list of all running containers
• Streams Deploy/undeploy Stream Definitions
• Jobs Perform Batch Job related tasks
• Analytics Create data visualizations for the various analytics modules
Upon starting Spring XD, the Admin UI is available at:
"http://<adminHost>:<adminPort>/admin-ui"
For example: http://localhost:9393/admin-ui
If you have enabled https, then it will be located at https://localhost:9393/admin-ui
If you have enabled security, a login form is available at http://localhost:9393/admin-ui/#/login
Note: Default admin server port is 9393
Figure 5.1. The Spring XD Admin UI
5.2 Containers
The Containers section of the admin UI shows the containers that are in the XD cluster. For eachcontainer the group properties and deployed modules are shown. More information on the container

Spring XD Guide
1.3.2.RELEASE Spring XD 54
(hostname, pid, ip address) and for the module (module options and deployment properties) is availableby clicking on the respective links. You can also shutdown a container (in distributed mode) by clickingon the shutdown button. You will be asked for confirmation if you select to shutdown.
Figure 5.2. List of Containers
5.3 Streams
The Streams section of the admin UI provides the Definitions tab that provides a listing of Streamdefinitions. There you have the option to deploy or undeploy those streams. Additionally you canremove the definition by clicking on destroy.
Figure 5.3. List of Stream Definitions

Spring XD Guide
1.3.2.RELEASE Spring XD 55
5.4 Jobs
The Jobs section of the admin UI currently has four tabs specific for Batch Jobs
• Modules
• Definitions
• Deployments
• Executions
Modules
Modules encapsulate a unit of work into a reusable component. Within the XD runtime environmentModules allow users to create definitions for Streams as well as Batch Jobs. Consequently, the Modulestab within the Jobs section allows users to create Batch Job definitions. In order to learn more aboutModules, please see the chapter on Modules.
List available batch job modules
This page lists the available batch job modules.
Figure 5.4. List Job Modules
On this screen you can perform the following actions:

Spring XD Guide
1.3.2.RELEASE Spring XD 56
View details such as the job module options.
Create a Job Definition from the respective Module.
Create a Job Definition from a selected Job Module
On this screen you can create a new Job Definition. As a minimum you must provide a name for thenew definition. Optionally you can select wether the new definition shall be automatically deployed.Depending on the selected module, you will also have the option to specify various parameters that areused during the deployment of the definition.
Figure 5.5. Create a Job Definition

Spring XD Guide
1.3.2.RELEASE Spring XD 57
View Job Module Details
Figure 5.6. View Job Module Details
On this page you can view the details of a selected job module. The pages lists the available options(properties) of the modules.
List job definitions
This page lists the XD batch job definitions and provides actions to deploy, un-deploy or destroy thosejobs.

Spring XD Guide
1.3.2.RELEASE Spring XD 58
Figure 5.7. List Job Definitions
List job deployments
This page lists all the deployed jobs and provides option to launch or schedule the deployed job.

Spring XD Guide
1.3.2.RELEASE Spring XD 59
Figure 5.8. List Job Deployments
Launching a batch Job
Once the job is deployed, they can be launched through the Admin UI as well. Navigate to theDeployments tab. Select the job you want to launch and press Launch. The following modal dialogshould appear:

Spring XD Guide
1.3.2.RELEASE Spring XD 60
Figure 5.9. Launch a Batch Job with parameters
Using this screen, you can define one or more job parameters. Job parameters can be typed and thefollowing data types are available:
• String (The default)
• Date (The default date format is: yyyy/MM/dd)
• Long
• Double
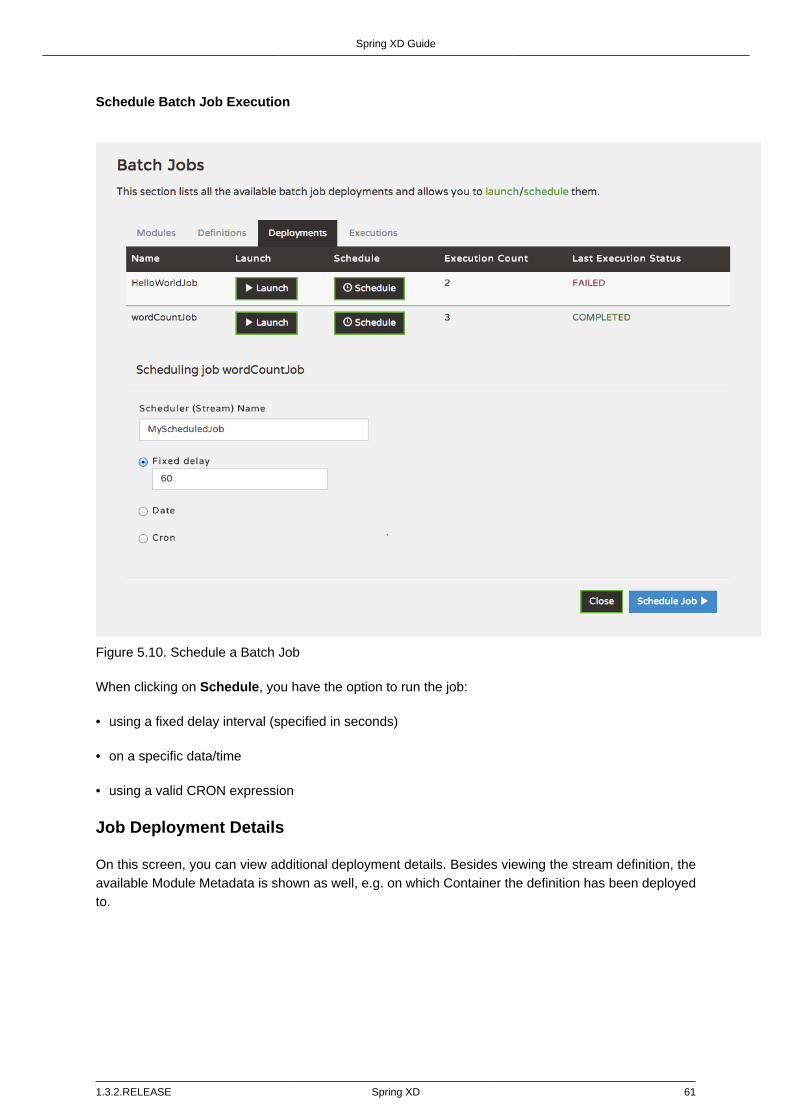
Spring XD Guide
1.3.2.RELEASE Spring XD 61
Schedule Batch Job Execution
Figure 5.10. Schedule a Batch Job
When clicking on Schedule, you have the option to run the job:
• using a fixed delay interval (specified in seconds)
• on a specific data/time
• using a valid CRON expression
Job Deployment Details
On this screen, you can view additional deployment details. Besides viewing the stream definition, theavailable Module Metadata is shown as well, e.g. on which Container the definition has been deployedto.

Spring XD Guide
1.3.2.RELEASE Spring XD 62
Figure 5.11. Job Deployment Details
List job executions
This page lists the Batch Job Executions and provides the option to restart or stop a specific jobexecution, provided the operation is available. Furthermore, you have the option to view the Jobexecution details.

Spring XD Guide
1.3.2.RELEASE Spring XD 63
Figure 5.12. List Job Executions
The list of Job Executions also shows the state of the underlying Job Definition. The following statescan be shown.
The underlying Job Definition was undeployed.
The underlying Job Definition was deleted.
This is a composed Job Definition.
As an example, we have created the following composed job using the Spring XD shell:
spring> job create composed1 --definition "myjob" --deploy
spring> job create composed2 --definition "myjob" --deploy
spring> job create composedDemoJob --definition "composed1 || composed2" --deploy
spring> job launch composedDemoJob
Once executed, you should see the composedDemoJob on the Job Execution page:
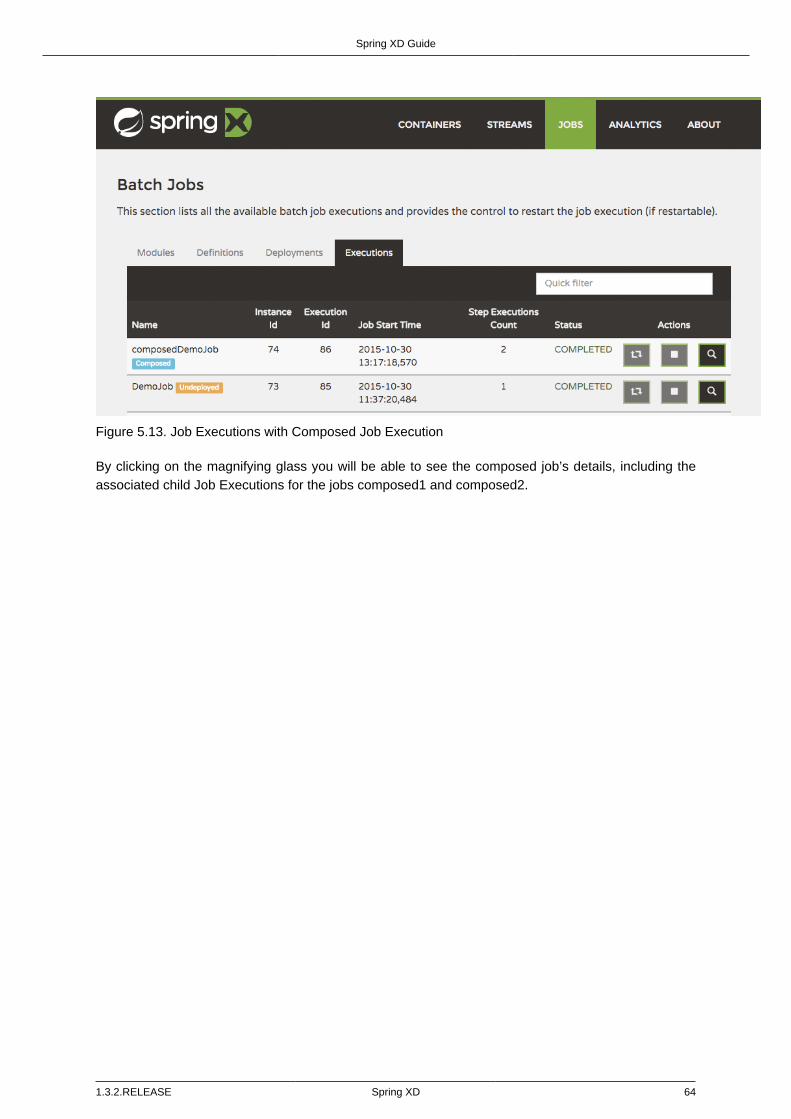
Spring XD Guide
1.3.2.RELEASE Spring XD 64
Figure 5.13. Job Executions with Composed Job Execution
By clicking on the magnifying glass you will be able to see the composed job’s details, including theassociated child Job Executions for the jobs composed1 and composed2.

Spring XD Guide
1.3.2.RELEASE Spring XD 65
Job execution details
Figure 5.14. Job Execution Details of Composed Job
The list of Job Executions on the Job execution details page will only be visible for composed jobs. Inthe case of a non-composed Job, you would see the following:

Spring XD Guide
1.3.2.RELEASE Spring XD 66
Figure 5.15. Job Execution Details - Steps
The Job Execution Details screen also contains a list of the executed steps. You can further drill intothe Step Execution Details by clicking onto the magnifying glass.
Step execution details
On the top of the page, you will see progress indicator the respective step, with the option to refresh theindicator. Furthermore, a link is provided to view the step execution history.

Spring XD Guide
1.3.2.RELEASE Spring XD 67
Figure 5.16. Step Execution Details
The Step Execution details screen provides a complete list of all Step Execution Context key/value pairs.For example, the Spring for Apache Hadoop steps provides exhaustive detail information.
Figure 5.17. Step Execution Context

Spring XD Guide
1.3.2.RELEASE Spring XD 68
This includes a link back to the Job History UI of the Hadoop Cluster.
Figure 5.18. Job History UI
Important
In case of exceptions, the Exit Description field will contain additional error information. Please beaware, though, that this field can only have a maximum of 2500 characters. Therefore, in caseof long exception stacktraces, trimming of error messages may occur. In that case, please referto the server log files for further details.

Spring XD Guide
1.3.2.RELEASE Spring XD 69
Step execution history
Figure 5.19. Step Execution History
On this screen, you can view various metrics associated with the selected step such as duration, readcounts, write counts etc.
5.5 Analytics
The Analytics section of the admin UI provides dashboarding and data visualization capabilities for thevarious analytics modules available in Spring XD:
• Counters
• Aggregate Counters
• Field-Value Counters
• Gauges
• Rich Gauges
For example, if you have created the springtweets stream and the corresponding counter in theCounter chapter, you can now easily create the corresponding graph from within the Dashboard tab:
1. Under Metric Type, select Counters from the select box
2. Under Stream, select tweetcount
3. Under Visualization, select the desired chart option, Bar Chart

Spring XD Guide
1.3.2.RELEASE Spring XD 70
You will see a visualization similar to the following:
Figure 5.20. Counter Bar Chart
Under Visualization, select the desired chart option, Graph Chart
You will see a visualization similar to the following:
Figure 5.21. Counter Graph
Using the icons to the right, you can add additional charts to the dashboard, re-arange the order ofcreated dashboards or remove data visualizations.
The remaining 3 tabs Counters, Gauges and Rich-Gauges, provide default visualizations for all SpringXD counters within the system. For example, if you have created the Simple Tap Example (Rich Gauge)in the Counter Chapter, you will see a visualization similar to the following under the Rich-Gauges tab:

Spring XD Guide
1.3.2.RELEASE Spring XD 71
Figure 5.22. Rich Gauge

Spring XD Guide
1.3.2.RELEASE Spring XD 72
6. Architecture
6.1 Introduction
Spring XD is a unified, distributed, and extensible service for data ingestion, real time analytics, batchprocessing, and data export. The foundations of XD’s architecture are based on the over 100+ manyears of work that have gone into the Spring Batch, Integration and Data projects. Building upon theseprojects, Spring XD provides servers and a configuration DSL that you can immediately use to startprocessing data. You do not need to build an application yourself from a collection of jars to start usingSpring XD.
Spring XD has two modes of operation - single and multi-node. The first is a single process that isresponsible for all processing and administration. This mode helps you get started easily and simplifiesthe development and testing of your application. The second is a distributed mode, where processingtasks can be spread across a cluster of machines and an administrative server reacts to user commandsand runtime events managed within a shared runtime state to coordinate processing tasks executingon the cluster.
Runtime Architecture
The key components in Spring XD are the XD Admin and XD Container Servers. Using a high-levelDSL, you post the description of the required processing tasks to the Admin server over HTTP. TheAdmin server then maps the processing tasks into processing modules. A module is a unit of executionand is implemented as a Spring ApplicationContext. A distributed runtime is provided that will assignmodules to execute across multiple XD Container servers. A single XD Container server can run multiplemodules. When using the single node runtime, all modules are run in a single XD Container and theXD Admin server is run in the same process.
DIRT Runtime
A distributed runtime, called Distributed Integration Runtime, aka DIRT, will distribute the processingtasks across multiple XD Container instances. The XD Admin server breaks up a processing task intoindividual module definitions and assigns each module to a container instance using ZooKeeper (seeXD Distributed Runtime). Each container listens for module definitions to which it has been assignedand deploys the module, creating a Spring ApplicationContext to run it.
Modules share data by passing messages using a configured messaging middleware (Rabbit, Redis,or Local for single node). To reduce the number of hops across messaging middleware between them,multiple modules may be composed into larger deployment units that act as a single module. To learnmore about that feature, refer to the Composing Modules section.

Spring XD Guide
1.3.2.RELEASE Spring XD 73
Figure 6.1. The XD Admin Server sending module definitions to each XD Container
How the processing task is broken down into modules is discussed in the section Container ServerArchitecture.
Support for other distributed runtimes
In the 1.0 release, You can run Spring XD natively, in which case you are responsible for starting upthe XD Admin and XD Container instances. Alternately you can run Spring XD on Hadoop’s YARN, seeRunning XD on YARN. Pivotal Cloud Foundry support is planned for a future release. If you are feelinga adventurous, you can also take a look at our scripts for deploying Spring XD to EC2. These are usedas part of our system integration tests.
Single Node Runtime
A single node runtime is provided that runs the Admin and Container servers, ZooKeeper, and HSQLDBin the same process. the single node runtime is primarily intended for testing and development purposesbut it may also appropriate to use in small production use-cases. The communication to the XD Admin

Spring XD Guide
1.3.2.RELEASE Spring XD 74
server is over HTTP and the XD Admin server communicates to an in-process XD Container using anembedded ZooKeeper server.
Figure 6.2. Single Node Runtime
Admin Server Architecture
The Admin Server uses an embedded servlet container and exposes REST endpoints for creating,deploying, undeploying, and destroying streams and jobs, querying runtime state, analytics, and thelike. The Admin Server is implemented using Spring’s MVC framework and the Spring HATEOAS libraryto create REST representations that follow the HATEOAS principle. The Admin Server and ContainerServers monitor and update runtime state using ZooKeeper (see XD Distributed Runtime).
Container Server Architecture
The key components of data processing in Spring XD are
• Streams
• Jobs
• Taps
Streams define how event driven data is collected, processed, and stored or forwarded. For example,a stream might collect syslog data, filter, and store it in HDFS.
Jobs define how coarse grained and time consuming batch processing steps are orchestrated, forexample a job could be be defined to coordinate performing HDFS operations and the subsequentexecution of multiple MapReduce processing tasks.
Taps are used to process data in a non-invasive way as data is being processed by a Stream or a Job.Much like wiretaps used on telephones, a Tap on a Stream lets you consume data at any point along

Spring XD Guide
1.3.2.RELEASE Spring XD 75
the Stream’s processing pipeline. The behavior of the original stream is unaffected by the presence ofthe Tap.
Figure 6.3. Taps, Jobs, and Streams
Streams
The programming model for processing event streams in Spring XD is based on the well knownEnterprise Integration Patterns as implemented by components in the Spring Integration project. Theprogramming model was designed so that it is easy to test components.
A Stream consist of the following types of modules: * An Input source * Processing steps * An Output sink
An Input source produces messages from an external source. XD supports a variety of sources, e.g.syslog, tcp, http. The output from a module is a Spring Message containing a payload of data and acollection of key-value headers. Messages flow through message channels from the source, throughoptional processing steps, to the output sink. The output sink delivers the message to an externalresource. For example, it is common to write the message to a file system, such as HDFS, but you mayalso configure the sink to forward the message over tcp, http, or another type of middleware, or routethe message to another stream.
A stream that consists of a input source and a output sink is shown below
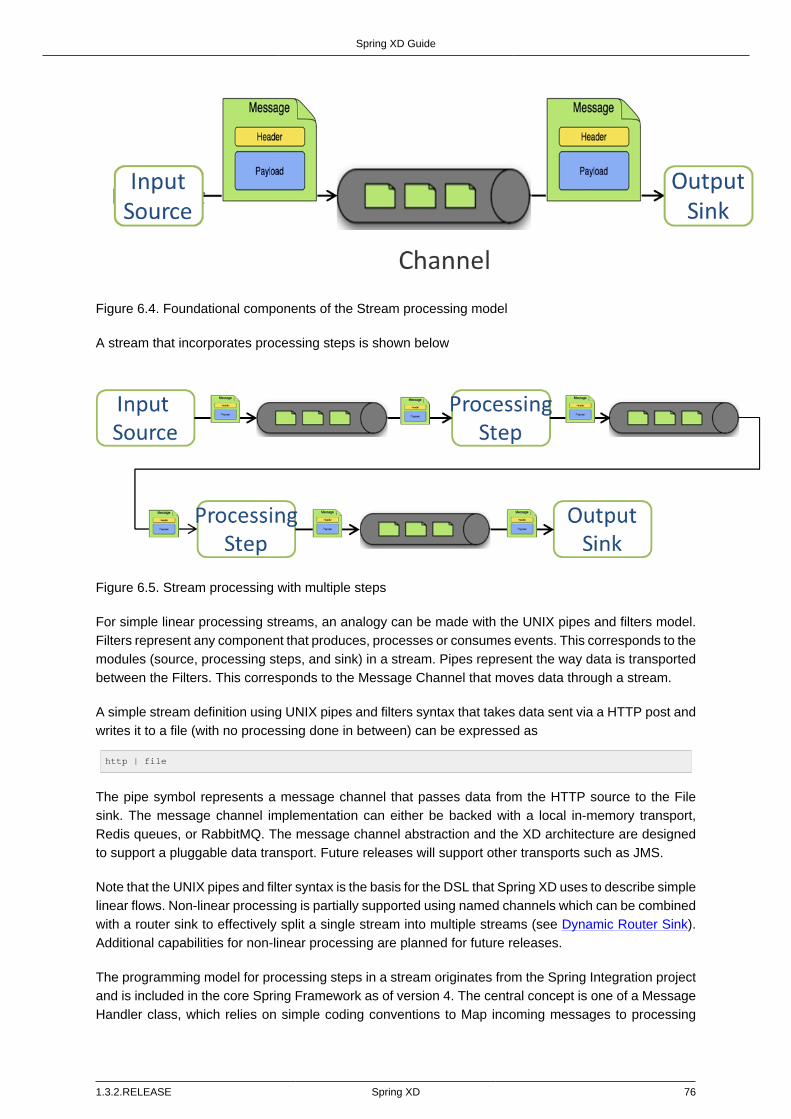
Spring XD Guide
1.3.2.RELEASE Spring XD 76
Figure 6.4. Foundational components of the Stream processing model
A stream that incorporates processing steps is shown below
Figure 6.5. Stream processing with multiple steps
For simple linear processing streams, an analogy can be made with the UNIX pipes and filters model.Filters represent any component that produces, processes or consumes events. This corresponds to themodules (source, processing steps, and sink) in a stream. Pipes represent the way data is transportedbetween the Filters. This corresponds to the Message Channel that moves data through a stream.
A simple stream definition using UNIX pipes and filters syntax that takes data sent via a HTTP post andwrites it to a file (with no processing done in between) can be expressed as
http | file
The pipe symbol represents a message channel that passes data from the HTTP source to the Filesink. The message channel implementation can either be backed with a local in-memory transport,Redis queues, or RabbitMQ. The message channel abstraction and the XD architecture are designedto support a pluggable data transport. Future releases will support other transports such as JMS.
Note that the UNIX pipes and filter syntax is the basis for the DSL that Spring XD uses to describe simplelinear flows. Non-linear processing is partially supported using named channels which can be combinedwith a router sink to effectively split a single stream into multiple streams (see Dynamic Router Sink).Additional capabilities for non-linear processing are planned for future releases.
The programming model for processing steps in a stream originates from the Spring Integration projectand is included in the core Spring Framework as of version 4. The central concept is one of a MessageHandler class, which relies on simple coding conventions to Map incoming messages to processing

Spring XD Guide
1.3.2.RELEASE Spring XD 77
methods. For example, using an http source you can process the body of an HTTP POST request usingthe following class
public class SimpleProcessor {
public String process(String payload) {
return payload.toUpperCase();
}
}
The payload of the incoming Message is passed as a string to the method process. The contents ofthe payload is the body of the http request as we are using a http source. The non-void return value isused as the payload of the Message passed to the next step. These programming conventions makeit very easy to test your Processor component in isolation. There are several processing componentsprovided in Spring XD that do not require you to write any code, such as a filter and transformer thatuse the Spring Expression Language or Groovy. For example, adding a processing step, such as atransformer, in a stream processing definition can be as simple as
http | transformer --expression=payload.toUpperCase() | file
For more information on processing modules, refer to the Processors section.
Stream Deployment
The Container Server listens for module deployment events initiated from the Admin Server viaZooKeeper. When the container node handles a module deployment event, it connects the module’sinput and output channels to the data bus used to transport messages during stream processing. In asingle node configuration, the data bus uses in-memory direct channels. In a distributed configuration,the data bus communications are backed by the configured transport middleware. Redis and Rabbit areboth provided with the Spring XD distribution, but other transports are envisioned for future releases.

Spring XD Guide
1.3.2.RELEASE Spring XD 78
Figure 6.6. A Stream Deployed in a single node server
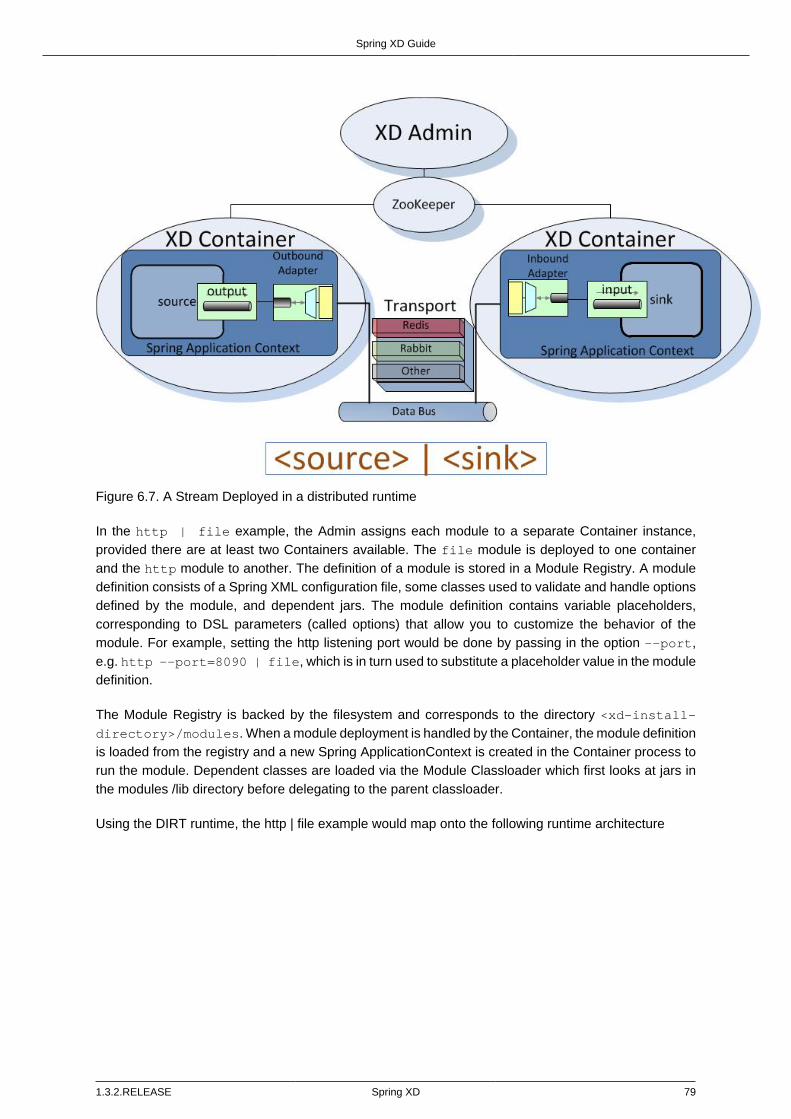
Spring XD Guide
1.3.2.RELEASE Spring XD 79
Figure 6.7. A Stream Deployed in a distributed runtime
In the http | file example, the Admin assigns each module to a separate Container instance,provided there are at least two Containers available. The file module is deployed to one containerand the http module to another. The definition of a module is stored in a Module Registry. A moduledefinition consists of a Spring XML configuration file, some classes used to validate and handle optionsdefined by the module, and dependent jars. The module definition contains variable placeholders,corresponding to DSL parameters (called options) that allow you to customize the behavior of themodule. For example, setting the http listening port would be done by passing in the option --port,e.g. http --port=8090 | file, which is in turn used to substitute a placeholder value in the moduledefinition.
The Module Registry is backed by the filesystem and corresponds to the directory <xd-install-directory>/modules. When a module deployment is handled by the Container, the module definitionis loaded from the registry and a new Spring ApplicationContext is created in the Container process torun the module. Dependent classes are loaded via the Module Classloader which first looks at jars inthe modules /lib directory before delegating to the parent classloader.
Using the DIRT runtime, the http | file example would map onto the following runtime architecture

Spring XD Guide
1.3.2.RELEASE Spring XD 80
Figure 6.8. Distributed HTTP to File Stream
Data produced by the HTTP module is sent over a Redis Queue and is consumed by the File module. Ifthere was a filter processing module in the stream definition, e.g http | filter | file that wouldmap onto the following DIRT runtime architecture.

Spring XD Guide
1.3.2.RELEASE Spring XD 81
Figure 6.9. Distributed HTTP to Filter to File Stream
6.2 Jobs
The creation and execution of Batch jobs builds upon the functionality available in the Spring Batch andSpring for Apache Hadoop projects. See the Batch Jobs section for more information.
6.3 Taps
Taps provide a non-invasive way to consume the data that is being processed by either a Stream ora Job, much like a real time telephone wire tap lets you eavesdrop on telephone conversations. Tapsare recommended as way to collect metrics and perform analytics on a Stream of data. See the sectionTaps for more information.

Spring XD Guide
1.3.2.RELEASE Spring XD 82
7. Distributed Runtime
7.1 Introduction
This document describes what’s happening "under the hood" of the Spring XD Distributed Runtime(DIRT) and in particular, how the runtime architecture achieves high availability and failover in aclustered production environment. See Running in Distributed Mode for more information on installingand running Spring XD in distributed mode.
This discussion focuses on Spring XD’s core runtime components and the role of ZooKeeper inmanaging the state of the Spring XD cluster and enabling automatic recovery from failures.
7.2 Configuring Spring XD for High Availabilty(HA)
A production Spring XD environment is typically distributed among multiple hosts in a clusteredenvironment. Spring XD scales horizontally when you add container instances. In the simplest case, allcontainers are replicas, that is each instance is running on an identically configured host and modulesare deployed to any available container in a round-robin fashion. However, this simplifying assumptiondoes not address real production scenarios in which more control is requred in order to optimize resourceutilization. To this end, Spring XD supports a flexible algorithm which allows you to match moduledeployments to specific container configurations. The container matching algorithm will be coveredin more detail later, but for now, let’s assume the simple case. Running multiple containers not onlyenables horizontal scalability, but enables failure recovery. If a container becomes unavailable due toan unrecoverable connection loss, any modules currently deployed to that container will be deployedautomatically to the other available instances.
Spring XD requires that a single active Admin server handle interactions with the containers, such asstream deployment requests, as these types of operations must be processed serially in the orderreceived. Without a backup, the Admin server becomes single point of failure. Therefore, two (or more forthe risk averse) Admin servers are recommended for a production environment. Note that every Adminserver can handle all requests via REST endpoints but only one instance, the "Leader", will actuallyperform requests that update the runtime state. If the Leader goes down, another available Admin serverwill assume the leader role. Leader Election is an example of a common feature for distributed systemsprovided by the Curator Framework which sits on top of ZooKeeper.
An HA Spring XD installation also requires that external servers - ZooKeeper, messaging middleware,and data stores needed for running Spring XD in distributed mode must be configured for HA aswell. Please consult the product documentation for specific recommendations regarding each of theseexternal components. Also see Message Bus Configuration for tips on configuring the MessageBus forHA, error handling, etc.
7.3 ZooKeeper Overview
In the previous section, we claimed that if a container goes down, Spring XD will redeploy any modulesdeployed on that instance to another available container. We also claimed that if the Admin Leadergoes down, another Admin server will assume that role. ZooKeeper is what makes this all possible.ZooKeeper is a widely used Apache project designed primarily for distributed system management andcoordination. This section will cover some basic concepts necessary to understand its role in SpringXD. See The ZooKeeper Wiki for a more complete overview.

Spring XD Guide
1.3.2.RELEASE Spring XD 83
ZooKeeper is based on a simple hierarchical data structure, formally a tree, and conceptually andsemantically similar to a file directory structure. As such, data is stored in nodes. A node is referencedvia a path, for example, /xd/streams/mystream. Each node can store additional data, serialized as abyte array. In Spring XD, all data is a java.util.Map serialized as JSON. The following figure shows theSpring XD schema:
A ZooKeeper node is either ephemeral or persistent. An ephemeral node exists only as long as thesession that created it remains active. A persistent node is, well, persistent. Ephemeral nodes are

Spring XD Guide
1.3.2.RELEASE Spring XD 84
appropriate for registering Container instances. When an Spring XD container starts up it creates anephemeral node, /xd/containers/<container-id>, using an internally generated container id. When thecontainer’s session is closed due to a connection loss, for example, the container process terminates,its node is removed. The ephemeral container node also holds metadata such as its hostname andIP address, runtime metrics, and user defined container attributes. Persistent nodes maintain stateneeded for normal operation and recovery. This includes data such as stream definitions, job definitions,deployment manifests, module deployments, and deployment state for streams and jobs.
Obviously ZooKeeper is a critical piece of the Spring XD runtime and must itself be HA. ZooKeeperitself supports a distributed architecture, called an ensemble. The details are beyond the scope of thisdocument but for the sake of this discussion it is worth mentioning that there should be at least threeZooKeeper server instances running (an odd number is always recommended) on dedicated hosts. TheContainer and Admin nodes are clients to the ZooKeeper ensemble and must connect to ZooKeeper atstartup. Spring XD components are configured with a zk.client.connect property which may designate asingle <host>:<port> or a comma separated list. The ZooKeeper client will attempt to connect to eachserver in order until it succeeds. If it is unable to connect, it will keep trying. If a connection is lost, theZooKeeper client will attempt to reconnect to one of the servers. The ZooKeeper cluster guaranteesconsistent replication of data across the ensemble. Specifically, ZooKeeper guarantees:
• Sequential Consistency - Updates from a client will be applied in the order that they were sent.
• Atomicity - Updates either succeed or fail. No partial results.
• Single System Image - A client will see the same view of the service regardless of the server thatit connects to.
• Reliability - Once an update has been applied, it will persist from that time forward until a clientoverwrites the update.
• Timeliness - The clients view of the system is guaranteed to be up-to-date within a certain time bound.
ZooKeeper maintains data primarily in memory backed by a disk cache. Updates are logged to disk forrecoverability, and writes are serialized to disk before they are applied to the in-memory database.
In addition to performing basic CRUD operations on nodes, A ZooKeeper client can register a callbackon a node to respond to any events or state changes to that node or any of its children. Such nodeoperations and callbacks are the mechanism that control the Spring XD runtime.

Spring XD Guide
1.3.2.RELEASE Spring XD 85
7.4 The Admin Server Internals
Assuming more than one Admin instance is running, Each instance requests leadership at start up.If there is already a designated leader, the instance will watch the xd/admin node to be notified if theLeader goes away. The instance designated as the "Leader", using the Leader Selector recipe providedby Curator, a ZooKeeper client library that implements some common patterns. Curator also providessome Listener callback interfaces that the client can register on a node. The AdminServer creates thetop level nodes, depicted in the figure above:
• /xd/admins - children are ephemeral nodes for each available Admin instance and used for LeaderSelector
• /xd/containers - children are ephemeral nodes containing runtime attributes includinghostname,process id, ip address, and user defined attributes for each container instance.
• /xd/streams - children are persistent nodes containing the definition (DSL) for each stream.
• /xd/jobs - children are persistent nodes containing the definition (DSL) for each job.
• /xd/taps - children are persistent nodes describing each deployed tap.
• /xd/deployments/streams - children are nodes containing stream deployment status (leaf nodes areephemeral).
• /xd/deployments/jobs - children are nodes containing job deployment status (leaf nodes areephemeral).
• /xd/deployments/modules/requested - stores module deployment requests including deploymentcriteria.

Spring XD Guide
1.3.2.RELEASE Spring XD 86
• /xd/deployments/modules/allocated - stores information describing currently deployed modules.
The admin leader creates a DeploymentSupervisor which registers listeners on /xd/deployments/modules/requested to handle module deployment requests related to stream and job deployments, andxd/containers/ to be notified when containers are added and removed from the cluster. Note that anyAdmin instance can handle user requests. For example, if you enter the following commands via XDshell,
xd>stream create ticktock --definition "time | log"
This command will invoke a REST service on its connected Admin instance to create a new node /xd/streams/ticktock
xd>stream deploy ticktock
Assuming the deployment is successful, This will result in the creation of several nodes used to managedeployed resources, for example, /xd/deployments/streams/ticktock. The details are discussed in theexample below.
If the Admin instance connected to the shell is not the Leader, it will perform no further action.The Leader’s DeploymentSupervisor will attempt to deploy each module in the stream definition, inaccordance with the deployment manifest, to an available container, and update the runtime state.
Example
Let’s walk through the simple example above. If you don’t have a Spring XD cluster set up, thisexample can be easily executed running Spring XD in a single node configuration. The single node

Spring XD Guide
1.3.2.RELEASE Spring XD 87
application includes an embedded ZooKeeper server by default and allocates a random unused port.The embedded ZooKeeper connect string is reported in the console log for the single node application:
...
13:04:27,016 INFO main util.XdConfigLoggingInitializer - Transport: local
13:04:27,016 INFO main util.XdConfigLoggingInitializer - Hadoop Distro: hadoop22
13:04:27,019 INFO main util.XdConfigLoggingInitializer - Hadoop version detected from classpath: 2.2.0
13:04:27,019 INFO main util.XdConfigLoggingInitializer - Zookeeper at: localhost:31316
...
For our purposes, we will use the ZooKeeper CLI tool to inspect the contents of ZooKeeper nodesreflecting the current state of Spring XD. First, we need to know the port to connect the CLI tool to theembedded server. For convenience, we will assign the ZooKeeper port (5555 in this example) whenstarting the single node application. From the XD install directory:
$export JAVA_OPTS="-Dzk.embedded.server.port=5555"
$xd/bin/xd-singlenode
In another terminal session, start the ZooKeeper CLI included with ZooKeeper to connect to theembedded server and inspect the contents of the nodes (NOTE: tab completion works) :
$zkCli.sh -server localhost:5555
After some console output, you should see a prompt:
WatchedEvent state:SyncConnected type:None path:null
[zk: localhost:5555(CONNECTED) 0]
navigate using the ls command. This will reflect the schema shown in the figure above, the uniquecontainer ID will be different for you.
[[zk: localhost:5555(CONNECTED) 0] ls /xd
[deployments, containers, admins, taps, streams, jobs]
[zk: localhost:5555(CONNECTED) 1] ls /xd/streams
[]
[zk: localhost:5555(CONNECTED) 2] ls /xd/deployments
[jobs, streams, modules]
[zk: localhost:5555(CONNECTED) 3] ls /xd/deployments/streams
[]
[zk: localhost:5555(CONNECTED) 4] ls /xd/deployments/modules
[requested, allocated]
[zk: localhost:5555(CONNECTED) 5] ls /xd/deployments/modules/allocated
[2ebbbc9b-63ac-4da4-aa32-e39d69eb546b]
[zk: localhost:5555(CONNECTED) 6] ls /xd/deployments/modules/2ebbbc9b-63ac-4da4-aa32-e39d69eb546b
[]
[zk: localhost:5555(CONNECTED) 7] ls /xd/containers
[2ebbbc9b-63ac-4da4-aa32-e39d69eb546b]
[zk: localhost:5555(CONNECTED) 8]
The above reflects the initial state of Spring XD with a running admin and container instance. Nothingis deployed yet and there are no existing stream or job definitions. Note that xd/deployments/modules/allocated has a persistent child corresponding to the id of the container at xd/containers. If you arerunning in a distributed configuration and connected to one of the ZooKeeper servers in the sameensemble that Spring XD is connected to, you might see multiple nodes under /xd/containers, and xd/admins. Because the external ensemble persists the state of the Spring XD cluster, you will also seeany deployments that existed when the Spring XD cluster was shut down.
Start the XD Shell in a new terminal session and create a stream:

Spring XD Guide
1.3.2.RELEASE Spring XD 88
$ shell/bin/xd-shell
_____ __ _______
/ ___| (-) \ \ / / _ \
\ `--. _ __ _ __ _ _ __ __ _ \ V /| | | |
`--. \ '_ \| '__| | '_ \ / _` | / ^ \| | | |
/\__/ / |_) | | | | | | | (_| | / / \ \ |/ /
\____/| .__/|_| |_|_| |_|\__, | \/ \/___/
| | __/ |
|_| |___/
eXtreme Data
1.3.2.RELEASE | Admin Server Target: http://localhost:9393
Welcome to the Spring XD shell. For assistance hit TAB or type "help".
xd:>stream create ticktock --definition "time | log"
Created new stream 'ticktock'
xd:>
Back to the ZK CLI session:
[zk: localhost:5555(CONNECTED) 8] ls /xd/streams
[ticktock]
[zk: localhost:5555(CONNECTED) 9] get /xd/streams/ticktock
{"definition":"time | log"}
cZxid = 0x31
ctime = Mon Jul 14 10:32:33 EDT 2014
mZxid = 0x31
mtime = Mon Jul 14 10:32:33 EDT 2014
pZxid = 0x31
cversion = 0
dataVersion = 0
aclVersion = 0
ephemeralOwner = 0x0
dataLength = 27
numChildren = 0
[zk: localhost:5555(CONNECTED) 10]
using the get command on the new stream node, we can see the stream definition represented asJSON, along with some standard ZooKeeper metadata.
Note
ephemeralOwner = 0x0, indicating this is not an ephemeral node. At this point, nothing else shouldhave changed from the initial state.
Now, Using the Spring XD shell, let’s deploy the stream,
xd>stream deploy ticktock
Deployed stream 'ticktock'
and verify with ZooKeeper:
[zk: localhost:5555(CONNECTED) 10] ls /xd/deployments/streams
[ticktock]
[zk: localhost:2181(CONNECTED) 11] ls /xd/streams/deployments/ticktock
[modules, status]
[[zk: localhost:2181(CONNECTED) 12] get /xd/deployments/streams/ticktock/status
{"state":"deployed"}
....
zk: localhost:2181(CONNECTED) 13] ls /xd/deployments/streams/ticktock/modules
[source.time.1.2ebbbc9b-63ac-4da4-aa32-e39d69eb546b, sink.log.1.2ebbbc9b-63ac-4da4-aa32-e39d69eb546b]
Note the deployment state shown for the stream’s status node is deployed, meaning the deploymentrequest was satisfied. Deployment states are discussed in more detail here.

Spring XD Guide
1.3.2.RELEASE Spring XD 89
Spring XD decomposes stream deployment requests to individual module deployment requests.Hence, we see that each module in the stream is associated with a container instance. Thecontainer instance in this case is the same since there is only one instance in the singlenode configuration. In a distributed configuration with more than one instance, the stream sourceand sink will each be deployed to a separate container. The node name itself is of the form<module_type>.<module_name>.<module_sequence_number>.<container_id>, where the sequencenumber identifies a deployed instance of a module if multiple instances of that module are requested.
[zk: localhost:2181(CONNECTED) 14] ls /xd/deployments/modules/allocated/2ebbbc9b-63ac-4da4-aa32-
e39d69eb546b/ticktock.source.time.1
[metadata, status]
The metadata and status nodes are ephemeral nodes which store details about the deployed module.This information is provided to XD shell queries. For example:
xd:>runtime modules
Module Container Id Options
Deployment Properties
---------------------- ------------------------------------
----------------------------------------------- ---------------------
ticktock.sink.log.1 2ebbbc9b-63ac-4da4-aa32-e39d69eb546b {name=ticktock, expression=payload,
level=INFO} {count=1, sequence=1}
ticktock.source.time.1 2ebbbc9b-63ac-4da4-aa32-e39d69eb546b {fixedDelay=1, format=yyyy-MM-dd
HH:mm:ss} {count=1, sequence=1}
7.5 Module Deployment
This section describes how the Spring XD runtime manages deployment internally. For more details onhow to deploy streams and jobs see Chapter 32, Deployment.
To process a stream deployment request, the StreamDeploymentListener invokes its ContainerMatcherto select a container instance for each module and records the module’s deployment properties under/xd/deployments/modules/requested/. If a match is found, the StreamDeploymentListener creates anode for the module under /xd/deployments/modules/allocated/<container_id>. The Container includesa DeploymentListener that monitors the container node for new modules to deploy. If the deployment issuccessful, the Container writes the ephemeral nodes status and metadata under the new module node.

Spring XD Guide
1.3.2.RELEASE Spring XD 90
When a container departs, the ephemeral nodes are deleted so its modules are now undeployed. TheContainerListener responds to the deleted nodes and attempts to redeploy any affected modules toanother instance.
Example: Automatic Redeployment
For this example we start two container instances and deploy and simple stream:
xd:>runtime containers
Container Id Host IP Address PID Groups Custom Attributes
------------------------------------ -------------- ----------- ----- ------ -----------------
0ddf80b9-1e80-44b8-8c12-ecc5c8c32e11 ultrafox.local 192.168.1.6 19222
6cac85f8-4c52-4861-a225-cdad3675f6c9 ultrafox.local 192.168.1.6 19244
xd:>stream create ticktock --definition "time | log"
Created new stream 'ticktock'
xd:>stream deploy ticktock
Deployed stream 'ticktock'
xd:>runtime modules
Module Container Id Options
Deployment Properties
---------------------- ------------------------------------
----------------------------------------------- ---------------------
ticktock.sink.log.1 0ddf80b9-1e80-44b8-8c12-ecc5c8c32e11 {name=ticktock, expression=payload,
level=INFO} {count=1, sequence=1}
ticktock.source.time.1 6cac85f8-4c52-4861-a225-cdad3675f6c9 {fixedDelay=1, format=yyyy-MM-dd
HH:mm:ss} {count=1, sequence=1}

Spring XD Guide
1.3.2.RELEASE Spring XD 91
Now we will kill one of the container processes and observe that the affect module has been redeployedto the remaining container:
xd:>runtime containers
Container Id Host IP Address PID Groups Custom Attributes
------------------------------------ -------------- ----------- ----- ------ -----------------
6cac85f8-4c52-4861-a225-cdad3675f6c9 ultrafox.local 192.168.1.6 19244
xd:>runtime modules
Module Container Id Options
Deployment Properties
---------------------- ------------------------------------
----------------------------------------------- ---------------------
ticktock.sink.log.1 6cac85f8-4c52-4861-a225-cdad3675f6c9 {name=ticktock, expression=payload,
level=INFO} {count=1, sequence=1}
ticktock.source.time.1 6cac85f8-4c52-4861-a225-cdad3675f6c9 {fixedDelay=1, format=yyyy-MM-dd
HH:mm:ss} {count=1, sequence=1}
Now if we kill the remaining container, we see warnings in the xd-admin log:
14:36:07,593 WARN DeploymentSupervisorCacheListener-0 server.DepartingContainerModuleRedeployer - No
containers available for redeployment of log for stream ticktock
14:36:07,599 WARN DeploymentSupervisorCacheListener-0 server.DepartingContainerModuleRedeployer - No
containers available for redeployment of time for stream ticktock

Spring XD Guide
1.3.2.RELEASE Spring XD 92
8. Batch Jobs
8.1 Introduction
One of the features that XD offers is the ability to launch and monitor batch jobs based on Spring Batch.The Spring Batch project was started in 2007 as a collaboration between SpringSource and Accentureto provide a comprehensive framework to support the development of robust batch applications. Batchjobs have their own set of best practices and domain concepts which have been incorporated intoSpring Batch building upon Accenture’s consulting business. Since then Spring Batch has been usedin thousands of enterprise applications and is the basis for the recent JSR standardization of batchprocessing, JSR-352.
Spring XD builds upon Spring Batch to simplify creating batch workflow solutions that span traditionaluse-cases such as moving data between flat files and relational databases as well as Hadoop use-caseswhere analysis logic is broken up into several steps that run on a Hadoop cluster. Steps specific toHadoop in a workflow can be MapReduce jobs, executing Hive/Pig scripts or HDFS operations. SpringXD ships with a number of useful job modules out of the box. This section presents an overview forcreating, deploying, and running batch jobs.
8.2 Workflow
The concept of a workflow translates to a Job, not to be confused with a MapReduce job. A Job is adirected graph, each node of the graph is a processing Step. Steps can be executed sequentially or inparallel, depending on the configuration. Jobs can be started, stopped, and restarted. Restarting jobs ispossible since the progress of executed steps in a Job is persisted in a database via a JobRepository.The following figures shows the basic components of a workflow.

Spring XD Guide
1.3.2.RELEASE Spring XD 93
A Job that has steps specific to Hadoop is shown below.
A JobLauncher is responsible for starting a job and is often triggered via a scheduler. Other options tolaunch a job are through Spring XD’s RESTful administration API, the XD web application, or in responseto an external event from and XD stream definition, e.g. file polling using the file source.
8.3 Features
Spring XD allows you to create and launch jobs. The launching of a job can be triggered using a cronexpression or in reaction to data on a stream. When jobs are executing, they are also a source ofevent data that can be subscribed to by a stream. There are several type of events sent during a job’sexecution, the most common being the status of the job and the steps taken within the job. This bi-direction communication between stream processing and batch processing allows for more complexchains of processing to be developed.
As a starting point, jobs for the following cases are provided to use out of the box
• Poll a Directory and import CSV files to HDFS
• Import CSV files to JDBC
• HDFS to JDBC Export
• JDBC to HDFS Import
• HDFS to MongoDB Export
These are described in the section below.
The purpose of this section is to show you how to create, schedule and monitor a job.

Spring XD Guide
1.3.2.RELEASE Spring XD 94
8.4 The Lifecycle of a Job in Spring XD
Before we dive deeper into the details of creating batch jobs with Spring XD, we need to understandthe typical lifecycle for batch jobs in the context of Spring XD:
1. Register a Job Module
2. Create a Job Definition
3. Deploy a Job
4. Launch a Job
5. Job Execution
6. Un-deploy a Job
7. Destroy a Job Definition
Register a Job Module
Register a Job Module with the Module Registry using the XD Shell module upload command. Seeregistering a module for details.
Create a Job Definition
Create a Job Definition from a Job Module by providing a definition name as well as properties thatapply to all Job Instances. At this point the job is not deployed, yet.
Deploy the Job
Deploy the Job Definition to one or more Spring XD containers. This will initialize the Job Definitionson those containers. The jobs are now "live" and a job can be created by sending a message to a jobqueue that contains optional runtime Job Parameters.
Launch a Job
Launch a job by sending a message to the job queue with Job Parameters. A Job Instance is created,representing a specific run of the job. A Job Instance is the Job Definition plus the runtime JobParameters. You can query for the Job Instances associated with a given job name.
Job Execution
The job is executed creating a Job Execution object that captures the success or failure of the job. Youcan query for Job Executions associated with a given job name.
Un-deploy a Job
This removes the job from the Spring XD container(s) preventing the launching of any new JobInstances. For reporting purposes, you will still be able to view historic Job Executions associated withthe the job.
Destroy a Job Definition
Destroying a Job Definition will not only un-deploy any still deployed Job Definitions but will also removethe Job Definition itself.

Spring XD Guide
1.3.2.RELEASE Spring XD 95
Creating Jobs - Additional Options
When creating jobs, the following options are available to all job definitions:
dateFormatThe optional date format for job parameters (default: yyyy-MM-dd)
numberFormatDefines the number format when parsing numeric parameters (default:NumberFormat.getInstance(Locale.US))
makeUniqueShall job parameters be made unique? (default: true)
Also, similar to the stream create command, the job create command has an optional --deployoption to create the job definition and deploy it. --deploy option is false by default.
Below is an example of some of these options combined:
job create myjob --definition "fooJob --makeUnique=false"
Remember that you can always find out about available options for a job by using the module infocommand.
8.5 Deployment manifest support for job
When deploying batch job you can provide a deployment manifest. Deployment manifest properties forjobs are the same as for streams, you can declare
• The number of job modules to deploy
• The criteria expression to use for matching the job to available containers
For example,
job create myjob --definition "fooJob --makeUnique=false"
job deploy myjob --properties "module.fooJob.count=3,module.fooJob.criteria=groups.contains('hdfs-
containers-group')"
The above deployment manifest would deploy 3 number of fooJob modules into containers whosegroup name matches "hdfs-containers-group".
When a batch job is launched/scheduled, the job module that picks up the job launching requestmessage executes the batch job. To support partitioning of the job across multiple containers, the jobdefinition needs to define how the job will be partitioned. The type of partitioning depends on the typeof the job, for example a job reading from JDBC would partition the data in a table by dividing up thenumber of rows and a job reading files form a directory would partition on the number of files available.
The FTP to HDFS and FILE to JDBC jobs support for partitioning. To add partitioning support for yourown jobs you should import singlestep-partition-support.xml in your job definition. This provides theinfrastructure so that the job module that processes the launch request can communicate as the masterwith the other job modules that have been deployed. You will also need to provide an implementationof the Partitioner interface.

Spring XD Guide
1.3.2.RELEASE Spring XD 96
For more information on the deployment manifest, please refer here
8.6 Launching a job
XD uses triggers as well as regular event flow to launch the batch jobs. So in this section we will coverhow to:
• Launch the Batch Job Ad-hoc
• Launch the Batch Job using a named Cron-Trigger
• Launch the Batch Job as sink.
Ad-hoc
To launch a job one time, use the launch option of the job command. So going back to our exampleabove, we’ve created a job module instance named helloSpringXD. Launching that Job Module Instancewould look like:
xd:> job launch helloSpringXD
In the logging output of the XDContainer you should see the following
16:45:40,127 INFO http-bio-9393-exec-1 job.JobPlugin:98 - Configuring module with the following
properties: {numberFormat=, dateFormat=, makeUnique=true, xd.job.name=myjob}
16:45:40,185 INFO http-bio-9393-exec-1 module.SimpleModule:140 - initialized module: SimpleModule
[name=job, type=job, group=myjob, index=0 @3a9ecb9d]
16:45:40,198 INFO http-bio-9393-exec-1 module.SimpleModule:161 - started module: SimpleModule
[name=job, type=job, group=myjob, index=0 @3a9ecb9d]
16:45:40,199 INFO http-bio-9393-exec-1 module.ModuleDeployer:161 - deployed SimpleModule [name=job,
type=job, group=myjob, index=0 @3a9ecb9d]
Hello Spring XD!
To re-launch the job just execute the launch command. For example:
xd:> job launch helloSpringXD
Launch the Batch using Cron-Trigger
To launch a batch job based on a cron scheduler is done by creating a stream using the trigger source.
xd:> stream create --name cronStream --definition "trigger --cron='0/5 * * * * *' >
queue:job:myCronJob" --deploy
A batch job can receive parameters from a source (in this case a trigger) or process. A trigger uses the--payload expression to declare its payload.
xd:> stream create --name cronStream --definition "trigger --cron='0/5 * * * * *' --
payload={\"param1\":\"Kenny\"} > queue:job:myCronJob" --deploy
Note
The payload content must be in a JSON-based map representation.
To pause/stop future scheduled jobs from running for this stream, the stream must be undeployed forexample:
Spring XD Guide
1.3.2.RELEASE Spring XD 97
xd:> stream undeploy --name cronStream
Launch the Batch using a Fixed-Delay-Trigger
A fixed-delay-trigger is used to launch a Job on a regular interval. Using the --fixedDelay parameter youcan set up the number of seconds between executions. In the example below we are running myXDJobevery 10 seconds and passing it a payload containing a single attribute.
xd:> stream create --name fdStream --definition "trigger --payload={\"param1\":\"fixedDelayKenny\"} --
fixedDelay=5 > queue:job:myXDJob" --deploy
To pause/stop future scheduled jobs from running for this stream, you must undeploy the stream forexample:
xd:> stream undeploy --name fdStream
Launch job as a part of event flow
A batch job is always used as a sink, with that being said it can receive messages from sources (otherthan triggers) and processors. In the case below we see that the user has created an http source (httpsource receives http posts and passes the payload of the http message to the next module in the stream)that will pass the http payload to the "myHttpJob".
stream create --name jobStream --definition "http > queue:job:myHttpJob" --deploy
To test the stream you can execute a http post, like the following:
xd:> http post --target http://localhost:9000 --data "{\"param1\":\"fixedDelayKenny\"}"
8.7 Retrieve job notifications
Spring XD offers the facilities to capture the notifications that are sent from the job as it is executing.When a batch job is deployed, by default it registers the following listeners along with pub/sub channelsthat these listeners send messages to.
• Job Execution Listener
• Chunk Listener
• Item Listener
• Step Execution Listener
• Skip Listener
Along with the pub/sub channels for each of these listeners, there will also be a pub/sub channel thatthe aggregated events from all these listeners are published to.
In the following example, we setup a Batch Job called myHttpJob. Afterwards we create a stream thatwill tap into the pub/sub channels that were implicitly generated when the myHttpJob job was deployed.
To receive aggregated events
The stream receives aggregated event messages from all the default batch job listeners and sendsthose messages to the log.

Spring XD Guide
1.3.2.RELEASE Spring XD 98
xd>job create --name myHttpJob --definition "httpJob" --deploy
xd>stream create --name aggregatedEvents --definition "tap:job:myHttpJob >log" --deploy
xd>job launch myHttpJob
Note: The syntax for the tap that receives the aggregated events is: tap:job:<job-name>
In the logging output of the container you should see something like the following when the job completes(with the aggregated events
09:55:53,532 WARN SimpleAsyncTaskExecutor-1 logger.aggregatedEvents:150 - JobExecution: id=2,
version=1, startTime=Sat Apr 12 09:55:53 PDT 2014, endTime=null, lastUpdated=Sat Apr 12 09:55:53 PDT
2014, status=STARTED, exitStatus=exitCode=UNKNOWN;exitDescription=, job=[JobInstance: id=2, version=0,
Job=[myHttpJob]], jobParameters=[{random=0.07002785662707867}]
09:55:53,554 WARN SimpleAsyncTaskExecutor-1 logger.aggregatedEvents:150 - StepExecution: id=2,
version=1, name=step1, status=STARTED, exitStatus=EXECUTING, readCount=0, filterCount=0, writeCount=0
readSkipCount=0, writeSkipCount=0, processSkipCount=0, commitCount=0, rollbackCount=0, exitDescription=
09:55:53,561 WARN SimpleAsyncTaskExecutor-1 logger.aggregatedEvents:150 - XdChunkContextInfo
[complete=false, stepExecution=StepExecution: id=2, version=1, name=step1, status=STARTED,
exitStatus=EXECUTING, readCount=0, filterCount=0, writeCount=0 readSkipCount=0, writeSkipCount=0,
processSkipCount=0, commitCount=0, rollbackCount=0, exitDescription=, attributes={}]
09:55:53,567 WARN SimpleAsyncTaskExecutor-1 logger.aggregatedEvents:150 - XdChunkContextInfo
[complete=false, stepExecution=StepExecution: id=2, version=2, name=step1, status=STARTED,
exitStatus=EXECUTING, readCount=0, filterCount=0, writeCount=0 readSkipCount=0, writeSkipCount=0,
processSkipCount=0, commitCount=1, rollbackCount=0, exitDescription=, attributes={}]
09:55:53,573 WARN SimpleAsyncTaskExecutor-1 logger.aggregatedEvents:150 - StepExecution: id=2,
version=2, name=step1, status=COMPLETED, exitStatus=COMPLETED, readCount=0, filterCount=0, writeCount=0
readSkipCount=0, writeSkipCount=0, processSkipCount=0, commitCount=1, rollbackCount=0, exitDescription=
09:55:53,580 WARN SimpleAsyncTaskExecutor-1 logger.aggregatedEvents:150 - JobExecution:
id=2, version=1, startTime=Sat Apr 12 09:55:53 PDT 2014, endTime=Sat Apr 12
09:55:53 PDT 2014, lastUpdated=Sat Apr 12 09:55:53 PDT 2014, status=COMPLETED,
exitStatus=exitCode=COMPLETED;exitDescription=, job=[JobInstance: id=2, version=0, Job=[myHttpJob]],
jobParameters=[{random=0.07002785662707867}]
To receive job execution events
xd>job create --name myHttpJob --definition "httpJob" --deploy
xd>stream create --name jobExecutionEvents --definition "tap:job:myHttpJob.job >log" --deploy
xd>job launch myHttpJob
Note: The syntax for the tap that receives the job execution events is: tap:job:<job-name>.job
In the logging output of the container you should see something like the following when the job completes
10:06:41,579 WARN SimpleAsyncTaskExecutor-1 logger.jobExecutionEvents:150 - JobExecution: id=3,
version=1, startTime=Sat Apr 12 10:06:41 PDT 2014, endTime=null, lastUpdated=Sat Apr 12 10:06:41 PDT
2014, status=STARTED, exitStatus=exitCode=UNKNOWN;exitDescription=, job=[JobInstance: id=3, version=0,
Job=[myHttpJob]], jobParameters=[{random=0.3774227747555795}]
10:06:41,626 INFO SimpleAsyncTaskExecutor-1 support.SimpleJobLauncher:136 - Job: [FlowJob:
[name=myHttpJob]] completed with the following parameters: [{random=0.3774227747555795}] and the
following status: [COMPLETED]
10:06:41,626 WARN SimpleAsyncTaskExecutor-1 logger.jobExecutionEvents:150 -
JobExecution: id=3, version=1, startTime=Sat Apr 12 10:06:41 PDT 2014, endTime=Sat
Apr 12 10:06:41 PDT 2014, lastUpdated=Sat Apr 12 10:06:41 PDT 2014, status=COMPLETED,
exitStatus=exitCode=COMPLETED;exitDescription=, job=[JobInstance: id=3, version=0, Job=[myHttpJob]],
jobParameters=[{random=0.3774227747555795}]
To receive step execution events
xd>job create --name myHttpJob --definition "httpJob" --deploy
xd>stream create --name stepExecutionEvents --definition "tap:job:myHttpJob.step >log" --deploy
xd>job launch myHttpJob
Note: The syntax for the tap that receives the step execution events is: tap:job:<job-name>.step
In the logging output of the container you should see something like the following when the job completes

Spring XD Guide
1.3.2.RELEASE Spring XD 99
10:13:16,072 WARN SimpleAsyncTaskExecutor-1 logger.stepExecutionEvents:150 - StepExecution: id=6,
version=1, name=step1, status=STARTED, exitStatus=EXECUTING, readCount=0, filterCount=0, writeCount=0
readSkipCount=0, writeSkipCount=0, processSkipCount=0, commitCount=0, rollbackCount=0, exitDescription=
10:13:16,092 WARN SimpleAsyncTaskExecutor-1 logger.stepExecutionEvents:150 - StepExecution: id=6,
version=2, name=step1, status=COMPLETED, exitStatus=COMPLETED, readCount=0, filterCount=0, writeCount=0
readSkipCount=0, writeSkipCount=0, processSkipCount=0, commitCount=1, rollbackCount=0, exitDescription=
To receive item, skip and chunk events
xd>job create --name myHttpJob --definition "httpJob" --deploy
xd>stream create --name itemEvents --definition "tap:job:myHttpJob.item >log" --deploy
xd>stream create --name skipEvents --definition "tap:job:myHttpJob.skip >log" --deploy
xd>stream create --name chunkEvents --definition "tap:job:myHttpJob.chunk >log" --deploy
xd>job launch myHttpJob
Note: The syntax for the tap that receives the item events: tap:job:<job-name>.item,for skipevents: tap:job:<job-name>.skip and for chunk events: tap:job:<job-name>.chunk
To disable the default listeners
xd>job create --name myHttpJob --definition "httpJob --listeners=disable" --deploy
To select specific listeners
To select specific listeners, specify comma separated list in --listeners option. Following exampleillustrates the selection of job and step execution listeners only:
xd>job create --name myHttpJob --definition "httpJob --listeners=job,step" --deploy
Note: List of options are: job, step, item, chunk and skip The aggregated channel is registered if at leastone of these default listeners are enabled.
For a complete example, please see the Batch Notifications Sample which is part of the Spring XDSamples repository.
8.8 Removing Batch Jobs
Batch Jobs can be deleted by executing:
xd:> job destroy helloSpringXD
Alternatively, one can just undeploy the job, keeping its definition for a future redeployment:
xd:> job undeploy helloSpringXD

Spring XD Guide
1.3.2.RELEASE Spring XD 100
9. Streams
9.1 Introduction
In Spring XD, a basic stream defines the ingestion of event driven data from a source to a sink thatpasses through any number of processors. Stream processing is performed inside the XD Containersand the deployment of stream definitions to containers is done via the XD Admin Server. The GettingStarted section shows you how to start these servers and how to start and use the Spring XD shell
Sources, sinks and processors are predefined configurations of a module. Module definitions are foundin the #0# directory. 1. Modules definitions are standard Spring configuration files that use existing Springclasses, such as Input/Output adapters and Transformers from Spring Integration that support generalEnterprise Integration Patterns.
A high level DSL is used to create stream definitions. The DSL to define a stream that has an http sourceand a file sink (with no processors) is shown below
http | file
The DSL mimics a UNIX pipes and filters syntax. Default values for ports and filenames are used in thisexample but can be overriden using -- options, such as
http --port=8091 | file --dir=/tmp/httpdata/
To create these stream definitions you make an HTTP POST request to the XD Admin Server. Moredetails can be found in the sections below.
9.2 Creating a Simple Stream
The XD Admin server 5 exposes a full RESTful API for managing the lifecycle of stream definitions, butthe easiest way to use the XD shell. Start the shell as described in the Getting Started section
New streams are created by posting stream definitions. The definitions are built from a simple DSL. Forexample, let’s walk through what happens if we execute the following shell command:
xd:> stream create --definition "time | log" --name ticktock
This defines a stream named ticktock based off the DSL expression time | log. The DSL usesthe "pipe" symbol |, to connect a source to a sink.
Then to deploy the stream execute the following shell command (or alternatively add the --deployflag when creating the stream so that this step is not needed):
xd:> stream deploy --name ticktock
The stream server finds the time and log definitions in the modules directory and uses them to setupthe stream. In this simple example, the time source simply sends the current time as a message eachsecond, and the log sink outputs it using the logging framework.
1Using the filesystem is just one possible way of storing module defintions. Other backends will be supported in the future, e.g.Redis.5The server is implemented by the AdminMain class in the spring-xd-dirt subproject

Spring XD Guide
1.3.2.RELEASE Spring XD 101
processing module 'Module [name=log, type=sink]' from group 'ticktock' with index: 1
processing module 'Module [name=time, type=source]' from group 'ticktock' with index: 0
17:26:18,774 WARN ThreadPoolTaskScheduler-1 logger.ticktock:141 - Thu May 23 17:26:18 EDT 2013
If you would like to have multiple instances of a module in the stream, you can include a property withthe deploy command:
xd:> stream deploy --name ticktock --properties "module.time.count=3"
You can also include a SpEL Expression as a criteria property for any module. That will be evaluatedagainst the attributes of each currently available Container. Instances of the module will only be deployedto Containers for which the expression evaluates to true.
xd:> stream deploy --name ticktock --properties
"module.time.count=3,module.log.criteria=groups.contains('x')"
Important
See Section 9.9, “Module Labels”.
9.3 Deleting a Stream
You can delete a stream by issuing the stream destroy command from the shell:
xd:> stream destroy --name ticktock
9.4 Deploying and Undeploying Streams
Often you will want to stop a stream, but retain the name and definition for future use. In that case youcan undeploy the stream by name and issue the deploy command at a later time to restart it.
xd:> stream undeploy --name ticktock
xd:> stream deploy --name ticktock
9.5 Other Source and Sink Types
Let’s try something a bit more complicated and swap out the time source for something else. Anothersupported source type is http, which accepts data for ingestion over HTTP POSTs. Note that the httpsource accepts data on a different port (default 9000) from the Admin Server (default 8080).
To create a stream using an http source, but still using the same log sink, we would change theoriginal command above to
xd:> stream create --definition "http | log" --name myhttpstream --deploy
which will produce the following output from the server
processing module 'Module [name=log, type=sink]' from group 'myhttpstream' with index: 1
processing module 'Module [name=http, type=source]' from group 'myhttpstream' with index: 0
Note that we don’t see any other output this time until we actually post some data (using shell command)
xd:> http post --target http://localhost:9000 --data "hello"
xd:> http post --target http://localhost:9000 --data "goodbye"
and the stream will then funnel the data from the http source to the output log implemented by the log sink

Spring XD Guide
1.3.2.RELEASE Spring XD 102
15:08:01,676 WARN ThreadPoolTaskScheduler-1 logger.myhttpstream:141 - hello
15:08:12,520 WARN ThreadPoolTaskScheduler-1 logger.myhttpstream:141 - goodbye
Of course, we could also change the sink implementation. You could pipe the output to a file (file),to hadoop (hdfs) or to any of the other sink modules which are provided. You can also define yourown modules.
9.6 Simple Stream Processing
As an example of a simple processing step, we can transform the payload of the HTTP posted data toupper case using the stream definitions
http | transform --expression=payload.toUpperCase() | log
To create this stream enter the following command in the shell
xd:> stream create --definition "http | transform --expression=payload.toUpperCase() | log" --name
myprocstrem --deploy
Posting some data (using shell command)
xd:> http post --target http://localhost:9000 --data "hello"
Will result in an uppercased hello in the log
15:18:21,345 WARN ThreadPoolTaskScheduler-1 logger.myprocstream:141 - HELLO
See the Processors section for more information.
9.7 DSL Syntax
In the examples above, we connected a source to a sink using the pipe symbol |. You can also passparameters to the source and sink configurations. The parameter names will depend on the individualmodule implementations, but as an example, the http source module exposes a port setting whichallows you to change the data ingestion port from the default value. To create the stream using port8000, we would use
xd:> stream create --definition "http --port=8000 | log" --name myhttpstream
If you know a bit about Spring configuration files, you can inspect the module definition to see whichproperties it exposes. Alternatively, you can read more in the source and sink documentation.
9.8 Advanced Features
In the examples above, simple module definitions are used to construct each stream. However, modulesmay be grouped together in order to avoid duplication and/or reduce the amount of chattiness over themessaging middleware. To learn more about that feature, refer to the Composing Modules section.
If directed graphs are needed instead of the simple linear streams described above, two features arerelevant. First, named channels may be used as a way to combine multiple flows upstream and/ordownstream from the channel. The behavior of that channel may either be queue-based or topic-baseddepending on what prefix is used ("queue:myqueue" or "topic:mytopic", respectively). To learn more,refer to the Named Channels section. Second, you may need to determine the output channel of astream based on some information that is only known at runtime. To learn about such content-basedrouting, refer to the Dynamic Router section.

Spring XD Guide
1.3.2.RELEASE Spring XD 103
9.9 Module Labels
When a stream is comprised of multiple modules with the same name, they must be qualified with labels.See Section 4.5, “Labels”.

Spring XD Guide
1.3.2.RELEASE Spring XD 104
10. Modules
10.1 Introduction
Spring XD supports data ingestion by allowing users to define streams. Streams are composed ofmodules which encapsulate a unit of work into a reusable component. A job in Spring XD must alsobe implemented as a module.
Modules are categorized by type, typically representing the role or function of the module. CurrentSpring XD module types include source, sink, processor, and job. The type determines how themodules may be composed in a stream, or used to deploy a batch job. More precisely:
• A source polls an external resource, or is triggered by an event and only provides output. The firstmodule in a stream must be a source.
• A processor performs some type of task, using a message as input and produces a new message,so it requires both input and output.
• A sink consumes input messages and outputs data to an external resource to terminate the stream.
• A job module implements a Spring Batch job enabled for Spring XD.
10.2 Available Modules
Spring XD ships with a number of pre-packaged modules ready to use for running batch jobs orassembling streams to perform common stream processing tasks using files, HDFS, Spark, Kafka,http, twitter, syslog, GemFire, and more. You can easily assemble these modules into streams to buildcomplex big data applications declaratively, without having to write Java code or know the underlyingSpring products on which Spring XD is built. You can use these modules out of the box or as a basisfor building your own custom modules.
Modules Included with Spring XD
The following pages provide a detailed description, along with configuration options, and examples forall modules included in the Spring XD Distribution:
• Sources
• Processors
• Sinks
• Counters and Gauges
• Jobs
In addition to the standard modules included with the Spring XD distribution, you will find community-contributed modules in the spring-xd-modules GitHub repository.
If you are looking for a technical deep dive or want to develop your own modules, the sections belowcontain the relevant details. If you are interested in developing your own modules, some knowledge ofSpring, Spring Integration or Spring Batch is essential. The remainder of this document assumes thereader has some familiarity with these topics.

Spring XD Guide
1.3.2.RELEASE Spring XD 105
10.3 Creating a Module
This section provides some general details on implementing and packaging custom modules. For aquick start, take a look at the si-dsl-module example, the community modules repository, or dive intothe examples of creating source, processor, sink, and job modules.
Stream Modules
Sources, processors, and sinks are built using Spring Integration and are typically perform a single taskthat they may be easily reused in streams. Alternately, a custom module may be required to perform aspecific function, such as integration with a legacy service. In Spring Integration terms:
• A source is a valid message flow that contains a direct channel named output which is fed by aninbound adapter, either configured with a poller, or triggered by an event.
• A processor is a valid message flow that contains a direct channel named input and a subscribablechannel named output (direct or publish subscribe). It typically performs some type of transformationon the message, using its input channel’s message to create a new message on its output channel.
• A sink is a valid message flow that contains a direct channel named input and an outbound adapter,or service activator used to provide the message to an external resource, HDFS for example.
For example, take a look at the file source which simply polls a directory using a file inbound adapterand file sink which appends an incoming message payload to a file using a file outbound adapter. Onthe surface, there is nothing special about these components. They are plain old Spring XML beandefinition files.
Notice that modules adhere to an important convention: The input and output channels are alwaysnamed input and output, in keeping with the KISS principle (let us know if you come up with some simplernames). The Spring XD runtime uses these names to bind these channels to the message transport.
Module Packaging
A module is a packaged component containing artifacts used to create a Spring application context.In general, a module is not aware of its runtime environment. Each module’s application context isconfigured and connected to other modules via Plugins in order to support distributed processing. Inthis respect, modules may potentially be applied to purposes other than stream processing. The moduletypes described here (source, processor, sink, and job) are specific to Spring XD, but the Module typeis designed to act as a core component of any micro-service architecture built with Spring.
Physically, a Module is somewhat analogous to a war file in Servlet container. The Spring XD containerconfigures and starts a module when it is deployed. Deploying a module in Spring XD terms meansactivating an instance for processing, not to be confused with deploying a web application in Servletcontainer. Here we use the terms install or register to refer to uploading the module jar to make itavailable to the Spring XD runtime. Consistent with the war analogy, a module uses a separate classloader to load its resources, notably the files found in its config in lib directories. Another feature incommon with a war file is that web applications are installed in a configured location and must conformto a standard layout. Artifacts are installed in a known location, either in expanded form or as a singlearchive. Spring XD modules work the same way. The module’s layout has evolved significantly as newfeatures have been added to support custom module development. This evolution has generally ledto increased flexibility with respect to individual artifacts. However, the module’s packaging structureis well defined:

Spring XD Guide
1.3.2.RELEASE Spring XD 106
<module_name>
### <local class files and resources, e.g. com/acme/....>
### config
# ### <any-name>.properties
# ### <any-name>.[xml | groovy] (optional)
### lib
# ### <dependent libraries not provided by Spring XD (xd/lib)>
#
For historical reasons, all modules included with Spring XD distribution are provided in expanded formand are commonly configured using XML bean definition files (<module-name>.xml) and propertyfiles (<module-name>.properties>. This is subject to change as this convention is no longerrequired. Meanwhile the out-of-the-box modules provide copious examples of module configuration andpackaging.
A module’s contents typically includes:
• Application context configuration: If either config/<any_name>.xml or config/
<any_name>.groovy are present, it will be used as the source for the module’s application context.At most one of these may be present. If using an @Configuration class, neither of these files shouldbe present.
• Module properties file: If the module declares options (e.g. property placeholders whose valuesmust be supplied for each instance when creating a stream), the properties file config/<any_name>.properties may contain an options_class property referencing the fully qualifiedclass name of a Module Options Metadata class. Alternately the properties file may provide in-lineModule Option descriptors (see Module Options below). If using @Configuration, the properties filemust include a base_packages property containing a comma delimited list of package names toenable Spring component scanning scoped to the module. Note that base_packages will be ignoredif a configuration resource (config/*.xml or config/*.groovy) is present.
Note
As of Spring XD 1.1, the names of the module’s bean definition resource (xml or groovy) andproperties file are arbitrary. This provides additional flexibilty over requiring a conventional filename, as has been the case in prior releases. Currently, the required top level config directoryis the convention. This carries the constraint that no other matching file types may be presentin config. Multiple xml, groovy, or properties files matching the pattern, for example, config/*.xml will result in an exception. If you want to combine bean definitions from multiple resources,you may use import declarations and the imported resources must be somewhere else in themodule’s class path. This may be a subdirectory of config or any other arbitrary location.
• Custom code: Any root level .class files packaged as in a typical jar file. This may include an@Configuration class, a Module Options Metadata class, and any dependent classes required bythe module.
• Dependent jar files: Any required runtime dependencies that are not provided by the Spring XDruntime (in $XD_INSTALL_DIR/xd/lib) are loaded from the module’s /lib directory.
As mentioned previously, a Spring XD module can be installed as an expanded directory tree or anarchive. If the module requires dependent jars, which is the typical case, it may be packaged as an uberjar compatible with the Spring Boot layout, and conforming to the above structure. The next sectiondescribes Spring XD’s support for module packaging and development.

Spring XD Guide
1.3.2.RELEASE Spring XD 107
Creating a Module Project
Spring XD (1.1.x or later) provides build tools for creating a module project to test and package themodule either with Maven or Gradle. As described in the above sections, the module jar must exportany dependencies that are not provided by the Spring XD container. The build tools address theseconcerns, packaging your module as an uber jar by wrapping the Spring Boot Maven Plugin or theSpring Boot Gradle Plugin, respectively. The plugins are configured with The MODULE layout for SpringBoot packaging. This does not build an executable jar file, as is normally done, and ensures provideddependencies will not be included in the uber jar.
In addition, the build tools provide Spring XD dependencies necessary to compile and test the module.Specifically, spring-xd-dirt and spring-xd-test provide some useful features for moduledevelopment. As you would expect, the Spring XD versions match the specified parent pom or pluginversion. These provide support for:
• Java defined Module Options Metadata
• In-container testing - You can start an embedded single node container in a test class, create a streamdesigned to test your module using a Spring XD test framework, deploy the stream, and validate theresults.
Note
If your module has no additional dependencies, a plain old jar file conforming to the module layoutshown above will work. In this case, you may still benefit from using the build tools to simplifydevelopment and testing.
Module dependency management
Normally a module should export only the dependencies not provided by the Spring XD runtime.Runtime dependencies provided by the module are loaded using a separate module class loader whenthe module is deployed. This potentially can cause class version conflicts. Spring XD build tools aredesigned to prevent this and allow you to override the default exclusion rules if necessary. Generallywe don’t recommend this unless you have a specific requirement for an alternate version. If yourmodule introduces version conflicts, you will see errors such as ClassDefNotFoundException orNoSuchMethodError when you deploy the module. If you encounter such errors, you should manuallycheck the contents of $XD_INSTALL_DIR/xd/lib against the contents of the module jar, or use thedependency analysis tools provided by Maven or Gradle, and make the necessary changes to yourbuild script.
Porting to another Spring XD version
A module project’s build script is configured for a specific Spring XD version. With each new release ofSpring XD, its runtime dependencies are subject to change and this directly affects which dependencieswill be exported to the module jar. Deploying an existing module to a different Spring XD runtime versionmay result in version conflicts or unsatisfied dependencies. For this reason, we highly recommendthat you rebuild any custom modules to match your target runtime environment. In many cases,this is simply a matter of updating the spring XD version in your build.
The details of dependency management depend on which build tool you are using. The sections onBuilding with Maven or Building with Gradle provide more specifics.
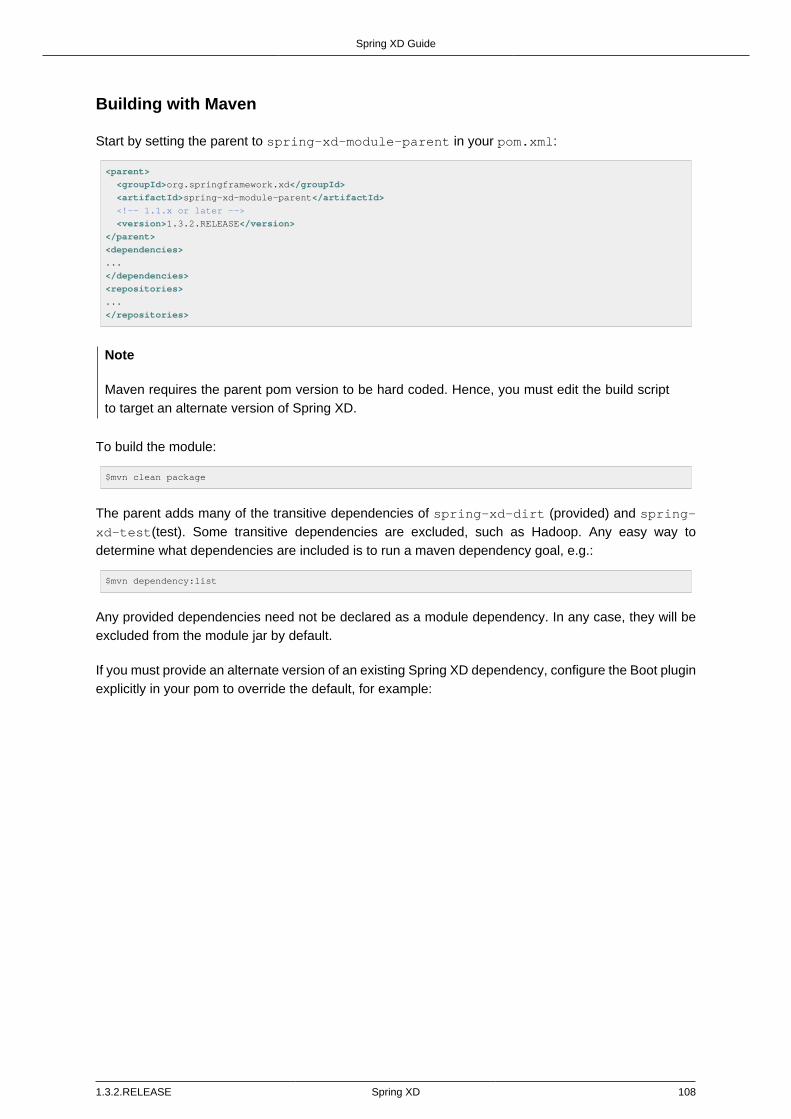
Spring XD Guide
1.3.2.RELEASE Spring XD 108
Building with Maven
Start by setting the parent to spring-xd-module-parent in your pom.xml:
<parent>
<groupId>org.springframework.xd</groupId>
<artifactId>spring-xd-module-parent</artifactId>
<!-- 1.1.x or later -->
<version>1.3.2.RELEASE</version>
</parent>
<dependencies>
...
</dependencies>
<repositories>
...
</repositories>
Note
Maven requires the parent pom version to be hard coded. Hence, you must edit the build scriptto target an alternate version of Spring XD.
To build the module:
$mvn clean package
The parent adds many of the transitive dependencies of spring-xd-dirt (provided) and spring-xd-test(test). Some transitive dependencies are excluded, such as Hadoop. Any easy way todetermine what dependencies are included is to run a maven dependency goal, e.g.:
$mvn dependency:list
Any provided dependencies need not be declared as a module dependency. In any case, they will beexcluded from the module jar by default.
If you must provide an alternate version of an existing Spring XD dependency, configure the Boot pluginexplicitly in your pom to override the default, for example:
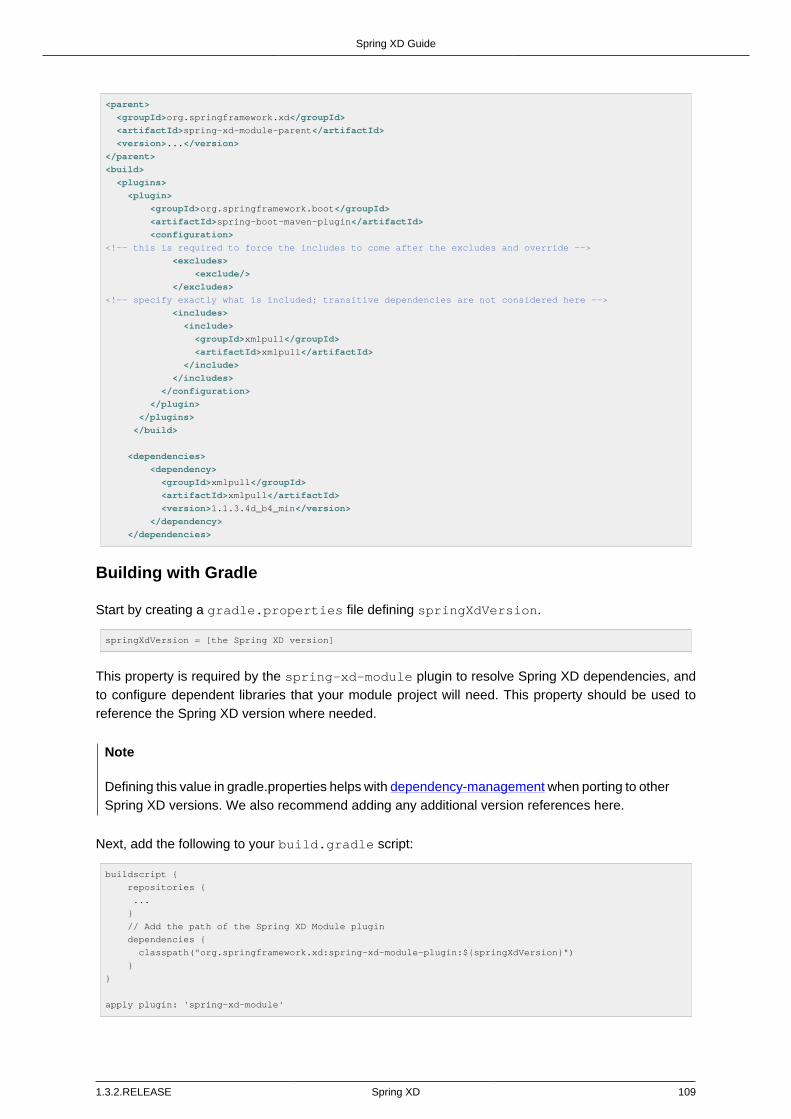
Spring XD Guide
1.3.2.RELEASE Spring XD 109
<parent>
<groupId>org.springframework.xd</groupId>
<artifactId>spring-xd-module-parent</artifactId>
<version>...</version>
</parent>
<build>
<plugins>
<plugin>
<groupId>org.springframework.boot</groupId>
<artifactId>spring-boot-maven-plugin</artifactId>
<configuration>
<!-- this is required to force the includes to come after the excludes and override -->
<excludes>
<exclude/>
</excludes>
<!-- specify exactly what is included; transitive dependencies are not considered here -->
<includes>
<include>
<groupId>xmlpull</groupId>
<artifactId>xmlpull</artifactId>
</include>
</includes>
</configuration>
</plugin>
</plugins>
</build>
<dependencies>
<dependency>
<groupId>xmlpull</groupId>
<artifactId>xmlpull</artifactId>
<version>1.1.3.4d_b4_min</version>
</dependency>
</dependencies>
Building with Gradle
Start by creating a gradle.properties file defining springXdVersion.
springXdVersion = [the Spring XD version]
This property is required by the spring-xd-module plugin to resolve Spring XD dependencies, andto configure dependent libraries that your module project will need. This property should be used toreference the Spring XD version where needed.
Note
Defining this value in gradle.properties helps with dependency-management when porting to otherSpring XD versions. We also recommend adding any additional version references here.
Next, add the following to your build.gradle script:
buildscript {
repositories {
...
}
// Add the path of the Spring XD Module plugin
dependencies {
classpath("org.springframework.xd:spring-xd-module-plugin:${springXdVersion}")
}
}
apply plugin: 'spring-xd-module'

Spring XD Guide
1.3.2.RELEASE Spring XD 110
The plugin adds many of the transitive dependencies of spring-xd-dirt (provided) and spring-xd-test(test). Some transitive dependencies are excluded, such as Hadoop. Any easy way to determinewhat dependencies are included is to run one of Gradle’s dependency tools, e.g.:
$./gradlew dependencies
To build the module:
$./gradlew clean build
This configuration allows you to override springXdVersion on the command line:
$./gradlew clean build -PspringXdVersion=1.3.2.RELEASE
Note
Overriding the property on the Gradle command line does not work if the springXdVersion ishard coded in build.gradle itself, e.g., in an ext closure.
If you must provide an alternate version of an existing Spring XD dependency, override the exportedconfiguration and the configureModule task in build.gradle, for example:
dependencies {
...
exported "org.springframework.integration:spring-integration-xml:${springIntegrationVersion}"
exported "org.springframework.ws:spring-xml:${springWsVersion}"
}
task configureModule(overwrite:true){
configurations {
exported {
transitive = false
exclude group:'org.springframework.xd'
}
}
}
Testing a Module Project
The sections Creating a Source Module, Creating a Processor Module, Creating a Sink Module, andCreating a Job Module each reference working examples of custom module projects including in-container tests.
See the si-dsl-module example for a complete working example.
10.4 Registering a Module
Registering a module requires you to install to the Spring XD Module Registry. A Module must beregistered before it may be deployed as part of a stream or job. Once you have packaged your module,following the instructions in the above section, you can register it using the Spring XD Shell moduleupload command:
xd:>module upload --file [path-to]/mymodule-1.0.0.BUILD-SNAPSHOT.jar --name mymodule --type processor

Spring XD Guide
1.3.2.RELEASE Spring XD 111
Note
By default, the module upload command will fail if a module with the same name and typealready exists. You may override this using the --force option. This is especially useful duringdevelopment.
The Module Registry
A module definition requires the following attributes to uniquely define a module:
• name - the name of the component, normally a single word representing the purpose of the module.Examples are file, http, syslog.
• type - the module type, current Spring XD module types include source, sink, processor, and job
All modules included with Spring XD out-of-the-box are located in the xd/modules directory where SpringXD is installed. The Module Registry organizes modules by type in corresponding sub-directories, soa directory listing will look something like:
modules
### job
### processor
### sink
### source
Spring XD provides a strategy interface ModuleRegistry used to locate a module of a given name andtype. Currently Spring XD implements a ResourceModuleRegistry which is configured to locate modulesin the following locations in this order:
• The file path given by xd.module.home (${xd.home}/modules by default)
• classpath:/modules/ (Spring XD does not provide any module definitions here)
• The file path given by xd.customModule.home (${xd.home}/custom-modules by default)
Custom Module Registry
Custom modules are located separately from out-of-the-box modules. The location is given byxd.customModule.home in servers.yml. The location defaults to ${xd.home}/custom-modulesbut we strongly recommend setting this to an external location on a network file system or using thereplicating registry if you are using custom modules in production. There are two reasons for doingthis. First, custom modules must be accessible to all nodes on the Spring XD cluster, including the XDAdmin node. This allows any container instance to deploy the module. Second, if custom modules areregistered within the Spring XD installation, they will not survive an upgrade to the Spring XD distributionand will need to be reinstalled. By default Spring XD expects MD5 hash files to be present next to thecustom module jar. This is done to ensure the module upload has completed successfully before themodule is used. Hash files are created automatically when installing modules vie the module uploadcommand. If you wish to disable this requirement, set xd.customModule.requiresHashFiles tofalse in servers.yml. This will allow you to manually copy module jars to a file based custom moduleregistry or reuse an existing custom module registry that may not include hash files. This setting doesnot apply to hdfs registries.

Spring XD Guide
1.3.2.RELEASE Spring XD 112
Note
An alternative way for specifying the location of custom modules via servers.yml is using theenvironment variable XD_CUSTOMMODULE_HOME that must point to the custom modules location.
In cases where you want to start e.g. a single-node runtime with a custom module location youcan also define the environment variable right before the executable like this:XD_CUSTOMMODULE_HOME=file\:/path/to/custom-modules bin/xd-singlenode
If you manually deploy your custom modules to XD_CUSTOMMODULE_HOME, since Spring XD (1.2.x orlater), you will need to calculate md5 md5 -q mymodule.jar > mymodule.jar.md5 and put ittogether with your module. Otherwise the module will not be loaded and displayed using Spring XDshell command module list
custom-modules
### job
### processor
### mymodule.jar
### mymodule.jar.md5
### sink
### source
Replicating Module Registry
When running in distributed mode, an alternative to using a shared file system for custom modules isto use the replicating module registry.
If the value of xd.customModule.home does not use the file: protocol, then Spring XD willautomatically set up a replicating registry that proxies that remote registry to the local filesystem. Thisis all done transparently and by default, files are copied down from the central repository only if theircontents has changed.
At the time of writing, only the hdfs: protocol is supported. Setting this up is straightforward:
xd:
customModule:
home: hdfs://somehost/root/path/of/registry
Files will be replicated on the local filesystem in a temporary directory, on demand and loaded fromthere. The XD Admin process will need to have write access to that shared HDFS directory. Intermediarypaths (/root/path/of/registry in the example above) are created at startup if they don’t exist yet.
10.5 Module Class Loading
Modules use a separate class loader that will first load classes from jars in the module’s /lib (andany class files located in the module’s root path). If not found, the class will be loaded from the parentClassLoader that Spring XD normally uses (which includes everything under $XD_HOME/lib). Still, thereare a couple of caveats to be aware of:
• Avoid putting into the module’s lib/ directory any jar files that are already in Spring XD’s class path oryou may end up with ClassCastExceptions or other class loading issues.
• When not using local transport, any class that is directly or indirectly referenced from the payload typeof your messages (i.e. any type in transit from module to module) must be referenced by both theproducing and consuming modules and thus should be installed into xd/lib.
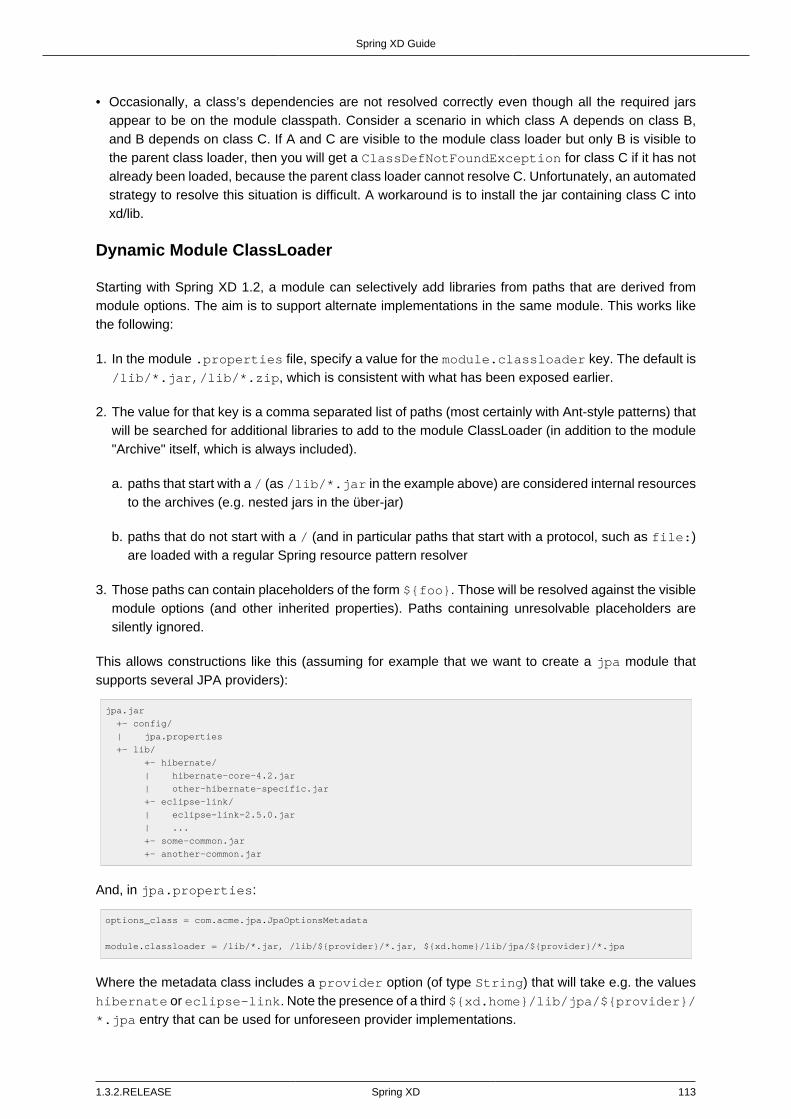
Spring XD Guide
1.3.2.RELEASE Spring XD 113
• Occasionally, a class’s dependencies are not resolved correctly even though all the required jarsappear to be on the module classpath. Consider a scenario in which class A depends on class B,and B depends on class C. If A and C are visible to the module class loader but only B is visible tothe parent class loader, then you will get a ClassDefNotFoundException for class C if it has notalready been loaded, because the parent class loader cannot resolve C. Unfortunately, an automatedstrategy to resolve this situation is difficult. A workaround is to install the jar containing class C intoxd/lib.
Dynamic Module ClassLoader
Starting with Spring XD 1.2, a module can selectively add libraries from paths that are derived frommodule options. The aim is to support alternate implementations in the same module. This works likethe following:
1. In the module .properties file, specify a value for the module.classloader key. The default is/lib/*.jar,/lib/*.zip, which is consistent with what has been exposed earlier.
2. The value for that key is a comma separated list of paths (most certainly with Ant-style patterns) thatwill be searched for additional libraries to add to the module ClassLoader (in addition to the module"Archive" itself, which is always included).
a. paths that start with a / (as /lib/*.jar in the example above) are considered internal resourcesto the archives (e.g. nested jars in the über-jar)
b. paths that do not start with a / (and in particular paths that start with a protocol, such as file:)are loaded with a regular Spring resource pattern resolver
3. Those paths can contain placeholders of the form ${foo}. Those will be resolved against the visiblemodule options (and other inherited properties). Paths containing unresolvable placeholders aresilently ignored.
This allows constructions like this (assuming for example that we want to create a jpa module thatsupports several JPA providers):
jpa.jar
+- config/
| jpa.properties
+- lib/
+- hibernate/
| hibernate-core-4.2.jar
| other-hibernate-specific.jar
+- eclipse-link/
| eclipse-link-2.5.0.jar
| ...
+- some-common.jar
+- another-common.jar
And, in jpa.properties:
options_class = com.acme.jpa.JpaOptionsMetadata
module.classloader = /lib/*.jar, /lib/${provider}/*.jar, ${xd.home}/lib/jpa/${provider}/*.jpa
Where the metadata class includes a provider option (of type String) that will take e.g. the valueshibernate or eclipse-link. Note the presence of a third ${xd.home}/lib/jpa/${provider}/*.jpa entry that can be used for unforeseen provider implementations.

Spring XD Guide
1.3.2.RELEASE Spring XD 114
10.6 Module Options
Each module instance is configured using property placeholders which are bound to the module’soptions defined via Module Options Metadata. Options may be required or optional, where optionalproperties must provide a default value. Module Options Metadata may be provided within the module’sproperties file or in a Java class provided by the module or one of its dependencies. In addition to bindingmodule options to properties in the module’s application context, options may also be used to activateSpring environment profiles.
For example, here is part of the Spring configuration for the twittersearch source that runs a queryagainst Twitter:
<beans>
<bean class="org.springframework.integration.x.twitter.TwitterSearchChannelAdapter">
<constructor-arg ref="twitterTemplate"/>
<property name="readTimeout" value="${readTimeout}"/>
<property name="connectTimeout" value="${connectTimeout}"/>
<property name="autoStartup" value="false"/>
<property name="outputChannel" ref="output"/>
<property name="query" value="${query}" />
<property name="language" value="${language}" />
<property name="geocode" value="${geocode}" />
<property name="resultType" value="${resultType}"/>
<property name="includeEntities" value="${includeEntities}"/>
</bean>
<bean id="twitterTemplate" class="org.springframework.social.twitter.api.impl.TwitterTemplate">
<constructor-arg value="${consumerKey}"/>
<constructor-arg value="${consumerSecret}"/>
</bean>
<int:channel id="output"/>
</beans>
Note the Spring properties such as query, language, consumerKey and consumerSecret. Spring XDwill bind values for all of these properties as provided as options for each module instance. The optionsexposed for this module are defined in TwitterSearchOptionsMetadata.java
For example, we can create two different streams, each using the twittersearch source providing differentoption values.
xd:> stream create --name tweettest --definition "twittersearch --query='java' | file"
and
xd:> stream create --name tweettest2 --definition "twittersearch --query='spring' --language=en --
consumerKey='mykey' --consumerSecret='mysecret' | file"
In addition to options, modules may reference Spring beans such that each module instance may injecta different implementation of a bean. The ability to deploy the same module definition with differentconfigurations is only possible because each module is created in its own application context. Thisresults in some very useful features, such as the ability to use standard bean ids such as input andoutput and simple property names without having to worry about naming collisions.
Observe the use of property placeholders with sensible defaults where possible in the above example.Sometimes, a sensible default is derived from the stream name, module name, or some other runtimecontext. For example, the file source requires a directory. An appropriate strategy is to define a common

Spring XD Guide
1.3.2.RELEASE Spring XD 115
root path for XD input files (At the time of this writing it is /tmp/xd/input/. This is subject to change,but illustrates the point). A stream definition using the file source may specify the the directory name byproviding a value for the dir option. If not provided, it will default to the stream name, which is containedin the xd.stream.name property bound to the module by the Spring XD runtime, see file sourcemetadata. The module info command illustrates this point:
xd:>module info --name source:file
Information about source module 'file':
Option Name Description
Default Type
----------------- ---------------------------------------------------------------------------
------------------------------- --------
dir the absolute path to the directory to monitor for files /tmp/
xd/input/${xd.stream.name} String
pattern a filter expression (Ant style) to accept only files that match the pattern *
String
preventDuplicates whether to prevent the same file from being processed twice true
boolean
ref set to true to output the File object itself false
boolean
fixedDelay the fixed delay polling interval specified in seconds 5
int
outputType how this module should emit messages it produces <none>
MimeType
Placeholders available to all modules
By convention, Spring XD defined properties are prefixed with xd. Below is the list of all available${xd.xxx} keys that module authors may use in their declaration.
Placeholder Context Meaning
${xd.stream.name} streams the name of the stream themodule lives in
${xd.job.name} jobs the name of the job the modulelives in
${xd.module.name} streams, jobs the technical name of themodule
${xd.module.type} streams, jobs the type of the module
${xd.module.index} streams the 0-based position of themodule inside the stream
${xd.container.id} streams, jobs the generated unique id ofthe container the module isdeployed in
${xd.container.host} streams, jobs the hostname of the containerthe module is deployed in
${xd.container.pid} streams, jobs the process id of the containerthe module is deployed in
${xd.container.ip} streams, jobs the IP address of the containerthe module is deployed in

Spring XD Guide
1.3.2.RELEASE Spring XD 116
Placeholder Context Meaning
${xd.container.<foo>} streams, jobs the value of the custom attribute<foo> for the container
Using placeholders in stream definitions
One can also use the ${xd.xxx} notation directly inside the DSL definition of a stream or a job.For example:
xd:>stream create foo --definition "http | filter --expression=\"'${xd.stream.name}'\" | log"
will only let messages that read "foo" pass through.
How module options are resolved
As we’ve seen so far, a module is a re-usable Spring Integration or Spring Batch application contextthat can be dynamically configured through the use of module options.
A module option is any value that the may be configured within a stream or job definition. Preferably, themodule provides metadata to describe the available options. This section explains how default valuesare computed for each module option.
In a nutshell, actual values are resolved from the following sources, in order of precedence:
1. values provided in the stream definition (e.g. --foo=bar)
2. platform-wide defaults (appearing e.g. in .yml and .properties files, see below)
3. defaults defined in the module’s metadata
Going into more detail, the platform-wide defaults will resolve like so, assuming option <optionname>of a module <modulename> which is of type <moduletype>:
1. a system property named <moduletype>.<modulename>.<optionname>
2. an environment variable named <moduletype>.<modulename>.<optionname> (or<MODULETYPE>_<MODULENAME>_<OPTIONNAME>)
3. a key named <optionname> in the properties file <root>/<moduletype>/<modulename>/<modulename>.properties
4. a key named <moduletype>.<modulename>.<optionname> in the YaML file <root>/<module-config>.yml
where
<root>
is the value of the xd.module.config.location system property (driven by theXD_MODULE_CONFIG_LOCATION env var when using the canonical Spring XD shell scripts). Thisproperty defaults to ${xd.config.home}/modules/
<module-config>
is the value of the xd.module.config.name system property (driven by theXD_MODULE_CONFIG_NAME env var). Defaults to xd-module-config

Spring XD Guide
1.3.2.RELEASE Spring XD 117
Note that YaML is particularly well suited for hierarchical configuration, so for example, instead of
source.file.dir: foo
source.file.pattern: *.txt
source.http.port: 1234
one can write
source:
file:
dir: foo
pattern: *.txt
http:
port: 1234
Note that options in the .properties files can reference values that appear in the modules.ymlfile (this makes sharing common configuration easy). Also, the values that are used to configure theserver runtimes (in servers.yml) are visible to modules.yml and .properties file (but the inverseis not true).
10.7 Composing Modules
As described above, a stream is defined as a sequence of modules, minimally a source module followedby a sink module. Sometimes streams may want share a common processing chain. For example,consider the following two streams:
stream1 = http | filter --expression=payload.contains('foo') | file
stream2 = file | filter --expression=payload.contains('foo') | file
Aside from the source, the two stream definitions are the same. Composite Modules provide a wayto avoid this type of duplication by allowing the filter processor and file sink to be combined into asingle composite module. Perhaps more importantly, composite modules may improve performance.Each module within a stream represents a unit of deployment. Therefore, stream1 and stream2, asdefined above, are each comprised of three such units (a source, a processor, and a sink). In asinglenode runtime with local transport, creating a composite module won’t affect performance sincethe communication between modules in this case already uses in-memory channels. However, whendeploying a stream to a distributed runtime environment, the communication between adjacent modulestypically occurs via messaging middleware, as modules are, by default, distributed evenly among theavailable containers. Often a stream will perform better when adjacent modules are co-located andcan avoid middleware "hops", and object marshalling. In such cases, composing modules allows thecomposite module to behave as a single "black box." In other words, if "foo | bar" are composed to createa new module named "baz", the input and/or output to "baz" will still go over the middleware, but fooand bar will be co-located in a single container instance and wired to communicate via local memory.
Working with Composite Modules
To create a composite module, use the module compose shell command:
xd:> module compose foo --definition "filter --expression=payload.contains('foo') | file"
Then, to verify the new module composition was successful, check if it exists:

Spring XD Guide
1.3.2.RELEASE Spring XD 118
xd:>module list
Source Processor Sink Job
------------------ ------------------ ----------------------- ----------------
file aggregator aggregate-counter filejdbc
gemfire http-client counter ftphdfs
(....)
trigger splunk
twittersearch tcp
twitterstream throughput-sampler
time (c) foo
Notice that the composed module shows up in the list of sink modules. That is because logically it actsas a sink: It provides an input channel (which is bridged to the filter processor’s input channel), but itprovides no output channel (since the file sink has no output). Also notice that the module has a small(c) prefixed to it, to indicate that it is a composed module.
If a module were composed of two processors, it would be classified as a processor:
xd:> module compose myprocessor --definition "splitter | filter --expression=payload.contains('foo')"
If a module were composed of a source and a processor, it would be classified as a source:
xd:> module compose mysource --definition "http | filter --expression=payload.contains('foo')"
Based on the logical type of the composed module, it may be used in a stream as if it were a simplemodule instance. For example, to redefine the two streams from the first problem case above, now thatthe foo sink module has been composed, you can issue the following shell commands:
xd:> stream create httpfoo --definition "http | foo" --deploy
xd:> stream create filefoo --definition "file --outputType=text/plain | foo" --deploy
To test the httpfoo stream, try the following:
xd:> http post --data hi
xd:> http post --data hifoo
The first message should have been ignored due to the filter, but the second one should exist in the file:
xd:> ! cat /tmp/xd/output/httpfoo.out
command is:cat /tmp/xd/output/httpfoo.out
hifoo
To test the filefoo stream, echo "foo" to a file in the /tmp/xd/input/filefoo directory, then verify:
xd:> ! cat /tmp/xd/output/filefoo.out
command is:cat /tmp/xd/output/filefoo.out
foo
When you no longer need a composed module, you may delete it with the module delete shellcommand. However, if that composed module is currently being used in one or more stream definitions,Spring XD will not allow you to delete it until those stream definitions are destroyed. In this case, moduledelete will fail as shown below:
xd:> module delete --name sink:foo
16:51:37,349 WARN Spring Shell client.RestTemplate:566 - DELETE request for "http://localhost:9393/
modules/sink/foo" resulted in 500 (Internal Server Error); invoking error handler
Command failed org.springframework.xd.rest.client.impl.SpringXDException: Cannot delete module sink:foo
because it is used by [stream:filefoo, stream:httpfoo]

Spring XD Guide
1.3.2.RELEASE Spring XD 119
As you can see, the failure message shows which stream(s) depend upon the composed module youare trying to delete.
If you destroy both of those streams and try again, it will work:
xd:> stream destroy --name filefoo
Destroyed stream 'filefoo'
xd:> stream destroy --name httpfoo
Destroyed stream 'httpfoo'
xd:> module delete --name sink:foo
Successfully destroyed module 'foo' with type sink
When creating a module, if you duplicate the name of an existing module for the same type, you willreceive an error. In the example below the user tried to compose a tcp module, however one alreadyexists:
xd:>module compose tcp --definition "filter --expression=payload.contains('foo') | file"
14:52:27,781 WARN Spring Shell client.RestTemplate:566 - POST request for "http://
ec2-50-16-24-31.compute-1.amazonaws.com:9393/modules" resulted in 409 (Conflict); invoking error handler
Command failed org.springframework.xd.rest.client.impl.SpringXDException: There is already a module
named 'tcp' with type 'sink'
However, you can create a module for a given type even though a module of that name exists but asa different type. For example: I can create a sink module named filter, even though filter already existsas a processor.
Finally, it’s worth mentioning that in some cases duplication may be avoided by reusing an actual streamrather than a composed module. This is possible when named channels are used in the source and/orsink position of a stream definition. For example, the same overall functionality as provided by the twostreams above could also be achieved as follows:
xd:> stream create foofilteredfile --definition "queue:foo > filter --expression=payload.contains('foo')
| file"
xd:> stream create httpfoo --definition "http > queue:foo"
xd:> stream create filefoo --definition "file > queue:foo"
This approach is more appropriate for use-cases where individual streams on either side of the namedchannel may need to be deployed or undeployed independently. Whereas the queue typed channelwill load-balance across multiple downstream consumers, the topic: prefix may be used if broadcastbehavior is needed instead. For more information about named channels, refer to the Named Channelssection.
10.8 Getting Information about Modules
To view the available modules use the the module list command. Modules appearing with a (c)marker are composed modules. For example:

Spring XD Guide
1.3.2.RELEASE Spring XD 120
xd:>module list
Source Processor Sink Job
------------------ ------------------ ----------------------- ----------------
file aggregator aggregate-counter filejdbc
gemfire analytic-pmml counter ftphdfs
gemfire-cq http-client field-value-counter hdfsjdbc
http bridge file hdfsmongodb
jms filter gauge jdbchdfs
mail json-to-tuple gemfire-json-server filepollhdfs
mqtt object-to-json gemfire-server
post script jdbc
reactor-syslog splitter mail
reactor-tcp transform mqtt
syslog-tcp (c) myfilter rich-gauge
syslog-udp splunk
tail tcp
tcp throughput-sampler
tcp-client avro
trigger hdfs
twittersearch log
twitterstream rabbit
rabbit router
time
To get information about a particular module (such as what options it accepts), use the module info--<module type>:<module name> command. For example:
xd:>module info --name source:file
Information about source module 'file':
Option Name Description
Default Type
----------------- ---------------------------------------------------------------------------
------- ---------
dir the absolute path to the directory to monitor for files <none>
String
pattern a filter expression (Ant style) to accept only files that match the pattern *
String
outputType how this module should emit messages it produces <none>
MimeType
preventDuplicates whether to prevent the same file from being processed twice true
boolean
ref set to true to output the File object itself false
boolean
fixedDelay the fixed delay polling interval specified in seconds 5
int
Spring XD Guide
1.3.2.RELEASE Spring XD 121
11. Sources
This section describes the source modules included with Spring XD. A source implements a dataprovider to originate a stream. To run the examples shown here, start the XD Container as instructedin the Getting Started page.
The available Sources are
• File
• FTP
• Gemfire CQ
• Gemfire Source
• HTTP
• JDBC
• JMS
• Kafka
• MongoDB
• MQTT
• RabbitMQ
• Reactor IP
• SFTP
• Stdout Capture
• Syslog
• Tail
• TCP
• TCP Client
• Time
• Trigger
• Twitter Search
• Twitter Stream
Future releases will provide support for other currently available Spring Integration Adapters. Forinformation on how to adapt an existing Spring Integration Adapter for use in Spring XD see the sectionCreating a Source Module.
Spring XD Guide
1.3.2.RELEASE Spring XD 122
The following sections show a mix of Spring XD shell and plain Unix shell commands, so if you are tryingthem out, you should open two separate terminal prompts, one running the XD shell and one to enterthe standard commands for sending HTTP data, creating directories, reading files and so on.
11.1 File
The file source provides the contents of a File as a byte array by default. However, this can becustomized using the --mode option:
• ref Provides a java.io.File reference
• lines Will split files line-by-line and emit a new message for each line
• contents The default. Provides the contents of a file as a byte array
When using --mode=lines, you can also provide the additional option --withMarkers=true. Ifset to true, the underlying FileSplitter will emit additional start-of-file and end-of-file markermessages before and after the actual data. The payload of these 2 additional marker messages is oftype FileSplitter.FileMarker. The option withMarkers defaults to false if not explicitly set.
To log the contents of a file create a stream definition using the XD shell
xd:> stream create --name filetest --definition "file | log" --deploy
The file source by default will look into a directory named after the stream, in this case /tmp/xd/input/filetest
Note the above will log the raw bytes. For text files, it is normally desirable to output the contents asplain text. To do this, set the outputType parameter:
xd:> stream create --name filetest --definition "file --outputType=text/plain | log" --deploy
For more details on the use of the outputType parameter see Type Conversion
Copy a file into the directory /tmp/xd/input/filetest and observe its contents being logged inthe XD Container.
File with options
The file source has the following options:
dirthe absolute path to the directory to monitor for files (String, default: /tmp/xd/input/<streamname>)
fixedDelaythe fixed delay polling interval specified in seconds (int, default: 5)
initialDelayan initial delay when using a fixed delay trigger, expressed in TimeUnits (seconds by default) (int,default: 0)
maxMessagesthe maximum messages per poll; -1 for unlimited (long, default: -1)

Spring XD Guide
1.3.2.RELEASE Spring XD 123
modespecifies how the file is being read. By default the content of a file is provided as byte array(FileReadingMode, default: contents, possible values: ref,lines,contents)
patterna filter expression (Ant style) to accept only files that match the pattern (String, default: *)
preventDuplicateswhether to prevent the same file from being processed twice (boolean, default: true)
timeUnitthe time unit for the fixed and initial delays (String, default: SECONDS)
withMarkersif true emits start of file/end of file marker messages before/after the data. Only valid withFileReadingMode 'lines' (Boolean, no default)
The ref option is useful in some cases in which the file contents are large and it would be more efficientto send the file path.
11.2 FTP
This source module supports transfer of files using the FTP protocol. Files are transferred from theremote directory to the local directory where the module is deployed. Messages emitted by the sourceare provided as a byte array by default. However, this can be customized using the --mode option:
• ref Provides a java.io.File reference
• lines Will split files line-by-line and emit a new message for each line
• contents The default. Provides the contents of a file as a byte array
When using --mode=lines, you can also provide the additional option --withMarkers=true. Ifset to true, the underlying FileSplitter will emit additional start-of-file and end-of-file markermessages before and after the actual data. The payload of these 2 additional marker messages is oftype FileSplitter.FileMarker. The option withMarkers defaults to false if not explicitly set.
Options
The ftp source has the following options:
autoCreateLocalDirlocal directory must be auto created if it does not exist (boolean, default: true)
clientModeclient mode to use : 2 for passive mode and 0 for active mode (int, default: 0)
deleteRemoteFilesdelete remote files after transfer (boolean, default: false)
filenamePatternsimple filename pattern to apply to the filter (String, default: *)
fixedDelaythe rate at which to poll the remote directory (int, default: 1)

Spring XD Guide
1.3.2.RELEASE Spring XD 124
hostthe host name for the FTP server (String, default: localhost)
initialDelayan initial delay when using a fixed delay trigger, expressed in TimeUnits (seconds by default) (int,default: 0)
localDirset the local directory the remote files are transferred to (String, default: /tmp/xd/ftp)
maxMessagesthe maximum messages per poll; -1 for unlimited (long, default: -1)
modespecifies how the file is being read. By default the content of a file is provided as byte array(FileReadingMode, default: contents, possible values: ref,lines,contents)
passwordthe password for the FTP connection (Password, no default)
portthe port for the FTP server (int, default: 21)
preserveTimestampwhether to preserve the timestamp of files retrieved (boolean, default: true)
remoteDirthe remote directory to transfer the files from (String, default: /)
remoteFileSeparatorfile separator to use on the remote side (String, default: /)
timeUnitthe time unit for the fixed and initial delays (String, default: SECONDS)
tmpFileSuffixextension to use when downloading files (String, default: .tmp)
usernamethe username for the FTP connection (String, no default)
withMarkersif true emits start of file/end of file marker messages before/after the data. Only valid withFileReadingMode 'lines' (Boolean, no default)
11.3 GemFire Continuous Query (gemfire-cq)
Continuous query allows client applications to create a GemFire query using Object QueryLanguage(OQL) and register a CQ listener which subscribes to the query and is notified every time thequery’s result set changes. The gemfire_cq source registers a CQ which will post CQEvent messagesto the stream.
Options
The gemfire-cq source has the following options:
Spring XD Guide
1.3.2.RELEASE Spring XD 125
hosthost name of the cache server or locator (if useLocator=true). May be a comma delimited list (String,no default)
portport of the cache server or locator (if useLocator=true). May be a comma delimited list (String, nodefault)
querythe query string in Object Query Language (OQL) (String, no default)
useLocatorindicates whether a locator is used to access the cache server (boolean, default: false)
The example is similar to that presented for the gemfire source above, and requires an external cacheserver as described in the above section. In this case the query provides a finer filter on data events.In the example below, the cqtest stream will only receive events matching a single ticker symbol,whereas the gftest stream example above will receive updates to every entry in the region.
xd:> stream create --name stocks --definition "http --port=9090 | gemfire-json-server --
regionName=Stocks --keyExpression=payload.getField('symbol')" --deploy
xd:> stream create --name cqtest --definition "gemfire-cq --query='Select * from /Stocks where
symbol=''FAKE''' | file" --deploy
Now send some messages to the stocks stream.
xd:> http post --target http://localhost:9090 --data {"symbol":"FAKE","price":73}
xd:> http post --target http://localhost:9090 --data {"symbol":"FAKE","price":78}
xd:> http post --target http://localhost:9090 --data {"symbol":"FAKE","price":80}
The cqtest stream is now listening for any stock quote updates for the ticker symbol FAKE. As updatesare posted to the cache you should see them captured in the output file:
$ cat /tmp/xd/output/cqtest.out
{"symbol":"FAKE","price":73}
{"symbol":"FAKE","price":78}
{"symbol":"FAKE","price":80}
11.4 GemFire Source (gemfire)
This source configures a client cache and client region, along with the necessary subscriptions enabled,in the XD container process along with a Spring Integration GemFire inbound channel adapter, backedby a CacheListener that outputs messages triggered by an external entry event on the region. By defaultthe payload contains the updated entry value, but may be controlled by passing in a SpEL expressionthat uses the EntryEvent as the evaluation context.
Tip
If native gemfire properties are required to configure the client cache, e.g., for security, place agemfire.properties file in $XD_HOME/config.
Options
The gemfire source has the following options:

Spring XD Guide
1.3.2.RELEASE Spring XD 126
cacheEventExpressionan optional SpEL expression referencing the event (String, default: newValue)
hosthost name of the cache server or locator (if useLocator=true). May be a comma delimited list (String,no default)
portport of the cache server or locator (if useLocator=true). May be a comma delimited list (String, nodefault)
regionNamethe name of the region for which events are to be monitored (String, default: <stream name>)
useLocatorindicates whether a locator is used to access the cache server (boolean, default: false)
Example
Use of the gemfire source requires an external process (or a separate stream) that creates or updatesentries in a GemFire region configured for a cache server. Such events may feed a Spring XD stream.To support such a stream, the Spring XD container must join a GemFire distributed client-server grid asa client, creating a client region corresponding to an existing region on a cache server. The client regionregisters a cache listener via the Spring Integration GemFire inbound channel adapter. The client regionand pool are configured for a subscription on all keys in the region.
The following example creates two streams: One to write http messages to a Gemfire region namedStocks, and another to listen for cache events and record the updates to a file. This works with theCache Server and sample configuration included with the Spring XD distribution:
xd:> stream create --name gftest --definition "gemfire --regionName=Stocks | file" --deploy
xd:> stream create --name stocks --definition "http --port=9090 | gemfire-json-server --
regionName=Stocks --keyExpression=payload.getField('symbol')" --deploy
Now send some messages to the stocks stream.
xd:> http post --target http://localhost:9090 --data {"symbol":"FAKE","price":73}
xd:> http post --target http://localhost:9090 --data {"symbol":"FAKE","price":78}
xd:> http post --target http://localhost:9090 --data {"symbol":"FAKE","price":80}
Note
Avoid spaces in the JSON when using the shell to post data
As updates are posted to the cache you should see them captured in the output file:
$ cat /tmp/xd/output/gftest.out
{"symbol":"FAKE","price":73}
{"symbol":"FAKE","price":78}
{"symbol":"FAKE","price":80}
Note
The useLocator option is intended for integration with an existing GemFire installation in whichthe cache servers are configured to use locators in accordance with best practice. GemFire

Spring XD Guide
1.3.2.RELEASE Spring XD 127
supports configuration of multiple locators (or direct server connections) and this is specified bysupplying comma-delimited values for the host and port options. You may specify a single valuefor either of these options otherwise each value must contain the same size list. The following areexamples are valid for multiple connection addresses:
gemfire --host=myhost --port=10334,10335
gemfire --host=myhost1,myhost2 --port=10334
gemfire --host=myhost1,myhost2,myhost3 --port=10334,10335,10336
The last example creates connections to myhost1:10334, myhost2:10335, myhost3:10336
Note
You may also configure default Gemfire connection settings for all gemfire modules in config/modules.yml:
gemfire:
useLocator: true
host: myhost1,myhost2
port: 10334
Tip
If you are deploying on Java 7 or earlier and need to deploy more than 4 Gemfire modules be sureto increase the permsize of the singlenode or container. i.e. JAVA_OPTS="-XX:PermSize=256m"
Launching the XD GemFire Server
This source requires a cache server to be running in a separate process and its host and port, or alocator host and port must be configured. The XD distribution includes a GemFire server executablesuitable for development and test purposes. This is a Java main class that runs with a Spring configuredcache server. The configuration is passed as a command line argument to the server’s main method.The configuration includes a cache server port and one or more configured region. XD includes a samplecache configuration called cq-demo. This starts a server on port 40404 and creates a region namedStocks. A Logging cache listener is configured for the region to log region events.
Run Gemfire cache server by changing to the gemfire/bin directory and execute
$ ./gemfire-server ../config/cq-demo.xml
11.5 HTTP
To create a stream definition in the server using the XD shell
xd:> stream create --name httptest --definition "http | file" --deploy
Post some data to the http server on the default port of 9000
xd:> http post --target http://localhost:9000 --data "hello world"
See if the data ended up in the file
$ cat /tmp/xd/output/httptest

Spring XD Guide
1.3.2.RELEASE Spring XD 128
To send binary data, set the Content-Type header to application/octet-string
$ curl --data-binary @foo.zip -H'Content-Type: application-octet-string' http://localhost:9000
HTTP with options
The http source has the following options:
httpstrue for https:// (boolean, default: false)
keyStorekey store location (if sslPropertiesLocation not used) (String, no default)
keyStorePassphrasekey store passphrase (if sslPropertiesLocation not used) (String, no default)
maxContentLengththe maximum allowed content length (int, default: 1048576)
messageConverterClassthe name of a custom MessageConverter class, to convert HttpRequest to Message;must have a constructor with a 'MessageBuilderFactory' parameter (String, default:org.springframework.integration.x.http.NettyInboundMessageConverter)
portthe port to listen to (int, default: 9000)
sslPropertiesLocationlocation (resource) of properties containing the location of the pkcs12 keyStore and pass phrase(String, no default)
Here is an example
xd:> stream create --name httptest9020 --definition "http --port=9020 | file" --deploy
Post some data to the new port
xd:> http post --target http://localhost:9020 --data "hello world"
$ cat /tmp/xd/output/httptest9020
hello world
Note
When using https, you may either provide a properties file that references a pkcs12key store (containing the server certificate(s)) and its passphrase, or set keyStore andkeyStorePassphrase explicitly. Setting --https=true enables https:// and the moduleuses SSL properties configured in config/modules/source/http/http.properties.By default, the resource classpath:httpSSL.properties is used. This location canbe overridden in config/modules/source/http/http.properties or with the --sslPropertiesLocation property. For example:
xd:> stream create --name https9021 --definition "http --port=9021 --https=true --
sslPropertiesLocation=file:/secret/ssl.properties | file" --deploy

Spring XD Guide
1.3.2.RELEASE Spring XD 129
$ cat /secret/ssl.properties
keyStore=file:/secret/httpSource.p12
keyStore.passPhrase=secret
Since this properties file contains sensitive information, it will typically be secured by the operatingsystem with the XD container process having read access.
Note
If you set keyStore and keyStorePassphrase in config/modules/source/http/http.properties in lieue of using an external properties file, the passPhrase may beencrypted. See Encrypted Properties for more details.
11.6 JDBC Source (jdbc)
This source module supports the ability to ingest data directly from various databases. It does this byquerying the database and sending the results as messages to the stream.
Configure a stream with a jdbc source using a query:
xd:> stream create foo --definition "jdbc --fixedDelay=1 --split=1 --url=jdbc:hsqldb:hsql://
localhost:9101/mydb --query='select * from testfoo' |log" --deploy
In the example above the user will be polling the testfoo table to retrieve all the rows in the table oncea second until the stream is undeployed or destroyed.
Configure a stream with a jdbc source using a query and update:
xd:> stream create foo --definition "jdbc --fixedDelay=1 --split=1 --url=jdbc:hsqldb:hsql://
localhost:9101/mydb --query='select * from testfoo where tag = 0' --update='update testfoo set tag=1
where fooid in (:fooid)'|log" --deploy
In the example above the user will be polling the testfoo table to retrieve rows in the table that have a"tag" of zero. The update will set the value of tag to 1 for the rows that were retrieved, thus rows thathave already been retrieved will not included in future queries.
Note
If you access any database other than HSQLDB or Postgres in a stream module then the JDBCdriver jar for that database needs to be present in the $XD_HOME/lib directory.
The jdbc source has the following options:
abandonWhenPercentageFullconnections that have timed out wont get closed and reported up unless the number of connectionsin use are above the percentage (int, default: 0)
alternateUsernameAlloweduses an alternate user name if connection fails (boolean, default: false)
connectionPropertiesconnection properties that will be sent to our JDBC driver when establishing new connections(String, no default)

Spring XD Guide
1.3.2.RELEASE Spring XD 130
driverClassNamethe JDBC driver to use (String, no default)
fairQueueset to true if you wish that calls to getConnection should be treated fairly in a true FIFO fashion(boolean, default: true)
fixedDelayhow often to poll for new messages (s) (int, default: 5)
initSQLcustom query to be run when a connection is first created (String, no default)
initialSizeinitial number of connections that are created when the pool is started (int, default: 0)
jdbcInterceptorssemicolon separated list of classnames extending org.apache.tomcat.jdbc.pool.JdbcInterceptor(String, no default)
jmxEnabledregister the pool with JMX or not (boolean, default: true)
logAbandonedflag to log stack traces for application code which abandoned a Connection (boolean, default:false)
maxActivemaximum number of active connections that can be allocated from this pool at the same time (int,default: 100)
maxAgetime in milliseconds to keep this connection (int, default: 0)
maxIdlemaximum number of connections that should be kept in the pool at all times (int, default: 100)
maxMessagesthe maximum messages per poll; -1 for unlimited (long, default: 1)
maxRowsPerPollmax numbers of rows to process for each poll (int, default: 0)
maxWaitmaximum number of milliseconds that the pool will wait for a connection (int, default: 30000)
minEvictableIdleTimeMillisminimum amount of time an object may sit idle in the pool before it is eligible for eviction (int, default:60000)
minIdleminimum number of established connections that should be kept in the pool at all times (int, default:10)

Spring XD Guide
1.3.2.RELEASE Spring XD 131
passwordthe JDBC password (Password, no default)
queryan SQL select query to execute to retrieve new messages when polling (String, no default)
removeAbandonedflag to remove abandoned connections if they exceed the removeAbandonedTimout (boolean,default: false)
removeAbandonedTimeouttimeout in seconds before an abandoned connection can be removed (int, default: 60)
splitwhether to split the SQL result as individual messages (boolean, default: true)
suspectTimeoutthis simply logs the warning after timeout, connection remains (int, default: 0)
testOnBorrowindication of whether objects will be validated before being borrowed from the pool (boolean,default: false)
testOnReturnindication of whether objects will be validated before being returned to the pool (boolean, default:false)
testWhileIdleindication of whether objects will be validated by the idle object evictor (boolean, default: false)
timeBetweenEvictionRunsMillisnumber of milliseconds to sleep between runs of the idle connection validation/cleaner thread (int,default: 5000)
updatean SQL update statement to execute for marking polled messages as 'seen' (String, no default)
urlthe JDBC URL for the database (String, no default)
useEqualstrue if you wish the ProxyConnection class to use String.equals (boolean, default: true)
usernamethe JDBC username (String, no default)
validationIntervalavoid excess validation, only run validation at most at this frequency - time in milliseconds (long,default: 30000)
validationQuerysql query that will be used to validate connections from this pool (String, no default)
validatorClassNamename of a class which implements the org.apache.tomcat.jdbc.pool.Validator (String, no default)

Spring XD Guide
1.3.2.RELEASE Spring XD 132
11.7 JMS
The "jms" source enables receiving messages from JMS.
The following example shows the default settings.
Configure a stream:
xd:> stream create --name jmstest --definition "jms | file" --deploy
This receives messages from a queue named jmstest and writes them to the default file sink (/tmp/xd/output/jmstest). It uses the default ActiveMQ broker running on localhost, port 61616.
To destroy the stream, enter the following at the shell prompt:
xd:> stream destroy --name jmstest
To test the above stream, you can use something like the following…
public class Broker {
public static void main(String[] args) throws Exception {
BrokerService broker = new BrokerService();
broker.setBrokerName("broker");
String brokerURL = "tcp://localhost:61616";
broker.addConnector(brokerURL);
broker.start();
ConnectionFactory cf = new ActiveMQConnectionFactory(brokerURL);
JmsTemplate template = new JmsTemplate(cf);
while (System.in.read() >= 0) {
template.convertAndSend("jmstest", "testFoo");
}
}
}
and tail -f /tmp/xd/output/jmstest
Run this as a Java application; each time you hit <enter> in the console, it will send a message to queuejmstest.
The out of the box configuration is setup to use ActiveMQ. To use another JMS provider you will needto update a few files in the XD distribution. There are sample files for HornetMQ in the distribution asan example for you to follow. You will also need to add the appropriate libraries for your provider in theJMS module lib directory or in the main XD lib directory.
JMS with Options
The jms source has the following options:
acknowledgethe session acknowledge mode (String, default: auto)
clientIdan identifier for the client, to be associated with a durable topic subscription (String, no default)
destinationthe destination name from which messages will be received (String, default: <stream name>)
durableSubscriptionwhen true, indicates the subscription to a topic is durable (boolean, default: false)

Spring XD Guide
1.3.2.RELEASE Spring XD 133
providerthe JMS provider (String, default: activemq)
pubSubwhen true, indicates that the destination is a topic (boolean, default: false)
subscriptionNamea name that will be assigned to the topic subscription (String, no default)
Note
the selected broker requires an infrastructure configuration file jms-<provider>-
infrastructure-context.xml in modules/common. This is used to declare anyinfrastructure beans needed by the provider. See the default (jms-activemq-infrastructure-context.xml) for an example. Typically, all that is requiredis a ConnectionFactory. The activemq provider uses a properties file jms-
activemq.properties which can be found in the config directory. This contains the brokerURL.
11.8 Kafka
This source module ingests data from a single or comma separated list of Kafka topics. When usingsingle topic configuration, one can also specify explicit partitions list and initial offsetto fetch data from. Also note that for the stream with the given name or kafka source with the givengroupId, the offsets for the configured topics aren’t deleted when the stream is undeployed/destroyed.This allows the re-deployed stream read from where it left when it was undeployed/destroyed.
The kafka source has the following options:
autoOffsetResetstrategy to reset the offset when there is no initial offset in ZK or if an offset is out of range(AutoOffsetResetStrategy, default: smallest, possible values: smallest,largest)
encodingstring encoder to translate bytes into string (String, default: UTF8)
fetchMaxBytesmax messages to attempt to fetch for each topic-partition in each fetch request (int, default:1048576)
fetchMaxWaitmax wait time before answering the fetch request (int, default: 100)
fetchMinBytesthe minimum amount of data the server should return for a fetch request (int, default: 1)
groupIdkafka consumer configuration group id (String, default: <stream name>)
initialOffsetscomma separated list of <partition>@<offset> pairs indicating where the source should startconsuming from (String, default: ``)

Spring XD Guide
1.3.2.RELEASE Spring XD 134
kafkaOffsetTopicBatchBytesmaximum batched bytes for writes to offset topic, if Kafka offset strategy is chosen (int, default:200)
kafkaOffsetTopicBatchTimemaximum time for batching writes to offset topic, if Kafka offset strategy is chosen (int, default:1000)
kafkaOffsetTopicMaxSizemaximum size of reads from offset topic, if Kafka offset strategy is chosen (int, default: 1048576)
kafkaOffsetTopicNamename of the offset topic, if Kafka offset strategy is chosen (String, default: <stream name>-${xd.module.name}-offsets)
kafkaOffsetTopicRequiredAcksrequired acks for writing to the Kafka offset topic, if Kafka offset strategy is chosen (int, default: 1)
kafkaOffsetTopicRetentionTimeretention time for dead records (tombstones), if Kafka offset strategy is chosen (int, default: 60000)
kafkaOffsetTopicSegmentSizesegment size of the offset topic, if Kafka offset strategy is chosen (int, default: 262144000)
offsetStoragestrategy for persisting offset values (OffsetStorageStrategy, default: kafka, possible values:inmemory,redis,kafka,kafkaNative)
offsetUpdateCountfrequency, in number of messages, with which offsets are persisted, per concurrent processor,mutually exclusive with the time-based offset update option (use 0 to disable either) (int, default: 0)
offsetUpdateShutdownTimeouttimeout for ensuring that all offsets have been written, on shutdown (int, default: 2000)
offsetUpdateTimeWindowfrequency (in milliseconds) with which offsets are persisted mutually exclusive with the count-basedoffset update option (use 0 to disable either) (int, default: 10000)
partitionscomma separated list of partition IDs to listen on (String, default: ``)
queueSizethe maximum number of messages held internally and waiting for processing, per concurrenthandler. Value must be a power of 2 (int, default: 8192)
socketBufferBytessocket receive buffer for network requests (int, default: 2097152)
socketTimeoutsock timeout for network requests in milliseconds (int, default: 30000)
streamsnumber of streams in the topic (int, default: 1)

Spring XD Guide
1.3.2.RELEASE Spring XD 135
topicsingle topic name (String, default: ``)
topicscomma separated kafka topic names (String, default: ``)
zkconnectzookeeper connect string (String, default: localhost:2181)
zkconnectionTimeoutthe max time the client waits to connect to ZK in milliseconds (int, default: 6000)
zksessionTimeoutzookeeper session timeout in milliseconds (int, default: 6000)
zksyncTimehow far a ZK follower can be behind a ZK leader in milliseconds (int, default: 2000)
Configure a stream that has kafka source with a single topic:
xd:> stream create myKafkaSource1 --definition "kafka --zkconnect=localhost:2181 --topic=mytopic | log"
--deploy
Configure a stream that has kafka source with a multiple topics:
xd:> stream create myKafkaSource2 --definition "kafka --zkconnect=localhost:2181 --
topics=mytopic1,mytopic2 | log" --deploy
11.9 Mail
Spring XD provides a source module for receiving emails, named mail. Depending on the protocolused, in can work by polling or receive mails as they become available.
Let’s see an example:
xd:> stream create --name mailstream --definition "mail --host=imap.gmail.com --username=your.user
%40gmail.com --password=password --port=993 | file" --deploy
One can also specify JavaMail properties as comma separated key=value pairs or as Spring supportedresource URL location for the properties file.
xd:> stream create --name mailstream --definition "mail --host=imap.gmail.com --username=your.user
%40gmail.com --password=password --port=993
--properties=mail.debug=true | file" --deploy
xd:> stream create --name mailstream --definition "mail --host=imap.gmail.com --username=your.user
%40gmail.com --password=password --port=993
--propertiesFile=file:/<path>/java-mail.properties | file" --deploy
If you are using imaps protocol, the mail source is configured to use these default properties:
mail.imap.socketFactory.class=javax.net.ssl.SSLSocketFactory
mail.imap.socketFactory.fallback=false
mail.store.protocol=imaps
Then send an email to yourself and you should see it appear inside a file at /tmp/xd/output/mailstream

Spring XD Guide
1.3.2.RELEASE Spring XD 136
Note: If the username/password have special characters like @, <space> then you need to enterappropriate unicode characters for them. For example the character @ can be specified with its unicode%40 as in the above definition.
The full list of options for the mail source is below:
The mail source has the following options:
charsetthe charset used to transform the body of the incoming emails to Strings (String, default: UTF-8)
deletewhether to delete the emails once they’ve been fetched (boolean, default: true)
expressiona SpEL expression which filters which mail messages will be processed (non polling imap only)(String, default: true)
fixedDelaythe polling interval used for looking up messages (s) (int, default: 60)
folderthe folder to take emails from (String, default: INBOX)
hostthe hostname of the mail server (String, default: localhost)
markAsReadwhether to mark emails as read once they’ve been fetched (boolean, default: false)
maxMessagesthe maximum messages per poll; -1 for unlimited (long, default: 1)
passwordthe password to use to connect to the mail server (String, no default)
portthe port of the mail server (int, default: 25)
propertiescomma separated JavaMail property values (String, no default)
propertiesFilefile to load the JavaMail properties (String, no default)
protocolthe protocol to use to retrieve messages (MailProtocol, default: imap, possible values:imap,imaps,pop3,pop3s)
usePollingwhether to use polling or not (no polling works with imap(s) only) (boolean, default: false)
usernamethe username to use to connect to the mail server (String, no default)
Spring XD Guide
1.3.2.RELEASE Spring XD 137
Warning
Of special attention are the markAsRead and delete options, which by default will delete theemails once they are consumed. It is hard to come up with a sensible default option for this (pleaserefer to the Spring Integration documentation section on mail handling for a discussion about this),so just be aware that the default for XD is to delete incoming messages.
11.10 MongoDB Source (mongodb)
The MongoDB source allows one to query a MongoDB collection and emit messages for each andevery matching result. This source works by regularly polling MongoDB and emitting the result list, asindependent objects. If split is set to false, the whole list is emitted as payload.
Here is an example:
xd:> stream create foo --definition "mongodb --collectionName=orders --fixedDelay=1 | log" --deploy
The mongodb source has the following options:
authenticationDatabaseNamethe MongoDB authentication database used for connecting (String, default: ``)
collectionNamethe MongoDB collection to read from (String, default: <stream name>)
databaseNamethe MongoDB database name (String, default: xd)
fixedDelaythe time delay between polls for data, expressed in TimeUnits (seconds by default) (int, default:1000)
hostthe MongoDB host to connect to (String, default: localhost)
initialDelayan initial delay when using a fixed delay trigger, expressed in TimeUnits (seconds by default) (int,default: 0)
maxMessagesthe maximum messages per poll; -1 for unlimited (long, default: 1)
passwordthe MongoDB password used for connecting (String, default: ``)
portthe MongoDB port to connect to (int, default: 27017)
querythe query to make to the mongo db (String, default: {})
splitwhether to split the query result as individual messages (boolean, default: true)
Spring XD Guide
1.3.2.RELEASE Spring XD 138
timeUnitthe time unit for the fixed and initial delays (String, default: SECONDS)
usernamethe MongoDB username used for connecting (String, default: ``)
11.11 MQTT
The mqtt source connects to an mqtt server and receives telemetry messages.
Configure a stream:
xd:> stream create tcptest --definition "mqtt --url='tcp://localhost:1883' --topics='xd.mqtt.test' |
log" --deploy
If you wish to use the MQTT Source defaults you can execute the command as follows:
xd:> stream create tcptest --definition "mqtt | log" --deploy
Options
The mqtt source has the following options:
binarytrue to leave the payload as bytes (boolean, default: false)
charsetthe charset used to convert bytes to String (when binary is false) (String, default: UTF-8)
cleanSessionwhether the client and server should remember state across restarts and reconnects (boolean,default: true)
clientIdidentifies the client (String, default: xd.mqtt.client.id.src)
connectionTimeoutthe connection timeout in seconds (int, default: 30)
keepAliveIntervalthe ping interval in seconds (int, default: 60)
passwordthe password to use when connecting to the broker (String, default: guest)
persistence'memory' or 'file' (String, default: memory)
persistenceDirectoryfile location when using 'file' persistence (String, default: /tmp/paho)
qosthe qos; a single value for all topics or a comma-delimited list to match the topics (String, default: 0)
topicsthe topic(s) (comma-delimited) to which the source will subscribe (String, default: xd.mqtt.test)

Spring XD Guide
1.3.2.RELEASE Spring XD 139
urllocation of the mqtt broker(s) (comma-delimited list) (String, default: tcp://localhost:1883)
usernamethe username to use when connecting to the broker (String, default: guest)
Note
The defaults are set up to connect to the RabbitMQ MQTT adapter on localhost.
11.12 RabbitMQ
The "rabbit" source enables receiving messages from RabbitMQ.
The following example shows the default settings.
Configure a stream:
xd:> stream create --name rabbittest --definition "rabbit | file --binary=true" --deploy
This receives messages from a queue named rabbittest and writes them to the default file sink (/tmp/xd/output/rabbittest.out). It uses the default RabbitMQ broker running on localhost, port5672.
The queue(s) must exist before the stream is deployed. We do not create the queue(s) automatically.However, you can easily create a Queue using the RabbitMQ web UI. Then, using that same UI, youcan navigate to the "rabbittest" Queue and publish test messages to it.
Notice that the file sink has --binary=true; this is because, by default, the data emitted by thesource will be bytes. This can be modified by setting the content_type property on messages totext/plain. In that case, the source will convert the message to a String; you can then omit the --binary=true and the file sink will then append a newline after each message.
To destroy the stream, enter the following at the shell prompt:
xd:> stream destroy --name rabbittest
RabbitMQ with Options
The rabbit source has the following options:
ackModethe acknowledge mode (AUTO, NONE, MANUAL) (String, default: AUTO)
addressesa comma separated list of 'host[:port]' addresses (String, default:${spring.rabbitmq.addresses})
concurrencythe minimum number of consumers (int, default: 1)
converterClassthe class name of the message converter (String, default:org.springframework.amqp.support.converter.SimpleMessageConverter)

Spring XD Guide
1.3.2.RELEASE Spring XD 140
enableRetryenable retry; when retries are exhausted the message will be rejected; message disposition willdepend on dead letter configuration (boolean, default: false)
initialRetryIntervalinitial interval between retries (int, default: 1000)
keyStorekeyStore location (if not using SSL properties) (String, default:${spring.rabbitmq.ssl.keyStore})
keyStorePassphrasekeyStore passphrase (if not using SSL properties) (String, default:${spring.rabbitmq.ssl.keyStorePassphrase})
mappedRequestHeadersrequest message header names to be propagated to/from the adpater/gateway (String, default:STANDARD_REQUEST_HEADERS)
maxAttemptsmaximum delivery attempts (int, default: 3)
maxConcurrencythe maximum number of consumers (int, default: 1)
maxRetryIntervalmaximum retry interval (int, default: 30000)
passwordthe password to use to connect to the broker (String, default: ${spring.rabbitmq.password})
prefetchthe prefetch size (int, default: 1)
queuesthe queue(s) from which messages will be received (String, default: <stream name>)
requeuewhether rejected messages will be requeued by default (boolean, default: true)
retryMultiplierretry interval multiplier (double, default: 2.0)
sslPropertiesLocationresource containing SSL properties (String, default: ${spring.rabbitmq.sslProperties})
transactedtrue if the channel is to be transacted (boolean, default: false)
trustStoretrustStore location (if not using SSL properties) (String, default:${spring.rabbitmq.ssl.trustStore})
trustStorePassphrasetrustStore passphrase (if not using SSL properties) (String, default:${spring.rabbitmq.ssl.trustStorePassphrase})

Spring XD Guide
1.3.2.RELEASE Spring XD 141
txSizethe number of messages to process before acking (int, default: 1)
useSSLtrue if SSL should be used for the connection (String, default: ${spring.rabbitmq.useSSL})
usernamethe username to use to connect to the broker (String, default:${spring.rabbitmq.username})
vhostthe RabbitMQ virtual host to use (String, default: ${spring.rabbitmq.virtual_host})
See the RabbitMQ MessageBus Documentation for more information about SSL configuration.
A Note About Retry
Note
With the default ackMode (AUTO) and requeue (true) options, failed message deliveries will beretried indefinitely. Since there is not much processing in the rabbit source, the risk of failure in thesource itself is small. However, when using the LocalMessageBus or Direct Binding, exceptionsin downstream modules will be thrown back to the source. Setting requeue to false will causemessages to be rejected on the first attempt (and possibly sent to a Dead Letter Exchange/Queueif the broker is so configured). The enableRetry option allows configuration of retry parameterssuch that a failed message delivery can be retried and eventually discarded (or dead-lettered)when retries are exhausted. The delivery thread is suspended during the retry interval(s). Retryoptions are enableRetry, maxAttempts, initialRetryInterval, retryMultiplier, and maxRetryInterval.Message deliveries failing with a MessageConversionException (perhaps when using a customconverterClassName) are never retried; the assumption being that if a message could not beconverted on the first attempt, subsequent attempts will also fail. Such messages are discarded(or dead-lettered).
11.13 Reactor IP (reactor-ip)
The reactor-ip source acts as a server and allows a remote party to connect to XD and submit dataover a raw TCP or UDP socket. The reactor-ip source differs from the standard tcp source in that itis based on the Reactor Project and can be configured to use the LMAX Disruptor RingBuffer libraryallowing for extremely high ingestion rates, e.g. ~ 1M/sec.
To create a stream definition use the following XD shell command
xd:> stream create --name tcpReactor --definition "reactor-ip | file" --deploy
This will create the reactor TCP source and send data read from it to the file named tcpReactor.
The reactor-ip source has the following options:
codeccodec used to transcode data (String, default: string)
dispatchertype of Reactor Dispatcher to use (String, default: shared)

Spring XD Guide
1.3.2.RELEASE Spring XD 142
framingmethod of framing the data (String, default: linefeed)
hosthost to bind the server to (String, default: 0.0.0.0)
lengthFieldLengthbyte precision of the number used in the length field (int, default: 4)
portport to bind the server to (int, default: 3000)
transportwhether to use TCP or UDP as a transport protocol (String, no default)
11.14 SFTP
This source module supports transfer of files using the SFTP protocol. Files are transferred from theremote directory to the local directory where the module is deployed.
Messages emitted by the source are provided as a byte array by default. However, this can becustomized using the --mode option:
• ref Provides a java.io.File reference
• lines Will split files line-by-line and emit a new message for each line
• contents The default. Provides the contents of a file as a byte array
When using --mode=lines, you can also provide the additional option --withMarkers=true. Ifset to true, the underlying FileSplitter will emit additional start-of-file and end-of-file markermessages before and after the actual data. The payload of these 2 additional marker messages is oftype FileSplitter.FileMarker. The option withMarkers defaults to false if not explicitly set.
Options
The sftp source has the following options:
allowUnknownKeystrue to allow connecting to a host with an unknown or changed key (boolean, default: false)
autoCreateLocalDirif local directory must be auto created if it does not exist (boolean, default: true)
deleteRemoteFilesdelete remote files after transfer (boolean, default: false)
fixedDelayfixed delay in SECONDS to poll the remote directory (int, default: 1)
hostthe remote host to connect to (String, default: localhost)
initialDelayan initial delay when using a fixed delay trigger, expressed in TimeUnits (seconds by default) (int,default: 0)

Spring XD Guide
1.3.2.RELEASE Spring XD 143
knownHostsExpressiona SpEL expresssion location of known hosts file; required if 'allowUnknownKeys' is false; examples:systemProperties["user.home"]+"/.ssh/known_hosts", "/foo/bar/known_hosts" (String, no default)
localDirset the local directory the remote files are transferred to (String, default: /tmp/xd/output)
maxMessagesthe maximum messages per poll; -1 for unlimited (long, default: -1)
modespecifies how the file is being read. By default the content of a file is provided as byte array(FileReadingMode, default: contents, possible values: ref,lines,contents)
passPhrasethe passphrase to use (String, default: ``)
passwordthe password for the provided user (String, default: ``)
patternsimple filename pattern to apply to the filter (String, no default)
portthe remote port to connect to (int, default: 22)
privateKeythe private key location (a valid Spring Resource URL) (String, default: ``)
regexPatternfilename regex pattern to apply to the filter (String, no default)
remoteDirthe remote directory to transfer the files from (String, no default)
timeUnitthe time unit for the fixed and initial delays (String, default: SECONDS)
tmpFileSuffixextension to use when downloading files (String, default: .tmp)
userthe username to use (String, no default)
withMarkersif true emits start of file/end of file marker messages before/after the data. Only valid withFileReadingMode 'lines' (Boolean, no default)
11.15 Stdout Capture
There isn’t actually a source named "stdin" but it is easy to capture stdin by redirecting it to a tcp source.For example if you wanted to capture the output of a command, you would first create the tcp stream,as above, using the appropriate sink for your requirements:
xd:> stream create tcpforstdout --definition "tcp --decoder=LF | log" --deploy

Spring XD Guide
1.3.2.RELEASE Spring XD 144
You can then capture the output from commands using the netcat command:
$ cat mylog.txt | netcat localhost 1234
11.16 Syslog
Three syslog sources are provided: reactor-syslog, syslog-udp, and syslog-tcp. The reactor-syslog adapter uses tcp and builds upon the functionality available in the Reactor project and providesimproved throughput over the syslog-tcp adapter.
The reactor-syslog source has the following options:
portthe port on which the system will listen for syslog messages (int, default: 5140)
The syslog-udp source has the following options:
portthe port on which to listen (int, default: 5140)
rfcthe format of the syslog (String, default: 3164)
The syslog-tcp source has the following options:
niouse nio (recommend false for a small number of senders, true for many) (boolean, default: false)
portthe port on which to listen (int, default: 5140)
rfcthe format of the syslog (String, default: 3164)
To create a stream definition (using shell command)
xd:> stream create --name syslogtest --definition "reactor-syslog --port=5140 | file" --deploy
or
xd:> stream create --name syslogtest --definition "syslog-udp --port=5140 | file" --deploy
or
xd:> stream create --name syslogtest --definition "syslog-tcp --port=5140 | file" --deploy
(--port is not required when using the default 5140)
Send a test message to the syslog
logger -p local3.info -t TESTING "Test Syslog Message"
See if the data ended up in the file
$ cat /tmp/xd/output/syslogtest

Spring XD Guide
1.3.2.RELEASE Spring XD 145
Refer to your syslog documentation to configure the syslog daemon to forward syslog messages to thestream; some examples are:
UDP - Mac OSX (syslog.conf) and Ubuntu (rsyslog.conf)
*.* @localhost:5140
TCP - Ubuntu (rsyslog.conf)
$ModLoad omfwd
*.* @@localhost:5140
Restart the syslog daemon after reconfiguring.
11.17 Tail
Make sure the default input directory exists
$ mkdir -p /tmp/xd/input
Create an empty file to tail (this is not needed on some platforms such as Linux)
$ touch /tmp/xd/input/tailtest
To create a stream definition using the XD shell
xd:> stream create --name tailtest --definition "tail | file" --deploy
Send some text into the file being monitored
$ echo blah >> /tmp/xd/input/tailtest
See if the data ended up in the file
$ cat /tmp/xd/output/tailtest
Tail with options
The tail source has the following options:
delayhow often (ms) to poll for new lines (forces use of the Apache Tailer, requires nativeOptions='')(long, no default)
fileDelayon platforms that don't wait for a missing file to appear, how often (ms) to look for the file (long,default: 5000)
fromEndwhether to tail from the end (true) or from the start (false) of the file (forces use of the Apache Tailer,requires nativeOptions='') (boolean, no default)
linesthe number of lines prior to the end of an existing file to tail; does not apply if 'nativeOptions' isprovided (int, default: 0)

Spring XD Guide
1.3.2.RELEASE Spring XD 146
namethe absolute path of the file to tail (String, default: /tmp/xd/input/<stream name>)
nativeOptionsoptions for a native tail command; do not set and use 'end', 'delay', and/or 'reOpen' to use theApache Tailer (String, no default)
reOpenwhether to reopen the file each time it is polled (forces use of the Apache Tailer, requiresnativeOptions='') (boolean, no default)
Here is an example
xd:> stream create --name tailtest --definition "tail --name=/tmp/foo | file --name=bar" --deploy
$ echo blah >> /tmp/foo
$ cat /tmp/xd/output/bar
Tail Status Events
Some platforms, such as linux, send status messages to stderr. The tail module sends these eventsto a logging adapter, at WARN level; for example…
[message=tail: cannot open `/tmp/xd/input/tailtest' for reading: No such file or directory, file=/tmp/
xd/input/tailtest]
[message=tail: `/tmp/xd/input/tailtest' has become accessible, file=/tmp/xd/input/tailtest]
11.18 TCP
The tcp source acts as a server and allows a remote party to connect to XD and submit data over araw tcp socket.
To create a stream definition in the server, use the following XD shell command
xd:> stream create --name tcptest --definition "tcp | file" --deploy
This will create the default TCP source and send data read from it to the tcptest file.
TCP is a streaming protocol and some mechanism is needed to frame messages on the wire. A numberof decoders are available, the default being CRLF which is compatible with Telnet.
$ telnet localhost 1234
Trying ::1...
Connected to localhost.
Escape character is '^]'.
foo
^]
telnet> quit
Connection closed.
See if the data ended up in the file
$ cat /tmp/xd/output/tcptest
By default, the TCP module will emit a byte[]; to convert to a String, add --outputType=text/plain to the module definition.

Spring XD Guide
1.3.2.RELEASE Spring XD 147
TCP with options
The tcp source has the following options:
bufferSizethe size of the buffer (bytes) to use when encoding/decoding (int, default: 2048)
charsetthe charset used when converting from bytes to String (String, default: UTF-8)
decoderthe decoder to use when receiving messages (Encoding, default: CRLF, possible values:CRLF,LF,NULL,STXETX,RAW,L1,L2,L4)
niowhether or not to use NIO (boolean, default: false)
portthe port on which to listen (int, default: 1234)
reverseLookupperform a reverse DNS lookup on the remote IP Address (boolean, default: false)
socketTimeoutthe timeout (ms) before closing the socket when no data is received (int, default: 120000)
useDirectBufferswhether or not to use direct buffers (boolean, default: false)
Available DecodersText Data
CRLF (default)text terminated by carriage return (0x0d) followed by line feed (0x0a)
LFtext terminated by line feed (0x0a)
NULLtext terminated by a null byte (0x00)
STXETXtext preceded by an STX (0x02) and terminated by an ETX (0x03)
Text and Binary Data
RAWno structure - the client indicates a complete message by closing the socket
L1data preceded by a one byte (unsigned) length field (supports up to 255 bytes)
L2data preceded by a two byte (unsigned) length field (up to 216-1 bytes)

Spring XD Guide
1.3.2.RELEASE Spring XD 148
L4data preceded by a four byte (signed) length field (up to 231-1 bytes)
Examples
The following examples all use echo to send data to netcat which sends the data to the source.
The echo options -en allows echo to interpret escape sequences and not send a newline.
CRLF Decoder.
xd:> stream create --name tcptest --definition "tcp | file" --deploy
This uses the default (CRLF) decoder and port 1234; send some data
$ echo -en 'foobar\r\n' | netcat localhost 1234
See if the data ended up in the file
$ cat /tmp/xd/output/tcptest
LF Decoder.
xd:> stream create --name tcptest2 --definition "tcp --decoder=LF --port=1235 | file" --deploy
$ echo -en 'foobar\n' | netcat localhost 1235
$ cat /tmp/xd/output/tcptest2
NULL Decoder.
xd:> stream create --name tcptest3 --definition "tcp --decoder=NULL --port=1236 | file" --deploy
$ echo -en 'foobar\x00' | netcat localhost 1236
$ cat /tmp/xd/output/tcptest3
STXETX Decoder.
xd:> stream create --name tcptest4 --definition "tcp --decoder=STXETX --port=1237 | file" --deploy
$ echo -en '\x02foobar\x03' | netcat localhost 1237
$ cat /tmp/xd/output/tcptest4
RAW Decoder.
xd:> stream create --name tcptest5 --definition "tcp --decoder=RAW --port=1238 | file" --deploy
$ echo -n 'foobar' | netcat localhost 1238
$ cat /tmp/xd/output/tcptest5
L1 Decoder.
xd:> stream create --name tcptest6 --definition "tcp --decoder=L1 --port=1239 | file" --deploy
$ echo -en '\x06foobar' | netcat localhost 1239

Spring XD Guide
1.3.2.RELEASE Spring XD 149
$ cat /tmp/xd/output/tcptest6
L2 Decoder.
xd:> stream create --name tcptest7 --definition "tcp --decoder=L2 --port=1240 | file" --deploy
$ echo -en '\x00\x06foobar' | netcat localhost 1240
$ cat /tmp/xd/output/tcptest7
L4 Decoder.
xd:> stream create --name tcptest8 --definition "tcp --decoder=L4 --port=1241 | file" --deploy
$ echo -en '\x00\x00\x00\x06foobar' | netcat localhost 1241
$ cat /tmp/xd/output/tcptest8
Binary Data Example
xd:> stream create --name tcptest9 --definition "tcp --decoder=L1 --port=1242 | file --binary=true" --
deploy
Note that we configure the file sink with binary=true so that a newline is not appended.
$ echo -en '\x08foo\x00bar\x0b' | netcat localhost 1242
$ hexdump -C /tmp/xd/output/tcptest9
00000000 66 6f 6f 00 62 61 72 0b |foo.bar.|
00000008
11.19 TCP Client (tcp-client)
The tcp-client source module uses raw tcp sockets, as does the tcp module but contrary to the tcpmodule, acts as a client. Whereas the tcp module will open a listening socket and wait for connectionsfrom a remote party, the tcp-client will initiate the connection to a remote server and emit asmessages what that remote server sends over the wire. As an optional feature, the tcp-client canitself emit messages to the remote server, so that a simple conversation can take place.
TCP Client options
The tcp-client source has the following options:
bufferSizethe size of the buffer (bytes) to use when encoding/decoding (int, default: 2048)
charsetthe charset used when converting from bytes to String (String, default: UTF-8)
closewhether to close the socket after each message (boolean, default: false)
decoderthe decoder to use when receiving messages (Encoding, default: CRLF, possible values:CRLF,LF,NULL,STXETX,RAW,L1,L2,L4)

Spring XD Guide
1.3.2.RELEASE Spring XD 150
encoderthe encoder to use when sending messages (Encoding, default: CRLF, possible values:CRLF,LF,NULL,STXETX,RAW,L1,L2,L4)
expressiona SpEL expression used to transform messages (String, default: payload.toString())
fixedDelaythe rate at which stimulus messages will be emitted (seconds) (int, default: 5)
hostthe remote host to connect to (String, default: localhost)
maxMessagesthe maximum messages per poll; -1 for unlimited (long, default: 1)
niowhether or not to use NIO (boolean, default: false)
portthe port on the remote host to connect to (int, default: 1234)
propertiesLocationthe path of a properties file containing custom script variable bindings (String, no default)
refreshDelayhow often to check (in milliseconds) whether the script has changed; -1 for never (long, default:60000)
reverseLookupperform a reverse DNS lookup on the remote IP Address (boolean, default: false)
scriptreference to a script used to process messages (String, no default)
socketTimeoutthe timeout (ms) before closing the socket when no data is received (int, default: 120000)
useDirectBufferswhether or not to use direct buffers (boolean, default: false)
variablesvariable bindings as a comma delimited string of name-value pairs, e.g., 'foo=bar,baz=car' (String,no default)
Implementing a simple conversation
That "stimulus" counter concept bears some explanation. By default, the module will emit (at interval setby fixedDelay) an incrementing number, starting at 1. Given that the default is to use an expressionof payload.toString(), this results in the module sending 1, 2, 3, ... to the remote server.
By using another expression, or more certainly a script, one can implement a simple conversation,assuming it is time based. As an example, let’s assume we want to join some kind of chat server whereone first needs to authenticate, then specify which rooms to join. Lastly, all clients are supposed to sendsome keepalive commands to make sure that the connection is open.

Spring XD Guide
1.3.2.RELEASE Spring XD 151
The following groovy script could be used to that effect:
def commands = ['', // index 0 is not used
'LOGIN user=johndoe', // first command sent
'JOIN weather',
'JOIN news',
'JOIN gossip'
]
// payload will contain an incrementing counter, starting at 1
if (commands.size > payload)
return commands[payload] + "\n"
else
return "PING\n" // send keep alive after 4th 'real' command
Tip
If the script option is set, the script file’s modified timestamp is checked for changes every60 seconds by default; this can be changed with the refreshDelay deployment property:--refreshDelay=30000 (every 30 seconds or 30,000ms), --refreshDelay=-1 to disablerefresh.
11.20 Time
The time source will simply emit a String with the current time every so often.
The time source has the following options:
fixedDelaytime delay between messages, expressed in TimeUnits (seconds by default) (int, default: 1)
formathow to render the current time, using SimpleDateFormat (String, default: yyyy-MM-ddHH:mm:ss)
initialDelayan initial delay when using a fixed delay trigger, expressed in TimeUnits (seconds by default) (int,default: 0)
maxMessagesthe maximum messages per poll; -1 for unlimited (long, default: 1)
timeUnitthe time unit for the fixed and initial delays (String, default: SECONDS)
11.21 Trigger Source (trigger)
The trigger source emits a message or messages according to the provided trigger configuration. Themessage payload is a simple literal value, provided in the payload property.
The trigger source has the following options:
croncron expression specifying when the trigger should fire (String, no default)

Spring XD Guide
1.3.2.RELEASE Spring XD 152
datea one-time date when the trigger should fire; only applies if 'fixedDelay' and 'cron' are not provided(String, default: The current time)
dateFormatthe format specifying how the 'date' should be parsed (String, default: MM/dd/yy HH:mm:ss)
fixedDelaytime delay between executions, expressed in TimeUnits (seconds by default) (Integer, no default)
initialDelayan initial delay when using a fixed delay trigger, expressed in TimeUnits (seconds by default) (int,default: 0)
maxMessagesthe maximum messages per poll; -1 for unlimited (long, default: 1)
payloadthe message that will be sent when the trigger fires (String, default: ``)
timeUnitthe time unit for the fixed and initial delays (String, default: SECONDS)
11.22 Twitter Search (twittersearch)
The twittersearch source runs a continuous query against Twitter.
The twittersearch source has the following options:
connectTimeoutthe connection timeout for making a connection to Twitter (ms) (int, default: 5000)
consumerKeya consumer key issued by twitter (String, no default)
consumerSecretconsumer secret corresponding to the consumer key (String, no default)
geocodegeo-location given as latitude,longitude,radius. e.g., '37.781157,-122.398720,1mi' (String, default:``)
includeEntitieswhether to include entities such as urls, media and hashtags (boolean, default: true)
languagelanguage code e.g. 'en' (String, default: ``)
querythe query string (String, default: ``)
readTimeoutthe read timeout for the underlying URLConnection to the twitter stream (ms) (int, default: 9000)

Spring XD Guide
1.3.2.RELEASE Spring XD 153
resultTyperesult type: recent, popular, or mixed (ResultType, default: mixed, possible values:mixed,recent,popular)
For information on how to construct a query, see the Search API v1.1.
To get a consumerKey and consumerSecret you need to register a twitter application. If you don’talready have one set up, you can create an app at the Twitter Developers site to get these credentials.
Tip
For both twittersearch and twitterstream you can put these keys in a module propertiesfile instead of supplying them in the stream definition. If both sources share the same credentials, itis easiest to configure the required credentials in config/modules/modules.yml. Alternately,each module has its own properties file. For twittersearch, the file would be config/modules/source/twittersearch/twittersearch.properties.
To create and deploy a stream definition in the server using the XD shell:
xd:> stream create --name springone2gx --definition "twittersearch --query='#springone2gx' | file" --
deploy
Let the twittersearch run for a little while and then check to see if some data ended up in the file
$ cat /tmp/xd/output/springone2gx
Note
Both twittersearch and twitterstream emit JSON in the native Twitter format.
11.23 Twitter Stream (twitterstream)
This source ingests data from Twitter’s streaming API v1.1. It uses the sample and filter stream endpointsrather than the full "firehose" which needs special access. The endpoint used will depend on theparameters you supply in the stream definition (some are specific to the filter endpoint).
You need to supply all keys and secrets (both consumer and accessToken) to authenticate forthis source, so it is easiest if you just add these to XD_HOME/config/modules/modules.yml orXD_HOME/config/modules/source/twitterstream/twitterstream.properties file.
Stream creation is then straightforward:
xd:> stream create --name tweets --definition "twitterstream | file" --deploy
The twitterstream source has the following options:
accessTokena valid OAuth access token (String, no default)
accessTokenSecretan OAuth secret corresponding to the access token (String, no default)
connectTimeoutthe connection timeout for making a connection to Twitter (ms) (int, default: 5000)

Spring XD Guide
1.3.2.RELEASE Spring XD 154
consumerKeya consumer key issued by twitter (String, no default)
consumerSecretconsumer secret corresponding to the consumer key (String, no default)
delimitedset to true to get length delimiters in the stream data (boolean, default: false)
discardDeletesset to discard 'delete' events (boolean, default: true)
filterLevelcontrols which tweets make it through to the stream: none,low,or medium (FilterLevel, default:none, possible values: none,low,medium)
followcomma delimited set of user ids whose tweets should be included in the stream (String, default: ̀ `)
languagelanguage code e.g. 'en' (String, default: ``)
locationscomma delimited set of latitude/longitude pairs to include in the stream (String, default: ``)
readTimeoutthe read timeout for the underlying URLConnection to the twitter stream (ms) (int, default: 9000)
stallWarningsset to true to enable stall warnings (boolean, default: false)
trackcomma delimited set of terms to include in the stream (String, default: ``)
Note: The options available are pretty much the same as those listed in the Twitter API docs and unlessotherwise stated, the accepted formats are the same.
Note
Both twittersearch and twitterstream emit JSON in the native Twitter format.

Spring XD Guide
1.3.2.RELEASE Spring XD 155
12. Processors
This section describes the processor modules included with Spring XD. A processor implements aprocessing task within a stream. A stream may chain multiple processors sequentially as needed. Torun the examples shown here, start the XD Container as instructed in the Getting Started page.
The available Processors are
• Aggregator
• Filter
• Header Enricher
• HTTP Client
• JSON to Tuple
• Object to JSON
• Script
• Shell Command
• Splitter
• Transform
See the section Creating a Processor Module for information on how to create custom processormodules.
12.1 Aggregator
The aggregator module does the opposite of the splitter, and builds upon the concept of the same namefound in Spring Integration. By default, it will consider all incoming messages from a stream to belongto the same group:
xd:> stream create --name aggregates --definition "http | aggregator --count=3 --
aggregation=T(org.springframework.util.StringUtils).collectionToDelimitedString(#this.![payload],' ') |
log" --deploy
This uses a SpEL expression that will basically concatenate all payloads together, inserting a spacecharacter in between. As such,
xd:> http post --data Hello
xd:> http post --data World
xd:> http post --data !
would emit a single message whose contents is "Hello World !". This is because we set the aggregatorrelease strategy to accumulate 3 messages.
The aggregator processor has the following options:
aggregationhow to construct the aggregated message (SpEL expression against a collection of messages)(String, default: #this.![payload])

Spring XD Guide
1.3.2.RELEASE Spring XD 156
correlationhow to correlate messages (SpEL expression against each message) (String, default: '<streamname>')
countthe number of messages to group together before emitting a group (int, default: 50)
dbkindwhich flavor of init scripts to use for the jdbc store (blank to attempt autodetection) (String, nodefault)
driverClassNamethe jdbc driver to use when using the jdbc store (String, no default)
hostnamehostname of the redis instance to use as a store (String, default: localhost)
initializeDatabasewhether to auto-create the database tables for the jdbc store (boolean, default: false)
passwordthe password to use when using the jdbc or redis store (String, default: ``)
portport of the redis instance to use as a store (int, default: 6379)
releasewhen to release messages (SpEL expression against a collection of messages accumulated so far)(String, no default)
storethe kind of store to use to retain messages (StoreKind, default: memory, possible values:memory,jdbc,redis)
timeoutthe delay (ms) after which messages should be released, even if the completion criteria is not met(int, default: 50000)
urlthe jdbc url to connect to when using the jdbc store (String, no default)
usernamethe username to use when using the jdbc store (String, no default)
Note
• Some of the options are only relevant when using a particular store
• The default correlation of '<stream name>' actually considers all messages to becorrelated, since they all belong to the same stream.
• Using the release option overrides the count option (which is a simpler approach)
• The default for aggregation creates a new collection made of the payloads of theaccumulated messages

Spring XD Guide
1.3.2.RELEASE Spring XD 157
• About the timeout option: due to the way it is implemented (see MessageGroupStoreReaperin the Spring Integration documentation), the actual observed delay may vary betweentimeout and 2xtimeout.
12.2 Filter
Use the filter module in a stream to determine whether a Message should be passed to the outputchannel.
The filter processor has the following options:
expressiona SpEL expression used to transform messages (String, default: payload.toString())
propertiesLocationthe path of a properties file containing custom script variable bindings (String, no default)
refreshDelayhow often to check (in milliseconds) whether the script has changed; -1 for never (long, default:60000)
scriptreference to a script used to process messages (String, no default)
variablesvariable bindings as a comma delimited string of name-value pairs, e.g., 'foo=bar,baz=car' (String,no default)
Filter with SpEL expression
The simplest way to use the filter processor is to pass a SpEL expression when creating the stream.The expression should evaluate the message and return true or false. For example:
xd:> stream create --name filtertest --definition "http | filter --expression=payload=='good' | log" --
deploy
This filter will only pass Messages to the log sink if the payload is the word "good". Try sending "good"to the HTTP endpoint and you should see it in the XD log:
xd:> http post --target http://localhost:9000 --data "good"
Alternatively, if you send the word "bad" (or anything else), you shouldn’t see the log entry.
Filter using jsonPath evaluation
As part of the SpEL expression you can make use of the pre-registered JSON Path function.
This filter example shows to pass messages to the output channel if they contain a specific JSON fieldmatching a specific value.
xd:> stream create --name jsonfiltertest --definition "http --port=9002 | filter --
expression=#jsonPath(payload,'$.firstName').contains('John') | log" --deploy
Note: There is no space between payload JSON and the jsonPath in the expression
Spring XD Guide
1.3.2.RELEASE Spring XD 158
This filter will only pass Messages to the log sink if the JSON payload contains the firstName "John".Try sending this payload to the HTTP endpoint and you should see it in the XD log:
xd:> http post --target http://localhost:9002 --data "{\"firstName\":\"John\", \"lastName\":\"Smith\"}"
Alternatively, if you send a different firstName, you shouldn’t see the log entry.
Here is another example usage of filter
filter --expression=#jsonPath(payload,'$.entities.hashtags[*].text').contains('obama')
This is an example that is operating on a JSON payload of tweets as consumed from the twitter searchmodule.
Filter with Groovy Script
For more complex filtering, you can pass the location of a Groovy script using the script option. If youwant to pass variable values to your script, you can statically bind values using the variables optionor optionally pass the path to a properties file containing the bindings using the propertiesLocationoption.All properties in the file will be made available to the script as variables. Note that payload andheaders are implicitly bound to give you access to the data contained in a message.
Example:
Note
These features are common to all modules backed by Groovy scripts.
//custom-filter.groovy
return payload.size()> 4 || shortstrings=='true'
#custom-filter.properties
shortstrings=false
By default, Spring XD will search the classpath for custom-filter.groovy and custom-filter.properties.You can place the script in ${xd.home}/modules/processor/scripts and the properties file in ${xd.home}/config to make them available on the classpath. Alternatively, you can prefix the script and properties-location values with file: to load from the file system.
In the following stream definitions, the filter will pass only the first message:
xd>: stream create --name groovyfiltertest1 --definition "http --port=9001 | filter --
script=file:<absolute-path-to>/custom-filter.groovy --variables='shortstrings=false' | log" --deploy
Created and deployed new stream 'groovyfiltertest1'
xd:>http post --target http://localhost:9001 --data hello
xd:http post --target http://localhost:9001 --data hi
xd>: stream create --name groovyfiltertest2 --definition "http --port=9002 | filter --
script=file:<absolute-path-to>/custom-filter.groovy --propertiesLocation=file:<absolute-path-to>/custom-
filter.properties | log" --deploy
Created and deployed new stream 'groovyfiltertest2'
xd:>http post --target http://localhost:9002 --data hello
xd:http post --target http://localhost:9002 --data hi
In the following stream definitions, the filter will pass all messages (provided the payload type supportsa size() method):
Spring XD Guide
1.3.2.RELEASE Spring XD 159
xd>: stream create --name groovyfiltertest1 --definition "http --port=9001 | filter --
script=file:<absolute-path-to>/custom-filter.groovy --variables='shortstrings=false' | log" --deploy
Created and deployed new stream 'groovyfiltertest1'
xd>: stream create --name groovyfiltertest2 --definition "http --port=9002 | filter --
script=file:<absolute-path-to>/custom-filter.groovy --variables='shortstring=false' --
propertiesLocation=file:<absolute-path-to>/custom-filter.properties | log" --deploy
Created and deployed new stream 'groovyfiltertest2'
Note the last example demonstrates that values specified in variables override values frompropertiesLocation
Tip
The script file’s modified timestamp is checked for changes every 60 seconds by default; this canbe changed with the refreshDelay deployment property: --refreshDelay=30000 (every 30seconds or 30,000ms), --refreshDelay=-1 to disable refresh.
12.3 Header Enricher (header-enricher)
The header-enricher processor provides a basic header enricher to allow a stream to add runtimestate in one or more message headers. Message headers are preserved across the entire stream flowand may be referenced by down stream modules using SpEL, e.g., expression=headers['foo'].
Header expressions are provided using the headers module option which expects a JSON string.
Some Examples:
A Simple SpEL expression
xd:>stream create t1 --definition "http | header-enricher --headers={\"foo\":\"payload.toUpperCase()\"}
| log --expression=headers" --deploy
xd:>http post --data hello --target http://localhost:9000
You should see the message headers, including foo=HELLO in the container console log:
2015-05-24T11:40:40-0400 1.2.0.SNAP INFO pool-12-thread-4 sink.t1 - {requestMethod=POST, foo=HELLO,
User-Agent=Java/1.8.0_25, Host=localhost:9000, id=f6b2c420-cd12-2d5e-e0cb-675f60fb9a63, Content-
Length=5, contentType=text/plain;Charset=UTF-8, requestPath=/, timestamp=1432482040939}
Multiple Headers: This will add 2 headers, foo and bar
xd:> stream create t2 --definition "http | header-enricher --headers={\"foo\":\"payload.toUpperCase()\",
\"bar\":\"payload+',world'\"} | log --expression=headers" --deploy
xd:>http post --data hello --target http://localhost:9000
The result:
2015-05-24T11:49:19-0400 1.2.0.SNAP INFO pool-27-thread-4 sink.t2 - {bar=hello,world,
requestMethod=POST, foo=HELLO, User-Agent=Java/1.8.0_25, Host=localhost:9000, id=c9220992-f71c-
db3f-0f22-b5ab262d4aee, Content-Length=5, contentType=text/plain;Charset=UTF-8, requestPath=/,
timestamp=1432482559740}
JSON Path expressions: This example uses a JSON Path expression to extract a field value in a JSONPayload:
xd:>stream create t3 --definition "http | header-enricher --headers={\"foo\":
\"#jsonPath(payload,'$.duration')\"} | log --expression=headers" --deploy
xd:>http post --data {"duration":123.45} --target http://localhost:9000

Spring XD Guide
1.3.2.RELEASE Spring XD 160
foo=123.45 !!
2015-05-24T11:45:16-0400 1.2.0.SNAP INFO pool-23-thread-4 sink.t3 - {requestMethod=POST, foo=123.45,
User-Agent=Java/1.8.0_25, Host=localhost:9000, id=87d229b9-a434-31c2-eb35-b42ca3f8352a, Content-
Length=19, contentType=text/plain;Charset=UTF-8, requestPath=/, timestamp=1432482316080}
Literal Strings with Embedded Spaces: SpEL expects literals to be enclosed in single quotes. This isstraight forward when the literal does not contain embedded spaces as in the Multple Headersexample above. Using embedded spaces requires either wrapping the headers value in single quotesand escaping the single quote for the literal string
xd:>stream create t4 --definition "http | header-enricher --headers='{\"foo\":\"''this is a literal
string''\"}' | log --expression=headers" --deploy
or you can encode embedded spaces using the Unicode escape sequence (the leading \ must itselfbe escaped):
xd:>stream create t4 --definition "http | header-enricher --headers={\"foo\":\"'this\\u0020is\\u0020a\
\u0020literal\\u0020string'\"} | log --expression=headers" --deploy
the result:
2015-05-24T12:26:32-0400 1.2.0.SNAP INFO pool-31-thread-4 sink.t4 - {requestMethod=POST, foo=this is a
literal string, User-Agent=Java/1.8.0_25, Host=localhost:9000, id=b8892a1b-57b1-de6e-71de-e30f84cd199a,
Content-Length=5, contentType=text/plain;Charset=UTF-8, requestPath=/, timestamp=1432484792949}
The header-enricher processor has the following options:
headersa JSON document representing headers in which values are SpEL expressions, e.g{"h1":"exp1","h2":"exp2"} (String, no default)
overwriteset to true to overwrite any existing message headers (Boolean, default: false)
12.4 HTTP Client (http-client)
The http-client processor acts as a client that issues HTTP requests to a remote server, submittingthe message payload it receices to that server and in turn emitting the response it receives to the nextmodule down the line.
For example, the following command will result in an immediate fetching of earthquake data and it beinglogged in the container:
xd:>stream create earthquakes --definition "trigger | http-client --url='''http://earthquake.usgs.gov/
earthquakes/feed/geojson/all/day''' --httpMethod=GET | log" --deploy
Note
Please be aware that the url option above is actually a SpEL expression, hence the triple quotes.If you’d like to learn more about quotes, please read the relevant documentation.
The http-client processor has the following options:
charsetthe charset to use when in the Content-Type header when emitting Strings (String, default: UTF-8)

Spring XD Guide
1.3.2.RELEASE Spring XD 161
httpMethodthe http method to use when performing the request (HttpMethod, default: POST, possible values:OPTIONS,GET,HEAD,POST,PUT,PATCH,DELETE,TRACE,CONNECT)
mappedRequestHeadersrequest message header names to be propagated to/from the adpater/gateway (String, default:HTTP_REQUEST_HEADERS)
mappedResponseHeadersresponse message header names to be propagated from the adpater/gateway (String, default:HTTP_RESPONSE_HEADERS)
replyTimeoutthe amount of time to wait (ms) for a response from the remote server (int, default: 0)
urlthe url to perform an http request on (String, no default)
12.5 JSON to Tuple (json-to-tuple)
The json-to-tuple processor is able to transform a String representation of some JSON map intoa Tuple.
Here is a simple example:
xd:>stream create tuples --definition "http | json-to-tuple | transform --expression='payload.firstName
+ payload.lastName' | log" --deploy
xd:>http post --data '{"firstName": "Spring", "lastName": "XD"}'
Note
Transformation to Tuple can be used as an alternative to Type Conversion.
The json-to-tuple processor has no particular option (in addition to options shared by all modules)
12.6 Object to JSON (object-to-json)
The object-to-json processor can be used to convert any java Object to a JSON String.
In the following example, notice how the collection of three elements is transformed to JSON (inparticular, the three Strings are surrounded by quotes):
xd:>stream create json --deploy --definition "http | aggregator --count | object-to-json | log"
xd:>http post --data hello
xd:>http post --data world
xd:>http post --data !
results in ["hello", "world", "!"] appearing in the log.
Note
Transformation to JSON can be used as an alternative to Type Conversion.

Spring XD Guide
1.3.2.RELEASE Spring XD 162
The object-to-json processor has no particular option (in addition to options shared by all modules)
12.7 Script
The script processor contains a Service Activator that invokes a specified Groovy script. This is a slightlymore generic way to accomplish processing logic, as the provided script may simply terminate the streamas well as transform or filter Messages.
The script processor has the following options:
propertiesLocationthe path of a properties file containing custom script variable bindings (String, no default)
refreshDelayhow often to check (in milliseconds) whether the script has changed; -1 for never (long, default:60000)
scriptreference to a script used to process messages (String, no default)
variablesvariable bindings as a comma delimited string of name-value pairs, e.g., 'foo=bar,baz=car' (String,no default)
To use the module, pass the location of a Groovy script using the script attribute. If you want to passvariable values to your script, you can statically bind values using the variables option or optionally passthe path to a properties file containing the bindings using the propertiesLocation option. All propertiesin the file will be made available to the script as variables. Note that payload and headers are implicitlybound to give you access to the data contained in a message. See the Filter example for a more detaileddiscussion of script variables.
xd:> stream create --name groovyprocessortest --definition "http --port=9006 | script --script=custom-
processor.groovy --variables='x=foo' | log" --deploy
xd:> stream create --name groovyprocessortest --definition "http --port=9006 | script --script=custom-
processor.groovy --propertiesLocation=custom-processor.properties | log" --deploy
By default, Spring XD will search the classpath for custom-processor.groovy and custom-processor.properties. You can place the script in ${xd.home}/modules/processor/scripts and theproperties file in ${xd.home}/config to make them available on the classpath. Alternatively, you can prefixthe location and properties-location values with file: to load from the file system.
Tip
The script file’s modified timestamp is checked for changes every 60 seconds by default; this canbe changed with the refreshDelay deployment property: --refreshDelay=30000 (every 30seconds or 30,000ms), --refreshDelay=-1 to disable refresh.
12.8 Shell
The shell processor forks an external process by running a shell command to launch a process writtenin any language. The process should implement a continual loop that waits for input from stdin andwrites a result to stdout in a request-response manner. The process will be destroyed when the stream
Spring XD Guide
1.3.2.RELEASE Spring XD 163
is undeployed. For example, it is possible to invoke a Python script within a stream in this manner. Sincethe shell processor relies on low-level stream processing there are some additional requirements:
• Input and output data are expected to be Strings, the charset is configurable.
• The shell process must not write out of band data to stdout, such as a start up message or prompt.
• Anything written to stderr will be logged as an ERROR in Spring XD but will not terminate the stream.
• Responses written to stdout must be terminated using the configured encoder (CRLF or "\r\n" is thedefault) for the module and must not exceed the configured bufferSize
• Any external software required to run the script must be installed on the container node to which themodule is deployed.
Here is a simple Python example that echos the input:
#echo.py
import sys
#=====================
# Write data to stdout
#=====================
def send(data):
sys.stdout.write(data)
sys.stdout.flush()
#===========================================
# Terminate a message using the default CRLF
#===========================================
def eod():
send("\r\n")
#===========================
# Main - Echo the input
#===========================
while True:
try:
data = raw_input()
if data:
send(data)
eod()
except EOFError:
eod()
break
Note
Spring XD provides additional Python programming support for handling basic stream processing,as shown above, see xref:creating a Python module.
To try this example, copy the above script and save it to echo.py. Start Spring XD and create a stream:
xd:>stream create pytest --definition "time | shell --command='python <absolute-path-to>/echo.py' | log"
--deploy
Created and deployed new stream 'pytest'
you should see the time echoed in the log:
09:49:14,856 INFO task-scheduler-5 sink.pytest - 2014-10-10 09:49:14
09:49:15,860 INFO task-scheduler-1 sink.pytest - 2014-10-10 09:49:15
09:49:16,862 INFO task-scheduler-1 sink.pytest - 2014-10-10 09:49:16
09:49:17,864 INFO task-scheduler-1 sink.pytest - 2014-10-10 09:49:17

Spring XD Guide
1.3.2.RELEASE Spring XD 164
This script can be easily modified to do some actual work by providing a function that takes the inputas an argument and returns a string. Then insert the function call:
while True:
try:
data = raw_input()
if data:
result = myfunc(data)
send(result)
eod()
except EOFError:
eod()
break
The shell processor has the following options:
bufferSizethe size of the buffer (bytes) to use when encoding/decoding (int, default: 2048)
charsetthe charset used when converting from String to bytes (String, default: UTF-8)
commandthe shell command (String, no default)
encoderthe encoder to use when sending messages (Encoding, default: CRLF, possible values:CRLF,LF,NULL,STXETX,RAW,L1,L2,L4)
environmentadditional process environment variables as comma delimited name-value pairs (String, nodefault)
redirectErrorStreamredirects stderr to stdout (boolean, default: false)
workingDirthe process working directory (String, no default)
12.9 Splitter
The splitter module builds upon the concept of the same name in Spring Integration and allows thesplitting of a single message into several distinct messages.
The splitter processor has the following options:
expressiona SpEL expression which would typically evaluate to an array or collection (String, default:payload)
Note
The default value for expression is payload, which actually does not split, unless the messageis already a collection.
As part of the SpEL expression you can make use of the pre-registered JSON Path function. The syntaxis #jsonPath(payload,<json path expression>)
Spring XD Guide
1.3.2.RELEASE Spring XD 165
Extract the value of a specific field
This splitter converts a JSON message payload to the value of a specific JSON field.
xd:> stream create --name jsontransformtest --definition "http --port=9005 | splitter --
expression=#jsonPath(payload,'$.firstName') | log" --deploy
Try sending this payload to the HTTP endpoint and you should see just the value "John" in the XD log:
xd:> http post --target http://localhost:9005 --data '{"firstName":"John", "lastName":"Smith"}'
12.10 Transform
Use the transform module in a stream to convert a Message’s content or structure.
The transform processor has the following options:
expressiona SpEL expression used to transform messages (String, default: payload.toString())
propertiesLocationthe path of a properties file containing custom script variable bindings (String, no default)
refreshDelayhow often to check (in milliseconds) whether the script has changed; -1 for never (long, default:60000)
scriptreference to a script used to process messages (String, no default)
variablesvariable bindings as a comma delimited string of name-value pairs, e.g., 'foo=bar,baz=car' (String,no default)
Transform with SpEL expression
The simplest way to use the transform processor is to pass a SpEL expression when creating the stream.The expression should return the modified message or payload. For example:
xd:> stream create --name transformtest --definition "http --port=9003 | transform --
expression=payload.toUpperCase() | log" --deploy
This transform will convert all message payloads to upper case. If sending the word "foo" to the HTTPendpoint and you should see "FOO" in the XD log:
xd:> http post --target http://localhost:9003 --data "foo"
As part of the SpEL expression you can make use of the pre-registered JSON Path function. The syntaxis #jsonPath(payload,<json path expression>)
Transform with Groovy Script
For more complex transformations, you can pass the location of a Groovy script using the script option.If you want to pass variable values to your script, you can statically bind values using the variablesoption or optionally pass the path to a properties file containing the bindings using the propertiesLocation

Spring XD Guide
1.3.2.RELEASE Spring XD 166
option. All properties in the file will be made available to the script as variables. Note that payload andheaders are implicitly bound to give you access to the data contained in a message. See the Filterexample for a more detailed discussion of script variables.
xd:> stream create --name groovytransformtest1 --definition "http --port=9004 | transform --
script=custom-transform.groovy --variables="x=foo" | log" --deploy
xd:> stream create --name groovytransformtest2 --definition "http --port=9004 | transform --
script=custom-transform.groovy --propertiesLocation=custom-transform.properties | log" --deploy
By default, Spring XD will search the classpath for custom-transform.groovy and custom-transform.properties. You can place the script in ${xd.home}/modules/processor/scripts and theproperties file in ${xd.home}/config to make them available on the classpath. Alternatively, you can prefixthe script and properties-location values with file: to load from the file system.
Tip
The script file’s modified timestamp is checked for changes every 60 seconds by default; this canbe changed with the refreshDelay deployment property: --refreshDelay=30000 (every 30seconds or 30,000ms), --refreshDelay=-1 to disable refresh.

Spring XD Guide
1.3.2.RELEASE Spring XD 167
13. SinksThis section describes the sink modules included with Spring XD. A sink terminates a stream to persistdata or push it to an external consumer. To run the examples shown here, start the XD Container asinstructed in the Getting Started page.
The available sinks are
• Dynamic Router
• File
• FTP
• GemFire Server
• GPFDIST
• Cassandra
• HDFS
• HDFS Dataset
• JDBC
• Kafka
• Log
• Mongo
• MQTT
• Null Sink
• RabbitMQ
• Redis
• Shell Command
• Splunk Server
• TCP
Additionally, Spring XD provides a number of counters and gauges, which are specialized sinks usefulfor real time analytics.
See the section Creating a Sink Module for information on how to create sink modules using otherSpring Integration Adapters.
13.1 Dynamic Router (router)
The Dynamic Router support allows for routing Spring XD messages to named channels based on theevaluation of SpEL expressions or Groovy Scripts.

Spring XD Guide
1.3.2.RELEASE Spring XD 168
SpEL-based Routing
In the following example, 2 streams are created that listen for message on the foo and the bar channel.Furthermore, we create a stream that receives messages via HTTP and then delegates the receivedmessages to a router:
xd:>stream create f --definition "queue:foo > transform --expression=payload+'-foo' | log" --deploy
Created new stream 'f'
xd:>stream create b --definition "queue:bar > transform --expression=payload+'-bar' | log" --deploy
Created new stream 'b'
xd:>stream create r --definition "http | router --
expression=payload.contains('a')?'queue:foo':'queue:bar'" --deploy
Created new stream 'r'
Now we make 2 requests to the HTTP source:
xd:>http post --data "a"
> POST (text/plain;Charset=UTF-8) http://localhost:9000 a
> 200 OK
xd:>http post --data "b"
> POST (text/plain;Charset=UTF-8) http://localhost:9000 b
> 200 OK
In the server log you should see the following output:
11:54:19,868 WARN ThreadPoolTaskScheduler-1 sink.f:145 - a-foo
11:54:25,669 WARN ThreadPoolTaskScheduler-1 sink.b:145 - b-bar
For more information, please also consult the Spring IntegrationReference manual: http://static.springsource.org/spring-integration/reference/html/messaging-routing-chapter.html#router-namespace particularly the section "Routers and the Spring Expression Language(SpEL)".
Groovy-based Routing
Instead of SpEL expressions, Groovy scripts can also be used. Let’s create a Groovy script in the filesystem at "/my/path/router.groovy"
println("Groovy processing payload '" + payload +"'");
if (payload.contains('a')) {
return ":foo"
}
else {
return ":bar"
}
Now we create the following streams:
xd:>stream create f --definition ":foo > transform --expression=payload+'-foo' | log" --deploy
Created new stream 'f'
xd:>stream create b --definition ":bar > transform --expression=payload+'-bar' | log" --deploy
Created new stream 'b'
xd:>stream create g --definition "http | router --script='file:/my/path/router.groovy'" --deploy
Now post some data to the HTTP source:

Spring XD Guide
1.3.2.RELEASE Spring XD 169
xd:>http post --data "a"
> POST (text/plain;Charset=UTF-8) http://localhost:9000 a
> 200 OK
xd:>http post --data "b"
> POST (text/plain;Charset=UTF-8) http://localhost:9000 b
> 200 OK
In the server log you should see the following output:
Groovy processing payload 'a'
11:29:27,274 WARN ThreadPoolTaskScheduler-1 sink.f:145 - a-foo
Groovy processing payload 'b'
11:34:09,797 WARN ThreadPoolTaskScheduler-1 sink.b:145 - b-bar
Note
You can also use Groovy scripts located on your classpath by specifying:
--script='org/my/package/router.groovy'
If you want to pass variable values to your script, you can statically bind values using the variablesoption or optionally pass the path to a properties file containing the bindings using the propertiesLocationoption. All properties in the file will be made available to the script as variables. You may specify bothvariables and propertiesLocation, in which case any duplicate values provided as variables overridevalues provided in propertiesLocation. Note that payload and headers are implicitly bound to give youaccess to the data contained in a message.
For more information, see the Spring Integration Reference manual: "Groovy support" http://static.springsource.org/spring-integration/reference/html/messaging-endpoints-chapter.html#groovy
Options
The router sink has the following options:
expressiona SpEL expression used to transform messages (String, default: payload.toString())
propertiesLocationthe path of a properties file containing custom script variable bindings (String, no default)
refreshDelayhow often to check (in milliseconds) whether the script has changed; -1 for never (long, default:60000)
scriptreference to a script used to process messages (String, no default)
variablesvariable bindings as a comma delimited string of name-value pairs, e.g., 'foo=bar,baz=car' (String,no default)
Tip
If the script option is set, the script file’s modified timestamp is checked for changes every60 seconds by default; this can be changed with the refreshDelay deployment property:
Spring XD Guide
1.3.2.RELEASE Spring XD 170
--refreshDelay=30000 (every 30 seconds or 30,000ms), --refreshDelay=-1 to disablerefresh.
13.2 File Sink (file)
Another simple option is to stream data to a file on the host OS. This can be done using the file sinkmodule to create a stream.
xd:> stream create --name myfilestream --definition "http --port=8000 | file" --deploy
We’ve used the http source again, so run the following command to send a message
xd:> http post --target http://localhost:8000 --data "hello"
The file sink uses the stream name as the default name for the file it creates, and places the file inthe /tmp/xd/output/ directory.
$ less /tmp/xd/output/myfilestream
hello
You can cutomize the behavior and specify the name and dir options of the output file. For example
xd:> stream create --name otherfilestream --definition "http --port=8000 | file --name=myfile --dir=/
some/custom/directory" --deploy
To set the filename from a SpEL expression (e.g. headers[file_name]), you can use thenameExpression option.
xd:> stream create --name myfilestream --definition "http --port=8000 | file --
nameExpression=payload.trim()" --deploy
If you run this command :
xd:> http post --target http://localhost:8000 --data "hello.txt"
It will take the payload of the message ("hello.txt"), as it’s defined previously with nameExpression,and use it as the filename. In this example, the filename is equal to the content of the file.
You can use dirExpression to specify the name of the directory that will contain the new file.
xd:> stream create --name myfilestream --definition "http --port=8000 | file --
nameExpression=payload.trim() --dirExpression='''/tmp/test/dir-'' + payload.trim()'" --deploy
If you run this command :
xd:> http post --target http://localhost:8000 --data "hello.txt"
For the filename, it will do the same thing as explained previously. For the directory name it will usethe content of the file (trimmed) concatenated with dir- (in that case : "/tmp/test/dir-hello.txt"). If thedestination directory does not exists, the respective destination directory and any non-existing parentdirectories are being created automatically.
When you use the nameExpression option you have to use the dirExpression option (not the diroption) to specify the destination directory name, even if it’s a simple string (e.g. 'mydir').
File with Options
The file sink has the following options:

Spring XD Guide
1.3.2.RELEASE Spring XD 171
binaryif false, will append a newline character at the end of each line (boolean, default: false)
charsetthe charset to use when writing a String payload (String, default: UTF-8)
dirthe directory in which files will be created (String, default: /tmp/xd/output/)
dirExpressionspring expression used to define directory name (String, no default)
modewhat to do if the file already exists (Mode, default: APPEND, possible values:APPEND,REPLACE,FAIL,IGNORE)
namefilename pattern to use (String, default: <stream name>)
nameExpressionspring expression used to define filename (String, no default)
suffixfilename extension to use (String, no default)
13.3 FTP Sink (ftp)
FTP sink is a simple option to push files to an FTP server from incoming messages.
It uses an ftp-outbound-adapter, therefore incoming messages could be either a java.io.Fileobject, a String (content of the file) or an array of bytes (file content as well).
To use this sink, you need a username and a password to login. Once you have this you can streamdata from, for instance, a file source to the ftp sink:
xd:> stream create --name mystream --definition "file | ftp --username=me --password=mypwd" --deploy
We use the file source, so create a file:
$ echo hello > /tmp/xd/input/mystream/test.txt
On the ftp server, you should see the file test.txt with the content hello.
To pass the filename to the module you can use the header file_name with the filename you wishto be used.
NOTE: By default Spring Integration will use o.s.i.file.DefaultFileNameGenerator if noneis specified. DefaultFileNameGenerator will determine the file name based on the value of thefile_name header (if it exists) in the MessageHeaders, or if the payload of the Message is alreadya java.io.File, then it will use the original name of that file.
FTP with Options
The ftp sink has the following options:

Spring XD Guide
1.3.2.RELEASE Spring XD 172
autoCreateDirremote directory must be auto created if it does not exist (boolean, default: true)
clientModeclient mode to use: 2 for passive mode and 0 for active mode (int, default: 0)
hostthe host name for the FTP server (String, default: localhost)
modewhat to do if the file already exists (Mode, default: REPLACE, possible values:APPEND,REPLACE,FAIL,IGNORE)
passwordthe password for the FTP connection (Password, no default)
portthe port for the FTP server (int, default: 21)
remoteDirthe remote directory to transfer the files to (String, default: /)
remoteFileSeparatorfile separator to use on the remote side (String, default: /)
temporaryRemoteDirtemporary remote directory that should be used (String, default: /)
tmpFileSuffixextension to use on server side when uploading files (String, default: .tmp)
useTemporaryFilenameuse a temporary filename while transferring the file and rename it to its final name once it's fullytransferred (boolean, default: true)
usernamethe username for the FTP connection (String, no default)
13.4 GemFire Server
Currently XD supports GemFire’s client-server topology. A sink that writes data to a GemFire cacherequires at least one cache server to be running in a separate process and may also be configured touse a Locator. While Gemfire configuration is outside of the scope of this document, details are coveredin the GemFire Product documentation. The XD distribution includes a standalone GemFire serverexecutable suitable for development and test purposes and bootstrapped using a Spring configurationfile provided as a command line argument. The GemFire jar is distributed freely under GemFire’sdevelopment license and is subject to the license’s terms and conditions. Sink modules provided withthe XD distrubution that write data to GemFire create a client cache and client region. No data is cachedon the client.
Tip
If native gemfire properties are required to configure the client cache, e.g., for security, place agemfire.properties file in $XD_HOME/config.

Spring XD Guide
1.3.2.RELEASE Spring XD 173
Launching the XD GemFire Server
To start the GemFire cache server GemFire Server included in the Spring XD distribution, go to theXD install directory:
$cd gemfire/bin
$./gemfire-server ../config/cq-demo.xml
The command line argument is the path of a Spring Data Gemfire configuration file with includinga configured cache server and one or more regions. A sample cache configuration is provided cq-demo.xml located in the config directory. Note that Spring interprets the path as a relative path unlessit is explicitly preceded by file:. The sample configuration starts a server on port 40404 and createsa region named Stocks.
Gemfire sinks
There are 2 implementations of the gemfire sink: gemfire-server and gemfire-json-server.They are identical except the latter converts JSON string payloads to a JSON document formatproprietary to GemFire and provides JSON field access and query capabilities. If you are not usingJSON, the gemfire-server module will write the payload using java serialization to the configured region.Both modules accept the same options.
The gemfire-server sink has the following options:
hosthost name of the cache server or locator (if useLocator=true). May be a comma delimited list (String,no default)
keyExpressiona SpEL expression which is evaluated to create a cache key (String, default: '<stream name>')
portport of the cache server or locator (if useLocator=true). May be a comma delimited list (String, nodefault)
regionNamename of the region to use when storing data (String, default: <stream name>)
useLocatorindicates whether a locator is used to access the cache server (boolean, default: false)
Tip
The keyExpression, as its name suggests, is a SpEL. Typically, the key value is derived fromthe payload. The default of '<streamname>' (mind the quotes), will overwrite the same entryfor every message received on the stream.
Note
The useLocator option is intended for integration with an existing GemFire installation in whichthe cache servers are configured to use locators in accordance with best practice. GemFiresupports configuration of multiple locators (or direct server connections) and this is specified bysupplying comma-delimited values for the host and port options. You may specify a single value
Spring XD Guide
1.3.2.RELEASE Spring XD 174
for either of these options otherwise each value must contain the same size list. The following areexamples are valid for multiple connection addresses:
gemfire-server --host=myhost --port=10334,10335
gemfire server --host=myhost1,myhost2 --port=10334
gemfire server --host=myhost1,myhost2,myhost3 --port=10334,10335,10336
The last example creates connections to myhost1:10334, myhost2:10335, myhost3:10336
Note
You may also configure default Gemfire connection settings for all gemfire modules in config\modules.yml:
gemfire:
useLocator: true
host: myhost1,myhost2
port: 10334
Example
Suppose we have a JSON document containing a stock price:
{"symbol":"FAKE", "price":73}
We want this to be cached using the stock symbol as the key. The stream definition is:
http | gemfire-json-server --regionName=Stocks --keyExpression=payload.getField('symbol')
The keyExpression is a SpEL expression that depends on the payload type. In this case,com.gemstone.org.json.JSONObject. JSONObject which provides the getField method. To run thisexample:
xd:> stream create --name stocks --definition "http --port=9090 | gemfire-json-server --
regionName=Stocks --keyExpression=payload.getField('symbol')" --deploy
xd:> http post --target http://localhost:9090 --data {"symbol":"FAKE","price":73}
This will write an entry to the GemFire Stocks region with the key FAKE. Please do not put spaces whenseparating the JSON key-value pairs, only a comma.
You should see a message on STDOUT for the process running the GemFire server like:
INFO [LoggingCacheListener] - updated entry FAKE
Tip
If you are deploying on Java 7 or earlier and need to deploy more than 4 Gemfire modules, be sureto increase the permsize of the singlenode or container. i.e. JAVA_OPTS="-XX:PermSize=256m".
13.5 GPFDIST
The gpfdist sink allows you to stream data in parallel to either Pivotal Greenplum DB or Pivotal HAWQ.Internally, this sink creates a custom http listener that supports the gpfdist protcol and schedules atask that orchestrates a gploadd session in the same way it is done natively in Greenplum.

Spring XD Guide
1.3.2.RELEASE Spring XD 175
No data is written into temporary files and all data is kept in stream buffers waiting to get inserted intoGreenplum DB or HAWQ. If there are no existing load sessions from Greenplum, the sink will block untilsuch sessions are established.
Example usage
The load-generator-gpfdist source can be used to send dummy test data to the gpfdist sink.
Using psql, create the following table with a simple schema that matches the data produced by theload-generator-string source, two integer values, a producer ID and a timestamp separated bya tab.
create table xdsink (date integer, time integer) distributed randomly;
Now create the stream definition and deploy. You should ensure that your pg_hba.conf (e.g. /data/master/gpsne-1/pg_hba.conf) is configured to allow a connection from your host where you are runningthe gpfdist sink. (an entry such as host all gpadmin 192.168.70.128/32 trust)
xd:>stream create --name gpfdiststream --definition "load-generator-gpfdist --messageCount=10000000 --
producers=1 --recordType=counter | gpfdist --dbHost=192.168.70.138 --table=xdsink --batchTimeout=5 --
batchCount=1000 --batchPeriod=0 --flushCount=200 --flushTime=2 --rateInterval=1000000" --deploy
Created and deployed new stream 'gpfdiststream'
In this XD stream we send 10M messages from the load-generator-string source to the gpfdistsink. We roughly keep load session alive for 5 seconds while flushing data after 2s or 200 entries whichever comes first and sleep 0s in between load sessions.
You will see log output (you will probably need to set the log level of the packagelog4j.logger.org.springframework.xd.greenplum to INFO.)
2015-05-14 22:48:23,669 1.2.0.SNAP INFO pool-14-thread-1 gpfdist.GPFDistMessageHandler - METER: 1
minute rate = 200000.0 mean rate = 269618.7284878825
2015-05-14 22:48:25,495 1.2.0.SNAP INFO sqlTaskScheduler-1 support.CleanableJdbcOperations - DROP
EXTERNAL TABLE xdsink_ext_fabcf3bb_c514_49ca_bfd6_cacb009463dc
2015-05-14 22:48:25,498 1.2.0.SNAP INFO sqlTaskScheduler-1 support.CleanableJdbcOperations - CREATE
READABLE EXTERNAL TABLE xdsink_ext_ae89e85d_eb65_4e11_ad72_4b8302086ebd ( LIKE xdsink ) LOCAT
gpfdist sink currently contains a throughput meter for this POC to get perf numbers. In this case it isshowing about 270K/sec messages per second to be transferred from XD into Greenplum.
In previous example we did a simple inserts into a table. Let’s see how we can update data in a table.Create a simple table xdsink2 with three text columns and insert some data.
create table xdsink2 (col1 text, col2 text, col3 text);
insert into xdsink2 values ('DATA1', 'DATA', 'DATA');
insert into xdsink2 values ('DATA2', 'DATA', 'DATA');
insert into xdsink2 values ('DATA3', 'DATA', 'DATA');
We’d have different data in col1 which is used to match data to be updated.
# select * from xdsink2;
col1 | col2 | col3
-------+------+------
DATA3 | DATA | DATA
DATA2 | DATA | DATA
DATA1 | DATA | DATA
Let’s create a stream which will update table xdsink2 by matching a column col1 and updates columnscol2 and col3.
Spring XD Guide
1.3.2.RELEASE Spring XD 176
xd:>stream create --name gpfdiststream2 --definition "http|gpfdist --mode=UPDATE --table=xdsink2 --
dbHost=mdw --columnDelimiter=',' --matchColumns=col1 --updateColumns=col2,col3" --deploy
Post some data into a stream which will be passed into a gpfdist sink via http source.
xd:>http post --data "DATA1,DATA1,DATA1"
If you query table again, you’ll see that row for DATA1 has been updated.
# select * from xdsink2;
col1 | col2 | col3
-------+-------+-------
DATA3 | DATA | DATA
DATA2 | DATA | DATA
DATA1 | DATA1 | DATA1
Performance Notes
On a Lenovo W540, Spring XD singlenode, load-generator-string | gpfdist inserted data at~ 540K/sec. The underlying message handler in the gpfdist sink is able to achieve ~1.2M/sec, whichis comprable to the use of the native gpload client. Additional performance optimizations when usedwithin an XD stream are on the roadmap.
Implementation Notes
Within a gpfdist sink we have a Reactor based stream where data is published from the incomingSI channel. This channel receives data from the Message Bus. The Reactor stream is then connectedto Netty based http channel adapters so that when a new http connection is established, the Reactorstream is flushed and balanced among existing http clients. When Greenplum does a load from anexternal table, each segment will initiate a http connection and start loading data. The net effect is thatincoming data is automatically spread among the Greenplum segments.
GPFDIST with Options
The options flushCount and flushTime are used to determine when to flush data that is bufferedin an internal Reactor stream to the http connection. Data is flushed based on if the count value hasbeen reached or the time specified has elapsed. Note that with too high a value, memory consumptionwill go up. Too small a value combined with a low ingestion rate will result in data being inserted intothe database less frequently.
batchCount defines the maximum count of aggregated windows the client takes before the internalReactor stream and http channel is closed.
batchTimeout defines how many seconds each http connection should be kept alive if no data isstreamed to a client. Use this together with batchCount to estimate how long each loading sessionshould last.
batchPeriod defines how many seconds a task running load operation should sleep in between aloads.
mode defines a database load logic which is either INSERT or UPDATE. INSERT is a default mode.Similar to control file GPLOAD.OUTPUT.MODE property. MERGE is not currently supported.
columnDelimiter defines a data delimiter character within a line of data. Defaults to tabulatorcharacter. Similar to control file GPLOAD.SOURCE.DELIMITER property.

Spring XD Guide
1.3.2.RELEASE Spring XD 177
updateColumns defines updated column names and required with mode UPDATE. Similar to controlfile GPLOAD.OUTPUT.UPDATE_COLUMNS property.
matchColumns defines matched column names and required with mode UPDATE. Similar to controlfile GPLOAD.OUTPUT.MATCH_COLUMNS property.
sqlBefore defines a simple sql clause to be run before of every load operation. Similar to control fileGPLOAD.SQL.BEFORE property.
sqlAfter defines a simple sql clause to be run after of every load operation. Similar to control fileGPLOAD.SQL.AFTER property.
delimiter is used to postfix incoming data with a line termination because Greenplum expects lineterminated data.
controlFile can be used to introduce more parameters for a load operation. For simple use cases,the table property can be used.
rateInterval if set, enables rate logging passing through sink.
The gpfdist sink has the following options:
batchCountbatch count (int, default: 100)
batchPeriodbatch period (int, default: 10)
batchTimeoutbatch timeout (int, default: 4)
columnDelimitercolumn delimiter (Character, no default)
controlFilepath to yaml control file (String, no default)
dbHostdatabase host (String, default: localhost)
dbNamedatabase name (String, default: gpadmin)
dbPassworddatabase password (String, default: gpadmin)
dbPortdatabase port (int, default: 5432)
dbUserdatabase user (String, default: gpadmin)
delimiterdata line delimiter (String, default: ` `)
flushCountflush item count (int, default: 100)

Spring XD Guide
1.3.2.RELEASE Spring XD 178
flushTimeflush item time (int, default: 2)
matchColumnsmatch columns with update (String, no default)
modemode, either insert or update (String, no default)
portgpfdist listen port (int, default: 0)
rateIntervalenable transfer rate interval (int, default: 0)
sqlAftersql to run after load (String, no default)
sqlBeforesql to run before load (String, no default)
tabletarget database table (String, no default)
updateColumnsupdate columns with update (String, no default)
13.6 Cassandra
The Cassandra sink write into a Cassandra table. Here is a simple example
xd:>stream create cassandraTest --definition "http | cassandra --initScript=file:<absolut-path-to>/int-
db.cql --ingestQuery='insert into book (isbn, title, author) values (uuid(), ?, ?)'" --deploy
Where int-db.cql looks like:
DROP TABLE IF EXISTS book;
CREATE TABLE book (
isbn uuid PRIMARY KEY,
author text,
instock boolean,
pages int,
saledate timestamp,
title text
);
You can then send data to this stream via
xd:>http post --data "{\"title\": \"The Art of War\", \"author\": \"Sun Tzu\"}" --target http://
localhost:9000
and see the table contents using the CQL
SELECT * FROM cassandratest.book;
Another Insert example using a domain Book object is

Spring XD Guide
1.3.2.RELEASE Spring XD 179
xd:>stream create cassandraTest2 --definition "http | transform --expression='new
org.springframework.xd.test.domain.Book(T(java.util.UUID).randomUUID(), #jsonPath(payload, \"$.title
\"), #jsonPath(payload, \"$.author\"))' | cassandra --keyspace=cassandraTest" --deploy
http post --data "{\"title\": \"The Art of War\", \"author\": \"Sun Tzu\"}" --target http://
localhost:9000
You must place your domain object into the xd/lib directory, since some Spring Data comons classesare in the xd/lib directory and loaded into root classpath, not the module’s classpath.
The cassandra sink has the following options:
compressionTypethe compression to use for the transport (CompressionType, default: NONE, possible values:NONE,SNAPPY)
consistencyLevelthe consistencyLevel option of WriteOptions (ConsistencyLevel, no default, possible values:ANY,ONE,TWO,THREE,QUOROM,LOCAL_QUOROM,EACH_QUOROM,ALL,LOCAL_ONE,SERIAL,LOCAL_SERIAL)
contactPointsthe comma-delimited string of the hosts to connect to Cassandra (String, default: localhost)
entityBasePackagesthe base packages to scan for entities annotated with Table annotations (String[], default: [])
ingestQuerythe ingest Cassandra query (String, no default)
initScriptthe path to file with CQL scripts (delimited by ';') to initialize keyspace schema (String, no default)
keyspacethe keyspace name to connect to (String, default: <stream name>)
metricsEnabledenable/disable metrics collection for the created cluster (boolean, default: true)
passwordthe password for connection (String, no default)
portthe port to use to connect to the Cassandra host (int, default: 9042)
queryTypethe queryType for Cassandra Sink (Type, default: INSERT, possible values:INSERT,UPDATE,DELETE,STATEMENT)
retryPolicythe retryPolicy option of WriteOptions (RetryPolicy, no default, possible values:DEFAULT,DOWNGRADING_CONSISTENCY,FALLTHROUGH,LOGGING)
statementExpressionthe expression in Cassandra query DSL style (String, no default)
ttlthe time-to-live option of WriteOptions (int, default: 0)

Spring XD Guide
1.3.2.RELEASE Spring XD 180
usernamethe username for connection (String, no default)
13.7 Hadoop (HDFS) (hdfs)
If you do not have Hadoop installed, you can install Hadoop as described in our separate guide. SpringXD supports 4 Hadoop distributions, see using Hadoop for more information on how to start Spring XDto target a specific distribution.
Once Hadoop is up and running, you can then use the hdfs sink when creating a stream
xd:> stream create --name myhdfsstream1 --definition "time | hdfs" --deploy
In the above example, we’ve scheduled time source to automatically send ticks to hdfs once in everysecond. If you wait a little while for data to accumuluate you can then list can then list the files in thehadoop filesystem using the shell’s built in hadoop fs commands. Before making any access to HDFS inthe shell you first need to configure the shell to point to your name node. This is done using the hadoopconfig command.
xd:>hadoop config fs --namenode hdfs://localhost:8020
In this example the hdfs protocol is used but you may also use the webhdfs protocol. Listing the contentsin the output directory (named by default after the stream name) is done by issuing the followingcommand.
xd:>hadoop fs ls /xd/myhdfsstream1
Found 1 items
-rw-r--r-- 3 jvalkealahti supergroup 0 2013-12-18 18:10 /xd/myhdfsstream1/
myhdfsstream1-0.txt.tmp
While the file is being written to it will have the tmp suffix. When the data written exceeds the rolloversize (default 1GB) it will be renamed to remove the tmp suffix. There are several options to control the inuse file file naming options. These are --inUsePrefix and --inUseSuffix set the file name prefixand suffix respectfully.
When you destroy a stream
xd:>stream destroy --name myhdfsstream1
and list the stream directory again, in use file suffix doesn’t exist anymore.
xd:>hadoop fs ls /xd/myhdfsstream1
Found 1 items
-rw-r--r-- 3 jvalkealahti supergroup 380 2013-12-18 18:10 /xd/myhdfsstream1/myhdfsstream1-0.txt
To list the list the contents of a file directly from a shell execute the hadoop cat command.
xd:> hadoop fs cat /xd/myhdfsstream1/myhdfsstream1-0.txt
2013-12-18 18:10:07
2013-12-18 18:10:08
2013-12-18 18:10:09
...
In the above examples we didn’t yet go through why the file was written in a specific directory andwhy it was named in this specific way. Default location of a file is defined as /xd/<stream name>/<stream name>-<rolling part>.txt. These can be changed using options --directory and--fileName respectively. Example is shown below.

Spring XD Guide
1.3.2.RELEASE Spring XD 181
xd:>stream create --name myhdfsstream2 --definition "time | hdfs --directory=/xd/tmp --fileName=data" --
deploy
xd:>stream destroy --name myhdfsstream2
xd:>hadoop fs ls /xd/tmp
Found 1 items
-rw-r--r-- 3 jvalkealahti supergroup 120 2013-12-18 18:31 /xd/tmp/data-0.txt
It is also possible to control the size of a files written into HDFS. The --rollover option can be usedto control when file currently being written is rolled over and a new file opened by providing the rolloversize in bytes, kilobytes, megatypes, gigabytes, and terabytes.
xd:>stream create --name myhdfsstream3 --definition "time | hdfs --rollover=100" --deploy
xd:>stream destroy --name myhdfsstream3
xd:>hadoop fs ls /xd/myhdfsstream3
Found 3 items
-rw-r--r-- 3 jvalkealahti supergroup 100 2013-12-18 18:41 /xd/myhdfsstream3/myhdfsstream3-0.txt
-rw-r--r-- 3 jvalkealahti supergroup 100 2013-12-18 18:41 /xd/myhdfsstream3/myhdfsstream3-1.txt
-rw-r--r-- 3 jvalkealahti supergroup 100 2013-12-18 18:41 /xd/myhdfsstream3/myhdfsstream3-2.txt
Shortcuts to specify sizes other than bytes are written as --rollover=64M, --rollover=512G or--rollover=1T.
The stream can also be compressed during the write operation. Example of this is shown below.
xd:>stream create --name myhdfsstream4 --definition "time | hdfs --codec=gzip" --deploy
xd:>stream destroy --name myhdfsstream4
xd:>hadoop fs ls /xd/myhdfsstream4
Found 1 items
-rw-r--r-- 3 jvalkealahti supergroup 80 2013-12-18 18:48 /xd/myhdfsstream4/
myhdfsstream4-0.txt.gzip
From a native os shell we can use hadoop’s fs commands and pipe data into gunzip.
# bin/hadoop fs -cat /xd/myhdfsstream4/myhdfsstream4-0.txt.gzip | gunzip
2013-12-18 18:48:10
2013-12-18 18:48:11
...
Often a stream of data may not have a high enough rate to roll over files frequently, leaving the file inan opened state. This prevents users from reading a consistent set of data when running mapreducejobs. While one can alleviate this problem by using a small rollover value, a better way is to use theidleTimeout option that will automatically close the file if there was no writes during the specifiedperiod of time. This feature is also useful in cases where burst of data is written into a stream and you’dlike that data to become visible in HDFS.
Note
The idleTimeout value should not exceed the timeout values set on theHadoop cluster. These are typically configured using the dfs.socket.timeout and/ordfs.datanode.socket.write.timeout properties in the hdfs-site.xml configurationfile.
xd:> stream create --name myhdfsstream5 --definition "http --port=8000 | hdfs --rollover=20 --
idleTimeout=10000" --deploy
In the above example we changed a source to http order to control what we write into a hdfs sink.We defined a small rollover size and a timeout of 10 seconds. Now we can simply post data into thisstream via source end point using a below command.

Spring XD Guide
1.3.2.RELEASE Spring XD 182
xd:> http post --target http://localhost:8000 --data "hello"
If we repeat the command very quickly and then wait for the timeout we should be able to see that somefiles are closed before rollover size was met and some were simply rolled because of a rollover size.
xd:>hadoop fs ls /xd/myhdfsstream5
Found 4 items
-rw-r--r-- 3 jvalkealahti supergroup 12 2013-12-18 19:02 /xd/myhdfsstream5/myhdfsstream5-0.txt
-rw-r--r-- 3 jvalkealahti supergroup 24 2013-12-18 19:03 /xd/myhdfsstream5/myhdfsstream5-1.txt
-rw-r--r-- 3 jvalkealahti supergroup 24 2013-12-18 19:03 /xd/myhdfsstream5/myhdfsstream5-2.txt
-rw-r--r-- 3 jvalkealahti supergroup 18 2013-12-18 19:03 /xd/myhdfsstream5/myhdfsstream5-3.txt
Files can be automatically partitioned using a partitionPath expression. If we create a stream withidleTimeout and partitionPath with simple format yyyy/MM/dd/HH/mm we should see writesending into its own files within every minute boundary.
xd:>stream create --name myhdfsstream6 --definition "time|hdfs --idleTimeout=10000 --
partitionPath=dateFormat('yyyy/MM/dd/HH/mm')" --deploy
Let a stream run for a short period of time and list files.
xd:>hadoop fs ls --recursive true --dir /xd/myhdfsstream6
drwxr-xr-x - jvalkealahti supergroup 0 2014-05-28 09:42 /xd/myhdfsstream6/2014
drwxr-xr-x - jvalkealahti supergroup 0 2014-05-28 09:42 /xd/myhdfsstream6/2014/05
drwxr-xr-x - jvalkealahti supergroup 0 2014-05-28 09:42 /xd/myhdfsstream6/2014/05/28
drwxr-xr-x - jvalkealahti supergroup 0 2014-05-28 09:45 /xd/myhdfsstream6/2014/05/28/09
drwxr-xr-x - jvalkealahti supergroup 0 2014-05-28 09:43 /xd/myhdfsstream6/2014/05/28/09/42
-rw-r--r-- 3 jvalkealahti supergroup 140 2014-05-28 09:43 /xd/myhdfsstream6/2014/05/28/09/42/
myhdfsstream6-0.txt
drwxr-xr-x - jvalkealahti supergroup 0 2014-05-28 09:44 /xd/myhdfsstream6/2014/05/28/09/43
-rw-r--r-- 3 jvalkealahti supergroup 1200 2014-05-28 09:44 /xd/myhdfsstream6/2014/05/28/09/43/
myhdfsstream6-0.txt
drwxr-xr-x - jvalkealahti supergroup 0 2014-05-28 09:45 /xd/myhdfsstream6/2014/05/28/09/44
-rw-r--r-- 3 jvalkealahti supergroup 1200 2014-05-28 09:45 /xd/myhdfsstream6/2014/05/28/09/44/
myhdfsstream6-0.txt
Partitioning can also be based on defined lists. In a below example we simulate feeding data byusing a time and a transform elements. Data passed to hdfs sink has a content APP0:foobar,APP1:foobar, APP2:foobar or APP3:foobar.
xd:>stream create --name myhdfsstream7 --definition "time | transform --expression=
\"'APP'+T(Math).round(T(Math).random()*3)+':foobar'\" | hdfs --idleTimeout=10000 --
partitionPath=path(dateFormat('yyyy/MM/dd/HH'),list(payload.split(':')[0],{{'0TO1','APP0','APP1'},
{'2TO3','APP2','APP3'}}))" --deploy
Let the stream run few seconds, destroy it and check what got written in those partitioned files.

Spring XD Guide
1.3.2.RELEASE Spring XD 183
xd:>stream destroy --name myhdfsstream7
Destroyed stream 'myhdfsstream7'
xd:>hadoop fs ls --recursive true --dir /xd
drwxr-xr-x - jvalkealahti supergroup 0 2014-05-28 19:24 /xd/myhdfsstream7
drwxr-xr-x - jvalkealahti supergroup 0 2014-05-28 19:24 /xd/myhdfsstream7/2014
drwxr-xr-x - jvalkealahti supergroup 0 2014-05-28 19:24 /xd/myhdfsstream7/2014/05
drwxr-xr-x - jvalkealahti supergroup 0 2014-05-28 19:24 /xd/myhdfsstream7/2014/05/28
drwxr-xr-x - jvalkealahti supergroup 0 2014-05-28 19:24 /xd/myhdfsstream7/2014/05/28/19
drwxr-xr-x - jvalkealahti supergroup 0 2014-05-28 19:24 /xd/
myhdfsstream7/2014/05/28/19/0TO1_list
-rw-r--r-- 3 jvalkealahti supergroup 108 2014-05-28 19:24 /xd/
myhdfsstream7/2014/05/28/19/0TO1_list/myhdfsstream7-0.txt
drwxr-xr-x - jvalkealahti supergroup 0 2014-05-28 19:24 /xd/
myhdfsstream7/2014/05/28/19/2TO3_list
-rw-r--r-- 3 jvalkealahti supergroup 180 2014-05-28 19:24 /xd/
myhdfsstream7/2014/05/28/19/2TO3_list/myhdfsstream7-0.txt
xd:>hadoop fs cat /xd/myhdfsstream7/2014/05/28/19/0TO1_list/myhdfsstream7-0.txt
APP1:foobar
APP1:foobar
APP0:foobar
APP0:foobar
APP1:foobar
Partitioning can also be based on defined ranges. In a below example we simulate feeding data by usinga time and a transform elements. Data passed to hdfs sink has a content ranging from APP0 toAPP15. We simple parse the number part and use it to do a partition with ranges {3,5,10}.
xd:>stream create --name myhdfsstream8 --definition "time | transform --expression=
\"'APP'+T(Math).round(T(Math).random()*15)\" | hdfs --idleTimeout=10000 --
partitionPath=path(dateFormat('yyyy/MM/dd/HH'),range(T(Integer).parseInt(payload.substring(3)),
{3,5,10}))" --deploy
Let the stream run few seconds, destroy it and check what got written in those partitioned files.
xd:>stream destroy --name myhdfsstream8
Destroyed stream 'myhdfsstream8'
xd:>hadoop fs ls --recursive true --dir /xd
drwxr-xr-x - jvalkealahti supergroup 0 2014-05-28 19:34 /xd/myhdfsstream8
drwxr-xr-x - jvalkealahti supergroup 0 2014-05-28 19:34 /xd/myhdfsstream8/2014
drwxr-xr-x - jvalkealahti supergroup 0 2014-05-28 19:34 /xd/myhdfsstream8/2014/05
drwxr-xr-x - jvalkealahti supergroup 0 2014-05-28 19:34 /xd/myhdfsstream8/2014/05/28
drwxr-xr-x - jvalkealahti supergroup 0 2014-05-28 19:34 /xd/myhdfsstream8/2014/05/28/19
drwxr-xr-x - jvalkealahti supergroup 0 2014-05-28 19:34 /xd/
myhdfsstream8/2014/05/28/19/10_range
-rw-r--r-- 3 jvalkealahti supergroup 16 2014-05-28 19:34 /xd/
myhdfsstream8/2014/05/28/19/10_range/myhdfsstream8-0.txt
drwxr-xr-x - jvalkealahti supergroup 0 2014-05-28 19:34 /xd/
myhdfsstream8/2014/05/28/19/3_range
-rw-r--r-- 3 jvalkealahti supergroup 35 2014-05-28 19:34 /xd/
myhdfsstream8/2014/05/28/19/3_range/myhdfsstream8-0.txt
drwxr-xr-x - jvalkealahti supergroup 0 2014-05-28 19:34 /xd/
myhdfsstream8/2014/05/28/19/5_range
-rw-r--r-- 3 jvalkealahti supergroup 5 2014-05-28 19:34 /xd/
myhdfsstream8/2014/05/28/19/5_range/myhdfsstream8-0.txt
xd:>hadoop fs cat /xd/myhdfsstream8/2014/05/28/19/3_range/myhdfsstream8-0.txt
APP3
APP3
APP1
APP0
APP1
xd:>hadoop fs cat /xd/myhdfsstream8/2014/05/28/19/5_range/myhdfsstream8-0.txt
APP4
xd:>hadoop fs cat /xd/myhdfsstream8/2014/05/28/19/10_range/myhdfsstream8-0.txt
APP6
APP15
APP7

Spring XD Guide
1.3.2.RELEASE Spring XD 184
Partition using a dateFormat can be based on content itself. This is a good use case if old log filesneeds to be processed where partitioning should happen based on timestamp of a log entry. We createa fake log data with a simple date string ranging from 1970-01-10 to 1970-01-13.
xd:>stream create --name myhdfsstream9 --definition "time | transform --expression=
\"'1970-01-'+1+T(Math).round(T(Math).random()*3)\" | hdfs --idleTimeout=10000 --
partitionPath=path(dateFormat('yyyy/MM/dd/HH',payload,'yyyy-MM-DD'))" --deploy
Let the stream run few seconds, destroy it and check what got written in those partitioned files. If yousee the partition paths, those are based on year 1970, not present year.
xd:>stream destroy --name myhdfsstream9
Destroyed stream 'myhdfsstream9'
xd:>hadoop fs ls --recursive true --dir /xd
drwxr-xr-x - jvalkealahti supergroup 0 2014-05-28 19:56 /xd/myhdfsstream9
drwxr-xr-x - jvalkealahti supergroup 0 2014-05-28 19:56 /xd/myhdfsstream9/1970
drwxr-xr-x - jvalkealahti supergroup 0 2014-05-28 19:56 /xd/myhdfsstream9/1970/01
drwxr-xr-x - jvalkealahti supergroup 0 2014-05-28 19:56 /xd/myhdfsstream9/1970/01/10
drwxr-xr-x - jvalkealahti supergroup 0 2014-05-28 19:57 /xd/myhdfsstream9/1970/01/10/00
-rw-r--r-- 3 jvalkealahti supergroup 44 2014-05-28 19:57 /xd/myhdfsstream9/1970/01/10/00/
myhdfsstream9-0.txt
drwxr-xr-x - jvalkealahti supergroup 0 2014-05-28 19:56 /xd/myhdfsstream9/1970/01/11
drwxr-xr-x - jvalkealahti supergroup 0 2014-05-28 19:57 /xd/myhdfsstream9/1970/01/11/00
-rw-r--r-- 3 jvalkealahti supergroup 99 2014-05-28 19:57 /xd/myhdfsstream9/1970/01/11/00/
myhdfsstream9-0.txt
drwxr-xr-x - jvalkealahti supergroup 0 2014-05-28 19:56 /xd/myhdfsstream9/1970/01/12
drwxr-xr-x - jvalkealahti supergroup 0 2014-05-28 19:57 /xd/myhdfsstream9/1970/01/12/00
-rw-r--r-- 3 jvalkealahti supergroup 44 2014-05-28 19:57 /xd/myhdfsstream9/1970/01/12/00/
myhdfsstream9-0.txt
drwxr-xr-x - jvalkealahti supergroup 0 2014-05-28 19:56 /xd/myhdfsstream9/1970/01/13
drwxr-xr-x - jvalkealahti supergroup 0 2014-05-28 19:57 /xd/myhdfsstream9/1970/01/13/00
-rw-r--r-- 3 jvalkealahti supergroup 55 2014-05-28 19:57 /xd/myhdfsstream9/1970/01/13/00/
myhdfsstream9-0.txt
xd:>hadoop fs cat /xd/myhdfsstream9/1970/01/10/00/myhdfsstream9-0.txt
1970-01-10
1970-01-10
1970-01-10
1970-01-10
HDFS with Options
The hdfs sink has the following options:
closeTimeouttimeout in ms, regardless of activity, after which file will be automatically closed (long, default: 0)
codeccompression codec alias name (gzip, snappy, bzip2, lzo, or slzo) (String, default: ``)
directorywhere to output the files in the Hadoop FileSystem (String, default: /xd/<stream name>)
enableSyncwhether writer will sync to datanode when flush is called, setting this to 'true' could impact throughput(boolean, default: false)
fileExtensionthe base filename extension to use for the created files (String, default: txt)
fileNamethe base filename to use for the created files (String, default: <stream name>)

Spring XD Guide
1.3.2.RELEASE Spring XD 185
fileOpenAttemptsmaximum number of file open attempts to find a path (int, default: 10)
fileUuidwhether file name should contain uuid (boolean, default: false)
flushTimeouttimeout in ms, regardless of activity, after which data written to file will be flushed (long, default: 0)
fsUrithe URI to use to access the Hadoop FileSystem (String, default: ${spring.hadoop.fsUri})
idleTimeoutinactivity timeout in ms after which file will be automatically closed (long, default: 0)
inUsePrefixprefix for files currently being written (String, default: ``)
inUseSuffixsuffix for files currently being written (String, default: .tmp)
overwritewhether writer is allowed to overwrite files in Hadoop FileSystem (boolean, default: false)
partitionPatha SpEL expression defining the partition path (String, default: ``)
rolloverthreshold in bytes when file will be automatically rolled over (String, default: 1G)
Note
In the context of the fileOpenAttempts option, attempt is either one rollover request or failedstream open request for a path (if another writer came up with a same path and already opened it).
Partition Path Expression
SpEL expression is evaluated against a Spring Messaging Message passed internally into a HDFSwriter. This allows expression to use headers and payload from that message. While you could do acustom processing within a stream and add custom headers, timestamp is always going to be there.Data to be written is then available in a payload.
Accessing Properties
Using a payload simply returns whatever is currently being written. Access to headers is viaheaders property. Any other property is automatically resolved from headers if found. For exampleheaders.timestamp is equivalent to timestamp.
Custom Methods
Addition to a normal SpEL functionality, few custom methods has been added to make it easier to buildpartition paths. These custom methods can be used to work with a normal partition concepts like dateformatting, lists, ranges and hashes.
Spring XD Guide
1.3.2.RELEASE Spring XD 186
path
path(String... paths)
Concatenates paths together with a delimiter /. This method can be used to make the expression lessverbose than using a native SpEL functionality to combine path parts together. To create a path part1/part2, expression 'part1' + '/' + 'part2' is equivalent to path('part1','part2').
Parameters
pathsAny number of path parts
Return Value. Concatenated value of paths delimited with /.
dateFormat
dateFormat(String pattern)
dateFormat(String pattern, Long epoch)
dateFormat(String pattern, Date date)
dateFormat(String pattern, String datestring)
dateFormat(String pattern, String datestring, String dateformat)
Creates a path using date formatting. Internally this method delegates into SimpleDateFormat andneeds a Date and a pattern. On default if no parameter used for conversion is given, timestampis expected. Effectively dateFormat('yyyy') equals to dateFormat('yyyy', timestamp) ordateFormat('yyyy', headers.timestamp).
Method signature with three parameters can be used to create a custom Date object which is thenpassed to SimpleDateFormat conversion using a dateformat pattern. This is useful in use caseswhere partition should be based on a date or time string found from a payload content itself. Defaultdateformat pattern if omitted is yyyy-MM-dd.
Parameters
patternPattern compatible with SimpleDateFormat to produce a final output.
epochTimestamp as Long which is converted into a Date.
dateA Date to be formatted.
dateformatSecondary pattern to convert datestring into a Date.
datestringDate as a String
Return Value. A path part representation which can be a simple file or directory name or a directorystructure.
list
list(Object source, List<List<Object>> lists)
Creates a partition path part by matching a source against a lists denoted by lists.

Spring XD Guide
1.3.2.RELEASE Spring XD 187
Lets assume that data is being written and it’s possible to extrace an appid
either from headers or payload. We can automatically do a list based partitionby using a partition method list(headers.appid,{{'1TO3','APP1','APP2','APP3'},
{'4TO6','APP4','APP5','APP6'}}). This method would create three partitions, 1TO3_list,4TO6_list and list. Latter is used if no match is found from partition lists passed to lists.
Parameters
sourceAn Object to be matched against lists.
listsA definition of list of lists.
Return Value. A path part prefixed with a matched key i.e. XXX_list or list if no match.
range
range(Object source, List<Object> list)
Creates a partition path part by matching a source against a list denoted by list using a simple binarysearch.
The partition method takes a source as first argument and list as a second argument. Behind thescenes this is using jvm’s binarySearch which works on an Object level so we can pass in anything.Remember that meaningful range match only works if passed in Object and types in list are of sametype like Integer. Range is defined by a binarySearch itself so mostly it is to match against an upperbound except the last range in a list. Having a list of {1000,3000,5000} means that everything above3000 will be matched with 5000. If that is an issue then simply adding Integer.MAX_VALUE as lastrange would overflow everything above 5000 into a new partition. Created partitions would then be1000_range, 3000_range and 5000_range.
Parameters
sourceAn Object to be matched against list.
listA definition of list.
Return Value. A path part prefixed with a matched key i.e. XXX_range.
hash
hash(Object source, int bucketcount)
Creates a partition path part by calculating hashkey using source`s hashCode and bucketcount.Using a partition method hash(timestamp,2) would then create partitions named 0_hash, 1_hashand 2_hash. Number suffixed with _hash is simply calculated using Object.hashCode() %
bucketcount.
Parameters
sourceAn Object which hashCode will be used.
bucketcountA number of buckets

Spring XD Guide
1.3.2.RELEASE Spring XD 188
Return Value. A path part prefixed with a hash key i.e. XXX_hash.
13.8 HDFS Dataset (Avro/Parquet) (hdfs-dataset)
The HDFS Dataset sink is used to store Java classes that are sent as the payload on the stream. It usesthe Kite SDK Data Module's Dataset implementation to store the payload data serialized in either Avroor Parquet format. The Avro schema is generated from the Java class that is persisted. For Parquet theJava object must follow JavaBean conventions with properties for any fields to be persisted. The fieldscan only be simple scalar values like Strings and numbers.
The HDFS Dataset sink requires that you have a Hadoop installation that is based on Hadoop v2(Hadoop 2.2.0, Pivotal HD 1.0, Cloudera CDH4 or Hortonworks HDP 2.0), see using Hadoop for moreinformation on how to start Spring XD to target a specific distribution.
Once Hadoop is up and running, you can then use the hdfs-dataset sink when creating a stream
xd:>stream create --name mydataset --definition "time | hdfs-dataset --batchSize=20" --deploy
In the above example, we’ve scheduled time source to automatically send ticks to the hdfs-datasetsink once every second. The data will be stored in a directory named /xd/<streamname> by default, soin this example it will be /xd/mydataset. You can change this by supplying a --basePath parameterand/or --namespace parameter. The --basePath defaults to /xd and the --namespace defaultsto <streamname>. The Avro format is used by default and the data files are stored in a sub-directorynamed after the payload Java class. In this example the stream payload is a String so the name ofthe data sub-directory is string. If you have multiple Java classes as payloads, each class will getits own sub-directory.
Let the stream run for a minute or so. You can then list the contents of the hadoop filesystem using theshell’s built in hadoop fs commands. You will first need to configure the shell to point to your name nodeusing the hadoop config command. We use the hdfs protocol is to access the hadoop name node.
xd:>hadoop config fs --namenode hdfs://localhost:8020
Then list the contents of the stream’s data directory.
xd:>hadoop fs ls /xd/mydataset/string
Found 3 items
drwxr-xr-x - trisberg supergroup 0 2013-12-19 12:23 /xd/mydataset/string/.metadata
-rw-r--r-- 3 trisberg supergroup 202 2013-12-19 12:23 /xd/mydataset/
string/1387473825754-63.avro
-rw-r--r-- 3 trisberg supergroup 216 2013-12-19 12:24 /xd/mydataset/
string/1387473846708-80.avro
You can see that the sink has created two files containing the first two batches of 20 stream payloadseach. There is also a .metadata directory created that contains the metadata that the Kite SDK Datasetimplementation uses as well as the generated Avro schema for the persisted type.
xd:>hadoop fs ls /xd/mydataset/string/.metadata
Found 2 items
-rw-r--r-- 3 trisberg supergroup 136 2013-12-19 12:23 /xd/mydataset/string/.metadata/
descriptor.properties
-rw-r--r-- 3 trisberg supergroup 8 2013-12-19 12:23 /xd/mydataset/string/.metadata/
schema.avsc
Now destroy the stream.
xd:>stream destroy --name mydataset

Spring XD Guide
1.3.2.RELEASE Spring XD 189
HDFS Dataset with Options
The hdfs-dataset sink has the following options:
allowNullValueswhether null property values are allowed, if set to true then schema will use UNION for each field(boolean, default: false)
basePaththe base directory path where the files will be written in the Hadoop FileSystem (String, default:/xd)
batchSizethreshold in number of messages when file will be automatically flushed and rolled over (long,default: 10000)
compressionTypecompression type name (snappy, deflate, bzip2 (avro only) or uncompressed) (String, default:snappy)
formatthe format to use, valid options are avro and parquet (String, default: avro)
fsUrithe URI to use to access the Hadoop FileSystem (String, default: ${spring.hadoop.fsUri})
idleTimeoutidle timeout in milliseconds when Hadoop file resource is automatically closed (long, default: -1)
namespacethe sub-directory under the basePath where files will be written (String, default: <stream name>)
partitionPaththe partition path strategy to use, a list of KiteSDK partition expressions separated by a '/' symbol(String, default: ``)
writerCacheSizethe size of the cache to be used for partition writers (10 if omitted) (int, default: -1)
About null values
If allowNullValues is set to true then each field in the generated schema will use a union of null andthe data type of the field. You can also set allowNullValues to false and instead annotate fields ina POJO using Avro’s org.apache.avro.reflect.Nullable annotation to create a schema usinga union with null for that annotated field.
About partitionPath
The partitionPath option lets you specify one or more paths that will be used to partition the filesthat the data is written to based on the content of the data. You can use any of the FieldPartitioners thatare available for the Kite SDK project. We simply pass in what is specified to create the correspondingpartition strategy. You can separate multiple paths with a / character. The following partitioning functionsare available:
• year, month, day, hour, minute creates partitions based on the value of a timestamp and createsdirectories named like "YEAR=2014" (works well with fields of datatype long)

Spring XD Guide
1.3.2.RELEASE Spring XD 190
• specify function plus field name like: year('timestamp')
• dateformat creates partitions based on a timestamp and a dateformat expression provided - createsdirectories based on the name provided (works well with fields of datatype long)
• specify function plus field name, a name for the partition and the date format like:dateFormat('timestamp', 'Y-M', 'yyyyMM')
• range creates partitions based on a field value and the upper bounds for each bucket that is specified(works well with fields of datatype int and string)
• specify function plus field name and the upper bounds for each partition bucketlike: range('age',20,50,80,T(Integer).MAX_VALUE) (Note that you can use SpELexpressions like we just did for the Integer.MAX_VALUE)
• identity creates partitions based on the exact value of a field (works well with fields of datatype string,long and int)
• specify function plus field name, a name for the partition, the type of the field (String or Integer) andthe number of values/buckets for the partition like: identity('region','R',T(String),10)
• hash creates partitions based on the hash calculated from the value of a field divided into a numberof buckets that is specified (works well with all data types)
• specify function plus field name and number of buckets like: hash('lastname',10)
Multiple expressions can be specified by separating them with a / like:identity('region','R',T(String),10)/year('timestamp')/month('timestamp')
13.9 JDBC
The JDBC sink can be used to insert message payload data into a relational database table. By defaultit inserts the entire payload into a table named after the stream name in the HSQLDB database that XDuses to store metadata for batch jobs. To alter this behavior, the jdbc sink accepts several options thatyou can pass using the --foo=bar notation in the stream, or change globally. There is also a config/init_db.sql file that contains the SQL statements used to initialize the database table. You can modifythis file if you’d like to create a table with your specific layout when the sink starts. You should alsochange the initializeDatabase property to true to have this script execute when the sink starts up.
The payload data will be inserted as-is if the names option is set to payload. This is the default behavior.If you specify any other column names the payload data will be assumed to be a JSON document thatwill be converted to a hash map. This hash map will be used to populate the data values for the SQLinsert statement. A matching of column names with underscores like user_name will match onto camelcase style keys like userName in the hash map. There will be one insert statement executed for eachmessage.
To create a stream using a jdbc sink relying on all defaults you would use a command like
xd:> stream create --name mydata --definition "time | jdbc --initializeDatabase=true" --deploy
This will insert the time messages into a payload column in a table named mydata. Since the defaultis using the XD batch metadata HSQLDB database we can connect to this database instance from anexternal tool. After we let the stream run for a little while, we can connect to the database and look atthe data stored in the database.

Spring XD Guide
1.3.2.RELEASE Spring XD 191
You can query the database with your favorite SQL tool using the following database URL:jdbc:hsqldb:hsql://localhost:9101/xdjob with sa as the user name and a blank password.You can also use the HSQL provided SQL Tool (download from HSQLDB) to run a quick query fromthe command line:
Note
If you access any database other than HSQLDB or Postgres in a stream module then the JDBCdriver jar for that database needs to be present in the $XD_HOME/lib directory.
$ java -cp ~/Downloads/hsqldb-2.3.0/hsqldb/lib/sqltool.jar org.hsqldb.cmdline.SqlTool --inlineRc
url=jdbc:hsqldb:hsql://localhost:9101/xdjob,user=sa,password= --sql "select payload from mydata;"
This should result in something similar to the following output:
2014-01-06 09:33:25
2014-01-06 09:33:26
2014-01-06 09:33:27
2014-01-06 09:33:28
2014-01-06 09:33:29
2014-01-06 09:33:30
2014-01-06 09:33:31
2014-01-06 09:33:32
2014-01-06 09:33:33
2014-01-06 09:33:34
2014-01-06 09:33:35
2014-01-06 09:33:36
2014-01-06 09:33:37
Now we can destroy the stream using:
xd:> stream destroy --name mydata
JDBC with Options
The jdbc sink has the following options:
abandonWhenPercentageFullconnections that have timed out wont get closed and reported up unless the number of connectionsin use are above the percentage (int, default: 0)
alternateUsernameAlloweduses an alternate user name if connection fails (boolean, default: false)
columnsthe database columns to map the data to (String, default: payload)
connectionPropertiesconnection properties that will be sent to our JDBC driver when establishing new connections(String, no default)
driverClassNamethe JDBC driver to use (String, no default)
fairQueueset to true if you wish that calls to getConnection should be treated fairly in a true FIFO fashion(boolean, default: true)

Spring XD Guide
1.3.2.RELEASE Spring XD 192
initSQLcustom query to be run when a connection is first created (String, no default)
initialSizeinitial number of connections that are created when the pool is started (int, default: 0)
initializeDatabasewhether the database initialization script should be run (boolean, default: false)
initializerScriptthe name of the SQL script (in /config) to run if 'initializeDatabase' is set (String, default:init_db.sql)
jdbcInterceptorssemicolon separated list of classnames extending org.apache.tomcat.jdbc.pool.JdbcInterceptor(String, no default)
jmxEnabledregister the pool with JMX or not (boolean, default: true)
logAbandonedflag to log stack traces for application code which abandoned a Connection (boolean, default:false)
maxActivemaximum number of active connections that can be allocated from this pool at the same time (int,default: 100)
maxAgetime in milliseconds to keep this connection (int, default: 0)
maxIdlemaximum number of connections that should be kept in the pool at all times (int, default: 100)
maxWaitmaximum number of milliseconds that the pool will wait for a connection (int, default: 30000)
minEvictableIdleTimeMillisminimum amount of time an object may sit idle in the pool before it is eligible for eviction (int, default:60000)
minIdleminimum number of established connections that should be kept in the pool at all times (int, default:10)
passwordthe JDBC password (Password, no default)
removeAbandonedflag to remove abandoned connections if they exceed the removeAbandonedTimout (boolean,default: false)
removeAbandonedTimeouttimeout in seconds before an abandoned connection can be removed (int, default: 60)
Spring XD Guide
1.3.2.RELEASE Spring XD 193
suspectTimeoutthis simply logs the warning after timeout, connection remains (int, default: 0)
tableNamethe database table to which the data will be written (String, default: <stream name>)
testOnBorrowindication of whether objects will be validated before being borrowed from the pool (boolean,default: false)
testOnReturnindication of whether objects will be validated before being returned to the pool (boolean, default:false)
testWhileIdleindication of whether objects will be validated by the idle object evictor (boolean, default: false)
timeBetweenEvictionRunsMillisnumber of milliseconds to sleep between runs of the idle connection validation/cleaner thread (int,default: 5000)
urlthe JDBC URL for the database (String, no default)
useEqualstrue if you wish the ProxyConnection class to use String.equals (boolean, default: true)
usernamethe JDBC username (String, no default)
validationIntervalavoid excess validation, only run validation at most at this frequency - time in milliseconds (long,default: 30000)
validationQuerysql query that will be used to validate connections from this pool (String, no default)
validatorClassNamename of a class which implements the org.apache.tomcat.jdbc.pool.Validator (String, no default)
Note
To include the whole message into a single column, use payload (the default) for the columnsoption
Tip
The connection pool settings for xd are located in servers.yml (i.e. spring.datasource.* )
13.10 Kafka Sink (kafka)
Kafka sink can be used to ingest data into a specific Kafka topic configuration.
For example,
Spring XD Guide
1.3.2.RELEASE Spring XD 194
xd:>stream create push-to-kafka --definition "http | kafka --topic=myTopic" --deploy
xd:>Created and deployed new stream 'push-to-kafka'
xd:>http post --data "push-messages"
> POST (text/plain;Charset=UTF-8) http://localhost:9000 push-messages
> 200 OK
Now, the posted messages will be available on kafka topic myTopic.
The kafka sink has the following options:
ackTimeoutOnServerthe maximum amount of time the server will wait for acknowledgments from followers to meet theacknowledgment requirements the producer has specified with the acks configuration (int, default:30000)
batchBytesbatch size in bytes, per partition (int, default: 16384)
blockOnBufferFullwhether to block or not when the memory buffer is full (boolean, default: true)
brokerListcomma separated broker list (String, default: localhost:9092)
bufferMemorythe total bytes of memory the producer can use to buffer records waiting to be sent to the server(int, default: 33554432)
compressionCodeccompression codec to use (String, default: none)
maxBufferTimethe amount of time, in ms that the producer will wait before sending a batch to the server (int,default: 0)
maxRequestSizethe maximum size of a request (int, default: 1048576)
maxSendRetriesnumber of attempts to automatically retry a failed send request (int, default: 3)
receiveBufferBytesthe size of the TCP receive buffer to use when reading data (int, default: 32768)
reconnectBackoffthe amount of time to wait before attempting to reconnect to a given host when a connection fails(long, default: 10)
requestRequiredAckproducer request acknowledgement mode (int, default: 0)
retryBackoffthe amount of time to wait before attempting to retry a failed produce request to a given topic partition(long, default: 100)
sendBufferBytesthe size of the TCP send buffer to use when sending data (int, default: 131072)

Spring XD Guide
1.3.2.RELEASE Spring XD 195
topickafka topic name (String, default: <stream name>)
topicMetadataFetchTimeoutthe maximum amount of time to block waiting for the metadata fetch to succeed (int, default: 60000)
topicMetadataRefreshIntervalthe period of time in milliseconds after which a refresh of metadata is forced (int, default: 300000)
13.11 Log
Probably the simplest option for a sink is just to log the data. The log sink uses the application loggerto output the data for inspection. The log level is set to WARN and the logger name is created from thestream name. To create a stream using a log sink you would use a command like
xd:> stream create --name mylogstream --definition "http --port=8000 | log" --deploy
You can then try adding some data. We’ve used the http source on port 8000 here, so run the followingcommand to send a message
xd:> http post --target http://localhost:8000 --data "hello"
and you should see the following output in the XD container console.
13/06/07 16:12:18 INFO sink.mylogstream: hello
The log sink has the following options:
expressionthe expression to be evaluated for the log content; use '#root' to log the full message (String,default: payload)
levelthe log level (String, default: INFO)
namethe name of the log category to log to (will be prefixed by 'xd.sink.') (String, default: <streamname>)
Here are some examples explaining the above options:
The logger name is the sink name prefixed with the string xd.sink.. The sink name is the same asthe stream name by default, but you can set it by passing the --name parameter
xd:> stream create --name myotherlogstream --definition "http --port=8001 | log --name=mylogger" --
deploy
The log level is INFO by default; this can be changed with the --level property (FATAL, ERROR, WARN,INFO, DEBUG, or TRACE)
xd:> stream create --name mylogstream --definition "http --port=8001 | log --level=WARN" --deploy
By default, the message payload is logged; this can be changed with the --expression property (e.g.payload.foo to log some property foo of the payload, or #root to log the entire message)
xd:> stream create --name mylogstream --definition "http --port=8001 | log --expression=#root" --deploy

Spring XD Guide
1.3.2.RELEASE Spring XD 196
13.12 Mail
The "mail" sink allows sending of messages as emails, leveraging Spring Integration mail-sendingchannel adapter. Please refer to Spring Integration documentation for the details, but in a nutshell, thesink is able to handle String, byte[] and MimeMessage messages out of the box.
Here is a simple example of how the mail module is used:
xd:> stream create mystream --definition "http | mail --to='\"[email protected]\"' --
host=your.imap.server --subject=payload+' world'" --deploy
Then,
xd:> http post --data Hello
You would then receive an email whose body contains "Hello" and whose subject is "Hellow world". Ofspecial attention here is the way you need to escape strings for most of the parameters, because they’reactually SpEL expressions (so here for example, we used a String literal for the to parameter).
The mail sink has the following options:
bccthe recipient(s) that should receive a blind carbon copy (SpEL) (String, default: null)
ccthe recipient(s) that should receive a carbon copy (SpEL) (String, default: null)
contentTypethe content type to use when sending the email (SpEL) (String, default: null)
fromthe primary recipient(s) of the email (SpEL) (String, default: null)
hostthe hostname of the mail server (String, default: localhost)
passwordthe password to use to connect to the mail server (String, no default)
portthe port of the mail server (int, default: 25)
replyTothe address that will become the recipient if the original recipient decides to "reply to" the email(SpEL) (String, default: null)
subjectthe email subject (SpEL) (String, default: null)
tothe primary recipient(s) of the email (SpEL) (String, default: null)
usernamethe username to use to connect to the mail server (String, no default)

Spring XD Guide
1.3.2.RELEASE Spring XD 197
13.13 Mongo
The Mongo sink writes into a Mongo collection. Here is a simple example
xd:>stream create --name attendees --definition "http | mongodb --databaseName=test --
collectionName=names" --deploy
Then,
xd:>http post --data {"firstName":"mark"}
In the mongo console you will see the document stored
> use test
switched to db test
> show collections
names
system.indexes
> db.names.find()
{ "_id" : ObjectId("53c93bc324ac76925a77b9df"), "firstName" : "mark" }
The mongodb sink has the following options:
authenticationDatabaseNamethe MongoDB authentication database used for connecting (String, default: ``)
collectionNamethe MongoDB collection to store (String, default: <stream name>)
databaseNamethe MongoDB database name (String, default: xd)
hostthe MongoDB host to connect to (String, default: localhost)
passwordthe MongoDB password used for connecting (String, default: ``)
portthe MongoDB port to connect to (int, default: 27017)
usernamethe MongoDB username used for connecting (String, default: ``)
writeConcernthe default MongoDB write concern to use (WriteConcern, default: SAFE, possible values:NONE,NORMAL,SAFE,FSYNC_SAFE,REPLICAS_SAFE,JOURNAL_SAFE,MAJORITY)
13.14 MQTT Sink (mqtt)
The mqtt sink connects to an mqtt server and publishes telemetry messages.
Options
The mqtt sink has the following options:
Spring XD Guide
1.3.2.RELEASE Spring XD 198
asyncwhether or not to use async sends (boolean, default: false)
charsetthe charset used to convert a String payload to byte[] (String, default: UTF-8)
cleanSessionwhether the client and server should remember state across restarts and reconnects (boolean,default: true)
clientIdidentifies the client (String, default: xd.mqtt.client.id.snk)
connectionTimeoutthe connection timeout in seconds (int, default: 30)
keepAliveIntervalthe ping interval in seconds (int, default: 60)
passwordthe password to use when connecting to the broker (String, default: guest)
persistence'memory' or 'file' (String, default: memory)
persistenceDirectoryfile location when using 'file' persistence (String, default: /tmp/paho)
qosthe quality of service to use (int, default: 1)
retainedwhether to set the 'retained' flag (boolean, default: false)
topicthe topic to which the sink will publish (String, default: xd.mqtt.test)
urllocation of the mqtt broker(s) (comma-delimited list) (String, default: tcp://localhost:1883)
usernamethe username to use when connecting to the broker (String, default: guest)
Note
The defaults are set up to connect to the RabbitMQ MQTT adapter on localhost.
13.15 Null Sink (null)
Null sink can be useful when the main stream isn’t focused on a specific destination but drives tapsused for analytics etc. It is also useful to iteratively add in steps to a stream without worrying aboutwhere the data will end up.
For example,

Spring XD Guide
1.3.2.RELEASE Spring XD 199
xd:>stream create nullStream --definition "http | null" --deploy
Created and deployed new stream 'nullStream'
xd:>stream create tap1 --definition "tap:stream:nullStream > counter" --deploy
Created and deployed new stream 'tap1'
In the above, the null sink can be useful as we can create as many number of tap streams off the mainstream while we set the main stream sink as null.
13.16 RabbitMQ
The "rabbit" sink enables outbound messaging over RabbitMQ.
The following example shows the default settings.
Configure a stream:
xd:> stream create --name rabbittest --definition "time --interval=3 | rabbit" --deploy
This sends the time, every 3 seconds to the default (no-name) Exchange for a RabbitMQ broker runningon localhost, port 5672.
The routing key will be the name of the stream by default; in this case: "rabbittest". Since the defaultExchange is a direct-exchange to which all Queues are bound with the Queue name as the binding key,all messages sent via this sink will be passed to a Queue named "rabbittest", if one exists. We do notcreate that Queue automatically. However, you can easily create a Queue using the RabbitMQ web UI.Then, using that same UI, you can navigate to the "rabbittest" Queue and click the "Get Message(s)"button to pop messages off of that Queue (you can choose whether to requeue those messages).
To destroy the stream, enter the following at the shell prompt:
xd:> stream destroy --name rabbittest
RabbitMQ with Options
The rabbit sink has the following options:
addressesa comma separated list of 'host[:port]' addresses (String, default:${spring.rabbitmq.addresses})
channelCacheSizethe channel cache size (String, default: ${spring.rabbitmq.channelCacheSize})
converterClassthe class name of the message converter (String, default:org.springframework.amqp.support.converter.SimpleMessageConverter)
deliveryModethe delivery mode (PERSISTENT, NON_PERSISTENT) (String, default: PERSISTENT)
exchangethe Exchange on the RabbitMQ broker to which messages should be sent (String, default: ``)
keyStorekeyStore location (if not using SSL properties) (String, default:${spring.rabbitmq.ssl.keyStore})

Spring XD Guide
1.3.2.RELEASE Spring XD 200
keyStorePassphrasekeyStore passphrase (if not using SSL properties) (String, default:${spring.rabbitmq.ssl.keyStorePassphrase})
mappedRequestHeadersrequest message header names to be propagated to/from the adpater/gateway (String, default:STANDARD_REQUEST_HEADERS)
passwordthe password to use to connect to the broker (String, default: ${spring.rabbitmq.password})
routingKeythe routing key to be passed with the message, as a SpEL expression (String, default: '<streamname>')
sslPropertiesLocationresource containing SSL properties (String, default: ${spring.rabbitmq.sslProperties})
trustStoretrustStore location (if not using SSL properties) (String, default:${spring.rabbitmq.ssl.trustStore})
trustStorePassphrasetrustStore passphrase (if not using SSL properties) (String, default:${spring.rabbitmq.ssl.trustStorePassphrase})
useSSLtrue if SSL should be used for the connection (String, default: ${spring.rabbitmq.useSSL})
usernamethe username to use to connect to the broker (String, default:${spring.rabbitmq.username})
vhostthe RabbitMQ virtual host to use (String, default: ${spring.rabbitmq.virtual_host})
Note
Please be aware that the routingKey option is actually a SpEL expression. Hence if a simple,constant, string literal is to be used, make sure to use something like this:
xd:> stream create rabbitSinkStream --definition "http | rabbit --routingKey='\"myqueue\"'" --
deploy
See the RabbitMQ MessageBus Documentation for more information about SSL configuration.
13.17 Redis
Redis sink can be used to ingest data into redis store. You can choose queue, topic or key withselcted collection type to point to a specific data store.
For example,
xd:>stream create store-into-redis --definition "http | redis --queue=myList" --deploy
xd:>Created and deployed new stream 'store-into-redis'

Spring XD Guide
1.3.2.RELEASE Spring XD 201
Options
The redis sink has the following options:
collectionTypethe collection type to use for the given key (CollectionType, default: LIST, possible values:LIST,SET,ZSET,MAP,PROPERTIES)
databasedatabase index used by the connection factory (int, default: 0)
hostnameredis host name (String, default: localhost)
keyname for the key (String, no default)
keyExpressiona SpEL expression to use for keyExpression (String, no default)
maxActivemax number of connections that can be allocated by the pool at a given time; negative value forno limit (int, default: 8)
maxIdlemax number of idle connections in the pool; a negative value indicates an unlimited number of idleconnections (int, default: 8)
maxWaitmax amount of time (in milliseconds) a connection allocation should block before throwing anexception when the pool is exhausted; negative value to block indefinitely (int, default: -1)
minIdletarget for the minimum number of idle connections to maintain in the pool; only has an effect if itis positive (int, default: 0)
passwordredis password (String, default: ``)
portredis port (int, default: 6379)
queuename for the queue (String, no default)
queueExpressiona SpEL expression to use for queue (String, no default)
sentinelMastername of Redis master server (String, default: ``)
sentinelNodescomma-separated list of host:port pairs (String, default: ``)

Spring XD Guide
1.3.2.RELEASE Spring XD 202
topicname for the topic (String, no default)
topicExpressiona SpEL expression to use for topic (String, no default)
13.18 Shell Sink (shell)
The shell sink forks an external process by running a shell command to launch a process written inany language. The process should implement a continual loop that waits for and consumes input fromstdin. The process will be destroyed when the stream is undeployed. For example, it is possible toinvoke a Python script within a stream in this manner. Since the shell sink relies on low-level streamprocessing there are some additional requirements:
• Input data is expected to be a String, the charset is configurable.
• Anything written to stderr will be logged as an ERROR in Spring XD but will not terminate the stream.
• All messages must be terminated using the configured encoder (CRLF or "\r\n" is the default) for themodule and must not exceed the configured bufferSize (see the detailed description of encodersin the TCP section).
• Any external software required to run the script must be installed on the container node to which themodule is deployed.
Here is a simple template for a Python script that consumes input:
#sink.py
import sys
while True:
try:
data = raw_input()
if data:
#insert a function call here, data is a string.
except EOFError:
break
Note
Spring XD provides additional Python programming support for handling basic stream processing,as shown above, see creating a Python module.
The shell sink has the following options:
bufferSizethe size of the buffer (bytes) to use when encoding/decoding (int, default: 2048)
charsetthe charset used when converting from String to bytes (String, default: UTF-8)
commandthe shell command (String, no default)
encoderthe encoder to use when sending messages (Encoding, default: CRLF, possible values:CRLF,LF,NULL,STXETX,RAW,L1,L2,L4)

Spring XD Guide
1.3.2.RELEASE Spring XD 203
environmentadditional process environment variables as comma delimited name-value pairs (String, nodefault)
redirectErrorStreamredirects stderr to stdout (boolean, default: false)
workingDirthe process working directory (String, no default)
13.19 Splunk Server (splunk)
A Splunk sink that writes data to a TCP Data Input type for Splunk.
Splunk sinks
The Splunk sink converts an object payload to a string using the object’s toString method and thenconverts this to a SplunkEvent that is sent via TCP to Splunk.
The splunk sink has the following options:
hostthe host name or IP address of the Splunk server (String, default: localhost)
ownerthe owner of the tcpPort (String, default: admin)
passwordthe password associated with the username (String, default: password)
portthe TCP port number of the Splunk server (int, default: 8089)
tcpPortthe TCP port number to where XD will send the data (int, default: 9500)
usernamethe login name that has rights to send data to the tcpPort (String, default: admin)
How To Setup Splunk for TCP Input
1. From the Manager page select Manage Inputs link
2. Click the Add data Button
3. Click the From a TCP port link
4. TCP Port enter the port you want Splunk to monitor
5. Set Source Type select Manual
6. Source Type enter tcp-raw
7. Click Save

Spring XD Guide
1.3.2.RELEASE Spring XD 204
Example
An example stream would be to take data from a twitter search and push it through to a splunk instance.
xd:> stream create --name springone2gx --definition "twittersearch --consumerKey= --consumerSecret= --
query='#LOTR' | splunk" --deploy
13.20 TCP Sink (tcp)
The TCP Sink provides for outbound messaging over TCP.
The following examples use netcat (linux) to receive the data; the equivalent on Mac OSX is nc.
First, start a netcat to receive the data, and background it
$ netcat -l 1234 &
Now, configure a stream
xd:> stream create --name tcptest --definition "time --fixedDelay=3 | tcp" --deploy
This sends the time, every 3 seconds to the default tcp Sink, which connects to port 1234 onlocalhost.
$ Thu May 30 10:28:21 EDT 2013
Thu May 30 10:28:24 EDT 2013
Thu May 30 10:28:27 EDT 2013
Thu May 30 10:28:30 EDT 2013
Thu May 30 10:28:33 EDT 2013
TCP is a streaming protocol and some mechanism is needed to frame messages on the wire. A numberof encoders are available, the default being CRLF.
Destroy the stream; netcat will terminate when the TCP Sink disconnects.
http://localhost:8080> stream destroy --name tcptest
TCP with Options
The tcp sink has the following options:
bufferSizethe size of the buffer (bytes) to use when encoding/decoding (int, default: 2048)
charsetthe charset used when converting from String to bytes (String, default: UTF-8)
closewhether to close the socket after each message (boolean, default: false)
encoderthe encoder to use when sending messages (Encoding, default: CRLF, possible values:CRLF,LF,NULL,STXETX,RAW,L1,L2,L4)
hostthe remote host to connect to (String, default: localhost)

Spring XD Guide
1.3.2.RELEASE Spring XD 205
niowhether or not to use NIO (boolean, default: false)
portthe port on the remote host to connect to (int, default: 1234)
reverseLookupperform a reverse DNS lookup on the remote IP Address (boolean, default: false)
socketTimeoutthe timeout (ms) before closing the socket when no data is received (int, default: 120000)
useDirectBufferswhether or not to use direct buffers (boolean, default: false)
Note
With the default retry configuration, the attempts will be made after 0, 2, 4, 8, and 16 seconds.
Available EncodersText Data
CRLF (default)text terminated by carriage return (0x0d) followed by line feed (0x0a)
LFtext terminated by line feed (0x0a)
NULLtext terminated by a null byte (0x00)
STXETXtext preceded by an STX (0x02) and terminated by an ETX (0x03)
Text and Binary Data
RAWno structure - the client indicates a complete message by closing the socket
L1data preceded by a one byte (unsigned) length field (supports up to 255 bytes)
L2data preceded by a two byte (unsigned) length field (up to 216-1 bytes)
L4data preceded by a four byte (signed) length field (up to 231-1 bytes)
An Additional Example
Start netcat in the background and redirect the output to a file foo
$ netcat -l 1235 > foo &
Create the stream, using the L4 encoder

Spring XD Guide
1.3.2.RELEASE Spring XD 206
xd:> stream create --name tcptest --definition "time --interval=3 | tcp --encoder=L4 --port=1235" --
deploy
Destroy the stream
http://localhost:8080> stream destroy --name tcptest
Check the output
$ hexdump -C foo
00000000 00 00 00 1c 54 68 75 20 4d 61 79 20 33 30 20 31 |....Thu May 30 1|
00000010 30 3a 34 37 3a 30 33 20 45 44 54 20 32 30 31 33 |0:47:03 EDT 2013|
00000020 00 00 00 1c 54 68 75 20 4d 61 79 20 33 30 20 31 |....Thu May 30 1|
00000030 30 3a 34 37 3a 30 36 20 45 44 54 20 32 30 31 33 |0:47:06 EDT 2013|
00000040 00 00 00 1c 54 68 75 20 4d 61 79 20 33 30 20 31 |....Thu May 30 1|
00000050 30 3a 34 37 3a 30 39 20 45 44 54 20 32 30 31 33 |0:47:09 EDT 2013|
Note the 4 byte length field preceding the data generated by the L4 encoder.

Spring XD Guide
1.3.2.RELEASE Spring XD 207
14. Counters and Gauges
Counter and Gauges are analytical data structures collectively referred to as metrics. Metrics can beused directly in place of a sink just as if you were creating any other stream, but you can also analyzedata from an existing stream using a tap. We’ll look at some examples of using metrics with taps in thefollowing sections. As a prerequisite start the XD Container as instructed in the Getting Started page.
The following types of metrics are available
• Counter
• Field Value Counter
• Aggregate Counter
• Gauge
• Rich Gauge
Spring XD supports these metrics and analytical data structures as a general purpose class librarythat works with several backend storage technologies. The 1.0 release provides in memory and Redisimplementations.
Tip
As of Spring XD 1.2 you can now create data visualizations for the various counters and gaugesusing the Admin UI. Please see the Admin UI Analytics Chapter for more details.
14.1 Counter
A counter is a Metric that associates a unique name with a long value. It is primarily used for countingevents triggered by incoming messages on a target stream. You create a counter with a uniquename and optionally an initial value then set its value in response to incoming messages. The moststraightforward use for counter is simply to count messages coming into the target stream. That is, itsvalue is incremented on every message. This is exactly what the counter module provided by SpringXD does.
Here’s an example:
Start by creating a data ingestion stream. Something like:
xd:> stream create --name springtweets --definition "twittersearch --consumerKey=<your_key> --
consumerSecret=<your_secret> --query=spring | file --dir=/tweets/" --deploy
Next, create a tap on the springtweets stream that sets a message counter named tweetcount
xd:> stream create --name tweettap --definition "tap:stream:springtweets > counter --name=tweetcount" --
deploy
To retrieve the count:
xd:>counter display tweetcount
The counter sink has the following options:
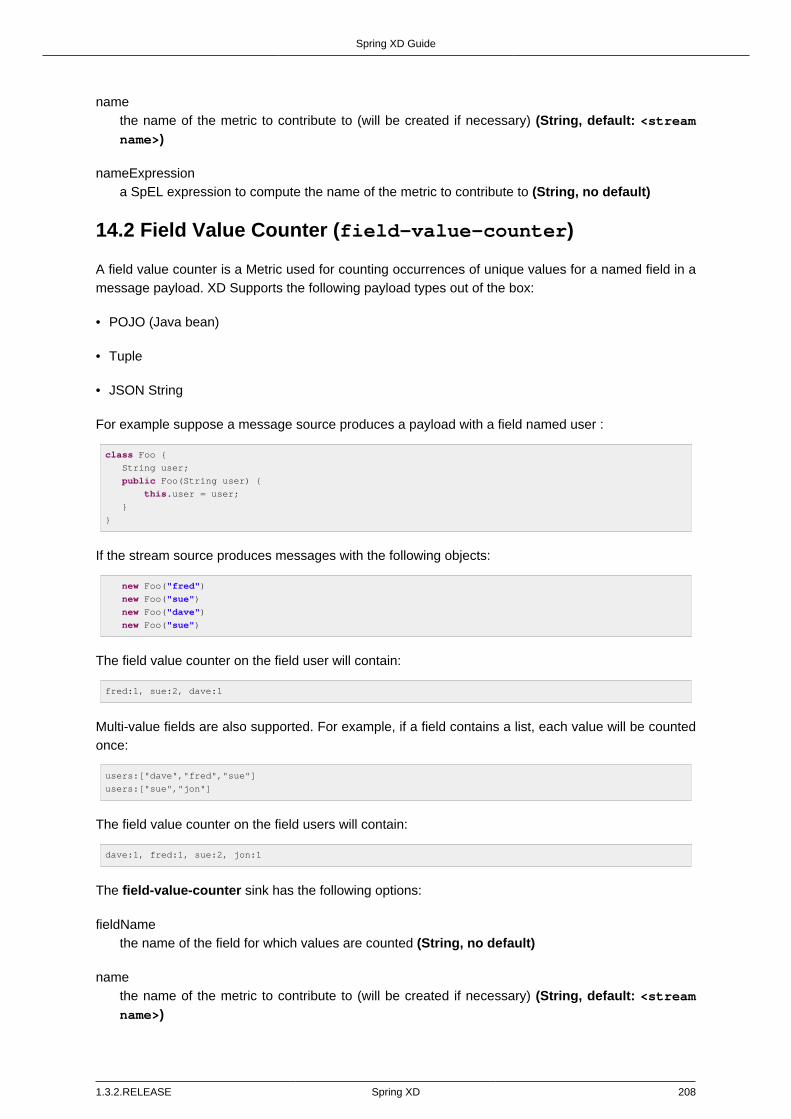
Spring XD Guide
1.3.2.RELEASE Spring XD 208
namethe name of the metric to contribute to (will be created if necessary) (String, default: <streamname>)
nameExpressiona SpEL expression to compute the name of the metric to contribute to (String, no default)
14.2 Field Value Counter (field-value-counter)
A field value counter is a Metric used for counting occurrences of unique values for a named field in amessage payload. XD Supports the following payload types out of the box:
• POJO (Java bean)
• Tuple
• JSON String
For example suppose a message source produces a payload with a field named user :
class Foo {
String user;
public Foo(String user) {
this.user = user;
}
}
If the stream source produces messages with the following objects:
new Foo("fred")
new Foo("sue")
new Foo("dave")
new Foo("sue")
The field value counter on the field user will contain:
fred:1, sue:2, dave:1
Multi-value fields are also supported. For example, if a field contains a list, each value will be countedonce:
users:["dave","fred","sue"]
users:["sue","jon"]
The field value counter on the field users will contain:
dave:1, fred:1, sue:2, jon:1
The field-value-counter sink has the following options:
fieldNamethe name of the field for which values are counted (String, no default)
namethe name of the metric to contribute to (will be created if necessary) (String, default: <streamname>)

Spring XD Guide
1.3.2.RELEASE Spring XD 209
nameExpressiona SpEL expression to compute the name of the metric to contribute to (String, no default)
To try this out, create a stream to ingest twitter feeds containing the word spring and output to a file:
xd:> stream create --name springtweets --definition "twittersearch --consumerKey=<your_key> --
consumerSecret=<your_secret> --query=spring | file" --deploy
Now create a tap for a field value counter:
xd:> stream create --name fromUserCount --definition "tap:stream:springtweets > field-value-counter --
fieldName=user.screen_name" --deploy
The twittersearch source produces JSON strings which contain the user id of the tweeter in thefromUser field. The field_value_counter sink parses the tweet and updates a field value counter namedfromUserCount in Redis. To view the counts:
From xd-shell,
xd:> field-value-counter display fromUserCount
14.3 Aggregate Counter (aggregate-counter)
The aggregate counter differs from a simple counter in that it not only keeps a total value for the count,but also retains the total count values for each minute, hour day and month of the period for which itis run. The data can then be queried by supplying a start and end date and the resolution at which thedata should be returned.
Creating an aggregate counter is very similar to a simple counter. For example, to obtain an aggregatecount for our spring tweets stream:
xd:> stream create --name springtweets --definition "twittersearch --query=spring | file" --deploy
you’d simply create a tap which pipes the input to aggregate-counter:
xd:> stream create --name tweettap --definition "tap:stream:springtweets > aggregate-counter --
name=tweetcount" --deploy
From the XD shell:
xd:> aggregate-counter display tweettap
Note: you can also use some criteria to filter out aggregate counter display values. Please refer to Shelldocumentation for aggregate counter for more details.
The aggregate-counter sink has the following options:
dateFormata pattern (as in SimpleDateFormat) for parsing/formatting dates and timestamps (String, default:yyyy-MM-dd'T'HH:mm:ss.SSS'Z')
incrementExpressionhow much to increment each bucket, as a SpEL against the message (String, default: 1)
namethe name of the metric to contribute to (will be created if necessary) (String, default: <streamname>)

Spring XD Guide
1.3.2.RELEASE Spring XD 210
nameExpressiona SpEL expression to compute the name of the metric to contribute to (String, no default)
timeFieldname of a field in the message that contains the timestamp to contribute to (String, default: null)
14.4 Gauge
A gauge is a Metric, similar to a counter in that it holds a single long value associated with a uniquename. In this case the value can represent any numeric value defined by the application.
The gauge sink provided with XD stores expects a numeric value as a payload, typically this would bea decimal formatted string.
The gauge sink has the following options:
namethe name of the metric to contribute to (will be created if necessary) (String, default: <streamname>)
nameExpressiona SpEL expression to compute the name of the metric to contribute to (String, no default)
Here is an example of creating a tap for a gauge:
Simple Tap Example
Create an ingest stream
xd:> stream create --name test --definition "http --port=9090 | file" --deploy
Next create the tap:
xd:> stream create --name simplegauge --definition "tap:stream:test > gauge" --deploy
Now Post a message to the ingest stream:
xd:> http post --target http://localhost:9090 --data "10"
Check the gauge:
xd:>gauge display --name simplegauge
14.5 Rich Gauge (rich-gauge)
A rich gauge is a Metric that holds a double value associated with a unique name. In addition to thevalue, the rich gauge keeps a running average, along with the minimum and maximum values and thesample count.
The rich-gauge sink provided with XD expects a numeric value as a payload, typically this would be adecimal formatted string, and keeps its value in a store.
The rich-gauge sink has the following options:

Spring XD Guide
1.3.2.RELEASE Spring XD 211
alphasmoothing constant, or -1 to use arithmetic mean (double, default: -1.0)
namethe name of the metric to contribute to (will be created if necessary) (String, default: <streamname>)
nameExpressiona SpEL expression to compute the name of the metric to contribute to (String, no default)
Note
The smoothing factor behaves as an exponential moving average. The default value does nosmoothing.
Here are some examples of creating a tap for a rich gauge:
Simple Tap Example
Create an ingest stream
xd:> stream create --name test --definition "http --port=9090 | file" --deploy
Next create the tap:
xd:> stream create --name testgauge --definition "tap:stream:test > rich-gauge" --deploy
Now Post some messages to the ingest stream:
xd:> http post --target http://localhost:9090 --data "10"
xd:> http post --target http://localhost:9090 --data "13"
xd:> http post --target http://localhost:9090 --data "16"
Check the gauge:
xd:>rich-gauge display testgauge
Stock Price Example
In this example, we will track stock prices, which is a more practical example. The data is ingested asJSON strings like
{"symbol":"VMW","price":72.04}
Create an ingest stream
xd:> stream create --name stocks --definition "http --port=9090 | file"
Next create the tap, using the transform module to extract the stock price from the payload:
xd:> stream create --name stockprice --definition "tap:stream:stocks > transform --
expression=#jsonPath(payload,'$.price') | rich-gauge"
Now Post some messages to the ingest stream:
xd:> http post --target http://localhost:9090 --data {"symbol":"VMW","price":72.04}
xd:> http post --target http://localhost:9090 --data {"symbol":"VMW","price":72.06}
xd:> http post --target http://localhost:9090 --data {"symbol":"VMW","price":72.08}

Spring XD Guide
1.3.2.RELEASE Spring XD 212
Note: JSON fields should be separated by a comma without any spaces. Alternatively, enclose thewhole argument to --data with quotes and escape inner quotes with a backslash.
Check the gauge:
xd:>rich-gauge display stockprice
Improved Stock Price Example
In this example, we will track stock prices for selected stocks. The data is ingested as JSON strings like
{"symbol":"VMW","price":72.04}
{"symbol":"EMC","price":24.92}
The previous example would feed these prices to a single gauge. What we really want is to create aseparate tap for each ticker symbol in which we are interested:
Create an ingest stream
xd:> stream create --name stocks --definition "http --port=9090 | file"
Next create the tap, using the transform module to extract the stock price from the payload:
xd:> stream create --name vmwprice --definition "tap:stream:stocks > filter --
expression=#jsonPath(payload,'$.symbol')==VMW | transform --expression=#jsonPath(payload,'$.price') |
rich-gauge" --deploy
xd:> stream create --name emcprice --definition "tap:stream:stocks > filter --
expression=#jsonPath(payload,'$.symbol')==EMC | transform --expression=#jsonPath(payload,'$.price') |
rich-gauge" --deploy
Now Post some messages to the ingest stream:
xd:> http post --target http://localhost:9090 --data {"symbol":"VMW","price":72.04}
xd:> http post --target http://localhost:9090 --data {"symbol":"VMW","price":72.06}
xd:> http post --target http://localhost:9090 --data {"symbol":"VMW","price":72.08}
xd:> http post --target http://localhost:9090 --data {"symbol":"EMC","price":24.92}
xd:> http post --target http://localhost:9090 --data {"symbol":"EMC","price":24.90}
xd:> http post --target http://localhost:9090 --data {"symbol":"EMC","price":24.96}
Check the gauge:
xd:>rich-gauge display emcprice
xd:>rich-gauge display vmwprice
14.6 Accessing Analytics Data over the RESTful API
Spring XD has a discoverable RESTful API based on the Spring HATEAOS library. You can discoverthe resources available by making a GET request on the root resource of the Admin server. Here is anexample where navigate down to find the data for a counter named httptap that was created by thesecommands
xd:>stream create --name httpStream --definition "http | file" --deploy
xd:>stream create --name httptap --definition "tap:stream:httpStream > counter" --deploy
xd:>http post --target http://localhost:9000 --data "helloworld"
The root resource returns

Spring XD Guide
1.3.2.RELEASE Spring XD 213
xd:>! wget -q -S -O - http://localhost:9393/
{
"links":[
{},
{
"rel":"jobs",
"href":"http://localhost:9393/jobs"
},
{
"rel":"modules",
"href":"http://localhost:9393/modules"
},
{
"rel":"runtime/modules",
"href":"http://localhost:9393/runtime/modules"
},
{
"rel":"runtime/containers",
"href":"http://localhost:9393/runtime/containers"
},
{
"rel":"counters",
"href":"http://localhost:9393/metrics/counters"
},
{
"rel":"field-value-counters",
"href":"http://localhost:9393/metrics/field-value-counters"
},
{
"rel":"aggregate-counters",
"href":"http://localhost:9393/metrics/aggregate-counters"
},
{
"rel":"gauges",
"href":"http://localhost:9393/metrics/gauges"
},
{
"rel":"rich-gauges",
"href":"http://localhost:9393/metrics/rich-gauges"
}
]
}
Following the resource location for the counter
xd:>! wget -q -S -O - http://localhost:9393/metrics/counters
{
"links":[
],
"content":[
{
"links":[
{
"rel":"self",
"href":"http://localhost:9393/metrics/counters/httptap"
}
],
"name":"httptap"
}
],
"page":{
"size":0,
"totalElements":1,
"totalPages":1,
"number":0
}
}

Spring XD Guide
1.3.2.RELEASE Spring XD 214
And then the data for the counter itself
xd:>! wget -q -S -O - http://localhost:9393/metrics/counters/httptap
{
"links":[
{
"rel":"self",
"href":"http://localhost:9393/metrics/counters/httptap"
}
],
"name":"httptap",
"value":2
}

Spring XD Guide
1.3.2.RELEASE Spring XD 215
15. Jobs
This section describes the job modules included with Spring XD. For a general overview of creating,deploying, and launching batch jobs in Spring XD, see the Batch Jobs section. To run the examplesshown here, start the XD Container as instructed in the Getting Started page.
The available jobs are
• Import CSV Files to HDFS
• Import CSV Files to JDBC
• Import FTP to HDFS
• Running gpload as a batch job
• Export HDFS to JDBC
• Export HDFS to MongoDB
• Import JDBC to HDFS
• Running a Spark application as a batch job
• Running Sqoop as a batch job
Regarding HDFS Configuration
To use the hdfs based jobs below, XD needs to have append enabled for hdfs. Update the hdfs-site.xml with the following settings:
<property>
<name>dfs.support.append</name>
<value>true</value>
</property>
15.1 Import CSV Files to HDFS (filepollhdfs)
This module is designed to be driven by a stream polling a directory. It imports data from CSV files andrequires that you supply a list of named columns for the data using the names parameter. For example:
xd:> job create myjob --definition "filepollhdfs --names=forename,surname,address" --deploy
You would then use a stream with a file source to scan a directory for files and drive the job. A separatejob will be started for each file found:
xd:> stream create csvStream --definition "file --mode=ref --dir=/mycsvdir --pattern=*.csv >
queue:job:myjob" --deploy
The filepollhdfs job has the following options:
commitIntervalthe commit interval to be used for the step (int, default: 1000)
deleteFileswhether to delete files after successful import (boolean, default: false)

Spring XD Guide
1.3.2.RELEASE Spring XD 216
directorythe directory to write the file(s) to in HDFS (String, default: /xd/<job name>)
fileExtensionthe file extension to use (String, default: csv)
fileNamethe filename to use in HDFS (String, default: <job name>)
fsUrithe URI to use to access the Hadoop FileSystem (String, default: ${spring.hadoop.fsUri})
namesthe field names in the CSV file (String, no default)
restartablewhether the job should be restartable or not in case of failure (boolean, default: false)
rolloverthe number of bytes to write before creating a new file in HDFS (int, default: 1000000)
15.2 Import CSV Files to JDBC (filejdbc)
A module which loads CSV files into a JDBC table using a single batch job. By default it uses the internalHSQL DB which is used by Spring Batch. Refer to how module options are resolved for further detailson how to change defaults (one can of course always use --foo=bar notation in the job definition toachieve the same effect).
Note
If you access any database other than HSQLDB or Postgres in a job module then the JDBC driverjar for that database needs to be present in the $XD_HOME/lib directory.
The filejdbc job has the following options:
abandonWhenPercentageFullconnections that have timed out wont get closed and reported up unless the number of connectionsin use are above the percentage (int, default: 0)
alternateUsernameAlloweduses an alternate user name if connection fails (boolean, default: false)
commitIntervalthe commit interval to be used for the step (int, default: 1000)
connectionPropertiesconnection properties that will be sent to our JDBC driver when establishing new connections(String, no default)
deleteFileswhether to delete files after successful import (boolean, default: false)
delimiterthe delimiter for the delimited file (String, default: ,)

Spring XD Guide
1.3.2.RELEASE Spring XD 217
driverClassNamethe JDBC driver to use (String, no default)
fairQueueset to true if you wish that calls to getConnection should be treated fairly in a true FIFO fashion(boolean, default: true)
fsUrithe URI to use to access the Hadoop FileSystem (String, default: ${spring.hadoop.fsUri})
initSQLcustom query to be run when a connection is first created (String, no default)
initialSizeinitial number of connections that are created when the pool is started (int, default: 0)
initializeDatabasewhether the database initialization script should be run (boolean, default: false)
initializerScriptthe name of the SQL script (in /config) to run if 'initializeDatabase' is set (String, default:init_batch_import.sql)
jdbcInterceptorssemicolon separated list of classnames extending org.apache.tomcat.jdbc.pool.JdbcInterceptor(String, no default)
jmxEnabledregister the pool with JMX or not (boolean, default: true)
logAbandonedflag to log stack traces for application code which abandoned a Connection (boolean, default:false)
maxActivemaximum number of active connections that can be allocated from this pool at the same time (int,default: 100)
maxAgetime in milliseconds to keep this connection (int, default: 0)
maxIdlemaximum number of connections that should be kept in the pool at all times (int, default: 100)
maxWaitmaximum number of milliseconds that the pool will wait for a connection (int, default: 30000)
minEvictableIdleTimeMillisminimum amount of time an object may sit idle in the pool before it is eligible for eviction (int, default:60000)
minIdleminimum number of established connections that should be kept in the pool at all times (int, default:10)

Spring XD Guide
1.3.2.RELEASE Spring XD 218
namesthe field names in the CSV file (String, no default)
partitionResultsTimeouttime (ms) that the partition handler will wait for results (long, default: 3600000)
passwordthe JDBC password (Password, no default)
removeAbandonedflag to remove abandoned connections if they exceed the removeAbandonedTimout (boolean,default: false)
removeAbandonedTimeouttimeout in seconds before an abandoned connection can be removed (int, default: 60)
resourcesthe list of paths to import (Spring resources) (String, no default)
restartablewhether the job should be restartable or not in case of failure (boolean, default: false)
suspectTimeoutthis simply logs the warning after timeout, connection remains (int, default: 0)
tableNamethe database table to which the data will be written (String, default: <job name>)
testOnBorrowindication of whether objects will be validated before being borrowed from the pool (boolean,default: false)
testOnReturnindication of whether objects will be validated before being returned to the pool (boolean, default:false)
testWhileIdleindication of whether objects will be validated by the idle object evictor (boolean, default: false)
timeBetweenEvictionRunsMillisnumber of milliseconds to sleep between runs of the idle connection validation/cleaner thread (int,default: 5000)
urlthe JDBC URL for the database (String, no default)
useEqualstrue if you wish the ProxyConnection class to use String.equals (boolean, default: true)
usernamethe JDBC username (String, no default)
validationIntervalavoid excess validation, only run validation at most at this frequency - time in milliseconds (long,default: 30000)

Spring XD Guide
1.3.2.RELEASE Spring XD 219
validationQuerysql query that will be used to validate connections from this pool (String, no default)
validatorClassNamename of a class which implements the org.apache.tomcat.jdbc.pool.Validator (String, no default)
The job should be defined with the resources parameter defining the files which should be loaded.It also requires a names parameter (for the CSV field names) and these should match the databasecolumn names into which the data should be stored. You can either pre-create the database table orthe module will create it for you if you use --initializeDatabase=true when the job is created.The table initialization is configured in a similar way to the JDBC sink and uses the same parameters.The default table name is the job name and can be customized by setting the tableName parameter.As an example, if you run the command
xd:> job create myjob --definition "filejdbc --resources=file:///mycsvdir/*.csv --
names=forename,surname,address --tableName=people --initializeDatabase=true" --deploy
it will create the table "people" in the database with three varchar columns called "forename", "surname"and "address". When you launch the job it will load the files matching the resources pattern and writethe data to this table. As with the filepollhdfs job, this module also supports the deleteFilesparameter which will remove the files defined by the resources parameter on successful completionof the job.
Launch the job using:
xd:> job launch myjob
Tip
The connection pool settings for xd are located in servers.yml (i.e. spring.datasource.* )
15.3 Import FTP to HDFS (ftphdfs)
Copies files from FTP directory into HDFS. Job is partitioned in a way that each separate file copy isexecuted on its own partitioned step.
An example which copies files:
job create --name ftphdfsjob --definition "ftphdfs --host=ftp.example.com --port=21" --deploy
job launch --name ftphdfsjob --params {"remoteDirectory":"/pub/files","hdfsDirectory":"/ftp"}
Full path is preserved so that above command would result files in HDFS shown below:
/ftp/pub/files
/ftp/pub/files/file1.txt
/ftp/pub/files/file2.txt
The ftphdfs job has the following options:
fsUrithe URI to use to access the Hadoop FileSystem (String, default: ${spring.hadoop.fsUri})
hostthe host name for the FTP server (String, default: localhost)

Spring XD Guide
1.3.2.RELEASE Spring XD 220
partitionResultsTimeouttime (ms) that the partition handler will wait for results (long, default: 3600000)
passwordthe password for the FTP connection (Password, no default)
portthe port for the FTP server (int, default: 21)
restartablewhether the job should be restartable or not in case of failure (boolean, default: false)
usernamethe username for the FTP connection (String, no default)
15.4 Running gpload as a batch job (gpload)
The gpload utility can be deployed and launched from Spring XD as a batch job. The gpload job usesa GploadTasklet that submits a gpload job as an external process. The Spring XD gpload batch jobaims to support most of the gpload functionality.
We need to provide the following required options:
• gploadHome - this must be the path to where gpload utility is installed. This is usually /usr/local/greenplum-loaders-<version>.
• controlFile - this file defines the gpload options in effect for this load job and is documented inthe Greenplum Load Tools Reference documentation.
• password or passswordFile - you can either speciy the passord or provide a password file thatmust follow the general format for a PostgreSQL password file.
Here is an example of a basic load job definition. Please note that some options like host, port, databaseand username could have been specified in the control file as well.
The content of the control file:
VERSION: 1.0.0.1
GPLOAD:
INPUT:
- SOURCE:
FILE: [/home/demo/data/test_file.csv]
- FORMAT: CSV
- DELIMITER: ','
- NULL_AS: '\N'
- QUOTE: '"'
- HEADER: FALSE
- ENCODING: 'UTF8'
- ERROR_LIMIT: 1000
- ERROR_TABLE: public.err_table
OUTPUT:
- TABLE: demo.test
- MODE: INSERT
PRELOAD:
- TRUNCATE: FALSE
- REUSE_TABLES: FALSE
This is the command used to create and launch the job:

Spring XD Guide
1.3.2.RELEASE Spring XD 221
xd:>job create myload --definition "gpload --gploadHome=/usr/local/greenplum-loaders-4.3.4.1-build-2 --
controlFile=/home/demo/basic.yml --host=pivhdsne --port=5432 --database=pivotal --username=gpadmin --
passwordFile=/home/demo/.pgpass" --deploy
xd:>job launch --name myload
Once the job is launched, go to Spring XD admin-ui to verify the job results. Jobs # Executions # Selectthe job to verify that step execution context holds the log for gpload execution results.
We can override the file name for the source file by providing it as a job parameter like this:
job launch --name myload --params {"input.source.file":"/home/demo/data/inputfile2.csv"}
This allows us to define a stream to capture new files created in a specific directory:
xd>stream create loadFiles --definition "file --ref=true --dir=/home/demo/input --pattern='*.csv'
| transform --expression='{\"input.source.file\":\"'+#{'payload.getAbsolutePath()'}+'\"}' >
queue:job:myload" --deploy
Now, any new file created in that directory will launch a gpload job for that new file.
The gpload job has the following options:
controlFilepath to the gpload control file (String, no default)
databasethe name of the database to load into (String, no default)
gploadHomethe gpload home location (String, no default)
hostthe host name for the Greenplum master database server (String, no default)
optionsthe gpload options to use (String, no default)
passwordthe password to use when connecting (String, no default)
passwordFilethe location of the password file (String, no default)
portthe port for the Greenplum master database server (Integer, no default)
usernamethe username to connect as (String, no default)
15.5 Export HDFS to JDBC (hdfsjdbc)
This module functions very similarly to the filejdbc one except that the resources you specify shouldactually be in HDFS, rather than the OS filesystem.
xd:> job create myjob --definition "hdfsjdbc --resources=/xd/data/*.csv --names=forename,surname,address
--tableName=people --initializeDatabase=true" --deploy

Spring XD Guide
1.3.2.RELEASE Spring XD 222
Launch the job using:
xd:> job launch myjob
Note
If you access any database other than HSQLDB or Postgres in a job module then the JDBC driverjar for that database needs to be present in the $XD_HOME/lib directory.
The hdfsjdbc job has the following options:
abandonWhenPercentageFullconnections that have timed out wont get closed and reported up unless the number of connectionsin use are above the percentage (int, default: 0)
alternateUsernameAlloweduses an alternate user name if connection fails (boolean, default: false)
commitIntervalthe commit interval to be used for the step (int, default: 1000)
connectionPropertiesconnection properties that will be sent to our JDBC driver when establishing new connections(String, no default)
delimiterthe delimiter for the delimited file (String, default: ,)
driverClassNamethe JDBC driver to use (String, no default)
fairQueueset to true if you wish that calls to getConnection should be treated fairly in a true FIFO fashion(boolean, default: true)
fsUrithe URI to use to access the Hadoop FileSystem (String, default: ${spring.hadoop.fsUri})
initSQLcustom query to be run when a connection is first created (String, no default)
initialSizeinitial number of connections that are created when the pool is started (int, default: 0)
initializeDatabasewhether the database initialization script should be run (boolean, default: false)
initializerScriptthe name of the SQL script (in /config) to run if 'initializeDatabase' is set (String, default:init_batch_import.sql)
jdbcInterceptorssemicolon separated list of classnames extending org.apache.tomcat.jdbc.pool.JdbcInterceptor(String, no default)

Spring XD Guide
1.3.2.RELEASE Spring XD 223
jmxEnabledregister the pool with JMX or not (boolean, default: true)
logAbandonedflag to log stack traces for application code which abandoned a Connection (boolean, default:false)
maxActivemaximum number of active connections that can be allocated from this pool at the same time (int,default: 100)
maxAgetime in milliseconds to keep this connection (int, default: 0)
maxIdlemaximum number of connections that should be kept in the pool at all times (int, default: 100)
maxWaitmaximum number of milliseconds that the pool will wait for a connection (int, default: 30000)
minEvictableIdleTimeMillisminimum amount of time an object may sit idle in the pool before it is eligible for eviction (int, default:60000)
minIdleminimum number of established connections that should be kept in the pool at all times (int, default:10)
namesthe field names in the CSV file (String, no default)
passwordthe JDBC password (Password, no default)
removeAbandonedflag to remove abandoned connections if they exceed the removeAbandonedTimout (boolean,default: false)
removeAbandonedTimeouttimeout in seconds before an abandoned connection can be removed (int, default: 60)
resourcesthe list of paths to import (Spring resources) (String, no default)
restartablewhether the job should be restartable or not in case of failure (boolean, default: false)
suspectTimeoutthis simply logs the warning after timeout, connection remains (int, default: 0)
tableNamethe database table to which the data will be written (String, default: <job name>)
testOnBorrowindication of whether objects will be validated before being borrowed from the pool (boolean,default: false)

Spring XD Guide
1.3.2.RELEASE Spring XD 224
testOnReturnindication of whether objects will be validated before being returned to the pool (boolean, default:false)
testWhileIdleindication of whether objects will be validated by the idle object evictor (boolean, default: false)
timeBetweenEvictionRunsMillisnumber of milliseconds to sleep between runs of the idle connection validation/cleaner thread (int,default: 5000)
urlthe JDBC URL for the database (String, no default)
useEqualstrue if you wish the ProxyConnection class to use String.equals (boolean, default: true)
usernamethe JDBC username (String, no default)
validationIntervalavoid excess validation, only run validation at most at this frequency - time in milliseconds (long,default: 30000)
validationQuerysql query that will be used to validate connections from this pool (String, no default)
validatorClassNamename of a class which implements the org.apache.tomcat.jdbc.pool.Validator (String, no default)
Tip
The connection pool settings for xd are located in servers.yml (i.e. spring.datasource.* )
15.6 Export HDFS to MongoDB (hdfsmongodb)
Exports CSV data from HDFS and stores it in a MongoDB collection which defaults to the job name.This can be overridden with the collectionName parameter. Once again, the field names should bedefined by supplying the names parameter. The data is converted internally to a Spring XD Tuple andthe collection items will have an id matching the tuple’s UUID. You can override this by setting theidField parameter to one of the field names if desired.
An example:
xd:> job create myjob --definition "hdfsmongodb --resources=/data/*.log --
names=employeeId,forename,surname,address --idField=employeeId --collectionName=people" --deploy
The hdfsmongodb job has the following options:
authenticationDatabaseNamethe MongoDB authentication database used for connecting (String, default: ``)
collectionNamethe MongoDB collection to store (String, default: <job name>)

Spring XD Guide
1.3.2.RELEASE Spring XD 225
commitIntervalthe commit interval to be used for the step (int, default: 1000)
databaseNamethe MongoDB database name (String, default: xd)
delimiterthe delimiter for the delimited file (String, default: ,)
fsUrithe URI to use to access the Hadoop FileSystem (String, default: ${spring.hadoop.fsUri})
hostthe MongoDB host to connect to (String, default: localhost)
idFieldthe name of the field to use as the identity in MongoDB (String, no default)
namesthe field names in the CSV file (String, no default)
passwordthe MongoDB password used for connecting (String, default: ``)
portthe MongoDB port to connect to (int, default: 27017)
resourcesthe list of paths to import (Spring resources) (String, no default)
restartablewhether the job should be restartable or not in case of failure (boolean, default: false)
usernamethe MongoDB username used for connecting (String, default: ``)
writeConcernthe default MongoDB write concern to use (WriteConcern, default: SAFE, possible values:NONE,NORMAL,SAFE,FSYNC_SAFE,REPLICAS_SAFE,JOURNAL_SAFE,MAJORITY)
15.7 Import JDBC to HDFS (jdbchdfs)
Performs the reverse of the previous module. The database configuration is the same as for filejdbcbut without the initialization options since you need to already have the data to import into HDFS. Whencreating the job, you must either supply the select statement by setting the sql parameter, or you cansupply both tableName and columns options (which will be used to build the SQL statement).
To import data from the database table some_table, you could use
xd:> job create myjob --definition "jdbchdfs --sql='select col1,col2,col3 from some_table'" --deploy
You can customize how the data is written to HDFS by supplying the options directory (defaultsto /xd/(job name)), fileName (defaults to job name), rollover (in bytes, default 1000000) andfileExtension (defaults to csv).

Spring XD Guide
1.3.2.RELEASE Spring XD 226
Launch the job using:
xd:> job launch myjob
Note
If you access any database other than HSQLDB or Postgres in a job module then the JDBC driverjar for that database needs to be present in the $XD_HOME/lib directory.
If you want to partition your job across multiple XD containers you can provide the partitionColumnand partitions option. When the job is launched the partitioner will query the database for the range ofvalues and evenly divide the load between the partitions. This assumes that there is an even distributionof column values in the table. When using the partitioning support you must also use the tableNameand columns options instead of the sql option. This is so the partitioner can construct the queries withthe appropriate where clauses for the different partitions.
An example of a partitioned job could look like this:
xd:> job create partitionedJob --definition "jdbchdfs --columns='id,col1,col2' --tableName=some_table --
partitionColumn=id --partitions=4" --deploy
Note
When using the partitioning support you can not use the sql option. Use tableName andcolumns instead.
You can perform incremental imports using this job by defining a column to check against. Currently thecolumn must be numeric (similar to how the partitionColumn works). An example of launching a job thatperforms incremental imports would look like the following:
xd:> job create incrementalImportJob --definition "jdbchdfs --columns='id,col1,col2' --
tableName=some_table --checkColumn=sequence --restartable=true" --deploy
If you want to specify the value for the checkColumn, you can pass the override value in as aJobParameter named overrideCheckColumnValue as shown below:
xd:> job launch incrementalImportJob --params {"overrideCheckColumnValue" : 2}
There are two things to keep in mind when using incremental imports with this job:
• When using incremental imports, the sql option is not available. Use tableName and columnsinstead.
• If an import fails, it must be rerun to completion before running the next import. Without this,inconsistent data may result. Since HDFS is a non-transactional store, failed records may not be rolledback. An administrator may need to check HDFS for completeness and the last imported value.
The jdbchdfs job has the following options:
abandonWhenPercentageFullconnections that have timed out wont get closed and reported up unless the number of connectionsin use are above the percentage (int, default: 0)
alternateUsernameAlloweduses an alternate user name if connection fails (boolean, default: false)

Spring XD Guide
1.3.2.RELEASE Spring XD 227
checkColumnthe column to be examined when determining which rows to import (String, default: ``)
columnsthe column names to read from the supplied table (String, default: ``)
commitIntervalthe commit interval to be used for the step (int, default: 1000)
connectionPropertiesconnection properties that will be sent to our JDBC driver when establishing new connections(String, no default)
delimiterthe delimiter for the delimited file (String, default: ,)
directorythe directory to write the file(s) to in HDFS (String, default: /xd/<job name>)
driverClassNamethe JDBC driver to use (String, no default)
fairQueueset to true if you wish that calls to getConnection should be treated fairly in a true FIFO fashion(boolean, default: true)
fileExtensionthe file extension to use (String, default: csv)
fileNamethe filename to use in HDFS (String, default: <job name>)
fsUrithe URI to use to access the Hadoop FileSystem (String, default: ${spring.hadoop.fsUri})
initSQLcustom query to be run when a connection is first created (String, no default)
initialSizeinitial number of connections that are created when the pool is started (int, default: 0)
jdbcInterceptorssemicolon separated list of classnames extending org.apache.tomcat.jdbc.pool.JdbcInterceptor(String, no default)
jmxEnabledregister the pool with JMX or not (boolean, default: true)
logAbandonedflag to log stack traces for application code which abandoned a Connection (boolean, default:false)
maxActivemaximum number of active connections that can be allocated from this pool at the same time (int,default: 100)

Spring XD Guide
1.3.2.RELEASE Spring XD 228
maxAgetime in milliseconds to keep this connection (int, default: 0)
maxIdlemaximum number of connections that should be kept in the pool at all times (int, default: 100)
maxWaitmaximum number of milliseconds that the pool will wait for a connection (int, default: 30000)
minEvictableIdleTimeMillisminimum amount of time an object may sit idle in the pool before it is eligible for eviction (int, default:60000)
minIdleminimum number of established connections that should be kept in the pool at all times (int, default:10)
partitionColumnthe column to use for partitioning, should be numeric and uniformly distributed (String, default: ``)
partitionResultsTimeouttime (ms) that the partition handler will wait for results (long, default: 3600000)
partitionsthe number of partitions (int, default: 1)
passwordthe JDBC password (Password, no default)
removeAbandonedflag to remove abandoned connections if they exceed the removeAbandonedTimout (boolean,default: false)
removeAbandonedTimeouttimeout in seconds before an abandoned connection can be removed (int, default: 60)
restartablewhether the job should be restartable or not in case of failure (boolean, default: false)
rolloverthe number of bytes to write before creating a new file in HDFS (int, default: 1000000)
sqlthe SQL to use to extract data (String, default: ``)
suspectTimeoutthis simply logs the warning after timeout, connection remains (int, default: 0)
tableNamethe table to read data from (String, default: ``)
testOnBorrowindication of whether objects will be validated before being borrowed from the pool (boolean,default: false)

Spring XD Guide
1.3.2.RELEASE Spring XD 229
testOnReturnindication of whether objects will be validated before being returned to the pool (boolean, default:false)
testWhileIdleindication of whether objects will be validated by the idle object evictor (boolean, default: false)
timeBetweenEvictionRunsMillisnumber of milliseconds to sleep between runs of the idle connection validation/cleaner thread (int,default: 5000)
urlthe JDBC URL for the database (String, no default)
useEqualstrue if you wish the ProxyConnection class to use String.equals (boolean, default: true)
usernamethe JDBC username (String, no default)
validationIntervalavoid excess validation, only run validation at most at this frequency - time in milliseconds (long,default: 30000)
validationQuerysql query that will be used to validate connections from this pool (String, no default)
validatorClassNamename of a class which implements the org.apache.tomcat.jdbc.pool.Validator (String, no default)
Tip
The connection pool settings for xd are located in servers.yml (i.e. spring.datasource.* )
15.8 Running Spark application as a batch job (sparkapp)
A Spark Application can be deployed and launched from Spring XD as a batch job. SparkTasklet submitsthe Spark application into Spark cluster manager using org.apache.spark.deploy.SparkSubmit.Through this approach, you can also launch a Spark application with specific criteria via Spring XDstream (for instance: A real time scoring algorithm through MLlib spark job can be triggered based on thestreaming data events). To get started, please refer to Spark examples here: https://spark.apache.org/examples.html.
Note
The current Spark release that is supported is Spark 1.2.1
Lets run some Spark examples as Spring XD batch jobs:
xd:>job create SparkPiExample --definition "sparkapp --appJar=<the location of spark-examples-1.2.1 jar>
--name=MyApp --master=<spark master url or local> --mainClass=org.apache.spark.examples.SparkPi" --
deploy
xd:>job launch SparkPiExample

Spring XD Guide
1.3.2.RELEASE Spring XD 230
xd:>job create JavaWordCountExample --definition "sparkapp --appJar=<the location
of spark-examples-1.2.1 jar> --name=MyApp --master=<spark master url or local> --
mainClass=org.apache.spark.examples.JavaWordCount --programArgs=<location of the file to count the
words>" --deploy
xd>job launch JavaWordCountExample
Once the job is launched, go to Spring XD admin-ui to verify the job results. Jobs # Executions # Selectthe job to verify that execution context holds the log for Spark application results. If you launch theSpark application through Spark Master, then the results and application status can be verified fromSparkUI as well.
The sparkapp job has the following options:
appJarpath to a bundled jar that includes your application and its dependencies - excluding spark (String,no default)
confcomma seperated list of key value pairs as config properties (String, default: ``)
filescomma separated list of files to be placed in the working directory of each executor (String, default:``)
mainClassthe main class for Spark application (String, no default)
masterthe master URL for Spark (String, default: local)
namethe name of the Spark application (String, default: ``)
programArgsprogram arguments for the application main class (String, default: ``)
15.9 Running Sqoop as a batch job (sqoop)
A Sqoop job can be deployed and launched from Spring XD as a batch job. TheSqoop job uses a SqoopTasklet and a SqoopRunner that submits a Sqoop job usingorg.apache.sqoop.Sqoop.runTool. The Spring XD Sqoop batch job aims to support most of the Sqoopfunctionality, but at this point we have only tested a subset:
• import
• export
• codegen
• merge
• job
• list-tables

Spring XD Guide
1.3.2.RELEASE Spring XD 231
Note
The current release supports Sqoop 1.4.5
The intention is to eventually support all features of the Sqoop tool. See Sqoop User Guide for fulldocumentation of the Sqoop features.
Note
If you access any database other than HSQLDB or Postgres in a job module then the JDBC driverjar for that database needs to be present in the $XD_HOME/lib directory.
We can test the Sqoop job by just listing the tables in the database:
xd:>job create sqoopListTables --definition "sqoop --command=list-tables" --deploy
xd:>job launch --name sqoopListTables
The definition contains the name of the provided job as sqoop and the --command option names theSqoop command we want to run, which in this case is "list-tables".
Once the job is launched, go to Spring XD admin-ui to verify the job results. Jobs # Executions # Selectthe job to verify that step execution context holds the log for Sqoop Tool execution results. You shouldsee some tables listed there. Since we didn’t provide any connection arguments Spring XD will by defaultuse the batch respoitory database for the Sqoop Tool execution. We could provide options specifying adifferent database using the --url, --username and --password options for the job:
xd:>job create sqoopListTables2 --definition "sqoop --command=list-tables --url=jdbc:mysql://
localhost:3306/test --username=myuser --password=mypasswd" --deploy
xd:>job launch --name sqoopListTables2
Here we connect to a local MySQL database. It’s important to note that you need to provide the MySQLJDBC driver jar in the Spring XD lib directory for this to work.
There also is an option to specify connection arguments using the --args option. This allows you touse the same arguments that you are used to provide on the command line when running the SqoopTool directly. To connect to the same MySQL database as above using --args we would use:
xd:>job create sqoopListTables3 --definition "sqoop --command=list-tables --args='--
connect=jdbc:mysql://localhost:3306/test --username=myuser --password=mypasswd'" --deploy
xd:>job launch --name sqoopListTables3
When importing data, you simply use "import" as the command to run. Here is an example:
xd:>job create sqoopImport1 --definition "sqoop --command=import --args='--table=MYTABLE' --
url=jdbc:mysql://localhost:3306/test --username=myuser --password=mypasswd" --deploy
xd:>job launch --name sqoopImport1
In this example we provided the connection arguments using the -args option. We could also haveused --url, --username and --password options like we did above for the "list-tables" example.The "import" command will use the spring.hadoop.fsUri that is specified when Spring XD startsup. You can override this by providing the --fsUri option when defining the job. The same is truefor spring.hadoop.resourceManagerHost and spring.hadoop.resourceManagerPort.You can override the Spring XD configured values with --resourceManagerHost and --resourceManagerPort options.
For exports we use the "export" command. Here is an example:

Spring XD Guide
1.3.2.RELEASE Spring XD 232
xd:>job create sqoopExport1 --definition "sqoop --command=export --args='--table=NEWTABLE --export-dir=/
user/xduser/MYTABLE'" --deploy
xd:>job launch --name sqoopExport1
Here we rely on the connection options to default to the same database used for the batch repository.Note that Sqoop requires that the table to export data into must already exist.
Note
If your Sqoop args are more complex, as is the case when you provide a query expression ora where clause, then you will need to use escaping for double quotes used within the --argsoption. A quick example of using a where clause:
job create sqoopComplexArgs1 --definition "sqoop --command=import --args='--table MYFILES --where \"ID <
390000\" --target-dir /user/xduser/TEST --split-by ID'"
(For this example we have omitted the equal sign for the individual Sqoop arguments within the --argsoption. Either style works fine.)
Note
If your Sqoop args use escape sequences (common when working with Hive data) then you shouldprovide double back-slash characters when working with the XD Shell (this effectively escapesthe escape character and only one back-slash will be passed on). Here is a brief example:
job create sqoopHiveArgs1 --definition "sqoop --command=import --args='--table MYFILES --target-dir /
user/xduser/TEST --split-by ID --null-string \\\\N --fields-terminated-by \\0001'"
For more detailed coverage of using quotes and escaping please see Single quotes, Double quotes,Escaping.
Note
Some JDBC drivers and some compression codecs require additional jars to work properly. Ifthis is the case, then you can use the --libjars option to provide a comma separated list ofjars to be added to the job execution. You should only specify the name of the jar and not thefull path. The jars will be looked up from the classpath and included in the job submitted to theHadoop cluster.
Note
When using Sqoop’s --as-avrodatafile argument we will automatically include the Avro jarsin the Sqoop job submission. No need to specify them as part of the --libjars option.
Note
Advanced Hadoop configuration options can be provided in one of several configuration files. Thehadoop-site.xml file is only used by the Sqoop job while the other configuration files are usedby all Hadoop related jobs and streams:
• $XD_HOME/config/hadoop.properties— just add the property you would like to set:
dfs.client.socket-timeout=20000

Spring XD Guide
1.3.2.RELEASE Spring XD 233
• $XD_HOME/config/hadoop-site.xml— add a property entry:
<property>
<name>dfs.client.socket-timeout</name>
<value>20000</value>
</property>
• $XD_HOME/config/servers.yml— add a spring.hadoop.config entry:
spring:
hadoop:
config:
dfs.client.socket-timeout: 20000
Using Sqoop’s metastore
It is possible to use Sqoop’s metastore with some restrictions.
Warning
Sqoop ships with HSQLDB version 1.8 and Spring XD ships with HSQLDB version 2.3. Sincethese two versions are not compatible you can not use a Sqoop metastore that uses HSQLDB.This is unfortunate since HSQLDB version 1.8 is the only database that is fully supported for themetastore by Sqoop. We can however use another database for the metastore as long as weuse some workarounds.
Note
You can use PostgreSQL for the Sqoop metastore. We recommend that you run the commandslisted below to create and initialize the tables to be used by the Sqoop metastore.
Create and initialize the Sqoop metastore tables:
CREATE TABLE
SQOOP_ROOT
(
version INTEGER,
propname CHARACTER VARYING(128) NOT NULL,
propval CHARACTER VARYING(256),
UNIQUE (version, propname)
);
CREATE TABLE
SQOOP_SESSIONS
(
job_name CHARACTER VARYING(64) NOT NULL,
propname CHARACTER VARYING(128) NOT NULL,
propval CHARACTER VARYING(1024),
propclass CHARACTER VARYING(32) NOT NULL,
UNIQUE (job_name, propname, propclass)
);
INSERT INTO sqoop_root (version, propname, propval) VALUES (null, 'sqoop.hsqldb.job.storage.version',
'0');
INSERT INTO sqoop_root (version, propname, propval) VALUES (0, 'sqoop.hsqldb.job.info.table',
'SQOOP_SESSIONS');
You can now modify the scoop-site.xml file in the Spring XD config directory. Add the JDBC URL,username and password to use for connection to the PostgreSQL database that hosts the Sqoopmetastore tables. You need to provide the following properties:
• sqoop.metastore.client.autoconnect.url
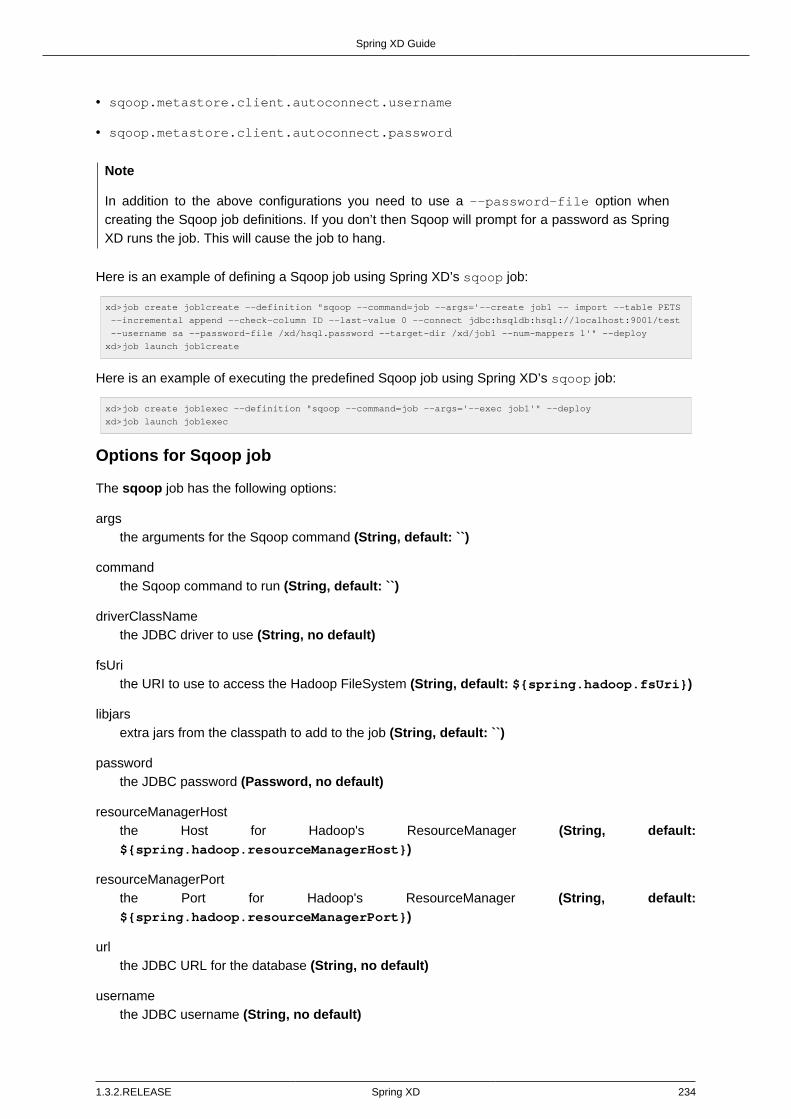
Spring XD Guide
1.3.2.RELEASE Spring XD 234
• sqoop.metastore.client.autoconnect.username
• sqoop.metastore.client.autoconnect.password
Note
In addition to the above configurations you need to use a --password-file option whencreating the Sqoop job definitions. If you don’t then Sqoop will prompt for a password as SpringXD runs the job. This will cause the job to hang.
Here is an example of defining a Sqoop job using Spring XD’s sqoop job:
xd>job create job1create --definition "sqoop --command=job --args='--create job1 -- import --table PETS
--incremental append --check-column ID --last-value 0 --connect jdbc:hsqldb:hsql://localhost:9001/test
--username sa --password-file /xd/hsql.password --target-dir /xd/job1 --num-mappers 1'" --deploy
xd>job launch job1create
Here is an example of executing the predefined Sqoop job using Spring XD’s sqoop job:
xd>job create job1exec --definition "sqoop --command=job --args='--exec job1'" --deploy
xd>job launch job1exec
Options for Sqoop job
The sqoop job has the following options:
argsthe arguments for the Sqoop command (String, default: ``)
commandthe Sqoop command to run (String, default: ``)
driverClassNamethe JDBC driver to use (String, no default)
fsUrithe URI to use to access the Hadoop FileSystem (String, default: ${spring.hadoop.fsUri})
libjarsextra jars from the classpath to add to the job (String, default: ``)
passwordthe JDBC password (Password, no default)
resourceManagerHostthe Host for Hadoop's ResourceManager (String, default:${spring.hadoop.resourceManagerHost})
resourceManagerPortthe Port for Hadoop's ResourceManager (String, default:${spring.hadoop.resourceManagerPort})
urlthe JDBC URL for the database (String, no default)
usernamethe JDBC username (String, no default)

Spring XD Guide
1.3.2.RELEASE Spring XD 235
16. Taps
16.1 Introduction
A Tap allows you to "listen" to data while it is processed in an existing stream and process the data in aseparate stream. The original stream is unaffected by the tap and isn’t aware of its presence, similar toa phone wiretap. (WireTap is included in the standard catalog of EAI patterns and implemented in theSpring Integration EAI framework used by Spring XD).
Simply put, a Tap is a stream that uses a point in another stream as a source.
Example
The following XD shell commands create a stream foo1 and a tap named foo1tap:
xd:> stream create --name foo1 --definition "time | log" --deploy
xd:> stream create --name foo1tap --definition "tap:stream:foo1 > log" --deploy
Since a tap is a type of stream, use the stream create command to create the tap. The tap sourceis specified using the named channel syntax and always begins with tap:. In this case, we are tappingthe stream named foo1 specified by :stream:foo1
Note
stream: is required in this case as it is possible to tap alternate XD targets such as jobs. Thistap consumes data at the source of the target stream.
A tap can consume data from any point along the target stream’s processing pipeline. XD provides afew ways to tap a stream after a given processor has been applied:
Example - tap after a processor has been applied
If the module name is unique in the target stream, use tap:stream:<stream_name>.<module_name>
If you have a stream called mystream, defined as
http | filter --expression=payload.startsWith('A') | transform --expression=payload.toLowerCase() | file
Create a tap after the filter is applied using
tap:stream:mystream.filter > ....
Example - using a label
You may also use labels to create an alias for a module and reference the label in the tap
If you have a stream called mystream, defined as
http | transform --expression=payload.toLowerCase() | flibble: transform --
expression=payload.substring(3) | file
Create a tap after the second transformer is applied using
tap:stream:mystream.flibble > ....

Spring XD Guide
1.3.2.RELEASE Spring XD 236
A primary use case for a Tap is to perform realtime analytics at the same time as data is being ingestedvia its primary stream. For example, consider a Stream of data that is consuming Twitter search resultsand writing them to HDFS. A tap can be created before the data is written to HDFS, and the data pipedfrom the tap to a counter that correspond to the number of times specific hashtags were mentionedin the tweets.
Creating a tap on a named channel, a stream whose source is a named channel, or a label is not yetsupported. This is planned for a future release.
You’ll find specific examples of creating taps on existing streams in the Analytics section.
Note
In cases where a multiple modules with the same module name, a label must be specifiedon the module to be tapped. For example if you want to tap the 2nd transform: http |
transform --expression=payload.toLowerCase() | tapMe: transform --
expression=payload.substring(3) | file
16.2 Tap Lifecycle
A side effect of a stream being unaware of any taps on its pipeline is that deleting the stream will notautomatically delete the taps. The taps have to be deleted separately. However if the tapped stream isre-created, the existing tap will continue to function.

Spring XD Guide
1.3.2.RELEASE Spring XD 237
17. Analytics
17.1 Introduction
Spring XD provides support for the real-time evaluation of various machine learning scoring algorithmsas well simple real-time data analytics using various types of counters and gauges. The analyticsfunctionality is provided via modules that can be added to a stream. In that sense, real-time analyticsis accomplished via the same exact model as data-ingestion. It’s possible that the primary role of astream is to perform real-time analytics, but it’s quite common to add a tap to initiate a secondary streamwhere analytics, e.g. a field-value-counter, is applied to the same data being ingested through a primarystream. You will see both approaches in the examples below.
17.2 Predictive analytics
Spring XD’s support for implementing predictive analytics by scoring analytical models thatleverage machine learning algorithms begins with an extensible class library foundation upon whichimplementations can be built, such as the PMML Module that we describe here.
That module integrates with the JPMML-Evaluator library that provides support for a wide range of modeltypes and is interoperable with models exported from R, Rattle, KNIME, and RapidMiner. For counterand gauge analytics, in-memory and Redis implementations are provided.
Incorporating the evaluation of machine learning algorithms into stream processing is as easy as usingany other processing module. Here is a simple example
http --outputType=application/x-xd-tuple | analytic-pmml
--location=/models/iris-flower-naive-bayes.pmml.xml
--inputFieldMapping=
'sepalLength:Sepal.Length,
sepalWidth:Sepal.Width,
petalLength:Petal.Length,
petalWidth:Petal.Width'
--outputFieldMapping='Predicted_Species:predictedSpecies' | log"
The http source converts posted data to a Tuple. The analytic-pmml processor loads the modelfrom the specifed file and creates two mappings so that fields from the Tuple can be mapped into theinput and output model names. The log sink writes the payload of the event message to the log fileof the XD container.
Posting the following JSON data to the http source
{
"sepalLength": "6.4",
"sepalWidth": "3.2",
"petalLength": "4.5",
"petalWidth": "1.5"
}
will produce output in the log file as shown below.

Spring XD Guide
1.3.2.RELEASE Spring XD 238
{
"id":"1722ec00-baad-11e3-b988-005056c00008",
"timestamp":1396473833152,
"sepalLength":"6.4",
"sepalWidth":"3.2",
"petalLength":"4.5",
"petalWidth":"1.5",
"predictedSpecies":"versicolor"
}
The next section on analytical models goes into more detail on the general infrastructure
17.3 Analytical Models
We provide some core abstractions for implementing analytical models in stream processingapplications. The main interface for integrating analytical models is Analytic. Some analytical modelsneed to adjust the domain input and the model output in some way, therefore we provide a special baseclass MappedAnalytic which has core abstractions for implementing that mapping via InputMapperand OutputMapper.
Since Spring XD 1.0.0.M6 we support the integration of analytical models, also called statistical modelsor mining models, that are defined via PMML. PMML is the abbreviation for Predictive Model MarkupLanguage and is a standard XML representation that allows specifications of different mining models,their ensembles, and associated preprocessing.
Note
PMML is maintained by the Data Mining Group (DMG) and supported by several state-of-the-art statistics and data mining software tools such as InfoSphere Warehouse, R / Rattle, SASEnterprise Miner, SPSS®, and Weka. The current version of the PMML specification is 4.2 atthe time of this writing. Applications can produce and consume PMML models, thus allowing ananalytical model created in one application to be implemented and used for scoring or predictionin another.
PMML is just one of many other technologies that one can integrate to implement analytics with, morewill follow in upcoming releases.
Modeling and Evaluation
Analytical models are usually defined by a statistician aka data scientist or quant by using somestatistical tool to analyze the data and build an appropriate model. In order to implement those modelsin a business application they are usually transformed and exported in some way (e.g. in the form of aPMML definition). This model is then loaded into the application which then evaluates it against a giveninput (event, tuple, example).
Modeling
Analytical models can be defined in various ways. For the sake of brevity we use R from the r-project todemonstrate how easy it is to export an analytical model to PMML and use it later in stream processing.
For our example we use the iris example dataset in R to generate a classifier for iris flower species byapplying the Naive Bayes algorithm.
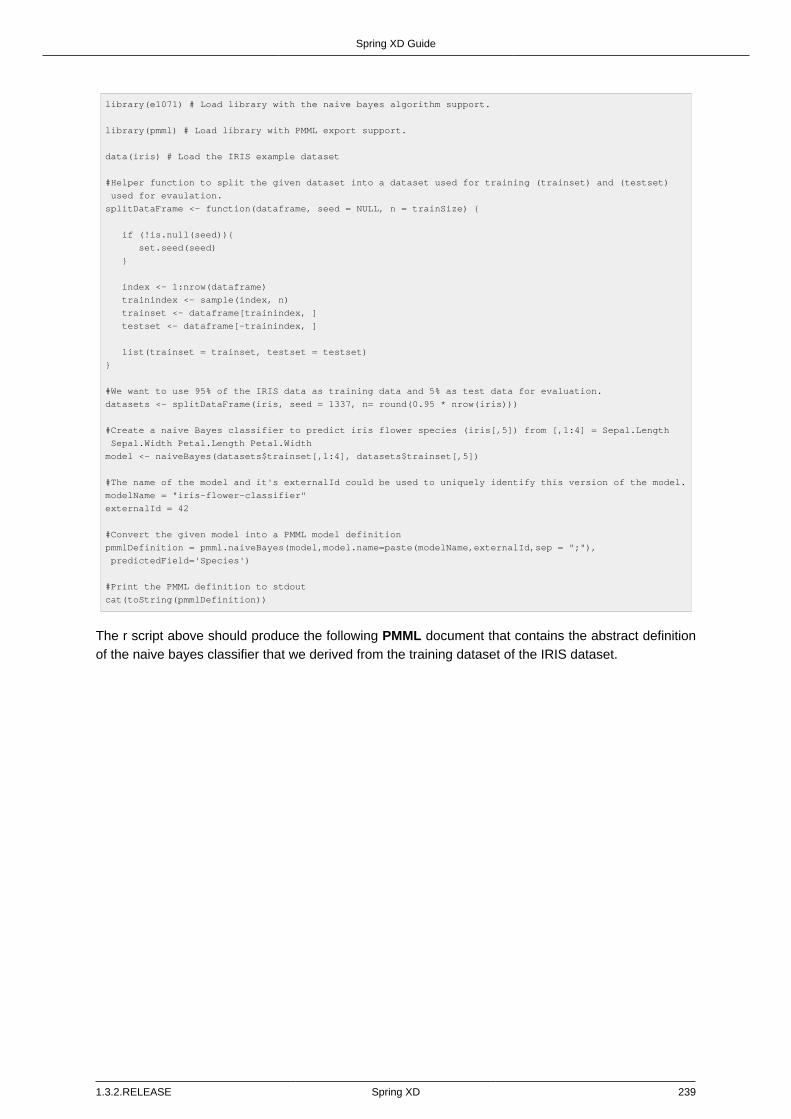
Spring XD Guide
1.3.2.RELEASE Spring XD 239
library(e1071) # Load library with the naive bayes algorithm support.
library(pmml) # Load library with PMML export support.
data(iris) # Load the IRIS example dataset
#Helper function to split the given dataset into a dataset used for training (trainset) and (testset)
used for evaulation.
splitDataFrame <- function(dataframe, seed = NULL, n = trainSize) {
if (!is.null(seed)){
set.seed(seed)
}
index <- 1:nrow(dataframe)
trainindex <- sample(index, n)
trainset <- dataframe[trainindex, ]
testset <- dataframe[-trainindex, ]
list(trainset = trainset, testset = testset)
}
#We want to use 95% of the IRIS data as training data and 5% as test data for evaluation.
datasets <- splitDataFrame(iris, seed = 1337, n= round(0.95 * nrow(iris)))
#Create a naive Bayes classifier to predict iris flower species (iris[,5]) from [,1:4] = Sepal.Length
Sepal.Width Petal.Length Petal.Width
model <- naiveBayes(datasets$trainset[,1:4], datasets$trainset[,5])
#The name of the model and it's externalId could be used to uniquely identify this version of the model.
modelName = "iris-flower-classifier"
externalId = 42
#Convert the given model into a PMML model definition
pmmlDefinition = pmml.naiveBayes(model,model.name=paste(modelName,externalId,sep = ";"),
predictedField='Species')
#Print the PMML definition to stdout
cat(toString(pmmlDefinition))
The r script above should produce the following PMML document that contains the abstract definitionof the naive bayes classifier that we derived from the training dataset of the IRIS dataset.

Spring XD Guide
1.3.2.RELEASE Spring XD 240
<PMML version="4.1" xmlns="http://www.dmg.org/PMML-4_1" xmlns:xsi="http://www.w3.org/2001/XMLSchema-
instance" xsi:schemaLocation="http://www.dmg.org/PMML-4_1 http://www.dmg.org/v4-1/pmml-4-1.xsd">
<Header copyright="Copyright (c) 2014 tom" description="NaiveBayes Model">
<Extension name="user" value="tom" extender="Rattle/PMML"/>
<Application name="Rattle/PMML" version="1.4"/>
<Timestamp>2014-04-02 13:22:15</Timestamp>
</Header>
<DataDictionary numberOfFields="6">
<DataField name="Species" optype="categorical" dataType="string">
<Value value="setosa"/>
<Value value="versicolor"/>
<Value value="virginica"/>
</DataField>
<DataField name="Sepal.Length" optype="continuous" dataType="double"/>
<DataField name="Sepal.Width" optype="continuous" dataType="double"/>
<DataField name="Petal.Length" optype="continuous" dataType="double"/>
<DataField name="Petal.Width" optype="continuous" dataType="double"/>
<DataField name="DiscretePlaceHolder" optype="categorical" dataType="string">
<Value value="pseudoValue"/>
</DataField>
</DataDictionary>
<NaiveBayesModel modelName="iris-flower-classifier;42"
functionName="classification" threshold="0.001">
<MiningSchema>
<MiningField name="Species" usageType="predicted"/>
<MiningField name="Sepal.Length" usageType="active"/>
<MiningField name="Sepal.Width" usageType="active"/>
<MiningField name="Petal.Length" usageType="active"/>
<MiningField name="Petal.Width" usageType="active"/>
<MiningField name="DiscretePlaceHolder" usageType="active"
missingValueReplacement="pseudoValue"/>
</MiningSchema>
<Output>
<OutputField name="Predicted_Species" feature="predictedValue"/>
<OutputField name="Probability_setosa" optype="continuous"
dataType="double" feature="probability" value="setosa"/>
<OutputField name="Probability_versicolor" optype="continuous"
dataType="double" feature="probability" value="versicolor"/>
<OutputField name="Probability_virginica" optype="continuous"
dataType="double" feature="probability" value="virginica"/>
</Output>
<BayesInputs>
<Extension>
<BayesInput fieldName="Sepal.Length">
<TargetValueStats>
<TargetValueStat value="setosa">
<GaussianDistribution mean="5.006" variance="0.124248979591837"/>
</TargetValueStat>
<TargetValueStat value="versicolor">
<GaussianDistribution mean="5.8953488372093" variance="0.283311184939092"/>
</TargetValueStat>
<TargetValueStat value="virginica">
<GaussianDistribution mean="6.58163265306122" variance="0.410697278911565"/>
</TargetValueStat>
</TargetValueStats>
</BayesInput>
</Extension>
<Extension>
<BayesInput fieldName="Sepal.Width">
<TargetValueStats>
<TargetValueStat value="setosa">
...

Spring XD Guide
1.3.2.RELEASE Spring XD 241
...
<GaussianDistribution mean="3.428" variance="0.143689795918367"/>
</TargetValueStat>
<TargetValueStat value="versicolor">
<GaussianDistribution mean="2.76279069767442" variance="0.0966777408637874"/>
</TargetValueStat>
<TargetValueStat value="virginica">
<GaussianDistribution mean="2.97142857142857" variance="0.105833333333333"/>
</TargetValueStat>
</TargetValueStats>
</BayesInput>
</Extension>
<Extension>
<BayesInput fieldName="Petal.Length">
<TargetValueStats>
<TargetValueStat value="setosa">
<GaussianDistribution mean="1.462" variance="0.0301591836734694"/>
</TargetValueStat>
<TargetValueStat value="versicolor">
<GaussianDistribution mean="4.21627906976744" variance="0.236633444075305"/>
</TargetValueStat>
<TargetValueStat value="virginica">
<GaussianDistribution mean="5.55510204081633" variance="0.310442176870748"/>
</TargetValueStat>
</TargetValueStats>
</BayesInput>
</Extension>
<Extension>
<BayesInput fieldName="Petal.Width">
<TargetValueStats>
<TargetValueStat value="setosa">
<GaussianDistribution mean="0.246" variance="0.0111061224489796"/>
</TargetValueStat>
<TargetValueStat value="versicolor">
<GaussianDistribution mean="1.30697674418605" variance="0.042093023255814"/>
</TargetValueStat>
<TargetValueStat value="virginica">
<GaussianDistribution mean="2.02448979591837" variance="0.0768877551020408"/>
</TargetValueStat>
</TargetValueStats>
</BayesInput>
</Extension>
<BayesInput fieldName="DiscretePlaceHolder">
<PairCounts value="pseudoValue">
<TargetValueCounts>
<TargetValueCount value="setosa" count="50"/>
<TargetValueCount value="versicolor" count="43"/>
<TargetValueCount value="virginica" count="49"/>
</TargetValueCounts>
</PairCounts>
</BayesInput>
</BayesInputs>
<BayesOutput fieldName="Species">
<TargetValueCounts>
<TargetValueCount value="setosa" count="50"/>
<TargetValueCount value="versicolor" count="43"/>
<TargetValueCount value="virginica" count="49"/>
</TargetValueCounts>
</BayesOutput>
</NaiveBayesModel>
</PMML>
Evaluation
The above defined PMML model can be evaluated in a Spring XD stream definition by using theanalytic-pmml module as a processor in your stream definition. The actual evaluation of the PMML isperformed via the PmmlAnalytic which uses the jpmml-evaluator library.

Spring XD Guide
1.3.2.RELEASE Spring XD 242
Model Selection
The PMML standard allows multiple models to be defined within a single PMML document. The modelto be used can be configured through the modelName option.
NOTE The PMML standard also supports other ways for selection models, e.g. based on a predicate.This is currently not supported.
In order to perform the evaluation in Spring XD you need to save the generated PMML document tosome folder, typically the with the extension "pmml.xml". For this example we save the PMML documentunder the name iris-flower-classification-naive-bayes-1.pmml.xml.
In the following example we set up a stream definition with an http source that produces iris-flower-records that are piped to the analytic-pmml module which applies our iris flower classifier to predictthe species of a given flower record. The result of that is a new record extended by a new attributepredictedSpecies which simply sent to a log sink.
The definition of the stream, which we call iris-flower-classification, looks as follows:
xd:>stream create --name iris-flower-classification
--definition "http --outputType=application/x-xd-tuple | analytic-pmml
--location=/models/iris-flower-classification-naive-bayes-1.pmml.xml
--inputFieldMapping='sepalLength:Sepal.Length,
sepalWidth:Sepal.Width,
petalLength:Petal.Length,
petalWidth:Petal.Width'
--outputFieldMapping='Predicted_Species:predictedSpecies' | log" --deploy
• The location parameter can be used to specify the exact location of the pmml document. The valuemust be a valid spring resource location
• The inputFieldMapping parameter defines a mapping of domain input fields to model input fields. Itis just a list of fields or optional field:alias mappings to control which fields and how they are goingto end up in the model-input. If no inputFieldMapping is defined then all domain input fields are usedas model input.
• The outputFieldMapping parameter defines a mapping of model output fields to domain output fieldswith semantics analog to the inputFieldMapping.
• The optional modelName parameter of the analytic-pmml module can be used to refer to a particularnamed model within the PMML definition. If modelName is not defined the first model is selected bydefault.
NOTE Some analytical models like for instance association rules require a different typ of mapping.You can implement your own custom mapping strategies by implementing a custom InputMapper andOutputMapper and defining a new PmmlAnalytic or TuplePmmlAnalytic bean that uses your custommappers.
After the stream has been successfully deployed to Spring XD we can eventually start to throw somedata at it by issuing the following http request via the XD-Shell (or curl, or any other tool):
Note that our example record contains no information about which species the example belongs to -this will be added by our classifier.
xd:>http post --target http://localhost:9000 --contentType application/json --data "{ \"sepalLength\":
6.4, \"sepalWidth\": 3.2, \"petalLength\":4.5, \"petalWidth\":1.5 }"

Spring XD Guide
1.3.2.RELEASE Spring XD 243
After posting the above json document to the stream we should see the following output in the console:
{
"id":"1722ec00-baad-11e3-b988-005056c00008"
, "timestamp":1396473833152
, "sepalLength":"6.4"
, "sepalWidth":"3.2"
, "petalLength":"4.5"
, "petalWidth":"1.5"
, "predictedSpecies":"versicolor"
}
NOTE the generated field predictedSpecies which now identifies our input as belonging to the irisspecies versicolor.
We verify that the generated PMML classifier produces the same result as R by executing the issuingthe following commands in rproject:
datasets$testset[,1:4][1,]
# This is the first example record that we sent via the http post.
Sepal.Length Sepal.Width Petal.Length Petal.Width
52 6.4 3.2 4.5 1.5
#Predict the class for the example record by using our naiveBayes model.
> predict(model, datasets$testset[,1:4][1,])
[1] versicolor
17.4 Counters and Gauges included with Spring XD
See the Counters and Gauges section for a list of available metrics included with Spring XD, along withconfiguration options and examples.

Spring XD Guide
1.3.2.RELEASE Spring XD 244
18. Tuples
18.1 Introduction
The Tuple class is a central data structure in Spring XD. It is an ordered list of values that can beretrieved by name or by index. Tuples are created by a TupleBuilder and are immutable. The valuesthat are stored can be of any type and null values are allowed.
The underlying Message class that moves data from one processing step to the next can have anarbitrary data type as its payload. Instead of creating a custom Java class that encapsulates theproperties of what is read or set in each processing step, the Tuple class can be used instead.Processing steps can be developed that read data from specific named values and write data to specificnamed values.
There are accessor methods that perform type conversion to the basic primitive types as well asBigDecimal and Date. This avoids you from having to cast the values to specific types. Instead you canrely on the Tuple’s type conversion infastructure to perform the conversion.
The Tuple’s types conversion is performed by Spring’s Type Conversion Infrastructure which supportscommonly encountered type conversions and is extensible.
There are several overloads for getters that let you provide default values for primitive types should thefield you are looking for not be found. Date format patterns and Locale aware NumberFormat conversionare also supported. A best effort has been made to preserve the functionality available in Spring Batch’sFieldSet class that has been extensively used for parsing String based data in files.
Creating a Tuple
The TupleBuilder class is how you create new Tuple instances. The most basic case is
Tuple tuple = TupleBuilder.tuple().of("foo", "bar");
This creates a Tuple with a single entry, a key of foo with a value of bar. You can also use a staticimport to shorten the syntax.
import static org.springframework.xd.tuple.TupleBuilder.tuple;
Tuple tuple = tuple().of("foo", "bar");
You can use the of method to create a Tuple with up to 4 key-value pairs.
Tuple tuple2 = tuple().of("up", 1, "down", 2);
Tuple tuple3 = tuple().of("up", 1, "down", 2, "charm", 3 );
Tuple tuple4 = tuple().of("up", 1, "down", 2, "charm", 3, "strange", 4);
To create a Tuple with more then 4 entries use the fluent API that strings together the put method andterminates with the build method
Tuple tuple6 = tuple().put("up", 1)
.put("down", 2)
.put("charm", 3)
.put("strange", 4)
.put("bottom", 5)
.put("top", 6)
.build();

Spring XD Guide
1.3.2.RELEASE Spring XD 245
To customize the underlying type conversion system you can specify the DateFormat to usefor converting String to Date as well as the NumberFormat to use based on a Locale. Formore advanced customization of the type conversion system you can register an instance of aFormattingConversionService. Use the appropriate setter methods on TupleBuilder to makethese customizations.
You can also create a Tuple from a list of String field names and a List of Object values.
Object[] tokens = new String[]
{ "TestString", "true", "C", "10", "-472", "354224", "543", "124.3", "424.3", "1,3245",
null, "2007-10-12", "12-10-2007", "" };
String[] nameArray = new String[]
{ "String", "Boolean", "Char", "Byte", "Short", "Integer", "Long", "Float", "Double",
"BigDecimal", "Null", "Date", "DatePattern", "BlankInput" };
List<String> names = Arrays.asList(nameArray);
List<Object> values = Arrays.asList(tokens);
tuple = tuple().ofNamesAndValues(names, values);
Getting Tuple values
There are getters for all the primitive types and also for BigDecimal and Date. The primitive types are
• Boolean
• Byte
• Char
• Double
• Float
• Int
• Long
• Short
• String
Each getter has an overload for providing a default value. You can access the values either by fieldname or by index.
The overloaded methods for asking for a value to be converted into an integer are
• int getInt(int index)
• int getInt(String name)
• int getInt(int index, int defaultValue)
• int getInt(String name, int defaultValue)
There are similar methods for other primitive types. For Boolean there is a special case of providingthe String value that represents a trueValue.
• boolean getBoolean(int index, String trueValue)
• boolean getBoolean(String name, String trueValue)

Spring XD Guide
1.3.2.RELEASE Spring XD 246
If the value that is stored for a given field or index is null and you ask for a primitive type, the standardJava defalt value for that type is returned.
The getString method will remove and leading and trailing whitespace. If you want to get the Stringand preserve whitespace use the methods getRawString
There is extra functionality for getting `Date`s. The are overloaded getters that take a String based dateformat
• Date getDateWithPattern(int index, String pattern)
• Date getDateWithPattern(int index, String pattern, Date defaultValue)
• Date getDateWithPattern(String name, String pattern)
• Date getDateWithPattern(String name, String pattern, Date defaultValue)
There are a few other more generic methods available. Their functionality should be obvious from theirnames
• size()
• getFieldCount()
• getFieldNames()
• getFieldTypes()
• getTimestamp() - the time the tuple was created - milliseconds since epoch
• getId() - the UUID of the tuple
• Object getValue(int index)
• Object getValue(String name)
• T getValue(int index, Class<T> valueClass)
• T getValue(String name, Class<T> valueClass)
• List<Object> getValues()
• List<String> getFieldNames()
• boolean hasFieldName(String name)
Using SpEL expressions to filter a tuple
SpEL provides support to transform a source collection into another by selecting from its entries. Wemake use of this functionalty to select a elements of a the tuple into a new one.
Tuple tuple = tuple().put("red", "rot")
.put("brown", "braun")
.put("blue", "blau")
.put("yellow", "gelb")
.put("beige", "beige")
.build();
Tuple selectedTuple = tuple.select("?[key.startsWith('b')]");
assertThat(selectedTuple.size(), equalTo(3));
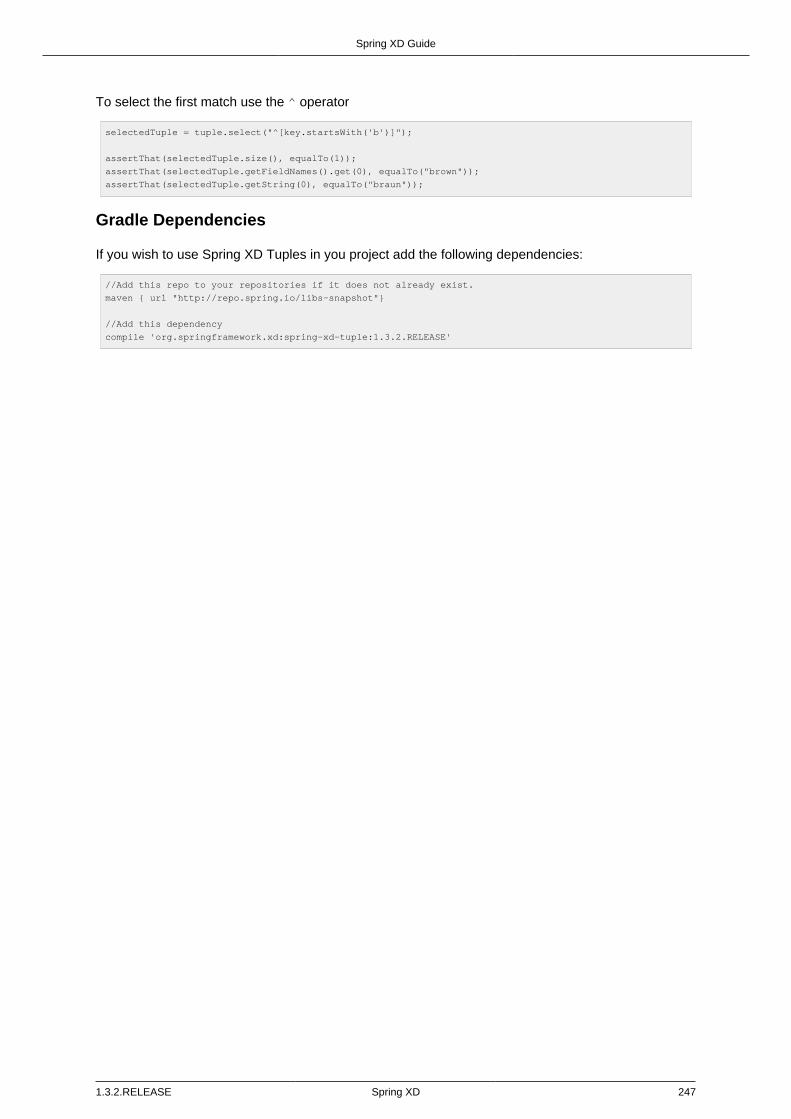
Spring XD Guide
1.3.2.RELEASE Spring XD 247
To select the first match use the ^ operator
selectedTuple = tuple.select("^[key.startsWith('b')]");
assertThat(selectedTuple.size(), equalTo(1));
assertThat(selectedTuple.getFieldNames().get(0), equalTo("brown"));
assertThat(selectedTuple.getString(0), equalTo("braun"));
Gradle Dependencies
If you wish to use Spring XD Tuples in you project add the following dependencies:
//Add this repo to your repositories if it does not already exist.
maven { url "http://repo.spring.io/libs-snapshot"}
//Add this dependency
compile 'org.springframework.xd:spring-xd-tuple:1.3.2.RELEASE'

Spring XD Guide
1.3.2.RELEASE Spring XD 248
19. Type Conversion
19.1 Introduction
Spring XD allows you to declaratively configure type conversion in stream definitions using the inputTypeand outputType module options. Note that general type conversion may also be accomplished easilywithin a transformer or a custom module. Currently, Spring XD natively supports the following typeconversions commonly used in streams:
• JSON to/from POJO
• JSON to/from org.springframework.xd.tuple.Tuple
• Object to/from byte[] : Either the raw bytes serialized for remote transport, bytes emitted by a module,or converted to bytes using Java serialization(requires the object to be Serializable)
• String to/from byte[]
• Object to plain text (invokes the object’s toString() method)
Where JSON represents either a byte array or String payload containing JSON. Currently, Objectsmay be converted from a JSON byte array or String. Converting to JSON always produces a String.Registration of custom type converters is covered in this section.
19.2 MIME types
inputType and outputType values are parsed as media types, e.g., application/
json or text/plain;charset=UTF-8. MIME types are especially useful for indicatinghow to convert to String or byte[] content. Spring XD also uses MIME type formatto represent Java types, using the general type application/x-java-object with atype parameter. For example, application/x-java-object;type=java.util.Map orapplication/x-java-object;type=com.bar.Foo can be used in an inputType convertion, --inputType='application/x-java-object;type=com.bar.Foo'. Note that the type is quotedwith '' to avoid parsing errors produced by the ; character or other invalid characters. For convenience,you can use the class name by itself and Spring XD will translate a valid class name to the correspondingMIME type. In addition, Spring XD provides custom MIME types, notably, application/x-xd-tupleto specify a Tuple.
19.3 Stream Definition Examples
19.4 POJO to JSON
Type conversion will likely come up when implementing a custom module which produces or consumesa custom domain object. For example, you want to create a stream that integrates with a legacy systemthat includes custom domain types in its API. To process custom domain types directly minimallyrequires these types to be defined in Spring XD’s class path. This approach will be cumbersome tomaintain when the domain model changes. The recommended approach is to convert such types toJSON at the source, or back to POJO at the sink. You can do this by declaring the required conversionsin the stream definition:
customPojoSource --outputType=application/json |p1 | p2 | ... | customPojoSink --inputType=application/
x-java-object;type=com.acme.MyDomainType

Spring XD Guide
1.3.2.RELEASE Spring XD 249
Note that the sink above does require the declared type to be in the module’s classpath to performthe JSON to POJO conversion. Generally, POJO to JSON does not require the Java class. Once thepayload is converted to JSON, Spring XD provided transformers and filters (p1, p2, etc.) can evaluatethe payload contents using JsonPath functions in SpEL expressions. Alternately, you can convert theJSON to a Tuple, as shown in the following example.
JSON to Tuple
Sometimes it is convenient to convert JSON content to a Tuple in order to evaluate and access individualfield values.
xd:> stream create tuple --definition "http | filter --inputType=application/
x-xd-tuple --expression=payload.hasFieldName('hello') | transform --
expression=payload.getString('hello').toUpperCase() | log" --deploy
Created and deployed new stream 'tuple'
Note inputType=application/x-xd-tuple on the filter module will cause the payload to be converted to aTuple at the filter’s input channel. Thus, subsequent expressions are evaluated on a Tuple object. Herewe invoke the Tuple methods hasFieldName('hello') on the filter and getString('hello') onthe transformer. The output of the http source is expected to be JSON in this case. We set the Content-Type header to tell Spring XD that the payload is JSON.
xd:>http post --data {"hello":"world","foo":"bar"} --contentType application/json --target http://
localhost:9000
> POST (application/json;charset=UTF-8) http://localhost:9000 {"hello":"world","foo":"bar"}
> 200 OK
In the Spring XD console log, you should see something like:
13:19:45,054 INFO pool-42-thread-4 sink.tuple - WORLD
Java Serialization
The following serializes a java.io.Serializable object to a file. Presumably the foo module outputs aSerializable type. If not, this will result in an exception. If remote transport is configured, the output offoo will be marshalled using Spring XD’s internal serialization. The object will be unmarshalled in thefile module and then converted to a byte array using Java serialization.
foo | --inputType=application/x-java-serialized-object file
19.5 MIME types and Java types
Internally, Spring XD implements type conversion using Spring Integration’s data type channels. Thedata type channel converts payloads to the configured data type using Spring’s MessageConverter.
Note
The use of MessageCoverter for data type channels was introduced in Spring Integration 4 to passthe Message to the converter method to allow it to access the Message’s content-type header.This provides greater flexibility. For example, it is now possible to support multiple strategies forconverting a String or byte array to a POJO, based on the content-type header.
When Spring XD deploys a module with a declared type conversion, it modifies the module’s input and/or output channel definition to set the required Java type and registers MessageConverters associated

Spring XD Guide
1.3.2.RELEASE Spring XD 250
with the target MIME type and Java type to the channel. The type conversions Spring XD provides outof the box are summarized in the following table:
Source Payload Target Payload content-typeheader
outputType/inputType
Comments
POJO JSON String ignored application/json
Tuple JSON String ignored application/json JSON is tailoredfor Tuple
POJO String (toString()) ignored text/plain,java.lang.String
POJO byte[] (java.ioserialized)
ignored application/x-java-serialized-object
JSON byte[] orString
POJO application/json(or none)
application/x-java-object
byte[] or String Serializable application/x-java-serialized-object
application/x-java-object
JSON byte[] orString
Tuple application/json(or none)
application/x-xd-tuple
byte[] String any text/plain,java.lang.String
will apply anyCharset specifiedin the content-type header
String byte[] any application/octet-stream
will apply anyCharset specifiedin the content-type header
Caveats
Note that inputType and outputType parameters only apply to payloads that require type conversion.For example, if a module produces an XML string with outputType=application/json, the payload will notbe converted from XML to JSON. This is because the payload at the module’s output channel is alreadya String so no conversion will be applied at runtime.

Part II. DevelopingModules and Extensions
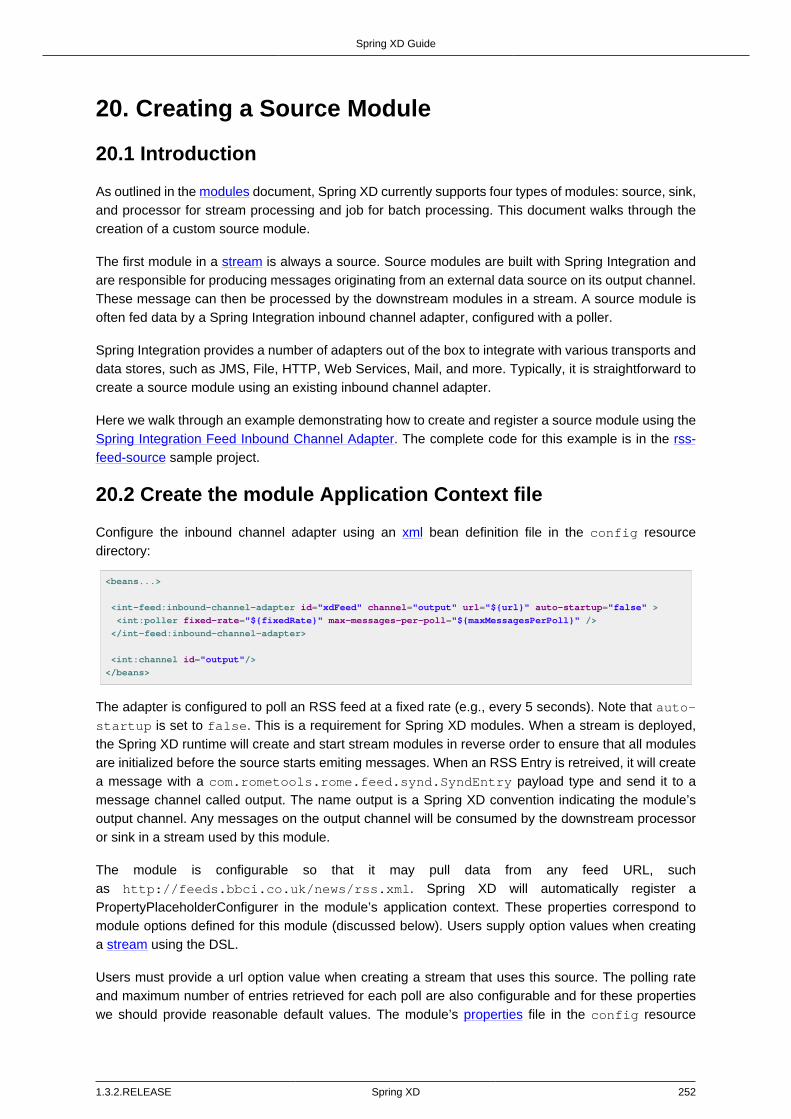
Spring XD Guide
1.3.2.RELEASE Spring XD 252
20. Creating a Source Module
20.1 Introduction
As outlined in the modules document, Spring XD currently supports four types of modules: source, sink,and processor for stream processing and job for batch processing. This document walks through thecreation of a custom source module.
The first module in a stream is always a source. Source modules are built with Spring Integration andare responsible for producing messages originating from an external data source on its output channel.These message can then be processed by the downstream modules in a stream. A source module isoften fed data by a Spring Integration inbound channel adapter, configured with a poller.
Spring Integration provides a number of adapters out of the box to integrate with various transports anddata stores, such as JMS, File, HTTP, Web Services, Mail, and more. Typically, it is straightforward tocreate a source module using an existing inbound channel adapter.
Here we walk through an example demonstrating how to create and register a source module using theSpring Integration Feed Inbound Channel Adapter. The complete code for this example is in the rss-feed-source sample project.
20.2 Create the module Application Context file
Configure the inbound channel adapter using an xml bean definition file in the config resourcedirectory:
<beans...>
<int-feed:inbound-channel-adapter id="xdFeed" channel="output" url="${url}" auto-startup="false" >
<int:poller fixed-rate="${fixedRate}" max-messages-per-poll="${maxMessagesPerPoll}" />
</int-feed:inbound-channel-adapter>
<int:channel id="output"/>
</beans>
The adapter is configured to poll an RSS feed at a fixed rate (e.g., every 5 seconds). Note that auto-startup is set to false. This is a requirement for Spring XD modules. When a stream is deployed,the Spring XD runtime will create and start stream modules in reverse order to ensure that all modulesare initialized before the source starts emiting messages. When an RSS Entry is retreived, it will createa message with a com.rometools.rome.feed.synd.SyndEntry payload type and send it to amessage channel called output. The name output is a Spring XD convention indicating the module’soutput channel. Any messages on the output channel will be consumed by the downstream processoror sink in a stream used by this module.
The module is configurable so that it may pull data from any feed URL, suchas http://feeds.bbci.co.uk/news/rss.xml. Spring XD will automatically register aPropertyPlaceholderConfigurer in the module’s application context. These properties correspond tomodule options defined for this module (discussed below). Users supply option values when creatinga stream using the DSL.
Users must provide a url option value when creating a stream that uses this source. The polling rateand maximum number of entries retrieved for each poll are also configurable and for these propertieswe should provide reasonable default values. The module’s properties file in the config resource

Spring XD Guide
1.3.2.RELEASE Spring XD 253
directory contains Module Options Metadata including a description, type, and optional default value foreach property. The metadata supports features like auto-completion in the Spring XD shell and optionvalidation:
options.url.description = the URL of the RSS feed
options.url.type = java.lang.String
options.fixedRate.description = the fixed rate polling interval specified in milliseconds
options.fixedRate.default = 5000
options.fixedRate.type = int
options.maxMessagesPerPoll.description = the maximum number of messages per poll
options.maxMessagesPerPoll.default = 100
options.maxMessagesPerPoll.type = int
Alternately, you can write a POJO to define the metadata. Using a Java class provides better validationalong with additional features and requires that the class be packaged as part of the module.
20.3 Create a Module Project
This section covers the setup of a standalone project containing the module configuration and somecode for testing the module. This example uses Maven but Spring XD supports Gradle as well.
Take a look at the pom file for this example. You will see it declares spring-xd-module-parent asits parent and declares a dependency on spring-integration-feed which provides the inboundchannel adapter. The parent pom provides everything else you need. We also need to configurerepositories to access the parent pom and any other dependencies. The required xml file containingthe bean definitions and properties file are located in src\main\resources\config. In this case,we have elected to use a custom transformer to convert the output of the feed inbound adapter to aJSON string.
<beans ...>
<int-feed:inbound-channel-adapter id="xdFeed" channel="to.json" url="${url}" auto-startup="false">
<int:poller fixed-rate="${fixedRate}" max-messages-per-poll="${maxMessagesPerPoll}" />
</int-feed:inbound-channel-adapter>
<int:transformer input-channel="to.json" output-channel="output">
<bean class="com.acme.SyndEntryJsonTransformer"/>
</int:transformer>
<int:channel id="output"/>
</beans>
The project README contains a detailed explanation of why this transformer is needed, but such thingsare easily accomplished with Spring Integration.
Create a Spring Integration test
The first level of testing should ensure that the module’s Application Context is loaded and that themessage flow works as expected independent of Spring XD. In this case, we need to wrap the moduleapplication context in a test context that provides a property placeholder (the Spring XD runtime doesthis for you). In addition, it is convenient to override the module’s output channel with a queue channelso that the test will block until a message is received from the feed.
Add the following configuration in the appropriate location under src/test/resources/:
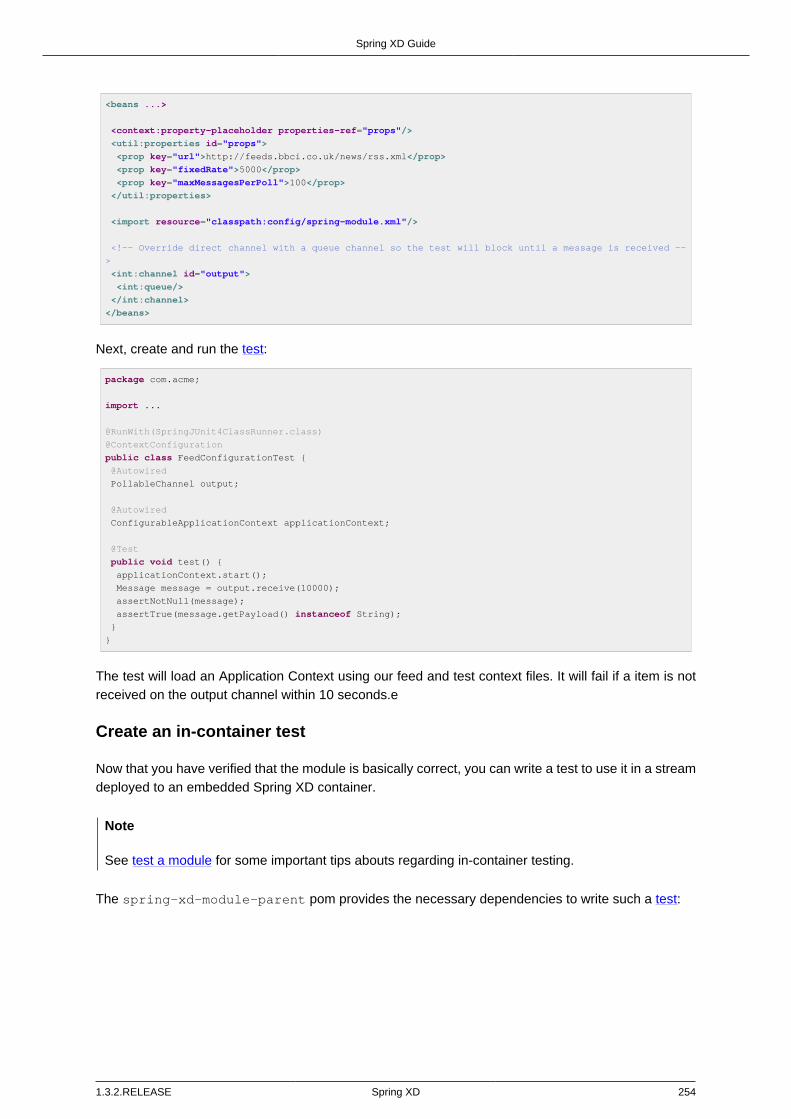
Spring XD Guide
1.3.2.RELEASE Spring XD 254
<beans ...>
<context:property-placeholder properties-ref="props"/>
<util:properties id="props">
<prop key="url">http://feeds.bbci.co.uk/news/rss.xml</prop>
<prop key="fixedRate">5000</prop>
<prop key="maxMessagesPerPoll">100</prop>
</util:properties>
<import resource="classpath:config/spring-module.xml"/>
<!-- Override direct channel with a queue channel so the test will block until a message is received --
>
<int:channel id="output">
<int:queue/>
</int:channel>
</beans>
Next, create and run the test:
package com.acme;
import ...
@RunWith(SpringJUnit4ClassRunner.class)
@ContextConfiguration
public class FeedConfigurationTest {
@Autowired
PollableChannel output;
@Autowired
ConfigurableApplicationContext applicationContext;
@Test
public void test() {
applicationContext.start();
Message message = output.receive(10000);
assertNotNull(message);
assertTrue(message.getPayload() instanceof String);
}
}
The test will load an Application Context using our feed and test context files. It will fail if a item is notreceived on the output channel within 10 seconds.e
Create an in-container test
Now that you have verified that the module is basically correct, you can write a test to use it in a streamdeployed to an embedded Spring XD container.
Note
See test a module for some important tips abouts regarding in-container testing.
The spring-xd-module-parent pom provides the necessary dependencies to write such a test:

Spring XD Guide
1.3.2.RELEASE Spring XD 255
package com.acme;
import ...
public class FeedSourceModuleIntegrationTest {
private static SingleNodeApplication application;
private static int RECEIVE_TIMEOUT = 6000;
/**
* Start the single node container, binding random unused ports, etc. to not conflict with any other
instances
* running on this host. Configure the ModuleRegistry to include the project module.
*/
@BeforeClass
public static void setUp() {
RandomConfigurationSupport randomConfigSupport = new RandomConfigurationSupport();
application = new SingleNodeApplication().run();
SingleNodeIntegrationTestSupport singleNodeIntegrationTestSupport = new
SingleNodeIntegrationTestSupport(application);
singleNodeIntegrationTestSupport.addModuleRegistry(new
SingletonModuleRegistry(ModuleType.source, "feed"));
}
@Test
public void test() {
String url = "http://feeds.bbci.co.uk/news/rss.xml";
SingleNodeProcessingChainConsumer chain = chainConsumer(application, "feedStream", String.format("feed
--url='%s'", url));
Object payload = chain.receivePayload(RECEIVE_TIMEOUT);
assertTrue(payload instanceof String);
chain.destroy();
}
}
The above test configures an and starts embedded Spring XD runtime (SingleNodeApplication) todeploy a stream that uses the module under test.
The SingleNodeProcessingChainConsumer can test a stream that does not include a sink. Thechain itself provides an in-memory sink to access the stream’s output directly. In this case, we use thechain to test the source in isolation. The above test is equivalent to deploying following stream definition:
feed --url='http://feeds.bbci.co.uk/news/rss.xml' > queue:aNamedChannel
and the chain consumes messages on the named queue channel. At the end of each test method, thechain should be destroyed to destroy these internal resources and restore the initial state of the SpringXD container.
Note
The spring-xd-module-parent Maven pom includes a tasks to install a local message busimplementation under lib in the project root to enable a local transport provider for the embeddedSpring XD container. It is necessary to run maven process-resources or a downstream goal(e.g., compile, test, package) once in order for this test to work correctly.
20.4 Install the Module
We have implemented and tested the module using Spring Integration directly and also by deployingthe module to an embedded Spring XD container. Time to install the module to Spring XD!

Spring XD Guide
1.3.2.RELEASE Spring XD 256
The next step is to package the module as an uber-jar using maven:
$mvn package
This will build an uber-jar in target/rss-feed-source-1.0.0.BUILD-SNAPSHOT.jar. If youinspect the contents of this jar, you will see it includes the module configuration files, custom transformerclass, and dependent jars. Fire up the Spring XD runtime if it is not already running and, using the SpringXD Shell, install the module as a source named feed using the module upload command:
xd:>module upload --file [path-to]/rss-source-feed/target/rss-source-feed-1.0.0.BUILD-SNAPSHOT.jar --
name feed --type source
Also See registering a module for more details.
20.5 Test the source module
Once Spring XD is running, create a stream to test it the module. This stream will write SyndEntry objectsrendered as JSON to the Spring XD log:
xd:> stream create --name feedtest --definition "feed --url='http://feeds.bbci.co.uk/news/rss.xml' |
log" --deploy
You should start seeing messages like the following in the container log:
16:46:41,309 1.1.0.SNAP INFO xdbus.feedTest.0-1 sink.feedTest - {"uri":"http://
www.bbc.co.uk/sport/0/football/30700069","link":"http://www.bbc.co.uk/sport/0/
football/30700069","comments":null,"updatedDate":null,"title":"Gerrard to seal move
to LA Galaxy","description":{"type":"text/html","value":"Liverpool captain Steven
Gerrard is on the brink of finalising an 18-month deal to join MLS side Los Angeles
Galaxy.","mode":null,"interface":"com.rometools.rome.feed.synd.SyndContent"},"links":[],"contents":
[],"modules":[{"uri":"http://purl.org/dc/
elements/1.1/","title":null,"creator":null,"subject":null,"description":null,"publisher":null,"contributors":
[],"date":1420580673000,"type":null,"format":null,"identifier":null,"source":null,"language":null,"relation":null,"coverage":null,"rights":null,"sources":
[],"types":[],"formats":[],"identifiers":
[],"interface":"com.rometools.rome.feed.module.DCModule","creators":[],"titles":
[],"descriptions":[],"publishers":[],"contributor":null,"dates":[1420580673000],"languages":
[],"relations":[],"coverages":[],"rightsList":[],"subjects":[]}],"enclosures":
[],"authors":[],"contributors":[],"source":null,"wireEntry":null,"categories":
[],"interface":"com.rometools.rome.feed.synd.SyndEntry","titleEx":{"type":null,"value":"Gerrard to seal
move to LA
Galaxy","mode":null,"interface":"com.rometools.rome.feed.synd.SyndContent"},"publishedDate":1420580673000,"author":""}

Spring XD Guide
1.3.2.RELEASE Spring XD 257
21. Creating a Data Stream Processor
21.1 Introduction
This section covers how to create a processor module that uses stream processing libraries andruntimes.module. Spring XD 1.2 provides integration with Project Reactor Stream, RxJava Observables,and Spark Streaming. Creating a data stream processor in XD allows you to use a functionalprogramming model to filter, transform and aggregate data in a very concise and performant way. Thissection walks through implementing a custom processor module using each of these libraries.
21.2 Reactor Streams
Project Reactor provides a Stream API that is based on the Reactive Streams specification. Thespecification was jointly developed by twenty people from a dozen companies (Pivotal included) and hasthe goal of creating a standard for asynchronous stream processing with non-blocking back pressureon the JVM.
Tip
Explore Reactor with the reference guide.
To implement a Stream based processor module you need to implement the interfaceorg.springframework.xd.reactor.Processor
public interface Processor<I, O> {
/**
* Process a stream of messages and return an output stream. The input
* and output stream will be mapped onto receive/send operations on the message bus.
*
* @param inputStream Input Stream the receives messages from the message bus
* @return Output Publisher (Stream, Promise, or any valid Reactive Stream Publisher) of messages
sent to the message bus
*/
Publisher<O> process(Stream<I> inputStream);
}
Messages that are delivered on the Message Bus are accessed from the input Stream, which can bedirectly composed. The return value is the output Stream that is the result of applying various operationsto the input stream. The content of the output Stream is sent to the message bus for consumption byother processors or sinks.
Examples of operations you can perform on the Stream are map, flatMap, buffer, window, andreduce. The parameterized data type can be a org.springframework.messaging.Message,org.springframework.xd.tuple.Tuple, java.lang.Map or any other POJO. The followingexample uses the Tuple object to compute the average value of a measurement from a sample sizeof 5.
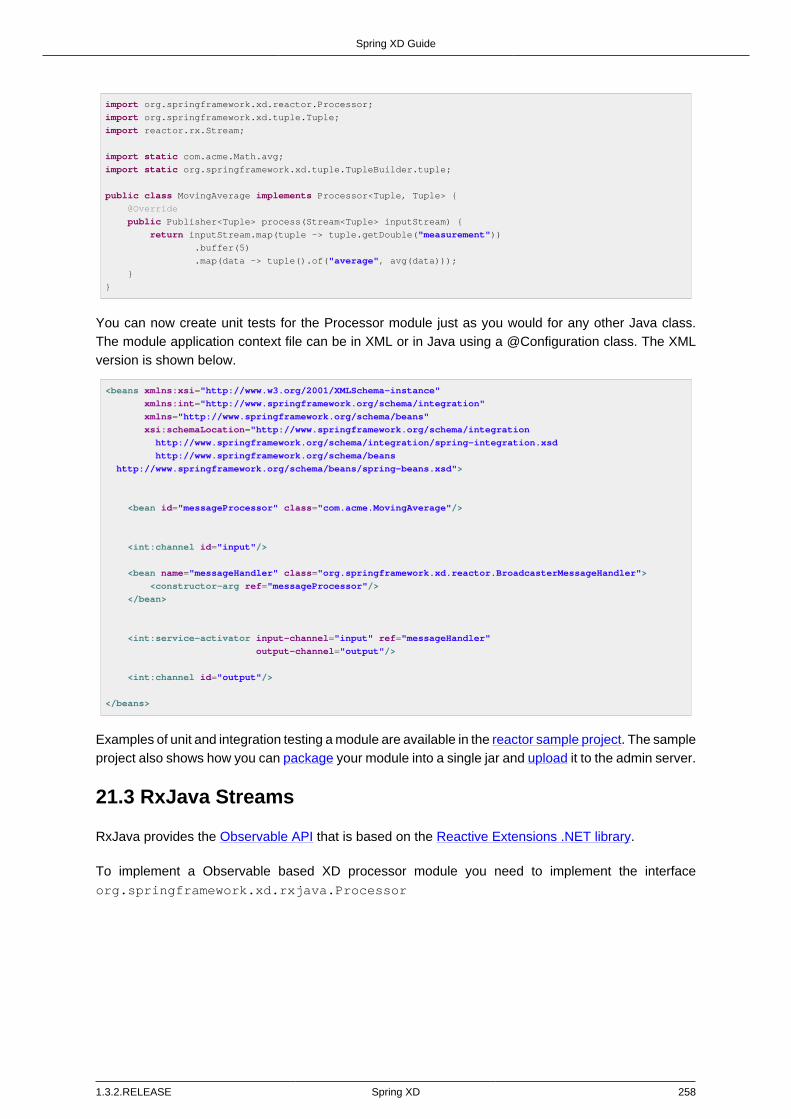
Spring XD Guide
1.3.2.RELEASE Spring XD 258
import org.springframework.xd.reactor.Processor;
import org.springframework.xd.tuple.Tuple;
import reactor.rx.Stream;
import static com.acme.Math.avg;
import static org.springframework.xd.tuple.TupleBuilder.tuple;
public class MovingAverage implements Processor<Tuple, Tuple> {
@Override
public Publisher<Tuple> process(Stream<Tuple> inputStream) {
return inputStream.map(tuple -> tuple.getDouble("measurement"))
.buffer(5)
.map(data -> tuple().of("average", avg(data)));
}
}
You can now create unit tests for the Processor module just as you would for any other Java class.The module application context file can be in XML or in Java using a @Configuration class. The XMLversion is shown below.
<beans xmlns:xsi="http://www.w3.org/2001/XMLSchema-instance"
xmlns:int="http://www.springframework.org/schema/integration"
xmlns="http://www.springframework.org/schema/beans"
xsi:schemaLocation="http://www.springframework.org/schema/integration
http://www.springframework.org/schema/integration/spring-integration.xsd
http://www.springframework.org/schema/beans
http://www.springframework.org/schema/beans/spring-beans.xsd">
<bean id="messageProcessor" class="com.acme.MovingAverage"/>
<int:channel id="input"/>
<bean name="messageHandler" class="org.springframework.xd.reactor.BroadcasterMessageHandler">
<constructor-arg ref="messageProcessor"/>
</bean>
<int:service-activator input-channel="input" ref="messageHandler"
output-channel="output"/>
<int:channel id="output"/>
</beans>
Examples of unit and integration testing a module are available in the reactor sample project. The sampleproject also shows how you can package your module into a single jar and upload it to the admin server.
21.3 RxJava Streams
RxJava provides the Observable API that is based on the Reactive Extensions .NET library.
To implement a Observable based XD processor module you need to implement the interfaceorg.springframework.xd.rxjava.Processor

Spring XD Guide
1.3.2.RELEASE Spring XD 259
public interface Processor<I,O> {
/**
* Process a stream of messages and return an output stream. The input
* and output stream will be mapped onto receive/send operations on the message bus.
*
* @param inputStream Input stream the receives messages from the message bus
* @return Output stream of messages sent to the message bus
*/
Observable<O> process(Observable<I> inputStream);
}
Messages that are delivered on the Message Bus are accessed from the Observable input stream. Thereturn value is the Observable output stream that contains the results of applying various operation tothe input stream. The content of the output stream is sent to the message bus for consumption by otherprocessors or sinks.
Examples of operations you can perform on the Stream are map, flatMap, buffer, window, andreduce. The parameterized data type can be a org.springframework.messaging.Message,org.springframework.xd.tuple.Tuple, java.lang.Map or any other POJO.
When used in combination with Data Partitioning on the Message Bus, this allows you to create anstreaming application where Stream state is calculated based on those partitions where necessary.
In this deployment the data that is sent to the RxJava processing modules from the HTTP sourcesis partitioned such that the red data always goes to the red stream processing module and so on forthe other colors. The next hop of processing, where writing to HDFS occurs, does not require datapartitioning, so the message load can be shared across the HDFS sink instances.
There can be as many layers of RxJava Stream processing as you require, allowing you to collocatespecific functional operations as you see fit within a single JVM or to distribute across multiple JVMs.

Spring XD Guide
1.3.2.RELEASE Spring XD 260
The following example uses the Tuple object to compute the average value of a measurement froma sample size of 5.
import org.springframework.xd.rxjava.Processor;
import org.springframework.xd.tuple.Tuple;
import rx.Observable;
import static com.acme.Math.avg;
import static org.springframework.xd.tuple.TupleBuilder.tuple;
public class MovingAverage implements Processor<Tuple, Tuple> {
@Override
public Observable<Tuple> process(Observable<Tuple> inputStream) {
return inputStream.map(tuple -> tuple.getDouble("measurement"))
.buffer(5)
.map(data -> tuple().of("average", avg(data)));
}
}
You can now create unit tests for the Processor module as you would for any other Java class. Themodule application context file can be in XML or in Java using a @Configuration class. The XML versionis shown below.
<beans xmlns:xsi="http://www.w3.org/2001/XMLSchema-instance"
xmlns:int="http://www.springframework.org/schema/integration"
xmlns="http://www.springframework.org/schema/beans"
xsi:schemaLocation="http://www.springframework.org/schema/integration
http://www.springframework.org/schema/integration/spring-integration.xsd
http://www.springframework.org/schema/beans
http://www.springframework.org/schema/beans/spring-beans.xsd">
<bean id="messageProcessor" class="com.acme.MovingAverage"/>
<!-- Using a SubjectMessageHandler to share Observerable state across threads -->
<int:channel id="input"/>
<bean name="messageHandler" class="org.springframework.xd.rxjava.SubjectMessageHandler">
<constructor-arg ref="messageProcessor"/>
</bean>
<int:service-activator input-channel="input" ref="messageHandler"
output-channel="output"/>
<int:channel id="output"/>
</beans>

Spring XD Guide
1.3.2.RELEASE Spring XD 261
Examples of unit and integration testing a module are available in the RxJava Moving Average sampleproject. The sample project also shows how you can package your module into a single jar and uploadit to the admin server.
Scheduling
There are two MessageHandler implementations that you can choose from,SubjectMessageHandler and MultipleSubjectMessageHandler.
SubjectMessageHandler uses a single SerializedSubject to process messages that werereceived from the Message Bus. This subject, downcast to Observable, is what is passed intothe process method. Using SubjectMessageHandler has the advantage that the state of theObservabale input stream can be shared across all the Message Bus dispatcher threads that areinvoking onNext. It has the disadvantage that the processing and consumption of the Observable outputstream (that sends messages to the Message Bus) will execute serially on one of the dispatcher threads.Note you can modify what thread the Observable output stream will use by calling observeOn beforereturning the output stream from your processor.
MultipleSubjectMessageHandler uses multiple Subjects to perform processing. A SpringExpression Language (SpEL) expression is used to map the incoming message to a specificSubject to use for processing. Using MultipleSubjectMessageHandler has the advantagethat it can use all Message Bus dispatcher threads. It has the disadvantage in that eachObservable input stream has its own state, which may not be desirable for certain types ofaggregate calculations that should see all of the data. A common partition expression to use isT(java.lang.Thread).currentThread().getId() so that a Subject will be created per thread.
<bean name="messageHandler" class="org.springframework.xd.rxjava.MultipleSubjectMessageHandler">
<constructor-arg ref="messageProcessor"/>
<constructor-arg value="T(java.lang.Thread).currentThread().getId()"/>
</bean>
The satisfies the contract to have single threaded access to a Subject. Another interesting partitionexpression to use in the case of the Kafka Message Bus is header['kafka_partition_id']. Thiswill create a Subject per Kafka partition that represents an ordered sequence of events. The XD KafkaMessage Bus statically maps partitions to dispatcher threads to there is only single threaded accesstoa Subject.
21.4 Spark streaming
Spring XD integrates with Spark streaming so that the streaming data computation logic can be run ona Spark cluster. Spring XD runs the Spark Driver as an XD module (processor or sink) in the XDcontainer while the Spark streaming reliable receiver and the data computation is done at theSpark Cluster.
This provides advantage over connecting to various streaming sources while running the computationlogic on Spark cluster. Running the spark driver on the XD container also provides automatic failovercapabilities in case of driver failure.
With Spark Streaming, events are processed at the micro batch level via DStreams, whichrepresent a continuous flow of partitioned RDDs. Setting up a Spark Streaming module within XD canbe beneficial when adding streaming data computation logic for a tapped XD stream. While the primarystream processes events one at a time (through the regular XD modules), the tapped stream will becomea source for the Spark Streaming module.

Spring XD Guide
1.3.2.RELEASE Spring XD 262
Lets discuss a real world scenario of data collection and doing some analytics on it.
stream create mainstream --definition "mqtt | filter1: <some filtering> | hdfs"
stream create sparkstream1 --definition "tap:stream:mainstream.filter1 > <some XD sink>"
stream create sparkstream2 --definition "tap:stream:mainstream.filter1 > spark-streaming-processor-
module2 | spark-streaming-sinkmodule1"
stream create sparkstream3 --definition "tap:stream:mainstream.filter1 > spark-streaming-sinkmodule2"
In the above set of streams, consider a primary stream that collects data one at a time from varioussensors and stores that raw data into HDFS, after only same basic filtering. At the same time, thereare a few other streams that perform analytics on the data being collected at micro-batch level.Here, the tapped stream’s source can be reliable or durable based on the messagebus implementation,and this data is processed (at the micro batch level) by the Spark Streaming module. This allows thedeveloper to choose the stream data processing based on the use case.
One can also add a tap at the output of the Spark streaming processor module. For instance, addinga tap at the output of sparkstream2's Spark stream processor would be:
stream create tapSparkStream --definition "tap:stream:sparkstream2.spark-streaming-processor-module2 >
<some XD sink>"
Writing a spark streaming module
Spring XD provides Java and Scala based interfaces which expose a process method that the sparkstreaming developer would implement. This method processes the input DStream received by the sparkstreaming receiver. In case of XD processor module this method would return an output DStream.In case of XD sink module, it would write the computed data into file system, HDFS etc., (for examplesaveAsTextFiles(), saveAsHadoopFiles() using Spark APIs).
For Java based implementation, the interfaceorg.springframework.xd.spark.streaming.java.Processor is defined
public interface Processor<I extends JavaDStreamLike, O extends JavaDStreamLike> extends
SparkStreamingSupport {
/**
* Processes the input DStream and optionally returns an output DStream.
*
* @param input the input DStream
* @return output DStream (optional, may be null)
*/
O process(I input);
}
It is recommended to write the implementation in Java 8.
For Scala based implementation, the traitorg.springframework.xd.spark.streaming.scala.Processor is defined
trait Processor[I, O] extends SparkStreamingSupport {
/**
* Processes the input DStream and optionally returns an output DStream.
*
* @param input the input DStream from the receiver
* @return output DStream (optional, may be null)
*/
def process(input: ReceiverInputDStream[I]): DStream[O]
When creating an XD processor/sink module, developer would implement this interface and make themodule archive (along with its dependencies) available in the modules registry.
Spring XD Guide
1.3.2.RELEASE Spring XD 263
To set the Spark configuration properties when developing spark streaming module, the developer canuse org.springframework.xd.spark.streaming.SparkConfig annotation on the method thatreturns type java.util.Properties.
To add default spark streaming command line options for the spark streaming module and tolet XD admin know this is spark streaming module, following entry should be added in moduleregistry module config properties (for example: modules/processor/spark-wordcount/config/spark-wordcount.properties):
options_class=org.springframework.xd.spark.streaming.DefaultSparkStreamingModuleOptionsMetadata
Developer can extend this to provide more custom command line options. By default, the followingmodule options are supported for the spark streaming module:
• batchInterval (the time interval in millis for batching the stream events)
• storageLevel (the streaming data persistence storage level)
Note
If you are using Java7 to run Spring XD, then make sure to set the JAVA_OPTS to increase -XX:MaxPermSize to avoid PermGen issue on the XD container where the spark driver would berunning.
How this works
When a Spark streaming processor (a processor or a sink) that implements Processor interface aboveis deployed, the SparkDriver sets up the streaming context and runs as an XD module inside theXD container.
This sets up Spark streaming receiver (in case of processor and sink) in spark cluster that connects to XDupstream module’s output channel in the message bus. Also note that this receiver is a reliable Sparkstreaming receiver (if you use rabbit or kafka as message-bus) out of the box. This is implementedusing manual acknowledgement and explicit offset management on Rabbit and Kafka respectively. TheMessageBusReceiver makes the incoming messages available for the computation in spark clusteras DStreams. If the streaming module is of XD processor type then the computed messages are pushedto the downstream module by MessageBusSender. The MessageBusSender binds to the downstreammodule’s input channel which subsequently connects to any of the XD processor or sink modules.
It is important to note that the MessageBusReceiver, streaming processor computation and theMessageBusSender run on Spark cluster.
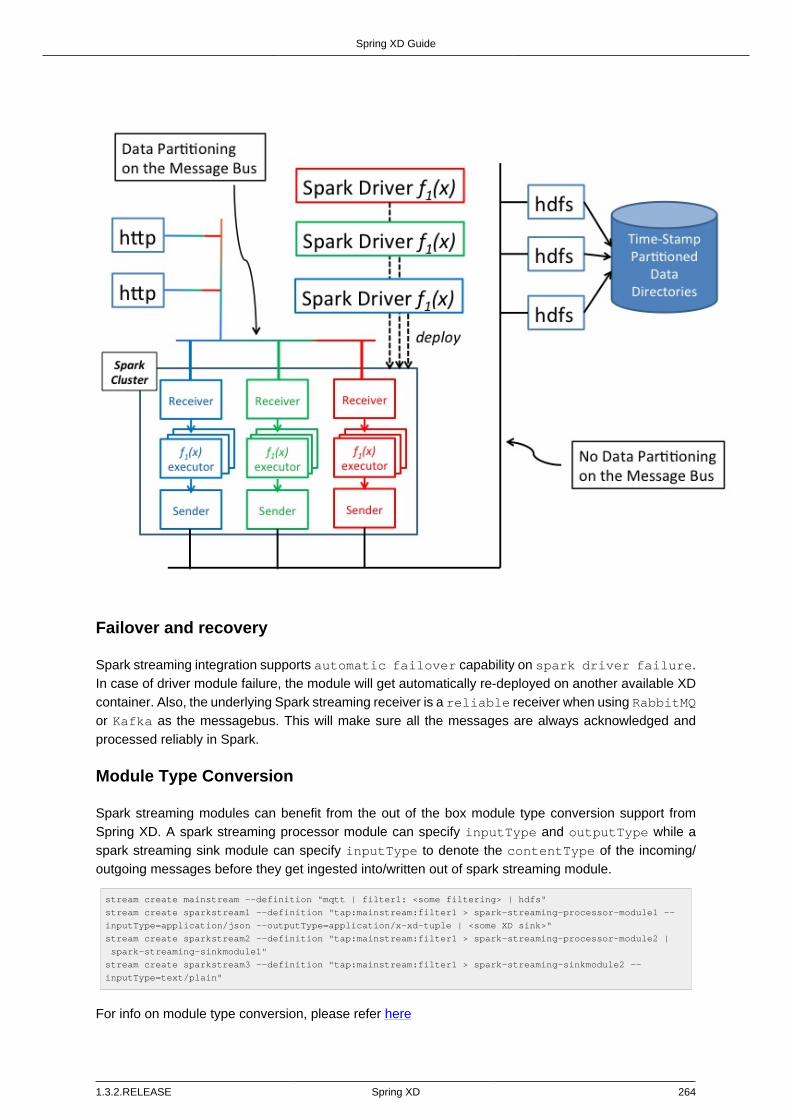
Spring XD Guide
1.3.2.RELEASE Spring XD 264
Failover and recovery
Spark streaming integration supports automatic failover capability on spark driver failure.In case of driver module failure, the module will get automatically re-deployed on another available XDcontainer. Also, the underlying Spark streaming receiver is a reliable receiver when using RabbitMQor Kafka as the messagebus. This will make sure all the messages are always acknowledged andprocessed reliably in Spark.
Module Type Conversion
Spark streaming modules can benefit from the out of the box module type conversion support fromSpring XD. A spark streaming processor module can specify inputType and outputType while aspark streaming sink module can specify inputType to denote the contentType of the incoming/outgoing messages before they get ingested into/written out of spark streaming module.
stream create mainstream --definition "mqtt | filter1: <some filtering> | hdfs"
stream create sparkstream1 --definition "tap:mainstream:filter1 > spark-streaming-processor-module1 --
inputType=application/json --outputType=application/x-xd-tuple | <some XD sink>"
stream create sparkstream2 --definition "tap:mainstream:filter1 > spark-streaming-processor-module2 |
spark-streaming-sinkmodule1"
stream create sparkstream3 --definition "tap:mainstream:filter1 > spark-streaming-sinkmodule2 --
inputType=text/plain"
For info on module type conversion, please refer here

Spring XD Guide
1.3.2.RELEASE Spring XD 265
XD processor module examples
Java based implementation
import java.util.Arrays;
import java.util.Properties;
import org.apache.spark.api.java.function.FlatMapFunction;
import org.apache.spark.api.java.function.Function2;
import org.apache.spark.api.java.function.PairFunction;
import org.apache.spark.streaming.api.java.JavaDStream;
import org.apache.spark.streaming.api.java.JavaPairDStream;
import org.springframework.xd.spark.streaming.SparkConfig;
import org.springframework.xd.spark.streaming.java.Processor;
import scala.Tuple2;
@SuppressWarnings({ "serial" })
public class WordCount implements Processor<JavaDStream<String>, JavaPairDStream<String, Integer>> {
@Override
public JavaPairDStream<String, Integer> process(JavaDStream<String> input) {
JavaDStream<String> words = input.flatMap(new FlatMapFunction<String, String>() {
@Override
public Iterable<String> call(String x) {
return Arrays.asList(x.split(" "));
}
});
JavaPairDStream<String, Integer> wordCounts = words.mapToPair(new PairFunction<String, String,
Integer>() {
@Override
public Tuple2<String, Integer> call(String s) {
return new Tuple2<String, Integer>(s, 1);
}
}).reduceByKey(new Function2<Integer, Integer, Integer>() {
@Override
public Integer call(Integer i1, Integer i2) {
return i1 + i2;
}
});
return wordCounts;
}
@SparkConfig
public Properties getSparkConfigProperties() {
Properties props = new Properties();
props.setProperty(SPARK_MASTER_URL_PROP, "local[4]");
return props;
}
}
Scala based implementation
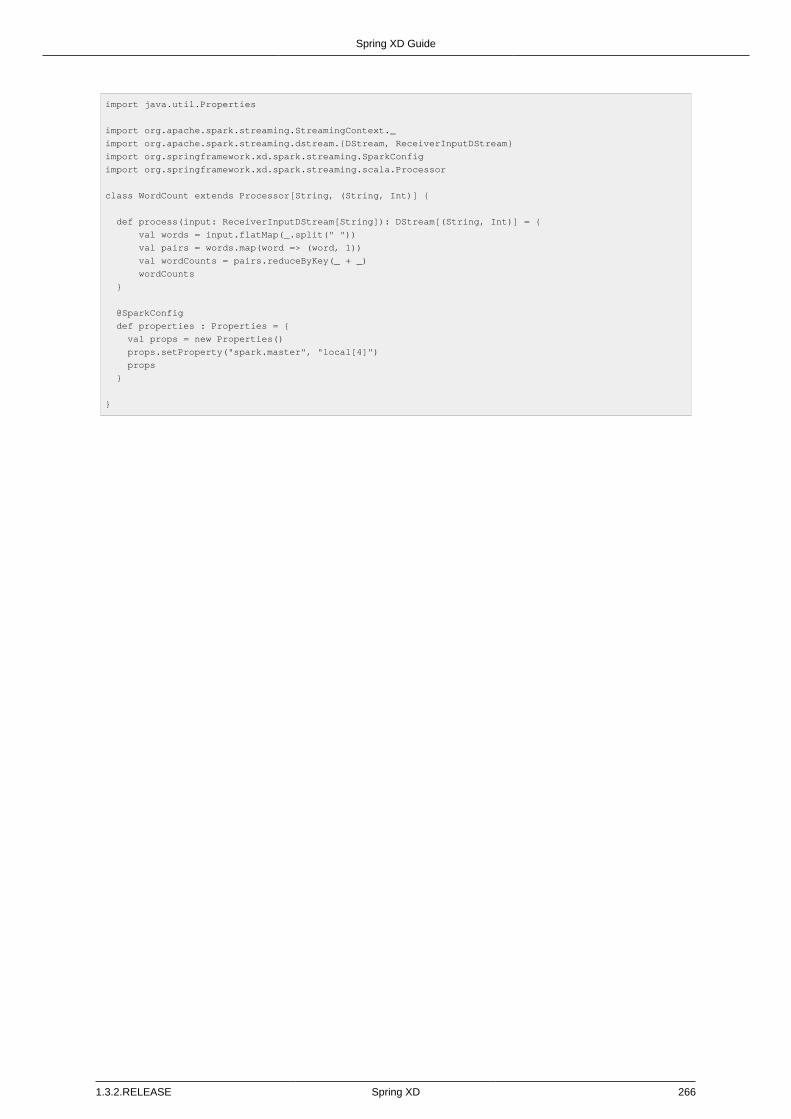
Spring XD Guide
1.3.2.RELEASE Spring XD 266
import java.util.Properties
import org.apache.spark.streaming.StreamingContext._
import org.apache.spark.streaming.dstream.{DStream, ReceiverInputDStream}
import org.springframework.xd.spark.streaming.SparkConfig
import org.springframework.xd.spark.streaming.scala.Processor
class WordCount extends Processor[String, (String, Int)] {
def process(input: ReceiverInputDStream[String]): DStream[(String, Int)] = {
val words = input.flatMap(_.split(" "))
val pairs = words.map(word => (word, 1))
val wordCounts = pairs.reduceByKey(_ + _)
wordCounts
}
@SparkConfig
def properties : Properties = {
val props = new Properties()
props.setProperty("spark.master", "local[4]")
props
}
}
Spring XD Guide
1.3.2.RELEASE Spring XD 267
22. XD sink module example
Java based implementation

Spring XD Guide
1.3.2.RELEASE Spring XD 268
import java.io.BufferedWriter;
import java.io.File;
import java.io.FileWriter;
import java.io.IOException;
import java.util.Iterator;
import java.util.Properties;
import org.apache.spark.api.java.JavaRDD;
import org.apache.spark.api.java.function.Function;
import org.apache.spark.api.java.function.VoidFunction;
import org.apache.spark.streaming.api.java.JavaDStream;
import org.springframework.xd.spark.streaming.SparkConfig;
import org.springframework.xd.spark.streaming.java.Processor;
@SuppressWarnings({ "serial" })
public class FileLogger implements Processor<JavaDStream<String>, JavaDStream<String>> {
private File file;
public void setPath(String filePath) {
file = new File(filePath);
if (!file.exists()) {
try {
file.createNewFile();
}
catch (IOException ioe) {
throw new RuntimeException(ioe);
}
}
}
@SparkConfig
public Properties getSparkConfigProperties() {
Properties props = new Properties();
props.setProperty("spark.master", "local[4]");
return props;
}
@Override
public JavaDStream<String> process(JavaDStream<String> input) {
input.foreachRDD(new Function<JavaRDD<String>, Void>() {
@Override
public Void call(JavaRDD<String> rdd) {
rdd.foreachPartition(new VoidFunction<Iterator<String>>() {
@Override
public void call(Iterator<String> items) throws Exception {
FileWriter fw;
BufferedWriter bw = null;
try {
fw = new FileWriter(file.getAbsoluteFile());
bw = new BufferedWriter(fw);
while (items.hasNext()) {
bw.append(items.next() + System.lineSeparator());
}
}
catch (IOException ioe) {
throw new RuntimeException(ioe);
}
finally {
if (bw != null) {
bw.close();
}
}
}
});
return null;
}
});
return null;
}
}

Spring XD Guide
1.3.2.RELEASE Spring XD 269
Scala based implementation
import java.io.{BufferedWriter, File, FileWriter, IOException}
import java.util.Properties
import org.apache.spark.streaming.dstream.{DStream, ReceiverInputDStream}
import org.springframework.xd.spark.streaming.SparkConfig
import org.springframework.xd.spark.streaming.scala.Processor
class FileLogger extends Processor[String, String] {
var file: File = null
def setPath(filePath: String) {
file = new File(filePath)
if (!file.exists) {
try {
file.createNewFile
}
catch {
case ioe: IOException => {
throw new RuntimeException(ioe)
}
}
}
}
@SparkConfig def getSparkConfigProperties: Properties = {
val props: Properties = new Properties
props.setProperty("spark.master", "local[4]")
return props
}
def process(input: ReceiverInputDStream[String]): DStream[String] = {
input.foreachRDD(rdd => {
rdd.foreachPartition(partition => {
var fw: FileWriter = null
var bw: BufferedWriter = null
try {
fw = new FileWriter(file.getAbsoluteFile)
bw = new BufferedWriter(fw)
while (partition.hasNext) {
bw.append(partition.next.toString + System.lineSeparator)
}
}
catch {
case ioe: IOException => {
throw new RuntimeException(ioe)
}
}
finally {
if (bw != null) {
bw.close
}
}
})
})
null
}
}
Checkout some examples, module configurations and tests
Spring XD Guide
1.3.2.RELEASE Spring XD 270
23. Creating a Processor Module
23.1 Introduction
As outlined in the modules document, Spring XD currently supports four types of modules: source,sink, and processor for stream processing and job for batch processing. This document walks throughimplementing a custom processor module.
One or more processors can be included in a stream definition to modify the data as it passes on its wayfrom the source to the sink. The architecture section covers the basics of stream processing. Processormodules provided out of the box are covered in the processors section.
Here we’ll look at how to create a simple processor module from scratch. This module will extractthe text field from input messages from from a twittersearch source. The steps are essentiallythe same regardless of the module’s functionality. Note that Spring XD can perform this type oftransformation without requiring a custom module. Rather than using the built-in functionality, we willimplement a custom processor and wire it up with Spring Integration. The complete code for this exampleis here.
23.2 Write the Transformer Code
The tweet messages from twittersearch contain quite a lot of data (id, author, time, hash tags, andso on). The transformer we’ll write extracts the text of each tweet and outputs this as a string. The outputmessages from the twittersearch source are also strings, rendering the tweet data as JSON. Wefirst load this into a map using Jackson library code, then extract the text field from the map.
package my.custom.transformer;
import java.io.IOException;
import java.util.Map;
import org.codehaus.jackson.map.ObjectMapper;
import org.codehaus.jackson.type.TypeReference;
import org.springframework.integration.transformer.MessageTransformationException;
public class TweetTransformer {
private ObjectMapper mapper = new ObjectMapper();
public String transform(String payload) {
try {
Map<String, Object> tweet = mapper.readValue(payload, new TypeReference<Map<String, Object>>()
{});
return tweet.get("text").toString();
} catch (IOException e) {
throw new MessageTransformationException("Unable to transform tweet: " + e.getMessage(), e);
}
}
}
23.3 Create the module Application Context File
Create the following file as spring-module.xml in the config resource directory:

Spring XD Guide
1.3.2.RELEASE Spring XD 271
<?xml version="1.0" encoding="UTF-8"?>
<beans:beans xmlns="http://www.springframework.org/schema/integration"
xmlns:xsi="http://www.w3.org/2001/XMLSchema-instance"
xmlns:beans="http://www.springframework.org/schema/beans"
xsi:schemaLocation="http://www.springframework.org/schema/beans
http://www.springframework.org/schema/beans/spring-beans.xsd
http://www.springframework.org/schema/integration
http://www.springframework.org/schema/integration/spring-integration.xsd">
<channel id="input"/>
<transformer input-channel="input" output-channel="output">
<beans:bean class="my.custom.transformer.TweetTransformer" />
</transformer>
<channel id="output"/>
</beans:beans>
Alternately, you can create the application context using an @Configuration class. In the example below,we’ve combined the configuration and the transformer into a single Java file for simplicity. Note thatTweetTransformer now includes Spring Integration annotations:
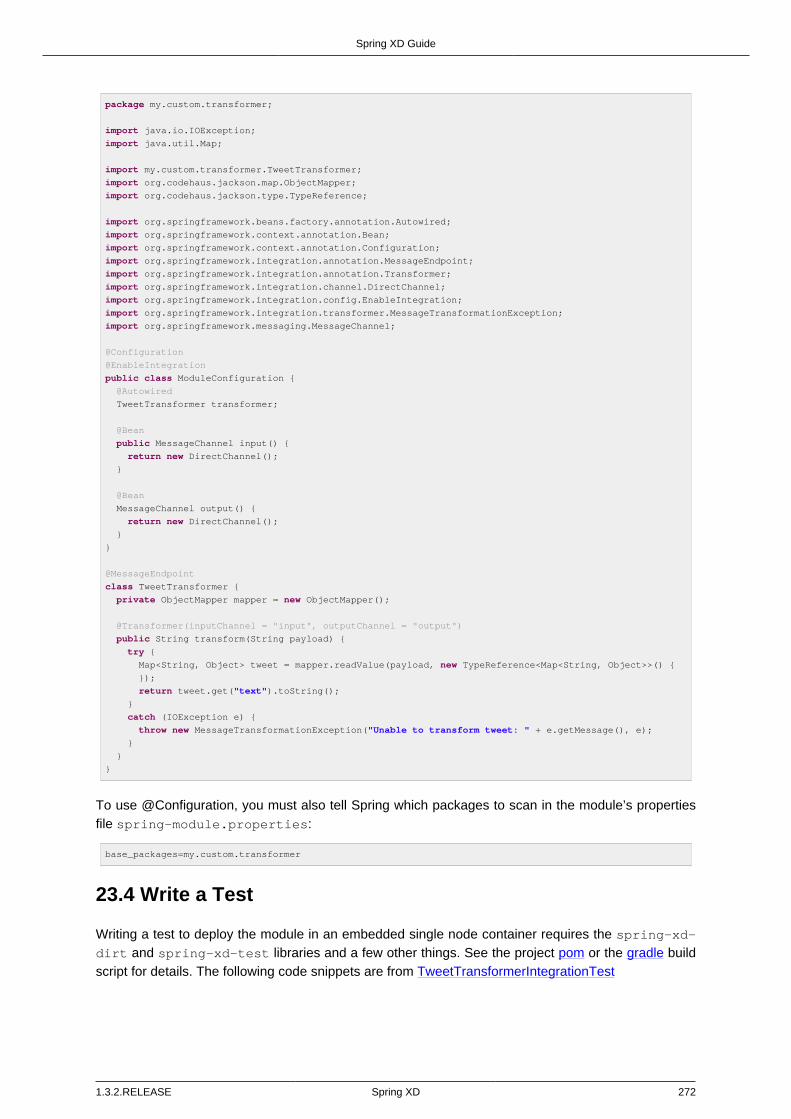
Spring XD Guide
1.3.2.RELEASE Spring XD 272
package my.custom.transformer;
import java.io.IOException;
import java.util.Map;
import my.custom.transformer.TweetTransformer;
import org.codehaus.jackson.map.ObjectMapper;
import org.codehaus.jackson.type.TypeReference;
import org.springframework.beans.factory.annotation.Autowired;
import org.springframework.context.annotation.Bean;
import org.springframework.context.annotation.Configuration;
import org.springframework.integration.annotation.MessageEndpoint;
import org.springframework.integration.annotation.Transformer;
import org.springframework.integration.channel.DirectChannel;
import org.springframework.integration.config.EnableIntegration;
import org.springframework.integration.transformer.MessageTransformationException;
import org.springframework.messaging.MessageChannel;
@Configuration
@EnableIntegration
public class ModuleConfiguration {
@Autowired
TweetTransformer transformer;
@Bean
public MessageChannel input() {
return new DirectChannel();
}
@Bean
MessageChannel output() {
return new DirectChannel();
}
}
@MessageEndpoint
class TweetTransformer {
private ObjectMapper mapper = new ObjectMapper();
@Transformer(inputChannel = "input", outputChannel = "output")
public String transform(String payload) {
try {
Map<String, Object> tweet = mapper.readValue(payload, new TypeReference<Map<String, Object>>() {
});
return tweet.get("text").toString();
}
catch (IOException e) {
throw new MessageTransformationException("Unable to transform tweet: " + e.getMessage(), e);
}
}
}
To use @Configuration, you must also tell Spring which packages to scan in the module’s propertiesfile spring-module.properties:
base_packages=my.custom.transformer
23.4 Write a Test
Writing a test to deploy the module in an embedded single node container requires the spring-xd-dirt and spring-xd-test libraries and a few other things. See the project pom or the gradle buildscript for details. The following code snippets are from TweetTransformerIntegrationTest

Spring XD Guide
1.3.2.RELEASE Spring XD 273
Note
See test a module for some important tips abouts regarding in-container testing.
First we start the SingleNodeApplication and register the module under test by addinga SingletonModuleRegistry providing the module name and type. This looks in theroot classpath by default, so will find the module configuration in src/main/resources/config.SingleNodeIntegrationTestSupport provides programmatic access to major beans in the Adminand Container application contexts, as well as the contexts themselves.
/**
* Unit tests a module deployed to an XD single node container.
*/
public class TweetTransformerIntegrationTest {
private static SingleNodeApplication application;
private static int RECEIVE_TIMEOUT = 5000;
private static String moduleName = "tweet-transformer";
/**
* Start the single node container, binding random unused ports, etc. to not conflict with any other
instances
* running on this host. Configure the ModuleRegistry to include the project module.
*/
@BeforeClass
public static void setUp() {
RandomConfigurationSupport randomConfigSupport = new RandomConfigurationSupport();
application = new SingleNodeApplication().run();
SingleNodeIntegrationTestSupport singleNodeIntegrationTestSupport = new
SingleNodeIntegrationTestSupport
(application);
singleNodeIntegrationTestSupport.addModuleRegistry(new SingletonModuleRegistry(ModuleType.processor,
moduleName));
}
To implement ths test, we will use the SingleNodeProcessingChain test fixture. The chain is apartial stream definition, represented as Spring XD DSL, which may be a single module, a chain ofprocessors separated by |. In this case we are testing a single module. The chain binds local messagehandlers that act as source and sink to complete the stream. Thus we can deploy the stream and sendmessages directly to the source and receive messages directly from the sink:
We could, in theory, test against the actual twittersearch source, but this is not advised because it woulddepend on connecting to Twitter, providing credentials, etc. So we will save that for when the module isactually installed to the target Spring XD runtime. Instead, we can simply send a message with a sampletweet and verify that we get the content of the text property as output, as expected.

Spring XD Guide
1.3.2.RELEASE Spring XD 274
/**
* This test creates a stream with the module under test, or in general a "chain" of processors. The
* SingleNodeProcessingChain is a test fixture that allows the test to send and receive messages to
verify each
* message is processed as expected.
*/
@Test
public void test() {
String streamName = "tweetTest";
String tweet = "..." //JSON omitted here for clarity
String processingChainUnderTest = moduleName;
SingleNodeProcessingChain chain = chain(application, streamName, processingChainUnderTest);
chain.sendPayload(tweet);
String result = (String) chain.receivePayload(RECEIVE_TIMEOUT);
assertEquals("Aggressive Ponytail #freebandnames", result);
//Unbind the source and sink channels from the message bus
chain.destroy();
}
23.5 Register the Module
Since the module requires no external dependencies in this case, we can build the project as a simplejar file and install it using the module upload shell command:
xd:>module upload --file [path-to]/tweet-transformer-1.0.0.BUILD-SNAPSHOT.jar --name tweet-transformer
--type processor
Successfully uploaded module 'processor:tweet-transformer'
If you make changes and need to re-install, you must first delete the existing module:
xd:>module delete processor:tweet-transformer
Note
A simple jar file works in this case because the module requires no additional library dependenciessince the Spring XD class path already includes Jackson and Spring Integration. See ModulePackaging for more details.
23.6 Test the custom module in the Spring XD runtime:
Start the Spring XD runtime and try creating a stream to test your processor:
xd:> stream create --name javatweets --definition "twittersearch --query=java --consumerKey=<your_key>
--consumerSecret=<your_secret> | tweet-transformer | file" --deploy
If you haven’t already used twittersearch, read the sources section for more details. Thiscommand should stream tweets to the file /tmp/xd/output/javatweets but, unlike the normaltwittersearch output, you should just see the text of the tweet rather than the full JSON document.
Also see si-dsl-module example for a more complex example of a processor module.

Spring XD Guide
1.3.2.RELEASE Spring XD 275
24. Creating a Sink Module
24.1 Introduction
As outlined in the modules document, Spring XD currently supports four types of modules: source,sink, and processor for stream processing and job for batch procesing. This document walks throughimplementing a custom sink module.
The last module in a stream is always a sink. A sink module is built with Spring Integration to consumemessages on its input channel and send them to an external resource to terminate the stream.
Spring Integration provides a number of outbound channel adapters to integrate with various transportssuch as TCP, AMQP, JMS, Kafka, HTTP, web services, mail, or data stores such as file, Redis,MongoDB, JDBC, Splunk, Gemfire, and more. It is straightforward to create a sink module using anexisting outbound channel adapters. Such outbound channel adapters are typically used to integratestreams with external data stores or legacy systems. Alternately, you may need to invoke a third partyJava API to provide data to an external system. In this case, the sink can easily invoke a Java methodusing a Service Activator.
Here, we will demonstrate step-by-step how to create and install a sink module using the SpringIntegration Redis Store Outbound Channel Adapter. The complete code for this example is redis-store-sink sample project.
24.2 Create the module Application Context
Configure the outbound channel adapter in an xml bean definition file under the config resourcedirectoy:
<beans ...>
<int:channel id="input" />
<int-redis:store-outbound-channel-adapter
id="redisListAdapter" collection-type="LIST" channel="input" key="${collection}" auto-startup="false"/
>
<beans:bean id="redisConnectionFactory"
class="org.springframework.data.redis.connection.jedis.JedisConnectionFactory">
<beans:property name="hostName" value="${host}" />
<beans:property name="port" value="${port}" />
</beans:bean>
</beans>
The adapter, as required by Spring XD, is configured as an endpoint on a channel named input. Whena message is consumed, the Redis Store outbound channel adapter will write the payload to a Redislist with a key given by the ${collection} property. By default, the Redis Store outbound channel adapteruses a bean named redisConnectionFactory to connect to the Redis server. Here the connection factoryis configured with property placeholders ${host}, ${port} which will be provided as module options instream definitions that use this sink. Note that auto-startup is set to false. This is a requirement forSpring XD modules. When a stream is deployed, the Spring XD runtime will create and start the modulesin the correct order to ensure that everything is initialized before the stream starts processing messages.

Spring XD Guide
1.3.2.RELEASE Spring XD 276
Note
By default, the adapter uses a StringRedisTemplate. Therefore, this module will store all payloadsdirectly as Strings. You may configure a RedisTemplate with a different value Serializer to serializeother data types, such as Java objects, to the Redis collection.
Spring XD will automatically register a PropertyPlaceholderConfigurer to your application context, sothere is no need to declare one here. These properties correspond to module options defined for thismodule (discussed below). Users supply option values when creating a stream using the DSL.
The module’s properties file in the config resource directory contains Module Options Metadataincluding a description, type, and optional default value for each property. The metadata supportsfeatures like auto-completion in the Spring XD shell and option validation:
options.collection.description = the name of the list
options.collection.default= ${xd.stream.name}
options.collection.type = java.lang.String
#
options.host.description = the host name for the Redis store
options.host.default= localhost
options.host.type = java.lang.String
#
options.port.description = the port for the Redis store
options.port.default= 6379
options.port.type = java.lang.Integer
Note that the collection defaults to the stream name, referencing a common property provided by SpringXD.
Alternately, you can write a POJO to define the metadata. Using a Java class provides better validationalong with additional features and requires that the class be packaged as part of the module.
24.3 Create a module project
This section covers creating the module as a standalone project containing some code to test themodule. This example uses Maven but Spring XD supports Gradle as well
Take a look at the pom file for this example. You will see it declares spring-xd-module-parent asits parent and declares a dependency on spring-integration-redis which provides the outboundchannel adapter. The parent pom provides everything else you need. We also need to configurerepositories to access the parent pom and any other dependencies. The xml file containing the beandefinitions and the properties file are located in src\main\resources\config.
Create the Spring integration test
The main objective of the test is to ensure that messages are stored in a Redis list once the module’sApplication Context is loaded. In order to test the module stand-alone, we need to enhance the modulecontext with property values and a RedisTemplate to retrieve the stored messages.
Add the following src/test/resources/org/springframework/xd/samples/RedisStoreSinkTest-context.xml:

Spring XD Guide
1.3.2.RELEASE Spring XD 277
<beans...>
<context:property-placeholder properties-ref="props"/>
<util:properties id="props">
<prop key="collection">mycollection</prop>
<prop key="host">localhost</prop>
<prop key="port">6379</prop>
</util:properties>
<import resource="classpath:config/spring-module.xml"/>
<bean id="redisTemplate" class="org.springframework.data.redis.core.StringRedisTemplate">
<property name="connectionFactory" ref="redisConnectionFactory"/>
</bean>
</beans>
Next, create and run the RedisStoreSinkTest:
package org.springframework.xd.samples;
import ...
@RunWith(SpringJUnit4ClassRunner.class)
@ContextConfiguration
public class RedisStoreSinkTest {
@Autowired
ConfigurableApplicationContext applicationContext;
@Autowired
MessageChannel input;
@Autowired
RedisTemplate<String,String> redisTemplate;
@Test
public void test() {
applicationContext.start();
input.send(new GenericMessage<String>("hello"));
assertEquals("hello", redisTemplate.boundListOps("mycollection").leftPop(5, TimeUnit.SECONDS));
}
@After
public void cleanUp() {
redisTemplate.delete("mycollection");
}
}
The test will load the module application context using our test context and send a message to themodule’s input channel. It will fail if the input payload "hello" is not added to the Redis list within 5seconds.
Run the test
The test requires a running Redis server. See Getting Started for information on installing and startingRedis.
Test the Module Options
Another test you may want to include is one to verify the module options metadata, asdefined in spring-module.properties Here is an example ModuleOptionsTest that uses Spring XD’sDefaultModuleOptionsMetadataResolver

Spring XD Guide
1.3.2.RELEASE Spring XD 278
package org.springframework.xd.samples;
import ...
/**
* Tests expected module properties are present.
*/
public class ModuleOptionsTest {
@Test
public void testModuleOptions() {
ModuleOptionsMetadataResolver moduleOptionsMetadataResolver = new
DefaultModuleOptionsMetadataResolver();
String resource = "classpath:/";
ModuleDefinition definition = ModuleDefinitions.simple("redis-store", sink, resource);
ModuleOptionsMetadata metadata = moduleOptionsMetadataResolver.resolve(definition);
assertThat(
metadata,
containsInAnyOrder(moduleOptionNamed("collection"), moduleOptionNamed("host"),
moduleOptionNamed("port")));
for (ModuleOption moduleOption : metadata) {
if (moduleOption.getName().equals("collection")) {
assertEquals("${xd.stream.name}", moduleOption.getDefaultValue());
}
if (moduleOption.getName().equals("port")) {
assertEquals("6379", moduleOption.getDefaultValue());
}
if (moduleOption.getName().equals("host")) {
assertEquals("localhost", moduleOption.getDefaultValue());
}
}
}
public static Matcher<ModuleOption> moduleOptionNamed(String name) {
return hasProperty("name", equalTo(name));
}
}
24.4 Install the module
The next step is to package the module as an uber-jar using maven:
$mvn package
This will build an uber-jar in target/redis-store-sink-1.0.0.BUILD-SNAPSHOT.jar. If youinspect the contents of this jar, you will see it includes the module configuration files and dependentjars (spring-integration-redis in this case). Fire up the Spring XD runtime if it is not alreadyrunning and, using the Spring XD Shell, install the module as a sink named redis-store using themodule upload command:
xd:>module upload --file [path-to]/redis-store-sink/target/redis-store-sink-1.0.0.BUILD-SNAPSHOT.jar --
name redis-store --type sink
See registering a module for more details.
24.5 Test the module
Once the XD server is running, create a stream to test your new module. This stream will write tweetscontaining the word "java" to Redis as a JSON string:
xd:> stream create --name javasearch --definition "twittersearch --consumerKey=<your_key> --
consumerSecret=<your_secret> --query=java | redis-store --collection=javatweets" --deploy

Spring XD Guide
1.3.2.RELEASE Spring XD 279
Note that you need to have a consumer key and secret to use the twittersearch module. See thedescription in the sources section for more information.
Fire up the redis-cli and verify that tweets are being stored:
$ redis-cli
redis 127.0.0.1:6379> lrange javatweets 0 -1
1) "{\"id\":342386150738120704,\"text\":\"Now Hiring: Senior Java Developer\",\"createdAt
\":1370466194000,\"fromUser\":\"jencompgeek\",...\"}"
If you prefer a simpler test, you can create a stream using the http source and manually post data to it:
xd:> stream create --name redisTest --definition "http | redis-store" --deploy
xd:> http post --target http://localhost:9000 --data hello
redis 127.0.0.1:6379> lrange redisTest 0 -1
1) "hello"
Spring XD Guide
1.3.2.RELEASE Spring XD 280
25. Creating a Job Module
25.1 Introduction
As outlined in the modules document, XD currently supports four types of modules: source, sink, andprocessor for stream processing and job for batch procesing. This document walks through creation ofa simple job module.
25.2 Developing your Job
The Job definitions provided as part of the Spring XD distribution as well as those included in the SpringXD Samples repository can be used a basis for building your own custom Jobs. The development of aJob largely follows the development of a Spring Batch job, for which there are several references.
• Spring Batch home page
• Spring Batch In Action - Manning
• Pro Spring Batch - APress
For help developing Job steps specific to Hadoop, e.g. HDFS, Pig, Hive, the Spring XD Samples isuseful as well as the following resources
• Spring for Apache Hadoop home page
• Spring Data - O’Reilly - Chapter 13
25.3 Creating a Simple Job
First we’ll look at how to create a job module from scratch. The complete working example is here.
Create a Module Project
This section covers the setup of a standalone project containing the module configuration and customcode. This example uses Maven but Spring XD supports Gradle as well.
Take a look at the pom file for this example. You will see it declares spring-xd-module-parentas its parent. The parent pom provides support for building and packaging Spring XD modules,including spring-batch libraries. We also need to configure repositories to access the parent pom andits dependencies.
First create a java project for your module, named batch-simple in your favorite IDE.
Create the Spring Batch Job Definition
Create a The job definition file in src\main\resources\config. In this case, we use a customTasklet. In this example there is only one step and it simply prints out the job parameters.

Spring XD Guide
1.3.2.RELEASE Spring XD 281
<?xml version="1.0" encoding="UTF-8"?>
<beans ...>
<batch:job id="job">
<batch:step id="helloSpringXDStep">
<batch:tasklet ref="helloSpringXDTasklet" />
</batch:step>
</batch:job>
<bean id="helloSpringXDTasklet"
class="org.springframework.springxd.samples.batch.HelloSpringXDTasklet" />
</beans>
Write the Tasklet
Write a HelloSpringXDTasklet java class that implements Tasklet. This will retrieve the job parametersand print them to stdout.

Spring XD Guide
1.3.2.RELEASE Spring XD 282
package org.springframework.springxd.samples.batch;
import ...
public class HelloSpringXDTasklet implements Tasklet, StepExecutionListener {
private volatile AtomicInteger counter = new AtomicInteger(0);
public HelloSpringXDTasklet() {
super();
}
public RepeatStatus execute(StepContribution contribution,
ChunkContext chunkContext) throws Exception {
final JobParameters jobParameters =
chunkContext.getStepContext().getStepExecution().getJobParameters();
final ExecutionContext stepExecutionContext =
chunkContext.getStepContext().getStepExecution().getExecutionContext();
System.out.println("Hello Spring XD!");
if (jobParameters != null && !jobParameters.isEmpty()) {
final Set<Entry<String, JobParameter>> parameterEntries = jobParameters.getParameters().entrySet();
System.out.println(String.format("The following %s Job Parameter(s) is/are present:",
parameterEntries.size()));
for (Entry<String, JobParameter> jobParameterEntry : parameterEntries) {
System.out.println(String.format(
"Parameter name: %s; isIdentifying: %s; type: %s; value: %s",
jobParameterEntry.getKey(),
jobParameterEntry.getValue().isIdentifying(),
jobParameterEntry.getValue().getType().toString(),
jobParameterEntry.getValue().getValue()));
if (jobParameterEntry.getKey().startsWith("context")) {
stepExecutionContext.put(jobParameterEntry.getKey(), jobParameterEntry.getValue().getValue());
}
}
if (jobParameters.getString("throwError") != null
&& Boolean.TRUE.toString().equalsIgnoreCase(jobParameters.getString("throwError"))) {
if (this.counter.compareAndSet(3, 0)) {
System.out.println("Counter reset to 0. Execution will succeed.");
}
else {
this.counter.incrementAndGet();
throw new IllegalStateException("Exception triggered by user.");
}
}
}
return RepeatStatus.FINISHED;
}
@Override
public void beforeStep(StepExecution stepExecution) {
}
@Override
public ExitStatus afterStep(StepExecution stepExecution) {
// To make the job execution fail, set the step execution to fail
// and return failed ExitStatus
// stepExecution.setStatus(BatchStatus.FAILED);
// return ExitStatus.FAILED;
return ExitStatus.COMPLETED;
}
}

Spring XD Guide
1.3.2.RELEASE Spring XD 283
Package and install the Module:
Follow the instructions in the project README for more details. The steps are summarized here.
Build the project with maven:
$mvn package
Uupload the jar file to Spring XD and register it as a job module named myjob using the Spring XDshell module upload command:
xd:>module upload --type job --name myjob --file [path-to]/batch-simple/target/springxd-batch-
simple-1.0.0.BUILD-SNAPSHOT.jar
Modules can reside in an expanded directory named after the module, e.g. modules/job/myjob oras a single uber-jar, e.g., modules/job/myjob.jar. See module packaging and registering a moduleformore details.
Run the job
Start the Spring XD container if it is not already running.
xd:> job create --name helloSpringXD --definition "myjob" --deploy
xd:> job launch helloSpringXD --params {"myStringParameter":"foobar","-secondParam(long)":"123456"}
Note
By default, deploy is set to false. "--deploy" or "--deploy true" will deploy the job along with jobcreation.
In the console log of the Spring XD container you should see the following:
Hello Spring XD!
The following 3 Job Parameter(s) is/are present:
Parameter name: secondParam; isIdentifying: false; type: LONG; value: 123456
Parameter name: myStringParameter; isIdentifying: true; type: STRING; value: foobar
Parameter name: random; isIdentifying: true; type: STRING; value: 0.06893349621991496
25.4 Creating a read-write processing Job
To create a job in the XD shell, execute the job create command specifying:
• name - the "name" that will be associated with the Job
• definition - the name of the job module
Often a batch job will involve reading batches of data from a source, tranforming or processing that dataand then wrting the batch of data to a destination. This kind of flow is implemented using Chunk-orientedprocessing, represented in the job configuration using the <chunk/> element containing reader,writer and optional processor elements. Other attributes define the size of the chunck and variouspolicies for handling failure cases.
You will usually be able to reuse existing reader and writer implementations. The filejdbc job providedwith the Spring XD distribution shows an example of this using the standard File reader and JDBC writer.
The processor is based on the ItemProcessor interface. It has a generic signature that lets youoperate on a record at at time. The batch of records is handled as a collection in reader and writer

Spring XD Guide
1.3.2.RELEASE Spring XD 284
implementations. In the filejdbc job, the reader converts input records into a Spring XD Tuple. Thetuple serves as a generic data structure but you can also use or write another converter to convert theinput record to your own custom POJO object.
25.5 Orchestrating Hadoop Jobs
There are several tasklet implementation that will run various types of Hadoop Jobs
• MapReduce Job
• HDFS Scripts
• Hive Scripts
• Pig Scripts
The Spring Hadoop Samples project provides examples of how to create batch jobs that orchestatevarious hadoop jobs at each step. You can also mix and match steps related to work that is executedon the Hadoop cluster and work that is executed on the Spring XD cluster.

Spring XD Guide
1.3.2.RELEASE Spring XD 285
26. Creating a Python Module
26.1 Introduction
Spring XD provides support for processor and sink modules that invoke an external shell command.You can use these to integrate a Python script with a Spring XD stream. The following echo.py scriptis a simple example which can implement a processor to simply echo the input.
#echo.py
import sys
#=====================
# Write data to stdout
#=====================
def send(data):
sys.stdout.write(data)
sys.stdout.flush()
#===========================================
# Terminate a message using the default CRLF
#===========================================
def eod():
send("\r\n")
#===========================
# Main - Echo the input
#===========================
while True:
try:
data = raw_input()
if data:
send(data)
eod()
except:
break
To use this in a stream, create a stream definition like this:
xd:>stream create pytest --definition "time | shell --command='python <absolute-path-to>/echo.py' | log"
--deploy
Created and deployed new stream 'pytest'
Note
Python must be installed on the host of any container to which the processor module is deployed.
You should see the time messages echoed in the Spring XD container log. The shell processor worksby binding its message channels to the external process' stdin and stdout. Behind the scenes, theshell modules use java.lang.ProcessBuilder to connect to the shell process. As you can see, most ofecho.py is boilerplate code. To make things easier, Spring XD provides a python module to handleall of the low level I/O.
from springxd.stream import Processor
def echo(data):
return data
process = Processor()
process.start(echo)

Spring XD Guide
1.3.2.RELEASE Spring XD 286
As you can see, this creates a Processor object which has a start method to which you may passany function that accepts a single argument and returns a value. Currently, both the input and outputdata must be strings. Processor uses Encoders.CRLF (\r\n) by default. This is how the Spring XDmodule delimits individual messages in the stream. Encoders.LF is also supported. The shell commandprocessor also uses CRLF by default.
xd:>stream create pytest --definition "time | shell --command='python <absolute-path-to>/echo.py' | log"
--deploy
Created and deployed new stream 'pytest'
Alternately, you can specify the LF encoder in the Python script and the stream definition:
from springxd.stream import Processor, Encoders
def echo(data):
return data
process = Processor(Encoders.LF)
process.start(echo)
xd:>stream create pytest --definition "time | shell --command='python <absolute-path-to>/echo.py' --
encoder=LF | log" --deploy
The stream module also provides a similar Sink object which accepts a function that need not returna value (Sink will ignore the returned value).
Note
In order to import the springxd.stream module into your script, you must include it in yourPython module search path. Python provides several ways to do this as described here. SpringXD python modules are included in the distribution in the python directory. The stream module isdesigned to be version agnostic and has been tested against Python 2.7.6 and Python 3.4.2

Spring XD Guide
1.3.2.RELEASE Spring XD 287
27. Providing Module Options Metadata
27.1 Introduction
Each available module can expose metadata about the options it accepts. This is useful to enhance theuser experience, and is the foundation to advanced features like contextual help and code completion.the For example, provided that the file source module has been enriched with options metadata (and ithas), one can use the module info command in the shell to get information about the module:
xd:> module info source:file
Information about source module 'file':
Option Name Description
Default Type
----------------- ---------------------------------------------------------------------------
------- ---------
dir the absolute path to the directory to monitor for files <none>
String
pattern a filter expression (Ant style) to accept only files that match the pattern *
String
outputType how this module should emit messages it produces <none>
MediaType
preventDuplicates whether to prevent the same file from being processed twice true
boolean
ref set to true to output the File object itself false
boolean
fixedDelay the fixed delay polling interval specified in seconds 5
int
For this to be available, module authors have to provide a little bit of extra information, known as "ModuleOptions Metadata". That metadata can take two forms, depending on the needs of the module: one caneither use the "simple" approach, or the "POJO" approach. If one does not need advanced features likeprofile activation, validation or options encapsulation, then the "simple" approach is sufficient.
27.2 Using the "Simple" approach
To use the simple approach, simply create a file named <module>.properties right next to the<module>.xml file for your module.
Declaring and documenting an option
In that file, each option <option> is declared by adding a line of the form
options.<option>.description = the description
The description for the option is the only required part, and is a very important piece of information forthe end user, so pay special attention to it (see also Style remarks)
That sole line in the properties file makes a --<option>= construct available in the definition of astream using your module.
About plugin provided options metadata
Some options are automatically added to a module, depending on its type. For example, everysource module automatically inherits a outputType option, that controls the type conversionfeature between modules. You don’t have to do anything for that to happen.
Similarly, every job module benefits from a handful of job specific options.

Spring XD Guide
1.3.2.RELEASE Spring XD 288
Here is a recap of those automatically provided options:
Module Type Options
Source outputType
Processor outputType, inputType
Sink inputType
Job makeUnique, numberFormat, dateFormat
Advertising default values
In addition to this, one can also provide a default value for the option, using
options.<option>.default = SomeDefault
Doing this, the default value should not be used in the placeholder syntax in the xml file. Assuming thisis the contents of foo.properties:
options.bar.description = a very useful option
options.bar.default = 5
then in foo.xml:
<!-- this is correct -->
<feature the-bar="${bar}"" />
<!-- this is incorrect/not needed -->
<feature the-bar="${bar:5}" />
Exposing the option type
Lastly, one can document the option type using a construct like
options.<option>.type = fully.qualified.class.Name
For simple "primitive" types, one can use short names, like so:
options.<option>.type = String
or
options.<option>.type = boolean
or
options.<option>.type = Integer
Note that there is support for both wrapper types (e.g. Integer) and primitive types (e.g. int). Althoughthis is used for documentation purposes only, the primitive type would typically be used to indicate arequired option (null being prohibited).
27.3 Using the "POJO" approach
To use advanced features such as profile activation driven by the values provided by the end user, onewould need to leverage the "POJO" approach.
Instead of writing a properties file, you will need to write a custom java class that will hold the values atruntime. That class is also introspected to derive metadata about your module.

Spring XD Guide
1.3.2.RELEASE Spring XD 289
Declaring options to the module
For the simplest cases, the class you need to write does not need to implement or inherit from anything.The only thing you need to do is to reference it in a properties file named after your module (the samefile location you would have used had you been leveraging the "simple" approach):
options_class = fully.qualified.name.of.your.Pojo
Note that the key is options_class, with an s and an underscore (not to be confused withoption.<optionname> that is used in the "simple" approach)
For each option you want available using the --<option>= syntax, you must write a public setterannotated with @ModuleOption, providing the option description in the annotation.
The type accepted by that setter will be used as the documented type.
That setter will typically be used to store the value in a private field. How the module application canget ahold of the value is the topic of the next section.
Exposing values to the context
For a provided value to be used in the module definition (using the ${foo} syntax), your POJO classneeds to expose a getFoo() getter.
At runtime, an instance of the POJO class will be created (it requires a no-arg constructor, by the way)and values given by the user will be bound (using setters). The POJO class thus acts as an intermediatePropertySource to provide values to ${foo} constructs.
Providing defaults
To provide default values, one would most certainly simply store a default value in the backing field of agetter/setter pair. That value (actually, the result of invoking the matching getter to a setter on a newlyinstanciated object) is what is advertised as the default.
Encapsulating options
Although one would typically use the combination of a foo field and a getFoo(), setFoo(x) pair,one does not have to.
In particular, if your module definition requires some "complex" (all things being relative here) valueto be computed from "simpler" ones (e.g. a suffix value would be computed from an extension option,that would take care of adding a dot, depending on whether it is blank or not), then you’d simply dothe following:
1 public class MyOptions {
private String extension;
@ModuleOption("the file extension to use")
5 public void setExtension(String extension) {
this.extension = extension;
}
public String getSuffix() {
10 return extension == null ? null : "." + extension;
}
}

Spring XD Guide
1.3.2.RELEASE Spring XD 290
This would expose a --extension= option, being surfaced as a ${suffix} placeholder construct.
The astute reader will have realized that the default can not be computed then, because there is nogetExtension() (and there should not be, as this could be mistakenly used in ${extension}).To provide the default value, you should use the defaultValue attribute of the @ModuleOptionannotation.
Using profiles
The real benefit of using a POJO class for options metadata comes with advanced features though, oneof which is dynamic profile activation.
If the set of beans (or xml namespaced elements) you would define in the module definition filedepends on the value that the user provided for one or several options, then you can makeyour POJO class implement ProfileNamesProvider. That interface brings one contract method,profilesToActivate() that you must implement, returning the names of the profiles you want to use(this method is invoked after user option values have been bound, so you can use any logic involvingthose to compute the list of profile names).
As an example of this feature, see e.g. TriggerSourceOptionsMetadata.
Using validation
Your POJO class can optionally bear JSR303 annotations. If it does, then validation will occur aftervalues have been successfully bound (understand that injection can fail early due to type incoherenceby the way. This comes for free and does not require JSR303 annotations).
This can be used to validate a set of options passed in (some are often mutually exclusive) or to catchmisconfiguration earlier than deployment time (e.g. a port number cannot be negative).
27.4 Metadata style remarks
To provide a uniform user experience, it is better if your options metadata information adheres to thefollowing style:
• option names should follow the camelCase syntax, as this is easier with the POJO approach. If welater decide to switch to a more unix-style, this will be taken care of by XD itself, with no changeto the metadata artifacts described here
• description sentences should be concise
• descriptions should start with a lowercase letter and should not end with a dot
• use primitive types for required numbers
• descriptions should mention the unit for numbers (e.g ms)
• descriptions should not describe the default value, to the best extent possible (this is surfaced thruthe actual default metadata awareness)
• options metadata should know about the default, rather than relying on the ${foo:default}construct

Spring XD Guide
1.3.2.RELEASE Spring XD 291
28. Extending Spring XD
28.1 Introduction
This document describes how to customize or extend the Spring XD Container. Spring XD is a distributedruntime platform delivered as executable components including XD Admin, XD Container, and XDShell. The XD Container is a Spring application combining XML resources, Java @Configurationclasses, and Spring Boot auto configuration for its internal configuration, initialized via the Spring BootSpringApplicationBuilder. Since Spring XD is open source, the curious user can see exactly how itis configured. However, all Spring XD’s configuration is bundled in jar files and therefore not directlyaccessible to end users. Most users do not need to customize or extend the XD Container. For thosethat do, Spring XD provides hooks to:
• Provide additional bean definitions
• Override selected bean definitions with custom implementations
Customization scenarios might include:
• Add a new data transport
• Add a Spring XD plugin to configure modules
• Embed a shared component used by user provided Plugin, such as a GemFire cache or a data source
• Providing additional type converters
This following sections provide an overview of XD Container internals and explain how to extend SpringXD for each of these scenarios. The reader is expected to have a working knowledge of both the SpringFramework and Spring Integration.
28.2 Spring XD Application Contexts
The diagram below shows how Spring XD is organized into several Spring application contexts.Some understanding of the Spring XD application context hierarchy is necessary for extending XD. Inthe diagram, solid arrows indicate a parent-child relationship. As with any Spring application a childapplication context may reference beans defined in its parent application context, but the parent contextcannot access beans defined in the child context. It is important to keep in mind that a bean definitionregistered in a child context with the same id as a bean in the parent context will create a separateinstance in the child context. Similarly, any bean definition will override an earlier bean definition in thesame application context registered with the same id (Sometimes referred to as "last one wins").
Spring XD’s primary extension mechanism targets the Plugin Context highlighted in the diagram. Usinga separate convention, it is also possible to register an alternate MessageBus implementation in theShared Server Context.

Spring XD Guide
1.3.2.RELEASE Spring XD 292
Figure 28.1. The Spring XD Application Context Hierarchy
While this arrangement of application contexts is more complex than the typical Spring application, XDis designed this way for the following reasons:
• Bean isolation - Some beans are "global" in that they are shared by all XD runtime components:Admin, Container, and Modules. Those allocated to the Shared Server Context are shared onlyby Admin and Container. Some beans must be available to Plugins ,used to configure Modules.However Plugins and Modules should be isolated from critical internal components. While completeisolation has proven difficult to achieve, the intention is to minimize any undesirable side effects whenintroducing extensions.
• Bean scoping - To ensure that single node and distributed configurations of the Spring XD runtimeare logically equivalent, the Spring configuration is identical in both cases, avoiding unnecessaryduplication of bean definitions.
• Lifecycle management - Plugins and other beans used to configure these application contexts arealso Spring beans which Spring XD dynamically "discovers" during initialization. Such componentsmust be fully instantiated prior to the creation of the application context to which they are targeted.

Spring XD Guide
1.3.2.RELEASE Spring XD 293
To ensure initialization happens in the desired order, such beans may be either defined in an isolatedapplication context (i.e., not part of the hierarchy) or in a parent context which Spring initializes beforeany of its descendants.
28.3 Plugin Architecture
The XD Container at its core is simply a runtime environment for hosting and managing micro Springapplications called Modules. Each module runs in its own application context (Module Context). TheModule Context is a child of Global Context, as modules share some bean definitions, but otherwise islogically isolated from beans defined in the XD Container. The Module Context is fundamental to theSpring XD design. In fact, this is what allows each module to define its own input and output channels,and in general, enables beans be uniquely configured via property placeholders evaluated for eachdeployed instance of a Module. The Module interface and its default implementation provide a thinwrapper around a Spring Application Context for which properties are bound, profiles activated, andbeans added or enhanced in order to "plug" the module into the XD Container.
The ModuleDeployer, shown in the diagram, is a core component of the Container Context, responsiblefor initializing modules during deployment, and shutting them down during undeployment. TheModuleDeployer sees the module as a "black box", unaware of its purpose or runtime requirements.Binding a module’s channels to XD’s data transport, for instance, is the responsibility of the MessageBusimplementation configured for the transport. The MessageBus binding methods are actually invoked bythe StreamPlugin during the initialization of a stream module. To support jobs, XD provides a JobPluginto wire the Spring Batch components defined in the module during deployment. The JobPlugin alsoinvokes the MessageBus to support communications between XD and job modules. These, and otherfunctions critical to Spring XD are performed by classes that implement the Plugin interface. A Pluginoperates on every deployed Module which it is implemented to support. Thus the ModuleDeployer simplyinvokes the deployment life cycle methods provided by every Plugin registered in the Plugin Context.
The ModuleDeployer discovers registered Plugins by calling getBeansOfType(Plugin.class) forthe Plugin Context (its parent context). This means that adding your own Plugin requires these steps:
• Implement the Plugin interface
• Add your Plugin implementation and any dependent classes to Spring XD’s class path
• Follow conventions that Spring XD uses to register Plugins
The next section covers these steps in more detail.
28.4 How to Add a Spring bean to the XD Container
This section applies to adding a Plugin, which is generally useful since a Plugin has access to everymodule as it is being deployed (see the previous section on Plugin Architecture). Furthermore, thissection describes a generic mechanism for adding any bean definition to the Plugin Context. SpringXD uses both Spring Framework’s class path component scanning and resource resolution to find anycomponents that you add to specified locations in the class path. This means you may provide Java@Configuration and/or any classes annotated with the @Component stereotype in a configured basepackage in addition to bean definitions defined in any XML or Groovy resource placed under a configuredresource location. These locations are given by the properties xd.extensions.locations andxd.extensions.basepackages, optionally configured in servers.yml down at the bottom:

Spring XD Guide
1.3.2.RELEASE Spring XD 294
# User Extensions: Where XD scans the class path to discover extended container configuration to adds
beans to the Plugins context.
# Each property may be a comma delimited string. 'basepackages' refers to package names used for
# annotated component (@Configuration or @Component stereotypes) scanning. 'locations' is a list of root
resource directories containing XML or Groovy configuration.
# XD prepends classpath:* if no prefix included and appends **/*.* to each location
#xd:
# extensions:
# basepackages: com.acme.xd.extensions
# locations: META-INF/spring-xd/ext
As the pluralization of these property names suggests, you may represent multiple values as a commadelimited string. Also note that there is no default for xd.extensions.basepackages. So if you wantto use annotation based configuration, you must first set up one or more base package locations. Theresource location(s) define the root locations where any XML or Groovy Spring bean definition file foundin the given root or any of its subdirectories will be loaded. The root location defaults to META-INF/spring-xd/ext
The Container loads any bean definitions found in these configured locations on the class path and addsthem to the Plugin Context. This is the appropriate application context since in order to apply customlogic to modules, you will most likely need to provide a custom Plugin.
Note
The extension mechanism is very flexible. In theory, one can define BeanPostProcessors,BeanFactoryPostProcessors, or ApplicationListeners to manipulate Spring XD applicationcontexts. Do so at your own risk as the Spring XD initialization process is fairly complex, and notall beans are intended to be extensible.
Extensions are packaged in a jar file which must be added to Spring XD’s class path. Currently, youmust manually copy the jar to $XD_HOME/lib for each container instance. To implement a Plugin, youwill need to include a compile time dependency on spring-xd-module in your build. To access othercontainer classes and to test your code in a container you will also require spring-xd-dirt.
28.5 Providing A new Type Converter
Spring XD supports automatic type conversion to convert payloads declaratively. For example, toconvert an object to JSON, you provide the module option --outputType=application/json toa module used in a stream definition. The conversion is enabled by a Plugin that binds a SpringMessageConverter to a media type. The default type converters are currently configured in streams.xml,packaged in spring-xd-dirt-<version>.jar. If you look at that file, you can see an empty listregistered as customMessageConverters.
<!-- Users can override this to add converters.-->
<util:list id="customMessageConverters"/>
So registering new type converters is a matter of registering an alternate list ascustomMessageConverters to the application context. Spring XD will replace the default empty listwith yours. xd.messageConverters and customMessageConverters are two lists injected into theModuleTypeConversionPlugin to build an instance of CompositeMessageConverter which delegates tothe first converter in list order that is able to perform the necessary conversion. The Plugin injects theCompositeMessageConverter into the module’s input or output the MessageChannel, corresponding tothe inputType or outputType options declared for any module in the stream definition (or definedas the module’s default inputType).

Spring XD Guide
1.3.2.RELEASE Spring XD 295
The CompositeMessageConverter is desirable because a module does not generally know whatpayload type it will get from its predecessor. For example, the converters that Spring XD provides outof the box can convert any Java object, including a Tuple and a byte array to a JSON String. Howeverthe methods for converting a byte array or a Tuple are each optimized for the respective type. TheCompositeMessageConverter for --outputType=application/json must provide all three methods and theData Type channel chooses the first converter that applies to both the incoming payload type and themedia type (e.g., application/json). Note that the order that the converters appear in the list is significant.In general, converters for specific payload types precede more general converters for the same mediatype. The customMessageConverters are added after the standard converters in the order defined.So it is generally easier to add converters for new media types than to replace existing converters.
For example, a member of the Spring XD community inquired about Spring XD’s support forGoogle protocol buffers. This user was interested in integrating Spring XD with an existingmessaging system that uses GPB heavily and needed a way to convert incoming and outgoingGPB payloads to interoperate with XD streams. This could be accomplished by providing acustomMessageConverters bean containing a list of required message converters. Writing a customconverter to work with XD requires extending AbstractFromMessageConverter provided by spring-xd-dirt. It is recommended to review the existing implementations listed in streams.xml to get a feelfor how to do this. In addition, you would likely define a custom MimeType such as application/gpb.
Note
It is worth mentioning that GPB is commonly used for marshaling objects over the network. Inthe context of Spring XD marshaling is treated as a separate concern from payload conversion.In Spring XD, marshaling happens at the "pipe" indicated by the | symbol using a differentserialization mechanism, described below. In this case, the GPB payloads are produced andconsumed by systems external to Spring XD and need to be converted in order that a GPB payloadcan work with XD streams. In this scenario, if the GPB is represented as a byte array, the bytesare transmitted over the network directly and marshaling is unnecessary.
As an illustration, suppose this user has developed a source module that emits GPB payloads froma legacy service. Spring XD provides transform and filter modules that accept SpEL expressions toperform their respective tasks. These modules are useful in many situations but the SpEL expressionsgenerally require a POJO representing a domain type, or a JSON string. In this case it would beconvenient to support stream definitions such as
gpb-source --outputType=application/x-java-object | transform --expression=...
where gpb-source represents a custom module that emits a GPB payload and expression referencessome specific object property. The media type application/x-java-object is a convention used by XD toindicate that the payload should be converted to a Java type embedded in the serialized representation(GPB in this example). Alternately, converting to JSON could be performed if the stream definition were:
gpb-source --outputType=application/json | transform --expression=...
To convert an XD stream result to GPB to be consumed by an external service might look like:
source | P1 ... | Pn | gpb-sink --inputType=application/gpb
These examples would require registering custom MessageConverters to handle the indicatedconversions. Alternately, this may be accomplished by writing custom processor modules to performthe required conversion. The above examples would then have stream definitions that look more like:

Spring XD Guide
1.3.2.RELEASE Spring XD 296
gpb-source | gpb-to-pojo | transform --expression=...
source | P1 ... | Pn | json-to-gpb | gpb-sink
Tip
While custom processor modules are easier to implement, they add unnecessary complexity tostream definitions that use them. If such conversions are required everywhere, enabling automaticconversion may be worth the effort. Also, note that using a separate module generally requiresadditional network hops (at each pipe). If a processor module is necessary only to perform acommon payload conversion, it is more efficient to install a custom converter.
28.6 Adding a New Data Transport
Spring XD offers Redis and Rabbit MQ for data transport out of the box. Transport is configured simplyby setting the property xd.transport to redis or rabbit. In addition xd-singlenode supports a--transport command line option that can accept local(the single node default) in addition. Thissimple configuration mechanism is supported internally by an import declaration that binds the transportimplementation to a name.
<import resource="classpath*:/META-INF/spring-xd/transports/${XD_TRANSPORT}-bus.xml"/>
The above snippet is from an internal Spring configuration file loaded into the Shared Server Context.Spring XD provides MessageBus implementations in META-INF/spring-xd/transports/redis-bus.xml and META-INF/spring-xd/transports/rabbit-bus.xml
This makes it relatively simple for Spring XD developers and advanced users to provide alternateMessageBus implementations to enable a new transport and activate that transport by setting thexd.transport property. For example, to implement a JMS MessageBus you would add a jarcontaining /META-INF/spring-xd/transports/jms-bus.xml in the class path. This file mustregister a bean of type MessageBus with the ID messageBus. A jar providing the above configuration filealong with the MessageBus implementation and any dependencies must be installed $XD_HOME/lib.
When implementing a MessageBus, it is advisable to review and understand the existingimplementations which extend MessageBusSupport. This base class performs some common tasksincluding payload marshaling. Spring XD uses the term codec to connote a component that performsboth serialization and deserialization and provides a bean with the same name. In the exampleabove, the JMS MessageBus configuration`/META-INF/spring-xd/transports/jms-bus.xml` might looksomething like:
<bean id="messageBus" class="my.example.JmsMessageBus">
<constructor-arg ref="jmsConnectionFactory" />
<constructor-arg ref="codec"/>
</bean>
where JmsMessageBus extends MessageBusSupport and the developer is responsible for configuringany dependent JMS resources appropriately.

Spring XD Guide
1.3.2.RELEASE Spring XD 297
29. Optimizing Serialization
29.1 Introduction
Spring XD is configured by default to use Kryo to serialize and deserialize POJO message payloadswhen using remote transport such as Redis, Rabbit, or Kafka. Note that if the payload is already inthe form of a byte array, then XD will transport it as is. Also if the payload is a String, XD will usegetBytes() and bypass Kryo. Kryo performs favorably compared to other JVM serialization librariesbut may become a bottleneck in high-throughput applications. In rare cases, custom serialization maybe needed to address functional issues. This section offers some tips and techniques for customizingand optimizing serialization to address such situations. In accordance with the usual caveats aboutpremature optimization, don’t apply these techniques unless you really need to. Furthermore, the timeit takes to serialize and deserialize an object is proportional to factors such the number of fields,composition, and collection sizes. Prerequisite to the techniques presented here, consider colocatingmodules (via local binding or module composition), or using lighter payloads.
29.2 Serialization Performance
Published serialization benchmarks have shown that Kryo serialization operations take less than 1000nanoseconds for reasonably sized objects. The Spring XD team has independently verified theseresults. Serializing large objects may take many orders of magnitude longer. To put this in perspective,let’s suppose that serialization and deserialization of your payload each take 5000 nanoseconds. For astream ,e.g., some-source | some-sink running in a distributed XD runtime, moving the payloadfrom the source to the sink requires serialization at the producer and deserialization at the consumer.Both operations would account for 10,000 ns or 10 microseconds. So the maximum theoreticalthroughput for this simple stream, with no partitioning or parallel deployment, is at most 100,000messages/sec. This does not account for network latency (transporting the serialized bytes), overheadin the messaging middleware, or computations performed by the modules. If your application requiresa higher level of throughput than mentioned above then serialization is a potential bottleneck. However,if your throughput requirements are not so demanding, serialization performance becomes less of anissue. In this hypothetical scenario, At a throughput of 10,000 messages/second, 10 microseconds isonly 10% of the maximum time required to process the message. However if you trying to stream largeobjects at this rate, serialization time, along with transport and processing time, will be significantlyhigher.
29.3 Serialization in XD
In Spring XD 1.2.x, MessageBus implementations inject a bean of type MultiTypeCodec, where theterm Codec refers to an component providing methods to serialize and deserialize objects. MultiTypemeans that the component can handle any object. Spring XD is internally configured with a PojoCodecthat delegates to Kryo and provides hooks to register custom Kryo serializers for specific types.
29.4 Customizing Kryo
By default, Kryo uses delegates unknown Java types to its FieldSerializer. Kryo also registersdefault serializers for each primitive type along with String, Collection and Map serializers.FieldSerializer uses reflection to navigate the object graph. A more efficient approach is toimplement a custom serializer that is aware of the object’s structure and can directly serialize selectedprimitive fields:
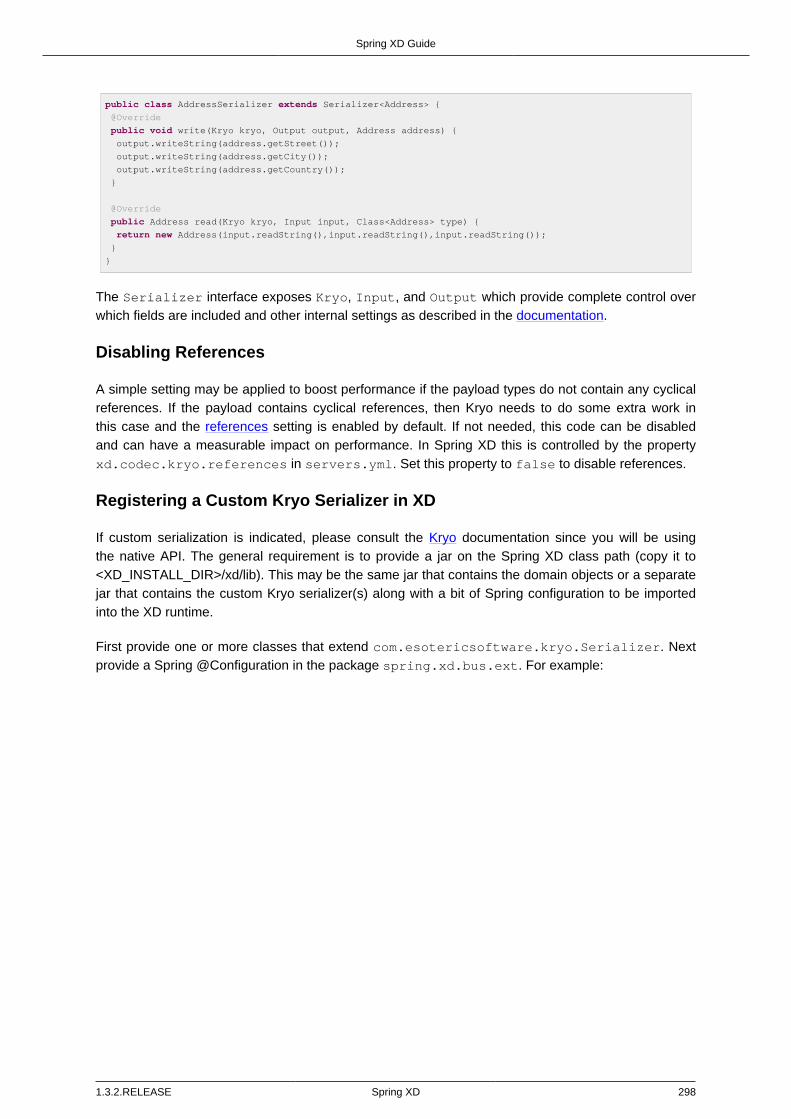
Spring XD Guide
1.3.2.RELEASE Spring XD 298
public class AddressSerializer extends Serializer<Address> {
@Override
public void write(Kryo kryo, Output output, Address address) {
output.writeString(address.getStreet());
output.writeString(address.getCity());
output.writeString(address.getCountry());
}
@Override
public Address read(Kryo kryo, Input input, Class<Address> type) {
return new Address(input.readString(),input.readString(),input.readString());
}
}
The Serializer interface exposes Kryo, Input, and Output which provide complete control overwhich fields are included and other internal settings as described in the documentation.
Disabling References
A simple setting may be applied to boost performance if the payload types do not contain any cyclicalreferences. If the payload contains cyclical references, then Kryo needs to do some extra work inthis case and the references setting is enabled by default. If not needed, this code can be disabledand can have a measurable impact on performance. In Spring XD this is controlled by the propertyxd.codec.kryo.references in servers.yml. Set this property to false to disable references.
Registering a Custom Kryo Serializer in XD
If custom serialization is indicated, please consult the Kryo documentation since you will be usingthe native API. The general requirement is to provide a jar on the Spring XD class path (copy it to<XD_INSTALL_DIR>/xd/lib). This may be the same jar that contains the domain objects or a separatejar that contains the custom Kryo serializer(s) along with a bit of Spring configuration to be importedinto the XD runtime.
First provide one or more classes that extend com.esotericsoftware.kryo.Serializer. Nextprovide a Spring @Configuration in the package spring.xd.bus.ext. For example:

Spring XD Guide
1.3.2.RELEASE Spring XD 299
package spring.xd.bus.ext;
...
@Configuration
public class CustomKryoRegistrarConfig {
@Bean
public KryoRegistrar myCustomRegistration() {
List<Registration> registrations = new ArrayList<>();
registrations.add(new Registration(MyObject.class, new MySerializer(),62));
return new KryoRegistrationRegistrar(registrations);
}
// Every thing self contained here for illustration purposes only.
public static class MyObject {}
public static class MySerializer extends Serializer<MyObject> {
@Override
public void write(Kryo kryo, Output output, MyObject object) {
...
}
@Override
public MyObject read(Kryo kryo, Input input, Class<MyObject> type) {
MyObject result;
...
return result;
}
}
}
The above example works by configuring a KryoRegistrationRegistrar. This class holds a list ofcom.esotericsoftware.kryo.Registration each of which associates a Java class to aSerializer and a unique integer. The integer is the registration ID for the type which allows Kryo toencode the serialized type as an integer instead of writing the fully qualified class name. This significantlyreduces the size of the serialized payload. Spring XD will inject any beans of type KryoRegistrarfound on the class path into the PojoCodec. Hence a jar containing a Spring configuration similarto the above and installed in xd/lib will register the custom serializer. One caveat is that multipleKryoRegistrars may contain conflicting registrations. The ID assigned must be unique, and theremay not be multiple registrations for the same class. PojoCodec will merge and validate all registrationsduring container initialization so that any conflicts will result in an exception during container initialization.
Note
The codec must be configured exactly the same way in every container instance. This it isimportant to keep custom jars and other related runtime configuration consistent. The containerlogs include the Kryo registration settings.
Implementing KryoSerializable
If you have write access to the domain object source code it may implement KryoSerializableas described here. In this case the class provides the serialization methods itself and no furtherconfiguration is required for Spring XD. This has the advantage of being much simpler to use with XD,however benchmarks have shown this is not quite as efficient as registering a custom serializer explicitly:

Spring XD Guide
1.3.2.RELEASE Spring XD 300
public class Address implements KryoSerializable {
...
@Override
public void write(Kryo kryo, Output output) {
output.writeString(this.street);
output.writeString(this.city);
output.writeString(this.country);
}
@Override
public void read(Kryo kryo, Input input) {
this.street = input.readString();
this.city = input.readString();
this.country = input.readString();
}
}
Note that this technique can also be used to wrap a serialization library other than Kryo.
Using DefaultSerializer Annotation
Kryo also provides an annotation as described here.
@DefaultSerializer(SomeClassSerializer.class)
public class SomeClass {
// ...
}
If you have write access to the domain object this may be a simpler alternative to specify a customserializer. Note this does not register the class with an ID, so your mileage may vary. This maybe combined with using a KryoClassMapRegistrar or KryoClassListRegistrar to register objects ifnecessary, but then there is less benefit to using the annotation.
Replacing PojoCodec
It is also possible to replace PojoCodec with an implementation of MultiTypeCodec that uses anotherserialization library in place of Kryo. XD does not provide an alternate implementation, but if one wereinclined to write one, a configuration similar to this, in the spring.xd.bus.ext package, is required:
package spring.xd.bus.ext;
...
@Configuration
public class CustomCodecConfig {
@Bean //must be named 'codec'
public MultiTypeCodec<Object> codec() {
return new CustomCodec(...);
}
}
29.5 Benchmarking
Prior to adding any serialization configuration to XD, we highly recommend running some benchmarktests to measure serialization of your data in isolation. It is important to first establish a baselinemeasurement. Once the baseline performance is known, you can readily measure the impact ofoptimizations. Serialization has been measured on the order of few hundred nanoseconds. At this scale,it is important to test in an environment which does not have external processes competing for resources.This type of microbenchmark must also account for JVM optimizations and garbage collection by"warming up" (letting the test run for a while before starting the timer) , requesting GC and pausing

Spring XD Guide
1.3.2.RELEASE Spring XD 301
between runs, and the like. Such tests can also be run with a JVM profiling tool such as Yourkit to getto the finest level of detail.
An excellent resource on JVM serialization benchmarks is the jvm-serializers project which incidentallydemonstrates that manually optimized Kryo is the fastest among the libraries tested. The Spring XDsamples repository includes a serialization-benchmarks project that has co-opted some of the jvm-serializer techniques and contains sample benchmarks, including one which closely matches resultsfor the jvm-serializers kryo_manual test using XD’s PojoCodec as an entry point. You can use one ofthese samples as a template to benchmark your custom serializer.

Spring XD Guide
1.3.2.RELEASE Spring XD 302
30. Samples
We have a number of sample projects in the Spring XD Samples GitHub repository. Below are someadditional examples for ingesting syslog data to HDFS.
30.1 Syslog ingestion into HDFS
In this section we will show a simple example on how to setup syslog ingestion from multiple hostsinto HDFS.
Create the streams with syslog as source and HDFS as sink (Please refer to source and sink)
If you’re using syslog over TCP and need the highest throughput, use the Reactor-backed syslogmodule.
xd:> stream create --definition "reactor-syslog --port=<tcp-port> | hdfs" --name <stream-name>
The reactor-syslog module doesn’t yet support UDP (though it soon will), so if you’re using syslogover UDP you’ll want to use the standard syslog module.
xd:> stream create --definition "syslog-udp --port=<udp-port> | hdfs" --name <stream-name>
xd:> stream create --definition "syslog-tcp --port=<tcp-port> | hdfs" --name <stream-name>
Please note for hdfs sink, set rollover parameter to a smaller value to avoid buffering and to see thedata has made to HDFS (incase of smaller volume of log).
Configure the external hosts’ syslog daemons forward their messages to the xd-container host’s UDP/TCP port (where the syslog-udp/syslog-tcp source module is deployed).
A sample configuration using syslog-ng
Edit syslog-ng configuration (for example: /etc/syslog-ng/syslog-ng.conf):
1) Add destination
destination <destinationName> {
tcp("<host>" port("<tcp-port>"));
};
or,
destination <destinationName> {
udp("<host>" port("<udp-port>"));
};
where "host" is the container(launcher) host where the syslog module is deployed.
2) Add log rule to log message sources:
log {
source(<message_source>); destination(<destinationName>);
};
3) Make sure to restart the service after the change:
sudo service syslog-ng restart

Spring XD Guide
1.3.2.RELEASE Spring XD 303
Now, the syslog messages from the syslog message sources are written into HDFS /xd/<stream-name>/

Part III. Configuration Guidelines

Spring XD Guide
1.3.2.RELEASE Spring XD 305
31. Overview
When running a distributed Spring XD runtime, there are a number of considerations related toperformance and reliability. In most cases, these involve settings that have tradeoffs, but in this sectionwe provide some background so you know what the options are and how to configure them.
In the Deployment section that follows, we provide detailed information about various properties thatcan be passed along with the stream deploy command. That section also describes a scenario thatis common for minimizing network hops, where direct binding can occur between modules rather thanhaving each pipe within a stream correspond to a send and receive over the Message Bus. For moredetail see the Direct Binding subsection.
Another relevant topic for minimizing network hops is the ability to compose modules. That is a usefultechnique where a subset of the stream’s contiguous modules can be grouped together as if a singlemodule. All of the pipes within the composed module will rely upon a local transport rather than sendingand receiving via the Message Bus. For more detail read the Composing Modules section.
For production use, high availability will typically be a requirement for the data transport. In the MessageBus Configuration section below, we provide details on the relevant HA configuration settings as wellas other reliability settings, security settings (including enabling SSL), and error-handling capabilities.
When configuring a RabbitMQ Message Bus, you will also want to consider several performancesettings. For example, unless strict sequential ordering is required, the prefetch and concurrency valuesshould be overridden (the default for each is 1). That can lead to a significant performance improvement.In the less likely case that performance concerns completely outweigh reliability, you can disableacknowledgements and even disable the persistence of messages. For a listing of these settings andmore, refer to the RabbitMQ Configuration section. Several performance related configuration settingsexist on the broker itself, and those are well-documented in the RabbitMQ Admin Guide. For example,the vm_memory_high_watermark and vm_memory_high_watermark_paging_ratio are both explainedwithin the Flow Control subsection of the guide.
If you are using the HTTP source module in a stream and want to scale, you can deploy multipleinstances by specifying the module.http.count property as described in the Deployment Propertiessection. Keep in mind that each instance will share the same port value. The default is 9000, but thatcan be overridden, for all instances, by including --port as an option for the HTTP module in the streamdefinition. That means you would want to ensure that each container that may be a candidate fordeploying one of the HTTP module instances (taking into account the criteria deployment property ifprovided), is running on a different host, either physically or on separate virtual machines. Of course, in aproduction environment, you would likely want to add a load balancer in front of those HTTP endpoints.
Also when using the HTTP source module, you may want to consider enabling support for HTTPS. Anexample is provided in the documentation for that module’s options.

Spring XD Guide
1.3.2.RELEASE Spring XD 306
32. Deployment
32.1 Introduction
This section covers topics related to deployment, including:
• The Deployment Manifest
• Deployment States
• Container Attributes
• Stream Partitioning
• Direct Binding
• Troubleshooting
When you deploy a Stream or Job, the Spring XD Runtime performs the following steps:
• parse the stream or job definition (DSL Guide) to resolve each Module reference along with its options
• set option values assigned to each component Module
• parse and store the deployment request including the Deployment Manifest
• allocate each Module to an available Container instance in accordance with the Deployment Manifest
• binding Module channel(s), either to the MessageBus or directly using Direct Binding
• track the state of each deployed module
• track the overall stream or job’s Deployment State
32.2 Deployment Manifest
A stream is composed of modules. Each module is deployed to one or more Container instance(s). Inthis way, stream processing is distributed among multiple containers. By default, deploying a stream to adistributed runtime configuration uses simple round robin logic. For example if there are three containersand three modules in a stream definition, s1= m1 | m2 | m3, then Spring XD will attempt to distributethe work load evenly among each container. This is a very simplistic strategy and does not take intoaccount things like:
• server load - how many modules are already deployed to a container? What is the current memoryand CPU utilization?
• server affinity - some containers may have external software installed and specific modules will benefitfrom co-location. For example, an hdfs sink might be deployed only to hosts running Hadoop. Orperhaps a file sink should be deployed to hosts configured with extra disk space.
• scalability - Suppose the stream s1, above, can achieve higher throughput with multiple instances ofm2 running, so we want to deploy m2 to every available container.

Spring XD Guide
1.3.2.RELEASE Spring XD 307
• fault tolerance - the ability to target physical servers on redundant networks, routers, racks, etc.
Generally, more complex deployment strategies are needed to tune and operate XD. Additionally, wemust consider various features and constraints when deploying to a PaaS, Yarn or some other clustermanager. Additionally, Spring XD allows supports Stream Partitioning and Direct Binding.
To address such deployment concerns, Spring XD provides a Deployment Manifest which is submittedwith the deployment request, in the form of in-line deployment properties (or potentially a reference toa separate document containing deployment properties).
Deployment Properties
When you execute the stream deploy shell command, you can optionally provide a commadelimited list of key=value pairs known as deployment properties. Examples for the key include module.[modulename].count and module.[modulename].criteria (for a full list of properties, see below). Thevalue for the count is a positive integer, and the value for criteria is a valid SpEL expression. The SpringXD runtime matches an available container for each module according to the deployment manifest.
The deployment properties allow you to specify deployment instructions for each module. Currently thisincludes:
• The number of module instances
• A target server or server group
• MessageBus attributes required for a specific module
• Stream Partitioning
• Direct Binding
• History Tracking
Spring XD Shell interaction
When using the Spring XD Shell, there are two ways to provide deployment properties: either inline orvia a file reference. Those two ways are exclusive and documented below:
Inline propertiesuse the --properties shell option and list properties as a comma separated list of key=valuepairs, like so:
stream deploy foo --properties
"module.transform.count=2,module.log.criteria=groups.contains('group1')"
Using a file referenceuse the --propertiesFile option and point it to a local Java .properties file (i.e. that lives inthe filesystem of the machine running the shell). Being read as a .properties file, normal rulesapply (ISO 8859-1 encoding, =, <space> or : delimiter, etc.) although we recommend using = asa key-value pair delimiter for consistency:
stream deploy foo --propertiesFile myprops.properties
where myprops.properties contains

Spring XD Guide
1.3.2.RELEASE Spring XD 308
# this is a comment
module.transform.count=2
module.log.criteria = groups.contains('group1')
Those two options apply to the stream deploy and job deploy commands.
General Properties
Note
You can apply criteria to all modules in the stream by using the wildcard * for [modulename]
module.[modulename].countThe number of module instances (see above).
module.[modulename].criteriaA boolean SpEL expression using the Container Attributes as an evaluation context.
module.[modulename].trackHistoryA boolean value indicating whether history should be tracked in a message header for this module.Usually used during stream development or for debugging, with module.*.trackHistory=trueto track all modules. The xdHistory message header contains an entry for each module thatprocesses the message; each entry includes useful information including the stream name, modulelabel, host, container id, thread name, etc. This enables the determination of exactly how a messagewas processed through the stream(s).
Example:
xd:>stream deploy --name test1 --properties
"module.transform.count=3,module.log.criteria=groups.contains('group1')"
Bus Properties
Common Bus Properties
Note
The following properties are only allowed when using a RabbitMessageBus or aRedisMessageBus; the LocalMessageBus does not support properties.
module.[modulename].consumer.backOffInitialIntervalThe number of milliseconds to wait for the first delivery retry (default 1000)
module.[modulename].consumer.backOffMaxIntervalThe maximum number of milliseconds to wait between retries (default 10000)
module.[modulename].consumer.backOffMultiplierThe previous retry interval is multiplied by this to determine the current interval (but seebackOffMaxInterval) (default 2.0)
module.[modulename].consumer.concurrencyThe number of concurrent consumers for the module (default 1).
module.[modulename].consumer.maxAttemptsThe maximum number of attempts to make a delivery when a failure occurs (default 3)

Spring XD Guide
1.3.2.RELEASE Spring XD 309
RabbitMQ Bus Properties
Note
The following properties are only allowed when using a RabbitMessageBus.
See the Spring AMQP reference documentation for information about the RabbitMQ-specific attributes.
module.[modulename].consumer.ackModeControls message acknowledgements (default AUTO)
module.[modulename].consumer.maxConcurrencyThe maximum number of concurrent consumers for the module (default 1).
module.[modulename].consumer.prefetchThe number of messages prefetched from the RabbitMQ broker (default 1)
module.[modulename].consumer.prefixA prefix applied to all queues/exchanges that are declared by the bus - allows policies to be applied(default xdbus.)
module.[modulename].consumer.requestHeaderPatternsControls which message headers are passed between modules (defaultSTANDARD_REQUEST_HEADERS,*)
module.[modulename].consumer.replyHeaderPatternsControls which message headers are passed between modules (only used in partitioned jobs)(default STANDARD_REPLY_HEADERS,*)
module.[modulename].consumer.requeueWhether messages will be requeued (and retried) on failure (default true)
module.[modulename].consumer.transactedWhether consumers use transacted channels (default false)
module.[modulename].consumer.txSizeThe number of delivered messages between acknowledgements (when ackMode=AUTO) (default1)
module.[modulename].consumer.durableSubscriptionWhen true, publish/subscribe named channels (tap:, topic:) will be backed by a durable queueand will be eligible for dead-letter configuration, accoring to the autBindDLQ setting. Note that,since RabbitMQ doesn’t permit queue attributes to be changed, changing the durableSubscriptionproperty from true to false between deployments, without first removing the queue, will not have anyeffect. If a stream is deployed with durableSubscription=true, and you wish to change it to a non-durable subscription, you will need to remove the queue from RabbitMQ before redeploying. SpringXD will create the queue the with the appropriate settings, unless the queue exists already. Changingfrom a non-durable subscription to a durable subscription will not have this problem because, for anon-durable subscription, the queue will be automatically deleted when the stream is undeployed.
module.[modulename].producer.deliveryModeThe delivery mode of messages sent to RabbitMQ (PERSISTENT or NON_PERSISTENT) (defaultPERSISTENT)

Spring XD Guide
1.3.2.RELEASE Spring XD 310
module.[modulename].producer.requestHeaderPatternsControls which message headers are passed between modules (defaultSTANDARD_REQUEST_HEADERS,*)
module.[modulename].producer.replyHeaderPatternsControls which message headers are passed between modules (only used in partitioned jobs)(default STANDARD_REPLY_HEADERS,*)
module.[modulename].consumer.autoBindDLQWhen true, the bus will automatically declare dead letter queues and binding for each bus queue.The user is responsible for setting a policy on the broker to enable dead-lettering; see Message BusConfiguration for more information. The bus will configure a dead-letter-exchange (<prefix>DLX)and bind a queue with the name <original queue name>.dlq and route using the originalqueue name..
module.[modulename].consumer.republishToDLQBy default, failed messages after retries are exhausted are rejected. If a dead-letter queue (DLQ) isconfigured, rabbitmq will route the failed message (unchanged) to the DLQ. Setting this property totrue instructs the bus to republish failed messages to the DLQ, with additional headers, includingthe exception message and stack trace from the cause of the final failure. Note that the republishwill occur even if maxAttempts is only set to 1. Also see autoBindDLQ (default false)
module.[modulename].producer.batchingEnbledBatch messages sent to the bus (default false)
module.[modulename].producer.batchSizeThe normal batch size, may be preempted by batchBufferLimit or batchTimeout (default 100)
module.[modulename].producer.batchBufferLimitIf a batch will exceed this limit, the batch will be sent prematurely (default 10000)
module.[modulename].producer.batchTimeoutIf no messages are received in this time (ms), the batch will be sent (default 5000)
module.[modulename].producer.compressWhen true, compress the message before sending to rabbit; (default false) see RabbitMQ MessageBus Properties for information about the compression level
Stream Partitioning
Note
Partitioning is not supported with the local transport.
A common pattern in stream processing is to partition the data as it is streamed. This entails deployingmultiple instances of a message consuming module and using content-based routing so that messagescontaining the identical data value(s) are always routed to the same module instance. You can usethe Deployment Manifest to declaratively configure a partitioning strategy to route each message to aspecific consumer instance.
Partition Properties
See below for examples of deploying partitioned streams.
Spring XD Guide
1.3.2.RELEASE Spring XD 311
module.[modulename].producer.partitionKeyExtractorClassThe class name of a PartitionKeyExtractorStrategy (default null)
module.[modulename].producer.partitionKeyExpressionA SpEL expression, evaluated against the message, to determine the partition key; only applies ifpartitionKeyExtractorClass is null. If both are null, the module is not partitioned (default null)
module.[modulename].producer.partitionSelectorClassThe class name of a PartitionSelectorStrategy (default null)
module.[modulename].producer.partitionSelectorExpressionA SpEL expression, evaluated against the partition key, to determine the partition index towhich the message will be routed. The final partition index will be the return value (aninteger) modulo [nextModule].count If both the class and expression are null, the bus’s defaultPartitionSelectorStrategy will be applied to the key (default null)
In summary, a module is partitioned if its count is > 1 and the previous module has apartitionKeyExtractorClass or partitionKeyExpression (class takes precedence). When a partition keyis extracted, the partitioned module instance is determined by invoking the partitionSelectorClass, ifpresent, or the partitionSelectorExpression % partitionCount , where partitionCount is count in the caseof Redis and RabbitMQ, and the underlying partition count of the topic in the case of Kafka (see theMessage Bus section on Kafka partition configuration for details). If neither a partitionSelectorClass nora partitionSelectorExpression is present the result is key.hashCode() % partitionCount.
For Redis and Rabbit, the use of partitionKeyExpression and partitionKeyExtractorClass is restricted tosending data modules that have count > 1. Any other use (i.e. sending data to a module with count =1, or to a named channel) will result in a error at deployment time.
In the case of Kafka, partitionKeyExpression and partitionKeyExtractorClass may be used for sendingdata to any modules, including the ones with count = 1, as well as to named channels, since partitioningis based on the partition count of the target topic, and not the receiving module count.
Direct Binding
Sometimes it is desirable to allow co-located, contiguous modules to communicate directly, rather thanusing the configured remote transport, to eliminate network latency. Spring XD creates direct bindingsby default only in cases where every "pair" of producer and consumer (modules bound on either sideof a pipe) are guaranteed to be co-located.
Currently Spring XD implements no conditional logic to force modules to be co-located. The only wayto guarantee that every producer-consumer pair is co-located is to specify that the pair be deployedto every available container instance, in other words, the module counts must be 0. The figure belowillustrates this concept. In the first hypothetical case, we deploy one instance (the default)of producerm1, and two instances of the consumer m2. In this case, enabling direct binding would isolate one of theconsumer instances. Spring XD will not create direct bindings in this case. The second case guaranteesco-location of the pairs and will result in direct binding.

Spring XD Guide
1.3.2.RELEASE Spring XD 312
In addition, direct binding requires that the producer is not configured for partitioning since partitioningis implemented by the Message Bus.
Using module.*.count=0 is the most straightforward way to enable direct binding. Direct binding may bedisabled for the stream using module.*.producer.directBindingAllowed=false. Additional direct bindingdeployment examples are shown below.
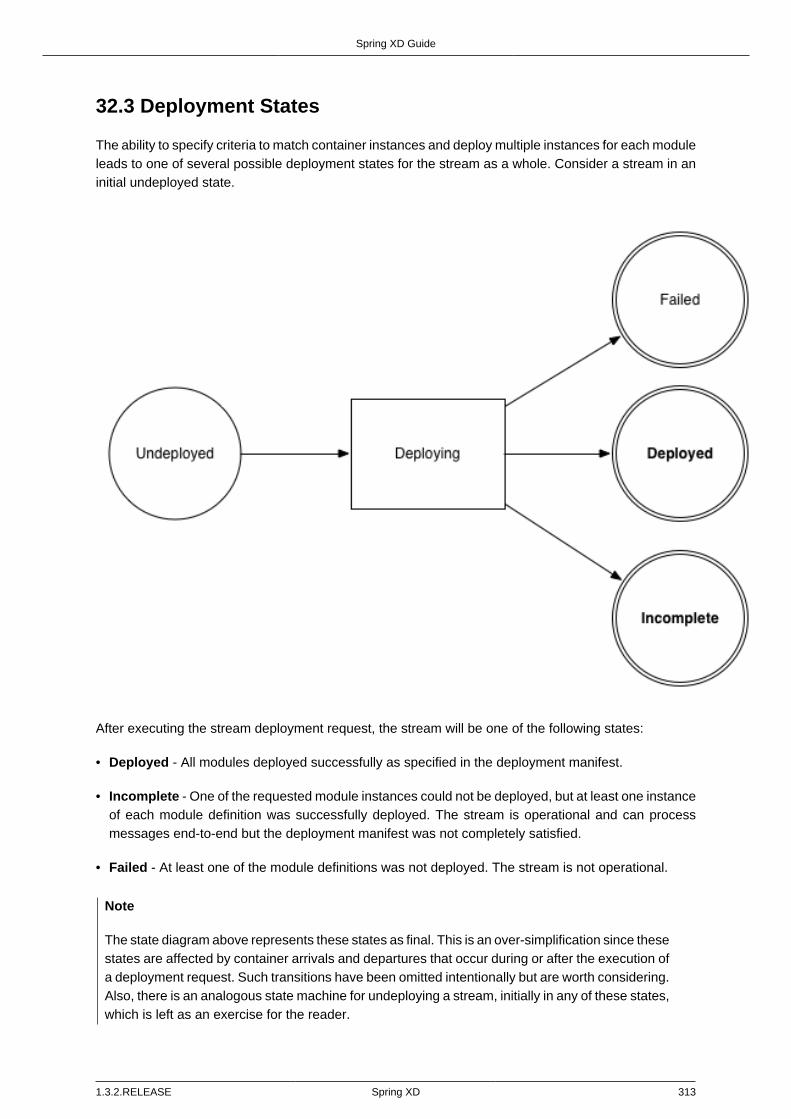
Spring XD Guide
1.3.2.RELEASE Spring XD 313
32.3 Deployment States
The ability to specify criteria to match container instances and deploy multiple instances for each moduleleads to one of several possible deployment states for the stream as a whole. Consider a stream in aninitial undeployed state.
After executing the stream deployment request, the stream will be one of the following states:
• Deployed - All modules deployed successfully as specified in the deployment manifest.
• Incomplete - One of the requested module instances could not be deployed, but at least one instanceof each module definition was successfully deployed. The stream is operational and can processmessages end-to-end but the deployment manifest was not completely satisfied.
• Failed - At least one of the module definitions was not deployed. The stream is not operational.
Note
The state diagram above represents these states as final. This is an over-simplification since thesestates are affected by container arrivals and departures that occur during or after the execution ofa deployment request. Such transitions have been omitted intentionally but are worth considering.Also, there is an analogous state machine for undeploying a stream, initially in any of these states,which is left as an exercise for the reader.
Spring XD Guide
1.3.2.RELEASE Spring XD 314
Example
xd:>stream create test1 --definition "http | transform --expression=payload.toUpperCase() | log"
Created new stream 'test1'
Next, deploy it requesting three transformer instances:
xd:>stream deploy --name test1 --properties "module.transform.count=3"
Deployed stream 'test1'
xd:>stream list
Stream Name Stream Definition Status
----------- --------------------------------------------------------- ----------
test1 http | transform --expression=payload.toUpperCase() | log incomplete
If there are only two container instances available, only two instances of transform will be deployed. Thestream deployment state is incomplete and the stream is functional. However the unfulfilled deploymentrequest remains active and the third instance will be deployed if a new container comes on line thatmatches the criteria.
32.4 Container Attributes
The SpEL context (root object) for module.[modulename].criteria is ContainerAttributes, basically a mapderivative that contains some standard attributes:
• id - the generated container ID
• pid - the process ID of the container instance
• host - the host name of the machine running the container instance
• ip — the IP address of the machine running the container instance
ContainerAttributes also includes any user-defined attribute values configured for the container. Theseattributes are configured by editing xd/config/servers.yml the file included in the XD distribution containssome commented out sections as examples. In this case, the container attributes configuration lookssomething like:
xd:
container:
groups: group2
color: red
Groups
Groups may be assigned to a container via the optional command line argument --groups or by settingthe environment variable XD_CONTAINER_GROUPS. As the property name suggests, a container maybelong to more than one group, represented as comma-delimited string. The concept of server groupsis considered an especially useful convention for targeting groups of servers for deployment to supportmany common scenarios, so it enjoys special status. Internally, groups is simply a user defined attribute.
IP Address
The IP address of the container can also be optionally set via the command argument --containerIpor by setting the environment variable XD_CONTAINER_IP. If not specified, the IP address will be

Spring XD Guide
1.3.2.RELEASE Spring XD 315
automatically set. Please be aware of the limitations, though, particularly in cases where the physicallymachine has multiple IP addresses assigned.
For the automatic assignment of the IP address, XD internally loops through the available networkinterfaces and assigned IP addresses and will pick the first available IPv4 address that is not a loopbackaddress.
Depending on your underlying server or network infrastructure, you may prefer specifying the IP addressexplicitly.
Hostname
The hostname of the container can be optionally set as well via the command argument --containerHostname or by setting the environment variable XD_CONTAINER_HOSTNAME. If notspecified, the hostname will be automatically set. Please be aware of the limitations, though. You mayprefer specifying the hostname address explicitly.
Tip
While there is no command line option to set the container hostname and IP address when runningin Single Node mode, you can still specify the values via environment variables or by customizingthe respective settings in application.yml
32.5 Stream Deployment Examples
To Illustrate how to use the Deployment Manifest, We will use a runtime configuration with 3 containerinstances, as displayed in the XD shell:
xd:>runtime containers
Container Id Host IP Address PID Groups Custom Attributes
------------------------------------ ---------------- ------------- ---- ------ -----------------
bc624816-f8a8-4f35-83f6-a125ed147b7c ip-10-110-18-10 10.110.18.10 1708 group2 {color=red}
018b7c8d-6fa9-4759-8471-76899766f892 ip-10-139-36-168 10.139.36.168 1852 group2 {color=blue}
afc3741c-217a-415a-9d86-a1f62de03613 ip-10-139-17-116 10.139.17.116 1861 group1 {color=green}
Each of the three containers is running on a different host and has configured Groups and CustomAttributes as shown.
First, create a stream:
xd:>stream create test1 --definition "http | transform --expression=payload.toUpperCase() | log"
Created new stream 'test1'
Next, deploy it using a manifest:
xd:>stream deploy --name test1 --properties
"module.transform.count=3,module.log.criteria=groups.contains('group1')"
Deployed stream 'test1'
Verify the deployment:

Spring XD Guide
1.3.2.RELEASE Spring XD 316
xd:>runtime modules
Module Container Id Options
Deployment Properties
--------------------------- ------------------------------------
----------------------------------------------
---------------------------------------------------------
test1.processor.transform.1 bc624816-f8a8-4f35-83f6-a125ed147b7c {valid=true,
expression=payload.toUpperCase()} {count=3, sequence=1}
test1.processor.transform.2 018b7c8d-6fa9-4759-8471-76899766f892 {valid=true,
expression=payload.toUpperCase()} {count=3, sequence=2}
test1.processor.transform.3 afc3741c-217a-415a-9d86-a1f62de03613 {valid=true,
expression=payload.toUpperCase()} {count=3, sequence=3}
test1.sink.log.1 afc3741c-217a-415a-9d86-a1f62de03613 {name=test1, expression=payload,
level=INFO} {count=1, sequence=1, criteria=groups.contains('group1')}
test1.source.http.1 bc624816-f8a8-4f35-83f6-a125ed147b7c {port=9000}
{count=1, sequence=1}
We can see that three instances of the transform processor have been deployed, one to each containerinstance. Also the log module has been deployed to the container assigned to group1. Now we canundeploy and deploy the stream using a different manifest:
xd:>stream undeploy test1
Un-deployed stream 'test1'
xd:>runtime modules
Module Container Id Properties
------ ------------ ----------
xd:>stream deploy --name test1 --properties "module.log.count=3,module.log.criteria=!
groups.contains('group1')"
Deployed stream 'test1'
xd:>stream list
Stream Name Stream Definition Status
----------- --------------------------------------------------------- ----------
test1 http | transform --expression=payload.toUpperCase() | log incomplete
xd:>runtime modules
Module Container Id Options
Deployment Properties
--------------------------- ------------------------------------
----------------------------------------------
----------------------------------------------------------
test1.processor.transform.1 018b7c8d-6fa9-4759-8471-76899766f892 {valid=true,
expression=payload.toUpperCase()} {count=1, sequence=1}
test1.sink.log.1 bc624816-f8a8-4f35-83f6-a125ed147b7c {name=test1, expression=payload,
level=INFO} {count=3, sequence=1, criteria=!groups.contains('group1')}
test1.sink.log.2 018b7c8d-6fa9-4759-8471-76899766f892 {name=test1, expression=payload,
level=INFO} {count=3, sequence=2, criteria=!groups.contains('group1')}
test1.source.http.1 afc3741c-217a-415a-9d86-a1f62de03613 {port=9000}
{count=1, sequence=1}
Now there are only two instances of the log module deployed. We asked for three however thedeployment criteria specifies only containers not in group1 are eligible. The log module is deployedonly to the two containers matching the criteria. The deployment status of stream test1 is shown asincomplete. The stream is functional even though the deployment manifest is not completely satisfied.If we fire up a new container not in group1, the DeploymentSupervisor will handle any outstandingdeployment requests by comparing xd/deployments/modules/requested to xd/deployments/modules/allocated, and will deploy the third log instance and update the stream state to deployed.
32.6 Partitioned Stream Deployment Examples
Using SpEL Expressions
First, create a stream:
Spring XD Guide
1.3.2.RELEASE Spring XD 317
xd:>stream create --name partitioned --definition "jms | transform --
expression=#expensiveTransformation(payload) | log"
Created new stream 'partitioned'
The hypothetical SpEL function expensiveTransformation represents a resource intensive processorwhich we want to load balance by running on multiple containers. In this case, we also want to partitionthe stream so that payloads containing the same customerId are always routed to the same processorinstance. Perhaps the processor aggregates data by customerId and this step needs to run using co-located resources.
Next, deploy it using a manifest:
xd:>stream deploy --name partitioned --properties
"module.jms.producer.partitionKeyExpression=payload.customerId,module.transform.count=3"
Deployed stream 'partitioned'
In this example three instances of the transformer will be created (with partition index of 0, 1, and2). When the jms module sends a message it will take the customerId property on the messagepayload, invoke its hashCode() method and apply the modulo function with the divisor being thetransform.count property to determine which instance of the transform will process the message(payload.getCustomerId().hashCode() % 3). Messages with the same customerId will always beprocessed by the same instance.
32.7 Direct Binding Deployment Examples
In the simplest case, we enforce direct binding by setting the instance count to 0 for all modules in thestream. A count of 0 means deploy the module to all available containers:
xd:>runtime containers
Container Id Host IP Address PID Groups Custom Attributes
------------------------------------ -------------- ------------ ----- ------ -----------------
8e814924-15de-4ca1-82d3-ddfe851668ab ultrafox.local 192.168.1.18 81532
a2b89274-2d40-46e4-afc5-4988bea28a16 ultrafox.local 192.168.1.9 4605 group1
We start with two container instances. One belongs to the group group1.
xd:>stream create direct --definition "time | log"
Created new stream 'direct'
xd:>stream deploy direct --properties module.*.count=0
Deployed stream 'direct'
xd:>runtime modules
Module Container Id Options
Deployment Properties
-------------------- ------------------------------------
---------------------------------------------
---------------------------------------------------------
direct.sink.log.0 a2b89274-2d40-46e4-afc5-4988bea28a16 {name=direct, expression=payload,
level=INFO} {count=0, sequence=0}
direct.sink.log.0 8e814924-15de-4ca1-82d3-ddfe851668ab {name=direct, expression=payload,
level=INFO} {count=0, sequence=0}
direct.source.time.0 a2b89274-2d40-46e4-afc5-4988bea28a16 {fixedDelay=1, format=yyyy-MM-dd HH:mm:ss}
{producer.directBindingAllowed=true, count=0, sequence=0}
direct.source.time.0 8e814924-15de-4ca1-82d3-ddfe851668ab {fixedDelay=1, format=yyyy-MM-dd HH:mm:ss}
{producer.directBindingAllowed=true, count=0, sequence=0}
Note that we have two containers and two instances of each module deployed toeach. Spring XD automatically sets the bus properties needed to allow direct binding,producer.directBindingAllowed=true on the time module.

Spring XD Guide
1.3.2.RELEASE Spring XD 318
Suppose we only want one instance of this stream and we want it to use direct binding. Here we canadd deployment criteria to restrict the available containers to group1.
xd:>stream undeploy direct
Un-deployed stream 'direct'
xd:>stream deploy direct --properties "module.*.count=0, module.*.criteria=groups.contains('group1')"
Deployed stream 'direct'
xd:>runtime modules
Module Container Id Options
Deployment Properties
-------------------- ------------------------------------
---------------------------------------------
---------------------------------------------------------------------------------------------
direct.sink.log.0 a2b89274-2d40-46e4-afc5-4988bea28a16 {name=direct, expression=payload,
level=INFO} {count=0, sequence=0, criteria=groups.contains('group1')}
direct.source.time.0 a2b89274-2d40-46e4-afc5-4988bea28a16 {fixedDelay=1, format=yyyy-MM-dd HH:mm:ss}
{producer.directBindingAllowed=true, count=0, sequence=0, criteria=groups.contains('group1')}
Direct binding eliminates latency between modules but sacrifices some of the resiliency providedby the messaging middleware. In the scenario above, if we lose one of the containers,we lose messages. To disable direct binding when module counts are set to 0, setmodule.*.producer.directBindingAllowed=false.
xd:>stream undeploy direct
Un-deployed stream 'direct'
xd:>stream deploy direct --properties "module.*.count=0, module.*.producer.directBindingAllowed=false"
Deployed stream 'direct'
xd:>runtime modules
Module Container Id Options
Deployment Properties
-------------------- ------------------------------------
---------------------------------------------
----------------------------------------------------------
direct.sink.log.0 a2b89274-2d40-46e4-afc5-4988bea28a16 {name=direct, expression=payload,
level=INFO} {producer.directBindingAllowed=false, count=0, sequence=0}
direct.sink.log.0 8e814924-15de-4ca1-82d3-ddfe851668ab {name=direct, expression=payload,
level=INFO} {producer.directBindingAllowed=false, count=0, sequence=0}
direct.source.time.0 a2b89274-2d40-46e4-afc5-4988bea28a16 {fixedDelay=1, format=yyyy-MM-dd HH:mm:ss}
{producer.directBindingAllowed=false, count=0, sequence=0}
direct.source.time.0 8e814924-15de-4ca1-82d3-ddfe851668ab {fixedDelay=1, format=yyyy-MM-dd HH:mm:ss}
{producer.directBindingAllowed=false, count=0, sequence=0}
Finally, we can still have the best of both worlds by enabling guaranteed delivery at one point in thestream, usually the source. If the tail of the stream is co-located and the source uses the message bus,the message bus may be configured so that if a container instance goes down, any unacknowledgedmessages will be retried until the container comes back or its modules are redeployed.
TDB: A realistic example
An alternate scenario with similar characteristics would be if the stream uses a rabbit or jms source.In this case, guaranteed delivery would be configured in the external messaging system instead of theSpring XD transport.
32.8 Troubleshooting
Debugging a distributed system to diagnose problems can be challenging. While using Spring XD, ifyou encounter
ZooKeeper disconnects
Problem: Spring XD processes disconnecting from ZooKeeper

Spring XD Guide
1.3.2.RELEASE Spring XD 319
Recommendation: Depending on your setup, modify either xd-singlenode or xd-container scriptsby setting the environment variable export JAVA_OPTS=-verbose:gc before launching them.
Reason: ZooKeeper requires a heartbeat at a regular interval to test liveness of connected processes.Full "stop the world" GCs can result in connection and session timeouts from ZooKeeper. While verbose,GC logs are helpful for diagnosing this and other performance issues.
Debugging Slowness
Problem: Slow or unresponsive application
Recommendation: Capture multiple thread dumps several seconds apart using jstack.
Reason: Examination of thread dumps can reveal stuck or slow moving threads. This data is useful fordetermining the root cause of a slow or unresponsive application.
File Descriptors and limit violation
Problem: java.io.FileNotFoundException: (Too many open files)
Recommendation: Default ulimit setting in most UNIX based operating systems is 1024. Raiseulimit setting to at least 10000.
Reason: Stream and job modules in Spring XD are loaded and unloaded dynamically on demand. Whena module is unloaded, the associated class loaders may not be garbage collected right away, resultingin open file handles for the jar files used by the module. Depending on the number of modules in use,the file handle limit of 1024 may be exceeded.

Spring XD Guide
1.3.2.RELEASE Spring XD 320
33. Message Bus Configuration
33.1 Introduction
This section contains additional information about configuring the Message Bus, including HighAvailability, SSL, Error handling and partitioning.
33.2 Rabbit Message Bus High Availability (HA) Configuration
Introduction
The RabbitMessageBus allows for HA configuration using normal RabbitMQ HA Configuration.
First, use the addresses property in servers.yml to include the host/port for each server in thecluster. See Application Configuration.
By default, queues and exchanges declared by the bus are prefixed with xdbus. (this prefix can bechanged as described in Application Configuration).
To configure the entire bus for HA, create a policy:
rabbitmqctl set_policy ha-xdbus "^xdbus\." '{"ha-mode":"all"}'
Connection Management and HA Queues
When consuming from HA queues, there might be some performance advantage in consuming from thenode that actually hosts the queue. Starting with version 1.2 it is now possible to configure the RabbitMessage Bus to do that.
Caution
To utilize this mechanism, the rabbit management plugin must be enabled on each node in thecluster. The plugin’s REST API is used to determine the location of the queue.
This feature is enabled by adding more than one node to the spring.rabbitmq.node property. SeeRabbitMQ Configuration for configuration details.
When a node fails and a queue is moved to one of the mirrors, the bus will automatically reconnectto the right node.
33.3 Error Handling (Message Delivery Failures)
RabbitMQ Message Bus
Note
The following applies to normally deployed streams. When direct binding between modules isbeing used, exceptions thrown by the consumer are thrown back to the producer.
When a consuming module (processor, sink) fails to handle a message, the bus will retry delivery basedon the module (or default bus) retry configuration. The default configuration will make 3 attempts todeliver the message. The retry configuration can be modified at the bus level (in servers.yml), or foran individual stream/module using the deployment manifest.

Spring XD Guide
1.3.2.RELEASE Spring XD 321
When retries are exhausted, by default, messages are discarded. However, using RabbitMQ, you canconfigure such messages to be routed to a dead-letter exchange/dead letter queue. See the RabbitMQDocumentation for more information.
Note
The following configuration examples assume you are using the default bus prefix used fornaming rabbit elements: "xdbus."
Consider a stream: stream create foo --definition "source | processor | sink"
The first pipe (by default) will be backed by a queue named xdbus.foo.0, the second byxdbus.foo.1. Messages are routed to these queues using the default exchange (with routing keysequal to the queue names).
To enable dead lettering just for this stream, first configure a policy:
rabbitmqctl set_policy foo.DLX "^xdbus\.foo\..*" '{"dead-letter-
exchange":"foo.dlx"}' --apply-to queues
To configure dead-lettering for all streams:
rabbitmqctl set_policy DLX "^xdbus\..*" '{"dead-letter-exchange":"dlx"}' --
apply-to queues
The next step is to declare the dead letter exchange, and bind dead letter queues with the appropriaterouting keys.
For example, for the second "pipe" in the stream above we might bind a queue foo.sink.dlq toexchange foo.dlx with a routing key xdbus.foo.1 (remember, the original routing key was the queuename).
Now, when the sink fails to handle a message, after the configured retries are exhausted, the failedmessage will be routed to foo.sink.dlq.
There is no automated mechanism provided to move dead lettered messages back to the bus queue.
Automatic Dead Lettering Queue Binding
Starting with version 1.1, the dead letter queue and binding can be automatically configured by thesystem. A new property autoBindDLQ has been added; it can be set at the bus level (in servers.yml)or using deployment properties, e.g. --properties module.*.consumer.autoBindDLQ=truefor all modules in the stream. When true, the dead letter queue will be declared (if necessary) andbound to a dead letter exchange named xdbus.DLX (again, assuming the default prefix) using thequeue name as the routing key.
In the above example, where we have queues xdbus.foo.0 and xdbus.foo.1, the systemwill also create xdbus.foo.0.dlq, bound to xdbus.DLX with routing key xdbus.foo.0 andxdbus.foo.1.dlq, bound to xdbus.DLX with routing key xdbus.foo.1.
Note
Starting with version 1.2, any queues that are deployed with autoBindDLQ will automatically beconfigured to enable dead-lettering, routing to the DLX with the proper routing key. It is no longernecessary to use a policy to set up dead-lettering when using autoBindDLQ.

Spring XD Guide
1.3.2.RELEASE Spring XD 322
Also, starting with version 1.2, the provision of dead-lettering on publish/subscribe named channels(tap: or topic:) depends on a new deployment property durable. This property is similar to a JMSdurable subscription to a topic and is false by default. When false (default), the queue backing sucha named channel is declared auto-delete and is removed when the stream is undeployed. A DLQwill not be created for such queues. When true, the queue becomes permanent (durable) and is notremoved when the stream is undeployed. Also, when true, the queue is eligible for DLQ provisioning,according to the autoBindDLQ deployment property. durable can be set at the bus level, or in anindividual deployment property, such as:
stream create ticktock --definition="time --fixedDelay=5 | log" --deploy
stream create tttap --definition="tap:stream:ticktock > log" stream deploytttap --properties=module.log.consumer.durableSubscription=true
Redis Message Bus
When Redis is the transport, the failed messages (after retries are exhausted) are LPUSH+ed to a+LIST ERRORS:<stream>.n (e.g. ERRORS:foo.1 in the above example in the RabbitMQ MessageBus section).
This is unconditional; the data in the ERRORS LIST is in "bus" format; again, as with the RabbitMQMessage Bus, some external mechanism would be needed to move the data from the ERRORS LISTback to the bus’s foo.1 LIST.
Note
When moving errored messages back to the main stream, it is important to understand that thesemessages contain binary data and are unlikely to survive conversion to and from Unicode (suchas with Java String variables). If you use Java to move these messages, we recommend thatyou use a RedisTemplate configured as follows:
<bean id="redisTemplate"
class="org.springframework.data.redis.core.RedisTemplate">
<property name="connectionFactory" ref="jedisConnectionFactory" />
<property name="keySerializer">
<bean
class="org.springframework.data.redis.serializer.StringRedisSerializer" />
</property>
<property name="enableDefaultSerializer" value="false" />
</bean>
or
@Bean
public RedisTemplate<String, byte[]> redisTemplate() {
RedisTemplate<String, byte[]> template = new RedisTemplate<String, byte[]>();
template.setConnectionFactory(connectionFactory());
template.setKeySerializer(new StringRedisSerializer());
template.setEnableDefaultSerializer(false);
return template;
}
This enables the message payload to be retained as byte[] with no conversion; you would then usesomething like…
byte[] errorEvt = redisTemplate.opsForList().rightPop(errorQueue);
redisTemplate.opsForList().leftPush(destinationQueue, errorEvt);
If, after moving a message, you see an error such as:

Spring XD Guide
1.3.2.RELEASE Spring XD 323
redis.RedisMessageBus$ReceivingHandler - Could not convert message: EFBFBD...
This is a sure sign that a UTF-8 # Unicode # UTF-8 conversion was performed on the message.
33.4 Rabbit Message Bus Secure Sockets Layer (SSL)
If you wish to use SSL for communications with the RabbitMQ server, consult the RabbitMQ SSL SupportDocumentation.
First configure the broker as described there. The message bus is a client of the broker and supportsboth of the described configurations for connecting clients (SSL without certificate validation and withcertficate validation).
To use SSL without certificate validation, simply set
spring:
rabbitmq:
useSSL: true
In servers.yml (and set the port(s) in the addresses property appropriately).
To use SSL with certificate validation, set
spring:
rabbitmq:
useSSL: true
sslProperties: file:path/to/secret/ssl.properties
#ssl:
# keyStore:
# keyStorePassphrase:
# trustStore:
# trustStorePassphrase:
The sslProperties property is a Spring resource (file:, classpath: etc) that points to aproperties file, Typically, this file would be secured by the operating system (and readable by the XDcontainer) because it contains security information. Specifically:
keyStore=file:/secret/client/keycert.p12
trustStore=file:/secret/trustStore
keyStore.passPhrase=secret
trustStore.passPhrase=secret
Where the pkcs12 keystore contains the client certificate and the truststore contains the server’scertificate as described in the rabbit documentation. The key/trust store properties are Spring resources.
Alternately, you may specify these properties in-line in lieu of using an external properties file. In thiscase,the passphrase properties may be encrypted. See Encrypted Properties for more details. Whenboth sslProperties and in-line ssl properties are configured,the in-line properties take precedence.
Note
By default, the rabbit source and sink modules inherit their default configuration from thecontainer, but it can be overridden, either using modules.yml or with specific module definitions.
33.5 Rabbit Message Bus Batching and Compression
See RabbitMQ Message Bus Properties for information about batching and compressing messagespassing through the bus.
Spring XD Guide
1.3.2.RELEASE Spring XD 324
33.6 Removing RabbitMQ MessageBus Resources
When a stream or job is undeployed, the broker resources (queues, exchanges) are NOT removedfrom RabbitMQ. This is due to the possibility that a stream might be being undeployed temporarily, andavoids message loss.
If you wish to completely remove these resources, a REST API is provided forthis purpose. In addition, the SpringXDTemplate provides a Java binding for thisREST api via its streamOperations().cleanBusResources(String name) andjobOperations().cleanBusResources(String name) APIs.
Or, you can use the REST API directly; for example:
curl 'http://localhost:9393/streams/clean/rabbit/foo\
?user=guest&pw=guest&vhost=/&busPrefix=xdbus.&adminUri=http://localhost:15672'
curl 'http://localhost:9393/jobs/clean/rabbit/bar\
?user=guest&pw=guest&vhost=/&busPrefix=xdbus.&adminUri=http://localhost:15672'
Where foo is the stream name and bar is the job name.
The stream or job name supports a simple wildcard syntax; if it ends with *, then all streams beginningwith the name (excluding the *) will be cleaned.
These operations remove the inter-module stream queues, any tap exchanges created for the stream,the job queue and request queue for partitioned jobs.
The operation will fail if any queue currently has a consumer; similarly, the operation will fail if anyexchange has a binding. Under either condition, no changes will be made to RabbitMQ.
The following query params are supported:
• adminUri - location of the RabbitMQ Admin (default http://localhost:15672)
• user - admin user (default guest)
• pw - admin password (default guest)
• vhost - the vhost used for the bus resources (default /)
• busPrefix - the prefix used for all bus resources (default xdbus.)
33.7 Kafka Message Bus Partition Control
This section describes how topic partitioning functions when using Kafka as transport.
Controlling the partition count of a transport topic
The KafkaMessageBus will attempt to set the number of partitions in a transport topic as consumerCount* consumerConcurrency, either by creating the topic with the required number of partitions, or byrepartitioning it, in case it exists.
For example, let’s consider a stream with the following definition:
stream create ingest --definition="http | hdfs"
Spring XD Guide
1.3.2.RELEASE Spring XD 325
A default deployment will result in the creation of a single topic with a single partition.
stream deploy ingest
A deployment (or redeployment) of the same stream with a different module count and concurrency willresult in 6 partitions, evenly distributed across the 3 module instances:
stream deploy ingest --properties module.hdfs.count=3,module.hdfs.concurrency=2
Besides relying on defaults, you can customize the number of Kafka partitions used by transport topicsby indicating a minimum value to be used by deployments (by minimum, it is understood that, if smallerthan consumerCount * consumerConcurrency, the latter value will be used instead).
This can be done globally by changing thexd.messagebus.kafka.default.minPartitionCount property in servers.yml:
xd:
messagebus:
kafka:
default:
minPartitionCount: 5
This will result in creating at least 5 partitions for each transport topic.
Alternatively, and for more granular control, the property can be specified for specific deployments andmodules, through the producer.minPartitionCount property in the deployment manifest, as in thefollowing example, where 10 partitions will be created:
stream deploy ingest --properties module.http.producer.minPartitionCount=10,module.hdfs.count=3
Overpartitioning can serve a number of purposes, such as load balancing and distributing data amongbrokers, as well as allowing for scaling up by increasing the number of concurrent consumers in thefuture.
Note
If the Kafka topic already exists and it already has a number of partitions larger than eitherminPartitionCount or consumerCount * consumerConcurrency, its partition count will remainunchanged, and the Kafka transport will operate with all the existing partitions.

Part IV. Administration

Spring XD Guide
1.3.2.RELEASE Spring XD 327
34. Monitoring and Management
Spring XD uses Spring Boot’s monitoring and management support over HTTP and JMX along withSpring Integration’s MBean Exporters
34.1 Monitoring XD Admin, Container and Single-node servers
JMX is disabled by default. To enable JMX, set XD_JMX_ENABLED=true. JMX is disabled by defaultdue to performance issues when message rates are over 100K (for ~100 byte messages). Peformancerelated issue will be addressed in a future release.
Spring integration components are exposed over JMX using IntegrationMBeanExporter
Once JMX is enabled, all the available MBeans can be accessed over HTTP using Jolokia.
If you want to disable Jolokia endpoints but still want to use JMX, then you can set this property inconfig/servers.yml:
endpoints:
jolokia:
enabled: false
To enable boot provided management endpoints over HTTP
The Spring Boot management endpoints are exposed over HTTP.
When starting admin, container or singlenode server, the command-line option --mgmtPort can bespecified to use an explicit port for management server. With the given valid management port, themanagement endpoints can be accessed from that port. Please refer Spring Boot document here formore details on the endpoints.
For instance, once XD admin is started on localhost and the management port set to use the adminport (9393)
http://localhost:9393/management/health
http://localhost:9393/management/env
http://localhost:9393/management/beans
etc..
To enable the container shutdown operation in the UI
Add the following configuration to config/servers.yml. This configuration is available as a commentedsection in config/servers.yml.
---
spring:
profiles: container
management:
port: 0
To disable boot endpoints over HTTP
Set management.port=-1 for both default and container profiles in config/servers.yml

Spring XD Guide
1.3.2.RELEASE Spring XD 328
34.2 Management over JMX
All the boot endpoints are exposed over JMX with the domain name org.springframework.bootThe MBeans that are exposed within XD admin, container server level are available with the domainnames xd.admin (for XD admin), xd.container (for XD container), xd.shared.server andxd.parent representing the application contexts common to both XD admin and container. Singlenodeserver will have all these domain names exposed. When the stream/job gets deployed into the XDcontainer, the stream/job MBeans are exposed with specific domain/object naming strategy.
Monitoring deployed modules in XD container
When a module is deployed (with JMX is enabled on the XD container), the IntegrationMBeanExporteris injected into module’s context via MBeanExportingPlugin and this exposes all the spring integrationcomponents inside the module. For the given module, the IntegrationMBeanExporter uses a specificobject naming strategy that assigns domain name as xd.<stream/job name> and, object name as<module name>.<module index>.
Streams
For a stream name mystream with DSL http | log will have
MBeans with domain name xd.mystream with two objects http.0 and log.1
Source, processor, and sink modules will generally have the following attributes and operations
Module Type Attributes andOperations
Source MessageSourceMetrics
Processor,Sink MessageHandlerMetrics
In addition, each module has channel attributes and operations defined by MessageChannelMetrics.
Jobs
For a job name myjob with DSL jdbchdfs will have
MBeans with domain name xd.myjob with an object jdbchdfs.0
You can also obtain monitoring information for Jobs using the UI or accessing the Job managementREST API. Documentation for the Job Management REST API is forthcoming, but until thenplease reference the request mappings in BatchJobsController, BatchJobExecutionsController,BatchStepExecutionsController, and BatchJobInstancesController.
34.3 Using Jolokia to access JMX over http
When JMX is enabled (after setting XD_JMX_ENABLED to true), Jolokia is auto-configured to exposethe XD admin, container and singenode server MBeans.
For example, with XD singlenode running management port 9080
http://localhost:9393/management/jolokia/search/xd*:*,component=MessageChannel

Spring XD Guide
1.3.2.RELEASE Spring XD 329
will list all the MessageChannel MBeans exposed in XD container. Apart from this, other availabledomain and types can be accessed via Jolokia endpoints.

Spring XD Guide
1.3.2.RELEASE Spring XD 330
35. REST API
35.1 Introduction
The Spring XD Administrator process (Admin) provides a REST API to access various Spring XDresources such as streams, jobs, metrics, modules, Spring batch resources, and container runtimeinformation. The REST API is used internally by the XD Shell and Admin UI and can support any customclient application that requires interaction with XD.
The HTTP port is configurable and may be set as a command line argument when starting the Adminserver, or set in $XD_HOME/config/servers.yml. The default port is 9393:
> $XD_HOME/bin/xd-admin --httpPort <port>
The Admin server also exposes runtime management resources enabled by Spring Boot under the/management context path, e.g., http://localhost:9393/management/metrics. These resources arecovered in the Spring Boot documentation.
Note
There is also a mgmtPort command line argument which assigns a separate port for managementservices. Normally the same port is used for everything.
35.2 XD Resources
Table 35.1. Table XD REST endpoints
stream definitions /streams/definitions
stream deployments /streams/deployments
job definitions /jobs/definitions
job deployments /jobs/deployments
batch job configurations /jobs/configurations
batch job executions /jobs/executions
batch job instances /jobs/instances
module definitions /modules
deployed modules /runtime/modules
containers /runtime/containers
counters /metrics/counters
field value counters /metrics/field-value-counters
aggregate counters /metrics/aggregate-counters
gauges /metrics/gauges
Spring XD Guide
1.3.2.RELEASE Spring XD 331
rich-gauges /metrics/rich-gauges
completions /completions
35.3 Stream Definitions
Table 35.2. Table Stream Definitions
Resource URL Request Method Description
/streams/definitions GET list defined streams along withdeployment state
/streams/definitions DELETE delete all stream definitions,undeploying deployed streams
/streams/definitions/{name} GET get a stream definition(currently no deploymentinformation is included)
/streams/definitions POST create a new stream,optionally deploying it ifdeploy=true(default). Therequest body is application/x-www-form-urlencoded andrequires two parameters, nameand definition (DSL)
/streams/definitions/{name} DELETE delete a stream, undeploying ifdeployed.
35.4 Stream Deployments
Table 35.3. Table Stream Deployments
Resource URL Request Method Description
/streams/deployments/ GET get detailed deployment statefor all streams (TBD)
/streams/deployments DELETE undeploy all streams
/streams/deployments/{name} GET get detailed deployment statefor a stream (TBD)
/streams/deployments/{name} POST deploy a stream, wherethe request body containsthe deployment propertiesapplication/x-www-form-urlencoded
/streams/deployments/{name} DELETE undeploy a stream

Spring XD Guide
1.3.2.RELEASE Spring XD 332
35.5 Job DefinitionsTable 35.4. Table Job Definitions
Resource URL Request Method Description
/jobs/definitions GET list defined jobs along withdeployment state
/jobs/definitions DELETE delete all job definitions,undeploying deployed jobs
/jobs/definitions/{name} GET get a job definition
/jobs/definitions POST create a new job, where theThe request body is application/x-www-form-urlencoded andrequires two parameters, nameand definition (DSL)
/jobs/definitions/{name} DELETE delete a job, undeploying ifdeployed
35.6 Job DeploymentsTable 35.5. Table Job Deployments
Resource URL Request Method Description
/jobs/deployments/ GET get detailed deployment statefor all jobs (TBD)
/jobs/deployments DELETE undeploy all jobs
/jobs/deployments/{name} GET get detailed deployment statefor a job (TBD. Probably not in1.0)
/jobs/deployments/{name} POST deploy a job, where the requestbody contains the deploymentproperties
/jobs/deployments/{name} DELETE undeploy a job
35.7 Batch Job Configurations
Spring Batch configured jobs stored in the Spring Batch Repository
Table 35.6. Table Batch Jobs
Resource URL Request Method Description
/jobs/configurations GET get configuration informationabout all batch jobs
/jobs/configurations/{jobName} GET get configuration informationabout a batch job

Spring XD Guide
1.3.2.RELEASE Spring XD 333
35.8 Batch Job Executions
Table 35.7. Table Batch Executions
Resource URL Request Method Description
/jobs/executions GET list all job executions (Onlyapplication/json mediatypesupported)
/jobs/executions?stop=true PUT stop all jobs
/jobs/executions?jobname={jobName}
GET get information about allexecutions of a job (Onlyapplication/json accept headeris supported)
/jobs/executions?jobname={jobName}
POST request the launch of a job
/jobs/executions/{jobExecutionId}
GET get information about aparticular execution of a job
/jobs/executions/{jobExecutionId}?restart=true
PUT restart a job
/jobs/executions/{jobExecutionId}?stop=true
PUT stop a job
/jobs/executions/{jobExecutionId}/steps
GET list the steps for a job execution(Only application/json acceptheader is supported)
/jobs/executions/{jobExecutionId}/steps/{stepExecutionId}
GET get a step execution
/jobs/executions/{jobExecutionId}/steps/{stepExecutionId}/progress
GET get the step execution progress
35.9 Batch Job Instances
Table 35.8. Table Batch Job Instances
Resource URL Request Method Description
/jobs/instances?jobname={jobName}
GET get information about allinstances of a job
/jobs/instances/{instanceId} GET get information about a batchjob instance
For both the GET endpoints only application/json accept header is supported.

Spring XD Guide
1.3.2.RELEASE Spring XD 334
35.10 Module Definitions
Table 35.9. Table Module Definitions
Resource URL Request Method Description
/modules GET list all registered modules
/modules POST create a composite module,where The request bodyis application/x-www-form-urlencoded and requirestwo parameters, name anddefinition (DSL). Themodule type is derived from thedefinition.
/modules/{type}/{name} POST upload a module archive (uberjar), where The content type isapplication/octect-stream andthe request body contains thebinary archive contents
/modules/{type}/{name} GET list a module along with optionsmetadata, where type issource,processor,sink, orjob
/modules/{type}/{name} DELETE delete a composed or uploadedmodule
35.11 Deployed Modules
Table 35.10. Table Deployed Modules
Resource URL Request Method Description
/runtime/modules GET display runtime moduleoption values anddeployment information fordeployed modules, optionalparameters are moduleId(<stream>.<type>.<moduleName>,containerId,jobname
35.12 Containers
Table 35.11. Table Containers
Resource URL Request Method Description
/runtime/containers GET display all available containersalong with runtime and user-defined container attributes

Spring XD Guide
1.3.2.RELEASE Spring XD 335
35.13 Counters
Table 35.12. Table Counters
Resource URL Request Method Description
/metrics/counters/ GET list all the known counters
/metrics/counters?detailed=true GET list metric values for all knowncounters
/metrics/counters/{name} GET get the current metric value
/metrics/counters/{name} DELETE delete the metric
35.14 Field Value Counters
Table 35.13. Table Field Value Counters
Resource URL Request Method Description
/metrics/field-value-counters/ GET list all the known field valuecounters
/metrics/field-value-counters?detailed=true
GET list metric values for all knownfield value counters
/metrics/field-value-counters/{name}
GET get the current metric values
/metrics/field-value-counters/{name}
DELETE delete the metric
35.15 Aggregate Counters
Table 35.14. Table Aggregate Counters
Resource URL Request Method Description
/metrics/aggregate-counters/ GET list all the known aggregatecounters
/metrics/aggregate-counters?detailed=true
GET list current metric values for allknown aggregate counters
/metrics/aggregate-counters/{name}
GET get the current metric values
/metrics/aggregate-counters/{name}
DELETE delete the metric

Spring XD Guide
1.3.2.RELEASE Spring XD 336
35.16 Gauges
Table 35.15. Table Gauges
Resource URL Request Method Description
/metrics/gauges/ GET list all the known gauges
/metrics/gauges?detailed=true GET list current metric values for allknown gauges
/metrics/gauges/{name} GET get the current metric values
/metrics/gauges/{name} DELETE delete the metric
35.17 Rich Gauges
Table 35.16. Table Rich Gauges
Resource URL Request Method Description
/metrics/rich-gauges/ GET list all the known rich gauges
/metrics/rich-gauges?detailed=true
GET list metric values for all knownrich gauges
/metrics/rich-gauges/{name} GET get the current metric values
/metrics/rich-gauges/{name} DELETE delete the metric
35.18 Tab Completions
Used to support DSL tab completion for the XD Shell. All requests require the start parameter whichcontains the incomplete definition.
Table 35.17. Table Tab Completions
Resource URL Request Method Description
/completions/stream?start={start}
GET retrieve valid choices tocomplete a stream definition
/completions/job?start={start} GET retrieve valid choices tocomplete a job definition
/completions/module?start={start}
GET retrieve valid choices tocomplete a module definition

Spring XD Guide
1.3.2.RELEASE Spring XD 337
36. JAVA API
36.1 Introduction
The class SpringXDTemplate lets you intereact with Spring XD’s REST API in Java. It saves you thetrouble of wrapping your own calls to RestTemplate or other REST client libraries. Within Spring XDSpringXDTemplate is used to implement shell commands and for testing.
Required Libraries
The following maven snippet will pull in the required dependencies:
<dependencies>
<dependency>
<groupId>org.springframework.xd</groupId>
<artifactId>spring-xd-rest-client</artifactId>
<version>1.0.1.RELEASE</version>
</dependency>
</dependencies>
<repositories>
<repository>
<id>spring-release</id>
<name>Spring Releases</name>
<url>http://repo.spring.io/libs-release</url>
</repository>
</repositories>
Note: The artifact is not yet hosted in maven central.
Sample Usage
The program
SpringXDTemplate xdTemplate = new SpringXDTemplate(new URI("http://localhost:9393"));
PagedResources<DetailedContainerResource> containers = xdTemplate.runtimeOperations().listContainers();
for (DetailedContainerResource container : containers) {
System.out.println(container);
}
Will produce the following output on a single node server
{groups=, host=feynman, id=e4fb54bc-119b-46cc-acb3-cd0b72ccd1df, ip=192.168.70.130, pid=9559}

Part V. Appendices

Spring XD Guide
1.3.2.RELEASE Spring XD 339
Appendix A. Installing HadoopA.1 Installing Hadoop
If you don’t have a local Hadoop cluster available already, you can do a local single node installation(v2.6.0) and use that to try out Hadoop with Spring XD.
Tip
This guide is intended to serve as a quick guide to get you started in the context of Spring XD. Formore complete documentation please refer back to the documentation provided by your respectiveHadoop distribution.
Download
First, download an installation archive (hadoop-2.6.0.tar.gz) and unpack it locally. Linux users can alsoinstall Hadoop through the system package manager and on Mac OS X, you can use Homebrew.However, the manual installation is self-contained and it’s easier to see what’s going on if you justunpack it to a known location.
If you have wget available on your system, you can also execute:
$ wget http://archive.apache.org/dist/hadoop/common/hadoop-2.6.0/hadoop-2.6.0.tar.gz
Unpack the distribution with:
$ tar xzf hadoop-2.6.0.tar.gz
Change into the directory and have a look around
$ cd hadoop-2.6.0
$ ls
$ bin/hadoop
Usage: hadoop [--config confdir] COMMAND
where COMMAND is one of:
fs run a generic filesystem user client
version print the version
jar <jar> run a jar file
...
The bin directory contains the start and stop scripts as well as the hadoop and hdfs scripts whichallow us to interact with Hadoop from the command line.
Java Setup
Make sure that you set JAVA_HOME in the etc/hadoop/hadoop-env.sh script, or you will get anerror when you start Hadoop. For example:
# The java implementation to use. Required.
#export JAVA_HOME=${JAVA_HOME}
export JAVA_HOME=/usr/lib/jdk1.7.0_65
Tip
When using Mac OS X you can determine the Java home directory by executing $ /usr/
libexec/java_home -v 1.6

Spring XD Guide
1.3.2.RELEASE Spring XD 340
Tip
When using Ubuntu you can determine the Java home directory by executing $ sudo update-java-alternatives -l
Note
When using MAC OS X (Other systems possible also) you may still encounter Unable to loadrealm info from SCDynamicStore (For details see Hadoop Jira HADOOP-7489). In thatcase, please also add to conf/hadoop-env.sh the following line: export HADOOP_OPTS="-Djava.security.krb5.realm= -Djava.security.krb5.kdc=".
Setup SSH
As described in the installation guide, you also need to set up SSH login to localhost without apassphrase. On Linux, you may need to install the ssh package and ensure the sshd daemon isrunning. On Mac OS X, ssh is already installed but the sshd daemon isn’t usually running. To start it,you need to enable "Remote Login" in the "Sharing" section of the control panel. Then you can carry onand setup SSH keys as described in the installation guide:
$ ssh-keygen -t dsa -P '' -f ~/.ssh/id_dsa
$ cat ~/.ssh/id_dsa.pub >> ~/.ssh/authorized_keys
Make sure you can log in at the command line using ssh localhost and ssh 0.0.0.0 before tryingto start Hadoop:
$ ssh localhost
Last login: Thu May 1 15:02:32 2014 from localhost
...
$ ssh 0.0.0.0
Last login: Thu May 1 15:06:02 2014 from localhost
You also need to decide where in your local filesystem you want Hadoop to store its data. Let’s sayyou decide to use /data.
First create the directory and make sure it is writeable:
$ mkdir /data
$ chmod 777 /data
Now edit etc/hadoop/core-site.xml and add the following property:
<property>
<name>hadoop.tmp.dir</name>
<value>/data</value>
</property>
You’re then ready to format the filesystem for use by HDFS
$ bin/hadoop namenode -format
Setting the Namenode Port
By default Spring XD will use a Namenode setting of hdfs://localhost:8020 which can beoverridden in ${xd.home}/config/server.yml, depending on the used Hadoop distribution andversion the by-default-defined port 8020 may be different, e.g. port 9000. Therefore, please ensure youhave the following property setting in etc/hadoop/core-site.xml:

Spring XD Guide
1.3.2.RELEASE Spring XD 341
<property>
<name>fs.defaultFS</name>
<value>hdfs://localhost:8020</value>
</property>
Further Configuration File Changes
In etc/hadoop/hdfs-site.xml add the following properties:
<property>
<name>dfs.replication</name>
<value>1</value>
</property>
<property>
<name>dfs.support.append</name>
<value>true</value>
</property>
<property>
<name>dfs.webhdfs.enabled</name>
<value>true</value>
</property>
Create etc/hadoop/mapred-site.xml and add:
<?xml version="1.0"?>
<?xml-stylesheet type="text/xsl" href="configuration.xsl"?>
<configuration>
<property>
<name>mapreduce.framework.name</name>
<value>yarn</value>
</property>
</configuration>
In etc/hadoop/yarn-site.xml add these properties:
<property>
<name>yarn.nodemanager.aux-services</name>
<value>mapreduce_shuffle</value>
</property>
<property>
<name>yarn.nodemanager.aux-services.mapreduce.shuffle.class</name>
<value>org.apache.hadoop.mapred.ShuffleHandler</value>
</property>
A.2 Running Hadoop
First we need to set up the environment settings. It’s convenient to add these to a file that you can sourcewhen you want to work with Hadoop. We create a file called hadoop-env and add the following content:
# The directory of the unpacked distribution
export HADOOP_INSTALL="$HOME/Downloads/hadoop-2.6.0"
# The JAVE_HOME (see above how to determine this)
export JAVA_HOME=/usr/lib/jdk1.7.0_65
# Some HOME settings
export HADOOP_MAPRED_HOME=$HADOOP_INSTALL
export HADOOP_YARN_HOME=$HADOOP_INSTALL
export HADOOP_COMMON_HOME=$HADOOP_INSTALL
# Add Hadoop scripts to the PATH
export PATH=$HADOOP_INSTALL/bin:$HADOOP_INSTALL/sbin:$PATH
To use these settings we need to source this script:

Spring XD Guide
1.3.2.RELEASE Spring XD 342
$ source hadoop-env
You should now finally be ready to run Hadoop. Run the following commands
$ start-dfs.sh
$ start-yarn.sh
$ mr-jobhistory-daemon.sh start historyserver
You should see six Hadoop Java processes running:
$ jps
21636 NameNode
22004 SecondaryNameNode
22360 NodeManager
22425 JobHistoryServer
21808 DataNode
22159 ResourceManager
22471 Jps
Try a few commands with hdfs dfs to make sure the basic system works
$ hdfs dfs -ls /
Found 1 items
drwxrwx--- - trisberg supergroup 0 2014-11-01 15:31 /tmp
$ hdfs dfs -mkdir /xd
$ bin/hadoop dfs -ls /
Found 2 items
drwxrwx--- - trisberg supergroup 0 2014-11-01 15:31 /tmp
drwxr-xr-x - trisberg supergroup 0 2014-11-01 15:34 /xd
Lastly, you can also browse the web interface for NameNode and ResourceManager at:
• NameNode: http://localhost:50070/
• ResourceManager: http://localhost:8088/
At this point you should be good to create a Spring XD stream using a Hadoop sink.

Spring XD Guide
1.3.2.RELEASE Spring XD 343
Appendix B. Building Spring XDB.1 Instructions
Here are some useful steps to build and run Spring XD.
Warning
Please ensure that you provide as a minimum 6GB of available RAM for a full build. The executedintegration tests use several embedded services such as Apache Kafka, Apache ZooKeeper andApache Hadoop which contribute to the high resource usage.
To build all sub-projects and run tests for Spring XD (please note tests require a running Redis instance):
./gradlew build
To build and bundle the distribution of Spring XD
./gradlew dist
The above gradle task creates spring-xd-<version>.zip binary distribution archive and spring-xd-<version>-docs.zip documentation archive files under build/distributions. This will also create a build/dist/spring-xd directory which is the expanded version of the binary distribution archive.
To just create the Spring XD expanded binary distribution directory
./gradlew copyInstall
The above gradle task creates the distribution directory under build/dist/spring-xd.
Once the binary distribution directory is created, please refer to Getting Started on how to run Spring XD.
To create the reference docs
./gradlew reference
B.2 IDE support
If you would like to work with the Spring XD code in your IDE, please use the following project generationdepending on the IDE you use:
For Eclipse/Spring Tool Suite
./gradlew eclipse
For IntelliJ IDEA
./gradlew idea

Spring XD Guide
1.3.2.RELEASE Spring XD 344
Appendix C. Using MQTT ModulesC.1 Introduction
MQTT(MQ for telemetry transport) is a machine to machine connectivity protocol. It is a lightweight pub/sub protocol for devices where bandwidth and battery power are at a premium. This purpose of thisdocument is to show you how to: enable the RabbitMQ MQTT plugin, setup a Spring XD MQTT sourceand Spring MQTT sink.
Note
This document assumes that you have a RabbitMQ installed and running. If you don’t haveRabbitMQ available already you can download it from http://www.rabbitmq.com/download.html.
Setting up MQTT on RabbitMQ
If you are using RabbitMQ 3.3.4 or above then the MQTT plugin is already included with yourdeployment, however it is inactive. To Activate:
1. Shutdown the Rabbit MQ instance
2. $RABBIT_HOME/sbin/rabbitmq-plugins list
...
[ ] rabbitmq_federation_management 3.3.4
[E] rabbitmq_management 3.3.4
[e] rabbitmq_management_agent 3.3.4
[ ] rabbitmq_management_visualiser 3.3.4
[ ] rabbitmq_mqtt 3.3.4
[ ] rabbitmq_shovel 3.3.4
[ ] rabbitmq_shovel_management 3.3.4
…
3. We see that the rabitt_mqtt does not have a [E] denoted next to it. Thus it is not enabled. Note: ifyou do see the [E] next to the rabbitmq_mqtt then your plugin is enabled and all you need to do isrestart your RabbitMQ.
4. Now enable rabbit_mqtt plugin
a. Run: $RABBIT_HOME/sbin/rabbitmq-plugins enable rabbitmq_mqtt
b. Run: $RABBIT_HOME/sbin/rabbitmq-plugins list
...
[ ] rabbitmq_federation_management 3.3.4
[E] rabbitmq_management 3.3.4
[e] rabbitmq_management_agent 3.3.4
[ ] rabbitmq_management_visualiser 3.3.4
[E] rabbitmq_mqtt 3.3.4
[ ] rabbitmq_shovel 3.3.4
[ ] rabbitmq_shovel_management 3.3.4
...
c. Now we see that the rabbitmq_mqtt plugin is now active.
d. Restart your RabbitMQ.

Spring XD Guide
1.3.2.RELEASE Spring XD 345
Rabbit MQTT Plugin settings
The MQTT plugin can be can be configured via the rabbitmq.config file and this is covered here: http://www.rabbitmq.com/mqtt.html. The settings for the MQTT plugin that Spring XD are concerned aboutare as follows:
1. allow_anonymous Determines if the user must supply a user name or password. If true then the pluginwill use the default_user and default password enumerated below. If false the Spring XD source orsink must provide the username and password Default: true
2. default_user If allow_anonymous is set to true then this will set the user for anonymous clients.Default: guest
3. default_password If allow_anonymous is set to true then this will set the password for anonymousclients. Default: guest
4. exchange - The name of the exchange that will route all MQTT messages to a the queues. Default:amq.topic
5. tcp_listeners - host and port that rabbit will monitor for MQTT messages. Default: 1883
Out of the box the Spring XD MQTT source and sink currently works with the MQTT plugin defaultswithout any configuration.
MQTT Source
When Spring XD deploys the MQTT source module, a message queue is created along with thenecessary binding on RabbitMQ. The message queue that is created will have the name structure[mqtt-subscription-][client_id][srcqos1]. * mqtt-subscription- Queues created for MQTTsubscribers will have names starting with mqtt-subscription. * client-id is the client-id specified by theMQTT source module, the default is xd.mqtt.client.id * srcqos1 - The QoS level for the queue.
The MQTT source module also generates the binding from the amq.topic to the message queue via therouting key (topic). The default topic for the MQTT source module is xd.mqtt.test.
Example 1: Using defaults
To show this in detail let us create the following stream: stream create mqtt-in --definition“mqtt|log” --deploy. In this example the stream will retrieve MQTT messages from RabbitMQ andwrite the content to Spring XD’s log. So on RabbitMQ a message queue named mqtt-subscription-xd.mqtt.client.id.srcqos1 and a binding for the topic (routing key) xd.mqtt.test will becreated.
Thus any message published with the topic, xd.mqtt.test will be sent to the mqtt-subscription-xd.mqtt.client.id.srcqos1 message queue and thus picked up by the Spring XD MQTT moduleand then written to log. So to exercise the stream created we can write the following:
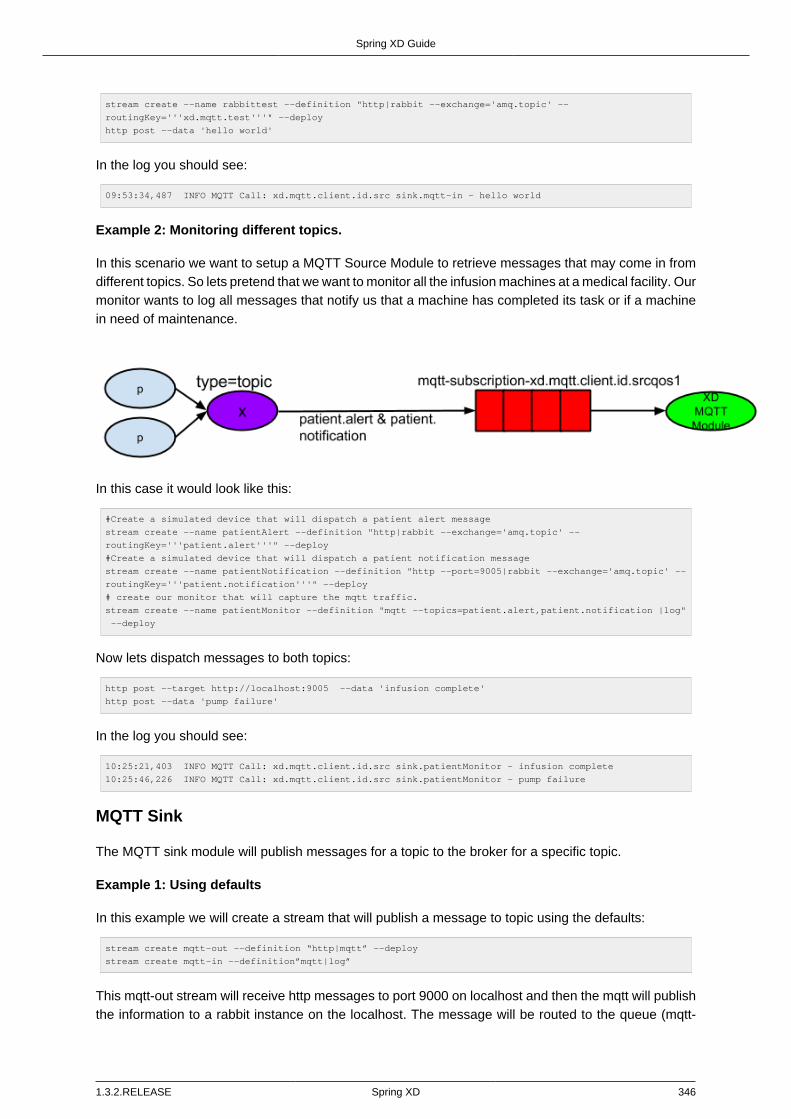
Spring XD Guide
1.3.2.RELEASE Spring XD 346
stream create --name rabbittest --definition "http|rabbit --exchange='amq.topic' --
routingKey='''xd.mqtt.test'''" --deploy
http post --data 'hello world'
In the log you should see:
09:53:34,487 INFO MQTT Call: xd.mqtt.client.id.src sink.mqtt-in - hello world
Example 2: Monitoring different topics.
In this scenario we want to setup a MQTT Source Module to retrieve messages that may come in fromdifferent topics. So lets pretend that we want to monitor all the infusion machines at a medical facility. Ourmonitor wants to log all messages that notify us that a machine has completed its task or if a machinein need of maintenance.
In this case it would look like this:
#Create a simulated device that will dispatch a patient alert message
stream create --name patientAlert --definition "http|rabbit --exchange='amq.topic' --
routingKey='''patient.alert'''" --deploy
#Create a simulated device that will dispatch a patient notification message
stream create --name patientNotification --definition "http --port=9005|rabbit --exchange='amq.topic' --
routingKey='''patient.notification'''" --deploy
# create our monitor that will capture the mqtt traffic.
stream create --name patientMonitor --definition "mqtt --topics=patient.alert,patient.notification |log"
--deploy
Now lets dispatch messages to both topics:
http post --target http://localhost:9005 --data 'infusion complete'
http post --data 'pump failure'
In the log you should see:
10:25:21,403 INFO MQTT Call: xd.mqtt.client.id.src sink.patientMonitor - infusion complete
10:25:46,226 INFO MQTT Call: xd.mqtt.client.id.src sink.patientMonitor - pump failure
MQTT Sink
The MQTT sink module will publish messages for a topic to the broker for a specific topic.
Example 1: Using defaults
In this example we will create a stream that will publish a message to topic using the defaults:
stream create mqtt-out --definition “http|mqtt” --deploy
stream create mqtt-in --definition”mqtt|log”
This mqtt-out stream will receive http messages to port 9000 on localhost and then the mqtt will publishthe information to a rabbit instance on the localhost. The message will be routed to the queue (mqtt-

Spring XD Guide
1.3.2.RELEASE Spring XD 347
subscription-xd.mqtt.client.id.srcqos1) that was created by MQTT source module and then, the messagewill be delivered to the MQTT source module.
So the output will look something like this, if you execute a http post --data ‘hello world’
14:03:57,340 INFO MQTT Call: xd.mqtt.client.id.src sink.mqtt-in - hello world
Spring XD Guide
1.3.2.RELEASE Spring XD 348
Appendix D. XD Shell CommandReferenceBelow is a reference list of all Spring XD specific commands you can use in the XD Shell.
D.1 Configuration Commands
admin config info
Show the XD admin server being used.
admin config info
admin config server
Configure the XD admin server to use.
admin config server [[--uri] <uri>] [--username <username>] [--password [<password>]]
urithe location of the XD Admin REST endpoint. (default: http://localhost:9393/)
usernamethe username for authenticated access to the Admin REST endpoint. (default: ``)
passwordthe password for authenticated access to the Admin REST endpoint (valid only with a username).
admin config timezone list
List all timezones.
admin config timezone list
admin config timezone set
Set the timezone of the Spring XD Shell (Not persisted).
admin config timezone set [--timeZone] <timeZone>
timeZonethe id of the timezone, You can obtain a list of timezone ids using 'admin config timezone list', If aninvalid timezone id is provided, then 'Greenwich Mean Time' is being used. (required)
D.2 Runtime Commands
runtime containers
List runtime containers.
runtime containers

Spring XD Guide
1.3.2.RELEASE Spring XD 349
runtime modules
List runtime modules.
runtime modules [--containerId <containerId>] [--moduleId <moduleId>]
containerIdto filter by container id.
moduleIdto filter by module id.
D.3 Stream Commands
stream all destroy
Destroy all existing streams.
stream all destroy [--force [<force>]]
forcebypass confirmation prompt. (default: false, or true if --force is specified without a value)
stream all undeploy
Un-deploy all previously deployed stream.
stream all undeploy [--force [<force>]]
forcebypass confirmation prompt. (default: false, or true if --force is specified without a value)
stream create
Create a new stream definition.
stream create [--name] <name> --definition <definition> [--deploy [<deploy>]]
namethe name to give to the stream. (required)
definitiona stream definition, using XD DSL (e.g. "http --port=9000 | hdfs"). (required)
deploywhether to deploy the stream immediately. (default: false, or true if --deploy is specifiedwithout a value)
stream deploy
Deploy a previously created stream.
stream deploy [--name] <name> [--properties <properties>] [--propertiesFile <propertiesFile>]
namethe name of the stream to deploy. (required)
Spring XD Guide
1.3.2.RELEASE Spring XD 350
propertiesthe properties for this deployment.
propertiesFilethe properties for this deployment (as a File).
stream destroy
Destroy an existing stream.
stream destroy [--name] <name>
namethe name of the stream to destroy. (required)
stream list
List created streams.
stream list
stream undeploy
Un-deploy a previously deployed stream.
stream undeploy [--name] <name>
namethe name of the stream to un-deploy. (required)
D.4 Job Commands
job all destroy
Destroy all existing jobs.
job all destroy [--force [<force>]]
forcebypass confirmation prompt. (default: false, or true if --force is specified without a value)
job all undeploy
Un-deploy all existing jobs.
job all undeploy [--force [<force>]]
forcebypass confirmation prompt. (default: false, or true if --force is specified without a value)
job create
Create a job.
job create [--name] <name> --definition <definition> [--deploy [<deploy>]]

Spring XD Guide
1.3.2.RELEASE Spring XD 351
namethe name to give to the job. (required)
definitionjob definition using xd dsl . (required)
deploywhether to deploy the job immediately. (default: false, or true if --deploy is specified withouta value)
job deploy
Deploy a previously created job.
job deploy [--name] <name> [--properties <properties>] [--propertiesFile <propertiesFile>]
namethe name of the job to deploy. (required)
propertiesthe properties for this deployment.
propertiesFilethe properties for this deployment (as a File).
job destroy
Destroy an existing job.
job destroy [--name] <name>
namethe name of the job to destroy. (required)
job execution all stop
Stop all the job executions that are running.
job execution all stop [--force [<force>]]
forcebypass confirmation prompt. (default: false, or true if --force is specified without a value)
job execution display
Display the details of a Job Execution.
job execution display [--id] <id>
idthe id of the job execution. (required)
job execution list
List all job executions.
Spring XD Guide
1.3.2.RELEASE Spring XD 352
job execution list
job execution restart
Restart a job that failed or interrupted previously.
job execution restart [--id] <id>
idthe id of the job execution that failed or interrupted. (required)
job execution step display
Display the details of a Step Execution.
job execution step display [--id] <id> --jobExecutionId <jobExecutionId>
idthe id of the step execution. (required)
jobExecutionIdthe job execution id. (required)
job execution step list
List all step executions for the provided job execution id.
job execution step list [--id] <id>
idthe id of the job execution. (required)
job execution step progress
Get the progress info for the given step execution.
job execution step progress [--id] <id> --jobExecutionId <jobExecutionId>
idthe id of the step execution. (required)
jobExecutionIdthe job execution id. (required)
job execution stop
Stop a job execution that is running.
job execution stop [--id] <id>
idthe id of the job execution. (required)
job instance display
Display information about a given job instance.

Spring XD Guide
1.3.2.RELEASE Spring XD 353
job instance display [[--id] <id>]
idthe id of the job instance to retrieve.
job launch
Launch previously deployed job.
job launch [[--name] <name>] [--params <params>]
namethe name of the job to deploy.
paramsthe parameters for the job. (default: ``)
job list
List all jobs.
job list
job undeploy
Un-deploy an existing job.
job undeploy [--name] <name>
namethe name of the job to un-deploy. (required)
D.5 Module Commands
module compose
Create a virtual module.
module compose [--name] <name> --definition <definition> [--force [<force>]]
namethe name to give to the module. (required)
definitionmodule definition using xd dsl. (required)
forceforce update if module already exists (only if not in use). (default: false, or true if --force isspecified without a value)
module delete
Delete a virtual module.
Spring XD Guide
1.3.2.RELEASE Spring XD 354
module delete [--name] <name>
namename of the module to delete, in the form 'type:name'. (required)
module info
Get information about a module.
module info [--name] <name> [--hidden [<hidden>]]
namename of the module to query, in the form 'type:name'. (required)
hiddenwhether to show 'hidden' options. (default: false, or true if --hidden is specified without avalue)
module list
List all modules.
module list
module upload
Upload a new module.
module upload --type <type> --name <name> [--file] <file> [--force [<force>]]
typethe type for the uploaded module. (required)
namethe name for the uploaded module. (required)
filepath to the module archive. (required)
forceforce update if module already exists (only if not in use). (default: false, or true if --force isspecified without a value)
D.6 Metrics Commands
counter delete
Delete the counter with the given name.
counter delete [--name] <name>
namethe name of the counter to delete. (required)

Spring XD Guide
1.3.2.RELEASE Spring XD 355
counter display
Display the value of a counter.
counter display [--name] <name> [--pattern <pattern>]
namethe name of the counter to display. (required)
patternthe pattern used to format the value (see DecimalFormat). (default: <use platform locale>)
counter list
List all available counter names.
counter list
field-value-counter delete
Delete the field-value-counter with the given name.
field-value-counter delete [--name] <name>
namethe name of the field-value-counter to delete. (required)
field-value-counter display
Display the value of a field-value-counter.
field-value-counter display [--name] <name> [--pattern <pattern>] [--size <size>]
namethe name of the field-value-counter to display. (required)
patternthe pattern used to format the field-value-counter's field count (see DecimalFormat). (default: <useplatform locale>)
sizethe number of values to display. (default: 25)
field-value-counter list
List all available field-value-counter names.
field-value-counter list
aggregate-counter delete
Delete an aggregate counter.
aggregate-counter delete [--name] <name>

Spring XD Guide
1.3.2.RELEASE Spring XD 356
namethe name of the aggregate counter to delete. (required)
aggregate-counter display
Display aggregate counter values by chosen interval and resolution(minute, hour).
aggregate-counter display [--name] <name> [--from <from>] [--to <to>] [--lastHours <lastHours>] [--
lastDays <lastDays>] [--resolution <resolution>] [--pattern <pattern>]
namethe name of the aggregate counter to display. (required)
fromstart-time for the interval. format: 'yyyy-MM-dd HH:mm:ss'.
toend-time for the interval. format: 'yyyy-MM-dd HH:mm:ss'. defaults to now.
lastHoursset the interval to last 'n' hours.
lastDaysset the interval to last 'n' days.
resolutionthe size of the bucket to aggregate (minute, hour, day, month). (default: hour)
patternthe pattern used to format the count values (see DecimalFormat). (default: <use platform
locale>)
aggregate-counter list
List all available aggregate counter names.
aggregate-counter list
gauge delete
Delete a gauge.
gauge delete [--name] <name>
namethe name of the gauge to delete. (required)
gauge display
Display the value of a gauge.
gauge display [--name] <name> [--pattern <pattern>]
namethe name of the gauge to display. (required)

Spring XD Guide
1.3.2.RELEASE Spring XD 357
patternthe pattern used to format the value (see DecimalFormat). (default: <use platform locale>)
gauge list
List all available gauge names.
gauge list
rich-gauge delete
Delete the richgauge.
rich-gauge delete [--name] <name>
namethe name of the richgauge to delete. (required)
rich-gauge display
Display Rich Gauge value.
rich-gauge display [--name] <name> [--pattern <pattern>]
namethe name of the richgauge to display value. (required)
patternthe pattern used to format the richgauge value (see DecimalFormat). (default: <use platformlocale>)
rich-gauge list
List all available richgauge names.
rich-gauge list
D.7 Http Commands
http get
Make GET request to http endpoint.
http get [[--target] <target>]
targetthe URL to make the request to. (default: http://localhost:9393)
http post
POST data to http endpoint.
http post [[--target] <target>] [--data <data>] [--file <file>] [--contentType <contentType>]
targetthe location to post to. (default: http://localhost:9000)
Spring XD Guide
1.3.2.RELEASE Spring XD 358
datathe text payload to post. exclusive with file. embedded double quotes are not supported if next toa space character.
filefilename to read data from. exclusive with data.
contentTypethe content-type to use. file is also read using the specified charset. (default: text/plain;Charset=UTF-8)
D.8 Hadoop Configuration Commands
hadoop config fs
Sets the Hadoop namenode.
hadoop config fs [--namenode] <namenode>
namenodenamenode URL - can be file:///|hdfs://<namenode>:<port>|webhdfs://<namenode>:<port>.(required)
hadoop config info
Returns basic info about the Hadoop configuration.
hadoop config info
hadoop config load
Loads the Hadoop configuration from the given resource.
hadoop config load [--location] <location>
locationconfiguration location (can be a URL). (required)
hadoop config props get
Returns the value of the given Hadoop property.
hadoop config props get [--key] <key>
keyproperty name. (required)
hadoop config props list
Returns (all) the Hadoop properties.
hadoop config props list
hadoop config props set
Sets the value for the given Hadoop property.
Spring XD Guide
1.3.2.RELEASE Spring XD 359
hadoop config props set [--property] <property>
propertywhat to set, in the form <name=value>. (required)
D.9 Hadoop FileSystem Commands
hadoop fs cat
Copy source paths to stdout.
hadoop fs cat [--path] <path>
pathfile name to be shown. (required)
hadoop fs chgrp
Change group association of files.
hadoop fs chgrp [--recursive [<recursive>]] --group <group> [--path] <path>
recursivewhether with recursion. (default: false, or true if --recursive is specified without a value)
groupgroup name. (required)
pathpath of the file whose group will be changed. (required)
hadoop fs chmod
Change the permissions of files.
hadoop fs chmod [--recursive [<recursive>]] --mode <mode> [--path] <path>
recursivewhether with recursion. (default: false, or true if --recursive is specified without a value)
modepermission mode. (required)
pathpath of the file whose permissions will be changed. (required)
hadoop fs chown
Change the owner of files.
hadoop fs chown [--recursive [<recursive>]] --owner <owner> [--path] <path>
recursivewhether with recursion. (default: false, or true if --recursive is specified without a value)
Spring XD Guide
1.3.2.RELEASE Spring XD 360
ownerowner name. (required)
pathpath of the file whose ownership will be changed. (required)
hadoop fs copyFromLocal
Copy single src, or multiple srcs from local file system to the destination file system. Same as put.
hadoop fs copyFromLocal --from <from> --to <to>
fromsource file names. (required)
todestination path name. (required)
hadoop fs copyMergeToLocal
Takes a source directory and a destination file as input and concatenates files in src into the destinationlocal file.
hadoop fs copyMergeToLocal --from <from> --to <to> [--endline [<endline>]]
fromsource file names. (required)
todestination path name. (required)
endlinewhether add a newline character at the end of each file. (default: false, or true if --endlineis specified without a value)
hadoop fs copyToLocal
Copy files to the local file system. Same as get.
hadoop fs copyToLocal --from <from> --to <to> [--ignoreCrc [<ignoreCrc>]] [--crc [<crc>]]
fromsource file names. (required)
todestination path name. (required)
ignoreCrcwhether ignore CRC. (default: false, or true if --ignoreCrc is specified without a value)
crcwhether copy CRC. (default: false, or true if --crc is specified without a value)
hadoop fs count
Count the number of directories, files, bytes, quota, and remaining quota.

Spring XD Guide
1.3.2.RELEASE Spring XD 361
hadoop fs count [--quota [<quota>]] --path <path>
quotawhether with quta information. (default: false, or true if --quota is specified without a value)
pathpath name. (required)
hadoop fs cp
Copy files from source to destination. This command allows multiple sources as well in which case thedestination must be a directory.
hadoop fs cp --from <from> --to <to>
fromsource file names. (required)
todestination path name. (required)
hadoop fs du
Displays sizes of files and directories contained in the given directory or the length of a file in case itsjust a file.
hadoop fs du [[--dir] <dir>] [--summary [<summary>]]
dirdirectory to be listed. (default: .)
summarywhether with summary. (default: false, or true if --summary is specified without a value)
hadoop fs expunge
Empty the trash.
hadoop fs expunge
hadoop fs get
Copy files to the local file system.
hadoop fs get --from <from> --to <to> [--ignoreCrc [<ignoreCrc>]] [--crc [<crc>]]
fromsource file names. (required)
todestination path name. (required)
ignoreCrcwhether ignore CRC. (default: false, or true if --ignoreCrc is specified without a value)

Spring XD Guide
1.3.2.RELEASE Spring XD 362
crcwhether copy CRC. (default: false, or true if --crc is specified without a value)
hadoop fs ls
List files in the directory.
hadoop fs ls [[--dir] <dir>] [--recursive [<recursive>]]
dirdirectory to be listed. (default: .)
recursivewhether with recursion. (default: false, or true if --recursive is specified without a value)
hadoop fs mkdir
Create a new directory.
hadoop fs mkdir [--dir] <dir>
dirdirectory name. (required)
hadoop fs moveFromLocal
Similar to put command, except that the source localsrc is deleted after it's copied.
hadoop fs moveFromLocal --from <from> --to <to>
fromsource file names. (required)
todestination path name. (required)
hadoop fs mv
Move source files to destination in the HDFS.
hadoop fs mv --from <from> --to <to>
fromsource file names. (required)
todestination path name. (required)
hadoop fs put
Copy single src, or multiple srcs from local file system to the destination file system.
hadoop fs put --from <from> --to <to>
fromsource file names. (required)

Spring XD Guide
1.3.2.RELEASE Spring XD 363
todestination path name. (required)
hadoop fs rm
Remove files in the HDFS.
hadoop fs rm [[--path] <path>] [--skipTrash [<skipTrash>]] [--recursive [<recursive>]]
pathpath to be deleted. (default: .)
skipTrashwhether to skip trash. (default: false, or true if --skipTrash is specified without a value)
recursivewhether to recurse. (default: false, or true if --recursive is specified without a value)
hadoop fs setrep
Change the replication factor of a file.
hadoop fs setrep --path <path> --replica <replica> [--recursive [<recursive>]] [--waiting [<waiting>]]
pathpath name. (required)
replicasource file names. (required)
recursivewhether with recursion. (default: false, or true if --recursive is specified without a value)
waitingwhether wait for the replic number is eqal to the number. (default: false, or true if --waitingis specified without a value)
hadoop fs tail
Display last kilobyte of the file to stdout.
hadoop fs tail [--file] <file> [--follow [<follow>]]
filefile to be tailed. (required)
followwhether show content while file grow. (default: false, or true if --follow is specified withouta value)
hadoop fs text
Take a source file and output the file in text format.
hadoop fs text [--file] <file>
Spring XD Guide
1.3.2.RELEASE Spring XD 364
filefile to be shown. (required)
hadoop fs touchz
Create a file of zero length.
hadoop fs touchz [--file] <file>
filefile to be touched. (required)

Spring XD Guide
1.3.2.RELEASE Spring XD 365
Appendix E. Connecting toKerberized HadoopIf you have enabled Kerberos security in your Hadoop cluster it is possible to connect Spring XD’s sinkand job modules to it as well as the XD Shell.
E.1 Spring XD Admin and Container
For XD Admin and Container you can either add the needed properties in xd/config/servers.ymlor in xd/config/hadoop.properties.
We’ll show an example of both files here (you only need to add this in one of them of course):
xd/config/servers.yml
---
# Hadoop properties
spring:
hadoop:
fsUri: hdfs://hadoop.example.com:8020
resourceManagerHost: hadoop.example.com
resourceManagerPort: 8032
jobHistoryAddress: hadoop.example.com:10020
security:
authMethod: kerberos
userPrincipal: [email protected]
userKeytab: /home/springxd/springxd.keytab
namenodePrincipal: hdfs/[email protected]
rmManagerPrincipal: yarn/[email protected]
config:
mapreduce.jobhistory.principal: mapred/[email protected]
---
xd/config/hadoop.properties
hadoop.security.authorization=true
spring.hadoop.security.authMethod=kerberos
spring.hadoop.security.userKeytab=/home/springxd/springxd.keytab
spring.hadoop.security.namenodePrincipal=hdfs/[email protected]
spring.hadoop.security.rmManagerPrincipal=yarn/[email protected]
spring.hadoop.config.mapreduce.jobhistory.principal=mapred/[email protected]
E.2 Spring Shell
For the XD Shell the config file is /shell/config/hadoop.properties.
xd/config/hadoop.properties
hadoop.security.authorization=true
spring.hadoop.security.authMethod=kerberos
spring.hadoop.security.userKeytab=/home/springxd/springxd.keytab
spring.hadoop.security.namenodePrincipal=hdfs/[email protected]

Spring XD Guide
1.3.2.RELEASE Spring XD 366
E.3 Setting Principals
Principals for spring.hadoop.security.namenodePrincipal andspring.hadoop.security.rmManagerPrincipal would equal what are in use in Hadoop cluster.
E.4 Automatic Login
If you want to avoid running kerberos login commands manually, usespring.hadoop.security.userKeytab and spring.hadoop.security.userPrincipal
propertys respectively. Path to your kerberos keytab file needs to be a fully qualified path in your filesystem. Essentially this is a model used by internal Hadoop components to do automatic Kerberoslogins.
Spring XD Guide
1.3.2.RELEASE Spring XD 367
Appendix F. Modules-Project-Migration
F.1 Introduction
With the release of Spring XD 1.1.0, creating and deploying a module has been greatly simplified.Features such as simplified pom (using the spring-xd-module-parent) or simplified build.gradle (using thespring-xd-module plugin) mean simpler dependency management and smaller build scripts to manage.Another new feature is that a user can execute the module upload command via the XD shell to register acustom module on the fly, vs. having to copy it to the modules subdirectory. The purpose of this appendixis to show how to upgrade an the existing 1.0.x style module project to a 1.1.0 style module project.
Note
If you are currently using the 1.0.x style of deploying modules, the format of deployment is stillsupported by 1.1.0.
Updating your Maven Project
Cleaning up
If you are using an assembly file for your POM, go ahead and remove it now. For example (From yourproject directory):
rm -rf src/assembly
Updating your POM file
Since we are using the XD Module Parent you can remove any XD dependencies as well as someof the boiler plate configurations. For example we can take the following pom.xml from a 1.0.x stylemodule project:

Spring XD Guide
1.3.2.RELEASE Spring XD 368
<?xml version="1.0" encoding="UTF-8"?>
<project xsi:schemaLocation="http://maven.apache.org/POM/4.0.0 http://maven.apache.org/xsd/
maven-4.0.0.xsd" xmlns="http://maven.apache.org/POM/4.0.0"
xmlns:xsi="http://www.w3.org/2001/XMLSchema-instance">
<modelVersion>4.0.0</modelVersion>
<groupId>org.springframework.xd.samples</groupId>
<artifactId>payload-conversion</artifactId>
<version>1.0.0.BUILD-SNAPSHOT</version>
<name>Spring XD Sample - Payload type conversion example with a custom module</name>
<packaging>jar</packaging>
<prerequisites>
<maven>2.2.1</maven>
</prerequisites>
<parent>
<groupId>io.spring.platform</groupId>
<artifactId>platform-bom</artifactId>
<version>1.0.1.RELEASE</version>
<relativePath/>
</parent>
<properties>
<project.build.sourceEncoding>UTF-8</project.build.sourceEncoding>
<spring.xd.version>1.1.0.RELEASE</spring.xd.version>
</properties>
<repositories>
<repository>
<id>spring-milestone</id>
<url>http://repo.springsource.org/libs-milestone</url>
</repository>
<repository>
<id>spring-release</id>
<url>http://repo.springsource.org/libs-milestone</url>
</repository>
</repositories>
<dependencies>
<dependency>
<groupId>org.springframework.xd</groupId>
<artifactId>spring-xd-tuple</artifactId>
<version>${spring.xd.version}</version>
<scope>compile</scope>
</dependency>
</dependencies>
<build>
<plugins>
<plugin>
<artifactId>maven-assembly-plugin</artifactId>
<version>2.4</version>
<configuration>
<descriptors>
<descriptor>src/main/assembly/assembly.xml</descriptor>
</descriptors>
</configuration>
</plugin>
</plugins>
</build>
</project>
and now replace it with a pom.xml that uses spring-xd-module-parent.

Spring XD Guide
1.3.2.RELEASE Spring XD 369
<?xml version="1.0" encoding="UTF-8"?>
<project xsi:schemaLocation="http://maven.apache.org/POM/4.0.0 http://maven.apache.org/xsd/
maven-4.0.0.xsd" xmlns="http://maven.apache.org/POM/4.0.0"
xmlns:xsi="http://www.w3.org/2001/XMLSchema-instance">
<modelVersion>4.0.0</modelVersion>
<groupId>org.springframework.xd.samples</groupId>
<artifactId>payload-conversion</artifactId>
<version>1.0.0.BUILD-SNAPSHOT</version>
<name>Spring XD Sample - Payload type conversion example with a custom module</name>
<parent>
<groupId>org.springframework.xd</groupId>
<artifactId>spring-xd-module-parent</artifactId>
<version>1.1.0.RELEASE</version>
</parent>
<repositories>
<repository>
<id>spring-io-release</id>
<url>http://repo.spring.io/release</url>
</repository>
<repository>
<id>jcenter</id>
<url>http://jcenter.bintray.com</url>
</repository>
</repositories>
</project>
If there is a dependency that your project needs and is not included in the XD dependencies you canadd the dependencies as you normally would. For example if we needed the feed adapter from SpringIntegration for a source module, we would need to add the following to our pom.xml file:
<dependencies>
<dependency>
<groupId>org.springframework.integration</groupId>
<artifactId>spring-integration-feed</artifactId>
<version>4.1.2.RELEASE</version>
</dependency>
</dependencies>
Updating your Gradle Project
Since we can now use the spring-xd-module plugin you can remove any XD dependencies from thebuild.gradle. For example we can take the following build.gradle from a 1.0.x style module project:

Spring XD Guide
1.3.2.RELEASE Spring XD 370
apply plugin: 'java'
apply plugin: 'eclipse'
apply plugin: 'idea'
apply plugin: 'io.spring.dependency-management'
repositories{
maven { url 'http://repo.spring.io/libs-milestone' }
}
dependencyManagement {
imports {
mavenBom 'io.spring.platform:platform-bom:1.0.1.RELEASE'
}
}
ext {
springXdVersion ='1.1.0.RELEASE'
}
dependencies{
compile "org.springframework.xd:spring-xd-tuple:$springXdVersion"
runtime "org.slf4j:jcl-over-slf4j"
runtime "org.slf4j:slf4j-log4j12"
runtime "log4j:log4j"
testCompile "junit:junit"
}
task dist(type: Copy) {
destinationDir = file("${buildDir}")
from { project.jar } {
into 'dist/modules/processor/myTupleProcessor/lib/'
}
from { 'modules/' } {
into 'dist/modules'
}
}
buildscript {
repositories {
maven { url 'http://repo.spring.io/plugins-snapshot'}
}
dependencies {
classpath 'io.spring.gradle:dependency-management-plugin:0.1.0.RELEASE'
}
}
task wrapper(type: Wrapper) {
description = 'Generates gradlew[.bat] scripts'
gradleVersion = '1.11'
}
and replace it with the a build.gradle that uses the spring-xd-module plugin.

Spring XD Guide
1.3.2.RELEASE Spring XD 371
buildscript {
repositories {
maven { url "http://repo.spring.io/plugins-snapshot" }
maven { url "http://repo.spring.io/release" }
jcenter()
maven { url "http://repo.spring.io/snapshot" }
maven { url "http://repo.spring.io/milestone" }
}
dependencies {
classpath("org.springframework.xd:spring-xd-module-plugin:1.1.0.RELEASE")
}
}
ext {
springXdVersion = '1.1.0.RELEASE'
springIntegrationVersion = '4.1.2.RELEASE'
}
apply plugin: 'java'
apply plugin: 'eclipse'
apply plugin: 'idea'
apply plugin: 'spring-xd-module'
task wrapper(type: Wrapper) {
gradleVersion = '1.12'
}
group = 'org.springframework.xd.samples'
version = '1.0.0.BUILD-SNAPSHOT'
description = "Spring XD processor module "
sourceCompatibility = 1.7
targetCompatibility = 1.7
repositories {
maven { url "http://repo.spring.io/release" }
mavenCentral()
jcenter()
maven { url "http://repo.spring.io/snapshot" }
maven { url "http://repo.spring.io/milestone" }
}
If there is a dependency that your project needs and is not included in the XD dependencies you canadd the dependencies as you normally would. For example if we needed the feed adapter from SpringIntegration for a source module, we would need to add the following to our build.gradle file:
dependencies {
compile "org.springframework.integration:spring-integration-feed:$springIntegrationVersion"
}
Building the Module Project
Maven
mvn clean package
Gradle
./gradlew clean test bootRepackage
Updating Configurations
Within your project the bean definition and property files in your resources directory will need to bemoved to the resources/config directory. i.e.

Spring XD Guide
1.3.2.RELEASE Spring XD 372
mkdir src/resources/config
mv src/resources/module.xml src/resources/config
mv src/resources/module.properties src/resources/config
If you have more than one bean definition file you will need to consolidate it to one bean definitionfile. You may import other bean definition files, but only the main one can be in the top level configdirectory. The same applies if you have more than one properties file, you will need to consolidate themto one properties file.
Registering the module
In XD 1.1.x there is no need for explicit copying of your module into the modules directory. You canregister your module from the XD Shell by executing the module upload command as shown below:
xd:>module upload --file [path-to]/payload-conversion-1.0.0.BUILD-SNAPSHOT.jar --name mymodule --type
processor
The example above will upload the payload-conversion-1.0.0.BUILD-SNAPSHOT.jar that was createdafter building the project. The module will be placed in the ${xd.customModule.home}/processor/mymodule subdirectory. To verify that the module was successfully registered, in the shell execute amodule info type:module_name command. For example:
xd:>module info processor:mymodule
Information about processor module 'mymodule':
Option Name Description Default Type
----------- ----------------------------------------------------- ------- --------
outputType how this module should emit messages it produces <none> MimeType
inputType how this module should interpret messages it consumes <none> MimeType
Note
The uploaded module will be deployed to the xd.customModule.home directory of the adminserver. If the XD deployment has containers that are not on the same machine as the adminserver, you’ll need to use a shared filesystem or a replicating registry, as documented here.
To do a deeper dive on Module Project Development refer to Creating a Module Project

Spring XD Guide
1.3.2.RELEASE Spring XD 373
Appendix G. Composed JobsSpring XD provides a DSL for creating a batch job as a directed graph of other jobs. This type of job isreferred to as a composed job. Much like the DSL for creating stream definitions, the DSL for composedjobs uses Unix style conventions such as the ampersand & and double pipe || symbols.
G.1 DSL Components
The DSL for the composed jobs is used when creating a job definition via the job create command.Note that jobs referenced by the DSL must be defined and deployed prior to launching the composedjob. For example:
xd:> job create batch_simple_def --definition "batch_simple_module" --deploy
xd:> job create batch_basic_def --definition "batch_basic_module" --deploy
xd:> job create testjob --definition "batch_simple_def || batch_basic_def" --deploy
xd:> job launch testjob
Conditional Execution
Conditional execution is expressed using a double pipe symbol ||. This allows each job in the sequenceto be launched only if the previous job successfully completed. For Example:
job create testjob --definition "batch_simple_def || batch_basic_def"

Spring XD Guide
1.3.2.RELEASE Spring XD 374
Figure G.1. Simple conditional execution
When the composed job testjob is launched, it will launch the job batch_simple_def and if itcompletes successfully, then the job batch_basic_def will be launched. If the batch_simple_defjobs fails, then the job batch_basic_def will not launch.
Transitions
The DSL supports fine grained control over the transitions taken during the execution of the directedgraph. Transitions are specified by providing a condition for equality based on the exit value of the

Spring XD Guide
1.3.2.RELEASE Spring XD 375
previous job. A job transition is represented by the pipe symbol |. Note, this is loosely derived frompattern matching syntax used in F#. For example:
job create testjob --definition "aaa | FAILED=bbb | SUCCESS=ccc || ddd"
Figure G.2. Simple transition example
In the example above aaa would launch and if it had an exit status of FAILED, then the bbb job wouldlaunch. If the exit status of aaa was SUCCESS then ccc would launch. All other statuses returned byaaa would launch ddd.
Another type of transition that can be specified uses * to represent wildcard matching. This means thatany exit status that is not specifically enumerated by a transition for the current job, the job associatedwith the * will be launched. ie.
job create testjob --definition "aaa | FAILED=bbb | SUCCESS=ccc || ddd | BAD=eee | '*' = fff"

Spring XD Guide
1.3.2.RELEASE Spring XD 376
Figure G.3. Global transition example
In the example above, if an exit status of ddd is BAD then the eee job will launch but all other exit status’swould launch the fff job.
Keywords
The DSL for composed jobs provides two keywords for transitions where the target of the transition isnot another job.
• $END - will either terminate the job composition or if used in a split, will terminate the flow within thespecific split.
• $FAIL - will set the status for the composed job to fail and terminate the job composition.
For example
job create testjob --definition "aaa | SUCCESS=ccc | '*' = $END"

Spring XD Guide
1.3.2.RELEASE Spring XD 377
Figure G.4. Example usage of END keyword

Spring XD Guide
1.3.2.RELEASE Spring XD 378
Will launch the ccc job if the exit status of aaa is SUCCESS but otherwise will end the entire testjobexecution successfully.
job create testjob --definition "aaa | SUCCESS=ccc | '*' = $FAIL"

Spring XD Guide
1.3.2.RELEASE Spring XD 379
Figure G.5. Example usage of FAIL keyword

Spring XD Guide
1.3.2.RELEASE Spring XD 380
Will launch the ccc job if the exit status of aaa is SUCCESS but otherwise will fail the entire testjobexecution.
Split
Splits allow for multiple jobs within a composed job to be run in parallel. It is denoted by using anglebrackets <> to group jobs and flows that are to be run in parallel. These jobs and flows are separatedby the ampersand & character. For example:
job create testjob --definition "<aaa & bbb & ccc>"
Figure G.6. Simple split example
The example above will launch jobs aaa, bbb and ccc in parallel. With the job composition DSL a usermay also execute multiple split groups in succession. For example:
job create testjob --definition "<aaa & bbb & ccc> || <ddd & eee & fff>"

Spring XD Guide
1.3.2.RELEASE Spring XD 381
Figure G.7. Composition of splits
In the example above jobs aaa, bbb and ccc will be launched in parallel, once they all complete thenjobs ddd, eee and fff will be launched in parallel. Once they complete the composed job will end.
Parenthesis
Supports the ability to launch conditional jobs within a split, for example:
job create testjob --definition "<(aaa || bbb || ccc) & ddd & eee> || fff"

Spring XD Guide
1.3.2.RELEASE Spring XD 382
Figure G.8. Split with paranthesis

Spring XD Guide
1.3.2.RELEASE Spring XD 383
In this example the jobs aaa, bbb, and ccc will be launched in succession at the same time that jobsddd and eee are launched in parallel. Once all of the jobs are complete within the angle brackets jobfff will be launched.
G.2 Composed Job Parameters
Composed jobs currently supports the timeout parameter which establishes the amount oftime in milliseconds a job can execute within the job composition before the XD throws anUnexpectedJobExecutionException. The default is -1 which means no timeout. An exampleusing the timeout is as follows:
job create testjob --definition "aaa || bbb --timeout=5000"

Spring XD Guide
1.3.2.RELEASE Spring XD 384
Figure G.9. Composed jobs with parameters

Spring XD Guide
1.3.2.RELEASE Spring XD 385
The timeout parameter affects all the jobs within the job composition. All parameters for aaa and bbbmust have been previously specified in their own job definitions.
G.3 Considerations
While Spring XD comes with HSQLDB as the default database for the job repository’s datastore, usersmay see concurrency issues using it on jobs that heavily use the split paradigm. Using a productionsupported database (Postgres, etc) is recommended for this type of functionality.