snapmanager 3.4.1 for sap administration guide for unix
TRANSCRIPT

Contents
Product overview ........................................................................................ 11Create backups using Snapshot copies ...................................................................... 11
Why you should prune archive log files .................................................................... 12
Archive log consolidation ......................................................................................... 12
Full or partial restoration of databases ...................................................................... 12
Verify backup status .................................................................................................. 13
Database backup clones ............................................................................................ 13
Track details and produce reports ............................................................................. 13
What repositories are ................................................................................................. 13
What profiles are ....................................................................................................... 14
What SnapManager operation states are ................................................................... 15
How SnapManager maintains security ...................................................................... 16
Accessing and printing online Help .......................................................................... 17
Recommended general database layouts and storage configurations ....................... 18
Defining the database home with the oratab file ........................................... 19
Requirements for using RAC databases with SnapManager ......................... 19
Supported partition devices ........................................................................... 20
Requirements for using databases with NFS and SnapManager ................... 20
Sample database volume layouts ................................................................... 21
Limitations when working with SnapManager ......................................................... 21
SnapManager limitations for clustered Data ONTAP ................................... 26
Limitations related to Oracle Database ......................................................... 26
Volume management restrictions .................................................................. 27
Configuring SnapManager ........................................................................ 28SnapManager configuration parameters .................................................................... 28
Editing the configuration parameters ............................................................ 34
Configuring SnapDrive for UNIX for an active/active Veritas SFRAC
environment ......................................................................................................... 34
Configuring SnapManager to support the Veritas SFRAC environment .................. 35
Security and credential management ....................................................... 36What user authentication is ....................................................................................... 36
About role-based access control ................................................................................ 37
Enabling role-based access control ............................................................... 38
Setting role-based access control capabilities and roles ................................ 39
Storing encrypted passwords for custom scripts ....................................................... 42
Authorizing access to the repository ......................................................................... 42
Authorizing access to profiles ................................................................................... 42
Viewing user credentials ........................................................................................... 43
Clearing user credentials for all hosts, repositories, and profiles .............................. 43
Setting credentials after clearing the credential cache .................................. 44
Deleting credentials for individual resources ............................................................ 44
Table of Contents | 3
Deleting user credentials for repositories ...................................................... 45
Deleting user credentials for hosts ................................................................ 45
Deleting user credentials for profiles ............................................................ 45
Managing profiles for efficient backups ................................................... 46Creating profiles ........................................................................................................ 47
Snapshot copy naming .............................................................................................. 52
Renaming profiles ..................................................................................................... 53
Changing profile passwords ...................................................................................... 54
Resetting the profile password .................................................................................. 54
Authorizing access to profiles ................................................................................... 55
Verifying profiles ....................................................................................................... 55
Updating profiles ....................................................................................................... 55
Deleting profiles ........................................................................................................ 58
Backing up databases ................................................................................. 60What SnapManager database backups are ................................................................ 61
What full and partial backups are .............................................................................. 62
Backup types and the number of Snapshot copies ........................................ 62
Full online backups ....................................................................................... 63
Partial online backups ................................................................................... 64
Examples of backup, restore, and recover operations ................................... 64
About control file and archive log file handling ........................................................ 66
What database backup scheduling is ......................................................................... 67
Creating database backups ........................................................................................ 70
Pruning archive log files ................................................................................ 76
Consolidating archive log backups ................................................................ 78
Scheduling archive log file pruning .............................................................. 78
Protecting archive log backups ...................................................................... 79
What AutoSupport is ................................................................................................. 80
Adding storage systems operating in clustered Data ONTAP to the
SnapManager server host ......................................................................... 80
Enabling AutoSupport in SnapManager ....................................................... 81
Disabling AutoSupport in SnapManager ...................................................... 81
Verifying database backups ....................................................................................... 82
Changing the backup retention policy ....................................................................... 82
Retaining backups forever ............................................................................. 82
Assigning backups with a specific retention class ........................................ 83
Changing the retention policy default behavior ............................................ 83
Freeing or deleting retention policy exempt backups ................................... 83
Viewing a list of backups .......................................................................................... 84
Viewing backup details ............................................................................................. 84
Mounting backups ..................................................................................................... 86
Unmounting backups ................................................................................................. 86
Freeing backups ......................................................................................................... 87
Deleting backups ....................................................................................................... 88
Scheduling database backups .................................................................... 90
4 | Administration Guide for UNIX
Creating backup schedules ........................................................................................ 90
Updating a backup schedule ...................................................................................... 92
Viewing a list of scheduled operations ...................................................................... 93
Suspending backup schedules ................................................................................... 93
Resuming backup schedules ...................................................................................... 93
Deleting backup schedules ........................................................................................ 93
Restoring database backups ...................................................................... 95What database restore is ............................................................................................ 95
Guidelines for when you can use fast restore ................................................ 98
Fast restore eligibility checks ...................................................................... 100
Backup recovery .......................................................................................... 105
Database state needed for the restore process ............................................. 106
What restore preview plans are ................................................................... 106
Previewing backup restore information ................................................................... 108
Restoring backups by using fast restore .................................................................. 109
Restoring backups by using Single File SnapRestore ............................................. 110
Restoring backups on primary storage .................................................................... 111
Restore files from an alternate location ................................................................... 115
Restore backups from an alternate location overview ................................. 115
Creating restore specifications .................................................................... 116
Restoring backups from an alternate location ............................................. 118
Cloning database backup ......................................................................... 119What Cloning is ....................................................................................................... 119
Cloning methods ..................................................................................................... 120
Creating clone specifications ................................................................................... 121
Cloning databases and using custom plug-in scripts ................................... 125
Cloning databases from backups ............................................................................. 126
Cloning databases in the current state ..................................................................... 127
Cloning database backups without resetlogs ........................................................... 127
Considerations for cloning a database to an alternate host ..................................... 128
Cloning a database to an alternate host ....................................................... 129
Viewing a list of clones ........................................................................................... 130
Viewing detailed clone information ........................................................................ 130
Deleting clones ........................................................................................................ 131
Splitting a clone ....................................................................................................... 132
Viewing a clone split estimate ..................................................................... 132
Splitting a clone on primary or secondary storage ...................................... 133
Viewing the status of the clone split process ............................................... 134
Viewing the result of the clone split process ............................................... 134
Stopping the clone split process .................................................................. 134
Deleting a profile ......................................................................................... 135
Destroying a profile ..................................................................................... 135
Deleting a clone split operation cycle from a repository database .............. 135
Introduction to data protection in SnapManager ................................. 136What protection policies are .................................................................................... 136
Table of Contents | 5
What protection states are ....................................................................................... 137
What resource pools are .......................................................................................... 137
About different protection policies .......................................................................... 138
Configuring and enabling policy-driven data protection ......................................... 139
Configuring DataFabric Manager server and SnapDrive when RBAC is
enabled ................................................................................................... 139
Configuring SnapDrive when RBAC is not enabled ................................... 140
Understanding enabling or disabling of data protection in profile .............. 141
How SnapManager retains backups on the local storage ........................................ 142
Considerations for performing data protection ....................................................... 144
Licences required for data protection in SnapManager .............................. 145
Protecting database backups on secondary or tertiary storage ................................ 146
Restoring protected backups from secondary storage ............................................. 147
Restores of protected backups overview ..................................................... 148
Restoring backups from secondary storage ................................................. 149
Cloning protected backups ...................................................................................... 150
SnapManager for SAP uses Protection Manager to protect adatabase backup .................................................................................. 151
Details of the target database ................................................................................... 151
Primary and secondary storage configuration and topology ................................... 151
Backup schedule and retention strategy .................................................................. 155
Workflow summary for local and secondary database backup ............................... 155
Protected backup configuration and execution ........................................................ 156
Using SnapManager for SAP to create the database profile for a local
backup .................................................................................................... 156
Using Protection Manager to configure a secondary resource pool ............ 158
Using Protection Manager to configure secondary backup schedules ........ 158
Using Protection Manager to configure a secondary backup protection
policy ..................................................................................................... 160
Using SnapManager for SAP to create the database profile and assign a
protection policy .................................................................................... 161
Using Protection Manager to provision the new dataset ............................. 163
Using SnapManager for SAP to create a protected backup ........................ 163
Using SnapManager for SAP to confirm backup protection ....................... 164
Database restoration from backup ........................................................................... 165
Using SnapManager for SAP to restore a local backup on primary
storage .................................................................................................... 165
Using SnapManager for SAP to restore backups from secondary storage . 166
Performing management operations ...................................................... 167Viewing a list of operations ..................................................................................... 167
Viewing operation details ........................................................................................ 167
Issuing commands from an alternate host ............................................................... 168
Checking the SnapManager software version ......................................................... 168
Stopping the SnapManager host server ................................................................... 168
Restarting the SnapManager UNIX host server ...................................................... 169
6 | Administration Guide for UNIX
Uninstalling the software from a UNIX host .......................................................... 169
Configuring notification ........................................................................... 170Configuring a mail server for a repository .............................................................. 171
Configuring email notification for a new profile ..................................................... 172
Customizing the email subject for a new profile ......................................... 173
Configuring email notification for an existing profile ............................................ 174
Customizing the email subject for an existing profile ................................. 175
Configuring summary email notification for multiple profiles ............................... 175
Adding a new profile to summary email notifications ............................................ 176
Adding an existing profile to summary email notifications .................................... 177
Disabling email notification for multiple profiles ................................................... 177
Creating task specification file and scripts for SnapManageroperations ............................................................................................. 178
Creating pretask, post-task, and policy scripts ........................................................ 179
Operations in task scripts ............................................................................ 182
Variables available in the task scripts for the backup operation .................. 183
Variables available in the task scripts for the restore operation .................. 185
Variables available in the task scripts for clone operation .......................... 186
Error handling in custom scripts ................................................................. 187
Viewing sample plug-in scripts ............................................................................... 187
Creating task scripts ................................................................................................ 190
Storing the task scripts ............................................................................................ 191
Verifying the installation of plug-in scripts ............................................................. 192
Creating a task specification file ............................................................................. 192
Performing backup, restore, and clone operations using prescript and post-
scripts ................................................................................................................. 194
Updating storage system name and target database host nameassociated with a profile ...................................................................... 196
Updating the storage system name associated with a profile .................................. 196
Viewing a list of storage systems associated with a profile .................................... 197
Updating the target database host name associated with a profile .......................... 198
Maintaining history of SnapManager operations ................................. 200Configuring history for backup operation ............................................................... 200
Viewing a list of SnapManager operation history ................................................... 201
Viewing the detailed history of a specific operation associated with a profile ....... 201
Deleting history of SnapManager operation ........................................................... 201
Removing history settings associated with a single profile or multiple profiles ..... 202
Viewing SnapManager history configuration details .............................................. 202
Using BR*Tools with SnapManager for SAP ........................................ 203What BR*Tools are ................................................................................................. 203
Disabling client access to Snapshot copies ............................................................. 205
Profile usage for BR*Tools backups ....................................................................... 206
Database backups created using BRBACKUP and BRARCHIVE ......................... 208
Scheduling backups with SAP transaction DB13 ................................................... 209
Database restore by using BRRESTORE and BRRECOVER ................................ 210
Table of Contents | 7
Backing up and restoring files using BR*Tools ...................................................... 210
Restoring a backup to a different host ..................................................................... 210
Restoring a backup from a secondary storage to a different location ..................... 211
SnapManager for SAP command reference .......................................... 212The backint register-sld command .......................................................................... 212
The smsap_server restart command ........................................................................ 213
The smsap_server start command ........................................................................... 214
The smsap_server status command ......................................................................... 214
The smsap_server stop command ........................................................................... 215
The smsap backup create command ........................................................................ 215
The smsap backup delete command ........................................................................ 219
The smsap backup free command ........................................................................... 220
The smsap backup list command ............................................................................ 221
The smsap backup mount command ....................................................................... 222
The smsap backup restore command ...................................................................... 224
The smsap backup show command ......................................................................... 228
The smsap backup unmount command ................................................................... 229
The smsap backup update command ....................................................................... 230
The smsap backup verify command ........................................................................ 231
The smsap clone create command ........................................................................... 232
The smsap clone delete command ........................................................................... 235
The smsap clone list command ............................................................................... 236
The smsap clone show command ............................................................................ 237
The smsap clone template command ...................................................................... 239
The smsap clone update command .......................................................................... 240
The smsap clone split-delete command .................................................................. 240
The smsap clone split-estimate command ............................................................... 241
The smsap clone split command ............................................................................. 242
The smsap clone split-result command ................................................................... 245
The smsap clone split-stop command ..................................................................... 246
The smsap clone split-status command ................................................................... 247
The smsap clone detach command .......................................................................... 247
The smsap cmdfile command .................................................................................. 248
The smsap credential clear command ..................................................................... 249
The smsap credential delete command .................................................................... 249
The smsap credential list command ........................................................................ 251
The smsap credential set command ......................................................................... 251
The smsap history list command ............................................................................. 253
The smsap history operation-show command ......................................................... 254
The smsap history purge command ......................................................................... 255
The smsap history remove command ...................................................................... 256
The smsap history set command ............................................................................. 257
The smsap history show command ......................................................................... 258
The smsap help command ....................................................................................... 259
The smsap notification remove-summary-notification command ........................... 260
8 | Administration Guide for UNIX
The smsap notification update-summary-notification command ............................ 261
The smsap notification set command ...................................................................... 262
The smsap operation dump command ..................................................................... 263
The smsap operation list command ......................................................................... 264
The smsap operation show command ..................................................................... 265
The smsap password reset command ...................................................................... 266
The smsap plugin check command ......................................................................... 267
The smsap profile create command ......................................................................... 268
The smsap profile delete command ......................................................................... 272
The smsap profile destroy command ....................................................................... 272
The smsap profile dump command ......................................................................... 273
The smsap profile list command ............................................................................. 274
The smsap profile show command .......................................................................... 275
The smsap profile sync command ........................................................................... 276
The smsap profile update command ........................................................................ 277
The smsap profile verify command ......................................................................... 281
The smsap protection-policy command .................................................................. 283
The smsap repository create command ................................................................... 283
The smsap repository delete command ................................................................... 285
The smsap repository rollback command ................................................................ 286
The smsap repository rollingupgrade command ..................................................... 287
The smsap repository show command .................................................................... 288
The smsap repository update command .................................................................. 289
The smsap schedule create command ..................................................................... 290
The smsap schedule delete command ..................................................................... 294
The smsap schedule list command .......................................................................... 294
The smsap schedule resume command ................................................................... 294
The smsap schedule suspend command .................................................................. 295
The smsap schedule update command .................................................................... 295
The smsap storage list command ............................................................................ 296
The smsap storage rename command ...................................................................... 297
The smsap system dump command ......................................................................... 298
The smsap system verify command ........................................................................ 298
The smsap version command .................................................................................. 299
Troubleshooting SnapManager ............................................................... 300Dump files ............................................................................................................... 305
Creating operation-level dump files ............................................................ 307
Creating profile-level dump files ................................................................. 307
Creating system-level dump files ................................................................ 308
How to locate dump files ............................................................................. 308
How to collect dump files ........................................................................... 309
Collecting additional log information for easier debugging ....................... 309
Troubleshooting clone issues .................................................................................. 310
Troubleshooting graphical user interface issues ..................................................... 313
Troubleshooting SnapDrive issues .......................................................................... 318
Table of Contents | 9
Troubleshooting storage system renaming issue ..................................................... 319
Troubleshooting known issues ................................................................................ 320
Mounting a FlexClone volume fails in NFS environment ...................................... 326
Running multiple parallel operations fails in SnapManager ................................... 326
Where to go for more information .......................................................................... 327
Error message classifications ................................................................... 328Error messages ......................................................................................... 329Copyright information ............................................................................. 350Trademark information ........................................................................... 351How to send comments about documentation and receive update
notifications .......................................................................................... 352Index ........................................................................................................... 353
10 | Administration Guide for UNIX

Product overview
SnapManager for SAP automates and simplifies the complex, manual, and time-consuming processesassociated with the backup, recovery, and cloning of databases. You can use SnapManager withONTAP SnapMirror technology to create copies of backups on another volume and with ONTAPSnapVault technology to archive backups efficiently to disk.
SnapManager provides the tools required, such as OnCommand Unified Manager and integrationwith SAP's BR* Tools, to perform policy-driven data management, schedule and create regulardatabase backups, and restore data from these backups in the event of data loss or disaster.
SnapManager also integrates with native Oracle technologies, such as Oracle Real ApplicationClusters (Oracle RAC) and Oracle Recovery Manager (RMAN) to preserve backup information.These backups can be used later in block-level restore or tablespace point-in-time recoveryoperations.
SnapManager highlights
SnapManager features seamless integration with databases on the UNIX host and with Snapshot,SnapRestore, and FlexClone technologies on the back end. It offers an easy-to-use user interface (UI)as well as command-line interface (CLI) for administrative functions.
SnapManager enables you to perform the following database operations and manage data efficiently:
• Creating space-efficient backups on primary or secondary storageSnapManager enables you to back up the data files and archive log files separately.
• Scheduling backups
• Restoring full or partial databases by using a file-based or volume-based restore operation
• Recovering databases by discovering, mounting, and applying archive log files from backups
• Pruning archive log files from archive log destinations when creating backups of only the archivelogs
• Retaining a minimum number of archive log backups automatically by retaining only the backupsthat contain unique archive log files
• Tracking operation details and generating reports
• Verifying backups to ensure that backups are in a valid block format and that none of the backed-up files are corrupted
• Maintaining a history of operations performed on the database profileA profile contains information about the database to be managed by SnapManager.
• Creating space-efficient clones of backups on primary or secondary storageSnapManager enables you to split a clone of a database.
Create backups using Snapshot copiesSnapManager enables you to create backups on the primary (local) storage and also on the secondary(remote) storage using protection policies or postprocessing scripts.
Backups created as Snapshot copies are virtual copies of the database and are stored in the samephysical medium as the database. Therefore, the backup operation takes less time and requiressignificantly less space than full, disk-to-disk backups. SnapManager enables you to back up thefollowing:
11
• All the data files, archive log files, and control files
• Selected data files or tablespaces, all the archive log files, and control files
SnapManager 3.2 or later enables you to optionally back up the following:
• All the data files and the control files
• Selected data files or tablespaces along with the control files
• Archive log files
Note: The data files, archive log files, and control files can be located on different storage systems,storage system volumes, or logical unit numbers (LUNs). You can also use SnapManager to backup a database when there are multiple databases on the same volume or LUN.
Why you should prune archive log filesSnapManager for SAP enables you to delete archive log files from the active file system that arealready backed up.
Pruning enables SnapManager to create backups of distinct archive log files. Pruning, along with thebackup retention policy, frees archive log space when backups are purged.
Note: You cannot prune the archive log files when Flash Recovery Area (FRA) is enabled forarchive log files. If you specify the archive log location in Flash Recovery Area, you must ensurethat you also specify the archive log location in the archive_log_dest parameter.
Archive log consolidationSnapManager (3.2 or later) for SAP consolidates the archive log backups to maintain a minimumnumber of backups for archive log files. SnapManager for SAP identifies and frees the backups thatcontain archive logs files that are subsets of other backups.
Full or partial restoration of databasesSnapManager provides the flexibility to restore full databases, specific tablespaces, files, controlfiles, or a combination of these entities. SnapManager enables you to restore data by using a file-based restore process or a faster, volume-based restore process. Database administrators can selectthe process they want to use or let SnapManager decide which process is appropriate.
SnapManager enables database administrators (DBAs) to preview restore operations. The previewfeature enables DBAs to view each restore operation on a file-by-file basis.
DBAs can specify the level to which SnapManager restores and recovers information whenperforming restore operations. For example, DBAs can restore and recover data to specific points intime. The restore point can be a date and time or an Oracle System Change Number (SCN).
SnapManager (3.2 or later) enables you to restore and recover database backups automaticallywithout DBA intervention. You can use SnapManager to create archive log backups, and then usethose archive log backups to restore and recover the database backups. Even if the backup's archivelog files are managed in an external archive log location, you can specify that external location sothose archive logs can help recover the restored database.
12 | Administration Guide for UNIX
Verify backup statusSnapManager can confirm the integrity of the backup using standard Oracle backup verificationoperations.
Database administrators (DBAs) can perform the verification as part of the backup operation, or atanother time. DBAs can set the verify operation to occur during an off-peak time when the load onthe host servers is less, or during a scheduled maintenance window.
Database backup clonesSnapManager uses the FlexClone technology to create a writable, space-efficient clone of a databasebackup. You can modify a clone without changing the backup source.
You might want to clone databases to enable testing or upgrades in nonproduction environments. Youcan clone a database residing on primary or secondary storage. A clone can be located on the samehost or on a different host as the database.
FlexClone technology enables SnapManager to use Snapshot copies of the database to avoid creatingan entire physical, disk-to-disk copy. Snapshot copies require less creation time and take upsignificantly less space than physical copies.
See the Data ONTAP documentation for more information about FlexClone technology.
Related information
Data ONTAP documentation: mysupport.netapp.com/documentation/productsatoz/index.html
Track details and produce reportsSnapManager reduces the level of detail database administrators need to track the status of differentoperations by offering methods to monitor operations from a single interface.
After administrators specify which databases should be backed up, SnapManager automaticallyidentifies the database files for backup. SnapManager displays information about repositories, hosts,profiles, backups, and clones. You can monitor the operations on specific hosts or databases. You canalso identify the protected backups and determine whether backups are in process or scheduled tooccur.
What repositories areSnapManager organizes information into profiles, which are then associated with repositories.Profiles contain information about the database that is being managed, while the repository containsdata about the operations that are performed on profiles.
The repository records when a backup took place, which files were backed up, and whether a clonewas created from the backup. When database administrators restore a database or recover a portion ofit, SnapManager queries the repository to determine what was backed up.
Because the repository stores the names of the database Snapshot copies created during backupoperations, the repository database cannot exist in the same database and also cannot be a part of thesame database that SnapManager is backing up. You must have at least two databases (theSnapManager repository database and the target database being managed by SnapManager) up andrunning when you execute SnapManager operations.
Product overview | 13

If you try to open the graphical user interface (GUI) when the repository database is down, thefollowing error message is logged in the sm_gui.log file: [WARN]: SMSAP-01106: Erroroccurred while querying the repository: No more data to read from socket.Also, SnapManager operations fail when the repository database is down. For more informationabout the different error messages, see Troubleshooting known issues.
You can use any valid host name, service name, or user name to perform operations. For a repositoryto support SnapManager operations, the repository user name and service name must consist of onlythe following characters: alphabetic characters (A-Z), digits (0-9), minus sign (-), underscore (_), andperiod (.).
The repository port can be any valid port number and the repository host name can be any valid hostname. The host name must consist of alphabetic characters (A-Z), digits (0-9), minus sign (-), andperiod (.), but not an underscore (_).
The repository must be created in an Oracle database. The database that SnapManager uses should beset up in accordance with Oracle procedures for database configuration.
A single repository can contain information about multiple profiles; however, each database isnormally associated with only one profile. You can have multiple repositories, with each repositorycontaining multiple profiles.
What profiles areSnapManager uses profiles to store the information necessary to perform operations on a givendatabase. A profile contains the information about the database including its credentials, backups,and clones. By creating a profile, you do not have to specify database details each time you performan operation on that database.
A profile can reference only one database. The same database can be referenced by more than oneprofile. Backups created using one profile cannot be accessed from a different profile, even if boththe profiles reference the same database.
Profile information is stored in a repository. The repository contains both the profile information forthe database and information about the Snapshot copies that serve as the database backup. The actualSnapshot copies are stored on the storage system. The Snapshot copy names are stored in therepository containing the profile for that database. When you perform an operation on a database,you must select the profile from the repository.
The following figure illustrates how repositories can hold multiple profiles, but also that each profilecan define only one database:
In the preceding example, Repository2 is on database DB1 and Repository1 is on the database DB4.
Each profile contains the credentials for the database associated with the profile. The credentialsenable SnapManager to connect to and work with the database. The stored credentials include the
14 | Administration Guide for UNIX
user name and password pairs for accessing the host, the repository, the database, and the requiredconnection information if you are using Oracle Recovery Manager (RMAN).
You cannot access a backup that was created using one profile from a different profile, even if boththe profiles are associated with the same database. SnapManager places a lock on the database toprevent two incompatible operations from being performed simultaneously.
Profile for creating full and partial backups
You can create profiles to take full backups or partial backups.
The profiles that you specify to create the full and partial backups contain both the data files andarchive log files. SnapManager does not allow such profiles to separate the archive log backups fromthe data file backups. The full and partial backups are retained based on the existing backup retentionpolicies and protected based on the existing protection policies. You can schedule full and partialbackups based on the time and frequency that suits you.
Profiles for creating data files-only backups and archive log-only backups
SnapManager (3.2 or later) allows you to create profiles that take backups of the archive log filesseparately from the data files. After you use the profile to separate the backup types, you can createeither data files-only backups or archive log-only backups of the database. You can also create abackup containing both the data files and archive log files together.
The retention policy applies to all the database backups when the archive log backups are notseparated. After you separate the archive log backups, SnapManager allows you to specify differentretention durations and protection policies for the archive log backups.
Retention policy
SnapManager determines whether a backup should be retained by considering both the retentioncount (for example, 15 backups) and the retention duration (for example, 10 days of daily backups).A backup expires when its age exceeds the retention duration set for its retention class and thenumber of backups exceeds the retention count. For example, if the backup count is 15 (meaning thatSnapManager has taken 15 successful backups) and the duration requirement is set for 10 days ofdaily backups, the five oldest, successful, and eligible backups expire.
Archive log retention duration
After the archive log backups are separated, they are retained based on the archive log retentionduration. Archive log backups taken with data file backups are always retained along with those datafile backups, regardless of the archive log retention duration.
Related concepts
Managing profiles for efficient backups on page 46
What SnapManager operation states areSnapManager operations (backup, restore, and clone) can be in different states, with each stateindicating the progress of the operation.
Operationstate
Description
Succeeded The operation completed successfully.
Running The operation has started, but is not finished. For instance, a backup, which takes twominutes, is scheduled to occur at 11:00 a.m.. When you view the Schedule tab at11:01 a.m., the operation appears as Running.
Product overview | 15
Operationstate
Description
Nooperationfound
The schedule has not run or the last run backup was deleted.
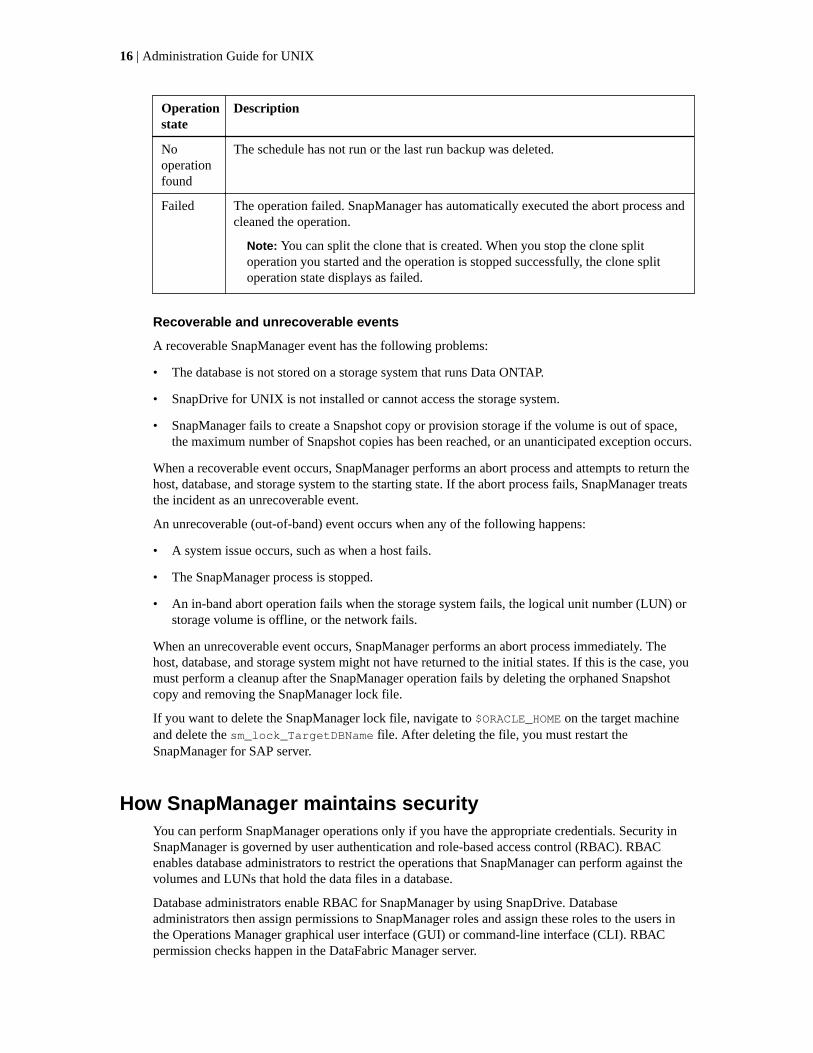
Failed The operation failed. SnapManager has automatically executed the abort process andcleaned the operation.
Note: You can split the clone that is created. When you stop the clone splitoperation you started and the operation is stopped successfully, the clone splitoperation state displays as failed.
Recoverable and unrecoverable events
A recoverable SnapManager event has the following problems:
• The database is not stored on a storage system that runs Data ONTAP.
• SnapDrive for UNIX is not installed or cannot access the storage system.
• SnapManager fails to create a Snapshot copy or provision storage if the volume is out of space,the maximum number of Snapshot copies has been reached, or an unanticipated exception occurs.
When a recoverable event occurs, SnapManager performs an abort process and attempts to return thehost, database, and storage system to the starting state. If the abort process fails, SnapManager treatsthe incident as an unrecoverable event.
An unrecoverable (out-of-band) event occurs when any of the following happens:
• A system issue occurs, such as when a host fails.
• The SnapManager process is stopped.
• An in-band abort operation fails when the storage system fails, the logical unit number (LUN) orstorage volume is offline, or the network fails.
When an unrecoverable event occurs, SnapManager performs an abort process immediately. Thehost, database, and storage system might not have returned to the initial states. If this is the case, youmust perform a cleanup after the SnapManager operation fails by deleting the orphaned Snapshotcopy and removing the SnapManager lock file.
If you want to delete the SnapManager lock file, navigate to $ORACLE_HOME on the target machineand delete the sm_lock_TargetDBName file. After deleting the file, you must restart theSnapManager for SAP server.
How SnapManager maintains securityYou can perform SnapManager operations only if you have the appropriate credentials. Security inSnapManager is governed by user authentication and role-based access control (RBAC). RBACenables database administrators to restrict the operations that SnapManager can perform against thevolumes and LUNs that hold the data files in a database.
Database administrators enable RBAC for SnapManager by using SnapDrive. Databaseadministrators then assign permissions to SnapManager roles and assign these roles to the users inthe Operations Manager graphical user interface (GUI) or command-line interface (CLI). RBACpermission checks happen in the DataFabric Manager server.
16 | Administration Guide for UNIX
In addition to role-based access, SnapManager maintains security by requesting user authenticationthrough password prompts or by setting user credentials. An effective user is authenticated andauthorized with the SnapManager server.
SnapManager credentials and user authentication differ significantly from SnapManager 3.0:
• In SnapManager versions earlier than 3.0, you would set an arbitrary server password when youinstall SnapManager. Anyone who wants to use the SnapManager server would need theSnapManager server password. The SnapManager server password would need to be added to theuser credentials by using the smsap credential set -host command.
• In SnapManager (3.0 and later), the SnapManager server password has been replaced byindividual user operating system (OS) authentication. If you are not running the client from thesame server as the host, the SnapManager server performs the authentication by using your OSuser names and passwords. If you do not want to be prompted for your OS passwords, you cansave the data to your SnapManager user credentials cache by using the smsap credential set-host command.
Note: The smsap credential set -host command remembers your credentials when thehost.credentials.persist property in the smsap.config file is set to true.
Example
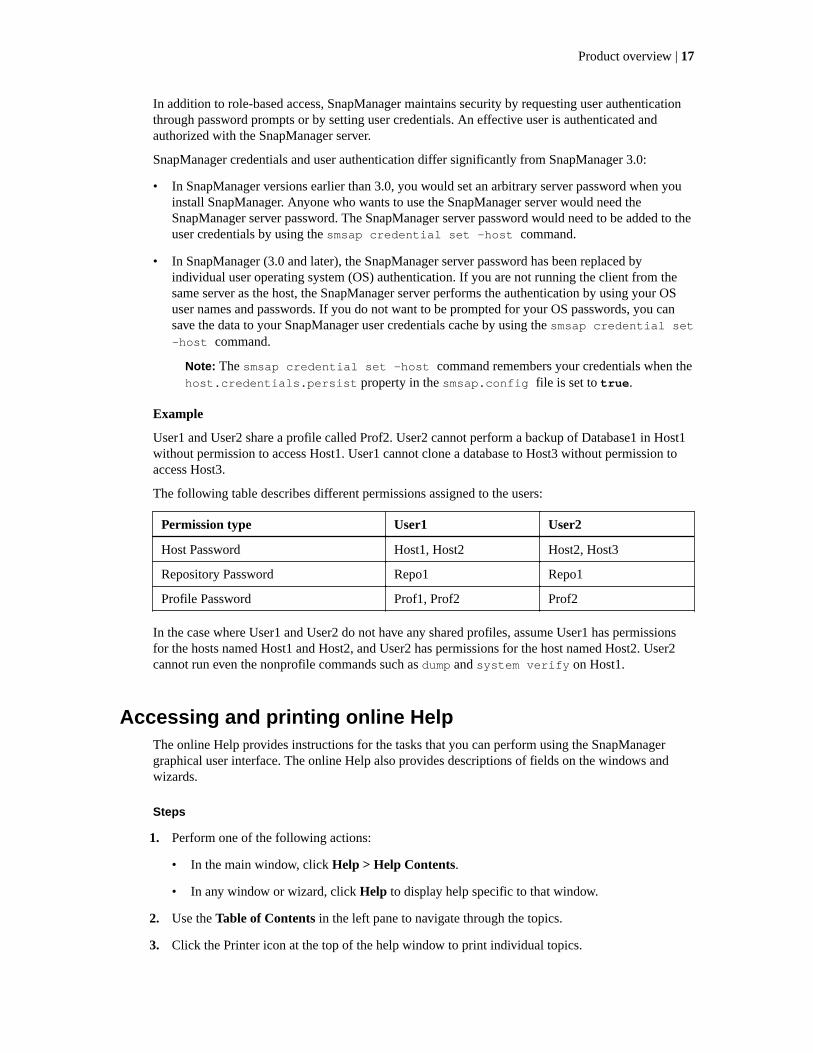
User1 and User2 share a profile called Prof2. User2 cannot perform a backup of Database1 in Host1without permission to access Host1. User1 cannot clone a database to Host3 without permission toaccess Host3.
The following table describes different permissions assigned to the users:
Permission type User1 User2
Host Password Host1, Host2 Host2, Host3
Repository Password Repo1 Repo1
Profile Password Prof1, Prof2 Prof2
In the case where User1 and User2 do not have any shared profiles, assume User1 has permissionsfor the hosts named Host1 and Host2, and User2 has permissions for the host named Host2. User2cannot run even the nonprofile commands such as dump and system verify on Host1.
Accessing and printing online HelpThe online Help provides instructions for the tasks that you can perform using the SnapManagergraphical user interface. The online Help also provides descriptions of fields on the windows andwizards.
Steps
1. Perform one of the following actions:
• In the main window, click Help > Help Contents.
• In any window or wizard, click Help to display help specific to that window.
2. Use the Table of Contents in the left pane to navigate through the topics.
3. Click the Printer icon at the top of the help window to print individual topics.
Product overview | 17
Recommended general database layouts and storageconfigurations
Knowing the recommended general database layouts and storage configurations can help you avoidissues related to disk groups, file types, and tablespaces.
• Do not include files from more than one type of SAN file system or volume manager in yourdatabase.
All files making up a database must reside on the same type of file system.
• SnapManager requires a multiple of 4K block size.
• Include the database system identifier in the oratab file.
Include an entry in the oratab file for each database to be managed. SnapManager relies on theoratab file to determine which Oracle home to use.
If you want to leverage the new volume-based restore or full disk group restore, consider thefollowing guidelines related to file systems and disk groups:
• A disk group containing data files cannot contain other types of files.
• The logical unit number (LUN) for the data file disk group must be the only object in the storagevolume.
The following are some guidelines for volume separation:
• Data files for only one database must be in the volume.
• You must use separate volumes for each of the following file classifications: database binaries,data files, online redo log files, archived redo log files, and control files.
• You do not need to create a separate volume for temporary database files because SnapManagerdoes not back up temporary database files.
SAP uses a standard layout for Oracle database installations. In this layout, SAP places copies of theOracle control file in E:\oracle\SID\origlogA, E:\oracle\SID\origlogB, and E:\oracle\SID\sapdata1 file systems.
The control file in the sapdata1 file system conflicts with the SnapManager requirements forseparating the control files and data files into separate volumes and must be adjusted to allow fastrestore capability.
Note: Because BR*Tools backups include the Oracle and SAP profiles located in the dbssubdirectory of the Oracle installation, the Oracle installation must be located on storage.
In the case of a new installation, you can modify the location of the control files by using SAPINSTand move the control file normally placed in the sapdata1 file system to a file system that does notreside in the same volume as the data files. (SAPINST is the tool that SAP provides for installingSAP systems.)
However, in the case of a system that has already been installed, you must move the control file fromthe file system to allow fast restore using SnapManager. You can do this by creating a new filesystem in a volume that does not contain data files, moving the control file to that file system, andthen creating a symbolic link from the previous file system to the directory for the new file system. Itis necessary to stop SAP and the Oracle database when moving the control file to avoid databaseerrors.
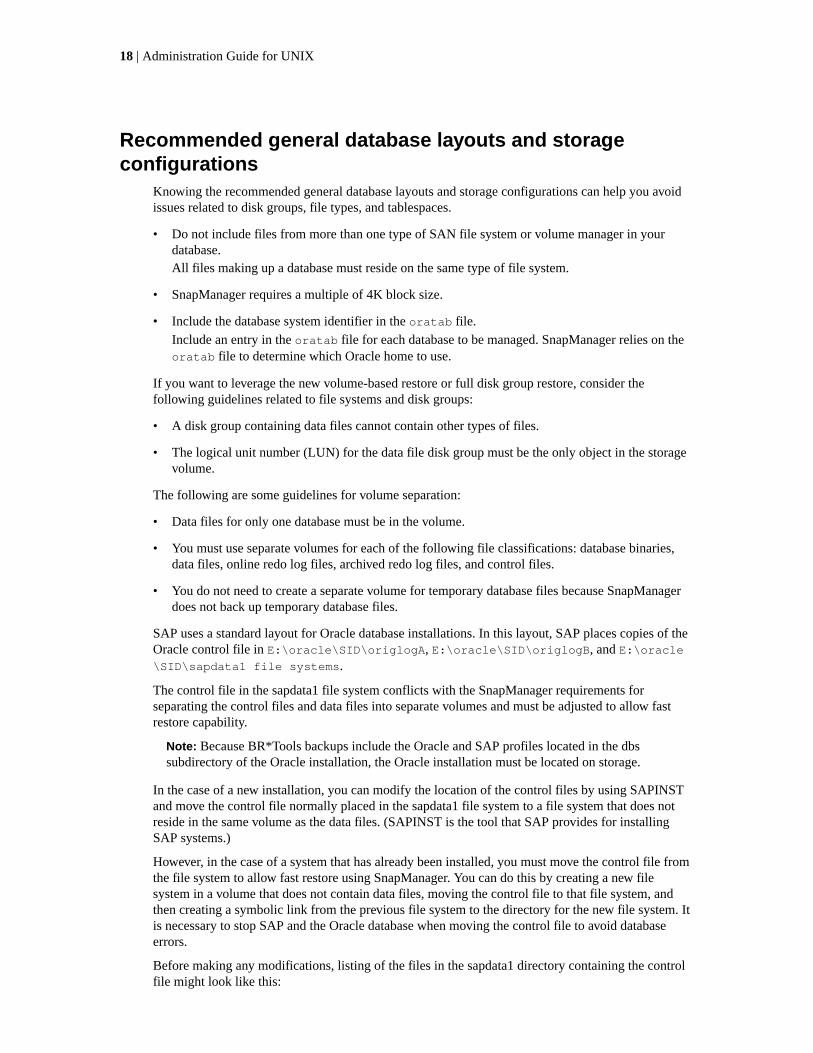
Before making any modifications, listing of the files in the sapdata1 directory containing the controlfile might look like this:
18 | Administration Guide for UNIX
hostname:/# ls -l /oracle/SID/sapdata1/cntrl-rw-r----- 1 orasid dba 9388032 Jun 19 01:51 cntrlSID.dbf
After the modification, the listing might look like this:
hostname:/# ls -sl /oracle/SID/sapdata1 0 lrwxrwxrwx 1 root root 19 2008-08-06 14:55 cntrl -> /oracle/SID/control0 -rw-r--r-- 1 root root 0 2008-08-06 14:57 data01.dbf
# ls -sl /oracle/SID/control0 -rw-r--r-- 1 root root 0 2008-08-06 14:56 cntrlSID.dbf
Defining the database home with the oratab file
SnapManager uses the oratab file during operations to determine the Oracle database homedirectory. An entry for your Oracle database must be in the oratab file for SnapManager to workcorrectly. The oratab file is created during the Oracle software installation.
About this task
Note: The Oracle home directory is set in the oratab file for SAP systems, just as it is for Oracle-only systems. SAP systems also have a database home directory, which is typically /oracle/SID/ xxx_yy, where xxx represents the database version and yy is either 32 or 64.
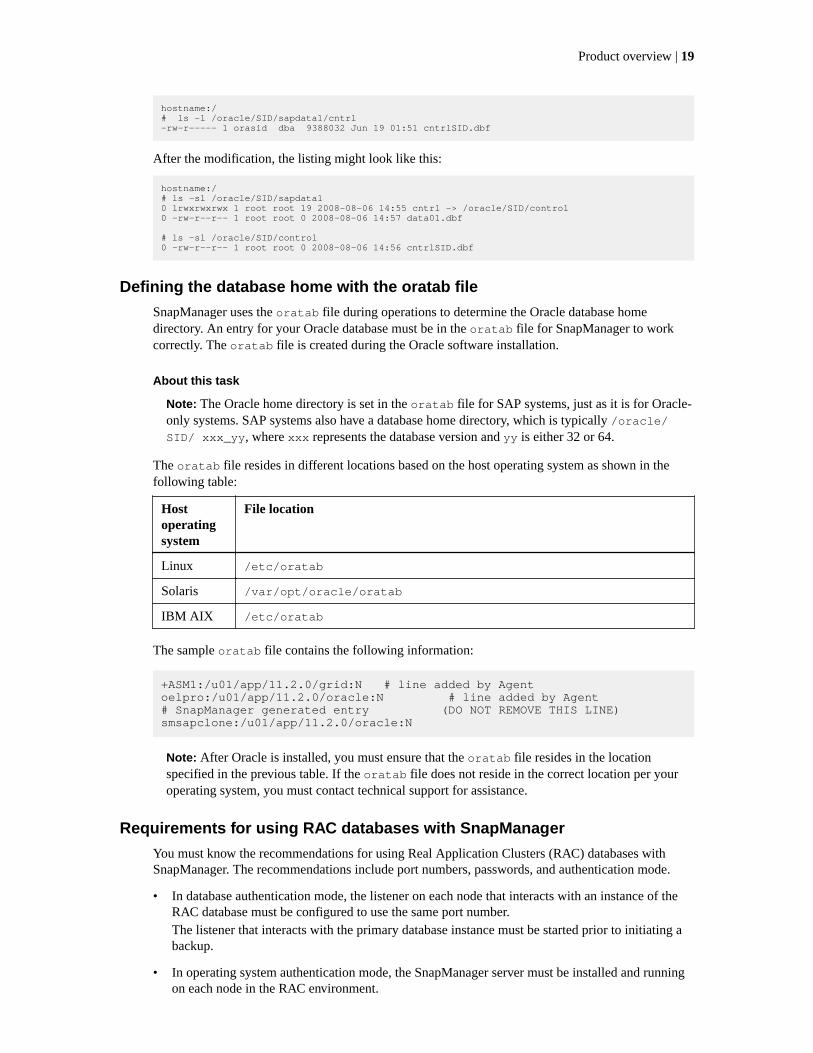
The oratab file resides in different locations based on the host operating system as shown in thefollowing table:
Hostoperatingsystem
File location
Linux /etc/oratab
Solaris /var/opt/oracle/oratab
IBM AIX /etc/oratab
The sample oratab file contains the following information:
+ASM1:/u01/app/11.2.0/grid:N # line added by Agentoelpro:/u01/app/11.2.0/oracle:N # line added by Agent# SnapManager generated entry (DO NOT REMOVE THIS LINE)smsapclone:/u01/app/11.2.0/oracle:N
Note: After Oracle is installed, you must ensure that the oratab file resides in the locationspecified in the previous table. If the oratab file does not reside in the correct location per youroperating system, you must contact technical support for assistance.
Requirements for using RAC databases with SnapManager
You must know the recommendations for using Real Application Clusters (RAC) databases withSnapManager. The recommendations include port numbers, passwords, and authentication mode.
• In database authentication mode, the listener on each node that interacts with an instance of theRAC database must be configured to use the same port number.
The listener that interacts with the primary database instance must be started prior to initiating abackup.
• In operating system authentication mode, the SnapManager server must be installed and runningon each node in the RAC environment.
Product overview | 19
• The database user password (for example, for a system administrator or a user with the sysdbaprivilege) must be same for all the Oracle database instances in a RAC environment.
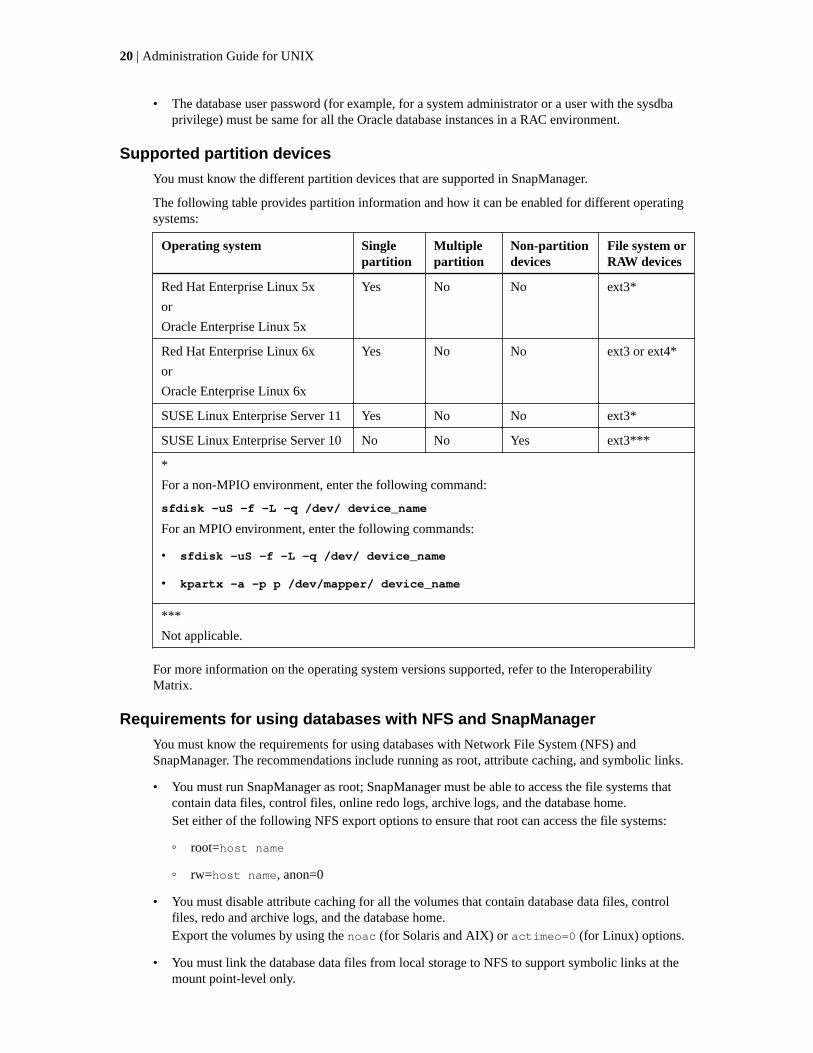
Supported partition devices
You must know the different partition devices that are supported in SnapManager.
The following table provides partition information and how it can be enabled for different operatingsystems:
Operating system Singlepartition
Multiplepartition
Non-partitiondevices
File system orRAW devices
Red Hat Enterprise Linux 5x
or
Oracle Enterprise Linux 5x
Yes No No ext3*
Red Hat Enterprise Linux 6x
or
Oracle Enterprise Linux 6x
Yes No No ext3 or ext4*
SUSE Linux Enterprise Server 11 Yes No No ext3*
SUSE Linux Enterprise Server 10 No No Yes ext3***
*
For a non-MPIO environment, enter the following command:
sfdisk -uS -f -L -q /dev/ device_name
For an MPIO environment, enter the following commands:
• sfdisk -uS -f -L -q /dev/ device_name
• kpartx -a -p p /dev/mapper/ device_name
***
Not applicable.
For more information on the operating system versions supported, refer to the InteroperabilityMatrix.
Requirements for using databases with NFS and SnapManager
You must know the requirements for using databases with Network File System (NFS) andSnapManager. The recommendations include running as root, attribute caching, and symbolic links.
• You must run SnapManager as root; SnapManager must be able to access the file systems thatcontain data files, control files, online redo logs, archive logs, and the database home.
Set either of the following NFS export options to ensure that root can access the file systems:
◦ root=host name
◦ rw=host name, anon=0
• You must disable attribute caching for all the volumes that contain database data files, controlfiles, redo and archive logs, and the database home.
Export the volumes by using the noac (for Solaris and AIX) or actimeo=0 (for Linux) options.
• You must link the database data files from local storage to NFS to support symbolic links at themount point-level only.
20 | Administration Guide for UNIX
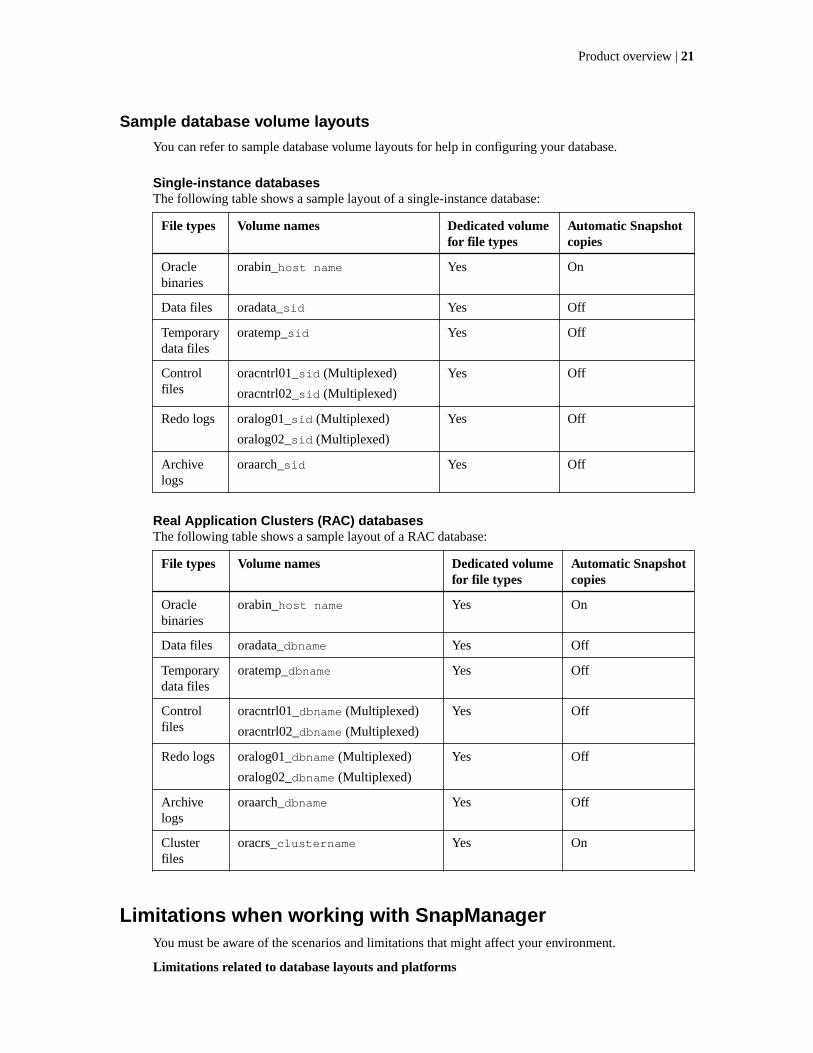
Sample database volume layouts
You can refer to sample database volume layouts for help in configuring your database.
Single-instance databasesThe following table shows a sample layout of a single-instance database:
File types Volume names Dedicated volumefor file types
Automatic Snapshotcopies
Oraclebinaries
orabin_host name Yes On
Data files oradata_sid Yes Off
Temporarydata files
oratemp_sid Yes Off
Controlfiles
oracntrl01_sid (Multiplexed)
oracntrl02_sid (Multiplexed)
Yes Off
Redo logs oralog01_sid (Multiplexed)
oralog02_sid (Multiplexed)
Yes Off
Archivelogs
oraarch_sid Yes Off
Real Application Clusters (RAC) databasesThe following table shows a sample layout of a RAC database:
File types Volume names Dedicated volumefor file types
Automatic Snapshotcopies
Oraclebinaries
orabin_host name Yes On
Data files oradata_dbname Yes Off
Temporarydata files
oratemp_dbname Yes Off
Controlfiles
oracntrl01_dbname (Multiplexed)
oracntrl02_dbname (Multiplexed)
Yes Off
Redo logs oralog01_dbname (Multiplexed)
oralog02_dbname (Multiplexed)
Yes Off
Archivelogs
oraarch_dbname Yes Off
Clusterfiles
oracrs_clustername Yes On
Limitations when working with SnapManagerYou must be aware of the scenarios and limitations that might affect your environment.
Limitations related to database layouts and platforms
Product overview | 21
• SnapManager supports control files on a file system and does not support control files on rawdevices.
• SnapManager operates in a Microsoft clustering (MSCS) environment but does not recognize thestate of the MSCS configuration (active or passive) and does not transfer active management of arepository to a standby server in an MSCS cluster.
• In Red Hat Enterprise Linux (RHEL) and Oracle Enterprise Linux 4.7, 5.0, 5.1, 5.2, and 5.3, theext3 file system is not supported when deploying Oracle over raw devices by using dynamicmultipathing (DMP) in a multipath network I/O (MPIO) environment.This issue is noticed in SnapManager only when using SnapDrive 4.1 for UNIX or earlierversions.
• SnapManager on RHEL does not support partitioning of disks using the parted utility.This is an issue with the RHEL parted utility.
• In a RAC configuration, when a profile name is updated from RAC node A, the schedule file forthe profile is updated only for RAC node A.The schedule file for the same profile on RAC node B is not updated and contains the earlierschedule information. When a scheduled backup is triggered from node B, the scheduled backupoperation fails because node B contains the earlier schedule file. However, the scheduled backupoperation succeeds from node A, on which the profile is renamed. You can restart theSnapManager server so that you receive the latest schedule file for the profile on node B.
• The repository database might exist on a host that can be accessed by using more than one IPaddress.If the repository is accessed by using more than one IP address, then the schedule file is createdfor each of the IP addresses. If the schedule backup is created for a profile (for example, profileA) under one of the IP addresses (for example, IP1), then the schedule file for only that IP addressgets updated. If profile A is accessed from another IP address (for example, IP2), the scheduledbackup is not listed because the schedule file of IP2 does not have an entry for the schedule thatwas created under IP1.You can wait for the schedule to be triggered from that IP address and the schedule file to beupdated, or you can restart the server.
Limitations related to SnapManager configuration
• SnapDrive for UNIX supports more than one type of file system and volume manager on certainplatforms.The file system and volume manager used for database files must be specified in the SnapDriveconfiguration file as the default file system and volume manager.
• SnapManager supports databases on MultiStore storage systems with the following requirements:
◦ You must configure SnapDrive to set passwords for MultiStore storage systems.
◦ SnapDrive cannot create a Snapshot copy of a LUN or file residing in a qtree in a MultiStorestorage system if the underlying volume is not in the same MultiStore storage system.
• SnapManager does not support accessing two SnapManager servers running on different portsfrom a single client (both from the CLI or GUI).The port numbers should be the same on the target and remote hosts.
• All LUNs within a volume should reside at the volume level or inside qtrees, but not both.This is because if the data is residing on the qtrees and you mount the volume, then the datainside the qtrees is not protected.
• SnapManager operations fail and you cannot access the GUI when the repository database isdown.You must verify that the repository database is running when you perform any SnapManageroperations.
22 | Administration Guide for UNIX

• SnapManager does not support Live Partition Mobility (LPM) and Live Application Mobility(LAM).
• SnapManager does not support Oracle Wallet Manager and Transparent Data Encryption (TDE).
• SnapManager does not support MetroCluster configurations in raw device mapping (RDM)environments because MetroCluster configurations are yet to be supported by Virtual StorageConsole (VSC).
Limitations related to profile management
• If you update the profile to separate the archive log backups, then you cannot perform a rollbackoperation on the host.
• If you enable a profile from the GUI to create archive log backups, and later try to update theprofile by using the Multi Profile Update window or Profile Update window, then you cannotmodify that profile to create a full backup.
• If you update multiple profiles in the Multi Profile Update window and some profiles have theBackup Archivelogs separately option enabled and other profiles have the option disabled, thenthe Backup Archivelogs separately option is disabled.
• If you update multiple profiles and some profiles have the Backup Archivelogs separatelyoption enabled and other profiles have the option disabled, then the Backup Archivelogsseparately option in the Multi Profile Update window is disabled.
• If you rename the profile, then you cannot roll back the host.
Limitations related to rolling upgrade or rollback operations
• If you try to install an earlier version of SnapManager for a host without performing the rollbackoperation on the host in the repository, you might not be able to do the following:
◦ View the profiles that were created in earlier or later versions of SnapManager for the host.
◦ Access backups or clones that were created in earlier or later versions of SnapManager.
◦ Perform rolling upgrade or rollback operations on the host.
• After you separate the profiles to create archive log backups, you cannot perform a rollbackoperation on the related host repository.
Limitations related to backup operations
• During recovery, if the backup is already mounted, SnapManager does not mount the backupagain and uses the already mounted backup.If the backup is mounted by a different user and you do not have access to the previouslymounted backup, then the other user must provide you the permission.All archive log files have read permission for users assigned to a group; you might not have theaccess permission to the archive log file, if the backup is mounted by a different user group. Userscan give permission to the mounted archive log files manually, and then retry the restore orrecovery operation.
• SnapManager sets the backup state as “PROTECTED”, even when one of the Snapshot copies ofthe database backup is transferred to the secondary storage system.
• You can use the task specification file for scheduled backup only from SnapManager 3.2 or later.
• SnapManager integrated with Protection Manager supports the backup of multiple volumes inprimary storage to a single volume in secondary storage for SnapVault and qtree SnapMirror.Dynamic secondary volume sizing is not supported. The Provisioning Manager and ProtectionManager Administration Guide For Use with DataFabric Manager Server 3.8 has for moreinformation about this.
Product overview | 23
• SnapManager does not support vaulting of backups using the post-processing script.
• If the repository database is pointing to more than one IP address and each IP address has adifferent host name, then the backup scheduling operation is successful for one IP address butfails for the other IP address.
• After upgrading to SnapManager 3.4, any backups scheduled with post-processing scripts usingSnapManager 3.3.1 cannot be updated.
You must delete the existing schedule and create a new schedule.
• In ONTAP environments, SnapManager does not support multiple secondary destinations for asource volume.
Limitations related to restore operations
• When you use an indirect method for performing a restore operation and the archive log filesrequired for recovery are available only in backups from the secondary storage system,SnapManager fails to recover the database.
This is because SnapManager cannot mount the backup of archive log files from the secondarystorage system.
• When SnapManager performs a volume restore operation, the archive log backup copies that aremade after the corresponding backup is restored are not purged.
When the data files and archive log file destination exist on the same volume, the data files can berestored through a volume restore operation if there are no archive log files available in thearchive log file destination. In such a scenario, the archive log Snapshot copies that are createdafter the backup of the data files are lost.
You should not delete all of the archive log files from the archive log destination.
Limitations related to clone operations
• You cannot view any numerical values between 0 and 100 for the progress of the clone splitoperation because of the speed with which the inodes are discovered and processed by the storagesystem containing the flexible volume.
• SnapManager does not support receiving emails only for the successful clone split operations.
• SnapManager only supports splitting a FlexClone.
• The cloning of online database backup of the RAC database that uses external archive log filelocation fails because of failure in recovery.
The cloning fails because Oracle fails to find and apply the archive log files for recovery from theexternal archive log location. This is an Oracle limitation. For more information, see the OracleBug ID: 13528007. Oracle does not apply archive log from the non-default location at the Oraclesupport site. You must have a valid Oracle metalink user name and password.
• SnapManager 3.3 or later does not support using the clone specification XML file created in thereleases before SnapManager 3.2.
• If temporary tablespaces are located in a different location from the datafiles location, a cloneoperation creates the tablespaces in the datafiles location.
However, if temporary tablespaces are Oracle Managed Files (OMFs) that are located in adifferent location from the datafiles location, the clone operation does not create the tablespacesin the datafiles location. The OMFs are not managed by SnapManager.
• SnapManager fails to clone a RAC database if you select the -resetlogs option.
Limitations related to archive log files and backups
• SnapManager does not support pruning of archive log files from the flash recovery areadestination.
24 | Administration Guide for UNIX
• SnapManager does not support pruning of archive log files from the standby destination.
• The archive log backups are retained based on the retention duration and default hourly retentionclass.When the archive log backup retention class is modified by using the SnapManager CLI or GUI,the modified retention class is not considered for backup because archive log backups are retainedbased on retention duration.
• If you delete the archive log files from the archive log destinations, the archive log backup doesnot include archive log files older than the missing archive log file.If the latest archive log file is missing, then the archive log backup operation fails.
• If you delete the archive log files from the archive log destinations, the pruning of archive logfiles fail.
• SnapManager consolidates the archive log backups even when you delete the archive log filesfrom the archive log destinations or when the archive log files are corrupted.
Limitations related to changing of target database host name
The following SnapManager operations are not supported when you change the target database hostname:
• Changing the target database host name from the SnapManager GUI.
• Rolling back of the repository database after updating the target database host name of the profile.
• Simultaneously updating multiple profiles for a new target database host name.
• Changing the target database host name when any SnapManager operation is running.
Limitations related to the SnapManager CLI or GUI
• The SnapManager CLI commands for the profile create operation that are generated fromthe SnapManager GUI do not have history configuration options.You cannot use the profile create command to configure history retention settings from theSnapManager CLI.
• SnapManager does not display the GUI in Mozilla Firefox when there is no Java RuntimeEnvironment (JRE) available on the UNIX client.
• While updating the target database host name using the SnapManager CLI, if there are one ormore open SnapManager GUI sessions, then all of the open SnapManager GUI sessions fail torespond.
Limitations related to SnapMirror and SnapVault
• The SnapVault post-processing script is not supported if you are using Data ONTAP operating in7-Mode.
• If you are using ONTAP, you cannot perform volume-based SnapRestore (VBSR) on the backupsthat were created in the volumes that have SnapMirror relationships established.This is because of an ONTAP limitation, which does not allow you to break the relationship whendoing a VBSR. However, you can perform a VBSR on the last or most recently created backuponly when the volumes have SnapVault relationships established.
• If you are using Data ONTAP operating in 7-Mode and want to perform a VBSR on the backupsthat were created in the volumes that have SnapMirror relationships established, you can set theoverride-vbsr-snapmirror-check option to ON in SnapDrive for UNIX.
The SnapDrive documentation has more information about this.
• In some scenarios, you cannot delete the last backup associated with the first Snapshot copy whenthe volume has a SnapVault relationship established.
Product overview | 25
You can delete the backup only when you break the relationship. This issue is because of anONTAP restriction with base Snapshot copies. In a SnapMirror relationship the base Snapshotcopy is created by the SnapMirror engine, and in a SnapVault relationship the base Snapshot copyis the backup created by using SnapManager. For each update, the base Snapshot copy points tothe latest backup created by using SnapManager.
Limitations related to Data Guard Standby databases
• SnapManager does not support Logical Data Guard Standby databases.
• SnapManager does not support Active Data Guard Standby databases.
• SnapManager does not allow online backups of Data Guard Standby databases.
• SnapManager does not allow partial backups of Data Guard Standby databases.
• SnapManager does not allow restoring of Data Guard Standby databases.
• SnapManager does not allow pruning of archive log files for Data Guard Standby databases.
• SnapManager does not support Data Guard Broker.
Related information
Documentation on the NetApp Support Site: mysupport.netapp.com
SnapManager limitations for clustered Data ONTAP
You must know the limitations for some functionalities and SnapManager operations if you are usingclustered Data ONTAP.
The following functionalities are not supported if you are using SnapManager on clustered DataONTAP:
• Data protection capabilities if SnapManager is integrated with OnCommand Unified Manager
• A database in which one LUN belongs to a system running Data ONTAP operating in 7-Modeand the other LUN belongs to a system running clustered Data ONTAP
• SnapManager for SAP does not support migration of a Vserver, which is not supported byclustered Data ONTAP
• SnapManager for SAP does not support the clustered Data ONTAP 8.2.1 functionality to specifydifferent export policies for volumes and qtrees
Limitations related to Oracle Database
Before you start working with SnapManager, you must know the limitations related to OracleDatabase.
The limitations are as follows:
• SnapManager supports Oracle version 10gR2 and does not support Oracle 10gR1 as therepository or target database.
• SnapManager does not support Oracle Cluster File System (OCFS).
• Support for Oracle Database 9i is deprecated from SnapManager 3.2.
• Support for Oracle Database 10gR2 (earlier than 10.2.0.5) is deprecated from SnapManager 3.3.1.
Note: Identify the different versions of Oracle databases supported by referring to theInteroperability Matrix.
26 | Administration Guide for UNIX
Related information
Interoperability Matrix: support.netapp.com/NOW/products/interoperability
Deprecated versions of Oracle database
Oracle database 9i is not supported by SnapManager 3.2 or later, and Oracle database 10gR2 (earlierthan 10.2.0.4) is not supported by SnapManager 3.3.1 or later.
If you are using Oracle 9i or 10gR2 (earlier than 10.2.0.4) databases and want to upgrade toSnapManager 3.2 or later, you cannot create new profiles; a warning message is displayed.
If you are using Oracle 9i or 10gR2 (earlier than 10.2.0.4) databases and want to upgrade toSnapManager 3.2 or later, you must perform one of the following:
• Upgrade Oracle 9i or 10gR2 (earlier than 10.2.0.4) databases to either Oracle 10gR2 (10.2.0.5),11gR1, or 11gR2 databases, and then upgrade to SnapManager 3.2 or 3.3.
If you are upgrading to Oracle 12c, then you must upgrade to SnapManager 3.3.1 or later.
Note: Oracle database 12c is supported only from SnapManager 3.3.1.
• Manage the Oracle 9i databases using a patch version of SnapManager 3.1.
You can use SnapManager 3.2 or 3.3 if you want to manage Oracle 10gR2, 11gR1, or 11gR2databases and use SnapManager 3.3.1 or later if you want to manage Oracle 12c databases alongwith the other supported databases.
Volume management restrictions
SnapManager has certain volume management restrictions that might affect your environment.
You can have multiple disk groups for a database; however, the following limitations apply to all diskgroups for a given database:
• Disk groups for the database can be managed by only one volume manager.
• A Linux environment without logical volume management requires a partition.
Product overview | 27
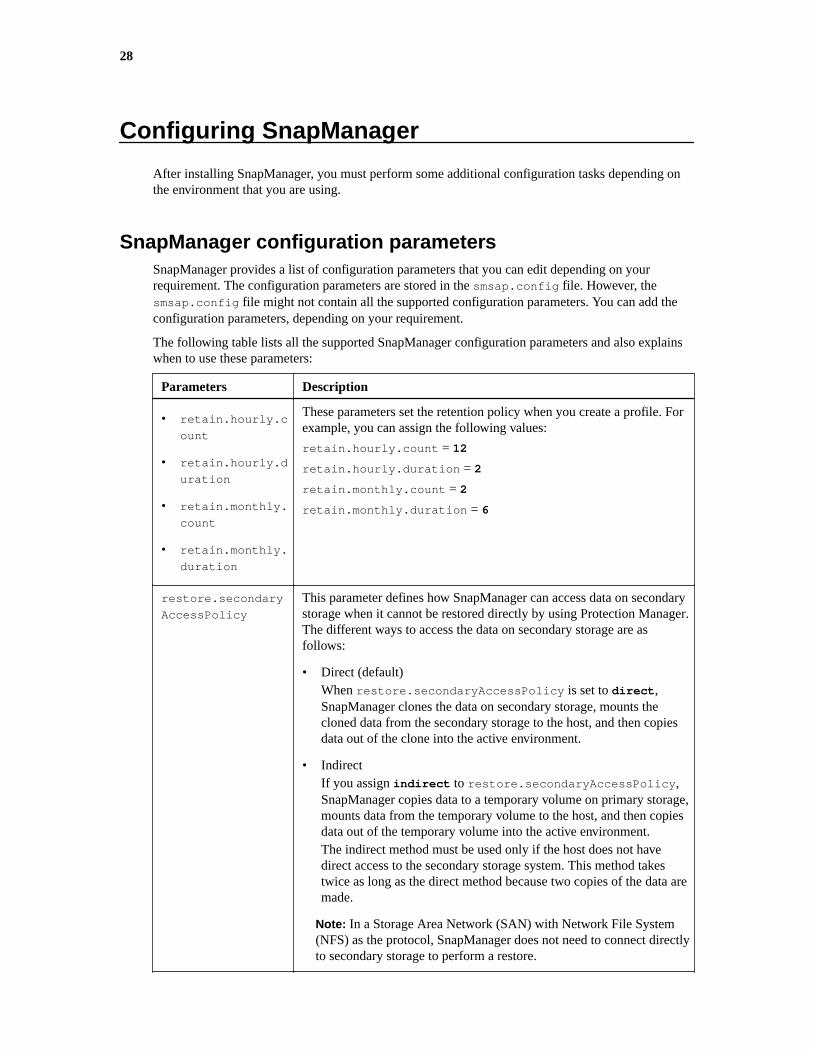
Configuring SnapManager
After installing SnapManager, you must perform some additional configuration tasks depending onthe environment that you are using.
SnapManager configuration parametersSnapManager provides a list of configuration parameters that you can edit depending on yourrequirement. The configuration parameters are stored in the smsap.config file. However, thesmsap.config file might not contain all the supported configuration parameters. You can add theconfiguration parameters, depending on your requirement.
The following table lists all the supported SnapManager configuration parameters and also explainswhen to use these parameters:
Parameters Description
• retain.hourly.c
ount
• retain.hourly.d
uration
• retain.monthly.
count
• retain.monthly.
duration
These parameters set the retention policy when you create a profile. Forexample, you can assign the following values:
retain.hourly.count = 12
retain.hourly.duration = 2
retain.monthly.count = 2
retain.monthly.duration = 6
restore.secondary
AccessPolicy
This parameter defines how SnapManager can access data on secondarystorage when it cannot be restored directly by using Protection Manager.The different ways to access the data on secondary storage are asfollows:
• Direct (default)
When restore.secondaryAccessPolicy is set to direct,SnapManager clones the data on secondary storage, mounts thecloned data from the secondary storage to the host, and then copiesdata out of the clone into the active environment.
• Indirect
If you assign indirect to restore.secondaryAccessPolicy,SnapManager copies data to a temporary volume on primary storage,mounts data from the temporary volume to the host, and then copiesdata out of the temporary volume into the active environment.
The indirect method must be used only if the host does not havedirect access to the secondary storage system. This method takestwice as long as the direct method because two copies of the data aremade.
Note: In a Storage Area Network (SAN) with Network File System(NFS) as the protocol, SnapManager does not need to connect directlyto secondary storage to perform a restore.
28
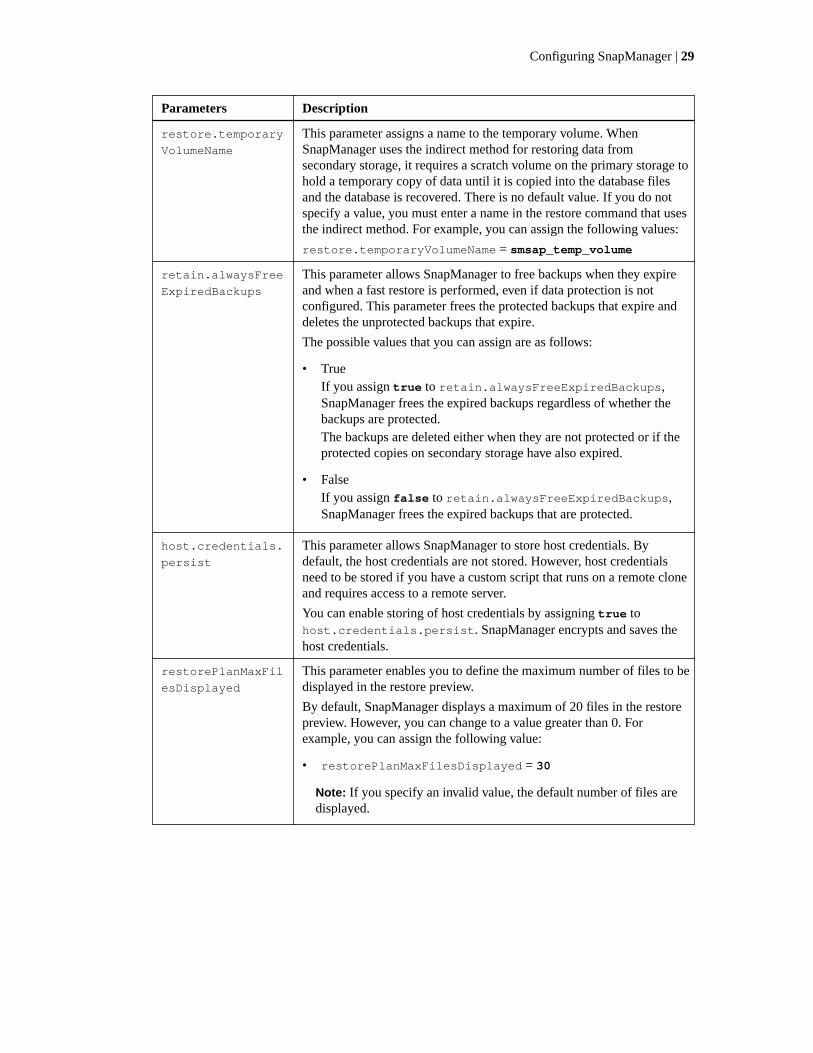
Parameters Description
restore.temporary
VolumeName
This parameter assigns a name to the temporary volume. WhenSnapManager uses the indirect method for restoring data fromsecondary storage, it requires a scratch volume on the primary storage tohold a temporary copy of data until it is copied into the database filesand the database is recovered. There is no default value. If you do notspecify a value, you must enter a name in the restore command that usesthe indirect method. For example, you can assign the following values:
restore.temporaryVolumeName = smsap_temp_volume
retain.alwaysFree
ExpiredBackups
This parameter allows SnapManager to free backups when they expireand when a fast restore is performed, even if data protection is notconfigured. This parameter frees the protected backups that expire anddeletes the unprotected backups that expire.
The possible values that you can assign are as follows:
• True
If you assign true to retain.alwaysFreeExpiredBackups,SnapManager frees the expired backups regardless of whether thebackups are protected.
The backups are deleted either when they are not protected or if theprotected copies on secondary storage have also expired.
• False
If you assign false to retain.alwaysFreeExpiredBackups,SnapManager frees the expired backups that are protected.
host.credentials.
persist
This parameter allows SnapManager to store host credentials. Bydefault, the host credentials are not stored. However, host credentialsneed to be stored if you have a custom script that runs on a remote cloneand requires access to a remote server.
You can enable storing of host credentials by assigning true tohost.credentials.persist. SnapManager encrypts and saves thehost credentials.
restorePlanMaxFil
esDisplayed
This parameter enables you to define the maximum number of files to bedisplayed in the restore preview.
By default, SnapManager displays a maximum of 20 files in the restorepreview. However, you can change to a value greater than 0. Forexample, you can assign the following value:
• restorePlanMaxFilesDisplayed = 30
Note: If you specify an invalid value, the default number of files aredisplayed.
Configuring SnapManager | 29
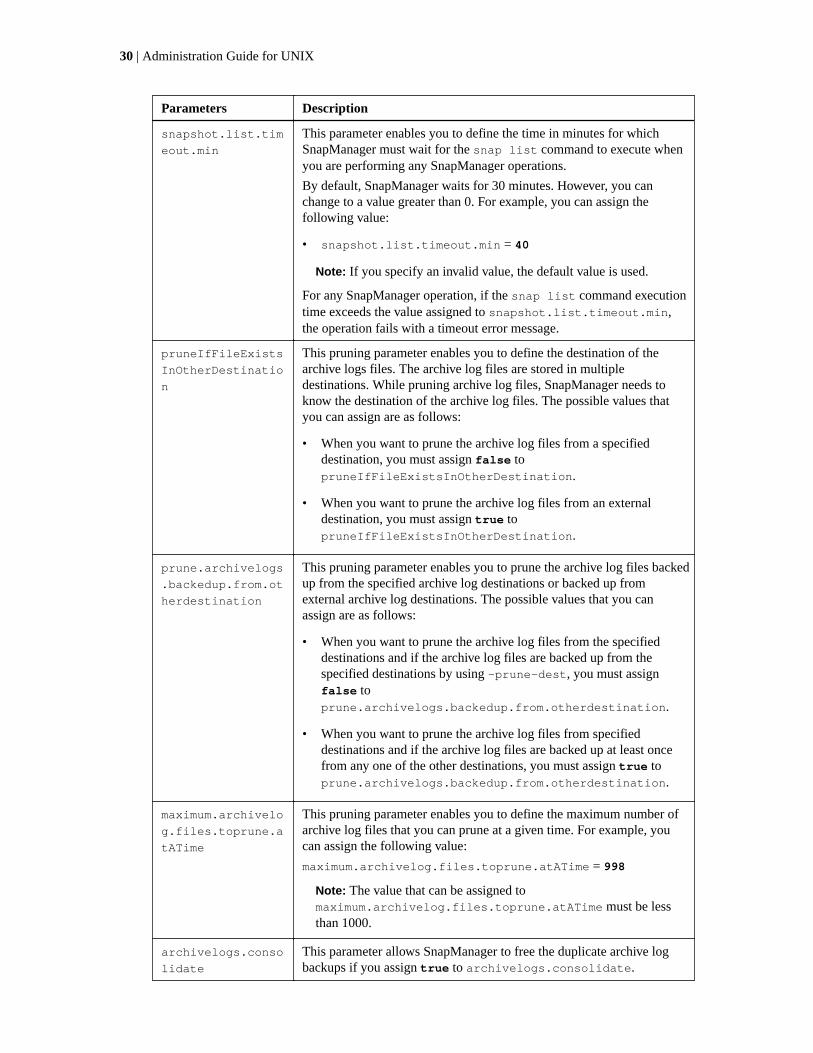
Parameters Description
snapshot.list.tim
eout.min
This parameter enables you to define the time in minutes for whichSnapManager must wait for the snap list command to execute whenyou are performing any SnapManager operations.
By default, SnapManager waits for 30 minutes. However, you canchange to a value greater than 0. For example, you can assign thefollowing value:
• snapshot.list.timeout.min = 40
Note: If you specify an invalid value, the default value is used.
For any SnapManager operation, if the snap list command executiontime exceeds the value assigned to snapshot.list.timeout.min,the operation fails with a timeout error message.
pruneIfFileExists
InOtherDestinatio
n
This pruning parameter enables you to define the destination of thearchive logs files. The archive log files are stored in multipledestinations. While pruning archive log files, SnapManager needs toknow the destination of the archive log files. The possible values thatyou can assign are as follows:
• When you want to prune the archive log files from a specifieddestination, you must assign false topruneIfFileExistsInOtherDestination.
• When you want to prune the archive log files from an externaldestination, you must assign true topruneIfFileExistsInOtherDestination.
prune.archivelogs
.backedup.from.ot
herdestination
This pruning parameter enables you to prune the archive log files backedup from the specified archive log destinations or backed up fromexternal archive log destinations. The possible values that you canassign are as follows:
• When you want to prune the archive log files from the specifieddestinations and if the archive log files are backed up from thespecified destinations by using -prune-dest, you must assignfalse toprune.archivelogs.backedup.from.otherdestination.
• When you want to prune the archive log files from specifieddestinations and if the archive log files are backed up at least oncefrom any one of the other destinations, you must assign true toprune.archivelogs.backedup.from.otherdestination.
maximum.archivelo
g.files.toprune.a
tATime
This pruning parameter enables you to define the maximum number ofarchive log files that you can prune at a given time. For example, youcan assign the following value:
maximum.archivelog.files.toprune.atATime = 998
Note: The value that can be assigned tomaximum.archivelog.files.toprune.atATime must be lessthan 1000.
archivelogs.conso
lidate
This parameter allows SnapManager to free the duplicate archive logbackups if you assign true to archivelogs.consolidate.
30 | Administration Guide for UNIX
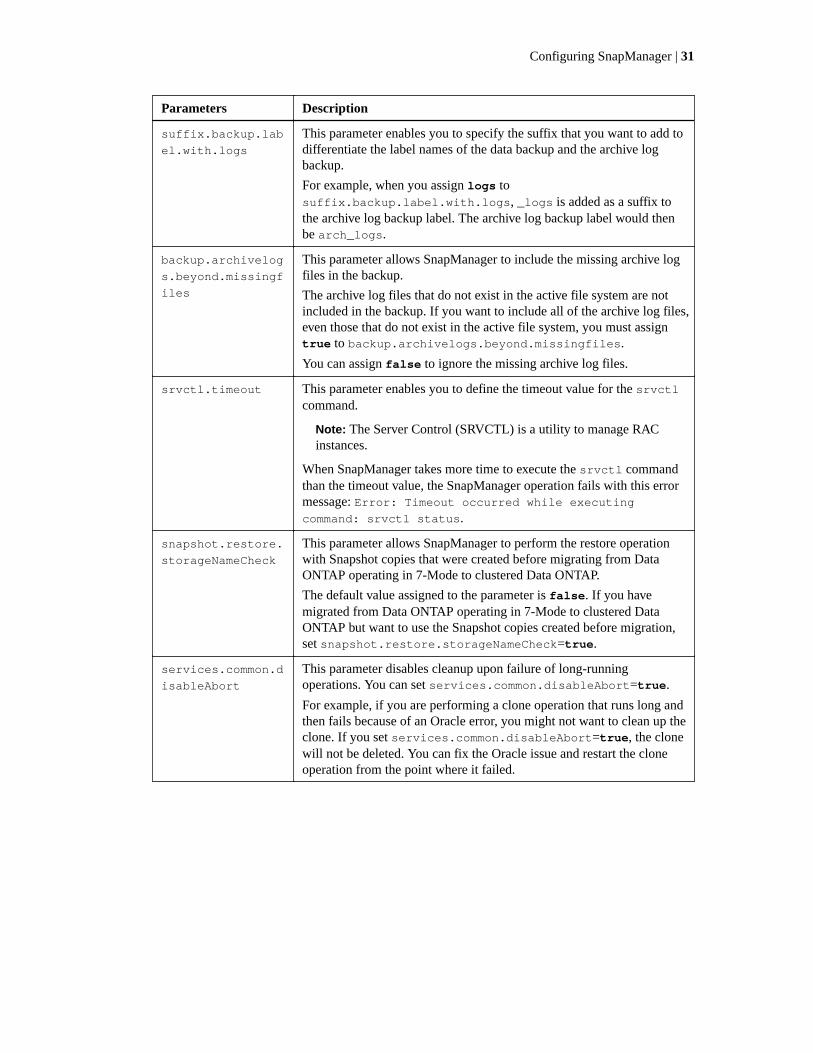
Parameters Description
suffix.backup.lab
el.with.logs
This parameter enables you to specify the suffix that you want to add todifferentiate the label names of the data backup and the archive logbackup.
For example, when you assign logs tosuffix.backup.label.with.logs, _logs is added as a suffix tothe archive log backup label. The archive log backup label would thenbe arch_logs.
backup.archivelog
s.beyond.missingf
iles
This parameter allows SnapManager to include the missing archive logfiles in the backup.
The archive log files that do not exist in the active file system are notincluded in the backup. If you want to include all of the archive log files,even those that do not exist in the active file system, you must assigntrue to backup.archivelogs.beyond.missingfiles.
You can assign false to ignore the missing archive log files.
srvctl.timeout This parameter enables you to define the timeout value for the srvctlcommand.
Note: The Server Control (SRVCTL) is a utility to manage RACinstances.
When SnapManager takes more time to execute the srvctl commandthan the timeout value, the SnapManager operation fails with this errormessage: Error: Timeout occurred while executingcommand: srvctl status.
snapshot.restore.
storageNameCheck
This parameter allows SnapManager to perform the restore operationwith Snapshot copies that were created before migrating from DataONTAP operating in 7-Mode to clustered Data ONTAP.
The default value assigned to the parameter is false. If you havemigrated from Data ONTAP operating in 7-Mode to clustered DataONTAP but want to use the Snapshot copies created before migration,set snapshot.restore.storageNameCheck=true.
services.common.d
isableAbort
This parameter disables cleanup upon failure of long-runningoperations. You can set services.common.disableAbort=true.
For example, if you are performing a clone operation that runs long andthen fails because of an Oracle error, you might not want to clean up theclone. If you set services.common.disableAbort=true, the clonewill not be deleted. You can fix the Oracle issue and restart the cloneoperation from the point where it failed.
Configuring SnapManager | 31
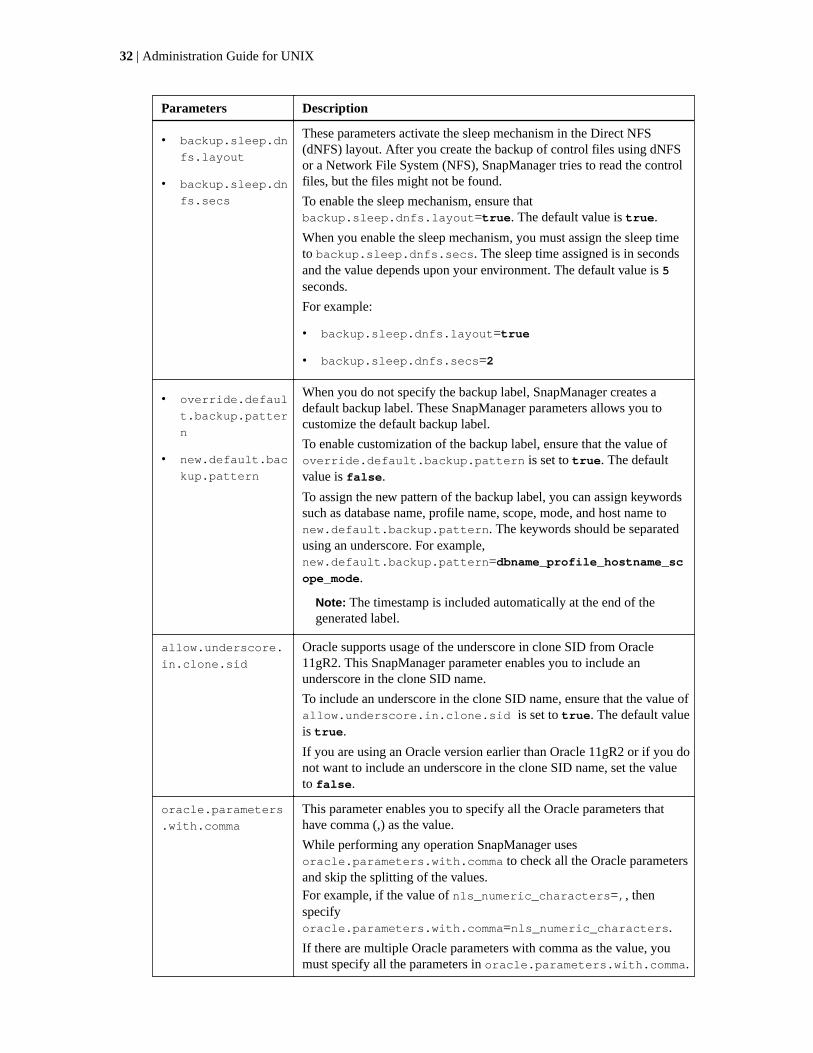
Parameters Description
• backup.sleep.dn
fs.layout
• backup.sleep.dn
fs.secs
These parameters activate the sleep mechanism in the Direct NFS(dNFS) layout. After you create the backup of control files using dNFSor a Network File System (NFS), SnapManager tries to read the controlfiles, but the files might not be found.
To enable the sleep mechanism, ensure thatbackup.sleep.dnfs.layout=true. The default value is true.
When you enable the sleep mechanism, you must assign the sleep timeto backup.sleep.dnfs.secs. The sleep time assigned is in secondsand the value depends upon your environment. The default value is 5seconds.
For example:
• backup.sleep.dnfs.layout=true
• backup.sleep.dnfs.secs=2
• override.defaul
t.backup.patter
n
• new.default.bac
kup.pattern
When you do not specify the backup label, SnapManager creates adefault backup label. These SnapManager parameters allows you tocustomize the default backup label.
To enable customization of the backup label, ensure that the value ofoverride.default.backup.pattern is set to true. The defaultvalue is false.
To assign the new pattern of the backup label, you can assign keywordssuch as database name, profile name, scope, mode, and host name tonew.default.backup.pattern. The keywords should be separatedusing an underscore. For example,new.default.backup.pattern=dbname_profile_hostname_scope_mode.
Note: The timestamp is included automatically at the end of thegenerated label.
allow.underscore.
in.clone.sid
Oracle supports usage of the underscore in clone SID from Oracle11gR2. This SnapManager parameter enables you to include anunderscore in the clone SID name.
To include an underscore in the clone SID name, ensure that the value ofallow.underscore.in.clone.sid is set to true. The default valueis true.
If you are using an Oracle version earlier than Oracle 11gR2 or if you donot want to include an underscore in the clone SID name, set the valueto false.
oracle.parameters
.with.comma
This parameter enables you to specify all the Oracle parameters thathave comma (,) as the value.
While performing any operation SnapManager usesoracle.parameters.with.comma to check all the Oracle parametersand skip the splitting of the values.
For example, if the value of nls_numeric_characters=,, thenspecifyoracle.parameters.with.comma=nls_numeric_characters.
If there are multiple Oracle parameters with comma as the value, youmust specify all the parameters in oracle.parameters.with.comma.
32 | Administration Guide for UNIX
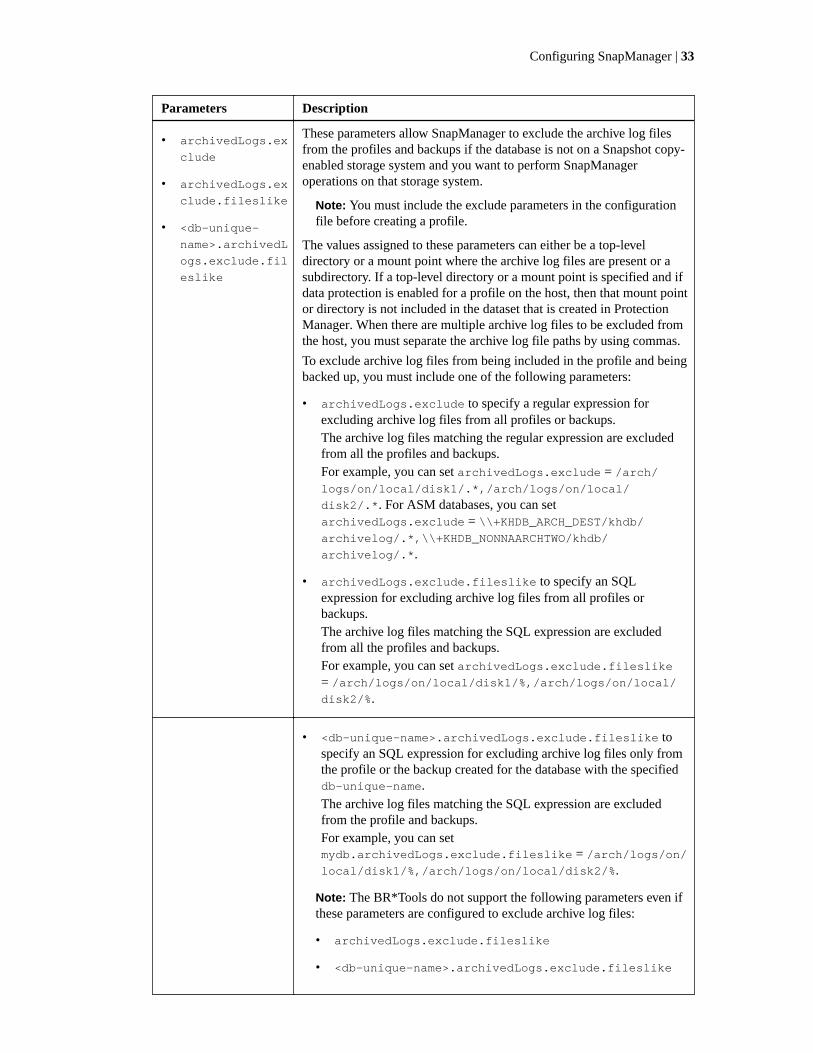
Parameters Description
• archivedLogs.ex
clude
• archivedLogs.ex
clude.fileslike
• <db-unique-
name>.archivedL
ogs.exclude.fil
eslike
These parameters allow SnapManager to exclude the archive log filesfrom the profiles and backups if the database is not on a Snapshot copy-enabled storage system and you want to perform SnapManageroperations on that storage system.
Note: You must include the exclude parameters in the configurationfile before creating a profile.
The values assigned to these parameters can either be a top-leveldirectory or a mount point where the archive log files are present or asubdirectory. If a top-level directory or a mount point is specified and ifdata protection is enabled for a profile on the host, then that mount pointor directory is not included in the dataset that is created in ProtectionManager. When there are multiple archive log files to be excluded fromthe host, you must separate the archive log file paths by using commas.
To exclude archive log files from being included in the profile and beingbacked up, you must include one of the following parameters:
• archivedLogs.exclude to specify a regular expression forexcluding archive log files from all profiles or backups.
The archive log files matching the regular expression are excludedfrom all the profiles and backups.
For example, you can set archivedLogs.exclude = /arch/logs/on/local/disk1/.*,/arch/logs/on/local/
disk2/.*. For ASM databases, you can setarchivedLogs.exclude = \\+KHDB_ARCH_DEST/khdb/archivelog/.*,\\+KHDB_NONNAARCHTWO/khdb/
archivelog/.*.
• archivedLogs.exclude.fileslike to specify an SQLexpression for excluding archive log files from all profiles orbackups.
The archive log files matching the SQL expression are excludedfrom all the profiles and backups.
For example, you can set archivedLogs.exclude.fileslike= /arch/logs/on/local/disk1/%,/arch/logs/on/local/disk2/%.
• <db-unique-name>.archivedLogs.exclude.fileslike tospecify an SQL expression for excluding archive log files only fromthe profile or the backup created for the database with the specifieddb-unique-name.
The archive log files matching the SQL expression are excludedfrom the profile and backups.
For example, you can setmydb.archivedLogs.exclude.fileslike = /arch/logs/on/local/disk1/%,/arch/logs/on/local/disk2/%.
Note: The BR*Tools do not support the following parameters even ifthese parameters are configured to exclude archive log files:
• archivedLogs.exclude.fileslike
• <db-unique-name>.archivedLogs.exclude.fileslike
Configuring SnapManager | 33
Editing the configuration parameters
Depending on your environment, you can change the default values assigned to the configurationparameter.
Steps
1. Open the configuration file from the following default location:
default installation location/properties/smsap.config
2. Change the default values of the configuration parameters.
Note: You can also add supported configuration parameters that are not included in theconfiguration file, and assign values to them.
3. Restart the SnapManager for SAP server.
Configuring SnapDrive for UNIX for an active/active VeritasSFRAC environment
If you have included the host-cluster-sw-restore-warn parameter in snapdrive.conf andhave assigned the value on, you must change the value to support the restore operation in the active/active Veritas Storage Foundation for Oracle RAC (SFRAC) environment.
About this task
When you are using the active/active Veritas Storage Foundation for Oracle RAC (SFRAC)environment, if the host-cluster-sw-restore-warn parameter is set to on, a warning messageis displayed and the restore operation is stopped. If you want to perform the restore operation in anactive/active Veritas SFRAC environment, you must set host-cluster-sw-restore-warn tooff.
For information on snapdrive.conf, see SnapDrive documentation.
Steps
1. Log in as the root user.
2. Open the snapdrive.conf file by using a text editor.
3. Change the value of host-cluster-sw-restore-warn to off.
After you finish
After configuring, restart the SnapDrive for UNIX server.
Related information
Documentation on the NetApp Support Site: mysupport.netapp.com
34 | Administration Guide for UNIX
Configuring SnapManager to support the Veritas SFRACenvironment
When SnapManager is installed on Solaris, you can configure SnapManager to support the VeritasStorage Foundation for Oracle RAC (SFRAC) environment.
Before you begin
• The host must have Solaris, host utilities, and Veritas installed.
Steps
1. Create a shared disk group and a file system for SnapManager by using SnapDrive for UNIX sothat the file systems are concurrently mounted on both nodes of the Real Application Clusters(RAC).
For information about how to create a shared disk group and file system, see SnapDrivedocumentation.
2. Install and configure the SAP database that is to be mounted on the shared file systems.
3. Start a database instance on any one node of the RAC.
Related information
Documentation on the NetApp Support Site: mysupport.netapp.com
Configuring SnapManager | 35
Security and credential management
You can manage security in SnapManager by applying user authentication and role-based accesscontrol (RBAC). The user authentication method allows you to access resources such as repositories,hosts, and profiles. RBAC allows you to restrict the operations that SnapManager can performagainst the volumes and LUNs containing the data files in your database.
When you perform an operation using either the command-line interface (CLI) or graphical userinterface (GUI), SnapManager retrieves the credentials set for repositories and profiles. SnapManagersaves credentials from previous installations.
The repository and profiles can be secured with a password. A credential is the password configuredfor the user for an object, and the password is not configured on the object itself.
You can manage authentication and credentials by performing the following tasks:
• Manage user authentication either through password prompts on operations or by using thesmsap credential set command.
Set credentials for a repository, host, or profile.
• View the credentials that govern the resources to which you have access.
• Clear a user's credentials for all resources (hosts, repositories, and profiles).
• Delete a user's credentials for individual resources (hosts, repositories, and profiles).
You can manage role-based access by performing the following tasks:
• Enable RBAC for SnapManager by using SnapDrive.
• Assign users to roles and set role capabilities by using the Operations Manager console.
• Optionally, enable SnapManager to store encrypted passwords by editing the smsap.configfile.
If Protection Manager is installed, access to the features is affected in the following ways:
• If Protection Manager is installed, when you create a database profile, SnapManager creates adataset and populates the dataset with the volumes that contain the database files.
After a backup operation, SnapManager keeps the dataset contents synchronized with thedatabase files.
• If Protection Manager is not installed, SnapManager cannot create a dataset and you cannot setprotection on profiles.
What user authentication isIn addition to using role-based access control (RBAC), SnapManager authenticates the user by usingan operating system (OS) login on the host where the SnapManager server is running. You can enableuser authentication either through password prompts on operations or by using the smsapcredential set command.
User authentication requirements depend on where the operation is performed.
• If the SnapManager client is on the same server as the SnapManager host, you are authenticatedby the OS credentials. You are not prompted for a password because you are already logged in tothe host where the SnapManager server is running.
36

• If the SnapManager client and the SnapManager server are on different hosts, SnapManagerneeds to authenticate you with both OS credentials. SnapManager prompts you for passwords forany operation, if you have not saved your OS credentials in your SnapManager user credentialcache. If you enter the smsap credential set -host command, you save the OS credentialsin your SnapManager credential cache file and so SnapManager does not prompt for the passwordfor any operation.
If you are authenticated with the SnapManager server, you are considered the effective user. Theeffective user for any operation must be a valid user account on the host on which the operationexecutes. For example, if you execute a clone operation, you should be able to log in to thedestination host for the clone.
You can manage credentials by performing the following tasks:
• Optionally, configure SnapManager to store user credentials in the SnapManager user credentialsfile. By default, SnapManager does not store host credentials. You might want to change this, forexample, if you have custom scripts that require access on a remote host. The remote cloneoperation is an example of a SnapManager operation that needs the login credentials of a user fora remote host. To have SnapManager remember user host login credentials in the SnapManageruser credentials cache, set the host.credentials.persist property to true in thesmsap.config file.
• Authorize user access to the repository.
• Authorize user access to profiles.
• View all user credentials.
• Clear a user's credentials for all resources (hosts, repositories, and profiles).
• Delete credentials for individual resources (hosts, repositories, and profiles).
About role-based access controlRole-based access control (RBAC) lets you control who has access to SnapManager operations.RBAC allows administrators to manage groups of users by defining roles and assigning users to thoseroles. You might want to use SnapManager RBAC in environments where RBAC is already in place.
RBAC includes the following components:
• Resources: Volumes and LUNs that hold the datafiles that make up your database.
• Capabilities: Types of operations that can be performed on a resource.
• Users: People to whom you grant capabilities.
• Roles: A set of resources and capabilities allowed on resources. You assign a specific role to auser who should perform those capabilities.
You enable RBAC in SnapDrive. You can then configure specific capabilities per role in theOperations Manager Web graphical user interface or command-line interface. RBAC checks occur inthe DataFabric Manager server.
The following table lists some roles and their typical tasks, as set in Operations Manager.
Security and credential management | 37
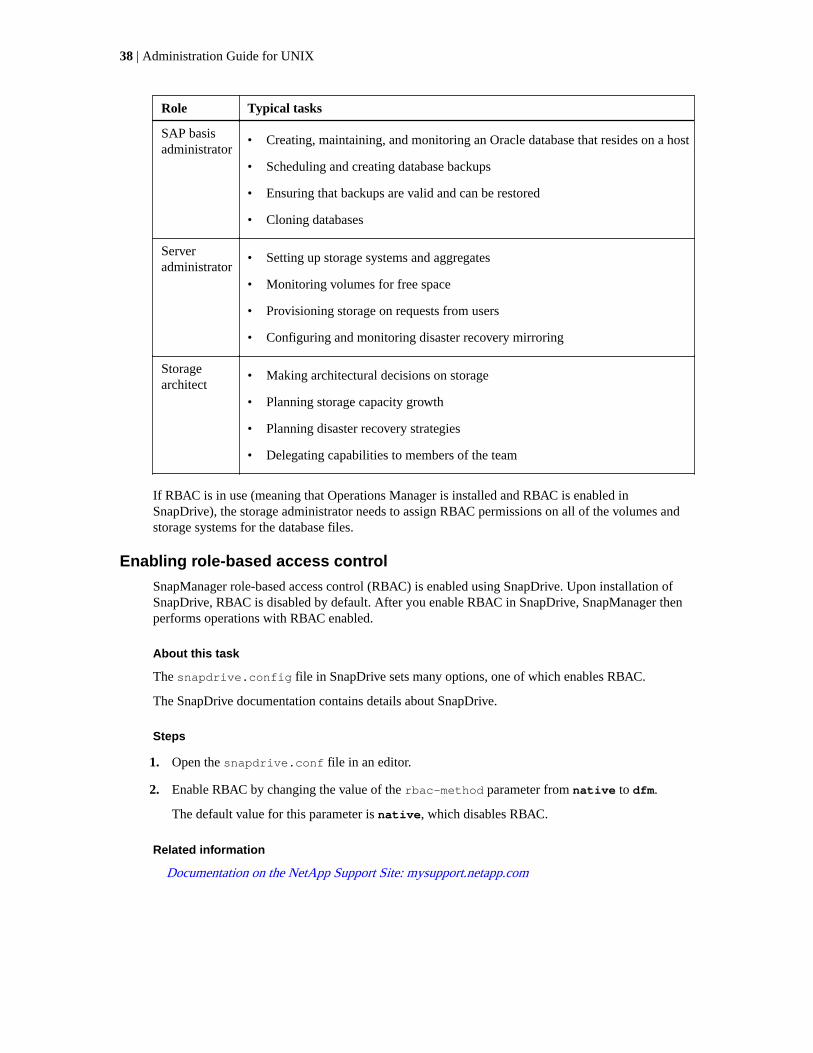
Role Typical tasks
SAP basisadministrator
• Creating, maintaining, and monitoring an Oracle database that resides on a host
• Scheduling and creating database backups
• Ensuring that backups are valid and can be restored
• Cloning databases
Serveradministrator
• Setting up storage systems and aggregates
• Monitoring volumes for free space
• Provisioning storage on requests from users
• Configuring and monitoring disaster recovery mirroring
Storagearchitect
• Making architectural decisions on storage
• Planning storage capacity growth
• Planning disaster recovery strategies
• Delegating capabilities to members of the team
If RBAC is in use (meaning that Operations Manager is installed and RBAC is enabled inSnapDrive), the storage administrator needs to assign RBAC permissions on all of the volumes andstorage systems for the database files.
Enabling role-based access control
SnapManager role-based access control (RBAC) is enabled using SnapDrive. Upon installation ofSnapDrive, RBAC is disabled by default. After you enable RBAC in SnapDrive, SnapManager thenperforms operations with RBAC enabled.
About this task
The snapdrive.config file in SnapDrive sets many options, one of which enables RBAC.
The SnapDrive documentation contains details about SnapDrive.
Steps
1. Open the snapdrive.conf file in an editor.
2. Enable RBAC by changing the value of the rbac-method parameter from native to dfm.
The default value for this parameter is native, which disables RBAC.
Related information
Documentation on the NetApp Support Site: mysupport.netapp.com
38 | Administration Guide for UNIX
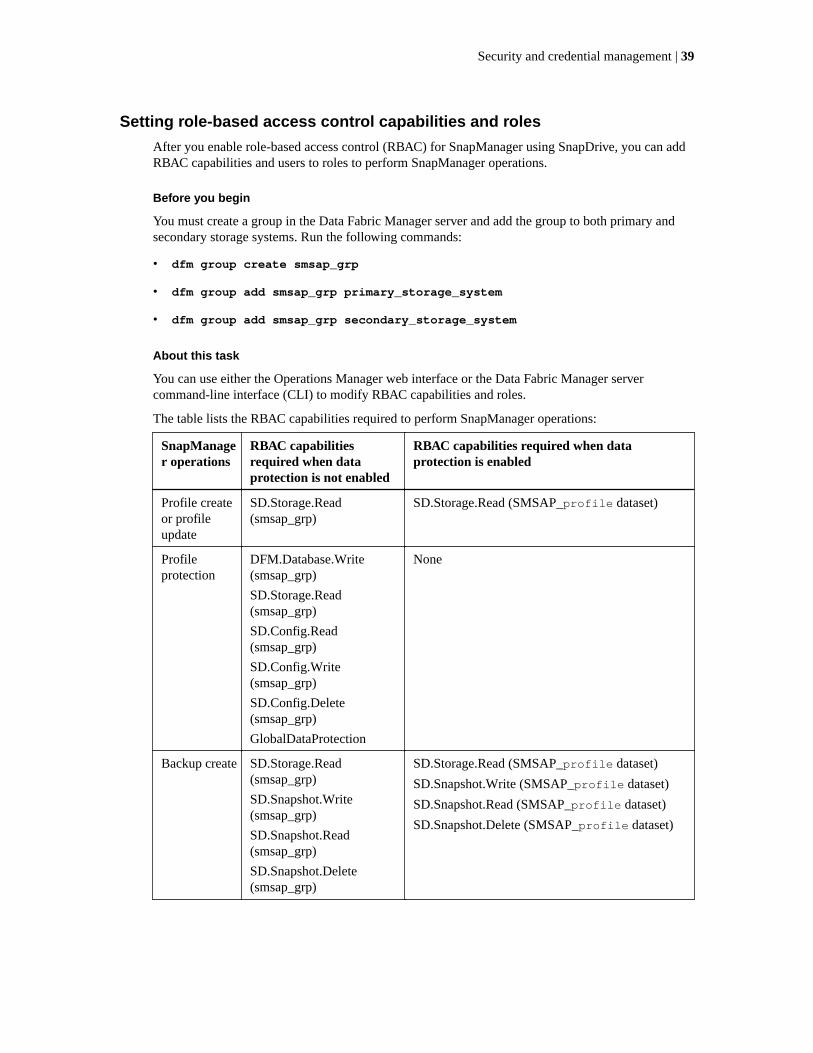
Setting role-based access control capabilities and roles
After you enable role-based access control (RBAC) for SnapManager using SnapDrive, you can addRBAC capabilities and users to roles to perform SnapManager operations.
Before you begin
You must create a group in the Data Fabric Manager server and add the group to both primary andsecondary storage systems. Run the following commands:
• dfm group create smsap_grp
• dfm group add smsap_grp primary_storage_system
• dfm group add smsap_grp secondary_storage_system
About this task
You can use either the Operations Manager web interface or the Data Fabric Manager servercommand-line interface (CLI) to modify RBAC capabilities and roles.
The table lists the RBAC capabilities required to perform SnapManager operations:
SnapManager operations
RBAC capabilitiesrequired when dataprotection is not enabled
RBAC capabilities required when dataprotection is enabled
Profile createor profileupdate
SD.Storage.Read(smsap_grp)
SD.Storage.Read (SMSAP_profile dataset)
Profileprotection
DFM.Database.Write(smsap_grp)
SD.Storage.Read(smsap_grp)
SD.Config.Read(smsap_grp)
SD.Config.Write(smsap_grp)
SD.Config.Delete(smsap_grp)
GlobalDataProtection
None
Backup create SD.Storage.Read(smsap_grp)
SD.Snapshot.Write(smsap_grp)
SD.Snapshot.Read(smsap_grp)
SD.Snapshot.Delete(smsap_grp)
SD.Storage.Read (SMSAP_profile dataset)
SD.Snapshot.Write (SMSAP_profile dataset)
SD.Snapshot.Read (SMSAP_profile dataset)
SD.Snapshot.Delete (SMSAP_profile dataset)
Security and credential management | 39
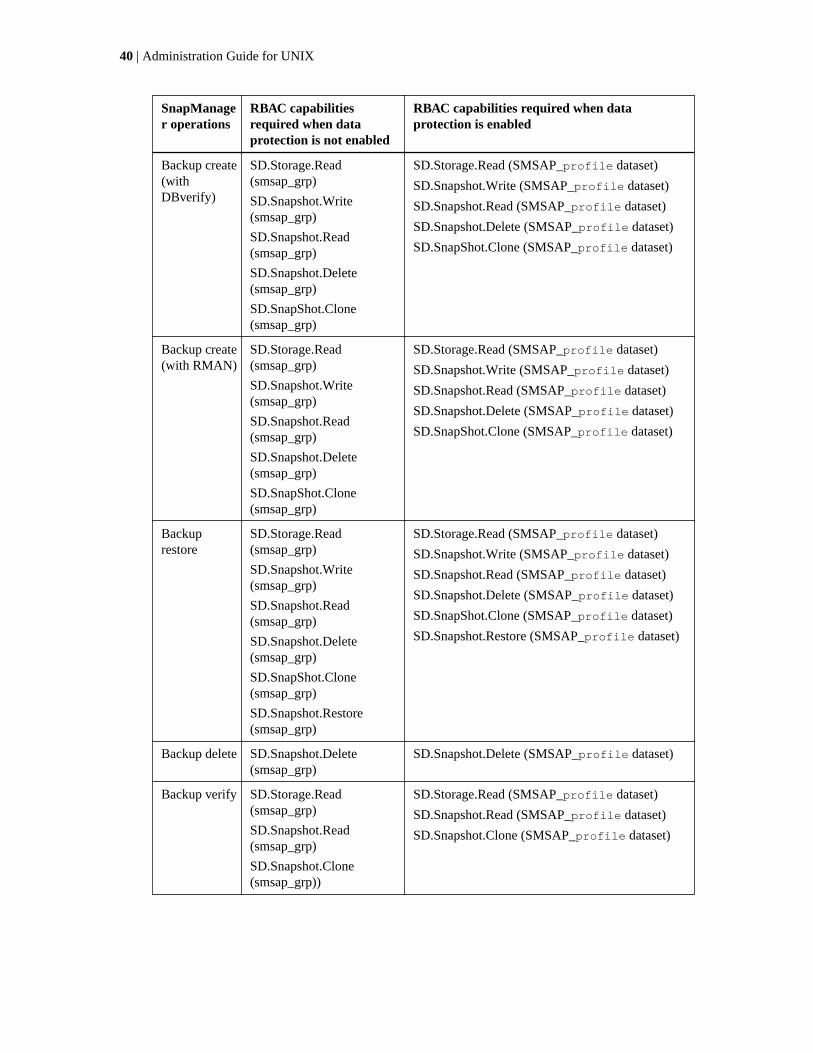
SnapManager operations
RBAC capabilitiesrequired when dataprotection is not enabled
RBAC capabilities required when dataprotection is enabled
Backup create(withDBverify)
SD.Storage.Read(smsap_grp)
SD.Snapshot.Write(smsap_grp)
SD.Snapshot.Read(smsap_grp)
SD.Snapshot.Delete(smsap_grp)
SD.SnapShot.Clone(smsap_grp)
SD.Storage.Read (SMSAP_profile dataset)
SD.Snapshot.Write (SMSAP_profile dataset)
SD.Snapshot.Read (SMSAP_profile dataset)
SD.Snapshot.Delete (SMSAP_profile dataset)
SD.SnapShot.Clone (SMSAP_profile dataset)
Backup create(with RMAN)
SD.Storage.Read(smsap_grp)
SD.Snapshot.Write(smsap_grp)
SD.Snapshot.Read(smsap_grp)
SD.Snapshot.Delete(smsap_grp)
SD.SnapShot.Clone(smsap_grp)
SD.Storage.Read (SMSAP_profile dataset)
SD.Snapshot.Write (SMSAP_profile dataset)
SD.Snapshot.Read (SMSAP_profile dataset)
SD.Snapshot.Delete (SMSAP_profile dataset)
SD.SnapShot.Clone (SMSAP_profile dataset)
Backuprestore
SD.Storage.Read(smsap_grp)
SD.Snapshot.Write(smsap_grp)
SD.Snapshot.Read(smsap_grp)
SD.Snapshot.Delete(smsap_grp)
SD.SnapShot.Clone(smsap_grp)
SD.Snapshot.Restore(smsap_grp)
SD.Storage.Read (SMSAP_profile dataset)
SD.Snapshot.Write (SMSAP_profile dataset)
SD.Snapshot.Read (SMSAP_profile dataset)
SD.Snapshot.Delete (SMSAP_profile dataset)
SD.SnapShot.Clone (SMSAP_profile dataset)
SD.Snapshot.Restore (SMSAP_profile dataset)
Backup delete SD.Snapshot.Delete(smsap_grp)
SD.Snapshot.Delete (SMSAP_profile dataset)
Backup verify SD.Storage.Read(smsap_grp)
SD.Snapshot.Read(smsap_grp)
SD.Snapshot.Clone(smsap_grp))
SD.Storage.Read (SMSAP_profile dataset)
SD.Snapshot.Read (SMSAP_profile dataset)
SD.Snapshot.Clone (SMSAP_profile dataset)
40 | Administration Guide for UNIX
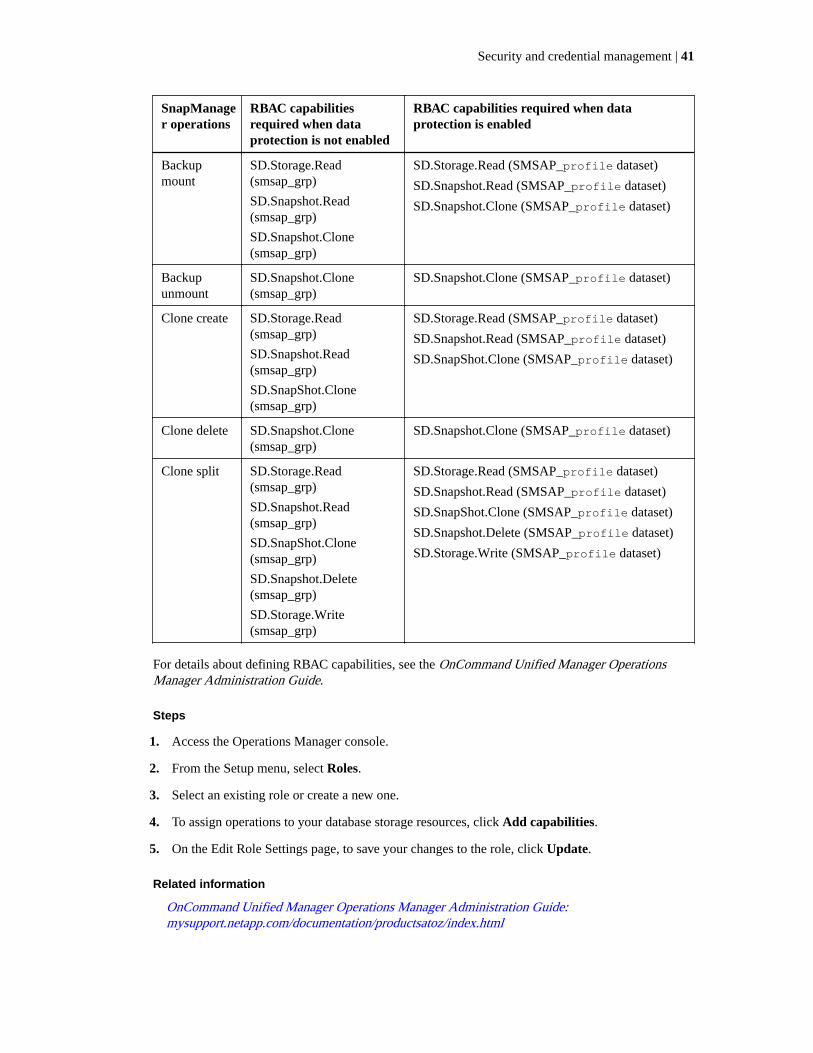
SnapManager operations
RBAC capabilitiesrequired when dataprotection is not enabled
RBAC capabilities required when dataprotection is enabled
Backupmount
SD.Storage.Read(smsap_grp)
SD.Snapshot.Read(smsap_grp)
SD.Snapshot.Clone(smsap_grp)
SD.Storage.Read (SMSAP_profile dataset)
SD.Snapshot.Read (SMSAP_profile dataset)
SD.Snapshot.Clone (SMSAP_profile dataset)
Backupunmount
SD.Snapshot.Clone(smsap_grp)
SD.Snapshot.Clone (SMSAP_profile dataset)
Clone create SD.Storage.Read(smsap_grp)
SD.Snapshot.Read(smsap_grp)
SD.SnapShot.Clone(smsap_grp)
SD.Storage.Read (SMSAP_profile dataset)
SD.Snapshot.Read (SMSAP_profile dataset)
SD.SnapShot.Clone (SMSAP_profile dataset)
Clone delete SD.Snapshot.Clone(smsap_grp)
SD.Snapshot.Clone (SMSAP_profile dataset)
Clone split SD.Storage.Read(smsap_grp)
SD.Snapshot.Read(smsap_grp)
SD.SnapShot.Clone(smsap_grp)
SD.Snapshot.Delete(smsap_grp)
SD.Storage.Write(smsap_grp)
SD.Storage.Read (SMSAP_profile dataset)
SD.Snapshot.Read (SMSAP_profile dataset)
SD.SnapShot.Clone (SMSAP_profile dataset)
SD.Snapshot.Delete (SMSAP_profile dataset)
SD.Storage.Write (SMSAP_profile dataset)
For details about defining RBAC capabilities, see the OnCommand Unified Manager OperationsManager Administration Guide.
Steps
1. Access the Operations Manager console.
2. From the Setup menu, select Roles.
3. Select an existing role or create a new one.
4. To assign operations to your database storage resources, click Add capabilities.
5. On the Edit Role Settings page, to save your changes to the role, click Update.
Related information
OnCommand Unified Manager Operations Manager Administration Guide:mysupport.netapp.com/documentation/productsatoz/index.html
Security and credential management | 41
Storing encrypted passwords for custom scriptsBy default, SnapManager does not store host credentials in the user credentials cache. However, youcan change this. You can edit the smsap.config file to allow storing of host credentials.
About this task
The smsap.config file is located at <default installation location>/properties/smsap.config
Steps
1. Edit the smsap.config file.
2. Set host.credentials.persist to true.
Authorizing access to the repositoryIn addition to role-based access control (RBAC), SnapManager enables you to set credentials fordatabase users to access the repository. Using credentials, you can restrict or prevent access to theSnapManager hosts, repositories, profiles, and databases.
About this task
If you set credentials by using the credential set command, SnapManager does not prompt youfor a password.
You can set user credentials when you install SnapManager or later.
Step
1. Enter the following command:
smsap credential set -repository -dbname repo_service_name -hostrepo_host -login -username repo_username [-password repo_password] -portrepo_port
Authorizing access to profilesIn addition to role-based access control (RBAC), SnapManager enables you to set a password for aprofile to prevent unauthorized access.
Step
1. Enter the following command:
smsap credential set -profile -name profile_name [-password password]
Related references
The smsap credential set command on page 251
42 | Administration Guide for UNIX
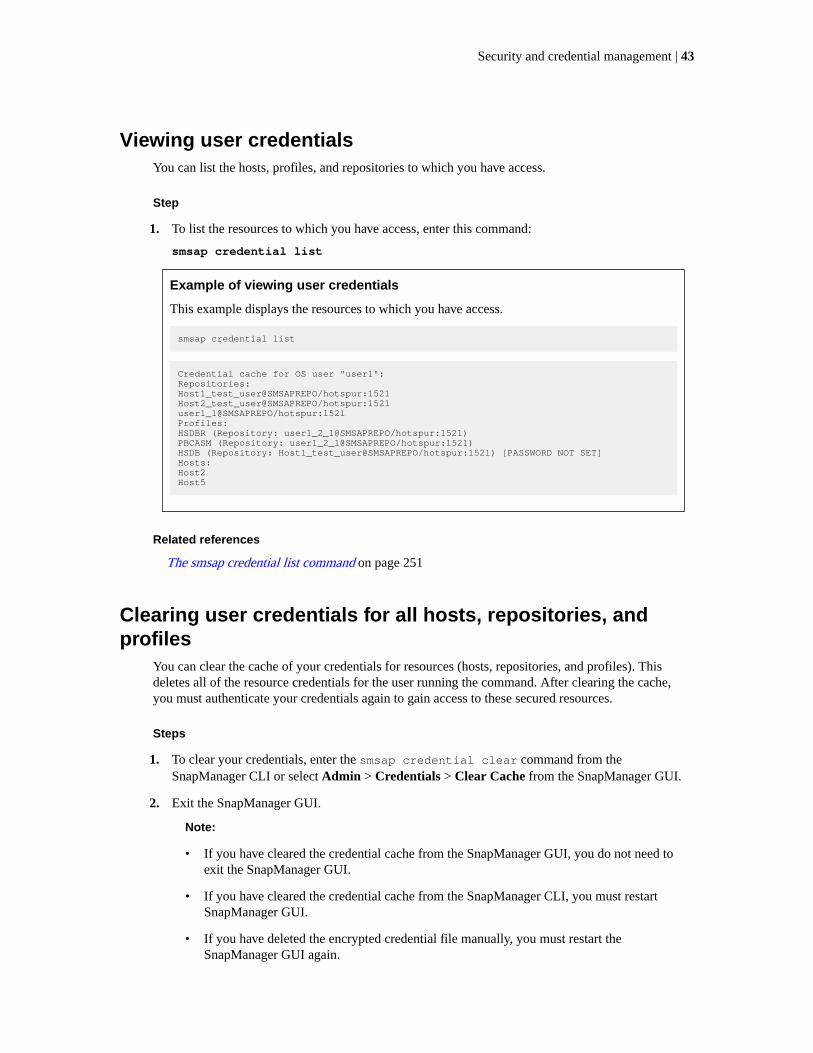
Viewing user credentialsYou can list the hosts, profiles, and repositories to which you have access.
Step
1. To list the resources to which you have access, enter this command:
smsap credential list
Example of viewing user credentials
This example displays the resources to which you have access.
smsap credential list
Credential cache for OS user "user1":Repositories:Host1_test_user@SMSAPREPO/hotspur:1521Host2_test_user@SMSAPREPO/hotspur:1521user1_1@SMSAPREPO/hotspur:1521Profiles:HSDBR (Repository: user1_2_1@SMSAPREPO/hotspur:1521)PBCASM (Repository: user1_2_1@SMSAPREPO/hotspur:1521)HSDB (Repository: Host1_test_user@SMSAPREPO/hotspur:1521) [PASSWORD NOT SET]Hosts:Host2Host5
Related references
The smsap credential list command on page 251
Clearing user credentials for all hosts, repositories, andprofiles
You can clear the cache of your credentials for resources (hosts, repositories, and profiles). Thisdeletes all of the resource credentials for the user running the command. After clearing the cache,you must authenticate your credentials again to gain access to these secured resources.
Steps
1. To clear your credentials, enter the smsap credential clear command from theSnapManager CLI or select Admin > Credentials > Clear Cache from the SnapManager GUI.
2. Exit the SnapManager GUI.
Note:
• If you have cleared the credential cache from the SnapManager GUI, you do not need toexit the SnapManager GUI.
• If you have cleared the credential cache from the SnapManager CLI, you must restartSnapManager GUI.
• If you have deleted the encrypted credential file manually, you must restart theSnapManager GUI again.
Security and credential management | 43

3. To set the credentials again, repeat the process to set credentials for the repository, profile host,and profile. For additional information on setting the user credentials again, refer to "Settingcredentials after clearing credential cache."
Related references
The smsap credential clear command on page 249
Setting credentials after clearing the credential cache
After clearing the cache to remove the stored user credentials, you can set the credentials for thehosts, repositories, and profiles.
About this task
You must ensure that you set the same user credentials for the repository, profile host, and profile thatyou had given earlier. An encrypted credentials file is created while setting the user credentials.
The credentials file is located at /root/.netapp/smsap/3.3.0.
From the SnapManager graphical user interface (GUI), if there is no repository under Repositories,perform the following steps:
Steps
1. Click Tasks > Add Existing Repository to add an existing repository.
2. Perform the following steps to set the credentials for repository:
a. Right-click the repository and select Open.
b. In the Repository Credentials Authentication window, enter the user credentials.
3. Perform the following steps to set the credentials for host:
a. Right-click the host under the repository and select Open.
b. In the Host Credentials Authentication window, enter the user credentials.
4. Perform the following steps to set the credentials for profile:
a. Right-click the profile under the host and select Open.
b. In the Profile Credentials Authentication window, enter the user credentials.
Deleting credentials for individual resourcesYou can delete the credentials for any one of the secured resources, such as a profile, repository, orhost. This enables you to remove the credentials for just one resource, rather than clearing the user'scredentials for all resources.
Related references
The smsap credential delete command on page 249
44 | Administration Guide for UNIX
Deleting user credentials for repositories
You can delete the credentials so a user can no longer access a particular repository. This commandenables you to remove the credentials for just one resource, rather than clearing the user's credentialsfor all resources.
Step
1. To delete repository credentials for a user, enter this command:
smsap credential delete -repository -dbname repo_service_name -hostrepo_host -login -username repo_username -port repo_port
Deleting user credentials for hosts
You can delete the credentials for a host so a user can no longer access it. This command enables youto remove the credentials for just one resource, rather than clearing all the user's credentials for allresources.
Step
1. To delete host credentials for a user, enter this command:
smsap credential delete -host -namehost_name -username-username
Deleting user credentials for profiles
You can delete the user credentials for a profile so a user can no longer access it.
Step
1. To delete profile credentials for a user, enter this command:
smsap credential delete -profile -name profile_name
Security and credential management | 45
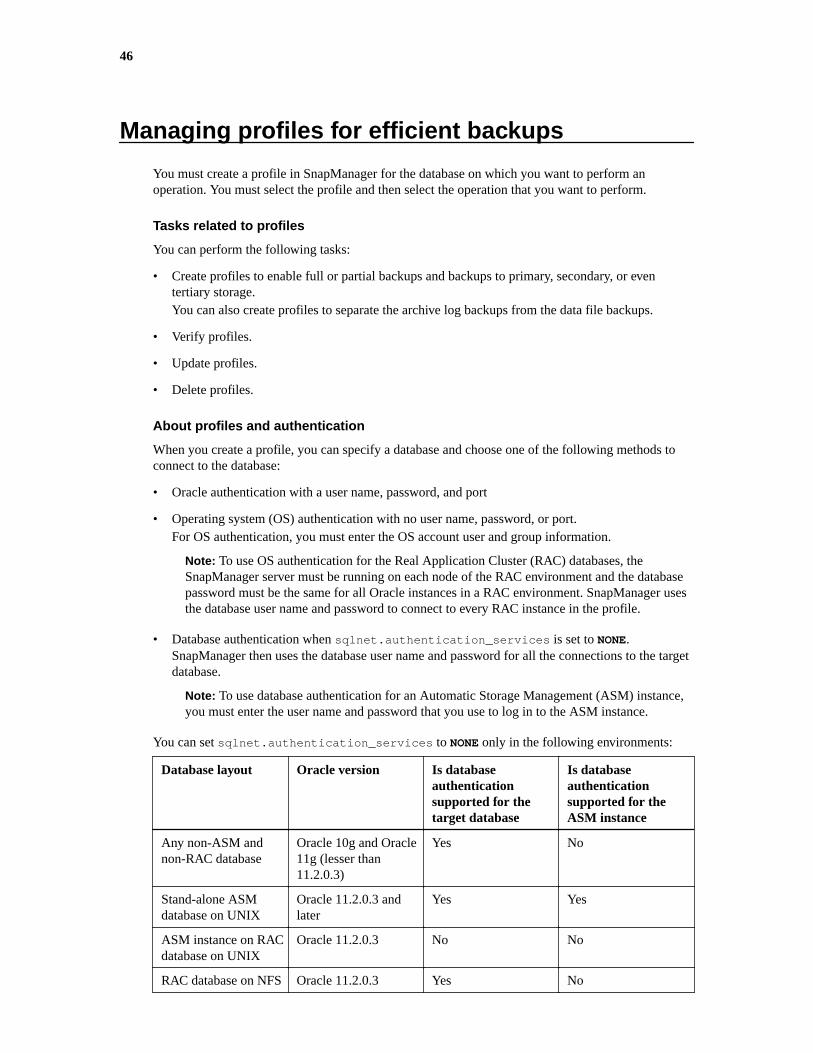
Managing profiles for efficient backups
You must create a profile in SnapManager for the database on which you want to perform anoperation. You must select the profile and then select the operation that you want to perform.
Tasks related to profiles
You can perform the following tasks:
• Create profiles to enable full or partial backups and backups to primary, secondary, or eventertiary storage.
You can also create profiles to separate the archive log backups from the data file backups.
• Verify profiles.
• Update profiles.
• Delete profiles.
About profiles and authentication
When you create a profile, you can specify a database and choose one of the following methods toconnect to the database:
• Oracle authentication with a user name, password, and port
• Operating system (OS) authentication with no user name, password, or port.
For OS authentication, you must enter the OS account user and group information.
Note: To use OS authentication for the Real Application Cluster (RAC) databases, theSnapManager server must be running on each node of the RAC environment and the databasepassword must be the same for all Oracle instances in a RAC environment. SnapManager usesthe database user name and password to connect to every RAC instance in the profile.
• Database authentication when sqlnet.authentication_services is set to NONE.SnapManager then uses the database user name and password for all the connections to the targetdatabase.
Note: To use database authentication for an Automatic Storage Management (ASM) instance,you must enter the user name and password that you use to log in to the ASM instance.
You can set sqlnet.authentication_services to NONE only in the following environments:
Database layout Oracle version Is databaseauthenticationsupported for thetarget database
Is databaseauthenticationsupported for theASM instance
Any non-ASM andnon-RAC database
Oracle 10g and Oracle11g (lesser than11.2.0.3)
Yes No
Stand-alone ASMdatabase on UNIX
Oracle 11.2.0.3 andlater
Yes Yes
ASM instance on RACdatabase on UNIX
Oracle 11.2.0.3 No No
RAC database on NFS Oracle 11.2.0.3 Yes No
46
Note: After you disable sqlnet.authentication_services and change the authenticationmethod to database authentication, you must set sqlnet.authentication_services to NONE.
If you are accessing a profile for the first time, you must enter your profile password. After you enteryour credentials, you can view the database backups within the profile.
Related concepts
What profiles are on page 14
Creating profilesWhen creating profiles, you can assign a particular Oracle database user account to the profile. Youcan set the retention policy for the profile, enable backup protection to secondary storage for all thebackups using this profile, and set the retention count and duration for each retention class.
About this task
If you do not provide the values of the -login, -password, and -port parameters of the database,the operating system (OS) authentication mode uses the default credentials.
While creating a profile, SnapManager performs a restore eligibility check to determine the restoremechanism that can be used to restore the database. If the database is on a qtree and the parentvolume is not eligible for a fast or volume-based restore, the analysis might be wrong.
SnapManager (3.2 or later) enables you to separate archive log files from the data files while creatinga new profile or updating an existing profile. After you have separated the backup using the profile,you can either create only the data files-only backup or archive log-only backup of the database. Youcan use the new profile or the updated profile to create the backup containing both the data files andarchive log files. However, you cannot use the profile to create the full backup or revert the settings.
Profiles for creating full and partial backups
You can create profiles to create the full database backup containing the data files, control files, andarchive log files and partial database backup containing specified data files or tablespaces, all thecontrol files, and all the archive log files. SnapManager does not allow you to create separate archivelog backups using the profiles created for full and partial backups.
Profiles for creating data files-only backups and archivelogs-only backups
When you create a new profile, you can include -separate-archivelog-backups to separate thearchive log backup from the data file backup. You can also update the existing profile to separate thearchive log backup from the data file backup.
By using the new profile options to separate the archive log backups, you can perform the followingSnapManager operations:
• Create an archive log backup
• Delete an archive log backup
• Mount an archive log backup
• Free an archive log backup
While creating the profile to separate archive log backups from the data files backup, if the archivelog files do not exist in the database for which the profile is created, then a warning messageArchived log file does not exist in the active file system. The archived
log file versions earlier than the <archive log thread version> log file
will not be included in the backup is displayed. Even if you create backups for thisdatabase, the archive log files are not available in the database backups.
Managing profiles for efficient backups | 47
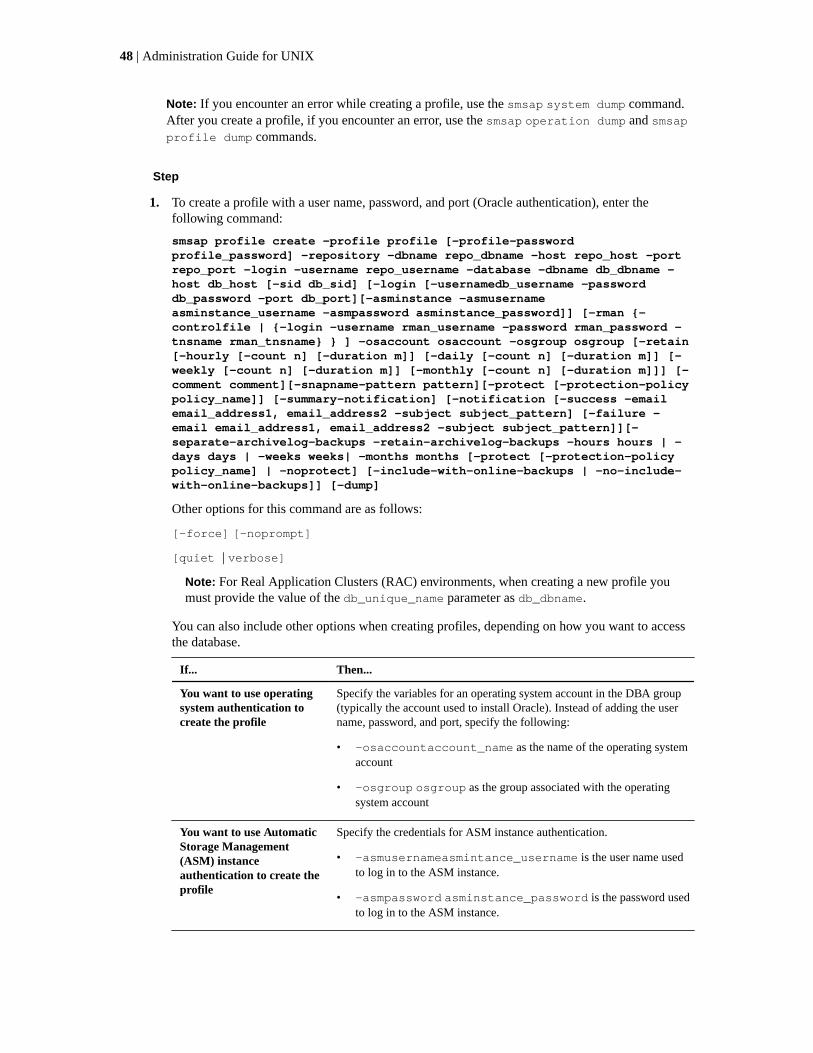
Note: If you encounter an error while creating a profile, use the smsap system dump command.After you create a profile, if you encounter an error, use the smsap operation dump and smsapprofile dump commands.
Step
1. To create a profile with a user name, password, and port (Oracle authentication), enter thefollowing command:
smsap profile create -profile profile [-profile-passwordprofile_password] -repository -dbname repo_dbname -host repo_host -portrepo_port -login -username repo_username -database -dbname db_dbname -host db_host [-sid db_sid] [-login [-usernamedb_username -passworddb_password -port db_port][-asminstance -asmusernameasminstance_username -asmpassword asminstance_password]] [-rman {-controlfile | {-login -username rman_username -password rman_password -tnsname rman_tnsname} } ] -osaccount osaccount -osgroup osgroup [-retain[-hourly [-count n] [-duration m]] [-daily [-count n] [-duration m]] [-weekly [-count n] [-duration m]] [-monthly [-count n] [-duration m]]] [-comment comment][-snapname-pattern pattern][-protect [-protection-policypolicy_name]] [-summary-notification] [-notification [-success -emailemail_address1, email_address2 -subject subject_pattern] [-failure -email email_address1, email_address2 -subject subject_pattern]][-separate-archivelog-backups -retain-archivelog-backups -hours hours | -days days | -weeks weeks| -months months [-protect [-protection-policypolicy_name] | -noprotect] [-include-with-online-backups | -no-include-with-online-backups]] [-dump]
Other options for this command are as follows:
[-force] [-noprompt]
[quiet | verbose]
Note: For Real Application Clusters (RAC) environments, when creating a new profile youmust provide the value of the db_unique_name parameter as db_dbname.
You can also include other options when creating profiles, depending on how you want to accessthe database.
If... Then...
You want to use operatingsystem authentication tocreate the profile
Specify the variables for an operating system account in the DBA group(typically the account used to install Oracle). Instead of adding the username, password, and port, specify the following:
• -osaccountaccount_name as the name of the operating systemaccount
• -osgroup osgroup as the group associated with the operatingsystem account
You want to use AutomaticStorage Management(ASM) instanceauthentication to create theprofile
Specify the credentials for ASM instance authentication.
• -asmusernameasmintance_username is the user name usedto log in to the ASM instance.
• -asmpassword asminstance_password is the password usedto log in to the ASM instance.
48 | Administration Guide for UNIX
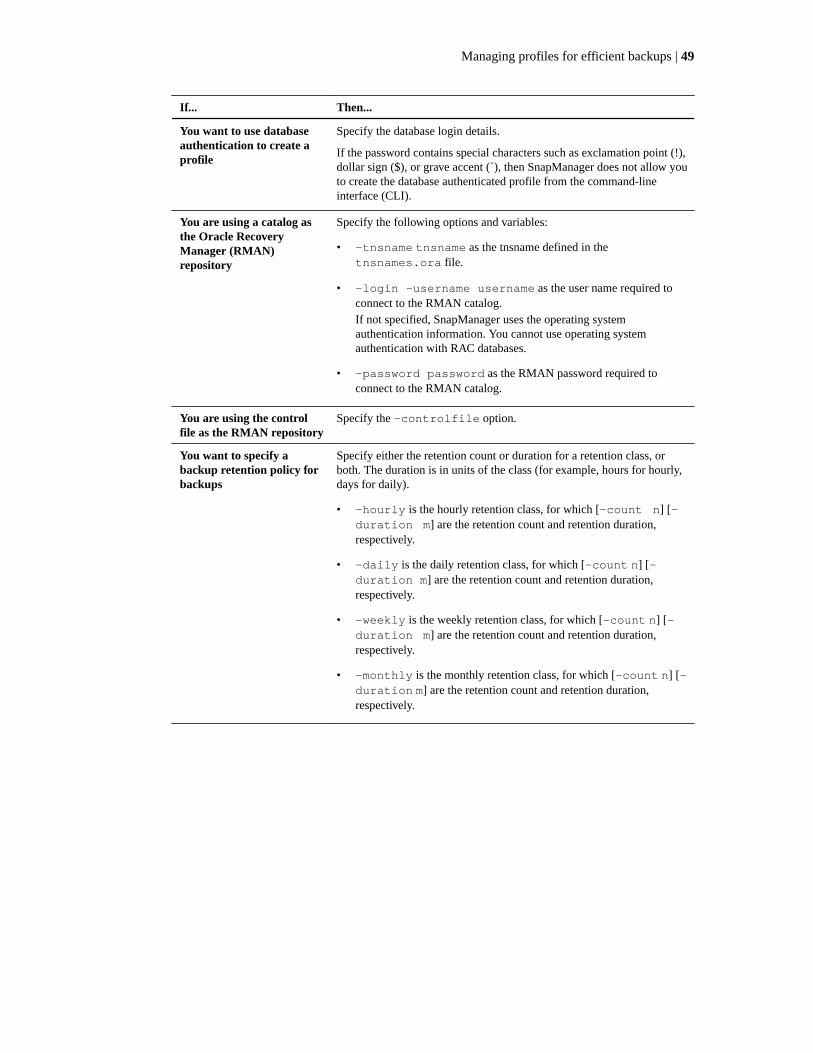
If... Then...
You want to use databaseauthentication to create aprofile
Specify the database login details.
If the password contains special characters such as exclamation point (!),dollar sign ($), or grave accent (`), then SnapManager does not allow youto create the database authenticated profile from the command-lineinterface (CLI).
You are using a catalog asthe Oracle RecoveryManager (RMAN)repository
Specify the following options and variables:
• -tnsname tnsname as the tnsname defined in thetnsnames.ora file.
• -login -username username as the user name required toconnect to the RMAN catalog.
If not specified, SnapManager uses the operating systemauthentication information. You cannot use operating systemauthentication with RAC databases.
• -password password as the RMAN password required toconnect to the RMAN catalog.
You are using the controlfile as the RMAN repository
Specify the -controlfile option.
You want to specify abackup retention policy forbackups
Specify either the retention count or duration for a retention class, orboth. The duration is in units of the class (for example, hours for hourly,days for daily).
• -hourly is the hourly retention class, for which [-count n] [-duration m] are the retention count and retention duration,respectively.
• -daily is the daily retention class, for which [-count n] [-duration m] are the retention count and retention duration,respectively.
• -weekly is the weekly retention class, for which [-count n] [-duration m] are the retention count and retention duration,respectively.
• -monthly is the monthly retention class, for which [-count n] [-duration m] are the retention count and retention duration,respectively.
Managing profiles for efficient backups | 49

If... Then...
You want to enable backupprotection for the profile
Specify the following options and variables:
• -protect enables backup protection.
If you are using Data ONTAP operating in 7-Mode, this optioncreates an application dataset in the Data Fabric Manager (DFM)server and adds members related to the database, data file, controlfiles, and archive logs. If the dataset already exists, the same datasetis reused when a profile is created.
• -protection-policy policy allows you to specify theprotection policy.
If you are using Data ONTAP operating in 7-Mode and SnapManageris integrated with Protection Manager, you must specify one of theProtection Manager policies.
Note: To list the possible protection policies, use the smsapprotection-policy list command.
If you are using clustered Data ONTAP, you must select eitherSnapManager_cDOT_Mirror or SnapManager_cDOT_Vault.
Note: The profile create operation fails in the following scenarios:
◦ If you are using clustered Data ONTAP but select ProtectionManager policy
◦ If you are using Data ONTAP operating in 7-Mode but selecteither SnapManager_cDOT_Mirror orSnapManager_cDOT_Vault policy
◦ If you created SnapMirror relationship but selectedSnapManager_cDOT_Vault policy or created SnapVaultrelationship but selected SnapManager_cDOT_Mirror policy
◦ If you have not created either SnapMirror or SnapVaultrelationship but selected either SnapManager_cDOT_Vault orSnapManager_cDOT_Mirror policy
• -noprotect indicates not to protect the database backups createdusing the profile.
Note: If -protect is specified without -protection-policy,then the dataset will not have a protection policy. If -protect isspecified and -protection-policy is not set when the profile iscreated, then it can be set later by the smsap profile updatecommand or set by the storage administrator by using ProtectionManager console.
50 | Administration Guide for UNIX
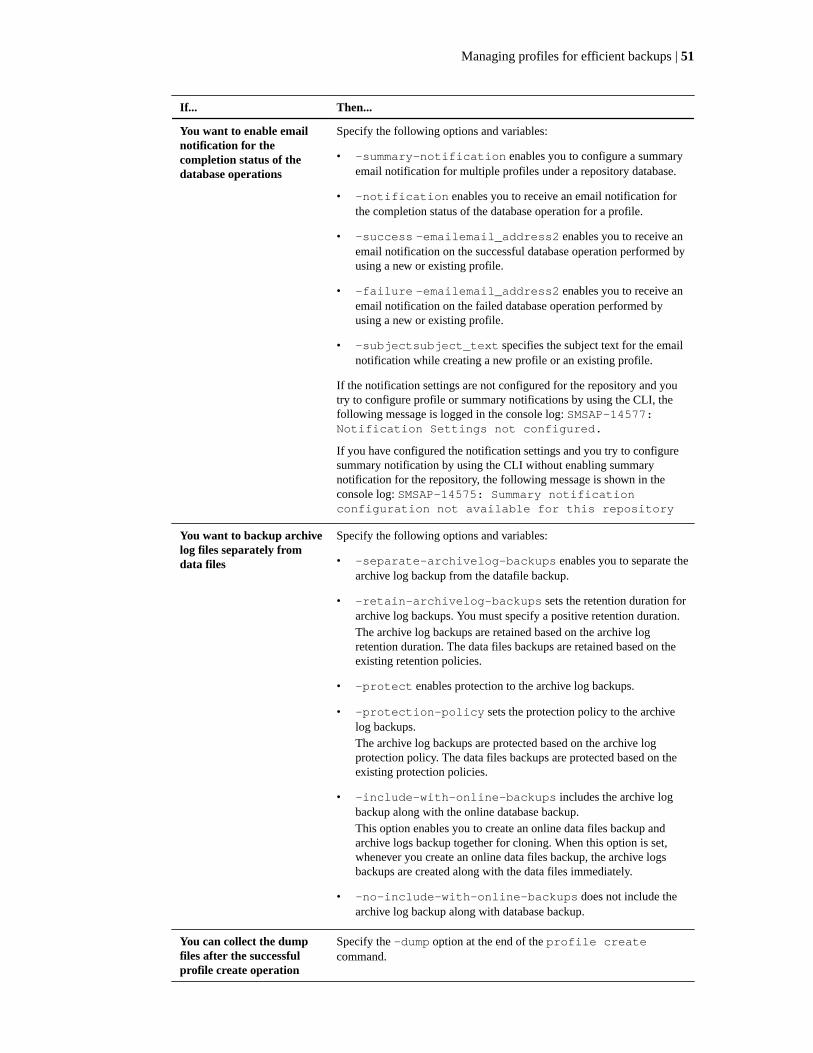
If... Then...
You want to enable emailnotification for thecompletion status of thedatabase operations
Specify the following options and variables:
• -summary-notification enables you to configure a summaryemail notification for multiple profiles under a repository database.
• -notification enables you to receive an email notification forthe completion status of the database operation for a profile.
• -success -emailemail_address2 enables you to receive anemail notification on the successful database operation performed byusing a new or existing profile.
• -failure -emailemail_address2 enables you to receive anemail notification on the failed database operation performed byusing a new or existing profile.
• -subjectsubject_text specifies the subject text for the emailnotification while creating a new profile or an existing profile.
If the notification settings are not configured for the repository and youtry to configure profile or summary notifications by using the CLI, thefollowing message is logged in the console log: SMSAP-14577:Notification Settings not configured.
If you have configured the notification settings and you try to configuresummary notification by using the CLI without enabling summarynotification for the repository, the following message is shown in theconsole log: SMSAP-14575: Summary notificationconfiguration not available for this repository
You want to backup archivelog files separately fromdata files
Specify the following options and variables:
• -separate-archivelog-backups enables you to separate thearchive log backup from the datafile backup.
• -retain-archivelog-backups sets the retention duration forarchive log backups. You must specify a positive retention duration.
The archive log backups are retained based on the archive logretention duration. The data files backups are retained based on theexisting retention policies.
• -protect enables protection to the archive log backups.
• -protection-policy sets the protection policy to the archivelog backups.
The archive log backups are protected based on the archive logprotection policy. The data files backups are protected based on theexisting protection policies.
• -include-with-online-backups includes the archive logbackup along with the online database backup.
This option enables you to create an online data files backup andarchive logs backup together for cloning. When this option is set,whenever you create an online data files backup, the archive logsbackups are created along with the data files immediately.
• -no-include-with-online-backups does not include thearchive log backup along with database backup.
You can collect the dumpfiles after the successfulprofile create operation
Specify the -dump option at the end of the profile createcommand.
Managing profiles for efficient backups | 51
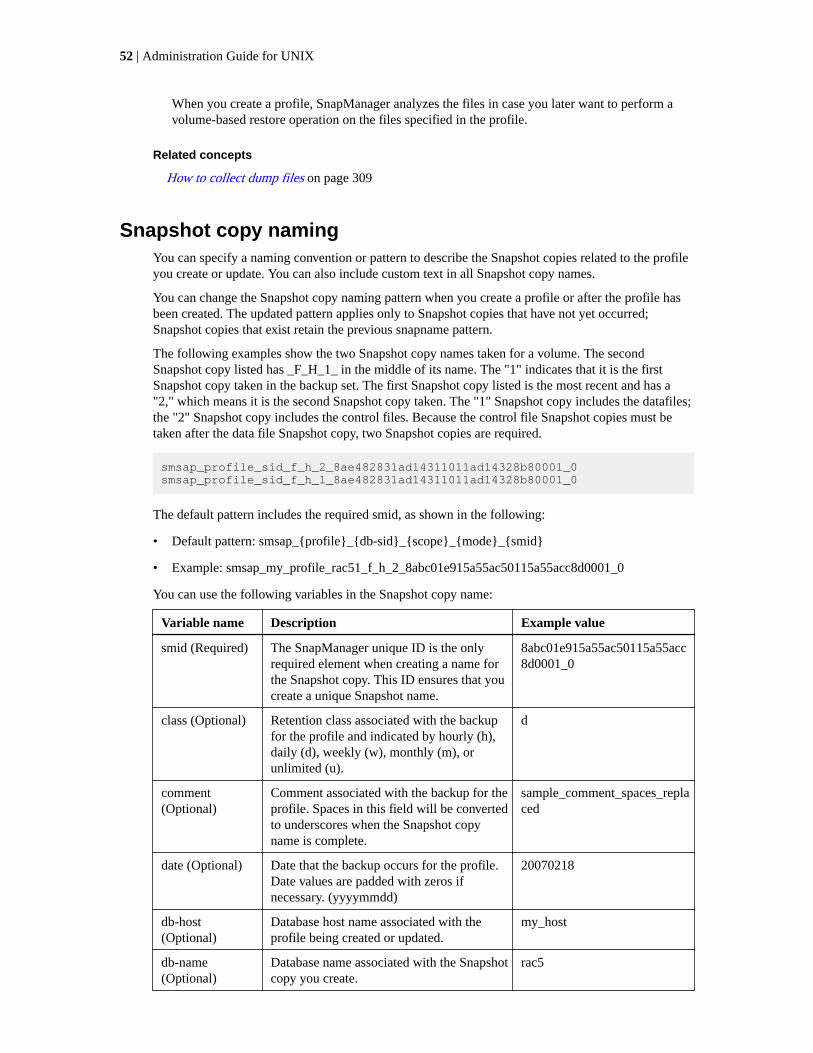
When you create a profile, SnapManager analyzes the files in case you later want to perform avolume-based restore operation on the files specified in the profile.
Related concepts
How to collect dump files on page 309
Snapshot copy namingYou can specify a naming convention or pattern to describe the Snapshot copies related to the profileyou create or update. You can also include custom text in all Snapshot copy names.
You can change the Snapshot copy naming pattern when you create a profile or after the profile hasbeen created. The updated pattern applies only to Snapshot copies that have not yet occurred;Snapshot copies that exist retain the previous snapname pattern.
The following examples show the two Snapshot copy names taken for a volume. The secondSnapshot copy listed has _F_H_1_ in the middle of its name. The "1" indicates that it is the firstSnapshot copy taken in the backup set. The first Snapshot copy listed is the most recent and has a"2," which means it is the second Snapshot copy taken. The "1" Snapshot copy includes the datafiles;the "2" Snapshot copy includes the control files. Because the control file Snapshot copies must betaken after the data file Snapshot copy, two Snapshot copies are required.
smsap_profile_sid_f_h_2_8ae482831ad14311011ad14328b80001_0smsap_profile_sid_f_h_1_8ae482831ad14311011ad14328b80001_0
The default pattern includes the required smid, as shown in the following:
• Default pattern: smsap_{profile}_{db-sid}_{scope}_{mode}_{smid}
• Example: smsap_my_profile_rac51_f_h_2_8abc01e915a55ac50115a55acc8d0001_0
You can use the following variables in the Snapshot copy name:
Variable name Description Example value
smid (Required) The SnapManager unique ID is the onlyrequired element when creating a name forthe Snapshot copy. This ID ensures that youcreate a unique Snapshot name.
8abc01e915a55ac50115a55acc8d0001_0
class (Optional) Retention class associated with the backupfor the profile and indicated by hourly (h),daily (d), weekly (w), monthly (m), orunlimited (u).
d
comment(Optional)
Comment associated with the backup for theprofile. Spaces in this field will be convertedto underscores when the Snapshot copyname is complete.
sample_comment_spaces_replaced
date (Optional) Date that the backup occurs for the profile.Date values are padded with zeros ifnecessary. (yyyymmdd)
20070218
db-host(Optional)
Database host name associated with theprofile being created or updated.
my_host
db-name(Optional)
Database name associated with the Snapshotcopy you create.
rac5
52 | Administration Guide for UNIX
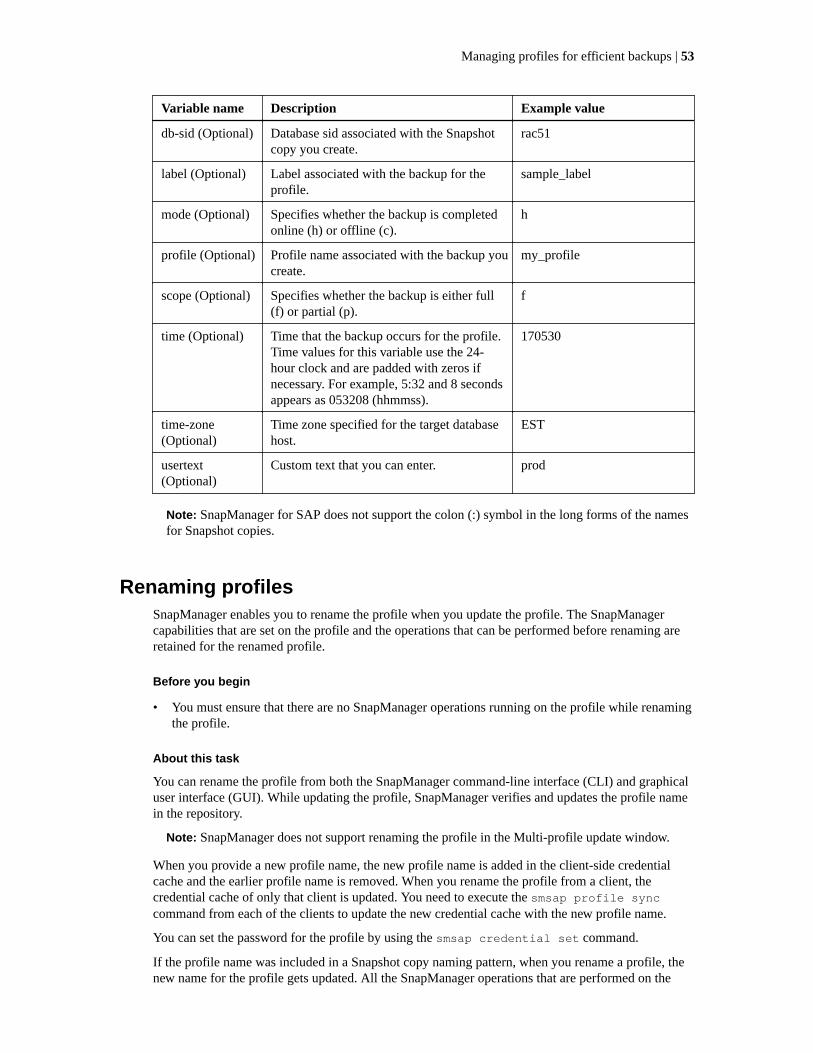
Variable name Description Example value
db-sid (Optional) Database sid associated with the Snapshotcopy you create.
rac51
label (Optional) Label associated with the backup for theprofile.
sample_label
mode (Optional) Specifies whether the backup is completedonline (h) or offline (c).
h
profile (Optional) Profile name associated with the backup youcreate.
my_profile
scope (Optional) Specifies whether the backup is either full(f) or partial (p).
f
time (Optional) Time that the backup occurs for the profile.Time values for this variable use the 24-hour clock and are padded with zeros ifnecessary. For example, 5:32 and 8 secondsappears as 053208 (hhmmss).
170530
time-zone(Optional)
Time zone specified for the target databasehost.
EST
usertext(Optional)
Custom text that you can enter. prod
Note: SnapManager for SAP does not support the colon (:) symbol in the long forms of the namesfor Snapshot copies.
Renaming profilesSnapManager enables you to rename the profile when you update the profile. The SnapManagercapabilities that are set on the profile and the operations that can be performed before renaming areretained for the renamed profile.
Before you begin
• You must ensure that there are no SnapManager operations running on the profile while renamingthe profile.
About this task
You can rename the profile from both the SnapManager command-line interface (CLI) and graphicaluser interface (GUI). While updating the profile, SnapManager verifies and updates the profile namein the repository.
Note: SnapManager does not support renaming the profile in the Multi-profile update window.
When you provide a new profile name, the new profile name is added in the client-side credentialcache and the earlier profile name is removed. When you rename the profile from a client, thecredential cache of only that client is updated. You need to execute the smsap profile synccommand from each of the clients to update the new credential cache with the new profile name.
You can set the password for the profile by using the smsap credential set command.
If the profile name was included in a Snapshot copy naming pattern, when you rename a profile, thenew name for the profile gets updated. All the SnapManager operations that are performed on the
Managing profiles for efficient backups | 53
profile use the new profile name. The backups created with earlier profile continue to have the earlierprofile name and are used to perform other SnapManager operations.
If you are performing rolling upgrade of SnapManager server hosts, you must ensure that youperform the complete upgrade before renaming the profile.
The new name for the profile is updated only from the SnapManager client from which the request ismade. The SnapManager clients that are connected to the SnapManager server are not notified aboutthe change in profile name. You can check the operation log to know about the change in the profilename.
Note: If a scheduled backup operation begins at the time of renaming the profile, then thescheduled operation fails.
Step
1. Enter the following command:
smsap profile update -profile profile [-new-profile new_profile_name]
Changing profile passwordsTo protect the existing profiles in the repository, you should update the passwords for the profiles.You can apply this updated password when creating a backup using this profile.
Step
1. To update the profile password for an existing profile, enter this command:
smsap profile update -profile profile_name -profile-password password
Related references
The smsap profile update command on page 277
Resetting the profile passwordYou can reset the profile password if you do not remember the password that you had provided whilecreating the profile.
Before you begin
• You must ensure that the SnapManager server is running on the repository database.
• You must have the root user credentials of the host on which the repository database is residing.
• You must ensure that the profile is not in use for any operation when the password is being resetfor that profile.
About this task
You can reset the password from either the SnapManager CLI or GUI. While resetting the password,SnapManager queries the SnapManager server on the repository host to identify the operating systemfor the repository host. You must enter the authorized user credentials for connecting to therepository host. The SnapManager server authenticates users with their root credentials on therepository database. When the authentication is successful, SnapManager resets the profile passwordon the SnapManager server with the new password.
Note: SnapManager does not maintain the history of the password reset operations.
54 | Administration Guide for UNIX
Step
1. Reset the profile password by entering the following command:
smsap password reset -profile profile [-profile-passwordprofile_password] [-repository-hostadmin-password admin_password]
Authorizing access to profilesIn addition to role-based access control (RBAC), SnapManager enables you to set a password for aprofile to prevent unauthorized access.
Step
1. Enter the following command:
smsap credential set -profile -name profile_name [-password password]
Related references
The smsap credential set command on page 251
Verifying profilesYou can verify that an existing profile is set up correctly. When you verify a profile, SnapManagerchecks the environment for the profile you specify and verifies that the profile is set up and thedatabase in this profile is accessible.
Step
1. To verify if the profile is set up correctly, enter this command:
smsap profile verify -profile profile_name
Related references
The smsap profile verify command on page 281
Updating profilesYou can update the profiles to modify the profile password, the number of backups to retain, accessto the database, the operating system (OS) authentication to database authentication and vice versa,and information about the host. If the Oracle database password information changes, you must alsochange that information in the profile.
About this task
If protection policy is enabled on the profile, you cannot change the policy by using SnapManager.The storage administrator must change the policy by using the Protection Manager's console.
SnapManager (3.2 or later) enables you to update the profile to separate archive log backups from thedata file backups by using the -separate-archivelog-backups option. You can specify separateretention duration and protection policy for the archive log backup. SnapManager enables you toinclude the archive log backup along with online database backup. You can also create an onlinedatafile backup and archive log backup together for cloning. When you create an online data filesbackup, the archive logs backups are immediately created along with the data files.
Managing profiles for efficient backups | 55
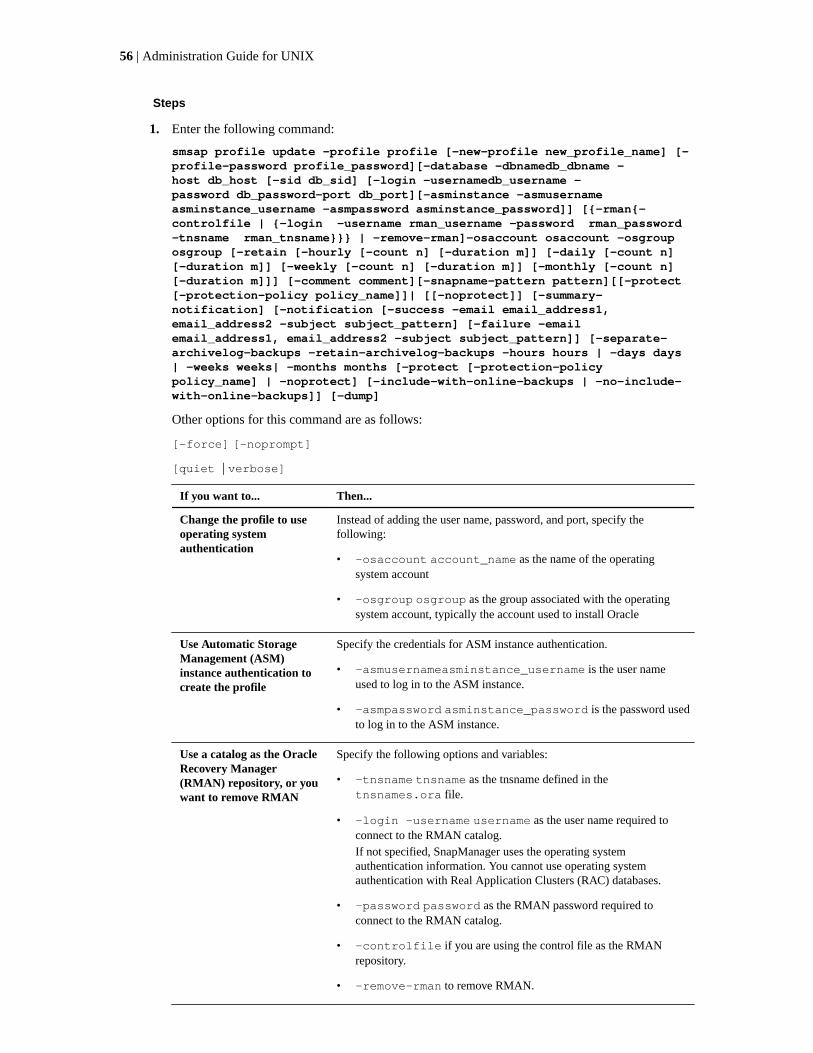
Steps
1. Enter the following command:
smsap profile update -profile profile [-new-profile new_profile_name] [-profile-password profile_password][-database -dbnamedb_dbname -host db_host [-sid db_sid] [-login -usernamedb_username -password db_password-port db_port][-asminstance -asmusernameasminstance_username -asmpassword asminstance_password]] [{-rman{-controlfile | {-login -username rman_username -password rman_password-tnsname rman_tnsname}}} | -remove-rman]-osaccount osaccount -osgrouposgroup [-retain [-hourly [-count n] [-duration m]] [-daily [-count n][-duration m]] [-weekly [-count n] [-duration m]] [-monthly [-count n][-duration m]]] [-comment comment][-snapname-pattern pattern][[-protect[-protection-policy policy_name]]| [[-noprotect]] [-summary-notification] [-notification [-success -email email_address1,email_address2 -subject subject_pattern] [-failure -emailemail_address1, email_address2 -subject subject_pattern]] [-separate-archivelog-backups -retain-archivelog-backups -hours hours | -days days| -weeks weeks| -months months [-protect [-protection-policypolicy_name] | -noprotect] [-include-with-online-backups | -no-include-with-online-backups]] [-dump]
Other options for this command are as follows:
[-force] [-noprompt]
[quiet | verbose]
If you want to... Then...
Change the profile to useoperating systemauthentication
Instead of adding the user name, password, and port, specify thefollowing:
• -osaccount account_name as the name of the operatingsystem account
• -osgroup osgroup as the group associated with the operatingsystem account, typically the account used to install Oracle
Use Automatic StorageManagement (ASM)instance authentication tocreate the profile
Specify the credentials for ASM instance authentication.
• -asmusernameasminstance_username is the user nameused to log in to the ASM instance.
• -asmpassword asminstance_password is the password usedto log in to the ASM instance.
Use a catalog as the OracleRecovery Manager(RMAN) repository, or youwant to remove RMAN
Specify the following options and variables:
• -tnsname tnsname as the tnsname defined in thetnsnames.ora file.
• -login -username username as the user name required toconnect to the RMAN catalog.
If not specified, SnapManager uses the operating systemauthentication information. You cannot use operating systemauthentication with Real Application Clusters (RAC) databases.
• -password password as the RMAN password required toconnect to the RMAN catalog.
• -controlfile if you are using the control file as the RMANrepository.
• -remove-rman to remove RMAN.
56 | Administration Guide for UNIX
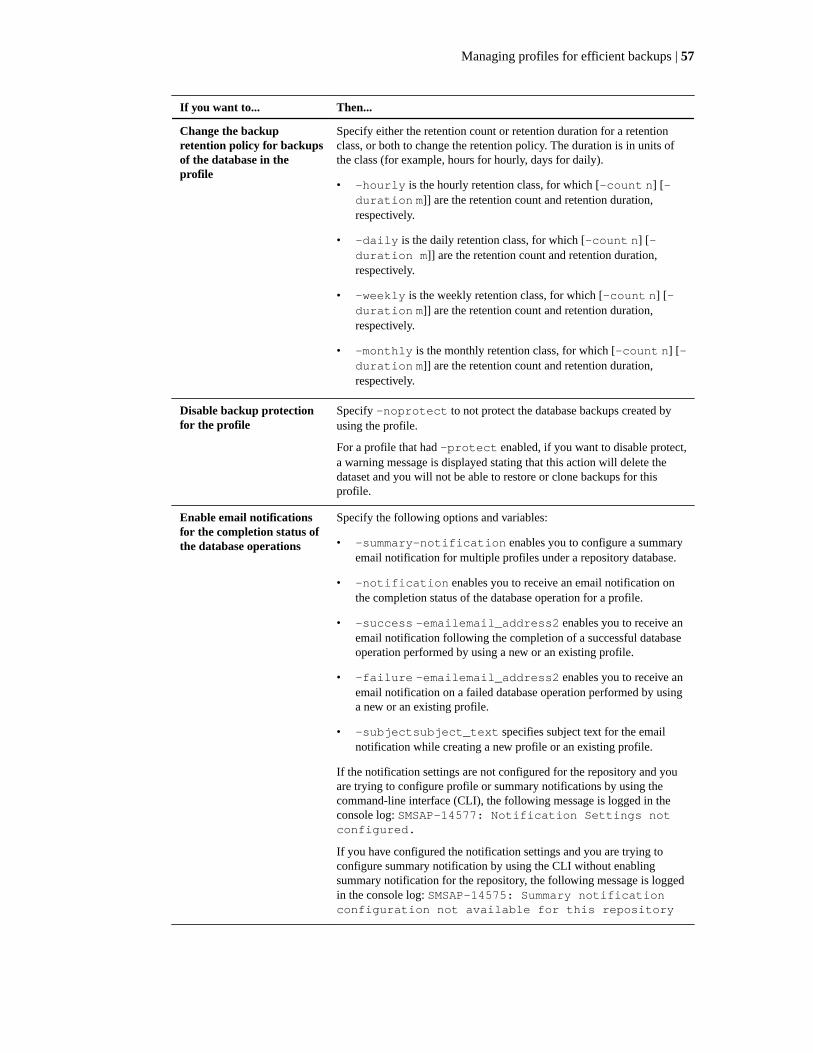
If you want to... Then...
Change the backupretention policy for backupsof the database in theprofile
Specify either the retention count or retention duration for a retentionclass, or both to change the retention policy. The duration is in units ofthe class (for example, hours for hourly, days for daily).
• -hourly is the hourly retention class, for which [-count n] [-duration m]] are the retention count and retention duration,respectively.
• -daily is the daily retention class, for which [-count n] [-duration m]] are the retention count and retention duration,respectively.
• -weekly is the weekly retention class, for which [-count n] [-duration m]] are the retention count and retention duration,respectively.
• -monthly is the monthly retention class, for which [-count n] [-duration m]] are the retention count and retention duration,respectively.
Disable backup protectionfor the profile
Specify -noprotect to not protect the database backups created byusing the profile.
For a profile that had -protect enabled, if you want to disable protect,a warning message is displayed stating that this action will delete thedataset and you will not be able to restore or clone backups for thisprofile.
Enable email notificationsfor the completion status ofthe database operations
Specify the following options and variables:
• -summary-notification enables you to configure a summaryemail notification for multiple profiles under a repository database.
• -notification enables you to receive an email notification onthe completion status of the database operation for a profile.
• -success -emailemail_address2 enables you to receive anemail notification following the completion of a successful databaseoperation performed by using a new or an existing profile.
• -failure -emailemail_address2 enables you to receive anemail notification on a failed database operation performed by usinga new or an existing profile.
• -subjectsubject_text specifies subject text for the emailnotification while creating a new profile or an existing profile.
If the notification settings are not configured for the repository and youare trying to configure profile or summary notifications by using thecommand-line interface (CLI), the following message is logged in theconsole log: SMSAP-14577: Notification Settings notconfigured.
If you have configured the notification settings and you are trying toconfigure summary notification by using the CLI without enablingsummary notification for the repository, the following message is loggedin the console log: SMSAP-14575: Summary notificationconfiguration not available for this repository
Managing profiles for efficient backups | 57
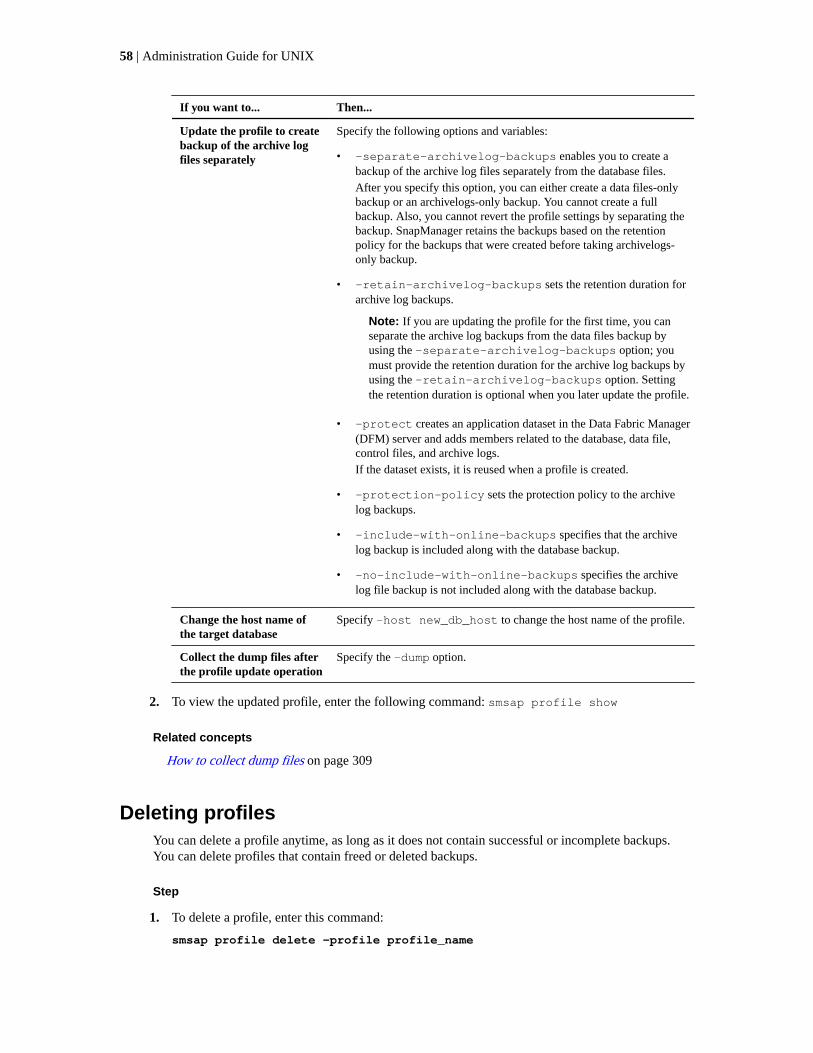
If you want to... Then...
Update the profile to createbackup of the archive logfiles separately
Specify the following options and variables:
• -separate-archivelog-backups enables you to create abackup of the archive log files separately from the database files.
After you specify this option, you can either create a data files-onlybackup or an archivelogs-only backup. You cannot create a fullbackup. Also, you cannot revert the profile settings by separating thebackup. SnapManager retains the backups based on the retentionpolicy for the backups that were created before taking archivelogs-only backup.
• -retain-archivelog-backups sets the retention duration forarchive log backups.
Note: If you are updating the profile for the first time, you canseparate the archive log backups from the data files backup byusing the -separate-archivelog-backups option; youmust provide the retention duration for the archive log backups byusing the -retain-archivelog-backups option. Settingthe retention duration is optional when you later update the profile.
• -protect creates an application dataset in the Data Fabric Manager(DFM) server and adds members related to the database, data file,control files, and archive logs.
If the dataset exists, it is reused when a profile is created.
• -protection-policy sets the protection policy to the archivelog backups.
• -include-with-online-backups specifies that the archivelog backup is included along with the database backup.
• -no-include-with-online-backups specifies the archivelog file backup is not included along with the database backup.
Change the host name ofthe target database
Specify -host new_db_host to change the host name of the profile.
Collect the dump files afterthe profile update operation
Specify the -dump option.
2. To view the updated profile, enter the following command: smsap profile show
Related concepts
How to collect dump files on page 309
Deleting profilesYou can delete a profile anytime, as long as it does not contain successful or incomplete backups.You can delete profiles that contain freed or deleted backups.
Step
1. To delete a profile, enter this command:
smsap profile delete -profile profile_name
58 | Administration Guide for UNIX

Related references
The smsap profile delete command on page 272
Managing profiles for efficient backups | 59
Backing up databases
SnapManager enables the backing up of data on local storage resources by using post-processingscripts or by protecting backups on secondary or tertiary storage resources. The choice to back up tosecondary storage provides an additional layer that preserves data in the case of a disaster.
SnapManager also enables storage administrators to configure their backups based on policy plans.By using SnapManager, administrators can identify backups that do not conform to policyrequirements and rectify those immediately.
SnapManager provides the following options to back up, restore, and recover the data in yourdatabase:
• Back up the entire database or a portion of it.
If you back up a portion of it, specify a group of tablespaces or a group of data files.
• Back up the data files and archive log files separately.
• Back up databases to primary storage (also called local storage) and protect them by backingthem up to secondary or tertiary storage (also called remote storage).
• Schedule routine backups.
How SnapManager (3.2 or later) differs from earlier SnapManager versions
SnapManager (3.1 or earlier) enables you to create full database backups that contain data files,control files, and archive log files.
SnapManager (3.1 or earlier) manages only the data files. The archive log files are maintained byusing solutions outside SnapManager.
SnapManager (3.1 or earlier) imposes the following constraints in managing database backups:
• Performance impact
When you perform a full, online database backup (when the database is in the backup mode), theperformance of the database reduces for the period of time until the backup is created. InSnapManager (3.2 or later), limited database backups and frequent archive log backups can betaken. Taking frequent archive log backups helps in preventing the database from being placed inbackup mode.
• Manual restore and recovery
When the required archive log files do not exist in the active file system, database administratorshave to identify which backup contains the archive log files, mount the database backups, andrecover the restored database. This process is time consuming.
• Space constraints
When a database backup is created, the archive log destinations become full causing the databasenot to respond until sufficient space is created on the storage. In SnapManager (3.2 or later), thearchive log files can be pruned from the active file system to free space periodically.
Why archive log backups are important
Archive log files are required to roll the database forward after a restore operation is performed.Every transaction on an Oracle database is captured in the archive log files (if the database is in thearchive log mode). Database administrators can restore the database backups by using the archive logfiles.
Advantages of archivelog-only backups
• Provides separate retention duration for archivelog-only backups
60
You can have less retention duration for the archivelog-only backups that are required forrecovery.
• Protects the archivelog-only backups based on archive log protection policies
You can select different protection policies for archivelog-only backups based on theirrequirement.
• Improves the performance of the database
• Consolidates archive log backups
SnapManager consolidates the archive log backups every time you take a backup by freeing theduplicate archive log backups.
What SnapManager database backups areSnapManager enables you to perform different backup tasks. You can assign retention classes tospecify how long the backup can be retained; once that time limit is reached, the backup is deleted.
• Create backups on the primary storage
• Create protected backups on the secondary storage resources
• Verify that the backups completed successfully
• View a list of backups
• Schedule backups by using the graphical user interface
• Manage the number of backups retained
• Free backup resources
• Mount and unmount backups
• Delete backups
SnapManager creates backups by using one of the following retention classes:
• Hourly
• Daily
• Weekly
• Monthly
• Unlimited
The Protection Manager must be installed to use protection policies for protecting backups. A backupcan have one of these protection states: not requested, not protected, or protected.
If new data files are added to the database, you should create a new backup immediately. Also, if yourestore a backup taken before the new data files were added and attempt to recover to a point after thenew data files were added, the automatic recovery process might fail. See the Oracle documentationto learn more about the process for recovering the data files added after a backup.
Backing up databases | 61
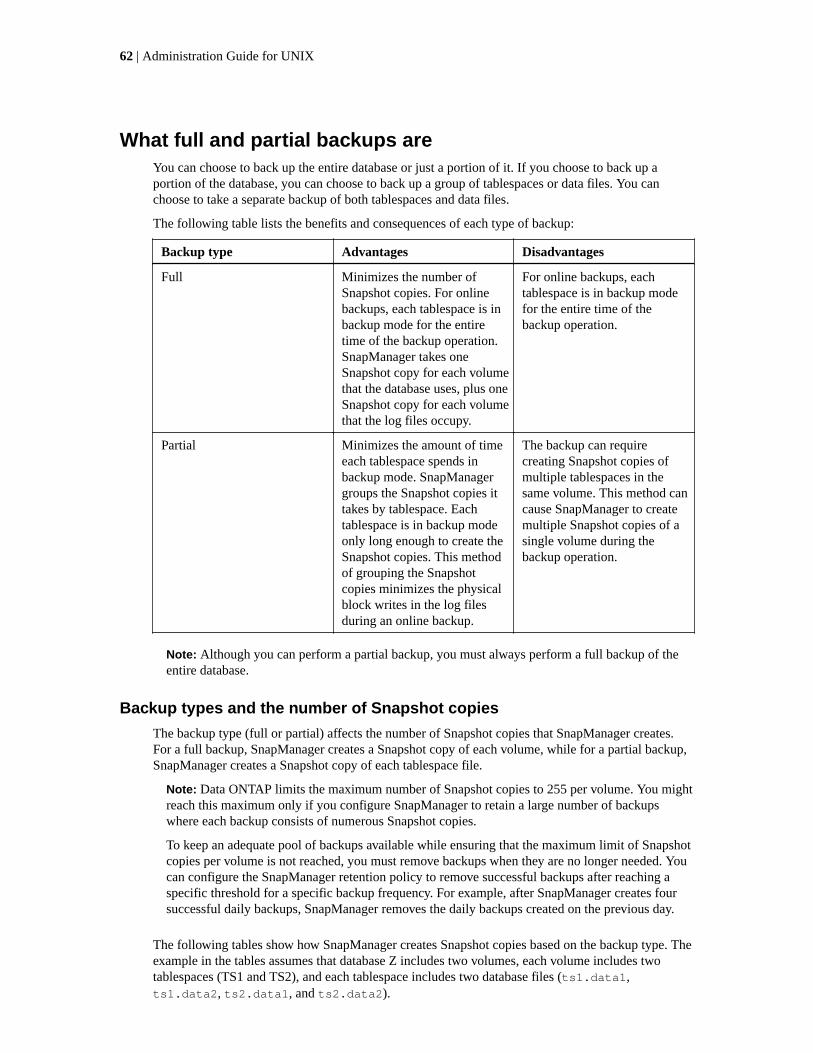
What full and partial backups areYou can choose to back up the entire database or just a portion of it. If you choose to back up aportion of the database, you can choose to back up a group of tablespaces or data files. You canchoose to take a separate backup of both tablespaces and data files.
The following table lists the benefits and consequences of each type of backup:
Backup type Advantages Disadvantages
Full Minimizes the number ofSnapshot copies. For onlinebackups, each tablespace is inbackup mode for the entiretime of the backup operation.SnapManager takes oneSnapshot copy for each volumethat the database uses, plus oneSnapshot copy for each volumethat the log files occupy.
For online backups, eachtablespace is in backup modefor the entire time of thebackup operation.
Partial Minimizes the amount of timeeach tablespace spends inbackup mode. SnapManagergroups the Snapshot copies ittakes by tablespace. Eachtablespace is in backup modeonly long enough to create theSnapshot copies. This methodof grouping the Snapshotcopies minimizes the physicalblock writes in the log filesduring an online backup.
The backup can requirecreating Snapshot copies ofmultiple tablespaces in thesame volume. This method cancause SnapManager to createmultiple Snapshot copies of asingle volume during thebackup operation.
Note: Although you can perform a partial backup, you must always perform a full backup of theentire database.
Backup types and the number of Snapshot copies
The backup type (full or partial) affects the number of Snapshot copies that SnapManager creates.For a full backup, SnapManager creates a Snapshot copy of each volume, while for a partial backup,SnapManager creates a Snapshot copy of each tablespace file.
Note: Data ONTAP limits the maximum number of Snapshot copies to 255 per volume. You mightreach this maximum only if you configure SnapManager to retain a large number of backupswhere each backup consists of numerous Snapshot copies.
To keep an adequate pool of backups available while ensuring that the maximum limit of Snapshotcopies per volume is not reached, you must remove backups when they are no longer needed. Youcan configure the SnapManager retention policy to remove successful backups after reaching aspecific threshold for a specific backup frequency. For example, after SnapManager creates foursuccessful daily backups, SnapManager removes the daily backups created on the previous day.
The following tables show how SnapManager creates Snapshot copies based on the backup type. Theexample in the tables assumes that database Z includes two volumes, each volume includes twotablespaces (TS1 and TS2), and each tablespace includes two database files (ts1.data1,ts1.data2, ts2.data1, and ts2.data2).
62 | Administration Guide for UNIX
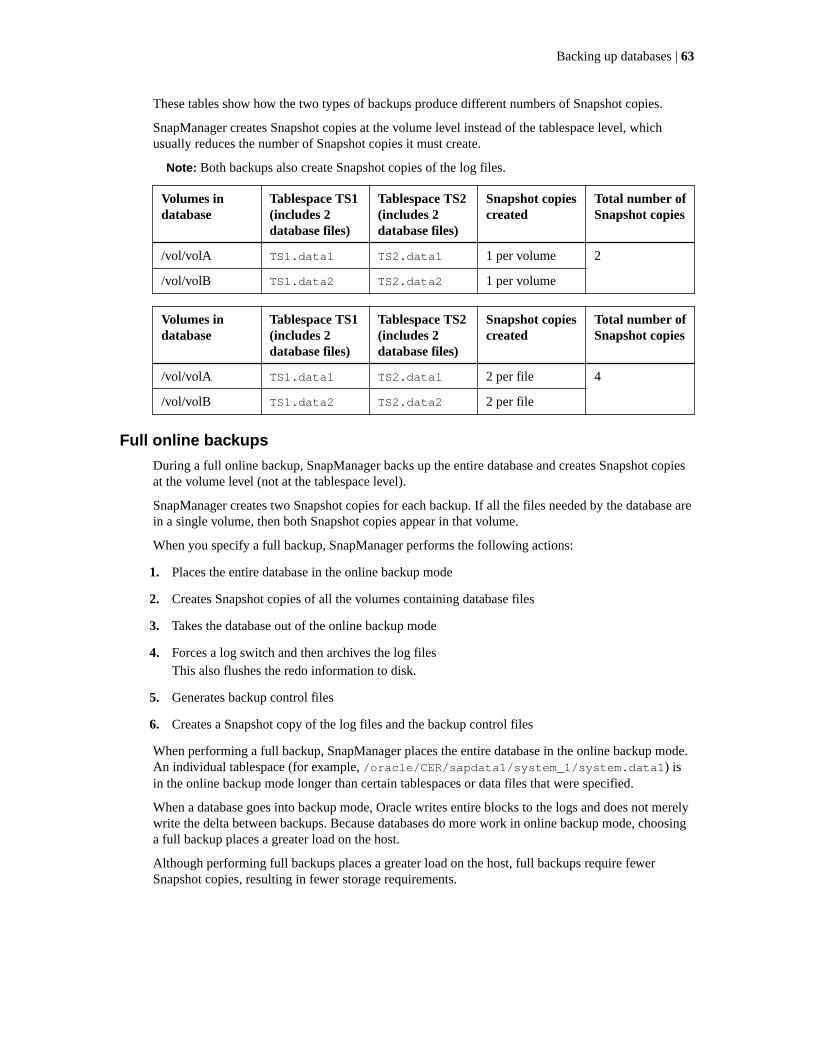
These tables show how the two types of backups produce different numbers of Snapshot copies.
SnapManager creates Snapshot copies at the volume level instead of the tablespace level, whichusually reduces the number of Snapshot copies it must create.
Note: Both backups also create Snapshot copies of the log files.
Volumes indatabase
Tablespace TS1(includes 2database files)
Tablespace TS2(includes 2database files)
Snapshot copiescreated
Total number ofSnapshot copies
/vol/volA TS1.data1 TS2.data1 1 per volume 2
/vol/volB TS1.data2 TS2.data2 1 per volume
Volumes indatabase
Tablespace TS1(includes 2database files)
Tablespace TS2(includes 2database files)
Snapshot copiescreated
Total number ofSnapshot copies
/vol/volA TS1.data1 TS2.data1 2 per file 4
/vol/volB TS1.data2 TS2.data2 2 per file
Full online backups
During a full online backup, SnapManager backs up the entire database and creates Snapshot copiesat the volume level (not at the tablespace level).
SnapManager creates two Snapshot copies for each backup. If all the files needed by the database arein a single volume, then both Snapshot copies appear in that volume.
When you specify a full backup, SnapManager performs the following actions:
1. Places the entire database in the online backup mode
2. Creates Snapshot copies of all the volumes containing database files
3. Takes the database out of the online backup mode
4. Forces a log switch and then archives the log files
This also flushes the redo information to disk.
5. Generates backup control files
6. Creates a Snapshot copy of the log files and the backup control files
When performing a full backup, SnapManager places the entire database in the online backup mode.An individual tablespace (for example, /oracle/CER/sapdata1/system_1/system.data1) isin the online backup mode longer than certain tablespaces or data files that were specified.
When a database goes into backup mode, Oracle writes entire blocks to the logs and does not merelywrite the delta between backups. Because databases do more work in online backup mode, choosinga full backup places a greater load on the host.
Although performing full backups places a greater load on the host, full backups require fewerSnapshot copies, resulting in fewer storage requirements.
Backing up databases | 63
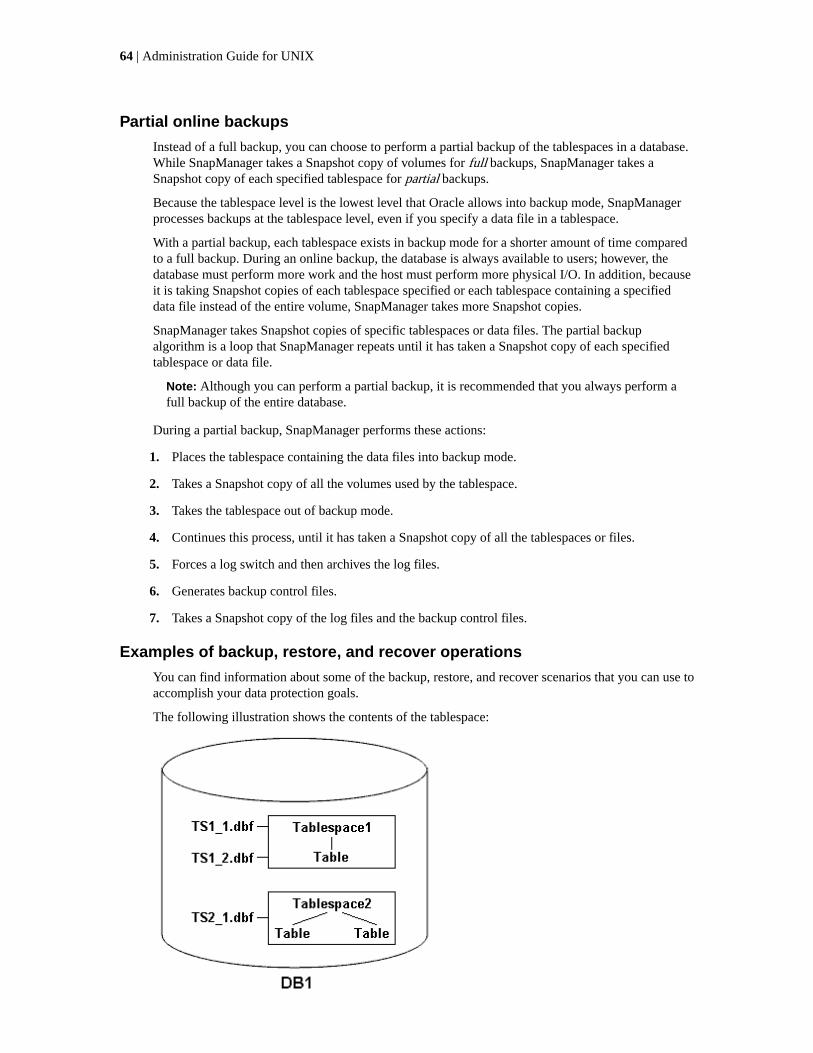
Partial online backups
Instead of a full backup, you can choose to perform a partial backup of the tablespaces in a database.While SnapManager takes a Snapshot copy of volumes for full backups, SnapManager takes aSnapshot copy of each specified tablespace for partial backups.
Because the tablespace level is the lowest level that Oracle allows into backup mode, SnapManagerprocesses backups at the tablespace level, even if you specify a data file in a tablespace.
With a partial backup, each tablespace exists in backup mode for a shorter amount of time comparedto a full backup. During an online backup, the database is always available to users; however, thedatabase must perform more work and the host must perform more physical I/O. In addition, becauseit is taking Snapshot copies of each tablespace specified or each tablespace containing a specifieddata file instead of the entire volume, SnapManager takes more Snapshot copies.
SnapManager takes Snapshot copies of specific tablespaces or data files. The partial backupalgorithm is a loop that SnapManager repeats until it has taken a Snapshot copy of each specifiedtablespace or data file.
Note: Although you can perform a partial backup, it is recommended that you always perform afull backup of the entire database.
During a partial backup, SnapManager performs these actions:
1. Places the tablespace containing the data files into backup mode.
2. Takes a Snapshot copy of all the volumes used by the tablespace.
3. Takes the tablespace out of backup mode.
4. Continues this process, until it has taken a Snapshot copy of all the tablespaces or files.
5. Forces a log switch and then archives the log files.
6. Generates backup control files.
7. Takes a Snapshot copy of the log files and the backup control files.
Examples of backup, restore, and recover operations
You can find information about some of the backup, restore, and recover scenarios that you can use toaccomplish your data protection goals.
The following illustration shows the contents of the tablespace:
64 | Administration Guide for UNIX
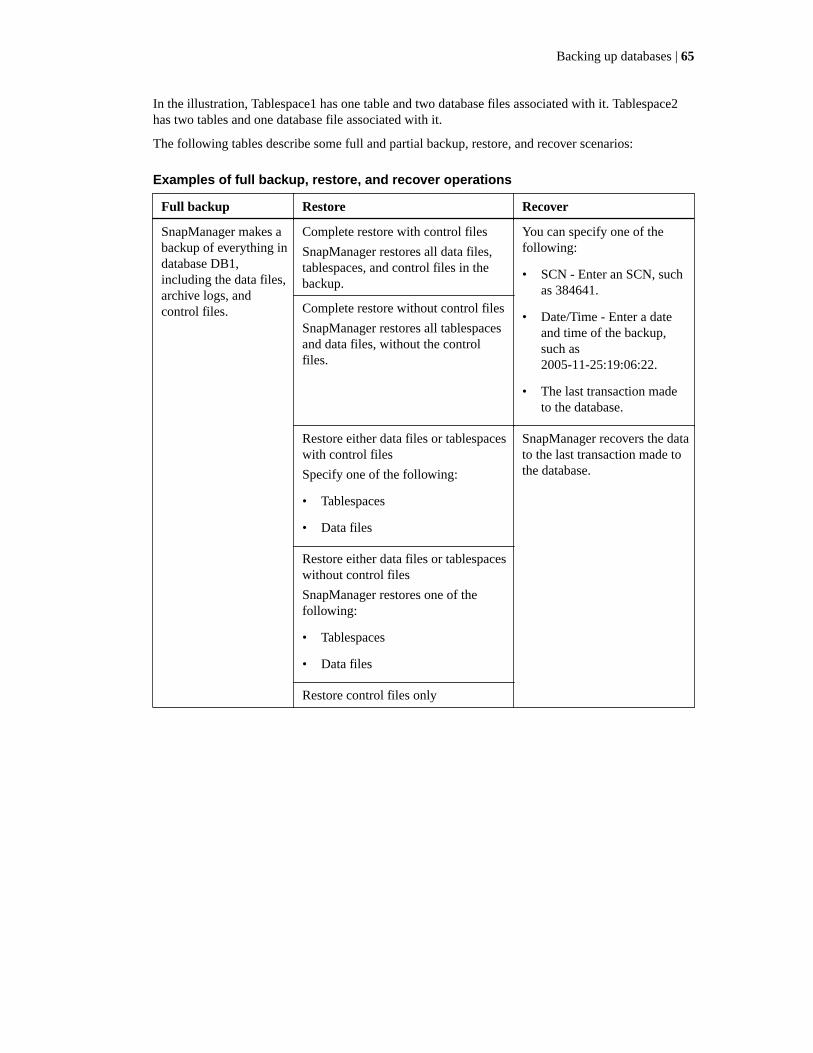
In the illustration, Tablespace1 has one table and two database files associated with it. Tablespace2has two tables and one database file associated with it.
The following tables describe some full and partial backup, restore, and recover scenarios:
Examples of full backup, restore, and recover operations
Full backup Restore Recover
SnapManager makes abackup of everything indatabase DB1,including the data files,archive logs, andcontrol files.
Complete restore with control files
SnapManager restores all data files,tablespaces, and control files in thebackup.
You can specify one of thefollowing:
• SCN - Enter an SCN, suchas 384641.
• Date/Time - Enter a dateand time of the backup,such as2005-11-25:19:06:22.
• The last transaction madeto the database.
Complete restore without control files
SnapManager restores all tablespacesand data files, without the controlfiles.
Restore either data files or tablespaceswith control files
Specify one of the following:
• Tablespaces
• Data files
SnapManager recovers the datato the last transaction made tothe database.
Restore either data files or tablespaceswithout control files
SnapManager restores one of thefollowing:
• Tablespaces
• Data files
Restore control files only
Backing up databases | 65
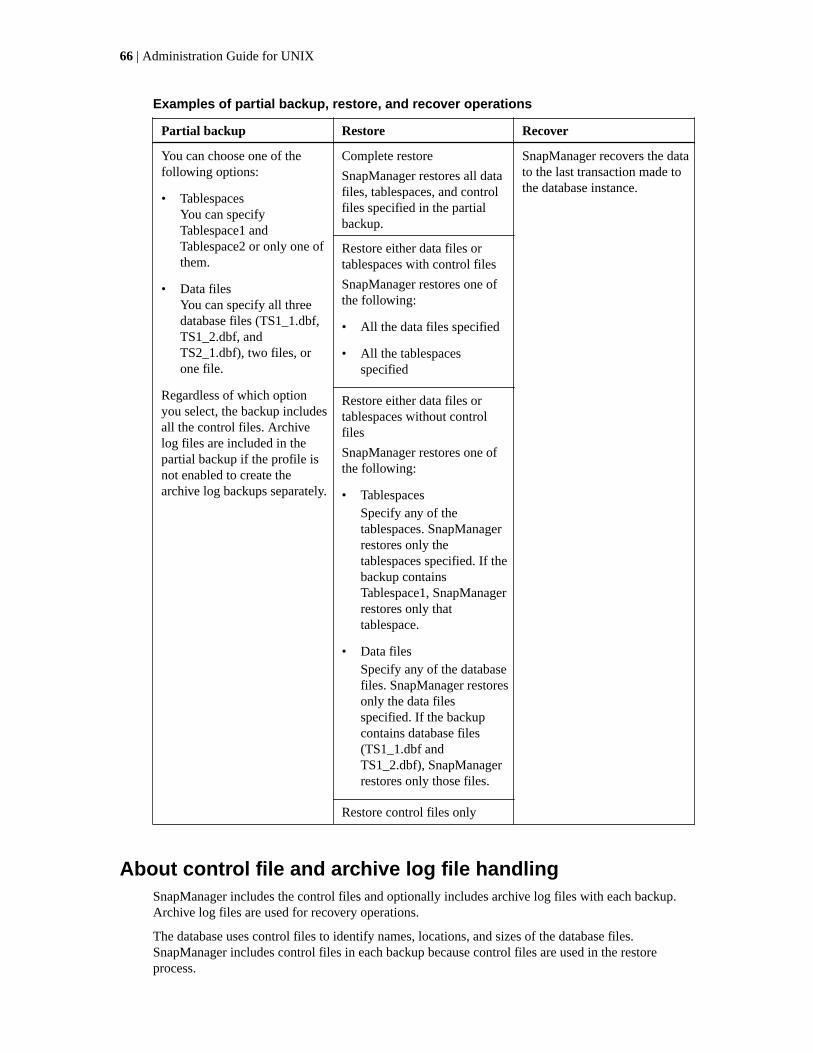
Examples of partial backup, restore, and recover operations
Partial backup Restore Recover
You can choose one of thefollowing options:
• TablespacesYou can specifyTablespace1 andTablespace2 or only one ofthem.
• Data filesYou can specify all threedatabase files (TS1_1.dbf,TS1_2.dbf, andTS2_1.dbf), two files, orone file.
Regardless of which optionyou select, the backup includesall the control files. Archivelog files are included in thepartial backup if the profile isnot enabled to create thearchive log backups separately.
Complete restore
SnapManager restores all datafiles, tablespaces, and controlfiles specified in the partialbackup.
SnapManager recovers the datato the last transaction made tothe database instance.
Restore either data files ortablespaces with control files
SnapManager restores one ofthe following:
• All the data files specified
• All the tablespacesspecified
Restore either data files ortablespaces without controlfiles
SnapManager restores one ofthe following:
• Tablespaces
Specify any of thetablespaces. SnapManagerrestores only thetablespaces specified. If thebackup containsTablespace1, SnapManagerrestores only thattablespace.
• Data files
Specify any of the databasefiles. SnapManager restoresonly the data filesspecified. If the backupcontains database files(TS1_1.dbf andTS1_2.dbf), SnapManagerrestores only those files.
Restore control files only
About control file and archive log file handlingSnapManager includes the control files and optionally includes archive log files with each backup.Archive log files are used for recovery operations.
The database uses control files to identify names, locations, and sizes of the database files.SnapManager includes control files in each backup because control files are used in the restoreprocess.
66 | Administration Guide for UNIX
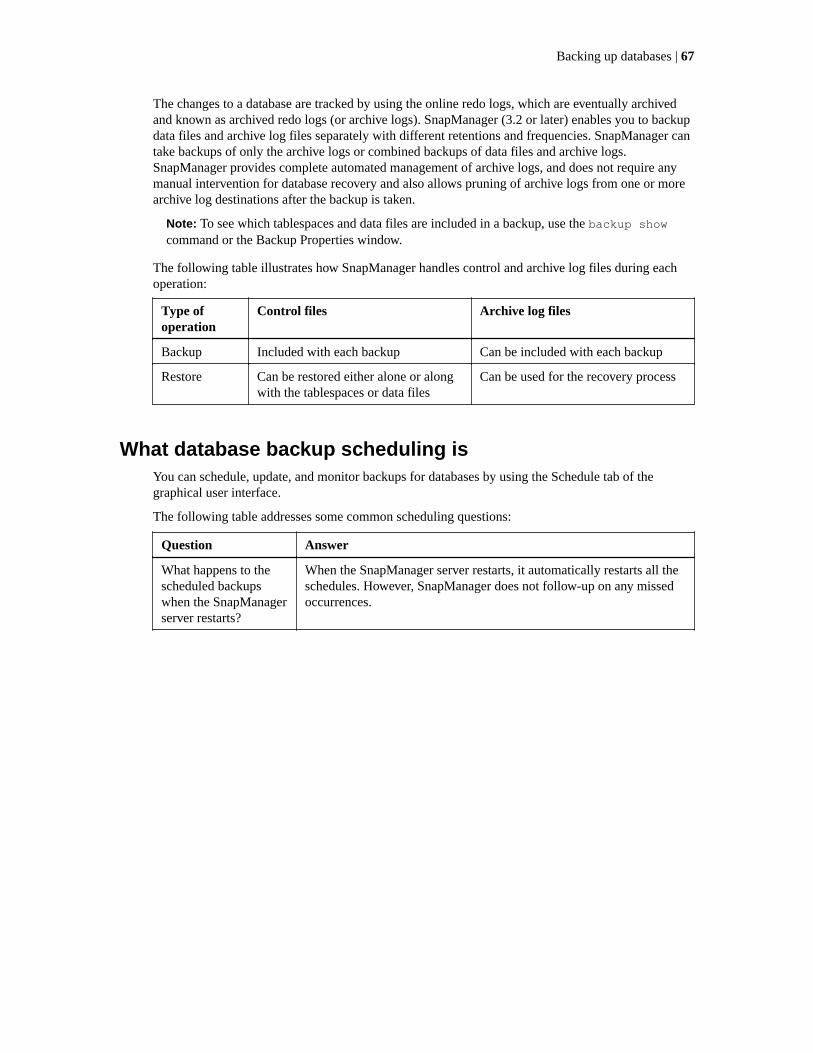
The changes to a database are tracked by using the online redo logs, which are eventually archivedand known as archived redo logs (or archive logs). SnapManager (3.2 or later) enables you to backupdata files and archive log files separately with different retentions and frequencies. SnapManager cantake backups of only the archive logs or combined backups of data files and archive logs.SnapManager provides complete automated management of archive logs, and does not require anymanual intervention for database recovery and also allows pruning of archive logs from one or morearchive log destinations after the backup is taken.
Note: To see which tablespaces and data files are included in a backup, use the backup showcommand or the Backup Properties window.
The following table illustrates how SnapManager handles control and archive log files during eachoperation:
Type ofoperation
Control files Archive log files
Backup Included with each backup Can be included with each backup
Restore Can be restored either alone or alongwith the tablespaces or data files
Can be used for the recovery process
What database backup scheduling isYou can schedule, update, and monitor backups for databases by using the Schedule tab of thegraphical user interface.
The following table addresses some common scheduling questions:
Question Answer
What happens to thescheduled backupswhen the SnapManagerserver restarts?
When the SnapManager server restarts, it automatically restarts all theschedules. However, SnapManager does not follow-up on any missedoccurrences.
Backing up databases | 67
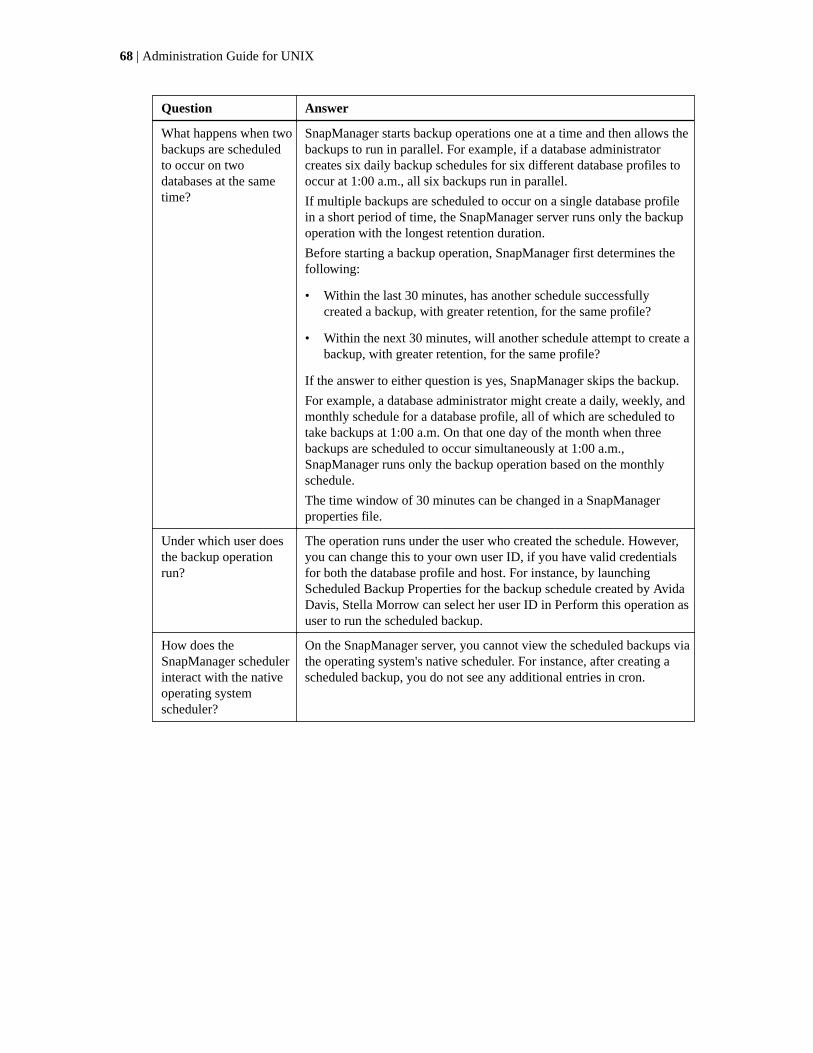
Question Answer
What happens when twobackups are scheduledto occur on twodatabases at the sametime?
SnapManager starts backup operations one at a time and then allows thebackups to run in parallel. For example, if a database administratorcreates six daily backup schedules for six different database profiles tooccur at 1:00 a.m., all six backups run in parallel.
If multiple backups are scheduled to occur on a single database profilein a short period of time, the SnapManager server runs only the backupoperation with the longest retention duration.
Before starting a backup operation, SnapManager first determines thefollowing:
• Within the last 30 minutes, has another schedule successfullycreated a backup, with greater retention, for the same profile?
• Within the next 30 minutes, will another schedule attempt to create abackup, with greater retention, for the same profile?
If the answer to either question is yes, SnapManager skips the backup.
For example, a database administrator might create a daily, weekly, andmonthly schedule for a database profile, all of which are scheduled totake backups at 1:00 a.m. On that one day of the month when threebackups are scheduled to occur simultaneously at 1:00 a.m.,SnapManager runs only the backup operation based on the monthlyschedule.
The time window of 30 minutes can be changed in a SnapManagerproperties file.
Under which user doesthe backup operationrun?
The operation runs under the user who created the schedule. However,you can change this to your own user ID, if you have valid credentialsfor both the database profile and host. For instance, by launchingScheduled Backup Properties for the backup schedule created by AvidaDavis, Stella Morrow can select her user ID in Perform this operation asuser to run the scheduled backup.
How does theSnapManager schedulerinteract with the nativeoperating systemscheduler?
On the SnapManager server, you cannot view the scheduled backups viathe operating system's native scheduler. For instance, after creating ascheduled backup, you do not see any additional entries in cron.
68 | Administration Guide for UNIX

Question Answer
What happens if theclocks in the graphicaluser interface and theserver are not in sync?
The clocks on the client and server are not synchronized. Therefore, youcan schedule a backup in which the start time is in the future on theclient but in the past on the server.
For recurring backups, the server still fulfills the request. For instance,if the server receives a request to perform hourly backups starting an01/30/08 at 3:00 p.m. but the current time is 3:30 p.m. on that day, theserver performs its first backup at 4:00 p.m. and continues to performbackups every hour.
However, for one-time only backups, the server handles the request asfollows:
• If the start time is within the last five minutes of the current servertime, SnapManager immediately begins the backup.
• If the start time is greater than five minutes, SnapManager does notinitiate the backup.
For instance, consider the following scenario:
• The clock in the graphical interface host is three minutes behind theactual time.
• The current time on the client is 8:58 a.m.
• You schedule a one-time backup to occur at 9:00 a.m.
• You schedule another one-time backup to occur at 8:30 a.m.
When the server receives the first request, the time on the server is 9:01a.m. Although the start time of the backup is in the past, SnapManagerimmediately performs the backup.
When the server receives the second request, the start time of thebackup is more than five minutes in the past. You will receive amessage that the schedule request failed because the start time is in thepast.
You can change the time of five minutes in a SnapManager propertiesfile.
What happens to thescheduled backups for aprofile when the profileis deleted?
When a database profile is deleted, the SnapManager server deletesscheduled backups defined for that profile.
Backing up databases | 69
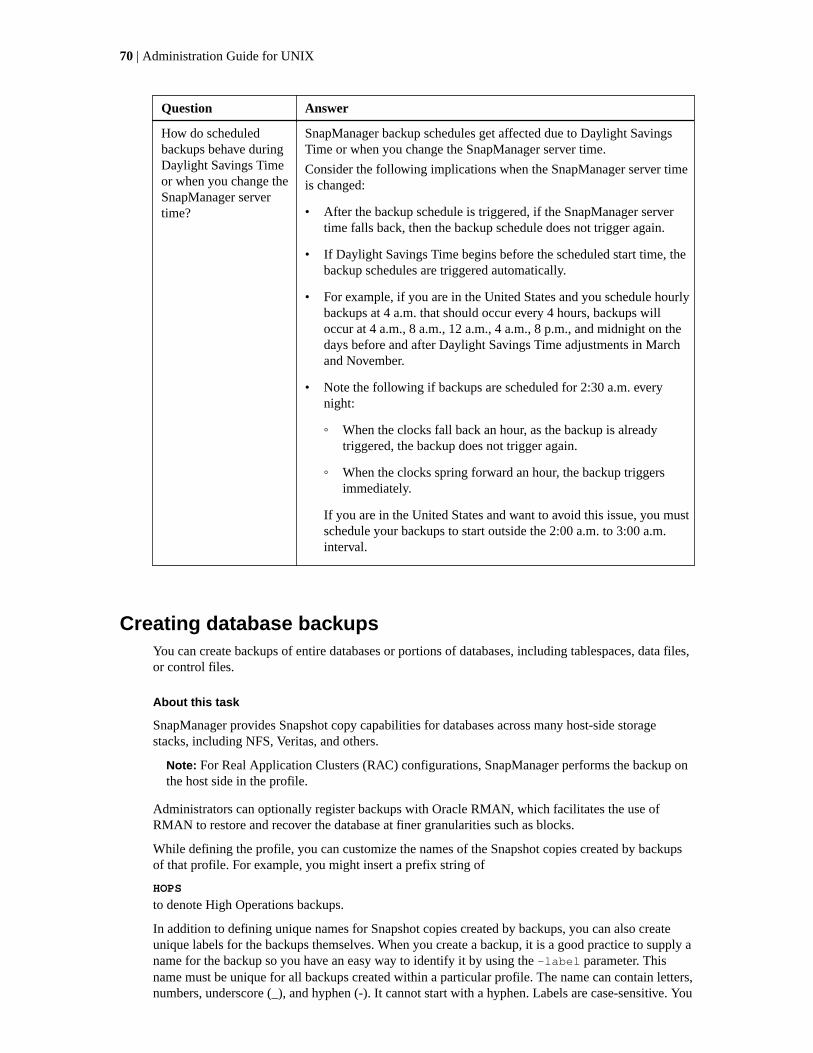
Question Answer
How do scheduledbackups behave duringDaylight Savings Timeor when you change theSnapManager servertime?
SnapManager backup schedules get affected due to Daylight SavingsTime or when you change the SnapManager server time.
Consider the following implications when the SnapManager server timeis changed:
• After the backup schedule is triggered, if the SnapManager servertime falls back, then the backup schedule does not trigger again.
• If Daylight Savings Time begins before the scheduled start time, thebackup schedules are triggered automatically.
• For example, if you are in the United States and you schedule hourlybackups at 4 a.m. that should occur every 4 hours, backups willoccur at 4 a.m., 8 a.m., 12 a.m., 4 a.m., 8 p.m., and midnight on thedays before and after Daylight Savings Time adjustments in Marchand November.
• Note the following if backups are scheduled for 2:30 a.m. everynight:
◦ When the clocks fall back an hour, as the backup is alreadytriggered, the backup does not trigger again.
◦ When the clocks spring forward an hour, the backup triggersimmediately.
If you are in the United States and want to avoid this issue, you mustschedule your backups to start outside the 2:00 a.m. to 3:00 a.m.interval.
Creating database backupsYou can create backups of entire databases or portions of databases, including tablespaces, data files,or control files.
About this task
SnapManager provides Snapshot copy capabilities for databases across many host-side storagestacks, including NFS, Veritas, and others.
Note: For Real Application Clusters (RAC) configurations, SnapManager performs the backup onthe host side in the profile.
Administrators can optionally register backups with Oracle RMAN, which facilitates the use ofRMAN to restore and recover the database at finer granularities such as blocks.
While defining the profile, you can customize the names of the Snapshot copies created by backupsof that profile. For example, you might insert a prefix string of
HOPS
to denote High Operations backups.
In addition to defining unique names for Snapshot copies created by backups, you can also createunique labels for the backups themselves. When you create a backup, it is a good practice to supply aname for the backup so you have an easy way to identify it by using the -label parameter. Thisname must be unique for all backups created within a particular profile. The name can contain letters,numbers, underscore (_), and hyphen (-). It cannot start with a hyphen. Labels are case-sensitive. You
70 | Administration Guide for UNIX
might want to append information such as operating system environment variables, system date, andbackup type.
If you do not supply a label, SnapManager creates a default label name in the formscope_mode_datestring, where scope is full or partial and mode is offline, online, or automatic(the letter c for cold, h for hot, or a for automatic).
From SnapManager 3.4, you can provide your own backup label by overriding the default backuplabel created by SnapManager. You must set the value of theoverride.default.backup.pattern parameter to true and specify the new backup label in thenew.default.backup.pattern parameter. The backup label pattern can contain keywords suchas database name, profile name, scope, mode and hostname, which has to be separated by underscore.For example, new.default.backup.pattern=dbname_profile_hostname_scope_mode.
Note: The timestamp will be included automatically at the end of the generated label.
When you enter a comment, you can include spaces and special characters. In contrast, when youenter a label, do not include spaces or special characters.
For each backup, SnapManager automatically generates a GUID, which is a 32-character HEX string.To determine the GUID, you must run the backup list command with the -verbose option.
You can create a full backup of a database while it is online or offline. To let SnapManager handlebacking up a database regardless of whether it is online or offline, you should use the -auto option.
While creating a backup, if you have enabled pruning and the summary notification was enabled inthe profile, two separate emails are triggered. One email is for the backup operation and the other forthe pruning. You can correlate these emails by comparing the backup name and backup ID containedin these emails.
You can create a cold backup when the database is in the shutdown state. If the database is in amounted state, change it to a shutdown state and perform the offline backup (cold backup).
SnapManager (3.2 or later) enables you to back up the archive log files separately from the data files,enabling you to manage the archive log files efficiently.
To create the archive log backups separately, you must create a new profile or update the existingprofile to separate the archive log backups by using the -separate-archivelog-backups option.Using the profile, you can perform the following SnapManager operations:
• Create an archive log backup.
• Delete an archive log backup.
• Mount an archive log backup.
• Free an archive log backup.
The backup options vary depending on the profile settings:
• Using a profile that is not separated to take archive log backups separately allows you to do thefollowing:
◦ Create a full backup.
◦ Create a partial backup.
◦ Specify archive log destinations to be backed up for archive log files.
◦ Specify archive log destinations to be excluded from the backup.
◦ Specify the pruning options for deleting the archive log files from the archive log destinations.
• Using a profile that is separated to take archive log backups allows you to do the following:
Backing up databases | 71
◦ Create a data files-only backup.
◦ Create an archivelogs-only backup.
◦ While creating a data files-only backup, include the archive log backup along with the onlinedata files only backup for cloning.
If you have included archive log backups along with data files in the Profile Settings page ofthe Profile Create wizard from the SnapManager GUI, and if you have not selected theArchivelogs option in the Backup Create wizard, SnapManager always creates the archivelog backup along with data files for all online backups.
In such a situation, from the SnapManager CLI, you can consider all the archive logdestinations for backup except for the exclude destinations specified in the SnapManagerconfiguration file. But you cannot prune these archive log files. However, you can still use the-archivelogs option to specify the archive log file destination and prune the archive logfiles from the SnapManager CLI.
If you are creating the backup using the -auto option and specify the –archivelogs option,SnapManager creates either an online or offline backup based on the current status of thebackup.
⁃ SnapManager creates an offline backup when the database is offline and does not includethe archive log files in the backup.
⁃ SnapManager creates an online backup including archive log files when the database isonline.
◦ While creating the archivelogs-only backup:
⁃ Specify the archive log destination to be backed up along with the archivelogs-only backup
⁃ Specify the archive log destinations to be excluded from the archive logs-only backup
⁃ Specify the pruning options for deleting the archive log files from the archive logdestinations
• Scenarios not supported
◦ You cannot create the archivelog-only backup along with an offline data files-only backup.
◦ You cannot prune the archive log files when the archive log files are not backed up.
◦ You cannot prune the archive log files when Flash Recovery Area (FRA) is enabled forarchive log files.
If you specify the archive log location in Flash Recovery Area, you must ensure that you alsospecify the archive log location in the archive_log_dest parameter.
When you specify the label for online data files backup with included archive log backup, the label isapplied for data files backup, and the archive log backup will be suffixed with (_logs). This suffixcan be configured by changing the parameter suffix.backup.label.with.logs parameter in theSnapManager configuration file.
For example, you can specify the value as suffix.backup.label.with.logs=arc so that the_logs default value is changed to _arc.
If you have not specified any archive log destinations to be included in the backup, thenSnapManager includes all the archive log destinations configured in the database.
If any archive log files are missing in any one of the destinations, SnapManager skips all thesearchive log files created before the missing archive log files even if these files are available in otherarchive log destination.
72 | Administration Guide for UNIX
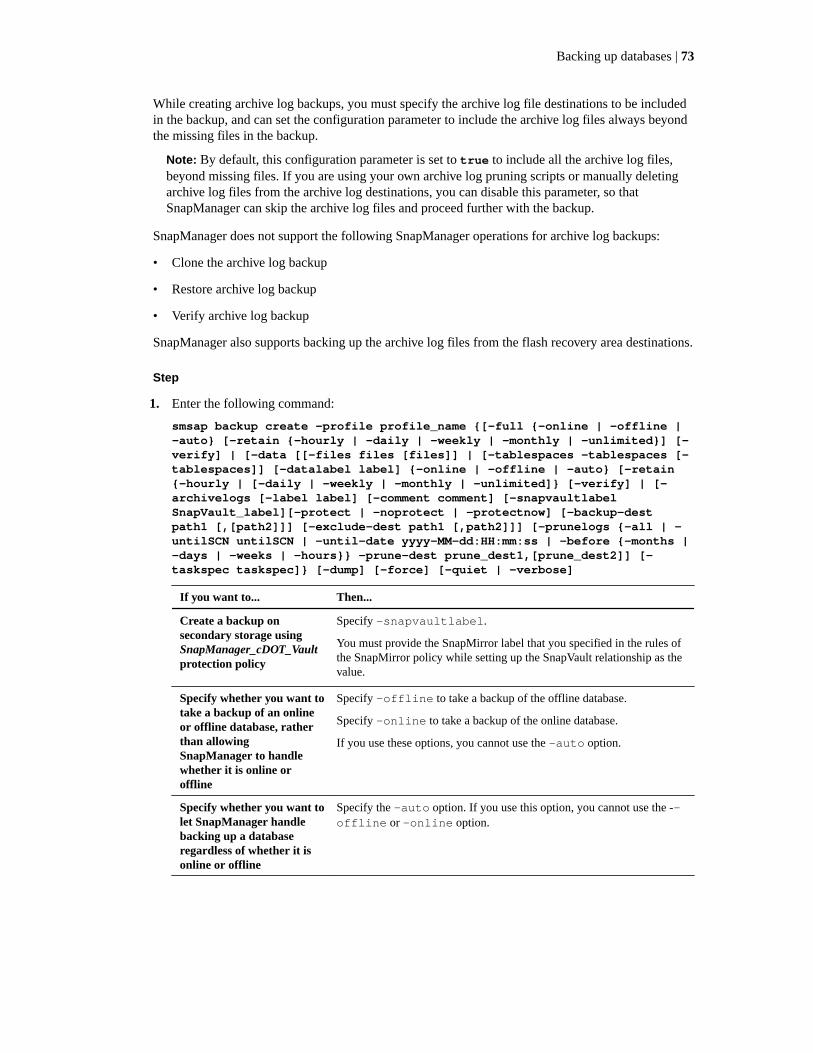
While creating archive log backups, you must specify the archive log file destinations to be includedin the backup, and can set the configuration parameter to include the archive log files always beyondthe missing files in the backup.
Note: By default, this configuration parameter is set to true to include all the archive log files,beyond missing files. If you are using your own archive log pruning scripts or manually deletingarchive log files from the archive log destinations, you can disable this parameter, so thatSnapManager can skip the archive log files and proceed further with the backup.
SnapManager does not support the following SnapManager operations for archive log backups:
• Clone the archive log backup
• Restore archive log backup
• Verify archive log backup
SnapManager also supports backing up the archive log files from the flash recovery area destinations.
Step
1. Enter the following command:
smsap backup create -profile profile_name {[-full {-online | -offline |-auto} [-retain {-hourly | -daily | -weekly | -monthly | -unlimited}] [-verify] | [-data [[-files files [files]] | [-tablespaces -tablespaces [-tablespaces]] [-datalabel label] {-online | -offline | -auto} [-retain{-hourly | [-daily | -weekly | -monthly | -unlimited]} [-verify] | [-archivelogs [-label label] [-comment comment] [-snapvaultlabelSnapVault_label][-protect | -noprotect | -protectnow] [-backup-destpath1 [,[path2]]] [-exclude-dest path1 [,path2]]] [-prunelogs {-all | -untilSCN untilSCN | -until-date yyyy-MM-dd:HH:mm:ss | -before {-months |-days | -weeks | -hours}} -prune-dest prune_dest1,[prune_dest2]] [-taskspec taskspec]} [-dump] [-force] [-quiet | -verbose]
If you want to... Then...
Create a backup onsecondary storage usingSnapManager_cDOT_Vaultprotection policy
Specify -snapvaultlabel.
You must provide the SnapMirror label that you specified in the rules ofthe SnapMirror policy while setting up the SnapVault relationship as thevalue.
Specify whether you want totake a backup of an onlineor offline database, ratherthan allowingSnapManager to handlewhether it is online oroffline
Specify -offline to take a backup of the offline database.
Specify -online to take a backup of the online database.
If you use these options, you cannot use the -auto option.
Specify whether you want tolet SnapManager handlebacking up a databaseregardless of whether it isonline or offline
Specify the -auto option. If you use this option, you cannot use the --offline or -online option.
Backing up databases | 73

If you want to... Then...
Specify whether you want toperform a partial backup ofspecific files
Specify the -data -files option and then list the files, separatedby commas. For example, list the file names f1, f2, and f3 after theoption.
Example for creating a partial datafile backup on UNIX
smsap backup create -profile nosep -data -files /user/user.dbf -online -label partial_datafile_backup -verbose
Specify whether you want toperform a partial backup ofspecific tablespaces
Specify the -data -tablespaces option and then list thetablespaces, separated by commas. For example, use ts1, ts2, and ts3after the option.
SnapManager supports backing up of read-only tablespaces. Whilecreating the backup, SnapManager changes the read-only table spaces toread-write. After creating the backup, the tablespaces are changed toread-only.
Example for creating a partial tablespace backup
smsap backup create -profile nosep -data -tablespaces tb2 -online -label partial_tablespace_bkup -verbose
Specify whether you want tocreate a unique label foreach backup in thefollowing format:full_hot_mybackup_label
For Linux, you might enter this example:
smsap backup create -profile targetdb1_prof1 -label full_hot_my_backup_label -online -full -verbose
Specify whether you want tocreate backup of the archivelog files separately from thedata files
Specify the following options and variables:
• -archivelogs creates a backup of the archive log files.
• -backup-dest specifies the archive log file destinations to bebacked up.
• -exclude-dest specifies the archive log destinations to beexcluded.
• -label specifies the label for the archive log file backup.
• -protect enables protection to the archive log backups.
Note: You must provide either the -backup-dest option or the -exclude-dest option.
Providing both these options together along with the backup displayserror message You have specified an invalid backupoption. Specify any one of the options: -backup-dest, or exclude-dest.
Example for creating archive log file backups separately on UNIX
smsap backup create -profile nosep -archivelogs -backup-dest /mnt/archive_dest_2/ -label archivelog_bkup -verbose
74 | Administration Guide for UNIX
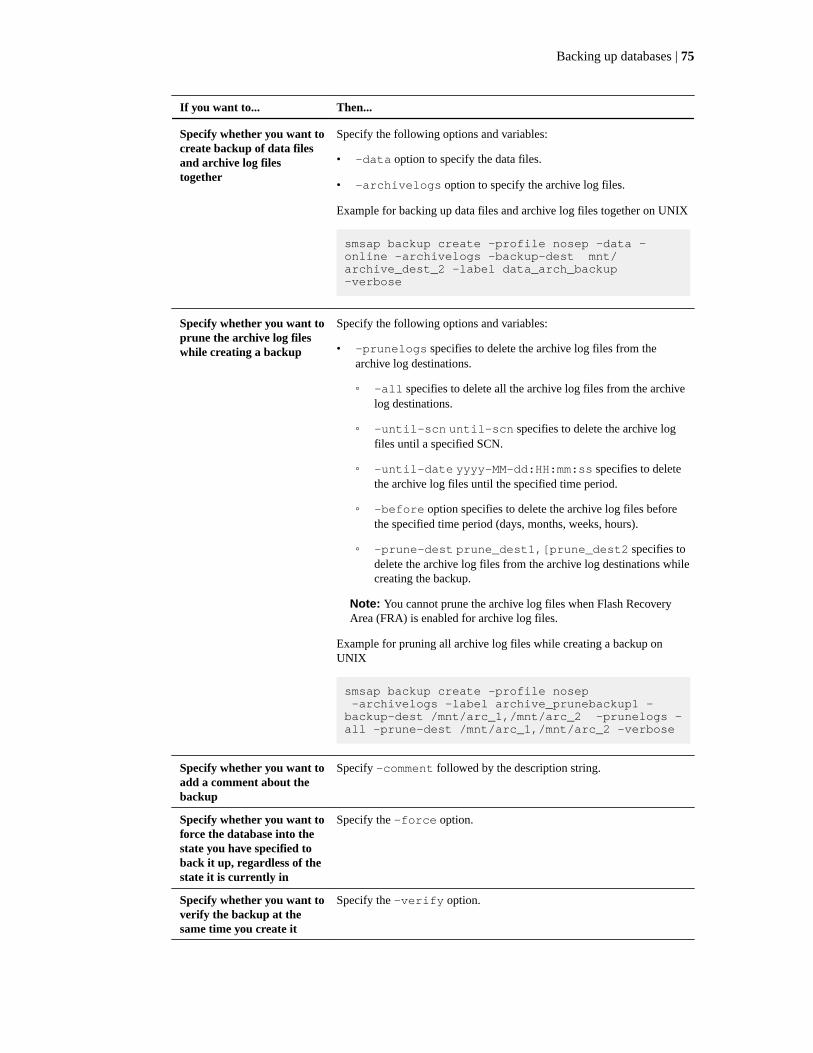
If you want to... Then...
Specify whether you want tocreate backup of data filesand archive log filestogether
Specify the following options and variables:
• -data option to specify the data files.
• -archivelogs option to specify the archive log files.
Example for backing up data files and archive log files together on UNIX
smsap backup create -profile nosep -data -online -archivelogs -backup-dest mnt/archive_dest_2 -label data_arch_backup -verbose
Specify whether you want toprune the archive log fileswhile creating a backup
Specify the following options and variables:
• -prunelogs specifies to delete the archive log files from thearchive log destinations.
◦ -all specifies to delete all the archive log files from the archivelog destinations.
◦ -until-scn until-scn specifies to delete the archive logfiles until a specified SCN.
◦ -until-date yyyy-MM-dd:HH:mm:ss specifies to deletethe archive log files until the specified time period.
◦ -before option specifies to delete the archive log files beforethe specified time period (days, months, weeks, hours).
◦ -prune-dest prune_dest1,[prune_dest2 specifies todelete the archive log files from the archive log destinations whilecreating the backup.
Note: You cannot prune the archive log files when Flash RecoveryArea (FRA) is enabled for archive log files.
Example for pruning all archive log files while creating a backup onUNIX
smsap backup create -profile nosep -archivelogs -label archive_prunebackup1 -backup-dest /mnt/arc_1,/mnt/arc_2 -prunelogs -all -prune-dest /mnt/arc_1,/mnt/arc_2 -verbose
Specify whether you want toadd a comment about thebackup
Specify -comment followed by the description string.
Specify whether you want toforce the database into thestate you have specified toback it up, regardless of thestate it is currently in
Specify the -force option.
Specify whether you want toverify the backup at thesame time you create it
Specify the -verify option.
Backing up databases | 75
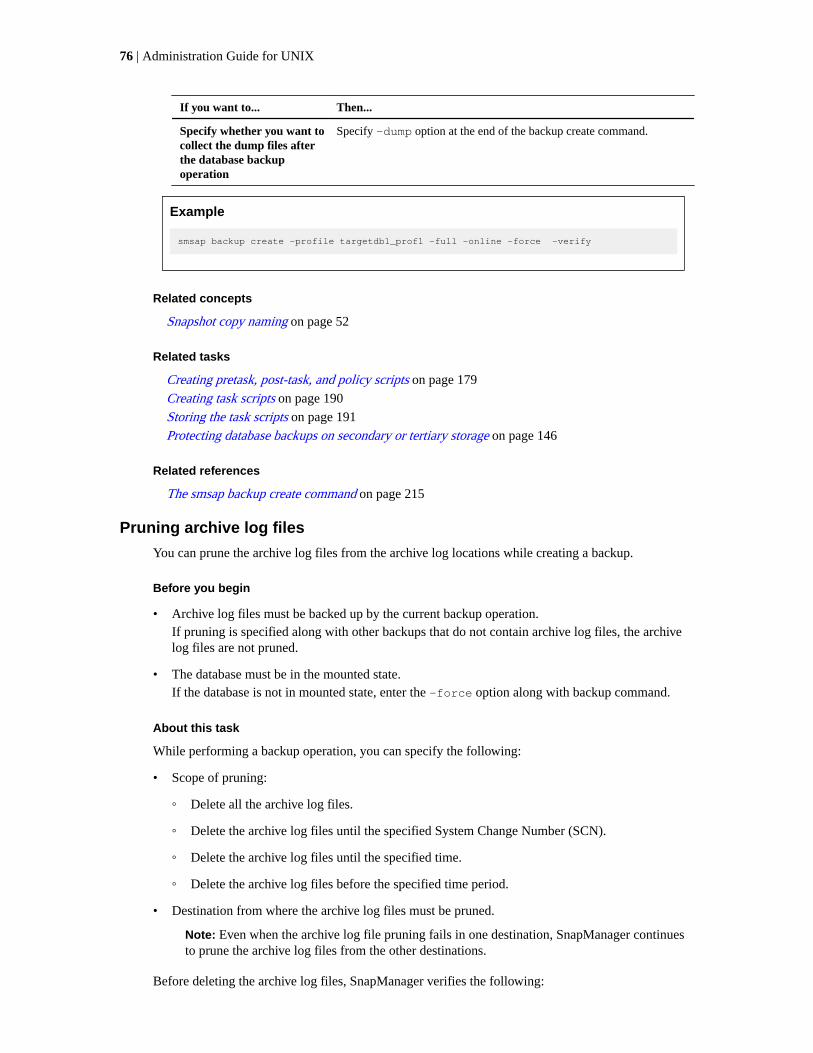
If you want to... Then...
Specify whether you want tocollect the dump files afterthe database backupoperation
Specify -dump option at the end of the backup create command.
Example
smsap backup create -profile targetdb1_prof1 -full -online -force -verify
Related concepts
Snapshot copy naming on page 52
Related tasks
Creating pretask, post-task, and policy scripts on page 179
Creating task scripts on page 190
Storing the task scripts on page 191
Protecting database backups on secondary or tertiary storage on page 146
Related references
The smsap backup create command on page 215
Pruning archive log files
You can prune the archive log files from the archive log locations while creating a backup.
Before you begin
• Archive log files must be backed up by the current backup operation.
If pruning is specified along with other backups that do not contain archive log files, the archivelog files are not pruned.
• The database must be in the mounted state.
If the database is not in mounted state, enter the -force option along with backup command.
About this task
While performing a backup operation, you can specify the following:
• Scope of pruning:
◦ Delete all the archive log files.
◦ Delete the archive log files until the specified System Change Number (SCN).
◦ Delete the archive log files until the specified time.
◦ Delete the archive log files before the specified time period.
• Destination from where the archive log files must be pruned.
Note: Even when the archive log file pruning fails in one destination, SnapManager continuesto prune the archive log files from the other destinations.
Before deleting the archive log files, SnapManager verifies the following:
76 | Administration Guide for UNIX
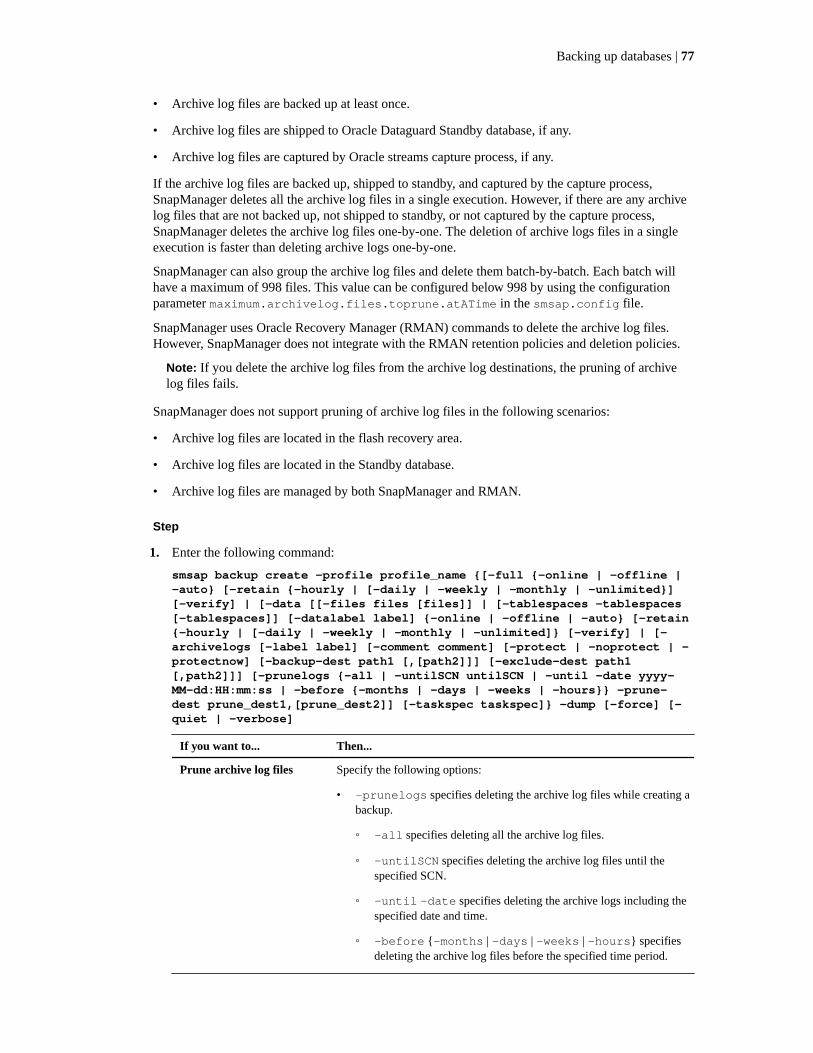
• Archive log files are backed up at least once.
• Archive log files are shipped to Oracle Dataguard Standby database, if any.
• Archive log files are captured by Oracle streams capture process, if any.
If the archive log files are backed up, shipped to standby, and captured by the capture process,SnapManager deletes all the archive log files in a single execution. However, if there are any archivelog files that are not backed up, not shipped to standby, or not captured by the capture process,SnapManager deletes the archive log files one-by-one. The deletion of archive logs files in a singleexecution is faster than deleting archive logs one-by-one.
SnapManager can also group the archive log files and delete them batch-by-batch. Each batch willhave a maximum of 998 files. This value can be configured below 998 by using the configurationparameter maximum.archivelog.files.toprune.atATime in the smsap.config file.
SnapManager uses Oracle Recovery Manager (RMAN) commands to delete the archive log files.However, SnapManager does not integrate with the RMAN retention policies and deletion policies.
Note: If you delete the archive log files from the archive log destinations, the pruning of archivelog files fails.
SnapManager does not support pruning of archive log files in the following scenarios:
• Archive log files are located in the flash recovery area.
• Archive log files are located in the Standby database.
• Archive log files are managed by both SnapManager and RMAN.
Step
1. Enter the following command:
smsap backup create -profile profile_name {[-full {-online | -offline |-auto} [-retain {-hourly | [-daily | -weekly | -monthly | -unlimited}][-verify] | [-data [[-files files [files]] | [-tablespaces -tablespaces[-tablespaces]] [-datalabel label] {-online | -offline | -auto} [-retain{-hourly | [-daily | -weekly | -monthly | -unlimited]} [-verify] | [-archivelogs [-label label] [-comment comment] [-protect | -noprotect | -protectnow] [-backup-dest path1 [,[path2]]] [-exclude-dest path1[,path2]]] [-prunelogs {-all | -untilSCN untilSCN | -until -date yyyy-MM-dd:HH:mm:ss | -before {-months | -days | -weeks | -hours}} -prune-dest prune_dest1,[prune_dest2]] [-taskspec taskspec]} -dump [-force] [-quiet | -verbose]
If you want to... Then...
Prune archive log files Specify the following options:
• -prunelogs specifies deleting the archive log files while creating abackup.
◦ -all specifies deleting all the archive log files.
◦ -untilSCN specifies deleting the archive log files until thespecified SCN.
◦ -until -date specifies deleting the archive logs including thespecified date and time.
◦ -before {-months | -days | -weeks | -hours} specifiesdeleting the archive log files before the specified time period.
Backing up databases | 77
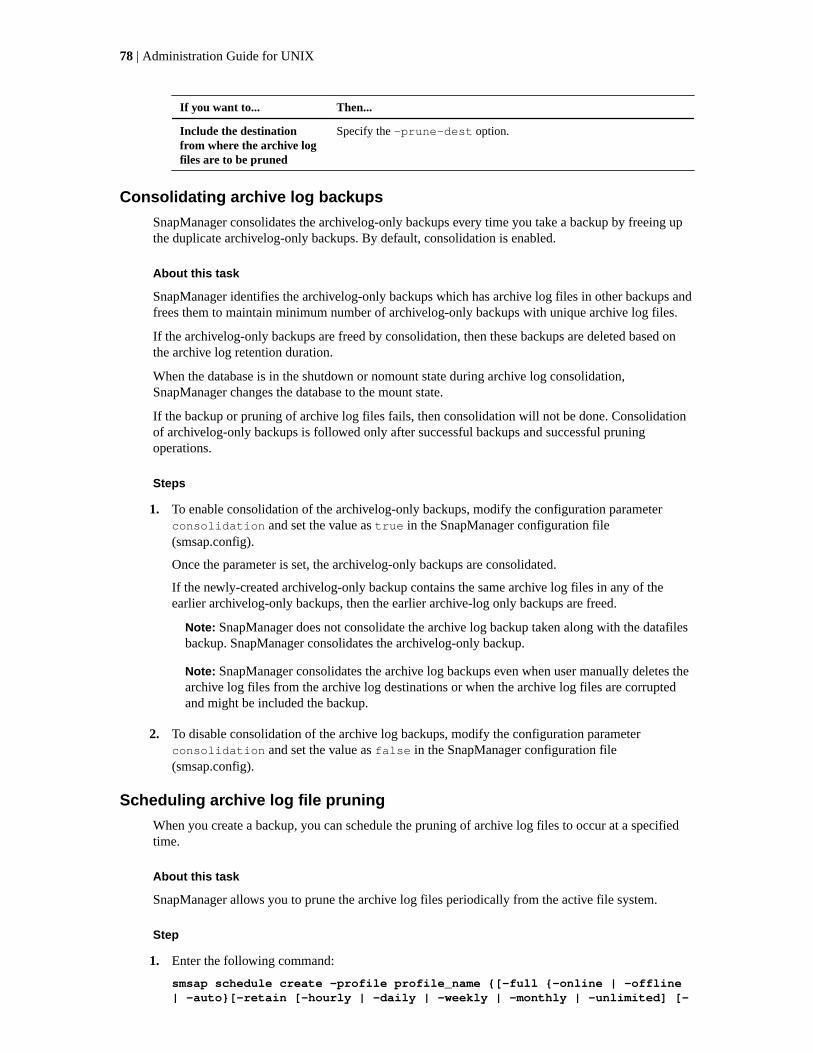
If you want to... Then...
Include the destinationfrom where the archive logfiles are to be pruned
Specify the -prune-dest option.
Consolidating archive log backups
SnapManager consolidates the archivelog-only backups every time you take a backup by freeing upthe duplicate archivelog-only backups. By default, consolidation is enabled.
About this task
SnapManager identifies the archivelog-only backups which has archive log files in other backups andfrees them to maintain minimum number of archivelog-only backups with unique archive log files.
If the archivelog-only backups are freed by consolidation, then these backups are deleted based onthe archive log retention duration.
When the database is in the shutdown or nomount state during archive log consolidation,SnapManager changes the database to the mount state.
If the backup or pruning of archive log files fails, then consolidation will not be done. Consolidationof archivelog-only backups is followed only after successful backups and successful pruningoperations.
Steps
1. To enable consolidation of the archivelog-only backups, modify the configuration parameterconsolidation and set the value as true in the SnapManager configuration file(smsap.config).
Once the parameter is set, the archivelog-only backups are consolidated.
If the newly-created archivelog-only backup contains the same archive log files in any of theearlier archivelog-only backups, then the earlier archive-log only backups are freed.
Note: SnapManager does not consolidate the archive log backup taken along with the datafilesbackup. SnapManager consolidates the archivelog-only backup.
Note: SnapManager consolidates the archive log backups even when user manually deletes thearchive log files from the archive log destinations or when the archive log files are corruptedand might be included the backup.
2. To disable consolidation of the archive log backups, modify the configuration parameterconsolidation and set the value as false in the SnapManager configuration file(smsap.config).
Scheduling archive log file pruning
When you create a backup, you can schedule the pruning of archive log files to occur at a specifiedtime.
About this task
SnapManager allows you to prune the archive log files periodically from the active file system.
Step
1. Enter the following command:
smsap schedule create -profile profile_name {[-full {-online | -offline| -auto}[-retain [-hourly | -daily | -weekly | -monthly | -unlimited] [-
78 | Administration Guide for UNIX
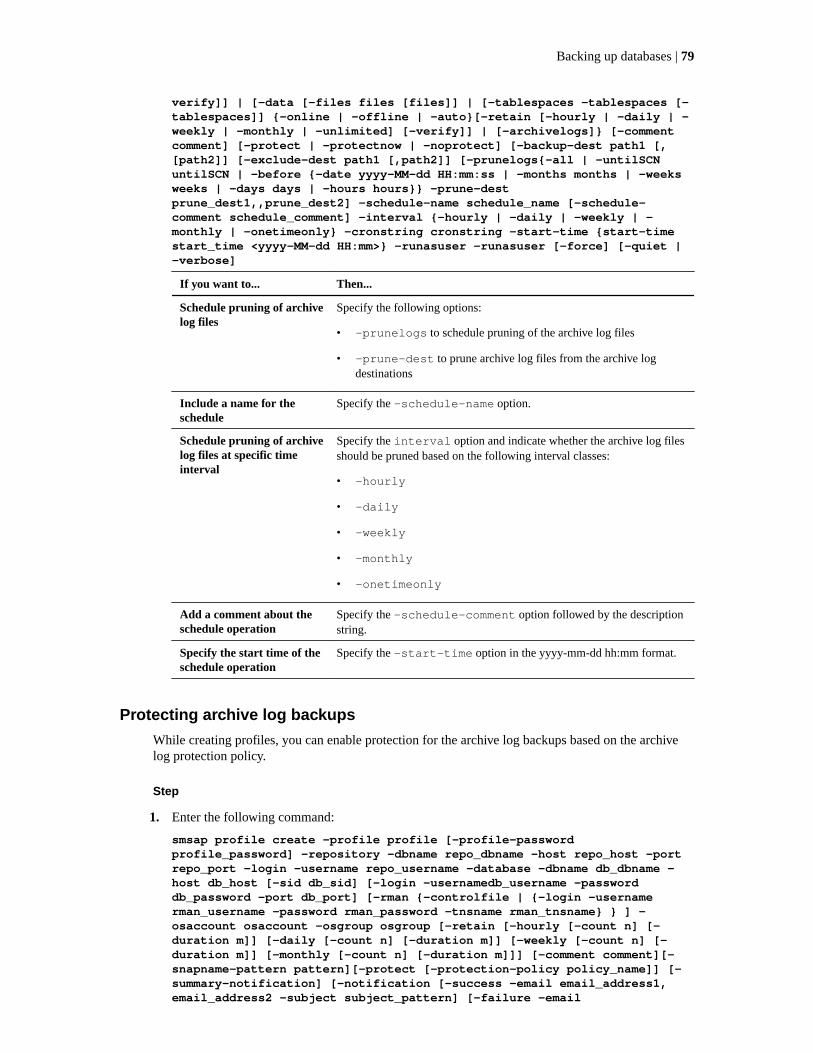
verify]] | [-data [-files files [files]] | [-tablespaces -tablespaces [-tablespaces]] {-online | -offline | -auto}[-retain [-hourly | -daily | -weekly | -monthly | -unlimited] [-verify]] | [-archivelogs]} [-commentcomment] [-protect | -protectnow | -noprotect] [-backup-dest path1 [,[path2]] [-exclude-dest path1 [,path2]] [-prunelogs{-all | -untilSCNuntilSCN | -before {-date yyyy-MM-dd HH:mm:ss | -months months | -weeksweeks | -days days | -hours hours}} -prune-destprune_dest1,,prune_dest2] -schedule-name schedule_name [-schedule-comment schedule_comment] -interval {-hourly | -daily | -weekly | -monthly | -onetimeonly} -cronstring cronstring -start-time {start-timestart_time <yyyy-MM-dd HH:mm>} -runasuser -runasuser [-force] [-quiet |-verbose]
If you want to... Then...
Schedule pruning of archivelog files
Specify the following options:
• -prunelogs to schedule pruning of the archive log files
• -prune-dest to prune archive log files from the archive logdestinations
Include a name for theschedule
Specify the -schedule-name option.
Schedule pruning of archivelog files at specific timeinterval
Specify the interval option and indicate whether the archive log filesshould be pruned based on the following interval classes:
• -hourly
• -daily
• -weekly
• -monthly
• -onetimeonly
Add a comment about theschedule operation
Specify the -schedule-comment option followed by the descriptionstring.
Specify the start time of theschedule operation
Specify the -start-time option in the yyyy-mm-dd hh:mm format.
Protecting archive log backups
While creating profiles, you can enable protection for the archive log backups based on the archivelog protection policy.
Step
1. Enter the following command:
smsap profile create -profile profile [-profile-passwordprofile_password] -repository -dbname repo_dbname -host repo_host -portrepo_port -login -username repo_username -database -dbname db_dbname -host db_host [-sid db_sid] [-login -usernamedb_username -passworddb_password -port db_port] [-rman {-controlfile | {-login -usernamerman_username -password rman_password -tnsname rman_tnsname} } ] -osaccount osaccount -osgroup osgroup [-retain [-hourly [-count n] [-duration m]] [-daily [-count n] [-duration m]] [-weekly [-count n] [-duration m]] [-monthly [-count n] [-duration m]]] [-comment comment][-snapname-pattern pattern][-protect [-protection-policy policy_name]] [-summary-notification] [-notification [-success -email email_address1,email_address2 -subject subject_pattern] [-failure -email
Backing up databases | 79
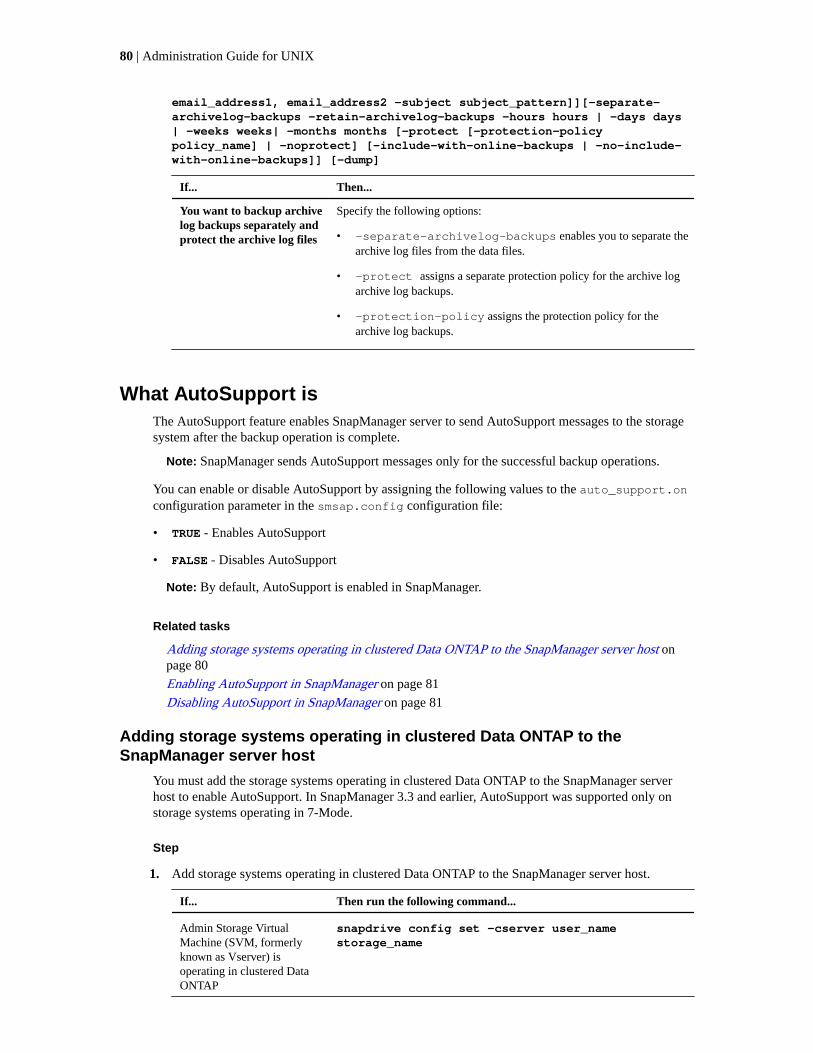
email_address1, email_address2 -subject subject_pattern]][-separate-archivelog-backups -retain-archivelog-backups -hours hours | -days days| -weeks weeks| -months months [-protect [-protection-policypolicy_name] | -noprotect] [-include-with-online-backups | -no-include-with-online-backups]] [-dump]
If... Then...
You want to backup archivelog backups separately andprotect the archive log files
Specify the following options:
• -separate-archivelog-backups enables you to separate thearchive log files from the data files.
• -protect assigns a separate protection policy for the archive logarchive log backups.
• -protection-policy assigns the protection policy for thearchive log backups.
What AutoSupport isThe AutoSupport feature enables SnapManager server to send AutoSupport messages to the storagesystem after the backup operation is complete.
Note: SnapManager sends AutoSupport messages only for the successful backup operations.
You can enable or disable AutoSupport by assigning the following values to the auto_support.onconfiguration parameter in the smsap.config configuration file:
• TRUE - Enables AutoSupport
• FALSE - Disables AutoSupport
Note: By default, AutoSupport is enabled in SnapManager.
Related tasks
Adding storage systems operating in clustered Data ONTAP to the SnapManager server host onpage 80
Enabling AutoSupport in SnapManager on page 81
Disabling AutoSupport in SnapManager on page 81
Adding storage systems operating in clustered Data ONTAP to theSnapManager server host
You must add the storage systems operating in clustered Data ONTAP to the SnapManager serverhost to enable AutoSupport. In SnapManager 3.3 and earlier, AutoSupport was supported only onstorage systems operating in 7-Mode.
Step
1. Add storage systems operating in clustered Data ONTAP to the SnapManager server host.
If... Then run the following command...
Admin Storage VirtualMachine (SVM, formerlyknown as Vserver) isoperating in clustered DataONTAP
snapdrive config set -cserver user_namestorage_name
80 | Administration Guide for UNIX

If... Then run the following command...
SVM is operating in clusteredData ONTAP
snapdrive config set -vserver user_namestorage_name
Enabling AutoSupport in SnapManager
You must enable AutoSupport, so that storage systems receive messages from the SnapManagerserver for every successful backup operation.
About this task
AutoSupport can be enabled in two ways:
• By default, the new installation of SnapManager does not contain the auto_support.onparameter in the smsap.config configuration file. This implies that autosupport is enabled.
• You can manually configure the auto_support.on parameter.
Steps
1. Stop the SnapManager server.
2. In the smsap.config configuration file, set the value of the auto_support.on parameter toTRUE.
Example
auto_support.on=TRUE
3. Restart the SnapManager server.
Disabling AutoSupport in SnapManager
You must disable AutoSupport if you do not want the storage system to receive messages from theSnapManager server for every successful backup operation.
About this task
By default, AutoSupport is enabled if the configuration file does not contain the auto_support.onparameter. In this scenario, you must add the auto_support.on parameter in the configuration fileand set the value to FALSE.
Steps
1. Stop the SnapManager server.
2. In the smsap.config configuration file, set the value of the auto_support.on parameter toFALSE.
Example
auto_support.on=FALSE
3. Restart the SnapManager server.
Backing up databases | 81
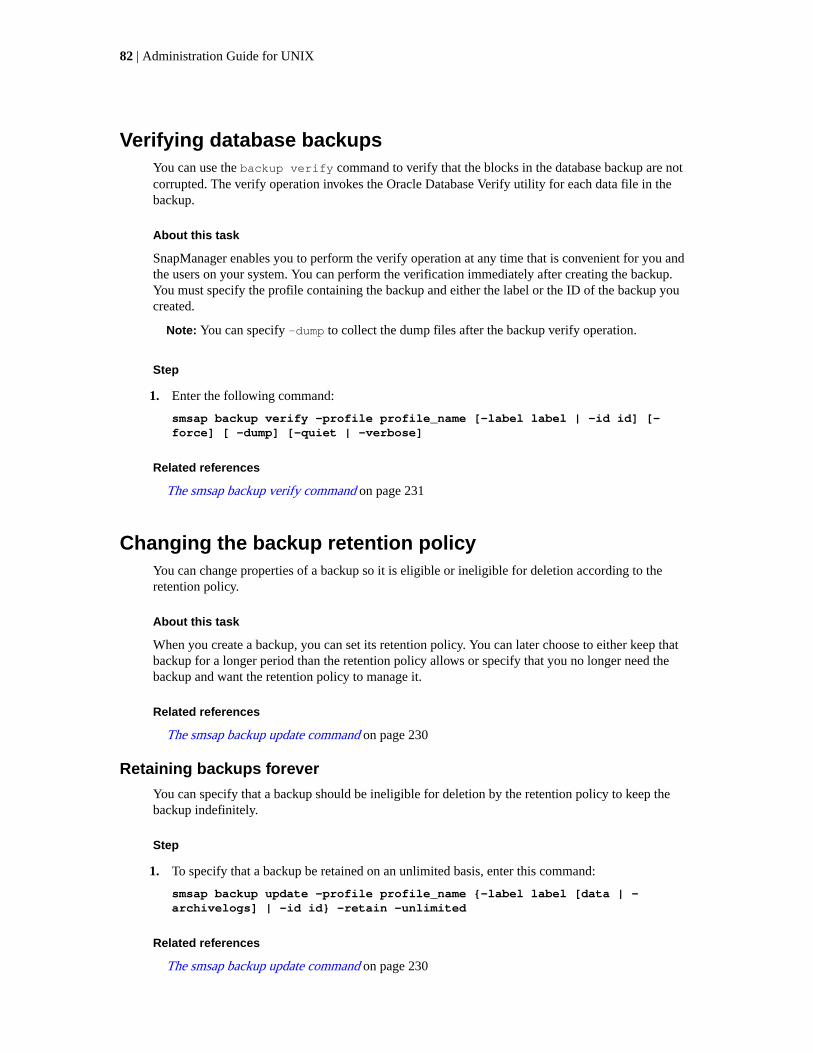
Verifying database backupsYou can use the backup verify command to verify that the blocks in the database backup are notcorrupted. The verify operation invokes the Oracle Database Verify utility for each data file in thebackup.
About this task
SnapManager enables you to perform the verify operation at any time that is convenient for you andthe users on your system. You can perform the verification immediately after creating the backup.You must specify the profile containing the backup and either the label or the ID of the backup youcreated.
Note: You can specify -dump to collect the dump files after the backup verify operation.
Step
1. Enter the following command:
smsap backup verify -profile profile_name [-label label | -id id] [-force] [ -dump] [-quiet | -verbose]
Related references
The smsap backup verify command on page 231
Changing the backup retention policyYou can change properties of a backup so it is eligible or ineligible for deletion according to theretention policy.
About this task
When you create a backup, you can set its retention policy. You can later choose to either keep thatbackup for a longer period than the retention policy allows or specify that you no longer need thebackup and want the retention policy to manage it.
Related references
The smsap backup update command on page 230
Retaining backups forever
You can specify that a backup should be ineligible for deletion by the retention policy to keep thebackup indefinitely.
Step
1. To specify that a backup be retained on an unlimited basis, enter this command:
smsap backup update -profile profile_name {-label label [data | -archivelogs] | -id id} -retain -unlimited
Related references
The smsap backup update command on page 230
82 | Administration Guide for UNIX
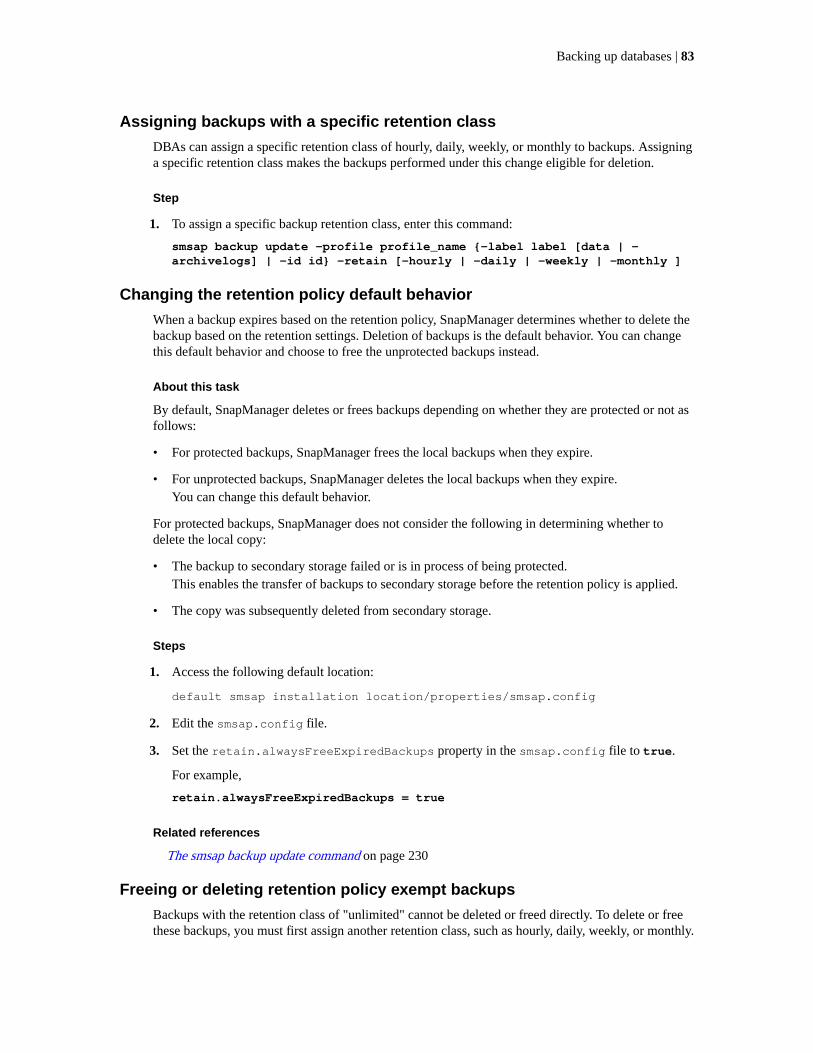
Assigning backups with a specific retention class
DBAs can assign a specific retention class of hourly, daily, weekly, or monthly to backups. Assigninga specific retention class makes the backups performed under this change eligible for deletion.
Step
1. To assign a specific backup retention class, enter this command:
smsap backup update -profile profile_name {-label label [data | -archivelogs] | -id id} -retain [-hourly | -daily | -weekly | -monthly ]
Changing the retention policy default behavior
When a backup expires based on the retention policy, SnapManager determines whether to delete thebackup based on the retention settings. Deletion of backups is the default behavior. You can changethis default behavior and choose to free the unprotected backups instead.
About this task
By default, SnapManager deletes or frees backups depending on whether they are protected or not asfollows:
• For protected backups, SnapManager frees the local backups when they expire.
• For unprotected backups, SnapManager deletes the local backups when they expire.
You can change this default behavior.
For protected backups, SnapManager does not consider the following in determining whether todelete the local copy:
• The backup to secondary storage failed or is in process of being protected.
This enables the transfer of backups to secondary storage before the retention policy is applied.
• The copy was subsequently deleted from secondary storage.
Steps
1. Access the following default location:
default smsap installation location/properties/smsap.config
2. Edit the smsap.config file.
3. Set the retain.alwaysFreeExpiredBackups property in the smsap.config file to true.
For example,
retain.alwaysFreeExpiredBackups = true
Related references
The smsap backup update command on page 230
Freeing or deleting retention policy exempt backups
Backups with the retention class of "unlimited" cannot be deleted or freed directly. To delete or freethese backups, you must first assign another retention class, such as hourly, daily, weekly, or monthly.
Backing up databases | 83
To delete or free a backup that is exempt from the retention policy, you must first update the backupto make it eligible for deletion or free it.
Steps
1. To update the backup to make it eligible for deletion by the retention policy, enter this command:
smsap backup update -profile profile_name {-label label [data | -archivelogs] | -id id} -retain [-hourly | -daily | -weekly | -monthly]
2. After updating the backup so it is eligible for deletion, you can either delete the backup or freebackup resources.
• To delete the backup, enter this command:
smsap backup delete -profile profile_name {-label label [data | -archivelogs] | -id id | -all}
• To free the backup resources, rather than delete the backup, enter this command:
smsap backup free -profile profile_name {-label label [data | -archivelogs] | -id id | -all} [-force] [ -dump] [-quiet | -verbose]
Related references
The smsap backup update command on page 230
Viewing a list of backupsYou can check which backups were created for a profile and the backup state by using the smsapbackup list command. For each profile, the command displays the information about the mostrecent backup first and then continues until the information for all the backups is displayed.
Step
1. Enter the following command:
smsap backup list -profile profile_name [-delimiter character] [data | -archivelogs] [-quiet | -verbose]
Related references
The smsap backup list command on page 221
Viewing backup detailsYou can view the detailed information about a particular backup in a profile by using the smsapbackup show command.
About this task
The smsap backup show command displays the following information for each backup:
• The backup ID
• Whether the backup succeeded or failed
• Backup scope (full, partial, online, or offline)
• Backup mode
84 | Administration Guide for UNIX
• Mount status
• The backup label
• Comment
• The date and time when the operation started and ended
• Information about whether the backup was verified
• The backup retention class
• The database and host name
• The checkpoint System Change Number (SCN)
• The end backup SCN (for online backups only)
• The tablespaces and data files from the database backed up
• The control files from the database backed up
• The archive logs from the database backed up
• The storage system and volumes where the files are located
• The Snapshot copies made and their location
• The status of the primary storage resources
• The backup protection status
• A list of copies on secondary storage, in the form of backup_copy ID - node name
• Backup mode
If you specify the -verbose option, the following additional information is displayed:
• The clones made from the backup, if there are any
• Verification information
• If the backup is mounted, SnapManager displays the mount points in use
For the archive log file backup, the same information is displayed as that of the other databasebackup except for the following information:
• Checkpoint SCN
• End Backup SCN
• Tablespace
• Control files
However, archive log file backup contains the following additional information:
• The first change number of the backup
• The next change number of the backup
• Thread number
• Reset logs ID
• Incarnation
Backing up databases | 85
• Log file name
Step
1. Enter the following command:
smsap backup show -profile profile_name {-label label [data | -archivelogs] | -id id [-quiet | -verbose]
Related references
The smsap backup show command on page 228
Mounting backupsSnapManager automatically handles the mounting of a backup to make it available to the host. Youcan also mount backups in scenarios where you use an external tool, such as Oracle RecoveryManager (RMAN), to access the files in the backup.
About this task
The smsap backup mount command displays a list of paths where the Snapshot copies consistingof the backup have been mounted.
You can use the -from-secondary option to mount the backup from secondary storage. If you donot use this option, SnapManager mounts the backup from primary storage.
You must specify the -copy-id option whenever you specify the -from-secondary option. Ifthere is more than one backup on the secondary storage system, the -copy-id option is used tospecify which backup copy on the secondary storage should be used to mount the backup.6
Note: If you are using Data ONTAP operating in 7-Mode, you must specify a valid value for the -copy-id option. However, if you are using clustered Data ONTAP, the -copy-id option is notrequired.
If you are mounting a database backup to a remote host, you must ensure that the Automatic StorageManagement (ASM) credentials are the same on both the hosts.
Note: You can optionally collect the dump files after a successful or failed backup mountoperation.
Step
1. To Mount a backup enter the following command:
smsap backup mount -profile profile_name label [data | -archivelogs] | -id id} [-host -host] [-from-secondary [-copy-id id]] [-dump] [-quiet | -verbose]
Related references
The smsap backup mount command on page 222
Unmounting backupsSnapManager automatically unmounts the backup to make it unavailable to the host server.SnapManager also allows you to unmount if you are using an external tool, such as Oracle Recovery
86 | Administration Guide for UNIX
Manager (RMAN), to access the files in the backup, and to change the state of the backup to removeaccess.
About this task
If you are unmounting a database backup from a remote host, you must ensure that the AutomaticStorage Management (ASM) credentials are same on both the hosts.
You can optionally collect the dump files after a successful or failed unmount backup operation.
The unmount operation might fail sometime with an error message if the mount point is busy, forexample, --[ERROR] FLOW-11019: Failure in Disconnect: SD-10046: You cannotunmount the backup as the mount point is busy with the following mount
paths and PID's: /opt/NetApp/smsap/mnt/-mnt-
neuse_nfsvrdb_arch-20120427052319903_0 with PID 6598.
You must identify the PID of the session that is resulting in the failure of the unmount operation. Stopthe session by running the following command:
kill pid
You can then run the unmount operation successfully.
Step
1. Enter the following command:
smsap backup unmount -profile profile_name {label label [data | -archivelogs] | -id id} [-quiet | -verbose]
Related references
The smsap backup unmount command on page 229
Freeing backupsYou can free backups, which deletes the Snapshot copies without deleting the backup metadata. Thisfunction frees the space occupied by the backup. You can use the smsap backup free command tofree the backups.
Before you begin
For a backup to be eligible for freeing, you must ensure the following:
• Backup was successful
• Backup is not to be mounted
• Backup does not have clones
• Backup is not to be retained by using an unlimited retention policy
• Backup is not already freed
About this task
If protection is enabled on the profile and the protection policy contains connections from theprimary node that use a mirror relationship, then Snapshot copies are deleted on the primary nodewhen a backup is freed. Those Snapshot copies are also deleted from the mirror nodes when the nexttransfer to secondary storage occurs.
Backing up databases | 87
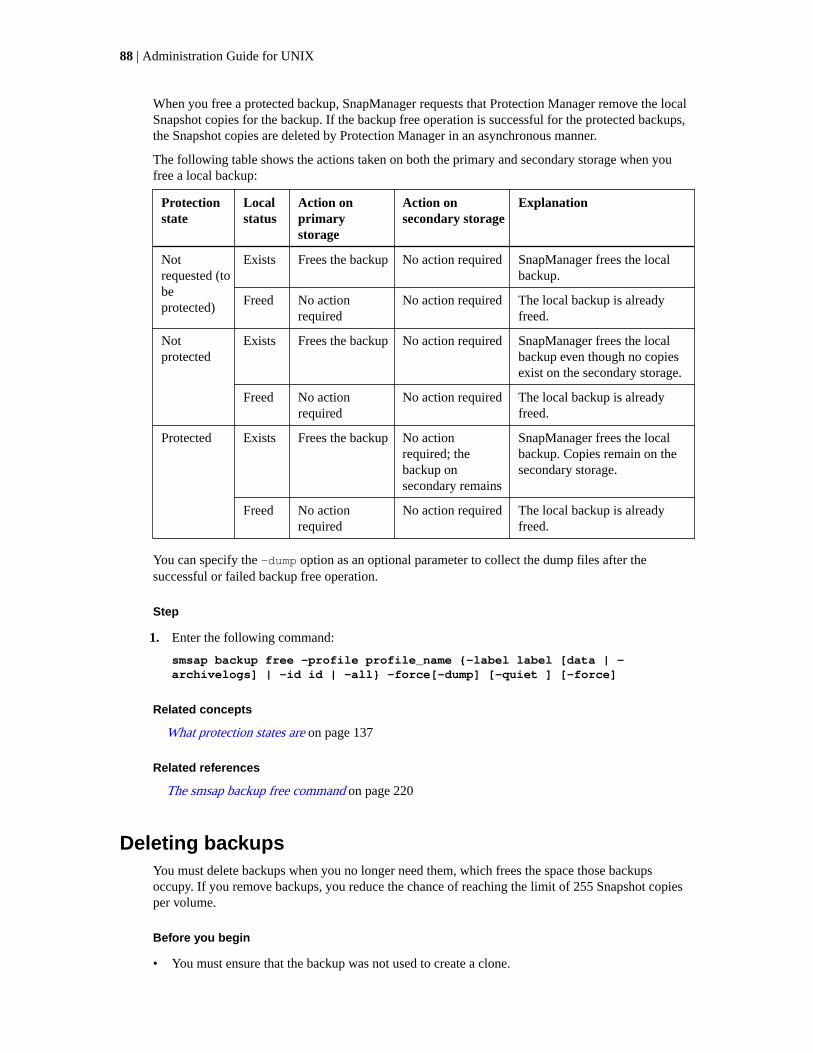
When you free a protected backup, SnapManager requests that Protection Manager remove the localSnapshot copies for the backup. If the backup free operation is successful for the protected backups,the Snapshot copies are deleted by Protection Manager in an asynchronous manner.
The following table shows the actions taken on both the primary and secondary storage when youfree a local backup:
Protectionstate
Localstatus
Action onprimarystorage
Action onsecondary storage
Explanation
Notrequested (tobeprotected)
Exists Frees the backup No action required SnapManager frees the localbackup.
Freed No actionrequired
No action required The local backup is alreadyfreed.
Notprotected
Exists Frees the backup No action required SnapManager frees the localbackup even though no copiesexist on the secondary storage.
Freed No actionrequired
No action required The local backup is alreadyfreed.
Protected Exists Frees the backup No actionrequired; thebackup onsecondary remains
SnapManager frees the localbackup. Copies remain on thesecondary storage.
Freed No actionrequired
No action required The local backup is alreadyfreed.
You can specify the -dump option as an optional parameter to collect the dump files after thesuccessful or failed backup free operation.
Step
1. Enter the following command:
smsap backup free -profile profile_name {-label label [data | -archivelogs] | -id id | -all} -force[-dump] [-quiet ] [-force]
Related concepts
What protection states are on page 137
Related references
The smsap backup free command on page 220
Deleting backupsYou must delete backups when you no longer need them, which frees the space those backupsoccupy. If you remove backups, you reduce the chance of reaching the limit of 255 Snapshot copiesper volume.
Before you begin
• You must ensure that the backup was not used to create a clone.
88 | Administration Guide for UNIX
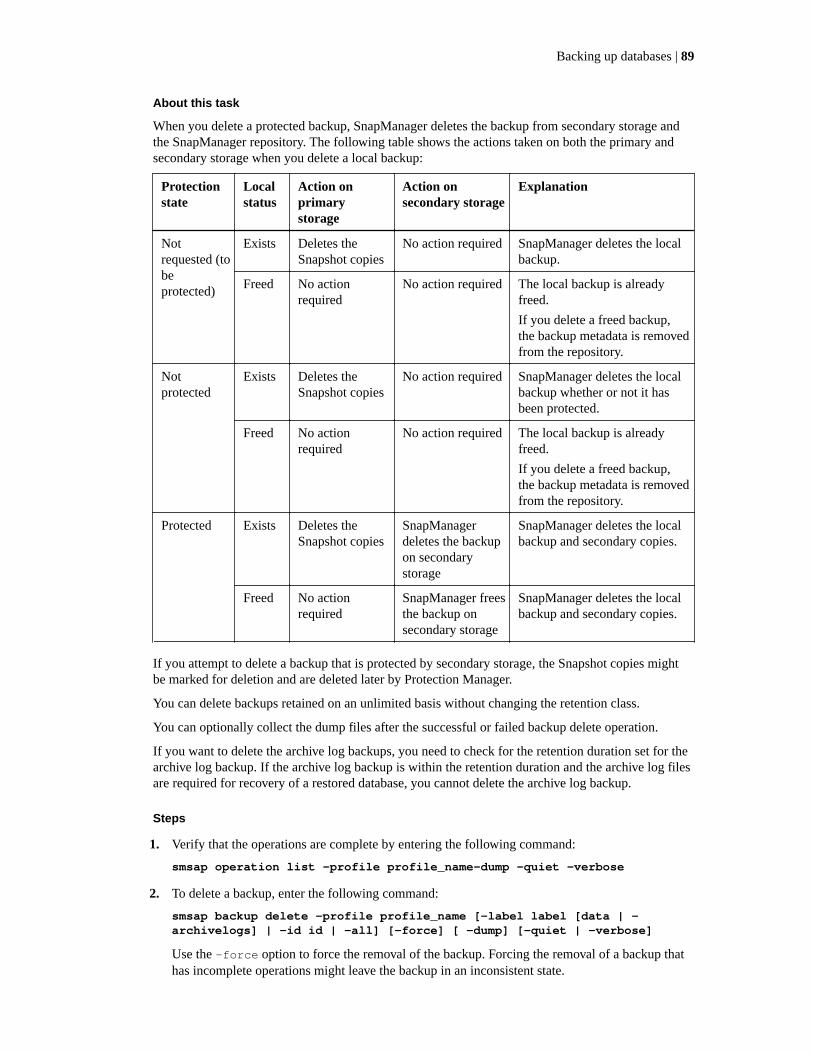
About this task
When you delete a protected backup, SnapManager deletes the backup from secondary storage andthe SnapManager repository. The following table shows the actions taken on both the primary andsecondary storage when you delete a local backup:
Protectionstate
Localstatus
Action onprimarystorage
Action onsecondary storage
Explanation
Notrequested (tobeprotected)
Exists Deletes theSnapshot copies
No action required SnapManager deletes the localbackup.
Freed No actionrequired
No action required The local backup is alreadyfreed.
If you delete a freed backup,the backup metadata is removedfrom the repository.
Notprotected
Exists Deletes theSnapshot copies
No action required SnapManager deletes the localbackup whether or not it hasbeen protected.
Freed No actionrequired
No action required The local backup is alreadyfreed.
If you delete a freed backup,the backup metadata is removedfrom the repository.
Protected Exists Deletes theSnapshot copies
SnapManagerdeletes the backupon secondarystorage
SnapManager deletes the localbackup and secondary copies.
Freed No actionrequired
SnapManager freesthe backup onsecondary storage
SnapManager deletes the localbackup and secondary copies.
If you attempt to delete a backup that is protected by secondary storage, the Snapshot copies mightbe marked for deletion and are deleted later by Protection Manager.
You can delete backups retained on an unlimited basis without changing the retention class.
You can optionally collect the dump files after the successful or failed backup delete operation.
If you want to delete the archive log backups, you need to check for the retention duration set for thearchive log backup. If the archive log backup is within the retention duration and the archive log filesare required for recovery of a restored database, you cannot delete the archive log backup.
Steps
1. Verify that the operations are complete by entering the following command:
smsap operation list -profile profile_name-dump -quiet -verbose
2. To delete a backup, enter the following command:
smsap backup delete -profile profile_name [-label label [data | -archivelogs] | -id id | -all] [-force] [ -dump] [-quiet | -verbose]
Use the -force option to force the removal of the backup. Forcing the removal of a backup thathas incomplete operations might leave the backup in an inconsistent state.
Backing up databases | 89
Scheduling database backups
SnapManager (3.2 or later) for SAP enables you to schedule database backups to occur on a regularbasis during off-peak hours to maintain high performance. To schedule a backup, you can create aprofile, which includes the database information and retention policy, and then set schedules for thebackup.
Note: You must schedule the backups as either a root user or an Oracle user. If you try to schedulethe backups as a non-existing user, SnapManager displays an error message: Invalid user:username: Cannot create schedule backup for a given user
The following are some of the schedule-related tasks:
• Schedule a database backup to occur on an hourly, daily, weekly, monthly, or one-time basis.
• View a list of scheduled backups associated with a profile.
• Update a scheduled backup.
• Suspend a schedule temporarily.
• Resume the suspended schedule.
• Delete a schedule.
Note: The Run Now Menu Operation check box is disabled when a scheduled backup is runningfor that schedule.
Creating backup schedulesYou can schedule a backup to occur at the time and frequency that are suited for your data andenvironment.
About this task
From SnapManager 3.2 for SAP, you can schedule the backups of the archive log files separately.However, you must use the profile that you created to separate the archive log files.
If you have scheduled the backups of the data files and archive log files at the same time, thenSnapManager creates the data files backup first.
If you select the schedule interval as -onetimeonly, then all the pruning options are available. Ifyou select a schedule interval other than -onetimeonly, then the pruning options -until-SCN and-until-date are not supported and the following error message is displayed: The archive logpruning option you have specified, -until-scn or -until-date for the
schedule interval hourly is invalid. Specify either the -onetimeonly option
for the schedule interval, or prune the archive logs using any one of the
option all, or -before {-months | -days | -weeks| -hours}.
When a failover happens in a High Availability Cluster Multiprocessing (HACMP) environment, youmust restart the SnapManager for SAP server so that the service (virtual) address is mapped to theactive host and the SnapManager schedules are adjusted to the active SnapManager host. You can addthis information in the preprocessing or post-processing HACMP failover scripts.
Note: If the same profile and schedule name exists in another repository, the backup schedulingoperation is not initiated in that repository. The operation will exit with the following message:operation is already running.
90

Step
1. Enter the following command:
smsap schedule create -profile profile_name {[-full {-online | -offline| -auto}[-retain [-hourly | -daily | -weekly | -monthly | -unlimited] [-verify]] | [-data [-files files [files]] | [-tablespaces -tablespaces [-tablespaces]] {-online | -offline | -auto}[-retain [-hourly | -daily | -weekly | -monthly | -unlimited] [-verify]] | [-archivelogs]} [-commentcomment] [-protect | -protectnow | -noprotect] [-backup-dest path1 [,[path2]] [-exclude-dest path1 [,path2]] [-prunelogs{-all | -untilSCNuntilSCN | -until-date yyyy-MM-dd HH:mm:ss | -before {-months | -weeks |-days | -hours}} -prune-dest prune_dest1,prune_dest2] -schedule-nameschedule_name [-schedule-comment schedule_comment] -interval {-hourly |-daily | -weekly | -monthly | -onetimeonly} -cronstring cronstring -start-time {start-time start_time <yyyy-MM-dd HH:mm>} -runasuser -runasuser [-force] [-taskspec -taskspec] [-quiet | -verbose]
If you want to... Then...
Schedule a backup of anonline or offline database
Specify -offline or -online to schedule a backup of the offline oronline database. If you specify these, you cannot use -auto.
Let SnapManager handlescheduling of a databaseregardless of whether it isonline or offline
Specify -auto. If you specify -auto, you cannot use --offline or-online.
Schedule a backup of datafiles
Specify -data -files to list the files separated by commas. Forexample, use file names f1,f2,f3.
Schedule a partial backupof specific tablespaces
Specify -tablespaces to list the tablespaces separated by commas.For example, use ts1,ts2,ts3.
Schedule backup of archivelog files
Specify the following:
• -archivelogs to schedule backup of the archive log files
• -backup-dest to schedule archive log file destinations to beincluded in the backup
• -exclude-dest to schedule the archive log destinations to beexcluded from the backup
Specify the retention classvalues
Specify -retain and indicate whether the backup should be retainedaccording to one of the following retention classes:
• -hourly
• -daily
• -weekly
• -monthly
• -unlimited
SnapManager defaults to hourly.
Schedule pruning of archivelog files
Specify the following:
• -prunelogs to prune the archive log files while scheduling abackup
• -prune-dest to specify the archive log destination from which thearchive log files are pruned
Scheduling database backups | 91
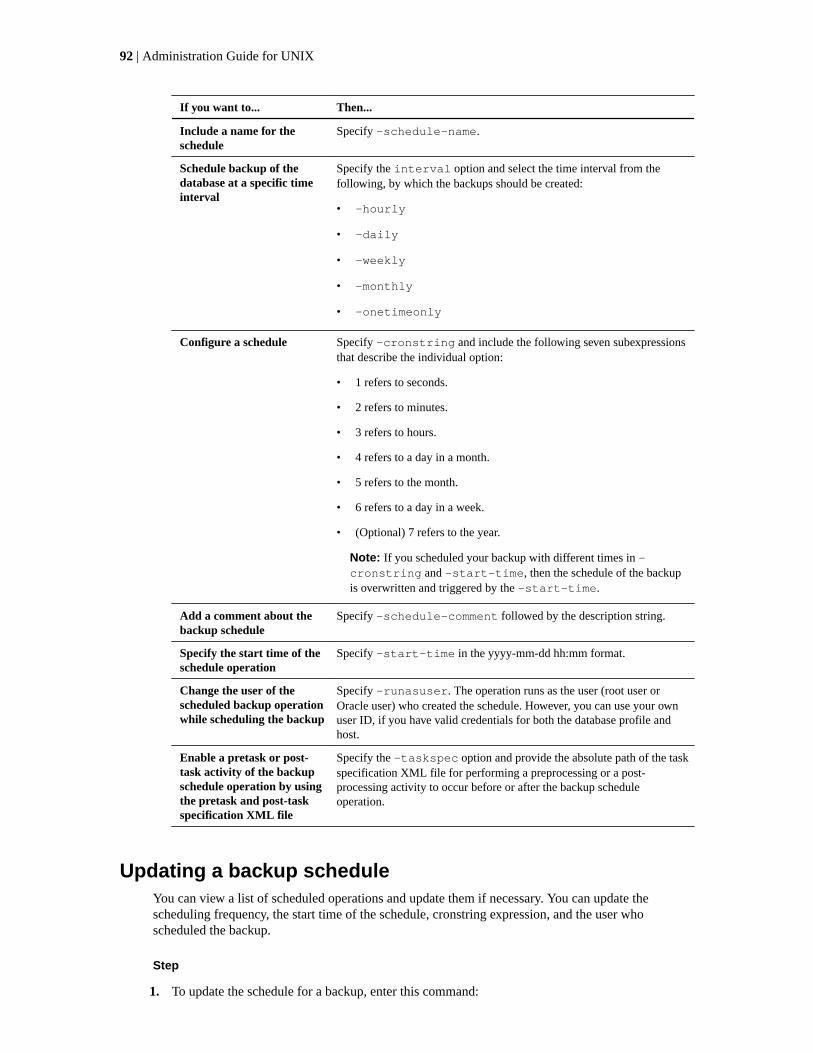
If you want to... Then...
Include a name for theschedule
Specify -schedule-name.
Schedule backup of thedatabase at a specific timeinterval
Specify the interval option and select the time interval from thefollowing, by which the backups should be created:
• -hourly
• -daily
• -weekly
• -monthly
• -onetimeonly
Configure a schedule Specify -cronstring and include the following seven subexpressionsthat describe the individual option:
• 1 refers to seconds.
• 2 refers to minutes.
• 3 refers to hours.
• 4 refers to a day in a month.
• 5 refers to the month.
• 6 refers to a day in a week.
• (Optional) 7 refers to the year.
Note: If you scheduled your backup with different times in -cronstring and -start-time, then the schedule of the backupis overwritten and triggered by the -start-time.
Add a comment about thebackup schedule
Specify -schedule-comment followed by the description string.
Specify the start time of theschedule operation
Specify -start-time in the yyyy-mm-dd hh:mm format.
Change the user of thescheduled backup operationwhile scheduling the backup
Specify -runasuser. The operation runs as the user (root user orOracle user) who created the schedule. However, you can use your ownuser ID, if you have valid credentials for both the database profile andhost.
Enable a pretask or post-task activity of the backupschedule operation by usingthe pretask and post-taskspecification XML file
Specify the -taskspec option and provide the absolute path of the taskspecification XML file for performing a preprocessing or a post-processing activity to occur before or after the backup scheduleoperation.
Updating a backup scheduleYou can view a list of scheduled operations and update them if necessary. You can update thescheduling frequency, the start time of the schedule, cronstring expression, and the user whoscheduled the backup.
Step
1. To update the schedule for a backup, enter this command:
92 | Administration Guide for UNIX
smsap schedule update -profile profile_name -schedule-name schedulename[-schedule-comment schedule comment] -interval {-hourly | -daily | -weekly | -monthly | -onetimeonly} -start-time starttime -cronstringcronstring -runasuser runasuser [-quiet | -verbose]
Viewing a list of scheduled operationsYou can view a list of scheduled operations for a profile.
Step
1. To display information about scheduled operation, enter this command:
smsap schedule list -profile profile_name [-quiet | -verbose]
Suspending backup schedulesSnapManager enables you to suspend a backup schedule until the backup schedule is resumed.
About this task
You can suspend the active schedules. If you try to suspend the backup schedule that is alreadysuspended, you might encounter error message "Cannot suspend: schedule <schedulename>already in suspend state".
Step
1. To suspend the backup schedule temporarily, enter this command:
smsap schedule suspend -profile profile_name -schedule-name schedulename[-quiet | -verbose]
Resuming backup schedulesAdministrators have the option to resume the suspended backup schedule.
About this task
If you try to resume the active schedules, you might encounter the error message: "Cannotresume: schedule <schedulename> already in resume state".
Step
1. To resume the suspended backup schedule, enter this command:
smsap schedule resume -profile profile_name -schedule-name schedulename[-quiet | -verbose]
Deleting backup schedulesYou can delete backup schedules when they are no longer necessary.
Step
1. To delete the backup schedule, enter this command:
Scheduling database backups | 93

smsap schedule delete -profile profile_name -schedule-name schedulename[-quiet | -verbose]
94 | Administration Guide for UNIX
Restoring database backups
SnapManager for SAP enables you to restore a database to the state it was when a Snapshot copy wastaken. In addition to the file-based restore process, SnapManager supports volume-based fast restoretechnology, which reduces the restore time significantly compared to other recovery methods.Because backups are created more frequently, the number of logs that need to be applied is reduced,thus reducing the mean-time-to-recovery (MTTR) for a database.
The following are some of the tasks that you can perform related to restoring and recovering data indatabases:
• Perform a file-based restore or a volume-based restore, which is the fastest method of restoringdatabase backups and is the default that SnapManager uses.
• Restore the entire backup or a portion of it.
If you restore a portion of it, you specify a group of tablespaces or a group of data files. You canalso restore the control files along with the data or just the control files themselves.
• Recover the data based on either a point in time or on all of the available logs, which stores thelast transaction committed to the database.
The point in time can be an Oracle System Change Number (SCN) or a date and time (yyyy-mm-dd:hh:mm:ss). SnapManager uses the 24-hour clock.
• Restore from backups on primary storage (local backups).
• Restore and recover the backup by using SnapManager, or use SnapManager to restore thebackup and use another tool, such as Recovery Manager (RMAN), to recover the data.
• Restore backups from alternate locations.
• Restore protected backups from secondary storage (remote backups) and from an alternatelocation by using the restore specification file.
For more information, see the .
You can restore a backup made by a previous version of SnapManager by using SnapManager 3.0and later versions.
Administrators can perform restore or recovery operations by using the SnapManager graphical userinterface (GUI) or by using the command-line interface (CLI).
Related concepts
Backing up databases on page 60
Related references
The smsap backup restore command on page 224
What database restore isSnapManager enables you to perform volume-based or file-based backup and restore operations.
The following table describes the restore methods:
95

Restore process Details
Volume-based fastrestores (fromprimary storage)
SnapManager restores the data files of a database by restoring a full volume.This default process is the fastest method for restoring your database.
File-based restores Storage-side full file system restore (from primary or secondary):SnapManager performs a full logical unit number (LUN) restore.
Storage-side file restore: SnapManager performs a single file snap restore(SFSR) in a NAS environment. In an SFSR, each of the files or LUNs thatrepresents the protected objects are restored.
Host-side file copy restore (from primary or secondary): SnapManager clonesthe local backup using either a LUN or a FlexClone. The clone is mountedand then SnapManager copies the host files from the clone into the active filesystem.
Although the default is the fast restore process, administrators can choose either type. In the fastrestore process, SnapManager provides information about the conditions that prevent the fast restoreprocess from completing and those that might affect the fast restore but which administrators canignore if they choose to continue with the process.
Note: You cannot restore a backup from the secondary storage, if the backup also exists on theprimary storage.
When the fast restore operation is completed, SnapManager performs the following tasks:
• Frees more recent backups (taken after the backup was restored) in the same profile, because theirSnapshot copies no longer exist on the primary storage.
• Deletes all Snapshot copies for backups in the same profile that had any Snapshot copiesautomatically deleted by the fast restore process.
This prevents backups from being partially freed. For example, Backup_A was created first andthen Backup_B was created. Each has a Snapshot copy for the data files and one for the archivelogs. After SnapManager restores Backup_A by using the fast restore process, SnapManagerautomatically deletes the data file Snapshot copy from Backup_B. Because the archive log is notrestored in the fast restore process, SnapManager must delete Backup_B's Snapshot copy of thearchive logs after the fast restore process completes.
Fast restore
Fast restore or volume-based restore is so named because it is the fastest possible restore method. Theentire storage system volume is reverted to a Snapshot copy. At the storage level, this restore isalmost instantaneous. However, performing a volume restore can have the following negativeconsequences, and therefore must be used with caution:
• The entire storage side volume is reverted, including the following:
◦ Files that were not considered as part of the backup
◦ Other files, file systems, or LUNs on the volume
• All the Snapshot copies that were created after the Snapshot copy to which the volume is beingreverted are deleted.
For example, you can no longer restore Tuesday's backup if you volume restored Monday'sbackup.
• Relationships to secondary storage systems are broken if the restored Snapshot copy is older thanthe baseline Snapshot copy in the relationship.
96 | Administration Guide for UNIX
Storage-side full file system restore
A storage-side full file system restore is performed when a volume restore cannot be performed, butthe entire files system can be restored on the storage system.
When a storage-side file system restore is performed, the following occurs:
• In a SAN environment, all the LUNs used by the file system (and underlying volume group ifany) are restored on the storage system.
• In a NAS environment, every file in the file system is restored on the storage system.
For NAS environments, this restore mechanism does not provide additional benefit over storageside file restore.
When a storage-side file system restore is performed, the following occurs, depending on the storagelocation:
• When SnapManager restores from primary storage systems, the LUNs (SAN) or files (NAS) arerestored in place via SFSR.
• When SnapManager restores from secondary storage systems, the LUNs (SAN) or files (NAS)are copied from secondary storage systems back to the primary storage system over the network.
Because the file system is fully restored, files that are not part of the backup are reverted as well. Anoverride is required if files, which are not part of the restore, exist in the file system that is beingrestored.
Storage-side file restore
A storage-side file restore is sometimes performed when a storage-side file system restore cannot beperformed. In a storage-side file restore, individual files within a file system are restored directly onthe storage systems.
This type of restore can be performed only in NFS environments or in certain cases in ASMenvironments.
When a storage-side file restore is performed, the following occurs:
• When SnapManager restores NFS files from primary storage systems, the individual files arerestored in place by using SFSR.
• When SnapManager restores NFS files from secondary storage systems, the individual files arecopied back to the primary storage system over the storage network.
Host-side file restore
A host-side file copy restore is used as a last resort in SAN environments when fast restore, storageside file system restore, and storage side file restore cannot be performed.
A host-side file copy restore involves the following tasks:
• Cloning the storage
• Connecting the cloned storage to the host
• Copying files out of the clone file systems back into the active file systems
• Disconnecting the clone storage from the host
• Deleting the clone storage
When restoring from the secondary storage, SnapManager first attempts to restore data directly fromthe secondary storage system to the primary storage system (without involving the host). IfSnapManager cannot perform this type of restore (for example, if files not part of the restore exist in
Restoring database backups | 97
a file system), then SnapManager will perform host-side file copy restore. SnapManager has twomethods of performing a host-side file copy restore from the secondary storage. The methodSnapManager selects is configured in the smsap.config file.
• Direct: SnapManager clones the data on the secondary storage, mounts the cloned data from thesecondary storage system to the host, and then copies data out of the clone into the activeenvironment. This is the default secondary access policy.
• Indirect: SnapManager first copies the data to a temporary volume on the primary storage, thenmounts the data from the temporary volume to the host, and then copies data out of the temporaryvolume into the active environment. This secondary access policy should be used only if the hostdoes not have direct access to the secondary storage system. Restores using this method taketwice as long as the direct secondary access policy because two copies of the data are made.
The decision whether to use the direct or indirect method is controlled by the value of therestore.secondaryAccessPolicy parameter in the smsap.config configuration file. Thedefault is direct.
Guidelines for when you can use fast restore
Specific rules apply for using fast restore to achieve optimal restore performance. In some cases, youcannot use fast restore.
To achieve optimal restore performance (volume restore or full disk group restore), you must adhereto the following rules:
• Only complete restores of full backups are eligible for fast restore.
• Only data files are eligible for fast restore.
• Data files must be the only files in a volume to be eligible for fast restore.
Although temporary data files can reside in the volume, control files, logs, pfiles, or other filesmust reside on a separate volume from the data files. You must set up an Oracle database withdata files on a separate volume from control files, archived logs, and online log files.
• Data files for only one database must be present in the volume.
• Multiple file systems can be used, but the files in those file systems must be data files for onlyone database.
• SAP requires a slightly different file layout.
The “General layout and configuration” section contains details.
• If BRRESTORE is used to restore the database, fast restore is used with the fast parameter in thebackup utility parameter file.
Note: To check whether a previously created backup is restorable by using fast restore, you canuse the -preview option of the smsap backup restore command.
The fast restore process cannot be used in the following cases:
• On partial backups
• On backups from the secondary storage if the backup also exists on the primary storage
You cannot restore these using the file-based or volume-based restore.
• On backups protected with SnapVault
The fast restore process cannot be used for backups that were created earlier than the lastprotected backup. However, you can use the fast restore process for backups created after the lastprotected backup. For example, consider backups A, B, and C. B is the last backup to transfer tosecondary storage by using SnapVault. You can fast restore B and C, but you cannot fast restore Abecause it was created earlier than the last protected backup. SnapVault needs a baseline
98 | Administration Guide for UNIX
SnapVault to compute the time difference and send to the secondary storage the next time abackup is transferred to the secondary storage. The last protected backup acts as the baselineSnapshot copy. Therefore, using the fast restore process prevents SnapVault from being able torecognize the baseline.
• FlexClones or LUN clones that use Snapshot copies that were created after the Snapshot copy towhich the volume is being reverted
For example, the clones can be the result of a later backup that is being mounted or being clonedby SnapManager.
• LUNs that are not part of the active SnapDrive Snapshot copy
You cannot perform a fast restore along with other types of restores for the same backup. Forexample, if one data volume can be restored by using the fast restore process but another data volumecannot, neither is restored by using the fast restore process. You can choose a file-based restore inthis case.
Additionally, you should consider the following points about database restores:
• SnapManager never restores archive logs or redo logs but mounts the backup of archive log filesand uses them for recovery.
• SnapManager never restores control files by using volume restore.
• If you want to restore control files and data files, SnapManager performs the restore in two steps.
SnapManager restores the control files first and then the data files.
• If SnapManager finds temporary files in the same volume as the standard tablespace files, you donot need to issue an override to perform a volume-level restore.
After a volume restore, the TEMP tablespace is brought back online.
Both SnapManager for SAP and the BACKINT interface use the same logic when determining whichrestore mechanism can be used. All restore methods can be used whether the backup was taken withSnapManager for SAP or the BACKINT interface, and whether the restore is performed viaSnapManager for SAP or the BACKINT interface.
Related concepts
Recommended general database layouts and storage configurations on page 18
Related information
Documentation on the NetApp Support Site: mysupport.netapp.com
Advantages and disadvantages of using fast restore
DBAs should be aware of the advantages and disadvantages of using volume-based fast restores.
Restoring database backups using fast restores provides the following advantages:
• Volume-based restores reduce the time needed to restore backups.
• SnapManager provides fast restore eligibility checks. SnapManager analyzes the database backupand displays information about whether it can perform the volume-based restore.
• You can preview the restore operation and decide whether to continue with the recommended pathor override the recommendation with your selected process.
Restoring database backups using fast restores has the following disadvantages:
• The entire file system is reverted, including files that were not considered part of the backup.Other files, file systems, or LUNs on the volume will also be reverted.
Restoring database backups | 99

• SnapManager removes all Snapshot copies that were taken after the Snapshot you are reverting to.In effect, you lose the history after the Snapshot copy date. For example, you cannot restoreTuesday's backup if you already restored Monday's backup.
You can avoid the disadvantages by following these recommendations:
• Optimize the database layout according to best practices.
• Protect backups to secondary storage. However, if you delete Snapshot copies from primarystorage, you cannot use fast restores to restore them from secondary storage.
Fast restore eligibility checks
When you choose to perform a fast restore of a backup, SnapManager first performs an eligibilitycheck to determine whether the fast restore process can be used.
SnapManager provides the following types of checks:
• Mandatory checks: SnapManager can perform the fast restore process only if all the conditionsunder this check pass.
• Overridable checks: If the conditions under this check fail, administrators can override the checkto force a fast restore process. However, you must override these checks with caution.
The following table lists issues that you might encounter and indicates whether the fast restoreeligibility check can be overridden:
Issue Passrequired
Details
ACFS, Voting Disk,or OCR is presenton ASM Disk groupin 11gR2
Yes Fast restore cannot be performed.
Resolution: None
Cannot override.
Only backupscreated withSnapManager 3.0 orlater can be fastrestored
Yes Cannot override.
Only Snapshotcopies created withSnapDrive forUNIX 4.0 or latercan be fast restored
Yes Cannot override.
Volume is a rootvolume
Yes Volume being restored is a root volume on the storage system.
Resolution: Do not use the root volume on the storage system.
Cannot override.
Volume restore isnot available onWindows
Yes Volume being restored is a root volume on the storage system.
Resolution: None
Cannot override.
Volume restore isdisabled
Yes Volume restore has been disabled.
Resolution: Enable volume restore by selecting different optionswhen starting the restore. In the command-line interface, do notuse -fast -off.
Cannot override.
100 | Administration Guide for UNIX
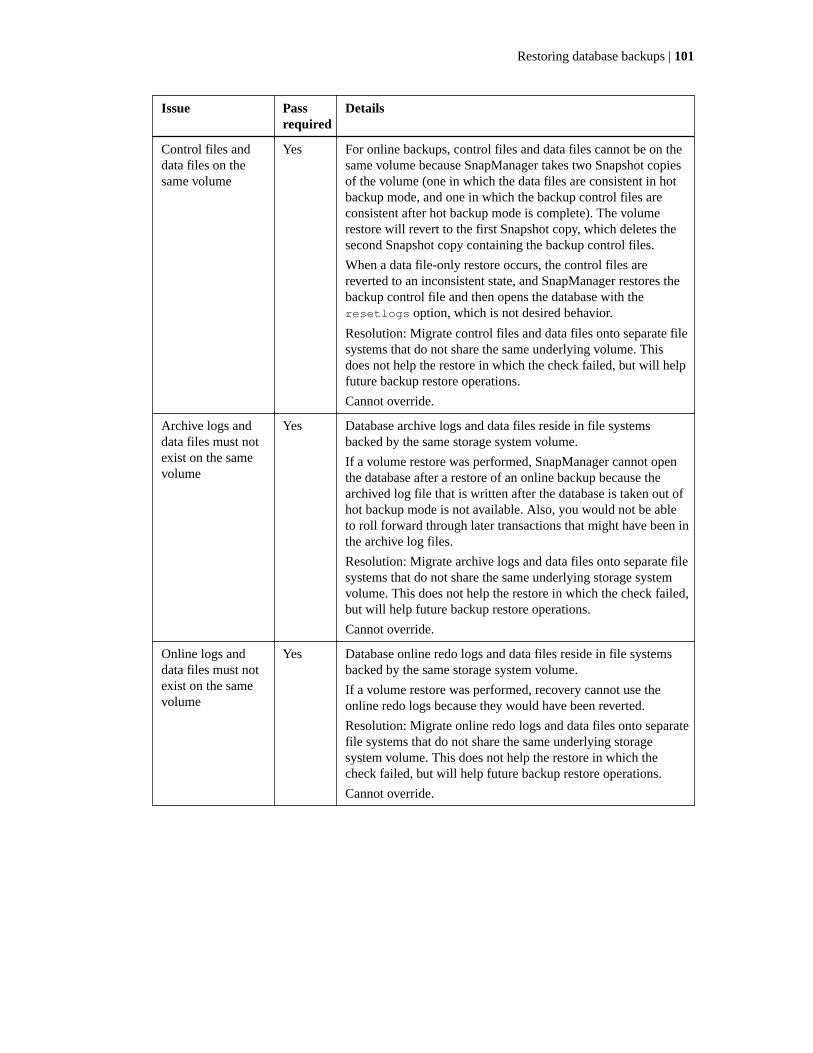
Issue Passrequired
Details
Control files anddata files on thesame volume
Yes For online backups, control files and data files cannot be on thesame volume because SnapManager takes two Snapshot copiesof the volume (one in which the data files are consistent in hotbackup mode, and one in which the backup control files areconsistent after hot backup mode is complete). The volumerestore will revert to the first Snapshot copy, which deletes thesecond Snapshot copy containing the backup control files.
When a data file-only restore occurs, the control files arereverted to an inconsistent state, and SnapManager restores thebackup control file and then opens the database with theresetlogs option, which is not desired behavior.
Resolution: Migrate control files and data files onto separate filesystems that do not share the same underlying volume. Thisdoes not help the restore in which the check failed, but will helpfuture backup restore operations.
Cannot override.
Archive logs anddata files must notexist on the samevolume
Yes Database archive logs and data files reside in file systemsbacked by the same storage system volume.
If a volume restore was performed, SnapManager cannot openthe database after a restore of an online backup because thearchived log file that is written after the database is taken out ofhot backup mode is not available. Also, you would not be ableto roll forward through later transactions that might have been inthe archive log files.
Resolution: Migrate archive logs and data files onto separate filesystems that do not share the same underlying storage systemvolume. This does not help the restore in which the check failed,but will help future backup restore operations.
Cannot override.
Online logs anddata files must notexist on the samevolume
Yes Database online redo logs and data files reside in file systemsbacked by the same storage system volume.
If a volume restore was performed, recovery cannot use theonline redo logs because they would have been reverted.
Resolution: Migrate online redo logs and data files onto separatefile systems that do not share the same underlying storagesystem volume. This does not help the restore in which thecheck failed, but will help future backup restore operations.
Cannot override.
Restoring database backups | 101
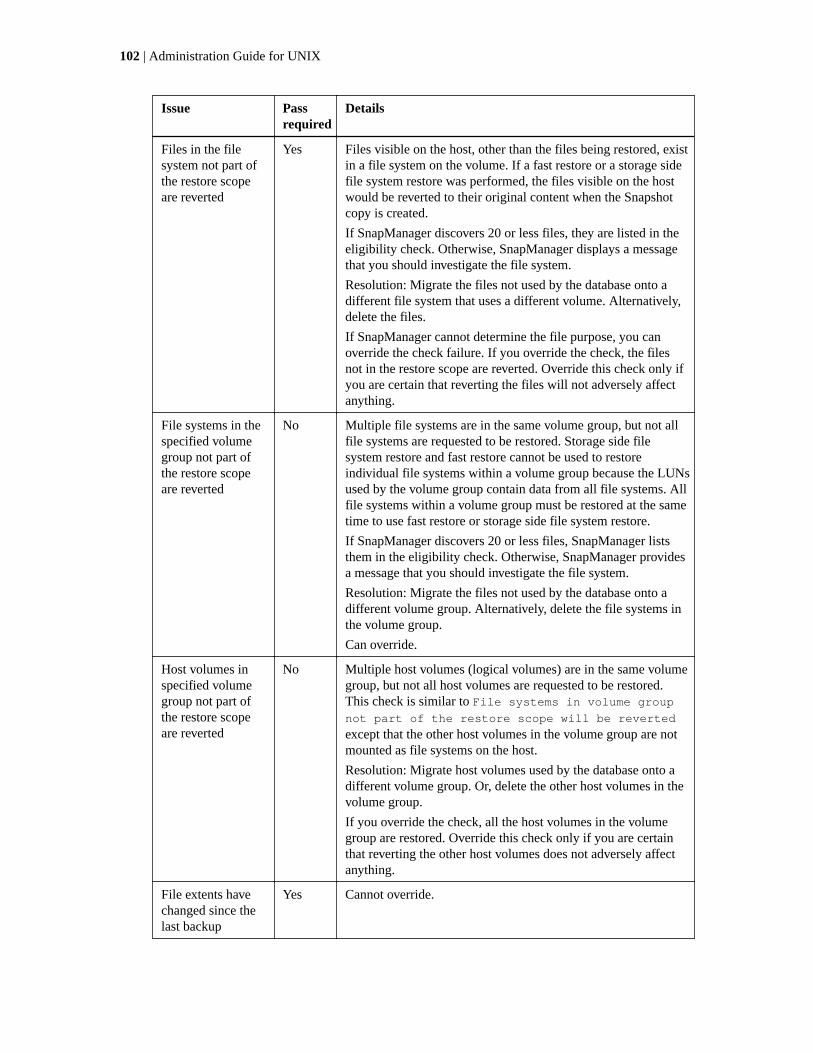
Issue Passrequired
Details
Files in the filesystem not part ofthe restore scopeare reverted
Yes Files visible on the host, other than the files being restored, existin a file system on the volume. If a fast restore or a storage sidefile system restore was performed, the files visible on the hostwould be reverted to their original content when the Snapshotcopy is created.
If SnapManager discovers 20 or less files, they are listed in theeligibility check. Otherwise, SnapManager displays a messagethat you should investigate the file system.
Resolution: Migrate the files not used by the database onto adifferent file system that uses a different volume. Alternatively,delete the files.
If SnapManager cannot determine the file purpose, you canoverride the check failure. If you override the check, the filesnot in the restore scope are reverted. Override this check only ifyou are certain that reverting the files will not adversely affectanything.
File systems in thespecified volumegroup not part ofthe restore scopeare reverted
No Multiple file systems are in the same volume group, but not allfile systems are requested to be restored. Storage side filesystem restore and fast restore cannot be used to restoreindividual file systems within a volume group because the LUNsused by the volume group contain data from all file systems. Allfile systems within a volume group must be restored at the sametime to use fast restore or storage side file system restore.
If SnapManager discovers 20 or less files, SnapManager liststhem in the eligibility check. Otherwise, SnapManager providesa message that you should investigate the file system.
Resolution: Migrate the files not used by the database onto adifferent volume group. Alternatively, delete the file systems inthe volume group.
Can override.
Host volumes inspecified volumegroup not part ofthe restore scopeare reverted
No Multiple host volumes (logical volumes) are in the same volumegroup, but not all host volumes are requested to be restored.This check is similar to File systems in volume groupnot part of the restore scope will be reverted
except that the other host volumes in the volume group are notmounted as file systems on the host.
Resolution: Migrate host volumes used by the database onto adifferent volume group. Or, delete the other host volumes in thevolume group.
If you override the check, all the host volumes in the volumegroup are restored. Override this check only if you are certainthat reverting the other host volumes does not adversely affectanything.
File extents havechanged since thelast backup
Yes Cannot override.
102 | Administration Guide for UNIX
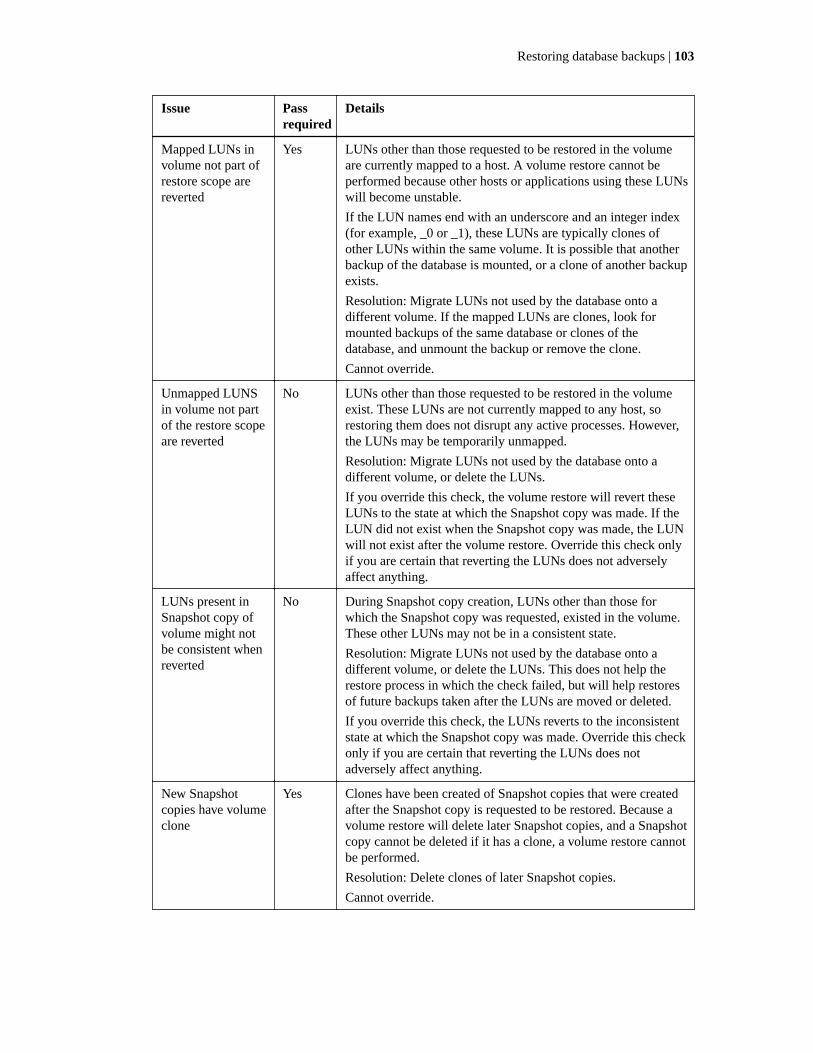
Issue Passrequired
Details
Mapped LUNs involume not part ofrestore scope arereverted
Yes LUNs other than those requested to be restored in the volumeare currently mapped to a host. A volume restore cannot beperformed because other hosts or applications using these LUNswill become unstable.
If the LUN names end with an underscore and an integer index(for example, _0 or _1), these LUNs are typically clones ofother LUNs within the same volume. It is possible that anotherbackup of the database is mounted, or a clone of another backupexists.
Resolution: Migrate LUNs not used by the database onto adifferent volume. If the mapped LUNs are clones, look formounted backups of the same database or clones of thedatabase, and unmount the backup or remove the clone.
Cannot override.
Unmapped LUNSin volume not partof the restore scopeare reverted
No LUNs other than those requested to be restored in the volumeexist. These LUNs are not currently mapped to any host, sorestoring them does not disrupt any active processes. However,the LUNs may be temporarily unmapped.
Resolution: Migrate LUNs not used by the database onto adifferent volume, or delete the LUNs.
If you override this check, the volume restore will revert theseLUNs to the state at which the Snapshot copy was made. If theLUN did not exist when the Snapshot copy was made, the LUNwill not exist after the volume restore. Override this check onlyif you are certain that reverting the LUNs does not adverselyaffect anything.
LUNs present inSnapshot copy ofvolume might notbe consistent whenreverted
No During Snapshot copy creation, LUNs other than those forwhich the Snapshot copy was requested, existed in the volume.These other LUNs may not be in a consistent state.
Resolution: Migrate LUNs not used by the database onto adifferent volume, or delete the LUNs. This does not help therestore process in which the check failed, but will help restoresof future backups taken after the LUNs are moved or deleted.
If you override this check, the LUNs reverts to the inconsistentstate at which the Snapshot copy was made. Override this checkonly if you are certain that reverting the LUNs does notadversely affect anything.
New Snapshotcopies have volumeclone
Yes Clones have been created of Snapshot copies that were createdafter the Snapshot copy is requested to be restored. Because avolume restore will delete later Snapshot copies, and a Snapshotcopy cannot be deleted if it has a clone, a volume restore cannotbe performed.
Resolution: Delete clones of later Snapshot copies.
Cannot override.
Restoring database backups | 103
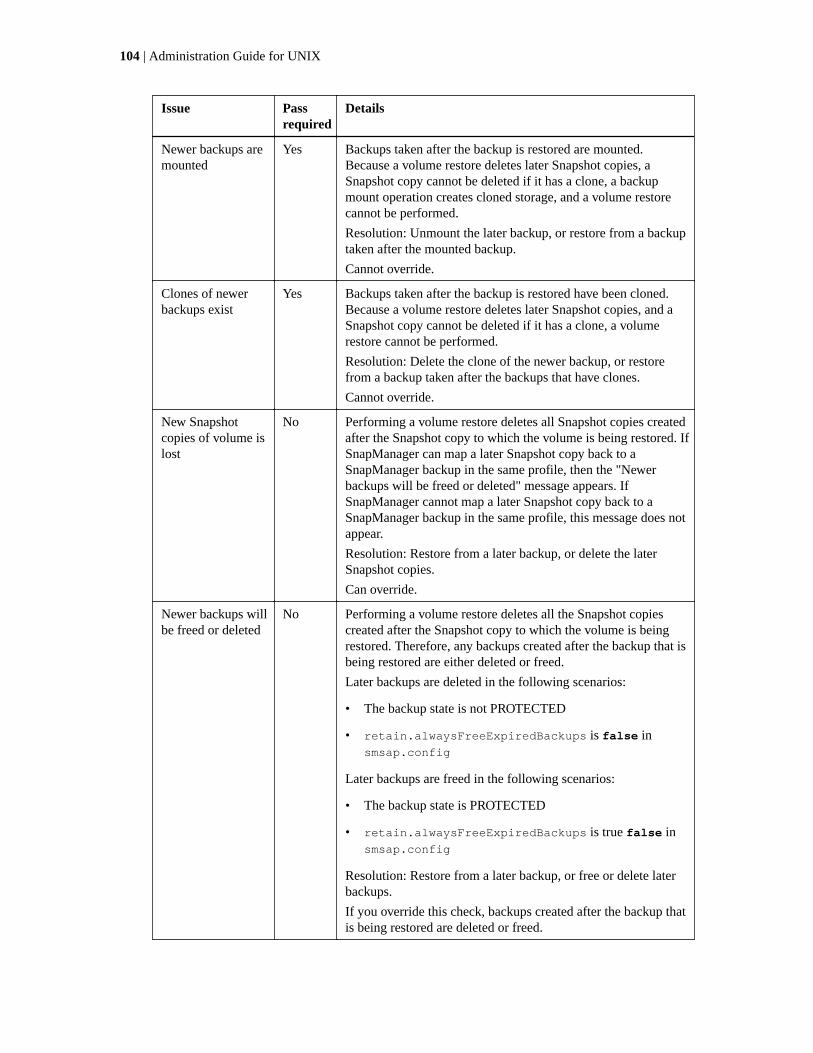
Issue Passrequired
Details
Newer backups aremounted
Yes Backups taken after the backup is restored are mounted.Because a volume restore deletes later Snapshot copies, aSnapshot copy cannot be deleted if it has a clone, a backupmount operation creates cloned storage, and a volume restorecannot be performed.
Resolution: Unmount the later backup, or restore from a backuptaken after the mounted backup.
Cannot override.
Clones of newerbackups exist
Yes Backups taken after the backup is restored have been cloned.Because a volume restore deletes later Snapshot copies, and aSnapshot copy cannot be deleted if it has a clone, a volumerestore cannot be performed.
Resolution: Delete the clone of the newer backup, or restorefrom a backup taken after the backups that have clones.
Cannot override.
New Snapshotcopies of volume islost
No Performing a volume restore deletes all Snapshot copies createdafter the Snapshot copy to which the volume is being restored. IfSnapManager can map a later Snapshot copy back to aSnapManager backup in the same profile, then the "Newerbackups will be freed or deleted" message appears. IfSnapManager cannot map a later Snapshot copy back to aSnapManager backup in the same profile, this message does notappear.
Resolution: Restore from a later backup, or delete the laterSnapshot copies.
Can override.
Newer backups willbe freed or deleted
No Performing a volume restore deletes all the Snapshot copiescreated after the Snapshot copy to which the volume is beingrestored. Therefore, any backups created after the backup that isbeing restored are either deleted or freed.
Later backups are deleted in the following scenarios:
• The backup state is not PROTECTED
• retain.alwaysFreeExpiredBackups is false insmsap.config
Later backups are freed in the following scenarios:
• The backup state is PROTECTED
• retain.alwaysFreeExpiredBackups is true false insmsap.config
Resolution: Restore from a later backup, or free or delete laterbackups.
If you override this check, backups created after the backup thatis being restored are deleted or freed.
104 | Administration Guide for UNIX
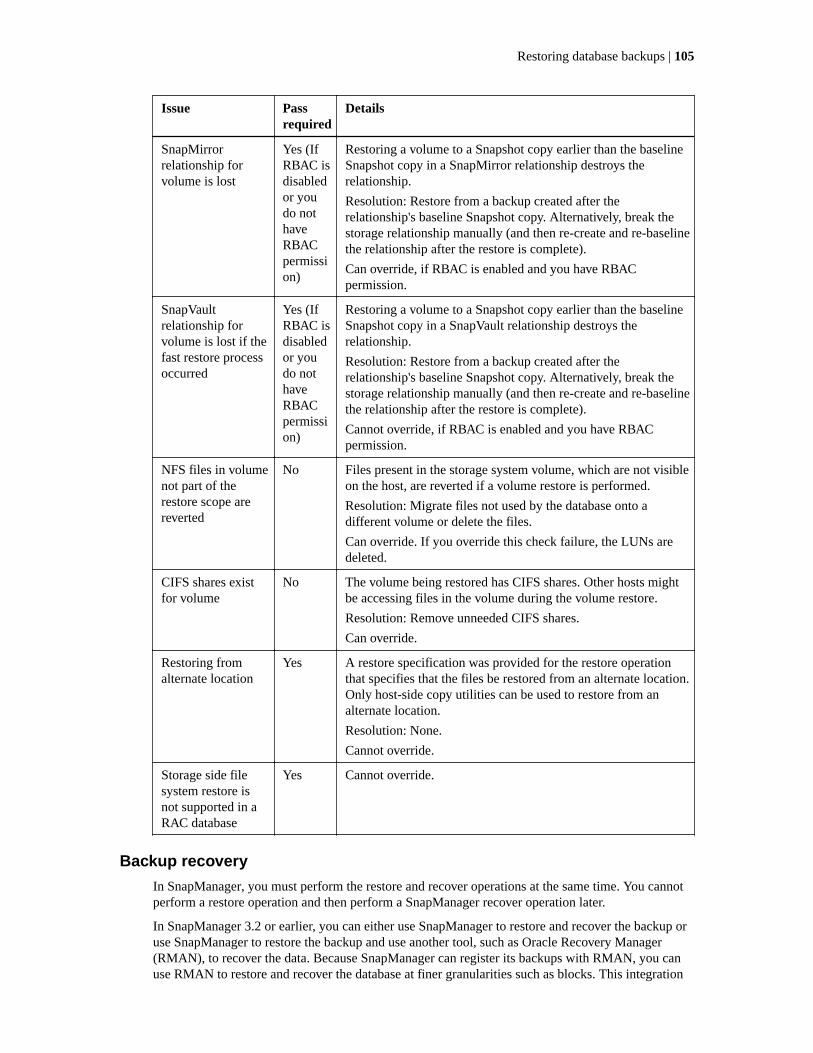
Issue Passrequired
Details
SnapMirrorrelationship forvolume is lost
Yes (IfRBAC isdisabledor youdo nothaveRBACpermission)
Restoring a volume to a Snapshot copy earlier than the baselineSnapshot copy in a SnapMirror relationship destroys therelationship.
Resolution: Restore from a backup created after therelationship's baseline Snapshot copy. Alternatively, break thestorage relationship manually (and then re-create and re-baselinethe relationship after the restore is complete).
Can override, if RBAC is enabled and you have RBACpermission.
SnapVaultrelationship forvolume is lost if thefast restore processoccurred
Yes (IfRBAC isdisabledor youdo nothaveRBACpermission)
Restoring a volume to a Snapshot copy earlier than the baselineSnapshot copy in a SnapVault relationship destroys therelationship.
Resolution: Restore from a backup created after therelationship's baseline Snapshot copy. Alternatively, break thestorage relationship manually (and then re-create and re-baselinethe relationship after the restore is complete).
Cannot override, if RBAC is enabled and you have RBACpermission.
NFS files in volumenot part of therestore scope arereverted
No Files present in the storage system volume, which are not visibleon the host, are reverted if a volume restore is performed.
Resolution: Migrate files not used by the database onto adifferent volume or delete the files.
Can override. If you override this check failure, the LUNs aredeleted.
CIFS shares existfor volume
No The volume being restored has CIFS shares. Other hosts mightbe accessing files in the volume during the volume restore.
Resolution: Remove unneeded CIFS shares.
Can override.
Restoring fromalternate location
Yes A restore specification was provided for the restore operationthat specifies that the files be restored from an alternate location.Only host-side copy utilities can be used to restore from analternate location.
Resolution: None.
Cannot override.
Storage side filesystem restore isnot supported in aRAC database
Yes Cannot override.
Backup recovery
In SnapManager, you must perform the restore and recover operations at the same time. You cannotperform a restore operation and then perform a SnapManager recover operation later.
In SnapManager 3.2 or earlier, you can either use SnapManager to restore and recover the backup oruse SnapManager to restore the backup and use another tool, such as Oracle Recovery Manager(RMAN), to recover the data. Because SnapManager can register its backups with RMAN, you canuse RMAN to restore and recover the database at finer granularities such as blocks. This integration
Restoring database backups | 105
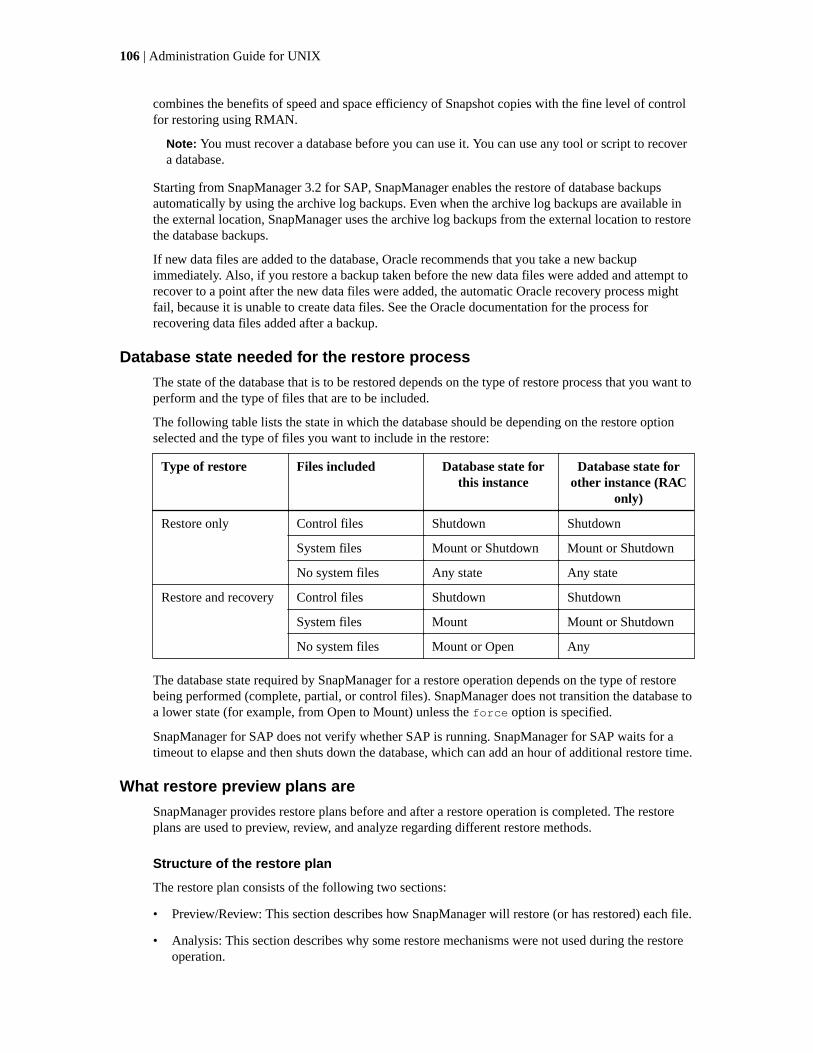
combines the benefits of speed and space efficiency of Snapshot copies with the fine level of controlfor restoring using RMAN.
Note: You must recover a database before you can use it. You can use any tool or script to recovera database.
Starting from SnapManager 3.2 for SAP, SnapManager enables the restore of database backupsautomatically by using the archive log backups. Even when the archive log backups are available inthe external location, SnapManager uses the archive log backups from the external location to restorethe database backups.
If new data files are added to the database, Oracle recommends that you take a new backupimmediately. Also, if you restore a backup taken before the new data files were added and attempt torecover to a point after the new data files were added, the automatic Oracle recovery process mightfail, because it is unable to create data files. See the Oracle documentation for the process forrecovering data files added after a backup.
Database state needed for the restore process
The state of the database that is to be restored depends on the type of restore process that you want toperform and the type of files that are to be included.
The following table lists the state in which the database should be depending on the restore optionselected and the type of files you want to include in the restore:
Type of restore Files included Database state forthis instance
Database state forother instance (RAC
only)
Restore only Control files Shutdown Shutdown
System files Mount or Shutdown Mount or Shutdown
No system files Any state Any state
Restore and recovery Control files Shutdown Shutdown
System files Mount Mount or Shutdown
No system files Mount or Open Any
The database state required by SnapManager for a restore operation depends on the type of restorebeing performed (complete, partial, or control files). SnapManager does not transition the database toa lower state (for example, from Open to Mount) unless the force option is specified.
SnapManager for SAP does not verify whether SAP is running. SnapManager for SAP waits for atimeout to elapse and then shuts down the database, which can add an hour of additional restore time.
What restore preview plans are
SnapManager provides restore plans before and after a restore operation is completed. The restoreplans are used to preview, review, and analyze regarding different restore methods.
Structure of the restore plan
The restore plan consists of the following two sections:
• Preview/Review: This section describes how SnapManager will restore (or has restored) each file.
• Analysis: This section describes why some restore mechanisms were not used during the restoreoperation.
106 | Administration Guide for UNIX
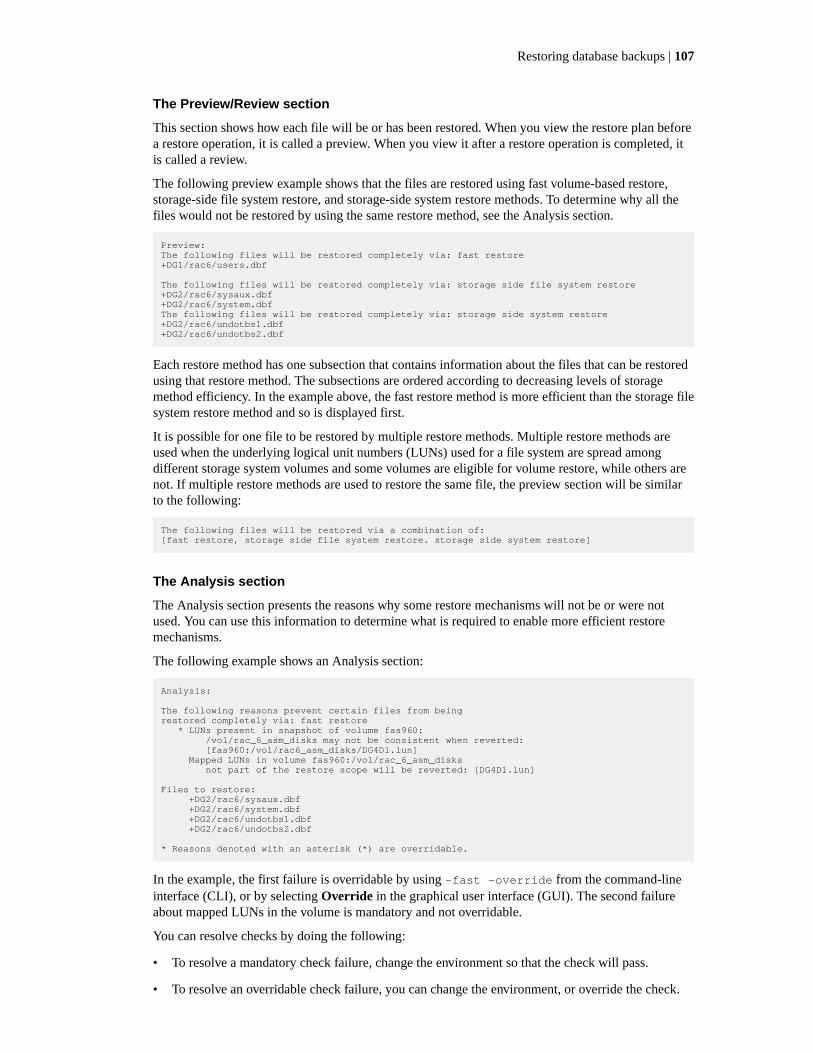
The Preview/Review section
This section shows how each file will be or has been restored. When you view the restore plan beforea restore operation, it is called a preview. When you view it after a restore operation is completed, itis called a review.
The following preview example shows that the files are restored using fast volume-based restore,storage-side file system restore, and storage-side system restore methods. To determine why all thefiles would not be restored by using the same restore method, see the Analysis section.
Preview: The following files will be restored completely via: fast restore +DG1/rac6/users.dbf
The following files will be restored completely via: storage side file system restore+DG2/rac6/sysaux.dbf +DG2/rac6/system.dbfThe following files will be restored completely via: storage side system restore+DG2/rac6/undotbs1.dbf+DG2/rac6/undotbs2.dbf
Each restore method has one subsection that contains information about the files that can be restoredusing that restore method. The subsections are ordered according to decreasing levels of storagemethod efficiency. In the example above, the fast restore method is more efficient than the storage filesystem restore method and so is displayed first.
It is possible for one file to be restored by multiple restore methods. Multiple restore methods areused when the underlying logical unit numbers (LUNs) used for a file system are spread amongdifferent storage system volumes and some volumes are eligible for volume restore, while others arenot. If multiple restore methods are used to restore the same file, the preview section will be similarto the following:
The following files will be restored via a combination of: [fast restore, storage side file system restore. storage side system restore]
The Analysis section
The Analysis section presents the reasons why some restore mechanisms will not be or were notused. You can use this information to determine what is required to enable more efficient restoremechanisms.
The following example shows an Analysis section:
Analysis:
The following reasons prevent certain files from beingrestored completely via: fast restore * LUNs present in snapshot of volume fas960: /vol/rac_6_asm_disks may not be consistent when reverted: [fas960:/vol/rac6_asm_disks/DG4D1.lun] Mapped LUNs in volume fas960:/vol/rac_6_asm_disks not part of the restore scope will be reverted: [DG4D1.lun]
Files to restore: +DG2/rac6/sysaux.dbf +DG2/rac6/system.dbf +DG2/rac6/undotbs1.dbf +DG2/rac6/undotbs2.dbf
* Reasons denoted with an asterisk (*) are overridable.
In the example, the first failure is overridable by using -fast -override from the command-lineinterface (CLI), or by selecting Override in the graphical user interface (GUI). The second failureabout mapped LUNs in the volume is mandatory and not overridable.
You can resolve checks by doing the following:
• To resolve a mandatory check failure, change the environment so that the check will pass.
• To resolve an overridable check failure, you can change the environment, or override the check.
Restoring database backups | 107
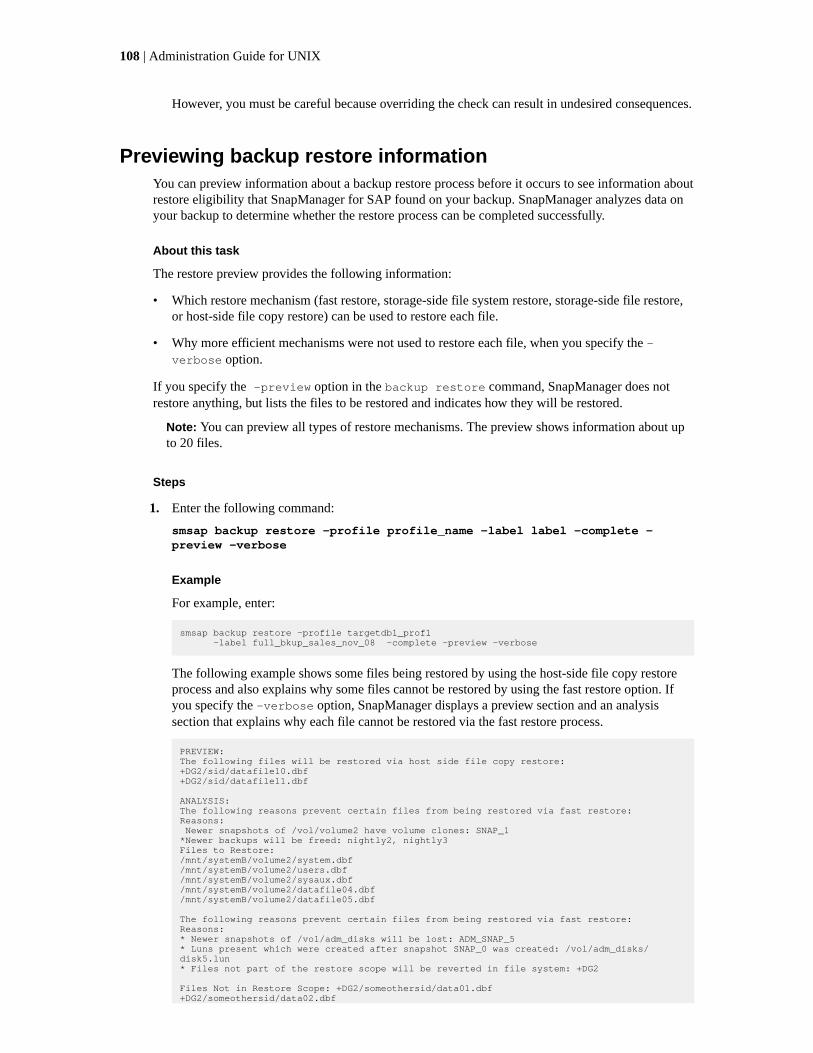
However, you must be careful because overriding the check can result in undesired consequences.
Previewing backup restore informationYou can preview information about a backup restore process before it occurs to see information aboutrestore eligibility that SnapManager for SAP found on your backup. SnapManager analyzes data onyour backup to determine whether the restore process can be completed successfully.
About this task
The restore preview provides the following information:
• Which restore mechanism (fast restore, storage-side file system restore, storage-side file restore,or host-side file copy restore) can be used to restore each file.
• Why more efficient mechanisms were not used to restore each file, when you specify the -verbose option.
If you specify the -preview option in the backup restore command, SnapManager does notrestore anything, but lists the files to be restored and indicates how they will be restored.
Note: You can preview all types of restore mechanisms. The preview shows information about upto 20 files.
Steps
1. Enter the following command:
smsap backup restore -profile profile_name -label label -complete -preview -verbose
Example
For example, enter:
smsap backup restore -profile targetdb1_prof1 -label full_bkup_sales_nov_08 -complete -preview -verbose
The following example shows some files being restored by using the host-side file copy restoreprocess and also explains why some files cannot be restored by using the fast restore option. Ifyou specify the -verbose option, SnapManager displays a preview section and an analysissection that explains why each file cannot be restored via the fast restore process.
PREVIEW:The following files will be restored via host side file copy restore: +DG2/sid/datafile10.dbf +DG2/sid/datafile11.dbf
ANALYSIS: The following reasons prevent certain files from being restored via fast restore: Reasons: Newer snapshots of /vol/volume2 have volume clones: SNAP_1*Newer backups will be freed: nightly2, nightly3 Files to Restore: /mnt/systemB/volume2/system.dbf /mnt/systemB/volume2/users.dbf/mnt/systemB/volume2/sysaux.dbf /mnt/systemB/volume2/datafile04.dbf/mnt/systemB/volume2/datafile05.dbf
The following reasons prevent certain files from being restored via fast restore: Reasons: * Newer snapshots of /vol/adm_disks will be lost: ADM_SNAP_5 * Luns present which were created after snapshot SNAP_0 was created: /vol/adm_disks/disk5.lun * Files not part of the restore scope will be reverted in file system: +DG2
Files Not in Restore Scope: +DG2/someothersid/data01.dbf+DG2/someothersid/data02.dbf
108 | Administration Guide for UNIX
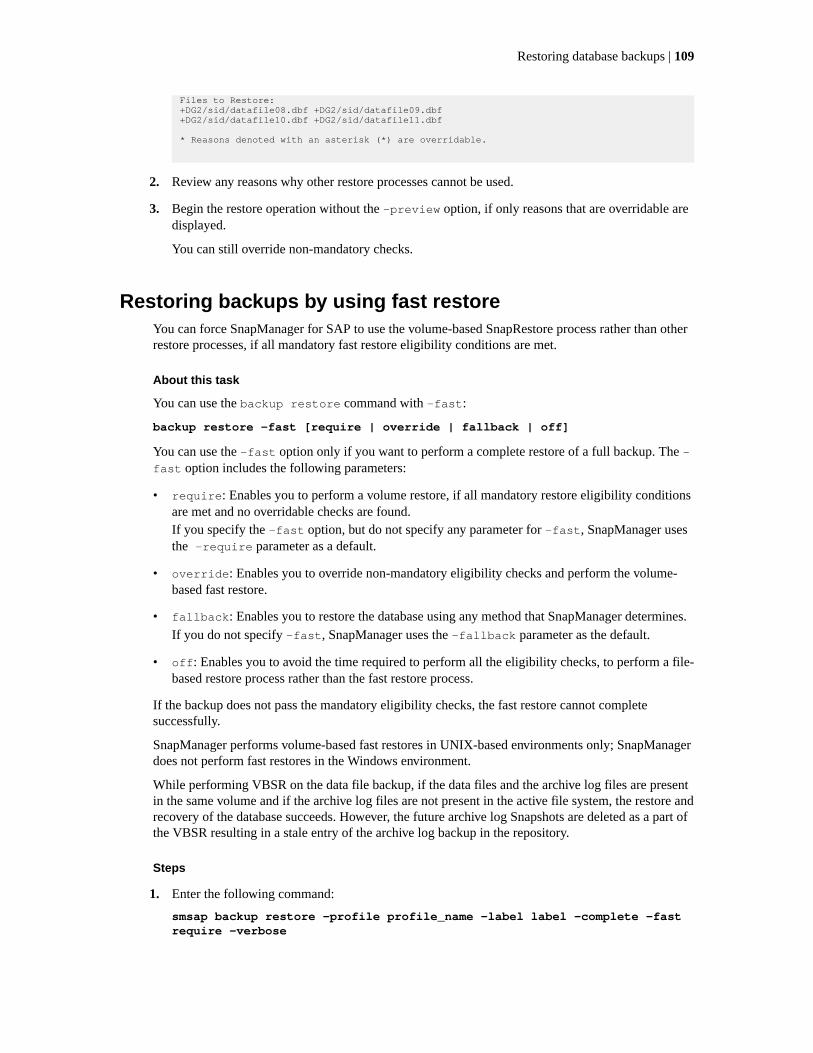
Files to Restore:+DG2/sid/datafile08.dbf +DG2/sid/datafile09.dbf+DG2/sid/datafile10.dbf +DG2/sid/datafile11.dbf
* Reasons denoted with an asterisk (*) are overridable.
2. Review any reasons why other restore processes cannot be used.
3. Begin the restore operation without the -preview option, if only reasons that are overridable aredisplayed.
You can still override non-mandatory checks.
Restoring backups by using fast restoreYou can force SnapManager for SAP to use the volume-based SnapRestore process rather than otherrestore processes, if all mandatory fast restore eligibility conditions are met.
About this task
You can use the backup restore command with -fast:
backup restore -fast [require | override | fallback | off]
You can use the -fast option only if you want to perform a complete restore of a full backup. The -fast option includes the following parameters:
• require: Enables you to perform a volume restore, if all mandatory restore eligibility conditionsare met and no overridable checks are found.
If you specify the -fast option, but do not specify any parameter for -fast, SnapManager usesthe -require parameter as a default.
• override: Enables you to override non-mandatory eligibility checks and perform the volume-based fast restore.
• fallback: Enables you to restore the database using any method that SnapManager determines.
If you do not specify -fast, SnapManager uses the -fallback parameter as the default.
• off: Enables you to avoid the time required to perform all the eligibility checks, to perform a file-based restore process rather than the fast restore process.
If the backup does not pass the mandatory eligibility checks, the fast restore cannot completesuccessfully.
SnapManager performs volume-based fast restores in UNIX-based environments only; SnapManagerdoes not perform fast restores in the Windows environment.
While performing VBSR on the data file backup, if the data files and the archive log files are presentin the same volume and if the archive log files are not present in the active file system, the restore andrecovery of the database succeeds. However, the future archive log Snapshots are deleted as a part ofthe VBSR resulting in a stale entry of the archive log backup in the repository.
Steps
1. Enter the following command:
smsap backup restore -profile profile_name -label label -complete -fastrequire -verbose
Restoring database backups | 109
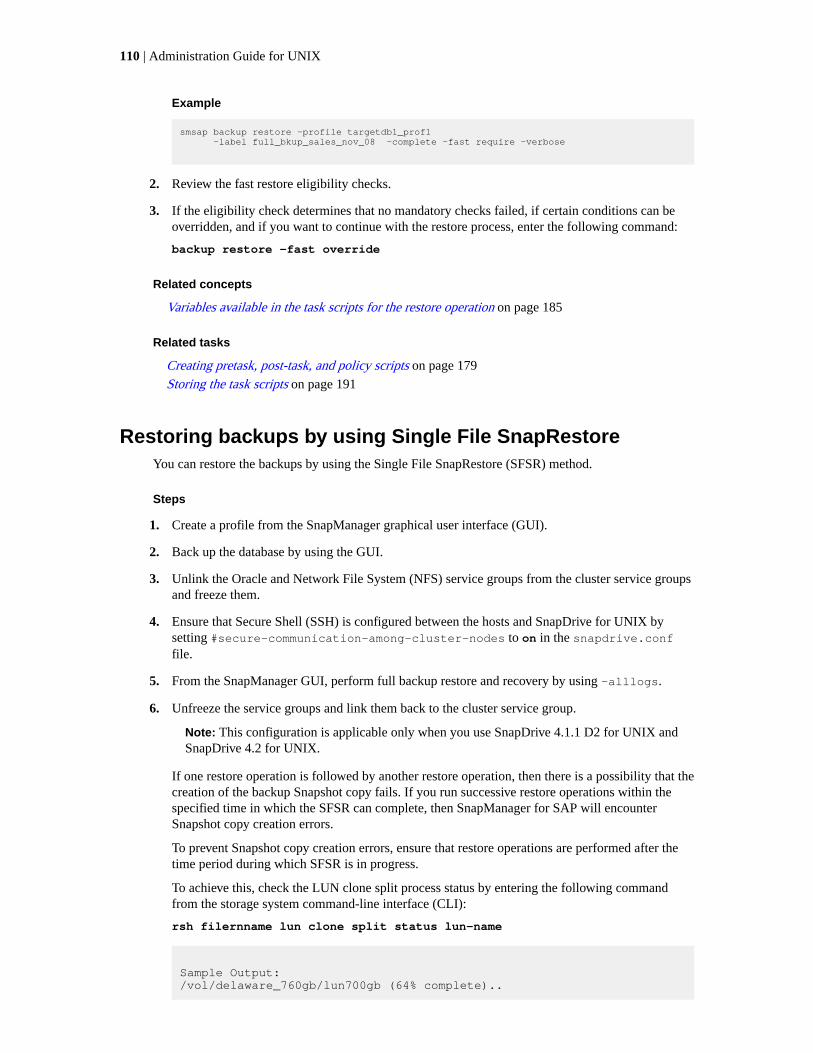
Example
smsap backup restore -profile targetdb1_prof1 -label full_bkup_sales_nov_08 -complete -fast require -verbose
2. Review the fast restore eligibility checks.
3. If the eligibility check determines that no mandatory checks failed, if certain conditions can beoverridden, and if you want to continue with the restore process, enter the following command:
backup restore -fast override
Related concepts
Variables available in the task scripts for the restore operation on page 185
Related tasks
Creating pretask, post-task, and policy scripts on page 179
Storing the task scripts on page 191
Restoring backups by using Single File SnapRestoreYou can restore the backups by using the Single File SnapRestore (SFSR) method.
Steps
1. Create a profile from the SnapManager graphical user interface (GUI).
2. Back up the database by using the GUI.
3. Unlink the Oracle and Network File System (NFS) service groups from the cluster service groupsand freeze them.
4. Ensure that Secure Shell (SSH) is configured between the hosts and SnapDrive for UNIX bysetting #secure-communication-among-cluster-nodes to on in the snapdrive.conffile.
5. From the SnapManager GUI, perform full backup restore and recovery by using –alllogs.
6. Unfreeze the service groups and link them back to the cluster service group.
Note: This configuration is applicable only when you use SnapDrive 4.1.1 D2 for UNIX andSnapDrive 4.2 for UNIX.
If one restore operation is followed by another restore operation, then there is a possibility that thecreation of the backup Snapshot copy fails. If you run successive restore operations within thespecified time in which the SFSR can complete, then SnapManager for SAP will encounterSnapshot copy creation errors.
To prevent Snapshot copy creation errors, ensure that restore operations are performed after thetime period during which SFSR is in progress.
To achieve this, check the LUN clone split process status by entering the following commandfrom the storage system command-line interface (CLI):
rsh filernname lun clone split status lun-name
Sample Output:/vol/delaware_760gb/lun700gb (64% complete)..
110 | Administration Guide for UNIX
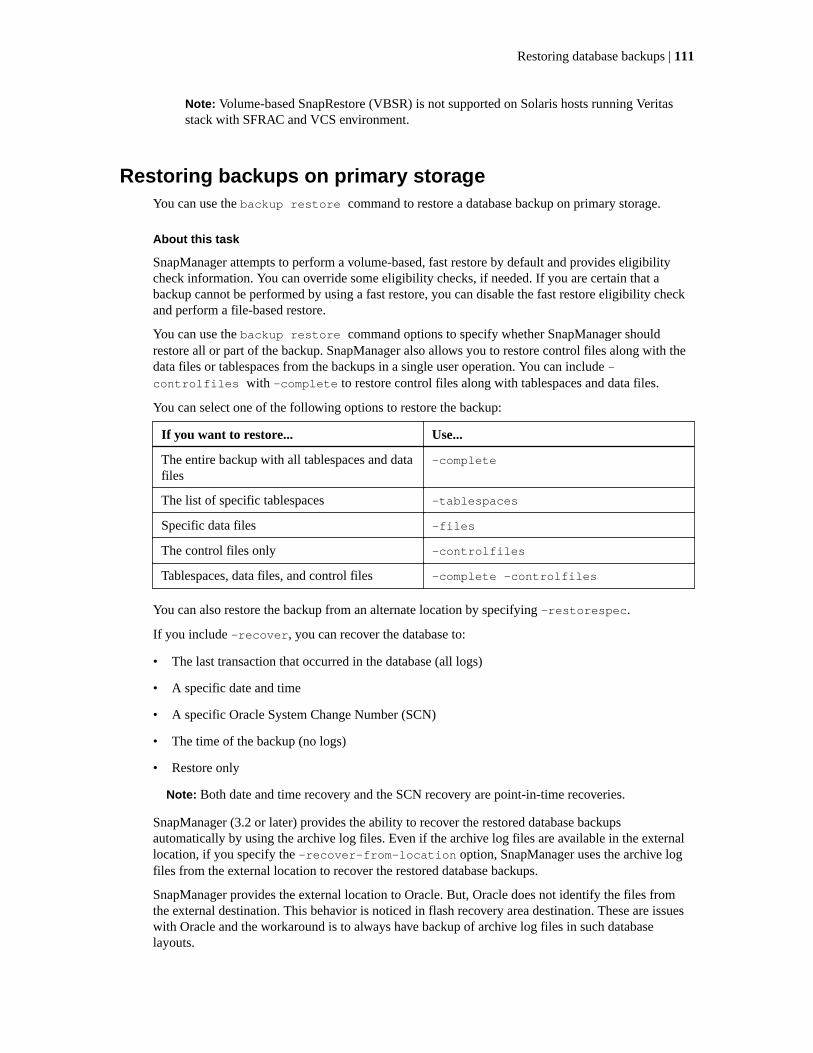
Note: Volume-based SnapRestore (VBSR) is not supported on Solaris hosts running Veritasstack with SFRAC and VCS environment.
Restoring backups on primary storageYou can use the backup restore command to restore a database backup on primary storage.
About this task
SnapManager attempts to perform a volume-based, fast restore by default and provides eligibilitycheck information. You can override some eligibility checks, if needed. If you are certain that abackup cannot be performed by using a fast restore, you can disable the fast restore eligibility checkand perform a file-based restore.
You can use the backup restore command options to specify whether SnapManager shouldrestore all or part of the backup. SnapManager also allows you to restore control files along with thedata files or tablespaces from the backups in a single user operation. You can include -controlfiles with -complete to restore control files along with tablespaces and data files.
You can select one of the following options to restore the backup:
If you want to restore... Use...
The entire backup with all tablespaces and datafiles
-complete
The list of specific tablespaces -tablespaces
Specific data files -files
The control files only -controlfiles
Tablespaces, data files, and control files -complete -controlfiles
You can also restore the backup from an alternate location by specifying -restorespec.
If you include -recover, you can recover the database to:
• The last transaction that occurred in the database (all logs)
• A specific date and time
• A specific Oracle System Change Number (SCN)
• The time of the backup (no logs)
• Restore only
Note: Both date and time recovery and the SCN recovery are point-in-time recoveries.
SnapManager (3.2 or later) provides the ability to recover the restored database backupsautomatically by using the archive log files. Even if the archive log files are available in the externallocation, if you specify the -recover-from-location option, SnapManager uses the archive logfiles from the external location to recover the restored database backups.
SnapManager provides the external location to Oracle. But, Oracle does not identify the files fromthe external destination. This behavior is noticed in flash recovery area destination. These are issueswith Oracle and the workaround is to always have backup of archive log files in such databaselayouts.
Restoring database backups | 111
If any inconsistent SCN or date is provided, then recovery will stop at the last consistent pointrecovered with the error message Recovery succeeded, but insufficient. You have tomanually perform recovery to a consistent state.
For recovery when no logs are applied, SnapManager recovers until the last SCN of the last archivelog file created during the backup. If the database is consistent until this SCN, then the database willbe opened successfully. If the database is not consistent at this point, SnapManager still attempts toopen the database, which will be opened successfully, if the database is already consistent.
Note: SnapManager does not support recovering the archive log-only backups.
If the archive log destination on an NFS mount point, is not a Snapshot-capable storage,SnapManager enables you to recover the restored database backups using the profile. Beforeperforming SnapManager operations on non-Snapshot-capable storage, you should add thedestinations for archivedLogs.exclude in smsap.config.
You must ensure that you set the exclude parameter before creating a profile. Only after setting theexclude parameter in the SnapManager configuration file, the profile creation is successful.
If the backup is already mounted, SnapManager does not mount the backup again and uses thealready mounted backup. If the backup is mounted by a different user, and if the current user does nothave access to the previously mounted backup, other users have to provide the permissions. All thearchive log files have read permissions for the groups owners; the current user might not get thepermissions, if the backup is mounted by a different user group. The users can give permissions tothe mounted archive log files manually and then retry the restore or recovery.
Recovering database backups in a Real Application Clusters (RAC) environment
During recovery of the database backups in a RAC environment, when the required archive log file isnot found, Oracle requests for archive log files, and switches between different thread and changenumber in the RAC database. SnapManager for SAP tries to recover the database as a best effort. Thesuccessful recovery of the database backups in the RAC environment depends on the availability ofthe archive log files in the backups.
The recommended recovery mechanism for the RAC database is as follows:
• Ensure that all the archive log files are available in the backups or all the archive log files areavailable in the one external archive log destination.
• If multiple external archive log destinations are provided, you can provide overlap of the archivelog files while specifying the external archive log destinations for all the threads.
For example, the external archive log location - I can have 1 to 100 archive log files, the externalarchive log location - II can have 98 to 200 archive log files, and the external archive log location- III can have 198 to 300 archive log files.
• While pruning the archive log files, instead of deleting all the archive log files, you can delete thearchive log files until SCN or date so that the backups can have same archive log files.
You can specify the -dump option as an optional parameter to collect the dump files after thesuccessful or failed restore operation.
Steps
1. Enter the following command:
smsap backup restore -profile profile_name -label label -complete -recover -alllogs [-recover-from-location path [,path2]]-dump-verbose
Example
smsap backup restore -profile targetdb1_prof1 -labelfull_bkup_sales_nov_08 - complete -recover -alllogs -verbose
112 | Administration Guide for UNIX
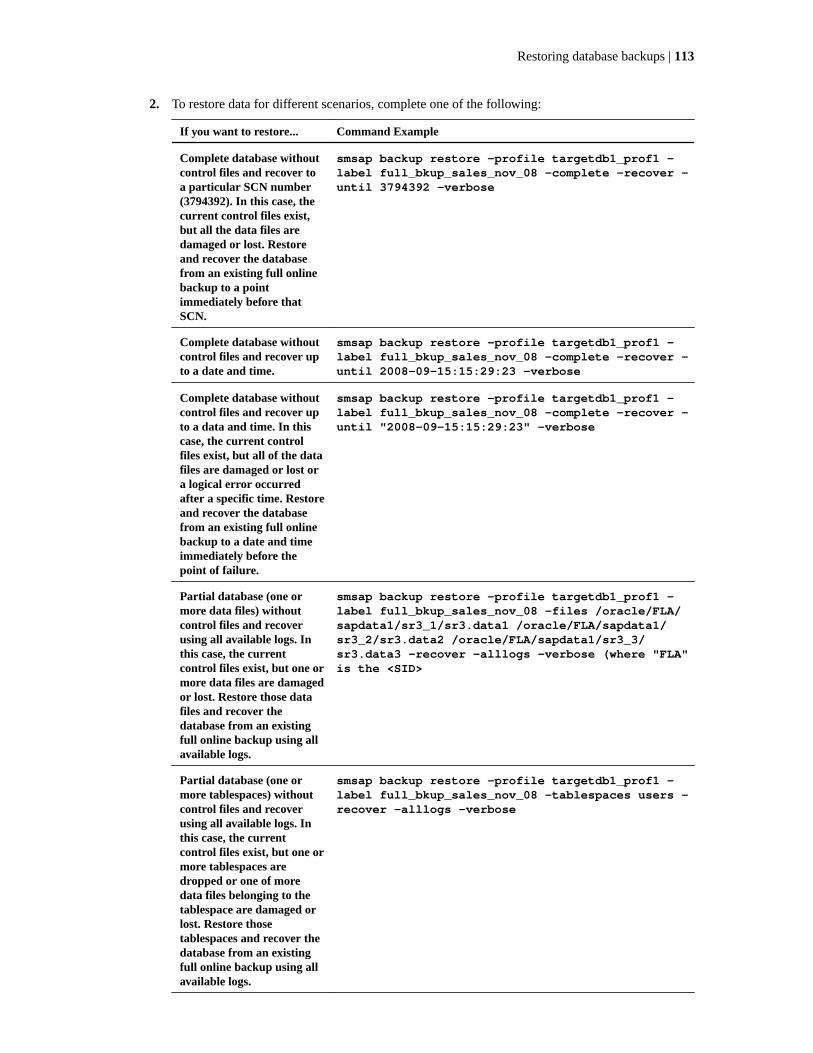
2. To restore data for different scenarios, complete one of the following:
If you want to restore... Command Example
Complete database withoutcontrol files and recover toa particular SCN number(3794392). In this case, thecurrent control files exist,but all the data files aredamaged or lost. Restoreand recover the databasefrom an existing full onlinebackup to a pointimmediately before thatSCN.
smsap backup restore -profile targetdb1_prof1 -label full_bkup_sales_nov_08 -complete -recover -until 3794392 -verbose
Complete database withoutcontrol files and recover upto a date and time.
smsap backup restore -profile targetdb1_prof1 -label full_bkup_sales_nov_08 -complete -recover -until 2008-09-15:15:29:23 -verbose
Complete database withoutcontrol files and recover upto a data and time. In thiscase, the current controlfiles exist, but all of the datafiles are damaged or lost ora logical error occurredafter a specific time. Restoreand recover the databasefrom an existing full onlinebackup to a date and timeimmediately before thepoint of failure.
smsap backup restore -profile targetdb1_prof1 -label full_bkup_sales_nov_08 -complete -recover -until "2008-09-15:15:29:23" -verbose
Partial database (one ormore data files) withoutcontrol files and recoverusing all available logs. Inthis case, the currentcontrol files exist, but one ormore data files are damagedor lost. Restore those datafiles and recover thedatabase from an existingfull online backup using allavailable logs.
smsap backup restore -profile targetdb1_prof1 -label full_bkup_sales_nov_08 -files /oracle/FLA/sapdata1/sr3_1/sr3.data1 /oracle/FLA/sapdata1/sr3_2/sr3.data2 /oracle/FLA/sapdata1/sr3_3/sr3.data3 -recover -alllogs -verbose (where "FLA"is the <SID>
Partial database (one ormore tablespaces) withoutcontrol files and recoverusing all available logs. Inthis case, the currentcontrol files exist, but one ormore tablespaces aredropped or one of moredata files belonging to thetablespace are damaged orlost. Restore thosetablespaces and recover thedatabase from an existingfull online backup using allavailable logs.
smsap backup restore -profile targetdb1_prof1 -label full_bkup_sales_nov_08 -tablespaces users -recover -alllogs -verbose
Restoring database backups | 113
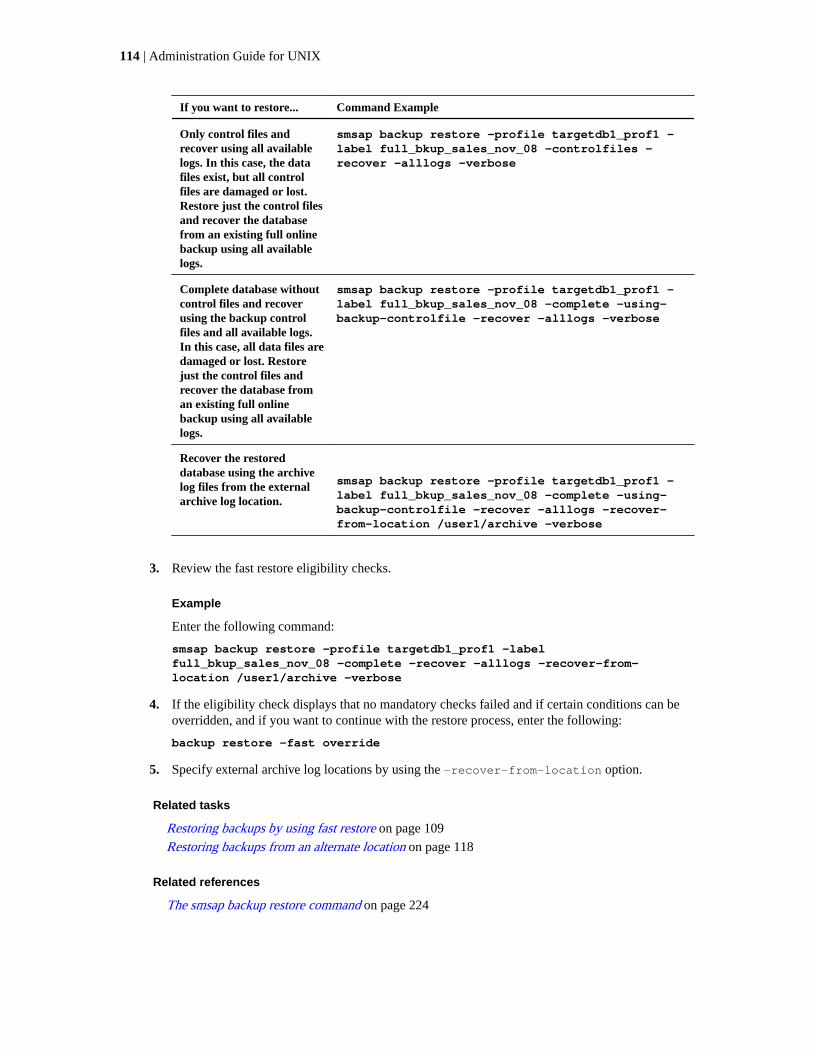
If you want to restore... Command Example
Only control files andrecover using all availablelogs. In this case, the datafiles exist, but all controlfiles are damaged or lost.Restore just the control filesand recover the databasefrom an existing full onlinebackup using all availablelogs.
smsap backup restore -profile targetdb1_prof1 -label full_bkup_sales_nov_08 -controlfiles -recover -alllogs -verbose
Complete database withoutcontrol files and recoverusing the backup controlfiles and all available logs.In this case, all data files aredamaged or lost. Restorejust the control files andrecover the database froman existing full onlinebackup using all availablelogs.
smsap backup restore -profile targetdb1_prof1 -label full_bkup_sales_nov_08 -complete -using-backup-controlfile -recover -alllogs -verbose
Recover the restoreddatabase using the archivelog files from the externalarchive log location.
smsap backup restore -profile targetdb1_prof1 -label full_bkup_sales_nov_08 -complete -using-backup-controlfile -recover -alllogs -recover-from-location /user1/archive -verbose
3. Review the fast restore eligibility checks.
Example
Enter the following command:
smsap backup restore -profile targetdb1_prof1 -labelfull_bkup_sales_nov_08 -complete -recover -alllogs -recover-from-location /user1/archive -verbose
4. If the eligibility check displays that no mandatory checks failed and if certain conditions can beoverridden, and if you want to continue with the restore process, enter the following:
backup restore -fast override
5. Specify external archive log locations by using the -recover-from-location option.
Related tasks
Restoring backups by using fast restore on page 109
Restoring backups from an alternate location on page 118
Related references
The smsap backup restore command on page 224
114 | Administration Guide for UNIX
Restore files from an alternate locationSnapManager enables you to restore data files and control files from a location other than that of theSnapshot copies in the original volume.
The original location is the location of the file on the active file system at the time of the backup. Thealternate location is the location from which a file will be restored.
You can restore the following data from an alternate location:
• The data files from an intermediate file system to an active file system
• The blocks of data from an intermediate raw device into an active raw device
Recovery is automated by SnapManager. When recovering files from external locations,SnapManager uses the recovery automatic from location command.
SnapManager also uses Oracle Recovery Manager (RMAN) to recover files. The files to be recoveredshould be recognizable by Oracle. The file names should be in the default format. When recoveringfrom flash recovery area, SnapManager provides the translated path to Oracle. Oracle though, doesnot recover from the flash recovery area because it cannot generate the correct file name. Ideally,flash recovery area is a destination that is intended to work with RMAN.
Related tasks
Creating restore specifications on page 116
Restore backups from an alternate location overview
To restore a database backup from an alternate location, use the following major steps, each of whichis further described in this section.
• Do one of the following, depending on your database layout and what needs to be restored:
◦ Restore the required data files from tape, SnapVault, SnapMirror, or any other media to anyfile system mounted on the database host.
◦ Restore the required file system and mount it on the database host.
◦ Connect to the required raw devices that exist in the local host.
• Create a restore specification Extensible Markup Language (XML) file that includes themappings that SnapManager requires to restore from the alternate location to the originallocation. Save the file in a location that SnapManager can access.
• Use SnapManager to restore and recover the data using the restore specification XML file.
Restoration of the data from files
Before you restore from an alternate location, you need to restore the necessary files from anystorage media and restore the files from applications like SnapVault or SnapMirror to a file systemmounted on the local host.
You can use the restore from an alternate location operation to copy the files from an alternate filesystem to an active file system.
You need to specify the alternate locations from which to restore the original files by creating arestore specification.
Restoring database backups | 115
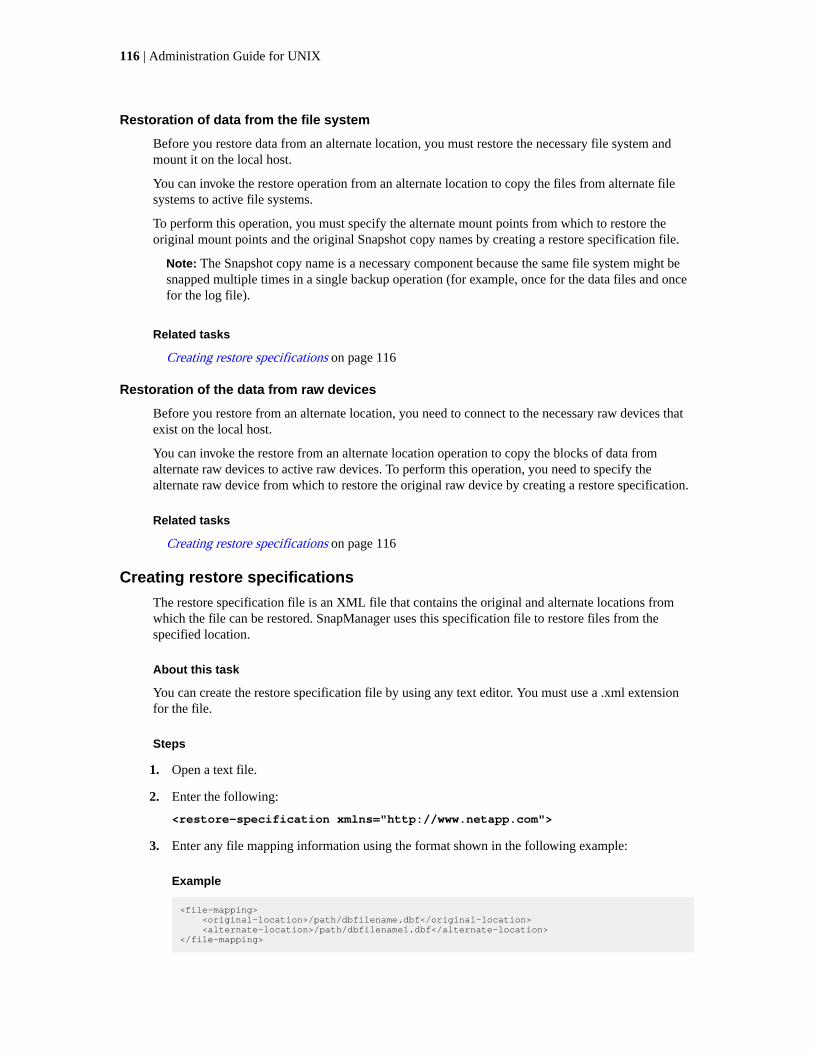
Restoration of data from the file system
Before you restore data from an alternate location, you must restore the necessary file system andmount it on the local host.
You can invoke the restore operation from an alternate location to copy the files from alternate filesystems to active file systems.
To perform this operation, you must specify the alternate mount points from which to restore theoriginal mount points and the original Snapshot copy names by creating a restore specification file.
Note: The Snapshot copy name is a necessary component because the same file system might besnapped multiple times in a single backup operation (for example, once for the data files and oncefor the log file).
Related tasks
Creating restore specifications on page 116
Restoration of the data from raw devices
Before you restore from an alternate location, you need to connect to the necessary raw devices thatexist on the local host.
You can invoke the restore from an alternate location operation to copy the blocks of data fromalternate raw devices to active raw devices. To perform this operation, you need to specify thealternate raw device from which to restore the original raw device by creating a restore specification.
Related tasks
Creating restore specifications on page 116
Creating restore specifications
The restore specification file is an XML file that contains the original and alternate locations fromwhich the file can be restored. SnapManager uses this specification file to restore files from thespecified location.
About this task
You can create the restore specification file by using any text editor. You must use a .xml extensionfor the file.
Steps
1. Open a text file.
2. Enter the following:
<restore-specification xmlns="http://www.netapp.com">
3. Enter any file mapping information using the format shown in the following example:
Example
<file-mapping> <original-location>/path/dbfilename.dbf</original-location> <alternate-location>/path/dbfilename1.dbf</alternate-location></file-mapping>
116 | Administration Guide for UNIX
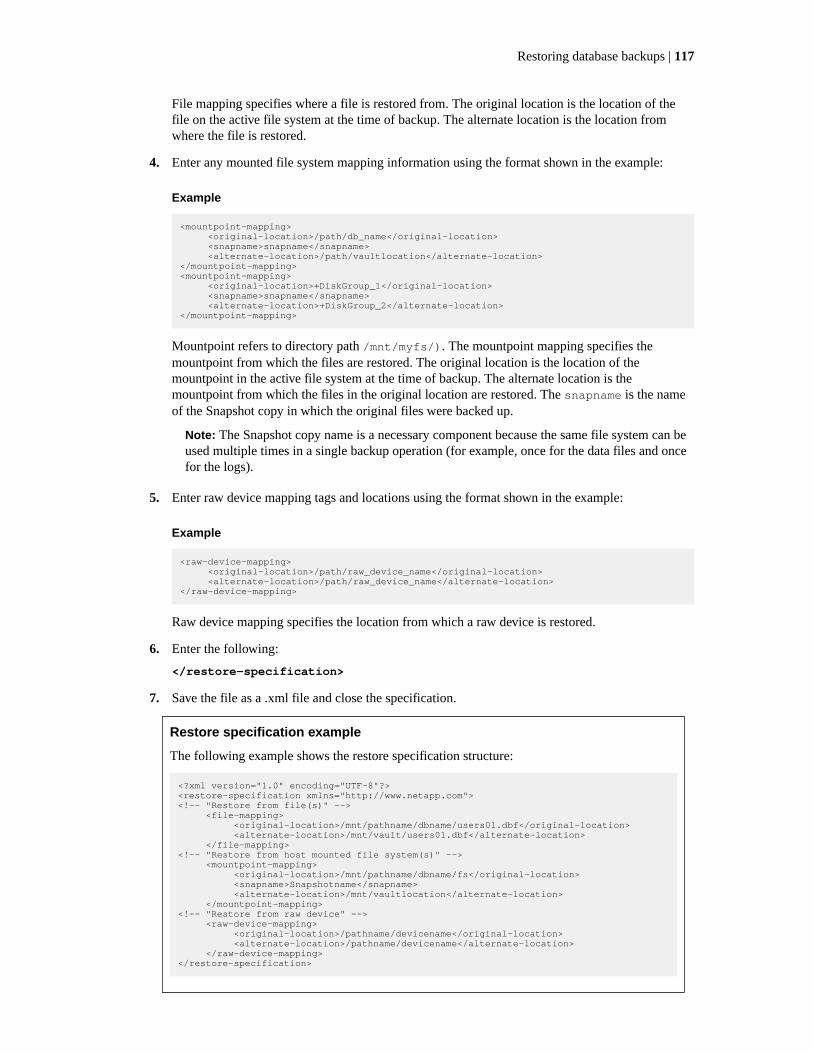
File mapping specifies where a file is restored from. The original location is the location of thefile on the active file system at the time of backup. The alternate location is the location fromwhere the file is restored.
4. Enter any mounted file system mapping information using the format shown in the example:
Example
<mountpoint-mapping> <original-location>/path/db_name</original-location> <snapname>snapname</snapname> <alternate-location>/path/vaultlocation</alternate-location></mountpoint-mapping><mountpoint-mapping> <original-location>+DiskGroup_1</original-location> <snapname>snapname</snapname> <alternate-location>+DiskGroup_2</alternate-location></mountpoint-mapping>
Mountpoint refers to directory path /mnt/myfs/). The mountpoint mapping specifies themountpoint from which the files are restored. The original location is the location of themountpoint in the active file system at the time of backup. The alternate location is themountpoint from which the files in the original location are restored. The snapname is the nameof the Snapshot copy in which the original files were backed up.
Note: The Snapshot copy name is a necessary component because the same file system can beused multiple times in a single backup operation (for example, once for the data files and oncefor the logs).
5. Enter raw device mapping tags and locations using the format shown in the example:
Example
<raw-device-mapping> <original-location>/path/raw_device_name</original-location> <alternate-location>/path/raw_device_name</alternate-location></raw-device-mapping>
Raw device mapping specifies the location from which a raw device is restored.
6. Enter the following:
</restore-specification>
7. Save the file as a .xml file and close the specification.
Restore specification example
The following example shows the restore specification structure:
<?xml version="1.0" encoding="UTF-8"?><restore-specification xmlns="http://www.netapp.com"><!-- "Restore from file(s)" --> <file-mapping> <original-location>/mnt/pathname/dbname/users01.dbf</original-location> <alternate-location>/mnt/vault/users01.dbf</alternate-location> </file-mapping><!-- "Restore from host mounted file system(s)" --> <mountpoint-mapping> <original-location>/mnt/pathname/dbname/fs</original-location> <snapname>Snapshotname</snapname> <alternate-location>/mnt/vaultlocation</alternate-location> </mountpoint-mapping><!-- "Restore from raw device" --> <raw-device-mapping> <original-location>/pathname/devicename</original-location> <alternate-location>/pathname/devicename</alternate-location> </raw-device-mapping></restore-specification>
Restoring database backups | 117
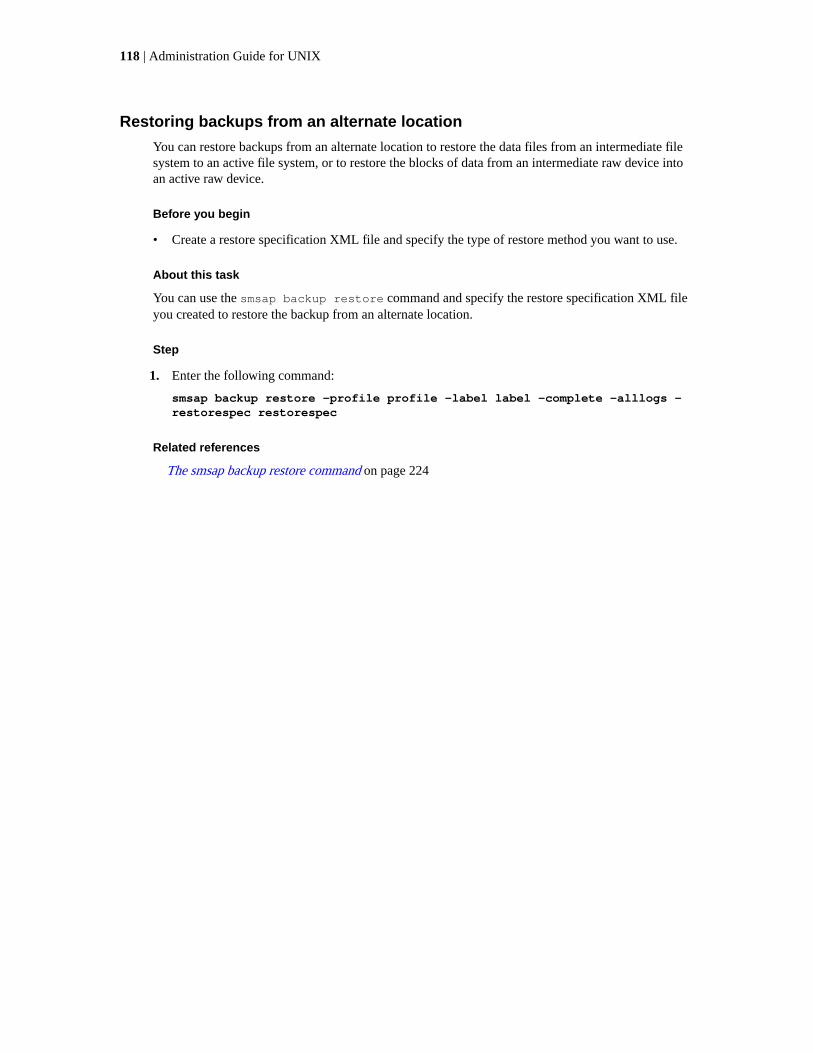
Restoring backups from an alternate location
You can restore backups from an alternate location to restore the data files from an intermediate filesystem to an active file system, or to restore the blocks of data from an intermediate raw device intoan active raw device.
Before you begin
• Create a restore specification XML file and specify the type of restore method you want to use.
About this task
You can use the smsap backup restore command and specify the restore specification XML fileyou created to restore the backup from an alternate location.
Step
1. Enter the following command:
smsap backup restore -profile profile -label label -complete -alllogs -restorespec restorespec
Related references
The smsap backup restore command on page 224
118 | Administration Guide for UNIX
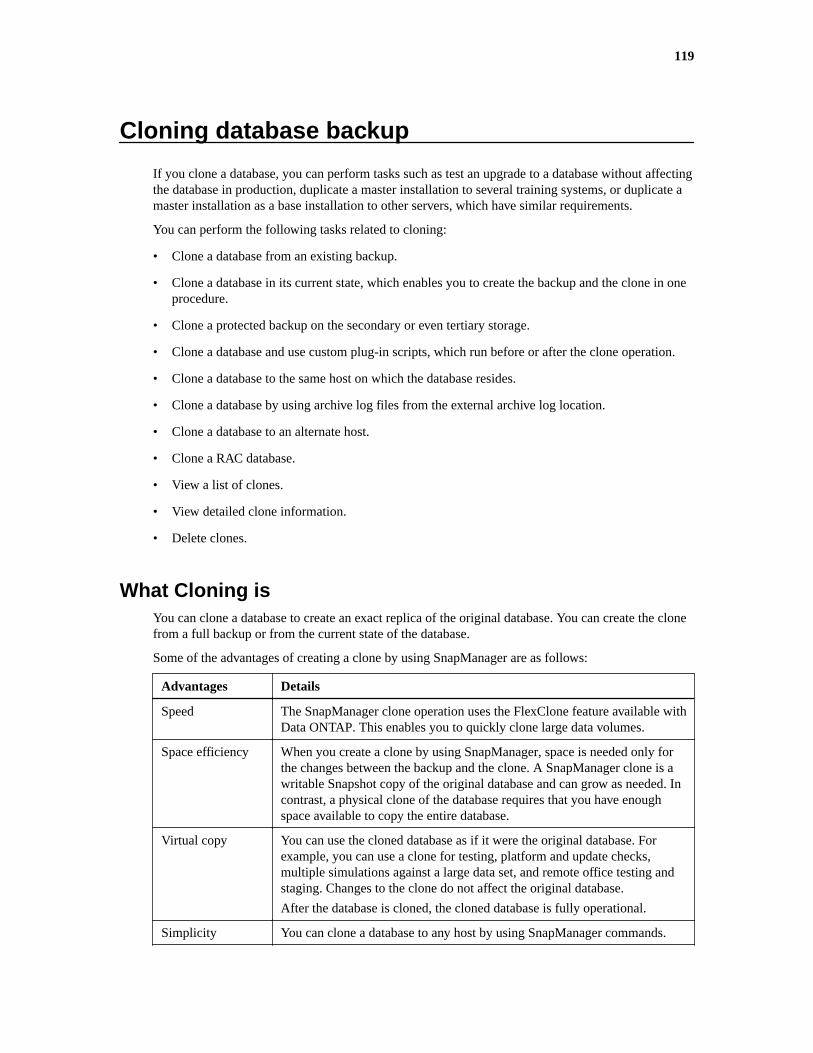
Cloning database backup
If you clone a database, you can perform tasks such as test an upgrade to a database without affectingthe database in production, duplicate a master installation to several training systems, or duplicate amaster installation as a base installation to other servers, which have similar requirements.
You can perform the following tasks related to cloning:
• Clone a database from an existing backup.
• Clone a database in its current state, which enables you to create the backup and the clone in oneprocedure.
• Clone a protected backup on the secondary or even tertiary storage.
• Clone a database and use custom plug-in scripts, which run before or after the clone operation.
• Clone a database to the same host on which the database resides.
• Clone a database by using archive log files from the external archive log location.
• Clone a database to an alternate host.
• Clone a RAC database.
• View a list of clones.
• View detailed clone information.
• Delete clones.
What Cloning isYou can clone a database to create an exact replica of the original database. You can create the clonefrom a full backup or from the current state of the database.
Some of the advantages of creating a clone by using SnapManager are as follows:
Advantages Details
Speed The SnapManager clone operation uses the FlexClone feature available withData ONTAP. This enables you to quickly clone large data volumes.
Space efficiency When you create a clone by using SnapManager, space is needed only forthe changes between the backup and the clone. A SnapManager clone is awritable Snapshot copy of the original database and can grow as needed. Incontrast, a physical clone of the database requires that you have enoughspace available to copy the entire database.
Virtual copy You can use the cloned database as if it were the original database. Forexample, you can use a clone for testing, platform and update checks,multiple simulations against a large data set, and remote office testing andstaging. Changes to the clone do not affect the original database.
After the database is cloned, the cloned database is fully operational.
Simplicity You can clone a database to any host by using SnapManager commands.
119
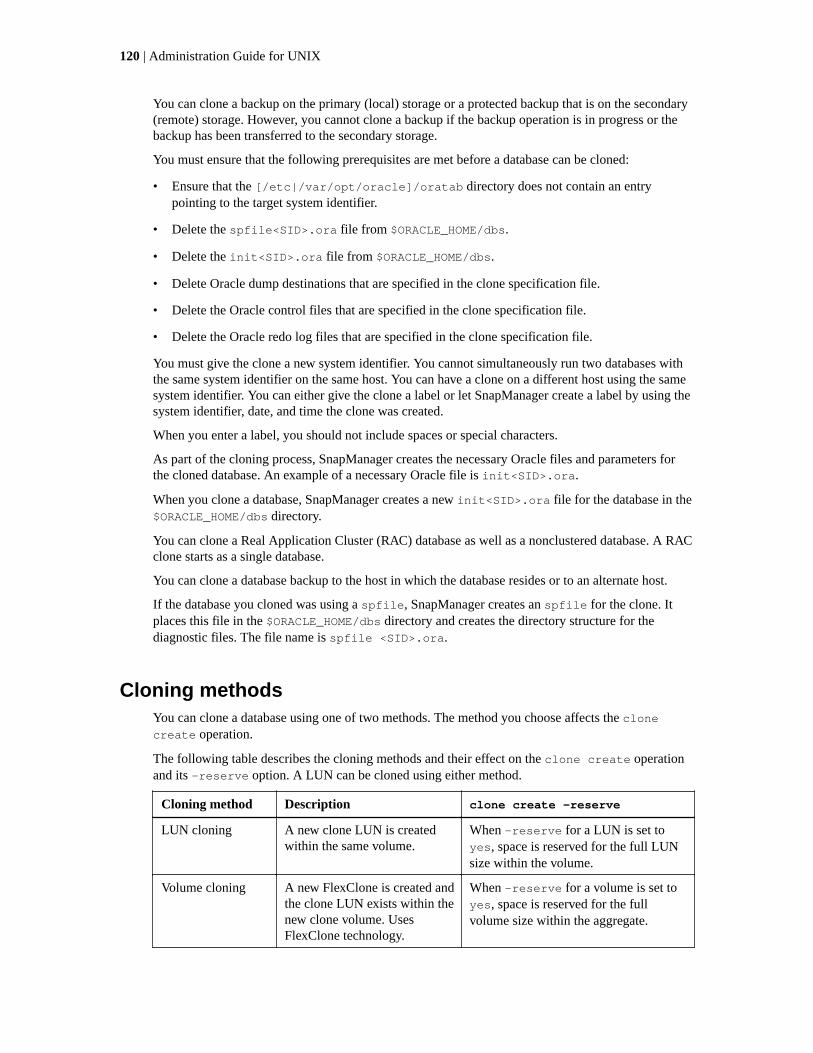
You can clone a backup on the primary (local) storage or a protected backup that is on the secondary(remote) storage. However, you cannot clone a backup if the backup operation is in progress or thebackup has been transferred to the secondary storage.
You must ensure that the following prerequisites are met before a database can be cloned:
• Ensure that the [/etc|/var/opt/oracle]/oratab directory does not contain an entrypointing to the target system identifier.
• Delete the spfile<SID>.ora file from $ORACLE_HOME/dbs.
• Delete the init<SID>.ora file from $ORACLE_HOME/dbs.
• Delete Oracle dump destinations that are specified in the clone specification file.
• Delete the Oracle control files that are specified in the clone specification file.
• Delete the Oracle redo log files that are specified in the clone specification file.
You must give the clone a new system identifier. You cannot simultaneously run two databases withthe same system identifier on the same host. You can have a clone on a different host using the samesystem identifier. You can either give the clone a label or let SnapManager create a label by using thesystem identifier, date, and time the clone was created.
When you enter a label, you should not include spaces or special characters.
As part of the cloning process, SnapManager creates the necessary Oracle files and parameters forthe cloned database. An example of a necessary Oracle file is init<SID>.ora.
When you clone a database, SnapManager creates a new init<SID>.ora file for the database in the$ORACLE_HOME/dbs directory.
You can clone a Real Application Cluster (RAC) database as well as a nonclustered database. A RACclone starts as a single database.
You can clone a database backup to the host in which the database resides or to an alternate host.
If the database you cloned was using a spfile, SnapManager creates an spfile for the clone. Itplaces this file in the $ORACLE_HOME/dbs directory and creates the directory structure for thediagnostic files. The file name is spfile <SID>.ora.
Cloning methodsYou can clone a database using one of two methods. The method you choose affects the clonecreate operation.
The following table describes the cloning methods and their effect on the clone create operationand its -reserve option. A LUN can be cloned using either method.
Cloning method Description clone create -reserve
LUN cloning A new clone LUN is createdwithin the same volume.
When -reserve for a LUN is set toyes, space is reserved for the full LUNsize within the volume.
Volume cloning A new FlexClone is created andthe clone LUN exists within thenew clone volume. UsesFlexClone technology.
When -reserve for a volume is set toyes, space is reserved for the fullvolume size within the aggregate.
120 | Administration Guide for UNIX
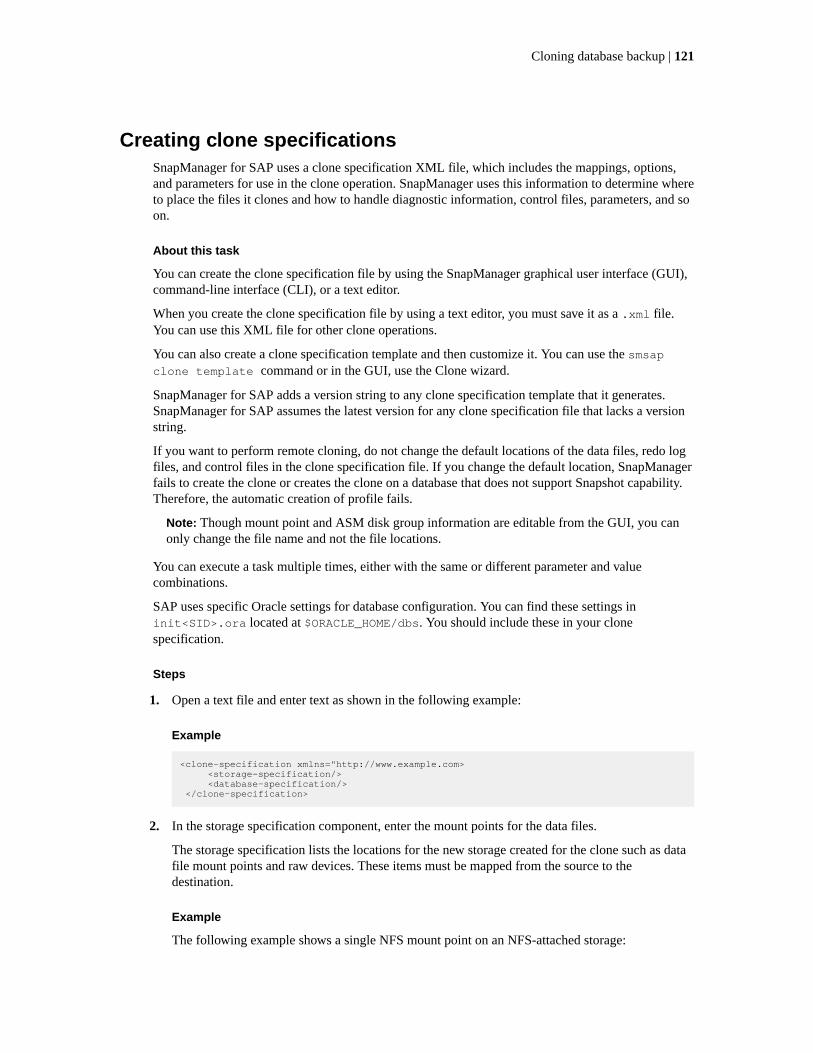
Creating clone specificationsSnapManager for SAP uses a clone specification XML file, which includes the mappings, options,and parameters for use in the clone operation. SnapManager uses this information to determine whereto place the files it clones and how to handle diagnostic information, control files, parameters, and soon.
About this task
You can create the clone specification file by using the SnapManager graphical user interface (GUI),command-line interface (CLI), or a text editor.
When you create the clone specification file by using a text editor, you must save it as a .xml file.You can use this XML file for other clone operations.
You can also create a clone specification template and then customize it. You can use the smsapclone template command or in the GUI, use the Clone wizard.
SnapManager for SAP adds a version string to any clone specification template that it generates.SnapManager for SAP assumes the latest version for any clone specification file that lacks a versionstring.
If you want to perform remote cloning, do not change the default locations of the data files, redo logfiles, and control files in the clone specification file. If you change the default location, SnapManagerfails to create the clone or creates the clone on a database that does not support Snapshot capability.Therefore, the automatic creation of profile fails.
Note: Though mount point and ASM disk group information are editable from the GUI, you canonly change the file name and not the file locations.
You can execute a task multiple times, either with the same or different parameter and valuecombinations.
SAP uses specific Oracle settings for database configuration. You can find these settings ininit<SID>.ora located at $ORACLE_HOME/dbs. You should include these in your clonespecification.
Steps
1. Open a text file and enter text as shown in the following example:
Example
<clone-specification xmlns="http://www.example.com> <storage-specification/> <database-specification/> </clone-specification>
2. In the storage specification component, enter the mount points for the data files.
The storage specification lists the locations for the new storage created for the clone such as datafile mount points and raw devices. These items must be mapped from the source to thedestination.
Example
The following example shows a single NFS mount point on an NFS-attached storage:
Cloning database backup | 121
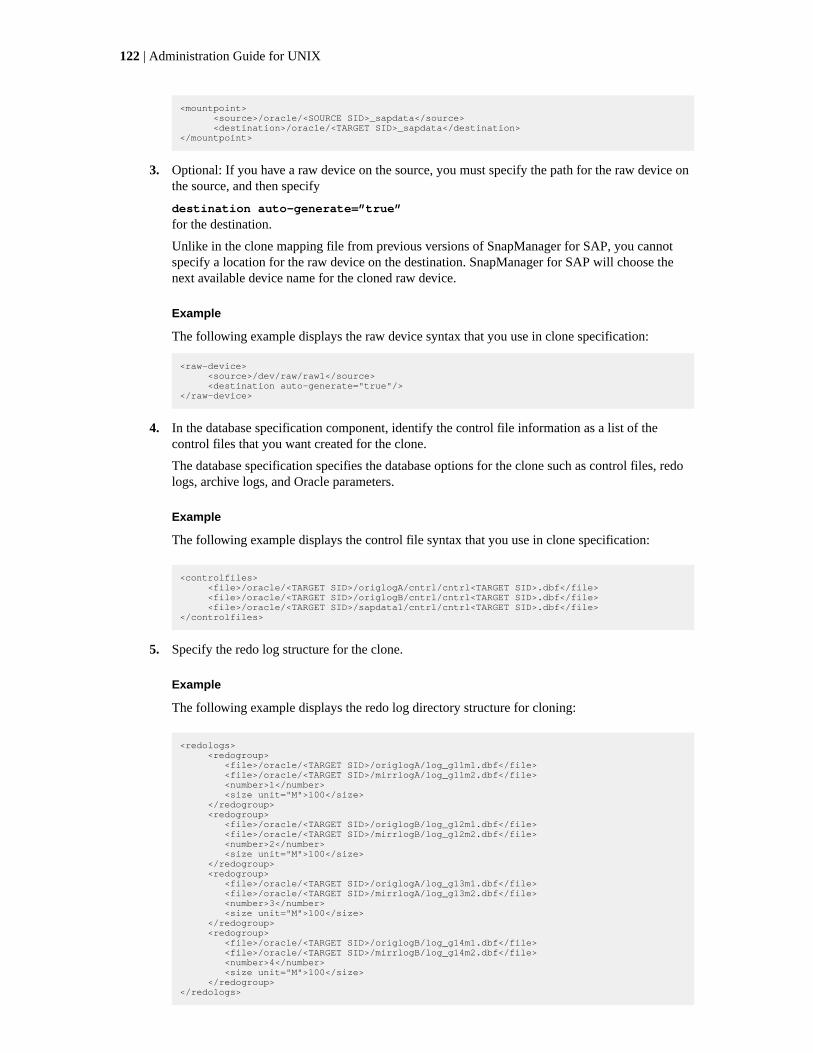
<mountpoint> <source>/oracle/<SOURCE SID>_sapdata</source> <destination>/oracle/<TARGET SID>_sapdata</destination></mountpoint>
3. Optional: If you have a raw device on the source, you must specify the path for the raw device onthe source, and then specify
destination auto-generate=”true”
for the destination.
Unlike in the clone mapping file from previous versions of SnapManager for SAP, you cannotspecify a location for the raw device on the destination. SnapManager for SAP will choose thenext available device name for the cloned raw device.
Example
The following example displays the raw device syntax that you use in clone specification:
<raw-device> <source>/dev/raw/raw1</source> <destination auto-generate="true"/></raw-device>
4. In the database specification component, identify the control file information as a list of thecontrol files that you want created for the clone.
The database specification specifies the database options for the clone such as control files, redologs, archive logs, and Oracle parameters.
Example
The following example displays the control file syntax that you use in clone specification:
<controlfiles> <file>/oracle/<TARGET SID>/origlogA/cntrl/cntrl<TARGET SID>.dbf</file> <file>/oracle/<TARGET SID>/origlogB/cntrl/cntrl<TARGET SID>.dbf</file> <file>/oracle/<TARGET SID>/sapdata1/cntrl/cntrl<TARGET SID>.dbf</file></controlfiles>
5. Specify the redo log structure for the clone.
Example
The following example displays the redo log directory structure for cloning:
<redologs> <redogroup> <file>/oracle/<TARGET SID>/origlogA/log_g11m1.dbf</file> <file>/oracle/<TARGET SID>/mirrlogA/log_g11m2.dbf</file> <number>1</number> <size unit="M">100</size> </redogroup> <redogroup> <file>/oracle/<TARGET SID>/origlogB/log_g12m1.dbf</file> <file>/oracle/<TARGET SID>/mirrlogB/log_g12m2.dbf</file> <number>2</number> <size unit="M">100</size> </redogroup> <redogroup> <file>/oracle/<TARGET SID>/origlogA/log_g13m1.dbf</file> <file>/oracle/<TARGET SID>/mirrlogA/log_g13m2.dbf</file> <number>3</number> <size unit="M">100</size> </redogroup> <redogroup> <file>/oracle/<TARGET SID>/origlogB/log_g14m1.dbf</file> <file>/oracle/<TARGET SID>/mirrlogB/log_g14m2.dbf</file> <number>4</number> <size unit="M">100</size> </redogroup></redologs>
122 | Administration Guide for UNIX
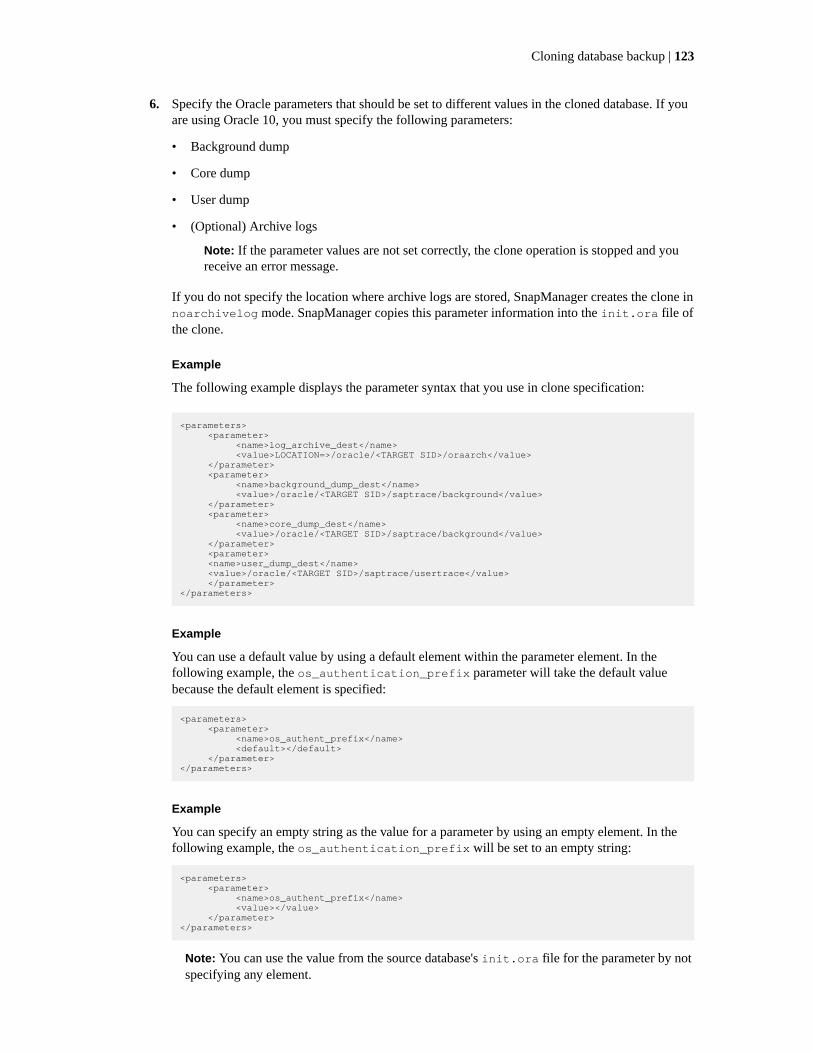
6. Specify the Oracle parameters that should be set to different values in the cloned database. If youare using Oracle 10, you must specify the following parameters:
• Background dump
• Core dump
• User dump
• (Optional) Archive logs
Note: If the parameter values are not set correctly, the clone operation is stopped and youreceive an error message.
If you do not specify the location where archive logs are stored, SnapManager creates the clone innoarchivelog mode. SnapManager copies this parameter information into the init.ora file ofthe clone.
Example
The following example displays the parameter syntax that you use in clone specification:
<parameters> <parameter> <name>log_archive_dest</name> <value>LOCATION=>/oracle/<TARGET SID>/oraarch</value> </parameter> <parameter> <name>background_dump_dest</name> <value>/oracle/<TARGET SID>/saptrace/background</value> </parameter> <parameter> <name>core_dump_dest</name> <value>/oracle/<TARGET SID>/saptrace/background</value> </parameter> <parameter> <name>user_dump_dest</name> <value>/oracle/<TARGET SID>/saptrace/usertrace</value> </parameter></parameters>
Example
You can use a default value by using a default element within the parameter element. In thefollowing example, the os_authentication_prefix parameter will take the default valuebecause the default element is specified:
<parameters> <parameter> <name>os_authent_prefix</name> <default></default> </parameter></parameters>
Example
You can specify an empty string as the value for a parameter by using an empty element. In thefollowing example, the os_authentication_prefix will be set to an empty string:
<parameters> <parameter> <name>os_authent_prefix</name> <value></value> </parameter></parameters>
Note: You can use the value from the source database's init.ora file for the parameter by notspecifying any element.
Cloning database backup | 123
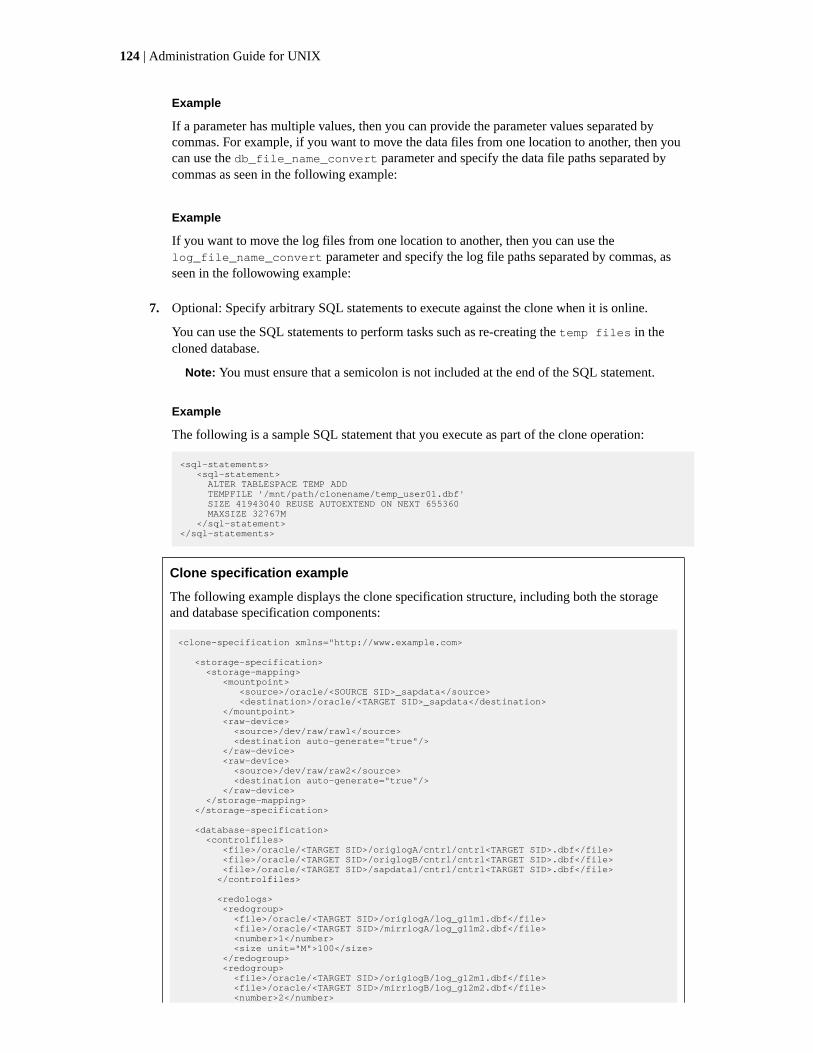
Example
If a parameter has multiple values, then you can provide the parameter values separated bycommas. For example, if you want to move the data files from one location to another, then youcan use the db_file_name_convert parameter and specify the data file paths separated bycommas as seen in the following example:
Example
If you want to move the log files from one location to another, then you can use thelog_file_name_convert parameter and specify the log file paths separated by commas, asseen in the followowing example:
7. Optional: Specify arbitrary SQL statements to execute against the clone when it is online.
You can use the SQL statements to perform tasks such as re-creating the temp files in thecloned database.
Note: You must ensure that a semicolon is not included at the end of the SQL statement.
Example
The following is a sample SQL statement that you execute as part of the clone operation:
<sql-statements> <sql-statement> ALTER TABLESPACE TEMP ADD TEMPFILE '/mnt/path/clonename/temp_user01.dbf' SIZE 41943040 REUSE AUTOEXTEND ON NEXT 655360 MAXSIZE 32767M </sql-statement></sql-statements>
Clone specification example
The following example displays the clone specification structure, including both the storageand database specification components:
<clone-specification xmlns="http://www.example.com>
<storage-specification> <storage-mapping> <mountpoint> <source>/oracle/<SOURCE SID>_sapdata</source> <destination>/oracle/<TARGET SID>_sapdata</destination> </mountpoint> <raw-device> <source>/dev/raw/raw1</source> <destination auto-generate="true"/> </raw-device> <raw-device> <source>/dev/raw/raw2</source> <destination auto-generate="true"/> </raw-device> </storage-mapping> </storage-specification>
<database-specification> <controlfiles> <file>/oracle/<TARGET SID>/origlogA/cntrl/cntrl<TARGET SID>.dbf</file> <file>/oracle/<TARGET SID>/origlogB/cntrl/cntrl<TARGET SID>.dbf</file> <file>/oracle/<TARGET SID>/sapdata1/cntrl/cntrl<TARGET SID>.dbf</file> </controlfiles>
<redologs> <redogroup> <file>/oracle/<TARGET SID>/origlogA/log_g11m1.dbf</file> <file>/oracle/<TARGET SID>/mirrlogA/log_g11m2.dbf</file> <number>1</number> <size unit="M">100</size> </redogroup> <redogroup> <file>/oracle/<TARGET SID>/origlogB/log_g12m1.dbf</file> <file>/oracle/<TARGET SID>/mirrlogB/log_g12m2.dbf</file> <number>2</number>
124 | Administration Guide for UNIX
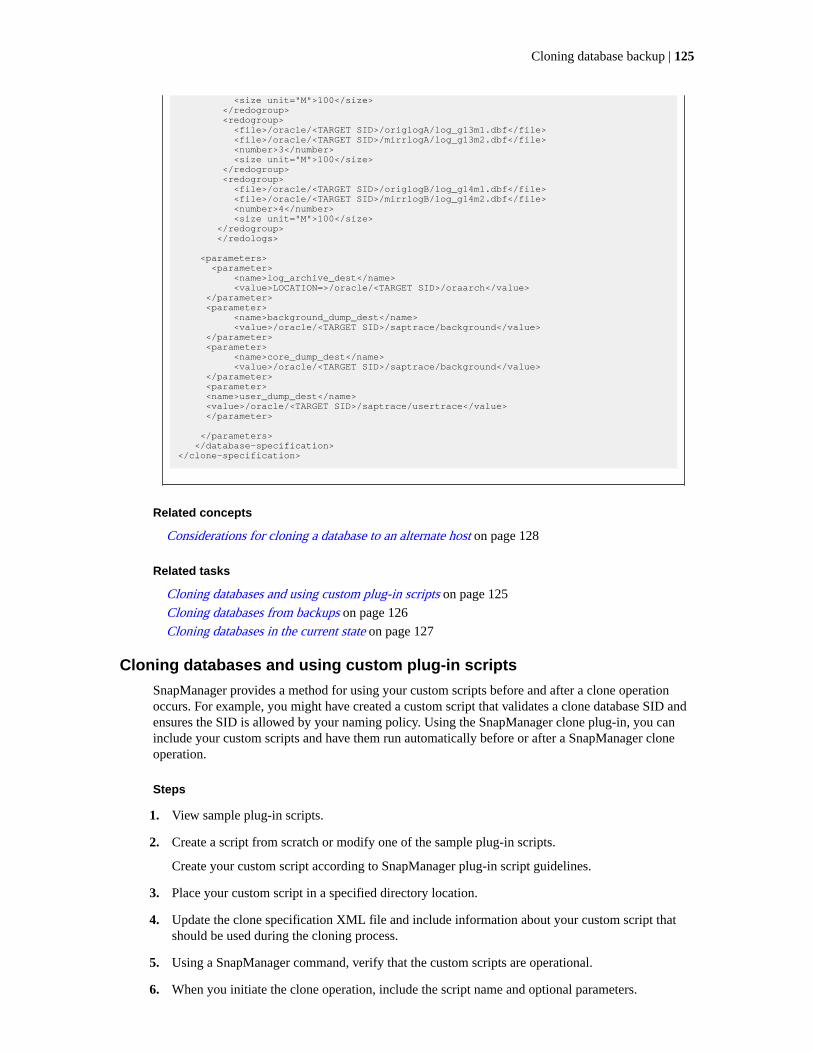
<size unit="M">100</size> </redogroup> <redogroup> <file>/oracle/<TARGET SID>/origlogA/log_g13m1.dbf</file> <file>/oracle/<TARGET SID>/mirrlogA/log_g13m2.dbf</file> <number>3</number> <size unit="M">100</size> </redogroup> <redogroup> <file>/oracle/<TARGET SID>/origlogB/log_g14m1.dbf</file> <file>/oracle/<TARGET SID>/mirrlogB/log_g14m2.dbf</file> <number>4</number> <size unit="M">100</size> </redogroup> </redologs>
<parameters> <parameter> <name>log_archive_dest</name> <value>LOCATION=>/oracle/<TARGET SID>/oraarch</value> </parameter> <parameter> <name>background_dump_dest</name> <value>/oracle/<TARGET SID>/saptrace/background</value> </parameter> <parameter> <name>core_dump_dest</name> <value>/oracle/<TARGET SID>/saptrace/background</value> </parameter> <parameter> <name>user_dump_dest</name> <value>/oracle/<TARGET SID>/saptrace/usertrace</value> </parameter>
</parameters> </database-specification></clone-specification>
Related concepts
Considerations for cloning a database to an alternate host on page 128
Related tasks
Cloning databases and using custom plug-in scripts on page 125
Cloning databases from backups on page 126
Cloning databases in the current state on page 127
Cloning databases and using custom plug-in scripts
SnapManager provides a method for using your custom scripts before and after a clone operationoccurs. For example, you might have created a custom script that validates a clone database SID andensures the SID is allowed by your naming policy. Using the SnapManager clone plug-in, you caninclude your custom scripts and have them run automatically before or after a SnapManager cloneoperation.
Steps
1. View sample plug-in scripts.
2. Create a script from scratch or modify one of the sample plug-in scripts.
Create your custom script according to SnapManager plug-in script guidelines.
3. Place your custom script in a specified directory location.
4. Update the clone specification XML file and include information about your custom script thatshould be used during the cloning process.
5. Using a SnapManager command, verify that the custom scripts are operational.
6. When you initiate the clone operation, include the script name and optional parameters.
Cloning database backup | 125
Cloning databases from backupsYou can clone a database from a backup by using the clone create command.
About this task
You must first create a clone specification file for the database. SnapManager creates the clone basedon the information in this specification file.
After you clone a database, you might want to update your tnsnames.ora files on your clientmachines with the new cloned database connection information. The tnsnames.ora files are usedto connect to an Oracle instance without having to specify the full database information.SnapManager does not update the tnsnames.ora files.
SnapManager always creates a backup including archive log files, if you are using the profile createdwith -include-with-online-backups. SnapManager allows you to clone only the full databasebackups.
SnapManager (3.2 or later) allows you to clone the backups containing the data files and archive logfiles.
If the archive log is available from an external location, you can specify the external location duringcloning for recovering the cloned database to a consistent state. You must ensure that the externallocation is accessible by Oracle. Cloning of the archive log-only backups is not supported.
Though the archive log backup is created along with the online partial backup, you cannot create adatabase clone by using this backup.
You can clone the database backup from the external archive log file location only for a stand-alonedatabase.
The cloning of online database backup of the Real Application Clusters (RAC) database using theexternal archive log file location fails due to failure in recovery. This is because Oracle database failsto find and apply the archive log files for recovery from the external archive log location whilecloning the database backup.
You can specify the -dump option as an optional parameter to collect the dump files after thesuccessful or failed clone create operation.
Cloning datafile backup without archive log backup
When the data files backup does not include the archive log backup, SnapManager for SAP clonesthe database based on the System Change Number (SCN) recorded during the backup. If the cloneddatabase cannot be recovered, the Archived log file for thread <number> and change<SCN> required to complete recovery error message is displayed, even thoughSnapManager for SAP continues to clone the database, and finally succeeds in creating the clone.
When cloning using the data files backup without including the archive log backup, SnapManagerrecovers the cloned database until the last archive log SCN, which is recorded during the backup.
Steps
1. Create a clone specification file.
2. To create a clone, enter the following command:
smsap clone create-backup-labelbackup_name -newsid new_sid -labelclone_label -profile profile_name -clonespec full_path_to_clonespecfile[-taskspec taskspec] [-recover-from-location] path1 [,<path2>...]] [-dump]
126 | Administration Guide for UNIX
Related concepts
Considerations for cloning a database to an alternate host on page 128
Variables available in the task scripts for clone operation on page 186
Related tasks
Cloning databases in the current state on page 127
Creating clone specifications on page 121
Creating pretask, post-task, and policy scripts on page 179
Creating task scripts on page 190
Storing the task scripts on page 191
Related references
The smsap clone create command on page 232
Cloning databases in the current stateYou can create a backup and a clone of the database from the current state of the database by using asingle command.
About this task
When you specify the profile with the -current option, SnapManager first creates a backup andthen a clone from the current state of the database.
In the profile setting, if you have enabled the backup of data files and archive logs together forcloning, whenever you back up the online data files, the archive logs are also backed up. Whilecloning the database, SnapManager creates the data files backup along with the archive log backupand creates the database clone. If the archive log backup is not included, SnapManager does notcreate the archive log backup and therefore cannot create the clone of the database.
Step
1. To clone the database in its current state, enter the following command:
smsap clone create -profile profile_name -current -label clone_name -clonespec ./clonespec_filename.xml
This command takes a full automatic backup (generating the backup label) and immediatelymakes a clone from that backup, using an existing clone specification that you want to use.
Note: You can specify the -dump option as an optional parameter to collect the dump files afterthe successful or failed operations. The dump is collected for both the backup and cloneoperations.
Cloning database backups without resetlogsSnapManager enables you to perform flexible cloning so that you can recover the cloned databasemanually to a desired point in time without opening the database by using resetlogs. You can alsomanually configure the cloned database as a Data Guard Standby database.
About this task
When you can select the -no-resetlogs option while creating the clone, SnapManager performsthe following activities to create the cloned database:
Cloning database backup | 127
1. Executes the preprocessing task activity, if specified, before starting the clone operation
2. Creates the cloned database with the user-specified SID
3. Executes the SQL statements issued against the cloned database.
Only the SQL statements that can be executed in mount state are successfully executed.
4. Executes the post-processing task activity, if specified.
What tasks you need to do to recover the cloned database manually
1. Mount the archive log backups and recover the cloned database manually by using the archive logfiles from the mounted path.
2. After performing manual recovery, open the recovered cloned database with -resetlogs option.
3. Create temporary tablespaces, if required.
4. Run the DBNEWID utility.
5. Grant sysdba privilege to the credentials of the cloned database.
While cloning the database backups using the -no-resetlogs option, SnapManager leaves thecloned database in the mounted state for manual recovery.
Note: The cloned database created with the -no-resetlogs option is not a complete database.Therefore you must not perform any SnapManager operations on this database, thoughSnapManager does not restrict you from performing any operations.
If you do not specify the -no-resetlogs option, SnapManager applies the archive log files, andopens the database with resetlogs.
Step
1. Enter the following command:
smsap clone create -profile profile_name [-backup-label backup_name | -backup-id backup_id | current] -newsid new_sid -clonespecfull_path_to_clonespecfile -no-resetlogs
If you try to specify both -no-resetlogs and recover-from-location options,SnapManager does not allow you to specify both these options together, and displays the errormessage: SMSAP-04084: You must specify either one of the options: -no-resetlogs or -recover-from-location.
Example
smsap clone create -profile product -backup-label full_offline -newsid PROD_CLONE -clonespec prod_clonespec.xml -label prod_clone-reserve -no-reset-logs
Considerations for cloning a database to an alternate hostBefore you can clone to a host other than the one on which the database resides, there are somerequirements that must be met.
The following table shows the source and target host setup requirements:
128 | Administration Guide for UNIX
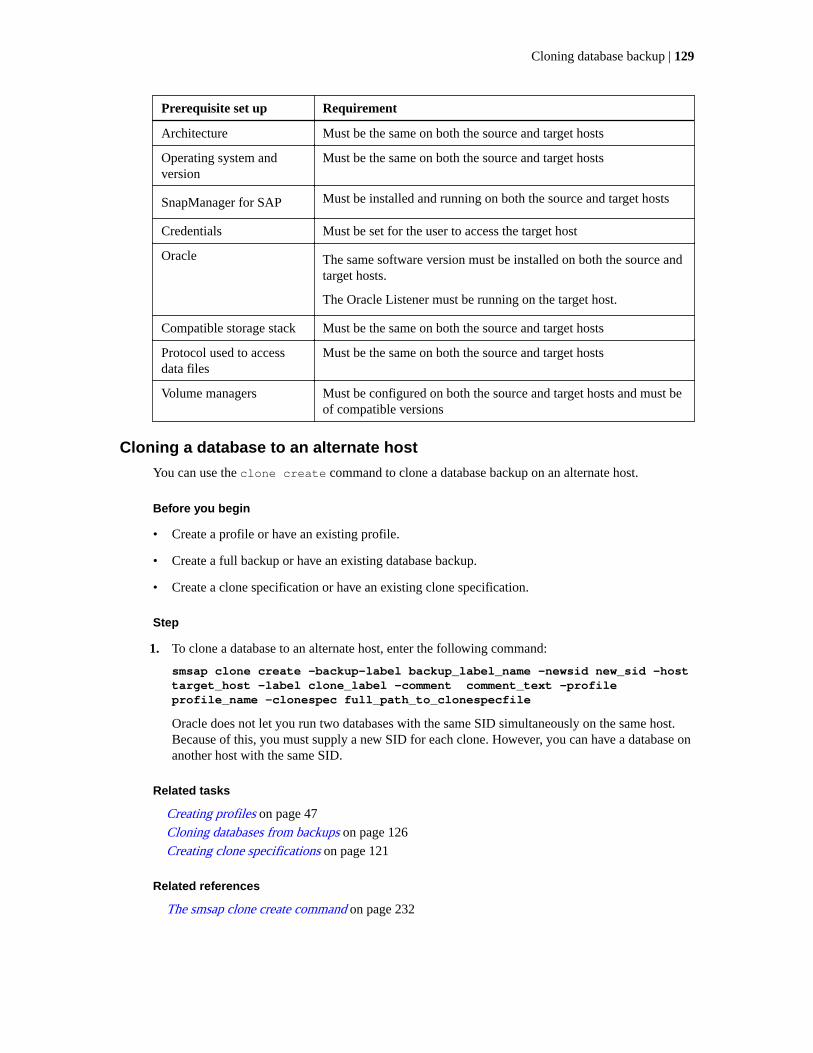
Prerequisite set up Requirement
Architecture Must be the same on both the source and target hosts
Operating system andversion
Must be the same on both the source and target hosts
SnapManager for SAP Must be installed and running on both the source and target hosts
Credentials Must be set for the user to access the target host
Oracle The same software version must be installed on both the source andtarget hosts.
The Oracle Listener must be running on the target host.
Compatible storage stack Must be the same on both the source and target hosts
Protocol used to accessdata files
Must be the same on both the source and target hosts
Volume managers Must be configured on both the source and target hosts and must beof compatible versions
Cloning a database to an alternate host
You can use the clone create command to clone a database backup on an alternate host.
Before you begin
• Create a profile or have an existing profile.
• Create a full backup or have an existing database backup.
• Create a clone specification or have an existing clone specification.
Step
1. To clone a database to an alternate host, enter the following command:
smsap clone create -backup-label backup_label_name -newsid new_sid -hosttarget_host -label clone_label -comment comment_text -profileprofile_name -clonespec full_path_to_clonespecfile
Oracle does not let you run two databases with the same SID simultaneously on the same host.Because of this, you must supply a new SID for each clone. However, you can have a database onanother host with the same SID.
Related tasks
Creating profiles on page 47
Cloning databases from backups on page 126
Creating clone specifications on page 121
Related references
The smsap clone create command on page 232
Cloning database backup | 129
Cloning with RAC databasesYou can clone your RAC database to a non-RAC database or you can clone it to a non-RAC databaseand then change it to a RAC database.
Steps
1. To clone your RAC database, enter the following command:
smsap clone create -backup-label backup_label -profile profile_name -newsid new_SID -clonespec full_path_to_clonespec_file -verbose
2. To change the cloned non-RAC database to a RAC database, rename the file frominitclone_SID.ora to initclone_local_instance_SID.ora.
3. Edit the renamed file to set the parameter cluster.database to true. RAC databaseinformation.
4. Register the cloned RAC database with srvctl.
Viewing a list of clonesYou can view a list of clones associated with a particular profile.
About this task
The list includes the following information about the clones in a profile:
• The ID for the clone
• Status of the clone operation
• Oracle SID for the clone
• Host on which the clone resides
• Label for the clone
If you specify the -verbose option, the output also shows the comments entered for the clone.
Step
1. To display a list of all clones for a profile, enter the following command
smsap clone list -profile profile_name [-quiet | -verbose]
Related references
The smsap clone list command on page 236
Viewing detailed clone informationYou can view detailed information about a specific clone by using the clone show command.
About this task
The clone show command displays the following information:
130 | Administration Guide for UNIX
• Clone system identifier and clone ID
• Clone operation status
• Clone create start and end date or time
• Clone label
• Clone comment
• Backup label and ID
• Source database
• Backup start and end time
• Database name, tablespaces, and data files
• Host name and file systems containing data files
• Storage system volumes and Snapshot copies backing the clone
• Whether the clone was created using the backup on the primary or secondary storage
Step
1. Enter the following command:
smsap clone show -profile profile_name [-label label | -id guid]
Related references
The smsap clone show command on page 237
Deleting clonesYou can delete the clones when the size of the Snapshot copy reaches between 10% and 20% of thebackup. This also guarantees that the clone has the most current data.
About this task
The label is the unique identifier for each clone in a profile. You can use the clone label or ID, but notthe system identifier (SID) to delete the clone.
Note: The clone SID and the clone label are not the same.
When you are deleting a clone, the database must be running. Otherwise, many files and directoriesfor the existing clone will not be deleted, resulting in more work before another clone can be created.
The directories specified for certain Oracle parameters in the clone are destroyed when the clone isdeleted, and should only contain data for the cloned database: Archive Log Destinations,Background, Core, and User Dump Destinations. The audit files are not deleted.
Note: You cannot delete a clone when the clone is used in other operations.
You can optionally collect the dump files after a successful or failed clone delete operation.
Step
1. Enter the following command:
smsap clone delete -profile profile_name [-label label | -id guid] [-syspassword syspassword]| [login -username db_username -password]
Cloning database backup | 131
db_password -port db_port] [-asminstance -asmusername asm_username -asmpassword asm_password][-force][-dump][-quiet]|[-verbose]
Example
smsap clone delete -profile targetdb1_prof1 -label sales0908_clone1
Related references
The smsap clone delete command on page 235
Splitting a cloneSnapManager enables you to split and manage an existing clone that was created by using theFlexClone technology. In the FlexClone technology, the clone and original database share the samephysical data blocks.
Before you perform the clone split operation, you can know that the estimated size of the clone to besplit and the required space available on the aggregate.
A new profile is generated by SnapManager if the clone split operation is successful. If SnapManagerfails to create the new profile, you can manually create a new profile. You can use the new profile tocreate database backups, restore data, and create clones. If the clone split operation is successful,irrespective of whether the new profile is created or not, the clone-related metadata is removed fromthe repository database.
You can perform the following tasks related to splitting clones:
• View the clone split estimate.
• Split a clone on a primary storage.
• Split a clone on a secondary storage.
• View the clone split operation status.
• Stop the clone split operation.
• Destroy the profile along with the underlying storage.
• Delete the profile created for a split clone.
When you split a clone from its parent volume, the Snapshot copies associated with the clonedvolume are deleted. The backups created for the cloned database before the clone split process cannotbe used because the Snapshot copies of these backups are deleted, and the backups remain as staleentries in the repository.
Viewing a clone split estimate
The clone split estimate helps you know the total free space available on the aggregate, the amount ofspace shared between the clone and the original database, and the space exclusively used by theclone. In addition, you can view the date and time at which the underlying clone was created and theage of the clone. Based on this estimate, you decide whether to split a clone or not.
About this task
To view the clone split estimate, you must enter the profile name of the original clone and the label orGUID of the clone operation. If the clone is in a different host, you can specify the host name.
132 | Administration Guide for UNIX
Step
1. To view the clone split estimate, enter the following command:
smsap clone split-estimate -profile profile [-host hostname] [-labelclone-label | -id clone-id][-quiet | -verbose]
The following example shows the command for clone split storage estimate:
smsap clone split-estimate -profile p1 -label clone_test_label
Splitting a clone on primary or secondary storage
You can use the clone split command to split the clone. After the clone split is complete, theclone metadata is removed from the repository database and the backup associated with the clone canbe deleted or freed.
About this task
The new profile created after the successful split operation is used for managing the split clone. Thenew profile will be like any other existing profile in SnapManager. You can use this profile toperform backup, restore, and clone operations.
In addition, you can also configure email notification for the new profile. This enables the databaseadministrator to be notified about the status of the database operation performed using the profile.
Note: SnapManager supports the splitting operation when performed on a FlexClone only.
If the split operation fails, an appropriate error message with the reason for failure is displayed. Thestatus of multiple operations is also displayed in the operation log. For example:
--[ INFO] The following operations were completed:Clone Split : SuccessProfile Create : FailedClone Detach : Success
You can optionally collect the dump files after a successful or failed clone split operation.
Note: After you enter the clone split command, you should not stop the SnapManager serveruntil the clone split operation has started.
Note: SnapManager generates the profile even if you do not provide any value for the Oracleaccount (osaccount and osgroup).
Step
1. Enter the following command:
smsap clone split -profile clone-profile -host hostname [-label clone-label | -id clone-id]-split-label split-operation-label -comment commentnew-profile new-profile-name [-profile-password new-profile_password] -repository -dbname repo_service_name -host repo_host -port repo_port -login -username repo_username -database -dbname db_dbname -host db_host[-sid db_sid] [-login -username db_username -password db_password -portdb_port] [-rman {-controlfile | {-login -username rman_username -password rman_password -tnsname rman_tnsname} } ] -osaccount osaccount -osgroup osgroup [-retain [-hourly -count n] [-duration m]] [-daily -count n] [-duration m]] [-weekly -count n] [-duration m]] [-monthly -count n] [-duration m]]] [-profile-comment profile-comment][-snapname-
Cloning database backup | 133
pattern pattern][-protect [-protection-policy policy_name]] | [-noprotect]][-summary-notification] [-notification [-success -emailemail_address1, email_address2 -subject subject_pattern] [-failure -email email_address1, email_address2 -subject subject_pattern]][-quiet |-verbose]-dump
Viewing the status of the clone split process
You can view the progress of the split process you started.
Step
1. To view the progress of the clone split process, enter the following command:
smsap clone split-status -profile profile [-host hostname] [-labelsplit-label | -id split-id] [-quiet | -verbose]
smsap clone split-status -profile p1 -id 8abc01ec0e78f3e2010e78f3fdd00001
Viewing the result of the clone split process
You can view the result of the clone split process you started.
Step
1. To view the result of the clone split process, enter the following command:
smsap clone split-result -profile profile [-host hostname] [-labelsplit-label | -id split-id] [-quiet | -verbose]
smsap clone split-result -profile p1 -id 8abc01ec0e78f3e2010e78f3fdd00001
Stopping the clone split process
You can stop the running clone split process.
About this task
After you stop the split process, you cannot resume it.
Step
1. To stop the clone split operation, enter the following command:
smsap clone split-stop -profile profile [-host hostname] [-label split-label | -id split-id] [-quiet | -verbose]
smsap clone split-stop -profile p1 -id 8abc01ec0e78f3e2010e78f3fdd00001
134 | Administration Guide for UNIX
Deleting a profile
You can delete a profile as long as it does not contain successful backups that are currently used inother operations. You can delete profiles that contain freed or deleted backups.
Step
1. Enter the following command:
smsap profile delete -profile profile [-quiet | -verbose]
You can delete a new profile created for the clone split. While deleting, the If you deletethe profile, you cannot destroy the profile later warning message is displayedin the SnapManager command-line interface.
smsap profile delete -profile AUTO-REVEN
Destroying a profile
SnapManager enables you to destroy the profile associated with the split clone (database) along withthe underlying storage. Before destroying the profile, ensure you remove the associated backups andclones.
Step
1. To destroy a profile created using the split clone operation as well as the split clone database,enter the following command:
smsap profile destroy -profile profile [-host hostname] [-quiet | -verbose]
smsap profile destroy -profile AUTO-REVEN
Deleting a clone split operation cycle from a repository database
You can delete a clone split operation cycle entry from a repository database.
Step
1. To delete a clone split operation cycle entry from a repository database, enter the followingcommand:
smsap clone split-delete -profile profile [-host hostname] [-labelsplit-label | -id split-id] [-quiet | -verbose]
smsap clone split-delete -profile p1 -id 8abc01ec0e78f3e2010e78f3fdd00001
Cloning database backup | 135
Introduction to data protection in SnapManager
SnapManager supports data protection to protect the backups on the secondary or tertiary storagesystems. You must set up SnapMirror and SnapVault relationships between the source and thedestination volumes.
If you are using Data ONTAP operating in 7-Mode, SnapManager provides policy-driven dataprotection by integrating with Protection Manager (OnCommand Unified Manager). This automatesreplicating SnapManager backups on a primary storage system to a secondary storage system or evento a tertiary storage system by using SnapVault or SnapMirror policies created by the storage orbackup administrator in Protection Manager. Retention on primary storage is controlled bySnapManager based on the retention defined during profile creation and the retention class taggedduring the backup creation. Secondary storage backup retention is controlled by the policy defined inProtection Manager.
If you are using clustered Data ONTAP, SnapManager 3.4 provides SnapManager_cDOT_Mirror andSnapManager_cDOT_Vault policies for data protection. While creating a profile, you can select thesepolicies depending on the SnapMirror or SnapVault relationship that was established using clusteredData ONTAP CLI or System Manager. When you create a backup selecting the profile for which youenabled protection, the backups are protected to a secondary storage system.
Note: Backups created using BR*Tools cannot be protected using SnapManager for SAP.
If you were using SnapManager 3.3.1 with clustered Data ONTAP, the backups were protected usingpost-scripts which were selected while creating profiles. If you want to use those profiles, afterupgrading to SnapManager 3.4 you must perform the following operations.
• You must update the profiles to select either SnapManager_cDOT_Mirror orSnapManager_cDOT_Vault policy and delete the post-script that was used for data protection.
• After updating profile to use SnapManager_cDOT_Vault policy, you must delete existing backupschedules and create new schedules to specify the SnapVault label for the backups.
• If the profiles were created in SnapManager 3.3.1 without selecting the post-scripts, you mustupdate the profiles to select either SnapManager_cDOT_Mirror or SnapManager_cDOT_Vaultpolicy to enable data protection.
Note: If you have backups in the secondary storage system that were mirrored or vaulted usingSnapManager 3.3.1 post-scripts, you cannot use those backups for restore or cloning usingSnapManager 3.4.
What protection policies areProtection policies are rules that govern how database backups are protected. You can select theprotection policies while creating the profile.
A protection policy defines the following parameters:
• When to transfer copies to secondary storage
• The maximum amount of data that should be transferred at scheduled times
• How long to retain copies for each backup location
• Warning and error thresholds for lag times
When protection is enabled, SnapManager creates a dataset for the database. A dataset consists of acollection of storage sets along with configuration information associated with their data. The storage
136
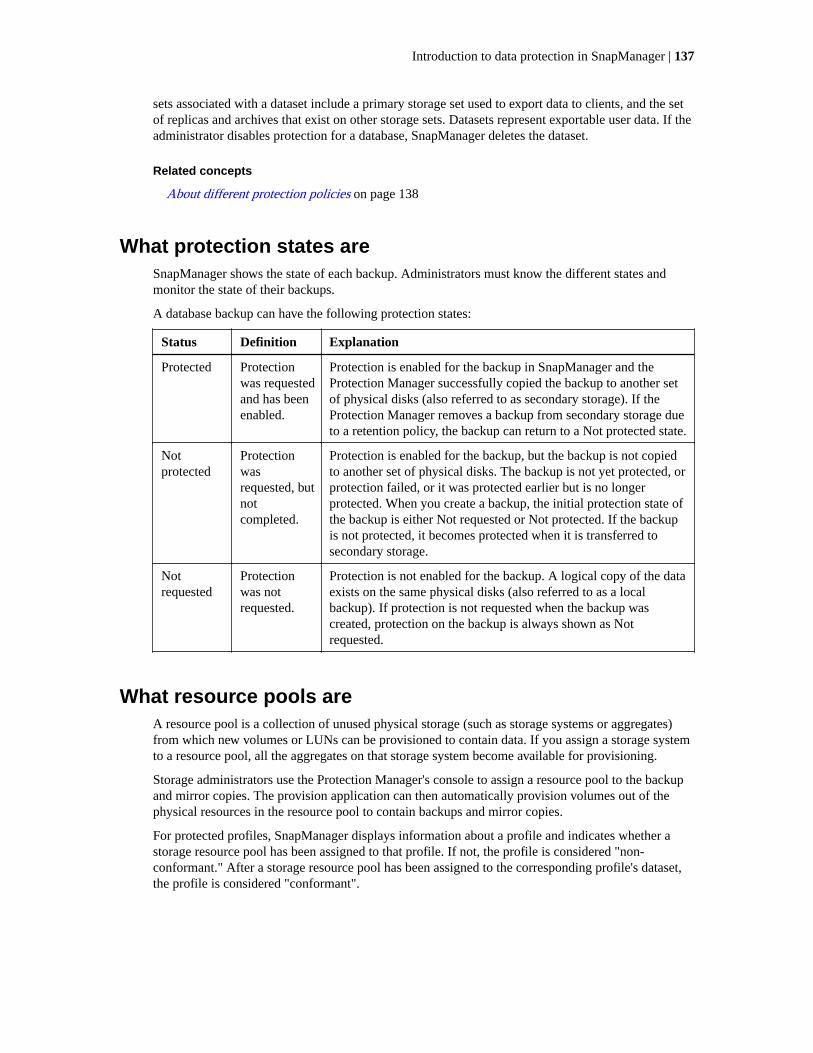
sets associated with a dataset include a primary storage set used to export data to clients, and the setof replicas and archives that exist on other storage sets. Datasets represent exportable user data. If theadministrator disables protection for a database, SnapManager deletes the dataset.
Related concepts
About different protection policies on page 138
What protection states areSnapManager shows the state of each backup. Administrators must know the different states andmonitor the state of their backups.
A database backup can have the following protection states:
Status Definition Explanation
Protected Protectionwas requestedand has beenenabled.
Protection is enabled for the backup in SnapManager and theProtection Manager successfully copied the backup to another setof physical disks (also referred to as secondary storage). If theProtection Manager removes a backup from secondary storage dueto a retention policy, the backup can return to a Not protected state.
Notprotected
Protectionwasrequested, butnotcompleted.
Protection is enabled for the backup, but the backup is not copiedto another set of physical disks. The backup is not yet protected, orprotection failed, or it was protected earlier but is no longerprotected. When you create a backup, the initial protection state ofthe backup is either Not requested or Not protected. If the backupis not protected, it becomes protected when it is transferred tosecondary storage.
Notrequested
Protectionwas notrequested.
Protection is not enabled for the backup. A logical copy of the dataexists on the same physical disks (also referred to as a localbackup). If protection is not requested when the backup wascreated, protection on the backup is always shown as Notrequested.
What resource pools areA resource pool is a collection of unused physical storage (such as storage systems or aggregates)from which new volumes or LUNs can be provisioned to contain data. If you assign a storage systemto a resource pool, all the aggregates on that storage system become available for provisioning.
Storage administrators use the Protection Manager's console to assign a resource pool to the backupand mirror copies. The provision application can then automatically provision volumes out of thephysical resources in the resource pool to contain backups and mirror copies.
For protected profiles, SnapManager displays information about a profile and indicates whether astorage resource pool has been assigned to that profile. If not, the profile is considered "non-conformant." After a storage resource pool has been assigned to the corresponding profile's dataset,the profile is considered "conformant".
Introduction to data protection in SnapManager | 137
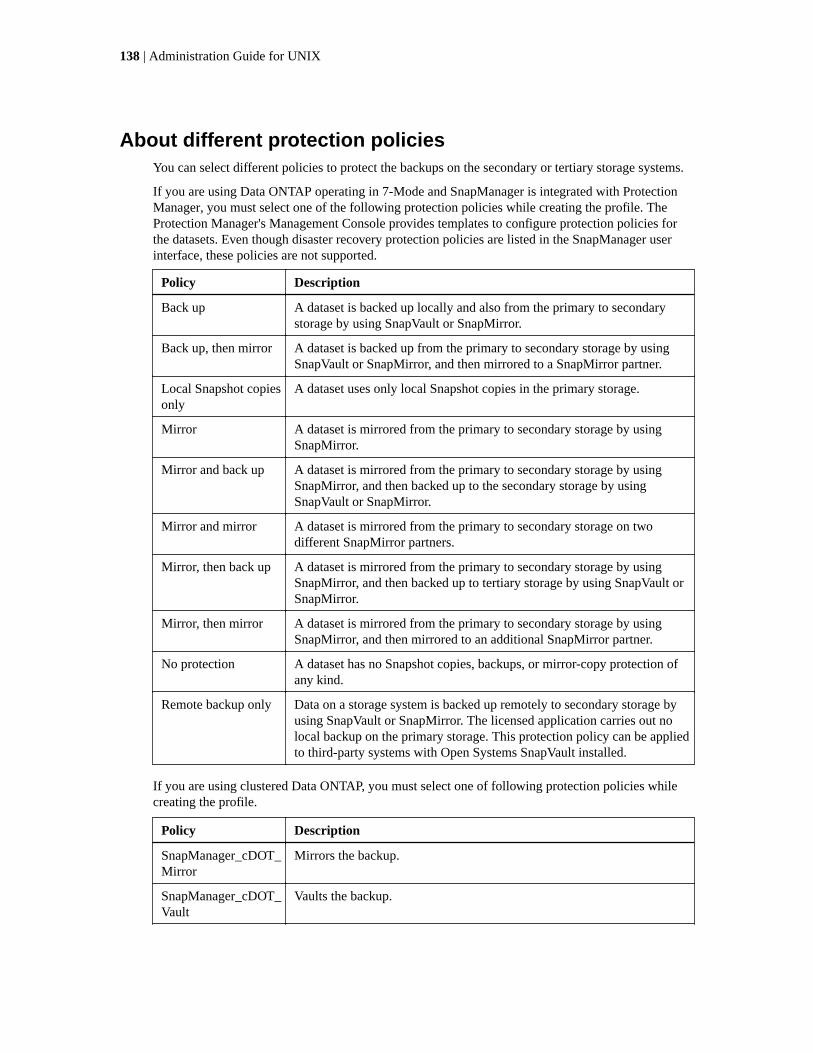
About different protection policiesYou can select different policies to protect the backups on the secondary or tertiary storage systems.
If you are using Data ONTAP operating in 7-Mode and SnapManager is integrated with ProtectionManager, you must select one of the following protection policies while creating the profile. TheProtection Manager's Management Console provides templates to configure protection policies forthe datasets. Even though disaster recovery protection policies are listed in the SnapManager userinterface, these policies are not supported.
Policy Description
Back up A dataset is backed up locally and also from the primary to secondarystorage by using SnapVault or SnapMirror.
Back up, then mirror A dataset is backed up from the primary to secondary storage by usingSnapVault or SnapMirror, and then mirrored to a SnapMirror partner.
Local Snapshot copiesonly
A dataset uses only local Snapshot copies in the primary storage.
Mirror A dataset is mirrored from the primary to secondary storage by usingSnapMirror.
Mirror and back up A dataset is mirrored from the primary to secondary storage by usingSnapMirror, and then backed up to the secondary storage by usingSnapVault or SnapMirror.
Mirror and mirror A dataset is mirrored from the primary to secondary storage on twodifferent SnapMirror partners.
Mirror, then back up A dataset is mirrored from the primary to secondary storage by usingSnapMirror, and then backed up to tertiary storage by using SnapVault orSnapMirror.
Mirror, then mirror A dataset is mirrored from the primary to secondary storage by usingSnapMirror, and then mirrored to an additional SnapMirror partner.
No protection A dataset has no Snapshot copies, backups, or mirror-copy protection ofany kind.
Remote backup only Data on a storage system is backed up remotely to secondary storage byusing SnapVault or SnapMirror. The licensed application carries out nolocal backup on the primary storage. This protection policy can be appliedto third-party systems with Open Systems SnapVault installed.
If you are using clustered Data ONTAP, you must select one of following protection policies whilecreating the profile.
Policy Description
SnapManager_cDOT_Mirror
Mirrors the backup.
SnapManager_cDOT_Vault
Vaults the backup.
138 | Administration Guide for UNIX
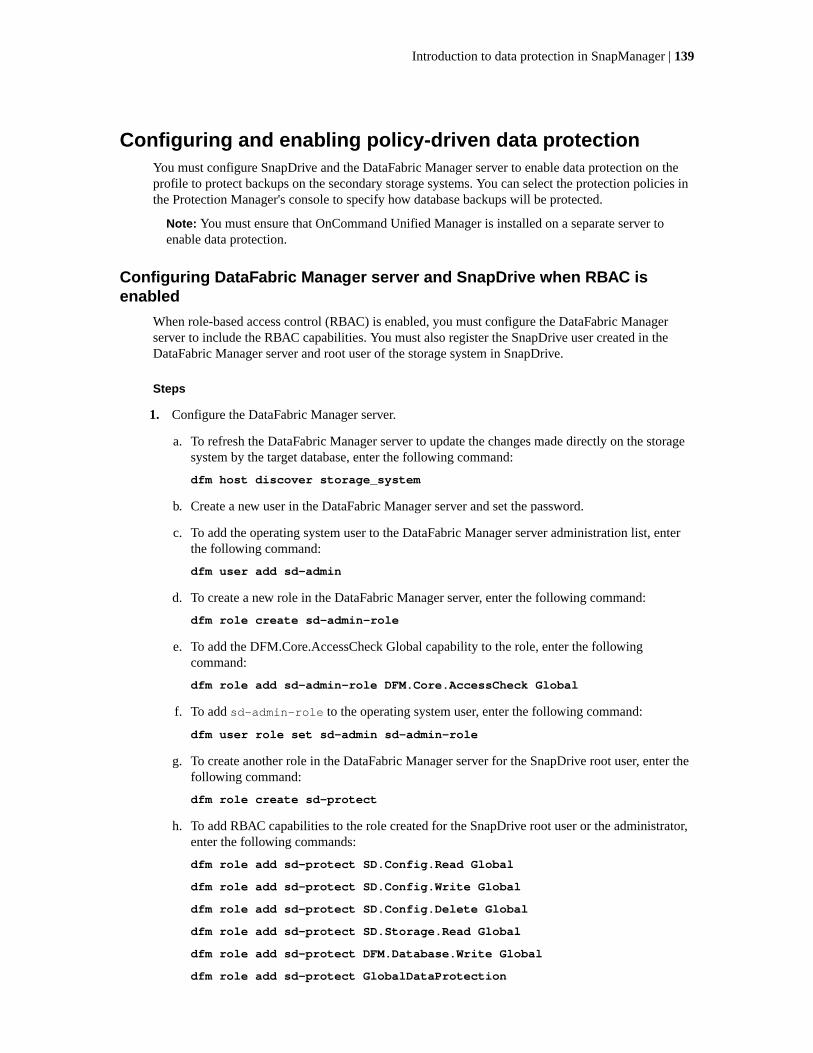
Configuring and enabling policy-driven data protectionYou must configure SnapDrive and the DataFabric Manager server to enable data protection on theprofile to protect backups on the secondary storage systems. You can select the protection policies inthe Protection Manager's console to specify how database backups will be protected.
Note: You must ensure that OnCommand Unified Manager is installed on a separate server toenable data protection.
Configuring DataFabric Manager server and SnapDrive when RBAC isenabled
When role-based access control (RBAC) is enabled, you must configure the DataFabric Managerserver to include the RBAC capabilities. You must also register the SnapDrive user created in theDataFabric Manager server and root user of the storage system in SnapDrive.
Steps
1. Configure the DataFabric Manager server.
a. To refresh the DataFabric Manager server to update the changes made directly on the storagesystem by the target database, enter the following command:
dfm host discover storage_system
b. Create a new user in the DataFabric Manager server and set the password.
c. To add the operating system user to the DataFabric Manager server administration list, enterthe following command:
dfm user add sd-admin
d. To create a new role in the DataFabric Manager server, enter the following command:
dfm role create sd-admin-role
e. To add the DFM.Core.AccessCheck Global capability to the role, enter the followingcommand:
dfm role add sd-admin-role DFM.Core.AccessCheck Global
f. To add sd-admin-role to the operating system user, enter the following command:
dfm user role set sd-admin sd-admin-role
g. To create another role in the DataFabric Manager server for the SnapDrive root user, enter thefollowing command:
dfm role create sd-protect
h. To add RBAC capabilities to the role created for the SnapDrive root user or the administrator,enter the following commands:
dfm role add sd-protect SD.Config.Read Global
dfm role add sd-protect SD.Config.Write Global
dfm role add sd-protect SD.Config.Delete Global
dfm role add sd-protect SD.Storage.Read Global
dfm role add sd-protect DFM.Database.Write Global
dfm role add sd-protect GlobalDataProtection
Introduction to data protection in SnapManager | 139
i. To add the target database oracle user to the list of administrators in the DataFabric Managerserver and assign the sd-protect role, enter the following command:
dfm user add -r sd-protect tardb_host1\oracle
j. To add the storage system used by the target database in the DataFabric Manager server, enterthe following command:
dfm host set storage_system hostLogin=oracle hostPassword=password
k. To create a new role in the storage system used by the target database in the DataFabricManager server, enter the following command:
dfm host role create -h storage_system-c "api-*,login-*" storage-rbac-role
l. To create a new group in the storage system and assign the new role created in the DataFabricManager server, enter the following command:
dfm host usergroup create -h storage_system-r storage-rbac-rolestorage-rbac-group
m. To create a new user in the storage system and assign the new role and the group created in theDataFabric Manager server, enter the following command:
dfm host user create -h storage_system-r storage-rbac-role -p password-g storage-rbac-group tardb_host1
2. Configure SnapDrive.
a. To register the credentials of the sd-admin user with SnapDrive, enter the followingcommand:
snapdrive config set -dfm sd-admin dfm_host
b. To register the root user or the administrator of the storage system with SnapDrive, enter thefollowing command:
snapdrive config set tardb_host1 storage_system
Configuring SnapDrive when RBAC is not enabled
You must register the root user or the administrator of the DataFabric Manager server and root user ofthe storage system with SnapDrive to enable data protection.
Steps
1. To refresh the DataFabric Manager server to update the changes made directly on the storagesystem by the target database, enter the following command:
Example
dfm host discover storage_system
2. To register the root user or the administrator of the DataFabric Manager server with SnapDrive,enter the following command:
Example
snapdrive config set -dfm Administrator dfm_host
3. To Register the root user or the administrator of the storage system with SnapDrive, enter thefollowing command:
140 | Administration Guide for UNIX
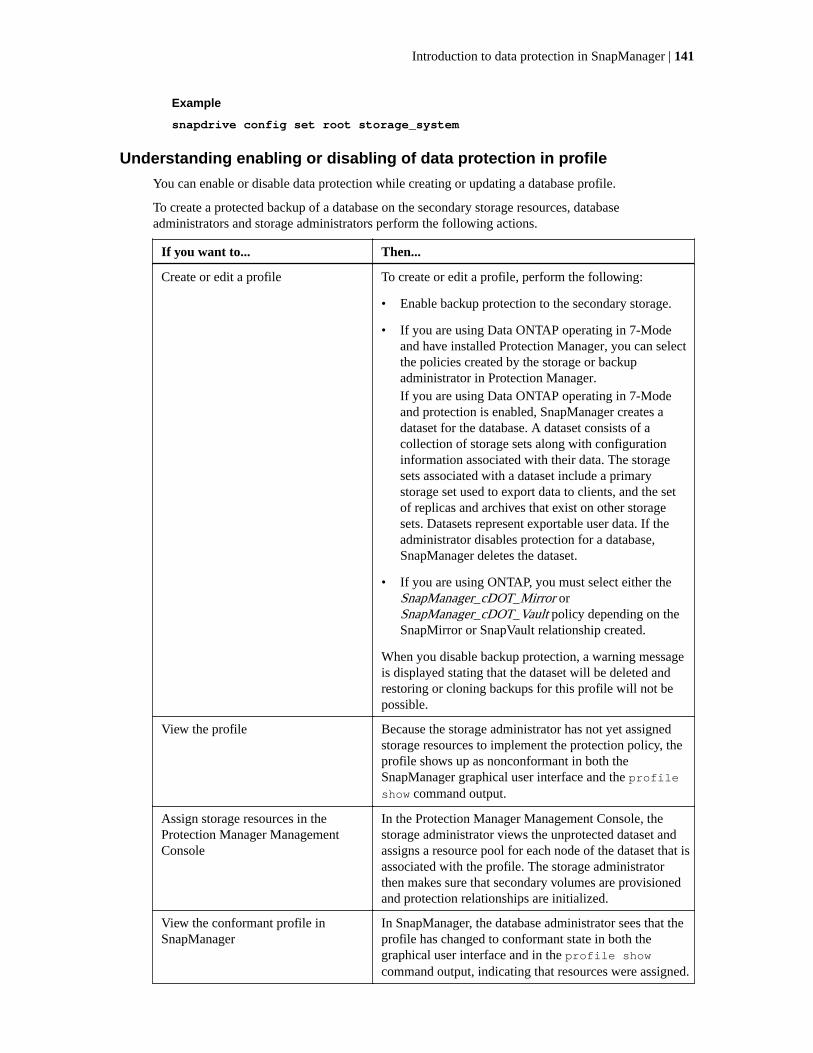
Example
snapdrive config set root storage_system
Understanding enabling or disabling of data protection in profile
You can enable or disable data protection while creating or updating a database profile.
To create a protected backup of a database on the secondary storage resources, databaseadministrators and storage administrators perform the following actions.
If you want to... Then...
Create or edit a profile To create or edit a profile, perform the following:
• Enable backup protection to the secondary storage.
• If you are using Data ONTAP operating in 7-Modeand have installed Protection Manager, you can selectthe policies created by the storage or backupadministrator in Protection Manager.
If you are using Data ONTAP operating in 7-Modeand protection is enabled, SnapManager creates adataset for the database. A dataset consists of acollection of storage sets along with configurationinformation associated with their data. The storagesets associated with a dataset include a primarystorage set used to export data to clients, and the setof replicas and archives that exist on other storagesets. Datasets represent exportable user data. If theadministrator disables protection for a database,SnapManager deletes the dataset.
• If you are using ONTAP, you must select either theSnapManager_cDOT_Mirror orSnapManager_cDOT_Vault policy depending on theSnapMirror or SnapVault relationship created.
When you disable backup protection, a warning messageis displayed stating that the dataset will be deleted andrestoring or cloning backups for this profile will not bepossible.
View the profile Because the storage administrator has not yet assignedstorage resources to implement the protection policy, theprofile shows up as nonconformant in both theSnapManager graphical user interface and the profileshow command output.
Assign storage resources in theProtection Manager ManagementConsole
In the Protection Manager Management Console, thestorage administrator views the unprotected dataset andassigns a resource pool for each node of the dataset that isassociated with the profile. The storage administratorthen makes sure that secondary volumes are provisionedand protection relationships are initialized.
View the conformant profile inSnapManager
In SnapManager, the database administrator sees that theprofile has changed to conformant state in both thegraphical user interface and in the profile showcommand output, indicating that resources were assigned.
Introduction to data protection in SnapManager | 141
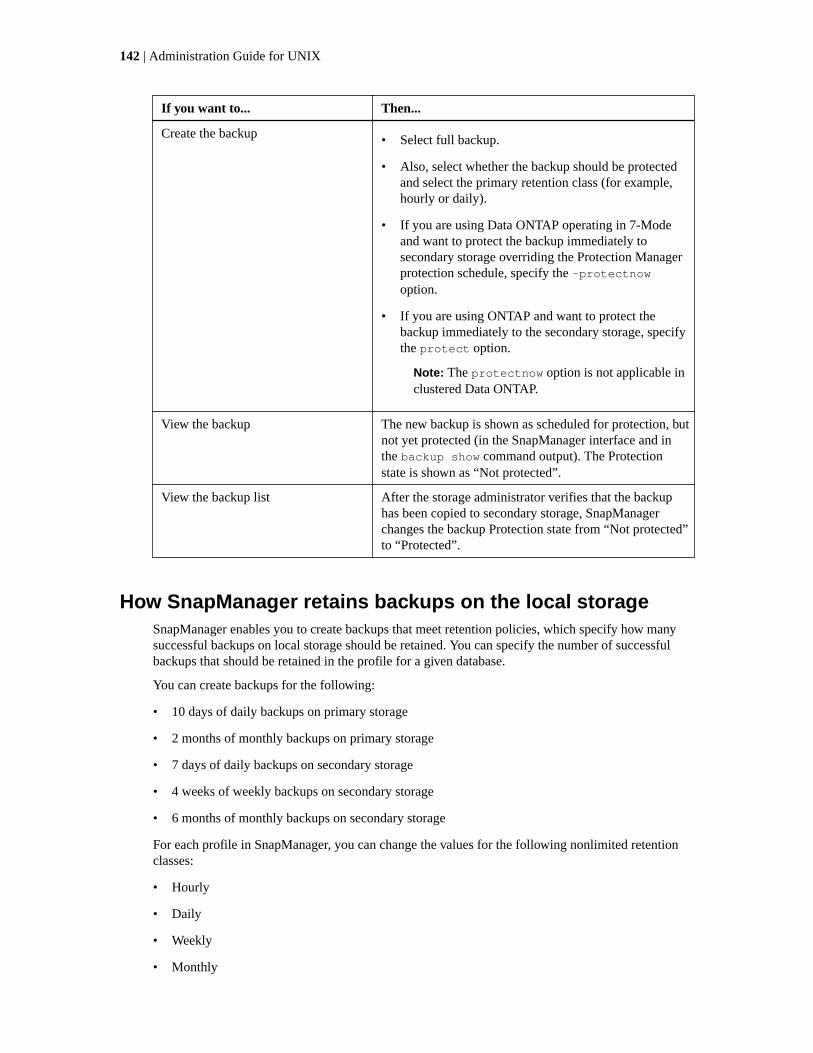
If you want to... Then...
Create the backup • Select full backup.
• Also, select whether the backup should be protectedand select the primary retention class (for example,hourly or daily).
• If you are using Data ONTAP operating in 7-Modeand want to protect the backup immediately tosecondary storage overriding the Protection Managerprotection schedule, specify the -protectnowoption.
• If you are using ONTAP and want to protect thebackup immediately to the secondary storage, specifythe protect option.
Note: The protectnow option is not applicable inclustered Data ONTAP.
View the backup The new backup is shown as scheduled for protection, butnot yet protected (in the SnapManager interface and inthe backup show command output). The Protectionstate is shown as “Not protected”.
View the backup list After the storage administrator verifies that the backuphas been copied to secondary storage, SnapManagerchanges the backup Protection state from “Not protected”to “Protected”.
How SnapManager retains backups on the local storageSnapManager enables you to create backups that meet retention policies, which specify how manysuccessful backups on local storage should be retained. You can specify the number of successfulbackups that should be retained in the profile for a given database.
You can create backups for the following:
• 10 days of daily backups on primary storage
• 2 months of monthly backups on primary storage
• 7 days of daily backups on secondary storage
• 4 weeks of weekly backups on secondary storage
• 6 months of monthly backups on secondary storage
For each profile in SnapManager, you can change the values for the following nonlimited retentionclasses:
• Hourly
• Daily
• Weekly
• Monthly
142 | Administration Guide for UNIX
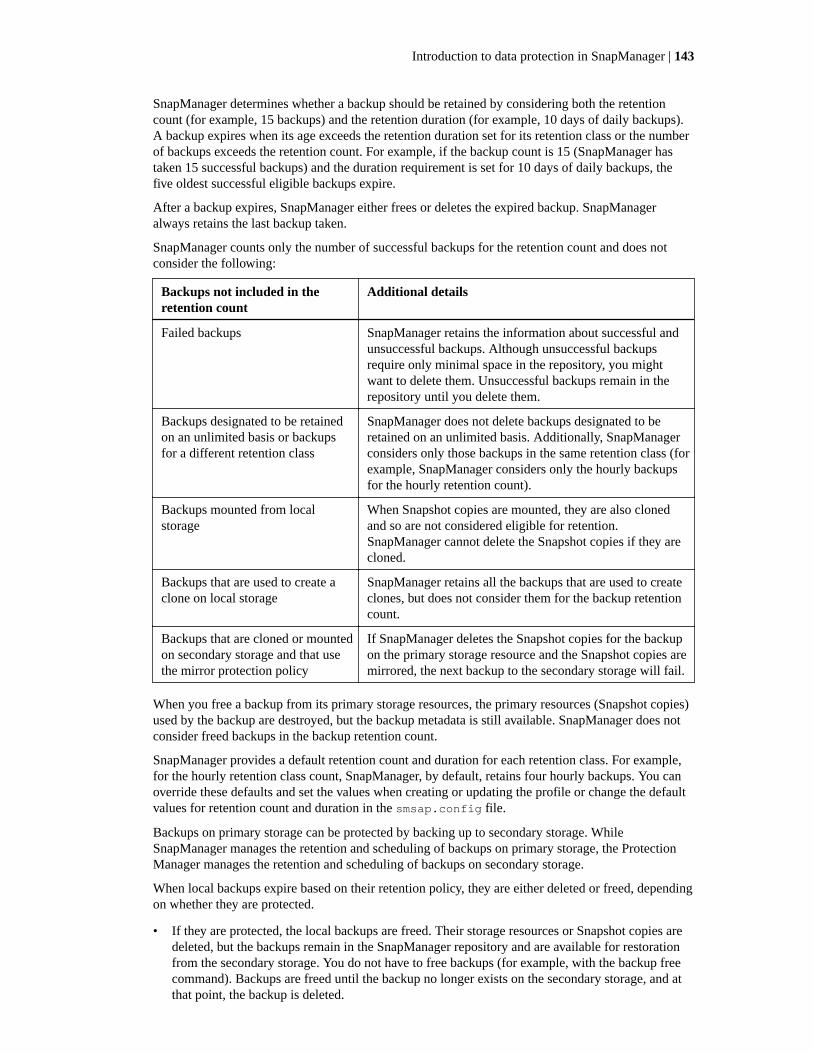
SnapManager determines whether a backup should be retained by considering both the retentioncount (for example, 15 backups) and the retention duration (for example, 10 days of daily backups).A backup expires when its age exceeds the retention duration set for its retention class or the numberof backups exceeds the retention count. For example, if the backup count is 15 (SnapManager hastaken 15 successful backups) and the duration requirement is set for 10 days of daily backups, thefive oldest successful eligible backups expire.
After a backup expires, SnapManager either frees or deletes the expired backup. SnapManageralways retains the last backup taken.
SnapManager counts only the number of successful backups for the retention count and does notconsider the following:
Backups not included in theretention count
Additional details
Failed backups SnapManager retains the information about successful andunsuccessful backups. Although unsuccessful backupsrequire only minimal space in the repository, you mightwant to delete them. Unsuccessful backups remain in therepository until you delete them.
Backups designated to be retainedon an unlimited basis or backupsfor a different retention class
SnapManager does not delete backups designated to beretained on an unlimited basis. Additionally, SnapManagerconsiders only those backups in the same retention class (forexample, SnapManager considers only the hourly backupsfor the hourly retention count).
Backups mounted from localstorage
When Snapshot copies are mounted, they are also clonedand so are not considered eligible for retention.SnapManager cannot delete the Snapshot copies if they arecloned.
Backups that are used to create aclone on local storage
SnapManager retains all the backups that are used to createclones, but does not consider them for the backup retentioncount.
Backups that are cloned or mountedon secondary storage and that usethe mirror protection policy
If SnapManager deletes the Snapshot copies for the backupon the primary storage resource and the Snapshot copies aremirrored, the next backup to the secondary storage will fail.
When you free a backup from its primary storage resources, the primary resources (Snapshot copies)used by the backup are destroyed, but the backup metadata is still available. SnapManager does notconsider freed backups in the backup retention count.
SnapManager provides a default retention count and duration for each retention class. For example,for the hourly retention class count, SnapManager, by default, retains four hourly backups. You canoverride these defaults and set the values when creating or updating the profile or change the defaultvalues for retention count and duration in the smsap.config file.
Backups on primary storage can be protected by backing up to secondary storage. WhileSnapManager manages the retention and scheduling of backups on primary storage, the ProtectionManager manages the retention and scheduling of backups on secondary storage.
When local backups expire based on their retention policy, they are either deleted or freed, dependingon whether they are protected.
• If they are protected, the local backups are freed. Their storage resources or Snapshot copies aredeleted, but the backups remain in the SnapManager repository and are available for restorationfrom the secondary storage. You do not have to free backups (for example, with the backup freecommand). Backups are freed until the backup no longer exists on the secondary storage, and atthat point, the backup is deleted.
Introduction to data protection in SnapManager | 143
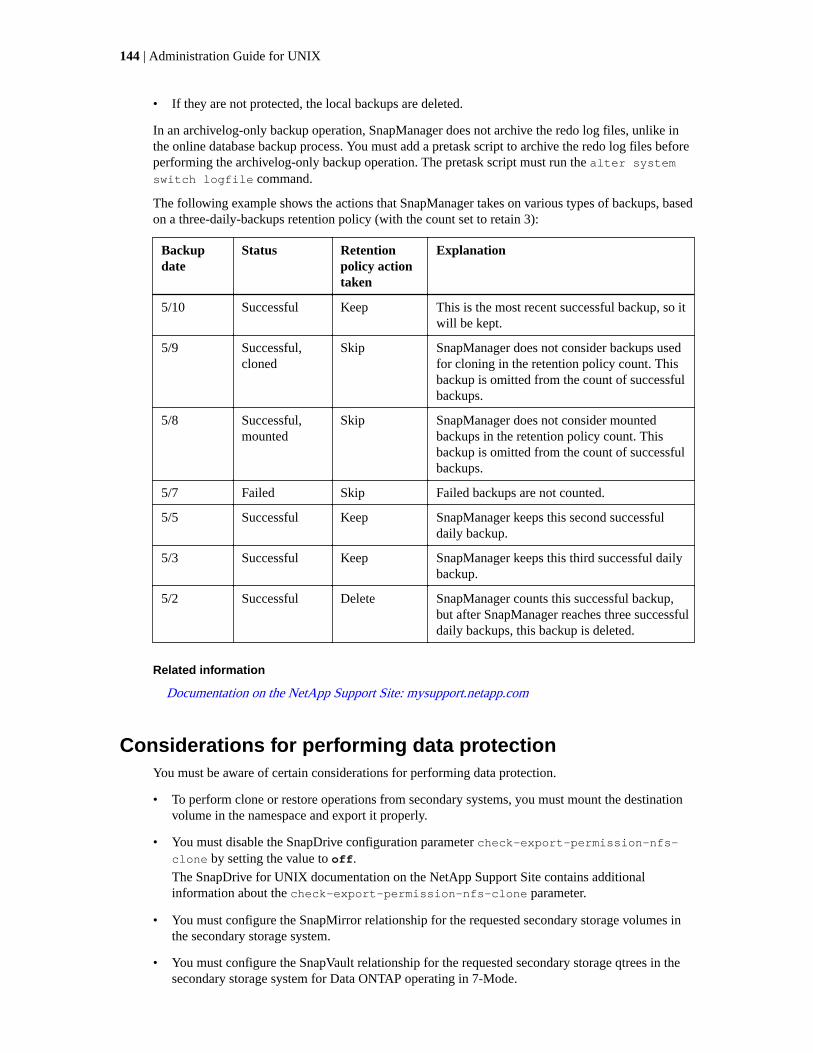
• If they are not protected, the local backups are deleted.
In an archivelog-only backup operation, SnapManager does not archive the redo log files, unlike inthe online database backup process. You must add a pretask script to archive the redo log files beforeperforming the archivelog-only backup operation. The pretask script must run the alter systemswitch logfile command.
The following example shows the actions that SnapManager takes on various types of backups, basedon a three-daily-backups retention policy (with the count set to retain 3):
Backupdate
Status Retentionpolicy actiontaken
Explanation
5/10 Successful Keep This is the most recent successful backup, so itwill be kept.
5/9 Successful,cloned
Skip SnapManager does not consider backups usedfor cloning in the retention policy count. Thisbackup is omitted from the count of successfulbackups.
5/8 Successful,mounted
Skip SnapManager does not consider mountedbackups in the retention policy count. Thisbackup is omitted from the count of successfulbackups.
5/7 Failed Skip Failed backups are not counted.
5/5 Successful Keep SnapManager keeps this second successfuldaily backup.
5/3 Successful Keep SnapManager keeps this third successful dailybackup.
5/2 Successful Delete SnapManager counts this successful backup,but after SnapManager reaches three successfuldaily backups, this backup is deleted.
Related information
Documentation on the NetApp Support Site: mysupport.netapp.com
Considerations for performing data protectionYou must be aware of certain considerations for performing data protection.
• To perform clone or restore operations from secondary systems, you must mount the destinationvolume in the namespace and export it properly.
• You must disable the SnapDrive configuration parameter check-export-permission-nfs-clone by setting the value to off.
The SnapDrive for UNIX documentation on the NetApp Support Site contains additionalinformation about the check-export-permission-nfs-clone parameter.
• You must configure the SnapMirror relationship for the requested secondary storage volumes inthe secondary storage system.
• You must configure the SnapVault relationship for the requested secondary storage qtrees in thesecondary storage system for Data ONTAP operating in 7-Mode.
144 | Administration Guide for UNIX
• You must define a policy and rules for the user-defined SnapMirror label if you are usingSnapVault post-script for clustered Data ONTAP.
SnapVault post-script supports clustered Data ONTAP volumes and the SnapMirror relation typesDP and XDP. The ONTAP documentation on the NetApp Support Site contains information aboutconfiguring SnapMirror and SnapVault.
• In NAS environments, you must configure the primary and secondary NAS data path by using thesnapdrive config set -mgmtpath management_path management_pathmanagement_path datapath_path command.
For example, snapdrive config set -mgmtpath f3050-197-91 f3050-197-91f3050-197-91 f3050-220-91, where f3050-197-91 is the management path andf3050-220-91 is the data path.
Related information
Documentation on the NetApp Support Site: mysupport.netapp.com
Licences required for data protection in SnapManager
You must ensure that licenses required for data protection are installed and enabled on the primaryand secondary storage systems.
Primary storage systems receive the latest transaction updates for the Oracle database, store the data,and provide local backup protection of the database. The primary storage system also maintainsdatabase data files, log files, and control files. Secondary storage systems act as remote storage forthe protected backups.
For data protection, the following licenses must be installed and enabled on primary storage systems:
Note: If you want to enable data protection on the secondary storage systems, you must also installand enable these licenses on the secondary storage systems.
• Either Data ONTAP operating in 7-Mode (7.3.1 or later) or clustered Data ONTAP (8.2 or later)
• SnapVault (depending on the protection policy)
• SnapRestore
• SnapMirror (depending on the protection policy)
• FlexClone is required for Network File System (NFS) and cloning.
FlexClone is also, required for Storage Area Network (SAN) only if SnapDrive is configured touse FlexClone in SAN environments.
• The appropriate protocol, for example, NFS, Internet Small Computer System Interface (iSCSI),or Fibre Channel (FC)
SnapVault or SnapMirror should be on the primary and secondary storage systems based on theprotection policies used. The basic backup protection policies require only SnapVault installed on thesupporting systems. The policies that include mirror protection require SnapMirror installed on thesupporting systems. The backup and mirror disaster recovery policies require SnapMirror installed onthe supporting systems.
Introduction to data protection in SnapManager | 145
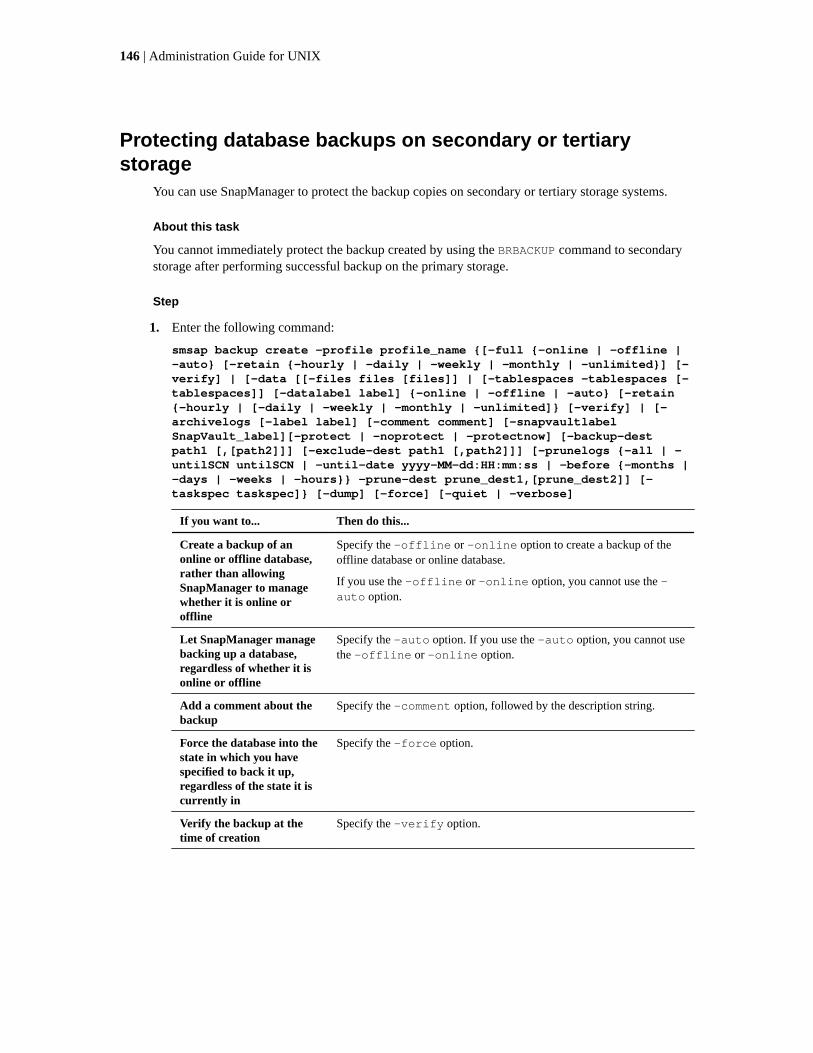
Protecting database backups on secondary or tertiarystorage
You can use SnapManager to protect the backup copies on secondary or tertiary storage systems.
About this task
You cannot immediately protect the backup created by using the BRBACKUP command to secondarystorage after performing successful backup on the primary storage.
Step
1. Enter the following command:
smsap backup create -profile profile_name {[-full {-online | -offline |-auto} [-retain {-hourly | -daily | -weekly | -monthly | -unlimited}] [-verify] | [-data [[-files files [files]] | [-tablespaces -tablespaces [-tablespaces]] [-datalabel label] {-online | -offline | -auto} [-retain{-hourly | [-daily | -weekly | -monthly | -unlimited]} [-verify] | [-archivelogs [-label label] [-comment comment] [-snapvaultlabelSnapVault_label][-protect | -noprotect | -protectnow] [-backup-destpath1 [,[path2]]] [-exclude-dest path1 [,path2]]] [-prunelogs {-all | -untilSCN untilSCN | -until-date yyyy-MM-dd:HH:mm:ss | -before {-months |-days | -weeks | -hours}} -prune-dest prune_dest1,[prune_dest2]] [-taskspec taskspec]} [-dump] [-force] [-quiet | -verbose]
If you want to... Then do this...
Create a backup of anonline or offline database,rather than allowingSnapManager to managewhether it is online oroffline
Specify the -offline or -online option to create a backup of theoffline database or online database.
If you use the -offline or -online option, you cannot use the -auto option.
Let SnapManager managebacking up a database,regardless of whether it isonline or offline
Specify the -auto option. If you use the -auto option, you cannot usethe -offline or -online option.
Add a comment about thebackup
Specify the -comment option, followed by the description string.
Force the database into thestate in which you havespecified to back it up,regardless of the state it iscurrently in
Specify the -force option.
Verify the backup at thetime of creation
Specify the -verify option.
146 | Administration Guide for UNIX
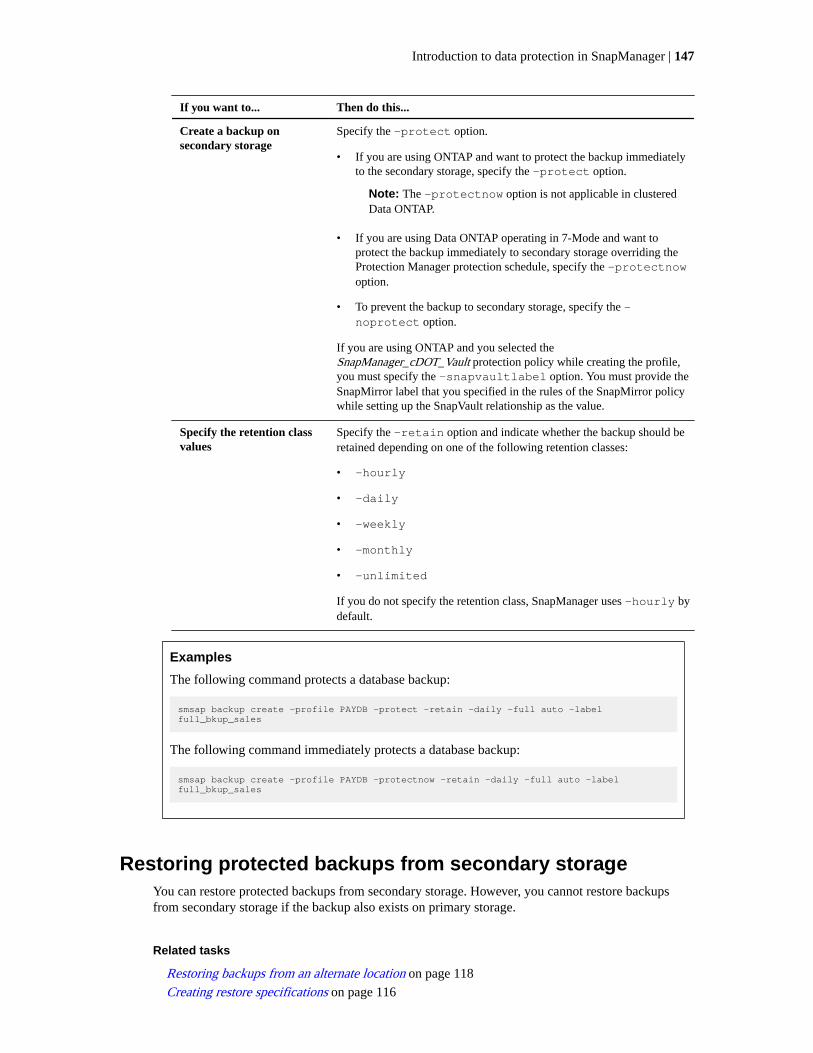
If you want to... Then do this...
Create a backup onsecondary storage
Specify the -protect option.
• If you are using ONTAP and want to protect the backup immediatelyto the secondary storage, specify the -protect option.
Note: The -protectnow option is not applicable in clusteredData ONTAP.
• If you are using Data ONTAP operating in 7-Mode and want toprotect the backup immediately to secondary storage overriding theProtection Manager protection schedule, specify the -protectnowoption.
• To prevent the backup to secondary storage, specify the -noprotect option.
If you are using ONTAP and you selected theSnapManager_cDOT_Vault protection policy while creating the profile,you must specify the -snapvaultlabel option. You must provide theSnapMirror label that you specified in the rules of the SnapMirror policywhile setting up the SnapVault relationship as the value.
Specify the retention classvalues
Specify the -retain option and indicate whether the backup should beretained depending on one of the following retention classes:
• -hourly
• -daily
• -weekly
• -monthly
• -unlimited
If you do not specify the retention class, SnapManager uses -hourly bydefault.
Examples
The following command protects a database backup:
smsap backup create -profile PAYDB -protect -retain -daily -full auto -label full_bkup_sales
The following command immediately protects a database backup:
smsap backup create -profile PAYDB -protectnow -retain -daily -full auto -label full_bkup_sales
Restoring protected backups from secondary storageYou can restore protected backups from secondary storage. However, you cannot restore backupsfrom secondary storage if the backup also exists on primary storage.
Related tasks
Restoring backups from an alternate location on page 118
Creating restore specifications on page 116
Introduction to data protection in SnapManager | 147
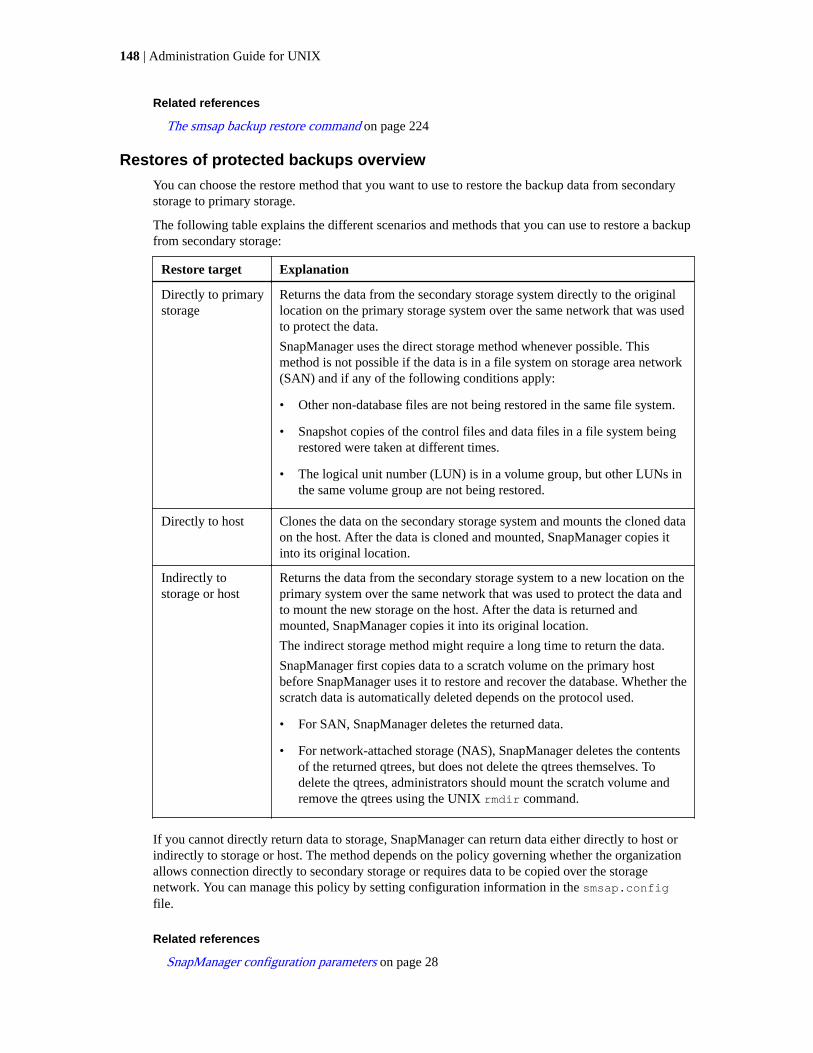
Related references
The smsap backup restore command on page 224
Restores of protected backups overview
You can choose the restore method that you want to use to restore the backup data from secondarystorage to primary storage.
The following table explains the different scenarios and methods that you can use to restore a backupfrom secondary storage:
Restore target Explanation
Directly to primarystorage
Returns the data from the secondary storage system directly to the originallocation on the primary storage system over the same network that was usedto protect the data.
SnapManager uses the direct storage method whenever possible. Thismethod is not possible if the data is in a file system on storage area network(SAN) and if any of the following conditions apply:
• Other non-database files are not being restored in the same file system.
• Snapshot copies of the control files and data files in a file system beingrestored were taken at different times.
• The logical unit number (LUN) is in a volume group, but other LUNs inthe same volume group are not being restored.
Directly to host Clones the data on the secondary storage system and mounts the cloned dataon the host. After the data is cloned and mounted, SnapManager copies itinto its original location.
Indirectly tostorage or host
Returns the data from the secondary storage system to a new location on theprimary system over the same network that was used to protect the data andto mount the new storage on the host. After the data is returned andmounted, SnapManager copies it into its original location.
The indirect storage method might require a long time to return the data.
SnapManager first copies data to a scratch volume on the primary hostbefore SnapManager uses it to restore and recover the database. Whether thescratch data is automatically deleted depends on the protocol used.
• For SAN, SnapManager deletes the returned data.
• For network-attached storage (NAS), SnapManager deletes the contentsof the returned qtrees, but does not delete the qtrees themselves. Todelete the qtrees, administrators should mount the scratch volume andremove the qtrees using the UNIX rmdir command.
If you cannot directly return data to storage, SnapManager can return data either directly to host orindirectly to storage or host. The method depends on the policy governing whether the organizationallows connection directly to secondary storage or requires data to be copied over the storagenetwork. You can manage this policy by setting configuration information in the smsap.configfile.
Related references
SnapManager configuration parameters on page 28
148 | Administration Guide for UNIX
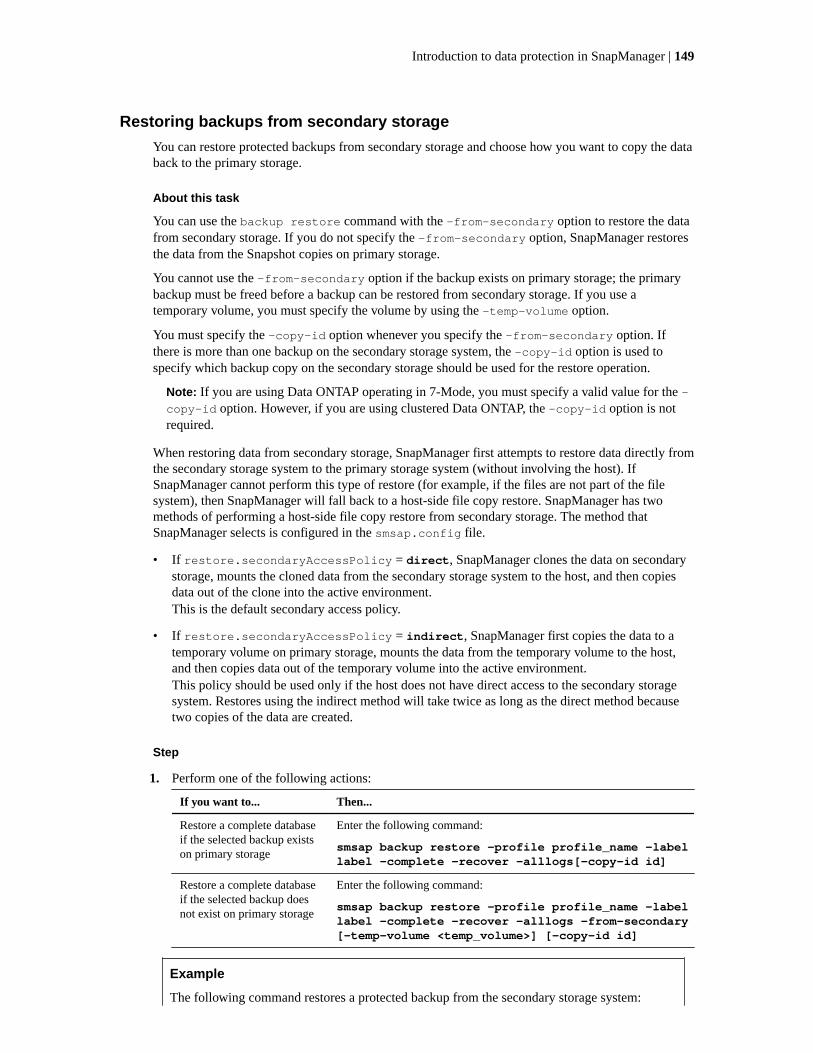
Restoring backups from secondary storage
You can restore protected backups from secondary storage and choose how you want to copy the databack to the primary storage.
About this task
You can use the backup restore command with the -from-secondary option to restore the datafrom secondary storage. If you do not specify the -from-secondary option, SnapManager restoresthe data from the Snapshot copies on primary storage.
You cannot use the -from-secondary option if the backup exists on primary storage; the primarybackup must be freed before a backup can be restored from secondary storage. If you use atemporary volume, you must specify the volume by using the -temp-volume option.
You must specify the -copy-id option whenever you specify the -from-secondary option. Ifthere is more than one backup on the secondary storage system, the -copy-id option is used tospecify which backup copy on the secondary storage should be used for the restore operation.
Note: If you are using Data ONTAP operating in 7-Mode, you must specify a valid value for the -copy-id option. However, if you are using clustered Data ONTAP, the -copy-id option is notrequired.
When restoring data from secondary storage, SnapManager first attempts to restore data directly fromthe secondary storage system to the primary storage system (without involving the host). IfSnapManager cannot perform this type of restore (for example, if the files are not part of the filesystem), then SnapManager will fall back to a host-side file copy restore. SnapManager has twomethods of performing a host-side file copy restore from secondary storage. The method thatSnapManager selects is configured in the smsap.config file.
• If restore.secondaryAccessPolicy = direct, SnapManager clones the data on secondarystorage, mounts the cloned data from the secondary storage system to the host, and then copiesdata out of the clone into the active environment.This is the default secondary access policy.
• If restore.secondaryAccessPolicy = indirect, SnapManager first copies the data to atemporary volume on primary storage, mounts the data from the temporary volume to the host,and then copies data out of the temporary volume into the active environment.This policy should be used only if the host does not have direct access to the secondary storagesystem. Restores using the indirect method will take twice as long as the direct method becausetwo copies of the data are created.
Step
1. Perform one of the following actions:
If you want to... Then...
Restore a complete databaseif the selected backup existson primary storage
Enter the following command:
smsap backup restore -profile profile_name -labellabel -complete -recover -alllogs[-copy-id id]
Restore a complete databaseif the selected backup doesnot exist on primary storage
Enter the following command:
smsap backup restore -profile profile_name -labellabel -complete -recover -alllogs -from-secondary[-temp-volume <temp_volume>] [-copy-id id]
Example
The following command restores a protected backup from the secondary storage system:
Introduction to data protection in SnapManager | 149
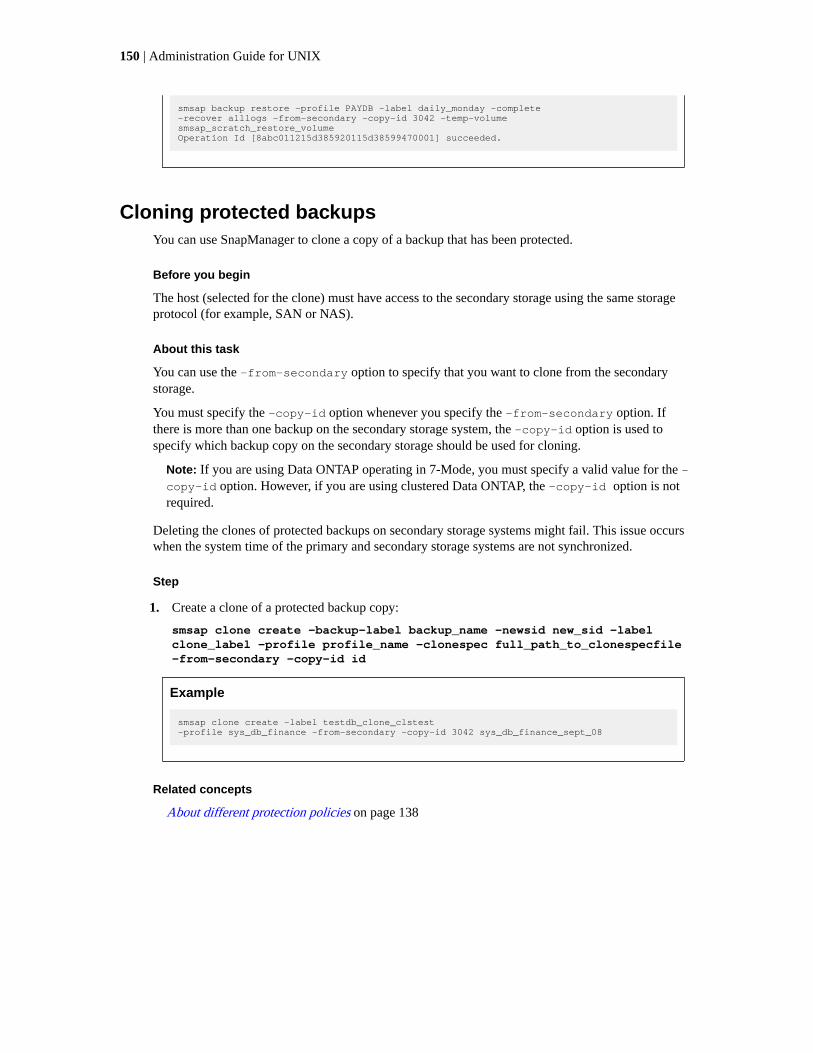
smsap backup restore -profile PAYDB -label daily_monday -complete-recover alllogs -from-secondary -copy-id 3042 -temp-volume smsap_scratch_restore_volume Operation Id [8abc011215d385920115d38599470001] succeeded.
Cloning protected backupsYou can use SnapManager to clone a copy of a backup that has been protected.
Before you begin
The host (selected for the clone) must have access to the secondary storage using the same storageprotocol (for example, SAN or NAS).
About this task
You can use the -from-secondary option to specify that you want to clone from the secondarystorage.
You must specify the -copy-id option whenever you specify the -from-secondary option. Ifthere is more than one backup on the secondary storage system, the -copy-id option is used tospecify which backup copy on the secondary storage should be used for cloning.
Note: If you are using Data ONTAP operating in 7-Mode, you must specify a valid value for the -copy-id option. However, if you are using clustered Data ONTAP, the -copy-id option is notrequired.
Deleting the clones of protected backups on secondary storage systems might fail. This issue occurswhen the system time of the primary and secondary storage systems are not synchronized.
Step
1. Create a clone of a protected backup copy:
smsap clone create -backup-label backup_name -newsid new_sid -labelclone_label -profile profile_name -clonespec full_path_to_clonespecfile-from-secondary -copy-id id
Example
smsap clone create -label testdb_clone_clstest -profile sys_db_finance -from-secondary -copy-id 3042 sys_db_finance_sept_08
Related concepts
About different protection policies on page 138
150 | Administration Guide for UNIX
SnapManager for SAP uses Protection Manager toprotect a database backup
SnapManager for SAP and Protection Manager, when installed on a UNIX host and on the serverrespectively, give the SnapManager database administrator (DBA) the ability to configure and carryout policy-based Oracle database backups to secondary storage, and to restore, if necessary, thebacked up data from secondary to primary storage.
In the following example, a DBA, who is using SnapManager, creates a profile for a local backup onprimary storage and another profile for a protected backup to secondary storage. Then this DBAworks with his network storage administrator, who is using the Protection Manager's console, toconfigure a policy-based backup of that database from primary to secondary storage.
Details of the target databaseThis example of integrated database protection describes the protection of a payroll database. Thefollowing data is used in the example.
The database administrator (DBA) at TechCo, a 3000-person company headquartered in Atlanta,must create a consistent backup of the production payroll database, PAYDB. The protection strategyfor backing up to primary and secondary storage requires that the DBA and the storage administratorwork together to back up the Oracle database both locally on primary storage and also remotely, tosecondary storage at a remote location.
Profile information
When creating a profile in SnapManager, you need the following data:
• Database name: P01
• Host name: prod01.sample.com
• Database ID: P01
• Profile name: P01_BACKUP
• Connection mode: Database authentication
• Snapshot naming scheme:smsap_hostname_dbsid_smsapprofile_scope_mode_smid (which translates to"smsap_prod01.sample.com_p01_p01_backup_f_h_x")
• Repository user: <sid>rep, which translates to p01rep.
Primary and secondary storage configuration and topologyIn this example, the TechCo corporation runs its payroll database on a database server that is also aSnapManager for SAP host and stores its payroll database data and configuration files on primarystorage systems at company headquarters. The corporate requirement is to protect that database withdaily and weekly backups to local storage as well as backups to storage systems at a secondarystorage site fifty miles away.
The following illustration shows the SnapManager for SAP and the NetApp Management Consoledata protection capability components required to support local and secondary backup protection.
151
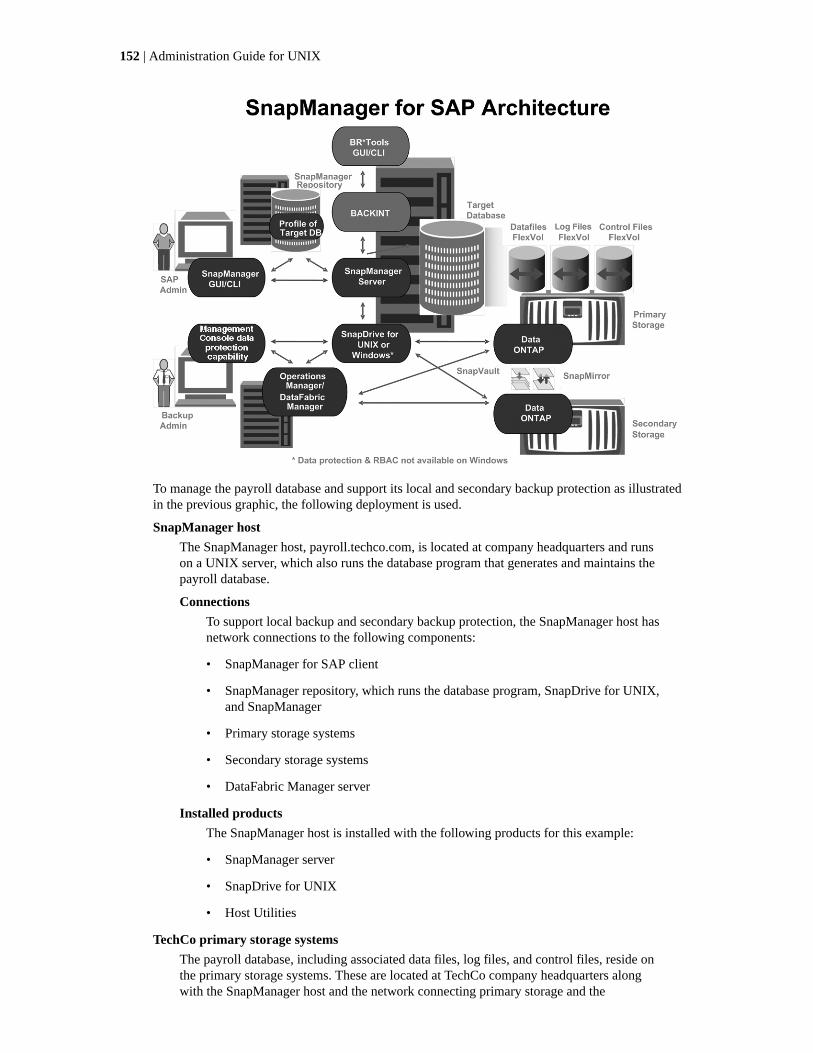
To manage the payroll database and support its local and secondary backup protection as illustratedin the previous graphic, the following deployment is used.
SnapManager host
The SnapManager host, payroll.techco.com, is located at company headquarters and runson a UNIX server, which also runs the database program that generates and maintains thepayroll database.
Connections
To support local backup and secondary backup protection, the SnapManager host hasnetwork connections to the following components:
• SnapManager for SAP client
• SnapManager repository, which runs the database program, SnapDrive for UNIX,and SnapManager
• Primary storage systems
• Secondary storage systems
• DataFabric Manager server
Installed products
The SnapManager host is installed with the following products for this example:
• SnapManager server
• SnapDrive for UNIX
• Host Utilities
TechCo primary storage systems
The payroll database, including associated data files, log files, and control files, reside onthe primary storage systems. These are located at TechCo company headquarters alongwith the SnapManager host and the network connecting primary storage and the
152 | Administration Guide for UNIX
SnapManager host. The latest payroll database transactions and updates are written to theprimary storage systems. Snapshot copies, which provide local backup protection of thepayroll database, also reside on the primary storage systems.
Connections
To support secondary backup protection, the primary storage systems have networkconnections to the following components:
• SnapManager host running the database program, SnapDrive for UNIX, andSnapManager
• Secondary storage systems
• DataFabric Manager server
Installed products
The following licenses must be enabled on these systems for this example:
• Data ONTAP 7.3.1 or later
• SnapVault Data ONTAP Primary
• FlexVol (required for NFS)
• SnapRestore
• NFS protocol
TechCo secondary storage systems
The secondary storage systems, located at a network-connected secondary storage sitefifty miles away, are used to store secondary backups of the payroll database.
Connections
To support secondary backup protection, the secondary storage systems have networkconnections to the following components:
• Primary storage systems
• DataFabric Manager server
Installed products
The following licenses must be enabled on the secondary storage systems for thisexample:
• Data ONTAP
• SnapVault Data ONTAP Secondary
• SnapRestore
• FlexVol (required for NFS)
• NFS protocol
DataFabric Manager server
The DataFabric Manager server, techco_dfm, is located at company headquarters in alocation accessible by the storage administrator. The DataFabric Manager server, amongother functions, coordinates the backup tasks between primary and secondary storage.
Connections
To support secondary backup protection, the DataFabric Manager server maintainsnetwork connections to the following components:
SnapManager for SAP uses Protection Manager to protect a database backup | 153
• NetApp Management Console
• Primary storage systems
• Secondary storage systems
Installed products
The DataFabric Manager server is licensed for the following server products for thisexample:
• DataFabric Manager
SnapManager repository
The SnapManager repository, located on a dedicated server, stores data about operationsperformed by SnapManager, for example the time of backups, tablespaces and datafilesbacked up, storage systems used, clones made, and Snapshot copies created. When a DBAattempts a full or partial restore, SnapManager queries the repository to identify backupsthat were created by SnapManager for SAP for restoration.
Connections
To support secondary backup protection, the secondary storage systems have networkconnections to the following components:
• SnapManager host
• SnapManager for SAP client
NetApp Management Console
The NetApp Management Console is the graphical user interface console used by thestorage administrator to configure schedules, policies, datasets, and resource poolassignments to enable backup to secondary storage systems, which are accessible to thestorage administrator.
Connections
To support secondary backup protection, NetApp Management Console has networkconnections to the following components:
• Primary storage systems
• Secondary storage systems
• DataFabric Manager server
SnapManager for SAP client
The SnapManager for SAP client is the graphical user interface and command line consoleused by the DBA for the payroll database in this example to configure and carry out localbackup and backup to secondary storage.
Connections
To support local backup and secondary backup protection, SnapManager for SAPclient has network connections to the following components:
• SnapManager host
• SnapManager repository, running the database program, SnapDrive for UNIX,and SnapManager
• Database host (if separate from the host running SnapManager)
• DataFabric Manager server
154 | Administration Guide for UNIX
Installed products
To support local backup and secondary backup protection, the SnapManager for SAPclient software must be installed on this component.
Backup schedule and retention strategyThe DBA wants to ensure that backups are available in case of a loss of data, in case of a disaster,and for regulatory reasons. This requires a carefully thought out retention policy for the variousdatabases.
For the production payroll database, the DBA adheres to the following TechCo retention strategy:
Backupfrequency
Retentionduration
Backup time Type of storage
Once daily 10 days 7 p.m. Primary (local)
Once daily 10 days 7 p.m. Secondary (archive)
Once weekly 52 weeks Saturdays 1 a.m. Secondary (archive)
Local backup advantages
Daily local backup provides database protection, which is instantaneous, uses zeronetwork bandwidth, uses a minimum of additional storage space, provides instantaneousrestore, and provides finely-grained backup and restore capability.
Because the final weekly backups of the payroll database are retained for a minimum 52weeks at a secondary storage site, there is no need to retain the daily backups any longerthan 10 days.
Protected backup advantages
Daily and weekly backups to secondary storage at a remote location guarantee that if thedata at the primary storage site is damaged, the target database is still protected and can berestored from secondary storage.
The daily backups to secondary storage are made to protect against primary storagesystem damage. Because the final weekly backups of the payroll database are retained fora minimum 52 weeks, there is no need to retain the daily backups any longer than 10 days.
Workflow summary for local and secondary databasebackup
In this example, the DBA (using SnapManager) and the storage administrator (using the NetAppManagement Console data protection capability) coordinate actions to configure local backup andsecondary backup (also known as a protected backup) of the target database.
The sequence of actions carried out are summarized as follows:
Secondary resource pool configuration
The storage administrator uses the NetApp Management Console data protectioncapability to configure a resource pool of storage systems at the secondary site that can beused to store the payroll database backup.
Secondary backup scheduling
The storage administrator uses the NetApp Management Console data protectioncapability to configure secondary backup schedules.
SnapManager for SAP uses Protection Manager to protect a database backup | 155
Protection policy configuration
The storage administrator uses the NetApp Management Console data protectioncapability to configure a secondary backup protection policy for the target database. Theprotection policy includes the schedules and specifies the base type of protection toimplement backup protection (backup, mirror, or a combination of both), and namesretention policies for primary data, secondary, and sometimes tertiary storage nodes.
Database profile configuration and protection policy assignment
The DBA uses SnapManager to create or edit a profile of the target database that supportssecondary backup. While configuring the profile, the DBA:
• Enables backup protection to secondary storage.
• Assigns the new protection policy, which was created in and retrieved from theNetApp Management Console data protection capability, to this profile.
Assigning the protection policy automatically includes the target database in a partiallyprovisioned, but nonconformant the NetApp Management Console data protectioncapability dataset. When fully provisioned, the dataset configuration enables backup ofthe target database to secondary storage.
The dataset name uses this syntax: smsap_hostname_databasename, whichtranslates to "smsap_prod01.sample.com_p01".
Secondary and tertiary storage provisioning
The storage administrator uses the NetApp Management Console data protectioncapability to assign resource pools to provision the secondary and sometimes tertiarystorage nodes (if the assigned protection policy specifies tertiary storage nodes).
Backup on local storage
The DBA opens the profile with protection enabled in SnapManager and creates a fullbackup to local storage. The new backup shows in SnapManager as scheduled forprotection, but not yet protected.
Secondary backup confirmation
Because the backup was based on a protection-enabled profile, the backup is transferred tosecondary according to the protection policy's schedule. The DBA uses SnapManager toconfirm the transferral of the backup to secondary storage. After the backup has beencopied to secondary storage, SnapManager changes the backup Protection State from "Notprotected" to "Protected."
Protected backup configuration and executionYou must configure SnapManager and Protection Manager to support database backup to secondarystorage. The database administrator and the storage administrator must coordinate their actions.
Using SnapManager for SAP to create the database profile for a localbackup
The database administrators use SnapManager to create a database profile that will be used to initiatea backup to local storage on a primary storage system. The entire profile creation and backupcreation processes are performed entirely in SnapManager; they do not involve Protection Manager.
About this task
A profile contains the information about the database being managed, including its credentials,backup settings, and protection settings for backups. By creating a profile, you do not need to specifydatabase details each time you perform an operation on that database, instead just provide the profile
156 | Administration Guide for UNIX
name. A profile can reference only one database. That same database can be referenced by more thanone profile.
Steps
1. Go to the SnapManager for SAP client.
2. From the SnapManager Repositories tree, right-click the host you want associated with thisprofile, and select Create Profile.
3. In the Profile Configuration Information page, enter the following information and click Next.
• Profile name: payroll_prod
• Profile password: payroll123
• Comment: Production Payroll database
4. In the Database Configuration Information page, enter the following information and click Next.
• Database name: PAYDB
• Database SID: payrolldb
• Database host: Accept the default
Because you are creating a profile from a host in the repository tree, SnapManager displaysthe host name.
5. In the second Database Configuration Information page, accept the following databaseinformation and click Next:
• Host Account, representing the Oracle user account (for ora<sid>): orapayrolldb
• Host Group, representing the Oracle group: dba
6. In the Database Connection Information page, select Use database Authentication to allow usersto authenticate using database information.
For this example, enter the following information and click Next.
• SYSDBA Privileged User Name, representing the system database administrator who hasadministrative privileges: sys
• Password (SYSDBA password): oracle
• Port to connect to database host: 1527
7. In the Snapshot Naming Information page, specify a naming convention for the Snapshotsassociated with this profile by selecting variables. The only variable that is required is the smidvariable, which creates a unique snapshot identifier.
For this example, do the following:
a. In the Variable Token list, select the {usertext} variable and click Add.
b. Enter "prod01.sample.com_" as the host name and click OK.
c. Click Left until the host name appears just after "smsap" in the Format box.
d. Click Next.
The Snapshot naming convention ofsmsap_hostname_smsapprofile_dbsid_scope_mode_smid becomes"smsap_prpd01.sample.com_P01_BACKUP_P01_f_a_x" (where the "f" indicates a full backup,the "a" indicates the automatic mode, and the "x" represents the unique SMID).
SnapManager for SAP uses Protection Manager to protect a database backup | 157
8. On the Perform Operation page, verify the information and click Create.
9. Click Operation Details to see information about the profile create operation and volume-basedrestore eligibility information.
Using Protection Manager to configure a secondary resource pool
To support backup of the database to secondary storage, the storage administrator uses ProtectionManager to organize the secondary storage systems enabled with the SnapVault Secondary licenseinto a resource pool for the backups.
Before you begin
Ideally, storage systems in a resource pool are interchangeable in terms of their acceptability asdestinations for backups. For example, when developing the protection strategy for the payrolldatabase, you, as the storage administrator, identified secondary storage systems with similarperformance and quality of service levels that would be suitable members of the same resource pool.
You have already created aggregates of unused space on storage systems that you intend to assign toresource pools. This ensures that there is adequate space to contain the backups.
Steps
1. Go to Protection Manager's NetApp Management Console.
2. From the menu bar, click Data > Resource Pools.
The Resource Pools window appears.
3. Click Add.
The Add Resource Pool wizard starts.
4. Complete the steps in the wizard to create the paydb_backup_resource resource pool.
Use the following settings:
• Name: Use paydb-backup_resource
• Space thresholds (use the defaults):
◦ Space utilization thresholds: enabled
◦ Nearly Full threshold (for resource pool): 80%
◦ Full threshold (for resource pool): 90%
Using Protection Manager to configure secondary backup schedules
To support backup of the database to secondary storage, the storage administrator uses ProtectionManager to configure a backup schedule.
Before you begin
Before configuring the schedule for secondary backups, the storage administrator confers with theDBA partner for the following information:
• The schedule that the DBA wants the secondary backups to follow.
In this case, once-daily backups occur at 7 p.m. and once-weekly backups occur on Saturday at 1a.m.
158 | Administration Guide for UNIX

Steps
1. Go to the Protection Manager's NetApp Management Console.
2. From the menu bar, click Policies > Protection > Schedules.
The Schedules tab of the Protection Policies window is displayed.
3. Select the Daily schedule Daily at 8:00 PM in the list of schedules.
4. Click Copy.
A new Daily schedule, Copy of Daily at 8:00 PM, is displayed in the list. It is already selected.
5. Click Edit.
The Edit Daily Schedule property sheet opens to the Schedule tab.
6. Change the schedule name to Payroll Daily at 7 PM, update the description, then click Apply.
Your changes are saved.
7. Click the Daily Events tab.
The schedule's current Daily backup time of 8:00 p.m. is displayed.
8. Click Add and enter 7:00 PM in the new time field, then click Apply.
The schedule's current Daily backup time is now 7:00 p.m.
9. Click OK to save your changes and exit the property sheet.
Your new Daily schedule, Payroll Daily at 7 PM, is displayed in the list of schedules.
10. Select the Weekly schedule Sunday at 8:00 PM plus daily in the list of schedules.
11. Click Copy.
A new Weekly schedule, Copy of Sunday at 8:00 PM plus daily, is displayed in the list. It isalready selected.
12. Click Edit.
The Edit Weekly Schedule property sheet opens to the Schedule tab.
13. Change the schedule name to Payroll Saturday at 1 AM plus daily at 7 PM and update thedescription.
14. From the Daily Schedule drop-down list, select the Daily schedule you just created, PayrollDaily at 7 PM.
Selecting Payroll Daily at 7 PM means that this schedule defines when Daily operations occurwhen the Payroll Saturday at 1 AM plus daily at 7 PM schedule is applied to a policy.
15. Click OK to save your changes and exit the property sheet.
Your new Weekly schedule, Payroll Saturday at 1 AM plus daily at 7 PM, is displayed in thelist of schedules.
SnapManager for SAP uses Protection Manager to protect a database backup | 159
Using Protection Manager to configure a secondary backup protectionpolicy
After configuring the backup schedule, the storage administrator configures a protected backupstorage policy in which that schedule is to be included.
Before you begin
Before configuring the protection policy, the storage administrator confers with the DBA partner forthe following information:
• Retention duration to specify for secondary storage
• Type of secondary storage protection required
About this task
The protection policy that is created, can be listed in SnapManager for SAP by the DBA partner andassigned to a database profile for the data to be protected.
Steps
1. Go to Protection Manager's NetApp Management Console.
2. From the menu bar, click Policies > Protection > Overview.
The Overview tab on the Protection Policies window is displayed.
3. Click Add Policy to start the Add Protection Policy wizard.
4. Complete the wizard with the following steps:
a. Specify a descriptive policy name.
For this example, enter TechCo Payroll Data: Backup and a description, then click Next.
b. Select a base policy.
For this example, select Back up and click Next.
c. In the Primary Data node policy property sheet, accept the default settings and click Next.
Note: In this example, the local backup schedule that was configured in SnapManager isapplied. Any local backup schedule that is specified using this method is ignored.
d. In the Primary Data to Backup connection property sheet, select a backup schedule.
For this example, select Payroll Saturday at 1 AM plus daily at 7 PM as your backupschedule, then click Next.
In this example, the schedule that you selected includes both the weekly and daily schedulesthat you configured earlier.
e. In the Backup policy property sheet, specify the name for the backup node and the retentiontimes for Daily, Weekly, or Monthly backups.
For this example, specify a Daily backup retention of 10 days and a Weekly backup retentionof 52 weeks. After you complete each property sheet, click Next.
After all property sheets are completed, the Add Protection Policy wizard displays a summarysheet for the protection policy that you want to create.
5. Click Finish to save your changes.
160 | Administration Guide for UNIX
Result
The TechCo Payroll Data: Backup protection policy is listed among the other policies configuredfor Protection Manager.
After you finish
The DBA partner can now use SnapManager for SAP to list and assign this policy when creating thedatabase profile for the data to be protected.
Using SnapManager for SAP to create the database profile and assign aprotection policy
You must create a profile in SnapManager for SAP, enable protection in the profile, and assign aprotection policy to create a protected backup.
About this task
A profile contains information about the database being managed, including its credentials, backupsettings, and protection settings for backups. After you create a profile, you do not need to specifydatabase details each time you perform an operation. A profile can reference only one database, butthat same database can be referenced by more than one profile.
Steps
1. Go to the SnapManager for SAP client.
2. From the Repositories tree, right-click the host, and select Create Profile.
3. On the Profile Configuration Information page, enter the profile details, and click Next.
Example
You can enter the following information:
• Profile name: P01_BACKUP
• Profile password: payroll123
• Comment: Production Payroll database
4. On the Database Configuration Information pages, enter the database details, and click Next.
Example
You can enter the following information:
• Database name: P01
• Database SID: P01
• Database host: Accept the default. Because you are creating a profile from a host in therepository tree, SnapManager displays the host name.
• Host Account, representing the Oracle user account (for ora<sid>): orapayrolldb
• Host Group, representing the Oracle group: dba
5. On the Database Connection Information page, click Use database Authentication to allowusers to authenticate using database information.
6. Enter the database connection details and click Next.
SnapManager for SAP uses Protection Manager to protect a database backup | 161
Example
You can enter the following information:
• SYSDBA Privileged User Name, representing the system database administrator who hasadministrative privileges: sys
• Password (SYSDBA password): oracle
• Port to connect to database host: 1527
7. On the Snapshot Naming Information page, specify a naming convention for the Snapshotsassociated with this profile by selecting variables.
The smid variable creates a unique snapshot identifier.
Perform the following:
a. In the Variable Token list, select usertext and click Add.
b. Enter prod01.sample.com_ as the host name and click OK.
c. Click Left until the host name appears just after smsap in the Format box.
d. Click Next.
The Snapshot naming convention ofsmsap_hostname_smsapprofile_dbsid_scope_mode_smid becomes"smsap_prpd01.sample.com_P01_BACKUP_P01_f_a_x" (where "f" indicates a full backup, "a"indicates the automatic mode, and "x" represents the unique SMID).
8. Select Protection Manager Protection Policy.
The Protection Manager Protection Policy enables you to select a protection policy that wasconfigured by using NetApp Management Console.
9. Select TechCo Payroll Data: Backup as the protection policy from the protection policiesretrieved from NetApp Management Console, and click Next.
10. On the Perform Operation page, verify the information and click Create.
11. Click Operation Details to see information about the profile create operation and volume-basedrestore eligibility information.
Result
• The assignment of a NetApp Management Console protection policy to the database profileautomatically creates a nonconformant dataset, visible to the NetApp Management Consoleoperator, with the name convention smsap_<hostname>_<profilename>, or in this example:smsap_prod01.sample.com_P01_BACKUP.
• If the profile is not eligible for volume restore (also called "fast restore"), the following occurs:
◦ The Results tab indicates that the profile creation was successful and that warnings occurredduring the operation.
◦ The Operation Details tab includes a WARNING log, which states the profile is not eligiblefor fast restore and explains why.
162 | Administration Guide for UNIX
Using Protection Manager to provision the new dataset
After the smsap_paydb dataset is created, the storage administrator uses Protection Manager toassign storage system resources to provision the dataset's Backup node.
Before you begin
Before provisioning the newly created dataset, the storage administrator confers with the DBApartner for the name of the dataset specified in the profile.
In this case, the dataset name is smsap_prod01.sample.com_P01.
Steps
1. Go to Protection Manager's NetApp Management Console.
2. From the menu bar, click Data > Datasets > Overview.
The Datasets tab of the Datasets window displays a list of datasets that includes the dataset thatwas just created through SnapManager.
3. Locate and select the smsap_prod01.sample.com_p01 dataset.
When you select this dataset, the graph area displays the smsap_p01 dataset with its backup nodeunprovisioned. Its conformance status is flagged as nonconformant.
4. With the smsap_p01 dataset still highlighted, click Edit.
The Protection Manager's NetApp Management Console displays the Edit Dataset window for thesmsap_prod01.sample.com_p01 dataset. The window's navigation pane displays configurationoptions for the dataset's primary node, backup connection, and backup node.
5. From the navigation pane, locate the options for the dataset's backup node and selectprovisioning/resource pools.
The Edit Dataset window displays a setting for default provisioning policy and a list of availableresource pools.
6. For this example, select the p01_backup_resource resource pool and click >.
The selected resource pool is listed in the "Resource Pools for this node" field.
7. Click Finish to save your changes.
Result
The Protection Manager automatically provisions the secondary backup node with resources from thepaydb_backup_resource resource pool.
Using SnapManager for SAP to create a protected backup
When creating a backup for this example, the DBA selects to create a full backup, sets backupoptions, and selects protection to secondary storage. Although the backup is initially made on localstorage, because this backup is based on a protection-enabled profile, the backup is then transferredto secondary storage according to the protection policy's schedule as defined in Protection Manager.
Steps
1. Go to the SnapManager for SAP client.
2. From the SnapManager Repository tree, right-click the profile containing the database that youwant to back up, and select Backup.
SnapManager for SAP uses Protection Manager to protect a database backup | 163
The SnapManager for SAP Backup Wizard starts.
3. Enter
Production_payroll
as the label.
4. Enter
Production payroll Jan 19 backup
as the comment.
5. Select Auto as the type of backup that you want to create.
This allows SnapManager to determine whether to perform an online or offline backup.
6. Select Daily or Weekly as the frequency of the backup.
7. To confirm that the backup is in a valid format for Oracle, check the box next to Verify backup.
This operation uses Oracle DBVerify to check the block format and structure.
8. To force the state of the database into the appropriate mode (for example, from open to mounted),select Allow startup or shutdown of database, if necessary, and click Next.
9. In the Database, Tablespaces, or Datafiles to Backup page, select Full Backup and click Next.
10. To protect the backup on secondary storage, check Protect the Backup and click Next.
11. In the Perform Operation page, verify the information you supplied and click Backup.
12. In the progress page, view the progress and results of the backup creation.
13. To view the details of the operation, click Operation Details.
Using SnapManager for SAP to confirm backup protection
Using SnapManager for SAP, you can view a list of backups associated with a profile, determinewhether the backups were enabled for protection, and view the retention class (daily or weekly, inthis example).
About this task
At first, the new backup in this example shows as scheduled for protection, but not yet protected (inthe SnapManager graphical user interface and in the backup show command output). After thestorage administrator ensures that the backup has been copied to secondary storage, SnapManagerchanges the backup protection state from "Not protected" to "Protected" in both the graphical userinterface and with the backup list command.
Steps
1. Go to the SnapManager for SAP client.
2. In the SnapManager Repository tree, expand the profile to display its backups.
3. Click the Backups/Clones tab.
4. In the Reports pane, select Backup Details.
5. View the Protection column and ensure that the status is "Protected."
164 | Administration Guide for UNIX

Database restoration from backupIf the active content of the payroll database is accidentally lost or destroyed, SnapManager and theNetApp Management Console data protection capability support restoration of that data from either alocal backup or secondary storage.
Using SnapManager for SAP to restore a local backup on primary storage
You can restore local backups that exist on primary storage. The entire process is performed usingSnapManager for SAP.
About this task
You can also preview information about a backup restore process. You might want to do this to seeinformation about restore eligibility of a backup. SnapManager analyzes data on a backup todetermine whether the restore process can be completed by using the volume-based restore or thefile-based restore method.
The restore preview shows the following information:
• Which restore mechanism (fast restore, storage-side file system restore, storage-side file restore,or host-side file copy restore) will be used to restore each file.
• Why more efficient mechanisms were not used to restore each file.
In preview of the restore plan, SnapManager does not restore anything. The preview showsinformation up to 20 files.
If you want to preview a restore of data files but the database is not mounted, then SnapManagermounts the database. If the database cannot be mounted, then the operation fails and SnapManagerreturns the database to its original state.
Steps
1. From the Repository tree, right-click the backup you want to restore, and select Restore.
2. On the Restore and Recovery Wizard Welcome page, click Next.
3. On the Restore Configuration Information page, select Complete Datafile/TablespaceRestore with Control Files.
4. Click Allow shutdown of database if necessary.
SnapManager changes the database state, if necessary. For example, if the database is offline andit needs to be online, SnapManager forces it online.
5. On the Recovery Configuration Information page, click All Logs.
SnapManager restores and recovers the database to the last transaction and applies all requiredlogs.
6. On the Restore Source Location Configuration page, view the information about the backup onprimary and click Next.
If the backup exists only on primary storage, SnapManager restores the backup from the primarystorage.
7. On the Volume Restore Configuration Information page, select Attempt volume restore toattempt volume restore method.
8. Click Fallback to file-based restore.
SnapManager for SAP uses Protection Manager to protect a database backup | 165
This allows SnapManager to use the file-based restore method if the volume restore methodcannot be used.
9. Click Preview to see the eligibility checks for fast restore and information about mandatory andoverridable checks.
10. On the Perform Operation page, verify the information you have entered, and click Restore.
11. To view details about the process, click Operation Details.
Using SnapManager for SAP to restore backups from secondary storage
Administrators can restore protected backups from secondary storage and can choose how they wantto copy the data back to the primary storage.
Before you begin
Before you attempt to restore the backup, check the properties of the backup and ensure that thebackup is freed on the primary storage system and is protected on secondary storage.
Steps
1. From the SnapManager for SAP Repository tree, right-click the backup you want to restore, andselect Restore.
2. In the Restore and Recovery Wizard Welcome page, click Next.
3. In the Restore Configuration Information page, click Complete Datafile/Tablespace Restorewith Control Files.
4. Click Allow shutdown of database if necessary, and then click Next.
SnapManager changes the database state, if necessary. For example, if the database is offline andit needs to be online, SnapManager forces it online.
5. At the Recovery Configuration Information page, click All Logs. Then, click Next.
SnapManager restores and recovers the database to the last transaction and applies all requiredlogs.
6. In the Restore Source Location Configuration page, select the ID of the protected backup sourceand click Next.
7. In the Volume Restore Configuration Information page, click Attempt volume restore to attemptvolume restore.
8. Click Fallback to file-based restore.
This allows SnapManager to use the file-based restore method if the volume restore methodcannot be completed.
9. To see the eligibility checks for fast restore and information about mandatory and overridablechecks, click Preview.
10. At the Perform Operation page, verify the information you have supplied and click Restore.
11. To view details about the process, click Operation Details.
166 | Administration Guide for UNIX
Performing management operations
You can perform management tasks after you have set up and configured SnapManager. These tasksenable you to manage normal operations beyond backing up, restoring, and cloning.
Administrators can perform operations either by using the graphical user interface or command-lineinterface.
Viewing a list of operationsYou can view a summary listing of all the operations performed against a profile.
About this task
You can view the following information when you list operations associated with a particular profile:
• Start and end date when the operation ran
• Operation status
• Operation ID
• Type of operation
• Host that it ran upon
Step
1. To list the summary information of all the operations, use the following command:
smsap operation list profile -profile profile_name -delimiter character[-quiet | -verbose]
When the -delimiter option is specified, the command lists each row on a separate line and theattributes in that row are separated by the character specified.
Related references
The smsap operation list command on page 264
Viewing operation detailsYou can view detailed information about a particular profile to verify the success or failure of anoperation. It can also help you determine the storage resources in use for a particular operation.
About this task
You can view the following details about a particular operation:
• Operation ID
• Type of operation
• Whether the operation was forced
• Runtime information, including status, start and end date of the operation
• The host on which the operation ran, including the Process ID and SnapManager version
167
• Repository information
• Storage resources in use
Step
1. To view the detailed information for a specific operation ID, enter the following command:
smsap operation show -profile profile_name [-label label | -id id] [-quiet | -verbose]
Related references
The smsap operation show command on page 265
Issuing commands from an alternate hostYou can issue CLI commands from a host other than the database host and SnapManager will routethe commands you enter to the appropriate host.
About this task
For the system to dispatch an operation to the correct host, it must first know where to find the profilefor the operation. In this procedure the system keeps the profile to repository mapping informationfor a file in the user’s home directory on the local host.
Step
1. To make the local user’s home directory aware of the profile-to-repository mappings so it canroute the operation request, enter the following command:
smsap profile sync -repository -dbname repo_dbname -host repo_host -portrepo_port -login -username repo_username [-quiet | -verbose]
Checking the SnapManager software versionYou can determine which version of the product you are running on your local host by running theversion command.
Step
1. To check the SnapManager version, enter this command:
smsap version
Related references
The smsap version command on page 299
Stopping the SnapManager host serverWhen you have finished using SnapManager, you might want to stop the server.
Step
1. To stop the server, enter the following command, as a root user:
smsap_server stop
168 | Administration Guide for UNIX
Related references
The smsap_server stop command on page 215
Restarting the SnapManager UNIX host serverYou can restart the server on a UNIX host using the CLI.
Step
1. To restart the server, enter the following command:
smsap_server restart
Uninstalling the software from a UNIX hostIf you no longer need the SnapManager software, you can uninstall it from the host server.
Steps
1. Log in as root.
2. To stop the server, enter the following command:
smsap_server stop
3. To remove the SnapManager software, enter the following command:
UninstallSmsap
4. After the introduction text, press Enter to continue.
The uninstallation completes.
Related references
The smsap_server stop command on page 215
Performing management operations | 169

Configuring an email notification
SnapManager enables you to receive an email notification about the completion status of the profile-executed database operations. SnapManager generates the email and helps you to take appropriateaction based on the database operation completion status. Configuring email notification is anoptional parameter.
You can configure an email notification for an individual profile as a profile notification and formultiple profiles on a repository database as a summary notification.
Profile notification
For an individual profile, you can receive an email for either or both the successful and faileddatabase operations.
Note: By default, email notification is enabled for failed database operations.
Summary notification
Summary notification enables you to receive a summary email about database operations performedusing multiple profiles. You can enable hourly, daily, weekly, or monthly notifications.
Note: From SnapManager 3.3, summary notifications are sent only if you specify the host serverthat has to send the notification. If you upgrade SnapManager from a version earlier than 3.3, thesummary notifications might not be sent if you had not specified the host server in the summarynotifications configuration.
Note: If you create a repository in one node of a database that is on a Real Application Clusters(RAC) environment and enable summary notification, later when you add the same repository toanother node of the database, the summary notification email is sent twice.
You can use either profile-level notification or summary notification at a time.
SnapManager enables email notification for the following profile-executed database operations:
• Create backup on primary storage
• Restore backups
• Create clones
• Split clones
• Verify backups
After you create or update profiles with the email notification enabled, you can disable it. If youdisable the email notification, you no longer receive email alerts for those profile-executed databaseoperations.
The email that you receive contains the following details:
• Name of the database operation, for example, backup, restore, or clone
• Profile name used for the database operation
• Name of the host server
• System identifier of the database
• Start and end time of the database operation
• Status of the database operation
170
• Error message, if any
• Warning messages, if any
You can configure the following:
• Mail server for a repository
• Email notification for a new profile
• Email notification for an existing profile
• Summary email notification for multiple profiles under a repository
Note: You can configure email notification from both the command-line interface (CLI) and thegraphical user interface (GUI).
Configuring a mail server for a repositorySnapManager enables you to specify the mail server details from which the email alerts are sent.
About this task
SnapManager enables you to specify the sender's email server host name or IP address, and the emailserver port number for a repository database name that requires email notification. You can configurethe mail server port number in a range from 0 through 65535; the default value is 25. If you requireauthentication for the email address, you can specify the user name and password.
You must specify name or IP address of the host server that handles the email notification.
Step
1. To configure the mail server to send email alerts, enter the following command:
smsap notification set -sender-email email_address -mailhost mailhost -mailport mailport [-authentication -username username -passwordpassword] -repository -port repo_port -dbname repo_service_name -hostrepo_host -login -username repo_username
Other options for this command are as follows:
[-force]
[quiet | -verbose]
To do the following... Then...
To specify the sender'semail address.
Specify the -sender-email option. From SnapManager 3.2 for SAP,you can include hyphen (-) while specifying the domain name of theemail address. For example, you can specify the sender email address as-sender-email [email protected].
To specify the sender'semail server host name orIP address.
Specify the -mailhost option.
Configuring an email notification | 171
To do the following... Then...
To specify the email serverport number for arepository database namethat requires emailnotification. You canconfigure the mail serverport number in a rangefrom zero through 65535;the default value is 25.
Specify the -mailport option.
Specify the user name andpassword if you requireauthentication for the emailaddress.
Specify -authentication option followed by the user name andpassword.
The following example configures the mail server.
smsap notification set -sender-email [email protected] -mailhost hostname.org.com -mailport 25 authentication -username admin1 -password admin1 -repository -port 1521 -dbname SMSAPREPO -host hotspur -login -username grabal21 -verbose
Configuring email notification for a new profileWhen you are creating a new profile, you can configure to receive an email notification oncompletion of the database operation.
Before you begin
• You must configure the email address from which the alerts are sent.
• You must use a comma-separated list for multiple email addresses.
You must ensure that there is no space between the comma and the next email address.
Step
1. Enter the following command:
smsap profile create -profile profile [-profile-passwordprofile_password] -repository -dbname repo_service_name -host repo_host-port repo_port -login -username repo_username -database -dbnamedb_dbname -host db_host [-sid db_sid] [-login -username db_username -password db_password -port db_port] [-rman {-controlfile | {-login -username rman_username -password rman_password -tnsnamerman_tnsname} } ] -osaccount osaccount -osgroup osgroup [-retain [-hourly [-count n] [-duration m]] [-daily [-count n] [-duration m]] [-weekly [-count n] [-duration m]] [-monthly [-count n] [-duration m]]] [-comment comment][-snapname-pattern pattern][-protect [-protection-policypolicy_name ]][-notification [-success -emailemail_address1,email_address2 -subject subject_pattern] [-failure -emailemail_address1,email_address2 -subject subject_pattern]]
Other options for this command are as follows:
[-force]
[quiet | -verbose]
Note: SnapManager supports up to 1000 characters for email addresses.
172 | Administration Guide for UNIX
When you create a backup of data files and archive log files together using the profile (forcreating separate archive log backups), and the data file backup creation fails, the emailnotification is sent with the data backup as the operation name instead of data backup and archivelogs backup. When the data file and archive log file backup operation is successful, you see theoutput as follows:
Profile Name : PROF_31 Operation Name : Data Backup and Archive Logs Backup Database SID : TENDB1 Database Host : repo1.rtp.org.com Start Date : Fri Sep 23 13:37:21 EDT 2011 End Date : Fri Sep 23 13:45:24 EDT 2011 Status : SUCCESS Error messages :
The following example displays the email notification configured while creating a new profile:
smsap profile create -profile sales1 -profile-password sales1 -repository -dbname repo2 -host 10.72.197.133 -port 1521 -login -username oba5 -database -dbname DB1 -host 10.72.197.142 -sid DB1 -osaccount oracle -osgroup dba -notification -success -email [email protected] -subject {profile}_{operation-name}_{db-sid}_{db-host}_{start-date}_{end-date}_{status}
Customizing the email subject for a new profile
You can customize the email subject for the new profile when you create it.
About this task
You can customize the email subject by using the {profile}_{operation-name}_{db-sid}_{db-host}_{start-date}_{end-date}_{status} pattern or enter your own text.
Variable name Description Example value
profile Profile name used for the database operation PROF1
operation-
name
Database operation name Backup, Data Backup, Data andArchive Logs Backup
db-sid SID of the database DB1
db-host Name of the host server hostA
start-date Start time of the database operation in themmdd:hh:ss yyyy format
April 27 21:00:45 PST 2012
end-date End time of the database operation in themmdd:hh:ss yyyy format
April 27 21:10:45 PST 2012
status Database operation status Success
If you do not provide any value for the variables, then SnapManager displays the following errormessage: Missing value(s) -subject.
Step
1. Enter the following command:
Configuring an email notification | 173
smsap profile create -profile profile [-profile-passwordprofile_password] -repository -dbname repo_service_name -host repo_host-port repo_port -login -username repo_username -database -dbnamedb_dbname -host db_host [-sid db_sid] [-login -username db_username -password db_password -port db_port] [-rman {-controlfile | {-login -username rman_username -password rman_password -tnsnamerman_tnsname} } ] -osaccount osaccount -osgroup osgroup [-retain [-hourly [-count n] [-duration m]] [-daily [-count n] [-duration m]] [-weekly [-count n] [-duration m]] [-monthly [-count n] [-duration m]]] [-comment comment][-snapname-pattern pattern][-protect [-protection-policypolicy_name]] [-notification [-success -emailemail_address1,email_address2 -subject subject_pattern] [-failure -emailemail_address1,email_address2 -subject subject_pattern]]
The following is an example showing the email subject pattern:
smsap profile create -profile sales1 -profile-password admin1 -repository -dbname repo2 -host 10.72.197.133 -port 1521 -login -username admin2 -database -dbname DB1 -host 10.72.197.142 -sid DB1 -osaccount oracle -osgroup dba -profile-notification -success -email [email protected] -subject {profile}_{operation-name}_{db-sid}_{db-host}_{start-date}_{end-date}_{status}
Configuring email notification for an existing profileWhen you are updating an profile, you can configure to receive an email notification on completionof the database operation.
Before you begin
• You must configure the email address from which the alerts are sent.
• You must enter a single email address or multiple email addresses to which alerts will be sent.
You can use a comma-separated list for multiple addresses. You must ensure that there is no spacebetween the comma and the next email address. Optionally, you can add a subject to the email aswell.
Step
1. Enter the following command:
smsap profile update -profile profile [-profile-passwordprofile_password][-database -dbname db_dbname -host db_host [-siddb_sid] [-login -username db_username -password db_password -port db_port]] [{-rman{-controlfile | {-login -username rman_username -password rman_password -tnsname rman_tnsname}}} | -remove-rman]-osaccount osaccount -osgroup osgroup [-retain [-hourly [-count n] [-duration m]] [-daily [-count n] [-duration m]] [-weekly [-count n] [-duration m]] [-monthly [-count n] [-duration m]]] [-comment comment][-snapname-pattern pattern][[-protect [-protection-policy policy_name]]|[[-noprotect]] [-notification [-success -emailemail_address1,email_address2 -subject subject_pattern] [-failure -emailemail_address1,email_address2 -subject subject_pattern]]
You can use the success option to receive a notification only for successful database operationsand the failure option to receive a notification only for failed database operations.
174 | Administration Guide for UNIX
Customizing the email subject for an existing profile
SnapManager enables you to customize the email subject pattern for an existing profile by updatingthat profile. This customized subject pattern is applicable only for the updated profile.
Step
1. Enter the following command:
smsap profile update -profile profile [-profile-passwordprofile_password][-database -dbname db_dbname -host db_host [-siddb_sid] [-login -username db_username -password db_password-port db_port]] [{-rman{-controlfile | {-login -username rman_username -password rman_password -tnsname rman_tnsname}}} | -remove-rman]-osaccount osaccount -osgroup osgroup [-retain [-hourly [-count n] [-duration m]] [-daily [-count n] [-duration m]] [-weekly [-count n] [-duration m]] [-monthly [-count n] [-duration m]]] [-comment comment][-snapname-pattern pattern][[-protect [-protection-policy policy_name]]|[[-noprotect]] [-notification [-success -emailemail_address1,email_address2 -subject subject_pattern] [-failure -emailemail_address1,email_address2 -subject subject_pattern]]
The following example shows an email subject pattern:
smsap profile update -profile sales1 -profile-password sales1 -repository -dbname repo2 -host 10.72.197.133 -port 1521 -login -username admin2 -database -dbname DB1 -host 10.72.197.142 -sid DB1 -osaccount oracle -osgroup dba -profile-notification -success -email [email protected] -subject {profile}_{operation-name}_{db-sid}_{db-host}_{start-date}_{end-date}_{status}
Configuring summary email notification for multiple profilesSnapManager enables you to configure a summary email notification for multiple profiles under arepository database.
About this task
You can set the SnapManager server host as a notification host from which the summary notificationemail is sent to the recipients. If the SnapManager server host name or IP address is changed, thenthe notification host can also be updated.
You can select any one of the schedule times at which you require an email notification:
• Hourly: To receive an email notification every hour
• Daily: To receive an email notification daily
• Weekly: To receive an email notification weekly
• Monthly: To receive an email notification monthly
You need to enter a single email address or a comma-separated list of email addresses to receivenotifications for operations performed using those profiles. You must ensure that there is no spacebetween the comma and the next email address when you enter multiple email addresses.
SnapManager allows you to add a customized email subject using the following variables:
Configuring an email notification | 175
• Profile name used for the database operation.
• Database name
• SID of the database
• Name of the host server
• Start time of the database operation in the yyyymmdd:hh:ss format
• End time of the database operation in the yyyymmdd:hh:ss format
• Database operation status
If you select not to add a customized subject, SnapManager displays an error message: Missingvalue -subject.
Step
1. Enter the following command:
smsap notification update-summary-notification -repository -portrepo_port -dbname repo_service_name -host repo_host -login -usernamerepo_username -email email_address1,email_address2 -subject subject-pattern -frequency {-daily -time daily_time | -hourly -time hourly_time| -monthly -time monthly_time -date {1|2...|31} | -weekly -timeweekly_time -day {1|2|3|4|5|6|7}} -profiles profile1 profile2 -notification-host notification-host
Other options for this command are as follows:
[-force] [-noprompt]
[quiet | -verbose]
smsap notification update-summary-notification –repository –port 1521 –dbname repo2 –host 10.72.197.133 –login –username oba5 –email-address [email protected] –subject success –frequency -daily -time 19:30:45 –profiles sales1 -notification-host wales
Adding a new profile to summary email notificationsAfter you configure a summary email notification for the repository database, you can add a newprofile to summary notification by using the summary notification command.
Step
1. Enter the following command:
smsap profile create -profile profile_name [-profile-passwordprofile_password] -repository -dbname repo_service_name -host repo_host-port repo_port -login -username repo_username -database -dbnamedb_dbname -host db_host [-sid db_sid] [-login -username db_username -password db_password -port db_port] [-rman {-controlfile | {-login -username rman_username -password rman_password -tnsnamerman_tnsname} } ] -osaccount osaccount -osgroup osgroup [-retain [-hourly -count n] [-duration m]] [-daily -count n] [-duration m]] [-weekly -count n] [-duration m]] [-monthly -count n] [-duration m]]] [-comment comment][-snapname-pattern pattern][-protect [-protection-policypolicy_name]] [-summary-notification]
176 | Administration Guide for UNIX
Other options for this command are as follows:
[-force]
[quiet | -verbose]
Adding an existing profile to summary email notificationsSnapManager enables you to add an existing profile to a summary email notification while updatingthat profile.
Step
1. Enter the following command:
smsap profile update -profile profile_name [-profile-passwordprofile_password] -repository -dbname repo_service_name -host repo_host-port repo_port -login -username repo_username -database -dbnamedb_dbname -host db_host [-sid db_sid] [-login -username db_username -password db_password -port db_port] [-rman {-controlfile | {-login -username rman_username -password rman_password -tnsnamerman_tnsname} } ] -osaccount osaccount -osgroup osgroup [-retain [-hourly -count n] [-duration m]] [-daily -count n] [-duration m]] [-weekly -count n] [-duration m]] [-monthly -count n] [-duration m]]] [-comment comment][-snapname-pattern pattern][-protect [-protection-policypolicy_name]] [-summary-notification]
Disabling email notification for multiple profilesAfter you enable the summary email notification for multiple profiles, you can disable them to nolonger receive email alerts.
About this task
SnapManager enables you to disable the summary email notification for those profile-executeddatabase operations. From the SnapManager CLI, enter the notification remove-summary-notification command to disable the summary email notification for multiple profiles and thename of the repository database for which you do not require email notification.
Step
1. To disable summary notification for multiple profiles on a repository database, enter the followingcommand:
smsap notification remove-summary-notification -repository -portrepo_port -dbname repo_service_name -host repo_host -login -usernamerepo_username
The following example shows summary notification being disabled for multiple profiles on arepository database:
smsap notification remove-summary-notification –repository –port 1521 –dbname repo2 –host 10.72.197.133 –login –username oba5
Configuring an email notification | 177
Creating task specification file and scripts forSnapManager operations
SnapManager for SAP uses a task specification Extensible Markup Language (XML) file thatindicates the pretasks and post-tasks for the backup, restore, and clone operations. You can add thepretask and post-task script names in the XML file for the tasks to be performed before or after thebackup, restore, and clone operations.
In SnapManager (3.1 or earlier), you can run the pretask and post-task scripts only for the cloneoperation. In SnapManager (3.2 or later) for SAP, you can run the pretask and post-task scripts forthe backup, restore, and clone operations.
In SnapManager (3.1 or earlier), the task specification section is part of the clone specification XMLfile. From SnapManager 3.2 for SAP, the task specification section is a separate XML file.
Note: SnapManager 3.3 or later does not support the use of the clone specification XML filecreated in the releases before SnapManager 3.2.
In SnapManager (3.2 or later) for SAP, you must ensure that the following conditions are met forsuccessful SnapManager operations:
• For backup and restore operations, use the task specification XML file.
• For the clone operation, provide two specification files: a clone specification XML file and a taskspecification XML file.
If you want to enable pretask or post-task activity, you can optionally add the task specificationXML file.
You can create the task specification file by using the SnapManager graphical user interface (GUI),command-line interface (CLI), or a text editor. You must use a .xml extension for the file to enableappropriate editing features. You might want to save this file so that you can use it for future backup,restore, and clone operations.
The task specification XML file includes two sections:
• The pretasks section includes scripts that could be run before the backup, restore, and cloneoperations.
• The post-tasks section includes scripts that could be run after the backup, restore, and cloneoperations.
The values included in the pretasks and post-tasks sections must adhere to the following guidelines:
• Task name: The name of the task must match the name of the script, which is displayed when yourun the plugin.sh -describe command.
Note: If there is a mismatch, then you might receive the following error message: the filenot found.
• Parameter name: The name of the parameter must be a string that can be used as an environmentvariable setting.
The string must match the parameter name in the custom script, which is displayed when you runthe plugin.sh -describe command.
You can create the specification file based on the structure of the following sample task specificationfile:
<task-specification>
178
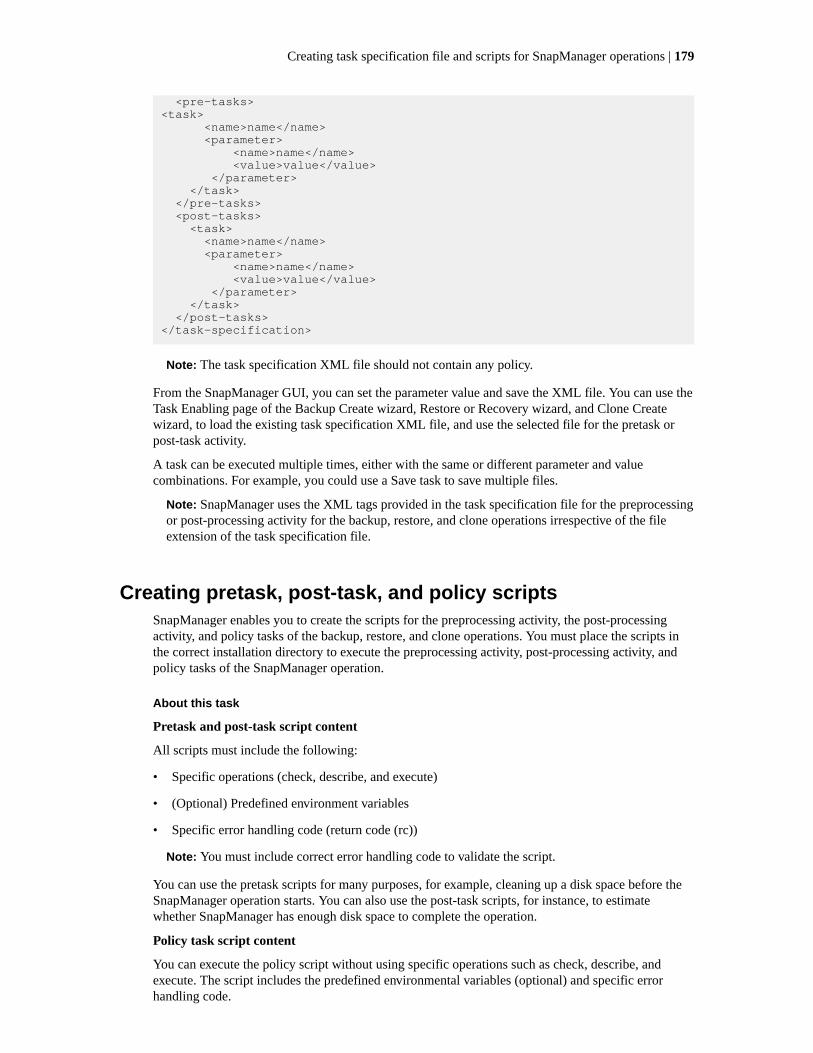
<pre-tasks><task> <name>name</name> <parameter> <name>name</name> <value>value</value> </parameter> </task> </pre-tasks> <post-tasks> <task> <name>name</name> <parameter> <name>name</name> <value>value</value> </parameter> </task> </post-tasks></task-specification>
Note: The task specification XML file should not contain any policy.
From the SnapManager GUI, you can set the parameter value and save the XML file. You can use theTask Enabling page of the Backup Create wizard, Restore or Recovery wizard, and Clone Createwizard, to load the existing task specification XML file, and use the selected file for the pretask orpost-task activity.
A task can be executed multiple times, either with the same or different parameter and valuecombinations. For example, you could use a Save task to save multiple files.
Note: SnapManager uses the XML tags provided in the task specification file for the preprocessingor post-processing activity for the backup, restore, and clone operations irrespective of the fileextension of the task specification file.
Creating pretask, post-task, and policy scriptsSnapManager enables you to create the scripts for the preprocessing activity, the post-processingactivity, and policy tasks of the backup, restore, and clone operations. You must place the scripts inthe correct installation directory to execute the preprocessing activity, post-processing activity, andpolicy tasks of the SnapManager operation.
About this task
Pretask and post-task script content
All scripts must include the following:
• Specific operations (check, describe, and execute)
• (Optional) Predefined environment variables
• Specific error handling code (return code (rc))
Note: You must include correct error handling code to validate the script.
You can use the pretask scripts for many purposes, for example, cleaning up a disk space before theSnapManager operation starts. You can also use the post-task scripts, for instance, to estimatewhether SnapManager has enough disk space to complete the operation.
Policy task script content
You can execute the policy script without using specific operations such as check, describe, andexecute. The script includes the predefined environmental variables (optional) and specific errorhandling code.
Creating task specification file and scripts for SnapManager operations | 179
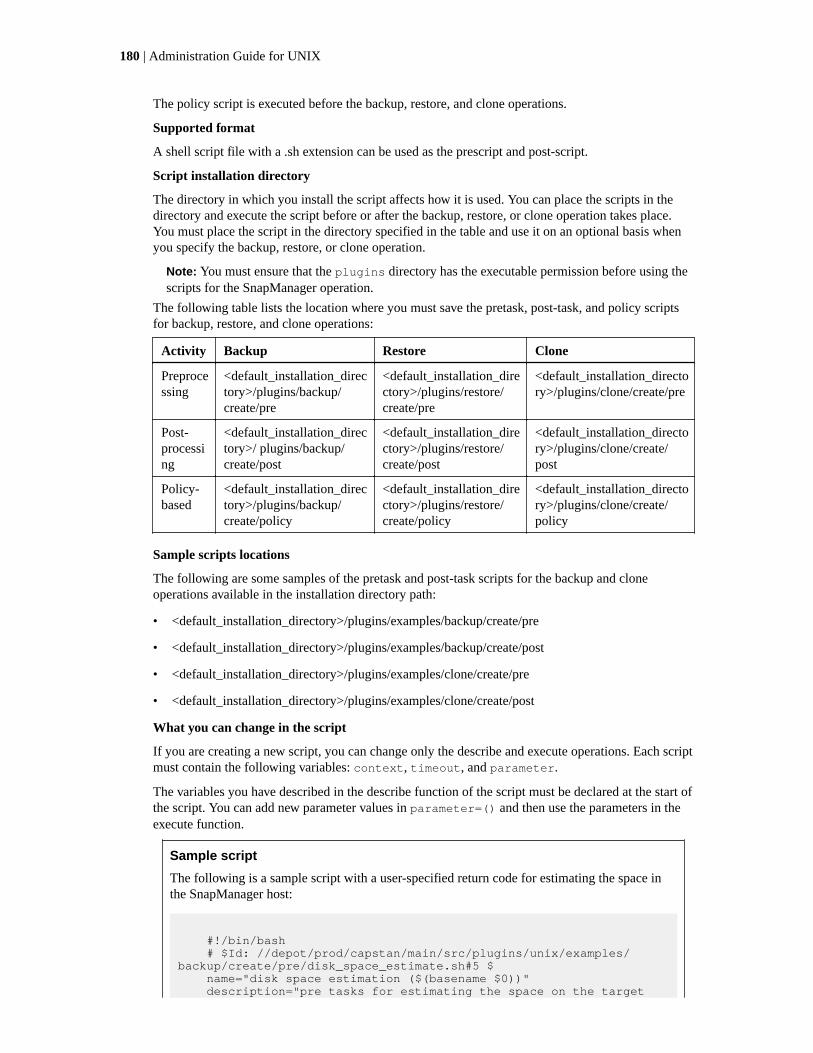
The policy script is executed before the backup, restore, and clone operations.
Supported format
A shell script file with a .sh extension can be used as the prescript and post-script.
Script installation directory
The directory in which you install the script affects how it is used. You can place the scripts in thedirectory and execute the script before or after the backup, restore, or clone operation takes place.You must place the script in the directory specified in the table and use it on an optional basis whenyou specify the backup, restore, or clone operation.
Note: You must ensure that the plugins directory has the executable permission before using thescripts for the SnapManager operation.
The following table lists the location where you must save the pretask, post-task, and policy scriptsfor backup, restore, and clone operations:
Activity Backup Restore Clone
Preprocessing
<default_installation_directory>/plugins/backup/create/pre
<default_installation_directory>/plugins/restore/create/pre
<default_installation_directory>/plugins/clone/create/pre
Post-processing
<default_installation_directory>/ plugins/backup/create/post
<default_installation_directory>/plugins/restore/create/post
<default_installation_directory>/plugins/clone/create/post
Policy-based
<default_installation_directory>/plugins/backup/create/policy
<default_installation_directory>/plugins/restore/create/policy
<default_installation_directory>/plugins/clone/create/policy
Sample scripts locations
The following are some samples of the pretask and post-task scripts for the backup and cloneoperations available in the installation directory path:
• <default_installation_directory>/plugins/examples/backup/create/pre
• <default_installation_directory>/plugins/examples/backup/create/post
• <default_installation_directory>/plugins/examples/clone/create/pre
• <default_installation_directory>/plugins/examples/clone/create/post
What you can change in the script
If you are creating a new script, you can change only the describe and execute operations. Each scriptmust contain the following variables: context, timeout, and parameter.
The variables you have described in the describe function of the script must be declared at the start ofthe script. You can add new parameter values in parameter=() and then use the parameters in theexecute function.
Sample script
The following is a sample script with a user-specified return code for estimating the space inthe SnapManager host:
#!/bin/bash # $Id: //depot/prod/capstan/main/src/plugins/unix/examples/backup/create/pre/disk_space_estimate.sh#5 $ name="disk space estimation ($(basename $0))" description="pre tasks for estimating the space on the target
180 | Administration Guide for UNIX
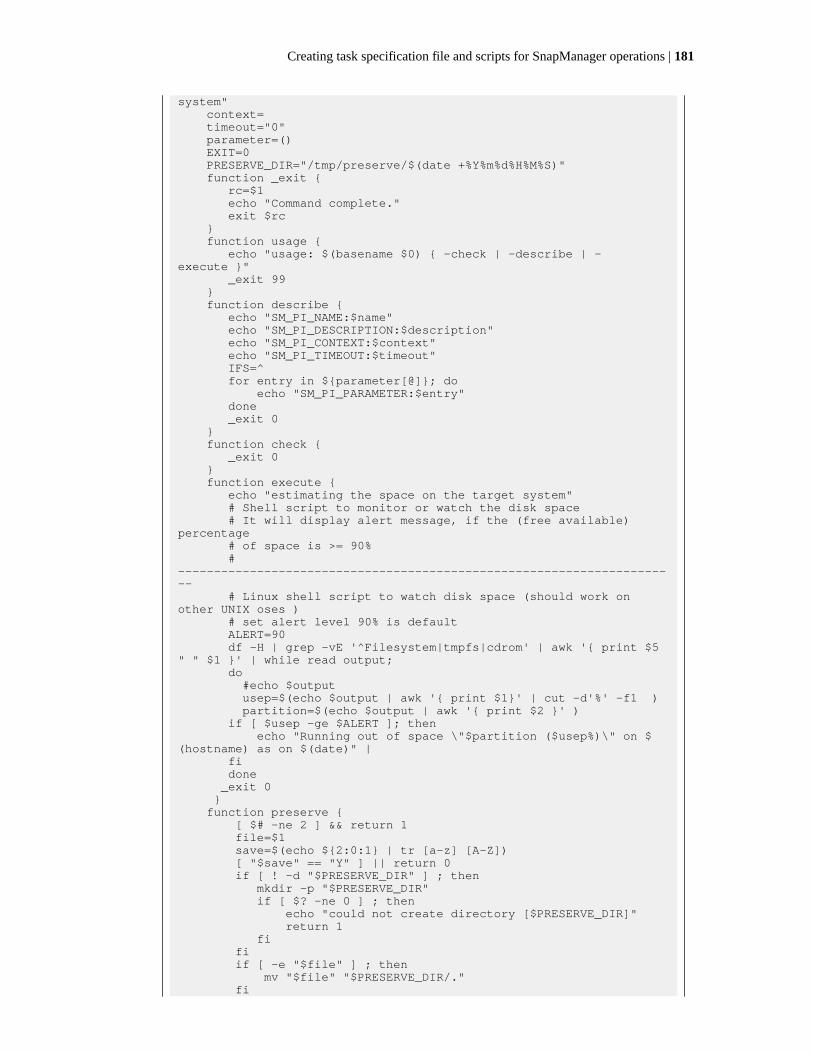
system" context= timeout="0" parameter=() EXIT=0 PRESERVE_DIR="/tmp/preserve/$(date +%Y%m%d%H%M%S)" function _exit { rc=$1 echo "Command complete." exit $rc } function usage { echo "usage: $(basename $0) { -check | -describe | -execute }" _exit 99 } function describe { echo "SM_PI_NAME:$name" echo "SM_PI_DESCRIPTION:$description" echo "SM_PI_CONTEXT:$context" echo "SM_PI_TIMEOUT:$timeout" IFS=^ for entry in ${parameter[@]}; do echo "SM_PI_PARAMETER:$entry" done _exit 0 } function check { _exit 0 } function execute { echo "estimating the space on the target system" # Shell script to monitor or watch the disk space # It will display alert message, if the (free available) percentage # of space is >= 90% # ---------------------------------------------------------------------- # Linux shell script to watch disk space (should work on other UNIX oses ) # set alert level 90% is default ALERT=90 df -H | grep -vE '^Filesystem|tmpfs|cdrom' | awk '{ print $5 " " $1 }' | while read output; do #echo $output usep=$(echo $output | awk '{ print $1}' | cut -d'%' -f1 ) partition=$(echo $output | awk '{ print $2 }' ) if [ $usep -ge $ALERT ]; then echo "Running out of space \"$partition ($usep%)\" on $(hostname) as on $(date)" | fi done _exit 0 } function preserve { [ $# -ne 2 ] && return 1 file=$1 save=$(echo ${2:0:1} | tr [a-z] [A-Z]) [ "$save" == "Y" ] || return 0 if [ ! -d "$PRESERVE_DIR" ] ; then mkdir -p "$PRESERVE_DIR" if [ $? -ne 0 ] ; then echo "could not create directory [$PRESERVE_DIR]" return 1 fi fi if [ -e "$file" ] ; then mv "$file" "$PRESERVE_DIR/." fi
Creating task specification file and scripts for SnapManager operations | 181
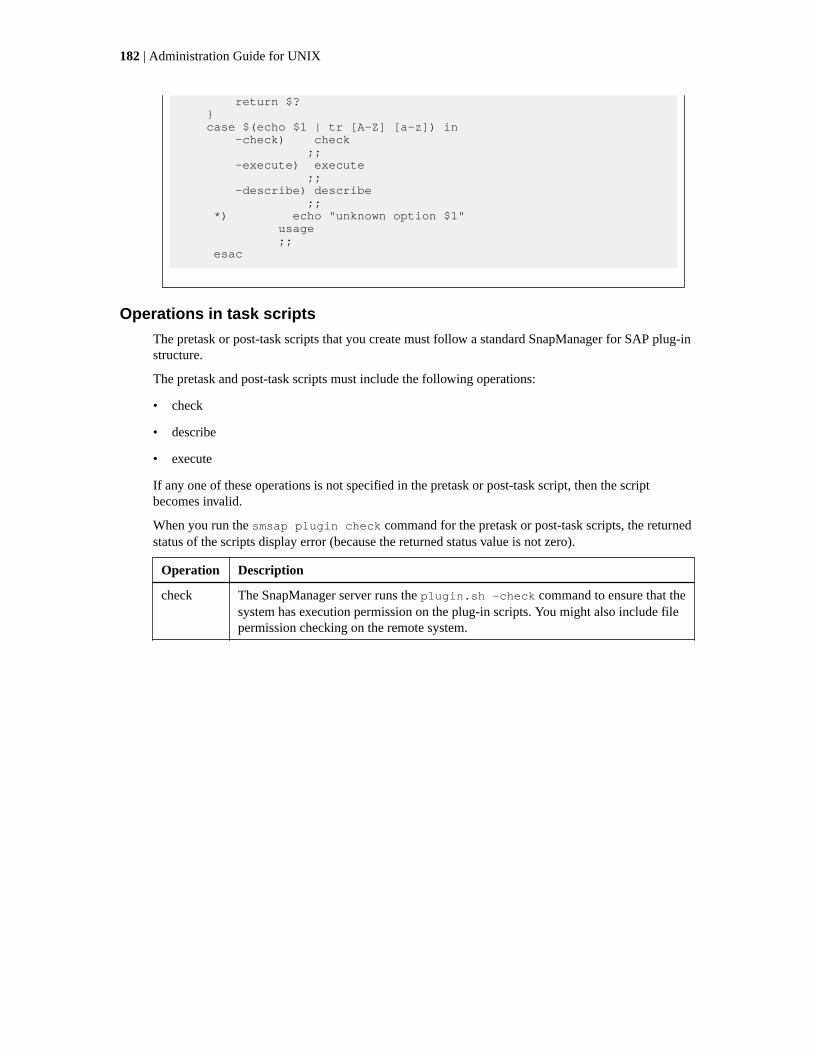
return $? } case $(echo $1 | tr [A-Z] [a-z]) in -check) check ;; -execute) execute ;; -describe) describe ;; *) echo "unknown option $1" usage ;; esac
Operations in task scripts
The pretask or post-task scripts that you create must follow a standard SnapManager for SAP plug-instructure.
The pretask and post-task scripts must include the following operations:
• check
• describe
• execute
If any one of these operations is not specified in the pretask or post-task script, then the scriptbecomes invalid.
When you run the smsap plugin check command for the pretask or post-task scripts, the returnedstatus of the scripts display error (because the returned status value is not zero).
Operation Description
check The SnapManager server runs the plugin.sh -check command to ensure that thesystem has execution permission on the plug-in scripts. You might also include filepermission checking on the remote system.
182 | Administration Guide for UNIX
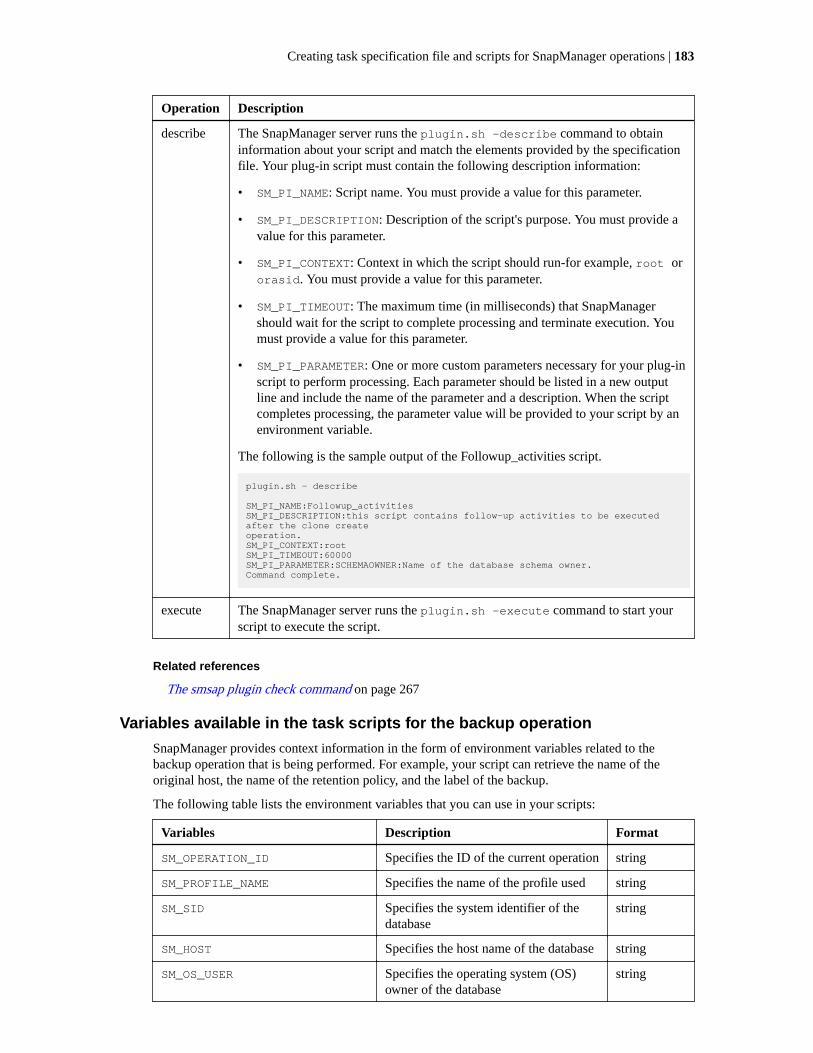
Operation Description
describe The SnapManager server runs the plugin.sh -describe command to obtaininformation about your script and match the elements provided by the specificationfile. Your plug-in script must contain the following description information:
• SM_PI_NAME: Script name. You must provide a value for this parameter.
• SM_PI_DESCRIPTION: Description of the script's purpose. You must provide avalue for this parameter.
• SM_PI_CONTEXT: Context in which the script should run-for example, root ororasid. You must provide a value for this parameter.
• SM_PI_TIMEOUT: The maximum time (in milliseconds) that SnapManagershould wait for the script to complete processing and terminate execution. Youmust provide a value for this parameter.
• SM_PI_PARAMETER: One or more custom parameters necessary for your plug-inscript to perform processing. Each parameter should be listed in a new outputline and include the name of the parameter and a description. When the scriptcompletes processing, the parameter value will be provided to your script by anenvironment variable.
The following is the sample output of the Followup_activities script.
plugin.sh - describe
SM_PI_NAME:Followup_activities SM_PI_DESCRIPTION:this script contains follow-up activities to be executed after the clone createoperation. SM_PI_CONTEXT:root SM_PI_TIMEOUT:60000SM_PI_PARAMETER:SCHEMAOWNER:Name of the database schema owner.Command complete.
execute The SnapManager server runs the plugin.sh -execute command to start yourscript to execute the script.
Related references
The smsap plugin check command on page 267
Variables available in the task scripts for the backup operation
SnapManager provides context information in the form of environment variables related to thebackup operation that is being performed. For example, your script can retrieve the name of theoriginal host, the name of the retention policy, and the label of the backup.
The following table lists the environment variables that you can use in your scripts:
Variables Description Format
SM_OPERATION_ID Specifies the ID of the current operation string
SM_PROFILE_NAME Specifies the name of the profile used string
SM_SID Specifies the system identifier of thedatabase
string
SM_HOST Specifies the host name of the database string
SM_OS_USER Specifies the operating system (OS)owner of the database
string
Creating task specification file and scripts for SnapManager operations | 183
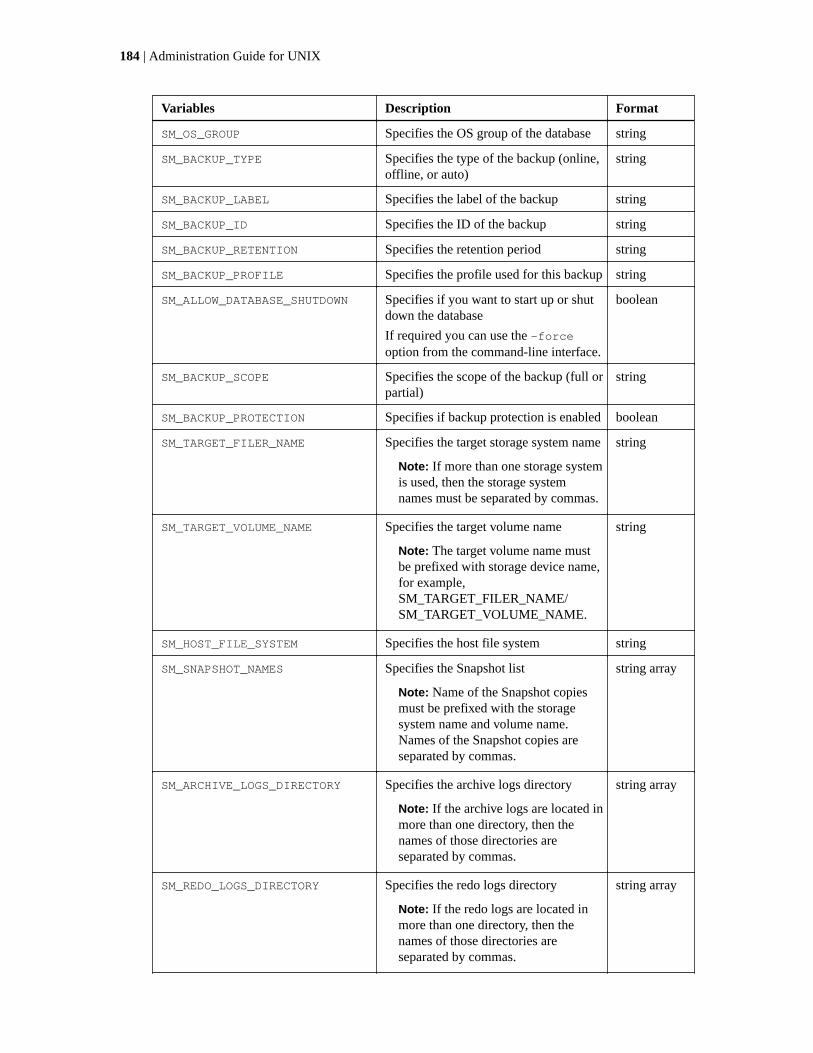
Variables Description Format
SM_OS_GROUP Specifies the OS group of the database string
SM_BACKUP_TYPE Specifies the type of the backup (online,offline, or auto)
string
SM_BACKUP_LABEL Specifies the label of the backup string
SM_BACKUP_ID Specifies the ID of the backup string
SM_BACKUP_RETENTION Specifies the retention period string
SM_BACKUP_PROFILE Specifies the profile used for this backup string
SM_ALLOW_DATABASE_SHUTDOWN Specifies if you want to start up or shutdown the database
If required you can use the -forceoption from the command-line interface.
boolean
SM_BACKUP_SCOPE Specifies the scope of the backup (full orpartial)
string
SM_BACKUP_PROTECTION Specifies if backup protection is enabled boolean
SM_TARGET_FILER_NAME Specifies the target storage system name
Note: If more than one storage systemis used, then the storage systemnames must be separated by commas.
string
SM_TARGET_VOLUME_NAME Specifies the target volume name
Note: The target volume name mustbe prefixed with storage device name,for example,SM_TARGET_FILER_NAME/SM_TARGET_VOLUME_NAME.
string
SM_HOST_FILE_SYSTEM Specifies the host file system string
SM_SNAPSHOT_NAMES Specifies the Snapshot list
Note: Name of the Snapshot copiesmust be prefixed with the storagesystem name and volume name.Names of the Snapshot copies areseparated by commas.
string array
SM_ARCHIVE_LOGS_DIRECTORY Specifies the archive logs directory
Note: If the archive logs are located inmore than one directory, then thenames of those directories areseparated by commas.
string array
SM_REDO_LOGS_DIRECTORY Specifies the redo logs directory
Note: If the redo logs are located inmore than one directory, then thenames of those directories areseparated by commas.
string array
184 | Administration Guide for UNIX

Variables Description Format
SM_CONTROL_FILES_DIRECTORY Specifies the control files directory
Note: If the control files are located inmore than one directory, then thenames of those directories areseparated by commas.
string array
SM_DATA_FILES_DIRECTORY Specifies the data files directory
Note: If the data files are located inmore than one directory, then thenames of those directories areseparated by commas.
string array
user_defined Specifies additional parameters definedby the user. User-defined parameters arenot available for plug-ins that are usedas policies.
user-defined
Variables available in the task scripts for the restore operation
SnapManager provides context information in the form of environment variables related to therestore operation that is being performed. For example, your script can retrieve the name of theoriginal host and the label of the backup that is restored.
The following table lists the environment variables that you can use in your scripts:
Variables Description Format
SM_OPERATION_ID Specifies the ID of the current operation string
SM_PROFILE_NAME Specifies the name of the profile used string
SM_HOST Specifies the host name of the database string
SM_OS_USER Specifies the operating system (OS) owner ofthe database
string
SM_OS_GROUP Specifies the OS group of the database string
SM_BACKUP_TYPE Specifies the type of the backup (online,offline, or auto)
string
SM_BACKUP_LABEL Specifies the backup label string
SM_BACKUP_ID Specifies the backup ID string
SM_BACKUP_PROFILE Specifies the profile used for the backup string
SM_RECOVERY_TYPE Specifies the recovery configurationinformation
string
SM_VOLUME_RESTORE_MODE Specifies the volume restore configuration string
SM_TARGET_FILER_NAME Specifies the target storage system name
Note: If more than one storage system isused, then the storage system names must beseparated by commas.
string
Creating task specification file and scripts for SnapManager operations | 185
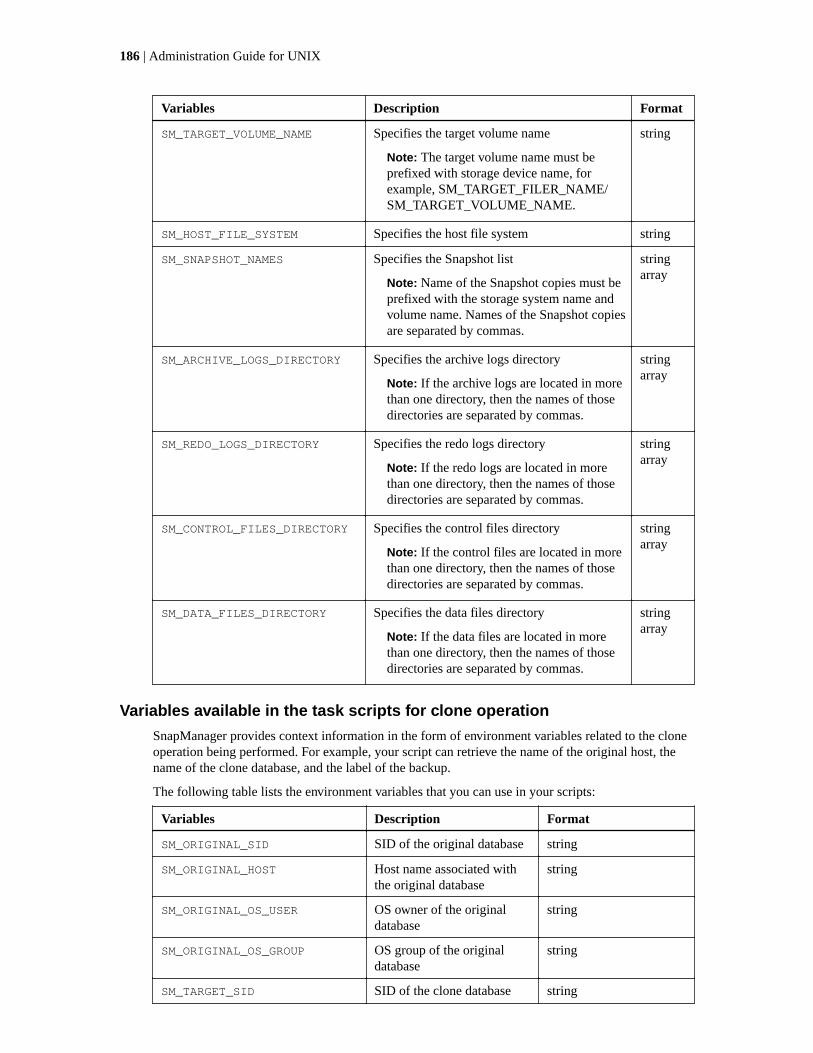
Variables Description Format
SM_TARGET_VOLUME_NAME Specifies the target volume name
Note: The target volume name must beprefixed with storage device name, forexample, SM_TARGET_FILER_NAME/SM_TARGET_VOLUME_NAME.
string
SM_HOST_FILE_SYSTEM Specifies the host file system string
SM_SNAPSHOT_NAMES Specifies the Snapshot list
Note: Name of the Snapshot copies must beprefixed with the storage system name andvolume name. Names of the Snapshot copiesare separated by commas.
stringarray
SM_ARCHIVE_LOGS_DIRECTORY Specifies the archive logs directory
Note: If the archive logs are located in morethan one directory, then the names of thosedirectories are separated by commas.
stringarray
SM_REDO_LOGS_DIRECTORY Specifies the redo logs directory
Note: If the redo logs are located in morethan one directory, then the names of thosedirectories are separated by commas.
stringarray
SM_CONTROL_FILES_DIRECTORY Specifies the control files directory
Note: If the control files are located in morethan one directory, then the names of thosedirectories are separated by commas.
stringarray
SM_DATA_FILES_DIRECTORY Specifies the data files directory
Note: If the data files are located in morethan one directory, then the names of thosedirectories are separated by commas.
stringarray
Variables available in the task scripts for clone operation
SnapManager provides context information in the form of environment variables related to the cloneoperation being performed. For example, your script can retrieve the name of the original host, thename of the clone database, and the label of the backup.
The following table lists the environment variables that you can use in your scripts:
Variables Description Format
SM_ORIGINAL_SID SID of the original database string
SM_ORIGINAL_HOST Host name associated withthe original database
string
SM_ORIGINAL_OS_USER OS owner of the originaldatabase
string
SM_ORIGINAL_OS_GROUP OS group of the originaldatabase
string
SM_TARGET_SID SID of the clone database string
186 | Administration Guide for UNIX
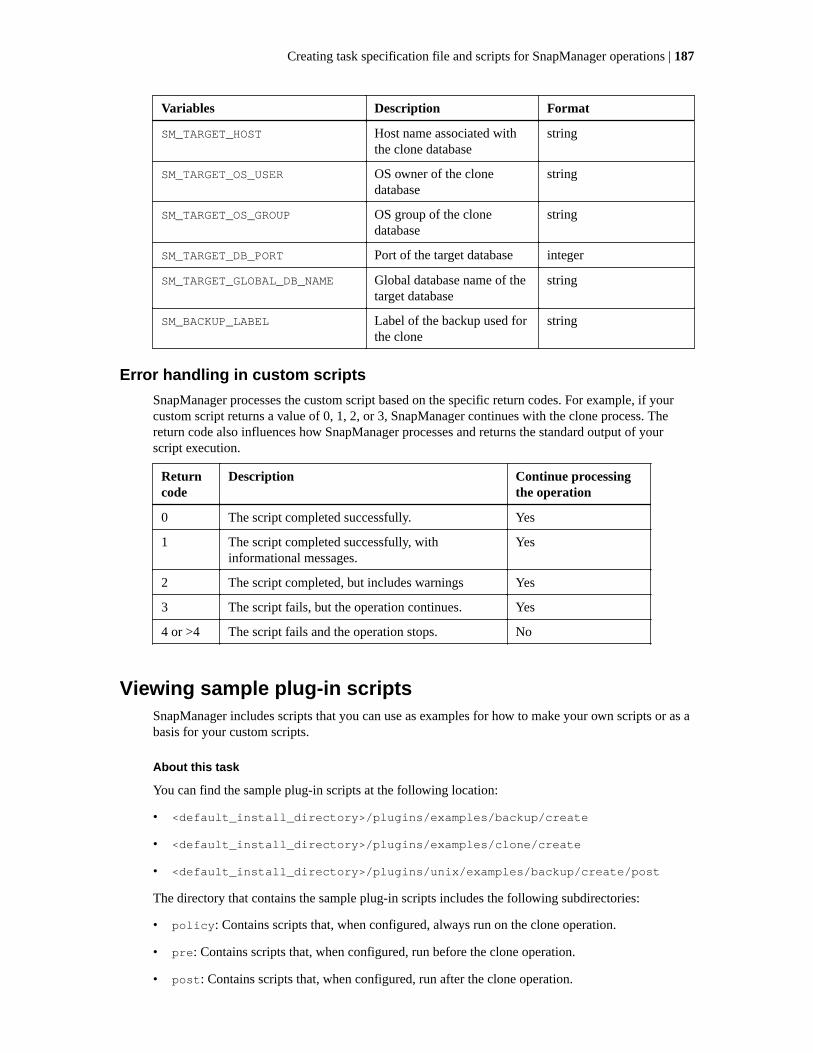
Variables Description Format
SM_TARGET_HOST Host name associated withthe clone database
string
SM_TARGET_OS_USER OS owner of the clonedatabase
string
SM_TARGET_OS_GROUP OS group of the clonedatabase
string
SM_TARGET_DB_PORT Port of the target database integer
SM_TARGET_GLOBAL_DB_NAME Global database name of thetarget database
string
SM_BACKUP_LABEL Label of the backup used forthe clone
string
Error handling in custom scripts
SnapManager processes the custom script based on the specific return codes. For example, if yourcustom script returns a value of 0, 1, 2, or 3, SnapManager continues with the clone process. Thereturn code also influences how SnapManager processes and returns the standard output of yourscript execution.
Returncode
Description Continue processingthe operation
0 The script completed successfully. Yes
1 The script completed successfully, withinformational messages.
Yes
2 The script completed, but includes warnings Yes
3 The script fails, but the operation continues. Yes
4 or >4 The script fails and the operation stops. No
Viewing sample plug-in scriptsSnapManager includes scripts that you can use as examples for how to make your own scripts or as abasis for your custom scripts.
About this task
You can find the sample plug-in scripts at the following location:
• <default_install_directory>/plugins/examples/backup/create
• <default_install_directory>/plugins/examples/clone/create
• <default_install_directory>/plugins/unix/examples/backup/create/post
The directory that contains the sample plug-in scripts includes the following subdirectories:
• policy: Contains scripts that, when configured, always run on the clone operation.
• pre: Contains scripts that, when configured, run before the clone operation.
• post: Contains scripts that, when configured, run after the clone operation.
Creating task specification file and scripts for SnapManager operations | 187
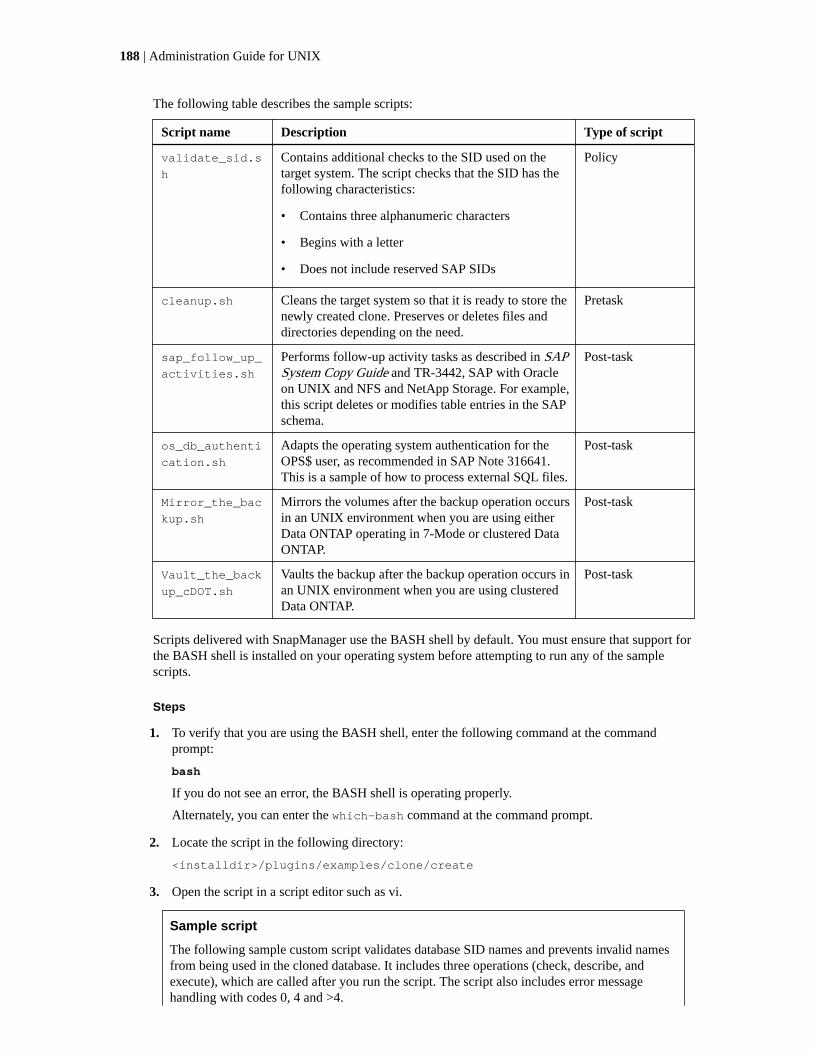
The following table describes the sample scripts:
Script name Description Type of script
validate_sid.s
h
Contains additional checks to the SID used on thetarget system. The script checks that the SID has thefollowing characteristics:
• Contains three alphanumeric characters
• Begins with a letter
• Does not include reserved SAP SIDs
Policy
cleanup.sh Cleans the target system so that it is ready to store thenewly created clone. Preserves or deletes files anddirectories depending on the need.
Pretask
sap_follow_up_
activities.sh
Performs follow-up activity tasks as described in SAPSystem Copy Guide and TR-3442, SAP with Oracleon UNIX and NFS and NetApp Storage. For example,this script deletes or modifies table entries in the SAPschema.
Post-task
os_db_authenti
cation.sh
Adapts the operating system authentication for theOPS$ user, as recommended in SAP Note 316641.This is a sample of how to process external SQL files.
Post-task
Mirror_the_bac
kup.sh
Mirrors the volumes after the backup operation occursin an UNIX environment when you are using eitherData ONTAP operating in 7-Mode or clustered DataONTAP.
Post-task
Vault_the_back
up_cDOT.sh
Vaults the backup after the backup operation occurs inan UNIX environment when you are using clusteredData ONTAP.
Post-task
Scripts delivered with SnapManager use the BASH shell by default. You must ensure that support forthe BASH shell is installed on your operating system before attempting to run any of the samplescripts.
Steps
1. To verify that you are using the BASH shell, enter the following command at the commandprompt:
bash
If you do not see an error, the BASH shell is operating properly.
Alternately, you can enter the which-bash command at the command prompt.
2. Locate the script in the following directory:
<installdir>/plugins/examples/clone/create
3. Open the script in a script editor such as vi.
Sample script
The following sample custom script validates database SID names and prevents invalid namesfrom being used in the cloned database. It includes three operations (check, describe, andexecute), which are called after you run the script. The script also includes error messagehandling with codes 0, 4 and >4.
188 | Administration Guide for UNIX
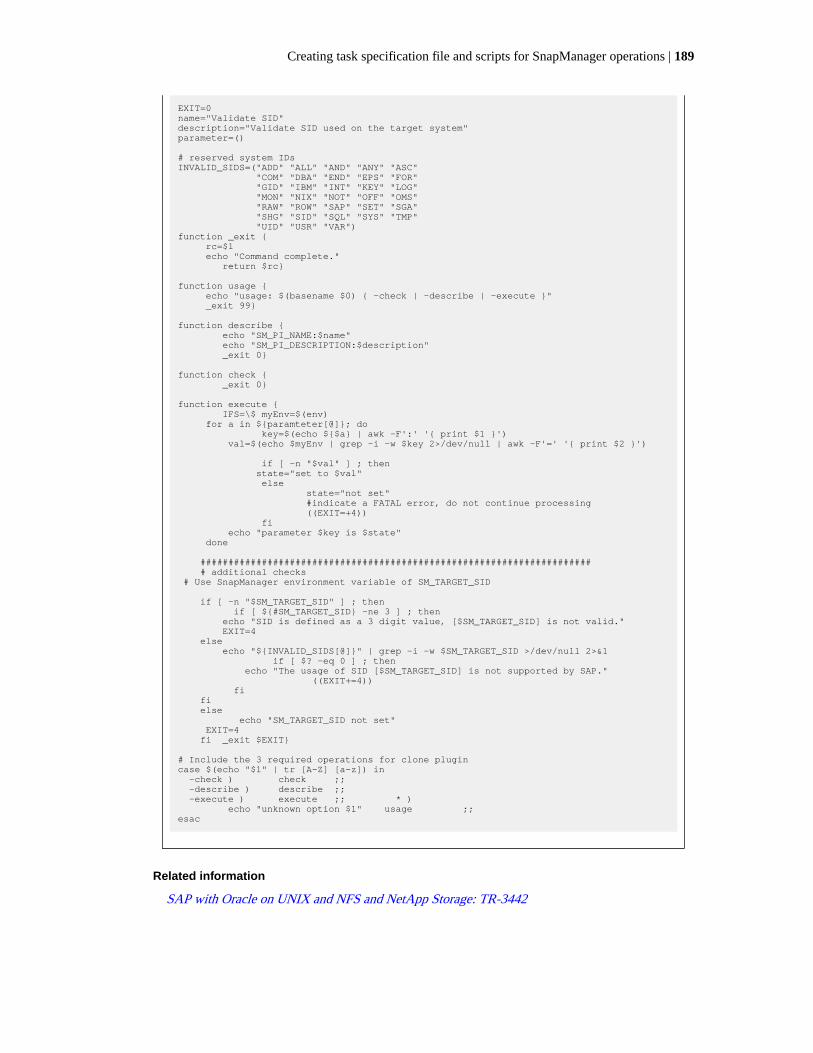
EXIT=0name="Validate SID"description="Validate SID used on the target system"parameter=()
# reserved system IDs INVALID_SIDS=("ADD" "ALL" "AND" "ANY" "ASC" "COM" "DBA" "END" "EPS" "FOR" "GID" "IBM" "INT" "KEY" "LOG" "MON" "NIX" "NOT" "OFF" "OMS" "RAW" "ROW" "SAP" "SET" "SGA" "SHG" "SID" "SQL" "SYS" "TMP" "UID" "USR" "VAR")function _exit { rc=$1 echo "Command complete." return $rc}
function usage { echo "usage: $(basename $0) { -check | -describe | -execute }" _exit 99}
function describe { echo "SM_PI_NAME:$name" echo "SM_PI_DESCRIPTION:$description" _exit 0}
function check { _exit 0}
function execute { IFS=\$ myEnv=$(env) for a in ${paramteter[@]}; do key=$(echo ${$a} | awk -F':' '{ print $1 }') val=$(echo $myEnv | grep -i -w $key 2>/dev/null | awk -F'=' '{ print $2 }')
if [ -n "$val" ] ; then state="set to $val" else state="not set" #indicate a FATAL error, do not continue processing ((EXIT=+4)) fi echo "parameter $key is $state" done
###################################################################### # additional checks # Use SnapManager environment variable of SM_TARGET_SID
if [ -n "$SM_TARGET_SID" ] ; then if [ ${#SM_TARGET_SID} -ne 3 ] ; then echo "SID is defined as a 3 digit value, [$SM_TARGET_SID] is not valid." EXIT=4 else echo "${INVALID_SIDS[@]}" | grep -i -w $SM_TARGET_SID >/dev/null 2>&1 if [ $? -eq 0 ] ; then echo "The usage of SID [$SM_TARGET_SID] is not supported by SAP." ((EXIT+=4)) fi fi else echo "SM_TARGET_SID not set" EXIT=4 fi _exit $EXIT}
# Include the 3 required operations for clone plugincase $(echo "$1" | tr [A-Z] [a-z]) in -check ) check ;; -describe ) describe ;; -execute ) execute ;; * ) echo "unknown option $1" usage ;;esac
Related information
SAP with Oracle on UNIX and NFS and NetApp Storage: TR-3442
Creating task specification file and scripts for SnapManager operations | 189
Creating task scriptsYou can create the pretask, post-task, and policy task scripts for backup, restore, and cloneoperations, write your script, and include the predefined environment variables in your parameters.You can either create a new script or modify one of the SnapManager sample scripts.
Before you begin
Before you start creating the script, ensure that:
• You must structure the script in a particular manner for it to be run in the context of aSnapManager operation.
• You must create the script based on the expected operations, available input parameters, andreturn code conventions.
• You must include log messages and redirect the messages to user-defined log files.
Steps
1. Create the task script by customizing the sample script.
Perform the following:
a. Locate a sample script in the following installation directory:
<default_install_directory>/plugins/examples/backup/create
<default_install_directory>/plugins/examples/clone/create
b. Open the script in your script editor.
c. Save the script with a different name.
2. Modify the functions, variables, and parameters as needed.
3. Save the script in one of the following directories:
Backup operations scripts
• <default_install_directory>/plugins/backup/create/pre: Executes the script before the backupoperation occurs. Use it optionally when you specify the backup creation.
• <default_install_directory>/plugins/backup/create/post: Executes the script after the backupoperation occurs. Use it optionally when you specify the backup creation.
• <default_install_directory>/plugins/backup/create/policy: Always executes the script beforethe backup operation occurs. SnapManager always uses this script for all the backups in therepository.
Restore operation scripts
• <default_install_directory>/plugins/restore/create/pre: Executes the script before the backupoperation occurs. Use it optionally when you specify the backup creation.
• <default_install_directory>/plugins/restore/create/post: Executes the script after the backupoperation occurs. Use it optionally when you specify the backup creation.
• <default_install_directory>/plugins/restore/create/policy: Always executes the script beforethe backup operation occurs. SnapManager always uses this script for all the backups in therepository.
Clone operation scripts
190 | Administration Guide for UNIX
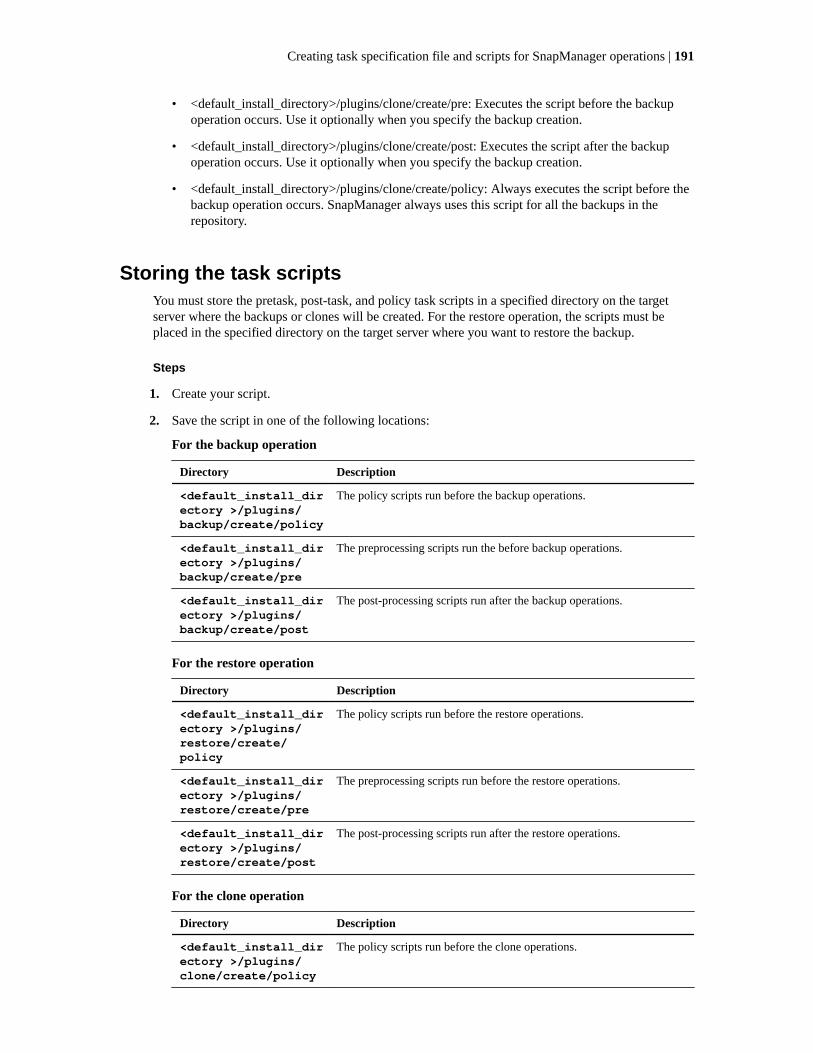
• <default_install_directory>/plugins/clone/create/pre: Executes the script before the backupoperation occurs. Use it optionally when you specify the backup creation.
• <default_install_directory>/plugins/clone/create/post: Executes the script after the backupoperation occurs. Use it optionally when you specify the backup creation.
• <default_install_directory>/plugins/clone/create/policy: Always executes the script before thebackup operation occurs. SnapManager always uses this script for all the backups in therepository.
Storing the task scriptsYou must store the pretask, post-task, and policy task scripts in a specified directory on the targetserver where the backups or clones will be created. For the restore operation, the scripts must beplaced in the specified directory on the target server where you want to restore the backup.
Steps
1. Create your script.
2. Save the script in one of the following locations:
For the backup operation
Directory Description
<default_install_directory >/plugins/backup/create/policy
The policy scripts run before the backup operations.
<default_install_directory >/plugins/backup/create/pre
The preprocessing scripts run the before backup operations.
<default_install_directory >/plugins/backup/create/post
The post-processing scripts run after the backup operations.
For the restore operation
Directory Description
<default_install_directory >/plugins/restore/create/policy
The policy scripts run before the restore operations.
<default_install_directory >/plugins/restore/create/pre
The preprocessing scripts run before the restore operations.
<default_install_directory >/plugins/restore/create/post
The post-processing scripts run after the restore operations.
For the clone operation
Directory Description
<default_install_directory >/plugins/clone/create/policy
The policy scripts run before the clone operations.
Creating task specification file and scripts for SnapManager operations | 191
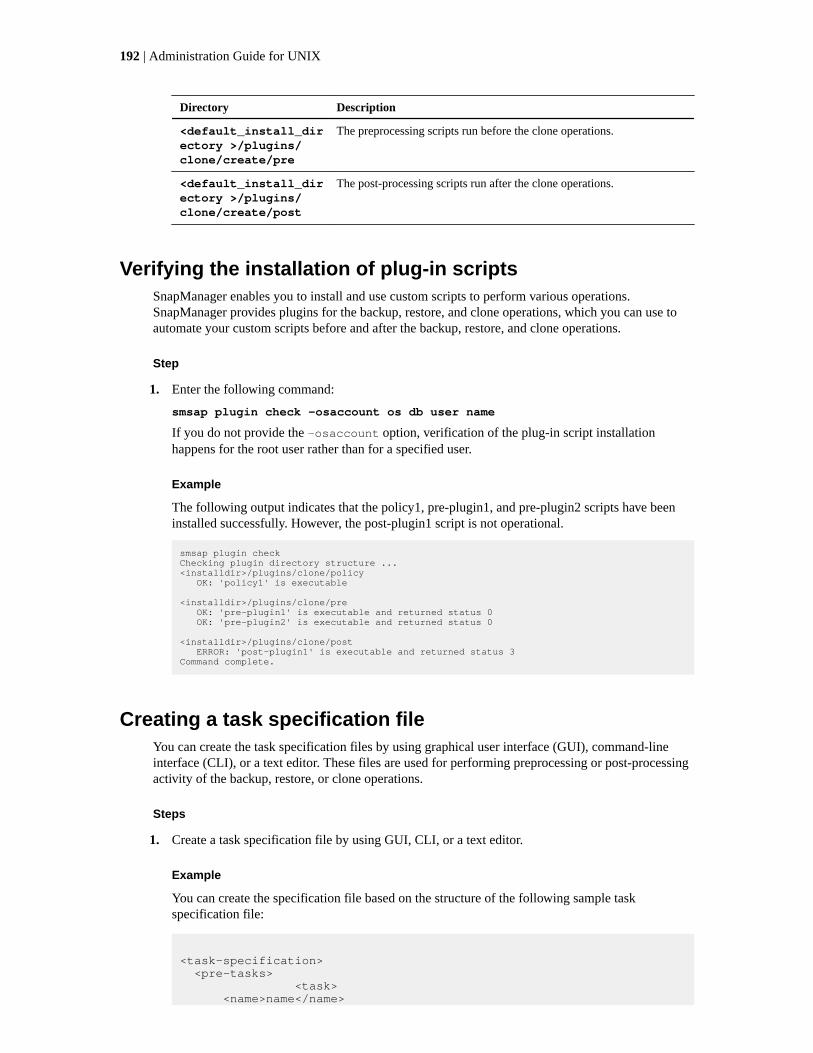
Directory Description
<default_install_directory >/plugins/clone/create/pre
The preprocessing scripts run before the clone operations.
<default_install_directory >/plugins/clone/create/post
The post-processing scripts run after the clone operations.
Verifying the installation of plug-in scriptsSnapManager enables you to install and use custom scripts to perform various operations.SnapManager provides plugins for the backup, restore, and clone operations, which you can use toautomate your custom scripts before and after the backup, restore, and clone operations.
Step
1. Enter the following command:
smsap plugin check -osaccount os db user name
If you do not provide the -osaccount option, verification of the plug-in script installationhappens for the root user rather than for a specified user.
Example
The following output indicates that the policy1, pre-plugin1, and pre-plugin2 scripts have beeninstalled successfully. However, the post-plugin1 script is not operational.
smsap plugin check Checking plugin directory structure ...<installdir>/plugins/clone/policy OK: 'policy1' is executable
<installdir>/plugins/clone/pre OK: 'pre-plugin1' is executable and returned status 0 OK: 'pre-plugin2' is executable and returned status 0
<installdir>/plugins/clone/post ERROR: 'post-plugin1' is executable and returned status 3 Command complete.
Creating a task specification fileYou can create the task specification files by using graphical user interface (GUI), command-lineinterface (CLI), or a text editor. These files are used for performing preprocessing or post-processingactivity of the backup, restore, or clone operations.
Steps
1. Create a task specification file by using GUI, CLI, or a text editor.
Example
You can create the specification file based on the structure of the following sample taskspecification file:
<task-specification> <pre-tasks> <task> <name>name</name>
192 | Administration Guide for UNIX

<parameter> <name>name</name> <value>value</value> </parameter> </task> </pre-tasks> <post-tasks> <task> <name>name</name> <parameter> <name>name</name> <value>value</value> </parameter> </task> </post-tasks></task-specification>
2. Enter the script name.
3. Enter the parameter name and the value assigned to the parameter.
4. Save the XML file in the correct installation directory.
Task specification example
<task-specification> <pre-tasks> <task> <name>clone cleanup</name> <description>pre tasks for cleaning up the target system</description> </task> </pre-tasks> <post-tasks> <task> <name>SystemCopy follow-up activities</name> <description>SystemCopy follow-up activities</description> <parameter> <name>SCHEMAOWNER</name> <value>SAMSR3</value> </parameter> </task> <task> <name>Oracle Users for OS based DB authentication</name> <description>Oracle Users for OS based DB authentication</description> <parameter> <name>SCHEMAOWNER</name> <value>SAMSR3</value> </parameter> <parameter> <name>ORADBUSR_FILE</name> <value>/mnt/sam/oradbusr.sql</value> </parameter> </task> </post-tasks> </task-specification>
Creating task specification file and scripts for SnapManager operations | 193
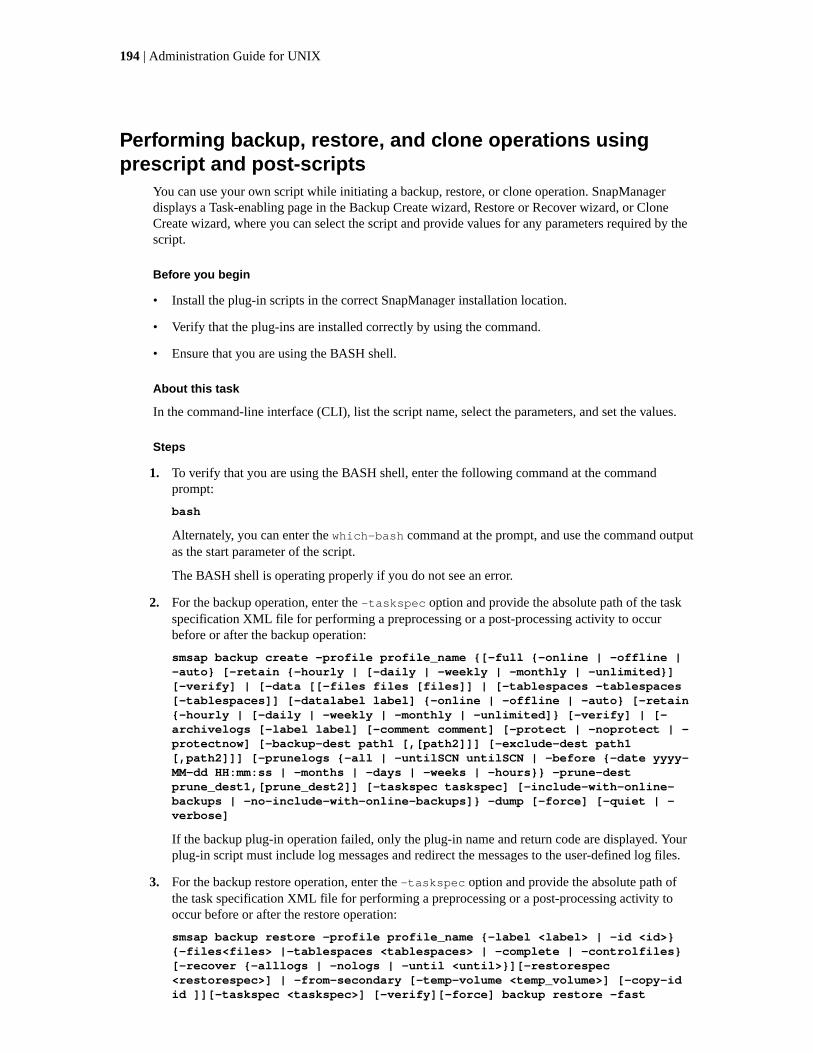
Performing backup, restore, and clone operations usingprescript and post-scripts
You can use your own script while initiating a backup, restore, or clone operation. SnapManagerdisplays a Task-enabling page in the Backup Create wizard, Restore or Recover wizard, or CloneCreate wizard, where you can select the script and provide values for any parameters required by thescript.
Before you begin
• Install the plug-in scripts in the correct SnapManager installation location.
• Verify that the plug-ins are installed correctly by using the command.
• Ensure that you are using the BASH shell.
About this task
In the command-line interface (CLI), list the script name, select the parameters, and set the values.
Steps
1. To verify that you are using the BASH shell, enter the following command at the commandprompt:
bash
Alternately, you can enter the which-bash command at the prompt, and use the command outputas the start parameter of the script.
The BASH shell is operating properly if you do not see an error.
2. For the backup operation, enter the -taskspec option and provide the absolute path of the taskspecification XML file for performing a preprocessing or a post-processing activity to occurbefore or after the backup operation:
smsap backup create -profile profile_name {[-full {-online | -offline |-auto} [-retain {-hourly | [-daily | -weekly | -monthly | -unlimited}][-verify] | [-data [[-files files [files]] | [-tablespaces -tablespaces[-tablespaces]] [-datalabel label] {-online | -offline | -auto} [-retain{-hourly | [-daily | -weekly | -monthly | -unlimited]} [-verify] | [-archivelogs [-label label] [-comment comment] [-protect | -noprotect | -protectnow] [-backup-dest path1 [,[path2]]] [-exclude-dest path1[,path2]]] [-prunelogs {-all | -untilSCN untilSCN | -before {-date yyyy-MM-dd HH:mm:ss | -months | -days | -weeks | -hours}} -prune-destprune_dest1,[prune_dest2]] [-taskspec taskspec] [-include-with-online-backups | -no-include-with-online-backups]} -dump [-force] [-quiet | -verbose]
If the backup plug-in operation failed, only the plug-in name and return code are displayed. Yourplug-in script must include log messages and redirect the messages to the user-defined log files.
3. For the backup restore operation, enter the -taskspec option and provide the absolute path ofthe task specification XML file for performing a preprocessing or a post-processing activity tooccur before or after the restore operation:
smsap backup restore -profile profile_name {-label <label> | -id <id>}{-files<files> |-tablespaces <tablespaces> | -complete | -controlfiles}[-recover {-alllogs | -nologs | -until <until>}][-restorespec<restorespec>] | -from-secondary [-temp-volume <temp_volume>] [-copy-idid ]][-taskspec <taskspec>] [-verify][-force] backup restore -fast
194 | Administration Guide for UNIX
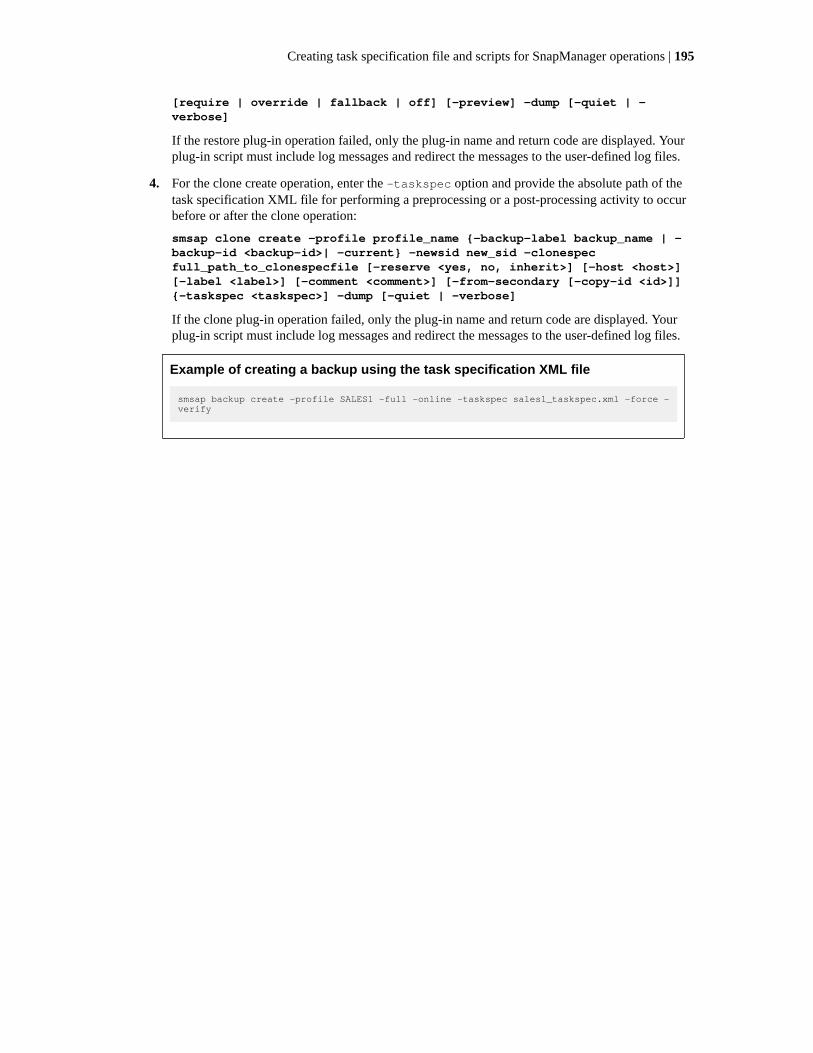
[require | override | fallback | off] [-preview] -dump [-quiet | -verbose]
If the restore plug-in operation failed, only the plug-in name and return code are displayed. Yourplug-in script must include log messages and redirect the messages to the user-defined log files.
4. For the clone create operation, enter the -taskspec option and provide the absolute path of thetask specification XML file for performing a preprocessing or a post-processing activity to occurbefore or after the clone operation:
smsap clone create -profile profile_name {-backup-label backup_name | -backup-id <backup-id>| -current} -newsid new_sid -clonespecfull_path_to_clonespecfile [-reserve <yes, no, inherit>] [-host <host>][-label <label>] [-comment <comment>] [-from-secondary [-copy-id <id>]]{-taskspec <taskspec>] -dump [-quiet | -verbose]
If the clone plug-in operation failed, only the plug-in name and return code are displayed. Yourplug-in script must include log messages and redirect the messages to the user-defined log files.
Example of creating a backup using the task specification XML file
smsap backup create -profile SALES1 -full -online -taskspec sales1_taskspec.xml -force -verify
Creating task specification file and scripts for SnapManager operations | 195

Updating storage system name and targetdatabase host name associated with a profile
SnapManager 3.3 or later allows you to update the storage system host name or storage systemaddress, and the target database host name associated with a SnapManager profile.
Updating the storage system name associated with a profileSnapManager 3.3 or later provides the ability to update the host name or IP address of a storagesystem associated with a profile.
Before you begin
You must ensure the following:
• The profile has at least one backup.
If the profile does not have any backup, then there is no necessity to update the storage systemname for that profile.
• No operation is running for the profile.
About this task
You can update the storage system name or IP address by using the SnapManager command-lineinterface (CLI). While updating the storage system name, the metadata stored in the repositorydatabase alone is updated. After renaming the storage system name, you can perform all theSnapManager operations as earlier.
Note: You cannot change the storage system name by using the SnapManager graphical userinterface (GUI).
You must ensure that Snapshot copies are available in the new storage system. SnapManager does notverify the existence of the Snapshot copies in the storage system.
However, you must remember the following while performing rolling upgrade and rollback of thehost after renaming the storage system name:
• If you are performing rolling upgrade of the host after renaming the storage system name, youmust update the profile with the new storage system name.
See Troubleshooting storage system name issues for information about how to use the SnapDrivecommands for changing the storage system name.
• If you are rolling back the host after renaming the storage system, you must ensure that youchange the storage system name back to the earlier storage system name so that you can use theprofiles, backups, and clones of the earlier storage system for performing SnapManageroperations.
Note: If SnapDrive could not identify the storage system and displays error messages, you canenter the ipmigrate command with the earlier and later host names of the storage system. Foradditional information about storage system name issues, see Troubleshooting storage systemname issues.
Step
1. Enter the following command:
196
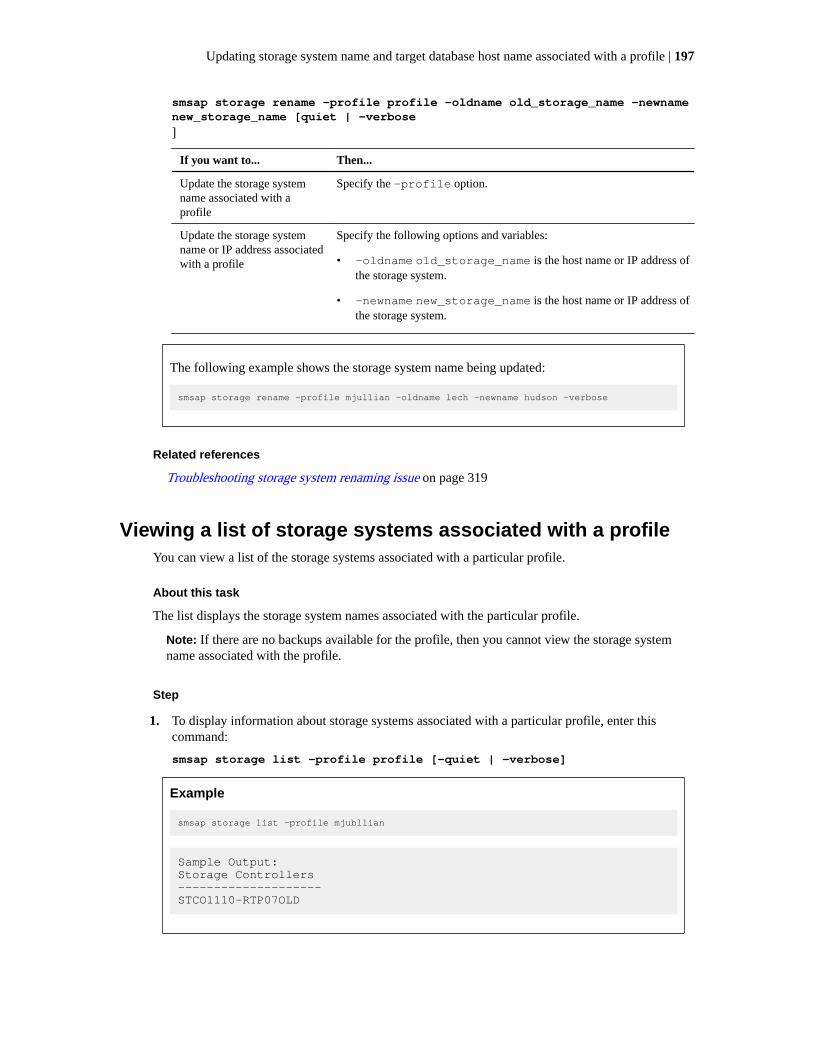
smsap storage rename -profile profile -oldname old_storage_name -newnamenew_storage_name [quiet | -verbose
]
If you want to... Then...
Update the storage systemname associated with aprofile
Specify the -profile option.
Update the storage systemname or IP address associatedwith a profile
Specify the following options and variables:
• -oldname old_storage_name is the host name or IP address ofthe storage system.
• -newname new_storage_name is the host name or IP address ofthe storage system.
The following example shows the storage system name being updated:
smsap storage rename -profile mjullian -oldname lech -newname hudson -verbose
Related references
Troubleshooting storage system renaming issue on page 319
Viewing a list of storage systems associated with a profileYou can view a list of the storage systems associated with a particular profile.
About this task
The list displays the storage system names associated with the particular profile.
Note: If there are no backups available for the profile, then you cannot view the storage systemname associated with the profile.
Step
1. To display information about storage systems associated with a particular profile, enter thiscommand:
smsap storage list -profile profile [-quiet | -verbose]
Example
smsap storage list -profile mjubllian
Sample Output:Storage Controllers--------------------STCO1110-RTP07OLD
Updating storage system name and target database host name associated with a profile | 197
Updating the target database host name associated with aprofile
SnapManager (3.2 or later) for SAP provides the ability to update the host name of the targetdatabase in the SnapManager profile.
Before you begin
• The local user’s home directory must be aware of the profile-to-repository mappings.
• The SnapManager graphical user interface (GUI) sessions must be closed.
• In a Real Application Clusters (RAC) environment, the clones or mounted backups available onthe host specified in the profile must be deleted and unmounted.
About this task
You can update the profile with the new host name by using only the CLI.
Scenarios not supported for changing the target database host name in profile
The following scenarios not supported for changing the target database host name in the profile:
• Changing the target database host name by using the SnapManager GUI
• Rolling back of the repository database after updating the target database host name of the profile
• Updating multiple profiles for a new target database host name by running a single command
• Changing the target database host name when any SnapManager operation is running
• Changing the target database host name if SnapManager is installed on Solaris and if the databaselogical unit numbers (LUNs) are created by using host-mounted file system with SVM stack.
Note: After you update the target database host name in the profile, only the target database hostname is changed. All the other configuration parameters set on the profile are retained.
After you update the new target database host name in a protection-enabled profile, the same datasetand protection policies are retained for the updated profile.
After you change the host name for the target host, you must ensure that you update the host namefor all the existing protected profiles before creating the new protected profiles. To update the hostname for a profile, run the smsap profile update command.
After you update the target database host name, you cannot delete or split the clone or unmount thebackup if the clone or mounted backup is not available in the new host. In such scenarios, running theSnapManager operations from the new host lead to failure as well as stale entries in the earlier host.To perform SnapManager operations, you must revert to the earlier host name by using profileupdate.
Steps
1. Enter the following command:
smsap profile update -profile profile [-profile-passwordprofile_password][-database -dbnamedb_dbname -host db_host [-sid db_sid][-login -usernamedb_username -password db_password-port db_port]] [{-rman{-controlfile | {-login -username rman_username -passwordrman_password -tnsname rman_tnsname}}} | -remove-rman]-osaccountosaccount -osgroup osgroup [-retain [-hourly [-count n] [-duration m]][-daily [-count n] [-duration m]] [-weekly [-count n] [-duration m]] [-
198 | Administration Guide for UNIX
monthly [-count n] [-duration m]]] [-comment comment][-snapname-patternpattern][[-protect [-protection-policy policy_name]]| [[-noprotect]] [-summary-notification] [-notification [-success -email email_address1,email_address2 -subject subject_pattern] [-failure -emailemail_address1, email_address2 -subject subject_pattern]] [-separate-archivelog-backups -retain-archivelog-backups -hours hours | -days days| -weeks weeks| -months months [-protect [-protection-policypolicy_name] | -noprotect] [-include-with-online-backups | -no-include-with-online-backups]] [-dump]
Other options for this command are as follows:
[-force] [-noprompt]
[quiet | -verbose]
If you want to... Then...
Change the target databasehost name
Specify -host new_db_host
2. To view the target database host name of the profile, enter the following command:
smsap profile show
Updating storage system name and target database host name associated with a profile | 199
Maintaining history of SnapManager operations
SnapManager for SAP enables you to maintain the history of SnapManager operations associatedwith a single profile or multiple profiles. You can maintain the history either from the SnapManagercommand-line interface (CLI) or graphical user interface (GUI). You can view the history of theoperations as a report, and use the report for audit compliance purposes.
You can maintain history for the following SnapManager operations:
• Backup create
• Backup verify
• Backup restore
• Clone create
• Clone split
The history information for the SnapManager operations is maintained based on the retention. Youcan configure different retention classes for each of the supported SnapManager operations.
The following are some retention classes that you can assign:
• Number of days
• Number of weeks
• Number of months
• Number of operations
Based on the retention, SnapManager purges the history automatically. You can also manually purgethe history of the SnapManager operations. If you delete or destroy the profile, all the historyinformation associated with the profile is deleted.
Note: After rollback of the host, you cannot view the history details or perform any history-relatedoperations associated with the profile that has been configured for history maintenance.
Configuring history for SnapManager operationSnapManager for SAP enables you to maintain the history of SnapManager operation from theSnapManager CLI or GUI. You can view the history of the SnapManager operation as a report.
Step
1. To configure the history of SnapManager operation, enter the following command:
smsap history set -profile {-name, profile_name [profile_name1,profile_name2] | -all -repository -login [-password repo_password] -username repo_username -dbname repo_dbname -host repo_host -portrepo_port} -operation {-operations operation_name [operation_name1,operation_name2] | -all} -retain {-count retain_count | -dailyretain_daily | -weekly retain_weekly | -monthly retain_monthly} [-quiet| -verbose]
200
smsap history set -profile -name PROFILE1 -operation -operations backup -retain -daily 6 -verbose
smsap history set -profile -name PROFILE1 -operation -all -retain -weekly 3 -verbose
Viewing a list of SnapManager operation historyYou can view the history of a specific or all SnapManager operations as a report based on theretention settings.
Step
1. To view a list of SnapManager history operations, enter the following command:
smsap history list -profile {-name, profile_name[profile_name1,profile_name2] | -all -repository -login [-passwordrepo_password] -username repo_username -dbname repo_dbname -hostrepo_host -port repo_port} -operation {-operations operation_name[operation_name1, operation_name2] | -all} [-delimiter delimiter] [-quiet | -verbose]
Viewing the detailed history of a specific operationassociated with a profile
You can view the detailed history of a specific SnapManager operation associated with a profile.
Step
1. To display detailed history information about a specific SnapManager operation associated with aprofile, enter the following command:
smsap history operation-show -profile profile_name {-label label | -idid} [-quiet | -verbose]
Deleting history of SnapManager operationYou can delete the history of the SnapManager operation, if you no longer require the history details.
Step
1. To delete the history of the SnapManager operation, enter the following command:
smsap history purge -profile {-name, profile_name profile_name1,profile_name2] | all -repository -login [-password repo_password] -username repo_username -dbname repo_dbname -host repo_host -portrepo_port} -operation {-operations operation_name [operation_name1,operation_name2] | -all} [-quiet | -verbose]
Maintaining history of SnapManager operations | 201
Removing history settings associated with a single profileor multiple profiles
SnapManager enables you to remove the history settings of a SnapManager operation. This operationpurges all the history information associated with a single profile or multiple profiles.
Step
1. To remove the history of SnapManager operations associated with a single profile or multipleprofiles, enter the following command:
smsap history remove -profile {-name, profile_name [profile_name1,profile_name2] | all -repository -login [-password repo_password] -username repo_username -dbname repo_dbname -host repo_host -portrepo_port} -operation {-operations operation_name [operation_name1,operation_name2] | -all} [-quiet | -verbose]
Viewing SnapManager history configuration detailsYou can view the history settings for a single profile.
About this task
The SnapManager history operation displays the following information for each profile:
• Operation name
• Retention class
• Retention count
Step
1. To display information about the SnapManager history operation for a specific profile, enter thefollowing command:
smsap history show -profile profile_name
202 | Administration Guide for UNIX
Using BR*Tools with SnapManager for SAP
You can use SAP BR*Tools commands with SnapManager for SAP. BR*Tools is a SAP programpackage that contains SAP tools for Oracle database administration, for example, BRARCHIVE,BRBACKUP, BRCONNECT, BRRECOVER, BRRESTORE, BRSPACE, and BRTOOLS.
You can complete the following tasks related to using BR*Tools and SnapManager for SAP:
• Disable client access to Snapshot copies
• Specify the profile for BR*Tools backups
• Create database backups using BRBACKUP and BRARCHIVE
• Schedule backups with SAP transaction DB13
• Restore a database using BRRESTORE and BRRECOVER
• Back up and restore files using BR*Tools
• Restore a backup to a different host
What BR*Tools areYou can find information that you would need to use SAP with the storage systems.
For general information about using BR*Tools, including command syntax, see the SAPdocumentation such as online BR*Tools for Oracle Database Administration.
Profile requirement
The SnapManager for SAP profile must be named correctly to work with BR*Tools. By default,BACKINT uses the profile, which has the same name as the SAP SID, from the repositorydetermined by the user ID that issues the BR*Tools commands.
You need to use a different profile name, if the SAP SID is not unique in your environment. For moreinformation, see Profile usage for BR* Tools backups.
You must have a link from the BR*Tools directory to the /opt/NetApp/smsap/bin/backint fileinstalled by SnapManager for SAP. For information about creating the link, see Integrating with SAPBR* Tools.
Backups created with versions before BR*Tools 7.00 cannot be verified. The block size of thetablespace or data file is required to complete the verification; however, versions before BR*Tools7.00 do not provide this.
About combining BR*Tools and SnapManager for SAP interfaces
You can use a combination of the BR*Tools and the SnapManager for SAP graphical user interface(GUI) or command-line interface (CLI) to perfom following operations:
Operation Interfaces that you can use
List, restore, recover, and delete databasebackups (backups that include data files, controlfiles, or online redo log files) created usingBRBACKUP
SnapManager for SAP CLI and GUI
Note: BR*Tools can list and restore onlybackups created by using BR*Tools.
203
Operation Interfaces that you can use
List and delete backups of other file sets createdwith BRBACKUP
SnapManager for SAP CLI and GUI
Clone backups of other file sets created withBRBACKUP
A full online or offline backup taken using theBRBACKUP command can be cloned by usingthe SnapManager for SAP CLI or GUI.
Options available under BR*Tools CLI with SnapManager for SAP
The following options are available under the BR*Tools CLI:
Option Tasks that can be performed
Instance management Log all actions in the file system and databasetables and also save backup logs and profiles tobackup media.
Space management Allows comprehensive volume management. Touse the functions provided in the spacemanagement, you must initialize the volumeswith BRBACKUP or BRARCHIVE to ensurethat they include an SAP-specific label.
Backup and database copy Create a backup of a database, perform offlineredo log (archive log), and verify backups.
Restore and recovery Restore and recover backups.
Database statistics Maintain the statistics of tables and indexes.
Similar functions available under BR*Tools GUI
The following operations are available under BR*Tools GUI:
Type of wizard Tasks that can be performed
Create Repository wizard Create a repository in a database.
Profile wizard Create a profile in a repository.
Backup wizard Create a backup of the profile.
Restore and Recovery wizard Restore and recover a backup of a profile.
SnapManager Clone Delete wizard Delete the clone of a backup.
SnapManager Backup Delete wizard Delete the backup of a profile.
About cloning backups created with BR*Tools
A full online or offline backup taken using the BRBACKUP command can be cloned using theSnapManager for SAP CLI or GUI.
To create a clone of the database backup created using the BRBACKUP command, ensure that you setthe configuration parameter brbackup.enable.cloneable.backups to true in thesmsap.config file and then restart the SnapManager for SAP server. Enter the following command:
brbackup.enable.cloneable.backups=true
For online backups created using the BRBACKUP command, SnapManager for SAP enables you toclone the backup without making any changes from the SnapManager for SAP CLI or GUI.
204 | Administration Guide for UNIX
For offline backups taken created the BRBACKUP command, SnapManager for SAP enables you toclone the backup from the SnapManager for SAP CLI or GUI after you perform the following steps:
1. Add the following configuration variables in the smsap.config file.The values for the variables shown below are default values. You can retain these values if youwant to set them to default.
• brbackup.oracle.maxdatafiles=254
• brbackup.oracle.maxloghistory=1168
• brbackup.oracle.maxinstances=50
• brbackup.oracle.maxlogfiles=255
• brbackup.oracle.maxlogmembers=3
• brbackup.oracle.character_set=UTF8
2. To change any of these default configuration parameter values in the smsap.config file, executethe following command from the SQL command prompt:
alter database backup controlfile to trace as file
The file can be any user-defined name and is created in the same directory from where SQL*Plusis invoked.
3. Open the file to set these values to the corresponding configuration variables in thesmsap.config file.
4. Restart the SnapManager server.
About deleting backups created with BR*Tools
BR*Tools does not delete backups. Because SnapManager for SAP backups are based on Snapshotcopies, there is a limit to the number of backups you can retain. You need to ensure backups aredeleted when they are no longer needed.
On the NetApp storage system, each volume can have a maximum of 255 Snapshot copies. If avolume reaches the limit, backups will fail. A backup made with BRBACKUP typically creates twoSnapshot copies of each affected volume.
To prevent reaching the 255 Snapshot copy maximum, you can manage backups in the followingways:
• You can set the retain options in the profile used for BR*Tools operations.SnapManager for SAP then automatically deletes older backups as needed.
• You can manually delete backups that are no longer needed by using the SnapManager for SAPCLI or GUI.
Related concepts
Profile usage for BR*Tools backups on page 206
Disabling client access to Snapshot copiesFor any storage system volume that uses the NFS protocol and contains SAP data backed up usingBR*Tools, you must disable client access to the Snapshot copies of that volume. If client access isenabled, BR*Tools will attempt to create backups of the hidden .snapshot directories that containprevious backups.
To disable client access, use one of the following methods.
Using BR*Tools with SnapManager for SAP | 205
• Using Data ONTAP: Using the Data ONTAP command line interface, enter the followingcommand:vol options volume_name nosnapdir on
wherein volume_name is the name of the volume containing SAP data, for example,/vol/falls_sap_cer9i_data1
• Using FilerView: To disable access using the FilerView graphical user interface, you must alreadyhave a Snapshot copy of the volume.
1. In the FilerView left pane, select Volumes > Snapshots > Manage.
2. On the Manage Snapshots page, click the volume name in the Volume column.
3. On the Configure Snapshots page, clear the Snapshot Directory Visible check box, and clickApply.
For more information about disabling client access to Snapshot copies, see the chapter aboutSnapshot Management of the Data ONTAP Data Protection Online Backup and Recovery Guide foryour version of Data ONTAP.
Profile usage for BR*Tools backupsWhen you run a BR*Tools command that uses the BACKINT interface, SnapManager uses a profilefrom the repository. The repository is determined by the SnapManager credentials of the user runningthe BR*Tools command.
By default, SnapManager uses the profile with the same name as the SAP database system identifier.
About creating credentials to access the repository
You can use the smsap credential set command to set the repository credentials for theBR*Tools user.
About specifying a different SnapManager profile name
As long as the system identifier is unique for all hosts whose SnapManager profiles are in a givenrepository, the default profile name is sufficient. You can create the SnapManager profile and name itby using the database system identifier value.
However, if the same system identifier is used on different hosts, or if you want to specify more thanone SnapManager profile for use with BR*Tools on a given SAP instance, then you need to definethe profile name for BR*Tools commands.
Database operations scheduled within the SAP application run as user. BR*Tools operationsscheduled within the SAP applications run as sidadm. These users must have access to the repositoryand the profile.
To set the credentials for a user, perform the following steps:
1. Log in as sidadm.
2. Set the repository credentials by entering the command:
smsap credential set command
3. Synchronize the profiles by entering the following command:
smsap profile sync
4. Set the password for the discovered profiles by entering the command:
smsap credential set
206 | Administration Guide for UNIX
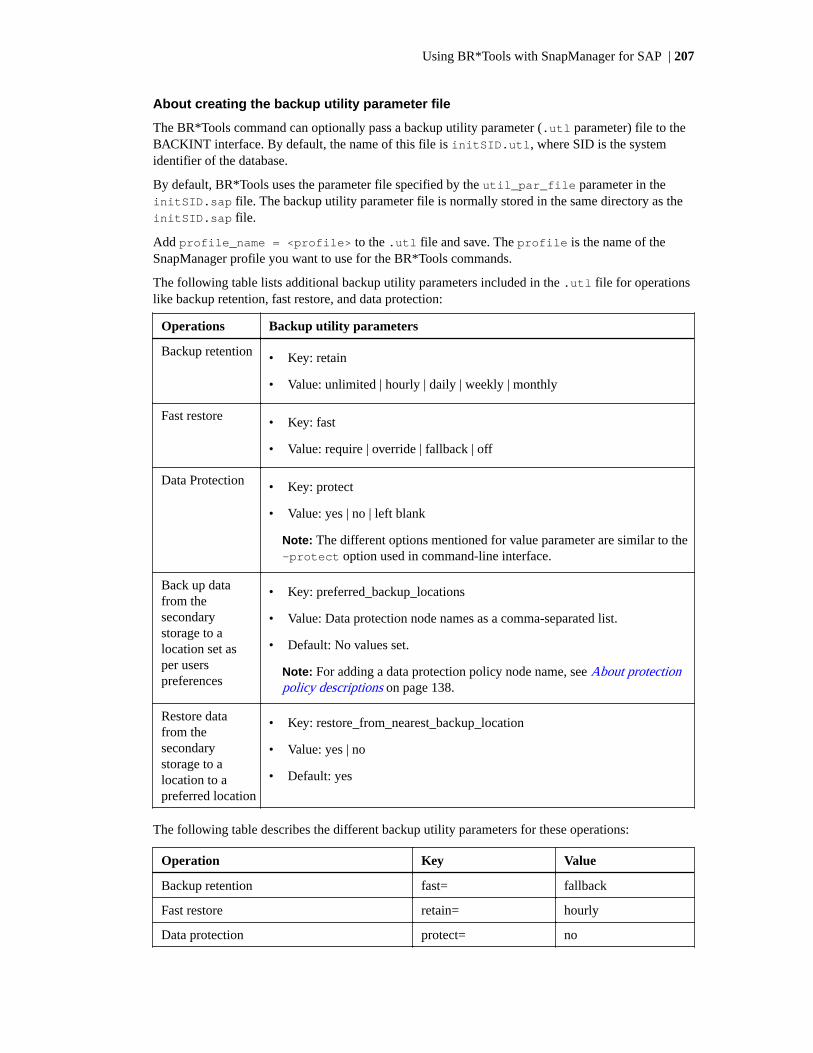
About creating the backup utility parameter file
The BR*Tools command can optionally pass a backup utility parameter (.utl parameter) file to theBACKINT interface. By default, the name of this file is initSID.utl, where SID is the systemidentifier of the database.
By default, BR*Tools uses the parameter file specified by the util_par_file parameter in theinitSID.sap file. The backup utility parameter file is normally stored in the same directory as theinitSID.sap file.
Add profile_name = <profile> to the .utl file and save. The profile is the name of theSnapManager profile you want to use for the BR*Tools commands.
The following table lists additional backup utility parameters included in the .utl file for operationslike backup retention, fast restore, and data protection:
Operations Backup utility parameters
Backup retention • Key: retain
• Value: unlimited | hourly | daily | weekly | monthly
Fast restore • Key: fast
• Value: require | override | fallback | off
Data Protection • Key: protect
• Value: yes | no | left blank
Note: The different options mentioned for value parameter are similar to the-protect option used in command-line interface.
Back up datafrom thesecondarystorage to alocation set asper userspreferences
• Key: preferred_backup_locations
• Value: Data protection node names as a comma-separated list.
• Default: No values set.
Note: For adding a data protection policy node name, see About protectionpolicy descriptions on page 138.
Restore datafrom thesecondarystorage to alocation to apreferred location
• Key: restore_from_nearest_backup_location
• Value: yes | no
• Default: yes
The following table describes the different backup utility parameters for these operations:
Operation Key Value
Backup retention fast= fallback
Fast restore retain= hourly
Data protection protect= no
Using BR*Tools with SnapManager for SAP | 207
Adding the backup utility parameter to the BR*Tools initialization file
SAP creates a backup profile file named initSID.sap for each SAP database instance in$ORACLE_HOME/dbs/. You can use this file to specify the default backup utility parameter (.utl)file used for BR*Tools commands.
1. Edit the initSID.sap file and locate the line starting with util_par_file =.
2. Uncomment this line and add the path to the backup utility parameter file that contains the nameof the profile, for example, util_par_file = initSA1.utl.
3. If you specify a value for the util_par_file, be sure that the file exists.
If the file is not found, the BRBACKUP commands fail because they attempt to include that filein a backup.
If any of the following error conditions are found, then you need to use the -u option as the profilename:
• Parameter files does not exist
• No profile_name entry
Both orasid and sidadm need access to the profile that would be used for creating or managingbackups created with BR*Tools.
Specifying the backup utility parameter file name on the BR*Tools command
You can optionally specify the backup utility parameter (.utl parameter) file on the BR*Toolscommands using the -r option. The value on the command line overrides the value specified in theSAP initialization file.
BR*Tools searches for the parameter file in the $ORACLE_HOME/dbs/ directory. If you store the filein another location, you need to supply the full path with the -r option. For example:
brbackup -r /opt/NetApp_fcp_price_10g_enterprise_inst_vol1/dbs/
initCER.utl ...
Database backups created using BRBACKUP andBRARCHIVE
The BRBACKUP command creates a backup of the SAP database using Snapshot copy on the storagesystem. You can run the BRBACKUP command from the SAP host’s command-line interface (CLI), orBR*Tools CLI or graphical user interface (GUI). To back up the offline redo log files, you can usethe BRARCHIVE command.
BRBACKUP backs up the data files, control files, and online redo log files of the SAP database. Youshould back up the other SAP configuration files, for example, SAP log files, kernel files, andtransports requests using BRBACKUP with the SAP_DIR option, and restore using BRRESTORE.
If the value of the SQLNET.AUTHENTICATION_SERVICES parameter in the sqlnet.ora is set toNONE, ensure that the Oracle database user (system) has sysoper privileges. The system is the defaultuser created during the creation of the Oracle database. To enable SYSOPER privileges, run thefollowing command:
grant sysoper to system;
You should use either the BR*Tools commands or the SnapManager commands to manage thearchive log files.
You should not use the combination of SnapManager profiles and the BR*Tools commands formanaging the archive log backups with respect to the following operations:
208 | Administration Guide for UNIX
• Creating separate backups of data files and archive log files using the BRBACKUP and BRARCHIVEcommands with the SnapManager profile (created using the option to separate archive logbackups)
• Pruning archive log files while creating the backup using the SnapManager profile
Note: SnapManager does not display any warning or error message when you use a combinationof SnapManager for SAP profiles and the BR*Tools commands for managing the archive log files.
You should create a profile without using the option to separate archive log backups and use thisprofile for regular BR*Tools operations.
You can restore the backup by using BRRESTORE. For database backups (backups include data files,control files, or online redo log files) created by using BRBACKUP with the -m all or -m fulloption, you can also restore the backup by using the SnapManager CLI or GUI.
For more information about how SnapManager handles backing up, see Backing up databases.
See the SAP documentation for the specific instructions and syntax for the BRBACKUP andBRARCHIVE commands. Before using the BRBACKUP and BRARCHIVE command with a storagesystem, ensure that the following conditions are met:
• If the SnapManager profile name is different from the SAP database system identifier, specify thename of the parameter file that contains the SnapManager profile name.
You can do so in one of the following ways:
◦ Specify the backup utility parameter file (initSID.utl) using the -r option with theBRBACKUP command.
◦ Specify the parameter file in the initialization file (initSID.sap). For more information, seeSpecifying the profile for BR*Tools backups.
• If it is appropriate for your environment, create additional backups of your SAP data using adifferent medium, such as tape. Snapshot copies are intended for rapid backup and restoration.They are stored on the same physical media as the data being backed up and are not intended fordisaster recovery unless copied to other storage devices.
Scheduling backups with SAP transaction DB13There are several steps required to enable backups by SnapManager for SAP to work from the DBAPlanning Calendar transaction DB13.
Steps
1. Change the permissions of the /oracle/SID/sapbackup directory to allow write access by thesidadm user identifier.
Use the following command as orasid:
chmod 775 /oracle/SID/sapbackup
This will allow members of the dba group to write to that directory. The user identifier sidadmis a member of the dba group.
2. Change the permissions of the SnapManager for SAP credentials file for orasid to allowsidadm access. Use the following command executed by orasid:
Use the following command executed by orasid:
chmod 660 /oracle/SID/.netapp/smsap/credentials
Using BR*Tools with SnapManager for SAP | 209
Follow the directions in section 3.3, "Registering Systems in the Repository" of TR-3582"SnapManager for SAP Best Practices" to register the sidadm user identifier in the SnapManagerfor SAP repository.
Database restore by using BRRESTORE and BRRECOVERThe BRRESTORE and BRRECOVER commands work only with backups created using BRBACKUP.
See the SAP documentation for specific instructions and syntax for the BRRESTORE and BRRECOVERcommands.
If the SnapManager profile name is different from the SAP database system identifier, you mustspecify the name of the parameter file that contains the SnapManager profile name. You can do thisin one of the following ways:
• Specify the backup utility parameter file (initSID.utl) using the -r option in the BRBACKUPcommand.
• Specify the parameter file in the BR*Tools initialization file (initSID.sap).
Note: Backups (data files, control files, or online redo log files) that are created by usingBRBACKUP can be restored from secondary or tertiary storage systems by using the smsaprestore command. However, it is recommended to back up the other SAP configuration files, forexample, SAP log files, kernel files, and transports requests by using BRBACKUP with SAP_DIR,and restore by using BRRESTORE.
You can override the checks on a volume-based, fast restore using BRRESTORE by specifyingfast=override in the .utl file (the same file in which you specify the profile name if it isdifferent from the database system identifier).
Backing up and restoring files using BR*ToolsIn addition to backing up database files, you can use BR*Tools to back up and restore any files, suchas the SAP system files stored on the storage system.
Follow the SAP BR*Tools documentation for the BRBACKUP and BRRESTORE commands. Thefollowing additional information applies when you are using SnapManager for SAP:
• The files must be stored on the storage system.
• Be sure you have permissions for the files you are backing up. For example, backing up SAPsystem files (BRBACKUP backup_mode=sap_dir) or Oracle system files (BRBACKUPbackup_mode=ora_dir) requires root permission on the host. Use the su root commandbefore running BRBACKUP.
Restoring a backup to a different hostYou can use the BRRESTORE or smsap restore command to restore a backup that you made withBRBACKUP on a different host. The new host must also be running SnapManager for SAP.
Make SnapManager profile available
Before you can run BRRESTORE, you must make the SnapManager profile of the original hostavailable to the new host. Complete the following steps:
• Set credential for repository: Use the smsap credential set command to enable the new hostto access the SnapManager repository used for the original backup.
210 | Administration Guide for UNIX
• Set credential for profile: Use the smsap credential set command to enable the new host toaccess the SnapManager profile used for the original backup.
• Load the profile on the new host: Use the smsap profile sync command to load theSnapManager profile information onto the new host.
Run BRRESTORE
Configure new storage on the new host with the same paths as the original storage on the originalhost.
Use the BRRESTORE command to restore the backup to the new host. By default, the files are restoredto the original path locations. You can specify an alternate path for the restored files using the -moption of the BRRESTORE command. See the SAP documentation for more information onBRRESTORE.
Restoring a backup from a secondary storage to a differentlocation
You can use the BRRESTORE or smsap restore command to restore a secondary backup to adifferent location. The new host must also be running SnapManager.
You must set the preferred_backup_locations andrestore_from_nearest_backup_location parameters in the initSID.utl file to restore thesecondary backup to a desired location.
1. Edit the initSID.utl file.
2. Add preferred_backup_locations and restore_from_nearest_backup_location inthe file.
Note: The PREFERRED_BACKUP_LOCATIONS environment variable overrides the value set forthe preferred_backup_locations parameter in the initSID.utl file.
Note:
• If the value for preferred_backup_locations does not match any protection policy nodenames and restore_from_nearest_backup_location is set to No, the operation fails.
• If either the value for preferred_backup_locations is not set orrestore_from_nearest_backup_location is set to Yes, the restore operation can beperformed from the nearest backup location.
Using BR*Tools with SnapManager for SAP | 211
SnapManager for SAP command reference
The SnapManager command reference includes the valid usage syntax, options, parameters, andarguments you should supply with the commands, along with examples.
The following issues apply to command usage:
• Commands are case-sensitive.
• SnapManager accepts up to 200 characters and labels up to 80 characters.
• If the shell on your host limits the number of characters that can appear on a command line, youcan use the cmdfile command.
• Do not use spaces in profile names or label names.
• In the clone specification, do not use spaces in the clone location.
SnapManager can display three levels of messages to the console:
• Error messages
• Warning messages
• Informational messages
You can specify how you want messages displayed. If you specify nothing, SnapManager displaysonly error messages and warnings to the console. To control the amount of output that SnapManagerdisplays on the console, use one of the following command line options:
• -quiet: Displays only error messages to the console.
• -verbose: Displays error, warning, and informational messages to the console.
Note: Regardless of the default behavior, or the level of detail you specify for the display,SnapManager always writes all message types to the log files.
The backint register-sld commandIf you want to use SAP BR*Tools, you can run the backint register-sld command withSnapManager for SAP to register the BACKINT interface at your System Landscape Directory(SLD). The BACKINT interface is provided by the storage vendor to make the storage system workwith the BR*Tools commands. SnapManager for SAP installs its BACKINT interface file at /opt/NetApp/smsap/bin/.
Syntax
backint register-sld-host host_name-port port_id-username username-password password-template template_ID
Parameters-host host_name
Specifies the name of the host on which the SAP SLD is running.
212
-port port_id
Specifies the ID of the port on which the SAP SLD accepts HTTP requests. The IDmust be numeric and less than or equal to nine digits.
-username username
Specifies a valid and authorized SAP SLD user name.
-password password
Specifies a valid and authorized SAP SLD user password. This is optional. If youdo not set the password by using -password, you will be prompted to enter apassword in the following format:
username@http://host:port
If you fail to enter the correct password, after three attempts the command fails andexits.
-template template_id
Specifies the name of the master template XML file, which can be used as a basefor your custom file.
Example command
The following example shows a successful completion of the command:
backint register-sld -host jack12 -port 50100 -username j2ee_admin -password user123 -template /u/template.xmlOperation Id [N96f4142a1442b31ee4636841babbc1d7] succeeded.
The smsap_server restart commandThis command restarts the SnapManager host server and is entered as root.
Syntax
smsap_server restart [-quiet | -verbose]
Parameters-quiet
Specifies that only error messages are displayed on the console. The default is todisplay error and warning messages.
-verbose
Specifies that error, warning, and informational messages are displayed on theconsole.
Example command
The following example restarts the host server.
smsap_server restart
SnapManager for SAP command reference | 213
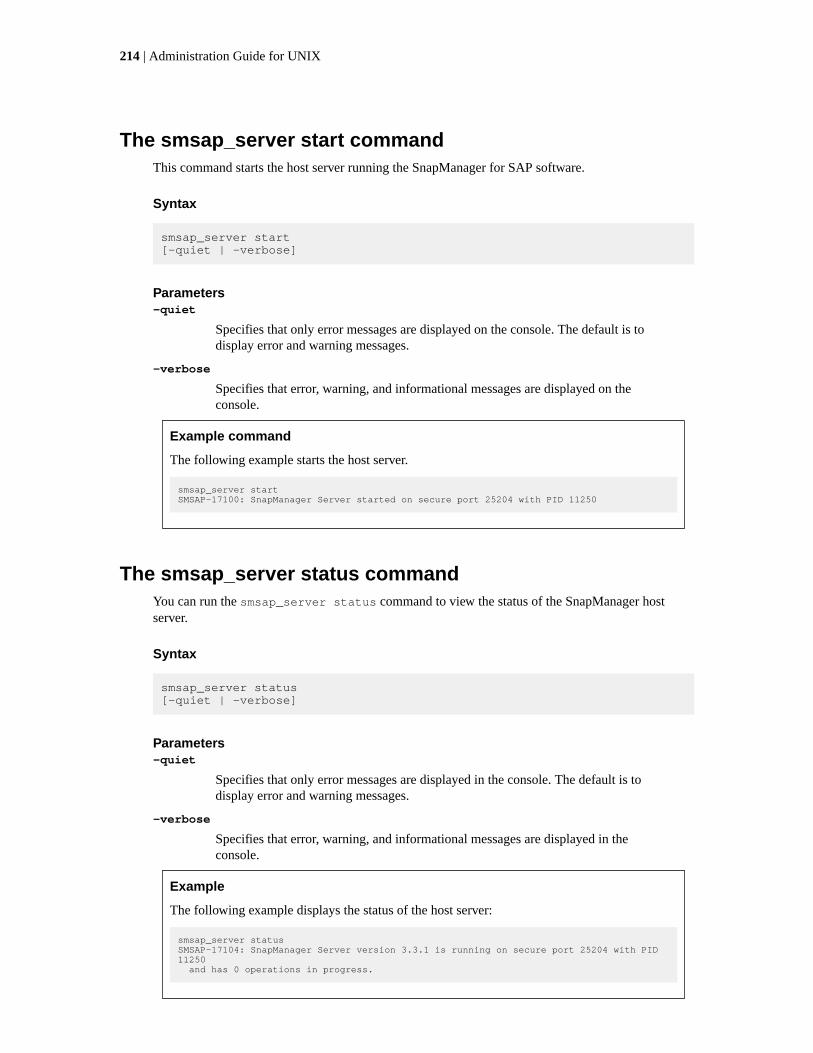
The smsap_server start commandThis command starts the host server running the SnapManager for SAP software.
Syntax
smsap_server start [-quiet | -verbose]
Parameters-quiet
Specifies that only error messages are displayed on the console. The default is todisplay error and warning messages.
-verbose
Specifies that error, warning, and informational messages are displayed on theconsole.
Example command
The following example starts the host server.
smsap_server startSMSAP-17100: SnapManager Server started on secure port 25204 with PID 11250
The smsap_server status commandYou can run the smsap_server status command to view the status of the SnapManager hostserver.
Syntax
smsap_server status [-quiet | -verbose]
Parameters-quiet
Specifies that only error messages are displayed in the console. The default is todisplay error and warning messages.
-verbose
Specifies that error, warning, and informational messages are displayed in theconsole.
Example
The following example displays the status of the host server:
smsap_server statusSMSAP-17104: SnapManager Server version 3.3.1 is running on secure port 25204 with PID 11250 and has 0 operations in progress.
214 | Administration Guide for UNIX
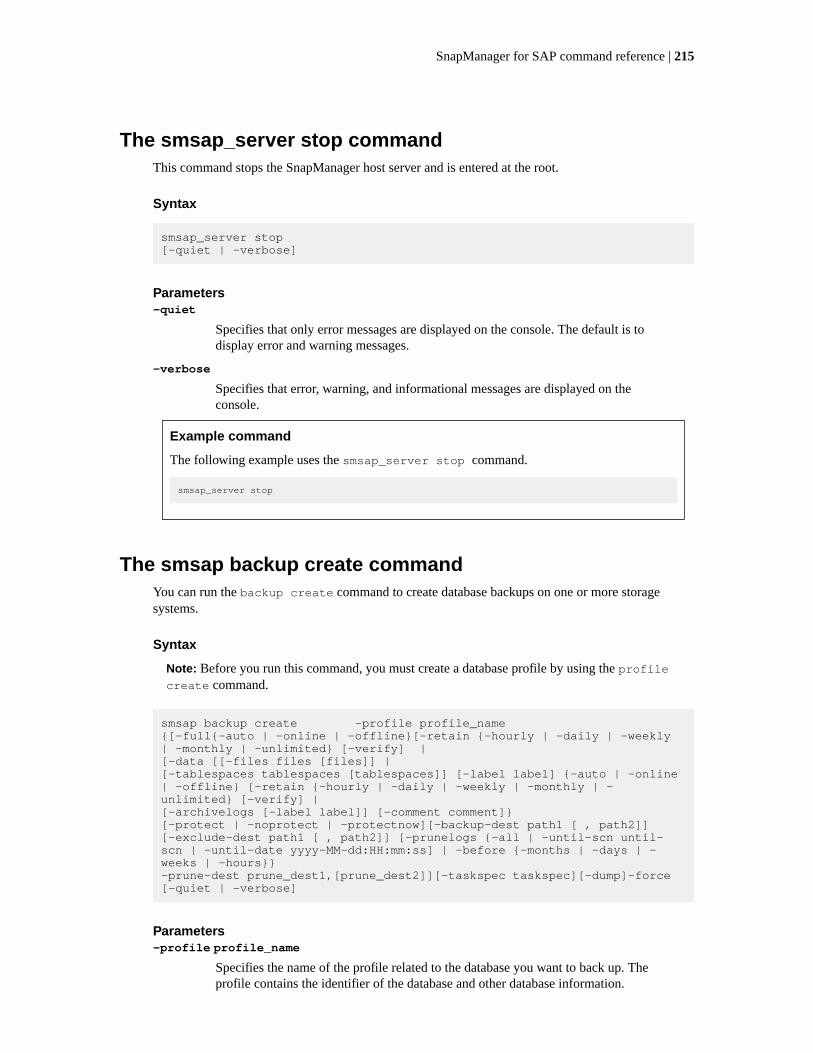
The smsap_server stop commandThis command stops the SnapManager host server and is entered at the root.
Syntax
smsap_server stop [-quiet | -verbose]
Parameters-quiet
Specifies that only error messages are displayed on the console. The default is todisplay error and warning messages.
-verbose
Specifies that error, warning, and informational messages are displayed on theconsole.
Example command
The following example uses the smsap_server stop command.
smsap_server stop
The smsap backup create commandYou can run the backup create command to create database backups on one or more storagesystems.
Syntax
Note: Before you run this command, you must create a database profile by using the profilecreate command.
smsap backup create -profile profile_name {[-full{-auto | -online | -offline}[-retain {-hourly | -daily | -weekly | -monthly | -unlimited} [-verify] |[-data [[-files files [files]] | [-tablespaces tablespaces [tablespaces]] [-label label] {-auto | -online | -offline} [-retain {-hourly | -daily | -weekly | -monthly | -unlimited} [-verify] |[-archivelogs [-label label]] [-comment comment]}[-protect | -noprotect | -protectnow][-backup-dest path1 [ , path2]] [-exclude-dest path1 [ , path2]] [-prunelogs {-all | -until-scn until-scn | -until-date yyyy-MM-dd:HH:mm:ss] | -before {-months | -days | -weeks | -hours}}-prune-dest prune_dest1,[prune_dest2]][-taskspec taskspec][-dump]-force [-quiet | -verbose]
Parameters-profile profile_name
Specifies the name of the profile related to the database you want to back up. Theprofile contains the identifier of the database and other database information.
SnapManager for SAP command reference | 215
-auto option
If the database is in the mounted or offline state, SnapManager performs an offlinebackup. If the database is in the open or online state, SnapManager performs anonline backup. If you use the -force option with the -offline option,SnapManager forces an offline backup even if the database is currently online.
-online option
Specifies an online database backup.
You can create an online backup of a Real Application Clusters (RAC) database, aslong as the primary is in the open state, or the primary is mounted and an instanceis in the open state. You can use the -force option for online backups if the localinstance is in the shutdown state, or no instance is in the open state. The version ofOracle must be 10.2.0.5; otherwise, the database will hang if any instance in theRAC is mounted.
• If the local instance is in the shutdown state and at least one instance is in theopen state, you can use the -force option to change the local instance to themounted state.
• If no instance is in open state, you can use the -force option to change thelocal instance to open state.
-offline option
Specifies an offline backup while the database is in the shut down state. If thedatabase is in the open or mounted state, the backup fails. If the -force option isused, SnapManager attempts to alter the database state to shut down the databasefor an offline backup.
-full option
Backs up the entire database. This includes all of the data, archived log, and controlfiles. The archived redo logs and control files are backed up no matter what type ofbackup you perform. If you want to back up only a portion of the database, use the-files option or -tablespaces option.
-data option
Specifies the data files.
-files list
Backs up only the specified data files plus the archived log and control files.Separate the list of file names with spaces. If the database is in the open state,SnapManager verifies that the appropriate tablespaces are in online backup mode.
-tablespaces tablespaces
Backs up only the specified database tablespaces plus the archived log and controlfiles. Separate the tablespace names with spaces. If the database is in the open state,SnapManager verifies that the appropriate tablespaces are in online backup mode.
-label label
Specifies an optional name for this backup. This name must be unique within theprofile. The name can contain letters, numbers, underscores (_), and hyphens (-). Itcannot start with a hyphen. If you do not specify a label, SnapManager creates adefault label in the scope_type_date format:
• Scope is either F to indicate a full backup or P to indicate a partial backup.
• Type is C to indicate an offline (cold) backup, H to indicate an online (hot)backup, or A to indicate auto backup, for example, P_A_20081010060037IST.
• Date is the year, month, day, and time of the backup.
216 | Administration Guide for UNIX
SnapManager uses a 24-hour clock.
For example, if you performed a full backup with the database offline on 16thJanuary 2007, at 5:45:16 p.m. Eastern Standard Time, SnapManager would createthe label F_C_20070116174516EST.
-comment string
Specifies an optional comment to describe this backup. Enclose the string in singlequotation marks (').
Note: Some shells strip the quotation marks off. In this case, you must includethe quotation mark with a backslash (\). For example, you might need to enter thefollowing: \' this is a comment\'.
-verify option
Verifies that the files in the backup are not corrupt by running the Oracle dbv utility.
Note: If you specify the -verify option, the backup operation is not completeduntil the verify operation is complete.
-force option
Forces a state change if the database is not in the correct state. For example,SnapManager might change the state of the database from online to offline, basedon the type of backup you specify and the state that the database is in.
With an online RAC database backup, use the -force option if the local instance isin the shutdown state, or no instance is in the open state.
Note: The version of Oracle must be 10.2.0.5; otherwise, the database will hangif any instance in the RAC is mounted.
• If the local instance is in the shutdown state and at least one instance is in theopen state, then using the -force option changes the local instance to themounted state.
• If no instance is in the open state, using the -force option changes the localinstance to the open state.
-quiet
Displays only error messages in the console. The default is to display error andwarning messages.
-verbose
Displays error, warning, and informational messages in the console.
-protect | -noprotect | -protectnow
Indicates whether the backup should be protected to secondary storage. The -noprotect option specifies that the backup should not be protected to secondarystorage. Only full backups are protected. If neither option is specified,SnapManager protects the backup as the default if the backup is a full backup andthe profile specifies a protection policy. The -protectnow option is applicableonly for Data ONTAP operating in 7-Mode. The option specifies that the backup beprotected immediately to secondary storage.
-retain { -hourly | -daily | -weekly | -monthly | -unlimited}
Specifies whether the backup should be retained on an hourly, daily, weekly,monthly, or unlimited basis. If the -retain option is not specified, the retentionclass defaults to -hourly option. To retain backups forever, use the -unlimitedoption. The -unlimited option makes the backup ineligible for deletion by theretention policy.
SnapManager for SAP command reference | 217
-archivelogs option
Creates archive log backup.
-backup-dest path1, [, [path2]]
Specifies the archive log destinations to be backed up for archive log backup.
-exclude-dest path1, [, [path2]]
Specifies the archive log destinations to be excluded from the backup.
-prunelogs {-all | -until-scn until-scn | -until-date yyyy-MM-dd:HH:mm:ss | -before {-months | -days | -weeks | -hours}
Deletes the archive log files from the archive log destinations based on optionsprovided while creating a backup. The -all option deletes all of the archive logfiles from the archive log destinations. The -until-scn option deletes the archivelog files until a specified System Change Number (SCN). The -until-dateoption deletes the archive log files until the specified time period. The -beforeoption deletes the archive log files before the specified time period (days, months,weeks, hours).
-prune-dest prune_dest1,prune_dest2
Deletes the archive log files from the archive log destinations while creating thebackup.
-taskspec taskspec
Specifies the task specification XML file that can be used for preprocessing activityor post-processing activity of the backup operation. The complete path of the XMLfile should be provided while giving the -taskspec option.
-dump option
Collects the dump files after a successful or failed database backup operation.
Example command
The following command creates a full online backup, creates a backup to secondary storage,and sets the retention policy to daily:
smsap backup create -profile SALES1 -full -online-label full_backup_sales_May -profile SALESDB -force -retain -dailyOperation Id [8abc01ec0e79356d010e793581f70001] succeeded.
Related concepts
Restoring protected backups from secondary storage on page 147
Related tasks
Creating database backups on page 70
Related references
The smsap profile create command on page 268
218 | Administration Guide for UNIX
The smsap backup delete commandYou can run the backup delete command to remove backups that are not automatically removed,such as backups that were used to create a clone or backups that failed. You can delete backupsretained on an unlimited basis without changing the retention class.
Syntax
smsap backup delete -profile profile_name [-label label [-data | -archivelogs] | [-id guid | -all] -force [-dump][-quiet | -verbose]
Parameters-profile profile_name
Specifies the database associated with the backup you want to remove. The profilecontains the identifier of the database and other database information.
-id guid
Specifies the backup with the specified GUID. The GUID is generated bySnapManager when you create a backup. You can use the smsap backup listcommand to display the GUID for each backup.
-label label
Specifies the backup with the specified label. Optionally, specify the scope of thebackup as data file or archive log.
-data
Specifies the data files.
-archivelogs
Specifies the archive log files.
-all
Specifies all backups. To delete only specified backups instead, use the -id or -label option.
-dump
Collects the dump files after a successful or failed backup delete operation.
-force
Forces the removal of the backup. SnapManager removes the backup even if thereare problems in freeing the resources associated with the backup. For example, ifthe backup was cataloged with Oracle Recovery Manager (RMAN), but the RMANdatabase no longer exists, including -force deletes the backup even though itcannot connect with RMAN.
-quiet
Displays only error messages in the console. The default is to display error andwarning messages.
SnapManager for SAP command reference | 219
-verbose
Displays error, warning, and informational messages in the console.
Example
The following example deletes the backup:
smsap backup delete -profile SALES1 -label full_backup_sales_MayOperation Id [8abc01ec0e79004b010e79006da60001] succeeded.
Related tasks
Deleting backups on page 88
Related references
The smsap profile create command on page 268
The smsap profile update command on page 277
The smsap backup free commandYou can run the backup free command to free the Snapshot copies of the backups withoutremoving the backup metadata from the repository.
Syntax
smsap backup free -profile profile_name [-label label [-data | -archivelogs] | [-id guid | -all] -force [-dump][-quiet | -verbose]
Parameters-profile profile_name
Specifies the profile associated with the backup you want to free. The profilecontains the identifier of the database and other database information.
-id guid
Specifies the resources of the backup with the specified GUID. The GUID isgenerated by SnapManager when you create a backup. You can use the smsapbackup list command to display the GUID for each backup. Include the -verbose option to display the backup IDs.
-label label
Specifies the backup with the specified label.
-data
Specifies the data files.
-archivelogs
Specifies the archive log files.
220 | Administration Guide for UNIX
-all
Specifies all backups. To delete specified backups instead, use the -id or -labeloption.
-force
Forces the removal of the Snapshot copies.
-quiet
Displays only error messages in the console. The default is to display error andwarning messages.
-verbose
Displays error, warning, and informational messages in the console.
Example
The following example frees the backup:
smsap backup free -profile SALES1 -label full_backup_sales_MayOperation Id [8abc01ec0e79004b010e79006da60001] succeeded.
Related tasks
Freeing backups on page 87
The smsap backup list commandYou can run the backup list command to display information about the backups in a profile,including information about the retention class and protection status.
Syntax
smsap backup list -profile profile_name -delimiter character [-data | -archivelogs | -all][-quiet | -verbose]
Parameters-profile profile_name
Specifies the profile you want to list backups for. The profile contains the identifierof the database and other database information.
-delimiter character
Displays each row on a separate line. The attributes in the row are separated by thecharacter specified.
-data
Specifies the data files.
-archivelogs
Specifies the archive log files.
SnapManager for SAP command reference | 221
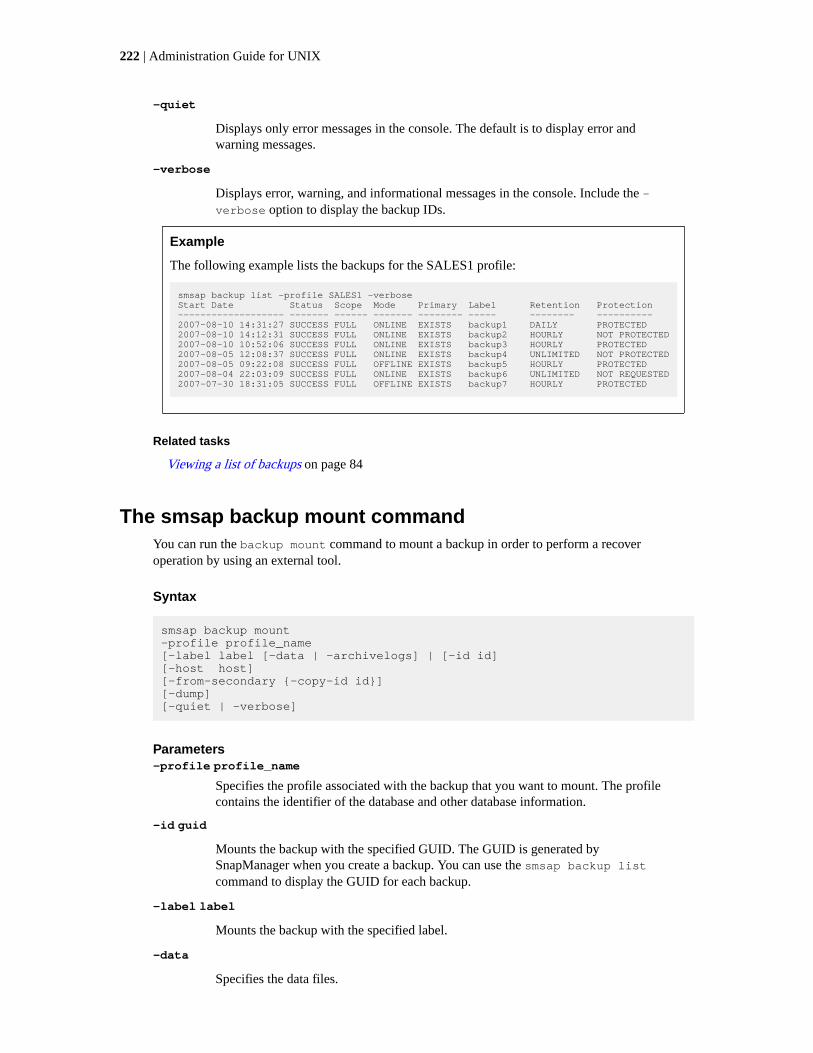
-quiet
Displays only error messages in the console. The default is to display error andwarning messages.
-verbose
Displays error, warning, and informational messages in the console. Include the -verbose option to display the backup IDs.
Example
The following example lists the backups for the SALES1 profile:
smsap backup list -profile SALES1 -verboseStart Date Status Scope Mode Primary Label Retention Protection------------------- ------- ------ ------- -------- ----- -------- ----------2007-08-10 14:31:27 SUCCESS FULL ONLINE EXISTS backup1 DAILY PROTECTED2007-08-10 14:12:31 SUCCESS FULL ONLINE EXISTS backup2 HOURLY NOT PROTECTED2007-08-10 10:52:06 SUCCESS FULL ONLINE EXISTS backup3 HOURLY PROTECTED2007-08-05 12:08:37 SUCCESS FULL ONLINE EXISTS backup4 UNLIMITED NOT PROTECTED2007-08-05 09:22:08 SUCCESS FULL OFFLINE EXISTS backup5 HOURLY PROTECTED2007-08-04 22:03:09 SUCCESS FULL ONLINE EXISTS backup6 UNLIMITED NOT REQUESTED2007-07-30 18:31:05 SUCCESS FULL OFFLINE EXISTS backup7 HOURLY PROTECTED
Related tasks
Viewing a list of backups on page 84
The smsap backup mount commandYou can run the backup mount command to mount a backup in order to perform a recoveroperation by using an external tool.
Syntax
smsap backup mount -profile profile_name [-label label [-data | -archivelogs] | [-id id] [-host host] [-from-secondary {-copy-id id}] [-dump][-quiet | -verbose]
Parameters-profile profile_name
Specifies the profile associated with the backup that you want to mount. The profilecontains the identifier of the database and other database information.
-id guid
Mounts the backup with the specified GUID. The GUID is generated bySnapManager when you create a backup. You can use the smsap backup listcommand to display the GUID for each backup.
-label label
Mounts the backup with the specified label.
-data
Specifies the data files.
222 | Administration Guide for UNIX
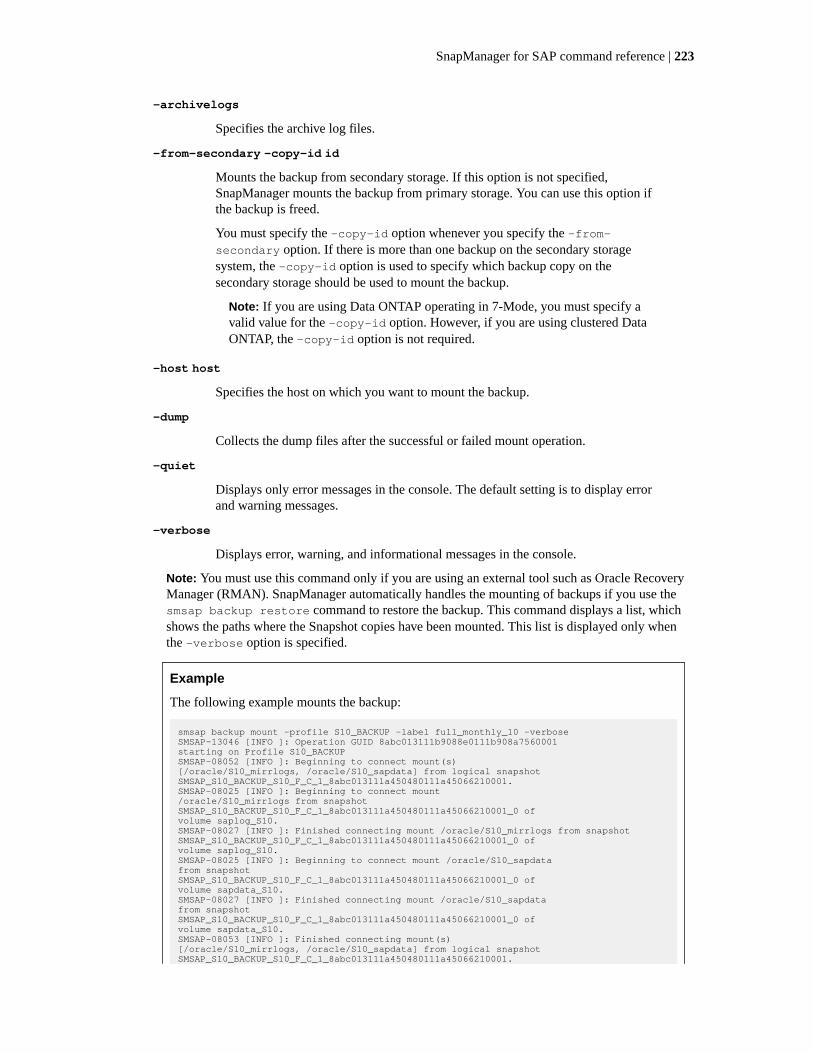
-archivelogs
Specifies the archive log files.
-from-secondary -copy-id id
Mounts the backup from secondary storage. If this option is not specified,SnapManager mounts the backup from primary storage. You can use this option ifthe backup is freed.
You must specify the -copy-id option whenever you specify the -from-secondary option. If there is more than one backup on the secondary storagesystem, the -copy-id option is used to specify which backup copy on thesecondary storage should be used to mount the backup.
Note: If you are using Data ONTAP operating in 7-Mode, you must specify avalid value for the -copy-id option. However, if you are using clustered DataONTAP, the -copy-id option is not required.
-host host
Specifies the host on which you want to mount the backup.
-dump
Collects the dump files after the successful or failed mount operation.
-quiet
Displays only error messages in the console. The default setting is to display errorand warning messages.
-verbose
Displays error, warning, and informational messages in the console.
Note: You must use this command only if you are using an external tool such as Oracle RecoveryManager (RMAN). SnapManager automatically handles the mounting of backups if you use thesmsap backup restore command to restore the backup. This command displays a list, whichshows the paths where the Snapshot copies have been mounted. This list is displayed only whenthe -verbose option is specified.
Example
The following example mounts the backup:
smsap backup mount -profile S10_BACKUP -label full_monthly_10 -verboseSMSAP-13046 [INFO ]: Operation GUID 8abc013111b9088e0111b908a7560001 starting on Profile S10_BACKUPSMSAP-08052 [INFO ]: Beginning to connect mount(s)[/oracle/S10_mirrlogs, /oracle/S10_sapdata] from logical snapshotSMSAP_S10_BACKUP_S10_F_C_1_8abc013111a450480111a45066210001.SMSAP-08025 [INFO ]: Beginning to connect mount/oracle/S10_mirrlogs from snapshotSMSAP_S10_BACKUP_S10_F_C_1_8abc013111a450480111a45066210001_0 ofvolume saplog_S10.SMSAP-08027 [INFO ]: Finished connecting mount /oracle/S10_mirrlogs from snapshotSMSAP_S10_BACKUP_S10_F_C_1_8abc013111a450480111a45066210001_0 ofvolume saplog_S10.SMSAP-08025 [INFO ]: Beginning to connect mount /oracle/S10_sapdatafrom snapshotSMSAP_S10_BACKUP_S10_F_C_1_8abc013111a450480111a45066210001_0 ofvolume sapdata_S10.SMSAP-08027 [INFO ]: Finished connecting mount /oracle/S10_sapdatafrom snapshotSMSAP_S10_BACKUP_S10_F_C_1_8abc013111a450480111a45066210001_0 ofvolume sapdata_S10.SMSAP-08053 [INFO ]: Finished connecting mount(s)[/oracle/S10_mirrlogs, /oracle/S10_sapdata] from logical snapshotSMSAP_S10_BACKUP_S10_F_C_1_8abc013111a450480111a45066210001.
SnapManager for SAP command reference | 223

SMSAP-13037 [INFO ]: Successfully completed operation: Backup MountSMSAP-13048 [INFO ]: Operation Status: SUCCESSSMSAP-13049 [INFO ]: Elapsed Time: 0:01:00.981Operation Id [8abc013111b9088e0111b908a7560001] succeeded.
Related tasks
Mounting backups on page 86
The smsap backup restore commandYou can run the backup restore command to restore backups of a database or a portion of adatabase, and then optionally recover the database information.
Syntax
smsap backup restore -profile profile_name [-label label | -id id] [-files files [files...] | -tablespaces tablespaces [tablespaces...]] | -complete | -controlfiles] [-recover {-alllogs | -nologs | -until until} [-using-backup-controlfile] ] [-restorespec restorespec | -from-secondary [-temp-volume temp_volume] [-copy-id id]] [-preview] [-fast {-require | -override | -fallback | -off}] [-recover-from-location path1 [, path2]][-taskspec taskspec][-dump][-force] [-quiet | -verbose]
Parameters-profile profile_name
Specifies the database that you want to restore. The profile contains the identifier ofthe database and other database information.
-label name
Restores the backup with the specified label.
-id guid
Restores the backup with the specified GUID. The GUID is generated bySnapManager when you create a backup. You can use the smsap backup listcommand to display the GUID for each backup.
Choose all or specified files
Optionally, you can use one of the following options:
• -complete: Restores all the data files in the backup.
• -tablespaces list: Restores only the specified tablespaces from the backup.
You must use spaces to separate the names in the list.
• -files list: Restores only the specified data files from the backup.
You must use spaces to separate the names in the list. If the database is running,SnapManager ensures that the tablespace containing the files is offline.
224 | Administration Guide for UNIX
-controlfiles
Restores the control files. SnapManager allows you to restore control files alongwith the data files from the backups in a single operation. The -controlfilesoption is independent of other restore scope parameters such as -complete, -tablespaces, and -files.
-recover
Recovers the database after restoring it. You must also specify the point to whichyou want SnapManager to recover the database by using one of the followingoptions:
• -nologs: Recovers the database to the time of the backup and applies no logs.
You can use this parameter for online or offline backups.
• -alllogs: Recovers the database to the last transaction or commit, and appliesall required logs.
• -until date: Recovers the database up to the date and time specified.
You must use the year-month-date: hour: minute: second (yyyy-mm-dd:hh:mm:ss) format. For hours, use either 12-hour or 24-hour format,depending on the database setting.
• -until scn: Rolls forward the data files until it reaches the specified systemchange number (SCN).
• -using-backup-controlfile: Recovers the database using the backupcontrol file.
-restorespec
Enables you to restore the data to an active file system and restore from thespecified data by providing a mapping of each original Snapshot copy to its activefile system. If you do not specify an option, SnapManager restores the data fromthe Snapshot copies on primary storage. You can specify one of the followingoptions:
• -restorespec: Specifies the data to restore and the restore format.
• -from-secondary: Restores the data from secondary storage.
You cannot use this option if the backup exists on primary storage; the primarybackup must be freed before a backup can be restored from secondary storage.If you use a temporary volume, you must specify the volume by using the -temp-volume option.
You must specify the -copy-id option whenever you specify the -from-secondary option. If there is more than one backup on the secondary storagesystem, the -copy-id option is used to specify which backup copy on thesecondary storage should be used for the restore operation.
Note: If you are using Data ONTAP operating in 7-Mode, you must specify avalid value for the -copy-id option. However, if you are using clusteredData ONTAP, the -copy-id option is not required
When restoring from secondary storage, SnapManager first attempts to restore datadirectly from the secondary storage system to the primary storage system (withoutinvolving the host). If SnapManager cannot perform this type of restore (forexample, if the files are not part of the file system), then SnapManager will fallback to a host-side file copy restore. SnapManager has two methods for performinga host-side file copy restore from secondary. The method that SnapManager selectsis configured in the smsap.config file.
SnapManager for SAP command reference | 225
• Direct: SnapManager clones the data on secondary storage, mounts the cloneddata from the secondary storage system to the host, and then copies data out ofthe clone into the active environment.
This is the default secondary access policy.
• Indirect: SnapManager first copies the data to a temporary volume on primarystorage, mounts the data from the temporary volume to the host, and then copiesdata out of the temporary volume into the active environment.
This policy should be used only if the host does not have direct access to thesecondary storage system. Restores using the indirect method will take twice aslong as the direct secondary access policy because two copies of the data aremade.
The decision whether to use the direct or indirect method is controlled by the valueof the restore.secondaryAccessPolicy parameter in the smsap.configconfiguration file.
-preview
Displays the following information:
• Which restore mechanism (fast restore, storage-side file system restore, storage-side file restore, or host-side file copy restore) will be used to restore each file
• Why more efficient mechanisms were not used to restore each file, when youspecify the -verbose option
If you are using the -preview option, you must know the following:
• The -force option has no impact on the command.
• The -recover option has no impact on the command.
• The -fast option (-require, -override, -fallback, or -off) hassignificant impact on the output.
To preview the restore operation, the database must be mounted. If you want topreview a restore plan, and the database currently is not mounted, thenSnapManager mounts the database. If the database cannot be mounted, then thecommand will fail, and SnapManager returns the database to its original state.
The -preview option displays up to 20 files. You can configure the maximumnumber of files to be displayed in the smsap.config file.
-fast
Enables you to choose the process to use in the restore operation. You can forceSnapManager to use the volume-based fast restore process rather than other restoreprocesses, if all mandatory restore eligibility conditions are met. If you are awarethat a volume restore cannot be performed, you can also use this process to preventSnapManager from conducting eligibility checks and the restore operation by usingthe fast restore process.
The -fast option includes the following parameters:
• -require: Enables you to force SnapManager to perform a volume restore, ifall restore eligibility conditions are met.
If you specify the -fast option, but do not specify any parameter for -fast,SnapManager uses the -require parameter as a default.
• -override: Enables you to override the non-mandatory eligibility checks andperform the volume-based fast restore process.
226 | Administration Guide for UNIX
• -fallback: Enables you to restore the database by using any method thatSnapManager determines.
If you do not specify the -fast option, SnapManager uses the default backuprestore -fast fallback option.
• -off: Enables you to avoid the time required to perform eligibility checks.
-recover-from-location
Specifies the external archive log location of the archive log files. SnapManagertakes the archive log files from the external location and uses them for the recoveryprocess.
-taskspec
Specifies the task specification XML file for preprocessing activity or post-processing activity of the restore operation. You must provide the complete path ofthe task specification XML file.
-dump
Specifies to collect the dump files after the restore operation.
-force
Changes the database state to a lower state than its current state, if necessary. ForReal Application Clusters (RAC), you must include the -force option ifSnapManager has to change the state of any RAC instance to a lower state.
By default, SnapManager can change the database state to a higher state during anoperation. This option is not required for SnapManager to change the database to ahigher state.
-quiet
Displays only error messages in the console. The default setting is to display errorand warning messages.
-verbose
Displays error, warning, and informational messages in the console. You can usethis option to see why more efficient restore processes could not be used to restorethe file.
Example
The following example restores a database along with the control files:
smsap backup restore -profile SALES1 -label full_backup_sales_May-complete -controlfiles -force
Related concepts
Restoring database backups on page 95
Related tasks
Restoring backups from an alternate location on page 118
Creating restore specifications on page 116
SnapManager for SAP command reference | 227
The smsap backup show commandYou can use the backup show command to display detailed information about a backup, includingits protection status, backup retention class, and backups on primary and secondary storage.
Syntax
smsap backup show -profile profile_name [-label label [-data | -archivelogs] | [-id id] [-quiet | -verbose]
Parameters-profile profile_name
Specifies the profile for which to show backups. The profile contains the identifierof the database and other database information.
-label label
Specifies the label of the backup.
-data
Specifies the data files.
-archivelogs
Specifies the archive log files.
-id id
Specifies the backup ID.
-quiet
Displays only error messages in the console. The default is to display error andwarning messages.
-verbose
Displays error, warning, and informational messages in the console, as well as anyclone and verification information.
Example
The following example shows detailed information about the backup:
smsap backup show -profile SALES1 -label BTNFS -verboseBackup id: 8abc013111a450480111a45066210001Backup status: SUCCESSPrimary storage resources: EXISTSProtection sate: PROTECTEDRetention class: DAILYBackup scope: FULLBackup mode: OFFLINEMount status: NOT MOUNTEDBackup label: BTNFSBackup comment:
Backup start time: 2007-03-30 15:26:30Backup end time: 2007-03-30 15:34:13Verification status: OKBackup Retention Policy: NORMALBackup database: hsdb1Checkpoint: 2700620Tablespace: SYSAUXDatafile: /mnt/ssys1/data/hsdb/sysaux01.dbf [ONLINE]...
228 | Administration Guide for UNIX

Control Files:File: /mnt/ssys1/data/control03.ctl...Archive Logs:File: /mnt/ssys1/data/archive_logs/2_131_626174106.dbf...Host: Host1Filesystem: /mnt/ssys1/dataFile: /mnt/ssys1/data/hsdb/SMSAPBakCtl_1175283005231_0...Volume: hs_dataSnapshot: SMSAP_HSDBR_hsdb1_F_C_1_8abc013111a450480111a45066210001_0File: /mnt/ssys1/data/hsdb/SMSAPBakCtl_1175283005231_0...Protected copies on Secondary Storage: 14448939 - manow 88309228 - graffe
Related tasks
Viewing backup details on page 84
The smsap backup unmount commandYou can run the backup unmount command to unmount a backup.
Syntax
smsap backup unmount -profile profile_name [-label label [-data | -archivelogs] | [-id id] [-force] [-dump][-quiet | -verbose]
Parameters-profile profile_name
Specifies the profile for which you want to unmount a backup. The profile containsthe identifier of the database and other database information.
-id id
Unmounts the backup with the specified GUID. The GUID is generated bySnapManager when you create a backup. You can use the smsap backup listcommand to display the GUID for each backup.
-label label
Unmounts the backup with the specified label.
-data
Specifies the data files.
-archivelogs
Specifies the archive log files.
-dump
Collects the dump files after a successful or failed unmount operation.
-force
Unmounts the backup even if there are problems in freeing the resources associatedwith the backup. SnapManager tries to unmount the backup and clean up any
SnapManager for SAP command reference | 229
associated resources. The log shows the unmount operation as successful, but youmay have to manually clean up resources if there are errors in the log.
-quiet
Displays only error messages in the console. The default is to display error andwarning messages.
-verbose
Displays error, warning, and informational messages in the console.
Example
The following is an example of an unmount operation:
# smsap backup unmount -label test -profile SALES1 -verbose
SMSAP-13046 [INFO ]: Operation GUID 8abc013111b909eb0111b90a02f50001 starting on Profile SALES1SMSAP-08028 [INFO ]: Beginning to disconnect connected mount(s)[/u/user1/mnt/_mnt_ssys1_logs_SMSAP_SALES1_hsdb1_F_C_1_8abc013111a450480111a45066210001, /u/user1/mnt/_mnt_ssys1_data_SMSAP_SALES1_hsdb1_F_C_1_8abc013111a450480111a45066210001].SMSAP-08030 [INFO ]: Done disconnecting connected mount(s)[/u/user1/mnt/_mnt_ssys1_logs_SMSAP_SALES1_hsdb1_F_C_1_8abc013111a450480111a45066210001, /u/user1//mnt/_mnt_ssys1_data_SMSAP_SALES1_hsdb1_F_C_1_8abc013111a450480111a45066210001].SMSAP-13037 [INFO ]: Successfully completed operation: Backup UnmountSMSAP-13048 [INFO ]: Operation Status: SUCCESSSMSAP-13049 [INFO ]: Elapsed Time: 0:00:33.715Operation Id [8abc013111b909eb0111b90a02f50001] succeeded.
Related tasks
Unmounting backups on page 86
The smsap backup update commandYou can run the backup update command to update the backup retention policy.
Syntax
smsap backup update -profile profile_name [-label label [-data | -archivelogs] | [-id guid] [-retain {-hourly | -daily | -weekly | -monthly | -unlimited}][-comment comment_text] [-quiet | -verbose]
Parameters-profile profile_name
Specifies the profile for which to update backups. The profile contains the identifierof the database and other database information.
-id guid
Verifies the backup with the specified GUID. The GUID is generated bySnapManager when you create a backup. You can use the smsap backup listcommand to display the GUID for each backup.
230 | Administration Guide for UNIX
-label label
Specifies the backup label and scope of the backup as data file or archive log.
-data
Specifies the data files.
-archivelogs
Specifies the archive log files.
-comment comment_text
Enter text (up to 200 characters) about the backup update. You can include spaces.
-quiet
Displays only error messages in the console. The default is to display error andwarning messages.
-verbose
Displays error, warning, and informational messages in the console.
-retain {-hourly | -daily | -weekly | -monthly | -unlimited}
Specifies whether the backup should be retained on an hourly, daily, weekly,monthly, or unlimited basis. If -retain is not specified, the retention class defaultsto -hourly. To retain backups forever, use the -unlimited option. The -unlimited option makes the backup ineligible for deletion.
Example
The following example updates the backup to be set the retention policy to unlimited:
smsap backup update -profile SALES1 -label full_backup_sales_May-retain -unlimited -comment save_forever_monthly_backup
Related tasks
Changing the backup retention policy on page 82
Retaining backups forever on page 82
Freeing or deleting retention policy exempt backups on page 83
The smsap backup verify commandYou can run the backup verify command to see if the backup is in a valid format for Oracle.
Syntax
smsap backup verify -profile profile_name [-label backup_name | [-id guid] [-retain {-hourly | -daily | -weekly | -monthly | -unlimited}][-force] [-dump][-quiet | -verbose]
Parameters-profile profile_name
Specifies the profile for which you want to verify a backup. The profile contains theidentifier of the database and other database information.
SnapManager for SAP command reference | 231
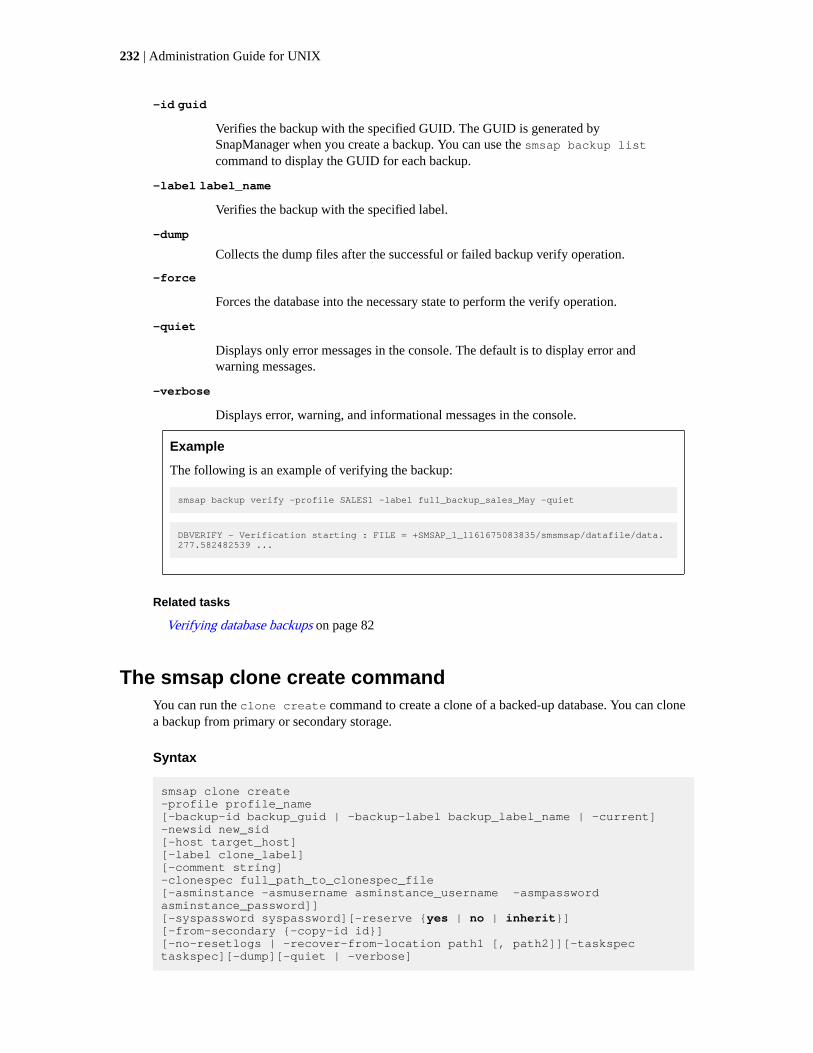
-id guid
Verifies the backup with the specified GUID. The GUID is generated bySnapManager when you create a backup. You can use the smsap backup listcommand to display the GUID for each backup.
-label label_name
Verifies the backup with the specified label.
-dump
Collects the dump files after the successful or failed backup verify operation.
-force
Forces the database into the necessary state to perform the verify operation.
-quiet
Displays only error messages in the console. The default is to display error andwarning messages.
-verbose
Displays error, warning, and informational messages in the console.
Example
The following is an example of verifying the backup:
smsap backup verify -profile SALES1 -label full_backup_sales_May -quiet
DBVERIFY - Verification starting : FILE = +SMSAP_1_1161675083835/smsmsap/datafile/data.277.582482539 ...
Related tasks
Verifying database backups on page 82
The smsap clone create commandYou can run the clone create command to create a clone of a backed-up database. You can clonea backup from primary or secondary storage.
Syntax
smsap clone create -profile profile_name [-backup-id backup_guid | -backup-label backup_label_name | -current] -newsid new_sid [-host target_host] [-label clone_label] [-comment string] -clonespec full_path_to_clonespec_file [-asminstance -asmusername asminstance_username -asmpassword asminstance_password]] [-syspassword syspassword][-reserve {yes | no | inherit}] [-from-secondary {-copy-id id}] [-no-resetlogs | -recover-from-location path1 [, path2]][-taskspec taskspec][-dump][-quiet | -verbose]
232 | Administration Guide for UNIX
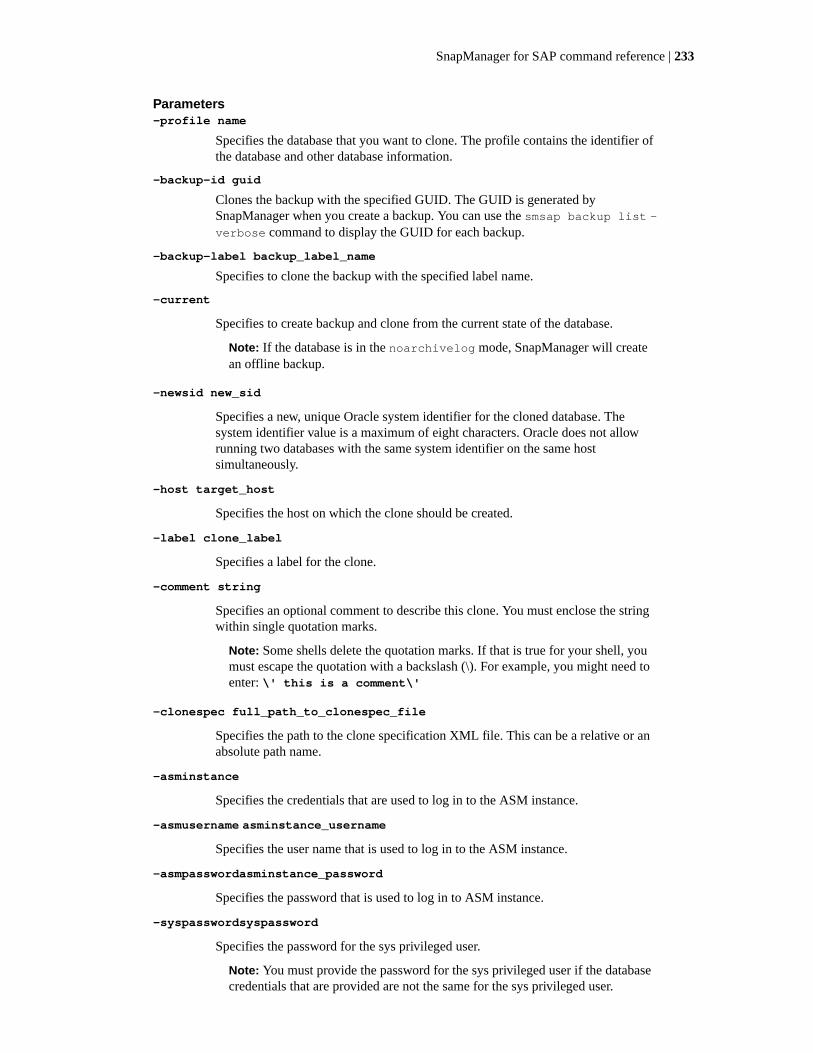
Parameters-profile name
Specifies the database that you want to clone. The profile contains the identifier ofthe database and other database information.
-backup-id guid
Clones the backup with the specified GUID. The GUID is generated bySnapManager when you create a backup. You can use the smsap backup list -verbose command to display the GUID for each backup.
-backup-label backup_label_name
Specifies to clone the backup with the specified label name.
-current
Specifies to create backup and clone from the current state of the database.
Note: If the database is in the noarchivelog mode, SnapManager will createan offline backup.
-newsid new_sid
Specifies a new, unique Oracle system identifier for the cloned database. Thesystem identifier value is a maximum of eight characters. Oracle does not allowrunning two databases with the same system identifier on the same hostsimultaneously.
-host target_host
Specifies the host on which the clone should be created.
-label clone_label
Specifies a label for the clone.
-comment string
Specifies an optional comment to describe this clone. You must enclose the stringwithin single quotation marks.
Note: Some shells delete the quotation marks. If that is true for your shell, youmust escape the quotation with a backslash (\). For example, you might need toenter: \' this is a comment\'
-clonespec full_path_to_clonespec_file
Specifies the path to the clone specification XML file. This can be a relative or anabsolute path name.
-asminstance
Specifies the credentials that are used to log in to the ASM instance.
-asmusername asminstance_username
Specifies the user name that is used to log in to the ASM instance.
-asmpasswordasminstance_password
Specifies the password that is used to log in to ASM instance.
-syspasswordsyspassword
Specifies the password for the sys privileged user.
Note: You must provide the password for the sys privileged user if the databasecredentials that are provided are not the same for the sys privileged user.
SnapManager for SAP command reference | 233

-reserve
Setting the -reserve option to yes ensures that the volume guarantee spacereserve is turned on for the new clone volumes. Setting the -reserve option to noensures that the volume guarantee space reserve is turned off for the new clonevolumes. Setting the -reserve option to inherit ensures that the new cloneinherits the space reservation characteristics of the parent Snapshot copy. Thedefault setting is no.
The following table describes the cloning methods and their effect on the clonecreate operation and its -reserve option. A LUN can be cloned by using eithermethod.
Cloningmethod
Description Result
LUN cloning A new clone LUN iscreated within the samevolume.
When the -reserve option for aLUN is set to yes, space isreserved for the full LUN sizewithin the volume.
Volume cloning A new FlexClone iscreated, and the cloneLUN exists within thenew clone volume. Usesthe FlexClone technology.
When the -reserve option for avolume is set to yes, space isreserved for the full volume sizewithin the aggregate.
-from-secondary [-copy-id copy_id]
Specifies that SnapManager should clone a copy of a backup that has beenprotected to secondary storage. If this option is not specified, SnapManager clonesthe copy from primary storage.
You must specify the -copy-id option whenever you specify the -from-secondary option. If there is more than one backup on the secondary storagesystem, the -copy-id option is used to specify which backup copy on thesecondary storage should be used for cloning.
Note: If you are using Data ONTAP operating in 7-Mode, you must specify avalid value for the -copy-id option. However, if you are using clustered DataONTAP, the -copy-id option is not required.
-no-resetlogs
Specifies to skip recovering the database, executing the DBNEWID utility, and notopening the database with the resetlogs while creating the clone.
-recover-from-location
Specifies the external archive log location of the archive log backups whereSnapManager takes the archive log files from the external location and uses themfor cloning.
-taskspec
Specifies the task specification XML file for preprocessing activity or post-processing activity of the clone operation. You must provide the complete path ofthe task specification XML file.
-dump
Specifies to collect the dump files after the clone create operation.
234 | Administration Guide for UNIX
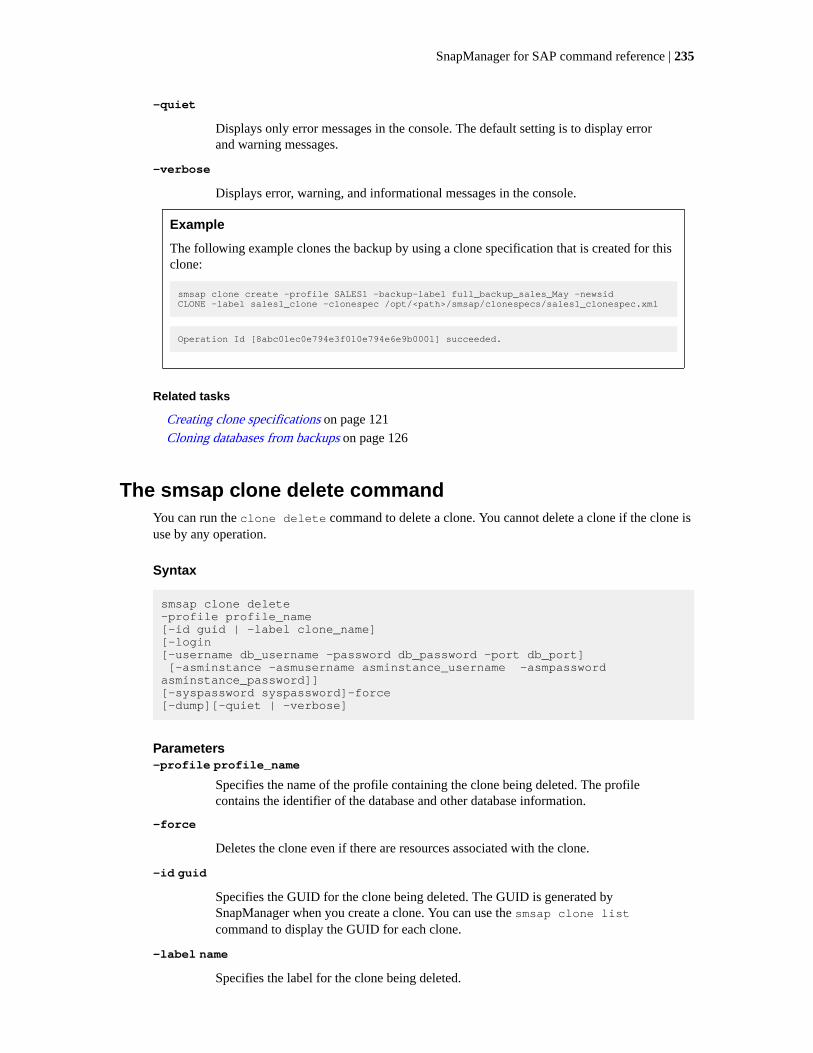
-quiet
Displays only error messages in the console. The default setting is to display errorand warning messages.
-verbose
Displays error, warning, and informational messages in the console.
Example
The following example clones the backup by using a clone specification that is created for thisclone:
smsap clone create -profile SALES1 -backup-label full_backup_sales_May -newsidCLONE -label sales1_clone -clonespec /opt/<path>/smsap/clonespecs/sales1_clonespec.xml
Operation Id [8abc01ec0e794e3f010e794e6e9b0001] succeeded.
Related tasks
Creating clone specifications on page 121
Cloning databases from backups on page 126
The smsap clone delete commandYou can run the clone delete command to delete a clone. You cannot delete a clone if the clone isuse by any operation.
Syntax
smsap clone delete -profile profile_name [-id guid | -label clone_name][-login [-username db_username -password db_password -port db_port] [-asminstance -asmusername asminstance_username -asmpassword asminstance_password]] [-syspassword syspassword]-force [-dump][-quiet | -verbose]
Parameters-profile profile_name
Specifies the name of the profile containing the clone being deleted. The profilecontains the identifier of the database and other database information.
-force
Deletes the clone even if there are resources associated with the clone.
-id guid
Specifies the GUID for the clone being deleted. The GUID is generated bySnapManager when you create a clone. You can use the smsap clone listcommand to display the GUID for each clone.
-label name
Specifies the label for the clone being deleted.
SnapManager for SAP command reference | 235

-asminstance
Specifies the credentials that are used to log in to the Automatic StorageManagement (ASM) instance.
-asmusername asminstance_username
Specifies the user name used to log in to the ASM instance.
-asmpassword asminstance_password
Specifies the password used to log in to ASM instance.
-syspasswordsyspassword
Specifies the password for the sys privileged user.
Note: You must provide the password for the sys privileged user if the databasecredentials provided are not the same for sys privileged user.
-login
Allows you to enter the database login details.
-usernamedb_username
Specifies the user name required to access the database.
-passworddb_password
Specifies the password required to access the database.
-portdb_port
Specifies the TCP port number used to access the database that the profiledescribes.
-dump
Specifies to collect the dump files after the clone delete operation.
-quiet
Displays only error messages in the console. The default is to display error andwarning messages.
-verbose
Displays error, warning, and informational messages in the console.
Example
The following example deletes the clone:
smsap clone delete -profile SALES1 -label SALES_May Operation Id [8abc01ec0e79004b010e79006da60001] succeeded.
The smsap clone list commandThis command lists the clones of the database for a given profile.
Syntax
smsap clone list -profile profile_name
236 | Administration Guide for UNIX
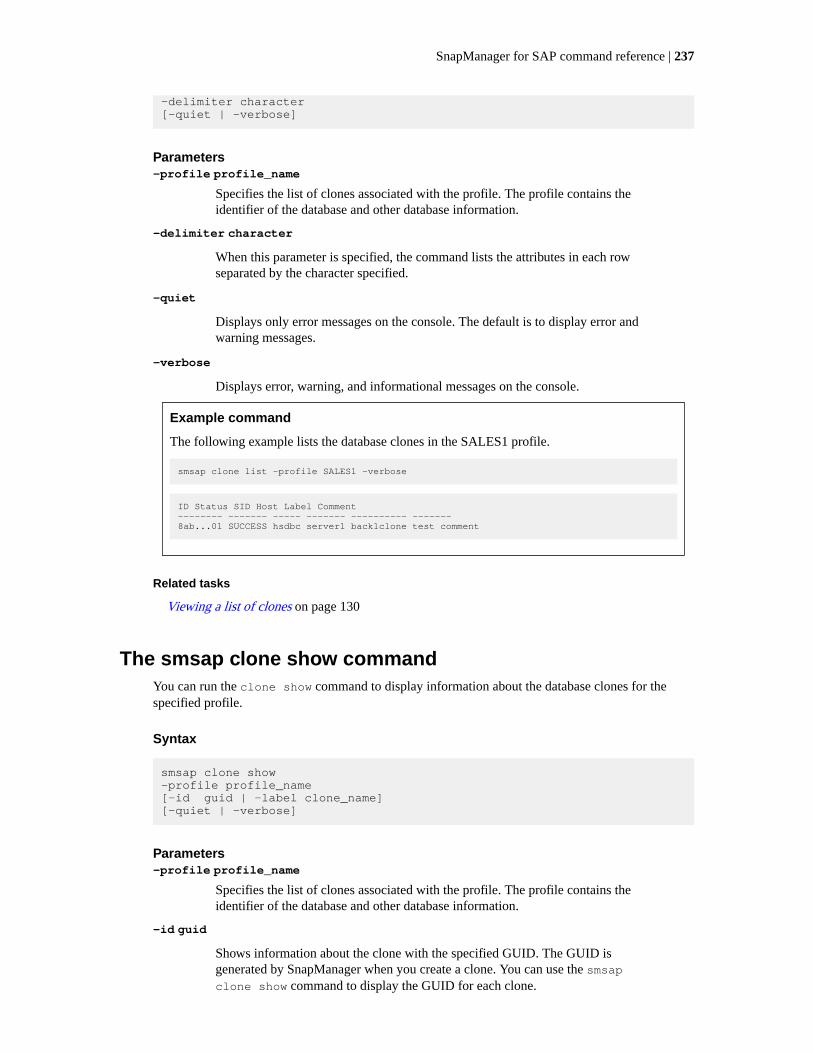
-delimiter character [-quiet | -verbose]
Parameters-profile profile_name
Specifies the list of clones associated with the profile. The profile contains theidentifier of the database and other database information.
-delimiter character
When this parameter is specified, the command lists the attributes in each rowseparated by the character specified.
-quiet
Displays only error messages on the console. The default is to display error andwarning messages.
-verbose
Displays error, warning, and informational messages on the console.
Example command
The following example lists the database clones in the SALES1 profile.
smsap clone list -profile SALES1 -verbose
ID Status SID Host Label Comment-------- ------- ----- ------- ---------- -------8ab...01 SUCCESS hsdbc server1 back1clone test comment
Related tasks
Viewing a list of clones on page 130
The smsap clone show commandYou can run the clone show command to display information about the database clones for thespecified profile.
Syntax
smsap clone show -profile profile_name [-id guid | -label clone_name] [-quiet | -verbose]
Parameters-profile profile_name
Specifies the list of clones associated with the profile. The profile contains theidentifier of the database and other database information.
-id guid
Shows information about the clone with the specified GUID. The GUID isgenerated by SnapManager when you create a clone. You can use the smsapclone show command to display the GUID for each clone.
SnapManager for SAP command reference | 237

-label label_name
Shows information about the clone with the specified label.
-quiet
Displays only error messages in the console. The default is to display error andwarning messages.
-verbose
Displays error, warning, and informational messages in the console.
Example
The following example displays information about the clone:
smsap clone show -profile SALES1 -label full_backup_sales_May -verbose
The following output shows information about a clone of a backup on primary storage:
Clone id: 8abc013111b916e30111b916ffb40001Clone status: SUCCESSClone SID: hsdbcClone label: hsdbcClone comment: nullClone start time: 2007-04-03 16:15:50Clone end time: 2007-04-03 16:18:17Clone host: Host1Filesystem: /mnt/ssys1/data_cloneFile: /mnt/ssys1/data_clone/hsdb/sysaux01.dbfFile: /mnt/ssys1/data_clone/hsdb/undotbs01.dbfFile: /mnt/ssys1/data_clone/hsdb/users01.dbfFile: /mnt/ssys1/data_clone/hsdb/system01.dbfFile: /mnt/ssys1/data_clone/hsdb/undotbs02.dbfBackup id: 8abc013111a450480111a45066210001Backup label: full_backup_sales_MayBackup SID: hsdb1Backup comment:Backup start time: 2007-03-30 15:26:30Backup end time: 2007-03-30 15:34:13Backup host: server1
The following output shows information about a clone of a protected backup on secondarystorage:
clone show -label clone_CLSTEST -profileTEST_USER_NFSTEST_DIRMAC Clone id:8abc01ec16514aec0116514af52f0001 Clone status: SUCCESSClone SID: CLSTEST Clone label: clone_CLSTEST Clone comment:comment_for_clone_CLSTEST Clone start time: 2007-11-18 00:46:10 Clone end time: 2007-11-18 00:47:54 Clone host: dirmacFilesystem: /ant/fish/bt_dirmac_nfs_clone File: /ant/fish/bt_dirmac_nfs_clone/datafiles/sysaux01.dbfFile: /ant/fish/bt_dirmac_nfs_clone/datafiles/system01.dbfFile: /ant/fish/bt_dirmac_nfs_clone/datafiles/undotbs01.dbfFile: /ant/fish/bt_dirmac_nfs_clone/datafiles/users01.dbfBackup id: 8abc01ec16514883011651488b580001 Backup label:full_backup Backup SID: NFSTEST Backup comment: Backup start time: 2007-11-18 00:43:32 Backup end time: 2007-11-18 00:45:30Backup host: dirmac Storage System: fish (Secondary storage) Volume: bt_dirmac_nfs Snapshot:smsap_user_nfstest_b_nfstest_f_c_1_8abc01ec16511d6a0116511d73590001_0File: /ant/fish/bt_dirmac_nfs/archlogs/1_14_638851420.dbfFile: /ant/fish/bt_dirmac_nfs/datafiles/sysaux01.dbfFile: /ant/fish/bt_dirmac_nfs/datafiles/undotbs01.dbfFile: /ant/fish/bt_dirmac_nfs/archlogs/1_13_638851420.dbf
238 | Administration Guide for UNIX
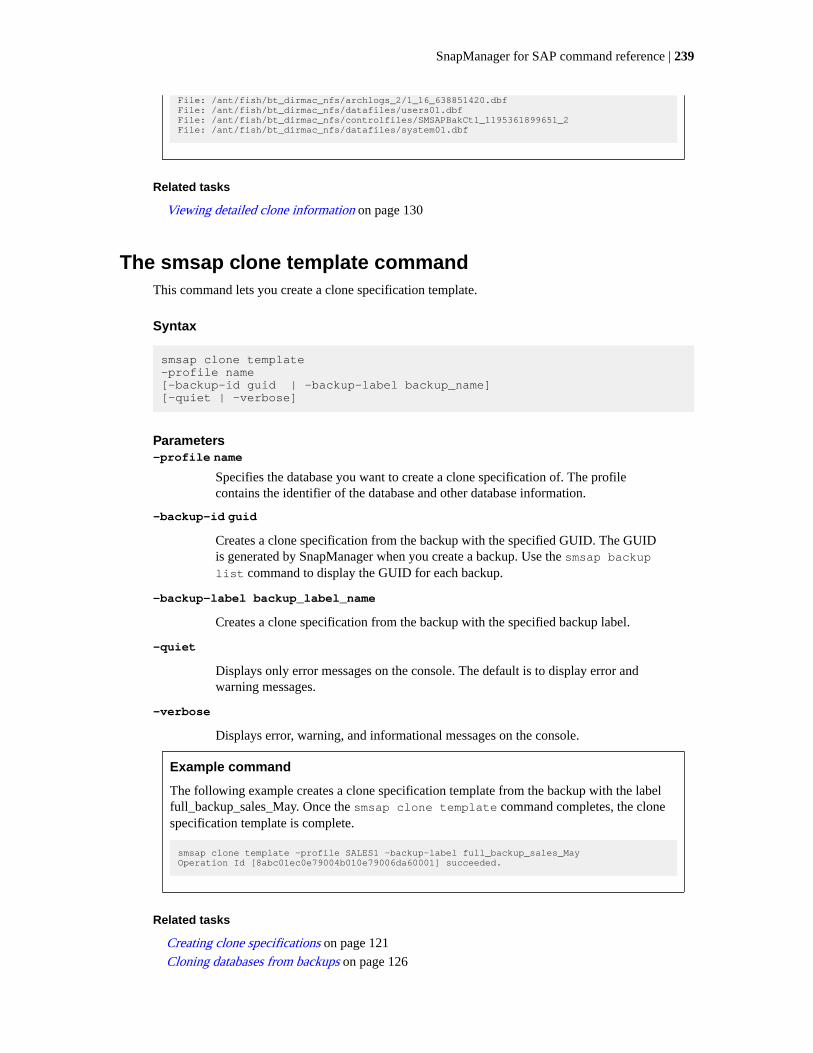
File: /ant/fish/bt_dirmac_nfs/archlogs_2/1_16_638851420.dbfFile: /ant/fish/bt_dirmac_nfs/datafiles/users01.dbfFile: /ant/fish/bt_dirmac_nfs/controlfiles/SMSAPBakCtl_1195361899651_2File: /ant/fish/bt_dirmac_nfs/datafiles/system01.dbf
Related tasks
Viewing detailed clone information on page 130
The smsap clone template commandThis command lets you create a clone specification template.
Syntax
smsap clone template -profile name [-backup-id guid | -backup-label backup_name] [-quiet | -verbose]
Parameters-profile name
Specifies the database you want to create a clone specification of. The profilecontains the identifier of the database and other database information.
-backup-id guid
Creates a clone specification from the backup with the specified GUID. The GUIDis generated by SnapManager when you create a backup. Use the smsap backuplist command to display the GUID for each backup.
-backup-label backup_label_name
Creates a clone specification from the backup with the specified backup label.
-quiet
Displays only error messages on the console. The default is to display error andwarning messages.
-verbose
Displays error, warning, and informational messages on the console.
Example command
The following example creates a clone specification template from the backup with the labelfull_backup_sales_May. Once the smsap clone template command completes, the clonespecification template is complete.
smsap clone template -profile SALES1 -backup-label full_backup_sales_MayOperation Id [8abc01ec0e79004b010e79006da60001] succeeded.
Related tasks
Creating clone specifications on page 121
Cloning databases from backups on page 126
SnapManager for SAP command reference | 239
The smsap clone update commandThis command updates information about the clone. You can update the comment.
Syntax
smsap clone update -profile profile_name [-label label | -id id] -comment commment_text [-quiet | -verbose]
Parameters-profile profile_name
Specifies the name of the profile containing the clone you want to update. Theprofile contains the identifier of the database and other database information.
-id id
Specifies the ID for the clone. The ID is generated by SnapManager when youcreate a clone. Use the smsap clone list command to display the ID for eachclone.
-label label
Specifies the label for the clone.
-comment
Shows the comment entered in the clone creation. This is an optional parameter.
-quiet
Displays only error messages on the console. The default is to display error andwarning messages.
-verbose
Displays error, warning, and informational messages on the console.
Example command
The following example updates the clone comment.
smsap clone update -profile anson.pcrac5 -label clone_pcrac51_20080820141624EDT -comment See updated clone
The smsap clone split-delete commandThis command lets you delete a clone split operation cycle entry from a repository database.
Syntax
smsap clone split-delete -profile profile [-host hostname] [-label split-label | -id split-id] [-quiet | -verbose]
240 | Administration Guide for UNIX
Parameters-profile profile
Specifies the profile name of the clone.
-host hostname
Specifies the hostname in which the clone exists.
-label split-label
Specifies the label name generated by clone split start process.
-id split-id
Specifies the unique ID generated by clone split start process.
-quiet
Displays only error messages on the console. The default is to display error andwarning messages.
-verbose
Displays error, warning, and informational messages on the console.
The smsap clone split-estimate commandThis command enables you to view the clone split amount of storage consumed estimate.
Syntax
smsap clone split-estimate -profile profile [-host hostname] [-label clone-label | -id clone-id] [-quiet | -verbose]
Parameters-profile profile
Specifies the profile name of the clone.
-host hostname
Specifies the hostname in which the clone exists.
-label clone-label
Specifies the label name generated by clone process.
-id clone-id
Specifies the unique ID generated by clone process.
-quiet
Displays only error messages on the console. The default is to display error andwarning messages.
-verbose
Displays error, warning, and informational messages on the console.
SnapManager for SAP command reference | 241
The smsap clone split commandYou can run the clone split command to split a clone. The split clone becomes independent of theoriginal clone. SnapManager generates a new profile after the clone split operation and you can usethis profile to manage the split clone.
Syntax
smsap clone split -profile clone-profile [-host hostname] {-label clone-label | -id clone-id} [-split-label split-operation_label][-comment comment] -new-profile new-profile-name [-profile-password new-profile_password] -repository -dbname repo_service_name -host repo_host -port repo_port -login -username repo_username -database -dbname db_dbname -host db_host [-sid db_sid] [-login -username db_username -password db_password -port db_port] [-rman {{-controlfile | {-login -username rman_username -password rman_password} -tnsname rman_tnsname}}] -osaccount osaccount -osgroup osgroup [-retain [-hourly [-count n] [-duration m]] [-daily [-count n] [-duration m]] [-weekly [-count n] [-duration m]] [-monthly [-count n] [-duration m]] ] [-profile-comment profile-comment] [-snapname-pattern pattern] [-protect [-protection-policy policy_name]] | [-noprotect]] [-summary-notification [-notification [-success -email email_address1,email_address2 -subject subject-pattern] [failure -email email_address1,email_address2 -subject subject-pattern] ] [-separate-archivelog-backups -retain-archivelog-backups -hours hours |-days days | -weeks weeks | -months months[-protect [-protection-policy policy_name | -noprotect][-include-with-online-backups | -no-include-with-online-backups]][-dump][-quiet | -verbose]
Parameters-profile clone-profile
Specifies the profile name from which the clone is created.
-host hostname
Specifies the host name in which the clone exists.
-label clone-label
Specifies the label name generated by the clone operation.
-id clone-id
Specifies the unique ID generated by the clone operation.
242 | Administration Guide for UNIX
-split-label split-operation_label
Specifies the label name generated by the clone operation.
-new-profile new-profile_name
Specifies the new profile name that SnapManager will generate after a successfulsplit operation.
-profile-password new-profile_password
Specifies the password for the profile.
-repository
Specifies the details of the database for the repository.
-dbname repo_service_name
Specifies the name of the database that stores the repository. You can use either theglobal name or system identifier.
-host repo_host
Specifies the name or IP address of the host computer on which the repositorydatabase resides.
-port repo_port
Specifies the Transmission Control Protocol (TCP) port number used to access thehost on which the repository database resides.
-login
Specifies the repository login details. This is optional. If not specified,SnapManager defaults to OS Authentication Connection Mode.
-usernamerepo_username
Specifies the user name required to access the host on which the repositorydatabase resides.
-database
Specifies the details of the database that will be backed up, restored, or cloned.
-dbname db_dbname
Specifies the name of the database that the profile describes. You can use either theglobal name or system identifier.
-hostdb_host
Specifies the name or IP address of the host computer on which the databaseresides.
-sid db_sid
Specifies the system identifier of the database that the profile describes. By default,SnapManager uses the database name as the system identifier. If the systemidentifier is different from the database name, you must specify it using the -sidoption.
-login
Specifies the database login details.
-username db_username
Specifies the user name needed to access the database that the profile describes.
-password db_password
Specifies the password needed to access the database that the profile describes.
SnapManager for SAP command reference | 243
-osaccount osaccount
Specifies the name of the Oracle database user account. SnapManager uses thisaccount to perform the Oracle operations such as startup and shutdown. It istypically the user who owns the Oracle software on the host, for example, orasid.
-osgroup osgroup
Specifies the name of the Oracle database group name associated with the orasidaccount.
Note: The -osaccount and -osgroup variables are required for UNIX but notallowed for databases running on Windows.
-retain [-hourly [-count n] [-duration m]] [-daily [-count n] [-duration m]] [-weekly [-count n] [-duration m]] [-monthly [-count n] [-duration m]]
Specifies the retention policy for a backup.
For each retention class, either or both the retention count or retention durationmight be specified. The duration is in units of the class (for example, hours forhourly, days for daily). For instance, if you specify only a retention duration of 7for daily backups, then SnapManager will not limit the number of daily backups forthe profile (because the retention count is 0), but SnapManager will automaticallydelete daily backups created over 7 days ago.
-profile-comment profile-comment
Specifies the comment for a profile describing the profile domain.
-snapname-pattern pattern
Specifies the naming pattern for Snapshot copies. You can also include custom text,for example, HAOPS for highly available operations, in all Snapshot copy names.You can change the Snapshot copy naming pattern when you create a profile orafter the profile has been created. The updated pattern applies only to Snapshotcopies that have not yet been created. Snapshot copies that exist retain the previousSnapname pattern. You can use several variables in the pattern text.
-protect -protection-policy policy_name
Specifies whether the backup should be protected to secondary storage.
Note: If -protect is specified without -protection-policy, then thedataset will not have a protection policy. If -protect is specified and -protection-policy is not set when the profile is created, then it may be setlater by the smsap profile update command or set by the storageadministrator by using the Protection Manager's console.
-summary-notification
Specifies the details for configuring summary email notification for multipleprofiles under a repository database. SnapManager generates this email.
-notification
Specifies the details for configuring email notification for the new profile.SnapManager generates this email. The email notification enables the databaseadministrator to receive emails on the succeeded or failed status of the databaseoperation that is performed by using this profile.
-success
Specifies that email notification is enabled for a profile for when the SnapManageroperation succeeds.
-emailemail address 1email address 2
Specifies the email address of the recipient.
244 | Administration Guide for UNIX
-subjectsubject-pattern
Specifies the email subject.
-failure
Specifies that email notification is enabled for a profile for when the SnapManageroperation fails.
-separate-archivelog-backups
Specifies that the archive log backup is separated from the datafile backup. This isan optional parameter, which you can provide while creating the profile. After thebackups are separated by using this option, you can either create datafiles-onlybackup or archive logs-only backup.
-retain-archivelog-backups -hours hours | -days days | -weeks weeks| -monthsmonths
Specifies that the archive log backups are retained based on the archive logretention duration (hourly, daily, weekly, or monthly).
protect [-protection-policy policy_name] | -noprotect
Specifies that the archive log files is protected based on the archive log protectionpolicy.
Specifies that the archive log files are not protected by using the -noprotectoption.
-include-with-online-backups | -no-include-with-online-backups
Specifies that the archive log backup is included along with the online databasebackup.
Specifies that the archive log backups are not included along with the onlinedatabase backup.
-dump
Specifies that the dump files are not collected after the successful profile createoperation.
-quiet
Displays only error messages in the console. The default setting displays error andwarning messages.
-verbose
Displays error, warning, and informational messages in the console.
The smsap clone split-result command
This command lets you view the result of the clone split process.
Syntax
smsap clone split-result -profile profile [-host hostname] [-label split-label | -id split-id] [-quiet | -verbose]
Parameters-profile profile
Specifies the profile name of the clone.
SnapManager for SAP command reference | 245
-host hostname
Specifies the hostname in which the clone exists.
-label split-label
Specifies label name generated by clone split start process.
-id split-id
Specifies unique ID generated by clone split start process.
-quiet
Displays only error messages on the console. The default is to display error andwarning messages.
-verbose
Displays error, warning, and informational messages on the console.
The smsap clone split-stop commandThis command stops the running clone split process.
Syntax
smsap clone split-stop -profile profile [-host hostname] [-label split-label | -id split-id] [-quiet | -verbose]
Parameters-profile profile
Specifies the profile name of the clone.
-host hostname
Specifies the hostname in which the clone exists.
-label split-label
Specifies the label name generated by clone process.
-id split-id
Specifies the unique ID generated by clone process.
-quiet
Displays only error messages on the console. The default is to display error andwarning messages.
-verbose
Displays error, warning, and informational messages on the console.
246 | Administration Guide for UNIX
The smsap clone split-status commandThis command lets you know the progress of running split process.
Syntax
smsap clone split-status -profile profile [-host hostname] [-label split-label | -id split-id] [-quiet | -verbose]
Parameters-profile profile
Specifies the profile name of the clone.
-host hostname
Specifies the hostname in which the clone exists.
-label split-label
Specifies the label name generated by clone process.
-id split-id
Specifies the unique ID generated by clone process.
-quiet
Displays only error messages on the console. The default is to display error andwarning messages.
-verbose
Displays error, warning, and informational messages on the console.
The smsap clone detach commandAfter splitting a cloned volume from its parent volume in Data ONTAP, you can run the clonedetach command from SnapManager to let SnapManager know that the volume is no longer aclone.
Syntax
smsap clone detach -profile profile_name -label clone_label
Parameters-profile profile_name
Specifies the profile name from which the clone is created.
-label clone_label
Specifies the name generated by the clone operation.
Example
The following command detaches the clone:
SnapManager for SAP command reference | 247
smsap clone detach -profile SALES1 -label sales1_clone
The smsap cmdfile commandYou can use the cmdfile command to run any command if the shell on your host limits the numberof characters that can appear on a command line.
Syntax
smsap cmdfile -file file_name [-quiet | -verbose]
You can include the command in a text file and use the smsap cmdfile command to execute thecommand. You can add only one command in a text file. You must not include smsap in thecommand syntax.
Note: The smsap cmdfile command replaces the smsap pfile command. The smsapcmdfile is not compatible with the smsap pfile command.
Parameters-file file_name
Specifies the path to text file containing the command you want to execute.
-quiet
Specifies that only error messages are displayed in the console. The default is todisplay error and warning messages.
-verbose
Specifies that error, warning, and informational messages are displayed in theconsole.
Example
This example creates a profile by including the profile create command in command.txtlocated at /tmp. You can then run the smsap cmdfile command.
The text file contains the following information:
profile create -profile SALES1 -repository -dbname SNAPMGRR-login -username server1_user -password ontap -port 1521 -host server1-database -dbname SMSMSAP -sid SMSMSAP -login -username sys -password oracle -port 1521-host Host2 -osaccount oracle -osgroup db2
You can now create the profile by running the smsap cmdfile command with thecommand.txt file:
smsap cmdfile -file /tmp/command.txt
248 | Administration Guide for UNIX

The smsap credential clear commandThis command clears the cache of the user credentials for all secured resources.
Syntax
smsap credential clear [-quiet | -verbose]
Parameters-quiet
Displays only error messages on the console. The default is to display error andwarning messages.
-verbose
Displays error, warning, and informational messages on the console.
Example command
This example clears all of the credentials for the user running the command.
smsap credential clear -verbose
SMSAP-20024 [INFO ]: Cleared credentials for user "user1".
Related tasks
Clearing user credentials for all hosts, repositories, and profiles on page 43
The smsap credential delete commandThis command deletes the user credentials for a particular secured resource.
Syntax
smsap credential delete [-host -name host_name -username username] | [-repository -dbname repo_service_name -host repo_host -login -username repo_username -port repo_port] | [-profile -name profile_name] [-quiet | -verbose]
Parameters-host hostname
Specifies the name of the host server on which SnapManager is running.
The -host parameter includes the following options:
SnapManager for SAP command reference | 249
• -name host_name: Specifies the name of the host for which you will delete thepassword.
• -username user_name: Specifies the user name on the host.
-repository-dbname
Specifies the name of the database that stores the profile. Use either the globalname or the SID.
The -repository parameter includes the following options:
• -dbname repo_service_name: Specifies the name of the database that storesthe profile. Use either the global name or the SID.
• -host repo_host: Specifies the name or IP address of the host server therepository database runs on.
• -login -username repo_username: Specifies the user name needed toaccess the database that stores the repository.
• -port repo_port: Specifies the TCP port number used to access the databasethat stores the repository.
-profile-name profile_name
Specifies the profile with which the database is associated.
The -profile parameter includes the following option:
• -name profilename: Specifies the name of the profile for which you willdelete the password.
-quiet
Displays only error messages on the console. The default is to display error andwarning messages.
-verbose
Displays error, warning, and informational messages on the console.
Example command
This example deletes the credentials of the profile.
smsap credential delete -profile -name user1 -verbose
SMSAP-20022 [INFO ]: Deleted credentials and repository mapping for profile "user1" in user credentials for "user1".
This example deletes the credentials of the repository.
smsap credential delete -repository -dbname SMSAPREPO -host Host2-login -username user1 -port 1521
SMSAP-20023 [INFO ]: Deleted repository credentials for "user1@SMSAPREPO/wasp:1521"and associated profile mappings in user credentials for "user1".
This example deletes the credentials of the host.
smsap credential delete -host -name Host2
250 | Administration Guide for UNIX
SMSAP-20033 [INFO ]: Deleted host credentials for "Host2" in user credentials for "user1".
Related tasks
Deleting credentials for individual resources on page 44
The smsap credential list commandThis command lists all credentials of a user.
Syntax
smsap credential list [-quiet | -verbose]
Parameters-quiet
Displays only error messages on the console. The default is to display error andwarning messages.
-verbose
Displays error, warning, and informational messages on the console.
Example command
This example displays all of the credentials for the user running the command.
smsap credential list
Credential cache for OS user "user1":Repositories:Host1_test_user@SMSAPREPO/hotspur:1521Host2_test_user@SMSAPREPO/hotspur:1521user1_1@SMSAPREPO/hotspur:1521Profiles:HSDBR (Repository: user1_2_1@SMSAPREPO/hotspur:1521)PBCASM (Repository: user1_2_1@SMSAPREPO/hotspur:1521)HSDB (Repository: Host1_test_user@SMSAPREPO/hotspur:1521) [PASSWORD NOT SET]Hosts:Host2Host5Host4Host1
Related tasks
Viewing user credentials on page 43
The smsap credential set commandThis command lets you set the credentials for users to access secure resources, such as hosts,repositories, and database profiles. The host password is the user's password on the host on whichSnapManager is running. The repository password is the password of the Oracle user that containsthe SnapManager repository schema. The profile password is a password that is made up by theperson who creates the profile. For the host and repository options, if the optional -password option
SnapManager for SAP command reference | 251
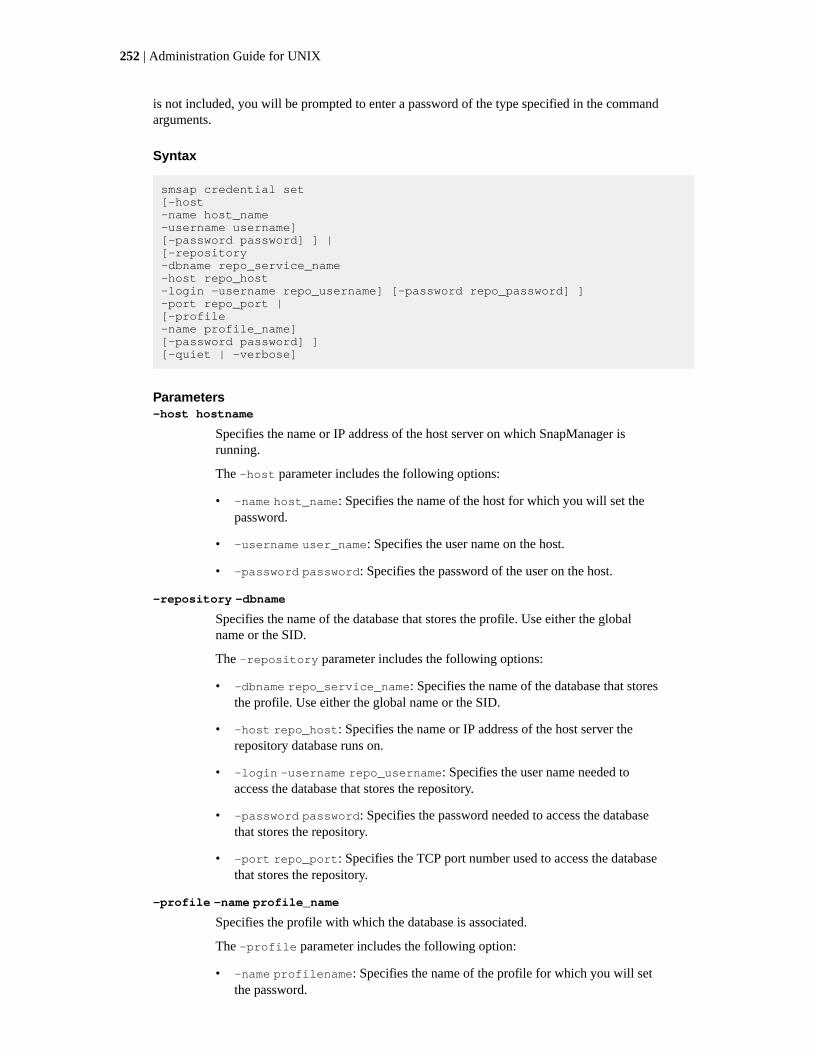
is not included, you will be prompted to enter a password of the type specified in the commandarguments.
Syntax
smsap credential set [-host -name host_name -username username] [-password password] ] | [-repository -dbname repo_service_name -host repo_host -login -username repo_username] [-password repo_password] ] -port repo_port | [-profile -name profile_name] [-password password] ] [-quiet | -verbose]
Parameters-host hostname
Specifies the name or IP address of the host server on which SnapManager isrunning.
The -host parameter includes the following options:
• -name host_name: Specifies the name of the host for which you will set thepassword.
• -username user_name: Specifies the user name on the host.
• -password password: Specifies the password of the user on the host.
-repository -dbname
Specifies the name of the database that stores the profile. Use either the globalname or the SID.
The -repository parameter includes the following options:
• -dbname repo_service_name: Specifies the name of the database that storesthe profile. Use either the global name or the SID.
• -host repo_host: Specifies the name or IP address of the host server therepository database runs on.
• -login -username repo_username: Specifies the user name needed toaccess the database that stores the repository.
• -password password: Specifies the password needed to access the databasethat stores the repository.
• -port repo_port: Specifies the TCP port number used to access the databasethat stores the repository.
-profile -name profile_name
Specifies the profile with which the database is associated.
The -profile parameter includes the following option:
• -name profilename: Specifies the name of the profile for which you will setthe password.
252 | Administration Guide for UNIX
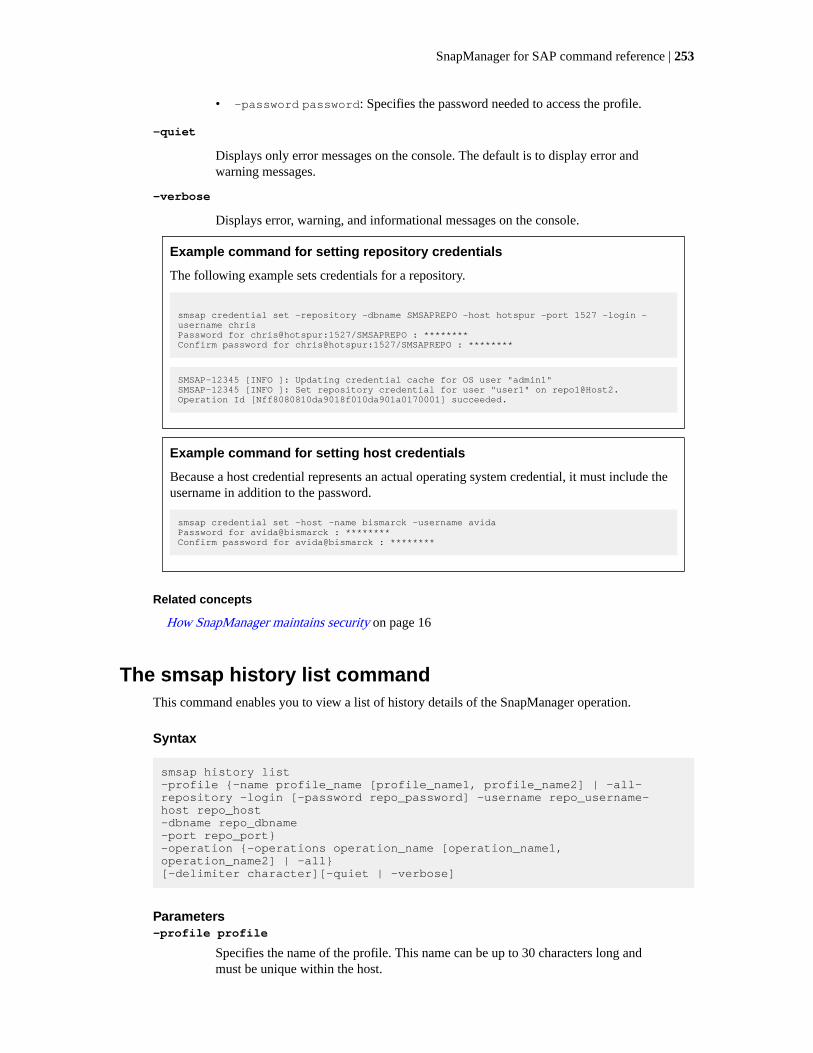
• -password password: Specifies the password needed to access the profile.
-quiet
Displays only error messages on the console. The default is to display error andwarning messages.
-verbose
Displays error, warning, and informational messages on the console.
Example command for setting repository credentials
The following example sets credentials for a repository.
smsap credential set -repository -dbname SMSAPREPO -host hotspur -port 1527 -login -username chrisPassword for chris@hotspur:1527/SMSAPREPO : ********Confirm password for chris@hotspur:1527/SMSAPREPO : ********
SMSAP-12345 [INFO ]: Updating credential cache for OS user "admin1"SMSAP-12345 [INFO ]: Set repository credential for user "user1" on [email protected] Id [Nff8080810da9018f010da901a0170001] succeeded.
Example command for setting host credentials
Because a host credential represents an actual operating system credential, it must include theusername in addition to the password.
smsap credential set -host -name bismarck -username avida Password for avida@bismarck : ******** Confirm password for avida@bismarck : ********
Related concepts
How SnapManager maintains security on page 16
The smsap history list commandThis command enables you to view a list of history details of the SnapManager operation.
Syntax
smsap history list -profile {-name profile_name [profile_name1, profile_name2] | -all-repository -login [-password repo_password] -username repo_username-host repo_host -dbname repo_dbname -port repo_port}-operation {-operations operation_name [operation_name1, operation_name2] | -all} [-delimiter character][-quiet | -verbose]
Parameters-profile profile
Specifies the name of the profile. This name can be up to 30 characters long andmust be unique within the host.
SnapManager for SAP command reference | 253
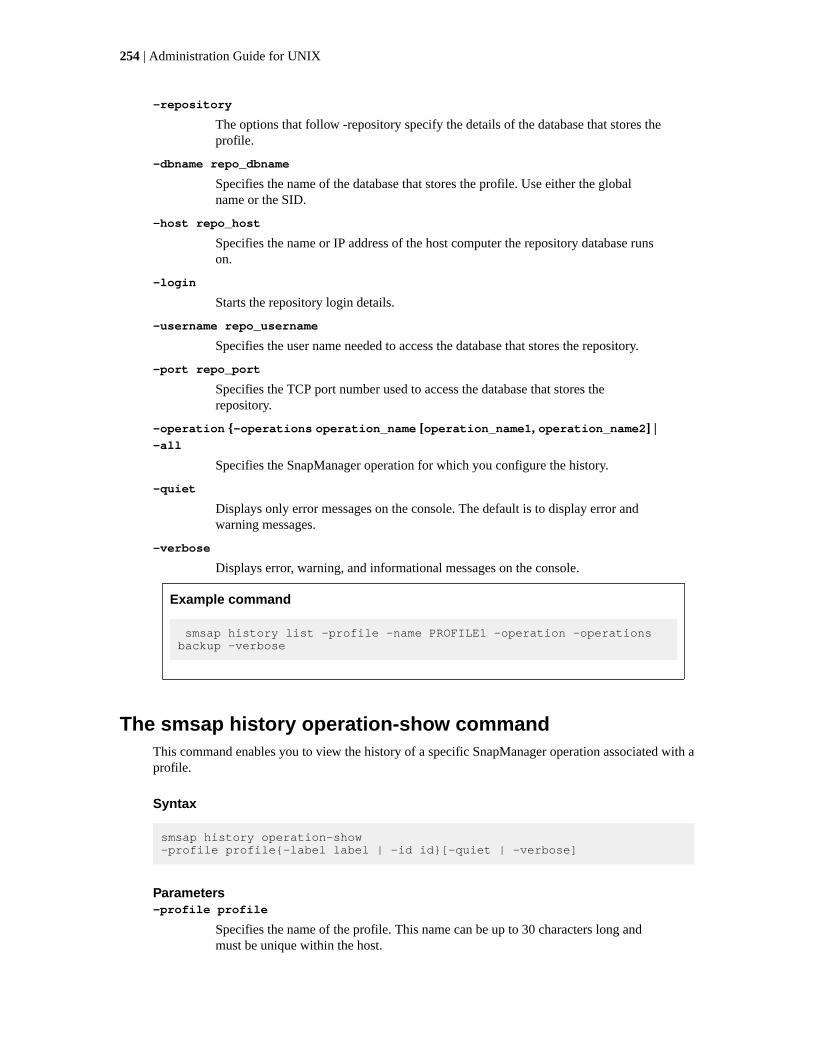
-repository
The options that follow -repository specify the details of the database that stores theprofile.
-dbname repo_dbname
Specifies the name of the database that stores the profile. Use either the globalname or the SID.
-host repo_host
Specifies the name or IP address of the host computer the repository database runson.
-login
Starts the repository login details.
-username repo_username
Specifies the user name needed to access the database that stores the repository.
-port repo_port
Specifies the TCP port number used to access the database that stores therepository.
-operation {-operations operation_name [operation_name1, operation_name2] |-all
Specifies the SnapManager operation for which you configure the history.
-quiet
Displays only error messages on the console. The default is to display error andwarning messages.
-verbose
Displays error, warning, and informational messages on the console.
Example command
smsap history list -profile -name PROFILE1 -operation -operations backup -verbose
The smsap history operation-show commandThis command enables you to view the history of a specific SnapManager operation associated with aprofile.
Syntax
smsap history operation-show -profile profile{-label label | -id id}[-quiet | -verbose]
Parameters-profile profile
Specifies the name of the profile. This name can be up to 30 characters long andmust be unique within the host.
254 | Administration Guide for UNIX
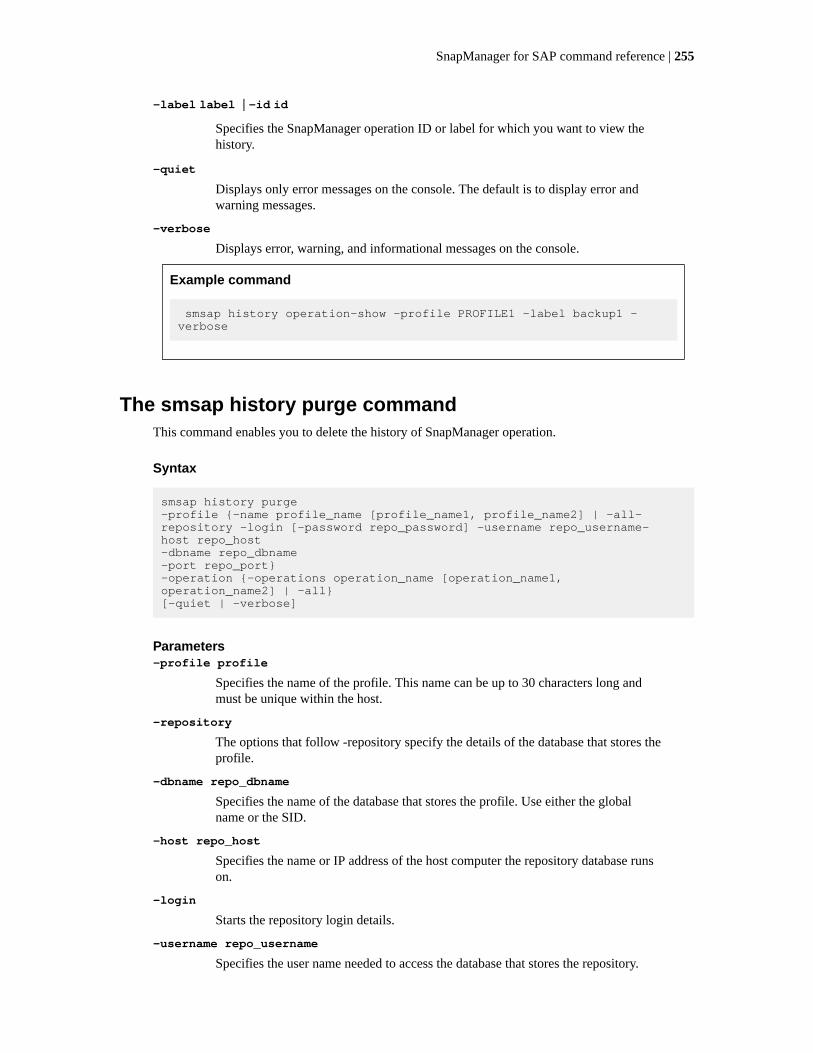
-label label | -id id
Specifies the SnapManager operation ID or label for which you want to view thehistory.
-quiet
Displays only error messages on the console. The default is to display error andwarning messages.
-verbose
Displays error, warning, and informational messages on the console.
Example command
smsap history operation-show -profile PROFILE1 -label backup1 -verbose
The smsap history purge commandThis command enables you to delete the history of SnapManager operation.
Syntax
smsap history purge -profile {-name profile_name [profile_name1, profile_name2] | -all-repository -login [-password repo_password] -username repo_username-host repo_host -dbname repo_dbname -port repo_port}-operation {-operations operation_name [operation_name1, operation_name2] | -all} [-quiet | -verbose]
Parameters-profile profile
Specifies the name of the profile. This name can be up to 30 characters long andmust be unique within the host.
-repository
The options that follow -repository specify the details of the database that stores theprofile.
-dbname repo_dbname
Specifies the name of the database that stores the profile. Use either the globalname or the SID.
-host repo_host
Specifies the name or IP address of the host computer the repository database runson.
-login
Starts the repository login details.
-username repo_username
Specifies the user name needed to access the database that stores the repository.
SnapManager for SAP command reference | 255
-port repo_port
Specifies the TCP port number used to access the database that stores therepository.
-operation {-operations operation_name [operation_name1, operation_name2] |-all
Specifies the SnapManager operation for which you configure the history.
-quiet
Displays only error messages on the console. The default is to display error andwarning messages.
-verbose
Displays error, warning, and informational messages on the console.
Example command
smsap history purge -profile -name PROFILE1 -operation -operations backup -verbose
The smsap history remove commandThis command enables you to remove the history of SnapManager operations associated with asingle profile, multiple profiles, or all profiles under a repository.
Syntax
smsap history remove -profile {-name profile_name [profile_name1, profile_name2] | -all-repository -login [-password repo_password] -username repo_username-host repo_host -dbname repo_dbname -port repo_port}-operation {-operations operation_name [operation_name, operation_name2] | -all} [-quiet | -verbose]
Parameters-profile profile
Specifies the name of the profile. This name can be up to 30 characters long andmust be unique within the host.
-repository
The options that follow -repository specify the details of the database that stores theprofile.
-dbname repo_dbname
Specifies the name of the database that stores the profile. Use either the globalname or the SID.
-host repo_host
Specifies the name or IP address of the host computer the repository database runson.
256 | Administration Guide for UNIX
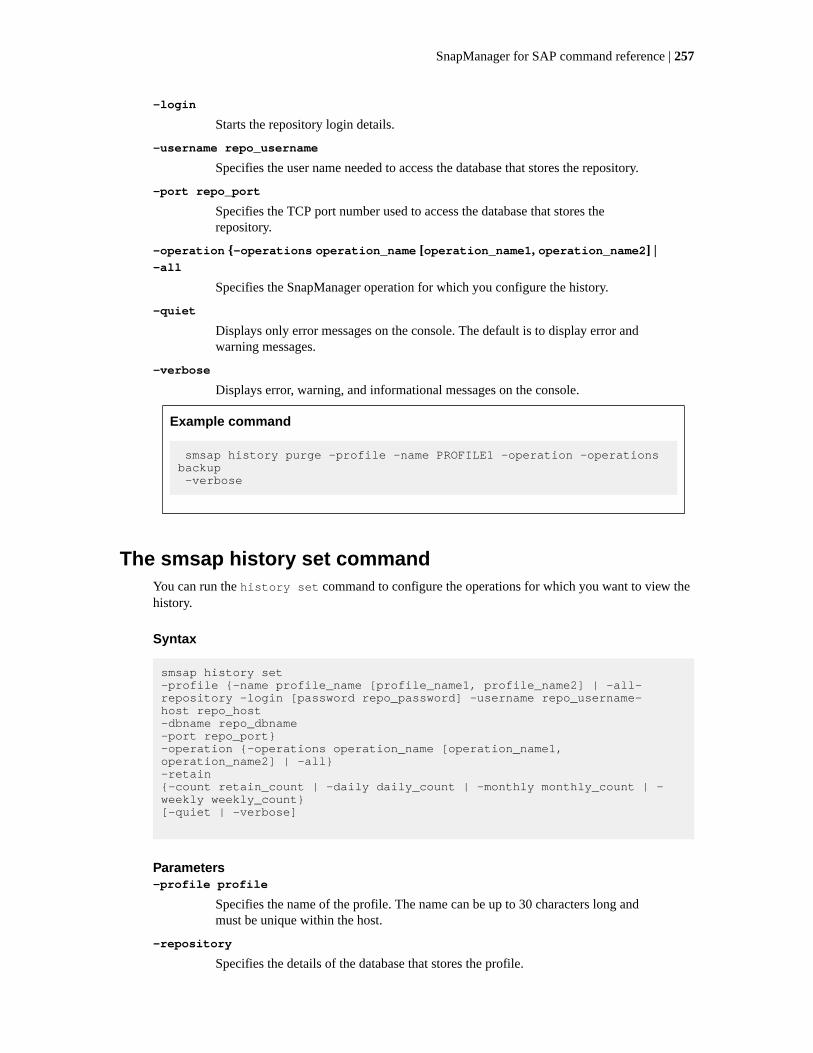
-login
Starts the repository login details.
-username repo_username
Specifies the user name needed to access the database that stores the repository.
-port repo_port
Specifies the TCP port number used to access the database that stores therepository.
-operation {-operations operation_name [operation_name1, operation_name2] |-all
Specifies the SnapManager operation for which you configure the history.
-quiet
Displays only error messages on the console. The default is to display error andwarning messages.
-verbose
Displays error, warning, and informational messages on the console.
Example command
smsap history purge -profile -name PROFILE1 -operation -operations backup -verbose
The smsap history set commandYou can run the history set command to configure the operations for which you want to view thehistory.
Syntax
smsap history set -profile {-name profile_name [profile_name1, profile_name2] | -all-repository -login [password repo_password] -username repo_username-host repo_host -dbname repo_dbname -port repo_port}-operation {-operations operation_name [operation_name1, operation_name2] | -all} -retain{-count retain_count | -daily daily_count | -monthly monthly_count | -weekly weekly_count}[-quiet | -verbose]
Parameters-profile profile
Specifies the name of the profile. The name can be up to 30 characters long andmust be unique within the host.
-repository
Specifies the details of the database that stores the profile.
SnapManager for SAP command reference | 257

-dbname repo_dbname
Specifies the name of the database that stores the profile. You can use either theglobal name or the system identifier.
-hostrepo_host
Specifies the name or IP address of the host where the repository database resides.
-login
Specifies the repository login details.
-usernamerepo_username
Specifies the user name required to access the repository database.
-portrepo_port
Specifies the Transmission Control Protocol (TCP) port number used to access therepository database.
-operation {-operations operation_name [operation_name1, operation_name2] |-all
Specifies the SnapManager operations for which you want to configure the history.
-retain {-count retain_count | -daily daily_count | -monthly -monthly_count |-weekly weekly_count}
Specifies the retention class of the create backup, verify backup, restore andrecover, and create and split clone operations. The retention class is set based on theoperation count number, number of days, weeks, or months.
-quiet
Displays only error messages in the console. The default is to display error andwarning messages.
-verbose
Displays error, warning, and informational messages in the console.
Example command
The following example displays information about the backup operation:
smsap history set -profile -name PROFILE1 -operation -operations backup -retain -daily 6 -verbose
The smsap history show commandThis command enables you to view a detailed history information for a specific profile.
Syntax
smsap history show -profile profile
Parameters-profile profile
Specifies the name of the profile. This name can be up to 30 characters long andmust be unique within the host.
258 | Administration Guide for UNIX
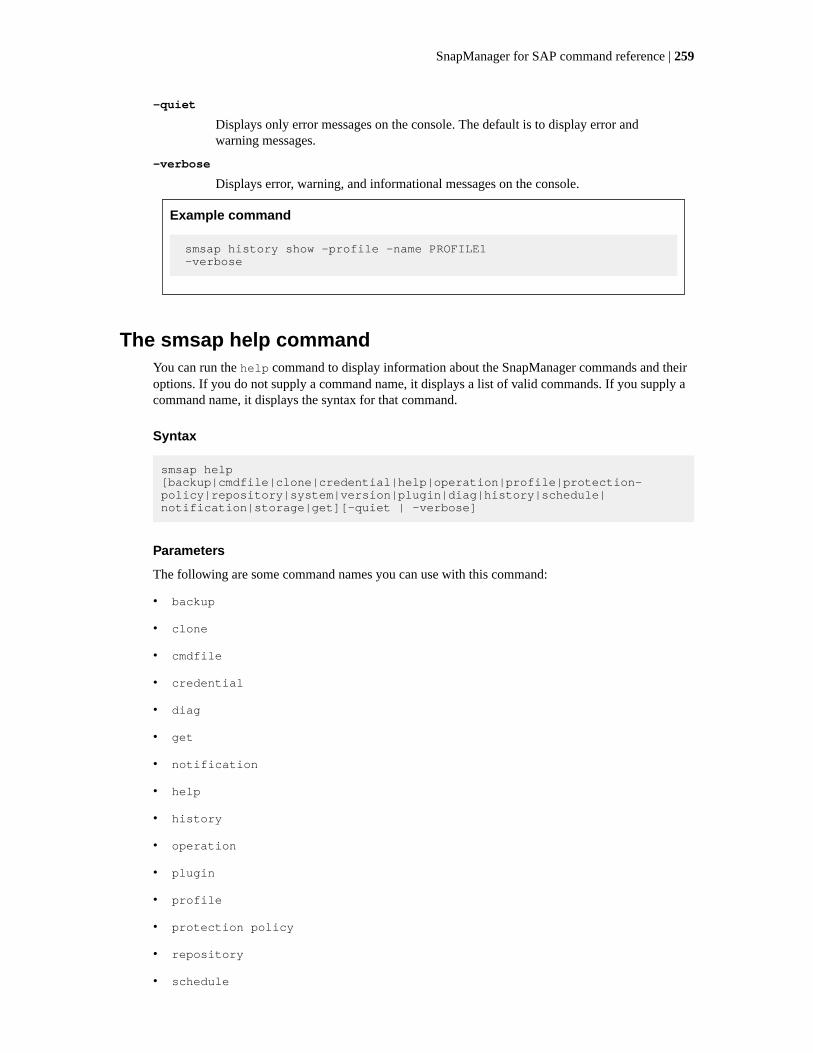
-quiet
Displays only error messages on the console. The default is to display error andwarning messages.
-verbose
Displays error, warning, and informational messages on the console.
Example command
smsap history show -profile -name PROFILE1 -verbose
The smsap help commandYou can run the help command to display information about the SnapManager commands and theiroptions. If you do not supply a command name, it displays a list of valid commands. If you supply acommand name, it displays the syntax for that command.
Syntax
smsap help [backup|cmdfile|clone|credential|help|operation|profile|protection-policy|repository|system|version|plugin|diag|history|schedule|notification|storage|get][-quiet | -verbose]
Parameters
The following are some command names you can use with this command:
• backup
• clone
• cmdfile
• credential
• diag
• get
• notification
• help
• history
• operation
• plugin
• profile
• protection policy
• repository
• schedule
SnapManager for SAP command reference | 259
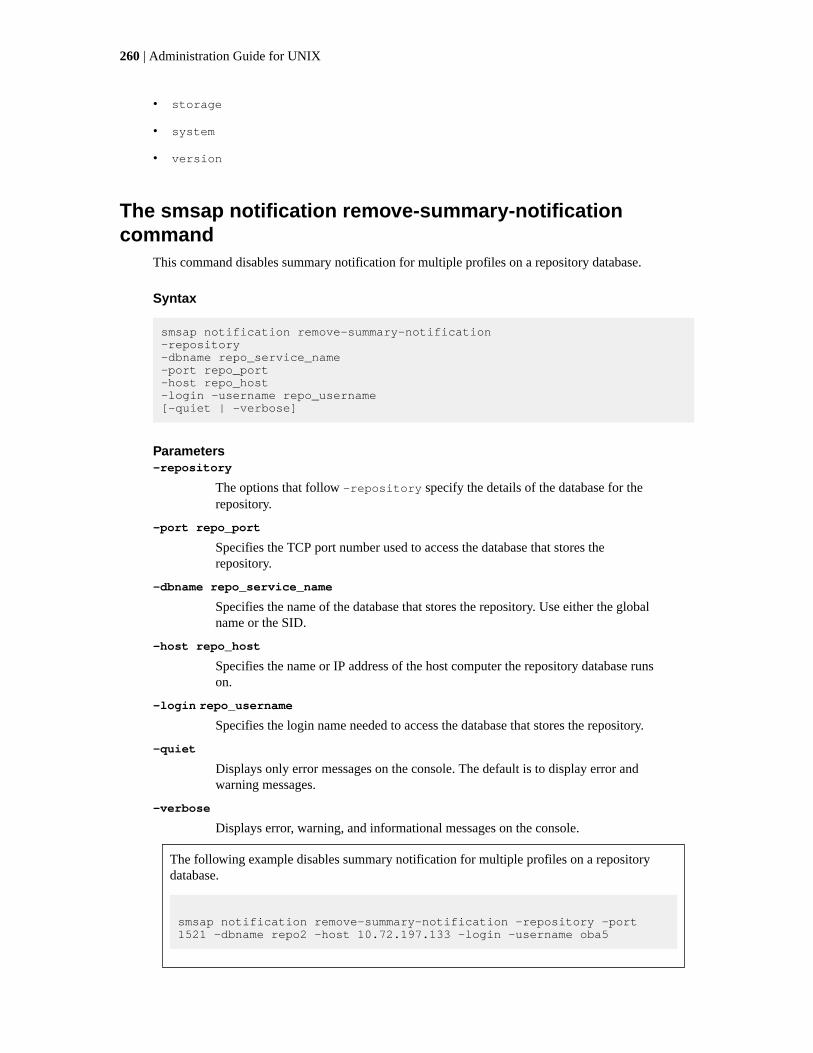
• storage
• system
• version
The smsap notification remove-summary-notificationcommand
This command disables summary notification for multiple profiles on a repository database.
Syntax
smsap notification remove-summary-notification -repository -dbname repo_service_name -port repo_port -host repo_host -login -username repo_username [-quiet | -verbose]
Parameters-repository
The options that follow -repository specify the details of the database for therepository.
-port repo_port
Specifies the TCP port number used to access the database that stores therepository.
-dbname repo_service_name
Specifies the name of the database that stores the repository. Use either the globalname or the SID.
-host repo_host
Specifies the name or IP address of the host computer the repository database runson.
-login repo_username
Specifies the login name needed to access the database that stores the repository.
-quiet
Displays only error messages on the console. The default is to display error andwarning messages.
-verbose
Displays error, warning, and informational messages on the console.
The following example disables summary notification for multiple profiles on a repositorydatabase.
smsap notification remove-summary-notification –repository –port 1521 –dbname repo2 –host 10.72.197.133 –login -username oba5
260 | Administration Guide for UNIX
The smsap notification update-summary-notificationcommand
You can run the notification update-summary-notification command to enable summarynotification for a repository database.
Syntax
smsap notification update-summary-notification -repository -port repo_port -dbname repo_service_name -host repo_host -login -username repo_username -email email-address1,email-address2 -subject subject-pattern -frequency [-daily –time daily_time | -hourly –time hourly_time | -monthly –time monthly_time -date [1|2|3|...|31] | -weekly –time weekly_time -day [1|2|3|4|5|6|7]] -profiles profile1,profile2-notification-host notification-host [-quiet | -verbose]
Parameters-repository
Specifies the details of the repository database.
-port repo_port
Specifies the TCP port number used to access the repository database.
-dbname repo_service_name
Specifies the name of the repository database. You can use either the global nameor the system identifier.
-host repo_host
Specifies the name or IP address of the host on which the repository databaseresides.
-login
Specifies the repository login details. This is optional. If not specified,SnapManager defaults to OS Authentication Connection Mode.
-username repo_username
Specifies the user name required to access the repository database.
-email email-address1,e-mail-address2
Specifies email addresses of the recipients.
-subject subject-pattern
Specifies the email subject pattern.
-frequency {-daily –time daily_time | -hourly –time hourly_time | -monthly –time monthly_time -date {1|2|3...|31 } | -weekly –time weekly_time -day {1|2|3|4|5|6|7 } }
Specifies schedule type and schedule time when you want the email notification.
SnapManager for SAP command reference | 261
-profiles profile1, profile2
Specifies profile names that require email notification.
-notification-host notification-host
Specifies SnapManager server host from which the summary notification email issent to the recipients. You can provide host name, or IP address for the notificationhost. You can also update the host IP or host name.
-quiet
Displays only error messages in the console. The default is to display error andwarning messages.
-verbose
Displays error, warning, and informational messages in the console.
Example
The following example enables summary notification for a repository database:
smsap notification update-summary-notification –repository –port 1521 –dbname repo2 –host 10.72.197.133 –login –username oba5 –email [email protected] –subject success –frequency -daily -time 19:30:45 –profiles sales1
The smsap notification set commandYou can use the notification set command to configure the mail server.
Syntax
smsap notification set -sender-email email_address -mailhost mailhost -mailport mailport [-authentication -username username -password password] -repository -dbname repo_service_name -port repo_port] -host repo_host -login -username repo_username [-quiet | -verbose]
Parameters-sender-email email_address
Specifies the sender's email address from which the email alerts are sent. FromSnapManager 3.2 for SAP, you can include a hyphen (-) while specifying thedomain name of the email address. For example, you can specify the sender emailaddress as [email protected].
-mailhost mailhost
Specifies the name or IP address of the host server that handles email notifications.
262 | Administration Guide for UNIX
-mailport mailport
Specifies the mail server port number.
-authentication -usernameusername-password password
Specifies authentication details for the email address. You must specify the username and password.
-repository
Specifies the details of the repository database.
-portrepo_port
Specifies the Transmission Control Protocol (TCP) port number used to access therepository database.
-dbnamerepo_service_name
Specifies the name of the repository database. You can use either the global nameor the system identifier.
-hostrepo_host
Specifies the name or IP address of the host where the repository database resides.
-login
Specifies the repository login details. This is optional. If not specified,SnapManager defaults to OS Authentication Connection Mode.
-username repo_username
Specifies the user name required to access the repository database.
-quiet
Displays only error messages in the console. The default is to display error andwarning messages.
-verbose
Displays error, warning, and informational messages in the console.
Example
The following example configures the mail server:
smsap notification set -sender-email [email protected] -mailhost hostname.org.com -mailport 25 authentication -username davis -password davis -repository -port 1521 -dbname SMSAPREPO -host hotspur -login -username grabal21 -verbose
The smsap operation dump commandYou can run the operation dump command to create a JAR file that contains diagnosticinformation about an operation.
Syntax
smsap operation dump -profile profile_name [-label label_name | -id guid] [-quiet | -verbose]
SnapManager for SAP command reference | 263
Parameters-profile profile_name
Specifies the profile for which you want to create the dump files. The profilecontains the identifier of the database and other database information.
-label label_name
Creates dump files for the operation and assigns the specified label.
-id guid
Creates dump files for the operation with the specified GUID. The GUID isgenerated by SnapManager when the operation begins.
-quiet
Displays only error messages in the console. The default is to display error andwarning messages.
-verbose
Displays error, warning, and informational messages in the console.
Example
The following example creates the dump file for the backup:
smsap operation dump -profile SALES1-id 8abc01ec0e78f3e2010e78f3fdd00001
Dump file created Path:/userhomedirectory/.netapp/smsap/3.3/smsap_dump_8abc01ec0e78f3e2010e78f3fdd00001.jar
Related concepts
Dump files on page 305
The smsap operation list commandThis command lists the summary information of all operations recorded against a specified profile.
Syntax
smsap operation list -profile profile_name [-delimiter character] [-quiet | -verbose]
Parameters-profile profile_name
Specifies the name of the profile. This name can be up to 30 characters long andmust be unique within the host.
-delimiter character
(Optional) When this parameter is specified, the command lists each row on aseparate line and the attributes in that row are separated by the character specified.
264 | Administration Guide for UNIX
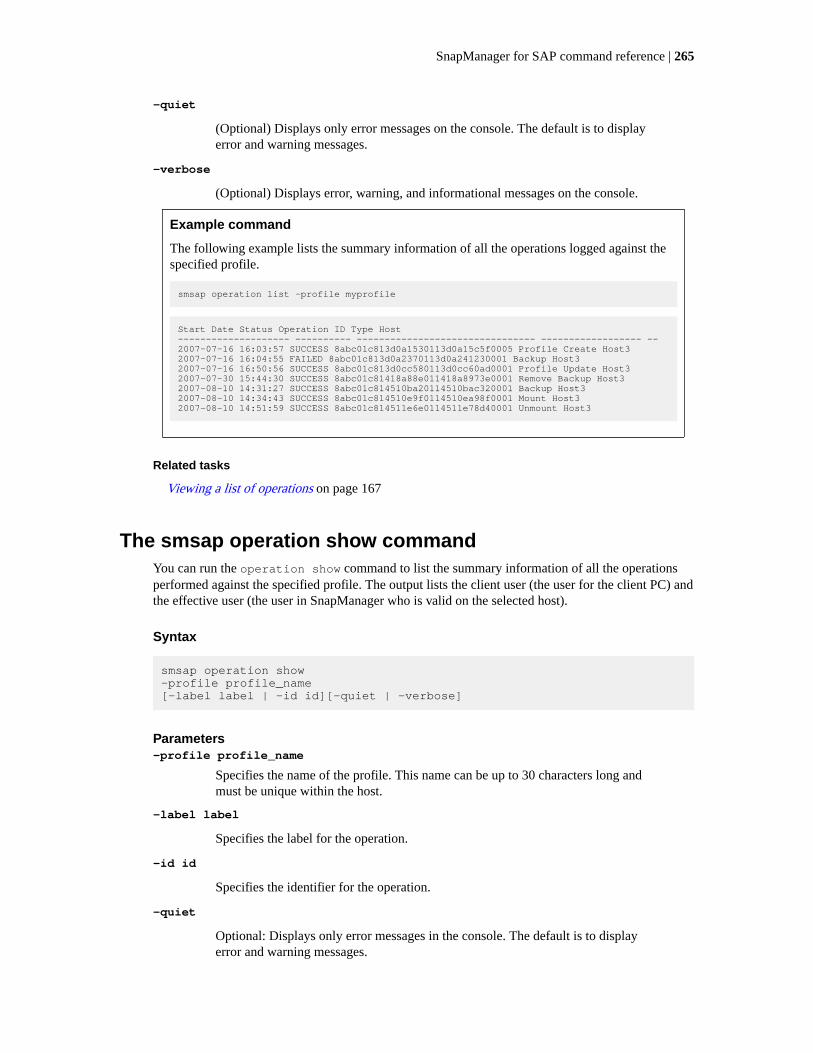
-quiet
(Optional) Displays only error messages on the console. The default is to displayerror and warning messages.
-verbose
(Optional) Displays error, warning, and informational messages on the console.
Example command
The following example lists the summary information of all the operations logged against thespecified profile.
smsap operation list -profile myprofile
Start Date Status Operation ID Type Host-------------------- ---------- -------------------------------- ------------------ --2007-07-16 16:03:57 SUCCESS 8abc01c813d0a1530113d0a15c5f0005 Profile Create Host32007-07-16 16:04:55 FAILED 8abc01c813d0a2370113d0a241230001 Backup Host32007-07-16 16:50:56 SUCCESS 8abc01c813d0cc580113d0cc60ad0001 Profile Update Host32007-07-30 15:44:30 SUCCESS 8abc01c81418a88e011418a8973e0001 Remove Backup Host32007-08-10 14:31:27 SUCCESS 8abc01c814510ba20114510bac320001 Backup Host32007-08-10 14:34:43 SUCCESS 8abc01c814510e9f0114510ea98f0001 Mount Host32007-08-10 14:51:59 SUCCESS 8abc01c814511e6e0114511e78d40001 Unmount Host3
Related tasks
Viewing a list of operations on page 167
The smsap operation show commandYou can run the operation show command to list the summary information of all the operationsperformed against the specified profile. The output lists the client user (the user for the client PC) andthe effective user (the user in SnapManager who is valid on the selected host).
Syntax
smsap operation show -profile profile_name [-label label | -id id][-quiet | -verbose]
Parameters-profile profile_name
Specifies the name of the profile. This name can be up to 30 characters long andmust be unique within the host.
-label label
Specifies the label for the operation.
-id id
Specifies the identifier for the operation.
-quiet
Optional: Displays only error messages in the console. The default is to displayerror and warning messages.
SnapManager for SAP command reference | 265
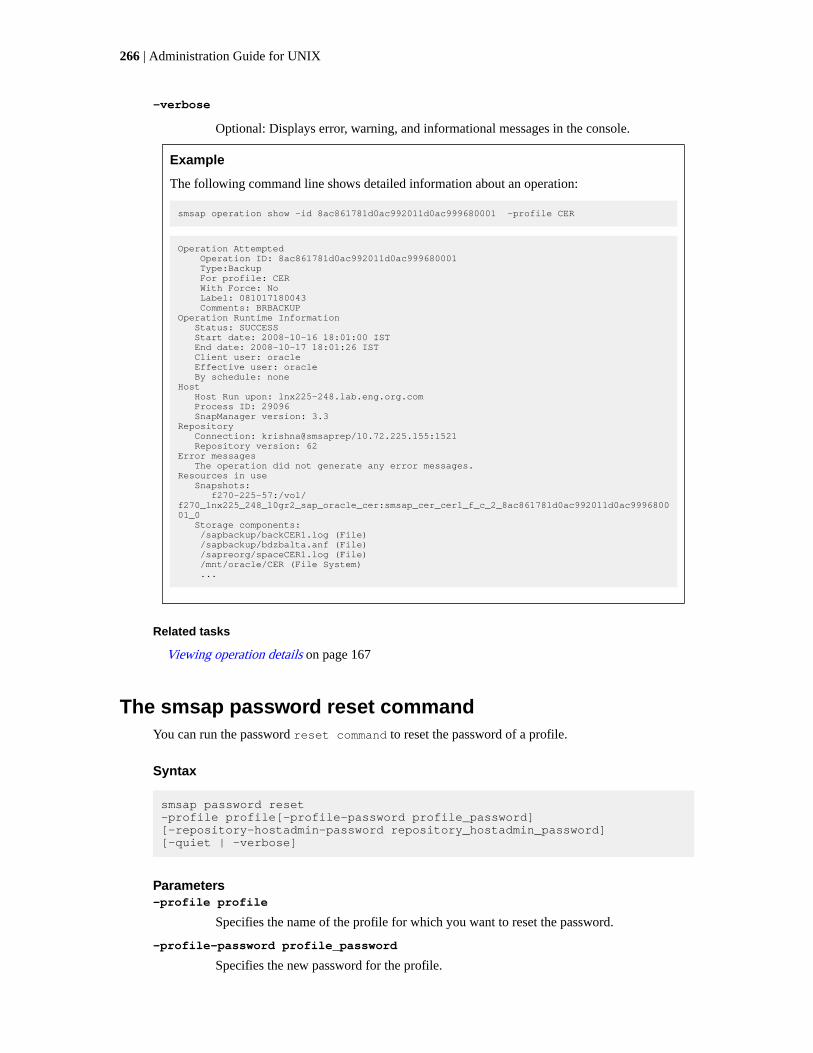
-verbose
Optional: Displays error, warning, and informational messages in the console.
Example
The following command line shows detailed information about an operation:
smsap operation show -id 8ac861781d0ac992011d0ac999680001 -profile CER
Operation Attempted Operation ID: 8ac861781d0ac992011d0ac999680001 Type:Backup For profile: CER With Force: No Label: 081017180043 Comments: BRBACKUPOperation Runtime Information Status: SUCCESS Start date: 2008-10-16 18:01:00 IST End date: 2008-10-17 18:01:26 IST Client user: oracle Effective user: oracle By schedule: noneHost Host Run upon: lnx225-248.lab.eng.org.com Process ID: 29096 SnapManager version: 3.3Repository Connection: krishna@smsaprep/10.72.225.155:1521 Repository version: 62Error messages The operation did not generate any error messages.Resources in use Snapshots: f270-225-57:/vol/f270_lnx225_248_10gr2_sap_oracle_cer:smsap_cer_cer1_f_c_2_8ac861781d0ac992011d0ac999680001_0 Storage components: /sapbackup/backCER1.log (File) /sapbackup/bdzbalta.anf (File) /sapreorg/spaceCER1.log (File) /mnt/oracle/CER (File System) ...
Related tasks
Viewing operation details on page 167
The smsap password reset commandYou can run the password reset command to reset the password of a profile.
Syntax
smsap password reset -profile profile[-profile-password profile_password] [-repository-hostadmin-password repository_hostadmin_password][-quiet | -verbose]
Parameters-profile profile
Specifies the name of the profile for which you want to reset the password.
-profile-password profile_password
Specifies the new password for the profile.
266 | Administration Guide for UNIX
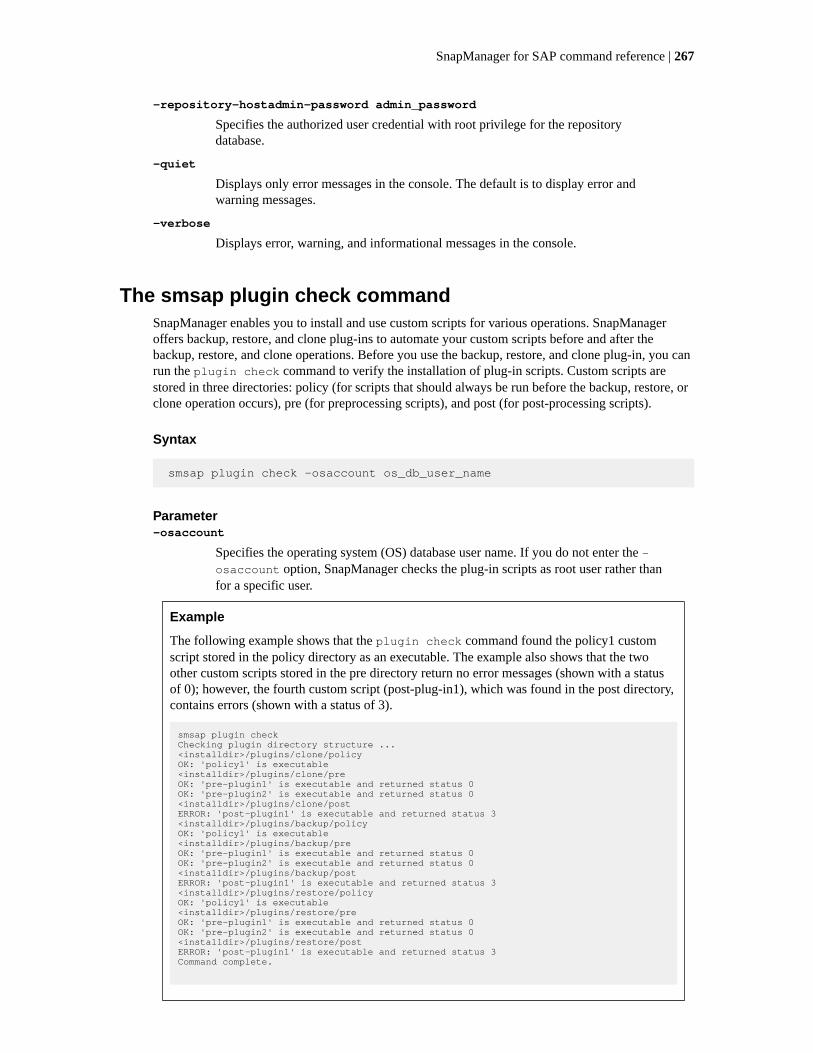
-repository-hostadmin-password admin_password
Specifies the authorized user credential with root privilege for the repositorydatabase.
-quiet
Displays only error messages in the console. The default is to display error andwarning messages.
-verbose
Displays error, warning, and informational messages in the console.
The smsap plugin check commandSnapManager enables you to install and use custom scripts for various operations. SnapManageroffers backup, restore, and clone plug-ins to automate your custom scripts before and after thebackup, restore, and clone operations. Before you use the backup, restore, and clone plug-in, you canrun the plugin check command to verify the installation of plug-in scripts. Custom scripts arestored in three directories: policy (for scripts that should always be run before the backup, restore, orclone operation occurs), pre (for preprocessing scripts), and post (for post-processing scripts).
Syntax
smsap plugin check -osaccount os_db_user_name
Parameter-osaccount
Specifies the operating system (OS) database user name. If you do not enter the -osaccount option, SnapManager checks the plug-in scripts as root user rather thanfor a specific user.
Example
The following example shows that the plugin check command found the policy1 customscript stored in the policy directory as an executable. The example also shows that the twoother custom scripts stored in the pre directory return no error messages (shown with a statusof 0); however, the fourth custom script (post-plug-in1), which was found in the post directory,contains errors (shown with a status of 3).
smsap plugin check Checking plugin directory structure ...<installdir>/plugins/clone/policyOK: 'policy1' is executable<installdir>/plugins/clone/preOK: 'pre-plugin1' is executable and returned status 0OK: 'pre-plugin2' is executable and returned status 0<installdir>/plugins/clone/postERROR: 'post-plugin1' is executable and returned status 3<installdir>/plugins/backup/policyOK: 'policy1' is executable<installdir>/plugins/backup/preOK: 'pre-plugin1' is executable and returned status 0OK: 'pre-plugin2' is executable and returned status 0<installdir>/plugins/backup/postERROR: 'post-plugin1' is executable and returned status 3<installdir>/plugins/restore/policyOK: 'policy1' is executable<installdir>/plugins/restore/preOK: 'pre-plugin1' is executable and returned status 0OK: 'pre-plugin2' is executable and returned status 0<installdir>/plugins/restore/postERROR: 'post-plugin1' is executable and returned status 3 Command complete.
SnapManager for SAP command reference | 267
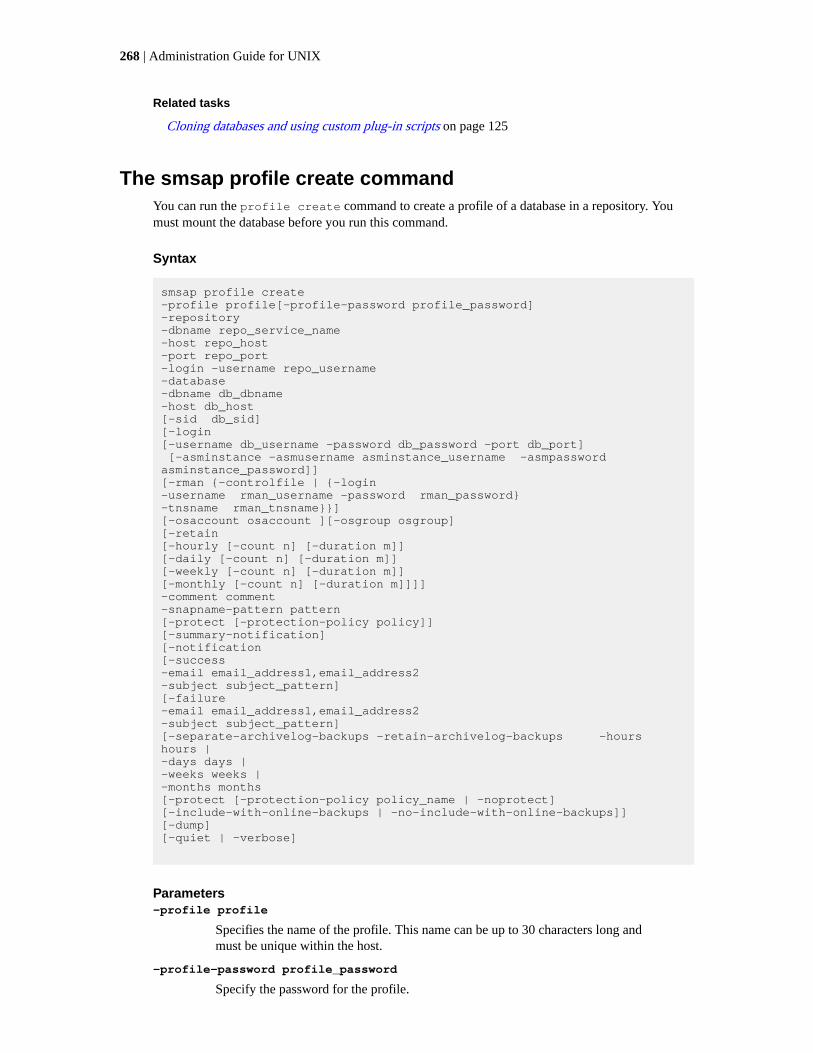
Related tasks
Cloning databases and using custom plug-in scripts on page 125
The smsap profile create commandYou can run the profile create command to create a profile of a database in a repository. Youmust mount the database before you run this command.
Syntax
smsap profile create -profile profile[-profile-password profile_password] -repository -dbname repo_service_name -host repo_host -port repo_port -login -username repo_username -database -dbname db_dbname -host db_host [-sid db_sid] [-login [-username db_username -password db_password -port db_port] [-asminstance -asmusername asminstance_username -asmpassword asminstance_password]] [-rman {-controlfile | {-login -username rman_username -password rman_password} -tnsname rman_tnsname}}][-osaccount osaccount ][-osgroup osgroup][-retain [-hourly [-count n] [-duration m]] [-daily [-count n] [-duration m]] [-weekly [-count n] [-duration m]] [-monthly [-count n] [-duration m]]]] -comment comment -snapname-pattern pattern [-protect [-protection-policy policy]] [-summary-notification] [-notification [-success -email email_address1,email_address2 -subject subject_pattern] [-failure -email email_address1,email_address2 -subject subject_pattern] [-separate-archivelog-backups -retain-archivelog-backups -hours hours |-days days | -weeks weeks | -months months[-protect [-protection-policy policy_name | -noprotect][-include-with-online-backups | -no-include-with-online-backups]][-dump][-quiet | -verbose]
Parameters-profile profile
Specifies the name of the profile. This name can be up to 30 characters long andmust be unique within the host.
-profile-password profile_password
Specify the password for the profile.
268 | Administration Guide for UNIX
-repository
The options that follow -repository specify the details of the database that storesthe profile.
-dbname repo_service_name
Specifies the name of the database that stores the profile. Use either the globalname or the SID.
-host repo_host
Specifies the name or IP address of the host computer the repository database runson.
-sid db_sid
Specifies the system identifier of the database that the profile describes. By default,SnapManager uses the database name as the system identifier. If the systemidentifier is different from the database name, you must specify it with the -sidoption.
For example, if you are using Oracle Real Application Clusters (RAC), you mustspecify the system identifier of the RAC instance on the RAC node from whichSnapManager is executed.
-login
Specifies the repository login details.
-username repo_username
Specifies the user name needed to access the repository database.
-port repo_port
Specifies the TCP port number used to access the repository database.
-database
Specifies the details of the database that the profile describes. This is the databasethat will be backed up, restored, or cloned.
-dbname db_dbname
Specifies the name of the database that the profile describes. You can use either theglobal name or the system identifier.
-host db_host db_host
Specifies the name or IP address of the host computer on which the database runs.
-asminstance
Specifies the credentials that are used to log in to the Automatic StorageManagement (ASM) instance.
-asmusernameasminstance_username
Specifies the user name used to log in to the ASM instance.
-asmpasswordasminstance_password
Specifies the password used to log in to ASM instance.
-login
Specifies the database login details.
-username db_username
Specifies the user name needed to access the database that the profile describes.
-password db_password
Specifies the password needed to access the database that the profile describes.
SnapManager for SAP command reference | 269
-port db_port
Specifies the TCP port number used to access the database that the profiledescribes.
-osaccount osaccount
Specifies the name of the Oracle database user account. SnapManager uses thisaccount to perform the Oracle operations such as startup and shutdown. It istypically the user who owns the Oracle software on the host, for example, orasid.
-osgroup osgroup
Specifies the name of the Oracle database group name associated with the orasidaccount.
-retain [-hourly [-count n] [-duration m]] [-daily [-count n] [-duration m]] [-weekly [-count n] [-duration m]] [-monthly [-count n] [-duration m]]
Specifies the retention policy for a backup where either or both of a retention countalong with a retention duration for a retention class (hourly, daily, weekly,monthly).
For each retention class, either or both of a retention count or a retention durationmay be specified. The duration is in units of the class (for example, hours forhourly, days for daily). For instance, if the user specifies only a retention durationof 7 for daily backups, then SnapManager will not limit the number of dailybackups for the profile (because the retention count is 0), but SnapManager willautomatically delete daily backups created over 7 days ago.
-comment comment
Specifies the comment for a profile describing the profile domain.
-snapname-pattern pattern
Specifies the naming pattern for Snapshot copies. You can also include custom text,for example, HAOPS for highly available operations, in all Snapshot copy names.You can change the Snapshot copy naming pattern when you create a profile orafter the profile has been created. The updated pattern applies only to Snapshotcopies that have not yet been created. Snapshot copies that exist retain the previousSnapname pattern. You can use several variables in the pattern text.
-protect -protection-policy policy
Indicates whether the backup should be protected to secondary storage.
Note: If -protect is specified without -protection-policy, then thedataset will not have a protection policy. If -protect is specified and -protection-policy is not set when the profile is created, then it may be setlater by smsap profile update command or set by the storageadministrator through Protection Manager's console.
-summary-notification
Specifies that summary email notification is enabled for the new profile.
-notification -success -email e-mail_address1,e-mail address2 -subject subject_pattern
Specifies that email notification is enabled for the new profile so that emails arereceived by recipients when the SnapManager operation succeeds. You must enter asingle email address or multiple email addresses to which email alerts will be sentand an email subject pattern for the new profile.
You can also include custom subject text for the new profile. You can change thesubject text when you create a profile or after the profile has been created. The
270 | Administration Guide for UNIX
updated subject applies only to the emails that are not sent. You can use severalvariables for the email subject.
-notification -failure -email e-mail_address1,e-mail address2 -subject subject_pattern
Specifies that enable email notification is enabled for the new profile so that emailsare received by recipients when the SnapManager operation fails. You must enter asingle email address or multiple email addresses to which email alerts will be sentand an email subject pattern for the new profile.
You can also include custom subject text for the new profile. You can change thesubject text when you create a profile or after the profile has been created. Theupdated subject applies only to the emails that are not sent. You can use severalvariables for the email subject.
-separate-archivelog-backups
Specifies that the archive log backup is separated from datafile backup. This is anoptional parameter you can provide while creating the profile. After you separatethe backup using this option, you can either take data files-only backup or archivelogs-only backup.
-retain-archivelog-backups -hours hours | -days days | -weeks weeks| -monthsmonths
Specifies that the archive log backups are retained based on the archive logretention duration (hourly, daily, weekly, monthly).
protect [-protection-policy policy_name] | -noprotect
Specifies to protect the archive log files based on the archive log protection policy.
The -noprotect option specifies not to protect the archive log files.
-quiet
Displays only error messages in the console. The default is to display error andwarning messages.
-verbose
Displays error, warning, and informational messages in the console.
-include-with-online-backups
Specifies that the archive log backup is included along with the online databasebackup.
-no-include-with-online-backups
Specifies that the archive log backups are not included along with the onlinedatabase backup.
-dump
Specifies that the dump files are collected after the successful profile createoperation.
Example
The following example shows the creation of a profile with hourly retention policy and emailnotification:
smsap profile create -profile test_rbac -profile-password netapp -repository -dbname SMSAPREP -host hostname.org.com -port 1521 -login -username smsaprep -database -dbname RACB -host saal -sid racb1 -login -username sys -password netapp -port 1521 -rman -controlfile -retain -hourly -count 30 -verboseOperation Id [8abc01ec0e78ebda010e78ebe6a40005] succeeded.
SnapManager for SAP command reference | 271
Related concepts
Managing profiles for efficient backups on page 46
Snapshot copy naming on page 52
How SnapManager retains backups on the local storage on page 142
Related references
The smsap protection-policy command on page 283
The smsap profile delete commandYou can run the profile delete command to delete a profile of the database.
Syntax
smsap profile delete -profile profile [-quiet | -verbose]
Parameters-profile profile
Specifies the profile to be deleted.
-quiet
Displays only error messages in the console. The default is to display error andwarning messages.
-verbose
Displays error, warning, and informational messages in the console.
Example
The following example deletes the profile:
smsap profile delete -profile SALES1Operation Id [Ncaf00af0242b3e8dba5c68a57a5ae932] succeeded.
Related tasks
Deleting profiles on page 58
The smsap profile destroy commandThis command deletes the split clone (database) along with the profile generated by SnapManagerduring the clone split process.
Syntax
smsap profile destroy -profile profile [-host hostname] [-quiet | -verbose]
272 | Administration Guide for UNIX
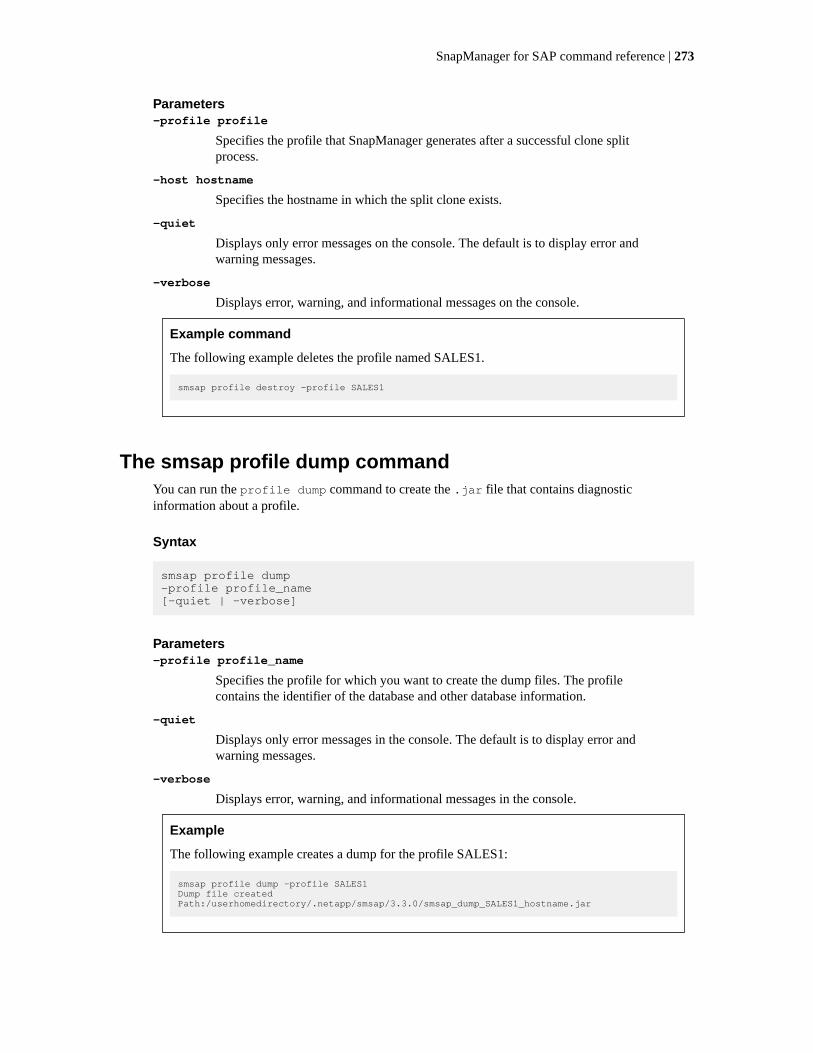
Parameters-profile profile
Specifies the profile that SnapManager generates after a successful clone splitprocess.
-host hostname
Specifies the hostname in which the split clone exists.
-quiet
Displays only error messages on the console. The default is to display error andwarning messages.
-verbose
Displays error, warning, and informational messages on the console.
Example command
The following example deletes the profile named SALES1.
smsap profile destroy -profile SALES1
The smsap profile dump commandYou can run the profile dump command to create the .jar file that contains diagnosticinformation about a profile.
Syntax
smsap profile dump -profile profile_name [-quiet | -verbose]
Parameters-profile profile_name
Specifies the profile for which you want to create the dump files. The profilecontains the identifier of the database and other database information.
-quiet
Displays only error messages in the console. The default is to display error andwarning messages.
-verbose
Displays error, warning, and informational messages in the console.
Example
The following example creates a dump for the profile SALES1:
smsap profile dump -profile SALES1Dump file createdPath:/userhomedirectory/.netapp/smsap/3.3.0/smsap_dump_SALES1_hostname.jar
SnapManager for SAP command reference | 273
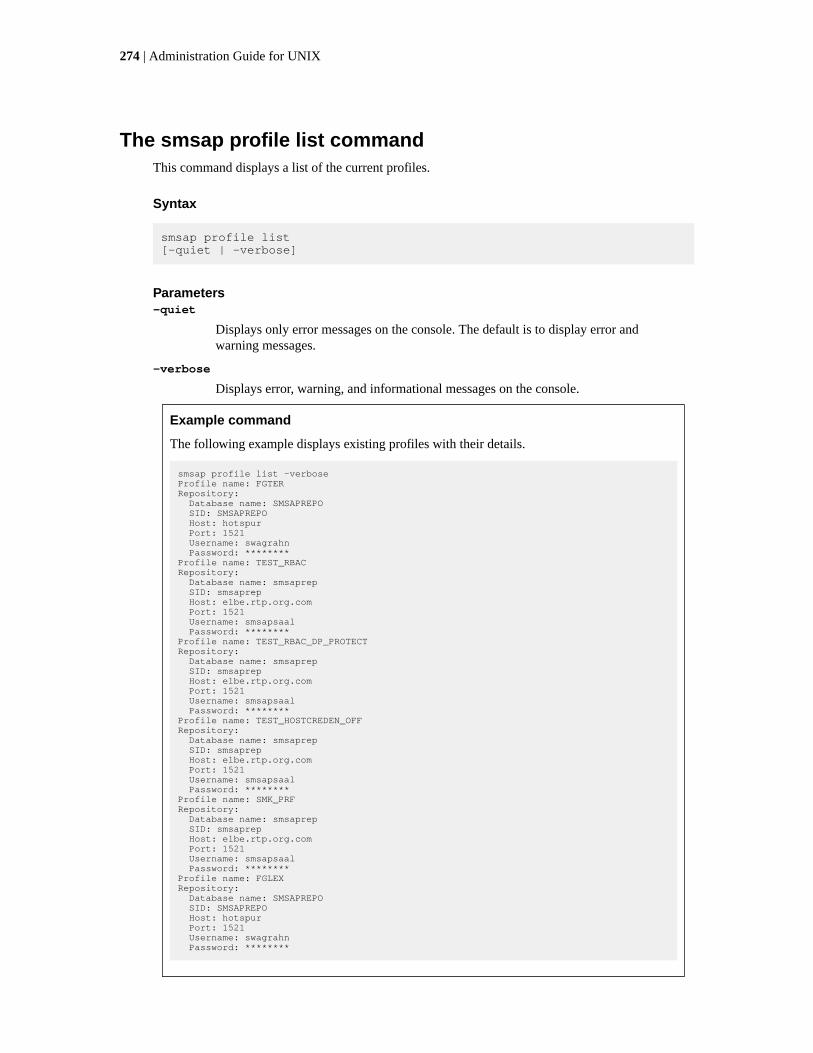
The smsap profile list commandThis command displays a list of the current profiles.
Syntax
smsap profile list [-quiet | -verbose]
Parameters-quiet
Displays only error messages on the console. The default is to display error andwarning messages.
-verbose
Displays error, warning, and informational messages on the console.
Example command
The following example displays existing profiles with their details.
smsap profile list -verboseProfile name: FGTERRepository: Database name: SMSAPREPO SID: SMSAPREPO Host: hotspur Port: 1521 Username: swagrahn Password: ********Profile name: TEST_RBACRepository: Database name: smsaprep SID: smsaprep Host: elbe.rtp.org.com Port: 1521 Username: smsapsaal Password: ********Profile name: TEST_RBAC_DP_PROTECTRepository: Database name: smsaprep SID: smsaprep Host: elbe.rtp.org.com Port: 1521 Username: smsapsaal Password: ********Profile name: TEST_HOSTCREDEN_OFFRepository: Database name: smsaprep SID: smsaprep Host: elbe.rtp.org.com Port: 1521 Username: smsapsaal Password: ********Profile name: SMK_PRFRepository: Database name: smsaprep SID: smsaprep Host: elbe.rtp.org.com Port: 1521 Username: smsapsaal Password: ********Profile name: FGLEXRepository: Database name: SMSAPREPO SID: SMSAPREPO Host: hotspur Port: 1521 Username: swagrahn Password: ********
274 | Administration Guide for UNIX
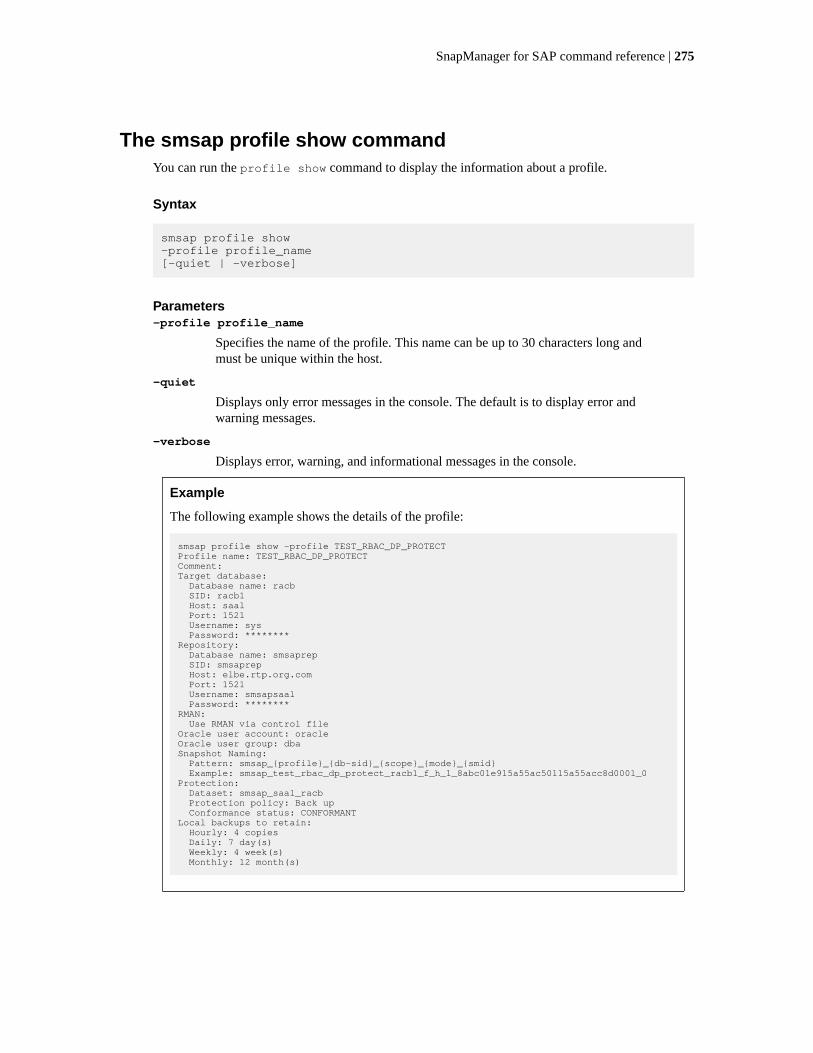
The smsap profile show commandYou can run the profile show command to display the information about a profile.
Syntax
smsap profile show -profile profile_name [-quiet | -verbose]
Parameters-profile profile_name
Specifies the name of the profile. This name can be up to 30 characters long andmust be unique within the host.
-quiet
Displays only error messages in the console. The default is to display error andwarning messages.
-verbose
Displays error, warning, and informational messages in the console.
Example
The following example shows the details of the profile:
smsap profile show -profile TEST_RBAC_DP_PROTECTProfile name: TEST_RBAC_DP_PROTECTComment:Target database: Database name: racb SID: racb1 Host: saal Port: 1521 Username: sys Password: ********Repository: Database name: smsaprep SID: smsaprep Host: elbe.rtp.org.com Port: 1521 Username: smsapsaal Password: ********RMAN: Use RMAN via control fileOracle user account: oracleOracle user group: dbaSnapshot Naming: Pattern: smsap_{profile}_{db-sid}_{scope}_{mode}_{smid} Example: smsap_test_rbac_dp_protect_racb1_f_h_1_8abc01e915a55ac50115a55acc8d0001_0Protection: Dataset: smsap_saal_racb Protection policy: Back up Conformance status: CONFORMANTLocal backups to retain: Hourly: 4 copies Daily: 7 day(s) Weekly: 4 week(s) Monthly: 12 month(s)
SnapManager for SAP command reference | 275
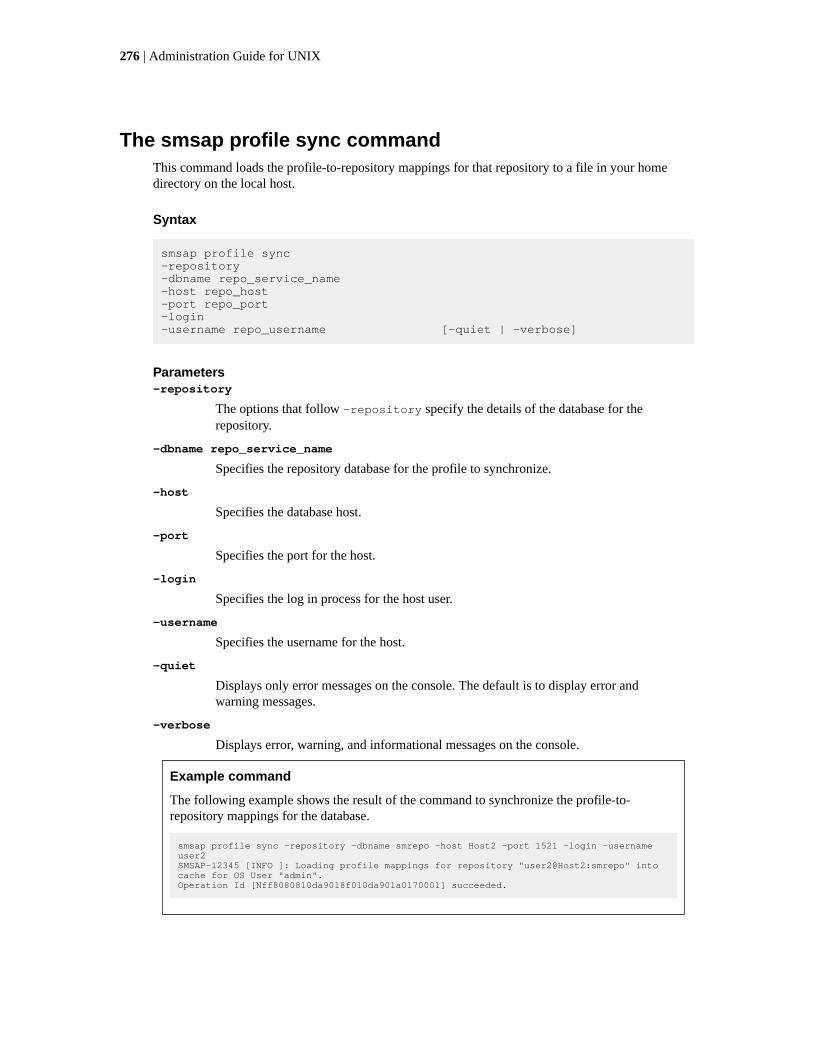
The smsap profile sync commandThis command loads the profile-to-repository mappings for that repository to a file in your homedirectory on the local host.
Syntax
smsap profile sync -repository -dbname repo_service_name -host repo_host -port repo_port -login -username repo_username [-quiet | -verbose]
Parameters-repository
The options that follow -repository specify the details of the database for therepository.
-dbname repo_service_name
Specifies the repository database for the profile to synchronize.
-host
Specifies the database host.
-port
Specifies the port for the host.
-login
Specifies the log in process for the host user.
-username
Specifies the username for the host.
-quiet
Displays only error messages on the console. The default is to display error andwarning messages.
-verbose
Displays error, warning, and informational messages on the console.
Example command
The following example shows the result of the command to synchronize the profile-to-repository mappings for the database.
smsap profile sync -repository -dbname smrepo -host Host2 -port 1521 -login -username user2SMSAP-12345 [INFO ]: Loading profile mappings for repository "user2@Host2:smrepo" into cache for OS User "admin".Operation Id [Nff8080810da9018f010da901a0170001] succeeded.
276 | Administration Guide for UNIX

The smsap profile update commandYou can run the profile update command to update the information for an existing profile.
Syntax
smsap profile update -profile profile[-new-profile new_profile_name][-profile-password profile_password][-database -dbname db_dbname -host db_host [-sid db_sid] [-login [-username db_username -password db_password -port db_port] [-asminstance -asmusername asminstance_username -asmpassword asminstance_password]] [{-rman {-controlfile | {{-login -username rman_username -password rman_password } [-tnsname tnsname]}}} | -remove-rman] -osaccount osaccount -osgroup osgroup [-retain [-hourly [-count n] [-duration m]] [-daily [-count n] [-duration m]] [-weekly [-count n] [-duration m]] [-monthly [-count n] [-duration m]]]] -comment comment -snapname-patternpattern [-protect [-protection-policy policy_name] | [-noprotect]] [-summary-notification] [-notification [-success -email email_address1,email_address2 -subject subject_pattern] [-failure -email email_address1,email_address2 -subject subject_pattern][-separate-archivelog-backups -retain-archivelog-backups-hours hours |-days days | -weeks weeks | -months months[-protect [-protection-policy policy_name] | [-noprotect]][-include-with-online-backups | -no-include-with-online-backups]][-dump] [-quiet | -verbose]
Parameters
If protection policy is set on the profile, you cannot change the policy using SnapManager. You mustchange the policy using the Protection Manager's console.
-profile profile
Specifies the name of the profile. This name can be up to 30 characters long andmust be unique within the host.
-profile-password profile_password
Specifies the password for the profile.
-new-profilenew_profile_name
Specifies the new name that you can provide for a profile.
SnapManager for SAP command reference | 277
-database
Specifies the details of the database that the profile describes. This is the databasethat will be backed up, restored, and so on.
-dbname db_dbname
Specifies the name of the database that the profile describes. You can use either theglobal name or the system identifier.
-host db_host
Specifies the name or IP address of the host computer on which the database runs.
-sid db_sid
Specifies the system identifier of the database that the profile describes. By default,SnapManager uses the database name as the system identifier. If the systemidentifier is different from the database name, you must specify it using the -sidoption.
For example, if you are using Oracle Real Application Clusters (RAC), you mustspecify the SID system identifier of the RAC instance on the RAC node from whichSnapManager is executed.
-login
Specifies the repository login details.
-username repo_username
Specifies the user name required to access the repository database.
-port repo_port
Specifies the TCP port number required to access the repository database.
-database
Specifies the details of the database that the profile describes. This is the databasethat will be backed up, restored, or cloned.
-dbname db_dbname
Specifies the name of the database that the profile describes. You can use either theglobal name or the system identifier.
-host db_host
Specifies the name or IP address of the host computer on which the database runs.
-login
Specifies the database login details.
-username db_username
Specifies the user name required to access the database that the profile describes.
-password db_password
Specifies the password required to access the database that the profile describes.
-port db_port
Specifies the TCP port number required to access the database that the profiledescribes.
-asminstance
Specifies the credentials that are used to log in to the Automatic StorageManagement (ASM) instance.
-asmusernameasminstance_username
Specifies the user name used to log in to the ASM instance.
278 | Administration Guide for UNIX

-asmpasswordasminstance_password
Specifies the password used to log in to ASM instance.
-osaccount osaccount
Specifies the name of the Oracle database user account. SnapManager uses thisaccount to perform the Oracle operations such as startup and shutdown. It istypically the user who owns the Oracle software on the host, for example, orasid.
-osgroup osgroup
Specifies the name of the Oracle database group name associated with the orasidaccount.
-retain [-hourly [-count n] [-duration m]] [-daily [-count n] [-duration m]][-weekly [-count n][-duration m]] [-monthly [-count n][-duration m]]
Specifies the retention class (hourly, daily, weekly, monthly) for a backup.
For each retention class, a retention count or a retention duration or both can bespecified. The duration is in units of the class (for example, hours for hourly ordays for daily). For instance, if the user specifies only a retention duration of 7 fordaily backups, then SnapManager will not limit the number of daily backups for theprofile (because the retention count is 0), but SnapManager will automaticallydelete daily backups created over 7 days ago.
-comment comment
Specifies the comment for a profile.
-snapname-pattern pattern
Specifies the naming pattern for Snapshot copies. You can also include custom text,for example, HAOPS for highly available operations, in all Snapshot copy names.You can change the Snapshot copy naming pattern when you create a profile orafter the profile has been created. The updated pattern applies only to Snapshotcopies that have not yet occurred. Snapshot copies that exist retain the previousSnapname pattern. You can use several variables in the pattern text.
-protect [-protection-policy policy_name] | [-noprotect ]
Indicates whether the backup should be protected to secondary storage or not.
Note: If -protect is specified without -protection-policy, then thedataset will not have a protection policy. If -protect is specified and -protection-policy is not set when the profile is created, then it may be setlater by smsap profile update command or set by the storageadministrator by using the Protection Manager's console .
The -noprotect option specifies not to protect the profile to secondary storage.
-summary-notification
Specifies that summary email notification is enabled for the existing profile.
-notification [-success -email e-mail_address1,e-mail address2 -subject subject_pattern]
Enables email notification for the existing profile so that emails are received byrecipients when the SnapManager operation succeeds. You must enter a singleemail address or multiple email addresses to which email alerts will be sent and anemail subject pattern for the existing profile.
You can change the subject text while updating the profile or include customsubject text. The updated subject applies only to the emails that are not sent. Youcan use several variables for the email subject.
SnapManager for SAP command reference | 279
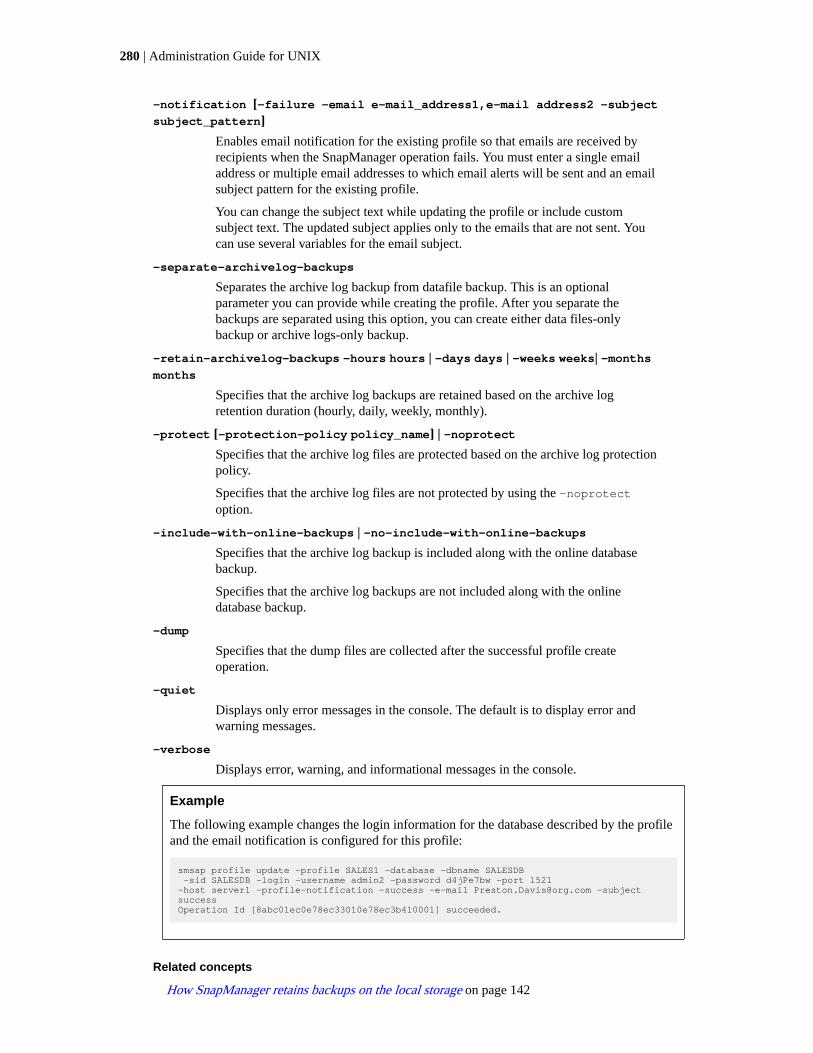
-notification [-failure -email e-mail_address1,e-mail address2 -subject subject_pattern]
Enables email notification for the existing profile so that emails are received byrecipients when the SnapManager operation fails. You must enter a single emailaddress or multiple email addresses to which email alerts will be sent and an emailsubject pattern for the existing profile.
You can change the subject text while updating the profile or include customsubject text. The updated subject applies only to the emails that are not sent. Youcan use several variables for the email subject.
-separate-archivelog-backups
Separates the archive log backup from datafile backup. This is an optionalparameter you can provide while creating the profile. After you separate thebackups are separated using this option, you can create either data files-onlybackup or archive logs-only backup.
-retain-archivelog-backups -hours hours | -days days | -weeks weeks| -monthsmonths
Specifies that the archive log backups are retained based on the archive logretention duration (hourly, daily, weekly, monthly).
-protect [-protection-policy policy_name] | -noprotect
Specifies that the archive log files are protected based on the archive log protectionpolicy.
Specifies that the archive log files are not protected by using the -noprotectoption.
-include-with-online-backups | -no-include-with-online-backups
Specifies that the archive log backup is included along with the online databasebackup.
Specifies that the archive log backups are not included along with the onlinedatabase backup.
-dump
Specifies that the dump files are collected after the successful profile createoperation.
-quiet
Displays only error messages in the console. The default is to display error andwarning messages.
-verbose
Displays error, warning, and informational messages in the console.
Example
The following example changes the login information for the database described by the profileand the email notification is configured for this profile:
smsap profile update -profile SALES1 -database -dbname SALESDB -sid SALESDB -login -username admin2 -password d4jPe7bw -port 1521-host server1 -profile-notification -success -e-mail [email protected] -subject successOperation Id [8abc01ec0e78ec33010e78ec3b410001] succeeded.
Related concepts
How SnapManager retains backups on the local storage on page 142
280 | Administration Guide for UNIX
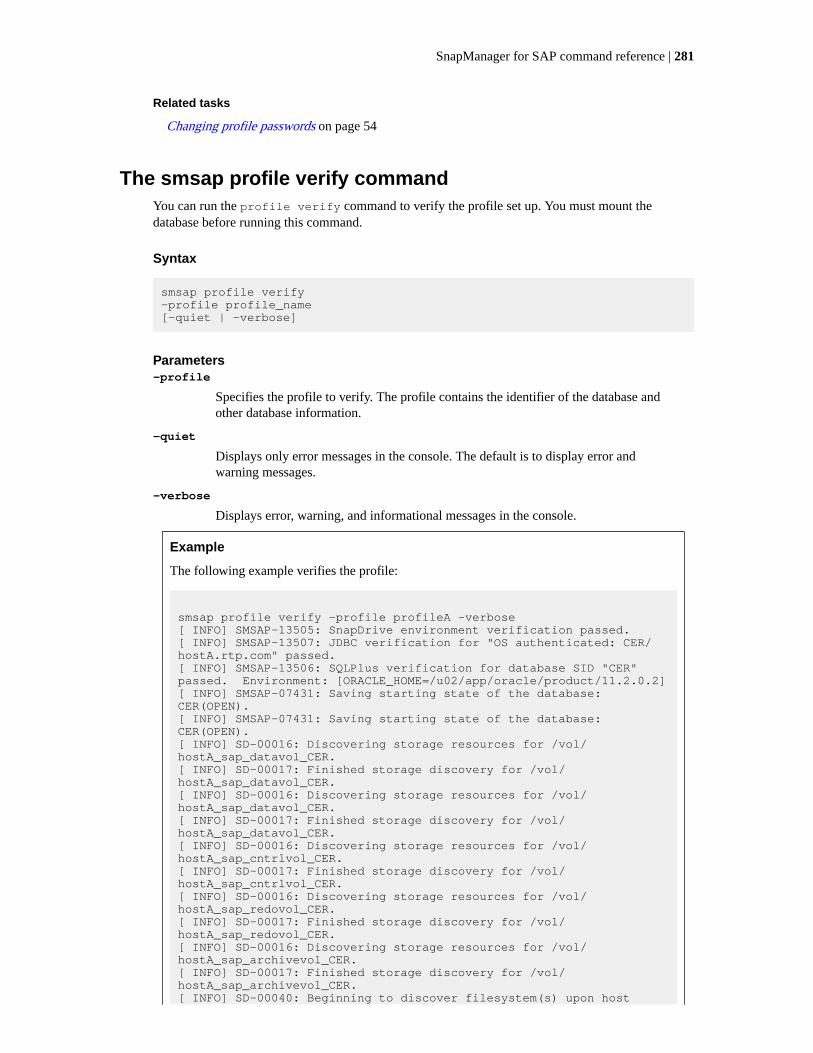
Related tasks
Changing profile passwords on page 54
The smsap profile verify commandYou can run the profile verify command to verify the profile set up. You must mount thedatabase before running this command.
Syntax
smsap profile verify -profile profile_name [-quiet | -verbose]
Parameters-profile
Specifies the profile to verify. The profile contains the identifier of the database andother database information.
-quiet
Displays only error messages in the console. The default is to display error andwarning messages.
-verbose
Displays error, warning, and informational messages in the console.
Example
The following example verifies the profile:
smsap profile verify -profile profileA –verbose[ INFO] SMSAP-13505: SnapDrive environment verification passed.[ INFO] SMSAP-13507: JDBC verification for "OS authenticated: CER/hostA.rtp.com" passed.[ INFO] SMSAP-13506: SQLPlus verification for database SID "CER" passed. Environment: [ORACLE_HOME=/u02/app/oracle/product/11.2.0.2][ INFO] SMSAP-07431: Saving starting state of the database: CER(OPEN).[ INFO] SMSAP-07431: Saving starting state of the database: CER(OPEN).[ INFO] SD-00016: Discovering storage resources for /vol/hostA_sap_datavol_CER.[ INFO] SD-00017: Finished storage discovery for /vol/ hostA_sap_datavol_CER.[ INFO] SD-00016: Discovering storage resources for /vol/hostA_sap_datavol_CER.[ INFO] SD-00017: Finished storage discovery for /vol/ hostA_sap_datavol_CER.[ INFO] SD-00016: Discovering storage resources for /vol/hostA_sap_cntrlvol_CER.[ INFO] SD-00017: Finished storage discovery for /vol/hostA_sap_cntrlvol_CER.[ INFO] SD-00016: Discovering storage resources for /vol/hostA_sap_redovol_CER.[ INFO] SD-00017: Finished storage discovery for /vol/hostA_sap_redovol_CER.[ INFO] SD-00016: Discovering storage resources for /vol/hostA_sap_archivevol_CER.[ INFO] SD-00017: Finished storage discovery for /vol/hostA_sap_archivevol_CER.[ INFO] SD-00040: Beginning to discover filesystem(s) upon host
SnapManager for SAP command reference | 281

volume group hostA-3_SdDg.[ INFO] SD-00041: Finished discovering filesystem(s) upon host volume group hostA-3_SdDg.[ INFO] SD-00040: Beginning to discover filesystem(s) upon host volume group hostA-2_SdDg.[ INFO] SD-00041: Finished discovering filesystem(s) upon host volume group hostA-2_SdDg.[ INFO] SD-00040: Beginning to discover filesystem(s) upon host volume group hostA_s_SdDg.[ INFO] SD-00041: Finished discovering filesystem(s) upon host volume group hostA_s_SdDg.[ INFO] SD-00040: Beginning to discover filesystem(s) upon host volume group hostA-1_SdDg.[ INFO] SD-00041: Finished discovering filesystem(s) upon host volume group hostA-1_SdDg.[ WARN] SMSAP-05071: Database profile profileA is not eligible for fast restore: Restore Plan: Preview:
The following components will be restored completely via: host side file copy restore /vol/hostA_sap_datavol_CER/CER/sapdata1/oradata/CER/sysaux01.dbf /vol/hostA_sap_datavol_CER/CER/sapdata1/oradata/CER/system01.dbf /vol/hostA_sap_datavol_CER/CER/sapdata1/oradata/CER/undotbs01.dbf /vol/hostA_sap_datavol_CER/CER/sapdata1/oradata/CER/users01.dbf
Analysis:
The following reasons prevent certain components from being restored completely via: storage side file system restore * Files in file system /vol/hostA_sap_datavol_CER not part of the restore scope will be reverted. * File systems in volume group hostA-1_SdDg not part of the restore scope will be reverted: [/vol/hostA_sap_datavol_CER] Components not in restore scope: /vol/hostA_sap_datavol_CER/CER/sapdata1/cfgtoollogs/catbundle/catbundle_PSU_CER_APPLY_2011Dec15_00_52_21.log /vol/hostA_sap_datavol_CER/CER/sapdata1/cfgtoollogs/catbundle/catbundle_PSU_CER_GENERATE_2011Dec15_00_52_16.log Components to restore: /vol/hostA_sap_datavol_CER/CER/sapdata1/oradata/CER/sysaux01.dbf /vol/hostA_sap_datavol_CER/CER/sapdata1/oradata/CER/system01.dbf /vol/hostA_sap_datavol_CER/CER/sapdata1/oradata/CER/undotbs01.dbf /vol/hostA_sap_datavol_CER/CER/sapdata1/oradata/CER/users01.dbf
* Reasons denoted with an asterisk (*) are overridable.
[ INFO] SMSAP-07433: Returning the database to its initial state: CER (OPEN).[ INFO] SMSAP-13048: Profile Verify Operation Status: SUCCESS[ INFO] SMSAP-13049: Elapsed Time: 0:01:17.857Operation Id [Nab0240e8200dae6f17ecf21060bc6de8] succeeded.
Related tasks
Verifying profiles on page 55
282 | Administration Guide for UNIX
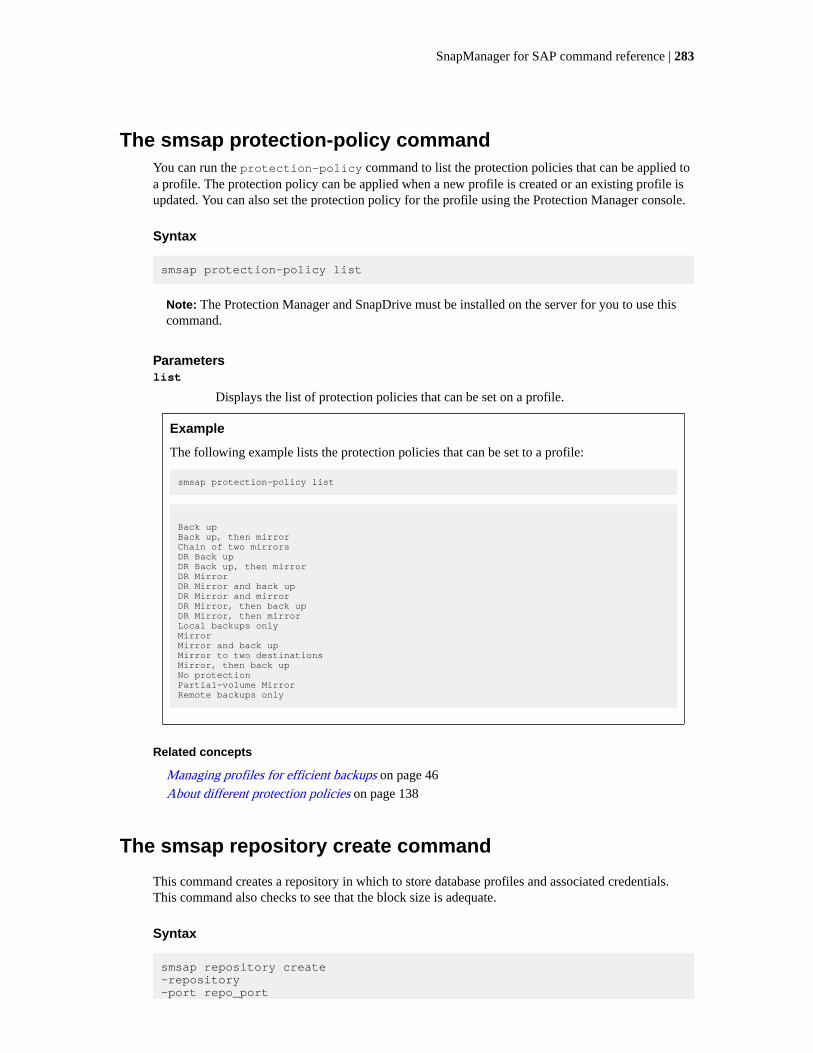
The smsap protection-policy commandYou can run the protection-policy command to list the protection policies that can be applied toa profile. The protection policy can be applied when a new profile is created or an existing profile isupdated. You can also set the protection policy for the profile using the Protection Manager console.
Syntax
smsap protection-policy list
Note: The Protection Manager and SnapDrive must be installed on the server for you to use thiscommand.
Parameterslist
Displays the list of protection policies that can be set on a profile.
Example
The following example lists the protection policies that can be set to a profile:
smsap protection-policy list
Back upBack up, then mirrorChain of two mirrorsDR Back upDR Back up, then mirrorDR MirrorDR Mirror and back upDR Mirror and mirrorDR Mirror, then back upDR Mirror, then mirrorLocal backups onlyMirrorMirror and back upMirror to two destinationsMirror, then back upNo protectionPartial-volume MirrorRemote backups only
Related concepts
Managing profiles for efficient backups on page 46
About different protection policies on page 138
The smsap repository create command
This command creates a repository in which to store database profiles and associated credentials.This command also checks to see that the block size is adequate.
Syntax
smsap repository create -repository -port repo_port
SnapManager for SAP command reference | 283
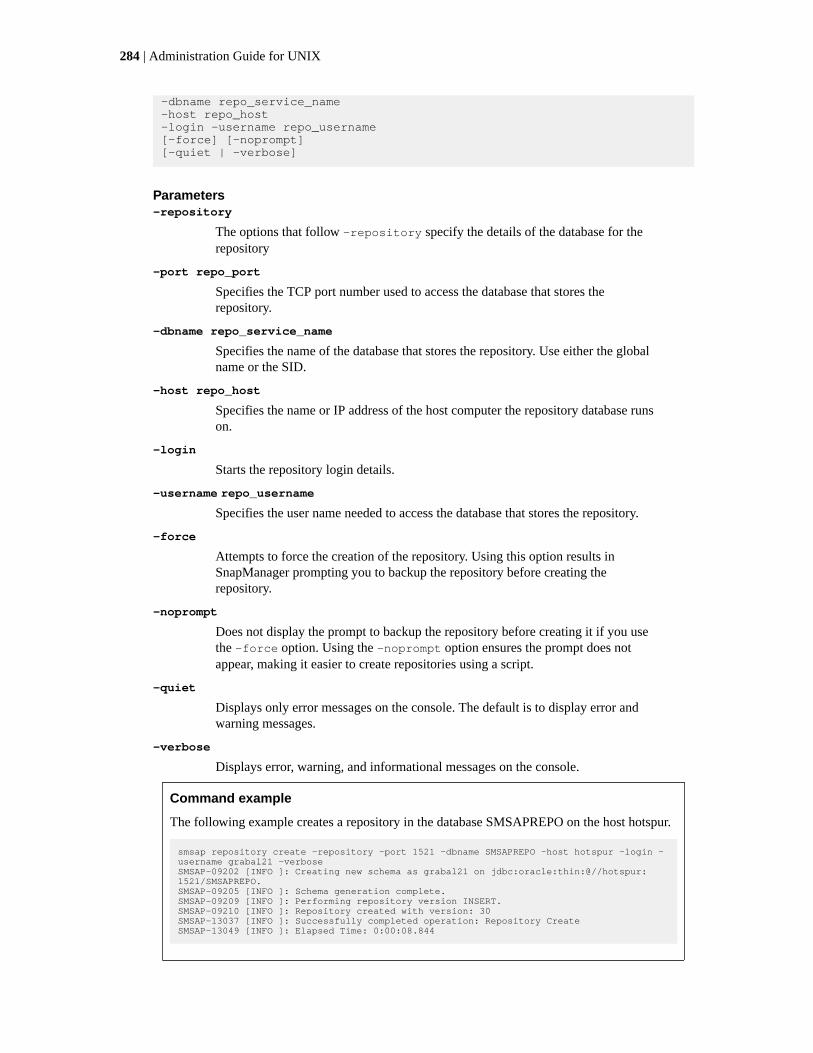
-dbname repo_service_name -host repo_host -login -username repo_username [-force] [-noprompt] [-quiet | -verbose]
Parameters-repository
The options that follow -repository specify the details of the database for therepository
-port repo_port
Specifies the TCP port number used to access the database that stores therepository.
-dbname repo_service_name
Specifies the name of the database that stores the repository. Use either the globalname or the SID.
-host repo_host
Specifies the name or IP address of the host computer the repository database runson.
-login
Starts the repository login details.
-username repo_username
Specifies the user name needed to access the database that stores the repository.
-force
Attempts to force the creation of the repository. Using this option results inSnapManager prompting you to backup the repository before creating therepository.
-noprompt
Does not display the prompt to backup the repository before creating it if you usethe -force option. Using the -noprompt option ensures the prompt does notappear, making it easier to create repositories using a script.
-quiet
Displays only error messages on the console. The default is to display error andwarning messages.
-verbose
Displays error, warning, and informational messages on the console.
Command example
The following example creates a repository in the database SMSAPREPO on the host hotspur.
smsap repository create -repository -port 1521 -dbname SMSAPREPO -host hotspur -login -username grabal21 -verboseSMSAP-09202 [INFO ]: Creating new schema as grabal21 on jdbc:oracle:thin:@//hotspur:1521/SMSAPREPO.SMSAP-09205 [INFO ]: Schema generation complete.SMSAP-09209 [INFO ]: Performing repository version INSERT.SMSAP-09210 [INFO ]: Repository created with version: 30SMSAP-13037 [INFO ]: Successfully completed operation: Repository CreateSMSAP-13049 [INFO ]: Elapsed Time: 0:00:08.844
284 | Administration Guide for UNIX
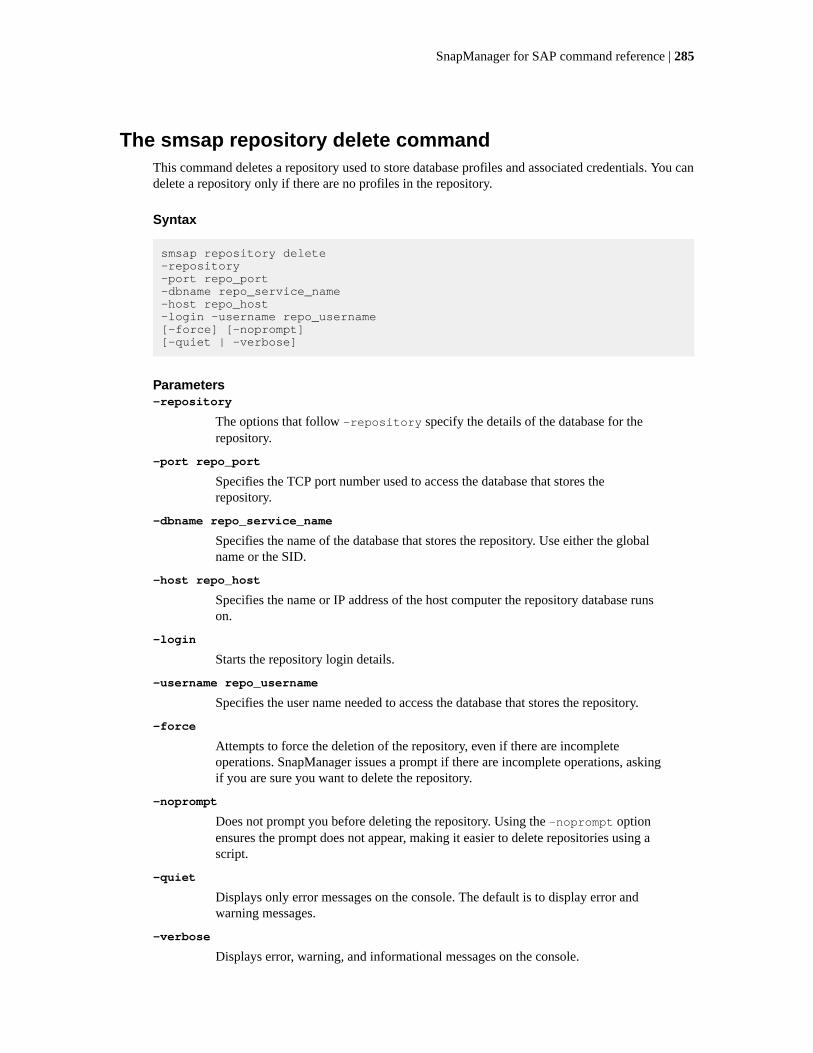
The smsap repository delete commandThis command deletes a repository used to store database profiles and associated credentials. You candelete a repository only if there are no profiles in the repository.
Syntax
smsap repository delete -repository -port repo_port -dbname repo_service_name -host repo_host -login -username repo_username [-force] [-noprompt] [-quiet | -verbose]
Parameters-repository
The options that follow -repository specify the details of the database for therepository.
-port repo_port
Specifies the TCP port number used to access the database that stores therepository.
-dbname repo_service_name
Specifies the name of the database that stores the repository. Use either the globalname or the SID.
-host repo_host
Specifies the name or IP address of the host computer the repository database runson.
-login
Starts the repository login details.
-username repo_username
Specifies the user name needed to access the database that stores the repository.
-force
Attempts to force the deletion of the repository, even if there are incompleteoperations. SnapManager issues a prompt if there are incomplete operations, askingif you are sure you want to delete the repository.
-noprompt
Does not prompt you before deleting the repository. Using the -noprompt optionensures the prompt does not appear, making it easier to delete repositories using ascript.
-quiet
Displays only error messages on the console. The default is to display error andwarning messages.
-verbose
Displays error, warning, and informational messages on the console.
SnapManager for SAP command reference | 285
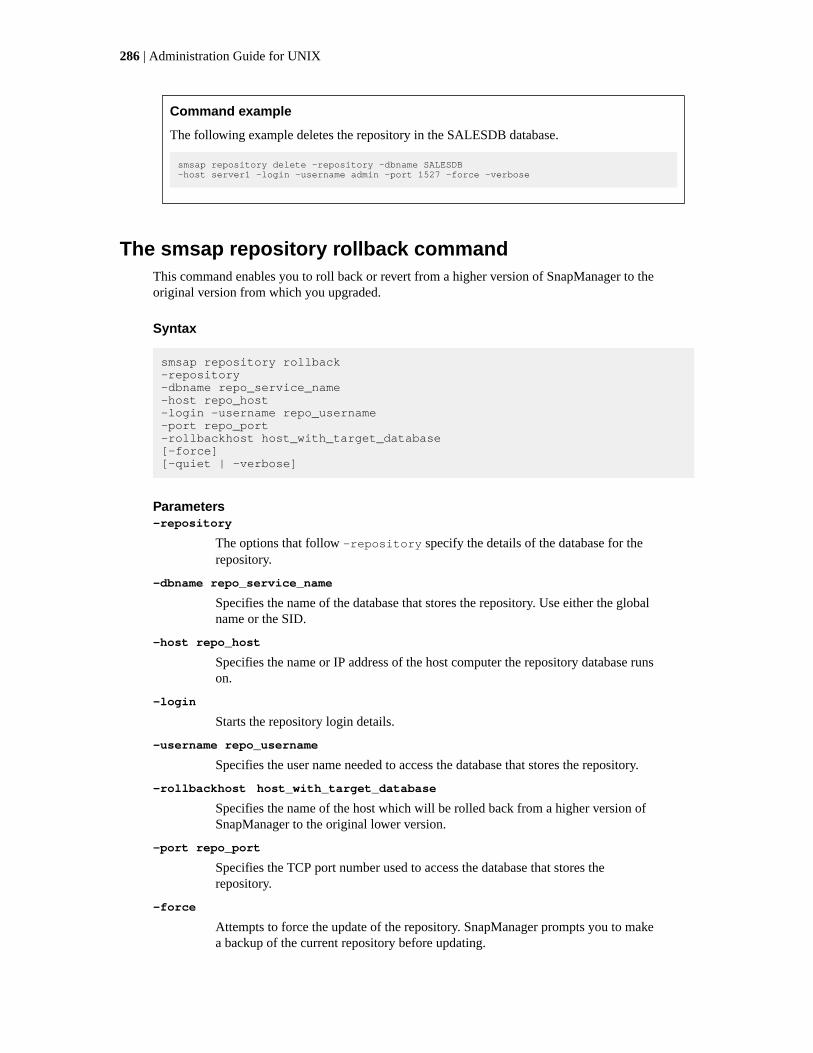
Command example
The following example deletes the repository in the SALESDB database.
smsap repository delete -repository -dbname SALESDB-host server1 -login -username admin -port 1527 -force -verbose
The smsap repository rollback commandThis command enables you to roll back or revert from a higher version of SnapManager to theoriginal version from which you upgraded.
Syntax
smsap repository rollback -repository -dbname repo_service_name -host repo_host -login -username repo_username -port repo_port -rollbackhost host_with_target_database [-force] [-quiet | -verbose]
Parameters-repository
The options that follow -repository specify the details of the database for therepository.
-dbname repo_service_name
Specifies the name of the database that stores the repository. Use either the globalname or the SID.
-host repo_host
Specifies the name or IP address of the host computer the repository database runson.
-login
Starts the repository login details.
-username repo_username
Specifies the user name needed to access the database that stores the repository.
-rollbackhost host_with_target_database
Specifies the name of the host which will be rolled back from a higher version ofSnapManager to the original lower version.
-port repo_port
Specifies the TCP port number used to access the database that stores therepository.
-force
Attempts to force the update of the repository. SnapManager prompts you to makea backup of the current repository before updating.
286 | Administration Guide for UNIX
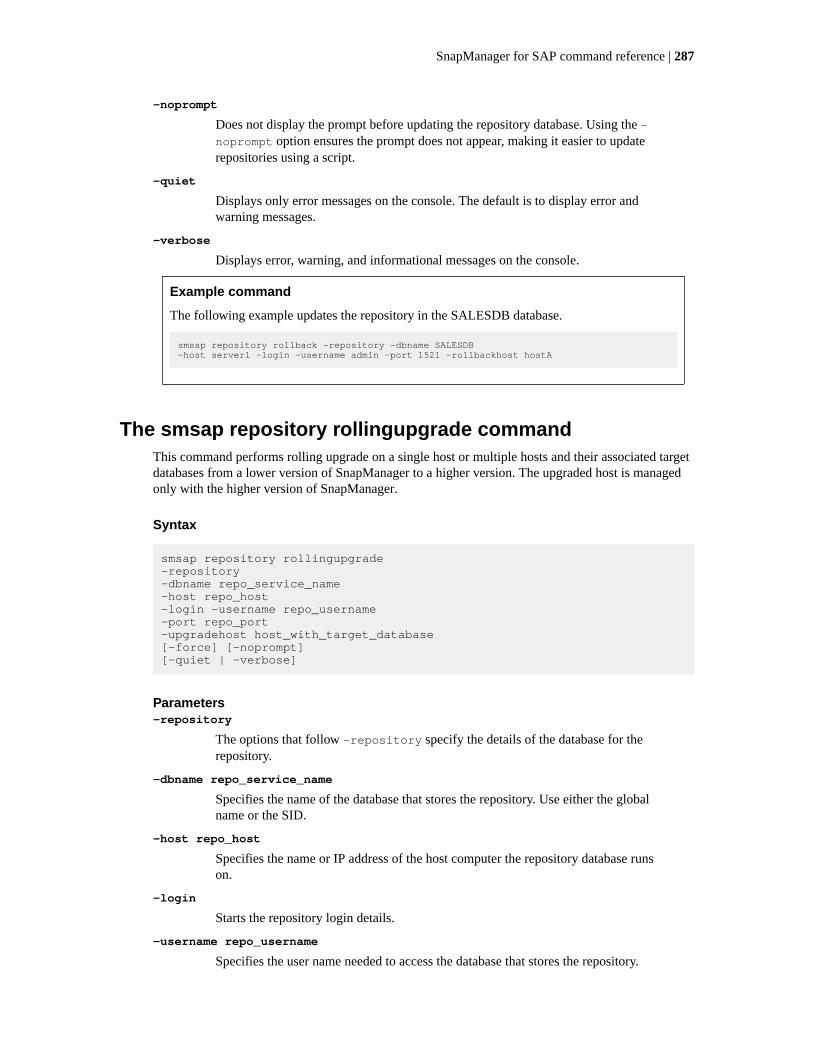
-noprompt
Does not display the prompt before updating the repository database. Using the -noprompt option ensures the prompt does not appear, making it easier to updaterepositories using a script.
-quiet
Displays only error messages on the console. The default is to display error andwarning messages.
-verbose
Displays error, warning, and informational messages on the console.
Example command
The following example updates the repository in the SALESDB database.
smsap repository rollback -repository -dbname SALESDB-host server1 -login -username admin -port 1521 -rollbackhost hostA
The smsap repository rollingupgrade commandThis command performs rolling upgrade on a single host or multiple hosts and their associated targetdatabases from a lower version of SnapManager to a higher version. The upgraded host is managedonly with the higher version of SnapManager.
Syntax
smsap repository rollingupgrade -repository -dbname repo_service_name -host repo_host -login -username repo_username -port repo_port -upgradehost host_with_target_database [-force] [-noprompt] [-quiet | -verbose]
Parameters-repository
The options that follow -repository specify the details of the database for therepository.
-dbname repo_service_name
Specifies the name of the database that stores the repository. Use either the globalname or the SID.
-host repo_host
Specifies the name or IP address of the host computer the repository database runson.
-login
Starts the repository login details.
-username repo_username
Specifies the user name needed to access the database that stores the repository.
SnapManager for SAP command reference | 287
-upgradehost host_with_target_database
Specifies the name of the host which will be rolling upgraded from a lower versionof SnapManager to a higher version.
-port repo_port
Specifies the TCP port number used to access the database that stores therepository.
-force
Attempts to force the update of the repository. SnapManager prompts you to makea backup of the current repository before updating.
-noprompt
Does not display the prompt before updating the repository database. Using the -noprompt option ensures the prompt does not appear, making it easier to updaterepositories using a script.
-quiet
Displays only error messages on the console. The default is to display error andwarning messages.
-verbose
Displays error, warning, and informational messages on the console.
Example command
The following example updates the repository in the SALESDB database.
smsap repository rollingupgrade -repository -dbname SALESDB-host server1 -login -username admin -port 1521 -upgradehost hostA
The smsap repository show commandThis command displays information about the repository.
Syntax
smsap repository show -repository -dbname repo_service_name -host repo_host -port repo_port -login -username repo_username [-quiet | -verbose]
Parameters-repository
The options that follow -repository specify the details of the database for therepository.
-dbname repo_service_name
Specifies the name of the database that stores the repository. Use either the globalname or the SID.
-host repo_host
Specifies the name or IP address of the host computer the repository database runson.
288 | Administration Guide for UNIX
-login
Starts the repository login details.
-username repo_username
Specifies the user name needed to access the database that stores the repository.
-port repo_port
Specifies the TCP port number used to access the database that stores therepository.
-quiet
Displays only error messages on the console. The default is to display error andwarning messages.
-verbose
Displays error, warning, and informational messages on the console.
Command example
The following example shows details about the repository in the SALESDB database.
smsap repository show -repository -dbname SALESDB -host server1 -port 1521 -login -username adminRepository Definition:User Name: adminHost Name: server1Database Name: SALESDBDatabase Port: 1521Version: 28Hosts that have run operations using this repository: 2server2server3Profiles defined in this repository: 2GSF5AGSF3AIncomplete Operations: 0
The smsap repository update commandThis command updates the repository that stores database profiles and associated credentials whenyou upgrade SnapManager. Any time you install a new version of SnapManager, you must run therepository update command before you can use the new version. You are able to use this commandonly if there are no incomplete commands in the repository.
Syntax
smsap repository update -repository -dbname repo_service_name -host repo_host -login -username repo_username -port repo_port [-force] [-noprompt] [-quiet | -verbose]
Parameters-repository
The options that follow -repository specify the details of the database for therepository.
SnapManager for SAP command reference | 289
-dbname repo_service_name
Specifies the name of the database that stores the repository. Use either the globalname or the SID.
-host repo_host
Specifies the name or IP address of the host computer the repository database runson.
-login
Starts the repository login details.
-username repo_username
Specifies the user name needed to access the database that stores the repository.
-port repo_port
Specifies the TCP port number used to access the database that stores therepository.
-force
Attempts to force the update of the repository. SnapManager prompts you to makea backup of the current repository before updating.
-noprompt
Does not display the prompt before updating the repository database. Using the -noprompt option ensures the prompt does not appear, making it easier to updaterepositories using a script.
-quiet
Displays only error messages on the console. The default is to display error andwarning messages.
-verbose
Displays error, warning, and informational messages on the console.
Example command
The following example updates the repository in the SALESDB database.
smsap repository update -repository -dbname SALESDB-host server1 -login -username admin -port 1521
The smsap schedule create commandYou can use the schedule create command to schedule a backup to be created at a specific time.
Syntax
smsap schedule create -profile profile_name [-full{-auto | -online | -offline} [-retain -hourly | -daily | -weekly | -monthly | -unlimited][-verify]] |[-data [[-files files [files]] | [-tablespaces tablespaces [tablespaces]] {-auto | -online | -offline} [-retain -hourly | -daily | -weekly | -monthly | -unlimited][-verify]] |[-archivelogs]}[-label label] [-comment comment] [-protect | -noprotect | -protectnow][-backup-dest path1 [ , path2]] [-exclude-dest path1 [ , path2]] [-prunelogs {-all | -until-scn until-scn | -until -date yyyy-MM-dd:HH:mm:ss] | -before {-months | -days | -
290 | Administration Guide for UNIX
weeks | -hours}}-prune-dest prune_dest1,[prune_dest2]]-schedule-name schedule_name[-schedule-comment schedule_comment]-interval {-hourly | -daily | -weekly | -monthly | -onetimeonly}-cronstring cron_string-start-time {start_time <yyyy-MM-dd HH:mm>}-runasuser runasuser[-taskspec taskspec]-force [-quiet | -verbose]
Parameters-profile profile_name
Specifies the name of the profile related to the database that you want to schedulethe backup for. The profile contains the identifier of the database and other databaseinformation.
-auto option
If the database is in the mounted or offline state, SnapManager performs an offlinebackup. If the database is in the open or online state, SnapManager performs anonline backup. If you use the -force option with the -offline option,SnapManager forces an offline backup even if the database is currently online.
-online option
Specifies an online database backup.
You can create an online backup of a Real Application Clusters (RAC) database, aslong as the primary is in the open or mounted state and an instance is in the openstate. You can use the -force option for online backups if the local instance is inthe shutdown state, or no instance is open.
• If the local instance is in the shutdown state and at least one instance is open,you can use the -force option to change the local instance to mounted.
• If no instance is in open state, you can use the -force option to change thelocal instance to open.
-offline option
Specifies an offline backup while the database is in the shutdown state. If thedatabase is in the open or mounted state, the backup fails. If the -force option isused, SnapManager attempts to alter the database state to shut down the databasefor an offline backup.
-full option
Backs up the entire database. This includes all of the data, archived log, and controlfiles. The archived redo logs and control files are backed up no matter what type ofbackup you perform. If you want to back up only a portion of the database, use the-files option or -tablespaces option.
-files list
Backs up only the specified data files plus the archived log and control files.Separate the list of file names with spaces. If the database is in open state,SnapManager verifies that the appropriate tablespaces are in online backup mode.
-tablespaces tablespaces
Backs up only the specified database tablespaces plus the archived log and controlfiles. Separate the tablespace names with spaces. If the database is in open state,SnapManager verifies that the appropriate tablespaces are in online backup mode.
-label name
Specifies an optional name for this backup. This name must be unique within theprofile. The name can contain letters, numbers, underscore (_), and hyphen (-). Itcannot start with a hyphen.
SnapManager for SAP command reference | 291
If you do not specify a label, SnapManager creates a default label in thescope_type_date format:
• Scope is either F to indicate a full backup or P to indicate a partial backup.
• Type is C to indicate an offline (cold) backup, H to indicate an online (hot)backup, or A to indicate auto backup, for example, P_A_20081010060037IST.
• Date is the year, month, day, and time of the backup.
SnapManager uses a 24-hour clock.
For example, if you performed a full backup with the database offline on 16thJanuary 2007, at 5:45:16 p.m. Eastern Standard Time, SnapManager would createthe label F_C_20070116174516EST.
-commentstring
Specifies an optional comment to describe this backup. Enclose the string withinsingle quotation marks (').
Note: Some shells strip quotation marks off. If that is true for your shell, youmust include the quotation mark with a backslash (\). For example, you mightneed to enter: \' this is a comment\'.
-verify option
Verifies that the files in the backup are not corrupt by running the Oracle dbv utility.
Note: If you specify the -verify option, the backup operation is not completeduntil the verify operation is complete.
-force option
Forces a state change if the database is not in the correct state. For example,SnapManager might change the state of the database from online to offline, basedon the type of backup you specify and the state that the database is in.
With an online RAC database backup, use the -force option if the local instance isin shutdown state, or no instance is open.
Note: The version of Oracle must be 10.2.0.5; otherwise, the database will hangif any instance in the RAC is mounted.
• If the local instance is in shutdown state and at least one instance is open, youcan change the local instance to mounted by using -force option.
• If no instance is open, you can change the local instance to open by using -force option.
-protect | -noprotect | -protectnow
Indicates whether the backup should be protected to secondary storage. The -noprotect option specifies that the backup should not be protected to secondarystorage. Only full backups are protected. If neither option is specified,SnapManager protects the backup as the default if the backup is a full backup andthe profile specifies a protection policy. The -protectnow option is applicableonly for Data ONTAP operating in 7-Mode. The option specifies that the backup beprotected immediately to secondary storage.
-retain { -hourly | -daily | -weekly | -monthly | -unlimited}
Specifies whether the backup should be retained on an hourly, daily, weekly,monthly, or unlimited basis. If -retain option is not specified, the retention classdefaults to -hourly. To retain backups forever, use the -unlimited option. The -unlimited option makes the backup ineligible for deletion by the retention policy.
292 | Administration Guide for UNIX
-archivelogs
Specifies creation of an archive log backup.
-backup-dest path1, [, [path2]]
Specifies the archive log destinations for archive log backup.
-exclude-dest path1, [, [path2]]
Specifies the archive log destinations to be excluded from the backup.
-prunelogs {-all | -until-scn until-scn | -until-date yyyy-MM-dd:HH:mm:ss | -before {-months | -days | -weeks | -hours}
Specifies whether to delete the archive log files from the archive log destinationsbased on options provided while creating a backup. The -all option deletes all ofthe archive log files from the archive log destinations. The -until-scn optiondeletes the archive log files until a specified system change number (SCN). The -until-date option deletes the archive log files until the specified time period.The -before option deletes the archive log files before the specified time period(days, months, weeks, hours).
-schedule-name schedule_name
Specifies the name that you provide for the schedule.
-schedule-comment schedule_comment
Specifies an optional comment to describe about scheduling the backup.
-interval { -hourly | -daily | -weekly | -monthly | -onetimeonly}
Specifies the time interval by which the backups are created. You can schedule thebackup on an hourly, daily, weekly, monthly, or one time only basis.
-cronstring cron_string
Specifies scheduling the backup using cronstring. Cron expressions are used toconfigure instances of CronTrigger. Cron expressions are strings that are made upof the following subexpressions:
• 1 refers to seconds.
• 2 refers to minutes.
• 3 refers to hours.
• 4 refers to a day in a month.
• 5 refers to the month.
• 6 refers to a day in a week.
• 7 refers to the year (optional).
-start-time yyyy-MM-dd HH:mm
Specifies the start time of the scheduled operation. The schedule start time shouldbe included in the yyyy-MM-dd HH:mm format.
-runasuser runasuser
Specifies changing the user (root user or Oracle user) of the scheduled backupoperation while scheduling the backup.
-taskspec taskspec
Specifies the task specification XML file that can be used for preprocessing activityor post-processing activity of the backup operation. The complete path of the XMLfile must be provided with the -taskspec option.
SnapManager for SAP command reference | 293
-quiet
Displays only error messages in the console. The default is to display error andwarning messages.
-verbose
Displays error, warning, and informational messages in the console.
The smsap schedule delete commandThis command deletes a backup schedule when it is are no longer necessary.
Syntax
smsap schedule delete -profile profile_name -schedule-name schedule_name[-quiet | -verbose]
Parameters-profile profile_name
Specifies the name of the profile related to the database you want to delete a backupschedule. The profile contains the identifier of the database and other databaseinformation.
-schedule-name schedule_name
Specifies the schedule name you provided while creating a backup schedule.
The smsap schedule list commandThis command lists the scheduled operations associated with a profile.
Syntax
smsap schedule list-profile profile_name [-quiet | -verbose]
Parameters-profile profile_name
Specifies the name of the profile related to the database, using which you can viewa list of scheduled operations. The profile contains the identifier of the database andother database information.
The smsap schedule resume commandThis command resumes the suspended backup schedule.
Syntax
smsap schedule resume -profile profile_name -schedule-name schedule_name[-quiet | -verbose]
294 | Administration Guide for UNIX
Parameters-profile profile_name
Specifies the name of the profile related to the database you want to resume thesuspended backup schedule. The profile contains the identifier of the database andother database information.
-schedule-name schedule_name
Specifies the schedule name you provided while creating a backup schedule.
The smsap schedule suspend commandThis command suspends a backup schedule until the backup schedule is resumed.
Syntax
smsap schedule suspend -profile profile_name -schedule-name schedule_name[-quiet | -verbose]
Parameters-profile profile_name
Specifies the name of the profile related to the database you want to suspend abackup schedule. The profile contains the identifier of the database and otherdatabase information.
-schedule-name schedule_name
Specifies the schedule name you provided while creating a backup schedule.
The smsap schedule update commandThis command updates the schedule for a backup.
Syntax
smsap schedule update-profile profile_name -schedule-name schedule_name[-schedule-comment schedule_comment]-interval {-hourly | -daily | -weekly | -monthly | -onetimeonly}-cronstring cron_string -start-time {start_time <yyyy-MM-dd HH:mm>}-runasuser runasuser[-taskspec taskspec]-force [-quiet | -verbose]
Parameters-profile profile_name
Specifies the name of the profile related to the database you want to schedule theback up. The profile contains the identifier of the database and other databaseinformation.
-schedule-name schedule_name
Specifies the name that you provide for the schedule.
-schedule-comment schedule_comment
Specifies an optional comment to describe about scheduling the backup.
SnapManager for SAP command reference | 295
-interval { -hourly | -daily | -weekly | -monthly | -onetimeonly}
Indicates the time interval by which the backups are created. You can schedule thebackup on an hourly, daily, weekly, monthly, or one time only.
-cronstring cron_string
Specifies to schedule the backup using cronstring. Cron expressions are used toconfigure instances of CronTrigger. Cron expressions are strings that are actuallymade up of seven sub-expressions:
• 1 refers to seconds
• 2 refers to minutes
• 3 refers to hours
• 4 refers to a day in a month
• 5 refers to the month
• 6 refers to a day in a week
• 7 refers to the year (optional)
-start-time yyyy-MM-dd HH:mm
Specifies the start time of the schedule operation. The schedule start time should beincluded in the format of yyyy-MM-dd HH:mm.
-runasuser runasuser
Specifies to change the user of the scheduled backup operation while schedulingthe backup.
-taskspec taskspec
Specifies the task specification XML file that can be used for pre-processingactivity or post-processing activity of the backup operation. The complete path ofthe XML file should be provided which give the -taskspec option.
The smsap storage list commandYou can run the storage list command to display the list of storage systems associated with aparticular profile.
Syntax
smsap storage list -profile profile
Parameters-profile profile
Specifies the name of the profile. The name can be up to 30 characters long andmust be unique within the host.
Example
The following example displays the storage systems associated with the profile mjullian:
smsap storage list -profile mjullian
296 | Administration Guide for UNIX
Sample Output:Storage Controllers--------------------FAS3020-RTP07OLD
The smsap storage rename commandThis command updates the name or IP address of the storage system.
Syntax
smsap storage rename -profile profile-oldname old_storage_name -newname new_storage_name[-quiet | -verbose]
Parameters-profile profile
Specifies the name of the profile. This name can be up to 30 characters long andmust be unique within the host.
-oldname old_storage_name
Specifies the IP address or name of the storage system before the storage system isrenamed. You must enter the IP address or name of the storage system that isdisplayed when you run the smsap storage list command.
-newname new_storage_name
Specifies the IP address or name of the storage system after the storage system isrenamed.
-quiet
Displays only error messages in the console. The default is to display error andwarning messages.
-verbose
Displays error, warning, and informational messages in the console.
Example
The following example uses the smsap storage rename command to rename the storagesystem:
smsap storage rename -profile mjullian -oldname lech -newname hudson -verbose
SnapManager for SAP command reference | 297
The smsap system dump commandYou can run the system dump command to create a JAR file that contains diagnostic informationabout the server environment.
Syntax
smsap system dump [-quiet | -verbose]
Parameters-quiet
Displays only error messages in the console. The default is to display error andwarning messages.
-verbose
Displays error, warning, and informational messages in the console.
Example of the system dump command
The following example uses the smsap system dump command to create a JAR file:
smsap system dumpPath:/userhomedirectory/.netapp/smsap/3.3.0/smsap_dump_hostname.jar
The smsap system verify commandThis command confirms that all the components of the environment required to run SnapManager areset up correctly.
Syntax
smsap system verify [-quiet | -verbose]
Parameters-quiet
Displays only error messages on the console. The default is to display error andwarning messages.
-verbose
Displays error, warning, and informational messages on the console.
Example of the system verify command
The following example uses the smsap system verify command.
smsap system verifySMSAP-13505 [INFO ]: Snapdrive verify passed.SMSAP-13037 [INFO ]: Successfully completed operation: System VerifySMSAP-13049 [INFO ]: Elapsed Time: 0:00:00.559Operation Id [N4f4e910004b36cfecee74c710de02e44] succeeded.
298 | Administration Guide for UNIX
The smsap version commandYou can run the version command to determine which version of SnapManager you are running onyour local host.
Syntax
smsap version [-quiet | -verbose]
Parameters-quiet
Displays only error messages in the console. The default is to display error andwarning messages.
-verbose
Displays the build date and contents of each profile. Also displays error, warning,and informational messages in the console.
Example of the version command
The following example displays the version of the SnapManager:
smsap versionSnapManager for SAP Version: 3.3.1
SnapManager for SAP command reference | 299
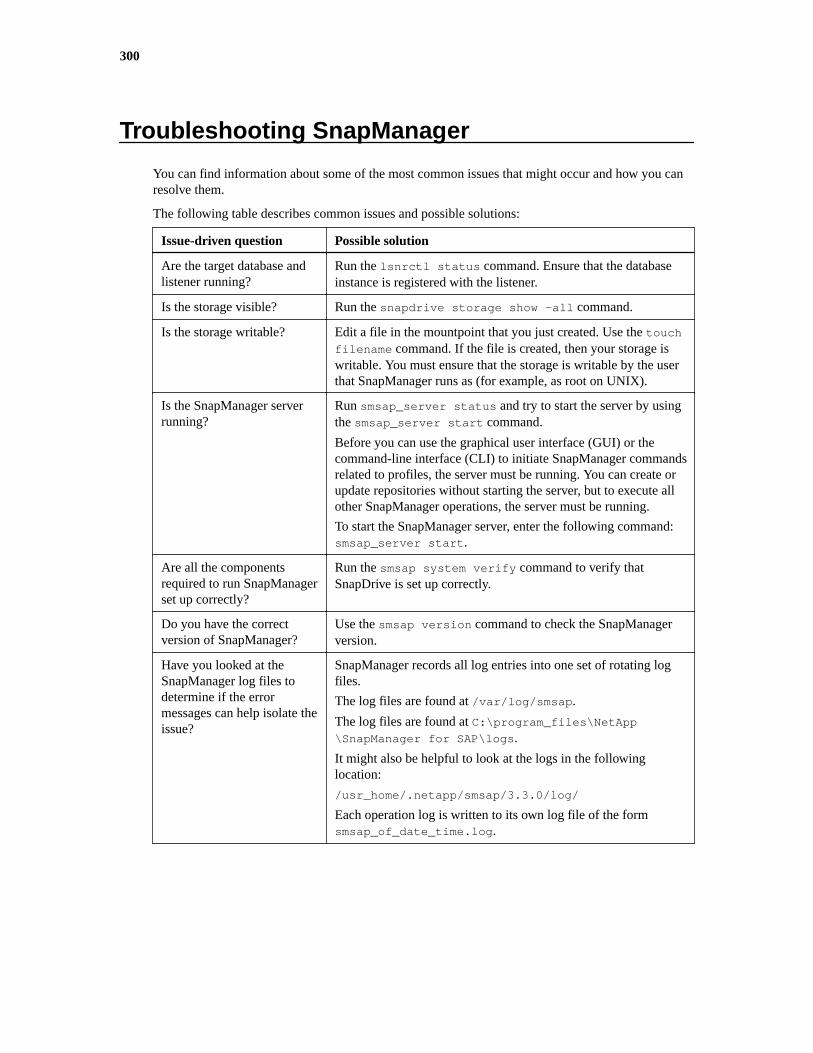
Troubleshooting SnapManager
You can find information about some of the most common issues that might occur and how you canresolve them.
The following table describes common issues and possible solutions:
Issue-driven question Possible solution
Are the target database andlistener running?
Run the lsnrctl status command. Ensure that the databaseinstance is registered with the listener.
Is the storage visible? Run the snapdrive storage show -all command.
Is the storage writable? Edit a file in the mountpoint that you just created. Use the touchfilename command. If the file is created, then your storage iswritable. You must ensure that the storage is writable by the userthat SnapManager runs as (for example, as root on UNIX).
Is the SnapManager serverrunning?
Run smsap_server status and try to start the server by usingthe smsap_server start command.
Before you can use the graphical user interface (GUI) or thecommand-line interface (CLI) to initiate SnapManager commandsrelated to profiles, the server must be running. You can create orupdate repositories without starting the server, but to execute allother SnapManager operations, the server must be running.
To start the SnapManager server, enter the following command:smsap_server start.
Are all the componentsrequired to run SnapManagerset up correctly?
Run the smsap system verify command to verify thatSnapDrive is set up correctly.
Do you have the correctversion of SnapManager?
Use the smsap version command to check the SnapManagerversion.
Have you looked at theSnapManager log files todetermine if the errormessages can help isolate theissue?
SnapManager records all log entries into one set of rotating logfiles.
The log files are found at /var/log/smsap.
The log files are found at C:\program_files\NetApp\SnapManager for SAP\logs.
It might also be helpful to look at the logs in the followinglocation:
/usr_home/.netapp/smsap/3.3.0/log/
Each operation log is written to its own log file of the formsmsap_of_date_time.log.
300
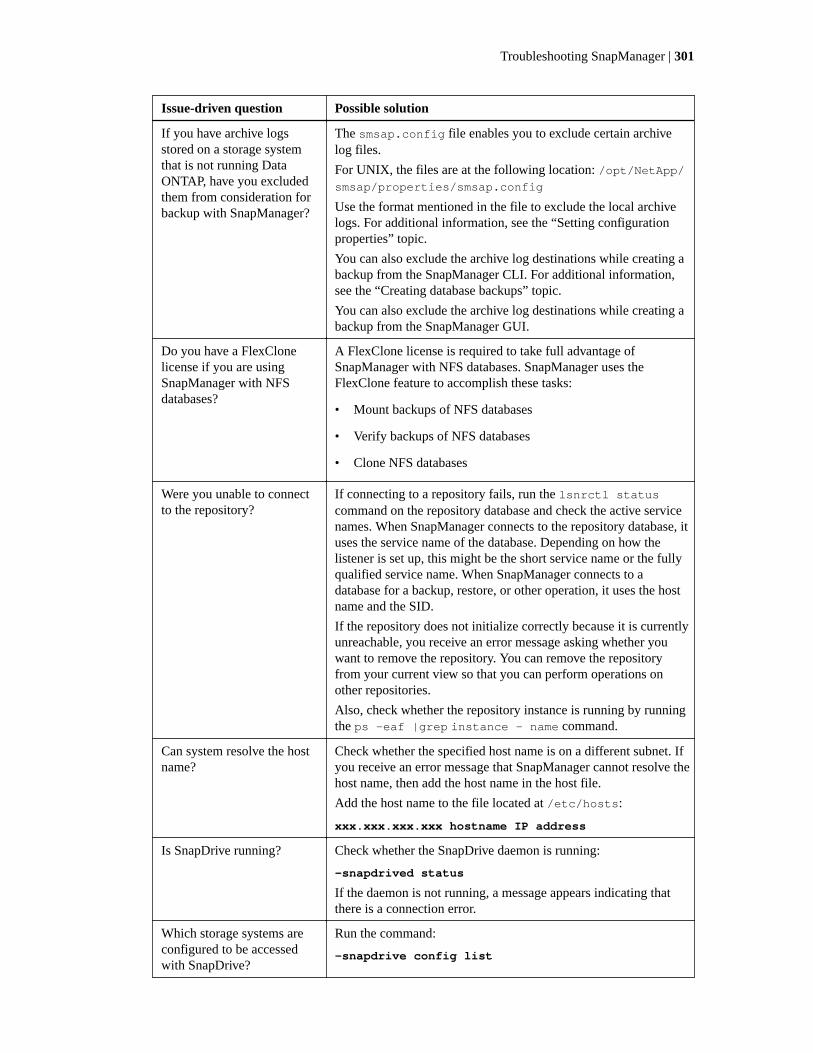
Issue-driven question Possible solution
If you have archive logsstored on a storage systemthat is not running DataONTAP, have you excludedthem from consideration forbackup with SnapManager?
The smsap.config file enables you to exclude certain archivelog files.
For UNIX, the files are at the following location: /opt/NetApp/smsap/properties/smsap.config
Use the format mentioned in the file to exclude the local archivelogs. For additional information, see the “Setting configurationproperties” topic.
You can also exclude the archive log destinations while creating abackup from the SnapManager CLI. For additional information,see the “Creating database backups” topic.
You can also exclude the archive log destinations while creating abackup from the SnapManager GUI.
Do you have a FlexClonelicense if you are usingSnapManager with NFSdatabases?
A FlexClone license is required to take full advantage ofSnapManager with NFS databases. SnapManager uses theFlexClone feature to accomplish these tasks:
• Mount backups of NFS databases
• Verify backups of NFS databases
• Clone NFS databases
Were you unable to connectto the repository?
If connecting to a repository fails, run the lsnrctl statuscommand on the repository database and check the active servicenames. When SnapManager connects to the repository database, ituses the service name of the database. Depending on how thelistener is set up, this might be the short service name or the fullyqualified service name. When SnapManager connects to adatabase for a backup, restore, or other operation, it uses the hostname and the SID.
If the repository does not initialize correctly because it is currentlyunreachable, you receive an error message asking whether youwant to remove the repository. You can remove the repositoryfrom your current view so that you can perform operations onother repositories.
Also, check whether the repository instance is running by runningthe ps -eaf |grep instance - name command.
Can system resolve the hostname?
Check whether the specified host name is on a different subnet. Ifyou receive an error message that SnapManager cannot resolve thehost name, then add the host name in the host file.
Add the host name to the file located at /etc/hosts:
xxx.xxx.xxx.xxx hostname IP address
Is SnapDrive running? Check whether the SnapDrive daemon is running:
-snapdrived status
If the daemon is not running, a message appears indicating thatthere is a connection error.
Which storage systems areconfigured to be accessedwith SnapDrive?
Run the command:
-snapdrive config list
Troubleshooting SnapManager | 301
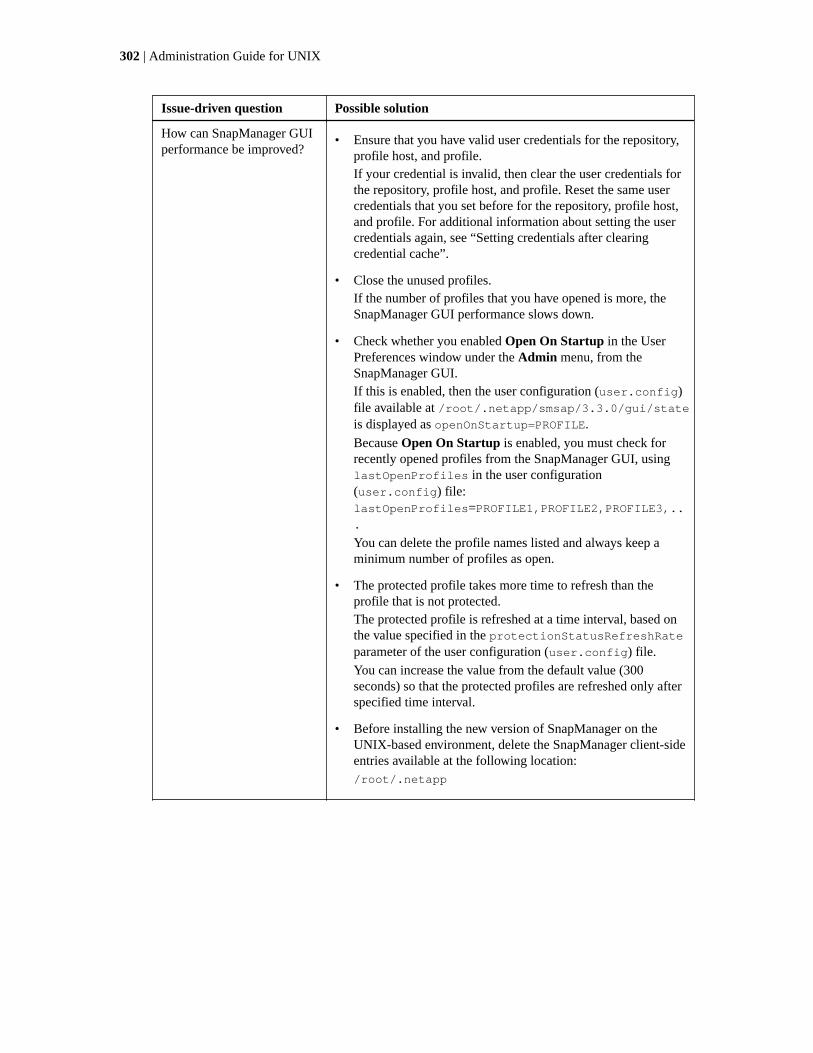
Issue-driven question Possible solution
How can SnapManager GUIperformance be improved?
• Ensure that you have valid user credentials for the repository,profile host, and profile.
If your credential is invalid, then clear the user credentials forthe repository, profile host, and profile. Reset the same usercredentials that you set before for the repository, profile host,and profile. For additional information about setting the usercredentials again, see “Setting credentials after clearingcredential cache”.
• Close the unused profiles.
If the number of profiles that you have opened is more, theSnapManager GUI performance slows down.
• Check whether you enabled Open On Startup in the UserPreferences window under the Admin menu, from theSnapManager GUI.
If this is enabled, then the user configuration (user.config)file available at /root/.netapp/smsap/3.3.0/gui/stateis displayed as openOnStartup=PROFILE.
Because Open On Startup is enabled, you must check forrecently opened profiles from the SnapManager GUI, usinglastOpenProfiles in the user configuration(user.config) file:lastOpenProfiles=PROFILE1,PROFILE2,PROFILE3,...
You can delete the profile names listed and always keep aminimum number of profiles as open.
• The protected profile takes more time to refresh than theprofile that is not protected.
The protected profile is refreshed at a time interval, based onthe value specified in the protectionStatusRefreshRateparameter of the user configuration (user.config) file.
You can increase the value from the default value (300seconds) so that the protected profiles are refreshed only afterspecified time interval.
• Before installing the new version of SnapManager on theUNIX-based environment, delete the SnapManager client-sideentries available at the following location:
/root/.netapp
302 | Administration Guide for UNIX
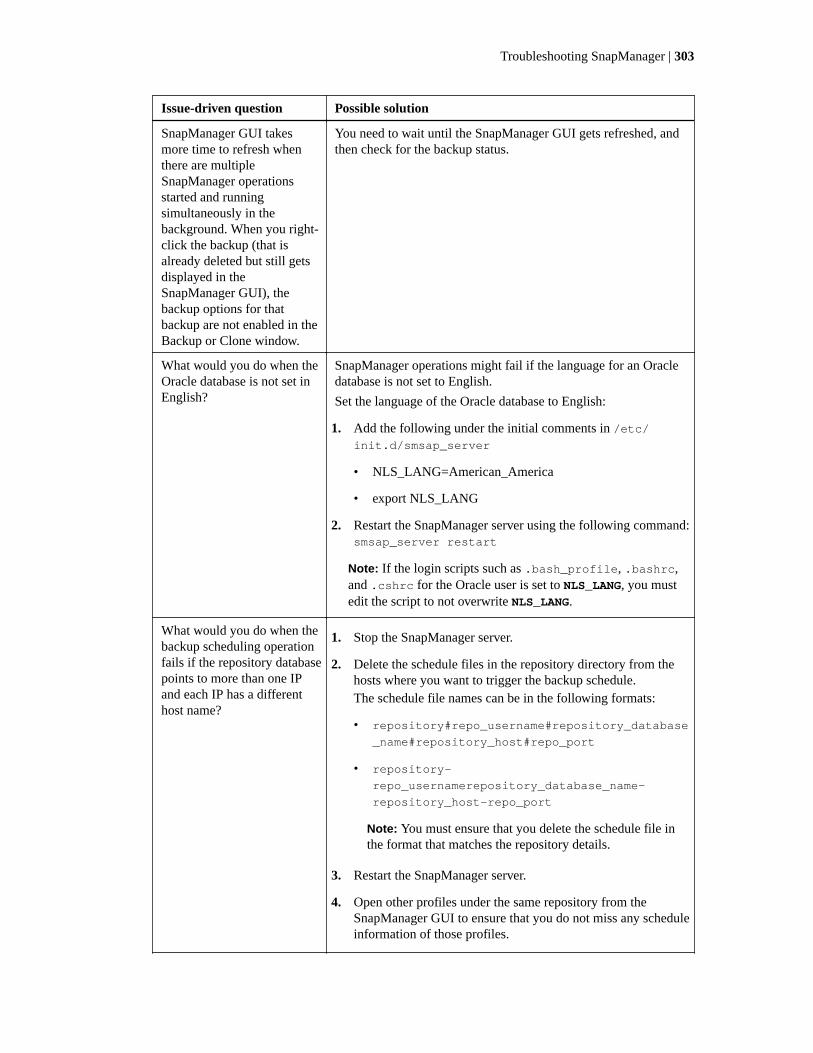
Issue-driven question Possible solution
SnapManager GUI takesmore time to refresh whenthere are multipleSnapManager operationsstarted and runningsimultaneously in thebackground. When you right-click the backup (that isalready deleted but still getsdisplayed in theSnapManager GUI), thebackup options for thatbackup are not enabled in theBackup or Clone window.
You need to wait until the SnapManager GUI gets refreshed, andthen check for the backup status.
What would you do when theOracle database is not set inEnglish?
SnapManager operations might fail if the language for an Oracledatabase is not set to English.
Set the language of the Oracle database to English:
1. Add the following under the initial comments in /etc/init.d/smsap_server
• NLS_LANG=American_America
• export NLS_LANG
2. Restart the SnapManager server using the following command:smsap_server restart
Note: If the login scripts such as .bash_profile, .bashrc,and .cshrc for the Oracle user is set to NLS_LANG, you mustedit the script to not overwrite NLS_LANG.
What would you do when thebackup scheduling operationfails if the repository databasepoints to more than one IPand each IP has a differenthost name?
1. Stop the SnapManager server.
2. Delete the schedule files in the repository directory from thehosts where you want to trigger the backup schedule.
The schedule file names can be in the following formats:
• repository#repo_username#repository_database
_name#repository_host#repo_port
• repository-
repo_usernamerepository_database_name-
repository_host-repo_port
Note: You must ensure that you delete the schedule file inthe format that matches the repository details.
3. Restart the SnapManager server.
4. Open other profiles under the same repository from theSnapManager GUI to ensure that you do not miss any scheduleinformation of those profiles.
Troubleshooting SnapManager | 303
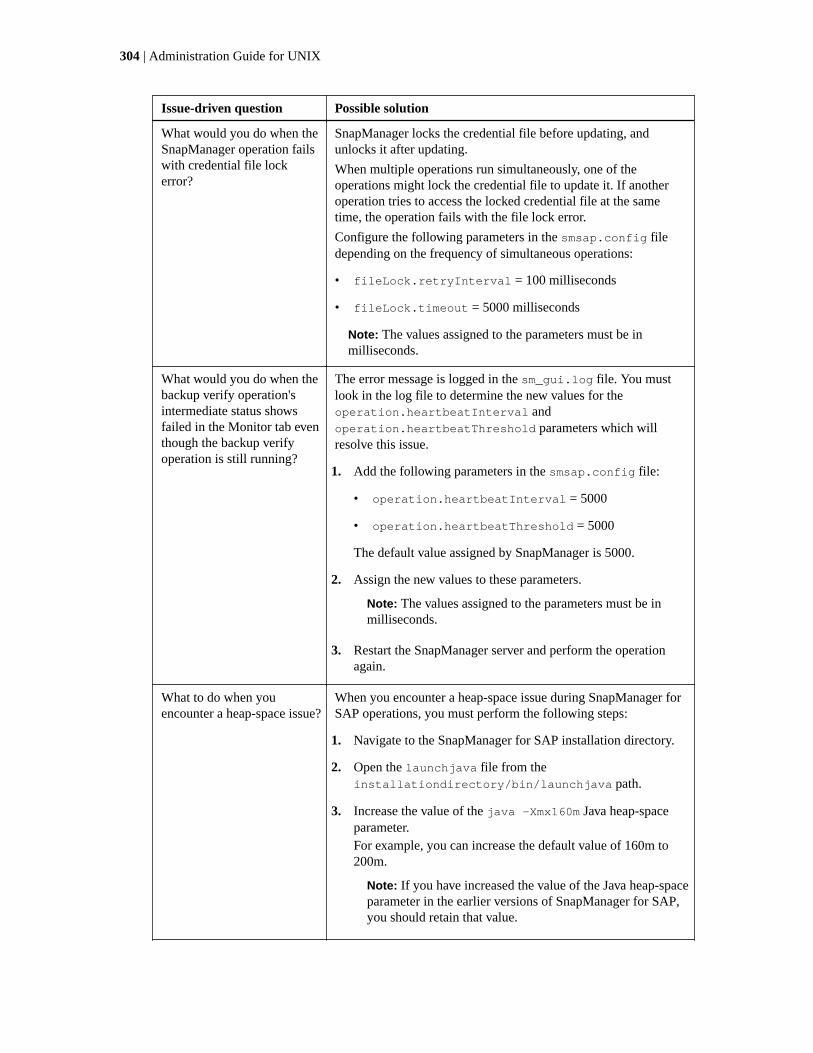
Issue-driven question Possible solution
What would you do when theSnapManager operation failswith credential file lockerror?
SnapManager locks the credential file before updating, andunlocks it after updating.
When multiple operations run simultaneously, one of theoperations might lock the credential file to update it. If anotheroperation tries to access the locked credential file at the sametime, the operation fails with the file lock error.
Configure the following parameters in the smsap.config filedepending on the frequency of simultaneous operations:
• fileLock.retryInterval = 100 milliseconds
• fileLock.timeout = 5000 milliseconds
Note: The values assigned to the parameters must be inmilliseconds.
What would you do when thebackup verify operation'sintermediate status showsfailed in the Monitor tab eventhough the backup verifyoperation is still running?
The error message is logged in the sm_gui.log file. You mustlook in the log file to determine the new values for theoperation.heartbeatInterval andoperation.heartbeatThreshold parameters which willresolve this issue.
1. Add the following parameters in the smsap.config file:
• operation.heartbeatInterval = 5000
• operation.heartbeatThreshold = 5000
The default value assigned by SnapManager is 5000.
2. Assign the new values to these parameters.
Note: The values assigned to the parameters must be inmilliseconds.
3. Restart the SnapManager server and perform the operationagain.
What to do when youencounter a heap-space issue?
When you encounter a heap-space issue during SnapManager forSAP operations, you must perform the following steps:
1. Navigate to the SnapManager for SAP installation directory.
2. Open the launchjava file from theinstallationdirectory/bin/launchjava path.
3. Increase the value of the java -Xmx160m Java heap-spaceparameter.
For example, you can increase the default value of 160m to200m.
Note: If you have increased the value of the Java heap-spaceparameter in the earlier versions of SnapManager for SAP,you should retain that value.
304 | Administration Guide for UNIX
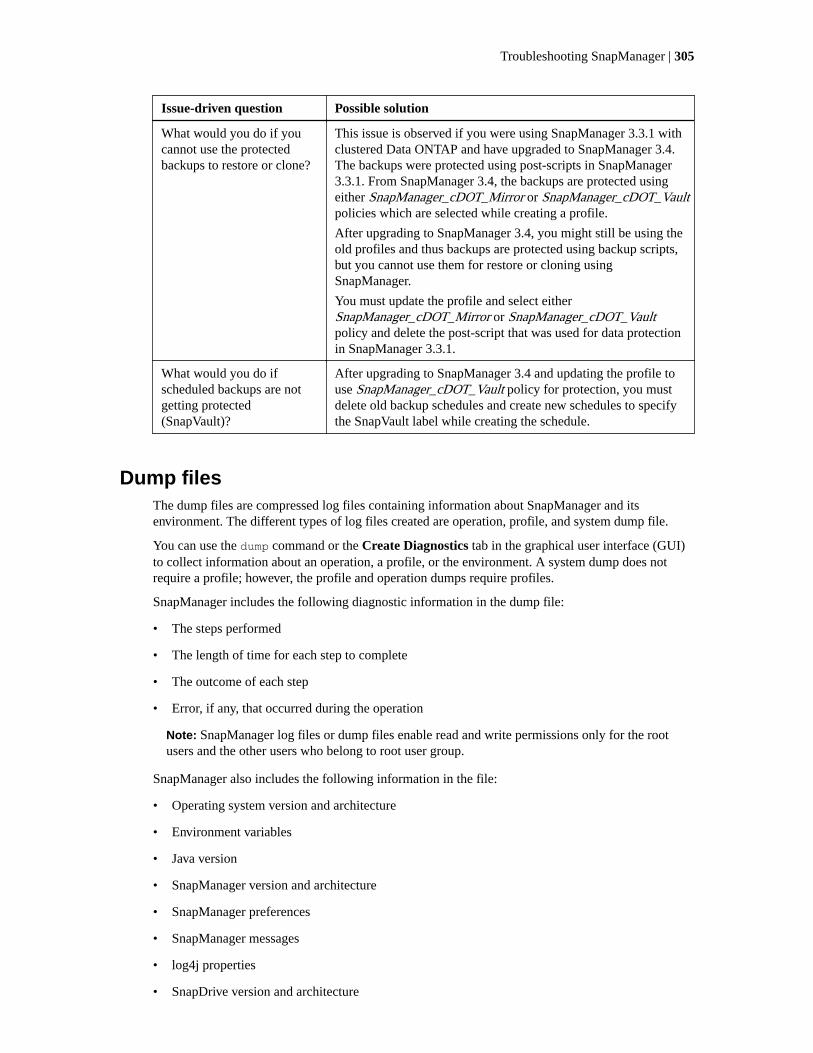
Issue-driven question Possible solution
What would you do if youcannot use the protectedbackups to restore or clone?
This issue is observed if you were using SnapManager 3.3.1 withclustered Data ONTAP and have upgraded to SnapManager 3.4.The backups were protected using post-scripts in SnapManager3.3.1. From SnapManager 3.4, the backups are protected usingeither SnapManager_cDOT_Mirror or SnapManager_cDOT_Vaultpolicies which are selected while creating a profile.
After upgrading to SnapManager 3.4, you might still be using theold profiles and thus backups are protected using backup scripts,but you cannot use them for restore or cloning usingSnapManager.
You must update the profile and select eitherSnapManager_cDOT_Mirror or SnapManager_cDOT_Vaultpolicy and delete the post-script that was used for data protectionin SnapManager 3.3.1.
What would you do ifscheduled backups are notgetting protected(SnapVault)?
After upgrading to SnapManager 3.4 and updating the profile touse SnapManager_cDOT_Vault policy for protection, you mustdelete old backup schedules and create new schedules to specifythe SnapVault label while creating the schedule.
Dump filesThe dump files are compressed log files containing information about SnapManager and itsenvironment. The different types of log files created are operation, profile, and system dump file.
You can use the dump command or the Create Diagnostics tab in the graphical user interface (GUI)to collect information about an operation, a profile, or the environment. A system dump does notrequire a profile; however, the profile and operation dumps require profiles.
SnapManager includes the following diagnostic information in the dump file:
• The steps performed
• The length of time for each step to complete
• The outcome of each step
• Error, if any, that occurred during the operation
Note: SnapManager log files or dump files enable read and write permissions only for the rootusers and the other users who belong to root user group.
SnapManager also includes the following information in the file:
• Operating system version and architecture
• Environment variables
• Java version
• SnapManager version and architecture
• SnapManager preferences
• SnapManager messages
• log4j properties
• SnapDrive version and architecture
Troubleshooting SnapManager | 305
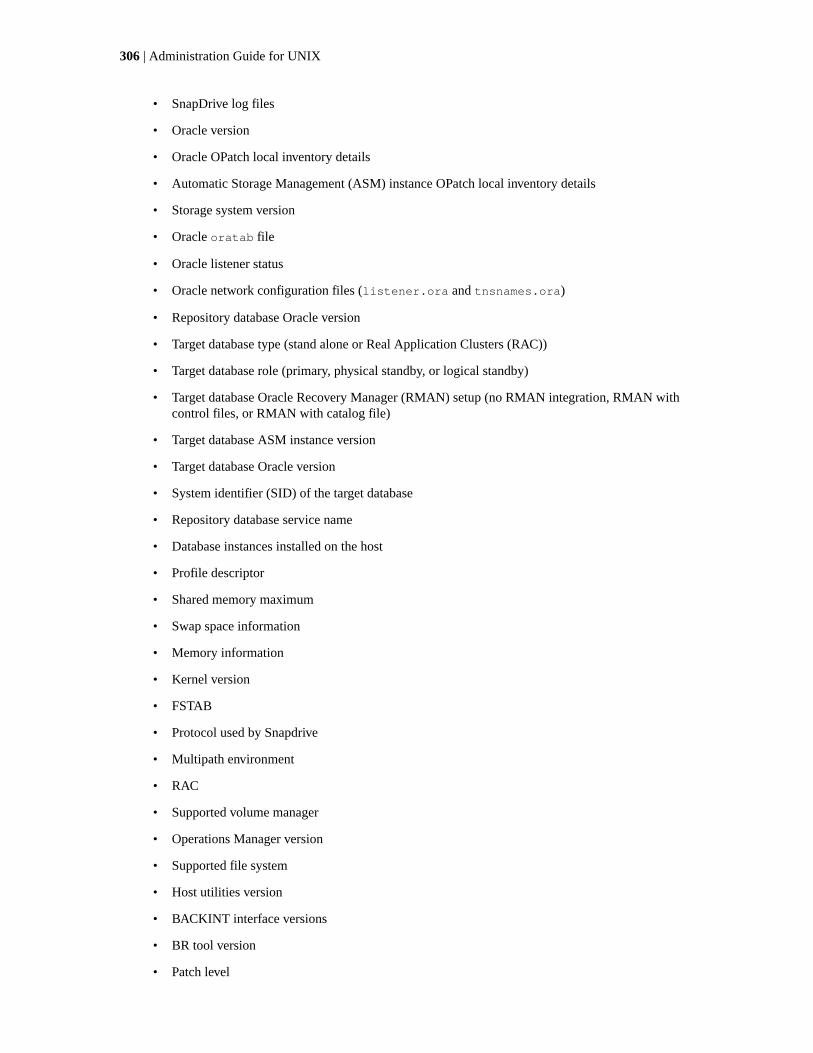
• SnapDrive log files
• Oracle version
• Oracle OPatch local inventory details
• Automatic Storage Management (ASM) instance OPatch local inventory details
• Storage system version
• Oracle oratab file
• Oracle listener status
• Oracle network configuration files (listener.ora and tnsnames.ora)
• Repository database Oracle version
• Target database type (stand alone or Real Application Clusters (RAC))
• Target database role (primary, physical standby, or logical standby)
• Target database Oracle Recovery Manager (RMAN) setup (no RMAN integration, RMAN withcontrol files, or RMAN with catalog file)
• Target database ASM instance version
• Target database Oracle version
• System identifier (SID) of the target database
• Repository database service name
• Database instances installed on the host
• Profile descriptor
• Shared memory maximum
• Swap space information
• Memory information
• Kernel version
• FSTAB
• Protocol used by Snapdrive
• Multipath environment
• RAC
• Supported volume manager
• Operations Manager version
• Supported file system
• Host utilities version
• BACKINT interface versions
• BR tool version
• Patch level
306 | Administration Guide for UNIX
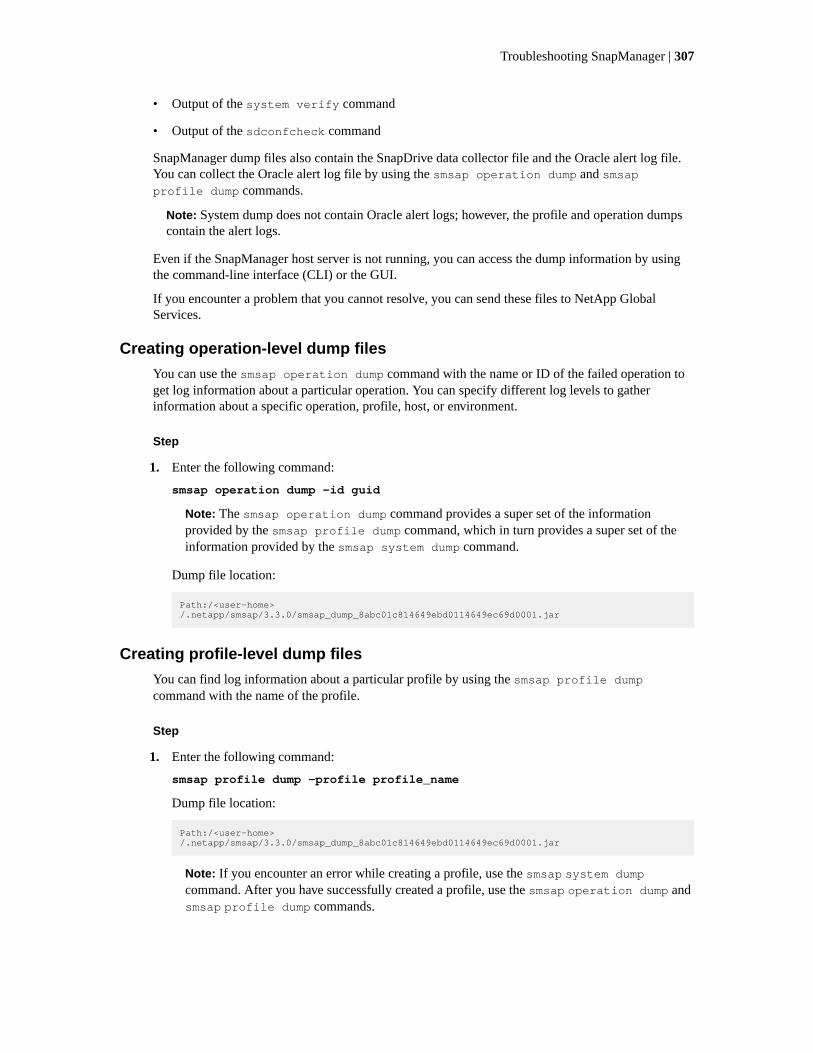
• Output of the system verify command
• Output of the sdconfcheck command
SnapManager dump files also contain the SnapDrive data collector file and the Oracle alert log file.You can collect the Oracle alert log file by using the smsap operation dump and smsapprofile dump commands.
Note: System dump does not contain Oracle alert logs; however, the profile and operation dumpscontain the alert logs.
Even if the SnapManager host server is not running, you can access the dump information by usingthe command-line interface (CLI) or the GUI.
If you encounter a problem that you cannot resolve, you can send these files to NetApp GlobalServices.
Creating operation-level dump files
You can use the smsap operation dump command with the name or ID of the failed operation toget log information about a particular operation. You can specify different log levels to gatherinformation about a specific operation, profile, host, or environment.
Step
1. Enter the following command:
smsap operation dump -id guid
Note: The smsap operation dump command provides a super set of the informationprovided by the smsap profile dump command, which in turn provides a super set of theinformation provided by the smsap system dump command.
Dump file location:
Path:/<user-home>/.netapp/smsap/3.3.0/smsap_dump_8abc01c814649ebd0114649ec69d0001.jar
Creating profile-level dump files
You can find log information about a particular profile by using the smsap profile dumpcommand with the name of the profile.
Step
1. Enter the following command:
smsap profile dump -profile profile_name
Dump file location:
Path:/<user-home>/.netapp/smsap/3.3.0/smsap_dump_8abc01c814649ebd0114649ec69d0001.jar
Note: If you encounter an error while creating a profile, use the smsap system dumpcommand. After you have successfully created a profile, use the smsap operation dump andsmsap profile dump commands.
Troubleshooting SnapManager | 307
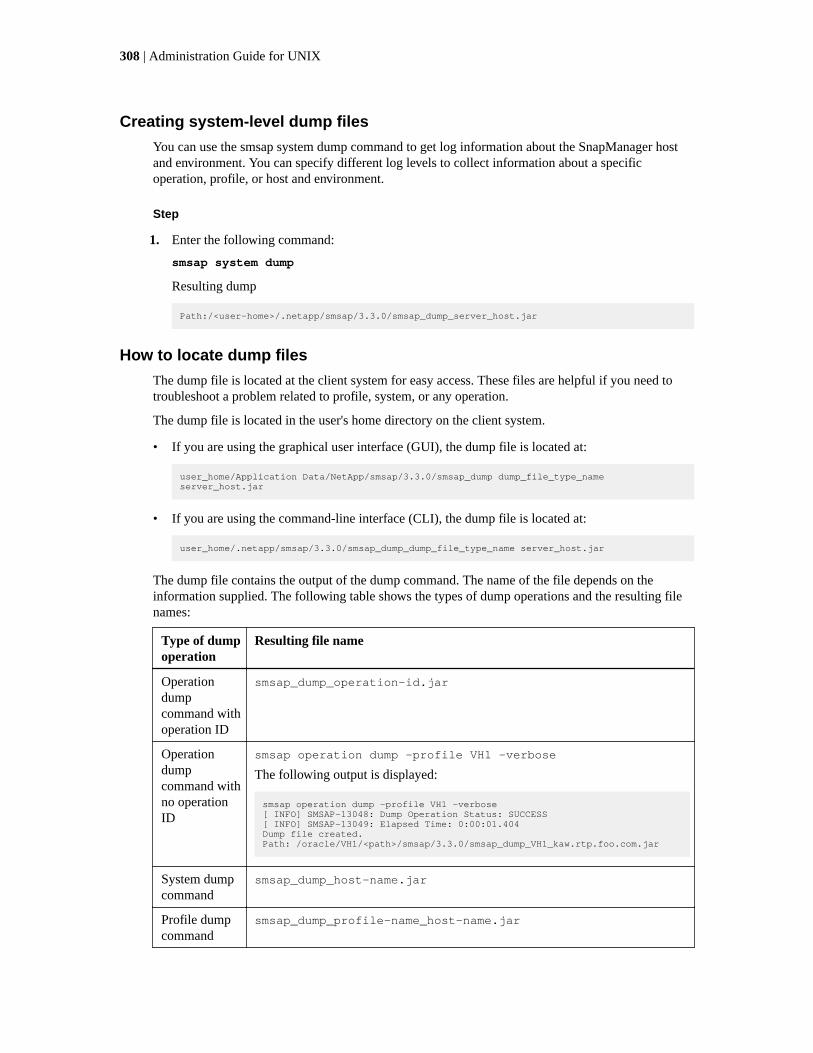
Creating system-level dump files
You can use the smsap system dump command to get log information about the SnapManager hostand environment. You can specify different log levels to collect information about a specificoperation, profile, or host and environment.
Step
1. Enter the following command:
smsap system dump
Resulting dump
Path:/<user-home>/.netapp/smsap/3.3.0/smsap_dump_server_host.jar
How to locate dump files
The dump file is located at the client system for easy access. These files are helpful if you need totroubleshoot a problem related to profile, system, or any operation.
The dump file is located in the user's home directory on the client system.
• If you are using the graphical user interface (GUI), the dump file is located at:
user_home/Application Data/NetApp/smsap/3.3.0/smsap_dump dump_file_type_name server_host.jar
• If you are using the command-line interface (CLI), the dump file is located at:
user_home/.netapp/smsap/3.3.0/smsap_dump_dump_file_type_name server_host.jar
The dump file contains the output of the dump command. The name of the file depends on theinformation supplied. The following table shows the types of dump operations and the resulting filenames:
Type of dumpoperation
Resulting file name
Operationdumpcommand withoperation ID
smsap_dump_operation-id.jar
Operationdumpcommand withno operationID
smsap operation dump -profile VH1 -verbose
The following output is displayed:
smsap operation dump -profile VH1 -verbose[ INFO] SMSAP-13048: Dump Operation Status: SUCCESS[ INFO] SMSAP-13049: Elapsed Time: 0:00:01.404Dump file created. Path: /oracle/VH1/<path>/smsap/3.3.0/smsap_dump_VH1_kaw.rtp.foo.com.jar
System dumpcommand
smsap_dump_host-name.jar
Profile dumpcommand
smsap_dump_profile-name_host-name.jar
308 | Administration Guide for UNIX
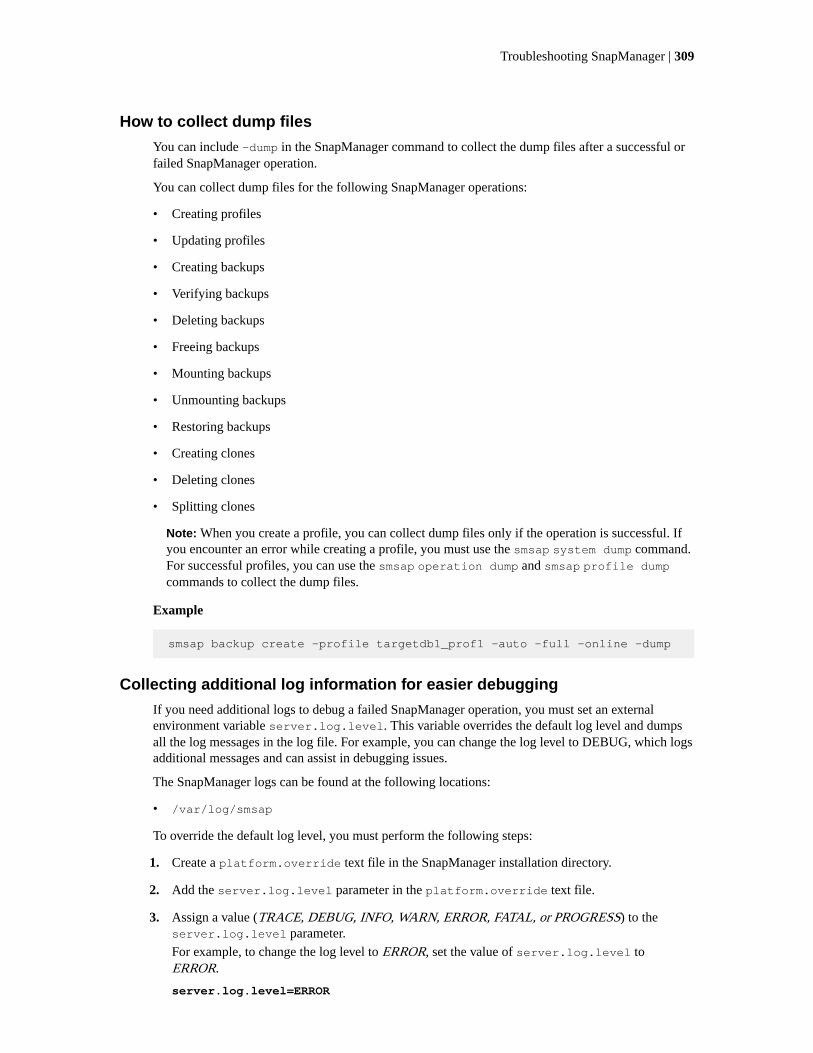
How to collect dump files
You can include -dump in the SnapManager command to collect the dump files after a successful orfailed SnapManager operation.
You can collect dump files for the following SnapManager operations:
• Creating profiles
• Updating profiles
• Creating backups
• Verifying backups
• Deleting backups
• Freeing backups
• Mounting backups
• Unmounting backups
• Restoring backups
• Creating clones
• Deleting clones
• Splitting clones
Note: When you create a profile, you can collect dump files only if the operation is successful. Ifyou encounter an error while creating a profile, you must use the smsap system dump command.For successful profiles, you can use the smsap operation dump and smsap profile dumpcommands to collect the dump files.
Example
smsap backup create -profile targetdb1_prof1 -auto -full -online -dump
Collecting additional log information for easier debugging
If you need additional logs to debug a failed SnapManager operation, you must set an externalenvironment variable server.log.level. This variable overrides the default log level and dumpsall the log messages in the log file. For example, you can change the log level to DEBUG, which logsadditional messages and can assist in debugging issues.
The SnapManager logs can be found at the following locations:
• /var/log/smsap
To override the default log level, you must perform the following steps:
1. Create a platform.override text file in the SnapManager installation directory.
2. Add the server.log.level parameter in the platform.override text file.
3. Assign a value (TRACE, DEBUG, INFO, WARN, ERROR, FATAL, or PROGRESS) to theserver.log.level parameter.
For example, to change the log level to ERROR, set the value of server.log.level toERROR.
server.log.level=ERROR
Troubleshooting SnapManager | 309
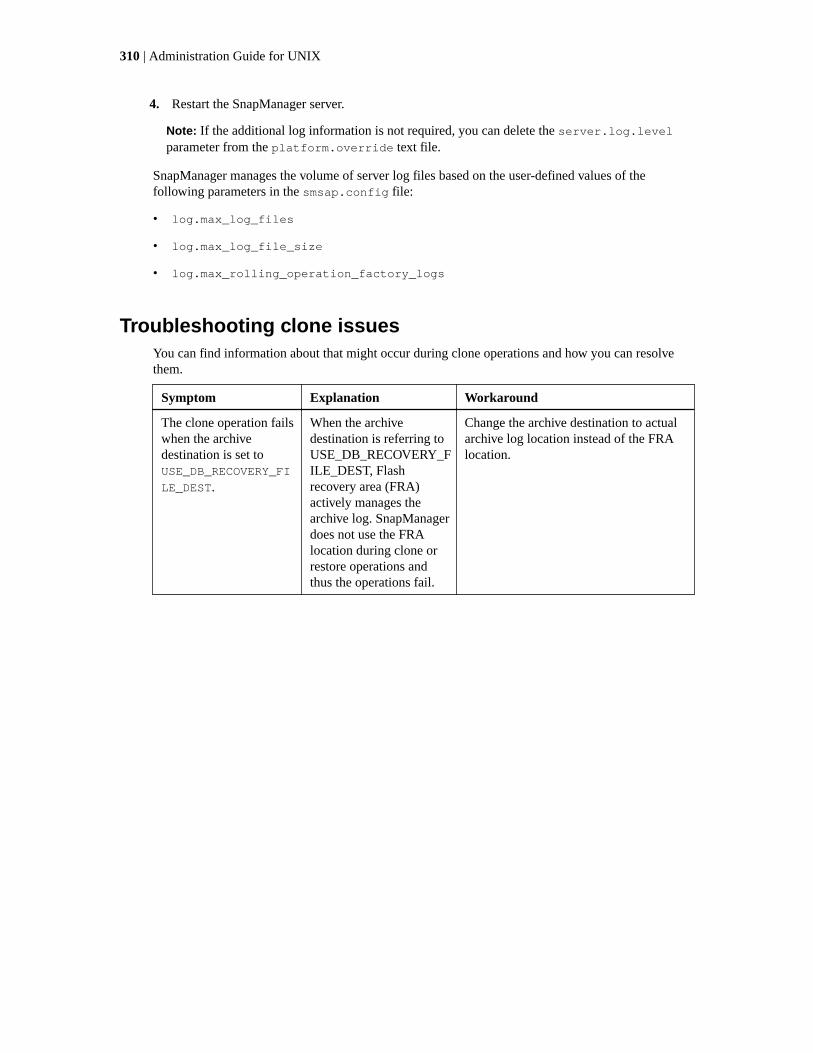
4. Restart the SnapManager server.
Note: If the additional log information is not required, you can delete the server.log.levelparameter from the platform.override text file.
SnapManager manages the volume of server log files based on the user-defined values of thefollowing parameters in the smsap.config file:
• log.max_log_files
• log.max_log_file_size
• log.max_rolling_operation_factory_logs
Troubleshooting clone issuesYou can find information about that might occur during clone operations and how you can resolvethem.
Symptom Explanation Workaround
The clone operation failswhen the archivedestination is set toUSE_DB_RECOVERY_FI
LE_DEST.
When the archivedestination is referring toUSE_DB_RECOVERY_FILE_DEST, Flashrecovery area (FRA)actively manages thearchive log. SnapManagerdoes not use the FRAlocation during clone orrestore operations andthus the operations fail.
Change the archive destination to actualarchive log location instead of the FRAlocation.
310 | Administration Guide for UNIX
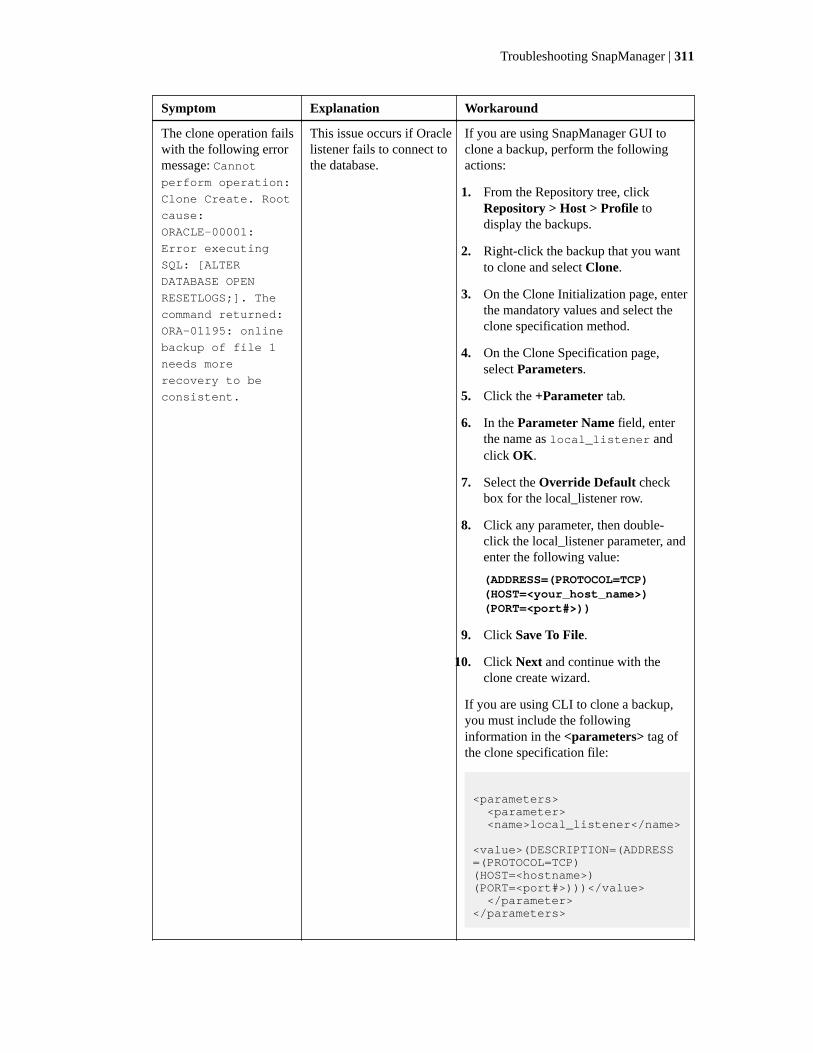
Symptom Explanation Workaround
The clone operation failswith the following errormessage: Cannotperform operation:
Clone Create. Root
cause:
ORACLE-00001:
Error executing
SQL: [ALTER
DATABASE OPEN
RESETLOGS;]. The
command returned:
ORA-01195: online
backup of file 1
needs more
recovery to be
consistent.
This issue occurs if Oraclelistener fails to connect tothe database.
If you are using SnapManager GUI toclone a backup, perform the followingactions:
1. From the Repository tree, clickRepository > Host > Profile todisplay the backups.
2. Right-click the backup that you wantto clone and select Clone.
3. On the Clone Initialization page, enterthe mandatory values and select theclone specification method.
4. On the Clone Specification page,select Parameters.
5. Click the +Parameter tab.
6. In the Parameter Name field, enterthe name as local_listener andclick OK.
7. Select the Override Default checkbox for the local_listener row.
8. Click any parameter, then double-click the local_listener parameter, andenter the following value:
(ADDRESS=(PROTOCOL=TCP)(HOST=<your_host_name>)(PORT=<port#>))
9. Click Save To File.
10. Click Next and continue with theclone create wizard.
If you are using CLI to clone a backup,you must include the followinginformation in the <parameters> tag ofthe clone specification file:
<parameters> <parameter> <name>local_listener</name> <value>(DESCRIPTION=(ADDRESS=(PROTOCOL=TCP)(HOST=<hostname>)(PORT=<port#>)))</value> </parameter></parameters>
Troubleshooting SnapManager | 311
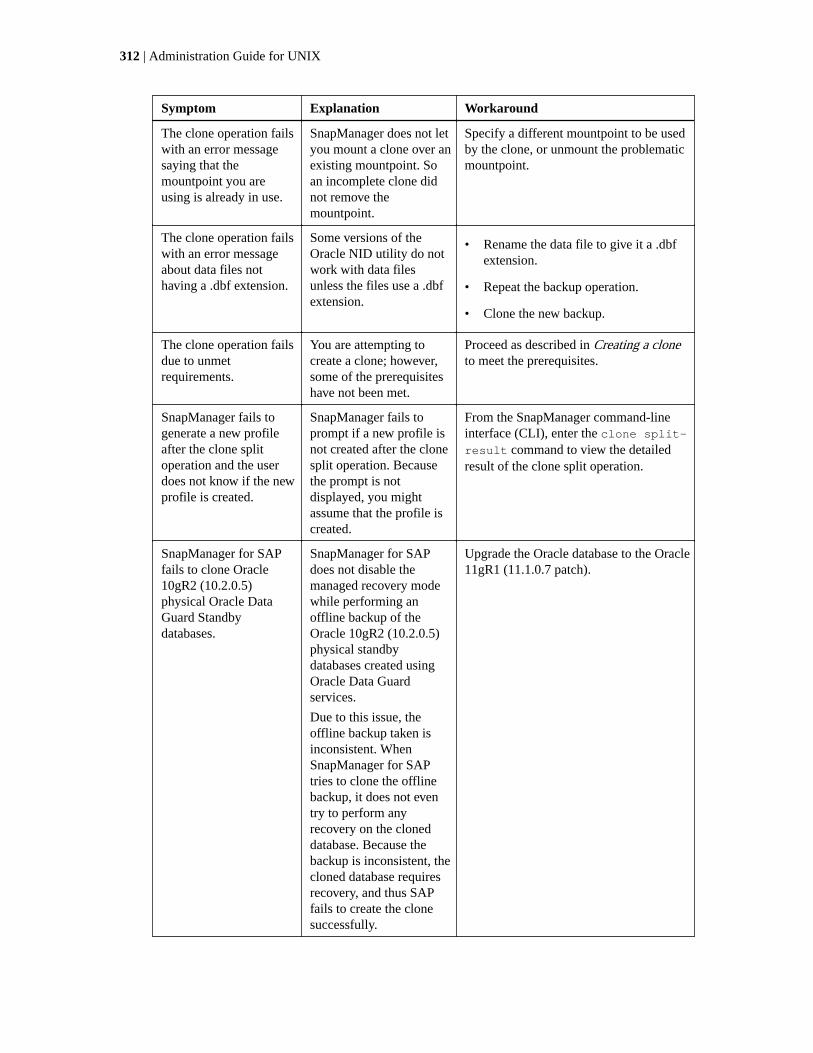
Symptom Explanation Workaround
The clone operation failswith an error messagesaying that themountpoint you areusing is already in use.
SnapManager does not letyou mount a clone over anexisting mountpoint. Soan incomplete clone didnot remove themountpoint.
Specify a different mountpoint to be usedby the clone, or unmount the problematicmountpoint.
The clone operation failswith an error messageabout data files nothaving a .dbf extension.
Some versions of theOracle NID utility do notwork with data filesunless the files use a .dbfextension.
• Rename the data file to give it a .dbfextension.
• Repeat the backup operation.
• Clone the new backup.
The clone operation failsdue to unmetrequirements.
You are attempting tocreate a clone; however,some of the prerequisiteshave not been met.
Proceed as described in Creating a cloneto meet the prerequisites.
SnapManager fails togenerate a new profileafter the clone splitoperation and the userdoes not know if the newprofile is created.
SnapManager fails toprompt if a new profile isnot created after the clonesplit operation. Becausethe prompt is notdisplayed, you mightassume that the profile iscreated.
From the SnapManager command-lineinterface (CLI), enter the clone split-result command to view the detailedresult of the clone split operation.
SnapManager for SAPfails to clone Oracle10gR2 (10.2.0.5)physical Oracle DataGuard Standbydatabases.
SnapManager for SAPdoes not disable themanaged recovery modewhile performing anoffline backup of theOracle 10gR2 (10.2.0.5)physical standbydatabases created usingOracle Data Guardservices.
Due to this issue, theoffline backup taken isinconsistent. WhenSnapManager for SAPtries to clone the offlinebackup, it does not eventry to perform anyrecovery on the cloneddatabase. Because thebackup is inconsistent, thecloned database requiresrecovery, and thus SAPfails to create the clonesuccessfully.
Upgrade the Oracle database to the Oracle11gR1 (11.1.0.7 patch).
312 | Administration Guide for UNIX
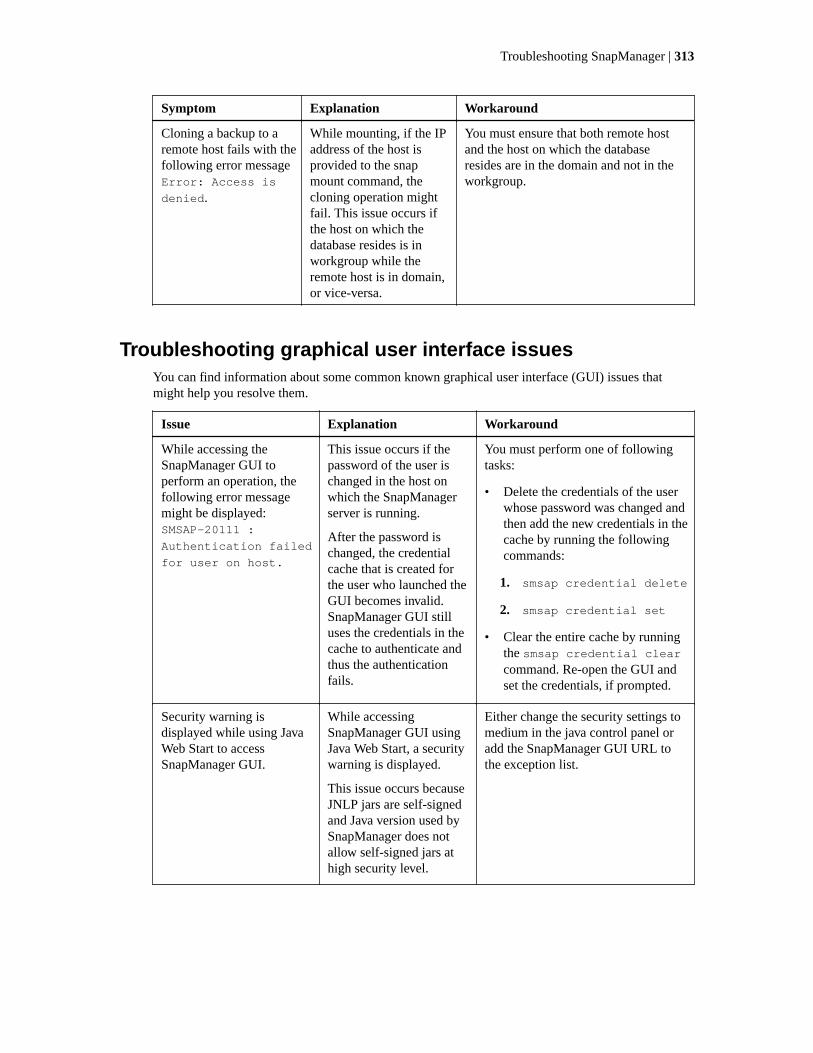
Symptom Explanation Workaround
Cloning a backup to aremote host fails with thefollowing error messageError: Access is
denied.
While mounting, if the IPaddress of the host isprovided to the snapmount command, thecloning operation mightfail. This issue occurs ifthe host on which thedatabase resides is inworkgroup while theremote host is in domain,or vice-versa.
You must ensure that both remote hostand the host on which the databaseresides are in the domain and not in theworkgroup.
Troubleshooting graphical user interface issuesYou can find information about some common known graphical user interface (GUI) issues thatmight help you resolve them.
Issue Explanation Workaround
While accessing theSnapManager GUI toperform an operation, thefollowing error messagemight be displayed:SMSAP-20111 :
Authentication failed
for user on host.
This issue occurs if thepassword of the user ischanged in the host onwhich the SnapManagerserver is running.
After the password ischanged, the credentialcache that is created forthe user who launched theGUI becomes invalid.SnapManager GUI stilluses the credentials in thecache to authenticate andthus the authenticationfails.
You must perform one of followingtasks:
• Delete the credentials of the userwhose password was changed andthen add the new credentials in thecache by running the followingcommands:
1. smsap credential delete
2. smsap credential set
• Clear the entire cache by runningthe smsap credential clearcommand. Re-open the GUI andset the credentials, if prompted.
Security warning isdisplayed while using JavaWeb Start to accessSnapManager GUI.
While accessingSnapManager GUI usingJava Web Start, a securitywarning is displayed.
This issue occurs becauseJNLP jars are self-signedand Java version used bySnapManager does notallow self-signed jars athigh security level.
Either change the security settings tomedium in the java control panel oradd the SnapManager GUI URL tothe exception list.
Troubleshooting SnapManager | 313

Issue Explanation Workaround
The SnapManager web startGUI displays the incorrectversion.
After downgradingSnapManager from a laterversion to an earlierversion when you launchthe web start GUI, thelater version of theSnapManager web startGUI is launched.
You must also clear the cache byperforming the following steps:
1. Start the console.
2. Enter the following:
javaws -viewer
3. On the Java cache viewer screen,right-click the SnapManagerapplication and select Delete.
When you restart the GUIand try to check the backupsfor a certain profile, you seeonly the names of theprofiles.
SnapManager does notdisplay any informationabout a profile until youopen it.
Perform the following steps:
1. Right-click the profile and selectOpen from the menu.
SnapManager displays the ProfileAuthentication dialog box.
2. Enter the host user name andpassword.
SnapManager displays the backuplist.
Note: You only need to authenticatethe profile once as long as thecredentials are valid and remain inthe cache.
When you open the firstrepository in the GUI, anerror message similar to thefollowing is displayed: TheProfile name XXXX
clashes with
previously loaded
repository.
Identically named profilescannot exist in arepository. Also, you canopen only one repositoryat a time.
Reference the conflicting profilesfrom two different operating system(OS) users or rename the profile byissuing an SQL statement for therepository:
UPDATE SMSAP_33_PROFILE SETNAME = 'NEW_NAME' WHERE NAME= 'OLD_NAME'
An error message similar tothe following is displayed:SMSAP-01092: Unable
to initialize
repository repo1@
does not exist:repo1
SMSAP-11006: Cannot
resolve host does not
exist
The repository isinaccessible, perhapsbecause it no longer exists.The GUI initializes the listof repositories from thecredentials file.
The error message asks if you wouldlike to remove this repository so thatno attempt is made to load it in thefuture. If you do not need to accessthis repository, click Delete to removeit from the GUI view. This removesthe reference to the repository in thecredentials file and the GUI does notattempt to load the repository again.
314 | Administration Guide for UNIX
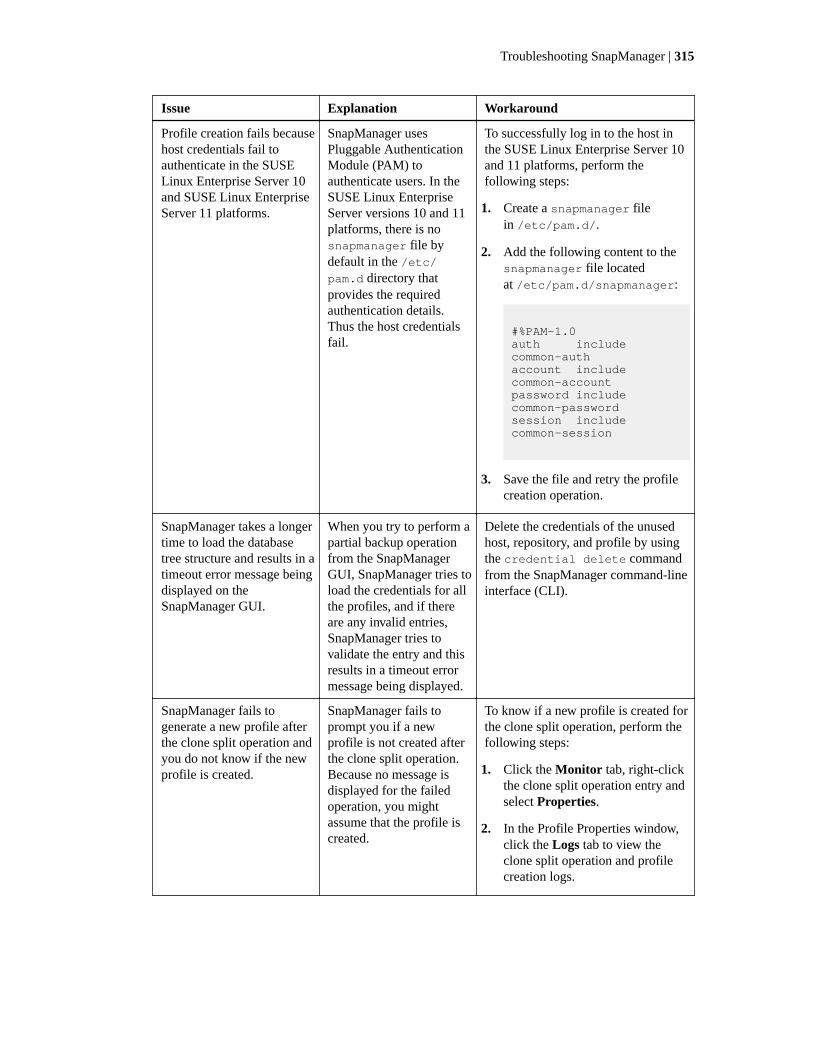
Issue Explanation Workaround
Profile creation fails becausehost credentials fail toauthenticate in the SUSELinux Enterprise Server 10and SUSE Linux EnterpriseServer 11 platforms.
SnapManager usesPluggable AuthenticationModule (PAM) toauthenticate users. In theSUSE Linux EnterpriseServer versions 10 and 11platforms, there is nosnapmanager file bydefault in the /etc/pam.d directory thatprovides the requiredauthentication details.Thus the host credentialsfail.
To successfully log in to the host inthe SUSE Linux Enterprise Server 10and 11 platforms, perform thefollowing steps:
1. Create a snapmanager filein /etc/pam.d/.
2. Add the following content to thesnapmanager file locatedat /etc/pam.d/snapmanager:
#%PAM-1.0auth include common-authaccount include common-accountpassword include common-passwordsession include common-session
3. Save the file and retry the profilecreation operation.
SnapManager takes a longertime to load the databasetree structure and results in atimeout error message beingdisplayed on theSnapManager GUI.
When you try to perform apartial backup operationfrom the SnapManagerGUI, SnapManager tries toload the credentials for allthe profiles, and if thereare any invalid entries,SnapManager tries tovalidate the entry and thisresults in a timeout errormessage being displayed.
Delete the credentials of the unusedhost, repository, and profile by usingthe credential delete commandfrom the SnapManager command-lineinterface (CLI).
SnapManager fails togenerate a new profile afterthe clone split operation andyou do not know if the newprofile is created.
SnapManager fails toprompt you if a newprofile is not created afterthe clone split operation.Because no message isdisplayed for the failedoperation, you mightassume that the profile iscreated.
To know if a new profile is created forthe clone split operation, perform thefollowing steps:
1. Click the Monitor tab, right-clickthe clone split operation entry andselect Properties.
2. In the Profile Properties window,click the Logs tab to view theclone split operation and profilecreation logs.
Troubleshooting SnapManager | 315
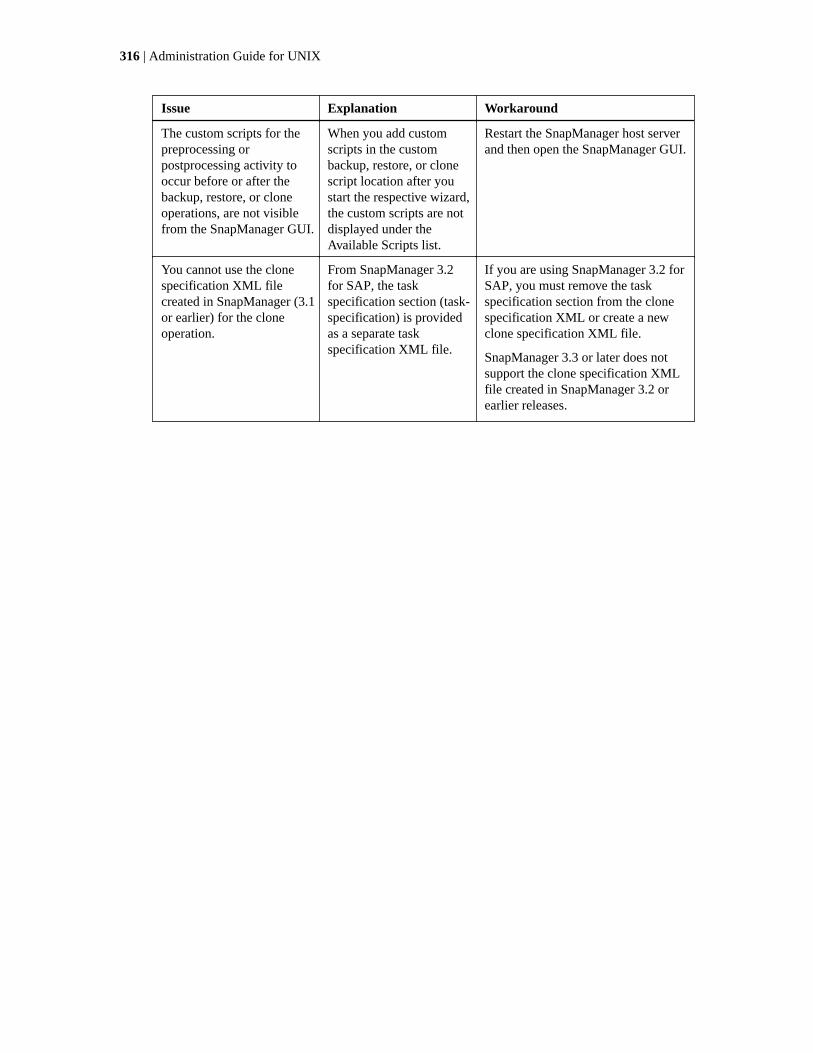
Issue Explanation Workaround
The custom scripts for thepreprocessing orpostprocessing activity tooccur before or after thebackup, restore, or cloneoperations, are not visiblefrom the SnapManager GUI.
When you add customscripts in the custombackup, restore, or clonescript location after youstart the respective wizard,the custom scripts are notdisplayed under theAvailable Scripts list.
Restart the SnapManager host serverand then open the SnapManager GUI.
You cannot use the clonespecification XML filecreated in SnapManager (3.1or earlier) for the cloneoperation.
From SnapManager 3.2for SAP, the taskspecification section (task-specification) is providedas a separate taskspecification XML file.
If you are using SnapManager 3.2 forSAP, you must remove the taskspecification section from the clonespecification XML or create a newclone specification XML file.
SnapManager 3.3 or later does notsupport the clone specification XMLfile created in SnapManager 3.2 orearlier releases.
316 | Administration Guide for UNIX
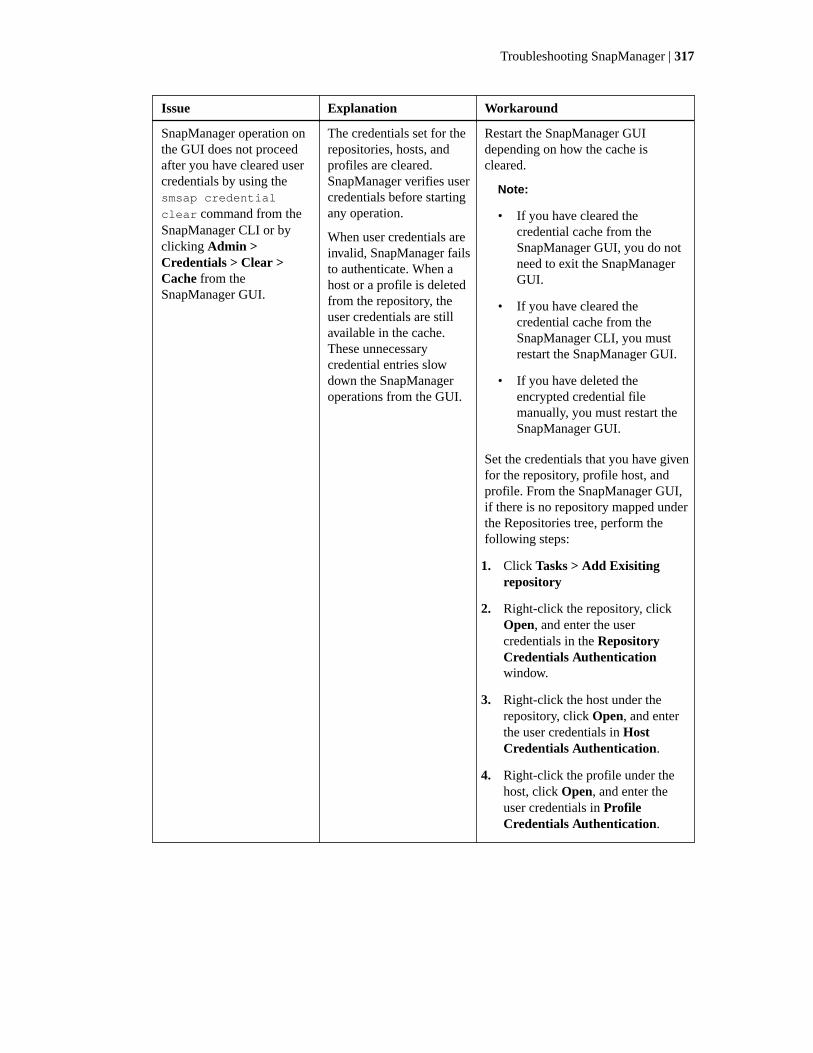
Issue Explanation Workaround
SnapManager operation onthe GUI does not proceedafter you have cleared usercredentials by using thesmsap credential
clear command from theSnapManager CLI or byclicking Admin >Credentials > Clear >Cache from theSnapManager GUI.
The credentials set for therepositories, hosts, andprofiles are cleared.SnapManager verifies usercredentials before startingany operation.
When user credentials areinvalid, SnapManager failsto authenticate. When ahost or a profile is deletedfrom the repository, theuser credentials are stillavailable in the cache.These unnecessarycredential entries slowdown the SnapManageroperations from the GUI.
Restart the SnapManager GUIdepending on how the cache iscleared.
Note:
• If you have cleared thecredential cache from theSnapManager GUI, you do notneed to exit the SnapManagerGUI.
• If you have cleared thecredential cache from theSnapManager CLI, you mustrestart the SnapManager GUI.
• If you have deleted theencrypted credential filemanually, you must restart theSnapManager GUI.
Set the credentials that you have givenfor the repository, profile host, andprofile. From the SnapManager GUI,if there is no repository mapped underthe Repositories tree, perform thefollowing steps:
1. Click Tasks > Add Exisitingrepository
2. Right-click the repository, clickOpen, and enter the usercredentials in the RepositoryCredentials Authenticationwindow.
3. Right-click the host under therepository, click Open, and enterthe user credentials in HostCredentials Authentication.
4. Right-click the profile under thehost, click Open, and enter theuser credentials in ProfileCredentials Authentication.
Troubleshooting SnapManager | 317
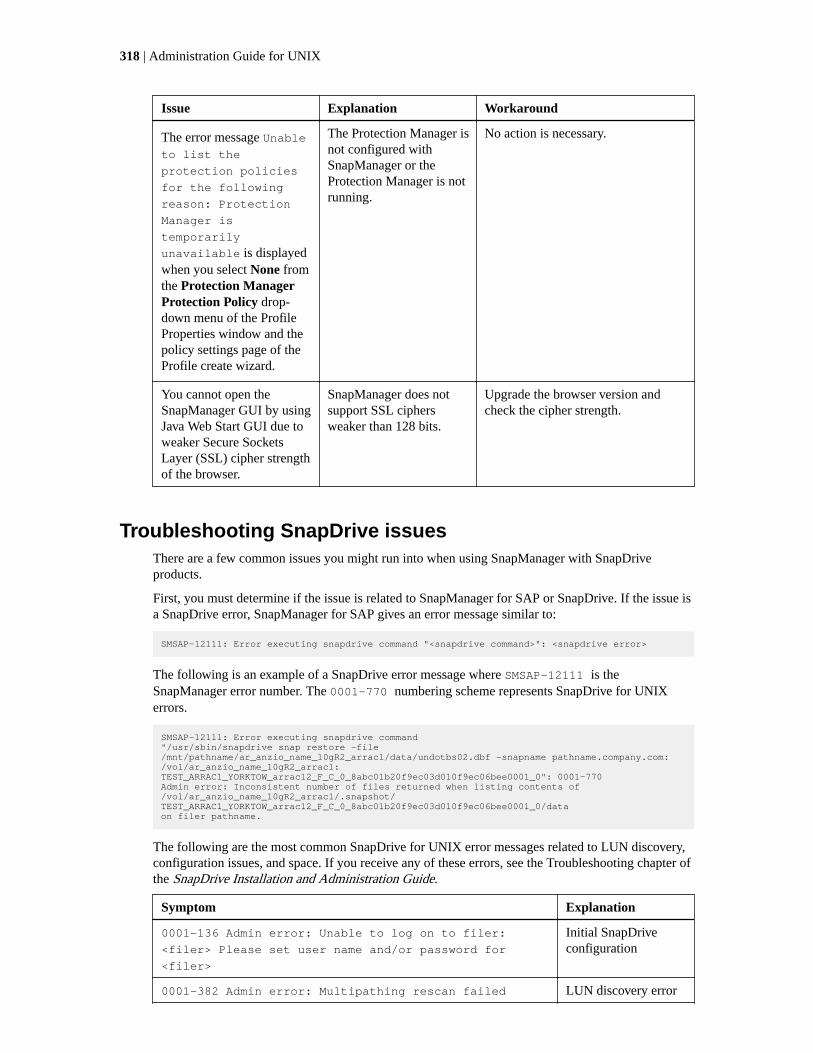
Issue Explanation Workaround
The error message Unableto list the
protection policies
for the following
reason: Protection
Manager is
temporarily
unavailable is displayedwhen you select None fromthe Protection ManagerProtection Policy drop-down menu of the ProfileProperties window and thepolicy settings page of theProfile create wizard.
The Protection Manager isnot configured withSnapManager or theProtection Manager is notrunning.
No action is necessary.
You cannot open theSnapManager GUI by usingJava Web Start GUI due toweaker Secure SocketsLayer (SSL) cipher strengthof the browser.
SnapManager does notsupport SSL ciphersweaker than 128 bits.
Upgrade the browser version andcheck the cipher strength.
Troubleshooting SnapDrive issuesThere are a few common issues you might run into when using SnapManager with SnapDriveproducts.
First, you must determine if the issue is related to SnapManager for SAP or SnapDrive. If the issue isa SnapDrive error, SnapManager for SAP gives an error message similar to:
SMSAP-12111: Error executing snapdrive command "<snapdrive command>": <snapdrive error>
The following is an example of a SnapDrive error message where SMSAP-12111 is theSnapManager error number. The 0001-770 numbering scheme represents SnapDrive for UNIXerrors.
SMSAP-12111: Error executing snapdrive command "/usr/sbin/snapdrive snap restore -file /mnt/pathname/ar_anzio_name_10gR2_arrac1/data/undotbs02.dbf -snapname pathname.company.com:/vol/ar_anzio_name_10gR2_arrac1:TEST_ARRAC1_YORKTOW_arrac12_F_C_0_8abc01b20f9ec03d010f9ec06bee0001_0": 0001-770 Admin error: Inconsistent number of files returned when listing contents of /vol/ar_anzio_name_10gR2_arrac1/.snapshot/TEST_ARRAC1_YORKTOW_arrac12_F_C_0_8abc01b20f9ec03d010f9ec06bee0001_0/data on filer pathname.
The following are the most common SnapDrive for UNIX error messages related to LUN discovery,configuration issues, and space. If you receive any of these errors, see the Troubleshooting chapter ofthe SnapDrive Installation and Administration Guide.
Symptom Explanation
0001-136 Admin error: Unable to log on to filer:
<filer> Please set user name and/or password for
<filer>
Initial SnapDriveconfiguration
0001-382 Admin error: Multipathing rescan failed LUN discovery error
318 | Administration Guide for UNIX
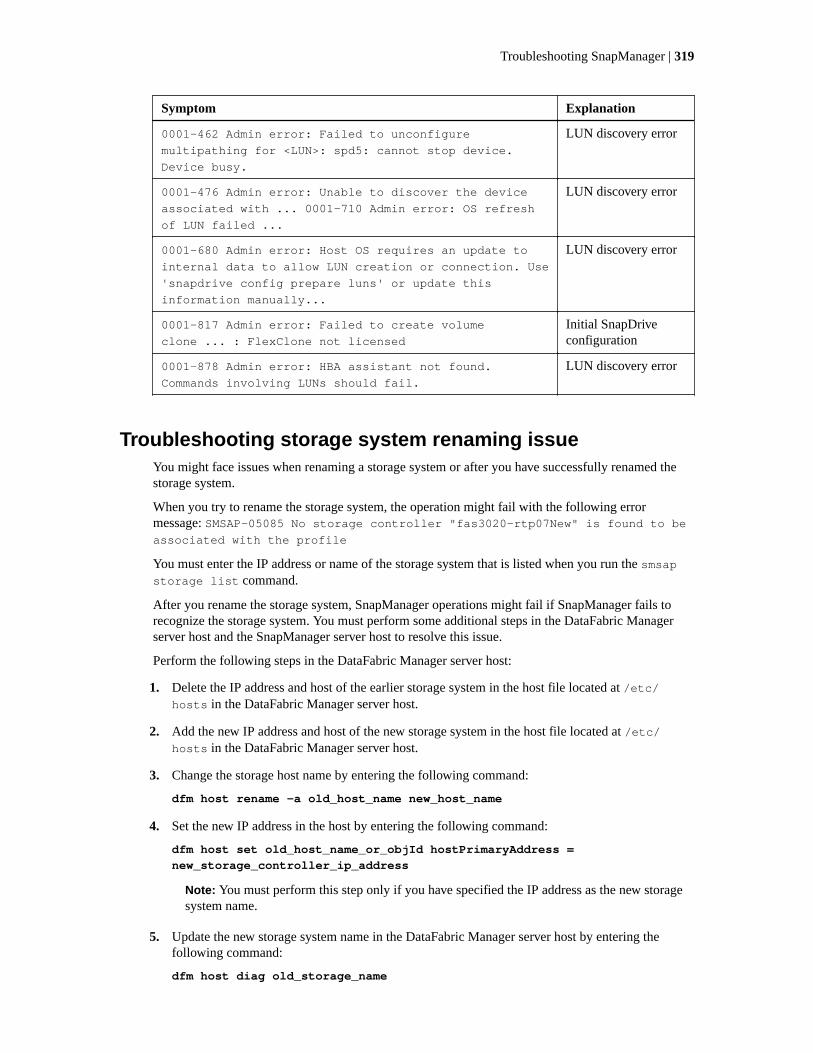
Symptom Explanation
0001-462 Admin error: Failed to unconfigure
multipathing for <LUN>: spd5: cannot stop device.
Device busy.
LUN discovery error
0001-476 Admin error: Unable to discover the device
associated with ... 0001-710 Admin error: OS refresh
of LUN failed ...
LUN discovery error
0001-680 Admin error: Host OS requires an update to
internal data to allow LUN creation or connection. Use
'snapdrive config prepare luns' or update this
information manually...
LUN discovery error
0001-817 Admin error: Failed to create volume
clone ... : FlexClone not licensed
Initial SnapDriveconfiguration
0001-878 Admin error: HBA assistant not found.
Commands involving LUNs should fail.
LUN discovery error
Troubleshooting storage system renaming issueYou might face issues when renaming a storage system or after you have successfully renamed thestorage system.
When you try to rename the storage system, the operation might fail with the following errormessage: SMSAP-05085 No storage controller "fas3020-rtp07New" is found to beassociated with the profile
You must enter the IP address or name of the storage system that is listed when you run the smsapstorage list command.
After you rename the storage system, SnapManager operations might fail if SnapManager fails torecognize the storage system. You must perform some additional steps in the DataFabric Managerserver host and the SnapManager server host to resolve this issue.
Perform the following steps in the DataFabric Manager server host:
1. Delete the IP address and host of the earlier storage system in the host file located at /etc/hosts in the DataFabric Manager server host.
2. Add the new IP address and host of the new storage system in the host file located at /etc/hosts in the DataFabric Manager server host.
3. Change the storage host name by entering the following command:
dfm host rename -a old_host_name new_host_name
4. Set the new IP address in the host by entering the following command:
dfm host set old_host_name_or_objId hostPrimaryAddress =
new_storage_controller_ip_address
Note: You must perform this step only if you have specified the IP address as the new storagesystem name.
5. Update the new storage system name in the DataFabric Manager server host by entering thefollowing command:
dfm host diag old_storage_name
Troubleshooting SnapManager | 319
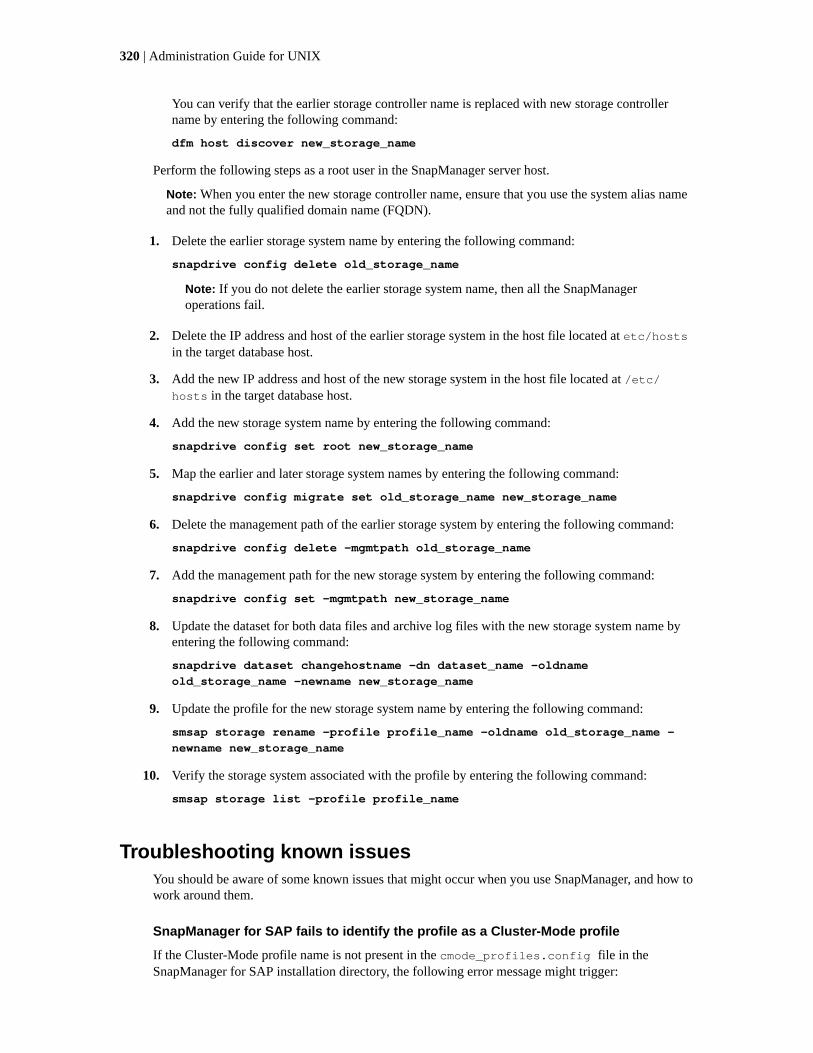
You can verify that the earlier storage controller name is replaced with new storage controllername by entering the following command:
dfm host discover new_storage_name
Perform the following steps as a root user in the SnapManager server host.
Note: When you enter the new storage controller name, ensure that you use the system alias nameand not the fully qualified domain name (FQDN).
1. Delete the earlier storage system name by entering the following command:
snapdrive config delete old_storage_name
Note: If you do not delete the earlier storage system name, then all the SnapManageroperations fail.
2. Delete the IP address and host of the earlier storage system in the host file located at etc/hostsin the target database host.
3. Add the new IP address and host of the new storage system in the host file located at /etc/hosts in the target database host.
4. Add the new storage system name by entering the following command:
snapdrive config set root new_storage_name
5. Map the earlier and later storage system names by entering the following command:
snapdrive config migrate set old_storage_name new_storage_name
6. Delete the management path of the earlier storage system by entering the following command:
snapdrive config delete -mgmtpath old_storage_name
7. Add the management path for the new storage system by entering the following command:
snapdrive config set -mgmtpath new_storage_name
8. Update the dataset for both data files and archive log files with the new storage system name byentering the following command:
snapdrive dataset changehostname -dn dataset_name -oldname
old_storage_name -newname new_storage_name
9. Update the profile for the new storage system name by entering the following command:
smsap storage rename -profile profile_name -oldname old_storage_name -
newname new_storage_name
10. Verify the storage system associated with the profile by entering the following command:
smsap storage list -profile profile_name
Troubleshooting known issuesYou should be aware of some known issues that might occur when you use SnapManager, and how towork around them.
SnapManager for SAP fails to identify the profile as a Cluster-Mode profile
If the Cluster-Mode profile name is not present in the cmode_profiles.config file in theSnapManager for SAP installation directory, the following error message might trigger:
320 | Administration Guide for UNIX
Please configure DFM server using snapdrive config set -dfm user_name
appliance_name.
Also, while upgrading the SnapManager for SAP, if you delete the /opt/NetApp/smsap/* folder,then the cmode_profiles.config file that has the Cluster-Mode profile names also get deleted.This issue also triggers the same error message.
Workaround
Update the profile:
smsap profile update-profile <profile_name>
Note: If SnapManager for SAP is installed in the /opt/NetApp/smsap/ path, then the filelocation will be /opt/NetApp/smsap/cmode_profile/cmode_profiles.config.
The server fails to start
When starting the server, you might see an error message similar to the following:
SMSAP-01104: Error invoking command: SMSAP-17107: SnapManager Server failed
to start on port 8074 because of the following errors:
java.net.BindException: Address already in use
This might be because the SnapManager listening ports (27314 and 27315, by default) are currentlyin use by another application.
This error can also occur if the smsap_server command is already running, but SnapManager doesnot detect the existing process.
Workaround
You can reconfigure either SnapManager or the other application to use different ports.
To reconfigure SnapManager, edit the following file: /opt/NTAP/smsap/properties/smsap.config
You assign the following values:
• SMSAP Server.port=27314
• SMSAP Server.rmiRegistry.port=27315
• remote.registry.ocijdbc.port= 27315
The remote.registry.ocijdbc.port must be the same as Server.rmiRegistry.port.
To start the SnapManager server, enter the following command:
smsap_server start
Note: An error message is displayed if the server is already running.
If the server is already running, perform the following steps:
1. Stop the server by entering the following command:
smsap_server stop
2. Restart the server by entering the following command:
smsap_server start
Terminating a currently running SnapManager operation
If SnapManager server hangs and you cannot execute any operations successfully, you can terminateSnapManager and its operations.
Troubleshooting SnapManager | 321
Workaround
SnapManager works with both SnapManager and Protection Manager. You must perform thefollowing steps to list the different processes running and stop the last process running.
1. List all SnapDrive processes that are running:
ps
Example:
ps | grep snapdrive
2. Stop the SnapDrive process or processes:
kill <pid>
pid is the list of processes you found using the ps command.
Note: Do not stop all SnapDrive processes. You might want to end only the last process that isrunning.
3. If one of the operations involves restoring a protected backup from secondary storage, open theProtection Manager console and perform the following:
a. From the System menu, select Jobs.
b. Select Restore.
c. Check for the name of the dataset that matches the one in the SnapManager profile.
d. Right-click and select Cancel.
4. List the SnapManager processes:
a. Log in as a root user.
b. List the processes by using the ps command.
Example:
ps | grep java
5. End the SnapManager process:
kill <pid>
Unable to delete or free the last protected backup
When you create the first backup for a profile on secondary storage, SnapManager sends all theinformation about the backup to Protection Manager. For subsequent backups related to this profile,SnapManager sends only the modified information. If you remove the last protected backup,SnapManager loses the ability to identify the differences between backups and must to find a way torebaseline these relationships. Therefore, attempting to delete the last protected backup results in anerror message being displayed.
Workaround
You can delete the profile or only the profile backup.
To delete the profile, perform the following steps:
1. Delete the profile's backups.
2. Update the profile and disable protection in the profile.
This deletes the dataset.
3. Delete the last protected backup.
322 | Administration Guide for UNIX

4. Delete the profile.
To delete only the backup, perform the following steps:
1. Create another backup copy of the profile.
2. Transfer that backup copy to secondary storage.
3. Delete the previous backup copy.
Unable to manage archive log file destination names if the destination names are partof other destination names
While creating an archive log backup, if the user excludes a destination that is part of otherdestination names, then the other destination names are also excluded.
For example, assume that there are three destinations available to be excluded: /dest, /dest1,and /dest2. While creating the archive log file backup, if you exclude /dest by using the command
smsap backup create -profile almsamp1 -data -online -archivelogs -exclude-dest /dest
, SnapManager for SAP excludes all the destinations starting with /dest.
Workaround
• Add a path separator after destinations are configured in v$archive_dest. For example, changethe /dest to /dest/.
• While creating a backup, include destinations instead of excluding any destination.
Restoring control files that are multiplexed on Automatic Storage Management (ASM)and non-ASM storage fails
When the control files are multiplexed on ASM and non-ASM storage, the backup operation issuccessful. However, when you try to restore control files from that successful backup, the restoreoperation fails.
SnapManager clone operation fails
When you clone a backup in SnapManager, the DataFabric Manager server might fail to discovervolumes, and display the following error message:
SMSAP-13032: Cannot perform operation: Clone Create. Root cause:
SMSAP-11007: Error cloning from snapshot: FLOW-11019: Failure in
ExecuteConnectionSteps: SD-00018: Error discovering storage for /mnt/
datafile_clone3: SD-10016: Error executing snapdrive command "/usr/sbin/
snapdrive storage show -fs /mnt/datafile_clone3": 0002-719 Warning: Could
not check SD.Storage.Read access on volume filer:/vol/
SnapManager_20091122235002515_vol1 for user user-vm5\oracle on Operations
Manager servers x.x.x.x
Reason: Invalid resource specified. Unable to find its Id on Operations
Manager server 10.x.x.x
This occurs if the storage system has large number of volumes.
Workaround
You must perform one of the following:
• From the Data Fabric Manager server, run
Troubleshooting SnapManager | 323
dfm host discover storage_system
.
You can also add the command in a shell script file and schedule a job in the DataFabric Managerserver to run the script at a frequent interval.
• Increase the value of dfm-rbac-retries in the Snapdrive.conf file.
SnapDrive uses the default refresh interval value and default number of retries. The default valueof dfm-rbac-retry-sleep-secs is 15 seconds and dfm-rbac-retries is 12 iterations.
Note: The Operations Manager refresh interval depends on the number of storage systems,number of storage objects in the storage system, and the load on the DataFabric Managerserver.
As a recommendation, perform the following:
1. From the DataFabric Manager server, manually run the following command for all thesecondary storage systems associated with the dataset:
dfm host discover storage_system
2. Double the time taken to perform the host discovery operation and assign that value to dfm-rbac-retry-sleep-secs.
For example, if the operation took 11 seconds, you can set the value of dfm-rbac-retry-sleep-secs to 22 (11*2).
Repository database size grows with time and not with the number of backups
The repository database size grows with time because SnapManager operations insert or delete datawithin the schema in the repository database tables, which results in high index space usage.
Workaround
You must monitor and rebuild the indexes according to the Oracle guidelines to control the spaceconsumed by the repository schema.
The SnapManager GUI cannot be accessed and SnapManager operations fail whenthe repository database is down
SnapManager operations fail and you cannot access the GUI when the repository database is down.
The following table lists the different actions you might want to perform, and their exceptions:
Operations Exceptions
Opening a closedrepository
The following error message is logged in sm_gui.log: [WARN ]:SMSAP-01106: Error occurred while querying the
repository: Closed Connection java.sql.SQLException:
Closed Connection.
Refreshing an openedrepository by pressingF5
A repository exception is displayed in the GUI and also logs aNullPointerException in the sm_gui.log file.
Refreshing the hostserver
A NullPointerException is logged in the sumo_gui.log file.
Creating a new profile A NullPointerException is displayed in the Profile Configuration window.
Refreshing a profile The following SQL exception is logged in sm_gui.log: [WARN ]:SMSAP-01106: Error occurred while querying the
repository: Closed Connection.
324 | Administration Guide for UNIX
Operations Exceptions
Accessing a backup The following error message is logged in sm_gui.log: Failed tolazily initialize a collection.
Viewing cloneproperties
The following error message is logged in sm_gui.log andsumo_gui.log: Failed to lazily initialize a collection.
Workaround
You must ensure that the repository database is running when you want to access the GUI or want toperform any SnapManager operations.
Unable to create temporary files for the cloned database
When temporary tablespace files of the target database are placed in mount points different from themount point of the data files, the clone create operation is successful but SnapManager fails to createtemporary files for the cloned database.
Workaround
You must perform either of the following:
• Ensure that the target database is laid out so that temporary files are placed in the same mountpoint as that of the data files.
• Manually create or add temporary files in the cloned database.
Unable to migrate the protocol from NFSv3 to NFSv4
You can migrate the protocol from NFSv3 to NFSv4 by enabling the enable-migrate-nfs-version parameter in the snapdrive.conf file. During the migration, SnapDrive considers onlythe protocol version, irrespective of the mount point options such as rw, largefiles, nosuid, andso on.
However, after migrating the protocol to NFSv4, when you restore the backup that was created byusing NFSv3, the following occurs:
• If NFSv3 and NFSv4 are enabled at the storage level, the restore operation is successful but ismounted with the mount point options that were available during backup.
• If only NFSv4 is enabled at the storage level, the restore operation is successful and only theprotocol version (NFSv4) is retained.
However, the other mount point options such as rw, largefiles, nosuid, and so on are notretained.
Workaround
You must manually shut down the database, unmount the database mount points, and mount with theoptions available prior to the restore.
Back up of Data Guard Standby database fails
If any archive log location is configured with the service name of the primary database, the back upof Data Guard Standby database fails.
Workaround
In the GUI, you must clear Specify External Archive Log location corresponding to the servicename of the primary database.
Troubleshooting SnapManager | 325
Mounting a FlexClone volume fails in NFS environmentWhen SnapManager creates a FlexClone of a volume in an NFS environment, an entry is added inthe /etc/exports file. The clone or backup fails to mount on a SnapManager host with an errormessage.
The error message is:0001-034 Command error: mount failed: mount: filer1:/vol/
SnapManager_20090914112850837_vol14 on /opt/NTAPsmsap/mnt/-
ora_data02-20090914112850735_1 - WARNING unknown option "zone=vol14" nfs
mount: filer1:/vol/SnapManager_20090914112850837_vol14: Permission denied.
At the same time, the following message is generated at the storage system console:Mon Sep 14 23:58:37 PDT [filer1: export.auto.update.disabled:
warning]: /etc/exports was not updated for vol14 when the vol clone create
command was run. Please either manually update /etc/exports or copy /etc/
exports.new to it.
This message might not be captured in the AutoSupport messages.
Note: You might encounter similar issues while cloning FlexVol volumes on NFS. You can followthe same steps to enable the nfs.export.auto-update option.
What to do
1. Set the nfs.export.auto-update option on so that the /etc/exports file is updatedautomatically.
options nfs.export.auto-update on
Note: In the HA pair configuration, ensure that you set the NFS exports option to on for both thestorage systems.
Running multiple parallel operations fails in SnapManagerWhen you run multiple parallel operations on separate databases that reside on the same storagesystem, the igroup for LUNs associated with both the databases might get deleted because of one ofthe operations. Later, if the other operation attempts to use the deleted igroup, SnapManager displaysan error message.
For example, if you are running the backup delete and backup create operations on differentdatabases almost at the same time, the backup create operation fails. The following sequential stepsshow what happens when you run backup delete and backup create operations on different databasesalmost at the same time.
1. Run the backup delete command.
2. Run the backup create command.
3. The backup create command identifies the already existing igroup and uses the same igroupfor mapping the LUN.
4. The backup delete command deletes the backup LUN, which was mapped to the same igroup.
5. The backup delete command then deletes the igroup because there are no LUNs associatedwith the igroup.
6. The backup create command creates the backup and tries to map to the igroup that does notexist, and therefore the operation fails.
326 | Administration Guide for UNIX
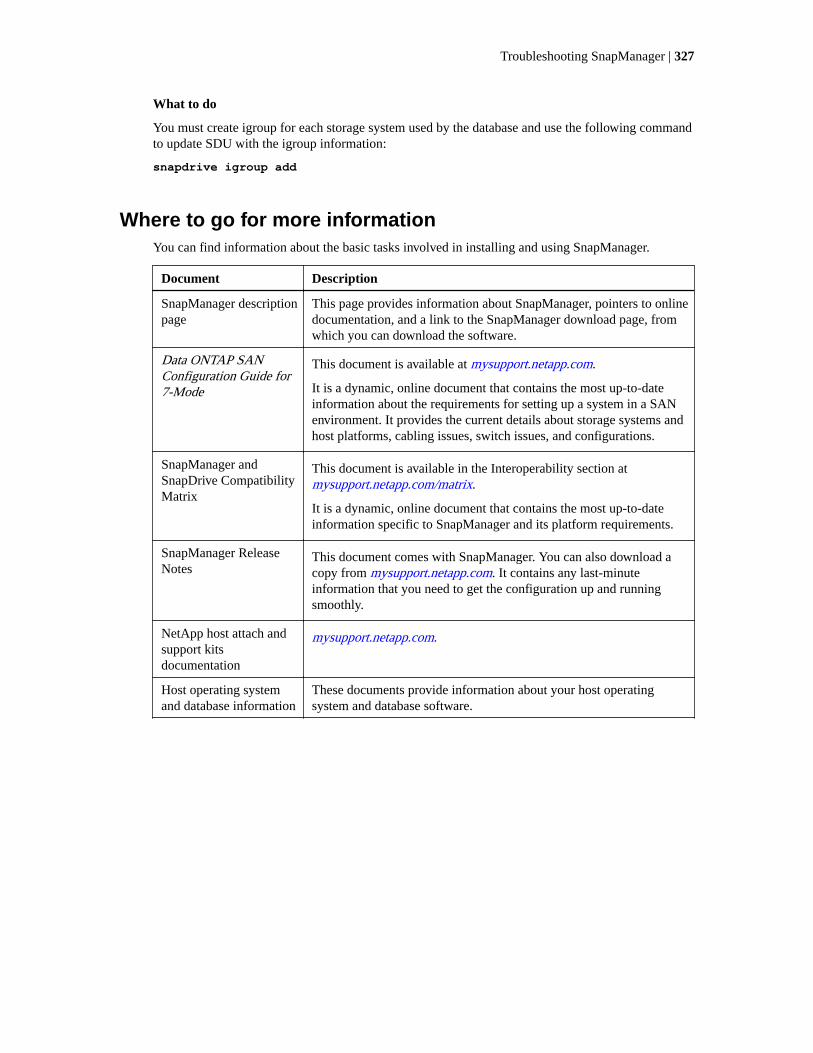
What to do
You must create igroup for each storage system used by the database and use the following commandto update SDU with the igroup information:
snapdrive igroup add
Where to go for more informationYou can find information about the basic tasks involved in installing and using SnapManager.
Document Description
SnapManager descriptionpage
This page provides information about SnapManager, pointers to onlinedocumentation, and a link to the SnapManager download page, fromwhich you can download the software.
Data ONTAP SANConfiguration Guide for7-Mode
This document is available at mysupport.netapp.com.
It is a dynamic, online document that contains the most up-to-dateinformation about the requirements for setting up a system in a SANenvironment. It provides the current details about storage systems andhost platforms, cabling issues, switch issues, and configurations.
SnapManager andSnapDrive CompatibilityMatrix
This document is available in the Interoperability section at mysupport.netapp.com/matrix.
It is a dynamic, online document that contains the most up-to-dateinformation specific to SnapManager and its platform requirements.
SnapManager ReleaseNotes
This document comes with SnapManager. You can also download acopy from mysupport.netapp.com. It contains any last-minuteinformation that you need to get the configuration up and runningsmoothly.
NetApp host attach andsupport kitsdocumentation
mysupport.netapp.com.
Host operating systemand database information
These documents provide information about your host operatingsystem and database software.
Troubleshooting SnapManager | 327

Error message classifications
You can determine the cause of an error if you know the message classifications.
The following table provides information about the numerical ranges for the different types ofmessages you might see with SnapManager:
Group Range Usage
ENVIRONMENT 1000-1999 Used to log the state or issues with the operatingenvironment of SnapManager. This group includesmessages about the systems that SnapManagerinteracts with, such as the host, storage system,database, and so on.
BACKUP 2000-2999 Associated with the database backup process.
RESTORE 3000-3999 Associated with the database restore process.
CLONE 4000-4999 Associated with the database clone process.
PROFILE 5000-5999 Used for managing profiles.
MANAGE 6000-6999 Used for managing backups.
VIRTUAL DATABASEINTERFACE
7000-7999 Associated with the virtual database interface.
VIRTUAL STORAGEINTERFACE
8000-8999 Associated with the virtual storage interface.
REPOSITORY 9000-9999 Associated with the Repository interface.
METRICS 10000-10999 Associated with the size of the database backup,elapsed time to perform the backup, time to restore thedatabase, the number of times a database has beencloned, and so on.
VIRTUAL HOSTINTERFACE
11000-11999 Associated with the virtual host interface. This is theinterface to the host operating system.
EXECUTION 12000-12999 Associated with the execution package, includingspawning and processing operating system calls.
PROCESS 13000-13999 Associated with the process component ofSnapManager.
UTILITIES 14000-14999 Associated with SnapManager utilities, global context,and so on.
DUMP/DIAGNOSTICS 15000-15999 Associated with dump or diagnostic operations.
HELP 16000-16999 Associated with help.
SERVER 17000-17999 Used in the SnapManager server administration.
API 18000-18999 Associated with the API.
BACKINT 19000-19999 Associated with BACKINT.
AUTH 20000-20999 Associated with the authorization of credentials.
328
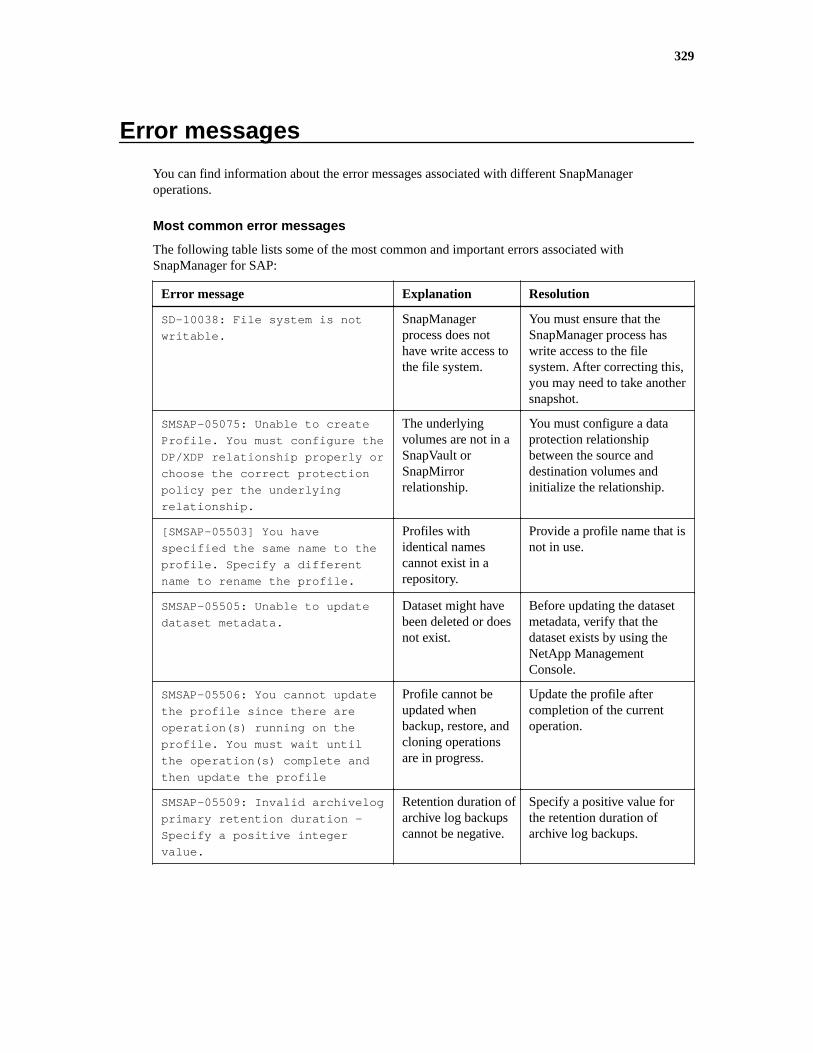
Error messages
You can find information about the error messages associated with different SnapManageroperations.
Most common error messages
The following table lists some of the most common and important errors associated withSnapManager for SAP:
Error message Explanation Resolution
SD-10038: File system is not
writable.
SnapManagerprocess does nothave write access tothe file system.
You must ensure that theSnapManager process haswrite access to the filesystem. After correcting this,you may need to take anothersnapshot.
SMSAP-05075: Unable to create
Profile. You must configure the
DP/XDP relationship properly or
choose the correct protection
policy per the underlying
relationship.
The underlyingvolumes are not in aSnapVault orSnapMirrorrelationship.
You must configure a dataprotection relationshipbetween the source anddestination volumes andinitialize the relationship.
[SMSAP-05503] You have
specified the same name to the
profile. Specify a different
name to rename the profile.
Profiles withidentical namescannot exist in arepository.
Provide a profile name that isnot in use.
SMSAP-05505: Unable to update
dataset metadata.
Dataset might havebeen deleted or doesnot exist.
Before updating the datasetmetadata, verify that thedataset exists by using theNetApp ManagementConsole.
SMSAP-05506: You cannot update
the profile since there are
operation(s) running on the
profile. You must wait until
the operation(s) complete and
then update the profile
Profile cannot beupdated whenbackup, restore, andcloning operationsare in progress.
Update the profile aftercompletion of the currentoperation.
SMSAP-05509: Invalid archivelog
primary retention duration -
Specify a positive integer
value.
Retention duration ofarchive log backupscannot be negative.
Specify a positive value forthe retention duration ofarchive log backups.
329
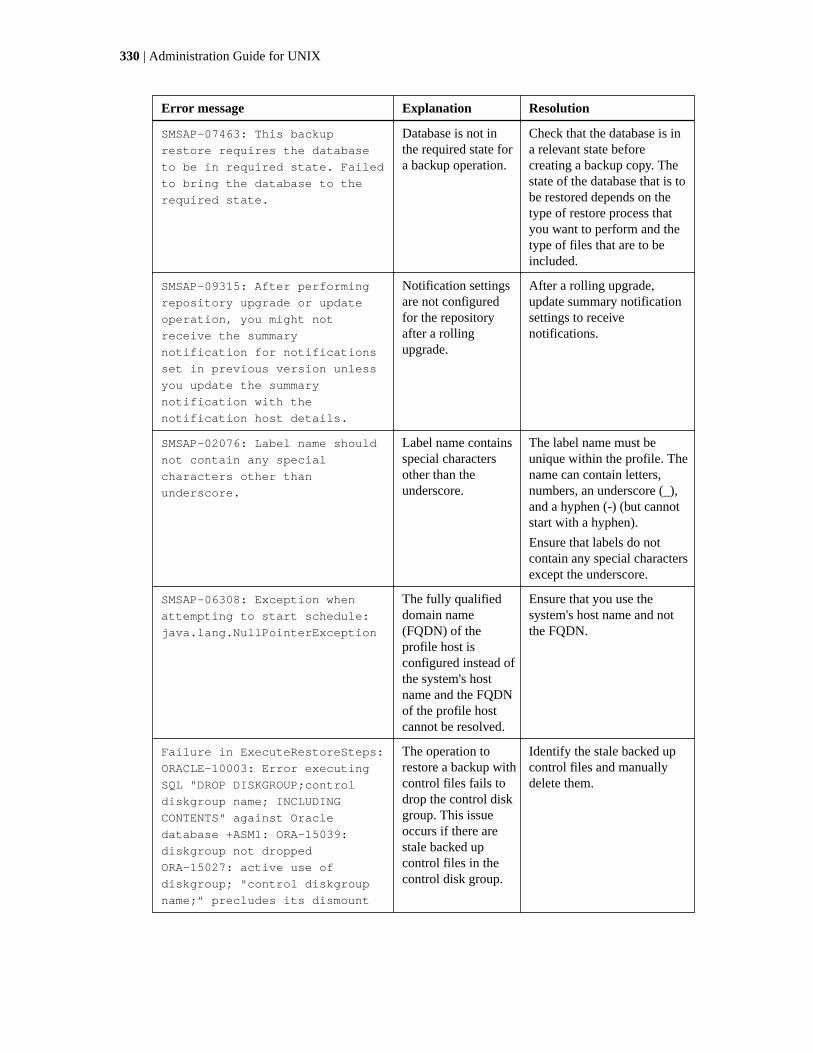
Error message Explanation Resolution
SMSAP-07463: This backup
restore requires the database
to be in required state. Failed
to bring the database to the
required state.
Database is not inthe required state fora backup operation.
Check that the database is ina relevant state beforecreating a backup copy. Thestate of the database that is tobe restored depends on thetype of restore process thatyou want to perform and thetype of files that are to beincluded.
SMSAP-09315: After performing
repository upgrade or update
operation, you might not
receive the summary
notification for notifications
set in previous version unless
you update the summary
notification with the
notification host details.
Notification settingsare not configuredfor the repositoryafter a rollingupgrade.
After a rolling upgrade,update summary notificationsettings to receivenotifications.
SMSAP-02076: Label name should
not contain any special
characters other than
underscore.
Label name containsspecial charactersother than theunderscore.
The label name must beunique within the profile. Thename can contain letters,numbers, an underscore (_),and a hyphen (-) (but cannotstart with a hyphen).
Ensure that labels do notcontain any special charactersexcept the underscore.
SMSAP-06308: Exception when
attempting to start schedule:
java.lang.NullPointerException
The fully qualifieddomain name(FQDN) of theprofile host isconfigured instead ofthe system's hostname and the FQDNof the profile hostcannot be resolved.
Ensure that you use thesystem's host name and notthe FQDN.
Failure in ExecuteRestoreSteps:
ORACLE-10003: Error executing
SQL "DROP DISKGROUP;control
diskgroup name; INCLUDING
CONTENTS" against Oracle
database +ASM1: ORA-15039:
diskgroup not dropped
ORA-15027: active use of
diskgroup; "control diskgroup
name;" precludes its dismount
The operation torestore a backup withcontrol files fails todrop the control diskgroup. This issueoccurs if there arestale backed upcontrol files in thecontrol disk group.
Identify the stale backed upcontrol files and manuallydelete them.
330 | Administration Guide for UNIX
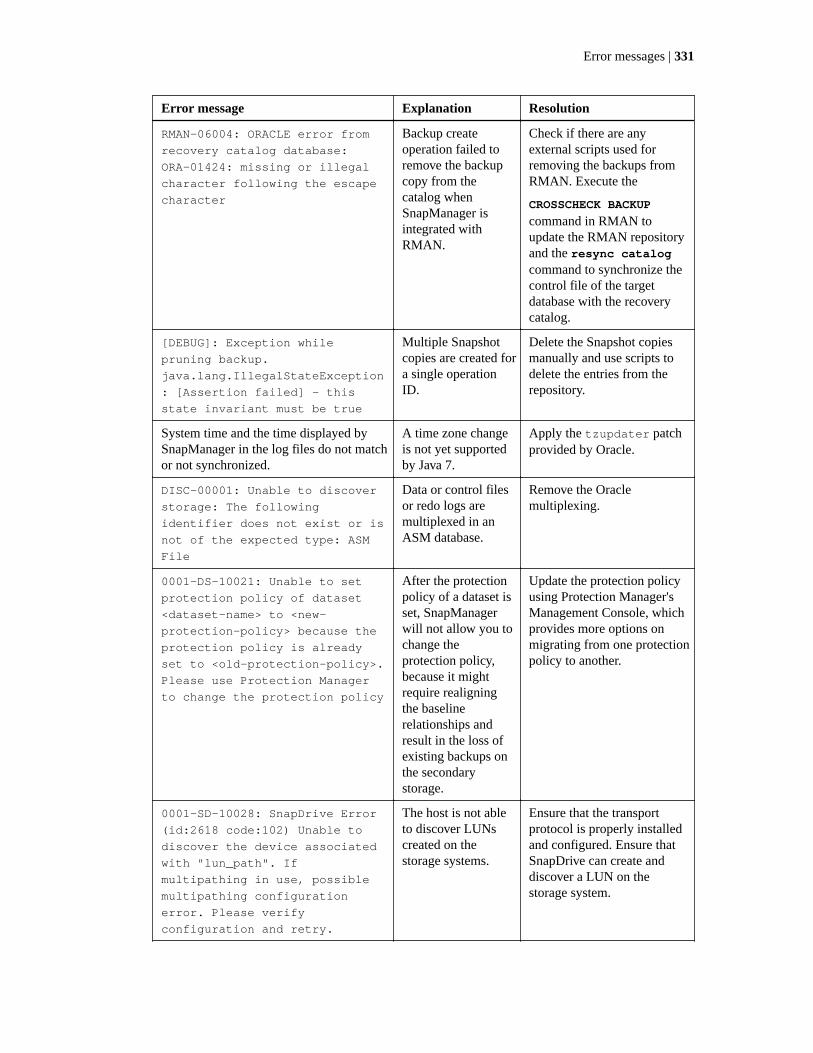
Error message Explanation Resolution
RMAN-06004: ORACLE error from
recovery catalog database:
ORA-01424: missing or illegal
character following the escape
character
Backup createoperation failed toremove the backupcopy from thecatalog whenSnapManager isintegrated withRMAN.
Check if there are anyexternal scripts used forremoving the backups fromRMAN. Execute the
CROSSCHECK BACKUP
command in RMAN toupdate the RMAN repositoryand the resync catalogcommand to synchronize thecontrol file of the targetdatabase with the recoverycatalog.
[DEBUG]: Exception while
pruning backup.
java.lang.IllegalStateException
: [Assertion failed] - this
state invariant must be true
Multiple Snapshotcopies are created fora single operationID.
Delete the Snapshot copiesmanually and use scripts todelete the entries from therepository.
System time and the time displayed bySnapManager in the log files do not matchor not synchronized.
A time zone changeis not yet supportedby Java 7.
Apply the tzupdater patchprovided by Oracle.
DISC-00001: Unable to discover
storage: The following
identifier does not exist or is
not of the expected type: ASM
File
Data or control filesor redo logs aremultiplexed in anASM database.
Remove the Oraclemultiplexing.
0001-DS-10021: Unable to set
protection policy of dataset
<dataset-name> to <new-
protection-policy> because the
protection policy is already
set to <old-protection-policy>.
Please use Protection Manager
to change the protection policy
After the protectionpolicy of a dataset isset, SnapManagerwill not allow you tochange theprotection policy,because it mightrequire realigningthe baselinerelationships andresult in the loss ofexisting backups onthe secondarystorage.
Update the protection policyusing Protection Manager'sManagement Console, whichprovides more options onmigrating from one protectionpolicy to another.
0001-SD-10028: SnapDrive Error
(id:2618 code:102) Unable to
discover the device associated
with "lun_path". If
multipathing in use, possible
multipathing configuration
error. Please verify
configuration and retry.
The host is not ableto discover LUNscreated on thestorage systems.
Ensure that the transportprotocol is properly installedand configured. Ensure thatSnapDrive can create anddiscover a LUN on thestorage system.
Error messages | 331
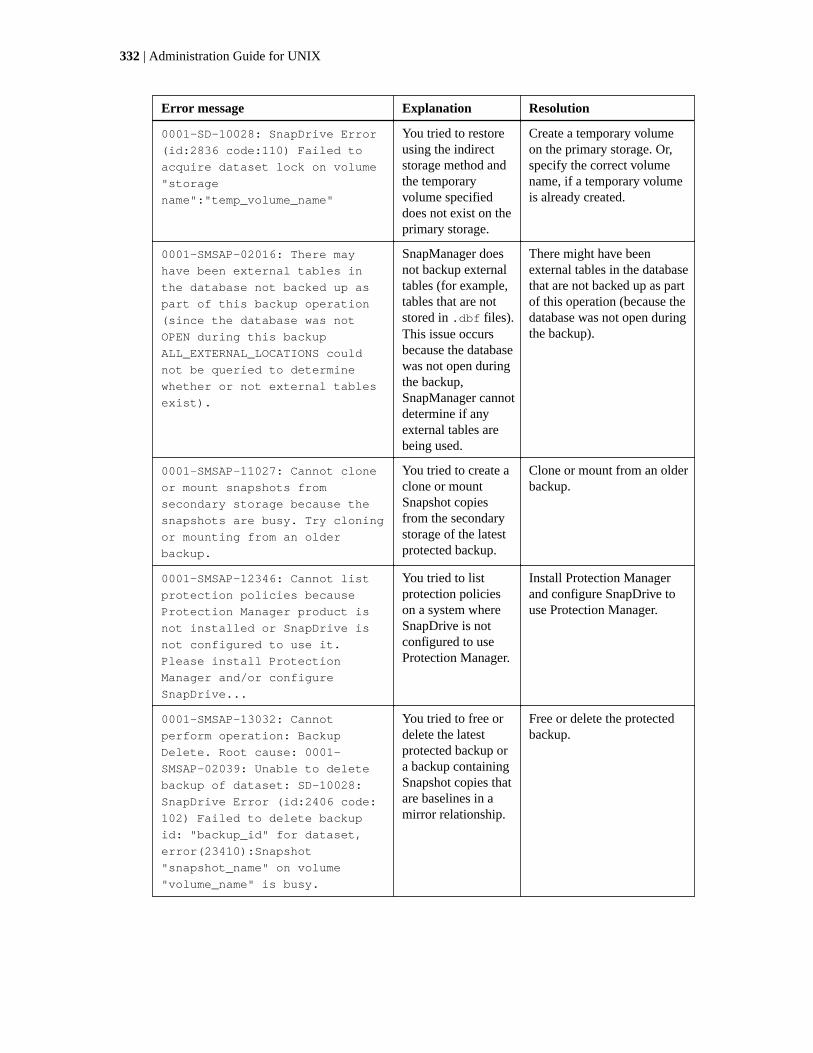
Error message Explanation Resolution
0001-SD-10028: SnapDrive Error
(id:2836 code:110) Failed to
acquire dataset lock on volume
"storage
name":"temp_volume_name"
You tried to restoreusing the indirectstorage method andthe temporaryvolume specifieddoes not exist on theprimary storage.
Create a temporary volumeon the primary storage. Or,specify the correct volumename, if a temporary volumeis already created.
0001-SMSAP-02016: There may
have been external tables in
the database not backed up as
part of this backup operation
(since the database was not
OPEN during this backup
ALL_EXTERNAL_LOCATIONS could
not be queried to determine
whether or not external tables
exist).
SnapManager doesnot backup externaltables (for example,tables that are notstored in .dbf files).This issue occursbecause the databasewas not open duringthe backup,SnapManager cannotdetermine if anyexternal tables arebeing used.
There might have beenexternal tables in the databasethat are not backed up as partof this operation (because thedatabase was not open duringthe backup).
0001-SMSAP-11027: Cannot clone
or mount snapshots from
secondary storage because the
snapshots are busy. Try cloning
or mounting from an older
backup.
You tried to create aclone or mountSnapshot copiesfrom the secondarystorage of the latestprotected backup.
Clone or mount from an olderbackup.
0001-SMSAP-12346: Cannot list
protection policies because
Protection Manager product is
not installed or SnapDrive is
not configured to use it.
Please install Protection
Manager and/or configure
SnapDrive...
You tried to listprotection policieson a system whereSnapDrive is notconfigured to useProtection Manager.
Install Protection Managerand configure SnapDrive touse Protection Manager.
0001-SMSAP-13032: Cannot
perform operation: Backup
Delete. Root cause: 0001-
SMSAP-02039: Unable to delete
backup of dataset: SD-10028:
SnapDrive Error (id:2406 code:
102) Failed to delete backup
id: "backup_id" for dataset,
error(23410):Snapshot
"snapshot_name" on volume
"volume_name" is busy.
You tried to free ordelete the latestprotected backup ora backup containingSnapshot copies thatare baselines in amirror relationship.
Free or delete the protectedbackup.
332 | Administration Guide for UNIX
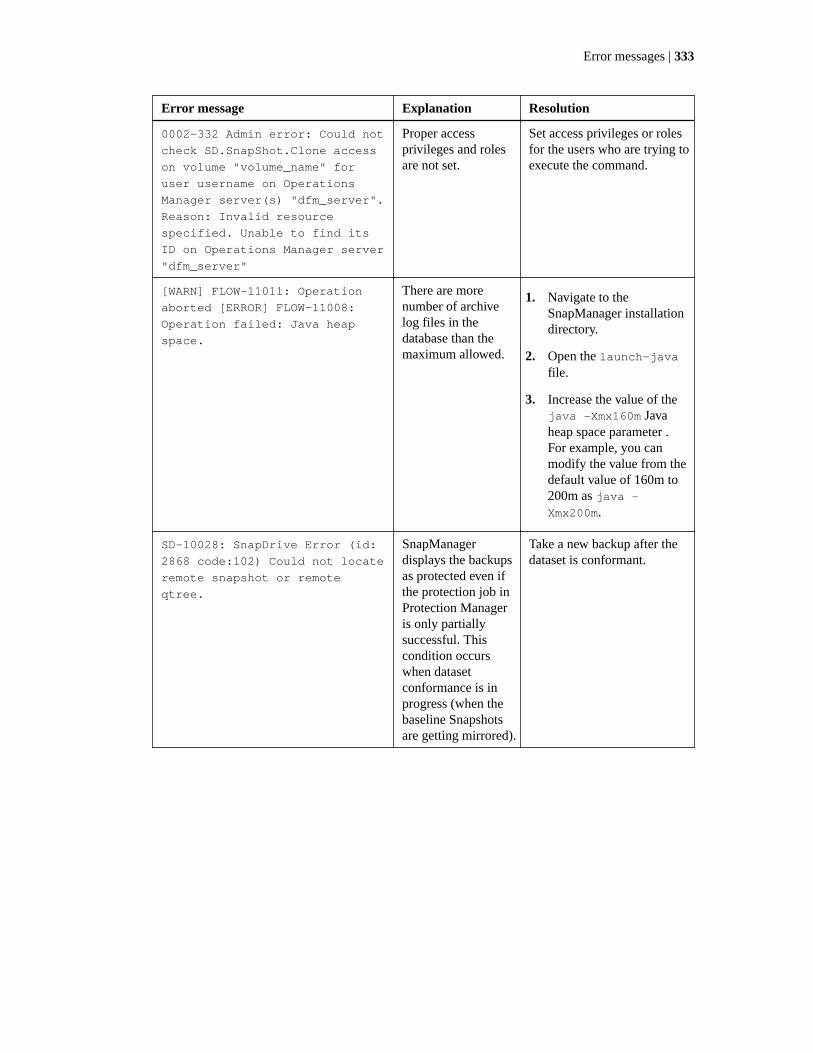
Error message Explanation Resolution
0002-332 Admin error: Could not
check SD.SnapShot.Clone access
on volume "volume_name" for
user username on Operations
Manager server(s) "dfm_server".
Reason: Invalid resource
specified. Unable to find its
ID on Operations Manager server
"dfm_server"
Proper accessprivileges and rolesare not set.
Set access privileges or rolesfor the users who are trying toexecute the command.
[WARN] FLOW-11011: Operation
aborted [ERROR] FLOW-11008:
Operation failed: Java heap
space.
There are morenumber of archivelog files in thedatabase than themaximum allowed.
1. Navigate to theSnapManager installationdirectory.
2. Open the launch-javafile.
3. Increase the value of thejava -Xmx160m Javaheap space parameter .For example, you canmodify the value from thedefault value of 160m to200m as java -Xmx200m.
SD-10028: SnapDrive Error (id:
2868 code:102) Could not locate
remote snapshot or remote
qtree.
SnapManagerdisplays the backupsas protected even ifthe protection job inProtection Manageris only partiallysuccessful. Thiscondition occurswhen datasetconformance is inprogress (when thebaseline Snapshotsare getting mirrored).
Take a new backup after thedataset is conformant.
Error messages | 333
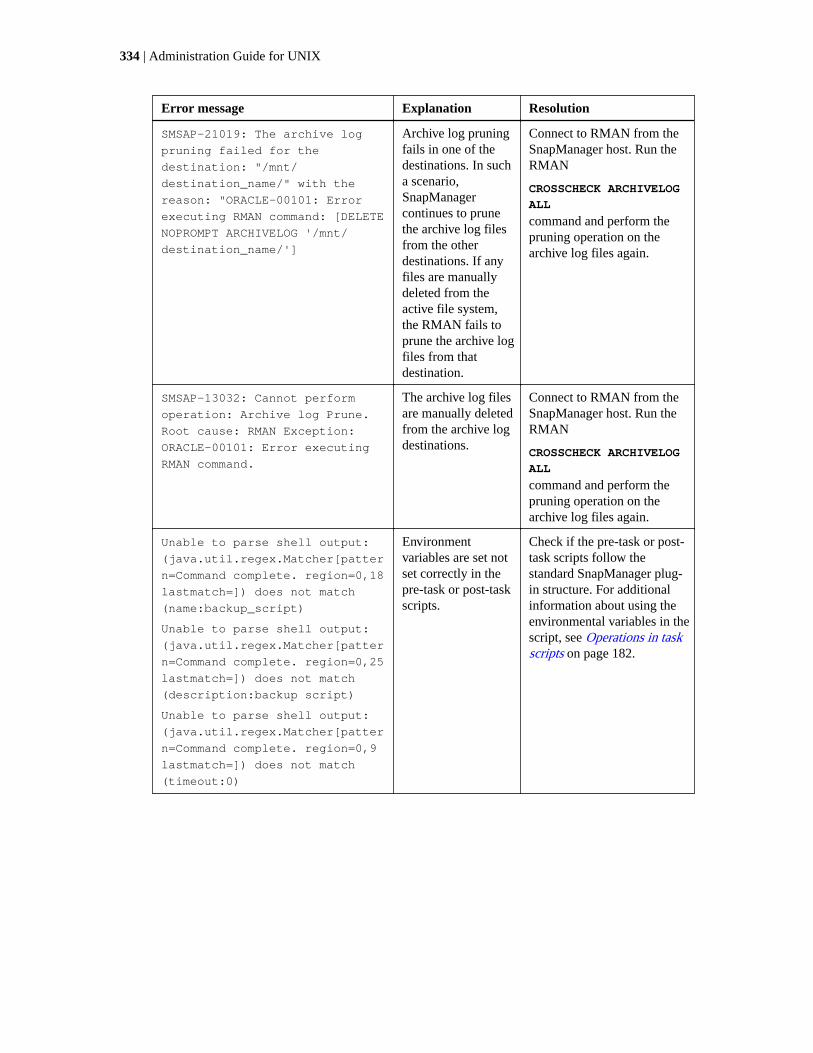
Error message Explanation Resolution
SMSAP-21019: The archive log
pruning failed for the
destination: "/mnt/
destination_name/" with the
reason: "ORACLE-00101: Error
executing RMAN command: [DELETE
NOPROMPT ARCHIVELOG '/mnt/
destination_name/']
Archive log pruningfails in one of thedestinations. In sucha scenario,SnapManagercontinues to prunethe archive log filesfrom the otherdestinations. If anyfiles are manuallydeleted from theactive file system,the RMAN fails toprune the archive logfiles from thatdestination.
Connect to RMAN from theSnapManager host. Run theRMAN
CROSSCHECK ARCHIVELOG
ALL
command and perform thepruning operation on thearchive log files again.
SMSAP-13032: Cannot perform
operation: Archive log Prune.
Root cause: RMAN Exception:
ORACLE-00101: Error executing
RMAN command.
The archive log filesare manually deletedfrom the archive logdestinations.
Connect to RMAN from theSnapManager host. Run theRMAN
CROSSCHECK ARCHIVELOG
ALL
command and perform thepruning operation on thearchive log files again.
Unable to parse shell output:
(java.util.regex.Matcher[patter
n=Command complete. region=0,18
lastmatch=]) does not match
(name:backup_script)
Unable to parse shell output:
(java.util.regex.Matcher[patter
n=Command complete. region=0,25
lastmatch=]) does not match
(description:backup script)
Unable to parse shell output:
(java.util.regex.Matcher[patter
n=Command complete. region=0,9
lastmatch=]) does not match
(timeout:0)
Environmentvariables are set notset correctly in thepre-task or post-taskscripts.
Check if the pre-task or post-task scripts follow thestandard SnapManager plug-in structure. For additionalinformation about using theenvironmental variables in thescript, see Operations in taskscripts on page 182.
334 | Administration Guide for UNIX
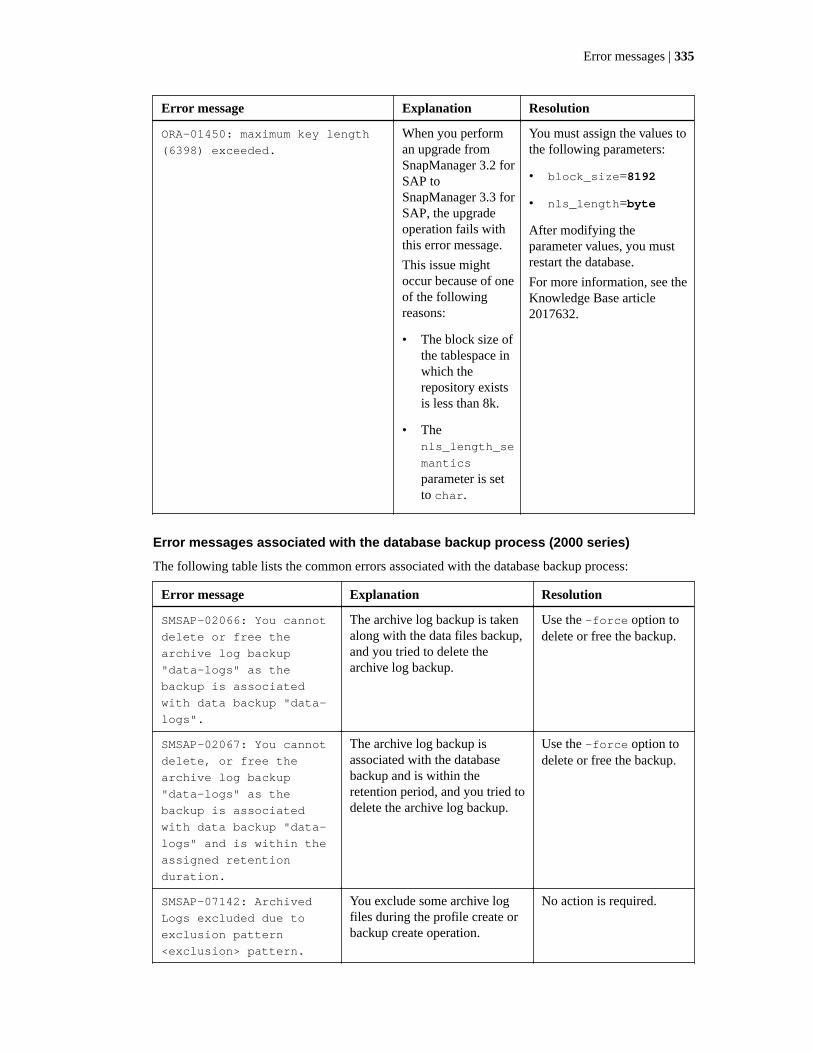
Error message Explanation Resolution
ORA-01450: maximum key length
(6398) exceeded.
When you performan upgrade fromSnapManager 3.2 forSAP toSnapManager 3.3 forSAP, the upgradeoperation fails withthis error message.
This issue mightoccur because of oneof the followingreasons:
• The block size ofthe tablespace inwhich therepository existsis less than 8k.
• Thenls_length_se
mantics
parameter is setto char.
You must assign the values tothe following parameters:
• block_size=8192
• nls_length=byte
After modifying theparameter values, you mustrestart the database.
For more information, see theKnowledge Base article2017632.
Error messages associated with the database backup process (2000 series)
The following table lists the common errors associated with the database backup process:
Error message Explanation Resolution
SMSAP-02066: You cannot
delete or free the
archive log backup
"data-logs" as the
backup is associated
with data backup "data-
logs".
The archive log backup is takenalong with the data files backup,and you tried to delete thearchive log backup.
Use the -force option todelete or free the backup.
SMSAP-02067: You cannot
delete, or free the
archive log backup
"data-logs" as the
backup is associated
with data backup "data-
logs" and is within the
assigned retention
duration.
The archive log backup isassociated with the databasebackup and is within theretention period, and you tried todelete the archive log backup.
Use the -force option todelete or free the backup.
SMSAP-07142: Archived
Logs excluded due to
exclusion pattern
<exclusion> pattern.
You exclude some archive logfiles during the profile create orbackup create operation.
No action is required.
Error messages | 335
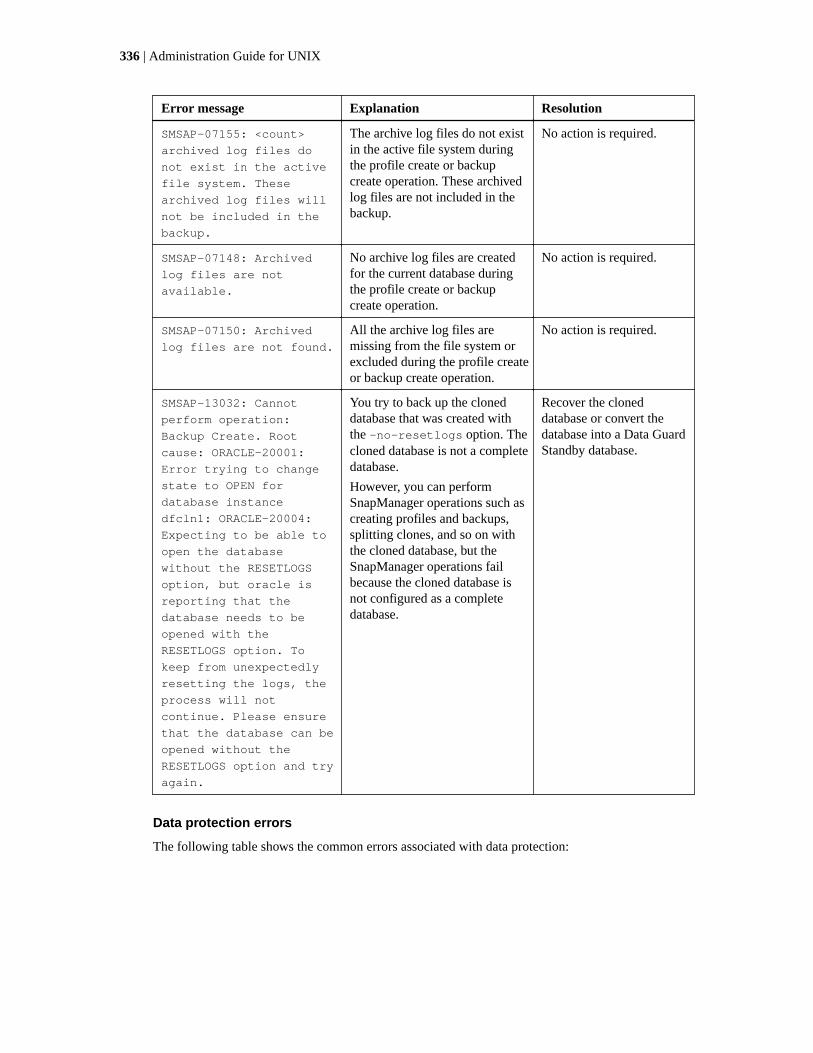
Error message Explanation Resolution
SMSAP-07155: <count>
archived log files do
not exist in the active
file system. These
archived log files will
not be included in the
backup.
The archive log files do not existin the active file system duringthe profile create or backupcreate operation. These archivedlog files are not included in thebackup.
No action is required.
SMSAP-07148: Archived
log files are not
available.
No archive log files are createdfor the current database duringthe profile create or backupcreate operation.
No action is required.
SMSAP-07150: Archived
log files are not found.
All the archive log files aremissing from the file system orexcluded during the profile createor backup create operation.
No action is required.
SMSAP-13032: Cannot
perform operation:
Backup Create. Root
cause: ORACLE-20001:
Error trying to change
state to OPEN for
database instance
dfcln1: ORACLE-20004:
Expecting to be able to
open the database
without the RESETLOGS
option, but oracle is
reporting that the
database needs to be
opened with the
RESETLOGS option. To
keep from unexpectedly
resetting the logs, the
process will not
continue. Please ensure
that the database can be
opened without the
RESETLOGS option and try
again.
You try to back up the cloneddatabase that was created withthe -no-resetlogs option. Thecloned database is not a completedatabase.
However, you can performSnapManager operations such ascreating profiles and backups,splitting clones, and so on withthe cloned database, but theSnapManager operations failbecause the cloned database isnot configured as a completedatabase.
Recover the cloneddatabase or convert thedatabase into a Data GuardStandby database.
Data protection errors
The following table shows the common errors associated with data protection:
336 | Administration Guide for UNIX

Error message Explanation Resolution
Backup protection is
requested but the
database profile does not
have a protection policy.
Please update the
protection policy in the
database profile or do
not use the 'protect'
option when creating
backups.
You try to create a backup withprotection to secondary storage;however, the profile associatedwith this backup does not have aprotection policy specified.
Edit the profile and selecta protection policy. Re-create the backup.
Cannot delete profile
because data protection
is enabled but the
Protection Manager is
temporarily unavailable.
Please try again later.
You try to delete a profile thathas protection enabled;however, Protection Manager isunavailable.
Ensure that appropriatebackups are stored ineither primary orsecondary storage. Disableprotection in the profile.When Protection Manageris available again, return tothe profile and delete it.
Cannot list protection
policies because
Protection Manager is
temporarily unavailable.
Please try again later.
While setting up the backupprofile, you enabled protectionon the backup so that thebackup would be stored onsecondary storage. However,SnapManager cannot retrievethe protection policies fromProtection ManagerManagement Console.
Disable protection in theprofile temporarily.Continue creating a newprofile or updating anexisting profile. WhenProtection Manager isavailable again, return tothe profile.
Cannot list protection
policies because
Protection Manager
product is not installed
or SnapDrive is not
configured to use it.
Please install Protection
Manager and/or configure
SnapDrive.
While setting up the backupprofile, you enabled protectionon the backup so that thebackup would be stored onsecondary storage. However,SnapManager cannot retrievethe protection policies fromProtection Manager'sManagement Console. TheProtection Manager is notinstalled or SnapDrive is notconfigured.
Install ProtectionManager.
Configure SnapDrive.
Return to the profile,reenable protection, andselect the protectionpolicies available inProtection Manager'sManagement Console.
Cannot set protection
policy because Protection
Manager is temporarily
unavailable. Please try
again later.
While setting up the backupprofile, you enabled protectionon the backup so that thebackup would be stored onsecondary storage. However,SnapManager cannot retrievethe protection policies fromProtection Manager'sManagement Console.
Disable protection in theprofile temporarily.Continue creating orupdating the profile. WhenProtection Manager'sManagement Console isavailable, return to theprofile.
Error messages | 337
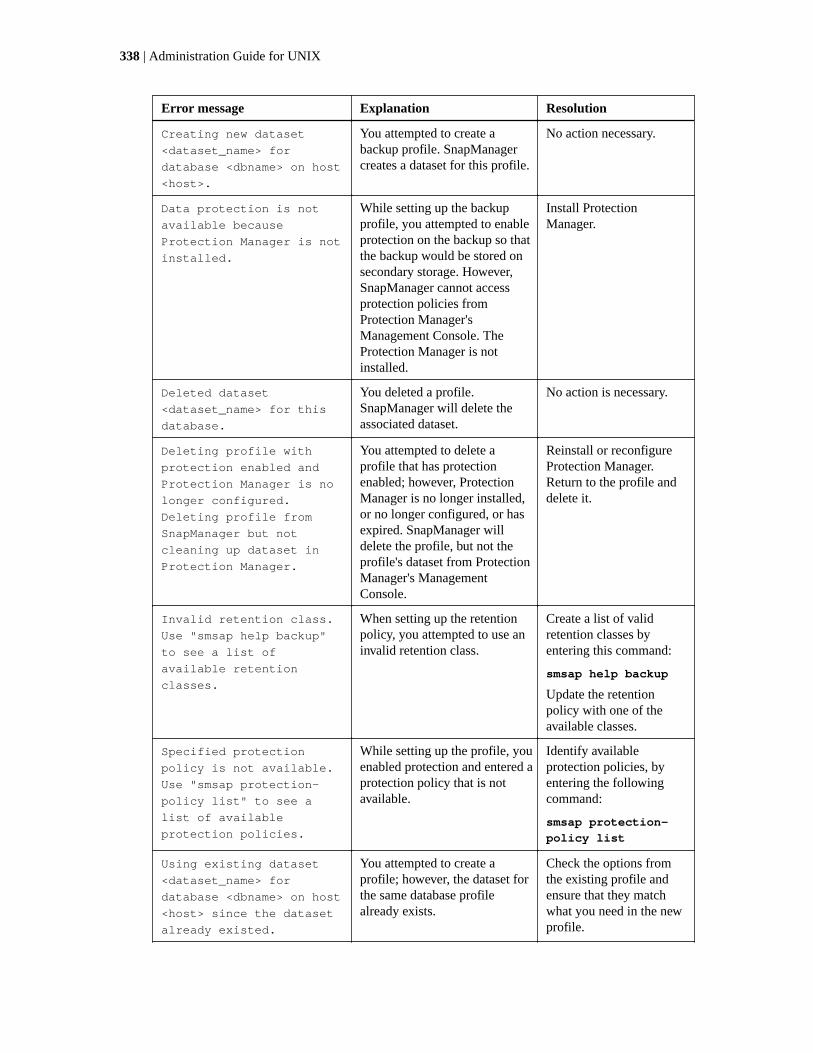
Error message Explanation Resolution
Creating new dataset
<dataset_name> for
database <dbname> on host
<host>.
You attempted to create abackup profile. SnapManagercreates a dataset for this profile.
No action necessary.
Data protection is not
available because
Protection Manager is not
installed.
While setting up the backupprofile, you attempted to enableprotection on the backup so thatthe backup would be stored onsecondary storage. However,SnapManager cannot accessprotection policies fromProtection Manager'sManagement Console. TheProtection Manager is notinstalled.
Install ProtectionManager.
Deleted dataset
<dataset_name> for this
database.
You deleted a profile.SnapManager will delete theassociated dataset.
No action is necessary.
Deleting profile with
protection enabled and
Protection Manager is no
longer configured.
Deleting profile from
SnapManager but not
cleaning up dataset in
Protection Manager.
You attempted to delete aprofile that has protectionenabled; however, ProtectionManager is no longer installed,or no longer configured, or hasexpired. SnapManager willdelete the profile, but not theprofile's dataset from ProtectionManager's ManagementConsole.
Reinstall or reconfigureProtection Manager.Return to the profile anddelete it.
Invalid retention class.
Use "smsap help backup"
to see a list of
available retention
classes.
When setting up the retentionpolicy, you attempted to use aninvalid retention class.
Create a list of validretention classes byentering this command:
smsap help backup
Update the retentionpolicy with one of theavailable classes.
Specified protection
policy is not available.
Use "smsap protection-
policy list" to see a
list of available
protection policies.
While setting up the profile, youenabled protection and entered aprotection policy that is notavailable.
Identify availableprotection policies, byentering the followingcommand:
smsap protection-
policy list
Using existing dataset
<dataset_name> for
database <dbname> on host
<host> since the dataset
already existed.
You attempted to create aprofile; however, the dataset forthe same database profilealready exists.
Check the options fromthe existing profile andensure that they matchwhat you need in the newprofile.
338 | Administration Guide for UNIX
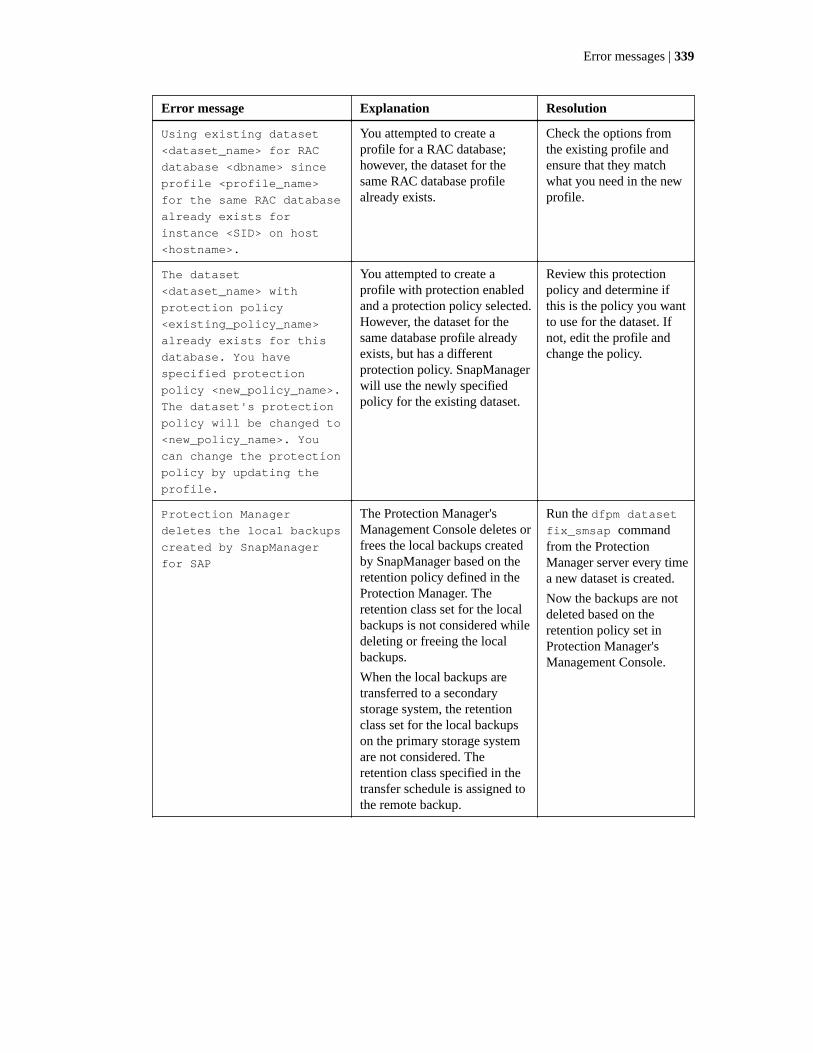
Error message Explanation Resolution
Using existing dataset
<dataset_name> for RAC
database <dbname> since
profile <profile_name>
for the same RAC database
already exists for
instance <SID> on host
<hostname>.
You attempted to create aprofile for a RAC database;however, the dataset for thesame RAC database profilealready exists.
Check the options fromthe existing profile andensure that they matchwhat you need in the newprofile.
The dataset
<dataset_name> with
protection policy
<existing_policy_name>
already exists for this
database. You have
specified protection
policy <new_policy_name>.
The dataset's protection
policy will be changed to
<new_policy_name>. You
can change the protection
policy by updating the
profile.
You attempted to create aprofile with protection enabledand a protection policy selected.However, the dataset for thesame database profile alreadyexists, but has a differentprotection policy. SnapManagerwill use the newly specifiedpolicy for the existing dataset.
Review this protectionpolicy and determine ifthis is the policy you wantto use for the dataset. Ifnot, edit the profile andchange the policy.
Protection Manager
deletes the local backups
created by SnapManager
for SAP
The Protection Manager'sManagement Console deletes orfrees the local backups createdby SnapManager based on theretention policy defined in theProtection Manager. Theretention class set for the localbackups is not considered whiledeleting or freeing the localbackups.
When the local backups aretransferred to a secondarystorage system, the retentionclass set for the local backupson the primary storage systemare not considered. Theretention class specified in thetransfer schedule is assigned tothe remote backup.
Run the dfpm datasetfix_smsap commandfrom the ProtectionManager server every timea new dataset is created.
Now the backups are notdeleted based on theretention policy set inProtection Manager'sManagement Console.
Error messages | 339
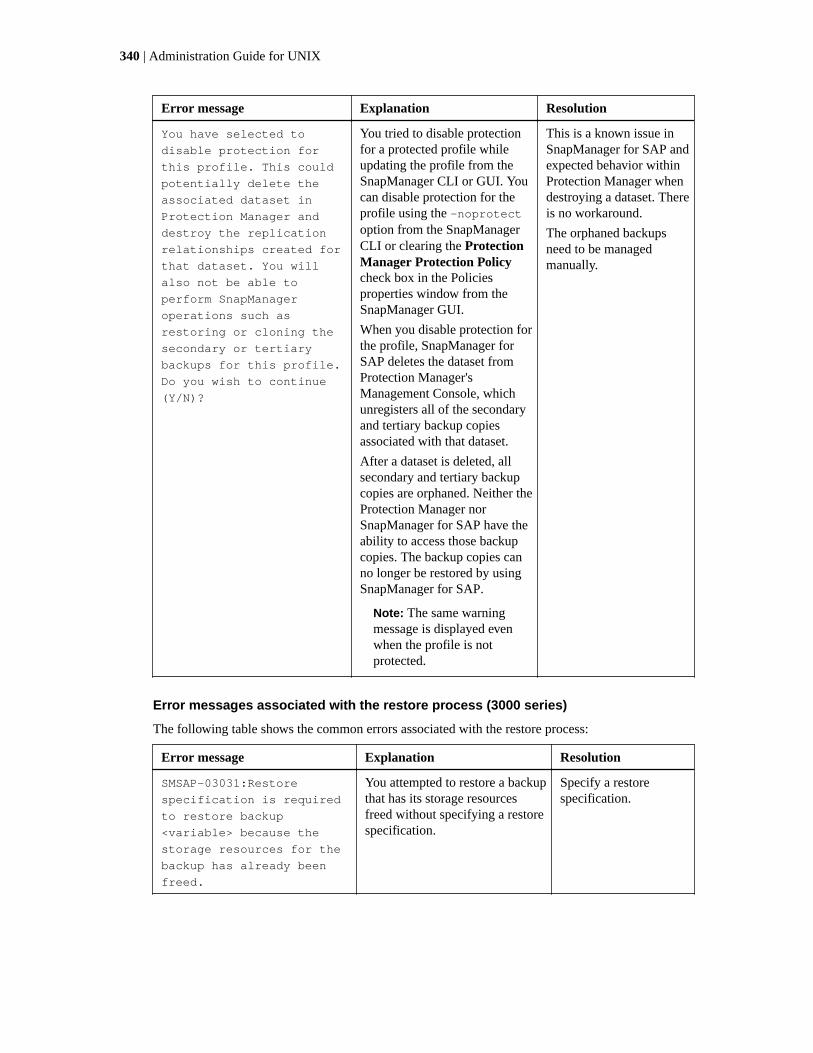
Error message Explanation Resolution
You have selected to
disable protection for
this profile. This could
potentially delete the
associated dataset in
Protection Manager and
destroy the replication
relationships created for
that dataset. You will
also not be able to
perform SnapManager
operations such as
restoring or cloning the
secondary or tertiary
backups for this profile.
Do you wish to continue
(Y/N)?
You tried to disable protectionfor a protected profile whileupdating the profile from theSnapManager CLI or GUI. Youcan disable protection for theprofile using the -noprotectoption from the SnapManagerCLI or clearing the ProtectionManager Protection Policycheck box in the Policiesproperties window from theSnapManager GUI.
When you disable protection forthe profile, SnapManager forSAP deletes the dataset fromProtection Manager'sManagement Console, whichunregisters all of the secondaryand tertiary backup copiesassociated with that dataset.
After a dataset is deleted, allsecondary and tertiary backupcopies are orphaned. Neither theProtection Manager norSnapManager for SAP have theability to access those backupcopies. The backup copies canno longer be restored by usingSnapManager for SAP.
Note: The same warningmessage is displayed evenwhen the profile is notprotected.
This is a known issue inSnapManager for SAP andexpected behavior withinProtection Manager whendestroying a dataset. Thereis no workaround.
The orphaned backupsneed to be managedmanually.
Error messages associated with the restore process (3000 series)
The following table shows the common errors associated with the restore process:
Error message Explanation Resolution
SMSAP-03031:Restore
specification is required
to restore backup
<variable> because the
storage resources for the
backup has already been
freed.
You attempted to restore a backupthat has its storage resourcesfreed without specifying a restorespecification.
Specify a restorespecification.
340 | Administration Guide for UNIX
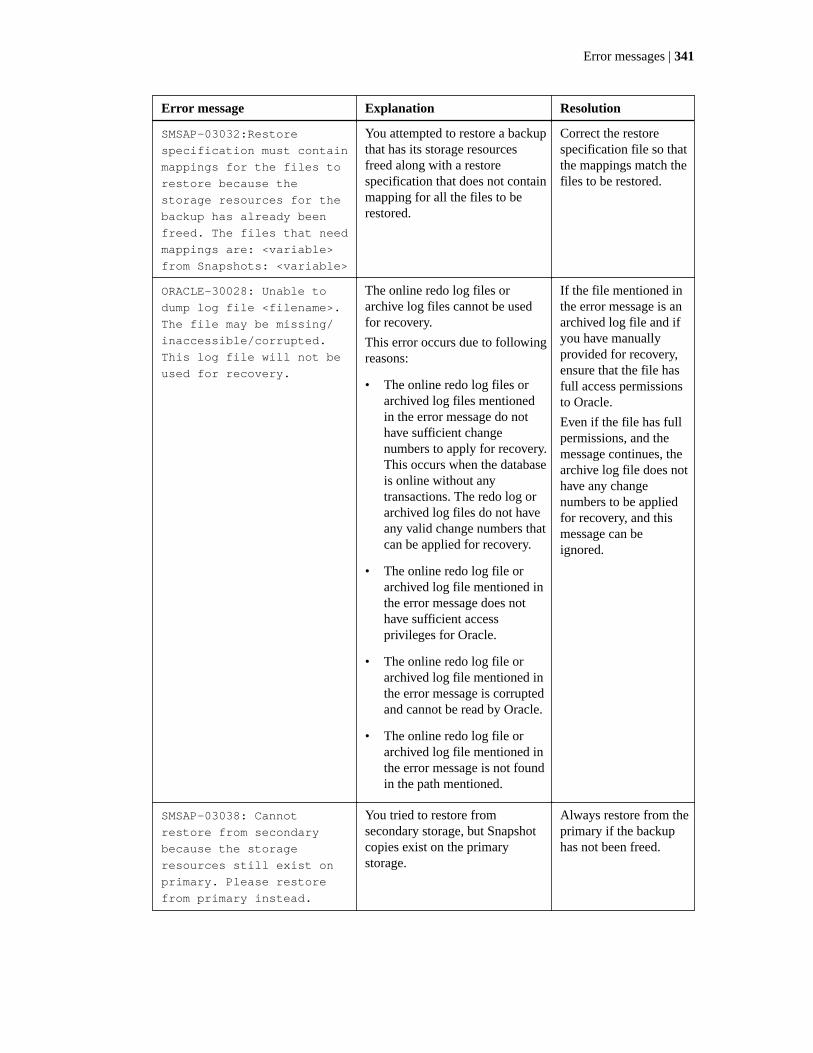
Error message Explanation Resolution
SMSAP-03032:Restore
specification must contain
mappings for the files to
restore because the
storage resources for the
backup has already been
freed. The files that need
mappings are: <variable>
from Snapshots: <variable>
You attempted to restore a backupthat has its storage resourcesfreed along with a restorespecification that does not containmapping for all the files to berestored.
Correct the restorespecification file so thatthe mappings match thefiles to be restored.
ORACLE-30028: Unable to
dump log file <filename>.
The file may be missing/
inaccessible/corrupted.
This log file will not be
used for recovery.
The online redo log files orarchive log files cannot be usedfor recovery.
This error occurs due to followingreasons:
• The online redo log files orarchived log files mentionedin the error message do nothave sufficient changenumbers to apply for recovery.This occurs when the databaseis online without anytransactions. The redo log orarchived log files do not haveany valid change numbers thatcan be applied for recovery.
• The online redo log file orarchived log file mentioned inthe error message does nothave sufficient accessprivileges for Oracle.
• The online redo log file orarchived log file mentioned inthe error message is corruptedand cannot be read by Oracle.
• The online redo log file orarchived log file mentioned inthe error message is not foundin the path mentioned.
If the file mentioned inthe error message is anarchived log file and ifyou have manuallyprovided for recovery,ensure that the file hasfull access permissionsto Oracle.
Even if the file has fullpermissions, and themessage continues, thearchive log file does nothave any changenumbers to be appliedfor recovery, and thismessage can beignored.
SMSAP-03038: Cannot
restore from secondary
because the storage
resources still exist on
primary. Please restore
from primary instead.
You tried to restore fromsecondary storage, but Snapshotcopies exist on the primarystorage.
Always restore from theprimary if the backuphas not been freed.
Error messages | 341
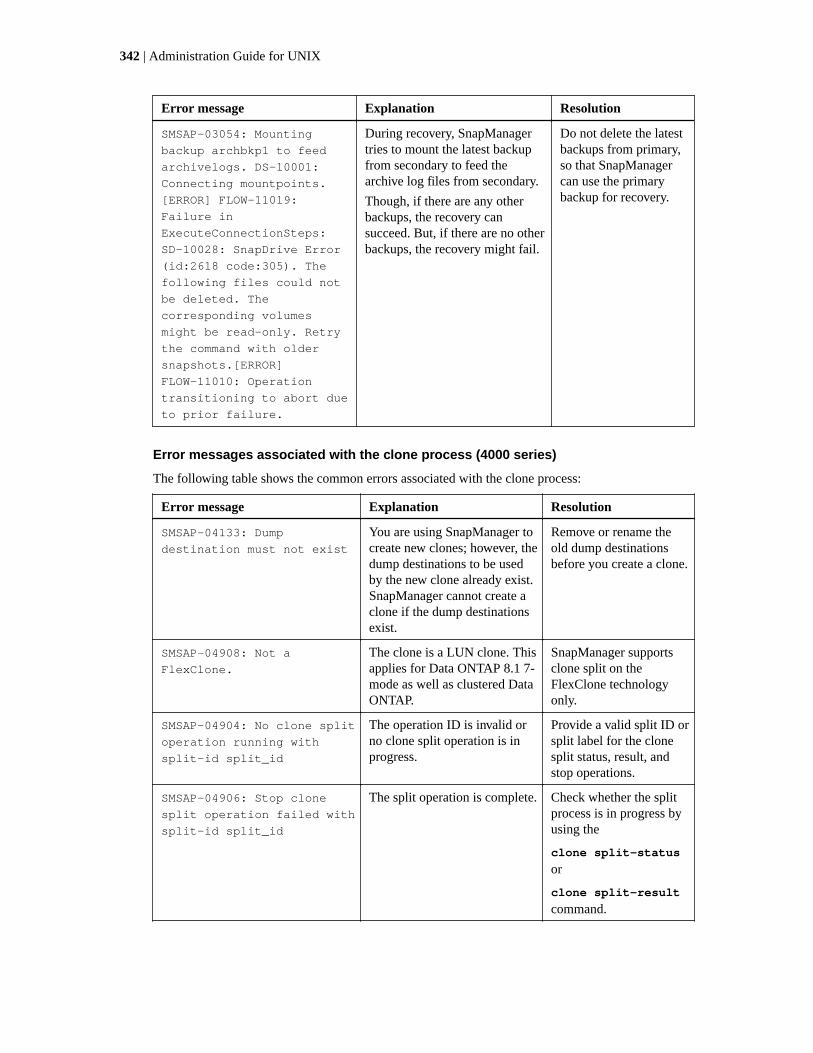
Error message Explanation Resolution
SMSAP-03054: Mounting
backup archbkp1 to feed
archivelogs. DS-10001:
Connecting mountpoints.
[ERROR] FLOW-11019:
Failure in
ExecuteConnectionSteps:
SD-10028: SnapDrive Error
(id:2618 code:305). The
following files could not
be deleted. The
corresponding volumes
might be read-only. Retry
the command with older
snapshots.[ERROR]
FLOW-11010: Operation
transitioning to abort due
to prior failure.
During recovery, SnapManagertries to mount the latest backupfrom secondary to feed thearchive log files from secondary.
Though, if there are any otherbackups, the recovery cansucceed. But, if there are no otherbackups, the recovery might fail.
Do not delete the latestbackups from primary,so that SnapManagercan use the primarybackup for recovery.
Error messages associated with the clone process (4000 series)
The following table shows the common errors associated with the clone process:
Error message Explanation Resolution
SMSAP-04133: Dump
destination must not exist
You are using SnapManager tocreate new clones; however, thedump destinations to be usedby the new clone already exist.SnapManager cannot create aclone if the dump destinationsexist.
Remove or rename theold dump destinationsbefore you create a clone.
SMSAP-04908: Not a
FlexClone.
The clone is a LUN clone. Thisapplies for Data ONTAP 8.1 7-mode as well as clustered DataONTAP.
SnapManager supportsclone split on theFlexClone technologyonly.
SMSAP-04904: No clone split
operation running with
split-id split_id
The operation ID is invalid orno clone split operation is inprogress.
Provide a valid split ID orsplit label for the clonesplit status, result, andstop operations.
SMSAP-04906: Stop clone
split operation failed with
split-id split_id
The split operation is complete. Check whether the splitprocess is in progress byusing the
clone split-status
or
clone split-result
command.
342 | Administration Guide for UNIX
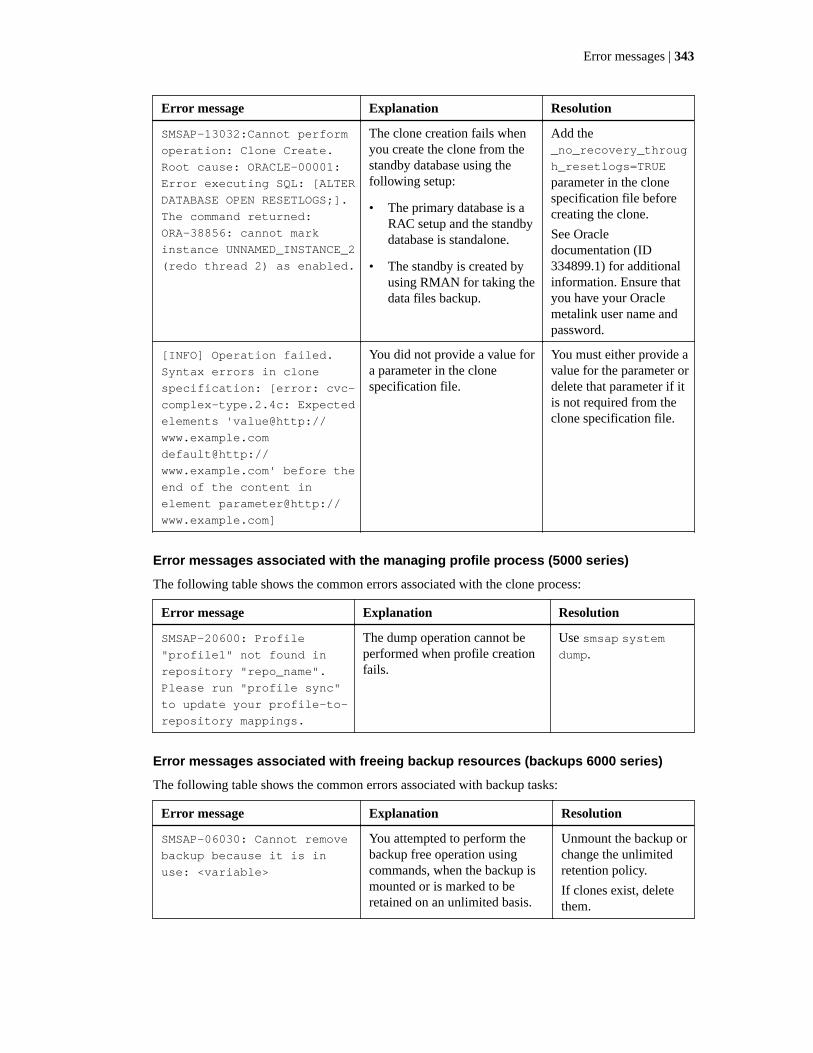
Error message Explanation Resolution
SMSAP-13032:Cannot perform
operation: Clone Create.
Root cause: ORACLE-00001:
Error executing SQL: [ALTER
DATABASE OPEN RESETLOGS;].
The command returned:
ORA-38856: cannot mark
instance UNNAMED_INSTANCE_2
(redo thread 2) as enabled.
The clone creation fails whenyou create the clone from thestandby database using thefollowing setup:
• The primary database is aRAC setup and the standbydatabase is standalone.
• The standby is created byusing RMAN for taking thedata files backup.
Add the_no_recovery_throug
h_resetlogs=TRUE
parameter in the clonespecification file beforecreating the clone.
See Oracledocumentation (ID334899.1) for additionalinformation. Ensure thatyou have your Oraclemetalink user name andpassword.
[INFO] Operation failed.
Syntax errors in clone
specification: [error: cvc-
complex-type.2.4c: Expected
elements 'value@http://
www.example.com
default@http://
www.example.com' before the
end of the content in
element parameter@http://
www.example.com]
You did not provide a value fora parameter in the clonespecification file.
You must either provide avalue for the parameter ordelete that parameter if itis not required from theclone specification file.
Error messages associated with the managing profile process (5000 series)
The following table shows the common errors associated with the clone process:
Error message Explanation Resolution
SMSAP-20600: Profile
"profile1" not found in
repository "repo_name".
Please run "profile sync"
to update your profile-to-
repository mappings.
The dump operation cannot beperformed when profile creationfails.
Use smsap systemdump.
Error messages associated with freeing backup resources (backups 6000 series)
The following table shows the common errors associated with backup tasks:
Error message Explanation Resolution
SMSAP-06030: Cannot remove
backup because it is in
use: <variable>
You attempted to perform thebackup free operation usingcommands, when the backup ismounted or is marked to beretained on an unlimited basis.
Unmount the backup orchange the unlimitedretention policy.
If clones exist, deletethem.
Error messages | 343
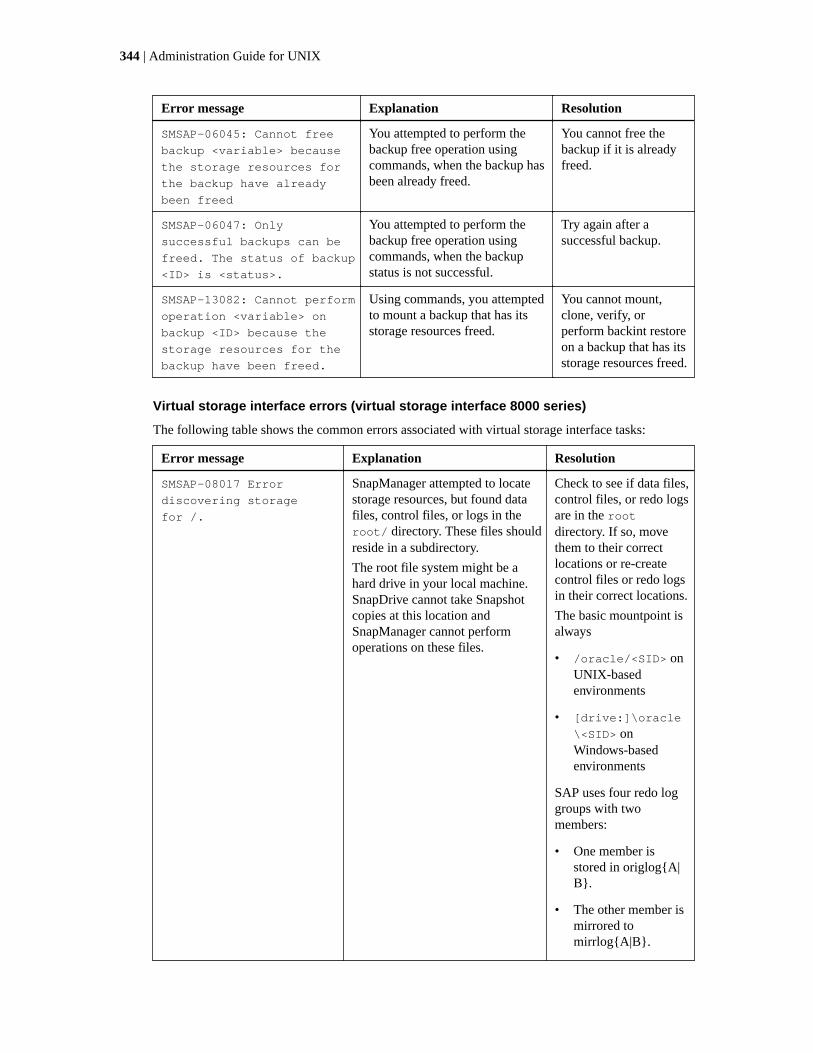
Error message Explanation Resolution
SMSAP-06045: Cannot free
backup <variable> because
the storage resources for
the backup have already
been freed
You attempted to perform thebackup free operation usingcommands, when the backup hasbeen already freed.
You cannot free thebackup if it is alreadyfreed.
SMSAP-06047: Only
successful backups can be
freed. The status of backup
<ID> is <status>.
You attempted to perform thebackup free operation usingcommands, when the backupstatus is not successful.
Try again after asuccessful backup.
SMSAP-13082: Cannot perform
operation <variable> on
backup <ID> because the
storage resources for the
backup have been freed.
Using commands, you attemptedto mount a backup that has itsstorage resources freed.
You cannot mount,clone, verify, orperform backint restoreon a backup that has itsstorage resources freed.
Virtual storage interface errors (virtual storage interface 8000 series)
The following table shows the common errors associated with virtual storage interface tasks:
Error message Explanation Resolution
SMSAP-08017 Error
discovering storage
for /.
SnapManager attempted to locatestorage resources, but found datafiles, control files, or logs in theroot/ directory. These files shouldreside in a subdirectory.
The root file system might be ahard drive in your local machine.SnapDrive cannot take Snapshotcopies at this location andSnapManager cannot performoperations on these files.
Check to see if data files,control files, or redo logsare in the rootdirectory. If so, movethem to their correctlocations or re-createcontrol files or redo logsin their correct locations.
The basic mountpoint isalways
• /oracle/<SID> onUNIX-basedenvironments
• [drive:]\oracle
\<SID> onWindows-basedenvironments
SAP uses four redo loggroups with twomembers:
• One member isstored in origlog{A|B}.
• The other member ismirrored tomirrlog{A|B}.
344 | Administration Guide for UNIX
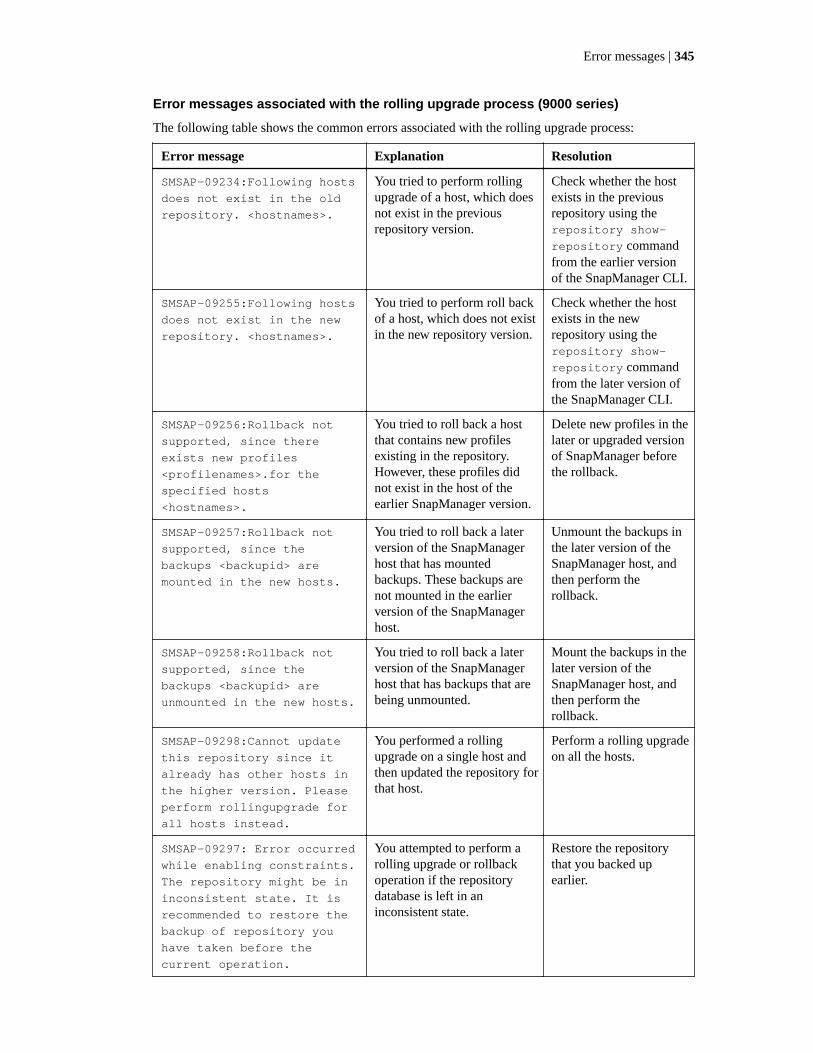
Error messages associated with the rolling upgrade process (9000 series)
The following table shows the common errors associated with the rolling upgrade process:
Error message Explanation Resolution
SMSAP-09234:Following hosts
does not exist in the old
repository. <hostnames>.
You tried to perform rollingupgrade of a host, which doesnot exist in the previousrepository version.
Check whether the hostexists in the previousrepository using therepository show-
repository commandfrom the earlier versionof the SnapManager CLI.
SMSAP-09255:Following hosts
does not exist in the new
repository. <hostnames>.
You tried to perform roll backof a host, which does not existin the new repository version.
Check whether the hostexists in the newrepository using therepository show-
repository commandfrom the later version ofthe SnapManager CLI.
SMSAP-09256:Rollback not
supported, since there
exists new profiles
<profilenames>.for the
specified hosts
<hostnames>.
You tried to roll back a hostthat contains new profilesexisting in the repository.However, these profiles didnot exist in the host of theearlier SnapManager version.
Delete new profiles in thelater or upgraded versionof SnapManager beforethe rollback.
SMSAP-09257:Rollback not
supported, since the
backups <backupid> are
mounted in the new hosts.
You tried to roll back a laterversion of the SnapManagerhost that has mountedbackups. These backups arenot mounted in the earlierversion of the SnapManagerhost.
Unmount the backups inthe later version of theSnapManager host, andthen perform therollback.
SMSAP-09258:Rollback not
supported, since the
backups <backupid> are
unmounted in the new hosts.
You tried to roll back a laterversion of the SnapManagerhost that has backups that arebeing unmounted.
Mount the backups in thelater version of theSnapManager host, andthen perform therollback.
SMSAP-09298:Cannot update
this repository since it
already has other hosts in
the higher version. Please
perform rollingupgrade for
all hosts instead.
You performed a rollingupgrade on a single host andthen updated the repository forthat host.
Perform a rolling upgradeon all the hosts.
SMSAP-09297: Error occurred
while enabling constraints.
The repository might be in
inconsistent state. It is
recommended to restore the
backup of repository you
have taken before the
current operation.
You attempted to perform arolling upgrade or rollbackoperation if the repositorydatabase is left in aninconsistent state.
Restore the repositorythat you backed upearlier.
Error messages | 345
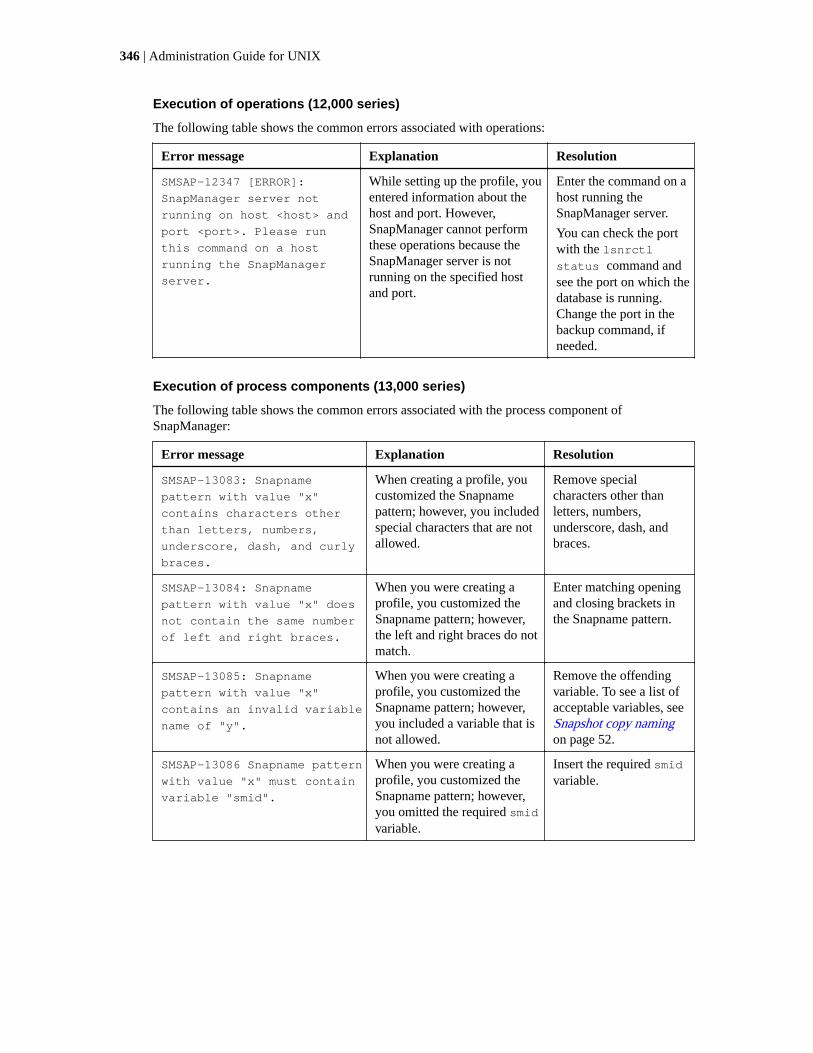
Execution of operations (12,000 series)
The following table shows the common errors associated with operations:
Error message Explanation Resolution
SMSAP-12347 [ERROR]:
SnapManager server not
running on host <host> and
port <port>. Please run
this command on a host
running the SnapManager
server.
While setting up the profile, youentered information about thehost and port. However,SnapManager cannot performthese operations because theSnapManager server is notrunning on the specified hostand port.
Enter the command on ahost running theSnapManager server.
You can check the portwith the lsnrctlstatus command andsee the port on which thedatabase is running.Change the port in thebackup command, ifneeded.
Execution of process components (13,000 series)
The following table shows the common errors associated with the process component ofSnapManager:
Error message Explanation Resolution
SMSAP-13083: Snapname
pattern with value "x"
contains characters other
than letters, numbers,
underscore, dash, and curly
braces.
When creating a profile, youcustomized the Snapnamepattern; however, you includedspecial characters that are notallowed.
Remove specialcharacters other thanletters, numbers,underscore, dash, andbraces.
SMSAP-13084: Snapname
pattern with value "x" does
not contain the same number
of left and right braces.
When you were creating aprofile, you customized theSnapname pattern; however,the left and right braces do notmatch.
Enter matching openingand closing brackets inthe Snapname pattern.
SMSAP-13085: Snapname
pattern with value "x"
contains an invalid variable
name of "y".
When you were creating aprofile, you customized theSnapname pattern; however,you included a variable that isnot allowed.
Remove the offendingvariable. To see a list ofacceptable variables, see Snapshot copy namingon page 52.
SMSAP-13086 Snapname pattern
with value "x" must contain
variable "smid".
When you were creating aprofile, you customized theSnapname pattern; however,you omitted the required smidvariable.
Insert the required smidvariable.
346 | Administration Guide for UNIX
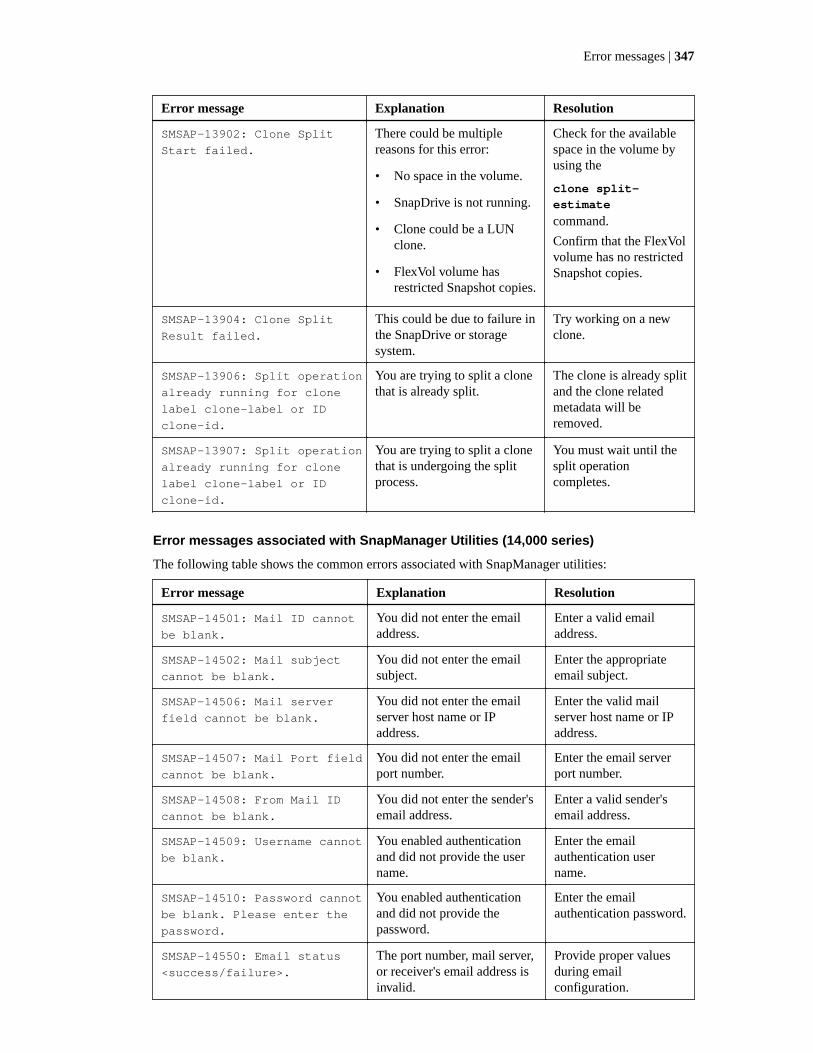
Error message Explanation Resolution
SMSAP-13902: Clone Split
Start failed.
There could be multiplereasons for this error:
• No space in the volume.
• SnapDrive is not running.
• Clone could be a LUNclone.
• FlexVol volume hasrestricted Snapshot copies.
Check for the availablespace in the volume byusing the
clone split-
estimate
command.
Confirm that the FlexVolvolume has no restrictedSnapshot copies.
SMSAP-13904: Clone Split
Result failed.
This could be due to failure inthe SnapDrive or storagesystem.
Try working on a newclone.
SMSAP-13906: Split operation
already running for clone
label clone-label or ID
clone-id.
You are trying to split a clonethat is already split.
The clone is already splitand the clone relatedmetadata will beremoved.
SMSAP-13907: Split operation
already running for clone
label clone-label or ID
clone-id.
You are trying to split a clonethat is undergoing the splitprocess.
You must wait until thesplit operationcompletes.
Error messages associated with SnapManager Utilities (14,000 series)
The following table shows the common errors associated with SnapManager utilities:
Error message Explanation Resolution
SMSAP-14501: Mail ID cannot
be blank.
You did not enter the emailaddress.
Enter a valid emailaddress.
SMSAP-14502: Mail subject
cannot be blank.
You did not enter the emailsubject.
Enter the appropriateemail subject.
SMSAP-14506: Mail server
field cannot be blank.
You did not enter the emailserver host name or IPaddress.
Enter the valid mailserver host name or IPaddress.
SMSAP-14507: Mail Port field
cannot be blank.
You did not enter the emailport number.
Enter the email serverport number.
SMSAP-14508: From Mail ID
cannot be blank.
You did not enter the sender'semail address.
Enter a valid sender'semail address.
SMSAP-14509: Username cannot
be blank.
You enabled authenticationand did not provide the username.
Enter the emailauthentication username.
SMSAP-14510: Password cannot
be blank. Please enter the
password.
You enabled authenticationand did not provide thepassword.
Enter the emailauthentication password.
SMSAP-14550: Email status
<success/failure>.
The port number, mail server,or receiver's email address isinvalid.
Provide proper valuesduring emailconfiguration.
Error messages | 347
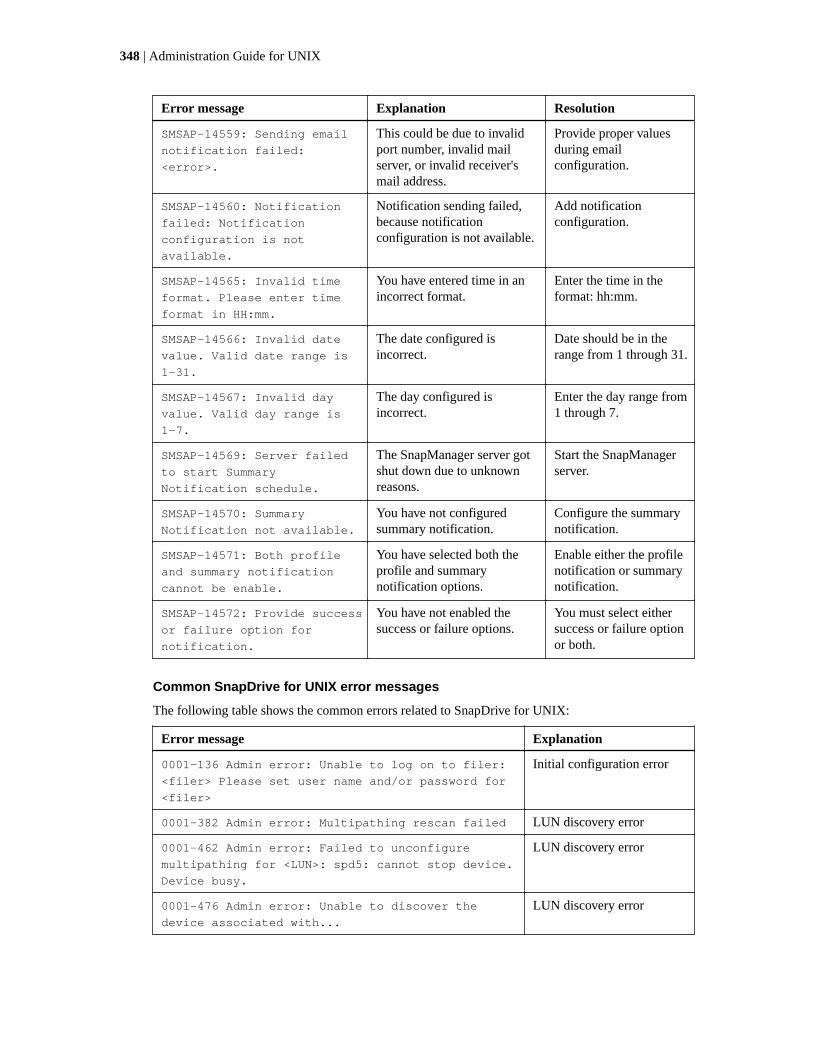
Error message Explanation Resolution
SMSAP-14559: Sending email
notification failed:
<error>.
This could be due to invalidport number, invalid mailserver, or invalid receiver'smail address.
Provide proper valuesduring emailconfiguration.
SMSAP-14560: Notification
failed: Notification
configuration is not
available.
Notification sending failed,because notificationconfiguration is not available.
Add notificationconfiguration.
SMSAP-14565: Invalid time
format. Please enter time
format in HH:mm.
You have entered time in anincorrect format.
Enter the time in theformat: hh:mm.
SMSAP-14566: Invalid date
value. Valid date range is
1-31.
The date configured isincorrect.
Date should be in therange from 1 through 31.
SMSAP-14567: Invalid day
value. Valid day range is
1-7.
The day configured isincorrect.
Enter the day range from1 through 7.
SMSAP-14569: Server failed
to start Summary
Notification schedule.
The SnapManager server gotshut down due to unknownreasons.
Start the SnapManagerserver.
SMSAP-14570: Summary
Notification not available.
You have not configuredsummary notification.
Configure the summarynotification.
SMSAP-14571: Both profile
and summary notification
cannot be enable.
You have selected both theprofile and summarynotification options.
Enable either the profilenotification or summarynotification.
SMSAP-14572: Provide success
or failure option for
notification.
You have not enabled thesuccess or failure options.
You must select eithersuccess or failure optionor both.
Common SnapDrive for UNIX error messages
The following table shows the common errors related to SnapDrive for UNIX:
Error message Explanation
0001-136 Admin error: Unable to log on to filer:
<filer> Please set user name and/or password for
<filer>
Initial configuration error
0001-382 Admin error: Multipathing rescan failed LUN discovery error
0001-462 Admin error: Failed to unconfigure
multipathing for <LUN>: spd5: cannot stop device.
Device busy.
LUN discovery error
0001-476 Admin error: Unable to discover the
device associated with...
LUN discovery error
348 | Administration Guide for UNIX
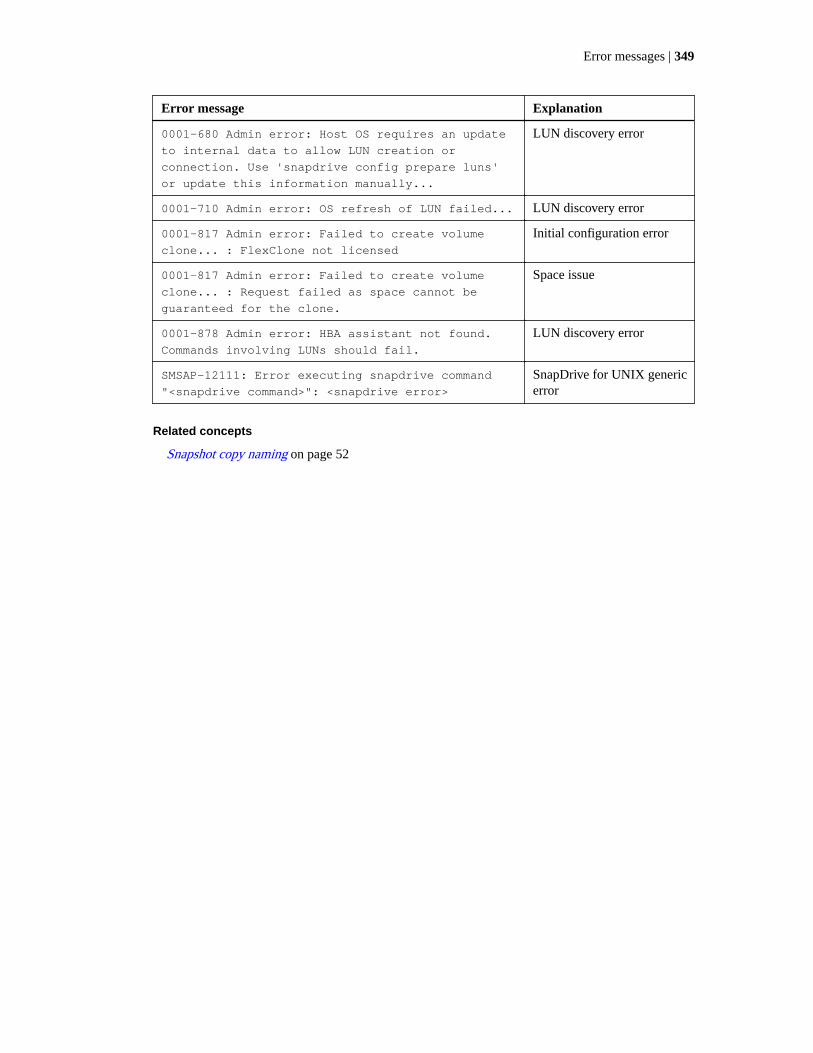
Error message Explanation
0001-680 Admin error: Host OS requires an update
to internal data to allow LUN creation or
connection. Use 'snapdrive config prepare luns'
or update this information manually...
LUN discovery error
0001-710 Admin error: OS refresh of LUN failed... LUN discovery error
0001-817 Admin error: Failed to create volume
clone... : FlexClone not licensed
Initial configuration error
0001-817 Admin error: Failed to create volume
clone... : Request failed as space cannot be
guaranteed for the clone.
Space issue
0001-878 Admin error: HBA assistant not found.
Commands involving LUNs should fail.
LUN discovery error
SMSAP-12111: Error executing snapdrive command
"<snapdrive command>": <snapdrive error>
SnapDrive for UNIX genericerror
Related concepts
Snapshot copy naming on page 52
Error messages | 349
Copyright information
Copyright © 1994–2017 NetApp, Inc. All rights reserved. Printed in the U.S.
No part of this document covered by copyright may be reproduced in any form or by any means—graphic, electronic, or mechanical, including photocopying, recording, taping, or storage in anelectronic retrieval system—without prior written permission of the copyright owner.
Software derived from copyrighted NetApp material is subject to the following license anddisclaimer:
THIS SOFTWARE IS PROVIDED BY NETAPP "AS IS" AND WITHOUT ANY EXPRESS ORIMPLIED WARRANTIES, INCLUDING, BUT NOT LIMITED TO, THE IMPLIEDWARRANTIES OF MERCHANTABILITY AND FITNESS FOR A PARTICULAR PURPOSE,WHICH ARE HEREBY DISCLAIMED. IN NO EVENT SHALL NETAPP BE LIABLE FOR ANYDIRECT, INDIRECT, INCIDENTAL, SPECIAL, EXEMPLARY, OR CONSEQUENTIALDAMAGES (INCLUDING, BUT NOT LIMITED TO, PROCUREMENT OF SUBSTITUTEGOODS OR SERVICES; LOSS OF USE, DATA, OR PROFITS; OR BUSINESS INTERRUPTION)HOWEVER CAUSED AND ON ANY THEORY OF LIABILITY, WHETHER IN CONTRACT,STRICT LIABILITY, OR TORT (INCLUDING NEGLIGENCE OR OTHERWISE) ARISING INANY WAY OUT OF THE USE OF THIS SOFTWARE, EVEN IF ADVISED OF THEPOSSIBILITY OF SUCH DAMAGE.
NetApp reserves the right to change any products described herein at any time, and without notice.NetApp assumes no responsibility or liability arising from the use of products described herein,except as expressly agreed to in writing by NetApp. The use or purchase of this product does notconvey a license under any patent rights, trademark rights, or any other intellectual property rights ofNetApp.
The product described in this manual may be protected by one or more U.S. patents, foreign patents,or pending applications.
RESTRICTED RIGHTS LEGEND: Use, duplication, or disclosure by the government is subject torestrictions as set forth in subparagraph (c)(1)(ii) of the Rights in Technical Data and ComputerSoftware clause at DFARS 252.277-7103 (October 1988) and FAR 52-227-19 (June 1987).
350
Trademark information
Active IQ, AltaVault, Arch Design, ASUP, AutoSupport, Campaign Express, Clustered Data ONTAP,Customer Fitness, Data ONTAP, DataMotion, Element, Fitness, Flash Accel, Flash Cache, FlashPool, FlexArray, FlexCache, FlexClone, FlexPod, FlexScale, FlexShare, FlexVol, FPolicy, Fueled bySolidFire, GetSuccessful, Helix Design, LockVault, Manage ONTAP, MetroCluster, MultiStore,NetApp, NetApp Insight, OnCommand, ONTAP, ONTAPI, RAID DP, RAID-TEC, SANscreen,SANshare, SANtricity, SecureShare, Simplicity, Simulate ONTAP, Snap Creator, SnapCenter,SnapCopy, SnapDrive, SnapIntegrator, SnapLock, SnapManager, SnapMirror, SnapMover,SnapProtect, SnapRestore, Snapshot, SnapValidator, SnapVault, SolidFire, SolidFire Helix,StorageGRID, SyncMirror, Tech OnTap, Unbound Cloud, and WAFL and other names aretrademarks or registered trademarks of NetApp, Inc., in the United States, and/or other countries. Allother brands or products are trademarks or registered trademarks of their respective holders andshould be treated as such. A current list of NetApp trademarks is available on the web.
http://www.netapp.com/us/legal/netapptmlist.aspx
351
How to send comments about documentation andreceive update notifications
You can help us to improve the quality of our documentation by sending us your feedback. You canreceive automatic notification when production-level (GA/FCS) documentation is initially released orimportant changes are made to existing production-level documents.
If you have suggestions for improving this document, send us your comments by email.
To help us direct your comments to the correct division, include in the subject line the product name,version, and operating system.
If you want to be notified automatically when production-level documentation is released orimportant changes are made to existing production-level documents, follow Twitter account@NetAppDoc.
You can also contact us in the following ways:
• NetApp, Inc., 495 East Java Drive, Sunnyvale, CA 94089 U.S.
• Telephone: +1 (408) 822-6000
• Fax: +1 (408) 822-4501
• Support telephone: +1 (888) 463-8277
352
Index
A
active/active SFRAC environmentconfiguring SnapDrive 34
archive logpruning 78
archive log backupsprotecting 79
archive log file handling 66archive log files
pruning 12archive logs
consolidating 12authentication
about 36overview 36profiles 46
AutoSupportclustered Data ONTAP 80description 80disabling 81enabling 80enabling in SnapManager 81understanding 80
B
BACKINT interfacebackup utility file 206guidelines for when you can use for fast restore 98
backint register-sldcommand 212
backupexamples 64restoring 165restoring from secondary storage 211Snapshot copies 62type 62using prescript and post-scripts 194verifying 82
backup create commandman page 215
backup deletecommand 219
backup freecommand 220
backup listcommand 221
backup mountcommand 222
backup restorecommand 224
backup schedulecreating 90
backup schedulesrelated tasks 90
backup showcommand 228
backup unmount
command 229backup update
command 230backup verify
command 231backups
about protection policies 136about restoring 95cloning 119cloning protected 150control and archive log files 66creating 70enabling protection to secondary storage 141freeing 87full and partial 62guidelines for when you can use fast restore for 98local 156mounting 86on primary storage 11on secondary systems 11protection states 137restoring 149restoring from alternate location 115restoring from primary storage 111restoring from secondary storage 147retention policy 142scheduling 90unmounting 86viewing details 84what you can back up 11
backups createdfor a profile 84
backups, databasescloning 13
BR*Toolscloning 119cloning options 13overview 203specifying the profile 206
BRRESTOREguidelines for when you can use for fast restore 98
C
clonedeleting 131splitting 132using prescript and post-scripts 194
clone deletecommand 235
clone informationviewing 130
clone showcommand 237
clone specificationscreating 121
clone splitcommand 242
clones, database backups
Index | 353
creating 13cloning
about 119backups 119BR*Tools 119creating clone specifications 121database in current state 127database uses an spfile 119databases from backups 126entering comments 119files created 119prerequisites 119protected backups 150RAC databases 119sample plugin scripts 187using custom plug-in scripts 125variables in custom plugin scripts 186
cloning backupwithout resetlogs 127
cloning databasealternate host 128requirements 128
clustered Data ONTAPlimitations 26
cmdfilecommand 248
collectdump files 309
commandbackint register-sld 212backup delete 219backup free 220backup list 221backup mount 222backup restore 224backup show 228backup unmount 229backup update 230backup verify 231clone create 232clone delete 235clone detach 247clone show 237clone split 242cmdfile 248help 259history set 257notification set 262notification update-summary-notification 261operation dump 263operation show 265password reset 266plugin check 267profile create 268profile delete 272profile dump 273profile show 275profile update 277profile verify 281protection-policy 283smsap_server status 214storage list 296storage rename
command 297system dump 298version 299
commandsbackup create man page 215reference to all 212schedule create man page 290
commentshow to send feedback about documentation 352
configurationfor protecting backups 156
configuration parametersediting 34SnapManager 28
configure SnapDrivedata protection 139
considerationfor data protection 144
control file handling 66create
policy script 179post-task script 179pretask script 179
create clonecommand 232
create detachcommand 247
create protected data backupof the database on the secondary storage 141
creatingdatabase backups 70profiles 47, 156
creating backupsBRARCHIVE 208BRBACKUP 208
credentialsclearing 43deleting 44overview of tasks and components 36setting 44viewing 43
credentials, userrole of, security purposes 16
customizingemail subject 175
D
data protectionconfigure SnapDrive 139consideration 144enabling in profile 139introducing 136using protection manager 151
databasebacking up 60cloning in current state 127sample volume layouts 21
database backupsabout 61tasks you can perform related to restoring andrecovering data 95
database layouts and platforms 21
354 | Administration Guide for UNIX
database profiles 14database protection
using Protection Manager 146database requirements
for NFS and SnapManager 20database volume layouts
sample 21databases
about backing up 61about restoring 95backing up 70cloning 119cloning from backups 126cloning using custom plug-in scripts 125creating backups 70disk group requirements 27Oracle, deprecated versions 27RAC 119recommended general layouts and storageconfigurations for 18requirements for using with NFS and SnapManager20restoring from alternate location 115restoring from primary storage 111restoring from secondary storage 147setting Oracle home directory 19
databases, fullrestore operations for 12
databases, partialrestore operations for 12
deletebackup
deleting 88clone 131profile 135Snapshot copies 87
direct storage connection method 95disabling
data protection in profile 141disk groups
recommended general database layouts and storageconfigurations 18requirements 27
documentationhow to receive automatic notification of changes to352how to send feedback about 352where to find it 327
dump filescollecting 309creating 307information 305locating 308operation level 307profile level 307system-level 308
E
email notificationconfiguring 170configuring for existing profile 174configuring for new profile 172
disabling 177email subject
customizing 173, 175enabling
data protection in profile 141encrypted passwords
storing 42error messages
classifications 328handling in custom cloning plugin scripts 186levels 212SnapManager 329
F
fast restore operationsguidelines for when you can use 98
feedbackhow to send comments about documentation 352
FlexClonesplitting a clone 132
full databasesrestore operations for 12
G
graphical user interfacetroubleshooting 313
GUItroubleshooting 313
H
help, onlineaccessing 17
historySnapManager operations 200
history setcommand 257
I
indirect storage connection method 95information
how to send feedback about improvingdocumentation 352in dump files 305
interfacesCLI 11UI 11
L
licensesdata protection
licenses required 145for data protection 145
limitationsarchive logs 21backup 21CLI and GUI 21
Index | 355
cloning 21clustered Data ONTAP 26Data Guard Standby databases 21database layouts and platforms 21installation and configuration 21profile 21restore 21rolling upgrade 21
log spacehow to free for archiving 12
logs, archiveconsolidating 12
M
mountingbackups 86
multiple operationsfail 326
N
NFSrequirements for using databases with 20
notification emailsconfiguring for multiple profiles 175
notification setcommand 262
notification update-summary-notificationcommand 261
O
online helpaccessing 17
operation dumpcommand 263
operation showcommand 265
operation statusconfiguring alerts 172, 174
operation-level dump files 307operations history
for a profile 201maintaining 200viewing 201
Operations Managersetting up role-based access control 39
operations, stateslist of 15what they are 15what they mean 15
operations, statusmethods for monitoring 13
Oraclelimitations 26setting home directory 19versions supported 26
Oracle 9ideprecated versions 27
overviewof SnapManager for SAP 11
P
parameters, configurationSnapManager 28
partial databasesrestore operations for 12
partition devices, supportedlist of 20
password resetcommand 266
plug-in scriptssamples 187verifying installation 192
plugin checkbackup 267clone 267command 267restore 267
policiesprotection 138
previewrestore information 108
product supportwhere to find more information 327
profileaccessing 42, 55deleting 135renaming 53
profile createcommand 268
profile deletecommand 272
profile passwordforgot 54resetting 54setting 42, 55
profile showcommand 275
profile updatecommand 277
profile verifycommand 281
profile-level dump files 307profiles
authentication 46creating 47, 156deleting 58host 156managing 46overview 46protection policy descriptions 138Snapshot copy naming patterns and variables 52updating properties 55verifying 55
profiles, databaseswhat they are 14
propertiesupdating profiles 55viewing backups 84
protectdatabase backup 146
protected backupsabout protection policies 136
356 | Administration Guide for UNIX
cloning 150protection policy descriptions 138protection states 137
protectingarchive log backups 79
protecting database backupson secondary storage 146on tertiary storage 146
protection-policycommand 283
prunearchive log
pruning 76
R
RAC databasescloning 119requirements with SnapManager 19
RBACabout authentication 36enabling in SnapDrive 38overview of tasks and components 36setting up in Operations Manager 39See also role-based access control
recoverexamples 64
recovery operationstasks you can perform related to database backups 95
renamingprofile 53
renaming the storage systemissues 319
repositorieswhat they are 13
repositoryaccessing 42
repository credentialssetting 42
resettingprofile password 54
resource poolsabout 137
restoreexamples 64from alternate location 115overview 148using prescript and post-scripts 194
restore datafrom file systems 116
restore operationsof full databases 12of partial databases 12tasks you can perform related to database backups 95
restore planpreview
reviewanalysis 106
restore specificationscreating 116
restoringbackups from secondary storage 149local backup 165
using BRRECOVER 210using BRRESTORE 210using SFSR 110using Single File SnapRestore 110
restoring backupsabout 95about file-based restores 95about volume-based restores 95, 109advantages for fast, volume-based restore 99connection method setting in configuration file 95eligibility checks 100from alternate location 115, 118from an alternate location 116from primary storage 111from secondary storage 147partial file snap restore (PFSR) 95preview restore information 108single file snap restore (SFSR) 95specifications 116
retentionbackups to retain 142classes 61
retention classesabout 61daily 142hourly 142monthly 142profile 142weekly 142
retention policychanging
retention policy 83example 142
role-based access controlabout 16, 37about authentication 36enabling in SnapDrive 38overview of tasks and components 36setting up in Operations Manager 39
S
SAPrecommended general database layouts and storageconfigurations for 18
schedule create commandman page 290
schedulingarchive log pruning 78
secondary resource poolconfiguring with Protection Manager 158
secondary storageabout protection policies 136backup protection 146enabling backup protection 141protected backup 141protection states 137restoring backups from 149
securityabout role-based access control 37clearing user credentials 43credentials 16deleting user credentials 44
Index | 357
enabling role-based access control in SnapDrive 38overview of tasks and components 36user authentication 16viewing user credentials 43
SFSRrestoring backups 110
SIDsused with clones 119
Single File SnapRestorerestoring backups 110
smsap_server statuscommand 214
SnapDriveconfiguring 34configuring when RBAC enabled 139configuring when RBAC not enabled 140enabling role-based access control 38troubleshooting 318
SnapManagerBACKINT interface 206data protection in 136debugging 309error messages 329general information 327how it maintains security 16log levels 309product support information 327troubleshooting 300with RAC databases 19
SnapManager for SAPconfiguring 28highlights and benefits of 11overview of 11
SnapManager known issuestroubleshooting 320
SnapManager operationshistory 200
SnapManager serverstarting 169
Snapshot copiesdescription of 11
Snapshot copy naming patterns 52spfile in database, cloning 119splitting
clone 132, 133splitting clone
on primary storage 133on secondary storage 133
storage configurationsrecommended general database layouts and 18
storage listcommand 296
storage system nameupdating 196
storage systemsadding to the SnapManager server host 80
storingencrypted passwords 42
suggestionshow to send feedback about documentation 352
summary notificationadding existing profile 177adding new profile 176
configuring 175system dump
command 298system-level dump files 308
T
target database host nameupdating 198
task scriptsoperations 182storing 191variables for backup operation 183variables for restore operation 185
task specification filecreating 192
troubleshootingclones 310graphical user interface 313GUI 313renaming storage system issues 319SnapDrive 318SnapManager 300SnapManager known issues 320
Twitterhow to receive automatic notification ofdocumentation changes 352
U
unmountbackup 86
updatedatabase host name 196storage system name 196
updatingtarget database host name 198
user accessauthorizing 42, 55
user authenticationrole of, security purposes 16understanding 36
user credentialsrole of, security purposes 16
V
variables for backup operationin task scripts 183
variables for restore operationin task scripts 185
verifyingbackups 82profile setup 55
veritas SFRACconfiguring 35
versioncommand 299
viewclone information 130list of backups 84
volume requirements 27
358 | Administration Guide for UNIX

volume-based restoreabout 109advantages and disadvantages 99eligibility checks 100from primary storage 111
from secondary storage 147volume-based restore operations
guidelines for when you can use BACKINT interfacefor 98
VserversSee SVMs
Index | 359