sams teach yourself html, css, and javascript all in one - igem
TRANSCRIPT


ptg999
800 East 96th Street, Indianapolis, Indiana, 46240 USA
Julie C. Meloni
SamsTeachYourself
HTML, CSSand JavaScript
AllinOne
www.it-ebooks.info

ptg999
Sams Teach Yourself HTML, CSS, and JavaScript All in One
Copyright © 2012 by Pearson Education, Inc.All rights reserved. No part of this book shall be reproduced, stored in a retrieval system,or transmitted by any means, electronic, mechanical, photocopying, recording, or other-wise, without written permission from the publisher. No patent liability is assumed withrespect to the use of the information contained herein. Although every precaution hasbeen taken in the preparation of this book, the publisher and author assume no responsi-bility for errors or omissions. Nor is any liability assumed for damages resulting from theuse of the information contained herein.
ISBN-13: 978-0-672-33332-3ISBN-10: 0-672-33332-5
Library of Congress Cataloging-in-Publication data is on file.
First Printing November 2011
TrademarksAll terms mentioned in this book that are known to be trademarks or service marks havebeen appropriately capitalized. Sams Publishing cannot attest to the accuracy of thisinformation. Use of a term in this book should not be regarded as affecting the validity ofany trademark or service mark.
Warning and DisclaimerEvery effort has been made to make this book as complete and as accurate as possible,but no warranty or fitness is implied. The information provided is on an “as is” basis. Theauthor and the publisher shall have neither liability nor responsibility to any person orentity with respect to any loss or damages arising from the information contained in thisbook or programs accompanying it.
Bulk SalesSams Publishing offers excellent discounts on this book when ordered in quantity for bulkpurchases or special sales. For more information, please contact
U.S. Corporate and Government [email protected]
For sales outside of the U.S., please contact
International [email protected]
Acquisitions Editor
Mark Taber
Development Editor
Songlin Qiu
Managing Editor
Sandra Schroeder
Project Editor
Seth Kerney
Copy Editor
Mike Henry
Indexer
Ken Johnson
Proofreader
Jovana San Nicolas-
Shirley
Technical Editor
Phil Ballard
Publishing Coordinator
Cindy Teeters
Book Designer
Gary Adair
Compositor
Trina Wurst
www.it-ebooks.info

ptg999
Contents at a Glance
PART I: Getting Started on the Web CHAPTER 1: Publishing Web ContentCHAPTER 2: Understanding HTML and XHTML
ConnectionsCHAPTER 3: Understanding Cascading Style
SheetsCHAPTER 4: Understanding JavaScript
PART II: Building Blocks of PracticalWeb Design
CHAPTER 5: Working with Fonts, Text Blocks, andLists
CHAPTER 6: Using Tables to Display InformationCHAPTER 7: Using External and Internal LinksCHAPTER 8: Working with Colors, Images, and
Multimedia
PART III: Advanced Web Page Designwith CSS
CHAPTER 9: Working with Margins, Padding,Alignment, and Floating
CHAPTER 10: Understanding the CSS Box Modeland Positioning
CHAPTER 11: Using CSS to Do More with Lists,Text, and Navigation
CHAPTER 12: Creating Fixed or Liquid Layouts
PART IV: Getting Started with DynamicWeb Sites
CHAPTER 13: Understanding Dynamic WebsitesCHAPTER 14: Getting Started with JavaScript
ProgrammingCHAPTER 15: Working with the Document Object
Model (DOM)CHAPTER 16: Using JavaScript Variables, Strings,
and ArraysCHAPTER 17: Using JavaScript Functions and
ObjectsCHAPTER 18: Controlling Flow with Conditions
and LoopsCHAPTER 19: Responding to EventsCHAPTER 20: Using Windows and Frames
PART V: Advanced JavaScriptProgramming
CHAPTER 21: Using Unobtrusive JavaScriptCHAPTER 22: Using Third-Party LibrariesCHAPTER 23: Greasemonkey: Enhancing the Web
with JavaScriptCHAPTER 24: AJAX: Remote Scripting
PART VI: Advanced WebsiteFunctionality and Management
CHAPTER 25: Creating Print-Friendly Web PagesCHAPTER 26: Working with Web-Based FormsCHAPTER 27: Organizing and Managing a
WebsiteCHAPTER 28: Helping People Find Your WebPagesIndex
www.it-ebooks.info

ptg999
Table of ContentsCHAPTER 1: Publishing Web Content 1A Brief History of HTML and the World Wide Web . . . . . . . . . . . . . . . . . . . . . . . . . . . . . . . . . . . . . . . . . . . . . . . . . . . . 1Creating Web Content . . . . . . . . . . . . . . . . . . . . . . . . . . . . . . . . . . . . 2Understanding Web Content Delivery . . . . . . . . . . . . . . . . 3Selecting a Web Hosting Provider . . . . . . . . . . . . . . . . . . . . 6Testing with Multiple Web Browsers. . . . . . . . . . . . . . . . . . 8Creating a Sample File . . . . . . . . . . . . . . . . . . . . . . . . . . . . . . . . . . 9Using FTP to Transfer Files . . . . . . . . . . . . . . . . . . . . . . . . . . . . 10Distributing Content Without a Web Server . . . . . . 18Tips for Testing Web Content . . . . . . . . . . . . . . . . . . . . . . . . 19
CHAPTER 2: Understanding HTML and XHTML Connections 25
Getting Prepared . . . . . . . . . . . . . . . . . . . . . . . . . . . . . . . . . . . . . . . . 25Getting Started with a Simple Web Page . . . . . . . . 26HTML Tags Every XHTML Web Page Must Have . . 29Organizing a Page with Paragraphs and LineBreaks . . . . . . . . . . . . . . . . . . . . . . . . . . . . . . . . . . . . . . . . . . . . . . . . . . . . . . 31Organizing Your Content with Headings . . . . . . . . . . 34Validating Your Web Content . . . . . . . . . . . . . . . . . . . . . . . . . . 36The Scoop on HTML, XML, XHTML, and HTML5 . . 38
CHAPTER 3: Understanding Cascading StyleSheets 45
How CSS Works . . . . . . . . . . . . . . . . . . . . . . . . . . . . . . . . . . . . . . . . . . 46A Basic Style Sheet . . . . . . . . . . . . . . . . . . . . . . . . . . . . . . . . . . . . 47A CSS Style Primer . . . . . . . . . . . . . . . . . . . . . . . . . . . . . . . . . . . . . . 52Using Style Classes . . . . . . . . . . . . . . . . . . . . . . . . . . . . . . . . . . . . 57Using Style IDs. . . . . . . . . . . . . . . . . . . . . . . . . . . . . . . . . . . . . . . . . . . . 59Internal Style Sheets and Inline Styles . . . . . . . . . . . . 59
CHAPTER 4: Understanding JavaScript 65Learning Web Scripting Basics . . . . . . . . . . . . . . . . . . . . . . 65How JavaScript Fits into a Web Page . . . . . . . . . . . . . . 67Exploring JavaScript’s Capabilities . . . . . . . . . . . . . . . . . . 70Displaying Time with JavaScript. . . . . . . . . . . . . . . . . . . . . . 71Beginning the Script . . . . . . . . . . . . . . . . . . . . . . . . . . . . . . . . . . . . 71Adding JavaScript Statements . . . . . . . . . . . . . . . . . . . . . . 72Creating Output . . . . . . . . . . . . . . . . . . . . . . . . . . . . . . . . . . . . . . . . . . 73Adding the Script to a Web Page . . . . . . . . . . . . . . . . . . . . 73Testing the Script . . . . . . . . . . . . . . . . . . . . . . . . . . . . . . . . . . . . . . . . 74
CHAPTER 5: Working with Fonts, Text Blocks,and Lists 81
Boldface, Italics, and Special Text Formatting . . . . 82Tweaking the Font . . . . . . . . . . . . . . . . . . . . . . . . . . . . . . . . . . . . . . . . 85Working with Special Characters . . . . . . . . . . . . . . . . . . . . 89Aligning Text on a Page . . . . . . . . . . . . . . . . . . . . . . . . . . . . . . . . 92The Three Types of HTML Lists . . . . . . . . . . . . . . . . . . . . . . 95Placing Lists Within Lists . . . . . . . . . . . . . . . . . . . . . . . . . . . . . . 97
CHAPTER 6: Using Tables to DisplayInformation 107
Creating a Simple Table . . . . . . . . . . . . . . . . . . . . . . . . . . . . . . 107Controlling Table Sizes. . . . . . . . . . . . . . . . . . . . . . . . . . . . . . . . 110Alignment and Spanning Within Tables . . . . . . . . . . 113Page Layout with Tables . . . . . . . . . . . . . . . . . . . . . . . . . . . . . . 116
CHAPTER 7: Using External and Internal Links 123
Using Web Addresses . . . . . . . . . . . . . . . . . . . . . . . . . . . . . . . . 123Linking Within a Page Using Anchors . . . . . . . . . . . . 126Linking Between Your Own Web Content . . . . . . . . 129Linking to External Web Content . . . . . . . . . . . . . . . . . . 131Linking to an Email Address . . . . . . . . . . . . . . . . . . . . . . . . 132Opening a Link in a New Browser Window . . . . 134Using CSS to Style Hyperlinks . . . . . . . . . . . . . . . . . . . . 134
CHAPTER 8: Working with Colors,Images, and Multimedia 141
Best Practices for Choosing Colors . . . . . . . . . . . . . . 141Understanding Web Colors . . . . . . . . . . . . . . . . . . . . . . . . . . 143Using Hexadecimal Values for Colors . . . . . . . . . . . . 145Using CSS to Set Background, Text, and Border Colors . . . . . . . . . . . . . . . . . . . . . . . . . . . . . . . . . . . . . . . . . . . . 146Choosing Graphics Software . . . . . . . . . . . . . . . . . . . . . . . . 148The Least You Need to Know About Graphics . . 149Preparing Photographic Images . . . . . . . . . . . . . . . . . . . . 150Creating Banners and Buttons . . . . . . . . . . . . . . . . . . . . 155Reducing the Number of Colors in an Image. . . . 157Working with Transparent Images . . . . . . . . . . . . . . . . 158Creating Tiled Backgrounds . . . . . . . . . . . . . . . . . . . . . . . . 159Creating Animated Web Graphics . . . . . . . . . . . . . . . . 160Placing Images on a Web Page . . . . . . . . . . . . . . . . . . . . 161Describing Images with Text . . . . . . . . . . . . . . . . . . . . . . . . 163Specifying Image Height and Width . . . . . . . . . . . . . . 165Aligning Images . . . . . . . . . . . . . . . . . . . . . . . . . . . . . . . . . . . . . . . . 165
www.it-ebooks.info

ptg999
Turning Images into Links . . . . . . . . . . . . . . . . . . . . . . . . . . 169Using Background Images . . . . . . . . . . . . . . . . . . . . . . . . . . 171Using Imagemaps . . . . . . . . . . . . . . . . . . . . . . . . . . . . . . . . . . . . . . 173Integrating Multimedia into Your Website . . . . . . 178
CHAPTER 9: Working with Margins, Padding,Alignment, and Floating 191
Using Margins . . . . . . . . . . . . . . . . . . . . . . . . . . . . . . . . . . . . . . . . . . 192Padding Elements . . . . . . . . . . . . . . . . . . . . . . . . . . . . . . . . . . . . . . 199Keeping Everything Aligned. . . . . . . . . . . . . . . . . . . . . . . . . . 203Understanding the Float Property . . . . . . . . . . . . . . . . 204
CHAPTER 10: Understanding the CSS BoxModel and Positioning 209
The CSS Box Model . . . . . . . . . . . . . . . . . . . . . . . . . . . . . . . . . . 209The Whole Scoop on Positioning . . . . . . . . . . . . . . . . . . 213Controlling the Way Things Stack Up . . . . . . . . . . . . 217Managing the Flow of Text . . . . . . . . . . . . . . . . . . . . . . . . . . 220
CHAPTER 11: Using CSS to Do More withLists, Text, and Navigation 225
HTML List Refresher . . . . . . . . . . . . . . . . . . . . . . . . . . . . . . . . . . 226How the CSS Box Model Affects Lists . . . . . . . . . . 226Placing List Item Indicators . . . . . . . . . . . . . . . . . . . . . . . . 229Creating Image Maps with List Items and CSS . . . . . . . . . . . . . . . . . . . . . . . . . . . . . . . . . . . . . . . . . . . . . . . . . . . . . . . . 231How Navigation Lists Differ from Regular Lists . . . . . . . . . . . . . . . . . . . . . . . . . . . . . . . . . . . . . . . . . . . . . . . . . . . . . . . . 235Creating Vertical Navigation with CSS . . . . . . . . . . 236Creating Horizontal Navigation with CSS . . . . . . . . 245
CHAPTER 12: Creating Fixed or Liquid Layouts 253
Understanding Fixed Layouts . . . . . . . . . . . . . . . . . . . . . . 254Understanding Liquid Layouts . . . . . . . . . . . . . . . . . . . . . . 255Creating a Fixed/Liquid Hybrid Layout . . . . . . . . . . 258
CHAPTER 13: Understanding DynamicWebsites 273
Understanding the Different Types of Scripting273Including JavaScript in HTML . . . . . . . . . . . . . . . . . . . . . . 274Displaying Random Content . . . . . . . . . . . . . . . . . . . . . . . . 276Understanding the Document Object Model . . 280Changing Images Based on User Interaction . . 281
CHAPTER 14: Getting Started with JavaScriptProgramming 287
Basic Concepts . . . . . . . . . . . . . . . . . . . . . . . . . . . . . . . . . . . . . . . . 287JavaScript Syntax Rules . . . . . . . . . . . . . . . . . . . . . . . . . . . . . . 291Using Comments . . . . . . . . . . . . . . . . . . . . . . . . . . . . . . . . . . . . . . 293Best Practices for JavaScript . . . . . . . . . . . . . . . . . . . . . . 293
CHAPTER 15: Working with the DocumentObject Model (DOM) 299
Understanding the Document Object Model (DOM) . . . . . . . . . . . . . . . . . . . . . . . . . . . . . . . . . . . . . . . . . . . . 299Using window Objects . . . . . . . . . . . . . . . . . . . . . . . . . . . . . . . . 300Working with the document Object. . . . . . . . . . . . . . . . 300Accessing Browser History . . . . . . . . . . . . . . . . . . . . . . . . . . 303Working with the location Object . . . . . . . . . . . . . . . . . . 305More About the DOM Structure . . . . . . . . . . . . . . . . . . . . 306Working with DOM Nodes . . . . . . . . . . . . . . . . . . . . . . . . . . . . 309Creating Positionable Elements (Layers) . . . . . . . . 311Hiding and Showing Objects . . . . . . . . . . . . . . . . . . . . . . . . 316Modifying Text Within a Page . . . . . . . . . . . . . . . . . . . . . . 317Adding Text to a Page . . . . . . . . . . . . . . . . . . . . . . . . . . . . . . . . 319
CHAPTER 16: Using JavaScript Variables,Strings, and Arrays 325
Using Variables . . . . . . . . . . . . . . . . . . . . . . . . . . . . . . . . . . . . . . . . 325Understanding Expressions and Operators . . . . 328Data Types in JavaScript . . . . . . . . . . . . . . . . . . . . . . . . . . . . 330Converting Between Data Types . . . . . . . . . . . . . . . . . . 331Using String Objects . . . . . . . . . . . . . . . . . . . . . . . . . . . . . . . . . . 332Working with Substrings. . . . . . . . . . . . . . . . . . . . . . . . . . . . . . 335Using Numeric Arrays . . . . . . . . . . . . . . . . . . . . . . . . . . . . . . . . 337Using String Arrays . . . . . . . . . . . . . . . . . . . . . . . . . . . . . . . . . . . . 338Sorting a Numeric Array . . . . . . . . . . . . . . . . . . . . . . . . . . . . . . 340
CHAPTER 17: Using JavaScript Functions and Objects 347
Using Functions . . . . . . . . . . . . . . . . . . . . . . . . . . . . . . . . . . . . . . . . 347Introducing Objects . . . . . . . . . . . . . . . . . . . . . . . . . . . . . . . . . . . . 352Using Objects to Simplify Scripting . . . . . . . . . . . . . . 354Extending Built-in Objects . . . . . . . . . . . . . . . . . . . . . . . . . . . . 356Using the Math Object . . . . . . . . . . . . . . . . . . . . . . . . . . . . . . . . 360Working with Math Functions . . . . . . . . . . . . . . . . . . . . . . 361Using the with Keyword . . . . . . . . . . . . . . . . . . . . . . . . . . . . . . 363Working with Dates . . . . . . . . . . . . . . . . . . . . . . . . . . . . . . . . . . . . 364
www.it-ebooks.info

ptg999
CHAPTER 18: Controlling Flow with Conditions and Loops 369
The if Statement. . . . . . . . . . . . . . . . . . . . . . . . . . . . . . . . . . . . . . . . 369Using Shorthand Conditional Expressions. . . . . . 372Testing Multiple Conditions with if and else . . 373Using Multiple Conditions with switch . . . . . . . . . . 375Using for Loops . . . . . . . . . . . . . . . . . . . . . . . . . . . . . . . . . . . . . . . . 377Using while Loops . . . . . . . . . . . . . . . . . . . . . . . . . . . . . . . . . . . . . . 379Using do...while Loops . . . . . . . . . . . . . . . . . . . . . . . . . . . . . . 380Working with Loops . . . . . . . . . . . . . . . . . . . . . . . . . . . . . . . . . . . . 380Looping Through Object Properties . . . . . . . . . . . . . . 382
CHAPTER 19: Responding to Events 389Understanding Event Handlers . . . . . . . . . . . . . . . . . . . . 389Using Mouse Events . . . . . . . . . . . . . . . . . . . . . . . . . . . . . . . . . . 394Using Keyboard Events . . . . . . . . . . . . . . . . . . . . . . . . . . . . . . 397Using the onLoad and onUnload Events . . . . . . . . 399Using onclick to Change <div> Appearance. . . . 400
CHAPTER 20: Using Windows and Frames 409Controlling Windows with Objects . . . . . . . . . . . . . . . . 409Moving and Resizing Windows . . . . . . . . . . . . . . . . . . . . 413Using Timeouts . . . . . . . . . . . . . . . . . . . . . . . . . . . . . . . . . . . . . . . . 414Displaying Dialog Boxes . . . . . . . . . . . . . . . . . . . . . . . . . . . . . . 417Working with Frames . . . . . . . . . . . . . . . . . . . . . . . . . . . . . . . . . . 418Building a Frameset . . . . . . . . . . . . . . . . . . . . . . . . . . . . . . . . . . 420Linking Between Frames and Windows . . . . . . . . . . 423Using Inline Frames . . . . . . . . . . . . . . . . . . . . . . . . . . . . . . . . . . 426
CHAPTER 21: Using Unobtrusive JavaScript 433
Scripting Best Practices . . . . . . . . . . . . . . . . . . . . . . . . . . . . . . 433Reading Browser Information . . . . . . . . . . . . . . . . . . . . . . 440Cross-Browser Scripting . . . . . . . . . . . . . . . . . . . . . . . . . . . . . . 443Supporting Non-JavaScript Browsers . . . . . . . . . . . . 445
CHAPTER 22: Using Third-Party Libraries 453Using Third-Party Libraries . . . . . . . . . . . . . . . . . . . . . . . . . . 453Other Libraries . . . . . . . . . . . . . . . . . . . . . . . . . . . . . . . . . . . . . . . . . . 456
CHAPTER 23: Greasemonkey: Enhancing the Web with JavaScript 463
Introducing Greasemonkey . . . . . . . . . . . . . . . . . . . . . . . . . . 463Working with User Scripts . . . . . . . . . . . . . . . . . . . . . . . . . . 466Creating Your Own User Scripts. . . . . . . . . . . . . . . . . . . . 468
CHAPTER 24: AJAX: Remote Scripting 479Introducing AJAX . . . . . . . . . . . . . . . . . . . . . . . . . . . . . . . . . . . . . . . . 479Using XMLHttpRequest . . . . . . . . . . . . . . . . . . . . . . . . . . . . . . 483Creating a Simple AJAX Library . . . . . . . . . . . . . . . . . . . . 485Creating an AJAX Quiz Using the Library . . . . . . . . 487Debugging AJAX Applications . . . . . . . . . . . . . . . . . . . . . . 491
CHAPTER 25: Creating Print-Friendly Web Pages 499
What Makes a Page Print-Friendly? . . . . . . . . . . . . . . 500Applying a Media-Specific Style Sheet . . . . . . . . . . 503Designing a Style Sheet for Print Pages . . . . . . . . 505Viewing a Web Page in Print Preview . . . . . . . . . . . . 508
CHAPTER 26: Working with Web-Based Forms 513
How HTML Forms Work . . . . . . . . . . . . . . . . . . . . . . . . . . . . . . 513Creating a Form . . . . . . . . . . . . . . . . . . . . . . . . . . . . . . . . . . . . . . . . 514Accepting Text Input . . . . . . . . . . . . . . . . . . . . . . . . . . . . . . . . . . 519Naming Each Piece of Form Data . . . . . . . . . . . . . . . . 519Exploring Form Input Controls . . . . . . . . . . . . . . . . . . . . . . 521Submitting Form Data . . . . . . . . . . . . . . . . . . . . . . . . . . . . . . . . 527Accessing Form Elements with JavaScript . . . . . . 528Displaying Data from a Form . . . . . . . . . . . . . . . . . . . . . . 528Sending Form Results by Email . . . . . . . . . . . . . . . . . . . . 530
CHAPTER 27: Organizing and Managing a Website 537
When One Page Is Enough . . . . . . . . . . . . . . . . . . . . . . . . . . 538Organizing a Simple Site . . . . . . . . . . . . . . . . . . . . . . . . . . . . 540Organizing a Larger Site . . . . . . . . . . . . . . . . . . . . . . . . . . . . . . 543Writing Maintainable Code . . . . . . . . . . . . . . . . . . . . . . . . . . 546Thinking About Version Control . . . . . . . . . . . . . . . . . . . . 548
CHAPTER 28: Helping People Find Your Web Pages 553
Publicizing Your Website. . . . . . . . . . . . . . . . . . . . . . . . . . . . . . 553Listing Your Pages with the Major Search Sites . . . . . . . . . . . . . . . . . . . . . . . . . . . . . . . . . . . . . . . . . . . . 555Providing Hints for Search Engines . . . . . . . . . . . . . . 556Additional Tips for Search Engine Optimization. . . . . . . . . . . . . . . . . . . . . . . . . . . . . . . . . . . . . . . . . . . . . . 562
INDEX 567
www.it-ebooks.info

ptg999
About the AuthorJulie C. Meloni is the Lead Technologist and Architect in the Online Library Environment at theUniversity of Virginia. Before coming to the library, she worked for more than 15 years in web appli-cation development for various corporations large and small in Silicon Valley. She has written sev-eral books and articles on Web-based programming languages and database topics, including thebestselling Sams Teach Yourself PHP, MySQL, and Apache All in One.
www.it-ebooks.info

ptg999
We Want to Hear from You!As the reader of this book, you are our most important critic and commentator. We value your opin-ion and want to know what we’re doing right, what we could do better, what areas you’d like to seeus publish in, and any other words of wisdom you’re willing to pass our way.
You can email or write directly to let us know what you did or didn’t like about this book—as wellas what we can do to make our books stronger.
Please note that we cannot help you with technical problems related to the topic of this book, andthat due to the high volume of mail we receive, we might not be able to reply to every message.
When you write, please be sure to include this book’s title and author as well as your name andemail address. We will carefully review your comments and share them with the author and editorswho worked on the book.
Email: feedback@samspublishing
Mail: Sams Publishing800 East 96th StreetIndianapolis, IN 46240 USA
Reader ServicesVisit our website and register this book at informit.com/register for convenient access to anyupdates, downloads, or errata that might be available for this book.
www.it-ebooks.info

ptg999
Before learning the intricacies of HTML (Hypertext Markup Language),CSS (Cascading Style Sheets), and JavaScript, it is important that you gaina solid understanding of the technologies that help transform these plain-text files to the rich multimedia displays you see on your computer orhandheld device when browsing the World Wide Web. For example, a filecontaining markup and client-side code HTML and CSS is useless withouta web browser to view it, and no one besides yourself will see your contentunless a web server is involved. Web servers make your content availableto others who, in turn, use their web browsers to navigate to an addressand wait for the server to send information to them. You will be intimatelyinvolved in this publishing process because you must create files and thenput them on a server to make them available in the first place, and youmust ensure that your content will appear to the end user as you intended.
A Brief History of HTML and theWorld Wide WebOnce upon a time, back when there weren’t any footprints on the moon,some farsighted folks decided to see whether they could connect severalmajor computer networks together. I’ll spare you the names and stories(there are plenty of both), but the eventual result was the “mother of allnetworks,” which we call the Internet.
Until 1990, accessing information through the Internet was a rather techni-cal affair. It was so hard, in fact, that even Ph.D.-holding physicists wereoften frustrated when trying to swap data. One such physicist, the now-famous (and knighted) Sir Tim Berners-Lee, cooked up a way to easilycross-reference text on the Internet through hypertext links.
WHAT YOU’LL LEARN INTHIS CHAPTER:
. A very brief history of theWorld Wide Web
. What is meant by the termweb page, and why thatterm doesn’t always reflectall the content involved
. How content gets from yourpersonal computer to some-one else’s web browser
. How to select a web host-ing provider
. How different webbrowsers and device typescan affect your content
. How to transfer files toyour web server using FTP
. Where files should beplaced on a web server
. How to distribute web con-tent without a web server
. How to use other publish-ing methods such as blogs
. Tips for testing the appear-ance and functionality ofweb content.
CHAPTER 1Publishing Web Content
www.it-ebooks.info
ptg999
2 CHAPTER 1 Publishing Web Content
This wasn’t a new idea, but his simple HTML managed to thrive whilemore ambitious hypertext projects floundered. Hypertext originally meanttext stored in electronic form with cross-reference links between pages. It isnow a broader term that refers to just about any object (text, images, files,and so on) that can be linked to other objects. Hypertext Markup Language isa language for describing how text, graphics, and files containing otherinformation are organized and linked together.
By 1993, only 100 or so computers throughout the world were equipped toserve up HTML pages. Those interlinked pages were dubbed the WorldWide Web (WWW), and several web browser programs had been written toallow people to view web pages. Because of the growing popularity of theWeb, a few programmers soon wrote web browsers that could view graph-ical images along with text. From that point forward, the continued devel-opment of web browser software and the standardization of the HTML—and XHTML—languages has lead us to the world we live in today, one inwhich more than 110 million web servers answer requests for more than 25billion text and multimedia files.
These few paragraphs really are a brief history of what has been a remark-able period. Today’s college freshmen have never known a time in whichthe Web didn’t exist, and the idea of always-on information and ubiquitouscomputing will shape all aspects of our lives moving forward. Instead ofseeing web content creation and management as a set of skills possessedonly by a few technically oriented folks (okay, call them geeks if you will),by the end of this book, you will see that these are skills that anyone canmaster, regardless of inherent geekiness.
Creating Web ContentYou might have noticed the use of the term web content rather than webpages—that was intentional. Although we talk of “visiting a web page,”what we really mean is something like “looking at all the text and theimages at one address on our computer.” The text that we read, and theimages that we see, are rendered by our web browsers, which are givencertain instructions found in individual files.
Those files contain text that is marked up, or surrounded by, HTML codesthat tell the browser how to display the text—as a heading, as a paragraph,in a red font, and so on. Some HTML markup tells the browser to display
NOTE
For more information about thehistory of the World Wide Web,see the Wikipedia article onthis topic: http://en.wikipedia.org/wiki/History_of_the_Web.
www.it-ebooks.info

ptg999
Understanding Web Content Delivery 3
an image or video file rather than plain text, which brings me back to thepoint: Different types of content are sent to your web browser, so simplysaying web page doesn’t begin to cover it. Here we use the term web contentinstead, to cover the full range of text, image, audio, video, and othermedia found online.
In later chapters, you will learn the basics of linking to or creating the vari-ous types of multimedia web content found in websites. All you need toremember at this point is that you are in control of the content a user seeswhen visiting your website. Beginning with the file that contains text todisplay or codes that tell the server to send a graphic along to the user’sweb browser, you have to plan, design, and implement all the pieces thatwill eventually make up your web presence. As you will learn throughoutthis book, it is not a difficult process as long as you understand all the littlesteps along the way.
In its most fundamental form, web content begins with a simple text filecontaining HTML or XHTML markup. XHTML is another flavor of HTML;the “X” stands for eXtensible, and you will learn more about it as you con-tinue through the chapters. The most important thing to know from theoutset is that all the examples in this book are HTML 4 and XHTML com-patible, meaning that they will be rendered similarly both now and in thefuture by any newer generations of web browsers. That is one of the bene-fits of writing standards-compliant code: You do not have to worry aboutgoing back to your code sometime in the future and changing it because itdoesn’t work. Your code will likely always work for as long as webbrowsers adhere to standards (hopefully a long time).
Understanding Web ContentDeliverySeveral processes occur, in many different locations, to eventually produceweb content that you can see. These processes occur very quickly—on theorder of milliseconds—and occur behind the scenes. In other words,although we might think all we are doing is opening a web browser, typ-ing in a web address, and instantaneously seeing the content we requested,technology in the background is working hard on our behalf. Figure 1.1shows the basic interaction between a browser and a server.
www.it-ebooks.info

ptg999
4 CHAPTER 1 Publishing Web Content
However, there are several steps in the process—and potentially severaltrips between the browser and server—before you see the entire content ofthe site you requested.
Suppose you want to do a Google search, so you dutifully typehttp://www.google.com in the address bar or select the Google bookmarkfrom your bookmarks list. Almost immediately, your browser will showyou something like what’s shown in Figure 1.2.
FIGURE 1.1A browser request and a serverresponse.
FIGURE 1.2Visiting www.google.com.
Figure 1.2 shows a website that contains text plus one image (the Googlelogo). A simple version of the processes that occurred to retrieve that textand image from a web server and display it on your screen is as follows:
1. Your web browser sends a request for the index.html file located atthe http://www.google.com/ address. The index.html file does nothave to be part of the address that you type in the address bar; you’lllearn more about the index.html file further along in this chapter.
www.it-ebooks.info

ptg999
Understanding Web Content Delivery 5
2. After receiving the request for a specific file, the web server processlooks in its directory contents for the specific file, opens it, and sendsthe content of that file back to your web browser.
3. The web browser receives the content of the index.html file, which istext marked up with HTML codes, and renders the content based onthese HTML codes. While rendering the content, the browser hap-pens upon the HTML code for the Google logo, which you can see inFigure 1.2. The HTML code looks like this:
<img src=”/logos/logo.gif” width=”384” height=”121” border=”0”alt=”Google”/>
The tag provides attributes that tell the browser the file source loca-tion (src), width (width), height (height), border type (border), andalternative text (alt) necessary to display the logo. You will learnmore about attributes throughout later chapters.
4. The browser looks at the src attribute in the <img/> tag to find thesource location. In this case, the image logo.gif can be found in thelogos directory at the same web address (www.google.com) fromwhich the browser retrieved the HTML file.
5. The browser requests the file at thehttp://www.google.com/logos/logo.gif web address.
6. The web server interprets that request, finds the file, and sends thecontents of that file to the web browser that requested it.
7. The web browser displays the image on your monitor.
As you can see in the description of the web content delivery process, webbrowsers do more than simply act as picture frames through which youcan view content. Browsers assemble the web content components andarrange those parts according to the HTML commands in the file.
You can also view web content locally, or on your own hard drive, withoutthe need for a web server. The process of content retrieval and display isthe same as the process listed in the previous steps in that a browser looksfor and interprets the codes and content of an HTML file, but the trip isshorter; the browser looks for files on your own computer’s hard driverather than on a remote machine. A web server is needed to interpret anyserver-based programming language embedded in the files, but that is out-side the scope of this book. In fact, you could work through all the chap-ters in this book without having a web server to call your own, but thennobody but you could view your masterpieces.
www.it-ebooks.info

ptg999
6 CHAPTER 1 Publishing Web Content
Selecting a Web Hosting ProviderDespite just telling you that you can work through all the chapters in thisbook without having a web server, having a web server is the recommend-ed method for continuing on. Don’t worry—obtaining a hosting provideris usually a quick, painless, and relatively inexpensive process. In fact, youcan get your own domain name and a year of web hosting for just slightlymore than the cost of the book you are reading now.
If you type web hosting provider in your search engine of choice, you willget millions of hits and an endless list of sponsored search results (alsoknown as ads). There are not this many web hosting providers in theworld, although it might seem like there are. Even if you are looking at amanaged list of hosting providers, it can be overwhelming—especially ifall you are looking for is a place to host a simple website for yourself oryour company or organization.
You’ll want to narrow your search when looking for a provider and chooseone that best meets your needs. Some selection criteria for a web hostingprovider include the following”
. Reliability/server “uptime”—If you have an online presence, youwant to make sure people can actually get there consistently.
. Customer service—Look for multiple methods for contacting cus-tomer service (phone, email, and chat) as well as online documenta-tion for common issues.
. Server space—Does the hosting package include enough serverspace to hold all the multimedia files (images, audio, and video) youplan to include in your website (if any)?
. Bandwidth—Does the hosting package include enough bandwidthso that all the people visiting your site and downloading files can doso without you having to pay extra?
. Domain name purchase and management—Does the packageinclude a custom domain name, or must you purchase and maintainyour domain name separately from your hosting account?
. Price—Do not overpay for hosting. You will see a wide range of pricesoffered and should immediately wonder “what’s the difference?”Often the difference has little to do with the quality of the service andeverything to do with company overhead and what the companythinks they can get away with charging people. A good rule of thumbis that if you are paying more than $75 per year for a basic hostingpackage and domain name, you are probably paying too much.
www.it-ebooks.info

ptg999
Selecting a Web Hosting Provider 7
Here are three reliable web hosting providers whose basic packages con-tain plenty of server space and bandwidth (as well as domain names andextra benefits) at a relatively low cost. If you don’t go with any of theseweb hosting providers, you can at least use their basic package descrip-tions as a guideline as you shop around.
. A Small Orange (http://www.asmallorange.com)—The “Tiny” and“Small” hosting packages are perfect starting places for the new webcontent publisher.
. DailyRazor (http://www.dailyrazor.com)—Even its Rookie hostingpackage is full featured and reliable.
. LunarPages (http://www.lunarpages.com)—The Basic hosting pack-age is suitable for many personal and small business websites.
One feature of a good hosting provider is that it provides a “control panel”for you to manage aspects of your account. Figure 1.3 shows the controlpanel for my own hosting account at Daily Razor. Many web hostingproviders offer this particular control panel software, or some controlpanel that is similar in design—clearly labeled icons leading to tasks youcan perform to configure and manage your account.
NOTEI have used all these providers(and then some) over the yearsand have no problem recom-mending any of them; predomi-nantly, I use DailyRazor as aweb hosting provider, especiallyfor advanced development envi-ronments.
FIGURE 1.3A sample control panel.
www.it-ebooks.info

ptg999
8 CHAPTER 1 Publishing Web Content
You might never need to use your control panel, but having it available toyou simplifies the installation of databases and other software, the viewingof web statistics, and the addition of email addresses (among many otherfeatures). If you can follow instructions, you can manage your own webserver—no special training required.
Testing with Multiple Web BrowsersHaving just discussed the process of web content delivery and the acquisi-tion of a web server, it might seem a little strange to step back and talkabout testing your websites with multiple web browsers. However, beforeyou go off and learn all about creating websites with HTML and CSS, do sowith this very important statement in mind: Every visitor to your websitewill potentially use hardware and software configurations that are differentthan your own. Their device types (desktop, laptop, netbook, smartphone,or iPhone), their screen resolutions, their browser types, their browser win-dow sizes, and their speed of connections will be different—remember thatyou cannot control any aspect of what your visitors use when they viewyour site. So, just as you’re setting up your web hosting environment andgetting ready to work, think about downloading several different webbrowsers so that you have a local test suite of tools available to you. Let meexplain why this is important.
Although all web browsers process and handle information in the samegeneral way, there are some specific differences among them that result inthings not always looking the same in different browsers. Even users of thesame version of the same web browser can alter how a page appears bychoosing different display options or changing the size of their viewingwindows. All the major web browsers allow users to override the back-ground and fonts specified by the web page author with those of their ownchoosing. Screen resolution, window size, and optional toolbars can alsochange how much of a page someone sees when it first appears on theirscreens. You can ensure only that you write standards-compliant HTMLand CSS.
Do not, under any circumstances, spend hours on end designing some-thing that looks perfect on your own computer—unless you are willing tobe disappointed when you look at it on your friend’s computer, on yourtablet, or on your iPhone.
You should always test your websites with as many of these web browsersas possible:
www.it-ebooks.info

ptg999
Creating a Sample File 9
. Apple Safari (http://www.apple.com/safari/) for Mac and Windows
. Google Chrome (http://www.google.com/chrome) for Windows
. Mozilla Firefox (http://www.mozilla.com/firefox/) for Mac,Windows, and Linux
. Microsoft Internet Explorer (http://www.microsoft.com/ie) forWindows
. Opera (http://www.opera.com/) for Mac, Windows, andLinux/UNIX
Now that you have a development environment set up, or at least someidea of the type you’d like to set up in the future, let’s move on to creating atest file.
Creating a Sample FileBefore we begin, take a look at Listing 1.1. This listing represents a simplepiece of web content—a few lines of HTML that print “Hello World!Welcome to My Web Server.” in large, bold letters on two lines centeredwithin the browser window.
LISTING 1.1 Our Sample HTML File<html><head><title>Hello World!</title></head><body><h1 style=”text-align: center”>Hello World!<br/>Welcome to My Web➥Server.</h1></body></html>
To make use of this content, open a text editor of your choice, such as Notepad(on Windows) or TextEdit (on a Mac). Do not use WordPad, Microsoft Word,or other full-featured word-processing software because those programs createdifferent sorts of files than the plain-text files we use for web content.
Type the content that you see in Listing 1.1, and then save the file using sample.html as the filename. The .html extension tells the web server thatyour file is, indeed, full of HTML. When the file contents are sent to the webbrowser that requests it, the browser will also know that it is HTML andwill render it appropriately.
NOTE
You will learn a bit about texteditors in Chapter 2,“Understanding HTML andXHTML Connections.” Rightnow, I just want you to have asample file that you can put ona web server!
www.it-ebooks.info

ptg999
10 CHAPTER 1 Publishing Web Content
Now that you have a sample HTML file to use—and hopefully somewhereto put it, such as a web hosting account—let’s get to publishing your webcontent.
Using FTP to Transfer FilesAs you’ve learned so far, you have to put your web content on a web serv-er to make it accessible to others. This process typically occurs by usingFile Transfer Protocol (FTP). To use FTP, you need an FTP client—a programused to transfer files from your computer to a web server.
FTP clients require three pieces of information to connect to your web serv-er; this information will have been sent to you by your hosting providerafter you set up your account:
. The hostname, or address, to which you will connect
. Your account username
. Your account password
After you have this information, you are ready to use an FTP client totransfer content to your web server.
Selecting an FTP ClientRegardless of the FTP client you use, FTP clients generally use the sametype of interface. Figure 1.4 shows an example of FireFTP, which is an FTPclient used with the Firefox web browser. The directory listing of the localmachine (your computer) appears on the left of your screen and the direc-tory listing of the remote machine (the web server) appears on the right.Typically, you will see right-arrow and left-arrow buttons—as shown inFigure 1.4. The right arrow sends selected files from your computer to yourweb server; the left arrow sends files from the web server to your comput-er. Many FTP clients also enable you to simply select files, and then dragand drop those files to the target machines.
There are many FTP clients freely available to you, but you can also trans-fer files via the web-based File Manager tool that is likely part of your webserver’s control panel. However, that method of file transfer typicallyintroduces more steps into the process and isn’t nearly as streamlined (orsimple) as installing an FTP client on your own machine.
www.it-ebooks.info

ptg999
Using FTP to Transfer Files 11
Here are some popular free FTP clients:
. Classic FTP (http://www.nchsoftware.com/classic/) for Mac andWindows
. Cyberduck (http://cyberduck.ch/) for Mac
. Fetch (http://fetchsoftworks.com/) for Mac
. FileZilla (http://filezilla-project.org/) for all platforms
. FireFTP (http://fireftp.mozdev.org/) Firefox extension for all plat-forms
When you have selected an FTP client and installed it on your computer, youare ready to upload and download files from your web server. In the nextsection, you’ll see how this process works using the sample file in Listing 1.1.
Using an FTP ClientThe following steps show how to use Classic FTP to connect to your webserver and transfer a file. However, all FTP clients use similar, if not exact,interfaces. If you understand the following steps, you should be able to useany FTP client.
Remember, you first need the hostname, the account username, and theaccount password.
1. Start the Classic FTP program and click the Connect button. You willbe prompted to fill out information for the site to which you want toconnect, as shown in Figure 1.5.
FIGURE 1.4The FireFTP interface.
www.it-ebooks.info

ptg999
12 CHAPTER 1 Publishing Web Content
2. Fill in each of the items shown in Figure 1.5 as follows:
. The site Label is the name you’ll use to refer to your own site.Nobody else will see this name, so enter whatever you want.
. The FTP Server is the FTP address of the web server to whichyou need to send your web pages. This address will have beengiven to you by your hosting provider. It will probably be yourdomain.com, but check the information you received whenyou signed up for service.
. The User Name field and the Password field should also becompleted using information given to you by your hostingprovider.
. Don’t change the values for Initial Remote Directory on FirstConnection and Initial Local Directory on First Connectionuntil you are used to using the client and have established aworkflow.
3. When you’re finished with the settings, click OK to save the settingsand establish a connection with the web server.
You will see a dialog box indicating that Classic FTP is attempting toconnect to the web server. Upon successful connection, you will seean interface similar to Figure 1.6, showing the contents of the localdirectory on the left and the contents of your web server on the right.
FIGURE 1.5Connecting to a new site inClassic FTP.
www.it-ebooks.info

ptg999
Using FTP to Transfer Files 13
4. You are now almost ready to transfer files to your web server. All thatremains is to change directories to what is called the document root ofyour web server. The document root of your web server is the directo-ry that is designated as the top-level directory for your web content—the starting point of the directory structure, which you will learnmore about later in this chapter. Often, this directory will be namedpublic_html (as shown in Figure 1.6), www (also shown in Figure 1.6,as www has been created as an alias for public_html), or htdocs. Thisis not a directory that you will have to create because your hostingprovider will have created it for you.
Double-click the document root directory name to open it. The dis-play shown on the right of the FTP client interface should change toshow the contents of this directory. (It will probably be empty at thispoint, unless your web hosting provider has put placeholder files inthat directory on your behalf.)
5. The goal is to transfer the sample.html file you created earlier fromyour computer to the web server. Find the file in the directory listingon the left of the FTP client interface (navigate around if you have to)and click it once to highlight the filename.
FIGURE 1.6A successful connection to aremote web server via Classic FTP.
www.it-ebooks.info

ptg999
14 CHAPTER 1 Publishing Web Content
6. Click the right-arrow button in the middle of the client interface tosend the file to the web server. After the file transfer is completed,the right side of the client interface should refresh to show you thatthe file has made it to its destination.
7. Click the Disconnect button to close the connection, and then exit outof the Classic FTP program.
These steps are conceptually similar to the steps you will take anytime youwant to send files to your web server via FTP. You can also use your FTPclient to create subdirectories on the remote web server. To create a subdi-rectory using Classic FTP, click the Remote menu, and then click NewFolder. Different FTP clients will have different interface options to achievethe same goal.
Understanding Where to Place Fileson the Web ServerAn important aspect of maintaining web content is determining how youwill organize that content—not only for the user to find, but also for you tomaintain on your server. Putting files in directories will help you to man-age those files.
Naming and organizing directories on your web server, and developingrules for file maintenance, is completely up to you. However, maintaininga well-organized server simply makes your management of its contentmore efficient in the long run.
Basic File ManagementAs you browse the Web, you might have noticed that URLs change as younavigate through websites. For instance, if you’re looking at a company’swebsite and you click on graphical navigation leading to the company’sproducts or services, the URL will probably change from
http://www.companyname.com/
to
http://www.companyname.com/products/
or
http://www.companyname.com/services/
www.it-ebooks.info

ptg999
Understanding Where to Place Files on the Web Server 15
In the previous section, I used the term document root without reallyexplaining what that is all about. The document root of a web server isessentially the trailing slash in the full URL. For instance, if your domain isyourdomain.com and your URL is http://www.yourdomain.com/, the docu-ment root is the directory represented by the trailing slash (/). The docu-ment root is the starting point of the directory structure you create on yourweb server; it is the place where the web server begins looking for filesrequested by the web browser.
If you put the sample.html file in your document root as previously direct-ed, you will be able to access it via a web browser at the following URL:
http://www.yourdomain.com/sample.html
If you were to enter this URL into your web browser, you would see therendered sample.html file, as shown in Figure 1.7.
FIGURE 1.7The sample.html file accessed viaa web browser.
However, if you created a new directory within the document root and putthe sample.html file in that directory, the file would be accessed at this URL:
http://www.yourdomain.com/newdirectory/sample.html
If you put the sample.html file in the directory you originally saw uponconnecting to your server—that is, you did not change directories andplace the file in the document root—the sample.html file would not beaccessible from your web server at any URL. The file will still be on themachine that you know as your web server, but because the file is not inthe document root—where the server software knows to start looking forfiles—it will never be accessible to anyone via a web browser.
www.it-ebooks.info

ptg999
16 CHAPTER 1 Publishing Web Content
The bottom line? Always navigate to the document root of your web serverbefore you start transferring files.
This is especially true with graphics and other multimedia files. A commondirectory on web servers is called images, where, as you can imagine, allthe image assets are placed for retrieval. Other popular directories includecss for stylesheet files (if you are using more than one) and js for externalJavaScript files. Or, if you know you will have an area on your websitewhere visitors can download many different types of files, you might sim-ply call that directory downloads.
Whether it’s a ZIP file containing your art portfolio or an Excel spreadsheetwith sales numbers, it’s often useful to publish files on the Internet thataren’t simply web pages. To make a file available on the Web that isn’t anHTML file, just upload the file to your website as if it were an HTML file,following the instructions provided earlier in this chapter for uploading.After the file is uploaded to the web server, you can create a link to it (asyou’ll learn in later chapters). In other words, your web server can servemuch more than HTML.
Here’s a sample of the HTML code that you will learn more about later inthis book. The following code would be used for a file named artfolio.zip,located in the downloads directory of your website, and link text thatreads “Download my art portfolio!”:
<a href=”/downloads/artfolio.zip”>Download my art portfolio!</a>
Using an Index PageWhen you think of an index, you probably think of the section in the backof a book that tells you where to look for various keywords and topics. Theindex file in a web server directory can serve that purpose—if you designit that way. In fact, that’s where the name originates.
The index.html file (or just index file, as it’s usually referred to) is the nameyou give to the page you want people to see as the default file when theynavigate to a specific directory in your website. If you’ve created that pagewith usability in mind, your users will be able to get to all content in thatsection from the index page.
For example, Figure 1.8 shows the drop-down navigation and left-sidenavigation both contain links to three pages: Solutions Overview (the sec-tion index page itself), Connection Management, and Cost Management.
www.it-ebooks.info

ptg999
Understanding Where to Place Files on the Web Server 17
The content of the page itself—called index.html and located within thesolutions directory—also has links to those two additional pages in thesolutions section. When users arrive at the index page of the “solutions”section in this particular website (at least at the time of the snapshot), theycan reach any other page in that section (and in three different ways!).
Another function of the index page is that when users visit a directory onyour site that has an index page, but they do not specify that page, they willstill land on the main page for that section of your site—or for the site itself.
For instance, in the previous example, a user could have typed either of thefollowing URLs and landed on the main page of the solutions section ofthat website:
http://www.ipass.com/solutions/
http://www.ipass.com/solutions/index.html
Had there been no index.html page in the solutions directory, the resultswould depend on the configuration of the web server. If the server is con-figured to disallow directory browsing, the user would have seen a“Directory Listing Denied” message when attempting to access the URLwithout a specified page name. However, if the server is configured toallow directory browsing, the user would have seen a list of the files inthat directory.
FIGURE 1.8Showing a good section indexpage.
www.it-ebooks.info

ptg999
18 CHAPTER 1 Publishing Web Content
These server configuration options will have already been determined foryou by your hosting provider. If your hosting provider enables you tomodify server settings via a control panel, you can change these settings sothat your server responds to requests based on your own requirements.
Not only is the index file used in subdirectories, it’s used in the top-leveldirectory (or document root) of your website as well. The first page of yourwebsite—or home page or main page, or however you like to refer to the webcontent you want users to see when they first visit your domain—shouldbe named index.html and placed in the document root of your web server.This will ensure that when users type http://www.yourdomain.com/ intotheir web browsers, the server will respond with content you intendedthem to see (rather than “Directory Listing Denied” or some other unin-tended consequence).
Distributing Content Without a WebServerPublishing HTML and multimedia files online is obviously the primaryreason to learn HTML and create web content. However, there are also sit-uations in which other forms of publishing simply aren’t viable. For exam-ple, you might want to distribute CD-ROMs, DVD-ROMs, or USB drives ata trade show with marketing materials designed as web content—that is,hyperlinked text viewable through a web browser, but without a web serv-er involved. You might also want to include HTML-based instructionalmanuals on removable media for students at a training seminar. These arejust two examples of how HTML pages can be used in publishing scenar-ios that don’t involve the Internet.
This process is also called creating local sites; even though there’s no webserver involved, these bundles of hypertext content are still called sites. Thelocal term comes into play because your files are accessed locally and notremotely (via a web server).
Publishing Content LocallyLet’s assume you need to create a local site that you want to distribute on aUSB drive. Even the cheapest USB drives hold so much data these days—and basic hypertext files are quite small—that you can distribute an entiresite and a fully functioning web browser all on one little drive.
NOTE
Distributing a web browser isn’trequired when creating and dis-tributing a local site, althoughit’s a nice touch. You can rea-sonably assume that usershave their own web browsersand will open the index.html filein a directory to start browsingthe hyperlinked content.However, if you would like todistribute a web browser on theUSB drive, go to http://www.portableapps.com/ and look forPortable Firefox.
www.it-ebooks.info

ptg999
Tips for Testing Web Content 19
Simply think of the directory structure of your USB drive just as you wouldthe directory structure of your web server. The top-level of the USB drivedirectory structure can be your document root. Or if you are distributing aweb browser along with the content, you might have two directories—forexample, one named browser and one named content. In that case, thecontent directory would be your document root. Within the documentroot, you could have additional subfolders in which you place content andother multimedia assets.
It’s as important to maintain good organization with a local site as it iswith a remote website so that you avoid broken links in your HTML files.You will learn more about the specifics of linking together files in a laterchapter.
Publishing Content on a BlogYou might have a blog hosted by a third-party, such as Blogger orWordPress (among others), and thus have already published content with-out having a dedicated web server or even knowing any HTML. Theseservices offer visual editors in addition to source editors, meaning that you cantype your words and add visual formatting such as bold, italics, or font col-ors without knowing the HTML for these actions. But still, the contentbecomes actual HTML when you click the Publish button in these editors.
However, with the knowledge you will acquire throughout this book, yourblogging will be enhanced because you will able to use the source editorfor your blog post content and blog templates, thus affording you morecontrol over the look and feel of that content. These actions occur different-ly from the process you learned for creating an HTML file and uploading itvia FTP to your own dedicated web server, but I would be remiss if I didnot note that blogging is, in fact, a form of web publishing.
Tips for Testing Web ContentWhenever you transfer files to your web server or place them on remov-able media for local browsing, you should immediately test every pagethoroughly. The following checklist will help ensure that your web contentbehaves the way you expected. Note that some of the terms might be unfa-miliar to you at this point, but come back to this checklist as you progressthrough this book and create larger projects:
www.it-ebooks.info

ptg999
20 CHAPTER 1 Publishing Web Content
. Before you transfer your files, test them locally on your machine toensure that the links work and the content reflects the visual designyou intended. After you transfer the pages to a web server or remov-able device, test them all again.
. Perform these tests with as many browsers that you can—Chrome,Firefox, Internet Explorer, Opera, and Safari is a good list—and onboth Mac and Windows platforms. If possible, check at low resolu-tion (800×600) and high resolution (1600×1200).
. Turn off auto image loading in your web browser before you starttesting so that you can see what each page looks like without thegraphics. Check your alt tag messages, and then turn image loadingback on to load the graphics and review the page carefully again.
. Use your browser’s font size settings to look at each page in variousfont sizes to ensure that your layout doesn’t fall to pieces if usersoverride your font specifications with their own.
. Wait for each page to completely finish loading, and then scroll allthe way down to make sure that all images appear where theyshould.
. Time how long it takes each page to load. Does it take more than afew seconds to load? If so, is the information on that page valuableenough to keep users from going elsewhere before the page finishesloading? Granted, broadband connections are common, but thatdoesn’t mean you should load up your pages with 1MB images.
If your pages pass all those tests, you can rest easy; your site is ready forpublic viewing.
SummaryThis chapter introduced you to the concept of using HTML to mark-up textfiles to produce web content. You also learned that there is more to webcontent than just the “page”—web content also includes image, audio, andvideo files. All of this content lives on a web server—a remote machineoften far away from your own computer. On your computer or otherdevice, you use a web browser to request, retrieve, and eventually displayweb content on your screen.
You learned the criteria you should consider when determining if a webhosting provider fits your needs. After you have a web hosting provider,
www.it-ebooks.info

ptg999
Summary 21
you can begin to transfer files to your web server using an FTP client. Youalso learned a little bit about web server directory structures and file man-agement, as well as the very important purpose of the index.html file in agiven web server directory. You discovered that you can distribute webcontent on removable media, and how to go about structuring the files anddirectories to achieve the goal of viewing content without using a remoteweb server. Finally, you learned the importance of testing your work inmultiple browsers after you’ve placed it on a web server. Writing valid,standards-compliant HTML and CSS will help ensure your site looks rea-sonably similar for all visitors, but you still shouldn’t design withoutreceiving input from potential users outside your development team—it iseven more important to get input from others when you are a design teamof one!
www.it-ebooks.info

ptg999
22 CHAPTER 1 Publishing Web Content
Q&AQ. I’ve looked at the HTML source of some web pages on the Internet
and it looks frighteningly difficult to learn. Do I have to think like acomputer programmer to learn this stuff?
A. Although complex HTML pages can indeed look daunting, learning HTMLis much easier than learning actual software programming languages(such as C++ or Java). HTML is a markup language rather than a pro-gramming language; you mark-up text so that the text can be rendereda certain way by the browser. That’s a completely different set ofthought processes than developing a computer program. You reallydon’t need any experience or skill as a computer programmer to be asuccessful web content author.
One of the reasons the HTML behind many commercial websites lookscomplicated is because it was likely created by a visual web designtool—a “what you see is what you get” or “WYSIWYG” editor that willuse whatever markup its software developer told it to use in certain cir-cumstances—as opposed to being hand-coded, in which you are com-pletely in control of the resulting markup. In this book, you are taughtfundamental coding from the ground up, which typically results in clean,easy-to-read source code. Visual web design tools have a knack formaking code difficult to read and for producing code that is convolutedand non-standards compliant.
Q. All the tests you recommend would take longer than creating mypages! Can’t I get away with less testing?
A. If your pages aren’t intended to make money or provide an importantservice, it’s probably not a big deal if they look funny to some users orproduce errors once in a while. In that case, just test each page with acouple of different browsers and call it a day. However, if you need toproject a professional image, there is no substitute for rigorous testing.
Q. Seriously, who cares how I organize my web content?
A. Believe it or not, the organization of your web content does matter tosearch engines and potential visitors to your site—you’ll learn moreabout this in Chapter 28, “Helping People Find Your Web Pages.” Butoverall, having an organized web server directory structure will help youkeep track of content that you are likely to update frequently. Forinstance, if you have a dedicated directory for images or multimedia,you will know exactly where to look for a file you want to update—noneed to hunt through directories containing other content.
www.it-ebooks.info

ptg999
Workshop 23
WorkshopThe workshop contains quiz questions and exercises to help you solidify yourunderstanding of the material covered. Try to answer all questions beforelooking at the “Answers” section that follows.
Quiz1. How many files would you need to store on a web server to produce a
single web page with some text and two images on it?
2. What are some of the features to look for in a web hosting provider?
3. What three pieces of information do you need to connect to your webserver via FTP?
4. What is the purpose of the index.html file?
5. Does your website have to include a directory structure?
Answers1. You would need three: one for the web page itself, which includes the
text and the HTML markup, and one for each of the two images.
2. Look for reliability, customer service, web space and bandwidth, domainname service, site management extras, and price.
3. The hostname, your account username, and your account password.
4. The index.html file is typically the default file for a directory within aweb server. It allows users to access http://www.yourdomain.com/somedirectory/ without using a trailing file name and still end up in theappropriate place.
5. No. Using a directory structure for file organization is completely up toyou, although it is highly recommended to use one because it simplifiescontent maintenance.
www.it-ebooks.info

ptg999
24 CHAPTER 1 Publishing Web Content
Exercises. Get your web hosting in order—are you going to go through the chap-
ters in this book by viewing files locally on your own computer, or areyou going to use a web hosting provider? Note that most web hostingproviders will have you up and running the same day you purchase yourhosting plan.
. If you are using an external hosting provider, and then using your FTPclient, create a subdirectory within the document root of your website.Paste the contents of the sample.html file into another file namedindex.html, change the text between the <title> and </title> tags tosomething new, and change the text between the <h1> and </h1> tagsto something new. Save the file and upload it to the new subdirectory.Use your web browser to navigate to the new directory on your webserver and see that the content in the index.html file appears. Then,using your FTP client, delete the index.html file from the remote subdi-rectory. Return to that URL with your web browser, reload the page, andsee how the server responds without the index.html file in place.
. Using the same set of files created in the previous exercise, placethese files on a removable media device—a CD-ROM or a USB drive, forexample. Use your browser to navigate this local version of your samplewebsite, and think about the instructions you would have to distributewith this removable media so that others could use it.
www.it-ebooks.info

ptg999
The first chapter gave you a basic idea of the process behind creating webcontent and viewing it online (or locally, if you do not yet have a web host-ing provider). In this chapter, we’ll get down to the business of explainingthe various elements that must appear in an HTML file so that it is dis-played appropriately in your web browser.
By the end of the chapter, you’ll learn how HTML differs from XHTML andwhy there are two different languages designed to do the same thing—create web content. In general, this chapter provides a quick summary ofHTML and XHTML basics and gives some practical tips to make the mostof your time as a web page author and publisher. It’s not all theory, howev-er; you do get to see a real web page and the HTML code behind it.
Getting PreparedHere’s a review of what you need to do before you’re ready to use the restof this book:
1. Get a computer. I used a computer running Ubuntu (Linux) to testthe sample web content and capture the figures in this book, but youcan use any Windows, Macintosh, or Linux/UNIX machine to createand view your web content.
2. Get a connection to the Internet. Whether you have a dial-up, wire-less, or broadband connection doesn’t matter for the creation andviewing of your web content, but the faster the connection, the betterfor the overall experience. The Internet service provider (ISP), school,or business that provides your Internet connection can help you withthe details of setting it up properly. Additionally, many public spacessuch as coffee shops, bookstores, and libraries offer free wirelessInternet service that you can use if you have a laptop computer withWi-Fi network support.
WHAT YOU’LL LEARN INTHIS CHAPTER:
. How to create a simpleweb page in HTML
. How to include all theHTML Tags that every webpage must have
. How to organize a pagewith paragraphs and linebreaks
. How to organize your con-tent with headings
. How to validate your webcontent
. How to differentiatebetween HTML, XML,XHTML, and HTML5
CHAPTER 2Understanding HTML and XHTML
Connections
www.it-ebooks.info

ptg999
26 CHAPTER 2 Understanding HTML and XHTML Connections
3. Get web browser software. This is the software your computer needsto retrieve and display web content. As you learned in the first chap-ter, the most popular browser software (in alphabetical order) isApple Safari, Google Chrome, Microsoft Internet Explorer, MozillaFirefox, and Opera. It’s a good idea to install several of thesebrowsers so that you can experiment and make sure that your con-tent looks consistent across them all; you can’t make assumptionsabout the browsers other people are using.
4. Explore! Use a web browser to look around the Internet for websitesthat are similar in content or appearance to those you’d like to create.Note what frustrates you about some pages, what attracts you andkeeps you reading others, and what makes you come back to somepages over and over again. If there is a particular topic that interestsyou, consider searching for it using a popular search engine such asGoogle (http://www.google.com/) or Bing (http://www.bing.com/).
Getting Started with a Simple WebPageIn the first chapter, you learned that a web page is just a text file that ismarked up by (or surrounded by) HTML codes that tell the browser howto display the text. To create these text files, use a text editor such asNotepad (on Windows) or TextEdit (on a Mac)—do not use WordPad,Microsoft Word, or other full-featured word-processing software becausethose create different sorts of files than the plain-text files we use for webcontent.
Before you begin working, you should start with some text that you wantto put on a web page:
1. Find (or write) a few paragraphs of text about yourself, your family,your company, your softball team, or some other subject in whichyou’re interested.
2. Save this text as plain, standard ASCII text. Notepad and most sim-ple text editors always save files as plain text, but if you’re usinganother program, you might need to choose this file type as anoption (after selecting File, Save As).
As you go through this chapter, you will add HTML markup (called tags)to the text file, thus making it into web content.
NOTE
Not sure how to find an ISP?The best way is to comparison-shop online (using a friend’scomputer or a public computerthat’s already connected to theInternet). You’ll find a compre-hensive list of national andregional ISPs at http://www.thelist.com/.
CAUTION
Although all web browsersprocess and handle informationin the same general way, thereare some specific differencesamong them that result inthings not always looking thesame in different browsers. Besure to check your web pagesin multiple browsers to makesure that they look reasonablyconsistent.
NOTE
As discussed in the first chap-ter, if you plan to put your webcontent on the Internet (asopposed to publishing it on CD-ROM or a local intranet), you’llneed to transfer it to a comput-er that is connected to theInternet 24 hours a day. Thesame company or school thatprovides you with Internetaccess might also provide webspace; if not, you might need topay a hosting provider for theservice.
www.it-ebooks.info
ptg999
Getting Started with a Simple Web Page 27
When you save files containing HTML tags, always give them a name end-ing in .html. This is important: If you forget to type the .html at the end ofthe filename when you save the file, most text editors will give it someother extension (such as .txt). If that happens, you might not be able to findthe file when you try to look at it with a web browser; if you find it, it cer-tainly won’t display properly. In other words, web browsers expect a webpage file to have a file extension of .html.
When visiting websites, you might also encounter pages with a file exten-sion of .htm, which is also an acceptable file extension to use. You mightfind other file extensions used on the Web, such as .jsp (Java Server Pages),.asp (Microsoft Active Server Pages), or .php (PHP: HypertextPreprocessor), but these file types use server-side technologies that arebeyond the scope of HTML and the chapters throughout this book.However, these files also contain HTML in addition to the programminglanguage; although the programming code in those files is compiled on theserver side and all you would see on the client side is the HTML output, ifyou were to look at the source files, you would likely see some intricateweaving of programming and markup codes.
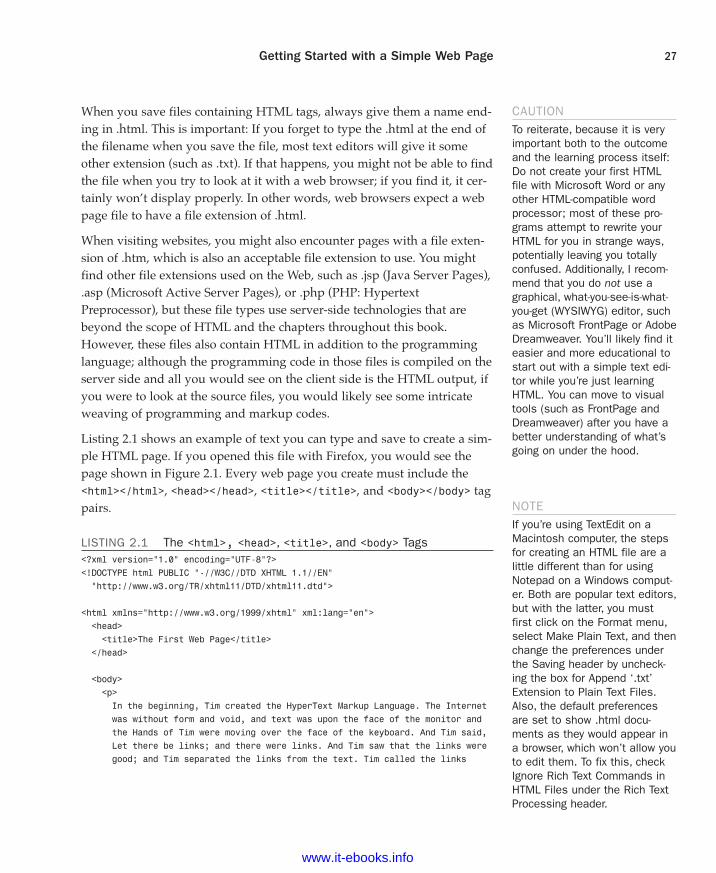
Listing 2.1 shows an example of text you can type and save to create a sim-ple HTML page. If you opened this file with Firefox, you would see thepage shown in Figure 2.1. Every web page you create must include the<html></html>, <head></head>, <title></title>, and <body></body> tagpairs.
LISTING 2.1 The <html>, <head>, <title>, and <body> Tags<?xml version=”1.0” encoding=”UTF-8”?><!DOCTYPE html PUBLIC “-//W3C//DTD XHTML 1.1//EN”“http://www.w3.org/TR/xhtml11/DTD/xhtml11.dtd”>
<html xmlns=”http://www.w3.org/1999/xhtml” xml:lang=”en”><head><title>The First Web Page</title>
</head>
<body><p>In the beginning, Tim created the HyperText Markup Language. The Internetwas without form and void, and text was upon the face of the monitor andthe Hands of Tim were moving over the face of the keyboard. And Tim said,Let there be links; and there were links. And Tim saw that the links weregood; and Tim separated the links from the text. Tim called the links
CAUTIONTo reiterate, because it is veryimportant both to the outcomeand the learning process itself:Do not create your first HTMLfile with Microsoft Word or anyother HTML-compatible wordprocessor; most of these pro-grams attempt to rewrite yourHTML for you in strange ways,potentially leaving you totallyconfused. Additionally, I recom-mend that you do not use agraphical, what-you-see-is-what-you-get (WYSIWYG) editor, suchas Microsoft FrontPage or AdobeDreamweaver. You’ll likely find iteasier and more educational tostart out with a simple text edi-tor while you’re just learningHTML. You can move to visualtools (such as FrontPage andDreamweaver) after you have abetter understanding of what’sgoing on under the hood.
NOTEIf you’re using TextEdit on aMacintosh computer, the stepsfor creating an HTML file are alittle different than for usingNotepad on a Windows comput-er. Both are popular text editors,but with the latter, you mustfirst click on the Format menu,select Make Plain Text, and thenchange the preferences underthe Saving header by uncheck-ing the box for Append ‘.txt’Extension to Plain Text Files.Also, the default preferencesare set to show .html docu-ments as they would appear ina browser, which won’t allow youto edit them. To fix this, checkIgnore Rich Text Commands inHTML Files under the Rich TextProcessing header.
www.it-ebooks.info

ptg999
28 CHAPTER 2 Understanding HTML and XHTML Connections
Anchors, and the text He called Other Stuff. And the whole thing togetherwas the first Web Page.
</p></body>
</html>
LISTING 2.1 Continued
FIGURE 2.1When you save the text in Listing2.1 as an HTML file and view itwith a web browser, only the actualtitle and body text are displayed.
In Listing 2.1, as in every HTML page, the words starting with < and end-ing with > are actually coded commands. These coded commands arecalled HTML tags because they “tag” pieces of text and tell the web brows-er what kind of text it is. This allows the web browser to display the textappropriately.
The first few lines of code in the web page serve as standard boilerplatecode that you will include in all of your pages. This code actually identifiesthe page as a valid XHTML 1.1 document, which means that, technically,the web page is an XHTML page. All the pages developed throughout thebook are XHTML 1.1 pages. Because XHTML is a more structured versionof HTML, it’s still okay to generally refer to all the pages in the book asHTML pages. By targeting XHTML 1.1 with your code, you are developingweb pages that adhere to the very latest web standards. This is a goodthing!
NOTE
Technically speaking, HTML5will be the next web standardbut it’s not quite at the point offull adoption. Current estimatesput the full adoption of HTMLsometime in 2011. However, asyou learn about important fea-tures of HTML and XHTML inthis book, I will include notesabout how HTML5 featuresmight differ.
www.it-ebooks.info

ptg999
HTML Tags Every XHTML Web Page Must Have 29
If you have obtained a web hosting account, you could use FTP at thispoint to transfer the firstpage.html file to the web server. In fact, from thischapter forward, the instructions will assume you have a hosting providerand are comfortable sending files back and forth via FTP; if that is not thecase, please review the first chapter before moving on. Or, if you are con-sciously choosing to work with files locally (without a web host), be pre-pared to adjust the instructions to suit your particular needs (such asignoring the commands “transfer the files” and “type in the URL”).
HTML Tags Every XHTML Web PageMust HaveThe time has come for the secret language of HTML tags to be revealed toyou. When you understand this language, you will have creative powersfar beyond those of other humans. Don’t tell the other humans, but it’sreally pretty easy.
Creating and Viewinga Basic Web Page
Before you learn the meaning of the HTML tags used in Listing 2.1, you mightwant to see exactly how I went about creating and viewing the documentitself. Follow these steps:
1. Type all the text in Listing 2.1, including the HTML tags, in WindowsNotepad (or use Macintosh TextEdit or another text editor of yourchoice).
2. Select File, Save As. Be sure to select plain text (or ASCII text) as thefile type.
3. Name the file firstpage.html.
4. Choose the folder on your hard drive where you would like to keep yourweb pages—and remember which folder you choose! Click the Save orOK button to save the file.
5. Now start your favorite web browser. (Leave Notepad running, too, soyou can easily switch between viewing and editing your page.)
In Internet Explorer, select File, Open and click Browse. If you’re using Firefox,select File, Open File. Navigate to the appropriate folder and select the firstpage.html file. Some browsers and operating systems will also enable youto drag and drop the firstpage.html file onto the browser window to view it.
Voilà! You should see the page shown in Figure 2.1.
TRY IT YOURSELF ▼
NOTEYou don’t need to be connected tothe Internet to view a web pagestored on your own computer. Bydefault, your web browser tries toconnect to the Internet every timeyou start it, which makes sensemost of the time. However, this canbe a hassle if you’re developingpages locally on your hard drive(offline) and you keep getting errorsabout a page not being found. Ifyou have a full-time web connectionvia a LAN, cable modem, or DSL,this is a moot point because thebrowser will never complain aboutbeing offline. Otherwise, the appro-priate disciplinary action willdepend on your breed of browser;check the options under yourbrowser’s Tools menu.
www.it-ebooks.info

ptg999
30 CHAPTER 2 Understanding HTML and XHTML Connections
Before you get into the HTML tags, let’s first address the messy-lookingcode at the top of Listing 2.1. The first line indicates that the HTML docu-ment is, in fact, an XML document:
<?xml version=”1.0” encoding=”UTF-8”?>
The version of XML is set to 1.0, which is fairly standard, as is the type ofcharacter encoding (UTF-8).
The second and third lines of code in Listing 2.1 are even more complicat-ed looking:
<!DOCTYPE html PUBLIC “-//W3C//DTD XHTML 1.1//EN”“http://www.w3.org/TR/xhtml11/DTD/xhtml11.dtd”>
Again, the specifics of this code aren’t terribly important as long as youremember to include the code at the start of your pages. This code identi-fies the document as being XHTML 1.1, which then allows web browsersto make sure the code meets all the requirements of XHTML 1.1.
Most HTML tags have two parts: an opening tag, which indicates where apiece of text begins, and a closing tag, which indicates where the piece oftext ends. Closing tags start with a / (forward slash) just after the < sym-bol.
Another type of tag is the empty tag, which is unique in that it doesn’tinclude a pair of matching opening and closing tags. Instead, an empty tagconsists of a single tag that starts with a < and ends with a / just before the> symbol.
Following is a quick summary of these three tags just to make sure youunderstand the role each plays:
. An opening tag is an HTML tag that indicates the start of an HTMLcommand; the text affected by the command appears after the open-ing tag. Opening tags always begin with < and end with >, as in<html>.
. A closing tag is an HTML tag that indicates the end of an HTML com-mand; the text affected by the command appears before the closingtag. Closing tags always begin with </ and end with >, as in </html>.
. An empty tag is an HTML tag that issues an HTML command with-out enclosing any text in the page. Empty tags always begin with <and end with />, as in <br /> and <img />.
NOTE
It isn’t terribly important that youunderstand concepts such ascharacter encoding at this point.What is important is that youinclude the appropriate boiler-plate code in your pages so thatthey adhere to the latest webstandards. As of this writing,XHTML 1.1 is a web standard.HTML5 is not yet a web stan-dard, but if you were creating anHTML5 document, these lines atthe beginning of your HTML filewould not be necessary.
NOTE
The XML/XHTML boilerplatecode isn’t strictly required foryou to create web pages. Youcan delete the opening lines ofcode in the example so that thepage starts with the <html>tag and it will still open fine ina web browser. The extra codeis included to ensure yourpages are up to date with thecurrent web standards.Additionally, the extra codeenables you to validate yourweb pages for accuracy, whichyou’ll learn how to do a bit laterin this chapter.
www.it-ebooks.info

ptg999
Organizing a Page with Paragraphs and Line Breaks 31
For example, the <body> tag in Listing 2.1 tells the web browser where theactual body text of the page begins, and </body> indicates where it ends.Everything between the <body> and </body> tags will appear in the maindisplay area of the web browser window, as shown in Figure 2.1.
The very top of the browser window (refer to Figure 2.1) shows title text,which is any text that is located between <title> and </title>. The titletext is also used to identify the page on the browser’s Bookmarks orFavorites menu, depending on which browser you use. It’s important toprovide titles for your pages so that visitors to the page can properly book-mark them for future reference.
You will use the <body> and <title> tag pairs in every HTML page youcreate because every web page needs a title and body text. You will alsouse the <html> and <head> tag pairs, which are the other two tags shownin Listing 2.1. Putting <html> at the very beginning of a document simplyindicates that the document is a web page. The </html> at the end indi-cates that the web page is over.
Within a page, there is a head section and a body section. Each section isidentified by <head> and <body> tags. The idea is that information in thehead of the page somehow describes the page but isn’t actually displayedby a web browser. Information placed in the body, however, is displayedby a web browser. The <head> tag always appears near the beginning ofthe HTML code for a page, just after the opening <html> tag.
The <title> tag pair used to identify the title of a page appears within thehead of the page, which means it is placed after the opening <head> tagand before the closing </head> tag. In upcoming chapters, you’ll learnabout some other advanced header information that can go between<head> and </head>, such as style sheet rules that are used to format thepage, as well as the JavaScript you’ll learn to write and embed.
The <p> tag used in Listing 2.1 encloses a paragraph of text. You shouldenclose your chunks of text in the appropriate container tags wheneverpossible.
Organizing a Page with Paragraphsand Line BreaksWhen a web browser displays HTML pages, it pays no attention to lineendings or the number of spaces between words. For example, the top ver-sion of the poem shown in Figure 2.2 appears with a single space between
NOTE
You no doubt noticed in Listing2.1 that there is some extracode associated with the<html> tag. This code consistsof two attributes (xmlns andxml:lang), which are used tospecify additional informationrelated to the tag. These twoattributes are standard require-ments of all XHTML web pages;the former defines the XMLnamespace, whereas the latterdefines the language of thecontent. Throughout this book,a standard namespace isdefined, and the English lan-guage is used. If you are writingin a different language, replacethe “en” (for English) with thelanguage identifier relevant toyou.
TIP
You might find it convenient tocreate and save a bare-bonespage (also known as a skeletonpage, or template) with just theopening and closing <html>,<head>, <title>, and <body>tags, similar to the documentused in Listing 2.1. You canthen open that document as astarting point whenever youwant to make a new web pageand save yourself the trouble oftyping all those obligatory tagsevery time.
www.it-ebooks.info

ptg999
32 CHAPTER 2 Understanding HTML and XHTML Connections
all words, even though that’s not how it’s entered in Listing 2.2. This isbecause extra whitespace in HTML code is automatically reduced to a sin-gle space. Additionally, when the text reaches the edge of the browser win-dow, it automatically wraps to the next line, no matter where the linebreaks were in the original HTML file.
FIGURE 2.2When the HTML in Listing 2.2 isviewed as a web page, line andparagraph breaks only appearwhere there are <br /> and <p>tags.
LISTING 2.2 HTML Containing Paragraph and Line Breaks<?xml version=”1.0” encoding=”UTF-8”?><!DOCTYPE html PUBLIC “-//W3C//DTD XHTML 1.1//EN”“http://www.w3.org/TR/xhtml11/DTD/xhtml11.dtd”>
<html xmlns=”http://www.w3.org/1999/xhtml” xml:lang=”en”><head><title>The Advertising Agency Song</title>
</head>
<body><p>When your client’s hopping mad,put his picture in the ad.
If he still should prove refractory,add a picture of his factory.
</p>
<hr />
<p>When your client’s hopping mad,<br />put his picture in the ad.
www.it-ebooks.info

ptg999
Organizing a Page with Paragraphs and Line Breaks 33
</p><p>If he still should prove refractory,<br />add a picture of his factory.
</p></body>
</html>
You must use HTML tags if you want to control where line and paragraphbreaks actually appear. When text is enclosed within the <p></p> containertags, a line break will be assumed after the closing tag. In later chapters,you will learn to control the height of the line break using CSS. The <br />tag forces a line break within a paragraph. Unlike the other tags you’veseen so far, <br /> doesn’t require a closing </br> tag—this is one of thoseempty tags discussed earlier. Although HTML 4 does not require the / inempty tags, XHTML does and future standards will, so it’s important foryou to stick to the latest standards and create web pages that are codedproperly. Always code empty tags so that they end with />.
The poem in Listing 2.2 and Figure 2.2 shows the <br /> and <p> tagsbeing used to separate the lines and verses of an advertising agency song.You might have also noticed the <hr /> tag in the listing, which causes ahorizontal rule line to appear on the page (see Figure 2.2). Inserting a hori-zontal rule with the <hr /> tag also causes a line break, even if you don’tinclude a <br /> tag along with it. Like <br />, the <hr /> horizontal ruletag is an empty tag and therefore never gets a closing </hr> tag.
LISTING 2.2 Continued
CAUTION
You might come across a lot ofweb content that includes <br>instead of <br />. Or youmight see other content thatdoes not include the closing</p> tag. Just remember thereis a lot of antiquated web con-tent floating around theInternet, and just because yousee it in use doesn’t mean it’scorrect. Save yourself a lot offuture work and frustration byadhering to the standards youlearn in this book. Developingclean HTML coding habits is avery important part of becominga successful web designer.
Formatting Text inHTML
Take a passage of text and try your hand at formatting it as proper HTML.
1. Add <html><head><title>My Title</title></head><body> to thebeginning of the text (using your own title for your page instead of MyTitle). Also include the boilerplate code at the top of the page thattakes care of meeting the requirements of XHTML.
2. Add </body></html> to the very end of the text.
3. Add a <p> tag at the beginning of each paragraph and a </p> tag at theend of each paragraph.
4. Use <br /> tags anywhere you want single-spaced line breaks.
5. Use <hr /> to draw horizontal rules separating major sections of text,or wherever you’d like to see a line across the page.
TRY IT YOURSELF ▼
www.it-ebooks.info

ptg999
34 CHAPTER 2 Understanding HTML and XHTML Connections
Organizing Your Content withHeadingsWhen you browse through web pages on the Internet, you’ll notice thatmany of them have a heading at the top that appears larger and bolderthan the rest of the text. Listing 2.3 is sample code and text for a simpleweb page containing an example of a heading as compared to normalparagraph text. Any text between <h1> and </h1> tags will appear as alarge heading. Additionally, <h2> and <h3> make progressively smallerheadings, and so on as far down as <h6>.
LISTING 2.3 Heading Tags<?xml version=”1.0” encoding=”UTF-8”?><!DOCTYPE html PUBLIC “-//W3C//DTD XHTML 1.1//EN”“http://www.w3.org/TR/xhtml11/DTD/xhtml11.dtd”>
<html xmlns=”http://www.w3.org/1999/xhtml” xml:lang=”en”><head><title>My Widgets</title>
</head>
<body><h1>My Widgets</h1><p>My widgets are the best in the land. Continue reading tolearn more about my widgets.</p>
<h2>Widget Features</h2><p>If I had any features to discuss, you can bet I’d doit here.</p>
<h3>Pricing</h3><p>Here, I would talk about my widget pricing.</p>
TRY IT YOURSELF▼
Formatting Text inHTMLcontinued
CAUTION
If you are using a word proces-sor to create the web page, besure to save the HTML file inplain-text or ASCII format.
6. Save the file as mypage.html (using your own filename instead ofmypage).
7. Open the file in a web browser to see your web content. (Send the filevia FTP to your web hosting account, if you have one.)
8. If something doesn’t look right, go back to the text editor to make cor-rections and save the file again (and send it to your web hostingaccount, if applicable). You then need to click Reload/Refresh in thebrowser to see the changes you made.
www.it-ebooks.info

ptg999
Organizing Your Content with Headings 35
<h3>Comparisons</h3><p>Here, I would talk about how my widgets compare to mycompetitor’s widgets.</p>
</body></html>
As you can see in Figure 2.3, the HTML that creates headings couldn’t besimpler. In this example, the phrase “My Widgets” is prominently dis-played using the <h1> tag. To create the biggest (level 1) heading, just putan <h1> tag at the beginning and a </h1> tag at the end of the text youwant to use as a heading. For a slightly smaller (level 2) heading—forinformation that is of lesser importance than the title— use the <h2> and</h2> tags around your text. For content that should appear even lessprominently than a level 2 heading, use the <h3> and </h3> tags aroundyour text.
However, bear in mind that your headings should follow a content hierar-chy; use only one level 1 heading, have one (or more) level 2 headings afterthe level 1 heading, use level 3 headings directly after level 2 headings,and so on. Do not fall into the trap of assigning headings to content just tomake that content display a certain way. Instead, ensure that you are cate-gorizing your content appropriately (as a main heading, a secondary head-ing, and so on), while using display styles to make that text render a par-ticular way in a web browser.
LISTING 2.3 Continued NOTE
By now you’ve probably caughton to the fact that HTML codeis often indented by its authorto reveal the relationshipbetween different parts of theHTML document. This indenta-tion is entirely voluntary—youcould just as easily run all thetags together with no spaces orline breaks and they would stilllook fine when viewed in abrowser. The indentations arefor you so that you can quicklylook at a page full of code andunderstand how it fits together.Indenting your code is a verygood web design habit and ulti-mately makes your pages easi-er to maintain.
FIGURE 2.3The use of three levels of head-ings shows the hierarchy of con-tent on this sample product page.
www.it-ebooks.info
ptg999
36 CHAPTER 2 Understanding HTML and XHTML Connections
Theoretically, you can also use <h4>, <h5>, and <h6> tags to make progres-sively less important headings, but these aren’t used very often. Webbrowsers seldom show a noticeable difference between these headings andthe <h3> headings anyway, and content usually isn’t displayed in such amanner as to need six levels of headings to show the content hierarchy.
It’s important to remember the difference between a title and a heading.These two words are often interchangeable in day-to-day English, butwhen you’re talking HTML, <title> gives the entire page an identifyingname that isn’t displayed on the page itself; it’s displayed only on thebrowser window’s title bar. The heading tags, on the other hand, causesome text on the page to be displayed with visual emphasis. There can beonly one <title> per page and it must appear within the <head> and</head> tags, whereas you can have as many <h1>, <h2>, and <h3> head-ings as you want, in any order that suits your fancy. However, as I men-tioned before, you should use the heading tags to keep tight control overcontent hierarchy; do not use headings as a way to achieve a particularlook because that’s what CSS is for.
You’ll learn to take complete control over the appearance of text on yourweb pages in Parts II and III of this book. Short of taking exacting controlof the size, family, and color of fonts, headings provide the easiest andmost popular way to draw extra attention to important text.
Validating Your Web ContentIn the first chapter, I discussed ways to test your pages; one very importantway to test your pages is to validate them. Think of it this way: It’s onething to design and draw a beautiful set of house plans, but it’s quiteanother for an architect to stamp it as a safe structure suitable for construc-tion. Validating your web pages is a similar process; in this case, however,the architect is an application—not a person.
In brief, validation is the process of testing your pages with a special appli-cation that searches for errors and makes sure your pages follow the strictXHTML standard. Validation is simple. In fact, the standards body respon-sible for developing web standards—the World Wide Web Consortium(W3C)—offers an online validation tool you can use. To validate a page,follow this URL: http://validator.w3.org/. The W3C Markup ValidationService is shown in Figure 2.4.
NOTE
On many web pages nowadays,graphical images of ornatelyrendered letters and logos areoften used in place of the ordi-nary text headings discussed inthis chapter. However, usingtext headings is one of manysearch engine optimization(SEO) tips that you will learnabout in Chapter 28, “HelpingPeople Find Your Web Pages.”Search engines look at headingtags to see how you organizeyour content; they give higherpreference to content that youhave indicated is more impor-tant (for example, a level 1heading) versus content thatyou indicate is of lesser impor-tance (lower-level headings).
CAUTION
Don’t forget that anythingplaced in the head of a webpage is not intended to beviewed on the page, whereaseverything in the body of thepage is intended for viewing.
www.it-ebooks.info

ptg999
Validating Your Web Content 37
FIGURE 2.4The W3C Markup Validation Service enables you to validate an HTML (XHTML) docu-ment to ensure it has been coded accurately.
If you’ve already published a page online, you can use the Validate by URItab. Use the Validate by File Upload tab to validate files stored on yourlocal computer file system. The Validate by Direct Input tab enables you topaste the contents of a file from your text editor. If all goes well, your pagewill get a passing report (see Figure 2.5).
If the W3C Markup Validation Service encounters an error in your webpage, it will provide specific details (including the line numbers of theoffending code). This is a great way to hunt down problems and rid yourpages of buggy code. Validation not only informs you whether your pagesare constructed properly, it also assists you in finding and fixing problemsbefore you post pages for the world to see.
Peeking at OtherDesigners’ PagesGiven the visual and sometimesaudio pizzazz present in manypopular web pages, you proba-bly realize that the simplepages described in this chapterare only the tip of the HTML ice-berg. Now that you know thebasics, you might surprise your-self with how much of the restyou can pick up just by lookingat other people’s pages on theInternet. You can see the HTMLfor any page by right-clickingand selecting View Source inany web browser.
Don’t worry if you aren’t yetable to decipher what someHTML tags do or exactly how touse them yourself. You’ll findout about all those things inthe next few chapters. However,sneaking a preview now willshow you the tags that you doknow in action and give you ataste of what you’ll soon beable to do with your web pages.
TIP
Some web development toolsinclude built-in validation featuresyou can use in lieu of the W3CMarkup Validation Service. Someexamples include browser exten-sions such as Firebug (http://getfirebug.com/) and HTMLValidator (http://users.skynet.be/mgueury/mozilla/), but manyother programs offer similar functionality; check your userdocumentation.
www.it-ebooks.info
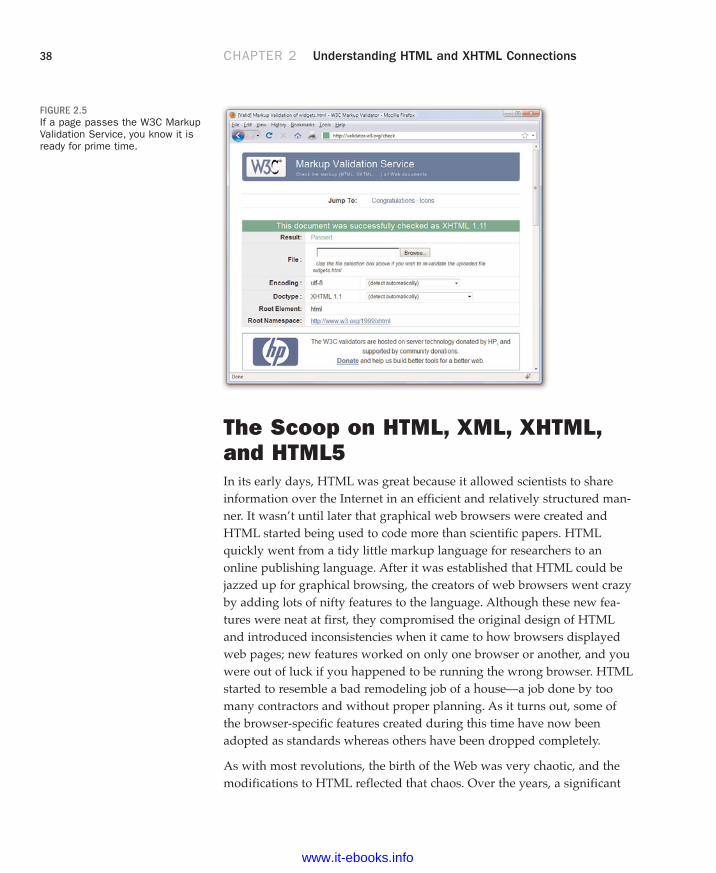
ptg999
38 CHAPTER 2 Understanding HTML and XHTML Connections
The Scoop on HTML, XML, XHTML,and HTML5In its early days, HTML was great because it allowed scientists to shareinformation over the Internet in an efficient and relatively structured man-ner. It wasn’t until later that graphical web browsers were created andHTML started being used to code more than scientific papers. HTMLquickly went from a tidy little markup language for researchers to anonline publishing language. After it was established that HTML could bejazzed up for graphical browsing, the creators of web browsers went crazyby adding lots of nifty features to the language. Although these new fea-tures were neat at first, they compromised the original design of HTMLand introduced inconsistencies when it came to how browsers displayedweb pages; new features worked on only one browser or another, and youwere out of luck if you happened to be running the wrong browser. HTMLstarted to resemble a bad remodeling job of a house—a job done by toomany contractors and without proper planning. As it turns out, some ofthe browser-specific features created during this time have now beenadopted as standards whereas others have been dropped completely.
As with most revolutions, the birth of the Web was very chaotic, and themodifications to HTML reflected that chaos. Over the years, a significant
FIGURE 2.5If a page passes the W3C MarkupValidation Service, you know it isready for prime time.
www.it-ebooks.info
ptg999
The Scoop on HTML, XML, XHTML, and HTML5 39
effort has been made to reel in the inconsistencies of HTML and restoresome order to the language. The problem with disorder in HTML is that itresults in web browsers having to guess at how a page is to be displayed,which is not a good thing. Ideally, a web page designer should be able todefine exactly how a page is to look and have it look the same regardlessof what kind of browser or operating system someone is using. Better still,a designer should be able to define exactly what a page means and havethat page look consistent across different browsers and platforms. Thisutopia is still off in the future somewhere, but a markup language calledXML (Extensible Markup Language) began to play a significant role inleading us toward it.
XML is a general language used to create specific languages, such asHTML. It might sound a little strange, but it really just means that XMLprovides a basic structure and set of rules to which any markup languagemust adhere. Using XML, you can create a unique markup language todescribe just about any kind of information, including web pages.Knowing that XML is a language for creating other markup languages, youcould create your own version of HTML using XML. You could even createa markup language called BCCML (Bottle Cap Collection MarkupLanguage), for example, which you could use to create and manage yourextensive collection of rare bottle caps. The point is that XML lays theground rules for organizing information in a consistent manner, and thatinformation can be anything from web pages to bottle caps.
You might be thinking that bottle caps don’t have anything to do with theWeb, so why mention them? The reason is that XML is not entirely aboutweb pages. XML is actually broader than the Web in that it can be used torepresent any kind of information on any kind of computer. If you canvisualize all the information whizzing around the globe among computers,mobile phones, handheld computers, televisions, and radios, you can startto understand why XML has much broader applications than just cleaningup web pages. However, one of the first applications of XML is to restoresome order to the Web, which is why XML is relevant to learning HTML.
If XML describes data better than HTML, does it mean that XML is set toupstage HTML as the markup language of choice for the Web? No. XML isnot a replacement for HTML; it’s not even a competitor of HTML. XML’simpact on HTML has to do with cleaning up HTML. HTML is a relativelyunstructured language that benefits from the rules of XML. The natural merg-er of the two technologies resulted in HTML’s adherence to the rules andstructure of XML. To accomplish this merger, a new version of HTML was
www.it-ebooks.info

ptg999
40 CHAPTER 2 Understanding HTML and XHTML Connections
formulated that follows the stricter rules of XML. The new XML-compliantversion of HTML is known as XHTML. Fortunately for you, you’ll actually belearning XHTML throughout this book because it is really just a cleaner ver-sion of HTML.
You might have heard about HTML5, which is touted as the next web stan-dard. It will be, but not quite yet. When it does become a web standard, itwill not render XHTML useless—HTML5 is not a replacement for XHTML,but instead is a major revision of HTML 4. In other words, XHTML andHTML5 can coexist on the Web, and web browsers that currently supportXHTML will also (one day) support HTML5 as well.
The goal of this book is to guide you through the basics of web publishing,using XHTML and CSS as the core languages of those pages. However,whenever possible, I will note elements of the languages that are not pres-ent in HTML5, should you want to design your content for even furthersustainability. If you gain a solid understanding of web publishing and theways in which CSS works with the overall markup language of the page(be it XHTML or HTML5), you will be in a good position if you decide youwant to move from XHTML to HTML5.
SummaryThis chapter introduced the basics of what web pages are and how theywork, including the history and differences between HTML and XHTML.You learned that coded HTML commands are included in a text file, andthat typing HTML text yourself is better than using a graphical editor tocreate HTML commands for you—especially when you’re learning HTML.
You were introduced to the most basic and important HTML tags. Byadding these coded commands to any plain-text document, you can quick-ly transform it into a bona fide web page. You learned that the first step increating a web page is to put a few obligatory HTML tags at the beginningand end, including a title for the page. You then mark where paragraphsand lines end and add horizontal rules and headings if you want them.Table 2.1 summarizes all the tags introduced in this chapter.
www.it-ebooks.info

ptg999
Summary 41
TABLE 2.1 HTML Tags Covered in Chapter 2
Tag Function
<html>...</html> Encloses the entire HTML document.
<head>...</head> Encloses the head of the HTML document. Used with-in the <html> tag pair.
<title>...</title> Indicates the title of the document. Used within the<head> tag pair.
<body>...</body> Encloses the body of the HTML document. Used with-in the <html> tag pair.
<p>...</p> A paragraph; skips a line between paragraphs.
<br /> A line break.
<hr /> A horizontal rule line.
<h1>...</h1> A first-level heading.
<h2>...</h2> A second-level heading.
<h3>...</h3> A third-level heading.
<h4>...</h4> A fourth-level heading (seldom used).
<h5>...</h5> A fifth-level heading (seldom used).
<h6>...</h6> A sixth-level heading (seldom used).
Finally, you learned about XML and XHTML, how they relate to HTML,and what HTML5 means in relation to what it is you’re learning here.
www.it-ebooks.info

ptg999
42 CHAPTER 2 Understanding HTML and XHTML Connections
Q&AQ. I’ve created a web page, but when I open the file in my web browser, I
see all the text including the HTML tags. Sometimes I even see weirdgobbledygook characters at the top of the page! What did I do wrong?
A. You didn’t save the file as plain text. Try saving the file again, beingcareful to save it as Text Only or ASCII Text. If you can’t quite figure outhow to get your word processor to do that, don’t stress. Just type yourHTML files in Notepad or TextEdit instead and everything should workjust fine. (Also, always make sure that the filename of your web pageends in .html or .htm.)
Q. I’ve seen web pages on the Internet that don’t have <html> tags at thebeginning. You said pages always have to start with <html>. What’sthe deal?
A. Many web browsers will forgive you if you forget to include the <html>tag and will display the page correctly anyway. However, it’s a very goodidea to include it because some software does need it to identify thepage as valid HTML. Besides, you want your pages to be bona fideXHTML pages so that they conform to the latest web standards.
WorkshopThe workshop contains quiz questions and exercises to help you solidify yourunderstanding of the material covered. Try to answer all questions beforelooking at the “Answers” section that follows.
Quiz1. What four tags are required in every HTML page?
2. What HTML tags and text would you use to produce the following webcontent:
. A small heading with the words We are Proud to Present
. A horizontal rule across the page
. A large heading with the one word Orbit
. A medium-sized heading with the words The Geometric Juggler
. Another horizontal rule
www.it-ebooks.info

ptg999
Workshop 43
3. What code would you use to create a complete HTML web page withthe title Foo Bar, a heading at the top that reads Happy Hour at theFoo Bar, followed by the words Come on down! in regular type?
Answers1. <html>, <head>, <title>, and <body> (along with their closing tags,
</html>, </head>, </title>, and </body>).
2. Your code would look like this:
<h3>We are Proud to Present</h3><hr /><h1>Orbit</h1><h2>The Geometric Juggler</h2><hr />
3. Your code would look like this:
<?xml version=”1.0” encoding=”UTF-8”?><!DOCTYPE html PUBLIC “-//W3C//DTD XHTML 1.1//EN”“http://www.w3.org/TR/xhtml11/DTD/xhtml11.dtd”>
<html xmlns=”http://www.w3.org/1999/xhtml” xml:lang=”en”><head><title>Foo Bar</title>
</head>
<body><h1>Happy Hour at the Foo Bar</h1><p>Come on Down!</p>
</body></html>
Exercises. Even if your main goal in reading this book is to create web content for
your business, you might want to make a personal web page just forpractice. Type a few paragraphs to introduce yourself to the world anduse the HTML tags you’ve learned in this chapter to make them into aweb page.
. Throughout the book, you’ll be following along with the code examplesand making pages of your own. Take a moment now to set up a basicdocument template containing the XML declaration, doctype declara-tion, and tags for the core HTML document structure. That way, you canbe ready to copy and paste that information whenever you need it.
www.it-ebooks.info


ptg999
In the previous chapter, you learned the basics of HTML and XHTML,including how to set up a skeletal HTML template for all your web con-tent. In this chapter, you will learn how to fine-tune the display of yourweb content using Cascading Style Sheets (CSS).
The concept behind style sheets is simple: You create a style sheet docu-ment that specifies the fonts, colors, spacing, and other characteristics thatestablish a unique look for a website. You then link every page that shouldhave that look to the style sheet, instead of specifying all those stylesrepeatedly in each separate document. Therefore, when you decide tochange your official corporate typeface or color scheme, you can modify allyour web pages at once just by changing one or two entries in your stylesheet rather than changing them in all of your static web files. So, a stylesheet is a grouping of formatting instructions that controls the appearanceof several HTML pages at once.
Style sheets enable you to set a great number of formatting characteristics,including exacting typeface controls, letter and line spacing, and marginsand page borders, just to name a few. Style sheets also enable sizes andother measurements to be specified in familiar units, such as inches, mil-limeters, points, and picas. You can also use style sheets to precisely posi-tion graphics and text anywhere on a web page, either at specific coordi-nates or relative to other items on the page.
In short, style sheets bring a sophisticated level of display to the Web. Andthey do so—you’ll pardon the expression—with style.
WHAT YOU’LL LEARN INTHIS CHAPTER:
. How to create a basic stylesheet
. How to use style classes
. How to use style IDs
. How to construct internalstyle sheets and inlinestyles
CHAPTER 3Understanding Cascading Style
Sheets
NOTE
If you have three or more webpages that share (or shouldshare) similar formatting andfonts, you might want to createa style sheet for them as youread this chapter. Even if youchoose not to create a com-plete style sheet, you’ll find ithelpful to apply styles to individ-ual HTML elements directlywithin a web page.
www.it-ebooks.info

ptg999
46 CHAPTER 3 Understanding Cascading Style Sheets
How CSS WorksThe technology behind style sheets is called CSS, which stands forCascading Style Sheets. CSS is a language that defines style constructs suchas fonts, colors, and positioning, which are used to describe how informa-tion on a web page is formatted and displayed. CSS styles can be storeddirectly in an HTML web page or in a separate style sheet file. Either way,style sheets contain style rules that apply styles to elements of a giventype. When used externally, style sheet rules are placed in an external stylesheet document with the file extension .css.
A style rule is a formatting instruction that can be applied to an element ona web page, such as a paragraph of text or a link. Style rules consist of oneor more style properties and their associated values. An internal style sheet isplaced directly within a web page, whereas an external style sheet exists in aseparate document and is simply linked to a web page via a special tag—more on this tag in a moment.
The cascading part of the name CSS refers to the manner in which stylesheet rules are applied to elements in an HTML document. More specifical-ly, styles in a CSS style sheet form a hierarchy in which more specific stylesoverride more general styles. It is the responsibility of CSS to determinethe precedence of style rules according to this hierarchy, which establishesa cascading effect. If that sounds a bit confusing, just think of the cascadingmechanism in CSS as being similar to genetic inheritance, in which generaltraits are passed from parents to a child, but more specific traits are entire-ly unique to the child. Base style rules are applied throughout a style sheetbut can be overridden by more specific style rules.
A quick example should clear things up. Take a look at the following codeto see whether you can tell what’s going on with the color of the text:
<div style=”color:green”>This text is green.<p style=”color:blue”>This text is blue.</p><p>This text is still green.</p>
</div>
In the previous example, the color green is applied to the <div> tag via thecolor style property. Therefore, the text in the <div> tag is colored green.Because both <p> tags are children of the <div> tag, the green text style
NOTE
You might notice that I use theterm element a fair amount inthis chapter (and I will for therest of the book, for that mat-ter). An element is simply apiece of information (content) ina web page, such as an image,a paragraph, or a link. Tags areused to code elements, andyou can think of an element asa tag complete with descriptiveinformation (attributes, text,images, and so on) within thetag.
www.it-ebooks.info

ptg999
A Basic Style Sheet 47
cascades down to them. However, the first <p> tag overrides the color styleand changes it to blue. The end result is that the first line (not surroundedby a paragraph tag) is green, the first official paragraph is blue, and thesecond official paragraph retains the cascaded green color.
If you made it through that description on your own, congratulations. Ifyou understood it after I explained it in the text, congratulations to you aswell. Understanding CSS isn’t like understanding rocket science, althoughmany people will try to convince you that it is (so that they can chargehigh consultation fees, most likely!).
Like many web technologies, CSS has evolved over the years. The originalversion of CSS, known as Cascading Style Sheets Level 1 (CSS1) was createdin 1996. The later CSS 2 standard was created in 1998, and CSS 2 is still inuse today. All modern web browsers support CSS 2, and you can safely useCSS 2 style sheets without too much concern. So when I talk about CSSthroughout the book, I’m referring to CSS 2.
You’ll find a complete reference guide to CSS at http://www.w3.org/Style/CSS/. The rest of this chapter explains how to put CSS to good use.
A Basic Style SheetDespite their intimidating power, style sheets can be simple to create.Consider the web pages shown in Figure 3.1 and Figure 3.2. These pagesshare several visual properties that could be put into a common style sheet:
. They use a large, bold Verdana font for the headings and a normalsize and weight Verdana font for the body text.
. They use an image named logo.gif floating within the content and onthe right side of the page.
. All text is black except for subheadings, which are purple.
. They have margins on the left side and at the top.
. There is vertical space between lines of text.
. The footnotes are centered and in small print.
www.it-ebooks.info

ptg999
48 CHAPTER 3 Understanding Cascading Style Sheets
Listing 3.1 shows the code for the style sheet specifying these properties.
FIGURE 3.1This page uses a style sheet tofine-tune the appearance andspacing of the text and images.
FIGURE 3.2This page uses the same stylesheet as the one shown in Figure3.1, thus maintaining a consistentlook and feel.
www.it-ebooks.info
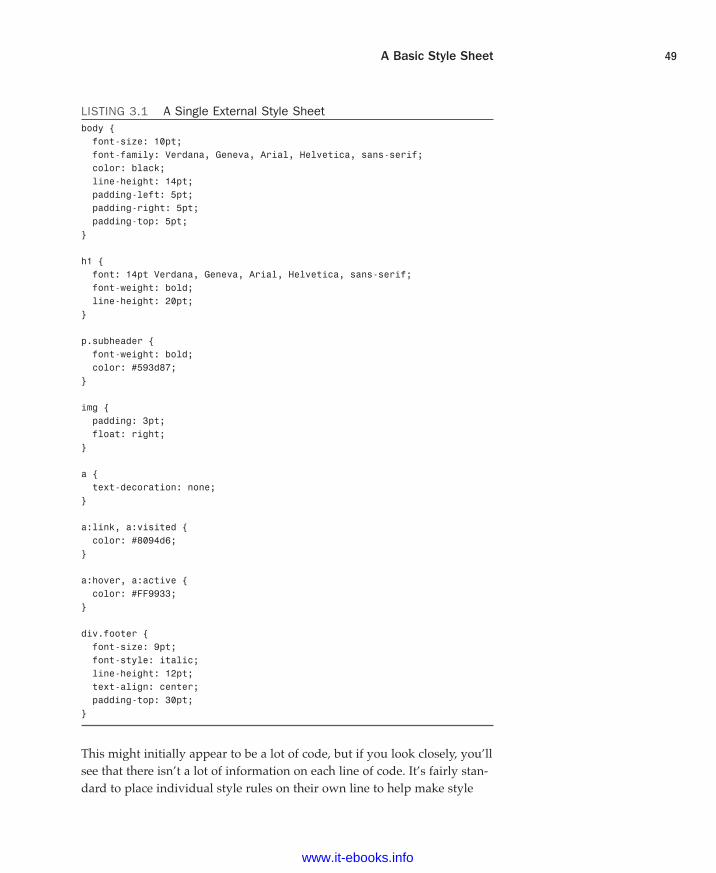
ptg999
A Basic Style Sheet 49
LISTING 3.1 A Single External Style Sheetbody {font-size: 10pt;font-family: Verdana, Geneva, Arial, Helvetica, sans-serif;color: black;line-height: 14pt;padding-left: 5pt;padding-right: 5pt;padding-top: 5pt;
}
h1 {font: 14pt Verdana, Geneva, Arial, Helvetica, sans-serif;font-weight: bold;line-height: 20pt;
}
p.subheader {font-weight: bold;color: #593d87;
}
img {padding: 3pt; float: right;
}
a {text-decoration: none;
}
a:link, a:visited {color: #8094d6;
}
a:hover, a:active {color: #FF9933;
}
div.footer {font-size: 9pt;font-style: italic;line-height: 12pt;text-align: center;padding-top: 30pt;
}
This might initially appear to be a lot of code, but if you look closely, you’llsee that there isn’t a lot of information on each line of code. It’s fairly stan-dard to place individual style rules on their own line to help make style
www.it-ebooks.info

ptg999
50 CHAPTER 3 Understanding Cascading Style Sheets
sheets more readable, but that is a personal preference; you could put allthe rules on one line as long as you kept using the semicolon to separateeach rule (more on that in a bit). Speaking of code readability, perhaps thefirst thing you noticed about this style sheet code is that it doesn’t lookanything like normal HTML code. CSS uses a language all its own to speci-fy style sheets.
Of course, the listing includes some familiar HTML tags. As you mightguess, body, h1, p, img, a, and div in the style sheet refer to the correspon-ding tags in the HTML documents to which the style sheet will be applied.The curly braces after each tag name contain the specifications for how allcontent within that tag should appear.
In this case, the style sheet says that all body text should be rendered at asize of 10 points, in the Verdana font (if possible), with the color black, and14 points between lines. If the user does not have the Verdana fontinstalled, the list of fonts in the style sheet represents the order in whichthe browser should search for fonts to use: Geneva, then Arial, and thenHelvetica. If the user has none of those fonts, the browser will use whatev-er default sans serif font is available. Additionally, the page should haveleft, right, and top margins of 5 points each.
Any text within an <h1> tag should be rendered in boldface Verdana at asize of 14 points. Moving on, any paragraph that uses only the <p> tag willinherit all the styles indicated by the body element. However, if the <p> taguses a special class named subheader, the text will appear bold and in thecolor #593d87 (a purple color).
The pt after each measurement in Listing 3.1 means points (there are 72points in an inch). If you prefer, you can specify any style sheet measure-ment in inches (in), centimeters (cm), pixels (px), or widths-of-a-letter-m,which are called ems (em).
You might have noticed that each style rule in the listing ends with a semi-colon (;). Semicolons are used to separate style rules from each other. It istherefore customary to end each style rule with a semicolon, so you caneasily add another style rule after it.
To link this style sheet to HTML documents, include a <link /> tag in the<head> section of each document. Listing 3.2 shows the HTML code for thepage shown in Figure 3.1. It contains the following <link /> tag:
<link rel=”stylesheet” type=”text/css” href=”styles.css” />
NOTE
You can specify font sizes aslarge as you like with stylesheets, although some displaydevices and printers will notcorrectly handle fonts largerthan 200 points.
www.it-ebooks.info

ptg999
A Basic Style Sheet 51
This assumes that the style sheet is stored under the name styles.css inthe same folder as the HTML document. As long as the web browser sup-ports style sheets—and all modern browsers do support style sheets—theproperties specified in the style sheet will apply to the content in the pagewithout the need for any special HTML formatting code. This confirms theultimate goal of XHTML, which is to provide a separation between thecontent in a web page and the specific formatting required to display thatcontent.
LISTING 3.2 HTML Code for the Page Shown in Figure 3.1<?xml version=”1.0” encoding=”UTF-8”?><!DOCTYPE html PUBLIC “-//W3C//DTD XHTML 1.1//EN”“http://www.w3.org/TR/xhtml11/DTD/xhtml11.dtd”>
<html xmlns=”http://www.w3.org/1999/xhtml” xml:lang=”en”><head><title>About BAWSI</title><link rel=”stylesheet” type=”text/css” href=”styles.css” />
</head><body>
<h1>About BAWSI</h1><p><img src=”logo.gif” alt=”BAWSI logo”/>The Bay Area Women’s Sports Initiative (BAWSI) is a public benefit, nonprofit corporation with a mission to create programs and partnerships through which women athletes bring health, hope and wholeness to our community. Founded in 2005 by Olympic and World Cup soccer stars Brandi Chastain and Julie Foudy and Marlene Bjornsrud, former general manager of the San Jose CyberRays women’s professional soccer team, BAWSI provides a meaningful path for women athletes to become a more visible and valued part of the Bay Area sports culture.</p><p class=”subheader”>BAWSI’s History</p><p>The concept of BAWSI was inspired by one of the most spectacular achievements in women’s sports history and born out of one its biggest disappointments... </p><p><a href=”secondpage.html”>[continue reading]</a></p><div class=”footer”>Copyright © 2005-2009 BAWSI (www.bawsi.org). All rights reserved. Used with permission.</div>
</body></html>
The code in Listing 3.2 is interesting because it contains no formatting ofany kind. In other words, there is nothing in the HTML code that dictateshow the text and images are to be displayed—no colors, no fonts, nothing.Yet the page is carefully formatted and rendered to the screen, thanks tothe link to the external style sheet, styles.css. The real benefit to this
TIP
In most web browsers, you canview the style rules in a stylesheet by opening the .css fileand choosing Notepad or anoth-er text editor as the helperapplication to view the file. (Todetermine the name of the .cssfile, look at the HTML source ofany web page that links to it.)To edit your own style sheets,just use a text editor.
NOTE
Although CSS is widely support-ed in all modern web browsers,it hasn’t always enjoyed suchwide support. Additionally, notevery browser’s support of CSSis flawless. To find out abouthow major browsers compare toeach other in terms of CSS sup-port, take a look at this website:http://www.quirksmode.org/css/contents.html.
www.it-ebooks.info
ptg999
52 CHAPTER 3 Understanding Cascading Style Sheets
approach is that you can easily create a site with multiple pages that main-tains a consistent look and feel. And you have the benefit of isolating thevisual style of the page to a single document (the style sheet) so that onechange impacts all pages.
TRY IT YOURSELF▼
Create a Style Sheetof Your Own
Starting from scratch, create a new text document called mystyles.css andadd some style rules for the following basic HTML tags: <body>, <p>, <h1>,and <h2>. After your style sheet has been created, make a new HTML file thatcontains these basic tags. Play around with different style rules and see foryourself how simple it is to change entire blocks of text in paragraphs withone simple change in a style sheet file.
A CSS Style PrimerYou now have a basic knowledge of CSS style sheets and how they arebased on style rules that describe the appearance of information in webpages. The next few sections of this chapter provide a quick overview ofsome of the most important style properties and allow you to get startedusing CSS in your own style sheets.
CSS includes various style properties that are used to control fonts, colors,alignment, and margins, to name just a few. The style properties in CSS canbe generally grouped into two major categories:
. Layout properties—Consist of properties that affect the positioningof elements on a web page, such as margins, padding, alignment,and so on
. Formatting properties—Consist of properties that affect the visualdisplay of elements within a website, such as the font type, size,color, and so on
Layout PropertiesCSS layout properties are used to determine how content is placed on aweb page. One of the most important layout properties is the displayproperty, which describes how an element is displayed with respect toother elements. There are four possible values for the display property:
www.it-ebooks.info

ptg999
A CSS Style Primer 53
. block—The element is displayed on a new line, as in a new paragraph.
. list-item—The element is displayed on a new line with a list-itemmark (bullet) next to it.
. inline—The element is displayed inline with the current paragraph.
. none—The element is not displayed; it is hidden.
It’s easier to understand the display property if you visualize each ele-ment on a web page occupying a rectangular area when displayed—thedisplay property controls the manner in which this rectangular area is dis-played. For example, the block value results in the element being placedon a new line by itself, whereas the inline value places the element nextto the content just before it. The display property is one of the few styleproperties that can be applied in most style rules. Following is an exampleof how to set the display property:
display:block;
You control the size of the rectangular area for an element with the width andheight properties. Like many size-related CSS properties, width and heightproperty values can be specified in several different units of measurement:
. in—Inches
. cm—Centimeters
. mm—Millimeters
. px—Pixels
. pt—Points
You can mix and match units however you choose within a style sheet, butit’s generally a good idea to be consistent across a set of similar style prop-erties. For example, you might want to stick with points for font propertiesor pixels for dimensions. Following is an example of setting the width ofan element using pixel units:
width: 200px;
Formatting PropertiesCSS formatting properties are used to control the appearance of content ona web page, as opposed to controlling the physical positioning of the con-tent. One of the most popular formatting properties is the border property,
NOTE
The display property relies ona concept known as relativepositioning, which means thatelements are positioned rela-tive to the location of other ele-ments on a page. CSS alsosupports absolute positioning,which enables you to place anelement at an exact location ona page independent of otherelements. You’ll learn moreabout both of these types ofpositioning in Part III,“Advanced Web Page Designwith CSS.”
www.it-ebooks.info

ptg999
54 CHAPTER 3 Understanding Cascading Style Sheets
which is used to establish a visible boundary around an element with abox or partial box. The following border properties provide a means ofdescribing the borders of an element:
. border-width—The width of the border edge
. border-color—The color of the border edge
. border-style—The style of the border edge
. border-left—The left side of the border
. border-right—The right side of the border
. border-top—The top of the border
. border-bottom—The bottom of the border
. border—All the border sides
The border-width property is used to establish the width of the borderedge. It is often expressed in pixels, as the following code demonstrates:
border-width:5px;
Not surprisingly, the border-color and border-style properties are usedto set the border color and style. Following is an example of how these twoproperties are set:
border-color:blue;border-style:dotted;
The border-style property can be set to any of the following values:
. solid—A single-line border
. double—A double-line border
. dashed—A dashed border
. dotted—A dotted border
. groove—A border with a groove appearance
. ridge—A border with a ridge appearance
. inset—A border with an inset appearance
. outset—A border with an outset appearance
. none—No border
www.it-ebooks.info

ptg999
A CSS Style Primer 55
The default value of the border-style property is none, which is why ele-ments don’t have a border unless you set the border property to a differentstyle. The most common border styles are the solid and double styles.
The border-left, border-right, border-top, and border-bottom proper-ties enable you to set the border for each side of an element individually. Ifyou want a border to appear the same on all four sides, you can use thesingle border property by itself, which expects the following styles sepa-rated by a space: border-width, border-style, and border-color.Following is an example of using the border property to set a border thatconsists of two (double) red lines that are a total of 10 pixels in width:
border:10px double red;
Whereas the color of an element’s border is set with the border-colorproperty, the color of the inner region of an element is set using the colorand background-color properties. The color property sets the color of textin an element (foreground) and the background-color property sets thecolor of the background behind the text. Following is an example of settingboth color properties to predefined colors:
color:black;background-color:orange;
You can also assign custom colors to these properties by specifying the col-ors in hexadecimal (covered in more detail in Chapter 8, “Working withColors, Images, and Multimedia”) or as RGB (Red, Green, Blue) decimalvalues, just as you do in HTML:
background-color:#999999;color:rgb(0,0,255);
You can also control the alignment and indentation of web page contentwithout too much trouble. This is accomplished with the text-align andtext-indent properties, as the following code demonstrates:
text-align:center;text-indent:12px;
After you have an element properly aligned and indented, you might beinterested in setting its font. The following font properties are used to setthe various parameters associated with fonts:
. font-family—The family of the font
. font-size—The size of the font
NOTE
The exception to the defaultborder-style of none is whenan image is placed within an<a> tag so that it serves as alinked image. In that case, asolid border is automatically setby default. That’s why you oftensee linked images with thestyle border-style:none,which turns off the automaticborder.
www.it-ebooks.info

ptg999
56 CHAPTER 3 Understanding Cascading Style Sheets
. font-style—The style of the font (normal or italic)
. font-weight—The weight of the font (light, medium, bold, and so on)
The font-family property specifies a prioritized list of font family names.A prioritized list is used instead of a single value to provide alternatives incase a font isn’t available on a given system. The font-size property spec-ifies the size of the font using a unit of measurement, usually points.Finally, the font-style property sets the style of the font and the font-weight property sets the weight of the font. Following is an example of set-ting these font properties:
font-family: Arial, sans-serif;font-size: 36pt;font-style: italic;font-weight: medium;
Now that you know a whole lot more about style properties and how theywork, refer back at Listing 3.1 and see whether it makes a bit more sense.Here’s a recap of the style properties used in that style sheet, which youcan use as a guide for understanding how it works:
. font—Lets you set many font properties at once. You can specify alist of font names separated by commas; if the first is not available,the next is tried, and so on. You can also include the words boldand/or italic and a font size. Each of these font properties can bespecified separately with font-family, font-size, font-weight, andfont-style if you prefer.
. line-height—Also known in the publishing world as leading. Thissets the height of each line of text, usually in points.
. color—Sets the text color using the standard color names or hexa-decimal color codes (see Chapter 8 for more details).
. text-decoration—Useful for turning link underlining off—simplyset it to none. The values of underline, italic, and line-throughare also supported. The application of styles to links is covered inmore detail in Chapter 7, “Using External and Internal Links.”
. text-align—Aligns text to the left, right, or center, along withjustifying the text with a value of justify.
. padding—Adds padding to the left, right, top, and bottom of an ele-ment; this padding can be in measurement units or a percentage of thepage width. Use padding-left and padding-right if you want to addpadding to the left and right of the element independently. Use
www.it-ebooks.info

ptg999
Using Style Classes 57
padding-top or padding-bottom to add padding to the top or bottom ofthe element, as appropriate. You’ll learn more about these style proper-ties in Chapters 9, “Working with Margins, Padding, Alignment, andFloating,” and 10, “Understanding the CSS Box Model and Positioning.”
Using Style ClassesThis is a “teach yourself” book, so you don’t have to go to a single class tolearn how to give your pages great style, although you do need to learnwhat a style class is. Whenever you want some of the text on your pages tolook different from the other text, you can create what amounts to a custom-built HTML tag. Each type of specially formatted text you define is called astyle class. A style class is a custom set of formatting specifications that can beapplied to any element in a web page.
Before showing you a style class, I need to take a quick step back and clarifysome CSS terminology. First off, a CSS style property is a specific style thatcan be assigned a value, such as color or font-size. You associate a styleproperty and its respective value with elements on a web page by using aselector. A selector is used to identify tags on a page to which you applystyles. Following is an example of a selector, a property, and a value allincluded in a basic style rule:
h1 { font: 36pt Courier; }
In this code, h1 is the selector, font is the style property, and 36pt Courieris the value. The selector is important because it means that the font settingwill be applied to all h1 elements in the web page. But maybe you want todifferentiate between some of the h1 elements—what then? The answer liesin style classes.
Suppose you want two different kinds of <h1> headings for use in your doc-uments. You would create a style class for each one by putting the followingCSS code in a style sheet:
h1.silly { font: 36pt Comic Sans; }h1.serious { font: 36pt Arial; }
Notice that these selectors include a period (.) after h1, followed by adescriptive class name. To choose between the two style classes, use theclass attribute, like this:
<h1 class=”silly”>Marvin’s Munchies Inc. </h1><p>Text about Marvin’s Munchies goes here. </p>
www.it-ebooks.info

ptg999
58 CHAPTER 3 Understanding Cascading Style Sheets
Or you could use this:
<h1 class=”serious”>MMI Investor Information</h1><p>Text for business investors goes here.</p>
When referencing a style class in HTML code, simply specify the classname in the class attribute of an element. In the previous example, thewords Marvin’s Munchies Inc. would appear in a 36-point Comic Sansfont, assuming that you included a <link /> to the style sheet at the top ofthe web page and assuming that the user has the Comic Sans fontinstalled. The words MMI Investor Information would appear in the 36-point Arial font instead. You can see another example of classes in action inListing 3.2; look for the subheader <p> class and the footer <div> class.
What if you want to create a style class that could be applied to any ele-ment, rather than just headings or some other particular tag? You can asso-ciate a style class with the <div> tag, as in Listing 3.2, which is used toenclose any text in a block that is somewhat similar to a paragraph of text;the <div> tag is another useful container element.
You can essentially create your own custom HTML tag by using the divselector followed by a period (.) followed by any style class name youmake up and any style specifications you choose. That tag can control anynumber of font, spacing, and margin settings all at once. Wherever youwant to apply your custom tag in a page, use a <div> tag with the classattribute followed by the class name you created.
For example, the style sheet in Listing 3.1 includes the following style classspecification:
div.footer {font-size: 9pt;font-style: italic;line-height: 12pt;text-align: center;padding-top: 30pt;
}
This style class is applied in Listing 3.2 with the following tag:
<div class=”footer”>
Everything between that tag and the closing </div> tag in Listing 3.2appears in 9-point, centered, italic text with 12-point vertical line spacingand 30 points of padding at the top of the element.
What makes style classes so valuable is how they isolate style code fromweb pages, effectively allowing you to focus your HTML code on the actual
TIPYou might have noticed a changein the coding style when multipleproperties are included in a stylerule. For style rules with a singlestyle, you’ll commonly see theproperty placed on the same lineas the rule, like this:div.footer { font-size: 9pt; }
However, when a style rule con-tains multiple style properties, it’smuch easier to read and under-stand the code if you list theproperties one-per-line, like this:div.footer {font-size:9pt;font-style: italic;line-height:12pt;text-align: center;padding-top: 30pt;
}
www.it-ebooks.info

ptg999
Internal Style Sheets and Inline Styles 59
content in a page, not how it is going to appear on the screen. Then you canfocus on how the content is rendered to the screen by fine-tuning the stylesheet. You might be surprised by how a relatively small amount of code in astyle sheet can have significant effects across an entire website. This makesyour pages much easier to maintain and manipulate.
Using Style IDsWhen you create custom style classes, you can use those classes as manytimes as you would like—they are not unique. However, there will besome instances when you want to have precise control over unique ele-ments for layout or formatting purposes (or both). In such instances, lookto IDs instead of classes.
A style ID is a custom set of formatting specifications that can be appliedonly to one element in a web page. You can use IDs across a set of pagesbut only once per time within each page.
For example, suppose you have a title within the body of all your pages.Each page has only one title, but all the pages themselves include oneinstance of that title. Following is an example of a selector with an ID indi-cated, plus a property and a value:
p#title {font: 24pt Verdana, Geneva, Arial, sans-serif}
Notice that this selector includes a hash mark, or pound sign (#), after p,followed by a descriptive ID name. When referencing a style ID in HTMLcode, simply specify the ID name in the id attribute of an element, like so:
<p id=”title”>Some Title Goes Here</p>
Everything between the opening and closing <p> tags will appear in 24-point Verdana text—but only once on any given page. You will often seestyle IDs used to define specific parts of a page for layout purposes, suchas a header area, footer area, main body area, and so on. These types ofareas in a page will appear only once per page, so using an ID rather thana class is the appropriate choice.
Internal Style Sheets and Inline StylesIn some situations, you might want to specify styles that will be used inonly one web page, in which case you can enclose a style sheet between<style> and </style> tags and include it directly in an HTML document.
www.it-ebooks.info
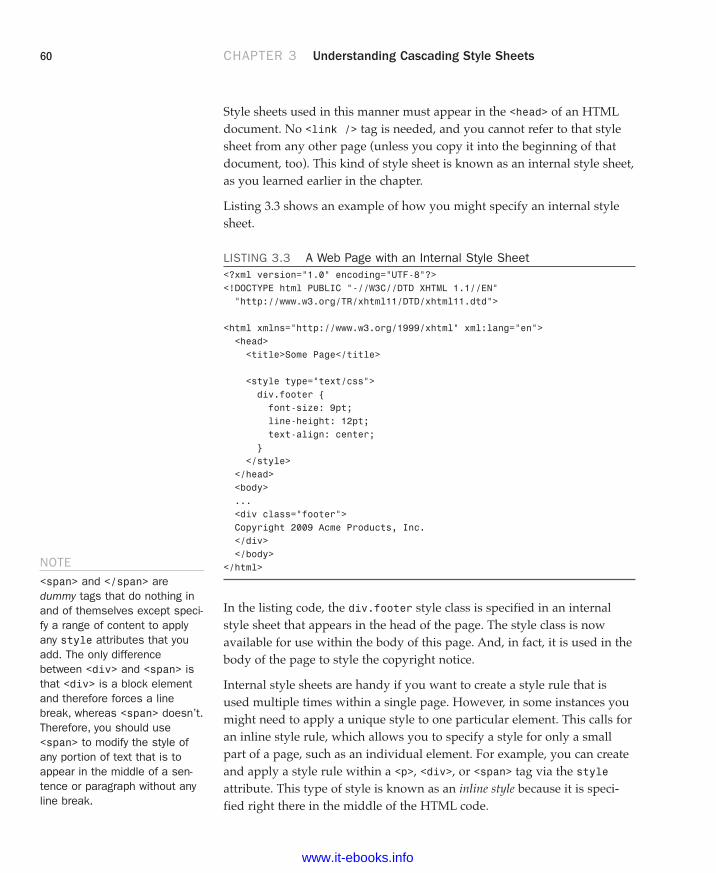
ptg999
60 CHAPTER 3 Understanding Cascading Style Sheets
Style sheets used in this manner must appear in the <head> of an HTMLdocument. No <link /> tag is needed, and you cannot refer to that stylesheet from any other page (unless you copy it into the beginning of thatdocument, too). This kind of style sheet is known as an internal style sheet,as you learned earlier in the chapter.
Listing 3.3 shows an example of how you might specify an internal stylesheet.
LISTING 3.3 A Web Page with an Internal Style Sheet<?xml version=”1.0” encoding=”UTF-8”?><!DOCTYPE html PUBLIC “-//W3C//DTD XHTML 1.1//EN”“http://www.w3.org/TR/xhtml11/DTD/xhtml11.dtd”>
<html xmlns=”http://www.w3.org/1999/xhtml” xml:lang=”en”><head><title>Some Page</title>
<style type=”text/css”>div.footer {font-size: 9pt;line-height: 12pt;text-align: center;
}</style>
</head><body>...<div class=”footer”>Copyright 2009 Acme Products, Inc.</div></body>
</html>
In the listing code, the div.footer style class is specified in an internalstyle sheet that appears in the head of the page. The style class is nowavailable for use within the body of this page. And, in fact, it is used in thebody of the page to style the copyright notice.
Internal style sheets are handy if you want to create a style rule that isused multiple times within a single page. However, in some instances youmight need to apply a unique style to one particular element. This calls foran inline style rule, which allows you to specify a style for only a smallpart of a page, such as an individual element. For example, you can createand apply a style rule within a <p>, <div>, or <span> tag via the styleattribute. This type of style is known as an inline style because it is speci-fied right there in the middle of the HTML code.
NOTE
<span> and </span> aredummy tags that do nothing inand of themselves except speci-fy a range of content to applyany style attributes that youadd. The only differencebetween <div> and <span> isthat <div> is a block elementand therefore forces a linebreak, whereas <span> doesn’t.Therefore, you should use<span> to modify the style ofany portion of text that is toappear in the middle of a sen-tence or paragraph without anyline break.
www.it-ebooks.info

ptg999
Internal Style Sheets and Inline Styles 61
Here’s how a sample style attribute might look:
<p style=”color:green”>This text is green, but <span style=”color:red”>this text is red.</span>Back to green again, but...
</p><p>...now the green is over, and we’re back to the default color for this page.
</p>
This code makes use of the <span> tag to show how to apply the colorstyle property in an inline style rule. In fact, both the <p> tag and the<span> tag in this example use the color property as an inline style.What’s important to understand is that the color:red style property over-rides the color:green style property for the text appearing between the<span> and </span> tags. Then in the second paragraph, neither of thecolor styles applies because it is a completely new paragraph that adheresto the default color of the entire page.
Validate Your StyleSheetsJust as it is important to vali-date your HTML or XHTMLmarkup, it is important to vali-date your style sheet. A specificvalidation tool for CSS can befound at http://jigsaw.w3.org/css-validator/. Just like the validation tool discussed inChapter 2, “UnderstandingHTML and XHTML Connections,”you can point the tool to a webaddress, upload a file, or pastecontent into the form field pro-vided. The ultimate goal is aresult such as that shown inFigure 3.3: valid!
FIGURE 3.3The W3C CSS Validator showsthere are no errors in the stylesheet contents of Listing 3.1.
www.it-ebooks.info
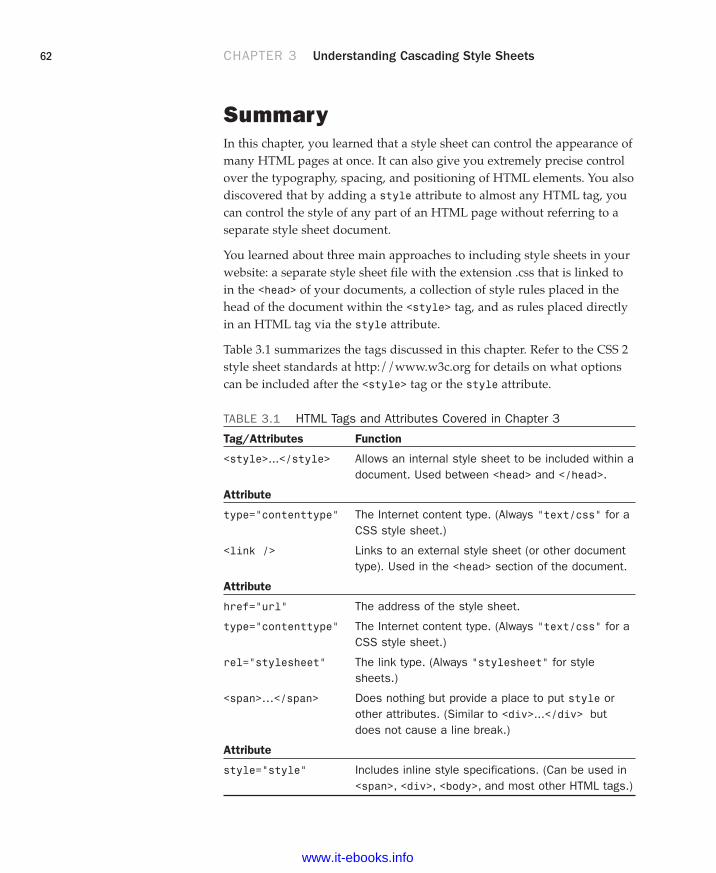
ptg999
62 CHAPTER 3 Understanding Cascading Style Sheets
SummaryIn this chapter, you learned that a style sheet can control the appearance ofmany HTML pages at once. It can also give you extremely precise controlover the typography, spacing, and positioning of HTML elements. You alsodiscovered that by adding a style attribute to almost any HTML tag, youcan control the style of any part of an HTML page without referring to aseparate style sheet document.
You learned about three main approaches to including style sheets in yourwebsite: a separate style sheet file with the extension .css that is linked toin the <head> of your documents, a collection of style rules placed in thehead of the document within the <style> tag, and as rules placed directlyin an HTML tag via the style attribute.
Table 3.1 summarizes the tags discussed in this chapter. Refer to the CSS 2style sheet standards at http://www.w3c.org for details on what optionscan be included after the <style> tag or the style attribute.
TABLE 3.1 HTML Tags and Attributes Covered in Chapter 3
Tag/Attributes Function
<style>...</style> Allows an internal style sheet to be included within adocument. Used between <head> and </head>.
Attribute
type=”contenttype” The Internet content type. (Always “text/css” for aCSS style sheet.)
<link /> Links to an external style sheet (or other documenttype). Used in the <head> section of the document.
Attribute
href=”url” The address of the style sheet.
type=”contenttype” The Internet content type. (Always “text/css” for aCSS style sheet.)
rel=”stylesheet” The link type. (Always “stylesheet” for stylesheets.)
<span>…</span> Does nothing but provide a place to put style orother attributes. (Similar to <div>...</div> butdoes not cause a line break.)
Attribute
style=”style” Includes inline style specifications. (Can be used in<span>, <div>, <body>, and most other HTML tags.)
www.it-ebooks.info

ptg999
Workshop 63
Q&AQ. Say I link a style sheet to my page that says all text should be blue,
but there’s a <span style=”font-color:red”> tag in the page some-where. Will that text display as blue or will it display as red?
A. Red. Local inline styles always take precedence over external stylesheets. Any style specifications you put between <style> and</style> tags at the top of a page will also take precedence overexternal style sheets (but not over inline styles later in the same page).This is the cascading effect of style sheets that I mentioned earlier inthe chapter. You can think of cascading style effects as starting with anexternal style sheet, which is overridden by an internal style sheet,which is overridden by inline styles.
Q. Can I link more than one style sheet to a single page?
A. Sure. For example, you might have a sheet for formatting (text, fonts,colors, and so on) and another one for layout (margins, padding, align-ment, and so on)—just include a <link /> for both. Technically speak-ing, the CSS standard requires web browsers to give the user theoption to choose between style sheets when multiple sheets are pre-sented via multiple <link /> tags. However, in practice, all major webbrowsers simply include every style sheet. The preferred technique forlinking in multiple style sheets involves using the special @import com-mand. Following is an example of importing multiple style sheets with@import:@import url(styles1.css);@import url(styles2.css);
Similar to the <link /> tag, the @import command must be placed inthe head of a web page. You learn more about this handy little com-mand in Chapter 25, “Creating Print-Friendly Web Pages,” when youlearn how to create a style sheet specifically for printing web pages.
WorkshopThe workshop contains quiz questions and exercises to help you solidify yourunderstanding of the material covered. Try to answer all questions beforelooking at the “Answers” section that follows.
www.it-ebooks.info

ptg999
64 CHAPTER 3 Understanding Cascading Style Sheets
Quiz1. What code would you use to create a style sheet to specify 30-point
blue Arial headings and all other text in double-spaced, 10-point blueTimes Roman (or the default browser font)?
2. If you saved the style sheet you made for Question 1 as corporate.css,how would you apply it to a web page named intro.html?
3. How many different ways are there to ensure style rules can be appliedto your content?
Answers1. Your style sheet would include the following:
h1 { font: 30pt blue Arial; }body { font: 10pt blue; }
2. Put the following tag between the <head> and </head> tags of theintro.html document:
<link rel=”stylesheet” type=”text/css” href=”corporate.css” />
3. Three: externally, internally, and inline.
Exercises. Using the style sheet you created earlier in this chapter, add some style
classes to your style sheet. To see the fruits of your labor, apply thoseclasses to the HTML page you created as well. Use classes with your<h1> and <p> tags to get the feel for things.
. Develop a standard style sheet for your website and link it into all yourpages. (Use internal style sheets and/or inline styles for pages thatneed to deviate from it.) If you work for a corporation, chances are ithas already developed font and style specifications for printed materi-als. Get a copy of those specifications and follow them for companyweb pages, too.
. Be sure to explore the official style sheet specs at http://www.w3.org/Style/CSS/ and try some of the more esoteric style properties not cov-ered in this chapter.
www.it-ebooks.info
ptg999
The World Wide Web (WWW) began as a text-only medium—the firstbrowsers didn’t even support images within web pages. The Web hascome a long way since those early days, as today’s websites include awealth of visual and interactive features in addition to useful content:graphics, sounds, animation, and video. Web scripting languages, such asJavaScript, are one of the easiest ways to spice up a web page and to inter-act with users in new ways.
The first part of this chapter introduces the concept of Web scripting and theJavaScript language. As the chapter moves ahead, you’ll learn how toinclude JavaScript commands directly in your HTML documents and howyour scripts will be executed when the page is viewed in a browser. You willwork with a simple script, edit it, and test it in your browser, all the whilelearning the basic tasks involved in creating and using JavaScript scripts.
Learning Web Scripting BasicsIn the world of science fiction movies (and many other movies that haveno excuse), computers are often seen obeying commands in English.Although this might indeed happen in the near future, computers current-ly find it easier to understand languages such as BASIC, C, and Java.
You already know how to use one type of computer language: HTML. Youuse HTML tags to describe how you want your document formatted, andthe browser obeys your commands and shows the formatted document tothe user. But because HTML is a simple text markup language, it can’trespond to the user, make decisions, or automate repetitive tasks.Interactive tasks such as these require a more sophisticated language: aprogramming language, or a scripting language.
WHAT YOU’LL LEARN INTHIS CHAPTER:
. What web scripting is andwhat it’s good for
. How scripting and program-ming are different (andsimilar)
. What JavaScript is andwhere it came from
. How to include JavaScriptcommands in a web page
. What JavaScript can do foryour web pages
. Beginning and endingscripts
. Formatting JavaScriptstatements
. How a script can display aresult
. Including a script within aweb document
. Testing a script in yourbrowser
. Modifying a script
. Dealing with errors inscripts
. Moving scripts into sepa-rate files
CHAPTER 4Understanding JavaScript
www.it-ebooks.info

ptg999
66 CHAPTER 4 Understanding JavaScript
Although many programming languages are complex, scripting languagesare generally simple. They have a simple syntax, can perform tasks with aminimum of commands, and are easy to learn. Web scripting languagesenable you to combine scripting with HTML to create interactive web pages.
Scripts and ProgramsA movie or a play follows a script—a list of actions (or lines) for the actorsto perform. A web script provides the same type of instructions for the webbrowser. A script in JavaScript can range from a single line to a full-scaleapplication. (In either case, JavaScript scripts usually run within a browser.)
Some programming languages must be compiled, or translated, intomachine code before they can be executed. JavaScript, on the other hand, isan interpreted language: The browser executes each line of script as it comesto it.
There is one main advantage to interpreted languages: Writing or changinga script is very simple. Changing a JavaScript script is as easy as changinga typical HTML document, and the change is enacted as soon as youreload the document in the browser.
Introducing JavaScriptJavaScript was developed by Netscape Communications Corporation, themaker of the Netscape web browser. JavaScript was the first web scriptinglanguage to be supported by browsers, and it is still by far the most popular.
JavaScript is almost as easy to learn as HTML, and it can be includeddirectly in HTML documents. Here are a few of the things you can do withJavaScript:
. Display messages to the user as part of a web page, in the browser’sstatus line, or in alert boxes
. Validate the contents of a form and make calculations (for example,an order form can automatically display a running total as you enteritem quantities)
. Animate images or create images that change when you move themouse over them
. Create ad banners that interact with the user, rather than simply dis-playing a graphic
NOTE
Is JavaScript a scripting lan-guage or a programming lan-guage? It depends on who youask. We’ll refer to scriptingthroughout this book, but feelfree to include JavaScript pro-gramming on your résumé afteryou’ve finished this book.
NOTE
Interpreted languages havetheir disadvantages—they can’texecute quickly, so they’re notideally suited for complicatedwork, such as graphics. Also,they require the interpreter (inJavaScript’s case, usually abrowser) to work.
NOTE
A bit of history: JavaScript wasoriginally called LiveScript andwas first introduced inNetscape Navigator 2.0 in1995. It was soon renamedJavaScript to indicate a market-ing relationship with Sun’s Javalanguage—although there is noother relationship, structurallyor otherwise, between Java andJavaScript.
www.it-ebooks.info

ptg999
How JavaScript Fits into a Web Page 67
. Detect the browser in use or its features and perform advanced func-tions only on browsers that support them
. Detect installed plug-ins and notify the user if a plug-in is required
. Modify all or part of a web page without requiring the user to reload it
. Display or interact with data retrieved from a remote server
You can do all this and more with JavaScript, including creating entireapplications. We’ll explore the uses of JavaScript throughout this book.
How JavaScript Fits into a Web PageUsing the <script> tag, you can add a short script (in this case, just oneline) to a web document, as shown in Listing 4.1. The <script> tag tellsthe browser to start treating the text as a script, and the closing </script>tag tells the browser to return to HTML mode. In most cases, you can’t useJavaScript statements in an HTML document except within <script> tags.The exception is event handlers, described later in this chapter.
LISTING 4.1 A Simple HTML Document with a Simple Script<?xml version=”1.0” encoding=”UTF-8”?><!DOCTYPE html PUBLIC “-//W3C//DTD XHTML 1.1//EN”“http://www.w3.org/TR/xhtml11/DTD/xhtml11.dtd”>
<html xmlns=”http://www.w3.org/1999/xhtml” xml:lang=”en”><head><title>The American Eggplant Society</title>
</head>
<body><h1>The American Eggplant Society</h1><p>Welcome to our site. Unfortunately, it is still
under construction.</p><p>We last worked on it on this date:<script type=”text/javascript”><!-- Hide the script from old browsersdocument.write(document.lastModified);// Stop hiding the script --></script></p>
</body></html>
www.it-ebooks.info

ptg999
68 CHAPTER 4 Understanding JavaScript
JavaScript’s document.write statement, which you’ll learn more aboutlater, sends output as part of the web document. In this case, it displays themodification date of the document, as shown in Figure 4.1.
FIGURE 4.1Using document.write to displaya last-modified date.
In this example, we placed the script within the body of the HTML docu-ment. There are actually four different places where you might use scripts:
. In the body of the page—In this case, the script’s output is displayedas part of the HTML document when the browser loads the page.
. In the header of the page between the <head> tags—Scripts in theheader can’t create output within the HTML document, but can bereferred to by other scripts. The header is often used for functions—groups of JavaScript statements that can be used as a single unit. Youwill learn more about functions in Chapter 14, “Getting Started withJavaScript Programming.”
. Within an HTML tag, such as <body> or <form>—This is called anevent handler and enables the script to work with HTML elements.When using JavaScript in event handlers, you don’t need to use the<script> tag. You’ll learn more about event handlers in Chapter 14.
. In a separate file entirely—JavaScript supports the use of files withthe .js extension containing scripts; these can be included by specify-ing a file in the <script> tag.
www.it-ebooks.info

ptg999
How JavaScript Fits into a Web Page 69
Using Separate JavaScript FilesWhen you create more complicated scripts, you’ll quickly find your HTMLdocuments become large and confusing. To avoid this, you can use one ormore external JavaScript files. These are files with the .js extension thatcontain JavaScript statements.
External scripts are supported by all modern browsers. To use an externalscript, you specify its filename in the <script> tag:
<script type=”text/javascript” src=”filename.js”></script>
Because you’ll be placing the JavaScript statements in a separate file, youdon’t need anything between the opening and closing <script> tags—infact, anything between them will be ignored by the browser.
You can create the .js file using a text editor. It should contain one or moreJavaScript commands and only JavaScript—don’t include <script> tags,other HTML tags, or HTML comments. Save the .js file in the same directo-ry as the HTML documents that refer to it.
Understanding JavaScript EventsMany of the useful things you can do with JavaScript involve interactingwith the user and that means responding to events—for example, a link ora button being clicked. You can define event handlers within HTML tags totell the browser how to respond to an event. For example, Listing 4.2defines a button that displays a message when clicked.
LISTING 4.2 A Simple Event Handler<?xml version=”1.0” encoding=”UTF-8”?><!DOCTYPE html PUBLIC “-//W3C//DTD XHTML 1.1//EN”“http://www.w3.org/TR/xhtml11/DTD/xhtml11.dtd”>
<html xmlns=”http://www.w3.org/1999/xhtml” xml:lang=”en”><head><title>Event Test</title>
</head>
<body><h1>Event Test</h1><button type=”button”
onclick=”alert(‘You clicked the button.’)”>Click Me!</button>
</body></html>
TIP
External JavaScript files have adistinct advantage: You can linkto the same .js file from two ormore HTML documents.Because the browser storesthis file in its cache, this canreduce the time it takes foryour web pages to display.
www.it-ebooks.info

ptg999
70 CHAPTER 4 Understanding JavaScript
In various places throughout this book, you’ll learn more about JavaScript’sevent model and how to create simple and complex event handlers.
Exploring JavaScript’s CapabilitiesIf you’ve spent any time browsing the Web, you’ve undoubtedly seen lotsof examples of JavaScript in action. Here are some brief descriptions oftypical applications for JavaScript, all of which you’ll explore further, laterin this book.
Improving NavigationSome of the most common uses of JavaScript are in navigation systems forwebsites. You can use JavaScript to create a navigation tool—for example, adrop-down menu to select the next page to read or a submenu that popsup when you hover over a navigation link.
When it’s done right, this kind of JavaScript interactivity can make a siteeasier to use, while remaining usable for browsers that don’t supportJavaScript.
Validating FormsForm validation is another common use of JavaScript. A simple script canread values the user types into a form and can make sure they’re in theright format, such as with ZIP Codes or phone numbers. This allows usersto notice common errors and fix them without waiting for a response fromthe web server. You’ll learn how to work with form data in Chapter 26,“Working with Web-Based Forms.”
Special EffectsOne of the earliest and most annoying uses of JavaScript was to createattention-getting special effects—for example, scrolling a message in thebrowser’s status line or flashing the background color of a page.
These techniques have fortunately fallen out of style, but thanks to theW3C DOM and the latest browsers, some more impressive effects are pos-sible with JavaScript—for example, creating objects that can be draggedand dropped on a page or creating fading transitions between images in aslideshow.
www.it-ebooks.info

ptg999
Beginning the Script 71
Remote Scripting (AJAX)For a long time, the biggest limitation of JavaScript was that there was noway for it to communicate with a web server. For example, you could useit to verify that a phone number had the right number of digits, but not tolook up the user’s location in a database based on the number.
Now that some of JavaScript’s advanced features are supported by mostbrowsers, this is no longer the case. Your scripts can get data from a serverwithout loading a page or send data back to be saved. These features arecollectively known as AJAX (Asynchronous JavaScript And XML), orremote scripting. You’ll learn how to develop AJAX scripts in Chapter 24,“AJAX: Remote Scripting.”
You’ve seen AJAX in action if you’ve used Google’s Gmail mail applicationor recent versions of Yahoo! Mail or Microsoft Hotmail. All of these useremote scripting to present you with a responsive user interface that workswith a server in the background.
Displaying Time with JavaScriptOne common and easy use for JavaScript is to display dates and times.Because JavaScript runs on the browser, the times it displays will be in theuser’s current time zone. However, you can also use JavaScript to calculate“universal” (UTC) time.
As a basic introduction to JavaScript, you will now create a simple scriptthat displays the current time and the UTC time within a web page, start-ing with the next section.
Beginning the ScriptYour script, like most JavaScript programs, begins with the HTML<script> tag. As you learned earlier in this chapter, you use the <script>and </script> tags to enclose a script within the HTML document.
To begin creating the script, open your favorite text editor and type thebeginning and ending <script> tags as shown.
<script type=”text/javascript”></script>
NOTEUTC stands for Universal TimeCoordinated, and is the atomictime standard based on the oldGMT (Greenwich Mean Time)standard. This is the time atthe Prime Meridian, which runsthrough Greenwich, London,England.
CAUTION
Remember to include only validJavaScript statements betweenthe starting and ending<script> tags. If the browserfinds anything but validJavaScript statements within the<script> tags, it will display aJavaScript error message.
www.it-ebooks.info

ptg999
72 CHAPTER 4 Understanding JavaScript
Adding JavaScript StatementsYour script now needs to determine the local and UTC times, and then dis-play them to the browser. Fortunately, all the hard parts, such as convert-ing between date formats, are built in to the JavaScript interpreter.
Storing Data in VariablesTo begin the script, you will use a variable to store the current date. Youwill learn more about variables in Chapter 16, “Using JavaScript Variables,Strings, and Arrays.” A variable is a container that can hold a value—anumber, some text, or in this case, a date.
To start writing the script, add the following line after the first <script>tag. Be sure to use the same combination of capital and lowercase letters inyour version because JavaScript commands and variable names are casesensitive.
now = new Date();
This statement creates a variable called now and stores the current date andtime in it. This statement and the others you will use in this script useJavaScript’s built-in Date object, which enables you to conveniently handledates and times. You’ll learn more about working with dates in Chapter 17,“Using JavaScript Functions and Objects.”
Calculating the ResultsInternally, JavaScript stores dates as the number of milliseconds sinceJanuary 1, 1970. Fortunately, JavaScript includes a number of functions toconvert dates and times in various ways, so you don’t have to figure outhow to convert milliseconds to day, date, and time.
To continue your script, add the following two statements before the final</script> tag:
localtime = now.toString();utctime = now.toGMTString();
These statements create two new variables: localtime, containing the cur-rent time and date in a nice readable format, and utctime, containing theUTC equivalent.
NOTE
Notice the semicolon at the endof the previous statement. Thistells the browser that it hasreached the end of a state-ment. Semicolons are optional,but using them helps you avoidsome common errors. We’ll usethem throughout this book forclarity.
NOTE
The localtime and utctimevariables store a piece of text,such as January 1, 200112:00 PM. In programming parl-ance, a piece of text is called astring.
www.it-ebooks.info

ptg999
Adding the Script to a Web Page 73
Creating OutputYou now have two variables—localtime and utctime—which contain theresults we want from our script. Of course, these variables don’t do usmuch good unless we can see them. JavaScript includes a number of waysto display information, and one of the simplest is the document.writestatement.
The document.write statement displays a text string, a number, or any-thing else you throw at it. Because your JavaScript program will be usedwithin a web page, the output will be displayed as part of the page. To dis-play the result, add these statements before the final </script> tag:
document.write(“<strong>Local time:</strong> “ + localtime + “<br/>”);document.write(“<strong>UTC time:</strong> “ + utctime);
These statements tell the browser to add some text to the web page con-taining your script. The output will include some brief strings introducingthe results and the contents of the localtime and utctime variables.
Notice the HTML tags, such as <strong>, within the quotation marks—because JavaScript’s output appears within a web page, it needs to be for-matted using HTML. The <br/> tag in the first line ensures that the twotimes will be displayed on separate lines.
Adding the Script to a Web PageYou should now have a complete script that calculates a result and dis-plays it. Your listing should match Listing 4.3.
LISTING 4.3 The Complete Date and Time Script<script type=”text/javascript”>now = new Date();localtime = now.toString();utctime = now.toGMTString();document.write(“<strong>Local time:</strong> “ + localtime + “<br/>”);document.write(“<strong>UTC time:</strong> “ + utctime);</script>
To use your script, you’ll need to add it to an HTML document. If you usethe general template you’ve seen in the chapters so far, you should end upwith something like Listing 4.4.
NOTE
Notice the plus signs (+) usedbetween the text and variablesin Listing 4.3. In this case, ittells the browser to combinethe values into one string oftext. If you use the plus signbetween two numbers, they areadded together.
www.it-ebooks.info
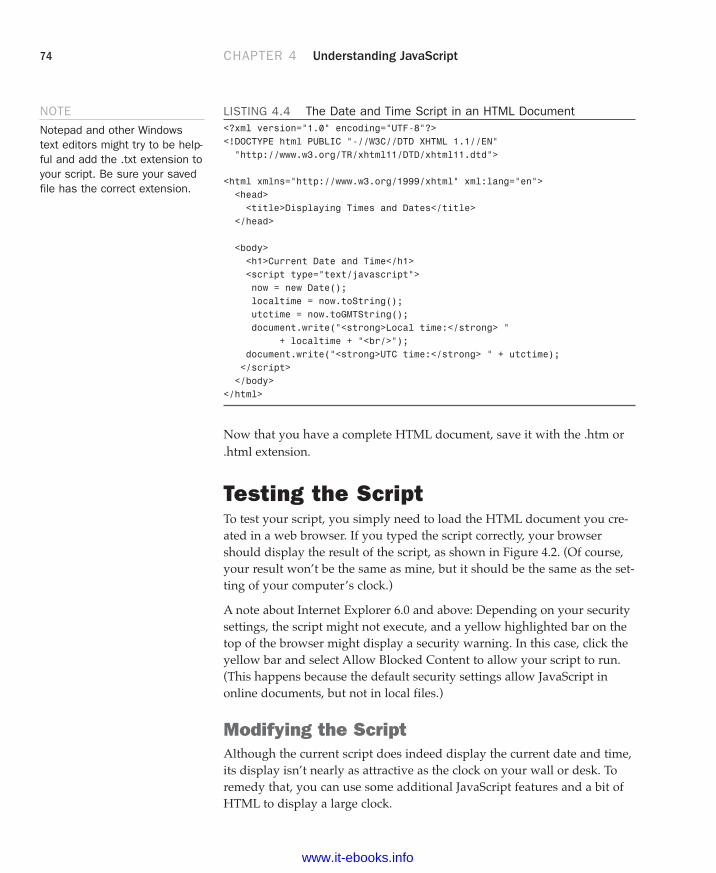
ptg999
74 CHAPTER 4 Understanding JavaScript
LISTING 4.4 The Date and Time Script in an HTML Document<?xml version=”1.0” encoding=”UTF-8”?><!DOCTYPE html PUBLIC “-//W3C//DTD XHTML 1.1//EN”“http://www.w3.org/TR/xhtml11/DTD/xhtml11.dtd”>
<html xmlns=”http://www.w3.org/1999/xhtml” xml:lang=”en”><head><title>Displaying Times and Dates</title>
</head>
<body><h1>Current Date and Time</h1><script type=”text/javascript”>now = new Date();localtime = now.toString();utctime = now.toGMTString();document.write(“<strong>Local time:</strong> “
+ localtime + “<br/>”);document.write(“<strong>UTC time:</strong> “ + utctime);</script>
</body></html>
Now that you have a complete HTML document, save it with the .htm or.html extension.
Testing the ScriptTo test your script, you simply need to load the HTML document you cre-ated in a web browser. If you typed the script correctly, your browsershould display the result of the script, as shown in Figure 4.2. (Of course,your result won’t be the same as mine, but it should be the same as the set-ting of your computer’s clock.)
A note about Internet Explorer 6.0 and above: Depending on your securitysettings, the script might not execute, and a yellow highlighted bar on thetop of the browser might display a security warning. In this case, click theyellow bar and select Allow Blocked Content to allow your script to run.(This happens because the default security settings allow JavaScript inonline documents, but not in local files.)
Modifying the ScriptAlthough the current script does indeed display the current date and time,its display isn’t nearly as attractive as the clock on your wall or desk. Toremedy that, you can use some additional JavaScript features and a bit ofHTML to display a large clock.
NOTE
Notepad and other Windowstext editors might try to be help-ful and add the .txt extension toyour script. Be sure your savedfile has the correct extension.
www.it-ebooks.info

ptg999
Testing the Script 75
To display a large clock, we need the hours, minutes, and seconds in separatevariables. Once again, JavaScript has built-in functions to do most of thework:
hours = now.getHours();mins = now.getMinutes();secs = now.getSeconds();
These statements load the hours, mins, and secs variables with the compo-nents of the time using JavaScript’s built-in date functions.
After the hours, minutes, and seconds are in separate variables, you cancreate document.write statements to display them:
document.write(“<h1>”);document.write(hours + “:” + mins + “:” + secs);document.write(“</h1>”);
The first statement displays an HTML <h1> header tag to display the clockin a large typeface. The second statement displays the hours, mins, and secsvariables, separated by colons, and the third adds the closing </h1> tag.
You can add the preceding statements to the original date and time scriptto add the large clock display. Listing 4.5 shows the complete modifiedversion of the script.
FIGURE 4.2Firefox displays the results of theDate and Time script.
www.it-ebooks.info

ptg999
76 CHAPTER 4 Understanding JavaScript
LISTING 4.5 The Date and Time Script with Large Clock Display<?xml version=”1.0” encoding=”UTF-8”?><!DOCTYPE html PUBLIC “-//W3C//DTD XHTML 1.1//EN”“http://www.w3.org/TR/xhtml11/DTD/xhtml11.dtd”>
<html xmlns=”http://www.w3.org/1999/xhtml” xml:lang=”en”><head><title>Displaying Times and Dates</title>
</head>
<body><h1>Current Date and Time</h1><script type=”text/javascript”>now = new Date();localtime = now.toString();utctime = now.toGMTString();document.write(“<strong>Local time:</strong> “
+ localtime + “<br/>”);document.write(“<strong>UTC time:</strong> “ + utctime);hours = now.getHours();mins = now.getMinutes();secs = now.getSeconds();document.write(“<h1>”);document.write(hours + “:” + mins + “:” + secs);document.write(“</h1>”);</script>
</body></html>
Now that you have modified the script, save the HTML file and open themodified file in your browser. If you left the browser running, you cansimply use the Reload button to load the new version of the script. Try itand verify that the same time is displayed in both the upper portion of thewindow and the new large clock. Figure 4.3 shows the results.
Dealing with JavaScript ErrorsAs you develop more complex JavaScript applications, you’re going to runinto errors from time to time. JavaScript errors are usually caused bymistyped JavaScript statements.
To see an example of a JavaScript error message, modify the statement youadded in the previous section. We’ll use a common error: omitting one ofthe parentheses. Change the last document.write statement in Listing 4.5to read:
document.write(“</h1>”;
www.it-ebooks.info

ptg999
Testing the Script 77
Save your HTML document again and load the document into the browser.Depending on the browser version you’re using, one of two things willhappen: Either an error message will be displayed, or the script will simplyfail to execute.
If an error message is displayed, you’re halfway to fixing the problem byadding the missing parenthesis. If no error was displayed, you should con-figure your browser to display error messages so that you can diagnosefuture problems:
. In Firefox, you can also select Tools, JavaScript Console from themenu. The console is shown in Figure 4.4, displaying the error mes-sage you created in this example.
. In Chrome, select Tools, JavaScript Console from the Customizations(Options) menu. A console will display in the bottom of the browserwindow.
. In Internet Explorer, select Tools, Internet Options. On the Advancedpage, uncheck the Disable Script Debugging box and check theDisplay a Notification About Every Script Error box. (If this is dis-abled, a yellow icon in the status bar will still notify you of errors.)
The error we get in this case is missing ) after argument list (Firefox) orExpected ‘)’ (Internet Explorer), which turns out to be exactly the problem.Be warned, however, that error messages aren’t always this enlightening.
FIGURE 4.3Firefox displays the modified Dateand Time script.
NOTE
The time formatting producedby this script isn’t perfect;hours after noon are in 24-hourtime, and there are no leadingzeroes, so 12:04 is displayedas 12:4. See Chapter 17 forsolutions to these issues.
www.it-ebooks.info

ptg999
78 CHAPTER 4 Understanding JavaScript
FIGURE 4.4Firefox’s JavaScript Console displays an error message.
Although Internet Explorer displays error dialog boxes for each error,Firefox’s JavaScript Console displays a single list of errors and enables youto test commands. For this reason, you might find it useful to installFirefox for debugging and testing JavaScript, even if Internet Explorer isyour primary browser.
SummaryDuring this chapter, you’ve learned what web scripting is and whatJavaScript is. You’ve also learned how to insert a script into an HTML doc-ument or refer to an external JavaScript file, what sorts of things JavaScriptcan do, and how JavaScript differs from other web languages. You alsowrote a simple JavaScript program and tested it using a web browser. Youdiscovered how to modify and test scripts and what happens when aJavaScript program runs into an error.
In the process of writing this script, you have used some of JavaScript’sbasic features: variables, the document.write statement, and functions forworking with dates and times.
Now that you’ve learned a bit of JavaScript syntax, you’re ready to contin-ue on to learn all manner and sorts of things about web developmentbefore settling in to write interactive websites using client-side scripting.
www.it-ebooks.info

ptg999
Workshop 79
Q&AQ. Do I need to test my JavaScript on more than one browser?
A. In an ideal world, any script you write that follows the standards forJavaScript will work in all browsers, and 93% of the time (give or take)that’s true in the real world. But browsers do have their quirks, and youshould test your scripts on Internet Explorer and Firefox at a minimum.
Q. If I plan to learn PHP or some other server-side programming lan-guage anyway, will I have any use for JavaScript?
A. Certainly. JavaScript is the ideal language for many parts of a web-based application, such as form validation. Although PHP and otherserver-side languages have their uses, they can’t interact directly withthe user on the client-side.
Q. When I try to run my script, the browser displays the actual script inthe browser window instead of executing it. What did I do wrong?
A. This is most likely caused by one of three errors. First, you might bemissing the beginning or ending <script> tags. Check them, and verifythat the first reads <script type=”text/javascript”>. Second, yourfile might have been saved with a .txt extension, causing the browser totreat it as a text file. Rename it to .htm or .html to fix the problem.Third, make sure your browser supports JavaScript and that it is notdisabled in the Preferences dialog.
Q. Why are the <strong> and <br /> tags allowed in the statements toprint the time? I thought HTML tags weren’t allowed within the<script> tags.
A. Because this particular tag is inside quotation marks, it’s considered avalid part of the script. The script’s output, including any HTML tags, isinterpreted and displayed by the browser. You can use other HTML tagswithin quotation marks to add formatting, such as the <h1> tags weadded for the large clock display.
WorkshopThe workshop contains quiz questions and exercises to help you solidify yourunderstanding of the material covered. Try to answer all questions beforelooking at the “Answers” section that follows.
www.it-ebooks.info

ptg999
80 CHAPTER 4 Understanding JavaScript
Quiz1. When a user views a page containing a JavaScript program, which
machine actually executes the script?
a. The user’s machine running a web browser
b. The web server
c. A central machine deep within Netscape’s corporate offices
2. What software do you use to create and edit JavaScript programs?
a. A browser
b. A text editor
c. A pencil and a piece of paper
3. What are variables used for in JavaScript programs?
a. Storing numbers, dates, or other values
b. Varying randomly
c. Causing high school algebra flashbacks
4. What should appear at the very end of a JavaScript script embedded inan HTML file?
a. The <script type=”text/javascript”> tag
b. The </script> tag
c. The END statement
Answers1. a. JavaScript programs execute on the web browser. (There is actually a
server-side version of JavaScript, but that’s another story.)
2. b. Any text editor can be used to create scripts. You can also use aword processor if you’re careful to save the document as a text file withthe .html or .htm extension.
3. a. Variables are used to store numbers, dates, or other values.
4. b. Your script should end with the </script> tag.
Exercises. Add a millisecond field to the large clock. You can use the
getMilliseconds function, which works just like getSeconds but returnsmilliseconds.
. Modify the script to display the time, including milliseconds, twice.Notice whether any time passes between the two time displays whenyou load the page.
www.it-ebooks.info

ptg999
In the early days of the Web, text was displayed in only one font and inone size. However, a combination of HTML and CSS now makes it possi-ble to control the appearance of text (font type, size, or color) and how it isaligned and displayed on a web page. In this chapter, you’ll learn how tochange the visual display of the font—its font family, size, and weight—and how to incorporate boldface, italics, superscripts, subscripts, andstrikethrough text into your pages. You will also learn how to change type-faces and font sizes. Then, after becoming conversant in these textualaspects, you’ll learn the basics of text alignment and some advanced texttips and tricks, such as the use of lists. Because lists are so common, HTMLprovides tags that automatically indent text and add numbers, bullets, orother symbols in front of each listed item. You’ll learn how to format dif-ferent types of lists, which are part of the many ways to display content inyour website.
WHAT YOU’LL LEARN INTHIS CHAPTER:
. How to use boldface, italics,and special text formatting
. How to tweak the font
. How to use special characters
. How to align text on apage
. How to use the three typesof HTML lists
. How to place lists withinlists
CHAPTER 5Working with Fonts, Text Blocks,
and Lists
NOTE
When viewing other designers’web content, you might noticemethods of marking up text thatare different than those taughtin this book. The old way of for-matting text includes the use ofthe <b></b> tag pair to indicatewhen a word should be bolded,the <i></i> tag pair to indicatewhen a word should be in italics,and the use of a <font></font>tag pair to specify font family,size, and other attributes.However, there is no reason tolearn it because it is beingphased out of HTML, and CSS isconsiderably more powerful.
www.it-ebooks.info

ptg999
82 CHAPTER 5 Working with Fonts, Text Blocks, and Lists
Boldface, Italics, and Special TextFormattingWay back in the age of the typewriter, we were content with a plain-textdisplay and with using an occasional underline to show emphasis. Today,boldface and italic text have become de rigueur in all paper communica-tion. Naturally, you can add bold and italic text to your web content as well.There are several tags and style rules that make text formatting possible.
The old school approach to adding bold and italic formatting to textinvolves the <b></b> and <i></i> tag pairs. For boldface text, put the <b>tag at the beginning of the text and </b> at the end. Similarly, you canmake any text italic by enclosing it between <i> and </i> tags. Althoughthis approach still works fine in browsers and is supported by XHTML, itisn’t as flexible or powerful as the CSS style rules for text formatting.
TRY IT YOURSELF▼
Preparing SampleText
You can make the most of learning how to style text throughout this chapter ifyou have some sample text that you can use to display different fonts andcolors and that can also be indented, centered, or otherwise manipulated. Itdoesn’t really matter what type of text you use because there are so manydifferent stylistic possibilities to try that they would never appear all on thesame web page anyway (unless you wanted to drive your visitors batty). Takethis opportunity just to get a feel for how text-level changes can affect theappearance of your content.
. If the text you’ll be using is from a word processing or database pro-gram, be sure to save it to a new file in plain-text or ASCII format. Youcan then add the appropriate HTML tags and style attributes to formatit as you go through this chapter.
. Any text will do, but try to find (or type) some text you want to put ontoa web page. The text from a company brochure or from your résumémight be a good choice.
. Any type of outline, bullet points from a presentation, numbered steps,glossary, or list of textual information from a database will serve asgood material to work with.
. Before you use the code introduced in this chapter to format the bodytext, add the set of skeleton HTML tags you’ve used in previous chap-ters (the <html>, <head>, <title>, and <body> tags).
www.it-ebooks.info

ptg999
Boldface, Italics, and Special Text Formatting 83
Although you’ll learn much more about CSS style rules in Part III,“Advanced Web Page Design with CSS,” it’s worth a little foreshadowingjust so that you understand the text formatting options. The font-weightstyle rule enables you to set the weight, or boldness, of a font using a stylerule. Standard settings for font-weight include normal, bold, bolder, andlighter (with normal being the default). Italic text is controlled via thefont-style rule, which can be set to normal, italic, or oblique. Stylerules can be specified together if you want to apply more than one, as thefollowing example demonstrates:
<p style=”font-weight:bold; font-style:italic”>This paragraph is bold anditalic!</p>
In this example, both style rules are specified in the style attribute of the<p> tag. The key to using multiple style rules is that they must be separat-ed by a semicolon (;).
You aren’t limited to using font styles in paragraphs, however. The follow-ing code shows how to italicize text in a bulleted list:
<ul><li style=”font-style:italic”>Important Stuff</li><li style=”font-style:italic”>Critical Information</li><li style=”font-style:italic”>Highly Sensitive Material</li><li>Nothing All That Useful</li>
</ul>
You can also use the font-weight style rule within headings, but a heavierfont usually doesn’t have an effect on headings because they are alreadybold by default.
Although using CSS enables you to apply richer formatting, there are afew other HTML tags that are good for adding special formatting to textwhen you don’t necessarily need to be as specific as CSS allows you to be.Following are some of these tags. Listing 5.1 and Figure 5.1 demonstrateeach tag in action.
. <small></small>—Small text
. <big></big>—Big text; not present in HTML5 because text size isbetter controlled by CSS
. <sup></sup>—Superscript text
. <sub></sub>—Subscript text
. <em></em> or <i></i>—Emphasized (italic) text
. <strong></strong> or <b></b>—Strong (boldface) text
NOTEAn alternative to style ruleswhen it comes to bold and italictext involves the <strong></strong> and <em></em> tagpairs. The <strong> tag doesthe same thing as the <b> tagin most browsers, whereas the<em> tag acts just like the tag<i> by formatting text as italics.
The <strong> and <em> tagsare considered by some to bean improvement over <b> and<i> because they imply onlythat the text should receivespecial emphasis, rather thandictating exactly how that effectshould be achieved. In otherwords, a browser doesn’t nec-essarily have to interpret<strong> as meaning bold or<em> as meaning italic. Thismakes <strong> and <em>more fitting in XHTML becausethey add meaning to text, alongwith affecting how the textshould be displayed. All fourtags remain part of HTML5,although their use becomesslightly more nuanced.
www.it-ebooks.info

ptg999
84 CHAPTER 5 Working with Fonts, Text Blocks, and Lists
. <tt></tt>—Monospaced text (typewriter font) not present inHTML5 because font appearance is better controlled by CSS
. <pre></pre>—Monospaced text, preserving spaces and line breaks
CAUTION
There used to be a <u> tag forcreating underlined text, butthere are a couple of reasonsnot to use it now. First off,users expect underlined text tobe a link, so they might get con-fused if you underline text thatisn’t a link. Second, the <u> tagis deprecated, which means thatit has been phased out of theHTML/XHTML language, as hasthe <strike> tag. Both tags arestill supported in web browsersand likely will be for quite awhile, but using CSS is the pre-ferred approach to creatingunderlined and strikethroughtext. In HTML5, deleted text canbe surrounded by the <strike><strike> tag pair, which willrender as text with astrikethrough.
FIGURE 5.1Here’s what the character formatting from Listing 5.1 looks like.
LISTING 5.1 Special Formatting Tags<?xml version=”1.0” encoding=”UTF-8”?><!DOCTYPE html PUBLIC “-//W3C//DTD XHTML 1.1//EN”“http://www.w3.org/TR/xhtml11/DTD/xhtml11.dtd”>
<html xmlns=”http://www.w3.org/1999/xhtml” xml:lang=”en”><head><title>The Miracle Product</title>
</head>
<body><p>New <sup>Super</sup><strong>Strength</strong> H<sub>2</sub>O<em>plus</em> will knock out any stain, <big>big</big> or<small>small</small>.<br /> Look for new<sup>Super</sup><b>Strength</b> H<sub>2</sub>O <i>plus</i>in a stream near you.
</p><p><tt>NUTRITION INFORMATION</tt> (void where prohibited)
</p><pre>
Calories Grams USRDA/Serving of Fat Moisture
Regular 3 4 100%Unleaded 3 2 100%
www.it-ebooks.info

ptg999
Tweaking the Font 85
Organic 2 3 99%Sugar Free 0 1 110%
</pre></body>
</html>
The <tt> tag usually changes the typeface to Courier New, a monospacedfont. (Monospaced means that all the letters and spaces are the same width.)However, web browsers let users change the monospaced <tt> font to thetypeface of their choice (look on the Options menu of your browser). Themonospaced font might not even be monospaced for some users, althoughthe vast majority of users stick with the standard fonts that their browsersshow by default.
The <pre> tag causes text to appear in the monospaced font, but it alsodoes something else unique and useful. As you learned in Chapter 2,“Understanding HTML and XHTML Connections,” multiple spaces andline breaks are normally ignored in HTML files, but <pre> causes exactspacing and line breaks to be preserved. For example, without <pre>, thetext at the end of Figure 5.1 would look like the following:
calories grams usrda /serving of fat moisture regular3 4 100% unleaded 3 2 100% organic 2 3 99% sugar free 0 1 110%
Even if you added <br /> tags at the end of every line, the columnswouldn’t line up properly. However, when you put <pre> at the beginningand </pre> at the end, the columns line up properly because the exactspaces are kept—no <br /> tags are needed. The <pre> tag gives you aquick and easy way to preserve the alignment of any monospaced text filesyou might want to transfer to a web page with minimum effort.
CSS provides you with more robust methods for lining up text (and doinganything with text, actually), and you’ll learn more about them throughoutPart III.
Tweaking the FontThe <big>, <small>, and <tt> tags give you some rudimentary controlover the size and appearance of the text on your pages. However, theremight be times when you’d just like a bit more control over the size andappearance of your text. Before I get into the appropriate way to tinkerwith the font in XHTML code, let’s briefly look at how things were done
LISTING 5.1 Continued
www.it-ebooks.info

ptg999
86 CHAPTER 5 Working with Fonts, Text Blocks, and Lists
prior to CSS because you might still find examples of this method whenyou look at the source code for other websites. Remember, just becausethese older methods are in use doesn’t mean you should follow suit.
Before style sheets entered the picture, the now phased-out <font> tag wasused to control the fonts in web page text. For example, the followingHTML will change the size and color of some text on a page:
<font size=”5” color=”purple”>this text will be big and purple.</font>
As you can see, the size and color attributes of the <font> tag made it pos-sible to alter the font of the text without too much effort. Although thisapproach worked fine, it was replaced with a far superior approach to fontformatting, thanks to CSS style rules. Following are a few of the main stylerules used to control fonts:
. font-family—Sets the family (typeface) of the font
. font-size—Sets the size of the font
. color—Sets the color of the font
The font-family style rule enables you to set the typeface used to displaytext. You can and usually should specify more than one value for this style(separated by commas) so that if the first font isn’t available on a user’ssystem, the browser can try an alternative. You’ve already seen this in pre-vious chapters.
Providing alternative font families is important because each user poten-tially has a different set of fonts installed, at least beyond a core set of com-mon basic fonts (Arial, Times New Roman, and so forth). By providing alist of alternative fonts, you have a better chance of your pages gracefullyfalling back on a known font when your ideal font isn’t found. Followingis an example of the font-family style used to set the typeface for a para-graph of text:
<p style=”font-family:arial, sans-serif, ‘times roman’”>
There are several interesting things about this example. First, arial is speci-fied as the primary font. Capitalization does not affect the font family, soarial is no different from Arial or ARIAL. Another interesting thing aboutthis code is how single quotes are used around the Times Roman font namebecause it has a space in it. However, because ’times roman’ appears afterthe generic specification of sans-serif, it is unlikely that ‘times roman’would be used. Because sans-serif is in the second position, it says to thebrowser “if Arial is not on this machine, use the default sans-serif font.”
NOTE
You’ll learn more about control-ling the color of the text on yourpages in Chapter 8, “Workingwith Colors, Images, andMultimedia.” That chapter alsoshows you how to create yourown custom colors and how tocontrol the color of text links.
www.it-ebooks.info

ptg999
Tweaking the Font 87
The font-size and color style rules are also commonly used to controlthe size and color of fonts. The font-size style can be set to a predefinedsize (such as small, medium, or large) or you can set it to a specific pointsize (such as 12pt or 14pt). The color style can be set to a predefined color(such as white, black, blue, red, or green), or you can set it to a specifichexadecimal color (such as #FFB499). Following is the previous paragraphexample with the font size and color specified:
<p style=”font-family:arial, sans-serif, ‘times roman’; font-size:14pt;color:green”>
The sample web content in Listing 5.2 and shown in Figure 5.2 uses somefont style rules to create the beginning of a basic online résumé
LISTING 5.2 Using Font Style Rules to Create a Basic Résumé<?xml version=”1.0” encoding=”UTF-8”?><!DOCTYPE html PUBLIC “-//W3C//DTD XHTML 1.1//EN”“http://www.w3.org/TR/xhtml11/DTD/xhtml11.dtd”>
<html xmlns=”http://www.w3.org/1999/xhtml” xml:lang=”en”><head><title>Résumé for Jane Doe</title>
<style type=”text/css”>body {font-family: Verdana, sans-serif;font-size: 12px;
}
h1 {font-family:Georgia, serif;font-size:28px;text-align:center;
}
p.contactinfo {font-size:14px;text-align:center;
}
p.categorylabel {font-size:12px;font-weight:bold;text-transform:uppercase;
}
div.indented {margin-left: 25px;
}</style>
NOTE
You’ll learn about hexadecimalcolors in Chapter 8. For now,just understand that the colorstyle rule enables you to speci-fy exact colors beyond justusing green, blue, orange, andso forth.
www.it-ebooks.info

ptg999
88 CHAPTER 5 Working with Fonts, Text Blocks, and Lists
</head><body>
<h1>Jane Doe</h1><p class=”contactinfo”>1234 Main Street, Sometown, CA 93829<br/>tel: 555-555-1212, e-mail: [email protected]</p>
<p class=”categorylabel”>Summary of Qualifications</p><ul><li>Highly skilled and dedicated professional offering a solid background in whatever it is you need.</li><li>Provide comprehensive direction for whatever it is that will get me a job.</li><li>Computer proficient in a wide range of industry-related computer programs and equipment. Any industry.</li></ul>
<p class=”categorylabel”>Professional Experience</p><div class=”indented”>
<p><span style=”font-weight:bold;”>Operations Manager, Super Awesome Company, Some City, CA [Sept 2002 – present]</span></p><ul><li>Direct all departmental operations</li><li>Coordinate work with internal and external resources</li><li>Generally in charge of everything</li></ul>
<p><span style=”font-weight:bold;”>Project Manager, Less Awesome Company, Some City, CA [May 2000 - Sept 2002]</span></p><ul><li>Direct all departmental operations</li><li>Coordinate work with internal and external resources</li><li>Generally in charge of everything</li></ul>
</div>
<p class=”categorylabel”>Education</p><ul><li>MBA, MyState University, May 2002</li><li>B.A, Business Administration, MyState University, May 2000</li></ul>
<p class=”categorylabel”>References</p><ul><li>Available upon request.</li></ul>
</body></html>
LISTING 5.2 Continued
www.it-ebooks.info

ptg999
Working with Special Characters 89
Using CSS, which organizes sets of styles into classes—as you learned inChapter 3, “Understanding Cascading Style Sheets”—you can see how textformatting is applied to different areas of this content. If you look closelyat the definition of the div.indented class, you will see the use of the margin-left style. This style, which you will learn more about in Part III,applies a certain amount of space (25 pixels, in this example) to the left ofthe element. That space accounts for the indentation shown in Figure 5.2.
FIGURE 5.2Here’s what the code used inListing 5.2 looks like.
Working with Special CharactersMost fonts now include special characters for European languages, such asthe accented é in Café. There are also a few mathematical symbols and spe-cial punctuation marks, such as the circular bullet •.
You can insert these special characters at any point in an HTML documentusing the appropriate codes, as shown in Table 5.1. You’ll find an evenmore extensive list of codes for multiple character sets at http://www.webstandards.org/learn/reference/named_entities.html.
For example, the word café could be written using either of the followingmethods:
cafécafé
www.it-ebooks.info

ptg999
90 CHAPTER 5 Working with Fonts, Text Blocks, and Lists
TABLE 5.1 Commonly Used English Language Special Characters
Character Numeric Code Code Name Description
“ " " Quotation mark
& & & Ampersand
< < < Less than
> > > Greater than
¢ ¢ ¢ Cent sign
£ £ £ Pound sterling
| ¦ ¦ or &brkbar; Broken vertical bar
§ § § Section sign
© © © Copyright
® ® ® Registered trademark
° ° ° Degree sign
+ – ± ± Plus or minus2 ² ² Superscript two3 ³ ³ Superscript three
· · · Middle dot1 ¹ ¹ Superscript one1⁄4 ¼ ¼ Fraction one-fourth1⁄2 ½ ½ Fraction one-half3⁄4 ¾ ¾ Fraction three-fourths
Æ Æ Æ Capital AE ligature
æ æ æ Small ae ligature
É É É Accented capital E
é é é Accented small e
× × × Multiplication sign
÷ ÷ ÷ Division sign
Although you can specify character entities by number, each symbol alsohas a mnemonic name that is often easier to remember.
HTML/XHTML uses a special code known as a character entity to representspecial characters such as © and ®. Character entities are always specifiedstarting with & and ending with ;. Table 5.1 lists the most commonly usedcharacter entities, although HTML supports many more.
TIPLooking for the copyright © andregistered trademark ®sym-bols? Those codes are ©and ®, respectively.
To create an unregistered trade-mark ™ symbol, use ™.
www.it-ebooks.info

ptg999
Working with Special Characters 91
Table 5.1 includes codes for the angle brackets, quotation, and ampersand.You must use those codes if you want these symbols to appear on yourpages; otherwise, the web browser interprets them as HTML commands.
In Listing 5.3 and Figure 5.3, several of the symbols from Table 5.1 areshown in use.
LISTING 5.3 Special Character Codes<?xml version=”1.0” encoding=”UTF-8”?><!DOCTYPE html PUBLIC “-//W3C//DTD XHTML 1.1//EN”“http://www.w3.org/TR/xhtml11/DTD/xhtml11.dtd”>
<html xmlns=”http://www.w3.org/1999/xhtml” xml:lang=”en”><head><title>Punctuation Lines</title>
</head>
<body><p>Q: What should you do when a British banker picks a fight with you?<br />A: £ some ¢¢ into him. <hr />Q: What do you call it when a judge takes part of a law off the books?<br /> A: § violence. <hr />Q: What did the football coach get from the locker room vending machine in the middle of the game?<br />A: A ¼ back at ½ time. <hr />Q: How hot did it get when the police detective interrogated the mathematician?<br />A: x³° <hr />Q: What does a punctilious plagiarist do?<br />A: © <hr />
</p></body>
</html>
www.it-ebooks.info

ptg999
92 CHAPTER 5 Working with Fonts, Text Blocks, and Lists
Aligning Text on a PageNow that you’ve seen how to change the appearance of your content at thetext level, it’s time to take it a step further and modify the blocks of text thatappear on the page. It’s easy to take for granted the fact that most paragraphsare automatically aligned to the left when you’re reading information on theWeb. However, there certainly are situations in which you might choose toalign content to the right or even the center of a page. HTML gives you theoption to align a single HTML block-level element, such as text containedwithin a <p></p> or <div></div> tag pair. Before we get into the details ofaligning block elements, however, let’s briefly note how attributes work.
Using AttributesAttributes are used to provide additional information related to an HTMLtag. Attributes are special code words used inside an HTML tag to controlexactly what the tag does. They are very important in even the simplest bitof web content, so it’s important that you are comfortable using them.
Attributes invoke the use of styles, classes, or IDs that are applied to par-ticular tags. If you define a particular class or ID in a style sheet—as youlearned in Chapter 3, “Understanding Cascading Style Sheets” then youcan invoke that class or ID using class=”someclass” or id=”someid” with-in the tag itself. When the browser renders the content for display, it willlook to the style sheet to determine exactly how the content will appear
FIGURE 5.3This is how the HTML page inListing 5.3 looks in most webbrowsers.
www.it-ebooks.info

ptg999
Aligning Text on a Page 93
according to the associated style definitions. Similarly, you can use thestyle attribute to include style information for a particular element with-out connecting the element to an actual style sheet. For example, when youbegin a paragraph with the <p> tag, you can specify whether the text inthat particular paragraph should be aligned to the left margin, the rightmargin, or to the center of the page by setting the style attribute. If youwant to associate that particular paragraph with an existing class or ID,you set the class or id attribute.
In the following example, each paragraph could be left-aligned:
<p style=”text-align: left;”>Text goes here.</p><p class=”leftAlignStyle”>Text goes here.</p><p id=”firstLeftAlign”>Text goes here.</p>
In the first paragraph, the style appears directly in the style attribute. Inthe second paragraph, the paragraph will be left-aligned if the style sheetentry for the leftAlignStyle class includes the text-align statement.Similarly, the third paragraph will be left-aligned if the style sheet entry forthe firstLeftAlign class includes the text-align statement.
In the previous example, you might have noticed the use of lowercase fortags, attributes, and styles. The exacting XHTML standard requires tagsand attributes to be lowercase; the XHTML standard also requires quota-tion marks around attribute values.
For example, the following code will be rendered by most popular webbrowsers:
<P STYLE=TEXT-ALIGN:CENTER>
However, this code does not conform to XHTML standards because the tagis uppercase, the style attribute and its value (text-align:center) isuppercase, and the value isn’t in quotation marks. If you want to stay com-patible with the latest standards and software, you should always use thefollowing instead:
<p style=”text-align:center”>
Aligning Block-Level ElementsTo align a block-level element such as <p> to the right margin without creating a separate class or ID in a style sheet, simply place style=”text-align:right” inside the <p> tag at the beginning of the paragraph.Similarly, to center the element, use <p style=”text-align:center”>. Toalign a paragraph to the left, use <p style=”text-align:left”>.
NOTE
Every attribute and style rule inHTML has a default value that isassumed when you don’t set theattribute yourself. In the case ofthe text-align style rule of the<p> tag, the default value isleft, so using the bare-bones<p> tag has the same effect as using <p style=”text-align:left”>.Learning the default values forcommon style rules is an impor-tant part of becoming a goodweb page developer.
www.it-ebooks.info

ptg999
94 CHAPTER 5 Working with Fonts, Text Blocks, and Lists
The text-align part of the style attribute is referred to as a style rule,which means that it is setting a particular style aspect of an HTML ele-ment. There are many style rules you can use to carefully control the for-matting of web content.
The text-align style rule is not reserved for just the <p> tag. In fact, you canuse the text-align style rule with any block-level element, which includes<h1>, <h2>, the other heading tags, and the <div> tag, among others. The<div> tag is especially handy because it can encompass other block-level ele-ments and thus enable you to control the alignment of large portions of yourweb content all at once. The div in the <div> tag is for division.
Listing 5.4 demonstrates the style attribute and text-align style rulewith both the <p> and the <div> tags. The results are shown in Figure 5.4.You’ll learn many more advanced uses of the <div> tag in Part III.
LISTING 5.4 The text-align Style Rule Used with the style Attribute<?xml version=”1.0” encoding=”UTF-8”?><!DOCTYPE html PUBLIC “-//W3C//DTD XHTML 1.1//EN”“http://www.w3.org/TR/xhtml11/DTD/xhtml11.dtd”>
<html xmlns=”http://www.w3.org/1999/xhtml” xml:lang=”en”><head><title>Bohemia</title>
</head>
<body><div style=”text-align:center”><h1>Bohemia</h1><h2>by Dorothy Parker</h2>
</div><p style=”text-align:left”>Authors and actors and artists and such<br />Never know nothing, and never know much.<br />Sculptors and singers and those of their kidney<br />Tell their affairs from Seattle to Sydney.
</p><p style=”text-align:center”>Playwrights and poets and such horses’ necks<br />Start off from anywhere, end up at sex.<br />Diarists, critics, and similar roe<br />Never say nothing, and never say no.
</p><p style=”text-align:right”>People Who Do Things exceed my endurance;<br />God, for a man that solicits insurance!
</p></body>
</html>
www.it-ebooks.info

ptg999
The Three Types of HTML Lists 95
The use of <div style=”text-align:center”> ensures that the contentarea, including the two headings, are centered. However, the text align-ment of the individual paragraphs within the <div> override the settingand ensure that the text of the first paragraph is left-aligned, the secondparagraph is centered, and the third paragraph is right-aligned.
The Three Types of HTML ListsFor clarity, it’s often useful to present information on a web page as a listof items. There are three basic types of HTML lists. All three are shown inFigure 5.5, and Listing 5.5 reveals the HTML used to construct them.
. Ordered list—An indented list that has numbers or letters beforeeach list item. The ordered list begins with the <ol> tag and endswith a closing </ol> tag. List items are enclosed in the <li></li>tag pair, and line breaks appear automatically at each opening <li>tag. The entire list is indented.
. Unordered list—An indented list that has a bullet or other symbolbefore each list item. The unordered list begins with the <ul> tag andcloses with </ul>. Like the ordered list, its list items are enclosed inthe <li></li> tag pair. A line break and symbol appear at each open-ing <li> tag, and the entire list is indented.
FIGURE 5.4The results of using the text align-ment in Listing 5.4.
www.it-ebooks.info

ptg999
96 CHAPTER 5 Working with Fonts, Text Blocks, and Lists
. Definition list—A list of terms and their meanings. This type of list,which has no special number, letter, or symbol before each item, beginswith <dl> and ends with </dl>. The <dt></dt> tag pair encloses eachterm and the <dd></dd> tag pair encloses each definition. Line breaksand indentations appear automatically.
LISTING 5.5 Unordered Lists, Ordered Lists, and Definition Lists<?xml version=”1.0” encoding=”UTF-8”?><!DOCTYPE html PUBLIC “-//W3C//DTD XHTML 1.1//EN”“http://www.w3.org/TR/xhtml11/DTD/xhtml11.dtd”>
<html xmlns=”http://www.w3.org/1999/xhtml” xml:lang=”en”><head><title>How to Be Proper</title>
</head>
<body><h1>How to Be Proper</h1><h2>Basic Etiquette for a Gentlemen Greeting a Lady Aquaintance</h2><ul><li>Wait for her acknowledging bow before tipping your hat.</li><li>Use the hand farthest from her to raise the hat.</li><li>Walk with her if she expresses a wish to converse; Nevermake a lady stand talking in the street.</li><li>When walking, the lady must always have the wall.</li>
</ul><h2>Recourse for a Lady Toward Unpleasant Men Who Persist in Bowing</h2><ol><li>A simple stare of iciness should suffice in most instances.</li><li>A cold bow discourages familiarity without offering insult.</li><li>As a last resort: “Sir, I have not the honour of youraquaintance.”</li>
</ol><h2>Proper Address of Royalty</h2><dl><dt>Your Majesty</dt><dd>To the king or queen.</dd><dt>Your Royal Highness</dt><dd>To the monarch’s spouse, children, and siblings.</dd><dt>Your Highness</dt><dd>To nephews, nieces, and cousins of the sovereign.</dd>
</dl></body>
</html>
www.it-ebooks.info

ptg999
Placing Lists Within Lists 97
Placing Lists Within ListsAlthough definition lists are officially supposed to be used for definingterms, many web page authors use them anywhere they’d like to see someindentation. In practice, you can indent any text simply by putting <dl><dd>at the beginning of it and </dd></dl> at the end and skipping over the<dt></dt> tag pair. However, a better approach to indenting text is to usethe <blockquote></blockquote> tag pair, which indents content without thepresumption of a definition and allows for much more clear styling. Withone set of attributes, you can set the width, height, background color, bordertype and color of your element area, and other visual effects.
Because of the level of control over the display of your items that you havewhen using CSS, there is no need to use nested lists to achieve the visualappearance of indentation. Reserve your use of nested lists for when thecontent warrants it. In other words, use nested lists to show a hierarchy ofinformation, such as in Listing 5.6.
Ordered and unordered lists can be nested inside one another, down to asmany levels as you want. In Listing 5.6, a complex indented outline is con-structed from several unordered lists. You’ll notice in Figure 5.6 that Firefoxautomatically uses a different type of bullet for each of the first three levels ofindentation, making the list very easy to read. This is common in modernbrowsers.
FIGURE 5.5The three basic types of HTMLlists.
NOTE
Remember that different webbrowsers can display web con-tent quite differently. The HTMLstandard doesn’t specify exactlyhow web browsers should for-mat lists, so users with olderweb browsers might not seeexactly the same indentationyou see. You can use CSS togain precise control over listitems, which you will learnabout later in this chapter.
NOTE
Nesting refers to a tag thatappears entirely within anothertag. Nested tags are alsoreferred to as child tags of the(parent) tag that contains them.It is a common (but notrequired) coding practice toindent nested tags so that youcan easily see their relationshipto the parent tag.
www.it-ebooks.info

ptg999
98 CHAPTER 5 Working with Fonts, Text Blocks, and Lists
LISTING 5.6 Using Lists to Build Outlines<?xml version=”1.0” encoding=”UTF-8”?><!DOCTYPE html PUBLIC “-//W3C//DTD XHTML 1.1//EN”“http://www.w3.org/TR/xhtml11/DTD/xhtml11.dtd”>
<html xmlns=”http://www.w3.org/1999/xhtml” xml:lang=”en”><head><title>Vertebrates</title>
</head>
<body><h1>Vertebrates</h1><ul><li><span style=”font-weight:bold”>Fish</span><ul><li>Barramundi</li><li>Kissing Gourami</li><li>Mummichog</li>
</ul></li><li><span style=”font-weight:bold”>Amphibians</span><ul>
<li>Anura<ul><li>Goliath Frog</li><li>Poison Dart Frog</li><li>Purple Frog</li>
</ul></li><li>Caudata<ul><li>Hellbender</li><li>Mudpuppy</li>
</ul></li>
</ul></li><li><span style=”font-weight:bold”>Reptiles</span><ul><li>Nile Crocodile</li><li>King Cobra</li><li>Common Snapping Turtle</li>
</ul></li>
</ul></body>
</html>
www.it-ebooks.info

ptg999
Placing Lists Within Lists 99
You can even change the bullet for any single point within an unorderedlist by using the list-style-type style rule in the <li> tag. For example,the following codes displays a hollow circle in front of the words extraand super and a solid square in front of the word special:
<ul style=”list-style-type:circle”><li>extra</li><li>super</li><li style=”list-style-type:square”>special</li>
</ul>
The list-style-type style rule also works with ordered lists, but insteadof choosing a type of bullet, you choose the type of numbers or letters toplace in front of each item. Listing 5.7 shows how to use Roman numerals(list-style-type:upper-roman), capital letters (list-style-type:upper-alpha), lowercase letters (list-style-type:lower-alpha), and ordinarynumbers in a multilevel list. Figure 5.7 shows the resulting outline, whichis nicely formatted.
FIGURE 5.6In Firefox, multilevel unorderedlists are neatly indented and bul-leted for improved readability.
As shown in Figure 5.6, a web browser will normally use a solid disc for thefirst-level bullet, a hollow circle for the second-level bullet, and a solid squarefor all deeper levels. However, you can explicitly choose which type of bulletto use for any level by using <ul style=”list-style-type:disc”>, <ul style=”list-style-type:circle”>, or <ul style=”list-style-type:square”> instead of <ul>.
www.it-ebooks.info

ptg999
100 CHAPTER 5 Working with Fonts, Text Blocks, and Lists
Although Listing 5.7 uses the list-style-type style rule only with the<ol> tag, you can also use it for specific <li> tags within a list (althoughit’s hard to imagine a situation in which you would want to do this). Youcan also explicitly specify ordinary numbering with list-style-type:decimal, and you can make lowercase Roman numerals with list-style-type:lower-roman.
LISTING 5.7 Using the list-style-type Style Rule with the styleAttribute in Multitiered Lists<?xml version=”1.0” encoding=”UTF-8”?><!DOCTYPE html PUBLIC “-//W3C//DTD XHTML 1.1//EN”“http://www.w3.org/TR/xhtml11/DTD/xhtml11.dtd”>
<html xmlns=”http://www.w3.org/1999/xhtml” xml:lang=”en”><head><title>Advice from the Golf Guru</title>
</head>
<body><h1>How to Win at Golf</h1><ol style=”list-style-type:upper-roman”>
<li>Training<ol><li>Mental prep<ol style=”list-style-type:upper-alpha”><li>Watch golf on TV religiously</li><li>Get that computer game with Tiger whatsisname</li><li>Rent “personal victory” subliminal tapes</li>
</ol></li><li>Equipment<ol style=”list-style-type:upper-alpha”><li>Make sure your putter has a pro autograph on it</li><li>Pick up a bargain bag of tees-n-balls at Costco</li>
</ol></li><li>Diet<ol style=”list-style-type:upper-alpha”><li>Avoid junk food<ol style=”list-style-type:lower-alpha”><li>No hotdogs</li>
</ol></li><li>Drink wine and mixed drinks only, no beer</li>
</ol></li>
</ol>
www.it-ebooks.info

ptg999
Placing Lists Within Lists 101
</li><li>Pre-game<ol><li>Dress<ol style=”list-style-type:upper-alpha”><li>Put on shorts, even if it’s freezing</li><li>Buy a new hat if you lost last time</li>
</ol></li><li>Location and Scheduling<ol style=”list-style-type:upper-alpha”><li>Select a course where your spouse or boss
won’t find you</li><li>To save on fees, play where your buddy works</li>
</ol></li><li>Opponent<ol style=”list-style-type:upper-alpha”><li>Look for: overconfidence, inexperience</li><li>Buy opponent as many pre-game drinks as possible</li>
</ol></li>
</ol></li><li>On the Course<ol><li>Tee off first, then develop severe hayfever</li><li>Drive cart over opponent’s ball to degrade
aerodynamics</li><li>Say “fore” just before ball makes contact
with opponent</li><li>Always replace divots when putting</li><li>Water cooler holes are a good time to correct
any errors in ballplacement</li>
</ol></li>
</ol></body>
</html>
LISTING 5.7 Continued
www.it-ebooks.info

ptg999
102 CHAPTER 5 Working with Fonts, Text Blocks, and Lists
SummaryIn this chapter, you learned how to make text appear as boldface or italicand how to code superscripts, subscripts, special symbols, and accented let-ters. You saw how to make the text line up properly in preformatted pas-sages of monospaced text and how to control the size, color, and typeface ofany section of text on a web page. You also learned that attributes are usedto specify options and special behavior of many HTML tags and how to usethe style attribute with CSS style rules to align text. You also discoveredhow to create and combine three basic types of HTML lists: ordered lists,unordered lists, and definition lists. Lists can be placed within other lists tocreate outlines and other complex arrangements of text.
Table 5.2 summarizes the tags and attributes discussed in this chapter.Don’t feel like you have to memorize all these tags, by the way!
TABLE 5.2 HTML Tags and Attributes Covered in Chapter 5
Tag/Attribute Function
<em>...</em> Emphasis (usually italic).
<strong>...</strong> Stronger emphasis (usually bold).
<b>...</b> Boldface text.
FIGURE 5.7A well-formatted outline can make almost any plan look moreplausible.
www.it-ebooks.info

ptg999
Summary 103
<i>...</i> Italic text.
<tt>...</tt> Typewriter (monospaced) font.
<pre>...</pre> Preformatted text (exact line endings and spacing willbe preserved—usually rendered in a monospaced font).
<big>...</big> Text is slightly larger than normal.
<small>...</small> Text is slightly smaller than normal.
<sub>...</sub> Subscript.
<sup>...</sup> Superscript.
<div>...</div> A region of text to be formatted.
<dl>...</dl> A definition list.
<dt>...</dt> A definition term, as part of a definition list.
<dd>...</dd> The corresponding definition to a definition term, aspart of a definition list.
<ol>...</ol> An ordered (numbered) list.
<ul>...</ul> An unordered (bulleted) list.
<li>...</li> A list item for use with <ol> or <ul>.
Attributes
style=”font- The typeface (family) of the font, which is the family:typeface” name of a font, such as Arial. (Can also be used with
<p>, <h1>, <h2>, <h3>, and so on.)
style=”font- The size of the font, which can be set to small,size:size” medium, or large, as well as x-small, x-large, and
so on. Can also be set to a specific point size (such as 12 pt).
style=”color:color” Changes the color of the text.
style=”text- Align text to center, left, or right. (Can also be ➥align:alignment” used with <p>, <h1>, <h2>, <h3>, and so on.)
style=”list- The type of numerals used to label the list. Possible ➥style-type: values are decimal, lower-roman, upper-roman,➥numtype” lower-alpha, upper-alpha, and none.
style=”list-style- The bullet dingbat used to mark list items. Possible ➥type:bullettype” values are disc, circle, square, and none.
style=”list-style- The type of bullet or number used to label this item. ➥type:type” Possible values are disc, circle, square, decimal,
lower-roman, upper-roman, lower-alpha, upper-alpha, and none.
TABLE 5.2 Continued
Tag/Attribute Function
www.it-ebooks.info

ptg999
104 CHAPTER 5 Working with Fonts, Text Blocks, and Lists
Q&AQ. How do I find out the exact name for a font I have on my computer?
A. On a Windows or Macintosh computer, open the Control Panel and clickthe Fonts folder—the fonts on your system are listed. (Vista usersmight have to switch to “Classic View” in your Control Panel.) Whenspecifying fonts in the font-family style rule, use the exact spelling offont names. Font names are not case-sensitive, however.
Q. How do I put Kanji, Arabic, Chinese, and other non-European charac-ters on my pages?
A. First of all, users who need to read these characters on your pagesmust have the appropriate language fonts installed. They must also haveselected that language character set and its associated font for theirweb browsers. You can use the Character Map program in Windows (or asimilar program in other operating systems) to get the numerical codesfor each character in any language font. To find Character Map, clickStart, All Programs, Accessories, and then System Tools. If the characteryou want has a code of 214, use Ö to place it on a web page. Ifyou cannot find the Character Map program, use your operating system’sbuilt-in Help function to find the specific location.
The best way to include a short message in an Asian language (suchas We Speak Tamil-Call Us!) is to include it as a graphics image. Thatway every user will see it, even if they use English as their primary lan-guage for web browsing. But even to use a language font in a graphic,you will likely have to download a specific language pack for your oper-ating system. Again, check your system’s Help function for specificinstructions.
Q. I’ve seen web pages that use three-dimensional little balls or otherspecial graphics for bullets. How do they do that?
A. That trick is a little bit beyond what this chapter covers. You’ll learn howto do it yourself in Chapter 8.
Q. How do I “full justify” text so that both the left and right margins areflush?
A. You can use text-align:justify in your style declaration.
www.it-ebooks.info

ptg999
105
WorkshopThe workshop contains quiz questions and activities to help you solidify yourunderstanding of the material covered. Try to answer all questions beforelooking at the “Answers” section that follows.
Quiz1. How would you create a paragraph in which the first three words are
bold, using styles rather than the <b> or <strong> tags?
2. How would you represent the chemical formula for water?
3. How do you display “© 2010, Webwonks Inc.” on a web page?
4. How would you center everything on an entire page?
5. What would you use to create a definition list to show that the wordglunch means “a look of disdain, anger, or displeasure” and that theword glumpy means “sullen, morose, or sulky”?
Answers1. You would use the following:
<p><span style=”font-weight: bold”>First three words</span> arebold.</p>
2. You would use H<sub>2</sub>O.
3. You would use either of the following:
© 2010, Webwonks Inc.© 2010, Webwonks Inc.
4. If you thought about putting a <div style=”text-align:center”>immediately after the <body> tag at the top of the page, and </div>just before the </body> tag at the end of the page, then you’re correct.However, the text-align style is also supported directly in the <body>tag, which means you can forego the <div> tag and place thestyle=”text-align:center” style directly in the <body> tag. Presto, theentire page is centered!
5. You would use the following:
<dl><dt>glunch</dt><dd>a look of disdain, anger, or displeasure</dd><dt>glumpy</dt><dd>sullen, morose, or sulky</dd></dl>
Workshop
www.it-ebooks.info
ptg999
106 CHAPTER 5 Working with Fonts, Text Blocks, and Lists
Exercises. Apply the font-level style attributes you learned about in this chapter to
various block-level elements such as <p>, <div>, <ul>, and <li> items.Try nesting your elements to get a feel for how styles do or do not cas-cade through the content hierarchy.
. Use the text alignment style attributes to place blocks of text in variousplaces on your web page. Try nesting your paragraphs and divisions(<p> and <div>) to get a feel for how styles do or do not cascadethrough the content hierarchy.
. Try producing an ordered list outlining the information you’d like to puton your web pages. This will give you practice formatting HTML lists andalso give you a head start on thinking about the issues covered in laterchapters of this book.
www.it-ebooks.info

ptg999
In this chapter, you learn how to build HTML tables you can use to controlthe spacing, layout, and appearance of tabular data in your web content.Although you can achieve similar results using CSS, there are definitelytimes when a table is the best way to present information, and you’ll findthat tables are useful for arranging information into rows and columns. Iwill also explain how designers have used tables for page layout in thepast and how that isn’t always the best idea. Before we begin, just remem-ber a table is simply an orderly arrangement of content into verticalcolumns and horizontal rows.
Creating a Simple TableA table consists of rows of information with individual cells inside. Tomake tables, you have to start with a <table> tag. Of course, you end yourtables with the </table> tag. If you want the table to have a border, use aborder attribute to specify the width of the border in pixels. A border sizeof 0 or none (or leaving the border attribute out entirely) will make theborder invisible, which is handy if you find yourself using a table as apage layout tool (not recommended).
With the <table> tag in place, the next thing you need is the <tr> tag. The<tr> tag creates a table row, which contains one or more cells of informa-tion before the closing </tr>. To create these individual cells, use the <td>tag (<td> stands for table data). Place the table information between the<td> and </td> tags. A cell is a rectangular region that can contain any text,images, and HTML tags. Each row in a table consists of at least one cell.Multiple cells within a row form columns in a table.
WHAT YOU’LL LEARN INTHIS CHAPTER:
. How to create simpletables
. How to control the size oftables
. How to align content andspan rows and columnswithin tables
CHAPTER 6Using Tables to Display
Information
TIPAs you read this chapter, thinkabout how arranging text intotables could benefit your webcontent. The following are somespecific ideas to keep in mind:
. The most obvious applica-tion of tables is to organizetabular information, such asa multicolumn list of namesand numbers.
. Whenever you need multiplecolumns of text or images,tables are the answer.
www.it-ebooks.info

ptg999
108 CHAPTER 6 Using Tables to Display Information
There is one more basic tag involved in building tables. The <th> tagworks exactly like a <td> tag except <th> indicates that the cell is part ofthe heading of the table. Most web browsers render the text in <th> cells ascentered and boldface.
You can create as many cells as you want, but each row in a table shouldhave the same number of columns as the other rows. The HTML codeshown in Listing 6.1 creates a simple table using only the four table tagsI’ve mentioned thus far. Figure 6.1 shows the resulting page as viewed in aweb browser.
LISTING 6.1 Creating Tables with the <table>, <tr>, <td>, and <th>Tags<?xml version=”1.0” encoding=”UTF-8”?><!DOCTYPE html PUBLIC “-//W3C//DTD XHTML 1.1//EN”“http://www.w3.org/TR/xhtml11/DTD/xhtml11.dtd”>
<html xmlns=”http://www.w3.org/1999/xhtml” xml:lang=”en”><head><title>Baseball Standings</title>
</head>
<body><h1>Baseball Standings</h1><table><tr><th>Team</th><th>W</th>
<th>L</th><th>GB</th>
</tr><tr><td>Los Angeles Dodgers</td><td>62</td><td>38</td><td>—</td>
</tr><tr><td>San Francisco Giants</td><td>54</td><td>46</td><td>8.0</td>
</tr><tr><td>Colorado Rockies</td><td>54</td><td>46</td><td>8.0</td>
</tr>
TIP
Some style properties enableyou to take much more controlover table borders. For example,you can set the border width(border-width), style (border-style), and color (border-color). These properties workfine, but you have to apply themto each table element, whichcan be cumbersome even if youuse classes for your table rowor table cell elements.
www.it-ebooks.info

ptg999
Creating a Simple Table 109
<tr><td>Arizona Diamondbacks</td><td>43</td><td>58</td><td>19.5</td>
</tr><tr>
<td>San Diego Padres</td><td>39</td><td>62</td><td>23.5</td>
</tr></table>
</body></html>
LISTING 6.1 Continued TIPHTML ignores extra spacesbetween words and tags.However, you might find yourHTML tables easier to read(and less prone to time-wastingerrors) if you use spaces toindent <tr> and <td> tags, as Idid in Listing 6.1.
FIGURE 6.1The HTML code in Listing 6.1 cre-ates a table with six rows and fourcolumns.
The table in the example contains baseball standings, which are perfect forarranging in rows and columns—if not a little plain. You’ll learn to jazzthings up a bit during this chapter. The headings in the table show theTeam, Wins (W), Losses (L), and Games Behind (GB) in the standings.
Although we did not apply any styles to the HTML in Listing 6.1, you canuse any text style in a table cell. However, styles or HTML tags used in onecell don’t carry over to other cells, and tags from outside the table don’tapply within the table. For example, consider the following table:
www.it-ebooks.info

ptg999
110 CHAPTER 6 Using Tables to Display Information
<p style=”font-weight:bold”><table><tr><td style=”font-style:italic”>hello</td><td>there</td>
</tr></table>
</p>
In this example, the <p> tag is used around a table to demonstrate howtables are immune to outside tags. The word there would be neither bold-face nor italic because neither the font-weight:bold style outside the tablenor the font-style:italic style from the previous cell affects it. In thisexample, the word hello is in italics, however.
To boldface the words hello and there, change the table code to this:
<table style=”font-weight:bold”><tr><td style=”font-style:italic”>hello</td><td>there</td>
</tr></table
In this example, both words are in bold and the word hello is italicized aswell. Of course, you don’t have to apply styles at the table level. The font-weight:bold style could just as easily be applied to each cell individually;you could repeat style=”font-weight:bold” in each cell or create a class inyour style sheet and use class=”classname” in each cell—it’s your choice.
Controlling Table SizesWhen a table width is not specified, the size of a table and its individualcells automatically expand to fit the data you place into it. However, youcan choose to control the exact size of the entire table by using widthand/or height styles in the <table> tag. You can also control the size ofeach cell by putting width and height styles in the individual <td> tags.The width and height styles can be specified as either pixels or percent-ages. For example, the following code creates a table 500 pixels wide and400 pixels high:
<table style=”width:500px; height:400px”>
To make the first cell of the table 20% of the total table width and the sec-ond cell 80% of the table width, type the following:
NOTE
There are actually width andheight HTML attributes thatwere deprecated in the move toXHTML, and you might still seethem when you look at anotherdesigner’s code. These attrib-utes still work in web browsers,but you should use the widthand height style propertiesinstead because they representthe appropriate use of XHTML.
www.it-ebooks.info

ptg999
Controlling Table Sizes 111
<table style=”width:100%”><tr><td style=”width:20%”>skinny cell</td><td style=”width:80%”>fat cell</td>
</tr></table>
Notice that the table is sized to 100%, which ensures the table fills theentire width of the browser window. When you use percentages instead offixed pixel sizes, the table will resize automatically to fit any size browserwindow while maintaining the aesthetic balance you’re after. In this case,the two cells within the table are automatically resized to 20% and 80% ofthe total table width, respectively.
In Listing 6.2, the simple table from Listing 6.1 is expanded to show specif-ic control over table cell widths.
LISTING 6.2 Specifying Table Cell Widths<?xml version=”1.0” encoding=”UTF-8”?><!DOCTYPE html PUBLIC “-//W3C//DTD XHTML 1.1//EN”“http://www.w3.org/TR/xhtml11/DTD/xhtml11.dtd”>
<html xmlns=”http://www.w3.org/1999/xhtml” xml:lang=”en”><head><title>Baseball Standings</title>
</head>
<body><h1>Baseball Standings</h1><table><tr><th style=”width:35px;”></th><th style=”width:175px;”>Team</th><th style=”width:25px;”>W</th><th style=”width:25px;”>L</th><th style=”width:25px;”>GB</th>
</tr><tr><td><img src=”losangeles.gif” alt=”Los Angeles
Dodgers” /></td><td>Los Angeles Dodgers</td><td>62</td><td>38</td><td>—</td>
</tr><tr><td><img src=”sanfrancisco.gif” alt=”San Francisco
Giants” /></td><td>San Francisco Giants</td><td>54</td>
www.it-ebooks.info

ptg999
112 CHAPTER 6 Using Tables to Display Information
<td>46</td><td>8.0</td>
</tr><tr><td><img src=”colorado.gif” alt=”Colorado
Rockies” /></td><td>Colorado Rockies</td><td>54</td><td>46</td><td>8.0</td>
</tr><tr><td><img src=”arizona.gif” alt=”Arizona
Diamondbacks” /></td><td>Arizona Diamondbacks</td><td>43</td><td>58</td><td>19.5</td>
</tr><tr><td><img src=”sandiego.gif” alt=”San Diego Padres” /></td><td>San Diego Padres</td><td>39</td><td>62</td><td>23.5</td>
</tr></table>
</body></html>
You can see the consistent column widths in Figure 6.2.
LISTING 6.2 Continued
FIGURE 6.2The HTML code in Listing 6.2 cre-ates a table with six rows and fivecolumns, with specific widths usedfor each column.
www.it-ebooks.info

ptg999
Alignment and Spanning Within Tables 113
There are two differences between the code from Listing 6.1 and the codeused in Listing 6.2. First, an additional column has been added in Listing6.2; this column does not have a heading, but the <th></th> tag pair is stillpresent in the first table row. In rows two through six, this additional col-umn contains an image (the <img /> tag). The second difference in Listing6.2 is the addition of a specific width style for each <th> element in thefirst row. The first column is defined as 35px wide, the second 175px wide,and the third, fourth, and fifth columns are each 25px wide.
Also note that these widths are not repeated in the <td> elements in subse-quent rows. Technically you must define only the widths in the first row;the remaining rows will follow suit because they are all part of the sametable. However, if you used another formatting style (such as a style tochange font size or color), that style must be repeated for each element thatshould have those display properties.
Alignment and Spanning WithinTablesBy default, anything you place inside a table cell is aligned to the left andvertically centered. Figures 6.1 and 6.2 show this default alignment.However, you can align the contents of table cells both horizontally andvertically with the text-align and vertical-align style properties.
You can apply these alignment attributes to any <tr>, <td>, or <th> tag.Alignment attributes assigned to a <tr> tag apply to all cells in that row.Depending on the size of your table, you can save yourself a considerableamount of time and effort by applying these attributes at the <tr> leveland not in each <td> or <th> tag.
The HTML code in Listing 6.3 uses a combination of text alignment stylesto apply a default alignment to a row, but it is overridden in a few individ-ual cells. Figure 6.3 shows the result of the code in Listing 6.3.
Following are some of the more commonly used vertical-align styleproperty values: top, middle, bottom, text-top, text-bottom, and baseline (for text). These property values give you plenty of flexibility in aligning table data vertically.
www.it-ebooks.info
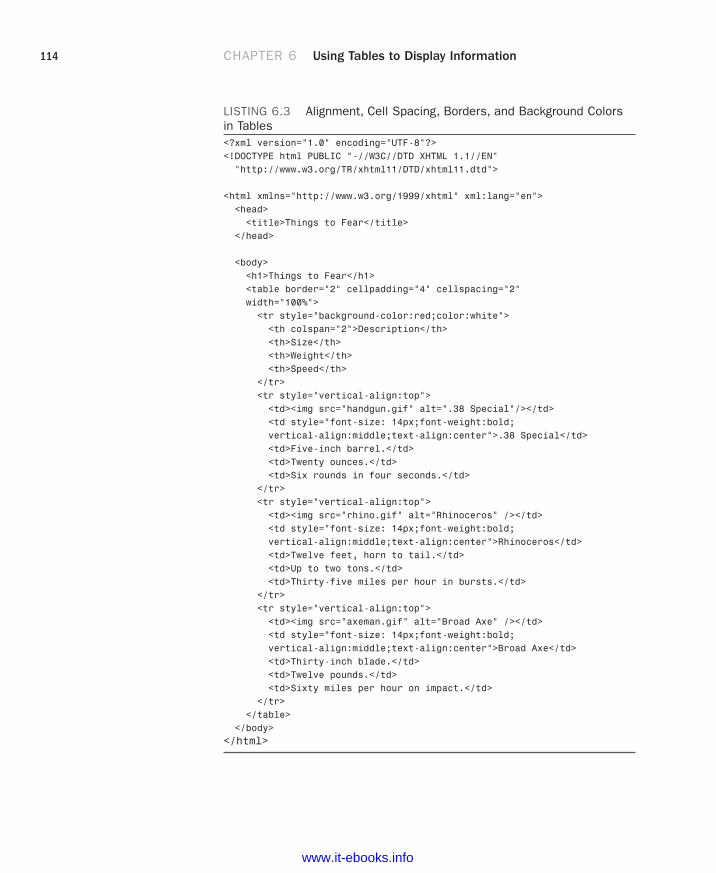
ptg999
114 CHAPTER 6 Using Tables to Display Information
LISTING 6.3 Alignment, Cell Spacing, Borders, and Background Colorsin Tables<?xml version=”1.0” encoding=”UTF-8”?><!DOCTYPE html PUBLIC “-//W3C//DTD XHTML 1.1//EN”“http://www.w3.org/TR/xhtml11/DTD/xhtml11.dtd”>
<html xmlns=”http://www.w3.org/1999/xhtml” xml:lang=”en”><head><title>Things to Fear</title>
</head>
<body><h1>Things to Fear</h1><table border=”2” cellpadding=”4” cellspacing=”2” width=”100%”><tr style=”background-color:red;color:white”><th colspan=”2”>Description</th><th>Size</th><th>Weight</th><th>Speed</th>
</tr><tr style=”vertical-align:top”><td><img src=”handgun.gif” alt=”.38 Special”/></td><td style=”font-size: 14px;font-weight:bold;vertical-align:middle;text-align:center”>.38 Special</td><td>Five-inch barrel.</td><td>Twenty ounces.</td><td>Six rounds in four seconds.</td>
</tr><tr style=”vertical-align:top”><td><img src=”rhino.gif” alt=”Rhinoceros” /></td><td style=”font-size: 14px;font-weight:bold;vertical-align:middle;text-align:center”>Rhinoceros</td><td>Twelve feet, horn to tail.</td><td>Up to two tons.</td><td>Thirty-five miles per hour in bursts.</td>
</tr><tr style=”vertical-align:top”><td><img src=”axeman.gif” alt=”Broad Axe” /></td><td style=”font-size: 14px;font-weight:bold;vertical-align:middle;text-align:center”>Broad Axe</td><td>Thirty-inch blade.</td><td>Twelve pounds.</td><td>Sixty miles per hour on impact.</td>
</tr></table>
</body></html>
www.it-ebooks.info

ptg999
Alignment and Spanning Within Tables 115
At the top of Figure 6.3, a single cell (Description) spans two columns. Thisis accomplished with the colspan attribute in the <th> tag for that cell. Asyou might guess, you can also use the rowspan attribute to create a cell thatspans more than one row.
Spanning is the process of forcing a cell to stretch across more than one rowor column of a table. The colspan attribute causes a cell to span acrossmultiple columns; rowspan has the same effect on rows.
Additionally, text styles are used in the second cell within the Descriptioncolumn to create bold text that is both vertically aligned to the middle andhorizontally aligned to the center of the cell.
There are a few tricks in Listing 6.3 that I haven’t explained yet. You can givean entire table—and each individual row or cell in a table—its own back-ground, distinct from any background you might use on the web page itself.You can do this by placing the background-color or background-image stylein the <table>, <tr>, <td>, or <th> tag exactly as you would in the <body>tag (see Chapter 8, “Working with Colors, Images, and Multimedia”). Togive an entire table a yellow background, for example, you would use<table style=”background-color:yellow”> or the equivalent <tablestyle=”background-color:#FFFF00”>. In Listing 6.3, only the top row has abackground color; it uses <tr style=”background-color:red;color:white”> to apply a red background across the cells in that row. Additionally,the color style ensures that the text in that row is white.
FIGURE 6.3The code in Listing 6.3 shows theuse of the colspan attribute andalignment styles.
TIP
Keeping the structure of rowsand columns organized in yourmind can be the most difficultpart of creating tables withcells that span multiplecolumns or rows. The tiniesterror can often throw the wholething into disarray. You’ll saveyourself time and frustration bysketching your tables on paperbefore you start writing theHTML to implement them.
NOTE
You will often see alternatingrow colors in a table. Forinstance, one row might have agrey background and the nextrow might have a white back-ground. Alternating row colorshelps users read the content ofyour table more clearly, espe-cially if the table is quite large.
www.it-ebooks.info

ptg999
116 CHAPTER 6 Using Tables to Display Information
Similar to the background-color style property is the background-imageproperty (not shown in this example), which is used to set an image for atable background. If you wanted to set the image leaves.gif as the back-ground for a table, you would use <table style=”background-image:url(leaves.gif)”>. Notice that the image file is placed withinparentheses and preceded by the word url, which indicates that you aredescribing where the image file is located.
Tweaking tables goes beyond just using style properties. As shown inListing 6.3, you can control the space around the borders of a table withthe cellpadding and cellspacing attributes. The cellspacing attributesets the amount of space (in pixels) between table borders and betweentable cells themselves. The cellpadding attribute sets the amount of spacearound the edges of information in the cells, also in pixels. Setting thecellpadding value to 0 causes all the information in the table to align asclosely as possible to the table borders, possibly even touching the borders.The cellpadding and cellspacing attributes give you good overall con-trol of the table’s appearance.
Page Layout with TablesAt the beginning of this chapter, I indicated that designers have used tablesfor page layout and to display tabular information. You will still find manyexamples of table-based layouts if you peek at another designer’s sourcecode. This method of design grew out of the old (mid-1990s to early 2000s)inconsistencies in browser support for CSS. All browsers supported tablesand in generally the same way, so web designers latched on to the table-based method of content creation to achieve the same visual page displayacross all browsers. However, now that support for CSS is relatively similaracross all major browsers, designers can follow the long-standing stan-dards-based recommendation not to use tables for page layout.
The World Wide Web Consortium (W3C), the standards body that overseesthe future of the Web, promotes style sheets as the proper way to lay outpages (instead of using tables). Style sheets are ultimately much morepowerful than tables, which is why the bulk of this book teaches you howto use style sheets for page layout.
The main reasons for avoiding using tables for layout include the following:
. Mixing presentation with content—One of the goals of CSS andstandards-compliant web design is to separate the presentation layerfrom the content layer.
NOTE
Although the cellpadding andcellspacing attributes are stillallowed in XHTML, a CSS equiv-alent for them exists in the formof the padding and border-spacing style properties.
www.it-ebooks.info

ptg999
Summary 117
. Creating unnecessarily difficult redesigns—To change a table-basedlayout, you would have to change the table-based layout on everysingle page of your site (unless it is part of a complicated, dynamical-ly driven site, in which case you would have to undo all the dynamicpieces and remake them).
. Accessibility issues—Screen reading software looks to tables for con-tent and will often try to read your layout table as a content table.
. Rendering on mobile devices—Table layouts are often not flexibleenough to scale downward to small screens (see Chapter 12,“Creating Fixed or Liquid Layouts”).
These are but a few of the issues in table-based web design. For a closerlook at some of these issues, see the popular presentation “Why Tables forLayout Is Stupid” at http://www.hotdesign.com/seybold/everything.html.
SummaryIn this brief chapter, you learned to arrange text and images into organizedarrangements of rows and columns called tables. You learned the threebasic tags for creating tables and many optional attributes and styles forcontrolling the alignment, spacing, and appearance of tables. You also dis-covered that tables can be used together and nested within one another foran even wider variety of layout options.
Table 6.1 summarizes the tags and attributes covered in this chapter.
TABLE 6.1 HTML Tags and Attributes Covered in Chapter 6
Tag/Attribute Function
<table>...</table> Creates a table that can contain any number of rows(<tr> tags).
Attributes
border=”width” Indicates the width in pixels of the table borders.Using border=”0” or omitting the border attributemakes borders invisible.
cellspacing= The amount of space between the cells in the ➥”spacing” table, in pixels.
cellpadding= The amount of space between the edges of the ➥”padding” cell and its contents, in pixels.
style= The width of the table on the page, either in exact ➥”width:width” pixel values or as a percentage of the page width.
www.it-ebooks.info

ptg999
118 CHAPTER 6 Using Tables to Display Information
style= The height of the table on the page, either in exact➥”height:height” pixel values or as a percentage of the page height.
style=”background- Background color of the table and individual table ➥color:color” cells that don’t already have a background color.
style= A background image to display within the table ➥”backgroundimage: and individual table cells that don’t already have ➥url(imageurl)” a background image. (If a background color is also
specified, the color will show through transparent areas of the image.)
Attributes
<tr>…</tr> Defines a table row containing one or more cells (<td> tags).
Attributes
style=”text-align: The horizontal alignment of the contents of the alignment” cells within this row. Possible values are left,
right, and center.
style=”vertical- The vertical alignment of the contents of the cells align:alignment” within this row. Commonly used values include top,
middle, and bottom.
style=”background- Background color of all cells in the row that do not color:color” already have a background color.
style= Background image to display within all cells in the ”backgroundimage: row that do not already have their own background url(imageurl)” image.
<td>...</td> Defines a table data cell.
<th>...</th> Defines a table heading cell. (Accepts all the same attributes and styles as <td>.)
Attributes
style=”text- The horizontal alignment of the contents of the align:alignment” cell. Possible values are left, right, and center.
style=”vertical- The vertical alignment of the contents of the cell. align:alignment” Commonly used values are top, middle, and bottom.
rowspan=”numrows” The number of rows this cell will span.
colspan=”numcols” The number of columns this cell will span.
style=”width:width” The width of this column of cells, in exact pixel values or as a percentage of the table width.
TABLE 6.1 Continued
Tag/Attribute Function
www.it-ebooks.info

ptg999
Summary 119
Attributes
style= The height of this row of cells, in exact pixel ”height:height” values or as a percentage of the table height.
style=”background- Background color of the cell.color:color”
style= Background image to display within the cell.”backgroundimage:
url(imageurl)”
TABLE 6.1 Continued
www.it-ebooks.info

ptg999
120 CHAPTER 6 Using Tables to Display Information
Q&AQ. I made a big table and when I load the page, nothing appears on the
page for a long time. Why the wait?
A. Complex tables can take a while to appear on the screen. The webbrowser has to figure out the size of everything in the table before itcan display any part of it. You can speed things up a bit by alwaysincluding width and height attributes for every graphics image within atable. Using width attributes in the <table> and <td> tags also helps.
Q. Can I put a table within a table?
A. Yes, you can nest tables within other table cells. However, nestedtables—especially large ones—take time to load and render properly.Before you create a nested table, think about the content you are plac-ing on the page and ask yourself if it could be displayed using CSS. Youmight not know all the answers until you finish this book, but here’s ahint: In most cases, the answer will be yes.
WorkshopThe workshop contains quiz questions and exercises to help you solidify yourunderstanding of the material covered. Try to answer all questions beforelooking at the “Answers” section that follows.
Quiz1. How would you create a simple two-row, two-column table with a stan-
dard border?
2. Expanding on question 1, how would you add 30 pixels of spacebetween the table border and the cells?
3. Continuing with the table you’ve built in questions 1 and 2, how wouldyou make the top-left cell green, the top-right cell red, the bottom-leftcell yellow, and the bottom-right cell blue?
www.it-ebooks.info

ptg999
Workshop 121
Answers1. Use the following HTML:
<table border=”1”><tr><td>Top left...</td><td>Top right...</td>
</tr><tr><td>Bottom left...</td><td>Bottom right...</td>
</tr></table>
2. Add cellspacing=”30” to the <table> tag.
3. Add style=”background-color:green” to the top left <td> tag, addstyle=”background-color:red” to the top right <td> tag, addstyle=”background-color:yellow” to the bottom left <td> tag, andadd style=”background-color:blue” to the bottom right <td> tag.
Exercises. Do you have any pages that have information visitors might be interest-
ed in viewing as lists or tables? Use a table to present some tabularinformation. Make sure each column has its own heading (or perhapsits own graphic). Play around with the various types of alignment andspacing that you have learned in this chapter.
. You will often see alternating row colors in a table, with one row havinga grey background and the next a white background. The goal of alter-nating colors in table rows is so that the individual rows are easier todiscern when looking quickly at the table full of data. Create a tablewith alternating row colors and text colors (if necessary). Although thelesson on colors comes in Chapter 8, you have enough information inthis lesson to begin trying out the process.
www.it-ebooks.info


ptg999
So far, you have learned how to use HTML tags to create some basic webpages. However, at this point, those pieces of content are islands untothemselves, with no connection to anything else (although it is true that inChapter 3, “Understanding Cascading Style Sheets,” I sneaked a few pagelinks into the examples). To turn your work into real web content, youneed to connect it to the rest of the Web—or at least to your other pageswithin your own personal or corporate sites.
This chapter shows you how to create hypertext links to content withinyour own document and how to link to other external documents.Additionally, you will learn how to style hypertext links so that they dis-play in the color and decoration that you desire—not necessarily thedefault blue underlined display.
Using Web AddressesThe simplest way to store web content for an individual website is to placethe files all in the same folder together. When files are stored together likethis, you can link to them by simply providing the name of the file in thehref attribute of the <a> tag.
An attribute is an extra piece of information associated with a tag that pro-vides further details about the tag. For example, the href attribute of the<a> tag identifies the address of the page to which you are linking.
After you have more than a few pages, or when you start to have anorganization structure to the content in your site, you should put your filesinto directories (or folders, if you will) whose names reflect the contentwithin them. For example, all your images could be in an “images” direc-tory, corporate information could be in an “about” directory, and so on.
WHAT YOU’LL LEARN INTHIS CHAPTER:
. How to use anchor links
. How to link between pageson your own site
. How to link to external content
. How to link to an emailaddress
. How to use window target-ing with your links
. How to style your links withCSS
CHAPTER 7Using External and Internal Links
NOTE
Before we begin, you mightwant a refresher on the basicsof where to put files on yourserver and how to manage fileswithin a set of directories. Thisinformation is important toknow when creating links inweb content. Refer back toChapter 1, “Publishing WebContent,” specifically the sec-tion titled “UnderstandingWhere to Place Files on theWeb Server.”
www.it-ebooks.info

ptg999
124 CHAPTER 7 Using External and Internal Links
Regardless of how you organize your documents within your own webserver, you can use relative addresses, which include only enough informa-tion to find one page from another.
A relative address describes the path from one web page to another, insteadof a full (or absolute) Internet address.
If you recall from Chapter 1, the document root of your web server is thedirectory designated as the top-level directory for your web content. Inweb addresses, that document root is represented by the forward slash (/).All subsequent levels of directories are separated by the same type of for-ward slash. For example:
/directory/subdirectory/subsubdirectory/
Suppose you are creating a page named zoo.html in your document rootand you want to include a link to pages named african.html and asian.htmlin the elephants subdirectory. The links would look like the following:
<a href=”/elephants/african.html”>Learn about African elephants.</a><a href=”/elephants/asian.html”>Learn about Asian elephants.</a>
These specific addresses are actually called relative-root addresses in thatthey are relative addresses that lack the entire domain name, but they arespecifically relative to the document root specified by the forward slash.
Using a regular relative address, you can skip the initial forward slash.This type of address allows the links to become relative to whatever direc-tory they are in—it could be the document root or it could be anotherdirectory one or more levels down from the document root:
<a href=”elephants/african.html”>Learn about African elephants.</a><a href=”elephants/asian.html”>Learn about Asian elephants.</a>
Your african.html and asian.html documents in the elephants subdirectorycould link back to the main zoo.html page in either of these ways:
<a href=”http://www.yourdomain.com/zoo.html”>Return to the zoo.</a><a href=”/zoo.html”>Return to the zoo.</a><a href=”../zoo.html”>Return to the zoo.</a>
The first link is an absolute link. With an absolute link there is absolutely nodoubt where the link should go because the full URL is provided—domainname included.
The second link is a relative-root link. It is relative to the domain you arecurrently browsing and therefore does not require the protocol type (for
CAUTION
The / forward slash is alwaysused to separate directories inHTML. Don’t use the \ back-slash (which is normally used inWindows) to separate yourdirectories. Remember, every-thing in the Web moves forward,so use forward slashes.
www.it-ebooks.info
ptg999
Using Web Addresses 125
example, http://) and the domain name (for example, www.yourdomain.com), but the initial forward slash is provided to show that the addressbegins at the document root.
In the third link, the double dot (..) is a special command that indicates thefolder that contains the current folder—in other words, the parent folder.Anytime you see the double dot, just think to yourself “go up a level” inthe directory structure.
If you use relative addressing consistently throughout your web pages,you can move the pages to another folder, disk drive, or web server with-out changing the links.
Relative addresses can span quite complex directory structures if necessary.Chapter 27, “Organizing and Managing a Website,” offers more detailedadvice for organizing and linking large numbers of web pages.
TIP
The general rule surroundingrelative addressing (elephants/african.html) versus absoluteaddressing (http://www.takeme2thezoo.com/elephants/african.html) is that you should userelative addressing when linkingto files that are stored together,such as files that are all part ofthe same website. Absoluteaddressing should be usedwhen you’re linking to filessomewhere else—another com-puter, another disk drive, or,more commonly, another web-site on the Internet.
Creating a SimpleSite Architecture
Hopefully, by now, you’ve created a page or two of your own while workingthrough the chapters. Follow these steps to add a few more pages and linkthem together:
1. Use a home page as a main entrance and as a central hub to which allof your other pages are connected. If you created a page about yourselfor your business, use that page as your home page. You also might liketo create a new page now for this purpose.
2. On the home page, put a list of links to the other HTML files you’ve cre-ated (or placeholders for the HTML files you plan to create soon). Besure that the exact spelling of the filename, including any capitalization,is correct in every link.
3. On every other page besides the home page, include a link at the bot-tom (or top) leading back to your home page. That makes it simple andeasy to navigate around your site.
4. You might also want to include a list of links to related or interestingsites, either on your home page or on a separate links page. Peopleoften include a list of their friends’ personal pages on their own homepage. Businesses, however, should be careful not to lead potential cus-tomers away to other sites too quickly—there’s no guarantee they’llremember to use relative addressing for links between your own pagesand absolute addressing for links to other sites.
TRY IT YOURSELF ▼
www.it-ebooks.info

ptg999
126 CHAPTER 7 Using External and Internal Links
Linking Within a Page Using AnchorsThe <a> tag—the tag responsible for hyperlinks on the Web—got its namefrom the word “anchor,”and means a link serves as a designation for aspot in a web page. In examples shown throughout this book so far, you’velearned how to use the <a> tag to link to somewhere else, but that’s onlyhalf of its usefulness. Let’s get started working with anchor links that linkto content within the same page.
Identifying Locations in a Page with AnchorsThe <a> tag can be used to mark a spot on a page as an anchor, enablingyou to create a link that points to that exact spot. Listing 7.1, which is pre-sented a bit later in this chapter, demonstrates a link to an anchor within apage. To see how such links are made, let’s take a quick peek ahead at thefirst <a> tag in the listing:
<a id=”top”></a>
The <a> tag normally uses the href attribute to specify a hyperlinked tar-get. The <a href> is what you click and <a id> is where you go when youclick there. In this example, the <a> tag is still specifying a target but noactual link is created. Instead, the <a> tag gives a name to the specific pointon the page where the tag occurs. The </a> tag must be included and aunique name must be assigned to the id attribute, but no text between <a>and </a> is necessary.
Linking to Anchor LocationsListing 7.1 shows a site with various anchor points placed throughout asingle page. Take a look at the last <a> tag in Listing 7.1 to see an example:
<a href=”#top”>Return to Index.</a>
The # symbol means that the word top refers to a named anchor pointwithin the current document, rather than to a separate page. When a userclicks Return to Index, the web browser displays the part of the pagestarting with the <a id=”top”> tag.
NOTE
Instead of using id, older ver-sions of HTML used name. Newerversions of HTML and XHTMLhave done away with the nameattribute and instead use id.
www.it-ebooks.info

ptg999
Linking Within a Page Using Anchors 127
LISTING 7.1 Setting Anchor Points by Using the <a> Tag with an id Attribute<?xml version=”1.0” encoding=”UTF-8”?><!DOCTYPE html PUBLIC “-//W3C//DTD XHTML 1.1//EN”“http://www.w3.org/TR/xhtml11/DTD/xhtml11.dtd”>
<html xmlns=”http://www.w3.org/1999/xhtml” xml:lang=”en”><head><title>Alphabetical Shakespeare</title></head>
<body><h1><a id=”top”></a>First Lines of Shakespearean Sonnets</h1><p>Don’t you just hate when you go a-courting, and you’re downon one knee about to rattle off a totally romantic Shakespeareansonnet, and zap! You space it. <em>”Um... It was, uh... I think itstarted with a B...”</em></p><p>Well, appearest thou no longer the dork. Simply refer to this page,click on the first letter of the sonnet you want, and get an instantreminder of the first line to get you started. <em>”Beshrew thatheart that makes my heart to groan...”</em></p><h2 style=”text-align:center”>Alphabetical Index</h2><h3 style=”text-align:center”><a href=”#A”>A</a> <a href=”#B”>B</a> <a href=”#C”>C</a><a href=”#D”>D</a> <a href=”#E”>E</a> <a href=”#F”>F</a><a href=”#G”>G</a> <a href=”#H”>H</a> <a href=”#I”>I</a><a href=”#J”>J</a> <a href=”#K”>K</a> <a href=”#L”>L</a><a href=”#M”>M</a> <a href=”#N”>N</a> <a href=”#O”>O</a><a href=”#P”>P</a> <a href=”#Q”>Q</a> <a href=”#R”>R</a><a href=”#S”>S</a> <a href=”#T”>T</a> <a href=”#U”>U</a><a href=”#V”>V</a> <a href=”#W”>W</a> <a href=”#X”>X</a><a href=”#Y”>Y</a> <a href=”#Z”>Z</a></h3><hr /><h3><a id=”A”></a>A</h3><ul><li>A woman’s face with nature’s own hand painted,</li><li>Accuse me thus, that I have scanted all, </li><li>Against my love shall be as I am now</li><li>Against that time (if ever that time come) </li><li>Ah wherefore with infection should he live, </li><li>Alack what poverty my muse brings forth, </li><li>Alas ‘tis true, I have gone here and there, </li><li>As a decrepit father takes delight, </li><li>As an unperfect actor on the stage, </li><li>As fast as thou shalt wane so fast thou grow’st, </li></ul><p><a href=”#top”><em>Return to Index.</em></a></p><hr /><!-- continue with the alphabet --><h3><a id=”Z”></a>Z</h3><p>(No sonnets start with Z.)</p><p><a href=”#top”><em>Return to Index.</em></a></p></body></html>
NOTENear the end of Listing 7.1 youwill see a line that reads:
<!-- continue with thealphabet -->
This text (an HTML comment)will appear in your source code,but will not be displayed by thebrowser. You can learn moreabout commenting your code inChapter 27.
CAUTION
Anchor names specified via theid attribute in the <a> tag muststart with an alphanumericcharacter. So, if you want tosimply number the IDs ofanchors, be sure to start themwith text (as in photo1, photo2,and so on) instead of just 1, 2,and so on. Purely numericanchor IDs will work inbrowsers, but they don’t qualifyas valid XHTML code.
www.it-ebooks.info

ptg999
128 CHAPTER 7 Using External and Internal Links
Each of the <a href> links in Listing 7.1 makes an underlined link leadingto a corresponding <a id> anchor—or it would if I had filled in all the text.Only A and Z will work in this example because only the A and Z linkshave corresponding text to link to, but feel free to fill in the rest on yourown! Clicking the letter Z under Alphabetical Index in Figure 7.1, forexample, takes you to the part of the page shown in Figure 7.2.
FIGURE 7.1The <a id> tags in Listing 7.1don’t appear at all on the webpage. The <a href> tags appearas underlined links.
FIGURE 7.2Clicking the letter Z on the pageshown in Figure 7.1 takes you tothe appropriate section of thesame page.
www.it-ebooks.info

ptg999
Linking Between Your Own Web Content 129
Having mastered the concept of linking to sections of text within a singlepage, you can now learn to link together other pieces of web content.
Linking Between Your Own WebContentAs you learned earlier in this chapter, you do not need to include http://before each address specified in the href attribute when linking to contentwithin your domain (or on the same computer, if you are viewing your sitelocally). When you create a link from one file to another file within thesame domain or on the same computer, you don’t need to specify a com-plete Internet address. In fact, if the two files are stored in the same folder,you can simply use the name of the HTML file by itself:
<a href=”pagetwo.html”>Go to Page 2.</a>
As an example, Listing 7.2 and Figure 7.3 show a quiz page with a link tothe answers page shown in Listing 7.3 and Figure 7.4. The answers pagecontains a link back to the quiz page. Because the page in Listing 7.2 linksto another page in the same directory, the filename can be used in place ofa complete address.
LISTING 7.2 The historyanswers.html file<?xml version=”1.0” encoding=”UTF-8”?><!DOCTYPE html PUBLIC “-//W3C//DTD XHTML 1.1//EN”“http://www.w3.org/TR/xhtml11/DTD/xhtml11.dtd”>
<html xmlns=”http://www.w3.org/1999/xhtml” xml:lang=”en”><head><title>History Quiz</title></head>
<body><h1>History Quiz</h1><p>Complete the following rhymes. (Example: William the ConquerorPlayed cruel tricks on the Saxons in... ten sixty-six.)</p><ol><li>Columbus sailed the ocean blue in...</li><li>The Spanish Armada met its fate in...</li><li>London burnt like rotten sticks in...</li></ol><p style=”text-align: center;font-weight: bold;”><a href=”historyanswers.html”>Check Your Answers!</a></p></body></html>
www.it-ebooks.info

ptg999
130 CHAPTER 7 Using External and Internal Links
LISTING 7.3 The historyanswers.html File That historyquiz.htmlLinks To<?xml version=”1.0” encoding=”UTF-8”?><!DOCTYPE html PUBLIC “-//W3C//DTD XHTML 1.1//EN”“http://www.w3.org/TR/xhtml11/DTD/xhtml11.dtd”>
<html xmlns=”http://www.w3.org/1999/xhtml” xml:lang=”en”><head><title>History Quiz Answers</title></head>
<body><h1>History Quiz Answers</h1><ol><li>...fourteen hundred and ninety-two.</li><li>...fifteen hundred and eighty eight.</li><li>...sixteen hundred and sixty-six.</li></ol><p style=”text-align: center;font-weight: bold;”><a href=”historyquiz.html”>Return to the Questions</a></p></body></html>
FIGURE 7.3This is the historyquiz.html filelisted in Listing 7.2 and referredto by the link in Listing 7.3.
www.it-ebooks.info
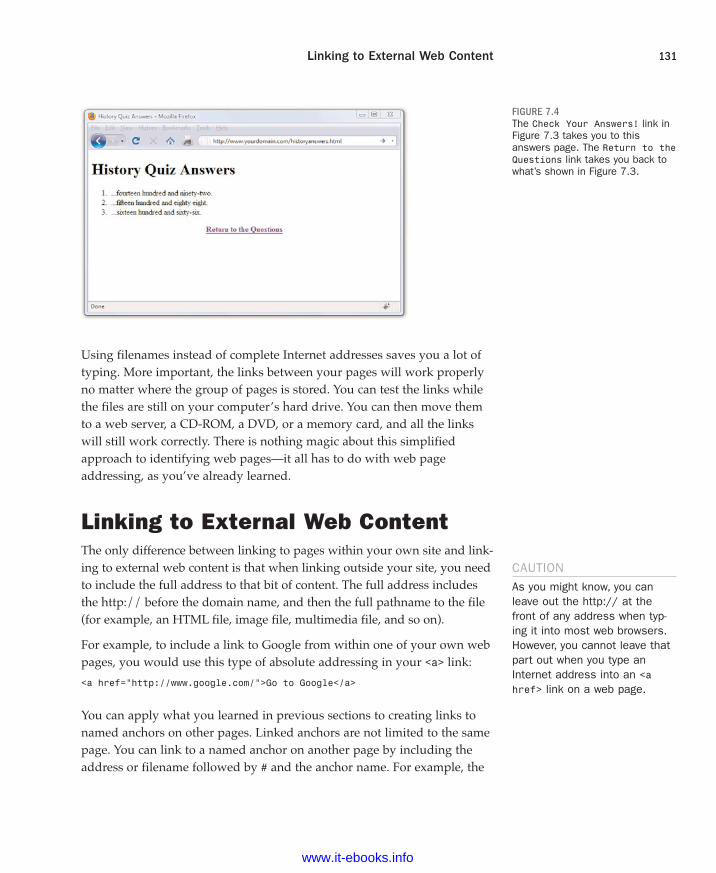
ptg999
Linking to External Web Content 131
Using filenames instead of complete Internet addresses saves you a lot oftyping. More important, the links between your pages will work properlyno matter where the group of pages is stored. You can test the links whilethe files are still on your computer’s hard drive. You can then move themto a web server, a CD-ROM, a DVD, or a memory card, and all the linkswill still work correctly. There is nothing magic about this simplifiedapproach to identifying web pages—it all has to do with web pageaddressing, as you’ve already learned.
Linking to External Web ContentThe only difference between linking to pages within your own site and link-ing to external web content is that when linking outside your site, you needto include the full address to that bit of content. The full address includesthe http:// before the domain name, and then the full pathname to the file(for example, an HTML file, image file, multimedia file, and so on).
For example, to include a link to Google from within one of your own webpages, you would use this type of absolute addressing in your <a> link:
<a href=”http://www.google.com/”>Go to Google</a>
You can apply what you learned in previous sections to creating links tonamed anchors on other pages. Linked anchors are not limited to the samepage. You can link to a named anchor on another page by including theaddress or filename followed by # and the anchor name. For example, the
FIGURE 7.4The Check Your Answers! link inFigure 7.3 takes you to thisanswers page. The Return to theQuestions link takes you back towhat’s shown in Figure 7.3.
CAUTION
As you might know, you canleave out the http:// at thefront of any address when typ-ing it into most web browsers.However, you cannot leave thatpart out when you type anInternet address into an <ahref> link on a web page.
www.it-ebooks.info

ptg999
132 CHAPTER 7 Using External and Internal Links
following link would take you to an anchor named photos within theafrican.html page inside the elephants directory on the domainwww.takeme2thezoo.com.
<a href=”http://www.takemetothezoo.com/elephants/african.html#photos”>Check out the African Elephant Photos!</a>
If you are linking from another page already on the www.takemetothezoo.com domain (because you are, in fact, the site maintainer), your link mightsimply be as follows:
<a href=”/elephants/african.html#photos”>Check out the African Elephant Photos!</a>
The http:// and the domain name would not be necessary in that instance,as you have already learned.
Linking to an Email AddressIn addition to linking between pages and between parts of a single page,the <a> tag allows you to link to email addresses. This is the simplest wayto enable your web page visitors to talk back to you. Of course, you couldjust provide visitors with your email address and trust them to type it intowhatever email programs they use, but that increases the likelihood forerrors. By providing a clickable link to your email address, you can make italmost completely effortless for them to send you messages and eliminatethe chance for typos.
An HTML link to an email address looks like the following:
<a href=”mailto:[email protected]”>Send me an email message.</a>
The words Send me an email message will appear just like any other <a>link.
If you want people to see your actual email address (so that they can makenote of it or send a message using a different email program), include itboth in the href attribute and as part of the message between the <a> and</a> tags, like this:
<a href=”mailto:[email protected]”>[email protected]</a>
In most web browsers, when someone clicks the link, she gets a window intowhich she can type a message that is immediately sent to you—whateveremail program the person uses to send and receive email will automatically
CAUTION
Be sure to include the # symbolonly in <a href> link tags. Don’tput the # symbol in the <a id>tag; links to that name won’twork in that case.
www.it-ebooks.info

ptg999
Linking to an Email Address 133
be used. You can provide some additional information in the link so that thesubject and body of the message also have default values. You do this byadding subject and body variables to the mailto link. You separate the vari-ables from the email address with a question mark (?), the value from thevariable with an equal sign (=), and then separate each of the variable andvalue pairs with an ampersand (&). You don’t have to understand the vari-able/value terminology at this point. Here is an example of specifying a sub-ject and body for the preceding email example:
<a href=”mailto:[email protected]?subject=Book Question&body=When is the next edition coming out?”>[email protected]</a>
When a user clicks this link, an email message is created with [email protected] as the recipient, Book Question as the subject of the mes-sage, and When is the next edition coming out? as the message body.
Before you run off and start plastering your email address all over yourweb pages, I have to give you a little warning and then let you in on ahandy trick. You’re no doubt familiar with spammers that build up data-bases of email addresses and then bombard them with junk mail advertise-ments. One way spammers harvest email addresses is by using programsthat automatically search web pages for mailto links.
Fortunately, there is a little trick that will thwart the vast majority of spam-mers. This trick involves using character entities to encode your emailaddress, which confuses scraper programs that attempt to harvest youremail address from your web pages. As an example, take the emailaddress, [email protected]. If you replace the letters in the address withtheir character entity equivalents, most email harvesting programs will bethrown off. Lowercase ASCII character entities begin at a for letter aand increase through the alphabet in order. For example, letter j is j, cis c, and so on. Replacing all the characters with their ASCII attributesproduces the following:
<a href=”mailto:jcmeloni@gmail.com”>Send me an email message.</a>
Because the browser interprets the character encoding as, well, characters,the end result is the same from the browser’s perspective. However, auto-mated email harvesting programs search the raw HTML code for pages,which in this case is showing a fairly jumbled-looking email address. Ifyou don’t want to figure out the character encoding for your own address,just type email address encoder in your search engine and you will findsome services online that will produce an encoded string for you.
TIPIf you want to specify only anemail message subject and notthe body, you can just leave offthe ampersand and the bodyvariable, equal sign, and valuetext string as follows:<a href=”mailto:[email protected]?subject=Book Question>[email protected]</a>
TIP
It is customary to put an emaillink to the web page author atthe bottom of every web page.Not only does this make it easyfor others to contact you, itgives them a way to tell youabout any problems with thepage that your testing mighthave missed. Just don’t forgetto use the email address char-acter entity trick so that youraddress flies under the radar ofspammers.
www.it-ebooks.info

ptg999
134 CHAPTER 7 Using External and Internal Links
Opening a Link in a New BrowserWindowNow that you have a handle on how to create addresses for links—bothinternal (within your site) and external (to other sites)—there is one addi-tional method of linking: forcing the user to open links in new windows.
You’ve no doubt heard of pop-up windows, which are browser windows—typi-cally advertising products or services—that are opened and displayed auto-matically without the user’s approval. However, the concept of opening anoth-er window or targeting another location does serve a valid purpose in someinstances. For example, you might want to present information in a smallersecondary browser window but still allow the user to see the information inthe main window. This is often the case when clicking on a link to an animateddemo, movie clip, or other multimedia element. You could also want to targeta new browser window when you are linking to content off-site.
However, opening a new browser window on behalf of your user—especiallywhen it’s a full-size new window—goes against some principles of usabilityand accessibility. When people opened new windows, typically it happenedthrough the use of the target attribute of the <a> tag. The target attribute hasbeen removed from the <a> tag in the strict XHTML 1.1 specification.
There are valid ways to achieve the same result while still adhering to prin-ciples of usability and accessibility, but these methods require a littleJavaScript and other advanced techniques. You will learn about these meth-ods as we move into the JavaScript portion of this book, which will alsocover standards-compliant and accessible ways to invoke new windowswith your external links.
Using CSS to Style HyperlinksThe default display of a text-based hyperlink on a web page is underlinedblue text. You might also have noticed that links you have previously visit-ed appear as underlined purple text—that color is also a default. If you’vespent any time at all on the Web, you will also have noticed that not alllinks are blue or purple—and for that, I think, we are all thankful. Using alittle CSS and knowledge of the various pseudoclasses for the <a> link, youcan make your links look however you want.
A pseudoclass is a class that describes styles for elements that apply to certaincircumstances, such as various states of user interaction with that element.
NOTE
You can use graphics as links(instead of using text as links)by putting an <img /> tagbetween the opening <a> andclosing </a> tags. You’ll learnhow to use graphics as links inChapter 8, “Working withColors, Images, andMultimedia.”
www.it-ebooks.info

ptg999
Using CSS to Style Hyperlinks 135
For example, the common pseudoclasses for the <a> tag are link, visited,hover, and active. You can remember them with the mnemonic “Love-Hate”—LV (love) HA (hate), if you choose.
. a:link describes the style of a hyperlink that has not been visitedpreviously.
. a:visited describes the style of a hyperlink that has been visitedpreviously and is present in the browser’s memory.
. a:hover describes the style of a hyperlink as a user’s mouse hoversover it (and before it has been clicked).
. a:active describes the style of a hyperlink that is in the act of beingclicked, but has not yet been released.
For example, let’s say you want to produce a link with the following styles:
. A font that is bold and Verdana (and not underlined, meaning it hasno text decoration)
. A base color that is light blue
. A color of red when users hover over it or when they are clicking it
. A color of gray after users have visited it
Your style sheet entries might look like the following:
a {font-family: Verdana, sans-serif;font-weight: bold;text-decoration: none;
}a:link {
color: #6479A0;}a:visited {
color: #CCCCCC;}a:hover {
color: #E03A3E;}a:active {
color: #E03A3E;}
Because the sample link will be Verdana bold (and not underlined) regard-less of the state it is in, those three property and value pairs can reside inthe rule for the a selector. However, because each pseudoclass must have a
NOTE
The colors in this example areindicated by their hexadecimalvalues, which you will learnabout in Chapter 8.
www.it-ebooks.info

ptg999
136 CHAPTER 7 Using External and Internal Links
specific color associated with it, we use a rule for each pseudoclass asshown in the code example. The pseudoclass inherits the style of the parentrule, unless the rule for the pseudoclass specifically overrides that rule. Inother words, all the pseudoclasses in the previous example will be Verdanabold (and not underlined). If, however, we had used the following rule forthe hover pseudoclass, the text would display in Comic Sans when usershovered over it (if, in fact, the user has the Comic Sans font installed):
a:hover {font-family: “Comic Sans MS”;color: #E03A3E;
}
Additionally, because the active and hover pseudoclasses use the same fontcolor, you can combine style rules for them:
a:hover, a:active {color: #E03A3E;
}
Listing 7.4 puts these code snippets together to produce a page usingstyled pseudoclasses; the results of this code can be seen in Figure 7.5.
LISTING 7.4 Using Styles to Display Link Pseudoclasses<?xml version=”1.0” encoding=”UTF-8”?><!DOCTYPE html PUBLIC “-//W3C//DTD XHTML 1.1//EN”“http://www.w3.org/TR/xhtml11/DTD/xhtml11.dtd”>
<html xmlns=”http://www.w3.org/1999/xhtml” xml:lang=”en”><head><title>Sample Link Style</title>
<style type=”text/css”>a {font-family: Verdana, sans-serif;font-weight: bold;text-decoration: none;}a:link {color: #6479A0;}a:visited {color: #CCCCCC;}a:hover, a:active {color: #FF0000;}
</style></head>
www.it-ebooks.info

ptg999
Using CSS to Style Hyperlinks 137
<body><h1>Sample Link Style</h1>
<p><a href=”simplelinkstyle.html”>The first time you see me, I should be a light blue, bold, non-underlined link in the Verdana font</a>.</p>
</body></html>
LISTING 7.4 Continued
FIGURE 7.5A link can use particular styles tocontrol the visual display.
If you view the example in your web browser, indeed the link should be alight blue, bold, non-underlined Verdana font. If you hover over the link,or click the link without releasing it, it should turn red. If you click andrelease the link, the page will simply reload because the link points to thefile with the same name. However, at that point the link will be in yourbrowser’s memory and thus will be displayed as a visited link—and it willappear gray instead of blue.
You can use CSS to apply a wide range of text-related changes to yourlinks. You can change fonts, sizes, weights, decoration, and so on.Sometimes you might want several different sets of link styles in yourstyle sheet. In that case, you can create classes; you aren’t limited to work-ing with only one set of styles for the <a> tag. The following example is aset of style sheet rules for a footerlink class for links I might want toplace in the footer area of my website:
a.footerlink {font-family: Verdana, sans-serif;font-weight: bold;font-size: 75%;text-decoration: none;
www.it-ebooks.info

ptg999
138 CHAPTER 7 Using External and Internal Links
}a.footerlink:link, a.footerlink:visited {
color: #6479A0;}a.footerlink:hover, a.footerlink:active {
color: #E03A3E;}
As you can see in the example that follows, the class name (footerlink)appears after the selector name (a), separated by a dot, and before thepseudoclass name (hover), separated by a colon:
selector.class:pseudoclassa.footerlink:hover
SummaryThe <a> tag is what makes hypertext “hyper.” With it, you can create linksbetween pages and links to specific anchor points on any page. This chap-ter focused on creating and styling simple links to other pages using eitherrelative or absolute addressing to identify the pages.
You learned that when you’re creating links to other people’s pages, it’simportant to include the full Internet address of each page in an <a href>tag. For links between your own pages, include just the filenames andenough directory information to get from one page to another.
You discovered how to create named anchor points within a page and howto create links to a specific anchor. You also learned how to link to youremail address so that users can easily send you messages. You evenlearned how to protect your email address from spammers. Finally, youlearned methods for controlling the display of your links using CSS.
Table 7.1 summarizes the <a> tag discussed in this chapter.
TABLE 7.1 HTML Tags and Attributes Covered in Chapter 7
Tag/Attribute Function
<a>...</a> With the href attribute, this creates a link to anotherdocument or anchor; with the id attribute, this createsan anchor that can be linked to.
Attributes
href=”address” The address of the document or anchor point to link to.
id=”name” The name for this anchor point in the document.
www.it-ebooks.info

ptg999
139Q&A
Q&AQ. What happens if I link to a page on the Internet, and then the person
who owns that page deletes or moves it?
A. That depends on how the maintainer of that external page has set uphis web server. Usually, you will see a page not found message orsomething to that effect when you click a link that has been moved ordeleted. You can still click the Back button to return to your page. As asite maintainer, you can periodically run link-checking programs toensure your internal and external links are valid. An example of this isthe Link Checker service at http://validator.w3.org/checklink.
Q. One of the internal links on my website works fine on my computer,but when I put the pages on the Internet, the link doesn’t work any-more. What’s up?
A. These are the most likely culprits:
. Capitalization problems—On Windows computers, linking to a filenamed MyFile.html with <a href=”myfile.html”> will work. Onmost web servers, the link must be <a href=”MyFile.html”> (oryou must change the name of the file to MyFile.html). To makematters worse, some text editors and file transfer programs actu-ally change the capitalization without telling you! The best solu-tion is to stick with all-lowercase filenames for web pages.
. Spaces in filenames—Most web servers don’t allow filenameswith spaces. For example, you should never name a web page my page.html. Instead, name it mypage.html or evenmy_page.html (using an underscore instead of a space).
. Local absolute addresses—If, for some reason, you link to a fileusing a local absolute address, such as C:\mywebsite\news.html, the link won’t work when you place the file on the Internet.You should never use local absolute addresses; when thisoccurs, it is usually an accident caused by a temporary link thatwas created to test part of a page. So, be careful to remove anytest links before publishing a page on the Web.
Q. Can I put both href and id in the same <a> tag? Would I want to forany reason?
A. You can, and it might save you some typing if you have a named anchorpoint and a link right next to each other. It’s generally better, however, touse <a href> and <a id> separately to avoid confusion because theyplay very different roles in an HTML document.
Q. What happens if I accidentally misspell the name of an anchor orforget to put the # in front of it?
A. If you link to an anchor name that doesn’t exist within a page or mis-spell the anchor name, the link goes to the top of that page.
www.it-ebooks.info

ptg999
140 CHAPTER 7 Using External and Internal Links
WorkshopThe workshop contains quiz questions and exercises to help you solidify yourunderstanding of the material covered. Try to answer all questions beforelooking at the “Answers” section that follows.
Quiz1. Your best friend from elementary school finds you on the Internet and
says he wants to trade home page links. How do you put a link to hissite at www.supercheapsuits.com/~billybob/ on one of your pages?
2. What HTML would you use to make it possible for someone clicking thewords “About the Authors” at the top of a page to skip down to a list ofcredits somewhere else on the page?
3. If your email address is [email protected], how would you make the text“goodnight greeting” into a link that people can click to compose andsend you an email message?
Answers1. Put the following on your page:
<a href=”http://www.supercheapsuits.com/~billybob/”>Billy Bob’s site</a>
2. Type this at the top of the page:
<a href=”#credits”>About the Authors</a>
Type this at the beginning of the credits section:
<a id=”credits”></a>
3. Type the following on your web page:
Send me a <a href=”mailto:[email protected]”>goodnight greeting</a>!
Exercises. Create an HTML file consisting of a formatted list of your favorite web-
sites. You might already have these sites bookmarked in your webbrowser, in which case you can visit them to find the exact URL in thebrowser’s address bar.
. If you have created any pages for a website, look through them andconsider whether there are any places in the text where you’d like tomake it easy for people to contact you. Include a link in that place toyour email address. You can never provide too many opportunities forpeople to contact you and tell you what they need or what they thinkabout your products—especially if you’re running a business.
www.it-ebooks.info

ptg999
This list might look long, but each of these tasks is short and sweet, andwill help you move your web development experience from the whitebackground/black text examples so far in this book to more interesting (orat least colorful) examples. But that’s not to say that dark text on a lightbackground is bad—in fact, it’s the most common color combination you’llfind online.
Although paying attention to color schemes and producing a visuallyappealing website is important, you don’t have to be an artist by trade toput high-impact graphics on your web pages. More importantly, you don’tneed to spend hundreds or thousands of dollars on software, either. Thischapter will help you get started with creating some of the images you canuse in your website. Although the sample figures in this chapter use a pop-ular and free graphics program for Windows, Mac, and Linux users (GNUImage Manipulation Program, or GIMP), you can apply the knowledgelearned in this chapter to any major Windows or Macintosh graphics appli-cation—although the menus and options will look slightly different.
After you learn to create the graphics themselves, you’ll learn how to inte-grate your graphics using HTML and CSS. At the end of the chapter you’lllearn a bit about integrating additional media, or multimedia, into yourwebsite.
Best Practices for Choosing ColorsI can’t tell you exactly which colors to use in your website, but I can helpyou understand the considerations you should make when selecting thosecolors on your own. The colors you use can greatly influence your visitors;if you are running an e-commerce site, you will want to use colors that
WHAT YOU’LL LEARN INTHIS CHAPTER:
. How to choose colors foryour website that work onthe Web
. How to use CSS to setbackground, text, and bor-der colors
. How to prepare photo-graphs for use online
. How to create banners andbuttons
. How to reduce the numberof colors in an image
. How to create transparentimages
. How to prepare an imagefor a tiled background
. How to place an image ona web page
. How to describe imageswith text
. How to specify imageheight and width
. How to align images
. How to use backgroundimages
. How to use imagemaps
. How to use multimediafiles
CHAPTER 8Working with Colors, Images, and
Multimedia
www.it-ebooks.info

ptg999
142 CHAPTER 8 Working with Colors, Images, and Multimedia
entice your users to view your catalog and eventually purchase something.To that end, you want to make sure colors are used judiciously and withrespect. You might wonder how respect enters into the mix when talkingabout colors, but remember the World Wide Web is an international com-munity and interpretations differ; for instance, pink is a very popular colorin Japan, but very unpopular in Eastern European countries. Similarly,green is the color of money in the United States, but the vast majority ofother countries have multi-colored paper bills such that “the color ofmoney” isn’t a single color at all and thus the metaphor would be of novalue to them.
Besides using colors that are culturally sensitive, other best practicesinclude the following:
. Use a natural palette of colors. This doesn’t mean you should useearth tones, but instead refers to using colors that one would natural-ly see on a casual stroll around town—avoid ultrabright colors thatcan cause eye strain.
. Use a small color palette. You don’t need to use 15 different colors toachieve your goals. In fact, if your page includes text and images in15 different colors, you might reevaluate the message you’re attempt-ing to send. Focus on three or four main colors with a few compli-mentary colors, at the most.
. Consider your demographics. You are likely not able to control yourdemographics and thus have to find a middle ground that accommo-dates everyone. The colors enjoyed by younger people are not neces-sarily those appreciated by older people, just as there are color biasesbetween men and women and people from different geographicregions and cultures.
With just these few tips in mind, it might seem as if your color options arelimited. Not so—it simply means you should think about the decisionsyou’re making before you make them. A search for color theory in thesearch engine of your choice should give you more food for thought, aswill the use of the color wheel.
The color wheel is a chart that shows the organization of colors in a circularmanner. The method of display is an attempt to help you visualize the rela-tionships between primary, secondary, and complementary colors. Colorschemes are developed from working with the color wheel; understandingcolor schemes can help you determine the color palette to use consistentlythroughout your website. For example, knowing something about color
www.it-ebooks.info

ptg999
Understanding Web Colors 143
relationships will hopefully enable you to avoid using orange text on alight blue background, or bright blue text on a brown background.
Some common color schemes in web design are as follows:
. Analogous—Colors that are adjacent to each other on the colorwheel, such as yellow and green. One color is the dominant colorand its analogous friend is used to enrich the display.
. Complementary—Colors that are opposite from each other on thecolor wheel, such as a warm color (red) and a cool color (green).
. Triadic—Three colors that are equally spaced around the colorwheel. The triadic scheme provides balance while still allowing richcolor use.
There are entire books and courses devoted to understanding color theory,so continuing the discussion in this book would indeed be a tangent.However, if you intend to work in web design and development, you willbe served well by a solid understanding of the basics of color theory.Spend some time reading about it—an online search will provide a wealthof information.
Additionally, spend some hands-on time with the color wheel. The ColorScheme Generator at http://colorschemedesigner.com/ enables you tostart with a base color and produce monochromatic, complementary, tri-adic, tetradic, analogic, and accented analogic color schemes.
Understanding Web ColorsSpecifying a background color other than white for a web page is easierthan you probably realize. For example, to specify blue as the backgroundcolor for a page, put style=”background-color:blue” inside the <body>tag or in the style sheet rule for the body element. Of course, you can usemany colors other than blue. In fact, there are 16 colors listed in the W3Cstandards: aqua, black, blue, fuchsia, gray, green, lime, maroon, navy, olive,purple, red, silver, teal, white, and yellow.
Obviously there are many more colors displayed on the Web than justthose 16. In fact, there are 140 color names that you can use with assurancethat all browsers will display these colors similarly. Here’s a partial list ofthe 140 descriptive color names: azure, bisque, cornflowerblue, dark-salmon, firebrick, honeydew, lemonchiffon, papayawhip, peachpuff, sad-dlebrown, thistle, tomato, wheat, and whitesmoke.
NOTE
For a complete list of the 140descriptive color names, theirhexadecimal codes, and anexample of the color as dis-played by your browser, visithttp://www.w3schools.com/HTML/html_colornames.asp.
www.it-ebooks.info

ptg999
144 CHAPTER 8 Working with Colors, Images, and Multimedia
But names are subjective—for instance, if you look at the color chart of 140cross-browser color names, you will not be able to distinguish betweenfuchsia and magenta. You will then realize that the associated hexadecimalcolor values for those two terms, fuchsia and magenta, are exactly thesame: #FF00FF. You’ll learn about hexadecimal color values in the next sec-tion, but for now, know that if you want to be standards-compliant anduse more than the 16 color names the W3C standards dictate, you shoulduse the hexadecimal color codes whenever possible.
There are, in fact, 16 million colors made possible with hexadecimal colorcodes. However, most modern computer displays can display “only”16,384. But 16,384 is still a lot more than 140, or 16.
You should be aware that not all computer monitors display colors in thesame hues. What might appear as a beautiful light blue background coloron your monitor might be more of a purple hue on another user’s monitor.Neutral, earth-tone colors (such as medium gray, tan, and ivory) can pro-duce even more unpredictable results on many computer monitors. Thesecolors might even seem to change color on one monitor depending onlighting conditions in the room or the time of day.
In addition to changing the background of your pages to a color other thanwhite, you can change the color of text links, including various propertiesof links (such as the color for when a user hovers over a link versus whenthe user clicks a link—as you learned in previous chapters). You can alsoset the background color of container elements (such as paragraphs, divs,blockquotes, and table cells), and you can use colors to specify the bordersaround those elements. You’ll see some examples of colors and containerelements later in this chapter.
There are plenty of very bad websites, some created by earnest people withno trace of irony whatsoever. However, “The World’s Worst Website”shown in Figure 8.1 was purposefully created to show some of the moreegregious sins of website design, especially with its use of colors. A screen-shot does not do it justice—visit and experience the site for yourself athttp://www.angelfire.com/super/badwebs/main.htm.
If you search for bad website examples in your search engine, you will findmany sites that collect examples of bad design and explain just why such asite should be in a Hall of Shame rather than a Hall of Fame. Many sites areconsidered bad because of their visual displays, and that display beginswith color selection. Therefore, understanding colors, as well as the nuancesof their specification and use, is a crucial step to creating a good website.
TIP
It’s worth pointing out that colornames are not case-sensitive.So, Black, black, and BLACKare all black, although mostweb designers stick with lower-case or mixed case (if they usecolor names at all, as mostdesigners will use the hexadeci-mal notation for a morenuanced approach to coloruse).
www.it-ebooks.info

ptg999
Using Hexadecimal Values for Colors 145
Using Hexadecimal Values for ColorsTo remain standards-compliant, as well as to retain precise control over thecolors in your website, you can reference colors by their hexadecimalvalue. The hexadecimal value of a color is an indication of how much red,green, and blue light should be mixed into each color. It works a little bitlike Play-Doh—just mix in the amounts of red, blue, and green you wantto get the appropriate color.
The hexadecimal color format is #rrggbb, in which rr, gg, and bb are two-digit hexadecimal values for the red (rr), green (gg), and blue (bb) compo-nents of the color. If you’re not familiar with hexadecimal numbers, don’tsweat it. Just remember that FF is the maximum and 00 is the minimum.Use one of the following codes for each component:
. FF means full brightness.
. CC means 80% brightness.
. 99 means 60% brightness.
. 66 means 40% brightness.
. 33 means 20% brightness.
. 00 means none of this color component.
FIGURE 8.1A partial screenshot of “TheWorld’s Worst Website.”
www.it-ebooks.info

ptg999
146 CHAPTER 8 Working with Colors, Images, and Multimedia
For example, bright red is #FF0000, dark green is #003300, bluish-purple is#660099, and medium-gray is #999999. To make a page with a red back-ground and dark green text, the HTML code would look like the following:
<body style=”background-color:#FF0000; color:#003300”>
Although only six examples of two-digit hexadecimal values are shownhere, there are actually 225 combinations of two-digit hexadecimal values—0 through 9 and A through F, paired up. For example, F0 is a possible hexvalue (decimal value 240), 62 is a possible hex value (decimal value 98), andso on.
As previously discussed, the rr, gg, and bb in the #rrggbb hexadecimal colorcode format stand for the red, green, and blue components of the color. Eachof those components has a decimal value ranging from 0 (no color) to 255(full color).
So, white (or #FFFFFF) translates to a red value of 255, a green value of255, and a blue value of 255. Similarly, black (#000000) translates to a redvalue of 0, a green value of 0, and a blue value of 0. True red is #FF0000(all red, no green, and no blue), true green is #00FF00 (no red, all green, noblue), and true blue is #0000FF (no red, no green, and all blue). All otherhexadecimal notations translate to some variation of the 255 possible val-ues for each of the three colors. The cross-browser compatible color namecornflowerblue is associated with the hexadecimal notation #6495ED—ared value of 40, a green value of 149, and a blue value of 237 (almost all ofthe available blue values).
When picking colors, either through a graphics program or by findingsomething online that you like, you might see the color notion in hexadeci-mal or decimal. If you type hexadecimal color converter in your searchengine, you will find numerous options to help you convert color valuesinto something you can use in your style sheets.
Using CSS to Set Background, Text,and Border ColorsWhen using CSS, there are three instances in which color values can beused: when specifying the background color, the text color, or the bordercolor of elements. Previous chapters contained examples of specifying col-ors without going in great detail about color notion or color theory. Forexample, in Chapter 7, “Using External and Internal Links,” you learnedabout using colors for various link states.
www.it-ebooks.info

ptg999
Using CSS to Set Background, Text, and Border Colors 147
Figure 8.2 shows an example of color usage that could easily go into a webdesign Hall of Shame. I can’t imagine ever using these combinations of col-ors and styles in a serious website, but it serves here as an example of howcolor style could be applied to various elements.
FIGURE 8.2Background, text, and border col-ors can all be set using CSS.
Listing 8.1 shows the XHTML and CSS styles used to produce Figure 8.2.
LISTING 8.1 Using Styles to Produce Background, Text, and BorderColors<?xml version=”1.0” encoding=”UTF-8”?><!DOCTYPE html PUBLIC “-//W3C//DTD XHTML 1.1//EN”“http://www.w3.org/TR/xhtml11/DTD/xhtml11.dtd”>
<html xmlns=”http://www.w3.org/1999/xhtml” xml:lang=”en”><head><title>Background, Text, and Border Colors</title>
</head>
<body><h1>Background, Text, and Border Colors</h1>
<p style=”background-color:#CCCCCC; border:1px solid #000000; color:#FF0000”>Grey paragraph, black border, red text with a <span style=”color:#FFA500”>orange span</span>.</p>
<div style=”width:300px; height:75px; margin-bottom: 12px; background-color:#000000; border:2px dashed #FF0000;
www.it-ebooks.info

ptg999
148 CHAPTER 8 Working with Colors, Images, and Multimedia
color: #FFFFFF”>Black div, red border, white text. </div>
<table border=”1”><tr><td style=”background-color: #00FF00”>Green Table Cell</td><td style=”background-color: #FF0000”>Red Table Cell</td></tr><tr><td style=”background-color: #FFFF00”>Blue Table Cell</td><td style=”background-color: #0000FF”>Yellow Table Cell</td></tr></table>
<blockquote style=”background-color:#0000FF; border:4px dotted #FFFF00; color:#FFFFFF”><p>Blue blockquote, yellow border, white text.</p></blockquote>
</body></html>
Looking at the styles used in Listing 8.1, you should be able to figure outalmost everything except some of the border styles. In CSS, borders can’tbe designated as a color without also having a width and type; in the firstexample shown in Listing 8.1, the border width is 1px, and the border typeis solid. In the second example shown in Listing 8.1, the border width is2px, and the border type is dashed. In the fourth example shown in Listing8.1, the border width is 4px, and the border type is dotted.
When picking colors for your website, remember that a little bit goes along way—if you really like a bright and spectacular color, use it as anaccent color and not throughout the primary design elements. For readabil-ity, remember that light backgrounds with dark text are much easier toread than dark backgrounds with light text.
Finally, consider the not-insignificant portion of your audience that mightbe color blind. For accessibility, you might consider using the ColorblindWeb Page Filter tool at http://colorfilter.wickline.org/ to see what yoursite will look like to a person with color blindness.
Choosing Graphics SoftwareSelecting an overall color scheme for your website is one thing; creating orediting images to go into those templates are quite another—and beyondthe scope of this book (or a single book, for that matter). However, in the
LISTING 8.1 Continued
NOTE
Adobe Photoshop is without adoubt the cream of the cropwhen it comes to image-editingprograms. However, it is expen-sive and quite complex if youdon’t have experience workingwith computer graphics. For moreinformation on Adobe’s products,visit the Adobe website athttp://www.adobe.com/. If youare in the market for one of theirproducts, you can download afree evaluation version from theirsite.
www.it-ebooks.info

ptg999
The Least You Need to Know About Graphics 149
sections that follow, you’ll learn a few of the basic actions that anyonemaintaining a website should quickly master.
You can use almost any graphics program to create and edit images foryour website, from the simple paint program that typically comes free withyour computer’s operating system to an expensive professional programsuch as Adobe Photoshop. Similarly, if you have a digital camera or scannerattached to your computer, it probably came with some graphics softwarecapable of creating web page graphics. There are also several free imageeditors available for download—or even online as a web application—thatdeal just with the manipulation of photographic elements.
If you already have software you think might be good for creating webgraphics, try using it to do everything described in these next sections. Ifyour software can’t do some of the tasks covered here, it probably won’t bea good tool for web graphics. In that case, download and install GIMPfrom http://www.gimp.org. This fully functional graphics program iscompletely free and is used to perform the actions shown in this chapter.
If GIMP doesn’t suit you, consider downloading the evaluation version ofAdobe Photoshop or Corel DRAW. For photo manipulation only, there aremany free options, all with helpful features. Google’s Picasa, which isavailable free at http://picasa.google.com/, is one such option. Picnik(http://www.picnik.com/) is another. Both of these programs are suitedfor editing images rather than creating them from scratch, and Picasa isalso oriented toward organizing your digital photograph collection. Assuch, these types of programs are not necessarily going to help you designa banner or button image for your site. However, these programs can helpyou work with some supplementary images, and they are powerfulenough that they are worth checking out.
The Least You Need to Know AboutGraphicsTwo forces are always at odds when you post graphics and multimedia onthe Internet. The users’ eyes and ears want all your content to be asdetailed and accurate as possible, and they also want that information dis-played immediately. Intricate, colorful graphics mean big file sizes, whichincrease the transfer time even over a fast connection. How do you maxi-mize the quality of your presentation while minimizing file size? To makethese choices, you need to understand how color and resolution worktogether to create a subjective sense of quality.
Using Another Site’sMaterialOne of the best ways to save timecreating the graphics and mediafiles for web pages is, of course,to avoid creating them altogether.Grabbing a graphic from any webpage is as simple as right-clickingit (or clicking and holding the but-ton on a Macintosh mouse) andselecting Save Image As or SavePicture As (depending on yourbrowser). Extracting a backgroundimage from a page is just aseasy: Right-click it and select SaveBackground As.
However, you should never useimages without the explicit per-mission of the owner, either byasking them or by looking for aCreative Commons license. Totake images without explicit per-mission is a copyright violation(and is also distasteful). To learnmore about copyrights, visithttp://www.utsystem.edu/OGC/IntellectualProperty/cprtindx.htm.
You might also want to considerroyalty-free clip art, which doesn’trequire you to get copyright per-mission. A good source of clipart online is Microsoft’s OfficeOnline Clip Art and Media web-site, which is located athttp://office.microsoft.com/clipart/. Barry’s Clipart Server isanother popular clip art destina-tion, and it’s located athttp://www.barrysclipart.com/.
www.it-ebooks.info

ptg999
150 CHAPTER 8 Working with Colors, Images, and Multimedia
The resolution of an image is the number of individual dots, or pixels, thatmake up an image. Large, high-resolution images generally take longer totransfer and display than small, low-resolution images. Resolution is usu-ally specified as the width times the height of the image, expressed in pix-els; a 300×200 image, for example, is 300 pixels wide and 200 pixels high.
You might be surprised to find that resolution isn’t the most significant fac-tor determining an image file’s storage size (and transfer time). This isbecause images used on web pages are always stored and transferred incompressed form. Image compression is the mathematical manipulationthat images are put through to squeeze out repetitive patterns. The mathe-matics of image compression is complex, but the basic idea is that repeat-ing patterns or large areas of the same color can be squeezed out when theimage is stored on a disk. This makes the image file much smaller andallows it to be transferred faster over the Internet. The web browser thenrestores the original appearance of the image when the image is displayed.
In the sections that follow, you’ll learn how to create graphics with bigvisual impact but small file sizes. The techniques you’ll use to accomplishthis depend on the contents and purpose of each image. There are as manyuses for web graphics as there are web pages, but four types of graphicsare by far the most common:
. Photos of people, products, or places
. Graphical banners and logos
. Buttons or icons to indicate actions and provide links
. Background textures for container elements
Preparing Photographic ImagesTo put photos on your web pages, you need to convert your print-basedphotos to digital images or create photos digitally by using a digital cam-era. You might need to use the custom software that comes with your scan-ner or camera to save pictures onto your hard drive, or you can just dragand drop files from your camera to your hard drive. If you are using ascanner to create digital versions of your print photos, you can control justabout any scanner directly from the graphics program of your choice—seethe software documentation for details.
NOTE
There are several types ofimage resolution, includingpixel, spatial, spectral, tempo-ral, and radiometric. You couldspend hours just learning abouteach type; and if you were tak-ing a graphics design class, youmight do just that. For now,however, all you need to remem-ber is that large images takelonger to download and alsouse a lot of space in your dis-play. Display size and storageor transfer size are factors youshould take into considerationwhen designing your website.
TIP
If you don’t have a scanner ordigital camera, almost all filmdevelopers offer a service thattransfers photos from 35mmfilm to a CD-ROM or DVD-ROMfor a modest fee. You can thencopy the files from the CD-ROMor DVD-ROM to your hard drive,and then use your graphics pro-gram to open and modify theimage files.
www.it-ebooks.info

ptg999
Preparing Photographic Images 151
After you transfer the digital image files to your computer, you can useyour graphics program to crop, resize, color-correct, and compress to getthem ready for use in your website.
Cropping an ImageBecause you want web page graphics to be as compact as possible, you’llusually need to crop your digital photos. When you crop a photo, youselect the area you want to display, and you crop away the rest.
Cropping in GIMPThe GIMP toolbox offers quick access to the crop tool and its possible attrib-utes. Find an image file—either a digital image you have taken with your cam-era and stored on your hard drive or an image you have found online. Afteropening the image in GIMP, perform the following steps to crop it in GIMP:
1. In the GIMP toolbox, click the crop tool (see Figure 8.3). Depending onthe tool you select, there might be additional attributes you can select.For example, Figure 8.3 shows the attributes for the cropping tool (suchas the aspect ratio, position, size, and so on).
TRY IT YOURSELF ▼
FIGURE 8.3Select the crop tool from thetoolbox.
www.it-ebooks.info

ptg999
152 CHAPTER 8 Working with Colors, Images, and Multimedia
3. Click one of the corners of the selection to apply the cropping.
Your graphics program will likely have a different method than the one shown, butthe concept is the same: select the area to keep, and then crop out the rest.
TRY IT YOURSELF▼
Cropping in GIMPcontinued
2. In the image you want to crop, draw a box around the selection by click-ing the upper-left corner of the portion of the image you want to keepand holding the left mouse button while you drag down to the lower-right corner (see Figure 8.4).
FIGURE 8.4Select the area of the imagethat you want to display.
Even after your image has been cropped, it might be larger than it needs tobe for a web page. Depending on the design of a specific web page, youmight want to limit large images to no more than 800×600 pixels (if it isshown on a page by itself, such as an item catalog) or even 640×480 pixelsor smaller. When shown alongside text, images tend to be in the 250 to 350pixel range for width, so there’s just enough room for the text as well. Insome cases, you might want to also provide a thumbnail version of theimage that links to a larger version, in which case you’ll probably stickcloser to 100 pixels in the larger dimension for the thumbnail.
TIPYour graphics software will likelyhave an omnipresent size dis-play somewhere in the imagewindow itself. In GIMP, the cur-rent image size can be seen inthe top of the window. Otherprograms might show it in thelower-right or lower-left corner.You might also see the magnifi-cation ratio in the window andthe ability to change it (byzooming in or zooming out).
www.it-ebooks.info

ptg999
Preparing Photographic Images 153
Resizing an ImageThe exact tool necessary to change an image’s size will depend on the pro-gram you are using. In GIMP, go to the Image menu and click Scale Imageto open the Scale Image dialog box (see Figure 8.5).
FIGURE 8.5Use the Scale Image dialog box tochange the size of an image.
You’ll almost always want to resize using the existing aspect ratio, meaningthat when you enter the width you’d like the image to be, the height will becalculated automatically (and vice versa) to keep the image from squishingout of shape. In GIMP, the aspect ratio is locked by default, as indicated bythe chain link displayed next to the Width and Height options shown inFigure 8.5. Clicking once on the chain will unlock it, enabling you to specifypixel widths and heights of your own choosing—squished or not.
In most, if not all, graphics programs, you can also resize the image basedon percentages instead of providing specific pixel dimensions. For exam-ple, if my image started out as 1629×1487, and I didn’t want to do the mathto determine the values necessary to show it as half that width, I couldsimply select Percent (in this instance from the drop-down next to the pixeldisplay shown in Figure 8.5) and change the default setting (100) to 50. Theimage width would then become 815 pixels wide by 744 high—and nomath was necessary on my part.
Tweaking Image ColorsIf you are editing photographic images rather than creating your owngraphics, you might need to use some color-correction tools to get the
NOTE
As with many of the features inGIMP, the Scale Image dialogbox appears in front of the win-dow containing the image beingresized. This placement enablesyou to make changes in the dia-log box, apply them, and seethe results immediately.
www.it-ebooks.info
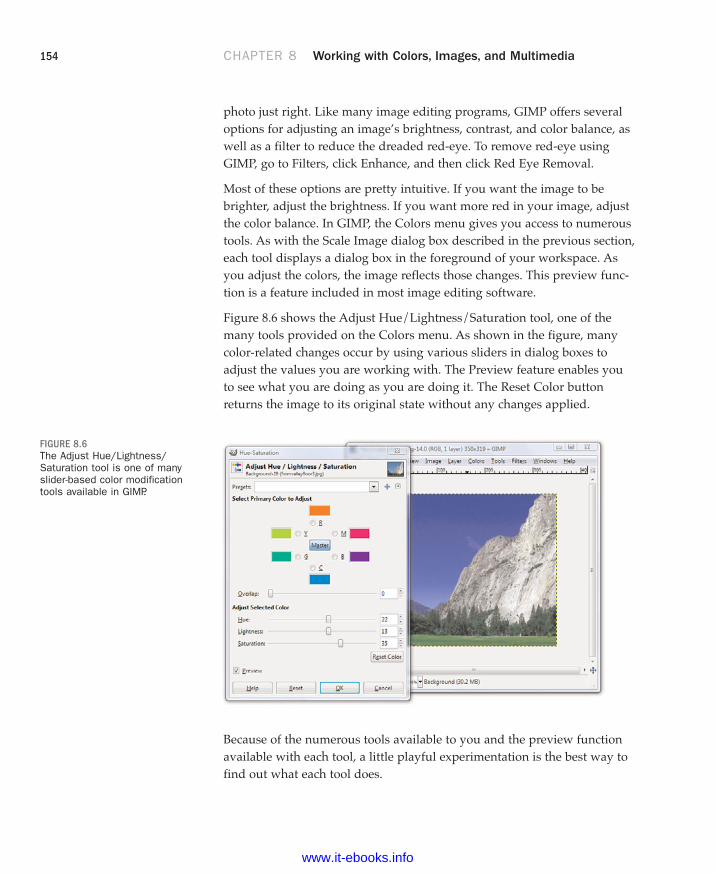
ptg999
154 CHAPTER 8 Working with Colors, Images, and Multimedia
photo just right. Like many image editing programs, GIMP offers severaloptions for adjusting an image’s brightness, contrast, and color balance, aswell as a filter to reduce the dreaded red-eye. To remove red-eye usingGIMP, go to Filters, click Enhance, and then click Red Eye Removal.
Most of these options are pretty intuitive. If you want the image to bebrighter, adjust the brightness. If you want more red in your image, adjustthe color balance. In GIMP, the Colors menu gives you access to numeroustools. As with the Scale Image dialog box described in the previous section,each tool displays a dialog box in the foreground of your workspace. Asyou adjust the colors, the image reflects those changes. This preview func-tion is a feature included in most image editing software.
Figure 8.6 shows the Adjust Hue/Lightness/Saturation tool, one of themany tools provided on the Colors menu. As shown in the figure, manycolor-related changes occur by using various sliders in dialog boxes toadjust the values you are working with. The Preview feature enables youto see what you are doing as you are doing it. The Reset Color buttonreturns the image to its original state without any changes applied.
FIGURE 8.6The Adjust Hue/Lightness/Saturation tool is one of many slider-based color modificationtools available in GIMP.
Because of the numerous tools available to you and the preview functionavailable with each tool, a little playful experimentation is the best way tofind out what each tool does.
www.it-ebooks.info

ptg999
Creating Banners and Buttons 155
Controlling JPEG CompressionPhotographic images on the Web work best when saved in the JPEG fileformat rather than GIF; JPEG enables you to retain the number of colors inthe file while still keeping the overall file size to a manageable level. Whenyou’re finished adjusting the size and appearance of your photo, selectFile, Save As and choose JPEG as the file type. Your graphics program willlikely provide you with another dialog box through which you can controlvarious JPEG options, such as compression.
Figure 8.7 shows the Save as JPEG dialog box you’ll see when you save aJPEG in GIMP. You can see here that you can control the compression ratiofor saving JPEG files by adjusting the Quality slider between 1 (low quali-ty, small file size) and 100 (high quality, large file size).
FIGURE 8.7GIMP enables you to reduce filesize while still retaining imagequality by saving in the JPEG format.
You might want to experiment a bit to see how various JPEG compressionlevels affect the quality of your images, but 85% quality (or 15% compres-sion) is generally a good compromise between file size (and thereforedownload speed) and quality for most photographic images.
Creating Banners and ButtonsGraphics that you create from scratch, such as banners and buttons,require you to make considerations uniquely different from photographs.
www.it-ebooks.info
ptg999
156 CHAPTER 8 Working with Colors, Images, and Multimedia
The first decision you need to make when you produce a banner or buttonis how big it should be. Most people accessing the web now have a com-puter with a screen that is at least 1024×768 pixels in resolution, if not con-siderably larger. For example, my screen is currently set at 1440×900 pixels.You should generally plan your graphics so that they will always fit withinsmaller screens (1024×768), with room to spare for scrollbars and margins.The crucial size constraint is the horizontal width of your pages becausescrolling a page horizontally is a huge hassle and a source of confusion forweb users. Vertically scrolling a page is much more acceptable, so it’s okayif your pages are taller than the minimum screen sizes.
Assuming that you target a minimum resolution of 800×600 pixels, full-sizedbanners and title graphics should be no more than 770 pixels wide by 430pixels tall, which is the maximum viewable area of the page after you’veaccounted for scrollbars, toolbars, and other parts of the browser window.Within a page, normal photos and artwork should be from 100 to 300 pixelsin each dimension, and smaller buttons and icons should be 20 to 100 pixelstall and wide. Obviously, if you design for the 1024×768 resolution, you havemore screen “real estate” to work with, but the size guidelines for banners,buttons, and other supplementary graphics are still in effect.
To create a new image in GIMP, go to File and choose New. The Create aNew Image dialog box displays (see Figure 8.8). If you aren’t sure how bigthe image needs to be, just accept the default size of a 640×480. Or you canchoose one of the other pre-determined sizes in the Template drop-down,such as Web banner common 468×60 or Web banner huge 728×90. Thosetwo settings are indeed considered “common” and “huge” for websitebanners. Otherwise, enter the width and height of the new image.
For the image’s background color, you should usually choose white tomatch the background that most web browsers use for web pages(although as you learned in the previous chapter, that color can bechanged). When you know that you’ll be creating a page with a back-ground other than white, you can choose a different background color foryour image. Or you might want to create an image with no background atall, in which case you’ll select Transparency as the background color. Whenan image’s background is transparent, the web page behind the image isallowed to show through those areas of the image. In GIMP, select thebackground color for your new image by opening the Advanced Optionsin the Create a New Image dialog box.
TIPFor many years, designing for800×600 screen resolution hasbeen the norm. Still keep thatlow number in mind, as manypeople do not open applica-tions in full-screen mode.However, designing for a base-line 1,024×768 screen resolu-tion is not a bad idea.
www.it-ebooks.info

ptg999
Reducing the Number of Colors in an Image 157
When you enter the width and height of the image in pixels and click OK,you are faced with a blank canvas—an intimidating sight if you’re as art-phobic as most of us! However, because there are so many image creationtutorials (not to mention entire books) available to lead you through theprocess, I am comfortable leaving you to your own creative devices. Thissection is all about introducing you to the things you want to keep in mindwhen creating graphics for use in your sites. This section does not neces-sarily teach you exactly how to do it because being comfortable with thetool you choose is the first step to mastering them.
Reducing the Number of Colors inan ImageOne of the most effective ways to reduce the size of, and therefore thedownload time for, an image is to reduce the number of colors used in theimage. This can drastically reduce the visual quality of some photographicimages, but it works great for most banners, buttons, and other icons.
You’ll be glad to know that there is a special file format for images with alimited number of colors; it’s called the Graphics Interchange Format(GIF). When you save an image as a GIF, you might be prompted to flattenlayers or reduce the number of colors by converting to an indexed image,
FIGURE 8.8You need to decide on the size ofan image before you start workingon it.
www.it-ebooks.info

ptg999
158 CHAPTER 8 Working with Colors, Images, and Multimedia
as those are requirements for GIFs, as shown in Figure 8.9. The dialog boxwill simply ask you to confirm these changes that the save process will dofor you—do not concern yourself with understanding these options at thistime, but read your software’s help file regarding layers and indexed col-ors for a full understanding.
TIP
Dithering is a technique usedby image-editing programs tosimulate a color that isn’t inthe color palette with alternat-ing pixels of two similar colors.For example, a dithered pinkcolor would consist of alternat-ing pixels of red and white pix-els, which would give the gener-al impression of pink. Ditheringcan make images look better insome cases, but it should usu-ally be avoided for web pagegraphics. Why? It substantiallyincreases the information com-plexity of an image, and thatusually results in much largerfile sizes and slower down-loads.
FIGURE 8.9When saving an image as a GIF, you might be prompted to convert it to an indexedcolor palette.
Remember, the GIF image format is designed for images that contain areasof solid colors, such as web page titles and other illustrated graphics; theGIF format is not ideal for photographs.
PNG (pronounced “ping”) is another useful file format that is supported inall major web browsers. Although the GIF image format enables you to speci-fy a single transparent color, which means that the background of the webpage will show through those areas of an image, the PNG format takes thingsa step further by enabling you to specify varying degrees of transparency.
Working with Transparent ImagesYou might have seen websites that use background colors or images intheir container elements, but also have images present in the foregroundthat allow the background to show through parts of the foreground graph-ics. In these cases, the images in the foreground have portions which aretransparent, so that the images themselves—which are always on a rectan-gular canvas—do not show the areas of the canvas in which the designdoes not occur. You’ll often want to use these types of partially transparentimages to make graphics look good over any background color or back-ground image you might have in place.
www.it-ebooks.info

ptg999
Creating Tiled Backgrounds 159
To make part of an image transparent, the image must be saved in the GIFor PNG file format. As mentioned previously in this chapter, most graphicsprograms that support the GIF format enable you to specify one color to betransparent, whereas PNG images allow for a range of transparency.Largely because of this transparency range, the PNG format is superior toGIF. All the latest web browsers already support PNG images. For moreinformation on the PNG image format, visit http://www.libpng.org/pub/png/pngintro.html.
The process of creating a transparent image depends on the type of imageyou are creating (GIF or PNG) and the graphics software you are using tocreate it. For instructions, look in your graphics program’s help files or typetransparent images with [your program here] into your search engine.
Creating Tiled BackgroundsAny GIF or JPEG image can be used as a background tile within a contain-er element. However, before you go off and create a tiled background,especially a highly patterned tiled background, ask yourself what that tiledbackground adds to the overall look and feel of your website, and—moreimportantly—ask yourself if the text of the site can be read easily whenplaced over that pattern.
Think about the websites you frequent every day and consider the fact thatfew use tiled, patterned backgrounds on their entire page. If you restrictyour browsing to websites for companies, products, sports teams, or othersites in which information (primarily text) is privileged, the number ofsites with tiled, patterned backgrounds will decrease even further.Although the Web affords everyone the right of individuality in design, ifyou are creating a site for your business, you might want to avoid a highlypatterned background with contrasting colored text.
If you do use a tiled, patterned background image for your entire site,remember that tiled images look best when you can’t tell they’re tiledimages. In other words, you know you have a good image when the topedge of a background tile matches seamlessly with the bottom edge, andthe left edge matches with the right.
Figures 8.10 and 8.11 show background tiles in use, both with seamlessbackground, but with varying degrees of effectiveness.
www.it-ebooks.info

ptg999
160 CHAPTER 8 Working with Colors, Images, and Multimedia
Further on in this chapter, you’ll learn how to place background imageswithin your container elements. Despite my warnings in this section, thereare actually times when background images can be powerful weapons inyour design arsenal—just not when used as entire page backgrounds.
Creating Animated Web GraphicsThe GIF image format enables you to create animated images that can beused to add some motion that will spice up any web page. Animated GIF
FIGURE 8.10This is an example of a seamlessbackground image whereby youcan tell the background is tiledbecause you can see six identicalshapes.
FIGURE 8.11This is also an example of a seam-less background image, only youcan’t tell that it is tiled.
TIP
If you really want to use a back-ground tile but you just cannotseem to get the pattern youwant, you can check out someof the hundreds of sites on theInternet offering public-domainbackground images that arefree or inexpensive, yet profes-sionally designed.
www.it-ebooks.info

ptg999
Placing Images on a Web Page 161
images also transfer much faster than most of the video or multimedia filesthat are often used for similar effect. With GIMP, you can create animatedGIFs by creating multiple layers within an image, and then modifying theAnimated GIF options when saving the file. Additionally, if you have aseries of images you want to animate, you can use the free, web-based GIFanimation service at Gickr (http://www.gickr.com/).
The first step in creating a GIF animation is to create a series of images to bedisplayed one after the other—or a series of layers, depending on your partic-ular software program. Each of these images is called a frame. By the way, thisuse of the word frame has nothing whatsoever to do with the frames you’lllearn about in Chapter 20, “Using Windows and Frames.” Instead, think ofthe frames like how movies or cartoons are put together—the images thatyou see on the screen are made up of many individual frames with slight dif-ferences in their appearance. After you have your frames in mind, the processof tying them together is relatively simple—it’s the planning stage that’s themost difficult. Take some time to sketch out the frames in storyboard fashion,especially if you plan to have more than just a few frames. After you knowhow your frames are going to fit together, use the Gickr service mentionedearlier in this section, or read the documentation for your graphics softwareto learn its particular process for pulling it all together.
Preparing Images forUse in Your Website
You should get two or three images ready now so that you can try puttingthem on your own pages as you follow along the rest of this chapter. If youhave some image files already saved in the GIF, PNG, or JPEG format (the file-names will end in .gif, .png, or .jpg), use those. It’s also fine to use any graph-ics you created while reading the preceding section.
Search engines (such as Google) can become a gold mine of images by leadingyou to sites related to your own theme. Search engines can also help you discov-er the oodles of sites specifically dedicated to providing free and cheap accessto reusable media collections. Also, don’t forget Microsoft’s massive clip artlibrary at the Office Online Clip Art and Media website, located at http://office.microsoft.com/clipart/. Other valuable sources include Google Images(http://images.google.com/) and Flickr (http://www.flickr.com)—look for imagesusing Creative Commons licenses that allow for free use with attribution.
TRY IT YOURSELF ▼
Placing Images on a Web PageTo put an image on a web page, first move the image file into the same fold-er as the HTML file or in a directory named images for easy organization.
www.it-ebooks.info

ptg999
162 CHAPTER 8 Working with Colors, Images, and Multimedia
Insert the following HTML tag at the point in the text where you want theimage to appear. Use the name of your image file instead of myimage.gif:
<img src=”myimage.gif” alt=”My Image” />
If your image file were in the images directory below the document root,you would use the following:
<img src=”/images/myimage.gif” alt=”My Image” />
Both the src and the alt attributes of the <img /> tag are required inXHTML web pages. The src attribute identifies the image file, and the altattribute enables you to specify descriptive text about the image, the latterof which is intended to serve as an alternative to the image in the eventthat a user is unable to view the image. You’ll read more on the alt attrib-ute later, in the section “Describing Images with Text.”
As an example of how to use the <img /> tag, Listing 8.2 inserts an imageat the top of the page, before a paragraph of text. Whenever a web browserdisplays the HTML file in Listing 8.2, it automatically retrieves and dis-plays the image file, as shown in Figure 8.12.
LISTING 8.2 Using the <img /> Tag to Place Images on a Web Page<?xml version=”1.0” encoding=”UTF-8”?><!DOCTYPE html PUBLIC “-//W3C//DTD XHTML 1.1//EN”“http://www.w3.org/TR/xhtml11/DTD/xhtml11.dtd”>
<html xmlns=”http://www.w3.org/1999/xhtml” xml:lang=”en”><head><title>A Spectacular Yosemite View</title></head>
<body><h1>A Spectacular Yosemite View</h1><p><img src=”hd.jpg” alt=”Half Dome” /></p><p><strong>Half Dome</strong> is a granite dome in Yosemite National
➥Park,located in northeastern Mariposa County, California, at the easternend of Yosemite Valley. The granite crest rises more than 4,737 ft(1,444 m) above the valley floor.</p><p>This particular view is of Half Dome as seen from Washburn
Point.</p></body></html>
NOTE
It doesn’t matter to the webserver, web browser, or enduser where you put yourimages, as long as you knowwhere they are and as long asyou use the correct paths inyour HTML code.
NOTE
The <img /> tag also supportsa title attribute that is usedto describe an image. Unlikethe alt attribute, the titleattribute is truly intended toprovide an image descriptionwith the assumption that theimage is visible. The alt attrib-ute serves a more importantpurpose and is put into play pri-marily when an image cannotbe displayed, such as when ablind user is “viewing” a pageusing supplementary screen-reading software. The altattribute is required, but it’s agood idea to provide both altand title attributes if you wantto ensure that your images areall well-described.
www.it-ebooks.info

ptg999
Describing Images with Text 163
If you guessed that img stands for image, you’re right. And src stands forsource, which is a reference to the location of the image file. As discussed atthe beginning of this book, an image is always stored in a file separatefrom the text, even though it appears to be part of the same page whenviewed in a browser.
Just as with the <a href> tag used for hyperlinks, you can specify anycomplete Internet address in the src attribute of the <img /> tag.Alternatively, if an image is located in the same folder as the HTML file,you can specify just the filename. You can also use relative addresses, suchas /images/birdy.jpg or ../smiley.gif.
Describing Images with TextEach <img /> tag in Listing 8.2 includes a short text message, such asalt=”Half Dome”. The alt stands for alternate text, which is the messagethat appears in place of the image itself if it does not load. An image mightnot load if its address is incorrect, if the user has turned off automaticimage downloading in her web browser preferences, or if the Internet con-nection is very slow and the data has yet to transfer. Figure 8.13 shows anexample of alt text used in place of an image.
FIGURE 8.12When a web browser displays theHTML code shown in Listing 8.2, itrenders the hd.jpg image.
NOTETheoretically, you can includean image from any website with-in your own pages. In thosecases, the image is retrievedfrom the other page’s web serv-er whenever your page is dis-played. You could do this, butyou shouldn’t! Not only is it badmanners because you are usingthe other person’s bandwidthfor your own personal gain, italso can make your pages dis-play more slowly. You also haveno way of controlling when theimage might be changed ordeleted.
If you are granted permission torepublish an image from anoth-er web page, always transfer acopy of that image to your com-puter and use a local file refer-ence, such as <img src=
”myimage.jpg” /> instead of<img src=”http://www.otherserver.com/theirimage.
jpg” />. This advice is notapplicable, however, when youhost your images—such asphotographs—at a servicespecifically meant as an imagerepository, such as Flickr(http://www.flickr.com/). Services likeFlickr provide you with a URL foreach image, and each URLincludes Flickr’s domain in theaddress.
www.it-ebooks.info

ptg999
164 CHAPTER 8 Working with Colors, Images, and Multimedia
Even when graphics have fully loaded and are visible in the web browser,the alt message typically appears in a little box (known as a tool tip) when-ever the mouse pointer passes over an image. The alt message also helpsany user who is visually impaired (or is using a voice-based interface toread the web page).
You must include a suitable alt attribute in every <img /> tag on your webpage, keeping in mind the variety of situations in which people might seethat message. A brief description of the image is usually best, but web pageauthors sometimes put short advertising messages or subtle humor in theiralt messages; too much humor and not enough information is frownedupon, however. For small or unimportant images, it’s tempting to omit thealt message altogether, but it is a required attribute of the <img /> tag.This doesn’t mean your page won’t display properly, but it does meanyou’ll be in violation of the latest XHTML standards. I recommend assign-ing an empty text message to alt if you absolutely don’t need it (alt=””),which is sometimes the case with small or decorative images.
The title attribute is not required by the <img /> tag, but it functionssimilarly to the alt attribute; in fact, the title attribute supersedes thealt attribute for tool tips if both attributes are present. Knowing this, thebest approach for describing images via text is to use both the alt attributeand the title attribute to provide relevant notation or helpful hints aboutthe image that you think might be useful when viewed as a tool tip or viascreen reader software.
FIGURE 8.13Users will see alt messageswhen images do not appear.
www.it-ebooks.info

ptg999
Aligning Images 165
Specifying Image Height and WidthBecause text moves over the Internet much faster than graphics, most webbrowsers display the text on a page before they display images. This givesusers something to read while they’re waiting to see the pictures, whichmakes the whole page seem to load faster.
You can make sure that everything on your page appears as quickly aspossible and in the right places by explicitly stating each image’s heightand width. That way, a web browser can immediately and accurately makeroom for each image as it lays out the page and while it waits for theimages to finish transferring.
For each image you want to include in your site, you can use your graph-ics program to determine its exact height and width in pixels. You mightalso be able to find these image properties by using system tools. Forexample, in Windows, you can see an image’s height and width by right-clicking on the image, selecting Properties, and then selecting Details. Afteryou know the height and width of an image, you can include its dimen-sions in the <img /> tag, like this:
<img src=”myimage.gif” alt=”Fancy Picture” width=”200” height=”100” />
Aligning ImagesJust as you can align text on a page, you can align images on the pageusing special attributes. Not only can you align images horizontally, youalso can align them vertically with respect to text and other images thatsurround them.
Horizontal Image AlignmentAs discussed in Chapter 5, “Working with Fonts, Text Blocks, and Lists,”you can use <div style=”text-align:center”>, <div style=”text-align:right”> and <div style=”text-align:left”> to align an elementto the center, to the right margin, or to the left margin. These style settingsaffect both text and images and can be used within the <p> tag as well.
Like text, images are normally lined up with the left margin unless astyle=”text-align:center” or style=”text-align:right” setting indi-cates that they should be centered or right-justified. In other words, left isthe default value of the text-align style property.
TIP
The height and width specifiedfor an image doesn’t have tomatch the image’s actual heightand width. A web browser willtry to squish or stretch theimage to display whatever sizeyou specify. However, this isgenerally a bad idea becausebrowsers aren’t particularlygood at resizing images. If youwant an image to display small-er, you’re definitely better offresizing it in an image editor.
www.it-ebooks.info

ptg999
166 CHAPTER 8 Working with Colors, Images, and Multimedia
You can also wrap text around images by using the float style propertydirectly within the <img /> tag.
In Listing 8.3, <img style=”float:left” /> aligns the first image to theleft and wraps text around the right side of it, as you might expect.Similarly, <img style=”float:right” /> aligns the second image to theright and wraps text around the left side of it. Figure 8.14 shows how theseimages align on a web page. There is no concept of floating an image to thecenter because there would be no way to determine how to wrap text oneach side of it.
LISTING 8.3 Using text-align Styles to Align Images on a Web Page<?xml version=”1.0” encoding=”UTF-8”?><!DOCTYPE html PUBLIC “-//W3C//DTD XHTML 1.1//EN”“http://www.w3.org/TR/xhtml11/DTD/xhtml11.dtd”>
<html xmlns=”http://www.w3.org/1999/xhtml” xml:lang=”en”><head><title>More Spectacular Yosemite Views</title></head>
<body><h1>More Spectacular Yosemite Views</h1><p><img src=”elcap_sm.jpg” alt=”El Capitan” width=”100”height=”75” style=”float:left; padding: 6px;”/><strong>ElCapitan</strong> is a 3,000-foot (910 m) vertical rock formationin Yosemite National Park, located on the north side of YosemiteValley, near its western end. The granite monolith is one of theworld’s favorite challenges for rock climbers. The formation wasnamed “El Capitan” by the Mariposa Battalion when it explored thevalley in 1851.</p><p><img src=”tunnelview_sm.jpg” alt=”Tunnel View” width=”100”height=”80” style=”float:right; padding: 6px;”/><strong>TunnelView</strong> is a viewpoint on State Route 41 located directly eastof the Wawona Tunnel as one enters Yosemite Valley from the south.The view looks east into Yosemite Valley including the southwest faceof El Capitan, Half Dome, and Bridalveil Falls. This is, to many, thefirst views of the popular attractions in Yosemite.</p></body></html>
NOTE
The float style property isactually more powerful thandescribed here and, in fact,applies to more than justimages. You can use the floatstyle property creatively toarrive at some interesting pagelayouts, as you’ll learn later inthe book.
NOTE
Notice the addition of paddingin the style attribute for both<img/> tags used in Listing 8.3.This padding provides somebreathing room between theimage and the text—6 pixels onall four sides of the image. Youwill learn more about padding inChapter 9, “Working withMargins, Padding, Alignment,and Floating.”
www.it-ebooks.info

ptg999
Aligning Images 167
Vertical Image AlignmentSometimes, you might want to insert a small image in the middle of a lineof text; or you might like to put a single line of text next to an image as acaption. In either case, it would be handy to have some control over howthe text and images line up vertically. Should the bottom of the image lineup with the bottom of the letters, or should the text and images all bearranged so that their middles line up? You can choose between these andseveral other options:
. To line up the top of an image with the top of the tallest image or letteron the same line, use <img style=”vertical-align:text-top” />.
. To line up the bottom of an image with the bottom of the text, use<img style=”vertical-align:text-bottom” />.
. To line up the middle of an image with the overall vertical center ofeverything on the line, use <img style=”vertical-align:middle” />.
. To line up the bottom of an image with the baseline of the text, use<img style=”vertical-align:baseline” />.
All four of these options are used in Listing 8.4 and displayed in Figure8.15. Four thumbnail images are now listed vertically down the page,along with descriptive text next to each image. Various settings for thevertical-align style property are used to align each image and its rele-vant text.
FIGURE 8.14Showing the image alignment fromListing 8.3.
NOTE
The vertical-align style prop-erty also supports values of topand bottom, which can be usedto align images with the overalltop or bottom of a line of ele-ments regardless of any text onthe line.
www.it-ebooks.info
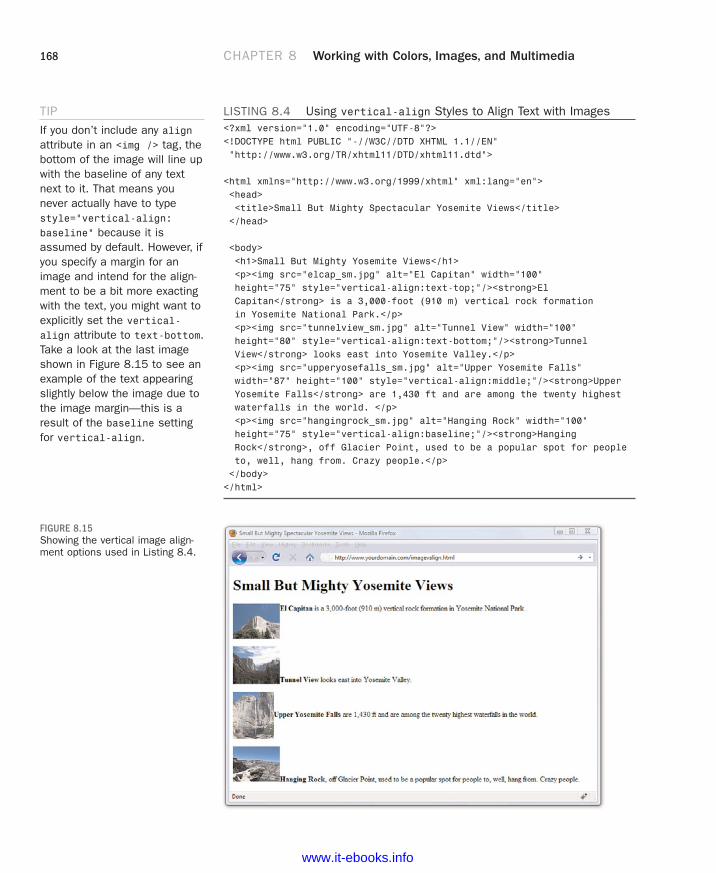
ptg999
168 CHAPTER 8 Working with Colors, Images, and Multimedia
LISTING 8.4 Using vertical-align Styles to Align Text with Images<?xml version=”1.0” encoding=”UTF-8”?><!DOCTYPE html PUBLIC “-//W3C//DTD XHTML 1.1//EN”“http://www.w3.org/TR/xhtml11/DTD/xhtml11.dtd”>
<html xmlns=”http://www.w3.org/1999/xhtml” xml:lang=”en”><head><title>Small But Mighty Spectacular Yosemite Views</title></head>
<body><h1>Small But Mighty Yosemite Views</h1><p><img src=”elcap_sm.jpg” alt=”El Capitan” width=”100”height=”75” style=”vertical-align:text-top;”/><strong>ElCapitan</strong> is a 3,000-foot (910 m) vertical rock formationin Yosemite National Park.</p><p><img src=”tunnelview_sm.jpg” alt=”Tunnel View” width=”100”height=”80” style=”vertical-align:text-bottom;”/><strong>TunnelView</strong> looks east into Yosemite Valley.</p><p><img src=”upperyosefalls_sm.jpg” alt=”Upper Yosemite Falls”width=”87” height=”100” style=”vertical-align:middle;”/><strong>UpperYosemite Falls</strong> are 1,430 ft and are among the twenty highestwaterfalls in the world. </p><p><img src=”hangingrock_sm.jpg” alt=”Hanging Rock” width=”100”height=”75” style=”vertical-align:baseline;”/><strong>HangingRock</strong>, off Glacier Point, used to be a popular spot for peopleto, well, hang from. Crazy people.</p></body></html>
TIP
If you don’t include any alignattribute in an <img /> tag, thebottom of the image will line upwith the baseline of any textnext to it. That means younever actually have to typestyle=”vertical-align:baseline” because it isassumed by default. However, ifyou specify a margin for animage and intend for the align-ment to be a bit more exactingwith the text, you might want toexplicitly set the vertical-align attribute to text-bottom.Take a look at the last imageshown in Figure 8.15 to see anexample of the text appearingslightly below the image due tothe image margin—this is aresult of the baseline settingfor vertical-align.
FIGURE 8.15Showing the vertical image align-ment options used in Listing 8.4.
www.it-ebooks.info

ptg999
Turning Images into Links 169
Turning Images into LinksYou probably noticed in Figure 8.12 that the image on the page is quitelarge, which is fine in this particular example but isn’t ideal when you’retrying to present multiple images. It makes more sense in this case to cre-ate smaller image thumbnails that link to larger versions of each image.Then, you can arrange the thumbnails on the page so that visitors can easi-ly see all the content, even if they see only a smaller version of the actual(larger) image. Thumbnails are one of the many ways you can use imagelinks to spice up your pages.
To turn any image into a clickable link to another page or image, you canuse the <a href> tag that you used previously to make text links. Listing8.5 contains the code for a modification of Listing 8.3—which already usedthumbnails—to provide links to larger versions of the images. To ensurethat the user knows to click the thumbnails, the image and some helpertext is enclosed in a <div>, as shown in Figure 8.16.
LISTING 8.5 Using Thumbnails for Effective Image Links<?xml version=”1.0” encoding=”UTF-8”?><!DOCTYPE html PUBLIC “-//W3C//DTD XHTML 1.1//EN”“http://www.w3.org/TR/xhtml11/DTD/xhtml11.dtd”>
<html xmlns=”http://www.w3.org/1999/xhtml” xml:lang=”en”><head><title>More Spectacular Yosemite Views</title><style type=”text/css”>div.imageleft {float:left;clear: all;text-align:center;font-size:9px;font-style:italic;}div.imageright {float:right;clear: all;text-align:center;font-size:9px;font-style:italic;}img {padding: 6px;border: none;}</style>
</head><body>
www.it-ebooks.info

ptg999
170 CHAPTER 8 Working with Colors, Images, and Multimedia
<h1>More Spectacular Yosemite Views</h1><p><div class=”imageleft”><a href=”http://www.flickr.com/photos/nofancyname/614253439/”><imgsrc=”elcap_sm.jpg” alt=”El Capitan” width=”100” height=”75”/></a><br/>click image to enlarge</div><strong>El Capitan</strong>is a 3,000-foot (910 m) vertical rock formation in Yosemite NationalPark, located on the north side of Yosemite Valley, near its westernend. The granite monolith is one of the world’s favorite challengesfor rock climbers. The formation was named “El Capitan” by theMariposa Battalion when it explored the valley in 1851.</p><p><div class=”imageright”><a href=”http://www.flickr.com/photos/nofancyname/614287355/”><imgsrc=”tunnelview_sm.jpg” alt=”Tunnel View” width=”100” height=”80”/></a><br/>click image to enlarge</div><strong>Tunnel View</strong> is aviewpoint on State Route 41 located directly east of the Wawona Tunnelas one enters Yosemite Valley from the south. The view looks east intoYosemite Valley including the southwest face of El Capitan, Half Dome,and Bridalveil Falls. This is, to many, the first views of the popularattractions in Yosemite.</p></body>
</html>
LISTING 8.5 Continued
FIGURE 8.16Using thumbnails as linksimproves the layout of a page thatuses large images.
The code in Listing 8.5 uses additional styles that will be explained in moredetail in later chapters, but you should be able to figure out the basics:
. The <a> tags link these particular images to larger versions, which inthis case are stored on an external server (at Flickr).
. The <div> tags, and their styles, are used to align those sets of graph-ics and caption text (and also include some padding).
www.it-ebooks.info

ptg999
Using Background Images 171
Unless instructed otherwise, web browsers display a colored rectanglearound the edge of each image link. Like text links, the rectangle usuallyappears blue for links that haven’t been visited recently or purple for linksthat have been visited recently—unless you specify different colored linksin your style sheet. Because you seldom, if ever, want this unsightly linearound your linked images, you should usually includestyle=”border:none” in any <img /> tag within a link. In this instance,the border:none style is made part of the style sheet entry for the img ele-ment because we use the same styles twice.
When you click one of the thumbnail images on the sample page shown,the link is opened in the browser, as shown in Figure 8.17.
Using Background ImagesAs you learned earlier in this chapter, you can use background images toact as a sort of wallpaper in a container element, so that the text or otherimages appear on top of this underlying design.
The basic style properties that work together to create a background are asfollows:
. background-color—Specifies the background color of the element.Although not image-related, it is part of the set of background-relatedproperties.
FIGURE 8.17Clicking a linked thumbnail imageopens the target of the link.
www.it-ebooks.info

ptg999
172 CHAPTER 8 Working with Colors, Images, and Multimedia
. background-image—Specifies the image to use as the background ofthe element using the following syntax: url(‘imagename.gif’).
. background-repeat—Specifies how the image should repeat, bothhorizontally and vertically. By default (without specifying anything),background images will repeat both horizontally and vertically. Otheroptions are repeat (same as default), repeat-x (horizontal), repeat-y(vertical), and no-repeat (only one appearance of the graphic).
. background-position—Specifies where the image should be initiallyplaced relative to its container. Options include top-left, top-center,top-right, center-left, center-center, center-right, bottom-left,bottom-center, bottom-right, and specific pixel and percentageplacements.
When specifying a background image, you can put all of these specifica-tions together into one property, like so:
body {background: #ffffff url(‘imagename.gif’) no-repeat top right;
}
In the previous style sheet entry, the body element of the web page will bewhite and include a graphic named imagename.gif on the top right. Anotheruse for the background property is the creation of custom bullets for yourunordered lists. To use images as bullets, first define the style for the <ul> tagas follows:
ul {list-style-type: none;padding-left: 0;margin-left: 0;
}
Next, change the declaration for the <li> tag to:
li {background: url(mybullet.gif) left center no-repeat
}
Make sure that mybullet.gif (or whatever you name your graphic) is onthe web server and accessible; in that case, all unordered list items willshow your custom image rather than the standard-filled disc bullet.
We will return to the specific use of background properties in Part III,“Advanced Web Page Design with CSS,” when using CSS for overall pagelayouts.
www.it-ebooks.info

ptg999
Using Imagemaps 173
Using ImagemapsSometimes you might want to use an image as navigation, but beyond thesimple button-based or link-based navigation that you often see in websites.For example, perhaps you have a website with medical information, andyou want to show an image of the human body that links to pages that pro-vide information about various body parts. Or, you have a website that pro-vides a world map users can click to access information about countries.You can divide an image into regions that link to different documents,depending on where users click within that image. This is called animagemap, and any image can be made into an imagemap.
Why Imagemaps Aren’t Always NecessaryThe first thing you should know about imagemaps is that you probablywon’t need to use them except in very special cases. It’s almost always easi-er and more efficient to use several ordinary images that are placed directlynext to one another and provide a separate link for each image.
For example, see Figure 8.18. This is a web page that shows 12 different corpo-rate logos; this example is a common type of web page in the business world,one in which you give a little free advertisement to your partners. You couldpresent these logos as one large image and create an imagemap that provideslinks to each of the 12 companies. Users could click each logo in the image tovisit each company’s site. Or, you could display the images on the page as inthis example and use 12 separate images—one for each company—with eachimage including a link to that particular company.
An imagemap is the best choice for an image that has numerous parts, isoddly arranged, or the design of the image itself might be too complicatedto divide into separate images. Figure 8.19 shows an image that is best suit-ed as an imagemap.
Mapping Regions Within an ImageTo create any type of imagemap, you need to figure out the numerical pixelcoordinates of each region within the image that you want to turn into a click-able link. These clickable links are also known as areas. Your graphics programmight provide you with an easy way to find these coordinates. Or you mightwant to use a standalone imagemapping tool such as Mapedit (http://www.boutell.com/mapedit/) or the online imagemap maker at http://www.image-maps.com/. In addition to helping you map the coordinates, these tools also provide the HTML code necessary to make the maps work.
www.it-ebooks.info

ptg999
174 CHAPTER 8 Working with Colors, Images, and Multimedia
Using an imagemapping tool is often as simple as using your mouse todraw a rectangle (or a custom shape) around the area you want to be alink. Figure 8.20 shows the result of one of these rectangular selections as
FIGURE 8.18Web page with 12 different logos;this could be presented as a sin-gle imagemap or divided into 12separate pieces.
FIGURE 8.19An image that wouldn’t take well tobeing sliced up—better make it animagemap.
www.it-ebooks.info

ptg999
Using Imagemaps 175
well as the interface for adding the URL and the title or alternate text forthis link. Several pieces of information are necessary to creating the HTMLfor your imagemap: coordinates, target URL, title of link, and alternativetext for the link.
FIGURE 8.20Using an imagemapping tool tocreate linked areas of a singlegraphic.
Creating Your OwnImagemap
You’re more likely to remember how to make imagemaps if you get an imageof your own and turn it into an imagemap as you continue with this chapter:
. For starters, it’s easiest to choose a fairly large image that is visuallydivided into roughly rectangular regions.
. If you don’t have a suitable image handy, use your favorite graphics pro-gram to make one. Perhaps use a single photograph showing severalpeople and use each person as an area of the imagemap.
. Try a few different imagemapping tools to determine which you likebest. Start with standalone software such as MapEdit(http://www.boutell.com/mapedit/) and move to the online imagemapmaker at http://www.image-maps.com/. There are others; use thesearch engine of your choice to find variations on the imagemap soft-ware theme.
TRY IT YOURSELF ▼
www.it-ebooks.info

ptg999
176 CHAPTER 8 Working with Colors, Images, and Multimedia
Creating the HTML for an ImagemapIf you use an imagemap generator, you will already have the HTML neces-sary for creating the imagemap. However, it is a good idea to understandthe parts of the code so that you can check it for accuracy. The followingHTML code is required to start any imagemap:
<map name=”mapname”>
Keep in mind that you can use whatever name you want for the name of the<map> tag, although it helps if you make it as descriptive as possible. Next,you’ll need an <area /> tag for each region of the image. Following is anexample of a single <area /> tag that is used in the mapping-a-mapimagemap example:
<area shape=”rect” coords=”100,136,116,152”href=”http://www.whitmancounty.org/”alt=”Whitman County, WA”title=”Whitman County, WA” />
This <area /> tag has five attributes, which you will use with every areayou describe in an imagemap:
. shape indicates whether the region is a rectangle (shape=”rect”), acircle (shape=”circle”), or an irregular polygon (shape=”poly”).
. coords gives the exact pixel coordinates for the region. For rectangles,give the x,y coordinates of the upper-left corner followed by the x,ycoordinates of the lower-right corner. For circles, give the x,y centerpoint followed by the radius in pixels. For polygons, list the x,y coor-dinates of all the corners in a connect-the-dots order.
. href specifies the page to which the region links. You can use anyaddress or filename that you would use in an ordinary <a href> linktag.
. alt enables you to provide a piece of text that is associated with theshape. Most browsers (Firefox excluded) display this text in a small boxwhen a user hovers his mouse over the shape. This text adds a subtlebut important visual cue to users who might not otherwise realize thatthey are looking at an imagemap. Firefox correctly uses the title attrib-ute in addition to the alt attribute to provide a visual cue, which is why,as noted previously in this chapter, you should use both attributes.
Each distinct clickable region in an imagemap must be described as a singlearea, which means a typical imagemap consists of a list of areas. After cod-ing the <area /> tags, you are done defining the imagemap, so wrap thingsup with a closing </map> tag.
www.it-ebooks.info

ptg999
Using Imagemaps 177
The last step in creating an imagemap is wiring it to the actual map image.The map image is placed on the page using an ordinary <img /> tag.However, there is an extra usemap attribute that is coded like this:
<img src=”map.png” usemap=”#countymap”style=”border:none; width:650px; height:509px”alt=”Native Peoples Census Map” />
When specifying the value of the usemap attribute, use the name you put inthe id of the <map> tag (and don’t forget the # symbol). Also include thestyle attribute to specify the height and width of the image and to turn offthe border around the imagemap, which you might or might not elect tokeep in imagemaps of your own.
Listing 8.6 shows the complete code for a sample web page containing themap graphic, its imagemap, and a few mapped areas.
LISTING 8.6 Defining the Regions of an Imagemap with <map> and<area /> Tags<?xml version=”1.0” encoding=”UTF-8”?><!DOCTYPE html PUBLIC “-//W3C//DTD XHTML 1.0 Transitional//EN”“http://www.w3.org/TR/xhtml1/DTD/xhtml1-transitional.dtd”>
<html xmlns=”http://www.w3.org/1999/xhtml” xml:lang=”en”><head><title>Testing an Imagemap</title></head>
<body><h1>Testing an Imagemap</h1><p style=”text-align:center”>Click on a logo to go to thecounty’s web site.<br/><img src=”map.png” usemap=”#countymap”style=”border:none; width:650px;height:509px”alt=”Native Peoples Census Map” /></p>
<map name=”countymap” id=”countymap”><area shape=”rect” coords=”100,136,116,152”href=”http://www.whitmancounty.org/”alt=”Whitman County, WA” title=”Whitman County, WA” />
<area shape=”rect” coords=”29,271,42,283”href=”http://www.sccgov.org/” alt=”Santa Clara County, CA”title=”Santa Clara County, CA” />
<area shape=”rect” coords=”535,216,548,228”href=”http://visitingmifflincounty.com/”alt=”Mifflin County, PA” title=”Mifflin County, PA” />
</map></body>
</html>
NOTE
If you’re a stickler for details,you might have noticed—checkout the first few lines of code—that this web page is coded asan XHTML 1.0 document, asopposed to the XHTML 1.1used with most of the otherexamples in the book. This isdone because some browsers(Internet Explorer, for one) arelagging in their support of a sin-gle XHTML 1.1 change in howimagemaps are used. Thischange is specific to theusemap attribute, which inXHTML 1.1 doesn’t require the# symbol in front of the mapname. In fact, the # symbolisn’t allowed at all in XHTML1.1. The # symbol is, however,allowed in XHTML 1.0, so tosatisfy current web browsersand still provide you with a validweb page; this particular exam-ple uses XHTML 1.0.
www.it-ebooks.info

ptg999
178 CHAPTER 8 Working with Colors, Images, and Multimedia
Figure 8.21 shows the imagemap in action. Notice in the bottom of yourbrowser window that your browser (in this example, Firefox) displays thelink address for whatever area the mouse is hovering over. Additionally,when you hover the mouse over an area, the alt or title text for thatarea—in this example, Whitman County—is displayed on the imagemap.
FIGURE 8.21The imagemap defined in Listing8.6 as it displays on the webpage.
NOTE
There is a method of producingmapped images that reliessolely on CSS and not theHTML <map> tag. You will learnmore about this in Chapter 11,“Using CSS to Do More withLists, Text, and Navigation.”
Integrating Multimedia into YourWebsiteNow that you’ve learned how to work with static images, the natural nextstep is to work with multimedia. The term multimedia encompasses every-thing we see and hear on a web page: audio, video, and animation, as wellas static images and text. In this section, you won’t learn how to create anyparticular audio, video, or animation, but you will learn how to includesuch files in your site, through either linking or embedding the content.
Remember, though, that not every user has devices that will play yourmedia type, nor do all users have broadband Internet connections whichallow these large files to transfer quickly. Always warn your visitors thatthe links they click will take them to multimedia files and offer them thechoice to view or listen to the content—don’t force the files upon them.
www.it-ebooks.info

ptg999
Integrating Multimedia into Your Website 179
Creating multimedia of any kind can be a challenging and complicatedtask. If you’re planning to create your own content from scratch, you’llneed far more than this book to become the next crackerjack multimediadeveloper. After you have some content, however, this section will showyou how to place your new creations into your web pages.
For those of us who are artistically challenged, several alternative ways toobtain useful multimedia assets are available. Aside from the obvious(such as hiring an artist), here are a few suggestions:
. Much of the material on the Internet is free. Of course, it’s still agood idea to double-check with the author or current owner of thecontent; you don’t want to be sued for copyright infringement. Inaddition, various offices of the U.S. government generate contentwhich, by law, belongs to all Americans. (For example, any NASAfootage found online is free for your use.)
. Many search engines (google.com, yahoo.com, bing.com, and so on)have specific search capabilities for finding multimedia files. As longas you are careful about copyright issues, this can be an easy way tofind multimedia related to a specific topic. A simple search for sam-ple Flash animations, sample QuickTime movie, or sample audiofiles will produce more results than you can handle.
. If you are creatively inclined, determine the medium you like most—for some of you it might be video production, others may enjoy audioproduction, and still others might want to dabble in animation. Afteryou have determined a starting point, look into the various types ofsoftware which will enable you to create such artistic masterpieces.Many companies provide multimedia software, such as Adobe(http://www.adobe.com/) and Apple (http://www.apple.com/).
Linking to Multimedia FilesThe simplest and most reliable option for incorporating a video or audiofile into your website is to simply link it in with <a href>, exactly as youwould link to another HTML file.
For example, the following line could be used to offer a MOV video of ahockey game:
<a href=”hockey.mov”>View the hockey video clip.</a>
NOTE
Regardless of the specificmedia types shown in thischapter, the procedures shownfor incorporating multimediainto your web pages will be sim-ilar no matter which media for-mat you choose.
www.it-ebooks.info

ptg999
180 CHAPTER 8 Working with Colors, Images, and Multimedia
When the user clicks the words View the hockey video clip., the hockey.mov QuickTime video file is transferred to her computer from yourweb server. Whichever helper application or plug-in she has installed auto-matically starts as soon as the file has finished downloading. If no compat-ible helper or plug-in can be found, the web browser will offer her achance to download the appropriate plug-in or save the video on her harddrive for later viewing.
The click action results in the browser either playing the video with thehelp of a plug-in (if one is found that can play the clip) or deferring to asuitable helper application.
If you change the link from pond.wmv (Windows Media) to pond.mov(QuickTime), your browser handles the link differently. Instead of launch-ing another program, the QuickTime plug-in enables you to view themovie clip directly in the browser window.
As you might have guessed, this approach of using a simple link to playmultimedia files offers the best backward compatibility because the browserbears all the responsibility of figuring out how to play a multimedia clip.The downside to this is that you don’t have much control over how a clip isplayed, and you definitely can’t play a clip directly in the context of a page.
Embedding Multimedia FilesXHTML contains a standard <object> tag that is the preferred way toembed multimedia of any kind in a web page. This tag is used instead ofthe old <embed /> tag that you might still see in some HTML source code.
Embedding a multimedia file into a page produces a set of software con-trols that allow the file to be played directly—no secondary window is nec-essary, and there’s no need to navigate away from the page you are on.Following is code to embed the pond video using the <object> tag by itself:
<object classid=”CLSID:6BF52A52-394A-11d3-B153-00C04F79FAA6”width=”320” height=”305”><param name=”type” value=”video/x-ms-wmv” /><param name=”URL” value=”pond.wmv” /><param name=”uiMode” value=”full” /><param name=”autoStart” value=”false” /></object>
This code isn’t too terribly complicated when you consider that it literallyembeds a video directly into your web page (see Figure 8.22). The messiestpart of the code is the classid attribute of the <object> tag, which is set to
NOTEIn case you’re unfamiliar withhelper applications (helper appsfor short), they are the externalprograms that a web browsercalls on to display any type offile it can’t handle on its own.Generally, the helper applicationassociated with a file type iscalled on whenever a webbrowser can’t display that typeof file on its own.
Plug-ins are a special sort ofhelper application installeddirectly into a web browser andthey enable you to view multi-media content directly withinthe browser window.
NOTE
If your browser has no supportfor QuickTime, you can down-load the QuickTime player freefrom Apple at http://www.apple.com/quicktime/. Even ifyou do have QuickTimeinstalled, some browsers mightstill play QuickTime movies dif-ferently based on whether aplug-in is installed. For exam-ple, on my Windows computer,Internet Explorer and Firefoxboth play QuickTime moviesdirectly in the browser windowvia a plug-in, whereas Operalaunches QuickTime as a helperapplication.
www.it-ebooks.info

ptg999
Integrating Multimedia into Your Website 181
a long alphanumeric code. This code is the global ID for Windows MediaPlayer, which means that you’re telling the <object> tag to embedWindows Media Player on the page to play the video clip. You can justcopy and paste this code into your own web pages.
NOTE
It’s important to note thatWindows Media Player is asophisticated enough mediaplayer that it automaticallystreams multimedia files, whichmeans that it begins playingthem after loading only the firstfew seconds of content. Theidea is that the rest of the con-tent is loaded in the back-ground while you’re watching orlistening to earlier portions. Theresult is that visitors don’t haveto wait through long downloadtimes when viewing or listeningto your multimedia clips.
FIGURE 8.22The <object> tag enables you to embed a video clip on a web page while specifyingwhich media player is to play it.
The width and height attributes of the <object> tag determine the size ofthe embedded Windows Media Player window. Some browsers will auto-matically size the embedded player to fit the content if you leave theseattributes off, whereas others won’t show anything at all. Play it safe bysetting them to a size that suits the multimedia content being played.
There are four <param> tags within the <object> tag that are responsiblefor additional details about how the clip is to be played. Each tag has twoattributes, name and value, which are responsible for associating data(value) with a particular setting (name). In this example, the URL for themedia clip is set to pond.wmv. The third parameter, uiMode, determineswhich buttons and user interface options are made available by WindowsMedia Player—full indicates that all user interface features are enabled,such as the control buttons and volume slider. Finally, the autoStartparameter is set to false so that the video clip does not automatically startplaying when the page is opened in a browser.
www.it-ebooks.info

ptg999
182 CHAPTER 8 Working with Colors, Images, and Multimedia
The type parameter is perhaps the trickiest. It identifies the type of mediabeing displayed, which in this case is a Windows Media Video (WMV) file.This media type must be specified as one of the standard Internet MIMEtypes.
A MIME type is an identifier for uniquely identifying different types ofmedia objects on the Internet. MIME stands for Multipurpose Internet MailExtensions, and this name comes from the fact that MIME types were orig-inally used to identify email attachments. These MIME types should beused in the type attribute of the <object> tag to identify what kind ofmultimedia object is being referenced in the data attribute.
Following are the MIME types for several popular sound and video for-mats you might want to use in your web pages:
. WAV Audio—audio/x-wav
. AU Audio—audio/basic
. MP3 Audio—audio/mpeg
. MIDI Audio—audio/midi
. WMA Audio—audio/x-ms-wma
. RealAudio—audio/x-pn-realaudio-plugin
. AVI—video/x-msvideo
. WMV—video/x-ms-wmv
. MPEG Video—video/mpeg
. QuickTime—video/quicktime
Listing 8.7 shows the relevant code for the pond web page, where you cansee the <object> tag as it appears in context.
LISTING 8.7 Using an <object> Tag to Directly Embed a WMV VideoClip<?xml version=”1.0” encoding=”UTF-8”?><!DOCTYPE html PUBLIC “-//W3C//DTD XHTML 1.1//EN”“http://www.w3.org/TR/xhtml11/DTD/xhtml11.dtd”>
<html xmlns=”http://www.w3.org/1999/xhtml” xml:lang=”en”><head><title>Fun in the Pond</title></head>
<body>
www.it-ebooks.info

ptg999
Integrating Multimedia into Your Website 183
<h1>Fun in the Pond</h1><div style=”float:left; padding:3px”><object classid=”CLSID:6BF52A52-394A-11d3-B153-00C04F79FAA6”width=”320” height=”305”><param name=”type” value=”video/x-ms-wmv” /><param name=”URL” value=”pond.wmv” /><param name=”uiMode” value=”full” /><param name=”autoStart” value=”false” /><embed width=”320” height=”305” type=”video/x-ms-wmv”src=”pond.wmv” controls=”All” loop=”false” autostart=”false”pluginspage=”http://www.microsoft.com/windows/windowsmedia/” /></object></div><p>Michael’s backyard pond is not only a fun hobby but alsoan ongoing home improvement project that is both creative andrelaxing.</p><p>He has numerous fish in the pond, all Koi from various placesas far as Japan, Israel, and Australia. Although they don’t bark,purr, or fetch anything other than food, these fish are his pets,and good ones at that.</p>
</body></html>
You might notice that there’s some extra code that didn’t appear in the ear-lier <object> tag example. Unfortunately, as discussed earlier in the section,not all web browsers are entirely consistent in their support of the <object>tag. For this reason, it is necessary to include an <embed /> tag within the<object> tag to account for browser inconsistencies. This isn’t an ideal solu-tion, but it’s all we have while browser vendors continue to lag behind pre-vailing standards. If you pay close attention, you’ll notice that the <embed/> tag contains all the same information as the <object> tag.
The <object> tag is a bit more complex than what is revealed here.However, you don’t need to know how to use the more advanced facets ofthe <object> tag just to play multimedia content. In other words, it isn’timportant for you to become a multimedia guru to share some multimediaclips on your web pages.
Additional Tips for Using MultimediaBefore you add video, audio, or animations to your website, first ask your-self if you really should. When you use these types of multimedia, be sureto do so for a reason. Gratuitous sound and video, just like gratuitousimages, can detract from your overall message. Then again, if your mes-sage is “Look at the videos I have made” or “Listen to my music and
LISTING 8.7 Continued NOTE
Because the <embed /> tag isnot supported in XHTML, it willprevent your pages from validat-ing. Unfortunately, there reallyis no workaround for this prob-lem—we’ll just have to wait forbrowsers to fully support the<object> tag by itself or moveto the <embed /> element ofHTML5.
NOTE
Video files aren’t the onlymedia files you can includewithin your website using the<object> and <embed /> tags.Adding any multimedia file willfollow the same process. Todetermine exactly which classidand codebase attributes to use,as well as additional parame-ters (in the <param /> tags),use your search engine to lookup something like objectembed mediatype, where mediatype is Real Audio,QuickTime, Flash, or whateveryou want.
www.it-ebooks.info

ptg999
184 CHAPTER 8 Working with Colors, Images, and Multimedia
download some songs,” then multimedia absolutely must play a role inyour website.
Here are a few additional tips to keep in mind:
. Don’t include multimedia in a page and set it to automatically playwhen the page loads. Always give users the option to start (and stop)your sound or video.
. When possible, give users a choice of multimedia players. Don’t limityourself to multimedia content playable by only one type of playeron only one operating system.
. Multimedia files are larger than the typical graphics and text files,which means you need to have the space on your web server to storethem, as well as the bandwidth allotment to transfer them towhomever requests them via your website.
. If your site is entirely audio or video and offers very little by way oftext or graphics, understand that a certain segment of your audiencewon’t see or hear what you want to present because of the limita-tions of their system or bandwidth. Provide these users with addi-tional options to get your information.
. Leverage free online video hosting services, such as YouTube(http://www.youtube.com/). Not only does YouTube provide stor-age for your video clips, it will provide you with the code necessaryto embed the video in your own web page. For example, Figure 8.23shows the YouTube page for the cutest puppy in the world. If youcopy and paste the text from the Embed area shown in the figure,you would get the following:
<object width=”425” height=”344”><param name=”movie” value=”http://www.youtube.com/v/yPxiHd2BOpo&rel=0&color1=0xb1b1b1&color2=0xcfcfcf&feature=player_profilepage&fs=1”></param><param name=”allowFullScreen” value=”true”></param><param name=”allowScriptAccess” value=”always”></param><embedsrc=”http://www.youtube.com/v/yPxiHd2BOpo&rel=0&color1=0xb1b1b1&color2=0xcfcfcf&feature=player_profilepage&fs=1” type=”application/x-shockwave-flash” allowfullscreen=”true” allowScriptAccess=”always” width=”425” height=”344”></embed></object>
You could then insert the code into your web page.
www.it-ebooks.info

ptg999
Summary 185
SummaryIn this chapter, you learned a few best practices for thinking about coloruse, and how to use the color wheel to help you find colors that will com-plement your text. Additionally, you learned about hexadecimal notion forcolors—that all colors are expressed in notations related to the amount ofred, green, and blue in them—and how hexadecimal notation enables youto apply nuanced colors to your elements. More importantly, you learnedabout the three color-related style properties that can be used to applycolor to container backgrounds, borders, and text using CSS.
You also learned the basics of preparing graphics for use on web pages. Ifnothing else, you learned that this is a very complex topic, and youlearned just enough in this chapter to whet your appetite. The examples inthis chapter used the popular (and free!) GIMP software package, but feelfree to use the graphics software that best suits your needs. Among theactions you learned were how to crop, resize, and tweak image colors, andyou also learned about the different file formats. There are many consider-ations you must keep in mind when including graphics in your site,including graphic size and resolution and how to use transparency, ani-mated GIFs, and tiled backgrounds.
After you have created or edited some images, you can place them in yourweb page, which you also learned how to do through the <img /> tag. You
FIGURE 8.23YouTube provides storage of yourvideo files as well as links and<object> code for use in your ownpages.
www.it-ebooks.info

ptg999
186 CHAPTER 8 Working with Colors, Images, and Multimedia
learned how to include a short text message that appears in place of the imageas it loads and also appears whenever users move the mouse pointer over theimage. You also discovered how to control the horizontal and vertical align-ment of each image and how to wrap text around the left or right of an image.
You learned how to use images as links—either by using the <a> tag aroundthe images or by creating imagemaps. You also learned a little bit about howto use images in the background of container elements.
Finally, you learned how to embed video and sound into a web page. Youdiscovered how to use a simple link to a multimedia file, which is the mostbroadly supported but least flexible option for playing media content. Youthen learned how to use the <object> tag to embed a media player directlyin a web page. Not only that, you discovered that for maximum browsercompatibility, it helps to assist the <object> tag with the <embed /> tag. The<object> and <embed /> tags can be used to include a vast array of mediatypes, including WAV, MP3, RealAudio, and MIDI files—not to mentionAVI, WMV, and QuickTime videos, to name just a few.
Table 8.1 summarizes the tags and attributes covered in this chapter.
TABLE 8.1 Tags and Attributes Covered in Chapter 8
Tag Function
<img /> Places an image file within the page.
<map>...</map> A client-side imagemap referenced by <img usemap=”...” />. Includes one or more <area /> tags.
<area /> Defines a clickable link within a client-side imagemap.
<embed /> Embeds a multimedia file to be read or displayed by aplug-in application; this tag is technically deprecatedbut still useful due to browsers not fully supporting the<object> tag yet.
<object>...</object> Inserts images, videos, Java applets, ActiveX controls,or other objects into a document.
<param>...</param> Runtime settings for an object, such as the width andheight of the area it occupies on a page.
Attribute/Style Function
style=”background- Sets the background color of an element (such as color:color” <body>, <p>, <div>, <blockquote>, and other
containers).
style=”color:color” Sets the color of text within an element.
style=”border:size Sets the color of the four borders around an element.type color “ Border colors cannot be used without also specifying
the width and type of the border.
www.it-ebooks.info

ptg999
Summary 187
src=”address” The address or filename of the image.
alt= An alternative description of the image that is ”altdescription” displayed in place of the image, primarily for users who
can’t view the image itself.
title=”title” A text message that is displayed as an image title, typi-cally in a small pop-up box (tool tip) over the image.
width=”width” The width of the image (in pixels).
height=”height” The height of the image (in pixels).
style= Gets rid of the border around the image if the image ”border:attributes” is serving as a link.
style=”vertical- Aligns the image vertically to text-top, top, text-align:alignment” bottom, bottom, middle, or baseline.
style=”float:float” Floats the image to one side so text can wrap around it.Possible values are left, right, and none (default).
usemap=”name” The name of an imagemap specification for client-sideimage mapping. Used with <map> and <area />.
shape=”value” Within the <area /> tag, specifies the shape of theclickable area. Valid options for this attribute are rect,poly, and circle.
coords=”values” Within the <area /> tag, specifies the coordinates ofthe clickable region within an image. Its meaning andsetting vary according to the type of area.
href=”linkurl” Within the <area /> tag, specifies the URL that shouldbe loaded when the area is clicked.
name=”name” A named parameter property.
value=”value” The value associated with a named parameter property.
width=”width” The width of the embedded object in pixels.
height=”height” The height of the embedded object in pixels.
type=”mimetype” The MIME type of the multimedia content.
src=”mediaurl” The URL of the file to embed.
controls=”controls” The configuration of the user input controls for themedia player; use all to enable all controls.
loop=”loop” Play the media clip once or loop it repeatedly; set totrue or false.
autostart= Play the media clip upon opening the page; set to true”autostart” or false.
pluginspage= The URL of the plug-in required to play the media clip.”pluginurl”
TABLE 8.1 Continued
Attribute/Style Function
www.it-ebooks.info

ptg999
188 CHAPTER 8 Working with Colors, Images, and Multimedia
Q&AQ. Instead of learning all this stuff myself, shouldn’t I just hire a graphic
artist to design my pages?
A. This is a difficult question to answer, and it’s not because I have a con-flict of interest here—I work for a web development and design agency,so it’s in my best interest to recommend agencies. But an agency isn’talways the best solution. Hiring a graphic designer takes time andmoney. Additionally, there are many graphic artists who do not producework suitable for the Web—they are specifically print-based artists, andthe print world is quite different than the online world. Also, hiring anindividual who deems himself a graphic designer to create a websitemight not play to the strengths of that particular graphic designer. Inother words, he might be good at designing the graphical elements of awebsite, but he might not be good as a content architect or at workingwith HTML and CSS. If your site is simply a personal site, a profession-al design might not be where you want to spend your money. But if yoursite is intended to promote a business, a product, a school, or anythingelse whereby your image is integral to your success, it’s worth yourwhile (and money) to consult with web design professional.
Q. I’ve produced graphics for printing on paper. Are web page graphicsany different?
A. Yes. In fact, many of the rules for print graphics are reversed on theWeb. Web page graphics have to be low resolution, whereas print graph-ics should be as high resolution as possible. White washes out blackon computer screens, whereas black bleeds into white on paper. Also,someone might stop a web page from loading when only half the graph-ics have been downloaded. Try to avoid falling into old habits if you’vedone a lot of print graphics design.
Q. I used the <img /> tag just as you advised, but when I view the page,all I see is a little box with some shapes in it. What’s wrong?
A. The broken image icon you’re seeing can mean one of two things:Either the web browser couldn’t find the image file or the image isn’tsaved in a format the browser recognizes. To solve these problems,first check to make sure that the image is where it is supposed to be.If it is, then open the image in your graphics editor and save it again asa GIF, JPG, or PNG format.
Q. What happens if I overlap areas on an imagemap?
A. You are allowed to overlap areas on an imagemap. Just keep in mind thatwhen determining which link to follow, one area will have precedence over
www.it-ebooks.info

ptg999
Workshop 189
the other area. Precedence is assigned according to which areas are list-ed first in the imagemap. For example, the first area in the map hasprecedence over the second area, which means that a click in the over-lapping portion of the areas will link to the first area. If you have an areawithin an imagemap that doesn’t link to anything (known as a dead area),you can use this overlap trick to deliberately prevent this area from link-ing to anything. To do this, just place the dead area before other areas sothat the dead area overlaps them, and then set its href attribute to “”.
Q. I hear a lot about streaming video and audio. What does that mean?
A. In the past, video and audio files took minutes and sometimes hours toretrieve through most modems, which severely limited the inclusion ofvideo and audio on web pages. The goal that everyone is moving towardis streaming video or audio, which plays while the data is beingreceived. In other words, you don’t have to completely download the clipbefore you can start to watch it or listen to it.
Streaming playback is now widely supported through most media play-ers, in both standalone versions and plug-ins. When you embed amedia object using the <object> tag, the underlying media player auto-matically streams the media clip if streaming is supported in the player.
WorkshopThe workshop contains quiz questions and exercises to help you solidify yourunderstanding of the material covered. Try to answer all questions beforelooking at the “Answers” section that follows.
Quiz1. How would you give a web page a black background and make all text
bright green? Based on what you’ve learned in this chapter, would youeven want to use that color combination?
2. You have a scanned picture of a horse that you need to put on a webpage. How big should you make it? In what file format should you save it?
3. How would you insert an elephant.jpg image file at the top of a webpage?
4. How would you make the word Elephant display whenever the actualelephant.jpg image couldn’t be displayed by a web browser?
www.it-ebooks.info

ptg999
190 CHAPTER 8 Working with Colors, Images, and Multimedia
Answers1. Put the following at the beginning of the web page or use a style rule for
the body element:
<body style=”background-color:#000000; color:#00FF00”>
2. Depending on how important the image is to your page, you shouldmake it as small as 100×40 pixels or as large as 300×120 pixels. TheJPEG format, with about 85% compression, would be best. Of course,you could also provide a thumbnail link to a larger image that is viewedby itself.
3. Copy the image file into the same directory folder as the HTML text file.Immediately after the <body> tag in the HTML text file, type <p><imgsrc=”elephant.jpg” alt=”” /></p>.
4. Use the following HTML:
<img src=”elephant.jpg” alt=”elephant” />
Exercises. Select a base color that you like—perhaps a lovely blue or an earthy tone—
and use the Color Scheme Generator at http://colorscheme-designer.com/to come up with a set of colors that you can use in a website. I recommendthe tetrad or accented analogic scheme types.
. After you have a set of colors—or a few options for sets of colors—create a basic HTML page with a <h1> element, a paragraph of text, andperhaps some list items. Use the color-related styles you’ve learnedabout in this chapter to change the background color of the page andthe text of the various block-level elements, to see how these sets ofcolors might work together. See how they interact and determine whichcolors are best used for containers and which are best used for plaintext, header text, and link text.
. Before you start designing graphics for an important business site, tryspicing up your own personal home page. This will give you a chance tolearn GIMP (or give you a chance to use your graphics software) so thatyou’ll know what you’re doing when you tackle the task at work.
. Practicing any of the image placement methods in this chapter will go along way toward helping you determine the role that images can, andwill, play in the websites you design. Using a few sample images, prac-tice using the float style to place images and text in relation to oneanother. Remember the possible values for float are left, right, andnone (default).
www.it-ebooks.info

ptg999
Now that you’ve learned some of the basics of creating web content, in thischapter you’ll learn the nitty-gritty of using CSS to enhance that content.Throughout the previous chapter, you have learned how to use basic CSSfor display purposes (such as font sizes and colors). In the chapters thatfollow, you’ll dive in to using CSS to control aspects of your entire webpage and not just individual pieces of text or graphics.
Before tackling page layout, however, it is important to understand fourparticular CSS properties individually before putting them all together:
. The margin and padding properties—For adding space around ele-ments
. The align and float properties—Used to place your elements inrelation to others
The examples provided during this chapter are not the most stylish exam-ples of web content ever created, but they are not intended to be. Instead,the examples clearly show just how XHTML and CSS are working togeth-er. After you master CSS through this and other chapters, you’ll be able tocreate web-based masterpieces such as the one shown in Figure 9.1, anexample at CSS Zen Garden.
The sites at CSS Zen Garden probably do not look like the typical e-commerce or social networking sites that you visit on a regular basis.Instead, these sites showcase the artistic possibilities that can unfold usingCSS. Make no mistake, these sites take careful thought and planning, butthe potential designs are limitless.
WHAT YOU’LL LEARN INTHIS CHAPTER:
. How to add marginsaround elements
. How to add padding withinelements
. How to keep everythingaligned
. How to use the floatproperty
CHAPTER 9Working with Margins, Padding,
Alignment, and Floating
www.it-ebooks.info

ptg999
192 CHAPTER 9 Working with Margins, Padding, Alignment, and Floating
Using MarginsStyle sheet margins enable you to add empty space around the outside of therectangular area for an element on a web page. It is important to rememberthat the margin property works with space outside of the element.
Following are the style properties for setting margins:
. margin-top—Sets the top margin
. margin-right—Sets the right margin
. margin-bottom—Sets the bottom margin
. margin-left—Sets the left margin
. margin—Sets the top, right, bottom, and left margins as a singleproperty
You can specify margins using any of the individual margin properties orusing the single margin property. Margins can be specified as auto, mean-ing the browser itself sets the margin in specific lengths (pixels, points,ems) or in percentages. If you decide to set a margin as a percentage, keepin mind that the percentage is calculated based on the size of the entire
FIGURE 9.1This is one of many examples inthe CSS Zen Garden of XHTML andCSS at work.
NOTESites in the CSS Zen Garden(http://www.csszengarden.com/) show the types of designthat can be accomplishedthrough using standards-compliant CSS. All of the user-submitted entries in the Gardenuse exactly the same HTML file,but artists are free to modifythe CSS file to create their ownvisual display. The exampleshown in Figure 9.1 is by Andy Clarke of Stuff and Nonsense (http://www.stuffandnonsense.co.uk/).
www.it-ebooks.info

ptg999
Using Margins 193
page, not the size of the element. So, if you set the margin-left propertyto 25%, the left margin of the element will end up being 25% of the widthof the entire page.
The code in Listing 9.1 produces four rectangles on the page, each 250 pix-els wide, 100 pixels high, and with a 5-pixel solid black border (see Figure9.2). Each rectangle—or <div>, in this case—has a different backgroundcolor. We want the margin around each <div> to be 15 pixels on all sides,so we can use the following:
margin-top:15px;margin-right:15px;margin-bottom:15px;margin-left:15px;
You could also write that in shorthand, using the margin property:
margin:15px 15px 15px 15px;
When you use the margin property (or padding, or border) and you wantall four values to be the same, you can simplify this even further and use:
margin:15px;
When using shorthand for setting margins, padding or borders, there areactually three approaches, which vary based on how many values you usewhen setting the property:
. One value—The size of all the margins
. Two values—The size of the top/bottom margins and the left/rightmargins (in that order)
. Four values—The size of the top, right, bottom, and left margins (inthat order)
You might find it easier to stick to either using one value or all four values,but that’s certainly not a requirement.
LISTING 9.1 Simple Code to Produce Four Colored <div>s with Bordersand Margins<?xml version=”1.0” encoding=”UTF-8”?><!DOCTYPE html PUBLIC “-//W3C//DTD XHTML 1.1//EN”“http://www.w3.org/TR/xhtml11/DTD/xhtml11.dtd”>
<html xmlns=”http://www.w3.org/1999/xhtml” xml:lang=”en”><head><title>Color Blocks</title>
NOTEYou can remember the short-hand order at least two differ-ent ways. First, if you think ofan element as a rectangle,start at the top and work yourway clockwise around the sides:top side, right side, bottomside, left side. Or you can use afirst-letter mnemonic device andremember “TRBL,” pronounced“trouble,” which also representsa possible state of beingshould you forget the order ofthe margin properties.
Also note that the TRBL order isvalid for padding properties andborder properties as well.
www.it-ebooks.info
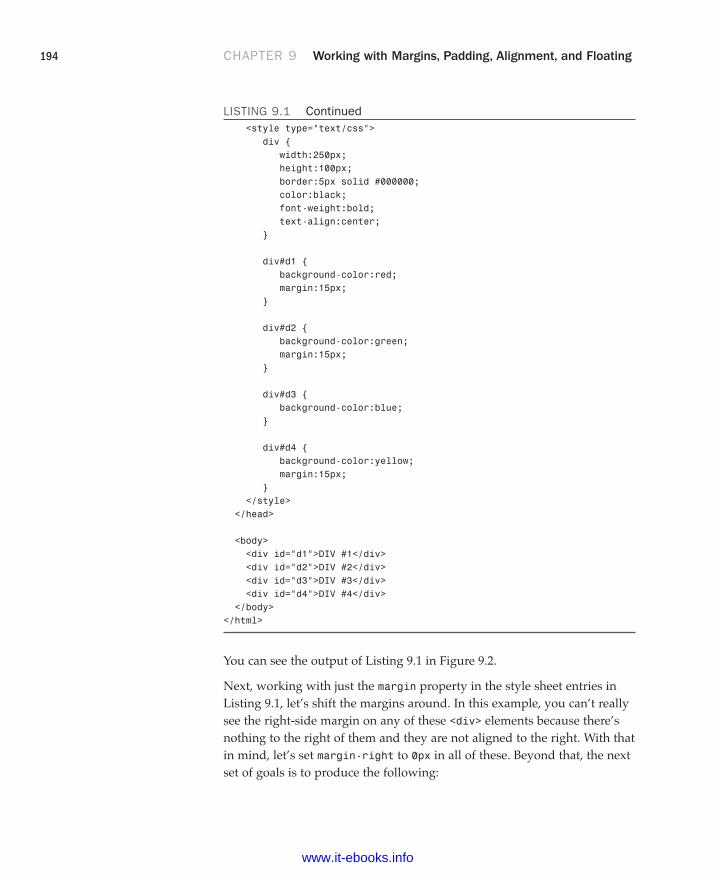
ptg999
194 CHAPTER 9 Working with Margins, Padding, Alignment, and Floating
<style type=”text/css”>div {
width:250px;height:100px;border:5px solid #000000;color:black;font-weight:bold;text-align:center;
}
div#d1 {background-color:red;margin:15px;
}
div#d2 {background-color:green;margin:15px;
}
div#d3 {background-color:blue;
}
div#d4 {background-color:yellow;margin:15px;
}</style>
</head>
<body><div id=”d1”>DIV #1</div><div id=”d2”>DIV #2</div><div id=”d3”>DIV #3</div><div id=”d4”>DIV #4</div>
</body></html>
You can see the output of Listing 9.1 in Figure 9.2.
Next, working with just the margin property in the style sheet entries inListing 9.1, let’s shift the margins around. In this example, you can’t reallysee the right-side margin on any of these <div> elements because there’snothing to the right of them and they are not aligned to the right. With thatin mind, let’s set margin-right to 0px in all of these. Beyond that, the nextset of goals is to produce the following:
LISTING 9.1 Continued
www.it-ebooks.info

ptg999
Using Margins 195
. No margin around the first color block.
. A left-side margin of 15 pixels, a top margin of 5 pixels, and no bot-tom margin around the second color block.
. A left-side margin of 75 pixels and no top margin or bottom marginsaround the third color block.
. A left-side margin of 250 pixels and a top margin of 25 pixels aroundthe fourth color block.
FIGURE 9.2The basic color blocks samplepage shows four color blocks,each with equal margins.
This seems like it would be straightforward—no margin is being setaround the first block. Except we want a margin at the top of the secondblock, so really there will be a visible margin between the first and secondblocks, even if we are not specifying a margin for the first block.
The new style sheet entries for the four named <div>s would now look likethis:
div#d1 {background-color:red;margin:0px;
}
div#d2 {
www.it-ebooks.info

ptg999
196 CHAPTER 9 Working with Margins, Padding, Alignment, and Floating
background-color:green;margin:5px 0px 0px 15px;
}
div#d3 {background-color:blue;margin:0px 0px 0px 75px;
}
div#d4 {background-color:yellow;margin:25px 0px 0px 250px;
}
The result of the previous code changes (see Figure 9.3) seems random butis actually quite useful for pointing out a few other important points. Forexample, when you recall that one of the goals was to produce no marginat all around the first color block, you might expect the border of the colorblock to be flush with the browser window. But, as shown in Figure 9.3,there is a clear space between the content of the page and the frame of thebrowser window.
FIGURE 9.3Modifications to the color blockssample page display some differ-ent margins.
www.it-ebooks.info

ptg999
Using Margins 197
If we were working on element placement—which we will get to in thenext chapter—this would cause a problem in your layout. To ensure thatyour placements and margins are counted from a position flush with thebrowser, you will need to address the margin of the <body> element itself.In this case, you would add the following to your style sheet:
body {margin:0px;
}
Another “gotcha” to remember is that if you have two bordered elementsstacked on top of each other but with no margin between them, the pointat which they touch will appear to have a double border. You might thenconsider making the top element’s border-bottom half the width and alsomake the bottom element’s border-top half the width. If you do this, theborders will appear to be the same width as the other sides when stackedon top of each other.
Also, you might have thought that by using a left-side margin of 250 pixels—the width of the <div>s—the fourth color block would begin where the thirdcolor block ended. That is not the case, however, because the third color blockhas a margin-left of 75 pixels. In order for them to even be close to liningup, the margin-left value for the fourth div would have to be 325 pixels.
Changing the styles to those shown in the code that follows produces thespacing shown in Figure 9.4.
body {margin:0px;
}div {width:250px;height:100px;color:black;font-weight:bold;text-align:center;
}div#d1 {border:5px solid #000000;background-color:red;margin:0px;
}div#d2 {border-width:6px 6px 3px 6px;border-style:solid;border-color:#000000;background-color:green;margin:10px 0px 0px 15px;
www.it-ebooks.info

ptg999
198 CHAPTER 9 Working with Margins, Padding, Alignment, and Floating
}div#d3 {border-width:3px 6px 6px 6px;border-style:solid;border-color:#000000;background-color:blue;margin:0px 0px 0px 15px;
}div#d4 {border:5px solid #000000;background-color:yellow;margin:0px 0px 0px 265px;
}
These changes give the <body> element a zero margin, thus ensuring that amargin-left value of 25 pixels truly is 25 pixels from the edge of thebrowser frame. It also shows the second and third color blocks stacked ontop of each other, but with modifications to the border element so that adouble border does not appear. Additionally, the fourth color block beginswhere the third color block ends.
FIGURE 9.4A third modification to the colorblocks pulls items into closer rela-tion with each other.
As you can see in Figure 9.4, there is some overlap between the right edgeof the third color block and the left edge of the fourth color block. Why isthat the case, if the color blocks are 250 pixels wide, the third color block
www.it-ebooks.info

ptg999
Padding Elements 199
has a margin-left value of 15 pixels, and the fourth color block is sup-posed to have a 265 pixel margin to its left? Well, it does have that 265pixel margin, but that margin size is not enough because we also have tofactor in the 6 pixels of border. If we change the margin property for thefourth color block to reflect the following code, the third and fourth blocksline up according to plan (see Figure 9.5):
margin:0px 0px 0px 276px;
FIGURE 9.5Changing the margin to allow for11 pixels of border width.
As shown in these examples, margin specifications are incredibly useful for ele-ment placement, but you must use caution when setting these specifications.
Padding ElementsPadding is similar to margins in that it adds extra space to elements, but thebig difference is where that space is located. If you recall, margins are addedto the outside of elements. On the other hand, padding adds space inside therectangular area of an element. As an example, if you create a style rule foran element that establishes a width of 50 pixels and a height of 30 pixels,and then sets the padding of the rule to 5 pixels, the remaining content areawill be 40 pixels by 20 pixels. Also, because the padding of an elementappears within the element’s content area, it will assume the same style asthe content of the element, including the background color.
www.it-ebooks.info

ptg999
200 CHAPTER 9 Working with Margins, Padding, Alignment, and Floating
You specify the padding of a style rule using one of the padding properties,which work very much like the margin properties. The following paddingproperties are available for use in setting the padding of style rules:
. padding-top—Sets the top padding
. padding-right—Sets the right padding
. padding-bottom—Sets the bottom padding
. padding-left—Sets the left padding
. padding—Sets the top, right, bottom, and left padding as a singleproperty
As with margins, you can set the padding of style rules using individualpadding properties or the single padding property. Padding can also beexpressed using either a unit of measurement or a percentage.
Following is an example of how you might set the left and right paddingfor a style rule so that there are 10 pixels of padding on each side of an ele-ment’s content:
padding-left:10px;padding-right:10px;
As with margins, you can set all the padding for an element with a singleproperty (the padding property). To set the padding property, you can usethe same three approaches available for the margin property. Following isan example of how you would set the vertical padding (top/bottom) to 12pixels and the horizontal padding (left/right) to 8 pixels for a style rule:
padding:12px 8px;
Following is more explicit code that performs the same task by specifyingall the padding values:
padding:12px 8px 12px 8px;
In all the previous figures, you’ll note that the text DIV #1, DIV #2, and soon appears at the top of the colored block, with just a little space betweenthe border and the text. That amount of space hasn’t been specified by anypadding value, but it appears as a sort of default within the element. But ifyou want specific control over your element padding, Listing 9.2 showssome examples. All of the color blocks are 250 pixels wide, 100 pixels high,have a 5-pixel solid black border, and 25 pixels of margin (see Figure 9.6).The fun stuff happens within the padding values for each individual <div>.
www.it-ebooks.info

ptg999
Padding Elements 201
LISTING 9.2 Simple Code to Produce Four Colored <div>s with Borders,Margins, and Padding<?xml version=”1.0” encoding=”UTF-8”?><!DOCTYPE html PUBLIC “-//W3C//DTD XHTML 1.1//EN”“http://www.w3.org/TR/xhtml11/DTD/xhtml11.dtd”>
<html xmlns=”http://www.w3.org/1999/xhtml” xml:lang=”en”><head><title>Color Blocks</title><style type=”text/css”>body {
margin:0px;}div {
width:250px;height:100px;border:5px solid #000000;color:black;font-weight:bold;margin:25px;
}
div#d1 {background-color:red;text-align:center;padding:15px;
}
div#d2 {background-color:green;text-align:right;padding:25px 50px 6px 6px;
}
div#d3 {background-color:blue;text-align:left;padding:6px 6px 6px 50px;
}
div#d4 {background-color:yellow;text-align:center;padding:50px;
}</style>
</head>
<body><div id=”d1”>DIV #1</div><div id=”d2”>DIV #2</div>
www.it-ebooks.info

ptg999
202 CHAPTER 9 Working with Margins, Padding, Alignment, and Floating
<div id=”d3”>DIV #3</div><div id=”d4”>DIV #4</div>
</body></html>
LISTING 9.2 Continued
You should immediately recognize that something is amiss in this example.The color blocks are all supposed to be 250 pixels wide and 100 pixelshigh. The color blocks in Figure 9.6 are not uniform because despite ourefforts to control the size of the <div>, the padding applied later overridesthat initial size declaration.
If you place the text in a <p> element and give that element a white back-ground (see Figure 9.7), you can see where the padding is in relation to thetext. When there just isn’t room to use all the padding that is defined, thesurrounding element has to make adjustments. You will learn about thiseffect in detail in Chapter 10, “Understanding the CSS Box Model andPositioning.”
The greatest number of “tweaks” or “nudges” you make in your webdesign with CSS will have to do with margins and padding. Just remem-ber: margins outside the element, padding inside it.
FIGURE 9.6The basic color blocks samplepage shows four color blocks withvariable padding.
www.it-ebooks.info

ptg999
Keeping Everything Aligned 203
Keeping Everything AlignedKnowing that content on a web page doesn’t always fill the entire width ofthe rectangular area in which it is displayed, it is often helpful to controlthe alignment of the content. Even if text within a rectangular area extendsto multiple lines, alignment still enters the picture because you might wantthe text left-justified, right-justified, or centered. There are two style prop-erties that enable you to control the alignment of elements: text-alignand vertical-align.
You saw examples of these style properties in action—aligning images—inChapter 8, “Working with Colors, Images, and Multimedia,” but it doesn’thurt to mention these properties again here because alignment plays a rolein overall page design as well.
As a refresher, using text-align aligns an element horizontally within itsbounding area, and it can be set to left, right, center, or justify.
The vertical-align property is similar to text-align except that it isused to align elements vertically. The vertical-align property specifieshow an element is aligned with its parent, or in some cases, the currentline of elements on the page. Current line refers to the vertical placementof elements that appear within the same parent element—in other words,
FIGURE 9.7Showing the padding in relation tothe text.
www.it-ebooks.info
ptg999
204 CHAPTER 9 Working with Margins, Padding, Alignment, and Floating
inline elements. If several inline elements appear on the same line, you canset their vertical alignments the same to align them vertically. A goodexample would be a row of images that appear one after the next—thevertical-align property enables you to align them vertically.
Following are common values for use with the vertical-align property:
. top—Aligns the top of an element with the current line
. middle—Aligns the middle of an element with the middle of its parent
. bottom—Aligns the bottom of an element with the current line
. text-top—Aligns the top of an element with the top of its parent
. baseline—Aligns the baseline of an element with the baseline of itsparent
. text-bottom—Aligns the bottom of an element with the bottom ofits parent
Alignment works in conjunction with margins, padding, and—as you willlearn in the next section—the float property to enable you to maintaincontrol over your design.
Understanding the Float PropertyUnderstanding the float property is fundamental to understanding CSS-based layout and design; it is one of the last pieces in the puzzle of how allthese elements fit together. Briefly stated, the float property allows ele-ments to be moved around in the design such that other elements canwrap around them. You will often find float used in conjunction withimages (as you saw in Chapter 8), but you can—and many designers do—float all sorts of elements in their layout.
Elements float horizontally, not vertically, so all you have to concern yourselfwith are two possible values: right and left. When used, an element thatfloats will float as far right or as far left (depending on the value of float) asthe containing element will allow it. For example, if you have three <div>sfloat values of left, they will all line up to the left of the containing body ele-ment. If you have your <div>s within another <div>, they will line up to theleft of that element, even if that element itself is floated to the right.
Floating is best understood by seeing a few examples, so let’s move on toListing 9.3. This listing simply defines three rectangular <div>s and floatsthem next to each other (floating to the left).
www.it-ebooks.info

ptg999
Understanding the Float Property 205
LISTING 9.3 Using float to Place <div>s<?xml version=”1.0” encoding=”UTF-8”?><!DOCTYPE html PUBLIC “-//W3C//DTD XHTML 1.1//EN”“http://www.w3.org/TR/xhtml11/DTD/xhtml11.dtd”>
<html xmlns=”http://www.w3.org/1999/xhtml” xml:lang=”en”><head><title>Color Blocks</title><style type=”text/css”>body {
margin:0px;}div {
width:250px;height:100px;border:5px solid #000000;color:black;font-weight:bold;margin:25px;
}
div#d1 {background-color:red;float:left;
}
div#d2 {background-color:green;float:left;
}
div#d3 {background-color:blue;float:left;
}</style>
</head>
<body><div id=”d1”>DIV #1</div><div id=”d2”>DIV #2</div><div id=”d3”>DIV #3</div>
</body></html>
The resulting page is shown in Figure 9.8, and already you can see a problem—these three color blocks were supposed to be floated next to each other. Well,actually they are floated next to each other, except the browser window is notwide enough to display these three 250-pixel-wide blocks with 25 pixels ofmargin between them. Because they are floating, the third one simply floats tothe next line.
www.it-ebooks.info

ptg999
206 CHAPTER 9 Working with Margins, Padding, Alignment, and Floating
You can imagine this could be a problem in a specifically designed visual lay-out, so pay attention to your margins, padding, alignment, and floating whilealso testing within a target browser window size. Granted, the browser win-dow shown in Figure 9.8 is a small one—to make this point about floating ele-ments moving to the next line when there is no room for them to fit wherethey should. In other words, if you open the same HTML file with a largerbrowser window, you might not see the issue—this is why you should alsocheck your sites at different resolutions to see if a fix is needed. The fix here isto adjust the margins and other size-related properties of your <div>s.
Figure 9.9 shows another interesting possibility when using the float proper-ty. The only changes made to the code from Listing 9.3 involved making thecolor blocks only 100-pixels wide, reducing the margins to 10px, and changingthe float alignment of the second color block to right (instead of left).
However, something very interesting happened. The second color block nowappears visually as the third color block because it is flush right. The secondcolor block has a float value of right, so it has floated all the way to the right.The first and third color blocks are floating as left as possible, regardless of theway in which the <div> code appears in the HTML, which is as follows:
<div id=”d1”>DIV #1</div><div id=”d2”>DIV #2</div><div id=”d3”>DIV #3</div>
FIGURE 9.8Using float to place the colorblocks.
www.it-ebooks.info

ptg999
Summary 207
Floating takes a lot of practice to get used to, especially when there areadditional elements in your page and not just a few colored blocks. Forexample, what happens when you add a basic paragraph into the mix? Allelements placed after the floating element will float around that element.To avoid that, use the clear property.
The clear property has five possible values: left, right, both, none, andinherit. The most common values are left, right, and both. Specifyingclear:left ensures there are no other floating elements allowed to the left,clear:right ensures there are no other floating elements to the right, andso on. Floating and clearing is a learn-by-doing process, so look for moresituations in the Workshop section later in this chapter.
SummaryThis chapter introduced you to some of the most fundamental style prop-erties in CSS-based design: margin, padding, and float. You learned howthe margin property controls space around the outside of elements andhow the padding property works with space within the elements.
After a refresher on the text-align and vertical-align properties youlearned about in a previous lesson, you learned about the float property.The float property allows for specific placement of elements and addi-tional content around those elements.
FIGURE 9.9Using float to place the colorblocks.
www.it-ebooks.info

ptg999
208 CHAPTER 9 Working with Margins, Padding, Alignment, and Floating
Q&AQ. The examples of margins and padding all had to do with boxes and
text. Can I apply margins and padding to images as well?
A. Yes, you can apply margins and padding to any block-level element,such as a <p>, a <div>, an <img/>, lists such as <ul> and <ol>, andlist items (<li>)—just to name a few.
WorkshopThe workshop contains quiz questions and exercises to help you solidify yourunderstanding of the material covered. Try to answer all questions beforelooking at the “Answers” section that follows.
Quiz1. To place two <div> elements next to each other, but with a 30-pixel mar-
gin between them, what entry or entries can you use in the style sheet?
2. Which CSS style property and value is used to ensure that contentdoes not appear to the left of a floating element?
3. What style sheet entry is used to place text within a <div> to appear12 pixels from the top of the element?
Answers1. You can use several. The first <div> uses a style property of margin-
right:15px and the second <div> uses a style property of margin-left:15px. Or you can assign the full 30 pixels to either <div> usingmargin-right or margin-left as appropriate.
2. In this instance, use clear:left.
3. padding-top:12px
Exercises. Fully understanding margins, padding, alignment, and floating takes
practice. Using the color blocks code or <div>s of your own, practice allmanner and sorts of spacing and floating before moving on to the nextchapter. The next chapter discusses the CSS box model as a whole,which encompasses the individual items discussed in this chapter.
. While you’re at it, practice applying margins and padding to every block-level element you’ve learned so far. Get used to putting images withinblocks of text and putting margins around the images so that the textdoes not run right up to the edge of the graphic.
www.it-ebooks.info

ptg999
In the previous chapter, I mentioned the CSS Box Model a few times—thischapter begins with a discussion of the box model and explains how theinformation you learned in the previous chapter helps you understand thismodel. By learning the box model, you won’t tear your hair out when youcreate a design, and then realize the elements don’t line up or that theyseem a little “off.” You’ll know that in almost all cases, something—themargin, the padding, or the border—just needs a little tweaking for it towork out.
You’ll also learn more about CSS positioning, including stacking elementson top of each in a three-dimensional way (rather than a vertical way).Finally, you’ll learn about controlling the flow of text around elementsusing the float property.
The CSS Box ModelEvery element in HTML is considered a “box,” whether it is a paragraph, a<div>, an image, or so on. Boxes have consistent properties, whether wesee them or not, and whether they are specified at all in the style sheet ornot. They’re always present, and as designers, we have to keep their pres-ence in mind when creating a layout.
Figure 10.1 is a diagram of the box model. The box model describes theway in which every HTML block-level element has the potential for a bor-der, padding, and margin and how the border, padding, and margin areapplied. In other words, all elements have some padding between the con-tent and the border of the element. Additionally, the border might or mightnot be visible, but there is space for it, just as there is a margin between theborder of the element and any other content outside of the element.
WHAT YOU’LL LEARN INTHIS CHAPTER:
. How to conceptualize theCSS box model
. How to position your elements
. How to control the way elements stack up
. How to manage the flow oftext
CHAPTER 10Understanding the CSS Box Model
and Positioning
www.it-ebooks.info

ptg999
210 CHAPTER 10 Understanding the CSS Box Model and Positioning
Here’s yet another explanation of the box model, going from the outsideinward:
. The margin is the area outside of the element. It never has color; it isalways transparent.
. The border extends around the element, on the outer edge of anypadding. The border can be of several types, widths, and colors.
. The padding exists around the content and inherits the backgroundcolor of the content area.
. The content is surrounded by padding.
Here’s where the tricky part comes in: To know the true height and width ofan element, you have to take all the elements of the box model into account.If you remember the example from the previous chapter when, despitespecifically indicating a <div> should be 250 pixels wide and 100 pixels high,that <div> had to grow larger to accommodate the padding in use.
You already know how to set the width and height of an element using thewidth and height properties. The following example shows how to definea <div> that is 250 pixels wide, 100 pixels high, has a red background, andhas a black single pixel border:
div {width: 250px;height: 100px;
MARGIN
BORDER
PADDING
CONTENT GOES HERE
FIGURE 10.1Every element in HTML is repre-sented by the CSS box model.
www.it-ebooks.info

ptg999
The CSS Box Model 211
background-color: #ff0000;border: 1px solid #000000;
}
This simple <div> is shown in Figure 10.2.
FIGURE 10.2This is a simple <div>.
If we define a second element with these same properties, but also addmargin and padding properties of a certain size, we begin to see how thesize of the element changes. This is because of the box model.
The second <div> will be defined as follows, just adding 10 pixels of mar-gin and 10 pixels of padding to the element:
div#d2 {width: 250px;height: 100px;background-color: #ff0000;border: 5px solid #000000;margin: 10px; padding: 10px;
}
The second <div>, shown in Figure 10.3, is defined as the same height andwidth as the first one, but the overall height and width of the entire boxsurrounding the element itself is much larger when margins and paddingare put in play.
www.it-ebooks.info

ptg999
212 CHAPTER 10 Understanding the CSS Box Model and Positioning
The total width of an element is the sum of the following:
width + padding-left + padding-right + border-left + border-right +margin-left + margin-right
The total height of an element is the sum of the following:
height + padding-top + padding-bottom + border-top + border-bottom +margin-top + margin-bottom
Therefore, the second <div> has an actual width of 300 (250 + 10 + 10 + 5 +5 + 10 + 10) and an actual height of 150 (100 + 10 + 10 + 5 + 5 + 10 + 10).
By now you can begin to see how the box model will affect your design.Let’s say you have only 250 pixels of horizontal space, but you like 10 pixelsof margin, 10 pixels of padding, and 5 pixels of border on all sides. Toaccommodate what you like with what you have room to display, you mustspecify the width of your <div> as only 200 pixels, so that 200 + 10 + 10 + 5+ 5 + 10 + 10 would add up to that 250 pixels of available horizontal space.
Not only is it important to understand the concept behind the box model,but the mathematics of the model are important as well. In dynamicallydriven sites or sites in which the client-side display is driven by user interac-tions (such as through JavaScript events), your server-side or client-side codemay draw and re-draw container elements on the fly. In other words, yourcode will produce the numbers, but you have to provide the boundaries.
Now that you’ve been schooled in the way of the box model, keep it inmind throughout the rest of the work you do in this book and in your web
FIGURE 10.3This is supposed to be anothersimple <div> but the box modelaffects the size of the second<div>.
NOTE
Throughout this book you’vebeen drilled in the use of theDOCTYPE declaration—all sam-ple code includes a DOCTYPE.Continue this practice not onlyso that your code validates, butbecause there is a very specificissue with Internet Explorer andthe CSS box model: If a DOC-TYPE is not defined, InternetExplorer manipulates the heightand width of your elements in away you did not intend. Thiscauses browser incompatibilityissues with your layout, so justremember to include a DOC-TYPE.
www.it-ebooks.info

ptg999
The Whole Scoop on Positioning 213
design. Among other things, it will affect element positioning and contentflow, which are the two topics we will tackle next.
The Whole Scoop on PositioningRelative positioning is the default type of positioning used by HTML. Youcan think of relative positioning as being akin to laying out checkers on acheckerboard: The checkers are arranged from left to right, and when youget to the edge of the board, you move on to the next row. Elements thatare styled with the block value for the display style property are automat-ically placed on a new row, whereas inline elements are placed on thesame row immediately next to the element preceding them. As an exam-ple, <p> and <div> tags are considered block elements, whereas the <span>tag is considered an inline element.
The other type of positioning supported by CSS is known as absolute position-ing because it enables you to set the exact position of HTML content on apage. Although absolute positioning gives you the freedom to spell out exact-ly where an element is to appear, the position is still relative to any parentelements that appear on the page. In other words, absolute positioningenables you to specify the exact location of an element’s rectangular area withrespect to its parent’s area, which is very different from relative positioning.
With the freedom of placing elements anywhere you want on a page, youcan run into the problem of overlap, which is when an element takes upspace used by another element. There is nothing stopping you from speci-fying the absolute locations of elements so they overlap. In this case, CSSrelies on the z-index of each element to determine which element is on thetop and which is on the bottom. You’ll learn more about the z-index of ele-ments later in the chapter. For now, let’s look at exactly how you controlwhether a style rule uses relative or absolute positioning.
The type of positioning (relative or absolute) used by a particular style ruleis determined by the position property, which is capable of having one ofthe following two values: relative or absolute. After specifying the typeof positioning, you then provide the specific position using the followingproperties:
. left—The left position offset
. right—The right position offset
. top—The top position offset
. bottom—The bottom position offset
www.it-ebooks.info

ptg999
214 CHAPTER 10 Understanding the CSS Box Model and Positioning
You might think that these position properties make sense only forabsolute positioning, but they actually apply to both types of positioning.Under relative positioning, the position of an element is specified as an off-set relative to the original position of the element. So, if you set the leftproperty of an element to 25px, the left side of the element will be shiftedover 25 pixels from its original (relative) position. An absolute position, onthe other hand, is specified relative to the parent of the element to whichthe style is applied. So, if you set the left property of an element to 25pxunder absolute positioning, the left side of the element will appear 25 pix-els to the right of the parent element’s left edge. On the other hand, usingthe right property with the same value would position the element so thatits right side is 25 pixels to the right of the parent’s right edge.
Let’s return to the color blocks example to show how positioning works. InListing 10.1, the four color blocks have relative positioning specified. Asyou can see in Figure 10.4, the blocks are positioned vertically.
FIGURE 10.4The color blocks are positionedvertically with one on top of theother.
LISTING 10.1 Showing Relative Positioning with Four Color Blocks<?xml version=”1.0” encoding=”UTF-8”?><!DOCTYPE html PUBLIC “-//W3C//DTD XHTML 1.1//EN”“http://www.w3.org/TR/xhtml11/DTD/xhtml11.dtd””>
<html xmlns=”http://www.w3.org/1999/xhtml” xml:lang=”en”><head><title>Positioning the Color Blocks</title>
www.it-ebooks.info

ptg999
The Whole Scoop on Positioning 215
<style type=”text/css”>div {position:relative;width:250px;height:100px;border:5px solid #000;color:black;font-weight:bold;text-align:center;}div#d1 {background-color:red;}
div#d2 {background-color:green;}
div#d3 {background-color:blue;}
div#d4 {background-color:yellow;}</style>
</head><body><div id=”d1”>DIV #1</div><div id=”d2”>DIV #2</div><div id=”d3”>DIV #3</div><div id=”d4”>DIV #4</div></body></html>
The style sheet entry for the <div> element itself sets the position styleproperty for the <div> element to relative. Because the remaining stylerules are inherited from the <div> style rule, they inherit its relative posi-tioning. In fact, the only difference between the other style rules is thatthey have different background colors.
Notice in Figure 10.4 that the <div> elements are displayed one after thenext, which is what you would expect with relative positioning. But tomake things more interesting, which is what we’re here to do, you canchange the positioning to absolute and explicitly specify the placement ofthe colors. In Listing 10.2, the style sheet entries are changed to useabsolute positioning to arrange the color blocks.
LISTING 10.1 Continued
www.it-ebooks.info

ptg999
216 CHAPTER 10 Understanding the CSS Box Model and Positioning
LISTING 10.2 Using Absolute Positioning of the Color Blocks<?xml version=”1.0” encoding=”UTF-8”?><!DOCTYPE html PUBLIC “-//W3C//DTD XHTML 1.1//EN”“http://www.w3.org/TR/xhtml11/DTD/xhtml11.dtd”>
<html xmlns=”http://www.w3.org/1999/xhtml” xml:lang=”en”><head><title>Positioning the Color Blocks</title><style type=”text/css”>div {position:absolute;width:250px; height:100px;border:5px solid #000;color:black;font-weight:bold;text-align:center;}div#d1 {background-color:red;left:0px;toppx;}div#d2 {background-color:green;left:75px;top:25px;}div#d3 {background-color:blue;left:150px;top:50px;}div#d4 {background-color:yellow;left:225px;top:75px;}</style>
</head><body><div id=”d1”>DIV #1</div><div id=”d2”>DIV #2</div>
<div id=”d3”>DIV #3</div><div id=”d4”>DIV #4</div></body></html>
This style sheet sets the position property to absolute, which is necessaryfor the style sheet to use absolute positioning. Additionally, the left andtop properties are set for each of the inherited <div> style rules. However,
www.it-ebooks.info

ptg999
Controlling the Way Things Stack Up 217
the position of each of these rules is set so that the elements are displayedoverlapping each other, as shown in Figure 10.5.
FIGURE 10.5The color blocks are displayedusing absolute positioning.
Now we’re talking layout! Figure 10.5 shows how absolute positioningenables you to place elements exactly where you want them. It also revealshow easy it is to arrange elements so that they overlap each other. Youmight be curious as to how a web browser knows which elements to drawon top when they overlap. The next section covers how you can controlstacking order.
Controlling the Way Things Stack UpThere are situations in which you’d like to carefully control the manner inwhich elements overlap each other on a web page. The z-index style prop-erty enables you to set the order of elements with respect to how theystack on top of each other. Although the name z-index might sound a littlestrange, it refers to the notion of a third dimension (Z) that points into thecomputer screen, in addition to the two dimensions that go across (X) anddown (Y) the screen. Another way to think of the z-index is the relativeposition of a single magazine within a stack of magazines. A magazinenear the top of the stack has a higher z-index than a magazine lower in thestack. Similarly, an overlapped element with a higher z-index is displayedon top of an element with a lower z-index.
www.it-ebooks.info

ptg999
218 CHAPTER 10 Understanding the CSS Box Model and Positioning
The z-index property is used to set a numeric value that indicates the rela-tive z-index of a style rule. The number assigned to z-index has meaningonly with respect to other style rules in a style sheet, which means that set-ting the z-index property for a single rule doesn’t mean much. On theother hand, if you set z-index for several style rules that apply to over-lapped elements, the elements with higher z-index values will appear ontop of elements with lower z-index values.
Listing 10.3 contains another version of the color blocks style sheet andHTML that uses z-index settings to alter the natural overlap of elements.
LISTING 10.3 Using z-index to Alter the Display of Elements in theColor Blocks Sample <?xml version=”1.0” encoding=”UTF-8”?><!DOCTYPE html PUBLIC “-//W3C//DTD XHTML 1.1//EN”“http://www.w3.org/TR/xhtml11/DTD/xhtml11.dtd”>
<html xmlns=”http://www.w3.org/1999/xhtml” xml:lang=”en”><head><title>Positioning the Color Blocks</title><style type=”text/css”>div {position:absolute;width:250px;height:100px;border:5px solid #000;color:black;font-weight:bold;text-align:center;}div#d1 {background-color:red;left:0px;top:0px;z-index:0;}div#d2 {background-color:green;left:75px;top:25px;z-index:3;}div#d3 {background-color:blue;left:150px;top:50px;z-index:2;}div#d4 {
NOTERegardless of the z-indexvalue you set for a style rule,an element displayed with therule will always appear on topof its parent.
www.it-ebooks.info

ptg999
Controlling the Way Things Stack Up 219
background-color:yellow;left:225px;top:75px; z-index:1;}</style>
</head><body><div id=”d1”>DIV #1</div><div id=”d2”>DIV #2</div><div id=”d3”>DIV #3</div><div id=”d4”>DIV #4</div></body></html>
The only change in this code from what you saw in Listing 10.2 is the addi-tion of the z-index property in each of the numbered div style classes.Notice that the first numbered div has a z-index setting of 0, whichshould make it the lowest element in terms of the z-index, whereas the sec-ond div has the highest z-index. Figure 10.6 shows the color blocks page asdisplayed with this style sheet, which clearly shows how the z-indexaffects the displayed content and makes it possible to carefully control theoverlap of elements.
LISTING 10.3 Continued
FIGURE 10.6Using z-index to alter the displayof the color blocks.
Although the examples show color blocks that are simple <div> elements,the z-index style property can affect any HTML content, including images.
www.it-ebooks.info

ptg999
220 CHAPTER 10 Understanding the CSS Box Model and Positioning
Managing the Flow of TextNow that you’ve seen some examples of placing elements relative to otherelements or placing them absolutely, it’s time to revisit the flow of contentaround elements. The conceptual current line is an invisible line used toplace elements on a page. This line has to do with the flow of elements ona page; it comes into play as elements are arranged next to each otheracross and down the page. Part of the flow of elements is the flow of texton a page. When you mix text with other elements (such as images), it’simportant to control how the text flows around those other elements.
You’ve already seen two of these style properties in Chapter 9, “Workingwith Margins, Padding, Alignment, and Floating.” Following are somestyle properties that provide you with control over text flow:
. float—Determines how text flows around an element
. clear—Stops the flow of text around an element
. overflow—Controls the overflow of text when an element is toosmall to contain all the text
The float property is used to control how text flows around an element. Itcan be set to either left or right. These values determine where to posi-tion an element with respect to flowing text. So, setting an image’s floatproperty to left positions the image to the left of flowing text.
As you learned in the previous chapter, you can prevent text from flowingnext to an element by using the clear property, which can be set to none,left, right, or both. The default value for the clear property is none, indi-cating that text is to flow with no special considerations for the element.The left value causes text to stop flowing around an element until the leftside of the page is free of the element. Likewise, the right value meansthat text is not to flow around the right side of the element. The both valueindicates that text isn’t to flow around either side of the element.
The overflow property handles overflow text, which is text that doesn’t fitwithin its rectangular area; this can happen if you set the width andheight of an element too small. The overflow property can be set to visible, hidden, or scroll. The visible setting automatically enlarges theelement so that the overflow text will fit within it; this is the default setting
www.it-ebooks.info

ptg999
Summary 221
for the property. The hidden value leaves the element the same size, allow-ing the overflow text to remain hidden from view. Perhaps the most inter-esting value is scroll, which adds scrollbars to the element so that youcan move around and see the text.
SummaryThis chapter began with an important discussion about the CSS box modeland how to calculate the width and height of elements when taking mar-gins, padding, and borders into consideration. The chapter continued bytackling absolute positioning of elements, and then you learned aboutpositioning using z-index. You also discovered a few nifty little style prop-erties that enable you to control the flow of text on a page.
This chapter was brief, but chock full of fundamental information aboutcontrolling the design of your site. It is worth re-reading and workingthrough the examples so that you have a good foundation for your work.
www.it-ebooks.info

ptg999
222 CHAPTER 10 Understanding the CSS Box Model and Positioning
Q&AQ. How would I determine when to use relative positioning and when to
use absolute positioning?
A. Although there are no set guidelines regarding the use of relative ver-sus absolute positioning, the general idea is that absolute positioningis required only when you want to exert a finer degree of control overhow content is positioned. This has to do with the fact that absolutepositioning enables you to position content down to the exact pixel,whereas relative positioning is much less predictable in terms of how itpositions content. This isn’t to say that relative positioning can’t do agood job of positioning elements on a page; it just means that absolutepositioning is more exact. Of course, this also makes absolute position-ing potentially more susceptible to changes in screen size, which youcan’t really control.
Q. If I don’t specify the z-index of two elements that overlap each other,how do I know which element will appear on top?
A. If the z-index property isn’t set for overlapping elements, the elementappearing later in the web page will appear on top. The easy way toremember this is to think of a web browser drawing each element on apage as it reads it from the HTML document; elements read later in thedocument are drawn on top of those that were read earlier.
WorkshopThe workshop contains quiz questions and exercises to help you solidify yourunderstanding of the material covered. Try to answer all questions beforelooking at the “Answers” section that follows.
Quiz1. What’s the difference between relative positioning and absolute posi-
tioning?
2. Which CSS style property controls the manner in which elements over-lap each other?
3. What HTML code could you use to display the words “Where would youlike to” starting exactly at the upper-left corner of the browser windowand displays the words “GO TODAY?” in large type exactly 80 pixelsdown and 20 pixels to the left of the corner?
www.it-ebooks.info

ptg999
Workshop 223
Answers1. In relative positioning, content is displayed according to the flow of a
page, with each element physically appearing after the element preced-ing it in the HTML code. Absolute positioning, on the other hand, allowsyou to set the exact position of content on a page.
2. The z-index style property is used to control the manner in which ele-ments overlap each other.
3. You could use the following:
<span style=”position:absolute;left:0px;top:0px”>Where would you like to</span><h1 style=”position:absolute;left:80px;top:20px”>GO TODAY?</h1>
Exercises. Practice working with the intricacies of the CSS box model by creating a
series of elements with different margins, padding, and borders andsee how these properties affect their height and width.
. Find a group of images that you like and use absolute positioning andmaybe even some z-index values to arrange them in a sort of gallery.Try to place your images so they form a design (such as a square, trian-gle, or circle).
www.it-ebooks.info


ptg999
In Chapter 5, “Working with Fonts, Text Blocks, and Lists,” you were intro-duced to three types of HTML lists, and in Chapter 9, “Working withMargins, Padding, Alignment, and Floating,” you learned about margins,padding, and alignment of elements. In this chapter, you will learn howmargins, padding, and alignment styles can be applied to different types ofHTML lists, helping you produce some powerful design elements purelyin HTML and CSS.
Specifically, you will learn how to modify the appearance of list ele-ments—beyond the use of the list-style-type property that you learnedin Chapter 5—and how to use a CSS-styled list to replace the client-sideimage maps you learned about in Chapter 8, “Working with Colors,Images, and Multimedia.” You will put into practice many of the CSSstyles you’ve learned thus far, and the knowledge you will gain in thischapter will lead directly into using lists for more than just simply present-ing a bulleted or numbered set of items. You will learn a few of the manyways to use lists as vertical or horizontal navigation, including how to uselists to create drop-down menus.
The methods explained in this chapter represent a very small subset of thenumerous and varied navigation methods you can create using lists.However, the concepts are all similar; different results come from yourown creativity and application of these basic concepts. To help you getyour creative juices flowing, I will provide pointers to other examples ofCSS-based navigation at the end of this chapter.
WHAT YOU’LL LEARN INTHIS CHAPTER:
. How the CSS box modelaffects lists
. How to customize the listitem indicator
. How to use list items andCSS to create an imagemap
. How navigation lists differfrom regular lists
. How to create vertical navi-gation with CSS
. How to create horizontalnavigation with CSS
CHAPTER 11Using CSS to Do More with Lists,
Text, and Navigation
www.it-ebooks.info

ptg999
226 CHAPTER 11 Using CSS to Do More with Lists, Text, and Navigation
HTML List RefresherAs you learned in Chapter 5, there are three basic types of HTML lists. Eachpresents content in a slightly different way based on its type and the context:
. The ordered list is an indented list that displays numbers or lettersbefore each list item. The ordered list is surrounded by <ol> and</ol> tags and list items are enclosed in the <li></li> tag pair. Thislist type is often used to display numbered steps or levels of content.
. The unordered list is an indented list that displays a bullet or othersymbol before each list item. The unordered list is surrounded by<ul> and </ul> tags, and list items are enclosed in the <li></li> tagpair. This list type is often used to provide a visual cue to show thatbrief, yet specific, bits of information will follow.
. A definition list is often used to display terms and their meanings,thereby providing information hierarchy within the context of the listitself—much like the ordered list but without the numbering. Thedefinition list is surrounded by <dl> and </dl> tags with <dt> and</dt> tags enclosing the term, and <dd> and </dd> tags enclosing thedefinitions.
When the content warrants it, you can nest your ordered and unordered —or place lists within other lists. Nested lists produce a content hierarchy, soreserve their use for when your content actually has a hierarchy you wantto display (such as content outlines or tables of content). Or, as you willlearn later in this chapter, you can use nested lists when your site naviga-tion contains sub-navigational elements.
How the CSS Box Model AffectsListsSpecific list-related styles include list-style-image (for placement of animage as a list-item marker), list-style-position (indicating where toplace the list-item marker), and list-style-type (the type of list-itemmarker itself). But although these styles control the structure of the list andlist items, you can use margin, padding, color, and background-colorstyles to achieve even more specific displays with your lists.
In Chapter 9, you learned that every element has some padding betweenthe content and the border of the element; you also learned there is a mar-gin between the border of the element and any other content. This is true
NOTE
Some older browsers handlemargins and padding differently,especially around lists and listitems. However, at the time ofwriting, the HTML and CSS inthis and other chapters in thisbook are displayed identically incurrent versions of the majorweb browsers (Apple Safari,Google Chrome, MicrosoftInternet Explorer, MozillaFirefox, and Opera). Of course,you should still review your webcontent in all browsers beforeyou publish it online, but theneed for “hacking” style sheetsto accommodate the renderingidiosyncrasies of browsers isfading away.
www.it-ebooks.info

ptg999
How the CSS Box Model Affects Lists 227
for lists, and when you are styling lists, you must remember that a “list” isactually made up of two elements: the parent list element type (<ul> or<ol>) and the individual list items themselves. Each of these elements hasmargins and padding that can be affected by a style sheet.
The examples in this chapter show you how different CSS styles affect thevisual display of HTML lists and list items. Keep these basic differences inmind as you practice working with lists in this chapter, and you will beable to use lists to achieve advanced visual effects within site navigation.
Listing 11.1 creates a basic list containing three items. In this listing, theunordered list itself (the <ul>) is given a blue background, a black border,and a specific width of 100 pixels, as shown in Figure 11.1. The list items(the individual <li>) have a gray background and a yellow border. The listitem text and indicators (the bullet) are black.
LISTING 11.1 Creating a Basic List with Color and Border Styles<?xml version=”1.0” encoding=”UTF-8”?><!DOCTYPE html PUBLIC “-//W3C//DTD XHTML 1.1//EN”“http://www.w3.org/TR/xhtml11/DTD/xhtml11.dtd”>
<html xmlns=”http://www.w3.org/1999/xhtml” xml:lang=”en”><head><title>List Test</title><style type=”text/css”>ul {
background-color: #6666ff;border: 1px solid #000000;width:100px;
}li {
background-color: #cccccc;border: 1px solid #ffff00;
}</style>
</head>
<body><h1>List Test</h1><ul><li>Item #1</li><li>Item #2</li><li>Item #3</li>
</ul></body>
</html>
NOTE
You can test the defaultpadding-left value as displayedby different browsers by creat-ing a simple test file such asthat shown in Listing 11.1.Then, add padding-left:40px; to the declaration for theul selector in the style sheet. Ifyou reload the page and thedisplay does not change, thenyou know that your test browseruses 40 pixels as a defaultvalue for padding-left.
www.it-ebooks.info
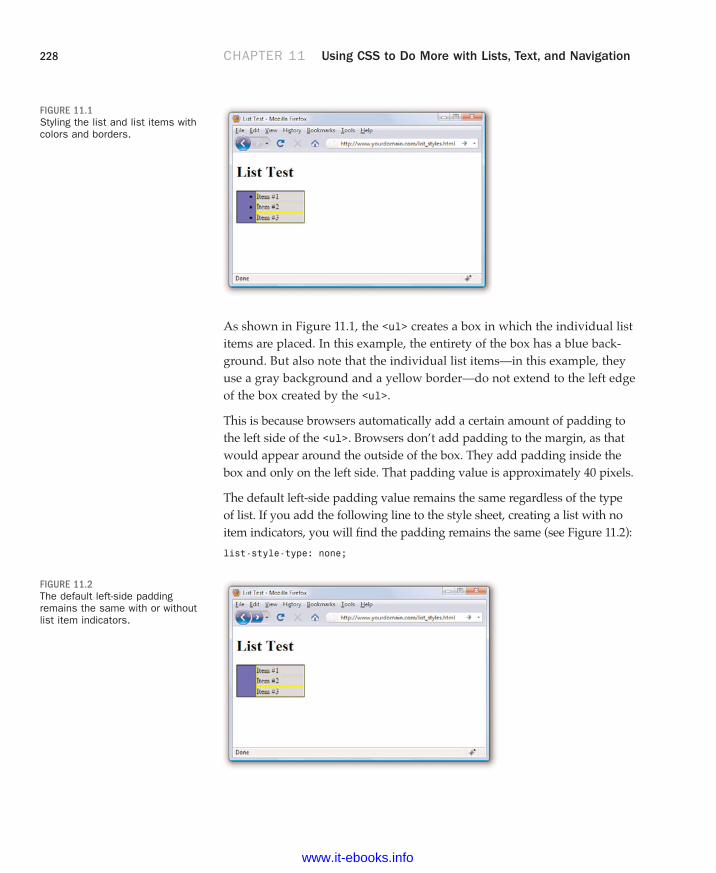
ptg999
228 CHAPTER 11 Using CSS to Do More with Lists, Text, and Navigation
As shown in Figure 11.1, the <ul> creates a box in which the individual listitems are placed. In this example, the entirety of the box has a blue back-ground. But also note that the individual list items—in this example, theyuse a gray background and a yellow border—do not extend to the left edgeof the box created by the <ul>.
This is because browsers automatically add a certain amount of padding tothe left side of the <ul>. Browsers don’t add padding to the margin, as thatwould appear around the outside of the box. They add padding inside thebox and only on the left side. That padding value is approximately 40 pixels.
The default left-side padding value remains the same regardless of the typeof list. If you add the following line to the style sheet, creating a list with noitem indicators, you will find the padding remains the same (see Figure 11.2):
list-style-type: none;
FIGURE 11.1Styling the list and list items withcolors and borders.
FIGURE 11.2The default left-side paddingremains the same with or withoutlist item indicators.
www.it-ebooks.info

ptg999
Placing List Item Indicators 229
When you are creating a page layout that includes lists of any type, playaround with padding to place the items “just so” on the page. Similarly,just because there is no default margin associated with lists doesn’t meanyou can’t assign some to the display; adding margin values to the declara-tion for the ul selector will provide additional layout control.
But remember, so far we’ve worked with only the list definition itself; wehaven’t worked with the application of styles to the individual list items.In Figures 11.1 and 11.2, the gray background and yellow border of the listitem shows no default padding or margin. Figure 11.3 shows the differenteffects created by applying padding or margin values to list items ratherthan the overall list “box” itself.
FIGURE 11.3Different values affect the paddingand margins on list items.
The first list item is the base item with no padding or margin applied to it.However, the second list item uses style=”padding: 6px;”, and you cansee the six pixels of padding on all sides (between the content and the yel-low border surrounding the element). Note that the placement of the bulletremains the same as the first list item. The third list item uses style=”margin: 6px;” to apply six pixels of margin around the list item; thismargin allows the blue background of the <ul> to show through.
Placing List Item IndicatorsAll this talk of margins and padding raises other issues: the control of listitem indicators (when used) and how text should wrap around them (ornot). The default value of the list-style-position property is “outside”—this placement means the bullets, numbers, or other indicators are kept tothe left of the text, outside of the box created by the <li></li> tag pair.
www.it-ebooks.info

ptg999
230 CHAPTER 11 Using CSS to Do More with Lists, Text, and Navigation
When text wraps within the list item, it wraps within that box and remainsflush left with the left border of element.
But when the value of list-style-position is “inside,” the indicators areinside the box created by the <li></li> tag pair. Not only are the list itemindicators then indented further (they essentially become part of the text),the text wraps beneath each item indicator.
An example of both outside and inside list-style-positions is shown inFigure 11.4. The only changes between Listing 11.1 and the code used toproduce the example shown in Figure 11.4 (not including the filler textadded to “Item #2” and “Item #3”) is that the second list item containsstyle=”list-style-position: outside;”, and the third list item containsstyle=”list-style-position: inside;”.
FIGURE 11.4The difference between outsideand inside values for list-style-position.
The additional filler text used for the second list item shows how the textwraps when the width of the list is defined as a value that is too narrow todisplay all on one line. The same result would have been achieved withoutusing style=”list-style-position: outside;” because that is thedefault value of list-style-position without any explicit statement inthe code.
However, you can clearly see the difference when the “inside” position isused. In the third list item, the bullet and the text are both within the grayarea bordered by yellow—the list item itself. Margins and padding affectlist items differently when the value of list-style-position is inside(see Figure 11.5).
www.it-ebooks.info

ptg999
Creating Image Maps with List Items and CSS 231
In Figure 11.5, both the second and third list items have a list-style-position value of inside. However, the second list item has a margin-left value of 12 pixels, and the third list item has a padding-left value of12 pixels. Although both content blocks (list indicator plus the text) showtext wrapped around the bullet, and the placement of these blocks withinthe gray area defining the list item is the same, the affected area is the listitem within the list itself.
As you would expect, the list item with the margin-left value of 12 pixelsdisplays 12 pixels of red showing through the transparent margin surround-ing the list item. Similarly, the list item with the padding-left value of 12pixels displays 12 pixels of gray background (of the list item) before the con-tent begins. Padding is within the element; margin is outside the element.
By understanding the way margins and padding affect both list items andthe list in which they appear, you should be able to create navigation ele-ments in your website that are pure CSS and do not rely on externalimages. Later in this chapter, you will learn how to create both vertical andhorizontal navigation menus as well as menu drop-downs.
Creating Image Maps with ListItems and CSSIn Chapter 8, you learned how to create client-side image maps using the<map/> tag in HTML. Image maps enable you to define an area of an imageand assign a link to that area (rather than having to slice an image intopieces, apply links to individual pieces, and stitch the image back togetherin HTML). However, you can also create an image map purely out of validXHTML and CSS.
FIGURE 11.5Margin and padding changes thedisplay of items using the insidelist-style-position.
NOTE
For links to several tutorialsgeared toward creating XHTMLand CSS image maps, visithttp://designreviver.com/tutorials/css-image-map-techniques-and-tutorials/. Thelevels of interactivity in thesetutorials differ, and some mightintroduce client-side coding out-side of the scope of this book,but the explanations are thorough.
www.it-ebooks.info

ptg999
232 CHAPTER 11 Using CSS to Do More with Lists, Text, and Navigation
The code in Listing 11.2 produces an image map similar to the one shownin Figure 11.6. (The code in Listing 11.2 does not produce the red bordersshown in the figure. The borders were added to the figure to highlight thedefined areas.) When the code is rendered in a web browser, it simplylooks like a web page with an image placed in it. The actions happen whenyour mouse hovers over a “hot” area.
LISTING 11.2 Creating an Image Map Using CSS<?xml version=”1.0” encoding=”UTF-8”?><!DOCTYPE html PUBLIC “-//W3C//DTD XHTML 1.1//EN”“http://www.w3.org/TR/xhtml11/DTD/xhtml11.dtd”>
<html xmlns=”http://www.w3.org/1999/xhtml” xml:lang=”en”><head><title>CSS Image Map Example</title><style type=”text/css”>#theImg {
width:500px;height:375px;background:url(tea_shipment.jpg) no-repeat;position:relative;border: 1px solid #000000;
}#theImg ul {
margin:0px;padding:0px;list-style:none;
}#theImg a {
position:absolute;text-indent: -1000em;
}#theImg a:hover {
border: 1px solid #ffffff;}#ss a {
top:0px;left:5px;width:80px;height:225px;
}#gn a {
top:226px;left:15px;width:70px;height:110px;
}#ib a {
top:225px;left:85px;
www.it-ebooks.info

ptg999
Creating Image Maps with List Items and CSS 233
width:60px;height:90px;
}#iTEA1 a {
top:100px;left:320px;width:178px;height:125px;
}#iTEA2 a {
top:225px;left:375px;width:123px;height:115px;
}</style>
</head><body>
<div id=”theImg”><ul><li id=”ss”><a href=”[some URL]”
title=”Sugarshots”>Sugarshots</a></li><li id=”gn”><a href=”[some URL]”
title=”Golden Needle”>Golden Needle</a></li><li id=”ib”><a href=”[some URL]”
title=”Irish Breakfast”>Irish Breakfast</a></li><li id=”iTEA1”><a href=”[some URL]”
title=”IngenuiTEA”>IngenuiTEA</a></li><li id=”iTEA2”><a href=”[some URL]”
title=”IngenuiTEA”>IngenuiTEA</a></li></ul>
</div></body>
</html>
As shown in Listing 11.2, the style sheet has quite a few entries but theactual HTML is quite short. List items are used to create five distinct click-able areas; those “areas” are list items given a specific height and widthand placed over an image that sits in the background. If the image isremoved from the background of the <div> that surrounds the list, the listitems still exist and are still clickable.
Let’s walk through the style sheet so that you understand the pieces thatmake up this XHTML and CSS image map, which is—at its most basiclevel—just a list of links.
LISTING 11.2 Continued
www.it-ebooks.info

ptg999
234 CHAPTER 11 Using CSS to Do More with Lists, Text, and Navigation
The list of links is enclosed in a <div> named “theImg”. In the style sheet,this <div> is defined as block element that is 500 pixels wide, 375 pixelshigh, and with a 1-pixel solid black border. The background of this elementis an image named tea_shipment.jpg that is placed in one position anddoes not repeat. The next bit of HTML that you see is the beginning of theunordered list (<ul>). In the style sheet, this unordered list is given marginand padding values of zero pixels all around and a list-style of none—list items will not be preceded by any icon.
The list item text itself never appears to the user because of this trick in thestyle sheet entry for all <a> tags within the <div>:
text-indent: -1000em;
By indenting the text negative 1000 ems, you can be assured that the textwill never appear. It does exist, but it exists in a nonviewable area 1000ems to the left of the browser window. In other words, if you raise yourleft hand and place it to the side of your computer monitor, text-indent:-1000em places the text somewhere to the left of your pinky finger. Butthat’s what we want because we don’t need to see the text link. We justneed an area to be defined as a link so that the user’s cursor will change asit does when rolling over any link in a website.
When the user’s cursor hovers over a list item containing a link, that listitem shows a one-pixel border that is solid white, thanks to this entry inthe style sheet:
FIGURE 11.6CSS enables you to definehotspots in an image map.
www.it-ebooks.info

ptg999
How Navigation Lists Differ from Regular Lists 235
#theImg a:hover {border: 1px solid #ffffff;
}
The list items themselves are then defined and placed in specific positionsbased on the areas of the image that are supposed to be the clickable areas.For example, the list item with the “ss” id for “Sugarshots”—the name ofthe item shown in the figure—has its top-left corner placed zero pixelsfrom the top of the <div> and five pixels in from the left edge of the <div>.This list item is 80 pixels wide and 225 pixels high. Similar style declara-tions are made for the “#gn”, “#ib”, “#iTEA1”, and “#iTEA2” list items,such that the linked areas associated with those IDs appear in certain posi-tions relative to the image.
How Navigation Lists Differ fromRegular ListsWhen we talk about using lists to create navigation elements, we reallymean using CSS to display content in the way website visitors expect navi-gation to look—in short, different from simple bulleted or numbered lists.Although it is true that a set of navigation elements is essentially a list oflinks, those links are typically displayed in a way that makes it clear thatusers should interact with the content:
. The user’s mouse cursor will change to indicate that the element isclickable.
. The area around the element changes appearance when the mousehovers over it.
. The content area is visually set apart from regular text.
Older methods of creating navigation tended to rely on images—such asgraphics with beveled edges and the use of contrasting colors for back-grounds and text—plus client-side programming with JavaScript to handleimage-swapping based on mouse actions. But using pure CSS to createnavigation from list elements produces a more usable, flexible, and search-engine friendly display that is accessible by users using all manner andsorts of devices.
Regardless of the layout of your navigational elements—horizontal or vertical—this chapter discusses two levels of navigation: primary and
www.it-ebooks.info

ptg999
236 CHAPTER 11 Using CSS to Do More with Lists, Text, and Navigation
secondary. Primary navigation takes users to the introductory pages of mainsections of your site; secondary navigation reflects those pages within a cer-tain section.
Creating Vertical Navigation withCSSDepending on your site architecture—both the display template you havecreated and the manner in which you have categorized the information inthe site—you might find yourself using vertical navigation for either pri-mary navigation or secondary navigation.
For example, suppose you have created a website for your company andthe primary sections are About Us, Products, Support, and Press. Withinthe primary About Us section, you might have several other pages, such asMission, History, Executive Team, and Contact Us—these other pages arethe secondary navigation within the primary About Us section.
Listing 11.3 sets up a basic secondary page with vertical navigation in theside of the page and content in the middle of the page. The links in the sideand the links in the content area of the page are basic HTML list elements.
This listing and the example shown in Figure 11.7 provides a starting pointfor showing you how CSS enables you to transform two similar HTML struc-tures into two different visual displays (and thus two different contexts).
LISTING 11.3 Basic Page with Vertical Navigation in a List<?xml version=”1.0” encoding=”UTF-8”?><!DOCTYPE html PUBLIC “-//W3C//DTD XHTML 1.1//EN”“http://www.w3.org/TR/xhtml11/DTD/xhtml11.dtd”>
<html xmlns=”http://www.w3.org/1999/xhtml” xml:lang=”en”><head><title>About Us</title><style type=”text/css”>body {
font: 12pt Verdana, Arial, Georgia, sans-serif;}#nav {
width:150px;float:left;margin-top:12px;margin-right:18px;
}#content {
width:550px;float:left;
}
www.it-ebooks.info

ptg999
Creating Vertical Navigation with CSS 237
</style></head>
<body><div id=”nav”><ul><li><a href=”#”>Mission</a></li><li><a href=”#”>History</a></li><li><a href=”#”>Executive Team</a></li><li><a href=”#”>Contact Us</a></li>
</ul></div><div id=”content”><h1>About Us</h1><p>On the introductory pages of main sections, it can be usefulto repeat the secondary navigation and provide more context,such as:</p><ul><li><a href=”#”>Mission</a>: Learn more about our corporatemission and philanthropic efforts.</li><li><a href=”#”>History</a>: Read about our corporate historyand learn how we grew to become the largest widget makerin the country.</li><li><a href=”#”>Executive Team</a>: Our team of executives makesthe company run like a well-oiled machine (also useful formaking widgets).</li><li><a href=”#”>Contact Us</a>: Here you can find multiplemethods for contacting us (and we really do care what youhave to say).</li></ul>
</div></body>
</html>
FIGURE 11.7The starting point: unstyled listnavigation.
LISTING 11.3 continued
www.it-ebooks.info

ptg999
238 CHAPTER 11 Using CSS to Do More with Lists, Text, and Navigation
The contents of this page are set up in two <div> elements that sit next toeach other: one is given an id value of nav and the other is given an idvalue of content. The only styles assigned to anything in this basic pageare the width, margin, and float values associated with each <div>. Nostyles have been applied to the list elements.
To differentiate between the links present in the list in the content area andthe links present in the list in the side navigation, add the following stylesto the style sheet:
#nav a {text-decoration: none;
}#content a {
text-decoration: none;font-weight: bold;
}
These styles simply say that all <a> links in the <div> with the id of navhave no underline, and all <a> links in the <div> with the id of contenthave no underline and are bold. The difference is shown in Figure 11.8.
FIGURE 11.8Differentiating the list elementsusing CSS.
But to really make the side navigation list look like something special, youhave to dig deeper into the style sheet.
www.it-ebooks.info

ptg999
Creating Vertical Navigation with CSS 239
Styling the Single-Level Vertical NavigationThe goal with this particular set of navigation elements is simply to pres-ent them as a block of links without bullets and with background and textcolors that change depending on their link state (regular link, visited link,hovering over the link, or activated link). The first step in the process isalready complete: separating the navigation from the content. We havedone that by putting the navigation in a <div> with an id of nav.
Next, you need to modify the <ul> that defines the link within the nav<div>. Let’s take away the list indicator and ensure that there is no extramargin or padding hanging around besides the top margin. That top mar-gin is used to line up the top of the navigation with the top of the “AboutUs” header text in the content area of the page:
#nav ul {list-style: none;margin: 12px 0px 0px 0px;;padding: 0px;
}
Because the navigation list items themselves appear as colored areas, giveeach list item a bottom border so that some visual separation of the contentcan occur:
#nav li {border-bottom: 1px solid #ffffff;
}
Now on to building the rest of the list items. The idea is that when the listitems simply sit there acting as links, they are a special shade of blue withbold white text (although they are a smaller font size than the body textitself). To achieve that, add the following:
#nav li a:link, #nav li a:visited {font-size: 10pt;font-weight: bold;display: block;padding: 3px 0px 3px 3px;background-color: #628794;color: #ffffff;
}
All the styles used previously should be familiar to you, except perhapsthe use of display: block; in the style sheet entry. Setting the displayproperty to block ensures that the entire <li> element is in play when auser hovers his mouse over it. Figure 11.9 shows the vertical list menu withthese new styles applied to it.
www.it-ebooks.info
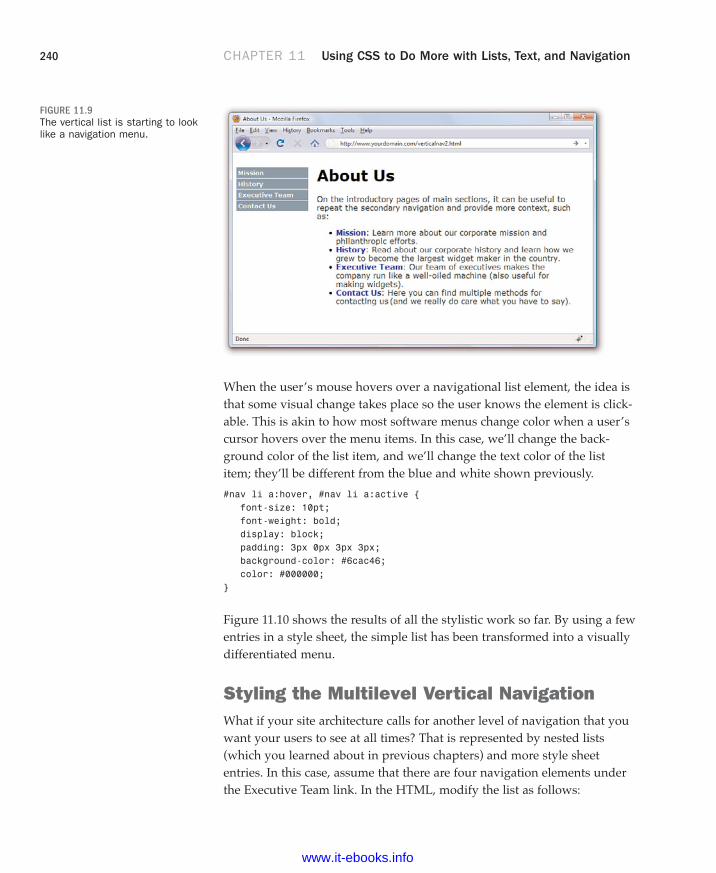
ptg999
240 CHAPTER 11 Using CSS to Do More with Lists, Text, and Navigation
When the user’s mouse hovers over a navigational list element, the idea isthat some visual change takes place so the user knows the element is click-able. This is akin to how most software menus change color when a user’scursor hovers over the menu items. In this case, we’ll change the back-ground color of the list item, and we’ll change the text color of the listitem; they’ll be different from the blue and white shown previously.
#nav li a:hover, #nav li a:active {font-size: 10pt;font-weight: bold;display: block;padding: 3px 0px 3px 3px;background-color: #6cac46;color: #000000;
}
Figure 11.10 shows the results of all the stylistic work so far. By using a fewentries in a style sheet, the simple list has been transformed into a visuallydifferentiated menu.
Styling the Multilevel Vertical NavigationWhat if your site architecture calls for another level of navigation that youwant your users to see at all times? That is represented by nested lists(which you learned about in previous chapters) and more style sheetentries. In this case, assume that there are four navigation elements underthe Executive Team link. In the HTML, modify the list as follows:
FIGURE 11.9The vertical list is starting to looklike a navigation menu.
www.it-ebooks.info

ptg999
Creating Vertical Navigation with CSS 241
<ul><li><a href=”#”>Mission</a></li><li><a href=”#”>History</a></li><li><a href=”#”>Executive Team</a>
<ul><li><a href=”#”>» CEO</a><li><a href=”#”>» CFO</a><li><a href=”#”>» COO</a><li><a href=”#”>» Other Minions</a></ul>
</li><li><a href=”#”>Contact Us</a></li>
</ul>
FIGURE 11.10The list items now change colorwhen the mouse hovers overthem.
This code produces a nested list under the Executive Team link (see Figure11.11). The » HTML entity produces the right-pointing arrows thatare displayed before the text in the new links.
The new items appear as block elements within the list, but the hierarchy ofinformation is not visually represented. To add some sort of visual elementthat identifies these items as sub-navigational elements attached to theExecutive Team link, modify the style sheet again to add some indentation.
But before doing that, modify some of the other style sheet entries as well.In the previous section, we added selectors such as #nav ul and #nav li,which indicate “all <ul> in the <div> called nav” and “all <li> in the<div> called nav,” respectively. However, we now have two instances of<ul> and another set of <li> elements with the <div> called nav, all ofwhich we want to appear different from the original set.
www.it-ebooks.info

ptg999
242 CHAPTER 11 Using CSS to Do More with Lists, Text, and Navigation
To ensure both sets of list items are styled appropriately, make sure thatthe style sheet selectors clearly indicate the hierarchy of the lists. To dothat, use entries such as #nav ul and #nav ul li for the first level of listsand #nav ul ul and #nav ul ul li for the second level of lists. Listing11.4 shows the new version of style sheet entries and HTML that producesthe menu shown in Figure 11.12.
LISTING 11.4 Multilevel Vertical Navigation in a List<?xml version=”1.0” encoding=”UTF-8”?><!DOCTYPE html PUBLIC “-//W3C//DTD XHTML 1.1//EN”“http://www.w3.org/TR/xhtml11/DTD/xhtml11.dtd”>
<html xmlns=”http://www.w3.org/1999/xhtml” xml:lang=”en”><head><title>About Us</title><style type=”text/css”>body {
font: 12pt Verdana, Arial, Georgia, sans-serif;}#nav {
width:150px;float:left;margin-top:12px;margin-right:18px;
}#content {
width:550px;float:left;
}#nav a {
FIGURE 11.11Creating a nested navigation list(but one that is not yet styledwell).
www.it-ebooks.info

ptg999
Creating Vertical Navigation with CSS 243
text-decoration: none;}#content a {
text-decoration: none;font-weight: bold;
}#nav ul {
list-style: none;margin: 12px 0px 0px 0px;padding: 0px;
}#nav ul li {
border-bottom: 1px solid #ffffff;}#nav ul li a:link, #nav ul li a:visited {
font-size: 10pt;font-weight: bold;display: block;padding: 3px 0px 3px 3px;background-color: #628794;color: #ffffff;
}#nav ul li a:hover, #nav ul li a:active {
font-size: 10pt;font-weight: bold;display: block;padding: 3px 0px 3px 3px;background-color: #c6a648;color: #000000;
}#nav ul ul {
margin: 0px;padding: 0px;
}#nav ul ul li {
border-bottom: none;}#nav ul ul li a:link, #nav ul ul li a:visited {
font-size: 8pt;font-weight: bold;display: block;padding: 3px 0px 3px 18px;background-color: #628794;color: #ffffff;
}#nav ul ul li a:hover, #nav ul ul li a:active {
font-size: 8pt;font-weight: bold;display: block;padding: 3px 0px 3px 18px;background-color: #c6a648;
LISTING 11.4 Continued
www.it-ebooks.info

ptg999
244 CHAPTER 11 Using CSS to Do More with Lists, Text, and Navigation
color: #000000;}
</style></head>
<body><div id=”nav”><ul><li><a href=”#”>Mission</a></li><li><a href=”#”>History</a></li><li><a href=”#”>Executive Team</a>
<ul><li><a href=”#”>» CEO</a></li><li><a href=”#”>» CFO</a></li><li><a href=”#”>» COO</a></li><li><a href=”#”>» Other Minions</a></li></ul>
</li><li><a href=”#”>Contact Us</a></li>
</ul></div><div id=”content”><h1>About Us</h1><p>On the introductory pages of main sections, it can be usefulto repeat the secondary navigation and provide more context,such as:</p><ul><li><a href=”#”>Mission</a>: Learn more about our corporatemission and philanthropic efforts.</li><li><a href=”#”>History</a>: Read about our corporate historyand learn how we grew to become the largest widget makerin the country.</li><li><a href=”#”>Executive Team</a>: Our team of executives makesthe company run like a well-oiled machine (also useful formaking widgets).</li><li><a href=”#”>Contact Us</a>: Here you can find multiplemethods for contacting us (and we really do care what youhave to say.</li></ul>
</div></body>
</html>
The different ways of styling vertical navigation are limited only by yourown creativity. You can use colors, margins, padding, background images,and any other valid CSS to produce vertical navigation that is quite flexibleand easily modified. If you type CSS vertical navigation in your searchengine, you will find thousands of examples—and they are all based onthe simple principles you’ve learned in this chapter.
LISTING 11.4 Continued
www.it-ebooks.info

ptg999
Creating Horizontal Navigation with CSS 245
Creating Horizontal Navigation withCSSThe lessons on navigation began with vertical navigation because the con-cept of converting a list into navigation is easier to grasp when the naviga-tion still looks like a list of items that you might write vertically on a piece ofpaper, like a grocery list. When creating horizontal navigation, you still useHTML list elements but instead of a vertical display achieved by using theinline value of the display property for both the <ul> and the <li>, use theblock value of the display property instead. It really is as simple as that.
Listing 11.5 shows a starting point for a page featuring horizontal naviga-tion. The page contains two main <div> elements: one for the header andone for the content. The header <div> contains a logo <div> and a naviga-tion <div> floated next to each other. The list that appears in the navigation<div> has a display property value of inline for both the list and the listitems. You can see these elements and their placement in Figure 11.13.
LISTING 11.5 Basic Horizontal Navigation from a List<?xml version=”1.0” encoding=”UTF-8”?><!DOCTYPE html PUBLIC “-//W3C//DTD XHTML 1.1//EN”“http://www.w3.org/TR/xhtml11/DTD/xhtml11.dtd”>
<html xmlns=”http://www.w3.org/1999/xhtml” xml:lang=”en”><head><title>ACME Widgets LLC</title>
FIGURE 11.12Creating two levels of vertical navi-gation using CSS.
www.it-ebooks.info

ptg999
246 CHAPTER 11 Using CSS to Do More with Lists, Text, and Navigation
<style type=”text/css”>body {
font: 12pt Verdana, Arial, Georgia, sans-serif;}#header {
width: auto;}#logo {
float:left;}#nav {
float:left;}#nav ul {
list-style: none;display: inline;
}#nav li {
display: inline;}#content {
width: auto;float: left;clear: left;
}#content a {
text-decoration: none;font-weight: bold;
}</style>
</head><body><div id=”header”>
<div id=”logo”><img src=”acmewidgets.jpg” alt=”ACME Widgets LLC” />
</div><div id=”nav”>
<ul><li><a href=”#”>About Us</a></li><li><a href=”#”>Products</a></li><li><a href=”#”>Support</a></li><li><a href=”#”>Press</a></li></ul>
</div></div><div id=”content”>
<p><strong>ACME Widgets LLC</strong> is the greatest widget-makerin all the land.</p><p>Don’t believe us? Read on...</p><ul><li><a href=”#”>About Us</a>: We are pretty great.</li>
LISTING 11.5 Continued
www.it-ebooks.info

ptg999
Creating Horizontal Navigation with CSS 247
<li><a href=”#”>Products</a>: Our products are the best.</li><li><a href=”#”>Support</a>: It is unlikely you will need support,but we provide it anyway.</li><li><a href=”#”>Press</a>: Read what others are saying (about howgreat we are).</li></ul>
</div></body>
</html>
LISTING 11.5 Continued
FIGURE 11.13Creating functional—but not nec-essarily beautiful—horizontal navi-gation using inline list elements.
Modifying the display of this list occurs purely through CSS; the structure ofthe content within the HTML itself is already set. To achieve the desired dis-play, use the following CSS. First, modify the <div> with the id of nav to bea particular width, display a background color and border, and use a topmargin of 85 pixels (so that it displays near the bottom of the logo).
#nav {float:left;margin: 85px 0px 0px 0px;width: 400px;background-color: #628794;border: 1px solid black;
}
The definition for the <ul> remains the same as in Listing 11.5, except forthe changes in margin and padding:
#nav ul {margin: 0px;
www.it-ebooks.info

ptg999
248 CHAPTER 11 Using CSS to Do More with Lists, Text, and Navigation
padding: 0px;list-style: none;display: inline;
}
The definition for the <li> remains the same as in Listing 11.5, except ithas been given a line-height value of 1.8em:
#nav li {display: inline;line-height: 1.8em;
}
The link styles are similar to those used in the vertical navigation; theseentries have different padding values, but the colors and font sizes remainthe same:
#nav ul li a:link, #nav ul li a:visited {font-size: 10pt; font-weight: bold;text-decoration: none;padding: 7px 10px 7px 10px;background-color: #628794;color: #ffffff;
}#nav ul li a:hover, #nav ul li a:active {
font-size: 10pt;font-weight: bold;text-decoration: none;padding: px 10px 7px 10px;background-color: #c6a648;color: #000000;
}
Putting these styles together, you produce the display shown in Figure 11.14.
When the user rolls over the navigation elements, the background and textcolors change in the same way they did when the user hovered her mouseover the vertical navigation menu. Also, just as you did with the verticalnavigation menu, you can use nested lists to produce drop-down function-ality in your horizontal menu. Try it yourself!
www.it-ebooks.info

ptg999
Summary 249
SummaryThis chapter began with examples of how lists and list elements are affect-ed by padding and margin styles. You first learned about the defaultpadding associated with lists and how to control that padding. Next, youlearned how to modify padding and margin values and how to place thelist item indicator either inside or outside the list item so you could beginto think about how styles and lists can affect your overall site design.Finally, you learned how to leverage lists and list elements to create a pureXHTML and CSS image map, thus reducing the need for slicing up linkedimages or using the <map/> tag.
After learning to “think outside the (list) box,” if you will, you learnedhow to use unordered lists to produce horizontal or vertical navigationwithin your website. By using CSS instead of graphics, you will have moreflexibility in both the display and maintenance of your site. Throughoutthis chapter you learned that with a few entries in your style sheet, youcan turn plain underlined text links into areas with borders, backgroundcolors, and other text styles. Additionally, you learned how to present nest-ed lists within menus.
FIGURE 11.14Creating horizontal navigation withsome style.
www.it-ebooks.info

ptg999
250 CHAPTER 11 Using CSS to Do More with Lists, Text, and Navigation
Q&AQ. There are an awful lot of web pages that talk about the “box model
hack” regarding margins and padding, especially around lists and listelements. Are you sure I don’t have to use a hack?
A. At the beginning of this chapter, you learned that the HTML and CSS inthis chapter (and others) all look the same in the current versions ofthe major web browsers. This is the product of several years of webdevelopers having to do code hacks and other tricks before modernbrowsers began handling things according to CSS specifications ratherthan their own idiosyncrasies. Additionally, there is a growing movementto rid Internet users of the very old web browsers that necessitatedmost of these hacks in the first place. So, although I wouldn’t neces-sarily advise you to design only for the current versions of the majorweb browsers, I also wouldn’t recommend that you spend a ton of timeimplementing hacks for the older versions of browsers—which are usedby less than 5% of the Internet population. You should continue to writesolid code that validates and adheres to design principles, test yourpages in a suite of browsers that best reflects your audience, andrelease your site to the world.
Q. The CSS image map seems like a lot of work. Is the <map/> tag sobad?
A. The <map/> tag isn’t at all bad and is valid in both XHTML and HTML5.The determination of coordinates used in client-side image maps canbe difficult, however, especially without graphics software or softwareintended for the creation of client-side image maps. The CSS versiongives you more options for defining and displaying clickable areas, onlyone of which you’ve seen here.
Q. Can I use graphics in the navigation menus as a custom list indicator?
A. Yes. You can use graphics within the HTML text of the list item or asbackground images within the <li> element. You can style your naviga-tion elements just as you style any other list element. The only differ-ences between an HTML unordered list and a CSS-based horizontal orvertical navigation list is that you are calling it that, and you are usingthe unordered list for a specific purpose outside of the body of the text.Along with that, you then style the list to show the user that it is indeedsomething different—and you can do that with small graphics to accen-tuate your lists.
www.it-ebooks.info

ptg999
Workshop 251
Q. Where can I find more examples of what I can do with lists?
A. The last time I checked, typing CSS navigation in a search enginereturned approximately 44 million results. Here are a few startingplaces:
. A List Apart’s CSS articles at http://www.alistapart.com/topics/code/
. Maxdesign’s CSS Listamatic at http://css.maxdesign.com.au/listamatic/
. Vitaly Friedman’s CSS Showcase at http://www.alvit.de/css-showcase/
WorkshopThe workshop contains quiz questions and activities to help you solidify yourunderstanding of the material covered. Try to answer all questions beforelooking at the “Answers” section that follows.
Quiz1. What is the difference between the inside and outside list-style-
position values? Which is the default value?
2. Does a list-style with a value of none still produce a structured list,either ordered or unordered?
3. When creating list-based navigation, how many levels of nested listscan you use?
4. When creating a navigation list of any type, can the four pseudoclassesfor the a selector have the same values?
Answers1. The list-style-position value of inside places the list item indicator
inside the block created by the list item. A value of outside places thelist item indicator outside the block. When inside, content wrapsbeneath the list item indicator. The default value is outside.
2. Yes. The only difference is that no list item indicator is present beforethe content within the list item.
www.it-ebooks.info

ptg999
252 CHAPTER 11 Using CSS to Do More with Lists, Text, and Navigation
3. Technically, you can nest your lists as deep as you want to. But from ausability standpoint, there is a limit to the number of levels that youwould want to use to nest your lists. Three levels is typically the limit—more than that and you run the risk of creating a poorly organized siteor simply giving the user more options than he needs to see at alltimes.
4. Sure, but then you run the risk of users not realizing that your beautifulmenus are indeed menus (because no visual display would occur for amouse action).
Exercises. Find an image and try your hand at mapping areas using the technique
shown in this chapter. Select an image that has areas where you coulduse hot spots or clickable areas leading to other web pages on yoursite or to someone else’s site. Then create the HTML and CSS todefine the clickable areas and the URLs to which they should lead.
. Using the techniques shown for a multilevel vertical list, add subnaviga-tion items to the vertical list created at the end of the chapter.
. Look at the numerous examples of CSS-based navigation used in web-sites and find some tricky-looking actions. Using the View Source func-tion of your web browser, look at the CSS used by these sites and try toimplement something similar for yourself.
www.it-ebooks.info

ptg999
So far you’ve learned a lot about styling web content, from font sizes andcolors to images, block elements, lists, and more. But what has yet to bediscussed is a high-level overview of page layout. In general, there are twotypes of layouts—fixed and liquid—but also a layout that is a combinationof the two, wherein some elements are fixed while others are liquid.
In this chapter, you’ll first learn about the characteristics of these two typesof layouts and see a few examples of websites that use them. At the end ofthe chapter, you will see a basic template that combines elements of bothtypes of layouts. Ultimately, the type of layout you decide is up to you—it’shard to go wrong as long as your sites follow HTML and CSS standards.
WHAT YOU’LL LEARN INTHIS CHAPTER:
. How fixed layouts work
. How liquid layouts work
. How to create a fixed/liquid hybrid layout
CHAPTER 12Creating Fixed or Liquid Layouts
Finding Examples ofLayouts You Like
A good place for examples of liquid layouts is the WordPress Theme Galleryat http://wordpress.org/extend/themes/. WordPress is a blogging platformthat is seeing increasing use as a non-blog site management tool. The themegallery shows hundreds of examples of both fixed-width and liquid layoutswhich give you an idea, if not all the code, for what you could create. Eventhough you are not working with a WordPress blog as part of the exercises inthis book, the template gallery is a place where you can see and interact withmany variations on designs.
Spend some time looking at the WordPress examples and perhaps the CSSZen Garden as well at http://www.csszengarden.com/. This will help you geta feel for the types of layouts you like without being swayed one way or theother by the content within the layout.
TRY IT YOURSELF ▼
www.it-ebooks.info

ptg999
254 CHAPTER 12 Creating Fixed or Liquid Layouts
Understanding Fixed LayoutsA fixed layout, or fixed-width layout, is just that: a layout in which the bodyof the page is set to a specific width. That width is typically controlled by amaster “wrapper” <div> in which all content is contained. The width prop-erty of that <div> would be set in the style attribute or in a style sheetentry if the <div> was given an ID value such as “main” or “wrapper”(although the name is up to you).
When creating a fixed-width layout, the most important decision is deter-mining the minimum screen resolution you want to accommodate. Formany years, 800×600 has been the “lowest common denominator” for webdesigners, resulting in a typical fixed width of approximately 760 pixels.However, since 2007, the number of people using 800×600 screen resolutionhas been less than 8% (and is currently approximately 4%). Given that, manyweb designers consider 1024×768 the current minimum screen resolution,leading to fixed-width designs anywhere between 800 and 1000 pixels wide.
A main reason for creating a fixed-width layout is so that you can haveprecise control over the appearance of the content area. However, if usersvisit your fixed-width site with smaller or much larger screen resolutionsthan the resolution you had in mind while you designed it, they mightencounter scrollbars (if their resolution is smaller) or a large amount ofempty space (if their resolution is greater).
The current ESPN.com home page provides a visual example of this issue;it has a content area fixed at 964 pixels wide. In Figure 12.1, the browserwindow is a shade under 800 pixels wide. On the right side of the image,important content is cut off (and at the bottom of the figure, a horizontalscrollbar displays in the browser).
However, Figure 12.2 shows how this site looks when the browser windowis more than 1400 pixels wide: There is a lot of empty space (or “realestate”) on both sides of the main body content.
There is another consideration when creating a fixed-width layout:whether to place the content flush-left or whether to center it. Placing thecontent flush-left produces extra space on the right side only; centering thecontent area creates extra space on both sides.
CAUTION
Remember, the web browserwindow contains non-viewableareas, including the scroll bar.So, if you are targeting a 1024-pixel-wide screen resolution,you really can’t use all 1024 ofthose pixels.
www.it-ebooks.info

ptg999
Understanding Liquid Layouts 255
FIGURE 12.2A fixed-width example with a largerscreen size.
FIGURE 12.1A fixed-width example with a small-er screen size.
Understanding Liquid LayoutsA liquid layout—also called a fluid layout—is one in which the body of thepage does not use a specified width in pixels, although it might be enclosed
www.it-ebooks.info

ptg999
256 CHAPTER 12 Creating Fixed or Liquid Layouts
in a master “wrapper” <div> that uses a percentage width. The idea behindthe liquid layout is that it can be perfectly usable and still retain the overalldesign aesthetic even if the user has a very small or very wide screen.
Three examples of a liquid layout in action are shown in Figures 12.3, 12.4,and 12.5.
FIGURE 12.3A liquid layout as viewed in a rela-tively small screen.
FIGURE 12.4A liquid layout as viewed in a verysmall screen.
www.it-ebooks.info

ptg999
Understanding Liquid Layouts 257
In Figure 12.3, the browser window is approximately 770 pixels wide. Thisexample shows a reasonable minimum screen width before a horizontalscrollbar appears. In fact, the scrollbar does not appear until the browser is735 pixels wide. On the other hand, Figure 12.4 shows a very small brows-er window (545 pixels wide).
In Figure 12.4, you can see a horizontal scrollbar; in the header area of thepage content, the logo graphic is beginning to take over the text andappear on top of it. But the bulk of the page is still quite usable. The infor-mational content on the left side of the page is still legible, and it is sharingthe available space with the input form on the right side.
Figure 12.5 shows how this same page looks in a very wide screen.
In Figure 12.5, the browser window is approximately 1330 pixels wide.There is plenty of room for all of the content on the page to spread out.This liquid layout is achieved because all the design elements have a per-centage width specified (instead of a fixed width). In doing so, the layoutmakes use of all the available browser real estate.
The liquid layout approach might seem like the best approach at firstglance—after all, who wouldn’t want to take advantage of all the screen realestate available to them? There is a fine line between taking advantage ofspace and not allowing the content to breathe, as it were. Too much contentis overwhelming; not enough content in an open space is underwhelming.
The pure liquid layout can be quite impressive, but it requires a significantamount of testing to ensure that it is usable in a wide range of browsers at
FIGURE 12.5A liquid layout as viewed in a widescreen.
www.it-ebooks.info

ptg999
258 CHAPTER 12 Creating Fixed or Liquid Layouts
varying screen resolutions. You might not have the time and effort to pro-duce such a design; in that case, a reasonable compromise is the fixed/liquid hybrid layout.
Creating a Fixed/Liquid Hybrid LayoutA fixed/liquid hybrid layout is one that contains elements of both types oflayouts. For example, you could have a fluid layout that includes fixed-width content areas either within the body area or as anchor elements(such as a left-side column or as a top navigation strip). You can even cre-ate a fixed content area that acts like a frame, as you’ll see in Chapter 20,“Using Windows and Frames,” in which the fixed content area remainsfixed even as users scroll through the content.
Starting with a Basic Layout StructureIn this example, you’ll learn to create a template that is liquid but with twofixed-width columns on either side of the main body area (which is a thirdcolumn, if you think about it, only much wider than the others). The tem-plate will also have a delineated header and footer area. Listing 12.1 showsthe basic HTML structure for this layout.
LISTING 12.1 Basic Fixed/Liquid Hybrid Layout Structure<?xml version=”1.0” encoding=”UTF-8”?><!DOCTYPE html PUBLIC “-//W3C//DTD XHTML 1.1//EN”“http://www.w3.org/TR/xhtml11/DTD/xhtml11.dtd”>
<html xmlns=”http://www.w3.org/1999/xhtml” xml:lang=”en”><head><title>Sample Layout</title><link href=”layout.css” rel=”stylesheet” type=”text/css” />
</head>
<body><div id=”header”>HEADER</div><div id=”wrapper”>
<div id=”content_area”>CONTENT</div><div id=”left_side”>LEFT SIDE</div><div id=”right_side”>RIGHT SIDE</div>
</div><div id=”footer”>FOOTER</div>
</body></html>
www.it-ebooks.info

ptg999
Creating a Fixed/Liquid Hybrid Layout 259
First, note that the style sheet for this layout is linked to with the <link> tagrather than included in the template. Because a template is used for morethan one page, you want to be able to control the display elements of thetemplate in the most organized way possible. This means you need only tochange the definitions of those elements in one place—the style sheet.
Next, you’ll notice that the basic HTML is just that: extremely basic. And,truth be told, this basic HTML structure can be used for a fixed layout, a liq-uid layout, or the fixed/liquid hybrid you’ll see here because all the actualstyling that makes a layout fixed, liquid, or hybrid happens in the style sheet.
What you actually have with the HTML structure in Listing 12.1 is an iden-tification of the content areas you want to include in your site. This plan-ning is crucial to any development; you have to know what you want toinclude before you even think about the type of layout you are going touse, let alone the specific styles that will be applied to that layout.
At this stage, the layout.css file includes only this entry:
body {margin:0;padding:0;
}
If you look at the HTML in Listing 12.1 and say to yourself “but those<div> elements will just stack on top of each other without any styles,”you are correct. As shown in Figure 12.6, there is no layout to speak of.
FIGURE 12.6A basic HTML template with nostyles applied to the <div> ele-ments.
www.it-ebooks.info
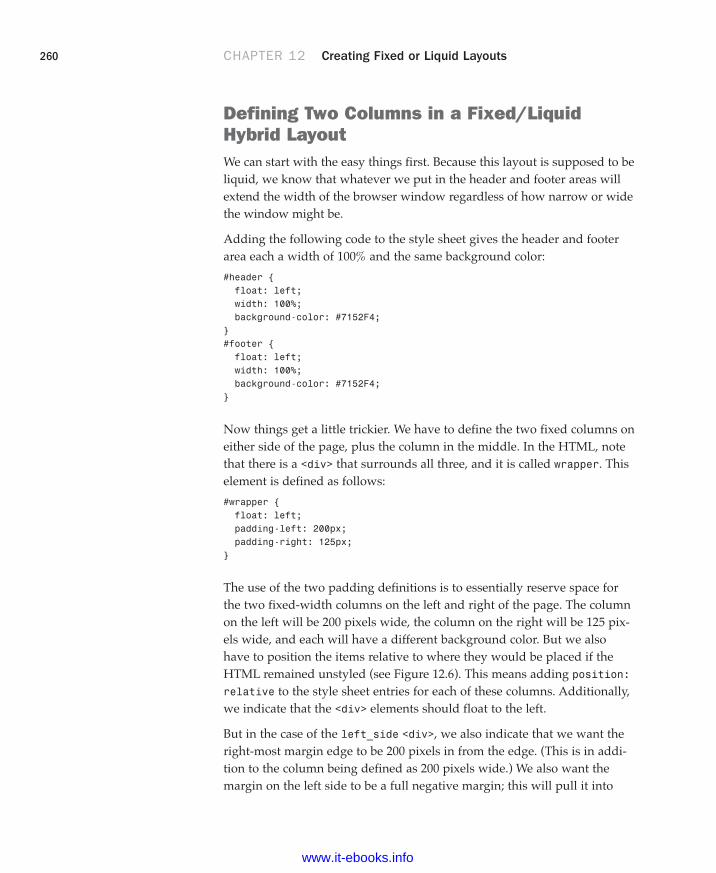
ptg999
260 CHAPTER 12 Creating Fixed or Liquid Layouts
Defining Two Columns in a Fixed/LiquidHybrid LayoutWe can start with the easy things first. Because this layout is supposed to beliquid, we know that whatever we put in the header and footer areas willextend the width of the browser window regardless of how narrow or widethe window might be.
Adding the following code to the style sheet gives the header and footerarea each a width of 100% and the same background color:
#header {float: left;width: 100%;background-color: #7152F4;
}#footer {float: left;width: 100%;background-color: #7152F4;
}
Now things get a little trickier. We have to define the two fixed columns oneither side of the page, plus the column in the middle. In the HTML, notethat there is a <div> that surrounds all three, and it is called wrapper. Thiselement is defined as follows:
#wrapper {float: left;padding-left: 200px;padding-right: 125px;
}
The use of the two padding definitions is to essentially reserve space forthe two fixed-width columns on the left and right of the page. The columnon the left will be 200 pixels wide, the column on the right will be 125 pix-els wide, and each will have a different background color. But we alsohave to position the items relative to where they would be placed if theHTML remained unstyled (see Figure 12.6). This means adding position:relative to the style sheet entries for each of these columns. Additionally,we indicate that the <div> elements should float to the left.
But in the case of the left_side <div>, we also indicate that we want theright-most margin edge to be 200 pixels in from the edge. (This is in addi-tion to the column being defined as 200 pixels wide.) We also want themargin on the left side to be a full negative margin; this will pull it into
www.it-ebooks.info

ptg999
Creating a Fixed/Liquid Hybrid Layout 261
place (as you will soon see). The right_side <div> does not include avalue for right but it does include a negative margin on the right side:
#left_side {position: relative;float: left;width: 200px;background-color: #52f471;right: 200px;margin-left: -100%;
}#right_side {position: relative;float: left;width: 125px;background-color: #f452d5;margin-right: -125px;
}
At this point, let’s also define the content area so that it has a white back-ground, takes up 100% of the available area, and floats to the left relativeto its position:
#content_area {position: relative;float: left;background-color: #ffffff;width: 100%;
}
At this point, the basic layout will look something like that shown inFigure 12.7, with the areas clearly delineated.
FIGURE 12.7A basic HTML template after somestyles have been put in place.
www.it-ebooks.info

ptg999
262 CHAPTER 12 Creating Fixed or Liquid Layouts
However, there’s a problem with this template if the window is resizedbelow a certain width. Because the left column is 200 pixels wide, the rightcolumn is 125 pixels wide, and you want at least some text in the contentarea, you can imagine this page will break if the window is only 350 to 400pixels wide. Figure 12.8 shows what happens when the window is resizedjust under 400 pixels wide (390, to be exact).
FIGURE 12.8A basic HTML template resizedunder 400 pixels: bad!
Setting the Minimum Width of a LayoutAlthough it is unlikely that users will visit your site with a browser lessthan 400 pixels wide, the example serves its purpose within the confines ofthis book’s pages. You can extrapolate and apply this information broadly:Even in fixed/liquid hybrid sites, there will be a point at which your lay-out breaks down unless you do something about it.
That “something” is to use the min-width property. The min-width propertysets the minimum width of an element, not including padding, borders, ormargins. Figure 12.9 shows what happens when min-width is applied to the<body> element.
Figure 12.9 shows a wee bit of the right column after scrolling to the right,but the point is that the layout does not break when resized below a mini-mum width. In this case, the minimum width is 525 pixels:
www.it-ebooks.info

ptg999
Creating a Fixed/Liquid Hybrid Layout 263
The horizontal scrollbar appears in this example because the browser windowitself is less than 500 pixels wide. The scrollbar disappears when the window isslightly larger than 525 pixels wide, and it’s definitely out of the picture entire-ly when the browser is approximately 875 pixels wide (see Figure 12.10).
FIGURE 12.9A basic HTML template resizedunder 400 pixels: better!
FIGURE 12.10A basic HTML template whenviewed in a browser window widerthan 800 pixels.
body {margin: 0;padding: 0;min-width: 525px;
}
www.it-ebooks.info

ptg999
264 CHAPTER 12 Creating Fixed or Liquid Layouts
Handling Column Height in a Fixed/LiquidHybrid LayoutThis example is all well and good except for one problem: It has no con-tent. When content is added to the various elements, more problems arise.As shown in Figure 12.11, the columns become as tall as necessary for thecontent they contain.
FIGURE 12.11Columns are only as tall as theircontents.
Because you cannot count on a user’s browser being a specific height, orthat the content will always be the same length, you might think this posesa problem with the fixed/liquid hybrid layout. Not so. If you think a littleoutside the box, you can apply a few more styles that will bring all thepieces together.
First, add the following declarations in the style sheet entries for theleft_side, right_side, and content_area IDs:
margin-bottom: -2000px;padding-bottom: 2000px;
www.it-ebooks.info

ptg999
Creating a Fixed/Liquid Hybrid Layout 265
These declarations add a ridiculous amount of padding and assign aridiculously large margin to the bottom of all three elements. You mustalso add position:relative to the footer ID in the style sheet so that it isvisible despite this padding.
At this point, the page looks like Figure 12.12—still not what we want, butcloser.
FIGURE 12.12Color fields are now visible despitethe amount of content in thecolumns.
To clip off all that extra color, add the following to the style sheet for thewrapper ID:
overflow: hidden;
Figure 12.13 shows the final result: a fixed-width/liquid hybrid layoutwith the necessary column spacing.
The full HTML code can be seen in Listing 12.2, and the final style sheet isshown in Listing 12.3.
www.it-ebooks.info

ptg999
266 CHAPTER 12 Creating Fixed or Liquid Layouts
LISTING 12.2 Basic Fixed/Liquid Hybrid Layout Structure (with Content)<?xml version=”1.0” encoding=”UTF-8”?><!DOCTYPE html PUBLIC “-//W3C//DTD XHTML 1.1//EN”“http://www.w3.org/TR/xhtml11/DTD/xhtml11.dtd”>
<html xmlns=”http://www.w3.org/1999/xhtml” xml:lang=”en”><head><title>Sample Layout</title><link href=”layout.css” rel=”stylesheet” type=”text/css” />
</head>
<body><div id=”header”><img src=”acmewidgets.jpg” alt=”ACME Widgets
LLC”/></div><div id=”wrapper”>
<div id=”content_area”><h1>Welcome to ACME Widgets!</h1><p>Lorem ipsum dolor sit amet, consectetur adipiscing elit.Nam tincidunt posuere malesuada. Suspendisse ac felis ac antetincidunt ullamcorper. Nulla vitae ligula vitae mi rhoncusadipiscing. Etiam congue felis id ante semper at imperdietmassa tempor. Nullam hendrerit fermentum ligula, sit ametpellentesque purus faucibus in. Sed molestie lacus mauris,ultrices accumsan sem. Phasellus facilisis malesuada sem, necornare ipsum dictum consectetur. Nulla libero nisl,consectetur eget accumsan vel, interdum ut risus. Donecvitae enim vitae nulla feugiat dignissim ut sit amet odio.Nunc non enim id sem faucibus congue. Integer ac mi in justoeuismod sodales. Aenean imperdiet vestibulum auctor. Sed
FIGURE 12.13Congratulations! It’s a fixed-width/liquid hybrid layout.
www.it-ebooks.info

ptg999
Creating a Fixed/Liquid Hybrid Layout 267
ullamcorper congue ipsum, eget vulputate sem scelerisque in.Donec ornare vestibulum congue. Etiam sapien nulla, rutrummattis mattis ut, pellentesque eget augue. Proin nisl mauris,suscipit quis elementum ac, vestibulum quis lacus. Ut egetjusto vitae urna varius sodales. </p></div><div id=”left_side”><ul><li><a href=”#”>Mission</a></li><li><a href=”#”>History</a></li><li><a href=”#”>Executive Team</a></li><li><a href=”#”>Contact Us</a></li>
</ul></div><div id=”right_side”><strong>SPECIAL WIDGET DEAL!</strong><br/>Buy three widgets and get a fourth for free.<br/><br/>Act now!
</div></div><div id=”footer”> Copyright information usually goes here.</div>
</body></html>
LISTING 12.3 Full Style Sheet for Fixed/Liquid Hybrid Layoutbody {margin:0;padding:0;min-width: 525px;
}#header {float: left;width:100%;background-color: #ffffff;
}#footer {float: left;width:100%;background-color: #7152f4;font-size: 8pt;font-weight: bold;text-align: center;position: relative;
}#wrapper {float: left;padding-left: 200px;padding-right: 125px;overflow: hidden;
}
LISTING 12.2 Continued
www.it-ebooks.info

ptg999
268 CHAPTER 12 Creating Fixed or Liquid Layouts
#left_side {position: relative;float: left;width: 200px;background-color: #52f471;right: 200px;margin-left: -100%;padding-bottom: 2000px;margin-bottom: -2000px;
}#right_side {position: relative;float: left;width: 125px;background-color: #f452d5;margin-right: -125px;padding-bottom: 2000px;margin-bottom: -2000px;
}#content_area {position: relative;float: left;background-color: #ffffff;width: 100%;padding-bottom: 2000px;margin-bottom: -2000px;
}#left_side ul {list-style: none;margin: 12px 0px 0px 12px;padding: 0px;
}#left_side li a:link, #nav li a:visited {font-size: 12pt;font-weight: bold;padding: 3px 0px 3px 3px;color: #000000;text-decoration: none;display: block;
}#left_side li a:hover, #nav li a:active {font-size: 12pt; font-weight: bold;padding: 3px 0px 3px 3px;color: #ffffff;text-decoration: none;display: block;
}
LISTING 12.3 Continued
www.it-ebooks.info

ptg999
Summary 269
SummaryIn this chapter, you saw some practical examples of the three main types oflayouts: fixed, liquid, and a fixed/liquid hybrid. In the third section of thechapter, you saw an extended example that took you through the processbit-by-bit for creating a fixed/liquid hybrid layout in which the HTML andCSS all validate properly. Remember, the most important part of creating alayout is figuring out the sections of content you think you might need toaccount for in the design.
www.it-ebooks.info

ptg999
270 CHAPTER 12 Creating Fixed or Liquid Layouts
Q&AQ. I’ve heard about something called an elastic layout. How is that differ-
ent from the liquid layout?
A. An elastic layout is a layout whose content areas resize when the userresizes the text. Elastic layouts use ems, which are inherently propor-tional to text and font size. An em is a typographical unit of measure-ment equal to the point size of the current font. When ems are used inan elastic layout, if a user forces the text size to increase or decreasein size by pressing Ctrl and using the mouse scroll wheel, the areascontaining the text increase or decrease proportionally. Elastic layoutsare very difficult to achieve and are more commonly found in portfoliosrather than actual practice due to the number of hours involved in per-fecting them.
Q. You’ve spent a lot of time talking about liquid layouts or hybrid layouts.Are they better than a purely fixed layout?
A. “Better” is a subjective term; in this book, the concern is with standards-compliant code. Most designers will tell you that liquid layouts takelonger to create (and perfect), but the usability enhancements are worthit. When might the time not be worth it? If your client does not have anopinion and if they are paying you a flat rate rather than an hourly rate,then it might not be worth it. In that case, you are working only to show-case your own skills—that might be worth it to you, however.
WorkshopThe workshop contains quiz questions and activities to help you solidify yourunderstanding of the material covered. Try to answer all questions beforelooking at the “Answers” section that follows.
Quiz1. Which is the best layout to use, in general: fixed, liquid, or a hybrid?
2. Can you position a fixed layout anywhere on the page?
3. What does min-width do?
www.it-ebooks.info

ptg999
Workshop 271
Answers1. This was a trick question; there is no “best” layout. It depends on your
content and the needs of your audience.
2. Sure. Although most fixed layouts are flush-left or centered, you couldassign a fixed position on an XY axis where you could place a <div>that contains all the other layout <div>s.
3. The min-width property sets the minimum width of an element, notincluding padding, borders, or margins.
Exercises. Figure 12.13 shows the finished fixed/liquid hybrid layout, but notice
there are a few areas for improvement. There isn’t any space aroundthe text in the right-side column, there aren’t any margins between thebody text and either column, the footer strip is a little sparse, and soon. Take some time to fix up these design elements.
. After you’ve added margin or padding as appropriate in the first exer-cise, spruce up this page with a horizontal navigation strip and fanciervertical navigation based on what you learned in Chapter 11, “UsingCSS to Do More with Lists, Text, and Navigation.”
www.it-ebooks.info


ptg999
The term dynamic means something active or something that motivatesanother to become active.
When talking about websites, a dynamic website is one that incorporatesinteractivity into its functionality and design, but also motivates a user totake an action—read more, purchase a product, and so on. In this chapter,you’ll learn a little bit about the different types of interactivity that canmake a site dynamic, including information about both server-side andclient-side scripting (as well as some practical examples of the latter, lead-ing to the all the remaining chapters in this book that are specificallygeared toward programming with JavaScript).
You’ve had a brief introduction to client-side scripting in Chapter 4,“Understanding JavaScript,” and you used a little of it in Chapter 11,“Using CSS to Do More with Lists, Text, and Navigation,” when you usedevent attributes and JavaScript to change the styles of particular ele-ments—that is called manipulating the Document Object Model (DOM). Youwill do a bit more of that type of manipulation in this chapter beforeattacking the language with gusto in the following chapters.
Understanding the Different Typesof ScriptingIn web development, there are two different types of scripting: server-sideand client-side. Server-side scripting is beyond the scope of this book,although not too far beyond. In fact, Sams Teach Yourself PHP, MySQL andApache All in One is a natural extension of this book—in my not-so-humbleopinion of it (as its author).
WHAT YOU’LL LEARN INTHIS CHAPTER:
. How to conceptualize dif-ferent types of dynamiccontent
. Basic information aboutother dynamic scripting languages
. A refresher for includingJavaScript in your HTML
. How to display randomizedtext with JavaScript
. How to change imagesusing JavaScript and userevents
CHAPTER 13Understanding Dynamic Websites
www.it-ebooks.info

ptg999
274 CHAPTER 13 Understanding Dynamic Websites
Server-side scripting refers to scripts that run on the web server, which thensends results to your web browser. If you have ever submitted a form at awebsite, which includes using a search engine, you have experienced theresults of a server-side script. Popular server-side scripting languagesinclude the following (to learn more, visit the websites listed here):
. PHP (PHP: Hypertext Preprocessor)—http://www.php.net/
. JSP (Java Server Pages)—http://java.sun.com/products/jsp/
. ASP (Active Server Pages)—http://www.asp.net/
. Perl—http://www.perl.org/
. Python—http://www.python.org/
. Ruby—http://www.ruby-lang.org/
On the other hand, client-side scripting refers to scripts that run within yourweb browser; there is no interaction with a web server in order for thescripts to run. The most popular client-side scripting language, by far, isJavaScript. For several years, research has shown that more than 93% of allweb browsers have JavaScript enabled.
Another client-side scripting language is Microsoft’s VBScript (Visual BasicScripting Edition). This language is only available with Microsoft InternetExplorer web browser, and therefore, it should not be used unless you aresure that users will access your site with that web browser (such as in aclosed corporate environment).
Including JavaScript in HTMLMuch of this chapter is a refresher from Chapter 4; I thought it would be agood idea to revisit some of the basics of JavaScript after the HTML and CSSchapters and before the heavy-duty client-side application programmingbegins.
If you recall, JavaScript code can live in one of two places within your files:
. In its own file with a .js extension
. Directly in your HTML files
External files are often used for script libraries (code you can reusethroughout many pages), whereas code appearing directly in the HTMLfiles tends to achieve functionality specific to those individual pages.Regardless of where your JavaScript lives, your browser learns of its exis-tence through the use of the <script></script> tag pair.
NOTE
Despite its name, JavaScript isnot a derivation or any otherclose relative to the object-oriented programming languagecalled Java. Released by SunMicrosystems in 1995, Java isvery closely related to the server-side scripting languageJSP. JavaScript was created byNetscape Communications,also in 1995, and given thename to indicate a similarity inappearance to Java but not adirect connection with it.
www.it-ebooks.info

ptg999
Including JavaScript in HTML 275
When you store your JavaScript in external files, it is referenced in thismanner:
<script type=”text/javascript” src=”/path/to/script.js”>
These <script></script> tags are typically placed between the<head></head> tag because it is not, strictly speaking, content that belongsin the <body> of the page. Instead, the <script> makes available a set ofJavaScript functions or other information that the rest of the page can thenuse. However, you can also just encapsulate your JavaScript functions orcode snippets with the <script> and place them anywhere in the page, asneeded. Listing 13.1 shows an example of a JavaScript snippet placed inthe <body> of an HTML document.
LISTING 13.1 Using JavaScript to Print Some Text<?xml version=”1.0” encoding=”UTF-8”?><!DOCTYPE html PUBLIC “-//W3C//DTD XHTML 1.1//EN”“http://www.w3.org/TR/xhtml11/DTD/xhtml11.dtd”>
<html xmlns=”http://www.w3.org/1999/xhtml” xml:lang=”en”><head><title>JavaScript Example</title>
</head>
<body><h1>JavaScript Example</h1><p>This text is HTML.</p><script type=”text/javascript”><!-- Hide the script from old browsersdocument.write(‘<p>This text comes from JavaScript.</p>’);// Stop hiding the script --></script>
</body></html>
Between the <script></script> tags is a single JavaScript command thatoutputs the following HTML:
<p>This text comes from JavaScript.</p>
When the browser renders this HTML page, it sees the JavaScript betweenthe <script></script> tags, stops for a millisecond to execute the com-mand, and then returns to rendering the output that now includes theHTML output from the JavaScript command. Figure 13.1 shows that thispage appears as any other HTML page appears. It’s an HTML page, butonly a small part of the HTML comes from a JavaScript command.
www.it-ebooks.info

ptg999
276 CHAPTER 13 Understanding Dynamic Websites
Displaying Random ContentYou can use JavaScript to display something different each time a page isloaded. Maybe you have a collection of text or images that you find inter-esting enough to include in your pages?
I’m a sucker for a good quote. If you’re like me, you might find it fun toincorporate an ever-changing quote into your web pages. To create a pagewith a quote that changes each time the page loads, you must first gatherall your quotes together, along with their respective sources. You’ll thenplace these quotes into a JavaScript array, which is a special type of storageunit in programming languages that is handy for holding lists of items.
After the quotes are loaded into an array, the JavaScript used to pluck out aquote at random is fairly simple. You’ve already seen the snippet that willprint the output into your HTML page.
Listing 13.2 contains the complete HTML and JavaScript code for a webpage that displays a random quote each time it loads.
LISTING 13.2 A Random-Quote Web Page<?xml version=”1.0” encoding=”UTF-8”?><!DOCTYPE html PUBLIC “-//W3C//DTD XHTML 1.1//EN”“http://www.w3.org/TR/xhtml11/DTD/xhtml11.dtd”>
<html xmlns=”http://www.w3.org/1999/xhtml” xml:lang=”en”><head><title>Quotable Quotes</title>
FIGURE 13.1The output of a JavaScript snippetlooks like any other output.
NOTEYou might have noticed thesetwo lines in Listing 13.1:
<!-- Hide the script fromold browsers
// Stop hiding the script-->
This is an HTML comment.Anything between the <!-- startand the --> end will be visiblein the source code, but will notbe rendered by the browser. Inthis case, JavaScript code issurrounded by HTML commentson the off chance that your visi-tor is running a very old webbrowser or has JavaScriptturned off.
www.it-ebooks.info

ptg999
Displaying Random Content 277
<script type=”text/javascript”><!-- Hide the script from old browsersfunction getQuote() {// Create the arraysquotes = new Array(4);sources = new Array(4);
// Initialize the arrays with quotesquotes[0] = “When I was a boy of 14, my father was so “ +“ignorant...but when I got to be 21, I was astonished “ +“at how much he had learned in 7 years.”;sources[0] = “Mark Twain”;quotes[1] = “Everybody is ignorant. Only on different “ +“subjects.”;sources[1] = “Will Rogers”;quotes[2] = “They say such nice things about people at “ +“their funerals that it makes me sad that I’m going to “ +“miss mine by just a few days.”;sources[2] = “Garrison Keilor”;quotes[3] = “What’s another word for thesaurus?”;sources[3] = “Steven Wright”;
// Get a random index into the arraysi = Math.floor(Math.random() * quotes.length);
// Write out the quote as HTMLdocument.write(“<dl style=’background-color: lightpink’>\n”);document.write(“<dt>” + “\”<em>” + quotes[i] + “</em>\”\n”);document.write(“<dd>” + “- “ + sources[i] + “\n”);document.write(“<dl>\n”);
}// Stop hiding the script -->
</script></head>
<body><h1>Quotable Quotes</h1><p>Following is a random quotable quote. To see a new quote justreload this page.</p><script type=”text/javascript”><!-- Hide the script from old browsersgetQuote();// Stop hiding the script -->
</script></body>
</html>
Although this code looks kind of long, if you look carefully, you’ll see thata lot of it consists of the four quotes available for display on the page. Afteryou get past the length, the code itself isn’t too terribly complex.
LISTING 13.2 Continued
www.it-ebooks.info

ptg999
278 CHAPTER 13 Understanding Dynamic Websites
The large number of lines between the first set of <script></script> tagsis creating a function called getQuote(). After a function is defined, it canbe called in other places in the same page. Note that if the function existedin an external file, the function could be called from all your pages.
If you look closely at the code, you will see some lines like this:
// Create the arrays
and
// Initialize the arrays with quotes
These are code comments. The developer uses these comments to leavenotes in the code so that anyone reading it has an idea of what the code isdoing in that particular place. After the first comment about creating thearrays, you can see that two arrays are created—one called quotes and onecalled sources—each containing four elements:
quotes = new Array(4);sources = new Array(4);
After the second comment (about initializing the arrays with quotes), fouritems are added to the arrays. We’ll look closely at one of them, the firstquote by Mark Twain:
quotes[0] = “When I was a boy of 14, my father was so “ +“ignorant...but when I got to be 21, I was astonished at “ +“how much he had learned in 7 years.”;sources[0] = “Mark Twain”;
You already know that the arrays are named quotes and sources. But thevariable to which values are assigned (in this instance) are calledquotes[0] and sources[0]. Because quotes and sources are arrays, theitems in the array will each have their own position. When using arrays,the first item in the array is not in slot #1; it is in slot #0. In other words,you begin counting at 0 instead of 1. Therefore, the text of the first quote (avalue) is assigned to quotes[0] (a variable). Similarly, the text of the firstsource is assigned to source[0].
Text strings are enclosed in quotation marks. However, in JavaScript, a linebreak indicates an end of a command, such that the following would causeproblems in the code:
quotes[0] = “When I was a boy of 14, my father was soignorant...but when I got to be 21, I was astonished athow much he had learned in 7 years.”;
www.it-ebooks.info

ptg999
Displaying Random Content 279
Therefore, you see that the string is built as a series of strings enclosed inquotation marks, with a plus sign (+) connecting the strings.
The next chunk of code definitely looks the most like programming; thisline gets a random number:
i = Math.floor(Math.random() * quotes.length);
But you can’t just pick any random number because the purpose of therandom number is to determine which of the quotes and sources should beprinted—and there are only four quotes. So, this line of JavaScript does thefollowing:
. Uses Math.random() to get a random number between 0 and 1. Forexample, 0.5482749 might be a result of Math.random().
. Multiplies the random number by the length of the quotes array,which is currently 4; the length of the array is the number of ele-ments in the array. If the random number is 0.5482749 (as shown pre-viously), multiplying that by 4 results in 2.1930996.
. Uses Math.floor() to round the result down to the nearest wholenumber. In other words, 2.1930996 turns into 2.
. Assigns the variable i a value of 2.
The rest of the function should look familiar, with a few exceptions. First,as you learned earlier this chapter, document.write() is used to writeHTML, which is then rendered by the browser. Next, the strings are sepa-rated to make it clear when something needs to be handled differently,such as escaping the quotation marks with a backslash when they shouldbe printed literally (\”) or when the value of a variable is substituted. Theactual quote and source that is printed is the one that matches quotes[i]and sources[i], where i is the number determined by the mathematicalfunctions shown previously.
But the act of simply writing the function doesn’t mean that any outputwill be created. Further on in the HTML, you can see getQuote();between two <script></script> tags; that is how the function is called.Wherever that function call is made, that is where the output of the func-tion will be placed. In this example, the output displays below a paragraphthat introduces the quotation.
Figure 13.2 shows the Quotable Quotes page as it appears when loaded ina web browser. When the page reloads, there is a one in four chance a dif-ferent quote displays—it is random, after all!
www.it-ebooks.info

ptg999
280 CHAPTER 13 Understanding Dynamic Websites
FIGURE 13.2The Quotable Quotes page dis-plays a random quote each time itis loaded.
Keep in mind that you can easily modify this page to include your ownquotes or other text that you want to display randomly. You can alsoincrease the number of quotes available for display by adding more entriesin the quotes and sources arrays in the code.
If you use the Quotable Quotes page as a starting point, you can easily alterthe script and create your own interesting variation on the idea. And if youmake mistakes along the way, so be it. The trick to getting past mistakes inscript code is to be patient and carefully analyze the code you’ve entered.You can always remove code to simplify a script until you get it working,and then add new code one piece at a time to make sure each piece works.
Understanding the Document ObjectModelClient-side interactivity using JavaScript typically takes the form of manip-ulating the DOM in some way. The DOM is the invisible structure of alldocuments—not the HTML structure or the way in which you apply levelsof formatting, but a sort of overall framework or container. If this descrip-tion seems vague, that’s because it is; it’s not a tangible object.
www.it-ebooks.info

ptg999
Changing Images Based on User Interaction 281
The overall container object is called the document. Any container withinthe document that has an ID is referenced by that ID. For example, if youhave a <div> with an ID called wrapper, then in the DOM that element isreferenced by the following:
document.wrapper
In Chapter 11, you changed the visibility of a specific element by changingsomething in the style object associated with it. If you wanted to accessthe background-color style of the <div> with an ID called wrapper, itwould be referred to as:
document.wrapper.style.background-color
To change the value of that style to something else, perhaps based on aninteractive user event, use the following to change the color to white:
document.wrapper.style.background-color=”#ffffff”
The DOM is the framework behind your ability to refer to elements andtheir associated objects in this way. Obviously, this is a brief overview ofsomething quite complicated, but at least you can now begin to grasp whatthis document-dot-something business is all about. To learn a lot moreabout the DOM, visit the World Wide Web Consortium’s informationabout the DOM at http://www.w3.org/DOM/.
Changing Images Based on UserInteractionIn Chapter 11, you were introduced to the different types of user interac-tion events, such as onclick, onmouseover, onmouseout, and so on. In thatchapter, you invoked changes in text based on user interaction; in this sec-tion, you’ll see an example of a visible type of interaction that is both prac-tical and dynamic.
Figure 13.3 shows a page from an online catalog for a collectibles company.Each page in the catalog shows a large image, information about the item,and a set of smaller images at the bottom of the page. In this type of cata-log, close-up images of the details of each item are important to the poten-tial buyer, but several large images on a page becomes unwieldy from botha display and bandwidth point of view.
www.it-ebooks.info

ptg999
282 CHAPTER 13 Understanding Dynamic Websites
The large image on the page is called using this <img/> tag:
<img name=”product_img” src=”/path/to/image.jpg” alt=”photo” />
As you can see, this image is given a name of product_img. Therefore, thisimage exists in the DOM as document.product_img. This is importantbecause a little bit of JavaScript functionality enables us to dynamicallychange the value of document.product_img.src, which is the source (src)of the image.
The following code snippet creates the fourth small image in the group offive images shown at the bottom of Figure 13.3. The onmouseover eventindicates that when the user rolls over this small image, the value of document.product_img.src—the large image slot—is filled with the pathto a matching large image.
<a href=”#” onmouseover=”javascript:document.product_img.src =‘/path/to/large4.jpg’”><img src=”/path/to/small4.jpg”width=”104” height=”104” style=”padding: 4px; border: 0px”alt=”photo” /></a>
Figure 13.4 shows the same page—not reloaded by the user—whereby theslot for the large image is filled by a different image when the user rolls overa smaller image at the bottom of the page. The mouse pointer hovers over thesecond image from the right. As the user rolls over the small version of theinterior photo, the large version of it is shown in the top area on the page.
FIGURE 13.3The catalog item page when firstloaded by the user.
www.it-ebooks.info

ptg999
Summary 283
SummaryIn this brief chapter, you were reminded of the differences between server-side scripting and client-side scripting, and you got a refresher for includ-ing JavaScript in your HTML files to add a little interactivity to your web-sites. You also learned how to use the JavaScript document.write()method to display random quotes upon page load. Lastly, you learnedwhat the DOM is all about.
By applying the knowledge you’ve gained from previous chapters, you’velearned how to use client-side scripting to make images on a web pagerespond to mouse movements. None of these tasks requires much in theway of programming skills, but it should inspire you to continue onthroughout the book and to learn more about JavaScript to give your pagesmore complex interactive features.
FIGURE 13.4The large image is replaced whenthe user rolls over a smaller one.
www.it-ebooks.info

ptg999
284 CHAPTER 13 Understanding Dynamic Websites
Q&AQ. If I want to use the random quote script from this chapter, but I want
to have a library of a lot of quotes, do I have to put all the quotes ineach page?
A. Yes. Each item in the array has to be there. This is where you canbegin to see a bit of a tipping point between something that can beclient-side and something that is better dealt with on the server side. Ifyou have a true library of random quotations and only one is presentedat any given time, it’s probably best to store those items in a databasetable and use a little piece of server-side scripting to connect to thatdatabase, retrieve the text, and print it on the page. Alternately, you canalways continue to carry all the quotes with you in JavaScript, but youshould at least put that JavaScript function into a different file that canbe maintained separately from the text.
Q. I’ve seen some online catalogs that display a large image in whatlooks to be a layer on top of the website content. I can see the regularwebsite content underneath it, but the focus is on the large image.How is that done?
A. The description sounds like an effect created by a JavaScript librarycalled Lightbox. The Lightbox library enables you to display an image, ora gallery of images, in a layer that is placed over your site content. Thisis a popular library used to show the details of large images or just aset of images deemed important enough to showcase “above” the con-tent, as it were. (To install and use it, follow the instructions includedwith the software. You will be able to integrate it into your site using theknowledge you’ve gained in this book so far.)
WorkshopThe workshop contains quiz questions and exercises to help you solidify yourunderstanding of the material covered. Try to answer all questions beforelooking at the “Answers” section that follows.
Quiz1. You’ve made a picture of a button and named it button.gif. You’ve also
made a simple GIF animation of the button whereby it flashes greenand white. You’ve named that GIF flashing.gif. What HTML andJavaScript code would you use to make the button flash whenever auser moves the mouse pointer over it and also link to a page namedgohere.html when a user clicks the button?
www.it-ebooks.info

ptg999
Workshop 285
2. How would you modify the code you wrote for question 1 so that thebutton flashes when a user moves his mouse over it and continuesflashing even if he moves the mouse away from it?
3. What does the plus sign (+) mean in the following context?
document.write(‘This is a text string ‘ + ‘that I have created.’);
Answers1. Your code might look something like this:
<a href=”gohere.html”onmouseover=”javascript:document.flasher.src=’flashing.gif’”onmouseout=”javascript:document.flasher.src=’button.gif’”><img src=”button.gif” id=”flasher” style=”border-style:none” /></a>
2. Your code might look something like this:
<a href=”gohere.html”onmouseover=”javascript:document.flasher.src=’flashing.gif’”><img src=”button.gif” id=”flasher” style=”border-style:none” /></a>
3. The plus sign (+) is used to join two strings together.
Exercises. Do you have any pages that would look flashier or be easier to under-
stand if the navigation icons or other images changed when the mousepassed over them? If so, try creating some highlighted versions of theimages and try modifying your own page using the information present-ed in this chapter.
. You can display random images—such as graphical banners or adver-tisements—in the same way you learned to display random contentusing JavaScript earlier in this chapter. Instead of printing text, justprint the <img/> tag for the images you want to display.
www.it-ebooks.info


ptg999
The previous chapter reminded you of what JavaScript is, what JavaScriptcan do, and had you create a simple script.
In this chapter, you’ll learn a few more basic concepts and script compo-nents that you’ll use in just about every script you write. This will prepareyou for the remaining chapters of this book, in which you’ll explore specif-ic JavaScript functions and features in greater depth.
Basic ConceptsThere are a few basic concepts and terms you’ll run into throughout thisbook. In the following sections, you’ll learn about the basic building blocksof JavaScript.
StatementsStatements are the basic units of a JavaScript program. A statement is a sec-tion of code that performs a single action. For example, the following threestatements are from the Date and Time example in Chapter 4,“Understanding JavaScript.”
hours = now.getHours();mins = now.getMinutes();secs = now.getSeconds();
Although a statement is typically a single line of JavaScript, this is not arule—it’s possible to break a statement across multiple lines or to includemore than one statement in a single line.
A semicolon marks the end of a statement. You can also omit the semicolonif you start a new line after the statement. If you combine statements into asingle line, you must use semicolons to separate them.
WHAT YOU’LL LEARN INTHIS CHAPTER:
. Organizing scripts usingfunctions
. What objects are and howJavaScript uses them
. How JavaScript canrespond to events
. An introduction to condi-tional statements andloops
. How browsers executescripts in the proper order
. Syntax rules for avoidingJavaScript errors
. Adding comments to docu-ment your JavaScript code
CHAPTER 14Getting Started with JavaScript
Programming
www.it-ebooks.info

ptg999
288 CHAPTER 14 Getting Started with JavaScript Programming
Combining Tasks with FunctionsIn the basic scripts you’ve examined so far, you’ve seen some JavaScriptstatements that have a section in parentheses, like this:
document.write(“Testing.”);
This is an example of a function. Functions provide a simple way to handlea task, such as adding output to a web page. JavaScript includes a widevariety of built-in functions, which you will learn about throughout thisbook. A statement that uses a function, as in the preceding example, isreferred to as a function call.
Functions take parameters (the expression inside the parentheses) to tellthem what to do. Additionally, a function can return a value to a waitingvariable. For example, the following function call prompts the user for aresponse and stores it in the text variable:
text = prompt(“Enter some text.”)
You can also create your own functions. This is useful for two main rea-sons: First, you can separate logical portions of your script to make it easi-er to understand. Second, and more importantly, you can use the functionseveral times or with different data to avoid repeating script statements.
VariablesIn Chapter 4, you learned that variables are containers that can store anumber, a string of text, or another value. For example, the following state-ment creates a variable called fred and assigns it the value 27:
var fred = 27;
JavaScript variables can contain numbers, text strings, and other values.You’ll learn more about them in Chapter 16, “Using JavaScript Variables,Strings, and Arrays.”
Understanding ObjectsJavaScript also supports objects. Like variables, objects can store data—butthey can store two or more pieces of data at once.
The items of data stored in an object are called the properties of the object.For example, you could use objects to store information about people suchas in an address book. The properties of each person object might include aname, an address, and a telephone number.
NOTE
You will learn how to define,call, and return values fromyour own functions in Chapter17, “Using JavaScript Functionsand Objects.”
www.it-ebooks.info

ptg999
Basic Concepts 289
JavaScript uses periods to separate object names and property names. Forexample, for a person object called Bob, the properties might includeBob.address and Bob.phone.
Objects can also include methods. These are functions that work with theobject’s data. For example, our person object for the address book mightinclude a display() method to display the person’s information. InJavaScript terminology, the statement Bob.display() would display Bob’sdetails.
Don’t worry if this sounds confusing—you’ll be exploring objects in muchmore detail later in this book. For now, you just need to know the basics.JavaScript supports three kinds of objects:
. Built-in objects are built in to the JavaScript language. You’ve alreadyencountered one of these, Date, in Chapter 2, “Understanding HTMLand XHTML Connections.” Other built-in objects include Array andString, which you’ll explore in Chapter 16, and Math, which isexplained in Chapter 17.
. DOM (Document Object Model) objects represent various componentsof the browser and the current HTML document. For example, thealert() function you used earlier in this chapter is actually amethod of the window object. You’ll explore these in more detail inChapter 15, “Working with the Document Object Model (DOM).”
. Custom objects are objects you create yourself. For example, you couldcreate a person object, as mentioned earlier in this section.
ConditionalsAlthough event handlers notify your script when something happens, youmight want to check certain conditions yourself. For example, did the userenter a valid email address?
JavaScript supports conditional statements, which enable you to answerquestions like this. A typical conditional uses the if statement, as in thisexample:
if (count==1) alert(“The countdown has reached 1.”);
This compares the variable count with the constant 1 and displays an alertmessage to the user if they are the same. You will use conditional state-ments like this in most of your scripts.
NOTE
The document.write functionwe discussed earlier this chap-ter is actually the writemethod of the document object,which you have seen severaltimes already.
NOTE
You’ll learn more about condi-tionals in Chapter 18,“Controlling Flow withConditions and Loops.”
www.it-ebooks.info

ptg999
290 CHAPTER 14 Getting Started with JavaScript Programming
LoopsAnother useful feature of JavaScript—and most other programming lan-guages—is the capability to create loops, or groups of statements thatrepeat a certain number of times. For example, these statements displaythe same alert 10 times, greatly annoying the user:
for (i=1; i<=10; i++) {alert(“Yes, it’s yet another alert!”);
}
The for statement is one of several statements JavaScript uses for loops.This is the sort of thing computers are supposed to be good at—perform-ing repetitive tasks. You will use loops in many of your scripts, in muchmore useful ways than this example.
Event HandlersAs mentioned in Chapter 1, not all scripts are located within <script>tags. You can also use scripts as event handlers. Although this might soundlike a complex programming term, it actually means exactly what it says:Event handlers are scripts that handle events. You learned a little bit aboutevents in Chapter 11, “Using CSS to Do More with Lists, Text, andNavigation,” but not to the extent you’ll read about now.
In real life, an event is something that happens to you. For example, thethings you write on your calendar are events: “Dentist appointment” or“Fred’s birthday.” You also encounter unscheduled events in your life: forexample, a traffic ticket, an IRS audit, or an unexpected visit from relatives.
Whether events are scheduled or unscheduled, you probably have normalways of handling them. Your event handlers might include things such as“When Fred’s birthday arrives, send him a present” or “When relativesvisit unexpectedly, turn out the lights and pretend nobody is home.”
Event handlers in JavaScript are similar: They tell the browser what to dowhen a certain event occurs. The events JavaScript deals with aren’t asexciting as the ones you deal with—they include such events as “When themouse button clicks” and “When this page is finished loading.”Nevertheless, they’re a very useful part of JavaScript.
Many JavaScript events (such as mouse clicks, which you’ve seen previ-ously) are caused by the user. Rather than doing things in a set order, yourscript can respond to the user’s actions. Other events don’t involve theuser directly—for example, an event is triggered when an HTML docu-ment finishes loading.
www.it-ebooks.info

ptg999
JavaScript Syntax Rules 291
Each event handler is associated with a particular browser object, and youcan specify the event handler in the tag that defines the object. For exam-ple, images and text links have an event, onMouseOver, which happenswhen the mouse pointer moves over the object. Here is a typical HTMLimage tag with an event handler:
<img src=”button.gif” onMouseOver=”highlight();”>
You specify the event handler as an attribute to the HTML tag and includethe JavaScript statement to handle the event within the quotation marks.This is an ideal use for functions because function names are short and tothe point and can refer to a whole series of statements.
See the Try It Yourself section at the end of this chapter for a completeexample of an event handler within an HTML document.
Which Script Runs First?You can actually have several scripts within a web document: one or moresets of <script> tags, external JavaScript files, and any number of eventhandlers. With all of these scripts, you might wonder how the browserknows which to execute first. Fortunately, this is done in a logical fashion:
. Sets of <script> tags within the <head> section of an HTML docu-ment are handled first, whether they include embedded code or referto a JavaScript file. Because these scripts cannot create output in theweb page, it’s a good place to define functions for use later.
. Sets of <script> tags within the <body> section of the HTML docu-ment are executed after those in the <head> section, while the webpage loads and displays. If there is more than one script in the body,they are executed in order.
. Event handlers are executed when their events happen. For example,the onLoad event handler is executed when the body of a web pageloads. Because the <head> section is loaded before any events, youcan define functions there and use them in event handlers.
JavaScript Syntax RulesJavaScript is a simple language, but you do need to be careful to use itssyntax—the rules that define how you use the language—correctly. The restof this book covers many aspects of JavaScript syntax, but there are a fewbasic rules you should understand to avoid errors.
www.it-ebooks.info

ptg999
292 CHAPTER 14 Getting Started with JavaScript Programming
Case SensitivityAlmost everything in JavaScript is case sensitive, which means you cannotuse lowercase and capital letters interchangeably. Here are a few generalrules:
. JavaScript keywords, such as for and if, are always lowercase.
. Built-in objects, such as Math and Date, are capitalized.
. DOM object names are usually lowercase, but their methods areoften a combination of capitals and lowercase. Usually capitals areused for all but the first word, as in toLowerCase andgetElementById.
When in doubt, follow the exact case used in this book or anotherJavaScript reference. If you use the wrong case, the browser will usuallydisplay an error message.
Variable, Object, and Function NamesWhen you define your own variables, objects, or functions, you can choosetheir names. Names can include uppercase letters, lowercase letters, num-bers, and the underscore (_) character. Names must begin with a letter orunderscore.
You can choose whether to use capitals or lowercase in your variablenames, but remember that JavaScript is case sensitive: score, Score, andSCORE would be considered three different variables. Be sure to use thesame name each time you refer to a variable.
Reserved WordsOne more rule for variable names: They must not be reserved words. Theseinclude the words that make up the JavaScript language (such as if andfor), DOM object names (such as window and document), and built-inobject names (such as Math and Date).
SpacingBlank space (known as whitespace by programmers) is ignored byJavaScript. You can include spaces and tabs within a line, or blank lines,without causing an error. Blank space often makes the script more read-able.
www.it-ebooks.info

ptg999
Best Practices for JavaScript 293
Using CommentsJavaScript comments enable you to include documentation within yourscript. This will be useful if someone else tries to understand the script oreven if you try to understand it after a long break. To include comments ina JavaScript program, begin a line with two slashes, as in this example:
//this is a comment.
You can also begin a comment with two slashes in the middle of a line,which is useful for documenting a script. In this case, everything on theline after the slashes is treated as a comment and ignored by the browser.For example,
a = a + 1; // add one to the value of a
JavaScript also supports C-style comments, which begin with /* and endwith */. These comments can extend across more than one line, as the fol-lowing example demonstrates:
/*This script includes a varietyof features, including this comment. */
Because JavaScript statements within a comment are ignored, C-style com-ments are often used for commenting out sections of code. If you have somelines of JavaScript that you want to temporarily take out of the picturewhile you debug a script, you can add /* at the beginning of the sectionand */ at the end.
Best Practices for JavaScriptYou should now be familiar with the basic rules for writing validJavaScript. Along with following the rules, it’s also a good idea to followbest practices. The following practices may not be required, but you’ll saveyourself and others some headaches if you follow them.
. Use comments liberally—These make your code easier for others tounderstand and also easier for you to understand when you edit themlater. They are also useful for marking the major divisions of a script.
. Use a semicolon at the end of each statement and only use onestatement per line—This will make your scripts easier to debug.
. Use separate JavaScript files whenever possible—This separatesJavaScript from HTML and makes debugging easier and also encour-ages you to write modular scripts that can be reused.
CAUTION
Because these comments arepart of JavaScript syntax, theyare only valid inside <script>tags or within an externalJavaScript file.
www.it-ebooks.info

ptg999
294 CHAPTER 14 Getting Started with JavaScript Programming
. Avoid being browser-specific—As you learn more about JavaScript,you’ll learn some features that only work in one browser. Avoid themunless absolutely necessary and always test your code in more thanone browser.
. Keep JavaScript optional—Don’t use JavaScript to perform an essen-tial function on your site—for example, the primary navigation links.Whenever possible, users without JavaScript should be able to useyour site, although it may not be quite as attractive or convenient.This strategy is known as progressive enhancement.
There are many more best practices involving more advanced aspects ofJavaScript.
TRY IT YOURSELF▼
Using an EventHandler
To conclude this chapter, here’s a simple example of an event handler. Thiswill demonstrate how you set up an event, which you’ll use throughout thisbook, and how JavaScript works without <script> tags. Listing 14.1 showsan HTML document that includes a simple event handler.
LISTING 14.1 An HTML Document with a Simple Event Handler<?xml version=”1.0” encoding=”UTF-8”?><!DOCTYPE html PUBLIC “-//W3C//DTD XHTML 1.1//EN”“http://www.w3.org/TR/xhtml11/DTD/xhtml11.dtd”>
<html xmlns=”http://www.w3.org/1999/xhtml” xml:lang=”en”><head><title>Event Handler Example</title>
</head>
<body><h1>Event Handler Example</h1><p><a href=”http://www.google.com/”onclick=”alert(‘Aha! An Event!’);”>Go to Google</a></p>
</body></html>
The event handler is defined with the following onClick attribute withinthe <a> tag that defines a link:
onclick=”alert(‘Aha! An Event!’);”
www.it-ebooks.info

ptg999
Summary 295
This event handler uses the built-in alert() function to display a messagewhen you click on the link. In more complex scripts, you will usuallydefine your own function to act as an event handler. Figure 14.1 shows thisexample in action.
FIGURE 14.1The browser displays an alertwhen you click the link.
You’ll use other event handlers similar to this in the next hour, and eventswill be covered in more detail in Chapter 19, “Responding to Events.”
SummaryDuring this chapter, you’ve been introduced to several components ofJavaScript programming and syntax: functions, objects, event handlers,conditions, and loops. You also learned how to use JavaScript comments tomake your script easier to read and looked at a simple example of an eventhandler.
TIP
Notice that after you click theOK button on the alert, thebrowser follows the link definedin the <a> tag. Your event han-dler could also stop the brows-er from following the link, asdescribed in Chapter 19.
www.it-ebooks.info

ptg999
296 CHAPTER 14 Getting Started with JavaScript Programming
Q&AQ. I’ve heard the term object-oriented applied to languages such as C++
and Java. If JavaScript supports objects, is it an object-oriented lan-guage?
A. Yes, although it might not fit some people’s strict definitions. JavaScriptobjects do not support all the features that languages such as C++ andJava support, although the latest versions of JavaScript have addedmore object-oriented features.
Q. Having several scripts that execute at different times seems confusing.Why would I want to use event handlers?
A. Event handlers are the ideal way (and in JavaScript, the only way) tohandle gadgets within the web page, such as buttons, check boxes, andtext fields. It’s actually more convenient to handle them this way. Ratherthan writing a script that sits and waits for a button to be pushed, youcan simply create an event handler and let the browser do the waitingfor you.
WorkshopThe workshop contains quiz questions and exercises to help you solidify yourunderstanding of the material covered. Try to answer all questions beforelooking at the “Answers” section that follows.
Quiz1. A script that executes when the user clicks the mouse button is an
example of what?
a. An object
b. An event handler
c. An impossibility
2. Which of the following are capabilities of functions in JavaScript?
a. Accept parameters
b. Return a value
c. Both of the above
www.it-ebooks.info

ptg999
Workshop 297
3. Which of the following is executed first by a browser?
a. A script in the <head> section
b. A script in the <body> section
c. An event handler for a button
Answers1. b. A script that executes when the user clicks the mouse button is an
event handler.
2. c. Functions can accept both parameters and return values.
3. a. Scripts defined in the <head> section of an HTML document are exe-cuted first by the browser.
Exercises. Examine the Date and Time script you created in Chapter 4 and find
any examples of functions and objects being used.
. Add JavaScript comments to the Date and Time script to make it moreclear what each line does. Verify that the script still runs properly.
www.it-ebooks.info


ptg999
The previous chapter introduced you to the basic concepts of programmingin JavaScript; this chapter will help you better understand the DocumentObject Model (DOM), which is the framework that properties and method ofJavaScript explicitly control so that you may develop rich user experiences.
Understanding the Document ObjectModel (DOM)One advantage that JavaScript has over plain HTML is that these client-sidescripts can manipulate the web document and its contents right there in thebrowser after the content has been loaded. Your script can load a new pageinto the browser, work with parts of the browser window and document,open new windows, and even modify text within the page dynamically.
To work with the browser and documents, JavaScript uses a hierarchy ofparent and child objects called the DOM. These objects are organized into atree-like structure and represent all the content and components of a webdocument.
The objects in the DOM have properties—variables that describe the webpage or document—and methods—functions that enable you to work withparts of the web page.
When you refer to an object, you use the parent object name followed bythe child object name or names, separated by periods. For example,JavaScript stores objects to represent images in a document as children ofthe document object. The following refers to the image9 object, a child ofthe document object, which is a child of the window object:
window.document.image9
WHAT YOU’LL LEARN INTHIS CHAPTER:
. How the W3C DOM stan-dard makes dynamic pageseasier to control
. The basics of the windowDOM object
. The basics of the document DOM object
. The basics of the historyDOM object
. The basics of the location DOM object
. How to work with nodes,parents, children, and sib-lings
. How to access and use theproperties of DOM nodes
. How to access and useDOM node methods
. How to control positioningwith JavaScript
. How to hide and showobjects with JavaScript
. How to modify text within apage with JavaScript
. How to add text to a pagewith JavaScript
CHAPTER 15Working with the Document
Object Model (DOM)
www.it-ebooks.info

ptg999
300 CHAPTER 15 Working with the Document Object Model (DOM)
Using window ObjectsAt the top of the browser object hierarchy is the window object, which repre-sents a browser window. You’ve already used at least one method of thewindow object: method, or simply alert(), displays a message in an alert box.
There can be several window objects at a time, each representing an openbrowser window. Frames are also represented by window objects. You’lllearn more about windows and frames in Chapter 20, “Using Windowsand Frames.”
The window object is the parent object for all the objects we will be lookingat in this chapter. Figure 15.1 shows the window section of the DOM objecthierarchy and a variety of its objects.
NOTE
The DOM is not part ofJavaScript or any other program-ming language—rather, it’s anAPI (application programminginterface) built in to the browser.
document
history
links[ ]
anchors[ ]
images[ ]
forms[ ]
DOM Level 1Objects
formelements
location
window(parent, frames[ ],
self, top)
FIGURE 15.1The window section of the DOMobject hierarchy.
Working with the document ObjectThe document object represents a web document or page. Web documentsare displayed within browser windows, so it shouldn’t surprise you tolearn that the document object is a child of the window object.
Because the window object always represents the current window (the onecontaining the script), you can use window.document to refer to the currentdocument. You can also simply refer to document, which automaticallyrefers to the current window.
If multiple windows or frames are in use, there might be several windowobjects, each with its own document object. To use one of these documentobjects, you use the name of the window and the name of the document.
NOTE
You’ve already used the document.write method to display text within a web docu-ment. The examples in earlierchapters only used a single win-dow and document, so it wasunnecessary to use window.document.write—but thislonger syntax would haveworked equally well.
www.it-ebooks.info

ptg999
Working with the document Object 301
In the following sections, you will look at some of the properties and meth-ods of the document object that will be useful in your scripting.
Getting Information About the DocumentSeveral properties of the document object include information about thecurrent document in general:
. document.URL specifies the document’s URL. This is a simple textfield. You can’t change this property. If you need to send the user to adifferent location, use the window.location object, which you willlearn about further along.
. document.title lists the title of the current page, defined by theHTML <title> tag.
. document.referrer is the URL of the page the user was viewing priorto the current page—usually, the page with a link to the current page.
. document.lastModified is the date the document was last modified.This date is sent from the server along with the page.
. document.cookie enables you to read or set a cookie for the document.
. document.images returns a collection of images used in the document.
As an example of a document property, Listing 15.1 shows a short HTMLdocument that displays its last modified date using JavaScript.
LISTING 15.1 Displaying the Last Modified Date<?xml version=”1.0” encoding=”UTF-8”?><!DOCTYPE html PUBLIC “-//W3C//DTD XHTML 1.1//EN”“http://www.w3.org/TR/xhtml11/DTD/xhtml11.dtd”>
<html xmlns=”http://www.w3.org/1999/xhtml” xml:lang=”en”><head><title>Displaying the Last Modified Date</title>
</head><body><h1>Displaying the Last Modified Date</h1><p>This page was last modified on:</p><script type=”text/javascript”>
document.write(document.lastModified);</script>
</body></html>
www.it-ebooks.info

ptg999
302 CHAPTER 15 Working with the Document Object Model (DOM)
Figure 15.2 shows the output of Listing 15.1.
FIGURE 15.2Viewing the last modified date of adocument.
If you use JavaScript to display the value of this document property, youdon’t have to remember to update the date each time you modify the page,should you choose to expose this information to the user. (You could alsouse the script to always print the current date instead of the last modifieddate, but that would be cheating.)
Writing Text in a DocumentThe simplest document object methods are also the ones you will use mostoften. In fact, you’ve used one of them already even in the most basic exam-ples in this book so far. The document.write method prints text as part ofthe HTML in a document window. An alternative statement, document.writeln, also prints text, but it also includes a newline (\n) character at theend. This is handy when you want your text to be the last thing on the line.
You can use these methods only within the body of the web page, so theywill be executed when the page loads. You can’t use these methods to addto a page that has already loaded without reloading it. You can write newcontent for a document, however, as the next section explains.
The document.write method can be used within a <script> tag in thebody of an HTML document. You can also use it in a function, providedyou include a call to the function within the body of the document, as yousaw in Listing 15.1.
NOTE
You might find that the document.lastModified prop-erty doesn’t work on your webpages or returns the wrongvalue. The date is received fromthe web server, and someservers do not maintain modifi-cation dates correctly.
CAUTION
Bear in mind that the newlinecharacter is displayed as aspace by the browser, exceptinside a <pre> container. Youwill need to use the <br/> tagif you want an actual line break.
NOTE
You can also directly modify thetext on a web page by usingmore advanced features of theDOM, which you’ll learn aboutlater in this chapter.
www.it-ebooks.info

ptg999
Accessing Browser History 303
Using Links and AnchorsAnother child of the document object is the link object. Actually, there canbe multiple link objects in a document. Each one includes informationabout a link to another location or an anchor.
You can access link objects with the links array. Each member of thearray is one of the link objects in the current page. A property of the array,document.links.length, indicates the number of links in the page.
Each link object (or member of the links array) has a list of propertiesdefining the URL. The href property contains the entire URL, and otherproperties define portions of it. These are the same properties as the location object, defined later in this chapter.
You can refer to a property by indicating the link number and propertyname. For example, the following statement assigns the entire URL of thefirst link to the variable link1:
link1 = links[0].href;
The anchor objects are also children of the document object. Each anchorobject represents an anchor in the current document—a particular locationthat can be jumped to directly.
Like links, you can access anchors with an array: anchors. Each element ofthis array is an anchor object. The document.anchors.length propertygives you the number of elements in the anchors array.
Accessing Browser HistoryThe history object is another child (property) of the window object. Thisobject holds information about the URLs that have been visited before andafter the current one, and it includes methods to go to previous or nextlocations.
The history object has one property you can access:
. history.length keeps track of the length of the history list—in otherwords, the number of different locations that the user has visited.
The history object has three methods you can use to move through thehistory list:
NOTE
The history object has cur-rent, previous, and next prop-erties that store URLs of docu-ments in the history list.However, for security and priva-cy reasons, these objects arenot normally accessible bybrowsers.
www.it-ebooks.info

ptg999
304 CHAPTER 15 Working with the Document Object Model (DOM)
. history.go() opens a URL from the history list. To use this method,specify a positive or negative number in parentheses. For example,history.go(-2) is equivalent to pressing the Back button twice.
. history.back() loads the previous URL in the history list—equiva-lent to pressing the Back button.
. history.forward() loads the next URL in the history list, if avail-able. This is equivalent to pressing the Forward button.
You can use the back and forward methods of the history object to addyour own Back and Forward buttons to a web document. The browseralready has Back and Forward buttons, of course, but it’s occasionally use-ful to include your own links that serve the same purpose.
Suppose you wanted to create a script that displays Back and Forward but-tons and use these methods to navigate the browser. Here’s the code thatwill create the Back button:
<input type=”button” onClick=”history.back();” value=”Go Back”>
The <input> tag defines a button labeled Go Back. The onClick event han-dler uses the history.back() method to go to the previous page in history.The code for the Go Forward button is similar:
<input type=”button” onClick=”history.forward();” value=”Go Forward”>
With these out of the way, you just need to build the rest of the HTML doc-ument. Listing 15.2 shows a complete HTML document, and Figure 15.3shows a browser’s display of the document. After you load this documentinto a browser, visit other URLs and make sure the Back and Forward but-tons work as expected.
LISTING 15.2 A Web Page That Uses JavaScript to Include Back andForward Buttons<?xml version=”1.0” encoding=”UTF-8”?><!DOCTYPE html PUBLIC “-//W3C//DTD XHTML 1.1//EN”“http://www.w3.org/TR/xhtml11/DTD/xhtml11.dtd”>
<html xmlns=”http://www.w3.org/1999/xhtml” xml:lang=”en”><head><title>Using Back and Forward Buttons</title>
</head><body><h1>Using Back and Forward Buttons</h1><p>This page allows you to go back or forward to pages in the history list. These should be equivalent to the back
www.it-ebooks.info

ptg999
Working with the location Object 305
and forward arrow buttons in the browser’s toolbar.</p><p><input type=”button”
onclick=”history.back();” value=”Go Back” />
<input type=”button”onclick=”history.forward();” value=”Go Forward” />
</p></body></html>
LISTING 15.2 Continued
FIGURE 15.3Showing custom Back and Forwardbuttons.
Working with the location ObjectA third child of the window object is the location object. This object storesinformation about the current URL stored in the window. For example, thefollowing statement loads a URL into the current window:
window.location.href=”http://www.google.com”;
The href property used in this statement contains the entire URL of thewindow’s current location. You can also access portions of the URL withvarious properties of the location object. To explain these properties, con-sider the following URL:
http://www.google.com:80/search?q=javascript
www.it-ebooks.info

ptg999
306 CHAPTER 15 Working with the Document Object Model (DOM)
The following properties represent parts of the URL:
. location.protocol is the protocol part of the URL (http: in theexample).
. location.hostname is the host name of the URL (www.google.comin the example).
. location.port is the port number of the URL (80 in the example).
. location.pathname is the filename part of the URL (search in theexample).
. location.search is the query portion of the URL, if any(q=javascript in the example).
Unused in this example but also accessible are
. location.host is the hostname of the URL plus the port number.
. location.hash is the anchor name used in the URL, if any (#anchorin the example) .
The link object, introduced earlier this chapter, also includes this list ofproperties for accessing portions of the URL.
The location object has three methods:
. location.assign() loads a new document when used as follows:
location.assign(“http://www.google.com”)
. location.reload() reloads the current document. This is the sameas the Reload button on the browser’s toolbar. If you optionallyinclude the true parameter, it will ignore the browser’s cache andforce a reload whether the document has changed or not.
. location.replace() replaces the current location with a new one.This is similar to setting the location object’s properties yourself.The difference is that the replace method does not affect the brows-er’s history. In other words, the Back button can’t be used to go tothe previous location. This is useful for splash screens or temporarypages that it would be useless to return to.
More About the DOM StructurePreviously in this chapter, you learned how some of the most importantDOM objects are organized: The window object contains the document
CAUTION
Although the location.hrefproperty usually contains thesame URL as the document.URLproperty described earlier inthis chapter, you can’t changethe document.URL property.Always use location.href toload a new page.
www.it-ebooks.info

ptg999
More About the DOM Structure 307
object, and so on. Although these objects were the only ones available orig-inally, the modern DOM adds objects under the document object for everyelement of a page.
To better understand this concept, let’s look at the simple HTML documentin Listing 15.3. This document has the usual <head> and <body> sections, aheading and a single paragraph of text.
LISTING 15.3 A Simple HTML Document<?xml version=”1.0” encoding=”UTF-8”?><!DOCTYPE html PUBLIC “-//W3C//DTD XHTML 1.1//EN”“http://www.w3.org/TR/xhtml11/DTD/xhtml11.dtd”>
<html xmlns=”http://www.w3.org/1999/xhtml” xml:lang=”en”><head><title>A Simple HTML Document</title>
</head><body><h1>This is a Level-1 Heading.</h1><p>This is a simple paragraph.</p>
</body></html>
Like all HTML documents, this one is composed of various containers andtheir contents. The <html> tags form a container that includes the entiredocument, the <body> tags contain the body of the page, and so on.
In the DOM, each container within the page and its contents are represent-ed by an object. The objects are organized into a tree-like structure, withthe document object itself at the root of the tree, and individual elementssuch as the heading and paragraph of text at the leaves of the tree. Figure15.4 shows a diagram of these relationships.
In the following sections, you will examine the structure of the DOM moreclosely.
NodesEach container or element in the document is called a node in the DOM. Inthe example in Figure 15.4, each of the objects in boxes is a node, and thelines represent the relationships between the nodes.
You will often need to refer to individual nodes in scripts. You can do thisby assigning an ID or by navigating the tree using the relationshipsbetween the nodes.
NOTE
Don’t worry if this tree structureconfuses you; you can doalmost anything by simplyassigning IDs to elements andreferring to them. This is themethod used in some earlierexamples in this book. Furtheron, you will look at more compli-cated examples that requireyou to understand the wayobjects are organized in theDOM.
www.it-ebooks.info

ptg999
308 CHAPTER 15 Working with the Document Object Model (DOM)
Parents and ChildrenAs you have already learned, each JavaScript object can have a parent—anobject that contains it—and can also have children—objects that it contains.The DOM uses the same terminology.
In Figure 15.4, the document object is the parent object for the remainingobjects and does not have a parent itself. The html object is the parent ofthe head and body objects, and the h1 and p objects are children of the bodyobject.
Text nodes work a bit differently. The actual text in the paragraph is a nodein itself and is a child of the p object. Similarly, the text within the <h1>tags is a child of the h1 object.
SiblingsThe DOM also uses another term for organization of objects: siblings. Asyou might expect, this refers to objects that have the same parent—in otherwords, objects at the same level in the DOM object tree.
In Figure 15.4, the h1 and p objects are siblings, as both are children of thebody object. Similarly, the head and body objects are siblings under thehtml object.
FIGURE 15.4How the DOM represents an HTMLdocument.
www.it-ebooks.info

ptg999
Working with DOM Nodes 309
Working with DOM NodesAs you’ve seen, the DOM organizes objects within a web page into a tree-like structure. Each node (object) in this tree can be accessed in JavaScript.In the next sections, you will learn how you can use the properties andmethods of nodes to manage them.
Basic Node PropertiesYou have already used the style property of nodes to change their stylesheet values. Each node also has a number of basic properties that you canexamine or set. These include the following:
. nodeName is the name of the node (not the ID). For nodes based onHTML tags, such as <p> or <body>, the name is the tag name: p orbody. For the document node, the name is a special code: #document.Similarly, text nodes have the name #text.
. nodeType is an integer describing the node’s type: 1 for normalHTML tags, 3 for text nodes, and 9 for the document node.
. nodeValue is the actual text contained within a text node. This prop-erty is not valid for other types of nodes.
. innerHTML is the HTML content of any node. You can assign a valueincluding HTML tags to this property and change the DOM childobjects for a node dynamically.
Node Relationship PropertiesIn addition to the basic properties described previously, each node has anumber of properties that describe its relation to other nodes. Theseinclude the following:
. firstChild is the first child object for a node. For nodes that containtext, such as h1 or p, the text node containing the actual text is thefirst child.
. lastChild is the node’s last child object.
. childNodes is an array that includes all of a node’s child nodes. Youcan use a loop with this array to work with all the nodes under agiven node.
. previousSibling is the sibling (node at the same level) previous tothe current node.
. nextSibling is the sibling after the current node.
NOTE
The following sections onlydescribe the most importantproperties and methods ofnodes and those that are sup-ported by current browsers. Fora complete list of availableproperties, see the W3C’s DOMspecification at http://www.w3.org/TR/DOM-Level-2/.
NOTE
The innerHTML property is not apart of the W3C DOM specifica-tion. However, it is supported bythe major browsers and is oftenthe easiest way to change con-tent in a page. You can alsoaccomplish this in a more stan-dard way by deleting and creatingnodes, as described further on.
CAUTION
Remember that, like allJavaScript objects and proper-ties, the node properties andfunctions described here arecase sensitive. Be sure youtype them exactly as shown.
www.it-ebooks.info

ptg999
310 CHAPTER 15 Working with the Document Object Model (DOM)
Document MethodsThe document node itself has several methods you might find useful. Youhave already used one of these, getElementById, to refer to DOM objects bytheir ID properties. The document node’s methods include the following:
. getElementById(id) returns the element with the specified idattribute.
. getElementsByTagName(tag) returns an array of all of the elementswith a specified tag name. You can use the wildcard * to return anarray containing all the nodes in the document.
. createTextNode(text) creates a new text node containing the speci-fied text, which you can then add to the document.
. createElement(tag) creates a new HTML element for the specifiedtag. As with createTextNode, you need to add the element to thedocument after creating it. You can assign content within the elementby changing its child objects or the innerHTML property.
Node MethodsEach node within a page has a number of methods available. Which ofthese are valid depends on the node’s position in the page and whether ithas parent or child nodes. These include the following:
. appendChild(new) appends the specified new node after all of theobject’s existing nodes.
. insertBefore(new, old) inserts the specified new child node beforethe specified old child node, which must already exist.
. replaceChild(new, old) replaces the specified old child node witha new node.
. removeChild(node) removes a child node from the object’s set ofchildren.
. hasChildNodes()returns a Boolean value of true if the object has oneor more child nodes or false if it has none.
. cloneNode()creates a copy of an existing node. If a parameter oftrue is supplied, the copy will also include any child nodes of theoriginal node.
www.it-ebooks.info

ptg999
Creating Positionable Elements (Layers) 311
Creating Positionable Elements(Layers)Now that you understand a little more about how the DOM is structured,you should be able to start thinking about how you can control any ele-ment in a web page, such as a paragraph or an image. For example, youcan use the DOM to change the position, visibility, and other attributes ofan element.
Before the W3C DOM and CSS2 standards, you could only reposition lay-ers, special groups of elements defined with a proprietary tag. Althoughyou can now position any element, it’s still useful to work with groups ofelements in many cases.
You can effectively create a layer, or a group of HTML objects that can becontrolled as a group, using the <div> or <span> tags, which you learnedabout early in this book.
To create a layer with <div>, enclose the content of the layer between thetwo division tags and specify the layer’s properties in the style attributeof the <div> tag. Here’s a simple example:
<div id=”layer1” style=”position:absolute; left:100px; top:100px”><p>This is the content of the layer.</p></div>
This code defines a layer with the name layer1. This is a moveable layerpositioned 100 pixels down and 100 pixels to the right of the upper-leftcorner of the browser window.
You’ve already learned about the positioning properties and seen them inaction in Parts II and III of this book. This includes setting object size (suchas height and width) and position (such as absolute or relative), objectvisibility, and object background and borders. The remaining examples inthis chapter will use HTML and CSS much like what you’ve already seenin this book, but will show you JavaScript-based interactions with theDOM in action.
Controlling Positioning with JavaScriptUsing the code snippet from the previous section, you’ll see an example ofhow you can control the positioning attributes of an object, usingJavaScript.
NOTE
As you’ve learned in earlierchapters, you can specify CSSproperties, such as the position property and otherlayer properties, in a <style>block, in an external stylesheet, or in the style attributeof an HTML tag, and then con-trol these properties usingJavaScript. The code snippetsshown here use properties inthe style attribute rather thanin a <style> block because itis a snippet of an example andnot a full code listing.
www.it-ebooks.info
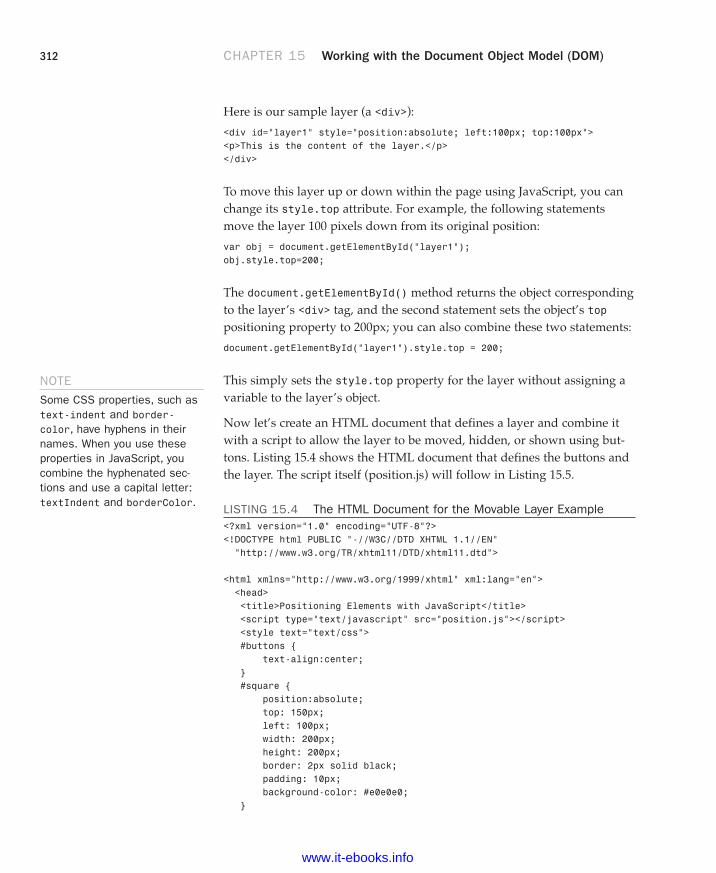
ptg999
312 CHAPTER 15 Working with the Document Object Model (DOM)
Here is our sample layer (a <div>):
<div id=”layer1” style=”position:absolute; left:100px; top:100px”><p>This is the content of the layer.</p></div>
To move this layer up or down within the page using JavaScript, you canchange its style.top attribute. For example, the following statementsmove the layer 100 pixels down from its original position:
var obj = document.getElementById(“layer1”);obj.style.top=200;
The document.getElementById() method returns the object correspondingto the layer’s <div> tag, and the second statement sets the object’s toppositioning property to 200px; you can also combine these two statements:
document.getElementById(“layer1”).style.top = 200;
This simply sets the style.top property for the layer without assigning avariable to the layer’s object.
Now let’s create an HTML document that defines a layer and combine itwith a script to allow the layer to be moved, hidden, or shown using but-tons. Listing 15.4 shows the HTML document that defines the buttons andthe layer. The script itself (position.js) will follow in Listing 15.5.
LISTING 15.4 The HTML Document for the Movable Layer Example<?xml version=”1.0” encoding=”UTF-8”?><!DOCTYPE html PUBLIC “-//W3C//DTD XHTML 1.1//EN”“http://www.w3.org/TR/xhtml11/DTD/xhtml11.dtd”>
<html xmlns=”http://www.w3.org/1999/xhtml” xml:lang=”en”><head><title>Positioning Elements with JavaScript</title><script type=”text/javascript” src=”position.js”></script><style text=”text/css”>#buttons {
text-align:center;}#square {
position:absolute;top: 150px;left: 100px;width: 200px;height: 200px;border: 2px solid black;padding: 10px;background-color: #e0e0e0;
}
NOTE
Some CSS properties, such astext-indent and border-color, have hyphens in theirnames. When you use theseproperties in JavaScript, youcombine the hyphenated sec-tions and use a capital letter:textIndent and borderColor.
www.it-ebooks.info

ptg999
Creating Positionable Elements (Layers) 313
</style></head>
<body><h1>Positioning Elements</h1><form action=”” name=”form1”><div id=”buttons”><input type=”button” name=”left” value=”Left”onclick=”pos(-1,0);” />
<input type=”button” name=”right” value=”Right”onclick=”pos(1,0);” />
<input type=”button” name=”up” value=”Up”onclick=”pos(0,-1);” />
<input type=”button” name=”down” value=”Down”onclick=”pos(0,1);” />
<input type=”button” name=”hide” value=”Hide”onclick=”hideSquare();” />
<input type=”button” name=”show” value=”Show”onclick=”showSquare();” />
</div></form><hr /><div id=”square”><p>This square is an absolutely positionedlayer that you can move using the buttons above.</p></div>
</body></html>
In addition to some basic HTML, Listing 15.4 contains the following:
. The <script> tag in the header reads a script called position.js,which is shown in Listing 15.5.
. The <style> section is a brief style sheet that defines the properties forthe movable layer. It sets the position property to absolute to indi-cate that it can be positioned at an exact location, sets the initial posi-tion in the top and left properties, and sets border and background-color properties to make the layer clearly visible.
. The <input> tags within the <form> section define six buttons: fourto move the layer left, right, up, or down and two to control whetherit is visible or hidden.
. The <div> section defines the layer itself. The id attribute is set to thevalue “square”. This id is used in the style sheet to refer to the layerand will also be used in your script.
If you load it into a browser, you should see the buttons and the “square”layer, but the buttons won’t do anything yet. The script in Listing 15.5 adds
LISTING 15.4 Continued
www.it-ebooks.info

ptg999
314 CHAPTER 15 Working with the Document Object Model (DOM)
the ability to use the actions. When you load the code in Listing 15.4 intoyour browser, it should look like Figure 15.5.
FIGURE 15.5The moveable layer is ready to bemoved.
Listing 15.5 shows the JavaScript variables and functions that are called inthe HTML in Listing 15.4. This code is expected (by the <script> tag) to bein a file called position.js.
LISTING 15.5 The Script for the Movable Layer Examplevar x=100,y=150; function pos(dx,dy) {
if (!document.getElementById) return;x += 10*dx;y += 10*dy;obj = document.getElementById(“square”);obj.style.top=y + “px”;obj.style.left=x + “px”;
}function hideSquare() {
if (!document.getElementById) return;obj = document.getElementById(“square”);obj.style.display=”none”;
}function showSquare() {
if (!document.getElementById) return;obj = document.getElementById(“square”);obj.style.display=”block”;
}
www.it-ebooks.info

ptg999
Creating Positionable Elements (Layers) 315
The var statement at the beginning of the script defines two variables, xand y, that will store the current position of the layer. The pos function iscalled by the event handlers for all four of the movement buttons.
The parameters of the pos() function, dx and dy, tell the script how the layershould move: If dx is negative, a number will be subtracted from x, movingthe layer to the left. If dx is positive, a number will be added to x, movingthe layer to the right. Similarly, dy indicates whether to move up or down.
The pos() function begins by making sure the getElementById() functionis supported, so it won’t attempt to run in older browsers. It then multi-plies dx and dy by 10 (to make the movement more obvious) and appliesthem to x and y. Finally, it sets the top and left properties to the newposition (including the “px” to indicate the unit of measurement), thusmoving the layer.
Two more functions, hideSquare() and showsquare(), hide or show thelayer by setting its display property to “none” (hidden) or “block” (shown).
To use this script, save it as position.js, and then load the HTML docu-ment in Listing 15.4 into your browser. Figure 15.6 shows this script inaction—well, after an action, at least. Figure 15.6 shows the script afterpressing the Right button seven times and the Down button ten times.
FIGURE 15.6The moveable layer has beenmoved.
www.it-ebooks.info

ptg999
316 CHAPTER 15 Working with the Document Object Model (DOM)
Hiding and Showing ObjectsIn the previous example, you saw some functions that could be used tohide or show the “square.” In this section, we’ll take a closer look at hidingand showing objects within a page.
As a refresher, objects have a visibility style property that specifieswhether they are currently visible within the page:Object.style.visibility=”hidden”; // hides an objectObject.style.visibility=”visible”; // shows an object
Using this property, you can create a script that hides or shows objects ineither browser. Listing 15.6 shows the HTML document for a script thatallows two headings to be shown or hidden.
LISTING 15.6 Hiding and Showing Objects<?xml version=”1.0” encoding=”UTF-8”?><!DOCTYPE html PUBLIC “-//W3C//DTD XHTML 1.1//EN”“http://www.w3.org/TR/xhtml11/DTD/xhtml11.dtd”>
<html xmlns=”http://www.w3.org/1999/xhtml” xml:lang=”en”><head><title>Hiding or Showing Objects</title><script type=”text/javascript”>function ShowHide() {
if (!document.getElementById) return;var head1 = document.getElementById(“head1”);var head2 = document.getElementById(“head2”);var showhead1 = document.form1.head1.checked;var showhead2 = document.form1.head2.checked;head1.style.visibility=(showhead1) ? “visible” : “hidden”;head2.style.visibility=(showhead2) ? “visible” : “hidden”;
}</script>
</head><body><h1 id=”head1”>This is the first heading</h1><h1 id=”head2”>This is the second heading</h1><p>Using the W3C DOM, you can choose whether to show or hide the headings on this page using the checkboxes below.</p><form action=”” name=”form1”><div><input type=”checkbox” name=”head1”
onclick=”ShowHide();” checked=”checked” /><span style=”font-weight:bold”>Show first heading</span><br/><input type=”checkbox” name=”head2”
onclick=”ShowHide();”checked=”checked” /><span style=”font-weight:bold”>Show second heading</span><br/></div></form></body></html>
www.it-ebooks.info

ptg999
Modifying Text Within a Page 317
The <h1> tags in this document define headings with the identifiers head1and head2. The <form> section defines a form with two check boxes, onefor each of the headings. When a check box is modified, the onClickmethod is used to call the ShowHide() function.
This function is defined within the <script> statements in the header. Thefunction assigns the head1 and head2 variables to the objects for the head-ings, using the getElementById() method. Next, it assigns the showhead1and showhead2 variables to the contents of the check boxes. Finally, thefunction uses the style.visibility attributes to set the visibility of theheadings.
Figure 15.7 shows this example in action. In the figure, the second head-ing’s check box has been unchecked, so only the first heading is visible.
TIP
The lines that set the visibility property might looka bit strange. The ? and : char-acters create conditional expres-sions, a shorthand way of han-dling if statements. To reviewconditional expressions, seeChapter 18, “Controlling Flowwith Conditions and Loops.”
FIGURE 15.7The text hiding/showing examplein action.
Modifying Text Within a PageNext, you can create a simple script to modify the contents of a headingwithin a web page. As you learned earlier in this chapter, the nodeValueproperty of a text node contains its actual text, and the text node for aheading is a child of that heading. Thus, the syntax to change the text of aheading with the identifier head1 would be the following:
var head1 = document.getElementById(“head1”);head1.firstChild.nodeValue = “New Text Here”;
www.it-ebooks.info

ptg999
318 CHAPTER 15 Working with the Document Object Model (DOM)
This assigns the variable head1 to the heading’s object. The firstChildproperty returns the text node that is the only child of the heading, and itsnodeValue property contains the heading text.
Using this technique, it’s easy to create a page that allows the heading tobe changed dynamically. Listing 15.7 shows the complete HTML documentfor this script.
LISTING 15.7 The Complete Text-Modifying Example<?xml version=”1.0” encoding=”UTF-8”?><!DOCTYPE html PUBLIC “-//W3C//DTD XHTML 1.1//EN”“http://www.w3.org/TR/xhtml11/DTD/xhtml11.dtd”>
<html xmlns=”http://www.w3.org/1999/xhtml” xml:lang=”en”><head><title>Dynamic Text in JavaScript</title><script type=”text/javascript”>function ChangeTitle() {
if (!document.getElementById) return;var newtitle = document.form1.newtitle.value;var head1 = document.getElementById(“head1”);head1.firstChild.nodeValue=newtitle;
}</script>
</head><body><h1 id=”head1”>Dynamic Text in JavaScript</h1><p>Using the W3C DOM, you can dynamically change the heading at the top of this page. Enter a new title and click the Change! button. </p><form action=”” name=”form1”><div><input type=”text” name=”newtitle” size=”40” /><input type=”button” value=”Change!” onclick=”ChangeTitle();” /></div></form></body></html>
This example defines a form that enables the user to enter a new headingfor the page. Pressing the button calls the ChangeTitle() function, definedin the header. This function gets the value the user entered in the form andchanges the heading’s value to the new text.
Figure 15.8 shows this page in action after a new title has been entered andthe Change! button has been clicked.
www.it-ebooks.info

ptg999
Adding Text to a Page 319
Adding Text to a PageNext, you can create a script that actually adds text to a page. To do this,you must first create a new text node. This statement creates a new textnode with the text “this is a test”:
var node=document.createTextNode(“this is a test”);
Next, you can add this node to the document. To do this, you use theappendChild method. The text can be added to any element that can con-tain text, but we will use a paragraph. The following statement adds thetext node defined previously to the paragraph with the identifier p1:
document.getElementById(“p1”).appendChild(node);
Listing 15.8 shows the HTML document for a complete example that usesthis technique, using a form to allow the user to specify text to add to thepage.
LISTING 15.8 Adding Text to a Page<?xml version=”1.0” encoding=”UTF-8”?><!DOCTYPE html PUBLIC “-//W3C//DTD XHTML 1.1//EN”“http://www.w3.org/TR/xhtml11/DTD/xhtml11.dtd”>
<html xmlns=”http://www.w3.org/1999/xhtml” xml:lang=”en”><head><title>Adding Text to a Page</title>
FIGURE 15.8The heading modification examplein action.
www.it-ebooks.info

ptg999
320 CHAPTER 15 Working with the Document Object Model (DOM)
<script type=”text/javascript”>function AddText() {
if (!document.getElementById) return;var sentence=document.form1.sentence.value;var node=document.createTextNode(“ “ + sentence);document.getElementById(“p1”).appendChild(node);document.form1.sentence.value=””;
}</script></head><body><h1 id=”head1”>Create Your Own Content</h1><p id=”p1”> Using the W3C DOM, you can dynamically add sentences to this paragraph. Type a sentence and click the Add! Button.</p><form action=”” name=”form1”><div><input type=”text” name=”sentence” size=”65” /><input type=”button” value=”Add!” onclick=”AddText();” /></div>
</form></body></html>
In this example, the <p> section defines the paragraph that will hold theadded text. The <form> section defines a form with a text field called sentence, and an Add button, which calls the AddText() function. This function is defined in the header.
The AddText() function first assigns the sentence variable to the texttyped in the text field. Next, it creates a new text node containing the sen-tence and appends the new text node to the paragraph.
Load this document into a browser to test it and try adding several sen-tences by typing them and clicking the Add button. Figure 15.9 shows thisdocument after several sentences have been added to the paragraph.
LISTING 15.8 Continued
www.it-ebooks.info

ptg999
Summary 321
SummaryIn this chapter, you’ve learned about the DOM, JavaScript’s hierarchy ofweb page objects. You’ve learned how you can use the document object towork with documents and used the history and location objects to con-trol the current URL displayed in the browser.
Additionally, you learned the functions and properties you can use to man-age DOM objects and used example scripts to hide and show elementswithin a page, modify text, and add text. You also learned how to useHTML and CSS to define a positionable layer and how you can use posi-tioning properties dynamically with JavaScript.
This foundational knowledge of the DOM puts you in position (no punintended) to more effectively work with JavaScript in more advancedways, as you’ll learn in the chapters that follow.
FIGURE 15.9The text addition example inaction.
www.it-ebooks.info

ptg999
322 CHAPTER 15 Working with the Document Object Model (DOM)
Q&AQ. Can I avoid assigning an id attribute to every DOM object I want to
handle with a script?
A. Yes. Although the scripts in this chapter typically use the id attributefor convenience, you can actually locate any object in the page by usingcombinations of node properties such as firstChild and nextSibling.However, keep in mind that any change you make to the HTML canchange an element’s place in the DOM hierarchy, so the id attribute isa reliable recommended way to handle this.
Q. I can use history and document instead of window.history andwindow.document. Can I leave out the window object in other cases?
A. Yes. For example, you can use alert instead of window.alert to dis-play a message. The window object contains the current script, so it’streated as a default object. However, be warned that you shouldn’t omitthe window object’s name when you’re using frames, layers, or multiplewindows or in an event handler.
Q. Can I change history entries or prevent the user from using the Backand Forward buttons?
A. You can’t change the history entries. You can’t prevent the use of theBack and Forward buttons, but you can use the location.replace()method to load a series of pages that don’t appear in the history. Thereare a few tricks for preventing the Back button from working properly,but I don’t recommend them—that’s the sort of thing that givesJavaScript a bad name.
Q. What happens when my web page includes multiple HTML documents,such as when frames are used?
A. In this case, each window or frame has its own document object thatstores the elements of the HTML document it contains.
Q. If the DOM allows any object to be dynamically changed, why does thepositioning example need to use <div> tags to define a layer?
A. The example could just as easily move a heading or a paragraph. The<div> is just a convenient and standard way to group objects and tocreate a square object with a border.
www.it-ebooks.info

ptg999
Workshop 323
WorkshopThe workshop contains quiz questions and exercises to help you solidify yourunderstanding of the material covered. Try to answer all questions beforelooking at the “Answers” section that follows.
Quiz1. Which of the following DOM objects never has a parent node?
a. body
b. div
c. document
2. Which of the following is the correct syntax to get the DOM object for aheading with the identifier head1?
a. document.getElementById(“head1”)
b. document.GetElementByID(“head1”)
c. document.getElementsById(“head1”)
3. Which of the following tags can be used to create a layer?
a. <layer>
b. <div>
c. <style>
4. Which property controls an element’s left-to-right position?
a. left
b. width
c. lrpos
5. Which of the following CSS rules would create a heading that is not cur-rently visible in the page?
a. h1 {visibility: invisible;}
b. h1 {display: none;}
c. h1 {style: invisible;}
www.it-ebooks.info

ptg999
324 CHAPTER 15 Working with the Document Object Model (DOM)
Answers1. c. The document object is the root of the DOM object tree and has no
parent object.
2. a. getElementById has a lowercase g at the beginning and a lower-case d at the end, contrary to standard English grammar.
3. b. The <div> tag can be used to create positionable layers.
4. a. The left property controls an element’s left-to-right position.
5. b. The none value for the display property makes it invisible. The visibility property could also be used, but its possible values are visible or hidden.
ExercisesIf you want to gain more experience using the DOM features you learned inthis chapter, try the following:
. Modify the Back and Forward example in Listing 15.2 to include aReload button along with the Back and Forward buttons. (This buttonwould trigger the location.reload() method.)
. Modify the positioning example in Listings 15.4 and 15.5 to move thesquare one pixel at a time rather than 10 at a time.
. Add a third check box to Listing 15.6 to allow the paragraph of text tobe shown or hidden. You will need to add an id attribute to the <p> tag,add a check box to the form, and add the appropriate lines to thescript.
www.it-ebooks.info

ptg999
Now that you have learned some of the fundamentals of JavaScript andthe DOM, it’s time to dig into more details of the JavaScript language.
In this chapter, you’ll learn three tools for storing data in JavaScript: vari-ables, which store numbers or text; strings, which are special variables forworking with text; and arrays, which are multiple variables you can refer toby number.
Using VariablesUnless you skipped over the JavaScript-related chapters in the beginningof this book, you’ve already used a few variables. You probably can alsofigure out how to use a few more without any help. Nevertheless, there aresome aspects of variables you haven’t learned yet. We will now look atsome of the details.
Choosing Variable NamesVariables are named containers that can store data (for example, a number,a text string, or an object). As you learned earlier in this book, each vari-able has a name. There are specific rules you must follow when choosing avariable name:
. Variable names can include letters of the alphabet, both upper- andlowercase. They can also include the digits 0–9 and the underscore(_) character.
. Variable names cannot include spaces or any other punctuation characters.
WHAT YOU’LL LEARN INTHIS CHAPTER:
. How to name and declarevariables
. How to choose whether touse local or global vari-ables
. How to assign values tovariables
. How to convert betweendifferent data types
. How to use variables andliterals in expressions
. How strings are stored inString objects
. How to create and useString objects
. How to create and usearrays of numbers andstrings
CHAPTER 16Using JavaScript Variables,
Strings, and Arrays
www.it-ebooks.info

ptg999
326 CHAPTER 16 Using JavaScript Variables, Strings, and Arrays
. The first character of the variable name must be either a letter or anunderscore.
. Variable names are case sensitive—totalnum, Totalnum, andTotalNum are separate variable names.
. There is no official limit on the length of variable names, but theymust fit within one line.
Using these rules, the following are examples of valid variable names:
total_number_of_fishLastInvoiceNumbertemp1a_var39
Using Local and Global VariablesSome computer languages require you to declare a variable before you useit. JavaScript includes the var keyword, which can be used to declare avariable. You can omit var in many cases; the variable is still declared thefirst time you assign a value to it.
To understand where to declare a variable, you will need to understandthe concept of scope. A variable’s scope is the area of the script in whichthat variable can be used. There are two types of variables:
. Global variables have the entire script (and other scripts in the sameHTML document) as their scope. They can be used anywhere, evenwithin functions.
. Local variables have a single function as their scope. They can be usedonly within the function they are created in.
To create a global variable, you declare it in the main script, outside anyfunctions. You can use the var keyword to declare the variable, as in thisexample:
var students = 25;
This statement declares a variable called students and assigns it a value of25. If this statement is used outside functions, it creates a global variable.The var keyword is optional in this case, so this statement is equivalent tothe previous one:
students = 25;
NOTE
You can choose to use eitherfriendly, easy-to-read names orcompletely cryptic ones. Doyourself a favor: Use longer,friendly names whenever possi-ble. Although you might remem-ber the difference between a, b,x, and x1 right now, you mightnot after a good night’s sleep.
www.it-ebooks.info
ptg999
Using Variables 327
Before you get in the habit of omitting the var keyword, be sure youunderstand exactly when it’s required. It’s actually a good idea to alwaysuse the var keyword—you’ll avoid errors and make your script easier toread, and it won’t usually cause any trouble.
A local variable belongs to a particular function. Any variable you declarewith the var keyword in a function is a local variable. Additionally, thevariables in the function’s parameter list are always local variables.
To create a local variable within a function, you must use the var keyword.This forces JavaScript to create a local variable, even if there is a globalvariable with the same name.
You should now understand the difference between local and global vari-ables. If you’re still a bit confused, don’t worry—if you use the var key-word every time, you’ll usually end up with the right type of variable.
Assigning Values to VariablesAs you learned in Chapter 4, “Understanding JavaScript,” you can use theequal sign to assign a value to a variable. For example, this statementassigns the value 40 to the variable lines:
lines = 40;
You can use any expression to the right of the equal sign, including othervariables. You have used this syntax earlier to add one to a variable:
lines = lines + 1;
Because incrementing or decrementing variables is quite common,JavaScript includes two types of shorthand for this syntax. The first is the+= operator, which enables you to create the following shorter version ofthe preceding example:
lines += 1;
Similarly, you can subtract a number from a variable using the -= operator:
lines -= 1;
If you still think that’s too much to type, JavaScript also includes the incre-ment and decrement operators, ++ and --. This statement adds one to thevalue of lines:
lines++;
www.it-ebooks.info

ptg999
328 CHAPTER 16 Using JavaScript Variables, Strings, and Arrays
Similarly, this statement subtracts one from the value of lines:
lines--;
You can alternately use the ++ or -- operators before a variable name, as in++lines. However, these are not identical. The difference is when theincrement or decrement happens:
. If the operator is after the variable name, the increment or decrementhappens after the current expression is evaluated.
. If the operator is before the variable name, the increment or decre-ment happens before the current expression is evaluated.
This difference is only an issue when you use the variable in an expressionand increment or decrement it in the same statement. As an example, sup-pose you have assigned the lines variable the value 40. The following twostatements have different effects:
alert(lines++);alert(++lines);
The first statement displays an alert with the value 40, and then incrementslines to 41. The second statement first increments lines to 41, then dis-plays an alert with the value 41.
Understanding Expressions andOperatorsAn expression is a combination of variables and values that the JavaScriptinterpreter can evaluate to a single value. The characters that are used tocombine these values, such as + and /, are called operators.
Using JavaScript OperatorsYou’ve already used some operators, such as the + sign (addition) and theincrement and decrement operators. Table 16.1 lists some of the mostimportant operators you can use in JavaScript expressions.
NOTE
These operators are strictly foryour convenience. If it makesmore sense to you to stick tolines = lines + 1, do it—your script won’t suffer.
TIP
Along with variables and con-stant values, you can also usecalls to functions that returnresults within an expression.
www.it-ebooks.info

ptg999
Understanding Expressions and Operators 329
TABLE 16.1 Common JavaScript Operators
Operator Description Example
+ Concatenate (combine) message=”this is” + “
strings a test”;
+ Add result = 5 + 7;
- Subtract score = score - 1;
* Multiply total = quantity * price;
/ Divide average = sum / 4;
% Modulo (remainder) remainder = sum % 4;
++ Increment tries++;
-- Decrement total--;
Along with these, there are also many other operators used in conditionalstatements; you’ll learn about these in Chapter 18, “Controlling Flow withConditions and Loops.”
Operator PrecedenceWhen you use more than one operator in an expression, JavaScript usesrules of operator precedence to decide how to calculate the value. Table 16.1lists the operators from lowest to highest precedence, and operators withhighest precedence are evaluated first. For example, consider this statement:
result = 4 + 5 * 3;
If you try to calculate this result, there are two ways to do it. You couldmultiply 5 * 3 first and then add 4 (result: 19) or add 4 + 5 first and thenmultiply by 3 (result: 27). JavaScript solves this dilemma by following theprecedence rules: Because multiplication has a higher precedence thanaddition, it first multiplies 5 * 3 and then adds 4, producing a result of 19.
Sometimes operator precedence doesn’t produce the result you want. Forexample, consider this statement:
result = a + b + c + d / 4;
This is an attempt to average four numbers by adding them all together,and then dividing by four. However, because JavaScript gives division ahigher precedence than addition, it will divide the d variable by 4 beforeadding the other numbers, producing an incorrect result.
NOTE
If you’re familiar with any otherprogramming languages, you’llfind that the operators andprecedence in JavaScript work,for the most part, the same wayas those in C, C++, and Java,as well as web scripting lan-guages such as PHP.
www.it-ebooks.info
ptg999
330 CHAPTER 16 Using JavaScript Variables, Strings, and Arrays
You can control precedence by using parentheses. Here’s the workingstatement to calculate an average:
result = (a + b + c + d) / 4;
The parentheses ensure that the four variables are added first, and then thesum is divided by four.
Data Types in JavaScriptIn some computer languages, you have to specify the type of data a vari-able will store, for example, a number or a string. In JavaScript, you don’tneed to specify a data type in most cases. However, you should know thetypes of data JavaScript can deal with.
These are the basic JavaScript data types:
. Numbers, such as 3, 25, or 1.4142138—JavaScript supports bothintegers and floating-point numbers.
. Boolean, or logical values—These can have one of two values: trueor false. These are useful for indicating whether a certain conditionis true.
. Strings, such as “I am a jelly doughnut”—These consist of one ormore characters of text. (Strictly speaking, these are String objects,which you’ll learn about later in this chapter.)
. The null value, represented by the keyword null—This is the valueof an undefined variable. For example, the statement document.write(fig) will result in this value (and an error message) if thevariable fig has not been previously used or defined.
Although JavaScript keeps track of the data type currently stored in eachvariable, it doesn’t restrict you from changing types midstream. For exam-ple, suppose you declared a variable by assigning it a value:
total = 31;
This statement declares a variable called total and assigns it the value of31. This is a numeric variable. Now suppose you changed the value oftotal:
total = “albatross”;
TIP
If you’re unsure about operatorprecedence, you can use paren-theses to make sure thingswork the way you expect and tomake your script morereadable.
NOTE
You’ll learn more about Booleanvalues and about using conditionsin JavaScript in Chapter 18.
NOTE
Although this feature ofJavaScript is convenient andpowerful, it can also make iteasy to make a mistake. Forexample, if the total variablewas later used in a mathemati-cal calculation, the result wouldbe invalid—but JavaScript doesnot warn you that you’ve madethis mistake.
www.it-ebooks.info

ptg999
Converting Between Data Types 331
This assigns a string value to total, replacing the numeric value.JavaScript will not display an error when this statement executes; it’s per-fectly valid, although it’s probably not a very useful total.
Converting Between Data TypesJavaScript handles conversions between data types for you whenever itcan. For example, you’ve already used statements like this:
document.write(“The total is “ + total);
This statement prints out a message such as “The total is 40”. Becausethe document.write function works with strings, the JavaScript interpreterautomatically converts any nonstrings in the expression (in this case, thevalue of total) to strings before performing the function.
This works equally well with floating-point and Boolean values. However,there are some situations where it won’t work. For example, the followingstatement will work fine if the value of total is 40:
average = total / 3;
However, the total variable could also contain a string; in this case, thepreceding statement would result in an error.
In some situations, you might end up with a string containing a numberand need to convert it to a regular numeric variable. JavaScript includestwo functions for this purpose:
. parseInt()—Converts a string to an integer number.
. parseFloat()—Converts a string to a floating-point number.
Both of these functions will read a number from the beginning of the stringand return a numeric version. For example, these statements convert thestring “30 angry polar bears” to a number:
stringvar = “30 angry polar bears”;numvar = parseInt(stringvar);
After these statements execute, the numvar variable contains the number30. The nonnumeric portion of the string is ignored.
NOTE
These functions look for a num-ber of the appropriate type atthe beginning of the string. If avalid number is not found, thefunction will return the specialvalue NaN, meaning not a num-ber.
www.it-ebooks.info

ptg999
332 CHAPTER 16 Using JavaScript Variables, Strings, and Arrays
Using String ObjectsYou’ve already used several strings in previous chapters. Strings store agroup of text characters and are named similarly to other variables. As asimple example, this statement assigns the string This is a test to astring variable called test:
test = “This is a test”;
Creating a String ObjectJavaScript stores strings as String objects. You usually don’t need to worryabout this, but it will explain some of the techniques for working withstrings, which use methods (built-in functions) of the String object.
There are two ways to create a new String object. The first is the oneyou’ve already used, whereas the second uses object-oriented syntax. Thefollowing two statements create the same string:
test = “This is a test”;test = new String(“This is a test”);
The second statement uses the new keyword, which you use to createobjects. This tells the browser to create a new String object containing thetext This is a test and assigns it to the variable test.
Assigning a ValueYou can assign a value to a string in the same way as any other variable.Both of the examples in the previous section assigned an initial value tothe string. You can also assign a value after the string has already been cre-ated. For example, the following statement replaces the contents of thetest variable with a new string:
test = “This is only a test.”;
You can also use the concatenation operator (+) to combine the values oftwo strings. Listing 16.1 shows a simple example of assigning and combin-ing the values of strings.
NOTE
Although you can create astring using object-oriented syn-tax, the standard JavaScriptsyntax is simpler, and there isno difference in the strings cre-ated by these two methods.
www.it-ebooks.info

ptg999
Using String Objects 333
LISTING 16.1 Assigning Values to Strings and Combining Them<?xml version=”1.0” encoding=”UTF-8”?><!DOCTYPE html PUBLIC “-//W3C//DTD XHTML 1.1//EN”“http://www.w3.org/TR/xhtml11/DTD/xhtml11.dtd”>
<html xmlns=”http://www.w3.org/1999/xhtml” xml:lang=”en”><head><title>String Text</title>
</head>
<body><h1>String Test</h1>
<script type=”text/javascript”>test1 = “This is a test. “;test2 = “This is only a test.”;both = test1 + test2;alert(both);</script>
</body></html>
This script assigns values to two string variables, test1 and test2, andthen displays an alert with their combined value. If you load this HTMLdocument in a browser, your output should resemble Figure 16.1.
FIGURE 16.1The output of the string examplescript.
www.it-ebooks.info

ptg999
334 CHAPTER 16 Using JavaScript Variables, Strings, and Arrays
In addition to using the + operator to concatenate two strings, you can usethe += operator to add text to a string. For example, this statement adds aperiod to the current contents of the string sentence:
sentence += “.”;
Calculating the String’s LengthFrom time to time, you might find it useful to know how many charactersa string variable contains. You can do this with the length property ofString objects, which you can use with any string. To use this property,type the string’s name followed by .length.
For example, test.length refers to the length of the test string. Here is anexample of this property:
test = “This is a test.”;document.write(test.length);
The first statement assigns the string This is a test to the test variable.The second statement displays the length of the string—in this case, 15characters. The length property is a read-only property, so you cannotassign a value to it to change a string’s length.
Converting the String’s CaseTwo methods of the String object enable you to convert the contents of astring to all uppercase or all lowercase:
. toUpperCase()—Converts all characters in the string to uppercase
. toLowerCase()—Converts all characters in the string to lowercase
For example, the following statement displays the value of the test stringvariable in lowercase:
document.write(test.toLowerCase());
Assuming that this variable contained the text This Is A Test, the resultwould be the following string:
this is a test
Note that the statement doesn’t change the value of the text variable.These methods return the upper- or lowercase version of the string, but
NOTE
Remember that although testrefers to a string variable, thevalue of test.length is a num-ber and can be used in anynumeric expression.
NOTE
Note that the syntax for thesemethods is similar to thelength property introduced ear-lier. The difference is that meth-ods always use parentheses,whereas properties don’t. ThetoUpperCase and toLowerCasemethods do not take anyparameters, but you still needto use the parentheses.
NOTE
The plus sign (+) is also usedto add numbers in JavaScript.The browser knows whether touse addition or concatenationbased on the types of data youuse with the plus sign. If youuse it between a number and astring, the number is convertedto a string and concatenated.
www.it-ebooks.info

ptg999
Working with Substrings 335
they don’t change the string itself. If you want to change the string’s value,you can use a statement like this:
test = test.toLowerCase();
Working with SubstringsSo far, you’ve worked with entire strings. JavaScript also enables you towork with substrings, or portions of a string. You can use the substringmethod to retrieve a portion of a string or the charAt method to get a sin-gle character. These are explained in the following sections.
Using Part of a StringThe substring method returns a string consisting of a portion of the origi-nal string between two index values, which you must specify in parenthe-ses. For example, the following statement displays the fourth through sixthcharacters of the text string:
document.write(text.substring(3,6));
At this point, you’re probably wondering where the 3 and the 6 comefrom. There are three things you need to understand about the indexparameters:
. Indexing starts with 0 for the first character of the string, so thefourth character is actually index 3.
. The second index is noninclusive. A second index of 6 includes up toindex 5 (the sixth character).
. You can specify the two indexes in either order. The smaller one willbe assumed to be the first index. In the previous example, (6,3)would have produced the same result. Of course, there is rarely areason to use the reverse order.
As another example, suppose you defined a string called alpha to hold thealphabet:
alpha = “ABCDEFGHIJKLMNOPQRSTUVWXYZ”;
The following are examples of the substring() method using this string:
. alpha.substring(0,4) returns ABCD.
. alpha.substring(10,12) returns KL.
www.it-ebooks.info

ptg999
336 CHAPTER 16 Using JavaScript Variables, Strings, and Arrays
. alpha.substring(12,10) also returns KL. Because it’s smaller, 10 isused as the first index.
. alpha.substring(6,7) returns G.
. alpha.substring(24,26) returns YZ.
. alpha.substring(0,26) returns the entire alphabet.
. alpha.substring(6,6) returns the null value, an empty string. Thisis true whenever the two index values are the same.
Getting a Single CharacterThe charAt method is a simple way to grab a single character from astring. You specify the character’s index, or position, in parentheses. Theindexes begin at 0 for the first character. Here are a few examples using thealpha string:
. alpha.charAt(0) returns A.
. alpha.charAt(12) returns M.
. alpha.charAt(25) returns Z.
. alpha.charAt(27) returns an empty string because there is no char-acter at that position.
Finding a SubstringAnother use for substrings is to find a string within another string. Oneway to do this is with the indexOf method. To use this method, addindexOf to the string you want to search and specify the string to searchfor in the parentheses. This example searches for “this” in the test string:
loc = test.indexOf(“this”);
The value returned in the loc variable is an index into the string, similar tothe first index in the substring method. The first character of the string isindex 0.
You can specify an optional second parameter to indicate the index valueto begin the search. For example, this statement searches for the word fishin the temp string, starting with the 20th character:
location = temp.indexOf(“fish”,19);
CAUTION
As with most JavaScript meth-ods and property names,indexOf is case sensitive. Makesure you type it exactly asshown here when you use it inscripts.
NOTE
One use for the second parame-ter is to search for multipleoccurrences of a string. Afterfinding the first occurrence, yousearch starting with that locationfor the second one, and so on.
www.it-ebooks.info
ptg999
Using Numeric Arrays 337
A second method, lastIndexOf(), works the same way, but finds the lastoccurrence of the string. It searches the string backwards, starting with thelast character. For example, this statement finds the last occurrence of Fredin the names string:
location = names.lastIndexOf(“Fred”);
As with indexOf(), you can specify a location to search from as the secondparameter. In this case, the string will be searched backward starting atthat location.
Using Numeric ArraysAn array is a numbered group of data items that you can treat as a singleunit. For example, you might use an array called scores to store severalscores for a game. Arrays can contain strings, numbers, objects, or othertypes of data. Each item in an array is called an element of the array.
Creating a Numeric ArrayUnlike most other types of JavaScript variables, you typically need todeclare an array before you use it. The following example creates an arraywith four elements:
scores = new Array(4);
To assign a value to the array, you use an index in brackets. Indexes beginwith 0, so the elements of the array in this example would be numbered 0to 3. These statements assign values to the four elements of the array:
scores[0] = 39;scores[1] = 40;scores[2] = 100;scores[3] = 49;
You can also declare an array and specify values for elements at the sametime. This statement creates the same scores array in a single line:
scores = new Array(39,40,100,49);
You can also use a shorthand syntax to declare an array and specify itscontents. The following statement is an alternative way to create thescores array:
scores = [39,40,100,49];
TIP
Remember to use parentheseswhen declaring an array withthe new keyword, as in a=newArray(3,4,5), and use bracketswhen declaring an array withoutnew, as in a=[3,4,5]. Otherwise,you’ll run into JavaScript errors.
www.it-ebooks.info

ptg999
338 CHAPTER 16 Using JavaScript Variables, Strings, and Arrays
Understanding Array LengthLike strings, arrays have a length property. This tells you the number ofelements in the array. If you specified the length when creating the array,this value becomes the length property’s value. For example, these state-ments would print the number 30:
scores = new Array(30);document.write(scores.length);
You can declare an array without a specific length, and change the lengthlater by assigning values to elements or changing the length property. Forexample, these statements create a new array and assign values to two ofits elements:
test = new Array();test[0]=21;test[5]=22;
In this example, because the largest index number assigned so far is 5, thearray has a length property of 6—remember, elements are numbered start-ing at 0.
Accessing Array ElementsYou can read the contents of an array using the same notation you usedwhen assigning values. For example, the following statements would dis-play the values of the first three elements of the scores array:
scoredisp = “Scores: “ + scores[0] + “,” + scores[1] + “,” + scores[2];document.write(scoredisp);
Using String ArraysSo far, you’ve used arrays of numbers. JavaScript also enables you to usestring arrays, or arrays of strings. This is a powerful feature that enablesyou to work with a large number of strings at the same time.
Creating a String ArrayYou declare a string array in the same way as a numeric array—in fact,JavaScript does not make a distinction between them:
names = new Array(30);
TIP
Looking at this example, youmight imagine it would beinconvenient to display all theelements of a large array. Thisis an ideal job for loops, whichenable you to perform the samestatements several times withdifferent values. You’ll learn allabout loops in Chapter 18.
www.it-ebooks.info

ptg999
Using String Arrays 339
You can then assign string values to the array elements:
names[0] = “Henry J. Tillman”;names[1] = “Sherlock Holmes”;
As with numeric arrays, you can also specify a string array’s contentswhen you create it. Either of the following statements would create thesame string array as the preceding example:
names = new Array(“Henry J. Tillman”, “Sherlock Holmes”);names = [“Henry J. Tillman”, “Sherlock Holmes”];
You can use string array elements anywhere you would use a string. Youcan even use the string methods introduced earlier. For example, the fol-lowing statement prints the first five characters of the first element of thenames array, resulting in Henry:
document.write(names[0].substring(0,5));
Splitting a StringJavaScript includes a string method called split, which splits a string intoits component parts. To use this method, specify the string to split and acharacter to divide the parts:
test = “John Q. Public”;parts = test.split(“ “);
In this example, the test string contains the name John Q. Public. Thesplit method in the second statement splits the name string at each space,resulting in three strings. These are stored in a string array called parts.After the example statements execute, the elements of parts contain thefollowing:
. parts[0] = “John”
. parts[1] = “Q.”
. parts[2] = “Public”
JavaScript also includes an array method, join, which performs the oppo-site function. This statement reassembles the parts array into a string:
fullname = parts.join(“ “);
The value in the parentheses specifies a character to separate the parts ofthe array. In this case, a space is used, resulting in the final string John Q.Public. If you do not specify a character, commas are used.
www.it-ebooks.info

ptg999
340 CHAPTER 16 Using JavaScript Variables, Strings, and Arrays
Sorting a String ArrayJavaScript also includes a sort method for arrays, which returns an alpha-betically sorted version of the array. For example, the following statementsinitialize an array of four names and sort them:
names[0] = “Public, John Q.”;names[1] = “Doe, Jane”;names[2] = “Duck, Daisy”;names[3] = “Mouse, Mickey”;sortednames = names.sort();
The last statement sorts the names array and stores the result in a newarray, sortednames.
Sorting a Numeric ArrayBecause the sort method sorts alphabetically, it won’t work with a numer-ic array—at least not the way you’d expect. If an array contains the num-bers 4, 10, 30, and 200, for example, it would sort them as 10, 200, 30, 4—not even close. Fortunately, there’s a solution: You can specify a function inthe sort method’s parameters, and that function will be used to comparethe numbers. The following code sorts a numeric array correctly:
function numcompare(a,b) {return a-b;
}nums = new Array(30, 10, 200, 4);sortednums = nums.sort(numcompare);
This example defines a simple function, numcompare, which subtracts thetwo numbers. After you specify this function in the sort method, the arrayis sorted in the correct numeric order: 4, 10, 30, 200.
NOTE
JavaScript expects the compari-son function to return a nega-tive number if a belongs beforeb, 0 if they are the same, or apositive number if a belongsafter b. This is why a-b is allyou need for the function tosort numerically.
TRY IT YOURSELF▼
Sorting andDisplaying Names
To gain more experience working with JavaScript’s string and array features,you can create a script that enables the user to enter a list of names anddisplays the list in sorted form.
Because this will be a larger script, you will create separate HTML andJavaScript files, as described in Chapter 14, “Getting Started with JavaScriptProgramming.” First, the sort.html file will contain the HTML structure andform fields for the script to work with. Listing 16.2 shows the HTML document.
www.it-ebooks.info
ptg999
Sorting a Numeric Array 341
Sorting andDisplaying Namescontinued
LISTING 16.2 The HTML Document for the Sorting Example<?xml version=”1.0” encoding=”UTF-8”?><!DOCTYPE html PUBLIC “-//W3C//DTD XHTML 1.1//EN”“http://www.w3.org/TR/xhtml11/DTD/xhtml11.dtd”>
<html xmlns=”http://www.w3.org/1999/xhtml” xml:lang=”en”><head><title>Array Sorting Example</title><script type=”text/javascript” src=”sort.js”></script></head>
<body><h1>Sorting String Arrays</h1>
<p>Enter two or more names in the field below,and the sorted list of names will appear in thetext area.</p><form name=”theform”>Name:<input type=”text” name=”newname” size=”20” /><input type=”button” name=”addname” value=”Add”onclick=”SortNames();”><br/><h2>Sorted Names</h2><textarea cols=”60” rows=”10” name=”sorted”>The sorted names will appear here.</textarea></form>
</body></html>
Because the script will be in a separate document, the <script> tag in theheader of this document uses the src attribute to include a JavaScript filecalled sort.js. You will create this file next.
This document defines a form named theform, a text field named newname,an addname button, and a text area named sorted. Your script will use theseform fields as its user interface.
Listing 16.3 provides the JavaScript necessary for the sorting process.
LISTING 16.3 The JavaScript File for the Sorting Example// initialize the counter and the arrayvar numnames=0;var names = new Array();function SortNames() {
// Get the name from the text field
TRY IT YOURSELF ▼
www.it-ebooks.info

ptg999
342 CHAPTER 16 Using JavaScript Variables, Strings, and Arrays
TRY IT YOURSELF▼
Sorting andDisplaying Namescontinued
thename=document.theform.newname.value;// Add the name to the arraynames[numnames]=thename;// Increment the counternumnames++;// Sort the arraynames.sort();document.theform.sorted.value=names.join(“\n”);
}
The script begins by defining two variables with the var keyword: numnameswill be a counter that increments as each name is added, and the namesarray will store the names.
When you type a name into the text field and click the button, the onclick eventhandler calls the SortNames function. This function stores the text field value ina variable, thename, and then adds the name to the names array using numnamesas the index. It then increments numnames to prepare for the next name.
The final section of the script sorts the names and displays them. First, thesort() method is used to sort the names array. Next, the join() method isused to combine the names, separate them with line breaks, and displaythem in the text area.
To test the script, save it as sort.js, and then load the sort.html file youcreated previously into a browser. You can then add some names and testthe script. Figure 16.2 shows the result after sorting several names.
LISTING 16.3 Continued
FIGURE 16.2The output of the name-sortingexample.
www.it-ebooks.info

ptg999
Summary 343
SummaryDuring this chapter, you’ve focused on variables and how JavaScript han-dles them. You’ve learned how to name variables, how to declare them,and the differences between local and global variables. You also exploredthe data types supported by JavaScript and how to convert between them.
You also learned about JavaScript’s more complex variables, strings, andarrays and looked at the features that enable you to perform operations onthem, such as converting strings to uppercase or sorting arrays.
In the next chapter, you’ll continue your foundational JavaScript educationby learning more about two additional key features: functions and objects.
www.it-ebooks.info

ptg999
344 CHAPTER 16 Using JavaScript Variables, Strings, and Arrays
Q&AQ. What is the importance of the var keyword? Should I always use it to
declare variables?
A. You only need to use var to define a local variable in a function.However, if you’re unsure at all, it’s always safe to use var. Using it con-sistently will help you keep your scripts organized and error free.
Q. Is there any reason I would want to use the var keyword to create alocal variable with the same name as a global one?
A. Not on purpose. The main reason to use var is to avoid conflicts withglobal variables you might not know about. For example, you might adda global variable in the future, or you might add another script to thepage that uses a similar variable name. This is more of an issue withlarge, complex scripts.
Q. What good are Boolean variables?
A. Often in scripts, you’ll need a variable to indicate whether something hashappened—for example, whether a phone number the user has enteredis in the right format. Boolean variables are ideal for this; they’re alsouseful in working with conditions, as you’ll see in Chapter 18.
Q. Can I store other types of data in an array? For example, can I have anarray of dates?
A. Absolutely. JavaScript enables you to store any data type in an array.
Q. What about two-dimensional arrays?
A. These are arrays with two indexes (such as columns and rows).JavaScript does not directly support this type of array, but you can useobjects to achieve the same effect. You will learn more about objects inthe next chapter.
WorkshopThe workshop contains quiz questions and exercises to help you solidify yourunderstanding of the material covered. Try to answer all questions beforelooking at the “Answers” section that follows.
www.it-ebooks.info

ptg999
Workshop 345
Quiz1. Which of the following is not a valid JavaScript variable name?
a. 2names
b. first_and_last_names
c. FirstAndLast
2. If the statement var fig=2 appears in a function, which type of vari-able does it declare?
a. A global variable
b. A local variable
c. A constant variable
3. If the string test contains the value The eagle has landed., whatwould be the value of test.length?
a. 4
b. 21
c. The
4. Using the same example string, which of these statements wouldreturn the word eagle?
a. test.substring(4,9)
b. test.substring(5,9)
c. test.substring(“eagle”)
5. What will be the result of the JavaScript expression 31 + “ angrypolar bears”?
a. An error message
b. 32
c. “31 angry polar bears”
www.it-ebooks.info

ptg999
346 CHAPTER 16 Using JavaScript Variables, Strings, and Arrays
Answers1. a. 2names is an invalid JavaScript variable name because it begins with
a number. The others are valid, although they’re probably not idealchoices for names.
2. b. Because the variable is declared in a function, it is a local variable.The var keyword ensures that a local variable is created.
3. b. The length of the string is 21 characters.
4. a. The correct statement is test.substring(4,9). Remember that theindexes start with 0 and that the second index is noninclusive.
5. c. JavaScript converts the whole expression to the string “31 angrypolar bears”. (No offense to polar bears, who are seldom angry andrarely seen in groups this large.)
Exercises. Modify the sorting example in Listing 16.3 to convert the names to all
uppercase before sorting and displaying them.
. Modify Listing 16.3 to display a numbered list of names in the textarea.
www.it-ebooks.info

ptg999
In this chapter, you’ll learn about two more key JavaScript concepts thatyou’ll use throughout the rest of this book. First, you’ll learn the details ofusing functions, which enable you to group any number of statements intoa block. This is useful for repeating sections of code, and you can also cre-ate functions that accept parameters and return values for later use.
Whereas functions enable you to group sections of code, objects enable youto group data—you can use them to combine related data items and func-tions for working with the data. You’ll learn how to define and use objectsand their methods and will work specifically with two useful built-inobjects, Math and Date.
Using FunctionsThe scripts you’ve seen so far are simple lists of instructions. The browserbegins with the first statement after the <script> tag and follows eachinstruction in order until it reaches the closing </script> tag (or encoun-ters an error).
Although this is a straightforward approach for short scripts, it can be confus-ing to read a longer script written in this fashion. To make it easier for you toorganize your scripts, JavaScript supports functions, which you learned aboutin Chapter 14, “Getting Started with JavaScript Programming.” In this sec-tion, you will learn how to define and use functions.
Defining a FunctionFunctions are groups of JavaScript statements that can be treated as a singleunit. To use a function, you must first define it. Here is a simple exampleof a function definition:
WHAT YOU’LL LEARN INTHIS CHAPTER:
. How to define and callfunctions
. How to return values fromfunctions
. How to define customobjects
. How to use object proper-ties and values
. How to define and useobject methods
. How to use objects tostore data and relatedfunctions
. How to use the Mathobject’s methods
. How to use with to workwith objects
. How to use the Dateobject to work with dates
CHAPTER 17Using JavaScript Functions and
Objects
www.it-ebooks.info

ptg999
348 CHAPTER 17 Using JavaScript Functions and Objects
function Greet() {alert(“Greetings.”);
}
This snippet defines a function that displays an alert message to the user.This begins with the function keyword. The function’s name is Greet.Notice the parentheses after the function’s name. As you’ll learn next, thespace between them is not always empty.
The first and last lines of the function definition include braces ({ and }).You use these to enclose all of the statements in the function. The browseruses the braces to determine where the function begins and ends.
Between the braces, this particular function contains a single line. This usesthe built-in alert function, which displays an alert message. The messagewill contain the text “Greetings.”
Now, about those parentheses. The current Greet function always does thesame thing: Each time you use it, it displays the same message. Althoughthis avoids a bit of typing, it doesn’t really provide much of an advantage.
To make your function more flexible, you can add parameters, also knownas arguments. These are variables that are received by the function eachtime it is called. For example, you can add a parameter called who that tellsthe function the name of the person to greet. Here is the modified Greetfunction:
function Greet(who) {alert(“Greetings, “ + who);
}
Of course, to use this function, you should include it in an HTML document.Traditionally, the best place for a function definition is within the <head> sec-tion of the document. Because the statements in the <head> section are exe-cuted first, this ensures that the function is defined before it is used.
Listing 17.1 shows the Greet function embedded in the header section ofan HTML document.
LISTING 17.1 The Greet Function in an HTML Document<?xml version=”1.0” encoding=”UTF-8”?><!DOCTYPE html PUBLIC “-//W3C//DTD XHTML 1.1//EN”“http://www.w3.org/TR/xhtml11/DTD/xhtml11.dtd”>
<html xmlns=”http://www.w3.org/1999/xhtml” xml:lang=”en”><head>
CAUTION
Function names are case sensi-tive. If you define a functionsuch as Greet with a capitalletter, be sure you use the iden-tical name when you call thefunction. That is to say, if youdefine the function with thename Greet but you attempt tocall the function using greet, itwill not work.
www.it-ebooks.info

ptg999
Using Functions 349
<title>Functions</title><script type=”text/javascript”>function Greet(who) {
alert(“Greetings, “ + who);}</script>
</head><body><p>This is the body of the page.</p>
</body></html>
Calling the FunctionYou have now defined a function and placed it in an HTML document.However, if you load Listing 17.1 into a browser, you’ll notice that it doesabsolutely nothing. This is because the function is defined—ready to beused—but we haven’t used it yet.
Making use of a function is referred to as calling the function. To call afunction, use the function’s name as a statement in a script. You will needto include the parentheses and the values for the function’s parameters.For example, here’s a statement that calls the Greet function:
Greet(“Fred”);
This tells the JavaScript interpreter to transfer control to the first statementin the Greet function. It also passes the parameter “Fred” to the function.This value will be assigned to the who variable inside the function.
Listing 17.2 shows a complete HTML document that includes the functiondefinition and a second script in the body of the page that actually calls thefunction. To demonstrate the usefulness of functions, we’ll call it twice togreet two different people.
LISTING 17.2 The Complete Function Example<?xml version=”1.0” encoding=”UTF-8”?><!DOCTYPE html PUBLIC “-//W3C//DTD XHTML 1.1//EN”“http://www.w3.org/TR/xhtml11/DTD/xhtml11.dtd”>
<html xmlns=”http://www.w3.org/1999/xhtml” xml:lang=”en”><head><title>Functions</title><script type=”text/javascript”>function Greet(who) {
LISTING 17.1 Continued
TIP
Functions can have more thanone parameter. To define afunction with multiple parame-ters, list a variable name foreach parameter, separated bycommas. To call the function,specify values for each parame-ter separated by commas.
www.it-ebooks.info

ptg999
350 CHAPTER 17 Using JavaScript Functions and Objects
alert(“Greetings, “ + who);}</script>
</head><body><h1>Function Example</h1><p>Prepare to be greeted twice.</p><script type=”text/javascript”>Greet(“Fred”);Greet(“Ethel”);</script>
</body></html>
This listing includes a second set of <script> tags in the body of the page.The second script includes two function calls to the Greet function, eachwith a different name.
Now that you have a script that actually does something, try loading itinto a browser. You should see something like Figure 17.1, which showsthe Greeting script when it is initially loaded in a browser.
LISTING 17.2 Continued
FIGURE 17.1The output of the Greeting example.
NOTE
Notice that the second alertmessage isn’t displayed untilyou press the OK button on thefirst alert. This is becauseJavaScript processing is haltedwhile alerts are displayed.
www.it-ebooks.info

ptg999
Using Functions 351
Returning a ValueThe function you just created displays a message to the user, but functionscan also return a value to the script that called them. This enables you touse functions to calculate values. As an example, you can create a functionthat averages four numbers.
Your function should begin with the function keyword, the function’sname, and the parameters it accepts. We will use the variable names a, b, c,and d for the four numbers to average. Here is the first line of the function:
function Average(a,b,c,d) {
Next, the function needs to calculate the average of the four parameters.You can calculate this by adding them, and then dividing by the number ofparameters (in this case, 4). Thus, here is the next line of the function:
result = (a + b + c + d) / 4;
This statement creates a variable called result and calculates the result byadding the four numbers, and then dividing by 4. (The parentheses arenecessary to tell JavaScript to perform the addition before the division.)
To send this result back to the script that called the function, you use thereturn keyword. Here is the last part of the function:
return result;}
Listing 17.3 shows the complete Average function in an HTML document.This HTML document also includes a small script in the <body> sectionthat calls the Average function and displays the result.
LISTING 17.3 The Average Function in an HTML Document<?xml version=”1.0” encoding=”UTF-8”?><!DOCTYPE html PUBLIC “-//W3C//DTD XHTML 1.1//EN”“http://www.w3.org/TR/xhtml11/DTD/xhtml11.dtd”>
<html xmlns=”http://www.w3.org/1999/xhtml” xml:lang=”en”><head><title>Function Example: Average</title><script type=”text/javascript”>function Average(a,b,c,d) {
result = (a + b + c + d) / 4;return result;
}</script>
</head>
NOTE
I’ve also included the openingbrace ({) on the first line of thefunction. This is a commonstyle, but you can also placethe brace on the next line or ona line by itself.
www.it-ebooks.info

ptg999
352 CHAPTER 17 Using JavaScript Functions and Objects
<body><h1>Function Example: Average</h1><p>The following is the result of the function call.</p><script type=”text/javascript”>score = Average(3,4,5,6);document.write(“The average is: “ + score);</script>
</body></html>
You can use a variable with the function call, as shown in this listing. Thisstatement averages the numbers 3, 4, 5, and 6 and stores the result in avariable called score:
score = Average(3,4,5,6);
Introducing ObjectsIn the previous chapter, you learned how to use variables to represent dif-ferent kinds of data in JavaScript. JavaScript also supports objects, a morecomplex kind of variable that can store multiple data items and functions.
Although a variable can have only one value at a time, an object can con-tain multiple values, as well as functions for working with the values. Thisenables you to group related data items and the functions that deal withthem into a single object.
In this chapter, you’ll learn how to define and use your own objects.You’ve already worked with some of them, including
. DOM objects—Allow your scripts to interact with web pages. Youlearned about these in Chapter 15, “Working with the DocumentObject Model (DOM).”
. Built-in objects—Include strings and arrays, which you learnedabout in Chapter 16, “Using JavaScript Variables, Strings, andArrays.”
The syntax for working with all three types of objects—DOM objects, built-in objects, and custom objects—is the same, so even if you don’t end upcreating your own objects, you should have a good understanding ofJavaScript’s object terminology and syntax.
LISTING 17.3 Continued
TIP
You can also use the functioncall directly in an expression.For example, you could use thealert statement to display theresult of the functionalert(Average(1,2,3,4))
www.it-ebooks.info

ptg999
Introducing Objects 353
Creating ObjectsWhen you created an array in the previous chapter, you used the followingJavaScript statement:
scores = new Array(4);
The new keyword tells the JavaScript interpreter to use a function—in thiscase, the built-in Array function—to create an object. You’ll create a func-tion for a custom object later in this chapter.
Object Properties and ValuesEach object has one or more properties—essentially, variables that will bestored within the object. For example, in Chapter 15, you learned that thelocation.href property gives you the URL of the current document. Thehref property is one of the properties of the location object in the DOM.
You’ve also used the length property of String objects, as in the followingexample from the previous chapter:
test = “This is a test.”;document.write(test.length);
Like variables, each object property has a value. To read a property’s value,you simply include the object name and property name, separated by aperiod, in any expression, as in test.length previously. You can change aproperty’s value using the = operator, just like a variable. The followingexample sends the browser to a new URL by changing the location.hrefproperty:
location.href=”http://www.google.com/”;
Understanding MethodsAlong with properties, each object can have one or more methods. These arefunctions that work with the object’s data. For example, the followingJavaScript statement reloads the current document, as you learned inChapter 15:
location.reload();
When you use reload(), you’re using a method of the location object.Like normal functions, methods can accept arguments in parentheses andcan return values.
NOTE
An object can also be a proper-ty of another object. This isreferred to as a child object.
www.it-ebooks.info

ptg999
354 CHAPTER 17 Using JavaScript Functions and Objects
Using Objects to Simplify ScriptingAlthough JavaScript’s variables and arrays are versatile ways to store data,sometimes you need a more complicated structure. For example, supposeyou are creating a script to work with a business card database that con-tains names, addresses, and phone numbers for a variety of people.
If you were using regular variables, you would need several separate vari-ables for each person in the database: a name variable, an address variable,and so on. This would be very confusing.
Arrays would improve things slightly. You could have a names array, anaddresses array, and a phone number array. Each person in the databasewould have an entry in each array. This would be more convenient, butstill not perfect.
With objects, you can make the variables that store the database as logicalas business cards. Each person is represented by a Card object, which hasproperties for name, address, and phone number. You can even add meth-ods to the object to display or work with the information.
In the following sections, you’ll use JavaScript to actually create the Cardobject and its properties and methods. Later in this chapter, you’ll use theCard object in a script to display information for several members of thedatabase.
Defining an ObjectThe first step in creating an object is to name it and its properties. We’vealready decided to call the object a Card object. Each object will have thefollowing properties:
. name
. address
. workphone
. homephone
The first step in using this object in a JavaScript program is to create afunction to make new Card objects. This function is called the constructorfor an object. Here is the constructor function for the Card object:
function Card(name,address,work,home) {this.name = name;
www.it-ebooks.info

ptg999
Using Objects to Simplify Scripting 355
this.address = address;this.workphone = work;this.homephone = home;
}
The constructor is a simple function that accepts parameters to initialize anew object and assigns them to the corresponding properties. This functionaccepts several parameters from the statement that calls the function, andthen assigns them as properties of an object. Because the function is calledCard, the object is the Card object.
Notice the this keyword. You’ll use it any time you create an object defini-tion. Use this to refer to the current object—the one that is being created bythe function.
Defining an Object MethodNext, you will create a method to work with the Card object. Because all Cardobjects will have the same properties, it might be handy to have a function thatprints out the properties in a neat format. Let’s call this function PrintCard.
Your PrintCard function will be used as a method for Card objects, so youdon’t need to ask for parameters. Instead, you can use the this keywordagain to refer to the current object’s properties. Here is a function definitionfor the PrintCard() function:
function PrintCard() {line1 = “Name: “ + this.name + “<br/>\n”;line2 = “Address: “ + this.address + “<br/>\n”;line3 = “Work Phone: “ + this.workphone + “<br/>\n”;line4 = “Home Phone: “ + this.homephone + “<hr/>\n”;document.write(line1, line2, line3, line4);
}
This function simply reads the properties from the current object (this),prints each one with a caption, and skips to a new line.
You now have a function that prints a card, but it isn’t officially a method ofthe Card object. The last thing you need to do is make PrintCard part of thefunction definition for Card objects. Here is the modified function definition:
function Card(name,address,work,home) {this.name = name;this.address = address;this.workphone = work;this.homephone = home;this.PrintCard = PrintCard;
}
www.it-ebooks.info

ptg999
356 CHAPTER 17 Using JavaScript Functions and Objects
The added statement looks just like another property definition, but itrefers to the PrintCard function. This will work so long as the PrintCardfunction is defined with its own function definition. Methods are essential-ly properties that define a function rather than a simple value.
Creating an Object InstanceNow let’s use the object definition and method you just created. To use anobject definition, you create a new object. This is done with the new key-word. This is the same keyword you’ve already used to create Date andArray objects.
The following statement creates a new Card object called tom:
tom = new Card(“Tom Jones”, “123 Elm Street”, “555-1234”, “555-9876”);
As you can see, creating an object is easy. All you do is call the Card()function (the object definition) and give it the required attributes, in thesame order as the definition.
After this statement executes, a new object is created to hold Tom’s infor-mation. This is called an instance of the Card object. Just as there can beseveral string variables in a program, there can be several instances of anobject you define.
Rather than specify all the information for a card with the new keyword,you can assign them after the fact. For example, the following script createsan empty Card object called holmes, and then assigns its properties:
holmes = new Card();holmes.name = “Sherlock Holmes”;holmes.address = “221B Baker Street”;holmes.workphone = “555-2345”;holmes.homephone = “555-3456”;
After you’ve created an instance of the Card object using either of thesemethods, you can use the PrintCard() method to display its information.For example, this statement displays the properties of the tom card:
tom.PrintCard();
Extending Built-in ObjectsJavaScript includes a feature that enables you to extend the definitions ofbuilt-in objects. For example, if you think the String object doesn’t quite
TIP
The previous example uses lowercase names such asworkphone for properties,and an uppercase name(PrintCard) for the method.You can use any case for prop-erty and method names, butthis is one way to make it clearthat PrintCard is a methodrather than an ordinaryproperty.
www.it-ebooks.info

ptg999
Extending Built-in Objects 357
fit your needs, you can extend it, adding a new property or method. Thismight be very useful if you were creating a large script that used manystrings.
You can add both properties and methods to an existing object by usingthe prototype keyword. (A prototype is another name for an object’s defini-tion, or constructor function.) The prototype keyword enables you tochange the definition of an object outside its constructor function.
As an example, let’s add a method to the String object definition. You willcreate a method called heading, which converts a string into an HTMLheading. The following statement defines a string called title:
title = “Fred’s Home Page”;
This statement would output the contents of the title string as an HTMLlevel 1 header:
document.write(title.heading(1));
Listing 17.4 adds a heading method to the String object definition thatwill display the string as a heading, and then displays three headingsusing the method.
LISTING 17.4 Adding a Method to the String Object<?xml version=”1.0” encoding=”UTF-8”?><!DOCTYPE html PUBLIC “-//W3C//DTD XHTML 1.1//EN”“http://www.w3.org/TR/xhtml11/DTD/xhtml11.dtd”>
<html xmlns=”http://www.w3.org/1999/xhtml” xml:lang=”en”><head><title>Test of Heading Method</title>
</head><body><script type=”text/javascript”>function addhead (level) {
html = “h” + level;text = this.toString();start = “<” + html + “>”;stop = “</” + html + “>”;return start + text + stop;
}String.prototype.heading = addhead;document.write (“This is a heading 1”.heading(1));document.write (“This is a heading 2”.heading(2));document.write (“This is a heading 3”.heading(3));</script>
</body></html>
www.it-ebooks.info

ptg999
358 CHAPTER 17 Using JavaScript Functions and Objects
First, you define the addhead() function, which will serve as the newstring method. It accepts a number to specify the heading level. The startand stop variables are used to store the HTML “begin header” and “endheader” tags, such as <h1> and </h1>.
After the function is defined, use the prototype keyword to add it as amethod of the String object. You can then use this method on any Stringobject or, in fact, any JavaScript string. This is demonstrated by the last threestatements, which display quoted text strings as level 1, 2, and 3 headers.
TRY IT YOURSELF▼
Storing Data inObjects
Now you’ve created a new object to store business cards and a method to printthem out. As a final demonstration of objects, properties, functions, and meth-ods, you will now use this object in a web page to display data for several cards.
Your script will need to include the function definition for PrintCard, along withthe function definition for the Card object. You will then create three cards andprint them out in the body of the document. We will use separate HTML andJavaScript files for this example. Listing 17.5 shows the complete script.
LISTING 17.5 A Sample Script That Uses the Card Object// define the functionsfunction PrintCard() {line1 = “<strong>Name: </strong>” + this.name + “<br/>\n”;line2 = “<strong>Address: </strong>” + this.address + “<br/>\n”;line3 = “<strong>Work Phone: </strong>” + this.workphone + “<br/>\n”;line4 = “<strong>Home Phone: </strong>” + this.homephone + “<hr/>\n”;document.write(line1, line2, line3, line4);}function Card(name,address,work,home) {
this.name = name;this.address = address;this.workphone = work;this.homephone = home;this.PrintCard = PrintCard;
}// Create the objectssue = new Card(“Sue Suthers”, “123 Elm Street”, “555-1234”, “555-9876”);phred = new Card(“Phred Madsen”, “233 Oak Lane”, “555-2222”, “555-4444”);henry = new Card(“Henry Tillman”, “233 Walnut Circle”, “555-1299”,
“555-1344”);// And print themsue.PrintCard();phred.PrintCard();henry.PrintCard();
www.it-ebooks.info

ptg999
Extending Built-in Objects 359
Storing Data inObjectscontinued
Notice that the PrintCard() function has been modified slightly to makethings look good with the captions in boldface. To use this script, save it ascardtest.js. Next, you’ll need to include the script in a simple HTML docu-ment. Listing 17.6 shows the HTML document for this example.
LISTING 17.6 The HTML File for the Card Object Example<?xml version=”1.0” encoding=”UTF-8”?><!DOCTYPE html PUBLIC “-//W3C//DTD XHTML 1.1//EN”“http://www.w3.org/TR/xhtml11/DTD/xhtml11.dtd”>
<html xmlns=”http://www.w3.org/1999/xhtml” xml:lang=”en”><head><title>JavaScript Business Cards</title>
</head><body><h1>JavaScript Business Cards</h1><p>Script begins here.</p><hr/><script type=”text/javascript” src=”cardtest.js” > </script>
<p>End of script.</p></body></html>
To test the script, save the HTML document in the same directory as thecardtest.js file you created earlier, and then load the HTML document into abrowser. The browser’s display of this example is shown in Figure 17.2.
TRY IT YOURSELF ▼
FIGURE 17.2Displaying the output of the busi-ness card example.
NOTE
This example isn’t a verysophisticated databasebecause you have to includethe data for each person in theHTML document. However, anobject like this could be used tostore a database recordretrieved from a database serv-er with thousands of records.
www.it-ebooks.info

ptg999
360 CHAPTER 17 Using JavaScript Functions and Objects
Using the Math ObjectThe Math object is a built-in JavaScript object that includes math constantsand functions. You don’t need to create a Math object; it exists automatical-ly in any JavaScript program. The Math object’s properties represent mathe-matical constants, and its methods are mathematical functions.
Rounding and TruncatingThree of the most useful methods of the Math object enable you to rounddecimal values up and down:
. Math.ceil() rounds a number up to the next integer.
. Math.floor() rounds a number down to the next integer.
. Math.round() rounds a number to the nearest integer.
All of these take the number to be rounded as their single parameter. Youmight notice one thing missing: the capability to round to a decimal place,such as for dollar amounts. Fortunately, you can easily simulate this. Hereis a simple function that rounds numbers to two decimal places:
function round(num) {return Math.round(num * 100) / 100;
}
This function multiplies the value by 100 to move the decimal, and thenrounds the number to the nearest integer. Finally, the value is divided by100 to restore the decimal to its original position.
Generating Random NumbersOne of the most commonly used methods of the Math object is theMath.random() method, which generates a random number. This methoddoesn’t require any parameters. The number it returns is a random decimalnumber between zero and one.
You’ll usually want a random number between one and a value. You cando this with a general-purpose random number function. The following isa function that generates random numbers between one and the parameteryou send it:
function rand(num) {return Math.floor(Math.random() * num) + 1;
}
www.it-ebooks.info

ptg999
Working with Math Functions 361
This function multiplies a random number by the value specified in the numparameter, and then converts it to an integer between one and the numberby using the Math.floor() method.
Other Math FunctionsThe Math object includes many functions beyond those you’ve looked athere. For example, Math.sin() and Math.cos() calculate sines and cosines.The Math object also includes properties for various mathematical constants,such as Math.PI.
Working with Math FunctionsThe Math.random method generates a random number between 0 and 1.However, it’s difficult for a computer to generate a truly random number. (It’salso hard for a human being to do so—that’s why dice were invented.)
Today’s computers do reasonably well at generating random numbers, butjust how good is JavaScript’s Math.random function? One way to test it is togenerate many random numbers and calculate the average of all of them.
In theory, the average should be somewhere near .5, halfway between 0and 1. The more random values you generate, the closer the average shouldget to this middle ground.
As an example of the use of the Math object’s methods, you can create ascript that tests JavaScript’s random number function. To do this, you’llgenerate 5,000 random numbers and calculate their average.
This example will use a look, which you’ll learn more about in the nextchapter. But this is a simple enough example that you should be able to fol-low along. In this case, the loop will generate the random numbers. You’llbe surprised how fast JavaScript can do this.
To begin your script, you will initialize a variable called total. This vari-able will store a running total of all of the random values, so it’s importantthat it starts at 0:
total = 0;
Next, begin a loop that will execute 5,000 times. Use a for loop because youwant it to execute a fixed number of times:
for (i=1; i<=5000; i++) {
Within the loop, you will need to create a random number and add itsvalue to total. Here are the statements that do this and continue with thenext iteration of the loop:
www.it-ebooks.info

ptg999
362 CHAPTER 17 Using JavaScript Functions and Objects
num = Math.random();total += num;
}
Depending on the speed of your computer, it might take a few seconds togenerate those 5,000 random numbers. Just to be sure something is hap-pening, the script will display a status message after each 1,000 numbers:
if (i % 1000 == 0)document.write(“Generated “ + i + “ numbers...<br/>”);
The final part of your script will calculate the average by dividing totalby 5,000. Your script can also round the average to three decimal places:
average = total / 5000;average = Math.round(average * 1000) / 1000;document.write(“<h2>Average of 5000 numbers: “ + average + “</h2>”);
To test this script and see just how random those numbers are, combine thecomplete script with an HTML document and <script> tags. Listing 17.7shows the complete random number testing script.
LISTING 17.7 A Script to Test JavaScript’s Random Number Function<?xml version=”1.0” encoding=”UTF-8”?><!DOCTYPE html PUBLIC “-//W3C//DTD XHTML 1.1//EN”“http://www.w3.org/TR/xhtml11/DTD/xhtml11.dtd”>
<html xmlns=”http://www.w3.org/1999/xhtml” xml:lang=”en”><head><title>Math Example</title>
</head><body><h1>Math Example</h1><p>How random are JavaScript’s random numbers?Let’s generate 5000 of them and find out.</p><script type=”text/javascript”>total = 0;for (i=1; i<=5000; i++) {num = Math.random();total += num;if (i % 1000 == 0) {
document.write(“Generated “ + i + “ numbers...<br/>”);}
}average = total / 5000;average = Math.round(average * 1000) / 1000;document.write(“<h2>Average of 5000 numbers: “ + average + “</h2>”);</script>
</body></html>
NOTE
The % symbol in the previouscode is the modulo operator,which gives you the remainderafter dividing one number byanother. Here it is used to findeven multiples of 1,000.
www.it-ebooks.info

ptg999
Using the with Keyword 363
To test the script, load the HTML document into a browser. After a shortdelay, you should see a result. If it’s close to .5, the numbers are reason-ably random. My result was .503, as shown in Figure 17.3.
NOTE
The average you’ve used hereis called an arithmetic mean.This type of average isn’t a per-fect way to test randomness.Actually, all it tests is the distri-bution of the numbers aboveand below .5. For example, ifthe numbers turned out to be2,500 .4s and 2,500 .6s, theaverage would be a perfect.5—but they wouldn’t be veryrandom numbers. (Thankfully,JavaScript’s random numbersdon’t have this problem.)
FIGURE 17.3The random number testing script in action.
Using the with KeywordThe with keyword is one you haven’t seen before. You can use it to makeJavaScript programming easier—or at least easier to type.
The with keyword specifies an object, and it is followed by a block of state-ments enclosed in braces. For each statement in the block, any propertiesyou mention without specifying an object are assumed to be for that object.
As an example, suppose you have a string called lastname. You can usewith to perform string operations on it without specifying the name of thestring every time:
with (lastname) {window.alert(“length of last name: “ + length);capname = toUpperCase();
}
In this example, the length property and the toUpperCase method refer tothe lastname string, although it is only specified once with the with keyword.
www.it-ebooks.info

ptg999
364 CHAPTER 17 Using JavaScript Functions and Objects
Obviously, the with keyword only saves a bit of typing in situations likethis. However, you might find it more useful when you’re dealing with aDOM object throughout a large procedure, or when you are repeatedlyusing a built-in object, such as the Math object.
Working with DatesThe Date object is a built-in JavaScript object that enables you to convenient-ly work with dates and times. You can create a Date object anytime you needto store a date and use the Date object’s methods to work with the date.
You encountered one example of a Date object in Chapter 4, “UnderstandingJavaScript,” with the time/date script. The Date object has no properties. Toset or obtain values from a Date object, you must use the methods describedin the next section.
Creating a Date ObjectYou can create a Date object using the new keyword. You can also optional-ly specify the date to store in the object when you create it. You can useany of the following formats:
birthday = new Date();birthday = new Date(“November 1, 2010 08:00:00”);birthday = new Date(11,1, 2010);birthday = new Date(11,1,2010, 8, 0, 0);
You can choose any of these formats, depending on which values you wantto set. If you use no parameters, as in the first example, the current date isstored in the object. You can then set the values using the set methods,described in the next section.
Setting Date ValuesA variety of set methods enable you to set components of a Date object tovalues:
. setDate() sets the day of the month.
. setMonth() sets the month. JavaScript numbers the months from 0 to11, starting with January (0).
. setFullYear() sets the year.
. setTime() sets the time (and the date) by specifying the number ofmilliseconds since January 1, 1970.
. setHours(), setMinutes(), and setSeconds() set the time.
NOTE
JavaScript dates are stored asthe number of millisecondssince midnight, January 1,1970. This date is called theepoch. Dates before 1970weren’t allowed in early ver-sions, but are now representedby negative numbers.
www.it-ebooks.info

ptg999
Working with Dates 365
As an example, the following statement sets the year of a Date object calledholiday to 2010:
holiday.setFullYear(2010);
Reading Date ValuesYou can use the get methods to get values from a Date object. This is theonly way to obtain these values because they are not available as proper-ties. Here are the available get methods for dates:
. getDate() gets the day of the month.
. getMonth() gets the month.
. getFullYear() gets the year.
. getTime() gets the time (and the date) as the number of millisecondssince January 1, 1970.
. getHours(), getMinutes(), getSeconds(), and getMilliseconds()get the components of the time.
Working with Time ZonesFinally, a few functions are available to help your Date objects work withlocal time values and time zones:
. getTimeZoneOffset() function gives you the local time zone’s offsetfrom UTC (Coordinated Universal Time, based on the old GreenwichMean Time standard). In this case, local refers to the location of thebrowser. (Of course, this only works if the user has set his systemclock accurately.)
. toUTCString() function converts the date object’s time value to text,using UTC. This method was introduced in JavaScript 1.2 to replacethe toGMTString method, which still works but should be avoided.
. toLocalString() function converts the date object’s time value totext, using local time.
Along with these basic functions, JavaScript 1.2 and later include UTC ver-sions of several of the functions described previously. These are identical tothe regular commands, but work with UTC instead of local time:
. getUTCDate() function gets the day of the month in UTC time.
. getUTCDay() function gets the day of the week in UTC time.
NOTE
Along with setFullYear andgetFullYear, which requirefour-digit years, JavaScriptincludes setYear and getYearmethods, which use two-digityear values. You should alwaysuse the four-digit version toavoid Year 2000 issues.
www.it-ebooks.info

ptg999
366 CHAPTER 17 Using JavaScript Functions and Objects
. getUTCFullYear() function gets the four-digit year in UTC time.
. getUTCMonth() function returns the month of the year in UTC time.
. getUTCHours(), getUTCMinutes(), getUTCSeconds(), andgetUTCMilliseconds() return the components of the time in UTC.
. setUTCDate(), setUTCFullYear(), setUTCMonth(), setUTCHours(),setUTCMinutes(), setUTCSeconds(), and setUTCMilliseconds() setthe time in UTC.
Converting Between Date FormatsTwo special methods of the Date object enable you to convert between dateformats. Instead of using these methods with a Date object you created, youuse them with the built-in object Date itself. These include the following:
. Date.parse()method converts a date string, such as November 1,2010, to a Date object (number of milliseconds since 1/1/1970).
. Date.UTC() method does the opposite. It converts a Date object value(number of milliseconds) to a UTC (GMT) time.
SummaryIn this chapter, you learned several important features of JavaScript. First, youlearned how to use functions to group JavaScript statements and how to callfunctions and use the values they return. Next, you learned about JavaScript’sobject-oriented features—defining objects with constructor functions, creatingobject instances, and working with properties, property values, and methods.
As an example of these object-oriented features, you looked closer at theMath and Date objects built into JavaScript and learned more than you everwanted to know about random numbers.
www.it-ebooks.info

ptg999
367Workshop
Q&AQ. Many objects in JavaScript, such as DOM objects, include parent and
child objects. Can I include child objects in my custom object defini-tions?
A. Yes. Just create a constructor function for the child object, and thenadd a property to the parent object that corresponds to it. For example,if you created a Nicknames object to store several nicknames for a per-son in the card file example, you could add it as a child object in theCard object’s constructor: this.nick = new Nicknames();.
Q. Can I create an array of custom objects?
A. Yes. First, create the object definition as usual and define an array withthe required number of elements. Then assign a new object to eacharray element (for example, cardarray[1] = new Card();). You canuse a loop, described in the next chapter, to assign objects to an entirearray at once.
Q. Can I modify all properties of objects?
A. With custom objects, yes—but this varies with built-in objects and DOMobjects. For example, you can use the length property to find thelength of a string, but it is a read-only property and cannot be modified.
Q. The random numbers are generated so quickly I can’t be sure it’s hap-pening at all. Is there a way to slow this process down?
A. Yes. If you add one or more form fields to the example and use them todisplay the data as it is generated, you’ll see a much slower result. Itwill still be done within a couple of seconds on a fast computer, though.
WorkshopThe workshop contains quiz questions and activities to help you solidify yourunderstanding of the material covered. Try to answer all questions beforelooking at the “Answers” section that follows.
Quiz1. What JavaScript keyword is used to create an instance of an object?
a. object
b. new
c. instance
www.it-ebooks.info

ptg999
368 CHAPTER 17 Using JavaScript Functions and Objects
2. What is the meaning of the this keyword in JavaScript?
a. The current object.
b. The current script.
c. It has no meaning.
3. Which of the following objects cannot be used with the new keyword?
a. Date
b. Math
c. String
4. How does JavaScript store dates in a Date object?
a. The number of milliseconds since January 1, 1970
b. The number of days since January 1, 1900
c. The number of seconds since Netscape’s public stock offering
5. What is the range of random numbers generated by the Math.randomfunction?
a. Between 1 and 100
b. Between 1 and the number of milliseconds since January 1, 1970
c. Between 0 and 1
Answers1. b. The new keyword creates an object instance.
2. a. The this keyword refers to the current object.
3. b. The Math object is static; you can’t create a Math object.
4. a. Dates are stored as the number of milliseconds since January 1, 1970.
5. c. JavaScript’s random numbers are between 0 and 1.
Exercises. Modify the Greet function to accept two parameters, who1 and who2,
and to include both names in a single greeting dialog. Modify Listing17.2 to use a single function call to the new function.
. Modify the definition of the Card object to include a property calledemail for the person’s email address. Modify the PrintCard function inListing 17.5 to include this property.
. Modify the random number script in Listing 17.7 to run three times, cal-culating a total of 15,000 random numbers, and display separate totalsfor each set of 5,000. (You’ll need to use another for loop that enclos-es most of the script.)
www.it-ebooks.info

ptg999
Statements in a JavaScript program generally execute in the order in whichthey appear, one after the other. Because this isn’t always practical, mostprogramming languages provide flow control statements that let you con-trol the order in which code is executed. Functions, which you learnedabout in the previous chapter, are one type of flow control—although afunction might be defined first thing in your code, its statements can beexecuted anywhere in the script.
In this chapter, you’ll look at two other types of flow control in JavaScript:conditions, which allow a choice of different options depending on a value,and loops, which allow repetitive statements.
The if StatementOne of the most important features of a computer language is the capabili-ty to test and compare values. This allows your scripts to behave different-ly based on the values of variables or based on input from the user.
The if statement is the main conditional statement in JavaScript. Thisstatement means much the same in JavaScript as it does in English—forexample, here is a typical conditional statement in English:
If the phone rings, answer it.
This statement consists of two parts: a condition (If the phone rings) and anaction (answer it). The if statement in JavaScript works much the sameway. Here is an example of a basic if statement:
if (a == 1) window.alert(“Found a 1!”);
WHAT YOU’LL LEARN INTHIS CHAPTER:
. How to test variables withthe if statement
. How to use various opera-tors to compare values
. How to use logical opera-tors to combine conditions
. How to use alternative con-ditions with else
. How to create expressionswith conditional operators
. How to test for multipleconditions
. How to perform repeatedstatements with the forloop
. How to use while for a dif-ferent type of loop
. How to use do...whileloops
. How to create infiniteloops (and why you shouldn’t)
. How to escape from loopsand continuing loops
. How to loop through anarray’s properties
CHAPTER 18Controlling Flow with Conditions
and Loops
www.it-ebooks.info

ptg999
370 CHAPTER 18 Controlling Flow with Conditions and Loops
This statement includes a condition (if a equals 1) and an action (display amessage). This statement checks the variable a and, if it has a value of 1,displays an alert message. Otherwise, it does nothing.
If you use an if statement like the preceding example, you can use a singlestatement as the action. You can also use multiple statements for the actionby enclosing them in braces ({}), as shown here:
if (a == 1) {window.alert(“Found a 1!”);a = 0;
}
This block of statements checks the variable a once again. If it finds a valueof 1, it displays a message and sets a back to 0.
Conditional OperatorsThe action part of an if statement can include any of the JavaScript state-ments you’ve already learned (and any others, for that matter), but thecondition part of the statement uses its own syntax. This is called a condi-tional expression.
A conditional expression usually includes two values to be compared (inthe preceding example, the values were a and 1). These values can be vari-ables, constants, or even expressions in themselves.
Between the two values to be compared is a conditional operator. This opera-tor tells JavaScript how to compare the two values. For instance, the ==operator is used to test whether the two values are equal. A variety of con-ditional operators is available:
. ==—Is equal to
. !=—Is not equal to
. <—Is less than
. >—Is greater than
. >=—Is greater than or equal to
. <=—Is less than or equal to
NOTE
Either side of the conditionalexpression can be a variable, aconstant, or an expression. Youcan compare a variable and avalue or compare two variables.(You can compare two con-stants, but there’s usually noreason to.)
CAUTION
Be sure not to confuse theequality operator (==) with theassignment operator (=), eventhough they both might be readas “equals.” Remember to use =when assigning a value to a vari-able, and == when comparing val-ues. Confusing these two is oneof the most common mistakes inJavaScript programming.
www.it-ebooks.info
ptg999
The if Statement 371
Combining Conditions with Logical OperatorsOften, you’ll want to check a variable for more than one possible value orcheck more than one variable at once. JavaScript includes logical operators,also known as Boolean operators, for this purpose. For example, the fol-lowing two statements check different conditions and use the same action:
if (phone == “”) window.alert(“error!”);if (email == “”) window.alert(“error!”);
Using a logical operator, you can combine them into a single statement:
if ((phone == “”) || (email == “”)) window.alert(“Something’s Missing!”);
This statement uses the logical Or operator (||) to combine the conditions.Translated to English, this would be, “If the phone number is blank or theemail address is blank, display an error message.”
An additional logical operator is the And operator, &&. Consider this statement:
if ((phone == “”) && (email == “”)) window.alert(“Both are Missing!”);
This statement uses &&, so the error message will only be displayed if boththe email address and phone number variables are blank. (In this particu-lar case, Or is a better choice.)
The third logical operator is the exclamation mark (!), which means Not. Itcan be used to invert an expression—in other words, a true expressionwould become false, and a false one would become true. For example,here’s a statement that uses the Not operator:
if (!(phone == “”)) alert(“phone is OK”);
In this statement, the ! (Not) operator inverts the condition, so the actionof the if statement is executed only if the phone number variable is notblank. The extra parentheses are necessary because all JavaScript condi-tions must be in parentheses. You could also use the != (Not equal) opera-tor to simplify this statement:
if (phone != “”) alert(“phone is OK”);
As with the previous statement, this alerts you if the phone number field isnot blank.
TIP
If the JavaScript interpreter dis-covers the answer to a condi-tional expression before reach-ing the end, it does not evalu-ate the rest of the condition.For example, if the first of twoconditions separated by the &&operator is false, the second isnot evaluated. You can takeadvantage of this to improvethe speed of your scripts.
TIP
The logical operators are power-ful, but it’s easy to accidentallycreate an impossible conditionwith them. For example, thecondition ((a < 10) && (a >20)) might look correct at firstglance. However, if you read italoud, you get “If a is less than10 and a is greater than 20”—an impossibility in our universe.In this case, Or (||) shouldhave been used.
www.it-ebooks.info

ptg999
372 CHAPTER 18 Controlling Flow with Conditions and Loops
The else KeywordAn additional feature of the if statement is the else keyword. Much likeits English equivalent, else tells the JavaScript interpreter what to do if thecondition isn’t true. The following is a simple example of the else key-word in action:
if (a == 1) {alert(“Found a 1!”);a = 0;
} else {alert(“Incorrect value: “ + a);
}
This is a modified version of the previous example. This displays a mes-sage and resets the variable a if the condition is met. If the condition is notmet (if a is not 1), a different message is displayed.
Using Shorthand ConditionalExpressionsIn addition to the if statement, JavaScript provides a shorthand type ofconditional expression that you can use to make quick decisions. This usesa peculiar syntax that is also found in other languages, such as C. A condi-tional expression looks like this:
variable = (condition) ? (true action) : (false action);
This assigns one of two values to the variable: one if the condition is true,and another if it is false. Here is an example of a conditional expression:
value = (a == 1) ? 1 : 0;
This statement might look confusing, but it is equivalent to the followingif statement:
if (a == 1) {value = 1;
} else {value = 0;
}
In other words, the value after the question mark (?) will be used if thecondition is true, and the value after the colon (:) will be used if the condi-tion is false. The colon represents the else portion of this statement and,like the else portion of the if statement, is optional.
NOTE
Like the if statement, else canbe followed either by a singleaction statement or by a num-ber of statements enclosed inbraces.
www.it-ebooks.info

ptg999
Testing Multiple Conditions with if and else 373
These shorthand expressions can be used anywhere JavaScript expects avalue. They provide an easy way to make simple decisions about values.As an example, here’s an easy way to display a grammatically correct mes-sage about a variable:
document.write(“Found “ + counter + ((counter == 1) ? “ word.” : “ words.”));
This will print the message Found 1 word if the counter variable has avalue of 1 and Found 2 words if its value is 2 or greater. This is one of themost common uses for a conditional expression.
Testing Multiple Conditions with ifand elseYou can now create an example script using if and else. In Chapter 4,“Understanding JavaScript,” you created a simple script that displays thecurrent date and time. This example will use conditions to display a greet-ing that depends on the time: “Good morning,” “Good afternoon,” “Goodevening,” or “Good day.” To accomplish this, you can use a combination ofseveral if statements:
if (hours < 10) {document.write(“Good morning.”);
} else if (hours >= 14 && hours <= 17) {document.write(“Good afternoon.”);
} else if (hours >= 17) { document.write(“Good evening.”);
} else {document.write(“Good day.”);
}
The first statement checks the hours variable for a value less than 10—inother words, it checks whether the current time is before 10:00 a.m. If so, itdisplays the greeting “Good morning.”
The second statement checks whether the time is between 2:00 p.m. and 5:00p.m. and, if so, displays “Good afternoon.” This statement uses else if toindicate that this condition will only be tested if the previous one failed—ifit’s morning, there’s no need to check whether it’s afternoon. Similarly, thethird statement checks for times after 5:00 p.m. and displays “Good evening.”
The final statement uses a simple else, meaning it will be executed if none ofthe previous conditions matched. This covers the times between 10:00 a.m.and 2:00 p.m. (neglected by the other statements) and displays “Good day.”
www.it-ebooks.info

ptg999
374 CHAPTER 18 Controlling Flow with Conditions and Loops
The HTML FileTo try this example in a browser, you’ll need an HTML file. We will keepthe JavaScript code separate, so Listing 18.1 is the complete HTML file.Save it as timegreet.html, but don’t load it into the browser until you’veprepared the JavaScript file in the next section.
LISTING 18.1 The HTML File for the Time and Greeting Example<?xml version=”1.0” encoding=”UTF-8”?><!DOCTYPE html PUBLIC “-//W3C//DTD XHTML 1.1//EN”“http://www.w3.org/TR/xhtml11/DTD/xhtml11.dtd”>
<html xmlns=”http://www.w3.org/1999/xhtml” xml:lang=”en”><head><title>Time Greet Example</title>
</head><body><h1>Current Date and Time</h1><script type=”text/javascript” src=”timegreet.js” > </script>
</body></html>
The JavaScript FileListing 18.2 shows the complete JavaScript file for the time greeting exam-ple. This uses the built-in Date object functions to find the current date andstore it in hours, mins, and secs variables. Next, document.write state-ments display the current time, and the if and else statements introducedearlier display an appropriate greeting.
LISTING 18.2 A Script to Display the Current Time and a Greeting// Get the current datenow = new Date();// Split into hours, minutes, secondshours = now.getHours();mins = now.getMinutes();secs = now.getSeconds();// Display the timedocument.write(“<h2>”);document.write(hours + “:” + mins + “:” + secs);document.write(“</h2>”);// Display a greetingdocument.write(“<p>”);if (hours < 10) {
document.write(“Good morning.”); } else if (hours >= 14 && hours <= 17) {
www.it-ebooks.info
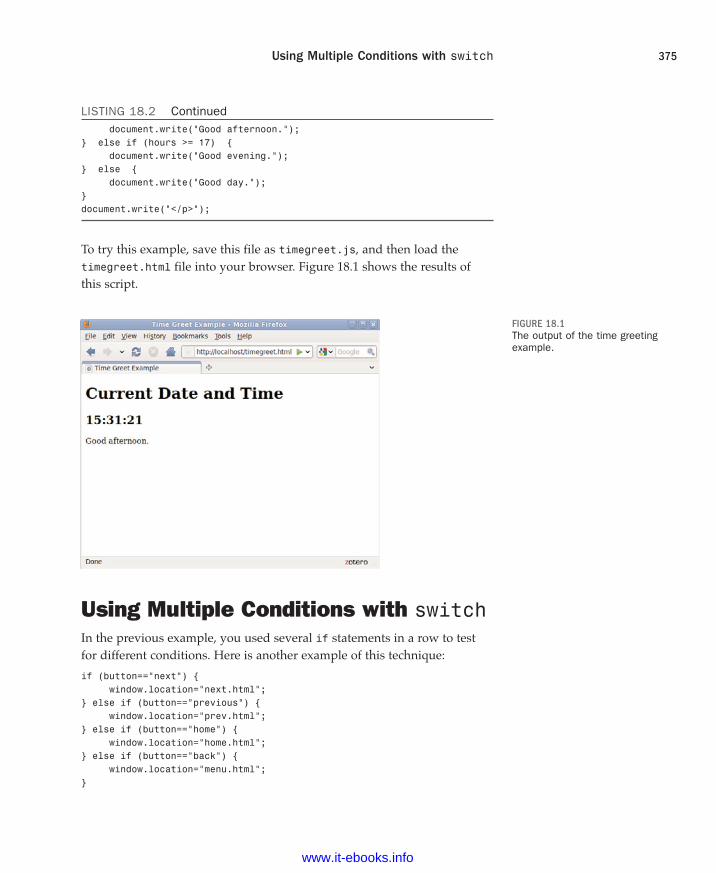
ptg999
Using Multiple Conditions with switch 375
document.write(“Good afternoon.”);} else if (hours >= 17) {
document.write(“Good evening.”);} else {
document.write(“Good day.”);}document.write(“</p>”);
To try this example, save this file as timegreet.js, and then load thetimegreet.html file into your browser. Figure 18.1 shows the results ofthis script.
LISTING 18.2 Continued
FIGURE 18.1The output of the time greetingexample.
Using Multiple Conditions with switchIn the previous example, you used several if statements in a row to testfor different conditions. Here is another example of this technique:
if (button==”next”) {window.location=”next.html”;
} else if (button==”previous”) {window.location=”prev.html”;
} else if (button==”home”) {window.location=”home.html”;
} else if (button==”back”) {window.location=”menu.html”;
}
www.it-ebooks.info
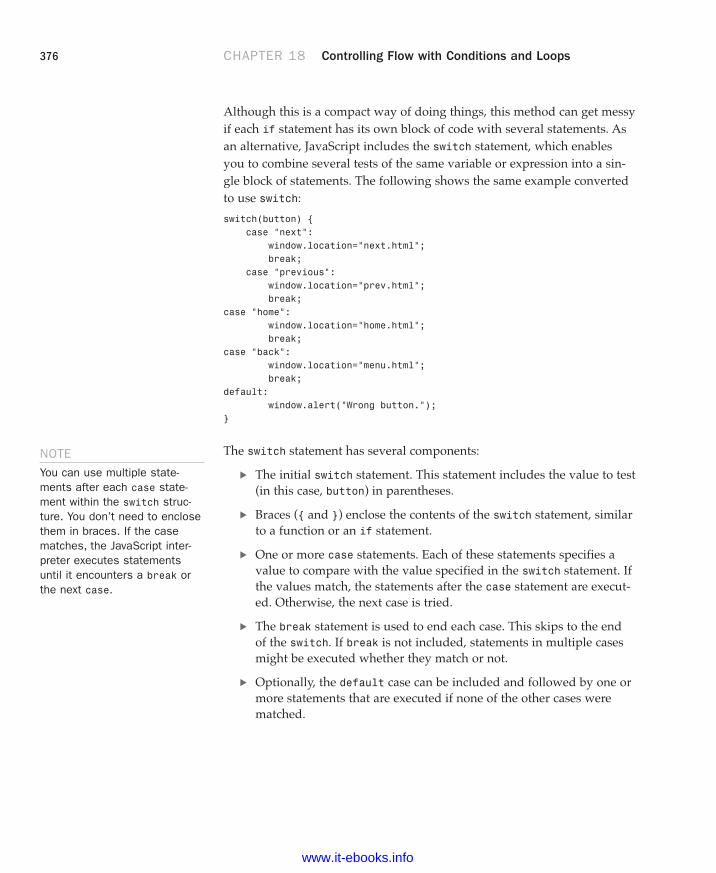
ptg999
376 CHAPTER 18 Controlling Flow with Conditions and Loops
Although this is a compact way of doing things, this method can get messyif each if statement has its own block of code with several statements. Asan alternative, JavaScript includes the switch statement, which enablesyou to combine several tests of the same variable or expression into a sin-gle block of statements. The following shows the same example convertedto use switch:
switch(button) {case “next”:
window.location=”next.html”;break;
case “previous”:window.location=”prev.html”;break;
case “home”:window.location=”home.html”;break;
case “back”:window.location=”menu.html”;break;
default:window.alert(“Wrong button.”);
}
The switch statement has several components:
. The initial switch statement. This statement includes the value to test(in this case, button) in parentheses.
. Braces ({ and }) enclose the contents of the switch statement, similarto a function or an if statement.
. One or more case statements. Each of these statements specifies avalue to compare with the value specified in the switch statement. Ifthe values match, the statements after the case statement are execut-ed. Otherwise, the next case is tried.
. The break statement is used to end each case. This skips to the endof the switch. If break is not included, statements in multiple casesmight be executed whether they match or not.
. Optionally, the default case can be included and followed by one ormore statements that are executed if none of the other cases werematched.
NOTE
You can use multiple state-ments after each case state-ment within the switch struc-ture. You don’t need to enclosethem in braces. If the casematches, the JavaScript inter-preter executes statementsuntil it encounters a break orthe next case.
www.it-ebooks.info

ptg999
Using for Loops 377
Using for LoopsThe for keyword is the first tool to consider for creating loops, much likeyou saw in the previous chapter during the random number example. Afor loop typically uses a variable (called a counter or an index) to keeptrack of how many times the loop has executed, and it stops when thecounter reaches a certain number. A basic for statement looks like this:
for (var = 1; var < 10; var++) { // more code }
There are three parameters to the for loop, separated by semicolons:
. The first parameter (var = 1 in the example) specifies a variable andassigns an initial value to it. This is called the initial expressionbecause it sets up the initial state for the loop.
. The second parameter (var < 10 in the example) is a condition thatmust remain true to keep the loop running. This is called the condi-tion of the loop.
. The third parameter (var++ in the example) is a statement that exe-cutes with each iteration of the loop. This is called the incrementexpression because it is typically used to increment the counter. Theincrement expression executes at the end of each loop iteration.
After the three parameters are specified, a left brace ({) is used to signalthe beginning of a block. A right brace (}) is used at the end of the block.All the statements between the braces will be executed with each iterationof the loop.
The parameters for a for loop might sound a bit confusing, but afteryou’re used to it, you’ll use for loops frequently. Here is a simple exampleof this type of loop:
for (i=0; i<10; i++) {document.write(“This is line “ + i + “<br />”);
}
These statements define a loop that uses the variable i, initializes it withthe value of zero, and loops as long as the value of i is less than 10. Theincrement expression, i++, adds one to the value of i with each iteration ofthe loop. Because this happens at the end of the loop, the output will listthe numbers zero through nine.
www.it-ebooks.info

ptg999
378 CHAPTER 18 Controlling Flow with Conditions and Loops
When a loop includes only a single statement between the braces, as in thisexample, you can omit the braces if you want. The following statementdefines the same loop without braces:
for (i=0; i<10; i++)document.write(“This is line “ + i + “<br />”);
The loop in this example contains a document.write statement that will berepeatedly executed. To see just what this loop does, you can add it to a<script> section of an HTML document, as shown in Listing 18.3.
LISTING 18.3 A Loop Using the for Keyword<?xml version=”1.0” encoding=”UTF-8”?><!DOCTYPE html PUBLIC “-//W3C//DTD XHTML 1.1//EN”“http://www.w3.org/TR/xhtml11/DTD/xhtml11.dtd”>
<html xmlns=”http://www.w3.org/1999/xhtml” xml:lang=”en”><head><title>Using a for Loop</title>
</head><body><h1>Using a for Loop</h1><p>The following is the output of the <strong>for</strong> loop:</p><script type=”text/javascript”>for (i=1;i<10;i++) {
document.write(“This is line “ + i + “<br />”);}</script>
</body></html>
This example displays a message with the loop’s counter during each itera-tion. The output of Listing 18.3 is shown in Figure 18.2.
Notice that the loop was only executed nine times. This is because the con-ditional is i<10. When the counter (i) is incremented to 10, the expressionis no longer true. If you need the loop to count to 10, you can change theconditional; either i<=10 or i<11 will work fine.
The for loop is traditionally used to count from one number to another,but you can use just about any statement for the initialization, condition,and increment. However, there’s usually a better way to do other types ofloops with the while keyword, as described in the next section.
TIP
It’s a good style convention touse braces with all loopswhether they contain one state-ment or many. This makes iteasy to add statements to theloop later without causing syn-tax errors.
www.it-ebooks.info

ptg999
Using while Loops 379
Using while LoopsAnother keyword for loops in JavaScript is while. Unlike for loops, whileloops don’t necessarily use a variable to count. Instead, they execute aslong as a condition is true. In fact, if the condition starts out as false, thestatements won’t execute at all.
The while statement includes the condition in parentheses, and it is fol-lowed by a block of statements within braces, just like a for loop. Here is asimple while loop:
while (total < 10) {n++;total += values[n];
}
This loop uses a counter, n, to iterate through the values array. Rather thanstopping at a certain count, however, it stops when the total of the valuesreaches 10.
You might have noticed that you could have done the same thing with afor loop:
for (n=0;total < 10; n++) {total += values[n];
}
As a matter of fact, the for loop is nothing more than a special kind ofwhile loop that handles an initialization and an increment for you. You can
FIGURE 18.2The results of the for loopexample.
www.it-ebooks.info

ptg999
380 CHAPTER 18 Controlling Flow with Conditions and Loops
generally use while for any loop. However, it’s best to choose whichevertype of loop makes the most sense for the job, or that takes the leastamount of typing.
Using do...while LoopsJavaScript, like many other programming languages, includes a third typeof loop: the do...while loop. This type of loop is similar to an ordinarywhile loop, with one difference: The condition is tested at the end of theloop rather than the beginning. Here is a typical do...while loop:
do {n++;total += values[n];
}while (total < 10);
As you’ve probably noticed, this is basically an upside-down version of theprevious while example. There is one difference: With the do loop, the condi-tion is tested at the end of the loop. This means that the statements in theloop will always be executed at least once, even if the condition is never true.
Working with LoopsAlthough you can use simple for and while loops for straightforwardtasks, there are some considerations you should make when using morecomplicated loops. In the next sections, we’ll look at infinite loops and thebreak and continue statements, which give you more control over yourloops.
Creating an Infinite LoopThe for and while loops give you quite a bit of control over the loop. Insome cases, this can cause problems if you’re not careful. For example,look at the following loop code:
while (i < 10) {n++;values[n] = 0;
}
There’s a mistake in this example. The condition of the while loop refers tothe i variable, but that variable doesn’t actually change during the loop.
NOTE
As with the for and whileloops, the do loop can include asingle statement without bracesor a number of statementsenclosed in braces.
www.it-ebooks.info

ptg999
Working with Loops 381
This creates an infinite loop. The loop will continue executing until the userstops it or until it generates an error of some kind.
Infinite loops can’t always be stopped by the user, except by quitting thebrowser—and some loops can even prevent the browser from quitting orcause a crash.
Obviously, infinite loops are something to avoid. They can also be difficultto spot because JavaScript won’t give you an error that actually tells youthere is an infinite loop. Thus, each time you create a loop in a script, youshould be careful to make sure there’s a way out.
Occasionally, you might want to create an infinite loop deliberately. Thismight include situations when you want your program to execute until theuser stops it, or if you are providing an escape route with the break state-ment, which is introduced in the next section. Here’s an easy way to createan infinite loop:
while (true) {
Because the value true is the conditional, this loop will always find itscondition to be true.
Escaping from a LoopThere is one way out of an infinite loop. You can use the break statementduring a loop to exit it immediately and continue with the first statementafter the loop. Here is a simple example of the use of break:
while (true) {n++;if (values[n] == 1) break;
}
Although the while statement is set up as an infinite loop, the if statementchecks the corresponding value of an array. If it finds a value of 1, it exitsthe loop.
When the JavaScript interpreter encounters a break statement, it skips therest of the loop and continues the script with the first statement after theright brace at the loop’s end. You can use the break statement in any typeof loop, whether infinite or not. This provides an easy way to exit if anerror occurs or if another condition is met.
NOTE
Depending on the browser ver-sion in use, an infinite loopmight even make the browserstop responding to the user. Besure you provide an escaperoute from infinite loops andsave your script before you testit just in case.
www.it-ebooks.info
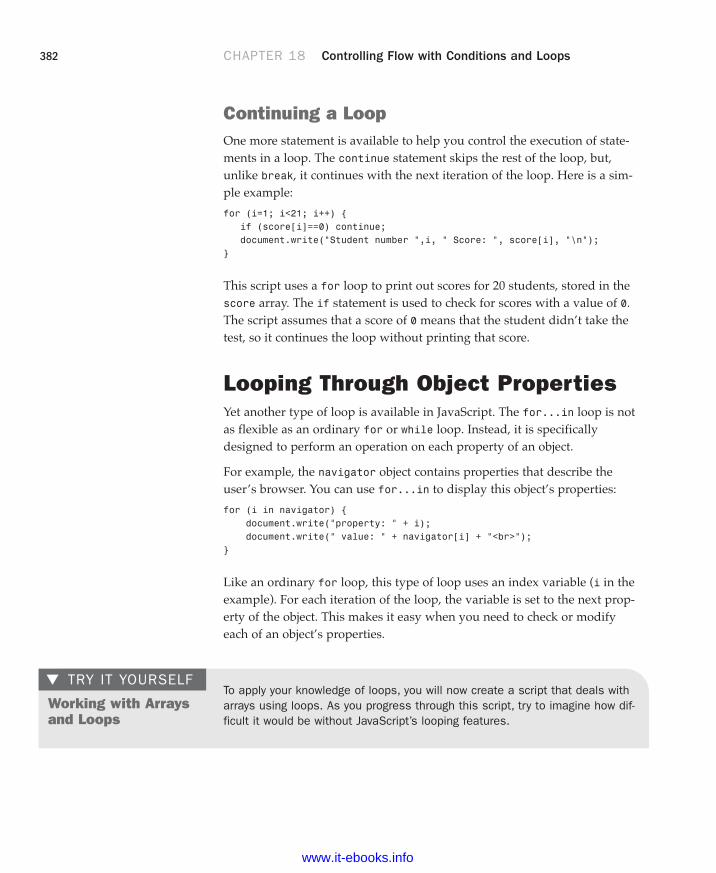
ptg999
382 CHAPTER 18 Controlling Flow with Conditions and Loops
Continuing a LoopOne more statement is available to help you control the execution of state-ments in a loop. The continue statement skips the rest of the loop, but,unlike break, it continues with the next iteration of the loop. Here is a sim-ple example:
for (i=1; i<21; i++) {if (score[i]==0) continue;document.write(“Student number “,i, “ Score: “, score[i], “\n”);
}
This script uses a for loop to print out scores for 20 students, stored in thescore array. The if statement is used to check for scores with a value of 0.The script assumes that a score of 0 means that the student didn’t take thetest, so it continues the loop without printing that score.
Looping Through Object PropertiesYet another type of loop is available in JavaScript. The for...in loop is notas flexible as an ordinary for or while loop. Instead, it is specificallydesigned to perform an operation on each property of an object.
For example, the navigator object contains properties that describe theuser’s browser. You can use for...in to display this object’s properties:
for (i in navigator) {document.write(“property: “ + i);document.write(“ value: “ + navigator[i] + “<br>”);
}
Like an ordinary for loop, this type of loop uses an index variable (i in theexample). For each iteration of the loop, the variable is set to the next prop-erty of the object. This makes it easy when you need to check or modifyeach of an object’s properties.
TRY IT YOURSELF▼
Working with Arraysand Loops
To apply your knowledge of loops, you will now create a script that deals witharrays using loops. As you progress through this script, try to imagine how dif-ficult it would be without JavaScript’s looping features.
www.it-ebooks.info

ptg999
Looping Through Object Properties 383
Working with Arraysand Loopscontinued
This simple script will prompt the user for a series of names. After all of thenames have been entered, it will display the list of names in a numbered list.To begin the script, initialize some variables:
names = new Array();i = 0;
The names array will store the names the user enters. You don’t know howmany names will be entered, so you don’t need to specify a dimension for thearray. The i variable will be used as a counter in the loops.
Next, use the prompt statement to prompt the user for a series of names.Use a loop to repeat the prompt for each name. You want the user to enter atleast one name, so a do loop is ideal:
do {next = prompt(“Enter the Next Name”, “”); if (next > “ “) names[i] = next;i = i + 1;}while (next > “ “);
This loop prompts for a string called next. If a name was entered and isn’tblank, it’s stored as the next entry in the names array. The i counter is thenincremented. The loop repeats until the user doesn’t enter a name or clicksCancel in the prompt dialog.
Next, your script can display the number of names that was entered:
document.write(“<h2>” + (names.length) + “ names entered.</h2>”);
This statement displays the length property of the names array, surroundedby level 2 header tags for emphasis.
Next, the script should display all the names in the order they were entered.Because the names are in an array, the for...in loop is a good choice:
document.write(“<ol>”);for (i in names) {
document.write(“<li>” + names[i] + “</li>”);}document.write(“</ol>”);
Here you have a for…in loop that loops through the names array, assigningthe counter i to each index in turn. The script then prints the name betweenopening and closing <li> tags as an item in an ordered list. Before and afterthe loop, the script prints beginning and ending <ol> tags.
TRY IT YOURSELF ▼
TIP
If you’re interested in makingyour scripts as short as possi-ble, remember that you coulduse the increment (++) opera-tor to combine the i = i + 1statement with the previousstatement: names[i++]=1.
www.it-ebooks.info

ptg999
384 CHAPTER 18 Controlling Flow with Conditions and Loops
TRY IT YOURSELF▼
Working with Arraysand Loopscontinued
You now have everything you need for a working script. Listing 18.4 showsthe HTML file for this example, and Listing 18.5 shows the JavaScript file.
LISTING 18.4 A Script to Prompt for Names and Display Them (HTML)<?xml version=”1.0” encoding=”UTF-8”?><!DOCTYPE html PUBLIC “-//W3C//DTD XHTML 1.1//EN”“http://www.w3.org/TR/xhtml11/DTD/xhtml11.dtd”>
<html xmlns=”http://www.w3.org/1999/xhtml” xml:lang=”en”><head><title>Loops Example</title>
</head><body>
<h1>Loops Example</h1><p>Enter a series of names and I will display them in a numbered list.</p><script type=”text/javascript” src=”loops.js” > </script>
</body></html>
LISTING 18.5 A Script to Prompt for Names and Display Them (JavaScript)// create the arraynames = new Array();i = 0;// loop and prompt for namesdo {
next = window.prompt(“Enter the Next Name”, “”); if (next > “ “) names[i] = next;i = i + 1;} while (next > “ “);
document.write(“<h2>” + (names.length) + “ names entered.</h2>”);// display all of the namesdocument.write(“<ol>”);for (i in names) {
document.write(“<li>” + names[i] + “</li>”);}document.write(“</ol>”);
To try this example, save the JavaScript file as loops.js, and then load theHTML document into a browser. You’ll be prompted for one name at a time.Enter several names, and then click Cancel to indicate that you’re finished.Figure 18.3 shows what the final results should look like in a browser.
www.it-ebooks.info

ptg999
Summary 385
SummaryIn this chapter, you learned two ways to control the flow of your scripts.First, you learned how to use the if statement to evaluate conditionalexpressions and react to them. You also learned a shorthand form of condi-tional expression using the ? operator and the switch statement for work-ing with multiple conditions.
You also learned about JavaScript’s looping capabilities using for, while,and other loops and how to control loops further using the break and con-tinue statements. Lastly, you looked at the for...in loop for workingwith each property of an object.
Working with Arraysand Loopscontinued
TRY IT YOURSELF ▼
FIGURE 18.3The output of the names example.
www.it-ebooks.info
ptg999
386 CHAPTER 18 Controlling Flow with Conditions and Loops
Q&AQ. What happens if I compare two items of different data types (for
example, a number and a string) in a conditional expression?
A. The JavaScript interpreter does its best to make the values a commonformat and compare them. In this case, it would convert them both tostrings before comparing. In JavaScript 1.3 and later, you can use thespecial equality operator === to compare two values and their types—using this operator, the expression will be true only if the expressionshave the same value and the same data type.
Q. Why would I use switch if using if and else is just as simple?
A. Either one works, so it’s your choice. Personally, I find switch state-ments confusing and prefer to use if. Your choice might also dependon what other programming languages you’re familiar with becausesome support switch and others don’t.
Q. Why don’t I get a friendly error message if I accidentally use = insteadof ==?
A. In some cases, this will result in an error. However, the incorrect ver-sion often appears to be a correct statement. For example, in the state-ment if (a=1), the variable a will be assigned the value 1. The ifstatement is considered true, and the value of a is lost.
Q. It seems like I could use a for loop to replace any of the other loopmethods (while, do, and so on). Why so many choices?
A. You’re right. In most cases, a for loop will work, and you can do allyour loops that way if you want. For that matter, you can use while toreplace a for loop. You can use whichever looping method makes themost sense for your application.
WorkshopThe workshop contains quiz questions and exercises to help you solidify yourunderstanding of the material covered. Try to answer all questions beforelooking at the “Answers” section that follows.
www.it-ebooks.info

ptg999
Workshop 387
Quiz1. Which of the following operators means “is not equal to” in JavaScript?
a. !
b. !=
c. <>
2. What does the switch statement do?
a. Tests a variable for a number of different values
b. Turns a variable on or off
c. Makes ordinary if statements longer and more confusing
3. Which type of JavaScript loop checks the condition at the end of theloop?
a. for
b. while
c. do...while
4. Within a loop, what does the break statement do?
a. Crashes the browser
b. Starts the loop over
c. Escapes the loop entirely
5. The statement while (3==3) is an example of
a. A typographical error
b. An infinite loop
c. An illegal JavaScript statement
www.it-ebooks.info

ptg999
388 CHAPTER 18 Controlling Flow with Conditions and Loops
Answers1. b. The != operator means is not equal to.
2. a. The switch statement can test the same variable or expression for anumber of different values.
3. c. The do...while loop uses a condition at the end of the loop.
4. c. The break statement escapes the loop.
5. b. Because the condition (3==3) will always be true, this statement cre-ates an infinite loop.
Exercises. Modify Listing 18.4 to sort the names in alphabetical order before dis-
playing them. You can use the sort method of the Array object,described in Chapter 16, “Using JavaScript Variables, Strings, andArrays.”
. Modify Listing 18.4 to prompt for exactly 10 names. What happens ifyou click the Cancel button instead of entering a name?
www.it-ebooks.info

ptg999
In your experience with JavaScript so far, most of the scripts you’ve writ-ten have executed in a calm, orderly fashion, moving from the first state-ment to the last. You’ve seen a few event handlers used in sample scriptsto focus your attention on other aspects of programming, and it is likelythat you used your common sense to follow along with the actions. Thatalone speaks to the relative ease and simplicity of using JavaScript eventhandlers within your HTML.
In this chapter, you’ll learn to use the wide variety of event handlers sup-ported by JavaScript. Rather than executing in order, scripts using eventhandlers can interact directly with the user. You’ll use event handlers in justabout every script you write throughout the rest of this book, and in factthey’re likely to feature prominently in most scripts you will write, period.
Understanding Event HandlersAs you learned in Chapter 14, “Getting Started with JavaScriptProgramming,” JavaScript programs don’t have to execute in order. Youalso learned they can detect events and react to them. Events are things thathappen to the browser—the user clicking a button, the mouse pointermoving, or a web page or image loading from the server.
A wide variety of events enable your scripts to respond to the mouse, thekeyboard, and other circumstances. Events are the key method JavaScriptuses to make web documents interactive.
The script that you use to detect and respond to an event is called an eventhandler. Event handlers are among the most powerful features ofJavaScript. Luckily, they’re also among the easiest features to learn anduse—often, a useful event handler requires only a single statement.
WHAT YOU’LL LEARN INTHIS CHAPTER:
. How event handlers work
. How event handlers relateto objects
. How to create an eventhandler
. How to detect mouse andkeyboard actions
. How to use onclick tochange the appearance of<div>
CHAPTER 19Responding to Events
www.it-ebooks.info

ptg999
390 CHAPTER 19 Responding to Events
Objects and EventsAs you learned in Chapter 15, “Working with the Document Object Model(DOM),” JavaScript uses a set of objects to store information about the var-ious parts of a web page—buttons, links, images, windows, and so on. Anevent can often happen in more than one place (for example, the usercould click any one of the links on the page), so each event is associatedwith an object.
Each event has a name. For example, the onMouseOver event occurs whenthe mouse pointer moves over an object on the page. When the pointermoves over a particular link, the onMouseOver event is sent to that link’sevent handler, if it has one.
To define an event handler, you add the word on to the beginning of theevent’s name. For example, the onMouseOver event handler is called whenthe mouse moves over a link. To define the event handler, you add it tothat particular link’s <a> HTML tag.
Creating an Event HandlerYou don’t need the <script> tag to define an event handler. Instead, youcan add an event handler attribute to an individual HTML tag. For exam-ple, here is a link that includes an onMouseOver event handler:
<a href=”http://www.google.com/”onmouseover=”alert(‘You moved over the link.’);”>This is a link.</a>
Note that this is all one <a> tag, although it’s split into multiple lines. Thisspecifies a statement to be used as the onMouseOver event handler for thelink. This statement displays an alert message when the mouse moves overthe link.
You can use JavaScript statements like the previous one in an event han-dler, but if you need more than one statement, it’s a good idea to use afunction instead. Just define the function in the header of the document,and then call the function as the event handler like this:
<a href=”#bottom” onmouseover=”DoIt();”>Move the mouse over this link.</a>
This example calls a function called DoIt() when the user moves themouse over the link. Using a function is convenient because you can uselonger, more readable JavaScript routines as event handlers.
NOTE
Notice the strange capitaliza-tion on the onMouseOver key-word. This is the standard nota-tion for event handlers. The onis always lowercase, and eachword in the event name is capi-talized. However, to be trulyXHTML-compliant, when you usethese event handlers in yourcode, you must write thementirely in lowercase.
NOTE
The example seen here usessingle quotation marks to sur-round the text. This is neces-sary in an event handlerbecause double quotationmarks are used to surround theevent handler itself. (You canalso use single quotationmarks to surround the eventhandler and double quotationmarks within the script state-ments.)
www.it-ebooks.info

ptg999
Understanding Event Handlers 391
Defining Event Handlers with JavaScriptRather than specifying an event handler in an HTML document, you canuse JavaScript to assign a function as an event handler. This enables you toset event handlers conditionally, turn them on and off, and change thefunction that handles an event dynamically.
To define an event handler in this way, you first define a function, andthen assign the function as an event handler. Event handlers are stored asproperties of the document object or another object that can receive anevent. For example, these statements define a function called mousealert,and then assign it as the onMouseDown event handler for the document:
function mousealert() {alert (“You clicked the mouse!”);
}document.onmousedown = mousealert;
You can use this technique to set up an event handler for any HTML element,but an additional step is required: You must first find the object correspon-ding to the element. To do this, use the document.getElementById function.First, define an element in the HTML document and specify an id attribute:
<a href=”http://www.google.com/” id=”link1”>
Next, in the JavaScript code, find the object and apply the event handler:
obj = document.getElementById(“link1”);obj.onclick = MyFunction;
You can do this for any object as long as you’ve defined it with a unique idattribute in the HTML file. Using this technique, you can easily assign thesame function to handle events for multiple objects without adding clutterto your HTML code.
Supporting Multiple Event HandlersWhat if you want more than one thing to happen when you click on anelement? For example, suppose you want two functions called update anddisplay to both execute when a button is clicked. You can’t assign twofunctions to the onclick property. One solution is to define a function thatcalls both functions:
function UpdateDisplay() {update();display();
}
TIP
For simple event handlers, youcan use two statements if youseparate them with a semi-colon. However, in most casesit’s easier to use a function toperform the statements.
TIP
Setting up event handlers thisway is also a good practice ingeneral: It enables you to usean external JavaScript file todefine the function and set upthe event, keeping the JavaScriptcode completely separate fromthe HTML file.
www.it-ebooks.info

ptg999
392 CHAPTER 19 Responding to Events
This isn’t always the ideal way to do things. For example, if you’re usingtwo third-party scripts and both of them want to add an onLoad event tothe page, there should be a way to add both. The W3C DOM standarddefines a function, addEventListener, for this purpose. This functiondefines a listener for a particular event and object, and you can add asmany listener functions as you need.
Unfortunately, addEventListener is not supported by Internet Explorer, soyou have to use a different function, attachEvent, in that browser. SeeChapter 21, “Using Unobtrusive JavaScript,” for a function that combinesthese two for a cross-browser event-adding script.
Using the event ObjectWhen an event occurs, you might need to know more about the event—forexample, for a keyboard event, you need to know which key was pressed.The DOM includes an event object that provides this information.
To use the event object, you can pass it on to your event handler function.For example, this statement defines an onKeyPress event that passes theevent object to a function:
<body onkeypress=”getkey(event);”>
You can then define your function to accept the event as a parameter:
function getkey(e) {...}
In Firefox, Safari, Opera, and Chrome, an event object is automaticallypassed to the event handler function, so this will work even if you useJavaScript rather than HTML to define an event handler. In InternetExplorer, the most recent event is stored in the window.event object. Theprevious HTML example passes this object to the event handler function. Ifyou define the event handler with JavaScript, this is not possible, so youneed to use some code to find the correct object:
function getkey(e) {if (!e) e=window.event;
...}
This checks whether the e variable is already defined. If not, it gets thewindow.event object and stores it in e. This ensures that you have a validevent object in any browser.
www.it-ebooks.info

ptg999
Understanding Event Handlers 393
Unfortunately, although both Internet Explorer and non-Internet Explorerbrowsers support event objects, they support different properties. Oneproperty that is the same in both browsers is event.type, the type ofevent. This is simply the name of the event, such as mouseover for anonMouseOver event and keypress for an onKeyPress event. The followingsections list some additional useful properties for each browser.
Internet Explorer event PropertiesThe following are some of the commonly used properties of the eventobject for Internet Explorer:
. event.button—The mouse button that was pressed. This value is 1for the left button and usually 2 for the right button.
. event.clientX—The x-coordinate (column, in pixels) where theevent occurred.
. event.clientY—The y-coordinate (row, in pixels) where the eventoccurred.
. event.altkey—A flag that indicates whether the Alt key waspressed during the event.
. event.ctrlkey—A flag that indicates whether the Ctrl key waspressed.
. event.shiftkey—A flag that indicates whether the Shift key waspressed.
. event.keyCode—The key code (in Unicode) for the key that waspressed.
. event.srcElement—The object where the element occurred.
Non-Internet Explorer event PropertiesThe following are some of the commonly used properties of the eventobject for modern browsers that are not Internet Explorer:
. event.modifiers—Indicates which modifier keys (Shift, Ctrl, Alt,and so on) were held down during the event. This value is an integerthat combines binary values representing the different keys.
. event.pageX—The x-coordinate of the event within the web page.
. event.pageY—The y-coordinate of the event within the web page.
. event.which—The keycode for keyboard events (in Unicode) or thebutton that was pressed for mouse events (It’s best to use the cross-browser button property instead.)
www.it-ebooks.info
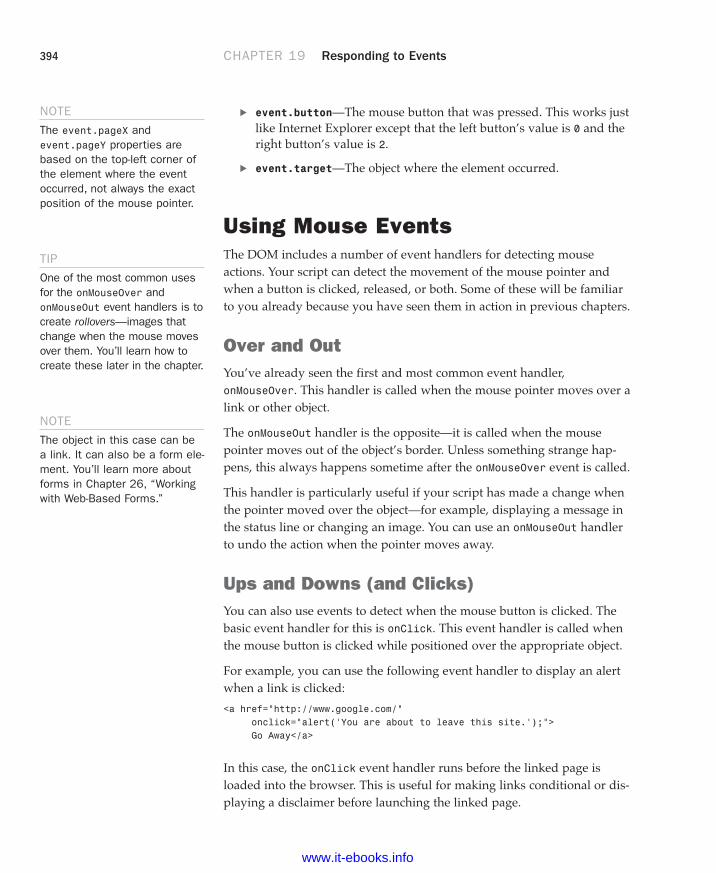
ptg999
394 CHAPTER 19 Responding to Events
. event.button—The mouse button that was pressed. This works justlike Internet Explorer except that the left button’s value is 0 and theright button’s value is 2.
. event.target—The object where the element occurred.
Using Mouse EventsThe DOM includes a number of event handlers for detecting mouseactions. Your script can detect the movement of the mouse pointer andwhen a button is clicked, released, or both. Some of these will be familiarto you already because you have seen them in action in previous chapters.
Over and OutYou’ve already seen the first and most common event handler,onMouseOver. This handler is called when the mouse pointer moves over alink or other object.
The onMouseOut handler is the opposite—it is called when the mousepointer moves out of the object’s border. Unless something strange hap-pens, this always happens sometime after the onMouseOver event is called.
This handler is particularly useful if your script has made a change whenthe pointer moved over the object—for example, displaying a message inthe status line or changing an image. You can use an onMouseOut handlerto undo the action when the pointer moves away.
Ups and Downs (and Clicks)You can also use events to detect when the mouse button is clicked. Thebasic event handler for this is onClick. This event handler is called whenthe mouse button is clicked while positioned over the appropriate object.
For example, you can use the following event handler to display an alertwhen a link is clicked:
<a href=”http://www.google.com/”onclick=”alert(‘You are about to leave this site.’);”>Go Away</a>
In this case, the onClick event handler runs before the linked page isloaded into the browser. This is useful for making links conditional or dis-playing a disclaimer before launching the linked page.
NOTE
The event.pageX andevent.pageY properties arebased on the top-left corner ofthe element where the eventoccurred, not always the exactposition of the mouse pointer.
TIP
One of the most common usesfor the onMouseOver andonMouseOut event handlers is tocreate rollovers—images thatchange when the mouse movesover them. You’ll learn how tocreate these later in the chapter.
NOTE
The object in this case can bea link. It can also be a form ele-ment. You’ll learn more aboutforms in Chapter 26, “Workingwith Web-Based Forms.”
www.it-ebooks.info

ptg999
Using Mouse Events 395
If your onClick event handler returns the false value, the link will not befollowed. For example, the following is a link that displays a confirmationdialog. If you click Cancel, the link is not followed; if you click OK, the newpage is loaded:
<a href=”http://www.google.com/”onclick=”return(window.confirm(‘Are you sure?’));”>Go Away</a>
This example uses the return statement to enclose the event handler. Thisensures that the false value that is returned when the user clicks Cancel isreturned from the event handler, which prevents the link from being followed.
The onDblClick event handler is similar, but is used only if the user double-clicks on an object. Because links usually require only a single click, youcould use this to make a link do two different things depending on thenumber of clicks. (Needless to say, this could be confusing.) You can alsodetect double-clicks on images and other objects.
To give you even more control of what happens when the mouse button ispressed, two more events are included:
. onMouseDown is used when the user presses the mouse button.
. onMouseUp is used when the user releases the mouse button.
These two events are the two halves of a mouse click. If you want to detectan entire click, use onClick. Use onMouseUp and onMouseDown to detect justone or the other.
To detect which mouse button is pressed, you can use the button propertyof the event object. This property is assigned the value 0 or 1 for the leftbutton and 2 for the right button. This property is assigned for onClick,onDblClick, onMouseUp, and onMouseDown events.
As an example of these event handlers, you can create a script that displaysinformation about mouse button events and determines which button ispressed. Listing 19.1 shows the mouse event script.
LISTING 19.1 The JavaScript File for the Mouse Click Examplefunction mousestatus(e) {
if (!e) e = window.event;btn = e.button;whichone = (btn < 2) ? “Left” : “Right”;message=e.type + “ : “ + whichone + “\n”;document.form1.info.value += message;
}
CAUTION
Browsers don’t normally detectonClick or onDblClick eventsfor the right mouse button. Ifyou want to detect the right but-ton, onMouseDown is the mostreliable way.
www.it-ebooks.info

ptg999
396 CHAPTER 19 Responding to Events
obj=document.getElementById(“testlink”);obj.onmousedown = mousestatus;obj.onmouseup = mousestatus;obj.onclick = mousestatus;obj.ondblclick = mousestatus;
This script includes a function, mousestatus, that detects mouse events.This function uses the button property of the event object to determinewhich button was pressed. It also uses the type property to display the typeof event because the function will be used to handle multiple event types.
After the function, the script finds the object for a link with the idattribute testlink and assigns its onmousedown, onmouseup, onclick, and ondblclick events to the mousestatus function.
Save this script as click.js. Next, you will need an HTML document towork with the script, as shown in Listing 19.2.
LISTING 19.2 The HTML File for the Mouse Click Example<?xml version=”1.0” encoding=”UTF-8”?><!DOCTYPE html PUBLIC “-//W3C//DTD XHTML 1.1//EN”“http://www.w3.org/TR/xhtml11/DTD/xhtml11.dtd”>
<html xmlns=”http://www.w3.org/1999/xhtml” xml:lang=”en”><head><title>Mouse Click Text</title>
</head><body><h1>Mouse Click Test</h1><p>Click the mouse on the test link below. A messagewill indicate which button was clicked.</p><h2><a href=”#” id=”testlink”>Test Link</a></h2><form action=”” name=”form1”><div><textarea rows=”10” cols=”70” name=”info”></textarea></div></form><script type=”text/javascript” src=”click.js”></script>
</body></html>
This file defines a test link with the id property testlink, which is used inthe script to assign event handlers. It also defines a form and a textareaused by the script to display the events. To test this document, save it inthe same folder as the JavaScript file you created previously and load theHTML document into a browser. The results are shown in Figure 19.1.
LISTING 19.1 Continued
www.it-ebooks.info

ptg999
Using Keyboard Events 397
Using Keyboard EventsJavaScript can also detect keyboard actions. The main event handler for thispurpose is onKeyPress, which occurs when a key is pressed and released orheld down. As with mouse buttons, you can detect the down and up partsof the keypress with the onKeyDown and onKeyUp event handlers.
Of course, you might find it useful to know which key the user pressed.You can find this out with the event object, which is sent to your eventhandler when the event occurs. In Internet Explorer, event.keyCode storesthe ASCII character code for the key that was pressed. In non-InternetExplorer browsers, the event.which property stores the ASCII charactercode for the key that was pressed.
If you’d rather deal with actual characters than key codes, you can use thefromCharCode string method to convert them. This method converts anumeric ASCII code to its corresponding string character. For example, thefollowing statement converts the event.which property to a character andstores it in the key variable:
key = String.fromCharCode(event.which);
Because different browsers have different ways of returning the key code,displaying key browsers independently is a bit harder. However, you cancreate a script that displays keys for either browser. The following functionwill display each key as it is typed:
FIGURE 19.1The mouse click example inaction.
NOTE
Notice that a single click of theleft mouse button triggers threeevents: onMouseDown,onMouseUp, and onClick.
NOTE
ASCII (American Standard Codefor Information Interchange) isthe standard numeric codeused by most computers to rep-resent characters. It assignsthe numbers 0–128 to variouscharacters—for example, thecapital letters A through Z areASCII values 65 to 90.
www.it-ebooks.info

ptg999
398 CHAPTER 19 Responding to Events
function DisplayKey(e) {// which key was pressed?if (e.keyCode) keycode=e.keyCode;
else keycode=e.which;character=String.fromCharCode(keycode);// find the object for the destination paragraphk = document.getElementById(“keys”);// add the character to the paragraphk.innerHTML += character;
}
The DisplayKey function receives the event object from the event handlerand stores it in the variable e. It checks whether the e.keyCode propertyexists and stores it in the keycode variable if present. Otherwise, it assumesthe browser is not Internet Explorer and assigns keycode to the e.whichproperty.
The remaining lines of the function convert the key code to a character andadd it to the paragraph in the document with the id attribute keys.Listing 19.3 shows a complete example using this function.
LISTING 19.3 Displaying Typed Characters<?xml version=”1.0” encoding=”UTF-8”?><!DOCTYPE html PUBLIC “-//W3C//DTD XHTML 1.1//EN”“http://www.w3.org/TR/xhtml11/DTD/xhtml11.dtd”>
<html xmlns=”http://www.w3.org/1999/xhtml” xml:lang=”en”><head><title>Displaying Keypresses</title><script type=”text/javascript”>function DisplayKey(e) {
// which key was pressed?if (e.keyCode) keycode=e.keyCode;
else keycode=e.which;character=String.fromCharCode(keycode);// find the object for the destination paragraphk = document.getElementById(“keys”);// add the character to the paragraphk.innerHTML += character;
}</script>
</head><body onkeypress=”DisplayKey(event)”><h1>Displaying Typed Characters</h1><p>This document includes a simple script that displays the keys you type in the paragraph below. Type a few keys to try it. </p><p id=”keys”></p>
</body></html>
NOTE
The final lines in theDisplayKey function use thegetElementById function andthe innerHTML attribute to dis-play the keys you type within aparagraph on the page.
www.it-ebooks.info

ptg999
Using the onLoad and onUnload Events 399
When you load this example, watch the characters you’ve typed appear ina paragraph of the document. Figure 19.2 shows this example in action.
FIGURE 19.2Displaying the keys that werepressed.
Using the onLoad and onUnloadEventsAnother event you might use often is onLoad. This event occurs when thecurrent page (including all of its images) finishes loading from the server.
The onLoad event is related to the window object, and to define it, you usean event handler in the <body> tag. For example, the following is a <body>tag that uses a simple event handler to display an alert when the page fin-ishes loading:
<body onload=”alert(‘Loading complete.’);”>
Images can also have an onLoad event handler. When you define an onLoadevent handler for an <img> tag, it is triggered as soon as the specifiedimage has completely loaded.
To set an onLoad event using JavaScript, you assign a function to theonload property of the window object:
window.onload = MyFunction;
CAUTION
Because the onLoad eventoccurs after the HTML documenthas finished loading and display-ing, you cannot use the document.write or document.open statements within anonLoad event handler. Thiswould overwrite the current document.
www.it-ebooks.info

ptg999
400 CHAPTER 19 Responding to Events
You can also specify an onUnload event for the <body> tag. This event willbe triggered whenever the browser unloads the current document—thisoccurs when another page is loaded or when the browser window is closed.
In the next section you’ll see an event handler in action, within the contextof functionality you’re likely to encounter when developing your own sites.
Using onclick to Change <div>AppearanceAs you’ve seen, the onclick event can be used to invoke all sorts of action;you might think of a mouse click as a way to submit a form by clicking ona button, but you can capture this event and use it to provide interactivitywithin your pages as well. In this example, you will see how you can usethe onclick event to show or hide information contained in a <div>. Inthis case, you are adding interactivity to your page by allowing the user toshow previously hidden information when users click on a piece of text.This is referred to as a piece of text because, strictly speaking, the text is nota link. That is to say, it will look like a link and act like a link, but it willnot be marked up within an <a> tag.
Listing 19.4 provides the complete code for this example, as shown initiallyin Figure 19.3.
LISTING 19.4 Using onclick to Show or Hide Content<?xml version=”1.0” encoding=”UTF-8”?><!DOCTYPE html PUBLIC “-//W3C//DTD XHTML 1.1//EN”“http://www.w3.org/TR/xhtml11/DTD/xhtml11.dtd”>
<html xmlns=”http://www.w3.org/1999/xhtml” xml:lang=”en”><head><title>Steptoe Butte</title><style type=”text/css”>a {
text-decoration: none;font-weight: bold;color: #7a7abf;
}#hide_e {
display: none;}#elevation {
display: none;}#hide_p {
display: none;
www.it-ebooks.info

ptg999
Using onclick to Change <div> Appearance 401
}#photos {
display: none;}#show_e {
display: block;}#show_p {
display: block;}.fakelink {
cursor:pointer;text-decoration: none;font-weight: bold;color: #E03A3E;
}</style>
</head><body><h1>Steptoe Butte</h1><p><img src=”steptoebutte.jpg” alt=”View from Steptoe Butte”style=”float:left;margin-right:12px;margin-bottom:6px;border:1pxsolid #000” />Steptoe Butte is a quartzite island jutting out of thesilty loess of the <a class=”tip”href=”http://en.wikipedia.org/wiki/Palouse”>Palouse <span>Learn moreabout the Palouse!</span></a> hills in Whitman County, Washington. The rock that forms the butte is over 400 million years old, in Contrast with the 15-7 million year old<a href=”http://en.wikipedia.org/wiki/Columbia_River”>Columbia River</a> basalts that underlie the rest of the Palouse (such “islands” of ancient rock have come to be called buttes, a butte being defined as a small hill with a flat top, whose width at top does not exceed its height).</p><p>A hotel built by Cashup Davis stood atop Steptoe Butte from 1888 to 1908, burning down several years after it closed. In 1946, Virgil McCroskey donated 120 acres (0.49 km2) of land to form Steptoe Butte State Park, which was later increased to over 150 acres (0.61 km2). Steptoe Butte is currently recognized as a National Natural Landmark because of its unique geological value. It is named in honor of <a href=”http://en.wikipedia.org/wiki/Colonel_Edward_Steptoe”>Colonel Edward Steptoe</a>.</p><div class=”fakelink”
id=”show_e”onclick=”this.style.display=’none’;document.getElementById(‘hide_e’).style.display=’block’;document.getElementById(‘elevation’).style.display=’inline’;
“>» Show Elevation</div>
<div class=”fakelink”id=”hide_e”onclick=”this.style.display=’none’;
LISTING 19.4 continued
www.it-ebooks.info
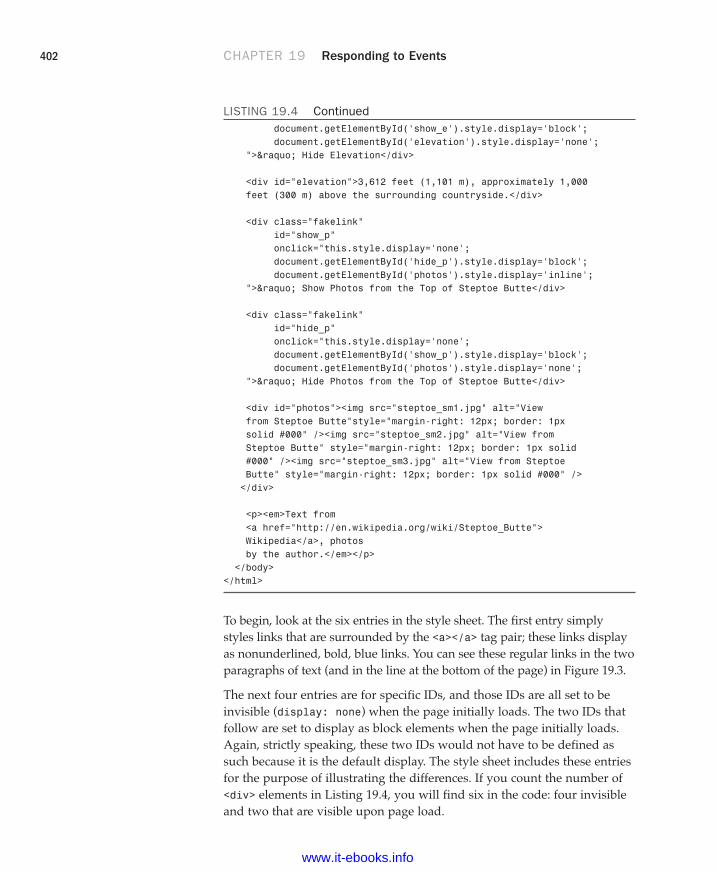
ptg999
402 CHAPTER 19 Responding to Events
document.getElementById(‘show_e’).style.display=’block’;document.getElementById(‘elevation’).style.display=’none’;
“>» Hide Elevation</div>
<div id=”elevation”>3,612 feet (1,101 m), approximately 1,000 feet (300 m) above the surrounding countryside.</div>
<div class=”fakelink”id=”show_p”onclick=”this.style.display=’none’;document.getElementById(‘hide_p’).style.display=’block’;document.getElementById(‘photos’).style.display=’inline’;
“>» Show Photos from the Top of Steptoe Butte</div>
<div class=”fakelink”id=”hide_p”onclick=”this.style.display=’none’;document.getElementById(‘show_p’).style.display=’block’;document.getElementById(‘photos’).style.display=’none’;
“>» Hide Photos from the Top of Steptoe Butte</div>
<div id=”photos”><img src=”steptoe_sm1.jpg” alt=”View from Steptoe Butte”style=”margin-right: 12px; border: 1px solid #000” /><img src=”steptoe_sm2.jpg” alt=”View from Steptoe Butte” style=”margin-right: 12px; border: 1px solid #000” /><img src=”steptoe_sm3.jpg” alt=”View from Steptoe Butte” style=”margin-right: 12px; border: 1px solid #000” /></div>
<p><em>Text from<a href=”http://en.wikipedia.org/wiki/Steptoe_Butte”>Wikipedia</a>, photosby the author.</em></p>
</body></html>
To begin, look at the six entries in the style sheet. The first entry simplystyles links that are surrounded by the <a></a> tag pair; these links displayas nonunderlined, bold, blue links. You can see these regular links in the twoparagraphs of text (and in the line at the bottom of the page) in Figure 19.3.
The next four entries are for specific IDs, and those IDs are all set to beinvisible (display: none) when the page initially loads. The two IDs thatfollow are set to display as block elements when the page initially loads.Again, strictly speaking, these two IDs would not have to be defined assuch because it is the default display. The style sheet includes these entriesfor the purpose of illustrating the differences. If you count the number of<div> elements in Listing 19.4, you will find six in the code: four invisibleand two that are visible upon page load.
LISTING 19.4 Continued
www.it-ebooks.info

ptg999
Using onclick to Change <div> Appearance 403
The goal in this example is to change the display value of two IDs whenanother ID is clicked. But first you have to make sure users realize a pieceof text is clickable, and that typically happens when users see their mousepointers change to reflect a link is present. Although not shown in Figure19.3, when you look at this example in your browser you will see that themouse pointer changes to a hand with a finger pointing at a particular link.
This functionality is achieved by defining a class for this particular text; theclass is called fakelink, as you can see in this snippet of code:
<div class=”fakelink”id=”show_e”onclick=”this.style.display=’none’;document.getElementById(‘hide_e’).style.display=’block’;document.getElementById(‘elevation’).style.display=’inline’;
“>» Show Elevation</div>
The fakelink class ensures that the text is rendered as nonunderlined,bold, and red; cursor: pointer causes the mouse pointer to change insuch a way that users think the text is a link of the type that would nor-mally be enclosed in an <a></a> tag. But the really interesting stuff hap-pens when we associate an onclick attribute with a <div>. In the samplesnippet just shown, the value of the onclick attribute is a series of com-mands that change the current value of CSS elements.
FIGURE 19.3The initial display of Listing 19.4.
www.it-ebooks.info

ptg999
404 CHAPTER 19 Responding to Events
Let’s look at them separately:
this.style.display=’none’;document.getElementById(‘hide_e’).style.display=’block’;document.getElementById(‘elevation’).style.display=’inline’;
What you are looking at are different JavaScript methods meant to changeparticular elements. In the first line, the this keyword refers to the elementitself. In other words, this refers to the <div> ID called show_e. The key-word style refers to the style object; the style object contains all the CSSstyles that you assign to the element. In this case, we are most interested inthe display style. Therefore, this.style.display means “the display styleof the show_e ID,” and what we are doing here is setting the value of thedisplay style to none when the text itself is clicked.
But that is not all we are doing because there are three actions that occurwithin the onclick attribute. The other two actions begin withdocument.getElementByID() and include a specific ID name within theparentheses. We use document.getElementByID() instead of this becausethe second and third actions set CSS style properties for elements that arenot the parent element. As you can see in the snippet, in the second andthird actions, we are setting the display property values for the elementIDs hide_e and elevation. All told, when users click the currently visible<div> called show_e:
. The show_e <div> becomes invisible.
. The hide_e <div> becomes visible and is displayed as a block.
. The elevation <div> becomes visible and is displayed inline.
The result of these actions is shown in Figure 19.4.
There is another set of <div> elements in the code in Listing 19.3, the onesthat control the visibility of the additional photos. These elements are notaffected by the onclick actions in the elevation-related elements. That is tosay, when you click on either Show Elevation or Hide Elevation, the photo-related <div> elements do not change at all. You could show the elevationand not the photos (as seen in Figure 19.4), the photos and not the eleva-tion, or both the elevation and photos at the same time (see Figure 19.5).
This brief example has shown you the very beginning of the layout andinteraction possibilities that await you when you master CSS in conjunc-tion with JavaScript events. For example, you can code your pages so thatyour users can change elements of the style sheet, change to an entirelydifferent style sheet, move blocks of text to other places in the layout, takequizzes or submit forms, and much, much more.
www.it-ebooks.info

ptg999
Using onclick to Change <div> Appearance 405
FIGURE 19.4After clicking “Show Elevation,” thevisibility of it and other <div> ele-ments change based on the com-mands in the onclick attribute.
FIGURE 19.5The page after clicking both ShowElevation and Show Photos fromthe Top of Steptoe Butte.
www.it-ebooks.info

ptg999
406 CHAPTER 19 Responding to Events
SummaryIn this chapter, you’ve learned to use events to detect mouse actions, key-board actions, and other events, such as the loading of the page. You canuse event handlers to perform a simple JavaScript statement when anevent occurs or to call a more complicated function.
JavaScript includes a variety of other events. Many of these are related toforms, which you’ll learn more about in Chapter 26. In a longer example atthe end of this chapter, you saw how to use onclick to show or hide textin a page with some design elements in it. Some new CSS was introduced:the use of the cursor property. Assigning a cursor property of pointerenabled you to indicate to users that particular text was acting as a linkeven though it was not enclosed in <a></a> tags as you are used to seeing.
In the next chapter, you’ll learn about the objects associated with windows,frames, and layers and how they work with JavaScript.
www.it-ebooks.info

ptg999
Workshop 407
Q&AQ. Can you capture mouse or keyboard events on elements other than
text, such as images?
A. Yes, these types of events can be applied to actions related to clickingon or rolling over images and text. However, other multimedia objects,such as embedded YouTube videos or Flash files, are not interactedwith in the same way, as those objects are played via additional soft-ware for which other mouse or keyboard actions are applicable. Forinstance, if you click on a YouTube video that is embedded in your webpage, you are interacting with the YouTube player and no longer youractual web page—that action cannot be captured in the same way.
Q. What happens if I define both onKeyDown and onKeyPress event han-dlers? Will they both be called when a key is pressed?
A. The onKeyDown event handler is called first. If it returns true, theonKeyPress event is called. Otherwise, no keypress event is generated.
Q. When I use the onLoad event, my event handler sometimes executesbefore the page is done loading or before some of the graphics. Isthere a better way?
A. This is a bug in some older browsers. One solution is to add a slightdelay to your script using the setTimeout method.
WorkshopThe workshop contains quiz questions and exercises to help you solidify yourunderstanding of the material covered. Try to answer all questions beforelooking at the “Answers” section that follows.
Quiz1. Which of the following is the correct event handler to detect a mouse
click on a link?
a. onMouseUp
b. onLink
c. onClick
www.it-ebooks.info

ptg999
408 CHAPTER 19 Responding to Events
2. When does the onLoad event handler for the <body> tag execute?
a. When an image is finished loading
b. When the entire page is finished loading
c. When the user attempts to load another page
3. Which of the following event object properties indicates which key waspressed for an onKeyPress event in Internet Explorer?
a. event.which
b. event.keyCode
c. event.onKeyPress
Answers1. c. The event handler for a mouse click is onClick.
2. b. The <body> tag’s onLoad handler executes when the page and all itsimages are finished loading.
3. b. In Internet Explorer, the event.keyCode property stores the charac-ter code for each key press.
Exercises. Add commands to the onClick attributes in Listing 19.4 so that only
one of the <div> elements (the elevation or photos) is visible at a time.
www.it-ebooks.info
ptg999
Now that you’ve gotten your feet wet with basic JavaScript functionality,let’s return to some specific aspects of the Document Object Model (DOM).In this chapter, you’ll learn more about some of the most useful objects inthe DOM—browser windows and frames—and how JavaScript can inter-act with them.
Controlling Windows with ObjectsIn Chapter 15, “Working with the Document Object Model (DOM),” youlearned that you can use DOM objects to represent various parts of thebrowser window and the current HTML document. You also learned that thehistory, document, and location objects are all children of the window object.
In this chapter, you’ll take a closer look at the window object itself. Asyou’ve probably guessed by now, this means you’ll be dealing with brows-er windows. A variation of the window object also enables you to work withframes, as you’ll see later in this chapter.
The window object always refers to the current window (the one containingthe script). The self keyword is also a synonym for the current window.As you’ll learn in the next sections, you can have more than one windowon the screen at the same time and can refer to them with different names.
Properties of the window ObjectAlthough there is normally a single window object, there might be morethan one if you are using pop-up windows or frames. As you learned inChapter 15, the document, history, and location objects are properties (orchildren) of the window object. In addition to these, each window object hasthe following properties:
WHAT YOU’LL LEARN INTHIS CHAPTER:
. How to access and use thewindow object hierarchy
. How to create new win-dows with JavaScript
. How to delay your script’sactions with timeouts
. How to display alerts, con-firmations, and prompts
. How to build a frameset
. How to link betweenframes and windows
. How to use JavaScript towork with frames
. How to use inline frames
CHAPTER 20Using Windows and Frames
www.it-ebooks.info
ptg999
410 CHAPTER 20 Using Windows and Frames
. window.closed—Indicates whether the window has been closed.This only makes sense when working with multiple windowsbecause the current window contains the script and cannot be closedwithout ending the script.
. window.defaultstatus and window.status—The default messagefor the status line and a temporary message to display on the statusline. Some recent browsers disable status line changes by default, soyou might not be able to use these.
. window.frames[]—An array of objects for frames, if the windowcontains them. You’ll learn more about frames later in this chapter.
. window.name—The name specified for a frame or for a windowopened by a script.
. window.opener—In a window opened by a script, this is a referenceto the window containing the script that opened it.
. window.parent—For a frame, a reference to the parent window con-taining the frame.
. window.screen—A child object that stores information about thescreen the window is in—its resolution, color depth, and so on.
. window.self—A synonym for the current window object.
. window.top—A reference to the top-level window when frames arein use.
Creating a New WindowOne of the most convenient uses for the window object is to create a newwindow. You can do this to display a document—for example, a pop-upadvertisement or the instructions for a game—without clearing the currentwindow. You can also create windows for specific purposes, such as navi-gation windows.
You can create a new browser window with the window.open() method. Atypical statement to open a new window looks like this:
WinObj=window.open(“URL”, “WindowName”, “LIST_OF_FEATURES”);
The following are the components of the window.open() statement in theprevious example:
. The WinObj variable is used to store the new window object. You canaccess methods and properties of the new object by using this name.
NOTE
The properties of thewindow.screen object includeheight, width, availHeight,and availWidth (the availableheight and width rather thantotal), and colorDepth, whichindicates the color support ofthe monitor: 8 for 8-bit color, 32for 32-bit color, and so on.
www.it-ebooks.info

ptg999
Controlling Windows with Objects 411
. The first parameter of the window.open() method is a URL, whichwill be loaded into the new window. If it’s left blank, no web pagewill be loaded. In this case, you could use JavaScript to fill the win-dow with content.
. The second parameter specifies a window name (here, WindowName).This is assigned to the window object’s name property and is used torefer to the window.
. The third parameter is a list of optional features, separated by com-mas. You can customize the new window by choosing whether toinclude the toolbar, status line, and other features. This enables youto create a variety of “floating” windows, which might look nothinglike a typical browser window.
The features available in the third parameter of the window.open() methodinclude width and height, to set the size of the window in pixels, and sev-eral features that can be set to either yes (1) or no (0): toolbar, location,directories, status, menubar, scrollbars, and resizable. You can listonly the features you want to change from the default.
This example creates a small window with no toolbar or status line:
SmallWin = window.open(“”,”small”,”width=100,height=120,toolbar=0,status=0”);
Opening and Closing WindowsOf course, you can use JavaScript to close windows as well. Thewindow.close() method closes a window. Browsers don’t normally allowyou to close the main browser window without the user’s permission; thismethod’s main purpose is for closing windows you have created. Forexample, this statement closes a window called updateWindow:
updateWindow.close();
As another example, Listing 20.1 shows an HTML document that enablesyou to open a small new window by pressing a button. You can then pressanother button to close the new window. The third button attempts toclose the current window. Depending on your browser and its settings, thismight or might not work (for example, by default, your browser might dis-allow scripts from closing windows that the script itself did not create oropen). If the script does close the window, most browsers will ask for con-firmation first.
www.it-ebooks.info
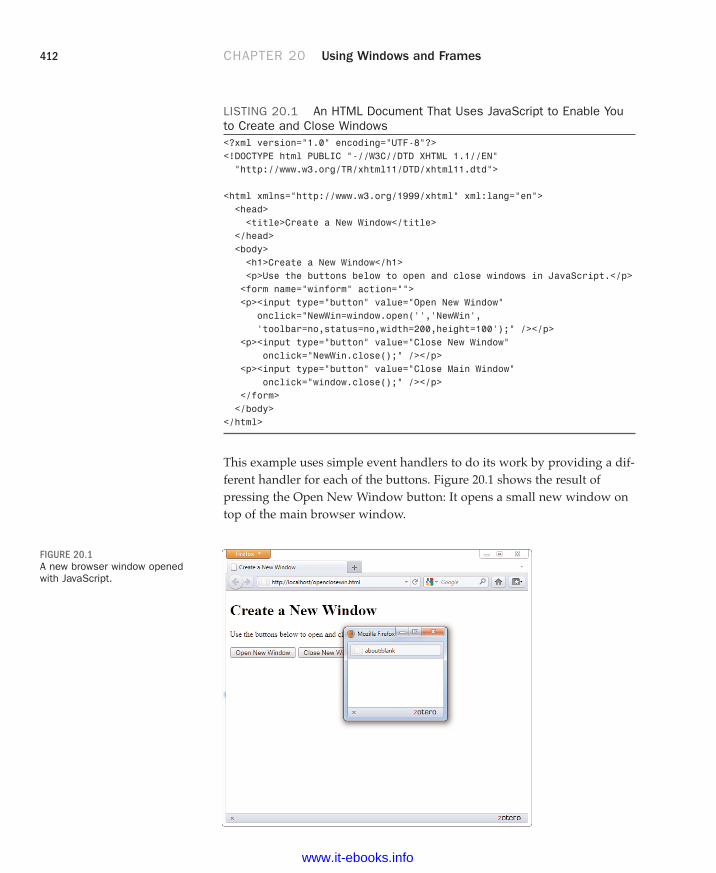
ptg999
412 CHAPTER 20 Using Windows and Frames
LISTING 20.1 An HTML Document That Uses JavaScript to Enable Youto Create and Close Windows<?xml version=”1.0” encoding=”UTF-8”?><!DOCTYPE html PUBLIC “-//W3C//DTD XHTML 1.1//EN”“http://www.w3.org/TR/xhtml11/DTD/xhtml11.dtd”>
<html xmlns=”http://www.w3.org/1999/xhtml” xml:lang=”en”><head><title>Create a New Window</title>
</head><body><h1>Create a New Window</h1><p>Use the buttons below to open and close windows in JavaScript.</p><form name=”winform” action=””><p><input type=”button” value=”Open New Window”
onclick=”NewWin=window.open(‘’,’NewWin’,‘toolbar=no,status=no,width=200,height=100’);” /></p>
<p><input type=”button” value=”Close New Window” onclick=”NewWin.close();” /></p>
<p><input type=”button” value=”Close Main Window” onclick=”window.close();” /></p>
</form></body>
</html>
This example uses simple event handlers to do its work by providing a dif-ferent handler for each of the buttons. Figure 20.1 shows the result ofpressing the Open New Window button: It opens a small new window ontop of the main browser window.
FIGURE 20.1A new browser window openedwith JavaScript.
www.it-ebooks.info

ptg999
Moving and Resizing Windows 413
Moving and Resizing WindowsThe DOM also enables you to move or resize windows. You can do thisusing the following methods for any window object:
. window.moveTo() moves the window to a new position. The parame-ters specify the x (column) and y (row) position.
. window.moveBy() moves the window relative to its current position.The x and y parameters can be positive or negative and are added tothe current values to reach the new position.
. window.resizeTo() resizes the window to the width and heightspecified as parameters.
. window.resizeBy() resizes the window relative to its current size.The parameters are used to modify the current width and height.
As an example, Listing 20.2 shows an HTML document with a simplescript that enables you to resize and move the main window based on val-ues entered in a form.
LISTING 20.2 Moving and Resizing the Current Window<?xml version=”1.0” encoding=”UTF-8”?><!DOCTYPE html PUBLIC “-//W3C//DTD XHTML 1.1//EN”“http://www.w3.org/TR/xhtml11/DTD/xhtml11.dtd”>
<html xmlns=”http://www.w3.org/1999/xhtml” xml:lang=”en”><head><title>Moving and Resizing Windows</title><script type=”text/javascript”>function doIt() {if (document.form1.w.value && document.form1.h.value) {
self.resizeTo(document.form1.w.value, document.form1.h.value);}if (document.form1.x.value && document.form1.y.value) {
self.moveTo(document.form1.x.value, document.form1.y.value);}}</script></head><body><h1>Moving and Resizing Windows</h1><form name=”form1”><p><strong>Resize to:</strong> <br/><input size=”5” type=”text” name=”w” /> pixels wide and <br/><input size=”5” type=”text” name=”h” /> pixels high </p><p><strong>— AND/OR —</strong></p><p><strong>Move to:</strong> <br/>
www.it-ebooks.info

ptg999
414 CHAPTER 20 Using Windows and Frames
X-position: <input size=”5” type=”text” name=”x” /> Y-position: <input size=”5” type=”text” name=”y” /> </p><div><input type=”button” value=”Change Window”
onclick=”doIt();” /></div></form></body>
</html>
In this example, the doIt function is called as an event handler when youclick the Change Window button. This function checks whether you havespecified width and height values. If you have, it uses the self.resizeTo()method to resize the current window. Similarly, if you have specified x andy values, it uses self.moveTo() to move the window. If you have set bothpairs of values, the script will both resize and move your window.
Depending on their settings, some browsers might not allow your script toresize or move the main window. In particular, Firefox can be configuredto disallow it. You can enable it by selecting Options from the menu. Selectthe Content tab, click the Advanced button next to the Enable JavaScriptoption, and enable or disable the Move or Resize Existing Windows option.Other browsers are likely to have similar options available in the Optionsor Preferences menus.
Using TimeoutsSometimes the hardest thing to get a script to do is to do nothing at all—for a specific amount of time. Fortunately, JavaScript includes a built-infunction to do this. The window.setTimeout method enables you to specifya time delay and a command that will execute after the delay passes.
You begin a timeout with a call to the setTimeout() method, which hastwo parameters. The first is a JavaScript statement, or group of statements,enclosed in quotes. The second parameter is the time to wait in millisec-onds (thousandths of seconds). For example, the following statement dis-plays an alert dialog box after 10 seconds:
ident=window.setTimeout(“alert(‘Time’s up!’)”,10000);
A variable (ident in this example) stores an identifier for the timeout. Thisenables you to set multiple timeouts, each with its own identifier. Before atimeout has elapsed, you can stop it with the clearTimeout() method,specifying the identifier of the timeout to stop:
window.clearTimeout(ident);
LISTING 20.2 Continued
CAUTION
Moving or resizing windows is aJavaScript feature you shouldthink twice about before using.These methods are best usedfor resizing or moving pop-upwindows your script has gener-ated—not as a way to force theuser to use your preferred win-dow size, which most users willfind very annoying. Becausebrowser settings may be config-ured to prevent resizing or mov-ing windows, make sure yourscript still works even withoutresizing.
NOTE
Timeouts don’t actually makethe browser stop what it’sdoing. Although the statementyou specify in the setTimeoutmethod won’t be executed untilthe delay passes, the browserwill continue to do other thingswhile it waits (for example, act-ing on event handlers).
www.it-ebooks.info

ptg999
Using Timeouts 415
Normally, a timeout only happens once because the statement you specifyin the setTimeout statement is only executed once. But often, you’ll wantyour statement to execute over and over. For example, your script might beupdating a clock or a countdown and need to execute once per second.
You can make a timeout repeat by issuing the setTimeout() method callagain in the function called by the timeout. Listing 20.3 shows an HTMLdocument that demonstrates a repeating timeout.
LISTING 20.3 Using Timeouts to Update a Page Every Two Seconds<?xml version=”1.0” encoding=”UTF-8”?><!DOCTYPE html PUBLIC “-//W3C//DTD XHTML 1.1//EN”“http://www.w3.org/TR/xhtml11/DTD/xhtml11.dtd”>
<html xmlns=”http://www.w3.org/1999/xhtml” xml:lang=”en”><head><title>Timeout Example</title><script type=”text/javascript”>var counter = 0;
// call Update function 2 seconds after first loadID=window.setTimeout(“Update();”,2000);
function Update() {counter++;textField = document.getElementById(“showText”);textField.innerHTML = “The counter is now at “ + counter;// set another timeout for the next countID=window.setTimeout(“Update();”,2000);}
</script></head><body><h1>Timeout Example</h1><p>The counter will update every two seconds.</p><p>Press RESET or STOP to restart or stop the count.</p><hr/><form name=”form1”><p id=”showText”></p><div><input type=”button” value=”RESET”
onclick=”counter = 0;” /><input type=”button” value=”STOP” onclick=”window.clearTimeout(ID);” />
</div></form></body>
</html>
CAUTION
Like event handlers, timeoutsuse a JavaScript statementwithin quotation marks. Makesure that you use a singlequote (apostrophe) on eachside of each string within thestatement, as shown in the pre-ceding example.
www.it-ebooks.info

ptg999
416 CHAPTER 20 Using Windows and Frames
This program displays a message inside a specially named <p> tag every twoseconds, including a counter that increments each time. The <p> tag is givenan id value of “showText” and the Update() function includes two lines thattells the script that the text should be placed between these two tags:
textField = document.getElementById(“showText”);textField.innerHTML = “The counter is now at “ + counter;
The first line creates a variable called textField that holds the value of theelement given the id value of “showText”. The second line says that giventhat value, the text about the counter and the counter number should beplaced inside the starting and ending tags of the element with the id valueof “showText”—that is the purpose of the innerHTML method.
After the script has loaded and begun the counting, you can use the Resetbutton to start the count over and the Stop button to stop the counting.
This script calls the setTimeout() method when the page loads and againat each update. The Update()function performs the update, adding one tothe counter and setting the next timeout. The Reset button sets the counterto zero, and the Stop button demonstrates the clearTimeout() method.Figure 20.2 shows the display of the timeout example after the counter hasbeen running for a while.
FIGURE 20.2
The output of the timeout example.
www.it-ebooks.info

ptg999
Displaying Dialog Boxes 417
Displaying Dialog BoxesThe window object includes three methods that are useful for displayingmessages and interacting with the user. You’ve already used these in someof your scripts. Here’s a summary:
. window.alert(message) displays an alert dialog box. This dialog boxsimply gives the user a message.
. window.confirm(message) displays a confirmation dialog box. Thisdisplays a message and includes the OK and Cancel buttons. Thismethod returns true if OK is clicked and false if Cancel is clicked.
. window.prompt(message,default) displays a message and promptsthe user for input. It returns the text entered by the user. If the userdoes not enter anything, the default value is used.
To use the confirm and prompt methods, use a variable to receive theuser’s response. For example, this statement displays a prompt and storesthe text the user enters in the text variable:
text = window.prompt(“Enter some text”,”Default value”);
As a further illustration of these types of dialog boxes, Listing 20.4 showsan HTML document that uses buttons and event handlers to enable you totest dialog boxes.
LISTING 20.4 An HTML Document That Uses JavaScript to DisplayAlerts, Confirmations, and Prompts<?xml version=”1.0” encoding=”UTF-8”?><!DOCTYPE html PUBLIC “-//W3C//DTD XHTML 1.1//EN”“http://www.w3.org/TR/xhtml11/DTD/xhtml11.dtd”>
<html xmlns=”http://www.w3.org/1999/xhtml” xml:lang=”en”><head><title>Alerts, Confirmations, and Prompts</title></head><body><h1>Alerts, Confirmations, and Prompts</h1><p>Use the buttons below to test dialogs in JavaScript.</p><form name=”winform”><div><input type=”button” value=”Display an Alert”
onclick=”window.alert(‘This is a test alert.’)” /><input type=”button” value=”Display a Confirmation”
onclick=”window.confirm(‘Would you like to confirm?’);” /><input type=”button” value=”Display a Prompt”
onclick=”window.prompt(‘Enter Text:’,
TIP
You can usually omit the win-dow object when referring tothese methods because it isthe default context of a script(for example, alert(“text”)).
www.it-ebooks.info

ptg999
418 CHAPTER 20 Using Windows and Frames
‘This is the default.’);” /></div></form></body>
</html>
This document displays three buttons, and each one uses an event handlerto display one of the dialog boxes.
Figure 20.3 shows the script in Listing 20.4 in action. The prompt dialogbox is currently displayed and shows the default value.
LISTING 20.4 Continued
FIGURE 20.3The dialog box example’s output,including a prompt dialog box.
Working with FramesBrowsers also support frames, which enable you to divide the browser win-dow into multiple panes. Each frame can contain a separate URL or theoutput of a script.
You might have visited websites in which the browser window seeminglyallowed you to move between several different pages. The truth is that thebrowser really was allowing you to view several pages at once by separat-ing the browser window into regions that contain separate web pages;each region is known as a frame. Of course, from the user’s perspective,everything comes together to form a single window of web content, butthere are separate pages at work.
www.it-ebooks.info

ptg999
Working with Frames 419
A frame is a rectangular region within the browser window that displays a webpage alongside other pages in other frames. At first glance, Figure 20.4 mightlook like an ordinary web page, but it is actually two separate HTML pages,both displayed in the same web browser window. Each page is displayed in itsown frame, arranged horizontally and separated by the horizontal bar.
FIGURE 20.4Frames allow more than one webpage to be displayed at once.
If frames are used, typically they are used to create a framed site that takesadvantage of a static set of navigational links; you can see these links in thetop frame of Figure 20.4. When one of the links in this example is clicked,the top frame will not change; a new page will be loaded and displayed inthe bottom frame (see Figure 20.5).
FIGURE 20.5Clicking Products brings up a newbottom page but leaves the topframe the same.
www.it-ebooks.info

ptg999
420 CHAPTER 20 Using Windows and Frames
You should be aware that frames have long been a vexed issue in webdesign. The advantages have never really outweighed the disadvantages,yet due to differences in browser support for HTML and CSS standards,frames were seen as a way to achieve certain goals despite their shortcom-ings. As a web developer, I do not recommend the use of frames for thefollowing reasons:
. Frames go against the fundamental concept of the Web, which is thehypertextual connection between individual instances of web contentthat can be accessed via a single web address (URL).
. Printing parts of a framed site is very difficult; unless you haveclicked on the specific frame you want to print, and select Print thisFrame from a context menu (if one is available), all that will print isthe frameset itself, which will have no content in it.
. If a frame lacks proper coding, or if it has proper coding but the codeis used for nefarious purposes, a user could get stuck inside a framedsite unable to view external content outside of the frame.
. Frames have been used historically in lieu of standard, professional,accessible methods of web development and design. There is no rea-son to choose the lesser option when the better option of CSS layoutis available.
. For these (and other) reasons, frames have been removed from theHTML5 standard. The antiquated <frame />, <frameset>, and<noframes> tags will simply not be available in the future.
Despite these shortcomings, in the next few sections you will learn how tocreate a very simple framed site. It is quite likely that you will still encounterframed sites, and you might need to know how to re-create the look and feelof the site but without using frames. In that case, it is important to under-stand how frames are constructed so you can successfully deconstruct them.
Additionally, you will learn about a type of frame—the <iframe>—thatdoes serve an important purpose and will still be present in HTML5.
Building a FramesetThis section shows you how to create the simple framed site shown inFigures 20.4 and 20.5. The contents of each frame were created as ordinaryHTML pages. The pages are top.html (for the navigation), home.html,products.html, services.html, and contact.html. These pages don’t containany tags you haven’t already seen in other chapters. A special page known
www.it-ebooks.info

ptg999
Building a Frameset 421
as a frameset document was used to put the pages together; in this case,that document is index.html.
Creating a Frameset DocumentA frameset document is an HTML page that instructs the web browser tosplit its window into multiple frames and specifies which web page shouldbe displayed in each frame.
A frameset document actually has no content. It only tells the browserwhich other pages to load and how to arrange them in the browser win-dow. Listing 20.5 shows the frameset document for the sample framed siteshown in Figures 20.4 and 20.5.
LISTING 20.5 Frameset Document for the Site Shown in Figures 20.4and 20.5<?xml version=”1.0” encoding=”UTF-8”?><!DOCTYPE html PUBLIC “-//W3C//DTD XHTML 1.0 Frameset//EN”“http://www.w3.org/TR/xhtml11/DTD/xhtml11.dtd”>
<html xmlns=”http://www.w3.org/1999/xhtml” xml:lang=”en”><head><title>Sample Framed Site</title>
</head>
<frameset rows=”50,*”><frame src=”top.html” name=”top” /><frame src=”home.html” name=”main” /><noframes><body><h1>Sample Framed Site</h1>Your browser does not support frames. Sorry!
</body></noframes>
</frameset></html>
Listing 20.4 uses a <frameset> tag instead of a <body> tag. No tags thatwould normally be contained in a <body> tag can be within the <frameset>tag. The <frameset> tag in this example includes a rows attribute, meaningthat the frames should be arranged on top of each other like the horizontalrows of a table. If you want your frames to be side by side, use a colsattribute (instead of a rows attribute).
You must specify the sizes of the rows or cols, either as precise pixel val-ues or as percentages of the total size of the browser window. You can also
NOTE
It’s important to notice that theDTD used in this sample pageis not the familiar XHTML 1.1DTD that you’ve been usingthroughout the book. This isbecause frames are not sup-ported in the standard XHTML1.1 DTD. Therefore, to validatea page with frames, you mustinstead use the XHTML 1.0Frameset DTD, which is a spe-cial DTD designed just forpages that use frames.
www.it-ebooks.info

ptg999
422 CHAPTER 20 Using Windows and Frames
use an asterisk (*) to indicate that a frame should fill whatever space isavailable in the window. If more than one frame has an * value, theremaining space will be divided equally between them.
In Listing 20.5, <frameset rows=”50,*”> splits the window vertically intotwo frames. The top frame will be exactly 50 pixels tall, and the bottomframe will take up all the remaining space in the window. The top framecontains the document top.html (see Listing 20.6), and the bottom framecontains home.html (see Listing 20.7).
LISTING 20.6 The top.html Navigation Bar for the Sample Framed Site<?xml version=”1.0” encoding=”UTF-8”?><!DOCTYPE html PUBLIC “-//W3C//DTD XHTML 1.0 Transitional//EN”“http://www.w3.org/TR/xhtml11/DTD/xhtml1-transitional.dtd”>
<html xmlns=”http://www.w3.org/1999/xhtml” xml:lang=”en”><head><title>Sample Framed Site</title><style type=”text/css”>body { background-color:#5F9F9F; }a { color: #FFFFFF; }.main {
text-align:center;color:#FFFFFF;font-weight:bold;font-size:16pt;
}</style>
</head><body><div class=”main”><a href=”home.html” target=”main”>HOME</a> ::<a href=”products.html” target=”main”>PRODUCTS</a> ::<a href=”services.html” target=”main”>SERVICES</a> ::<a href=”contact.html” target=”main”>CONTACT</a>
</div></body>
</html>
LISTING 20.7 The home.html Single Content Frame Within the SampleFramed Site<?xml version=”1.0” encoding=”UTF-8”?><!DOCTYPE html PUBLIC “-//W3C//DTD XHTML 1.1//EN”“http://www.w3.org/TR/xhtml11/DTD/xhtml11.dtd”>
<html xmlns=”http://www.w3.org/1999/xhtml” xml:lang=”en”><head><title>Sample Framed Site</title>
TIPAfter the framesets in Listing20.6, there is a complete webpage between the <body> and</body> tags. Notice that thecontent of this page doesn’tappear at all in Figure 20.4 orFigure 20.5. All web browsersthat support frames will ignoreanything between the<noframes> and </noframes>tags.
All major browsers these dayssupport frames, so the issue offrames compatibility is muchless significant now than inyears past. Even so, it’s easyenough to include the<noframes> tag and cover thefew users who might still useancient browsers—if you useframes at all, that is.
www.it-ebooks.info

ptg999
Linking Between Frames and Windows 423
<style type=”text/css”>body { background-color:#5F9F9F; }</style>
</head><body><h1 style=”text-align:center”>Sample Framed Site: Home</h1><p style=”text-align:center”>This is an example of the
“home” page.</p></body>
</html>
In this example, the top navigation frame has a fixed height of 50 pixels.But because you can’t predict the size of the window in which users willview your web page, it is often convenient to use percentages rather thanexact pixel values to dictate the size of the rows and columns. For example,to make a left frame 20% of the width of the browser window with a rightframe taking up the remaining 80%, you would type the following:
<frameset cols=”20%,80%”>
Whenever you specify any frame size in pixels, it’s a good idea to includeat least one frame in the same frameset with a variable (*) width so thatthe document can grow to fill a window of any size.
Adding Individual FramesWithin the <frameset> and </frameset> tags, you should have a <frame />tag indicating which HTML document to display in each frame. Note that ifyou have fewer <frame /> tags than the number of frames defined in the<frameset> tag, any remaining frames will be left blank.
Include a src attribute in each <frame> tag with the address of the webpage to load in that frame. You can put the address of an image file,instead of a web page, if you just want a frame with a single image in it.
Linking Between Frames andWindowsThe real power of frames begins to emerge when you give a frame a uniquename with the name attribute in the <frame /> tag. You can then make anylink on the page change the contents of that frame by using the targetattribute in an <a> tag. For example, Listing 20.6 includes the following tag:
<frame src=”home.html” name=”main” />
NOTE
The pages in Listing 20.6 andListing 20.7 use the XHTML 1.0Transitional and XHTML 1.1DTDs, respectively. The XHTML1.1 DTD is newer and muchstricter, but the use of the target attribute in Listing 20.6requires the use of the XHTML1.0 Transitional DTD for validity;there is nothing in Listing 20.7that is invalid in XHTML 1.1.
LISTING 20.7 Continued
www.it-ebooks.info

ptg999
424 CHAPTER 20 Using Windows and Frames
This code displays the home.html page in that frame when the page loadsand names the frame “main”.
In the code for the top frame, which is shown in Listing 20.7, you will seethe following link:
<a href=”services.html” target=”main”>SERVICES</a>
When the user clicks this link, services.html is displayed in the framenamed main (the lower frame). If the target=”main” attribute had been leftout, the services.html page would be displayed in the current (top) frameinstead.
Modifying Frame BordersThere are HTML attributes that you can use with your frame code to getrid of the frame dividers, make more space in small frames by reducing thesize of the margins, and force frames not to have scrollbars. Listing 20.8shows a modified version of the code in Listing 20.4. The two changesmade to the code are the addition of the following attributes to the<frame> tags: scrolling=”no” and frameborder=”0”.
LISTING 20.8 Frameset Document for the Site Shown in Figure 20.6<?xml version=”1.0” encoding=”UTF-8”?><!DOCTYPE html PUBLIC “-//W3C//DTD XHTML 1.0 Frameset//EN”“http://www.w3.org/TR/xhtml11/DTD/xhtml11.dtd”>
<html xmlns=”http://www.w3.org/1999/xhtml” xml:lang=”en”><head><title>Sample Framed Site</title>
</head>
<frameset rows=”50,*”><frame src=”top.html” name=”top” scrolling=”no” frameborder=”0” /><frame src=”home.html” name=”main” scrolling=”no” frameborder=”0”/><noframes><body><h1>Sample Framed Site</h1>Your browser does not support frames. Sorry!
</body></noframes>
</frameset></html>
NOTETechnically speaking, the nametag is outdated and has beenreplaced by the id tag.
However, current web browsersstill rely on name instead of idwhen it comes to identifyingframes as targets and the useof name is still valid XHTML. So, for now, you need to stickwith the name attribute whenidentifying frames. Of course,it wouldn’t hurt to use bothattributes.
www.it-ebooks.info

ptg999
Linking Between Frames and Windows 425
Using JavaScript Objects for FramesWhen a window contains multiple frames, each frame is represented inJavaScript by a frame object. This object is equivalent to a window object,but it is used for dealing specifically with that frame. The frame object’sname is the same as the NAME attribute you give it in the <frame> tag.
Remember the window and self keywords, which refer to the current win-dow? When you are using frames, these keywords refer to the currentframe instead. Another keyword, parent, enables you to refer to the mainwindow.
Each frame object in a window is a child of the parent window object.Suppose you define a set of frames using the following HTML:
<frameset rows=”*,*” cols=”*,*”><frame name=”topleft” src=”topleft.html”><frame name=”topright” src=”topright.html”><frame name=”bottomleft” src=”botleft.html”><frame name=”bottomright” src=”botright.html”></frameset>
This simply divides the window into quarters. If you have a JavaScriptscript in the topleft.html file, it would refer to the other windows as parent.topright, parent.bottomleft, and so on. The keywords windowand self would refer to the topleft frame.
FIGURE 20.6This is the page whose code isshown in Listing 20.8 after attrib-utes were added to the <frame />tags.
NOTE
If you use nested framesets,things are a bit more complicat-ed. window still represents thecurrent frame, parent repre-sents the frameset containingthe current frame, and top rep-resents the main frameset thatcontains all the others.
www.it-ebooks.info
ptg999
426 CHAPTER 20 Using Windows and Frames
The frames ArrayRather than referring to frames in a document by name, you can use theframes array. This array stores information about each of the frames in thedocument. The frames are indexed starting with zero and beginning withthe first <frame> tag in the frameset document.
For example, you could refer to the frames defined in the previous exam-ple using array references:
. parent.frames[0] is equivalent to the topleft frame.
. parent.frames[1] is equivalent to the topright frame.
. parent.frames[2] is equivalent to the bottomleft frame.
. parent.frames[3] is equivalent to the bottomright frame.
You can refer to a frame using either method interchangeably, and depend-ing on your application, you should use the most convenient method. Forexample, a document with 10 frames would probably be easier to use bynumber, but a simple two-frame document is easier to use if the frameshave meaningful names.
Using Inline Frames Inline frames do not have the same usability issues that regular frames do,but inline frames are used for different reasons. Instead of being a purelayout trick, the <iframe> is used much like an <object> tag—to place achunk of something within an existing document. In the case of the<object> tag, that “something” is usually multimedia. You can use an<iframe> to embed an entirely separate HTML document, image, or othersource. Listing 20.9 and Listing 20.10 show the code to produce the inlineframe shown in Figure 20.7.
LISTING 20.9 XHTML Code to Call an <iframe><?xml version=”1.0” encoding=”UTF-8”?><!DOCTYPE html PUBLIC “-//W3C//DTD XHTML 1.0 Transitional//EN”“http://www.w3.org/TR/xhtml1/DTD/xhtml1-transitional.dtd”>
<html xmlns=”http://www.w3.org/1999/xhtml” xml:lang=”en”><head><title>Using an iframe</title><style type=”text/css”>body { background-color:#CCCCCC; }
www.it-ebooks.info

ptg999
Using Inline Frames 427
iframe { width:500px;height:100px;border:1px solid black;background-color:#FFFFFF;
}</style>
</head><body style=”background:#CCCCCC”>
<h1 style=”text-align:center”>Inline Frame Example</h1><div style=”text-align:center”>
<iframe src=”iframe_src.html”><p>Uh oh...your browser does not support iframes.</p></iframe>
</div></body>
</html>
LISTING 20.10 The Source of the <iframe> Called in Listing 20.9<?xml version=”1.0” encoding=”UTF-8”?><!DOCTYPE html PUBLIC “-//W3C//DTD XHTML 1.1//EN”“http://www.w3.org/TR/xhtml1/DTD/xhtml11.dtd”>
<html xmlns=”http://www.w3.org/1999/xhtml” xml:lang=”en”><head><title>iframe source</title><style type=”text/css”>body { background-color:#FFFFFF; }p {
color: #FF0000;font-weight: bold;
}</style>
</head><body>
<p>I AM A SOURCE DOCUMENT...inside an iframe.</p></body>
</html>
The only XHTML code you haven’t yet encountered in Listing 20.9 is the<iframe> itself. You can see that it requires a value for the src attribute—the source—and that you can use styles to define a width, height, bordertype, and background color (among other things). Listing 20.10 shows thesource of the <iframe>, which is just a regular file with some text andstyles in it.
LISTING 20.9 Continued
www.it-ebooks.info

ptg999
428 CHAPTER 20 Using Windows and Frames
Inline frames are often used to bring in content from other websites.Common uses include serving ads to users from third-party advertisingservices and using Google’s Site Search to display search results to yourusers (leveraging Google’s search technology). Figure 20.8 shows an instanceof an <iframe> used to pull search results into a custom site template.
FIGURE 20.8Using an <iframe> to displayGoogle Custom Search results.
FIGURE 20.7Listing 20.9 calls the inline framewhose code is shown in Listing20.10.
www.it-ebooks.info

ptg999
Summary 429
In Figure 20.8, everything in the white area is actually content in an<iframe>, with the source being a script on Google’s website that runs andthen displays content within the template at the Digital Inspiration website.If you look closely at Figure 20.8—and I do not believe you can see it in thefigure—you can see a faint gray border around the actual <iframe> itself.
Unlike the <frame /> you learned about earlier in this chapter, the<iframe> is here to stay and is still a part of HTML5.
SummaryIn this chapter, you’ve learned how to use the window object to work withbrowser windows and used its properties and methods to set timeouts anddisplay dialog boxes. You’ve also learned how JavaScript can work withframed documents.
As to the framed documents themselves, you learned how to display morethan one page simultaneously by splitting the web browser window intoframes. You learned how to use a frameset document to define the size andarrangement of the frames and which web content will be loaded into eachframe. You learned how to create links that change the contents of anyframe you choose while leaving the other frames unchanged. You alsolearned about a few optional settings that control the appearance of resiz-able borders and scrollbars in frames. Finally, you learned how to use theinline frame to display content from your site or other websites.
Table 20.1 summarizes the tags and attributes covered in this chapter.
www.it-ebooks.info

ptg999
430 CHAPTER 20 Using Windows and Frames
TABLE 20.1 HTML Tags and Attributes Covered in Chapter 20
Tag/Attribute Function
<frame /> Defines a single frame within a <frameset>.
Attributes
src=”url” The URL of the document to be displayed in thisframe.
id=”name” A name to be used for targeting this frame withthe target attribute in <a href> links; compli-ant with XHTML.
name=”name” A name to be used for targeting this frame withthe target attribute in <a href> links. Willeventually be replaced by id but for the timebeing is still useful because it works in currentweb browsers.
scrolling=”yes/no/auto” Determines whether a frame has scrollbars.Possible values are yes, no, and auto.
noresize=”noresize” Prevents the user from resizing this frame (andpossibly adjacent frames) with the mouse.
<frameset>...</frameset> Divides the main window into a set of framesthat can each display a separate document.
rows=”numrows” Splits the window or frameset vertically into anumber of rows specified by a number (such as7), a percentage of the total window width (suchas 25%), or an asterisk (*) indicating that a frameshould take up all the remaining space or dividethe space evenly between frames (if multiple *frames are specified).
cols=”numcols” Works similar to rows, except that the window orframeset is split horizontally into columns.
frameborder=”1/0” Specifies whether to display a border for aframe. Options are 1 (yes) and 0 (no).
<noframes>...</noframes> Provides an alternative document body in<frameset> documents for browsers that do notsupport frames (usually encloses<body>...</body>).
<iframe>...</iframe> Creates an inline frame; accepts all the sameattributes as does <frame /> and can be styledwith CSS.
www.it-ebooks.info

ptg999
Workshop 431
Q&AQ. When a script is running in a window created by another script, how
can it refer back to the original window?
A. JavaScript includes the window.opener property, which lets you refer tothe window that opened the current window.
Q. How can I update two frames at once when the user clicks on a singlelink?
A. You can do this by using an event handler and including two statementsto load URLs into different frames.
Q. Can I display other users’ web pages in one frame and my own pagesin another frame at the same time? What if those other sites useframes, too?
A. You can load any document from anywhere on the Internet (or anintranet) into a frame. If the document is a frameset, its frames aresized to fit within the existing frame into which you load it.
For example, you could put a list of your favorite links in one frame anduse a separate frame to display the pages that those links refer to.This makes it easy to provide links to other sites without risking thatsomeone will get lost and never come back to your own site.
You should also be aware that framing somebody else’s pages so thatthey appear to be part of your own site might get you in legal trouble,so be sure to get explicit written permission from anyone whose pagesyou plan to put within one of your frames (just as you would if you wereputting images or text from their site on your own pages).
WorkshopThe workshop contains quiz questions and exercises to help you solidify yourunderstanding of the material covered. Try to answer all questions beforelooking at the “Answers” section that follows.
Quiz1. Which of the following methods displays a dialog box with OK and
Cancel buttons and waits for a response?
a. window.alert
b. window.confirm
c. window.prompt
www.it-ebooks.info

ptg999
432 CHAPTER 20 Using Windows and Frames
2. What does the window.setTimeout method do?
a. Executes a JavaScript statement after a delay
b. Locks up the browser for the specified amount of time
c. Sets the amount of time before the browser exits automatically
3. You’re working with a document that contains three frames with thenames first, second, and third. If a script in the second frameneeds to refer to the first frame, what is the correct syntax?
a. window.first
b. parent.first
c. frames.first
4. What <iframe> code would produce a borderless <iframe> with a whitebackground that encompasses 98% of the width of the page and is250 pixels high?
Answers1. b. The window.confirm method displays a dialog box with OK and
Cancel buttons.
2. a. The window.setTimeout method executes a JavaScript statementafter a delay.
3. b. The script in the second frame would use parent.first to refer tothe first frame.
4. Use the following code:
<iframe src=”some_source.html” style=”width:98%;height:250px;border:none; background-color:#FFFFFF;”>
<p>Put message here for people not able to see the inlineframe.</p></iframe>
Exercises. Using timeouts and JavaScript to display date and time (which you
learned earlier in this book), create a script to reload automaticallyevery second or two to display a “live” clock.
. Think of some ways you can use an <iframe> or two in your site—perhapsfor an ad or perhaps to leverage the free Google Site Search that you canoffer to your users. Leave room in your design for that element.
www.it-ebooks.info

ptg999
In this chapter, you’ll learn some guidelines for creating scripts and pagesthat are easy to maintain, easy to use, and follow web standards. This isknown as unobtrusive scripting: Scripts add features without getting in theway of the user, the developer maintaining the code, or the designer build-ing the layout of the site. You’ll also learn how to make sure your scriptswill work in multiple browsers and won’t stop working when a newbrowser comes along.
Scripting Best PracticesAs you start to develop more complex scripts, it’s important to know somescripting best practices. These are guidelines for using JavaScript that moreexperienced programmers have learned the hard way. Here are a few ofthe benefits of following these best practices:
. Your code will be readable and easy to maintain, whether you’returning the page over to someone else or just trying to rememberwhat you did a year ago.
. You’ll create code that follows standards and won’t be crippled by anew version of a particular browser.
. You’ll create pages that work even without JavaScript.
. It will be easy to adapt code you create for one site to another site orproject.
. Your users will thank you for creating a site that is easy to use andeasy to fix when things go wrong.
WHAT YOU’LL LEARN INTHIS CHAPTER:
. Best practices for creatingunobtrusive scripts
. Separating content, presen-tation, and behavior
. Following web standards tocreate cross-browserscripts
. Reading and displayingbrowser information
. Using feature sensing toavoid errors
. Supporting non-JavaScriptbrowsers
CHAPTER 21Using Unobtrusive JavaScript
www.it-ebooks.info
ptg999
434 CHAPTER 21 Using Unobtrusive JavaScript
Whether you’re writing an entire AJAX web application or simply enhanc-ing a page with a three-line script, it’s useful to know some of the conceptsthat are regularly considered by those who write complex scripts for a liv-ing. The following sections introduce some of these best practices.
Content, Presentation, and BehaviorWhen you create a web page, or especially an entire site or application,you’re dealing with three key areas: content, presentation, and behavior—allof which you’ve learned about in the previous chapters.
. Content consists of the words that a visitor can read on your pages.You create the content as text and mark it up with HTML to definedifferent classes of content—headings, paragraphs, links, and so on.
. Presentation is the appearance and layout of the words on eachpage—text formatting, fonts, colors, and graphics. Although it wascommon in the early days of the Web to create the presentation usingHTML only, you can now use Cascading Style Sheets (CSS) to definethe presentation.
. Behavior is what happens when you interact with a page—items thathighlight when you move over them, forms you can submit, and soon. This is where JavaScript comes in, along with server-side lan-guages such as PHP.
It’s a good idea to keep these three areas in mind, especially as you createlarger sites. Ideally, you want to keep content, presentation, and behaviorseparated as much as possible. One good way to do this is to create anexternal CSS file for the presentation, an external JavaScript file for thebehavior, and link them to the HTML document.
Keeping things separated like this makes it easier to maintain a large site—ifyou need to change the color of the headings, for example, you can make aquick edit to the CSS file without having to look through all of the HTMLmarkup to find the right place to edit. It also makes it easy for you to reusethe same CSS and JavaScript on multiple pages of a site. Last but not least,this will encourage you to use each language where its strengths lie, makingyour job easier.
Progressive EnhancementOne of the old buzzwords of web design was graceful degradation. The ideawas that you could build a site that used all the bells and whistles of the
www.it-ebooks.info

ptg999
Scripting Best Practices 435
latest browsers, as long as it would “gracefully degrade” to work on olderbrowsers. This mostly meant testing on a few older browsers and hoping itworked, and there was always the possibility of problems in browsers thatdidn’t support the latest features.
Ironically, you might expect browsers that lack the latest features to be older,less popular ones, but some of the biggest problems are with brand-newbrowsers—those included with mobile phones and other new devices, all ofwhich are primitive compared to the latest browsers running on computers.
One new approach to web design that addresses this problem is known asprogressive enhancement. The idea is to keep the HTML documents as simpleas possible so that they’ll definitely work in even the most primitivebrowsers. After you’ve tested that and made sure the basic functionality isthere, you can add features that make the site easier to use or better look-ing for those with new browsers.
If you add these features unobtrusively, they have little chance of prevent-ing the site from working in its primitive HTML form. Here are someguidelines for progressive enhancement:
. Enhance the presentation by adding rules to a separate CSS file. Tryto avoid using HTML markup strictly for presentation, such as <em>for boldface or <blockquote> for an indented section.
. Enhance behavior by adding scripts to an external JavaScript file.
. Add events without using inline event handlers, as described inChapter 19, “Responding to Events,” and later in this chapter.
. Use feature sensing, described later this chapter, to ensure thatJavaScript code only executes on browsers that support the featuresit requires.
Adding Event HandlersIn Chapter 19, you learned that there is more than one way to set up anevent handler. The simplest way is to add them directly to an HTML tag.For example, this <body> tag has an event handler that calls a functioncalled Startup.
<body onLoad=”Startup();”>
This method still works, but it does mean putting JavaScript code in theHTML page, which means you haven’t fully separated content and
NOTE
The term progressive enhance-ment first appeared in a pres-entation and article on thistopic by Steve Champeon. Theoriginal article, along with manymore web design articles, isavailable on his company’s web-site at http://hesketh.com/.
www.it-ebooks.info

ptg999
436 CHAPTER 21 Using Unobtrusive JavaScript
behavior. To keep things entirely separate, you can set up the event han-dler in the JavaScript file instead, using syntax like this:
window.onload=Startup;
Right now, this is usually the best way to set up events: It keeps JavaScriptout of the HTML file, and it works in all modern browsers. However, itdoes have one problem: You can’t attach more than one event to the sameelement of a page. For example, you can’t have two different onLoad eventhandlers that both execute when the page loads.
When you’re the only one writing scripts, this is no big deal—you cancombine the two into one function. But when you’re trying to use two orthree third-party scripts on a page, and all of them want to add an onLoadevent handler to the body, you have a problem.
The W3C Event ModelTo solve this problem and standardize event handling, the W3C created anevent model as part of the DOM level 2 standard. This uses a method,addEventListener(), to attach a handler to any event on any element. Forexample, the following uses the W3C model to set up the same onLoadevent handler as the previous examples:
window.addEventListener(‘load’, Startup, false);
The first parameter of addEventListener() is the event name without theon prefix—load, click, mouseover, and so on. The second parameter speci-fies the function to handle the event, and the third is an advanced flag thatindicates how multiple events should be handled. (false works for mostpurposes.)
Any number of functions can be attached to an event in this way. Becauseone event handler doesn’t replace another, you use a separate function,removeEventListener(), which uses the same parameters:
window.removeEventListener(‘load’, Startup, false);
The problem with the W3C model is that Internet Explorer (versions 6, 7and 8) doesn’t support it (it has been introduced in IE9). Instead, it sup-ports a proprietary method, attachEvent(), which does much the samething. Here’s the Startup event handler defined Microsoft-style:
window.attachEvent(‘onload’, Startup);
www.it-ebooks.info
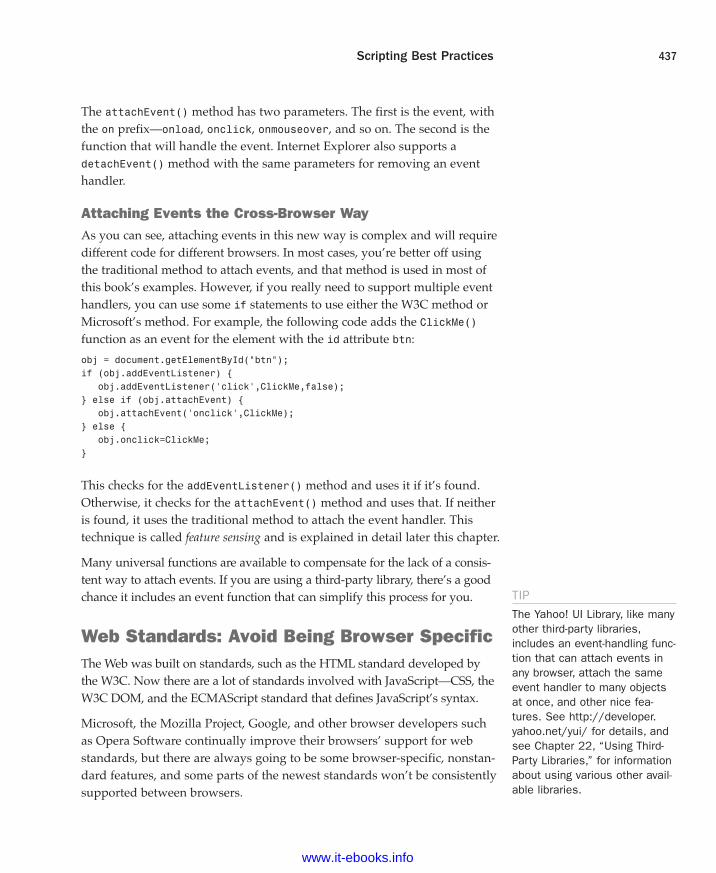
ptg999
Scripting Best Practices 437
The attachEvent() method has two parameters. The first is the event, withthe on prefix—onload, onclick, onmouseover, and so on. The second is thefunction that will handle the event. Internet Explorer also supports adetachEvent() method with the same parameters for removing an eventhandler.
Attaching Events the Cross-Browser WayAs you can see, attaching events in this new way is complex and will requiredifferent code for different browsers. In most cases, you’re better off usingthe traditional method to attach events, and that method is used in most ofthis book’s examples. However, if you really need to support multiple eventhandlers, you can use some if statements to use either the W3C method orMicrosoft’s method. For example, the following code adds the ClickMe()function as an event for the element with the id attribute btn:
obj = document.getElementById(“btn”);if (obj.addEventListener) {
obj.addEventListener(‘click’,ClickMe,false);} else if (obj.attachEvent) {
obj.attachEvent(‘onclick’,ClickMe);} else {
obj.onclick=ClickMe;}
This checks for the addEventListener() method and uses it if it’s found.Otherwise, it checks for the attachEvent() method and uses that. If neitheris found, it uses the traditional method to attach the event handler. Thistechnique is called feature sensing and is explained in detail later this chapter.
Many universal functions are available to compensate for the lack of a consis-tent way to attach events. If you are using a third-party library, there’s a goodchance it includes an event function that can simplify this process for you.
Web Standards: Avoid Being Browser SpecificThe Web was built on standards, such as the HTML standard developed bythe W3C. Now there are a lot of standards involved with JavaScript—CSS, theW3C DOM, and the ECMAScript standard that defines JavaScript’s syntax.
Microsoft, the Mozilla Project, Google, and other browser developers suchas Opera Software continually improve their browsers’ support for webstandards, but there are always going to be some browser-specific, nonstan-dard features, and some parts of the newest standards won’t be consistentlysupported between browsers.
TIP
The Yahoo! UI Library, like manyother third-party libraries,includes an event-handling func-tion that can attach events inany browser, attach the sameevent handler to many objectsat once, and other nice fea-tures. See http://developer.yahoo.net/yui/ for details, andsee Chapter 22, “Using Third-Party Libraries,” for informationabout using various other avail-able libraries.
www.it-ebooks.info

ptg999
438 CHAPTER 21 Using Unobtrusive JavaScript
Although it’s perfectly fine to test your code in multiple browsers and dowhatever it takes to get it working, it’s a good idea to follow the standardsrather than browser-specific techniques when you can. This ensures thatyour code will work on future browsers that improve their standards sup-port, whereas browser-specific features might disappear in new versions.
Documenting Your CodeAs you create more complex scripts, don’t forget to include comments inyour code to document what it does, especially when some of the codeseems confusing or is difficult to get working. It’s also a good idea to docu-ment all the data structures, variables, and function arguments used in alarger script.
Comments are a good way to organize code, and will help you work onthe script in the future. If you’re doing this for a living, you’ll definitelyneed to use comments so that others can work on your code as easily asyou can.
UsabilityWhile you’re adding cool features to your site, don’t forget aboutusability— making things as easy, logical, and convenient as possible forusers of your site. Although there are many books and websites devoted tousability information, a bit of common sense goes a long way.
For example, suppose you use a drop-down list as the only way to navi-gate between pages of your site. This is a common use for JavaScript, andit works well, but is it usable? Try comparing it to a simple set of linksacross the top of a page.
. The list of links lets you see at a glance what the site contains; thedrop-down list requires you to click to see the same list.
. Users expect links and can spot them quickly—a drop-down list ismore likely to be part of a form than a navigation tool, and thuswon’t be the first thing they look for when they want to navigateyour site.
. Navigating with a link takes a single click—navigating with thedrop-down list takes at least two clicks.
Remember to consider the user’s point of view whenever you addJavaScript to a site, and be sure you’re making the site easier to use—or at
NOTE
One reason to make sure youfollow standards is that yourpages can be better interpretedby search engines, which oftenhelps your site get search traf-fic. Separating content, presen-tation, and behavior is alsogood for search enginesbecause they can focus on theHTML content of your site with-out having to skip overJavaScript or CSS.
www.it-ebooks.info

ptg999
Scripting Best Practices 439
least not harder to use. Also, make sure the site is easy to use even withoutJavaScript; although this might only apply to a small percentage of yourusers, that percentage is likely to include users of screen readers or othersoftware packages necessary for people with visual impairments.
Design PatternsIf you learn more about usability, you’ll undoubtedly see design patternsmentioned. This is a computer science term meaning “an optimal solutionto a common problem.” In web development, design patterns are ways ofdesigning and implementing part of a site that webmasters run into overand over.
For example, if you have a site that displays multiple pages of data, you’llhave Next Page and Previous Page links, and perhaps numeric links foreach page. This is a common design pattern—a problem many web design-ers have had to solve, and one with a generally agreed-upon solution.Other common web design patterns include a login form, a search engine,or a list of navigation links for a site.
Of course, you can be completely original and make a search engine, ashopping cart, or a login form that looks nothing like any other, but unlessyou have a way of making them even easier to use, you’re better off fol-lowing the pattern and giving your users an experience that matches theirexpectations.
Although you can find some common design patterns just by browsing sitessimilar to yours and noticing how they solved particular problems, there arealso sites that specialize in documenting these patterns, and they’re a goodplace to start if you need ideas on how to make your site work.
AccessibilityOne final aspect of usability to consider is accessibility—making your site asaccessible as possible for all users, including the disabled. For example,blind users might use a text-reading program to read your site, which willignore images and most scripts. More than just good manners, accessibilityis mandated by law in some countries.
The subject of accessibility is complex, but you can get most of the waythere by following the philosophy of progressive enhancement: Keep theHTML as simple as possible, keep JavaScript and CSS separate, and makeJavaScript an enhancement rather than a requirement for using your site.
TIP
The Yahoo! Developer Networkdocuments a variety of designpatterns used on its network ofsites, many of which are imple-mented using JavaScript:http://developer.yahoo.net/ypatterns/.
NOTE
Ensuring that sites functionwithout JavaScript is one of thefirst steps toward accessibilitycompliance. For more informa-tion on accessibility, seehttp://www.w3.org/WAI/.
www.it-ebooks.info

ptg999
440 CHAPTER 21 Using Unobtrusive JavaScript
Reading Browser InformationIn Chapter 15, “Working with the Document Object Model (DOM),” youlearned about the various objects (such as window and document) that rep-resent portions of the browser window and the current web document.JavaScript also includes an object called navigator that you can use toread information about the user’s browser.
The navigator object isn’t part of the DOM, so you can refer to it directly.It includes a number of properties, each of which tells you somethingabout the browser. These include the following:
. navigator.appCodeName is the browser’s internal code name, such asMozilla.
. navigator.appName is the browser’s name, such as Netscape orMicrosoft Internet Explorer.
. navigator.appVersion is the version of the browser being used—forexample, 5.0 (Windows).
. navigator.userAgent is the user-agent header, a string that thebrowser sends to the web server when requesting a web page. Itincludes the entire version information—for example, Mozilla/5.0(Windows NT 6.1; WOW64; rv:5.0) Gecko/20100101 Firefox/5.0.
. navigator.language is the language (such as English or Spanish) ofthe browser. This is stored as a code, such as en_US for U.S. English.This property is supported by Chrome, Firefox, Opera, and Safari.
. navigator.platform is the computer platform of the current brows-er. This is a short string, such as Linux i686, Win32, or MacPPC. Youcan use this to enable any platform-specific features—for example,ActiveX components.
Displaying Browser InformationAs an example of how to read the navigator object’s properties, Listing21.1 shows a script that displays a list of the properties and their values forthe current browser.
LISTING 21.1 A Script to Display Information About the Browser<?xml version=”1.0” encoding=”UTF-8”?><!DOCTYPE html PUBLIC “-//W3C//DTD XHTML 1.1//EN”“http://www.w3.org/TR/xhtml11/DTD/xhtml11.dtd”>
<html xmlns=”http://www.w3.org/1999/xhtml” xml:lang=”en”><head>
NOTE
As you might have guessed, thenavigator object is namedafter Netscape Navigator, thebrowser that originally support-ed JavaScript. Fortunately, thisobject is also supported byInternet Explorer and mostother recent browsers.
www.it-ebooks.info

ptg999
Reading Browser Information 441
<title>Browser Information</title></head><body><h1>Browser Information</h1>
<p>The <strong>navigator</strong> object contains the following information about the browser you are using:</p><script type=”text/javascript”>document.write(“<ul>”);document.write(“<li><strong>Code Name:</strong> “ + navigator.appCodeName);
document.write(“<li><strong>App Name:</strong> “ + navigator.appName);
document.write(“<li><strong>App Version:</strong> “ + navigator.appVersion);
document.write(“<li><strong>User Agent:</strong> “ + navigator.userAgent);
document.write(“<li><strong>Language:</strong> “ + navigator.language);
document.write(“<li><strong>Platform:</strong> “ + navigator.platform);
document.write(“</ul>”);</script>
</body></html>
This script includes a basic HTML document. A script is used within thebody of the document to display each of the properties of the navigatorobject using the document.write() statement.
To try this script, load it into the browser of your choice. If you have morethan one browser or browser version handy, try it in each one. Firefox’sdisplay of the script is shown in Figure 21.1.
LISTING 21.1 Continued
FIGURE 21.1Firefox displays the browser information script.
www.it-ebooks.info
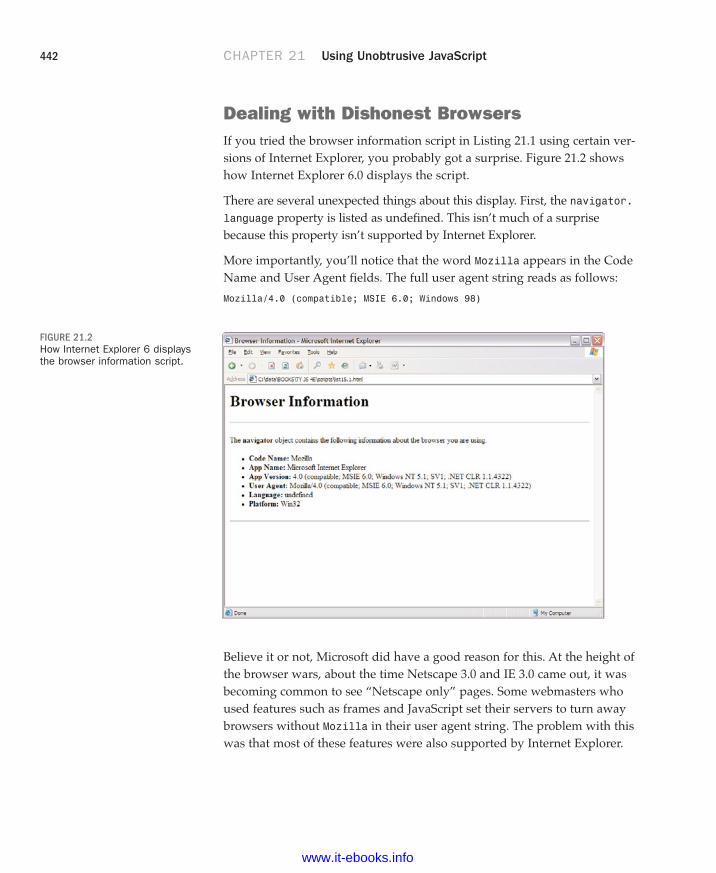
ptg999
442 CHAPTER 21 Using Unobtrusive JavaScript
Dealing with Dishonest BrowsersIf you tried the browser information script in Listing 21.1 using certain ver-sions of Internet Explorer, you probably got a surprise. Figure 21.2 showshow Internet Explorer 6.0 displays the script.
There are several unexpected things about this display. First, the navigator.language property is listed as undefined. This isn’t much of a surprisebecause this property isn’t supported by Internet Explorer.
More importantly, you’ll notice that the word Mozilla appears in the CodeName and User Agent fields. The full user agent string reads as follows:
Mozilla/4.0 (compatible; MSIE 6.0; Windows 98)
FIGURE 21.2How Internet Explorer 6 displaysthe browser information script.
Believe it or not, Microsoft did have a good reason for this. At the height ofthe browser wars, about the time Netscape 3.0 and IE 3.0 came out, it wasbecoming common to see “Netscape only” pages. Some webmasters whoused features such as frames and JavaScript set their servers to turn awaybrowsers without Mozilla in their user agent string. The problem with thiswas that most of these features were also supported by Internet Explorer.
www.it-ebooks.info
ptg999
Cross-Browser Scripting 443
Microsoft solved this problem in IE 4.0 by making IE’s user agent readMozilla, with the word compatible in parentheses. This allows IE users toview those pages, but still includes enough details to tell web serverswhich browser is in use.
You’ve probably already noticed the other problem with Internet Explorer6.0’s user agent string: the portion reading Mozilla/4.0. Not only is IEclaiming to be Netscape, but it’s also masquerading as version 4.0. Why?
As it turns out, this was another effort by Microsoft to stay one step aheadof the browser wars, although this one doesn’t make quite as much sense.Because poorly written scripts were checking specifically for Mozilla/4 fordynamic HTML pages, Microsoft was concerned that its 5.0 version wouldfail to run these pages. Because changing it now would only create moreconfusion, this tradition continued with IE 6.0.
Although these are two interesting episodes in the annals of the browserwars, what does all this mean to you? Well, you’ll need to be careful whenyour scripts are trying to differentiate between IE and Netscape andbetween different versions. You’ll need to check for specific combinationsinstead of merely checking the navigator.appVersion value. Fortunately,there’s a better way to handle this, as you’ll learn in the next section.
Cross-Browser ScriptingIf all those details about detecting different browser versions seem confusing,here’s some good news—in most cases, you can write cross-browser scriptswithout referring to the navigator object at all. This is not only easier, it’s bet-ter because browser-checking code is often confused by new browser ver-sions and has to be updated each time a new browser is released.
Feature SensingChecking browser versions is sometimes called browser sensing. The betterway of dealing with multiple browsers is called feature sensing. In featuresensing, rather than checking for a specific browser, you check for a specif-ic feature. For example, suppose your script needs to use thedocument.getElementById() function. You can begin a script with an ifstatement that checks for the existence of this function:
if (document.getElementById) {// do stuff
}
www.it-ebooks.info

ptg999
444 CHAPTER 21 Using Unobtrusive JavaScript
If the getElementById function exists, the block of code between the brack-ets will be executed. Another common way to use feature sensing is at thebeginning of a function that will make use of a feature:
function changeText() {if (!document.getElementById) return;// the rest of the function executes if the feature is supported
}
You don’t need to check for every feature before you use it—for example,there’s not much point in verifying that the window object exists in mostcases. You can also assume that the existence of one feature means othersare supported: If getElementById() is supported, chances are the rest ofthe W3C DOM functions are supported.
Feature sensing is a very reliable method of keeping your JavaScript unobtrusive—if a browser supports the feature, it works, and if the browserdoesn’t, your script stays out of the way. It’s also much easier than trying tokeep track of hundreds of different browser versions and what they support.
Dealing with Browser QuirksSo, if feature sensing is better than browser sensing, why do you still needto know about the navigator object? There’s one situation where it stillcomes in handy, although if you’re lucky you won’t find yourself in thatsituation.
As you develop a complex script and test it in multiple browsers, youmight run across a situation where your perfectly standard code works asit should in one browser and fails to work in another. Assuming you’veeliminated the possibility of a problem with your script, you’ve probablyrun into a browser bug or a difference in features between browsers at thevery least. Here are some tips for this situation:
. Double-check for a bug in your own code.
. Search the Web to see whether to the code, and you might sidestepthe bug.
. If the problem is that a feature is missing in one browser, use featuresensing to check for that feature.
. When all else fails, use the navigator object to detect a particularbrowser and substitute some code that works in that browser. Thisshould be your last resort.
NOTE
Feature sensing is also handywhen working with third-partylibraries, as discussed inChapter 22. You can check forthe existence of an object or afunction belonging to the libraryto verify that the library file hasbeen loaded before your scriptuses its features.
TIP
Peter-Paul Koch’s QuirksMode,http://www.quirksmode.org, isa good place to start whenyou’re looking for specific infor-mation about browser bugs.
www.it-ebooks.info

ptg999
Supporting Non-JavaScript Browsers 445
Supporting Non-JavaScript BrowsersSome visitors to your site will be using browsers that don’t supportJavaScript at all. These aren’t just a few holdouts using ancient browsers—actually, there are more non-JavaScript browsers than you might think:
. Most modern browsers, such as Internet Explorer, Firefox, andChrome, include an option to turn off JavaScript, and some users doso. More often, the browser might have been set up by their ISP oremployer with JavaScript turned off by default, usually in a misguid-ed attempt to increase security.
. Some corporate firewalls and personal antivirus software blockJavaScript.
. Some ad-blocking software mistakenly prevents scripts from work-ing even if they aren’t related to advertising.
. More and more mobile phones are coming with web browsers thesedays, and most of these support little to no JavaScript.
. Some visually impaired users use special-purpose browsers or text-only browsers that might not support JavaScript.
As you can see, it would be foolish to assume that all your visitors willsupport JavaScript. Two techniques you can use to make sure these userscan still use the site are discussed in the following sections.
Using the <noscript> TagOne way to be friendly to non-JavaScript browsers is to use the<noscript> tag. Supported in most modern browsers, this tag displays amessage to non-JavaScript browsers. Browsers that support JavaScriptignore the text between the <noscript> tags, whereas others display it.Here is a simple example:
<noscript>This page requires JavaScript. You can either switch to a browserthat supports JavaScript, turn your browser’s script support on,or switch to the <a href=”nojs.html”>Non-JavaScript</a> version ofthis page.</noscript>
Although this works, the trouble is that <noscript> is not consistentlysupported by all browsers that support JavaScript. An alternative thatavoids <noscript> is to send users with JavaScript support to anotherpage. This can be accomplished with a single JavaScript statement:
NOTE
Search engines are another“browser” that will visit yoursite frequently, and they usuallydon’t pay any attention toJavaScript. If you want searchengines to fully index your site,it’s critical that you avoid mak-ing JavaScript a requirement tonavigate the site.
www.it-ebooks.info

ptg999
446 CHAPTER 21 Using Unobtrusive JavaScript
<script type=”text/javascript”>window.location=”JavaScript.html”;</script>
This script redirects the user to a different page. If the browser doesn’t sup-port JavaScript, of course, the script won’t be executed, and the rest of thepage can display a warning message to explain the situation.
Keeping JavaScript OptionalAlthough you can detect JavaScript browsers and display a message to therest, the best choice is to simply make your scripts unobtrusive. UseJavaScript to enhance rather than as an essential feature; keep JavaScript inseparate files and assign event handlers in the JavaScript file rather than inthe HTML. Browsers that don’t support JavaScript will simply ignore yourscript.
In those rare cases where you absolutely need JavaScript—for example, anAJAX application or a JavaScript game—you can warn users thatJavaScript is required. However, it’s a good idea to offer an alternativeJavaScript-free way to use your site, especially if it’s an e-commerce orbusiness site that your business relies on. Don’t turn away customers withlazy programming.
One place you should definitely not require JavaScript is in the navigationof your site. Although you can create drop-down menus and other fancynavigation tools using JavaScript, they prevent users’ non-JavaScriptbrowsers from viewing all of your site’s pages. They also prevent searchengines from viewing the entire site, compromising your chances of get-ting search traffic.
Avoiding ErrorsIf you’ve made sure JavaScript is only an enhancement to your site, ratherthan a requirement, those with browsers that don’t support JavaScript forwhatever reason will still be able to navigate your site. One last thing toworry about: It’s possible for JavaScript to cause an error or confuse thesebrowsers into displaying your page incorrectly.
This is a particular concern with browsers that partially support JavaScript,such as mobile phone browsers. They might interpret a <script> tag andstart the script, but might not support the full JavaScript language orDOM. Here are some guidelines for avoiding errors:
NOTE
Google’s Gmail application(http://mail.google.com), one ofthe most well-known uses ofAJAX, requires JavaScript for itselegant interface. However,Google offers a Basic HTMLView that can be used withoutJavaScript. This allows Googleto support older browsers andmobile phones without compro-mising the user experience forthose with modern browsers.
www.it-ebooks.info

ptg999
Supporting Non-JavaScript Browsers 447
. Use a separate JavaScript file for all scripts. This is the best way toguarantee that the browser will ignore your script completely if itdoes not have JavaScript support.
. Use feature sensing whenever your script tries to use the newerDOM features, such as document.getElementById().
. Test your pages with your browser’s JavaScript support turned off.Make sure nothing looks strange and make sure you can still navi-gate the site.
TIP
The developer’s toolbars forFirefox and Internet Explorerinclude a convenient way toturn off JavaScript for testing.
Creating anUnobtrusive Script
As an example of unobtrusive scripting, you can create a script that addsfunctionality to a page with JavaScript without compromising its performancein older browsers. In this example, you will create a script that creates graph-ic check boxes as an alternative to regular check boxes.
Let’s start with the final result: Figure 21.3 shows this example as it appearsin Firefox. The first check box is an ordinary HTML one, and the second is agraphic check box managed by JavaScript.
TRY IT YOURSELF ▼
FIGURE 21.3The graphic check box examplein action, with the graphicalcheck box checked.
The graphic check box is just a larger graphic that you can click on to displaythe checked or unchecked version of the graphic. Although this could just bea simple JavaScript simulation that acts like a check box, it’s a bit moresophisticated. Take a look at the HTML for this example in Listing 21.2.
www.it-ebooks.info

ptg999
448 CHAPTER 21 Using Unobtrusive JavaScript
TRY IT YOURSELF▼
Creating anUnobtrusive Scriptcontinued
LISTING 21.2 The HTML File for the Graphic Check Box Example<?xml version=”1.0” encoding=”UTF-8”?><!DOCTYPE html PUBLIC “-//W3C//DTD XHTML 1.1//EN”“http://www.w3.org/TR/xhtml11/DTD/xhtml11.dtd”>
<html xmlns=”http://www.w3.org/1999/xhtml” xml:lang=”en”><head><title>Graphic Checkboxes</title>
</head><body><h1>Graphic Checkbox Example</h1><form name=”form1” method=”post” action=””><p><input type=”checkbox” name=”check1” id=”check1”/>An ordinary checkbox.</p><p><input type=”checkbox” name=”check2” id=”check2”/>A graphic checkbox, created with unobtrusive JavaScript.</p></form><script type=”text/javascript” src=”checkbox.js”></script>
</body></html>
If you look closely at the HTML, you’ll see that the two check boxes aredefined in exactly the same way with the standard <input> tag. Rather thansubstitute for a check box, this script actually replaces the regular check boxwith the graphic version. The script for this example is shown in Listing 21.3.
LISTING 21.3 The JavaScript File for the Graphic Check Box Examplefunction graphicBox(box) {
// be unobtrusiveif (!document.getElementById) return;// find the object and its parentobj = document.getElementById(box);parentobj = obj.parentNode;// hide the regular checkboxobj.style.visibility = “hidden”;// create the image element and set its onclick eventimg = document.createElement(“img”);img.onclick = Toggle;img.src = “unchecked.gif”;// save the checkbox id within the image IDimg.id = “img” + box;// display the graphic checkboxparentobj.insertBefore(img,obj);
}function Toggle(e) {
if (!e) var e=window.event;// find the image ID
www.it-ebooks.info

ptg999
Supporting Non-JavaScript Browsers 449
Creating anUnobtrusive Scriptcontinued
img = (e.target) ? e.target : e.srcElement;// find the checkbox by removing “img” from the image IDcheckid = img.id.substring(3);checkbox = document.getElementById(checkid);// “click” the checkboxcheckbox.click();// display the right image for the clicked or unclicked stateif (checkbox.checked) file = “checked.gif”;
else file=”unchecked.gif”;img.src=file;
}//replace the second checkbox with a graphicgraphicBox(“check2”);
This script has three main components:
. The graphicBox() function converts a regular check box to a graphicone. It starts by hiding the existing check box by changing itsstyle.visibility property, and then creates a new image node con-taining the unchecked.gif graphic and inserts it into the DOM next tothe original check box. It gives the image an id attribute containing thetext img plus the check box’s id attribute to make it easier to find thecheck box later.
. The Toggle() function is specified by graphicBox() as the event han-dler for the new image’s onClick event. This function removes img fromthe image’s id attribute to find the id of the real check box. It executesthe click() method on the check box, toggling its value. Finally, itchanges the image to unchecked.gif or checked.gif depending on thestate of the real check box.
. The last line of the script file runs the graphicBox() function to replacethe second check box with the id attribute check2.
Using this technique has three important advantages. First, it’s an unobtru-sive script. The HTML has been kept simple, and browsers that don’t supportJavaScript will display the ordinary check box. Second, because the realcheck box is still on the page but hidden, it will work correctly when the formis submitted to a server-side script. Last but not least, you can use it to cre-ate any number of graphic check boxes simply by defining regular ones in theHTML file and adding a call to graphicBox() to transform each one.
To try this example, save the JavaScript file as checkbox.js and be sure theHTML file is in the same folder. You’ll also need two graphics the same size,unchecked.gif and checked.gif, in the same folder.
TRY IT YOURSELF ▼LISTING 21.3 Continued
www.it-ebooks.info

ptg999
450 CHAPTER 21 Using Unobtrusive JavaScript
SummaryIn this chapter, you’ve learned many guidelines for creating scripts thatwork in as many browsers as possible and how to avoid errors andheadaches when working with different browsers. Most importantly, youlearned how you can use JavaScript while keeping your pages small, effi-cient, and valid with web standards.
www.it-ebooks.info

ptg999
Workshop 451
Q&AQ. Is it possible to create 100% unobtrusive JavaScript that can enhance
a page without causing any trouble for anyone?
A. Not quite. For example, the unobtrusive script in the Try It Yourself sec-tion of this chapter is close—it will work in the latest browsers, and theregular check box will display and work fine in even ancient browsers.However, it can still fail if someone with a modern browser has imagesturned off: The script will hide the check box because JavaScript is sup-ported, but the image won’t be there. This is a rare circumstance, butit’s an example of how any feature you add can potentially cause aproblem for some small percentage of your users.
Q. Can I detect the user’s email address using the navigator object oranother technique?
A. No, there is no reliable way to detect users’ email addresses usingJavaScript. (If there were, you would get hundreds of advertisements inyour mailbox every day from companies that detected your address asyou browsed their pages.) You can use a signed script to obtain theuser’s email address, but this requires the user’s permission and onlyworks in some versions of Netscape.
WorkshopThe workshop contains quiz questions and exercises to help you solidify yourunderstanding of the material covered. Try to answer all questions beforelooking at the “Answers” section that follows.
Quiz1. Which of the following is the best place to put JavaScript code?
a. Right in the HTML document
b. In a separate JavaScript file
c. In a CSS file
2. Which of the following is something you can’t do with JavaScript?
a. Send browsers that don’t support a feature to a different page
b. Send users of Internet Explorer to a different page
c. Send users of non-JavaScript browsers to a different page
www.it-ebooks.info
ptg999
452 CHAPTER 21 Using Unobtrusive JavaScript
3. Which of the following is the best way to define an event handler thatworks in all modern browsers?
a. <body onLoad=”MyFunction()”>
b. window.onload=MyFunction;
c. window.attachEvent(‘load’,MyFunction,false);
Answers1. b. The best place for JavaScript is in a separate JavaScript file.
2. c. You can’t use JavaScript to send users of non-JavaScript browsers toa different page because the script won’t be executed at all.
3. b. The code window.onload=MyFunction; defines an event handler in allmodern browsers. This is better than using an inline event handler asin (a) because it keeps JavaScript out of the HTML document. Option(c) uses the W3C’s standard method, but does not work in InternetExplorer.
Exercises. Add several check boxes to the HTML document in Listing 21.2 and
add the corresponding function calls to the script in Listing 21.3 toreplace all of them with graphic check boxes.
. Modify the script in Listing 21.3 to convert all check boxes with a classvalue of graphic into graphic check boxes. You can usegetElementsByTagName() and then check each item for the rightclassName property.
www.it-ebooks.info
ptg999
Third-party JavaScript libraries, or code libraries written and maintainedby another party for easy implementation in your own code, offer manyadvantages. First and foremost, using these libraries enables you to avoidreinventing the wheel for common tasks. Additionally, these librariesenable you to implement cross-browser scripting and sophisticated userinterface elements without first having to become an expert in JavaScript.
Using Third-Party LibrariesWhen you use JavaScript’s built-in Math and Date functions, JavaScriptdoes most of the work—you don’t have to figure out how to convert datesbetween formats or calculate a cosine. Third-party libraries are not includ-ed with JavaScript, but they serve a similar purpose: enabling you to docomplicated things with only a small amount of code.
Using one of these libraries is usually as simple as copying one or morefiles to your site and including a <script> tag in your document to loadthe library. Several popular JavaScript libraries are discussed in the follow-ing sections.
PrototypePrototype, created by Sam Stephenson, is a JavaScript library that simpli-fies tasks such as working with DOM objects, dealing with data in forms,and remote scripting (AJAX). By including a single prototype.js file in yourdocument, you have access to many improvements to basic JavaScript.
For example, you’ve used the document.getElementById method to obtainthe DOM object for an element within a web page. Prototype includes an
WHAT YOU’LL LEARN INTHIS CHAPTER:
. Why you might use a third-party JavaScript library
. How to download and useone of the more popularthird-party JavaScriptlibraries in your applications
CHAPTER 22Using Third-Party Libraries
www.it-ebooks.info

ptg999
454 CHAPTER 22 Using Third-Party Libraries
improved version of this in the $() function. Not only is it easier to type,but it is also more sophisticated than the built-in function and supportsmultiple objects.
Adding Prototype to your pages requires only one file, prototype.js, andone <script> tag:
<script type=”text/javascript” src=”prototype.js”></script>
jQueryThe first implementation of jQuery was introduced in 2006. What was orig-inally an easy, cross-browser means DOM manipulation has subsequentlybecome a stable, powerful library containing not just DOM manipulationtools, but many additional features that make cross-browser JavaScriptcoding much more straightforward and productive.
The library is currently up to version 1.6.2 and now also has an additionaladvanced user interface extensions library that can be used alongside theexisting library to rapidly build and deploy rich user interfaces or add avariety of attractive effects to existing components.
Like the Prototype library described previously, jQuery has at its heart asophisticated, cross-browser method for selection of page elements. Theselectors used to obtain elements are based on a combination of simpleCSS-like selector styles, so with the CSS techniques you learned in Part III,“Advanced Web Page Design with CSS,” you should have no problem get-ting up to speed with jQuery. For example, if you want to get an elementthat has an ID of someElement, all you do is use the following:
$(“#someElement”)
Or to return a collection of elements that have the someClass class name,you can simply use the following:
$(“.someClass”)
We can very simply get or set values associated with our selected elements.Let’s suppose, for example, that we want to hide all elements having theclass name hideMe. We can do that, in a fully cross-browser manner, in justone line of code:
$(“.hideMe”).hide();
NOTE
Prototype is free, open-sourcesoftware. You can download itfrom its official website athttp://www.prototypejs.org/.Prototype is also built into theRuby on Rails framework for theserver-side language Ruby—seehttp://www.rubyonrails.com/for more information.
NOTEjQuery’s home page is athttp://jquery.com/, where youcan not only download the lat-est version, but also gainaccess to extensive documenta-tion and example code.
The companion UI library canbe found at http://jqueryui.com/.
TIPIf you don’t want to downloadand store the jQuery library onyour own computer, you can usea remotely hosted version, suchas the one by Google. Insteadof including a locally hosted .jsfile in your page head, use thefollowing code:<scriptsrc=”http://ajax.googleapis.com/ajax/libs/jquery/1.6.2/jquery.min.js” type=”text/javascript”></script>
In many cases, this providesbetter performance than host-ing your own version, due toGoogle’s servers being opti-mized for low-latency, massivelyparallel content delivery.
www.it-ebooks.info

ptg999
Using Third-Party Libraries 455
Manipulating HTML and CSS properties is just as straightforward. Toappend the phrase “powered by jQuery” to all paragraph elements, forexample, we would simply write the following:
$(“p”).append(“ powered by jQuery”);
To then change the background color of those same elements, we canmanipulate their CSS properties directly:
$(“p”).css(“background-color”,”yellow”);
Additionally, jQuery includes simple cross-browser methods for determin-ing whether an element has a class, adding and removing classes, gettingand setting the text or innerHTML of an element, navigating the DOM, get-ting and setting CSS properties, and handling of easy cross-browser events.
The associated UI library adds a huge range of UI widgets (such as datepickers, sliders, dialogs and progress bars), animation tools, drag-and-dropcapabilities, and much more.
Script.aculo.usBy the end of this book, you’ll learn to do some useful things withJavaScript, often using complex code. But you can also include impressiveeffects in your pages using a prebuilt library. This enables you to useimpressive effects with only a few lines of code.
Script.aculo.us by Thomas Fuchs is one such library. It includes functionsto simplify drag-and-drop tasks, such as rearranging lists of items. It alsoincludes a number of combination effects, which enable you to use high-lighting and animated transitions within your pages. For example, a newsection of the page can be briefly highlighted in yellow to get the user’sattention, or a portion of the page can fade out or slide off the screen.
After you’ve included the appropriate files, using effects is as easy as usingany of JavaScript’s built-in methods. For example, the following statementsuse Script.aculo.us to fade out an element of the page with the id value test:
obj = document.getElementById(“test”);new Effect.Fade(obj);
Script.aculo.us is built on the Prototype framework described in the previ-ous section and includes all of the functions of Prototype, so you couldalso simplify this further by using the $ function:
new Effect.Fade($(“test”));
TIP
You can even extend jQueryyourself by writing further plug-ins or use the thousandsalready submitted by otherdevelopers. Browsehttp://www.jqueryplugins.com/to see lots of examples insearchable categories.
NOTE
You will create a script thatdemonstrates severalScript.aculo.us effects in theTry It Yourself section later thischapter.
www.it-ebooks.info

ptg999
456 CHAPTER 22 Using Third-Party Libraries
AJAX FrameworksAJAX (Asynchronous JavaScript and XML), also known as remote scripting,enables JavaScript to communicate with a program running on the webserver. This enables JavaScript to do things that were traditionally not possi-ble, such as dynamically loading information from a database or storingdata on a server without refreshing a page.
AJAX requires some complex scripting, particularly because the methodsyou use to communicate with the server vary depending on the browser inuse. Fortunately, many libraries have been created to fill the need for a sim-ple way to use AJAX, and you’ll try your hand at this later in this book.
Both jQuery and the Prototype library, described previously, include AJAX fea-tures. There are also many dedicated AJAX libraries. One of the most popularis SAJAX (Simple AJAX), an open-source toolkit that makes it easy to useAJAX to communicate with PHP, Perl, and other languages from JavaScript.Visit the SAJAX website for details at http://www.modernmethod.com/sajax.
Other LibrariesThere are many more JavaScript libraries out there, and more are appearingall the time as JavaScript is taken more seriously as an application language.Here are some more libraries you might want to explore:
. Dojo (http://www.dojotoolkit.org/) is an open-source toolkit thatadds power to JavaScript to simplify building applications and userinterfaces. It adds features ranging from extra string and math func-tions to animation and AJAX.
. The Yahoo! UI Library (http://developer.yahoo.net/yui/) was devel-oped by Yahoo! and made available to everyone under an open-sourcelicense. It includes features for animation, DOM features, event man-agement, and easy-to-use user interface elements such as calendarsand sliders.
. MochiKit (http://mochikit.com/) is a lightweight library that addsfeatures for working with the DOM, CSS colors, string formatting, andAJAX. It also supports a nice logging mechanism for debugging yourscripts.
. MooTools (http://mootools.net/) is a compact, modular JavaScriptframework enabling you to build powerful, flexible, and cross-browser code using a simple-to-understand, well-documented API(application programming interface).
NOTE
See Chapter 24, “AJAX: RemoteScripting,” for examples ofremote scripting, with and with-out using third-party libraries.
www.it-ebooks.info

ptg999
Other Libraries 457
Adding Effects with aLibrary
To see how simple it is to use an external library, you will now create anexample script that includes the Script.aculo.us library and use event han-dlers to demonstrate several of the available effects.
Downloading the LibraryTo use the library, you will need to download it and copy the files you need to thesame folder where you will store your script. You can download the library fromthe Script.aculo.us website at http://script.aculo.us/downloads.
The download is available as a Zip file. Inside the Zip file you will find a folderfollowing the naming convention of scriptaculous-js-x.x.x where each x standsfor part of the version number (the version as of this writing is 1.9.0). You willneed the following files from the folders under this folder:
. prototype.js (the Prototype library) from the lib folder
. effects.js (the effects functions) from the src folder
Copy both of these files to a folder on your computer, and be sure to createyour demonstration script in the same folder.
Including the FilesTo add the library to your HTML document, simply use <script> tags toinclude the two JavaScript files you copied from the download:
<script type=”text/javascript” src=”prototype.js”> </script><script type=”text/javascript” src=”effects.js”> </script>
If you include these statements as the first things in the <head> section ofyour document, the library functions will be available to other scripts or eventhandlers anywhere in the page.
Using EffectsAfter you have included the library, you simply need to include a bit ofJavaScript to trigger the effects. We will use a section of the page wrapped ina <div> tag with the id value test to demonstrate the effects. Each effect istriggered by a simple event handler on a button. For example, this codedefines the Fade Out button:
<input type=”button” value=”Fade Out”onclick=”new Effect.Fade($(‘test’))”>
This uses the $ function built into Prototype to obtain the object for the ele-ment with the id value test, and then passes it to the Effect.Fade functionbuilt into Script.aculo.us.
TRY IT YOURSELF ▼
CAUTION
This example was createdusing version 1.9.0 of theScript.aculo.us library. Itshould work with later ver-sions, but the library mighthave changed since this waswritten. If you have trouble,you might need to use thisspecific version.
NOTE
The Script.aculo.us downloadincludes many other files, andyou can include the entirelibrary if you intend to use allof its features. For this exam-ple, you only need the twofiles described here.
TIP
This example will demon-strate six effects: Fade,Appear, SlideUp, SlideDown,Highlight, and Shake. Thereare more than 16 effects inthe library, plus methods forsupporting Drag and Drop and other features. Seehttp://script.aculo.us fordetails.
www.it-ebooks.info

ptg999
458 CHAPTER 22 Using Third-Party Libraries
TRY IT YOURSELF▼
Adding Effects with aLibrarycontinued
Building the ScriptAfter you have included the libraries, you can combine them with event han-dlers and some example text to create a complete demonstration ofScript.aculo.us effects. The complete HTML document for this example isshown in Listing 22.1.
LISTING 22.1 The Complete Library Effects Example<?xml version=”1.0” encoding=”UTF-8”?><!DOCTYPE html PUBLIC “-//W3C//DTD XHTML 1.1//EN”“http://www.w3.org/TR/xhtml11/DTD/xhtml11.dtd”>
<html xmlns=”http://www.w3.org/1999/xhtml” xml:lang=”en”><head><title>Testing script.aculo.us effects</title><script type=”text/javascript” src=”prototype.js”></script><script type=”text/javascript” src=”effects.js”></script></head><body><h1>Testing script.aculo.us Effects</h1><form name=”form1”><input type=”button” value=”Fade Out”
onclick=”new Effect.Fade($(‘test’))”><input type=”button” value=”Fade In”
onclick=”new Effect.Appear($(‘test’))”><input type=”button” value=”Slide Up”
onclick=”new Effect.SlideUp($(‘test’))”><input type=”button” value=”Slide Down”
onclick=”new Effect.SlideDown($(‘test’))”><input type=”button” value=”Highlight”
onclick=”new Effect.Highlight($(‘test’))”><input type=”button” value=”Shake”
onclick=”new Effect.Shake($(‘test’))”></form><div id=”test” style=”background-color:#CCC;margin:20px; padding:10px;”> <h2>Testing Effects</h2><hr/><p>This section of the document is within a <div> elementwith the <strong>id</strong> value of <strong>test</strong>. The event handlers on the buttons above send this object to the<a href=”http://script.aculo.us/”>script.aculo.us</a> libraryto perform effects. Click the buttons to see the effects.</p></div>
</body></html>
www.it-ebooks.info

ptg999
Summary 459
SummaryIn this chapter, you learned about some of the many third-party librariesavailable for JavaScript. These can offer many advantages including easycross-browser scripting, selection and editing of HTML and CSS values,animation, and more sophisticated user-interface tools such as drag-and-drop.
Adding Effects with aLibrarycontinued
This document starts with two <script> tags to include the library’s files. Theeffects are triggered by the event handlers defined for each of the six but-tons. The <div> section at the end defines the test element that will beused to demonstrate the effects.
To try this example, make sure the prototype.js and effects.js files fromScript.aculo.us are stored in the same folder as your script, and then load itinto a browser. The display should look like Figure 22.1, and you can use thesix buttons at the top of the page to trigger effects.
TRY IT YOURSELF ▼
FIGURE 22.1The library effects example.
www.it-ebooks.info

ptg999
460 CHAPTER 22 Using Third-Party Libraries
Q&AQ. How do I include a third-party JavaScript library into my pages?
A. The process varies slightly from library to library. Usually it’s simply amatter of including one or more external .js files into the <head> part ofyour web page. See the documentation supplied with your chosenlibrary for specific details.
Q. Can I use more than one third-party library in the same script?
A. Yes, in theory: If the libraries are well written and designed not to inter-fere with each other, there should be no problem combining them. Inpractice, this will depend on the libraries you need and how they werewritten.
Q. Can I build my own library to simplify scripting?
A. Yes, as you deal with more complicated scripts, you’ll find yourselfusing the same functions over and over. You can combine them into alibrary for your own use. This is as simple as creating a .js file.
WorkshopThe workshop contains quiz questions and exercises to help you solidify yourunderstanding of the material covered. Try to answer all questions beforelooking at the “Answers” section that follows.
Quiz1. Which of the following objects is not a JavaScript library?
a. MooTools
b. Prototype
c. AJAX
2. How can you extend jQuery yourself?
a. jQuery can’t be extended.
b. By writing server-side scripts.
c. By writing a plug-in or using a prewritten one.
www.it-ebooks.info

ptg999
Workshop 461
3. What other JavaScript third-party library does Script.aculo.us employ?
a. Prototype
b. Dojo
c. jQuery
Answers1. c. AJAX is a programming technique enabling your scripts to use
resources hosted on your server. There are many libraries to help youemploy AJAX functionality, but AJAX itself is not a library.
2. c. jQuery has a well documented way to write and use plug-ins.
3. a. Script.aculo.us uses the prototype.js library.
Exercises. Write a simple script using the jQuery library or use an example script
from the jQuery website. Run the script using both locally and remotelyhosted versions of jQuery. Can you see any difference in performance?
. Visit the Script.aculo.us page at http://script.aculo.us/ to find the com-plete list of effects. Modify Listing 22.1 to add buttons for one or moreadditional effects.
www.it-ebooks.info


ptg999
One of the recent trends is that JavaScript is being used in new ways, bothinside and outside web browsers. In this chapter, you’ll look atGreasemonkey, a Firefox extension that enables you to write scripts tomodify the appearance and behavior of sites you visit. User scripts canalso work in Internet Explorer, Opera, and Safari with the right add-ons,and Chrome has native support for user scripts.
Introducing GreasemonkeySo far in this book, you’ve been using JavaScript to work on your ownsites. In this chapter, you’ll take a break from that and learn about a way touse JavaScript on other people’s sites. Greasemonkey is an extension for theFirefox browser that enables user scripts. These are scripts that run as soonas you load a page and can make changes to the page’s DOM.
A user script can be designed to work on all web pages or to only affectparticular sites. Here are some of the things user scripts can do:
. Change the appearance of one or more sites—colors, font size, and so on
. Change the behavior of one or more sites with JavaScript
. Fix a bug in a site before the site author does
. Add a feature to your browser, such as text macros—see the Try ItYourself section later in this chapter for an example
WHAT YOU’LL LEARN INTHIS CHAPTER:
. How Greasemonkey anduser scripts can enhanceyour web browser
. How to install and config-ure Greasemonkey inFirefox
. Installing and managinguser scripts
. Creating your own userscripts
. Defining metadata forscripts
. Using the GreasemonkeyAPI
. Adding macros to webforms
CHAPTER 23Greasemonkey: Enhancing the
Web with JavaScript
www.it-ebooks.info

ptg999
464 CHAPTER 23 Greasemonkey: Enhancing the Web with JavaScript
As a simple example, a user script called Linkify is provided withGreasemonkey. It affects all pages you visit and turns unlinked URLs intohyperlinks. In other words, the script looks for any string that resembles aURL in the page, and if it finds a URL that is not enclosed in an <a> tag, itmodifies the DOM to add a link to the URL.
Greasemonkey scripts can range from simple ones such as Linkify to com-plex scripts that add a feature to the browser, rearrange a site to make itmore usable, or eliminate annoying features of sites such as pop-up ads.
Keep in mind that Greasemonkey doesn’t do anything to the websites youvisit—it strictly affects your personal experience with the sites. In this way,it’s similar to other browser customizations, such as personal style sheetsand browser font settings.
Installing Greasemonkey in FirefoxGreasemonkey works in Firefox for Windows, Macintosh, and Linux plat-forms. You can install it by visiting the http://www.greasespot.net/ andfollowing the Download link. Use the Add To Firefox button to installGreasemonkey (see Figure 23.1). After installation, you might be asked torestart Firefox before Greasemonkey can be used.
NOTE
Greasemonkey was created in2004 by Aaron Boodman. Itsofficial site is http://www.greasespot.net/. At this writing,the current version ofGreasemonkey is 0.9.10.
FIGURE 23.1Use the Add To Firefox button toinstall Greasemonkey.
NOTE
When you first installGreasemonkey, the extensiondoesn’t do anything—you’llneed to install one or moreuser scripts, as described laterin this chapter in “Working withUser Scripts,” to make it useful.
www.it-ebooks.info

ptg999
Introducing Greasemonkey 465
Trixie for Internet ExplorerThe Greasemonkey extension was written as a Firefox extension and doesnot work on other browsers (although user scripts do with the righthelpers). Fortunately, there’s an alternative for those that prefer InternetExplorer: Trixie is an add-on for Internet Explorer that supports userscripts. Trixie is available free from its official site at http://www.bhelpuri.net/Trixie/. To install Trixie, you will need to make sure that you have the.NET Framework installed.
Trixie supports most of Greasemonkey’s features, and user scripts forGreasemonkey often work with Trixie without modification; however, dueto differences between Firefox and Internet Explorer, not all Greasemonkeyscripts can be run within IE. See the Trixie site for more detailed informa-tion on installing and running Trixie.
Other BrowsersUser script features have also appeared for other browsers. Along withTrixie for IE, some other browsers can support user scripts:
. Opera, the cross-platform browser from Opera Software ASA, hasbuilt-in support for user scripts and supports Greasemonkey scriptsin many cases. See Opera’s site for details at http://www.opera.com/.
. From version 4.0, Google’s Chrome browser has included native sup-port for Greasemonkey scripts. Behind the scenes, these are convert-ed into Chrome extensions.
. Creammonkey is a beta add-on for Apple’s Safari browser to supportuser scripts. You can find it at http://8-p.info/CreamMonkey/index.html.en.
User Script SecurityBefore you get into user scripting, a word of warning: Don’t install a scriptunless you understand what it’s doing or you’ve obtained it from a trust-worthy source. Although the Greasemonkey developers have spent a greatdeal of time eliminating security holes, it’s still possible for a maliciousscript to cause you trouble—at the very least, it could send informationabout which sites you visit to a third-party website.
www.it-ebooks.info

ptg999
466 CHAPTER 23 Greasemonkey: Enhancing the Web with JavaScript
To minimize security risks, be sure you’re running the latest version ofGreasemonkey or Trixie. Only enable scripts you are actively using and limitscripts you don’t trust to specific pages so that they don’t run on every pageyou visit.
Working with User ScriptsUser scripts are a whole new way of working with JavaScript—rather thanuploading them for use on your website, you install them in the browser foryour own personal use. The following sections show you how to find usefulscripts and install and manage them.
Finding ScriptsAnyone can write user scripts, and many people have. Greasemonkey spon-sors a directory of user scripts at http://userscripts.org/. There you canbrowse or search for scripts or submit scripts you’ve written.
The script archive has thousands of scripts available. Along with general-purpose scripts, many of the scripts are designed to add features to—orremove annoying features from—particular sites.
Installing a ScriptAfter you’ve found a script you want to install, you can install it from the Web:
. In Firefox with Greasemonkey, open the script in the browser, andthen select Tools, Install This User Script from the menu.
. In IE with Trixie, download the script into the Scripts directory underthe Trixie installation folder. By default, this is at ProgramFiles\Bhelpuri\Trixie\Scripts. Then, go to the Tools menu and selectTrixie Options (Alt-T, X). This will show the Trixie Options dialogwhere you can click on the Reload Scripts button and select OK. Thiswill load your new script and enable it.
You can also install a script from a local file. You’ll use this technique toinstall your own script later this chapter.
Managing ScriptsAfter you’ve installed one or more scripts with Greasemonkey, you canmanage them by selecting Greasemonkey, Manage User Scripts from theFirefox menu. The Manage User Scripts dialog is shown in Figure 23.2.
www.it-ebooks.info

ptg999
Working with User Scripts 467
The user scripts you have available are listed in the right column. Click on ascript name to manage it:
. Use the Enable/Disable button to enable or disable each script.
. Click the Remove button to remove a script.
. Right-click and choose Edit to open a script in a text editor. When it issaved, it will immediately take effect on pages you load.
Trixie for IE has a similar dialog. The Trixie Options dialog (Alt-T, X) can be usedto manage the scripts you have installed. From this dialog, as shown in Figure23.3, you can view the scripts installed, enable or disable scripts, or reloadscripts. The dialog also shows which sites or pages the script will execute on.
FIGURE 23.2Managing user scripts inGreasemonkey.
FIGURE 23.3The Trixie Options dialog.
www.it-ebooks.info

ptg999
468 CHAPTER 23 Greasemonkey: Enhancing the Web with JavaScript
Testing User ScriptsIf you have a script enabled, it will be activated as soon as you load a pagethat matches one of the Included Pages specified for the script. (The scriptis run after the page is loaded, but before the onload event.) If you want tomake sure Greasemonkey is running, either try one of the scripts availablefor a script enabled (it will activate as soon as you load a page that match-es one download) or type in the simple script in the next section.
Activating and Deactivating Greasemonkey orTrixieSometimes when a script is enabled, it will be activated as soon as youload a page that matches one where you’ll want to turn off Greasemonkeyaltogether, especially if one of the scripts you’ve installed is causing anerror. To do this, right-click on the monkey icon in the lower-right corner ofthe browser window and select the Enabled option to deselect it. The mon-key icon changes to a gray sad-faced monkey, and no user scripts will berun at all. You can re-enable it at any time using the same option.
With Trixie for Internet Explorer, use Explorer’s Manage Add-Ons menu todisable Trixie.
Creating Your Own User ScriptsYou’ve already learned most of what you need to know to create userscripts since they’re written in JavaScript. In this section, you’ll create andtest a simple script and look at some features you’ll use when creatingmore advanced scripts.
Creating a Simple User ScriptOne of the best uses for Greasemonkey is to solve annoyances with sitesyou visit. For example, a site might use green text on an orange back-ground. Although you could contact the webmaster and beg for a colorchange, user scripting lets you deal with the problem quickly yourself.
As a simple demonstration of user scripting, you can create a user scriptthat changes the text and background colors of paragraphs in sites youvisit. Listing 23.1 shows this user script.
www.it-ebooks.info

ptg999
Creating Your Own User Scripts 469
LISTING 23.1 A Simple User Script to Change Paragraph Colors// Change the color of each paragraphvar zParagraphs = document.getElementsByTagName(“p”);for (var i=0; i<zParagraphs.length; i++) {
zParagraphs[i].style.backgroundColor=”#000000”;zParagraphs[i].style.color=”#ffffff”;
}
This script uses the getElementsByTagName() DOM method to find all theparagraph tags in the current document and store their objects in thezParagraphs array. The for loop iterates through the array and changesthe style.color and style.backgroundColor properties for each one.
Describing a User ScriptGreasemonkey supports metadata at the beginning of your script. These areJavaScript comments that aren’t executed by the script, but provide infor-mation to Greasemonkey. To use this feature, enclose your commentsbetween // ==UserScript== and // ==/UserScript comments.
The metadata section can contain any of the following directives. All ofthese are optional, but using them will make your user script easier toinstall and use.
. @name—A short name for the script, displayed in Greasemonkey’s listof scripts after installation.
. @namespace—An optional URL for the script author’s site. This isused as a namespace for the script: Two scripts can have the samename as long as the namespace is different.
. @description—A one-line description of the script’s purpose.
. @include—The URL of a site on which the script should be used.You can specify any number of URLs, each in its own @include line.You can also use the wildcard * to run the script on all sites or a par-tial URL with a wildcard to run it on a group of sites.
. @exclude—The URL of a site on which the script should not be used.You can specify a wildcard for @include, and then exclude one ormore sites that the script is incompatible with. The @exclude direc-tive can also use wildcards.
Listing 23.2 shows the color-changing example with a complete set ofmetadata comments added at the top.
www.it-ebooks.info

ptg999
470 CHAPTER 23 Greasemonkey: Enhancing the Web with JavaScript
LISTING 23.2 The Color-Changing Script with Metadata Comments// ==UserScript==// @name WhiteOnBlack// @namespace http://www.thickbook.com/// @description Display paragraphs in white text on black// @include *// ==/UserScript==//// Change the color of each paragraphvar zParagraphs = document.getElementsByTagName(“p”);for (var i=0; i<zParagraphs.length; i++) {
zParagraphs[i].style.backgroundColor=”#000000”;zParagraphs[i].style.color=”#ffffff”;
}
Testing Your ScriptNow that you’ve added the metadata, installing your script is simple.Follow these steps to install the script in Firefox:
1. Save the script file as colors.user.js. The filename must end in .user.jsto be recognized as a Greasemonkey script.
2. In Firefox, choose File, Open from the menu.
3. Select your script from the Open File dialog.
4. After the script is displayed in the browser, select Tools, Install ThisUser Script.
5. An alert will display to inform you that the installation was success-ful. The new user script is now running on all sites.
Both Greasemonkey and Trixie for IE will use the metadata you specifiedto set the script’s included pages, description, and other options when youinstall it.
After you’ve installed and enabled the script, any page you load will haveits paragraphs displayed in white text on a black background. For exam-ple, Figure 23.4 shows the user script’s effect on a simple “Hello World”script. Because the body text is enclosed in a <p> tag, it is displayed inwhite on black.
www.it-ebooks.info

ptg999
Creating Your Own User Scripts 471
Greasemonkey API FunctionsYou can use all the DOM methods covered in this book to work with pagesin user scripts, along with JavaScript’s built-in functions. In addition tothese, Greasemonkey defines an API (application programming interface)with a few functions that can be used exclusively in user scripts:
. GM_log(message, level)—Inserts a message into the JavaScript con-sole. The level parameter indicates the severity of the message: 0 forinformation, 1 for a warning, and 2 for an error.
. GM_setValue(variable, value)—Sets a variable stored byGreasemonkey. These variables are stored on the local machine. Theyare specific to the script that set them and can be used in the futureby the same script. (These are similar to cookies, but are not sent to aserver.)
. GM_getValue(variable)—Retrieves a value previously set withGM_setValue.
. GM_registerMenuCommand(command, function)—Adds a commandto the browser menu. These commands appear under Tools, UserScript Commands. The command parameter is the name listed in themenu, and function is a function in your script that the menu selec-tion will activate.
. GM_xmlhttpRequest(details)—Requests a file from a remote server,similar to the AJAX features described in Chapter 24, “AJAX: RemoteScripting.” The details parameter is an object that can contain anumber of properties to control the request. See the Greasemonkeydocumentation for all the properties you can specify.
FIGURE 23.4A basic page altered by the color-changing user script.
NOTE
You probably don’t want to makea change this drastic to all sitesyou visit. Instead, you can use@include to make this scriptaffect only one or two siteswhose colors you find hard toread. Don’t forget that you canalso change the colors in thescript to your own preference.
www.it-ebooks.info

ptg999
472 CHAPTER 23 Greasemonkey: Enhancing the Web with JavaScript
Creating a Site-Specific ScriptYou might want to use a user script to fix a problem or add a feature to aspecific site. For example, you might want to remove all of the advertise-ments that display on your Facebook profile page—there are numerousGreasemonkey scripts at http://userscripts.org/ to address such an issue.To create such custom scripts, in addition to using @include to specify thesite’s URL, you’ll need to know something about the site’s DOM.
You can use the DOM Inspector in Firefox (or the similar feature inInternet Explorer’s developer toolbar) to browse the DOM for the site andfind the objects you want to work with. Depending on how they aremarked up, you can access them through the DOM:
. If an element has an id attribute, you can simply usedocument.getElementById() in your script to find its object.
. If a nearby element has an id defined, you can use DOM methods tofind it—for example, if the parent element has an id, you can use amethod such as firstChild() to find the object you need.
. If all else fails, you can use document.getElementsByTagName() tofind all objects of a certain type—for example, all paragraphs. If youneed to refer to a specific one, you can use a loop and check each onefor a certain attribute.
As an example, Listing 23.3 shows a simple user script you could use as asite-specific script to automatically fill out certain fields in forms.
LISTING 23.3 A User Script to Fill Out Form Fields Automatically// ==UserScript==// @name AutoForm// @namespace http://www.thickbook.com/// @description Fills in forms automatically// @include *// ==/UserScript==// this function fills out form fields//var zTextFields = document.getElementsByTagName(“input”);for (var i=0; i<zTextFields.length; i++) {thefield=zTextFields[i].name;if (!thefield) thefield=zTextFields[i].id;// Set up your auto-fill values hereif (thefield == “yourname”) zTextFields[i].value=”Your Name Here”;if (thefield == “phone”) zTextFields[i].value=”(xxx) xxx-xxxx”;alert(“field:” + thefield + “ value: “ + zTextFields[i].value);
}
www.it-ebooks.info

ptg999
Creating Your Own User Scripts 473
This script uses getElementsByTagName() to find all the <input> elementsin a document, including text fields. It uses a for loop to examine eachone. If it finds a field with the name or id value “yourname” or “phone”, itinserts the appropriate value.
To test this script, save it as autoform.user.js and install the user script asdescribed earlier in this chapter. To test it, save Listing 23.4 as form.htmland load it into Firefox—it happens to have both of the field names thescript looks for. The yourname and phone fields will be automatically filledout with the value shown first in an alert, as shown in Figure 23.5.
LISTING 23.4 An HTML Form to Test AutoForm<?xml version=”1.0” encoding=”UTF-8”?><!DOCTYPE html PUBLIC “-//W3C//DTD XHTML 1.1//EN”“http://www.w3.org/TR/xhtml11/DTD/xhtml11.dtd”>
<html xmlns=”http://www.w3.org/1999/xhtml” xml:lang=”en”><head><title>Auto-Fill Form Example</title></head><body><h1>Auto-Fill Form Example</h1><p>Please enter the following information:</p><form method=”post” action=””><p><strong>Name:</strong>
<input type=”text” size=”20” name=”yourname” /></p><p><strong>Address:</strong>
<input type=”text” size=”20” name=”address” /></p><p><strong>Phone:</strong>
<input type=”text” size=”20” name=”phone” /></p><p><input type=”button” value=”Display” onclick=”display();” /></p></form>
</body></html>
To make it easy to test, Listing 23.3 doesn’t include specific sites in the@include line. To make a true site-specific script, you would need to findout the field names for a particular site, add if statements to the script tofill them out, and use @include to make sure the script only runs on thesite.
www.it-ebooks.info

ptg999
474 CHAPTER 23 Greasemonkey: Enhancing the Web with JavaScript
Debugging User ScriptsDebugging a user script is much like debugging a regular JavaScript program—errors are displayed in the JavaScript Console in Firefox or in an error message in Internet Explorer. Here are a few debugging tips:
. As with regular scripts, you can also use the alert() method to dis-play information about what’s going on in your script.
. The browser may display a line number with an error message, butwhen you’re working with user scripts, these line numbers are mean-ingless—they refer neither to lines in your user script nor to the pageyou’re currently viewing.
. Use the GM_log() method described earlier in this chapter to loginformation about your script, such as the contents of variables, tothe JavaScript console.
. If you’re trying to write a cross-browser user script, watch for meth-ods that are browser specific. See Chapter 21, “Using UnobtrusiveJavaScript,” for information about cross-browser issues.
. Watch for conflicts with any existing scripts on the page.
. If you’re using multiple user scripts, be sure they don’t conflict. Useunique variable and function names in your scripts.
Most of the issues with user scripts are the same as for regular JavaScript.
FIGURE 23.5The form-filling user script inaction.
www.it-ebooks.info
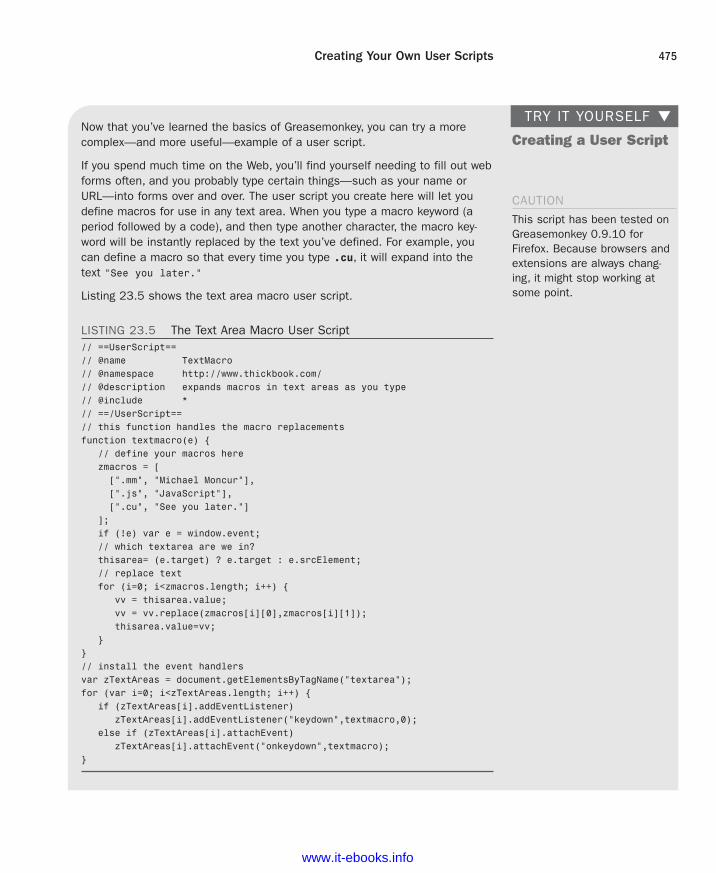
ptg999
Creating Your Own User Scripts 475
Creating a User ScriptNow that you’ve learned the basics of Greasemonkey, you can try a morecomplex—and more useful—example of a user script.
If you spend much time on the Web, you’ll find yourself needing to fill out webforms often, and you probably type certain things—such as your name orURL—into forms over and over. The user script you create here will let youdefine macros for use in any text area. When you type a macro keyword (aperiod followed by a code), and then type another character, the macro key-word will be instantly replaced by the text you’ve defined. For example, youcan define a macro so that every time you type .cu, it will expand into thetext “See you later.”
Listing 23.5 shows the text area macro user script.
LISTING 23.5 The Text Area Macro User Script// ==UserScript==// @name TextMacro// @namespace http://www.thickbook.com/// @description expands macros in text areas as you type// @include *// ==/UserScript==// this function handles the macro replacementsfunction textmacro(e) {
// define your macros herezmacros = [[“.mm”, “Michael Moncur”],[“.js”, “JavaScript”],[“.cu”, “See you later.”]
];if (!e) var e = window.event;// which textarea are we in?thisarea= (e.target) ? e.target : e.srcElement;// replace textfor (i=0; i<zmacros.length; i++) {
vv = thisarea.value;vv = vv.replace(zmacros[i][0],zmacros[i][1]);thisarea.value=vv;
}}// install the event handlersvar zTextAreas = document.getElementsByTagName(“textarea”);for (var i=0; i<zTextAreas.length; i++) {
if (zTextAreas[i].addEventListener)zTextAreas[i].addEventListener(“keydown”,textmacro,0);
else if (zTextAreas[i].attachEvent)zTextAreas[i].attachEvent(“onkeydown”,textmacro);
}
TRY IT YOURSELF ▼
CAUTION
This script has been tested onGreasemonkey 0.9.10 forFirefox. Because browsers andextensions are always chang-ing, it might stop working atsome point.
www.it-ebooks.info

ptg999
476 CHAPTER 23 Greasemonkey: Enhancing the Web with JavaScript
TRY IT YOURSELF▼
Creating a User Scriptcontinued
How It WorksThis user script begins with the usual comment metadata. The @include com-mand specifies a wildcard, *, so the script will work on all sites. The actualwork is done in the textmacro function. This function begins by defining themacros that will be available:
zmacros = [[“.mm”, “Michael Moncur”],[“.js”, “JavaScript”],[“.cu”, “See you later.”]
];
This example defines three macros using a two-dimensional array. To makethe script useful to you, define your own. You can have any number ofmacros—just add a comma after the last macro line and add your itemsbefore the closing bracket.
Next, the function uses the target property to find the text area in whichyou’re currently typing. Next, it uses a for loop to do a search and replacewithin the text area’s value property for each of your macros.
The section of code after the textmacro() function sets up an event handlerfor each text area. First, it uses getElementsByTagName() to find all the textareas, and then it uses a for loop to add an onkeydown event handler toeach one.
Using This ScriptTo use this script, first make sure you’ve installed and enabledGreasemonkey as described earlier this chapter. Save the script astextmacro.user.js. You can then install the user script.
After the script is installed, try loading any page with a text area. You shouldbe able to type a macro, such as .jd or .js, followed by another charactersuch as a space, within the text area and see it instantly expand into the cor-rect text.
NOTE
To avoid conflicts with existingevent handlers within webpages, this example uses theaddEventListener() methodto add the event handler. Thismethod defines an event han-dler without overwriting exist-ing events. In InternetExplorer, it uses the similarattachEvent() method.
TIP
This script runs on all sites bydefault. If you only want themacros to work on certainsites, you can change the@include directive to specifythem. If the script causestrouble on some sites, youcan exclude them with@exclude.
SummaryIn this chapter, you’ve learned how to use Greasemonkey for Firefox—andits counterpart for Internet Explorer, Trixie—to enable user scripting inyour browser. You’ve learned how user scripts work and how to installand manage them. Finally, you created two examples of functioning userscripts.
www.it-ebooks.info

ptg999
Workshop 477
Q&AQ. Is there any way to prevent users from using Greasemonkey while viewing
my site?
A. Because Greasemonkey affects only the user who installed it, it’s usuallyharmless to allow it. If you still want to prevent its use, this is difficult, butnot impossible, and varies with different versions of Greasemonkey.Search the Web to find current solutions.
Q. What if I want to do something more sophisticated, such as modifyingFirefox’s menu?
A. This capability does not exist in Greasemonkey, but Firefox extensions arealso written in JavaScript. In fact, you can compile a user script into a Firefoxextension, and then add more advanced features. See http://www.ghacks.net/2009/08/31/greasemonkey-to-firefox-add-on-compiler/ for details.
Q. What happens when a new version of Firefox or Internet Explorer isreleased?
A. Although I have faith in the Greasemonkey developers, there’s no guaranteethat this extension will work in future browser versions. If you’re concernedabout this, you might want to write your own Firefox extension instead.
Q. Are there limits to how much I can modify a page using Greasemonkey?
A. No—in fact, you can yank the entire content of the page’s DOM out andreplace it with HTML of your choosing using the innerHTML property. You’dhave to do quite a bit of work to make something as useful as the originalpage, of course.
WorkshopThe workshop contains quiz questions and exercises to help you solidify yourunderstanding of the material covered. Try to answer all questions before lookingat the “Answers” section that follows.
Quiz1. Which of the following offers user scripting for Microsoft Internet Explorer?
a. Greasemonkey
b. Microsoft Live Scripting Toolbar
c. Trixie
www.it-ebooks.info

ptg999
478 CHAPTER 23 Greasemonkey: Enhancing the Web with JavaScript
2. Which of the following is not a valid Greasemonkey API function?
a. GM_log()
b. GM_alert()
c. GM_setValue()
3. Which is the correct @include directive to run a script on bothwww.google.com and google.com?
a. @include *.google.com
b. @include www.google.com.*
c. @include google.com
Answers1. c. Trixie is a user script add-on for Internet Explorer.
2. b. There is no GM_alert() method, although the standard alert()method will work in a user script.
3. a. Using @include *.google.com will run the script on any page on anysite within the google.com domain.
Exercises. Modify the color-changing user script in Listing 23.2 to use different col-
ors and add another style attribute—for example, use style.fontSizeto change the font size.
. The color-changing example works on paragraphs, but text oftenappears in other places, such as bullet lists. Modify Listing 23.2 tomake the changes to <li> tags and paragraphs.
. Currently, the macro example in the Try It Yourself section only works ontext inputs that use <textarea> tags. Modify the script in Listing 23.3to work on <input> tags also. (You’ll need to add a second callgetElementsByTagName() and a loop to add the event handlers.)
www.it-ebooks.info

ptg999
Remote scripting, also known as AJAX (Asynchronous JavaScript and XML), isa browser feature that enables JavaScript to escape its client-side boundariesand work with files on a web server or with server-side programs. In thischapter, you’ll learn how AJAX works and create two working examples.
Introducing AJAXTraditionally, one of the major limitations of JavaScript is that it couldn’tcommunicate with a web server because it is a client-side technology—it stays within the browser. For example, you could create a game inJavaScript, but keeping a list of high scores stored on a server wouldrequire submitting a page to a server-side form, which JavaScript could notdo (because it wasn’t meant to do that).
Speaking purely about user interactions, one of the limitations of webpages in general was that getting data from the user to the server, or fromthe server to the user, generally required a new page to be loaded and dis-played. But in 2011, you likely run across websites every day that enableyou to interact with content without loading a new page every time youclick or submit a button.
AJAX is the answer to both of these problems. AJAX refers to JavaScript’scapability to use a built-in object, XMLHttpRequest, to communicate with aweb server without submitting a form or loading a page. This object issupported by Internet Explorer, Firefox, Chrome, and all other modernbrowsers.
Although the term AJAX was coined in 2005, XMLHttpRequest has beensupported by browsers for years—it was developed by Microsoft and firstappeared in Internet Explorer 5. Nonetheless, it has only recently become a
WHAT YOU’LL LEARN INTHIS CHAPTER:
. How AJAX enablesJavaScript to communicatewith server-side programsand files
. Using the XMLHttpRequestobject’s properties andmethods
. Creating your own AJAXlibrary
. Using AJAX to read datafrom an XML file
. Debugging AJAX applica-tions
. Using AJAX to communi-cate with a PHP program
CHAPTER 24AJAX: Remote Scripting
www.it-ebooks.info

ptg999
480 CHAPTER 24 AJAX: Remote Scripting
popular way of developing applications because browsers that support ithave become more common. Another name for this technique is remotescripting.
The JavaScript Client (Front End)JavaScript traditionally only has one way of communicating with a server—submitting a form. Remote scripting allows for much more versa-tile communication with the server. The A in AJAX stands for asynchronous,which means that the browser (and the user) isn’t left hanging while wait-ing for the server to respond. Here’s how a typical AJAX request works:
1. The script creates an XMLHttpRequest object and sends it to the webserver. The script can continue after sending the request.
2. The server responds by sending the contents of a file or the output ofa server-side program.
3. When the response arrives from the server, a JavaScript function istriggered to act on the data.
4. Because the goal is a more responsive user interface, the script usual-ly displays the data from the server using the DOM, eliminating theneed for a page refresh.
In practice, this happens quickly, but even with a slow server, it can stillwork. Also, because the requests are asynchronous, more than one can bein progress at a time.
The Server-Side Script (Back End)The part of an application that resides on the web server is known as theback end. The simplest back end is a static file on the server—JavaScript canrequest the file with XMLHttpRequest, and then read and act on its con-tents. More commonly, the back end is a server-side program running in alanguage such as PHP, Perl, or Ruby.
JavaScript can send data to a server-side program using GET or POST meth-ods, the same two ways an HTML form works. In a GET request, the data isencoded in the URL that loads the program. In a POST request, it is sentseparately and can contain more data.
NOTE
The term AJAX first appeared inan online article by JesseJames Garrett of Adaptive Pathon February 18, 2005. It stillappears here: http://www.adaptivepath.com/ideas/ajax-new-approach-web-applications.
www.it-ebooks.info

ptg999
Introducing AJAX 481
XMLThe X in AJAX stands for XML (Extensible Markup Language), the univer-sal markup language upon which the latest versions of HTML are built. Aserver-side file or program can send data in XML format, and JavaScriptcan act on the data using its methods for working with XML. These aresimilar to the DOM methods you’ve already used—for example, you canuse the getElementsByTagName() method to find elements with a particu-lar tag in the data.
Keep in mind that XML is just one way to send data, and not always theeasiest. The server could just as easily send plain text, which the scriptcould display, or HTML, which the script could insert into the page usingthe innerHTML property. Some programmers have even used server-sidescripts to return data in JavaScript format, which can be easily executedusing the eval function.
Popular Examples of AJAXAlthough typical HTML and JavaScript is used to build web pages andsites, AJAX techniques often result in web applications—web-based servicesthat perform work for the user. Here are a few well-known examples ofAJAX:
. Google’s Gmail mail client (http://mail.google.com/) uses AJAX tomake a fast-responding email application. You can delete messagesand perform other tasks without waiting for a new page to load.
. Amazon.com uses AJAX for some functions. For example, if youclick on one of the Yes/No voting buttons for a product comment, itsends your vote to the server and a message appears next to the but-ton thanking you, all without loading a page.
. Digg (http://www.digg.com) is a site where users can submit newsstories and vote to determine which ones are displayed on the frontpage. The voting happens inside the page next to each story.
These are just a few examples. Subtle bits of remote scripting are appearingall over the Web, and you might not even notice them—you’ll just beannoyed a little bit less often at waiting for a page to load.
NOTE
JSON (JavaScript ObjectNotation) takes the idea ofencoding data in JavaScript andformalizes it. See http://www.json.org/ for details and codeexamples in many languages.
www.it-ebooks.info

ptg999
482 CHAPTER 24 AJAX: Remote Scripting
AJAX Frameworks and LibrariesBecause remote scripting can be complicated, especially considering thebrowser differences you’ll learn about later this chapter, several frame-works and libraries have been developed to simplify AJAX programming.
For starters, three of the libraries described earlier in this book, JQuery,Prototype, and Script.aculo.us, include functions to simplify remote script-ing. There are also some dedicated libraries for languages such as PHP,Python, and Ruby.
Some libraries are designed to add server-side functions to JavaScript,whereas others are designed to add JavaScript interactivity to a languagelike PHP. You’ll build a simple library later this chapter that will be used tohandle the remote scripting functions for this chapter’s examples.
Limitations of AJAXRemote scripting is a relatively new technology, so there are some things itcan’t do, and some things to watch out for. Here are some of the limita-tions and potential problems of AJAX:
. The script and the XML data or server-side program it requests datafrom must be on the same domain.
. Some older browsers and some less common browsers (such asmobile browsers) don’t support XMLHttpRequest, so you can’t counton its availability for all users.
. Requiring AJAX might compromise the accessibility of a site for dis-abled users.
. Users may still be accustomed to seeing a new page load each timethey change something, so there might be a learning curve for themto understand an AJAX application.
As with other advanced uses of JavaScript, the best approach is to beunobtrusive—make sure there’s still a way to use the site without AJAXsupport if possible, and use feature sensing to prevent errors on browsersthat don’t support it. See Chapter 21, “Using Unobtrusive JavaScript,” formore details.
NOTE
See Chapter 22, “Using Third-Party Libraries,” for informationabout using third-party librarieswith JavaScript.
www.it-ebooks.info

ptg999
Using XMLHttpRequest 483
Using XMLHttpRequestYou will now look at how to use XMLHttpRequest to communicate with aserver. This might seem a bit complex, but the process is the same for anyrequest. Later, you will create a reusable code library to simplify thisprocess.
Creating a RequestThe first step is to create an XMLHttpRequest object. To do this, you use thenew keyword, as with other JavaScript objects. The following statement cre-ates a request object in some browsers:
ajaxreq = new XMLHttpRequest();
The previous example works with Firefox, Chrome, Internet Explorer 7and 8, and other modern browsers, but not with Internet Explorer 5 or 6. Itis up to you whether you want to support these browsers or not becausetheir percentages of use are very low. However, some institutions might bestuck with a lot of IE6 browsers installed at workstations, so your mileagemay vary.
From this point forward, the sample code will only support IE7 andbeyond (modern browsers), but if you want to support these old browsers,you have to use ActiveX syntax:
ajaxreq = new ActiveXObject(“Microsoft.XMLHTTP”);
The library section later this chapter demonstrates how to use the correctmethod depending on the browser in use. In either case, the variable youuse (ajaxreq in the example) stores the XMLHttpRequest object. You’ll usethe methods of this object to open and send a request, as explained in thefollowing sections.
Opening a URLThe open() method of the XMLHttpRequest object specifies the filename aswell as the method in which data will be sent to the server: GET or POST.These are the same methods supported by web forms.
ajaxreq.open(“GET”,”filename”);
www.it-ebooks.info

ptg999
484 CHAPTER 24 AJAX: Remote Scripting
For the GET method, the data you send is included in the URL. For exam-ple, this command opens the search.php program and sends the value“John” for the query parameter:
ajaxreq.open(“GET”,”search.php?query=John”);
Sending the RequestYou use the send() method of the XMLHttpRequest object to send therequest to the server. If you are using the POST method, the data to send isthe argument for send(). For a GET request, you can use the null valueinstead:
ajaxreq.send(null);
Awaiting a ResponseAfter the request is sent, your script will continue without waiting for aresult. Because the result could come at any time, you can detect it with anevent handler. The XMLHttpRequest object has an onreadystatechangeevent handler for this purpose. You can create a function to deal with theresponse and set it as the handler for this event:
ajaxreq.onreadystatechange = MyFunc;
The request object has a property, readyState, that indicates its status, andthis event is triggered whenever the readyState property changes. Thevalues of readyState range from 0 for a new request to 4 for a completerequest, so your event-handling function usually needs to watch for avalue of 4.
Although the request is complete, it might not have been successful. Thestatus property is set to 200 if the request succeeded or an error code if itfailed. The statusText property stores a text explanation of the error or“OK” for success.
Interpreting the Response DataWhen the readyState property reaches 4 and the request is complete, thedata returned from the server is available to your script in two properties:responseText is the response in raw text form, and responseXML is theresponse as an XML object. If the data was not in XML format, only thetext property will be available.
CAUTION
As usual with event handlers,be sure to specify the functionname without parentheses.With parentheses, you’re refer-ring to the result of the func-tion; without them, you’re refer-ring to the function itself.
www.it-ebooks.info

ptg999
Creating a Simple AJAX Library 485
JavaScript’s DOM methods are meant to work on XML, so you can usethem with the responseXML property. Later this chapter, you’ll use thegetElementsByTagName() method to extract data from XML.
Creating a Simple AJAX LibraryYou should be aware by now that AJAX requests can be a bit complex. Tomake things easier, you can create an AJAX library. This is a JavaScript filethat provides functions that handle making a request and receiving theresult, which you can reuse any time you need AJAX functions.
This library will be used in the two examples later this chapter. Listing 24.1shows the complete AJAX library, including the special case for olderbrowsers.
LISTING 24.1 The AJAX Library// global variables to keep track of the request// and the function to call when donevar ajaxreq=false, ajaxCallback;// ajaxRequest: Sets up a requestfunction ajaxRequest(filename) {
try {// Firefox / IE7 / Othersajaxreq= new XMLHttpRequest();} catch (error) {try {// IE 5 / IE 6ajaxreq = new ActiveXObject(“Microsoft.XMLHTTP”);
} catch (error) {return false;
}}ajaxreq.open(“GET”, filename);ajaxreq.onreadystatechange = ajaxResponse;ajaxreq.send(null);
}// ajaxResponse: Waits for response and calls a functionfunction ajaxResponse() {
if (ajaxreq.readyState !=4) return;if (ajaxreq.status==200) {
// if the request succeeded...if (ajaxCallback) ajaxCallback();
} else alert(“Request failed: “ + ajaxreq.statusText);return true;
}
The following sections explain how this library works and how to use it.
www.it-ebooks.info

ptg999
486 CHAPTER 24 AJAX: Remote Scripting
The ajaxRequest FunctionThe ajaxRequest function handles all the steps necessary to create andsend an XMLHttpRequest. First, it creates the XMLHttpRequest object. Asnoted before, this requires a different command for older browsers andwill cause an error if the wrong one executes, so try and catch are used tocreate the request. First the standard method is used, and if it causes anerror, the ActiveX method is tried. If that also causes an error, the ajaxreqvariable is set to false to indicate that AJAX is unsupported.
The ajaxResponse FunctionThe ajaxResponse function is used as the onreadystatechange event han-dler. This function first checks the readyState property for a value of 4. Ifit has a different value, the function returns without doing anything.
Next, it checks the status property for a value of 200, which indicates therequest was successful. If so, it runs the function stored in theajaxCallback variable. If not, it displays the error message in an alert box.
Using the LibraryTo use this library, follow these steps:
1. Save the library file as ajax.js in the same folder as your HTMLdocuments and scripts.
2. Include the script in your document with a <script src> tag. Itshould be included before any other scripts that use its features.
3. In your script, create a function to be called when the request is com-plete and set the ajaxCallback variable to the function.
4. Call the ajaxRequest() function. Its parameter is the filename of theserver-side program or file. (This library supports GET requests only,so you don’t need to specify the method.)
5. Your function specified in ajaxCallback will be called when therequest completes successfully, and the global variable ajaxreq willstore the data in its responseXML and responseText properties.
The two remaining examples in this chapter make use of this library to cre-ate AJAX applications.
www.it-ebooks.info
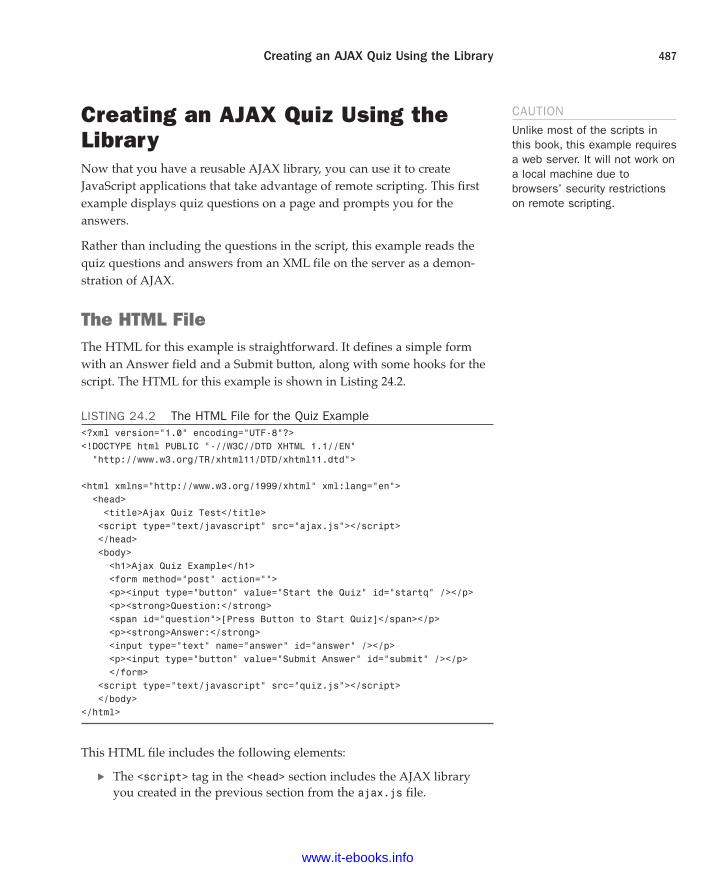
ptg999
Creating an AJAX Quiz Using the Library 487
Creating an AJAX Quiz Using theLibraryNow that you have a reusable AJAX library, you can use it to createJavaScript applications that take advantage of remote scripting. This firstexample displays quiz questions on a page and prompts you for theanswers.
Rather than including the questions in the script, this example reads thequiz questions and answers from an XML file on the server as a demon-stration of AJAX.
The HTML FileThe HTML for this example is straightforward. It defines a simple formwith an Answer field and a Submit button, along with some hooks for thescript. The HTML for this example is shown in Listing 24.2.
LISTING 24.2 The HTML File for the Quiz Example<?xml version=”1.0” encoding=”UTF-8”?><!DOCTYPE html PUBLIC “-//W3C//DTD XHTML 1.1//EN”“http://www.w3.org/TR/xhtml11/DTD/xhtml11.dtd”>
<html xmlns=”http://www.w3.org/1999/xhtml” xml:lang=”en”><head><title>Ajax Quiz Test</title><script type=”text/javascript” src=”ajax.js”></script></head><body><h1>Ajax Quiz Example</h1><form method=”post” action=””><p><input type=”button” value=”Start the Quiz” id=”startq” /></p><p><strong>Question:</strong> <span id=”question”>[Press Button to Start Quiz]</span></p><p><strong>Answer:</strong> <input type=”text” name=”answer” id=”answer” /></p><p><input type=”button” value=”Submit Answer” id=”submit” /></p></form>
<script type=”text/javascript” src=”quiz.js”></script></body>
</html>
This HTML file includes the following elements:
. The <script> tag in the <head> section includes the AJAX libraryyou created in the previous section from the ajax.js file.
CAUTION
Unlike most of the scripts inthis book, this example requiresa web server. It will not work ona local machine due tobrowsers’ security restrictionson remote scripting.
www.it-ebooks.info

ptg999
488 CHAPTER 24 AJAX: Remote Scripting
. The <script> tag in the <body> section includes the quiz.js file,which will contain the quiz script.
. The <span id=”question”> tag sets up a place for the question to beinserted by the script.
. The text field with the id value “answer” is where the user willanswer the question.
. The button with the id value “submit” will submit an answer.
. The button with the id value “startq” will start the quiz.
You can test the HTML document at this time by placing the file on yourweb server and accessing it via the URL, but the buttons won’t work untilyou add the XML and JavaScript files, as you’ll learn about in the next twosections.
The XML FileThe XML file for the quiz is shown in Listing 24.3. I’ve filled it with a fewJavaScript questions, but it could easily be adapted for another purpose.
LISTING 24.3 The XML File Containing the Quiz Questions and Answers<?xml version=”1.0” ?><questions>
<q>What DOM object contains URL information for the window?</q><a>location</a><q>Which method of the document object finds the
object for an element?</q><a>getElementById</a><q>If you declare a variable outside a function,
is it global or local?</q><a>global</a><q>What is the formal standard for the JavaScript language
called?</q><a>ECMAScript</a>
</questions>
The <questions> tag encloses the entire file and each question and answerare enclosed in <q> and <a> tags. Remember, this is XML, not HTML—these are not standard HTML tags, but tags that were created for thisexample. Because this file will be used only by your script, it does not needto follow a standard format.
www.it-ebooks.info

ptg999
Creating an AJAX Quiz Using the Library 489
To use this file, save it as questions.xml in the same folder as the HTMLdocument. It will be loaded by the script you create in the next section.
Of course, with a quiz this small, you could have made things easier bystoring the questions and answers in a JavaScript array. But imagine amuch larger quiz, with thousands of questions, or a server-side programthat pulls questions from a database, or even a hundred different files withdifferent quizzes to choose from, and you can see the benefit of using aseparate XML file.
The JavaScript FileBecause you have a separate library to handle the complexities of makingan AJAX request and receiving the response, the script for this exampleonly needs to deal with the action for the quiz itself. Listing 24.4 shows theJavaScript file for this example.
LISTING 24.4 The JavaScript File for the Quiz Example// global variable qn is the current question numbervar qn=0;// load the questions from the XML filefunction getQuestions() {
obj=document.getElementById(“question”);obj.firstChild.nodeValue=”(please wait)”;ajaxCallback = nextQuestion;ajaxRequest(“questions.xml”);
}// display the next questionfunction nextQuestion() {
questions = ajaxreq.responseXML.getElementsByTagName(“q”);obj=document.getElementById(“question”);if (qn < questions.length) {
q = questions[qn].firstChild.nodeValue;obj.firstChild.nodeValue=q;
} else {obj.firstChild.nodeValue=”(no more questions)”;
}}// check the user’s answerfunction checkAnswer() {
answers = ajaxreq.responseXML.getElementsByTagName(“a”);a = answers[qn].firstChild.nodeValue;answerfield = document.getElementById(“answer”);if (a == answerfield.value) {
alert(“Correct!”);}else {
alert(“Incorrect. The correct answer is: “ + a);
www.it-ebooks.info

ptg999
490 CHAPTER 24 AJAX: Remote Scripting
}qn = qn + 1;answerfield.value=””;nextQuestion();
}// Set up the event handlers for the buttonsobj=document.getElementById(“startq”);obj.onclick=getQuestions;ans=document.getElementById(“submit”);ans.onclick=checkAnswer;
This script consists of the following:
. The first var statement defines a global variable, qn, which will keeptrack of which question is currently displayed. It is initially set tozero for the first question.
. The getQuestions() function is called when the user clicks the StartQuiz button. This function uses the AJAX library to request the con-tents of the questions.xml file. It sets the ajaxCallback variable tothe nextQuestion() function.
. The nextQuestion() function is called when the AJAX request iscomplete. This function uses the getElementsByTagName() methodon the responseXML property to find all the questions (<q> tags) andstore them in the questions array.
. The checkAnswer() function is called when the user submits ananswer. It uses getElementsByTagName() to store the answers (<a>tags) in the answers array, and then compares the answer for the cur-rent question with the user’s answer and displays an alert indicatingwhether they were right or wrong.
. The script commands after this function set up two event handlers.One attaches the getQuestions() function to the Start Quiz button toset up the quiz; the other attaches the checkAnswer() function to theSubmit button.
Testing the QuizTo try this example, you’ll need all four files in the same folder: ajax.js (theAJAX library), quiz.js (the quiz functions), questions.xml (the questions),and the HTML document. All but the HTML document need to have thecorrect filenames so they will work correctly. Also, remember that becauseit uses AJAX, this example requires a web server.
LISTING 24.4 Continued
www.it-ebooks.info

ptg999
Debugging AJAX Applications 491
Figure 24.1 shows the quiz in action. The second question has just beenanswered.
FIGURE 24.1The quiz example loaded in a webbrowser.
Debugging AJAX ApplicationsDealing with remote scripting means working with several languages atonce—JavaScript, server-side languages such as PHP, XML, and of courseHTML. Thus, when you find an error, it can be difficult to track down.Here are some tips for debugging AJAX applications:
. Be sure all filenames are correct and that all files for your applicationare in the same folder on the server.
. If you are using a server-side language, test it without the script:Load it in the browser and make sure it works; try passing variablesto it in the URL and checking the results.
. Check the statusText property for the results of your request—analert message is helpful here. It is often a clear message such as“File not found” that might explain the problem.
. If you’re using a third-party AJAX library, check its documentation—many libraries have built-in debugging features you can enable toexamine what’s going on.
www.it-ebooks.info

ptg999
492 CHAPTER 24 AJAX: Remote Scripting
TRY IT YOURSELF▼
Making a Live SearchForm
One of the most impressive demonstrations of AJAX is live search: Whereas anormal search form requires that you click a button and wait for a page toload to see the results, a live search displays results within the page immedi-ately as you type in the search field. As you type letters or press the back-space key, the results are updated instantly to make it easy to find the resultyou need.
Using the AJAX library you created earlier, live search is not too hard to imple-ment. This example will use a PHP program on the server to provide thesearch results, and can be easily adapted to any search application.
The HTML FormThe HTML for this example simply defines a search field and leaves someroom for the dynamic results. The HTML document is shown in Listing 24.5.
LISTING 24.5 The HTML File for the Live Search Example<?xml version=”1.0” encoding=”UTF-8”?><!DOCTYPE html PUBLIC “-//W3C//DTD XHTML 1.1//EN”“http://www.w3.org/TR/xhtml11/DTD/xhtml11.dtd”>
<html xmlns=”http://www.w3.org/1999/xhtml” xml:lang=”en”><head><title>Ajax Live Search Example</title><script type=”text/javascript” src=”ajax.js”></script></head><body><h1>Ajax Live Search Example</h1><form method=”get” action=””><p><strong>Search for:</strong><input type=”text” size=”40” id=”searchlive” /></p><div id=”results”><ul id=”list”><li>[Search results will display here.]</li>
</ul></div>
</form><script type=”text/javascript” src=”search.js”></script></body>
</html>
This HTML document includes the following:
. The <script> tag in the <head> section includes the AJAX library, ajax.js.
. The <script> tag in the <body> section includes the search.js script,which you’ll create next.
CAUTION
Once again, because it usesAJAX, this example requires aweb server. You’ll also needPHP to be installed, which it isby default by the vast majorityof hosting services.
www.it-ebooks.info

ptg999
Debugging AJAX Applications 493
Making a Live SearchFormcontinued
. The <input> element with the id value “searchlive” is where you’lltype your search query.
. The <div> element with the id value “results” will act as a containerfor the dynamically fetched results. A bulleted list is created with a <ul>tag; this will be replaced with a list of results when you start typing.
The PHP Back EndNext, you’ll need a server-side program to produce the search results. ThisPHP program includes a list of names stored in an array. It will respond to aJavaScript query with the names that match what the user has typed so far.The names will be returned in XML format. For example, here is the output ofthe PHP program when searching for “smith”:
<names><name>John Smith</name><name>Jane Smith</name></names>
Although the list of names is stored within the PHP program here for simplici-ty, in a real application it would more likely be stored in a database—and thisscript could easily be adapted to work with a database containing thousandsof names. The PHP program is shown in Listing 24.6.
LISTING 24.6 The PHP Code for the Live Search Example<?phpheader(“Content-type: text/xml”);$names = array (“John Smith”, “John Jones”, “Jane Smith”, “Jane Tillman”,“Abraham Lincoln”, “Sally Johnson”, “Kilgore Trout”,“Bob Atkinson”, “Joe Cool”, “Dorothy Barnes”,“Elizabeth Carlson”, “Frank Dixon”, “Gertrude East”,“Harvey Frank”, “Inigo Montoya”, “Jeff Austin”,“Lynn Arlington”, “Michael Washington”, “Nancy West” );
if (!$query) {$query=$_GET[‘query’];
}echo “<?xml version=\”1.0\” ?>\n”;echo “<names>\n”;while (list($k,$v)=each($names)) {
if (stristr($v,$query)) {echo “<name>$v</name>\n”;
}}echo “</names>\n”;?>
TRY IT YOURSELF ▼
www.it-ebooks.info

ptg999
494 CHAPTER 24 AJAX: Remote Scripting
TRY IT YOURSELF▼
Making a Live SearchFormcontinued
This chapter is too small to teach you PHP, but here’s a summary of how thisprogram works:
. The header statement sends a header indicating that the output is inXML format. This is required for XMLHttpRequest to correctly use theresponseXML property.
. The $names array stores the list of names. You can use a much longerlist of names without changing the rest of the code.
. The program looks for a GET variable called query and uses a loop tooutput all the names that match the query.
. Because PHP can be embedded in an HTML file, the <?php and ?> tagsindicate that the code between them should be interpreted as PHP.
Save the PHP program as search.php in the same folder as the HTML file.You can test it by typing a query such as search.php?query=John in thebrowser’s URL field. Use the View Source command to view the XML result.
The JavaScript Front EndFinally, the JavaScript for this example is shown in Listing 24.7.
LISTING 24.7 The JavaScript File for the Live Search Example// global variable to manage the timeoutvar t;// Start a timeout with each keypressfunction StartSearch() {
if (t) window.clearTimeout(t);t = window.setTimeout(“LiveSearch()”,200);
}// Perform the searchfunction LiveSearch() {
// assemble the PHP filenamequery = document.getElementById(“searchlive”).value;filename = “search.php?query=” + query;// DisplayResults will handle the Ajax responseajaxCallback = DisplayResults;// Send the Ajax requestajaxRequest(filename);
}// Display search resultsfunction DisplayResults() {
// remove old listul = document.getElementById(“list”);div = document.getElementById(“results”);div.removeChild(ul);
NOTE
If you want to learn moreabout PHP, try Sams TeachYourself PHP, MySQL andApache All-in-One (ISBN:067232976X).
www.it-ebooks.info
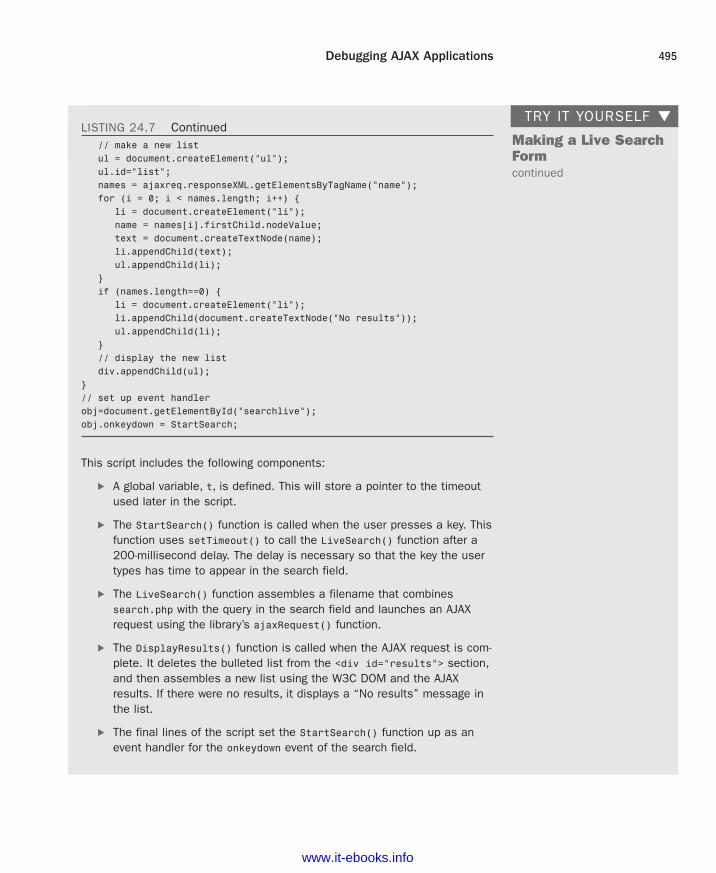
ptg999
Debugging AJAX Applications 495
Making a Live SearchFormcontinued
// make a new listul = document.createElement(“ul”);ul.id=”list”;names = ajaxreq.responseXML.getElementsByTagName(“name”);for (i = 0; i < names.length; i++) {
li = document.createElement(“li”);name = names[i].firstChild.nodeValue;text = document.createTextNode(name);li.appendChild(text);ul.appendChild(li);
}if (names.length==0) {
li = document.createElement(“li”);li.appendChild(document.createTextNode(“No results”));ul.appendChild(li);
}// display the new listdiv.appendChild(ul);
}// set up event handlerobj=document.getElementById(“searchlive”);obj.onkeydown = StartSearch;
This script includes the following components:
. A global variable, t, is defined. This will store a pointer to the timeoutused later in the script.
. The StartSearch() function is called when the user presses a key. Thisfunction uses setTimeout() to call the LiveSearch() function after a200-millisecond delay. The delay is necessary so that the key the usertypes has time to appear in the search field.
. The LiveSearch() function assembles a filename that combinessearch.php with the query in the search field and launches an AJAXrequest using the library’s ajaxRequest() function.
. The DisplayResults() function is called when the AJAX request is com-plete. It deletes the bulleted list from the <div id=”results”> section,and then assembles a new list using the W3C DOM and the AJAXresults. If there were no results, it displays a “No results” message inthe list.
. The final lines of the script set the StartSearch() function up as anevent handler for the onkeydown event of the search field.
TRY IT YOURSELF ▼LISTING 24.7 Continued
www.it-ebooks.info

ptg999
496 CHAPTER 24 AJAX: Remote Scripting
SummaryIn this chapter, you’ve learned how AJAX, or remote scripting, allowsJavaScript to communicate with a web server. You created a reusable AJAXlibrary that can be used to create any number of AJAX applications, andyou created an example using an XML file. Finally, you created a livesearch form using AJAX and PHP.
TRY IT YOURSELF▼
Making a Live SearchFormcontinued
Making It All WorkTo try this example, you’ll need three files on a web server: ajax.js (thelibrary), search.js (the search script), and the HTML file. Figure 24.2 showsthis example in action.
FIGURE 24.2The live search example as dis-played in the browser.
www.it-ebooks.info
ptg999
497
Q&AQ. What happens if the server is slow, or never responds to the request?
A. This is another reason you should use AJAX as an optional feature—whether caused by the server or by the user’s connection, there will betimes when a request is slow to respond or never responds. In thiscase, the callback function will be called late or not at all. This cancause trouble with overlapping requests; for example, in the live searchexample, an erratic server might cause the responses for the first fewcharacters typed to come in a few seconds apart, confusing the user.You can remedy this by checking the readyState property to make surea request is not already in progress before you start another one.
Q. In the live search example, why is the onkeydown event handler neces-sary? Wouldn’t the onchange event be easier to use?
A. Although onchange tells you when a form field has changed, it is nottriggered until the user moves on to a different field—it doesn’t workfor “live” search, so you have to watch for key presses instead. Theonkeypress handler would work, but in some browsers it doesn’t detectthe Backspace key, and it’s nice to have the search update when youbackspace to shorten the query.
WorkshopThe workshop contains quiz questions and exercises to help you solidify yourunderstanding of the material covered. Try to answer all questions beforelooking at the “Answers” section that follows.
Quiz1. Which of the following is the A in AJAX?
a. Advanced
b. Asynchronous
c. Application
Workshop
www.it-ebooks.info

ptg999
498 CHAPTER 24 AJAX: Remote Scripting
2. Which property of an XMLHttpRequest object indicates whether therequest was successful?
a. status
b. readyState
c. success
3. True or False: To support old versions of Internet Explorer, you must cre-ate an ActiveX object rather than an XMLHttpRequest object when usingAJAX.
Answers1. b. AJAX stands for Asynchronous JavaScript and XML.
2. a. The status property indicates whether the request was successful;readyState indicates whether the request is complete, but does notindicate success.
3. True. Internet Explorer 5 and 6 require ActiveX, whereas versions ofInternet Explorer after version 7 support the XMLHttpRequest objectnatively.
Exercises. Build your own XML file of questions and answers on your favorite topic
and try it with the quiz example.
. Use the AJAX library to add an AJAX feature to your site or create a sim-ple example of your own.
www.it-ebooks.info

ptg999
If you’ve ever used an online mapping tool such as MapQuest or GoogleMaps, you’ve no doubt experienced the need to print a web page.Similarly, the proliferation of coupons offered only online, purchasereceipts for items from online resellers, and web-based flight check-in andthe ability to print boarding passes from your home computer haveincreased the need for print-friendly pages. It’s true, not all web pages aredesigned entirely for viewing on the screen!
You might not realize this, but it’s possible to specifically design and offerprint-friendly versions of your pages for users who want to print a copyfor offline reading—something that Google Maps offers after showing youthe on-screen version of content. CSS makes it easy to create web pagesthat will change appearance based on how they are viewed. In this chapter,you learn how to create such pages.
WHAT YOU’LL LEARN INTHIS CHAPTER:
. What makes a page print-friendly
. How to apply a media-specific style sheet
. How to create a stylesheet for print pages
. How to view your web pagein print preview mode
CHAPTER 25Creating Print-Friendly Web Pages
www.it-ebooks.info

ptg999
500 CHAPTER 25 Creating Print-Friendly Web Pages
What Makes a Page Print-Friendly?It’s important to point out that some web pages are print-friendly already.If your pages use white backgrounds with dark contrasting text and fewimages, you might not even need to concern yourself with a special print-friendly version. On the other hand, pages with dark backgrounds,dynamic links, and several images might prove to be unwieldy for theaverage printer.
The main things to keep in mind as you consider what it takes to makeyour pages more print-friendly are the limitations imposed by the medi-um. In other words, what is it about a printed page that makes it uniquelydifferent from a computer screen? The obvious difference is size—a printedpage is at a fixed size, typically 8 1⁄2 by 11 inches, whereas the size ofscreens can vary greatly. In addition to size, printed pages also have colorlimitations (even on color printers). Very few users want to waste the inkrequired to print a full-color background when they really just want toprint the text on the page.
TRY IT YOURSELF▼
Reviewing YourContent for Print-Friendliness
As you work your way through this chapter, consider any of your own webpages that might look good in print. Then think about what you would want tochange about them to make them look even better on the printed page. Hereare some ideas to consider:
. Even against warnings in previous chapters, do you have pages thatuse a patterned background image or an unusual background color withcontrasting text? This kind of page can be difficult to print because ofthe background, so you might consider offering a print version of thepage that doesn’t use a custom background image or color and simplyuses black text. When preparing a page for printing, stick to black texton a white background if possible.
. Do your pages include lots of links? If so, you might consider changingthe appearance of links for printing so that they don’t stand out—remove any underlining, for example. Remember, you can’t click a pieceof paper!
. Finally, is every image on your page absolutely essential? Colorfulimages cost valuable ink to print on most printers, so you might consid-er leaving some, if not all, images out of your print-friendly pages.
www.it-ebooks.info

ptg999
What Makes a Page Print-Friendly? 501
Most users also aren’t interested in printing more than the text that servesas the focus on the page. For example, Figure 25.1 shows a travel routemapped out from Independence, Missouri to Oregon City, Oregon (anapproximation of the historic Oregon Trail).
FIGURE 25.1This page isn’t very print-friendlydue to the form inputs and largeimage with its own display controls.
The page shown in Figure 25.1 contains form input fields, a large imagethat can itself be controlled (moved, zoomed, and so on), and other ancil-lary items that you come to expect in web content. Above the map appearsa set of Actions that you can perform, one of which is a link to print thepage. At this point, you might wonder why you can’t just click the Printbutton on your web browser. You certainly can do this, but that commandprints the page as it is shown on your screen—complete with the forminput fields and graphical elements, when all you really want to know arethe turns you need to make when driving this route.
If you click the Print link in the body of the page, your web browser willdisplay a page (see Figure 25.2) that Google has formatted specifically tobe printed.
As shown in the figure, the print-friendly version of this page represents asignificant improvement over the original, at least from the perspective ofa printer. All the form inputs and images were removed.
www.it-ebooks.info

ptg999
502 CHAPTER 25 Creating Print-Friendly Web Pages
In the spirit of giving you a better grasp on what, specifically, to consideras you move toward creating print-friendly pages, following is a list ofchanges you should at least consider:
. Remove the background of the page, which effectively gives theprinted page a white background.
. Change text colors to black; it’s okay to have some color in the textbut black is preferred.
. Make sure that the font size is large enough that the page can be easi-ly read when printed. You might have to test some different sizes.
. Remove link formatting or simply revert to a basic underlined link.Some designers like to retain an underline just so that a visitorknows that a link exists in the original page.
. Remove any and all nonessential images. This typically includes anyimages that aren’t critical to conveying the content in the page, suchas navigation buttons, most ads, and animated images.
In addition to these suggestions, you might find it useful to add a bylinewith information about the author of the page, along with a URL for thepage and copyright information. This is information that could potentiallyget lost after the user leaves your website and has only the printed versionof the page in hand.
FIGURE 25.2The print-friendly version of thepage isolates the text of the driv-ing instructions so that it can beprinted by itself.
NOTE
If the font of printer-specificpages is sans serif, some webdesigners recommend changingthe font to serif, which is con-sidered easier to read in print.If you use a sans serif font onyour pages, it’s up to you todecide whether you want tomaintain the core look of apage when it’s printed—whichmeans you don’t change thefont to serif.
www.it-ebooks.info

ptg999
Applying a Media-Specific Style Sheet 503
You probably don’t need to make these changes to your pages just yet. Theidea is to plant the seed of what constitutes a print-friendly page so thatyou can do a better job of creating a printer-specific style sheet. That’sright: It’s possible to create a style sheet that is applied to pages only whenthey are printed. You learn this in the next section.
Applying a Media-Specific StyleSheetFigure 25.1 showed how a small printer icon with a link enables you toview a special print-friendly version of a page. This type of icon is popularon many news sites, and it’s an important feature because you otherwisemight not want to hassle with printing a page and wasting paper and inkon the graphics and ads that accompany articles. Although the printer iconand link approach is intuitive and works great, there is an option that doesnot require these specific links to print-friendly content.
This option involves using a print-specific style sheet that is automaticallyapplied to a page when the user elects to print the page. CSS supports theconcept of media-specific style sheets, which are style sheets that target a par-ticular medium, such as the screen or printer. CSS doesn’t stop with thosetwo forms of media, however. Check out the following list of specificmedia types that CSS 2 enables you to support with a unique style sheet:
. all—For all devices
. aural—For speech synthesizers (called speech in CSS 1 media types)
. braille—For Braille tactile feedback devices
. embossed—For paged Braille printers
. handheld—For handheld devices with limited screen size and band-width
. print—For printed material and documents viewed on screen inPrint Preview mode
. projection—For projected presentations
. screen—For color computer screens
. tty—For devices using a fixed-pitch character grid (such as a termi-nal, teletype, or handheld devices with limited displays)
. tv—For television-type devices, which are typically low resolution,color and have limited ability to scroll
www.it-ebooks.info

ptg999
504 CHAPTER 25 Creating Print-Friendly Web Pages
Perhaps the most interesting of these media is the aural type, which allowsfor web pages that can be read aloud or otherwise listened to. Clearly, thearchitects of CSS envision a Web with a much broader reach than we cur-rently think of as we design pages primarily for computer screens.Although you probably don’t need to worry too much about aural webpage design just yet, it serves as a good heads-up as to what might be onthe horizon.
The good news about style sheets as applied to other media is that theydon’t require you to learn anything new. Okay, maybe in the case of auralweb pages you’ll need to learn a few new tricks, but for now you can usethe same style properties you’ve already learned to create print-specificstyle sheets. The trick is knowing how to apply a style sheet for a particu-lar medium.
If you recall, the <link /> tag is used to link an external style sheet to aweb page. This tag supports an attribute named media that you haven’tseen yet. This attribute is used to specify the name of the medium to whichthe style sheet applies. By default, this attribute is set to all, which meansthat an external style sheet will be used for all media if you don’t specifyotherwise. The other acceptable attribute values correspond to the list ofmedia provided in the previous list.
Establishing a print-specific style sheet for a web page involves using two<link /> tags, one for the printer and one for each remaining medium.Following is code that handles this task:
<link rel=”stylesheet” type=”text/css” href=”standard.css” media=”all” /><link rel=”stylesheet” type=”text/css” href=”for_print.css” media=”print”/>
In this example, two style sheets are linked into a web page. The first sheettargets all media by setting the media attribute to all. If you did nothingelse, the standard.css style sheet would apply to all media. However, thepresence of the second style sheet results in the for_print.css style sheetbeing used to print the page.
You can specify multiple media types in a single <link /> tag by separat-ing the types with a comma, like this:
<link rel=”stylesheet” type=”text/css” href=”for_pp.css” media=”print, projector” />
This code results in the for_pp.css style sheet applying solely to the printand projector media types and nothing else.
NOTEYou can also use the @importcommand to link media-specificstyle sheets. For example, thefollowing code works just likethe previous <link /> code:@import url(player.css) all;@import url(player_print.css)print;
CAUTION
You might have been temptedto specify media=”screen” inthe first linked style sheet inthe previous code. Althoughthis would work for viewing thepage in a normal web browser,it would cause problems if auser viewed the page using ahandheld browser or any of theother types of media. In otherwords, a style sheet appliesonly to the specific media typesmentioned in the media attrib-ute and nothing more.
www.it-ebooks.info

ptg999
Designing a Style Sheet for Print Pages 505
Designing a Style Sheet for PrintPagesUsing the recommended list of modifications required for a print-friendlyweb page, it’s time to take a stab at creating a print-friendly style sheet.Let’s first look at a page that is displayed using a normal (screen) stylesheet (see Figure 25.3).
FIGURE 25.3A CSS-styled page as viewed in anormal web browser.
TIP
You can specify a media typefor your style sheets even if youaren’t linking to external ver-sions. The <style> tag alsouses the same media attributeas the <link /> tag.
This figure reveals how the page looks in a normal web browser. In reality,this page isn’t too far from being print-ready, but it could still benefit fromsome improvements.
The following changes can help make this web page more print-friendly:
. Change the color of all text to black.
. Remove link formatting (bold and color).
. Stack the two player information sections vertically because they areunlikely to fit horizontally on the printed page.
. Remove the contact link entirely.
The first two changes to the normal style sheet are straightforward; theyprimarily involve changing or undoing existing styles. The third change,
www.it-ebooks.info

ptg999
506 CHAPTER 25 Creating Print-Friendly Web Pages
however, requires a bit of thought. Because you know that printed pagesare a fixed size, you should use absolute positioning for all the elements onthe printed page. This makes it much easier to place the content sectionsexactly where you want them. Finally, the last item on the list is very easyto accommodate by simply setting the display style property of the con-tact element to none.
Listing 25.1 shows the CSS code for the player_print.css style sheet,which incorporates these changes into a style sheet that is perfectly suitedfor printing hockey player pages.
LISTING 25.1 CSS Code for the Print-Specific Hockey Player Style Sheetbody {font-family:Verdana, Arial;font-size:12pt;color:black;
}
div {padding:3px;
}
div.title {font-size:18pt;font-weight:bold;font-variant:small-caps;letter-spacing:2px;position:absolute;left:0in;top:0in;
}
div.image {position:absolute;left:0in;top:0.5in;
}
div.info {position:absolute;left:1.75in;top:0.5in;
}
div.favorites {position:absolute;left:1.75in;top:2in;
}
CAUTION
Although absolute positioningworks for the hockey player sam-ple page, it’s not always a goodidea for styling print-specificpages. More specifically, if youhave a page that contains morethan a printed page worth ofcontent, you’re better off usingrelative positioning and lettingcontent flow onto multiplepages.
www.it-ebooks.info

ptg999
Designing a Style Sheet for Print Pages 507
div.footer {position:absolute;text-align:left;left:0in;top:9in;
}
table.stats {width:100%;text-align:right;font-size:11pt;position:absolute;left:0in;top:3.75in;
}
div.contact {display:none;
}
.label {font-weight:bold;font-variant:small-caps;
}
tr.heading {font-variant:small-caps;background-color:black;color:white;
}
tr.light {background-color:white;
}
tr.dark {background-color:#EEEEEE;
}
th.season, td.season {text-align:left;
}
a, a:link, a:visited {color:black;font-weight:normal;text-decoration:none;
}
LISTING 25.1 Continued
www.it-ebooks.info

ptg999
508 CHAPTER 25 Creating Print-Friendly Web Pages
Probably the neatest thing about this code is how it uses inches (in) as theunit of measure for all the absolute positioning code. This makes sensewhen you consider that we think of printed pages in terms of inches, notpixels. If you study the code carefully, you’ll notice that the text is all black,all special style formatting has been removed from the links, and contentsections are now absolutely positioned (so that they appear exactly whereyou want them).
Viewing a Web Page in PrintPreviewFigure 25.4 shows the print-friendly version of a hockey player page as itappears in a browser’s Print Preview window.
FIGURE 25.4You can use Print Preview to viewthe print-friendly version of a webpage before you print it.
If Figure 25.4 had shown the entire page—all 11 inches of height and thensome—you would have noticed that the print-friendly version of the pagenow includes the footer at the very bottom of the page (see Figure 25.5).
www.it-ebooks.info

ptg999
Summary 509
Just to show you how print-friendly pages can be used in a practical situa-tion, check out Figure 25.5. This figure shows the same hockey player pageas a PDF document that can be viewed in Adobe Acrobat Reader.
Adobe’s virtual printer can be used to “print” the hockey player web pageto a PDF document. You might also find PDF converters such as DoPDF(http://www.dopdf.com/) will work for you for at a lower cost than theAdobe Acrobat software. Printing to a PDF effectively creates a version ofthe print-friendly web page in a format that can be easily shared electroni-cally for printing.
SummaryThis chapter focused on a practical application of CSS that solves a commonneed: printing web pages. You began the chapter by learning what exactlyconstitutes a print-friendly web page. From there, you learned about themechanism built into CSS that allows a page to distinguish between themedia in which it is being rendered, and then you learned how to select astyle sheet accordingly. And finally, you created a print-specific style sheetthat was used to style a page just for printing. Although most users preferviewing a page on a large computer screen to reading it on paper, there aretimes when a printed web page is a necessity. Be sure to give your webpage visitors the utmost in flexibility by offering print-friendly pages.
FIGURE 25.5The hockey player page was con-verted to a PDF document by print-ing it as an Adobe PDF.
NOTE
To learn more about Acrobat,visit http://www.adobe.com/products/acrobat/.
www.it-ebooks.info

ptg999
510 CHAPTER 25 Creating Print-Friendly Web Pages
Q&AQ. Can I use the media attribute of the <link /> tag to create a style
sheet specifically for viewing a web page on a handheld device?
A. Yes. By setting the media attribute of the <link /> tag to handheld, youspecifically target handheld devices with a style sheet. You will likelysee all mobile websites eventually shift toward this approach to servemobile pages, as opposed to using specialized markup languages suchas WML (Wireless Markup Language).
Q. Do I still need to provide printer icons on my pages so that they canbe printed?
A. No. The linked style sheet technique you learned about in this chapterallows you to support print-friendly web pages without any special linkson the page. However, if you want to enable the user to view a print-friendly version of a page in a browser, you can link to another versionof the page that uses the print-specific style sheet as its main (brows-er) style sheet. Or you can provide some “fine print” on the page thatinstructs the user to use the browser’s Print Preview feature to view theprint-friendly version of the page.
WorkshopThe workshop contains quiz questions and activities to help you solidify yourunderstanding of the material covered. Try to answer all questions beforelooking at the “Answers” section that follows.
Quiz1. Does having a button to a print-friendly page mean the page is actually
print-friendly?
2. What happens to an external style sheet that is linked to a page with-out any media attribute specified?
3. How would you link a style sheet named freestyle.css to a page sothat it applies only when the page is viewed on a television?
www.it-ebooks.info

ptg999
Workshop 511
Answers1. No—you still have to link to a page with a specific style sheet applied to
the content so that it appears print-friendly.
2. The media attribute assumes its default value of all, which causes thestyle sheet to target all media types.
3. Use the following in the <head> section of your HTML:
<link rel=”stylesheet” type=”text/css” href=”freestyle.css” media=”tv”/>
Exercises. Create a print-friendly style sheet for a page that has a fair number of
colors and images. Be sure to add an extra <link /> tag to the page that links in the print-specific style sheet.
. If you’re feeling really ambitious, try using the handheld value of the <link /> tag’s media attribute to create a handheld-specific version of one of your web pages. The concept is the same as creating a print-friendly page, except in this case you’re dealing with an extremely con-strained screen size instead of a printed page. You can test the page bypublishing it and then opening it on a mobile phone or handheld browser.
www.it-ebooks.info


ptg999
To this point, pretty much everything in this book has focused on gettinginformation out to others. But you can also use your web pages to gatherinformation from the people who read them.
Web forms enable you to receive feedback, orders, or other informationfrom the users who visit your web pages. If you’ve ever used a searchengine such as Google, Yahoo!, or Bing, you’re familiar with HTMLforms—those single field entry forms with one button that, when pressed,give you all the information you are looking for and then some. Productorder forms are also an extremely popular use of forms; if you’ve orderedanything from Amazon.com or purchased something from an eBay seller,you’ve used forms. In this chapter, you learn how to create your ownforms, but you learn only how to create the front-end of those forms.Working with the back-end of forms requires the knowledge of a program-ming language and is beyond the scope of this book. However, in someinstances JavaScript can play a role in form processing, such as rudimenta-ry form content delivery and validation.
How HTML Forms WorkAn HTML form is part of a web page that includes areas where users canenter information to be sent back to you, sent to another email address thatyou specify, sent to a database that you manage, or sent to another systemaltogether such as a third-party management system for your forms suchas Salesforce.com.
Before you learn the HTML tags that are used to make your own forms, youshould at least conceptually understand how the information from thoseforms makes its way back to you. The actual behind-the-scenes (the server-side
WHAT YOU’LL LEARN INTHIS CHAPTER:
. How HTML forms work
. How to create the front-endof an HTML form
. How to name pieces ofform data
. How to include hidden datain forms
. How to choose the correctform input controls for thesituation
. How to submit form data
. Using the form object withJavaScript
. Sending form results byemail
. Validating a form withJavaScript
CHAPTER 26Working with Web-Based Forms
www.it-ebooks.info

ptg999
514 CHAPTER 26 Working with Web-Based Forms
or back-end) process requires knowledge of at least one programming lan-guage or at least the ability to follow specific instructions when using some-one else’s server-side script to handle the form input. At that point in theprocess, you should either work with someone who has the technical knowl-edge, or you should learn the basics on your own. Simple form-processing isnot difficult at all and it is likely that your web-hosting provider has severalback-end scripts that you can use with minimal customization.
Forms include a button for the user to submit the form; that button can bean image that you create yourself or a standard HTML form button that iscreated when a form <input> tag is created and given a type value of submit. When someone clicks a form submission button, all the informa-tion typed in the form is sent to a URL that you specify in the actionattribute of the <form> tag. That URL should point to a specific script thatwill process your form, sending the form contents via email or performinganother step in an interactive process (such as requesting results from asearch engine or placing items in an online shopping cart).
After you start thinking about doing more with form content than simplyemailing results to yourself, additional technical knowledge is required.For example, if you want to create an online store that accepts credit cardsand processes transactions, there are some well-established practices fordoing so, all geared toward ensuring the security of your customers’ data.That is not an operation that you’ll want to enter into lightly; you’ll needmore knowledge than this book provides.
Before you put a form online, you should look in the user guide for yourweb-hosting provider and see what they offer in the way of form-processingscripts. You are likely to find a readily available Perl or PHP script that youcan use with only minimal configuration.
Creating a FormEvery form must begin with a <form> tag, which can be located anywherein the body of the HTML document. The <form> tag normally has threeattributes, name, method and action:
<form name=”form1” method=”post” action=”/myprocessingscript.php”>
The most common method is post, which sends the form entry results as adocument. In some situations, you might need to use method=”get”, whichsubmits the results as part of the URL header instead. For example, get is
NOTE
PHP is the most popular server-side programming language; it’ssupported by any web-hostingprovider worth its salt. You canlearn more about PHP athttp://www.php.net/ or you canjust dive right in to learning thisprogramming language (plusdatabase interactivity) from theground up in PHP, MySQL andApache All in One (ISBN:067232976X). Although severalother books on PHP and relatedtechnologies are available, I ampartial to this one because Iwrote it. It is geared towardabsolute beginners with PHP or any other programming language.
NOTE
There is a way to send formdata without a server-sidescript, and you’ll learn aboutthat method—which uses amailto link in the action attrib-ute of the <form>—later in thischapter. But as you try that, beaware that it can produce incon-sistent results; individual webbrowsers, as well as personalsecurity settings, can causethat action to respond different-ly than what you intended.
www.it-ebooks.info

ptg999
Creating a Form 515
sometimes used when submitting queries to search engines from a webform. Because you’re not yet an expert on forms, just use post unless yourweb-hosting provider’s documentation tells you to do otherwise.
The action attribute specifies the address to which to send the form data.You have two options here:
. You can type the location of a form-processing program or script on aweb server and the form data will then be sent to that program.
. You can type mailto: followed by your email address and the formdata will be sent directly to you whenever someone fills out theform. However, this approach is completely dependent on the user’scomputer being properly configured with an email client. Peopleaccessing your site from a public computer without an email clientwill be left out in the cold.
<form method=”post” action=”mailto:[email protected]”>
Each form in your HTML page is represented in JavaScript by a formobject, which has the same name as the name attribute in the <form> tagyou used to define it.
Alternatively, you can use the forms array to refer to forms. This arrayincludes an item for each form element, indexed starting with 0. For exam-ple, if the first form in a document has the name form1, you can refer to itin one of two ways:
document.form1document.forms[0]
Along with the elements, each form object also has a list of properties,most of which are defined by the corresponding <form> tag. You can alsoset these from within JavaScript. They include the following:
. action is the form’s action attribute, or the program to which theform data will be submitted.
. encoding is the MIME type of the form, specified with the enctypeattribute. In most cases, this is not needed (unless you are uploadinga file with the form).
. length is the number of elements in the form. You cannot changethis property.
. method is the method used to submit the form, either GET or POST.This determines the data format used to send the form result to aCGI script and does not affect JavaScript.
www.it-ebooks.info

ptg999
516 CHAPTER 26 Working with Web-Based Forms
. target specifies the window in which the result of the form (fromthe CGI script) will be displayed. Normally, this is done in the mainwindow, replacing the form itself, but you can use this attribute towork with pop-up windows or frames.
The form created in Listing 26.1 and shown in Figure 26.1 includes justabout every type of user input component you can currently use on HTMLforms. Refer to this listing and figure as you read the following explana-tions of each type of input element.
LISTING 26.1 A Form with Various User-Input Components<?xml version=”1.0” encoding=”UTF-8”?><!DOCTYPE html PUBLIC “-//W3C//DTD XHTML 1.1//EN”“http://www.w3.org/TR/xhtml11/DTD/xhtml11.dtd”>
<html xmlns=”http://www.w3.org/1999/xhtml” xml:lang=”en”><head><title>Guest Book</title>
<style type=”text/css”>.formlabel {
font-weight:bold;width: 250px;margin-bottom: 12px;float: left;text-align: left;clear: left;
}.formfield {
font-weight:normal;margin-bottom: 12px;float: left;text-align: left;
}
input, textarea, select {border: 1px solid black;
}</style>
</head><body><h1>My Guest Book</h1>
<p>Please sign my guest book. Thanks!</p><form name=”gbForm” method=”post” action=”URL_to_script”>
<div class=”formlabel”>What is your name?</div><div class=”formfield”><input type=”text” name=”name”
size=”50” /></div>
<div class=”formlabel”>What is your e-mail address?</div><div class=”formfield”><input type=”text” name=”email”
www.it-ebooks.info

ptg999
Creating a Form 517
size=”50” /></div>
<div class=”formlabel”>Please check all that apply:</div><div class=”formfield”>
<input type=”checkbox” name=”website_response[]” value=”Ireally like your Web site.” />I really like your Web site.<br /><input type=”checkbox” name=”website_response[]” value=”Oneof the best sites I’ve seen.” />One of the best sites I’veseen.<br /><input type=”checkbox” name=”website_response[]” value=”I surewish my site looked as good as yours.” />I sure wish my sitelooked as good as yours.<br /><input type=”checkbox” name=”website_response[]” value=”I haveno taste and I’m pretty dense, so your site didn’t do much forme.” />I have no taste and I’m pretty dense, so your sitedidn’t do much for me.<br />
</div>
<div class=”formlabel”>Choose the one thing you love best about myweb site:</div><div class=”formfield”>
<input type=”radio” name=”lovebest” value=”me” />That gorgeouspicture of you.<br /><input type=”radio” name=”lovebest” value=”cats” />All thebeautiful pictures of your cats.<br /><input type=”radio” name=”lovebest” value=”childhood” />Theinspiring recap of your suburban childhood.<br /><input type=”radio” name=”lovebest” value=”treasures” />Thedetailed list of all your Elvis memorabilia.<br />
</div>
<div class=”formlabel”>If my web site were a book, how many copieswould it sell?</div><div class=”formfield”><select size=”3” name=”sales”><option value=”Millions, for sure.” selected=”selected”>Millions,
for sure.</option><option value=”100,000+ (would be Oprah’s favorite)”>100,000+
(would be Oprah’s favorite)</option><option value=”Thousands (an under-appreciated classic)”>
Thousands (an under-appreciated classic)</option><option value=”Very few: not banal enough for today’s
public”>Very few: not banal enough for today’s public.</option>
<option value=”Sell? None. Everyone will download it for free.”>Sell? None. Everyone will download it for free.</option>
</select></div>
<div class=”formlabel”>How can I improve my web site?</div><div class=”formfield”><select name=”suggestion”><option value=”Couldn’t be better.” selected=”selected”>Couldn’t
LISTING 26.1 Continued
www.it-ebooks.info

ptg999
518 CHAPTER 26 Working with Web-Based Forms
be better.</option><option value=”More about the cats.”>More about the
cats.</option><option value=”More about the family.”>More about the
family.</option><option value=”More about Elvis.”>More about Elvis.</option>
</select></div>
<div class=”formlabel”>Feel free to type more praise, gift offers, etc. below:</div>
<div class=”formfield”><textarea name=”comments” rows=”4” cols=”55”></textarea>
</div>
<div style=”float:left;”><input type=”submit” value=”Click Here to Submit” /><input type=”reset” value=”Erase and Start Over” />
</div></form>
</body></html>
LISTING 26.1 Continued
FIGURE 26.1The code shown in Listing 26.1uses nearly every type of HTMLform input element.
www.it-ebooks.info

ptg999
Naming Each Piece of Form Data 519
The code in Listing 26.1 uses a <form> tag that contains quite a few <input/> tags. Each <input /> tag corresponds to a specific user input compo-nent, such as a check box or radio button. The input, select, and text areaelements contain borders in the style sheet, so it is easy to see the outline ofthe elements in the form. Keep in mind that you can apply all sorts of CSSto those elements.
The next few sections dig into the <input /> and other form-related tagsin detail.
Accepting Text InputTo ask the user for a specific piece of information within a form, use the<input /> tag. This tag must fall between the <form> and </form> tags,but it can be anywhere on the page in relation to text, images, and otherHTML tags. For example, to ask for someone’s name, you could type thefollowing text followed immediately by an <input /> field:
<p>What’s your name? <input type=”text” size=”50” maxlength=”100” name=”user_name” /></p>
The type attribute indicates what type of form element to display—a sim-ple, one-line text entry box in this case. (Each element type is discussedindividually in this chapter.)
The size attribute indicates approximately how many characters wide thetext input box should be. If you are using a proportionally spaced font, thewidth of the input will vary depending on what the user enters. If theinput is too long to fit in the box, most web browsers will automaticallyscroll the text to the left.
The maxlength attribute determines the number of characters the user isallowed to type into the text box. If a user tries to type beyond the speci-fied length, the extra characters won’t appear. You can specify a length thatis longer, shorter, or the same as the physical size of the text box. The sizeand maxlength attributes are used only for type=”text” because otherinput types (check boxes, radio buttons, and so on) have fixed sizes.
Naming Each Piece of Form DataNo matter what type an input element is, you must give a name to thedata it gathers. You can use any name you like for each input item, as longas each one on the form is different (except in the case of radio buttons and
TIP
If you want the user to entertext without the text being dis-played on the screen, you canuse <input type=”password”/> instead of <inputtype=”text” />. Asterisks(***) are then displayed inplace of the text the user types.The size, maxlength, and nameattributes work exactly thesame for type=”password” asthey do for type=”text”. Keepin mind that this technique ofhiding a password provides onlyvisual protection; there is noencryption or other protectionassociated with the passwordbeing transmitted.
www.it-ebooks.info

ptg999
520 CHAPTER 26 Working with Web-Based Forms
check boxes, which are discussed later in this chapter). When the form isprocessed by a back-end script, each data item is identified by name. Thisname becomes a variable, which is filled with a value. The value is eitherwhat the user typed in the form or the value associated with the elementthe user selected.
For example, if a user enters Jane Doe in the text box defined previously, avariable is sent to the form processing script; the variable is user_nameand the value of the variable is Jane Doe. Form-processing scripts workwith these types of variable names and values.
To use this (or other) text fields in JavaScript, remember that the text objectuses the name attribute; you would refer to the value of the field in the pre-vious snippet as:
document.formname.user_name.value
Additional examples of name/value pairs are covered throughout thischapter.
Including Hidden Data in FormsWant to send certain data items to the server script that processes a formbut don’t want the user to see those data items? Use an <input /> tag witha type=”hidden” attribute. This attribute has no effect on the display; itjust adds any name and value you specify to the form results when theyare submitted.
If you are using a form-processing script provided by your web-hostingprovider, you might use this attribute to tell a script where to email theform results. For example, including the following code will email theresults to [email protected] after the form has been submitted:
<input type=”hidden” name=”mailto” value=”[email protected]” />
You might sometimes see scripts using hidden input elements to carryadditional data that might be useful when you receive the results of theform submission; some examples of hidden form fields include an emailaddress and a subject for the email. If you are using a script provided byyour web hosting provider, consult the documentation provided with thatscript for additional details about potential required hidden fields.
NOTE
Form-processing scripts areoversimplified here for the sakeof explanation within the scopeof this book. The exact appear-ance (or name) of the variablesmade available to your process-ing script depends on the pro-gramming language of thatscript. But conceptually, it’svalid to say that the name ofthe input element becomes thename of the variable and thevalue of the input elementbecomes that variable’s valueon the back-end.
www.it-ebooks.info

ptg999
Exploring Form Input Controls 521
Exploring Form Input ControlsVarious input controls are available for retrieving information from theuser. You’ve already seen one text-entry option, and the next few sectionsintroduce you to most of the remaining form-input options you can use todesign forms.
Check BoxesThe simplest input type is a check box, which appears as a small square.Users can click checkboxes to select or deselect one or more items in agroup. For example, the checkboxes listed in Listing 26.1 display after alabel that reads “Please check all that apply,” implying that the user couldindeed check all that apply.
The HTML for the check boxes in Listing 26.1 shows that the value of thename attribute is the same for all of them: website_response[].
<input type=”checkbox” name=”website_response[]” value=”Ireally like your Web site.” />I really like your Web site.<br />
<input type=”checkbox” name=”website_response[]” value=”Oneof the best sites I’ve seen.” />One of the best sites I’veseen.<br />
<input type=”checkbox” name=”website_response[]” value=”I surewish my site looked as good as yours.” />I sure wish my sitelooked as good as yours.<br />
<input type=”checkbox” name=”website_response[]” value=”I haveno taste and I’m pretty dense, so your site didn’t do much forme.” />I have no taste and I’m pretty dense, so your sitedidn’t do much for me.<br />
The use of the brackets in the name attribute ([]) indicates to the processingscript that a series of values will be placed into this one variable, instead ofjust one value (well, it might just be one value if the user only selects onecheck box). If a user selects the first check box, the text string “I really likeyour Web site.” will be placed in the website_response[] bucket. If theuser selects the third checkbox, the text string “I sure wish my site lookedas good as yours.” will also be put into the website_response[] bucket.The processing script will then work with that variable as an array of datarather just a single entry.
However, you might see groups of check boxes that do use individualnames for the variables in the group. For example, the following is anotherway of writing the check box group:
TIPIf you find that the label for aninput element is displayed tooclose to the element, just add aspace between the close of the<input /> tag and the start ofthe label text, like this:<input type=”checkbox”name=”mini” /> Mini PianoStool
www.it-ebooks.info

ptg999
522 CHAPTER 26 Working with Web-Based Forms
<input type=”checkbox” name=”liked_site” value=”yes” /> I really likeyour Web site.<br />
<input type=”checkbox” name=”best_site” value=”yes” /> One of the bestSites I’ve seen.<br />
<input type=”checkbox” name=”my_site_sucks” value=”yes” />I sure wish mysite looked as good as yours.<br />
<input type=”checkbox” name=”am_dense” value=”yes” />I have no taste andI’m pretty dense, so your site didn’t do much for me.<br />
In the previous check boxes, the variable name of the first check box is“liked_site” and the value (if checked) is “yes”.
If you want a check box to be checked by default when the form is ren-dered by the web browser, include the checked attribute. For example, thefollowing code creates two check boxes and the first is checked by default:
<input type=”checkbox” name=”website_response[]” value=”Ireally like your Web site.” checked=”checked” />I really like your Web site.<br />
<input type=”checkbox” name=”website_response[]” value=”Oneof the best sites I’ve seen.” />One of the best sites I’veseen.<br />
The check box labeled “I really like your site.” is checked by default in thisexample. The user would have to click the check box to indicate they hadanother opinion of your site. The check box marked “One of the best I’veseen.” would be unchecked to begin with, so the user would have to clickit to turn it on. Check boxes that are not selected do not appear in the formoutput at all.
If you want to handle values from the checkbox object in JavaScript, theobject has the following four properties:
. name is the name of the check box and also the object name.
. value is the “true” value for the check box—usually on. This value isused by server-side programs to indicate whether the check box waschecked. In JavaScript, you should use the checked property instead.
. defaultChecked is the default status of the check box, assigned bythe checked attribute in HTML.
. checked is the current value. This is a Boolean value: true forchecked and false for unchecked.
To manipulate the check box or use its value, you use the checked proper-ty. For example, this statement turns on a check box called same_addressin a form named order:
document.order.same.checked = true;
CAUTION
XHTML requires all attributes tohave an equal sign followed bya value. This explains whychecked=”checked” is used toindicate that a check box ischecked (as opposed to justchecked). This rule applies toall Boolean attributes(true/false, on/off, yes/no,and so on) that you might comeacross in HTML.
www.it-ebooks.info

ptg999
Exploring Form Input Controls 523
The check box has a single method: click(). This method simulates a clickon the box. It also has a single event, onClick, which occurs whenever thecheck box is clicked. This happens whether the box was turned on or off, soyou’ll need to examine the checked property via JavaScript to see whataction really happened.
Radio ButtonsRadio buttons, for which only one choice can be selected at a time, are almostas simple to implement as check boxes. The simplest use of a radio button isfor yes/no questions or for voting when only one candidate can be selected.
To create a radio button, just use type=”radio” and give each option itsown <input /> tag. Use the same name for all the radio buttons in a group,but don’t use the [] that you used with the check box:
<input type=”radio” name=”vote” value=”yes” checked=”checked” /> Yes<br /><input type=”radio” name=”vote” value=”no” /> No <br/>
The value can be any name or code you choose. If you include the checkedattribute, that button is selected by default. No more than one radio buttonwith the same name can be checked.
When designing your form and choosing between checkboxes and radiobuttons, ask yourself, “Is the question being asked one that could beanswered only one way?” If so, use a radio button.
As for scripting, radio buttons are similar to check boxes, except that anentire group of them shares a single name and a single object. You can referto the following properties of the radio object:
. name is the name common to the radio buttons.
. length is the number of radio buttons in the group.
To access the individual buttons in JavaScript, you treat the radio object asan array. The buttons are indexed, starting with 0. Each individual buttonhas the following properties:
. value is the value assigned to the button.
. defaultChecked indicates the value of the checked attribute and thedefault state of the button.
. checked is the current state.
NOTE
Radio buttons are named fortheir similarity to the buttons onold pushbutton radios. Thosebuttons used a mechanicalarrangement so that when youpushed one button in, the oth-ers popped out.
www.it-ebooks.info

ptg999
524 CHAPTER 26 Working with Web-Based Forms
For example, you can check the first radio button in the radio1 group on theform1 form with this statement:
document.form1.radio1[0].checked = true;
However, if you do this, be sure you set the other values to false as needed.This is not done automatically. You can use the click() method to do bothof these in one step.
Like a check box, radio buttons have a click() method and an onClickevent handler. Each radio button can have a separate statement for thisevent.
Selection ListsBoth scrolling lists and pull-down pick lists are created with the <select> tag.You use this tag together with the <option> tag, as the following exampleshows (taken from Listing 26.1):
<select size=”3” name=”sales”><option value=”Millions, for sure.” selected=”selected”>Millions,
for sure.</option><option value=”100,000+ (would be Oprah’s favorite)”>100,000+
(would be Oprah’s favorite)</option><option value=”Thousands (an under-appreciated classic)”>Thousands
(an under-appreciated classic)</option><option value=”Very few: not banal enough for today’s public”>Very
few: not banal enough for today’s public.</option><option value=”Sell? None. Everyone will download it for free.”>Sell?
None. Everyone will download it for free.</option></select>
No HTML tags other than <option> and </option> should appear betweenthe <select> and </select> tags.
Unlike the text input type, the size attribute here determines how manyitems show at once on the selection list. If size=”2” were used in the pre-ceding code, only the first two options would be visible and a scrollbarwould appear next to the list so the user could scroll down to see the thirdoption.
Including the multiple attribute enables users to select more than oneoption at a time; the selected attribute makes an option initially selected bydefault. When the form is submitted, the text specified in the value attributefor each option accompanies the selected option.
TIPIf you leave out the size attrib-ute or specify size=”1”, the listcreates a drop-down pick list.Pick lists don’t allow for multi-ple choices; they are logicallyequivalent to a group of radiobuttons. The following exampleshows another way to chooseyes or no for a question:<select name=”vote”><option
value=”yes”>Yes</option><option
value=”no”>No</option></select>
www.it-ebooks.info

ptg999
Exploring Form Input Controls 525
The object for selection lists is the select object. The object itself has thefollowing properties:
. name is the name of the selection list.
. length is the number of options in the list.
. options is the array of options. Each selectable option has an entryin this array.
. selectedIndex returns the index value of the currently selected item.You can use this to check the value easily. In a multiple-selection list,this indicates the first selected item.
The options array has a single property of its own, length, which indi-cates the number of selections. In addition, each item in the options arrayhas the following properties:
. index is the index into the array.
. defaultSelected indicates the state of the selected attribute.
. selected is the current state of the option. Setting this property totrue selects the option. The user can select multiple options if themultiple attribute is included in the <select> tag.
. name is the value of the name attribute. This is used by the server.
. text is the text that is displayed in the option.
The select object has two methods—blur() and focus()—which performthe same purposes as the corresponding methods for text objects. Theevent handlers are onBlur, onFocus, and onChange, also similar to otherobjects.
Reading the value of a selected item is a two-step process. You first use theselectedIndex property, and then use the value property to find the valueof the selected choice. Here’s an example:
ind = document.mvform.choice.selectedIndex;val = document.mvform.choice.options[ind].value;
This uses the ind variable to store the selected index, and then assigns theval variable to the value of the selected choice. Things are a bit more com-plicated with a multiple selection; you have to test each option’s selectedattribute separately.
NOTE
You can change selection listsdynamically—for example,choosing a product in one listcould control which options areavailable in another list. Youcan also add and deleteoptions from the list.
www.it-ebooks.info

ptg999
526 CHAPTER 26 Working with Web-Based Forms
Text Fields and Text AreasThe <input type=”text”> attribute mentioned earlier this chapter allowsthe user to enter only a single line of text. When you want to allow multiplelines of text in a single input item, use the <textarea> and </textarea> tagsto create a text area instead of just a text field. Any text you include betweenthese two tags is displayed as the default entry. Here’s an example:
<textarea name=”comments” rows=”4” cols=”20”>Your message here.</textarea>
As you probably guessed, the rows and cols attributes control the numberof rows and columns of text that fit in the input box. The cols attribute is alittle less exact than rows and approximates the number of characters that fitin a row of text. Text area boxes do have a scrollbar, however, so the usercan enter more text than what fits in the display area.
The text and textarea objects also have a few methods you can use:
. focus() sets the focus to the field. This positions the cursor in thefield and makes it the current field.
. blur() is the opposite; it removes the focus from the field.
. select() selects the text in the field, just as a user can do with themouse. All of the text is selected; there is no way to select part of the text.
You can also use event handlers to detect when the value of a text fieldchanges. The text and textarea objects support the following event handlers:
. The onFocus event happens when the text field gains focus.
. The onBlur event happens when the text field loses focus.
. The onChange event happens when the user changes the text in thefield and then moves out of it.
. The onSelect event happens when the user selects some or all of thetext in the field. Unfortunately, there’s no way to tell exactly whichpart of the text was selected. (If the text is selected with the select()method described previously, this event is not triggered.)
If used, these event handlers should be included in the <input> tag declara-tion. For example, the following is a text field including an onChange eventthat displays an alert:
<input type=”text” name=”text1” onChange=”window.alert(‘Changed.’);” />
www.it-ebooks.info

ptg999
Submitting Form Data 527
Submitting Form DataForms typically include a button that submits the form data to a script onthe server or invokes a JavaScript action. You can put any label you like onthe submit button with the value attribute:
<input type=”submit” value=”Place My Order Now!” />
A gray button will be sized to fit the label you put in the value attribute.When the user clicks it, all data items on the form are sent to the emailaddress or script specified in the form’s action attribute.
You can also include a Reset button that clears all entries on the form sousers can start over if they change their minds or make mistakes. Use thefollowing:
<input type=”reset” value=”Clear This Form and Start Over” />
If the standard Submit and Reset buttons look a little bland to you, rememberthat you can style them using CSS. If that’s not good enough, you’ll be glad toknow that there is an easy way to substitute your own graphics for these but-tons. To use an image of your choice for a Submit button, use the following:
<input type=”image” src=”button.gif” alt=”Order Now!” />
The button.gif image will display on the page and the form will be sub-mitted when a user clicks the button.gif image. You can also include anyattributes normally used with the <img /> tag, such as alt and style.
The form element also includes a generic button type. When usingtype=”button” in the <input /> tag, you will get a button that performs noaction on its own but can have an action assigned to it using a JavaScriptevent handler.
Using JavaScript for Form Events The form object has two methods: submit() and reset(). You can use thesemethods to submit the data or reset the form yourself, without requiring theuser to press a button. One reason for this is to submit the form when theuser clicks an image or performs another action that would not usually sub-mit the form.
The form object has two event handlers, onSubmit and onReset. You canspecify a group of JavaScript statements or a function call for these eventswithin the <form> tag that defines the form.
CAUTION
If you use the submit() methodto send data to a server or byemail, most browsers willprompt the user to verify thathe wants to submit the informa-tion. There’s no way to do thisbehind the user’s back.
www.it-ebooks.info

ptg999
528 CHAPTER 26 Working with Web-Based Forms
If you specify a statement or a function for the onSubmit event, the state-ment is called before the data is submitted to the server-side script. Youcan prevent the submission from happening by returning a value of falsefrom the onSubmit event handler. If the statement returns true, the datawill be submitted. In the same fashion, you can prevent a Reset buttonfrom working with an onReset event handler.
Accessing Form Elements withJavaScriptThe most important property of the form object is the elements array,which contains an object for each of the form elements. You can refer to anelement by its own name or by its index in the array. For example, the fol-lowing two expressions both refer to the first element in the form shown inListing 26.1:
document.gbForm.elements[0]document.gbForm.name
If you do refer to forms and elements as arrays, you can use the lengthproperty to determine the number of objects in the array: document.forms.length is the number of forms in a document, and document.gbForm.elements.length is the number of elements in the gbForm form.
You can also access form elements using the W3C DOM. In this case, youuse an id attribute on the form element in the HTML document, and usethe document.getElementById() method to find the object for the form.For example, this statement finds the object for the text field called nameand stores it in the name variable:
name = document.getElementById(“name”);
This enables you to quickly access a form element without first finding theform object. You can assign an id to the <form> tag and find the correspon-ding object if you need to work with the form’s properties and methods.
Displaying Data from a FormAs a simple example of using forms, Listing 26.2 shows a form with name,address, and phone number fields, as well as a JavaScript function that dis-plays the data from the form in a pop-up window.
NOTE
Both forms and elements canbe referred to by their ownnames or as indices in theforms and elements arrays. Forclarity, the examples in thischapter use individual form andelement names rather thanarray references. You’ll also findit easier to use names in yourown scripts.
www.it-ebooks.info

ptg999
Displaying Data from a Form 529
LISTING 26.2 A Form That Displays Data in a Pop-up Window<?xml version=”1.0” encoding=”UTF-8”?><!DOCTYPE html PUBLIC “-//W3C//DTD XHTML 1.1//EN”“http://www.w3.org/TR/xhtml11/DTD/xhtml11.dtd”>
<html xmlns=”http://www.w3.org/1999/xhtml” xml:lang=”en”><head><title>Form Display Example</title><script type=”text/javascript”>function display() {dispWin = window.open(‘’,’NewWin’, ‘toolbar=no,status=no,width=300,height=200’)message = “<ul><li><strong>NAME: </strong>” + document.form1.name.value;message += “<li><strong>ADDRESS: </strong>” + document.form1.address.value;message += “<li><strong>PHONE: </strong>” + document.form1.phone.value + “</ul>”;dispWin.document.write(message);
}</script>
</head><body><h1>Form Display Example</h1>
<p>Enter the following information. When you press the Display button, the data you entered will be displayed in a pop-up.</p><form name=”form1” method=”get” action=””><p>NAME: <input type=”text” name=”name” size=”50” /></p><p>ADDRESS: <input type=”text” name=”address” size=”50” /></p><p>PHONE: <input type=”text” name=”phone” size=”50” /></p><p><input type=”button” value=”Display” onclick=”display();” /></p></form>
</body></html>
Here is a breakdown of how this HTML document and script work:
. The <script> section in the document’s header defines a functioncalled display() that opens a new window and displays the infor-mation from the form.
. The <form> tag begins the form. Because this form is handled entire-ly by JavaScript, the form action and method have no value.
. The <input /> tags define the form’s three fields: yourname,address, and phone. The last <input /> tag defines the Display but-ton, which is set to run the display() function.
Figure 26.2 shows this form in action. The Display button has been
www.it-ebooks.info

ptg999
530 CHAPTER 26 Working with Web-Based Forms
pressed, and the pop-up window shows the results.
FIGURE 26.2
Displaying data from a form in apop-up window.
Sending Form Results by EmailOne easy way to use a form is to send the results by email. You can do thiswithout using any JavaScript, although you could use JavaScript to vali-date the information entered (as you’ll learn later in this chapter).
To send a form’s results by email, you use the mailto: action in the form’saction attribute. Listing 26.3 is a modified version of the name andaddress form from Listing 26.2 that sends the results by email.
LISTING 26.3 Sending a Form’s Results by Email<?xml version=”1.0” encoding=”UTF-8”?><!DOCTYPE html PUBLIC “-//W3C//DTD XHTML 1.1//EN”“http://www.w3.org/TR/xhtml11/DTD/xhtml11.dtd”>
<html xmlns=”http://www.w3.org/1999/xhtml” xml:lang=”en”><head><title>Form Submit Example</title>
</head><body><h1>Form Submit Example</h1>
<p>Enter the following information. When you press the Sendbutton, the data you entered will be send via e-mail.</p><form name=”form1” method=”post” action=”mailto:[email protected]”
enctype=”text/plain”>
www.it-ebooks.info

ptg999
Sending Form Results by Email 531
<p>NAME: <input type=”text” name=”name” size=”50” /></p><p>ADDRESS: <input type=”text” name=”address” size=”50” /></p><p>PHONE: <input type=”text” name=”phone” size=”50” /></p><p><input type=”submit” value=”Submit Form” /></p></form>
</body></html>
To use this form, change [email protected] in the action attribute of the<form> tag to your email address. Notice the enctype=”text/plain” attrib-ute in the <form> tag. This ensures that the information in the email mes-sage will be in a readable plain-text format rather than encoded.
Although this provides a quick and dirty way of retrieving data from aform, the disadvantage of this technique is that it is highly browserdependent. Whether it will work for each user of your page depends onthe configuration of her browser and email client.
LISTING 26.3 Continued CAUTION
Because this technique does notconsistently work on allbrowsers, I don’t recommend youuse it. Some browsers will invokeyour mail client; others will sendthe form data via your browser-based email account. This exam-ple is offered more as an exam-ple of a process you could useJavaScript to accomplish andmight see in many scripts youfind on the web. For a more reli-able way of sending form results,you can use a server-side form-to-email script; your hostingprovider will likely have one ormore available for your use.
Validating a FormOne of JavaScript’s most useful purposes is validating forms. This meansusing a script to verify that the information entered is valid—for example, thatno fields are blank and that the data is in the right format.
You can use JavaScript to validate a form whether it’s submitted by email orto a server-side script or is simply used by a script. Listing 26.4 is a versionof the name and address form that includes validation.
LISTING 26.4 A Form with a Validation Script<?xml version=”1.0” encoding=”UTF-8”?><!DOCTYPE html PUBLIC “-//W3C//DTD XHTML 1.1//EN”“http://www.w3.org/TR/xhtml11/DTD/xhtml11.dtd”>
<html xmlns=”http://www.w3.org/1999/xhtml” xml:lang=”en”><head><title>Form Submit Example</title><script type=”text/javascript”>function validate() {if (document.form1.name.value.length < 1) {
alert(“Please enter your full name.”);return false;
}if (document.form1.address.value.length < 3) {
alert(“Please enter your address.”);return false;
}
TRY IT YOURSELF ▼
www.it-ebooks.info

ptg999
532 CHAPTER 26 Working with Web-Based Forms
TRY IT YOURSELF▼
Validating a Formcontinued
if (document.form1.phone.value.length < 3) {alert(“Please enter your phone number.”);return false;
}return true;
}</script></head><body><h1>Form Submit Example</h1>
<p>Enter the following information. When you press the Sendbutton, the data you entered will be send via e-mail.</p><form name=”form1” method=”post” action=”mailto:[email protected]”
enctype=”text/plain” onsubmit=”return validate();”><p>NAME: <input type=”text” name=”name” size=”50” /></p><p>ADDRESS: <input type=”text” name=”address” size=”50” /></p><p>PHONE: <input type=”text” name=”phone” size=”50” /></p><p><input type=”submit” value=”Submit Form” /></p></form>
</body></html>
This form uses a function called validate() to check the data in each of theform fields. Each if statement in this function checks a field’s length. If thefield is long enough to be valid, the form can be submitted; otherwise, thesubmission is stopped and an alert message is displayed.
This form is set up to send its results by email, as in Listing 26.3. If youwant to use this feature, be sure to read the information about email formsearlier in this chapter and change [email protected] to your desired emailaddress.
The <form> tag uses an onsubmit event handler to call the validate() func-tion. The return keyword ensures that the value returned by validate() willdetermine whether the form is submitted.
Figure 26.3 shows this script in action. The form has been filled out exceptfor the name, and a dialog box indicates that the name needs to be entered.
LISTING 26.4 Continued
NOTE
The validation in this script isbasic—you could go furtherand ensure that the phonefield contains only numbersand the right amount of digitsby using JavaScript’s stringfeatures described in Chapter16, “Using JavaScriptVariables, Strings, andArrays.”
TIP
You can also use theonchange event handler ineach form field to call a vali-dation routine. This allows thefield to be validated beforethe Submit button is pressed.
www.it-ebooks.info

ptg999
Summary 533
SummaryThis chapter demonstrated how to create HTML forms, which allow yourvisitors to provide information to you.
You learned about all the major form elements and how form-processingscripts interpret the names and value attributes of those elements. Whenyou are ready to try a back-end form processing script, you’re now well-versed in the front-end details.
You also learned how form elements can be used with JavaScript. Youlearned about the form object and the objects for the various form elementsand used them in several sample scripts.
We stopped short of doing anything in-depth with that informationbecause form handling requires an external script to process that form. Youdid learn one way to send simple form data by email and how to useJavaScript to validate a form before it is submitted.
Table 26.1 summarizes the HTML tags and attributes covered in this chapter.
Validating a Formcontinued
FIGURE 26.3The form validation example inaction.
TRY IT YOURSELF ▼
www.it-ebooks.info

ptg999
534 CHAPTER 26 Working with Web-Based Forms
TABLE 26.1 HTML Tags and Attributes Covered in Chapter 26
Tag/Attribute Function
<form>...</form> Indicates an input form.
Attributes
action=”scripturl” The address of the script to process this form input.
method=”post/get” How the form input will be sent to the server. Normallyset to post, rather than get.
<input /> An input element for a form.
Attributes
type=”controltype” The type for this input widget. Possible values are check-box, hidden, radio, reset, submit, text, and image.
name=”name” The unique name of this item, as passed to the script.
value=”value” The default value for a text or hidden item. For a checkbox or radio button, it’s the value to be submitted withthe form. For reset or submit buttons, it’s the label forthe button itself.
src=”imageurl” The source file for an image.
checked=”checked” For check boxes and radio buttons. Indicates that thisitem is checked.
size=”width” The width, in characters, of a text input region.
maxlength= The maximum number of characters that can be ”maxlength” entered into a text region.
<textarea>... Indicates a multiline text entry form element. Default </textarea> text can be included.
Attributes
name=”name” The name to be passed to the script.
rows=”numrows” The number of rows this text area displays.
cols=”numchars” The number of columns (characters) this text area displays.
<select>...</select> Creates a menu or scrolling list of possible items.
Attributes
name=”name” The name that is passed to the script.
size=”numelements” The number of elements to display. If size is indicated,the selection becomes a scrolling list. If no size isgiven, the selection is a drop-down pick list.
multiple=”multiple” Allows multiple selections from the list.
<option>...</option> Indicates a possible item within a <select> element.
Attributes
selected=”selected” With this attribute included, the <option> will be select-ed by default in the list.
value=”value” The value to submit if this <option> is selected whenthe form is submitted.
www.it-ebooks.info

ptg999
Workshop 535
Q&AQ. If I use JavaScript to add validation and other features to my form, can
users with non-JavaScript browsers still use the form?
A. Yes, if you’re careful. Be sure to use a Submit button rather than thesubmit action. Also, the server-side script might receive nonvalidateddata, so be sure to include the same validation in the CGI script. Non-JavaScript users will be able to use the form, but won’t receive instantfeedback about their errors.
Q. Is there any way to create a large number of text fields without deal-ing with different names for all of them?
A. Yes. If you use the same name for several elements in the form, theirobjects will form an array. For example, if you defined 20 text fields withthe name member, you could refer to them as member[0] throughmember[19]. This also works with other types of form elements.
Q. Is there a way to place the cursor on a particular field when the formis loaded or after my validation routine displays an error message?
A. Yes. You can use the field’s focus() method to send the cursor there.To do this when the page loads, you can use the onLoad method in the<body> tag. However, there is no way to place the cursor in a particularposition within the field.
WorkshopThe workshop contains quiz questions and activities to help you solidify yourunderstanding of the material covered. Try to answer all questions beforelooking at the “Answers” section that follows.
Quiz1. What HTML code would you use to create a guestbook form that asks
someone for his name and gender? Assume that you have a form-pro-cessing script set up at /scripts/formscript and that you need toinclude the following hidden input element to tell the script where tosend the form results:<input type=”hidden” name=”mailto” value=”[email protected]” />
2. If you created an image named submit.gif, how would you use it asthe Submit button for the form you created in Question 1?
3. Which of these attributes of a <form> tag determines where the datawill be sent?
a. action
b. method
c. name
www.it-ebooks.info
ptg999
536 CHAPTER 26 Working with Web-Based Forms
4. Where do you place the onsubmit event handler to validate a form?
a. In the <body> tag
b. In the <form> tag
c. In the <input /> tag for the Submit button
Answers1. You would use HTML code similar to the following (with the appropriate
DOCTYPE and other structural markup, of course):
<form name=”form1” method=”post” action=”/scripts/formscript”><input type=”hidden” name=”mailto” value=”[email protected]” /><p>Your Name: <input type=”text” name=”name” size=”50” /></p><p>Your Gender: <input type=”radio” name=”gender” value=”male” /> male <input type=”radio” name=”gender” value=”female” /> female <input type=”radio” name=”gender” value=”mind your business” />
mind your business </p><p><input type=”submit” value=”Submit Form” /></p></form>
2. Replace the following code:
<input type=”submit” value=”Submit Form” />
with this code:
<input type=”image” src=”submit.gif” />
3. a. The action attribute determines where the data is sent.
4. b. You place the onsubmit event handler in the <form> tag.
Exercises. Create a form using all the different types of input elements and selec-
tion lists to make sure you understand how each of them works.
. Change the validate function in Listing 26.4 so that after a messageis displayed indicating that a field is wrong, the cursor is moved to thatfield. (Use the focus method for the appropriate form element.)
. Add a text field to the form in Listing 26.4 for an email address. Add afeature to the validate function that verifies that the email address isat least five characters and that it contains the @ symbol.
. Investigate the form-handling options at your web-hosting provider anduse a script made available to you by the web-hosting provider toprocess the form you created in the previous exercise.
www.it-ebooks.info

ptg999
The bulk of this book has led you through the design and creation of yourown web content, from text to graphics and multimedia, as well as theimplementation of basic JavaScript functionality for enhanced user interac-tion. Along the way I’ve noted some of the ways you can think about thelifecycle of that content, but in this chapter you’ll learn how to look at yourwork as a whole.
This chapter shows you how to think about organizing and presentingmultiple web pages so that visitors will be able to navigate among themwithout confusion. You’ll also learn about ways to make your websitememorable enough to visit again and again. Web developers use the termsticky to describe pages that people don’t want to leave. Hopefully thischapter will help you to make your websites downright gooey!
Because websites can be (and usually should be) updated frequently, it’sessential to create pages that can be easily maintained. This chapter showsyou how to add comments and other documentation to your pages so thatyou—or anyone else on your staff—can understand and modify yourpages, and also introduces you to version control so that you can innovateindividually or as part of a team without overwriting work that you mightwant to save.
WHAT YOU’LL LEARN INTHIS CHAPTER:
. How to determine whenone page is enough to han-dle all your content
. How to organize a simplesite
. How to organize a largersite
. How to write maintainablecode
. How to get started withversion control
CHAPTER 27Organizing and Managing a
Website
www.it-ebooks.info
ptg999
538 CHAPTER 27 Organizing and Managing a Website
When One Page Is EnoughBuilding and organizing an attractive and effective website doesn’t alwaysneed to be a complex task. If you are creating a web presence for a singleentity (such as a local event) that requires only a brief amount of very spe-cific information, you can effectively present that information on a singlepage without a lot of flashy graphics. In fact, there are several positive fea-tures to a single-page web presence:
. All the information on the site downloads quicker than on moreextensive sites.
. The whole site can be printed on paper with a single print command,even if it is several paper pages long.
. Visitors can easily save the site on their hard drives for future refer-ence, especially if it uses a minimum of graphics.
. Links between different parts of the same page usually respond morequickly than links to other pages.
Figure 27.1 shows the first part of a web page that serves its intended audi-ence better as a single lengthy page than it would as a multipage site. Thepage begins, as most introductory pages should, with a succinct explana-tion of what the page is about and who would want to read it. A detailedtable of contents allows visitors to skip directly to the reference material inwhich they are most interested. It contains about eight paper pages worthof text explaining how to begin the process of buying a house—somethinga visitor might think about printing out and reading later, perhaps whilealso taking notes.
TRY IT YOURSELF▼
Evaluating YourOrganization
By this point in the book, you should have enough HTML, CSS, and JavaScriptknowledge to produce most of your website. You probably have created anumber of pages already and perhaps even published them online.
As you read this chapter, think about how your pages are organized now andhow you can improve that organization. Have you used comments in yourHTML and JavaScript or created a document showing your organization forfuture website maintainers? If not, this would be a good time to start. Alongthe way, don’t be surprised if you decide to do a redesign that involves chang-ing almost all of your pages—the results are likely to be well worth the effort!
www.it-ebooks.info

ptg999
When One Page Is Enough 539
As Figure 27.2 shows, each short section of the page is followed by a linkleading back to the table of contents, so navigating around the page feelsmuch the same as navigating around a multipage site. Because the con-tents of the page are intended as a handy reference, visitors will definitelyprefer the convenience of bookmarking or saving a single page instead ofseveral separate pages.
FIGURE 27.1A good table of contents can makea lengthy page easy to navigate.
FIGURE 27.2Always provide a link back to thetable of contents after each sec-tion of a long web page.
www.it-ebooks.info
ptg999
540 CHAPTER 27 Organizing and Managing a Website
Having seen all the fancy graphics and layouts in this book, you might betempted to forget that a good, old-fashioned outline is often the clearestand most efficient way to organize long web pages within a site.
Organizing a Simple SiteAlthough single-page sites have their place, most companies and individu-als serve their readers better by dividing their site into short, quick-readpages surrounded by graphical navigation that allows them to reachalmost all the information they could want within a few clicks.Furthermore, using multiple pages instead of a series of very long pagesminimizes scrolling around on the page, which can be especially bother-some for visitors who are using mobile devices to view the site or whohave relatively low-resolution monitors (less than 800×600).
The goal of the home page is simply to make the organization visible onthe Internet, but also—and more importantly—act as a portal to the infor-mation contained within the site itself. The main page of a site should pro-vide the user with enough information to provide a clear picture of theorganization, as well as traditional address and telephone contact informa-tion and an email address to contact with questions or feedback. It shouldalso provide clear pathways into the highly structured information thatshould be contained on other pages in the site. The main page shown inFigure 27.3 provides examples of all these good features: basic information,contact information, and paths to information for multiple audiences.
One of the most common mistakes beginning website developers make iscreating pages that look different than other pages on the site. Anotherequally serious mistake is using the same, publicly available clip art thatthousands of other web authors are also using. Remember that on theInternet, one click can take you around the world. The only way to makeyour pages memorable and recognizable as a cohesive site is to make allyour pages adhere to a unique, unmistakable visual theme. In other words,strive for uniqueness as compared to other websites, yet uniformity withinthe site itself.
As an example of how uniformity can help make a site more cohesive,think about large, popular sites you might have visited, such as ESPN.com.If you visit the MLB section at ESPN.com (see Figure 27.4) and the NFLsection (see Figure 27.5), you’ll notice a very similar structure.
TIP
Regardless of how large yoursite is, it’s a good idea to care-fully organize your resources.For example, place the imagesfor your web pages in a sepa-rate folder named images.Similarly, if you have files thatare available for download,place them in a folder calleddownloads. This makes it mucheasier to keep track of webpage resources based on theirparticular types (HTML pages,GIF images, and so on).Additionally, if you organize yoursite into sections, such asCompany, Products, Press, andso on, put the individual pagesinto similarly named directories(company, products, press, andso on) for the same organiza-tional reasons.
www.it-ebooks.info

ptg999
Organizing a Simple Site 541
FIGURE 27.4The MLB section at ESPN.com.
FIGURE 27.3This university main page uses abasic design, minimal but usefulgraphics, and clear structure toentice users to explore for moreinformation.
www.it-ebooks.info

ptg999
542 CHAPTER 27 Organizing and Managing a Website
In both examples, you see navigation elements at the top of the page(including some sub-navigation elements), a large area in the middle of thepage for the featured item graphic, a rectangle on the right side containinglinks to top stories at the moment, and a second rectangle under the top sto-ries links for the display of an advertisement. The only difference betweenthe MLB section and the NFL section is the color scheme: The MLB sectionis part of a predominantly blue color scheme, whereas the NFL section ispredominantly green. However, in both sections, you know that if you wantto read the popular news stories, you look to the right of the page. If youwant to navigate to another section in the site or to the site’s main page,you look to a navigational element in the top left of the page.
These consistent elements help ensure your users will be able to navigatethroughout your content with confidence. From a maintenance perspec-tive, the consistent structural template enables you to reuse pieces of thecode. This code reuse typically happens through dynamic server-side pro-gramming outside the scope of this book, but in general it means thatinstead of copying and pasting the same HTML and JavaScript over andover, that client-side code only exists in one place and is applied dynami-cally to the content. Therefore, instead of making changes to thousands offiles, you would only need to make a change once.
FIGURE 27.5The NFL section at ESPN.com.
www.it-ebooks.info

ptg999
Organizing a Larger Site 543
Organizing a Larger SiteFor complex sites, sophisticated layout and graphics can help organize andimprove the look of your site when used consistently throughout all ofyour pages. To see how you can make aesthetics and organization workhand-in-hand, let’s look at examples of navigation (and thus underlyingorganization) for a few sites that present a large volume of information toseveral different audiences.
Figure 27.6 shows the main page of Amazon.com, specifically with the sidenavigation selected. Amazon is in the business of selling products, plainand simple. Therefore, it makes sense for Amazon to show product cate-gories as the main navigational elements, as shown in this figure.
FIGURE 27.6Amazon.com shows product cate-gories as primary navigation ele-ments.
Although Amazon is in the business of selling products, it still has to pro-vide information regarding who it is, how to contact it, and other ancillaryyet important information to enhance the business-to-consumer relation-ship. Links to this sort of information appear in the footer, or bottom por-tion, of the Amazon.com website—outside of the viewing area of thisscreenshot. When creating your site template, you must determine themost important content areas and how to organize that content; also,
www.it-ebooks.info

ptg999
544 CHAPTER 27 Organizing and Managing a Website
remember to provide users with basic information—especially if that infor-mation will enhance your image and make the user feel as if you valuewhat they have to say.
The next example is of a secondary page within the Starbucks.com website.All of the pages in the Starbucks.com website follow one of the commontypes of presenting navigation and subnavigation: a horizontal strip formain navigation, with secondary elements for that section placed in a ver-tical column on the left. As shown in Figure 27.7, the section the user iscurrently browsing (About Us) is highlighted. This visual indicator helpsusers orient themselves within the site. Using a visual indicator is a usefultactic because your users might arrive at a page via a search engine or by alink from another website. After your users arrive, you want them to feelat home—or at least feel as if they know where they are in relation to yoursite—once they get there.
FIGURE 27.7This Starbucks.com secondarypage shows a main navigation ele-ment selected with secondary navi-gation on the left side of the page.
As you can see by the different main navigation elements—Our Coffees, OurStores, Starbucks Card, At Home, For Business, About Us, and ShopOnline—the Starbucks website has to serve the needs of many differenttypes of people coming to the website for many different reasons. As youorganize your own site content, determine the information that is mostimportant to you, as well as that which is most important to your users, andcreate a navigation scheme that finds a happy medium between the two.
www.it-ebooks.info

ptg999
Organizing a Larger Site 545
Figure 27.8 shows another example of a navigation style, this time with atwist on the standard top navigation/left-side navigation scheme. In thisexample, the left-side navigation (secondary navigation in this case) alsoappears in a drop-down menu under the main navigation (refer to Chapter11, “Using CSS to Do More with Lists, Text, and Navigation,” for informa-tion on how to do something like this). Hovering the mouse over any of theother main navigation elements shows similar menus. This scheme enablesusers to have an entire site map at their fingertips because they would beable to reach any place in the site within one click of any other page.
FIGURE 27.8The BAWSI.org website shows sub-navigation attached to each mainnavigation element.
You will also notice that the Overview link in the side navigation windowis styled a bit differently—with heavier purple text—than the other links inthe window, indicating to visitors what page they are on. This visualdetail, similar to what you saw on the Starbucks site, is an unobtrusiveway to provide users with a sense of where they are within the currentnavigational scheme.
There are many different types of navigation styles and ways of indicatingto users just where they are and where they might want to go next. Keep inmind the following fact: Studies have repeatedly shown that peoplebecome confused and annoyed when presented with more than sevenchoices at a time, and people feel most comfortable with five or fewerchoices. Therefore, you should avoid presenting more than five links
www.it-ebooks.info

ptg999
546 CHAPTER 27 Organizing and Managing a Website
(either in a list or as graphical icons) next to one another if at all possibleand definitely avoid presenting more than seven at once. Amazon.com getsa pass here because it is an Internet superstore and users expect a lot of“departments” in which to shop when they get there. But when you needto present more than seven links in a navigation list, break them into mul-tiple lists with a separate heading for each of the five to seven items, asyou saw in the Amazon.com example in Figure 27.6.
It will also help your readers navigate your site without confusion if youavoid putting any page more than two (or, at most, three) links away fromthe main page. You should also always send readers back to a main catego-ry page (or the home page) after they’ve read a subsidiary page. In otherwords, try to design somewhat of a flat link structure in which most pagesare no more than one or two links deep. You don’t want visitors to have torely heavily, if at all, on their browsers’ Back buttons to navigate throughyour site.
Writing Maintainable CodeIf you’ve ever done any programming before reading this book, youalready know how important it is to write code that can be maintained—that is, you or someone else should be able look at your code later and notbe utterly confused by it. The challenge is to make your code as immedi-ately understandable as possible. There will come a time when you’ll lookback on a page that you wrote and you won’t have a clue what you werethinking or why you wrote the code the way you did. Fortunately, there isa way to combat this problem of apparent memory loss!
Documenting Code with CommentsWhenever you develop an HTML page or JavaScript snippet, keep in mindthat you or someone else will almost certainly need to make changes to itsomeday. Simple text web pages are usually easy to read and revise, butcomplex pages with graphics, tables, and other layout tricks can be quitedifficult to decipher.
To see what I’m talking about, visit just about any page in a web browserand view its source code. Using Internet Explorer, click the View menu,and then click Source. Using Firefox, click the View menu, and then clickPage Source. You might see a jumbled bunch of code that is tough to deci-pher as pure HTML. This might be due to the fact that the markup hasbeen generated dynamically by content management software systems. Or
NOTETo include comments in aJavaScript script, put // at thebeginning of each commentline. (No closing tag is neededfor JavaScript comments.) Instyle sheets, start commentswith /* and end them with */.
The HTML <!-- and --> tagswill not work properly in scriptsor style sheets!
You can and should, however,include one <!-- tag just aftera <script> or <style> tag,with a --> tag just before thematching </script> or</style>. This hides the scriptor style commands from olderbrowsers that would otherwisetreat them as regular text anddisplay them on the page.
www.it-ebooks.info

ptg999
Writing Maintainable Code 547
it might be due to the fact that its human maintainer has not paid attentionto structure, ease of reading, code commenting, and other methods formaking the code readable by humans. For the sake of maintaining yourown pages, I encourage you to impose a little more order on your HTMLmarkup. The same goes for your JavaScript: Proper indentation is your(and your future development partner’s) friend.
As you have seen in several different chapters throughout this book, youcan enclose comments to yourself or your coauthors between <!-- and -->tags. These comments will not appear on the web page when viewed witha browser but can be read by anyone who examines the HTML code in atext editor or via web browser’s View Source (or View Page Source) func-tion. The following example provides a little refresher just to show youhow a comment is coded:
<!-- This image needs to be updated daily. --><img src=”headline.jpg” alt=”Today’s Headline” />
As this code reveals, the comment just before the <img /> tag provides aclue as to how the image is used. When someone reads this code, heknows immediately that this is an image that must be updated every day.The text in the comment is completely ignored by web browsers.
TIP
One handy usage of commentsis to hide parts of a web pagethat are currently under con-struction. Rather than makingthe text and graphics visibleand explaining that they’reunder construction, you canhide them from view entirelywith some carefully placedopening and closing commenttags around the HTML you donot want to appear. This is agreat way to work on portionsof a page gradually and showonly the end result to the worldwhen you’re finished.
Commenting YourCode
It will be well worth your time now to go through all the web pages, scripts,and style sheets you’ve created so far and add any comments that you orothers might find helpful when revising them in the future. Here’s what to do:
1. Put a comment explaining any fancy formatting or layout techniquesbefore the tags that make it happen.
2. Use a comment just before an <img /> tag to briefly describe anyimportant graphic whose function isn’t obvious from the alt message.
3. Consider using a comment (or several comments) to summarize howthe cells of a <table> are supposed to fit together visually.
4. If you use hexadecimal color codes (such as <div style=”color:#8040B0”>), insert a comment indicating what the color actually is(bluish-purple).
5. Place a comment near a JavaScript function that explains the purposeof that function.
6. Indent your comments to help them stand out and make both the com-ments and the HTML or JavaScript easier to read. Don’t forget to useindentation in the HTML and JavaScript itself to make it more readable,too, as we’ll discuss in the next section.
TRY IT YOURSELF ▼
www.it-ebooks.info

ptg999
548 CHAPTER 27 Organizing and Managing a Website
Indenting Code for ClarityI have a confession. Throughout the book I’ve been carefully indoctrinatingyou into an HTML code development style without really letting on. It’s timeto spill the beans. You’ve no doubt noticed a consistent pattern with respect tothe indentation of all the HTML code in the book. More specifically, each childtag is indented to the right two spaces from its parent tag. Furthermore, con-tent within a tag that spans more than one line is indented within the tag.
The best way to learn the value of indentation is to see some HTML code with-out it. You know how the song goes—”you don’t know what you’ve got ‘til it’sgone.” Anyway, here’s a very simple table coded without any indentation:
<table><tr><td>Cell One</td><td>Cell Two</td></tr><tr><td>Cell Three</td><td>Cell Four</td></tr></table>
Not only is there no indentation, there also is no delineation between rowsand columns within the table. Now compare this code with the followingcode, which describes the same table:
<table><tr><td>Cell One</td><td>Cell Two</td>
</tr><tr><td>Cell Three</td><td>Cell Four</td>
</tr></table>
This heavily indented code makes it plainly obvious how the rows andcolumns are divided up via <tr> and <td> tags.
Consistent indentation might even be more important than comments whenit comes to making your HTML code understandable and maintainable.And you don’t have to buy into this specific indentation strategy. If you’drather use three or four spaces instead of two, that’s fine. And if you want totighten things up a bit and not indent content within a tag, that also works.The main thing to take from this is that it’s important to develop a codingstyle of your own and then ruthlessly stick to it.
Thinking About Version ControlIf you’ve ever used Google Docs, you have encountered a form of versioncontrol; in Google Docs, Google automatically saves revisions of your work
TIP
If you work with other people orplan on working with other peo-ple developing web pages, youshould consider getting togeth-er as a group to formulate aconsistent coding style. Thatway everyone is on the samepage, pun intended.
www.it-ebooks.info

ptg999
Thinking About Version Control 549
as you are typing. This is different than simply automatically saving yourwork (although it does that, too) because you can revert to any revisionalong the way. You might have encountered this concept when using pop-ular blog-authoring software such as Blogger or WordPress, or even whenediting wikis—both of these also enable users to revise their work withoutoverwriting, and thus deleting for all time, the previous work.
You might be wondering, “Well, what does that have to do with code? You’retalking about documents.” The answer is simple: Just as you might want torevert to a previous edition of an article or letter, you might want to revert toa previous edition of your code. This could be because you followed a goodidea to the end, and the code just proved untenable, but you don’t want tostart over entirely—just at a certain point along your revision path.
There is more to version control than just revision history. When you startusing version control systems to maintain your code, you will hear terms like:
. Commit/check-in and checkout—When you put an object into thecode repository, you are committing that file; when you checkout afile, you are grabbing it from the repository (where all the currentand historical versions are stored) and working on it until you areready to commit or check-in the file again.
. Branch—The files you have under version control can branch or forkat any point, thus creating two or more development paths. Supposeyou want to try some new display layouts or form interactivity butyou don’t want an existing site to appear modified in any way. Youmight have started with one master set of files but then forked thisset of files for the new site, continuing to develop them independent-ly. If you continued developing the original set of files, that would beworking with the trunk.
. Change/diff—This is just the term (change OR diff) for a modificationmade under version control. You might also hear diff used as a verb,as in “I diffed the files,” to refer to the action of comparing two ver-sions of an object. (There is an underlying UNIX command called diff.)
There are many more terms than just these few listed here, but if you canconceptualize the repository, the (local) working copy, and the process ofchecking in and checking out files, you are well on your way to imple-menting version control for your digital objects.
Using a Version Control SystemAlthough there are several different version control systems available foruse—some free and open source and some proprietary—two of the most
www.it-ebooks.info

ptg999
550 CHAPTER 27 Organizing and Managing a Website
popular systems are Subversion (http://subversion.apache.org) and Git(http://git-scm.com). If you have a web hosting service that enables you toinstall Subversion, you can create your own repository and use aSubversion client to connect to it.
But an increasingly popular tool is Git, which is a decentralized approach toversion control and also offers numerous tools and hosting options for userswho want to get started with a repository but don’t necessarily want/need/understand all the extra installation and maintenance overhead that goeswith it. One such hosting option for Git repositories is GitHub (http://github.org), which allows users to create accounts and store and maintain asmany code repositories for free as they would like (as long as they are opensource), while also providing paid solutions for users who would like tomaintain private code repositories.
For anyone wanting to get started with version control, I recommend Git andGitHub for its relative ease of use and free, cross-platform tools for use. TheGitHub Help site would be a great place to start: http://help.github.com/. Anadded benefit of the already-free GitHub account is the ability to use Gist(http://gist.github.com), which is a way to share code snippets (or wholepages) with others, while these snippets themselves are git repositories andthus versioned and forkable in their own right. GitHub repositories, includingGists, are both excellent ways to get started with version control of your work.
SummaryThis chapter has given you examples and explanations to help you organizeyour web pages into a coherent site that is informative, attractive, and easyto navigate. Web users have grown to become quite savvy in terms ofexpecting well-designed websites, and they will quickly abandon your siteif they experience a poor design that is difficult to navigate.
This chapter also discussed the importance of making your code easy tomaintain by adding comments and indentation. Comments are importantnot only as a reminder for you when you revisit code later but also asinstruction if someone else should inherit your code. Indentation mightseem like an aesthetic issue, but it can truly help you to quickly analyze andunderstand the structure of a web page at a glance. Because you are likelysoon to need code management tools either for yourself or yourself plusother developers in your group, you were introduced to a few concepts inversion control. Version control enables you to innovate without losing yoursolid, production-quality work and also provides more opportunities forother developers to work within your code base.
www.it-ebooks.info

ptg999
551Workshop
Q&AQ. I’ve seen pages that ask viewers to change the width of their browser
window or adjust other settings before proceeding beyond the homepage. Why do they do this?
A. The snarky response is that the site creators do not care about theirusers. Never force your users to do something differently than they aredoing with their browsers, and especially never, ever resize the browserautomatically. Those are some of the biggest usability no-no’s. Whensites tell you to change your settings, it is because the site creators thinkthey can offer a better presentation if they’re given that specific controlover the size of users’ windows or fonts. Of course, few people bother tochange their settings when told to do so (as they shouldn’t), so thesesites often look weird or unreadable. You’ll be much better off using thetips you learn in this book to make your site readable and attractive usingany window size and using a wide variety of browser settings. The betterorganized your site is, the more usable it will be for visitors.
Q. Will lots of comments and spaces make my pages load slower whensomeone views them?
A. The size of a little extra text in your pages is negligible when comparedto other, chunkier web page resources (such as images and multimedia).Besides, slower dial-up modem connections typically do a decent job ofcompressing text when transmitting it, so adding spaces to format yourHTML doesn’t usually change the transfer time at all. You’d have to typehundreds of comment words to cause even one extra second of delay inloading a page. And keep in mind that with the broadband connections(cable, DSL, and so on) that many people now have, text travels extreme-ly fast. It’s the graphics that slow pages down, so squeeze your imagesas tightly as you can, but use text comments freely.
WorkshopThe workshop contains quiz questions and activities to help you solidify yourunderstanding of the material covered. Try to answer all questions beforelooking at the “Answers” section that follows.
Quiz1. What are three ways to ensure all your pages form a single cohesive
website?
2. What two types of information should always be included on your homepage?
www.it-ebooks.info

ptg999
552 CHAPTER 27 Organizing and Managing a Website
3. You want to say, “Don’t change this image of me. It’s my only chance atimmortality,” to future editors of a web page, but you don’t want userswho view the page to see that message. How would you do it?
Answers1. Use consistent background, colors, fonts, and styles. Repeat the same
link words or graphics on the top of the page that the link leads to.Repeat the same small header, buttons, or other element on everypage of the site.
2. Use enough identifying information so that users can immediately seethe name of the site and what it is about. Also, whatever the mostimportant message you want to convey to your intended audience is,state it directly and concisely. Whether it’s your mission statement ortrademarked marketing slogan, make sure that it is in plain view here.
3. Put the following comment immediately before the <img /> tag:
<!-- Don’t change this image of me.It’s my only chance at immortality. -->
Exercises. Grab a pencil (the oldfangled kind) and sketch out your website as a
bunch of little rectangles with arrows between them. Sketch a roughoverview of what each page will look like by putting squiggles where thetext goes and doodles where the images go. Each arrow should start ata doodle icon that corresponds to the navigation button for the pagethe arrow leads to. Even if you have the latest whiz-bang website man-agement tools (which are often more work than just creating the siteitself), sketching your site by hand can give you a much more intuitivegrasp of which pages on your site will be easy to get to and how thelayout of adjacent pages will work together—all before you invest timein writing the actual HTML to connect the pages together. Believe it ornot, I still sketch out websites like this when I’m first designing them.Sometimes you can’t beat a pencil and paper!
. Open the HTML files that make up your current website, and checkthem all for comments and code indentation. Are there areas in whichthe code needs to be explained to anyone who might look at it in thefuture? If so, add explanatory comments. Is it difficult for you to tell thehierarchy of your code? Is it difficult to see headings and sections? Ifso, indent your HTML so that the structure matches the hierarchy andthus enables you to jump quickly to the section you need to edit.
www.it-ebooks.info

ptg999
Your web pages are ultimately only as useful as they are accessible—if noone can find your pages, your hard work in creating a useful architecture,providing interesting content, and coding them correctly will be for naught.The additional HTML tags you’ll discover in this chapter won’t make anyvisible difference in your web pages, but they are extremely important inthat they will help your audience more easily find your web pages.
For most website creators, this might be the easiest—but most important—chapter in the book. You’ll learn how to add elements to your pages andhow to construct your site architecture in such a way as to increase thepossibility that search engines will return links to your site when someonesearches for words related to your topic or company; this is called searchengine optimization (SEO).
Contrary to what you might hear from companies who try to sell SEOservices to you, there are no magic secrets that guarantee you’ll be at thetop of every list of search results. However, there is a set of free best prac-tices that you can do on your own to make sure your site is as easy to findas possible.
Publicizing Your WebsitePresumably, you want your website to attract someone’s attention or youwouldn’t bother to create it in the first place. However, if you are placingyour pages only on a local network or corporate intranet, or you are dis-tributing your site exclusively on removable storage media, helping usersfind your pages might not be much of a problem. But if you are adding thecontent of your website to the billions of other pages of content indexed bysearch engines, bringing your intended audience to your site is a very bigchallenge indeed.
WHAT YOU’LL LEARN INTHIS CHAPTER:
. How to publicize your website
. How to list your pages withthe major search sites
. How to optimize your sitefor search engines
CHAPTER 28Helping People Find Your Web
Pages
www.it-ebooks.info

ptg999
554 CHAPTER 28 Helping People Find Your Web Pages
To tackle this problem, you need a basic understanding of how most peo-ple decide which pages they will look at. There are basically three wayspeople become aware of your website:
. Somebody tells them about it and gives them the address; they enterthat address directly into their web browser.
. They follow a link to your site from someone else’s site, an aggrega-tor and recommendation service such as Digg or Reddit, or from alink or mention on a social networking site such as Facebook, Twitter,or Google+.
. They find your site indexed in the databases that power the Google,Bing, or Yahoo! search engines (among others).
You can increase your website traffic with a little time and effort. Toincrease the number of people who hear about you through word-of-mouth, well, use your mouth—and every other channel of communicationavailable to you. If you have an existing contact database or mailing list,announce your website to those people. Add the site address to your busi-ness cards or company literature. If you have the money, go buy TV andradio ads broadcasting your Internet address. In short, do the marketingthing. Good old-fashioned word-of-mouth marketing is still the best thinggoing, even on the Internet—we just have more and more tools available tous online.
Increasing the number of incoming links to your site from other sites isalso pretty straightforward—although that doesn’t mean it isn’t a lot ofwork. If there are specialized directories on your topic, either online or inprint, be sure you are listed. Participate in social networking, including theimplementation of Facebook fan pages (if applicable) for your service orbusiness. Create a Twitter account to broadcast news and connect with cus-tomers—again, if that is applicable to your online presence. Go into thespaces where your customers might be, such as blogs that comment onyour particular topic of interest, and participate in those communities. Thatis not to say that you should find a forum on your topic or service andspam its users with links to your site. Act as an expert in your given field,offering advice and recommendations along with your own site URL.There’s not much I can say in this chapter to help you with that, except togo out and do it.
The main thing I can help you with is making sure your content has beengathered and indexed correctly by search engines. It’s a fair assumptionthat if your content isn’t in Google’s databases, you’re in trouble.
NOTE
A very popular, high traffic, andwell-respected site (due to theiraccuracy and added value) fortips for interacting in social net-working spaces, especially forthe business user, is Mashable:http://www.mashable.com/.
www.it-ebooks.info

ptg999
Listing Your Pages with the Major Search Sites 555
Search engines are basically huge databases that index as much content onthe Internet as possible—including videos and other rich media. They useautomated processing to search sites, using programs called robots or spi-ders to search pages for content and build the databases. After the contentis indexed, the search applications themselves use highly sophisticatedtechniques of ranking pages to determine which content to display first,second, third, and so on when a user enters a search term.
When the search engine processes a user query, it looks for content thatcontains the key words and phrases that the user is looking for. But it isnot a simple match, as in “if this page contains this phrase, return it as aresult,” because content is ranked according to frequency and context ofthe keywords and phrases, as well as the number of links from other sitesthat lend credibility to it. This chapter will teach you a few ways to ensurethat your content appears appropriately in the search engine, based on thecontent and context you provide.
Listing Your Pages with the MajorSearch SitesIf you want users to find your pages, you absolutely must submit a requestto each of the major search sites to index your pages. Even though searchengines index web content automatically, this is the best way to ensureyour site has a presence on their sites. Each of these sites has a form foryou to fill out with the URL address, a brief description of the site, and, insome cases, a category or list of keywords with which your listing shouldbe associated. These forms are easy to fill out; you can easily complete allof them in an hour with time left over to list yourself at one or two special-ized directories you might have found as well. (How do you find the spe-cialized directories? Through the major search sites, of course!)
Even though listing with the major search engines is easy and quick, it canbe a bit confusing: Each search engine uses different terminology to identi-fy where you should click to register your pages. The following list mightsave you some frustration; it includes the addresses of some popularsearch engines which will include your site for free, along with the exactwording of the link you should click to register:
. Google—Visit http://www.google.com/addurl/, enter the addressof your site and a brief description, and then enter the squiggly veri-fication text, called a CAPTCHA, (or Completely Automated PublicTuring test to tell Computers and Humans Apart) shown on thepage. Then click the Add URL button to add your site to Google.
Before You List YourPagesBut wait! Before you rush offthis minute to submit your list-ing requests, read the rest ofthis chapter. Otherwise, you’llhave a very serious problem,and you will have already lostyour best opportunity to solve it.
To see what I mean, imaginethis scenario: You publish apage selling automatic cock-roach flatteners. I am anInternet user who has a roachproblem, and I’m allergic to bugspray. I open my laptop, brushthe roaches off the keyboard,log on to my favorite searchsite, and enter cockroach as asearch term. The search enginepromptly presents me with alist of the first 10 out of10,400,000 web pages contain-ing the word cockroach. Youhave submitted your listingrequest, so you know that yourpage is somewhere on that list.
Did I mention that I’m rich? Anddid I mention that two roachesare mating on my foot? Youeven offer same-day delivery inmy area. Do you want your pageto be number 3 on the list ornumber 8,542? Okay, now youunderstand the problem. Justgetting listed in a search engineisn’t enough—you need to workyour way up the rankings.
www.it-ebooks.info
ptg999
556 CHAPTER 28 Helping People Find Your Web Pages
. Yahoo! Search—Visit http://siteexplorer.search.yahoo.com/submit,click on Submit a Website or Webpage, enter the address of your site,and then click the Submit URL button.
. Bing—Visit http://www.bing.com/docs/submit.aspx, enter the veri-fication text, enter the address of your site, and then click the SubmitURL button.
. AllTheWeb—AllTheWeb search results are provided by Yahoo!Search, so just be sure to submit your site to Yahoo! Search, asexplained previously.
. AltaVista—AltaVista search results are also provided by Yahoo!Search, so just be sure to submit your site to Yahoo!. Search, asexplained previously.
Providing Hints for Search EnginesFact: There is absolutely nothing you can do to guarantee that your sitewill appear in the top 10 search results for a particular word or phrase inany major search engine (short of buying ad space from the search site,that is). After all, if there were such guarantees, why couldn’t everyoneelse who wants to be number one on the list do it, too? What you can do isavoid being last on the list and give yourself as good a chance as anyoneelse of being first; this is called SEO, or optimizing the content and struc-ture of your pages so that search engines will favor your pages over others.
Each search engine uses a different method for determining which pagesare likely to be most relevant and should therefore be sorted to the top of asearch result list. You don’t need to get too hung up on the differences,though, because they all use some combination of the same basic criteria.The following list includes almost everything any search engine considerswhen trying to evaluate which pages best match one or more keywords:
. Do keywords appear in the <title> tag of the page?
. Do keywords appear in the first few lines of the page?
. Do keywords appear in a <meta /> tag in the page?
. Do keywords appear in <h1> headings in the page?
. Do keywords appear in the names of image files and alt text forimages in the page?
. How many other pages within the website link to the page?
TIP
There are sites that provide oneform that automatically submitsitself to all the major searchengines, plus several minorsearch engines. These sites—such as http://www.scrubtheweb.com/,http://www.submitexpress.com/,and http://www.hypersubmit.com/—are popular examples ofsites that attempt to sell you apremium service that lists you inmany other directories and index-es as well. Depending on yourtarget audience, these servicesmight or might not be of value,but I strongly recommend thatyou go directly to the majorsearch sites listed on the rightand use their forms to submityour requests to be listed. Thatway you can be sure to answerthe questions (which are slightlydifferent at every site) accurately,and you will know exactly howyour site listing will appear ateach search engine.
www.it-ebooks.info

ptg999
Providing Hints for Search Engines 557
. How many other pages in other websites link to the page? Howmany other pages link to those pages?
. How many times have users chosen this page from a previous searchlist result?
Clearly, the most important thing you can do to improve your position isto consider the keywords your intended audience are most likely to enter.I’d recommend that you not concern yourself with common, single-wordsearches like food; the lists they generate are usually so long that trying tomake it to the top is like playing the lottery. Focus instead on uncommonwords and two- or three-word combinations that are most likely to indi-cate relevance to your topic (for instance, Southern home-style cookinginstead of simply food). Make sure that those terms and phrases occur sev-eral times on your page and be certain to put the most important ones inthe <title> tag and the first heading or introductory paragraph.
Of all the search-engine evaluation criteria just listed, the use of <meta />tags is probably the least understood. Some people rave about <meta />tags as if using them could instantly move you to the top of every searchlist. Other people dismiss <meta /> tags as ineffective and useless. Neitherof these extremes is true.
A <meta /> tag is a general-purpose tag you can put in the <head> portionof any document to specify some information about the page that doesn’tbelong in the <body> text. Most major search engines look at <meta /> tagsto provide them with a short description of your page and some keywordsto identify what your page is about. For example, your automatic cock-roach flattener order form might include the following two tags:
<meta name=”description”content=”Order the SuperSquish cockroach flattener.” />
<meta name=”keywords”content=”cockroach,roaches,kill,squish,supersquish” />
The first tag in this example ensures that the search engine has an accuratedescription of the page to present on its search results list. The second<meta /> tag slightly increases your page’s ranking on the list wheneverany of your specified keywords are included in a search query.
NOTESome over-eager web pageauthors put dozens or evenhundreds of repetitions of thesame word on their pages,sometimes in small print or ahard-to-see color, just to get thesearch engines to position thatpage at the top of the list when-ever users search for that word.This practice is called searchengine spamming.
Don’t be tempted to try thissort of thing—all the majorsearch engines are aware ofthis practice and immediatelydelete any page from their data-base that sets off a spamdetector by repeating the sameword or group of words in asuspicious pattern. It’s still fine(and quite beneficial) to haveseveral occurrences of impor-tant search words on a page, inthe natural course of your con-tent. Make sure, however, thatyou use those words in normalsentences or phrases—thenthe spam police will leave youalone.
CAUTIONAlways place <meta /> tagsafter the <head>, <title>, and</title> tags but before theclosing </head> tag.
According to XHTML standards,<title> must be the very firsttag in the <head> section ofevery document.
www.it-ebooks.info

ptg999
558 CHAPTER 28 Helping People Find Your Web Pages
You should always include <meta /> tags with name=”description” andname=”keywords” attributes in any page that you want to be indexed by asearch engine. Doing so might not have a dramatic effect on your positionin search lists, and not all search engines look for <meta /> tags, but it canonly help.
To give you a concrete example of how to improve search engine results,consider the page shown in Listing 28.1.
This page should be easy to find because it deals with a specific topic andincludes several occurrences of some uncommon technical terms for whichusers interested in this subject would be likely to search. However, thereare several things you could do to improve the chances of this pageappearing high on a search engine results list.
LISTING 28.1 A Page That Will Have Little Visibility During an InternetSite Search<?xml version=”1.0” encoding=”UTF-8”?><!DOCTYPE html PUBLIC “-//W3C//DTD XHTML 1.1//EN”“http://www.w3.org/TR/xhtml11/DTD/xhtml11.dtd”>
<html xmlns=”http://www.w3.org/1999/xhtml” xml:lang=”en”><head><title>Fractal Central</title>
</head>
<body><div style=”text-align:center”><img src=”fractalaccent.gif” alt=”a fractal” />
</div><div style=”width:133px; float:left; padding:6px;
text-align:center; border-width:4px; border-style:ridge”>
Discover the latest software, books and more at our online store.<br /><a href=”orderform.html”><img src=”orderform.gif”
alt=”Order Form” style=”border-style:none” /></a></div><div style=”float:left; padding:6px”><h2>A Comprehensive Guide to the<br />Art and Science of Chaos and Complexity</h2><p>What’s that? You say you’re hearing about “fractals” and “chaos” all over the place, but still aren’t too sure what they are? How about a quick summary of some key concepts:</p><ol><li>Even the simplest systems become deeply complex and richly beautiful when a process is “iterated” over and over, using the results
TIP
The previous cockroach exam-ple aside, search engineexperts suggest that the ideallength of a page description ina <meta /> tag is in the 100-to 200-character range. For key-words, the recommended lengthis in the 200- to 400-characterrange. Experts also suggest notwasting spaces in between key-words, which is evident in thecockroach example. And, finally,don’t go crazy repeating thesame keywords in multiplephrases in the keywords—somesearch engines will penalize youfor attempting to overdo it.
TIPIn the unlikely event that youdon’t want a page to be includ-ed in search engine databasesat all, you can put the following<meta /> tag in the <head> por-tion of that page:<meta name=”robots”content=”noindex,noindex” />
This causes some searchrobots to ignore the page. Formore robust protection fromprying robot eyes, ask the per-son who manages your webserver to include your pageaddress in the server’srobots.txt file. (She will knowwhat that means and how to doit; if not, you can refer to thehandy information athttp://www.robotstxt.org/.) Allmajor search spiders will thenbe sure to ignore your pages.This might apply to internalcompany pages that you’drather not be readily availablevia public searches.
www.it-ebooks.info

ptg999
Providing Hints for Search Engines 559
of each step as the starting point of the next. This is how Nature creates a magnificently detailed 300-foot redwood tree from a seed the size of your fingernail.</li><li>Most “iterated systems” are easily simulated on computers, but only a few are predictable and controllable. Why? Because a tiny influence, like a “butterfly flapping its wings,” can be strangelyamplified to have major consequences such as completely changing tomorrow’s weather in a distant part of the world.</li><li>Fractals can be magnified forever without loss of detail, so mathematics that relies on straight lines is useless with them. However, they give us a new concept called “fractal dimension” whichcan measure the texture and complexity of anything from coastlines to storm clouds.</li><li>While fractals win prizes at graphics shows, their chaotic patterns pop up in every branch of science. Physicists find beautiful artwork coming out of their plotters. “Strange attractors” withfractal turbulence appear in celestial mechanics. Biologists diagnose “dynamical diseases” when fractal rhythms fall out of sync. Even puremathematicians go on tour with dazzling videos of theirresearch.</li>
</ol><p>Think all these folks may be on to something?</p>
</div><div style=”text-align:center”><a href=”http://netletter.com/nonsense/”>
<img src=”findout.gif” alt=”Find Out More” style=”border-style:none” /></a>
</div></body>
</html>
Now compare the page in Listing 28.1 with the changes made to the pagein Listing 28.2. The two pages look almost the same, but to search robotsand search engines, these two pages appear quite different. The followinglist summarizes what was changed in the page and how those changesaffected indexing:
. Important search terms were added to the <title> tag and the firstheading on the page. The original page didn’t even include the wordfractal in either of these two key positions.
. <meta /> tags were added to assist search engines with a descrip-tion and keywords.
LISTING 28.1 Continued
www.it-ebooks.info

ptg999
560 CHAPTER 28 Helping People Find Your Web Pages
. A very descriptive alt attribute was added to the first <img /> tag.Not all search engines read and index alt text, but some do.
. The quotation marks around technical terms (such as “fractal” and“iterated”) were removed because some search engines consider“fractal” to be a different word than fractal. The quotation marks werereplaced with the character entity ", which search robots simplydisregard. This is also a good idea because XHTML urges web devel-opers to use the " entity instead of quotation marks anyway.
. The keyword fractal was added twice to the text in the order-formbox.
It is impossible to quantify how much more frequently users searching forinformation on fractals and chaos were able to find the page shown in Listing28.2 versus the page shown in Listing 28.1, but it’s a sure bet that the changescould only improve the page’s visibility to search engines. As is often thecase, the improvements made for the benefit of the search spiders probablymade the page’s subject easier for humans to recognize and understand aswell. This makes optimizing a page for search engines a win-win effort!
LISTING 28.2 An Improvement on the Page in LISTING 28.1<?xml version=”1.0” encoding=”UTF-8”?><!DOCTYPE html PUBLIC “-//W3C//DTD XHTML 1.1//EN”“http://www.w3.org/TR/xhtml11/DTD/xhtml11.dtd”>
<html xmlns=”http://www.w3.org/1999/xhtml” xml:lang=”en”><head><title>Fractal Central: A Guide to Fractals, Chaos,
and Complexity</title><meta name=”description” content=”A comprehensive guide
to fractal geometry, chaos science and complexity theory.” />
<meta name=”keywords” content=”fractal,fractals,chaos science,chaos theory,fractal geometry,complexity,complexity theory” />
</head>
<body><div style=”text-align:center”><img src=”fractalaccent.gif” alt=” Fractal Central: A
Guide to Fractals, Chaos, and Complexity “ /></div><div style=”width:133px; float:left; padding:6px;
text-align:center; border-width:4px; border-style:ridge”>
Discover the latest fractal software, books and more at the <span style=”font-weight:bold”>Fractal Central</span> online store <br />
www.it-ebooks.info

ptg999
Providing Hints for Search Engines 561
<a href=”orderform.html”><img src=”orderform.gif” alt=”Order Form” style=”border-style:none” /></a></div>
<div style=”float:left; padding:6px”><h2>A Comprehensive Guide to the<br />Art and Science of Chaos and Complexity</h2><p>What’s that? You say you’re hearing about "fractals" and "chaos" all over the place, but still aren’t too sure what they are? How about a quick summary of some key concepts:</p><ol><li>Even the simplest systems become deeply complex and richly beautiful when a process is "iterated" over and over, using the Results of each step as the starting point of the next. This is how Nature creates a magnificently detailed 300-foot redwood tree from a seed the size of your fingernail.</li><li>Most "iterated systems" are easily simulated on computers, but only a few are predictableand controllable. Why? Because a tiny influence, like a "butterfly flapping its wings, " can bestrangely amplified to have major consequences such as completely changing tomorrow’s weather in a distant part of the world.</li><li>Fractals can be magnified forever without loss of detail, so mathematics that relies on straight lines is useless with them. However, they give us a new concept called "fractal dimension"which can measure the texture and complexity of anything from coastlines to storm clouds.</li><li>While fractals win prizes at graphics shows, their chaotic patterns pop up in every branch of science. Physicists find beautiful artwork coming out of their plotters. "Strange attractors" with fractal turbulence appear in celestial mechanics. Biologists diagnose "dynamical diseases" when fractal rhythms fall out of sync. Even puremathematicians go on tour with dazzling videos of theirresearch.</li>
</ol><p>Think all these folks may be on to something?</p>
</div><div style=”text-align:center”><a href=”http://netletter.com/nonsense/”>
<img src=”findout.gif” alt=”Find Out More” style=”border-style:none” /></a>
</div></body>
</html>
LISTING 28.2 Continued
www.it-ebooks.info

ptg999
562 CHAPTER 28 Helping People Find Your Web Pages
These changes will go a long way toward making the content of this sitemore likely to be appropriately indexed. In addition to good, indexed con-tent, remember that the quality of content—as well as the number of othersites linking to yours—is important as well.
Additional Tips for Search EngineOptimizationThe most important tip I can give you regarding SEO is to not pay an SEOcompany to perform your SEO tasks if that company promises specificresults for you. If a company promises that your site will be the numberone result in a Google search, run for the hills and take your checkbookwith you—no one can promise that because the search algorithms have somany variables that the number one result might change several timesover the course of a given week. That is not to say that all SEO companiesare scam artists. Some legitimate site content and architect consultants whoperform SEO tasks get lumped in with the spammers who send unsolicitedemail, such as this:
“Dear google.com, I visited your website and noticed that you are notlisted in most of the major search engines and directories...”
This sample e-mail is used as an example in Google’s own guidelines forwebmasters, along with the note to “reserve the same skepticism for unso-licited email about search engines as you do for burn-fat-at-night diet pillsor requests to help transfer funds from deposed dictators.” Yes, someoneactually sent Google a spam e-mail about how to increase their searchranking...in Google. For more good advice from Google, visithttp://www.google.com/webmasters/.
Here are some additional actions you can take, for free, to optimize yourcontent for search engines:
. Use accurate page titles. Your titles should be brief, but descriptiveand unique. Do not try to stuff your titles with keywords.
. Create human-friendly URLs, such as those with words in them thatusers can easily remember. It is a lot easier to remember—and it’seasier for search engines to index in a relevant way—a URL such ashttp://www.mycompany.com/products/super_widget.html com-pared to something like http://www.mycompany.com?c=p&id=4&id=49f8sd7345fea.
. Create URLs that reflect your directory structure. This assumes youhave a directory structure in the first place, which you should.
www.it-ebooks.info

ptg999
Summary 563
. When possible, use text—not graphical elements—for navigation.
. If you have content several levels deep, use a breadcrumb trail so thatusers can find their way back home. A breadcrumb trail also providessearch engines with more words to index. For example, if you are look-ing at a recipe for biscuits in the Southern Cooking category of a food-related website, the breadcrumb trail for this particular page mightlook like this:
Home > Southern Cooking > Recipes > Biscuits
. Within the content of your page, use headings (<h1>, <h2>, <h3>)appropriately.
In addition to providing rich and useful content for your users, you shouldfollow these tips to increase your site’s prominence in page rankings.
SummaryThis chapter covered some extremely important territory by exploring howto provide hints to search engines (such as Google, Bing, and Yahoo!) so thatusers can find your pages more easily. You also saw an example of theHTML behind a perfectly reasonable web page redone to make it more searchengine friendly. Finally, you learned a few more tips to optimize the index-ing of your site overall.
Table 28.1 lists the tags and attributes covered in this chapter.
TABLE 28.1 HTML Tags and Attributes Covered in Chapter 28
Tag/Attribute Function
<meta /> Indicates meta-information about this document (informationabout the document itself). Most commonly used to add a pagedescription and to designate keywords. Used in the document<head>.
Attributes
name=”name” Can be used to specify which type of information about the doc-ument is in the content attribute. For example, name=”keywords” means that keywords for the page are in content.
content= The actual message or value for the information specified in ”value” http-equiv or name. For example, if the http-equiv attribute
is set to refresh, the content attribute should be set to thenumber of seconds to wait, followed by a semicolon and theaddress of the page to load.
www.it-ebooks.info
ptg999
564 CHAPTER 28 Helping People Find Your Web Pages
Q&AQ. I have lots of pages in my site. Do I need to fill out a separate form for
each page at each search site?
A. No. If you submit just your home page (which is presumably linked toall the other pages), the search spiders will crawl through all the linkson the page (and all the links on the linked pages, and so on) until theyhave indexed all the pages on your site.
Q. I submitted a request to be listed with a search engine, but when Isearch for my page, my page never comes up—not even when I entermy company’s unique name. What can I do?
A. Most of the big search engines offer a form you can fill out to instantlycheck whether a specific address is included in their database. If youfind that it isn’t included, you can submit another request form.Sometimes it takes days or even weeks for the spiders to get around toindexing your pages after you submit a request.
Q. When I put keywords in a <meta /> tag, do I need to include everypossible variation of spelling and capitalization?
A. Don’t worry about capitalization; almost all searches are entered in alllowercase letters. Do include any obvious variations or common spellingerrors as separate keywords. Although simple in concept, there aremore advanced strategies available when it comes to manipulating the<meta /> tag than I’ve been able to cover in this chapter. Visithttp://en.wikipedia.org/wiki/Meta_element for good information on thevarious attributes of this tag and how to use it.
Q. I’ve heard that I can use the <meta /> tag to make a page automati-cally reload itself every few seconds or minutes. Is this true?
A. Yes, but there’s no point in doing that unless you have some sort ofprogram or script set up on your web server to provide new informationon the page. And if that is the case, the chances are good that you cango about that refresh in a different way using AJAX (see Chapter 24,“AJAX: Remote Scripting,” for basic information on AJAX). For usabilityreasons, the use of <meta /> to refresh content is frowned upon by theW3C and users in general.
WorkshopThe workshop contains quiz questions and activities to help you solidify yourunderstanding of the material covered. Try to answer all questions beforelooking at the “Answers” section that follows.
www.it-ebooks.info

ptg999
Workshop 565
Quiz1. If you publish a page about puppy adoption, how could you help make
sure that the page can be found by users who enter puppy, dog, and/oradoption at all the major Internet search sites?
2. Suppose you decide to paste your keywords hundreds of times in yourHTML code, using a white font on a white background, so that yourreaders cannot see them. How would search engine spiders deal withthis?
3. Is it better to throw all your content in one directory or to organize itinto several directories?
Answers1. Make sure that puppy, dog, and adoption all occur frequently on your
main page (as they probably already do) and title your page somethingalong the lines of Puppy Dog Adoption. While you’re at it, put the follow-ing <meta /> tags in the <head> portion of the page:
<meta name=”description”content=”dog adoption information and services” /><meta name=”keywords” content=”puppy, dog, adoption” />
Publish your page online, and then visit the site submittal page for eachmajor search engine (listed earlier in the chapter) to fill out the sitesubmission forms.
2. Search engine spiders would ignore the duplications and possibly black-list you from their index and label you as a spammer.
3. Definitely organize your content into several directories. This will provideeasier maintenance of your content, but will also give you the opportu-nity to create human-readable URLs with directory structures that makesense. It also creates a navigational breadcrumb trail.
Exercises. You’ve reached the end of the book. If you have a site that is ready for
the world to see, review the content and structure for the best possibleoptimizations, and then submit the address to all the major searchengines.
www.it-ebooks.info


ptg999
INDEX
absolute positioning, 213
display property (CSS), 53
positioning property, 214-217
accessibility, JavaScript best practices, 439
Adaptive Path, AJAX, 480
addEventListener function, 392
Adjust Hue/Lightness/Saturation tool(GIMP), 154
Adobe Photoshop, 148
AJAX, 71, 479. See also JavaScript
AJAX Frameworks JavaScriptlibrary, 456
debugging applications, 491-496
examples of, 481
frameworks, 482
libraries, 482
ajaxRequest function, 486
ajaxResponse function, 486
creating, 485-486
quiz building example, 487-491
using, 486
limitations of, 482
live search forms, creating, 496
front end, 495
HTML file example, 493
HTML forms, 492
JavaScript front end, 494-495
PHP back end, 493-494
Symbols
/ (forward slashes), HTML and, 124
+ (plus signs) in JavaScript state-ments, 73
+= operator, 327
(;) semicolons, JavaScript statements,72, 287
Numbers
140 cross-browser color names,143-144
A
A Small Orange web hosting provider, 7
<a> tags (HTML), 170
anchor locations, linking to,126-129
naming, 127
web pages, identifying locationswithin, 126
absolute addresses, web pages and,124-125
absolute links, web pages and, 124
quiz building example
HTML files, 487-488
JavaScript files, 489-490
testing, 490-491
XML files, 488-489
requests
awaiting responses, 484
back end, 480, 493-494
creating, 483
front end, 480, 494-495
interpreting response data, 484
JavaScript client, 480
sending, 484
server-side scripts, 480,493-495
XML and, 481
XMLHttpRequest
awaiting responses torequests, 484
creating requests, 483
interpretting request responsedata, 484
opening URLs, 483
sending requests, 484
alert() function, event handlers and, 295
alerts (dialog boxes), 417-418
www.it-ebooks.info

ptg999
aligning568
numeric arrays, 337, 340-342
string arrays, 338
sorting, 340-342
splitting, 339
ASCII text, 26, 34, 82, 397
.asp file extensions, 27
ASP scripting language, 274
attributes, 92-93, 123
auto image loading, web browsers, 20
B
<b> tags (HTML), 81-83
back end (AJAX requests), 480,493-494
Back/Forward buttons, adding to documents, 304-305
backgrounds
background-position style property, 172
background-repeat style property, 172
colors,
background-color property(CSS), 55
background-color style property, 171
CSS and 146-148
images, 171-172
tiled backgrounds, 159-160
bad website examples, 144
bandwidth, web hosting providers, 6
banners, creating, 156
Barry’s Clipart Server website, 149
BAWSI.org, website organization, 545
behavior, Javascripting scripting bestpractices, 434
Berners-Lee, Sir Tim, 1
<big> tags (HTML), 83
big text, 83
aligning
align property (CSS), 191, 203-204
images
horizontal alignment, 165-166
vertical alignment, 167-168
text
attributes, 92-93
block-level elements, 93-95
paragraphs, 93-95
tables, 113-115
text-align property (CSS), 56
text-align style rule (CSS),93-95
text-decoration property (CSS), 56
AllTheWeb, listing websites with, 556
AltaVista, listing websites with, 556
alternate text, 163-164
Amazon.com, 481, 543
analogous color schemes, 143
anchor objects (DOM), 303
anchor tags
naming, 127
web pages, identifying locationswithin, 126
web pages,linking to anchor loca-tions, 126-129
anchors, documents, 303
animated graphics, 160-161
API functions (Greasemonkey), 471
Apple computers
HTML file creation, 27
Safari, 9, 465
arguments (JavaScript functions), 348
Arial font (text), 86
arithmetic mean, 363
arrays (JavaScript)
declaring, 337
elements of, accessing, 338
frames arrays, 426
length of, 338
Bing, listing websites with, 556
block value (CSS display property), 53
blogs, publishing to web content, 19
<body> tags, 27, 31-33
boilerplate code, web page creation,28-30
boldface text, 82-83
Boodman, Aaron, 464
Boolean operators. See logical opera-tors (JavaScript)
Boolean values (JavaScript), 330
borders
CSS box model, 210
border property, 54-55
border-bottom property, 54-55
border-color property, 54-55
border-left property, 54-55
border-right property, 54-55
border-style property, 54-55
border-top property, 54-55
border-width property, 54
frame borders, modifying,424-425
lists, styling, 227-228
tables
CSS and color, 146-148
sizing, 107
spacing, 116
box model (CSS), 209, 212
borders, 210
content, 210
lists and, 226-229
margins, 210
padding, 210
sizing elements, 210-212
<br /> tags, 32-33, 85
break statements (JavaScript), 381
browsers (web)
140 cross-browser color names,143-144
cross-browser scripting
www.it-ebooks.info

ptg999
color 569
non-viewable window areas, 254
Opera, 9, 465
padding and, 226-228
pop-up windows, 134
popularity of, 26
Safari, 9
search engines, 445
sensing. See feature sensing
servers, basic browser server inter-action, 3-5
text, adjusting font size settings, 20
websites
comparing, 26
testing, 8-9, 26
windows
creating, 410-411
linking frames to windows,423-424
moving, 413-414
opening/closing, 411-412
resizing, 413-414
timeouts, 414-416
built-in objects (JavaScript), 289, 352,356-359
date object
converting date formats, 366
creating, 364
local time values, 365-366
reading date values, 365
setting date values, 364-365
time zones, 365
definitions, extending, 359
math object, 361
generating random numbers,360-363
rounding decimal numbers, 360
truncating decimal numbers, 360
buttons, creating, 156
buying domain names, 6
debugging browsers, 444
feature sensing, 437, 443-444
CSS, support for, 51
debugging, 444
development of, 2
dialog boxes, displaying, 417-418
distributing, 18
Firefox, 9, 464
frames, 418-420
adding individual frames, 423
creating frameset documents,421-423
frames array, 426
inline frames, 426-429
JavaScript objects and, 425
linking windows to frames,423-424
modifying borders, 424-425
nested framesets, 425
Google Chrome, 9, 465
history, accessing, 2, 303-305
HTML development, 2
images, auto image loading, 20
information, reading via JavaScript
dishonest browsers, 442-443
displaying information,440-441
Internet Explorer, 9
event properties, 393
Trixie, 465-468
links, opening in new browser windows, 134
lists, displaying in, 97
margins and, 226-229
non-Internet Explorer event proper-ties, 393-394
non-JavaScript browsers
avoiding errors, 446-449
detecting, 445-446
JavaScript optionality, 446
<noscript> tag, 445-446
<script> tag, 457
C
case statements (JavaScript), 376
case-sensitivity, JavaScript syntax, 292
CD-ROM, transferring photos to, 150
cells (tables)
creating, 107
sizing, 111-113
Champeon, Steve, 435
check boxes (forms), 521-523
child objects (JavaScript), 353
child tags. See nested tags (HTML)
children (DOM), 308
Chrome (Google), 9
error messages, displaying, 77
Greasemonkey and, 465
clarity, coding for, 548
Classic FTP FTP client
server connections, 13
website connections, 11-12
clear property (CSS), text flow and, 220
client-side scripting, 274
clip art, 149
closing tags (HTML), 30
closing/opening browser windows,411-412
cm value (CSS height/width properties), 53
color
140 cross-browser color names,143-144
analogous color schemes, 143
background color
background-color style property, 171
CSS and, 146-148
best practices, 141-143
border color (tables), CSS and,146-148
color property (CSS), 56
www.it-ebooks.info

ptg999
color570
conditional statements (JavaScript), 289
conditions (for loops), 377
confirmations (dialog boxes), 417-418
constructor functions (JavaScript), 354
containers, 307
content (web)
creating, 2-3
CSS box model, 210
delivering, 3-5
Javascripting scripting best prac-tices, 434
publishing
locally, 18-19
to blogs, 19
viewing locally, 5
web hosting providers, selecting,6-8, 26
continue statements (JavaScript), 382
continuing loops (JavaScript), 382
control panels, selecting web hostingproviders, 7-8
converting
data formats (JavaScript dateobjects), 366
data types (JavaScript), 331
string case (JavaScript), 334
copyrights, graphics and, 149
counters (JavaScript), for loops, 377
Creammonkey add-on, Greasemonkeysupport in Safari, 465
Creative Commons licenses, 149
cropping images, 151-152
cross-browser scripting
debugging browsers, 444
event handlers, JavaScript and, 437
feature sensing, 437, 443-444
CSS
align property, 191, 203-204
box model, 209
borders, 210
content, 210
Color Scheme Generator website, 143
color style rule (CSS), fonts and,86-87
color theory, 142
color wheel, 142
Colorblind Web Page Filter tool, 148
complementary color schemes, 143
graphics, adjusting color in, 154
hexadecimal color codes,144-146
links and, 144
lists, styling, 227-228
monitors and, 144
tables and, 115
text
CSS and, 146-148
formatting in style sheets, 46
triadic color schemes, 143
using, 141-143
W3C color standards, 143
columns, fixed/liquid hybrid layouts
defining, 260-262
height, setting, 264-268
combining
string object values, 332-334
tasks. See functions (JavaScript)
comments
HTML, JavaScript and, 276
JavaScript, 293
websites, maintaining code via,546-547
complementary color schemes, 143
compression
graphics, 150
JPEG, 155
conditional expressions, 317,370-373
conditional operators (JavaScript), 370
lists and, 226-229
margins, 210
padding, 210
sizing elements, 210-212
cascading component of, 46
clear property, text flow and, 220
color, specifying via CSS, 146-148
CSS 2, 47
CSS Zen Garden, 191-192, 253
CSS1, 47
definition of, 45-46
<div> tags, 46
DOCTYPE declarations, 212
float property, 191, 204-207, 220
formatting properties, 53
background-color property, 55
border property, 54-55
border-bottom property, 54-55
border-color property, 54-55
border-left property, 54-55
border-right property, 54-55
border-style property, 54-55
border-top property, 54-55
border-width property, 54
color property, 56
font property, 56
font-family property, 55
font-size property, 55
font-style property, 56
font-weight property, 56
line-height property, 56
padding property, 56
text-align property, 55-56
text-decoration property, 56
text-indent property, 55
image maps, creating, 231-235
inline styles, 60-61
layouts
display property, 52-53
fixed layouts, 254
www.it-ebooks.info

ptg999
displaying 571
list-style-type style rule,99-101
multiple style properties in, 58
text-align style rule, 93-95
viewing, 51
style sheets
creating, 47-52
definition of, 45
external style sheets, 46-51
formatting properties, 53-56
formatting text color, 46
inline styles and, 61
internal style sheets, 46,59-60
italic text, 56
layout properties, 52-53
line-through text, 56
linking to HTML documents, 50
sizing text, 50
strikethrough text, 56
underline text, 56
tags, 50
elements and, 46
selectors, 57
validating, 61
web browsers, CSS support, 51
z-index property, 217-219
current line, text flow and, 220
custom HTML tags, creating, 58
custom objects (JavaScript), 289
customer service, web hostingproviders, 6
Cyberduck FTP client, 11
D
DailyRazor web hosting provider, 7
dashed value (CSS border-style prop-erties), 54
fixed/liquid hybrid layouts,258-268
height property, 53
liquid layouts, 253- 257
width property, 53
<link /> tag, 50
links, styling, 134-138
lists
horizontal navigation, 245-248
list-style-image property, 226
list-style-position property,226, 229-231
list-style-type property, 226
navigation lists, 236-248
vertical navigation, 236-244
margin property, 191-199
media-specific style sheets,503-504
overflow property, text flow and, 220
padding property, 191, 199-202
positioning
absolute positioning, 213-217
overlapping elements, 213,217-219
positioning property, 213
relative positioning, 213-215
z-index property, 217-219
print pages, desiging style sheetsfor, 505-508
properties, hyphenating, 312
reference guide online resource, 47
selectors, 57
style classes, 57-58
style IDs, 59
style properties, 57
style rules, 46, 50
color style rule, 86-87
font weight style rule, 83
font-family style rule, 86
font-size style rule, 86-87
data types (JavaScript), 330-331
date object (JavaScript)
creating, 364
date formats, converting, 366
date values, reading, 365
date values, setting, 364-365
local time values, 365-366
time zones, 365
Date objects (JavaScript), time displayexample, 72
debugging
AJAX applications, 491-496
browsers, 444
user scripts, 474-476
decimal numbers
rounding, 360
truncating, 360
declaring variables (JavaScript), 326
decrementing/incrementing variables(JavaScript), 327
definition lists, 96, 226
design patterns, JavaScript best prac-tices, 439
dialog boxes, displaying, 417-418
Digg, 481
directories (web content), 123-124
display property (CSS), 52-53
displaying
document information, 301-302
error messages, 77
time (JavaScript example)
adding scripts to web pages,73-74
creating output, 73
Date objects, 72
error handling, 76-78
modifying scripts, 74-76
<script> tags, 71-72
statements, 72
testing scripts, 74
variables, 72
www.it-ebooks.info

ptg999
DisplayKey function, keyboard events572
link objects, 303, 306
location objects, 305-306
methods, 299
naming, 299
parents, 308
properties, 299
referencing, 299
showing/hiding, 316-317
siblings, 308
window objects, 300, 409-418
parents, 308
siblings, 308
structure of, 306-307
text, web pages
adding to, 319-321
modifying in, 317-318
DOM objects (JavaScript), 289
domain names, purchasing, 6
dotted value (CSS border-style properties), 54
double value (CSS border-style proper-ties), 54-55
downloading JavaScript libraries, 457
dynamic websites
client-side scripting, 274
DOM, 280-281
images, changing via user interac-tion, 281-283
server-side scripting, 274
text, printing via JavaScript, 275
web content, displaying randomcontent via JavaScript, 276-280
E
editors, blogs, 19
effects (JavaScript), 70
elements, definition of, 46
DisplayKey function, keyboard events,398-399
distributing web browsers, 18
dithering, 158
<div> tags (CSS), 46, 170
do, while loops (JavaScript), 380
DOCTYPE declarations, 212
document objects (DOM), 300
anchor objects, 303
document information, displaying,301-302
link objects, 303, 306
methods of, 302, 310
properties of, 301
text, writing within documents, 302
document roots, 13-16
document.write statements(JavaScript), 68, 73
documenting code, 546-547
documents
anchors, 303
Back/Forward buttons, adding,304-305
information, displaying in,301-302
links, 303, 306
text, writing within documents, 302
Dojo JavaScript library, 456
DOM, 280-281
children, 308
layers
controlling positioning viaJavaScript, 311-315
creating, 311
moveable layers, 311-315
nodes, 307, 309-310
objects, 352
anchor objects, 303
document objects,300-303, 306
hiding/showing, 316-317
history objects, 303-305
else keyword (JavaScript), testing mul-tiple conditions, 372-373
HTML files, 374
JavaScript files, 374-375
<em> tags (HTML), 83
addresses
email address encoders, 133
linking to, 132-133
form data, sending via, 530-531
<embed> tags (XHTML), 183
embedded multimedia files, 180-183
emphasized text. See italic text
empty tags (HTML), 30, 33
error handling, 448
JavaScript scripts, 76-78
non-JavaScript browsers, 446-449
error messages, displaying, 77
escaping loops (JavaScript), 381
ESPN.com, 254, 540-542
European languages, formatting textfor, 89-91
event handlers, 389
creating, 390-391
defining, 390-391
event objects, 392
functions and, 484
JavaScript and, 68-70,290-291, 435
alert() function, 295
best practices, 294-295
cross-browser scripting, 437
W3C event model, 436-437
keyboard events, 397-399
mouse events
mousestatus function, 396
onClick, 394-397, 400-404
onDblClick, 395
onMouseDown, 395-397
onMouseOut, 394
onMouseOver, 394
www.it-ebooks.info
ptg999
formatting 573
minimum width, setting, 262-263
structure of, 258-259
Flickr, 161-163
float property (CSS), 191, 204-207, 220
float style property, 166
flow control (JavaScript), 369
break statements, 381
case statements, 376
continue statements, 382
do, while loops, 380
for loops, 377-378
for, in loops, 382-384
if statements, 369
conditional expressions,370-373
conditional operators, 370
else keyword, 372-375
logical operators, 371
testing multiple conditions,373-375
infinite loops, 380-381
loops
break statements, 381
continue statements, 382
escaping, 381
switch statements, using multipleconditions, 375-376
while loops, 379-380
flowing text, 220
fluid layouts. See liquid layouts
folders (web content), 123-125
<font> tags (HTML), 81, 86
fonts (text)
Arial font, 86
CSS
color style rule, 86-87
font property, 56
font-family property, 55
font-family style rule, 86
font-size property, 55
font-size style rule, 86-87
onMouseUp, 395-397
rollover images, 394
multiple event handlers, 391-392
naming, 390
onLoad events, 399
onUnload events, 400
parentheses and, 484
quotation marks and, 390
syntax of, 390
Yahoo! UI Library, 437
event objects
event handlers and, 392
Internet Explorer event properties, 393
non-Internet Explorer event properties, 393-394
events (JavaScript), 69
expressions (JavaScript), 328
extending built-in object definitions, 359
external scripts (JavaScript), 69
external style sheets (CSS), 46-51
F
feature sensing, 437, 443-444
Fetch FTP client, 11
finding
substrings (JavaScript), 336-337
user scripts, 466
Firebug, validating web content, 37
Firefox, 9
error messages, displaying, 77
Greasemonkey, installing, 464
FireFTP FTP client, 10-11
FireZilla FTP client, 11
fixed layouts, 254
fixed/liquid hybrid layouts
columns
defining in, 260-262
setting height, 264-268
font-style property, 56
font-weight property, 56
font weight style rule, 83
foreign languages, 89-91
HTML, customizing in, 85-89
resumes, creating, 87-89
sans-serif font, 86
sizing, style sheets, 50
special characters, 89-91
Times Roman font, 86
typerwriter font. See monospacedtext
web browsers, adjusting font sizesettings, 20
for loops (JavaScript), 377-378
for statements (JavaScript), 290
for, in loops (JavaScript), 382-384
foreign languages, formatting text for,89-91
formatting
CSS, 53
background-color property, 55
border property, 54-55
border-bottom property, 54-55
border-color property, 54-55
border-left property, 54-55
border-right property, 54-55
border-style property, 54-55
border-top property, 54-55
border-width property, 54
color property, 56
font property, 56
font-family property, 55
font-size property, 55
font-style property, 56
font-weight property, 56
line-height property, 56
padding property, 56
text-align property, 55-56
text-decoration property, 56
text-indent property, 55
www.it-ebooks.info

ptg999
formatting574
selection lists, 524-525
text areas, 526
text fields, 526
text input, accepting, 519
user input, accepting, 519
validating, 70, 531-532
forward slashes (/), HTML and, 124
Forward/Back buttons, adding to doc-uments, 304-305
frames, 418-420
animated graphics, 161
borders, modifying, 424-425
frames array, 426
frameset documents, creating,421-423
individual frames, adding, 423
inline frames, 426-429
JavaScript objects and, 425
nested framesets, 425
windows, linking to frames,423-424
front end (AJAX requests), 480,494-495
FTP (File Transfer Protocol), 10, 29
Classic FTP client
server connections, 13
website connections, 11-12
Cyberduck, 11
Fetch, 11
FireFTP, 10-11
FireZilla, 11
FTP clients
selecting, 10-11
using, 11-13
Fuchs, Thomas, 455
functions
API functions (Greasemonkey), 471
JavaScript functions, 68, 288, 347
alert() function, 265
arguments, 348
calling, 349-350
style sheets, 46, 50
text, 82
aligning text, 92-95
big text, 83
boldface text, 82-83
color, style sheets, 46
customizing fonts in HTML,85-89
definition lists, 96, 226
foreign languages, 89-91
italic text, 82-83
monospaced text, 84-85
multitiered lists, 100-101
nested lists, 97-100, 226
older HTML tags, 81
ordered lists, 95-96, 226
outlines, 98-100
resumes, creating, 87-89
sizing, style sheets, 50
small text, 83
special characters, 89-91
subscript text, 83
superscript text, 83
unordered lists, 95-96, 226
web page creation, 33-35
forms, 513
check boxes, 521-523
creating, 514-519
data
displaying in pop-up windows,528-530
naming, 519-520
sending via email, 530-531
submitting, 527
elements, accessing viaJavaScript, 528
hidden data, 520
JavaScript events, 527-528
pull-down pick lists, 524-525
radio buttons, 523-524
scrolling lists, 524-525
constructor functions, 354
defining, 347-349
function call statements, 288
math functions, 361-363
naming, 292
parameters, 288, 348
returning values, 351-352
G
Garrett, Jesse James, 480
get methods (JavaScript objects), 365
Gickr, animated graphics, 161
GIFs, 157-158
animated graphics, 160-161
tiled backgrounds, 159-160
transparent images, 159
GIMP, 149
Adjust Hue/Lightness/Saturationtool, 154
banners, creating, 156
buttons, creating, 156
images
adjusting color, 154
cropping, 151-152
JPEG compression, 155
resizing, 153
Red Eye Removal, 154
Git website version control, 550
global variables (JavaScript), 326
GMT (Greenwich Mean Time),JavaScript time displaying example, 71
Chrome, 9
displaying error messages, 77
Greasemonkey, 465
Gmail, 446, 481
Images, 161
listing websites with, 555
www.it-ebooks.info

ptg999
HTML 575
height/width, specifying, 165
image maps, 173-178
JPEGs
compression, 155
tiled backgrounds, 159-160
links, turning graphics into,169-171
Picnik, 149
PNGs, 158-159
Red Eye Removal, 154
republishing, 163
resizing, 153
resolution, 150
rollover images, 394
software, choosing, 149
text descriptions, 163-164
transparent graphics, 158
uses of, 150
web pages
grabbing graphics from, 149
placing graphics on webpages, 161-163
Greasemonkey, 463
API functions, 471
browser support, 465
installing, 464
metadata, 470
turning on/off, 468
user scripts
creating, 468, 475
debugging user scripts,474-476
describing, 469-470
finding, 466
installing, 466
managing, 466-467
metadata and, 469-470
site-specific user scripts,472-473
testing, 468-471
text area macro user scripts,475-476
Picasa, 149
searches, 4
graceful degradation, web design and, 434
graphics
Adobe Photoshop, 148
aligning
horizontal alignment, 165-166
vertical alignment, 167-168
animated graphics, 160-161
backgrounds
background-image style property, 172
graphics, 171-172
tiled backgrounds, 159-160
banners, creating, 156
buttons, creating, 156
CD-ROM, transferring graphics to, 150
clip art, 149
color, adjusting, 154
compression, 150
copyrights and, 149
Creative Commons licenses, 149
cropping, 151-152
dithering, 158
file sizes, 150
Flickr, 161-163
GIFs, 157-158
animated graphics, 160-161
tiled backgrounds, 159-160
transparent images, 159
GIMP, 149
adjusting image color, 154
banners, 156
buttons, 156
cropping images, 151-152
JPEG compression, 155
resizing images, 153
Google Images, 161
Google Picasa, 149
groove value (CSS border-style properties), 54
grouping statements (JavaScript). Seeloops
H
<head> tags, 27, 31-33, 68
heading tags (HTML), 34-36
headings (tables), creating, 108
height
CSS box model, adjusting heightin, 210-212
fixed/liquid hybrid layouts, settingcolumn height in, 264-268
height property (CSS), 53
images, specifying height in, 165
Hello World HTML file, creating, 9-10
help
CSS, reference guide onlineresource, 47
web hosting providers, selecting, 6
helper applications, 180
hexadecimal color codes, 144-146
hidden form data, 520
hiding/showing DOM objects,316-317
history objects (DOM), 303-305
horizontal image alignment, 165-166
horizontal navigation, 245-248
horizontal rule tags (HTML), 33
<hr /> tags, 33
HTML
AJAX
live search forms, 492
quiz building example, 487-488
attributes, 92-93, 123
comments, JavaScript and, 276
containers, 307
www.it-ebooks.info

ptg999
HTML576
check boxes, 521-523
creating, 514-519
displaying data in pop-up windows, 528-530
hidden data, 520
JavaScript events, 527-528
naming form data, 519-520
pull-down pick lists, 524-525
radio buttons, 523-524
scrolling lists, 524-525
selection lists, 524-525
sending data via email,530-531
submitting form data, 527
text areas, 526
text fields, 526
text input, 519
user input, 519
validating, 531-532
forward slashes (/), 124
frames, 418-420
adding individual frames, 423
creating frameset documents,421-423
frames array, 426
JavaScript objects and, 425
linking windows to frames,423-424
modifying borders, 424-425
nested framesets, 425
FTP
selecting FTP clients, 10-11
using FTP clients, 11-13
future of, 28
graphics, image maps, 176-178
<head> tags, functions and, 68
Hello World sample file, creating,9-10
history of, 1-2
html file extensions, 27
HTML-compatible word proces-sors, creating HTML files, 27
CSS
CSS box model, 209-212
external style sheets, 51
linking style sheets to HTMLdocuments, 50
development of, 1-2, 38
event handlers
JavaScript, 435-437
Yahoo! UI Library, 437
file creation
boilerplate code, 28-30
comparing web page HTMLcodes, 37
formatting text, 33-35
html file extensions, 27
HTML tags, 27-33
HTML-compatible word processors, 27
indenting text, 35
line breaks, 32-33
naming files with HTML tags, 27
Notepad, 26
organizing content via headings, 34-36
overview of, 29
paragraphs, 32-33
saving files with HTML tags, 27
templates, 31
TextEdit, 27
Word, 27
WYSIWYG editors, 27
files
creating, 9-10
index pages, 16-18
managing, 14-16
organizing, 14-16
transfering, 10-13, 29
viewing, 29
forms, 513
accessing elements viaJavaScript, 528
HTML4, empty tags, 33
HTML5, 28, 40
images, placing on web pages,162-163
JavaScript and, 274
adding libraries to HTML documents, 457
adding scripts to HTML documents, 73-74
changing images via user interaction, 281-283
displaying random web contentvia, 276-280
DOM, 280-281
HTML comments, 276
printing text via, 275
JavaScript’s advantages over, 299
.js files, linking to, 69
layouts
fixed layouts, 254
fixed/liquid hybrid layouts,258-268
liquid layouts, 253- 257
links
absolute links, 124
anchor tags, 126-129
images as, 134
linking between web content,129-131
linking to email addresses,132-133
linking to external web con-tent, 131-132
opening links in new browserwindows, 134
relative-root links, 124
styling via CSS, 134-138
lists
definition lists, 96, 226
multitiered lists, 100-101
nested lists, 97-100, 226
ordered lists, 95-96, 226
www.it-ebooks.info

ptg999
HTML 577
<head> tag, 27, 31-33
heading tags, 34-36
horizontal rule tag, 33
<hr /> tag, 33
<html> tag, 27, 31-33
<i> tags, 81-83
<img> tags, 162-163
line breaks, 32-33
naming files with, 27
nested tags, 97
opening tags, 30
<p> tag, 31-33
paragraphs, 32-33
<pre> tags, 84-85
pseudoclasses, 134-138
saving files with, 27
<small> tags, 83
<strike> tags, 84
<strong> tags, 83
<sub> tags, 83
<sup> tags, 83
<table> tags, 107
<td> tags, 107
<th> tags, 108
<title> tags, 27, 31-33, 36
<tr> tags, 107
<tt> tags, 84-85
<u> tags, 84
xml : lang attribute, 31
xmlns attribute, 31
text, formatting
aligning text, 92-95
big text, 83
boldface text, 82-83
customizing fonts, 85-89
definition lists, 96, 226
foreign languages, 89-91
italic text, 82-83
monospaced text, 84-85
multitiered lists, 100-101
nested lists, 97-100, 226
outlines, creating via lists,98-100
unordered lists, 95-96, 226
“marked up” text, 2
multiple conditions, testing, 374
Notepad, creating HTML files, 26
outlines, creating, 98-100
pseudoclasses, 134-138
tables
aligning within, 113-115
cells, creating, 107
cells, sizing, 111-113
color in, 115
creating, 107-110
headings, creating, 108
images in, 116
page layout via, 116-117
rows, creating, 107
sizing, 110-113
sizing borders, 107
spacing borders, 116
spanning within, 115
uses for, 107
tags, 5, 28
<a> tags, 126-129, 170
attributes, 92-93, 123
</b> tags, 81-83
<big> tags, 83
<body> tag, 27, 31-33
<br /> tag, 32-33, 85
<b> tags, 81-83
closing tags, 30
creating custom tags, 58
<div> tags, 170
<em> tags, 83
empty tags, 30, 33
<em> tags, 83
event handlers, 68, 291
<font> tags, 81, 86
formatting and older HTMLtags, 81
older HTML tags, 81
ordered lists, 95-96, 226
outlines, 98-100
resumes, creating, 87-89
small text, 83
special characters, 89-91
subscript text, 83
superscript text, 83
unordered lists, 95-96, 226
whitespace, 32
TextEdit, creating HTML files, 27
validating, 36-37
web content
absolute addresses, 124-125
absolute links, 124
anchor tags, 126-129
creating, 2-3
delivering, 3-5
directories, 123-124
folders, 123-125
images as links, 134
linking between, 129-131
linking to email addresses,132-133
linking to external web con-tent, 131-132
opening links in new browserwindows, 134
organizing, 123-124
publishing locally, 18-19
publishing to blogs, 19
relative addresses, 124-125
relative-root addresses, 124
relative-root links, 124
selecting web hostingproviders, 6-8, 26
styling links via CSS, 134-138
website architectures,creating, 125
whitespace, 32
Word, creating HTML files, 27
www.it-ebooks.info

ptg999
HTML578
clip art, 149
color, adjusting, 154
compression, 150
copyrights and, 149
Creative Commons licenses, 149
cropping, 151-152
dithering, 158
dynamic websites, changingimages via user interaction,281-283
file sizes, 150
Flickr, 161-163
GIFs, 157-158
animated images, 160-161
tiled backgrounds, 159-160
transparent images, 159
Google Images, 161
Google Picasa, 149
height/width, specifying, 165
image maps, 173-178
JPEGs
compression, 155
tiled backgrounds, 159-160
links, images as, 134, 169-171
Picnik, 149
PNGs, 158-159
Red Eye Removal, 154
republishing, 163
resizing, 153
resolution, 150
rollover images, 394
tables and, 116
text descriptions, 163-164
transparent images, 158
uses of, 150
web pages
grabbing images from, 149
placing images on web pages,161-163
Images (Google), 161
WYSIWYG editors, creating HTMLfiles, 27
XHTML, development of, 40
XML, development of, 39-40
HTML Validator, 37
hyperlinks. See links
hyphenating CSS properties, 312
I
<i> tags (HTML), 81-83
if statements (JavaScript), 369
conditional expressions, 317,370-373
conditional operators, 370
else keyword, 372-375
logical operators, 371
multiple conditions, testing, 373
HTML files, 374
JavaScript files, 374-375
<iframe>. See inline frames
image maps, creating
creating, web resources, 231
CSS, 231-235
tutorials, 231
images
aligning
horizontal alignment, 165-166
vertical alignment, 167-168
animated images, 160-161
auto image loading, webbrowsers, 20
background images, 171-172
backgrounds
background images, 171-172
tiled backgrounds, 159-160
banners, creating, 156
buttons, creating, 156
CD-ROM, transferring images to, 150
<img> tags (HTML), 162-163
in value (CSS height/width properties), 53
increment expressions (for loops), 377
incrementing/decrementing variables(JavaScript), 327
indenting
code, 548
text, web page creation, 35
index pages, HTML file management,16-18
indexes (JavaScript), for loops, 377
infinite loops (JavaScript), 380-381
initial expressions (for loops), 377
inline frames, 426-429
inline styles (CSS), 60-61
inline value (CSS display property), 53
inset value (CSS border-style properties), 54
installing
Greasemonkey, 464
user scripts, 466
internal style sheets (CSS), 46, 59-61
Internet, ISP selection, 25-26
Internet Explorer, 9
DOCTYPE declarations, 212
error messages, displaying, 77
event properties, 393
Internet Explorer 6.0, JavaScripttesting, 74
Trixie, 465
installing user scripts, 466
managing user scripts, 467
turning on/off, 468
interpreted languages, 66
ISP (Internet service providers),selecting, 25-26
italic text, 56, 82-83
www.it-ebooks.info

ptg999
JavaScript 579
data types, 330-331
Date objects, time display exam-ple, 72
design patterns, 439
development of, 66
do, while loops, 380
document.write statements, 68, 73
documenting code, 438
DOM, 280-281
adding text to web pages,319-321
anchor objects, 303
children, 308
document objects, 300-303, 306
hiding/showing objects, 316-317
history objects, 303-305
layers, 311-315
link objects, 303, 306
location objects, 305-306
modifying text in web pages,317-318
naming objects, 299
nodes, 307-310
object methods, 299
object properties, 299
objects, 352
parents, 308
referencing objects, 299
showing/hiding objects,316-317
siblings, 308
structure of, 306-307
window objects, 300, 409-418
else keyword, 372-375
error handling, 76-78, 446-449
event handlers, 68-70, 290-291,389, 435
alert() function, 295
best practices, 294-295
creating, 390-391
cross-browser scripting, 437
defining, 390-391
J
JavaScript, 274. See also AJAX
accessibility, 439
AJAX, 71
live search forms, creating,494-496
quiz building example, 489-490
requests, 480, 494-495
arrays
accessing elements of, 338
declaring, 337
length of, 338
numeric arrays, 337, 340-342
string arrays, 338-340
best practices, 293-295, 433
accessibility, 439
behavior, 434
comments, 438
content, 434
design patterns, 439
documenting code, 438
event handlers, 435-437
presentation, 434
“progressive enhancement”, 435
usability, 438-439
web standards and browserspecificity, 437-438
break statements, 381
browser specificity, web standards,437-438
browsers, reading information on,440-443
capabilities of, 66, 70
case statements, 376
comments, 293, 438
conditional expressions, 370-373
conditional operators, 370
continue statements, 382
cross-browser scripting
debugging browsers, 444
feature sensing, 437, 443-444
event objects, 392
keyboard events, 397-399
mouse events, 394-397,400-404
multiple event handlers,391-392
naming, 390
onLoad events, 399
onUnload events, 400
quotation marks and, 390
syntax of, 390
W3C event model, 436-437
events, 69
expressions, 328
external scripts, 69
flow control
break statements, 381
case statements, 376
continue statements, 382
continuing loops, 382
do, while loops, 380
escaping loops, 381
for loops, 377-378
for, in loops, 382-384
if statements, 369-375
infinite loops, 380-381
switch statements, 375-376
while loops, 379-380
for loops, 377-378
for, in loops, 382-384
form elements, accessing, 528
form events, 527-528
forms, validating, 70
function call statements, 288
functions, 68, 288
alert() function, 295
arguments, 348
calling, 349-350
constructor functions, 354
defining, 347-349
math functions, 361-363
www.it-ebooks.info

ptg999
JavaScript580
libraries
adding effects via, 457
adding to HTML documents,457
AJAX Frameworks, 456
building scripts, 458-459
Dojo, 456
downloading, 457
jQuery, 454-455
Mochikit, 456
MooTools, 456
Prototype, 453-454
Script.aculo.us, 455-459
using effects via, 457
Yahoo! UI Library, 456
logical operators, 371
loops
break statements, 381
continue statements, 382
escaping, 381
modifying scripts, 74-76
modulo operators, 362
multiple conditions, testing,374-375
non-JavaScript browsers
avoiding errors, 446-449
detecting, 445-446
JavaScript optionality, 446
<noscript> tag, 445-446
<script> tag, 457
objects, 288
built-in objects, 289, 352, 356-361, 364-366
child objects, 353
creating, 353
creating instances of, 356
custom objects, 289
date object, 364-366
defining, 354-355
defining methods, 355-356
naming, 292
parameters, 288, 348
returning values, 351-352
Gmail and, 446
Greasemonkey, 463
API functions, 471
browser support, 465
creating user scripts, 468, 475
debugging user scripts,474-476
describing user scripts,469-470
finding user scripts, 466
installing, 464
installing user scripts, 466
managing user scripts, 466-467
metadata and user scripts,469-470
site-specific user scripts,472-473
testing user scripts, 468-471
text area macro user scripts,475-476
turning on/off, 468
history of, 66
HTML, 274
comments, 276
JavaScript’s advantages over, 299
if statements, 369
conditional expressions,370-373
conditional operators, 370-371
else keyword, 372-375
testing multiple conditions,373-375
images, changing via user interac-tion, 281-283
infinite loops, 380-381
.js files, 69
JSON, 481
layers, controlling positioning of,311-315
DOM objects, 289, 352
frames and, 425
math object, 360-363
methods, 289, 353, 365
naming, 292
properties, 288, 353
prototypes, 357-358
simplifying scripting via,354-356
operators, 328-330
order of script operation, deter-mining, 291
output, creating, 73
parseFloat() function, 331
parseInt() function, 331
programming language versusscripting language, 66
“progressive enhancement”strategies, 294
random web content, displayingvia, 276-280
remote scripting, 71
<script> tags, 67-72, 457
scripting language versus pro-gramming language, 66
special effects, 70
statements
conditional statements, 289
for statements, 290
function calls, 288
loops, 290
objects, 288-289, 292
plus signs (+) in, 73
semicolons, 72
time display example, 72
variables, 288, 292
strings
calculating length of, 334
converting case, 334
string arrays, 338-340
string objects, 332-334, 357
substrings, 335-337
www.it-ebooks.info

ptg999
link objects (DOM) 581
declaring, 326
global variables, 326
incrementing/decrementing, 327
local variables, 326
localtime variable, 72
naming, 292, 325-326
scope of, 326
time display example, 72
UTC variable, 72
web pages, adding JavaScript to,67-68, 73-74
websites, navigating, 70
while loops, 379-380
with keyword, 363-364
join() method, 342
JPEG
compression, 155
tiled backgrounds, 159-160
jQuery JavaScript library, 454-455
.js files, 69
JSON, 481
.jsp file extension, 27
JSP scripting language, 274
K - L
keyboard events, 397-399
Koch, Peter-Paul, 444
languages (foreign), formatting textfor, 89-91
layers (DOM)
creating, 311
moveable layers, 311-315
positioning, controlling viaJavaScript, 311-315
layouts
CSS layout properties, 52-53
fixed layouts, 254
switch statements
syntax of, 376
using multiple conditions,375-376
syntax, 332
case-sensitivity, 292
functions, 292
objects, 292
reserved words, 292
spacing (whitespace), 292
variables, 292
testing scripts, Internet Explorer6.0, 74
text
printing via, 275
text editors, 74
time display example
adding scripts to web pages,73-74
creating output, 73
Date objects, 72
error handling, 76-78
modifying scripts, 74-76
<script> tags, 71-72
statements, 72
testing scripts, 74
variables, 72
toLowerCase() method, 334
toUpperCase() method, 334
Trixie, 465
installing user scripts, 466
managing user scripts, 467
turning on/off, 468
.txt file extension, 74
“unobtrusive scripting”, 433,447-449
usability and, 438-439
using, 68
variables, 288
assigning values to variables,327-328
fixed/liquid hybrid layouts, 258
defining columns in, 260-262
setting column height,264-268
setting minimum width,262-263
structure of, 258-259
liquid layouts, 255-257
web resources, 253
leading (text), line-height property(CSS), 56
libraries (AJAX), 482
ajaxRequest function, 486
ajaxResponse function, 486
creating, 485-486
quiz building example
HTML files, 487-488
JavaScript files, 489-490
testing, 490-491
XML files, 488-489
using, 486
libraries (JavaScript)
AJAX Frameworks, 456
Dojo, 456
downloading, 457
effects, using via, 457
HTML documents, adding librariesto, 457
jQuery, 454-455
Mochikit, 456
MooTools, 456
Prototype, 453-454
Script.aculo.us, 455-459
scripts, building, 458-459
Yahoo! UI Library, 456
line breaks, web page creation, 32-33
line-height property (CSS), 56
line-through text, style sheets, 56
<link /> tags (CSS), 50
link objects (DOM), 303, 306
www.it-ebooks.info

ptg999
links582
regular lists versus, 235
secondary navigation, 236
vertical navigation, 236-244
nested lists, 97-100, 226
ordered lists, 95-96, 226
outlines, creating via lists, 98-100
unordered lists, 95-96, 226
live search forms
AJAX, creating via, 496
HTML forms, 492
JavaScript front end, 494-495
PHP back end, 493-494
example, requirements for, 496
LiveScript, JavaScript development, 66
loading web content, timing, 20
local time values, date object(JavaScript) and, 365-366
local variables (JavaScript), 326
localtime variable (JavaScript), 72
location objects (DOM), 305-306
logical operators (JavaScript), 371
loops (JavaScript), 290
break statements, 381
continue statements, 382
continuing, 382
do, while loops, 380
escaping, 381
for loops, 377-378
for, in loops, 382-384
infinite loops, 380-381
while loops, 379-380
LunarPages web hosting provider, 7
M
Macintosh computers, HTML file creation, 27
managing
domain names, 6
HTML files, 14
links
absolute links, 124
anchor tags
identifying locations within webpages via, 126
linking to anchor locations,126-129
naming, 127
color and, 144
documents, 303, 306
email addresses, 132-133
images, 134, 169-171
.js files, 69
multimedia/website integration,179-180
opening in new browser windows, 134
relative-root links, 124
styling via CSS, 134-138
web content
linking between, 129-131
linking to external web content, 131-132
liquid layouts, 253-257
list-item value (CSS display property), 53
lists
borders, styling, 227-228
color, styling, 227-228
CSS box model and, 226-229
definition lists, 96, 226
list item indicators, placing,229-231
list-style-image property (CSS), 226
list-style-position property (CSS),226, 229-231
list-style-type property (CSS), 226
list-style-type style rule (CSS),99-101
multitiered lists, 100-101
navigation lists
horizontal navigation, 245-248
primary navigation, 236
document roots, 15-16
index pages, 16-18
user scripts, 466-467
web pages, headings, 34-36
websites
coding clarity, 548
comments, 546-547
documenting code, 546-547
indenting code, 548
maintainable code, 546-548
version control, 548-550
margin property (CSS), 191-199
margins
browsers and, 226-229
CSS box model, 210
marked up text in HTML, 2
Mashable.com, publicizing websitesvia, 554
math object (JavaScript)
decimal numbers
rounding, 360
truncating, 360
math functions, 361-363
random numbers, generating,360-363
media-specific style sheets, 503-504
metadata, user scripts, 469-470
methods
DOM objects, 299
document objects, 302, 310
history objects, 303
location objects, 306
JavaScript objects, 289, 353
adding to string objects, 357
defining, 355-356
get methods, 365
prototypes, 357-358
MIME types, 182
mm value (CSS height/width properties), 53
Mochikit JavaScript library, 456
www.it-ebooks.info

ptg999
objects (DOM) 583
event handlers, 390
files with HTML tags, 27
form data, 519-520
JavaScript functions, 292
JavaScript objects, 292
JavaScript variables, 292, 325-326
NaN (not a number), 331
navigating websites, JavaScript, 70
navigation lists
horizontal navigation, 245-248
primary navigation, 236
regular lists versus, 235
secondary navigation, 236
vertical navigation, 236-238
multilevel vertical navigation,240-244
single-level vertical navigation,239-241
nested framesets, 425
nested lists, 97-100, 226
nested tags (HTML), 97
nodes (DOM), 307
methods of, 310
properties, 309
non-viewable window areas(browsers), 254
none value (CSS)
border-style properties, 54
display property, 53
<noscript> tag (JavaScript), detectingnon-JavaScript browsers, 445-446
Notepad, creating HTML files, 26
null values (JavaScript), 330
numbers
arithmetic mean, 363
decimal numbers
rounding, 360
truncating, 360
random numbers, generating,360-363
numeric arrays (JavaScript), 337,340-342
numeric data types (JavaScript), 330
modifying
frame borders, 424-425
JavaScript scripts, 74-76
text in web pages, 317-318
modulo operators (JavaScript), 362
monitors and color, 144
monospaced text, 84-85
MooTools JavaScript library, 456
mouse events
mousestatus function, 396
onClick event handler, 394-397,400-404
onDblClick event handler, 395
onMouseDown event handler,395-397
onMouseOut event handler, 394
onMouseOver event handler, 394
onMouseUp event handler,395-397
rollover images, 394
mousestatus function, mouse eventsand, 396
moveable layers (DOM), 311-315
moving browser windows, 413-414
Mozilla Firefox web browser, 9
multimedia
QuickTime, 180
website integration with, 178-179
embedded multimedia files,180-183
links, 179-180
streaming multimedia, 181
tips for using, 184-185
multiple event handlers, 391-392
multitiered lists, 100-101
N
naming
anchor tags, 127
DOM objects, 299
O
<object> tags (XHTML), 180-183
objects (built-in), extending definitions, 359
objects (DOM), 352
anchor objects, 303
document objects, 300
anchor objects, 303
displaying document informa-tion, 301-302
link objects, 303, 306
methods of, 302
properties of, 301
writing text within documents, 302
hiding/showing, 316-317
history objects, 303-305
link objects, 303, 306
location objects, 305-306
methods, 299
document objects, 302
history objects, 303
location objects, 306
naming, 299
parents, 308
properties, 299
document objects, 301
history objects, 303
location objects, 305-306
referencing, 299
showing/hiding, 316-317
siblings, 308
window objects, 300
creating browser windows,410-411
displaying dialog boxes,417-418
moving browser windows,413-414
opening/closing browser windows, 411-412
www.it-ebooks.info

ptg999
objects (DOM)584
string objects
adding methods to, 357
assigning values, 332-334
combining values, 332-334
creating, 332
Office Online Clip Art and Media web-site (Microsoft), 149
onClick event handler, 394-397,400-404
onDblClick event handler, 395
online resources, CSS referenceguide, 47
onLoad events, 399
onMouseDown event handler, 395-397
onMouseOut event handler, 394
onMouseOver event handler, 394
onMouseUp event handler, 395-397
onUnload events, 400
opening tags (HTML), 30
opening/closing, browser windows,411-412
Opera, 9, 465
operators (JavaScript), 328-330
ordered lists, 95-96, 226
organizing
HTML files, 14
document roots, 15-16
index pages, 16-18
web content, 123-124
web pages, headings, 34-36
websites, 538
Amazon.com, 543
BAWSI.org, 545
ESPN.com, 540-542
larger websites, 543-546
simple websites, 540-542
single-page websites, 538-539
Starbucks.com, 544
outlines, creating via lists, 98-100
outset value (CSS border-style properties), 54
properties of, 409-410
resizing browser windows,413-414
timeouts, 414-416
objects (JavaScript), 288
built-in objects, 289, 352, 356-359
date object, 364-366
math object, 360-361
child objects, 353
creating, 353
custom objects, 289
date object
converting date formats, 366
creating, 364
local time values, 365-366
reading date values, 365
setting date values, 364-365
time zones, 365
defining, 354-355
DOM objects, 289, 352
instances, creating, 356
math object
generating random numbers,360-363
math functions, 361-363
rounding decimal numbers, 360
truncating decimal numbers, 360
methods, 289, 353
adding to string objects, 357
get methods, 365
prototypes, 357-358
methods, defining, 355-356
naming, 292
properties, 288
prototypes, 357-358
values, 353
prototypes, 357-358
scripting, simplifying
creating object instances, 356
defining object methods,355-356
defining objects, 354-355
overflow property (CSS), text flow and, 220
overlapping elements, 213, 217-219
P
<p> tags, 31-33
padding
browsers and, 226-228
CSS box model, 210
padding property (CSS), 56, 191,199-202
paragraphs
aligning, 93-95
web page creation, 32-33
parameters (JavaScript functions),288, 348
parent folders, 125
parents (DOM), 308
parseFloat() function (JavaScript), 331
parseInt() function (JavaScript), 331
periods (.), JavaScript objects, 289
Perl scripting language, 274
photos
aligning
horizontal alignment, 165-166
vertical alignment, 167-168
background photos, 171-172
background-image style property, 172
CD-ROM, transferring photos to, 150
cropping, 151-152
Flickr, 161-163
Google Images, 161
height/width, specifying, 165
image maps, 173-178
links, turning images into, 169-171
Red Eye Removal, 154
republishing, 163
resizing, 153
www.it-ebooks.info

ptg999
<script> tag (JavaScript) 585
programming languages, strings, 72
“progressive enhancement”
strategies for, 294
web design and, 435
prompts (dialog boxes), 417-418
properties
DOM objects, 299
document objects, 301
history objects, 303
location objects, 305-306
relationship properties, 309
JavaScript objects, 288
prototypes, 357-358
values, 353
Prototype JavaScript library, 453-454
prototypes (JavaScript objects),357-358
pseudoclasses, 134-138
pt value (CSS height/width proper-ties), 53
publicizing websites, 553-555
publishing web content
blog publication, 19
local publication, 18-19
pull-down pick lists (forms), 524-525
purchasing domain names, 6
px value (CSS height/width properties), 53
Python scripting language, 274
Q - R
QuickTime, 180
QuirksMode, debugging code, 444
quiz building example (AJAX)
HTML files, 487-488
JavaScript files, 489-490
testing, 490-491
XML files, 488-489
text descriptions, 163-164
web pages, placing photos on,161-163
Photoshop (Adobe), 148
PHP, 274, 514
AJAX live search forms, creating,493-494
.php file extensions, 27
Picasa (Google), 149
Picnik, 149
“plain” text, 26, 34, 82
plug-ins, 180
plus signs (+), JavaScript statements, 73
PNGs, 158-159
pop-up windows, 134, 528-530
positionable elements. See layers
positioning
absolute positioning, 213-217
overlapping elements, 213,217-219
positioning property, 213
relative positioning, 213-215
presentation, JavaScript scripting bestpractices, 434
<pre> tags (HTML), 84-85
pricing, web hosting providers, 6
primary navigation, 236
printing
Print Preview, viewing web pagesin, 508-509
print-friendly web pages, 499
criteria for print-friendliness,500-503
designing style sheets for printpages, 505-508
media-specific style sheets,503-504
reviewing content for print-friendliness, 500
viewing web pages in PrintPreview, 508-509
text via JavaScript, 275
radio buttons (forms), 523-524
random numbers, generating, 360-363
Red Eye Removal, 154
relationship properties (DOM nodes), 309
relative addresses and web pages,124-125
relative positioning, 213-215
display property (CSS), 53
positioning property, 214
relative-root addresses and webpages, 124
relative-root links and web pages, 124
reliability, web hosting providers, 6
remote scripting, 71. See also AJAX
republishing images, 163
reserved words, JavaScript syntax, 292
resizing
browser windows, 413-414
images, 153
resolution (graphics), 150
ridge value (CSS border-style properties), 54
rollover images, 394
rounding decimal numbers, 360
rows (tables), creating, 107
Ruby scripting language, 274
S
Safari, 9, 465
sans-serif font (text), 86
saving files
files with HTML tags, 27
.js files, 69
scaling images, 153
<script> tag (JavaScript), 67-69
detecting non-JavaScriptbrowsers, 457
time display example, 71-72
www.it-ebooks.info

ptg999
Script.aculo.us JavaScript library586
site-specific user scripts,472-473
testing user scripts, 468-471
text area macro user scripts,475-476
turning on/off, 468
interpreted languages, 66
JavaScript, 274
accessibility, 439
adding scripts to web pages,73-74
adding to web pages, 67-68
advantages over HTML, 299
AJAX, 71
AJAX live search forms, 494-496
AJAX quiz building example,489-490
AJAX requests, 480, 494-495
arrays, 337-342
best practices, 293-295,433-439
break statements, 381
capabilities of, 66, 70
case statements, 376
changing images via user interaction, 281-283
comments, 293, 438
conditional expressions,370-373
conditional operators, 370
continue statements, 382
continuing loops, 382
creating .js files, 69
creating output, 73
cross-browser scripting, 437,443-444
data types, 330-331
Date objects, 72
design patterns, 439
determining order of scriptoperation, 291
development of, 66
Script.aculo.us JavaScript library,455-459
scripting
AJAX, 479
ajaxRequest function, 486
ajaxResponse function, 486
back end, 480, 493-494
debugging applications, 491-496
examples of, 481
frameworks, 482
front end, 480, 494-495
JavaScript client, 480
libraries, 482, 485-491
limitations of, 482
live search forms, 492-496
quiz building example, 487-491
requests, 480, 483-484,493-495
server-side scripts, 480,493-495
XML and, 481
XMLHttpRequest, 483-484
ASP, 274
client-side scripting, 274
comments, adding, 293
cross-browser scripting, 443
debugging browsers, 444
event handlers and JavaScript, 437
feature sensing, 437, 443-444
Greasemonkey, 463-464
API functions, 471
browser support, 465
creating user scripts, 468, 475
debugging user scripts, 474-476
describing user scripts, 469-470
finding user scripts, 466
installing, 464
installing user scripts, 466
managing user scripts, 466-467
metadata and user scripts,469-470
displaying random web contentvia, 276-280
do, while loops, 380
document.write statements,68, 73
documenting code, 438
DOM, 280-281, 299-321,409-418
else keyword, 372-375
error handling, 76-78
escaping loops, 381
event handlers, 68-70, 290-291, 294-295, 389-392, 394-404, 435-437
window objects (DOM), 409
events, 69
expressions, 328
external scripts, 69
flow control, 369-384
for loops, 377-378
for, in loops, 382-384
form events, 527-528
frames and JavaScript objects, 425
functions, 68, 288, 292,347, 352-354, 361-363
Gmail and, 446
Greasemonkey, 463-476
history of, 66
HTML and, 274-276
if statements, 369-375
infinite loops, 380-381
.js file extension, 69
JSON, 481
libraries (third-party), 453-459
linking to .js files, 69
logical operators, 371
modifying scripts, 74-76
navigating websites, 70
non-JavaScript browsers,445-449
objects, 288-289, 292,352-361, 364-366
www.it-ebooks.info
ptg999
sizing 587
usability, 438-439
using, 68
validating forms, 70
variables, 72, 288, 292,325-328
web standards and browserspecificity, 437-438
while loops, 379-380
with keyword, 363-364
JSON, 481
JSP, 274
languages, 65
Perl, 274
PHP, 274, 514
Python, 274
remote scripting. See AJAX
Ruby, 274
server-side scripts, 274, 480,493-495
text editors, 74
Trixie, 465
installing user scripts, 466
managing user scripts, 467
turning on/off, 468
.txt file extension, 74
“unobtrusive scripting”, 433,447-449
user scripts
creating, 468, 475
debugging, 474-476
describing, 469-470
finding, 466
Greasemonkey, 463-476
installing, 466
managing, 466-467
metadata and, 469-470
scripting, 465
site-specific scripts, 472-473
testing, 468-471
text area macro user scripts,475-476
Trixie, 465-467
VBScript, 274
operators, 328-330
parseFloat() function, 331
parseInt() function, 331
plus signs (+) in statements, 73
printing text via, 275
programming language versusscripting language, 66
“progressive enhancement”strategies, 294
reading browser information,440-443
remote scripting, 71
saving .js files, 69
<script> tags, 67-72
scripting language versus programming language, 66
simplifying, 354-356
special effects, 70
statements, 72, 287
statements, conditional state-ments, 289
statements, for statements, 290
statements, function calls, 288
statements, loops, 290
statements, objects,288-289, 292
statements, variables, 288, 292
strings, 332-340, 357
switch statements, 375-376
syntax, case-sensitivity, 292
syntax, functions, 292
syntax, objects, 292
syntax, reserved words, 292
syntax, spacing (whitespace), 292
syntax, variables, 292
testing scripts, 74
time display example, 71-78
toLowerCase() method, 334
toUpperCase() method, 334
Trixie, 465-468
“unobtrusive scripting”, 433,447-449
scrolling lists (forms), 524-525
search engines, 445
heading tags (HTML), 36
SEO, 553, 562-563
spamming, 557
websites, listing with searchengines, 555-562
searches
Google searches, 4
live search forms, creating viaAJAX, 496
HTML forms, 492
JavaScript front end, 494-495
PHP back end, 493-494
secondary navigation, 236
security, user scripts, 465
selection lists (forms), 524-525
selectors (CSS), 57
semicolons (;), JavaScript statements,72, 287
server-side scripting, 274, 480, 493-495
servers
browsers, basic server interaction, 3-5
document roots, 13-16
FTP client connections, 13
space, 6
“uptime”, 6
web hosting providers, selecting, 6
shorthand conditional expressions(JavaScript), 372-373
siblings (DOM), 308
single-page websites, 538-539
site-specific user scripts, 472-473
sizing
borders (tables), 107
browser windows, 413-414
cells (tables), 111-113
elements (CSS box model),210-212
images, 153
tables, 110-113
www.it-ebooks.info

ptg999
sizing588
strings (JavaScript), 330
case, converting, 334
length of, calculating, 334
string arrays, 338
sorting, 340
splitting, 339
string objects
adding methods to, 357
assigning values, 332-334
combining values, 332-334
creating, 332
substrings
finding, 336-337
getting single characters, 336
using parts of strings, 335-336
<strong> tags (HTML), 83
strong text. See boldface text
style classes (CSS), 57-58
style IDs (CSS), 59
style properties (CSS), 57
style rules (CSS), 46, 50
color style rule, fonts and, 86-87
font weight style rule, 83
font-family style rule, 86
font-size style rule, 86-87
list-style-type style rule, 99-101
multiple style properties in, 58
text-align style rule, 93-95
viewing, 51
style sheets
align property, 191, 203-204
box model, 209, 212
borders, 210
content, 210
lists and, 226-229
lists and, 226
margins, 210
padding, 210
sizing elements, 210-212
clear property, text flow and, 220
text
font-size style rule (CSS), 86-87
style sheets, 50
skeleton pages. See templates
<small> tags (HTML), 83
small text, 83
solid value (CSS border-style proper-ties), 54-55
sorting arrays (JavaScript)
numeric arrays, 340-342
string arrays, 340
source editors, blogs and, 19
spacing (whitespace), JavaScript syntax, 292
spamming search engines, 557
spanning with tables, 115
special effects (JavaScript), 70
splitting string arrays (JavaScript), 339
Starbucks.com, website organization, 544
statements (JavaScript), 287
conditional statements, 289
for statements, 290
function calls, 288
loops, 290
objects, 288
built-in objects, 289
custom objects, 289
DOM objects, 289
naming, 292
plus signs (+) in, 73
semicolons, 72
time display example, 72
variables, 288, 292
Stephenson, Sam, 453
streaming multimedia, 181
<strike> tags (HTML), 84
strikethrough text, style sheets, 56
string arrays, sorting, 340
strings, 72
color, specifying via style sheets,146-148
creating, 47, 49-52
CSS tags, 50
CSS Zen Garden, 191-192
definition of, 45
DOCTYPE declarations, 212
external style sheets, 46-51
float property, 191, 204-207, 220
formatting properties, 53
background-color property, 55
border property, 54-55
border-bottom property, 54-55
border-color property, 54-55
border-left property, 54-55
border-right property, 54-55
border-style property, 54-55
border-top property, 54-55
border-width property, 54
color property, 56
font property, 56
font-family property, 55
font-size property, 55
font-style property, 56
font-weight property, 56
line-height property, 56
padding property, 56
text-align property, 55-56
text-decoration property, 56
text-indent property, 55
HTML documents, linking to, 50
image maps, creating, 231-235
inline styles, 60-61
internal style sheets, 46, 59-61
italic text, 56
layouts
display property, 52-53
fixed layouts, 254
fixed/liquid hybrid layouts,258-268
height property, 53
www.it-ebooks.info

ptg999
tags (HTML) 589
text
formatting color, 46
sizing, 50
underline text, 56
validating, 61
web browsers, CSS support, 51
z-index property, 217-219
<sub> tags (HTML), 83
subscript text, 83
substrings
finding, 336-337
parts of strings, using, 335-336
single characters, getting, 336
Subversion website version control, 550
<sup> tags (HTML), 83
superscript text, 83
support
CSS, web browser support for, 51
web hosting providers, selecting, 6
switch statements (JavaScript)
multiple conditions, using,375-376
syntax of, 376
syntax, JavaScript, 332
T
<table> tags (HTML), 107
tables
aligning within, 113-115
borders
sizing, 107
spacing, 116
specifying color via CSS,146-148
cells
creating, 107
sizing, 111-113
color in, 115
liquid layouts, 253- 257
width property, 53
line-through text, 56
links, styling, 134-138
list-style-image property, 226
list-style-position property, 226,229-231
list-style-type property, 226
lists
horizontal navigation, 245-248
navigation lists, 236-248
vertical navigation, 236-244
margin property, 191-199
media-specific style sheets, 503-504
overflow property, text flow and, 220
padding property, 191, 199-202
positioning
absolute positioning, 213-217
overlapping elements, 213,217-219
positioning property, 213
relative positioning, 213-215
z-index property, 217-219
print pages, designing style sheetsfor, 505-508
properties, hyphenating, 312
selectors, 57
strikethrough text, 56
style classes, 57-58
style IDs, 59
style properties, 57
style rules, 46, 50
color style rule, 86-87
font weight style rule, 83
font-family style rule, 86
font-size style rule, 86-87
list-style-type style rule, 99-101
multiple style properties in, 58
text-align style rule, 93-95
viewing, 51
creating, 107-110
headings, creating, 108
images in, 116
page layout via, 116-117
rows, creating, 107
sizing, 110-113
spanning within, 115
uses for, 107
tags (CSS), 50
elements and, 46
<link /> tag, 50
selectors, 57
tags (HTML), 5, 28
<a> tags, 170
identifying locations within webpages, 126
linking to anchor locations,126-129
naming, 127
attributes, 92-93, 123
<b> tags, 81-83
<big> tags, 83
<body> tag, 27, 31-33
<br /> tags, 32-33, 85
closing tags, 30
containers, 307
custom tags, creating, 58
<div> tags, 170
<em> tags, 83
empty tags, 30, 33
event handlers, 68
<font> tags, 81, 86
<head> tags, 27, 31-33, 68
heading tags, 34-36
horizontal rule tag, 33
<hr /> tag, 33
<html> tag, 27, 31-33
<i> tags, 81-83
<img> tags, 162-163
line breaks, 32-33
naming files with, 27
www.it-ebooks.info

ptg999
tags (HTML)590
paragraphs, 93-95
tables, 113-115
text-align style rule (CSS),93-95
alternate text, 163-164
ASCII text, 26, 34, 82
color, CSS and, 56, 146-148
documents, writing text within, 302
flowing text, 220
fonts
Arial font, 86
color style rule (CSS), 86-87
font property (CSS), 56
font weight style rule (CSS), 83
font-family property (CSS), 55
font-family style rule (CSS), 86
font-size property (CSS), 55
font-size style rule (CSS), 86-87
font-style property (CSS), 56
font-weight property (CSS), 56
sans-serif font, 86
Times Roman font, 86
typewriter font. See mono-spaced text
formatting
aligning text, 92-95
big text, 83
boldface text, 82-83
customizing fonts in HTML,85-89
definition lists, 96, 226
foreign languages, 89-91
italic text, 82-83
monospaced text, 84-85
multitiered lists, 100-101
nested lists, 97-100, 226
ordered lists, 95-96, 226
outlines, 98-100
resumes, creating, 87-89
small text, 83
special characters, 89-91
nested tags, 97
older HTML tags, formatting and, 81
opening tags, 30
<p> tag, 31-33
paragraphs, 32-33
<pre> tags, 84-85
pseudoclasses, 134-138
saving files with, 27
<script> tags, 67-72
<small> tags, 83
<strike> tags, 84
<strong> tags, 83
<sub> tags, 83
<sup> tags, 83
<table> tags, 107
<td> tags, 107
<th> tags, 108
<title> tags, 27, 31-33, 36
<tr> tags, 107
<tt> tags, 84-85
<u> tags, 84
xml : lang attribute, 31
xmlns attribute, 31
tags (XHTML)
<embed> tags, 183
<object> tags, 180-183
tasks, combining. See functions(JavaScript)
<td> tags (HTML), 107
templates, web page creation, 31
testing
AJAX quiz building example, 490-491
JavaScript scripts, Internet Explorer6.0, 74
user scripts, 468, 470-471
web content, 19-20
websites, multiple web browsers,8-9, 26
text
aligning
attributes, 92-93
block-level elements, 93-95
subscript text, 83
superscript text, 83
unordered lists, 95-96, 226
web page creation, 33-35
forms, accepting text input in, 519
graphics and, 163-164
HTML, whitespace, 32
indenting, web page creation, 35
italic text, style sheets, 56
leading, line height property(CSS), 56
line breaks, web page creation,32-33
line-through text, style sheets, 56
paragraphs, web page creation,32-33
“plain” text, 26, 34, 82
printing, JavaScript and, 275
sizing, font-size style rule (CSS),86-87
strikethrough text, style sheets, 56
style sheets, 56
formatting color, 46
sizing, 50
text-align property (CSS), 55-56
text-align style rule (CSS), 93-95
text area macro user scripts,475-476
text areas (forms), 526
text-decoration property (CSS), 56
text editors, 74
text fields (forms), 526
text-indent property (CSS), 55
underline text, style sheets, 56
web browsers, adjusting font sizesettings, 20
web pages
adding to web pages, 319-321
modifying text in, 317-318
TextEdit, creating HTML files, 27
<th> tags (HTML), 108
www.it-ebooks.info

ptg999
variables (JavaScript) 591
Trixie, 465
turning on/off, 468
user scripts
installing, 466
managing, 467
truncating decimal numbers, 360
<tt> tags (HTML), 84-85
turning on/off
Greasemonkey, 468
Trixie, 468
.txt file extension, 74
typewriter font. See monospaced text
U
<u> tags (HTML), 84
underline text, style sheets, 56
“unobtrusive scripting”, 433, 447-449
unordered lists, 95-96, 226
“uptime,” servers and, 6
URLs, opening, 483
usability, JavaScript best practices,438-439
USB drivers, 18
user input, accepting in forms, 519
user scripts
creating, 468, 475
debugging, 474-476
describing, 469-470
finding, 466
Greasemonkey, 463
API functions, 471
browser support, 465
creating user scripts, 468, 475
debugging user scripts, 474-476
describing user scripts, 469-470
finding user scripts, 466
installing, 464
installing user scripts, 466
third-party JavaScript libraries
AJAX Frameworks, 456
Dojo, 456
downloading, 457
effects, adding via, 457-459
effects, using, 457
HTML documents, adding librariesto, 457
jQuery, 454-455
Mochikit, 456
MooTools, 456
Prototype, 453-454
Script.aculo.us, 455-459
scripts, building, 458-459
Yahoo! UI Library, 456
tiled backgrounds, 159-160
time, displaying (JavaScript example), 71
Date objects, 72
error handling, 76-78
output, creating, 73
scripts
adding to web pages, 73-74
modifying, 74-76
<script> tags, 71-72
testing, 74
statements, 72
variables, 72
time zones, date object (JavaScript)and, 365
timeouts (browser windows), 414-416
Times Roman font (text), 86
timing loading of web content, 20
<title> tags, 27, 31-33, 36
toLowerCase() method (JavaScript), 334
tool tips, 164
toUpperCase() method (JavaScript), 334
<tr> tags (HTML), 107
transferring HTML files, FTP clients,10-13, 29
transparent images, 158
triadic color schemes, 143
managing user scripts, 466-467
metadata and user scripts,469-470
site-specific user scripts,472-473
testing user scripts, 468-471
text area macro user scripts,475-476
installing, 466
managing, 466-467
metadata and, 469-470
security, 465
site-specific scripts, 472-473
testing, 468-471
text area macro user scripts,475-476
Trixie, 465
installing user scripts, 466
managing user scripts, 467
UTC (Universal Time [Coordinated]), 71
UTC variable (JavaScript), 72
V
validating
forms, 70, 531-532
style sheets, 61
web content, 36-37
variables (JavaScript), 288
declaring, 326
global variables, 326
incrementing/decrementing, 327
local variables, 326
localtime variable, 72
naming, 292, 325-326
scope of, 326
time display example, 72
UTC variable, 72
values, assigning to variables,327-328
www.it-ebooks.info

ptg999
VBScript scripting language592
JavaScript objects and, 425
linking windows to frames,423-424
modifying borders, 424-425
nested framesets, 425
Google Chrome, 9, 465
history, accessing, 2, 303-305
HTML development, 2
images, auto image loading, 20
information, reading via JavaScript
dishonest browsers, 442-443
displaying information, 440-441
Internet Explorer, 9
event properties, 393
Trixie, 465-468
links, opening in new browser win-dows, 134
lists, displaying in, 97
margins and, 226-229
non-Internet Explorer event proper-ties, 393-394
non-JavaScript browsers
avoiding errors, 446-449
detecting, 445-446
JavaScript optionality, 446
<noscript> tag, 445-446
<script> tag, 457
non-viewable window areas, 254
Opera, 9, 465
padding and, 226-228
pop-up windows, 134
popularity of, 26
Safari, 9
search engines, 445
sensing. See feature sensing
servers, basic browser serverinteraction, 3-5
text, adjusting font size settings, 20
websites
comparing, 26
testing, 8-9, 26
VBScript scripting language, 274
version control, websites and, 548-550
vertical image alignment, 167-168
vertical navigation, 236-238
multilevel vertical navigation,240-244
single-level vertical navigation,239-241
vertical-align style property, 167
video, embedding, 182
viewing
CSS style rules, 51
HTML files, 29
web pages, 29
visual editors, blogs, 19
W
W3C color standards, 143
W3C CSS Validator, 61
W3C event model, 436-437
W3C Validation Service, 37-38
web browsers
140 cross-browser color names,143-144
cross-browser scripting
debugging browsers, 444
feature sensing, 437, 443-444
CSS, support for, 51
debugging, 444
development of, 2
dialog boxes, displaying, 417-418
distributing, 18
Firefox, 9, 464
frames, 418-420
adding individual frames, 423
creating frameset documents,421-423
frames array, 426
inline frames, 426-429
windows
creating, 410-411
linking frames to windows,423-424
moving, 413-414
opening/closing, 411-412
resizing, 413-414
timeouts, 414-416
web content
absolute addresses, 124-125
aligning via align property (CSS),191, 203-204
clear property (CSS), text flowand, 220
color
140 cross-browser colornames, 143-144
best practices, 141-143
Colorblind Web Page Filter tool, 148
hexadecimal color codes,144-146
using, 141-143
W3C color standards, 143
comparing, 26
creating, 2-3
ASCII text, 26, 34
boilerplate code, 28-30
comparing web content HTMLcodes, 37
formatting text, 33-35
HTML tags, 27-33
indenting text, 35
line breaks, 32-33
organizing content via head-ings, 34-36
overview of, 29
paragraphs, 32-33
“plain” text, 26, 34
templates, 31
CSS box model, 209
borders, 210
content, 210
www.it-ebooks.info

ptg999
web content 593
compression, 150
copyrights and, 149
Creative Commons licenses, 149
cropping, 151-152
dithering, 158
file sizes, 150
Flickr, 161, 163
GIFs, 157-161
GIMP, 149
GIMP, adjusting image color, 154
GIMP, banners, 156
GIMP, buttons, 156
GIMP, cropping images, 151-152
GIMP, JPEG compression, 155
GIMP, resizing images, 153
Google Images, 161
Google Picasa, 149
grabbing from web pages, 149
image maps, 173-178
JPEGs, 155, 159-160
Picnik, 149
placing graphics on web pages,161-163
PNGs, 158-159
Red Eye Removal, 154
republishing, 163
resizing, 153
resolution, 150
specifying height/width, 165
text descriptions, 163-164
tiled backgrounds, 159-160
transparent graphics, 158
turning graphics into links,169-171
uses of, 150
images, changing images via userinteraction, 281-283
links
absolute links, 124
anchor tags, 126-129
email addresses, 132-133
lists and, 226-229
margins, 210
padding, 210
sizing elements, 210-212
delivering, 3-5
directories, 123-124
float property (CSS), 191,204-207, 220
folders, 123-125
forms, 513
accessing elements viaJavaScript, 528
check boxes, 521-523
creating, 514-519
displaying data in pop-up windows, 528-530
hidden data, 520
JavaScript events, 527-528
naming form data, 519-520
pull-down pick lists, 524-525
radio buttons, 523-524
scrolling lists, 524-525
selection lists, 524-525
sending data via email, 530-531
submitting form data, 527
text areas, 526
text fields, 526
text input, 519
user input, 519
validating, 531-532
“graceful degradation”, 434
graphics
adjusting color, 154
Adobe Photoshop, 148
aligning graphics, 165-168
animated graphics, 160-161
background graphics, 171-172
banners, 156
buttons, 156
choosing software, 149
clip art, 149
images as, 134
linking between, 129-131
linking to external web content, 131-132
opening in new browser windows, 134
relative-root links, 124
styling via CSS, 134-138
lists
borders, 227-228
color, 227-228
CSS box model and, 226-229
horizontal navigation, 245-248
navigation lists, 235-248
placing list item indicators,229-231
vertical navigation, 236-244
loading, timing, 20
managing
coding clarity, 548
comments, 546-547
documenting code, 546-547
indenting code, 548
maintainable code, 546-548
version control, 548-550
margins
browsers and, 226-229
margin property (CSS), 191-199
multimedia, integrating with, 178
embedded multimedia files,180-183
links, 179-180
tips for using, 184-185
organizing, 123-124, 538
larger websites, 543-546
simple websites, 540-542
single-page websites, 538-539
overflow property (CSS), text flowand, 220
padding
browsers and, 226-228
padding property (CSS), 191,199-202
www.it-ebooks.info

ptg999
web content594
cells, sizing, 111-113
color in, 115
creating, 107-110
headings, creating, 108
images in, 116
page layout via, 116-117
rows, creating, 107
sizing, 110-113
sizing borders, 107
spacing borders, 116
spanning within, 115
uses for, 107
testing, 19-20
text, formatting, 82
adding to web pages, 319-321
aligning text, 92-95
big text, 83
boldface text, 82-83
customizing fonts in HTML,85-89
definition lists, 96, 226
flowing text, 220
foreign languages, 89-91
italic text, 82-83
modifying, 317-318
monospaced text, 84-85
multitiered lists, 100-101
nested lists, 97-100, 226
older HTML tags, 81
ordered lists, 95-96, 226
outlines, 98-100
resumes, creating, 87-89
small text, 83
special characters, 89-91
subscript text, 83
superscript text, 83
unordered lists, 95-96, 226
transferring, FPT, 29
validating, 36-37
viewing, 5, 29
Print Preview, viewing web contentin, 508-509
print-friendly web pages, 499
criteria for print-friendliness,500-503
designing style sheets for printpages, 505-508
media-specific style sheets,503-504
reviewing content for print-friendliness, 500
viewing web pages in PrintPreview, 508-509
“progressive enhancement”, 435
publishing
locally, 18-19
to blogs, 19
random web content, displayingvia JavaScript, 276-280
relative addresses, 124-125
relative-root addresses, 124
search engines, listing web content with, 555-562
style sheets
creating, 47-52
definition of, 45
external style sheets, 46-51
formatting properties, 53-56
formatting text color, 46
inline styles, 60-61
internal style sheets, 46, 59-61
layout properties, 52-53
linking to HTML documents, 50
selectors, 57
sizing text, 50
style classes, 57-58
style IDs, 59
style properties, 57
style rules, 46, 50-51, 58
validating, 61
web browser support, 51
tables
aligning within, 113-115
cells, creating, 107
web hosting providers, selecting,6-8, 26
website architectures, creating, 125
YouTube and, 184
web design
“graceful degradation”, 434
“progressive enhancement”, 435
web hosting provider DailyRazor, 7
web hosting providers
A Small Orange, 7
bandwidth, 6
control panels, 7-8
customer service, 6
domain names, purchasing, 6
LunarPages, 7
pricing, 6
reliability, 6
selecting, 6-8, 26
server space, 6
web pages
absolute addresses, 124-125
aligning via align property (CSS),191, 203-204
clear property (CSS), text flow and, 220
color
140 cross-browser color names,143-144
best practices, 141-143
Colorblind Web Page Filter tool, 148
hexadecimal color codes,144-146
using, 141-143
W3C color standards, 143
creating
ASCII text, 26, 34
boilerplate code, 28-30
comparing web page HTMLcodes, 37
formatting text, 33-35
HTML tags, 27-33
www.it-ebooks.info

ptg999
web pages 595
graphics
adjusting color, 154
Adobe Photoshop, 148
aligning graphics, 165-168
animated graphics, 160-161
background graphics, 171-172
banners, 156
buttons, 156
choosing software, 149
clip art, 149
compression, 150
copyrights and, 149
Creative Commons licenses, 149
cropping, 151-152
dithering, 158
file sizes, 150
Flickr, 161-163
GIFs, 157-161
GIMP, 149
GIMP, adjusting image color, 154
GIMP, banners, 156
GIMP, buttons, 156
GIMP, cropping images, 151-152
GIMP, JPEG compression, 155
GIMP, resizing images, 153
Google Images, 161
Google Picasa, 149
grabbing from web pages, 149
image maps, 173-178
JPEG compression, 155
JPEGs, 159-160
Picnik, 149
placing graphics on web pages,161-163
PNGs, 158-159
Red Eye Removal, 154
republishing, 163
resizing, 153
resolution, 150
specifying height/width, 165
text descriptions, 163-164
indenting text, 35
line breaks, 32-33
organizing content via head-ings, 34-36
overview of, 29
paragraphs, 32-33
“plain” text, 26, 34
templates, 31
CSS box model, 209
borders, 210
content, 210
lists and, 226-229
margins, 210
padding, 210
sizing elements, 210-212
directories, 123-124
float property (CSS), 191,204-207, 220
folders, 123-125
forms, 513
accessing elements viaJavaScript, 528
check boxes, 521-523
creating, 514-519
displaying data in pop-up windows, 528-530
hidden data, 520
JavaScript events, 527-528
naming form data, 519-520
pull-down pick lists, 524-525
radio buttons, 523-524
scrolling lists, 524-525
selection lists, 524-525
sending data via email, 530-531
submitting form data, 527
text areas, 526
text fields, 526
text input, 519
user input, 519
validating, 531-532
“graceful degradation”, 434
tiled backgrounds, 159-160
transparent graphics, 158
turning graphics into links,169-171
uses of, 150
images, changing images via userinteraction, 281-283
JavaScript, adding to web pages,67-68
links
absolute links, 124
anchor tags, 126-129
email addresses, 132-133
images as, 134
linking between web pages,129-131
linking to external web pages,131-132
opening in new browser windows, 134
relative-root links, 124
styling via CSS, 134-138
lists
borders, 227-228
color, 227-228
CSS box model and, 226-229
horizontal navigation, 245-248
navigation lists, 235-248
placing list item indicators,229-231
vertical navigation, 236-244
loading, timing, 20
managing
coding clarity, 548
comments, 546-547
documenting code, 546-547
indenting code, 548
maintainable code, 546-548
version control, 548-550
margins
browsers and, 226-229
margin property (CSS), 191-199
www.it-ebooks.info

ptg999
web pages596
selectors, 57
sizing text, 50
style classes, 57-58
style IDs, 59
style properties, 57
style rules, 46, 50-51, 58
validating, 61
web browser support, 51
tables
aligning within, 113-115
cells, creating, 107
cells, sizing, 111-113
color in, 115
creating, 107-110
headings, creating, 108
images in, 116
page layout via, 116-117
rows, creating, 107
sizing, 110-113
sizing borders, 107
spacing borders, 116
spanning within, 115
uses for, 107
text, formatting
adding to web pages, 319-321
aligning text, 92-95
big text, 83
boldface text, 82-83
customizing fonts in HTML,85-89
definition lists, 96, 226
flowing text, 220
foreign languages, 89-91
italic text, 82-83
modifying, 317-318
monospaced text, 84-85
multitiered lists, 100-101
nested lists, 97-100, 226
older HTML tags, 81
ordered lists, 95-96, 226
outlines, 98-100
resumes, creating, 87-89
small text, 83
multimedia, integrating with, 178
embedded multimedia files,180-183
links, 179-180
tips for using, 184-185
organizing, 123-124, 538
larger websites, 543-546
simple websites, 540, 542
single-page websites, 538-539
overflow property (CSS), text flowand, 220
padding
browsers and, 226-228
padding property (CSS), 191,199-202
Print Preview, viewing web pagesin, 508-509
print-friendly web pages, 499
criteria for print-friendliness,500-503
designing style sheets for printpages, 505-508
media-specific style sheets,503-504
reviewing content for print-friendliness, 500
viewing web pages in PrintPreview, 508-509
“progressive enhancement”, 435
relative addresses, 124-125
relative-root addresses, 124
scripts, adding to web pages(JavaScript), 73-74
search engines, listing web pageswith, 555-562
style sheets
creating, 47-52
definition of, 45
external style sheets, 46-51
formatting properties, 53-56
formatting text color, 46
inline styles, 60-61
internal style sheets, 46, 59-61
layout properties, 52-53
linking to HTML documents, 50
special characters, 89-91
subscript text, 83
superscript text, 83
unordered lists, 95-96, 226
transferring FTP, 29
validating, 36-37
viewing, 29
web content, displaying randomcontent via JavaScript, 276-280
website architectures, creating, 125
YouTube and, 184
websites
aligning via align property (CSS),191, 203-204
architectures, creating, 125
bad website examples, 144
clear property (CSS), text flow and, 220
color
140 cross-browser color names,143-144
best practices, 141-143
Colorblind Web Page Filter tool, 148
hexadecimal color codes,144-146
using, 141-143
W3C color standards, 143
comparing, 26
connecting to, Classic FTP client, 12
CSS box model, 209
borders, 210
content, 210
lists and, 226-229
margins, 210
padding, 210
sizing elements, 210-212
dynamic websites
changing images via user inter-action, 281-283
client-side scripting, 274
displaying random web contentvia JavaScript, 276-280
DOM, 280-281
www.it-ebooks.info

ptg999
websites 597
GIFs, 157-161
GIMP, 149
GIMP, adjusting image color, 154
GIMP, banners, 156
GIMP, buttons, 156
GIMP, cropping images, 151-152
GIMP, JPEG compression, 155
GIMP, resizing images, 153
Google Images, 161
Google Picasa, 149
grabbing from web pages, 149
image maps, 173-178
JPEGs, 155, 159-160
Picnik, 149
placing graphics on web pages,161-163
PNGs, 158-159
Red Eye Removal, 154
republishing, 163
resizing, 153
resolution, 150
specifying height/width, 165
text descriptions, 163-164
tiled backgrounds, 159-160
transparent graphics, 158
turning graphics into links,169-171
uses of, 150
links
absolute links, 124
anchor tags, 126-129
email addresses, 132-133
images as, 134
linking between web pages,129-131
linking to external web pages,131-132
opening in new browser windows, 134
relative-root links, 124
styling via CSS, 134-138
lists
borders, 227-228
color, 227-228
printing text via JavaScript, 275
server-side scripting, 274
float property (CSS), 191,204-207, 220
forms, 513
accessing elements viaJavaScript, 528
check boxes, 521-523
creating, 514-519
displaying data in pop-up windows, 528-530
hidden data, 520
JavaScript events, 527-528
naming form data, 519-520
pull-down pick lists, 524-525
radio buttons, 523-524
scrolling lists, 524-525
selection lists, 524-525
sending data via email, 530-531
submitting form data, 527
text areas, 526
text fields, 526
text input, 519
user input, 519
validating, 531-532
“graceful degradation”, 434
graphics
adjusting color, 154
Adobe Photoshop, 148
aligning graphics, 165-168
animated graphics, 160-161
background graphics, 171-172
banners, 156
buttons, 156
choosing software, 149
clip art, 149
compression, 150
copyrights and, 149
Creative Commons licenses, 149
cropping, 151-152
dithering, 158
file sizes, 150
Flickr, 161-163
CSS box model and, 226-229
horizontal navigation, 245-248
navigation lists, 235-248
placing list item indicators,229-231
vertical navigation, 236-244
managing
coding clarity, 548
comments, 546-547
documenting code, 546-547
indenting code, 548
maintainable code, 546-548
version control, 548-550
margins
browsers and, 226-229
margin property (CSS), 191-199
multimedia, integrating with,178-179
embedded multimedia files,180-183
links, 179-180
tips for using, 184-185
navigating JavaScript, 70
organizing
Amazon.com, 543
BAWSI.org, 545
ESPN.com, 540-542
larger websites, 543-546
simple websites, 540-542
single-page websites, 538-539
Starbucks.com, 544
overflow property (CSS), text flowand, 220
padding
browsers and, 226-228
padding property (CSS), 191,199-202
“progressive enhancement”, 435
publicizing, 553-555
search engines, listing websiteswith, 555-562
SEO, 553, 562-563
single-page websites, 538-539
www.it-ebooks.info

ptg999
websites598
fixed/liquid hybrid layouts, settingminimum width in, 262-263
images, specifying width in, 165
width property (CSS), 53
window objects (DOM), 300
browser windows
creating, 410-411
moving, 413-414
opening/closing, 411-412
resizing, 413-414
timeouts, 414-416
dialog boxes, displaying, 417-418
properties of, 409-410
windows (browser)
closing, 412
creating, 410-411
frames, linking to windows, 423-424
moving, 413-414
non-viewable window areas, 254
opening/closing, 411-412
pop-up windows, displaying formdata in, 528-530
resizing, 413-414
timeouts, 414-416
with keyword (JavaScript), 363-364
.WMV video clips, embedding, 182
Word, creating HTML files, 27
WordPress Theme Gallery, layouts and, 253
writing text within documents, 302
WWW (World Wide Web), HTML devel-opment, 2
WYSIWYG (what-you-see-is-what-you-get) editors, 27
X
XHTML
boilerplate code, 30
check boxes (forms), 522
defining, 3
style sheets
creating, 47-52
definition of, 45
external style sheets, 46-51
formatting properties, 53-56
formatting text color, 46
inline styles, 60-61
internal style sheets, 46, 59-61
layout properties, 52-53
linking to HTML documents, 50
selectors, 57
sizing text, 50
style classes, 57-58
style IDs, 59
style properties, 57
style rules, 46, 50-51, 58
validating, 61
web browser support, 51
testing, 8-9, 26
text
adding to web pages, 319-321
flowing text, 220
modifying, 317-318
web content
absolute addresses, 124-125
directories, 123-124
folders, 123-125
organizing, 123-124
relative addresses, 124-125
relative-root addresses, 124
web pages
print-friendly web pages,499-509
viewing in Print Preview,508-509
YouTube and, 184
while loops (JavaScript), 379-380
whitespace (spacing)
HTML, 32
JavaScript syntax, 292
width
CSS box model, adjusting in,210-212
development of, 40
function of, 51
goal of, 51
image maps, 231
inline frames, 426-429
tags
<embed> tags, 183
<object> tags, 180-183
xml : lang attribute (HTML tags), 31
xmlns attribute (HTML tags), 31
XML
AJAX and, 481, 488-489
boilerplate code, 30
development of, 39-40
xml : lang attribute (HTML tags), 31
XMLHttpRequest, 483
requests
awaiting responses, 484
creating, 483
interpreting response data, 484
sending, 484
URLs, opening, 483
xmlns attribute (HTML tags), 31
Y - Z
Yahoo! Developer Network, JavaScriptdesign patterns, 439
Yahoo! Search, listing websites with, 556
Yahoo! UI Library, 437, 456
YouTube, website integration, 184
z-index property (CSS), 217-219
Zen Garden (CSS), 191-192, 253
www.it-ebooks.info
