reading & writing handbook grades 4-6 - knox educational
TRANSCRIPT
Reading & Writing Handbook Grades 4-6
Together is Better Teaching Literacy in Integrated Units
©Charlotte Knox knoxeducation.com – Narrative Writing – Page 1

©Charlotte Knox knoxeducation.com – Narrative Writing – Page 2
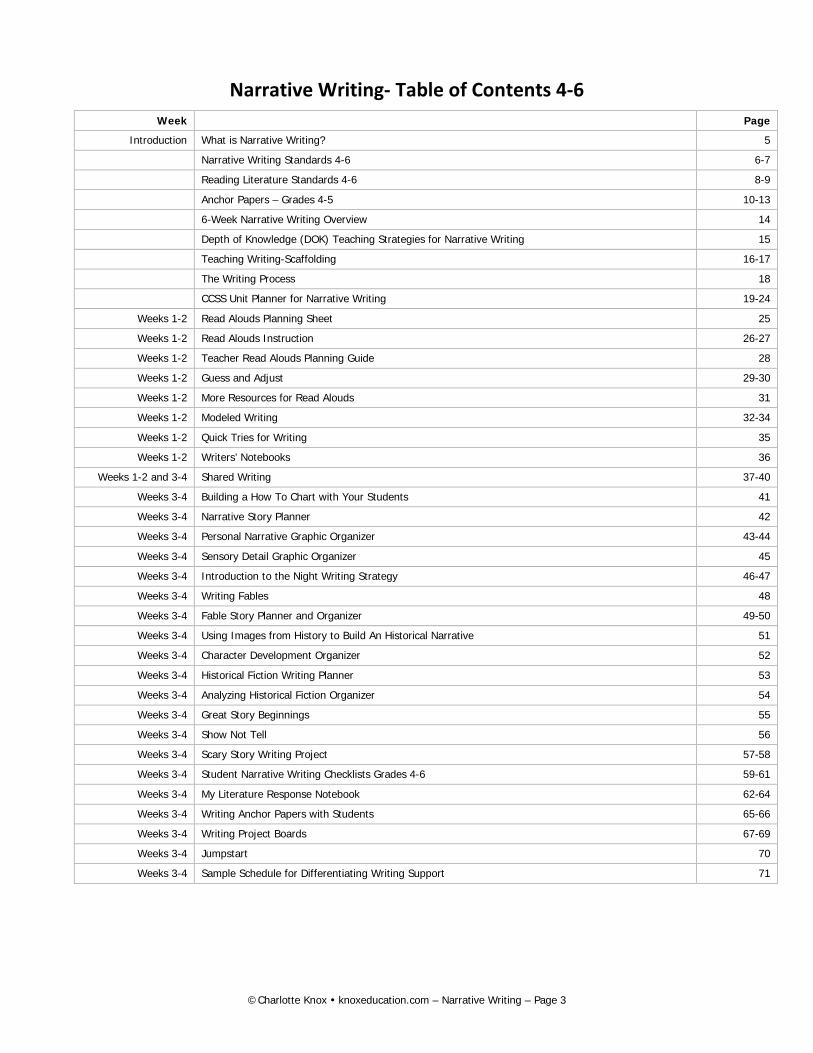
Narrative Writing- Table of Contents 4-6 Week Page
Introduction What is Narrative Writing? 5
Narrative Writing Standards 4-6 6-7
Reading Literature Standards 4-6 8-9
Anchor Papers – Grades 4-5 10-13
6-Week Narrative Writing Overview 14
Depth of Knowledge (DOK) Teaching Strategies for Narrative Writing 15
Teaching Writing-Scaffolding 16-17
The Writing Process 18
CCSS Unit Planner for Narrative Writing 19-24
Weeks 1-2 Read Alouds Planning Sheet 25
Weeks 1-2 Read Alouds Instruction 26-27
Weeks 1-2 Teacher Read Alouds Planning Guide 28
Weeks 1-2 Guess and Adjust 29-30
Weeks 1-2 More Resources for Read Alouds 31
Weeks 1-2 Modeled Writing 32-34
Weeks 1-2 Quick Tries for Writing 35
Weeks 1-2 Writers’ Notebooks 36
Weeks 1-2 and 3-4 Shared Writing 37-40
Weeks 3-4 Building a How To Chart with Your Students 41
Weeks 3-4 Narrative Story Planner 42
Weeks 3-4 Personal Narrative Graphic Organizer 43-44
Weeks 3-4 Sensory Detail Graphic Organizer 45
Weeks 3-4 Introduction to the Night Writing Strategy 46-47
Weeks 3-4 Writing Fables 48
Weeks 3-4 Fable Story Planner and Organizer 49-50
Weeks 3-4 Using Images from History to Build An Historical Narrative 51
Weeks 3-4 Character Development Organizer 52
Weeks 3-4 Historical Fiction Writing Planner 53
Weeks 3-4 Analyzing Historical Fiction Organizer 54
Weeks 3-4 Great Story Beginnings 55
Weeks 3-4 Show Not Tell 56
Weeks 3-4 Scary Story Writing Project 57-58
Weeks 3-4 Student Narrative Writing Checklists Grades 4-6 59-61
Weeks 3-4 My Literature Response Notebook 62-64
Weeks 3-4 Writing Anchor Papers with Students 65-66
Weeks 3-4 Writing Project Boards 67-69
Weeks 3-4 Jumpstart 70
Weeks 3-4 Sample Schedule for Differentiating Writing Support 71
©Charlotte Knox knoxeducation.com – Narrative Writing – Page 3

Narrative Writing- Table of Contents
Weeks 5-6 Learning About Revision and Editing 72
Weeks 5-6 Whole Group Conferences as Mini Lessons for Writing 73-74
Weeks 5-6 Improved Writing with Synonyms for Tired Words 75-76
Weeks 5-6 A.R.M.S. Add, Remove, Move, Substitute Poster 77
Weeks 5-6 Implementing a Publishing Week in the Classroom 78-80
Weeks 5-6 The Editing Machine 81
Weeks 5-6 Editing is Fun Poster 82
Weeks 5-6 C.U.P.S. Capitalization, Usage, Punctuation, Spelling Poster 83
Weeks 5-6 Preparing Student for On-Demand Writing Assessments/Dress Rehearsal 84
Grade 4-5-6 Narrative Writing Rubrics 85-87
Language Language Instruction Planning Sheet 88
Language Language Standards Grades 4-6 89-90
Language Ideas for Helping Students Add Dialogue 91
Language Using Comic Strips to Write Dialogue 92
Language Rules for Quotation Marks 93
Language Treasure Hunt for Figurative Language 94
Language Using White Boards to Teach Writing Conventions 95
Language Show Not Tell: Shades of Meaning Emotion Words 96
Language Regular and Irregular Past Tense Verbs in English 97-99
Language Techniques of Effective Description Survey 100
Language Cues, Sequences, and Transition Words 101-102
DIFFERENTIATION Special Strategies and Support for the 4 subgroups: Special Ed, English Learners, Extend Learners, and Jumpstart Learners
103-110
©Charlotte Knox knoxeducation.com – Narrative Writing – Page 4
What is Narrative Writing? Definition
Students write narratives to develop real or imagined experiences or events using effective technique, well-chosen details, and well-structured event sequences.
Forms of narrative writing include:
Personal narratives and memoirs: students choose meaningful stories from their own lives and share what the experience was like as well as why it was important to them
Fictional narratives: These run the gamut of all forms of literature we read.
Fantasy stories including characters with special powers
Realistic fiction drawing on settings and characters from their current lives
Historical fiction which involves researching about a period in history and including factual details about that time within their narrative.
Folktales and fables: students may study multiple examples of folk literature to learn about the structure and purpose for that kind of writing
All well-written narratives use sensory details and create characters whose appearance, speech, thoughts, emotions, and actions enable readers to accept them as believable within the context of the story. Narratives that focus on autobiographical incidents allow students to make close observations of people and places. They involve students in the discovery of the most important details that support the re-creation of personal experiences.
“Any fiction should be a story. In any story there are
three elements: persons, a situation, and the fact that
in the end something has changed. If nothing has changed, it isn’t a story.”
Malcolm Cowley
©Charlotte Knox knoxeducation.com – Narrative Writing – Page 5
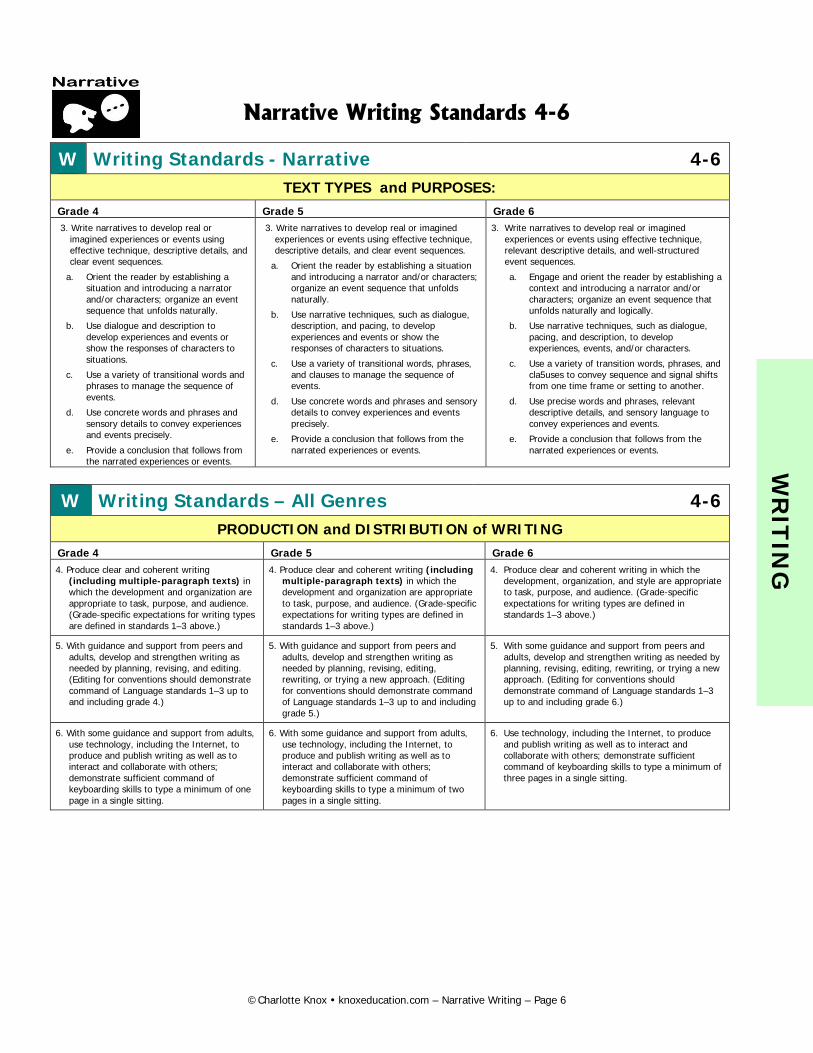
Narrative Writing Standards 4-6
W Writing Standards - Narrative 4-6 TEXT TYPES and PURPOSES:
Grade 4 Grade 5 Grade 6 3. Write narratives to develop real or
imagined experiences or events using effective technique, descriptive details, and clear event sequences.
a. Orient the reader by establishing a situation and introducing a narrator and/or characters; organize an event sequence that unfolds naturally.
b. Use dialogue and description to develop experiences and events or show the responses of characters to situations.
c. Use a variety of transitional words and phrases to manage the sequence of events.
d. Use concrete words and phrases and sensory details to convey experiences and events precisely.
e. Provide a conclusion that follows from the narrated experiences or events.
3. Write narratives to develop real or imagined experiences or events using effective technique, descriptive details, and clear event sequences.
a. Orient the reader by establishing a situation and introducing a narrator and/or characters; organize an event sequence that unfolds naturally.
b. Use narrative techniques, such as dialogue, description, and pacing, to develop experiences and events or show the responses of characters to situations.
c. Use a variety of transitional words, phrases, and clauses to manage the sequence of events.
d. Use concrete words and phrases and sensory details to convey experiences and events precisely.
e. Provide a conclusion that follows from the narrated experiences or events.
3. Write narratives to develop real or imagined experiences or events using effective technique, relevant descriptive details, and well-structured event sequences.
a. Engage and orient the reader by establishing a context and introducing a narrator and/or characters; organize an event sequence that unfolds naturally and logically.
b. Use narrative techniques, such as dialogue, pacing, and description, to develop experiences, events, and/or characters.
c. Use a variety of transition words, phrases, and cla5uses to convey sequence and signal shifts from one time frame or setting to another.
d. Use precise words and phrases, relevant descriptive details, and sensory language to convey experiences and events.
e. Provide a conclusion that follows from the narrated experiences or events.
W Writing Standards – All Genres 4-6 PRODUCTION and DISTRIBUTION of WRITING
Grade 4 Grade 5 Grade 6 4. Produce clear and coherent writing
(including multiple-paragraph texts) in which the development and organization are appropriate to task, purpose, and audience. (Grade-specific expectations for writing types are defined in standards 1–3 above.)
4. Produce clear and coherent writing (including multiple-paragraph texts) in which the development and organization are appropriate to task, purpose, and audience. (Grade-specific expectations for writing types are defined in standards 1–3 above.)
4. Produce clear and coherent writing in which the development, organization, and style are appropriate to task, purpose, and audience. (Grade-specific expectations for writing types are defined in standards 1–3 above.)
5. With guidance and support from peers and adults, develop and strengthen writing as needed by planning, revising, and editing. (Editing for conventions should demonstrate command of Language standards 1–3 up to and including grade 4.)
5. With guidance and support from peers and adults, develop and strengthen writing as needed by planning, revising, editing, rewriting, or trying a new approach. (Editing for conventions should demonstrate command of Language standards 1–3 up to and including grade 5.)
5. With some guidance and support from peers and adults, develop and strengthen writing as needed by planning, revising, editing, rewriting, or trying a new approach. (Editing for conventions should demonstrate command of Language standards 1–3 up to and including grade 6.)
6. With some guidance and support from adults, use technology, including the Internet, to produce and publish writing as well as to interact and collaborate with others; demonstrate sufficient command of keyboarding skills to type a minimum of one page in a single sitting.
6. With some guidance and support from adults, use technology, including the Internet, to produce and publish writing as well as to interact and collaborate with others; demonstrate sufficient command of keyboarding skills to type a minimum of two pages in a single sitting.
6. Use technology, including the Internet, to produce and publish writing as well as to interact and collaborate with others; demonstrate sufficient command of keyboarding skills to type a minimum of three pages in a single sitting.
W
RIT
ING
©Charlotte Knox knoxeducation.com – Narrative Writing – Page 6
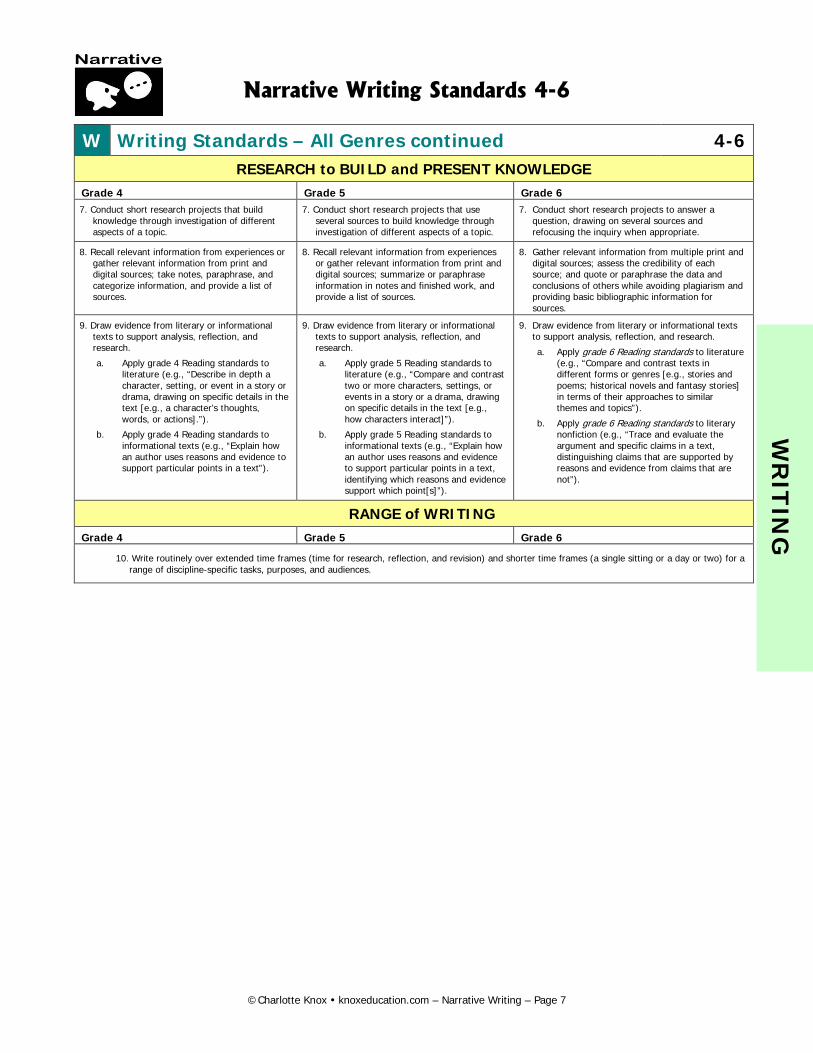
Narrative Writing Standards 4-6
W Writing Standards – All Genres continued 4-6 RESEARCH to BUILD and PRESENT KNOWLEDGE
Grade 4 Grade 5 Grade 6 7. Conduct short research projects that build
knowledge through investigation of different aspects of a topic.
7. Conduct short research projects that use several sources to build knowledge through investigation of different aspects of a topic.
7. Conduct short research projects to answer a question, drawing on several sources and refocusing the inquiry when appropriate.
8. Recall relevant information from experiences or gather relevant information from print and digital sources; take notes, paraphrase, and categorize information, and provide a list of sources.
8. Recall relevant information from experiences or gather relevant information from print and digital sources; summarize or paraphrase information in notes and finished work, and provide a list of sources.
8. Gather relevant information from multiple print and digital sources; assess the credibility of each source; and quote or paraphrase the data and conclusions of others while avoiding plagiarism and providing basic bibliographic information for sources.
9. Draw evidence from literary or informational texts to support analysis, reflection, and research.
a. Apply grade 4 Reading standards to literature (e.g., “Describe in depth a character, setting, or event in a story or drama, drawing on specific details in the text [e.g., a character’s thoughts, words, or actions].”).
b. Apply grade 4 Reading standards to informational texts (e.g., “Explain how an author uses reasons and evidence to support particular points in a text”).
9. Draw evidence from literary or informational texts to support analysis, reflection, and research.
a. Apply grade 5 Reading standards to literature (e.g., “Compare and contrast two or more characters, settings, or events in a story or a drama, drawing on specific details in the text [e.g., how characters interact]”).
b. Apply grade 5 Reading standards to informational texts (e.g., “Explain how an author uses reasons and evidence to support particular points in a text, identifying which reasons and evidence support which point[s]”).
9. Draw evidence from literary or informational texts to support analysis, reflection, and research.
a. Apply grade 6 Reading standards to literature (e.g., “Compare and contrast texts in different forms or genres [e.g., stories and poems; historical novels and fantasy stories] in terms of their approaches to similar themes and topics”).
b. Apply grade 6 Reading standards to literary nonfiction (e.g., “Trace and evaluate the argument and specific claims in a text, distinguishing claims that are supported by reasons and evidence from claims that are not”).
RANGE of WRITING Grade 4 Grade 5 Grade 6
10. Write routinely over extended time frames (time for research, reflection, and revision) and shorter time frames (a single sitting or a day or two) for a range of discipline-specific tasks, purposes, and audiences.
W
RIT
ING
©Charlotte Knox knoxeducation.com – Narrative Writing – Page 7
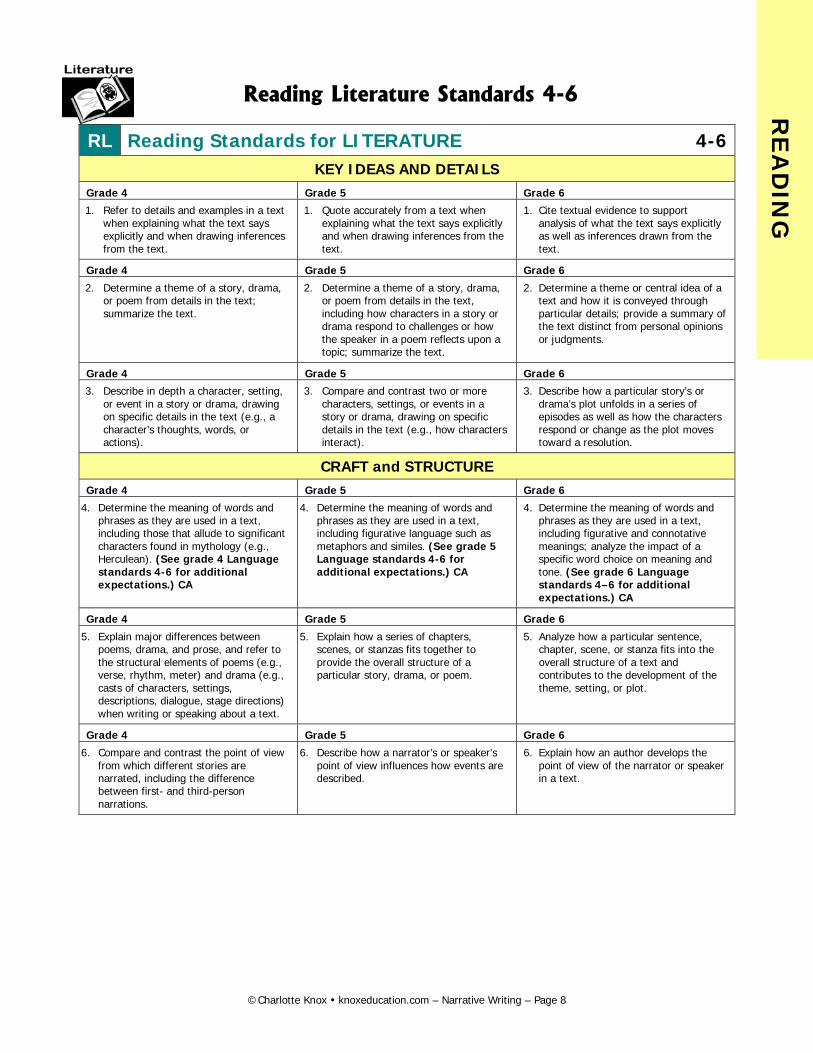
Reading Literature Standards 4-6
RL Reading Standards for LITERATURE 4-6 KEY IDEAS AND DETAILS
Grade 4 Grade 5 Grade 6
1. Refer to details and examples in a text when explaining what the text says explicitly and when drawing inferences from the text.
1. Quote accurately from a text when explaining what the text says explicitly and when drawing inferences from the text.
1. Cite textual evidence to support analysis of what the text says explicitly as well as inferences drawn from the text.
Grade 4 Grade 5 Grade 6
2. Determine a theme of a story, drama, or poem from details in the text; summarize the text.
2. Determine a theme of a story, drama, or poem from details in the text, including how characters in a story or drama respond to challenges or how the speaker in a poem reflects upon a topic; summarize the text.
2. Determine a theme or central idea of a text and how it is conveyed through particular details; provide a summary of the text distinct from personal opinions or judgments.
Grade 4 Grade 5 Grade 6
3. Describe in depth a character, setting, or event in a story or drama, drawing on specific details in the text (e.g., a character’s thoughts, words, or actions).
3. Compare and contrast two or more characters, settings, or events in a story or drama, drawing on specific details in the text (e.g., how characters interact).
3. Describe how a particular story’s or drama’s plot unfolds in a series of episodes as well as how the characters respond or change as the plot moves toward a resolution.
CRAFT and STRUCTURE Grade 4 Grade 5 Grade 6
4. Determine the meaning of words and phrases as they are used in a text, including those that allude to significant characters found in mythology (e.g., Herculean). (See grade 4 Language standards 4-6 for additional expectations.) CA
4. Determine the meaning of words and phrases as they are used in a text, including figurative language such as metaphors and similes. (See grade 5 Language standards 4-6 for additional expectations.) CA
4. Determine the meaning of words and phrases as they are used in a text, including figurative and connotative meanings; analyze the impact of a specific word choice on meaning and tone. (See grade 6 Language standards 4–6 for additional expectations.) CA
Grade 4 Grade 5 Grade 6
5. Explain major differences between poems, drama, and prose, and refer to the structural elements of poems (e.g., verse, rhythm, meter) and drama (e.g., casts of characters, settings, descriptions, dialogue, stage directions) when writing or speaking about a text.
5. Explain how a series of chapters, scenes, or stanzas fits together to provide the overall structure of a particular story, drama, or poem.
5. Analyze how a particular sentence, chapter, scene, or stanza fits into the overall structure of a text and contributes to the development of the theme, setting, or plot.
Grade 4 Grade 5 Grade 6
6. Compare and contrast the point of view from which different stories are narrated, including the difference between first- and third-person narrations.
6. Describe how a narrator’s or speaker’s point of view influences how events are described.
6. Explain how an author develops the point of view of the narrator or speaker in a text.
RE
AD
ING
©Charlotte Knox knoxeducation.com – Narrative Writing – Page 8

Reading Literature Standards 4-6
RL Reading Standards for LITERATURE 6-12 INTEGRATION of KNOWLEDGE and IDEAS
Grade 4 Grade 5 Grade 6
7. Make connections between the text of a story or drama and a visual or oral presentation of the text, identifying where each version reflects specific descriptions and directions in the text.
7. Analyze how visual and multimedia elements contribute to the meaning, tone, or beauty of a text (e.g., graphic novel, multimedia presentation of fiction, folktale, myth, poem).
7. Compare and contrast the experience of reading a story, drama, or poem to listening to or viewing an audio, video, or live version of the text, including contrasting what they “see” and “hear” when reading the text to what they perceive when they listen or watch.
* Please see “Research to Build and Present Knowledge” in Writing and “Comprehension and Collaboration” in Speaking and Listening for additional standards relevant to gathering, assessing, and applying information from print and digital sources.
8. (Not applicable to literature)
Grade 4 Grade 5 Grade 6
9. Compare and contrast the treatment of similar themes and topics (e.g., opposition of good and evil) and patterns of events (e.g., the quest) in stories, myths, and traditional literature from different cultures.
9. Compare and contrast stories in the same genre (e.g., mysteries and adventure stories) on their approaches to similar themes and topics.
9. Compare and contrast texts in different forms or genres (e.g., stories and poems; historical novels and fantasy stories) in terms of their approaches to similar themes and topics.
RANGE of READING and LEVEL of TEXT COMPLEXITY Grade 4 Grade 5 Grade 6
10. By the end of the year, read and comprehend literature, including stories, dramas, and poetry, in the grades 4–5 text complexity band proficiently, with scaffolding as needed at the high end of the range.
10. By the end of the year, read and comprehend literature, including stories, dramas, and poetry, at the high end of the grades 4–5 text complexity band independently and proficiently.
10. By the end of the year, read and comprehend literature, including stories, dramas, and poems, in the grades 6–8 text complexity band proficiently, with scaffolding as needed at the high end of the range.
RE
AD
ING
©Charlotte Knox knoxeducation.com – Narrative Writing – Page 9
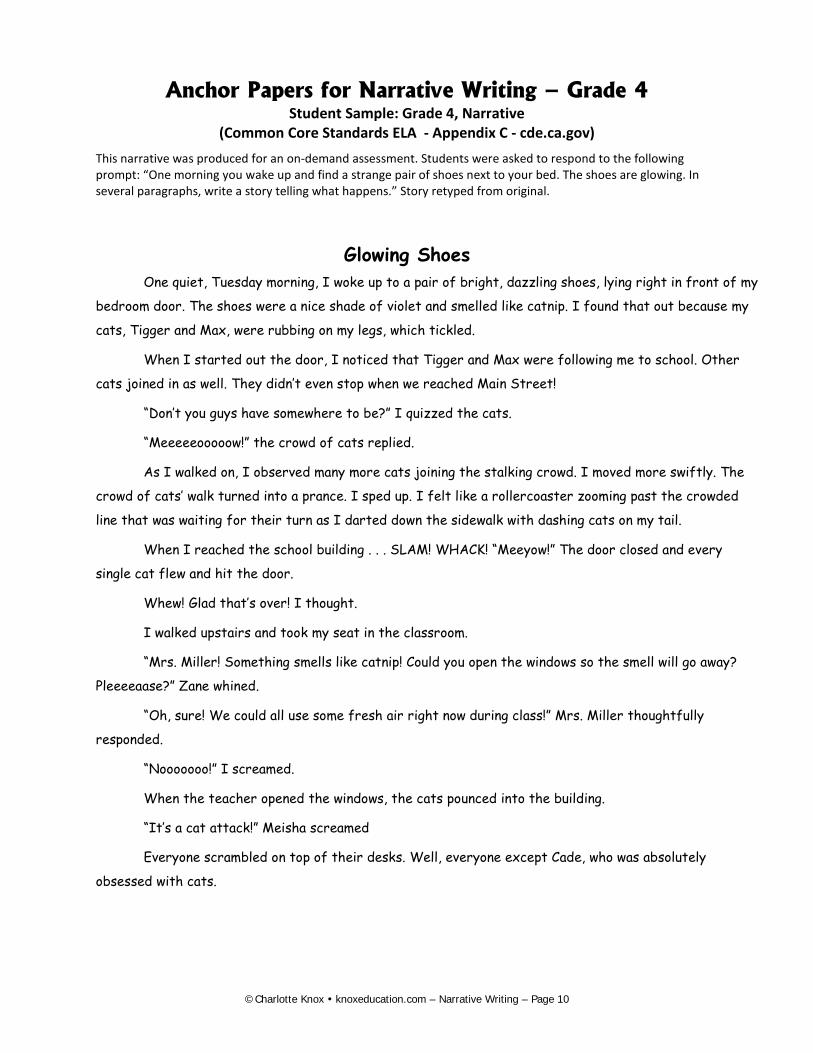
Anchor Papers for Narrative Writing – Grade 4 Student Sample: Grade 4, Narrative
(Common Core Standards ELA - Appendix C - cde.ca.gov) This narrative was produced for an on-demand assessment. Students were asked to respond to the following prompt: “One morning you wake up and find a strange pair of shoes next to your bed. The shoes are glowing. In several paragraphs, write a story telling what happens.” Story retyped from original.
Glowing Shoes One quiet, Tuesday morning, I woke up to a pair of bright, dazzling shoes, lying right in front of my
bedroom door. The shoes were a nice shade of violet and smelled like catnip. I found that out because my
cats, Tigger and Max, were rubbing on my legs, which tickled.
When I started out the door, I noticed that Tigger and Max were following me to school. Other
cats joined in as well. They didn’t even stop when we reached Main Street!
“Don’t you guys have somewhere to be?” I quizzed the cats.
“Meeeeeooooow!” the crowd of cats replied.
As I walked on, I observed many more cats joining the stalking crowd. I moved more swiftly. The
crowd of cats’ walk turned into a prance. I sped up. I felt like a rollercoaster zooming past the crowded
line that was waiting for their turn as I darted down the sidewalk with dashing cats on my tail.
When I reached the school building . . . SLAM! WHACK! “Meeyow!” The door closed and every
single cat flew and hit the door.
Whew! Glad that’s over! I thought.
I walked upstairs and took my seat in the classroom.
“Mrs. Miller! Something smells like catnip! Could you open the windows so the smell will go away?
Pleeeeaase?” Zane whined.
“Oh, sure! We could all use some fresh air right now during class!” Mrs. Miller thoughtfully
responded.
“Nooooooo!” I screamed.
When the teacher opened the windows, the cats pounced into the building.
“It’s a cat attack!” Meisha screamed
Everyone scrambled on top of their desks. Well, everyone except Cade, who was absolutely
obsessed with cats.
©Charlotte Knox knoxeducation.com – Narrative Writing – Page 10
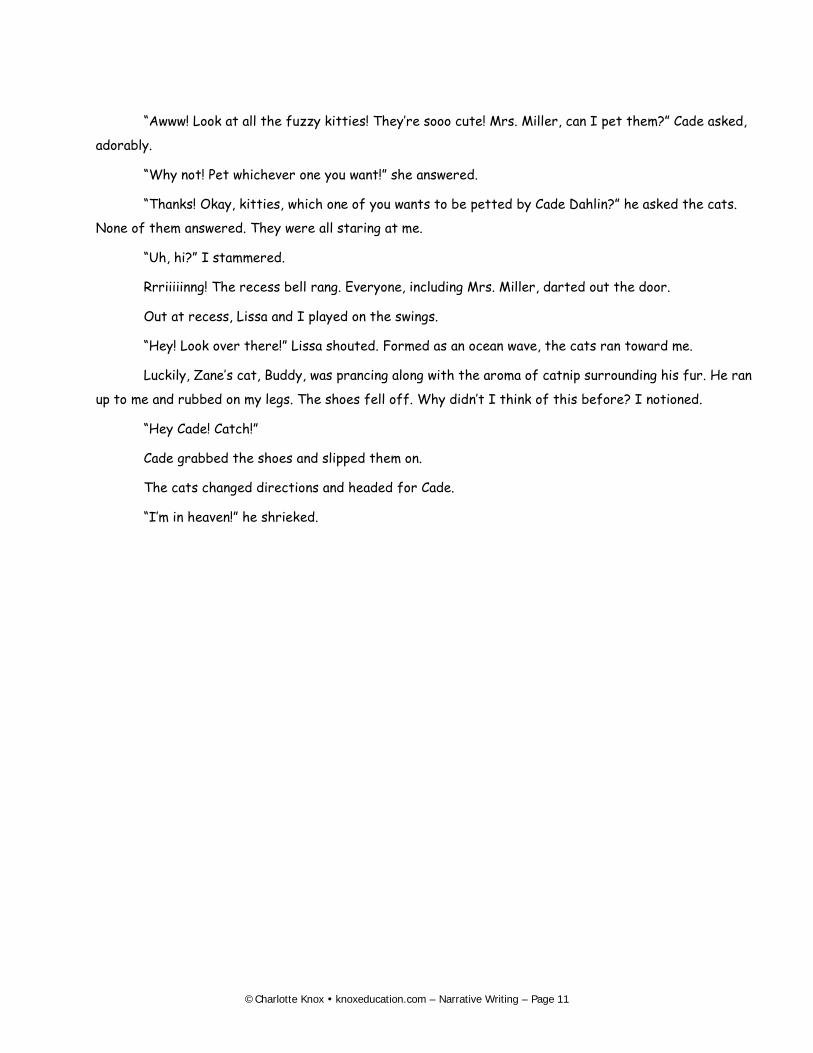
“Awww! Look at all the fuzzy kitties! They’re sooo cute! Mrs. Miller, can I pet them?” Cade asked,
adorably.
“Why not! Pet whichever one you want!” she answered.
“Thanks! Okay, kitties, which one of you wants to be petted by Cade Dahlin?” he asked the cats.
None of them answered. They were all staring at me.
“Uh, hi?” I stammered.
Rrriiiiinng! The recess bell rang. Everyone, including Mrs. Miller, darted out the door.
Out at recess, Lissa and I played on the swings.
“Hey! Look over there!” Lissa shouted. Formed as an ocean wave, the cats ran toward me.
Luckily, Zane’s cat, Buddy, was prancing along with the aroma of catnip surrounding his fur. He ran
up to me and rubbed on my legs. The shoes fell off. Why didn’t I think of this before? I notioned.
“Hey Cade! Catch!”
Cade grabbed the shoes and slipped them on.
The cats changed directions and headed for Cade.
“I’m in heaven!” he shrieked.
©Charlotte Knox knoxeducation.com – Narrative Writing – Page 11
Anchor Papers for Narrative Writing – Grade 5
Student Sample: Grade 5, Narrative
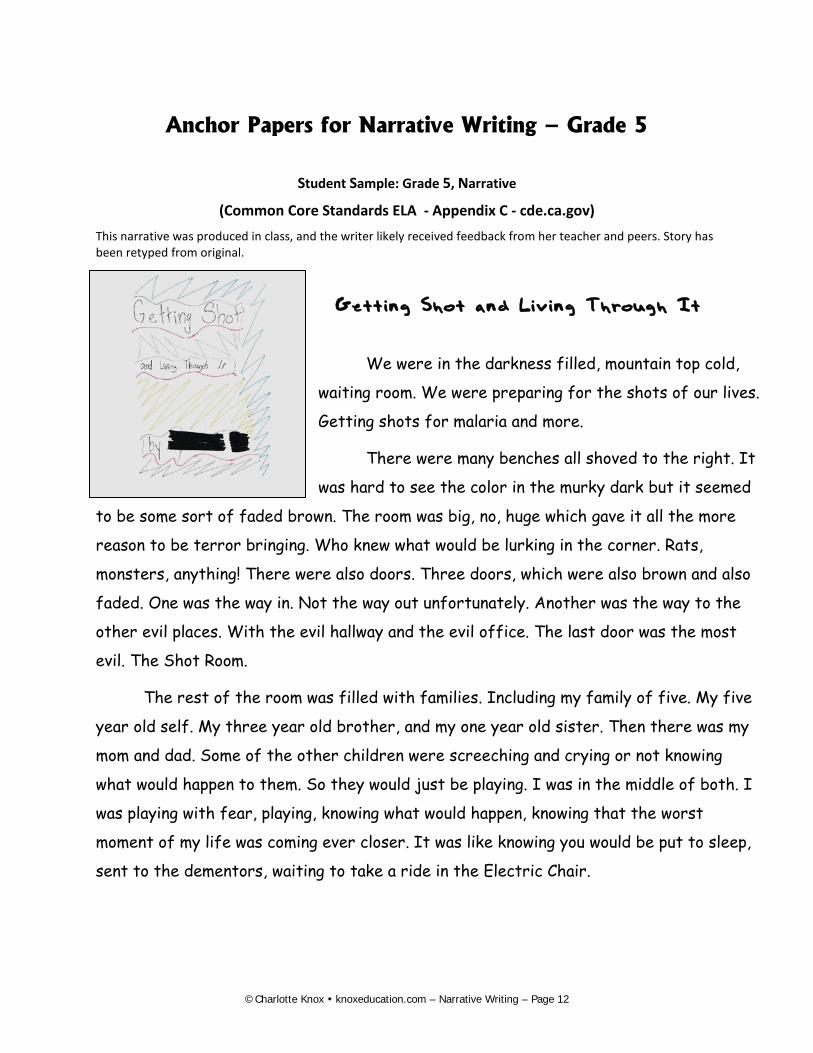
(Common Core Standards ELA - Appendix C - cde.ca.gov) This narrative was produced in class, and the writer likely received feedback from her teacher and peers. Story has been retyped from original.
Getting Shot and Living Through It
We were in the darkness filled, mountain top cold,
waiting room. We were preparing for the shots of our lives.
Getting shots for malaria and more.
There were many benches all shoved to the right. It
was hard to see the color in the murky dark but it seemed
to be some sort of faded brown. The room was big, no, huge which gave it all the more
reason to be terror bringing. Who knew what would be lurking in the corner. Rats,
monsters, anything! There were also doors. Three doors, which were also brown and also
faded. One was the way in. Not the way out unfortunately. Another was the way to the
other evil places. With the evil hallway and the evil office. The last door was the most
evil. The Shot Room.
The rest of the room was filled with families. Including my family of five. My five
year old self. My three year old brother, and my one year old sister. Then there was my
mom and dad. Some of the other children were screeching and crying or not knowing
what would happen to them. So they would just be playing. I was in the middle of both. I
was playing with fear, playing, knowing what would happen, knowing that the worst
moment of my life was coming ever closer. It was like knowing you would be put to sleep,
sent to the dementors, waiting to take a ride in the Electric Chair.
©Charlotte Knox knoxeducation.com – Narrative Writing – Page 12
I had shots before. They were not your best friend. After a long while a nurse
said, “Alyssa, Trevor, and Taryn, your turn.” It was our turn. I got half dragged and I
half walked. The door creaked open. It was the room of no return. The door slammed
shut. There was no way out. Grown-ups guarding every outryway, making sure we couldn’t
escape. Seeing there was no way out we gave up and went for it.
Trevor went first. Before the shot was even touching him he was already
howling. When it didn’t hit him he was yelling loud enough to deafen you. He was
done. It was my turn (he was still crying so a nurse tried to calm him down).
I was paralyzed with fear, I was death-defyed, I was scared. My mom and
dad told me to “just be brave.” “Just be brave?!”” How could I “just be brave?!” But
I had no time to think. It was coming, closer, closer!
It touched, entered my flesh, and fulfilled it’s job. I started with a whimper
then, BOOM! The last cry.
Then Taryn had her turn, she didn’t even notice! Ugh! She was supposed to
cry the most! Worse than Trevor!
But then I remembered it was over. We opened the door and the sparkling
sun blinded our eyes. It was over. All over.
Finally.
©Charlotte Knox knoxeducation.com – Narrative Writing – Page 13
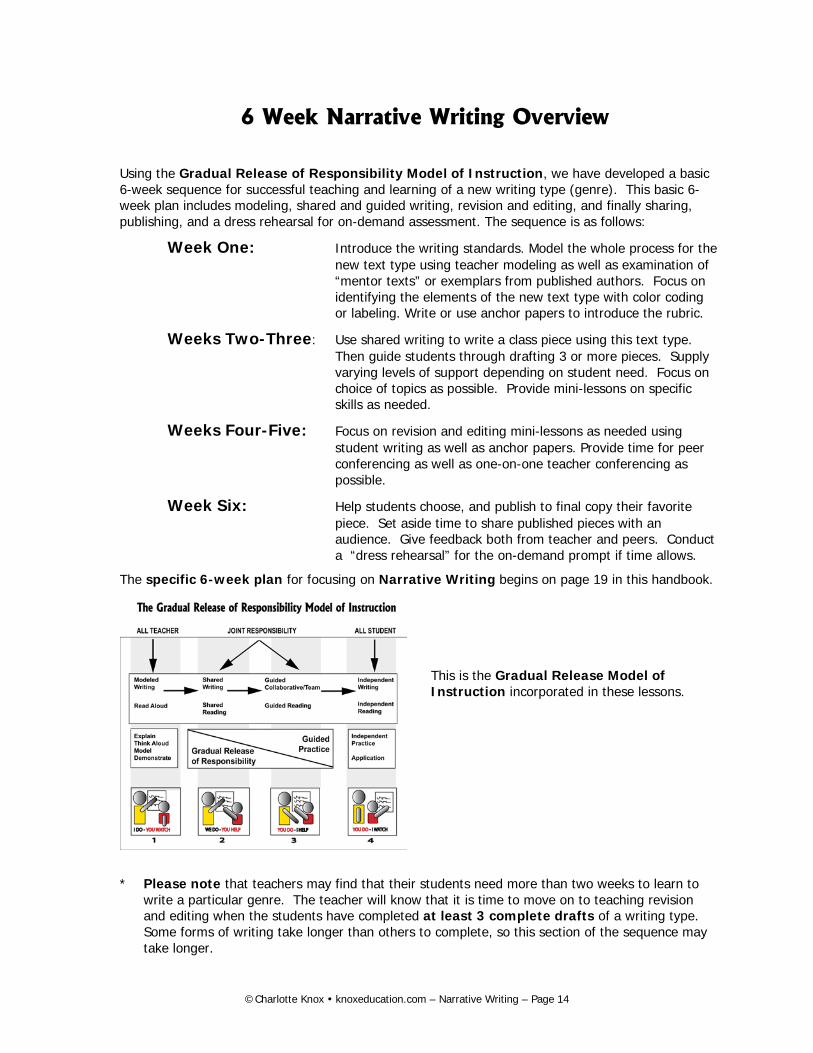
6 Week Narrative Writing Overview
Using the Gradual Release of Responsibility Model of Instruction, we have developed a basic 6-week sequence for successful teaching and learning of a new writing type (genre). This basic 6-week plan includes modeling, shared and guided writing, revision and editing, and finally sharing, publishing, and a dress rehearsal for on-demand assessment. The sequence is as follows:
Week One: Introduce the writing standards. Model the whole process for the new text type using teacher modeling as well as examination of “mentor texts” or exemplars from published authors. Focus on identifying the elements of the new text type with color coding or labeling. Write or use anchor papers to introduce the rubric.
Weeks Two-Three: Use shared writing to write a class piece using this text type. Then guide students through drafting 3 or more pieces. Supply varying levels of support depending on student need. Focus on choice of topics as possible. Provide mini-lessons on specific skills as needed.
Weeks Four-Five: Focus on revision and editing mini-lessons as needed using student writing as well as anchor papers. Provide time for peer conferencing as well as one-on-one teacher conferencing as possible.
Week Six: Help students choose, and publish to final copy their favorite piece. Set aside time to share published pieces with an audience. Give feedback both from teacher and peers. Conduct a “dress rehearsal” for the on-demand prompt if time allows.
The specific 6-week plan for focusing on Narrative Writing begins on page 19 in this handbook.
This is the Gradual Release Model of Instruction incorporated in these lessons.
* Please note that teachers may find that their students need more than two weeks to learn to write a particular genre. The teacher will know that it is time to move on to teaching revision and editing when the students have completed at least 3 complete drafts of a writing type. Some forms of writing take longer than others to complete, so this section of the sequence may take longer.
©Charlotte Knox knoxeducation.com – Narrative Writing – Page 14
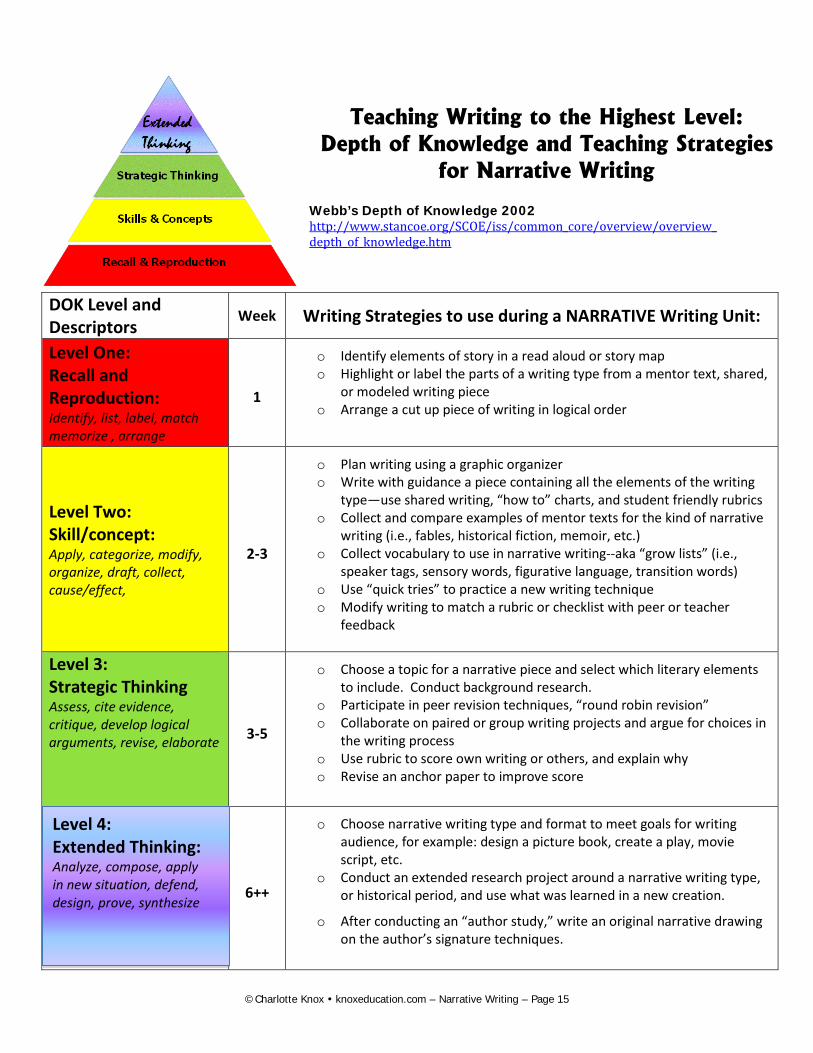
Teaching Writing to the Highest Level:
Depth of Knowledge and Teaching Strategies for Narrative Writing
Webb’s Depth of Knowledge 2002 http://www.stancoe.org/SCOE/iss/common_core/overview/overview_depth_of_knowledge.htm
DOK Level and Descriptors
Week Writing Strategies to use during a NARRATIVE Writing Unit:
Level One: Recall and Reproduction: Identify, list, label, match memorize , arrange
1
o Identify elements of story in a read aloud or story map o Highlight or label the parts of a writing type from a mentor text, shared,
or modeled writing piece o Arrange a cut up piece of writing in logical order
Level Two: Skill/concept: Apply, categorize, modify, organize, draft, collect, cause/effect,
2-3
o Plan writing using a graphic organizer o Write with guidance a piece containing all the elements of the writing
type—use shared writing, “how to” charts, and student friendly rubrics o Collect and compare examples of mentor texts for the kind of narrative
writing (i.e., fables, historical fiction, memoir, etc.) o Collect vocabulary to use in narrative writing--aka “grow lists” (i.e.,
speaker tags, sensory words, figurative language, transition words) o Use “quick tries” to practice a new writing technique o Modify writing to match a rubric or checklist with peer or teacher
feedback
Level 3: Strategic Thinking Assess, cite evidence, critique, develop logical arguments, revise, elaborate 3-5
o Choose a topic for a narrative piece and select which literary elements to include. Conduct background research.
o Participate in peer revision techniques, “round robin revision” o Collaborate on paired or group writing projects and argue for choices in
the writing process o Use rubric to score own writing or others, and explain why o Revise an anchor paper to improve score
6++
o Choose narrative writing type and format to meet goals for writing audience, for example: design a picture book, create a play, movie script, etc.
o Conduct an extended research project around a narrative writing type, or historical period, and use what was learned in a new creation.
o After conducting an “author study,” write an original narrative drawing on the author’s signature techniques.
Level 4: Extended Thinking: Analyze, compose, apply in new situation, defend, design, prove, synthesize
©Charlotte Knox knoxeducation.com – Narrative Writing – Page 15
Teaching Writing - Scaffolding
“Scaffolding is not simply a case
of breaking learning segments into scope and sequence. Instead, it is a complex interactive process
whereby the teacher regulates levels of support according to how well the children understand the task at hand.”
“By that we mean that the child’s behavior signals the teacher, I don’t need your help anymore.
I can do this by myself.” Dorn et. Al (1998). Apprenticeship in Literacy. York, ME: Stenhouse.
One of the most important aspects of the scaffolding process in writing is the celebration of the independence being earned along the way. The students need to be praised and validated for the skills that are becoming automatic. Understanding that automaticity means mastery provides a springboard for the student to take further risks and go deeper into the writing process. Writers invent themselves from successful feedback and praise experiences.
Most of us unfortunately learned to write through trial and error. We were given a writing assignment, and told how it would be graded. Then we faced the blank page and tried to figure out how to do the assignment to get the grade. Our efforts focused on getting a grade, not on improving our writing. When we are writing, our thinking should be about writing. Once we turned the paper in, we waited with trepidation to see how we did. The marks on our papers either became our “teachers” as reminders of what NOT to do next time, OR they simply made us feel a surge of resistance to any future writing tasks. As a result, many of us do not enjoy writing. This is not the way to train writers. However, it does scare students into copying someone else’s voice and style. Writing instruction is sabotaged when students only focus on completing assignments during the K-12 experience. Students learning to write in this way will never get to the depth necessary to be successful in college.
The most successful approach to teaching writing we have found with today’s students is to honor the Gradual Release of Responsibility Model of Instruction. The model is shown in the graphic on the previous page. To make this paradigm work, 1) we first model the process through writing in front of the students OR through showing them examples of that writing type. Next, 2) we identify the steps or processes involved with producing that genre and list these in student friendly language. After that, 3) we write another sample piece with input from the class. This is often called “shared writing” or “language experience”. Finally, 4) we provide guided writing experiences through mini-lessons preceding an independent writing period. During this phase of the model, 5) teachers can pull small groups of students to re-teach or extend the process based on individual progress with understanding writing skills. Differentiating for the language needs of English learners can also be offered during these small group sessions.
When this supportive flow is offered to student writers they become able to independently write a variety of complex forms of writing as indicated by the grade level standards for their age group. If students are still having difficulty, it’s a signal to the teacher that perhaps a more gradual release of responsibility is called for. The teacher can ask him or herself, “Did I model enough? Did we look at enough examples? Did we walk through the process as a group in shared writing? Have I provided support for vocabulary for English learners? Did I leave up the examples and checklists for reference as students write?” If the answer is no to any of the above…more support may be needed.
©Charlotte Knox knoxeducation.com – Narrative Writing – Page 16
Teaching Writing - Scaffolding
As an example, we are choosing to provide a detailed explanation for teaching descriptive w riting as a model for this section. Remember that using description in writing is a skill that extends across all grade levels and needs to be taught and revisited throughout elementary and middle school. The following pages show how descriptive writing instruction may look over a 6-week period. The first few pages in this chapter provide a template for lesson planning with reminders about what might happen during each phase of the model. Detailed notes for each phase follow the template and provide examples of the kinds of teaching charts that may be generated over this 6-week course of instruction. This process is repeated for each of the other genres explored in this book. The amount of time and the individual lessons can be planned by each teacher or grade level team based on the needs of the student writers and the constraints on the instructional schedule.
If necessary, for example, something new in writing could be taught with a single session each for modeling, shared writing, and guided writing. However, writing is a complex task, and most teachers will find it necessary to take more time to teach specific aspects of the writing process at hand. Direct explicit instruction must always be followed by a writing project or inquiry based activity to ensure integration of the material presented. The formula we prefer is: explicit instruction: 10/15minutes – writing practice: 20/30minutes – edit, debrief the process, and get response: 10/15 minutes. This provides for some variation in the classroom time and emphasis but ultimately allows for one hour of writing instruction, practice, support, review, editing, and reinforcement. Stand and deliver writing instruction does not stand alone without practice in writing. Worksheets regarding language conventions and rules are not writing practice; practice worksheets involve the subskills that lead to writing. SO, when we say practice the gradual release model related to descriptive texts, we are asking you to allow the students to write descriptions of something on a daily basis.
©Charlotte Knox knoxeducation.com – Narrative Writing – Page 17
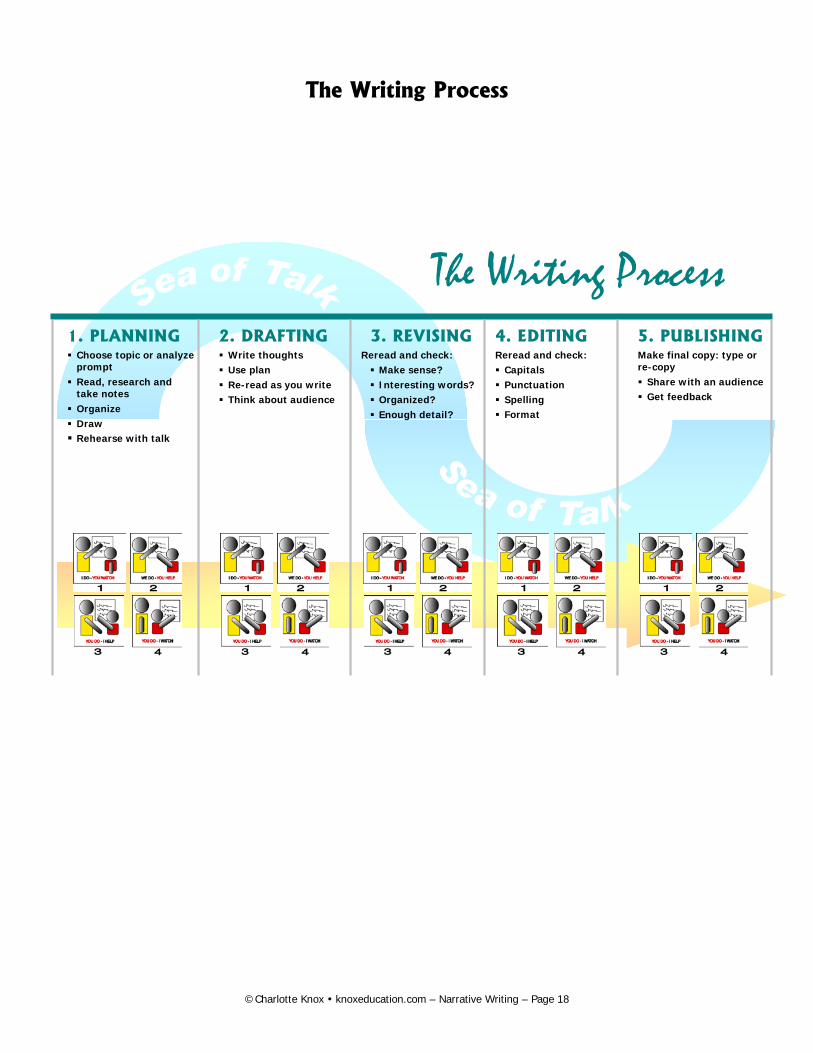
The Writing Process
1. PLANNING Choose topic or analyze
prompt Read, research and
take notes Organize Draw Rehearse with talk
2. DRAFTING Write thoughts Use plan Re-read as you write Think about audience
3. REVISING Reread and check: Make sense? Interesting words? Organized? Enough detail?
4. EDITING Reread and check: Capitals Punctuation Spelling Format
5. PUBLISHING Make final copy: type or re-copy Share with an audience Get feedback
The Writing Process
©Charlotte Knox knoxeducation.com – Narrative Writing – Page 18
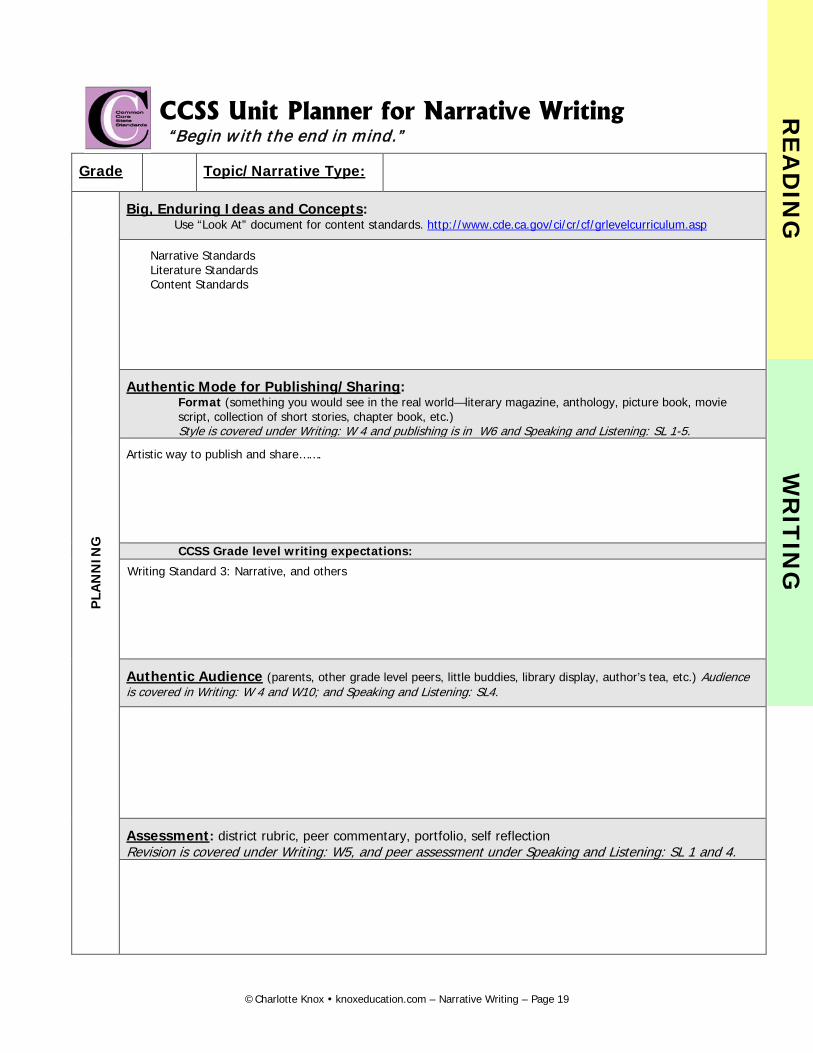
CCSS Unit Planner for Narrative Writing “Begin w ith the end in mind.”
Grade Topic/Narrative Type:
PLA
NN
ING
Big, Enduring Ideas and Concepts: Use “Look At” document for content standards. http://www.cde.ca.gov/ci/cr/cf/grlevelcurriculum.asp
Narrative Standards Literature Standards Content Standards
Authentic Mode for Publishing/Sharing: Format (something you would see in the real world—literary magazine, anthology, picture book, movie script, collection of short stories, chapter book, etc.) Style is covered under Writing: W 4 and publishing is in W6 and Speaking and Listening: SL 1-5.
Artistic way to publish and share…….
CCSS Grade level writing expectations:
Writing Standard 3: Narrative, and others
Authentic Audience (parents, other grade level peers, little buddies, library display, author’s tea, etc.) Audience is covered in Writing: W 4 and W10; and Speaking and Listening: SL4.
Assessment: district rubric, peer commentary, portfolio, self reflection Revision is covered under Writing: W5, and peer assessment under Speaking and Listening: SL 1 and 4.
RE
AD
ING
WR
ITIN
G
©Charlotte Knox knoxeducation.com – Narrative Writing – Page 19
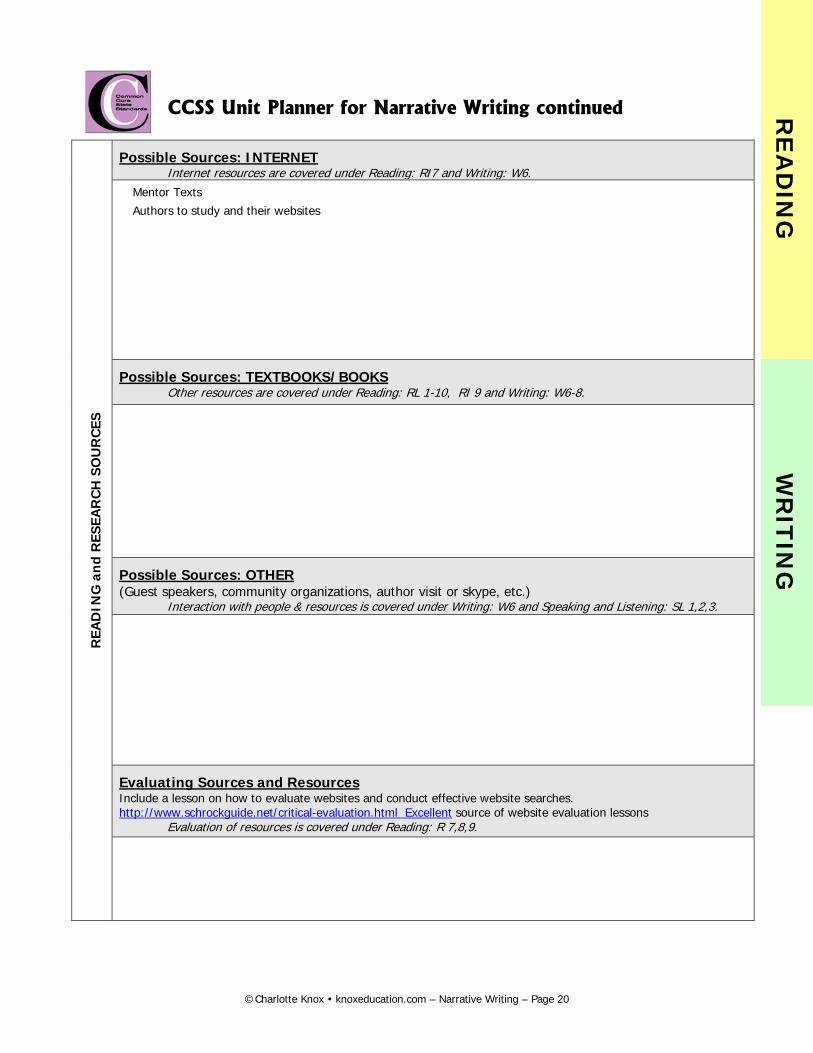
CCSS Unit Planner for Narrative Writing continued
REA
DIN
G a
nd
RES
EAR
CH
SO
UR
CES
Possible Sources: INTERNET Internet resources are covered under Reading: RI7 and Writing: W6.
Mentor Texts Authors to study and their websites
Possible Sources: TEXTBOOKS/BOOKS Other resources are covered under Reading: RL 1-10, RI 9 and Writing: W6-8.
Possible Sources: OTHER (Guest speakers, community organizations, author visit or skype, etc.) Interaction with people & resources is covered under Writing: W6 and Speaking and Listening: SL 1,2,3.
Evaluating Sources and Resources Include a lesson on how to evaluate websites and conduct effective website searches. http://www.schrockguide.net/critical-evaluation.html Excellent source of website evaluation lessons Evaluation of resources is covered under Reading: R 7,8,9.
RE
AD
ING
WR
ITIN
G
©Charlotte Knox knoxeducation.com – Narrative Writing – Page 20
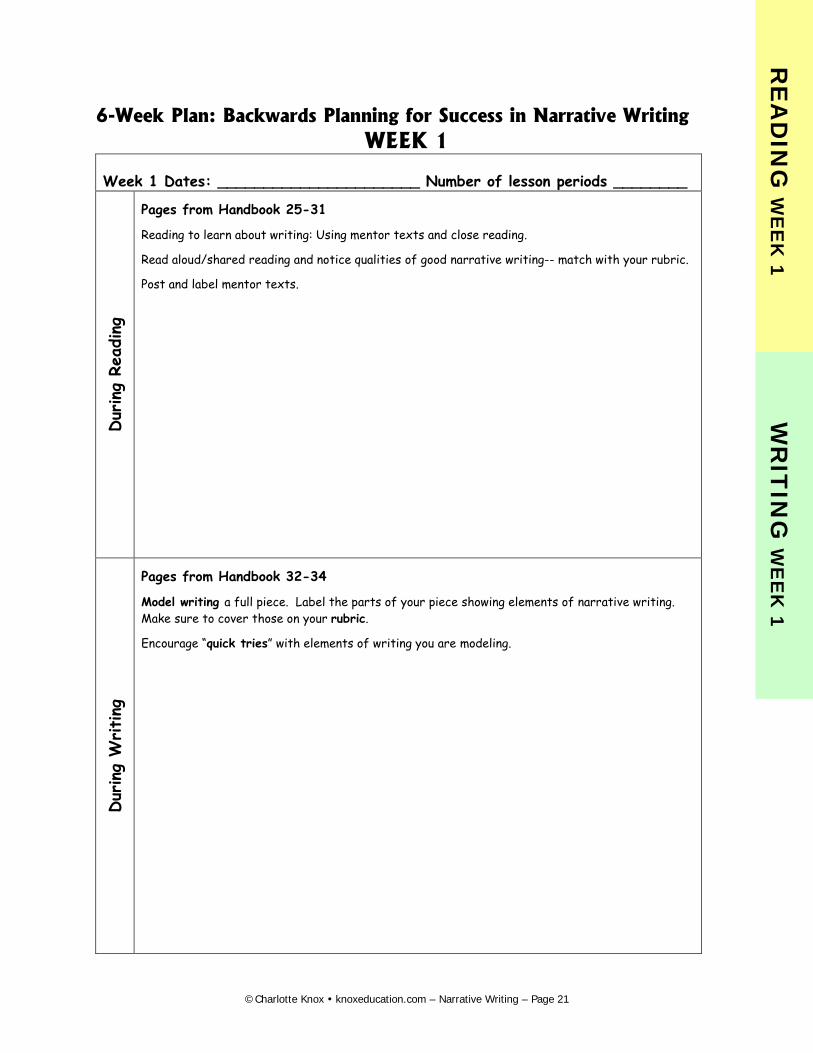
6-Week Plan: Backwards Planning for Success in Narrative Writing WEEK 1
Week 1 Dates: ______________________ Number of lesson periods ________
Dur
ing
Read
ing
Pages from Handbook 25-31
Reading to learn about writing: Using mentor texts and close reading.
Read aloud/shared reading and notice qualities of good narrative writing-- match with your rubric.
Post and label mentor texts.
Dur
ing
Writing
Pages from Handbook 32-34
Model writing a full piece. Label the parts of your piece showing elements of narrative writing. Make sure to cover those on your rubric.
Encourage “quick tries” with elements of writing you are modeling.
RE
AD
ING
WE
EK
1 W
RIT
ING
WE
EK
1
©Charlotte Knox knoxeducation.com – Narrative Writing – Page 21
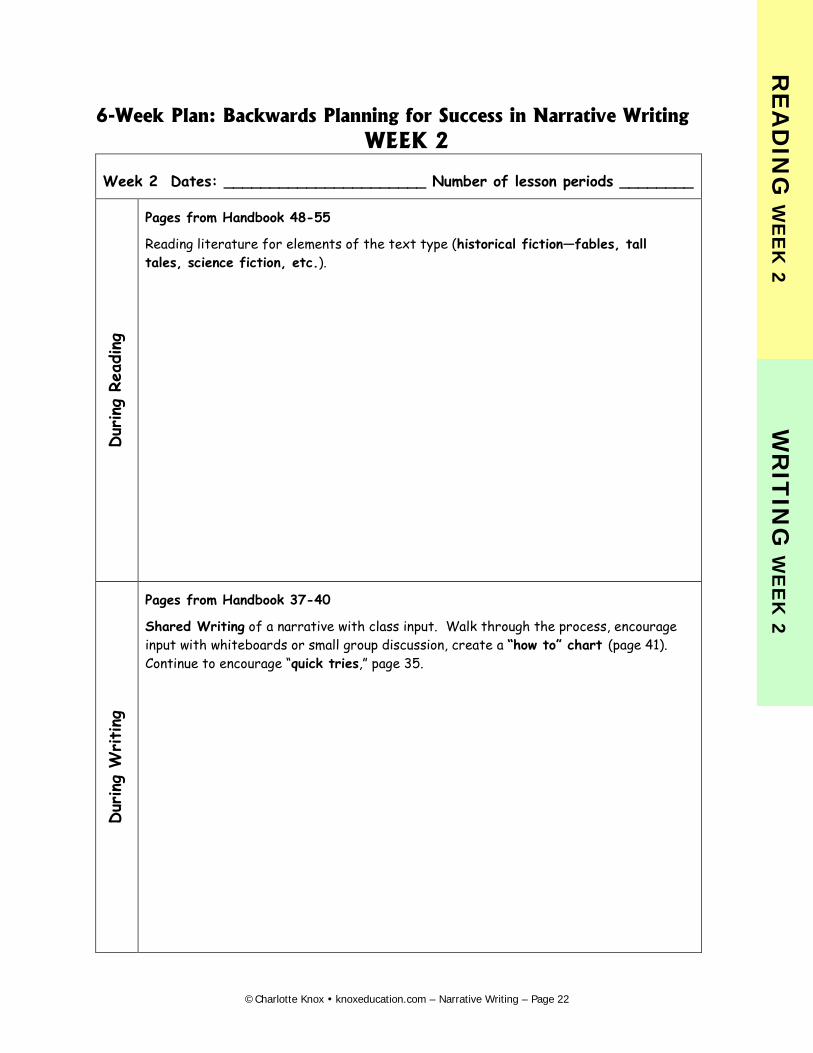
6-Week Plan: Backwards Planning for Success in Narrative Writing WEEK 2
Week 2 Dates: ______________________ Number of lesson periods ________
Dur
ing
Read
ing
Pages from Handbook 48-55
Reading literature for elements of the text type (historical fiction—fables, tall tales, science fiction, etc.).
Dur
ing
Writing
Pages from Handbook 37-40
Shared Writing of a narrative with class input. Walk through the process, encourage input with whiteboards or small group discussion, create a “how to” chart (page 41). Continue to encourage “quick tries,” page 35.
RE
AD
ING
WE
EK
2 W
RIT
ING
WE
EK
2
©Charlotte Knox knoxeducation.com – Narrative Writing – Page 22

6-Week Plan: Backwards Planning for Success in Narrative Writing WEEKS 3-4
Weeks 3-4 Dates: ___________________ Number of lesson periods ________
Dur
ing
Read
ing
Continue to explore literature OR conduct research for background information of students’ writing choices to develop settings, characters, story line.
Dur
ing
Writing
Pages from Handbook 32-71
Guided Writing: students choose, plan, and draft one or more pieces following the process modeled in weeks 1-2. Mini-lessons: provide short, targeted lessons on aspects of narrative as needed. Write anchor papers with students to match their rubric (student checklists 59-61 and teacher rubrics are on pages 85-87 of handbook).
RE
AD
ING
Weeks 3-4
WR
ITIN
G W
eeks 3-4
©Charlotte Knox knoxeducation.com – Narrative Writing – Page 23
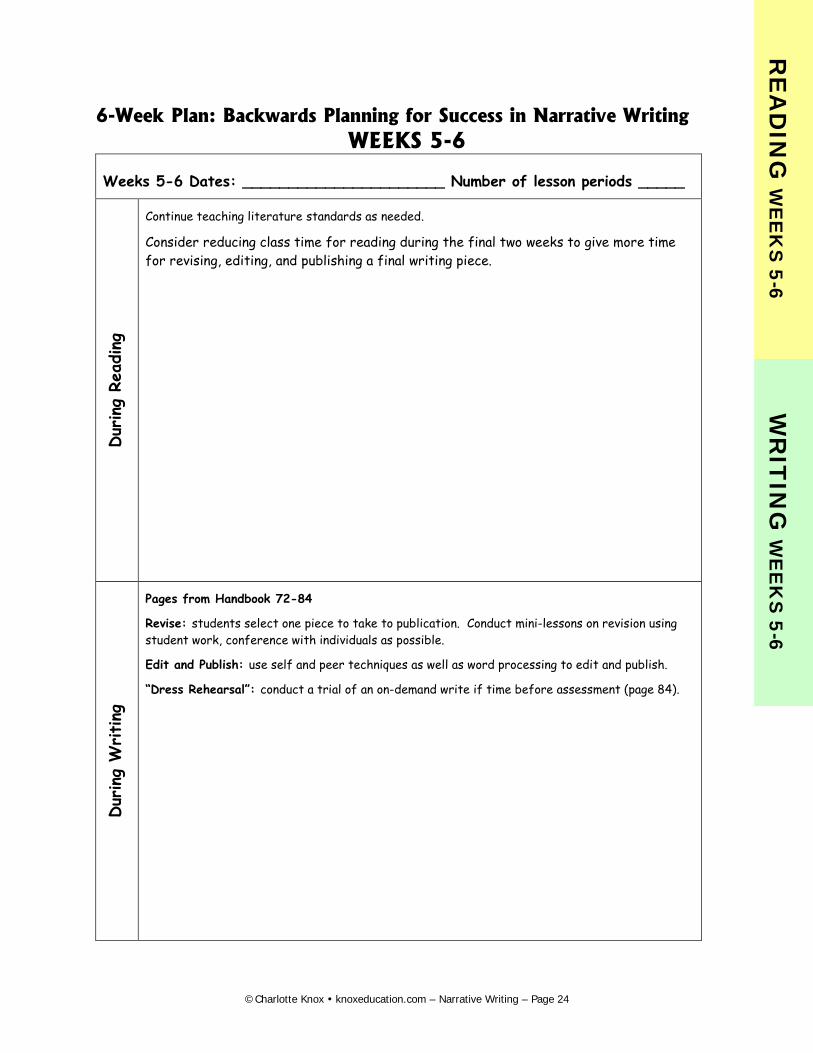
6-Week Plan: Backwards Planning for Success in Narrative Writing WEEKS 5-6
Weeks 5-6 Dates: ______________________ Number of lesson periods _____
Dur
ing
Read
ing
Continue teaching literature standards as needed.
Consider reducing class time for reading during the final two weeks to give more time for revising, editing, and publishing a final writing piece.
Dur
ing
Writing
Pages from Handbook 72-84
Revise: students select one piece to take to publication. Conduct mini-lessons on revision using student work, conference with individuals as possible.
Edit and Publish: use self and peer techniques as well as word processing to edit and publish.
“Dress Rehearsal”: conduct a trial of an on-demand write if time before assessment (page 84).
RE
AD
ING
WE
EK
S 5-6
WR
ITIN
G W
EE
KS
5-6
©Charlotte Knox knoxeducation.com – Narrative Writing – Page 24
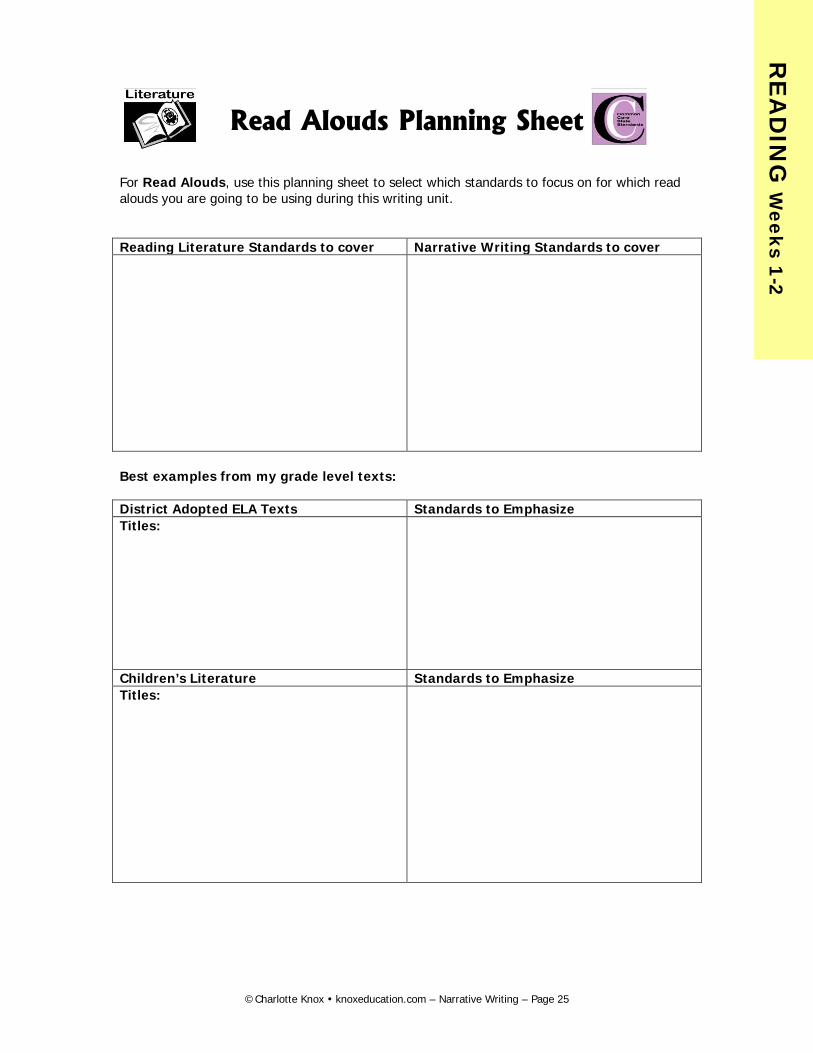
Read Alouds Planning Sheet For Read Alouds, use this planning sheet to select which standards to focus on for which read alouds you are going to be using during this writing unit. Reading Literature Standards to cover Narrative Writing Standards to cover
Best examples from my grade level texts: District Adopted ELA Texts Standards to Emphasize Titles:
Children’s Literature Standards to Emphasize Titles:
RE
AD
ING
Weeks 1-2
©Charlotte Knox knoxeducation.com – Narrative Writing – Page 25
Read Alouds “The single most important activity for building the knowledge required for eventual success in reading is reading aloud to children. Reading aloud is a practice that should continue throughout the grades.”
Becoming a Nation of Readers (1985)
Benefits of Reading Aloud to Students: • Introduces students to the language of books--book concepts, story structures, literary
language, and specialized vocabulary
• Gives them access to new worlds of knowledge
• Helps them learn new concepts without having to worry about reading each word
• Bridges the gap between oral and written language
• Provides models of fluent and expressive reading
• Exposes students to a wide range of story genres and individual author’s styles
• Allows children to see into the worlds of culturally diverse people through the use of high quality multi-cultural literature
• Builds a sense of literary community in the classroom as students experience and discuss texts together
Procedures for Read Alouds: Book Introduction:
Engage students in a discussion that will help them anticipate the meaning of the selection. This should include lots of talk connecting students’ prior knowledge or experiences with the topic.
This may include discussion about:
• the genres type
• the author’s style and other books known by that author
• the format of the book
For ELLs: Use visuals to make the discussion comprehensible (the book illustrations, other charts/maps/photos etc.). Bring in realia when possible that relates to the story. Allow children to rehearse the discussion in their primary language with others. If you are bilingual, provide an overview of the story before reading in the students’ primary language. Alternatively, you can provide a book overview in simple English and use the visuals from the text as comprehensible input during this preview.
RE
AD
ING
Weeks 1-2
Differentiation Techniques for Narrative Writing are at the end of this
handbook.
©Charlotte Knox knoxeducation.com – Narrative Writing – Page 26
Read Alouds During Reading:
Read with expression. Show pictures to enhance the text. Display the illustrations via document camera as possible.
Facilitate analytic talk:
• Stop and connect to background knowledge
• Stop and reflect on the meaning of a word or phrase in context
• Stop and facilitate a prediction
For ELLs: Point clearly to the illustrations you are discussing, preview parts of the story in conversational English as you talk through the illustrations. Use book illustration, realia, gesture, quick doodles etc. where possible to explain unknown vocabulary.
After Reading:
Facilitate a retelling using the illustrations to recall the storyline if needed. Encourage full group participation with partner talk, or by assigning each part of the story to a different group or pair of students.
For ELLs: Use visuals to support retelling (draw on the whiteboard or chart, copies of book illustrations, etc.).
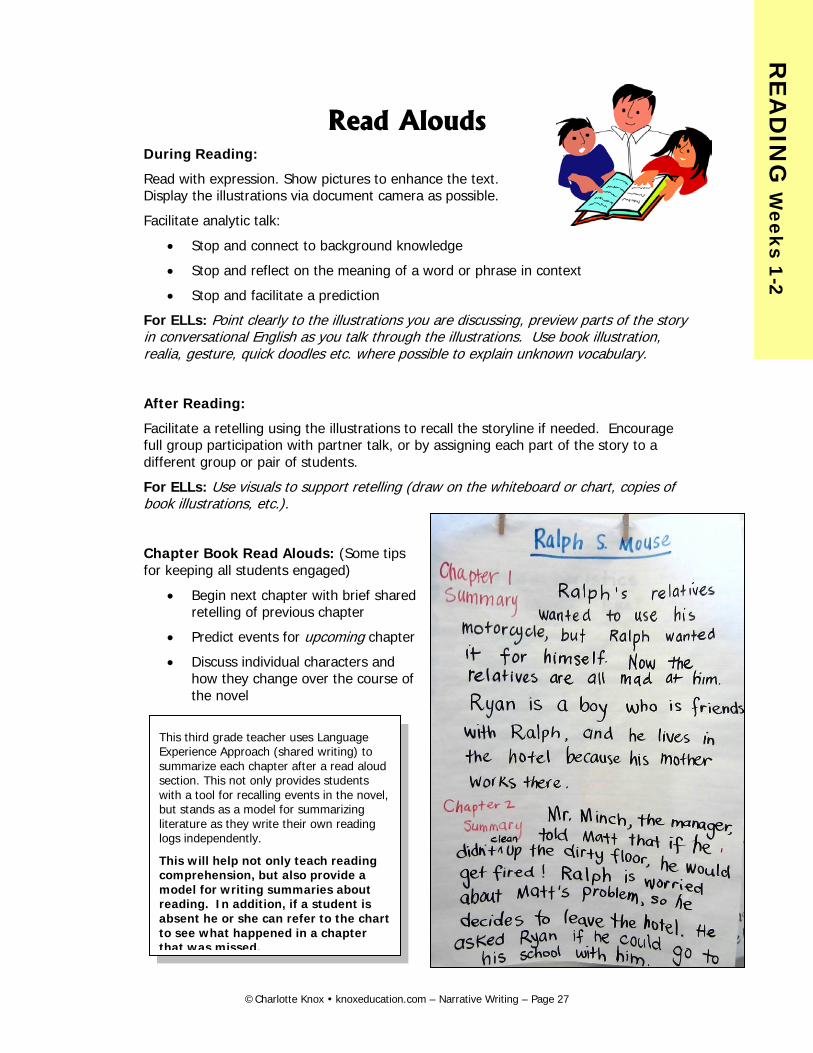
Chapter Book Read Alouds: (Some tips for keeping all students engaged)
• Begin next chapter with brief shared retelling of previous chapter
• Predict events for upcoming chapter
• Discuss individual characters and how they change over the course of the novel
This third grade teacher uses Language Experience Approach (shared writing) to summarize each chapter after a read aloud section. This not only provides students with a tool for recalling events in the novel, but stands as a model for summarizing literature as they write their own reading logs independently.
This will help not only teach reading comprehension, but also provide a model for writing summaries about reading. In addition, if a student is absent he or she can refer to the chart to see what happened in a chapter that was missed.
RE
AD
ING
Weeks 1-2
©Charlotte Knox knoxeducation.com – Narrative Writing – Page 27
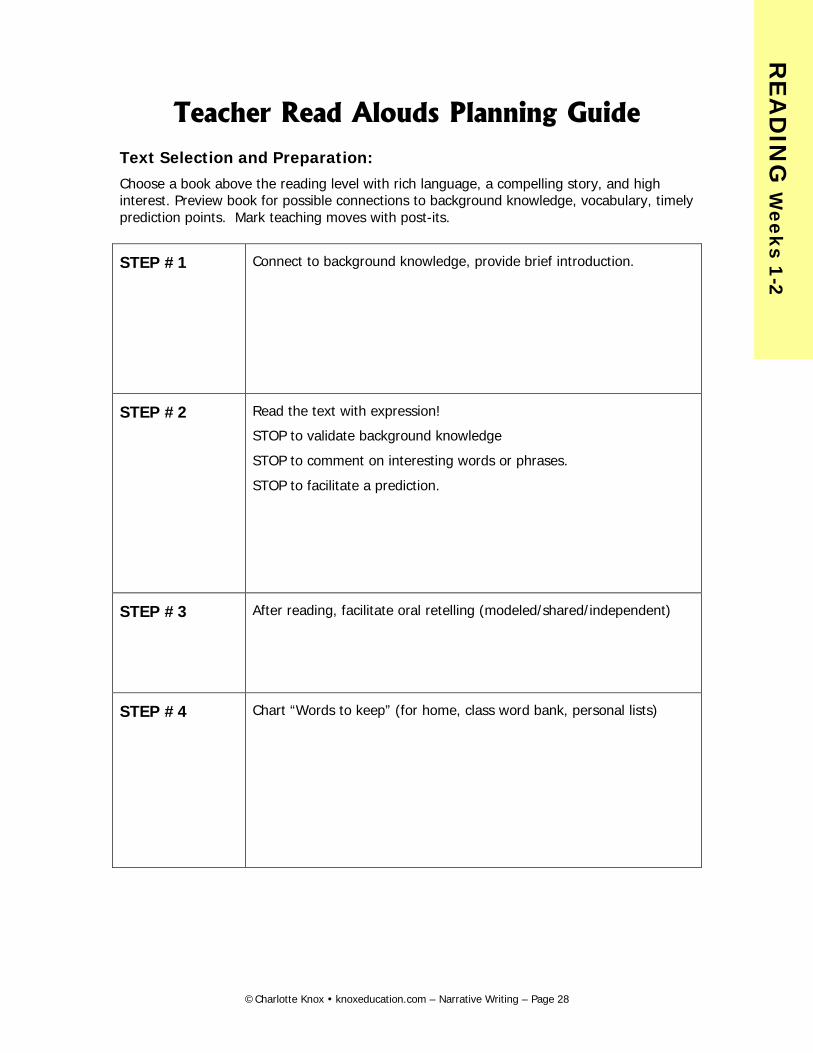
Teacher Read Alouds Planning Guide Text Selection and Preparation:
Choose a book above the reading level with rich language, a compelling story, and high interest. Preview book for possible connections to background knowledge, vocabulary, timely prediction points. Mark teaching moves with post-its.
STEP #1 Connect to background knowledge, provide brief introduction.
STEP #2 Read the text with expression!
STOP to validate background knowledge
STOP to comment on interesting words or phrases.
STOP to facilitate a prediction.
STEP #3 After reading, facilitate oral retelling (modeled/shared/independent)
STEP #4 Chart “Words to keep” (for home, class word bank, personal lists)
RE
AD
ING
Weeks 1-2
©Charlotte Knox knoxeducation.com – Narrative Writing – Page 28
GUESS and ADJUST
This strategy can help students learn to use context as a tool for defining unfamiliar vocabulary.
Reading Anchor Standard 4
Interpret words and phrases as they are used in a text, including determining technical, connotative, and figurative meanings, and analyze how specific word choices shape meaning or tone.
⇒ Choose one to three words from the read aloud with multiple meanings. Select words that can be clearly defined when read in context, but may have unexpected meanings when read within the story.
⇒ Students ‘Guess’ the meaning of each word.
Ask the students to define word with prompts such as:
• Does anyone think they know what this word means?
• Does this word remind you of any word you know?
• What do you think it might mean? Why?
List the student responses next to the words so that they can check their predictions against what they discover in the text.
⇒ Read the text. During this read aloud, project the text on the screen so that when you encounter the word(s) you can explore the context clues around it to find out the meaning of the word in that text.
⇒ ‘Adjust’ the meaning of each word using information from its context.
• Discuss the adjustments and why they were made.
• Ask: What information caused you to adjust?
RE
AD
ING
Weeks 1-2
©Charlotte Knox knoxeducation.com – Narrative Writing – Page 29
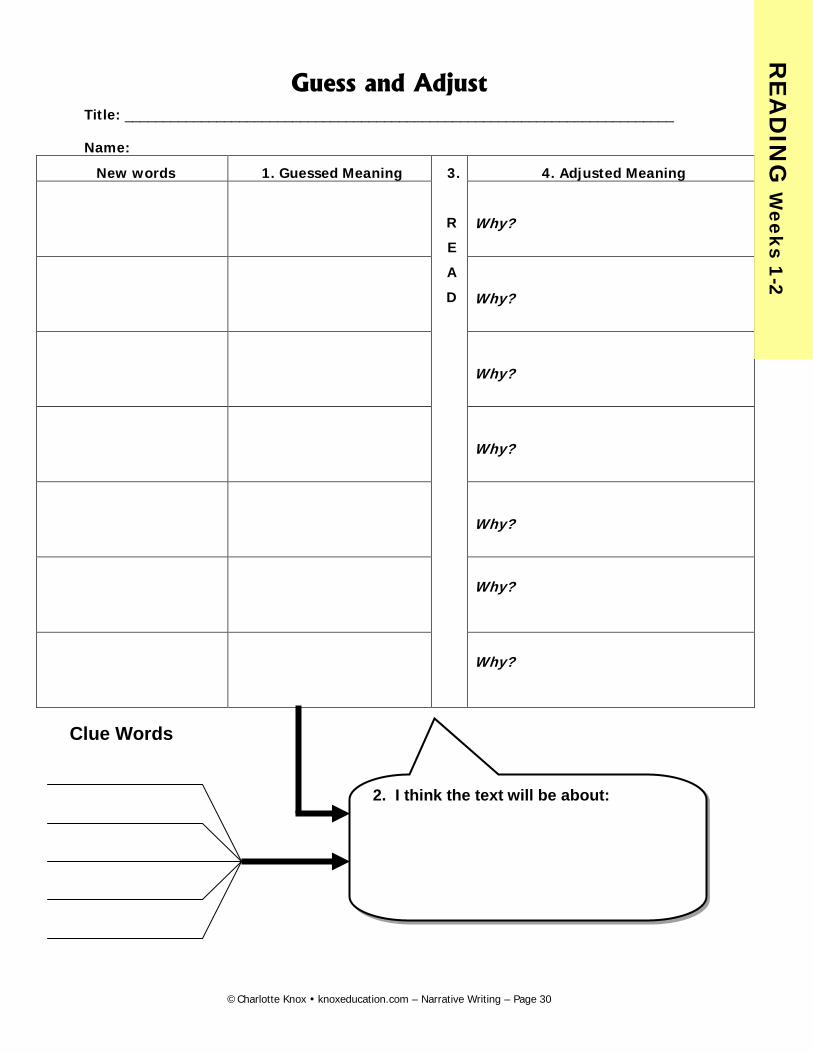
Guess and Adjust Title: ________________________________________________________________________
Name:
New words 1. Guessed Meaning 3.
R
E
A
D
4. Adjusted Meaning
Why?
Why?
Why?
Why?
Why?
Why?
Why?
Clue Words
2. I think the text will be about:
RE
AD
ING
Weeks 1-2
©Charlotte Knox knoxeducation.com – Narrative Writing – Page 30
Where to Read More about Read Alouds:
Calkins, Lucy (2001) The Art of Teaching Reading. New York, NY: Addison Wesley.
Fox, Mem (2001) Reading Magic: Why Reading Aloud to Our Children Will Change Their Lives Forever. New York, NY: Harcourt Brace.
Routman, Regie (2000) Conversations. Portsmouth, NH: Heinemann.
Trelease, Jim (2013) The Read Aloud Handbook. New York, NY: Penguin.
Trelease, Jim (1993) Read All About It. New York, NY: Penguin.
Where to find more on the web:
www.memfox.net You can listen to Mem herself read from several titles on this wonderful site. There is also a lecture by Mem describing how to read aloud to children based on her book, above, on this site.
http://www.trelease-on-reading.com/index.html
Totally comprehensive website dedicated to his lifetime study of the power of reading aloud to children. There are loads of free resources such as brochures for parents about reading aloud.
www.readaloud.org This site houses the national movement to get parents to spend 15 minutes reading to their children daily. It has wonderful downloadable g
RE
AD
ING
Weeks 1-2
©Charlotte Knox knoxeducation.com – Narrative Writing – Page 31
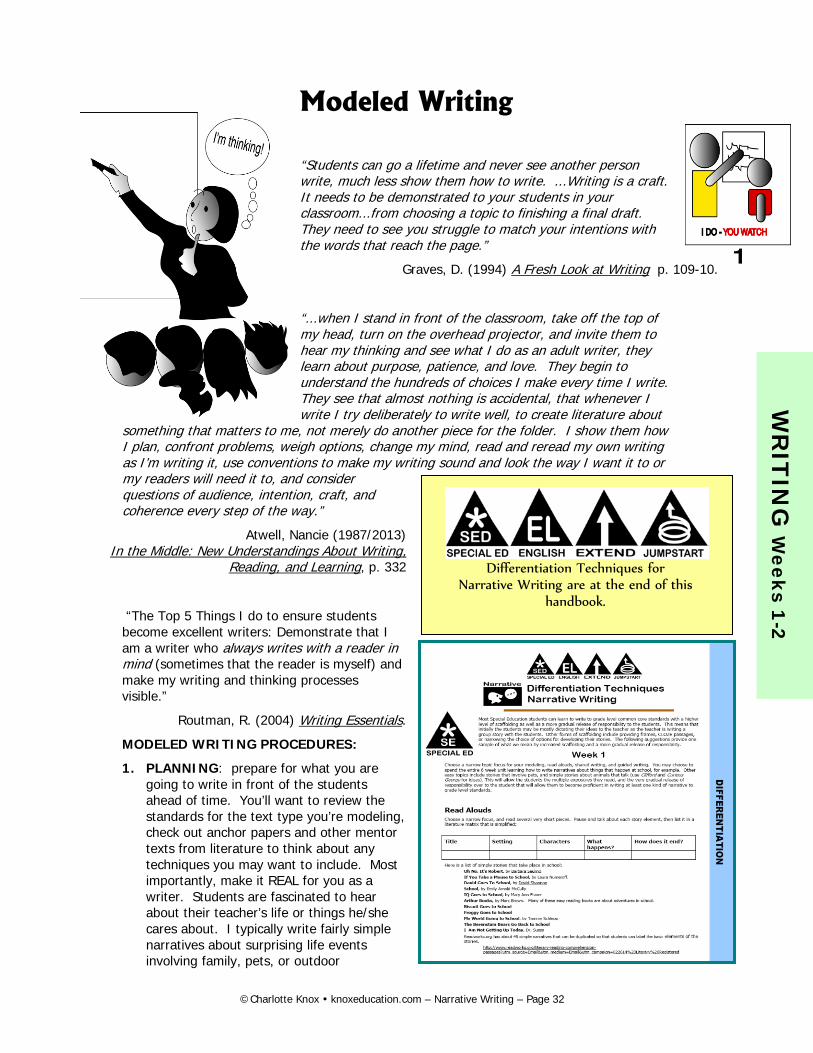
Modeled Writing “Students can go a lifetime and never see another person write, much less show them how to write. ...Writing is a craft. It needs to be demonstrated to your students in your classroom...from choosing a topic to finishing a final draft. They need to see you struggle to match your intentions with the words that reach the page.”
Graves, D. (1994) A Fresh Look at Writing p. 109-10.
“...when I stand in front of the classroom, take off the top of my head, turn on the overhead projector, and invite them to hear my thinking and see what I do as an adult writer, they learn about purpose, patience, and love. They begin to understand the hundreds of choices I make every time I write. They see that almost nothing is accidental, that whenever I write I try deliberately to write well, to create literature about
something that matters to me, not merely do another piece for the folder. I show them how I plan, confront problems, weigh options, change my mind, read and reread my own writing as I’m writing it, use conventions to make my writing sound and look the way I want it to or my readers will need it to, and consider questions of audience, intention, craft, and coherence every step of the way.”
Atwell, Nancie (1987/2013) In the Middle: New Understandings About Writing,
Reading, and Learning, p. 332
“The Top 5 Things I do to ensure students become excellent writers: Demonstrate that I am a writer who always writes with a reader in mind (sometimes that the reader is myself) and make my writing and thinking processes visible.”
Routman, R. (2004) Writing Essentials.
MODELED WRITING PROCEDURES:
1. PLANNING: prepare for what you are going to write in front of the students ahead of time. You’ll want to review the standards for the text type you’re modeling, check out anchor papers and other mentor texts from literature to think about any techniques you may want to include. Most importantly, make it REAL for you as a writer. Students are fascinated to hear about their teacher’s life or things he/she cares about. I typically write fairly simple narratives about surprising life events involving family, pets, or outdoor
Differentiation Techniques for Narrative Writing are at the end of this
handbook.
W
RIT
ING
Weeks 1-2
©Charlotte Knox knoxeducation.com – Narrative Writing – Page 32

adventures. Take care not to choose topics for your writing that are beyond the imagination or background experiences of your students. Help your students see through your modeling that their every day lives may provide opportunities for stories to tell. Once you’ve decided the direction of your modeling, take some notes on a post-it to keep handy during the lesson, it can be challenging to be thinking out loud as a writer, while also managing a classroom full of students.
2. DRAFTING: Gather the students to the rug or draw their attention to your chart or writing
projected on-screen. Tell them that you are going to show them what you do while you are writing, and that their job is to simply observe what you do to see if they can pick up some tips for writing. Older students may even take notes about what you do as you write. Remind them that this is your writing, not a shared writing. To make this literal start by writing your title and listing yourself as the author.
Begin writing and keep a running dialogue going about every step of your thinking process. Your monologue might sound like this:
“So I was looking at my notes and thinking I might want to start this story off with the sound of my cat meowing to get the reader’s attention. Let’s see, I could write……Meeeoooow, meeooow! A howling noise outside the window interrupted dinner at
the Jones’ house……. Ok, that’s a start, it tells when it happened and where, now I need more detail…. Suddenly, Ms. Jones realized she hadn’t seen my cat since she got home from
working late at school……. Ok, so now they know the main character is a teacher……. “Not
again! What are we going to do about Jason’s cat? He seems to want to cause a nuisance
every day.”
This dialogue will let the readers know the character doesn’t like this cat.
3. REREADING: Modeled writing gives teachers an authentic excuse for teaching students to
reread as they write. After you add each sentence or two, tell the students you need to reread what you have so far to see about what you will write next. Continue to reread and add more writing until you are done with the whole piece or the section you are working on for that day.
4. REVISION: Modeling allows you to show students in a natural way how some revision happens as you are writing a piece. Feel free to modify words or sentences as you go during modeled writing. For example in the piece above, I may, after rereading the first part, add a descriptor to howling: “a mournful howling” might sound better. You can show the students how to insert more language with a carat. ^
5. CONVENTIONS: Modeled writing is not the time to focus on conventions. Making errors on purpose so that your students can “catch” you, takes the focus away from the purpose of modeled writing which is to demonstrate for students what good writers do in their heads as they write. Belaboring the modeled writing process with talk of the conventions will distract students from the composing process.
6. DEBRIEFING: When you are finished, ask students to share with you what they saw you doing
as a writer. You may want to start a chart labeled “What Ms. _____does when she writes” and list there what the students notice that you do so they can remember literally what you did when they are working on their own pieces.
W
RIT
ING
Weeks 1-2
WR
ITIN
G W
eeks 1-2
©Charlotte Knox knoxeducation.com – Narrative Writing – Page 33
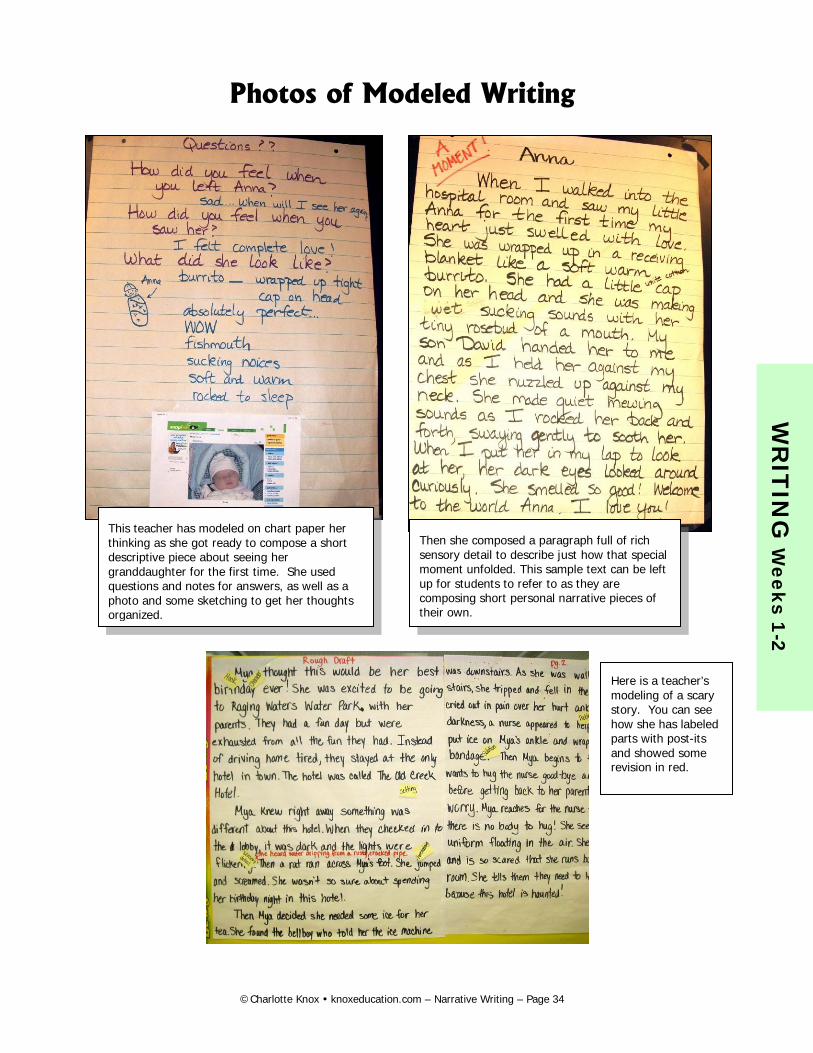
Photos of Modeled Writing
Then she composed a paragraph full of rich sensory detail to describe just how that special moment unfolded. This sample text can be left up for students to refer to as they are composing short personal narrative pieces of their own.
This teacher has modeled on chart paper her thinking as she got ready to compose a short descriptive piece about seeing her granddaughter for the first time. She used questions and notes for answers, as well as a photo and some sketching to get her thoughts organized.
Here is a teacher’s modeling of a scary story. You can see how she has labeled parts with post-its and showed some revision in red.
W
RIT
ING
Weeks 1-2
©Charlotte Knox knoxeducation.com – Narrative Writing – Page 34
“Quick Tries” for Writing Letting students “have a go” with a writing idea
An effective way to get students to put a mini lesson or shared writing demonstration to use right away is to encourage Quick Tries. Following any lesson, have students try out the demonstrated strategy. For example, if you’ve just produced a piece of your narrative during shared or modeled writing with lots of visual detail, ask students to close their eyes and visualize the opening scene of their story. Next, ask them to write out what they saw as quickly as they can without worrying about spelling or even neatness! This is very similar to a “free write” but strategically focuses on the writing element the students just learned about. This also removes any pressure for correctness that students may feel when they are adding writing to a larger project.
Other examples of “quick tries” while teaching narrative writing might include:
• Write a piece of dialogue for your character. What would your character say to someone in your scene?
• Write to show how your character is feeling without using any feeling words • Write a few sentences to describe what it sounds like in your setting
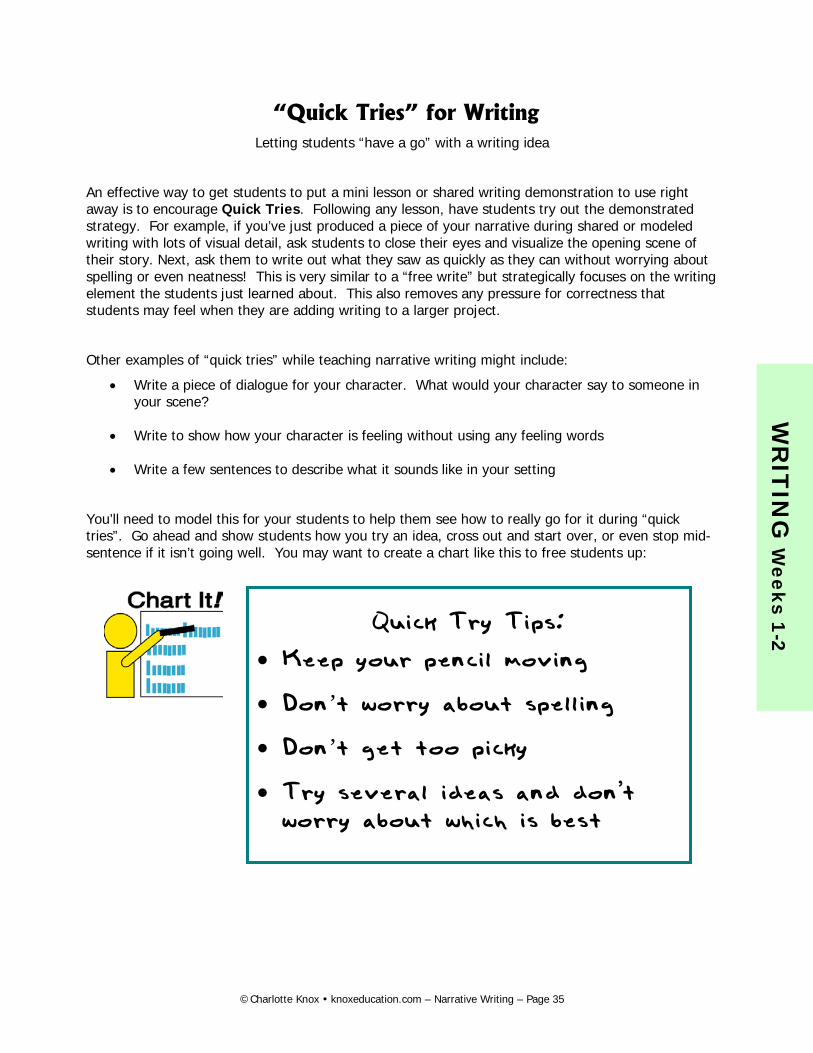
You’ll need to model this for your students to help them see how to really go for it during “quick tries”. Go ahead and show students how you try an idea, cross out and start over, or even stop mid-sentence if it isn’t going well. You may want to create a chart like this to free students up:
Quick Try Tips:
• Keep your pencil moving
• Don’t worry about spelling
• Don’t get too picky
• Try several ideas and don’t worry about which is best
W
RIT
ING
Weeks 1-2
©Charlotte Knox knoxeducation.com – Narrative Writing – Page 35
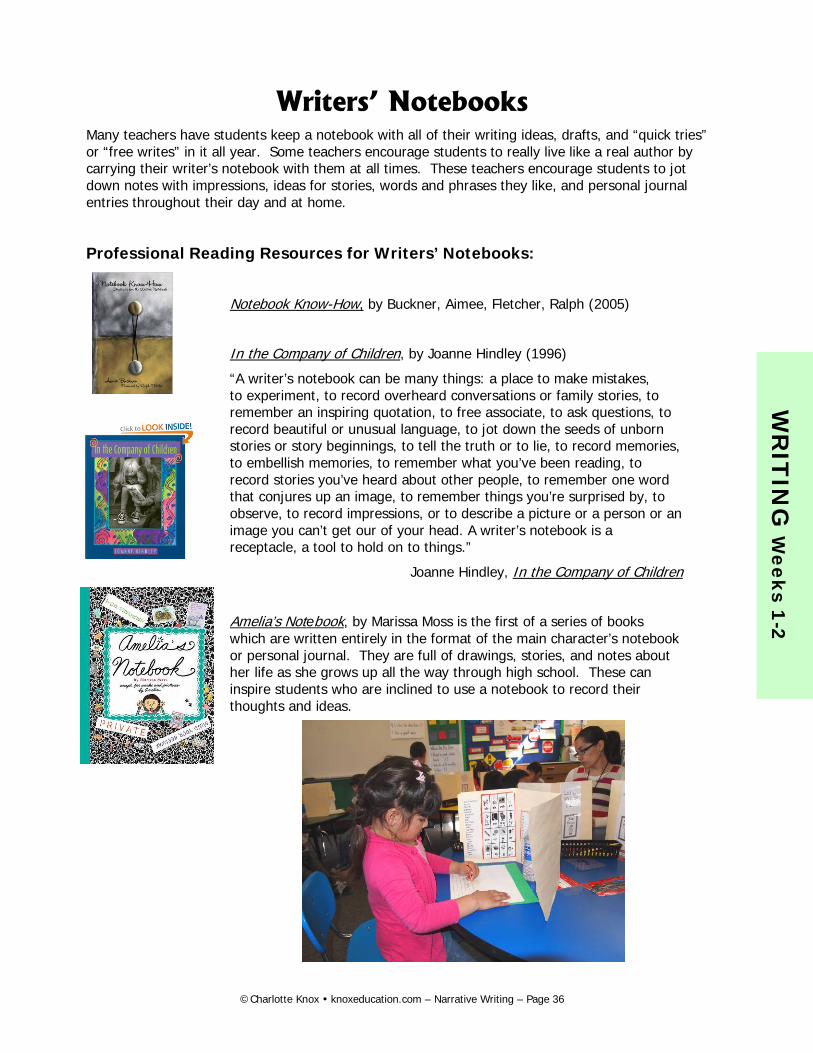
Writers’ Notebooks Many teachers have students keep a notebook with all of their writing ideas, drafts, and “quick tries” or “free writes” in it all year. Some teachers encourage students to really live like a real author by carrying their writer’s notebook with them at all times. These teachers encourage students to jot down notes with impressions, ideas for stories, words and phrases they like, and personal journal entries throughout their day and at home.
Professional Reading Resources for Writers’ Notebooks:
Notebook Know-How, by Buckner, Aimee, Fletcher, Ralph (2005)
In the Company of Children, by Joanne Hindley (1996)
“A writer’s notebook can be many things: a place to make mistakes, to experiment, to record overheard conversations or family stories, to remember an inspiring quotation, to free associate, to ask questions, to record beautiful or unusual language, to jot down the seeds of unborn stories or story beginnings, to tell the truth or to lie, to record memories, to embellish memories, to remember what you’ve been reading, to record stories you’ve heard about other people, to remember one word that conjures up an image, to remember things you’re surprised by, to observe, to record impressions, or to describe a picture or a person or an image you can’t get our of your head. A writer’s notebook is a receptacle, a tool to hold on to things.”
Joanne Hindley, In the Company of Children
Amelia’s Notebook, by Marissa Moss is the first of a series of books which are written entirely in the format of the main character’s notebook or personal journal. They are full of drawings, stories, and notes about her life as she grows up all the way through high school. These can inspire students who are inclined to use a notebook to record their thoughts and ideas.
W
RIT
ING
Weeks 1-2
©Charlotte Knox knoxeducation.com – Narrative Writing – Page 36
Weeks 2-3: Shared Writing
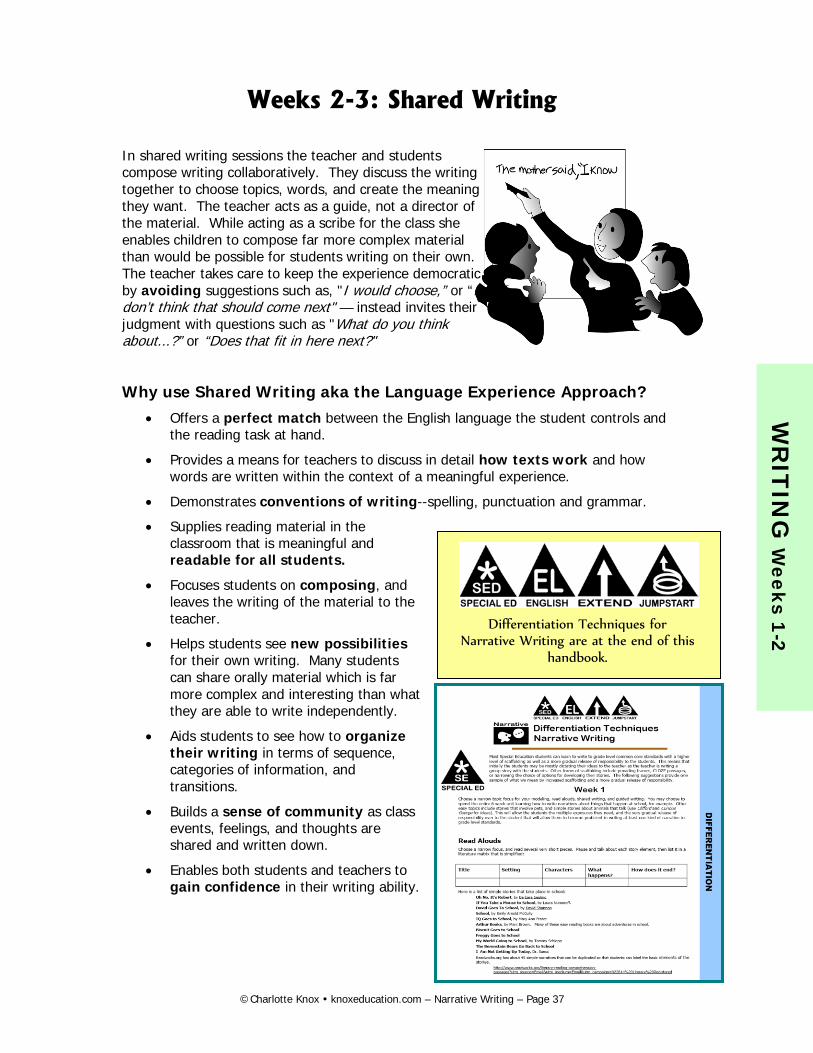
In shared writing sessions the teacher and students compose writing collaboratively. They discuss the writing together to choose topics, words, and create the meaning they want. The teacher acts as a guide, not a director of the material. While acting as a scribe for the class she enables children to compose far more complex material than would be possible for students writing on their own. The teacher takes care to keep the experience democratic by avoiding suggestions such as, "I would choose,” or “I don’t think that should come next" — instead invites their judgment with questions such as "What do you think about...?” or “Does that fit in here next?"
Why use Shared Writing aka the Language Experience Approach? • Offers a perfect match between the English language the student controls and
the reading task at hand.
• Provides a means for teachers to discuss in detail how texts work and how words are written within the context of a meaningful experience.
• Demonstrates conventions of writing--spelling, punctuation and grammar.
• Supplies reading material in the classroom that is meaningful and readable for all students.
• Focuses students on composing, and leaves the writing of the material to the teacher.
• Helps students see new possibilities for their own writing. Many students can share orally material which is far more complex and interesting than what they are able to write independently.
• Aids students to see how to organize their writing in terms of sequence, categories of information, and transitions.
• Builds a sense of community as class events, feelings, and thoughts are shared and written down.
• Enables both students and teachers to gain confidence in their writing ability.
W
RIT
ING
Weeks 1-2
Differentiation Techniques for Narrative Writing are at the end of this
handbook.
©Charlotte Knox knoxeducation.com – Narrative Writing – Page 37
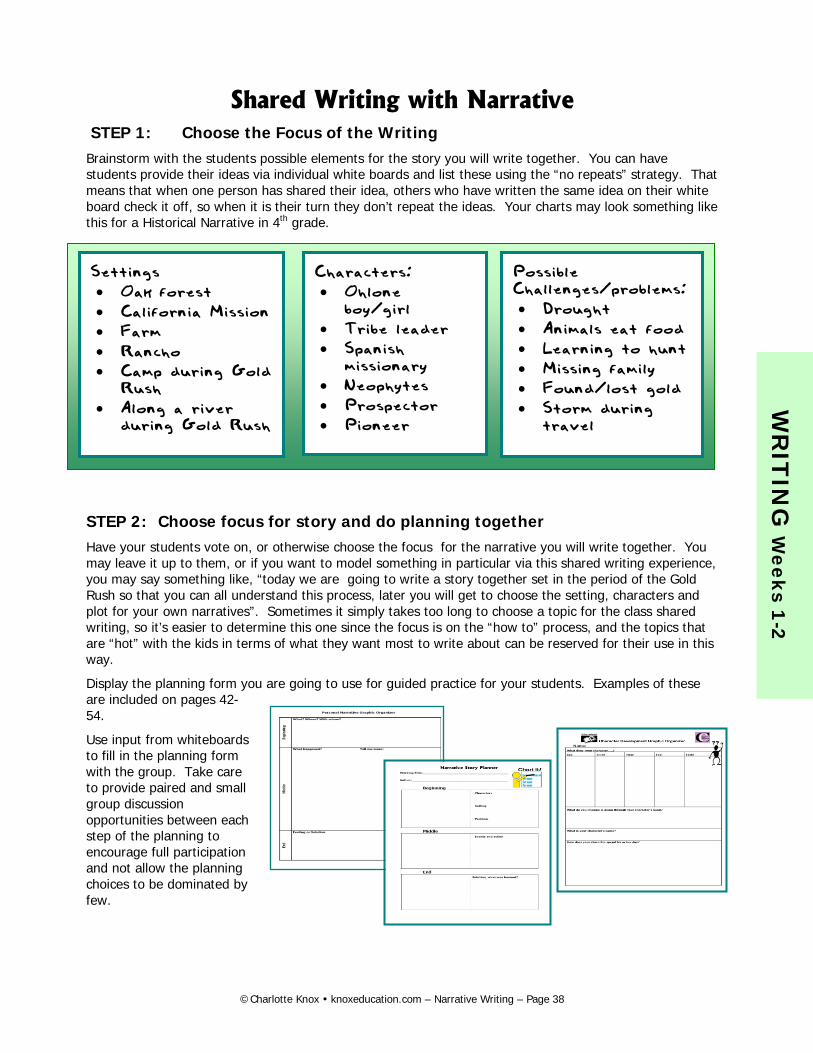
Characters: • Ohlone
boy/girl • Tribe leader • Spanish
missionary • Neophytes • Prospector • Pioneer
Settings • Oak forest • California Mission • Farm • Rancho • Camp during Gold
Rush • Along a river
during Gold Rush
Possible Challenges/problems: • Drought • Animals eat food • Learning to hunt • Missing family • Found/lost gold • Storm during
travel
Shared Writing with Narrative STEP 1: Choose the Focus of the Writing Brainstorm with the students possible elements for the story you will write together. You can have students provide their ideas via individual white boards and list these using the “no repeats” strategy. That means that when one person has shared their idea, others who have written the same idea on their white board check it off, so when it is their turn they don’t repeat the ideas. Your charts may look something like this for a Historical Narrative in 4th grade.
STEP 2: Choose focus for story and do planning together Have your students vote on, or otherwise choose the focus for the narrative you will write together. You may leave it up to them, or if you want to model something in particular via this shared writing experience, you may say something like, “today we are going to write a story together set in the period of the Gold Rush so that you can all understand this process, later you will get to choose the setting, characters and plot for your own narratives”. Sometimes it simply takes too long to choose a topic for the class shared writing, so it’s easier to determine this one since the focus is on the “how to” process, and the topics that are “hot” with the kids in terms of what they want most to write about can be reserved for their use in this way.
Display the planning form you are going to use for guided practice for your students. Examples of these are included on pages 42-54.
Use input from whiteboards to fill in the planning form with the group. Take care to provide paired and small group discussion opportunities between each step of the planning to encourage full participation and not allow the planning choices to be dominated by few.
W
RIT
ING
Weeks 1-2
©Charlotte Knox knoxeducation.com – Narrative Writing – Page 38
STEP 3: Draft the writing with student input: At this point, you can write the narrative on chart paper in front of the students, or type it into your computer projecting the text on the screen. Title the piece and list the name of your class as the author so that students don’t later copy from this text that has already been written.
As you write each sentence of the narrative, talk out loud about each element and get input from the students about the writing via whiteboards or sharing aloud. Having students write their ideas for the sentences takes time, so you may only do that for key elements you want to focus on such as a great opening line, a piece of dialogue, or vivid word choice to include in particular sentences. Encourage students to “try on” several ideas for each sentence before writing it into the piece to support flexibility in their own writing and help them see how writing is really about making choices about what to say.
Reread from the beginning of a paragraph or section before adding each new sentence. This will model a critical element of the writing process as well as keep the class focused on the task. After rereading say something like, “I wonder what we could say next to help the reader……..” “Do we like the way that sounds?” Check off items from your planner as you compose the piece so students can see explicitly how to use a planner to create connected text.
STEP 4: Reread and Revise: If time allows, come back to the text the next day and reread for any revisions. This may include refining word choice, adding detail, providing a stronger conclusion, etc. Use a different color of text to help the students see the changes.
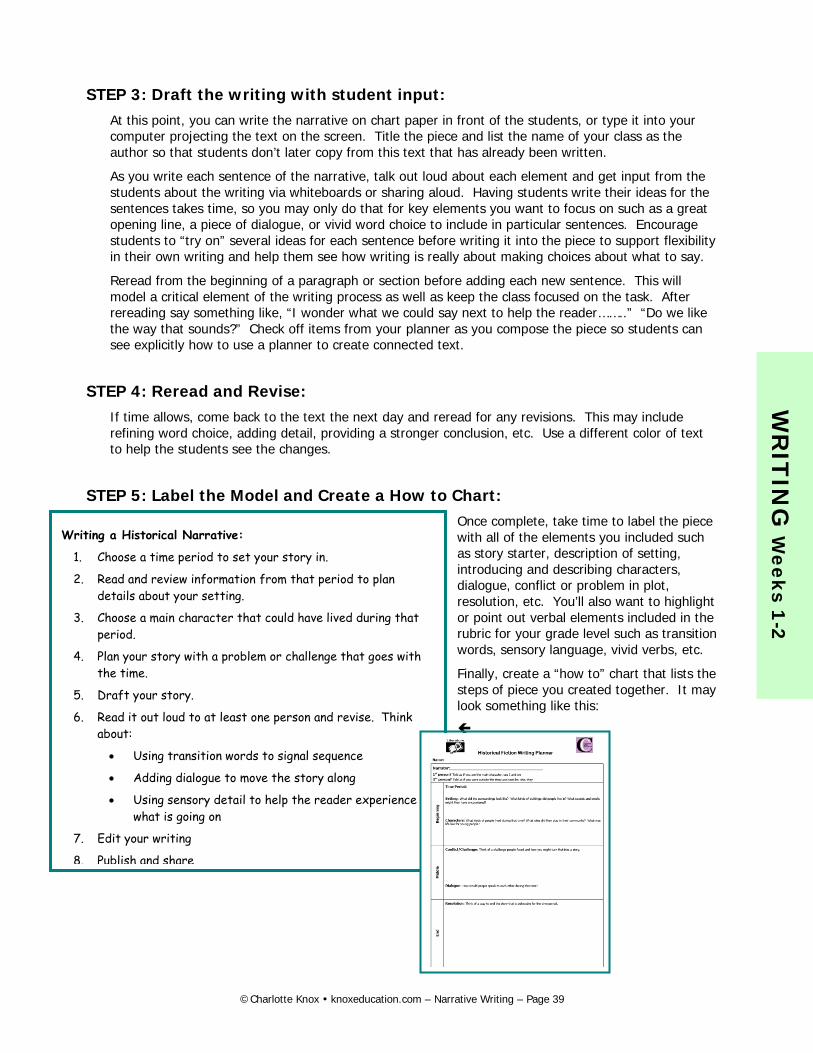
STEP 5: Label the Model and Create a How to Chart: Once complete, take time to label the piece with all of the elements you included such as story starter, description of setting, introducing and describing characters, dialogue, conflict or problem in plot, resolution, etc. You’ll also want to highlight or point out verbal elements included in the rubric for your grade level such as transition words, sensory language, vivid verbs, etc.
Finally, create a “how to” chart that lists the steps of piece you created together. It may look something like this:
Writing a Historical Narrative:
1. Choose a time period to set your story in.
2. Read and review information from that period to plan details about your setting.
3. Choose a main character that could have lived during that period.
4. Plan your story with a problem or challenge that goes with the time.
5. Draft your story.
6. Read it out loud to at least one person and revise. Think about:
• Using transition words to signal sequence
• Adding dialogue to move the story along
• Using sensory detail to help the reader experience what is going on
7. Edit your writing
8. Publish and share
W
RIT
ING
Weeks 1-2
©Charlotte Knox knoxeducation.com – Narrative Writing – Page 39
Teacher Tips for Making Shared Writing Flow Smoothly
Pacing: Keep it lively! Remember the focus is on the content of the writing, and the “how to” of the decision making along the way. Don’t distract or slow down for conversation about conventions, spelling, or taking too long to choose the “perfect” word. You may want to spread the creation of a shared writing piece over several sessions to keep each session to 15-20 minutes.
Teacher Talk: Use respectful language that honors contributions from the class. Say things like:
• Great idea, let’s include that
• Thanks for sharing your thinking about that
• That’s one way to say that, here’s another, what do we think?
• What else do we want to add to our piece?
• Interesting idea, why don’t you keep that one for your piece (if the idea is off topic or there isn’t room for it in the class piece)
Encourage focus on the content from the readers perspective:
• How can we say that so the reader will know…….
• What words shall we use here to let the reader know this is about…..
• Let’s reread, do you think our reader will be able to visualize……do we want to add some more detail to help them?
• How can we start so that the reader will want to read our piece?
Professional Reading resource for Shared Writing: Routman, R. (2005) Writing Essentials: Raising Expectations and Results While Simplifying Teaching. Portsmouth, NH: Heinemann.
W
RIT
ING
Weeks 1-2
©Charlotte Knox knoxeducation.com – Narrative Writing – Page 40
Building a “How To” Chart with Your Students:
After you have
• Looked at examples of a text type with your students.
• Learned to identify the elements of the text type
• Modeled the process once in front of your students
It’s time to write a piece together with input from the students through “shared writing” or the “language experience approach”. Follow the procedure on pages 37-40 to create a shared piece of writing together.
Once the piece is finished, label the parts of the writing with the elements you are highlighting for that text type.
Next, create a “how to chart” listing the steps you just completed to create the class shared writing. Here is an example of what that may say:
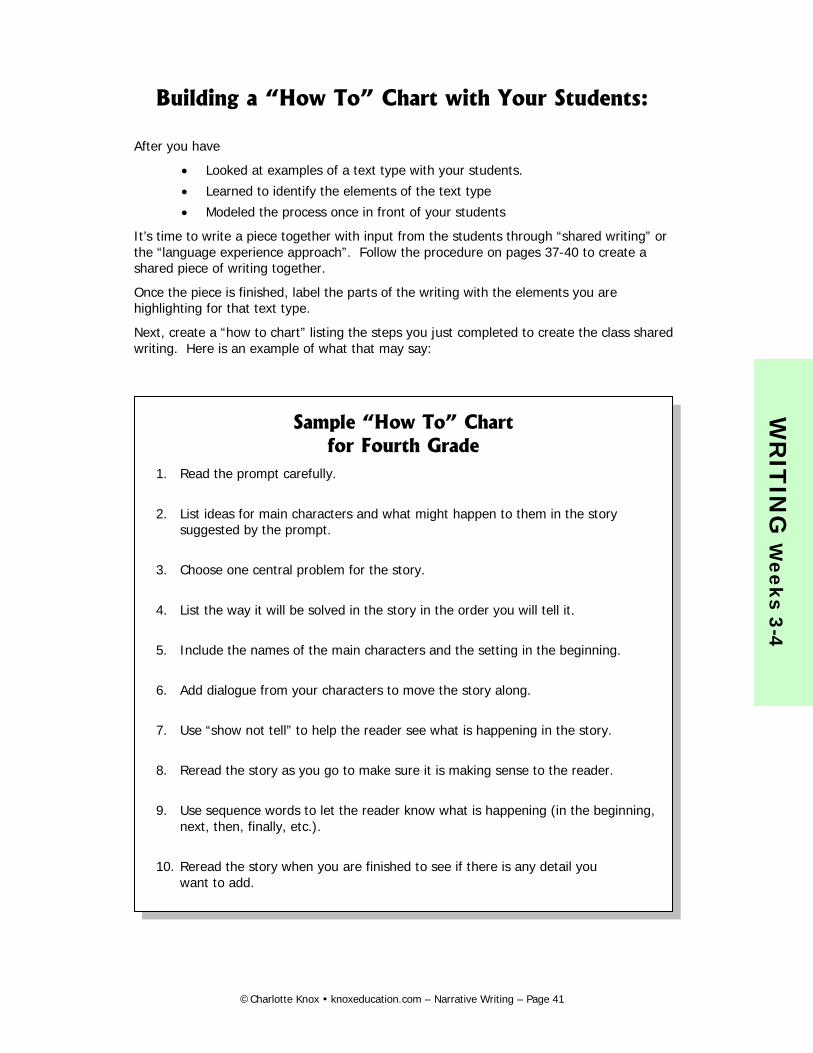
Sample “How To” Chart for Fourth Grade
1. Read the prompt carefully.
2. List ideas for main characters and what might happen to them in the story suggested by the prompt.
3. Choose one central problem for the story.
4. List the way it will be solved in the story in the order you will tell it.
5. Include the names of the main characters and the setting in the beginning.
6. Add dialogue from your characters to move the story along.
7. Use “show not tell” to help the reader see what is happening in the story.
8. Reread the story as you go to make sure it is making sense to the reader.
9. Use sequence words to let the reader know what is happening (in the beginning, next, then, finally, etc.).
10. Reread the story when you are finished to see if there is any detail you want to add.
W
RIT
ING
Weeks 3-4
©Charlotte Knox knoxeducation.com – Narrative Writing – Page 41
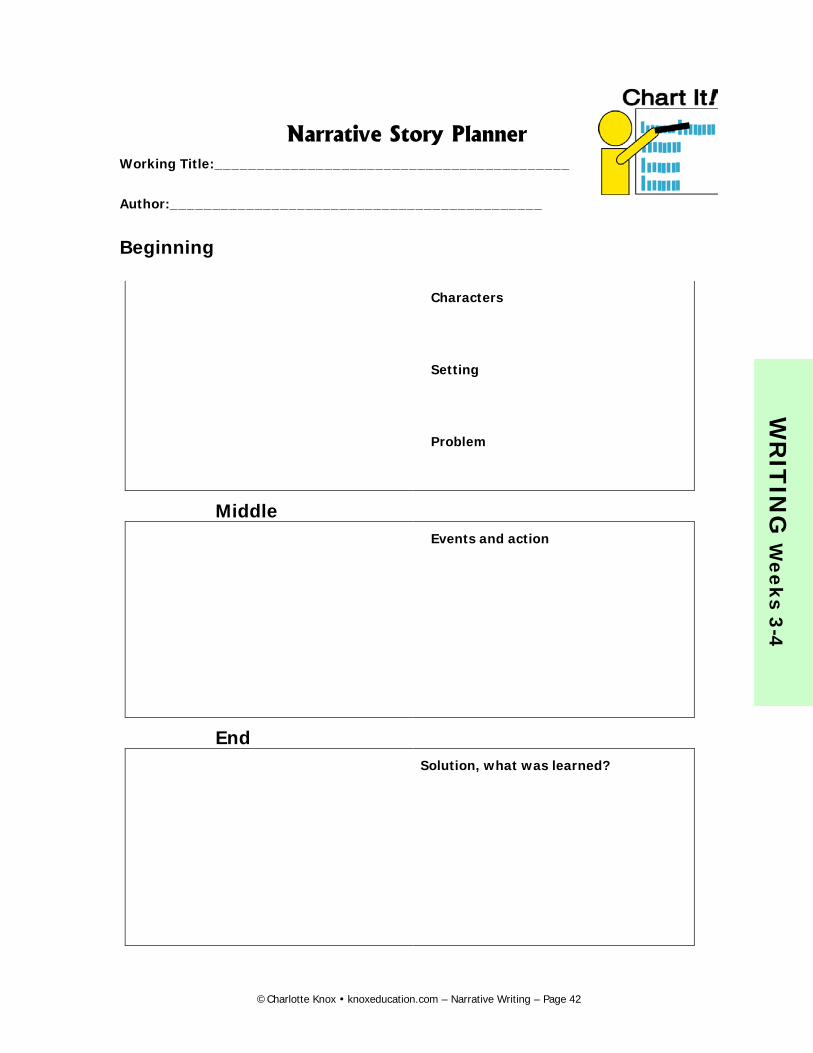
Narrative Story Planner Working Title:__________________________________________
Author:____________________________________________
Beginning
Characters
Setting
Problem
Middle Events and action
End Solution, what was learned?
W
RIT
ING
Weeks 3-4
©Charlotte Knox knoxeducation.com – Narrative Writing – Page 42
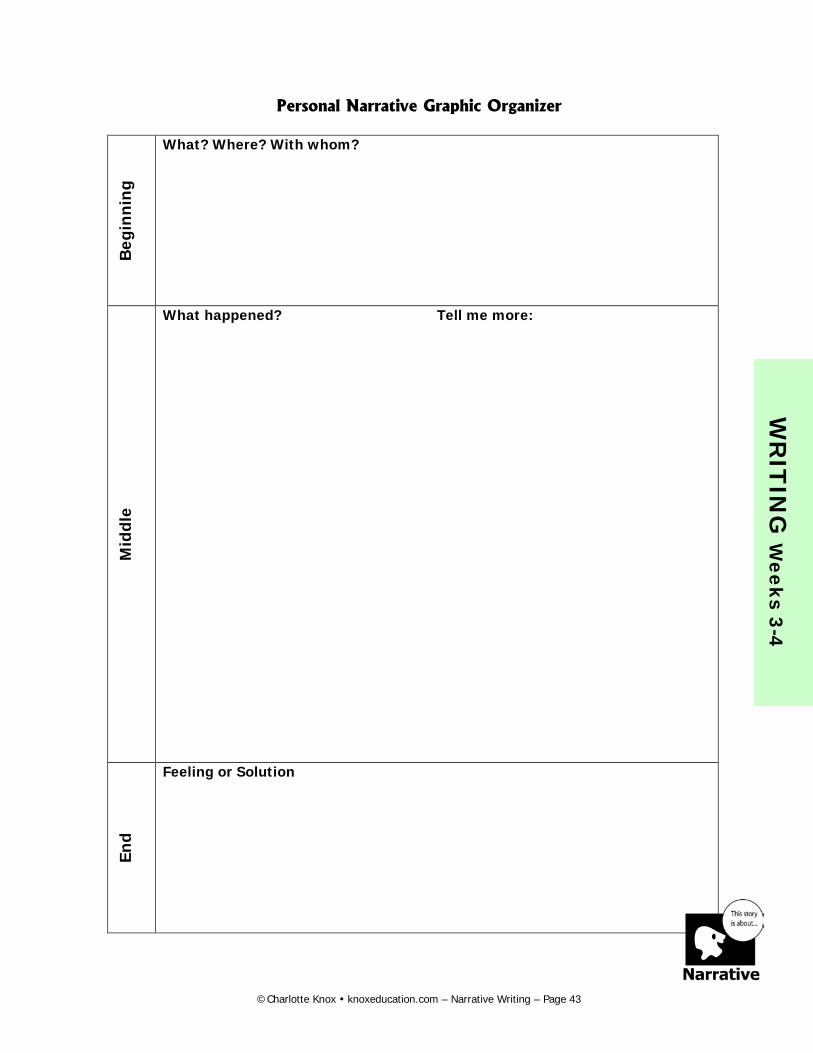
Personal Narrative Graphic Organizer
Beg
inni
ng
What? Where? With whom?
Mid
dle
What happened? Tell me more:
End
Feeling or Solution
W
RIT
ING
Weeks 3-4
©Charlotte Knox knoxeducation.com – Narrative Writing – Page 43
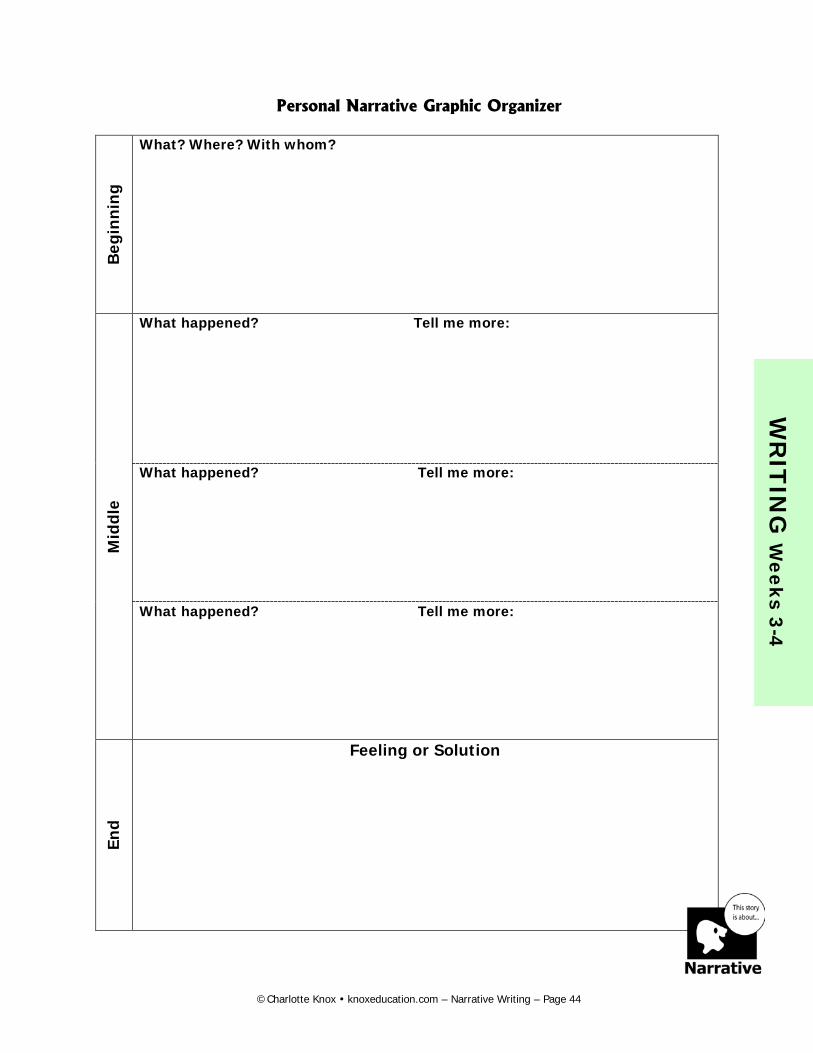
Personal Narrative Graphic Organizer
Beg
inni
ng
What? Where? With whom?
Mid
dle
What happened? Tell me more:
What happened? Tell me more:
What happened? Tell me more:
End
Feeling or Solution
W
RIT
ING
Weeks 3-4
©Charlotte Knox knoxeducation.com – Narrative Writing – Page 44
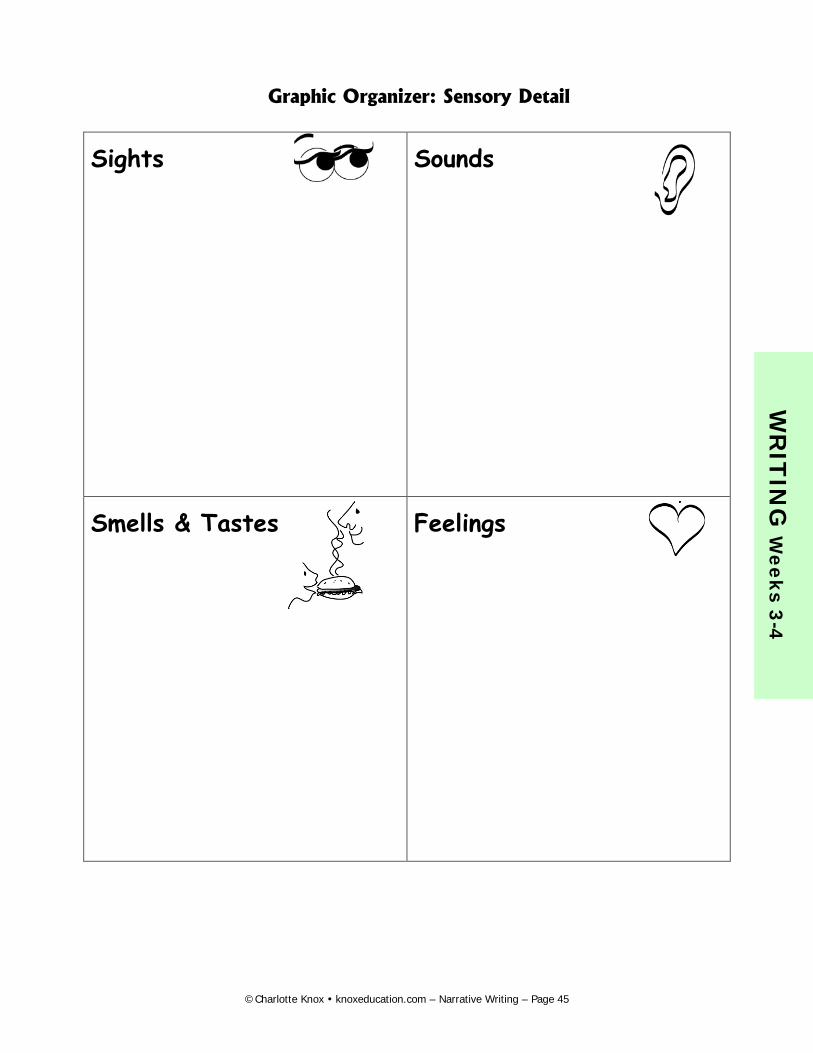
Graphic Organizer: Sensory Detail
Sights Sounds
Smells & Tastes Feelings
W
RIT
ING
Weeks 3-4
©Charlotte Knox knoxeducation.com – Narrative Writing – Page 45
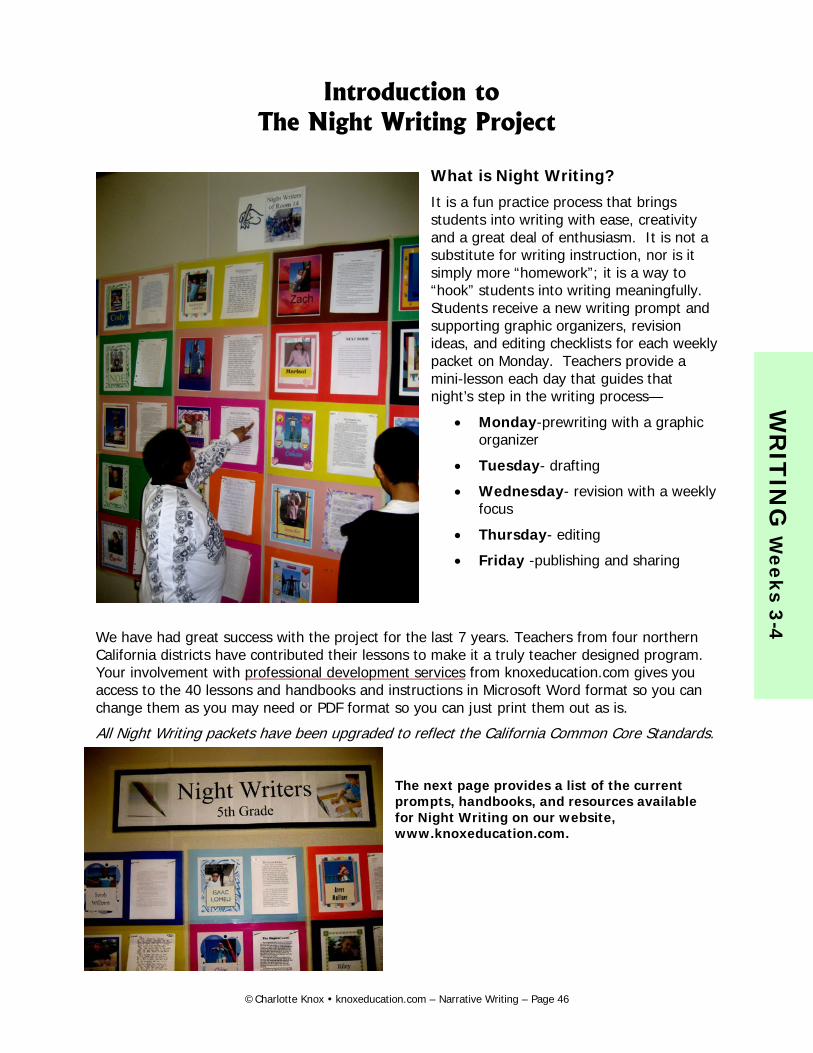
Introduction to The Night Writing Project
What is Night Writing?
It is a fun practice process that brings students into writing with ease, creativity and a great deal of enthusiasm. It is not a substitute for writing instruction, nor is it simply more “homework”; it is a way to “hook” students into writing meaningfully. Students receive a new writing prompt and supporting graphic organizers, revision ideas, and editing checklists for each weekly packet on Monday. Teachers provide a mini-lesson each day that guides that night’s step in the writing process—
• Monday-prewriting with a graphic organizer
• Tuesday- drafting
• Wednesday- revision with a weekly focus
• Thursday- editing
• Friday -publishing and sharing
We have had great success with the project for the last 7 years. Teachers from four northern California districts have contributed their lessons to make it a truly teacher designed program. Your involvement with professional development services from knoxeducation.com gives you access to the 40 lessons and handbooks and instructions in Microsoft Word format so you can change them as you may need or PDF format so you can just print them out as is.
All Night Writing packets have been upgraded to reflect the California Common Core Standards.
The next page provides a list of the current prompts, handbooks, and resources available for Night Writing on our website, www.knoxeducation.com.
W
RIT
ING
Weeks 3-4
©Charlotte Knox knoxeducation.com – Narrative Writing – Page 46
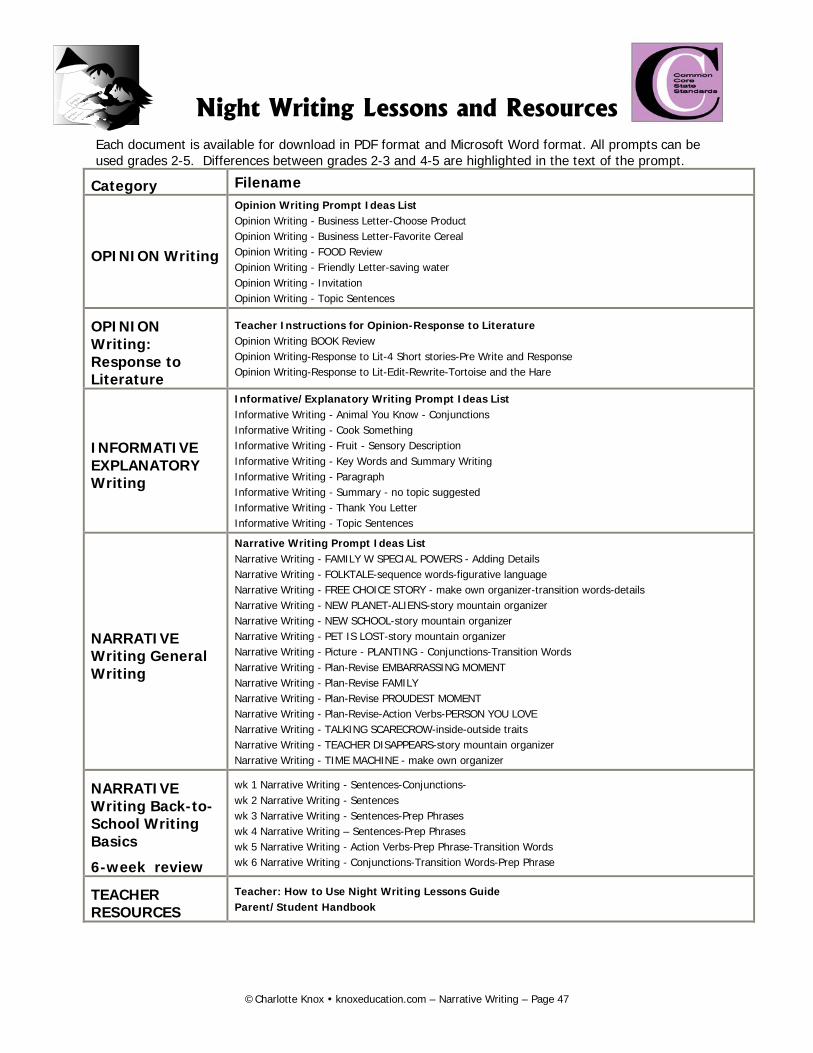
Night Writing Lessons and Resources Each document is available for download in PDF format and Microsoft Word format. All prompts can be used grades 2-5. Differences between grades 2-3 and 4-5 are highlighted in the text of the prompt.
Category Filename
OPINION Writing
Opinion Writing Prompt Ideas List Opinion Writing - Business Letter-Choose Product Opinion Writing - Business Letter-Favorite Cereal Opinion Writing - FOOD Review Opinion Writing - Friendly Letter-saving water Opinion Writing - Invitation Opinion Writing - Topic Sentences
OPINION Writing: Response to Literature
Teacher Instructions for Opinion-Response to Literature Opinion Writing BOOK Review Opinion Writing-Response to Lit-4 Short stories-Pre Write and Response Opinion Writing-Response to Lit-Edit-Rewrite-Tortoise and the Hare
INFORMATIVE EXPLANATORY Writing
Informative/Explanatory Writing Prompt Ideas List Informative Writing - Animal You Know - Conjunctions Informative Writing - Cook Something Informative Writing - Fruit - Sensory Description Informative Writing - Key Words and Summary Writing Informative Writing - Paragraph Informative Writing - Summary - no topic suggested Informative Writing - Thank You Letter Informative Writing - Topic Sentences
NARRATIVE Writing General Writing
Narrative Writing Prompt Ideas List Narrative Writing - FAMILY W SPECIAL POWERS - Adding Details Narrative Writing - FOLKTALE-sequence words-figurative language Narrative Writing - FREE CHOICE STORY - make own organizer-transition words-details Narrative Writing - NEW PLANET-ALIENS-story mountain organizer Narrative Writing - NEW SCHOOL-story mountain organizer Narrative Writing - PET IS LOST-story mountain organizer Narrative Writing - Picture - PLANTING - Conjunctions-Transition Words Narrative Writing - Plan-Revise EMBARRASSING MOMENT Narrative Writing - Plan-Revise FAMILY Narrative Writing - Plan-Revise PROUDEST MOMENT Narrative Writing - Plan-Revise-Action Verbs-PERSON YOU LOVE Narrative Writing - TALKING SCARECROW-inside-outside traits Narrative Writing - TEACHER DISAPPEARS-story mountain organizer Narrative Writing - TIME MACHINE - make own organizer
NARRATIVE Writing Back-to-School Writing Basics
6-week review
wk 1 Narrative Writing - Sentences-Conjunctions- wk 2 Narrative Writing - Sentences wk 3 Narrative Writing - Sentences-Prep Phrases wk 4 Narrative Writing – Sentences-Prep Phrases wk 5 Narrative Writing - Action Verbs-Prep Phrase-Transition Words wk 6 Narrative Writing - Conjunctions-Transition Words-Prep Phrase
TEACHER RESOURCES
Teacher: How to Use Night Writing Lessons Guide Parent/Student Handbook
©Charlotte Knox knoxeducation.com – Narrative Writing – Page 47
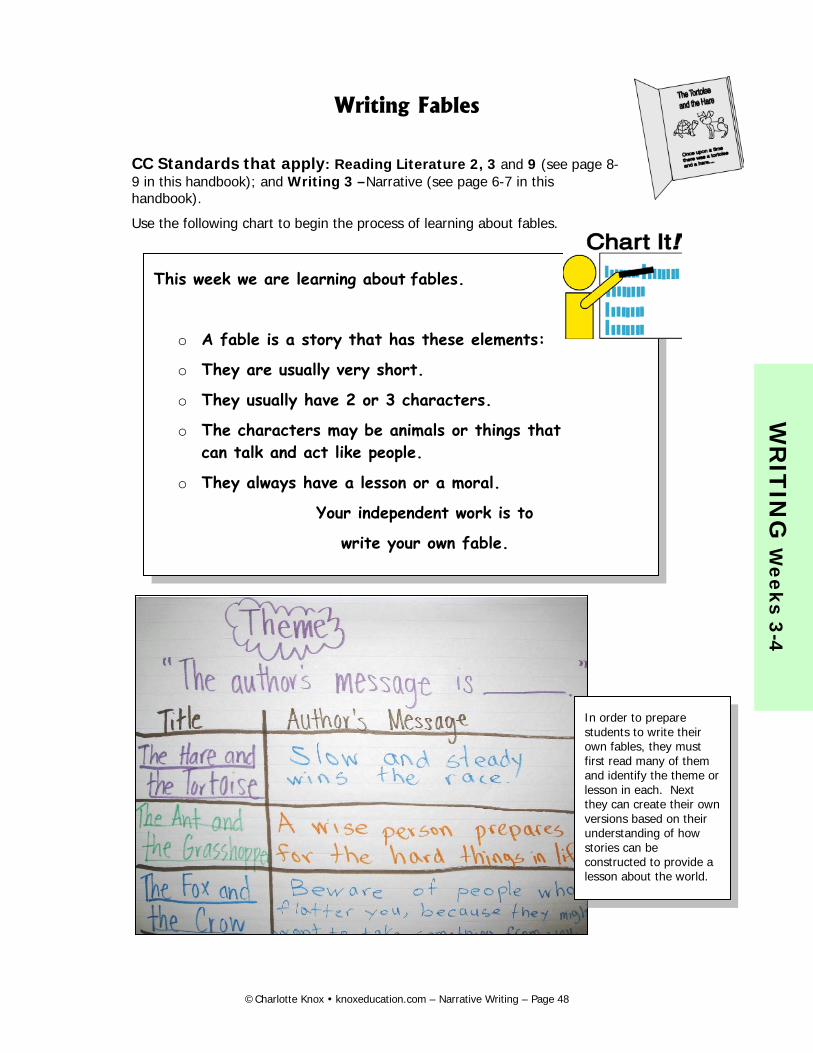
Writing Fables
CC Standards that apply: Reading Literature 2, 3 and 9 (see page 8-9 in this handbook); and Writing 3 –Narrative (see page 6-7 in this handbook).
Use the following chart to begin the process of learning about fables.
This week we are learning about fables.
o A fable is a story that has these elements:
o They are usually very short.
o They usually have 2 or 3 characters.
o The characters may be animals or things that can talk and act like people.
o They always have a lesson or a moral.
Your independent work is to
write your own fable.
In order to prepare students to write their own fables, they must first read many of them and identify the theme or lesson in each. Next they can create their own versions based on their understanding of how stories can be constructed to provide a lesson about the world.
W
RIT
ING
Weeks 3-4
©Charlotte Knox knoxeducation.com – Narrative Writing – Page 48

Fable Story Organizer Working Title:__________________________________________
Author:_______________________________________________
\
This process is adapted from Thinking Maps at www.thinkingmaps.com.
Morals/Lesson Something Learned
W
RIT
ING
Weeks 3-4
W
RIT
ING
Weeks 3-4
©Charlotte Knox knoxeducation.com – Narrative Writing – Page 49
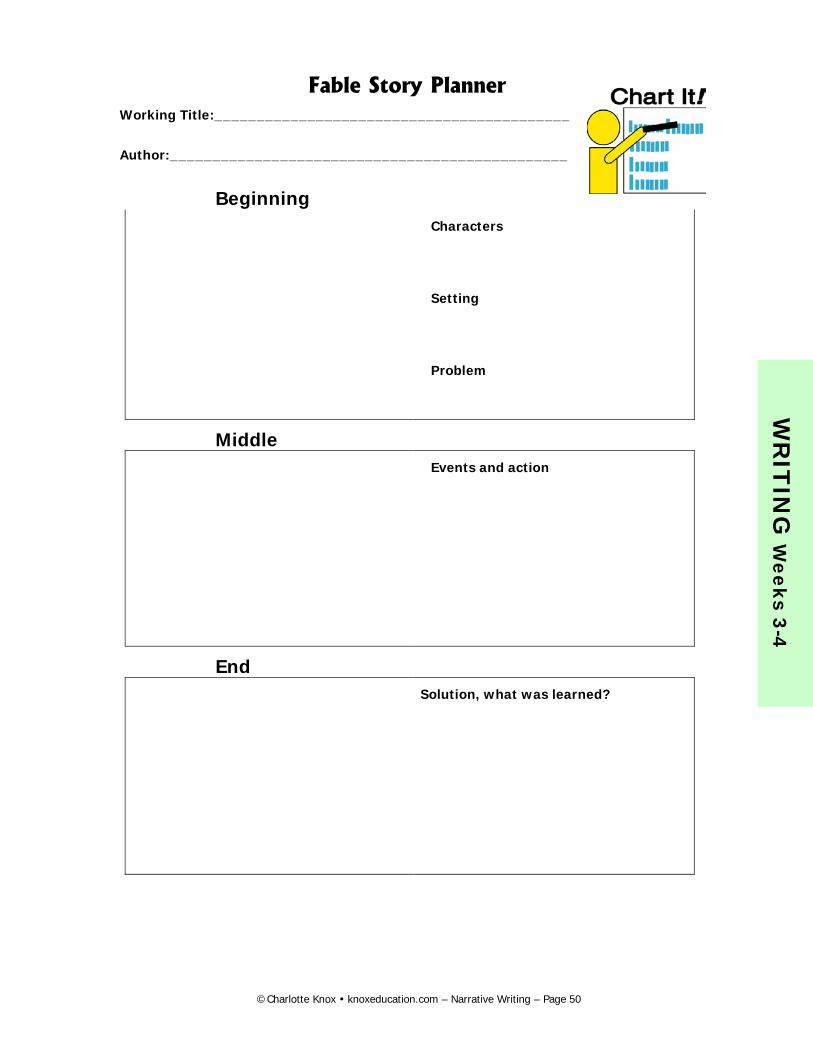
Fable Story Planner Working Title:__________________________________________
Author:_______________________________________________
Beginning Characters
Setting
Problem
Middle Events and action
End Solution, what was learned?
W
RIT
ING
Weeks 3-4
©Charlotte Knox knoxeducation.com – Narrative Writing – Page 50
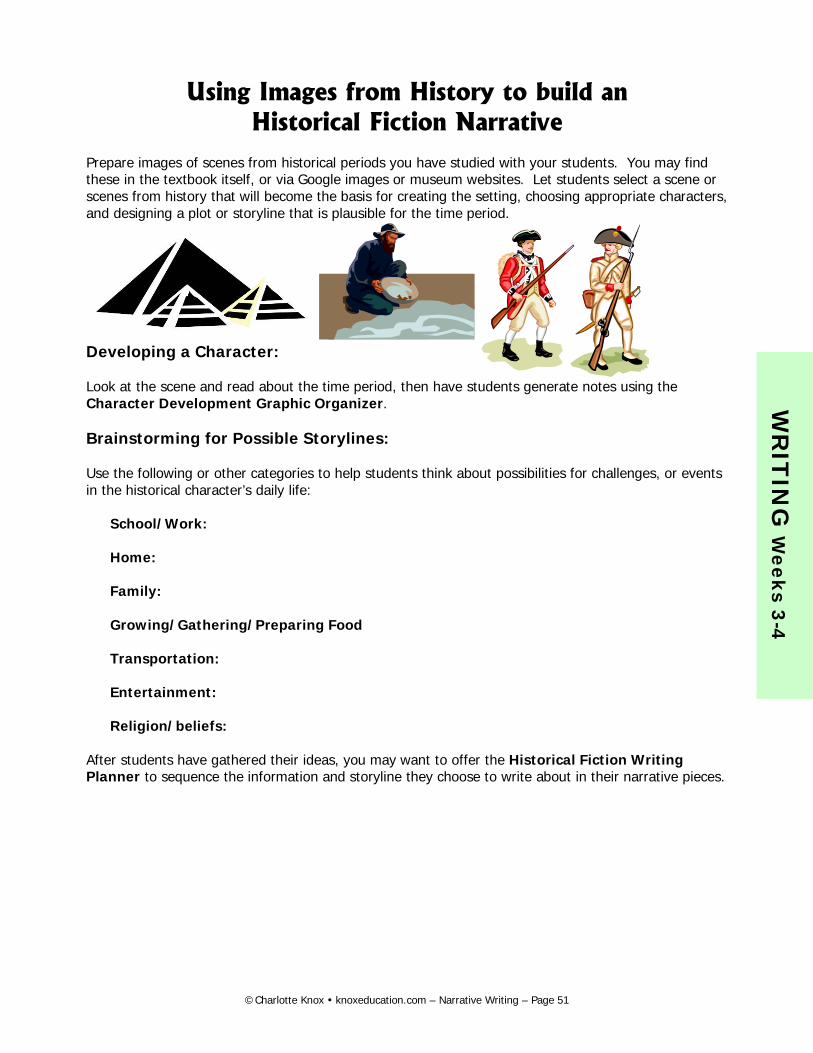
Using Images from History to build an Historical Fiction Narrative
Prepare images of scenes from historical periods you have studied with your students. You may find these in the textbook itself, or via Google images or museum websites. Let students select a scene or scenes from history that will become the basis for creating the setting, choosing appropriate characters, and designing a plot or storyline that is plausible for the time period. Developing a Character: Look at the scene and read about the time period, then have students generate notes using the Character Development Graphic Organizer. Brainstorming for Possible Storylines: Use the following or other categories to help students think about possibilities for challenges, or events in the historical character’s daily life:
School/Work: Home: Family: Growing/Gathering/Preparing Food Transportation: Entertainment: Religion/beliefs:
After students have gathered their ideas, you may want to offer the Historical Fiction Writing Planner to sequence the information and storyline they choose to write about in their narrative pieces.
W
RIT
ING
Weeks 3-4
©Charlotte Knox knoxeducation.com – Narrative Writing – Page 51
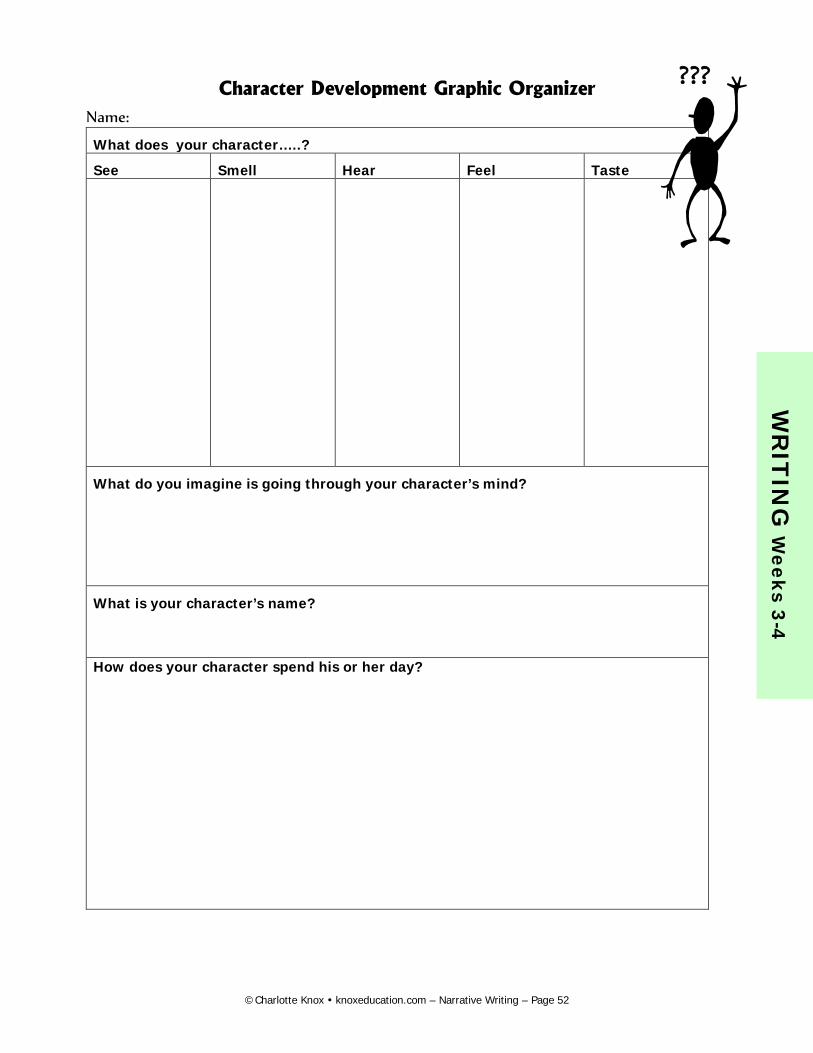
Character Development Graphic Organizer Name:
What does your character…..?
See Smell Hear Feel Taste
What do you imagine is going through your character’s mind?
What is your character’s name?
How does your character spend his or her day?
???
W
RIT
ING
Weeks 3-4
©Charlotte Knox knoxeducation.com – Narrative Writing – Page 52
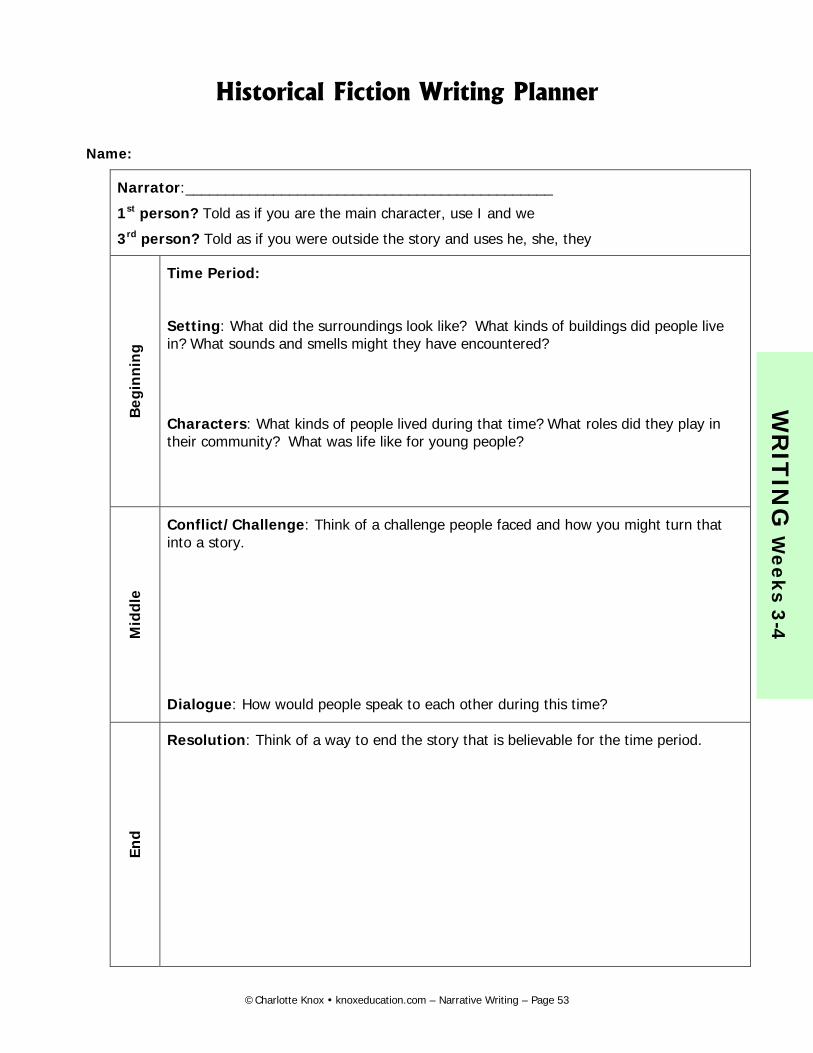
Historical Fiction Writing Planner
Name:
Narrator:______________________________________________
1st person? Told as if you are the main character, use I and we
3rd person? Told as if you were outside the story and uses he, she, they
Beg
inn
ing
Time Period:
Setting: What did the surroundings look like? What kinds of buildings did people live in? What sounds and smells might they have encountered?
Characters: What kinds of people lived during that time? What roles did they play in their community? What was life like for young people?
Mid
dle
Conflict/Challenge: Think of a challenge people faced and how you might turn that into a story.
Dialogue: How would people speak to each other during this time?
End
Resolution: Think of a way to end the story that is believable for the time period.
W
RIT
ING
Weeks 3-4
©Charlotte Knox knoxeducation.com – Narrative Writing – Page 53
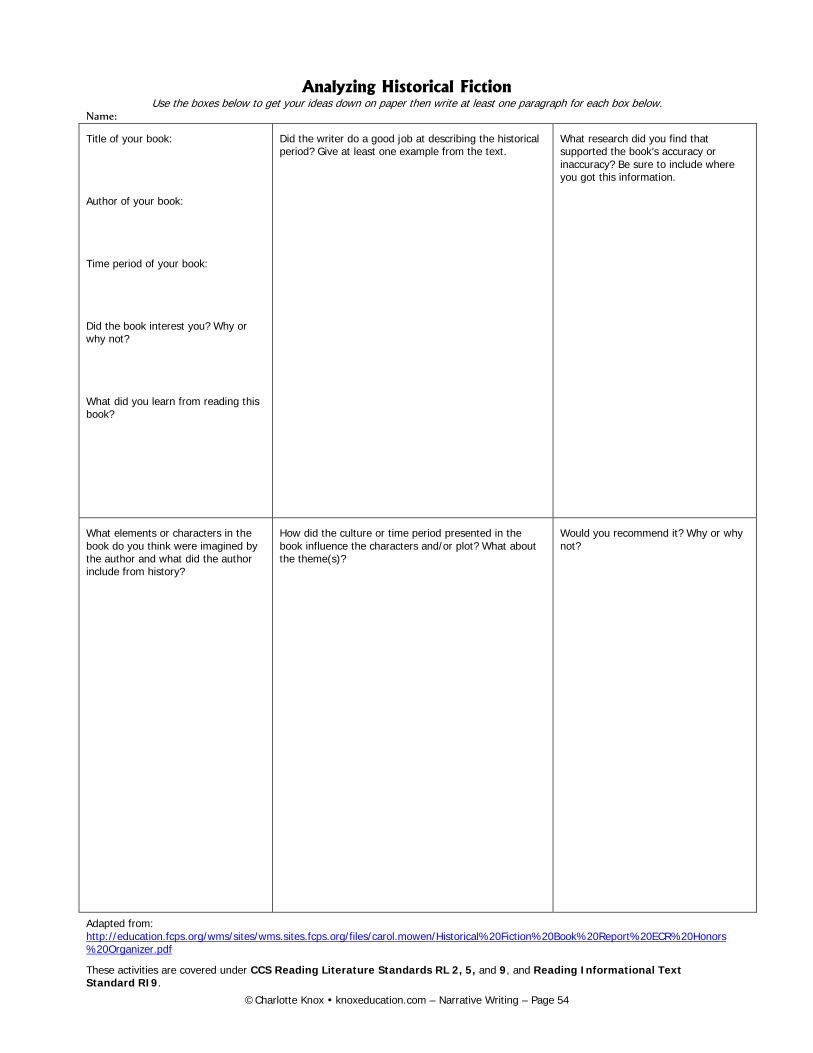
Analyzing Historical Fiction Use the boxes below to get your ideas down on paper then write at least one paragraph for each box below.
Name:
Title of your book:
Author of your book:
Time period of your book:
Did the book interest you? Why or why not?
What did you learn from reading this book?
Did the writer do a good job at describing the historical period? Give at least one example from the text.
What research did you find that supported the book’s accuracy or inaccuracy? Be sure to include where you got this information.
What elements or characters in the book do you think were imagined by the author and what did the author include from history?
How did the culture or time period presented in the book influence the characters and/or plot? What about the theme(s)?
Would you recommend it? Why or why not?
Adapted from: http://education.fcps.org/wms/sites/wms.sites.fcps.org/files/carol.mowen/Historical%20Fiction%20Book%20Report%20ECR%20Honors%20Organizer.pdf
These activities are covered under CCS Reading Literature Standards RL 2, 5, and 9, and Reading Informational Text Standard RI9.
©Charlotte Knox knoxeducation.com – Narrative Writing – Page 54
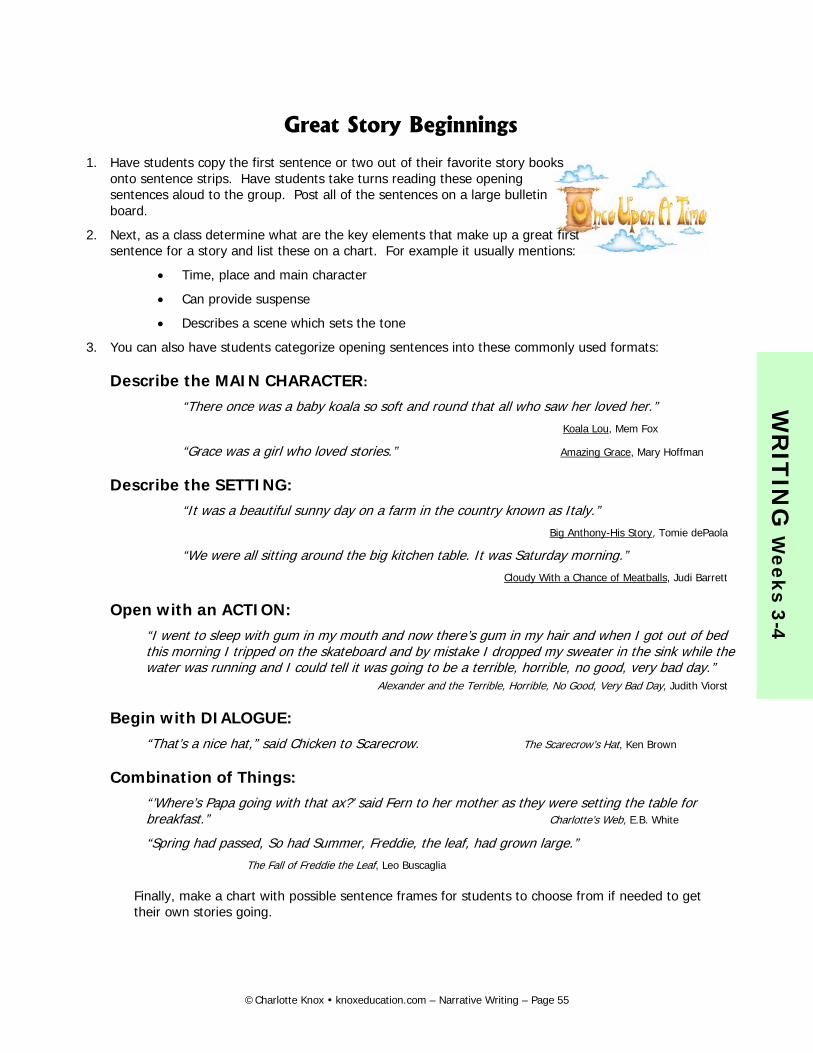
Great Story Beginnings
1. Have students copy the first sentence or two out of their favorite story books onto sentence strips. Have students take turns reading these opening sentences aloud to the group. Post all of the sentences on a large bulletin board.
2. Next, as a class determine what are the key elements that make up a great first sentence for a story and list these on a chart. For example it usually mentions:
• Time, place and main character
• Can provide suspense
• Describes a scene which sets the tone
3. You can also have students categorize opening sentences into these commonly used formats:
Describe the MAIN CHARACTER:
“There once was a baby koala so soft and round that all who saw her loved her.” Koala Lou, Mem Fox
“Grace was a girl who loved stories.” Amazing Grace, Mary Hoffman
Describe the SETTING: “It was a beautiful sunny day on a farm in the country known as Italy.”
Big Anthony-His Story, Tomie dePaola
“We were all sitting around the big kitchen table. It was Saturday morning.” Cloudy With a Chance of Meatballs, Judi Barrett
Open with an ACTION: “I went to sleep with gum in my mouth and now there’s gum in my hair and when I got out of bed this morning I tripped on the skateboard and by mistake I dropped my sweater in the sink while the water was running and I could tell it was going to be a terrible, horrible, no good, very bad day.”
Alexander and the Terrible, Horrible, No Good, Very Bad Day, Judith Viorst
Begin with DIALOGUE: “That’s a nice hat,” said Chicken to Scarecrow. The Scarecrow’s Hat, Ken Brown
Combination of Things: “’Where’s Papa going with that ax?’ said Fern to her mother as they were setting the table for breakfast.” Charlotte’s Web, E.B. White
“Spring had passed, So had Summer, Freddie, the leaf, had grown large.” The Fall of Freddie the Leaf, Leo Buscaglia
Finally, make a chart with possible sentence frames for students to choose from if needed to get their own stories going.
W
RIT
ING
Weeks 3-4
©Charlotte Knox knoxeducation.com – Narrative Writing – Page 55
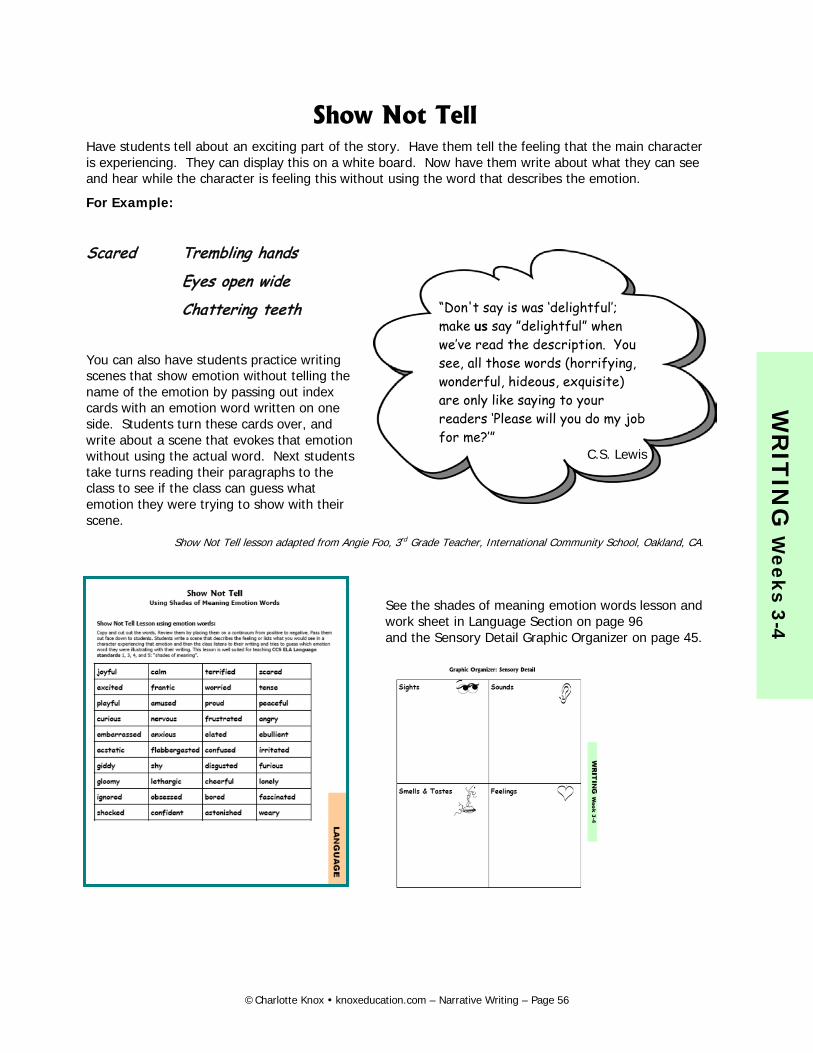
Show Not Tell Have students tell about an exciting part of the story. Have them tell the feeling that the main character is experiencing. They can display this on a white board. Now have them write about what they can see and hear while the character is feeling this without using the word that describes the emotion.
For Example:
Scared Trembling hands
Eyes open wide
Chattering teeth
You can also have students practice writing scenes that show emotion without telling the name of the emotion by passing out index cards with an emotion word written on one side. Students turn these cards over, and write about a scene that evokes that emotion without using the actual word. Next students take turns reading their paragraphs to the class to see if the class can guess what emotion they were trying to show with their scene.
Show Not Tell lesson adapted from Angie Foo, 3rd Grade Teacher, International Community School, Oakland, CA.
See the shades of meaning emotion words lesson and work sheet in Language Section on page 96 and the Sensory Detail Graphic Organizer on page 45.
“Don't say is was ‘delightful’; make us say ”delightful” when we’ve read the description. You see, all those words (horrifying, wonderful, hideous, exquisite) are only like saying to your readers ‘Please will you do my job for me?’” C.S. Lewis
W
RIT
ING
Weeks 3-4
©Charlotte Knox knoxeducation.com – Narrative Writing – Page 56
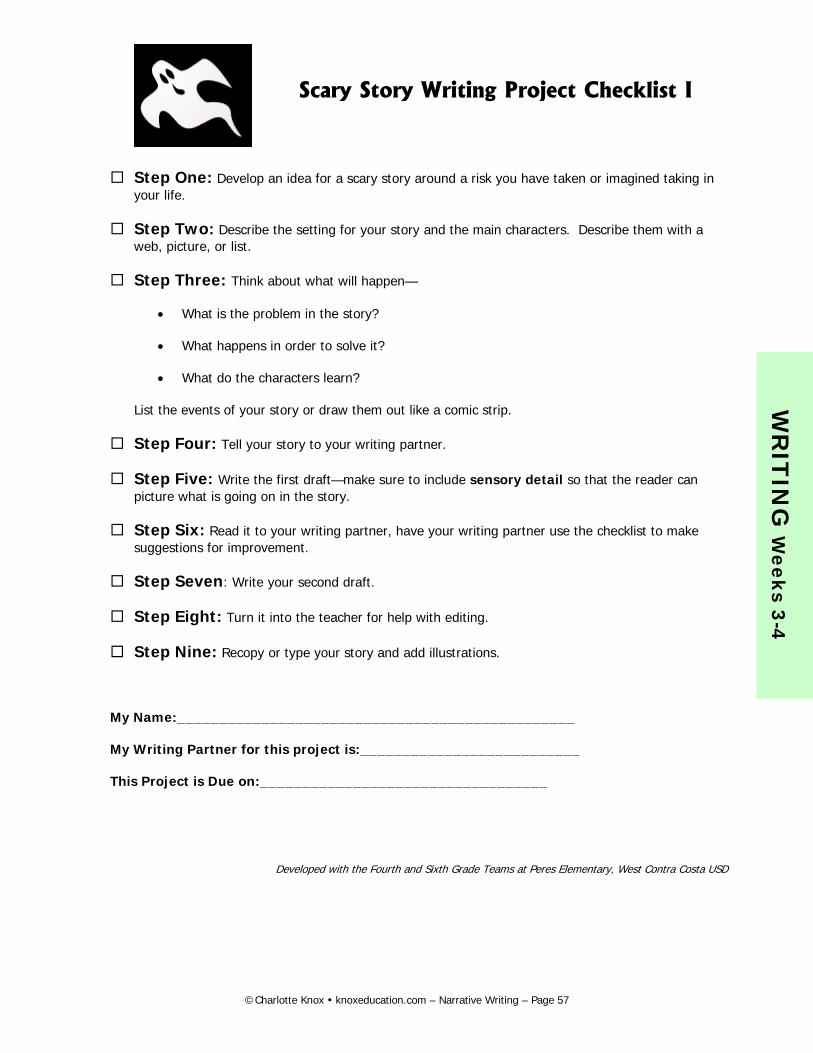
Scary Story Writing Project Checklist I
Step One: Develop an idea for a scary story around a risk you have taken or imagined taking in your life.
Step Two: Describe the setting for your story and the main characters. Describe them with a web, picture, or list.
Step Three: Think about what will happen—
• What is the problem in the story?
• What happens in order to solve it?
• What do the characters learn?
List the events of your story or draw them out like a comic strip.
Step Four: Tell your story to your writing partner.
Step Five: Write the first draft—make sure to include sensory detail so that the reader can picture what is going on in the story.
Step Six: Read it to your writing partner, have your writing partner use the checklist to make suggestions for improvement.
Step Seven: Write your second draft.
Step Eight: Turn it into the teacher for help with editing.
Step Nine: Recopy or type your story and add illustrations.
My Name:_______________________________________________
My Writing Partner for this project is:__________________________
This Project is Due on:__________________________________
Developed with the Fourth and Sixth Grade Teams at Peres Elementary, West Contra Costa USD
W
RIT
ING
Weeks 3-4
©Charlotte Knox knoxeducation.com – Narrative Writing – Page 57
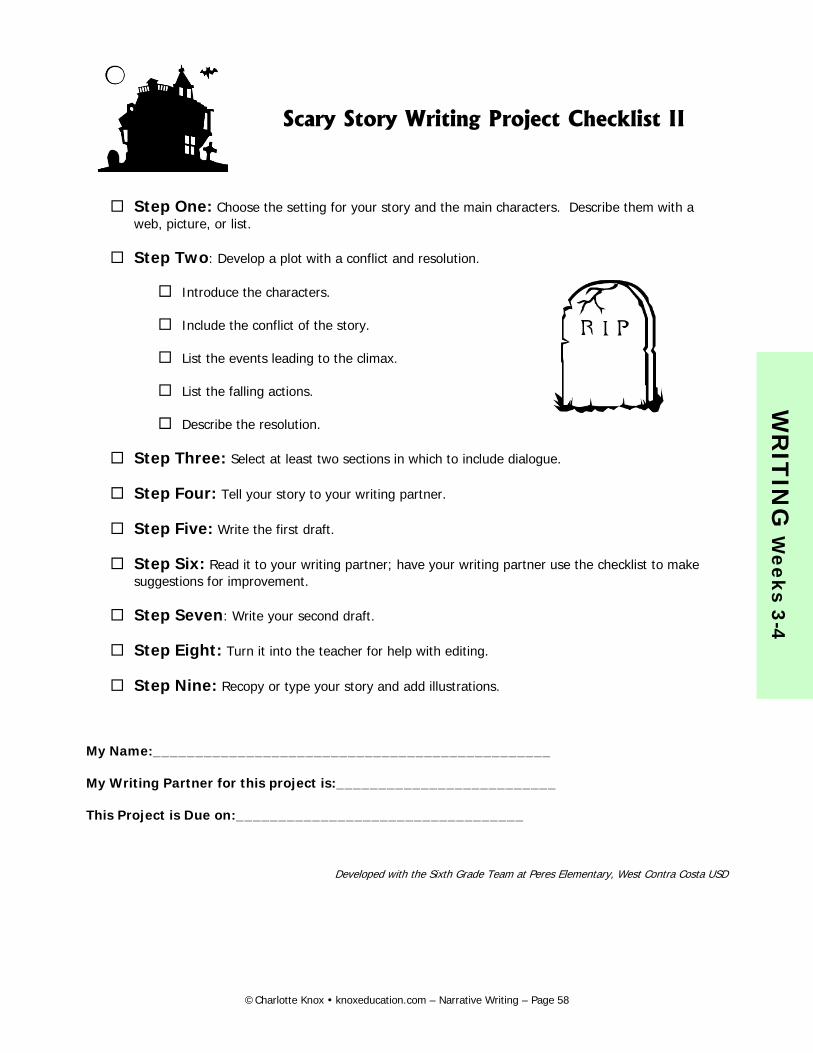
Scary Story Writing Project Checklist II
Step One: Choose the setting for your story and the main characters. Describe them with a web, picture, or list.
Step Two: Develop a plot with a conflict and resolution.
Introduce the characters.
Include the conflict of the story.
List the events leading to the climax.
List the falling actions.
Describe the resolution.
Step Three: Select at least two sections in which to include dialogue.
Step Four: Tell your story to your writing partner.
Step Five: Write the first draft.
Step Six: Read it to your writing partner; have your writing partner use the checklist to make suggestions for improvement.
Step Seven: Write your second draft.
Step Eight: Turn it into the teacher for help with editing.
Step Nine: Recopy or type your story and add illustrations.
My Name:_______________________________________________
My Writing Partner for this project is:__________________________
This Project is Due on:__________________________________
Developed with the Sixth Grade Team at Peres Elementary, West Contra Costa USD
W
RIT
ING
Weeks 3-4
©Charlotte Knox knoxeducation.com – Narrative Writing – Page 58
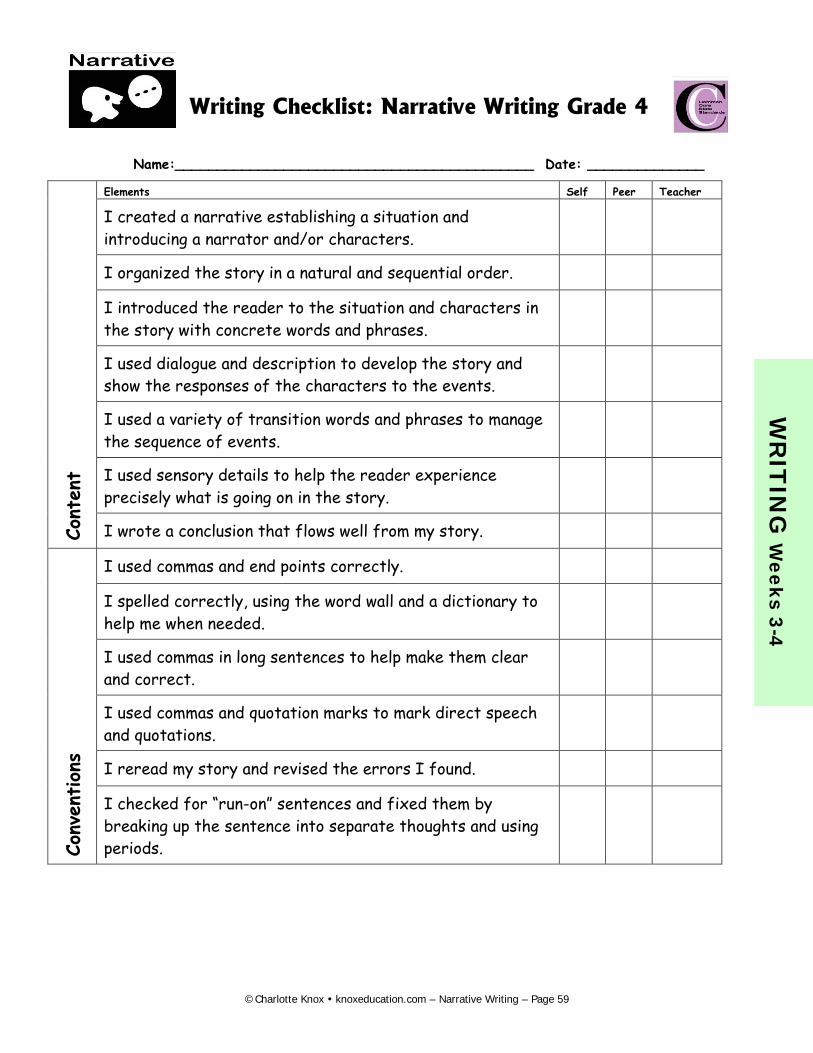
Writing Checklist: Narrative Writing Grade 4
Name:___________________________________________ Date: ______________
Cont
ent
Elements Self Peer Teacher
I created a narrative establishing a situation and introducing a narrator and/or characters.
I organized the story in a natural and sequential order.
I introduced the reader to the situation and characters in the story with concrete words and phrases.
I used dialogue and description to develop the story and show the responses of the characters to the events.
I used a variety of transition words and phrases to manage the sequence of events.
I used sensory details to help the reader experience precisely what is going on in the story.
I wrote a conclusion that flows well from my story.
Conv
ention
s
I used commas and end points correctly.
I spelled correctly, using the word wall and a dictionary to help me when needed.
I used commas in long sentences to help make them clear and correct.
I used commas and quotation marks to mark direct speech and quotations.
I reread my story and revised the errors I found.
I checked for “run-on” sentences and fixed them by breaking up the sentence into separate thoughts and using periods.
W
RIT
ING
Weeks 3-4
©Charlotte Knox knoxeducation.com – Narrative Writing – Page 59
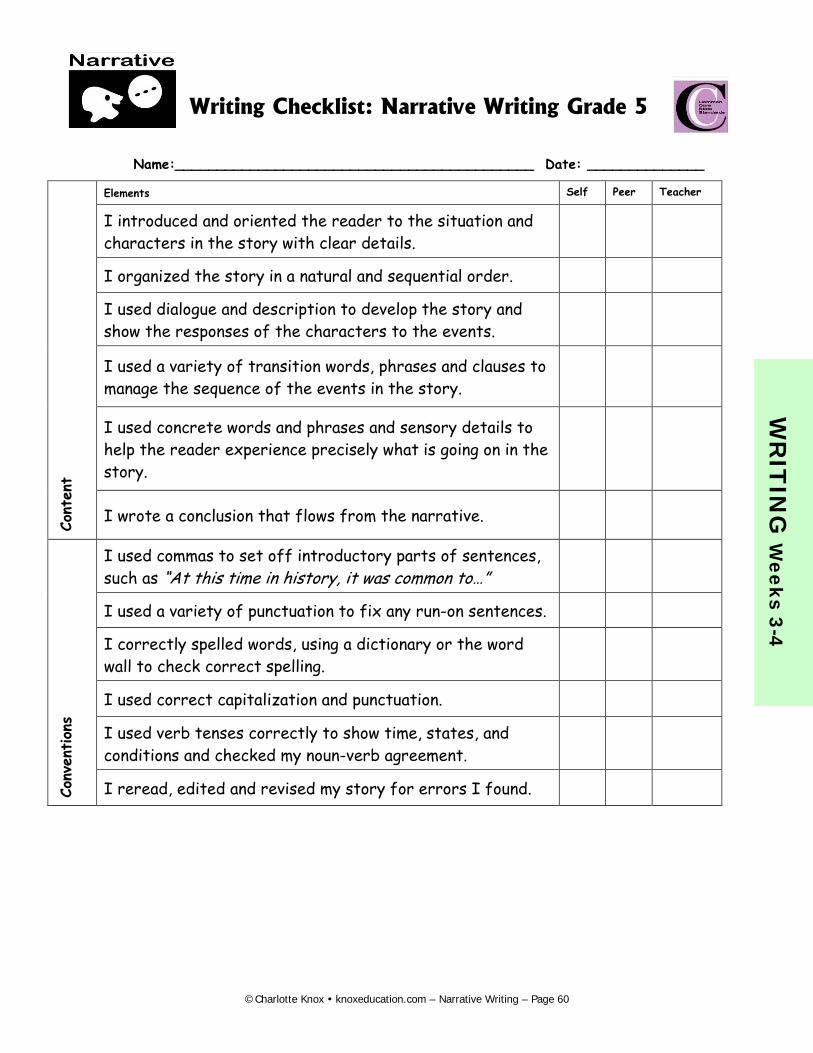
Writing Checklist: Narrative Writing Grade 5
Name:___________________________________________ Date: ______________
Cont
ent
Elements Self Peer Teacher
I introduced and oriented the reader to the situation and characters in the story with clear details.
I organized the story in a natural and sequential order.
I used dialogue and description to develop the story and show the responses of the characters to the events.
I used a variety of transition words, phrases and clauses to manage the sequence of the events in the story.
I used concrete words and phrases and sensory details to help the reader experience precisely what is going on in the story.
I wrote a conclusion that flows from the narrative.
Conv
ention
s
I used commas to set off introductory parts of sentences, such as “At this time in history, it was common to…”
I used a variety of punctuation to fix any run-on sentences.
I correctly spelled words, using a dictionary or the word wall to check correct spelling.
I used correct capitalization and punctuation.
I used verb tenses correctly to show time, states, and conditions and checked my noun-verb agreement.
I reread, edited and revised my story for errors I found.
W
RIT
ING
Weeks 3-4
©Charlotte Knox knoxeducation.com – Narrative Writing – Page 60
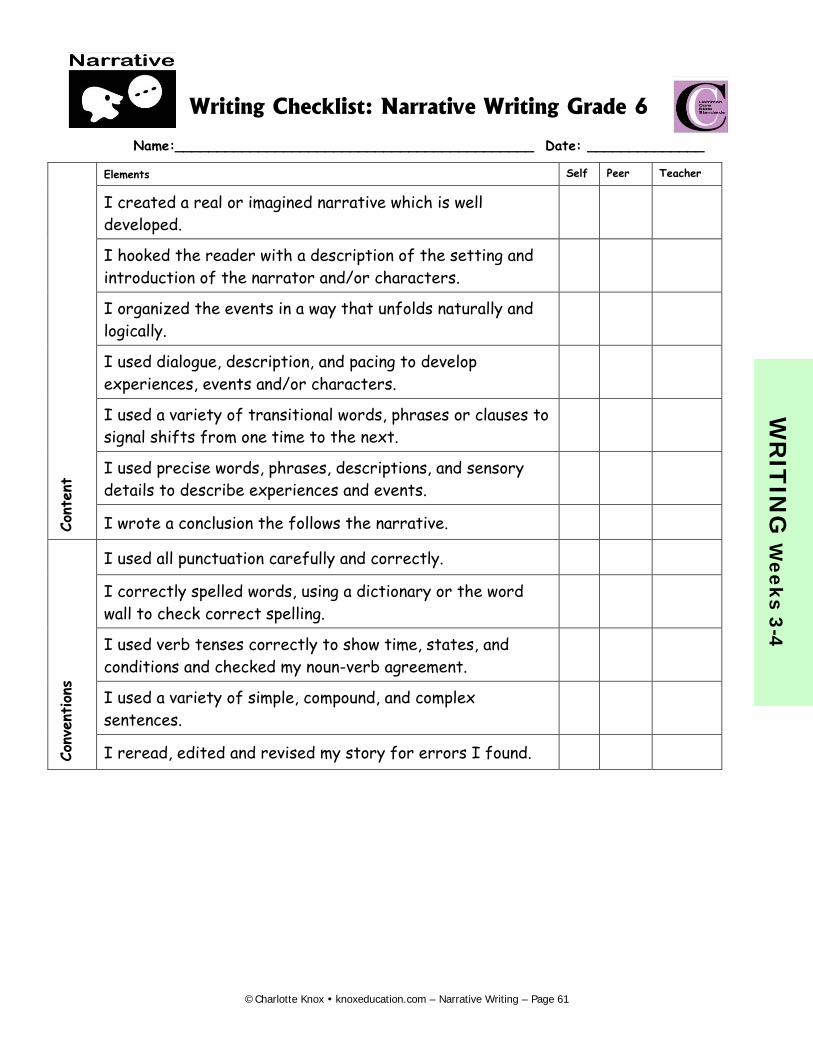
Writing Checklist: Narrative Writing Grade 6
Name:___________________________________________ Date: ______________
Cont
ent
Elements Self Peer Teacher
I created a real or imagined narrative which is well developed.
I hooked the reader with a description of the setting and introduction of the narrator and/or characters.
I organized the events in a way that unfolds naturally and logically.
I used dialogue, description, and pacing to develop experiences, events and/or characters.
I used a variety of transitional words, phrases or clauses to signal shifts from one time to the next.
I used precise words, phrases, descriptions, and sensory details to describe experiences and events.
I wrote a conclusion the follows the narrative.
Conv
ention
s
I used all punctuation carefully and correctly.
I correctly spelled words, using a dictionary or the word wall to check correct spelling.
I used verb tenses correctly to show time, states, and conditions and checked my noun-verb agreement.
I used a variety of simple, compound, and complex sentences.
I reread, edited and revised my story for errors I found.
W
RIT
ING
Weeks 3-4
©Charlotte Knox knoxeducation.com – Narrative Writing – Page 61
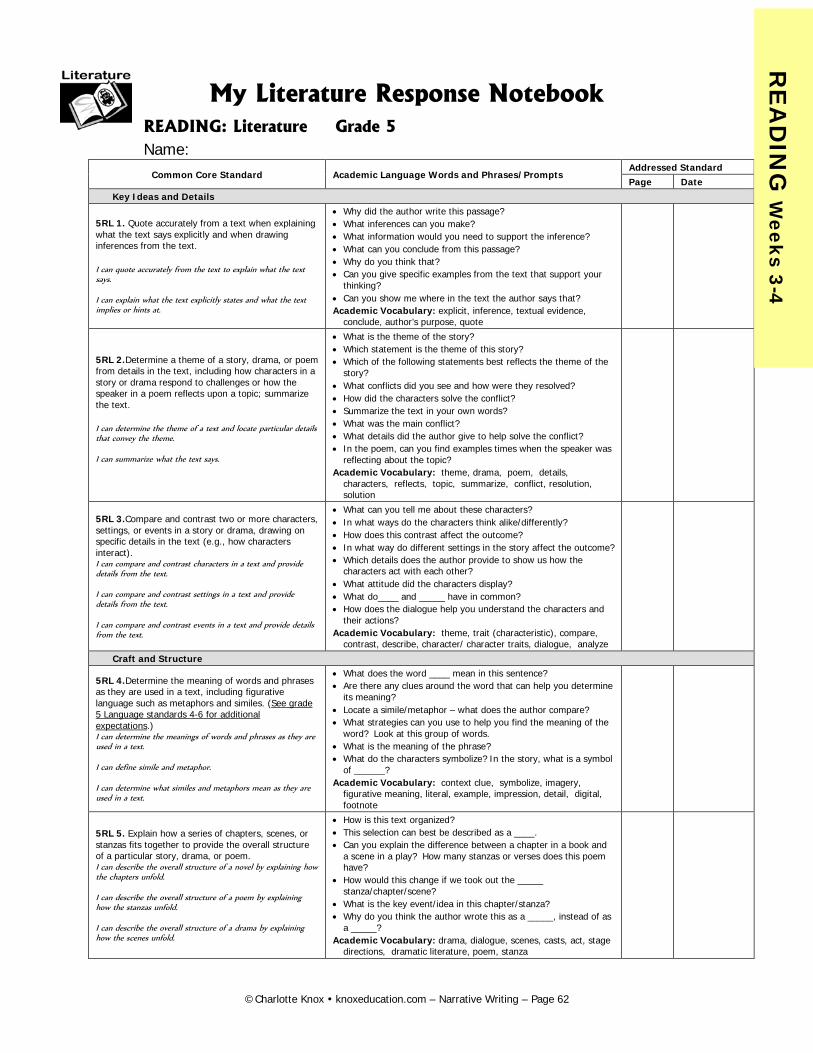
My Literature Response Notebook READING: Literature Grade 5 Name:
Common Core Standard Academic Language Words and Phrases/Prompts Addressed Standard Page Date
Key Ideas and Details
5RL 1. Quote accurately from a text when explaining what the text says explicitly and when drawing inferences from the text. I can quote accurately from the text to explain what the text says. I can explain what the text explicitly states and what the text implies or hints at.
• Why did the author write this passage? • What inferences can you make? • What information would you need to support the inference? • What can you conclude from this passage? • Why do you think that? • Can you give specific examples from the text that support your
thinking? • Can you show me where in the text the author says that? Academic Vocabulary: explicit, inference, textual evidence,
conclude, author’s purpose, quote
5RL 2.Determine a theme of a story, drama, or poem from details in the text, including how characters in a story or drama respond to challenges or how the speaker in a poem reflects upon a topic; summarize the text. I can determine the theme of a text and locate particular details that convey the theme. I can summarize what the text says.
• What is the theme of the story? • Which statement is the theme of this story? • Which of the following statements best reflects the theme of the
story? • What conflicts did you see and how were they resolved? • How did the characters solve the conflict? • Summarize the text in your own words? • What was the main conflict? • What details did the author give to help solve the conflict? • In the poem, can you find examples times when the speaker was
reflecting about the topic? Academic Vocabulary: theme, drama, poem, details,
characters, reflects, topic, summarize, conflict, resolution, solution
5RL 3.Compare and contrast two or more characters, settings, or events in a story or drama, drawing on specific details in the text (e.g., how characters interact). I can compare and contrast characters in a text and provide details from the text. I can compare and contrast settings in a text and provide details from the text. I can compare and contrast events in a text and provide details from the text.
• What can you tell me about these characters? • In what ways do the characters think alike/differently? • How does this contrast affect the outcome? • In what way do different settings in the story affect the outcome? • Which details does the author provide to show us how the
characters act with each other? • What attitude did the characters display? • What do____ and _____ have in common? • How does the dialogue help you understand the characters and
their actions? Academic Vocabulary: theme, trait (characteristic), compare,
contrast, describe, character/ character traits, dialogue, analyze
Craft and Structure
5RL 4.Determine the meaning of words and phrases as they are used in a text, including figurative language such as metaphors and similes. (See grade 5 Language standards 4-6 for additional expectations.) I can determine the meanings of words and phrases as they are used in a text. I can define simile and metaphor. I can determine what similes and metaphors mean as they are used in a text.
• What does the word ____ mean in this sentence? • Are there any clues around the word that can help you determine
its meaning? • Locate a simile/metaphor – what does the author compare? • What strategies can you use to help you find the meaning of the
word? Look at this group of words. • What is the meaning of the phrase? • What do the characters symbolize? In the story, what is a symbol
of ______? Academic Vocabulary: context clue, symbolize, imagery,
figurative meaning, literal, example, impression, detail, digital, footnote
5RL 5. Explain how a series of chapters, scenes, or stanzas fits together to provide the overall structure of a particular story, drama, or poem. I can describe the overall structure of a novel by explaining how the chapters unfold. I can describe the overall structure of a poem by explaining how the stanzas unfold. I can describe the overall structure of a drama by explaining how the scenes unfold.
• How is this text organized? • This selection can best be described as a ____. • Can you explain the difference between a chapter in a book and
a scene in a play? How many stanzas or verses does this poem have?
• How would this change if we took out the _____ stanza/chapter/scene?
• What is the key event/idea in this chapter/stanza? • Why do you think the author wrote this as a _____, instead of as
a _____? Academic Vocabulary: drama, dialogue, scenes, casts, act, stage
directions, dramatic literature, poem, stanza
RE
AD
ING
Weeks 3-4
©Charlotte Knox knoxeducation.com – Narrative Writing – Page 62
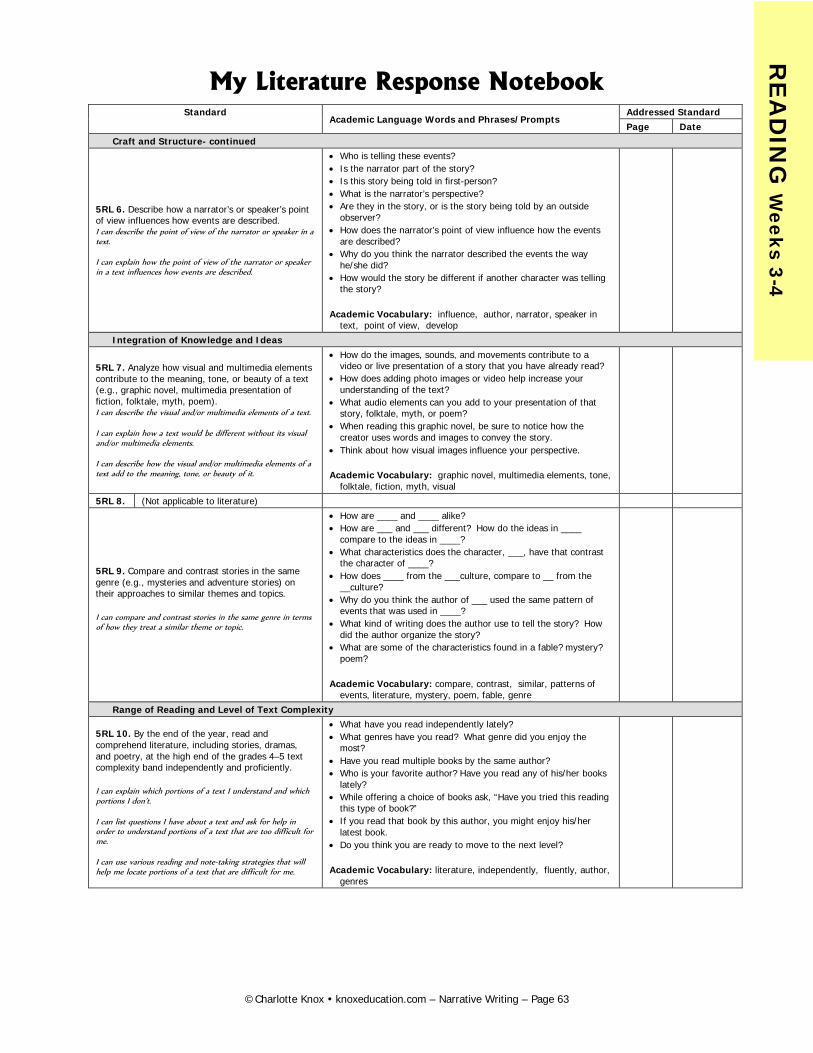
My Literature Response Notebook
Standard Academic Language Words and Phrases/Prompts
Addressed Standard Page Date
Craft and Structure- continued
5RL 6. Describe how a narrator’s or speaker’s point of view influences how events are described. I can describe the point of view of the narrator or speaker in a text. I can explain how the point of view of the narrator or speaker in a text influences how events are described.
• Who is telling these events? • Is the narrator part of the story? • Is this story being told in first-person? • What is the narrator’s perspective? • Are they in the story, or is the story being told by an outside
observer? • How does the narrator’s point of view influence how the events
are described? • Why do you think the narrator described the events the way
he/she did? • How would the story be different if another character was telling
the story? Academic Vocabulary: influence, author, narrator, speaker in
text, point of view, develop
Integration of Knowledge and Ideas
5RL 7. Analyze how visual and multimedia elements contribute to the meaning, tone, or beauty of a text (e.g., graphic novel, multimedia presentation of fiction, folktale, myth, poem). I can describe the visual and/or multimedia elements of a text. I can explain how a text would be different without its visual and/or multimedia elements. I can describe how the visual and/or multimedia elements of a text add to the meaning, tone, or beauty of it.
• How do the images, sounds, and movements contribute to a video or live presentation of a story that you have already read?
• How does adding photo images or video help increase your understanding of the text?
• What audio elements can you add to your presentation of that story, folktale, myth, or poem?
• When reading this graphic novel, be sure to notice how the creator uses words and images to convey the story.
• Think about how visual images influence your perspective. Academic Vocabulary: graphic novel, multimedia elements, tone,
folktale, fiction, myth, visual
5RL 8. (Not applicable to literature)
5RL 9. Compare and contrast stories in the same genre (e.g., mysteries and adventure stories) on their approaches to similar themes and topics. I can compare and contrast stories in the same genre in terms of how they treat a similar theme or topic.
• How are ____ and ____ alike? • How are ___ and ___ different? How do the ideas in ____
compare to the ideas in ____? • What characteristics does the character, ___, have that contrast
the character of ____? • How does ____ from the ___culture, compare to __ from the
__culture? • Why do you think the author of ___ used the same pattern of
events that was used in ____? • What kind of writing does the author use to tell the story? How
did the author organize the story? • What are some of the characteristics found in a fable? mystery?
poem? Academic Vocabulary: compare, contrast, similar, patterns of
events, literature, mystery, poem, fable, genre
Range of Reading and Level of Text Complexity
5RL 10. By the end of the year, read and comprehend literature, including stories, dramas, and poetry, at the high end of the grades 4–5 text complexity band independently and proficiently. I can explain which portions of a text I understand and which portions I don’t. I can list questions I have about a text and ask for help in order to understand portions of a text that are too difficult for me. I can use various reading and note-taking strategies that will help me locate portions of a text that are difficult for me.
• What have you read independently lately? • What genres have you read? What genre did you enjoy the
most? • Have you read multiple books by the same author? • Who is your favorite author? Have you read any of his/her books
lately? • While offering a choice of books ask, “Have you tried this reading
this type of book?” • If you read that book by this author, you might enjoy his/her
latest book. • Do you think you are ready to move to the next level? Academic Vocabulary: literature, independently, fluently, author,
genres
RE
AD
ING
Weeks 3-4
©Charlotte Knox knoxeducation.com – Narrative Writing – Page 63
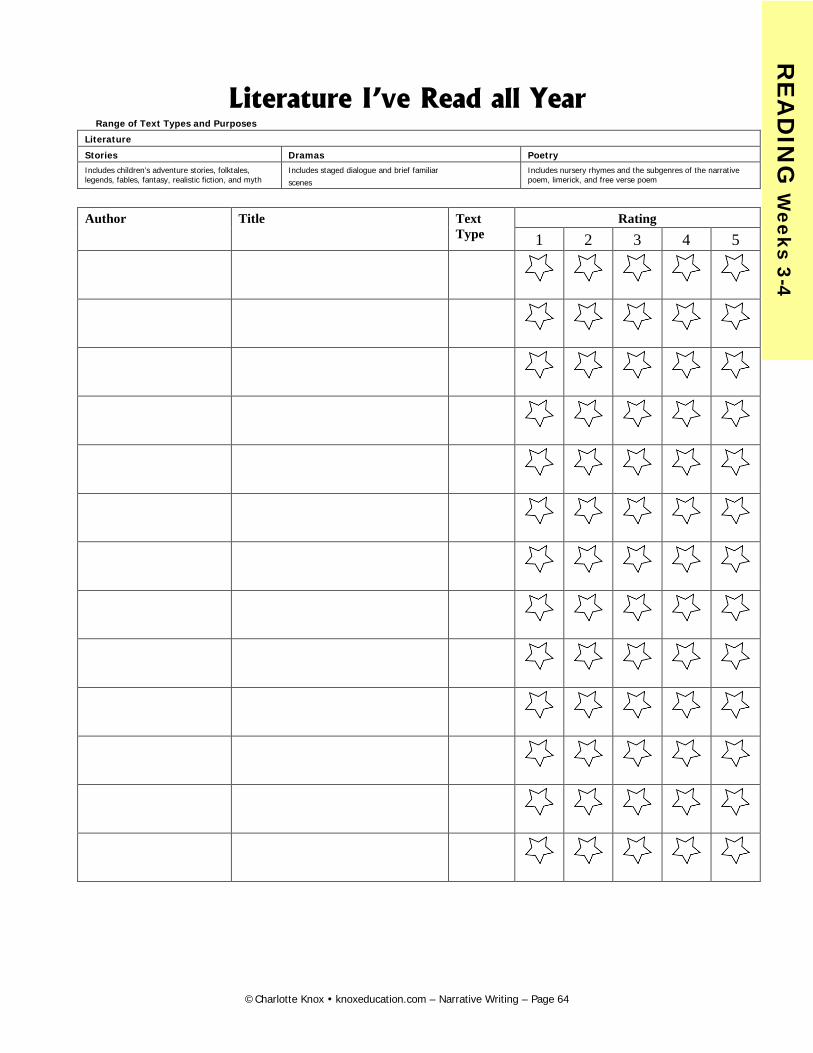
Literature I’ve Read all Year Range of Text Types and Purposes
Literature
Stories Dramas Poetry Includes children’s adventure stories, folktales, legends, fables, fantasy, realistic fiction, and myth
Includes staged dialogue and brief familiar scenes
Includes nursery rhymes and the subgenres of the narrative poem, limerick, and free verse poem
Author Title Text
Type Rating
1 2 3 4 5
RE
AD
ING
Weeks 3-4
©Charlotte Knox knoxeducation.com – Narrative Writing – Page 64
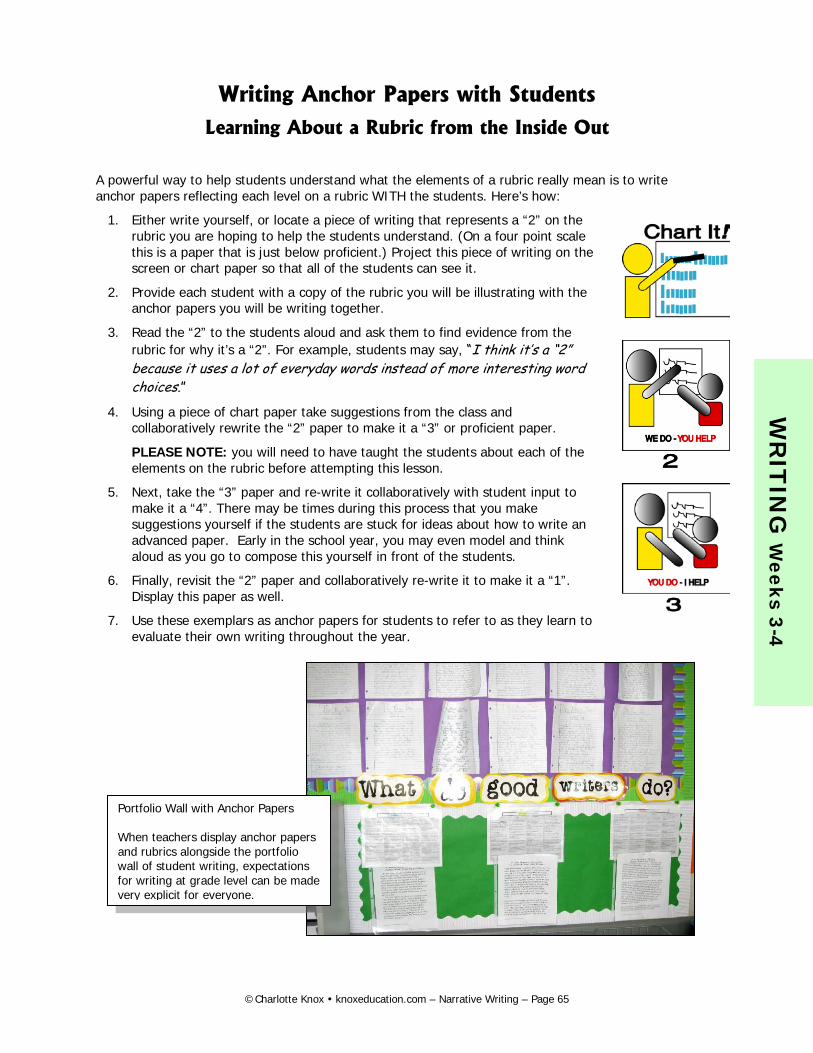
Writing Anchor Papers with Students Learning About a Rubric from the Inside Out
A powerful way to help students understand what the elements of a rubric really mean is to write anchor papers reflecting each level on a rubric WITH the students. Here’s how:
1. Either write yourself, or locate a piece of writing that represents a “2” on the rubric you are hoping to help the students understand. (On a four point scale this is a paper that is just below proficient.) Project this piece of writing on the screen or chart paper so that all of the students can see it.
2. Provide each student with a copy of the rubric you will be illustrating with the anchor papers you will be writing together.
3. Read the “2” to the students aloud and ask them to find evidence from the rubric for why it’s a “2”. For example, students may say, “I think it’s a “2” because it uses a lot of everyday words instead of more interesting word choices.”
4. Using a piece of chart paper take suggestions from the class and collaboratively rewrite the “2” paper to make it a “3” or proficient paper.
PLEASE NOTE: you will need to have taught the students about each of the elements on the rubric before attempting this lesson.
5. Next, take the “3” paper and re-write it collaboratively with student input to make it a “4”. There may be times during this process that you make suggestions yourself if the students are stuck for ideas about how to write an advanced paper. Early in the school year, you may even model and think aloud as you go to compose this yourself in front of the students.
6. Finally, revisit the “2” paper and collaboratively re-write it to make it a “1”. Display this paper as well.
7. Use these exemplars as anchor papers for students to refer to as they learn to evaluate their own writing throughout the year.
Portfolio Wall with Anchor Papers When teachers display anchor papers and rubrics alongside the portfolio wall of student writing, expectations for writing at grade level can be made very explicit for everyone.
W
RIT
ING
Weeks 3-4
©Charlotte Knox knoxeducation.com – Narrative Writing – Page 65
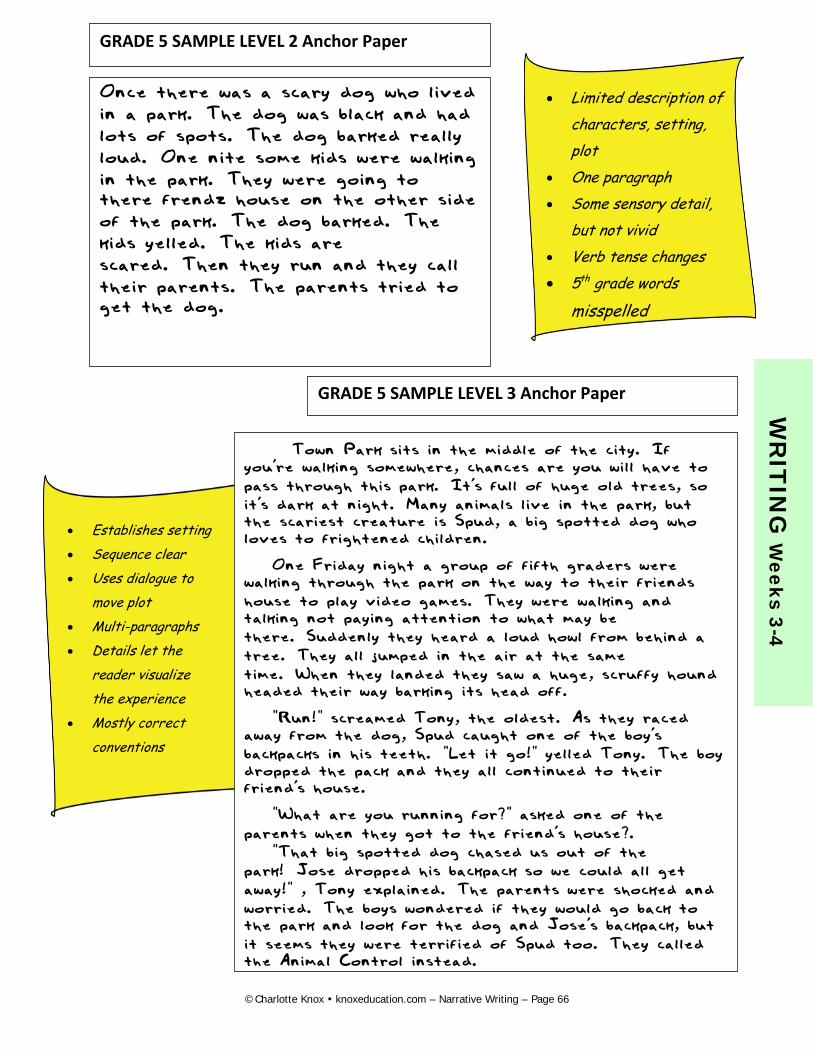
W
RIT
ING
Weeks 3-4
Once there was a scary dog who lived in a park. The dog was black and had lots of spots. The dog barked really loud. One nite some kids were walking in the park. They were going to there frendz house on the other side of the park. The dog barked. The kids yelled. The kids are scared. Then they run and they call their parents. The parents tried to get the dog.
GRADE 5 SAMPLE LEVEL 2 Anchor Paper
Town Park sits in the middle of the city. If you're walking somewhere, chances are you will have to pass through this park. It's full of huge old trees, so it's dark at night. Many animals live in the park, but the scariest creature is Spud, a big spotted dog who loves to frightened children.
One Friday night a group of fifth graders were walking through the park on the way to their friends house to play video games. They were walking and talking not paying attention to what may be there. Suddenly they heard a loud howl from behind a tree. They all jumped in the air at the same time. When they landed they saw a huge, scruffy hound headed their way barking its head off.
"Run!" screamed Tony, the oldest. As they raced away from the dog, Spud caught one of the boy's backpacks in his teeth. "Let it go!" yelled Tony. The boy dropped the pack and they all continued to their friend's house.
"What are you running for?" asked one of the parents when they got to the friend's house?. "That big spotted dog chased us out of the park! Jose dropped his backpack so we could all get away!" , Tony explained. The parents were shocked and worried. The boys wondered if they would go back to the park and look for the dog and Jose's backpack, but it seems they were terrified of Spud too. They called the Animal Control instead.
GRADE 5 SAMPLE LEVEL 3 Anchor Paper
• Limited description of characters, setting, plot
• One paragraph • Some sensory detail,
but not vivid • Verb tense changes • 5th grade words
misspelled
• Establishes setting • Sequence clear • Uses dialogue to
move plot • Multi-paragraphs • Details let the
reader visualize the experience
• Mostly correct conventions
©Charlotte Knox knoxeducation.com – Narrative Writing – Page 66
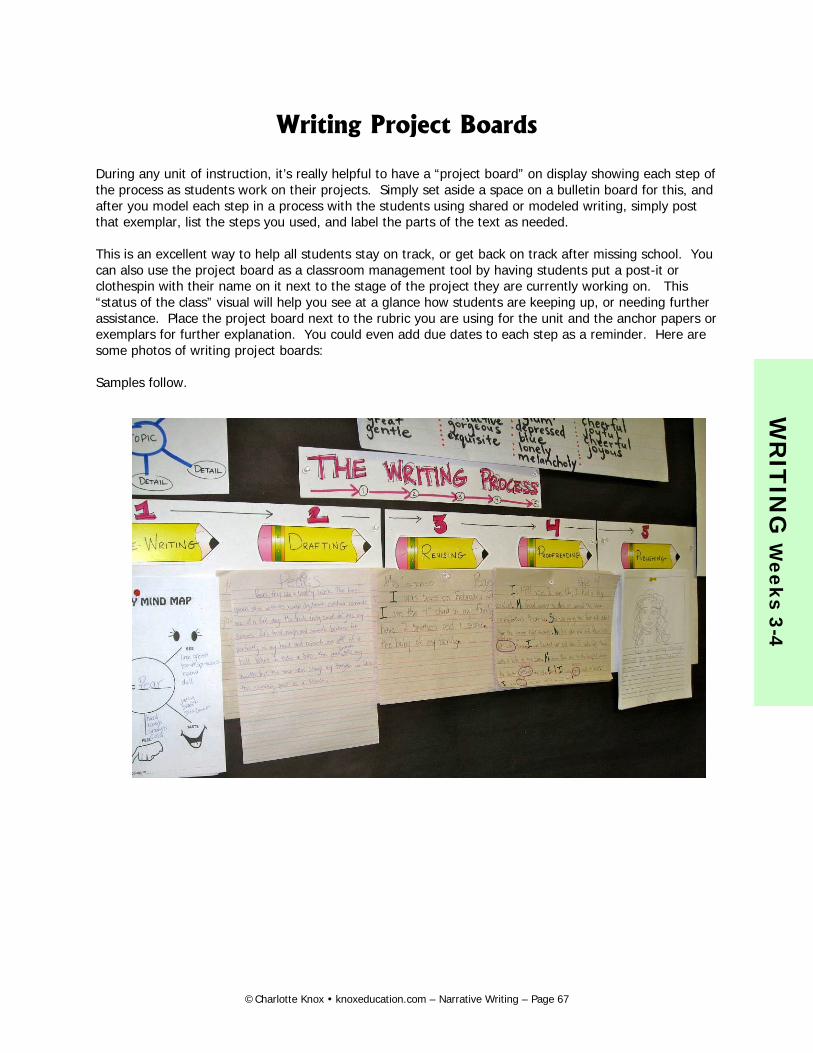
Writing Project Boards
During any unit of instruction, it’s really helpful to have a “project board” on display showing each step of the process as students work on their projects. Simply set aside a space on a bulletin board for this, and after you model each step in a process with the students using shared or modeled writing, simply post that exemplar, list the steps you used, and label the parts of the text as needed. This is an excellent way to help all students stay on track, or get back on track after missing school. You can also use the project board as a classroom management tool by having students put a post-it or clothespin with their name on it next to the stage of the project they are currently working on. This “status of the class” visual will help you see at a glance how students are keeping up, or needing further assistance. Place the project board next to the rubric you are using for the unit and the anchor papers or exemplars for further explanation. You could even add due dates to each step as a reminder. Here are some photos of writing project boards: Samples follow.
W
RIT
ING
Weeks 3-4
©Charlotte Knox knoxeducation.com – Narrative Writing – Page 67
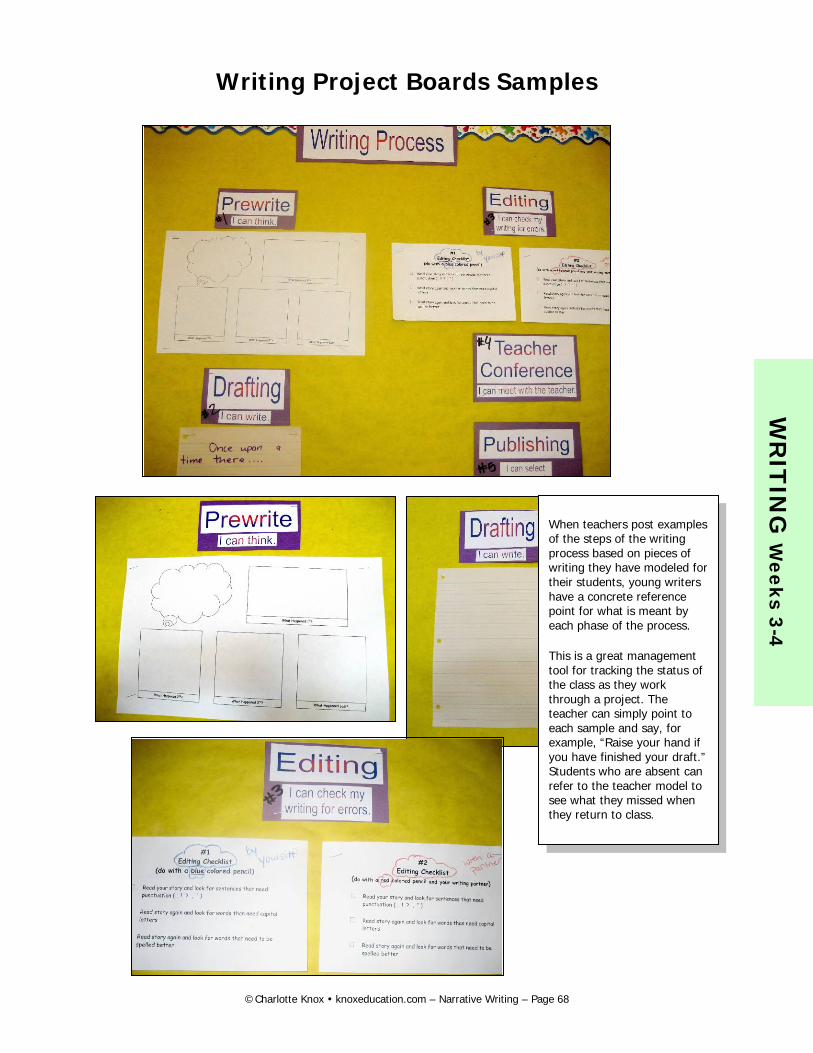
Writing Project Boards Samples
When teachers post examples of the steps of the writing process based on pieces of writing they have modeled for their students, young writers have a concrete reference point for what is meant by each phase of the process.
This is a great management tool for tracking the status of the class as they work through a project. The teacher can simply point to each sample and say, for example, “Raise your hand if you have finished your draft.” Students who are absent can refer to the teacher model to see what they missed when they return to class.
W
RIT
ING
Weeks 3-4
©Charlotte Knox knoxeducation.com – Narrative Writing – Page 68
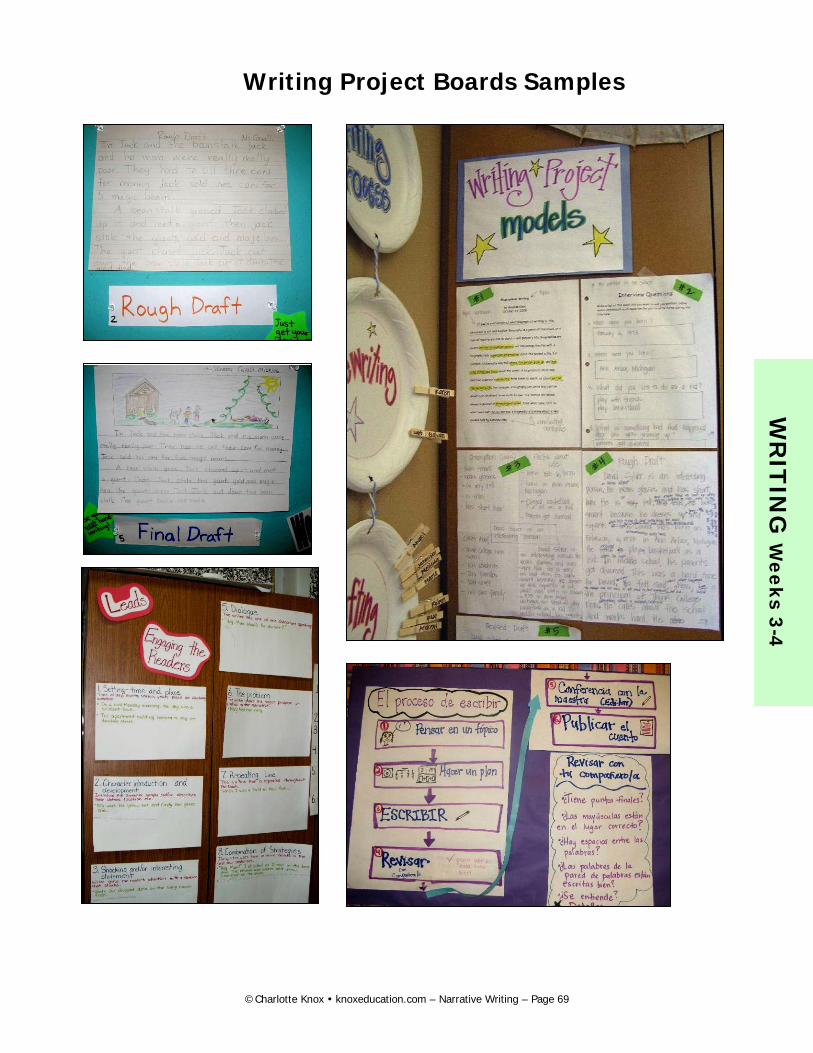
Writing Project Boards Samples
W
RIT
ING
Weeks 3-4
©Charlotte Knox knoxeducation.com – Narrative Writing – Page 69
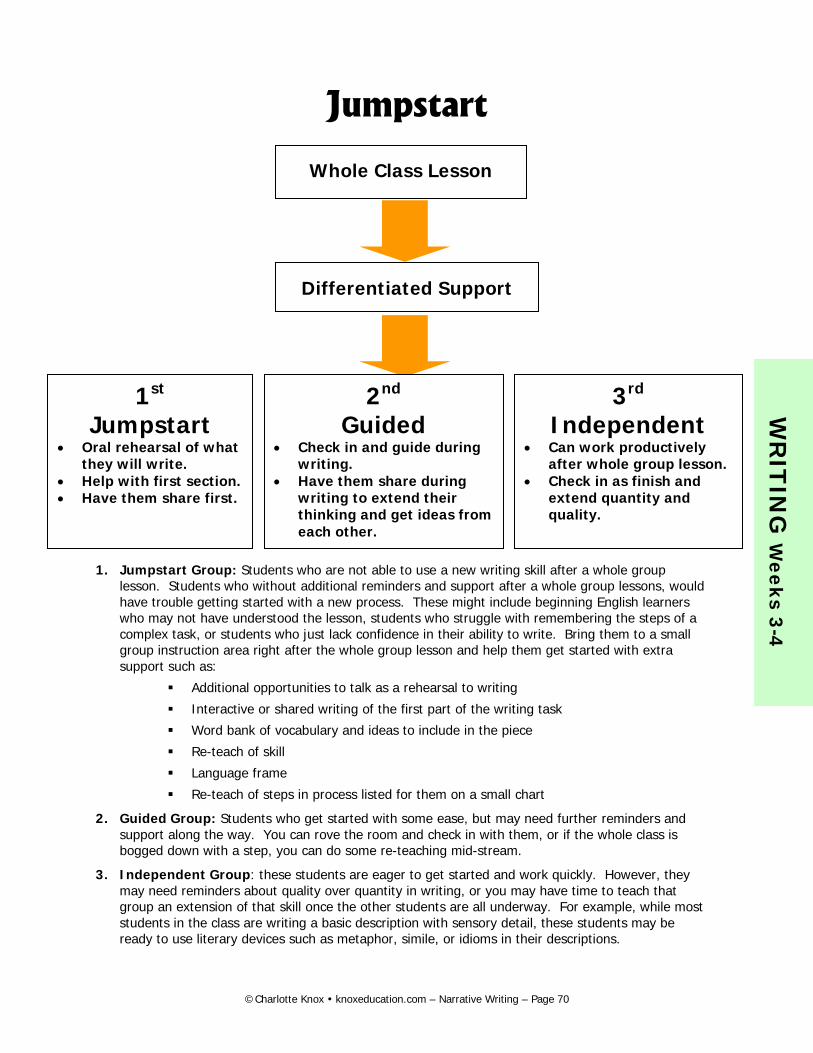
Jumpstart
1. Jumpstart Group: Students who are not able to use a new writing skill after a whole group lesson. Students who without additional reminders and support after a whole group lessons, would have trouble getting started with a new process. These might include beginning English learners who may not have understood the lesson, students who struggle with remembering the steps of a complex task, or students who just lack confidence in their ability to write. Bring them to a small group instruction area right after the whole group lesson and help them get started with extra support such as:
Additional opportunities to talk as a rehearsal to writing
Interactive or shared writing of the first part of the writing task
Word bank of vocabulary and ideas to include in the piece
Re-teach of skill
Language frame
Re-teach of steps in process listed for them on a small chart
2. Guided Group: Students who get started with some ease, but may need further reminders and support along the way. You can rove the room and check in with them, or if the whole class is bogged down with a step, you can do some re-teaching mid-stream.
3. Independent Group: these students are eager to get started and work quickly. However, they may need reminders about quality over quantity in writing, or you may have time to teach that group an extension of that skill once the other students are all underway. For example, while most students in the class are writing a basic description with sensory detail, these students may be ready to use literary devices such as metaphor, simile, or idioms in their descriptions.
Whole Class Lesson
Differentiated Support
3rd Independent
• Can work productively after whole group lesson.
• Check in as finish and extend quantity and quality.
1st Jumpstart
• Oral rehearsal of what they will write.
• Help with first section. • Have them share first.
2nd Guided
• Check in and guide during writing.
• Have them share during writing to extend their thinking and get ideas from each other.
W
RIT
ING
Weeks 3-4
©Charlotte Knox knoxeducation.com – Narrative Writing – Page 70

Sample Schedule for Differentiated Writing Support
MONDAY TUESDAY WEDNESDAY THURSDAY FRIDAY
Writing Lesson: Model with samples, teacher model; identify features of focus genre. Students Write: Meet with Jumpstart group
Writing Lesson continued Students Write: Small group 1 Students share.
Mini-lesson Students Write: Small group 2,3 or individual conferences Students share.
Mini-lesson Students Write: Small group 2,3 or individual conferences Students share.
Remind students of project/lessons using samples and a checklist of “how to” chart. Meet with individual students. Longer student sharing period with reflection.
WHOLE GROUP FOCUS FOR WEEK:
Standards Assignment Modeling Mini-lessons
Small Group Differentiated Lessons
W
RIT
ING
Weeks 3-4
©Charlotte Knox knoxeducation.com – Narrative Writing – Page 71
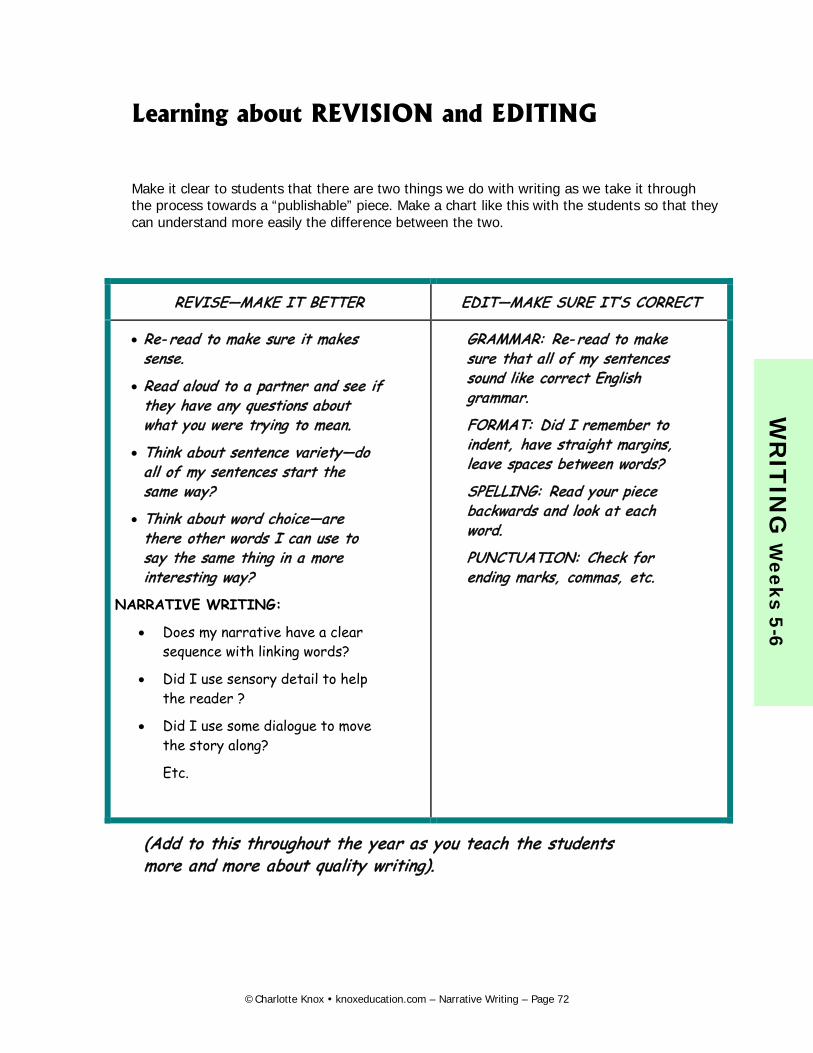
Learning about REVISION and EDITING
Make it clear to students that there are two things we do with writing as we take it through the process towards a “publishable” piece. Make a chart like this with the students so that they can understand more easily the difference between the two.
REVISE—MAKE IT BETTER EDIT—MAKE SURE IT’S CORRECT
• Re- read to make sure it makes sense.
• Read aloud to a partner and see if they have any questions about what you were trying to mean.
• Think about sentence variety—do all of my sentences start the same way?
• Think about word choice—are there other words I can use to say the same thing in a more interesting way?
NARRATIVE WRITING:
• Does my narrative have a clear sequence with linking words?
• Did I use sensory detail to help the reader ?
• Did I use some dialogue to move the story along?
Etc.
GRAMMAR: Re- read to make sure that all of my sentences sound like correct English grammar.
FORMAT: Did I remember to indent, have straight margins, leave spaces between words?
SPELLING: Read your piece backwards and look at each word.
PUNCTUATION: Check for ending marks, commas, etc.
(Add to this throughout the year as you teach the students more and more about quality writing).
W
RIT
ING
Weeks 5-6
©Charlotte Knox knoxeducation.com – Narrative Writing – Page 72
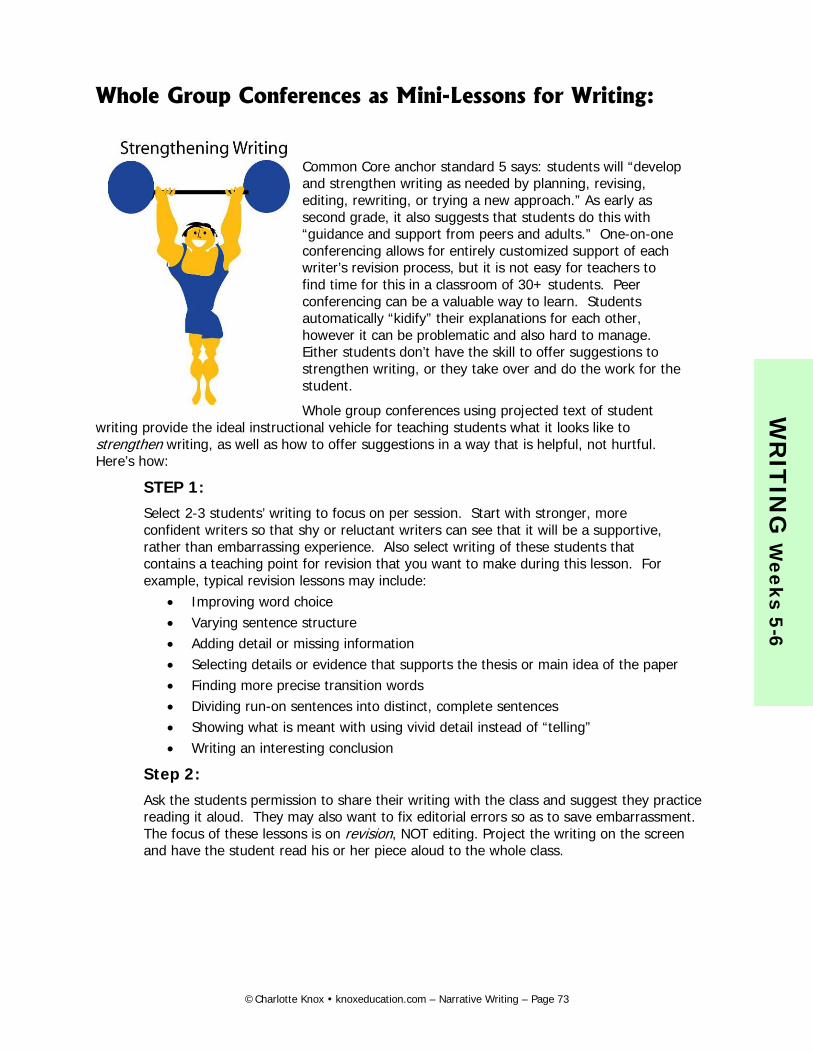
Whole Group Conferences as Mini-Lessons for Writing:
Common Core anchor standard 5 says: students will “develop and strengthen writing as needed by planning, revising, editing, rewriting, or trying a new approach.” As early as second grade, it also suggests that students do this with “guidance and support from peers and adults.” One-on-one conferencing allows for entirely customized support of each writer’s revision process, but it is not easy for teachers to find time for this in a classroom of 30+ students. Peer conferencing can be a valuable way to learn. Students automatically “kidify” their explanations for each other, however it can be problematic and also hard to manage. Either students don’t have the skill to offer suggestions to strengthen writing, or they take over and do the work for the student.
Whole group conferences using projected text of student writing provide the ideal instructional vehicle for teaching students what it looks like to strengthen writing, as well as how to offer suggestions in a way that is helpful, not hurtful. Here’s how:
STEP 1: Select 2-3 students’ writing to focus on per session. Start with stronger, more confident writers so that shy or reluctant writers can see that it will be a supportive, rather than embarrassing experience. Also select writing of these students that contains a teaching point for revision that you want to make during this lesson. For example, typical revision lessons may include:
• Improving word choice • Varying sentence structure • Adding detail or missing information • Selecting details or evidence that supports the thesis or main idea of the paper • Finding more precise transition words • Dividing run-on sentences into distinct, complete sentences • Showing what is meant with using vivid detail instead of “telling” • Writing an interesting conclusion
Step 2: Ask the students permission to share their writing with the class and suggest they practice reading it aloud. They may also want to fix editorial errors so as to save embarrassment. The focus of these lessons is on revision, NOT editing. Project the writing on the screen and have the student read his or her piece aloud to the whole class.
W
RIT
ING
Weeks 5-6
©Charlotte Knox knoxeducation.com – Narrative Writing – Page 73

Step 3: “I noticed”
Ask students to celebrate the strengths they notice in the writing with “I noticed…” statements. For example they may say, “I noticed that you really told about your topic in the first sentence,” or “I noticed that there is a lot of detail in your picture,” or “ I noticed that you used a lot of adjectives to describe things in your writing,” etc. Feel free to model these statements yourself during the initial lessons.
Step 4: “I wonder?” Tell students they can ask questions about the writing to help the writer think about what may be missing in the writing or made more interesting. Students use questions, not suggestions, to keep the writer in control of his or her own writing. Initially, students will need a lot of modeling of this by the teacher in order to get the difference between a comment or judgment, and a question. For example, “I wonder what the room looked like when you stepped inside?” or “I wonder what else you learned about _____ that you might want to include to explain more.” As the writer answers these questions from the students, you take notes for the student writer on a post-it so that the writer can remember what they said they wanted to add or change. After 3-5 questions are answered, project the post-it with your notes on the screen so that the class can see what you wrote for the writer. The post-it may look something like this with bullet points, not entire sentences:
Step 5: Closure: End the session with reminding students what we learned about revising writing today while helping our fellow students. Suggest to the others that they use what they learned to strengthen their own writing during writing time. The spillover effect of these whole group conferences on all the students’ writing is notable. Make sure to be equitable and work your way through the entire class list before you invite the first writers up to share again. You may choose to do this at the beginning of a writing session to make a specific teaching point to apply, or at the end as a way to celebrate as well as extend quality into the writing for the next day.
I wonder?
• dog: rusty brown, long fur
• park: windy, leaves, ground
• feeling: confused
W
RIT
ING
Weeks 5-6
©Charlotte Knox knoxeducation.com – Narrative Writing – Page 74
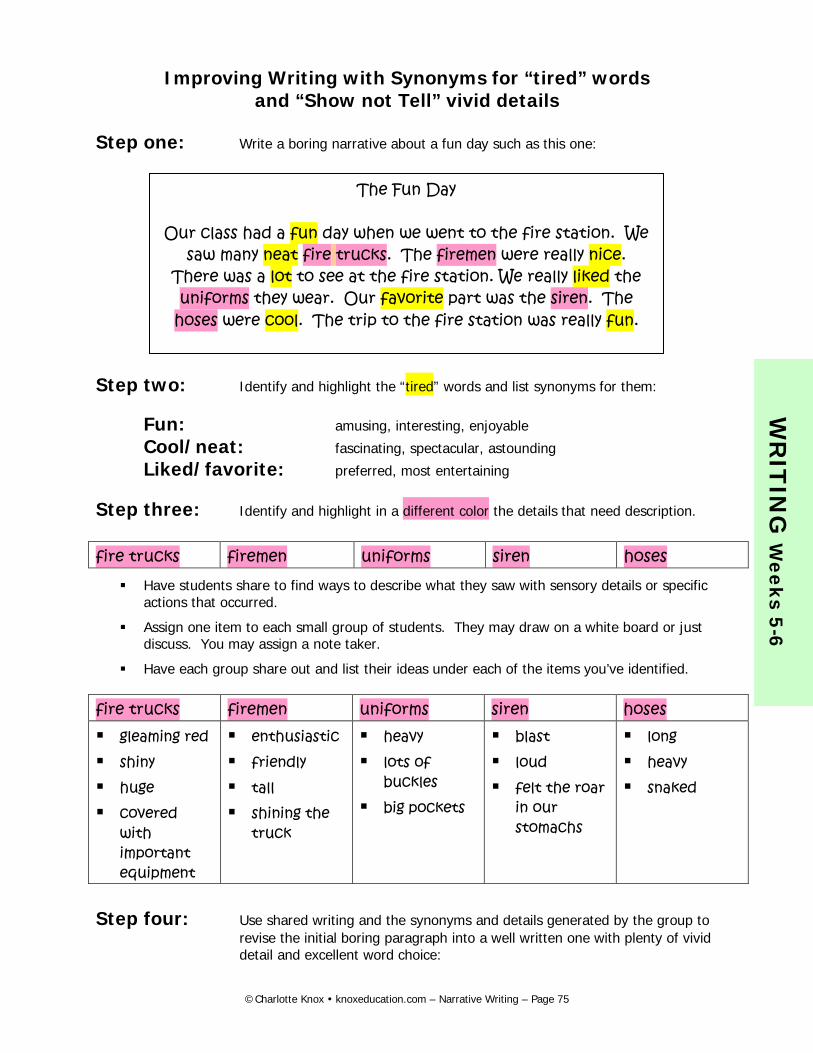
Improving Writing with Synonyms for “tired” words
and “Show not Tell” vivid details Step one: Write a boring narrative about a fun day such as this one: Step two: Identify and highlight the “tired” words and list synonyms for them:
Fun: amusing, interesting, enjoyable Cool/neat: fascinating, spectacular, astounding Liked/favorite: preferred, most entertaining
Step three: Identify and highlight in a different color the details that need description.
fire trucks firemen uniforms siren hoses
Have students share to find ways to describe what they saw with sensory details or specific actions that occurred.
Assign one item to each small group of students. They may draw on a white board or just discuss. You may assign a note taker.
Have each group share out and list their ideas under each of the items you’ve identified.
fire trucks firemen uniforms siren hoses gleaming red shiny huge covered
with important equipment
enthusiastic friendly tall shining the
truck
heavy lots of
buckles big pockets
blast loud felt the roar
in our stomachs
long heavy snaked
Step four: Use shared writing and the synonyms and details generated by the group to
revise the initial boring paragraph into a well written one with plenty of vivid detail and excellent word choice:
The Fun Day
Our class had a fun day when we went to the fire station. We saw many neat fire trucks. The firemen were really nice.
There was a lot to see at the fire station. We really liked the uniforms they wear. Our favorite part was the siren. The
hoses were cool. The trip to the fire station was really fun.
W
RIT
ING
Weeks 5-6
©Charlotte Knox knoxeducation.com – Narrative Writing – Page 75
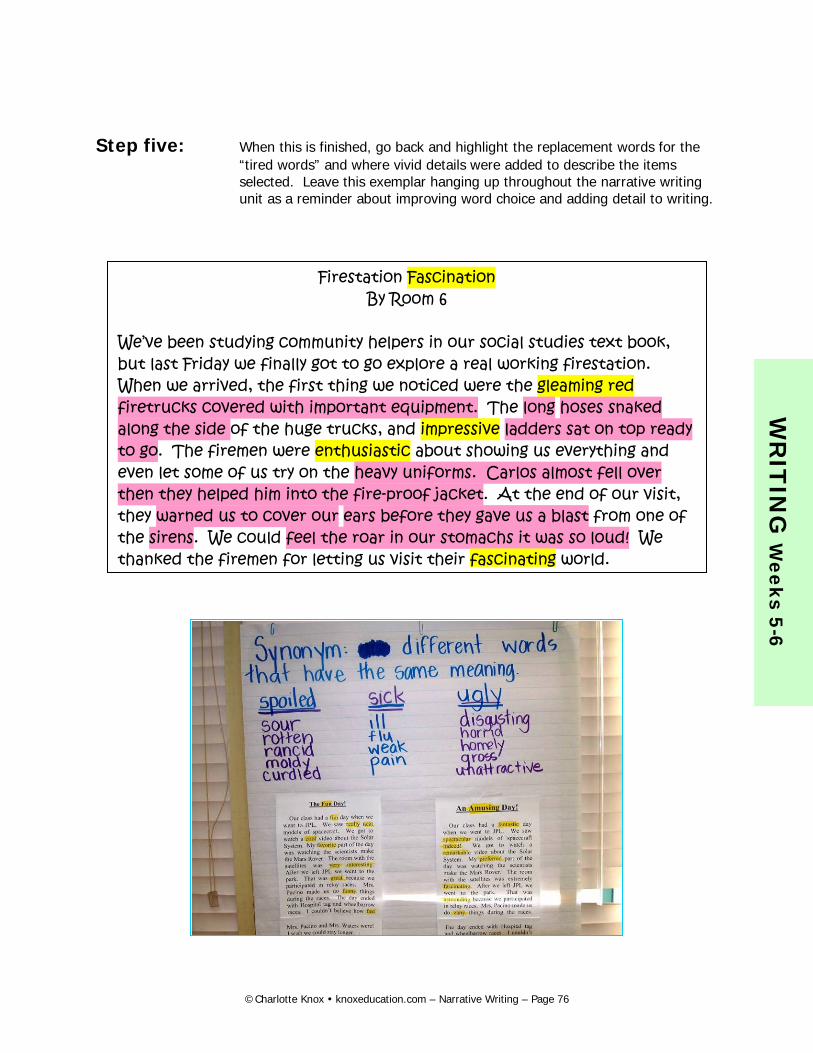
Step five: When this is finished, go back and highlight the replacement words for the
“tired words” and where vivid details were added to describe the items selected. Leave this exemplar hanging up throughout the narrative writing unit as a reminder about improving word choice and adding detail to writing.
Firestation Fascination
By Room 6
We’ve been studying community helpers in our social studies text book, but last Friday we finally got to go explore a real working firestation. When we arrived, the first thing we noticed were the gleaming red firetrucks covered with important equipment. The long hoses snaked along the side of the huge trucks, and impressive ladders sat on top ready to go. The firemen were enthusiastic about showing us everything and even let some of us try on the heavy uniforms. Carlos almost fell over then they helped him into the fire-proof jacket. At the end of our visit, they warned us to cover our ears before they gave us a blast from one of the sirens. We could feel the roar in our stomachs it was so loud! We thanked the firemen for letting us visit their fascinating world.
W
RIT
ING
Weeks 5-6
©Charlotte Knox knoxeducation.com – Narrative Writing – Page 76
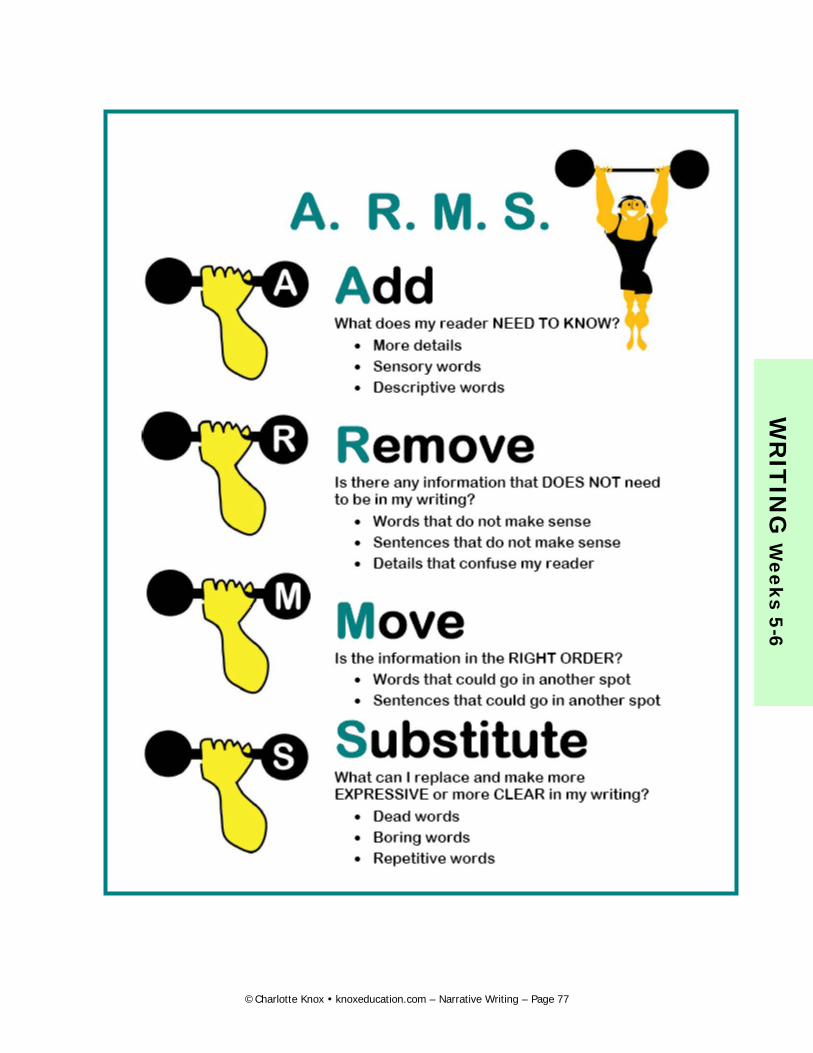
W
RIT
ING
Weeks 5-6
©Charlotte Knox knoxeducation.com – Narrative Writing – Page 77
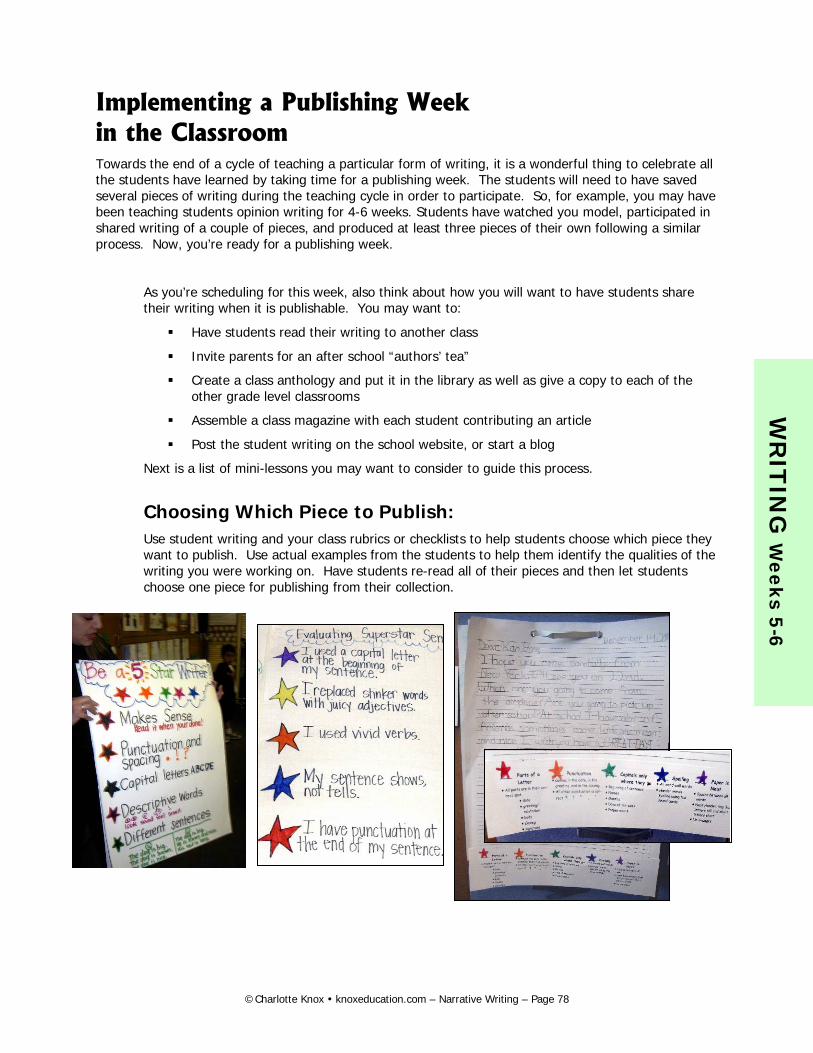
Implementing a Publishing Week in the Classroom Towards the end of a cycle of teaching a particular form of writing, it is a wonderful thing to celebrate all the students have learned by taking time for a publishing week. The students will need to have saved several pieces of writing during the teaching cycle in order to participate. So, for example, you may have been teaching students opinion writing for 4-6 weeks. Students have watched you model, participated in shared writing of a couple of pieces, and produced at least three pieces of their own following a similar process. Now, you’re ready for a publishing week.
As you’re scheduling for this week, also think about how you will want to have students share their writing when it is publishable. You may want to:
Have students read their writing to another class
Invite parents for an after school “authors’ tea”
Create a class anthology and put it in the library as well as give a copy to each of the other grade level classrooms
Assemble a class magazine with each student contributing an article
Post the student writing on the school website, or start a blog
Next is a list of mini-lessons you may want to consider to guide this process.
Choosing Which Piece to Publish: Use student writing and your class rubrics or checklists to help students choose which piece they want to publish. Use actual examples from the students to help them identify the qualities of the writing you were working on. Have students re-read all of their pieces and then let students choose one piece for publishing from their collection.
W
RIT
ING
Weeks 5-6
©Charlotte Knox knoxeducation.com – Narrative Writing – Page 78
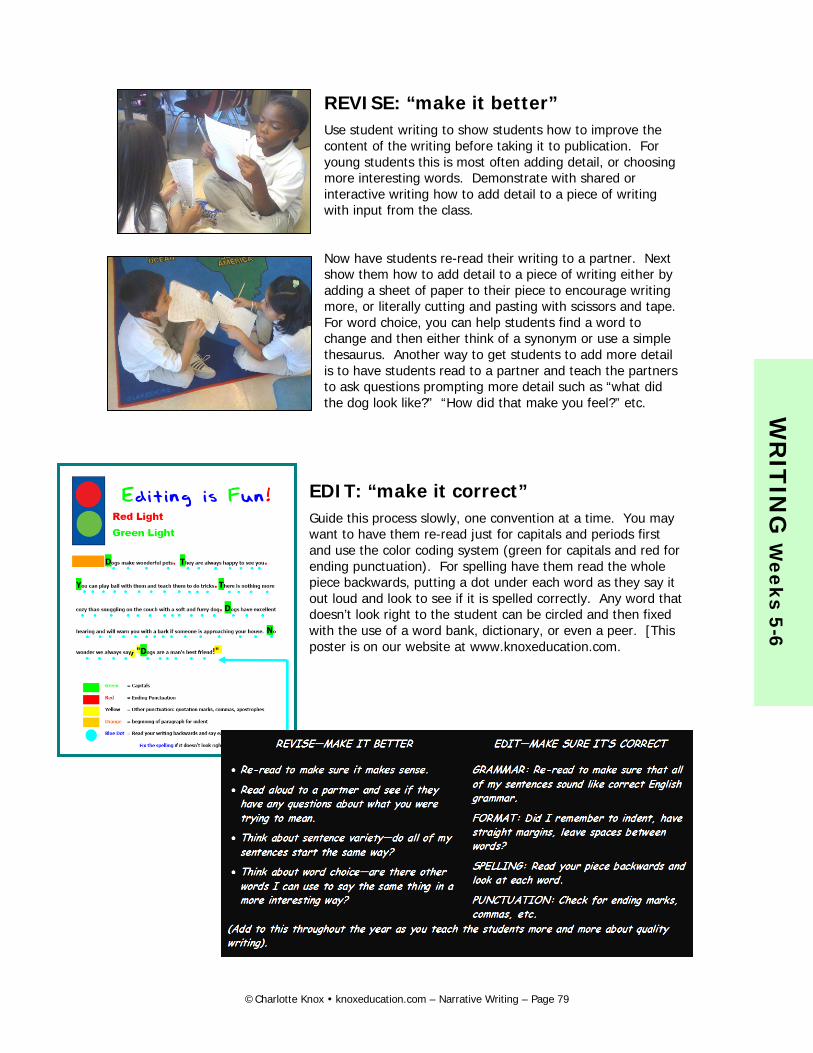
REVISE: “make it better” Use student writing to show students how to improve the content of the writing before taking it to publication. For young students this is most often adding detail, or choosing more interesting words. Demonstrate with shared or interactive writing how to add detail to a piece of writing with input from the class.
Now have students re-read their writing to a partner. Next show them how to add detail to a piece of writing either by adding a sheet of paper to their piece to encourage writing more, or literally cutting and pasting with scissors and tape. For word choice, you can help students find a word to change and then either think of a synonym or use a simple thesaurus. Another way to get students to add more detail is to have students read to a partner and teach the partners to ask questions prompting more detail such as “what did the dog look like?” “How did that make you feel?” etc.
EDIT: “make it correct” Guide this process slowly, one convention at a time. You may want to have them re-read just for capitals and periods first and use the color coding system (green for capitals and red for ending punctuation). For spelling have them read the whole piece backwards, putting a dot under each word as they say it out loud and look to see if it is spelled correctly. Any word that doesn’t look right to the student can be circled and then fixed with the use of a word bank, dictionary, or even a peer. [This poster is on our website at www.knoxeducation.com.
W
RIT
ING
Weeks 5-6
©Charlotte Knox knoxeducation.com – Narrative Writing – Page 79
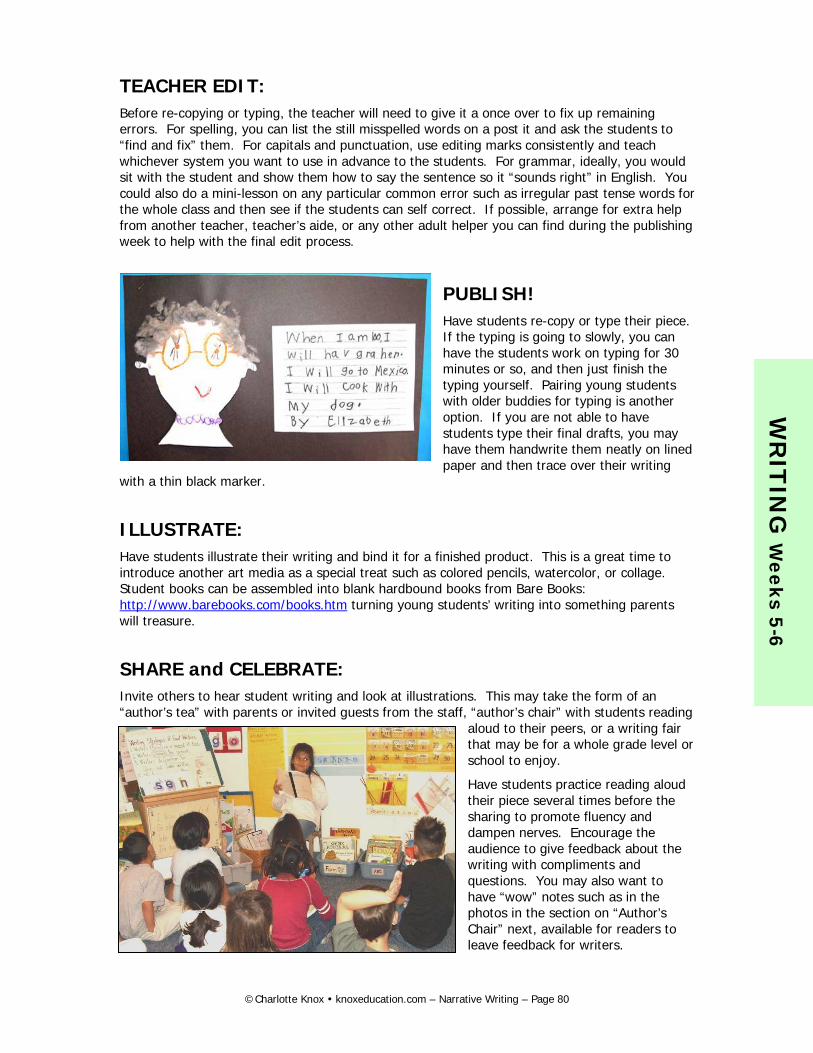
TEACHER EDIT: Before re-copying or typing, the teacher will need to give it a once over to fix up remaining errors. For spelling, you can list the still misspelled words on a post it and ask the students to “find and fix” them. For capitals and punctuation, use editing marks consistently and teach whichever system you want to use in advance to the students. For grammar, ideally, you would sit with the student and show them how to say the sentence so it “sounds right” in English. You could also do a mini-lesson on any particular common error such as irregular past tense words for the whole class and then see if the students can self correct. If possible, arrange for extra help from another teacher, teacher’s aide, or any other adult helper you can find during the publishing week to help with the final edit process.
PUBLISH! Have students re-copy or type their piece. If the typing is going to slowly, you can have the students work on typing for 30 minutes or so, and then just finish the typing yourself. Pairing young students with older buddies for typing is another option. If you are not able to have students type their final drafts, you may have them handwrite them neatly on lined paper and then trace over their writing
with a thin black marker.
ILLUSTRATE: Have students illustrate their writing and bind it for a finished product. This is a great time to introduce another art media as a special treat such as colored pencils, watercolor, or collage. Student books can be assembled into blank hardbound books from Bare Books: http://www.barebooks.com/books.htm turning young students’ writing into something parents will treasure.
SHARE and CELEBRATE: Invite others to hear student writing and look at illustrations. This may take the form of an “author’s tea” with parents or invited guests from the staff, “author’s chair” with students reading
aloud to their peers, or a writing fair that may be for a whole grade level or school to enjoy.
Have students practice reading aloud their piece several times before the sharing to promote fluency and dampen nerves. Encourage the audience to give feedback about the writing with compliments and questions. You may also want to have “wow” notes such as in the photos in the section on “Author’s Chair” next, available for readers to leave feedback for writers.
W
RIT
ING
Weeks 5-6
©Charlotte Knox knoxeducation.com – Narrative Writing – Page 80
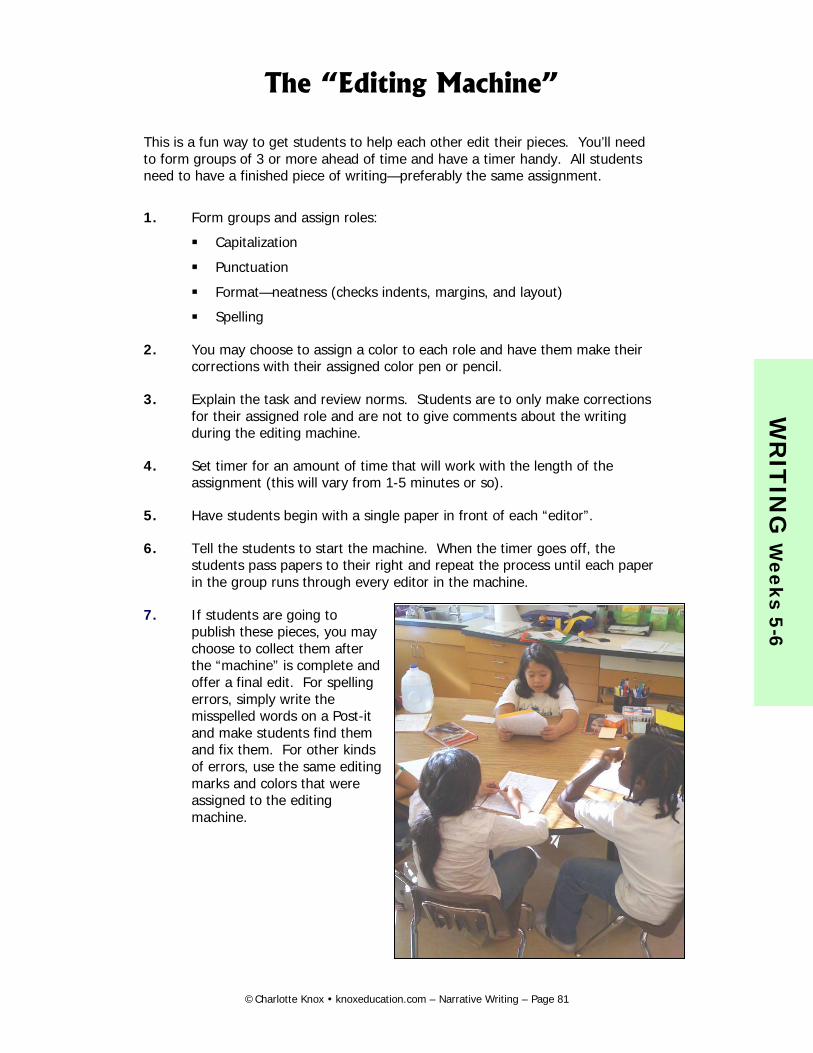
The “Editing Machine”
This is a fun way to get students to help each other edit their pieces. You’ll need to form groups of 3 or more ahead of time and have a timer handy. All students need to have a finished piece of writing—preferably the same assignment.
1. Form groups and assign roles:
Capitalization
Punctuation
Format—neatness (checks indents, margins, and layout)
Spelling
2. You may choose to assign a color to each role and have them make their corrections with their assigned color pen or pencil.
3. Explain the task and review norms. Students are to only make corrections for their assigned role and are not to give comments about the writing during the editing machine.
4. Set timer for an amount of time that will work with the length of the assignment (this will vary from 1-5 minutes or so).
5. Have students begin with a single paper in front of each “editor”.
6. Tell the students to start the machine. When the timer goes off, the students pass papers to their right and repeat the process until each paper in the group runs through every editor in the machine.
7. If students are going to publish these pieces, you may choose to collect them after the “machine” is complete and offer a final edit. For spelling errors, simply write the misspelled words on a Post-it and make students find them and fix them. For other kinds of errors, use the same editing marks and colors that were assigned to the editing machine.
W
RIT
ING
Weeks 5-6
©Charlotte Knox knoxeducation.com – Narrative Writing – Page 81
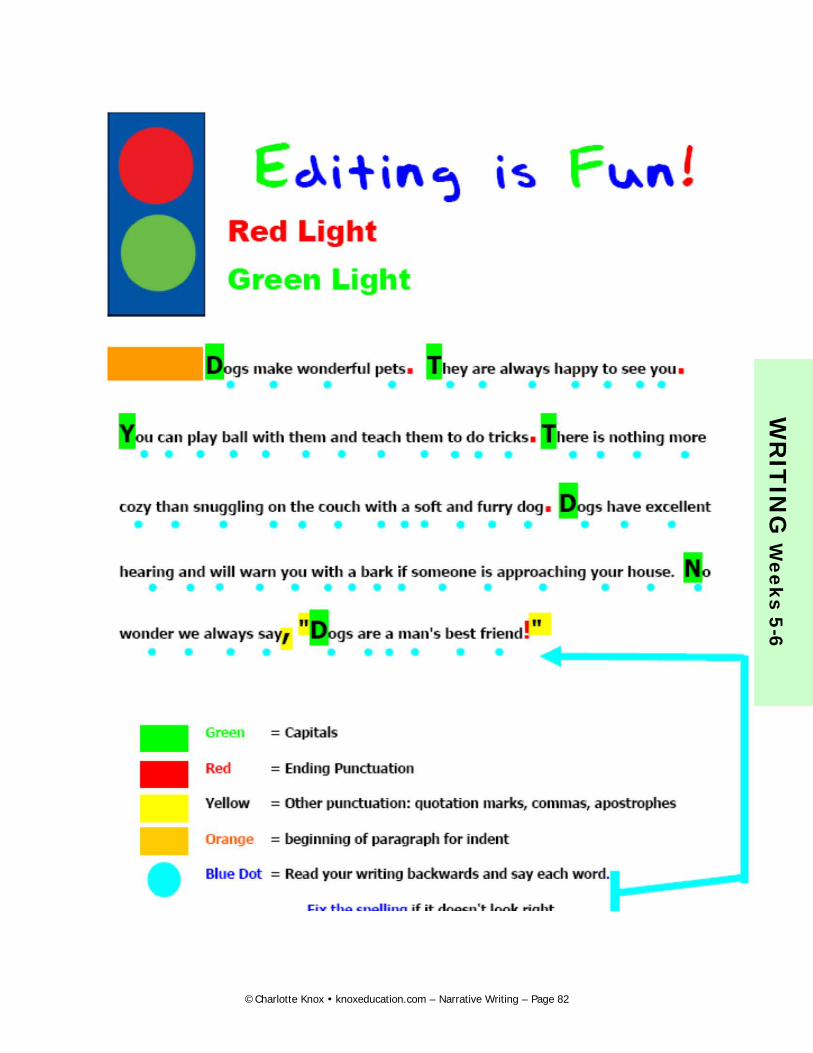
W
RIT
ING
Weeks 5-6
©Charlotte Knox knoxeducation.com – Narrative Writing – Page 82
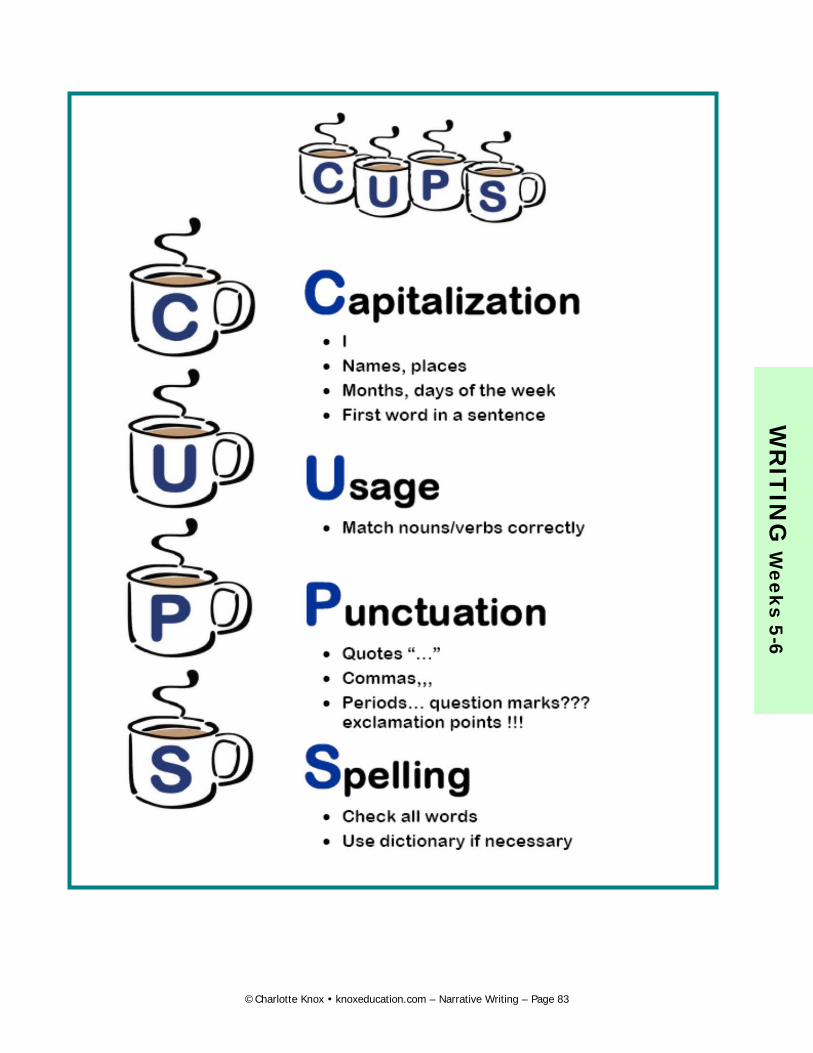
W
RIT
ING
Weeks 5-6
©Charlotte Knox knoxeducation.com – Narrative Writing – Page 83
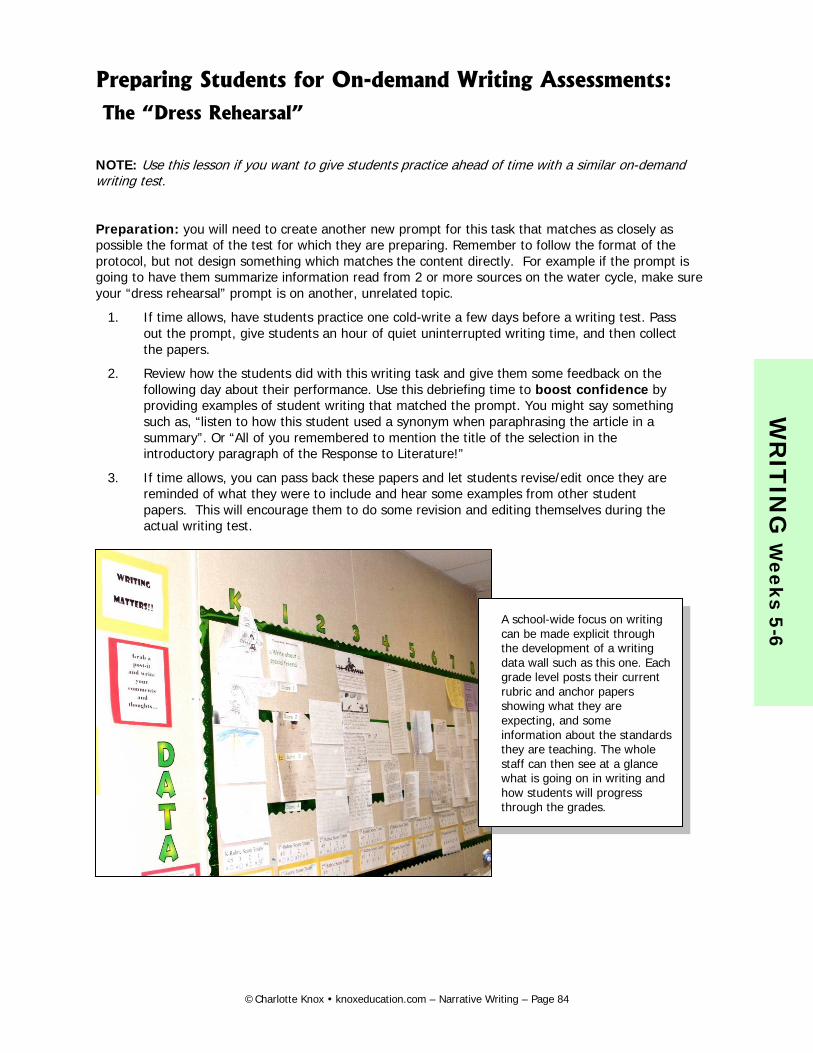
Preparing Students for On-demand Writing Assessments: The “Dress Rehearsal”
NOTE: Use this lesson if you want to give students practice ahead of time with a similar on-demand writing test.
Preparation: you will need to create another new prompt for this task that matches as closely as possible the format of the test for which they are preparing. Remember to follow the format of the protocol, but not design something which matches the content directly. For example if the prompt is going to have them summarize information read from 2 or more sources on the water cycle, make sure your “dress rehearsal” prompt is on another, unrelated topic.
1. If time allows, have students practice one cold-write a few days before a writing test. Pass out the prompt, give students an hour of quiet uninterrupted writing time, and then collect the papers.
2. Review how the students did with this writing task and give them some feedback on the following day about their performance. Use this debriefing time to boost confidence by providing examples of student writing that matched the prompt. You might say something such as, “listen to how this student used a synonym when paraphrasing the article in a summary”. Or “All of you remembered to mention the title of the selection in the introductory paragraph of the Response to Literature!”
3. If time allows, you can pass back these papers and let students revise/edit once they are reminded of what they were to include and hear some examples from other student papers. This will encourage them to do some revision and editing themselves during the actual writing test.
A school-wide focus on writing can be made explicit through the development of a writing data wall such as this one. Each grade level posts their current rubric and anchor papers showing what they are expecting, and some information about the standards they are teaching. The whole staff can then see at a glance what is going on in writing and how students will progress through the grades.
W
RIT
ING
Weeks 5-6
©Charlotte Knox knoxeducation.com – Narrative Writing – Page 84
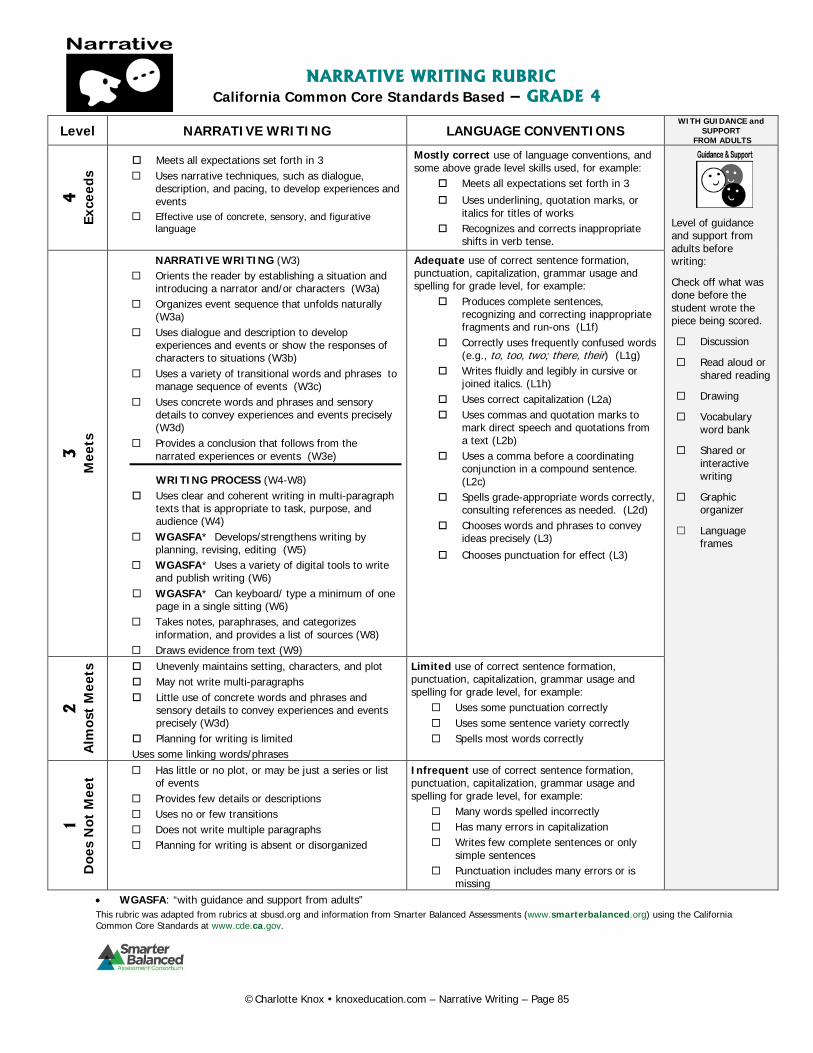
NARRATIVE WRITING RUBRIC
California Common Core Standards Based – GRADE 4
Level NARRATIVE WRITING LANGUAGE CONVENTIONS WITH GUIDANCE and
SUPPORT FROM ADULTS
4
Exce
eds
Meets all expectations set forth in 3 Uses narrative techniques, such as dialogue,
description, and pacing, to develop experiences and events
Effective use of concrete, sensory, and figurative language
Mostly correct use of language conventions, and some above grade level skills used, for example:
Meets all expectations set forth in 3
Uses underlining, quotation marks, or italics for titles of works
Recognizes and corrects inappropriate shifts in verb tense.
Level of guidance and support from adults before writing:
Check off what was done before the student wrote the piece being scored.
Discussion
Read aloud or shared reading
Drawing
Vocabulary word bank
Shared or interactive writing
Graphic organizer
Language frames
3
Mee
ts
NARRATIVE WRITING (W3) Orients the reader by establishing a situation and
introducing a narrator and/or characters (W3a) Organizes event sequence that unfolds naturally
(W3a) Uses dialogue and description to develop
experiences and events or show the responses of characters to situations (W3b)
Uses a variety of transitional words and phrases to manage sequence of events (W3c)
Uses concrete words and phrases and sensory details to convey experiences and events precisely (W3d)
Provides a conclusion that follows from the narrated experiences or events (W3e)
WRITING PROCESS (W4-W8) Uses clear and coherent writing in multi-paragraph
texts that is appropriate to task, purpose, and audience (W4)
WGASFA* Develops/strengthens writing by planning, revising, editing (W5)
WGASFA* Uses a variety of digital tools to write and publish writing (W6)
WGASFA* Can keyboard/ type a minimum of one page in a single sitting (W6)
Takes notes, paraphrases, and categorizes information, and provides a list of sources (W8)
Draws evidence from text (W9)
Adequate use of correct sentence formation, punctuation, capitalization, grammar usage and spelling for grade level, for example:
Produces complete sentences, recognizing and correcting inappropriate fragments and run-ons (L1f)
Correctly uses frequently confused words (e.g., to, too, two; there, their) (L1g)
Writes fluidly and legibly in cursive or joined italics. (L1h)
Uses correct capitalization (L2a) Uses commas and quotation marks to
mark direct speech and quotations from a text (L2b)
Uses a comma before a coordinating conjunction in a compound sentence. (L2c)
Spells grade-appropriate words correctly, consulting references as needed. (L2d)
Chooses words and phrases to convey ideas precisely (L3)
Chooses punctuation for effect (L3)
2
Alm
ost
Mee
ts
Unevenly maintains setting, characters, and plot May not write multi-paragraphs Little use of concrete words and phrases and
sensory details to convey experiences and events precisely (W3d)
Planning for writing is limited Uses some linking words/phrases
Limited use of correct sentence formation, punctuation, capitalization, grammar usage and spelling for grade level, for example:
Uses some punctuation correctly Uses some sentence variety correctly Spells most words correctly
1
Doe
s N
ot M
eet Has little or no plot, or may be just a series or list
of events Provides few details or descriptions Uses no or few transitions Does not write multiple paragraphs Planning for writing is absent or disorganized
Infrequent use of correct sentence formation, punctuation, capitalization, grammar usage and spelling for grade level, for example:
Many words spelled incorrectly Has many errors in capitalization Writes few complete sentences or only
simple sentences Punctuation includes many errors or is
missing • WGASFA: “with guidance and support from adults” This rubric was adapted from rubrics at sbusd.org and information from Smarter Balanced Assessments (www.smarterbalanced.org) using the California Common Core Standards at www.cde.ca.gov.
©Charlotte Knox knoxeducation.com – Narrative Writing – Page 85
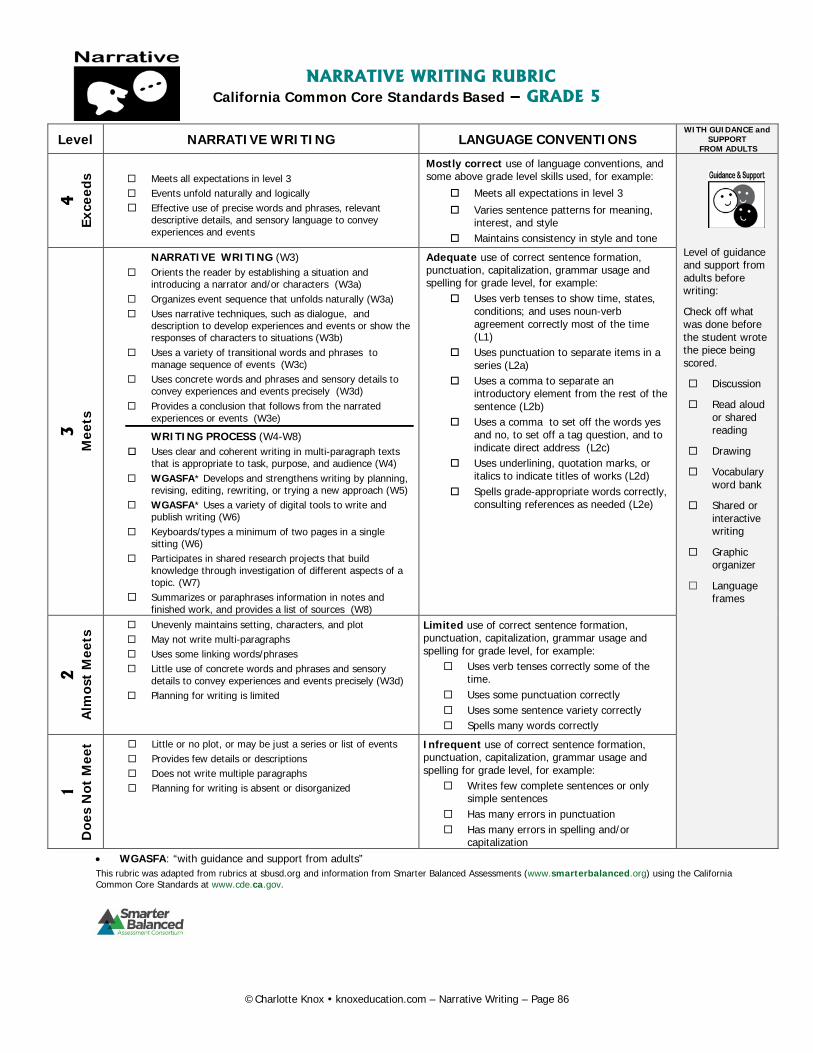
NARRATIVE WRITING RUBRIC
California Common Core Standards Based – GRADE 5
Level NARRATIVE WRITING LANGUAGE CONVENTIONS WITH GUIDANCE and
SUPPORT FROM ADULTS
4
Exce
eds
Meets all expectations in level 3 Events unfold naturally and logically Effective use of precise words and phrases, relevant
descriptive details, and sensory language to convey experiences and events
Mostly correct use of language conventions, and some above grade level skills used, for example:
Meets all expectations in level 3
Varies sentence patterns for meaning, interest, and style
Maintains consistency in style and tone
Level of guidance and support from adults before writing:
Check off what was done before the student wrote the piece being scored.
Discussion
Read aloud or shared reading
Drawing
Vocabulary word bank
Shared or interactive writing
Graphic organizer
Language frames
3
Mee
ts
NARRATIVE WRITING (W3) Orients the reader by establishing a situation and
introducing a narrator and/or characters (W3a) Organizes event sequence that unfolds naturally (W3a) Uses narrative techniques, such as dialogue, and
description to develop experiences and events or show the responses of characters to situations (W3b)
Uses a variety of transitional words and phrases to manage sequence of events (W3c)
Uses concrete words and phrases and sensory details to convey experiences and events precisely (W3d)
Provides a conclusion that follows from the narrated experiences or events (W3e)
WRITING PROCESS (W4-W8) Uses clear and coherent writing in multi-paragraph texts
that is appropriate to task, purpose, and audience (W4) WGASFA* Develops and strengthens writing by planning,
revising, editing, rewriting, or trying a new approach (W5) WGASFA* Uses a variety of digital tools to write and
publish writing (W6) Keyboards/types a minimum of two pages in a single
sitting (W6) Participates in shared research projects that build
knowledge through investigation of different aspects of a topic. (W7)
Summarizes or paraphrases information in notes and finished work, and provides a list of sources (W8)
Adequate use of correct sentence formation, punctuation, capitalization, grammar usage and spelling for grade level, for example:
Uses verb tenses to show time, states, conditions; and uses noun-verb agreement correctly most of the time (L1)
Uses punctuation to separate items in a series (L2a)
Uses a comma to separate an introductory element from the rest of the sentence (L2b)
Uses a comma to set off the words yes and no, to set off a tag question, and to indicate direct address (L2c)
Uses underlining, quotation marks, or italics to indicate titles of works (L2d)
Spells grade-appropriate words correctly, consulting references as needed (L2e)
2
Alm
ost
Mee
ts Unevenly maintains setting, characters, and plot
May not write multi-paragraphs Uses some linking words/phrases Little use of concrete words and phrases and sensory
details to convey experiences and events precisely (W3d) Planning for writing is limited
Limited use of correct sentence formation, punctuation, capitalization, grammar usage and spelling for grade level, for example:
Uses verb tenses correctly some of the time.
Uses some punctuation correctly Uses some sentence variety correctly Spells many words correctly
1
Doe
s N
ot M
eet Little or no plot, or may be just a series or list of events
Provides few details or descriptions Does not write multiple paragraphs Planning for writing is absent or disorganized
Infrequent use of correct sentence formation, punctuation, capitalization, grammar usage and spelling for grade level, for example:
Writes few complete sentences or only simple sentences
Has many errors in punctuation Has many errors in spelling and/or
capitalization • WGASFA: “with guidance and support from adults” This rubric was adapted from rubrics at sbusd.org and information from Smarter Balanced Assessments (www.smarterbalanced.org) using the California Common Core Standards at www.cde.ca.gov.
©Charlotte Knox knoxeducation.com – Narrative Writing – Page 86
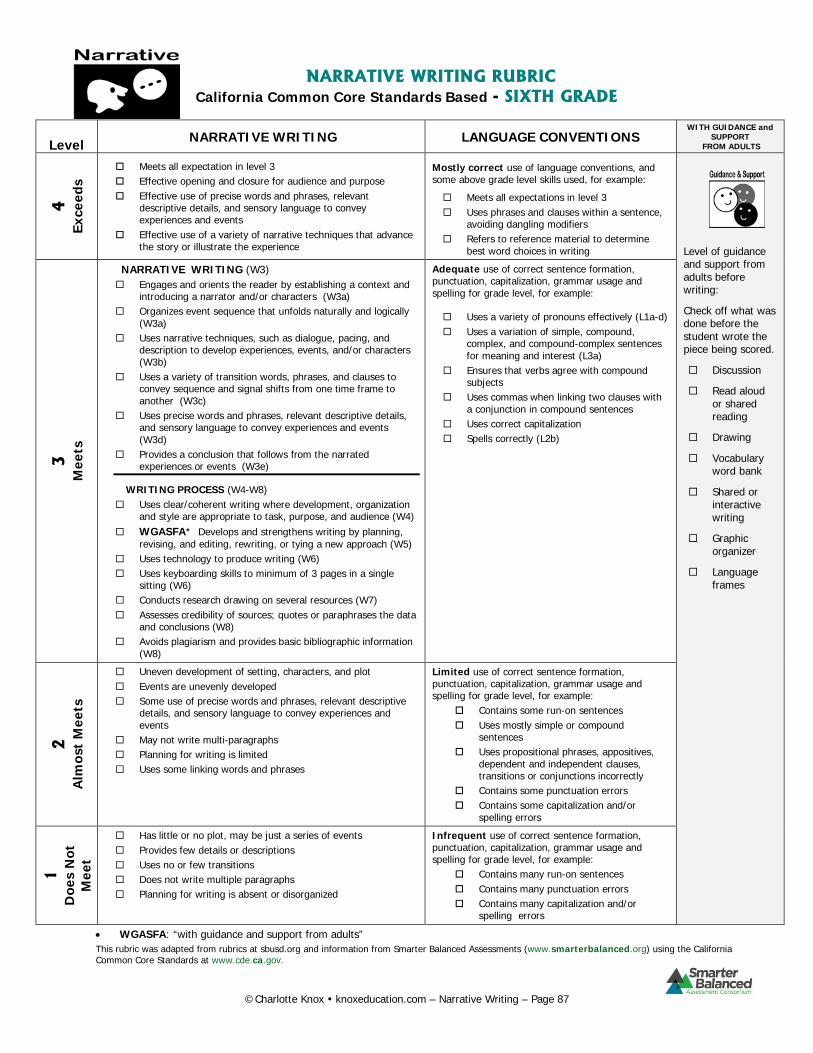
NARRATIVE WRITING RUBRIC
California Common Core Standards Based - SIXTH GRADE
Level NARRATIVE WRITING LANGUAGE CONVENTIONS
WITH GUIDANCE and SUPPORT
FROM ADULTS
4
Exce
eds
Meets all expectation in level 3 Effective opening and closure for audience and purpose Effective use of precise words and phrases, relevant
descriptive details, and sensory language to convey experiences and events
Effective use of a variety of narrative techniques that advance the story or illustrate the experience
Mostly correct use of language conventions, and some above grade level skills used, for example:
Meets all expectations in level 3 Uses phrases and clauses within a sentence,
avoiding dangling modifiers Refers to reference material to determine
best word choices in writing
Level of guidance and support from adults before writing:
Check off what was done before the student wrote the piece being scored.
Discussion
Read aloud or shared reading
Drawing
Vocabulary word bank
Shared or interactive writing
Graphic organizer
Language frames
3
Mee
ts
NARRATIVE WRITING (W3) Engages and orients the reader by establishing a context and
introducing a narrator and/or characters (W3a) Organizes event sequence that unfolds naturally and logically
(W3a) Uses narrative techniques, such as dialogue, pacing, and
description to develop experiences, events, and/or characters (W3b)
Uses a variety of transition words, phrases, and clauses to convey sequence and signal shifts from one time frame to another (W3c)
Uses precise words and phrases, relevant descriptive details, and sensory language to convey experiences and events (W3d)
Provides a conclusion that follows from the narrated experiences or events (W3e)
WRITING PROCESS (W4-W8) Uses clear/coherent writing where development, organization
and style are appropriate to task, purpose, and audience (W4) WGASFA* Develops and strengthens writing by planning,
revising, and editing, rewriting, or tying a new approach (W5) Uses technology to produce writing (W6) Uses keyboarding skills to minimum of 3 pages in a single
sitting (W6) Conducts research drawing on several resources (W7) Assesses credibility of sources; quotes or paraphrases the data
and conclusions (W8) Avoids plagiarism and provides basic bibliographic information
(W8)
Adequate use of correct sentence formation, punctuation, capitalization, grammar usage and spelling for grade level, for example:
Uses a variety of pronouns effectively (L1a-d) Uses a variation of simple, compound,
complex, and compound-complex sentences for meaning and interest (L3a)
Ensures that verbs agree with compound subjects
Uses commas when linking two clauses with a conjunction in compound sentences
Uses correct capitalization Spells correctly (L2b)
2
Alm
ost
Mee
ts
Uneven development of setting, characters, and plot Events are unevenly developed Some use of precise words and phrases, relevant descriptive
details, and sensory language to convey experiences and events
May not write multi-paragraphs Planning for writing is limited Uses some linking words and phrases
Limited use of correct sentence formation, punctuation, capitalization, grammar usage and spelling for grade level, for example:
Contains some run-on sentences Uses mostly simple or compound
sentences Uses propositional phrases, appositives,
dependent and independent clauses, transitions or conjunctions incorrectly
Contains some punctuation errors Contains some capitalization and/or
spelling errors
1
Doe
s N
ot
Mee
t
Has little or no plot, may be just a series of events Provides few details or descriptions Uses no or few transitions Does not write multiple paragraphs Planning for writing is absent or disorganized
Infrequent use of correct sentence formation, punctuation, capitalization, grammar usage and spelling for grade level, for example:
Contains many run-on sentences Contains many punctuation errors Contains many capitalization and/or
spelling errors
• WGASFA: “with guidance and support from adults” This rubric was adapted from rubrics at sbusd.org and information from Smarter Balanced Assessments (www.smarterbalanced.org) using the California Common Core Standards at www.cde.ca.gov.
©Charlotte Knox knoxeducation.com – Narrative Writing – Page 87
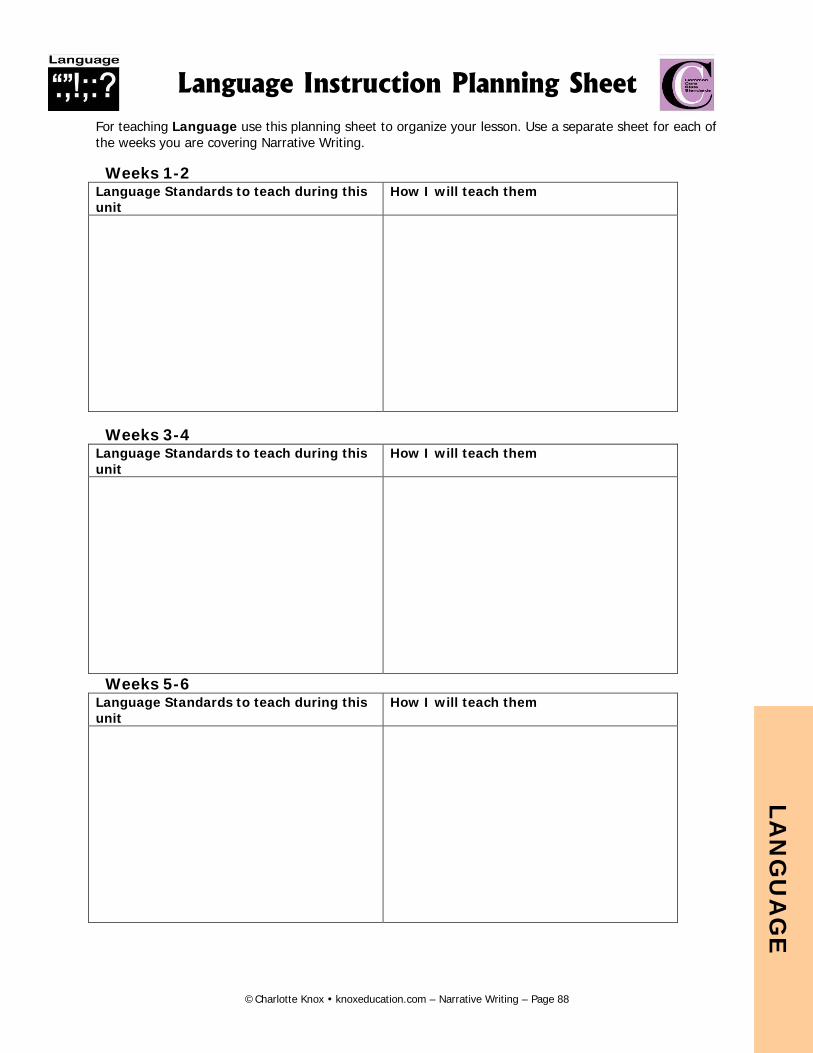
Language Instruction Planning Sheet For teaching Language use this planning sheet to organize your lesson. Use a separate sheet for each of the weeks you are covering Narrative Writing.
Weeks 1-2 Language Standards to teach during this unit
How I will teach them
Weeks 3-4 Language Standards to teach during this unit
How I will teach them
Weeks 5-6 Language Standards to teach during this unit
How I will teach them
LAN
GU
AG
E
©Charlotte Knox knoxeducation.com – Narrative Writing – Page 88
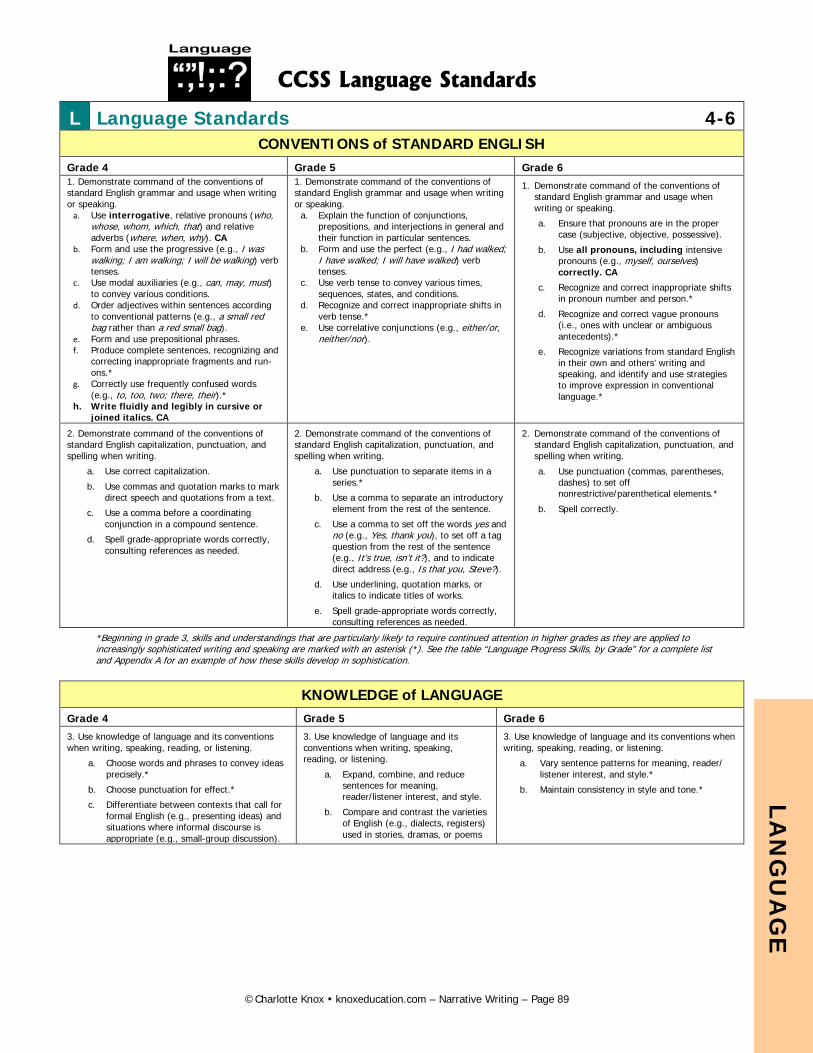
LAN
GU
AG
E
CCSS Language Standards
L Language Standards 4-6 CONVENTIONS of STANDARD ENGLISH
Grade 4 Grade 5 Grade 6 1. Demonstrate command of the conventions of standard English grammar and usage when writing or speaking.
a. Use interrogative, relative pronouns (who, whose, whom, which, that) and relative adverbs (where, when, why). CA
b. Form and use the progressive (e.g., I was walking; I am walking; I will be walking) verb tenses.
c. Use modal auxiliaries (e.g., can, may, must) to convey various conditions.
d. Order adjectives within sentences according to conventional patterns (e.g., a small red bag rather than a red small bag).
e. Form and use prepositional phrases. f. Produce complete sentences, recognizing and
correcting inappropriate fragments and run-ons.*
g. Correctly use frequently confused words (e.g., to, too, two; there, their).*
h. Write fluidly and legibly in cursive or joined italics. CA
1. Demonstrate command of the conventions of standard English grammar and usage when writing or speaking.
a. Explain the function of conjunctions, prepositions, and interjections in general and their function in particular sentences.
b. Form and use the perfect (e.g., I had walked; I have walked; I will have walked) verb tenses.
c. Use verb tense to convey various times, sequences, states, and conditions.
d. Recognize and correct inappropriate shifts in verb tense.*
e. Use correlative conjunctions (e.g., either/or, neither/nor).
1. Demonstrate command of the conventions of standard English grammar and usage when writing or speaking.
a. Ensure that pronouns are in the proper case (subjective, objective, possessive).
b. Use all pronouns, including intensive pronouns (e.g., myself, ourselves) correctly. CA
c. Recognize and correct inappropriate shifts in pronoun number and person.*
d. Recognize and correct vague pronouns (i.e., ones with unclear or ambiguous antecedents).*
e. Recognize variations from standard English in their own and others’ writing and speaking, and identify and use strategies to improve expression in conventional language.*
2. Demonstrate command of the conventions of standard English capitalization, punctuation, and spelling when writing.
a. Use correct capitalization.
b. Use commas and quotation marks to mark direct speech and quotations from a text.
c. Use a comma before a coordinating conjunction in a compound sentence.
d. Spell grade-appropriate words correctly, consulting references as needed.
2. Demonstrate command of the conventions of standard English capitalization, punctuation, and spelling when writing.
a. Use punctuation to separate items in a series.*
b. Use a comma to separate an introductory element from the rest of the sentence.
c. Use a comma to set off the words yes and no (e.g., Yes, thank you), to set off a tag question from the rest of the sentence (e.g., It’s true, isn’t it?), and to indicate direct address (e.g., Is that you, Steve?).
d. Use underlining, quotation marks, or italics to indicate titles of works.
e. Spell grade-appropriate words correctly, consulting references as needed.
2. Demonstrate command of the conventions of standard English capitalization, punctuation, and spelling when writing.
a. Use punctuation (commas, parentheses, dashes) to set off nonrestrictive/parenthetical elements.*
b. Spell correctly.
*Beginning in grade 3, skills and understandings that are particularly likely to require continued attention in higher grades as they are applied to increasingly sophisticated writing and speaking are marked with an asterisk (*). See the table “Language Progress Skills, by Grade” for a complete list and Appendix A for an example of how these skills develop in sophistication.
KNOWLEDGE of LANGUAGE Grade 4 Grade 5 Grade 6
3. Use knowledge of language and its conventions when writing, speaking, reading, or listening.
a. Choose words and phrases to convey ideas precisely.*
b. Choose punctuation for effect.*
c. Differentiate between contexts that call for formal English (e.g., presenting ideas) and situations where informal discourse is appropriate (e.g., small-group discussion).
3. Use knowledge of language and its conventions when writing, speaking, reading, or listening.
a. Expand, combine, and reduce sentences for meaning, reader/listener interest, and style.
b. Compare and contrast the varieties of English (e.g., dialects, registers) used in stories, dramas, or poems
3. Use knowledge of language and its conventions when writing, speaking, reading, or listening.
a. Vary sentence patterns for meaning, reader/ listener interest, and style.*
b. Maintain consistency in style and tone.*
LAN
GU
AG
E
LAN
GU
AG
E
©Charlotte Knox knoxeducation.com – Narrative Writing – Page 89
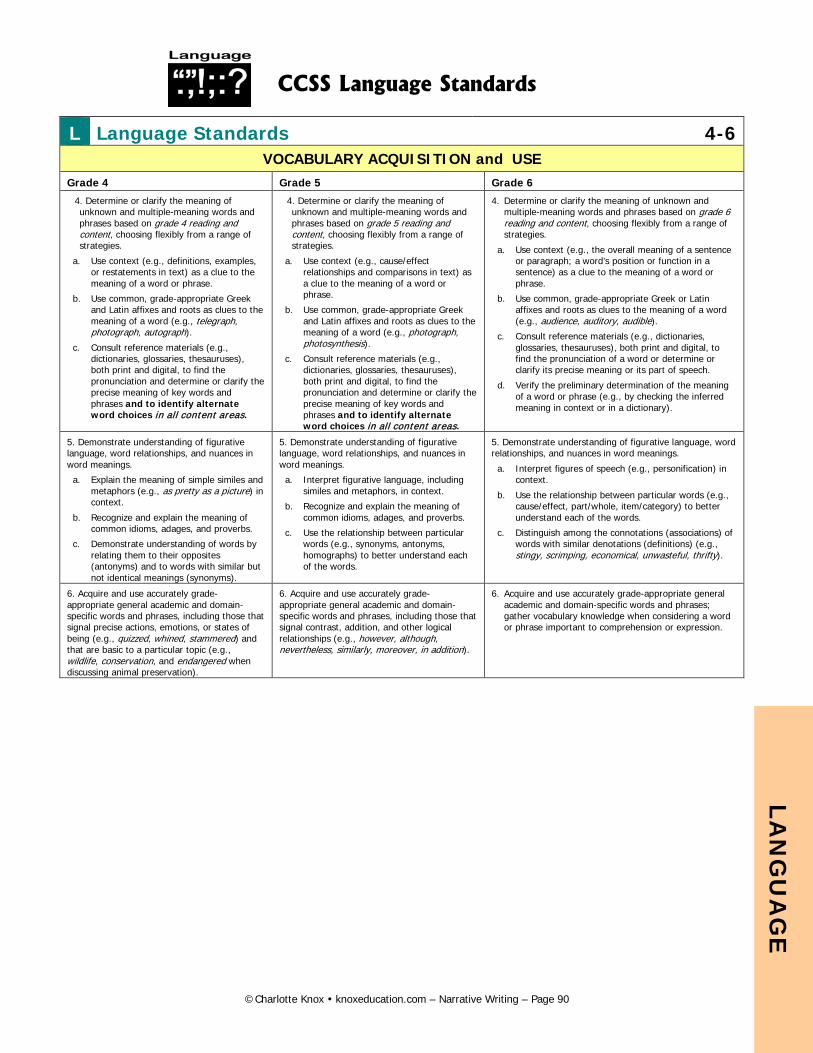
CCSS Language Standards
L Language Standards 4-6 VOCABULARY ACQUISITION and USE
Grade 4 Grade 5 Grade 6
4. Determine or clarify the meaning of unknown and multiple-meaning words and phrases based on grade 4 reading and content, choosing flexibly from a range of strategies.
a. Use context (e.g., definitions, examples, or restatements in text) as a clue to the meaning of a word or phrase.
b. Use common, grade-appropriate Greek and Latin affixes and roots as clues to the meaning of a word (e.g., telegraph, photograph, autograph).
c. Consult reference materials (e.g., dictionaries, glossaries, thesauruses), both print and digital, to find the pronunciation and determine or clarify the precise meaning of key words and phrases and to identify alternate word choices in all content areas.
4. Determine or clarify the meaning of unknown and multiple-meaning words and phrases based on grade 5 reading and content, choosing flexibly from a range of strategies.
a. Use context (e.g., cause/effect relationships and comparisons in text) as a clue to the meaning of a word or phrase.
b. Use common, grade-appropriate Greek and Latin affixes and roots as clues to the meaning of a word (e.g., photograph, photosynthesis).
c. Consult reference materials (e.g., dictionaries, glossaries, thesauruses), both print and digital, to find the pronunciation and determine or clarify the precise meaning of key words and phrases and to identify alternate word choices in all content areas.
4. Determine or clarify the meaning of unknown and multiple-meaning words and phrases based on grade 6 reading and content, choosing flexibly from a range of strategies.
a. Use context (e.g., the overall meaning of a sentence or paragraph; a word’s position or function in a sentence) as a clue to the meaning of a word or phrase.
b. Use common, grade-appropriate Greek or Latin affixes and roots as clues to the meaning of a word (e.g., audience, auditory, audible).
c. Consult reference materials (e.g., dictionaries, glossaries, thesauruses), both print and digital, to find the pronunciation of a word or determine or clarify its precise meaning or its part of speech.
d. Verify the preliminary determination of the meaning of a word or phrase (e.g., by checking the inferred meaning in context or in a dictionary).
5. Demonstrate understanding of figurative language, word relationships, and nuances in word meanings.
a. Explain the meaning of simple similes and metaphors (e.g., as pretty as a picture) in context.
b. Recognize and explain the meaning of common idioms, adages, and proverbs.
c. Demonstrate understanding of words by relating them to their opposites (antonyms) and to words with similar but not identical meanings (synonyms).
5. Demonstrate understanding of figurative language, word relationships, and nuances in word meanings.
a. Interpret figurative language, including similes and metaphors, in context.
b. Recognize and explain the meaning of common idioms, adages, and proverbs.
c. Use the relationship between particular words (e.g., synonyms, antonyms, homographs) to better understand each of the words.
5. Demonstrate understanding of figurative language, word relationships, and nuances in word meanings.
a. Interpret figures of speech (e.g., personification) in context.
b. Use the relationship between particular words (e.g., cause/effect, part/whole, item/category) to better understand each of the words.
c. Distinguish among the connotations (associations) of words with similar denotations (definitions) (e.g., stingy, scrimping, economical, unwasteful, thrifty).
6. Acquire and use accurately grade-appropriate general academic and domain-specific words and phrases, including those that signal precise actions, emotions, or states of being (e.g., quizzed, whined, stammered) and that are basic to a particular topic (e.g., wildlife, conservation, and endangered when discussing animal preservation).
6. Acquire and use accurately grade-appropriate general academic and domain-specific words and phrases, including those that signal contrast, addition, and other logical relationships (e.g., however, although, nevertheless, similarly, moreover, in addition).
6. Acquire and use accurately grade-appropriate general academic and domain-specific words and phrases; gather vocabulary knowledge when considering a word or phrase important to comprehension or expression.
LAN
GU
AG
E
©Charlotte Knox knoxeducation.com – Narrative Writing – Page 90
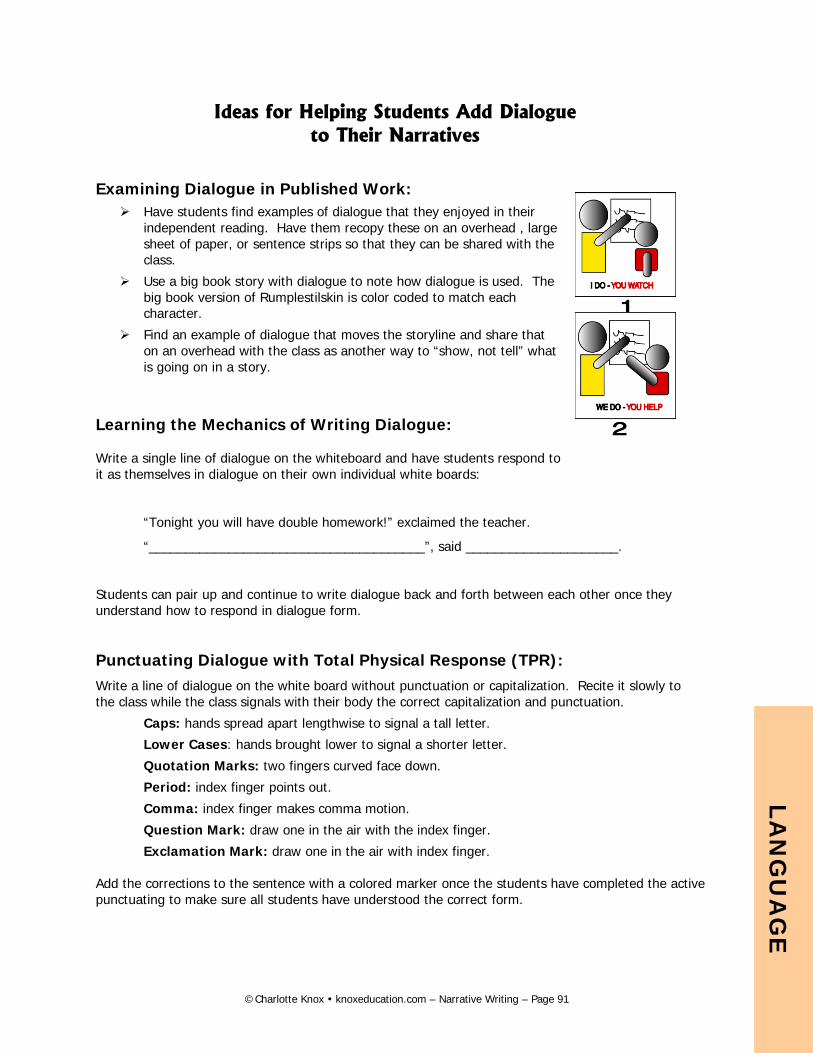
Ideas for Helping Students Add Dialogue
to Their Narratives
Examining Dialogue in Published Work: Have students find examples of dialogue that they enjoyed in their
independent reading. Have them recopy these on an overhead , large sheet of paper, or sentence strips so that they can be shared with the class.
Use a big book story with dialogue to note how dialogue is used. The big book version of Rumplestilskin is color coded to match each character.
Find an example of dialogue that moves the storyline and share that on an overhead with the class as another way to “show, not tell” what is going on in a story.
Learning the Mechanics of Writing Dialogue:
Write a single line of dialogue on the whiteboard and have students respond to it as themselves in dialogue on their own individual white boards:
“Tonight you will have double homework!” exclaimed the teacher.
“______________________________________”, said _____________________.
Students can pair up and continue to write dialogue back and forth between each other once they understand how to respond in dialogue form.
Punctuating Dialogue with Total Physical Response (TPR): Write a line of dialogue on the white board without punctuation or capitalization. Recite it slowly to the class while the class signals with their body the correct capitalization and punctuation.
Caps: hands spread apart lengthwise to signal a tall letter.
Lower Cases: hands brought lower to signal a shorter letter.
Quotation Marks: two fingers curved face down.
Period: index finger points out.
Comma: index finger makes comma motion.
Question Mark: draw one in the air with the index finger.
Exclamation Mark: draw one in the air with index finger.
Add the corrections to the sentence with a colored marker once the students have completed the active punctuating to make sure all students have understood the correct form.
LAN
GU
AG
E
©Charlotte Knox knoxeducation.com – Narrative Writing – Page 91
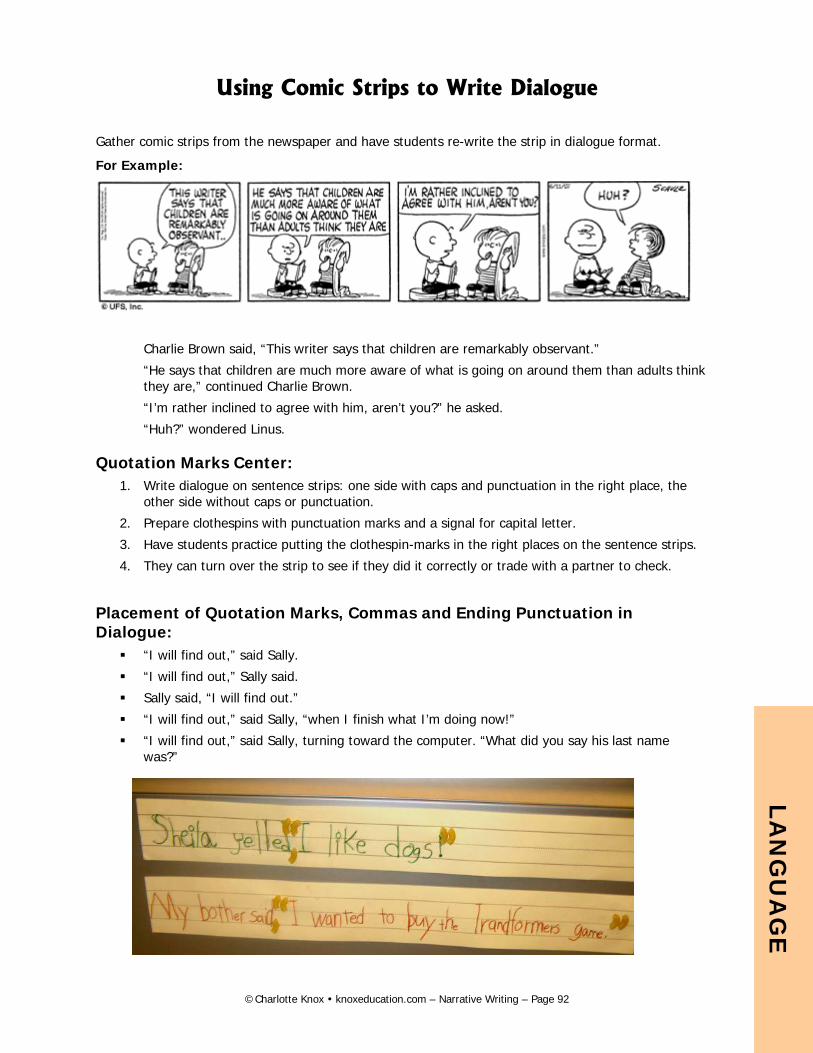
Using Comic Strips to Write Dialogue
Gather comic strips from the newspaper and have students re-write the strip in dialogue format.
For Example:
Charlie Brown said, “This writer says that children are remarkably observant.”
“He says that children are much more aware of what is going on around them than adults think they are,” continued Charlie Brown.
“I’m rather inclined to agree with him, aren’t you?” he asked.
“Huh?” wondered Linus.
Quotation Marks Center: 1. Write dialogue on sentence strips: one side with caps and punctuation in the right place, the
other side without caps or punctuation.
2. Prepare clothespins with punctuation marks and a signal for capital letter.
3. Have students practice putting the clothespin-marks in the right places on the sentence strips.
4. They can turn over the strip to see if they did it correctly or trade with a partner to check.
Placement of Quotation Marks, Commas and Ending Punctuation in Dialogue:
“I will find out,” said Sally.
“I will find out,” Sally said.
Sally said, “I will find out.”
“I will find out,” said Sally, “when I finish what I’m doing now!”
“I will find out,” said Sally, turning toward the computer. “What did you say his last name was?”
LAN
GU
AG
E
©Charlotte Knox knoxeducation.com – Narrative Writing – Page 92
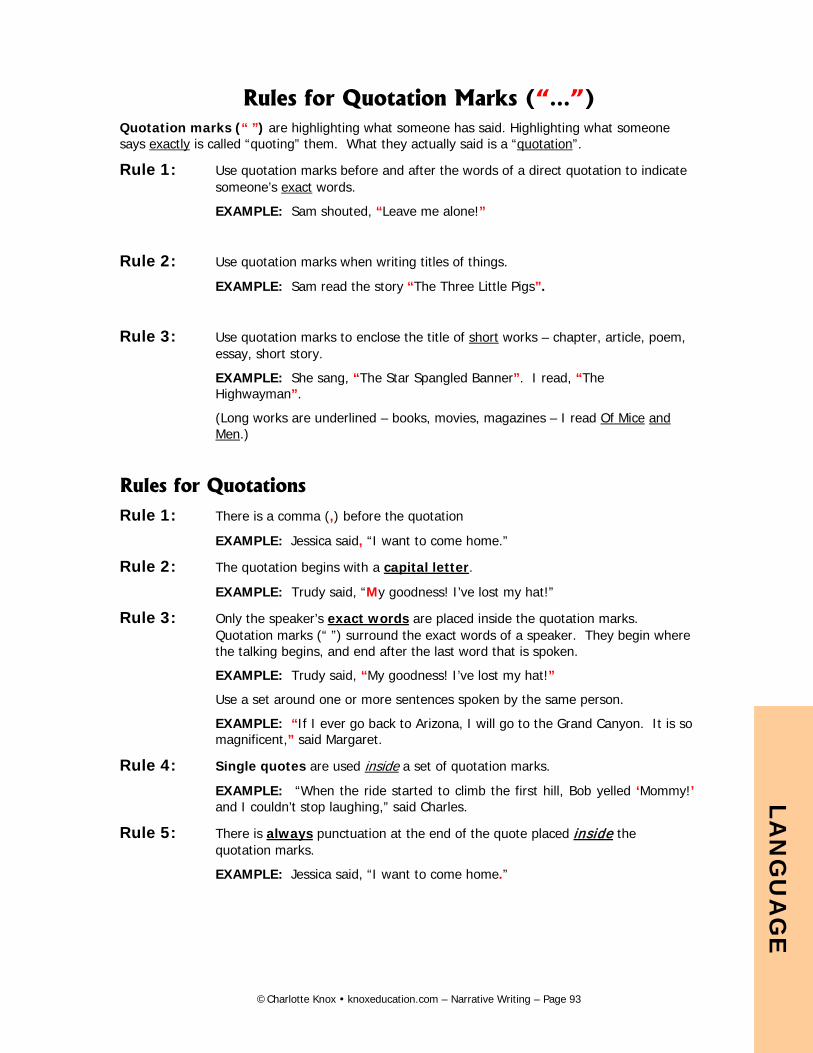
Rules for Quotation Marks (“…”) Quotation marks (“ ”) are highlighting what someone has said. Highlighting what someone says exactly is called “quoting” them. What they actually said is a “quotation”.
Rule 1: Use quotation marks before and after the words of a direct quotation to indicate someone’s exact words.
EXAMPLE: Sam shouted, “Leave me alone!”
Rule 2: Use quotation marks when writing titles of things.
EXAMPLE: Sam read the story “The Three Little Pigs”.
Rule 3: Use quotation marks to enclose the title of short works – chapter, article, poem, essay, short story.
EXAMPLE: She sang, “The Star Spangled Banner”. I read, “The Highwayman”.
(Long works are underlined – books, movies, magazines – I read Of Mice and Men.)
Rules for Quotations Rule 1: There is a comma (,) before the quotation
EXAMPLE: Jessica said, “I want to come home.”
Rule 2: The quotation begins with a capital letter.
EXAMPLE: Trudy said, “My goodness! I’ve lost my hat!”
Rule 3: Only the speaker’s exact words are placed inside the quotation marks. Quotation marks (“ ”) surround the exact words of a speaker. They begin where the talking begins, and end after the last word that is spoken.
EXAMPLE: Trudy said, “My goodness! I’ve lost my hat!”
Use a set around one or more sentences spoken by the same person.
EXAMPLE: “If I ever go back to Arizona, I will go to the Grand Canyon. It is so magnificent,” said Margaret.
Rule 4: Single quotes are used inside a set of quotation marks.
EXAMPLE: “When the ride started to climb the first hill, Bob yelled ‘Mommy!’ and I couldn’t stop laughing,” said Charles.
Rule 5: There is always punctuation at the end of the quote placed inside the quotation marks.
EXAMPLE: Jessica said, “I want to come home.”
LAN
GU
AG
E
©Charlotte Knox knoxeducation.com – Narrative Writing – Page 93
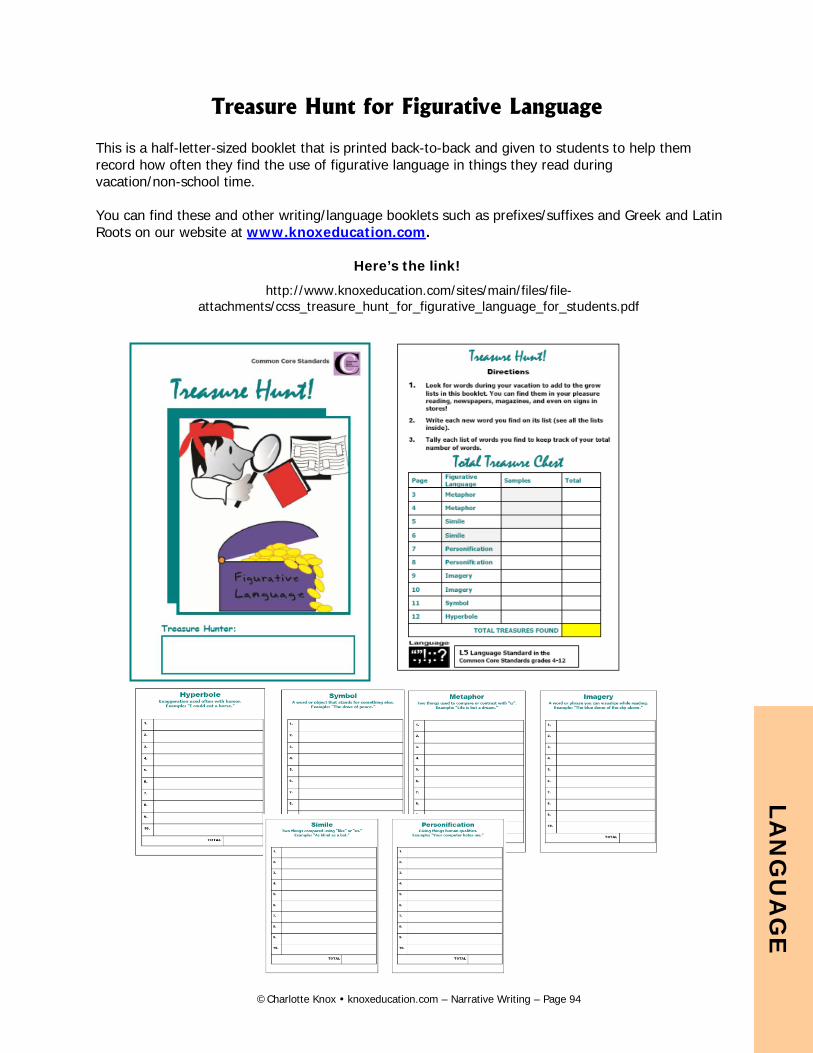
Treasure Hunt for Figurative Language
This is a half-letter-sized booklet that is printed back-to-back and given to students to help them record how often they find the use of figurative language in things they read during vacation/non-school time.
You can find these and other writing/language booklets such as prefixes/suffixes and Greek and Latin Roots on our website at www.knoxeducation.com.
Here’s the link!
http://www.knoxeducation.com/sites/main/files/file-attachments/ccss_treasure_hunt_for_figurative_language_for_students.pdf
LAN
GU
AG
E
LAN
GU
AG
E
©Charlotte Knox knoxeducation.com – Narrative Writing – Page 94
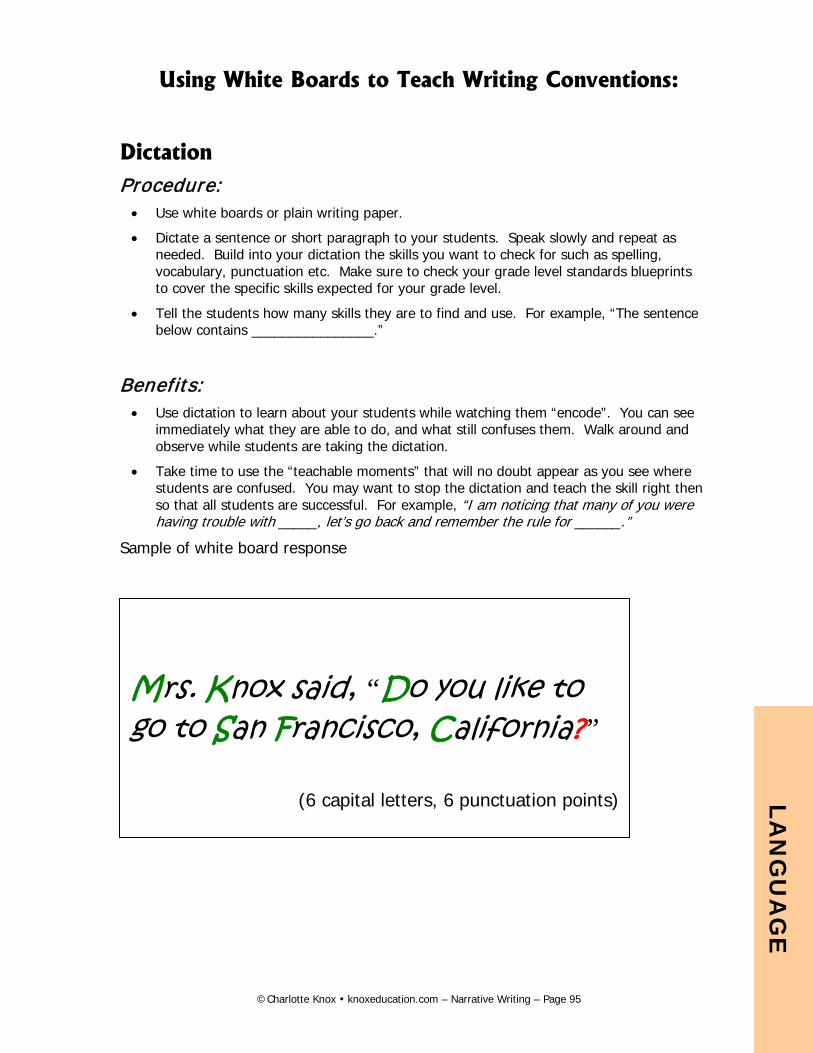
Using White Boards to Teach Writing Conventions:
Dictation Procedure: • Use white boards or plain writing paper.
• Dictate a sentence or short paragraph to your students. Speak slowly and repeat as needed. Build into your dictation the skills you want to check for such as spelling, vocabulary, punctuation etc. Make sure to check your grade level standards blueprints to cover the specific skills expected for your grade level.
• Tell the students how many skills they are to find and use. For example, “The sentence below contains ________________.”
Benefits: • Use dictation to learn about your students while watching them “encode”. You can see
immediately what they are able to do, and what still confuses them. Walk around and observe while students are taking the dictation.
• Take time to use the “teachable moments” that will no doubt appear as you see where students are confused. You may want to stop the dictation and teach the skill right then so that all students are successful. For example, “I am noticing that many of you were having trouble with _____, let’s go back and remember the rule for ______.”
Sample of white board response
Mrs. Knox said, “Do you like to go to San Francisco, California?”
(6 capital letters, 6 punctuation points)
LAN
GU
AG
E
©Charlotte Knox knoxeducation.com – Narrative Writing – Page 95
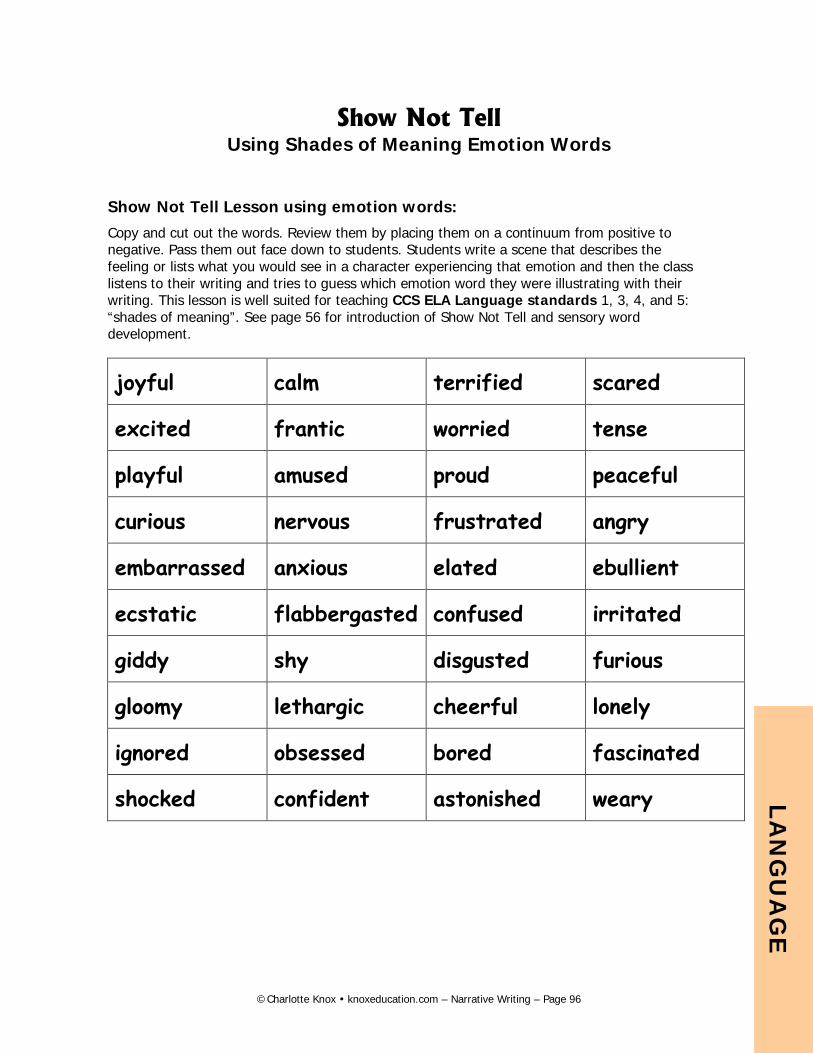
Show Not Tell
Using Shades of Meaning Emotion Words
Show Not Tell Lesson using emotion words: Copy and cut out the words. Review them by placing them on a continuum from positive to negative. Pass them out face down to students. Students write a scene that describes the feeling or lists what you would see in a character experiencing that emotion and then the class listens to their writing and tries to guess which emotion word they were illustrating with their writing. This lesson is well suited for teaching CCS ELA Language standards 1, 3, 4, and 5: “shades of meaning”. See page 56 for introduction of Show Not Tell and sensory word development.
joyful calm terrified scared
excited frantic worried tense
playful amused proud peaceful
curious nervous frustrated angry
embarrassed anxious elated ebullient
ecstatic flabbergasted confused irritated
giddy shy disgusted furious
gloomy lethargic cheerful lonely
ignored obsessed bored fascinated
shocked confident astonished weary
LAN
GU
AG
E
©Charlotte Knox knoxeducation.com – Narrative Writing – Page 96
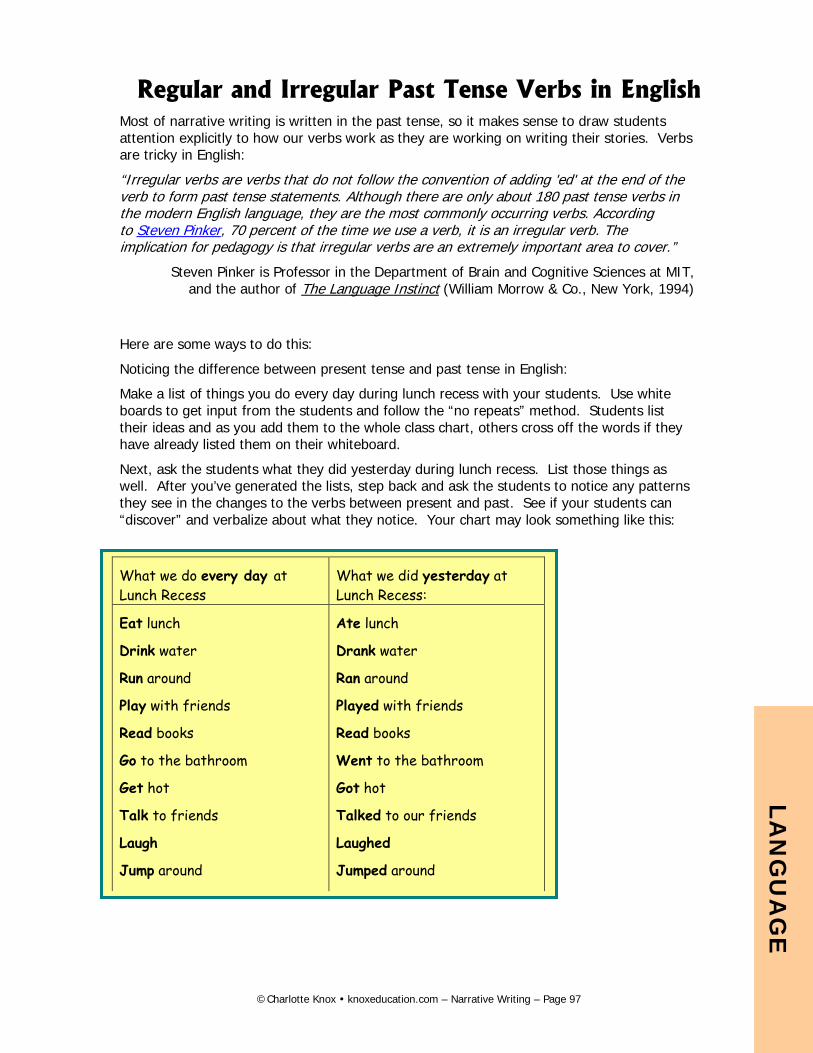
Regular and Irregular Past Tense Verbs in English Most of narrative writing is written in the past tense, so it makes sense to draw students attention explicitly to how our verbs work as they are working on writing their stories. Verbs are tricky in English:
“Irregular verbs are verbs that do not follow the convention of adding 'ed' at the end of the verb to form past tense statements. Although there are only about 180 past tense verbs in the modern English language, they are the most commonly occurring verbs. According to Steven Pinker, 70 percent of the time we use a verb, it is an irregular verb. The implication for pedagogy is that irregular verbs are an extremely important area to cover.”
Steven Pinker is Professor in the Department of Brain and Cognitive Sciences at MIT, and the author of The Language Instinct (William Morrow & Co., New York, 1994)
Here are some ways to do this:
Noticing the difference between present tense and past tense in English:
Make a list of things you do every day during lunch recess with your students. Use white boards to get input from the students and follow the “no repeats” method. Students list their ideas and as you add them to the whole class chart, others cross off the words if they have already listed them on their whiteboard.
Next, ask the students what they did yesterday during lunch recess. List those things as well. After you’ve generated the lists, step back and ask the students to notice any patterns they see in the changes to the verbs between present and past. See if your students can “discover” and verbalize about what they notice. Your chart may look something like this:
What we do every day at Lunch Recess
What we did yesterday at Lunch Recess:
Eat lunch
Drink water
Run around
Play with friends
Read books
Go to the bathroom
Get hot
Talk to friends
Laugh
Jump around
Ate lunch
Drank water
Ran around
Played with friends
Read books
Went to the bathroom
Got hot
Talked to our friends
Laughed
Jumped around
LAN
GU
AG
E
©Charlotte Knox knoxeducation.com – Narrative Writing – Page 97

Once the students have noticed that some past tense verbs have –ed at the end and others change their spelling and pronunciation, introduce the concept of regular and irregular verbs to the students. Next sort the verbs they listed for lunch recess and then expand that to include other things they did yesterday to broaden the sort.
Based on this initial lesson have students “grow” a list of regular and irregular past tense verbs over the course of the next week. Have students, for example, highlight the verbs in a story passage that is written in past tense and list and sort those verbs as regular or irregular. Produce a finer sort for the regular –ed past tense verbs by pronunciation like the photo below:
Encourage students to use these in authentic language practice during class by either writing sentences on white boards about something that happened in the past, or by telling each other stories about something that happened in the past. Let them have their irregular verbs chart handy as they do this. It is challenging to keep all of these straight rules in one’s mind. A list of past tense verbs follows.
LAN
GU
AG
E
©Charlotte Knox knoxeducation.com – Narrative Writing – Page 98
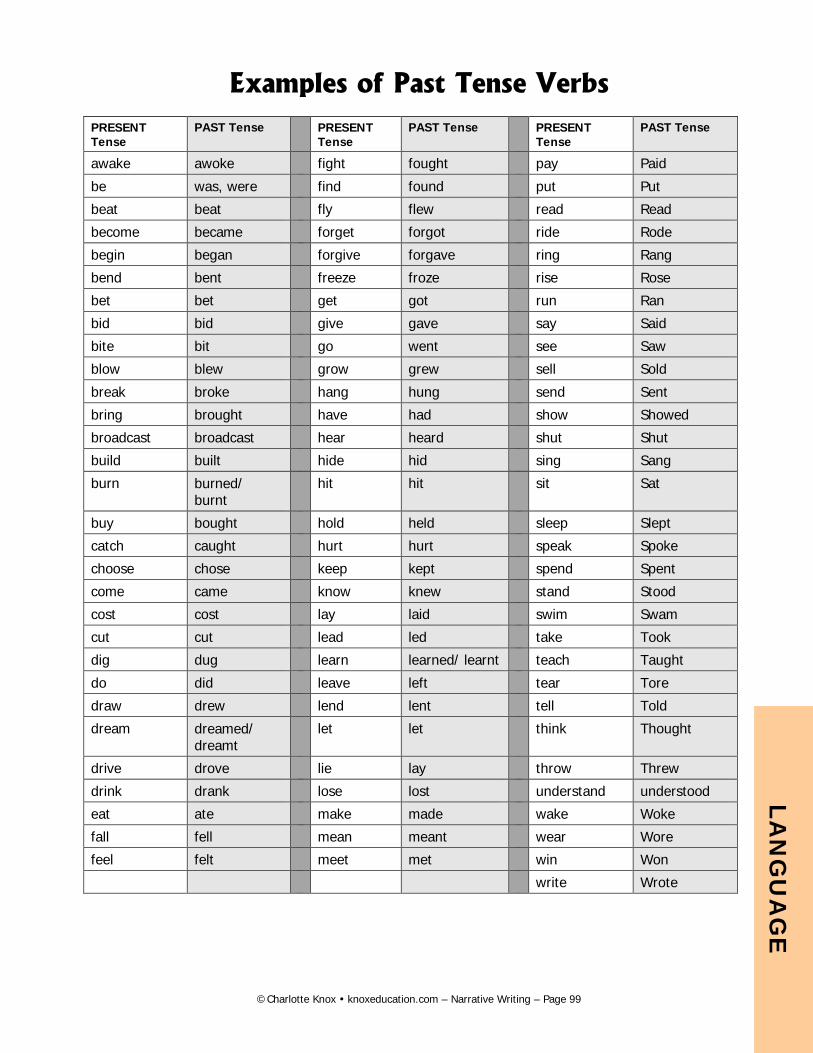
Examples of Past Tense Verbs
PRESENT Tense
PAST Tense PRESENT Tense
PAST Tense PRESENT Tense
PAST Tense
awake awoke fight fought pay Paid
be was, were find found put Put
beat beat fly flew read Read
become became forget forgot ride Rode
begin began forgive forgave ring Rang
bend bent freeze froze rise Rose
bet bet get got run Ran
bid bid give gave say Said
bite bit go went see Saw
blow blew grow grew sell Sold
break broke hang hung send Sent
bring brought have had show Showed
broadcast broadcast hear heard shut Shut
build built hide hid sing Sang
burn burned/ burnt
hit hit sit Sat
buy bought hold held sleep Slept
catch caught hurt hurt speak Spoke
choose chose keep kept spend Spent
come came know knew stand Stood
cost cost lay laid swim Swam
cut cut lead led take Took
dig dug learn learned/ learnt teach Taught
do did leave left tear Tore
draw drew lend lent tell Told
dream dreamed/ dreamt
let let think Thought
drive drove lie lay throw Threw
drink drank lose lost understand understood
eat ate make made wake Woke
fall fell mean meant wear Wore
feel felt meet met win Won
write Wrote
LAN
GU
AG
E
©Charlotte Knox knoxeducation.com – Narrative Writing – Page 99
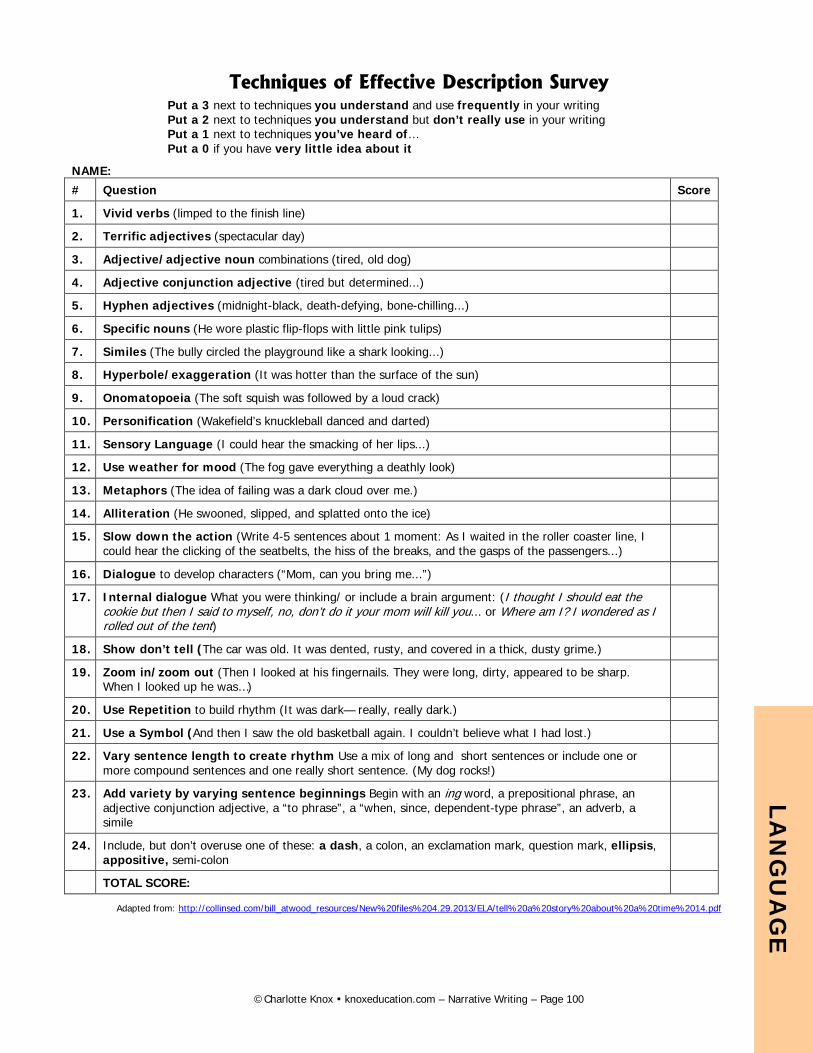
Techniques of Effective Description Survey Put a 3 next to techniques you understand and use frequently in your writing Put a 2 next to techniques you understand but don’t really use in your writing Put a 1 next to techniques you’ve heard of… Put a 0 if you have very little idea about it
NAME: # Question Score
1. Vivid verbs (limped to the finish line)
2. Terrific adjectives (spectacular day)
3. Adjective/adjective noun combinations (tired, old dog)
4. Adjective conjunction adjective (tired but determined...)
5. Hyphen adjectives (midnight-black, death-defying, bone-chilling...)
6. Specific nouns (He wore plastic flip-flops with little pink tulips)
7. Similes (The bully circled the playground like a shark looking...)
8. Hyperbole/exaggeration (It was hotter than the surface of the sun)
9. Onomatopoeia (The soft squish was followed by a loud crack)
10. Personification (Wakefield’s knuckleball danced and darted)
11. Sensory Language (I could hear the smacking of her lips...)
12. Use weather for mood (The fog gave everything a deathly look)
13. Metaphors (The idea of failing was a dark cloud over me.)
14. Alliteration (He swooned, slipped, and splatted onto the ice)
15. Slow down the action (Write 4-5 sentences about 1 moment: As I waited in the roller coaster line, I could hear the clicking of the seatbelts, the hiss of the breaks, and the gasps of the passengers...)
16. Dialogue to develop characters (“Mom, can you bring me...”)
17. Internal dialogue What you were thinking/ or include a brain argument: (I thought I should eat the cookie but then I said to myself, no, don’t do it your mom will kill you... or Where am I? I wondered as I rolled out of the tent)
18. Show don’t tell (The car was old. It was dented, rusty, and covered in a thick, dusty grime.)
19. Zoom in/zoom out (Then I looked at his fingernails. They were long, dirty, appeared to be sharp. When I looked up he was…)
20. Use Repetition to build rhythm (It was dark— really, really dark.)
21. Use a Symbol (And then I saw the old basketball again. I couldn’t believe what I had lost.)
22. Vary sentence length to create rhythm Use a mix of long and short sentences or include one or more compound sentences and one really short sentence. (My dog rocks!)
23. Add variety by varying sentence beginnings Begin with an ing word, a prepositional phrase, an adjective conjunction adjective, a “to phrase”, a “when, since, dependent-type phrase”, an adverb, a simile
24. Include, but don’t overuse one of these: a dash, a colon, an exclamation mark, question mark, ellipsis, appositive, semi-colon
TOTAL SCORE:
Adapted from: http://collinsed.com/bill_atwood_resources/New%20files%204.29.2013/ELA/tell%20a%20story%20about%20a%20time%2014.pdf
LAN
GU
AG
E
©Charlotte Knox knoxeducation.com – Narrative Writing – Page 100
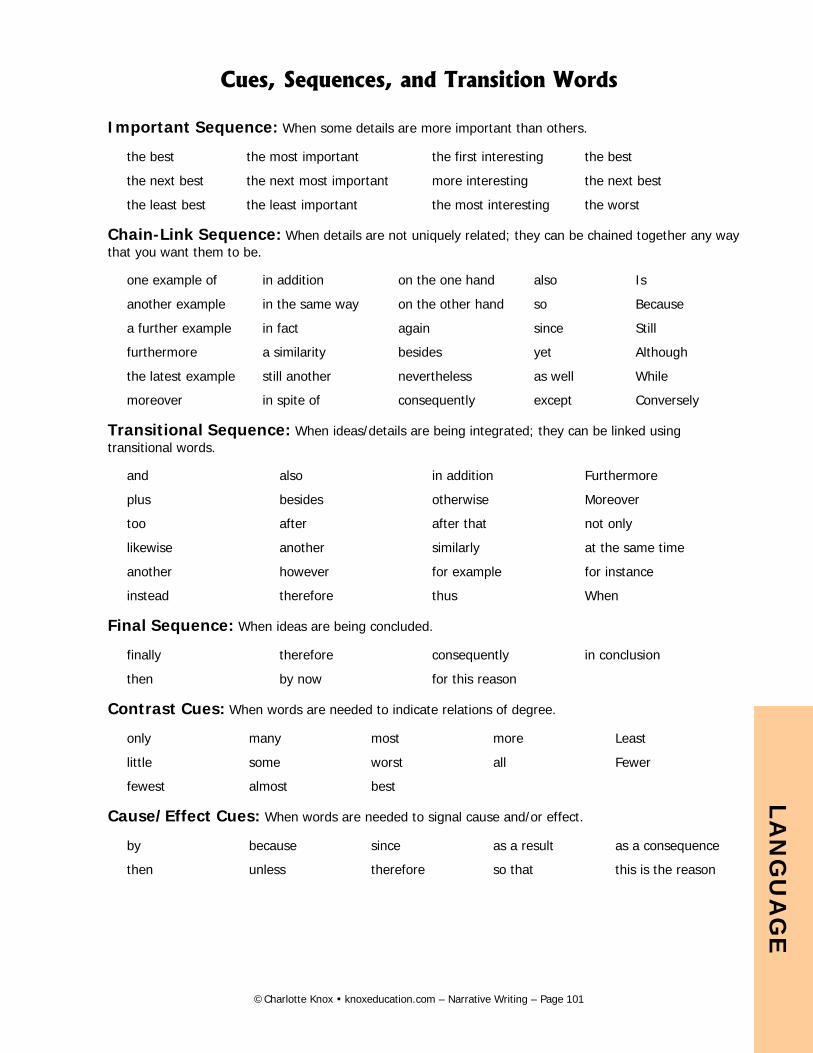
Cues, Sequences, and Transition Words
Important Sequence: When some details are more important than others.
the best the most important the first interesting the best
the next best the next most important more interesting the next best
the least best the least important the most interesting the worst
Chain-Link Sequence: When details are not uniquely related; they can be chained together any way that you want them to be.
one example of in addition on the one hand also Is
another example in the same way on the other hand so Because
a further example in fact again since Still
furthermore a similarity besides yet Although
the latest example still another nevertheless as well While
moreover in spite of consequently except Conversely
Transitional Sequence: When ideas/details are being integrated; they can be linked using transitional words.
and also in addition Furthermore
plus besides otherwise Moreover
too after after that not only
likewise another similarly at the same time
another however for example for instance
instead therefore thus When
Final Sequence: When ideas are being concluded.
finally therefore consequently in conclusion
then by now for this reason
Contrast Cues: When words are needed to indicate relations of degree.
only many most more Least
little some worst all Fewer
fewest almost best
Cause/Effect Cues: When words are needed to signal cause and/or effect.
by because since as a result as a consequence
then unless therefore so that this is the reason
LAN
GU
AG
E
©Charlotte Knox knoxeducation.com – Narrative Writing – Page 101
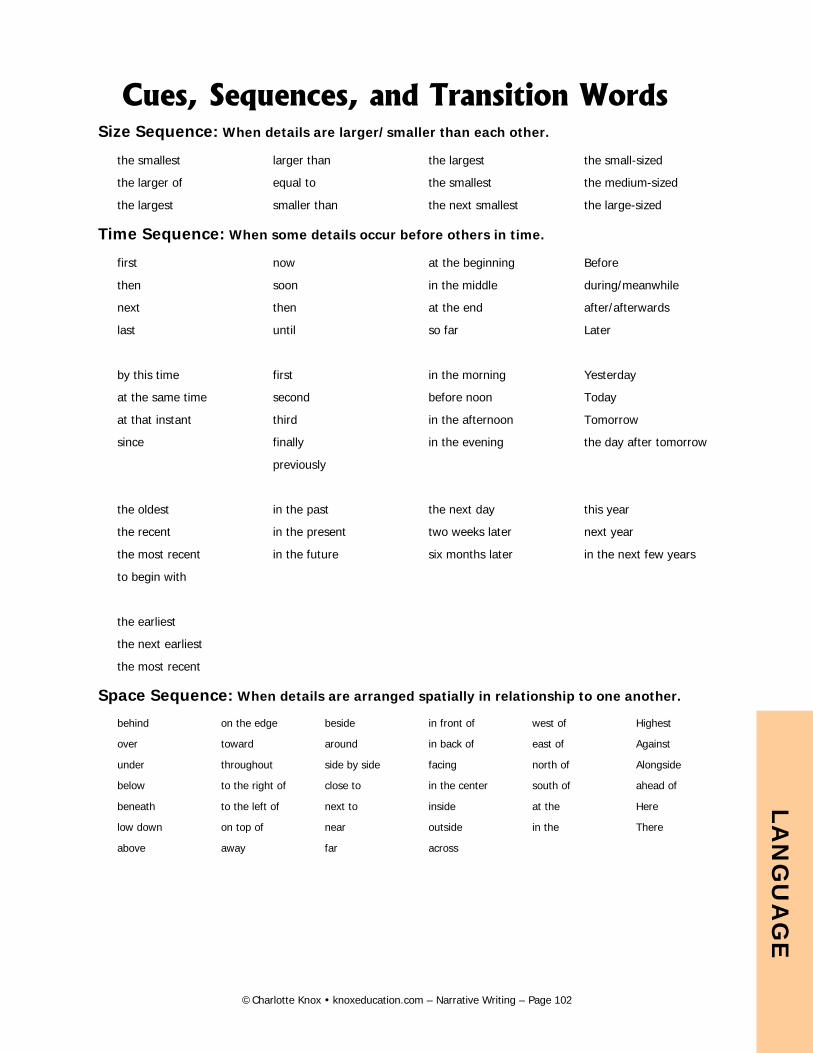
Cues, Sequences, and Transition Words Size Sequence: When details are larger/smaller than each other.
the smallest larger than the largest the small-sized
the larger of equal to the smallest the medium-sized
the largest smaller than the next smallest the large-sized
Time Sequence: When some details occur before others in time.
first now at the beginning Before
then soon in the middle during/meanwhile
next then at the end after/afterwards
last until so far Later
by this time first in the morning Yesterday
at the same time second before noon Today
at that instant third in the afternoon Tomorrow
since finally in the evening the day after tomorrow
previously
the oldest in the past the next day this year
the recent in the present two weeks later next year
the most recent in the future six months later in the next few years
to begin with
the earliest
the next earliest
the most recent
Space Sequence: When details are arranged spatially in relationship to one another.
behind on the edge beside in front of west of Highest
over toward around in back of east of Against
under throughout side by side facing north of Alongside
below to the right of close to in the center south of ahead of
beneath to the left of next to inside at the Here
low down on top of near outside in the There
above away far across
LAN
GU
AG
E
©Charlotte Knox knoxeducation.com – Narrative Writing – Page 102
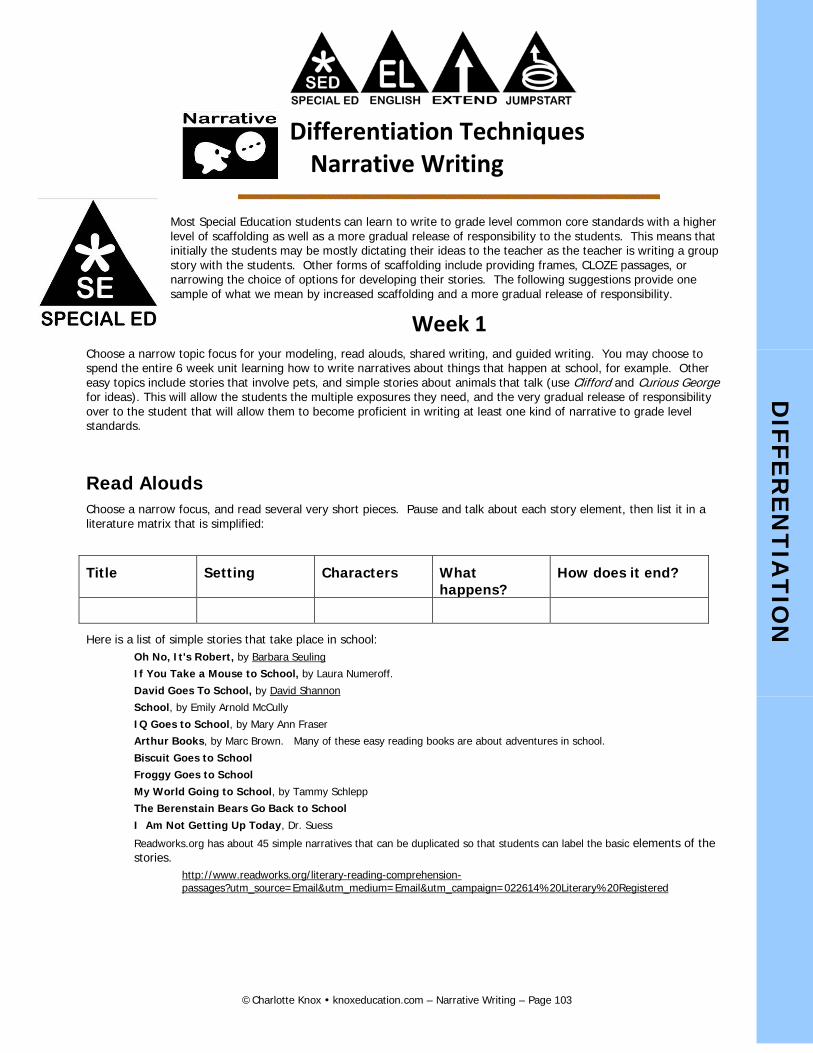
Differentiation Techniques Narrative Writing
Most Special Education students can learn to write to grade level common core standards with a higher level of scaffolding as well as a more gradual release of responsibility to the students. This means that initially the students may be mostly dictating their ideas to the teacher as the teacher is writing a group story with the students. Other forms of scaffolding include providing frames, CLOZE passages, or narrowing the choice of options for developing their stories. The following suggestions provide one sample of what we mean by increased scaffolding and a more gradual release of responsibility.
Week 1
Choose a narrow topic focus for your modeling, read alouds, shared writing, and guided writing. You may choose to spend the entire 6 week unit learning how to write narratives about things that happen at school, for example. Other easy topics include stories that involve pets, and simple stories about animals that talk (use Clifford and Curious George for ideas). This will allow the students the multiple exposures they need, and the very gradual release of responsibility over to the student that will allow them to become proficient in writing at least one kind of narrative to grade level standards.
Read Alouds Choose a narrow focus, and read several very short pieces. Pause and talk about each story element, then list it in a literature matrix that is simplified:
Title Setting Characters What happens?
How does it end?
Here is a list of simple stories that take place in school: Oh No, It's Robert, by Barbara Seuling If You Take a Mouse to School, by Laura Numeroff. David Goes To School, by David Shannon School, by Emily Arnold McCully
IQ Goes to School, by Mary Ann Fraser
Arthur Books, by Marc Brown. Many of these easy reading books are about adventures in school.
Biscuit Goes to School Froggy Goes to School My World Going to School, by Tammy Schlepp
The Berenstain Bears Go Back to School I Am Not Getting Up Today, Dr. Suess
Readworks.org has about 45 simple narratives that can be duplicated so that students can label the basic elements of the stories.
http://www.readworks.org/literary-reading-comprehension-passages?utm_source=Email&utm_medium=Email&utm_campaign=022614%20Literary%20Registered
D
IFFER
EN
TIA
TIO
N
©Charlotte Knox knoxeducation.com – Narrative Writing – Page 103
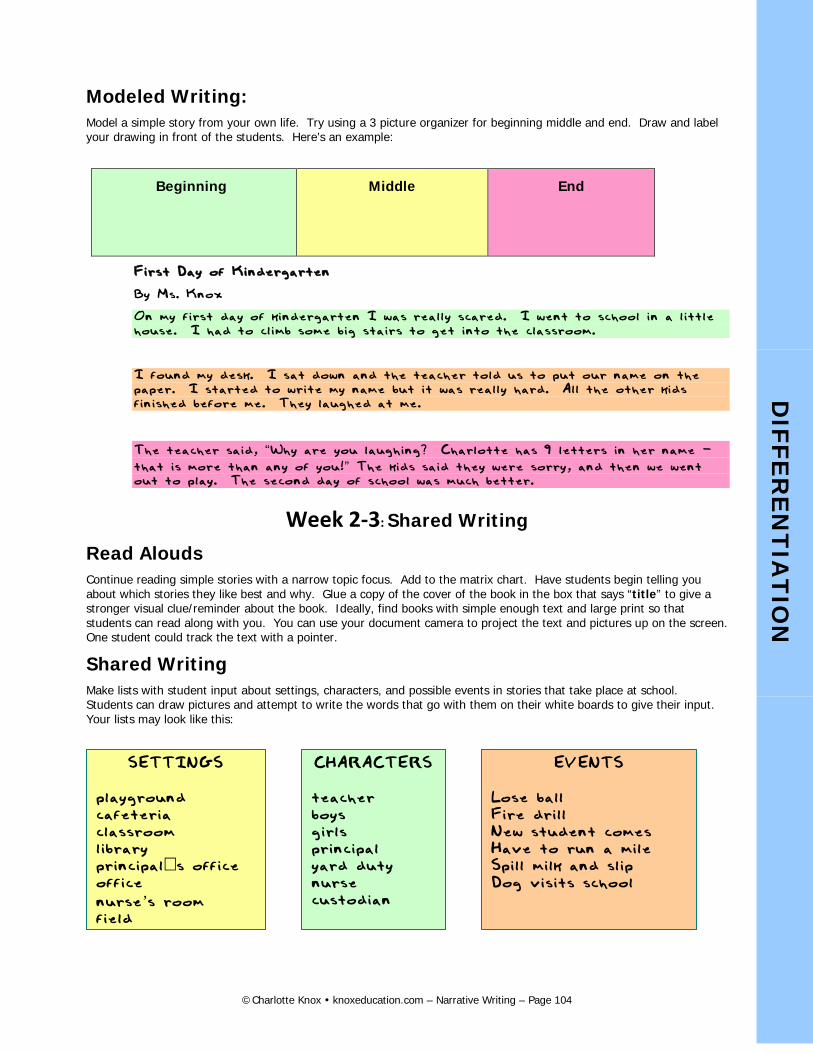
Modeled Writing: Model a simple story from your own life. Try using a 3 picture organizer for beginning middle and end. Draw and label your drawing in front of the students. Here’s an example:
Beginning
Middle
End
First Day of Kindergarten
By Ms. Knox
On my first day of kindergarten I was really scared. I went to school in a little house. I had to climb some big stairs to get into the classroom.
I found my desk. I sat down and the teacher told us to put our name on the paper. I started to write my name but it was really hard. All the other kids finished before me. They laughed at me.
The teacher said, “Why are you laughing? Charlotte has 9 letters in her name - that is more than any of you!” The kids said they were sorry, and then we went out to play. The second day of school was much better.
Week 2-3: Shared Writing
Read Alouds Continue reading simple stories with a narrow topic focus. Add to the matrix chart. Have students begin telling you about which stories they like best and why. Glue a copy of the cover of the book in the box that says “title” to give a stronger visual clue/reminder about the book. Ideally, find books with simple enough text and large print so that students can read along with you. You can use your document camera to project the text and pictures up on the screen. One student could track the text with a pointer.
Shared Writing Make lists with student input about settings, characters, and possible events in stories that take place at school. Students can draw pictures and attempt to write the words that go with them on their white boards to give their input. Your lists may look like this:
SETTINGS playground cafeteria classroom library principal’s office office nurse’s room field
CHARACTERS teacher boys girls principal yard duty nurse custodian
EVENTS Lose ball Fire drill New student comes Have to run a mile Spill milk and slip Dog visits school
D
IFFER
EN
TIA
TIO
N
©Charlotte Knox knoxeducation.com – Narrative Writing – Page 104
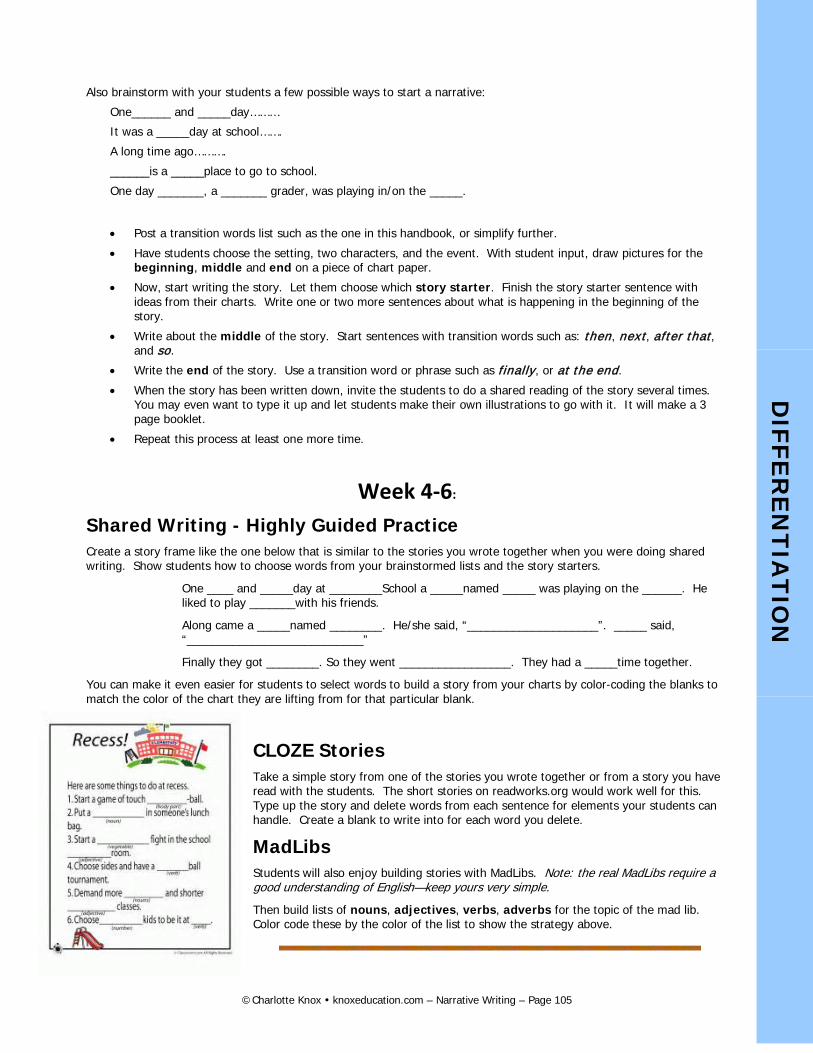
Also brainstorm with your students a few possible ways to start a narrative:
One______ and _____day………
It was a _____day at school…….
A long time ago……….
______is a _____place to go to school.
One day _______, a _______ grader, was playing in/on the _____.
• Post a transition words list such as the one in this handbook, or simplify further.
• Have students choose the setting, two characters, and the event. With student input, draw pictures for the beginning, middle and end on a piece of chart paper.
• Now, start writing the story. Let them choose which story starter. Finish the story starter sentence with ideas from their charts. Write one or two more sentences about what is happening in the beginning of the story.
• Write about the middle of the story. Start sentences with transition words such as: then, next, after that, and so.
• Write the end of the story. Use a transition word or phrase such as finally, or at the end.
• When the story has been written down, invite the students to do a shared reading of the story several times. You may even want to type it up and let students make their own illustrations to go with it. It will make a 3 page booklet.
• Repeat this process at least one more time.
Week 4-6:
Shared Writing - Highly Guided Practice Create a story frame like the one below that is similar to the stories you wrote together when you were doing shared writing. Show students how to choose words from your brainstormed lists and the story starters.
One ____ and _____day at ________School a _____named _____ was playing on the ______. He liked to play _______with his friends.
Along came a _____named ________. He/she said, “____________________”. _____ said, “___________________________”
Finally they got ________. So they went _________________. They had a _____time together.
You can make it even easier for students to select words to build a story from your charts by color-coding the blanks to match the color of the chart they are lifting from for that particular blank.
CLOZE Stories Take a simple story from one of the stories you wrote together or from a story you have read with the students. The short stories on readworks.org would work well for this. Type up the story and delete words from each sentence for elements your students can handle. Create a blank to write into for each word you delete.
MadLibs Students will also enjoy building stories with MadLibs. Note: the real MadLibs require a good understanding of English—keep yours very simple.
Then build lists of nouns, adjectives, verbs, adverbs for the topic of the mad lib. Color code these by the color of the list to show the strategy above.
D
IFFER
EN
TIA
TIO
N
©Charlotte Knox knoxeducation.com – Narrative Writing – Page 105
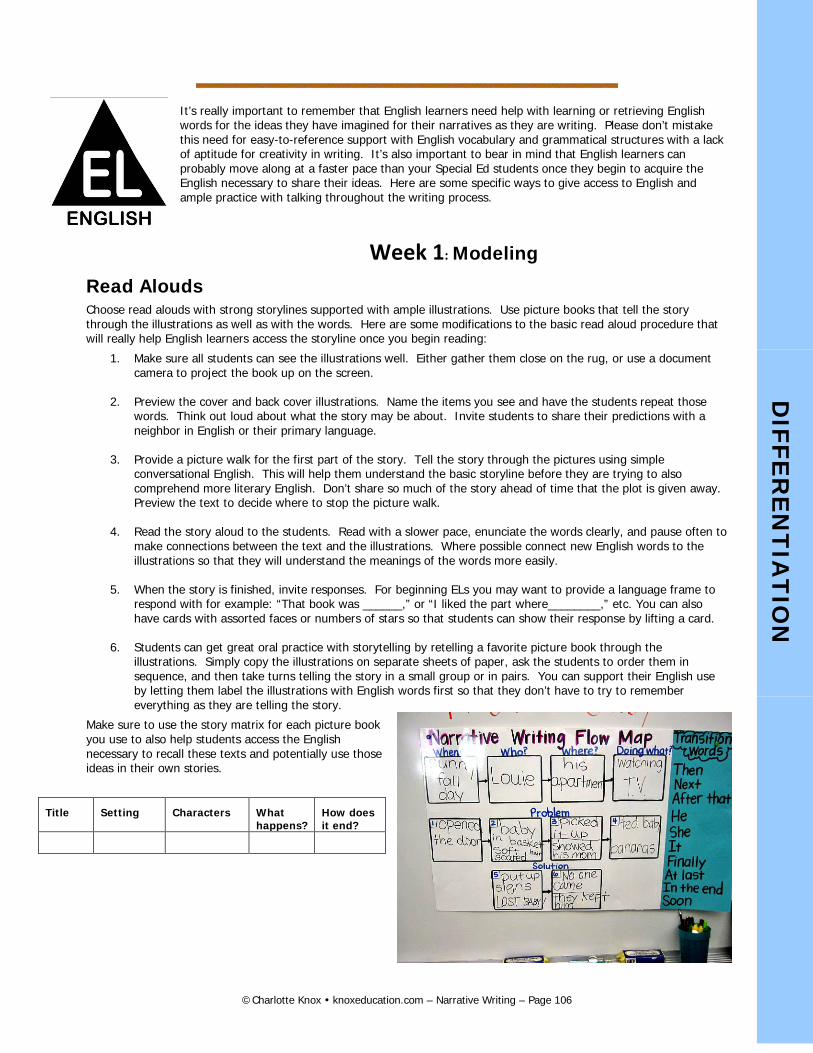
It’s really important to remember that English learners need help with learning or retrieving English words for the ideas they have imagined for their narratives as they are writing. Please don’t mistake this need for easy-to-reference support with English vocabulary and grammatical structures with a lack of aptitude for creativity in writing. It’s also important to bear in mind that English learners can probably move along at a faster pace than your Special Ed students once they begin to acquire the English necessary to share their ideas. Here are some specific ways to give access to English and ample practice with talking throughout the writing process.
Week 1: Modeling
Read Alouds Choose read alouds with strong storylines supported with ample illustrations. Use picture books that tell the story through the illustrations as well as with the words. Here are some modifications to the basic read aloud procedure that will really help English learners access the storyline once you begin reading:
1. Make sure all students can see the illustrations well. Either gather them close on the rug, or use a document camera to project the book up on the screen.
2. Preview the cover and back cover illustrations. Name the items you see and have the students repeat those
words. Think out loud about what the story may be about. Invite students to share their predictions with a neighbor in English or their primary language.
3. Provide a picture walk for the first part of the story. Tell the story through the pictures using simple
conversational English. This will help them understand the basic storyline before they are trying to also comprehend more literary English. Don’t share so much of the story ahead of time that the plot is given away. Preview the text to decide where to stop the picture walk.
4. Read the story aloud to the students. Read with a slower pace, enunciate the words clearly, and pause often to
make connections between the text and the illustrations. Where possible connect new English words to the illustrations so that they will understand the meanings of the words more easily.
5. When the story is finished, invite responses. For beginning ELs you may want to provide a language frame to
respond with for example: “That book was ______,” or “I liked the part where________,” etc. You can also have cards with assorted faces or numbers of stars so that students can show their response by lifting a card.
6. Students can get great oral practice with storytelling by retelling a favorite picture book through the
illustrations. Simply copy the illustrations on separate sheets of paper, ask the students to order them in sequence, and then take turns telling the story in a small group or in pairs. You can support their English use by letting them label the illustrations with English words first so that they don’t have to try to remember everything as they are telling the story.
Make sure to use the story matrix for each picture book you use to also help students access the English necessary to recall these texts and potentially use those ideas in their own stories.
Title Setting Characters What happens?
How does it end?
D
IFFER
EN
TIA
TIO
N
©Charlotte Knox knoxeducation.com – Narrative Writing – Page 106
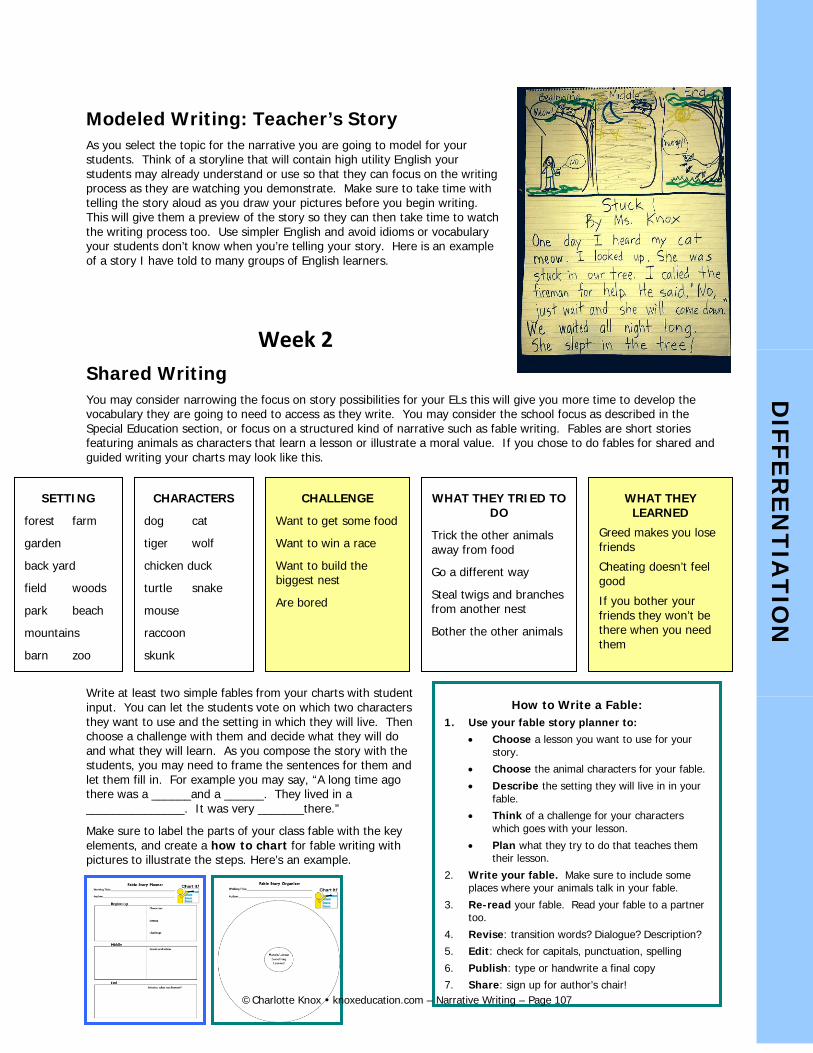
Modeled Writing: Teacher’s Story As you select the topic for the narrative you are going to model for your students. Think of a storyline that will contain high utility English your students may already understand or use so that they can focus on the writing process as they are watching you demonstrate. Make sure to take time with telling the story aloud as you draw your pictures before you begin writing. This will give them a preview of the story so they can then take time to watch the writing process too. Use simpler English and avoid idioms or vocabulary your students don’t know when you’re telling your story. Here is an example of a story I have told to many groups of English learners.
Week 2
Shared Writing
You may consider narrowing the focus on story possibilities for your ELs this will give you more time to develop the vocabulary they are going to need to access as they write. You may consider the school focus as described in the Special Education section, or focus on a structured kind of narrative such as fable writing. Fables are short stories featuring animals as characters that learn a lesson or illustrate a moral value. If you chose to do fables for shared and guided writing your charts may look like this.
Write at least two simple fables from your charts with student input. You can let the students vote on which two characters they want to use and the setting in which they will live. Then choose a challenge with them and decide what they will do and what they will learn. As you compose the story with the students, you may need to frame the sentences for them and let them fill in. For example you may say, “A long time ago there was a ______and a ______. They lived in a _______________. It was very _______there.”
Make sure to label the parts of your class fable with the key elements, and create a how to chart for fable writing with pictures to illustrate the steps. Here’s an example.
SETTING
forest farm
garden
back yard
field woods
park beach
mountains
barn zoo
CHARACTERS
dog cat
tiger wolf
chicken duck
turtle snake
mouse
raccoon
skunk
CHALLENGE
Want to get some food
Want to win a race
Want to build the biggest nest
Are bored
WHAT THEY TRIED TO DO
Trick the other animals away from food
Go a different way
Steal twigs and branches from another nest
Bother the other animals
WHAT THEY LEARNED
Greed makes you lose friends
Cheating doesn’t feel good
If you bother your friends they won’t be there when you need them
D
IFFER
EN
TIA
TIO
N
How to Write a Fable: 1. Use your fable story planner to:
• Choose a lesson you want to use for your story.
• Choose the animal characters for your fable.
• Describe the setting they will live in in your fable.
• Think of a challenge for your characters which goes with your lesson.
• Plan what they try to do that teaches them their lesson.
2. Write your fable. Make sure to include some places where your animals talk in your fable.
3. Re-read your fable. Read your fable to a partner too.
4. Revise: transition words? Dialogue? Description?
5. Edit: check for capitals, punctuation, spelling
6. Publish: type or handwrite a final copy
7. Share: sign up for author’s chair!
©Charlotte Knox knoxeducation.com – Narrative Writing – Page 107
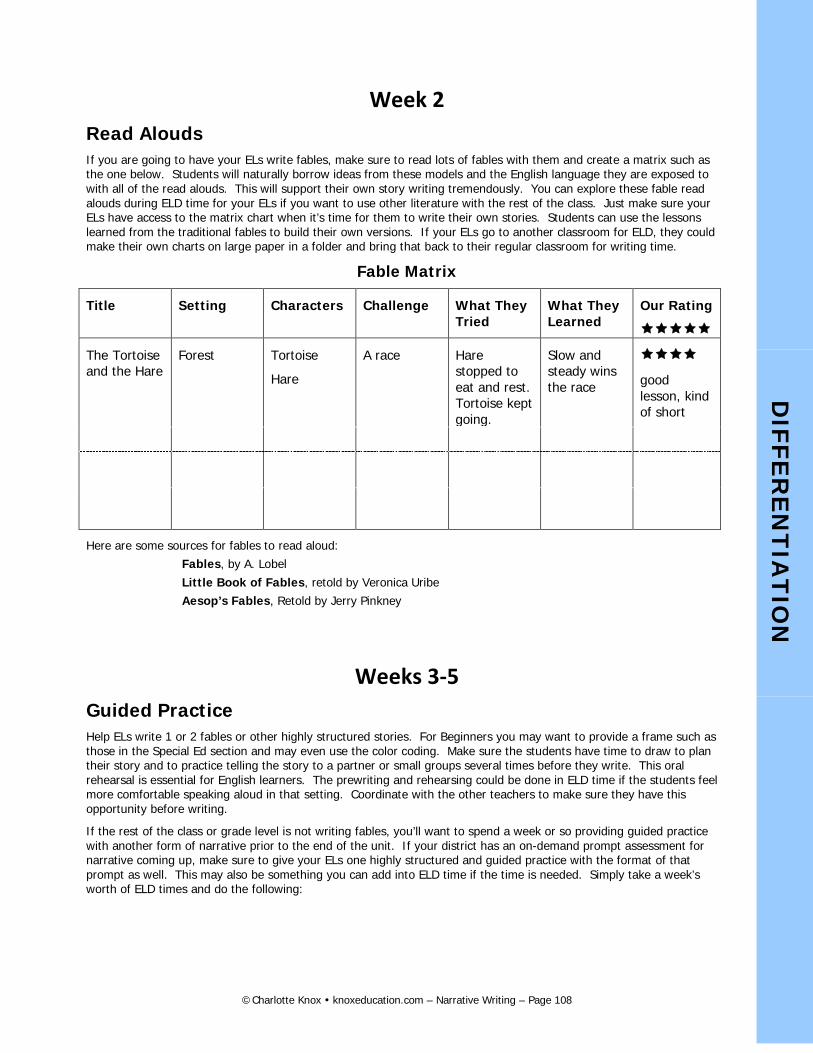
Week 2
Read Alouds
If you are going to have your ELs write fables, make sure to read lots of fables with them and create a matrix such as the one below. Students will naturally borrow ideas from these models and the English language they are exposed to with all of the read alouds. This will support their own story writing tremendously. You can explore these fable read alouds during ELD time for your ELs if you want to use other literature with the rest of the class. Just make sure your ELs have access to the matrix chart when it’s time for them to write their own stories. Students can use the lessons learned from the traditional fables to build their own versions. If your ELs go to another classroom for ELD, they could make their own charts on large paper in a folder and bring that back to their regular classroom for writing time.
Fable Matrix
Title Setting Characters Challenge What They Tried
What They Learned
Our Rating
The Tortoise and the Hare
Forest Tortoise
Hare
A race Hare stopped to eat and rest. Tortoise kept going.
Slow and steady wins the race
good lesson, kind of short
Here are some sources for fables to read aloud: Fables, by A. Lobel Little Book of Fables, retold by Veronica Uribe Aesop’s Fables, Retold by Jerry Pinkney
Weeks 3-5
Guided Practice
Help ELs write 1 or 2 fables or other highly structured stories. For Beginners you may want to provide a frame such as those in the Special Ed section and may even use the color coding. Make sure the students have time to draw to plan their story and to practice telling the story to a partner or small groups several times before they write. This oral rehearsal is essential for English learners. The prewriting and rehearsing could be done in ELD time if the students feel more comfortable speaking aloud in that setting. Coordinate with the other teachers to make sure they have this opportunity before writing.
If the rest of the class or grade level is not writing fables, you’ll want to spend a week or so providing guided practice with another form of narrative prior to the end of the unit. If your district has an on-demand prompt assessment for narrative coming up, make sure to give your ELs one highly structured and guided practice with the format of that prompt as well. This may also be something you can add into ELD time if the time is needed. Simply take a week’s worth of ELD times and do the following:
D
IFFER
EN
TIA
TIO
N
©Charlotte Knox knoxeducation.com – Narrative Writing – Page 108
Monday: review prompt, generate language and ideas, students choose their ideas and fill in a graphic organizer
Tuesday: students draft a narrative, guide and prompt students through the steps for the elements on your grade level rubric. For example, if the story needs dialogue, have the students write a piece of dialogue to go with their story on a white board and share those ideas with the class, then add to their piece.
Wednesday: finish draft and re-read to a partner. Revise to add detail or enhance word choice
Thursday: Edit: use a collaborative format such as the Editing Machine (see page 81 in this handbook).
Friday: Share stories with author’s chair (see page 80 in this handbook) and give feedback based on rubric they will use in their on-demand assessment.
Week 6
Publishing
English learners may need very explicit help with grammar. Remember, what they wrote probably “sounds right” to them. Give gentle corrective feedback that may sound like this:
It’s great that you added what your character felt when that happened, here’s how we say that in English: “The fox felt” (instead of feel) “excited as he saw the fat chicken walking down the road.”
If possible, don’t just fix it all with a red pen that may be embarrassing to a student learning English. For example, you could pull your ELs during silent reading one at a time to help with grammar.
Students who write and read with ease will thrive during the narrative writing unit. They will have more ideas than they have time for and may want to rush from inspiration to inspiration. The challenge with these students will be to help them first explore all of their ideas, and then choose one and stick with it through to the end to create a really quality narrative. Here are some ideas for supporting and corralling these students.
Week 1
Read Alouds
Make sure to use collaborative talk structures as you discuss the qualities of the great literature you are reading to the students. These students may dominate the conversation, so provide an equitable way for sharing. Challenge these students to read additional texts by the same authors of your read alouds throughout this unit. You may want to collect 2-3 titles by each author you share and have them at the ready. If a student has read another title by the author, you may allow them to prepare a one minute “infomercial” and present that to the class during the read aloud time.
Modeled Writing: As you model the writing of your own narrative, these students may want to chime in with their own ideas and suggestions. Gently remind them that this is your story and that they will have many opportunities to create their own. Encourage students to keep a notebook handy and to jot their ideas down as they come to keep them from blurting them out to the whole class. Make sure to include some elements in your own modeled narrative that are beyond your grade level standards. Your Extend students may be able to include these elements in their own writing with very little instruction. For example, you may include a metaphor or simile as a descriptor.
D
IFFER
EN
TIA
TIO
N
©Charlotte Knox knoxeducation.com – Narrative Writing – Page 109
Week 2
Read Alouds
Your extend students may choose to read their own choices as you explore qualities of excellent narrative writing with your students. That is fine, but hold them to the same focus areas you are exploring with the rest of the class. For example, if you are learning about how authors use dialogue, challenge them to find quality examples of dialogue to share and ask them to transfer those to their writer’s notebook while you are working with the rest of the class.
Shared Writing: Extend students may be able to begin guided practice after viewing the teacher modeling and receiving an explanation of the process via the “how to” chart. If they are dying to get started with their ideas, allow them to do so as long as they can work quietly while you teach the rest of the class. You’ll probably see them look up and take in a lot of your shared writing instruction anyhow, but they won’t be slowed down unless they need help.
Quick tries: Extend students will love this because they generally are quick at doing just about everything. You can use their attempts as models for the other students. Make sure they participate in all of your quick try practices.
Weeks 3-5
Guided Practice
Make sure to find time to meet with your Extend students as is possible. Early on in the guided practice phase of the unit, you may want to pull them together and do a lesson on the elements in the level 4 (above grade level) aspects of your rubric. Make sure the students understand what each item means, and use the “quick try” method to get them to have a go with each element.
Extend students tend to write a lot, but not all of it is quality writing or on topic and necessary. Help them discipline themselves by referring to their planning notes frequently, checking off the elements they have incorporated, and labeling those elements on their draft. You may also be able to interest them in cutting unnecessary text by crossing out or even cutting up the paper and taping sections to each other. You’ll probably have to schedule some one to one conferencing with these students to keep them focused as they finish up their pieces.
Jumpstart students are those who are slow to get started with writing for a variety of reasons. They may simply lack confidence, have trouble following and remembering multi-step processes in writing, or need more think time to gather their ideas. It is very helpful to establish a procedure in your classroom for meeting with them first just after any whole group mini-lessons at the beginning of a writing period.
Have those students meet you at a small table or on the carpet to receive a “jumpstart” for the writing task of the day. If possible, arrange this small group area within view of any teaching charts you may be using for this writing unit so that the students can easily reference them from where they are working. Remind the students to bring their writing folders, a pencil and any
other tools for writing you expect them to use. Make sure they have a copy of the rubric or checklist for the task, and the “how to” chart of the type of writing you are working on. Start by reviewing the task for the day and how to do it.
For example, you might say, “Remember, today we are working on describing the setting for your stories, let’s have each person tell us what their setting is and how you would describe it.” Then go around the group and have each person describe their setting out loud. If they have drawn pictures as a pre-writing activity, ask your Jumpstart group to label their pictures with describing words.
Next you could get the group started with the writing by reminding them where they could access vocabulary or even language frames to get going. Once everyone has started writing, leave your Jumpstart group and circulate to the other students in class. After several minutes, swing back by the jumpstart group to remind them of the next step in the process. Remember to praise with specific feedback for this group. They are typically reluctant and lacking in confidence—your positive feedback will begin to erode that negativity and help them begin to see themselves as writers. When it’s time to share at the end of the writing period, let this group share their work first so that they can shine before others share.
D
IFFER
EN
TIA
TIO
N
DIFFE
RE
NT
IAT
ION
©Charlotte Knox knoxeducation.com – Narrative Writing – Page 110