plan user guide quantity tracking - the ineight
TRANSCRIPT

PLAN USER GUIDEQuantity Tracking
FIELD EXECUTION MANAGE
MENT

Information in this document is subject to change without notice. Companies, names and data used inexamples are fictitious.
Copyright ©2021 by InEight. All rights reserved. No part of this document may be reproduced ortransmitted in any form or by any means, electronic or mechanical, for any purpose, without theexpress permission of InEight.
Microsoft Windows, Internet Explorer and Microsoft Excel are registered trademarks of MicrosoftCorporation.
Although InEight Plan has undergone extensive testing, InEight makes no warranty or representation,either express or implied, with respect to this software or documentation, its quality, performance,merchantability, or fitness for purpose. As a result, this software and documentation are licensed “asis”, and you, the licensee are assuming the entire risk as to its quality and performance. In no eventwill InEight be liable for direct, indirect, special, incidental or consequential damages arising out of theuse or inability to use the software or documentation.
Page 2 of 112 InEight Inc. | Release 21.1
Release 21.1Last Updated: 18 February 2021
InEight Inc. | Release 21.1 Page 3 of 112
CONTENTSLESSON 1 — QUANTITY TRACKING OVERVIEW 91.1 Plan Quantity Tracking Overview 101.1.1 InEight Plan Work Flow 101.1.2 Quantity Tracking Terminology 111.1.3 Components 131.1.4 Component Attributes 161.1.5 Claiming Schemes 171.1.6 Quantities Sent to InEight Control 19
Lesson 1 Review 20Lesson 1 Summary 21
LESSON 2 — GENERAL NAVIGATION 232.1 Page Navigation 25
Navigate to the Quantity Tracking Module via the Project Home Page 25Navigate to the Quantity Tracking Module via the Navigation Bar 26
2.1.1 Standard Grid vs Data Block View 292.1.1.1 Standard Grid view 292.1.1.2 Data Block view 29
2.2 Columns 302.2.1 Move Columns 30
Move Columns 312.2.2 Add and Remove Columns 31
Add Additional Columns 312.2.3 Sort Columns 34
Sort Columns 342.2.4 Filter Columns 34
Filter Columns 342.2.5 Saved Filters 36
Create a Saved Filter 37Exercise 2.1 — Saved Filters 402.3 Viewsets 41
Create a Viewset 41Exercise 2.2 — Create a Viewset 432.4 Data Blocks 442.4.1 Add Data Blocks 44
Add Data Blocks 442.4.2 Navigate Data Blocks 452.4.3 Context Menu 46
Utilize the Context Menu 46Lesson 2 Review 48Lesson 2 Summary 49
LESSON 3 — CLAIMING SCHEMES 513.1 What is a Claiming Scheme? 523.1.1 What is the purpose? 523.1.2 Setting up a Claiming Scheme 533.1.3 Claiming Scheme Solutions 553.1.4 Account Code Assignment 55
3.2 Claiming Scheme Creation 56Build a Claiming Scheme 57
3.2.1 Import and Export 61Import Claiming Schemes 61Export Claiming Schemes 61
Exercise 3.1 — Claiming Scheme 633.3 Claiming Scheme Management 643.3.1 Assigning Claiming Schemes 64
Assign a WBS to a Claiming Scheme 653.3.2 Edit Claiming Schemes 69
Edit a Claiming Scheme 69Lesson 3 Review 72Lesson 3 Summary 73
LESSON 4 — COMPONENT MANAGEMENT 754.1 InEight Plan Workflow – Component Management 764.2 Component Creation from Scratch 764.2.1 Why Create Components? 764.2.2 Types of Components 77
Page 4 of 112 InEight Inc. | Release 21.1
Plan User Guide
4.2.3 Methods of Creating Components 784.2.4 Component Attributes 794.2.4.1 Validated Fields 794.2.4.2 Location 804.2.4.3 Engineering 804.2.4.4 Using Component Attributes 81
4.2.5 Component Creation 83Create a Component from Scratch 83Copy an Existing Component 87Split an Existing Component 884.2 Step by Step 1 — Bulk Edit Components 88
4.3 Component Creation from Import 894.3.1 Import Template 89
Create Components from Excel Import 90Exercise 4.1 — Create Components 97Lesson 4 Review 98Lesson 4 Summary 98
LESSON 5 — QUANTITY CLAIMING 995.1 InEight Plan Workflow – Quantity Claiming 1005.2 Quantity Claiming 1005.2.1 Process for claiming quantities 1005.2.2 Why claim at a component level? 1015.2.3 Claiming in the Standard Grid View 101
Quantity Claiming (Standard Grid View) 1015.2.4 Claiming in the Data Blocks View 103
Quantity Claiming (Data Blocks View) 1045.3 Edit Claimed Quantities 1055.3.1 Quantity Joined 1065.3.2 Quantity Editing 107
Edit Claimed Quantity 107Exercise 5.1 — Quantity Claiming 110Lesson 5 Review 111Lesson 5 Summary 112
InEight Inc. | Release 21.1 Page 5 of 112
Plan User Guide
STEP-BY-STEP PROCEDURESNavigate to the Quantity Tracking Module via the Project Home Page 25
Navigate to the Quantity Tracking Module via the Navigation Bar 26
Move Columns 31
Add Additional Columns 31
Sort Columns 34
Filter Columns 34
Create a Saved Filter 37
Create a Viewset 41
Add Data Blocks 44
Utilize the Context Menu 46
Build a Claiming Scheme 57
Import Claiming Schemes 61
Export Claiming Schemes 61
Assign a WBS to a Claiming Scheme 65
Edit a Claiming Scheme 69
Create a Component from Scratch 83
Copy an Existing Component 87
Split an Existing Component 88
4.2 Step by Step 1 — Bulk Edit Components 88
Create Components from Excel Import 90
Quantity Claiming (Standard Grid View) 101
Quantity Claiming (Data Blocks View) 104
Edit Claimed Quantity 107
Page 6 of 112 InEight Inc. | Release 21.1
Plan User Guide
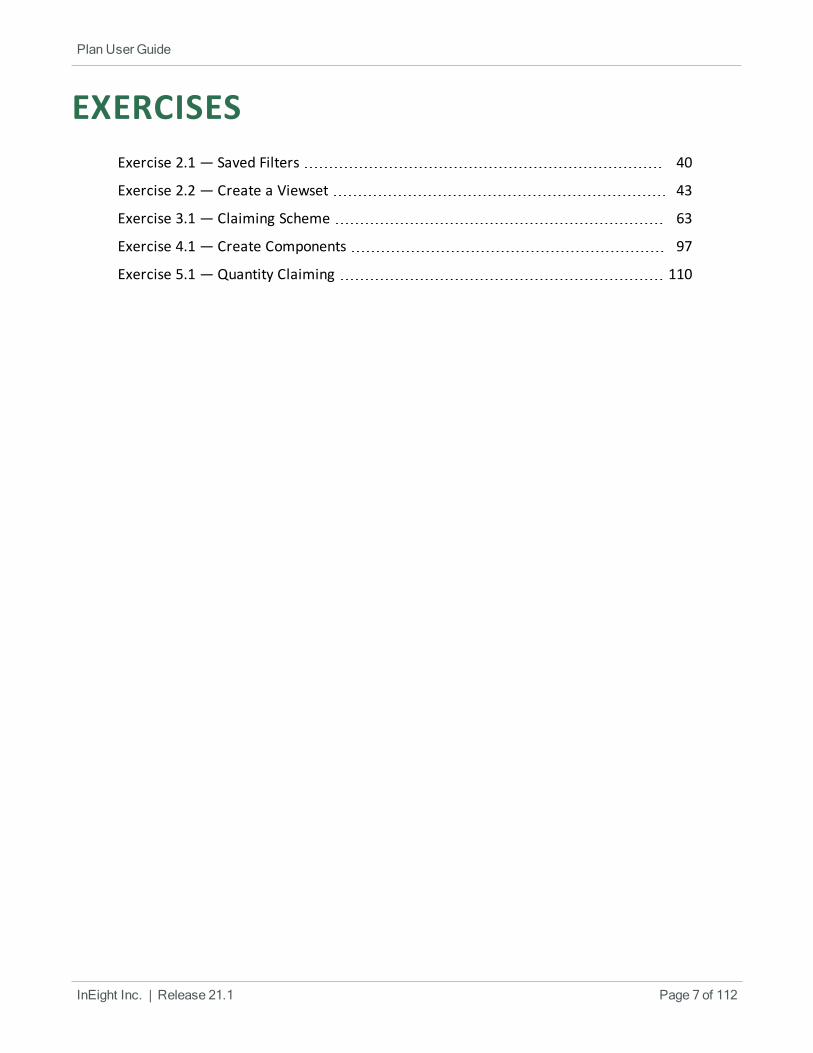
EXERCISESExercise 2.1 — Saved Filters 40
Exercise 2.2 — Create a Viewset 43
Exercise 3.1 — Claiming Scheme 63
Exercise 4.1 — Create Components 97
Exercise 5.1 — Quantity Claiming 110
InEight Inc. | Release 21.1 Page 7 of 112
Plan User Guide

Page 8 of 112 InEight Inc. | Release 21.1
This page intentionally left blank.
Plan User Guide
InEight Inc. | Release 21.1 Page 9 of 112
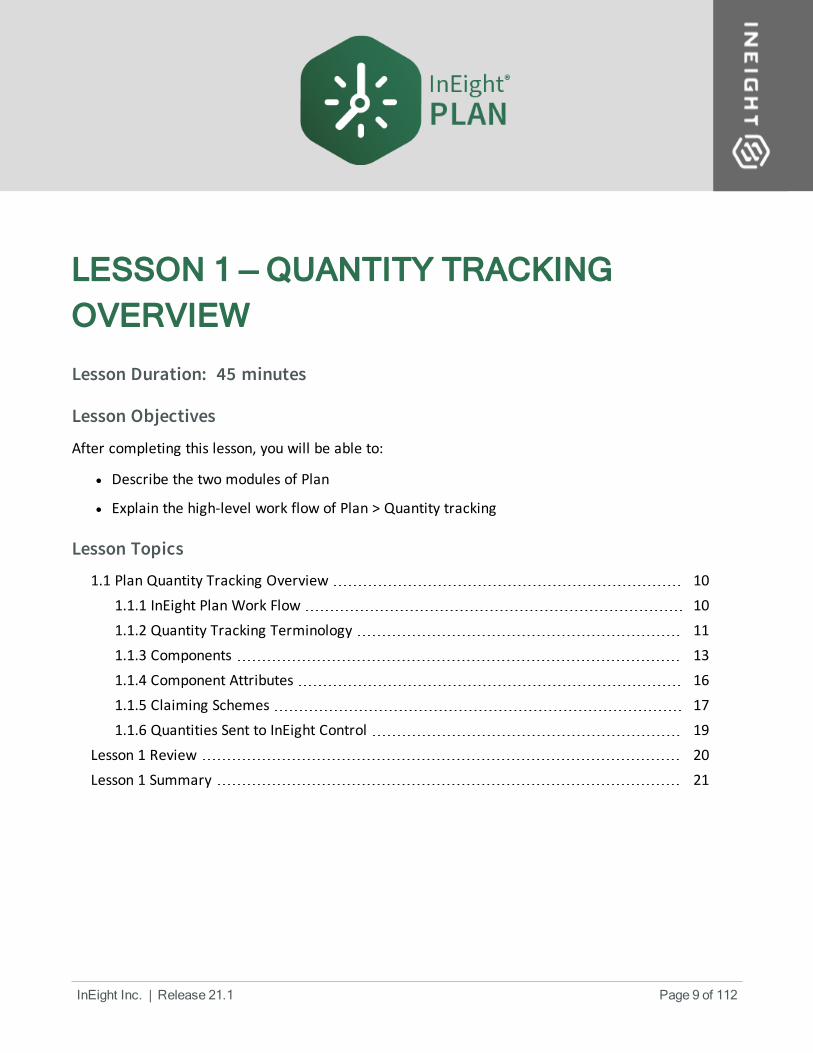
LESSON 1 — QUANTITY TRACKINGOVERVIEW
Lesson Duration: 45 minutes
Lesson Objectives
After completing this lesson, you will be able to:
l Describe the two modules of Plan
l Explain the high-level work flow of Plan > Quantity tracking
Lesson Topics
1.1 Plan Quantity Tracking Overview 101.1.1 InEight Plan Work Flow 101.1.2 Quantity Tracking Terminology 111.1.3 Components 131.1.4 Component Attributes 161.1.5 Claiming Schemes 171.1.6 Quantities Sent to InEight Control 19
Lesson 1 Review 20Lesson 1 Summary 21
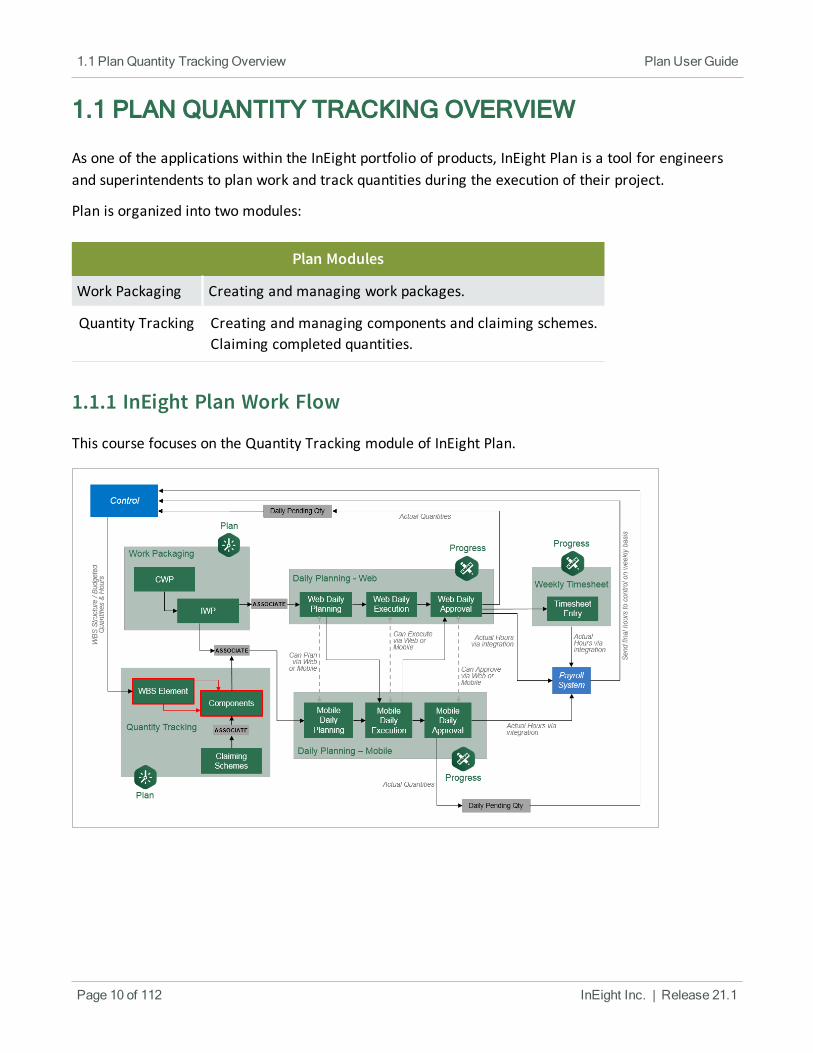
1.1 PLAN QUANTITY TRACKING OVERVIEW
As one of the applications within the InEight portfolio of products, InEight Plan is a tool for engineersand superintendents to plan work and track quantities during the execution of their project.
Plan is organized into two modules:
Plan Modules
Work Packaging Creating and managing work packages.
Quantity Tracking Creating and managing components and claiming schemes.Claiming completed quantities.
1.1.1 InEight Plan Work Flow
This course focuses on the Quantity Tracking module of InEight Plan.
Page 10 of 112 InEight Inc. | Release 21.1
1.1 Plan Quantity Tracking Overview Plan User Guide
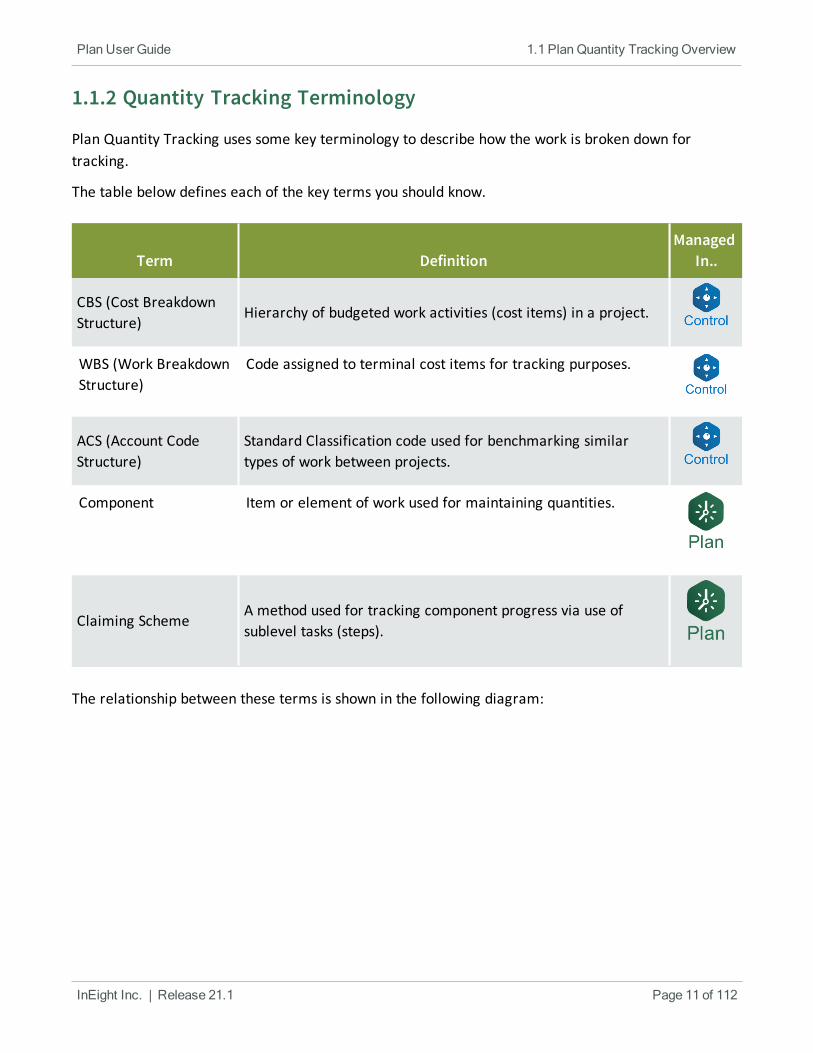
1.1.2 Quantity Tracking Terminology
Plan Quantity Tracking uses some key terminology to describe how the work is broken down fortracking.
The table below defines each of the key terms you should know.
Term DefinitionManaged
In..
CBS (Cost BreakdownStructure)
Hierarchy of budgeted work activities (cost items) in a project.
WBS (Work BreakdownStructure)
Code assigned to terminal cost items for tracking purposes.
ACS (Account CodeStructure)
Standard Classification code used for benchmarking similartypes of work between projects.
Component Item or element of work used for maintaining quantities.
Claiming SchemeA method used for tracking component progress via use ofsublevel tasks (steps).
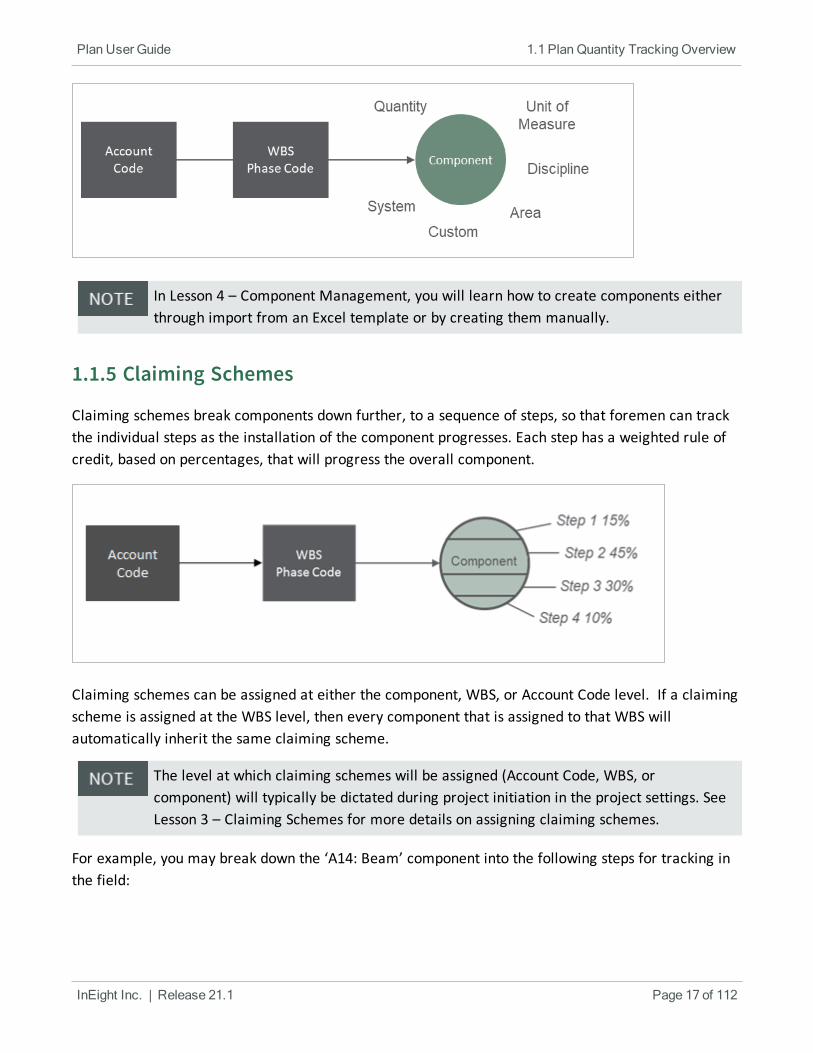
The relationship between these terms is shown in the following diagram:
InEight Inc. | Release 21.1 Page 11 of 112
Plan User Guide 1.1 Plan Quantity Tracking Overview
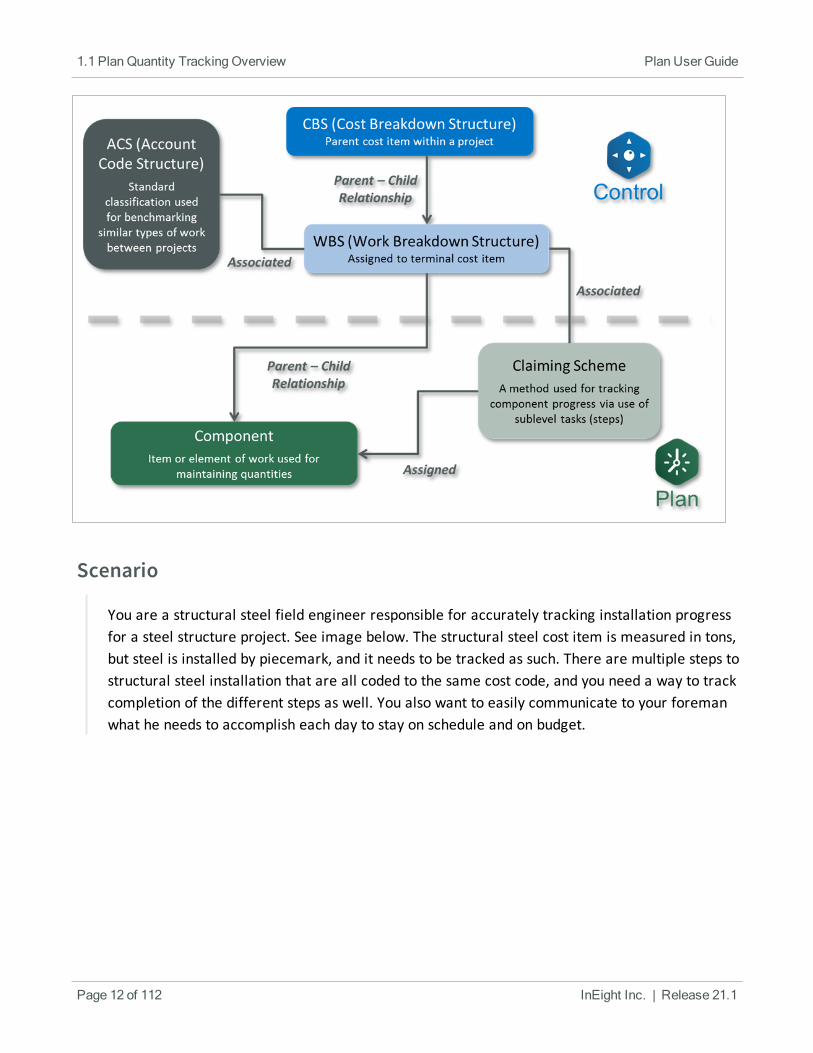
Scenario
You are a structural steel field engineer responsible for accurately tracking installation progressfor a steel structure project. See image below. The structural steel cost item is measured in tons,but steel is installed by piecemark, and it needs to be tracked as such. There are multiple steps tostructural steel installation that are all coded to the same cost code, and you need a way to trackcompletion of the different steps as well. You also want to easily communicate to your foremanwhat he needs to accomplish each day to stay on schedule and on budget.
Page 12 of 112 InEight Inc. | Release 21.1
1.1 Plan Quantity Tracking Overview Plan User Guide
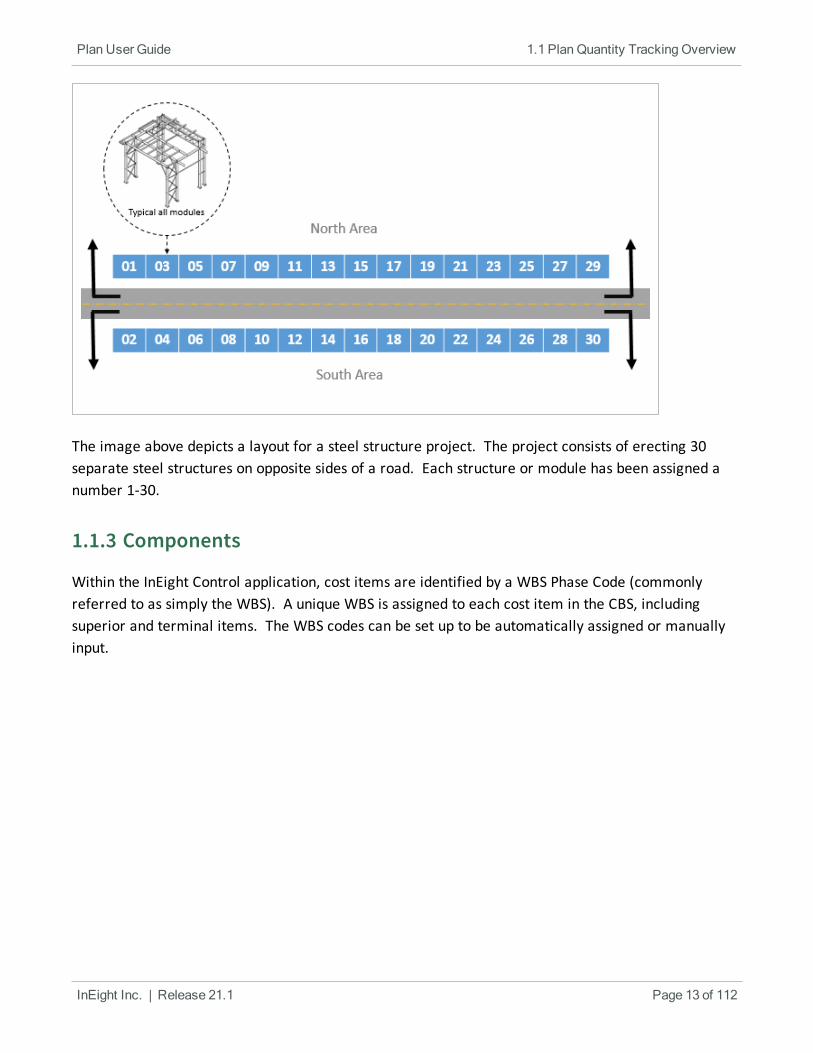
The image above depicts a layout for a steel structure project. The project consists of erecting 30separate steel structures on opposite sides of a road. Each structure or module has been assigned anumber 1-30.
1.1.3 Components
Within the InEight Control application, cost items are identified by a WBS Phase Code (commonlyreferred to as simply the WBS). A unique WBS is assigned to each cost item in the CBS, includingsuperior and terminal items. The WBS codes can be set up to be automatically assigned or manuallyinput.
InEight Inc. | Release 21.1 Page 13 of 112
Plan User Guide 1.1 Plan Quantity Tracking Overview
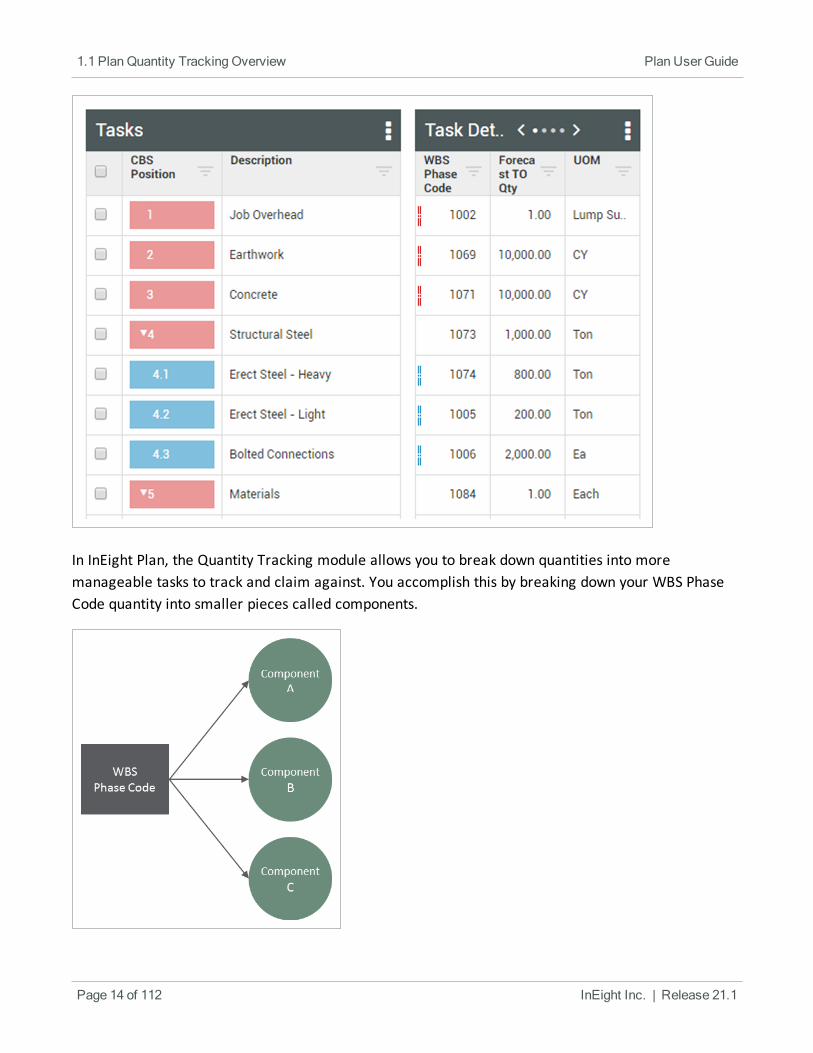
In InEight Plan, the Quantity Tracking module allows you to break down quantities into moremanageable tasks to track and claim against. You accomplish this by breaking down your WBS PhaseCode quantity into smaller pieces called components.
Page 14 of 112 InEight Inc. | Release 21.1
1.1 Plan Quantity Tracking Overview Plan User Guide
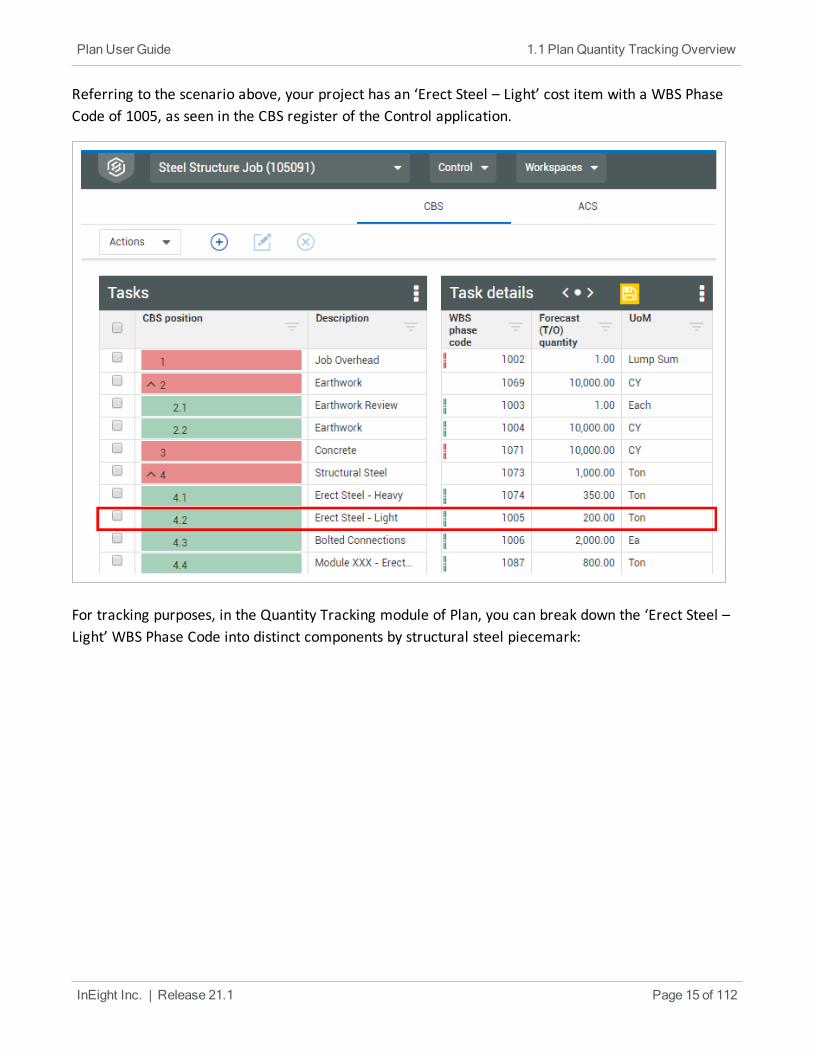
Referring to the scenario above, your project has an ‘Erect Steel – Light’ cost item with a WBS PhaseCode of 1005, as seen in the CBS register of the Control application.
For tracking purposes, in the Quantity Tracking module of Plan, you can break down the ‘Erect Steel –Light’ WBS Phase Code into distinct components by structural steel piecemark:
InEight Inc. | Release 21.1 Page 15 of 112
Plan User Guide 1.1 Plan Quantity Tracking Overview
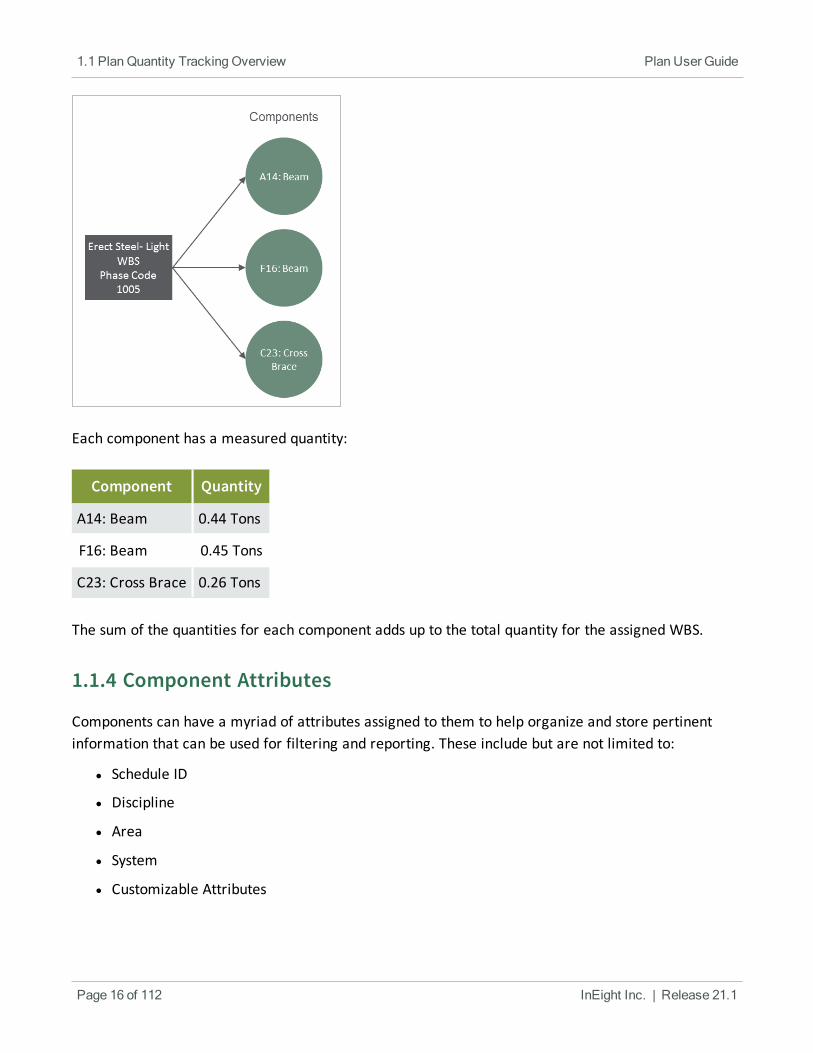
Each component has a measured quantity:
Component Quantity
A14: Beam 0.44 Tons
F16: Beam 0.45 Tons
C23: Cross Brace 0.26 Tons
The sum of the quantities for each component adds up to the total quantity for the assigned WBS.
1.1.4 Component Attributes
Components can have a myriad of attributes assigned to them to help organize and store pertinentinformation that can be used for filtering and reporting. These include but are not limited to:
l Schedule ID
l Discipline
l Area
l System
l Customizable Attributes
Page 16 of 112 InEight Inc. | Release 21.1
1.1 Plan Quantity Tracking Overview Plan User Guide
In Lesson 4 – Component Management, you will learn how to create components eitherthrough import from an Excel template or by creating them manually.
1.1.5 Claiming Schemes
Claiming schemes break components down further, to a sequence of steps, so that foremen can trackthe individual steps as the installation of the component progresses. Each step has a weighted rule ofcredit, based on percentages, that will progress the overall component.
Claiming schemes can be assigned at either the component, WBS, or Account Code level. If a claimingscheme is assigned at the WBS level, then every component that is assigned to that WBS willautomatically inherit the same claiming scheme.
The level at which claiming schemes will be assigned (Account Code, WBS, orcomponent) will typically be dictated during project initiation in the project settings. SeeLesson 3 – Claiming Schemes for more details on assigning claiming schemes.
For example, you may break down the ‘A14: Beam’ component into the following steps for tracking inthe field:
InEight Inc. | Release 21.1 Page 17 of 112
Plan User Guide 1.1 Plan Quantity Tracking Overview
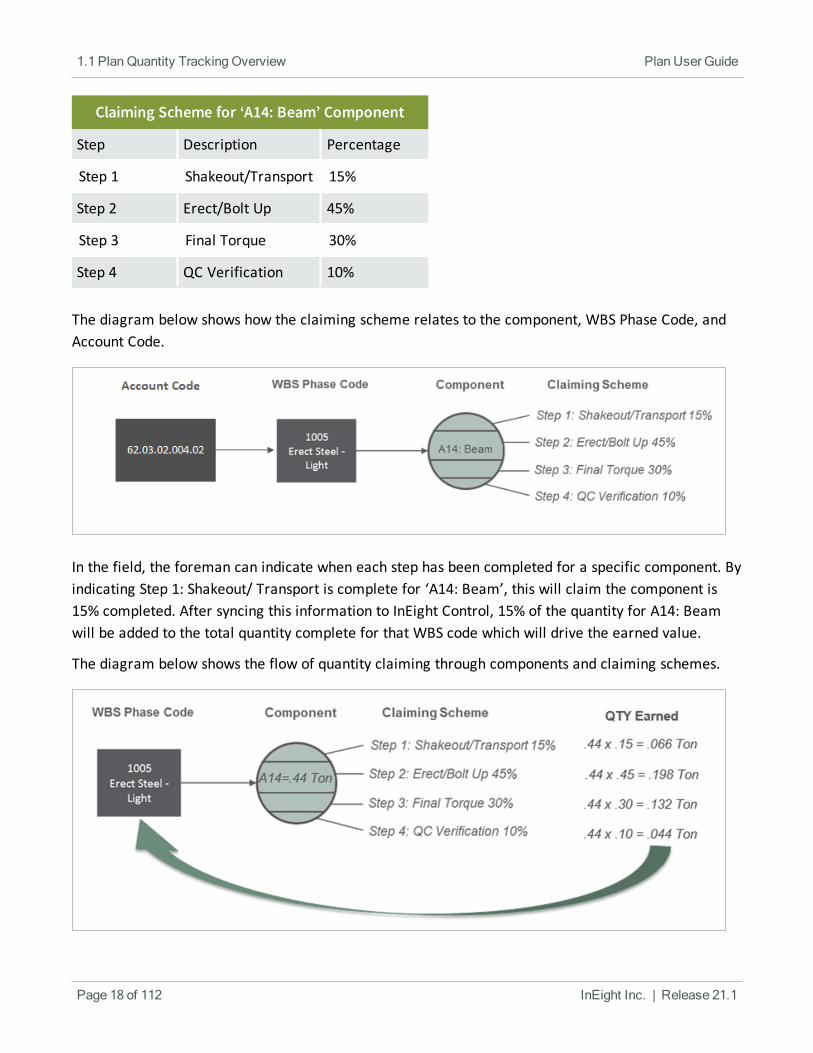
Claiming Scheme for ‘A14: Beam’ Component
Step Description Percentage
Step 1 Shakeout/Transport 15%
Step 2 Erect/Bolt Up 45%
Step 3 Final Torque 30%
Step 4 QC Verification 10%
The diagram below shows how the claiming scheme relates to the component, WBS Phase Code, andAccount Code.
In the field, the foreman can indicate when each step has been completed for a specific component. Byindicating Step 1: Shakeout/ Transport is complete for ‘A14: Beam’, this will claim the component is15% completed. After syncing this information to InEight Control, 15% of the quantity for A14: Beamwill be added to the total quantity complete for that WBS code which will drive the earned value.
The diagram below shows the flow of quantity claiming through components and claiming schemes.
Page 18 of 112 InEight Inc. | Release 21.1
1.1 Plan Quantity Tracking Overview Plan User Guide
1.1.6 Quantities Sent to InEight Control
The quantities tracked at the component level will “roll up” to the assigned WBS Phase Code and beavailable for progress analysis and forecasting in the Control application. Learn more about syncing inthe Control Knowledge Library.
In this example, the quantities claimed for steel components roll up to the ‘Erect Steel – Light’ WBSitem, which then gets sent to Control upon request.
InEight Inc. | Release 21.1 Page 19 of 112
Plan User Guide 1.1 Plan Quantity Tracking Overview
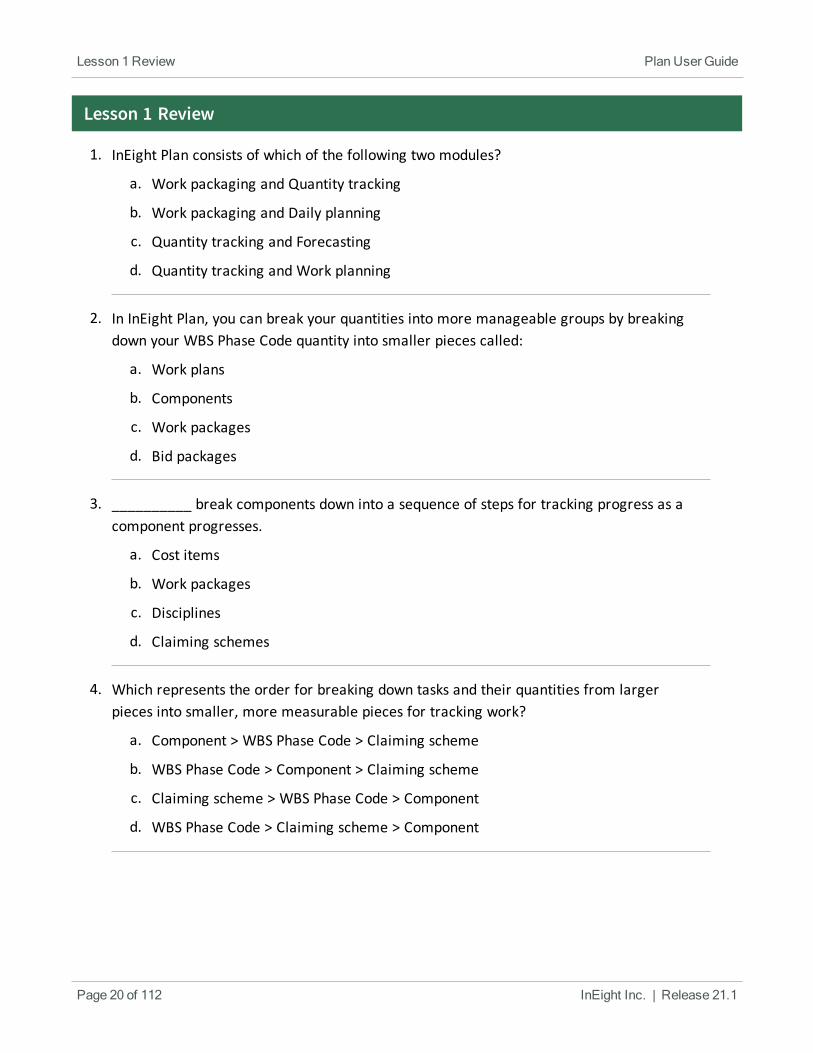
Lesson 1 Review
1. InEight Plan consists of which of the following two modules?
a. Work packaging and Quantity tracking
b. Work packaging and Daily planning
c. Quantity tracking and Forecasting
d. Quantity tracking and Work planning
2. In InEight Plan, you can break your quantities into more manageable groups by breakingdown your WBS Phase Code quantity into smaller pieces called:
a. Work plans
b. Components
c. Work packages
d. Bid packages
3. __________ break components down into a sequence of steps for tracking progress as acomponent progresses.
a. Cost items
b. Work packages
c. Disciplines
d. Claiming schemes
4. Which represents the order for breaking down tasks and their quantities from largerpieces into smaller, more measurable pieces for tracking work?
a. Component > WBS Phase Code > Claiming scheme
b. WBS Phase Code > Component > Claiming scheme
c. Claiming scheme > WBS Phase Code > Component
d. WBS Phase Code > Claiming scheme > Component
Page 20 of 112 InEight Inc. | Release 21.1
Lesson 1 Review Plan User Guide

Lesson 1 Summary
As a result of this lesson, you can:
l Describe the modules of Plan
l Explain the high-level work flow of Plan > Quantity tracking
InEight Inc. | Release 21.1 Page 21 of 112
Plan User Guide Lesson 1 Summary

Page 22 of 112 InEight Inc. | Release 21.1
This page intentionally left blank.
Lesson 1 Summary Plan User Guide
InEight Inc. | Release 21.1 Page 23 of 112
LESSON 2 — GENERAL NAVIGATION
Lesson Duration: 30 minutes
Lesson Objectives
After completing this lesson, you will be able to:
l Navigate the Plan > Quantity tracking page
l Manage columns
l Create viewsets
l Manage data blocks
Lesson Topics
2.1 Page Navigation 252.1.1 Standard Grid vs Data Block View 29
2.2 Columns 302.2.1 Move Columns 302.2.2 Add and Remove Columns 312.2.3 Sort Columns 342.2.4 Filter Columns 342.2.5 Saved Filters 36
Exercise 2.1 — Saved Filters 402.3 Viewsets 41Exercise 2.2 — Create a Viewset 432.4 Data Blocks 44
2.4.1 Add Data Blocks 442.4.2 Navigate Data Blocks 45
2.4.3 Context Menu 46Lesson 2 Review 48Lesson 2 Summary 49
Page 24 of 112 InEight Inc. | Release 21.1
Plan User Guide
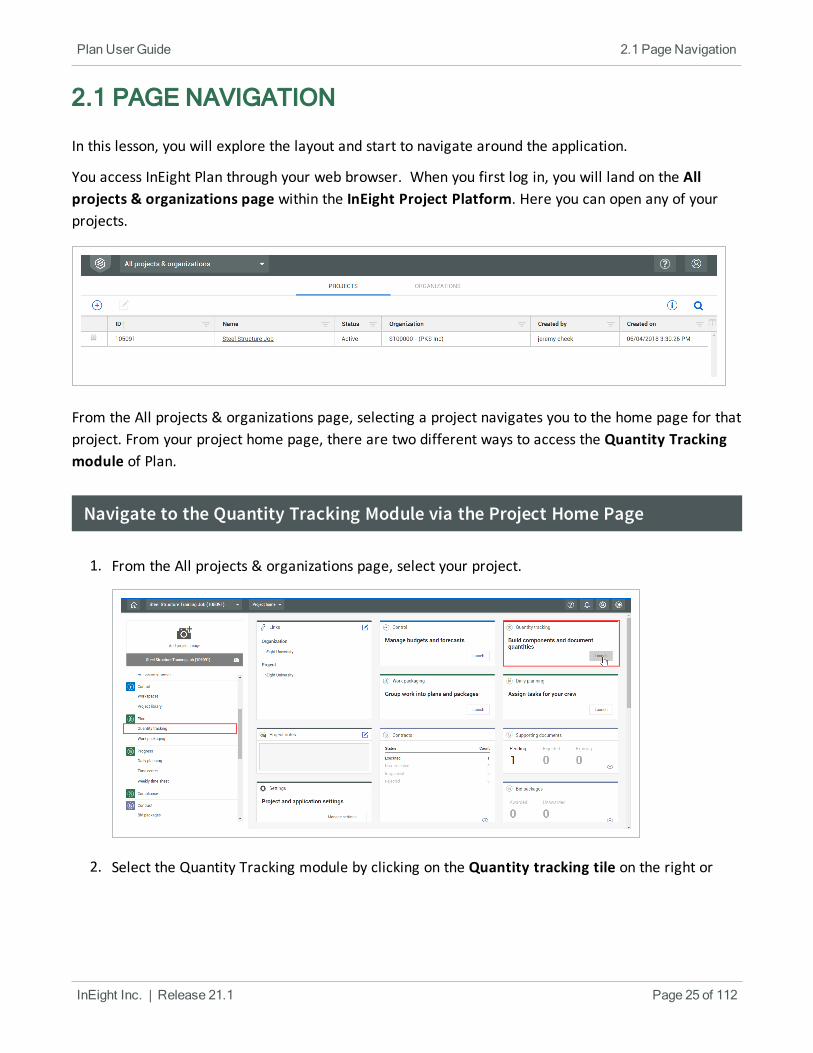
2.1 PAGE NAVIGATION
In this lesson, you will explore the layout and start to navigate around the application.
You access InEight Plan through your web browser. When you first log in, you will land on the Allprojects & organizations page within the InEight Project Platform. Here you can open any of yourprojects.
From the All projects & organizations page, selecting a project navigates you to the home page for thatproject. From your project home page, there are two different ways to access the Quantity Trackingmodule of Plan.
Navigate to the Quantity Tracking Module via the Project Home Page
1. From the All projects & organizations page, select your project.
2. Select the Quantity Tracking module by clicking on the Quantity tracking tile on the right or
InEight Inc. | Release 21.1 Page 25 of 112
Plan User Guide 2.1 Page Navigation
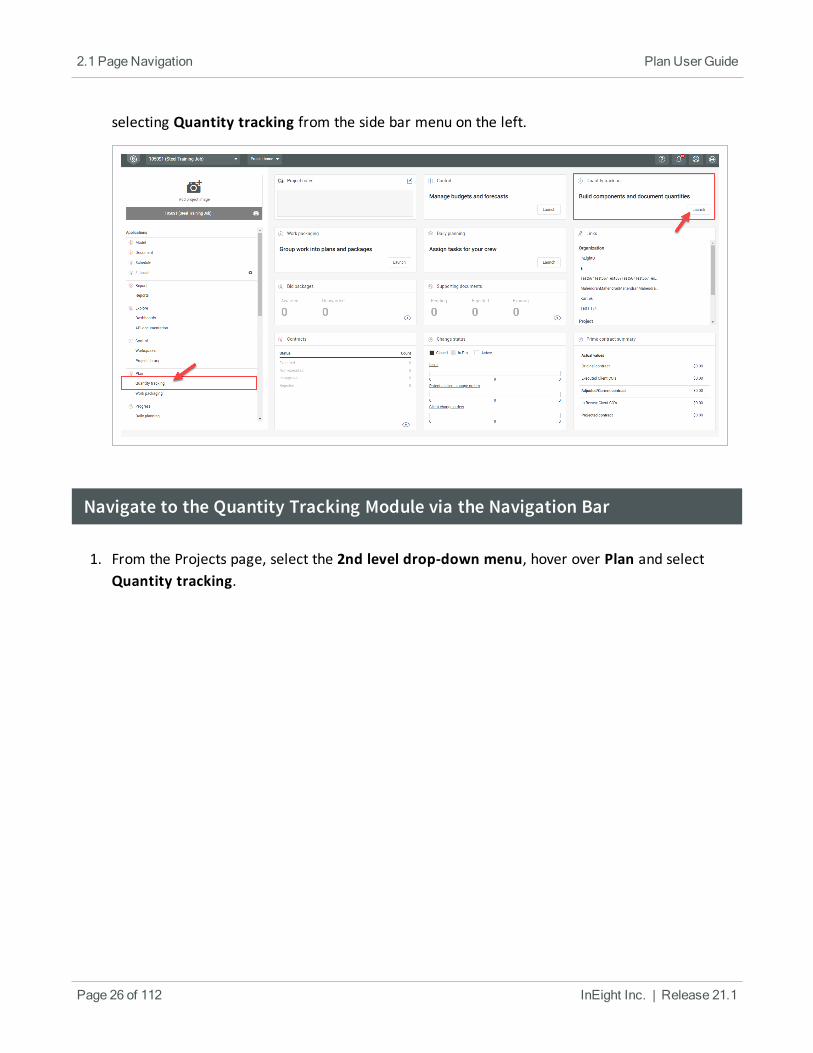
selecting Quantity tracking from the side bar menu on the left.
Navigate to the Quantity Tracking Module via the Navigation Bar
1. From the Projects page, select the 2nd level drop-down menu, hover over Plan and selectQuantity tracking.
Page 26 of 112 InEight Inc. | Release 21.1
2.1 Page Navigation Plan User Guide
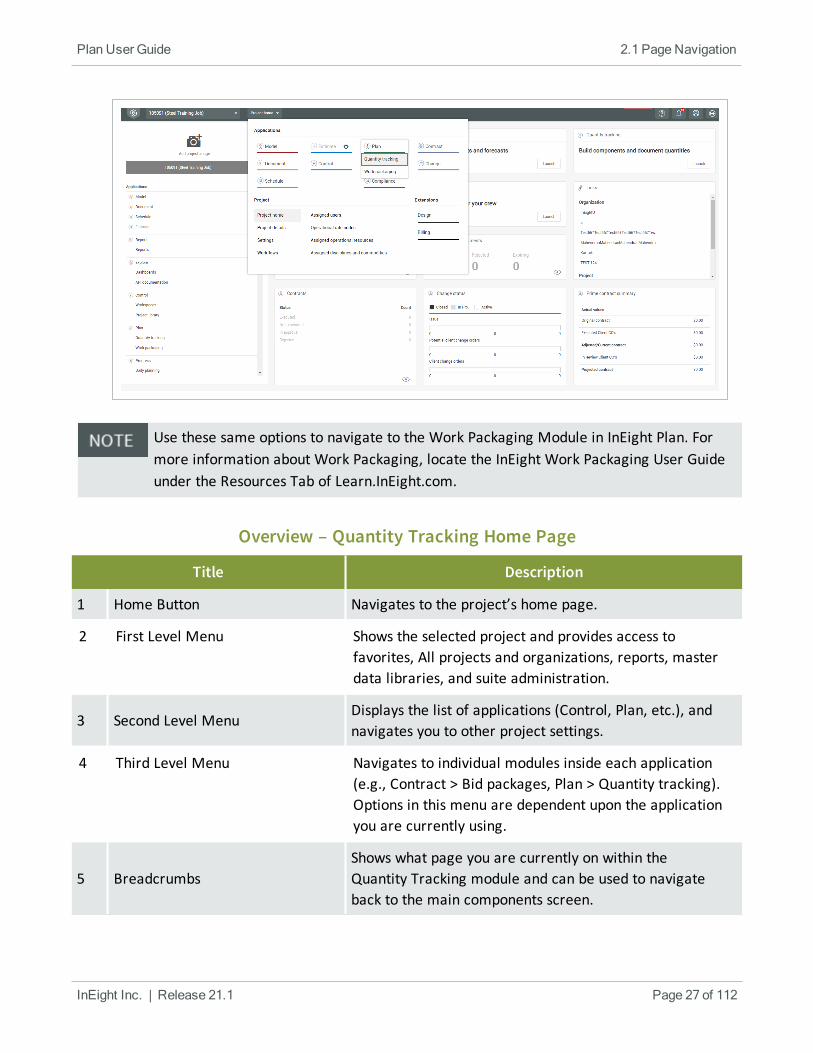
Use these same options to navigate to the Work Packaging Module in InEight Plan. Formore information about Work Packaging, locate the InEight Work Packaging User Guideunder the Resources Tab of Learn.InEight.com.
Title Description
1 Home Button Navigates to the project’s home page.
2 First Level Menu Shows the selected project and provides access tofavorites, All projects and organizations, reports, masterdata libraries, and suite administration.
3 Second Level MenuDisplays the list of applications (Control, Plan, etc.), andnavigates you to other project settings.
4 Third Level Menu Navigates to individual modules inside each application(e.g., Contract > Bid packages, Plan > Quantity tracking).Options in this menu are dependent upon the applicationyou are currently using.
5 BreadcrumbsShows what page you are currently on within theQuantity Tracking module and can be used to navigateback to the main components screen.
Overview – Quantity Tracking Home Page
InEight Inc. | Release 21.1 Page 27 of 112
Plan User Guide 2.1 Page Navigation
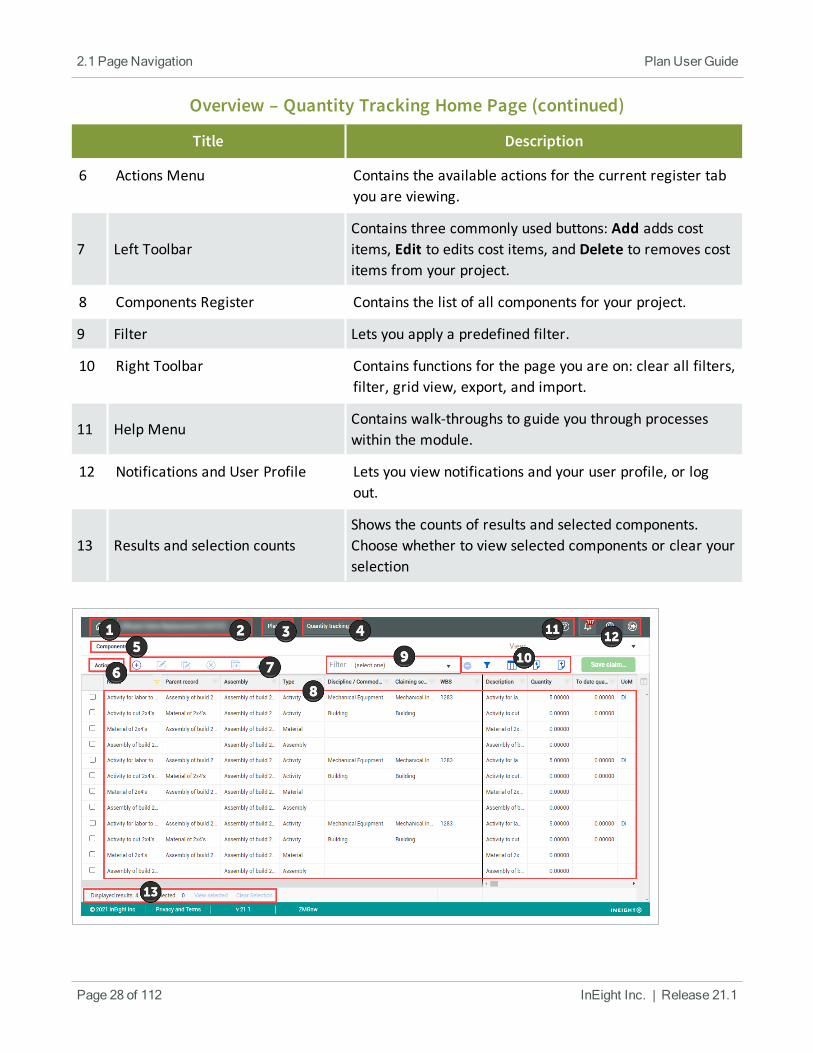
Title Description
6 Actions Menu Contains the available actions for the current register tabyou are viewing.
7 Left ToolbarContains three commonly used buttons: Add adds costitems, Edit to edits cost items, and Delete to removes costitems from your project.
8 Components Register Contains the list of all components for your project.
9 Filter Lets you apply a predefined filter.
10 Right Toolbar Contains functions for the page you are on: clear all filters,filter, grid view, export, and import.
11 Help MenuContains walk-throughs to guide you through processeswithin the module.
12 Notifications and User Profile Lets you view notifications and your user profile, or logout.
13 Results and selection countsShows the counts of results and selected components.Choose whether to view selected components or clear yourselection
Overview – Quantity Tracking Home Page (continued)
Page 28 of 112 InEight Inc. | Release 21.1
2.1 Page Navigation Plan User Guide
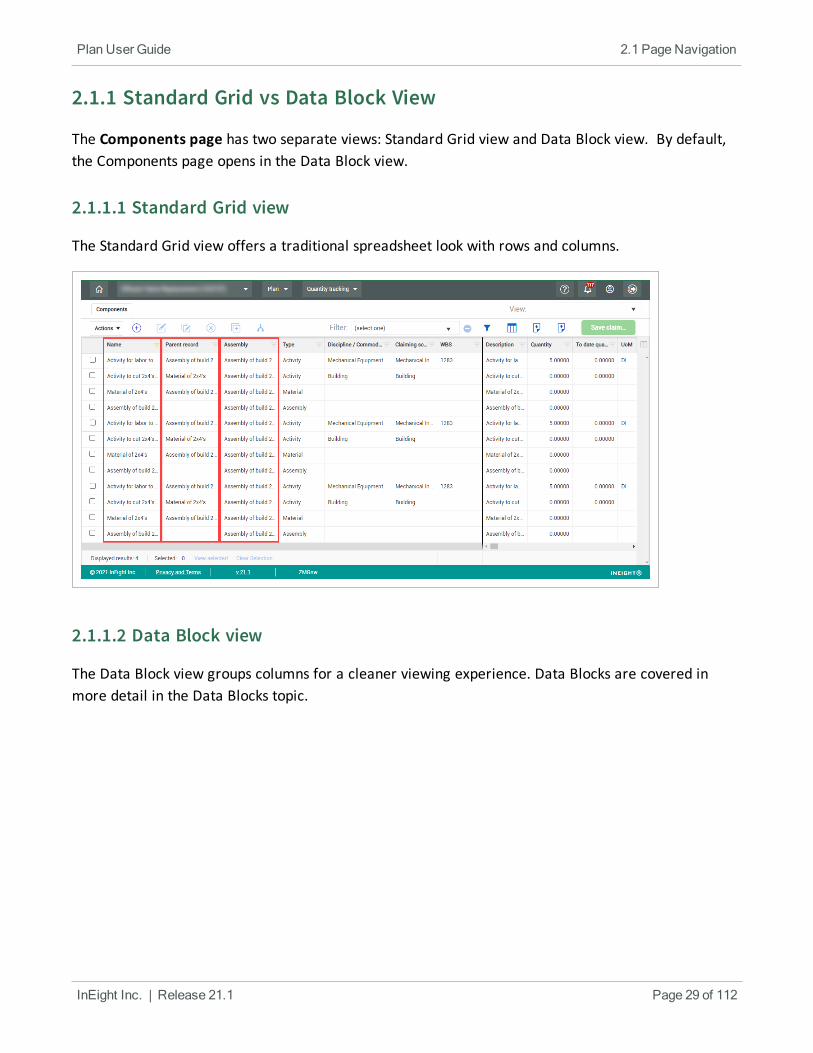
2.1.1 Standard Grid vs Data Block View
The Components page has two separate views: Standard Grid view and Data Block view. By default,the Components page opens in the Data Block view.
2.1.1.1 Standard Grid view
The Standard Grid view offers a traditional spreadsheet look with rows and columns.
2.1.1.2 Data Block view
The Data Block view groups columns for a cleaner viewing experience. Data Blocks are covered inmore detail in the Data Blocks topic.
InEight Inc. | Release 21.1 Page 29 of 112
Plan User Guide 2.1 Page Navigation
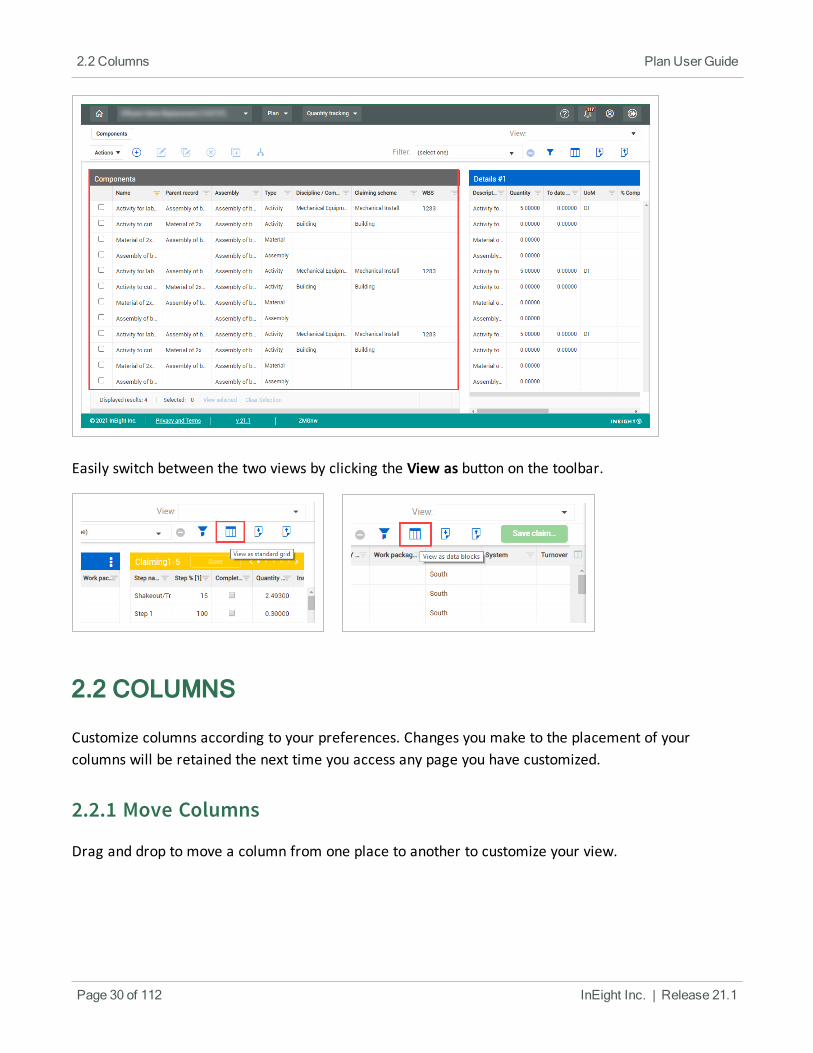
Easily switch between the two views by clicking the View as button on the toolbar.
xx
2.2 COLUMNS
Customize columns according to your preferences. Changes you make to the placement of yourcolumns will be retained the next time you access any page you have customized.
2.2.1 Move Columns
Drag and drop to move a column from one place to another to customize your view.
Page 30 of 112 InEight Inc. | Release 21.1
2.2 Columns Plan User Guide
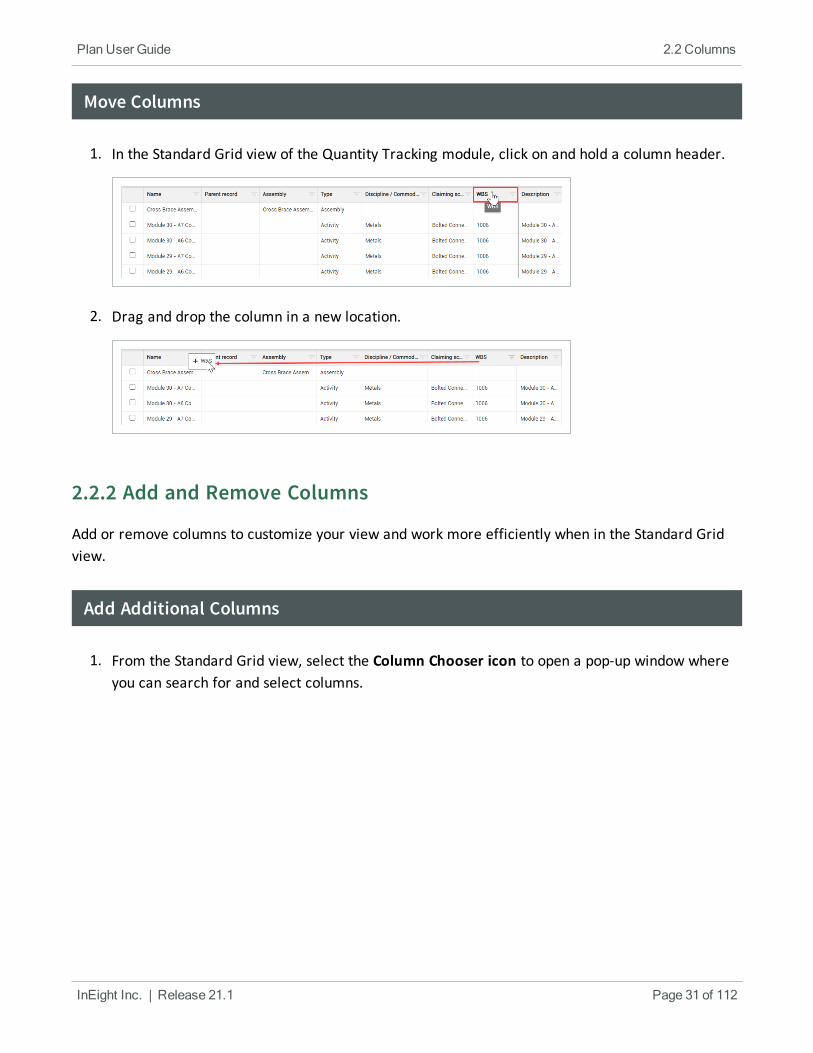
Move Columns
1. In the Standard Grid view of the Quantity Tracking module, click on and hold a column header.
2. Drag and drop the column in a new location.
2.2.2 Add and Remove Columns
Add or remove columns to customize your view and work more efficiently when in the Standard Gridview.
Add Additional Columns
1. From the Standard Grid view, select the Column Chooser icon to open a pop-up window whereyou can search for and select columns.
InEight Inc. | Release 21.1 Page 31 of 112
Plan User Guide 2.2 Columns
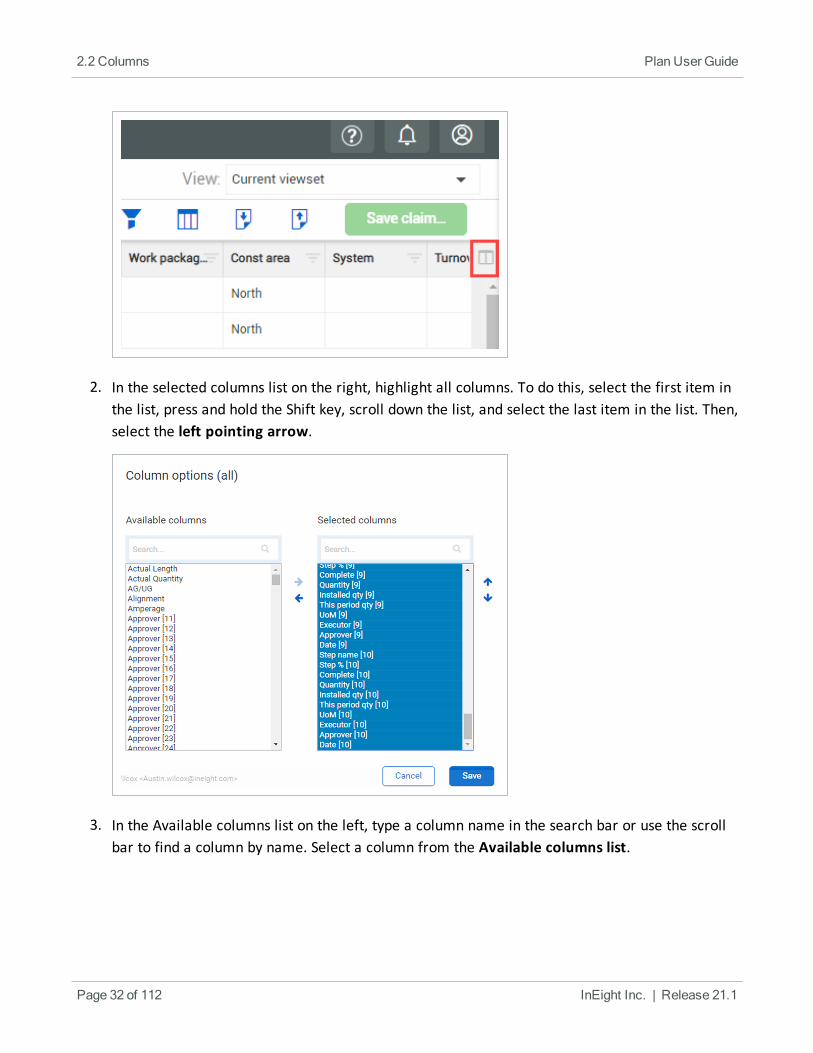
2. In the selected columns list on the right, highlight all columns. To do this, select the first item inthe list, press and hold the Shift key, scroll down the list, and select the last item in the list. Then,select the left pointing arrow.
3. In the Available columns list on the left, type a column name in the search bar or use the scrollbar to find a column by name. Select a column from the Available columns list.
Page 32 of 112 InEight Inc. | Release 21.1
2.2 Columns Plan User Guide
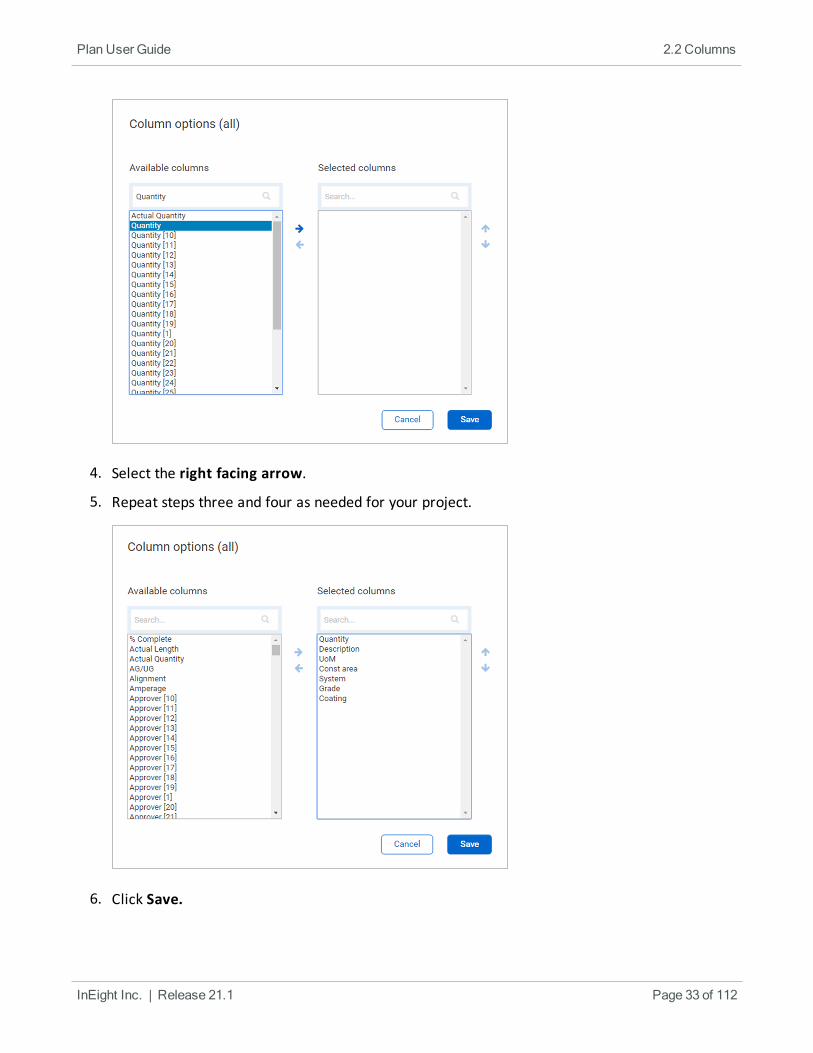
4. Select the right facing arrow.
5. Repeat steps three and four as needed for your project.
6. Click Save.
InEight Inc. | Release 21.1 Page 33 of 112
Plan User Guide 2.2 Columns
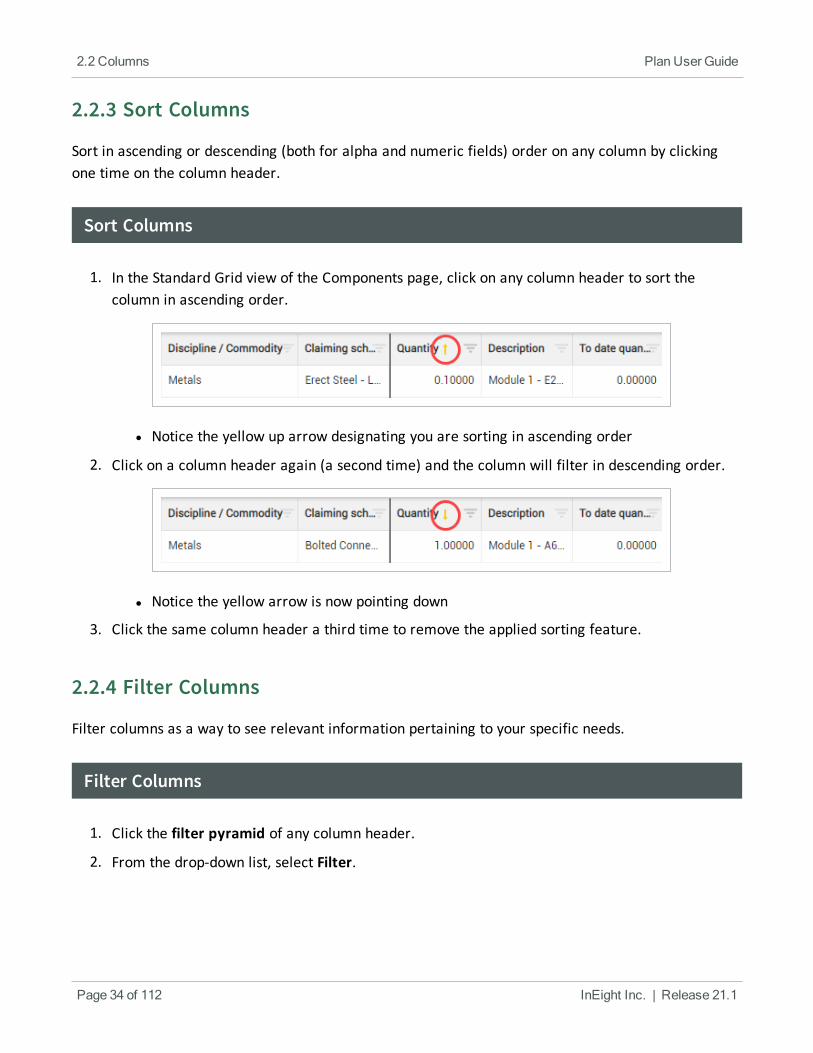
2.2.3 Sort Columns
Sort in ascending or descending (both for alpha and numeric fields) order on any column by clickingone time on the column header.
Sort Columns
1. In the Standard Grid view of the Components page, click on any column header to sort thecolumn in ascending order.
l Notice the yellow up arrow designating you are sorting in ascending order
2. Click on a column header again (a second time) and the column will filter in descending order.
l Notice the yellow arrow is now pointing down
3. Click the same column header a third time to remove the applied sorting feature.
2.2.4 Filter Columns
Filter columns as a way to see relevant information pertaining to your specific needs.
Filter Columns
1. Click the filter pyramid of any column header.
2. From the drop-down list, select Filter.
Page 34 of 112 InEight Inc. | Release 21.1
2.2 Columns Plan User Guide
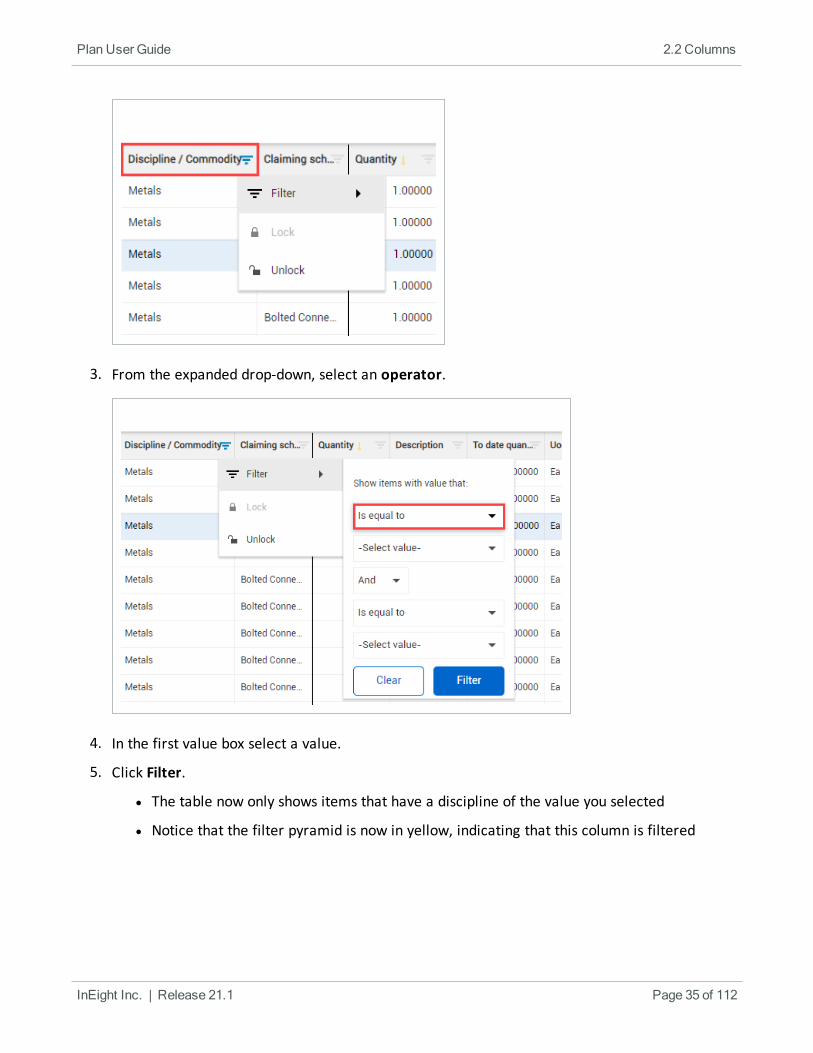
3. From the expanded drop-down, select an operator.
4. In the first value box select a value.
5. Click Filter.
l The table now only shows items that have a discipline of the value you selected
l Notice that the filter pyramid is now in yellow, indicating that this column is filtered
InEight Inc. | Release 21.1 Page 35 of 112
Plan User Guide 2.2 Columns
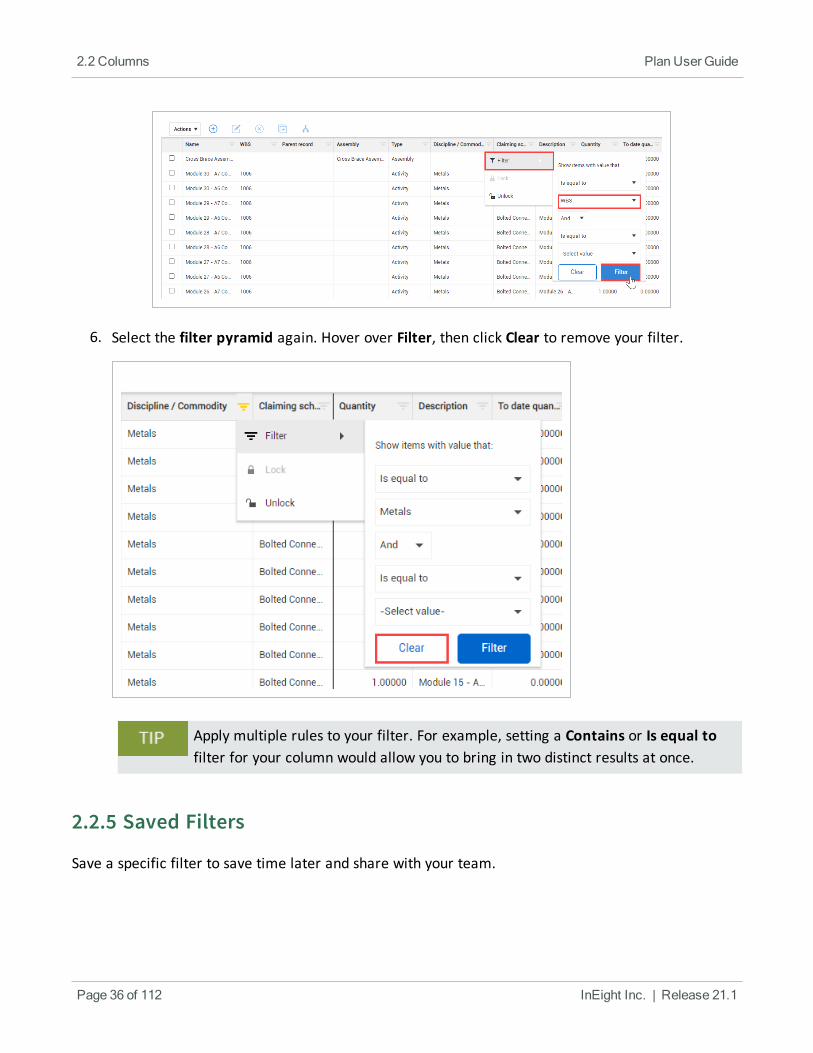
6. Select the filter pyramid again. Hover over Filter, then click Clear to remove your filter.
Apply multiple rules to your filter. For example, setting a Contains or Is equal tofilter for your column would allow you to bring in two distinct results at once.
2.2.5 Saved Filters
Save a specific filter to save time later and share with your team.
Page 36 of 112 InEight Inc. | Release 21.1
2.2 Columns Plan User Guide
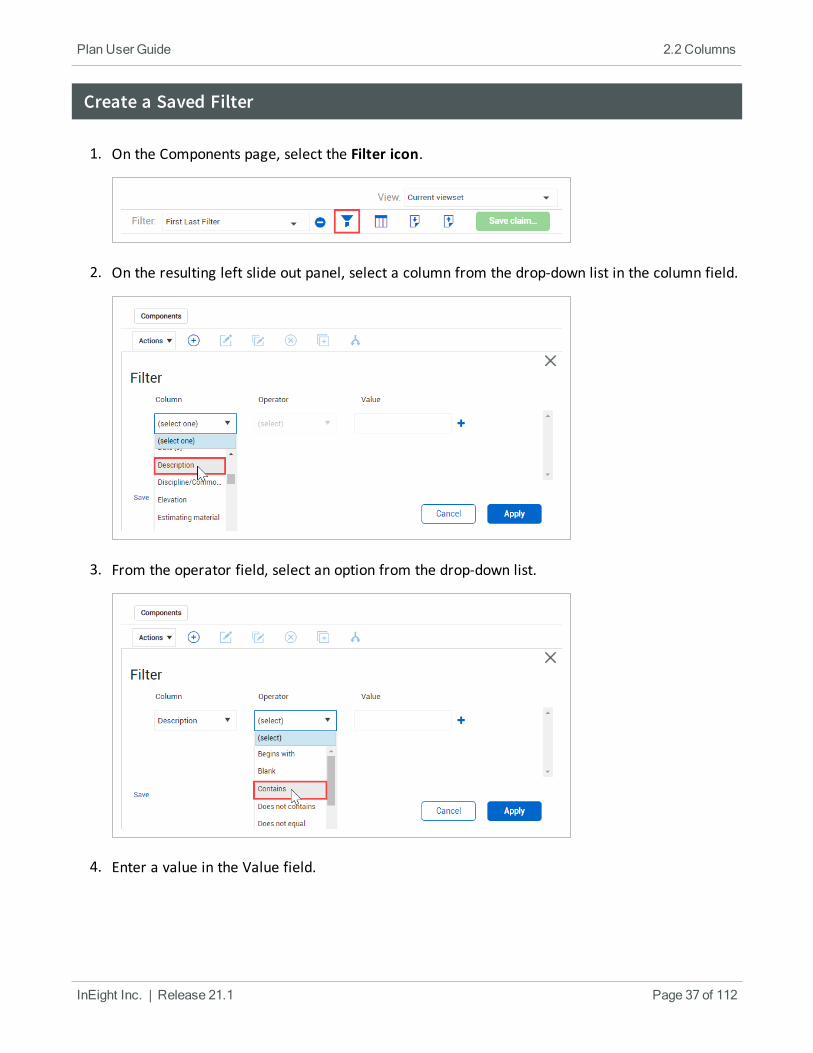
Create a Saved Filter
1. On the Components page, select the Filter icon.
2. On the resulting left slide out panel, select a column from the drop-down list in the column field.
3. From the operator field, select an option from the drop-down list.
4. Enter a value in the Value field.
InEight Inc. | Release 21.1 Page 37 of 112
Plan User Guide 2.2 Columns
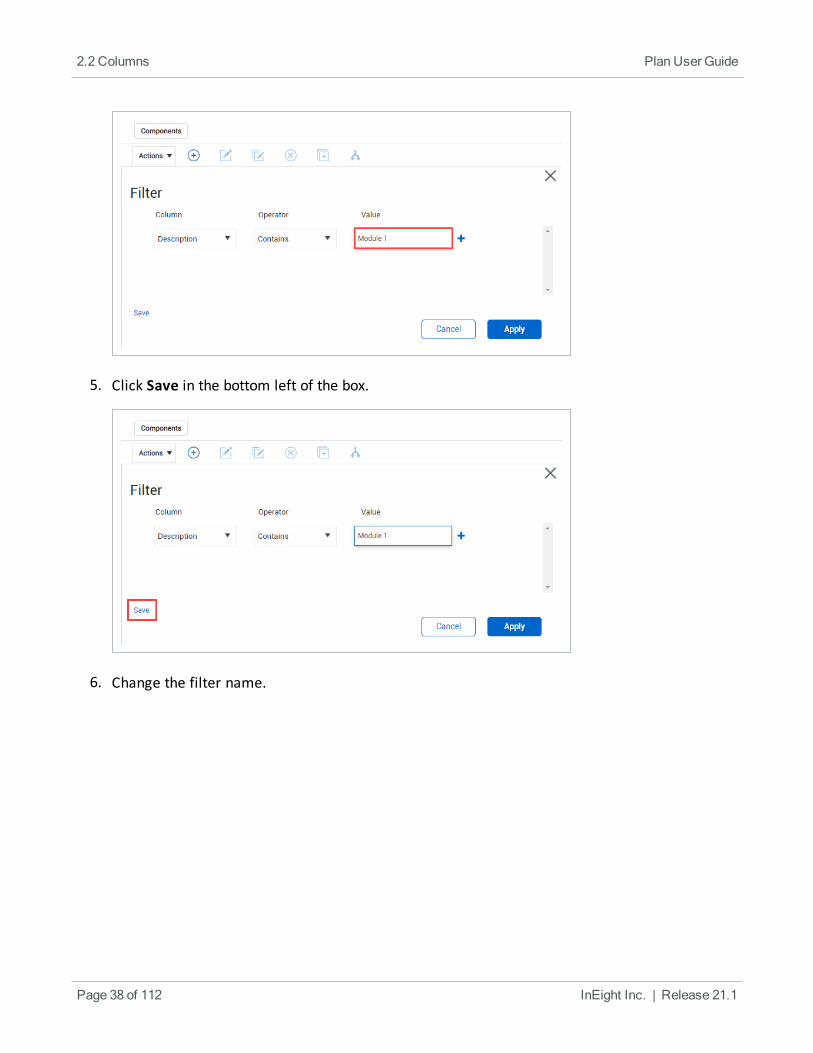
5. Click Save in the bottom left of the box.
6. Change the filter name.
Page 38 of 112 InEight Inc. | Release 21.1
2.2 Columns Plan User Guide
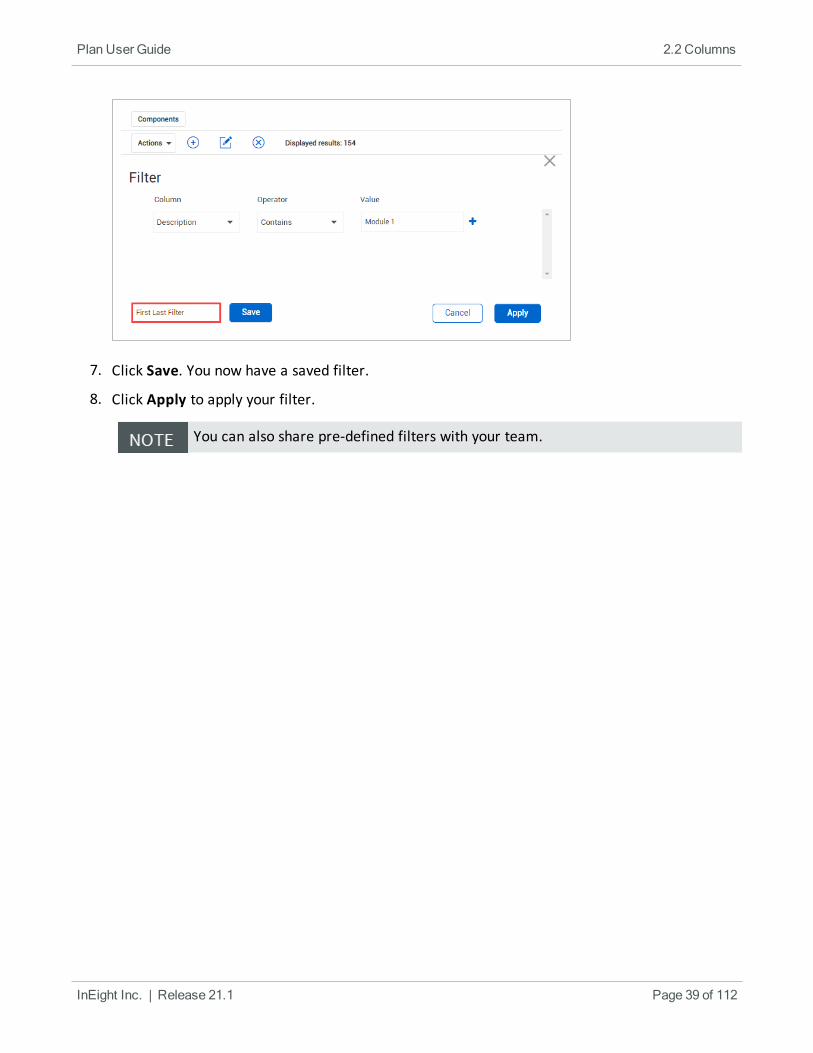
7. Click Save. You now have a saved filter.
8. Click Apply to apply your filter.
You can also share pre-defined filters with your team.
InEight Inc. | Release 21.1 Page 39 of 112
Plan User Guide 2.2 Columns
Exercise 2.1 — Saved Filters
In this exercise, you will practice creating saved filters from the Components page.
1. Find a discipline that you most identify with by using the Discipline column sort function.
2. Select the Filter icon and select two (2) parameters you think would help you performyour job.
3. Save and apply the filter.
Congratulations, you have completed this exercise!
Page 40 of 112 InEight Inc. | Release 21.1
Exercise 2.1 — Saved Filters Plan User Guide
2.3 VIEWSETS
Once you have all columns organized, you can create a saved view of your page so that you can alwaysrevert back to it. This saved view is called a viewset.
Create a Viewset
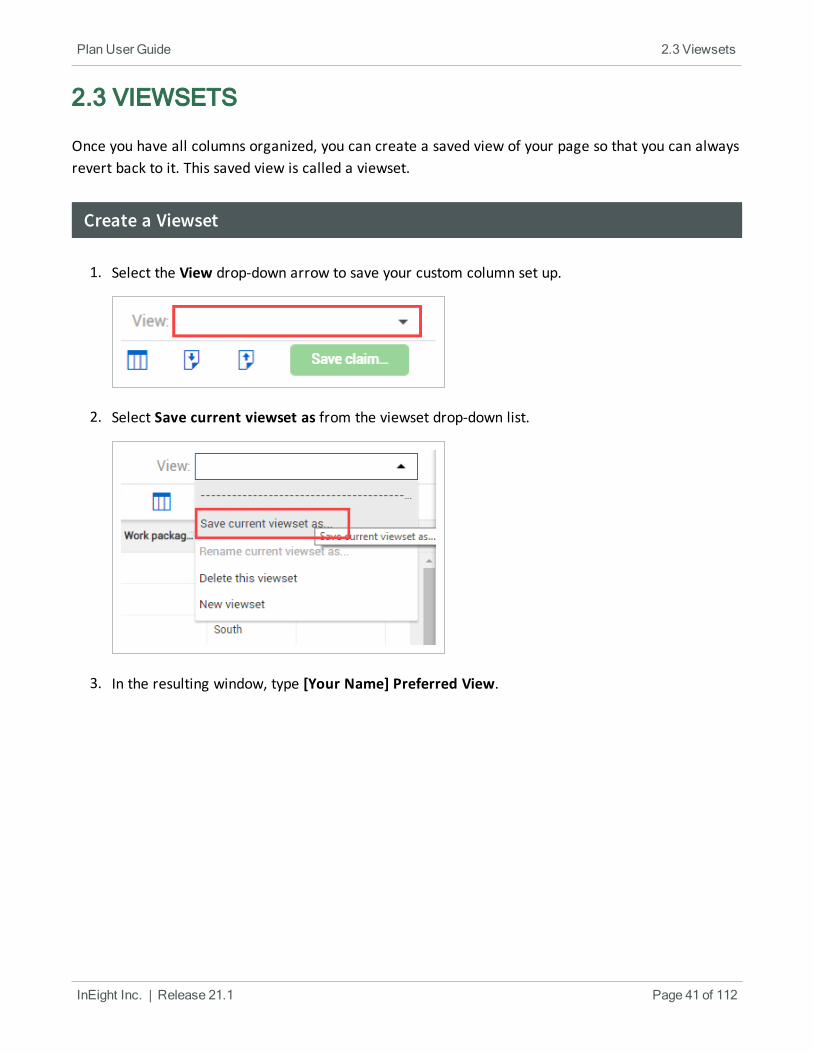
1. Select the View drop-down arrow to save your custom column set up.
2. Select Save current viewset as from the viewset drop-down list.
3. In the resulting window, type [Your Name] Preferred View.
InEight Inc. | Release 21.1 Page 41 of 112
Plan User Guide 2.3 Viewsets
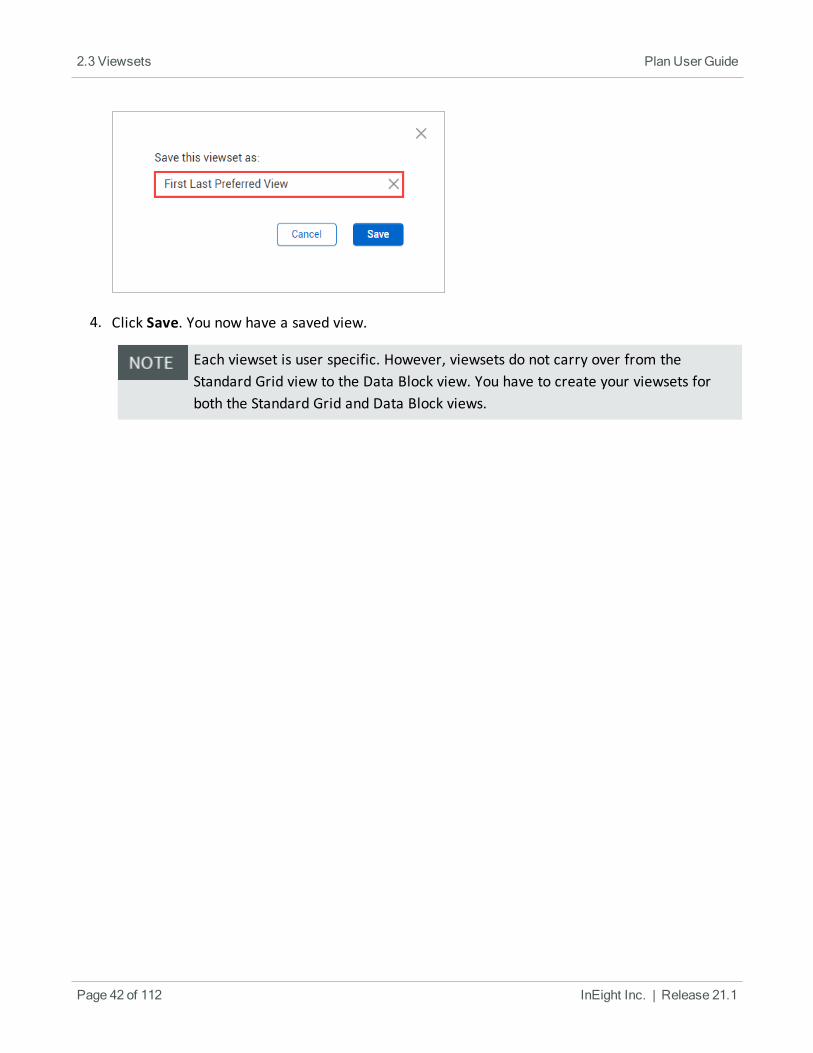
4. Click Save. You now have a saved view.
Each viewset is user specific. However, viewsets do not carry over from theStandard Grid view to the Data Block view. You have to create your viewsets forboth the Standard Grid and Data Block views.
Page 42 of 112 InEight Inc. | Release 21.1
2.3 Viewsets Plan User Guide

Exercise 2.2 — Create a Viewset
Now that you have learned some of the basics of navigating in InEight Plan, from the Componentspage, in the Standard Grid view, create a components viewset that you would use.
1. Bring in any columns you find useful or relevant.
2. Apply filters to your data if desired.
3. Save the viewset.
Congratulations, you have completed this exercise!
InEight Inc. | Release 21.1 Page 43 of 112
Plan User Guide Exercise 2.2 — Create a Viewset
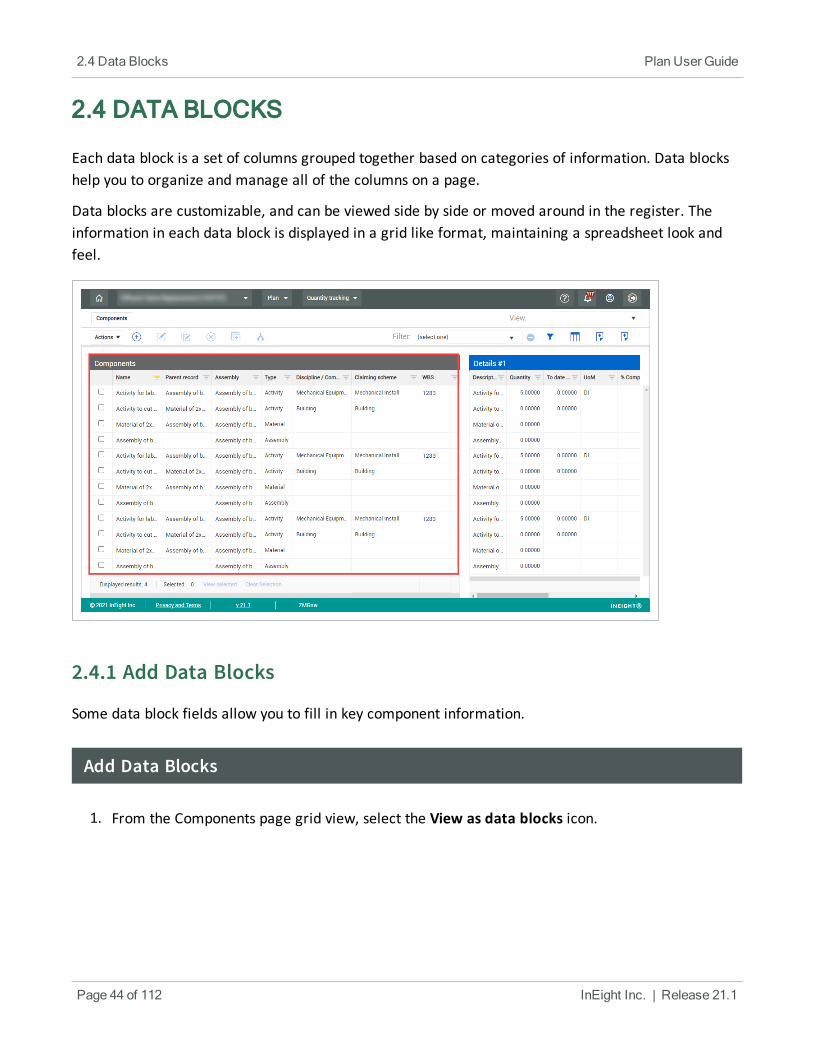
2.4 DATA BLOCKS
Each data block is a set of columns grouped together based on categories of information. Data blockshelp you to organize and manage all of the columns on a page.
Data blocks are customizable, and can be viewed side by side or moved around in the register. Theinformation in each data block is displayed in a grid like format, maintaining a spreadsheet look andfeel.
2.4.1 Add Data Blocks
Some data block fields allow you to fill in key component information.
Add Data Blocks
1. From the Components page grid view, select the View as data blocks icon.
Page 44 of 112 InEight Inc. | Release 21.1
2.4 Data Blocks Plan User Guide
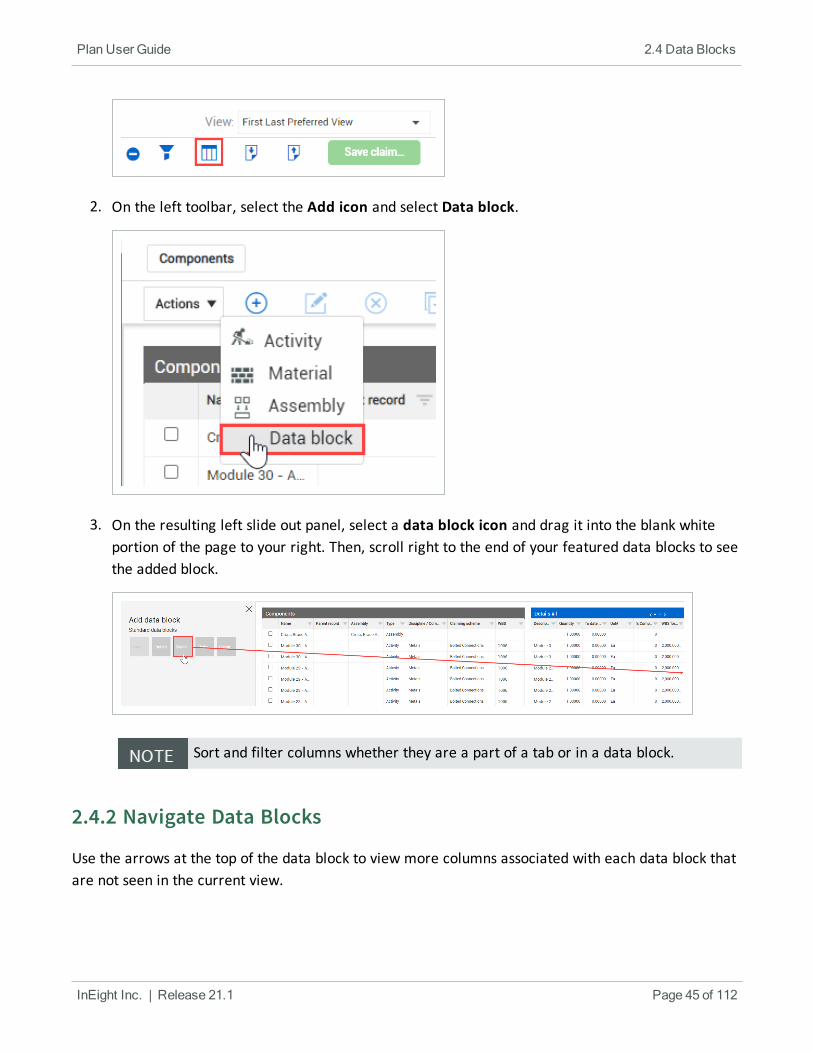
2. On the left toolbar, select the Add icon and select Data block.
3. On the resulting left slide out panel, select a data block icon and drag it into the blank whiteportion of the page to your right. Then, scroll right to the end of your featured data blocks to seethe added block.
Sort and filter columns whether they are a part of a tab or in a data block.
2.4.2 Navigate Data Blocks
Use the arrows at the top of the data block to view more columns associated with each data block thatare not seen in the current view.
InEight Inc. | Release 21.1 Page 45 of 112
Plan User Guide 2.4 Data Blocks
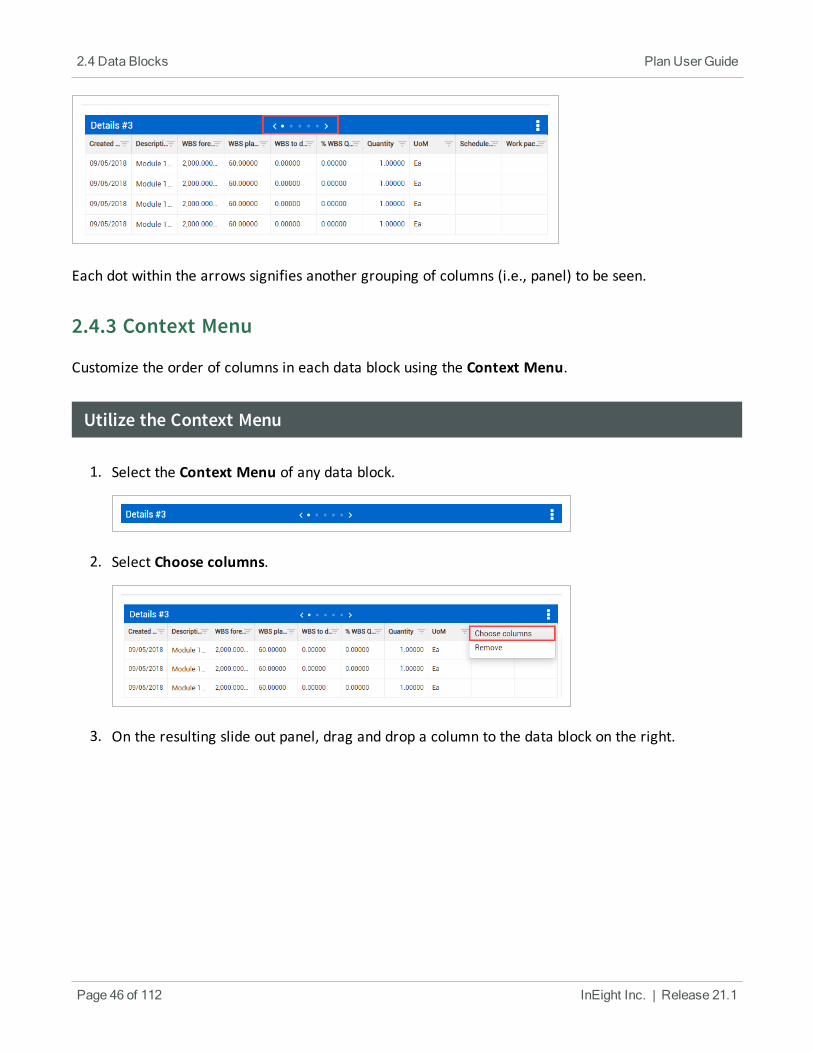
Each dot within the arrows signifies another grouping of columns (i.e., panel) to be seen.
2.4.3 Context Menu
Customize the order of columns in each data block using the Context Menu.
Utilize the Context Menu
1. Select the Context Menu of any data block.
2. Select Choose columns.
3. On the resulting slide out panel, drag and drop a column to the data block on the right.
Page 46 of 112 InEight Inc. | Release 21.1
2.4 Data Blocks Plan User Guide
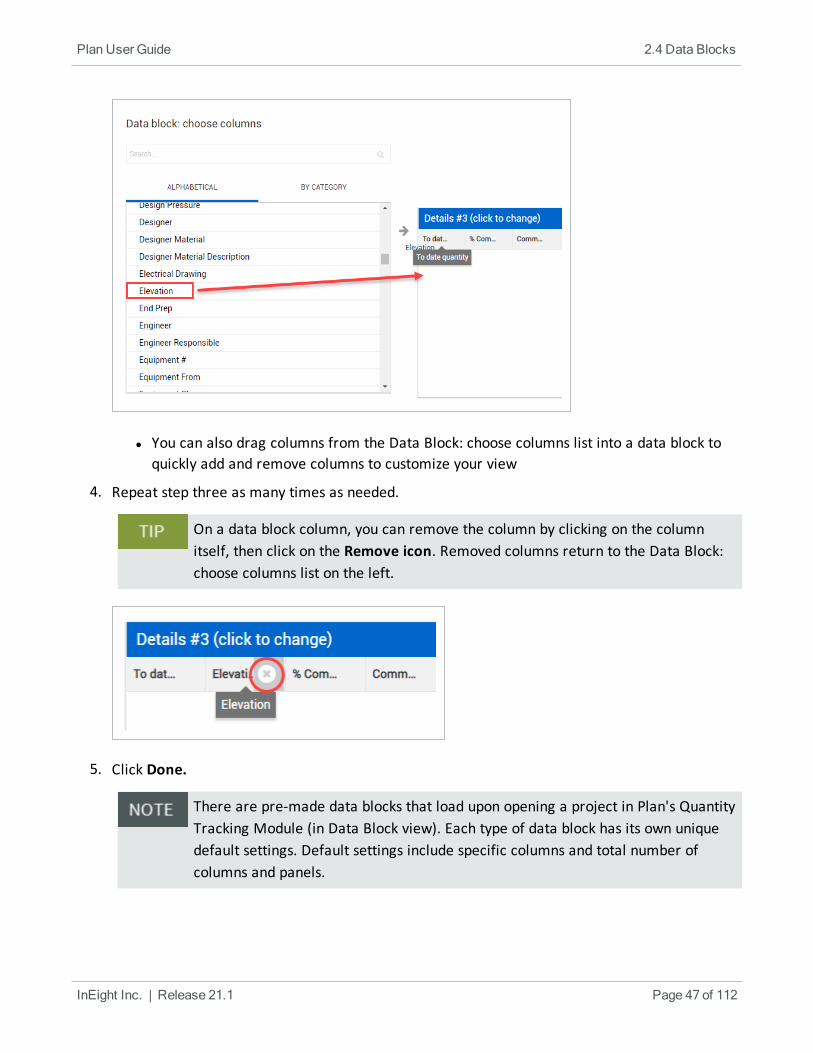
l You can also drag columns from the Data Block: choose columns list into a data block toquickly add and remove columns to customize your view
4. Repeat step three as many times as needed.
On a data block column, you can remove the column by clicking on the columnitself, then click on the Remove icon. Removed columns return to the Data Block:choose columns list on the left.
5. Click Done.
There are pre-made data blocks that load upon opening a project in Plan's QuantityTracking Module (in Data Block view). Each type of data block has its own uniquedefault settings. Default settings include specific columns and total number ofcolumns and panels.
InEight Inc. | Release 21.1 Page 47 of 112
Plan User Guide 2.4 Data Blocks
Lesson 2 Review
1. Which option below indicates your open project?
a. First level menu
b. Third level menu
c. Left toolbar
d. Profile
2. On the Components page, you can add, edit, or delete components from the:
a. Breadcrumbs
b. Left toolbar
c. Viewset menu
d. Actions menu
3. What can you do to your columns to better align them with how you want to view a page?
a. Move them
b. Add/Remove them
c. Sort/Filter them
d. All of the above
4. Viewsets can be used from plan to plan, but do not carry over from the Standard Gridview to the Data Block view.
a. True
b. False
5. Which icon would you select to toggle between Standard Grid and Data Block view?a.
b.
c.
d.
Page 48 of 112 InEight Inc. | Release 21.1
Lesson 2 Review Plan User Guide
Lesson 2 Summary
As a result of this lesson, you can:
l Navigate the Plan > Quantity tracking page
l Manage columns
l Create viewsets
l Manage data blocks
InEight Inc. | Release 21.1 Page 49 of 112
Plan User Guide Lesson 2 Summary

Page 50 of 112 InEight Inc. | Release 21.1
This page intentionally left blank.
Lesson 2 Summary Plan User Guide
InEight Inc. | Release 21.1 Page 51 of 112
LESSON 3 — CLAIMING SCHEMES
Lesson Duration: 30 minutes
Lesson Objectives
After completing this lesson, you will be able to:
l Explain what a claiming scheme is
l Create a claiming scheme
l Manage claiming schemes
Lesson Topics
3.1 What is a Claiming Scheme? 523.1.1 What is the purpose? 523.1.2 Setting up a Claiming Scheme 533.1.3 Claiming Scheme Solutions 553.1.4 Account Code Assignment 55
3.2 Claiming Scheme Creation 563.2.1 Import and Export 61
Exercise 3.1 — Claiming Scheme 633.3 Claiming Scheme Management 64
3.3.1 Assigning Claiming Schemes 643.3.2 Edit Claiming Schemes 69
Lesson 3 Review 72Lesson 3 Summary 73
3.1 WHAT IS A CLAIMING SCHEME?
A claiming scheme is a formula used to record partial progress of installed quantities. The installationsequence is broken down by steps or milestones and assigned a completion percentage based on thelevel of effort to complete each step. This allows you to progressively track progress as phases ofconstruction are completed on a daily or weekly basis.
Scenario
Imagine you are a field engineer responsible for tracking completion progress for the installationof structural steel for your assigned module. Work includes shaking out and transporting steel tothe work area, erecting and bolting up steel members and final torqueing of bolts to the requiredspecification. These steps happen over a period of time, and you need to report percent completeas work is performed. Predefined claiming schemes help you accomplish this without having towait until the very end when all steps are complete.
Why would you not want to wait until all work steps are complete to claim an activity?
The answer: Delayed reporting of progress can hide issues and cause more impactful schedule andbudget concerns if gone unnoticed. Short interval claiming via claiming schemes provides up-to-datereporting at all times.
3.1.1 What is the purpose?
Quantity tracking/claiming is the backbone for accurate cost reporting. Completed quantities driveyour earned budget, overall percent complete, and forecasted cost at completion. It is imperative tohave accurate completion percentages at short intervals (daily or weekly) to quickly recognize negativetrends and react in a timely manner. Claiming schemes are designed to methodically claim portions ofwork that are completed within shorter intervals than the overall scope of work.
For example, referring to the scenario above:
You can predefine the percent complete of each step required to complete the structural steelinstallation, including final quality verification.
l Step 1: Shake out / Transport
l Step 2: Erect / Bolt up
Page 52 of 112 InEight Inc. | Release 21.1
3.1What is a Claiming Scheme? Plan User Guide
l Step 3: Final Torque
l Step 4: Quality Verification
The percent complete assigned to each step should be based on the level of effort required tocomplete that step.
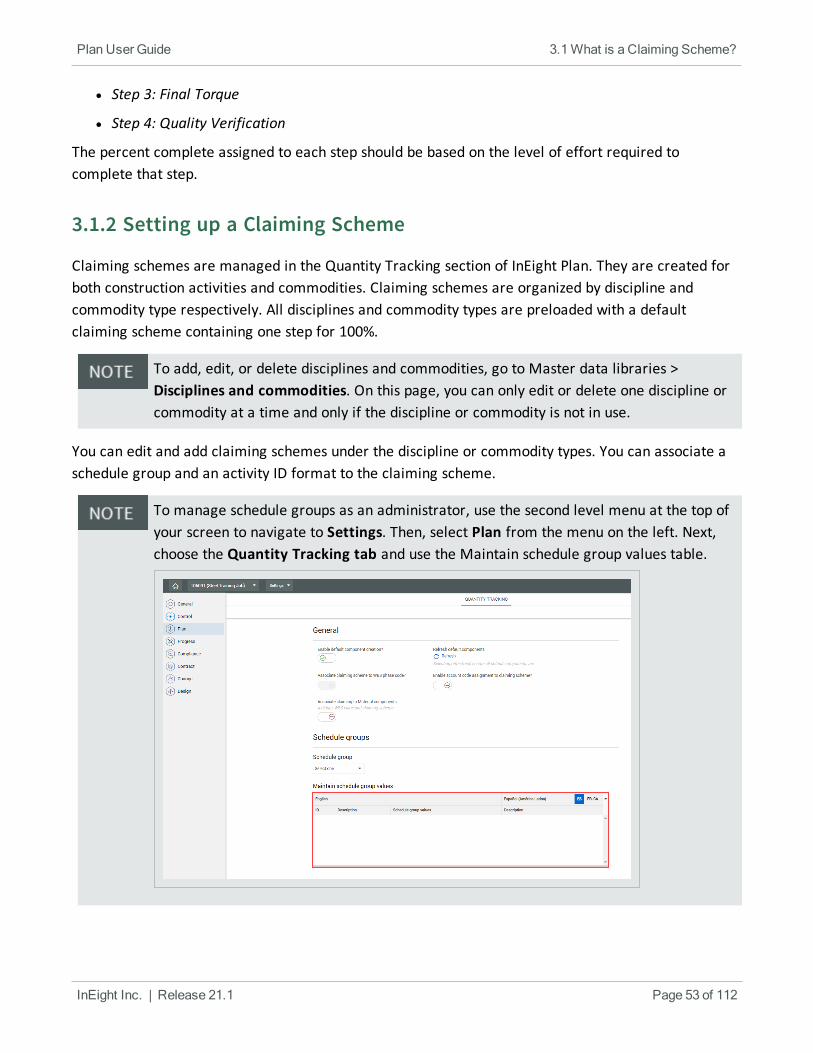
3.1.2 Setting up a Claiming Scheme
Claiming schemes are managed in the Quantity Tracking section of InEight Plan. They are created forboth construction activities and commodities. Claiming schemes are organized by discipline andcommodity type respectively. All disciplines and commodity types are preloaded with a defaultclaiming scheme containing one step for 100%.
To add, edit, or delete disciplines and commodities, go to Master data libraries >Disciplines and commodities. On this page, you can only edit or delete one discipline orcommodity at a time and only if the discipline or commodity is not in use.
You can edit and add claiming schemes under the discipline or commodity types. You can associate aschedule group and an activity ID format to the claiming scheme.
To manage schedule groups as an administrator, use the second level menu at the top ofyour screen to navigate to Settings. Then, select Plan from the menu on the left. Next,choose the Quantity Tracking tab and use the Maintain schedule group values table.
InEight Inc. | Release 21.1 Page 53 of 112
Plan User Guide 3.1What is a Claiming Scheme?
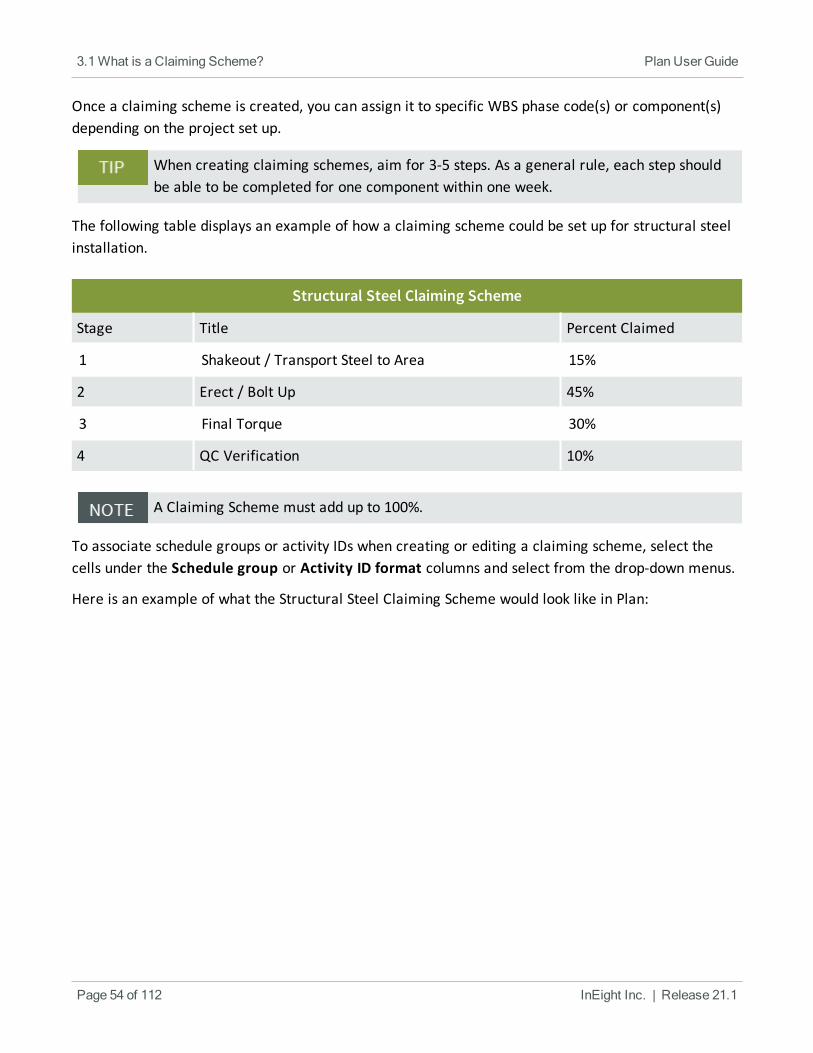
Once a claiming scheme is created, you can assign it to specific WBS phase code(s) or component(s)depending on the project set up.
When creating claiming schemes, aim for 3-5 steps. As a general rule, each step shouldbe able to be completed for one component within one week.
The following table displays an example of how a claiming scheme could be set up for structural steelinstallation.
Structural Steel Claiming Scheme
Stage Title Percent Claimed
1 Shakeout / Transport Steel to Area 15%
2 Erect / Bolt Up 45%
3 Final Torque 30%
4 QC Verification 10%
A Claiming Scheme must add up to 100%.
To associate schedule groups or activity IDs when creating or editing a claiming scheme, select thecells under the Schedule group or Activity ID format columns and select from the drop-down menus.
Here is an example of what the Structural Steel Claiming Scheme would look like in Plan:
Page 54 of 112 InEight Inc. | Release 21.1
3.1What is a Claiming Scheme? Plan User Guide
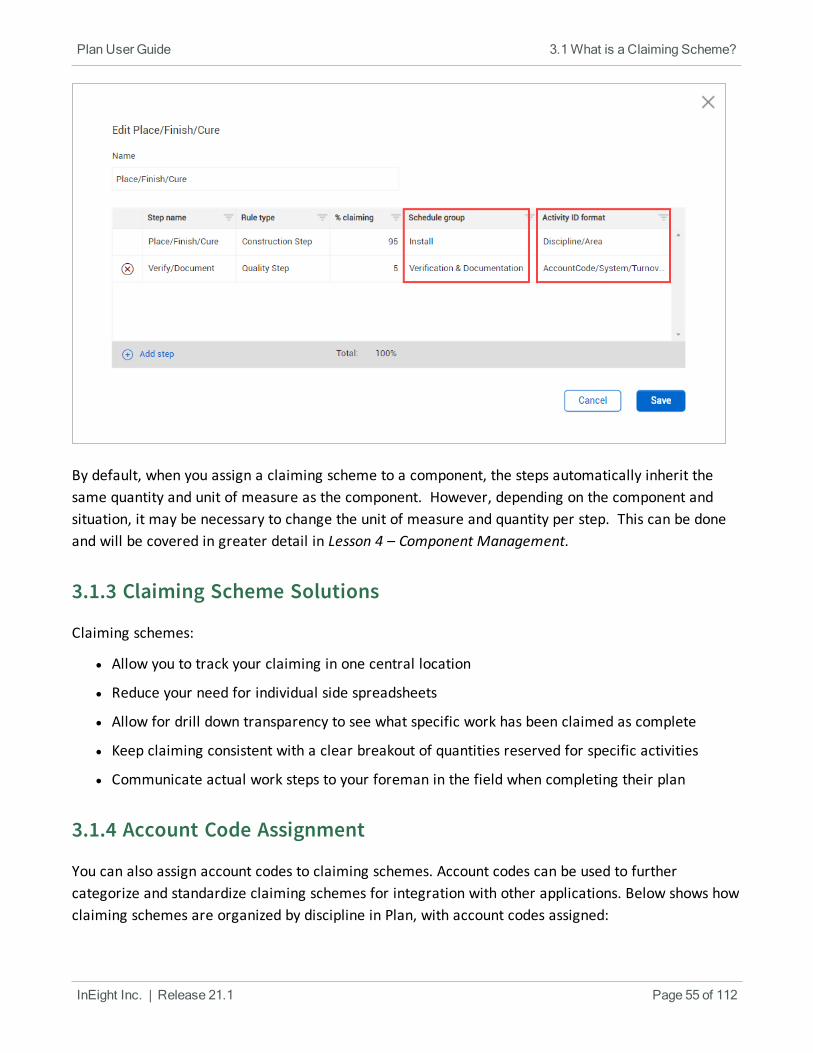
By default, when you assign a claiming scheme to a component, the steps automatically inherit thesame quantity and unit of measure as the component. However, depending on the component andsituation, it may be necessary to change the unit of measure and quantity per step. This can be doneand will be covered in greater detail in Lesson 4 – Component Management.
3.1.3 Claiming Scheme Solutions
Claiming schemes:
l Allow you to track your claiming in one central location
l Reduce your need for individual side spreadsheets
l Allow for drill down transparency to see what specific work has been claimed as complete
l Keep claiming consistent with a clear breakout of quantities reserved for specific activities
l Communicate actual work steps to your foreman in the field when completing their plan
3.1.4 Account Code Assignment
You can also assign account codes to claiming schemes. Account codes can be used to furthercategorize and standardize claiming schemes for integration with other applications. Below shows howclaiming schemes are organized by discipline in Plan, with account codes assigned:
InEight Inc. | Release 21.1 Page 55 of 112
Plan User Guide 3.1What is a Claiming Scheme?
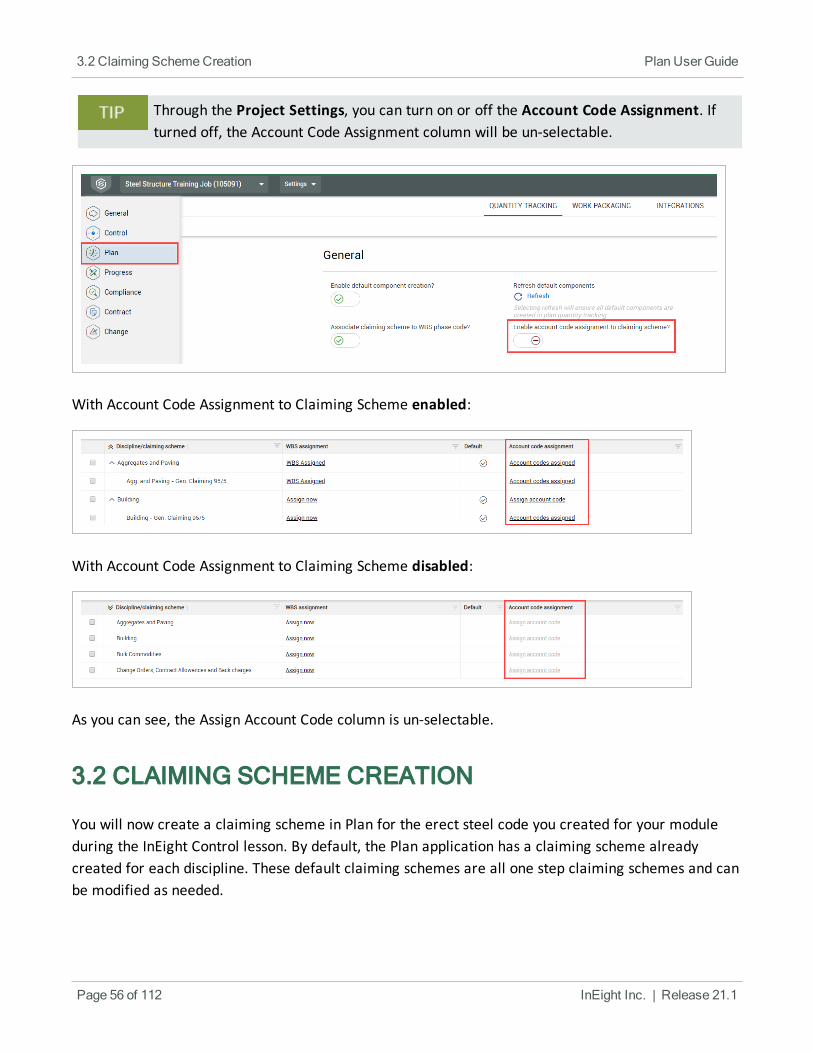
Through the Project Settings, you can turn on or off the Account Code Assignment. Ifturned off, the Account Code Assignment column will be un-selectable.
With Account Code Assignment to Claiming Scheme enabled:
With Account Code Assignment to Claiming Scheme disabled:
As you can see, the Assign Account Code column is un-selectable.
3.2 CLAIMING SCHEME CREATION
You will now create a claiming scheme in Plan for the erect steel code you created for your moduleduring the InEight Control lesson. By default, the Plan application has a claiming scheme alreadycreated for each discipline. These default claiming schemes are all one step claiming schemes and canbe modified as needed.
Page 56 of 112 InEight Inc. | Release 21.1
3.2 Claiming SchemeCreation Plan User Guide
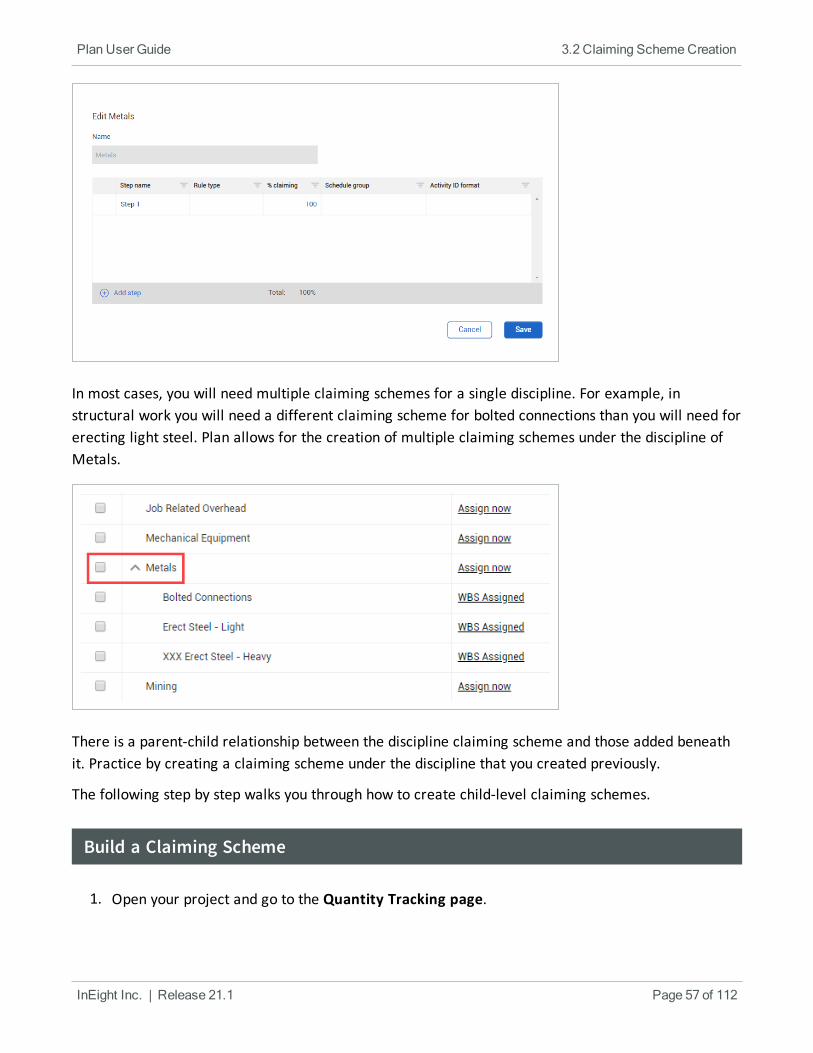
In most cases, you will need multiple claiming schemes for a single discipline. For example, instructural work you will need a different claiming scheme for bolted connections than you will need forerecting light steel. Plan allows for the creation of multiple claiming schemes under the discipline ofMetals.
There is a parent-child relationship between the discipline claiming scheme and those added beneathit. Practice by creating a claiming scheme under the discipline that you created previously.
The following step by step walks you through how to create child-level claiming schemes.
Build a Claiming Scheme
1. Open your project and go to the Quantity Tracking page.
InEight Inc. | Release 21.1 Page 57 of 112
Plan User Guide 3.2 Claiming SchemeCreation
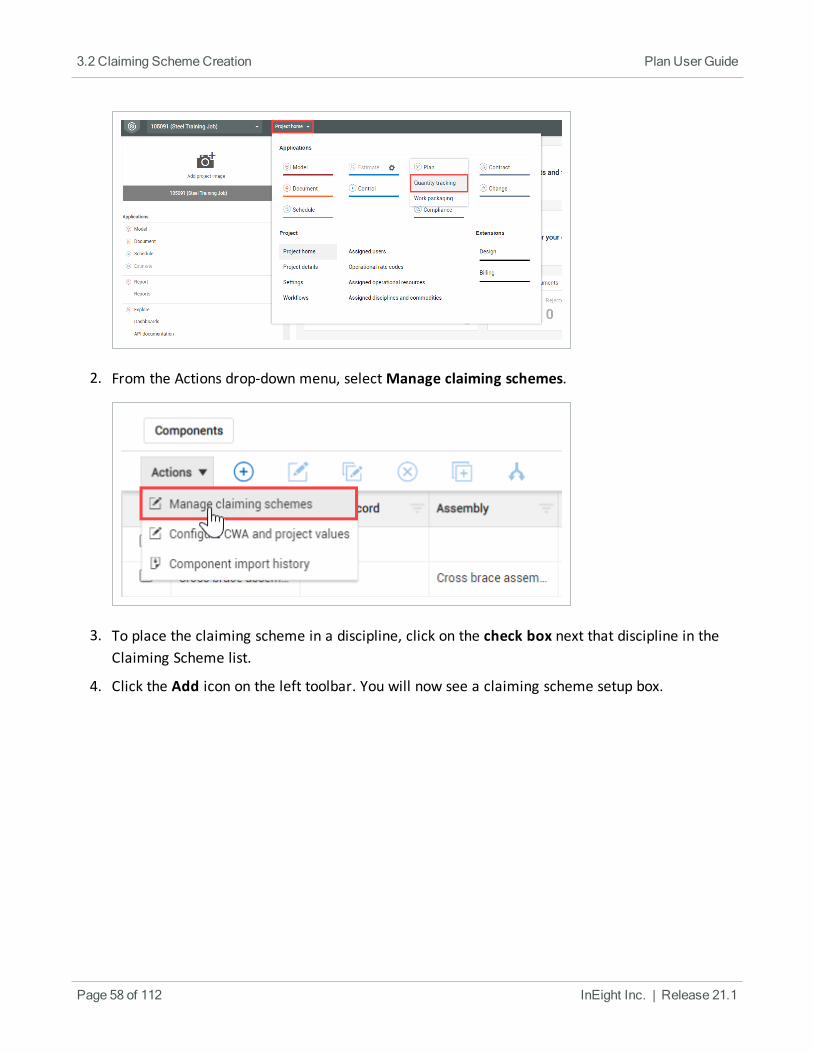
2. From the Actions drop-down menu, selectManage claiming schemes.
3. To place the claiming scheme in a discipline, click on the check box next that discipline in theClaiming Scheme list.
4. Click the Add icon on the left toolbar. You will now see a claiming scheme setup box.
Page 58 of 112 InEight Inc. | Release 21.1
3.2 Claiming SchemeCreation Plan User Guide
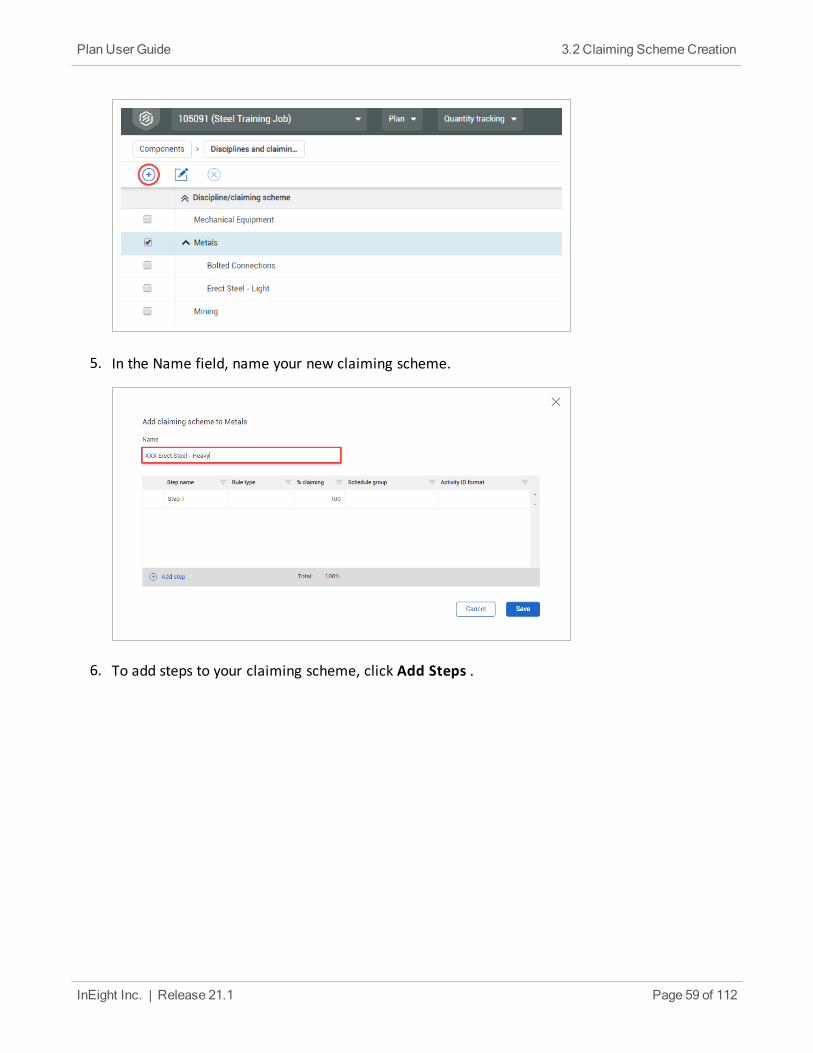
5. In the Name field, name your new claiming scheme.
6. To add steps to your claiming scheme, click Add Steps .
InEight Inc. | Release 21.1 Page 59 of 112
Plan User Guide 3.2 Claiming SchemeCreation
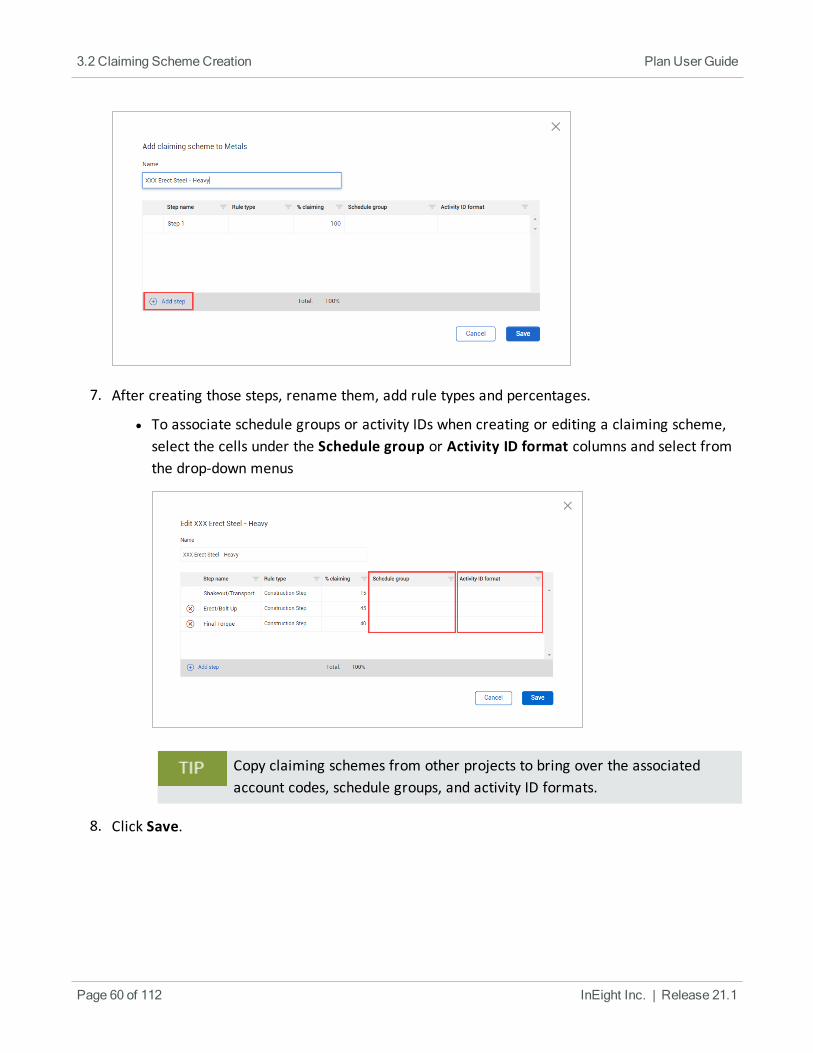
7. After creating those steps, rename them, add rule types and percentages.
l To associate schedule groups or activity IDs when creating or editing a claiming scheme,select the cells under the Schedule group or Activity ID format columns and select fromthe drop-down menus
Copy claiming schemes from other projects to bring over the associatedaccount codes, schedule groups, and activity ID formats.
8. Click Save.
Page 60 of 112 InEight Inc. | Release 21.1
3.2 Claiming SchemeCreation Plan User Guide
3.2.1 Import and Export
You can import and export claiming schemes between projects by using the Import and Export icons inthe top right of the page.
The following Step by Step shows you how to import claiming schemes from another project.
Import Claiming Schemes
1. In the top right of the Disciplines and claiming schemes page, click the Import icon.
l The Select a project to import claiming schemes dialog box is shown
2. Select a project from the list.
You can search for a project using the Search bar in the top right.
You can only import claiming schemes from one project at a time.
3. Click Select.
All of the project's claiming schemes are imported into your project.
There are two methods to export claiming schemes:
l Export all of the current project's claiming schemes to another project.
l Select specific claiming schemes and then export only those schemes.
The following Step by Step shows you how to export specific claiming schemes to another project.
Export Claiming Schemes
1. On the Disciplines and claiming schemes page, select the check boxes next to the claimingschemes you want to export.
2. Click the Export icon in the top right of the page.
l The Claiming scheme project export dialog box is shown
3. Select a project from the list.
InEight Inc. | Release 21.1 Page 61 of 112
Plan User Guide 3.2 Claiming SchemeCreation
You can search for a project using the Search bar in the top right.
You can only export claiming schemes to one project at a time.
4. Under Claiming schemes to send, choose Selected claiming schemes.
If you choose All active claiming schemes, your selections are ignored and allschemes are exported.
5. Click Send.
The selected claiming schemes are exported to the target project.
Page 62 of 112 InEight Inc. | Release 21.1
3.2 Claiming SchemeCreation Plan User Guide
Exercise 3.1 — Claiming Scheme
Now that you have learned about claiming schemes and how to create them, you will complete anexercise to test your knowledge.
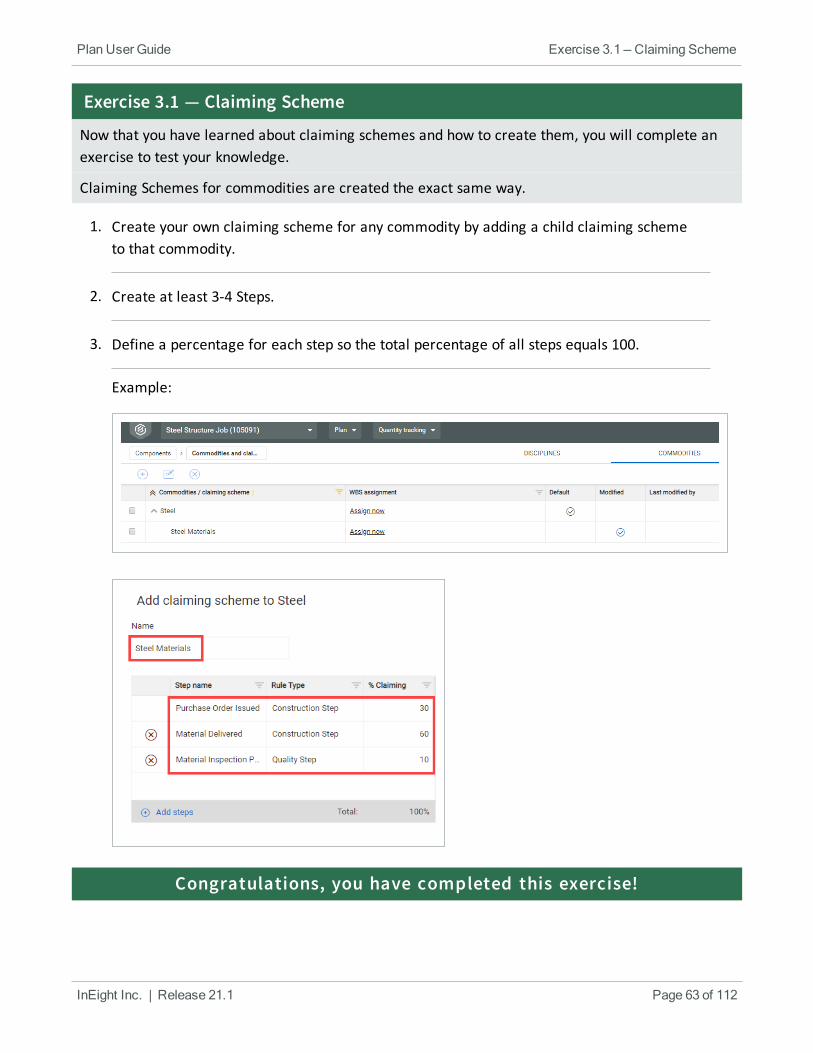
Claiming Schemes for commodities are created the exact same way.
1. Create your own claiming scheme for any commodity by adding a child claiming schemeto that commodity.
2. Create at least 3-4 Steps.
3. Define a percentage for each step so the total percentage of all steps equals 100.
Example:
Congratulations, you have completed this exercise!
InEight Inc. | Release 21.1 Page 63 of 112
Plan User Guide Exercise 3.1 — Claiming Scheme

3.3 CLAIMING SCHEME MANAGEMENT
3.3.1 Assigning Claiming Schemes
Once you create a claiming scheme and it is ready to be used, the next step is to assign that claimingscheme. You can assign claiming schemes in two different ways:
l Option 1: Assign to WBS cost items
l Option 2: Assign to each component
To assign claiming schemes at the component level, you must assign them to each componentindividually. If you assign a claiming scheme at the WBS level, then every component assigned to thatWBS will inherit the same claiming scheme.
To change at the level at which your claiming schemes are assigned, navigate to theProject Settings.
Page 64 of 112 InEight Inc. | Release 21.1
3.3 Claiming SchemeManagement Plan User Guide

When choosing to assign claiming schemes at a WBS level you must have a claimingscheme assigned to a WBS before you can add components with that WBS. If you chooseto assign claiming schemes at a component level, you will not be able to assign any to aWBS.
The following step by step walks you through how to assign a WBS item to a claiming scheme.
Assign a WBS to a Claiming Scheme
In order to be able to assign a WBS to a claiming scheme, the Allow As-Built setting forthat WBS line item in Control should either be “All” or “Quantities." This makes that WBSavailable for Plan.
1. From the Quantity Tracking page, select the Actions menu and choose Manage claimingschemes from the drop-down list.
InEight Inc. | Release 21.1 Page 65 of 112
Plan User Guide 3.3 Claiming SchemeManagement
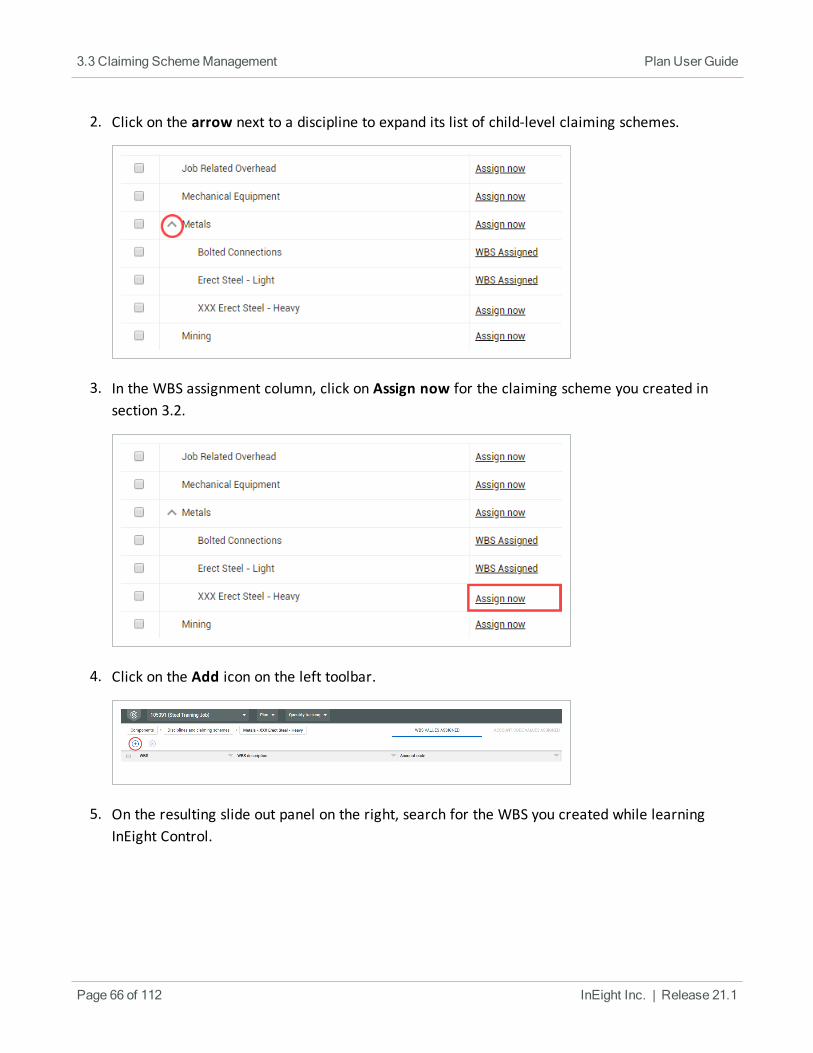
2. Click on the arrow next to a discipline to expand its list of child-level claiming schemes.
3. In the WBS assignment column, click on Assign now for the claiming scheme you created insection 3.2.
4. Click on the Add icon on the left toolbar.
5. On the resulting slide out panel on the right, search for the WBS you created while learningInEight Control.
Page 66 of 112 InEight Inc. | Release 21.1
3.3 Claiming SchemeManagement Plan User Guide
If you can’t find your WBS use WBS 1004 to follow along with the Steel Training Jobscenario.
6. When the WBS appears, click on the Add icon on the left.
A WBS can only be assigned to one claiming scheme. However, multiple WBS itemscan be assigned to a single claiming scheme. Make sure to select the Module # ofthe computer you are using.
l You should see your WBS has moved to the Selected WBS field below
7. Click Done on the bottom right of the screen.
InEight Inc. | Release 21.1 Page 67 of 112
Plan User Guide 3.3 Claiming SchemeManagement
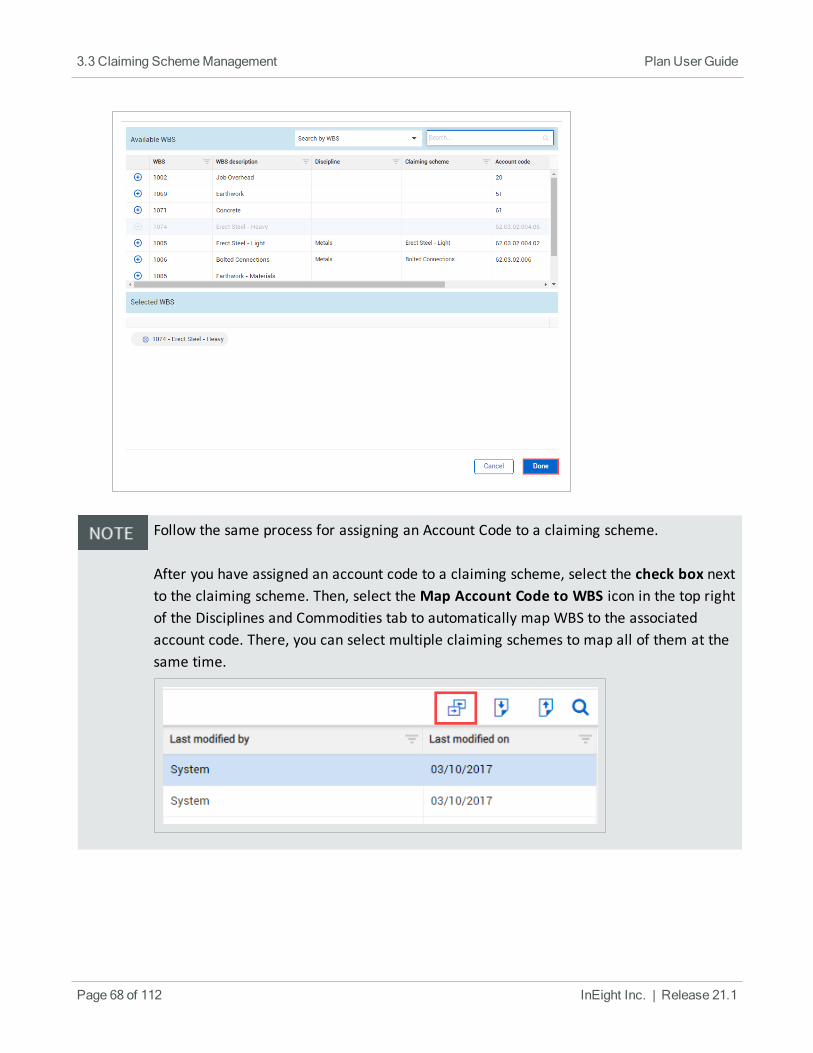
Follow the same process for assigning an Account Code to a claiming scheme.
After you have assigned an account code to a claiming scheme, select the check box nextto the claiming scheme. Then, select the Map Account Code to WBS icon in the top rightof the Disciplines and Commodities tab to automatically map WBS to the associatedaccount code. There, you can select multiple claiming schemes to map all of them at thesame time.
Page 68 of 112 InEight Inc. | Release 21.1
3.3 Claiming SchemeManagement Plan User Guide
3.3.2 Edit Claiming Schemes
In this step by step you will add a quality verification step to the claiming scheme you createdpreviously.
The following step by step walks you through how to edit a claiming scheme.
Edit a Claiming Scheme
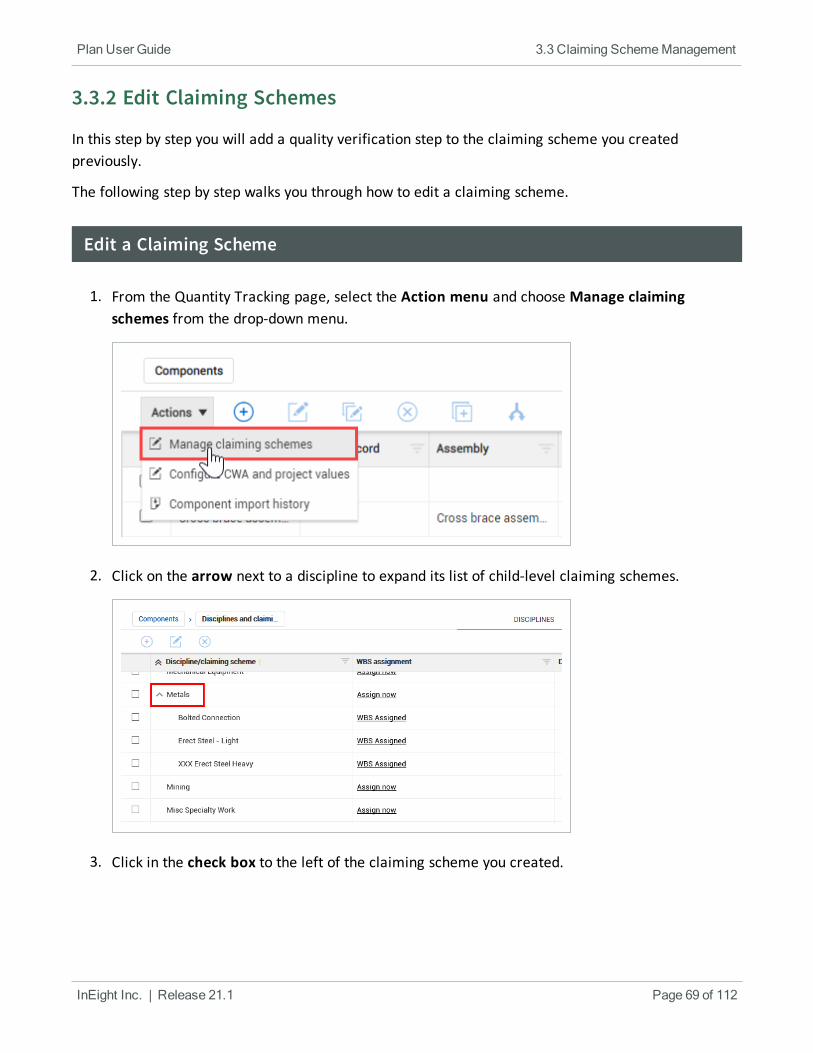
1. From the Quantity Tracking page, select the Action menu and choose Manage claimingschemes from the drop-down menu.
2. Click on the arrow next to a discipline to expand its list of child-level claiming schemes.
3. Click in the check box to the left of the claiming scheme you created.
InEight Inc. | Release 21.1 Page 69 of 112
Plan User Guide 3.3 Claiming SchemeManagement
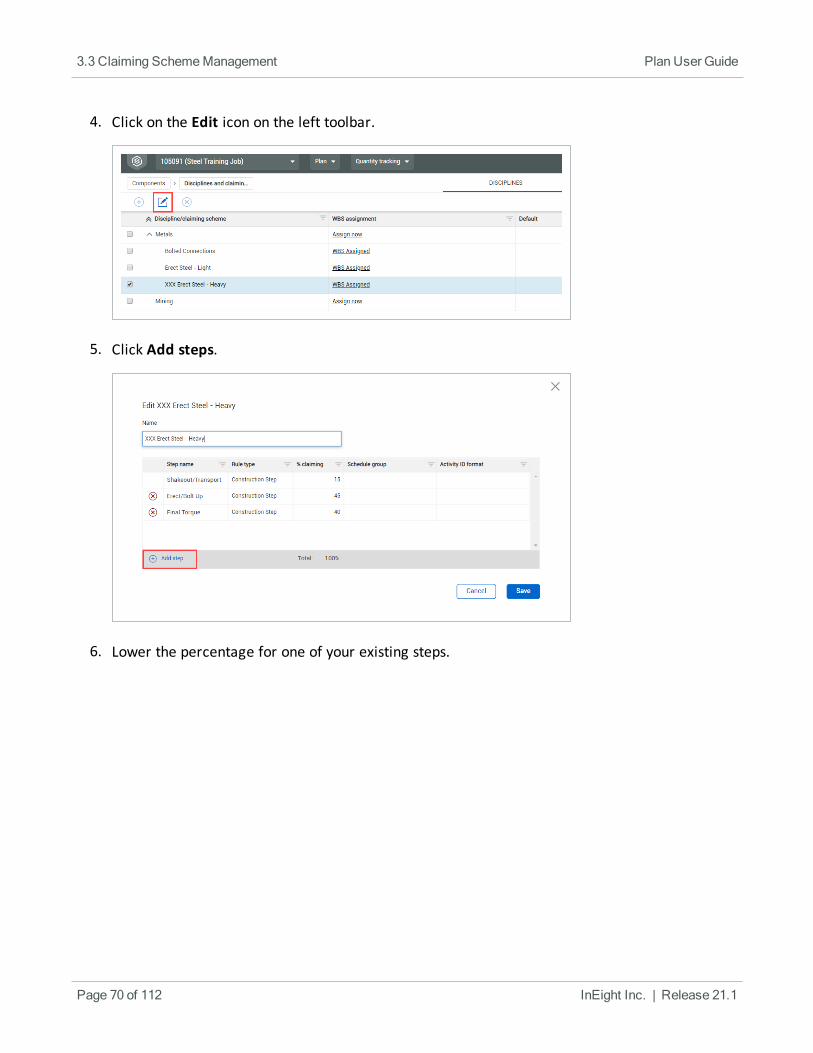
4. Click on the Edit icon on the left toolbar.
5. Click Add steps.
6. Lower the percentage for one of your existing steps.
Page 70 of 112 InEight Inc. | Release 21.1
3.3 Claiming SchemeManagement Plan User Guide
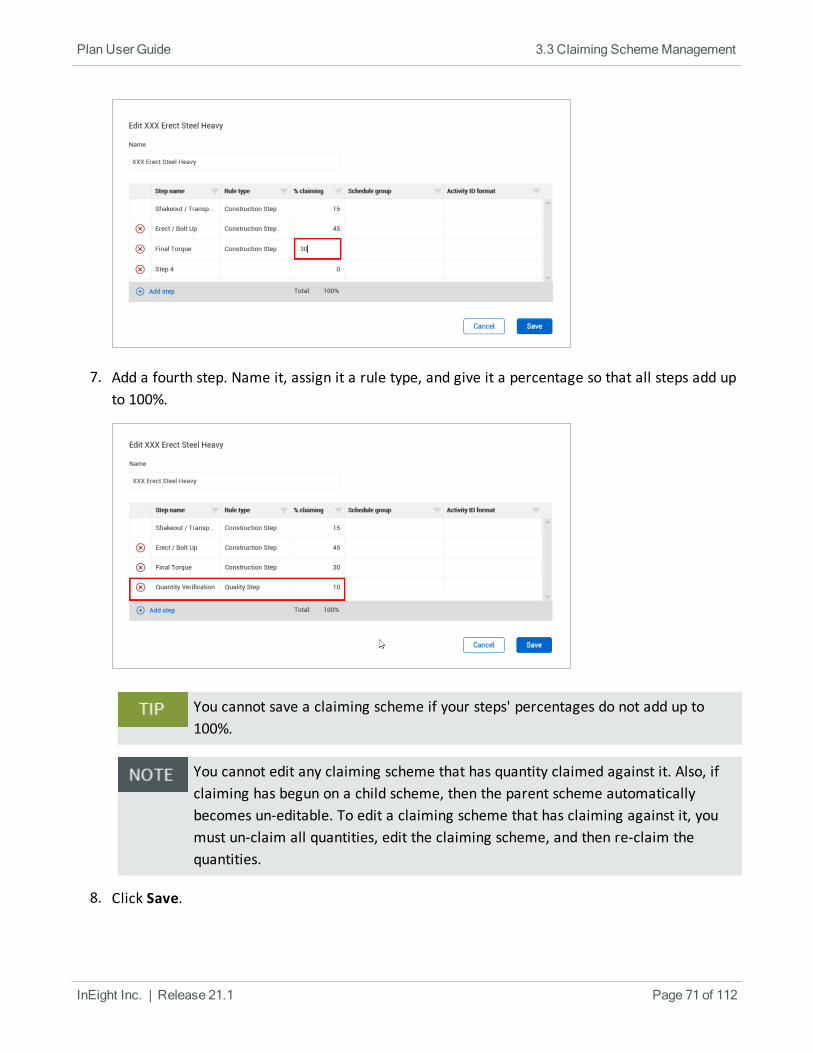
7. Add a fourth step. Name it, assign it a rule type, and give it a percentage so that all steps add upto 100%.
You cannot save a claiming scheme if your steps' percentages do not add up to100%.
You cannot edit any claiming scheme that has quantity claimed against it. Also, ifclaiming has begun on a child scheme, then the parent scheme automaticallybecomes un-editable. To edit a claiming scheme that has claiming against it, youmust un-claim all quantities, edit the claiming scheme, and then re-claim thequantities.
8. Click Save.
InEight Inc. | Release 21.1 Page 71 of 112
Plan User Guide 3.3 Claiming SchemeManagement
Lesson 3 Review
1. The purpose of a claiming scheme is to break a component down into steps so that youcan do which one of the following?
a. Progressively track progress of quantities installed as phases of construction arecompleted.
b. Schedule components in multiple phases.
c. Measure the quality of the component installation in multiple phases.
d. Monitor safety during the installation of the component.
2. On the page for creating claiming schemes, claiming schemes are organized under:
a. Areas
b. Work Types
c. Disciplines
d. Components
3. A claiming scheme must add up to:
a. 85%
b. 90%
c. 95%
d. 100%
4. How do you break out the steps of your claiming scheme?
a. EA
b. LF
c. Percentages
d. Decimals
5. You can edit a claiming scheme that has quantity claimed against it.
Page 72 of 112 InEight Inc. | Release 21.1
Lesson 3 Review Plan User Guide
a. True
b. False
6. A WBS can only be assigned to __________ claiming scheme(s).
a. no
b. one
c. two
d. three
Lesson 3 Summary
As a result of this lesson, you can:
l Explain what a claiming scheme is
l Create a claiming scheme
l Manage claiming schemes
InEight Inc. | Release 21.1 Page 73 of 112
Plan User Guide Lesson 3 Summary

Page 74 of 112 InEight Inc. | Release 21.1
This page intentionally left blank.
Lesson 3 Summary Plan User Guide
InEight Inc. | Release 21.1 Page 75 of 112
LESSON 4 — COMPONENT MANAGEMENT
Lesson Duration: 60 minutes
Lesson Objectives
After completing this lesson, you will be able to:
l Create components in Plan from scratch
l Create components in Plan using an import template
Lesson Topics
4.1 InEight Plan Workflow – Component Management 764.2 Component Creation from Scratch 76
4.2.1 Why Create Components? 764.2.2 Types of Components 774.2.3 Methods of Creating Components 784.2.4 Component Attributes 794.2.5 Component Creation 83
4.3 Component Creation from Import 894.3.1 Import Template 89
Exercise 4.1 — Create Components 97Lesson 4 Review 98Lesson 4 Summary 98
4.1 INEIGHT PLAN WORKFLOW – COMPONENTMANAGEMENT
4.2 COMPONENT CREATION FROM SCRATCH
In this topic, you will create a new component from scratch in InEight Plan.
4.2.1 Why Create Components?
In InEight Control, a direct cost item (WBS phase codes) has a quantity that is the sum of manycomponents with smaller quantities which are created in InEight Plan. For example, a structural steelcost item measured in tons is made up of many pieces of steel, each with a specific weight (in tons).When claiming work complete, you could calculate the weight of each piece of steel installed andclaim that much at the WBS level.
l If you did this, how would you know what work is complete and what specific work is remaining?
l What have you already claimed and what have you not?
Page 76 of 112 InEight Inc. | Release 21.1
4.1 InEight PlanWorkflow – Component Management Plan User Guide
l What if a Foreman doesn’t have the time to weigh each piece of steel before installing, or what ifhe weighs incorrectly?
This is why you create components. Components allow you to break down the WBS quantity intosmaller, more manageable sub items for claiming. When you claim components, you can easily seewhat specific items have been completed and what is remaining. You do not have to guess at what hasalready been claimed to date. Foremen do not need to do any calculating in the field; they simplyreport the components they completed. Components already have an assigned quantity based ontakeoff calculations.
l Can you think of how components would help claiming of other disciplines like Pipe, Electrical, orConcrete?
l How are these disciplines measured vs how is the work performed?
Components aim to bridge that gap.
4.2.2 Types of Components
There are three types of components in the Plan – Quantity Tracking module:
l Activity
l Material
l Assembly
This lets you to claim procurement activities and construction activities separately. To do this, materialcost and labor cost must be broken out in separate WBS codes. If that is the case, you can add thesame steel components as activity components and material components as pictured below:
When you create components for both the material and activity, you can then earn hours based on aunit rate for the activity, and earn dollars based on material unit cost for the material and assign themto two separate WBS codes.
You can combine activity and material components into assembly components. An assembly allowsclaiming to roll up into one parent record.
For example, if you are building a wall using 2x4s, you might have the following components:
InEight Inc. | Release 21.1 Page 77 of 112
Plan User Guide 4.2 Component Creation from Scratch
l Material of 2x4s
l Activity of cutting 2x4s to lengths from rough cut
l Activity of labor to assemble 2x4s into wall
If you create a new assembly component to build a 2x4 wall, you can set the parent record of thematerial and labor activities to be the assembly. If you set the parent record of the cutting activity tobe the material, the cutting activity also becomes part of the assembly. Using assembly componentsand parent records lets you create hierarchies of components so that claiming rolls up into one record.The new Assembly column shows which assembly each component belongs to.
When you edit an assembly or material component, you can use the Related Componentstab in the slide-out panel to associate existing components. Only associated componentslower in the hierarchy are shown.
You can only add associations from the Related Components tab. To remove anassociation, you must edit the Parent record field of the associated component.
4.2.3 Methods of Creating Components
There are four methods for creating components:
Component Creation
From Scratch Create each component manually using the new component slide out panel.
Import Template Import multiple components into InEight Plan simultaneously.
Page 78 of 112 InEight Inc. | Release 21.1
4.2 Component Creation from Scratch Plan User Guide
Component Creation
Copy Create one new component from an existing component.
Split Create multiple new components from an existing component.
4.2.4 Component Attributes
When creating components, a number of fields called attributes are available to be filled out. It is notnecessary to fill out every single field, but the more information input, the better. Attributes help maketracking components easier. In many cases, depending on the size of the job, you may have hundredsof thousands of components. In such a case, it can be difficult at times to distinguish the differencesbetween components if only a few attributes are filled out.
4.2.4.1 Validated Fields
You will rely heavily on certain component attributes for reporting purposes. For these attributes, it isimportant that data integrity is maintained.
For example, the area and system fields are commonly used for reporting. For these fields, it isimportant that the area and system entered are always spelled and formatted exactly the same wayevery time. Imagine a scenario where the data entered for the area field is spelled and formatted fivedifferent ways by five different users. In this case, when a report is run for areas, the report will onlyidentify the data that is spelled and formatted one of the five ways. All data for the other four will beleft out and your report will be missing crucial information.
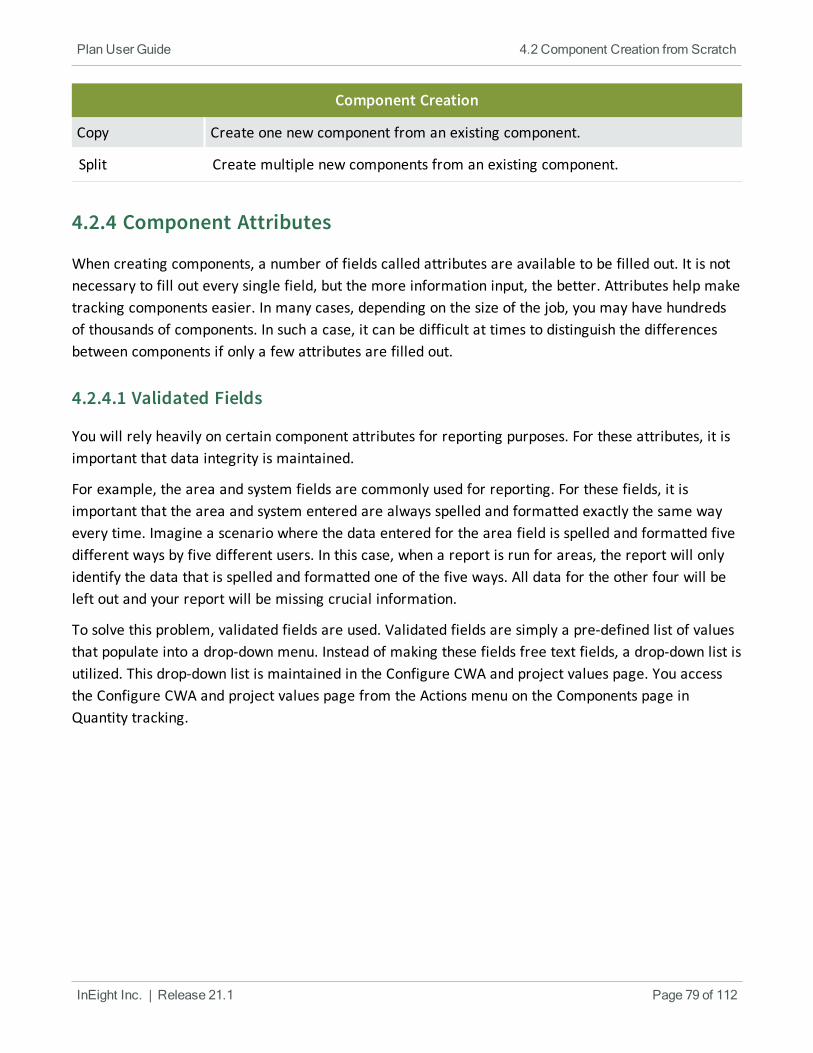
To solve this problem, validated fields are used. Validated fields are simply a pre-defined list of valuesthat populate into a drop-down menu. Instead of making these fields free text fields, a drop-down list isutilized. This drop-down list is maintained in the Configure CWA and project values page. You accessthe Configure CWA and project values page from the Actions menu on the Components page inQuantity tracking.
InEight Inc. | Release 21.1 Page 79 of 112
Plan User Guide 4.2 Component Creation from Scratch
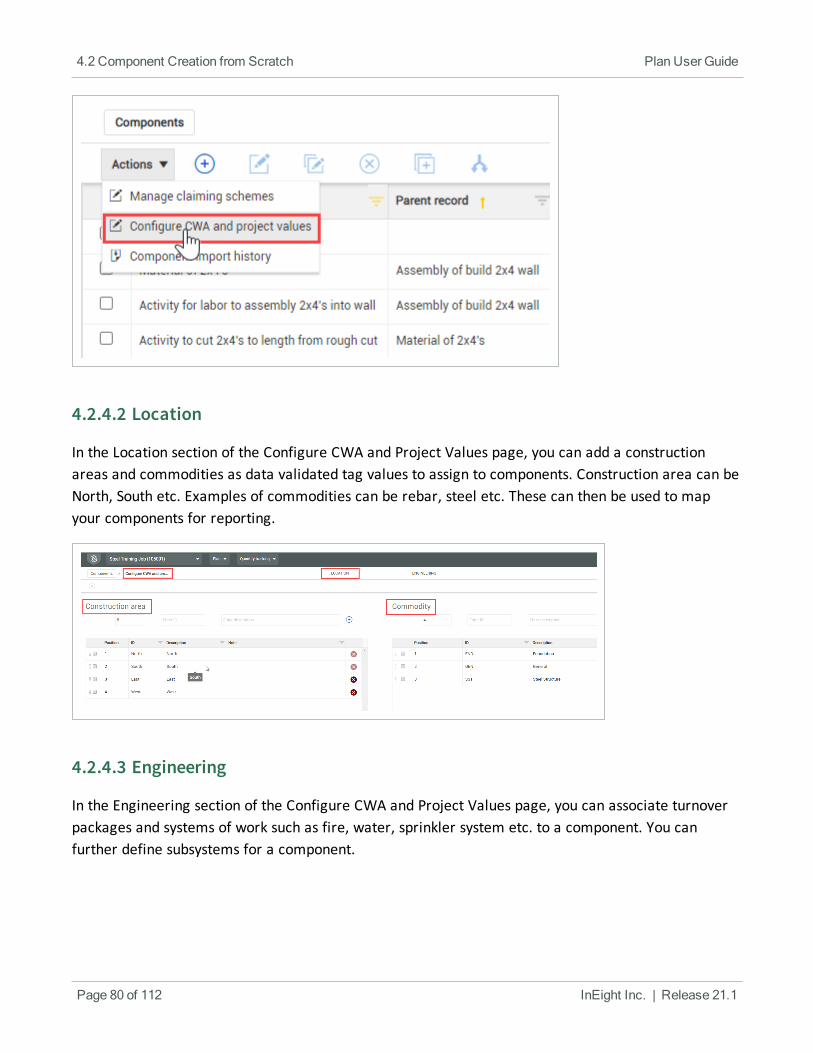
4.2.4.2 Location
In the Location section of the Configure CWA and Project Values page, you can add a constructionareas and commodities as data validated tag values to assign to components. Construction area can beNorth, South etc. Examples of commodities can be rebar, steel etc. These can then be used to mapyour components for reporting.
4.2.4.3 Engineering
In the Engineering section of the Configure CWA and Project Values page, you can associate turnoverpackages and systems of work such as fire, water, sprinkler system etc. to a component. You canfurther define subsystems for a component.
Page 80 of 112 InEight Inc. | Release 21.1
4.2 Component Creation from Scratch Plan User Guide
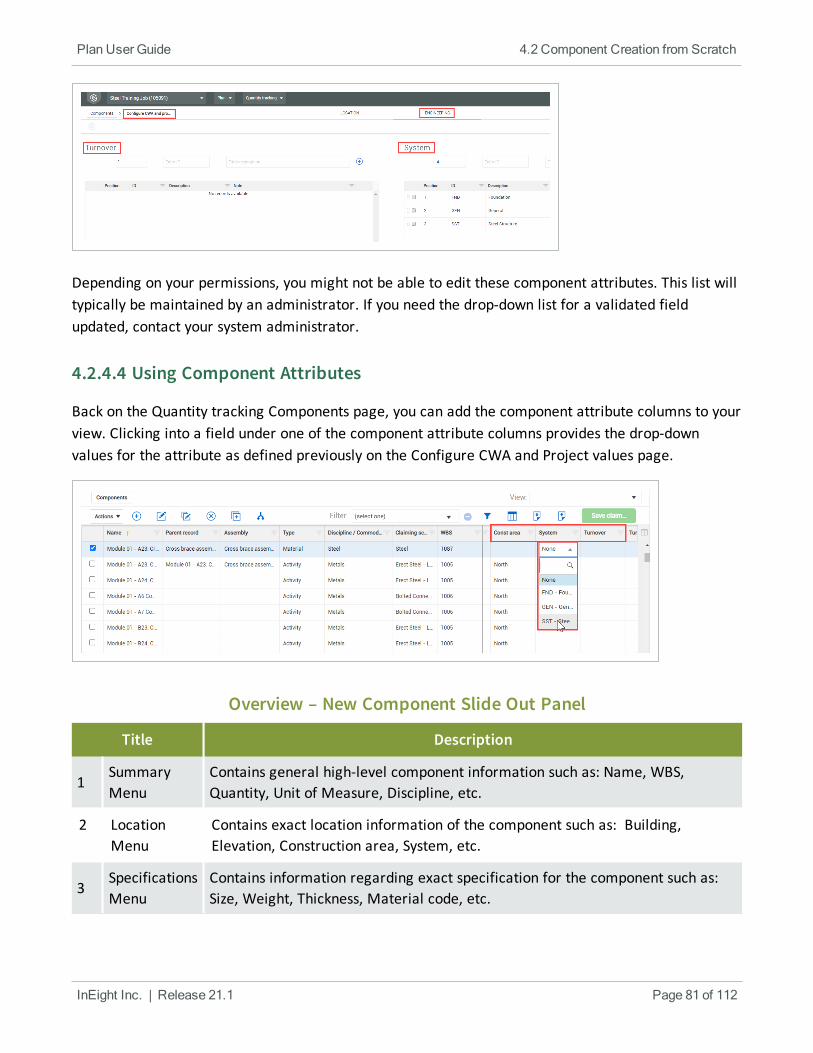
Depending on your permissions, you might not be able to edit these component attributes. This list willtypically be maintained by an administrator. If you need the drop-down list for a validated fieldupdated, contact your system administrator.
4.2.4.4 Using Component Attributes
Back on the Quantity tracking Components page, you can add the component attribute columns to yourview. Clicking into a field under one of the component attribute columns provides the drop-downvalues for the attribute as defined previously on the Configure CWA and Project values page.
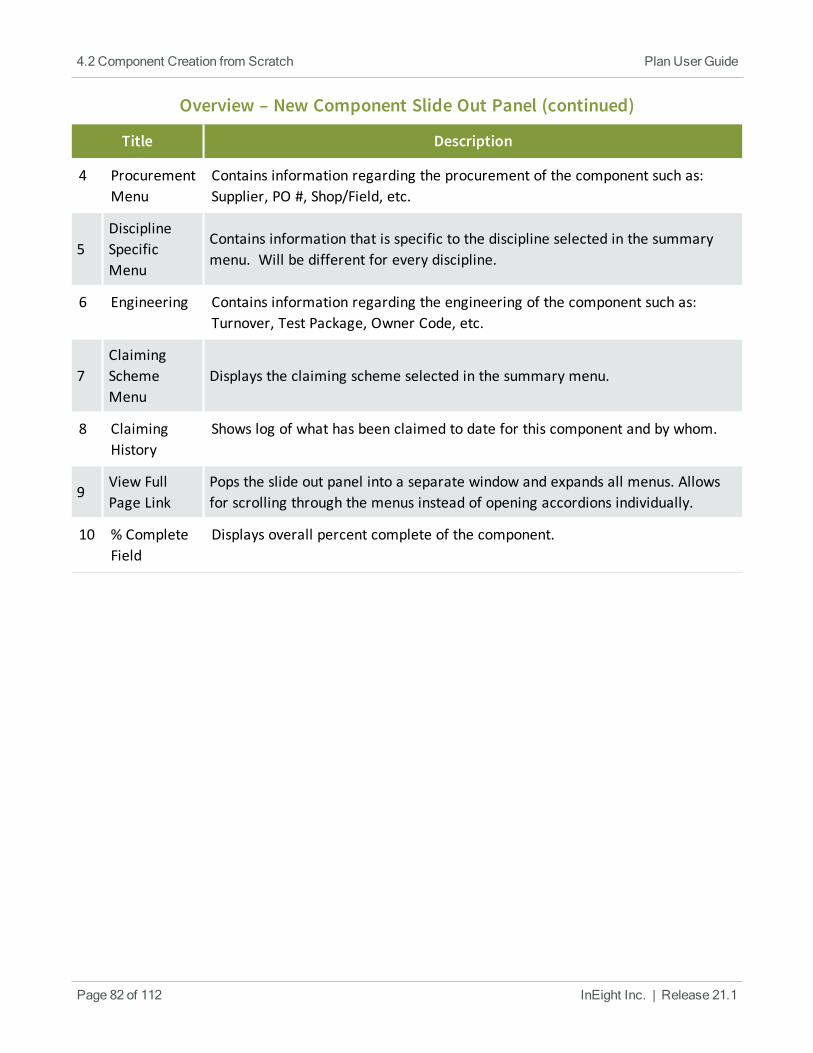
Title Description
1SummaryMenu
Contains general high-level component information such as: Name, WBS,Quantity, Unit of Measure, Discipline, etc.
2 LocationMenu
Contains exact location information of the component such as: Building,Elevation, Construction area, System, etc.
3SpecificationsMenu
Contains information regarding exact specification for the component such as:Size, Weight, Thickness, Material code, etc.
Overview – New Component Slide Out Panel
InEight Inc. | Release 21.1 Page 81 of 112
Plan User Guide 4.2 Component Creation from Scratch
Title Description
4 ProcurementMenu
Contains information regarding the procurement of the component such as:Supplier, PO #, Shop/Field, etc.
5DisciplineSpecificMenu
Contains information that is specific to the discipline selected in the summarymenu. Will be different for every discipline.
6 Engineering Contains information regarding the engineering of the component such as:Turnover, Test Package, Owner Code, etc.
7ClaimingSchemeMenu
Displays the claiming scheme selected in the summary menu.
8 ClaimingHistory
Shows log of what has been claimed to date for this component and by whom.
9View FullPage Link
Pops the slide out panel into a separate window and expands all menus. Allowsfor scrolling through the menus instead of opening accordions individually.
10 % CompleteField
Displays overall percent complete of the component.
Overview – New Component Slide Out Panel (continued)
Page 82 of 112 InEight Inc. | Release 21.1
4.2 Component Creation from Scratch Plan User Guide

4.2.5 Component Creation
The following step by step walks you through how to create a component from scratch.
Create a Component from Scratch
1. From an open project, go to the Quantity Tracking module.
InEight Inc. | Release 21.1 Page 83 of 112
Plan User Guide 4.2 Component Creation from Scratch
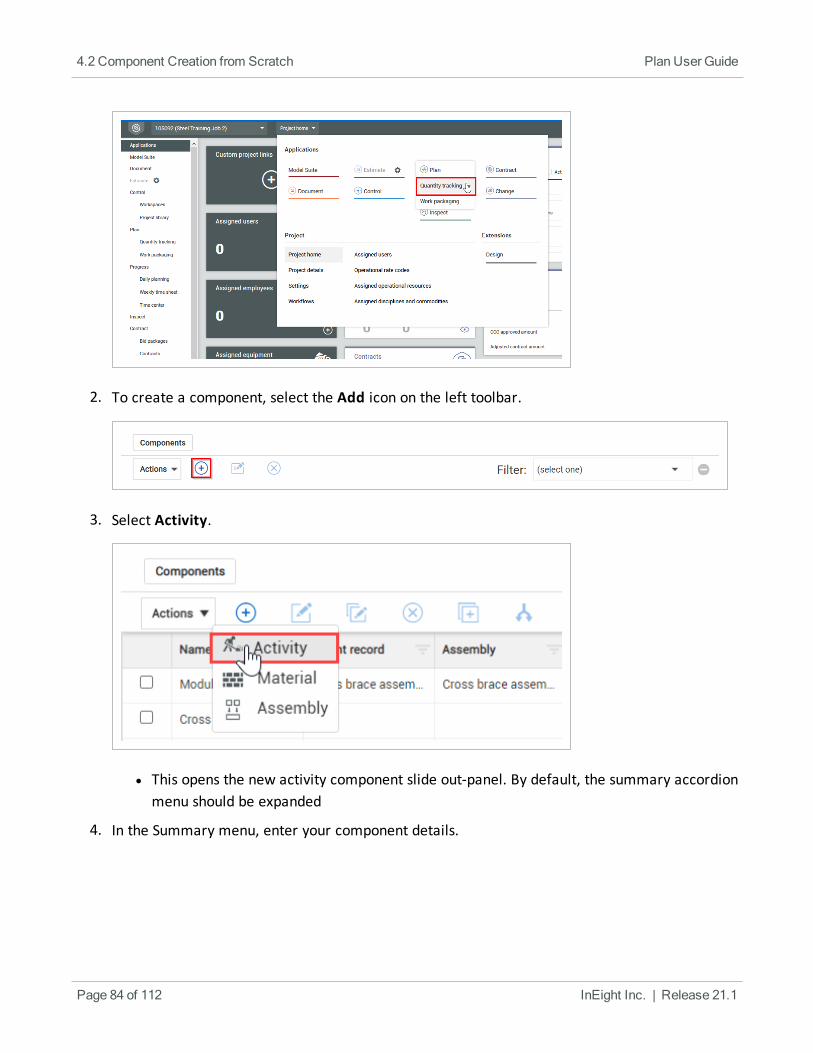
2. To create a component, select the Add icon on the left toolbar.
3. Select Activity.
l This opens the new activity component slide out-panel. By default, the summary accordionmenu should be expanded
4. In the Summary menu, enter your component details.
Page 84 of 112 InEight Inc. | Release 21.1
4.2 Component Creation from Scratch Plan User Guide
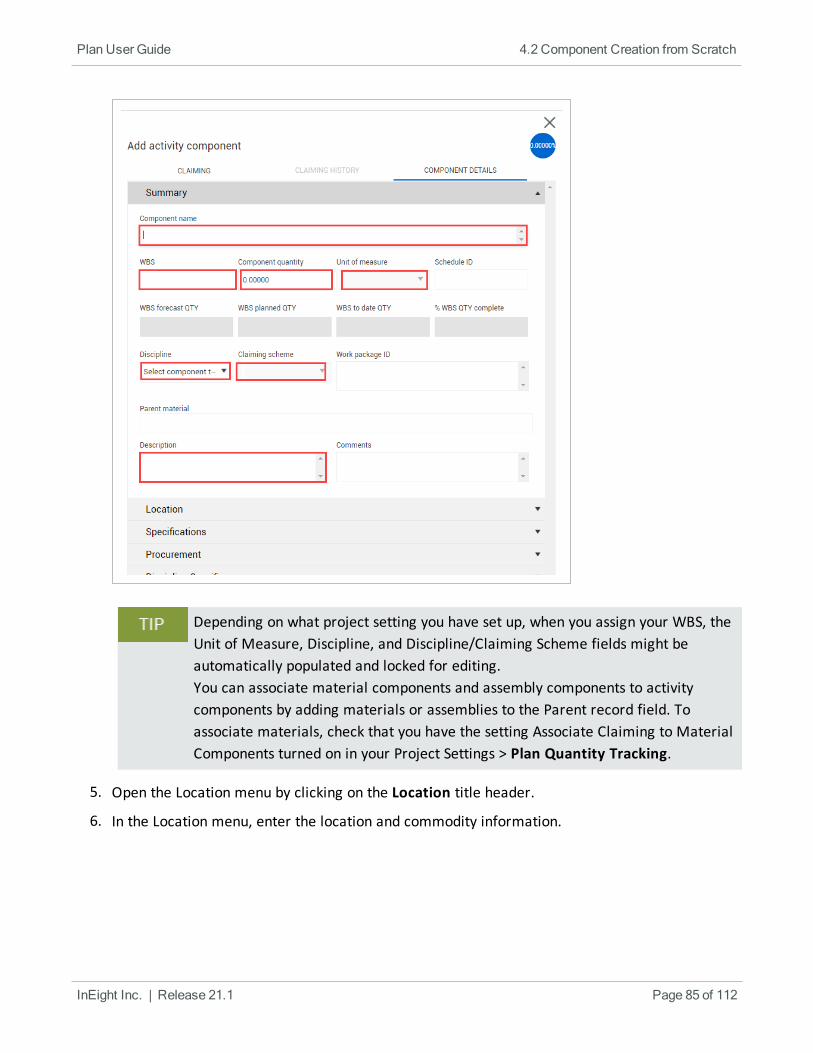
Depending on what project setting you have set up, when you assign your WBS, theUnit of Measure, Discipline, and Discipline/Claiming Scheme fields might beautomatically populated and locked for editing.You can associate material components and assembly components to activitycomponents by adding materials or assemblies to the Parent record field. Toassociate materials, check that you have the setting Associate Claiming to MaterialComponents turned on in your Project Settings > Plan Quantity Tracking.
5. Open the Location menu by clicking on the Location title header.
6. In the Location menu, enter the location and commodity information.
InEight Inc. | Release 21.1 Page 85 of 112
Plan User Guide 4.2 Component Creation from Scratch
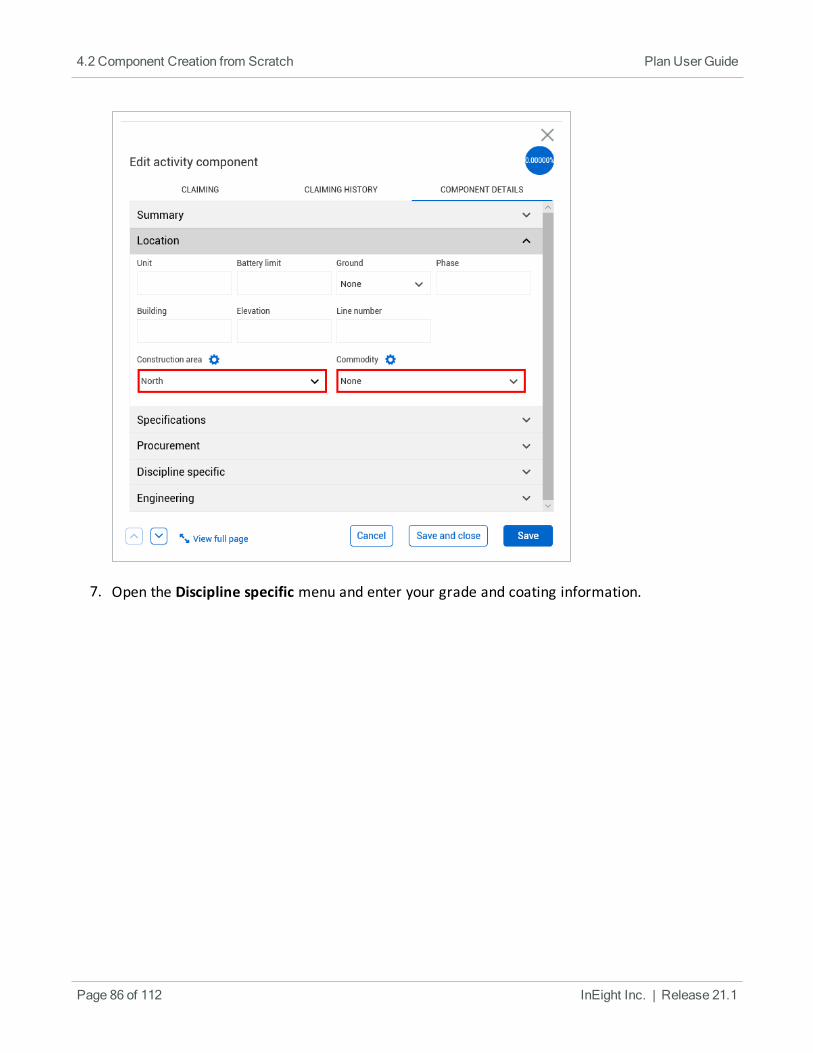
7. Open the Discipline specific menu and enter your grade and coating information.
Page 86 of 112 InEight Inc. | Release 21.1
4.2 Component Creation from Scratch Plan User Guide
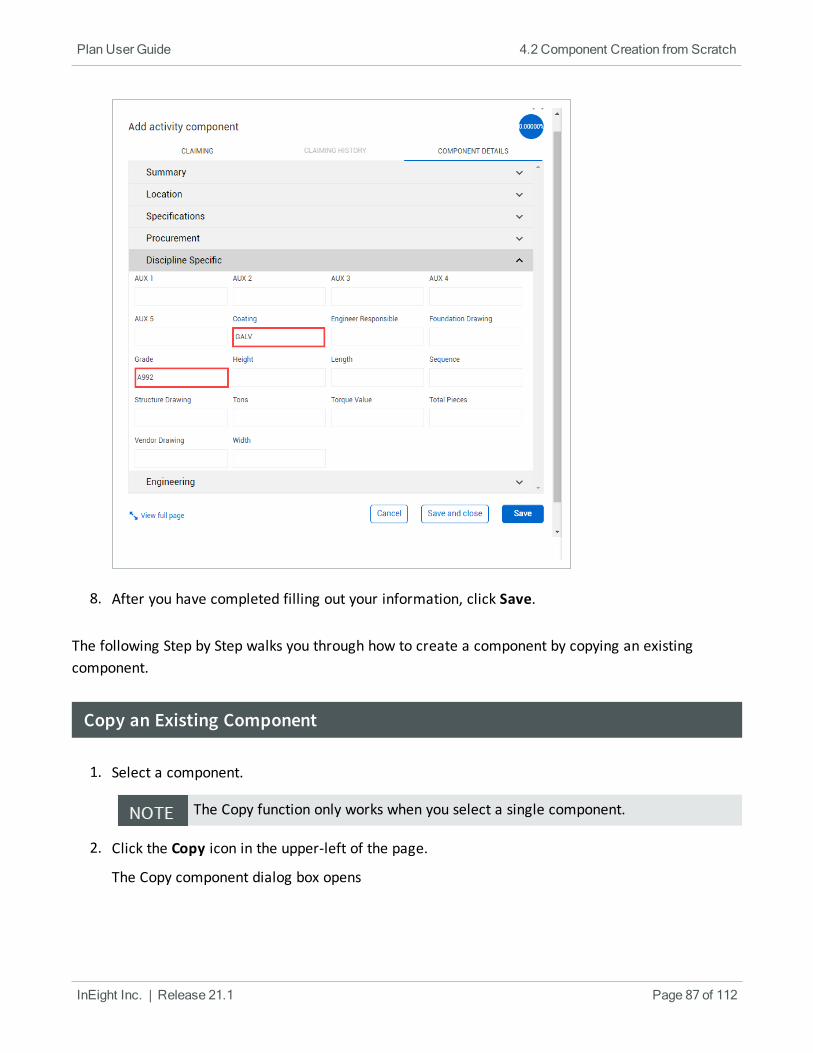
8. After you have completed filling out your information, click Save.
The following Step by Step walks you through how to create a component by copying an existingcomponent.
Copy an Existing Component
1. Select a component.
The Copy function only works when you select a single component.
2. Click the Copy icon in the upper-left of the page.
The Copy component dialog box opens
InEight Inc. | Release 21.1 Page 87 of 112
Plan User Guide 4.2 Component Creation from Scratch
3. Enter a name for the new component.
The default name adds -copy to the end of the original component’s name
4. Click Copy.
The following Step by Step walks you through how to create multiple components by splitting anexisting component.
Split an Existing Component
1. Select a component.
The Split function only works when you select a single component.
2. Click the Split icon in the upper-left of the page.
The Split component dialog box opens
3. Click the Add icon next to Split components to increase the number of new components to splitthe original into.
To remove a split component, click the Remove icon next to the component.
4. Enter names for the split components.
The default names add -n to the end of the original component’s name, where n is an increasingnumber starting at 1
5. Change the Quantity for each of the split components.
6. Click Split.
The following Step by Step walks you through how to edit multiple components at the same time.
4.2 Step by Step 1 — Bulk Edit Components
1. Select multiple components.
You can edit a maximum of 50 components at the same time.
Page 88 of 112 InEight Inc. | Release 21.1
4.2 Component Creation from Scratch Plan User Guide
2. Click the Bulk edit icon in the upper-left of the page.
l The Bulk edit dialog box shows
3. In the dialog box, select a column and enter a new value for the column.
4. Add or remove additional columns as necessary, and then click Save.
You can edit a maximum of five columns at the same time.
4.3 COMPONENT CREATION FROM IMPORT
In this topic, you will learn how to upload multiple components at once via the Import Template.
Scenario
Imagine you are the structural steel field engineer responsible for tracking all steel erection foryour module. You receive a bill of materials from your steel fabricator that matches the erectiondrawings. The bill of materials has all the information you need to input for components -piecemarks, weight, grade, coating, etc. You need to add all the piecemarks as components, soyou can track them as they are installed.
4.3.1 Import Template
As is the case with this scenario, you will often receive lists of components from an outside source.
Can you think of other examples?
l Electrical Cable or Termination Schedules
l Pipe Spool Fabricator Bill of Materials
l Mechanical Equipment List
l Take off sheets from the estimators
In these situations, it saves time to import multiple items at once. This can be done using the exportand import feature within Plan.
What is the Import Template?
The Import Template is a Microsoft Excel spreadsheet used to upload multiple components into Plan atonce. The import template is generated first by setting up your view to show the columns ofinformation you wish to import. Then you export the import template to Excel. You can export with or
InEight Inc. | Release 21.1 Page 89 of 112
Plan User Guide 4.3 Component Creation from Import
without data (by choosing Data Export), as well as, Excel equations. This means you can export just thecolumn headers or all the information in the cells below as well. Once exported, you can fill in yourinformation in the spreadsheet, save it, and import it. You have the option to import only new items oroverwrite information on existing items (based on unique component IDs).
Upon import, Plan will check the file for any errors. Errors may include:
l Validated fields that don’t exist
l WBS codes that are not available
l Non-unique component IDs
A report is generated to help you find and correct any errors before continuing the import.
The following step by step walks you through how to export the Import Template, populate it, andupload it back into Plan.
Component IDs must be unique within the same type of component (activity, material, orassembly). You cannot have two components of the same type with the exact same ID,but you can have an activity component with the same ID as a material component.
If you wish to duplicate an existing component (perhaps, the component createdmanually in the previous section), you must either delete it, or rename either the existingor imported component.
The same scenario follows for the creation of components through an Excel import.
Create Components from Excel Import
1. From an open project, go to the Quantity Trackingmodule.
Page 90 of 112 InEight Inc. | Release 21.1
4.3 Component Creation from Import Plan User Guide
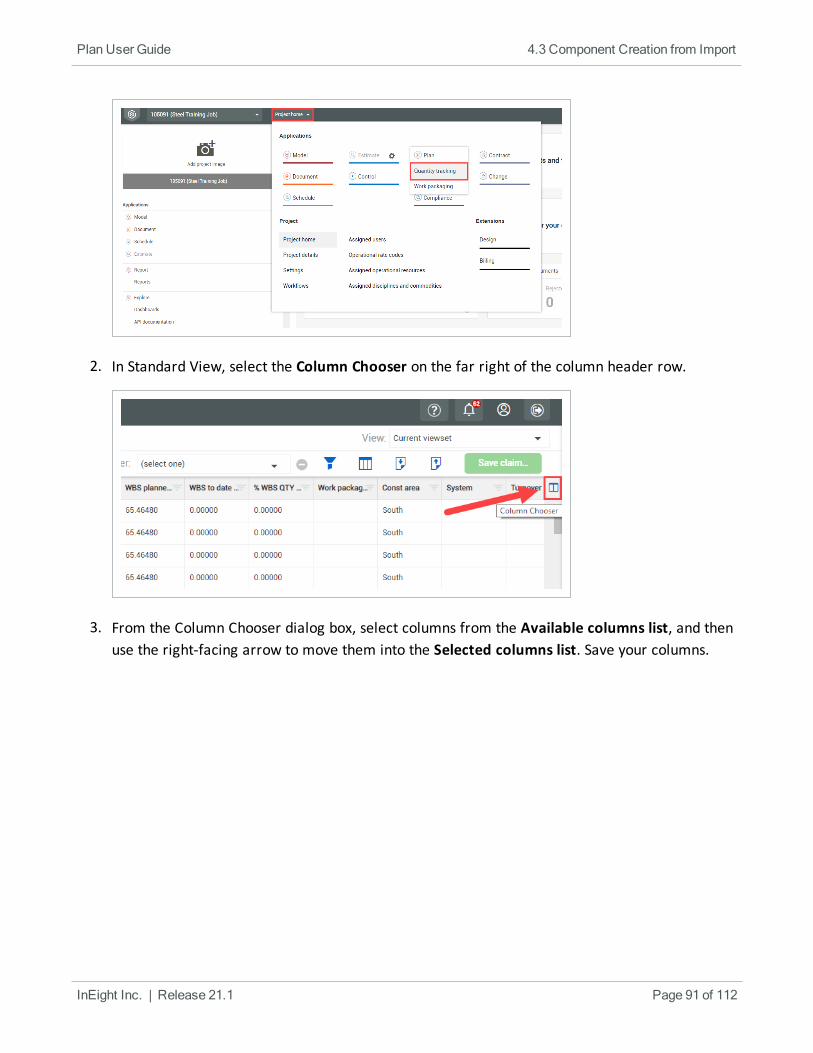
2. In Standard View, select the Column Chooser on the far right of the column header row.
3. From the Column Chooser dialog box, select columns from the Available columns list, and thenuse the right-facing arrow to move them into the Selected columns list. Save your columns.
InEight Inc. | Release 21.1 Page 91 of 112
Plan User Guide 4.3 Component Creation from Import

4. Click the Export icon on the toolbar.
5. Select Template.
Page 92 of 112 InEight Inc. | Release 21.1
4.3 Component Creation from Import Plan User Guide
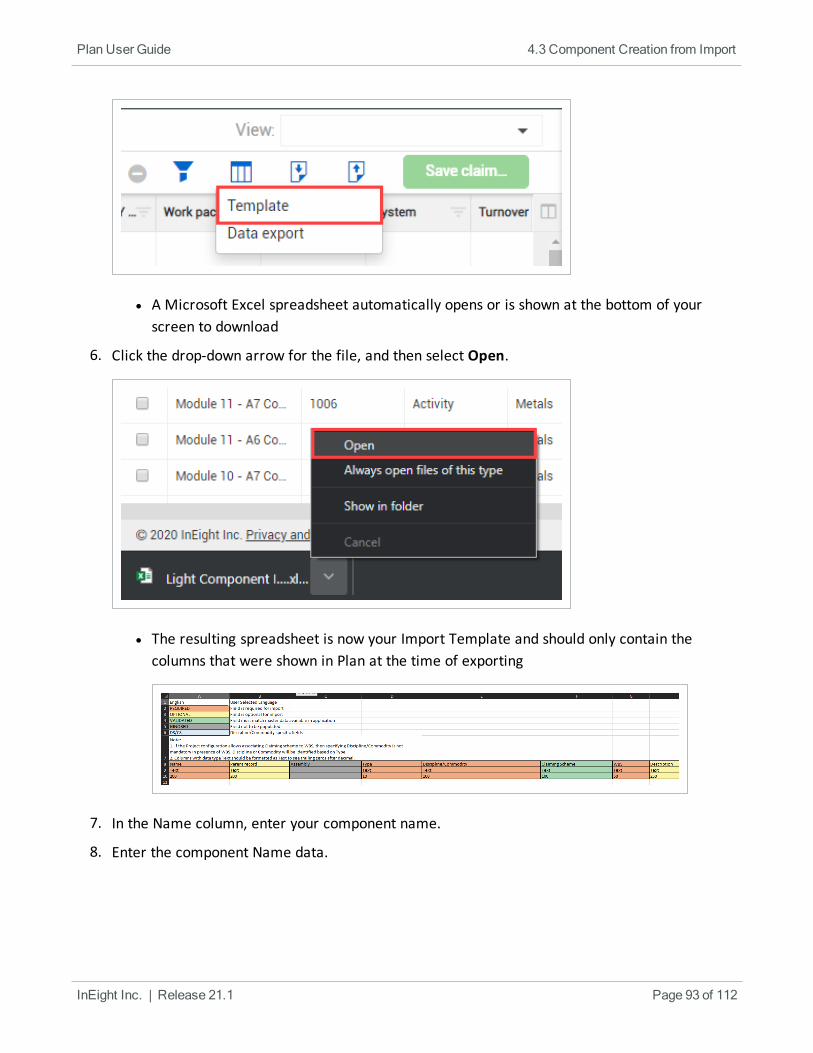
l A Microsoft Excel spreadsheet automatically opens or is shown at the bottom of yourscreen to download
6. Click the drop-down arrow for the file, and then select Open.
l The resulting spreadsheet is now your Import Template and should only contain thecolumns that were shown in Plan at the time of exporting
7. In the Name column, enter your component name.
8. Enter the component Name data.
InEight Inc. | Release 21.1 Page 93 of 112
Plan User Guide 4.3 Component Creation from Import
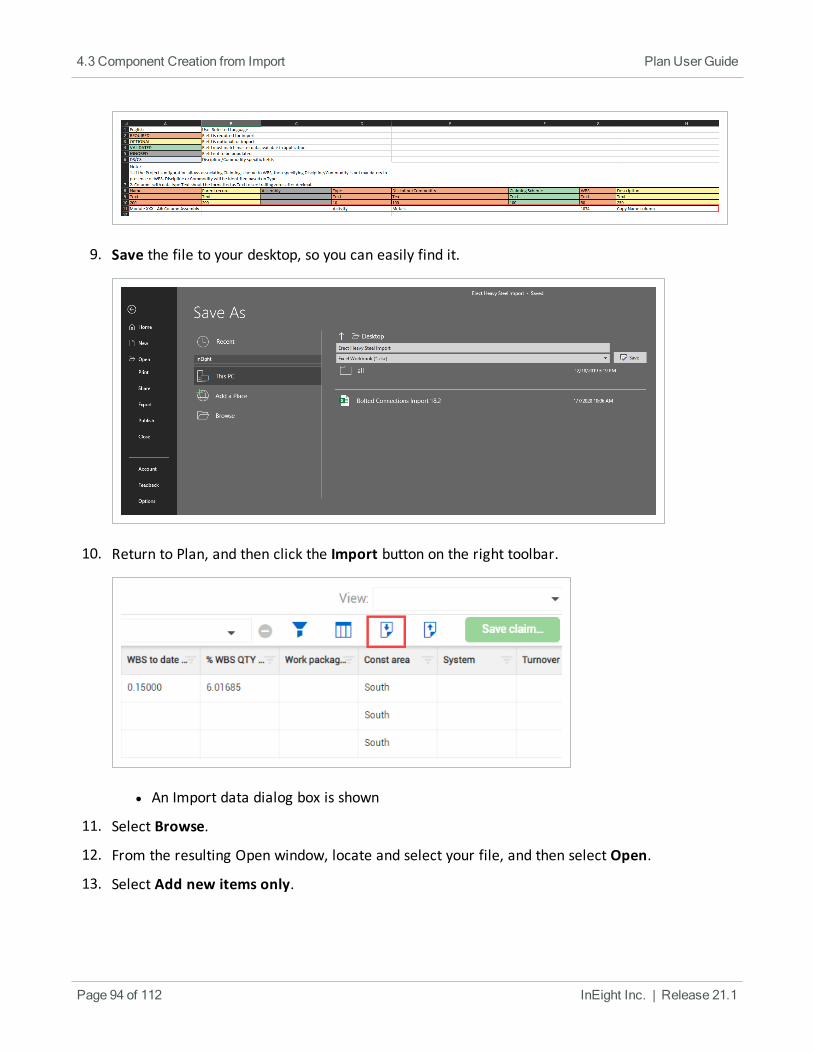
9. Save the file to your desktop, so you can easily find it.
10. Return to Plan, and then click the Import button on the right toolbar.
l An Import data dialog box is shown
11. Select Browse.
12. From the resulting Open window, locate and select your file, and then select Open.
13. Select Add new items only.
Page 94 of 112 InEight Inc. | Release 21.1
4.3 Component Creation from Import Plan User Guide
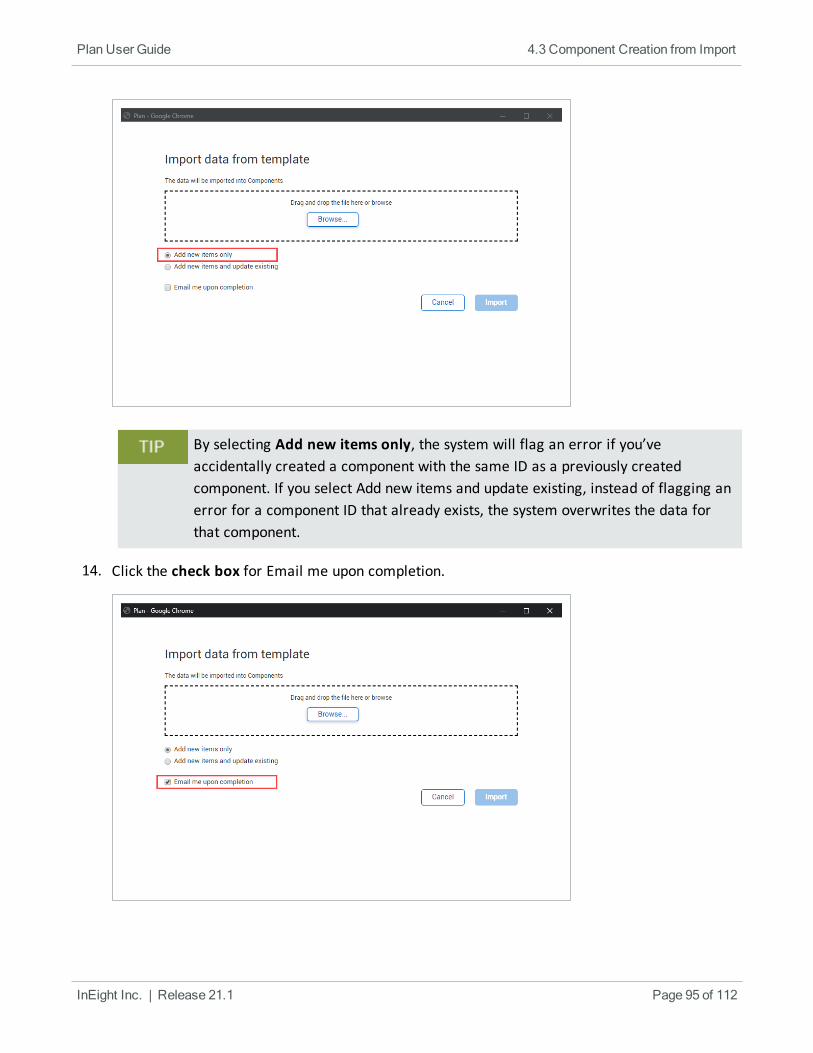
By selecting Add new items only, the system will flag an error if you’veaccidentally created a component with the same ID as a previously createdcomponent. If you select Add new items and update existing, instead of flagging anerror for a component ID that already exists, the system overwrites the data forthat component.
14. Click the check box for Email me upon completion.
InEight Inc. | Release 21.1 Page 95 of 112
Plan User Guide 4.3 Component Creation from Import

l This alerts you to the completion of the upload
15. Click Import.
l The import file is added to the import queue
l To see all your import files and their statuses, click View file import queue
You can continue working in the application while your imports areprocessed. A notification tells you if your file is imported successfully or not.
If you have an error, check that the name of your component is not the sameas an existing component.
16. Click Close.
Scenario Recap
Now you can see how easy it is to upload multiple components. Picture a project with thousandsof components from multiple sources that can be combined on an import template and easilyloaded in quickly.
Page 96 of 112 InEight Inc. | Release 21.1
4.3 Component Creation from Import Plan User Guide
Exercise 4.1 — Create Components
Now that you have learned how to upload components from a template and create componentsfrom scratch, create 5 components on your own using either method. Use Type - Material to creatematerial components and assign them toWBS 1087.
1. Create some sample components that you might actually use on one of your projects.
2. Don’t forget that Component ID’s must be unique within the same component type.
Congratulations, you have completed this exercise!
InEight Inc. | Release 21.1 Page 97 of 112
Plan User Guide Exercise 4.1 — Create Components
Lesson 4 Review
1. What do you create in Plan to track quantities?
a. Cost Codes
b. Values
c. Attributes
d. Components
2. If you need to upload multiple components at once, which method is preferred?
a. From scratch
b. Copying existing components
c. Import template
d. None of the above
3. A component ID within the same component type must be _____________.
a. At least 6 characters long
b. Unique
c. Contain both letters and numbers
d. All of the above
Lesson 4 Summary
As a result of this lesson, you can:
l Create components in Plan from scratch
l Create components in Plan using an import template
Page 98 of 112 InEight Inc. | Release 21.1
Lesson 4 Review Plan User Guide
InEight Inc. | Release 21.1 Page 99 of 112
LESSON 5 — QUANTITY CLAIMING
Lesson Duration: 45 minutes
Lesson Objectives
After completing this lesson, you will be able to:
l Claim quantities in Plan
l Edit claimed quantities
Lesson Topics
5.1 InEight Plan Workflow – Quantity Claiming 1005.2 Quantity Claiming 100
5.2.1 Process for claiming quantities 1005.2.2 Why claim at a component level? 1015.2.3 Claiming in the Standard Grid View 1015.2.4 Claiming in the Data Blocks View 103
5.3 Edit Claimed Quantities 1055.3.1 Quantity Joined 1065.3.2 Quantity Editing 107
Exercise 5.1 — Quantity Claiming 110Lesson 5 Review 111Lesson 5 Summary 112
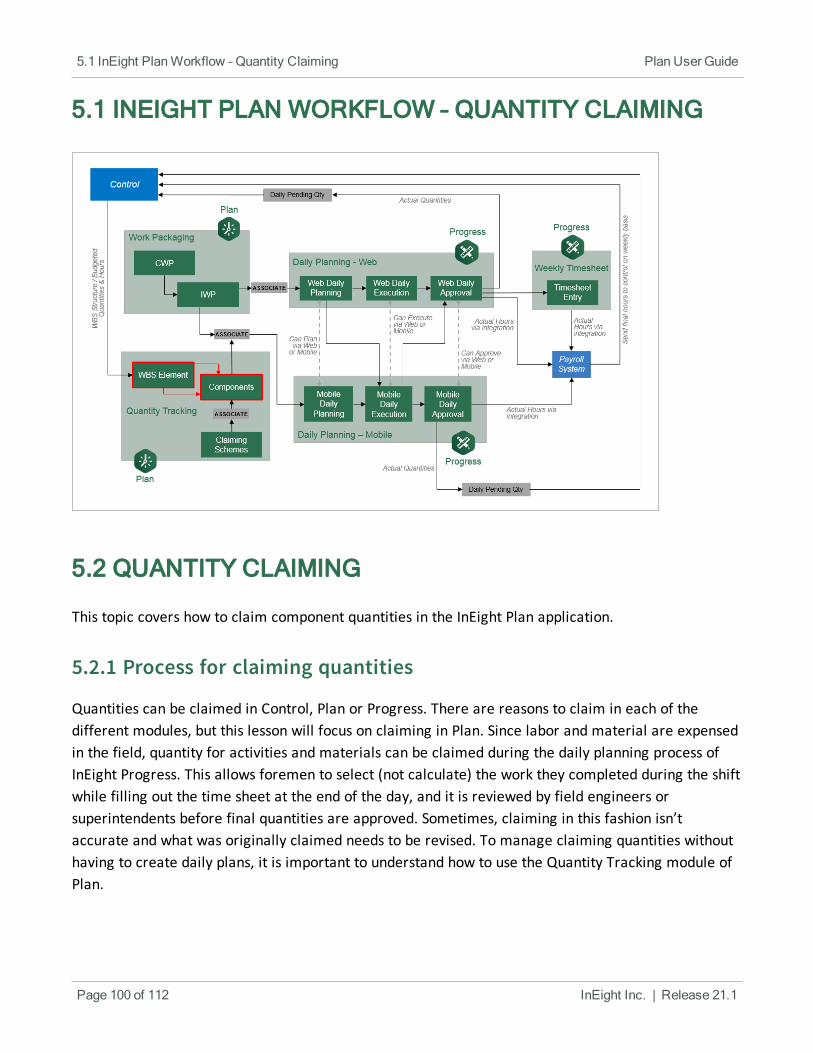
5.1 INEIGHT PLAN WORKFLOW – QUANTITY CLAIMING
5.2 QUANTITY CLAIMING
This topic covers how to claim component quantities in the InEight Plan application.
5.2.1 Process for claiming quantities
Quantities can be claimed in Control, Plan or Progress. There are reasons to claim in each of thedifferent modules, but this lesson will focus on claiming in Plan. Since labor and material are expensedin the field, quantity for activities and materials can be claimed during the daily planning process ofInEight Progress. This allows foremen to select (not calculate) the work they completed during the shiftwhile filling out the time sheet at the end of the day, and it is reviewed by field engineers orsuperintendents before final quantities are approved. Sometimes, claiming in this fashion isn’taccurate and what was originally claimed needs to be revised. To manage claiming quantities withouthaving to create daily plans, it is important to understand how to use the Quantity Tracking module ofPlan.
Page 100 of 112 InEight Inc. | Release 21.1
5.1 InEight PlanWorkflow – Quantity Claiming Plan User Guide
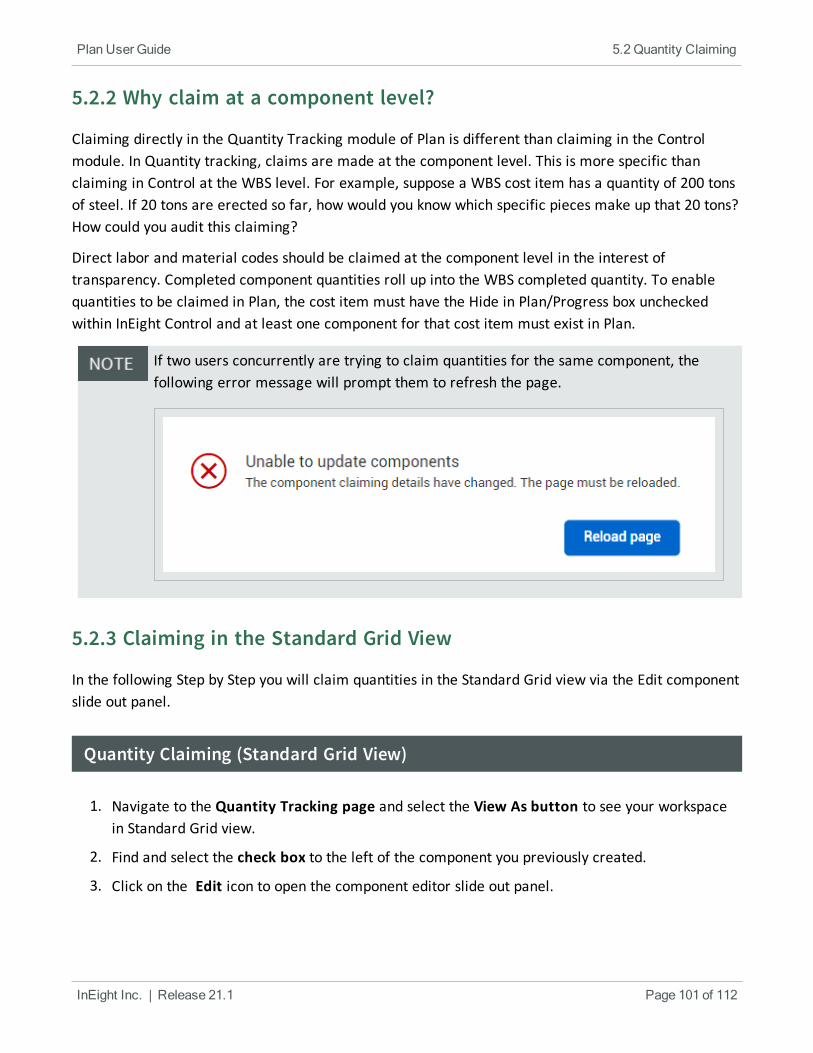
5.2.2 Why claim at a component level?
Claiming directly in the Quantity Tracking module of Plan is different than claiming in the Controlmodule. In Quantity tracking, claims are made at the component level. This is more specific thanclaiming in Control at the WBS level. For example, suppose a WBS cost item has a quantity of 200 tonsof steel. If 20 tons are erected so far, how would you know which specific pieces make up that 20 tons?How could you audit this claiming?
Direct labor and material codes should be claimed at the component level in the interest oftransparency. Completed component quantities roll up into the WBS completed quantity. To enablequantities to be claimed in Plan, the cost item must have the Hide in Plan/Progress box uncheckedwithin InEight Control and at least one component for that cost item must exist in Plan.
If two users concurrently are trying to claim quantities for the same component, thefollowing error message will prompt them to refresh the page.
5.2.3 Claiming in the Standard Grid View
In the following Step by Step you will claim quantities in the Standard Grid view via the Edit componentslide out panel.
Quantity Claiming (Standard Grid View)
1. Navigate to the Quantity Tracking page and select the View As button to see your workspacein Standard Grid view.
2. Find and select the check box to the left of the component you previously created.
3. Click on the Edit icon to open the component editor slide out panel.
InEight Inc. | Release 21.1 Page 101 of 112
Plan User Guide 5.2 Quantity Claiming
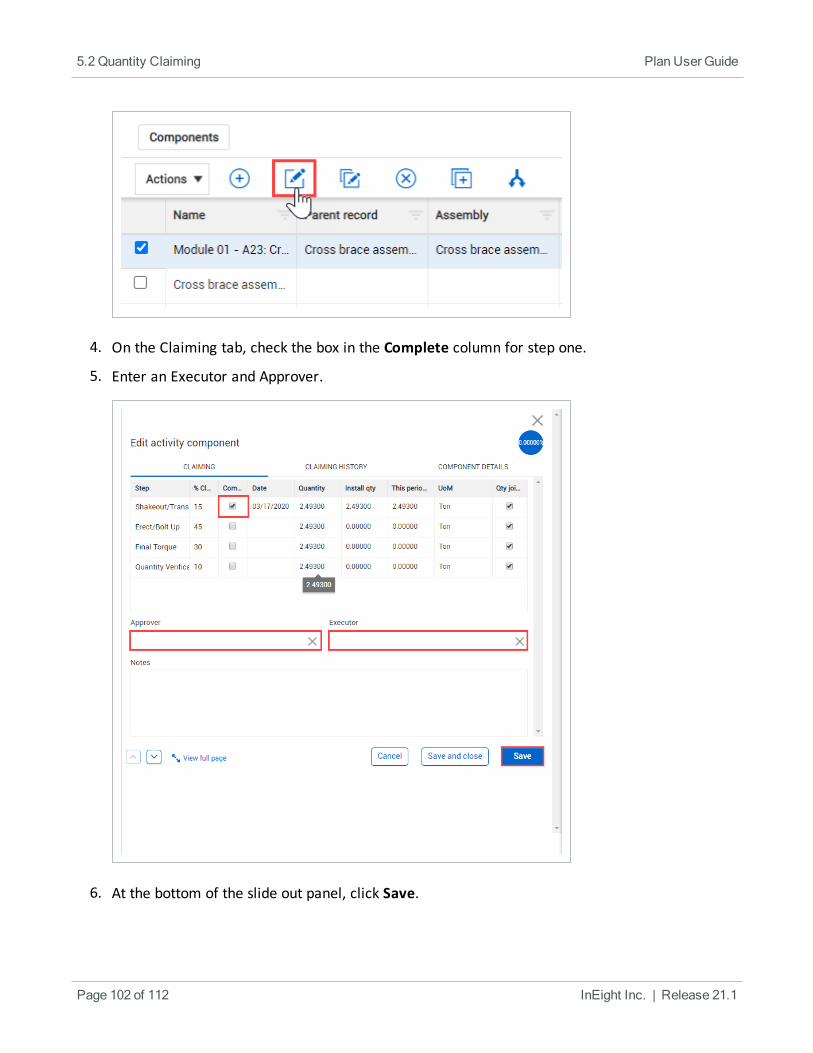
4. On the Claiming tab, check the box in the Complete column for step one.
5. Enter an Executor and Approver.
6. At the bottom of the slide out panel, click Save.
Page 102 of 112 InEight Inc. | Release 21.1
5.2 Quantity Claiming Plan User Guide
Select Save to have claimed quantities be added/deducted from your percentcomplete or to show up in your claiming history report.
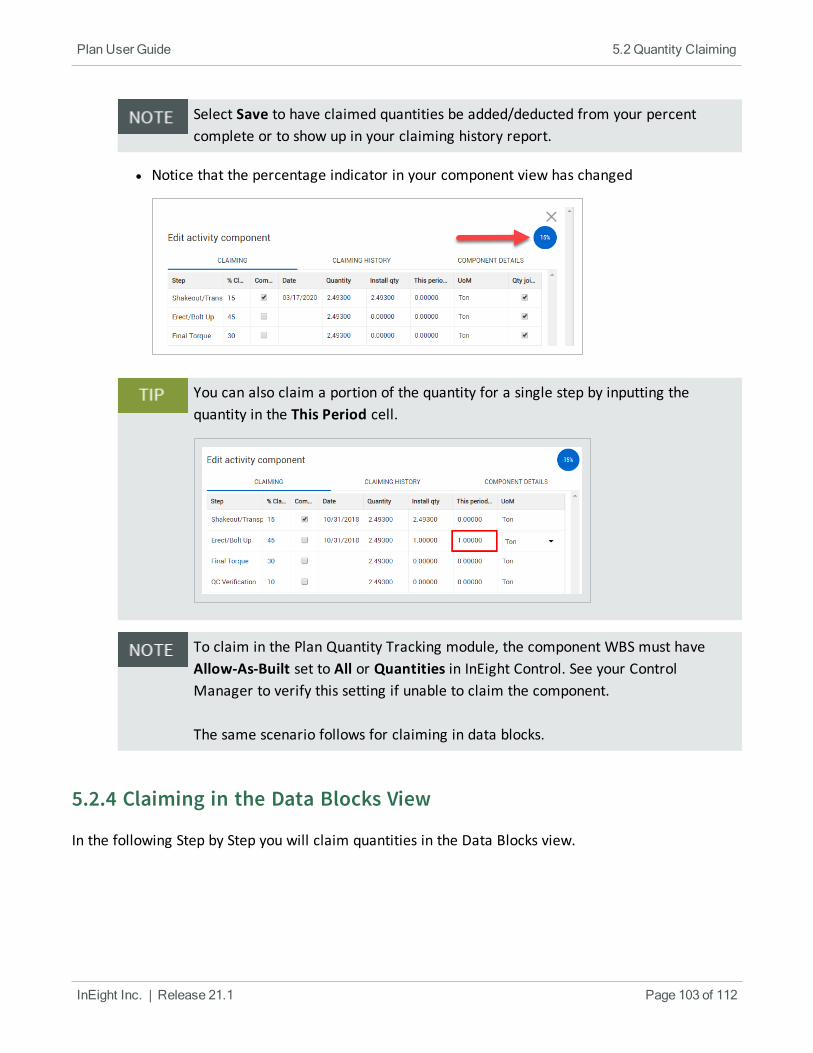
l Notice that the percentage indicator in your component view has changed
You can also claim a portion of the quantity for a single step by inputting thequantity in the This Period cell.
To claim in the Plan Quantity Tracking module, the component WBS must haveAllow-As-Built set to All or Quantities in InEight Control. See your ControlManager to verify this setting if unable to claim the component.
The same scenario follows for claiming in data blocks.
5.2.4 Claiming in the Data Blocks View
In the following Step by Step you will claim quantities in the Data Blocks view.
InEight Inc. | Release 21.1 Page 103 of 112
Plan User Guide 5.2 Quantity Claiming
Quantity Claiming (Data Blocks View)
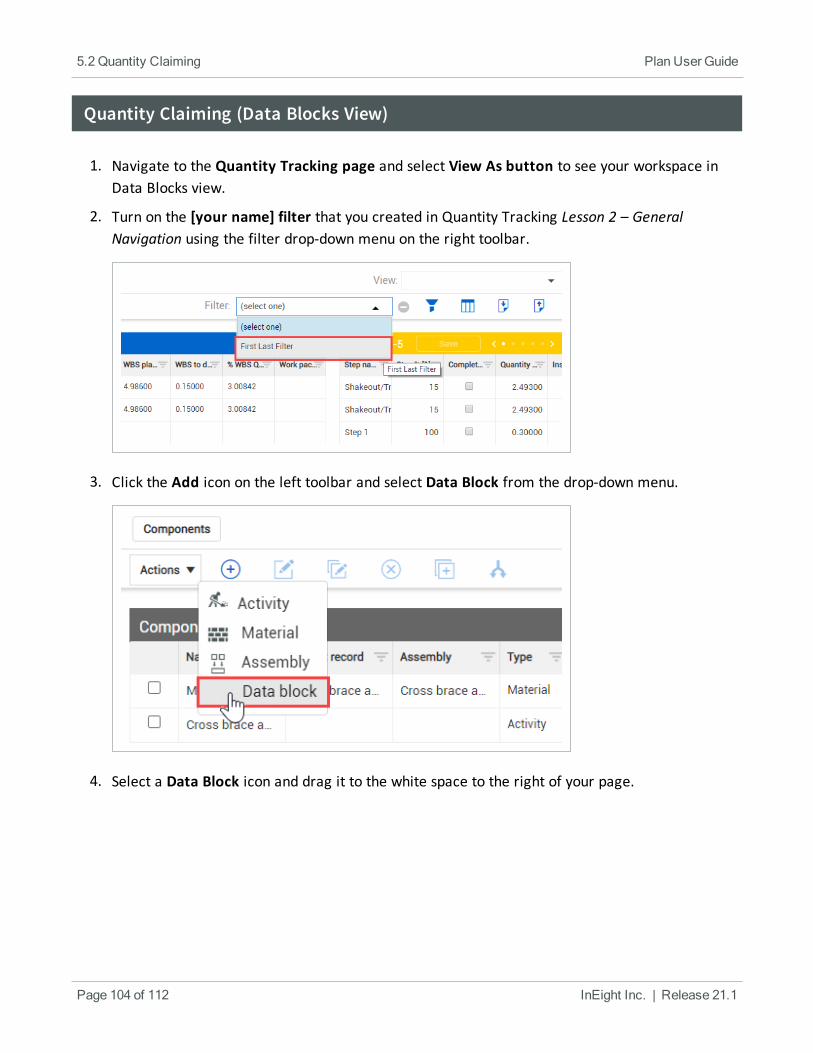
1. Navigate to the Quantity Tracking page and select View As button to see your workspace inData Blocks view.
2. Turn on the [your name] filter that you created in Quantity Tracking Lesson 2 – GeneralNavigation using the filter drop-down menu on the right toolbar.
3. Click the Add icon on the left toolbar and select Data Block from the drop-down menu.
4. Select a Data Block icon and drag it to the white space to the right of your page.
Page 104 of 112 InEight Inc. | Release 21.1
5.2 Quantity Claiming Plan User Guide
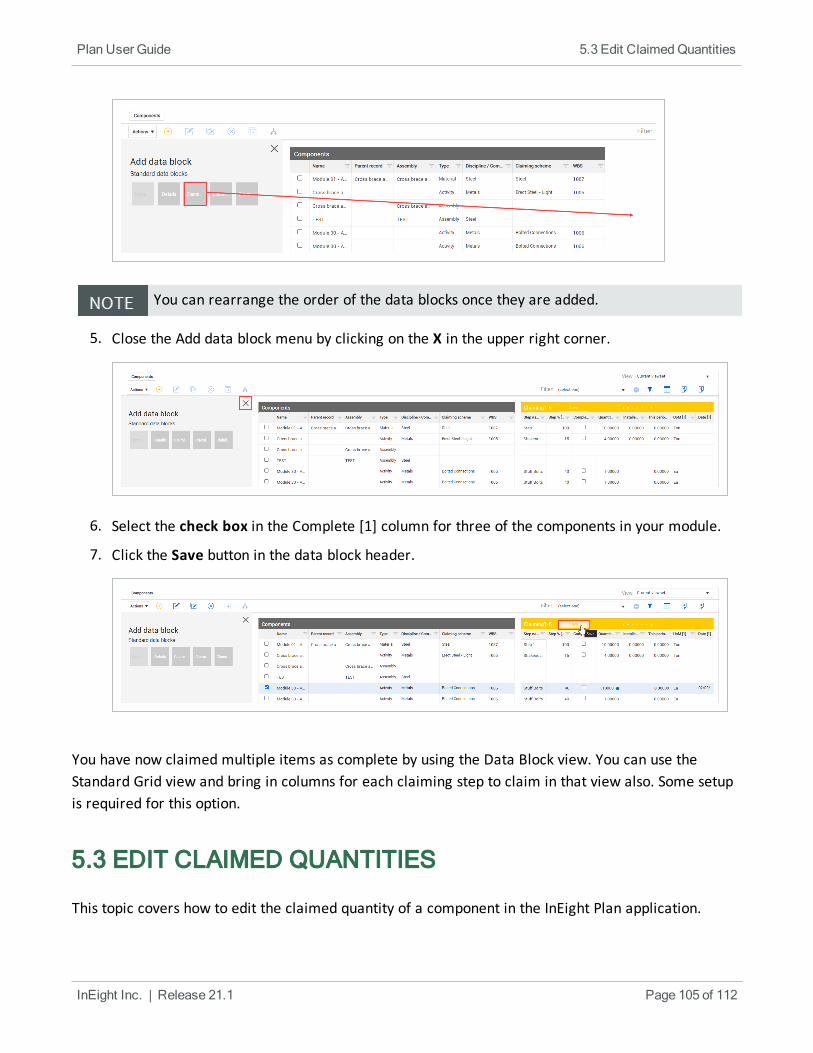
You can rearrange the order of the data blocks once they are added.
5. Close the Add data block menu by clicking on the X in the upper right corner.
6. Select the check box in the Complete [1] column for three of the components in your module.
7. Click the Save button in the data block header.
You have now claimed multiple items as complete by using the Data Block view. You can use theStandard Grid view and bring in columns for each claiming step to claim in that view also. Some setupis required for this option.
5.3 EDIT CLAIMED QUANTITIES
This topic covers how to edit the claimed quantity of a component in the InEight Plan application.
InEight Inc. | Release 21.1 Page 105 of 112
Plan User Guide 5.3 Edit ClaimedQuantities
It is possible that you may need to update the quantity that has been claimed for a component. Youmight find the need to:
l Claim more quantity for a step in a specific component
l Back out quantity that was reported incorrectly
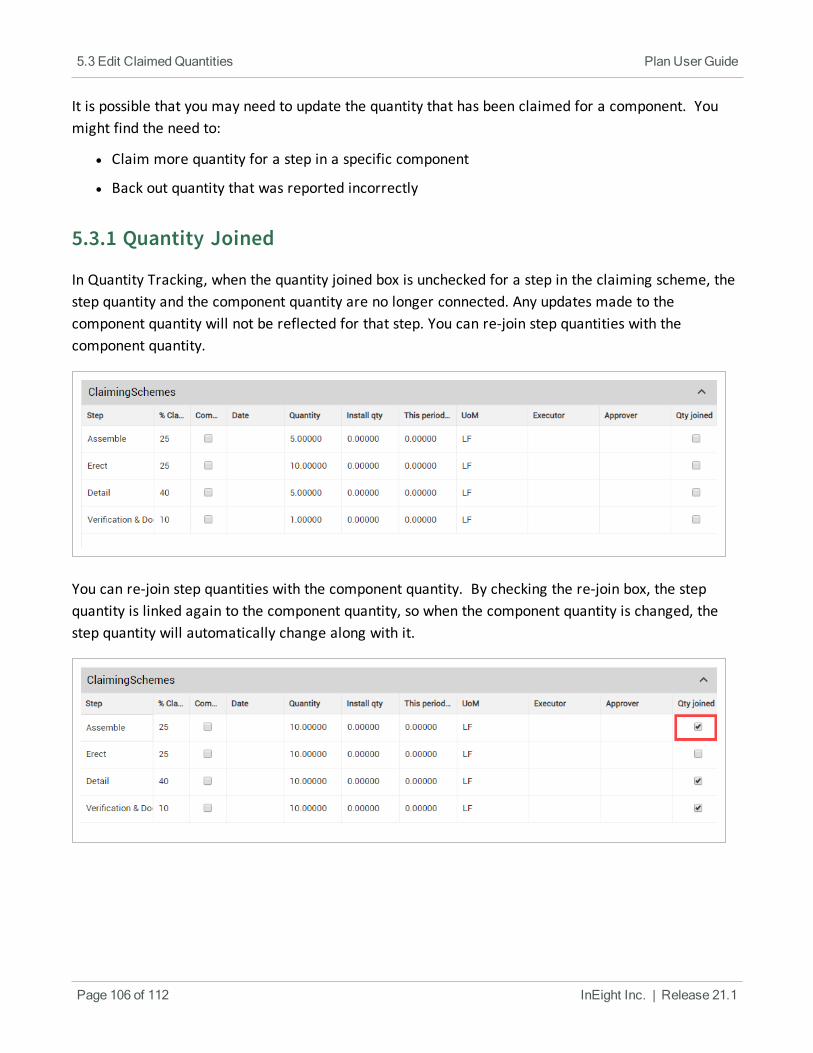
5.3.1 Quantity Joined
In Quantity Tracking, when the quantity joined box is unchecked for a step in the claiming scheme, thestep quantity and the component quantity are no longer connected. Any updates made to thecomponent quantity will not be reflected for that step. You can re-join step quantities with thecomponent quantity.
You can re-join step quantities with the component quantity. By checking the re-join box, the stepquantity is linked again to the component quantity, so when the component quantity is changed, thestep quantity will automatically change along with it.
Page 106 of 112 InEight Inc. | Release 21.1
5.3 Edit ClaimedQuantities Plan User Guide
5.3.2 Quantity Editing
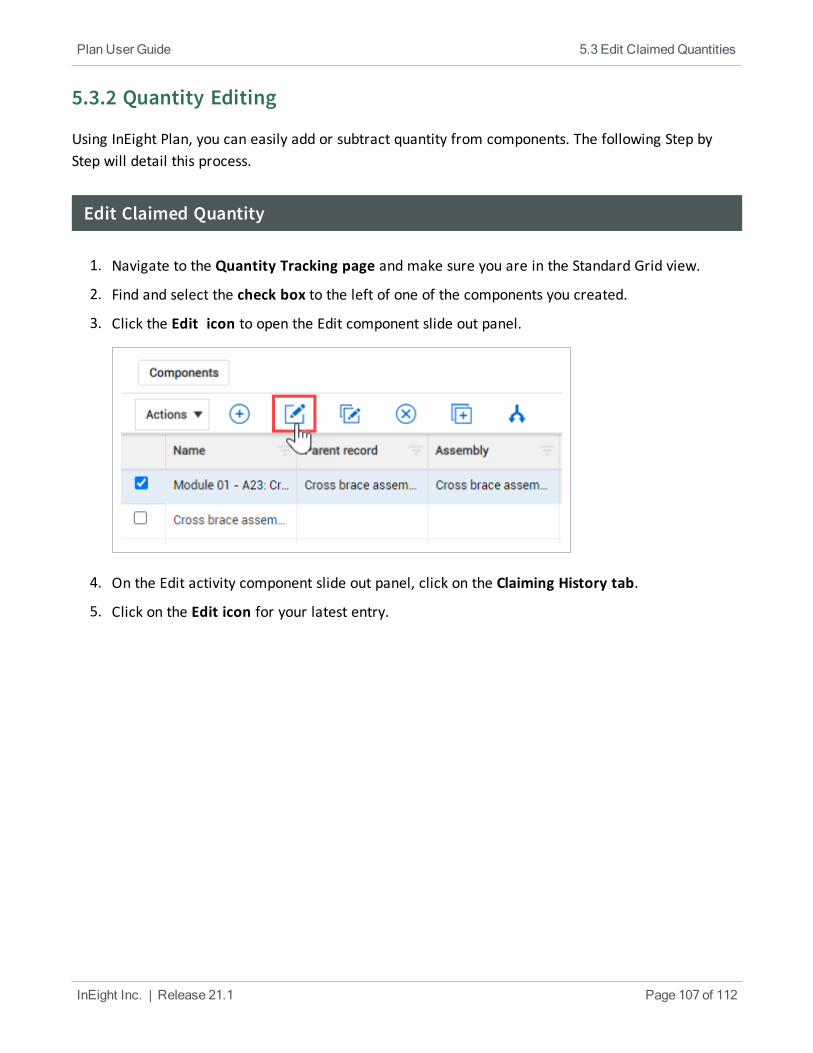
Using InEight Plan, you can easily add or subtract quantity from components. The following Step byStep will detail this process.
Edit Claimed Quantity
1. Navigate to the Quantity Tracking page and make sure you are in the Standard Grid view.
2. Find and select the check box to the left of one of the components you created.
3. Click the Edit icon to open the Edit component slide out panel.
4. On the Edit activity component slide out panel, click on the Claiming History tab.
5. Click on the Edit icon for your latest entry.
InEight Inc. | Release 21.1 Page 107 of 112
Plan User Guide 5.3 Edit ClaimedQuantities
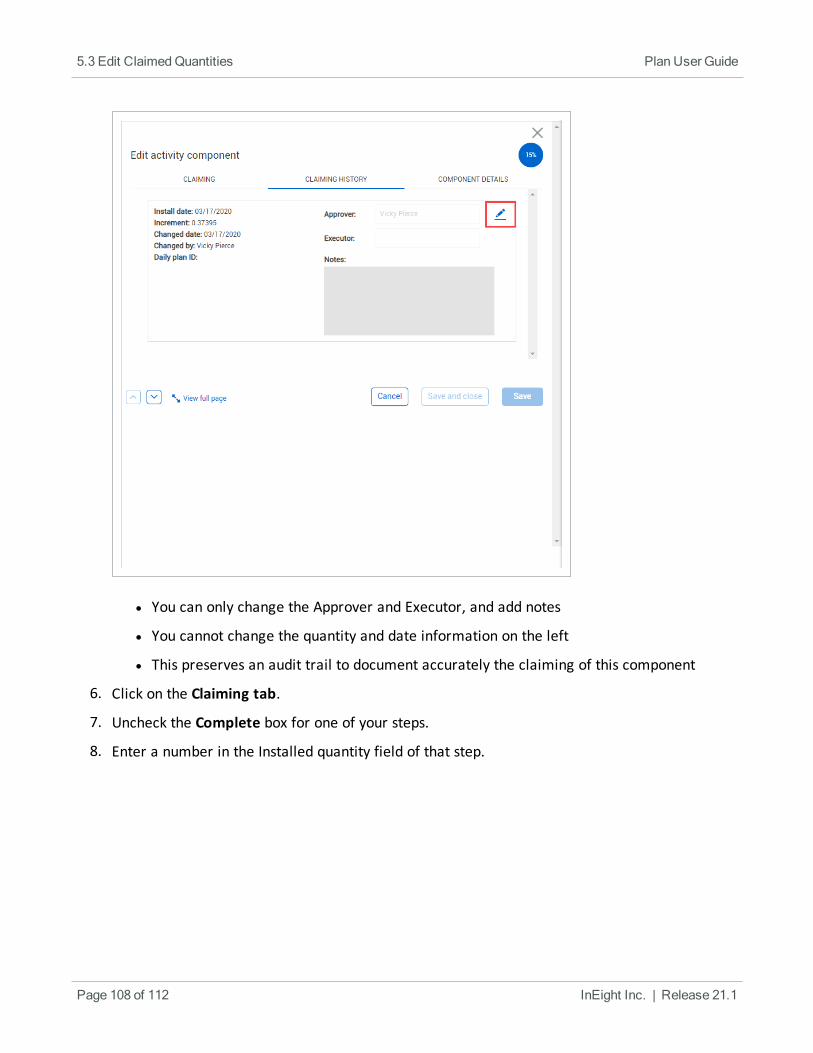
l You can only change the Approver and Executor, and add notes
l You cannot change the quantity and date information on the left
l This preserves an audit trail to document accurately the claiming of this component
6. Click on the Claiming tab.
7. Uncheck the Complete box for one of your steps.
8. Enter a number in the Installed quantity field of that step.
Page 108 of 112 InEight Inc. | Release 21.1
5.3 Edit ClaimedQuantities Plan User Guide
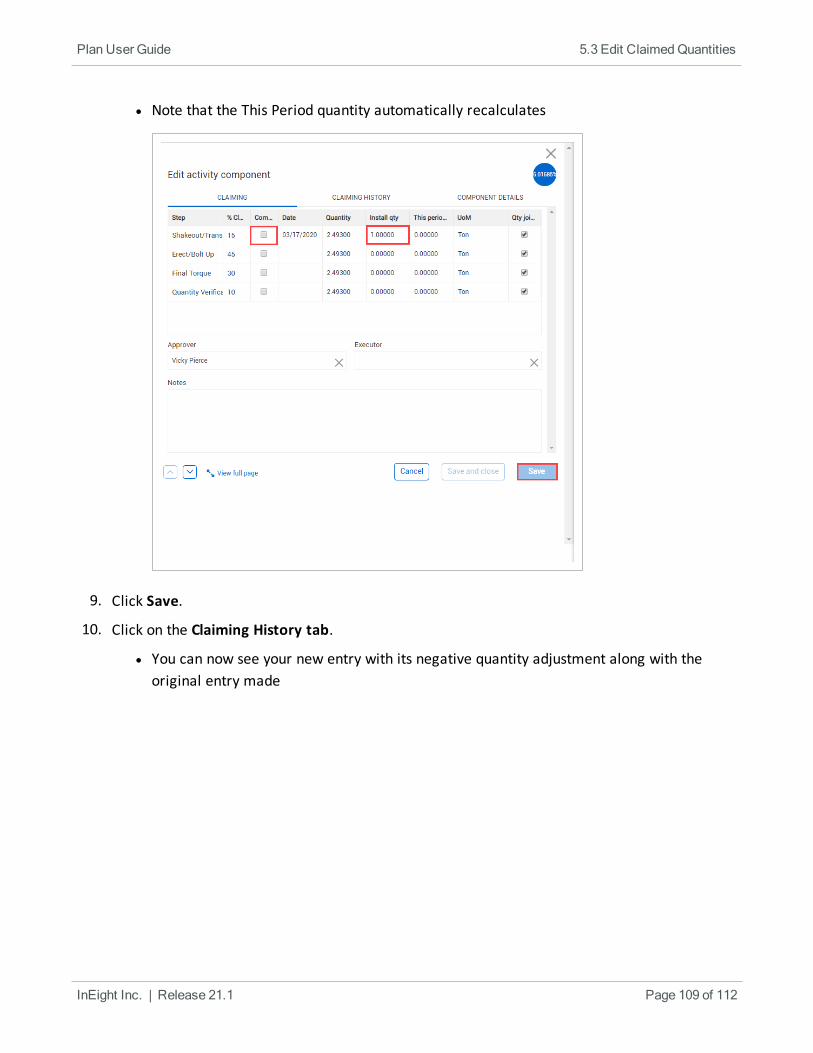
l Note that the This Period quantity automatically recalculates
9. Click Save.
10. Click on the Claiming History tab.
l You can now see your new entry with its negative quantity adjustment along with theoriginal entry made
InEight Inc. | Release 21.1 Page 109 of 112
Plan User Guide 5.3 Edit ClaimedQuantities
Exercise 5.1 — Quantity Claiming
Now that you have learned how to claim and edit quantities in InEight Plan, practice claimingquantities on your own.
1. Using the components you created in Exercise 4.1, claim quantities for each of them.
l Claim at least one of the components from the Edit component slide out panel(accessed from the Standard Grid view of the Quantity tracking page)
l Claim at least one of the components from the Data Blocks view
2. After completing step 1, change the installed quantities back to 0.
Congratulations, you have completed this exercise!
Page 110 of 112 InEight Inc. | Release 21.1
Exercise 5.1 — Quantity Claiming Plan User Guide
Lesson 5 Review
1. Why is it recommended to claim quantities at a component level, instead of at a higherWBS code level?
a. Improved scheduling information
b. Because Accounting needs the information
c. Improved accuracy for inspections
d. Improved tracking visibility because it is more specific
2. What individual(s) can you assign to a component when you are claiming quantities?(Select all that apply)
a. Project Manager
b. Field engineer
c. Executor
d. Approver
e. Superintendent
3. When you claim actuals on components, the quantity complete rolls __________ to theWBS quantity complete, but allows you to drill __________ and see what specific itemsmake up that quantity.
a. up, down
b. down, up
c. left, right
d. right, left
4. When editing claimed quantities on the Edit activity component slide out panel, which ofthe following columns can you edit? (Select all that apply)
a. % Claim
b. Complete
c. Install qty
InEight Inc. | Release 21.1 Page 111 of 112
Plan User Guide Lesson 5 Review
d. Step
e. This period qty
5. You can only add quantities, not deduct any.
a. True
b. False
Lesson 5 Summary
Upon completion of this lesson, you can:
l Claim quantities in Plan
l Edit claimed quantities
Page 112 of 112 InEight Inc. | Release 21.1
Lesson 5 Summary Plan User Guide