pianow - piano self-learning assistant in mixed reality
TRANSCRIPT

Pianow - Piano Self-learning Assistant in Mixed Reality
Created by
Bui Thanh Tung*
Supervisor Dr. Dirk Schnieders
Department of Computer Science The University of Hong Kong
April 14, 2018
* UID: 3035124491, Email: [email protected]

Abstract Learning to play the piano is a difficult process that requires constant
and rigorous practice. While it is believed that 65% percent of human beings are visual learners [1], traditional methods of teaching and learning to play the piano have not been focusing on exploiting the potential of human vision. For example, young children, when learning to play the piano, are very often not allowed to see the names of the keys they press but are instead required to picture the keys in their minds [2]. Meanwhile, in helping new learners picking up the instrument faster, the idea of using falling notes and colored keys as visual hints has proven to be highly promising by many applications. In this project, this idea will be brought into Mixed Reality, a combination that is expected to improve the learning experience, as learners can follow the tutorials without looking away from their own physical piano keyboard. The new application, named Pianow, aims to offer beginners a new way to practice playing the piano by themselves, which is easy, fun, and interactive. Pianow is developed for the HoloLens. It can effectively align virtual assets to the physical piano keyboard and display interactive piano tutorials con-sisting of falling notes and colored keys.
This interim report will discuss the significance of Pianow in assisting and motivating piano learners and justify why the idea of falling notes and colored keys are chosen. In the methodology section, the solutions to some technical challenges, especially hologram alignment, will be presented. Fi-nally, the result and future direction of the project will be discussed and reported.

Acknowledgement We would like to express our sincere appreciation to Dr. Dirk Schnie-
ders, our supervisor, for having offered us the best support from the very beginning of this project to now. We would also like to thank our second examiner Dr. Loretta Choi for the valuable advice and feedback she gave us. Last but not least, we would like to thank the Department of Computer Science HKU for providing us with the funding and materials needed to carry out this project. This project would not have been possible without the help from all of you.

Table of Contents Abstract ____________________________________ 2
Acknowledgement _______________________________ 3
List of Figures _________________________________ 6
List of Tables _________________________________ 8
1 Introduction ________________________________ 9
1.1 Background & Problem Statement ________________ 9
1.2 Current Solutions _________________________ 11
1.3 Motivation _____________________________ 13
1.4 Objectives _____________________________ 13
1.5 Design for Effectiveness _____________________ 14
1.6 Scope ________________________________ 15
1.7 Work Distribution _________________________ 16
2 Methodology ______________________________ 17
2.1 System & Equipment Setup ___________________ 17
2.1.1 Hardware ___________________________ 17
2.1.2 Software ____________________________ 17
2.2 Alignment Methods ________________________ 18
2.2.1 Manual Alignment ______________________ 18
2.2.2 Keyboard Recognition with OpenCV ___________ 20
2.2.3 Marker Detection with Vuforia _______________ 25
2.3 User Interface & Tutorial Content _______________ 27
2.4 Testing & Evaluation _______________________ 27
3 Final Result & Evaluation ______________________ 29
3.1 Work Accomplished ________________________ 29
3.2 Evaluation & Comparison ____________________ 31
3.2.1 Manual Alignment ______________________ 31
3.2.2 Keyboard recognition with OpenCV ____________ 32
3.3.3 Marker Detection with Vuforia _______________ 32
3.3.4 Comparison __________________________ 33
3.3 Difficulties Encountered _____________________ 35
4 Future Direction ____________________________ 37
4.1 Further Improvements ______________________ 37
4.2 Future Prospect __________________________ 38
5 Conclusion ________________________________ 39
References __________________________________ 40

List of Figures Figure 1: An octave consisted of 7 white keys and 5 black keys ............. 9
Figure 2: Synthesia's tutorial with falling notes and colored keys ........ 11
Figure 3: Teomirn's tutorial with virtual hands and keyboard ............. 12
Figure 4: MusicEverywhere's tutorial with virtual band and keys ........ 12
Figure 5: Drag and drop hologram using gestures ................................ 19
Figure 6: Piano keyboard image after binarization ............................... 20
Figure 7: Piano keyboard image after morphologocal closing operation 20
Figure 8: Contour extraction of a preprocessed frame (raw) ................. 21
Figure 9: One remaining contour in quadrangle shape after filtering and approximation ..................................................................................... 21
Figure 10: Center of mass (M) and eigenvector (ME) of the piano keyboard ............................................................................................. 22
Figure 11: Center of mass (red) and geometrical center (blue) of the piano keyboard .................................................................................... 23
Figure 12: Back-projecting pixel coordinates of 𝑀𝑝 and 𝐸𝑝 to world coordinates 𝑀𝑤 and 𝐸𝑤 ...................................................................... 23
Figure 13: Offset of the hologram relative to the piano keyboard ......... 25
Figure 14: Image target with adaquate features detected (yellow cross signs) ................................................................................................... 25
Figure 15: Image target setup with attached 3D keys that can be matched to an octave on the piano keyboard ....................................... 26
Figure 16: Extended tracking allows rendering of the 3D keys without the presence of the marker ................................................................... 26
Figure 17: Manual alignment: low accuracy (left), high accuracy ........ 29

Figure 18: Indicator of the center of mass (the circle) and the orientation of the keyboard (the arrow) recognized by OpenCV .......... 29
Figure 19: Render of the 3D model ontop of the piano keyboard with the correct center of mass and orientation ........................................... 30
Figure 20: Adjust the marker's position to align the virtual keys with the forth octave on the piano keyboard ............................................... 30
Figure 21: Preliminary test result summary ......................................... 34
Figure 22: Performance profiling: mannual alignment .......................... 34
Figure 23: Performance profiling: keyboard recognition with OpenCV . 35
Figure 24: Performance profilling: marker detection with Vuforia ........ 35

List of Tables
Table 1: Work distribution of the final report ...................................... 16
Table 2: Criteria of success testing methods for alignment mechanism . 27
Table 3: Evaluation of 3 alignment methods by testing criteria ........... 33

1 Introduction
1.1 Background & Problem Statement The piano keyboard is composed of only black and white color. The pat-
tern of black and white keys on the piano is repeated every 12 notes (i.e. an octave). This includes 7 white keys and 5 black keys (see Figure 1). The reason for this color scheme is that the black keys help distinguish flats and sharps in musical notation and allow the players to quickly determine where they are on the keyboard [3].
Figure 1: An octave consisted of 7 white keys and 5 black keys
Mastering the piano requires regular and rigorous practice. Professional pianists normally practice 6-8 hours per day and have to take regular breaks [4]. For most piano students, a reasonable amount of practice is around 30 minutes per day [4]. Although, learning to play the piano is time-consuming and repetitive, there are a lot of benefits to playing the piano. Since learners have to quickly differentiate repetitive groups of black and white keys, they acquire the ability to split concentration, which is good for multitasking in real-life situations [5]. Each hand performs entirely different movements, which stimulate multiple parts of the brain. This process is beneficial to hand/eye coordination and also inspires creativity [5].
However, not everyone can attend piano lessons regularly. A 30-minute piano lesson costs USD30-60 on average [6]. Learning to play the piano by oneself is not an easy process, especially for absolute beginners who are not able to read the music sheets. An estimation by CMUSE [7] indicates that 85 percent of piano learners give up on learning at an early stage because they dislike learning the basics. For starters, it is easy to get disheartened if the progress comes slowly. Furthermore, in teaching piano to young children,

many teachers try to use letters of the Alphabet system as notes. However, there is an arising school of thought that this method may hold back the music ear development of children [2]. Sound is an important element of music perception and these abstract symbols do not rely on articulation and have no relationship with music sounds [2]. As a result, forcing the skill of memorizing abstract symbols are arguably not good for children’s musical development.
There have been many attempts to address this problem. The most com-mon form of assistance is self-learning tutorials by means of a video, a book or an application. All these forms, however, have their critical shortcomings. While books are not visually friendly, video tutorials are not interactive enough. From time to time, learners have to alternate between playing the piano and watching the tutorial, which causes great inconvenience. Mobile applications such as Perfect Piano1, an intelligent piano simulator designed for Android phones and tablets, are more interactive, but they fail to offer such experience on a physical piano keyboard. As a result, the learning ex-perience on one of these applications is drastically different from that on a real piano.
Mixed Reality is an emerging technology that embraces the interactions between the virtual and the physical worlds. Many studies have shown that the application of Mixed Reality in education can significantly boost the effectiveness of teaching as well as the performance of learners. For example, Dickey [8] mentions that the use of virtual content in education facilitates a constructivist learning environment, where learners can proactively partici-pate in practical learning activities rather than just trying to absorb theo-retical concepts. Dede [9] also points out that the interactivity brought about by Mixed Reality technology allows knowledge to be obtained through hands-on practices in a virtual environment, which is very difficult to achieve in the real world.
The potentials of Mixed Reality are especially apparent when it comes to learning activities that demand constant practice and high level of interac-tivity like learning to play the piano. A piano tutorial built in Mixed Reality
1 Available at: https://play.google.com/store/apps/details?id=com.gamestar.perfectpiano&hl=en

is expected to offer strong immersive experience and significantly improve the learning outcome.
1.2 Current Solutions There are several piano self-learning tools that are available on the market.
The most prominent solutions include Synthesis, Teomirn and Music Eve-rywhere.
Figure 2: Synthesia's tutorial with falling notes and colored keys2
Synthesia [10] attracts special attention due to its successful idea of build-ing a piano tutorial using falling notes and colored keys (see Figure 2Figure 2). The falling notes match with the keys and let the user know beforehand which notes to be played next. The colored keys simply indicate which keys should be pressed at the moment. The application allows the user to connect to a MIDI piano keyboard, the data from which is then passed back to Synthesia to determine whether a key has been pressed by the user and for how long it has been pressed. With the appropriate piano keyboard, the keys can be illuminated to create the effect of key coloring. Thanks to its intuitive design, Synthesia has made playing the piano easier and more fun to many people. The major downside of Synthesia is that most of the tutorial con-tents are still displayed on the computer screen, and the application needs to be paired with certain types of digital piano keyboard to enable all func-tionality.
2 Youtube Image. Available: https://i.ytimg.com/vi/m5RmYEd1N9I/maxresdefault.jpg
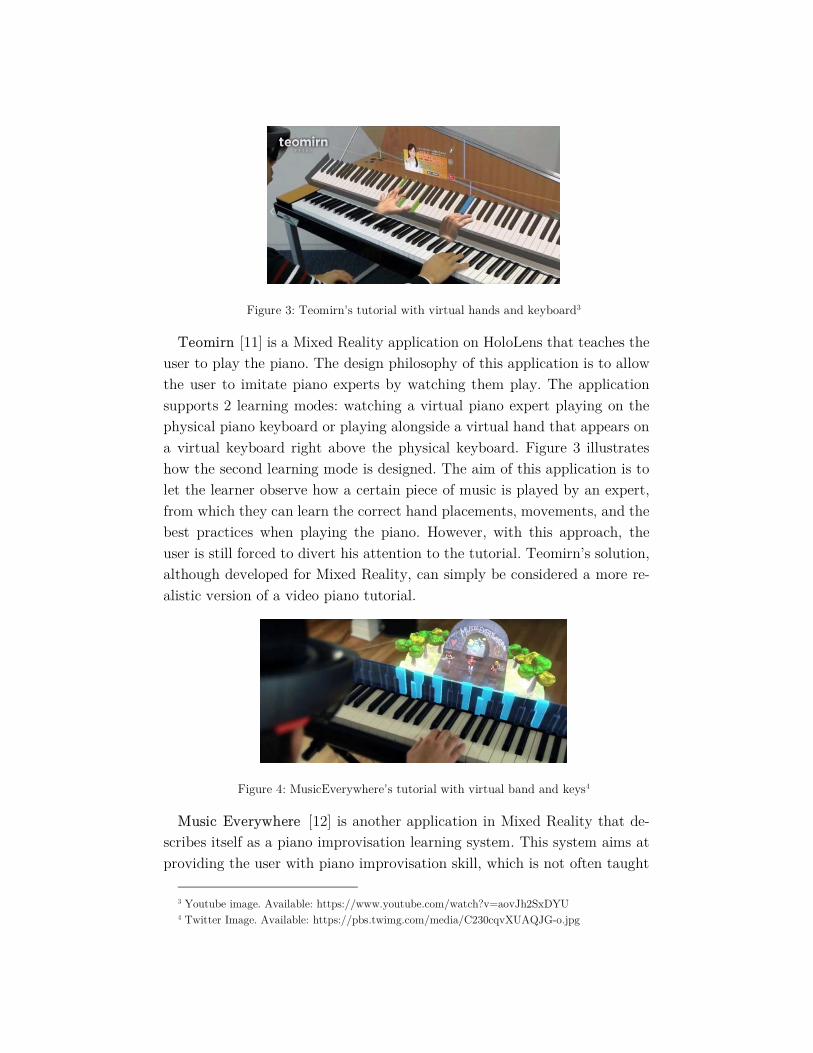
Figure 3: Teomirn's tutorial with virtual hands and keyboard3
Teomirn [11] is a Mixed Reality application on HoloLens that teaches the user to play the piano. The design philosophy of this application is to allow the user to imitate piano experts by watching them play. The application supports 2 learning modes: watching a virtual piano expert playing on the physical piano keyboard or playing alongside a virtual hand that appears on a virtual keyboard right above the physical keyboard. Figure 3 illustrates how the second learning mode is designed. The aim of this application is to let the learner observe how a certain piece of music is played by an expert, from which they can learn the correct hand placements, movements, and the best practices when playing the piano. However, with this approach, the user is still forced to divert his attention to the tutorial. Teomirn’s solution, although developed for Mixed Reality, can simply be considered a more re-alistic version of a video piano tutorial.
Figure 4: MusicEverywhere's tutorial with virtual band and keys4
Music Everywhere [12] is another application in Mixed Reality that de-scribes itself as a piano improvisation learning system. This system aims at providing the user with piano improvisation skill, which is not often taught
3 Youtube image. Available: https://www.youtube.com/watch?v=aovJh2SxDYU 4 Twitter Image. Available: https://pbs.twimg.com/media/C230cqvXUAQJG-o.jpg

but is needed when playing with other artists or in a band. Music Every-where, hence, addresses a slightly different problem compared to that men-tioned in Section 1.1. There are two main components of instruction used in this application: a virtual band along with which the user can play, and a virtual panel placed perpendicular to the piano keyboard to indicate which keys to be pressed or for how long it should be pressed (see Figure 4). Like Teomirn, Music Everywhere does not overlay the tutorial content directly on the physical piano keyboard, which may present a significant obstacle for absolute beginners. The specific focus on piano improvisation skill also ren-ders this application as an inappropriate choice for many piano learners. Additionally, Music Everywhere requires the use of a marker to locate the position of the piano keyboard. In the long term, this is not the best ap-proach to be used on the HoloLens.
1.3 Motivation The project team is motivated to provide a solution that solves the prob-
lems of self-learning piano mentioned in Section 1.1, which is better than or is a complement to the current solutions mentioned in Section 1.2. As Mixed Reality is foreseen to be popular in the near future, a Mixed Reality appli-cation is likely to cost less than hiring a human instructor. Using Mixed Reality as the medium of instruction enhances the teaching content with more visual elements, which make the tutorials easier and more intuitive, especially for young children who have little or no knowledge of musical notation. At the same time, a Mixed Reality application should be fun and interactive, which will inspire beginners to keep practicing as they can see their own progress. Unlike Music Everywhere and Teomirn, however, the new application should append all tutorial content directly on the piano keyboard to make full use of the immersivity of Mixed Reality.
1.4 Objectives The project team aspires to develop a new Mixed Reality application to
assist piano self-learning. The application is named Pianow. Pianow mainly aims to help beginners find playing the piano fun and easy at the early stage so that they have the motivation to keep learning and moving on to later stages. It can also be entertaining even for experienced piano players. In the long term, Pianow is expected to change the way self-taught pianists learn

and allow more people to feel the excitement of playing the piano. At this stage of the project, there are 2 objectives to be achieved:
1. Pianow is reasonably accurate and effective in aligning its virtual content with a standard 88-key piano keyboard.
2. Pianow offers at least 2 working tutorials with intuitive user interface and good user experience.
The first objective involves the main technical challenge of the project. It is important that the application has knowledge about where the physical piano keyboard is in the environment so that virtual contents can be placed appropriately. The second objective is about the practicality of the project, i.e. whether piano tutorials in Mixed Reality are practicable and whether they offer good experience to the user. These two aspects are identified as the two most fundamental issues that the project needs to address at the current stage.
1.5 Design for Effectiveness Pianow's two methods of instruction are determined to be falling notes
and color keys. The choice of these two methods are based on several factors.
The first factor that justifies this approach is the success of Synthesia itself. Synthesia uses the same idea of falling notes and colored keys as the instruction medium, which has proven to be useful for many users, based on multiple ratings and review on App Store and Google Play Store. On Google Play Store, Synthesia has more than a million downloads and holds a rating of 3.8 stars [13]. Meanwhile, on App Store, it is rated at 4.5 [14]. The reviews are generally positive, and a large number of users believe that Synthesia has helped them improve their piano skills in a fun and interactive way.
Nevertheless, from time to time, the most commonly mentioned issue of Synthesia-style tutorial is the fact that it discourages learners from looking at the music sheet, which will form a bad habit in the long term. However, while following the music sheet is one way to learn the piano, learning-by-ear is another method that has proven to be helpful to many people, includ-ing professional pianists. This method, proposed by Shinichi Suzuki in the 1930s, is also referred to as the mother-tongue approach, which is advocated by many influential musicians and has become widely accepted in North

America [15]. The method involves 2 steps. First, to familiarize the learner with a piece of music by letting them listen to it repeatedly for many times and, second, to let them find out by themselves how to play the piece of music on a keyboard without any printed music sheet [15]. The music sheet will be introduced at a later stage when the learner’s ears have been well-trained [15]. The design of Pianow does not strictly follow this framework because it is hard to guarantee that users have been familiar with a piece of music before they start learning it, and when following the tutorial, users do not need to find out by themselves which key to press to replicate the mem-orized melody. Pianow, however, do embrace the idea of intuitive music learning, which allows new learners to learn music in a natural way, without too much emphasis on learning to read the music sheet.
Finally, by overlaying the graphical content directly on the piano key-board, Pianow is likely to boost the productivity of the learning process. The Social Science Research Network states that 65% of human beings are visual learners [1]. Using visual instructions directly on the piano keyboard will probably allow many learners to remember the songs much faster com-pared to other methods.
Certainly, the effectiveness of this design needs to be formally examined. Case study, expert consultation and user-assisted testing are the intended methods for gathering related information and opinions. In the long term, it is necessary to perform an evaluation of real-life use cases over a long period of time to objectively determine the effectiveness of the application. This requires more resources and is out of the scope of the project at the current stage.
1.6 Scope Pianow is a Mixed Reality application developed for HoloLens only. The
piano keyboard to be used with the application should be a standard 88-key keyboard. The application is expected to be used under stable and slightly dim lighting condition (300-500 lux). At this stage, a tutorial consists of only two elements: falling notes and colored keys. Pianow allows basic tutorial customizations, including choosing song, changing speed and switching the music on or off.

1.7 Work Distribution The following table specifies the distribution of work between the 2 mem-
bers of the project team specifically for this report.
Task Bui, Thanh Tung
Tsai, Yi-Ting
Introduction Shared Shared
Methodology - Hologram Alignment ✓
Methodology - User Interface ✓
Final Result & Evaluation for Hologram Alignment
✓
Final Result & Evaluation for User Interface
✓
Future Direction Shared Shared
Conclusion Shared Shared
Table 1: Work distribution of the final report

2 Methodology
2.1 System & Equipment Setup This project requires a range of hardware and software that should be set
up to work in coordination with each other during the development process.
2.1.1 Hardware
The major pieces of hardware used in this project are the HoloLens and a standard 88-key piano keyboard. The HoloLens is a powerful headset designed exclusively for Mixed Reality, and arguably the best of this category on the market. It is also the most widely known Mixed Reality headset with a large supporting community. Hence, it is the most viable option for this project.
Besides, in this project, most of the development tasks are performed in a system with 64-bit dual-core CPU, 8GB of RAM and integrated Intel HD Graphics.
2.1.2 Software
For Mixed Reality development on HoloLens, Microsoft has provided a detailed list of software requirements. According to this list, Unity is required as the officially supported development platform, and Visual Studio has to be used alongside Unity as the debugging and deployment tool for HoloLens [16].
For achieving the first objective of the project, OpenCV and Vuforia are used for keyboard recognition and marker detection respectively. OpenCV library contains implementations of many traditional computer vision algorithms, which are suitable for recognizing objects with standard features like a piano keyboard. Vuforia, on the other hand, is a well-known Augmented Reality SDK with a robust mechanism for marker detection and tracking. It is recommended by Microsoft for application that requires holograms to be placed at certain locations or attached to certain objects [16].
Starting from version 2017.2, Unity has integrated Vuforia as a buit-in module. With appropriate settings, Vuforia can be easily enabled for any

Unity projects. However, as OpenCV is not officially supported by Unity and HoloLens, some extra integration steps need to be performed. First, the code for piano keyboard recognition is written in C++ and then compiled to a Dynamically-linked Library (DLL) file for Universal Windows Platform. OpenCV source code also needs to be slightly modified to remove some dependencies on the Windows Desktop Platform before being compiled to DLLs. This modified version is available on the opencv-hololens5 repository by Sylvain Prevost. Finally, all the DLLs are imported to Unity as native plugins, which can be gracefully deployed and run in the HoloLens.
Additionally, to stream data from the locatable camera of the HoloLens to Unity, the HoloLensCameraStrea6 plugin written by Vulcan Technologies is used. This plugin is necessary since the HoloLens API does not offer a native method for accessing the camera video stream in real-time. The plugin allows the camera stream to be passed to the application at 30 frames per second (fps), which is sufficient for the recognition task.
Finally, some functions that can be implemented using HoloLens API are adapted from the MixedRealityToolkit-Unity 7 repository written by Microsoft. This repository is a collection of pre-made components that can be utilized to accelerate the application development process on the HoloLens. In this project, the features that are adapted from this repository include input handling, spatial mapping and draggable hologram.
2.2 Alignment Methods This section discusses the implementation of three alignment methods. A
comparison of the corresponding alignment results is provided in Section 3.2.
2.2.1 Manual Alignment
The ability to reposition holograms is built-in to the HoloLens. this is the simplest and most effective method to implement when it comes to placing holograms at certain locations in the real world.
5 Source code available at: https://github.com/sylvain-prevost/opencv-hololens 6 Source code available at: https://github.com/VulcanTechnologies/HoloLensCameraStream 7 Source code available at: https://github.com/Microsoft/MixedRealityToolkit-Unity

Figure 5: Drag and drop hologram using gestures
First, a realistic 3D model of the piano keyboard, the size of which accu-rately matches that of a physical piano keyboard, is prepared. This model is available for free download on 3D Warehouse8. The model is oriented per-pendicular to the physical keyboard because it is believed that the user would find it easier to align the virtual and the physical keyboard if they can see both of them clearly at the same time (see Figure 5). The model is attached with HandDraggable script from HoloToolkit, allowing it to be dragged and dropped by the user. A greatly simplified implementation of this mechanism is described in the following pseudo-code snippet.
// All vectors and coordinates are in world space If grabbing gesture detected: Vector3 pivotPosition = Approximately the base of the neck; Vector3 handPosition = Hand position estimated by the HoloLens; Vector3 objectPosition = Position of the point where the object is grabbed; Vector3 handDirection = handPosition - pivotPosition; Vector3 objectDirection = objectPosition - pivotPosition; Quaternion handToObject = Rotation from handDirection to objectDiretion; Float objectDistance = Magnitude(objectDirection); For each frame: If not grabbing: break; Vector3 newPivotPosition = Approximately the base of the neck; Vector3 newHandPosition = Hand position estimated by the HoloLens; Vector3 newHandDirection = newHandPosition - newPivotPosition; Vector3 newObjectDirection = newHandDirection * handToObject; Vector3 newObjectPosition = newPivotPosition + newObjectDirection *
objectDistance;
LinearlyInterpolate(objectPostion, newObjectPosition) objectPosition = newObjectPosition;
8 Download link: https://3dwarehouse.sketchup.com/model/u8824856f-150f-4ae5-b7eb-
a8f4484e9641/88-Key-Piano-Keyboard

The pseudo-code snippet above describes roughly how the new position of the hologram (i.e. newObjectPosition) is calculated based on the displace-ment of the hand in world space. The calculation is done every frame, and after that the hologram is moved smoothly to the new position by linear interpolation. In practice, the changes in the hologram’s rotation and its distance from the user (i.e. objectDistance) also need to be taken into con-sideration.
Additionally, a separate layer mask is assigned to the 3D keyboard model. This layer mask is prioritized to receive raycast hits to ensure that the model can always be selected for drag-and-drop, even if it is blocked by other meshes such as wall and ceiling.
2.2.2 Keyboard Recognition with OpenCV
The piano keyboard recognition algorithm is written in OpenCV and is based on a markerless tracking method proposed by a research group from Nanjing University [17]. The algorithm follows 3 major steps:
Figure 6: Piano keyboard image after binarization
Preprocessing: The purpose of this preprocessing step is to extract only relevant information from the image to reduce computational cost in later steps. The input frame is first binarized with a threshold of 200, taking advantage of the fact that the piano keyboard is only composed of black and white color (see Figure 6). This threshold is chosen empirically, considering how much irrelevant details in the image can be filtered out, leaving only the keyboard area.
Figure 7: Piano keyboard image after morphologocal closing operation
After that, a morphological closing operation with the kernel of size 5x5 is performed on the binary image to eliminate gaps between different keys, which ensures that the entire keyboard area is considered as a connected component (see Figure 7).

Figure 8: Contour extraction of a preprocessed frame (raw)
Contour extraction and analysis: This step is aimed at identifying the keyboard area in the image. The preprocessed image is used for exterior contour extraction (see Figure 8). The contours are then filtered in two ways:
The minimum-size rectangle enclosing each contour is constructed. Only the contours whose minimum-size rectangle’ size and dimension are similar to that of a piano keyboard will be retained. The contours that are too small, too short or have unmatched dimension will be discarded.
The contours are then approximated using Convex Hull and Douglas-Peucker approximation. Convex Hull is meant for including all black keys in the keyboard area, while Douglas-Peucker approximation is intended to approximate the contour containing the piano keyboard to a quadrangle, using an appropriate epsilon value. In this case, the epsilon value is empirically determined to be 𝜀 = 0.015𝑃 , where P is the contour perimeter. Only the convex hulls of those contours that can be approximated to a quadrangle will be retained (see Figure 9).
Figure 9: One remaining contour in quadrangle shape after filtering and approximation

After the filtering steps, if there are more than one remaining contour, one will be chosen as the piano keyboard area. On the other hand, if no contour is retained, it is concluded that the keyboard does not appear in the current frame.
Figure 10: Center of mass (M) and eigenvector (ME) of the piano keyboard
Obtaining the keyboard’s position and orientation: The keyboard po-sition is determined by its center of mass of the contour (point M in Figure 10), which can be calculate using OpenCV Moments class. Image moment is a weighted average of the intensities of all pixels, and it takes on different meanings depending on the order of moment. In OpenCV, moment is calcu-lated with the following formula, where 𝐼(𝑥, 𝑦) is the pixel intensity at co-ordinate (𝑥, 𝑦) and (𝑖, 𝑗) denotes the order of moment.
𝑚 = (𝐼(𝑥, 𝑦) × 𝑥 × 𝑦 )
Applying this formula to calculate the following moments:
𝑚 = 𝐼(𝑥, 𝑦)
𝑚 = (𝐼(𝑥, 𝑦) × 𝑥)
𝑚 = (𝐼(𝑥, 𝑦) × 𝑦)
Here, 𝑚 is the summed intensity of all pixels in the contour without any weighting factor, while 𝑚 and 𝑚 are the summed intensity of all pixels in the contour, weighted by the value of 𝑥 and 𝑦, respectively. The center of mass’ coordinates are given by:
𝑥̅ = 𝑚𝑚
, 𝑦̅ = 𝑚𝑚
By taking into consideration pixel intensities, the center of mass is more stable and consistent compared to the geometrical center, especially for in-put frames of low resolution, or input frames that are blurred or distorted (a comparison can be found in Figure 11). This is critically important due to the low-quality images produced by the HoloLens’ locatable camera (see Section 3.3 for more details).

Figure 11: Center of mass (red) and geometrical center (blue) of the piano keyboard
To find out the orientation of the piano keyboard, the eigenvector of the contour is calculated using Principal Component Analysis (PCA) (vector ME in Figure 10). The calculation of eigenvector in OpenCV is based on the following formula, where C is the covariance matrix, V is the matrix of eigenvectors that diagonalizes C and D is the diagonal matrix of eigenvalues of C [18].
𝑉 − 𝐶𝑉 = 𝐷
The eigenvector denoting the orientation of the keyboard is the first col-umn of V because only one contour is expected to remain after the filtering step. Every time the algorithm finishes processing a frame, the coordinates of two points M and E will be returned to the main program for pose esti-mation.
Figure 12: Back-projecting pixel coordinates of 𝑀 and 𝐸 to
world coordinates 𝑀 and 𝐸
Back-projecting pixel coordinates to world coordinates: In the main program, the pixel coordinates of the center of mass 𝑀 and point 𝐸 on the eigenvector 𝑀 𝐸 of the piano keyboard are returned. These pixel coor-dinates are used to find the coordinates of the corresponding points 𝑀 and 𝐸 in Unity’s world coordinate system (see Figure 12).
yw
xw
zw
World Coordinate
yc
𝑀
xc
zc
Camera Coordinate Image Plane
Piano Spatial Mapping Mesh
𝐸𝑝
𝑀𝑤 𝐸
𝐶

The locatable camera is automatically calibrated by the HoloLens. Its in-trinsic and extrinsic matrices can be retrieved by simply calling the HoloLens API.
𝐾 =𝑓 𝑠 𝑥0 𝑓 𝑦0 0 1
[𝑅|𝑡] = [𝑅 𝑅 𝑅 𝑡]
Where 𝑓 , 𝑓 denotes the focal length, (𝑥 , 𝑦 ) denotes the principal point coordinates, 𝑅 denotes the 3 × 3 rotation matrix and 𝑡 denotes the translation vector of the locatable camera.
Let (𝑥, 𝑦) be the coordinate of a point A in the image plane, then the direction vector of A in the image plane is:
𝑑 = (𝑥 − 𝑥 , 𝑦 − 𝑦 , 1)
In the camera coordinate system, the direction vector of A is: 𝑑 = (𝑥 − 𝑥 𝑓⁄ , 𝑦 − 𝑦 𝑓⁄ , 1)
Image streams from the HoloLens are assumably undistorted throughout the internal processing pipeline [19], so no extra correction step is needed. However, 𝑑 may need to be normalized to 𝑑 ‖𝑑 ‖⁄ .
In the world coordinate system, the rotation of the locatable camera is given by matrix 𝑅. The columns of 𝑅 (i.e. 𝑅 ,𝑅 ,𝑅 ) represent the axes of the world coordinate system as seen from the camera coordinate system. So, the direction vector of A in the world coordinate system is:
𝑑 = (𝑑 ∙ 𝑅 , 𝑑 ∙ 𝑅 , 𝑑 ∙ 𝑅 )
By performing similar steps, the directions of 𝑀 and 𝐸 in world coor-dinate system (i.e. 𝑑 and 𝑑 , respectively) can be obtained. The posi-tion of the camera’s optical center in the world coordinate system is given by 𝐶 = −𝑅 𝑡.
By firing 2 raycasts from 𝐶 along the directions of 𝑑 and 𝑑 in the world coordinate system, the coordinates of 𝑀 and 𝐸 can be determined to be the corresponding hit points on the spatial mapping mesh of the piano keyboard. 𝑀 is taken as the center of mass of the piano keyboard and vector 𝑀 𝐸 indicates the orientation of the keyboard in world space. With this information, a hologram can be placed on top of the physical piano with

the correct position and rotation. This allows the alignment of virtual con-tent on top of the physical piano keyboard.
Figure 13: Offset of the hologram relative to the piano keyboard
Finally, appropriate offsets are added to the transform of application’s content (see Figure 13) as the holograms rendered by the HoloLens are not perfectly static and will shift their positions slightly as the user moves closer to the piano keyboard after the recognition is done. The offset is to take this limitation into account and guarantee that the virtual content ends up in the correct position when the user settles down in front of the piano.
2.2.3 Marker Detection with Vuforia
Since Vuforia is not an open source SDK, the internal algorithms and implementations are not disclosed to the public.
Figure 14: Image target with adaquate features detected (yellow cross signs)
Vuforia allows a custom image target (marker) to be registered in its da-tabase. When an image is registered as an image target, Vuforia performs feature-based analysis on the image’s texture and records the image’s feature points into its database. An image with richer texture allows more feature points to be detected [20]. The image chosen for Pianow after registered with

Vuforia is shown in Figure 14. As it contains many different shapes, bright-ness levels and non-repetitive patterns, there is a large number of feature points detected by Vuforia.
Figure 15: Image target setup with attached 3D keys that can be matched to an octave on the piano keyboard
After the image target is available in the database, it can be imported into a Unity project. The setup of the image target in the Unity scene is illustrated in Figure 15. Upon detecting the image target, Vuforia performs feature-based pose estimation and generates the attached content based on the pose of the target detected. The user is required to make sure that the 3D indicator attached to the image target is aligned with the forth octave on the piano keyboard such that the application content, once generated, will be well aligned with the piano keyboard.
Figure 16: Extended tracking allows rendering of the 3D keys without the presence of the marker
It is important that extended tracking is enabled for the image target. With extended tracking enabled, Vuforia will transform the pose of the im-age target to the HoloLens’ coordinate system. When the target is out of view or Vuforia is disabled, HoloLens will take over the tracking and the

pose information will not be lost. In Figure 16 for example, the marker has been removed from the camera’s view, but the transform of the attached 3D keys is still preserved by the HoloLens.
Once the alignment is finalized, Vuforia is disabled to improve the overall performance and is only re-enabled upon re-alignment operation is requested by the user.
2.3 User Interface & Tutorial Content Please refer to Tsai Yi-Ting’s report for the implementation of the user
interface and tutorial content.
2.4 Testing & Evaluation To assure the quality of the application, a criterion of success and a testing
method have been assigned to each alignment method (see Table 2).
Criterion of Success Testing Method
1 Universality The alignment mecha-nism should work on most standard 88-key piano keyboards under reasonable lighting conditions.
Test the recognition and alignment mecha-nism under various lighting conditions (300-500 lux), using different standard 88-key pi-ano keyboards.
2 Quality An accurate alignment result should be easily attainable.
Moving the head by at most 10cm in all di-rections and check if the holograms are still aligned correctly with the physical keyboard. An accurate alignment result should allow less than 3mm offset. It should not take a user more than 3 tries to achieve good align-ment.
3 Simplicity The alignment process should be simple
The user should be able to follow a simple set of instruction consisted of at most 3 steps to complete the alignment.
Table 2: Criteria of success testing methods for alignment mechanism

To facilitate the testing process, especially for the second and third crite-rion of success, a group of 10 users is selected to attend a preliminary test. This is a simple test organized with the objective of finding out if the align-ment process is easy enough for an ordinary HoloLens user. The participants may or may not have previous exposure to the HoloLens. Experience and knowledge if the piano is irrelevant. The procedure of the test is as follows:
Step 1: Prior to the test, each user is asked to briefly learn some basic gestures on the HoloLens. Afterwards, the user should start using the appli-cation without receiving any further instructions. Help is only provided if explicitly asked by the user.
Step 2: The alignment actions performed by the user are carefully ob-served, and some are recorded with consent. The test users’ live feedback is carefully documented. After the alignment is confirmed, the user is asked if the alignment is satisfactory and if not, he/she is asked to retry. Once the user starts the tutorial, his/her opinion on whether the alignment result poses any difficulties to his/her performance will be collected.
Step 3: The user the is asked to fill in a survey composed of both polar and open-ended questions to collect some final opinion about mainly 2 mat-ters: (i) whether the alignment is good enough for the purpose of the appli-cation and (ii) whether he/she has any suggestion for improving the align-ment process.
Please refer to Tsai Yi-Ting’s report for more details on usability testing.

3 Final Result & Evaluation
3.1 Work Accomplished All three alignment methods discussed in section 2.2 has been imple-
mented and tested against real use cases. Meanwhile, the first prototype of the application, including a functional user interface and two working tuto-rials, is also ready for demonstration.
Figure 17: Manual alignment: low accuracy (left), high accuracy (right)
For Manual Alignment method, Pianow allows the user to move the hologram around the space by simple drag-and-drop gestures. The user can evaluate the alignment result by matching the black and white keys on the 3D model with those on the physical keyboard (see Figure 17). When a good alignment result is achieved, the user can say “confirm” to finalize the align-ment.
Figure 18: Indicator of the center of mass (the circle) and the orientation of the keyboard (the arrow) recognized by OpenCV
For the Keyboard Recognition with OpenCV method, when the user wears the HoloLens and look at the piano keyboard, a white arrow will appear to indicate the center as well as orientation of the keyboard (see Figure 18). The user may need to adjust his/her own perspective of the

physical piano keyboard (e.g. by moving closer or further) to achieve a good recognition result.
Figure 19: Render of the 3D model ontop of the piano keyboard with the correct center of mass and orientation
After obtaining a stable and well-positioned and well-oriented indicator, the user can say “confirm” to finalize the recognition result. A 3D model of the piano keyboard will be rendered at that position, and its orientation should match that of the physical piano keyboard (see Figure 19). The 3D model is not closely attached to the physical piano keyboard due to some programmed offset values (refer to Section 3.2.2 Keyboard recognition with OpenCV). This is because when the user moves closer to the keyboard, the hologram is expected to shift its position and rest right above the top edge of the keyboard.
Figure 20: Adjust the marker's position to align the virtual keys with the forth octave on the piano keyboard
For Marker Detection with Vuforia method , the user should sit down comfortably in front of the keyboard, at a distance suitable for playing the piano, before performing any alignment. Next, the user should place the marker on the top left corner of the middle C and wait for a 3D indicator will show up on top of the marker. the user needs to adjust the marker’s

position to align the indicator with the fourth octave on the piano keyboard (i.e. the octave containing the middle C key, see Figure 20). Upon achieving a good alignment, the user can say “confirm” to finalize the alignment.
In all these three methods mentioned above, the user is always given in-app instructions on how to complete the alignment process, either by voice or by text. Additionally, if the alignment result is not satisfactory, the user has the option to perform re-alignment to obtain a better result.
Please refer to Tsai Yi-Ting’s report for the results of user interface and
tutorial content development, and the corresponding evaluation.
3.2 Evaluation & Comparison This section provides an overall evaluation of each alignment method and
a comparison of these methods.
3.2.1 Manual Alignment
Manual Alignment method is flexible as it gives the user the most control over the alignment process. The user can perform more precise adjustments of the hologram’s position according to his/her own judgement. However, this also means that the method requires more effort from the user compared to other methods. Also, it depends on the assumption that the user is famil-iar with using the HoloLens and has adequate skill to accurately align a hologram with real-world objects.
According to the success criterions in Table 2, this method satisfies uni-versality criterion (1) as it does not depend on any feature of the keyboard except for the dimensions, which are assumed to be fixed. It does not satisfy quality criterion (2) as a good alignment result of less than 3mm offset can only be achieved with enough effort. Finally, simplicity criterion (3) is sat-isfied as the process is easy to understand and requires only 2 steps: (i) drag and drop the hologram and (ii) say “confirm” to finalize the alignment.
This evaluation is consistent with the observations collected during the preliminary test, as most users struggled to align the hologram with the physical keyboard. Eight out of 10 test users indicated that they could not obtain an accurate alignment result with this method. This is predictable

because 70% of the test users did not have any previous exposure to the HoloLens.
3.2.2 Keyboard recognition with OpenCV
Keyboard recognition with OpenCV method provides a better recognition result when the user faces the piano keyboard upfront, and the locatable camera can capture the entire keyboard. This method depends largely on the spatial understanding capability of the HoloLens because the spatial mapping mesh is used to determine the center of mass and orientation of the piano keyboard in world coordinates. Generally, the position and orien-tation of the hologram becomes more accurate as the HoloLens has more time to scan the environment and obtain a better spatial mapping mesh.
The method does not completely satisfy universality criterion (1) because it cannot accurately recognize the keyboard of a white piano. However, it works well on all pianos of darker colors that it has been tested on. Quality criterion (2) is also not met by this method, as the recognition result is unstable due to the instability of the HoloLens’ spatial mapping mesh. Fur-thermore, the programmed offset is currently static, so accuracy is not guar-anteed in all cases, for all users with different heights. In general, it takes around 4-5 attempts to achieve a good alignment result. The method, how-ever, well satisfies simplicity criterion (3) because it is simple and only in-volve two steps from the user’s perspective: (i) wait for the indicator to show up and stabilize itself and (ii) say “confirm” to finalize the alignment.
During the preliminary test, 6 out of 10 test users stated that they could not obtain a good alignment result with this method. Amongst, the 4 users who succeeded with this method, 2 of them had to attempt the alignment more than 3 times.
3.3.3 Marker Detection with Vuforia
Marker detection with Vuforia is a reliable method as the user can carry it out without having to move around the space too much. It also produces reliable and consistent results as the marker tracking mechanism provided by Vuforia is robust. Furthermore, this method does not depend too much on the capabilities of the HoloLens such as field of view or spatial mapping mesh, so it effectively eliminates most shortcomings of this device.

Like manual alignment method, this method satisfies the universality cri-terion as it only depends on the dimensions of the piano keyboard. It also satisfies the quality criterion (2) because an accurate alignment result can be consistently achieved if the marker is correctly positioned and the user can make sure the indicator is aligned with the fourth octave on the key-board. However, it arguably meets the simplicity criterion (3), as the user needs to follow only 3 steps to complete the alignment process: (I) place the marker, (ii) adjust the marker’s position and (iii) say “confirm” to finalize the alignment.
During the preliminary test, 9 out of 10 participants indicated that they could achieve a good alignment result with the using this method. By obser-vation, the 7 participants succeeded with the alignment at first try, and most participants can follow the tutorial with the achieved alignment result.
3.3.4 Comparison
This section offers a summary of the differences three methods regarding and more in-depth comparisons on their performances.
Criteria of success: Marker detection with Vuforia is the only method that satisfies all three criteria.
Manual OpenCV Vuforia Universality ✔ ✖ ✔ Quality ✖ ✖ ✔ Simplicity ✔ ✔ ✔
Table 3: Evaluation of 3 alignment methods by testing criteria
Preliminary test result: Marker detection with Vuforia offers the most satisfaction, the least difficulty and the most successful alignment on first try, while manual alignment is on the opposite side of the scale.

Figure 21: Preliminary test result summary
Performance (CPU, GPU usage, frame rate): Marker detection with Vuforia offers a constant frame rate at 60 fps after startup. However, it is a lot more GPU-intensive compared to the other two. Mannual alignment has a fluctuating frame rate everytime the the drag-and-drop actions are performed. Keyboard recognition with OpenCV has higher average frame rate compared to to mannual alignment (although there is still some fluctuations). All three application makes use of the CPU equally at runtime. In conclusion, marker deteciton method, although GPU-intensive, is still more stable and efficient than the other methods.
Figure 22: Performance profiling: mannual alignment
2
4
910
8
5
12
7
0
2
4
6
8
10
12
Manual OpenCV VuforiaN
umbe
r of u
sers
Satisfied Encounter difficulties Succeed at first try

Figure 23: Performance profiling: keyboard recognition with OpenCV
Figure 24: Performance profilling: marker detection with Vuforia
3.3 Difficulties Encountered There are 3 major difficulties encountered in this project.
Firstly, the project team lacks experience with most of the tools, such as Unity, .NET development, HoloLens API, OpenCV, etc. This introduces a big learning curve to every development steps and requires extensive effort and patience in researching and debugging.

Secondly, most of the tools related to the HoloLens are new. Therefore, the documentations are not detailed and well-organized enough. The com-munity is also highly immature, so there is not much support if any problem is encountered during the development process. Additionally, since the tech-nologies are still under development, there are many shortcomings. For ex-ample, different versions of Unity may cause conflicts with different versions of other software, so it is difficult to decide on a version that can integrate gracefully with every tool. Besides, as the HoloLens’ locatable camera cannot be accessed from the Unity Editor, it is impossible to test the application within the editor environment. The consequence is that every testing and debugging process requires deployment to the HoloLens, which significantly slow down the development progress.
Finally, the HoloLens itself has many unexpected limitations that cause the project's approach to change several times. For instance, the video stream from the HoloLens’ locatable camera has a much lower resolution than how it is claimed to be. This makes it impossible to achieve a very good recognition result and requires additional alignment method such as manual alignment by the user. Other limitations such as the low frame rate, small field of view and inaccurate spatial mapping mesh also disallowed many solutions that the project team came up with.

4 Future Direction
4.1 Further Improvements In the future, improvements on the robustness of Keyboard Recognition
with OpenCV method will be attempted. More specifically, the underlying algorithm will be enhanced to meet the universality criterion. The reason for this is because this method, although does not offer good alignment re-sults at this stage, is foreseen to be more suitable for future releases of the HoloLens (see Section 4.2 for more details). Besides, the implementation of marker detection will be attempted with the Aruco marker feature offered by OpenCV. This change is expected to get rid of many unused Vuforia modules and, hence, improve the overall performance of the application.
In the future, we aim to have more tutorials available, allowing the users to play different music genres. The songs will be separated into different levels of difficulty to let the users choose their own preferences. In this way, the user could obtain a sense of achievement after completing each level and have the motivation to keep learning. Furthermore, the project team is plan-ning to add the ability to choose only left or right hand to practice in a tutorial, which offers an easier option to beginners. Additionally, the current version of HoloLens has a very limited field of view that the user cannot play both hands at the same time. Almost all participants in our preliminary test encountered the same problem. This new functionality can be a tempo-rary solution to this.
In the further future, the project team is aspired to add a personal evalu-ation system, which will give live feedback to the user on their performance and will also collect relevant data to personalize the user’s experience. This functionality, however, may requires Bluetooth connection and requires a Bluetooth-enabled keyboard. Also, it is observed from preliminary survey that some subjects who have not previously learnt to play the piano had the incorrect hand placement. Thus, a functionality that teach users the correct hand placement, such as numbering the keys according to finger indexes, will be helpful.

4.2 Future Prospect The next generation of HoloLens is expected to have more accurate spatial
mapping and locatable camera with higher resolution. These two improve-ments will greatly enhance the OpenCV keyboard recognition results. Also, if the holograms are more stable or the field of view is wider, the need for an initial offset between the virtual content and the physical piano keyboard can be removed, which will enhance the reliability of the method. For this reason, the implementation of keyboard recognition in OpenCV is still be-lieved to be the best method of recognition in the future, which is easy, fast and accurate.
Additionally, the wider field of view and more stable holograms will also improve the user experience and allow fully immersive tutorials. When the HoloLens is more accessible as a commercial product, Pianow is expected to be one of the applications that led the trend of musical education in Mixed Reality.
To ensure that Pianow has educational practicality, however, it is important to ensure that the application is effective in assisting piano learners. This will necessarily require a formal study which involves a large number of participants over a long period of time to objectively determine the extent to which the application can assist people in self-learning the piano. If the current design of the application is proven to be ineffective, there are still many possible designs that can be attempted, thanks to the flexibility of the current design. For example, most of the formal piano lessons for beginners such as learning the music notes, ear training, finger speed exercises or chord progression can be implemented for Pianow, with the use of the 3D screen and key overlays.

5 Conclusion The objective of the project is to build a piano tutorial application on
HoloLens that gives piano learners a better learning experience with its 2 guiding features: falling notes and colored keys. The main difference of this application compared to existing solutions is that all holograms are shown directly on the physical piano keyboard, which makes the tutorials easier to follow. The project uses the HoloLens, OpenCV and Vuforia during the de-velopment process. There are two major challenges to be addressed in this project: virtual asset alignment and design for effectiveness. The first objec-tive of the project has been achieved with satisfactory results. Three meth-ods have been implemented, including manual alignment, keyboard recogni-tion with OpenCV and marker detection with Vuforia. Generally speaking, the third method currently offers the best alignment results. However, with view to the future improvements of the HoloLens, the second method is more prominent as it is expected to offer better user experience. The UI and the tutorial contents of the application have also been implemented, and the application is ready for a demonstration. A preliminary test involving se-lected participants from outside the development team have also been car-ried out to collect input on the usefulness and usability of the application. The result is promising, even though there are still room for improvement.
In the future, more functionality such as hand placement lessons and eval-
uation system will be added. Regarding the effectiveness of the current tu-torial design, more in-depth research is needed before any conclusion can be derived. Regardless of the uncertainty, the flexible design of Pianow makes many future adjustments possible, so its potential is hard to undermine. In the long term, the application is anticipated to change the way self-taught pianists learn and be a good foundation for future projects which aspire to exploit the potential of Mixed Reality in musical education.

References
[1] T. J. McCue, »Why Infographics Rule,« 2013. [Online]. Available: https://www.forbes.com/sites/tjmccue/2013/01/08/what-is-an-infographic-and-ways-to-make-it-go-viral/#432c05dd7272.
[2] Soft Mozart Community, »How Traditional Piano Lessons Cripple Our Children,« 2018. [Online]. Available: http://www.softmozart.com/our-library/articles/46-how-traditional-piano-lessons-cripple-our-children.html.
[3] Living Pianos, »Why are there Black and White Keys on the Piano?,« 2015. [Online]. Available: https://livingpianos.com/uncategorized/why-are-there-black-and-white-keys-on-the-piano/.
[4] Musiah, »Piano Practice Tips: The 12 Most Common Piano Practice Mistakes And How To Correct Them,« 2013. [Online]. Available: http://www.musiah.com/blog/2013/august/12-common-piano-practice-mistakes.aspx.
[5] Health Fitness Revolution, »Top 10 Health Benefits of Playing the Piano,« 2015. [Online]. Available: http://www.healthfitnessrevolution.com/top-10-health-benefits-playing-piano/.
[6] Thumbtack, »How much do piano lessons cost?,« 2017. [Online]. Available: https://www.thumbtack.com/p/piano-lessons-cost.
[7] CMUSE, »How To Get Your Child Excited To Play A Musical Instrument,« 2014. [Online]. Available: https://www.cmuse.org/how-to-get-your-child-excited-to-play-a-musical-instrument/.
[8] M. D. Dickey, »Teaching in 3D: Pedagogical Affordances and Constraints of 3D Virtual Worlds for Synchronous Distance Learning,« Distance Education, årg. 24, nr. 1, pp. 105-121, 2013.
[9] C. Dede, »The Evolution of Constructivist Learning Environments: Immersion in Distributed, Virtual Worlds,« Educational Technology, årg. 35, nr. 5, pp. 46-52, 1995.
[10] N. Piegdon, »Synthesia,« 2017. [Online]. Available: http://www.synthesiagame.com/.

[11] RealityDome, »Exclusive Interview with Ayato Fujii creator of Teomirn App,« 2017. [Online]. Available: http://www.realitydome.com/interview-ayato-fujii-teomirn-app/.
[12] S. Glickman, S. Das, B. Lee og F. Y. Hsiao, »Music Everywhere,« 2016. [Online]. Available: https://www.etc.cmu.edu/projects/music-everywhere/.
[13] Google, »Synthesia,« 2018. [Online]. Available: https://play.google.com/store/apps/details?id=com.synthesia.synthesia&hl=en.
[14] Apple, »Synthesia,« 2018. [Online]. Available: https://itunes.apple.com/us/app/synthesia/id579518445?mt=8.
[15] G. Comeau, »Playing by ear in the Suzuki Method: Supporting evidence and concerns in the context of piano playing,« The Canadian Music Teacher, årg. 62, nr. 3, p. 42, 2012.
[16] Microsoft, »Install the tools,« 2018. [Online]. Available: https://docs.microsoft.com/en-us/windows/mixed-reality/install-the-tools.
[17] F. Huang, Y. Zhou, Y. Yu, Z. Wang og S. Du, »Piano AR: A Markerless Augmented Reality Based Piano Teaching System,« Third International Conference on Intelligent Human-Machine Systems and Cybernetics, årg. 2, pp. 47-52, 2011.
[18] OpenCV, »Introduction to Principal Component Analysis(PCA),« 2015. [Online]. Available: https://docs.opencv.org/3.1.0/d1/dee/tutorial_introduction_to_pca.html.
[19] Microsoft, »Locatable Camera,« 2018. [Online]. Available: https://docs.microsoft.com/en-us/windows/mixed-reality/locatable-camera.
[20] Vuforia, »User Defined Targets,« 2018. [Online]. Available: https://library.vuforia.com/articles/Training/User-Defined-Targets-Guide.