owner's manual - billebro
TRANSCRIPT

Owner’s ManualDigital Multitracker
8588062100(428387)

2
MR-8HD Owner’s Manual (Safety instructions/Contents)
CAUTION: TO REDUCE THE RISK OF ELECTRIC SHOCK,
DO NOT REMOVE COVER (OR BACK).
NO USER - SERVICEABLE PARTS INSIDE.
REFER SERVICING TO QUALIFIED SERVICE PERSONNEL.
CAUTIONRISK OF ELECTRIC SHOCK
DO NOT OPEN
11. Grounding or Polarization - The precautions that should betaken so that the grounding or polarization means of anappliance is not defeated.
12. Power Cord Protection - Power supply cords should berouted so that they are not likely to be walked on or pinchedby items placed upon or against them, paying particularattention to cords at plugs, convenience receptacles, andthe point where they exit from the appliance.
13. Cleaning - The appliance should be cleaned only asrecommended by the manufacturer.
14. Nonuse Periods - The power cord of the appliance shouldbe unplugged from the outlet when left unused for a longperiod of time.
15. Object and Liquid Entry - Care should be taken so that objectsdo not fall and liquids are not spilled into the enclosure throughopenings.
16. Damage Requiring Service - The appliance should beserviced by qualified service personnel when:A. The power supply cord or the plug has been damaged; orB. Objects have fallen, or liquid has been spilled into the appliance;
orC. The appliance has been exposed to rain; orD. The appliance does not appear to operate normally or
exhibits a marked change in performance; orE. The appliance has been dropped, or the enclosure damaged.
17. Servicing - The user should not attempt to service theappliance beyond that described in the operating instructions.All other servicing should be referred to qualified servicepersonnel.
18. The appliance should be situated away from drops of wateror spray of water.
19. Objects containing liquid such as vase must not be put onthe appliance.
20. The appliance is not completely isolated from the powersupply even if the power switch is at off position.
21. Apparatus shall not be exposed to dripping or splashingand no objects filled with liquids, such as vases, shall beplaced on the apparatus.
22. Only use attachments/accessories specified by themanufacturer.
23. An appliance with a protective earth terminal should beconnected to a mains outlet with a protective earthconnection.
24. An appliance should be placed in a position where an ACplug / inlet can be easily pulled out by hand.
The lightning flash with arrowhead symbol, within anequilateral triangle, is intended to alert the user to thepresence of uninsulated "dangerous voltage" within theproduct's enclosure that may be of sufficient magnitude toconstitute a risk of electric shock to persons.
The exclamation point within an equilateral triangle isintended to alert the user to the presence of importantoperating and maintenance (servicing) instructions in theliterature accompanying the appliance.
CAUTION:TO PREVENT ELECTRIC SHOCK, MATCH WIDE BLADEOF PLUG TO WIDE SLOT, FULLY INSERT.
ATTENTION:POUR EVITER LES CHOCS ELECTRIQUES,INTRODUIRE LA LAME LA PLUS LARGE DE LA FICHEDANS LA BORNE CORRESPONDANTE DE LA PRISE ETPOUSSER JUSQU' AU FOND.
An appliance and cart combination should be moved withcare. Quick stops, excessive force, and uneven surfacesmay cause the appliance and cart combination to overturn.
7. Wall or Ceiling Mounting - The appliance should be mountedto a wall or ceiling only as recommended by themanufacturer.
8. Ventilation - The appliance should be situated so that itslocation or position dose not interfere with its properventilation. For example, the appliance should not be situatedon a bed, sofa, rug, or similar surface that may block theventilation openings; or, placed in a built-in installation, suchas a bookcase or cabinet that may impede the flow of airthrough the ventilation openings.
9. Heat - The appliance should be situated away from heatsources such as radiators, heat registers, stoves, or otherappliances (including amplifiers) that produce heat.
10. Power Sources - The appliance should be connected to apower supply only of the type described in the operatinginstructions or as marked on the appliance.
"WARNING""TO REDUCE THE RISK OF FIRE OR ELECTRICSHOCK, DO NOT EXPOSE THIS APPLIANCE TO RAINOR MOISTURE."
SAFETY INSTRUCTIONS1. Read Instructions - All the safety and operating instructions
should be read before the appliance is operated.2. Retain Instructions - The safety and operating instructions
should be retained for future reference.3. Heed Warnings - All warnings on the appliance and in the
operating instructions should be adhered to.4. Follow Instructions - All operating and use instructions should
be followed.5. Water and Moisture - The appliance should not be used
near water - for example, near a bathtub, washbowl, kitchensink, laundry tub, in a wet basement, or near a swimmingpool, and the like.
6. Carts and Stands - The appliance should be used only witha cart or stand that is recommended by the manufacturer.

3
MR-8HD Owner’s Manual (Safety instructions/Contents)
Important Safety Instructions
1) Read these instructions.
2) Keep these instructions.
3) Heed all warnings.
4) Follow all instructions.
5) Do not use this apparatus near water.
6) Clean only with dry cloth.
7) Do not block any ventilation openings.
Install in accordance with the
manufacturer's instructions.
8) Do not install near any heat sources such
as radiators, heat registers, stoves, or
other apparatus (including amplifiers) that
produce heat.
9) Do not defeat the safety purpose of the
polarized or grounding-type plug.
A polarized plug has two blades with one
wider than the other. A grounding type
plug has two blades and a third grounding
prong. The wide blade or the third prong
are provided for your safety.
If the provided plug does not fit into your
outlet, consult an electrician for
replacement of the obsolete outlet.
10) Protect the power cord from being walked
on or pinched particularly at plugs,
convenience receptacles, and the point
where they exit from the apparatus.
11) Only use attachments/accessories
specified by the manufacturer.
12) Use only with the cart, stand, tripod,
bracket, or table specified by the
manufacturer, or sold with the apparatus.
When a cart is used, use caution when
moving the cart/apparatus combination
to avoid injury from tip-over.
13) Unplug this apparatus during lightning
storms or when unused for long periods
of time.
14) Refer all servicing to qualified service
personnel. Servicing is required when the
apparatus has been damaged in any
way, such as power-supply cord or plug
is damaged, liquid has been spilled or
objects have fallen into the apparatus, the
apparatus has been exposed to rain or
moisture, does not operate normally, or
has been dropped.

4
MR-8HD Owner’s Manual (Safety instructions/Contents)
Read this chapter first! ...................................................................................................... .......9
Introduction .................................................................................................................. ........10
MR-8HD main features ........................................................................................................10
Precautions before using ...................................................................................................11About power supply ...................................................................................................11Precautions upon installing the MR-8HD ...............................................................11Notes on repair ...........................................................................................................11About copyrights ........................................................................................................11About damages ...........................................................................................................11Note on audio interruption .......................................................................................11Notes on USB connection with Mac OS ....................................................................11
The basics of the MR-8HD ..................................................................................................12Recording method ......................................................................................................12About song ...................................................................................................................13Remain (recordable space left on the disk) ............................................................13Time base .....................................................................................................................14Input and repro monitor ...........................................................................................14TRIM control ................................................................................................................15
Names and functions ........................................................................................................... ..17
Top panel 1 ................................................................................................................... .........18
Top panel 2 ................................................................................................................... .........20
Rear panel .................................................................................................................... .........22
LCD display ................................................................................................................... .......23Home screen ................................................................................................................23Selecting a time base mode ......................................................................................24Adjusting the display contrast .................................................................................24MENU mode screen ....................................................................................................25Warning message .......................................................................................................25
Basic operations .............................................................................................................. .......27
About power ................................................................................................................... ......28Power connection .......................................................................................................28
About the standby mode ......................................................................28Turning on the unit ....................................................................................................28
Listening the demo song ....................................................................................................29Connecting headphones (or monitor speaker system) ........................................29Playing back the demo song .....................................................................................30
Creating a song for recording ..........................................................................................31
Safety Instructions ........................................................................................................... ......2
Table of contents

5
MR-8HD Owner’s Manual (Safety instructions/Contents)
Input connection .............................................................................................................. ....33Input channel ..............................................................................................................33INPUT A SEL switch .....................................................................................................33Recording track combinations and available input channel(s) ..........................34
Recording onto a single track ............................................................................................35Preparation for recording .........................................................................................35Starting recording ......................................................................................................36Playing back the recorded track ...............................................................................36Undoing recording (undo/redo) .............................................................................36
Overdubbing basics ............................................................................................................ 37Preparation for recording .........................................................................................37Adjusting the recording levels while listening to track 1 .....................................38Starting recording ......................................................................................................38Playing back recorded track .....................................................................................38Undoing recording (undo/redo) .............................................................................38
Recording onto four tracks simultaneously ....................................................................39Preparation for recording .........................................................................................39Starting recording ......................................................................................................40Playing back recorded tracks ....................................................................................40Undoing recording (undo/redo) .............................................................................40
Basic mixdown ................................................................................................................. ....41Mixdown to an analog recorder ...............................................................................41Mixdown to a digital recorder ..................................................................................42
Advanced playback and locates functions .........................................................................43
3 x cueing .................................................................................................................... ..........44
Playback between LOCATE A and B points .....................................................................44
Play mode ..................................................................................................................... .........45Selecting a play mode ................................................................................................45Auto play mode ...........................................................................................................46Auto return mode .......................................................................................................46Loop mode ...................................................................................................................46
Loop function in auto punch in/out mode ........................................47
Locate function ............................................................................................................... .....48Time locate ..................................................................................................................48
Locating to the beginning (ABS ZERO) of a song ...............................48Locating to the recording end point (REC END) of a song ...............48
Locating to the LOCATE A or LOCATE B point ........................................................49Setting the LOCATE A or LOCATE B point ..........................................49Locating ...................................................................................................50
Punch in/out .................................................................................................................. ...........51
Punch in/out using the keys on the top panel ..................................................................52
Punch in/out using the footswitch .....................................................................................53
Auto punch in/out ............................................................................................................. ....54Setting the punch-in and punch-out points ...........................................................54Rehearsal for auto punch in/out ..............................................................................55Actual auto punch in/out ..........................................................................................56
6
MR-8HD Owner’s Manual (Safety instructions/Contents)
Track bouncing ................................................................................................................ .......63
Preliminary knowledge .......................................................................................................64Track bouncing example ...........................................................................................64Signal flow of track bouncing ...................................................................................65
Bouncing tracks 1 through 4 to tracks 5/6 ........................................................................66Rehearsal of track bouncing .....................................................................................66Actual track bouncing ...............................................................................................67Checking the bounced signals on tracks 5/6 .........................................................67
Bouncing tracks 1 through 6 to tracks 7/8 ........................................................................68Rehearsal of track bouncing .....................................................................................68Actual track bouncing ...............................................................................................69Checking the bounced signals on tracks 7/8 .........................................................69
Bouncing tracks 1 through 8 to a new song .....................................................................70Rehearsal of track bouncing .....................................................................................70Actual track bouncing ...............................................................................................71
Mixing signals of inputs A through D ................................................................................72Connecting sound sources to INPUT A through INPUT D ....................................72[TO STEREO BUSS ON/OFF] key setting ...................................................................72Panning setting for INPUT A through INPUT D ......................................................73
Bouncing the desired part of a song .................................................................................74
Rhythm guide function ......................................................................................................... .75
Using the rhythm guide function .......................................................................................76Setting the time signature and tempo .....................................................................76
Creating the conductor map ..............................................................................................78Setting the signature map .........................................................................................78
Editing a time signature event .............................................................80Deleting an unnecessary time signature event .................................80
Editing the bar offset ..................................................................................................81Setting the tempo map ...............................................................................................82
Editing a tempo event ...........................................................................84Deleting an unnecessary tempo event ...............................................84
Using effects ................................................................................................................. ...........57
Using the insert effects ...................................................................................................... .58Mic simulation effects ................................................................................................58Amp simulation effects ..............................................................................................58
Applying external effects ....................................................................................................5 9
Using the reverb or delay ....................................................................................................6 0Selecting an effect type ..............................................................................................60Selecting a delay type ................................................................................................60Adjusting the delay/reverb time .............................................................................61Adjusting the effect send levels ................................................................................61
Using the mastering effects ...............................................................................................62Selecting the desired effect type ..............................................................................62

7
MR-8HD Owner’s Manual (Safety instructions/Contents)
MIDI synchronization .......................................................................................................... ...85
Synchronization using MTC ...............................................................................................86Connection ..................................................................................................................86Settings of the MR-8HD and MIDI sequencer .........................................................86MIDI sync/MTC frame rate settings .........................................................................86
Synchronization using MIDI clock .....................................................................................87Connection ..................................................................................................................87Settings of the MR-8HD and MIDI sequencer .........................................................87
Data export to a personal computer .....................................................................................89
WAV file conversion ........................................................................................................... ..90Enabling the file conversion .....................................................................................90Procedure of file conversion .....................................................................................90
Exporting data to a personal computer ............................................................................92Connection to a personal computer ........................................................................92Notes on exporting a file ............................................................................................92Exporting a WAV file to a personal computer ........................................................93
Protecting the hard disk ...................................................................................................... 94
Archiving a song .............................................................................................................. ....95
Song management ............................................................................................................... ..97
Selecting the desired song .................................................................................................98
Editing a song name ........................................................................................................... .99
Deleting an unnecessary song ......................................................................................100
Protecting a song ............................................................................................................. 101
Track editing ................................................................................................................. .........103
Erasing track data ............................................................................................................ ..104
Copying/pasting track data ..............................................................................................105
Moving track data ............................................................................................................. ..107
Exchanging whole track data ...........................................................................................108
Part editing .................................................................................................................. ...........111
Playing back the “part” (Between LOCATE A and LOCATE B) to be edited......112Changing an edit point during editing .................................................................112
Editing the part(s) ........................................................................................................... ...113
Copying/pasting the part(s)-1 ..........................................................................................114
Copying/pasting the part(s)-2 ..........................................................................................116Copying to the clipboard ........................................................................................116Pasting clipboard data .............................................................................................117

8
MR-8HD Owner’s Manual (Safety instructions/Contents)
Trouble for recording ......................................................................................................... 132
Trouble for playback .......................................................................................................... 133
Trouble for effect ............................................................................................................ ....134
Trouble for USB connection .............................................................................................134
Other troubles ................................................................................................................ .....135
Troubleshooting ............................................................................................................... ....131
Specifications ................................................................................................................ .....138
Physical dimensions .........................................................................................................13 9
Block diagram ................................................................................................................. ...140
MIDI implementation chart ...............................................................................................142
Index ......................................................................................................................... ...........143
Declaration of EC Directive ..............................................................................................144
MR-8HD Specifications ........................................................................................................1 37
Hard disk formatting .......................................................................................................... 124
Peak hold time setting .......................................................................................................1 25
Pre-roll/post-roll time setting ...........................................................................................126
Beat resolution mode on/off .............................................................................................127
Phantom power on/off .......................................................................................................128
Initializing the MR-8HD ......................................................................................................1 30
Other functions ............................................................................................................... ......123
Moving the part(s) ............................................................................................................ .119
Exchange the parts ............................................................................................................ 120

9
MR-8HD Owner’s Manual (Read this chapter first!)
Read this chapter first!This chapter describes precautions before using, as well as featuresand basic knowledge of the MR-8HD.To understand the MR-8HD features and basic functions, read this chap-ter before using.

10
MR-8HD Owner’s Manual (Read this chapter first!)
Thank you very much for purchasing the Fostex MR-8HD digital multitracker.The MR-8HD is a digital multitracker which can record 8-track audio at 44.1 kHz/16 bits on theinternal 3.5-inch hard disk. Up to four tracks can be recorded simultaneously.
The MR-8HD is also equipped with an 8-channel digital mixer, digital effects including the de-lay/reverb, mastering effects and insert effects (simulation effects). It allows you to carry out allthe process for digital multitrack recording including overdubbing, track bouncing and mixdownwithin the digital domain, ensuring no loss of sound quality.
• You can record high quality audio to thebuilt-in high performance 3.5-inch harddisk drive (40MB).You can also edit recorded audio laterwithout sound deterioration.Up to 99 songs can be recorded.
• Provides four analog input channels andup to four tracks can be recordedsimultaneously.Signals of four input channels ([INPUT A]through [INPUT D]) can be mixed to thestereo buss (Pre mastering effects).
• You can bounce all eight tracks to a newsong, which is automatically created in thebouncing process.
• An ASP digital effect processor (delay/reverb) with the algorithm newlydeveloped by Fostex is built in, allowingeffect processing to tracks 1 through 4during track bouncing.In addition, the MR-8HD also providesinsert effects for microphone andamplifier simulation for coloring sounds.
• The dedicated mastering effects are builtin for the stereo buss, allowing you toprocess sounds during track bouncing orfinal mixdown.
• The adoption of self-illuminated keysallows intuitive operation.
• Phantom power is built in, allowing directconnection of condenser microphones.
• The rhythm guide function is provided.You can make global time signature/temposetting for a simple song or create aconductor map for a more complicate song,and output the guide click.
• Song data (on mono WAV files on tracks 7and 8) mastered by the MR-8HD can beconverted to a stereo WAV file easily.You can export the converted file to apersonal computer and create an audio CDusing the CD burn function of the PC.
• The [DIGITAL OUT] port outputs S/PDIFformat digital signals. You can makemixdown or digital copy to an external DATor MD recorder.
• The whole or a part of track data can beedited (i.e. copied, pasted, moved,exported, exchanged and erased).
• The [MIDI OUT] port is provided.You can synchronize the MR-8HD withexternal MIDI devices (MIDI sequencer, etc.)using MTC or MIDI clock.
Introduction
MR-8HD main features

11
MR-8HD Owner’s Manual (Read this chapter first!)
About power supply
• Be sure to connect the MR-8HD to the powersupply specified in the specifications sectionof this owner's manual. Do not use an ACoutlet of any other voltage.
• Do not connect the MR-8HD to the same ACoutlet to which devices that could generatenoise (such as a large motor or dimmer), orthe devices that consume a large amount ofpower (such as an air conditioning system orlarge electric heater) are connected.
• If you use the MR-8HD in an area with adifferent power voltage, first consult yourdealer or the nearest Fostex service station.
• The [POWER] switch cannot turn off thepower completely. When this switch is "up",the MR-8HD enters standby mode (i.e. thepower does not completely turned off).Therefore, if you do not use the MR-8HD fora long time, we recommend unplugging thepower cord from the AC outlet.
• It is very dangerous to use a power cord thatis frayed or damage. In such a case, stopusing the MR-8HD immediately and ask yourdealer to repair the cord.
<Important! >Model name, power requirement, serialnumber and other information for theMR-8HD are shown at the bottom of theunit.
Precautions upon installing the MR-8HD
• Do not install the MR-8HD in locationssubject to the following:
* Extremely high or low temperature, orsignificant changes in temperature.
* Excessive humidity or dust.* Excessive changes in power supply
voltage.* Unstable or significantly vibrating or
shaking surfaces.* Near a strong magnetic field (such as a
TV or speaker).
Notes on repair
• The MR-8HD does not use any parts that usercan repair easily. Contact your dealer or thenearest Fostex service station to ask aboutrepairs.
• Use the original packing carton of theMR-8HD when you transport or send theMR-8HD to the dealer or Fostex servicestation for repair.If you have discarded the packing carton,pack the MR-8HD using shock absorbingmaterials. Fostex is not responsible formalfunction or damage due to incompletepackaging or caused during transportation.
• Because the MR-8HD is a consumer product,Fostex does not offer on-site service orprovide a loaner unit while your MR-8HD isunder repair.
About copyrights
• It is prohibited by law to use any part of a CDrecording or video images or audio data forwhich copyright is possessed by a third partyfor commercial purposes such as contents,broadcasts, sales, or distribution-any purposeother than for your personal pleasure.
About damages
• Fostex is not responsible for any "directdamage" or "indirect damage" caused byusing the MR-8HD.
Notes on audio interruption
• If you make recording or editing to a songmany times, audio may be occasionallyinterrupted when the song is played back,due to data fragmentation. Note that this isnot a malfunction.
Note on USB connection with Mac OS
• Before you connect the MR-8HD to aMacintosh computer, make sure that the OSis Mac OS X or higher. The MR-8HD supportsonly Mac OS X or higher. If you connect theMR-8HD to a Macintosh computer with MacOS lower than "OS X", song data on theMR-8HD may be damaged.
MODEL MR-8HDDIGITAL MULTITRACKER
FOSTEX CO.100 - 230V ~
SERIAL NO.
MADE IN CHINA
14W 60Hz
Precautions before using

12
MR-8HD Owner’s Manual (Read this chapter first!)
This section describes the basics of the MR-8HD you should know before using the MR-8HD.
Recording method
The MR-8HD is fitted with a 3.5-inch hard disk drive. Songs are recorded on a hard disk alongwith the ABS time (from 00m00s000ms to 99m59s999ms).
The ABS time shows the absolute time on a hard disk and you can start recording from anydesired time within the range between 00m00s000ms and 99m59s999ms ABS time.
As the MR-8HD does not consume the disk space when no audio is recorded, you can recordaudio effectively, while the recordable time for a tape recorder depends on the tape length.
MIN MAX
100
L R
100
L R
100
L RRL
MIN MAX LINE MIC LINE MIC LINE MIC LINE MIC
REC SELECT
0 10
1 2 3 4 5/6 MASTER
MAXMAX
MINMIN
7/8
LOCATE REC END
A-B PLAYLOCATE ABS ZERO
PLAYSTOPRECORD REWIND F FWD
GUIDERHYTHM
CONTRAST
1-8 >SONGNEW
1-6 > 7/81-4 > 5/6 STEREO
WAV FILE
BOUNCE
POWERFUL
MASTERING
B / OUTA / INLOCATE
STOREPLAY MODEAUTO PUNCH
NATURAL BRIGHT
TIME BASESELECT
UNDO/REDO
7/8 >
MENU / ENTER
SIMULATIONDYNAMIC CONDENSER TUBE MIC
PAN
EFFECT
REVERB / DELAY TIME
HALLROOM
PLATE DELAY
PHONES VOL
LSTEREO OUT
R
2PHONES
1
MAXMIN
BALBALBAL
TRIM
UNBAL
PEAK
TRIM
UNBAL
PEAK
TRIM
UNBAL
PEAKPEAK
DISTORTION
GUITAR
/GUITAR
INPUT A SELECT
INSERT
BAL
UNBAL
TRIM
INPUT A INPUT B INPUT C INPUT D
ON/OFF
POWER
ABC1 DEF2 GHI3
JKL4 MNO5
PQR6 STU7 VWX8 YZ9 +-_0 DELETE
TO STEREO BUSS
EFFECT SEND
DIGITAL MULTITRACKER
ON/OFF
ON/OFF
ON/OFF
60'S COMBOUS METALBRIT STACK AMP SIMULATION
INPUT A
The beginning of a song0m00s000ms(ABS ZERO) 05m00s000ms 10m00s000ms
15m00s000ms(REC END) 99m59s999ms
Recorded area Recorded areaNon-recorded area Non-recorded area ......
You can start recording from any desired time within the range between 00m00s000ms and 99m59s999ms ABS time.
0m00s000ms 99m59s999ms
Non-recorded area (remain) ......5-minute recording 5-minute recording
Non recorded area (shown in white)
3.5-inch hard disk drive
Recorded area (shown in gray)
The basics of the MR-8HD

13
MR-8HD Owner’s Manual (Read this chapter first!)
About song
To understand songs, imagine separated rooms as shown below. Each room can be regarded asa song. With the MR-8HD, you can create up to 99 rooms (songs) on the hard disk (although theavailable space may limit the number of songs).
Recorded track data is stored in a song as mono WAVfiles, as shown below.
Each song is independent on a disk and you can record, play back or edit a song without affect-ing other songs.You can give a desired song name for managing recorded songs (see page 99).
Recorded track data is stored in a song as mono WAV files.The MR-8HD can convert the two WAV files recorded on tracks 7 and 8 (L and R) to a stereo WAVfile (see page 90).
You can export the converted stereo WAV file to your USB-connected personal computer, anduse the file by a music software application or make an original audio CD using a CD burnsoftware application (see page 92).
Song01
Track 1 Track 2 Track 8
Song01
Song02
Song03
Song04
Song05
Song99
Song98
Remain (recordable space left on the disk)
"Remain" shows how much time you can further record audio data to the available space left onthe internal hard disk.
As described earlier, the MR-8HD stripes ABS time from 0m00s000ms to 99m59s999ms at maxi-mum for each song. However, the remaining time (= available recording time left) depends onthe available space on the hard disk in actual use. The remaining time is shown as in the screenexample below during recording or record standby. Note that it shows the remaining time forrecording onto a mono track.
A "mono" track means a single track. Therefore, you can calculate the remaining time for record-ing to more than one track by dividing the displayed time by the number of tracks. Note that theremaining time shown on the screen is an approximate time.
Remain value
WAV files

14
MR-8HD Owner’s Manual (Read this chapter first!)
Time base
Input monitor and repro monitor
The term, "time base", is used as the reference of recorder position information.Using the [TIME BASE SELECT] key, you can select from among two time base modes: ABS timeand bar/beat mode. Each screen example below shows the recorder is located at the beginning ofa song in each time base mode.
<ABS time mode> <Bar/beat mode>
ABS time mode:ABS time stands for Absolute time, which is "striped" on the disk when creating a song. It startsfrom 0m00s000ms (=ABS zero, the beginning of a song) and ends by 99m59s999ms at maxi-mum.
Bar/beat mode:The bar/beat/clock information is created according to the internal tempo map.The ABS zero position is set to "bar -2/beat 1/clk 000" by default (this is called "bar offset").The MR-8HD determines the bar/beat/clock value in a song in referenced to the bar offset, aswell as the time signature map and tempo map. You can set the bar offset between bar 1 to bar-8 via the menu mode (see page 81). The figure below shows the relation between two time basemodes.
Each of the MR-8HD tracks has two output modes: repro monitor and input monitor.In the repro monitor mode, the track playback signal is output. So if you want to listen to thetrack playback sound, select the repro monitor mode.In the input monitor mode, the input signal fed to the track is output. So you can check the levelof the input signal to be recorded.
To enter a MR-8HD track to input monitor mode, press the appropriate [REC SELECT] key to armthe track (i.e. make the track record-ready), then press only the [RECORD] key to enter the"RECORD READY" mode or press both the [RECORD] and [PLAY] keys simultaneously to startrecording.
Bar/beat mode
The beginning of a song0m00s000ms (ABS ZERO) 0m03s000ms 0m06s000ms
1bar 1 000clk 3bar 1 000clk-2bar 1 000clk
ABS time mode
Input signals forrecorder tracks
Output signals fromrecorder tracks
Track 1
Track 5
Track 6
Track 7
Track 8
Playback signal (repro monitor)
Playback signal (repro monitor)
Playback signal (repro monitor)
Playback signal (repro monitor)
Playback signal (repro monitor)
Track 3 READY
Track 4 READY
Input signal (input monitor)
Input signal (input monitor)
Track 2 Playback signal (repro monitor)

15
MR-8HD Owner’s Manual (Read this chapter first!)
[TRIM] control
You must pay great attention to the [TRIM] control adjustment when recording to the MR-8HD.
The analog signal received at each input ([INPUT A] through [INPUT D]) is sent to the TRIMcontrol, by which the signal level fed to the A/D converter of the MR-8HD is controlled.
You can check this level by the PEAK indicator. If the level is too high, the PEAK indicator lights,while you may hear the sound distorted or noisy. This distortion (noise) generated at this stagecannot be eliminated, therefore, adjust the TRIM control properly so that the PEAK indicatordoes not light at the loudest part of the input signal.
MIN MAX LINE MIC LINE MIC LINE MIC LINE MIC
BALBALBAL
TRIM
UNBAL
PEAK
TRIM
UNBAL
PEAK
TRIM
UNBAL
PEAKPEAK
DISTORTION
GUITAR
/GUITAR INSERT
BAL
UNBAL
TRIM
INPUT A INPUT B INPUT C INPUT D
ONOFF
ONOFF
ONOFF
ONOFF
[TRIM] control
PEAK LED
Clipping level
Clipping level
Proper level The level is too high.

16
MR-8HD Owner’s Manual (Read this chapter first!)

17
MR-8HD Owner’s Manual (Names and functions)
Names and functionsThis chapter describes the names and functions of the controls,keys, connectors, etc. on the MR-8HD top panel and rear panel, aswell as details of the display. See this chapter whenever you want toknow the function of a control, key, etc.

18
MR-8HD Owner’s Manual (Names and functions)
1. [INPUT A] input connectors (XLRconnector and phone jack)
MIN MAX
100
L R
100
L R
100
L RRL
MIN MAX LINE MIC LINE MIC LINE MIC LINE MIC
REC SELECT
0 10
1 2 3 4 5/6 MASTER
MAXMAX
MINMIN
7/8
LOCATE REC END
A-B PLAYLOCATE ABS ZERO
PLAYSTOPRECORD REWIND F FWD
GUIDERHYTHM
CONTRAST
1-8 >SONGNEW
1-6 > 7/81-4 > 5/6 STEREO
WAV FILE
BOUNCE
POWERFUL
MASTERING
B / OUTA / INLOCATE
STOREPLAY MODEAUTO PUNCH
NATURAL BRIGHT
TIME BASESELECT
UNDO/REDO
7/8 >
MENU / ENTER
SIMULATIONDYNAMIC CONDENSER TUBE MIC
PAN
EFFECT
REVERB / DELAY TIME
HALLROOM
PLATE DELAY
PHONES VOL
LSTEREO OUT
R
2PHONES
1
MAXMIN
BALBALBAL
TRIM
UNBAL
PEAK
TRIM
UNBAL
PEAK
TRIM
UNBAL
PEAKPEAK
DISTORTION
GUITAR
/GUITAR
INPUT A SELECT
INSERT
BAL
UNBAL
TRIM
INPUT A INPUT B INPUT C INPUT D
ON/OFF
POWER
ABC1 DEF2 GHI3
JKL4 MNO5
PQR6 STU7 VWX8 YZ9 +-_0 DELETE
TO STEREO BUSS
EFFECT SEND
DIGITAL MULTITRACKER
ON/OFF
ON/OFF
ON/OFF
60'S COMBOUS METALBRIT STACK AMP SIMULATION
INPUT A
1 2 4 5 6 7 8
9
10
11
1213
14
15
16171819
20
21
3
3. [INPUT B] input connectors (XLRconnector and phone jack)
TIP: SEND
RING: RETURN
GND
From the effect output.
To the effect input.
You can connect a guitar, microphone, key-board, etc. to the [INPUT C] input.Both the [BAL] XLR connector and [UNBAL]phone jack are provided so you can use theappropriate connector according to thesound source.If you connect sources to both the XLR con-nector and phone jack, the phone input takespriority (see page 33).
4. [INPUT C] input connectors (XLRconnector and phone jack)
You can connect a guitar, microphone, key-board, etc. to the [INPUT B] input.Both the [BAL] XLR connector and [UNBAL]phone jack are provided so you can use theappropriate connector according to thesound source.If you connect sources to both the XLR con-nector and phone jack, the phone input takespriority (see page 33).
Connects an external effect processor (typi-cally, a compressor/limiter, etc.).For connection between the MR-8HD and theeffect processor, use a Y-cable as shown be-low (see page 59).
2. [INSERT] connector (TRS phone jack)
Both the [BAL] XLR connector and [UNBAL/GUITAR] phone jack are provided. You canconnect a guitar, microphone, keyboard, etc.If you connect sources to both the XLR con-nector and phone jack, the phone input takespriority. When using the [INPUT A] section,select the [INPUT A SEL] switch on the rearpanel appropriately according to your us-age (see page 33).
Top panel 1

19
MR-8HD Owner’s Manual (Names and functions)
<Note>: This switch cannot turn off thepower completely. When this switch is "up",the MR-8HD enters standby mode (i.e. thepower does not completely turned off).Therefore, if you do not use the MR-8HDfor a long time, we recommend unpluggingthe power cord from the AC outlet.
5. [INPUT D] input connectors (XLRconnector and phone jack)
10. [REVERB/DELAY TIME] control
14. [REC SELECT] keys
21. [TRIM] controlsEach control adjusts the input gain of thecorresponding input channel (see page 15,and 35 through 40).
20. [DISTORTION] controlControls the amount of the distortion effectfor a guitar connected to the [XLR] connec-tor or [UNBAL/GUITAR] jack (phone type)on the [INPUT A] channel.This control is effective only when the [IN-PUT A SEL] switch is set to "GTR/DIST" (seepages 35 through 40).
19. [PEAK] indicatorsEach indicator lights when the input signalis overloaded (see page 15). You should ad-just the input gain using the [TRIM] controlso that the [PEAK] indicator does not light.
18. [TO STEREO BUSS ON/OFF] keysEach key selects whether or not sending thecorresponding input signal to the stereo L/R busses (see page 72). Each press of thekey alternates ON and OFF. When ON, thekey illuminates in green. When OFF, it isunlit. When the corresponding input is as-signed to a recording track, the key flashesin green.A long press of the key enters the input menuof the MENU mode, in which you can setphantom power on/off, panning, etc. (seepage 128).
17. Insert effect selection keysUsed to select the insert effect (mic simula-tion or amp simulation) for the signal fromthe [INPUT A] jack.When setting the [INPUT A SELECT] switchon the rear panel to "MIC/LINE", you canuse the mic simulation effect. When settingthe switch to "GTR/DIST", you can use theguitar amp simulation effect (see page 58).
16. [EFFECT SEND] controlsControl the amount of signals from tracks 1through 4 sent to the internal effect (reverbor delay) (see page 61).
15. [PAN] controlsControl panning for tracks 1 through 4.
Used to select the recording track(s). You canrecord onto up to four tracks simultaneously.Pressing a key arms or unarms the corre-sponding track(s).Tracks 5/6 or 7/8 are armed or unarmedsimultaneously (see pages 35 through 42).
Each fader adjusts the track playback level.Each of track faders 5/6 and 7/8 controlsthe stereo signal (see pages 30 through 39).
13. Track faders
Adjusts the stereo (L and R) buss output level (see pages 30 through 39).
12. [MASTER] fader
These keys are used to select the effect type.You can select from three reverb types(ROOM, HALL and PLATE) and a delay(DELAY). The selected key is lit (see page 60).
11. [EFFECT] keys
This control adjusts the reverb time or de-lay time. When you select "ROOM", "HALL"or "PLATE" for the effect type, it adjusts thereverb time.When you select "DELAY", itadjusts the delay time. (See page 61.)
Switches between standby mode and poweron (see page 28). To turn off the power whenthe power is on, press and hold down the[POWER] switch for a few seconds.
9. [POWER] switch
Adjusts the headphone output level (seepage 30).
8. [PHONES VOL] control
Two jacks (1 and 2) are provided. You canuse two pairs of stereo headphones with theMR-8HD (see page 29).
7. [PHONES] jacks (1, 2)
These jacks output the stereo (L and R) busssignals. Connect these jacks to the monitor-ing equipment or master recorder (see pages29 and 41).
6. [STEREO OUT] jacks (L, R)
You can connect a guitar, microphone, key-board, etc. to the [INPUT D] input.Both the [BAL] XLR connector and [UNBAL]phone jack are provided so you can use theappropriate connector according to thesound source. If you connect sources to boththe XLR connector and phone jack, the phoneinput takes priority (see page 33).
20
MR-8HD Owner’s Manual (Names and functions)
MIN MAX
100
L R
100
L R
100
L RRL
MIN MAX LINE MIC LINE MIC LINE MIC LINE MIC
REC SELECT
0 10
1 2 3 4 5/6 MASTER
MAXMAX
MINMIN
7/8
LOCATE REC END
A-B PLAYLOCATE ABS ZERO
PLAYSTOPRECORD REWIND F FWD
GUIDERHYTHM
CONTRAST
1-8 >SONGNEW
1-6 > 7/81-4 > 5/6 STEREO
WAV FILE
BOUNCE
POWERFUL
MASTERING
B / OUTA / INLOCATE
STOREPLAY MODEAUTO PUNCH
NATURAL BRIGHT
TIME BASESELECT
UNDO/REDO
7/8 >
MENU / ENTER
SIMULATIONDYNAMIC CONDENSER TUBE MIC
PAN
EFFECT
REVERB / DELAY TIME
HALLROOM
PLATE DELAY
PHONES VOL
LSTEREO OUT
R
2PHONES
1
MAXMIN
BALBALBAL
TRIM
UNBAL
PEAK
TRIM
UNBAL
PEAK
TRIM
UNBAL
PEAKPEAK
DISTORTION
GUITAR
/GUITAR
INPUT A SELECT
INSERT
BAL
UNBAL
TRIM
INPUT A INPUT B INPUT C INPUT D
ON/OFF
POWER
ABC1 DEF2 GHI3
JKL4 MNO5
PQR6 STU7 VWX8 YZ9 +-_0 DELETE
TO STEREO BUSS
EFFECT SEND
DIGITAL MULTITRACKER
ON/OFF
ON/OFF
ON/OFF
60'S COMBOUS METALBRIT STACK AMP SIMULATION
INPUT A
22 23 24 25 26 27 28 29
30
313233
34353637
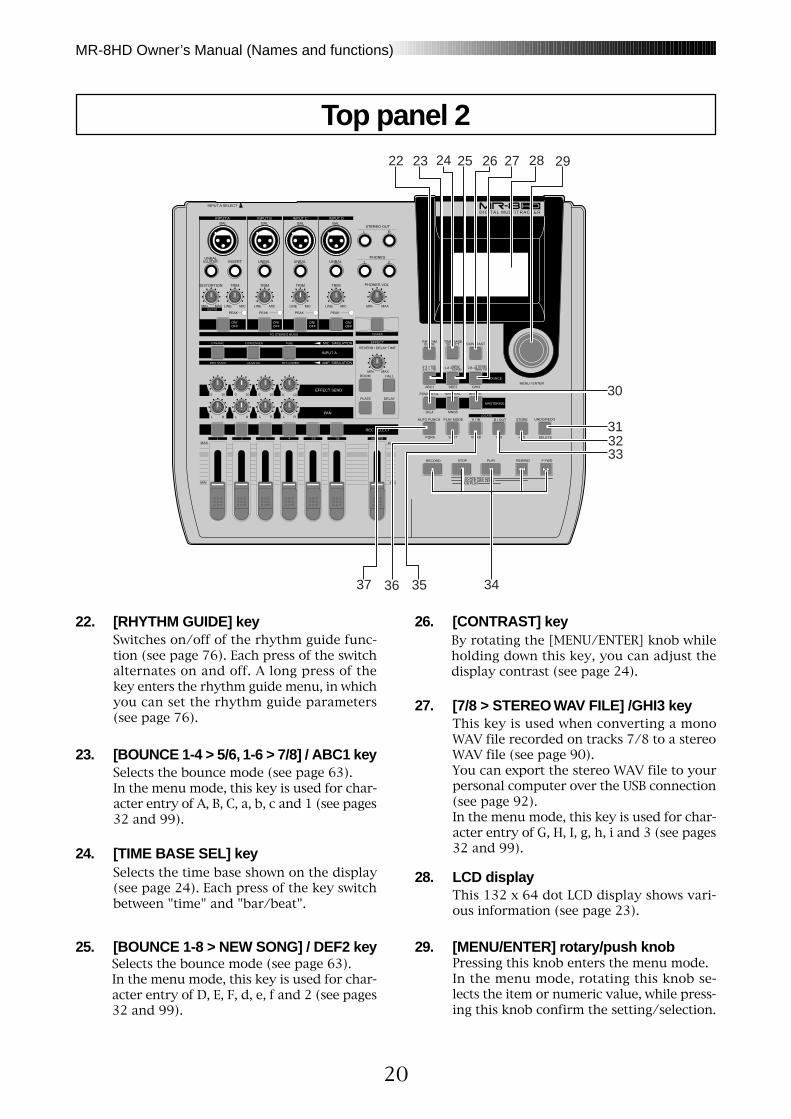
22. [RHYTHM GUIDE] keySwitches on/off of the rhythm guide func-tion (see page 76). Each press of the switchalternates on and off. A long press of thekey enters the rhythm guide menu, in whichyou can set the rhythm guide parameters(see page 76).
23. [BOUNCE 1-4 > 5/6, 1-6 > 7/8] / ABC1 keySelects the bounce mode (see page 63).In the menu mode, this key is used for char-acter entry of A, B, C, a, b, c and 1 (see pages32 and 99).
24. [TIME BASE SEL] keySelects the time base shown on the display(see page 24). Each press of the key switchbetween "time" and "bar/beat".
25. [BOUNCE 1-8 > NEW SONG] / DEF2 keySelects the bounce mode (see page 63).In the menu mode, this key is used for char-acter entry of D, E, F, d, e, f and 2 (see pages32 and 99).
26. [CONTRAST] keyBy rotating the [MENU/ENTER] knob whileholding down this key, you can adjust thedisplay contrast (see page 24).
27. [7/8 > STEREO WAV FILE] /GHI3 keyThis key is used when converting a monoWAV file recorded on tracks 7/8 to a stereoWAV file (see page 90).You can export the stereo WAV file to yourpersonal computer over the USB connection(see page 92).In the menu mode, this key is used for char-acter entry of G, H, I, g, h, i and 3 (see pages32 and 99).
28. LCD displayThis 132 x 64 dot LCD display shows vari-ous information (see page 23).
29. [MENU/ENTER] rotary/push knobPressing this knob enters the menu mode.In the menu mode, rotating this knob se-lects the item or numeric value, while press-ing this knob confirm the setting/selection.
Top panel 2
21
MR-8HD Owner’s Manual (Names and functions)
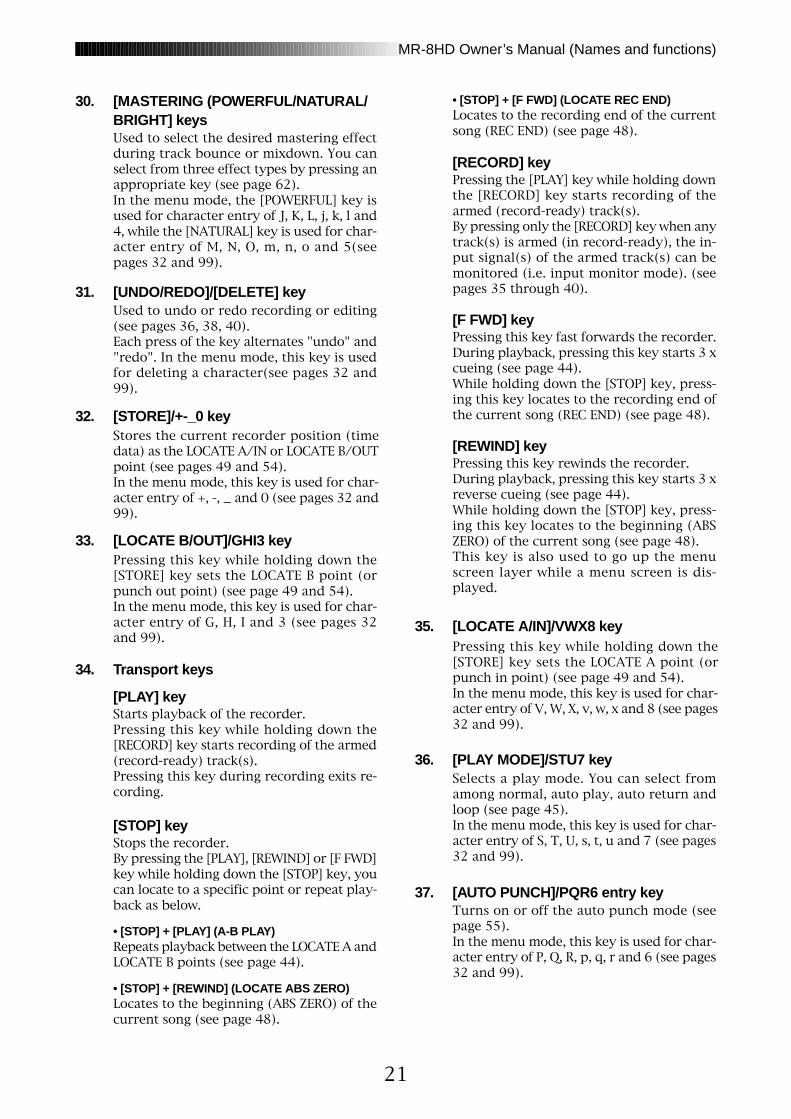
30. [MASTERING (POWERFUL/NATURAL/BRIGHT] keysUsed to select the desired mastering effectduring track bounce or mixdown. You canselect from three effect types by pressing anappropriate key (see page 62).In the menu mode, the [POWERFUL] key isused for character entry of J, K, L, j, k, l and4, while the [NATURAL] key is used for char-acter entry of M, N, O, m, n, o and 5(seepages 32 and 99).
31. [UNDO/REDO]/[DELETE] keyUsed to undo or redo recording or editing(see pages 36, 38, 40).Each press of the key alternates "undo" and"redo". In the menu mode, this key is usedfor deleting a character(see pages 32 and99).
32. [STORE]/+-_0 keyStores the current recorder position (timedata) as the LOCATE A/IN or LOCATE B/OUTpoint (see pages 49 and 54).In the menu mode, this key is used for char-acter entry of +, -, _ and 0 (see pages 32 and99).
33. [LOCATE B/OUT]/GHI3 keyPressing this key while holding down the[STORE] key sets the LOCATE B point (orpunch out point) (see page 49 and 54).In the menu mode, this key is used for char-acter entry of G, H, I and 3 (see pages 32and 99).
34. Transport keys
[PLAY] keyStarts playback of the recorder.Pressing this key while holding down the[RECORD] key starts recording of the armed(record-ready) track(s).Pressing this key during recording exits re-cording.
[STOP] keyStops the recorder.By pressing the [PLAY], [REWIND] or [F FWD]key while holding down the [STOP] key, youcan locate to a specific point or repeat play-back as below.
• [STOP] + [PLAY] (A-B PLAY)Repeats playback between the LOCATE A andLOCATE B points (see page 44).
• [STOP] + [REWIND] (LOCATE ABS ZERO)Locates to the beginning (ABS ZERO) of thecurrent song (see page 48).
[RECORD] keyPressing the [PLAY] key while holding downthe [RECORD] key starts recording of thearmed (record-ready) track(s).By pressing only the [RECORD] key when anytrack(s) is armed (in record-ready), the in-put signal(s) of the armed track(s) can bemonitored (i.e. input monitor mode). (seepages 35 through 40).
[F FWD] keyPressing this key fast forwards the recorder.During playback, pressing this key starts 3 xcueing (see page 44).While holding down the [STOP] key, press-ing this key locates to the recording end ofthe current song (REC END) (see page 48).
[REWIND] keyPressing this key rewinds the recorder.During playback, pressing this key starts 3 xreverse cueing (see page 44).While holding down the [STOP] key, press-ing this key locates to the beginning (ABSZERO) of the current song (see page 48).This key is also used to go up the menuscreen layer while a menu screen is dis-played.
35. [LOCATE A/IN]/VWX8 keyPressing this key while holding down the[STORE] key sets the LOCATE A point (orpunch in point) (see page 49 and 54).In the menu mode, this key is used for char-acter entry of V, W, X, v, w, x and 8 (see pages32 and 99).
36. [PLAY MODE]/STU7 keySelects a play mode. You can select fromamong normal, auto play, auto return andloop (see page 45).In the menu mode, this key is used for char-acter entry of S, T, U, s, t, u and 7 (see pages32 and 99).
37. [AUTO PUNCH]/PQR6 entry keyTurns on or off the auto punch mode (seepage 55).In the menu mode, this key is used for char-acter entry of P, Q, R, p, q, r and 6 (see pages32 and 99).
• [STOP] + [F FWD] (LOCATE REC END)Locates to the recording end of the currentsong (REC END) (see page 48).

22
MR-8HD Owner’s Manual (Names and functions)
Either of the [BAL] XLR and[UNBAL/GUITAR] phone connec-tors can be used. Set the switch tothis position when the source is anexternal microphone or line levelsource.
MIC/LINE
GTR DIST
GTR CLEAN
4. [DIGITAL OUT] connector(Toslink optical connector)
5. [MIDI OUT] jack (DIN 5-pin connector)
If you need to connect theunit to a digital device whichonly provides a coaxial typedigital connector (typically,an RCA pin jack), use theFostex COP-1/96k coaxial-optical converter (shownright).
<Note>: The dust protec-tion cap is inserted tothe [DIGITAL OUT] con-nector when the unit isshipped.Remove the cap when you use this connec-tor. If you do not use this connector, attachthe dust protection cap.
3. [FOOT SW] jack (TRS phone jack)
unlatched-type footswitch
Either of the [BAL] XLR and[UNBAL/GUITAR] phone connec-tors can be used. You can adjustthe input level and distortion usingthe [TRIM] and [DISTORTION]controls respectively. You can alsouse the amp simulation insert ef-fect.
Either of the [BAL] XLR and[UNBAL/GUITAR] phone connec-tors can be used. You can adjustthe input level using the [TRIM]control. You can also use the ampsimulation insert effect.
Model COP-1/96k
INPUT A SEL
USB USB HOSTAC-INDIGITAL
OUT FOOT SWMIDI OUT
GTR CLEAN MIC/LINEGTR DIST
1 2
34567
Use an optical digitalcable with Toslink plugson both ends.
<Caution>: Do not connect your personalcomputer to the [USB HOST] port.
1. [AC IN] connectorConnect the supplied power cord to this con-nector (see page 28).
2. [INPUT A SELECT] switchThis switch must be set appropriately accord-ing to the input source of the [INPUT A] chan-nel (see page 33).
Used to connect with an unlatched-typefootswitch (see page 53).
Used to connect with an external digital de-vice using an optical cable (see page 42).
Used to connect to a MIDI IN jack of an ex-ternal MIDI device (such as a MIDI se-quencer) (see page 86).
6. [USB HOST] connector (USB A type)Prepared for the future expansion.
7. [USB] port (USB B type)Used to connect with a personal computerusing a standard USB cable for song file datatransfer between the MR-8HD and the per-sonal computer (see page 92).
Rear panel

23
MR-8HD Owner’s Manual (Names and functions)
When turning on the MR-8HD, the display shows the startup screen (showing the startup status of the MR-8HD), followed by the "home" screen, which is similar to the one below. In this condition, the previouslyloaded song is loaded and the recorder is located at the beginning of the song.The home screen provides the following information.
The following describes details about the LCD display, including screen contents andoperation.
1. Time counter display
6. Song number display
4. Stereo buss (L and R) level display
5. Song status display
At least one of the tracks is in theinput monitor mode (see pages36, 38 and 40).
The auto punch mode is active(see page 55).
The auto return mode is active(see page 45).
3. Track level display
The remain time shows how much time youcan further record audio data onto a monotrack using the available space left on the harddisk.
2. Character display
The loop mode is active (see page45).
Home screen
The auto play mode is active (seepage 45).
1
2
3 4
5
6
Time information of the current recorder po-sition is shown in ABS or bar/beat mode (bydefault, bar/beat). Using the [TIME BASE SE-LECT] key, you can select a desired time basemode. When the recorder is moving (playingback, fast forwarding, etc.), the appropriateicon is also shown. While the hard disk drive isin access, " ACC " lights up.
Normally, the name of the song currentlyloaded is shown (up 16 characters can beshown at a time).It also shows following information.• A name of the operation mode currently
being executed (such as "BOUNCE 1-6->7/8).• A (not-so-serious) warning message• The "Remain" time when at least one track is
record-armed (i.e. At least one of the[REC SELECT] keys is active).
The recording or playback levels of tracks 1through 8 are shown. When a track is recordarmed, the track number indication changesto the source input channel (any of A, B, C andD).
During recording or playback, the output lev-els of the L/R stereo buss are shown.
Lights up the following status icons when theappropriate modes (functions) are active.
Shows the song number of the song currently
loaded. Also, " " is lit when the phantom poweris on.
LCD display

24
MR-8HD Owner’s Manual (Names and functions)
When the display shows the home screen, pressing the [TIME BASE SELECT] key switches the time basemode between ABS and bar/beat.
Example of ABS display
Example of bar/beat display
You can adjust the display contrast by rotating the [MENU/ENTER] knob while holding down the [CON-TRAST] key. Rotating the dial clockwise heightens the contrast, while rotating it counterclockwise lowersthe contrast.
[MENU/ENTER] knob[CONTRAST] key
GUIDERHYTHM
CONTRAST
1-8 > SONGNEW
1-6 > 7/81-4 > 5/6 STEREO
WAV FILE
BOUNCE
TIME BASESELECT
7/8 >
MENU/ENTERABC1 DEF2 GHI3
DIGITAL MULTITRACKER
GUIDERHYTHM
CONTRAST
1-8 > SONGNEW
1-6 > 7/81-4 > 5/6 STEREO
WAV FILE
BOUNCE
TIME BASESELECT
7/8 >
MENU/ENTERABC1 DEF2 GHI3
DIGITAL MULTITRACKER
[TIME BASE SELECT] key
High contrast
Low contrast
Selecting a time base mode
Adjusting the display contrast
While pressing down the [CONTRAST] key, the dis-play shows "CONTRAST -> DIAL".

25
MR-8HD Owner’s Manual (Names and functions)
If a serious problem happens to the MR-8HD during operation, an appropriate warning message is shownon the display. Most warning messages are being shown until the [MENU/ENTER] knob is pressed. Notethat there are also not-so-serious warning messages besides the following.
Pressing the [MENU/ENTER] knob while the recorder is stopped enters the menu mode and brings up themenu screen.In the menu mode, you can make setting or editing via the appropriate screen. The top menu screen hastwo pages, in which you can select the desired menu by rotating the [MENU/ENTER] knob.
GUIDERHYTHM
CONTRAST
1-8 > SONGNEW
1-6 > 7/81-4 > 5/6 STEREO
WAV FILE
BOUNCE
TIME BASESELECT
7/8 >
MENU/ENTERABC1 DEF2 GHI3
DIGITAL MULTITRACKER
[MENU/ENTER] knob
First page
This message is shownwhen you are going todelete a song which isprotected.
This message is shownwhen the hard diskdrive has a problem.
This message is shownwhen you are going toedit a track or part butthere is not enoughspace on the hard diskfor executing the undofunction.
During recording, thismessage is shown ifthere is no more spaceleft on the hard disk forrecording.
This message is shownwhen you are going tomake recording or ed-iting to a song which isprotected.
This message is shownwhen you are going tocreate a new songwhile 99 songs exist onthe hard disk.
Second page
MENU screen
Warning message

26
MR-8HD Owner’s Manual (Names and functions)

27
MR-8HD Owner’s Manual (Basic operations)
Basic operationsThis chapter describes power connection, power on/off, demo songplayback, etc., as well as basic multitrack recording.
If it is the first time for you to use a Multitracker, read this chaptercarefully first so that you are familiar with the MR-8HD basic opera-tions, then read other sections which describe advanced operations.

28
MR-8HD Owner’s Manual (Basic operations)
The MR-8HD operates by AC power. Before you start using the MR-8HD, you must connect thesupplied power cord.
INPUT A SEL
USB USB HOSTAC-INDIGITAL
OUT FOOT SWMIDI OUT
GTR CLEAN MIC/LINEGTR DIST
Connect between the [AC IN] connector on the MR-8HD rear panel and an AC outlet using the sup-plied power cord. The MR-8HD enters the standby mode when the power cord is connected.
Power connection
AC outletSupplied power cord
You can turn on or off the MR-8HD power using the [POWER] switch (pointed by an arrow below).To turn off the power, press and hold down the [POWER] switch for a few seconds.
Turning on the unit
MIN MAX
100
L R
100
L R
100
L RRL
MIN MAX LINE MIC LINE MIC LINE MIC LINE MIC
REC SELECT
0 10
1 2 3 4 5/6 MASTER
MAXMAX
MINMIN
7/8
LOCATE REC END
A-B PLAYLOCATE ABS ZERO
PLAYSTOPRECORD REWIND F FWD
GUIDERHYTHM
CONTRAST
1-8 >SONGNEW
1-6 > 7/81-4 > 5/6 STEREO
WAV FILE
BOUNCE
POWERFUL
MASTERING
B / OUTA / INLOCATE
STOREPLAY MODEAUTO PUNCH
NATURAL BRIGHT
TIME BASESELECT
UNDO/REDO
7/8 >
MENU / ENTER
SIMULATIONDYNAMIC CONDENSER TUBE MIC
PAN
EFFECT
REVERB / DELAY TIME
HALLROOM
PLATE DELAY
PHONES VOL
LSTEREO OUT
R
2PHONES
1
MAXMIN
BALBALBAL
TRIM
UNBAL
PEAK
TRIM
UNBAL
PEAK
TRIM
UNBAL
PEAKPEAK
DISTORTION
GUITAR
/GUITAR
INPUT A SELECT
INSERT
BAL
UNBAL
TRIM
INPUT A INPUT B INPUT C INPUT D
ON/OFF
POWER
ABC1 DEF2 GHI3
JKL4 MNO5
PQR6 STU7 VWX8 YZ9 +-_0 DELETE
TO STEREO BUSS
EFFECT SEND
DIGITAL MULTITRACKER
ON/OFF
ON/OFF
ON/OFF
60'S COMBOUS METALBRIT STACK AMP SIMULATION
INPUT A
[POWER] switch
[AC IN] connector
<Note>: When you do not operate the MR-8HD for a long period of time, we recommenddisconnecting the power cord.
About the standby modeThe standby mode is the condition when the power cord is connected and the [POWER]switch is set to OFF. In the standby mode, a small amount of power is consumed and theindicator of the [POWER] switch flashes slowly.
When you press the [POWER] switch toturn on the power for the first time, theMR-8HD starts up and the display showsthe screen as below (note that it takessome time until the screen as below isshown).This screen shows that the demo song isloaded and stopped at the beginning (ABS0) of the song named "FOSTEX_FEVER".
Follow the procedure described on thenext page to play back the demo song.
About power

29
MR-8HD Owner’s Manual (Basic operations)
Connect headphones to either of the two [PHONES] jacks of the MR-8HD. Both jacks feed the samesignal so you may connect headphones whichever you like.If you have a powered monitor speaker, you may connect it to the [STEREO OUT] jacks of the MR-8HD.
Connecting headphones (or a monitor speaker system)
<Note>: When you connect a powered monitorspeaker to the unit, turn down the volume of thepowered monitor speaker to minimum before youturn on the MR-8HD and the powered monitorspeaker.
A demo song is pre-recorded on the hard disk of the MR-8HD when shipped.Before you make recording, let's listen to the demo song via headphones (or a monitor speaker).
MIN MAX
100
L R
100
L R
100
L RRL
MIN MAX LINE MIC LINE MIC LINE MIC LINE MIC
REC SELECT
0 10
1 2 3 4 5/6 MASTER
MAXMAX
MINMIN
7/8
LOCATE REC END
A-B PLAYLOCATE ABS ZERO
PLAYSTOPRECORD REWIND F FWD
GUIDERHYTHM
CONTRAST
1-8 >SONGNEW
1-6 > 7/81-4 > 5/6 STEREO
WAV FILE
BOUNCE
POWERFUL
MASTERING
B / OUTA / INLOCATE
STOREPLAY MODEAUTO PUNCH
NATURAL BRIGHT
TIME BASESELECT
UNDO/REDO
7/8 >
MENU / ENTER
SIMULATIONDYNAMIC CONDENSER TUBE MIC
PAN
EFFECT
REVERB / DELAY TIME
HALLROOM
PLATE DELAY
PHONES VOL
LSTEREO OUT
R
2PHONES
1
MAXMIN
BALBALBAL
TRIM
UNBAL
PEAK
TRIM
UNBAL
PEAK
TRIM
UNBAL
PEAKPEAK
DISTORTION
GUITAR
/GUITAR
INPUT A SELECT
INSERT
BAL
UNBAL
TRIM
INPUT A INPUT B INPUT C INPUT D
ON/OFF
POWER
ABC1 DEF2 GHI3
JKL4 MNO5
PQR6 STU7 VWX8 YZ9 +-_0 DELETE
TO STEREO BUSS
EFFECT SEND
DIGITAL MULTITRACKER
ON/OFF
ON/OFF
ON/OFF
60'S COMBOUS METALBRIT STACK AMP SIMULATION
INPUT A
<Note>: You can plug a 1/4" phone plug to the[STEREO OUT] L or R jack.
Powered monitorspeaker
Headphones
Listening the demo song

30
MR-8HD Owner’s Manual (Basic operations)
In the demo song, approximately 1-minute audio is recorded on all eight tracks. Follow the procedurebelow for listening to the demo song. In the following procedure, it is assumed that the MR-8HD isturned on and a pair of headphones (or a monitor speaker system) is connected.
Playing back the demo song
<Hint-2>: To listen to the demo song again:When the recorder is stopped after listen-ing to the demo song, press the [REWIND]key while holding down the [STOP] key. Therecorder instantly moves back to the be-ginning of the demo song (see page 48).Then pressing the [PLAY] key starts play-back from the beginning of the demo song.
<Note>: The demo song is protected and you can-not overwrite or erase it. Therefore, you cannotmake recording in this condition.If you want to make new recording while keep-ing the demo tape on the hard disk, see "Creat-ing a song for recording" on the next page.If you do not keep the demo song, carry out ei-ther of the following operations.
(1) Release the song protection (see page101).Then, start recording (overwriterecording) from the beginning of the demosong, or delete the demo song from thehard disk. If you delete the demo song,create a new song (see the next page) andmake recording to the new song.
(2) Format the hard disk (see page 124) andmake recording.Because a new song is automaticallycreated after formatting the disk, you canstart recording without the need ofcreating a new song manually.
1) Raise the [MASTER] fader to the " " position.Set the track faders at the lowest position.
2) Press the [PLAY] key to start playback.
3) Raise the track faders (1 through 8) gradually toadjust the playback level and balance.Also raise the [PHONES VOL] control graduallyto adjust the headphones level. (If you areusing a powered monitor speaker formonitoring, adjust the level control of thepowered speaker.)
MIN MAX
100
L R
100
L R
100
L RRL
MIN MAX LINE MIC LINE MIC LINE MIC LINE MIC
REC SELECT
0 10
1 2 3 4 5/6 MASTER
MAXMAX
MINMIN
7/8
LOCATE REC END
A-B PLAYLOCATE ABS ZERO
PLAYSTOPRECORD REWIND F FWD
GUIDERHYTHM
CONTRAST
1-8 >SONGNEW
1-6 > 7/81-4 > 5/6 STEREO
WAV FILE
BOUNCE
POWERFUL
MASTERING
B / OUTA / INLOCATE
STOREPLAY MODEAUTO PUNCH
NATURAL BRIGHT
TIME BASESELECT
UNDO/REDO
7/8 >
MENU / ENTER
SIMULATIONDYNAMIC CONDENSER TUBE MIC
PAN
EFFECT
REVERB / DELAY TIME
HALLROOM
PLATE DELAY
PHONES VOL
LSTEREO OUT
R
2PHONES
1
MAXMIN
BALBALBAL
TRIM
UNBAL
PEAK
TRIM
UNBAL
PEAK
TRIM
UNBAL
PEAKPEAK
DISTORTION
GUITAR
/GUITAR
INPUT A SELECT
INSERT
BAL
UNBAL
TRIM
INPUT A INPUT B INPUT C INPUT D
ON/OFF
POWER
ABC1 DEF2 GHI3
JKL4 MNO5
PQR6 STU7 VWX8 YZ9 +-_0 DELETE
TO STEREO BUSS
EFFECT SEND
DIGITAL MULTITRACKER
ON/OFF
ON/OFF
ON/OFF
60'S COMBOUS METALBRIT STACK AMP SIMULATION
INPUT A
1 21,3
3
4
Hint-2
Hint-1
4) When the demo song ends, press the [STOP] keyto stop the recorder.
<Hint-1>: While listening to the playbacksound, adjust panning setting of tracks 1through 4, as well as try to adjust the inter-nal effects (reverb/delay) (see page 60).

31
MR-8HD Owner’s Manual (Basic operations)
This section describes how to create a new song for recording on the hard disk, while keeping thedemo song. In the following procedure, it is assumed that the MR-8HD is stopped at the begin-ning (ABS ZERO) of the demo song.
1) While the recorder is stopped, press the[MENU/ENTER] knob to enter the menu mode.The display now shows the first page of themenu selection screen, where "<< Back" ishighlighted initially.
2) Rotate the [MENU/ENTER] knob to select "Song",and press the [MENU/ENTER] knob.The display now shows the first page of thesong menu screen, where "<< Back" ishighlighted initially.
3) Rotate the [MENU/ENTER] knob to select"Select Song", and press the [MENU/ENTER]knob.The display now shows the first page of thesong selection screen. You can see the list ofthe song numbers/names on the hard disk.Currently, only the demo song is created, and"S01: FOSTEX_FEVER" and "---:(New Song)" areshown."---:(New Song)" is used to create a new song.
4) Rotate the [MENU/ENTER] knob to select"- - -:(New Song)", and press the [MENU/ENTER]knob.
5) Enter the desired song name.
<Note>: By selecting "<< Back" and press-ing the [MENU/ENTER] knob, the displayreturns to the previous screen. You can alsoreturn the display to the previous screenby pressing the [REWIND] key.
<Note>: You may leave the default songname as it is. Also, you can edit the songname after creating a song using the "Re-name Song" menu item in the song menuof the menu mode (see page 99).
The display now shows the screen for enteringa new song name. The rightmost character onthe default song name is flashing (in the ex-ample below, "2" of "Song02" starts flashing).
Use the character entry keys to enter the de-sired character at the flashing point.Rotate the [MENU/ENTER] knob to move theflashing point. Use the [UNDO/REDO/DELETE]key to delete the character at the flashing point.Therefore, when the rightmost character isflashing as in the screen example above, youcan delete all characters by pressing the[UNDO/REDO/DELETE] key repeatedly. Youcan enter up to 16 characters for a song name.
See <How to enter characters> on the next pagefor entering the song name as "My_Song".
Creating a song for recording

32
MR-8HD Owner’s Manual (Basic operations)
6) After completing song name entry, press the[MENU/ENTER] knob.The cursor moves to “[ENTER]” at the bottomof the screen.
7) While “[ENTER]” is flashing, press the[MENU/ENTER] knob.The display now shows the home screen of thenewly created song (My_Song).As shown in the lower screen example, the songname (My_Song) and the song number(Song02) are shown.
<Note>: If you want to cancel creating a song,rotate the [MENU/ENTER] knob to move thecursor to "[CANCEL]" and press the [MENU/ENTER] knob.
Now, in addition to the demo song, a newsong on which no audio is recorded is cre-ated by the procedure above.
It is a good idea to create more than onesong before you start recording.
After creating a song or songs for recording,connect the sound source to the MR-8HD (seethe next page) and start recording.
<Character entry keys>Some keys on the MR-8HD top panelact as character entry keys in themenu mode. For example, the [PLAYMODE] key (shown at the left) canbe used for entering S, T, U, s, t, uand 7. Each press of a character en-try key switches the character to beentered among those assigned tothe key.
<Character entry example>The following procedure example shows how to en-ter "My_Song" as a song name.
1. Use the [NATURAL] key to enter "M".
2. Use the [LOCATE B/OUT] key to enter "y".
3. Use the [STORE] key to enter "_".
4. Use the [PLAY MODE] key to enter "S".
5. Use the [NATURAL] key to enter "o".
6. Rotate the [MENU/ENTER] knob to move thecursor right.
7. Use the [NATURAL] key to enter "n".
8. Use the [7/8>STEREO WAV FILE] key toenter "g".
PLAY MODE
STU7
<Note>: After creating a new song, by ex-ecuting procedure steps 1 through 3, thefollowing song selection screen appears.This screen is used for loading the desiredsong from the list, as well as creating a newsong.For example, by rotating the [MENU/ENTER]knob to highlight “S01: FOSTEX_FEVER” andpressing the [MENU/ENTER] knob, you canload the demo song.
For details about how to select the desiredsong, see "Song management" on page 97.
<How to enter characters>
<Notes on cursor movement>Pressing a different character entry key automati-cally moves the cursor right.If two successive characters are assigned to thesame character entry key, rotate the [MENU/EN-TER] knob after selecting the first character tomove the cursor right.

33
MR-8HD Owner’s Manual (Basic operations)
The MR-8HD provides four input channels: [INPUT A], [INPUT B], [INPUT C] and [INPUT D]. Eachchannel provides both the XLR and 1/4" phone connectors.
INPUT A INPUT B INPUT C INPUT D
INPUT A
INPUT B
INPUT C
INPUT D
• When you use the [INPUT A] channel, set the [INPUT A SEL] switch on the rear panelappropriately.
• If you use a condenser microphone, use the XLR (balanced) connector. The MR-8HD cansupply the phantom power (see page 128).
Available input connectors Shapes of connectable connectorInput channel
Either of the XLR (balanced) con-nector or phone (unbalanced) jackcan be used (if both connectorsare plugged, the phone jack is ef-fective).
Input channel
When you use the [INPUT A] channel, you must set the [INPUT A SEL] switch on the rear panelappropriately.
INPUT A SEL switch
INPUT A SEL
MIC/LINEGTR CLEANGTR DIST
INPUT A SEL
MIC/LINEGTR CLEANGTR DIST
INPUT A SEL
MIC/LINEGTR CLEANGTR DIST
“MIC/LINE” position
“GTR DIST” position
“GTR CLEAN” position
Both the [BAL] XLR and [UNBAL/GUI-TAR] phone connectors can be used.Set the switch to this position when thesource is an external microphone orline level source.
Both the [BAL] XLR and [UNBAL/GUI-TAR] phone connectors can be used.You can adjust the input level and dis-tortion using the [TRIM] and [DISTOR-TION] controls respectively. You canalso use the amp simulation insert ef-fect.
Both the [BAL] XLR and [UNBAL/GUI-TAR] phone connectors can be used.You can adjust the input level using the[TRIM] control. You can also use theamp simulation insert effect.
XLR-3-12C type PHONE plug
MIN MAX LINE MIC LINE MIC LINE MIC LINE MIC
PHONES VOL
LSTEREO OUT
R
2PHONES
1
MAXMIN
BALBALBAL
TRIM
UNBAL
PEAK
TRIM
UNBAL
PEAK
TRIM
UNBAL
PEAKPEAK
DISTORTION
GUITAR
/GUITAR
INPUT A SELECT
INSERT
BAL
UNBAL
TRIM
INPUT A INPUT B INPUT C INPUT D
DIGITAL MULTITRACKER
INPUT A SEL
DIGITALOUT FOOT SWMIDI OUT
GTR CLEAN MIC/LINEGTR DIST
[INPUT A SEL] switch
Input connection

34
MR-8HD Owner’s Manual (Basic operations)
The following shows the recording track combinations and available input channel(s) by the numberof tracks simultaneously recorded.
Recording track combinations and available input channel(s)
Recording to a single track
Only [INPUT A] is available.You can record only the [INPUT A] channel signal to theselected track. The channels from [INPUT B] to [INPUTD] are not available.
[INPUT A], [INPUT B] and [INPUT C] are available.The [INPUT A] channel signal is assigned to the trackwith the lowest number, the [INPUT B] signal assignedto the track with the next lowest number, and the [IN-PUT C] signal is assigned to the track with the highestnumber.
All input channels are available.The [INPUT A] channel signal is assigned to the trackwith the lowest number, the [INPUT B] signal assignedto the track with the next lowest number, the [INPUT C]signal is assigned to the track with the second highestnumber, and the [INPUT D] signal is assigned to thetrack with the highest number.
Recording to two tracks simultaneously
Recording to four tracks simultaneously
Recording to three tracks simultaneously
Track 1
Track 2
Track 3
Track 4
Trk 1, 2 and 3
Trk 1, 2 and 4
Trk 1, 3 and 4
Trk 1, 5 and 6
Trk 1, 7 and 8
Trk 2, 3 and 4
Trk 2, 5 and 6
Trk 2, 7 and 8
Trk 3, 5 and 6
Trk 3, 7 and 8
Trk 4, 5 and 6
Trk 4, 7 and 8
Trk 1 and 2
Trk 3 and 4
Trk 5 and 6
Trk 7 and 8
Trk 1, 2, 3 and 4
Trk 1, 2, 5 and 6
Trk 1, 2, 7 and 8
Trk 3, 4, 5 and 6
Trk 3, 4, 7 and 8
Trk 1, 3, 5 and 6
Trk 1, 3, 7 and 8
Trk 1, 4, 5 and 6
Trk 1, 4, 7 and 8
[INPUT A] and [INPUT B] are available.The [INPUT A] channel signal is assigned to the trackwith the lower number, while the [INPUT B] channel sig-nal is assigned to the track with the higher number.
Trk 1 and 3
Trk 1 and 4
Trk 2 and 3
Trk 2 and 4
Trk 2, 3, 5 and 6
Trk 2, 3, 7 and 8
Trk 2, 4, 5 and 6
Trk 2, 4, 7 and 8
1
2
3
4
1 2 3
1 2 4
1 43
1 5/6
1 7/8
2 5/6
2 7/8
3 5/6
3 7/8
4 5/6
4 7/8
42 3
21
43
5/6
7/8
31
41
32
42
4321
21 5/6
21 7/8
43 5/6
43 7/8
31 5/6
31 7/8
41 5/6
41 7/8
2 3 7/8
2 3 5/6
2 4 5/6
2 4 7/8<Example of input assignment to tracks>If you make recording to tracks 2, 4, 7 and 8, input-to-track assignment is as follows.
INPUT A -> Track 2 INPUT B -> Track 4 INPUT C -> Track 7 INPUT D -> Track 8

35
MR-8HD Owner’s Manual (Basic operations)
You can record onto any one of tracks 1 through 4. When making recording to a single track, youcan record a signal fed to the [INPUT A] channel.The following describes the procedure for recording an acoustic guitar onto track 1 via a micro-phone. We assume that Song02 is loaded and no sound is recorded to Song02. See "Creating asong for recording" on page 31 for details about how to create a song.
1) Connect a microphone to the [BAL] or[UNBAL/GUITAR] input connector of the[INPUT A] channel.
<Note>: You can apply the mic simulationas insert effects when the [INPUT A SEL]switch to "MIC/LINE" (see page 58).
3) Press the [REC SELECT] key for track 1.Track 1 is record armed and the [REC SELECT]key for track 1 starts flashing.On the home screen, the remaining time isshown, while "1" for the track number changesto "A".
Preparation for recording
2) Set the [INPUT A SEL] switch to "MIC/LINE".
<Note>: You can supply the phantom powerto a condenser microphone connected tothe [BAL] XLR connector (see page 128).Note that you cannot supply the phantompower via the [GUITAR/UNBAL] phone con-nector.
MIN MAX
100
L R
100
L R
100
L RRL
MIN MAX LINE MIC LINE MIC LINE MIC LINE MIC
REC SELECT
0 10
1 2 3 4 5/6 MASTER
MAXMAX
MINMIN
7/8
LOCATE REC END
A-B PLAYLOCATE ABS ZERO
PLAYSTOPRECORD REWIND F FWD
GUIDERHYTHM
CONTRAST
1-8 >SONGNEW
1-6 > 7/81-4 > 5/6 STEREO
WAV FILE
BOUNCE
POWERFUL
MASTERING
B / OUTA / INLOCATE
STOREPLAY MODEAUTO PUNCH
NATURAL BRIGHT
TIME BASESELECT
UNDO/REDO
7/8 >
MENU / ENTER
SIMULATIONDYNAMIC CONDENSER TUBE MIC
PAN
EFFECT
REVERB / DELAY TIME
HALLROOM
PLATE DELAY
PHONES VOL
LSTEREO OUT
R
2PHONES
1
MAXMIN
BALBALBAL
TRIM
UNBAL
PEAK
TRIM
UNBAL
PEAK
TRIM
UNBAL
PEAKPEAK
DISTORTION
GUITAR
/GUITAR
INPUT A SELECT
INSERT
BAL
UNBAL
TRIM
INPUT A INPUT B INPUT C INPUT D
ON/OFF
POWER
ABC1 DEF2 GHI3
JKL4 MNO5
PQR6 STU7 VWX8 YZ9 +-_0 DELETE
TO STEREO BUSS
EFFECT SEND
DIGITAL MULTITRACKER
ON/OFF
ON/OFF
ON/OFF
60'S COMBOUS METALBRIT STACK AMP SIMULATION
INPUT A
INPUT A SEL
MIC/LINEGTR CLEANGTR DIST1
4 4 5
6
37
8
9
10
6
2
4) Set track fader 1 and [MASTER] fader to thenominal position (marked by ).Raising these faders allows you to monitor theinput sound. If these faders are not raised, youcannot monitor the sound via headphones.
Recording onto a single track

36
MR-8HD Owner’s Manual (Basic operations)
6) While playing the guitar, adjust the recording levelusing the [TRIM] control of the [INPUT A]channel.Adjust the level appropriately so that the PEAKindicator does not light.Turning the [PHONES VOL] control clockwiseraises the headphone monitor level.
The screen shows the input level of track 1, aswell as the stereo L and R output levels.
<Note>: The fader for track 1 is used to ad-just the monitor level. To adjust the record-ing level, use the [TRIM] control of the [IN-PUT A] channel.
<Note>: Adjust the [TRIM] control properlyso that the PEAK indicator does not light atthe loudest part of the guitar sound. If theinput level is too high, the PEAK indicatorlights and the sound may be distorted ornoisy.
<Tip>: When receiving a line level signal, setthe [TRIM] control to left ("LINE") to get theappropriate level. When receiving a micro-phone signal, set the [TRIM] control to right("MIC") to get the appropriate level.
7) While holding down the [RECORD] key, press the[PLAY] key to start recording.The guitar is recorded.
8) When recording completes, press the [STOP] keyto stop the recorder.
<Note>: We recommend to press the [RECSELECT] key for track 1 to unarm track 1.
Starting recording
9) Press the [REWIND] key while holding down the[STOP] key to locate the recorder to thebeginning of the song.
10) Press the [PLAY] key to start playback.You can adjust the monitor level using the track1 fader, as well as the [MASTER] fader and[PHONES VOL] control.
Playing back the recorded track
If you are not satisfied with the result, usethe undo/redo function to cancel the re-cording and try again.
Undoing recording (undo/redo)
5) Press the [RECORD] key once (the key indicatorstarts flashing).Track 1 (which is record armed) now entersthe input monitor mode and " " isshown on the home screen.
If you press the [UNDO/REDO] key after finishingrecording, you can return to the condition beforethe recording started (UNDO operation). Therefore,you can try recording again.If you press the [UNDO/REDO] key again (afterUNDO), the undo operation is canceled and youcan return to the condition when the recordingfinished (REDO operation).
<Notes>: The undo/redo function is available forall kind of recordings, however, if you carry outany of the following operations after making re-cording, you cannot undo the recording.
• Carrying out new recording.• Carrying out track or part editing.• Turning off the power.• Selecting another song or editing the song name.
END ZERO
PLAY REWIND F FWD
BOUNCE
MASTERING
B / OUTLOCATE
STORE UNDO/REDO
MENU / ENTER
YZ9 +-_0 DELETE
[UNDO/REDO] key

37
MR-8HD Owner’s Manual (Basic operations)
Overdubbing is recording something new while listening to the previously recorded track(s). It isa very important method in multitrack recording. The following describes an example of over-dubbing for recording a stereo keyboard to tracks 7/8 while listening to the guitar on track 1.See the procedure previously described in "Recording onto a single track" for details about howto record a guitar on track 1. In the procedure below, we assume that the song of which theguitar has been recorded on track 1 is loaded.Note that you can make overdubbing to another track or other tracks in the same manner asdescribed below.
1) Connect the L and R outputs of the keyboard toinput connectors of the [INPUT A] and [INPUT B]channels.Connect the L and R outputs to the [INPUT A]and [INPUT B] channels respectively.
2) Set the [INPUT A SEL] switch to "MIC/LINE".
3) Press the [REC SELECT] key for tracks 7/8.Tracks 7/8 are record armed and the[REC SELECT] key for tracks 7/8 startsflashing.
On the home screen, the remaining time isshown, while "7" and "8" for the tracknumbers change to "A" and "B" respectively.
Preparation for recording
4) Set track faders 1 and 7/8 and the [MASTER] faderto the nominal position (marked by ).Raising these faders allows you to monitor theinput sound. If these faders are not raised, youcannot monitor the sound via headphones.
This indicates you can now record the [INPUTA] and [INPUT B] channel signals to tracks 7and 8 respectively.
MIN MAX
100
L R
100
L R
100
L RRL
MIN MAX LINE MIC LINE MIC LINE MIC LINE MIC
REC SELECT
0 10
1 2 3 4 5/6 MASTER
MAXMAX
MINMIN
7/8
LOCATE REC END
A-B PLAYLOCATE ABS ZERO
PLAYSTOPRECORD REWIND F FWD
GUIDERHYTHM
CONTRAST
1-8 >SONGNEW
1-6 > 7/81-4 > 5/6 STEREO
WAV FILE
BOUNCE
POWERFUL
MASTERING
B / OUTA / INLOCATE
STOREPLAY MODEAUTO PUNCH
NATURAL BRIGHT
TIME BASESELECT
UNDO/REDO
7/8 >
MENU / ENTER
SIMULATIONDYNAMIC CONDENSER TUBE MIC
PAN
EFFECT
REVERB / DELAY TIME
HALLROOM
PLATE DELAY
PHONES VOL
LSTEREO OUT
R
2PHONES
1
MAXMIN
BALBALBAL
TRIM
UNBAL
PEAK
TRIM
UNBAL
PEAK
TRIM
UNBAL
PEAKPEAK
DISTORTION
GUITAR
/GUITAR
INPUT A SELECT
INSERT
BAL
UNBAL
TRIM
INPUT A INPUT B INPUT C INPUT D
ON/OFF
POWER
ABC1 DEF2 GHI3
JKL4 MNO5
PQR6 STU7 VWX8 YZ9 +-_0 DELETE
TO STEREO BUSS
EFFECT SEND
DIGITAL MULTITRACKER
ON/OFF
ON/OFF
ON/OFF
60'S COMBOUS METALBRIT STACK AMP SIMULATION
INPUT A
INPUT A SEL
MIC/LINEGTR CLEANGTR DIST
1
4 4 5
7
39
8,10
8,11
12
4 6,12
7
Overdubbing basics

38
MR-8HD Owner’s Manual (Basic operations)
9) While holding down the [RECORD] key, press the[PLAY] key to start recording.The recorder records the keyboard whileplaying back track 1 (guitar).
10) When recording completes, press the [STOP] keyto stop the recorder.
<Note>: We recommend to press the [RECSELECT] key for tracks 7/8 to unarm tracks7/8.
Starting recording
11) Press the [REWIND] key while holding down the[STOP] key to locate the recorder to thebeginning of the song.
12) Press the [PLAY] key to start playback.You can adjust the monitor level using the trackfaders, as well as the [MASTER] fader and[PHONES VOL] control.
Playing back the recorded track
<Note>: If you are not satisfied with the re-sult, use the undo/redo function to cancelthe recording and try again.
Undoing recording (undo/redo)If you press the [UNDO/REDO] key after finishingrecording, you can return to the condition beforethe recording started (UNDO operation). Therefore,you can try recording again.If you press the [UNDO/REDO] key again (afterUNDO), the undo operation is canceled and youcan return to the condition when the recordingfinished (REDO operation).
<Notes>: The undo/redo function is available forall kind of recordings, however, if you carry outany of the following operations after making re-cording, you cannot undo the recording.
• Carrying out new recording.• Carrying out track or part editing.• Turning off the power.• Selecting another song or editing the song name.
END ZERO
PLAY REWIND F FWD
BOUNCE
MASTERING
B / OUTLOCATE
STORE UNDO/REDO
MENU / ENTER
YZ9 +-_0 DELETE
[UNDO/REDO] key
<Note>: Track 1 and 7/8 faders are used toadjust the monitor level. To adjust the re-cording levels, use the [TRIM] controls ofthe [INPUT A] and [INPUT B] channels.
<Note>: Adjust each [TRIM] control prop-erly so that the corresponding PEAK indi-cator does not light at the loudest part ofthe keyboard sound.
<Tip>: When receiving a line level signal, setthe [TRIM] control to left ("LINE") to get theappropriate level. When receiving a micro-phone signal, set the [TRIM] control to right("MIC") to get the appropriate level.
5) Press the [RECORD] key once (the key indicatorstarts flashing).The armed tracks 7/8 now enter the inputmonitor mode, while " " is shown onthe home screen.
Adjusting the recording levels while listening to track 1
6) Press the [PLAY] key to play back the song fromthe beginning.Though tracks 7/8 are in the input monitormode, you can hear the track 1 signal byrotating the [PHONES VOL] control clockwise(while the meter for track 1 shows theplayback level).
7) While playing the keyboard, adjust the recordinglevels using the [TRIM] controls of the [INPUT A]and [INPUT B] channels.Adjust the levels appropriately so that the PEAKindicators for these input channels do not light.
The home screen shows the playback level oftrack 1 and the input levels of tracks 7 and 8,as well as the stereo L and R output levels.
8) After adjusting the recording levels properly,press the [REWIND] key while holding down the[STOP] key to locate the recorder to thebeginning of the song.

39
MR-8HD Owner’s Manual (Basic operations)
You can simultaneously record up to four tracks. See page 34 for the available combinations offour recording tracks. The following describes the procedure for recording different sound sourcessimultaneously to tracks 1 through 4. You can make four-track simultaneous recording with anyavailable track combination in the same manner.
1) Connect the following sound sources to the[INPUT A] through [INPUT D] channels.
[INPUT A] -> Electric guitar[INPUT B] -> Electric bass[INPUT C] -> Microphone (vocal)[INPUT D] -> Drum machine
Preparation for recording
MIN MAX
100
L R
100
L R
100
L RRL
MIN MAX LINE MIC LINE MIC LINE MIC LINE MIC
REC SELECT
0 10
1 2 3 4 5/6 MASTER
MAXMAX
MINMIN
7/8
LOCATE REC END
A-B PLAYLOCATE ABS ZERO
PLAYSTOPRECORD REWIND F FWD
GUIDERHYTHM
CONTRAST
1-8 >SONGNEW
1-6 > 7/81-4 > 5/6 STEREO
WAV FILE
BOUNCE
POWERFUL
MASTERING
B / OUTA / INLOCATE
STOREPLAY MODEAUTO PUNCH
NATURAL BRIGHT
TIME BASESELECT
UNDO/REDO
7/8 >
MENU / ENTER
SIMULATIONDYNAMIC CONDENSER TUBE MIC
PAN
EFFECT
REVERB / DELAY TIME
HALLROOM
PLATE DELAY
PHONES VOL
LSTEREO OUT
R
2PHONES
1
MAXMIN
BALBALBAL
TRIM
UNBAL
PEAK
TRIM
UNBAL
PEAK
TRIM
UNBAL
PEAKPEAK
DISTORTION
GUITAR
/GUITAR
INPUT A SELECT
INSERT
BAL
UNBAL
TRIM
INPUT A INPUT B INPUT C INPUT D
ON/OFF
POWER
ABC1 DEF2 GHI3
JKL4 MNO5
PQR6 STU7 VWX8 YZ9 +-_0 DELETE
TO STEREO BUSS
EFFECT SEND
DIGITAL MULTITRACKER
ON/OFF
ON/OFF
ON/OFF
60'S COMBOUS METALBRIT STACK AMP SIMULATION
INPUT A
INPUT A SEL
MIC/LINEGTR CLEANGTR DIST
1
4 5
6
37
8
9
12
4 10
1 1 6
<Note>: You can apply the amp simulationas insert effects when the [INPUT A SEL]switch is set to "GUIT DIST" (see page 58).
<Note>: If you connect a condenser micro-phone to the [BAL] XLR connector of the [IN-PUT C] channel, you can supply the phan-tom power to the microphone (see page128).
2) Set the [INPUT A SEL] switch to "GUIT DIST".You can add distortion of the internal effectsto your guitar sound.
3) Press the [REC SELECT] key for tracks 1 through4.Tracks 1 through 4 are record armed and the[REC SELECT] keys for tracks 1 through 4 startflashing.
On the home screen, track numbers "1"through "4" changes to "A" through "D"respectively, showing that each input isassigned to the appropriate track.The remaining time of the hard disk is shown.
4) Set the track faders 1 through 4 and [MASTER]fader to the nominal position (marked by ).Raising these faders allows you to monitor theinput sound. If these faders are not raised, youcannot monitor the sound via headphones.
Recording onto four tracks simultaneously

40
MR-8HD Owner’s Manual (Basic operations)
6) While playing the music, adjust the recordinglevel of each track using the [TRIM] control ofeach input channel.Adjust the level appropriately so that the PEAKindicator does not light.Turning the [PHONES VOL] control clockwiseraises the headphone monitor level.
The screen shows the input level of tracks 1through 4, as well as the stereo L and R outputlevels.
<Note>: Track faders 1 through 4 are usedto adjust the monitor levels. To adjust therecording level, use the [TRIM] controls for[INPUT A] through [INPUT D].
<Note>: Adjust the [TRIM] control of eachinput channel properly so that the PEAKindicator does not light at the loudest partof the sound.
<Tip>: When receiving a line level signal, setthe [TRIM] control to left ("LINE") to get theappropriate level. When receiving a micro-phone signal, set the [TRIM] control to right("MIC") to get the appropriate level.
7) While holding down the [RECORD] key, press the[PLAY] key to start recording.The recorder starts recording.
8) When recording completes, press the [STOP] keyto stop the recorder.
<Note>: We recommend to press the [RECSELECT] key for tracks 1 through 4 to un-arm these tracks.
Starting recording
9) Press the [REWIND] key while holding down the[STOP] key to locate the recorder to thebeginning of the song.
10) Press the [PLAY] key to start playback.You can adjust the monitor level using trackfaders 1 through 4, as well as the [MASTER]fader and [PHONES VOL] control.
Playing back the recorded track
<Tip>: If you are not satisfied with the re-sult, use the undo/redo function to cancelthe recording and try again.
Undoing recording (undo/redo)
5) Press the [RECORD] key once (the key indicatorstarts flashing).Tracks 1 through 4 (which are armed) nowenter the input monitor mode and" " is shown on the home screen.
If you press the [UNDO/REDO] key after finishingrecording, you can return to the condition beforethe recording started (UNDO operation). Therefore,you can try recording again.If you press the [UNDO/REDO] key again (afterUNDO), the undo operation is canceled and youcan return to the condition when the recordingfinished (REDO operation).
<Notes>: The undo/redo function is available forall kind of recordings, however, if you carry outany of the following operations after making re-cording, you cannot undo the recording.
• Carrying out new recording.• Carrying out track or part editing.• Turning off the power.• Selecting another song or editing the song name.
[UNDO/REDO] key
END ZERO
PLAY REWIND F FWD
BOUNCE
MASTERING
B / OUTLOCATE
STORE UNDO/REDO
MENU / ENTER
YZ9 +-_0 DELETE
<Tip>: You can add distortion to an electricguitar connected to [INPUT A]. Use the [DIS-TORTION] control to adjust the distortionlevel. When you add distortion, readjust the[TRIM] control.

41
MR-8HD Owner’s Manual (Basic operations)
<Tip>: By sliding up or down the MR-8HD[MASTER] fader gradually, you can fade inor fade out recording.
3) Adjust the recording level of the master recorderwhile rehearsing mixdown.See the manual of the master recorder fordetails about how to adjust the recording level.
4) After rehearsing mixdown and adjusting therecording level, locate the MR-8HD to thebeginning of the song.
5) Start the master recorder recording and then startthe MR-8HD playing back.
6) After finishing recording, stop both recorders.
1) Connect the [STEREO OUT (L, R)] connectors ofthe MR-8HD to the input connectors of ananalog master recorder.
2) While playing back the MR-8HD, rehearse mixingdown the recorded sounds by adjusting the leveland panning of each track, applying effects totracks 1 through 4 and applying the masteringeffects to the L/R stereo mix, etc.The output levels from the [STEREO OUT (L,R)] connectors can be controlled by the[MASTER] fader.Adjust the levels appropriately so that thehighest segments of L and R meters do not light.
See "Using effects" on page 57 for details aboutthe delay/reverb and mastering effects.You can also mix sound sources connected to[INPUT A] through [INPUT D] during mixdown.See page 73 for details.
The following describes how to make mixdown recording to an external analog recorder.
MIN MAX LINE MIC LINE MIC LINE MIC LINE MIC
PHONES VOL
LSTEREO OUT
R
2PHONES
1
MAXMIN
BALBALBAL
TRIM
UNBAL
PEAK
TRIM
UNBAL
PEAK
TRIM
UNBAL
PEAKPEAK
DISTORTION
GUITAR
/GUITAR
INPUT A SELECT
INSERT
BAL
UNBAL
TRIM
INPUT A INPUT B INPUT C INPUT D
ON/OFF
POWERTO STEREO BUSS
DIGITAL MULTITRACKER
ON/OFF
ON/OFF
ON/OFF
Analog master recorder
MR-8HD
This section describes basic mixdown which is the final process of multitrack recording. Mixdownmixes recorded materials on tracks 1 through 8 down to stereo. The mixdowned material can berecorded to an external master recorder.The MR-8HD is equipped with the [DIGITAL OUT] connector, so you can record a mixdownedsignal to a digital master recorder (DAT, MD, etc.) which can accept an S/P DIF digital signal indigital domain. With the MR-8HD, you can also record a mixdowned signal internally to a newsong of the MR-8HD using the track bouncing function, without the need of an external masterrecorder (see "Track bouncing" described later).
Mixdown to an analog recorder
[STEREO OUT L, R]
Track 1 (Playback)
Mastering effects
STEREO OUT (R)
Mixing
STEREO OUT (L)D/A
DIGITAL OUT
Delay or R
everb
Analog signals
Digital signal
Track 2 (Playback)Track 3 (Playback)Track 4 (Playback)
Track 5 (Playback)
Track 6 (Playback)
Track 7 (Playback)
Track 8 (Playback)
Basic mixdown

42
MR-8HD Owner’s Manual (Basic operations)
1) Connect the [DIGITAL OUT] connector of theMR-8HD to the digital input connector of a digitalmaster recorder using an optical cable.
<Note>: The [DIGITAL OUT] connector ofthe MR-8HD is the Toslink optical type.If your digital recorder provides only thecoaxial type connector, use the Fostex COP-1/96 kHz coaxial-optical converter.Contact Fostex or our dealer for detailsabout the Model COP-1/96 kHz.
The following describes how to make mixdown recording to an external digital recorder.
<Tip>: By sliding up or down the MR-8HD[MASTER] fader gradually, you can fade inor fade out recording.
INPUT A SEL
USB USB HOSTAC-INDIGITAL
OUT FOOT SWMIDI OUT
GTR CLEAN MIC/LINEGTR DIST
Digital master recorder
MR-8HD
Mixdown to a digital recorder
Optical cable
2) Set the master recorder to accept the digitalinput.Make sure that the recorder accepts the digitalsignal output from the MR-8HD, which is 44.1-kHz, 16-bit, S/P DIF signal.Generally, a digital recorder cannot adjust thedigital input level.
3) While playing back the MR-8HD, rehearse mixingdown the recorded sounds by adjusting the leveland panning of each track, applying effects totracks 1 through 4 and applying the masteringeffects to the L/R stereo mix, etc.See "Using effects" on page 57 for details aboutthe delay/reverb and mastering effects.You can also mix sound sources connected to[INPUT A] through [INPUT D] during mixdown.See page 72 for details.
4) Use the [MASTER] fader of the MR-8HD to adjustthe output level.Adjust the level appropriately so that the levelmeter of the master recorder shows "0" whenthe MR-8HD outputs the biggest signal.If the level meter exceeds "0", the sound maybe distorted.
5) Start the master recorder recording and then startthe MR-8HD playing back.
6) After finishing recording, stop both recorders.
[DIGITAL OUT]
Model COP-1/96kHz

43
MR-8HD Owner’s Manual (Advanced playback and locate functions)
Advanced playback and locate functions
This chapter describes advanced playback functions including cue-ing, partial playback (between points A and B), special play modes,as well as the locate function.

44
MR-8HD Owner’s Manual (Advanced playback and locate functions)
• By holding down the [F FWD] key during playback, the recorder starts cueing forwards at 3 xspeed.During forward cueing, ">>" is shown on thedisplay.
• By holding down the [REWIND] key during playback, the recorder starts cueing backwards at 3x speed.During backward cueing, "<<" is shown on thedisplay.
When the LOCATE A and LOCATE B points are set, you can playback between these points once.This function is always available regardless of the play mode setting (see "Play mode" on nextpage). This function allows you to check the editing part (between LOCATE A and B points) forcopy/paste, erase, etc. See "Part editing" described later.
By holding down the [F FWD] or [REWIND] key during playback, the recorder enters cueingmode and you can monitor playback at 3 x speed. It may be useful for searching a specificposition.
• While the recorder is stopped, press the [PLAY]key while holding down the [STOP] key.The MR-8HD plays back audio data betweenthe LOCATE A and LOCATE B points once, thenstops.
<Note>: If you carry out the operation above whenthe LOCATE A point is set ahead of the LOCATE Bpoint (i.e. LOCATE A > LOCATE B), the MR-8HDplays back audio data from the LOCATE A pointto the REC END points once, then stops.
<Note>: Note that this function is available onlywhen the LOCATE A and B points are set.See page 49 for details about how to set the LO-CATE A and B points.
LOCATE A point
Playback
LOCATE B point
During playback, you can monitor playbackaudio of the desired track(s) by raising the ap-propriate track fader(s), the [MASTER] faderand the [PHONES] control.
While the recorder is playing back between theLOCATE A and B points, the display shows theicon as below.
LOCATE REC END
A-B PLAYLOCATE ABS ZERO
PLAYSTOPRECORD REWIND F FWD
LOCATE REC END
A-B PLAYLOCATE ABS ZERO
PLAYSTOPRECORD REWIND F FWD
[REWIND] key [F FWD] key
[STOP] key [PLAY] key
3 x cueing
Playback between LOCATE A and B points

45
MR-8HD Owner’s Manual (Advanced playback and locate functions)
While the recorder is stopped, each time you press the [PLAY MODE] key, the playmode switches among "Off", "Auto Play", "Auto return" and "Loop".The current mode is shown on the screen as follows (when "Off" is selected, there isno indication).
The MR-8HD offers special play modes including the auto play, auto return and loop playbackmodes in addition to the normal playback mode.
Selecting a play mode
Play mode "off" Auto play mode
Auto return modeLoop mode
MIN MAX
100
L R
100
L R
100
L RRL
MIN MAX LINE MIC LINE MIC LINE MIC LINE MIC
REC SELECT
0 10
1 2 3 4 5/6 MASTER
MAXMAX
MINMIN
7/8
LOCATE REC END
A-B PLAYLOCATE ABS ZERO
PLAYSTOPRECORD REWIND F FWD
GUIDERHYTHM
CONTRAST
1-8 >SONGNEW
1-6 > 7/81-4 > 5/6 STEREO
WAV FILE
BOUNCE
POWERFUL
MASTERING
B / OUTA / INLOCATE
STOREPLAY MODEAUTO PUNCH
NATURAL BRIGHT
TIME BASESELECT
UNDO/REDO
7/8 >
MENU / ENTER
SIMULATIONDYNAMIC CONDENSER TUBE MIC
PAN
EFFECT
REVERB / DELAY TIME
HALLROOM
PLATE DELAY
PHONES VOL
LSTEREO OUT
R
2PHONES
1
MAXMIN
BALBALBAL
TRIM
UNBAL
PEAK
TRIM
UNBAL
PEAK
TRIM
UNBAL
PEAKPEAK
DISTORTION
GUITAR
/GUITAR
INPUT A SELECT
INSERT
BAL
UNBAL
TRIM
INPUT A INPUT B INPUT C INPUT D
ON/OFF
POWER
ABC1 DEF2 GHI3
JKL4 MNO5
PQR6 STU7 VWX8 YZ9 +-_0 DELETE
TO STEREO BUSS
EFFECT SEND
DIGITAL MULTITRACKER
ON/OFF
ON/OFF
ON/OFF
60'S COMBOUS METALBRIT STACK AMP SIMULATION
INPUT A
PLAY MODE
STU7
While the recorder is stopped,you can choose the desiredplay mode by pressing the[PLAY MODE] key as manytimes as needed.
Lighting Lighting
Lighting
Play mode

46
MR-8HD Owner’s Manual (Advanced playback and locate functions)
In the Auto play mode, when locating to the ABS ZERO, REC END, LOCATE A or LOCATE B point,the recorder automatically starts playback from the point. The following shows the auto playfunction after locating to the LOCATE A point (see page 48 for the locate function).
The auto return mode is active when the LOCATE A and LOCATE B points are set.In the auto return mode, when reaching at the LOCATE B point during playback, the recorderautomatically locates to the LOCATE A point and stops.
As with the auto return mode, the loop mode is active when the LOCATE A and LOCATE B pointsare set. In the loop mode, when reaching at the LOCATE B point during playback, the recorderautomatically locates to the LOCATE A point and starts playback. The recorder repeats thisbehavior until you stop the recorder.You may find it very convenience to use the loop function together with the auto punch in/outfunction (see the next page).
Auto play mode
Auto return mode
Loop mode
When locating to the LOCATE A point, the recorder automatically starts playback.
When reaching at the LOCATE B point during playback, the recorder automatically locates to the LOCATE A point.
LOCATE A point
Playback
LOCATE B point
LOCATE A point
playback
LOCATE B point
When reaching at the LOCATE B point during playback, the recorder automatically locates to the LOCATE A point and stops.
When locating to the LOCATE A point, the recorder automatically starts playback immediately.
LOCATE A point
Playback
The point where you execute the locate function
The point where you execute the locate function
Locate Locate

47
MR-8HD Owner’s Manual (Advanced playback and locate functions)
When the loop mode is active (while the auto punch in/out mode is inactive), the LOCATEA and LOCATE B points are used as the loop start and end points. When the auto punch in/out mode is active (while the loop mode is inactive), the LOCATE A and LOCATE B pointsare used as the punch-in and punch-out points.When both the auto punch in/out and loop modes are active, the LOCATE A and LOCATEB points are used as the punch-in and punch-out points, while the loop function starts at"the LOCATE A point minus the pre-roll time" and ends at "the LOCATE B point plus thepost-roll time, as shown below. The pre-roll time is initially set to four seconds, while thepost-roll time is set to one second.
Using the loop function in the auto punch in/out mode reduces the number of key presses,allowing you to concentrate on playing.
LOCATE A point LOCATE B point
4 sec. 1 sec.
LOOP START point LOOP END point
LOCATE A point(Punch in point)
LOCATE B point(Punch out point)
LOOP START pointLOOP END point
You can change the pre-roll and post-roll time within the range between 0.1 and 10.0seconds (in 0.1 second steps) in the menu mode (see page 126).
<Note>: If you set the LOCATE A point to the beginning of a song (ABS ZERO) or set theLOCATE B point to the recording end point (REC END) of a song, the pre-roll or post-rolltime is ignored.
Loop function in auto punch in/out mode

48
MR-8HD Owner’s Manual (Advanced playback and locate functions)
The following describes the locate functions, which allow you to immediately skip to a specifiedpoint in a song.
Time locate
Regardless of the current recorder position, you can locate to the beginning (ABS ZERO) of thesong or the recording end (REC END) of the song.
• While the recorder is stopped, press the[REWIND] key while holding down the [STOP] key.
The MR-8HD immediately locates to thebeginning of the song (ABS ZERO) and stops.
REC ENDABS ZERO
Locate
The current position
REC ENDABS ZERO
Locate
The current position
Locating to the beginning (ABS ZERO) of a song
• While the recorder is stopped, press the [F FWD]key while holding down the [STOP] key.
The MR-8HD immediately locates to therecording end of the song (REC END) and stops.
Locating to the recording end point (REC END) of a song
MIN MAX
100
L R
100
L R
100
L RRL
MIN MAX LINE MIC LINE MIC LINE MIC LINE MIC
REC SELECT
0 10
1 2 3 4 5/6 MASTER
MAXMAX
MINMIN
7/8
LOCATE REC END
A-B PLAYLOCATE ABS ZERO
PLAYSTOPRECORD REWIND F FWD
GUIDERHYTHM
CONTRAST
1-8 >SONGNEW
1-6 > 7/81-4 > 5/6 STEREO
WAV FILE
BOUNCE
POWERFUL
MASTERING
B / OUTA / INLOCATE
STOREPLAY MODEAUTO PUNCH
NATURAL BRIGHT
TIME BASESELECT
UNDO/REDO
7/8 >
MENU / ENTER
SIMULATIONDYNAMIC CONDENSER TUBE MIC
PAN
EFFECT
REVERB / DELAY TIME
HALLROOM
PLATE DELAY
PHONES VOL
LSTEREO OUT
R
2PHONES
1
MAXMIN
BALBALBAL
TRIM
UNBAL
PEAK
TRIM
UNBAL
PEAK
TRIM
UNBAL
PEAKPEAK
DISTORTION
GUITAR
/GUITAR
INPUT A SELECT
INSERT
BAL
UNBAL
TRIM
INPUT A INPUT B INPUT C INPUT D
ON/OFF
POWER
ABC1 DEF2 GHI3
JKL4 MNO5
PQR6 STU7 VWX8 YZ9 +-_0 DELETE
TO STEREO BUSS
EFFECT SEND
DIGITAL MULTITRACKER
ON/OFF
ON/OFF
ON/OFF
60'S COMBOUS METALBRIT STACK AMP SIMULATION
INPUT A
[STOP] key + [REWIND] key
[STOP] key + [F FWD] key
Locate function

49
MR-8HD Owner’s Manual (Advanced playback and locate functions)
Locating to the LOCATE A or LOCATE B point
You can set the desired point of a song as the LOCATE A or LOCATE B point.The LOCATE A and B points can be used not only for locating, but also for auto punch in/out,play modes and part editing, etc.
Setting the LOCATE A or LOCATE B point
You can set the LOCATE A or LOCATE B point while the recorder is running or stops at thedesired point, regardless of time base setting.
<Note>: The LOCATE A point must be earlier than the LOCATE B point. If not, you cannot carryout the auto punch in/out or loop function correctly.
<Tip>: While the time base is set to the bar/beat mode, if you set the "Beat resolution" menuitem in the menu mode to "On", you can store the LOCATE A or B point in beat resolution. Inother words, the clock digit of the Bar/Beat/Clk value is automatically rounded down or up, sothat the clock digit is always "000".See page 127 for details about how to make the beat resolution active or inactive.
<Note>: You cannot set the LOCATE A or B point for a protected song. If you are going to do so,the warning message ("This song is protected!") is shown. To set the LOCATE A or B point for aprotected song, release the protection first (see page 101).
• To set the LOCATE B point:When the recorder is playing back (or stopped), press the [LOCATE B/OUT] key at the desiredpoint while holding down the [STORE] key.The display briefly shows "Store LOCATE B", and the point when pressing the[LOCATE B/OUT] key is stored as the LOCATE B point.
• To set the LOCATE A point:When the recorder is playing back (or stopped), press the [LOCATE A/IN] key at the desired pointwhile holding down the [STORE] key.The display briefly shows "Store LOCATE A", and the point when pressing the [LOCATE A/IN]key is stored as the LOCATE A point.
MIN MAX
100
L R
100
L R
100
L RRL
MIN MAX LINE MIC LINE MIC LINE MIC LINE MIC
REC SELECT
0 10
1 2 3 4 5/6 MASTER
MAXMAX
MINMIN
7/8
LOCATE REC END
A-B PLAYLOCATE ABS ZERO
PLAYSTOPRECORD REWIND F FWD
GUIDERHYTHM
CONTRAST
1-8 >SONGNEW
1-6 > 7/81-4 > 5/6 STEREO
WAV FILE
BOUNCE
POWERFUL
MASTERING
B / OUTA / INLOCATE
STOREPLAY MODEAUTO PUNCH
NATURAL BRIGHT
TIME BASESELECT
UNDO/REDO
7/8 >
MENU / ENTER
SIMULATIONDYNAMIC CONDENSER TUBE MIC
PAN
EFFECT
REVERB / DELAY TIME
HALLROOM
PLATE DELAY
PHONES VOL
LSTEREO OUT
R
2PHONES
1
MAXMIN
BALBALBAL
TRIM
UNBAL
PEAK
TRIM
UNBAL
PEAK
TRIM
UNBAL
PEAKPEAK
DISTORTION
GUITAR
/GUITAR
INPUT A SELECT
INSERT
BAL
UNBAL
TRIM
INPUT A INPUT B INPUT C INPUT D
ON/OFF
POWER
ABC1 DEF2 GHI3
JKL4 MNO5
PQR6 STU7 VWX8 YZ9 +-_0 DELETE
TO STEREO BUSS
EFFECT SEND
DIGITAL MULTITRACKER
ON/OFF
ON/OFF
ON/OFF
60'S COMBOUS METALBRIT STACK AMP SIMULATION
INPUT A
[STORE] key + [LOCATE B/OUT] key
[STORE] key + [LOCATE A/IN] key

50
MR-8HD Owner’s Manual (Advanced playback and locate functions)
Locating
While the recorder is stopped, press the [LOCATE A/IN] (or [LOCATE B/OUT]) key.The recorder instantly locates to the appropriate point.
<Tip>: By selecting the play mode to "Auto play", the recorder automatically startsplayback after locating the LOCATE A or LOCATE B point.
The current position LOCATE B pointLOCATE A point
Locate
Locate
The current position LOCATE B pointLOCATE A point
Locate Locate
The current positionLOCATE B pointLOCATE A point
Locate
Locate
• When the current recorder position is between the LOCATE A and LOCATE B points:
• When the current recorder position is before the LOCATE A and LOCATE B points:
• When the current recorder position is after the LOCATE A and LOCATE B points:

51
MR-8HD Owner’s Manual (Punch in/out)
Punch in/outUsing the punch in/out function of the MR-8HD, you can overwritethe desired part of the recorded track. "Punch in" means switchingfrom playback to recording, while "punch out" means switchingfrom recording to playback. The MR-8HD offers three methods formaking punch in/out recording.
1) Manual punch in/out using the top panel keys2) Punch in/out using a footswitch3) Auto punch in/out at the specified in/out points
The following description assumes that the song you are going tomake punch in/out recording to is loaded and the preparations forrecording is completed.

MR-8HD Owner’s Manual (Punch in/out)
52
1) Press the [REC SELECT] key for the track youare going to make punch in/out recording.The track is record-armed.
2) Locate the recorder to the point before the punch-in point and press the [PLAY] key to startplayback.It may be a good idea to play the instrumentalong with the playback sound, so that you canget the tempo and feel.
3) When the recorder reaches at the point you wantto punch in, press the [RECORD] key while holdingdown the [PLAY] key (see <Important note> below>).The armed track is punched in (i.e. startsrecording).
<Note>: The punch in/out operation by yourself using the keys on the top panel sometimesprevents you from concentrating on playing. In such a case, ask someone to operate the MR-8HD, or use either of the other two punch in/out methods described later.
You can make punch in/out manually by using the [RECORD] and [PLAY] keys on the MR-8HDtop panel.
4) When the recorder reaches at the point you wantto punch out, press only the [PLAY] key.The recorder status switches from recordingto playback.
5) Press the [STOP] key to stop the recorder.
6) Rewind the recorder and play back the part youperformed the punch in/out recording to checkthe result.If you are not satisfied with the result, use theundo function to cancel the punch in/outrecording and try again.
MIN MAX
100
L R
100
L R
100
L RRL
MIN MAX LINE MIC LINE MIC LINE MIC LINE MIC
REC SELECT
0 10
1 2 3 4 5/6 MASTER
MAXMAX
MINMIN
7/8
LOCATE REC END
A-B PLAYLOCATE ABS ZERO
PLAYSTOPRECORD REWIND F FWD
GUIDERHYTHM
CONTRAST
1-8 >SONGNEW
1-6 > 7/81-4 > 5/6 STEREO
WAV FILE
BOUNCE
POWERFUL
MASTERING
B / OUTA / INLOCATE
STOREPLAY MODEAUTO PUNCH
NATURAL BRIGHT
TIME BASESELECT
UNDO/REDO
7/8 >
MENU / ENTER
SIMULATIONDYNAMIC CONDENSER TUBE MIC
PAN
EFFECT
REVERB / DELAY TIME
HALLROOM
PLATE DELAY
PHONES VOL
LSTEREO OUT
R
2PHONES
1
MAXMIN
BALBALBAL
TRIM
UNBAL
PEAK
TRIM
UNBAL
PEAK
TRIM
UNBAL
PEAKPEAK
DISTORTION
GUITAR
/GUITAR
INPUT A SELECT
INSERT
BAL
UNBAL
TRIM
INPUT A INPUT B INPUT C INPUT D
ON/OFF
POWER
ABC1 DEF2 GHI3
JKL4 MNO5
PQR6 STU7 VWX8 YZ9 +-_0 DELETE
TO STEREO BUSS
EFFECT SEND
DIGITAL MULTITRACKER
ON/OFF
ON/OFF
ON/OFF
60'S COMBOUS METALBRIT STACK AMP SIMULATION
INPUT A
1
2,4
3
<Important note>You cannot punch in by only pressing the[RECORD] key. You need to hold down the[PLAY] key when pressing the [RECORD] key.
Press the [RECORD] key while holding down the [PLAY] key.
(Punch in)Press only the [PLAY] key.
(Punch out)
Playback Recording Playback
Punch in/out using the keys on the top panel

53
MR-8HD Owner’s Manual (Punch in/out)
1) Connect the footswitch to the [FOOT SW] jackon the MR-8HD rear panel.
2) Press the [REC SELECT] key for the track youare going to make punch in/out recording.The track is record-armed.
3) Locate the recorder to the point before the punch-in point, and press the [PLAY] key to start playback.It may be a good idea to play the instrumentalong with the playback sound, so that you canget the tempo and feel.
4) When the recorder reaches at the point you wantto punch in, press the footswitch.The armed track is punched in (i.e. startsrecording).
5) When the recorder reaches at the point you wantto punch out, press the footswitch again.The recorder status switches from recordingto playback.
You can make hands-free punch in/out recording using an unlatched-type footswitch.
INPUT A SEL
USB USB HOSTAC-INDIGITAL
OUT FOOT SWMIDI OUT
GTR CLEAN MIC/LINEGTR DIST
<Note>: You cannot perform another punchin/out recording successively.To perform punch in/out recording in an-other part, stop the recorder and performthe steps above again.
[FOOT SW] jack
Unlatched-type footswitch
6) Press the [STOP] key to stop the recorder.
7) Rewind the recorder and play back the part youperformed the punch in/out recording to checkthe result.If you are not satisfied with the result, use theundo function to cancel the punch in/outrecording and try again.
Press the footswitch. (Punch in)
Playback Recording Playback
Press the footswitch. (Punch out)
Punch in/out using the footswitch

MR-8HD Owner’s Manual (Punch in/out)
54
By setting the punch-in and punch-out points in advance, The recorder automatically makespunch in/out recording for you. You can rehearse punch in/out recording as many times youlike.
Setting the punch-in and punch-out points
3) When the recorder reaches at the point whereyou want to make punching out, press the[LOCATE B/OUT] key while holding down the[STORE] key.The display briefly shows "Store LOCATE B"and the time data when you press the[LOCATE B/OUT] key is set as the punch-outpoint.
4) Stop the recorder after setting the punch-in andpunch-out points, and rewind the recorder to thebeginning of the song (or to a point before thepoint where you want to make punching in).
<Hint>: The punch-in and punch-outpoints you set also can be used for thelocate function, playback by the playmode and part editing (see pages 45 and111).
<Note>: If you are not satisfied with thepunch-in or punch-out point you set, sim-ply redo the operation above. The new timedata overwrites the previous one.
1) Start playback from the beginning of the song(or from a point before the point where you wantto make punching in) by pressing the [PLAY] key.
2) When the recorder reaches at the point whereyou want to make punching in, press the[LOCATE A/IN] key while holding down the[STORE] key.The display briefly shows "Store LOCATE A"and the time data when you press the[LOCATE A/IN] key is set as the punch-in point.
<Note>: You cannot make punch-in/out recordingon a song which is protected. Release the song pro-tection before making punch-in/out recording.
Punch-in point Punch-out point
Part replaced with a new recording
<Hint>: To rewind the recorder to the be-ginning of the song after setting thepunch-out point, press the [REWIND] keywhile holding down the [STOP] key.
To locate before the punch-in point, carryout the following.
(1) While the recorder is stopped, pressthe [LOCATE A/IN] key.The recorder immediately locates tothe punch-in point and stops.
(2) Press the [REWIND] key to move backthe recorder and press the [STOP] keyat the desired point.
B / OUTA / INLOCATE
STOREPLAY MODEAUTO PUNCH UNDO/REDO
PQR6 STU7 VWX8 YZ9 +-_0 DELETE
B / OUTA / INLOCATE
STOREPLAY MODEAUTO PUNCH UNDO/REDO
PQR6 STU7 VWX8 YZ9 +-_0 DELETE
You can set the punch-in and punch-out points on-the-fly while playing back the recorder (aswell as you can set them while the recorder is stopped at the desired position).
Auto punch in/out

55
MR-8HD Owner’s Manual (Punch in/out)
After setting the punch-in and punch-out points appropriately, you can rehearse the auto punchin/out for checking the punch-in and -out points or practicing punch-in and -out timing.
<Tip>: You can immediately locate to thepunch-in point by pressing the [LOCATEA/IN] key. Therefore, by pressing the [LO-CATE A/IN] key, followed by the [RE-WIND] key then the [STOP] key, you caneasily locate to the point before thepunch-in point.
1) Locate the recorder to the point before the punch-in point (or the beginning of the song).
4) Press the [PLAY] key.The recorder starts punch in/out rehearsal. The
" " icon on the display changes to the
" " icon.
2) Press the [REC SELECT] key of the track you aregoing to make punch in/out operation to arm thetrack.
3) Press the [AUTO PUNCH] key to make the autopunch mode active.The " " icon is now shown on thescreen.
Lighting
<Note>: By using the loop function whenrehearsing the auto punch in/out operation,you can concentrate on playing without theneed of troublesome operation of the MR-8HD. See page 45 for details about the loopfunction.
5) After the punch-out point is passed, locate therecorder back to the beginning position.
In the rehearsal mode, the recorder automati-cally switches the monitor of the armed trackfrom "repro" to "input" at the punch-in point,but actual recording is not made (the [RECORD]
key flashes while " " is shown on thedisplay.By repeating the operation above, you can prac-tice auto in/out operation as many times asyou like.
MIN MAX
100
L R
100
L R
100
L RRL
MIN MAX LINE MIC LINE MIC LINE MIC LINE MIC
REC SELECT
0 10
1 2 3 4 5/6 MASTER
MAXMAX
MINMIN
7/8
LOCATE REC END
A-B PLAYLOCATE ABS ZERO
PLAYSTOPRECORD REWIND F FWD
GUIDERHYTHM
CONTRAST
1-8 >SONGNEW
1-6 > 7/81-4 > 5/6 STEREO
WAV FILE
BOUNCE
POWERFUL
MASTERING
B / OUTA / INLOCATE
STOREPLAY MODEAUTO PUNCH
NATURAL BRIGHT
TIME BASESELECT
UNDO/REDO
7/8 >
MENU / ENTER
SIMULATIONDYNAMIC CONDENSER TUBE MIC
PAN
EFFECT
REVERB / DELAY TIME
HALLROOM
PLATE DELAY
PHONES VOL
LSTEREO OUT
R
2PHONES
1
MAXMIN
BALBALBAL
TRIM
UNBAL
PEAK
TRIM
UNBAL
PEAK
TRIM
UNBAL
PEAKPEAK
DISTORTION
GUITAR
/GUITAR
INPUT A SELECT
INSERT
BAL
UNBAL
TRIM
INPUT A INPUT B INPUT C INPUT D
ON/OFF
POWER
ABC1 DEF2 GHI3
JKL4 MNO5
PQR6 STU7 VWX8 YZ9 +-_0 DELETE
TO STEREO BUSS
EFFECT SEND
DIGITAL MULTITRACKER
ON/OFF
ON/OFF
ON/OFF
60'S COMBOUS METALBRIT STACK AMP SIMULATION
INPUT A
AUTO PUNCH
PQR6
<How to make auto punch in/outmode active>
Rehearsal for auto punch in/out
Pressing the [AUTO PUNCH]key switches the auto punchin/out mode on or off.Each press of the [AUTOPUNCH] key turns on or off theindicator.
Punch-in point Punch-out point
Playback
Input monitor
Playback

MR-8HD Owner’s Manual (Punch in/out)
56
After rehearsing the auto punch-in/out operation, it's time for executing actual auto punch in/out operation.
1) Locate the recorder to the point before the punch-in point.
2) Make sure that "AUTO PUNCH" is shown on thescreen (i.e. the auto punch mode is active).If it is not shown, press the [AUTO PUNCH] key.
3) Press the [RECORD] key while holding down the[PLAY] key.The recorder starts executing actual punch in/out operation. The " " icon on the
display changes to the " " icon.
Unlike the rehearsal, the recorderautomatically starts recording when it reachesthe punch-in point, then automatically stopsrecording and exits the auto punch mode atthe punch-out point.
<Note>: You can cancel the auto punch in/out recording you made by pressing the[UNDO/REDO] key.
<Note>: In addition to the punch in/out func-tion, the MR-8HD allows you to edit the re-corded material using the following editingfunctions.
• Deleting the whole data on the desiredtrack (using the "Erase Track" menu item).See page 104.
• Copying all data on a track and pasting itto another track (using the "Copy PasteTrack" menu item). See page 105.
• Moving the desired track data to the othertrack(s) (using the "Move Track" menuitem). See page 107.
• Exchanging all track data between tracks(using the "Change Track" menu item). Seepage 108.
• Deleting the desired part (using the "ErasePart" menu item). See page 113.
• Pasting the desired part(s) to the othertrack(s) (using the "Copy Paste Part" menuitem or the "Copy Part" and "Paste Part"menu items). See pages 114 and 116.
• Moving the desired part(s) to the othertrack(s) (using the "Move Part" menu item).See page 119.
• Exchanging parts between tracks (using the"Change Part" menu item). See page 121.
<About "part">A "part" is defined as audio data betweenthe "LOCATE A" and "LOCATE B" points.Therefore, you have to set the "LOCATEA" and "LOCATE B" points when editing a"part".The punch-in and punch-out points setfor the auto punch in/out function alsocan be used as the "LOCATE A" and "LO-CATE B" points.
Actual auto punch in/out
Punch out point
Playback Recording Playback
Punch in point

57
MR-8HD Owner’s Manual (Using effects)
Using effectsThe MR-8HD provides the insert effects for recording (microphoneand amplifier simulation effects), the delay/reverb effects for trackbounce or mixdown (for tracks 1 through 4 only), and the master-ing effects for L/R mix. You can also use an external effect deviceconnected to the [INSERT] connector.

58
MR-8HD Owner’s Manual (Using effects)
The [INPUT A] channel of the MR-8HD provides two types of insert effects: microphone andamplifier simulation effects. These effects can be used during recording.
These effects simulate popular microphones and guitar amplifiers. If you use the microphonesimulation effect when you record an acoustic guitar through your microphone, you can makerecording as if you are using a famous microphone. If you use the guitar amplifier simulationeffect when you record an electric guitar directly connected to the MR-8HD, you can makerecording as if you are using a famous guitar amplifier.Note that you cannot get exactly the same sound as the original microphone/guitar amplifier byusing simulation effects.
You can use mic simulation effects when the [INPUT A SELECT] switch on the rear panel is set to"MIC/LINE".
By pressing the appropriate key, you canchoose from among three mic simulation ef-fects: DYNAMIC, CONDENSER and TUBE (theindicator of the key lights up).
• Details of each mic simulation effect
DYNAMIC
CONDENSER
TUBE
Simulates the sound of a popular dy-namic microphone.
Simulates the sound of a popular con-denser microphone for professional use.
Simulates the sound of a popular tubemicrophone for professional use.
Set to the "MIC/LINE" positionSIMULATIONDYNAMIC CONDENSER TUBE MIC
60'S COMBOUS METALBRIT STACK AMP SIMULATION
INPUT AINPUT A SEL
MIC/LINEGTR CLEANGTR DIST
“DYNAMIC” “CONDENSER” “TUBE”
Mic simulation effects
Amp simulation effects
You can choose from three guitar amp simu-lation effects: BRIT STACK, US METAL and 60'sCOMBO (the selected key lights up).
• Amp simulation effects details
BRIT STACK
US METAL
60’s COMBO
Simulates a popular British 800-seriestube guitar amp head.
Simulates a popular US high gain metalguitar amplifier.
Simulates a popular tube combo guitaramplifier.
When the switch is set to"GTR DIST".
SIMULATIONDYNAMIC CONDENSER TUBE MIC
60'S COMBOUS METALBRIT STACK AMP SIMULATION
INPUT A
INPUT A SEL
MIC/LINEGTR CLEANGTR DIST
INPUT A SEL
MIC/LINEGTR CLEANGTR DIST
When the switch is set to"GTR CLEAN".
“BRIT STACK” “US METAL” “60”s COMBO”
You can use mic simulation effects when the [INPUT A SEL] switch on the rear panel is set to "GTRDIST" or "GTR CLEAN". Only when the switch is set to "GTR DIST", you can also use the distortion(adjusted by the [DISTORTION] control), as well as the insert effects.
Using the insert effects

59
MR-8HD Owner’s Manual (Using effects)
During recording, you can apply external effects to a sound source connected to an input con-nector in the [INPUT A] channel.
The [INPUT A] channel has the [INSERT] connector (phone jack). You can connects an externaleffect unit (typically, a compressor/limiter) to this connector using a Y-cable, as shown below.
MIN MAX
100
L R
100
L R
100
L RRL
MIN MAX LINE MIC LINE MIC LINE MIC LINE MIC
REC SELECT
0 10
1 2 3 4 5/6 MASTER
MAXMAX
MINMIN
7/8
LOCATE REC END
A-B PLAYLOCATE ABS ZERO
PLAYSTOPRECORD REWIND F FWD
GUIDERHYTHM
CONTRAST
1-8 >SONGNEW
1-6 > 7/81-4 > 5/6 STEREO
WAV FILE
BOUNCE
POWERFUL
MASTERING
B / OUTA / INLOCATE
STOREPLAY MODEAUTO PUNCH
NATURAL BRIGHT
TIME BASESELECT
UNDO/REDO
7/8 >
MENU / ENTER
SIMULATIONDYNAMIC CONDENSER TUBE MIC
PAN
EFFECT
REVERB / DELAY TIME
HALLROOM
PLATE DELAY
PHONES VOL
LSTEREO OUT
R
2PHONES
1
MAXMIN
BALBALBAL
TRIM
UNBAL
PEAK
TRIM
UNBAL
PEAK
TRIM
UNBAL
PEAKPEAK
DISTORTION
GUITAR
/GUITAR
INPUT A SELECT
INSERT
BAL
UNBAL
TRIM
INPUT A INPUT B INPUT C INPUT D
ON/OFF
POWER
ABC1 DEF2 GHI3
JKL4 MNO5
PQR6 STU7 VWX8 YZ9 +-_0 DELETE
TO STEREO BUSS
EFFECT SEND
DIGITAL MULTITRACKER
ON/OFF
ON/OFF
ON/OFF
60'S COMBOUS METALBRIT STACK AMP SIMULATION
INPUT A
EFFECTOR (COMP/LIMITER) etc.
Input Output
Sound source
INPUT A
EFFECTOR
Input Output
The source (dry) signal fed to the [INPUT A] channel is sent to the externaleffect unit connected to the [INSERT] connector and the wet (effect) signal re-turns to the [INPUT A] channel. Thus, you can apply effects to the "INPUT A"signal by connecting an external effect unit.
See the manual of your effect unit for details about how to use it.A Y-cable is not supplied with the MR-8HD, therefore, purchase an appropriateY-cable available in the market.
Soundsource
Dry (original) soundWet (effect) sound
Applying external effects

60
MR-8HD Owner’s Manual (Using effects)
Selecting an effect type
The MR-8HD has the original built-in reverb/delay processor featuring the newly-developedalgorithm. You can apply the reverb or delay to playback signals of tracks 1 through 4 duringmixdown and track bouncing.
Details of each effect type
ROOM
HALL
PLATE
DELAY
Simulates reverberation in a medium-sizedroom. When you select "ROOM", you canadjust the reverb time using the [REVERB/DELAY TIME] control.
Simulates reverberation in a hall with moder-ate early reflection.When you select "HALL", you can adjust thereverb time using the [REVERB/DELAYTIME] control.
Simulates a plate reverb with a wide fre-quency range.When you select "PLATE", you can adjust thereverb time using the [REVERB/DELAYTIME] control.
Adds delay effects. You can select the de-sired delay types using the "Delay Type" itemof the System menu in the menu mode (youcan easily access to the "Delay Type" settingscreen by a long press of the [DELAY] key).
Three delay types are available: Mono, L-Rand Diff. See below for details.
When you select "ROOM", you can adjustthe delay time using the [REVERB/DELAYTIME] control.
2) Rotate the [MENU/ENTER] knob to select"System", and press the [MENU/ENTER] knob.The display now shows the system menuscreen, where "<< Back" is highlighted.
You can select an effect type from among threereverb options (ROOM, HALL and PLATE) anda delay (DELAY) by using the keys in the [EF-FECT] section shown below. 1) While the recorder is stopped, press the
[MENU/ENTER] knob to enter the menu mode.The display now shows the first page of themenu selection screen, where "<< Back" ishighlighted initially.
When you use the delay effect, you can selecta delay type.
3) Rotate the [MENU/ENTER] knob to select"Delay Type" and press the [MENU/ENTER] knob.The current delay type starts flashing and youcan now select from among three optionsshown below ("L-R" is initially selected).
MIN MAX
EFFECT
REVERB / DELAY TIME
HALLROOM
PLATE DELAY
HALL
DELAY
ROOM
PLATE
Selecting a delay type
Using the reverb or delay

61
MR-8HD Owner’s Manual (Using effects)
As shown in the signal flowchart below, a track(playback) signal after the track fader is fedto the [EFFECT SEND] control and adjusted,then fed to the effect processor input.
The effect processor's stereo output signals(wet signals) and stereo (L/R) signals (dry sig-nals) are merged together and then outputfrom the [STEREO OUT] jacks.
As you can see in the flowchart below, thesignal sent to the effect processor is affectedby the track fader (i.e. a track fader must beraised to send track signal to the effect pro-cessor). The signal which passes through afader is generally called a "post fader signal".
[REVERB / DELAY TIME] control
HALL
ROOM
PLATE
DELAY
Adjusts the reverb time within the range between1.0 s and 6.0 s (center position: 3.0 s)
Adjusts the reverb time within the range between0.1 s and 2.0 s (center position: 1.0 s)
Adjusts the reverb time within the range between0.5 s and 4.0 s (center position: 2.0 s)
Adjusts the delay time within the range between100 ms to 1000 ms (center position: 300 ms)
<Signal flow from a track to the effect processor (only Track 1~ 4)>
Dry sound
Wet sound
Playback
Adjusts the trackplayback level
Adjusts the send level to theeffect processor
To apply the effect (reverb or delay) to tracks1 through 4, adjust the [EFFECT SEND] con-trol for each track to adjust the level of thetrack signal sent to the effect processor.In the example as illustrated below, tracks 1and 2 signals are sent to the effect processor.
You can adjust the reverb time or delay timeusing the [REVERB/DELAY TIME] control, de-pending on the selected effect type.
4) Rotate the [MENU/ENTER] knob to select thedesired delay type and press the [MENU/ENTER]knob.The selected delay type is set, while thedisplay returns to the previous screen.
5) Press the [STOP] key to quit the menu mode.
You can choose from among the following threedelay types.
L - R
Mono
Diff
L-R delay (default)
Mono delay
Diffusion delay
MIN MAX
EFFECT
REVERB / DELAY TIME
HALLROOM
PLATE DELAY
Track 1
1
0 10
Delayor
Reverb
L R
EFFECT SEND
PAN
STEREO BUSS
L R
1001001000 10EFFECT SEND
Adjusting the delay/reverb time
Adjusting the effect send levels

62
MR-8HD Owner’s Manual (Using effects)
The MR-8HD provides the dedicated mastering effects for the L/R stereo buss.You can use the mastering effects when bouncing more than one track to stereo tracks or whenmixing down tracks 1 through 8 to stereo and sent to an external master recorder for recording.
POWERFUL
NATURAL
BRIGHT
<Bouncing tracks 1 through 4 to track 5/6> <Bouncing tracks 1 through 6 to track 7/8>
<Mixing down tracks 1 through 8>
Trk 4Trk 3Trk 2Trk 1
Mastering effects
Trk 5
Trk 6
Mixing
Reverbor Delay
Playback
bouncing
Playback
Playback
Playback
Playback
Record
Record
INPUT A ~ INPUT D
Trk 4Trk 3Trk 2Trk 1 M
astering effectsTrk 5
Trk 6
Trk 7
Trk 8
Mixing
Reverbor Delay
bouncing
Playback
Playback
Playback
Playback
Playback
Playback
Record
Record
INPUT A ~ INPUT D
Trk 4Trk 3Trk 2Trk 1
Mastering effects
Trk 5
Trk 6
Trk 7
Trk 8
Mixing
D/A
Reverbor Delay
Playback
Playback
Playback
Playback
Playback
Playback
Playback
Playback
INPUT A ~ INPUT D
See "Track bounce" on page 63 for details about trackbounce which allows mixing multiple tracks to stereo.See "Mixdown" on page 41 for details about mixdown.
Mastering effects Mastering effects
Mastering effects
[STEREO OUT L, R]
[DIGITAL OUT]
<Note>: By activating the mastering effect, the out-put level raises. Therefore, be careful of the levelchange when monitoring via headphones or moni-tor speakers, as well as when adjusting the record-ing level of an external recorder.
Trk 4
Trk 3
Trk 2
Trk 1
Mastering effects
Trk 5Trk 6
Mixing
Reverbor Delay
bouncing
Trk 7Trk 8 Playback
STEREO OUT (L, R)
Trk 7Trk 8
RecordNew Song
Record
Playback
Playback
Playback
Playback
Playback
Playback
Playback
INPUT A ~ INPUT D
<Bouncing tracks 1 through 8 to the New song>
Mastering effects
Adds power to the sound. Good for rock.
Slightly adds power to the sound. Good foracoustic music.
Add brightness to the sound. Good for usewhen the mixed sound is dark.
Each effect type has the following character.Select the appropriate type.
Three mastering effect types are available. Youcan select the desired type using the [MAS-TERING] keys (POWERFUL, NATURAL andBRIGHT).
POWERFUL
MASTERING
NATURAL BRIGHT
JKL4 MNO5
Selecting the desired effect type
Using the mastering effects

63
MR-8HD Owner’s Manual (Track bouncing)
Track bouncingThis chapter describes track bouncing which is an importantfunction in the recording process.The track bouncing mixes several tracks and records onto othertwo tracks. By using this function, you can record more soundmaterials to the MR-8HD tracks.Three track bouncing modes are available:
(1) Bouncing tracks 1 through 4 to tracks 5/6.
(2) Bouncing tracks 1 through 6 to tracks 7/8
(3) Bouncing tracks 1 through 8 to tracks 7/8 of a new song.
In any mode, you can apply a reverb (or delay) to tracks 1through 4 when bouncing to two tracks in stereo. Further-more, you can apply the mastering effect to the mixed signals.You can also execute track bouncing while mixing soundsources from inputs A through D.

64
MR-8HD Owner’s Manual (Track bouncing)
You can record more than eight materials using the track bouncing function as shown in thefollowing example.
<Step 1>Make recording to tracks 1 through 6.
<Step 2>Bounce tracks 1 through 6 to tracks 7/8.
<Step 3>Delete tracks 1 through 6.
<Step 4>Overdub new materials to tracks 1through 4.
<Step 5>Bounce tracks 1 through 4 to tracks 5/6.
Track 4Track 3Track 2Track 1
Track 5
Track 6
Track 7
Track 8
Track 4Track 3Track 2Track 1
Track 5
Track 6
Track 7
Track 8
Mixing Track 4
Track 3Track 2Track 1
Track 5
Track 6
Track 7
Track 8
Track 4Track 3Track 2Track 1
Track 5
Track 6
Track 7
Track 8
Track 4Track 3Track 2Track 1
Track 5
Track 6
Track 7
Track 8
Mixing
Track 4Track 3Track 2Track 1
Track 5
Track 6
Track 7
Track 8
Track 4Track 3Track 2Track 1
Track 5
Track 6
Track 7
Track 8
<Step 6>Delete tracks 1 through 4.
<Step 7>Overdub new materials to tracks 1through 4.
In this step, you can make trackbouncing while listening totracks 7/8 as well.
Before executing track bouncing, read "Track bouncing example" below and "Track bouncingsignal flow" on the next page.
Track bouncing example
Preliminary knowledge

65
MR-8HD Owner’s Manual (Track bouncing)
• "1-6 > 7/8" mode (see page 68)In the "1-6 > 7/8" mode, tracks 1 through6 are played back, mixed down to stereo,and bounced to tracks 7/8.In this mode, you can apply a reverb (ordelay) to tracks 1 through 4, as well as themastering effect to the mixed signals.You can also mix signals from the [INPUTA] through [INPUT D] channels during trackbouncing.From headphones (or monitor speakers),you can hear the signals bounced to tracks7/8 (i.e. mixed signals).
• "1-4 > 5/6" mode (see page 66)In the "1-4 > 5/6" mode, tracks 1 through4 are played back, mixed down to stereo,and bounced to tracks 5/6.You can apply a reverb (or delay) to tracks1 through 4, as well as the mastering effectto the mixed signals.You can also mix signals from the [INPUTA] through [INPUT D] channels during trackbouncing.From headphones (or monitor speakers),you can hear the signals bounced to tracks5/6 (i.e. mixed signals) as well as playbacksignals of tracks 7/8.
• "1-8 > NEW SONG" mode (see page 70)In the "1-8 > NEW SONG" mode, tracks 1through 8 are played back, mixed down tostereo, and bounced to tracks 7/8 of a newsong which is automatically created. So thisbouncing mode allows you to internallyrecord a stereo master without the need ofan external master recorder.In this mode, you can apply a reverb (ordelay) to tracks 1 through 4, as well as themastering effect to the mixed signals.You can also mix signals from the [INPUTA] through [INPUT D] channels during trackbouncing.From headphones (or monitor speakers),you can hear the signals bounced to tracks7/8 of the new song.
Trk 4
Trk 3
Trk 2
Trk 1
Mastering effects
Trk 5Trk 6
Mixing
Reverbor Delay
Track bounce
Trk 7Trk 8 Playback
STEREO OUT (L, R)
Trk 7Trk 8
RecordNew Song
Record
Playback
Playback
Playback
Playback
Playback
Playback
Playback
INPUT A ~ INPUT D
Signal flow of track bouncing
The following shows the signal flow for each of three track bouncing modes.
Trk 4
Trk 3
Trk 2
Trk 1
Trk 7Trk 8
Playback
Reverbor
Delay
Track bouncing
Trk 5Trk 6
STEREO OUT (L, R)
INPUT A ~ INPUT D
Playback
Playback
Playback
Playback
Playback
Record
Record
Mixing
Mastering effects
Trk 4
Trk 3
Trk 2
Trk 1
Trk 5Trk 6
Trk 7Trk 8
STEREO OUT (L, R)
INPUT A ~ INPUT D
Playback
Reverbor
Delay
Track bouncing
Playback
Playback
Playback
Record
Record
Mixing
Mastering effectsPlayback
Playback

66
MR-8HD Owner’s Manual (Track bouncing)
Before executing track bouncing, you can rehearse it. While rehearsing track bouncing, you cancontrol the playback level, panning and reverb (or delay) send setting of each source track, aswell as apply the mastering effect to the mixed L/R signals. We recommend to make rehearsalthoroughly until you are satisfied with the sound.The following assumes that the song you are going to execute track bouncing is loaded.
1) Use the [1-4 > 5/6, 1-6 > 7/8] key to select the"1-4 > 5/6" bounce mode.Selecting this bounce mode automatically armstracks 5/6 and changes the monitoring modefor these tracks to input monitoring mode.The display looks like this:
Lighting
Flashing
2) Raise the [5/6] fader and [MASTER] fader to the" " position. Set all the other track faders downto the minimum position.
Playback levels of tracks 1 through4 for bouncing.
Faders1 through 4
Lighting
Rehearsal of track bouncing
You can bounce tracks 1 through 4 to tracks 5/6.Before executing track bouncing, you can rehearse track bouncing as many times as you like.
3) Press the [PLAY] key to start playback from thebeginning of the song.
4) While playing back the song, adjust playbacklevels of tracks 1 through 4 using the trackfaders.You can also adjust panning for tracks 1through 4 and apply the reverb or delay tothese tracks, as well as apply the masteringeffect to the mixed sound.
During rehearsal and actual track bouncing,the track faders and [MASTER] fader controlthe following signals.
[MASTER]fader
Fader 5/6
Recording master level of tracks5/6.
Monitor levels of tracks 5/6.
MIN MAX
100
L R
100
L R
100
L RRL
MIN MAX LINE MIC LINE MIC LINE MIC LINE MIC
REC SELECT
0 10
1 2 3 4 5/6 MASTER
MAXMAX
MINMIN
7/8
LOCATE REC END
A-B PLAYLOCATE ABS ZERO
PLAYSTOPRECORD REWIND F FWD
GUIDERHYTHM
CONTRAST
1-8 >SONGNEW
1-6 > 7/81-4 > 5/6 STEREO
WAV FILE
BOUNCE
POWERFUL
MASTERING
B / OUTA / INLOCATE
STOREPLAY MODEAUTO PUNCH
NATURAL BRIGHT
TIME BASESELECT
UNDO/REDO
7/8 >
MENU / ENTER
SIMULATIONDYNAMIC CONDENSER TUBE MIC
PAN
EFFECT
REVERB / DELAY TIME
HALLROOM
PLATE DELAY
PHONES VOL
LSTEREO OUT
R
2PHONES
1
MAXMIN
BALBALBAL
TRIM
UNBAL
PEAK
TRIM
UNBAL
PEAK
TRIM
UNBAL
PEAKPEAK
DISTORTION
GUITAR
/GUITAR
INPUT A SELECT
INSERT
BAL
UNBAL
TRIM
INPUT A INPUT B INPUT C INPUT D
ON/OFF
POWER
ABC1 DEF2 GHI3
JKL4 MNO5
PQR6 STU7 VWX8 YZ9 +-_0 DELETE
TO STEREO BUSS
EFFECT SEND
DIGITAL MULTITRACKER
ON/OFF
ON/OFF
ON/OFF
60'S COMBOUS METALBRIT STACK AMP SIMULATION
INPUT A
1
2,4 3
44
4 5
4
Bouncing tracks 1 through 4 to tracks 5/6

67
MR-8HD Owner’s Manual (Track bouncing)
5) After finishing rehearsal, press the [STOP] keyto stop the recorder and locate it to thebeginning of the song.Do not move the controls and faders afterfinishing rehearsal.
1) Before carrying out actual track bouncing, makesure that the bounce mode is selected to"1-4>5/6".
2) Press the [PLAY] key while holding down the[RECORD] key.Track bouncing starts with the effect/levelsettings made in the rehearsal mode. The mixedsignals are recorded onto tracks 5/6.
3) After track bouncing completes, press the [STOP]key to stop the recorder.Stopping the recorder automatically turns offthe input monitoring mode of tracks 5/6.
1) Press the [REWIND] key while holding down the[STOP] key to locate the recorder to thebeginning of the song.
2) Make sure that the input monitoring mode isturned off.
3) Press the [PLAY] key to start playback from thebeginning of the song.
4) Use the [5/6] fader to control the playback levelof the bounced signals.By playing back the recorder while the bouncemode ("1-4 > 5/6") is active, only tracks 5/6can be monitored. In this condition, youcannot monitor playback signals of tracks 1through 4 even if you raise their faders.
If you want to redo track bouncing, use theundo function to go back to the conditionbefore carrying out track bouncing, and tryagain.
After finishing rehearsal, let's carry out ac-tual track bouncing. Make sure that the re-corder stops at the beginning of the song.
<Panning control>You can freely adjust panning for tracks1 through 4 using the PAN controls.For example, a guitar to left, a vocal tocenter, etc.
By raising the [PHONES VOL] control, you canhear the signals bounced to tracks 5/6.
Use the [5/6] fader to control the monitor out-put levels, and use the [MASTER] fader to ad-just the recording levels of the bounced sig-nals appropriately while checking meters 5/6.
You can apply the delay/reverb to tracks 1through 4 and the mastering effects to the ste-reo L and R signals. See "Using effects" on page57 for details about the delay/reverb and mas-tering effects.
Playback levels of tracks 1 through4.
Meters1 through 4
You can check the bounced signals while thebounce mode is active.
MetersL and R
Meters 5/6
Monitor output levels of STEREOOUT (L, R).
Recording levels of tracks 5/6.
During rehearsal and actual track bouncing,level meters on the screen show the followingsignal levels.
Actual track bouncing
Checking the bounced signals on tracks 5/6
<Auto punch in/out of track bouncing>You can bounce only the desired part (betweenthe IN and OUT points) using the auto punchin/out function (see page 74).
<Track bouncing while mixing signals from [INPUTA] through [INPUT D]>When you bounce tracks 1 through 4 to tracks5/6, you can also mix signals from [INPUT A]through [INPUT D] together (see page 72).

68
MR-8HD Owner’s Manual (Track bouncing)
You can bounce tracks 1 through 6 to tracks 7/8.As described earlier in "Bouncing tracks 1 through 4 to tracks 5/6", you can rehearse trackbouncing as many times as you like before executing actual track bouncing.
Before executing track bouncing, you can rehearse it. While rehearsing track bouncing, you cancontrol the playback level, panning and reverb (or delay) send setting of each source track, aswell as apply the mastering effect to the mixed L/R signals. We recommend to make rehearsalthoroughly until you are satisfied with the sound.The following assumes that the song you are going to execute track bouncing is loaded.
Rehearsal of track bouncing
1) Use the [1-4 > 5/6, 1-6 > 7/8] key to select the"1-6 > 7/8" bounce mode.Selecting this bounce mode automatically armstracks 7/8 and changes the monitoring modefor these tracks to input monitoring mode.The display looks like this:
Lighting
Flashing
2) Raise the [5/6] fader and [MASTER] fader to the" " position. Set all the other track fadersdown to the minimum position.
Lighting
3) Press the [PLAY] key to start playback from thebeginning of the song.
4) While playing back the song, adjust playback levelsof tracks 1 through 6 using the track faders.You can also adjust panning for tracks 1through 4 and apply the reverb or delay tothese tracks, as well as apply the masteringeffect to the mixed sound.
During rehearsal and actual track bouncing,the track faders and [MASTER] fader controlthe following signals.
MIN MAX
100
L R
100
L R
100
L RRL
MIN MAX LINE MIC LINE MIC LINE MIC LINE MIC
REC SELECT
0 10
1 2 3 4 5/6 MASTER
MAXMAX
MINMIN
7/8
LOCATE REC END
A-B PLAYLOCATE ABS ZERO
PLAYSTOPRECORD REWIND F FWD
GUIDERHYTHM
CONTRAST
1-8 >SONGNEW
1-6 > 7/81-4 > 5/6 STEREO
WAV FILE
BOUNCE
POWERFUL
MASTERING
B / OUTA / INLOCATE
STOREPLAY MODEAUTO PUNCH
NATURAL BRIGHT
TIME BASESELECT
UNDO/REDO
7/8 >
MENU / ENTER
SIMULATIONDYNAMIC CONDENSER TUBE MIC
PAN
EFFECT
REVERB / DELAY TIME
HALLROOM
PLATE DELAY
PHONES VOL
LSTEREO OUT
R
2PHONES
1
MAXMIN
BALBALBAL
TRIM
UNBAL
PEAK
TRIM
UNBAL
PEAK
TRIM
UNBAL
PEAKPEAK
DISTORTION
GUITAR
/GUITAR
INPUT A SELECT
INSERT
BAL
UNBAL
TRIM
INPUT A INPUT B INPUT C INPUT D
ON/OFF
POWER
ABC1 DEF2 GHI3
JKL4 MNO5
PQR6 STU7 VWX8 YZ9 +-_0 DELETE
TO STEREO BUSS
EFFECT SEND
DIGITAL MULTITRACKER
ON/OFF
ON/OFF
ON/OFF
60'S COMBOUS METALBRIT STACK AMP SIMULATION
INPUT A
1
2,4 3
44
4 5
4
Playback levels of tracks 1 through4 for bouncing.
Faders1 through 4
[MASTER]fader
Fader 7/8
Fader 5/6
Recording master level of tracks 7/8.
Monitor levels of tracks 7/8.
Playback levels of tracks 5/6 forbouncing.
Bouncing tracks 1 through 6 to tracks 7/8

69
MR-8HD Owner’s Manual (Track bouncing)
5) After finishing rehearsal, press the [STOP] keyto stop the recorder and locate it to thebeginning of the song.Do not move the controls and faders afterfinishing rehearsal.
1) Before carrying out actual track bouncing, makesure that the bounce mode is selected to "1-6>7/8".
2) Press the [PLAY] key while holding down the[RECORD] key.Track bouncing starts with the effect/levelsettings made in the rehearsal mode. The mixedsignals are recorded onto tracks 7/8.
3) After track bouncing completes, press the [STOP]key to stop the recorder.Stopping the recorder automatically turns offthe input monitoring mode of tracks 7/8.
1) Press the [REWIND] key while holding down the[STOP] key to locate the recorder to thebeginning of the song.
2) Make sure that the input monitoring mode isturned off.
3) Press the [PLAY] key to start playback from thebeginning of the song.
4) Use the [7/8] fader to control the playback levelof the bounced signals.By playing back the recorder while the bouncemode ("1-6 > 7/8") is active, only tracks 7/8can be monitored. In this condition, you cannot monitor playback signals of tracks 1through 6 even if you raise their faders.
If you want to redo track bouncing, use theundo function to go back to the conditionbefore carrying out track bouncing, and tryagain.
After finishing rehearsal, let's carry out ac-tual track bouncing. Make sure that the re-corder stops at the beginning of the song.
<Panning control>You can freely adjust panning for tracks1 through 4 using the PAN controls. Forexample, a guitar to left, a vocal to cen-ter, etc.
By raising the [PHONES VOL] control, you canhear the signals bounced to tracks 7/8.
Use the [7/8] fader to control the monitor out-put levels, and use the [MASTER] fader to ad-just the recording levels of the bounced sig-nals appropriately while checking meters 7/8.
You can apply the delay/reverb to tracks 1through 4 and the mastering effects to the ste-reo L and R signals. See "Using effects" on page57 for details about the delay/reverb and mas-tering effects.
You can check the bounced signals while thebounce mode is active.
<Track bouncing while mixing signals from [INPUTA] through [INPUT D]>When you bounce tracks 1 through 6 to tracks7/8, you can also mix signals from [INPUT A]through [INPUT D] together (see page 72).
During rehearsal and actual track bouncing,the level meters on the screen show the fol-lowing signal levels.
Actual track bouncing
Checking the bounced signals on tracks 7/8
Playback levels of tracks 1 through 4.Meters
1 through 4
Meters Land R
Meters 7/8
Meters 5/6
Monitor output levels of STEREOOUT (L, R).
Recording levels of tracks 7/8.
Recording levels of tracks 5/6.
<Exporting bounced data to a PC>Song data bounced to tracks 7/8 can be ex-ported to a PC.You can use the exported data as a source whenburning an original audio CD using a CD-RWdrive, or use it with a computer's music soft-ware.Before exporting song data on tracks 7/8 to aPC, you must convert the two mono WAV fileson tracks 7/8 to a stereo WAV file (see page90).
<Auto punch in/out of track bouncing>You can bounce only the desired part (betweenthe IN and OUT points) using the auto punchin/out function (see page 74).

70
MR-8HD Owner’s Manual (Track bouncing)
You can bounce tracks 1 through 8 to tracks 7/8 of a new song. A new song is automaticallycreated when executing track bouncing (<Note>: In the “1-8 > NEW SONG” mode, you cannot bouncethe desired part of a song by using the track bouncing and auto punch in/out functions together ).
Before executing track bouncing, you can rehearse it. While rehearsing track bouncing, you cancontrol the playback level, panning and reverb (or delay) send setting of each source track, aswell as apply the mastering effect to the mixed L/R signals. We recommend to make rehearsalthoroughly until you are satisfied with the sound. The following assumes that the song you aregoing to execute track bouncing is loaded.
During rehearsal and actual track bouncing,the level meters on the screen show the fol-lowing signal levels.
1) Raise the [MASTER] fader to the " " position.Set all the track faders down to the minimumposition.
2) Press the [PLAY] key to start playback from thebeginning of the song.
3) While playing back the song, adjust playbacklevels of tracks 1 through 8 using the trackfaders.You can also adjust panning for tracks 1through 4 and apply the reverb or delay tothese tracks, as well as apply the masteringeffect to the mixed sound.
During rehearsal and actual track bouncing,the track faders and [MASTER] fader controlthe following signal levels.
Playback levels of tracks 1 through8 for bouncing.
Faders1 through 8
[MASTER]fader
Recording master levels of bounc-ing.
Playback levels of tracks 1 through8.
Meters1 through 8
MetersL and R
Output levels of STEREO OUT (=recording levels of bouncing)
4) After finishing rehearsal, press the [STOP] keyto stop the recorder and locate it to thebeginning of the song.Do not move the controls and faders afterfinishing rehearsal.
By raising the [PHONES VOL] control, you canhear the bounced signals.
Use the track faders (1 through 8) to controlthe track output levels, and use the [MASTER]fader to adjust the master recording levels ofthe bounced signals appropriately while check-ing meters L/R.
See "Using effects" on page 57 for details aboutthe delay/reverb and mastering effects.
Rehearsal of track bouncing
MIN MAX
100
L R
100
L R
100
L RRL
MIN MAX LINE MIC LINE MIC LINE MIC LINE MIC
REC SELECT
0 10
1 2 3 4 5/6 MASTER
MAXMAX
MINMIN
7/8
LOCATE REC END
A-B PLAYLOCATE ABS ZERO
PLAYSTOPRECORD REWIND F FWD
GUIDERHYTHM
CONTRAST
1-8 >SONGNEW
1-6 > 7/81-4 > 5/6 STEREO
WAV FILE
BOUNCE
POWERFUL
MASTERING
B / OUTA / INLOCATE
STOREPLAY MODEAUTO PUNCH
NATURAL BRIGHT
TIME BASESELECT
UNDO/REDO
7/8 >
MENU / ENTER
SIMULATIONDYNAMIC CONDENSER TUBE MIC
PAN
EFFECT
REVERB / DELAY TIME
HALLROOM
PLATE DELAY
PHONES VOL
LSTEREO OUT
R
2PHONES
1
MAXMIN
BALBALBAL
TRIM
UNBAL
PEAK
TRIM
UNBAL
PEAK
TRIM
UNBAL
PEAKPEAK
DISTORTION
GUITAR
/GUITAR
INPUT A SELECT
INSERT
BAL
UNBAL
TRIM
INPUT A INPUT B INPUT C INPUT D
ON/OFF
POWER
ABC1 DEF2 GHI3
JKL4 MNO5
PQR6 STU7 VWX8 YZ9 +-_0 DELETE
TO STEREO BUSS
EFFECT SEND
DIGITAL MULTITRACKER
ON/OFF
ON/OFF
ON/OFF
60'S COMBOUS METALBRIT STACK AMP SIMULATION
INPUT A
1,3 2
33
3 4
3
4
Bouncing tracks 1 through 8 to a new song

71
MR-8HD Owner’s Manual (Track bouncing)
After finishing rehearsal, let's carry out actual track bouncing.
1) While the recorder is stopped, press the[1-8 > NEW SONG] key.The [1-8 > NEW SONG] key lights up and thedisplay shows the screen below.If you execute track bouncing, press the[MENU/ENTER] knob while holding down the[RECORD] key. If you cancel track bouncing,press the [STOP] key.
2) Press the [MENU/ENTER] knob while holdingdown the [RECORD] key.Track bouncing starts. The mixed (bounced)signals are recorded to tracks 7/8 of a newsong. The screen example below shows thattracks 1 through 8 of Song02 (whose name is“Moonlit”) is now being bounced to tracks 7/8of the new song (Song04). Meters 1 through 8show the playback levels of tracks 1 through8, while the L and R meters shows therecording levels of tracks 7/8 of Song04.
Actual track bouncing
MIN MAX
100
L R
100
L R
100
L RRL
MIN MAX LINE MIC LINE MIC LINE MIC LINE MIC
REC SELECT
0 10
1 2 3 4 5/6 MASTER
MAXMAX
MINMIN
7/8
LOCATE REC END
A-B PLAYLOCATE ABS ZERO
PLAYSTOPRECORD REWIND F FWD
GUIDERHYTHM
CONTRAST
1-8 >SONGNEW
1-6 > 7/81-4 > 5/6 STEREO
WAV FILE
BOUNCE
POWERFUL
MASTERING
B / OUTA / INLOCATE
STOREPLAY MODEAUTO PUNCH
NATURAL BRIGHT
TIME BASESELECT
UNDO/REDO
7/8 >
MENU / ENTER
SIMULATIONDYNAMIC CONDENSER TUBE MIC
PAN
EFFECT
REVERB / DELAY TIME
HALLROOM
PLATE DELAY
PHONES VOL
LSTEREO OUT
R
2PHONES
1
MAXMIN
BALBALBAL
TRIM
UNBAL
PEAK
TRIM
UNBAL
PEAK
TRIM
UNBAL
PEAKPEAK
DISTORTION
GUITAR
/GUITAR
INPUT A SELECT
INSERT
BAL
UNBAL
TRIM
INPUT A INPUT B INPUT C INPUT D
ON/OFF
POWER
ABC1 DEF2 GHI3
JKL4 MNO5
PQR6 STU7 VWX8 YZ9 +-_0 DELETE
TO STEREO BUSS
EFFECT SEND
DIGITAL MULTITRACKER
ON/OFF
ON/OFF
ON/OFF
60'S COMBOUS METALBRIT STACK AMP SIMULATION
INPUT A
1
2
2
3
<Note>: To stop track bouncing, press the[STOP] key. Pressing the [STOP] key alsoturns off the bounce mode. If you stop trackbouncing in the middle, the new song isautomatically deleted.
<Note>: When you are going to execute trackbouncing, if there is not enough space onthe hard disk or 99 songs already exist onthe disk, a warning message appears and theoperation is canceled.
<Track bouncing while mixing signals from [INPUTA] through [INPUT D]>When you bounce tracks 1 through 8 to tracks 7/8 of the new song, you can also mix signals from[INPUT A] through [INPUT D] together (see page72).
<Exporting bounced data to a PC>Song data bounced to tracks 7/8 of the new songcan be exported to a PC.You can use the exported data as a source whenburning an original audio CD using a CD-RW drive,or use it with a computer's music software (seepage 90).
When track bouncing to a new song completes,the recorder automatically stops and the dis-play shows the home screen of the new song.
The song name of the new song is given by thename of the original song with “-**” (** is atwo-digit number).
You can check the result by following the pro-cedure described in “Checking the bouncedsignals on tracks 7/8” on page 69.

72
MR-8HD Owner’s Manual (Track bouncing)
The MR-8HD can mix input signals of [INPUT A] through [INPUT D]. The following diagramshows an example of mixing signals of INPUT A through INPUT D when bouncing tracks 1 through6 to tracks 7/8. As you can see, the signals of INPUT A through INPUT D are mixed to the L/Rstereo buss together with the bounced signals.
Before starting track bouncing, connect thedesired sound source(s) to any desiredinput(s) between INPUT A and INPUT D.
Connecting sound sources to INPUT A through INPUT D
Adjust the input level of each input using the[TRIM] control to match the balance with thebounced track levels.Also, you can adjust panning of each inputfor stereo mix. See the next page for detailsabout how to set panning.
To mix the input signal of an input channel(any of INPUT A through INPUT D) to the L/Rstereo buss, turn on the corresponding [TOSTEREO BUSS ON/OFF] switch.
[TO STEREO BUSS ON/OFF] key setting
MIN MAX LINE MIC LINE MIC LINE MIC LINE MIC
BALBALBAL
TRIM
UNBAL
PEAK
TRIM
UNBAL
PEAK
TRIM
UNBAL
PEAKPEAK
DISTORTION
GUITAR
/GUITAR
INPUT A SELECT
INSERT
BAL
UNBAL
TRIM
INPUT A INPUT B INPUT C INPUT D
ON/OFF
TO STEREO BUSS
ON/OFF
ON/OFF
ON/OFF
[TRIM] control MIN MAX LINE MIC LINE MIC LINE MIC LINE MIC
BALBALBAL
TRIM
UNBAL
PEAK
TRIM
UNBAL
PEAK
TRIM
UNBAL
PEAKPEAK
DISTORTION
GUITAR
/GUITAR
INPUT A SELECT
INSERT
BAL
UNBAL
TRIM
INPUT A INPUT B INPUT C INPUT D
ON/OFF
TO STEREO BUSS
ON/OFF
ON/OFF
ON/OFF
[TO STEREO BUSS ON/OFF] key
When the [TO STEREO BUSS ON/OFF] key isturned on, the key illuminates in green. Thatis, when the key illuminates, input signal issent to recording tracks. (Note that when thekey flashes, the corresponding input is as-signed to any recording track.)
Trk 4
Trk 3
Trk 2
Trk 1
Mastering E
ffectsTrk 5Trk 6
Mixing
Playback
Reverbor
DElay
Bouncing
Trk 7Trk 8
STEREO OUT (L, R)
INPUT A
INPUT B
INPUT C
INPUT D
TRIM
Playback
Playback
Playback
Playback
Playback
Record
Record
<Note>: If you press the [TO STEREO BUSS ON/OFF] key when make recording other than track bouncing, thekey lamp may flash. This shows the input signal is routed to the armed track. That is, the input signal will berecorded to the armed track, in stead of mixed to the stereo buss.
Mixing signals of inputs A through D
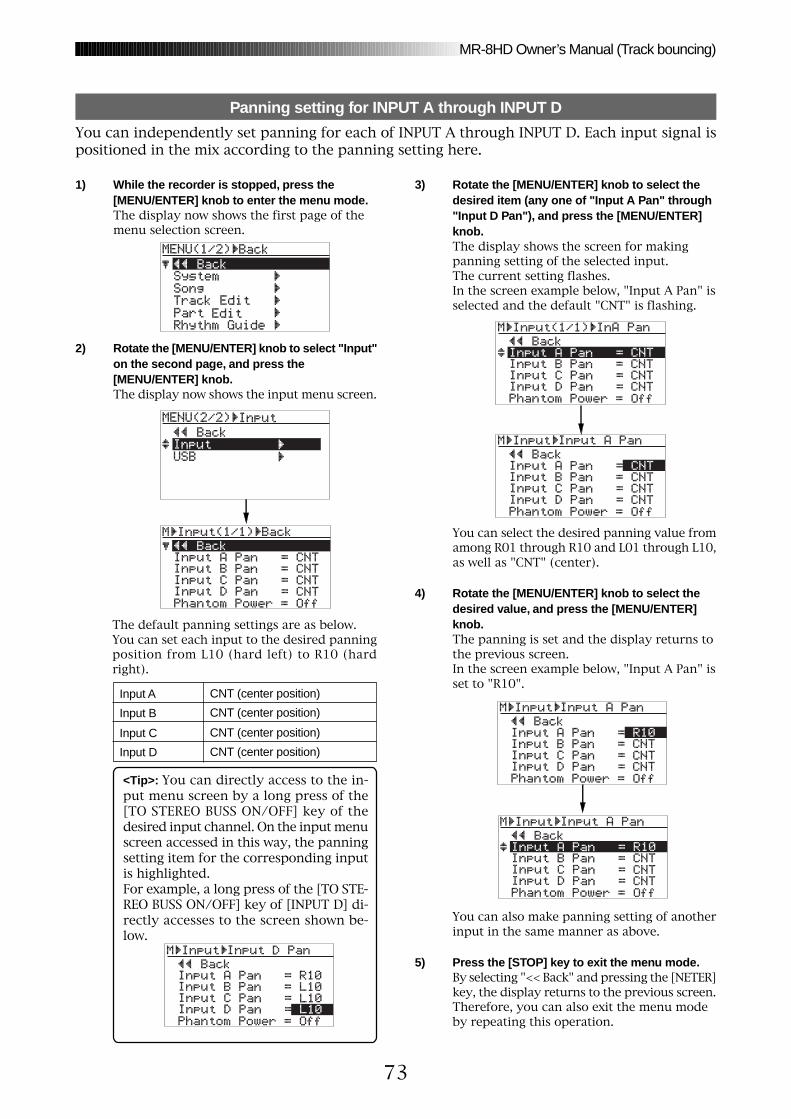
73
MR-8HD Owner’s Manual (Track bouncing)
The default panning settings are as below.You can set each input to the desired panningposition from L10 (hard left) to R10 (hardright).
Input A CNT (center position)
Input B CNT (center position)
Input C CNT (center position)
Input D CNT (center position)
3) Rotate the [MENU/ENTER] knob to select thedesired item (any one of "Input A Pan" through"Input D Pan"), and press the [MENU/ENTER]knob.The display shows the screen for makingpanning setting of the selected input.The current setting flashes.In the screen example below, "Input A Pan" isselected and the default "CNT" is flashing.
You can select the desired panning value fromamong R01 through R10 and L01 through L10,as well as "CNT" (center).
4) Rotate the [MENU/ENTER] knob to select thedesired value, and press the [MENU/ENTER]knob.The panning is set and the display returns tothe previous screen.In the screen example below, "Input A Pan" isset to "R10".
You can also make panning setting of anotherinput in the same manner as above.
5) Press the [STOP] key to exit the menu mode.By selecting "<< Back" and pressing the [NETER]key, the display returns to the previous screen.Therefore, you can also exit the menu modeby repeating this operation.
<Tip>: You can directly access to the in-put menu screen by a long press of the[TO STEREO BUSS ON/OFF] key of thedesired input channel. On the input menuscreen accessed in this way, the panningsetting item for the corresponding inputis highlighted.For example, a long press of the [TO STE-REO BUSS ON/OFF] key of [INPUT D] di-rectly accesses to the screen shown be-low.
Panning setting for INPUT A through INPUT D
1) While the recorder is stopped, press the[MENU/ENTER] knob to enter the menu mode.The display now shows the first page of themenu selection screen.
2) Rotate the [MENU/ENTER] knob to select "Input"on the second page, and press the[MENU/ENTER] knob.The display now shows the input menu screen.
You can independently set panning for each of INPUT A through INPUT D. Each input signal ispositioned in the mix according to the panning setting here.

74
MR-8HD Owner’s Manual (Track bouncing)
Typically, bouncing is executed from the beginning to the end of a song, as shown in Figure 1below. However, you can bounce only the desired part by using the track bouncing and punchin/out functions together. The following assumes that the song you are going to execute trackbouncing is loaded and you finished rehearsal of track bouncing.The following procedure shows the example of bouncing the desired part of a song in the "Bounce1-6 > 7/8" mode (<Note>: In the “1-8 > NEW SONG” mode, you cannot bounce the desired part of a songby using the track bouncing and auto punch in/out functions together) .
1) Set the punch-in and punch-out points (see page54).By pressing the [PLAY] key while holding downthe [STOP] key, you can play back the partbetween the punch-in and punch-out points(see page 44).
2) Locate the recorder to a position before thepunch-in point.
3) Press the [1-4>5/6, 1-6>7/8] key to set the bouncemode to "1-6>7/8".When setting the bounce mode to "1-6>7/8",tracks 7/8 automatically enter the input
monitor mode and " " lights on thehome screen.
TRK 1TRK 2TRK 3TRK 4TRK 5TRK 6
TRK 7TRK 8
ABS ZERO REC END
Mixing
Punch in point(=LOCATE A point)
Punch out point(=LOCATE B point)
TRK 1TRK 2TRK 3TRK 4TRK 5TRK 6
TRK 7TRK 8
Mixing
Typical bouncing (Fig. 1) Bouncing the desired part (Fig. 2)
Lighting
4) Press the [AUTO PUNCH] key to activate the autopunch mode.When the auto punch mode is active,
" " lights on the home screen.
5) Press the [RECORD] key while holding down the[PLAY] key.The " " icon is shown and the recorderstarts playback. It automatically startsrecording (bouncing) when it reaches thepunch-in point.
Punch-in point(=LOCATE A point)
Punch-out point(=LOCATE B point)
TRK 1TRK 2TRK 3TRK 4TRK 5TRK 6
TRK 7TRK 8
Playback(Input monitor)
Recording(track bouncing)
Playback
The recorder stops recording (bouncing) at thepunch-out point and returns to playback, whilethe auto punch mode exits and " " inthe screen turns off.
6) Press the [STOP] key to stop the recorder.Check the result by playing back the bouncedtracks, as described earlier.
<Note>: During playback in the operationabove, you cannot monitor the sound. Youcan monitor the sound (bounced sound)only during recording between punch-in andpunch-out points.
<Note>: If you are not satisfied with the re-sult, press the [UNDO/REDO] key to redo theoperation.
Lighting
Flashing
Lighting
Bouncing the desired part of a song

75
MR-8HD Owner’s Manual (Rhythm guide function)
Rhythm guide functionThe MR-8HD offers the rhythm guide function, which allows out-putting the rhythm guide click during recording.
This chapter describes how to output the rhythm guide, set thetime signature/tempo and create the conductor map.

76
MR-8HD Owner’s Manual (Rhythm guide function)
The MR-8HD provides the metronome function which can output the rhythm guide click duringrecording. You can easily output the guide click from the [STEREO OUT] jacks by pressing the[RHYTHM GUIDE] key on the top panel. Two types of the rhythm guide are available: one has theconstant time signature/tempo throughout a song, while the other has the programmed timesignature/tempo map.
MIN MAX
100
L R
100
L R
100
L RRL
MIN MAX LINE MIC LINE MIC LINE MIC LINE MIC
REC SELECT
0 10
1 2 3 4 5/6 MASTER
MAXMAX
MINMIN
7/8
LOCATE REC END
A-B PLAYLOCATE ABS ZERO
PLAYSTOPRECORD REWIND F FWD
GUIDERHYTHM
CONTRAST
1-8 >SONGNEW
1-6 > 7/81-4 > 5/6 STEREO
WAV FILE
BOUNCE
POWERFUL
MASTERING
B / OUTA / INLOCATE
STOREPLAY MODEAUTO PUNCH
NATURAL BRIGHT
TIME BASESELECT
UNDO/REDO
7/8 >
MENU / ENTER
SIMULATIONDYNAMIC CONDENSER TUBE MIC
PAN
EFFECT
REVERB / DELAY TIME
HALLROOM
PLATE DELAY
PHONES VOL
LSTEREO OUT
R
2PHONES
1
MAXMIN
BALBALBAL
TRIM
UNBAL
PEAK
TRIM
UNBAL
PEAK
TRIM
UNBAL
PEAKPEAK
DISTORTION
GUITAR
/GUITAR
INPUT A SELECT
INSERT
BAL
UNBAL
TRIM
INPUT A INPUT B INPUT C INPUT D
ON/OFF
POWER
ABC1 DEF2 GHI3
JKL4 MNO5
PQR6 STU7 VWX8 YZ9 +-_0 DELETE
TO STEREO BUSS
EFFECT SEND
DIGITAL MULTITRACKER
ON/OFF
ON/OFF
ON/OFF
60'S COMBOUS METALBRIT STACK AMP SIMULATION
INPUT A
RHYTHMGUIDE
Setting the time signature and tempo
To output the rhythm guide click,turn on the [RHYTHM GUIDE]key. By default, the guide click isoutput at time signature=4/4,tempo=120.
You can output the rhythm guideclick according to the desiredconstant time signature andtempo, as well as the pro-grammed rhythm guide clickbased on the conductor map.
You can set the default rhythm guide (time signature: 4/4, tempo: 120), output level, etc. usingthe "Rhythm Guide" menu in the menu mode.
2) Rotate the [MENU/ENTER] knob to select"Rhythm Guide", and press the [MENU/ENTER]knob.The display now shows the screen for settingthe rhythm guide, where "<< Back" ishighlighted.
1) While the recorder is stopped, press the[MENU/ENTER] knob to enter the menu mode.The display now shows the first page of themenu selection screen, where "<< Back" ishighlighted initially (selecting "<< Back"returns to the previous screen).
Tip!: While the home screen is shown andthe recorder is stopped, long press of the[RHYTHM GUIDE] key directly brings up thescreen for setting the rhythm guide.
When recording starts, the MR-8HD simultaneously starts feeding the rhythm guideclick from the [STEREO OUT (L, R)] jacks at the selected level (the default is 80). Notethat the rhythm guide click is not output during track bouncing. The output level ofthe rhythm guide click is shown on the L and R level meters.Note that you can monitor the rhythm guide click via headphones or (a) monitorspeaker(s). You cannot record the rhythm guide click to any MR-8HD track(s). If youdo not want to output the rhythm guide click, turn off the [RHYTHM GUIDE] key.
Using the rhythm guide function

77
MR-8HD Owner’s Manual (Rhythm guide function)
Rhythm Guide: Off
Conductor Map: Off
Rhythm guide
No output
Bar/beatindication
The "Signature"and "Tempo"item settings areeffective.
Rhythm Guide: Off
Conductor Map: OnNo output The conductor
map is effective.
Rhythm Guide: On
Conductor Map: Off
Output:The tempo andtime signaturesetting on thisscreen is effec-tive.
The "Signature"and "Tempo"item settings areeffective.
Rhythm Guide: On
Conductor Map: On
Output:The conductormap setting iseffective.
The conductormap is effective.
On/off conditions
1. Rhythm Guide: On/off selection of the rhythm guideThe setting you make here is reflected to the[RHYTHM GUIDE] key (the key is lit when ON, whileit is unlit when OFF). Conversely, when you turnon or off the rhythm guide using the[RHYTHM GUIDE] key, the status is reflected tothis screen. See the table on the right for details.
2. Conductor Map: On/off selection of the conductor mapThis item enables or disables the conductor map(see "Conductor map" described later).The default is "Off". See the table on the right fordetails.
3. Signature: Time signature settingThe default is "4/4". You can select from among1/4 through 5/4 and 1/8 through 8/8.The setting here is effective from the beginning tothe end of the song when the "Conductor Map"item is set to "Off" (i.e. the same time signatureall through the song). When the "Conductor Map"item is set to "On", the setting here is ineffective.See the table on the right for details.
You can make setting for each item similarly.The rhythm guide setting screen has the followingitems.
To exit the menu mode, press the [STOP] key, or se-lect "<< Back" and press the [MENU/ENTER] knobrepeatedly.
The table below shows how the "Rhythm Guide" and"Conductor Map" item settings affect the conditionsof rhythm guide output and bar/beat indication.
3) Rotate the [MENU/ENTER] knob to select thedesired item, and press the [MENU/ENTER] knob.The current setting of the selected item startsflashing. On the screen examples below, the"Rhythm Guide" item is highlighted (see theupper screen) and the [MENU/ENTER] knob ispressed (see the lower screen).
4) Rotate the [MENU/ENTER] knob to select thedesired option, and press the [MENU/ENTER]knob.The selected option (in the example above,"On" or "Off") is confirmed and the displayreturns to the previous screen.
4. Tempo: Tempo settingThe default is "120bpm". You can select between30 and 250 bpm. The setting here is effective fromthe beginning to the end of the song when the"Conductor Map" item is set to "Off" (i.e. the sametempo all through the song).When the "Conductor Map" item is set to "On",the setting here is ineffective. See the table on thebelow for details.
5. Int ClickLevel: Internal click output levelThe default is "80". You can set it between 0 and99.
12
3
4
5
See the next page for details about how to set theconductor map.
<Note>: When “Conductor Map” is set to “On”,the “Signature” and “Tempo” fields show “- - -” asbelow. This indicates that the signature and tempovalues set on this screen are ineffective, while theconductor map setting is effective.

78
MR-8HD Owner’s Manual (Rhythm guide function)
2) Rotate the [MENU/ENTER] knob to select "Song",and press the [MENU/ENTER] knob.The display now shows the song editing screen,where "<< Back" is highlighted.
3) Rotate the [MENU/ENTER] knob to select"Signature Map" on the second page, and pressthe [MENU/ENTER] knob.The display shows the signature map screenon which the current time signature events arelisted. Each event specifies the bar number andtime signature. By default, "1Bar -> 4/4" and"---Bar -> ---" are listed. In this condition, thesong is played in 4/4 from the beginning tothe end."---Bar -> ---" is used to create a new event.
The procedure example below shows how toadd the following events to the signature map.
1) While the recorder is stopped, press the[MENU/ENTER] knob to enter the menu mode.The display now shows the first page of themenu selection screen, where "<< Back" is highlighted initially (selecting "<< Back" returns tothe previous screen). You can also return tothe previous screen by pressing the [REWIND]key.
Setting the signature map
The MR-8HD can output the rhythm guide click which follows the "conductor map" duringrecording. It can also output MIDI clock and song position pointer which follows the "conductormap" from the [MIDI OUT] connector.The conductor map consists of the time signature map and tempo map. You can add "events" toeach map. Each event specifies the time signature or tempo, as well as the position from whichthe specified time signature or tempo is effective. The time signature or tempo specified by eachevent is effective until the next event in the map appears.For example, if the time signature map has two events -- one sets "4/4" at the first bar 1, whilethe other sets "2/4" at the third bar --, the song is played in 4/4 from bar 1 to 2, and played in2/4 from bar 3 to the end.For another example, if the tempo map has two events -- one sets "120" at the first bar 1/firstbeat while the other sets "90" at bar 12/beat 2 --, the song is played at 120 bpm from bar 1 to bar12/beat 1, while it is played at 90 from bar 12/beat 2 to the end.
44
43
120 180
90 120
Creating the conductor map
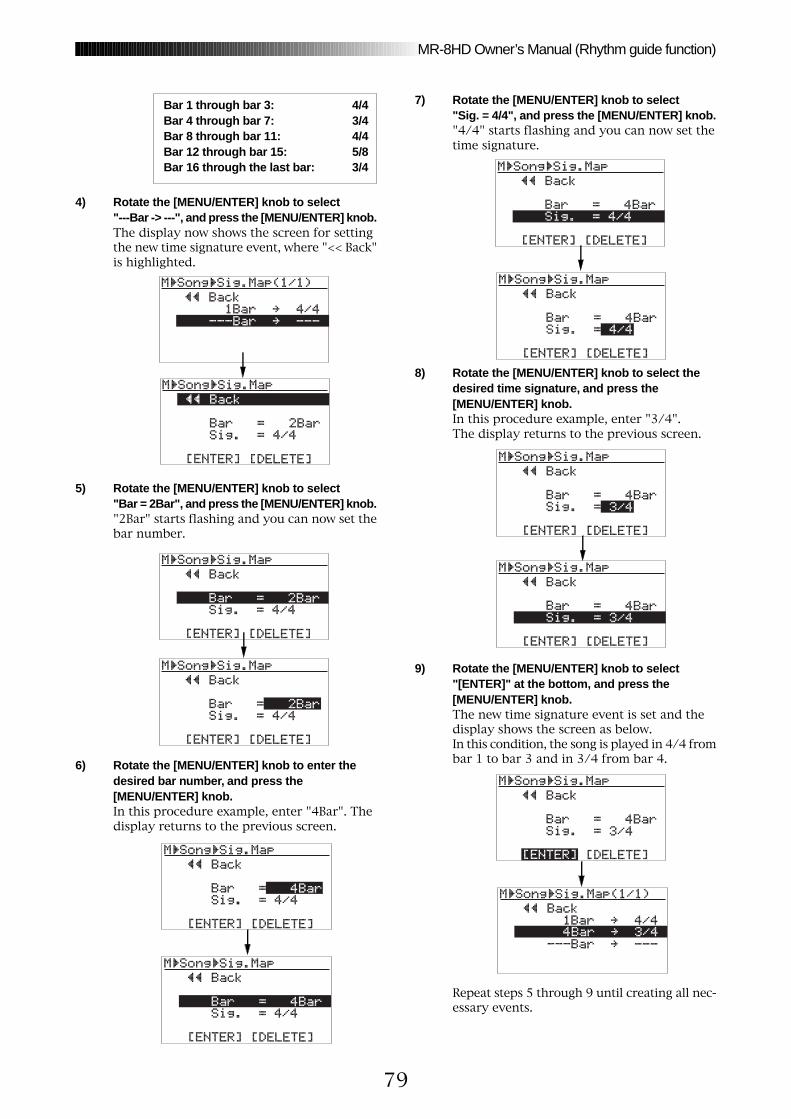
79
MR-8HD Owner’s Manual (Rhythm guide function)
4) Rotate the [MENU/ENTER] knob to select"---Bar -> ---", and press the [MENU/ENTER] knob.The display now shows the screen for settingthe new time signature event, where "<< Back"is highlighted.
Bar 1 through bar 3: 4/4Bar 4 through bar 7: 3/4Bar 8 through bar 11: 4/4Bar 12 through bar 15: 5/8Bar 16 through the last bar: 3/4
5) Rotate the [MENU/ENTER] knob to select"Bar = 2Bar", and press the [MENU/ENTER] knob."2Bar" starts flashing and you can now set thebar number.
6) Rotate the [MENU/ENTER] knob to enter thedesired bar number, and press the[MENU/ENTER] knob.In this procedure example, enter "4Bar". Thedisplay returns to the previous screen.
7) Rotate the [MENU/ENTER] knob to select"Sig. = 4/4", and press the [MENU/ENTER] knob."4/4" starts flashing and you can now set thetime signature.
8) Rotate the [MENU/ENTER] knob to select thedesired time signature, and press the[MENU/ENTER] knob.In this procedure example, enter "3/4".The display returns to the previous screen.
9) Rotate the [MENU/ENTER] knob to select"[ENTER]" at the bottom, and press the[MENU/ENTER] knob.The new time signature event is set and thedisplay shows the screen as below.In this condition, the song is played in 4/4 frombar 1 to bar 3 and in 3/4 from bar 4.
Repeat steps 5 through 9 until creating all nec-essary events.

80
MR-8HD Owner’s Manual (Rhythm guide function)
• Deleting an unnecessary time signature event
You can delete an unnecessary time signatureevent.
2) Rotate the [MENU/ENTER] knob to select"[DELETE]" at the bottom, and press the[MENU/ENTER] knob.The event is immediately deleted and thedisplay returns to the signature map screen.
• Editing a time signature event
You can edit a time signature event.
2) To change the bar number, rotate the[MENU/ENTER] knob to select "Bar = 8Bar", andpress the [MENU/ENTER] knob.To change the time signature, rotate the[MENU/ENTER] knob to select "Sig. = 4/4", andpress the [MENU/ENTER] knob.As with the procedure described on theprevious page, you can now set the barnumber or time signature.
3) Rotate the [MENU/ENTER] knob to edit the value,and press the [MENU/ENTER] knob.In this procedure example, enter "10" for thebar number.
4) Rotate the [MENU/ENTER] knob to select"[ENTER]" at the bottom, and press the[MENU/ENTER] knob.The editing is confirmed and the displayreturns to the signature map screen.
<Before editing>
<After editing>
To exit the menu mode, press the [STOP] key,
<Before deleting>
<After deleting>
To exit the menu mode, press the [STOP] key,
1) On the time signature map screen, rotate the[MENU/ENTER] knob to select the event you wantto edit, and press the [MENU/ENTER] knob.As with the description on the previous page, thedisplay now shows the screen for setting the event.For example, let's select "8Bar -> 4/4".
1) On the time signature map screen, rotate the[MENU/ENTER] knob to select the event you wantto delete, and press the [MENU/ENTER] knob.As with the description on the previous page,the display now shows the screen for settingthe event.For example, let's select "8Bar -> 4/4".

81
MR-8HD Owner’s Manual (Rhythm guide function)
By default, the bar/beat value at the beginning (ABS ZERO) of the song is set to "bar -2/beat 1".This offset (the bar/beat value at ABS ZERO) is called "bar offset". You can change the default baroffset to the desired value.
2) Rotate the [MENU/ENTER] knob to select thedesired offset value, and press the[MENU/ENTER] knob.The selected offset value is confirmed, whilethe display returns to the previous screen.
Option
-8Bar
-7Bar
-6Bar
-5Bar
-4Bar
-3Bar
-2Bar
-1Bar
0Bar
ABS Zero= bar -8
ABS Zero= bar -7
ABS Zero = bar -6
ABS Zero= bar -5
ABS Zero= bar -4
ABS Zero= bar -3
ABS Zero= bar -2
ABS Zero= bar -1
ABS Zero= bar 1
OptionMeaning Meaning
The table below shows the available offset val-ues.
To exit the menu mode, press the [STOP] key,
1) On the second page of the song editing menuscreen, highlight "Bar Offset" and press the[MENU/ENTER] knob.The current offset value (by default, "-2Bar")starts flashing.
Editing the bar offset
You can see the bar offset value on the homescreen when the recorder is at the beginningof the song (ABS 0).The screen example below shows the homescreen when the bar offset is set to “-4 bars”.
The default home screen (bar offset = -2 bars).
The home screen when thebar offset is set to “-4 bars”.

82
MR-8HD Owner’s Manual (Rhythm guide function)
Bar 1/beat 1: 120 bpmBar 4/beat 2: 180 bpmBar 8/beat 3: 90 bpmBar 12/beat 1: 120 bpmBar 16/beat 4: 250 bpm
After setting the time signature map, you have to create the tempo map by adding the necessarytempo event(s). Like a time signature event, a tempo event specifies the tempo at the tempochanging point. Each tempo specified by a tempo event is effective until the next event appears.For example, you can set the tempo to 120 at the third beat in bar 4, and set to 90 at the secondbeat in bar 12, etc.
Setting the tempo map
2) Rotate the [MENU/ENTER] knob to select "Song",and press the [MENU/ENTER] knob.The display now shows the song editing screen,where "<< Back" is highlighted.
1) While the recorder is stopped, press the[MENU/ENTER] knob to enter the menu mode.The display now shows the first page of themenu selection screen, where "<< Back" ishighlighted initially (selecting "<< Back"returns to the previous screen). You can alsoreturn to the previous screen by pressing the[REWIND] key.
3) Rotate the [MENU/ENTER] knob to select"Tempo Map" on the second page, and press the[MENU/ENTER] knob.The display shows the tempo map screen onwhich the current tempo events are listed.Each event specifies the bar/beat position andtempo. By default, "1Bar 1 -> 120 bpm" and"---Bar - -> ---bpm" are listed. In thiscondition, the song starts in 120 bpm and thereis no tempo change. "---Bar - -> ---bpm" is usedto create a new tempo event.
The procedure example below shows how toadd the following tempo events to the tempomap.
4) Rotate the [MENU/ENTER] knob to select "---Bar - -> ---bpm", and press the [MENU/ENTER] knob.
The display now shows the screen for settingthe new tempo event, where "<< Back" ishighlighted.
5) Rotate the [MENU/ENTER] knob to select"Bar = 2Bar", and press the [MENU/ENTER] knob."2Bar" starts flashing and you can now set thebar number. You can enter the bar numberbetween 1 and 999.

83
MR-8HD Owner’s Manual (Rhythm guide function)
7) Rotate the [MENU/ENTER] knob to select"Beat = 1 ", and press the [MENU/ENTER] knob."1 " starts flashing and you can now set thebeat number. You can enter the beat numberbetween 1 and 8.
8) Rotate the [MENU/ENTER] knob to enter thedesired beat number, and press the[MENU/ENTER] knob.In this procedure example, let's enter "2 ".The display returns to the previous screen.
11) Rotate the [MENU/ENTER] knob to select"[ENTER]" at the bottom, and press the[MENU/ENTER] knob.The new tempo event is set and the displayshows the screen as below. In this condition,the song is played in 120 bpm from thebeginning to bar 4/beat 1 and in 180 from bar4/beat 2 to the end.
Repeat steps 4 through 11 until creating allnecessary tempo events.
"120bpm" starts flashing and you can now setthe tempo. You can enter the tempo between30 and 250.
10) Rotate the [MENU/ENTER] knob to enter thedesired tempo, and press the [MENU/ENTER]knob.In this procedure example, enter "180bpm".The display returns to the previous screen.
6) Rotate the [MENU/ENTER] knob to enter thedesired bar number, and press the[MENU/ENTER] knob.In this procedure example, enter "4Bar".The display returns to the previous screen.
9) Rotate the [MENU/ENTER] knob to select"Tempo = 120bpm", and press the[MENU/ENTER] knob.

84
MR-8HD Owner’s Manual (Rhythm guide function)
• Deleting an unnecessary tempo event
You can delete an unnecessary tempo event.
2) Rotate the [MENU/ENTER] knob to select"[DELETE]" at the bottom, and press the[MENU/ENTER] knob.The event is immediately deleted and thedisplay returns to the tempo map screen.
• Editing a tempo event
You can edit a tempo event.
2) To change the bar number, rotate the[MENU/ENTER] knob to select "Bar = 12Bar", andpress the [MENU/ENTER] knob.To change the beat number, rotate the[MENU/ENTER] knob to select "Beat = 1 ", andpress the [MENU/ENTER] knob.To change the tempo, rotate the [MENU/ENTER]knob to select "Tempo = 120bpm", and press the[MENU/ENTER] knob.As with the procedure described on theprevious page, you can now set the barnumber, beat number or tempo.
3) Rotate the [MENU/ENTER] knob to edit the value,and press the [MENU/ENTER] knob.In this procedure example, let's enter "10" forthe bar number.
4) Rotate the [MENU/ENTER] knob to select"[ENTER]" at the bottom, and press the[MENU/ENTER] knob.The editing is confirmed and the displayreturns to the tempo map screen.
<Before editing>
<After editing>
<After deleting>
To exit the menu mode, press the [STOP] key,or select "<< Back" and press the [MENU/EN-TER] knob repeatedly.
1) On the tempo map screen, rotate the[MENU/ENTER] knob to select the event you wantto edit, and press the [MENU/ENTER] knob.As with the description on the previous page,the display now shows the screen for settingthe event.For example, let's select "12Bar 1 -> 120bpm".
1) On the tempo map screen, rotate the[MENU/ENTER] knob to select the event you wantto delete, and press the [MENU/ENTER] knob.As with the description on the previous page,the display now shows the screen for settingthe event. For example, let's select"12Bar 1 ->120bpm".
To exit the menu mode, press the [STOP] key,or select "<< Back" and press the [MENU/EN-TER] knob repeatedly.

85
MR-8HD Owner’s Manual (MIDI synchronization)
MIDI synchronizationBy connecting the external MIDI devices (such as a sequencer, soundmodule, computer, etc.) via the [MIDI OUT] connector of the MR-8HD, you can make powerful recording.For example, by synchronizing a sequencer with the MR-8HD dur-ing playback, you can mix down signals (such as a vocal, guitar,etc.) recorded on the MR-8HD tracks and audio from a sound mod-ule.You can synchronize MIDI with the MR-8HD by connecting a MIDIdevice to the [MIDI OUT] connector on the MR-8HD and sendingout MTC (MIDI time code) or MIDI clock (with Song Position Pointer)from the MR-8HD.
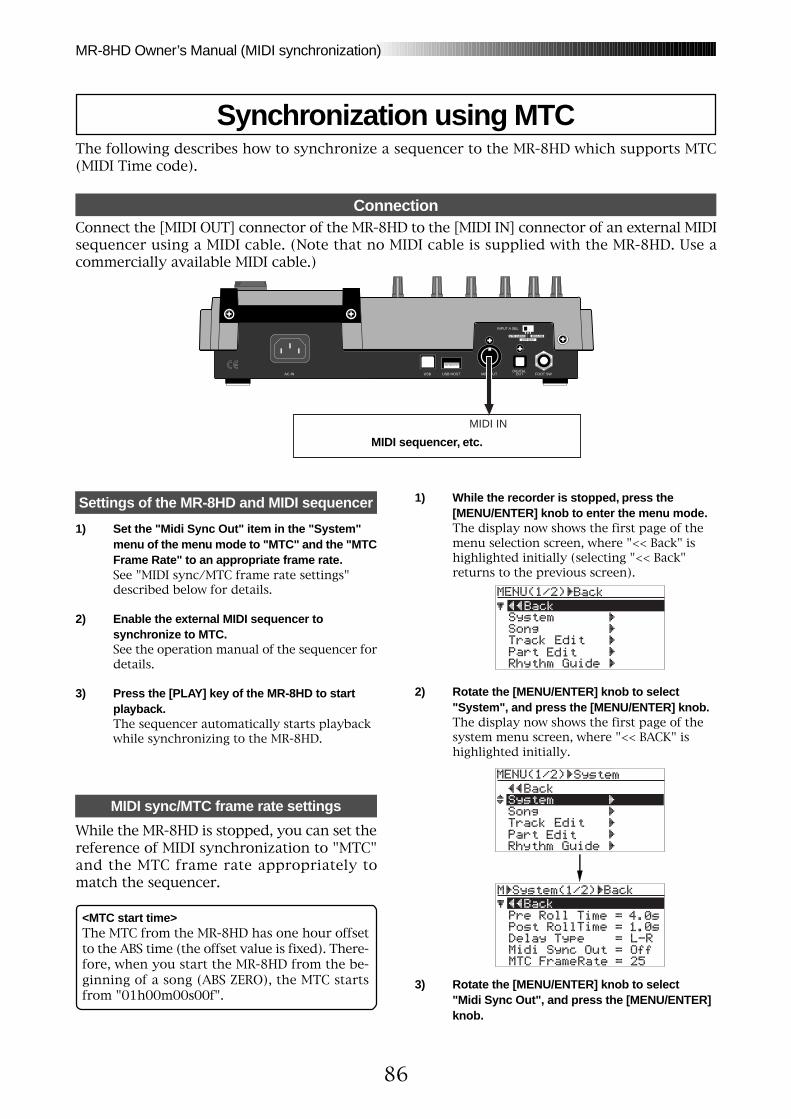
86
MR-8HD Owner’s Manual (MIDI synchronization)
The following describes how to synchronize a sequencer to the MR-8HD which supports MTC(MIDI Time code).
Connect the [MIDI OUT] connector of the MR-8HD to the [MIDI IN] connector of an external MIDIsequencer using a MIDI cable. (Note that no MIDI cable is supplied with the MR-8HD. Use acommercially available MIDI cable.)
1) Set the "Midi Sync Out" item in the "System"menu of the menu mode to "MTC" and the "MTCFrame Rate" to an appropriate frame rate.See "MIDI sync/MTC frame rate settings"described below for details.
2) Enable the external MIDI sequencer tosynchronize to MTC.See the operation manual of the sequencer fordetails.
3) Press the [PLAY] key of the MR-8HD to startplayback.The sequencer automatically starts playbackwhile synchronizing to the MR-8HD.
While the MR-8HD is stopped, you can set thereference of MIDI synchronization to "MTC"and the MTC frame rate appropriately tomatch the sequencer.
2) Rotate the [MENU/ENTER] knob to select"System", and press the [MENU/ENTER] knob.The display now shows the first page of thesystem menu screen, where "<< BACK" ishighlighted initially.
<MTC start time>The MTC from the MR-8HD has one hour offsetto the ABS time (the offset value is fixed). There-fore, when you start the MR-8HD from the be-ginning of a song (ABS ZERO), the MTC startsfrom "01h00m00s00f".
1) While the recorder is stopped, press the[MENU/ENTER] knob to enter the menu mode.The display now shows the first page of themenu selection screen, where "<< Back" ishighlighted initially (selecting "<< Back"returns to the previous screen).
INPUT A SEL
USB USB HOSTAC-INDIGITAL
OUT FOOT SWMIDI OUT
GTR CLEAN MIC/LINEGTR DIST
MIDI IN
MIDI sequencer, etc.
Connection
Settings of the MR-8HD and MIDI sequencer
MIDI sync/MTC frame rate settings
3) Rotate the [MENU/ENTER] knob to select"Midi Sync Out", and press the [MENU/ENTER]knob.
Synchronization using MTC

87
MR-8HD Owner’s Manual (MIDI synchronization)
The following describes how to synchronize a sequencer to the MR-8HD using MIDI clock. Usethis method if the sequencer does not support MTC (MIDI Time code)
<Notes>• To synchronize a sequencer to the MR-8HD
using MIDI clock, you have to make thesignature/tempo map in the MR-8HD. The MIDIclock is output based on the signature/tempomap in the MR-8HD.When you record MIDI sounds, synchronize thesequencer to the MIDI clock fed from theMR-8HD.
• Generally, a sequencer supporting MIDI songposition pointer as well as MIDI clock cansynchronize to the MR-8HD when you startplayback of the MR-8HD from the middle of asong. It locates the current song position andchases the MR-8HD. However, note that somesequencer may not synchronize to the MR-8HD.
6) Rotate the [MENU/ENTER] knob to select thedesired frame rate, and press the [MENU/ENTER]knob.The selected frame rate is now effective, while"MTC FrameRate" is highlighted on the screen.
7. Press the [STOP] key to exit the menu mode.
5) Rotate the [MENU/ENTER] knob to select"MTC FrameRate", and press the [MENU/ENTER]knob.The current option (the default is "25") flashes.You can now select the desired frame rate (theoptions are "24", "25", "30nd" and "30df").
1) Set the "Midi Sync Out" item in the "System"menu of the menu mode to "Clk".See "MIDI sync/MTC frame rate settings"described above about how to set.
2) Create the signature/tempo map by setting"Signature Map" and "Tempo Map" items in the"Song" menu of the menu mode appropriately.See "Using the rhythm guide function" on page76 for details about how to set these items.
3) Enable the external MIDI sequencer tosynchronize to MIDI clock.See the operation manual of the sequencer fordetails.
4) Press the [PLAY] key of the MR-8HD to startplayback.The sequencer also starts playback in sync withthe MR-8HD.
The current option (the default is "Off")flashes. You can now select the desired option(the available options are Off, CLK and MTC).
Off
CLK
MTC
No signal is output from the [MIDI OUT]connector. This is the default.
MIDI clock with Song Position Pointer isoutput from the [MIDI OUT] connector.
MIDI time code is output from the [MIDIOUT] connector.
4) Rotate the [MENU/ENTER] knob to select "MTC",and press the [MENU/ENTER] knob."Midi Sync Out" is now set to "MTC", while"Midi Sync Out" is highlighted on the screen.
Connection
As with the connection for MTC synchroniza-tion, connect the [MIDI OUT] connector of theMR-8HD to the [MIDI IN] connector of an ex-ternal MIDI sequencer using a MIDI cable.
Settings of the MR-8HD and MIDI sequencer
Synchronization using MIDI clock

88
MR-8HD Owner’s Manual (MIDI synchronization)
89
MR-8HD Owner’s Manual (Data export to a personal computer)
Data export to a personal computerThis chapter describes how to export song data on tracks 7/8 to apersonal computer.
To export the desired song data to a personal computer, you mustconvert the song data to a stereo WAV file.You can export the converted (WAV) file to the personal computerand create an audio CD using a CD burning function on the per-sonal computer.
<Notes on USB connection with Mac OS>When making USB connection with a Macintosh computer, note that onlyMac OS X or higher is supported. Do not connect to a Macintosh computerwith the earlier version. The song data on the MR-8HD may be damaged.

90
MR-8HD Owner’s Manual (Data export to a personal computer)
By converting track data recorded on tracks 7/8 (which consists of an L/R pair of mono WAVfiles) to a stereo WAV file, you can export the data to a personal computer.The following describes how to convert data on tracks 7/8 (which may be bounced from othertracks or simply recorded in stereo) to a stereo WAV file. See page 92 for details about how toexport a converted WAV file to a personal computer.
You can enable or disable the WAV file con-version function by pressing the [7/8 > STE-REO WAV FILE] key.
1) While the recorder is stopped, press the[7/8 > STEREO WAV FILE] key to enable the fileconversion function.The display shows the "7/8 > STEREO WAVFILE" screen, on which "ABS0-Rec End" ishighlighted.
Each press of the [7/8 > STEREO WAV FILE]key enables or disables the conversion func-tion. The key lights when the conversion func-tion is enabled.
[7/8 > STEREO WAV FILE] key
Track 7(L ch)
Track 8(R ch)
Stereo(L, R)
Two mono WAV files recorded on tracks 7/8are converted to a stereo WAV file as shownbelow. (Note that only files recorded on tracks7/8 can be converted to a stereo WAV file.)
You can convert all track data (from ABS ZEROto REC END) or data of a specified part (be-tween the LOCATE A and LOCATE B points).
The following assumes that the song whosetrack data you want to convert is loaded.
<Note>: If you want to convert a part of trackdata, you have to set the LOCATE A and LO-CATE B points in advance.
<Note>: If you are going to make conversionwhen no WAV data exists on tracks 7/8, theerror message ("Track 7/8 Empty!") appearsand the operation is canceled.
1-8 > SONGNEW
1-6 > 7/81-4 > 5/6 STEREO
WAV FILE
BOUNCE
7/8 >
ABC1 DEF2 GHI3
To convert all track data, select "ABS0-Rec End".To convert a specified range, select "LOCATEA - LOCATE B".
2) Press the [MENU/ENTER] knob."ABS0-Rec End" starts flashing, and you cannow select the conversion range between"ABS0-Rec End" and "LOCATE A - LOCATE B".
3) Rotate the [MENU/ENTER] knob to select theconversion range and press the [MENU/ENTER]knob.The selection is confirmed and the displayreturns to the previous screen.
Enabling the file conversion
Procedure of file conversion
"NAME = *********" shows the name for the con-verted file, and you can enter a desired name.Initially, it shows the name of the source file,therefore, if you do not change the name, thesame file name is given.The following assumes that the file name is notchanged. For details about how to edit a name,see "Editing a file name" on the next page.When you convert data in the same song morethan once, you have to give a different namefor each converted file. See the <Note> on thenext page.
WAV file conversion

91
MR-8HD Owner’s Manual (Data export to a personal computer)
5) Press the [MENU/ENTER] knob.The MR-8HD quits the conversion function andthe display returns to the home screen.
<Editing a file name>You can edit a file name by the followingprocedure.
2) Enter a new name using the characterentry keys.Pressing a different character entry keyautomatically moves the cursor right.If two successive characters are assignedto the same character entry key, rotatethe [MENU/ENTER] knob after selectingthe first character to move the cursorright.
<Note>: If you convert data with the same nameas previously converted data, the followingscreen appears on the display.This screen warns you that the WAV file withthe same name already exists and asks you tocarry out the conversion by overwriting the ex-isting file or cancel the conversion.
If you carry out the conversion by overwritingthe existing file, rotate the [MENU/ENTER] knobto move the cursor to "[YES]", and press the[MENU/ENTER] knob.
If you do not want to overwrite the existing file,rotate the [MENU/ENTER] knob to move the cur-sor to "[NO]", then press the [MENU/ENTER]knob. The display returns to show the screenfor editing the file name, so you can enter a dif-ferent file name and then carry out the conver-sion.
If you want to cancel the conversion when thescreen above is shown, rotate the [MENU/ENTER]knob to move the cursor to "[NO]" and press the[MENU/ENTER] knob to show the screen for ed-iting the file name, and then press the [7-8>STE-REO WAV FILE] key to quit the conversion func-tion.
3) After entering a new name, press the[MENU/ENTER] knob.
Then, by pressing the [MENU/ENTER] knob whileholding down the [RECORD] key to carry out theWAV file conversion.
While the rightmost character is flash-ing, pressing the [UNDO/REDO]/[DE-LETE] key repeatedly deletes the cur-rent file name.
When the conversion is completed, the displayshows "Completed!".
Flashing
<Note>: If you cancel the conversion in themiddle, no file (incomplete file) is created.
4) Press the [MENU/ENTER] knob while holdingdown the [RECORD] key.The file conversion starts and the percentnumber on the screen counts up as theconversion progresses.To cancel the conversion in the middle, pressthe [STOP] key. 1) After selecting the range of track data to be
converted, rotate the [MENU/ENTER] knobto move the cursor to "Name" and press the[MENU/ENTER] knob.The rightmost character of the file namestarts flashing.You can now start editing.

92
MR-8HD Owner’s Manual (Data export to a personal computer)
The MR-8HD is equipped with the USB port for direct connection to a personal computer using aUSB cable.The USB connection allows you to export the stereo WAV file data, which is converted from a pairof mono WAV files on tracks 7/8, to your computer. The exported data can be played back oredited using a computer's music software application, or used as a source when burning anoriginal audio CD using a CD-R/RW drive. You can also use this exporting capability for backingup data to a personal computer when the remaining space of a hard disk becomes small.
Connection to a personal computerConnect the [USB] port of the MR-8HD to theUSB port of a personal computer using a USBcable, as shown above.(A USB cable is not supplied with the MR-8HD.)
Windows Me/2000/XP machine supporting USBconnection
USB cable
<Note>: Only Windows Me, 2000 and XP comput-ers, as well as Macintosh computers with OS X orhigher, can be used with the MR-8HD. Other com-puters cannot be used.Check your computer before making connection.
Notes on exporting a file
<Note on backup>When exporting song data on the hard disk to apersonal computer for backup, always export thewhole song folder. You cannot export individualtrack data. See page 95 for details. See “Archivinga song” on page 95 for details about song databackup.
<Notes on USB connection with Mac OS>When making USB connection with a Macintoshcomputer, note that only Mac OS X or higher issupported. Do not connect to a Macintosh com-puter with the earlier version. The song data onthe MR-8HD may be damaged.
INPUT A SEL
USB USB HOSTAC-INDIGITAL
OUT FOOT SWMIDI OUT
GTR CLEAN MIC/LINEGTR DIST
PC
USB USB HOST
<Caution>:Use the [USB] portfor connection to apersonal com-puter. Do not con-nect the [USBHOST] port to apersonal com-puter.
<Note>: You can export only a stereo WAV filewhich is converted from a pair of mono WAVfiles on tracks 7/8, as described earlier in "WAVfile conversion". A mono WAV file or undo filecannot be exported to a personal computer.See the next page for details about the export-able files.
<Disk protection>By default, the “disk protect” function whichis effective in the USB mode is set to “On”.In this condition, the MR-8HD can export datato a personal computer but cannot import datafrom a computer. This is for protecting theMR-8HD internal hard disk from importing afile from a computer inappropriately and de-stroying the MR-8HD song data.
You can enable or disable this function, how-ever, we recommend using the MR-8HD bysetting it to “On”.
If you use the MR-8HD by setting the “diskprotect” function to “Off”, read “Archiving asong” on page 95 before using. See page 94for details about how to make the “disk pro-tection” setting.
Exporting data to a personal computer

93
MR-8HD Owner’s Manual (Data export to a personal computer)
3) Highlight "USB" by rotating the [MENU/ENTER]knob, then press the [MENU/ENTER] knob.The display shows the USB menu screen.
1) Turn on the power of the personal computer andthe MR-8HD.
2) Press the [MENU/ENTER] knob to enter the menumode.The display now shows the first page of themenu selection screen, where "<< Back" ishighlighted initially.
<Important note>Converted stereo WAVfiles are located in the "2MIX" folder in the Songfolder, as shown below. Soyou can export only a ste-reo WAV file in the "2MIX" folder (indicated byan arrow).
Note that, if you export aWAV file which is locatedin a folder other than the"2 MIX" folder, the MR-8HD may malfunction.
Exporting a WAV file to a personal computer
The following describes the procedure forexporting a WAV file to a Windows ME com-puter.
#####001.wav
Song
#####002.wav
#####003.wav
#####008.wav
2 MIX
*********.wav
5) Connect the MR-8HD to a personal computerusing a USB cable.
6) Open "My computer" on the computer screen.You see the "Removable disk" drive added onthe computer. The first time you connect theMR-8HD, thedevice driver is installedautomatically.
7) Open the added Removable disk drive, andselect the stereo WAV file in the desired songfolder, then copy to the computer.When you open the added Removable diskdrive, the contents of the MR-8HD hard diskare shown, in which you can see all the songfolders.
Open the "2 MIX" folder in the desired songfolder, and select the stereo WAV file, then copyit to the computer.
While copying data, the [RECORD] keyindicator of the MR-8HD lights (flashes),showing that the hard disk is being accessed.When data copy completes, the indicator turnsoff.
<Note>: By default, the disk protect func-tion is enabled. In this condition, when theMR-8HD enters the USB mode, “<DISK PRO-TECTED>” is shown in the USB screen, asabove.
<Note>: After copying a WAV file in the folderto a computer, the original file remains. How-ever, if you execute "move to anotherfolder",the original file on the disk is lost.
<Note>: To disconnect the MR-8HD from thepersonal computer after completing the dataexport, make sure that the [RECORD] keyindicator is not lit, and follow the procedurefor hardware disconnection of Windows.
8) When the data export completes, disconnect theMR-8HD from the personal computer.
4) Rotate the [MENU/ENTER] knob to move thecursor to “USB Device Mode”, and press the[MENU/ENTER] knob.The MR-8HD enters the USB mode and thedisplay shows the screen as below.
9) Press the [STOP] key to exit the menu mode.
<Note>: While the MR-8HD is in the USBmode, all keys except the [STOP] key areineffective. Pressing the [STOP] key exits theUSB mode.

94
MR-8HD Owner’s Manual (Data export to a personal computer)
The MR-8HD internal hard disk is protected by default.The protection is effective only in the USB mode in which the MR-8HD is used with a personalcomputer. You can make the hard disk “read only” (protected) or “read/write enabled”(unprotected). The default is “read only”.As mentioned earlier in “Disk protection” on page 92, if you transfer song data from a computerto the MR-8HD improperly, the data may be damaged. To avoid such an accident, we recommendedenabling hard disk protection. To disabling the disk protection, follow the procedure below.
1) While the recorder is stopped, press the[MENU/ENTER] knob to enter the menu mode.The display now shows the first page of themenu selection screen, where "<< Back" ishighlighted initially.
2) Rotate the [MENU/ENTER] knob to select “USB”on the second page, and press the[MENU/ENTER] knob.The display now shows the USB menu screen,where “<<Back” is highlighted. Selecting“<<Back” returns to the previous screen.You can also return to the previous screen bypressing the [REWIND] key.
3) Rotate the [MENU/ENTER] knob to highlight “DiskProtect”, and press the [MENU/ENTER] knob.The current setting (the default is “On”)flashes.
4) Rotate the [MENU/ENTER] knob to select “Off”,and press the [MENU/ENTER] knob.The selection is confirmed and the displayreturns to the previous screen.
5) Press the [STOP] key to exit the menu mode.
OffThe disk is “read/write enabled”(unprotected). You can transfer databetween the MR-8HD and a computer inboth ways.
OnThe disk is “read only” (protected).You can transfer data only from the MR-8HD to a computer (default setting).
<Note>: When you enter the USB mode while thedisk protection is disabled, the screen as below isshown. In this condition, the hard disk is “read/write enabled” and you can bi-directionally trans-fer song data between a computer and the MR-8HD.
Protecting the hard disk

95
MR-8HD Owner’s Manual (Data export to a personal computer)
You can archive song data recorded by the MR-8HD by using either of the following methods.
(1) Using the WAV Manager supplied by FostexThe WAV Manager converts each track data to a single mono file. Data is compressed so youcan save the file in small size to a personal computer. This method is useful for exporting datato a PC software application for multitrack recording.For details about how to use the WAV Manager, see the owner's manual supplied with the WAVManager. You can download the WAV Manager from Fostex web site (http:www.fostex.co.jp).
(2) Using drag & drop techniqueYou can copy a song folder using drag & drop technique. This method allows saving all data inthe folder (including the history data, etc.).
• Exporting data to a personal computer
1) Connect the MR-8HD to a personal computer via USB, and open the root folder.You can copy each song folder in the root folder to the personal computer.
2) Copy a desired song folder to the personal computer using drag & droptechnique.
3) After making copy, exit the USB mode.
<Note>: When drag & drop the folder on your personal computer, use the "copy" func-tion. If you use the "move" function, not only the song on the MR-8HD is deleted but alsoother songs on the MR-8HD may be destroyed.We recommend to enable the disk protection (the default is "enabled") when executingdata copy.
Using this method, you can also copy the hidden folder which includes hidden files"deleted" by the MR-8HD song management operation. Copied hidden files can be usedas a normal song files by turning off the hidden attribute by the computer.
<Note>: If you cannot see the hidden folder, consult the manual of your personal com-puter.
• Importing data from a personal computerWhen importing data from a personal computer to the MR-8HD, there is the danger that theMR-8HD file system may be destroyed. Especially, deleting or adding files many times maycause the fragmentation of FAT32, resulting in sound jump caused by performance deteriora-tion. Therefore, before loading data from a personal computer to the MR-8HD, save all neces-sary folders to the personal computer and format the MR-8HD hard disk.
1) Format the MR-8HD internal hard disk (see page 124).
2) Disable the disk protection (see page 94).
3) Connect the MR-8HD to a personal computer via USB (see page 93).
4) Copy the desired song folder on the personal computer to the root folder of theMR-8HD hard disk.
5) Repeat step 4) as many times as required.
6) After making copy of all necessary folders, exit the USB mode.
<Note>: Do not use "move" operation, as with saving data to a computer.
<Note>: Usually, the song order follows the copied order. However, it may be dif-ferent depending on a computer OS.
Archiving a song

96
MR-8HD Owner’s Manual (Data export to a personal computer)

97
MR-8HD Owner’s Manual (Song management)
Song managementThis chapter explains the following five operation procedures forsong management.
1) Selecting the desired song.2) Editing a song name.3) Deleting an unnecessary song.4) Protecting a song.
<Notes>While a menu screen is shown, you can go up the menu screen levelor directly exit the menu mode by the following operations.
(1) Select “<< Back” on a menu screen and press the [MENU/ENTER] knob.The display returns to the previous (upper level) screen. Repeatingthis operation finally exits the menu mode.
(2) Press the [REWIND] key.The display returns to the previous (upper level) screen.Repeating this operation finally exits the menu mode.
(3) Press the [STOP] key.The menu mode exits and the display shows the home screen.

98
MR-8HD Owner’s Manual (Song management)
The following describes how to select the desired song from the disk when more than one songis created on the disk. You can also create a new song by the similar procedure. See "Basicoperations" (page 31) for details about how to create a new song.
1) While the recorder is stopped, press the[MENU/ENTER] knob to enter the menu mode.The display now shows the first page of themenu selection screen, where "<< Back" ishighlighted initially (selecting "<< Back"returns to the previous screen).
2) Rotate the [MENU/ENTER] knob to select "Song",and press the [MENU/ENTER] knob.The display now shows the song menu screen,where "<< Back" is highlighted.
3) Rotate the [MENU/ENTER] knob to select"Select Song >" and press the [MENU/ENTER]knob.The display now shows the song list screen.
The screen example above shows that foursongs are currently created on the hard disk.The song list is shown on a single page.
When more songs are created, the song listscreen has more than one page, and you canscroll the list by rotating the [MENU/ENTER]knob."- - - :(New Song)" at the bottom of the screenis used when you create a new song.
4) Rotate the [MENU/ENTER] knob to select thedesired song number/song name, and press the[MENU/ENTER] knob.The display returns to the song menu screen,where "Select Song >" is highlighted.
5) Press the [STOP] key to exit the menu mode.The display shows the home screen of theselected song.
Selecting the desired song

99
MR-8HD Owner’s Manual (Song management)
You can edit a current song name save the edited song name. Only the current song can beedited.
1) Load the desired song of which you are going toedit the song name.
2) While the recorder is stopped, press the[MENU/ENTER] knob to enter the menu mode.The display now shows the first page of themenu selection screen, where "<< Back" ishighlighted initially (selecting "<< Back"returns to the previous screen).
6) After entering the name, press the [MENU/ENTER]knob.The cursor moves to "[ENTER]" at the bottomof the screen. To cancel the operation, use the[MENU/ENTER] knob to highlight “[CANCEL]”and press the [MENU/ENTER] knob.
<Character entry keys>Some keys on the MR-8HDtop panel act as characterentry keys in the menu mode.For example, the [PLAYMODE] key (shown on theleft) can be used to enter S,T, U, s, t, u and 7. Each press
of a character entry key switches the characterto be entered from among those assigned tothe key.
<Note>: If you enter the same name as anexisting song or do not enter a name in step5 and press the [MENU/ENTER] knob in step6 below, the display shows "Illegal SongName!" and returns to the song name edit-ing screen.
3) Rotate the [MENU/ENTER] knob to select"Song >", and press the [MENU/ENTER] knob.The display now shows the song menu screen,where "<< Back" is highlighted.
4) Rotate the [MENU/ENTER] knob to select"Rename Song >", then press the [MENU/ENTER]knob.The display now shows the screen for songname editing of the current song, on which therightmost character of song name flashes.
5) Use the character entry keys to enter the desiredcharacter to the flashing point.You can move the cursor (flashing point) byrotating the [MENU/ENTER] knob (or bypressing another character entry key).
PLAY MODE
STU7
<[DELETE] key>Pressing the [UNDO/REDO -DELETE] key deletes thecharacter at the flashing point.By pressing this key repeat-edly, you can delete all char-acters under the flashingpoint.
UNDO/REDO
DELETE
7) Press the [MENU/ENTER] knob again.The edited name is stored and the displayreturns to the song menu screen, where“Rename Song >” is highlighted.
8) Press the [STOP] key to exit the menu mode.The MR-8HD exits the menu mode and thedisplay shows the home screen where theedited song name is displayed.
Editing a song name

100
MR-8HD Owner’s Manual (Song management)
<Notes>• You cannot delete a song which is protected. To delete such a song, release the protection of
the song first (see the next page).• A deleted song file still remains as a “hidden file” on the hard disk. So deleting a song file
does not increase the remaining (recordable) space of the hard disk.• You can export a “hidden file” to your personal computer via USB connection and use it on
the computer (see page 95).
1) While the recorder is stopped, press the[MENU/ENTER] knob to enter the menu mode.The display now shows the first page of themenu selection screen, where "<< Back" ishighlighted initially (selecting "<< Back"returns to the previous screen).
5) Press the [MENU/ENTER] knob while holdingdown the [RECORD] key.The selected song is deleted, and the displayreturns to the song list screen.
You can delete a song created on the hard disk.
2) Rotate the [MENU/ENTER] knob to select "Song",and press the [MENU/ENTER] knob.The display now shows the song menu screen,where "<< Back" is highlighted.
3) Rotate the [MENU/ENTER] knob to select"Delete Song", and press the [MENU/ENTER] knob.The display now shows the list of songscreated on the hard disk, from which youselect a song to be deleted. In the screenexample below, five songs are created so thelist has only one page. (If more than five songsare created, the list has more than one page.)
4) Rotate the [MENU/ENTER] knob to select a songto be deleted, and press the [MENU/ENTER] knob.The display shows warning and confirmationfor deleting the song.
Any song number greater than the song num-ber of the deleted song is moved up.In the screen example above, after Song 03 isdeleted, ex-Song 04 is moved up to Song 03and ex-Song 05 is moved up to Song 04.
6) Press the [STOP] key to exit the menu mode.In the example above, the display now showsthe home screen of new Song 03 (ex-Song 04).
Deleting an unnecessary song

101
MR-8HD Owner’s Manual (Song management)
You can protect a song to prevent an accidental erasure. The protection can be released when-ever you want. To keep a recorded song safely, we recommend protecting it. You can makeprotection setting only for the current song.
5) Rotate the [MENU/ENTER] knob to select "On",and press the [MENU/ENTER] knob.The current song is now protected.The display returns to the previous screen.
To release the protection, carry out the same pro-cedure above but select "Off" and press the[MENU/ENTER] knob in step 5.
1) Load the song you want to protect.
2) While the recorder is stopped, press the[MENU/ENTER] knob to enter the menu mode.The display now shows the first page of themenu selection screen, where "<< Back" ishighlighted initially (selecting "<< Back"returns to the previous screen).
3) Rotate the [MENU/ENTER] knob to select "Song",and press the [MENU/ENTER] knob.The display now shows the song menu screen,where "<< Back" is highlighted.
4) Rotate the [MENU/ENTER] knob to select"Protect", then press the [MENU/ENTER] knob.The current option ("On" or "Off") flashes.The default option is "Off".
If you delete all songs on the hard disk byrepeating the procedure above, ":(New Song")is shown. Then, create a new song (see page31).
Protecting a song

102
MR-8HD Owner’s Manual (Song management)
<Note>: You cannot make recording orediting to a protected song. If you want tomake recording or editing to a protectedsong, you must release the protection first.
<Note>: When you set the protection to"On", all the recording-related keys, suchas the [REC SELECT] and [BOUNCE] keys,are turned off.
6) Press the [STOP] key to exit the menu mode.
<Tips>When the protected song is loaded, “ ” is shownin the upper left corner of the Home screen (in-dicated by the arrow in the screen example be-low).When this icon is shown, you cannot make re-cording or edit the song.

103
MR-8HD Owner’s Manual (Track editing)
Track editingThis chapter describes how to edit whole data of a selected (monoor stereo) track. Track editing does not consume the hard disk space.Therefore, the remaining space of the disk does not change by ex-ecuting track editing.
<Undo/redo of track editing>By pressing the [UNDO/REDO] key after executing track editing, youcan undo the editing. By pressing the [UNDO/REDO] key after theundo operation, you can return the track(s) to the condition afterbeing edited.
UNDO/REDO
DELETE
<Notes>Also note that, if you carry out any of the followingafter editing, you cannot undo the editing anymore.
1. Making new recording2. Making new editing3. Turning off the power4. Loading another song
<Notes>While a menu screen is shown, you can go up the menu screen levelor directly exit the menu mode by the following operations.
(1) Select “<< Back” on a menu screen and press the [MENU/ENTER] knob.The display returns to the previous (upper level) screen. Repeatingthis operation finally exits the menu mode.
(2) Press the [REWIND] key.The display returns to the previous (upper level) screen.Repeating this operation finally exits the menu mode.
(3) Press the [STOP] key.The menu mode exits and the display shows the home screen.
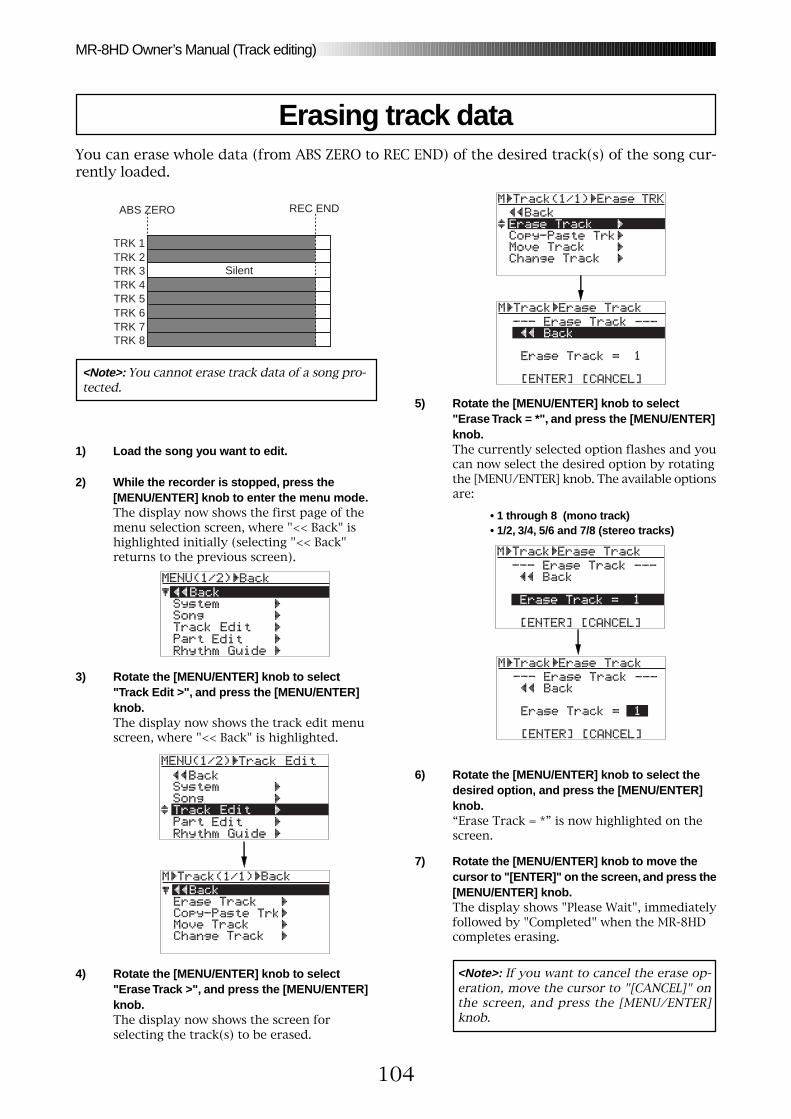
104
MR-8HD Owner’s Manual (Track editing)
5) Rotate the [MENU/ENTER] knob to select"Erase Track = *", and press the [MENU/ENTER]knob.The currently selected option flashes and youcan now select the desired option by rotatingthe [MENU/ENTER] knob. The available optionsare:
• 1 through 8 (mono track)• 1/2, 3/4, 5/6 and 7/8 (stereo tracks)
<Note>: If you want to cancel the erase op-eration, move the cursor to "[CANCEL]" onthe screen, and press the [MENU/ENTER]knob.
6) Rotate the [MENU/ENTER] knob to select thedesired option, and press the [MENU/ENTER]knob.“Erase Track = *” is now highlighted on thescreen.
7) Rotate the [MENU/ENTER] knob to move thecursor to "[ENTER]" on the screen, and press the[MENU/ENTER] knob.The display shows "Please Wait", immediatelyfollowed by "Completed" when the MR-8HDcompletes erasing.
You can erase whole data (from ABS ZERO to REC END) of the desired track(s) of the song cur-rently loaded.
1) Load the song you want to edit.
2) While the recorder is stopped, press the[MENU/ENTER] knob to enter the menu mode.The display now shows the first page of themenu selection screen, where "<< Back" ishighlighted initially (selecting "<< Back"returns to the previous screen).
TRK 1TRK 2TRK 3TRK 4TRK 5TRK 6TRK 7TRK 8
Silent
ABS ZERO REC END
4) Rotate the [MENU/ENTER] knob to select"Erase Track >", and press the [MENU/ENTER]knob.The display now shows the screen forselecting the track(s) to be erased.
<Note>: You cannot erase track data of a song pro-tected.
3) Rotate the [MENU/ENTER] knob to select"Track Edit >", and press the [MENU/ENTER]knob.The display now shows the track edit menuscreen, where "<< Back" is highlighted.
Erasing track data
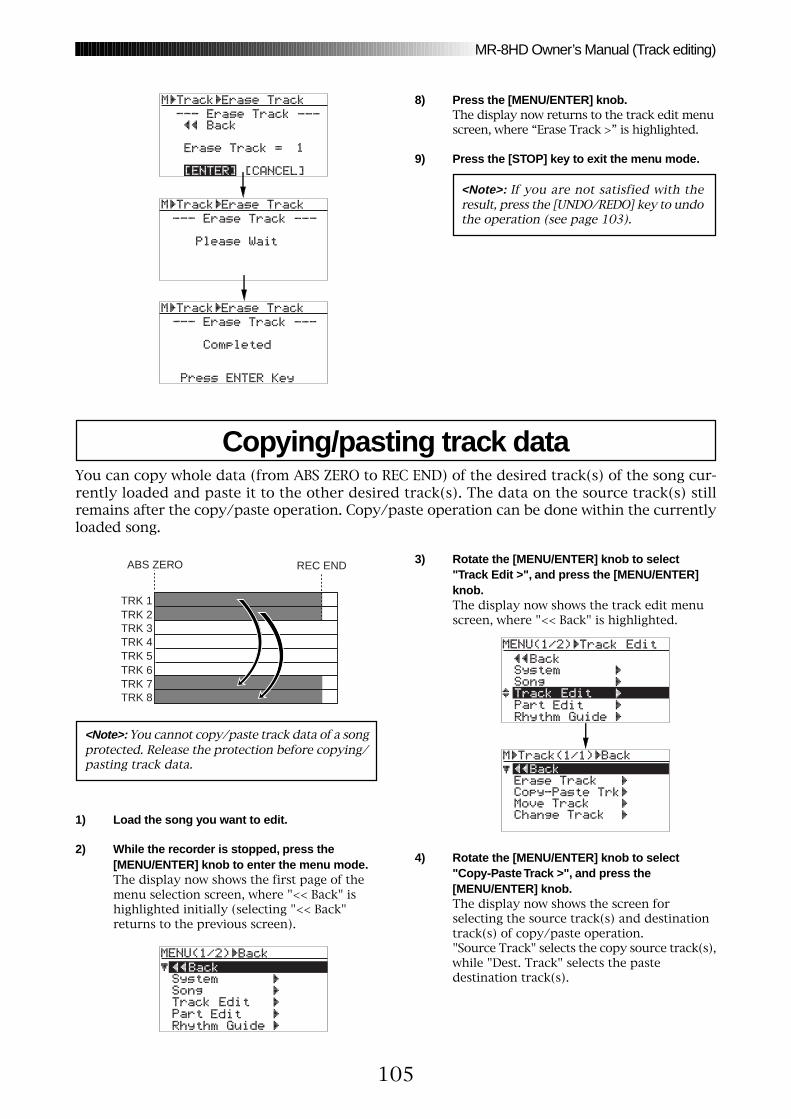
105
MR-8HD Owner’s Manual (Track editing)
8) Press the [MENU/ENTER] knob.The display now returns to the track edit menuscreen, where “Erase Track >” is highlighted.
9) Press the [STOP] key to exit the menu mode.
You can copy whole data (from ABS ZERO to REC END) of the desired track(s) of the song cur-rently loaded and paste it to the other desired track(s). The data on the source track(s) stillremains after the copy/paste operation. Copy/paste operation can be done within the currentlyloaded song.
<Note>: You cannot copy/paste track data of a songprotected. Release the protection before copying/pasting track data.
TRK 1TRK 2TRK 3TRK 4TRK 5TRK 6TRK 7TRK 8
ABS ZERO REC END
<Note>: If you are not satisfied with theresult, press the [UNDO/REDO] key to undothe operation (see page 103).
1) Load the song you want to edit.
2) While the recorder is stopped, press the[MENU/ENTER] knob to enter the menu mode.The display now shows the first page of themenu selection screen, where "<< Back" ishighlighted initially (selecting "<< Back"returns to the previous screen).
3) Rotate the [MENU/ENTER] knob to select"Track Edit >", and press the [MENU/ENTER]knob.The display now shows the track edit menuscreen, where "<< Back" is highlighted.
4) Rotate the [MENU/ENTER] knob to select"Copy-Paste Track >", and press the[MENU/ENTER] knob.The display now shows the screen forselecting the source track(s) and destinationtrack(s) of copy/paste operation."Source Track" selects the copy source track(s),while "Dest. Track" selects the pastedestination track(s).
Copying/pasting track data

106
MR-8HD Owner’s Manual (Track editing)
9) Press the [MENU/ENTER] knob.The display now returns to the track edit menuscreen, where “Copy-Paste Trk >” is highlighted.
10) Press the [STOP] key to exit the menu mode.
<Note>: If a destination track has recordeddata, pasting the copied data overwrites theprevious data.
<Note>: If you want to cancel the copy/pasteoperation, move the cursor to "[CANCEL]"on the screen, and press the [MENU/ENTER]knob.
<Note>: If you are not satisfied with the re-sult, press the [UNDO/REDO] key to undothe operation (see page 103).
5) Rotate the [MENU/ENTER] knob to select"Source Track = *", and press the [MENU/ENTER]knob.You can now select the desired copy sourcetrack(s) by rotating the [MENU/ENTER] knob.The available options are:
• 1 through 8 (mono track)• 1/2, 3/4, 5/6 and 7/8 (stereo tracks)
7) Rotate the [MENU/ENTER] knob to select thedestination track(s), and press the [MENU/ENTER]knob.“Dest. Track = *” is now highlighted on thescreen.
<Note>: You cannot select the same track(s)for the copy source and destination.
8) Rotate the [MENU/ENTER] knob to move thecursor to "ENTER" at the bottom of the screen,then press the [MENU/ENTER] knob.The display shows "Please Wait", immediatelyfollowed by "Completed" when the MR-8HDcompletes the copy/paste operation.
You can select the same number of tracks asthe copy source track(s). For example, if youselect a mono track for the source, you canonly select a mono track for the destination.
6) Rotate the [MENU/ENTER] knob to select thesource track(s) to be copied, and press the[MENU/ENTER] knob.You can now select the desired copydestination track(s)

107
MR-8HD Owner’s Manual (Track editing)
TRK 1TRK 2TRK 3TRK 4TRK 5TRK 6TRK 7TRK 8
ABS ZERO REC END
You can move whole data (from ABS ZERO to REC END) of the desired track(s) to the otherdesired track(s). After the data is moved, the original track(s) is(are) silent. You can only movetrack data within the current song.
<Note>: You cannot move track data of a song pro-tected. Release the protection before moving trackdata.
1) Load the song you want to edit.
2) While the recorder is stopped, press the[MENU/ENTER] knob to enter the menu mode.The display now shows the first page of themenu selection screen, where "<< Back" ishighlighted initially (selecting "<< Back"returns to the previous screen).
3) Rotate the [MENU/ENTER] knob to select"Track Edit >", and press the [MENU/ENTER] knob.The display now shows the track edit menuscreen, where "<< Back" is highlighted.
5) Rotate the [MENU/ENTER] knob to select"Source Track = *", and press the [MENU/ENTER]knob.You can now select the desired move sourcetrack(s) by rotating the [MENU/ENTER] knob.The available options are:
• 1 through 8 (mono track)• 1/2, 3/4, 5/6 and 7/8 (stereo tracks)
6) Rotate the [MENU/ENTER] knob to select sourcetrack(s), and press the [MENU/ENTER] knob.You can now select the desired destinationtrack(s).
4) Rotate the [MENU/ENTER] knob to select"Move Track >", and press the [MENU/ENTER]knob.The display now shows the screen forselecting the source track(s) and destinationtrack(s) of the move operation. "Source Track"selects the move source track(s), while "Dest.Track" selects the move destination track(s).
Moving track data

108
MR-8HD Owner’s Manual (Track editing)
You can exchange whole data (from ABS ZERO to REC END) between the desired track(s).
<Note>: You cannot exchange track data of a songprotected. Release the protection before exchang-ing track data.
TRK 1TRK 2TRK 3TRK 4TRK 5TRK 6TRK 7TRK 8
ABS ZERO REC END
<Note>: If you want to cancel the move opera-tion, move the cursor to "[CANCEL]" on thescreen, and press the [MENU/ENTER] knob.
9) Press the [MENU/ENTER] knob.The display now returns to the track edit menuscreen, where “Move Track >” is highlighted.
10) Press the [STOP] key to exit the menu mode.
<Note>: If a destination track has recordeddata, moving data overwrites the previousdata.
<Note>: If you are not satisfied with the re-sult, press the [UNDO/REDO] key to undothe operation (see page 103).
<Note>: You cannot select the same track(s)for the move source and destination.
You can select the same number of tracks asthe move source track(s). For example, if youselect a mono track for the move source, youcan only select a mono for the move destina-tion.
1) Load the song you want to edit.
2) While the recorder is stopped, press the[MENU/ENTER] knob to enter the menu mode.The display now shows the first page of themenu selection screen, where "<< Back" ishighlighted initially (selecting "<< Back"returns to the previous screen).
3) Rotate the [MENU/ENTER] knob to select"Track Edit >", and press the [MENU/ENTER] knob.The display now shows the track edit menuscreen, where "<< Back" is highlighted.
8) Rotate the [MENU/ENTER] knob to move thecursor to "[ENTER]" on the screen, and press the[MENU/ENTER] knob.The display shows "Please Wait", immediatelyfollowed by "Completed" when the MR-8HDcompletes the move operation.
7) Rotate the [MENU/ENTER] knob to selectdestination track(s), and press the[MENU/ENTER] knob.“Dest. Track = *” is now highlighted on thescreen.
Exchanging whole track data

109
MR-8HD Owner’s Manual (Track editing)
4) Rotate the [MENU/ENTER] knob to select"Change Track >", and press the [MENU/ENTER]knob.
5) Rotate the [MENU/ENTER] knob to select"Source Track = *", and press the [MENU/ENTER]knob.You can now select the desired exchange sourcetrack(s) by rotating the [MENU/ENTER] knob.The available options are:
• 1 through 8 (mono track)• 1/2, 3/4, 5/6 and 7/8 (stereo tracks)
6) Rotate the [MENU/ENTER] knob to select thesource track(s), and press the [MENU/ENTER] knob.You can now select the desired destinationtrack(s).
<Note>: If you want to cancel the exchangeoperation, move the cursor to "[CANCEL]"on the screen, and press the [MENU/ENTER]knob.
<Note>: You cannot select the same track(s)for the exchange source and destination.
8) Rotate the [MENU/ENTER] knob to move thecursor to "[ENTER]" on the screen, and press the[MENU/ENTER] knob.The display shows "Please Wait", immediatelyfollowed by "Completed" when the MR-8HDcompletes the exchange operation.
You can select the same number of tracks asthe exchange source track(s). For example, ifyou select a mono track for the exchangesource, you can only select a mono track forthe exchange destination.
The display now shows the screen for select-ing the source track(s) and destination track(s)of the exchange operation."Source Track" selects the exchange sourcetrack(s), while "Dest. Track" selects the ex-change destination track(s). 7) Rotate the [MENU/ENTER] knob to select the
destination track(s), and press the[MENU/ENTER] knob.“Dest. Track = *” is now highlighted on thescreen.

110
MR-8HD Owner’s Manual (Track editing)
9) Press the [MENU/ENTER] knob.The display now returns to the track edit menuscreen, where “Change Track >” is highlighted.
10) Press the [STOP] key to exit the menu mode.
<Note>: If you are not satisfied with the re-sult, press the [UNDO/REDO] key to undothe operation (see page 103).

111
MR-8HD Owner’s Manual (Part editing)
Part editingThis chapter describes how to edit a "part" (*) of recorded song.You can edit data of a track or tracks between the "LOCATE A" and"LOCATE B" points. Part editing does not consume the hard diskspace. Therefore, the remaining space of the disk does not changeby executing part editing.
<Undo/redo of editing>You can undo part editing. By pressing the [UNDO/REDO] key after executingpart editing, the song returns to the original condition before editing.By pressing the [UNDO/REDO] key after undoing part editing, you can againreturn the song to the condition after being edited.
<Notes>Also note that if you carry out any of the following afterediting, you cannot undo the editing anymore.
1. Making new recording2. Making new editing3. Turning off the power4. Loading another song
UNDO/REDO
DELETE
[UNDO/REDO] key
<(*) About "part">A "part" is defined as audio data between the "LOCATE A" and "LOCATE B"points. You can edit a "part" as described later.Therefore, before carrying out part editing, the "LOCATE A" and "LOCATE B"points must be set. See page 49 for details about how to set these points.You can set these points after entering the part editing mode (see the nextpage for details).
<Notes>While a menu screen is shown, you can go up the menu screen level or di-rectly exit the menu mode by the following operations.
(1) Select “<< Back” on a menu screen and press the [MENU/ENTER] knob.The display returns to the previous (upper level) screen. Repeatingthis operation finally exits the menu mode.
(2) Press the [REWIND] key.The display returns to the previous (upper level) screen.Repeating this operation finally exits the menu mode.
(2) Press the [STOP] key.The menu mode exits and the display shows the home screen.

112
MR-8HD Owner’s Manual (Part editing)
The time (or bar/beat/clock) value changesin realtime as the recorder moves (i.e. whenit plays, fastforwards, rewinds, locates, etc.).When you carry out the locate operationto the LOCATE A or LOCATE B point andthe current position matches the locatepoint, "LocA=" (or "LocB=") is shown to theleft of the current position information, asshown below. This shows that the recorderis now at the LOCATE A (or LOCATE B)point.
1) Move the recorder to the desired pointby using the [PLAY], [REWIND] or [F FWD]key.
2) While the recorder is at the desired point,press the [STORE] key and followed bythe [LOCATE A/IN] or [LOCATE B/OUT]key.The old editing point is overwritten bythe new point. After setting the newediting point, "LocA=" (or "LocB=") isshown to the left of the current positioninformation, as shown left.
After setting the new editing points, youcan edit (erase, paste, move or exchange)data of newly specified part.
On the screen for selecting the targettrack(s) to be edited, you can see the cur-rent recorder position information (in ABStime or bar/beat/clock). The followingscreen example shows the screen for select-ing the track(s) for part erasing.
The LOCATE A or LOCATE B point can bechanged while this screen is shown by fol-lowing the procedure below.
You can play back audio of the "part" before carrying out edit operation. After setting theLOCATE A and LOCATE B points, follow the procedure below for checking the part. You cancheck the part before entering the menu mode, as well as while the part editing screen isshown.
1) Press the [PLAY] key while holding down the [STOP] key.The MR-8HD starts playback between the LOCATE A and LOCATE B points (see also page 44).
2) During playback, raise the appropriate track fader(s) and the [MASTER] fader.You can monitor only the "part" to be edited, so you can check the editing range.
You can change the LOCATE A and LOCATE B points during the edit operation, as well asbefore entering the editing mode (see the following for details).
Playing back the "part" (between LOCATE A and LOCATE B) to be edited
Changing an edit point during editing

113
MR-8HD Owner’s Manual (Part editing)
TRK 1TRK 2TRK 3TRK 4TRK 5TRK 6TRK 7TRK 8
Silent
LOCATE Apoint
LOCATE Bpoint
REC ENDABS ZERO
<Note>: You cannot erase the part(s) of a songwhich is protected. Release the song protectionbefore erasing the part(s).
1) Load the song you want to edit.
2) Set the LOCATE A and LOCATE B points (seepage 49).You can check the part(s) by playing back therecorder between the LOCATE A and LOCATEB points (see page 44).
3) While the recorder is stopped, press the[MENU/ENTER] knob to enter the menu mode.The display now shows the first page of themenu selection screen, where "<< Back" ishighlighted initially (selecting "<< Back"returns to the previous screen).
4) Rotate the [MENU/ENTER] knob to select"Part Edit >", and press the [MENU/ENTER] knob.The display now shows the part edit menuscreen, where "<< Back" is highlighted.
5) Rotate the [MENU/ENTER] knob to select"Erase Part >", and press the [MENU/ENTER] knob.The display now shows the screen forselecting a track or tracks of which you wantto erase the part(s). On the screen, "<< Back"is initially highlighted.
6) Rotate the [MENU/ENTER] knob to select "EraseTrack = *", and press the [MENU/ENTER] knob.The current option starts flashing and you cannow select the desired track(s) by rotating the[MENU/ENTER] knob. The available optionsare:
• 1 through 8 (mono track)• 1/2, 3/4, 5/6 and 7/8 (stereo tracks)
7) Rotate the [MENU/ENTER] knob to select thedesired option, and press the [MENU/ENTER]knob.The display returns to the previous screen.
You can erase the part(s) on the selected track(s) of the current song.
Erasing the part(s)

114
MR-8HD Owner’s Manual (Part editing)
You can copy the desired part(s) of the selected track(s) and paste it(them) to the same timeposition of the other desired track(s). The copy/paste operation of a part or parts can be madeonly within the current song. You can also make the copy/paste operation of a part or partsusing another method described later in "Copying/pasting the desired part(s) (2)".
1) Load the song you want to edit.
2) Set the LOCATE A and LOCATE B points forspecifying the desired part(s) (see page 49).You can check the part(s) by playing backbetween the LOCATE A and LOCATE B points(see page 44).
TRK 1TRK 2TRK 3TRK 4TRK 5TRK 6TRK 7TRK 8
LOCATE Apoint
LOCATE Bpoint
<Note>: You cannot copy/paste track data of a songprotected. Release the protection before makingthe copy/paste operation. 4) Rotate the [MENU/ENTER] knob to select
"Part Edit >", and press the [MENU/ENTER] knob.The display now shows the part edit menuscreen, where "<< Back" is highlighted.<Note>: If you want to paste the copied part(s) to
the desired time position of other track(s) otherthan the position between the LOCATE A and LO-CATE B points, use the method described later in"Copying/pasting the desired part(s) (2)".
9) Press the [MENU/ENTER] knob.The display now returns to the part edit menuscreen, where “Erase Part >” is highlighted.
10) Press the [STOP] key to exit the menu mode.
<Note>: If you are not satisfied with the re-sult, press the [UNDO/REDO] key to undothe operation (see page 111).
8) Rotate the [MENU/ENTER] knob to move thecursor to "[ENTER]" on the screen, and press the[MENU/ENTER] knob.The display shows "Please Wait", immediatelyfollowed by "Completed" when the MR-8HDcompletes erasing.
If you want to cancel the part erase operation,move the cursor to "[CANCEL]" on the screen,and press the [MENU/ENTER] knob.
3) While the recorder is stopped, press the[MENU/ENTER] knob to enter the menu mode.The display now shows the first page of themenu selection screen, where "<< Back" ishighlighted initially (selecting "<< Back"returns to the previous screen).
Copying/pasting the part(s)-1

115
MR-8HD Owner’s Manual (Part editing)
10) Press the [MENU/ENTER] knob.The display now returns to the part edit menuscreen, where “Copy-Paste Part >” is highlighted.
11) Press the [STOP] key to exit the menu mode.
6) Rotate the [MENU/ENTER] knob to select "SourceTrack = *", and press the [MENU/ENTER] knob.The display now shows the screen forselecting the copy source track(s).You can select the copy source track(s) byrotating the [MENU/ENTER] knob.The available options are:
• 1 through 8 (mono track)• 1/2, 3/4, 5/6 and 7/8 (stereo tracks)
7) Rotate the [MENU/ENTER] knob to select thesource track(s) to be copied, and press the[MENU/ENTER] knob.You can select the destination track(s) byrotating the [MENU/ENTER] knob.The available options are:
• 1 through 8 (mono track)• 1/2, 3/4, 5/6 and 7/8 (stereo tracks)
<Note>: You cannot select the same track(s)for the copy source and destination.
<Note>: If you are not satisfied with the re-sult, press the [UNDO/REDO] key to undothe operation (see page 111).
5) Rotate the [MENU/ENTER] knob to select "Copy-PastePart >", and press the [MENU/ENTER] knob.The display now shows the screen forselecting the source track(s) and destinationtrack(s) of copy/paste. "<<Back" is initiallyhighlighted.
9) Rotate the [MENU/ENTER] knob to move thecursor to "[ENTER]" at the bottom of the screen,then press the [MENU/ENTER] knob.The display shows "Please Wait", immediatelyfollowed by "Completed" when the MR-8HDcompletes the copy/paste operation.
To cancel the copy/paste operation, move thecursor to "[CANCEL]" at the bottom of thescreen, and press the [MENU/ENTER] knob.
8) Rotate the [MENU/ENTER] knob to select thedestination track(s), and press the[MENU/ENTER] knob.The display returns to the previous screen.

116
MR-8HD Owner’s Manual (Part editing)
You can copy the desired part(s) of the selected track(s) and paste it(them) to the other timeposition of the desired track(s). Unlike the method described above in "Copying/pasting thedesired part(s) (1)", the part data is copied to the (virtual) clipboard and then pasted to thespecified position of the other specified track(s).The copy/paste operation of a part or parts can be made only within the current song.
1) Load the song you want to edit.
2) Set the LOCATE A and LOCATE B points (seepage 49).You can check the edited part(s) by playingback between the LOCATE A and LOCATE Bpoints (see page 44).
3) While the recorder is stopped, press the[MENU/ENTER] knob to enter the menu mode.The display now shows the first page of themenu selection screen, where "<< Back" ishighlighted initially (selecting "<< Back"returns to the previous screen).
<Note>: You cannot copy/paste track data of a songprotected. Release the protection before makingthe copy/paste operation.
<Note>: If you turn off the MR-8HD after copyingthe part data to the clipboard, the data on theclipboard is lost.Also note that you cannot undo copying data tothe clipboard.
4) Rotate the [MENU/ENTER] knob to select"Part Edit >", and press the [MENU/ENTER] knob.The display now shows the part edit menuscreen, where "<< Back" is highlighted.
<Note>: If you paste the part(s) to the same timeposition of the other track(s), we recommend us-ing the method described above in "Copying/past-ing the desired part(s) (1)", because it works faster.
5) Rotate the [MENU/ENTER] knob to select"Copy Part >", and press the [MENU/ENTER]knob.The display now shows the screen forselecting the source track(s)."<<Back" is initially highlighted.
Copying to the clipboard
TRK 1TRK 2TRK 3TRK 4TRK 5TRK 6TRK 7TRK 8
LOCATE Apoint
LOCATE Bpoint
Clipboard(Virtual)
ABS ZERO REC END
TRK 1TRK 2TRK 3TRK 4TRK 5TRK 6TRK 7TRK 8
LOCATE Apoint
Copying/pasting the part(s)-2

117
MR-8HD Owner’s Manual (Part editing)
6) Rotate the [MENU/ENTER] knob to select"Copy Track >", and press the [MENU/ENTER]knob.The display now shows the screen forselecting the copy source track(s).You can select the copy source track(s) byrotating the [MENU/ENTER] knob.The available options are:
• 1 through 8 (mono track)• 1/2, 3/4, 5/6 and 7/8 (stereo tracks)
8) Rotate the [MENU/ENTER] knob to move thecursor to "[ENTER]" at the bottom of the screen,then press the [MENU/ENTER] knob.The display shows "Please Wait", immediatelyfollowed by "Completed" when the MR-8HDcompletes the part copy operation.
The following procedure is assumed that theLOCATE A point, the paste destination, is set
Pasting clipboard data
The display now returns to the part edit menuscreen, where “Copy Part >” is highlighted.
The procedure example below shows how topaste the copied part data on the clipboard tothe LOCATE A point of the selected track.
7) Rotate the [MENU/ENTER] knob to select thetrack(s) to be copied, and press the[MENU/ENTER] knob.The display returns to the previous screen.
1) Rotate the [MENU/ENTER] knob to select"Paste Part >", and press the [MENU/ENTER]knob.The display now shows the screen forselecting the paste destination track(s)."<< Back" is initially highlighted .
2) Rotate the [MENU/ENTER] knob to select"Paste Track = *", and press the [MENU/ENTER]knob.You can now select the desired paste destinationtrack(s) by rotating the [MENU/ENTER] knob.The available options are:
• 1 through 8 (mono track)• 1/2, 3/4, 5/6 and 7/8 (stereo tracks)
To cancel the part copy operation, move thecursor to "[CANCEL]" at the bottom of thescreen, and press the [MENU/ENTER] knob.

118
MR-8HD Owner’s Manual (Part editing)
5) Press the [MENU/ENTER] knob.The display now returns to the part edit menuscreen, where “Paste Part >” is highlighted.
6) Press the [STOP] key to exit the menu mode.
<Note>: If you are going to carry out thepaste operation when no data is pasted onthe clipboard, the error message (“Clip-board Empty!) is shown on the display andthe MR-8HD does not accept the operation.Press the [STOP] key to exit the menu modeand copy the desired data to the clipboardbefore carrying out the paste operation.
<Note>: If you are not satisfied with the re-sult, press the [UNDO/REDO] key to undothe operation (see page 111).
3) Rotate the [MENU/ENTER] knob to select thepaste destination track(s), and press the[MENU/ENTER] knob.The display returns to the previous screen.
4) Rotate the [MENU/ENTER] knob to move thecursor to "[ENTER]" on the screen, and press the[MENU/ENTER] knob.The display shows "Please Wait", immediatelyfollowed by "Completed" when the MR-8HDcompletes the paste operation.
If you want to cancel the part paste operation,move the cursor to "[CANCEL]" on the screen,and press the [MENU/ENTER] knob.

119
MR-8HD Owner’s Manual (Part editing)
You can move the desired part(s) of the desired track(s) to the other desired track(s). The partmove operation can be made only within the current song. After the part move operation iscarried out, the source part(s) becomes silent.
<Note>: You cannot move data of a song protected.Release the protection before moving data.
TRK 1TRK 2TRK 3TRK 4TRK 5TRK 6TRK 7TRK 8
LOCATE Apoint
LOCATE Bpoint
1) Load the song you want to edit.
2) Set the LOCATE A and LOCATE B points (seepage 49).You can check the part(s) by playing backbetween the LOCATE A and LOCATE B points(see page 44).
3) While the recorder is stopped, press the[MENU/ENTER] knob to enter the menu mode.The display now shows the first page of themenu selection screen, where "<< Back" ishighlighted initially (selecting "<< Back"returns to the previous screen).
4) Rotate the [MENU/ENTER] knob to select"Part Edit >", and press the [MENU/ENTER] knob.The display now shows the part edit menuscreen, where "<< Back" is highlighted.
5) Rotate the [MENU/ENTER] knob to select"Move Part >", and press the [MENU/ENTER]knob.The display now shows the screen forselecting the source track(s) and destinationtrack(s) of the move operation.Initially, "<<Back" is highlighted.
6) Rotate the [MENU/ENTER] knob to select"Source Track = *", and press the [MENU/ENTER]knob.You can now select the move source track(s)by rotating the [MENU/ENTER] knob.The available options are:
• 1 through 8 (mono track)• 1/2, 3/4, 5/6 and 7/8 (stereo tracks)
7) Rotate the [MENU/ENTER] knob to select themove source track(s), and press the[MENU/ENTER] knob.You can now select the move destinationtrack(s) by rotating the [MENU/ENTER] knob.The available options are:
• 1 through 8 (mono track)• 1/2, 3/4, 5/6 and 7/8 (stereo tracks)
Moving the part(s)

120
MR-8HD Owner’s Manual (Part editing)
9) Rotate the [MENU/ENTER] knob to move thecursor to "[ENTER]" on the screen, and press the[MENU/ENTER] knob.The display shows "Please Wait", immediatelyfollowed by "Completed" when the MR-8HDcompletes the move operation.
<Note>: You cannot select the same track(s)for the move source and destination.
<Note>: If you are not satisfied with the re-sult, press the [UNDO/REDO] key to undothe operation (see page 111).
10) Press the [MENU/ENTER] knob.The display now returns to the part edit menuscreen, where “Move Part >” is highlighted.
11) Press the [STOP] key to exit the menu mode.
8) Rotate the [MENU/ENTER] knob to select thedestination track(s), and press the[MENU/ENTER] knob.The display returns to the screen where"Dest. Track = *" is highlighted.
If you want to cancel the move operation, movethe cursor to "[CANCEL]" on the screen, andpress the [MENU/ENTER] knob.

121
MR-8HD Owner’s Manual (Part editing)
5) Rotate the [MENU/ENTER] knob to select"Change Part >" in the second page, and pressthe [MENU/ENTER] knob.The display now shows the screen forselecting the source track(s) and destinationtrack(s) of the exchange operation.Initially, "<< Back" is highlighted.
6) Rotate the [MENU/ENTER] knob to select"Source Track=*", and press the [MENU/ENTER]knob.You can now select the exchange source track(s)by rotating the [MENU/ENTER] knob.The available options are:
• 1 through 8 (mono track)• 1/2, 3/4, 5/6 and 7/8 (stereo tracks)
7) Rotate the [MENU/ENTER] knob to select thesource track(s) to be exchanged, and press the[MENU/ENTER] knob.You can now select the exchange destinationtrack(s) by rotating the [MENU/ENTER] knob.The available options are:
• 1 through 8 (mono track)• 1/2, 3/4, 5/6 and 7/8 (stereo tracks)
1) Load the song you want to edit.
2) Set the LOCATE A and LOCATE B points (seepage 49).You can check the parts by playing backbetween the LOCATE A and LOCATE B points(see page 44).
3) While the recorder is stopped, press the[MENU/ENTER] knob to enter the menu mode.The display now shows the first page of the menuselection screen, where "<< Back" is highlightedinitially (selecting "<< Back" returns to theprevious screen).
You can exchange the parts between the desired tracks. The part exchange operation can bemade only within the current song.
TRK 1TRK 2TRK 3TRK 4TRK 5TRK 6TRK 7TRK 8
LOCATE Apoint
LOCATE Bpoint
ABS ZERO REC END
<Note>: You cannot exchange data of a song pro-tected. Release the protection before exchangingparts.
4) Rotate the [MENU/ENTER] knob to select"Part Edit >", and press the [MENU/ENTER] knob.The display now shows the part edit menuscreen, where "<< Back" is highlighted.
<Note>: You cannot select the same track(s)for the exchange source and destination.
Exchange the part(s)

122
MR-8HD Owner’s Manual (Part editing)
10) Press the [MENU/ENTER] knob.The display now returns to the part edit menuscreen, where “Change Part >” is highlighted.
11) Press the [STOP] key to exit the menu mode.
8) Rotate the [MENU/ENTER] knob to select thedestination track(s), and press the[MENU/ENTER] knob.The display shows the screen where"Dest. Track = **" is highlighted.
<Note>: If you are not satisfied with the re-sult, press the [UNDO/REDO] key to undothe operation (see page 111).
9) Rotate the [MENU/ENTER] knob to move thecursor to "[ENTER]" on the screen, and press the[MENU/ENTER] knob.The display shows "Please Wait", immediatelyfollowed by "Completed" when the MR-8HDcompletes the exchange operation.
If you want to cancel the exchange operation,move the cursor to "[CANCEL]" on the screen,and press the [MENU/ENTER] knob.

123
MR-8HD Owner’s Manual (Other functions)
Other functionsThis chapter describes the following functions which are importantfor using the MR-8HD.
(1) Hard disk formatting
(2) Peak hold time setting
(3) Pre-roll/post-roll time setting
(4) Beat resolution mode on/off
(5) Phantom power on/off
(6) Initializing the MR-8HD
<Notes>While a menu screen is shown, you can go up the menu screen levelor directly exit the menu mode by the following operations.
(1) Select “<< Back” on a menu screen and press the [MENU/ENTER] knob.The display returns to the previous (upper level) screen. Repeatingthis operation finally exits the menu mode.
(2) Press the [REWIND] key.The display returns to the previous (upper level) screen.Repeating this operation finally exits the menu mode.
(3) Press the [STOP] key.The menu mode exits and the display shows the home screen.

124
MR-8HD Owner’s Manual (Other functions)
You can reformat the MR-8HD internal hard disk by using the FAT32 file system. By reformattingthe hard disk, all existing song data on the hard disk is erased, while all setting data includingthe menu settings are initialized, and a new song (Song01) is automatically created.
<Note>: You cannot undo hard disk formatting. Therefore, before executing hard disk format-ting, make sure that all song data on the hard disk is not necessary.
1) While the recorder is stopped, press the[MENU/ENTER] knob to enter the menu mode.The display now shows the first page of themenu selection screen, where "<< Back" ishighlighted initially.You can select between "0.1s" and "10s" in 0.1second steps.
2) Rotate the [MENU/ENTER] knob to select"System", and press the [MENU/ENTER] knob.The display now shows the first page of thesystem menu screen, where "<< Back" ishighlighted.
3) Rotate the [MENU/ENTER] knob to select"Disk Format" on the second page and press the[MENU/ENTER] knob.The display show the screen where "Are YouSure?" flashes. As this screen indicates,formatting the hard disk deletes all songs onthe disk and you cannot undo disk formatting.To stop formatting, press the [STOP] key to exitthe menu mode.
4) Press the [MENU/ENTER] knob while holdingdown the [RECORD] key.Formatting starts.When formatting completes, “Completed!” isshown on the display and the MR-8HD stopsdisk access.
6) Press the [MENU/ENTER] knob.The MR-8HD exits the menu mode.The display changes to the home screen forSong01 (song name: Song01) which isautomatically created after formatting.
Hard disk formatting

125
MR-8HD Owner’s Manual (Other functions)
The level meters shown on the display have the peak hold function. When it is enabled, themeter peak value during recording is held for the specified time.The default meter peak hold time is three seconds. You can disable the peak hold function orchange the peak hold time.
1) While the recorder is stopped, press the[MENU/ENTER] knob to enter the menu mode.The display now shows the first page of themenu selection screen, where "<< Back" ishighlighted initially.You can select between "0.1s" and "10s" in 0.1second steps.
2) Rotate the [MENU/ENTER] knob to select"System", and press the [MENU/ENTER] knob.The display now shows the first page of thesystem menu screen, where "<< Back" ishighlighted.
3) Rotate the [MENU/ENTER] knob to select"PeakHold Time" on the second page and pressthe [MENU/ENTER] knob.The currently selected peak hold time (bydefault, "3s") flashes.You can now make the desired peak holdsetting.
4) Rotate the [MENU/ENTER] knob to select thedesired hold time, and press the [MENU/ENTER]knob.The peak hold setting is confirmed and thedisplay returns to the previous screen.
5) Press the [STOP] key to exit the menu mode.The peak hold setting is effective to all songs.
You can select from "3s" (3 seconds, default),"1s", "2s", "5s" and "Off".
When "Off" is selected, the peak hold functionis disabled (the peak value is not held).
Peak hold indicationBy default, it is held for threeseconds.
Peak hold time setting

126
MR-8HD Owner’s Manual (Other functions)
As described earlier on page 47, when both the auto punch in/out and loop modes are active,the pre-roll and post-roll are effective in the loop function.You can set the pre-roll and post-roll time value by the following procedure.
When both the auto punch in/out and loop modes areactive, the loop starts from "the LOCATE A point minusthe pre-roll time" and ends by "the LOCATE B pointplus the post-roll time". The pre-roll time is initially setto four seconds, while the post-roll time is set to onesecond.
In other words, with the default pre-roll and post-rolltime settings, when executing auto punch in/out, theMR-8HD starts playback four seconds before thepunch-in point, and ends playback one second afterthe punch-out point.
1) While the recorder is stopped, press the[MENU/ENTER] knob to enter the menu mode.The display now shows the first page of themenu selection screen, where "<< Back" ishighlighted initially.You can also return to the previous screen bypressing the [REWIND] key.
2) Rotate the [MENU/ENTER] knob to select"System", and press the [MENU/ENTER] knob.The display now shows the first page of thesystem menu screen, where "<< Back" ishighlighted.
3) Rotate the [MENU/ENTER] knob to select"Pre Roll Time" and press the [MENU/ENTER]knob.The currently selected pre-roll time (by default,"4.0s") flashes. You can now set the desiredpre-roll time.
4) Rotate the [MENU/ENTER] knob to select thepre-roll hold time, and press the [MENU/ENTER]knob.The pre-roll time setting is confirmed and thedisplay returns to the previous screen. To setthe post-roll time, follow the procedure below.
5) Rotate the [MENU/ENTER] knob to select"Post Roll Time" and press the [MENU/ENTER]knob.The currently selected post-roll time (bydefault, "1.0s") flashes. You can now set thedesired post-roll time.
You can select between "0.1s" and "10s" in 0.1second steps.
6) Rotate the [MENU/ENTER] knob to select thepost-roll hold time, and press the [MENU/ENTER]knob.The post-roll time setting is confirmed and thedisplay returns to the previous screen.
7) Press the [STOP] key to exit the menu mode.
LOCATE APoint
LOCATE BPoint
4 sec. 1 sec.
LOOP STARTpoint
LOOP ENDpoint
You can select between "0.1s" and "10s" in 0.1second steps.
Pre-roll/post-roll time setting

127
MR-8HD Owner’s Manual (Other functions)
While the time base is set to the bar/beat mode, if you set the "Beat resolution" item in the menuto "On", the LOCATE A and B points are set in beat resolution.When "Beat resolution" is set to "On", the clock digit in the bar/beat/clock value is automaticallyrounded down or up, so that the clock digit is always "000".
Let's see an example when the time base is set to the bar/beat mode and the"Beat resolution" is set to "On". If you set the LOCATE A point to "Bar 1/1 /clock468" and the LOCATE B point to "Bar 12/ 4 /clock 485", the rounded values arestored as below.
"Bar 1 / 1 / clock 468" -> "Bar 1 / 1 / clock 000"(The clock value "468" is rounded down.)
"Bar 12 / 4 / clock 485" -> "Bar 3 / 1 / clock 000"(The clock value "485" is rounded up.)
1) While the recorder is stopped, press the[MENU/ENTER] knob to enter the menu mode.The display now shows the first page of themenu selection screen, where "<< Back" ishighlighted initially.You can also return to the previous screen bypressing the [REWIND] key.
2) Rotate the [MENU/ENTER] knob to select"System", and press the [MENU/ENTER] knob.The display now shows the first page of thesystem menu screen, where "<< Back" ishighlighted.
3) Rotate the [MENU/ENTER] knob to select" Resolution" on the second page and pressthe [MENU/ENTER] knob.The current option (by default, "Off") flashes.You can now set the desired option.
4) Rotate the [MENU/ENTER] knob to select "On"or "Off", and press the [MENU/ENTER] knob.The selection is confirmed and the displayreturns to the previous screen.
5) Press the [STOP] key to exit the menu mode.
Beat resolution mode on/off

128
MR-8HD Owner’s Manual (Other functions)
The MR-8HD can supply phantom power (+48 V) to the XLR balanced connectors of [INPUT A]through [INPUT D].So you can connect condenser microphones which require phantom power.You can turn on or off phantom power to the XLR connectors via the menu mode.
<Note>: The phantom power can be supplied to the XLR balanced connectors of [INPUT A]through [INPUT D]. Therefore, to connect a sound source which does not require thephantom power, use any of the unbalanced phone input jacks on [INPUT A] through [IN-PUT D].
If any plug is inserted to the unbalanced phone input jack, the phantom power is notsupplied to the balanced XLR connector on the same channel.
The phantom power setting returns to "Off" (default) when you turn off the MR-8HDpower.
<Notes on using phantom power>• Confirm that the connected microphone needs +48 V phantom power.
• Turn on the phantom power after making microphone connection.
• Mute the outputs of the MR-8HD when turning on or off the phantom power orplugging/unplugging the microphone.
• Do not supply the phantom power to a microphone such as below.* A microphone whose output is unbalanced* A high impedance microphone* A microphone whose pin 1 and pin 2 or pin1 and pin 3 are short-circuited.* A microphone with the grounded center tapout such as an old-fashioned ribbon
microphone
ONOFF
ONOFF
ONOFF
ONOFF
[TO STEREO BUSS ON/OFF] key
<Tip>You can directly access to the input menu screen by a long press of the desired [TOSTEREO BUSS ON/OFF] key. For example, a long press of the [TO STEREO BUSS ON/OFF]key of [INPUT A] directly accesses to the screen shown below.
Phantom power on/off

129
MR-8HD Owner’s Manual (Other functions)
4) Rotate the [MENU/ENTER] knob to select "On",and press the [MENU/ENTER] knob.The screen shows a warning message for fewseconds, and returns to the previous screen.While the message is shown, all inputchannels are muted. When the message isdismissed, the mute is released.If you select “Off” from “On”, a warningmessage appears and all channels are muted.
5) After making "Phantom Power" setting, press the[STOP] key to exit the menu mode.The display returns to the home screen.
When "Phantom Power" is set to "On", " "lights on the home screen, as below.
3) Rotate the [MENU/ENTER] knob to select"Phantom Power", and press the [MENU/ENTER]knob.The current option (by default, "Off") flashes.You can now set the desired option.
1) While the recorder is stopped, press the[MENU/ENTER] knob to enter the menu mode.The display now shows the first page of themenu selection screen, where "<< Back" ishighlighted initially.
You can also return to the previous screen bypressing the [REWIND] key.
2) Rotate the [MENU/ENTER] knob to select "Input"on the second page, and press the[MENU/ENTER] knob.The display now shows the input menu screen.

130
MR-8HD Owner’s Manual (Other functions)
By initializing the MR-8HD, you can initialize all global menu settings common to all songs, aswell as the time base and display contrast level.
1) While the recorder is stopped, press the[MENU/ENTER] knob to enter the menu mode.The display now shows the first page of themenu selection screen, where "<< Back" ishighlighted initially.You can also return to the previous screen bypressing the [REWIND] key.
3) Rotate the [MENU/ENTER] knob to select "Inti.Memory" on the second page, and press the[MENU/ENTER] knob.The display now shows the confirmation screenfor initializing.
4) Press the [MENU/ENTER] knob while holdingdown the [RECORD] key.The settings are immediately initialized.The initialize is confirmed and the displayreturns to the previous screen.To cancel the initialization, press the [STOP]key.
5) Press the [STOP] key to exit the menu mode.
Initialized item Default setting
Pre-roll time setting
Post-roll time setting
Delay type setting
MIDI sync out setting
MTC frame rate setting
Beat resolution mode setting
Peak hold time setting
Time base (shown when turning on the power)
Display contrast level
4 seconds
1 second
L-R (stereo) delay
Off
25 frames
Off
3 seconds
Bar/Beat
Factory present level
2) Rotate the [MENU/ENTER] knob to select"System", and press the [MENU/ENTER] knob.The display now shows the first page of thesystem menu screen, where "<< Back" ishighlighted.
Initializing the MR-8HD

131
MR-8HD Owner’s Manual (Troubleshooting)
TroubleshootingIf you encounter any problem while operating the MR-8HD, check the following for the possible cause of theproblem before contacting our service station or dealer.

132
MR-8HD Owner’s Manual (Troubleshooting)
<Trouble 7>During overdubbing, I cannot monitor the playback sig-nal of the recorded track.
• Is the track fader for the playback trackraised?During overdubbing, raise the faders for both theplayback and recording tracks appropriately.Otherwise, you cannot make overdubbing whilelistening to the recorded track(s).
<Trouble 3>The input level of the track to which I am going to recordis too low.
• Is the [TRIM] control of the input to whichthe sound source is connected adjustedappropriately?To set the input level (= recording level)appropriately, use the [TRIM] control so that the peakindicator does not light continuously.
<Trouble 1>I cannot record the sound source connected to[INPUT B] to track 1.
<Trouble 5>The meter shows very low level and the recording levelis too low.
• When recording a sound source to a monotrack, you can only use the [INPUT A]section.Connect the source to [INPUT A].
• Is the recording track in the input monitormode?Make sure that the [RECORD] key flashes and" " is shown on the display. If not, pressthe [RECORD] key to set the armed track to theinput monitor mode.
• Is the [TRIM] control for the input sectionthe sound source is connected adjustedappropriately?Set the [TRIM] control just below the position wherethe [PEAK] indicator in the [INPUT A] section lightsat the loudest part.
<Trouble 6>The meter shows good level for recording, but no sig-nal can be monitored via headphones though the[PHONES VOL] control is raised.
• Are the track fader for the recording trackand the [MASTER] fader raised?Both of these faders, as well as the [PHONES VOL]control, have to be raised in order to monitor therecording signal via headphones.We recommend to raise both the track fader for therecording track and the [MASTER] fader to the “ ”position.
<Trouble 2>I cannot record the sound sources connected to [IN-PUT C] and [INPUT D] to tracks 1 and 2.
• When recording two sound sourcessimultaneously, you must use [INPUT A] and[INPUT B]. You cannot use [INPUT C] and[INPUT D].Reconnect the sources to [INPUT A] and[INPUT B].
<Trouble 4>I cannot hear the input signal via the headphones thoughthe [REC SELECT] key is active.
• Did you press the [RECORD] key to makethe armed track in the input monitor mode?Is the [PHONES VOL] control raised?You cannot hear the input signal unless the assignedtrack is in the input monitor mode by pressing thecorresponding [REC SELECT] key to turn on theindicator. Also, you cannot hear any signal if the[PHONES VOL] control is set to minimum.
Troubles for recording

133
MR-8HD Owner’s Manual (Troubleshooting)
<Trouble 8>I cannot execute auto punch in/out.
• Is " " shown on the screen?If it is not, press the [AUTO PUNCH] key to makethe auto punch in/out function active.
• Are the punch-in and punch-out points setcorrectly?To check each point, press the [LOCATE A/IN] or[LOCATE B/OUT] key. The recorder locates to thepunch-in or punch-out point, while the screen showsthe appropriate time data.
If the punch-out point is earlier than the punch-inpoint, set these points appropriately so that thepunch-in point is earlier than the punch-out point.
<Trouble 1>During playback, the recorder suddenly executes locat-ing.
• Is " " or " " shown on thedisplay?If so, the play mode is set to the auto return or loopmode.Press the [PLAY MODE] key until "Off" is selected.
<Trouble 2>Cannot monitor the playback sound.
• Are the track fader(s) for the playbacktrack(s) and the [MASTER] fader brought upto the appropriate positions?Raise the fader(s) for the track(s) you want tomonitor, as well as the [MASTER] fader.If you monitor via headphones, also raise the[PHONES VOL] control.
<Trouble 9>I cannot record audio data of a song onto an externaldigital recorder.
• Is the connection between the[DIGITAL OUT] connector on the MR-8HDand the optical input connector of thedigital recorder made correctly?Check the connection, as well as the optical cable.
• Is the digital recorder set correctly forrecording the signal fed to the digital input?See the manual of the digital recorder for detailsabout the setting.
<Trouble 3>I press the [PLAY] key while holding down the [STOP]key, but I cannot execute loop playback.
• Are the LOCATE A and LOCATE B pointsset correctly?By default, both of these points are set to thebeginning of a song (i.e. "0m00s000ms" or "-2bar1ÅÙ 00clk"). In this condition, you cannot executeloop playback.Also, if the LOCATE B point is earlier than theLOCATE A point, you cannot execute loop playback.
Troubles for playback

134
MR-8HD Owner’s Manual (Troubleshooting)
<Trouble 1>I cannot apply the effects.
• Are the [EFFECT SEND] control for the trackyou want to apply the effect and track faderraised appropriately?
Raise the [EFFECT SEND] control(s) for the track(s)(1 through 4) you want to apply the effect to sendsignal(s) to the internal digital effects.Also, make sure that the fader(s) for the track(s)you want to apply the effect is(are) raised.
<Trouble 1>Cannot export a WAV file to a personal computer.
• Is the USB cable connected correctly?Check the connection, as well as the USB cable.
• Is the personal computer meets therequirement?The MR-8HD can export a WAV file to a personalcomputer which runs on any of the following OSsystems.
Windows Me, 2000 or XP Macintosh 0S X or higher
1001001000 10EFFECT SEND
<Trouble 2>I cannot apply the mic simulation effects.
• Is the [INPUT A SEL] switch on the rear panelis set to "MIC/LINE" position?
To apply the mic simulation effects to [INPUT A], the[INPUT A SEL] switch on the rear panel must be setto "MIC/LINE" position.When you set the switch to any other position, youcan use the amp simulation effects for insert effects.
INPUT A SEL
MIC/LINEGTR CLEANGTR DIST
<Trouble 2>The MR-8HD drive icon is not shown on the personalcomputer screen.
• It may take some times for showing aremovable drive depending on a personalcomputer.It may take some times for reading the drive data.Wait for a while until the drive icon appears.
On a Windows machine, the MR-8HD is shown as"removable drive". On a Macintosh machine, it isshown as "MR-8HD".
Troubles for effect
Troubles for USB connection

135
MR-8HD Owner’s Manual (Troubleshooting)
<Trouble 1>I cannot hear the rhythm guide click.
• Is the [RHYTHM GUIDE] key is illuminated?When the [RHYTHM GUIDE] key is not illuminated,the rhythm guide function is not active and youcannot hear the rhythm guide click.
• Is the "Int Click level" item in the "Rhythm Guide" menu set correctly?If the "Int Click level" item is set to "00" or a smallvalue, you cannot hear the rhythm guide click.
<Trouble 2>I want to hear the rhythm guide click based on the "Sig-nature" and "Tempo" settings on the rhythm guide set-ting screen but the rhythm guide click based on theconductor map is output.
• Is the "Conductor Map" setting on therhythm guide setting screen set to "On"?As shown on the screen below, if "Conductor Map"on the rhythm guide setting screen is set to "On",the rhythm guide click based on the conductor mapis output. In this condition, the "Signature" and"Tempo" fields on this screen indicate "---" asbelow, showing that they are disabled.
Set "Conductor Map" to "Off" (see page 77).
Other troubles

136
MR-8HD Owner’s Manual (Troubleshooting)

137
MR-8HD Owner’s Manual (Specifications)
MR-8HD Specifications

138
MR-8HD Owner’s Manual (Specifications)
[Inputs/Outputs]
0dBu=0.775Vrms, 0dBV=1.0Vrms, Reference level: -12dBfs
Analog input [INPUT A - INPUT D]Connectors : XLR-3-31 type (#2: hot balanced)
: 1/4-inch, phone typeInput level : -48dBu (MIC) to +4dBu (LINE)Input impedance : 1.5kΩ or more
: 400kΩ or more (When the INPUTA SEL switch is set to “GTR”.)
Phantom power : P48V (Phantom power ON/OFF isselected in the “Input” menu of theMENU mode.)
Insert [INSERT (input A only)]Connector : 1/4-inch, TRS phone type
(Tip: output, Ring: input)Norminal output level : -10dBVLoad impedance : 10kΩ or moreNorminal input level : -10dBVInput impedance : 10kΩ or more
Stereo analog output [STEREO OUT (L, R)]Connectors : 1/4-inch, phone typeNorminal output level : -10dBV (unbalanced)Load impedance : 10kΩ or more
Headphones output [PHONES 1, 2]Connectors : 1/4-inch, stereo phone typeMax. output power : 30mW or more (at 32Ω load)Load impedance : 16Ω or more
MIDI output [MIDI OUT]Connector : DIN 5-pinFormat : Conformed to the MIDI standard
Digital output [DIGITAL OUT]Connector : Toslink optical typeFormat : IEC 60958 (S/P DIF)
Footswitch [FOOT SW]Connector : 1/4-inch, phone typeLevel : TTL level
USBConnector : B type (standard)
USB HOSTConnector : A type (standard)
1
3
2
[Pin assignment of XLR connectors]
1 GND2 HOT3 COLD
[Pin assignment of USB port]
1 VBUS2 D-3 D+
[Pin assignment of USB HOST port]
4 GND
12
3 4
1 2 3 41 VBUS2 D-3 D+4 GND
Specifications
[General]
Weight (net) : Approx. 3.0 kg
Dimensions : 312 (W) x 264 (D) x 88 (H ) mm
Power supply : 120VAC 60Hz, 230VAC 50/60Hz
Power consumption : 14W
Supplied Accessaries : Power cord, Owner’s Manual
* Changes in specifications and features may be madewithout notice or obligation.
[Record / playback]
Recording medium : 3.5-inch hard disk drive
Sampling frequencies: 44.1kHz
Quantization : 16-bits, linear (non expanded)
File format : FAT32
Audio recording type : Conformed to AES-31
The number of tracks : 8* the number of simultaneously recordable tracks: 4
ADC : 24-bits, delta-sigma
DAC : 24-bits, delta-sigma
Frequency response : 20Hz to 20kHz
Dynamic range : 90dB or more (TYPICAL)
Total harmonic distortion : 0.06% or less (TYPICAL)

139
MR-8HD Owner’s Manual (Specifications)
MIN MAX
100
L R
100
L R
100
L RRL
MIN MAX LINE MIC LINE MIC LINE MIC LINE MIC
REC SELECT
0 10
1 2 3 4 5/6 MASTER
MAXMAX
MINMIN
7/8
LOCATE REC END
A-B PLAYLOCATE ABS ZERO
PLAYSTOPRECORD REWIND F FWD
GUIDERHYTHM
CONTRAST
1-8 >SONGNEW
1-6 > 7/81-4 > 5/6 STEREO
WAV FILE
BOUNCE
POWERFUL
MASTERING
B / OUTA / INLOCATE
STOREPLAY MODEAUTO PUNCH
NATURAL BRIGHT
TIME BASESELECT
UNDO/REDO
7/8 >
MENU / ENTER
SIMULATIONDYNAMIC CONDENSER TUBE MIC
PAN
EFFECT
REVERB / DELAY TIME
HALLROOM
PLATE DELAY
PHONES VOL
LSTEREO OUT
R
2PHONES
1
MAXMIN
BALBALBAL
TRIM
UNBAL
PEAK
TRIM
UNBAL
PEAK
TRIM
UNBAL
PEAKPEAK
DISTORTION
GUITAR
/GUITAR
INPUT A SELECT
INSERT
BAL
UNBAL
TRIM
INPUT A INPUT B INPUT C INPUT D
ON/OFF
POWER
ABC1 DEF2 GHI3
JKL4 MNO5
PQR6 STU7 VWX8 YZ9 +-_0 DELETE
TO STEREO BUSS
EFFECT SEND
DIGITAL MULTITRACKER
ON/OFF
ON/OFF
ON/OFF
60'S COMBOUS METALBRIT STACK AMP SIMULATION
INPUT A
INPUT A SEL
USB USB HOSTAC-INDIGITAL
OUT FOOT SWMIDI OUT
GTR CLEAN MIC/LINEGTR DIST
312
264
88
Physical dimensions

140
MR-8HD Owner’s Manual (Specifications)
When using the bounce mode (1-4 > 5/6 mode)
When using the normal mode
DISTORTION
CLEAN
INPUT A
INPUT B
INPUT C
INPUT D
TRIM
TRIM
TRIM
TRIM
A/D
A/D
A/D
SIMULATIONFX
A/D
BAL
BAL
BAL
BAL
IN7
IN8
OUT7
OUT8
IN5
IN6
OUT5
OUT6
IN4 OUT4
IN3 OUT3
IN2 OUT2
IN1 OUT1
RECORDERREC
SELECTTRK 1 FADER
TRK 2 FADER
TRK 3 FADER
TRK 4 FADER
TRK 5/6 FADER
TRK 7/8 FADER
TRK 4 EFF
TRK 3 EFF
TRK 2 EFF
TRK 1 EFF
TRK 1 PAN
TRK 2 PAN
TRK 3 PAN
TRK 4 PAN
PAN
PAN
PAN
PAN
INPUT A
INPUT B
INPUT C
INPUT D
TO STEREO BUSS
TO STEREO BUSSL R
EFF
REVERB / DELAY
REVERB / DELAY TIME
MASTERFADER
MASTERING FX ST OUT L
ST OUT R
DISTORTION
CLEAN
INPUT A
INPUT B
INPUT C
INPUT D
TRIM
TRIM
TRIM
TRIM
A/D
A/D
A/D
SIMULATIONFX
A/D
BAL
BAL
BAL
BAL
IN7
IN8
OUT7
OUT8
IN5
IN6
OUT5
OUT6
IN4 OUT4
IN3 OUT3
IN2 OUT2
IN1 OUT1
RECORDERREC
SELECTTRK 1 FADER
TRK 2 FADER
TRK 3 FADER
TRK 4 FADER
TRK 5/6 FADER
TRK 7/8 FADER
TRK 4 EFF
TRK 3 EFF
TRK 2 EFF
TRK 1 EFF
TRK 1 PAN
TRK 2 PAN
TRK 3 PAN
TRK 4 PAN
PAN
PAN
PAN
PAN
INPUT A
INPUT B
INPUT C
INPUT D
TO STEREO BUSS
TO STEREO BUSSL R
EFF
REVERB / DELAY
REVERB / DELAY TIME
MASTERFADER
MASTERING FX
ST OUT L
ST OUT R
Block diagram
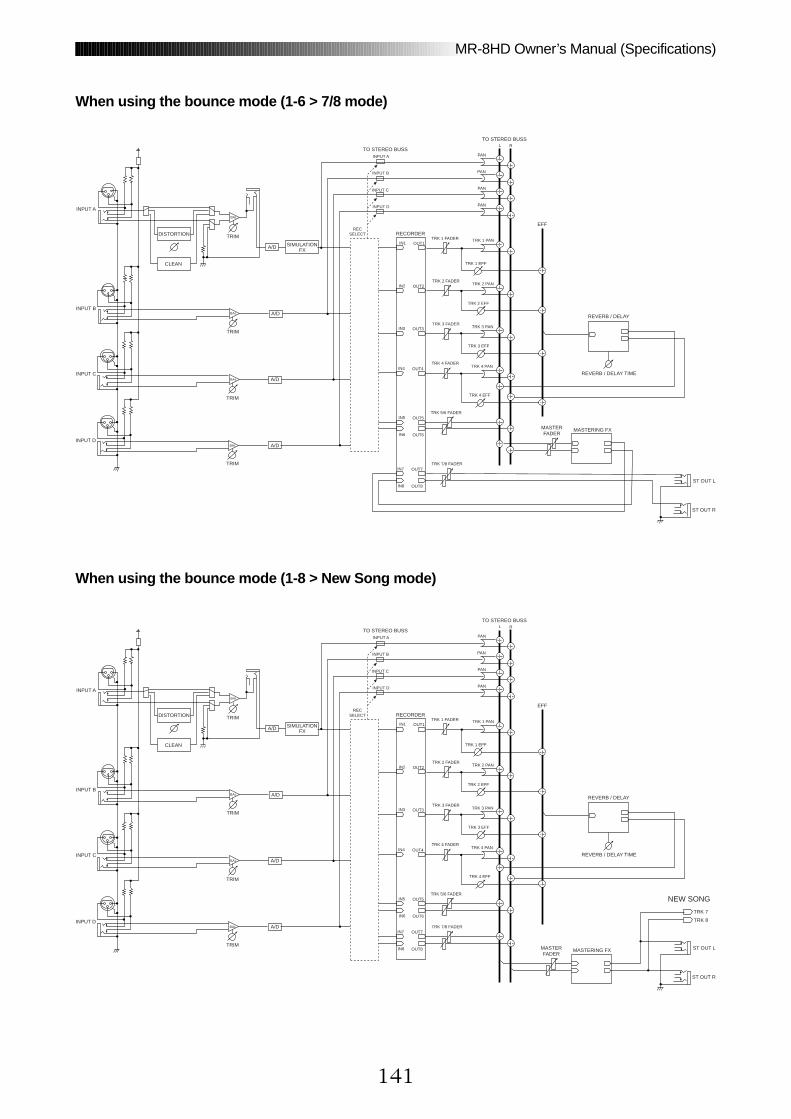
141
MR-8HD Owner’s Manual (Specifications)
When using the bounce mode (1-6 > 7/8 mode)
When using the bounce mode (1-8 > New Song mode)
DISTORTION
CLEAN
INPUT A
INPUT B
INPUT C
INPUT D
TRIM
TRIM
TRIM
TRIM
A/D
A/D
A/D
SIMULATIONFX
A/D
BAL
BAL
BAL
BAL
IN7
IN8
OUT7
OUT8
IN5
IN6
OUT5
OUT6
IN4 OUT4
IN3 OUT3
IN2 OUT2
IN1 OUT1
RECORDERREC
SELECTTRK 1 FADER
TRK 2 FADER
TRK 3 FADER
TRK 4 FADER
TRK 5/6 FADER
TRK 7/8 FADER
TRK 4 EFF
TRK 3 EFF
TRK 2 EFF
TRK 1 EFF
TRK 1 PAN
TRK 2 PAN
TRK 3 PAN
TRK 4 PAN
PAN
PAN
PAN
PAN
INPUT A
INPUT B
INPUT C
INPUT D
TO STEREO BUSS
TO STEREO BUSSL R
EFF
REVERB / DELAY
REVERB / DELAY TIME
MASTERFADER
MASTERING FX
ST OUT L
ST OUT R
DISTORTION
CLEAN
INPUT A
INPUT B
INPUT C
INPUT D
TRIM
TRIM
TRIM
TRIM
A/D
A/D
A/D
SIMULATIONFX
A/D
BAL
BAL
BAL
BAL
IN7
IN8
OUT7
OUT8
IN5
IN6
OUT5
OUT6
IN4 OUT4
IN3 OUT3
IN2 OUT2
IN1 OUT1
RECORDERREC
SELECTTRK 1 FADER
TRK 2 FADER
TRK 3 FADER
TRK 4 FADER
TRK 5/6 FADER
TRK 7/8 FADER
TRK 4 EFF
TRK 3 EFF
TRK 2 EFF
TRK 1 EFF
TRK 1 PAN
TRK 2 PAN
TRK 3 PAN
TRK 4 PAN
PAN
PAN
PAN
PAN
INPUT A
INPUT B
INPUT C
INPUT D
TO STEREO BUSS
TO STEREO BUSSL R
EFF
REVERB / DELAY
REVERB / DELAY TIME
MASTERFADER
MASTERING FX ST OUT L
ST OUT R
TRK 7
TRK 8
NEW SONG

142
MR-8HD Owner’s Manual (Specifications)
<Digital multitracker>
Transmitted Recognized RemarksFunction............
Basic Default
Channel Changed
DefaultMessage
Altered
Mode
NoteNumber: True Voice
Velocity Note ONNote OFF
After Key's
Touch Channel's
Pitch Bend
ControlChange
ProgramChange: True #
System Exclusive
: Quarter Frame: Song Position: Song Select: Tune
Common
SystemReal Time
: Clock: Commands
: Local ON/OFF
: All Notes OFF
: Active Sense
: Reset
Aux.Message
Notes
X
X
X
X
X
X
X
X
X
X
X
X
X
X
X
X
*****************************
X X
X X
X
X
X
X
X
X
X
X
X
*****************************
X
X
X
X
*****************************
X
X
X
X
X
X
X
rem.1 : MTCrem. 2 : START, STOP, CONTINUE
Mode 1: OMNI ON, POLY Mode 2: OMNI ON, MONOMode 3: OMNI OFF, POLY Mode 4: OMNI OFF, MONO
: YesX : No
rem. 2
X
X
X
X
rem. 1
Date:Version: V1.00Model MR-8HD
MIDI Implementation Chart

143
MR-8HD Owner’s Manual (Specifications)
<A>Amp simulation ...............................................................58Auto return ......................................................................45Auto play .........................................................................45ABS time .........................................................................14Archiving a song .............................................................95Analog mixdown .............................................................41
<B>Bounce ............................................................................63Bar/Beat .............................................................14, 24,127Beginning a song .....................................................14, 48Bar offset .........................................................................81
<C>Cueing .............................................................................44Clipboard .......................................................................116Click level ........................................................................76Clock ...............................................................................87Contrast ..........................................................................24Copy ...........................................................105, 114 to 118Copyrights .......................................................................11Conductor map ...............................................................78Changing track ..............................................................108Character entry key .................................................32, 99Creating a song ...............................................................31
<D>Delay ...............................................................................60Distortion ...................................................................33, 35Display ............................................................................23Demo song ......................................................................29Digital mixdown ...............................................................42Delete song ...................................................................100Damage ...........................................................................11
<E>Effector ............................................................................57Effect send ......................................................................61Erasing track .................................................................104Erase part ......................................................................113Event .....................................................................78 to 84Exchange the track .......................................................108Exchange the parts .......................................................121
<F>Format ...........................................................................124Foot switch ......................................................................53
<G>Gain .............................................................15, 36, 38, 40
<H>Hard disk .................................................................12, 124Hidden file ...............................................................95, 100
<I>Insert effect ......................................................................58Input A select switch ........................................................33Input monitor ...............................................14, 36, 38, 40Insert ...............................................................................59Input ................................................................................33Initialize .........................................................................130
<L>Loop ................................................................................45Locate .............................................................................48
<M>Master recorder ....................................................41 to 42Mastering effect ..............................................................62Mic simulation .................................................................58MIDI .................................................................................85MIDI implementation chart ...........................................142Mixdown ................................................................41 to 42Move .....................................................................107, 119MENU mode ...................................................................25
<O>Overdubbing ...................................................................37Offset ...............................................................................81Optical cable ............................................................22, 42
<P>Playback .........................................................36 to 42, 43Power supply ..................................................................28Power switch ...................................................................28Personal computer .........................................................89Part ................................................................................111Punch in/out ....................................................................51Punch in/out points .........................................................54Play mode .......................................................................45Pre roll .....................................................................47, 126Peak LED ........................................................................15Peak hold ......................................................................125Phantom power ............................................................128Protect ....................................................................101, 94Paste ...........................................................105, 114 to 118Post roll ...................................................................47, 126
<Q>Quantization ..............................................................138
<R>Recording ..............................................................35 to 42Recording level .....................................................35 to 42Recording track ...............................................................34Recording method ..........................................................12Reverb ............................................................................60Redo ...................................................36, 38, 40, 103, 113Remain ........................................................13, 35, 37, 39Rehearsal ....................................................55, 66, 68, 70Repro monitor .................................................................14Resolution .....................................................................127REC END .................................................................12, 48Rhythm guide ..................................................................75
<S>Signature ...............................................................75 to 80Simulation .......................................................................58Sequencer ......................................................................86Signature map ......................................................75 to 80Standby mode .................................................................28Song ................................................................................13Select a song ..................................................................98
Index
144
MR-8HD Owner’s Manual (Specifications)
Declaration of EC DirectiveThis equipment is compatible with the EMC Directive (89/336/EEC) - Directive on approximation of member nation's ordinanceconcerning the electromagnetic compatibility and with the Low Voltage Directive (73/23/EEC) - Directive on approximation ofmember nation's ordinance concerning electric equipment designed to be used within the specified voltage range.
The Affect of Immunity on This Equipment
FOSTEX DISTRIBUTORS LIST IN EUROPE* Including non-EU countries (as of January, 2005)
<ITALY>NAME: Proel S. p. A.ADD: Zona Via Alla Ruenia, 37/43 64027 - Sant'Omero(Teramo), ItalyTEL: (+39) 0861-81241, FAX: (+39) 0861-887862
<THE NETHERLANDS>NAME: IEMKE ROOS AUDIO B. V.ADD: Kuiperbergweg 20, 1101 AG Amsterdam, TheNetherlandsTEL: (+31) 20-697-2121, FAX: (+31) 20-697-4201
<NORWAY>NAME: Siv. Ing. Benum ASADD: P.O. Box 145, Vinderen, 0319 Oslo, NorwayTEL: (+47) 2213 9900, FAX: (+47) 2214 8529
<PORTUGAL>NAME: Caius - Tecnologias Audio e Musica, Lda.ADD: Praca do Bom Sucesso, No 61 Bom Sucesso TradeCenter, Escritorio 701/702, 4150-1460 Porto, PortugalTEL: (+351) 22-608-06-10, FAX: (+351) 22-608-06-29
<SPAIN>NAME: Letusa S. A.ADD: C/Laguna 10, 28923 Alcorcon, Madrid, SpainTEL: (+34) 91-4862800, 91-4470898FAX: (+34) 91-6414597
<SWEDEN>NAME: Sennheiser ABADD: John Ericssonsgatan 10, P.O. Box 22035, SE-104 22Stockholm, SwedenTEL: (+46) 8 566 16400, FAX: (+46) 8 566 16490
<SWITZERLAND>NAME: Audio Bauer Pro AGADD: Bernerstrasse-Nord 182, CH-8064 Zurich, SwitzerlandTEL: (+41) 1-4323230, FAX: (+41) 1-4326558
<UK>NAME: SCV LondonADD: 40 Chigwell Lane, Oakwood Hill Industrial Estate,Loughton, Essex IG10 3NY U. K.TEL: (+44) 20-8418-0778, FAX: (+44) 20-8418-0624
<AUSTRIA>NAME: ATEC Audio-u. Videogeraete VertriebsgesmbH.ADD: Im Winkel 5, A-2325 Velm, AustriaTEL: (+43) 2234-74004, FAX: (+43) 2234-74074
<BELGIUM>NAME: General AudioADD: Raymond Pelgrimslaan 101, B-1702 Groot-Bijgaarden,BelgiumTEL: (+32) 2-4630650, FAX: (+32) 2-4661500
<DENMARK>NAME: SC Sound ApSADD: Malervej 2, DK-2630 Taastrup, DenmarkTEL: (+45) 4399-8877, FAX: (+45) 4399-8077
<FINLAND>NAME: Noretron Oy AudioADD: P. O. Box 22, FIN-02631 Espoo, FinlandTEL: (+358) 9-5259330, FAX: (+358) 9-52593352
<FRANCE>NAME: Sennheiser FranceADD: 128 bis, avenue Jean-Jaures, 94851 Ivry-sur-SeineCedex, FranceTEL: (+33) 1 4987 0300, FAX: (+33) 1 4987 0324
<GERMANY>NAME: Mega Audio GmbHADD: Stromberger Str. 32, D-55411 Bingen, GermanyTEL: (+49) 6721-94330, FAX: (+49) 6721-32046
<GREECE>NAME: Bon Studio S. A.ADD: 6 Zaimi Street, Exarchia, 106.83 Athens, GreeceTEL: (+30) 210-3809-605, 606, 607, 608FAX: (+30) 210-3845-755, 210-3827-868
<ICELAND>NAME: I. D. elrf. electronic Ltd.ADD: ARMULA 38 108 REYKJAVIK, ICELANDTEL: (+354) 588 5010, FAX: (+354) 588 5011
In the electrical fast transient/burst requirements, surge, conducted disturbances by radio-frequency fields, power frequencymagnetic field, radiate electromagnetic field requirements and static electricity discharging environment, this could beaffected by generation of noise in some cases.
The affect of the European Specification EN61000-6-1 (coexistence of electromagnetic waves - common immunityspecification) on this equipment are as shown below.
Song name ...............................................................32, 99Synchronization ..............................................................85Song protect ..................................................................101S/P DIF ............................................................................42
<T>Track ...............................................................................34Trouble shooting ...........................................................131Trim .................................................................15, 35 to 40Track fader ...........................................................35 to 40Time base ................................................................14, 24Tempo map .....................................................................82
<U>Undo ...................................................36, 38, 40, 103, 113USB .........................................................................92, 138USB HOST .............................................................22, 138
<W>WAV file ....................................................................13, 90WAV file conversion ........................................................90Warning ...........................................................................25
<Y>Y cable .....................................................................18, 59


FOSTEX CO.3-2-35, Musashino, Akishima-shi, Tokyo, Japan, 196-0021
FOSTEX AMERICA13701 Cimarron Avenue Gardena, CA 90249 U.S.A.
© PRINTED IN CHINA JUNE 2005 8588062100428387