oracle® secure backup - installation and configuration guide
TRANSCRIPT
Oracle® Secure BackupInstallation and Configuration Guide
Release 18.1F10203-04March 2022

Oracle Secure Backup Installation and Configuration Guide, Release 18.1
F10203-04
Copyright © 2006, 2022, Oracle and/or its affiliates.
Primary Authors: Manish Garodia, Sarika Surampudi
Contributing Authors: Aishwarya Minocha, Craig B. Foch, Kathy Rich, Lance Ashdown, Padmaja Potineni
Contributors: Anand Agrawal, Ashok Joshi, Chris Plakyda, Cris Pedregal-Martin, Donna Cooksey, GeoffHickey, George Claborn, George Stabler, Joe Wadleigh, Judy Ferstenberg, Michael Chamberlain, RadhikaVullikanti, Rhonda Day, Roopesh Ashok Kumar, Senad Dizdar, Steve Wertheimer, Steven Fried, SumitChougule, Tammy Bednar, Tony Dziedzic
This software and related documentation are provided under a license agreement containing restrictions onuse and disclosure and are protected by intellectual property laws. Except as expressly permitted in yourlicense agreement or allowed by law, you may not use, copy, reproduce, translate, broadcast, modify, license,transmit, distribute, exhibit, perform, publish, or display any part, in any form, or by any means. Reverseengineering, disassembly, or decompilation of this software, unless required by law for interoperability, isprohibited.
The information contained herein is subject to change without notice and is not warranted to be error-free. Ifyou find any errors, please report them to us in writing.
If this is software or related documentation that is delivered to the U.S. Government or anyone licensing it onbehalf of the U.S. Government, then the following notice is applicable:
U.S. GOVERNMENT END USERS: Oracle programs (including any operating system, integrated software,any programs embedded, installed or activated on delivered hardware, and modifications of such programs)and Oracle computer documentation or other Oracle data delivered to or accessed by U.S. Government endusers are "commercial computer software" or "commercial computer software documentation" pursuant to theapplicable Federal Acquisition Regulation and agency-specific supplemental regulations. As such, the use,reproduction, duplication, release, display, disclosure, modification, preparation of derivative works, and/oradaptation of i) Oracle programs (including any operating system, integrated software, any programsembedded, installed or activated on delivered hardware, and modifications of such programs), ii) Oraclecomputer documentation and/or iii) other Oracle data, is subject to the rights and limitations specified in thelicense contained in the applicable contract. The terms governing the U.S. Government’s use of Oracle cloudservices are defined by the applicable contract for such services. No other rights are granted to the U.S.Government.
This software or hardware is developed for general use in a variety of information management applications.It is not developed or intended for use in any inherently dangerous applications, including applications thatmay create a risk of personal injury. If you use this software or hardware in dangerous applications, then youshall be responsible to take all appropriate fail-safe, backup, redundancy, and other measures to ensure itssafe use. Oracle Corporation and its affiliates disclaim any liability for any damages caused by use of thissoftware or hardware in dangerous applications.
Oracle, Java, and MySQL are registered trademarks of Oracle and/or its affiliates. Other names may betrademarks of their respective owners.
Intel and Intel Inside are trademarks or registered trademarks of Intel Corporation. All SPARC trademarks areused under license and are trademarks or registered trademarks of SPARC International, Inc. AMD, Epyc,and the AMD logo are trademarks or registered trademarks of Advanced Micro Devices. UNIX is a registeredtrademark of The Open Group.
This software or hardware and documentation may provide access to or information about content, products,and services from third parties. Oracle Corporation and its affiliates are not responsible for and expresslydisclaim all warranties of any kind with respect to third-party content, products, and services unless otherwiseset forth in an applicable agreement between you and Oracle. Oracle Corporation and its affiliates will not beresponsible for any loss, costs, or damages incurred due to your access to or use of third-party content,products, or services, except as set forth in an applicable agreement between you and Oracle.
Contents
Preface
Audience x
Documentation Accessibility x
Related Documents x
Conventions xi
Changes in This Release for Oracle Secure Backup Installation andConfiguration Guide
Changes in Oracle Secure Backup 18c Release 1 (18.1) xii
1 Introduction to Oracle Secure Backup
What Is Oracle Secure Backup? 1-1
Oracle Secure Backup Features 1-2
Overview of Oracle Secure Backup Concepts 1-3
About Oracle Secure Backup Administrative Domains and Hosts 1-3
Host Roles in an Administrative Domain 1-3
Host Naming in an Administrative Domain 1-4
Oracle Secure Backup Host Access Modes 1-4
About Oracle Secure Backup Administrative Domain: Examples 1-5
About Disk Pools 1-6
About Tape Devices 1-7
Tape Drives 1-7
Tape Libraries 1-9
Virtual Tape Libraries 1-11
Device Names and Attachments 1-11
About Cloud Storage Devices 1-12
Oracle Secure Backup Daemons 1-14
Oracle Secure Backup Interfaces 1-14
iii

2 Oracle Secure Backup Installation Overview
Overview of Installing and Configuring Oracle Secure Backup 2-1
About Installing Oracle Secure Backup 2-1
About Configuring Oracle Secure Backup 2-2
About Oracle Secure Backup Client Backward Compatibility 2-2
Client Backward Compatibility Requirements 2-2
About Certificate Lifetime 2-3
Steps to Install and Configure Oracle Secure Backup 2-3
Preparing to Install Oracle Secure Backup 2-4
System Requirements for Oracle Secure Backup 2-4
Supported Platforms and Tape Devices 2-5
Disk Space Requirements for Oracle Secure Backup 2-5
Other System Requirements for Oracle Secure Backup 2-6
Acquiring Oracle Secure Backup Installation Media 2-6
Decide Which Role the Host Performs in the Administrative Domain 2-7
Overview of Customizing Configuration Parameters During Installation 2-8
Oracle Secure Backup Temporary Directory 2-8
Oracle Secure Backup Home Directory 2-9
Preauthorized User for Performing Oracle Database Backup and Restore Operations 2-10
Length of Oracle Secure Backup User Passwords 2-10
Identity Key Certificate Length 2-11
Oracle Secure Backup Database Directory 2-11
3 Installing Oracle Secure Backup on Linux or UNIX
Prerequisites for Installing Oracle Secure Backup on Linux or UNIX 3-1
Options for Installing Oracle Secure Backup on Linux or UNIX 3-2
Installing Oracle Secure Backup on Linux or UNIX 3-2
Specifying Advanced Settings for Linux/UNIX 3-6
Silently Installing the Client Role on Linux or UNIX 3-6
Configuring Platform-Specific Media Server Devices 3-8
Configuring Devices on Linux Media Servers 3-9
Manually creating devices using mkdev in Linux 3-11
Configuring Devices on Solaris Media Servers 3-12
Manually creating devices using mkdev in Solaris 3-14
Configuring Devices on AIX Media Servers 3-15
Manually Creating Devices in AIX 3-16
Identifying and Configuring AIX Devices in a Point-to-Point or FC-AL Configuration 3-19
Configuring Devices on HP-UX Media Servers 3-20
Assigning Oracle Secure Backup Logical Unit Numbers to Devices 3-22
Additional Information for Installation of Oracle Secure Backup on Linux 3-22
iv
Linux Media Server System Requirement: SCSI Generic Driver 3-23
Additional Information for Installing Oracle Secure Backup on AIX 3-23
Configuring IOCP on AIX Systems 3-24
4 Installing Oracle Secure Backup on Windows
Prerequisites for Installing Oracle Secure Backup on Windows 4-1
Installing Oracle Secure Backup on Windows 4-1
Enabling Installer Logging on Windows 4-7
Configuring Advanced Installation Settings for Windows 4-8
Configuring Firewalls for Oracle Secure Backup on Windows 4-10
5 Uninstalling Oracle Secure Backup
Uninstalling Oracle Secure Backup on Linux or UNIX 5-1
Uninstalling Oracle Secure Backup on Windows 5-2
6 Oracle Secure Backup User Interfaces
Using Oracle Secure Backup in Enterprise Manager 6-1
Enabling Oracle Secure Backup Links in Oracle Enterprise Manager 6-2
Registering an Administrative Server in Oracle Enterprise Manager 6-2
Accessing the Web Tool from Enterprise Manager 6-3
Using the Oracle Secure Backup Web Tool 6-4
Starting a Web Tool Session 6-4
Web Tool Home Page 6-5
Persistent Page Links 6-6
Web Tool Configure Page 6-7
Web Tool Manage Page 6-8
Web Tool Backup Page 6-10
Web Tool Restore Page 6-11
Using obtool 6-11
Displaying Help for Invoking obtool 6-12
Starting obtool in Interactive Mode 6-12
Running obtool Commands in Interactive Mode 6-12
Redirecting obtool Input from Text Files 6-13
Executing obtool Commands in Noninteractive Mode 6-13
Running Multiple Commands in Noninteractive Mode 6-13
Redirecting Input in Noninteractive Mode 6-13
Ending an obtool Session 6-14
Starting obtool as a Specific User 6-14
Using Oracle Secure Backup through Recovery Manager (RMAN) 6-14
v
Configuring Oracle Secure Backup for Use with RMAN 6-15
Setting Up User Preauthorization in Oracle Secure Backup 6-15
Defining Backup Storage Selectors Using Oracle Secure Backup 6-15
7 Configuring and Managing the Administrative Domain
Overview of Configuring the Administrative Domain 7-1
Network Load Balancing in Oracle Secure Backup 7-2
Steps to Configure the Administrative Domain 7-3
Configuring the Administrative Domain with Hosts 7-4
About Administrative Domain Host Configuration 7-4
Steps to Configure Hosts in the Administrative Domain 7-5
Adding a Host to the Administrative Domain 7-6
Adding the Media Server Role to an Administrative Server 7-10
Adding Backup and Restore Environment Variables to an NDMP Host 7-11
Configuring Preferred Network Interfaces (PNI) 7-11
About PNI 7-11
Configuring PNI for Inbound Connections 7-13
Configuring PNI for Outbound Connections 7-14
Removing a PNI for Inbound Connections 7-15
Removing a PNI for Outbound Connections 7-15
Pinging Hosts in the Administrative Domain 7-15
Enable tcpkeepalive on local host 7-16
About tcpkeeplive 7-16
Steps to enable tcpkeepalive 7-16
Overview of Automatic Device Discovery 7-17
About Automatic Device Discovery 7-17
About Persistent Binding for SCSI Tape Devices 7-18
Steps to Discover and Configure Tape Devices in the Administrative Domain 7-19
Steps to Detect Missing Tape Devices 7-21
Adding Tape Devices to an Administrative Domain 7-21
About Tape Device Names 7-22
About Manually Configuring Tape Drives and Libraries 7-22
Methods of Configuring Tape Devices 7-23
Steps to Configure Tape Devices in the Administrative Domain 7-24
Displaying the Devices Page 7-25
Manually Configuring Tape Libraries 7-25
Configuring Automatic Tape Drive Cleaning for a Library 7-28
Configuring Tape Drives 7-29
Configuring an NDMP Copy-Enabled Virtual Tape Library 7-31
Adding Tape Device Attachments 7-33
vi
Pinging Device Attachments 7-34
Displaying Device Attachment Properties 7-34
Multiple Attachments for SAN-Attached Tape Devices 7-34
Configuring Multihosted Device Objects 7-35
Updating Tape Library Inventory 7-36
Verifying and Configuring Added Tape Devices 7-37
Displaying Device Properties 7-37
Pinging Tape Devices 7-37
Editing Device Properties 7-38
Verifying Tape Device Configuration 7-38
Setting Serial Number Checking 7-39
Configuring Disk Pools 7-41
Displaying the Defined Disk Pools 7-41
Creating Disk Pools 7-41
Editing Disk Pool Properties 7-43
Renaming Disk Pools 7-44
Removing Disk Pools 7-44
Managing Hosts in the Administrative Domain 7-45
Viewing the Hosts in the Administrative Domain 7-45
Viewing or Editing Host Properties 7-46
Updating Hosts in the Administrative Domain 7-46
Removing Hosts from an Administrative Domain 7-46
Configuring Cloud Storage Devices 7-47
Prerequisites for Configuring Storage Devices for OCI Classic 7-47
Configuring an Authentication Object for Oracle Cloud Infrastructure 7-48
Creating Cloud Storage Devices for Oracle Cloud Infrastructure 7-49
Creating Cloud Storage Devices for Oracle Cloud Infrastructure Classic 7-52
Displaying the Defined Cloud Storage Devices 7-54
Editing Cloud Storage Device Properties 7-54
Renaming Cloud Storage Devices 7-55
Removing Cloud Storage Devices 7-55
About Cloud Certificates 7-55
Adding Certificates to the Cloud Wallet 7-56
Manually Creating a Cloud Wallet 7-59
8 Upgrading Oracle Secure Backup
About Upgrade Installations 8-1
About Upgrade Requirements 8-1
Upgrade Installation on Windows x64 8-2
vii
Performing an Upgrade Installation on Linux or UNIX 8-3
9 Managing Security for Backup Networks
Backup Network Security Overview 9-1
Planning Security for an Administrative Domain 9-2
Identifying Assets and Principals 9-2
Identifying Your Backup Environment Type 9-3
Single System 9-3
Data Center 9-4
Corporate Network 9-6
Choosing Secure Hosts for the Administrative and Media Servers 9-7
Determining the Distribution Method of Host Identity Certificates 9-7
Trusted Hosts 9-9
Host Authentication and Communication 9-9
Identity Certificates and Public Key Cryptography 9-10
Authenticated SSL Connections 9-11
Certification Authority 9-11
Automated and Manual Certificate Provisioning Mode 9-11
Oracle Wallet 9-12
Oracle Secure Backup Encryption Wallet 9-13
Web Server Authentication 9-14
Revoking a Host Identity Certificate 9-14
Encryption of Data in Transit 9-15
Default Security Configuration 9-17
Configuring Security for the Administrative Domain 9-17
Providing Certificates for Hosts in the Administrative Domain 9-17
Configuring the Administrative Server 9-17
Configuring Media Servers and Clients 9-18
Setting the Size for Public and Private Keys 9-20
Setting the Key Size During Installation 9-20
Setting the Key Size in the certkeysize Security Policy 9-21
Setting the Key Size in mkhost 9-21
Enabling and Disabling SSL for Host Authentication and Communication 9-22
Managing Certificates with obcm 9-22
Renewing Certificates in Automated Certificate Provisioning Mode 9-23
Renewing Certificates in Manual Certificate Provisioning Mode 9-24
Renewing Certificates in Automated Certificate Provisioning Mode on Earlier Versionsof Oracle Secure Backup 9-25
Renewing Certificates in Manual Provisioning Mode on Earlier Versions of OracleSecure Backup 9-26
Manually Authenticating Hosts After Certificate Renewal 9-27
viii
Exporting Signed Certificates 9-27
Importing Signed Certificate Chains 9-27
A Oracle Secure Backup Directories and Files
Oracle Secure Backup Home Directory A-1
Administrative Server Directories and Files A-1
Media Server Directories and Files A-4
Client Host Directories and Files A-5
B Determining Linux SCSI Parameters
Determining SCSI Device Parameters on Linux B-1
C Oracle Secure Backup and ACSLS
About ACSLS C-1
ACSLS and Oracle Secure Backup C-2
Communicating with ACSLS C-3
Drive Association C-3
Volume Loading and Unloading C-3
Imports and Exports C-4
Access Controls C-4
Scratch Pool Management C-4
Modified Oracle Secure Backup Commands C-4
Unsupported Oracle Secure Backup Commands C-5
Installation and Configuration C-5
D Oracle Secure Backup and Reliable Datagram Socket (RDS)
Overview of Reliable Datagram Socket (RDS) D-1
Using Reliable Datagram Socket (RDS) Protocol over Infiniband for Data Transfer inOracle Secure Backup D-1
Enabling RDS for Interhost Communication D-2
Glossary
Index
ix
Preface
This Preface contains these topics:
• Audience
• Documentation Accessibility
• Related Documents
• Conventions
AudienceThis guide is intended for system administrators and database administrators whoinstall the Oracle Secure Backup software. These administrators might also performbackup and restore operations. To use this document, you must be familiar with theoperating system environment on which you plan to use Oracle Secure Backup. Toperform Oracle database backup and restore operations, you should also be familiarwith Recovery Manager concepts.
Documentation AccessibilityFor information about Oracle's commitment to accessibility, visit the OracleAccessibility Program website at http://www.oracle.com/pls/topic/lookup?ctx=acc&id=docacc.
Access to Oracle Support
Oracle customers that have purchased support have access to electronic supportthrough My Oracle Support. For information, visit http://www.oracle.com/pls/topic/lookup?ctx=acc&id=info or visit http://www.oracle.com/pls/topic/lookup?ctx=acc&id=trsif you are hearing impaired.
Related DocumentsFor more information about backing up and restoring file systems with Oracle SecureBackup, see the following Oracle resources:
• Oracle Secure Backup Reference
This manual contains information about the command-line interface for OracleSecure Backup.
• Oracle Secure Backup Administrator's Guide
This book describes how to use Oracle Secure Backup to perform backup andrestore operations. The book is oriented to the Oracle Secure Backup Web tool,which is a Web-based GUI interface.
Preface
x
For more information about database backup and recovery, including the Recovery Manager(RMAN) utility, see the following Oracle resources:
• Oracle Database Backup and Recovery User’s Guide
This book provides an overview of backup and recovery and discusses backup andrecovery strategies. It provides instructions for basic backup and recovery of yourdatabase using Recovery Manager (RMAN).
The Oracle Secure Backup product site is located at the following URL:
http://www.oracle.com/technetwork/database/database-technologies/secure-backup/documentation/securebackup-094467.htmlYou can download the Oracle Secure Backup software from the Download tab on this page.
ConventionsThe following text conventions are used in this document:
Convention Meaning
boldface Boldface type indicates graphical user interface elements associated with anaction, or terms defined in text or the glossary.
italic Italic type indicates book titles, emphasis, or placeholder variables for whichyou supply particular values.
monospace Monospace type indicates commands within a paragraph, URLs, code inexamples, text that appears on the screen, or text that you enter.
Preface
xi
Changes in This Release for OracleSecure Backup Installation andConfiguration Guide
This preface lists new and changed features provided in Oracle Secure Backup 18.1.
Changes in Oracle Secure Backup 18c Release 1 (18.1)The following are the changes in Oracle Secure Backup Installation and ConfigurationGuide for Oracle Secure Backup 18.1.
New Features
• Oracle Secure Backup now supports backup to Oracle Cloud Infrastructure ObjectStorage.
Oracle Cloud Infrastructure Object Storage is accessed and managed usingOracle Secure Backup cloud storage devices in a manner similar to other OracleSecure Backup devices. All backup data is securely written to cloud storagedevices by encrypting the backup data at the client host, with encryption keysbeing managed by the Oracle Secure Backup administrative server.
See About Cloud Storage Devices and Creating Cloud Storage Devices for OracleCloud Infrastructure .
• Oracle Secure Backup allows adding new certificates to an existing Cloud wallet.You can download Cloud server certificates and import them into your Cloudwallet.
The Oracle Secure Backup installer creates a Cloud wallet with the defaultcertificates during installation. However, you can manually create a Cloud wallet, ifrequired.
See About Cloud Certificates, Adding Certificates to the Cloud Wallet, and Manually Creating a Cloud Wallet.
• Oracle Secure Backup now allows control connections to remain open using alocal policy for tcpkeepalive.
While performing large backups, the tcpkeepalive policy prevents idle OracleSecure Backup network connections from being terminated by a proxy or firewalldue to inactivity.
See Enable tcpkeepalive on local host, About tcpkeeplive, and ConfiguringFirewalls for Oracle Secure Backup on Windows.
• Oracle Secure Backup offers a new Cloud storage class option, infrequent access.
Changes in This Release for Oracle Secure Backup Installation and Configuration Guide
xii

This storage option is useful for data that the user accesses infrequently, but is madeavailable when needed. The storage costs for the infrequent access option are lower thanthe standard Object Storage.
See About Cloud Storage Devices and Creating Cloud Storage Devices for Oracle CloudInfrastructure.
Changes in This Release for Oracle Secure Backup Installation and Configuration Guide
xiii
1Introduction to Oracle Secure Backup
This chapter provides an introduction to Oracle Secure Backup and includes advice onplanning and configuring your administrative domain.
This chapter contains these sections:
• What Is Oracle Secure Backup?
• Overview of Oracle Secure Backup Concepts
• Oracle Secure Backup Interfaces
See Also:
Oracle Secure Backup Administrator's Guide for conceptual information aboutOracle Secure Backup
What Is Oracle Secure Backup?Oracle Secure Backup enables reliable data protection through file-system backup to tape. Itsupports every major tape drive and tape library in SAN, Gigabit Ethernet (GbE), and SCSIenvironments using standard tape formats.
Oracle Secure Backup supports Internet Protocol v4 (IPv4), Internet Protocol v6 (IPv6), andmixed IPv4/IPv6 environments on all platforms that support IPv6.
Using Oracle Secure Backup on your network enables you to take data from a networkedhost running Oracle Secure Backup or a NAS device that supports NDMP, and back up thatdata on a tape device on the network. That data can include ordinary file-system files anddatabases backed up with Recovery Manager (RMAN).
As part of the Oracle storage solution, Oracle Secure Backup provides scalable distributedbackup and recovery capabilities. It reduces complexity of your backup solution, by:
• Integrating with the Oracle stack for maximum ease of use in a single Oracle solution toback up your data from disk to tape
• Employing single-vendor technical support for database and file-system backup andrecovery to tape
• Using existing or new hardware, with broad tape device support in SCSI, GbE, and SANenvironments with dynamic tape drive sharing for maximum tape drive utilization
• Enabling use of disk pools to store file-system backups, RMAN backups, and NDMP filerbackups. Backups stored on disk pools can be moved to tape later for optimum storagespace utilization.
Oracle Secure Backup eliminates integration challenges with ready-to-use tape managementsoftware that provides single-vendor support. Oracle Secure Backup also reduces your costs.When using Oracle Secure Backup with RMAN to back up and recover databases and files to
1-1
and from tape, no third-party tape management software is required. Oracle SecureBackup provides the media management layer needed to use tape storage withRMAN.
Centralized administration, heterogeneous network support, and flexible schedulingsimplify and automate protection of the entire Oracle environment, including databasedata and file-system data such as the contents of the Oracle home.
Oracle Secure Backup FeaturesOracle Secure Backup provides the following features:
• Integration with other Oracle products thus enabling you to easily backup andrestore both Oracle Databases and file-system data to tape
Oracle Secure Backup is fully integrated with Recovery Manager (RMAN) andOracle Enterprise Manager. You can use Oracle Enterprise Manager to backupboth file-system data and Oracle Databases to tape. Oracle Secure Backup servesas a media management layer, through the System Backup to Tape (SBT)interface, to securely backup Oracle Databases using RMAN.
• Support for disk pools and a wide range of tape drives and libraries that areaccessible through various protocols such as SCSI, ISCSI, SAN, NDMP, and FibreChannel
• Centralized tape backup management
Oracle Secure Backup enables centralized backup management of diversedistributed servers and multiple platforms including UNIX, Linux, Windows, andSAN. It can backup and restore locally or over a LAN/WAN.
• Policy-based backup management
Oracle Secure Backup provides customizable administrative policies that enableyou to control backup operations in the administrative domain. Policies also enableyou to control aspects of domain security.
• Flexible interface options that provide maximum ease of use
Oracle Secure Backup functionality can be accessed using any of the followinginterfaces: Oracle Secure Backup Web Tool, Oracle Enterprise Manager DBControl, Oracle Enterprise Manager Cloud Control, or obtool command-lineinterface.
• Maximum security options for data and inter-host communication
Inter-domain communication is secured using the Secure Socket Layer (SSL)protocol. All hosts in the Oracle Secure Backup administrative domain areidentified and authenticated using SSL and X.509 certificates. Data transmissionwithin the administrative domain is secured using encryption. You can also encryptOracle Database backups before they are stored to tape.
• Automated device discovery
Oracle Secure Backup can automatically discover and configure each secondarystorage device connected to certain types of NDMP servers, such as a NetworkAppliance filer. It can also discover devices connected to the Oracle SecureBackup media servers.
• Automated tape library and device management that includes automated control oftape libraries
Chapter 1Oracle Secure Backup Features
1-2
Oracle Secure Backup automates the management of tape libraries to ensure efficientand reliable use of their capabilities. It controls library robotics and enables automaticloading and unloading of volumes. It can also automatically clean tape drives in a tapelibrary.
• Automated media management that includes volume and backup expiration
Oracle Secure Backup enables automatic tape recycling by specifying when volumes canbe recycled. You create policies to define when volumes are eligible to be recycled orrewritten.
• Flexible, multi-level, backup options
Oracle Secure Backup enables you to create full, incremental, and differential backups.
• Flexible options for restoring backups
Oracle Secure Backup enables you to restores backup data stored on tapes either to theoriginal location or to an alternative server.
Overview of Oracle Secure Backup ConceptsThis section discusses Oracle Secure Backup concepts that enable you to better understandthe installation process.
This section contains these topics:
• About Oracle Secure Backup Administrative Domains and Hosts
• About Oracle Secure Backup Administrative Domain: Examples
• About Disk Pools
• About Tape Devices
• About Cloud Storage Devices
About Oracle Secure Backup Administrative Domains and HostsOracle Secure Backup organizes hosts and tape devices into an administrative domain,representing the network of hosts containing data to be backed up, hosts with attached tapedevices on which backups are stored, and each tape device with its attachment to the hosts.A host can belong to only one administrative domain.
Host Roles in an Administrative DomainEach host in an administrative domain must be assigned one or more of the following OracleSecure Backup roles:
• Administrative server
Each administrative domain must have exactly one administrative server. Duringpostinstallation configuration, the administrative server must be configured with completedata regarding the other hosts in the administrative domain, their roles, and their attachedtape devices. This configuration information is maintained in a set of configuration filesstored on the administrative server.
The administrative server runs the scheduler, which starts and monitors each backup job.The scheduler also keeps a backup catalog with metadata for all backup and restoreoperations performed in the administrative domain.
Chapter 1Overview of Oracle Secure Backup Concepts
1-3
• Media server
A media server is a host with at least one tape device attached to it. A mediaserver transfers data to or from a volume loaded on one of these tape devices. Amedia server has at least one attachment to a tape drive or library. It might haveattachments to multiple tape libraries and disk pools.
You specify the attachments between media servers and tape devices duringpostinstallation configuration of Oracle Secure Backup.
• Client
The client role is assigned to any host that has access to file-system or databasedata that can be backed up or restored by Oracle Secure Backup. Any host whereOracle Secure Backup is installed can be a client, including hosts that are alsomedia servers or the administrative server. A network-attached storage device thatOracle Secure Backup accesses through NDMP can also serve the client role.
Note:
A host can be assigned multiple roles in an administrative domain. Forexample, a host with a tape drive attached could be both the administrativeserver and media server for a network that includes several other clients. Formore examples of administrative domains, see "About Oracle SecureBackup Administrative Domain: Examples".
See Also:
"Choosing Secure Hosts for the Administrative and Media Servers"
Host Naming in an Administrative DomainYou must assign each host in an administrative domain a unique name to be used inOracle Secure Backup operations. Typically, the host name in your DNS for this host isa good choice for the Oracle Secure Backup host name. However, you can assign adifferent name to a host.
Oracle Secure Backup Host Access ModesCommunication among hosts in an administrative domain is always based on NDMP,but implementations and versions of NDMP vary. Oracle Secure Backup supports twohost access modes: primary access mode and NDMP access mode.
Primary access mode is used among hosts on which Oracle Secure Backup isinstalled. Oracle Secure Backup daemons run in the background on the host,communicate with the administrative server using the Oracle Secure Backupimplementation of NDMP, and perform backup and restore tasks. Hosts on whichdatabases reside are typically accessed using primary access mode.
Chapter 1Overview of Oracle Secure Backup Concepts
1-4
Note:
In Oracle Enterprise Manager, primary access mode is referred to as native accessmode. In the Oracle Secure Backup Web tool and the output of some obtoolcommands such as lshost, primary mode is referred to as OB access mode.
NDMP access mode is used to communicate with devices such as storage appliances that donot run Oracle Secure Backup natively. For example, devices from third-party vendors suchas Network Appliance and EMC are supported only in NDMP access mode. Each NDMP hostuses a vendor-specific implementation of the NDMP protocol to back up and restore filesystems. Some devices support older versions of the NDMP protocol. When adding suchdevices to the administrative domain, extra parameters might be required.
Oracle Secure Backup supports NDMP versions 3 and 4, and various extensions to version4. It automatically negotiates with other, non-Oracle NDMP components to select a mutuallysupported protocol version. Between its own components, Oracle Secure Backup usesNDMP version 4. When communicating with hosts that are not running Oracle SecureBackup, Oracle Secure Backup usually chooses the protocol version proposed by that hostwhen the connection is established. You can change the NDMP protocol version with whichOracle Secure Backup communicates to a specific host. You might want to do this whentesting or troubleshooting.
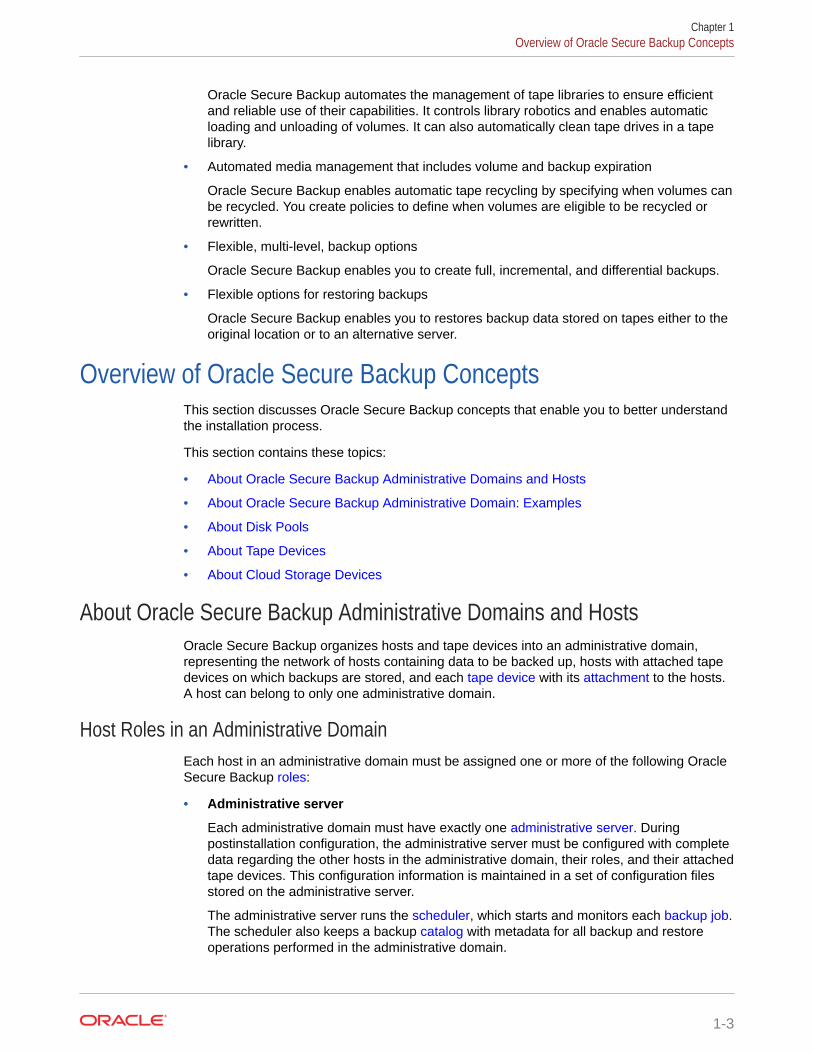
About Oracle Secure Backup Administrative Domain: ExamplesFigure 1-1 shows a minimal administrative domain, in which a single host is administrativeserver, media server, and client. An Oracle database also runs on the same host.
Figure 1-1 Administrative Domain with One Host
Ta
pe
�L
ibra
ry
Ta
pe
. . .
. . .
. . .
. . .
. . .
. . .
. . .
. . .
. . .
. . .
Off
sit
e�
Sto
rag
e
Re
sto
re
Ba
cku
p
Ora
cle
�D
ata
ba
se
Lin
ux
Re
co
ve
ry �
Ma
na
ge
r
Ad
min
istr
ati
ve
Se
rve
r,
Me
dia
Se
rve
r, a
nd
Cli
en
t
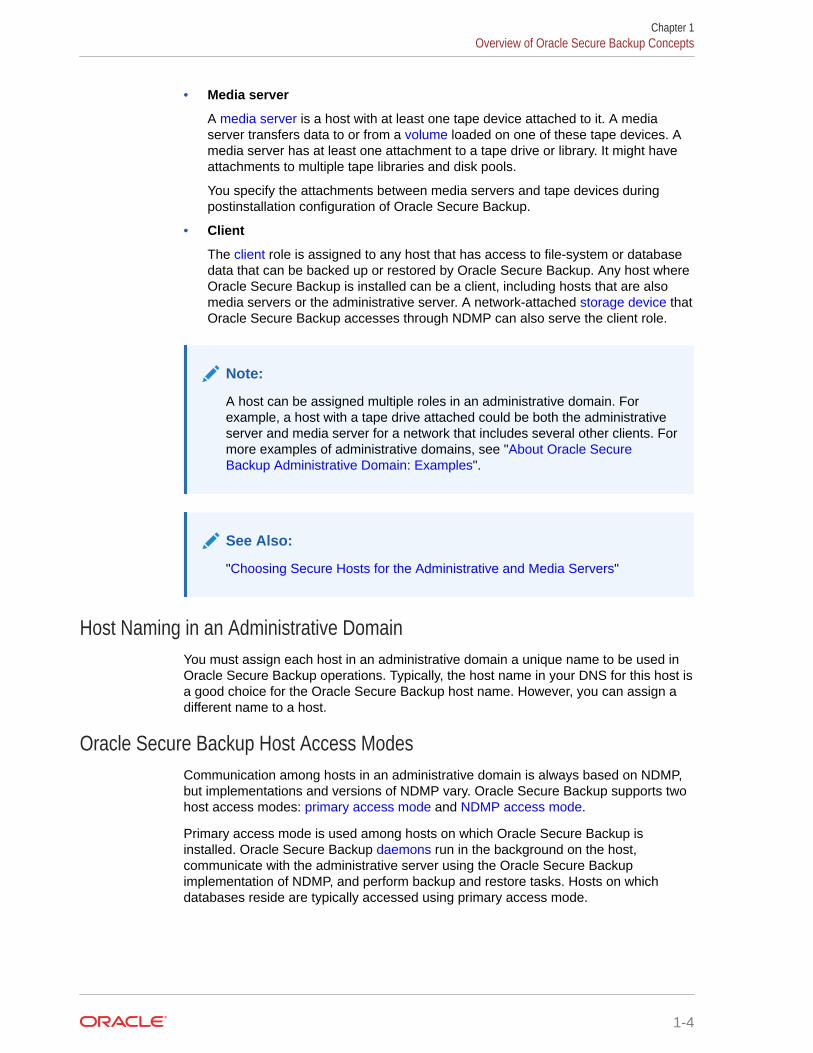
Figure 1-2 shows a possible Oracle Secure Backup administrative domain that includes threeclient hosts, one administrative server, and one media server. A NAS appliance containsordinary file data. One client based on UNIX and another based on Windows containdatabases and other file data. Oracle Secure Backup can back up to tape the non-databasefiles on file systems accessible on client hosts. RMAN can back up to tape database filesthrough the Oracle Secure Backup SBT interface.
Chapter 1Overview of Oracle Secure Backup Concepts
1-5
Figure 1-2 Oracle Secure Backup Administrative Domain with Multiple Hosts
Tap
e�
Lib
rary
Tap
e
. . .
. . .
. . .
. . .
. . .
. . .
. . .
. . .
. . .
. . .
Off
sit
e�
Sto
rag
e
Resto
reB
ackup
Ora
cle
�S
ecu
re B
acku
p�
Med
ia S
erv
er
Ora
cle
�
Se
cu
re B
acku
p�
Ad
min
istr
ati
ve �
Serv
er
Ora
cle
�D
ata
base
Ora
cle
�D
ata
base
Ora
cle
Se
cu
re
Ba
ck
up
Cli
en
ts
Data
Flo
w
Contr
ol F
low
Ora
cle
�S
ecu
re �
Backu
p�
Cata
log
ND
MP
OB
OB
NA
S�
Applia
nce
UN
IXLin
ux
Lin
ux
Win
dow
s
Reco
very
�M
an
ag
er
Reco
very
�M
an
ag
er
About Disk PoolsA disk pool is a file-system directory that acts as a repository for backup imageinstances. Disk pools can store file-system backups, RMAN backups of Oracledatabases, and backups created by NDMP filers.
Each disk pool is represented as a device in Oracle Secure Backup. A disk pool canbelong to only one administrative domain. To monitor space utilization on disk pools,you must delete expired backup image instances.
See Also:
Oracle Secure Backup Administrator's Guide for more information onmanaging disk pools
Chapter 1Overview of Oracle Secure Backup Concepts
1-6
About Tape DevicesOracle Secure Backup maintains information about each tape library and tape drive so thatyou can use them for local and network backup and restore operations. You can configuretape devices during installation or add a new tape device to an existing administrativedomain. When configuring tape devices, the basic task is to inform Oracle Secure Backupabout the existence of a tape device and then specify which media server can communicatewith this tape device.
This section contains these topics:
• Tape Drives
• Tape Libraries
• Device Names and Attachments
Tape DrivesA tape drive is a tape device that uses precisely controlled motors to wind a tape from onereel to another. The tape passes a read/write head as it winds. Most magnetic tape systemsuse small reels fixed inside a cartridge to protect the tape and make handling of the tapeeasier.
A magnetic cassette or tape is sequential-access storage. It has a beginning and an end,which means that to access data in the middle of the tape, a tape device must read throughthe beginning part of the tape until it locates the desired data.
In a typical format, a tape drive writes data to a tape in blocks. The tape drive writes eachblock in a single operation, leaving gaps between the blocks. The tape runs continuouslyduring the write operation.
The block size of a block of data is the size of the block in bytes as it was written to tape. Allblocks read or written during a given backup or restore operation have the same block size.The blocking factor of a block of data expresses the number of 512-byte records contained inthe block. For example, the Oracle Secure Backup default blocking factor (128) results in atape block size of 128*512 bytes or 64 KB.
The maximum blocking factor is an upper limit on the blocking factor that Oracle SecureBackup uses. This limit comes into play particularly during restores, when Oracle SecureBackup must pick an initial block size to use without knowing the actual block size on thetape. The maximum blocking factor limits this initial block size to a value that is acceptable toboth the tape device and the underlying operating system.
When Oracle Secure Backup starts a backup, it decides what block size to use based onseveral factors. Listed in order of precedence, these factors are:
• Blocking factor specified using the obtar -b option
This option can also be specified as part of the operations/backupoptions policy. If thisoption is specified, then it overrides all other factors.
Chapter 1Overview of Oracle Secure Backup Concepts
1-7
See Also:
Oracle Secure Backup Reference for more information on the obtar -boption and the operations/backupoptions policy
• Configuration of the tape drive to be used
You can specify what blocking factor, maximum blocking factor, or both that OracleSecure Backup should use for a particular tape drive when you configure thatdrive. You might want to do this if you have tape drives with very different blocksize limits.
See Also:
"Configuring Tape Drives"
• Domain-wide blocking factors or maximum blocking factors set with the media/blockingfactor and media/maxblockingfactor policies.
See Also:
Oracle Secure Backup Reference for more information on the media/blockingfactor and media/maxblockingfactor policies
• The default blocking factor (128) and maximum blocking factor (128), resulting in ablock size of 64K
When a blocking factor has been nominated by one or another of these factors, it mustpass the following tests:
• The block size must be less than or equal to the maximum block size (blockingfactor) put in effect by whatever policies or tape drive configuration attributes are inforce.
• The block size must be supported by the tape drive and attach point in question.
Sometimes a tape drive, device driver, or kernel operating system has a limitationthat supersedes all other considerations.
When Oracle Secure Backup begins a restore operation, it does not know what blocksize was used to write a given tape. Because issuing a read for a too-small blockwould result in an error condition and a tape reposition, Oracle Secure Backup alwaysstarts a restore operation by reading the largest possible block size. This is either thecurrent setting of the media/maxblockingfactor policy or the tape drive configurationattribute. The maximum blocking factor, therefore, must always be greater than orequal to the largest block size you ever want to restore.
After the first read from the backup image instance, Oracle Secure Backup comparesthe amount of data requested to the actual size of the block and adjusts the size ofsubsequent reads to match what is on the tape.
Each tape drive supports a specific tape format. Typical tape formats include:
Chapter 1Overview of Oracle Secure Backup Concepts
1-8
• 4mm, or Digital Audio Tape (DAT)
• Advanced Intelligent Tape (AIT)
• Digital Linear Tape (DLT) and Super DLT (SDLT)
• Linear Tape-Open (LTO)
• T9840
• T9940
• T10000
Information about the tape formats of tape devices supported by Oracle Secure Backup isavailable in the Getting Started section at the following URL:
http://www.oracle.com/technetwork/products/secure-backup/learnmore/index.html
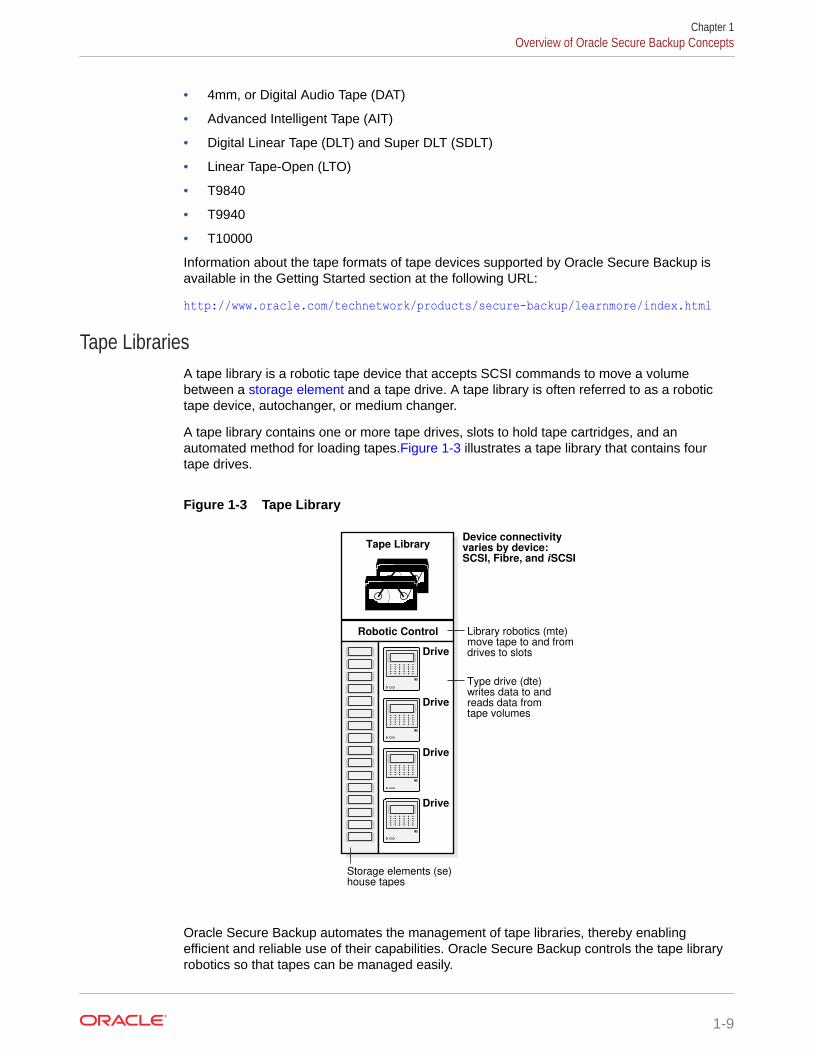
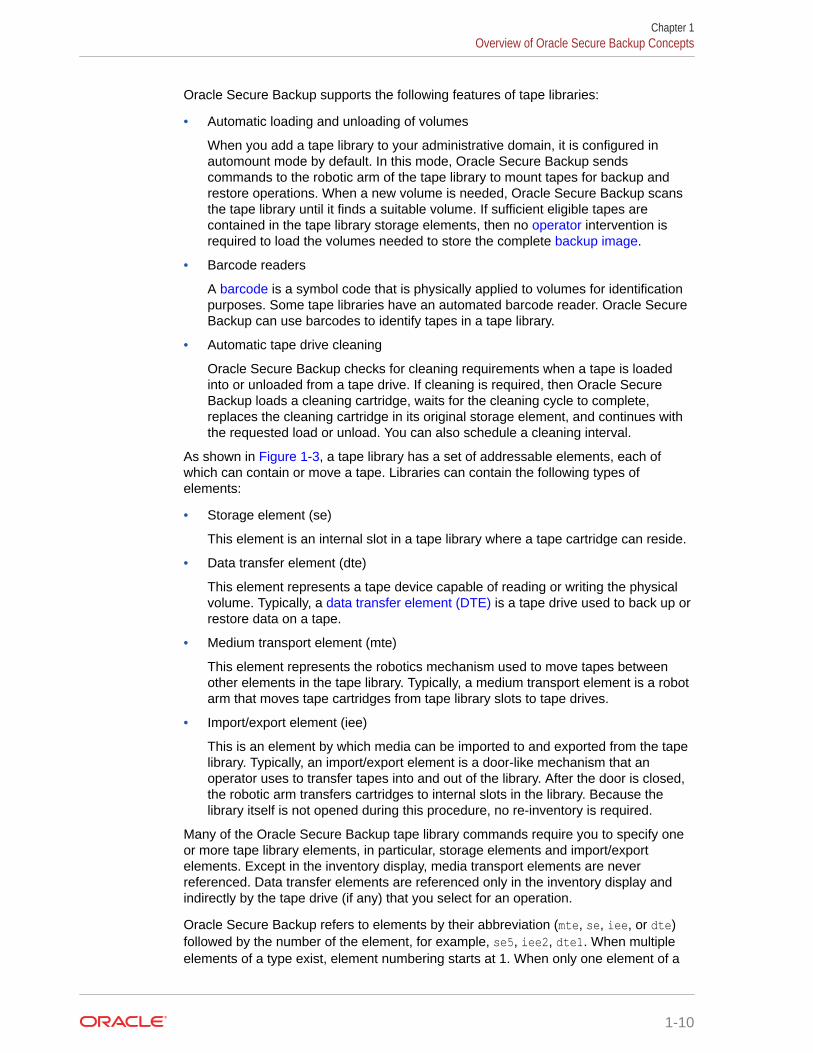
Tape LibrariesA tape library is a robotic tape device that accepts SCSI commands to move a volumebetween a storage element and a tape drive. A tape library is often referred to as a robotictape device, autochanger, or medium changer.
A tape library contains one or more tape drives, slots to hold tape cartridges, and anautomated method for loading tapes.Figure 1-3 illustrates a tape library that contains fourtape drives.
Figure 1-3 Tape Library
Tape Library
Robotic Control
. . . . . .. . . . . .. . . . . .. . . . . .. . . . . .
Drive
. . . . . .. . . . . .. . . . . .. . . . . .. . . . . .
Drive
. . . . . .. . . . . .. . . . . .. . . . . .. . . . . .
Drive
. . . . . .. . . . . .. . . . . .. . . . . .. . . . . .
Drive
Library robotics (mte) �move tape to and from drives to slots
Type drive (dte) writes data to and �reads data from �tape volumes
Storage elements (se) house tapes
Device connectivity �varies by device: �SCSI, Fibre, and iSCSI
Oracle Secure Backup automates the management of tape libraries, thereby enablingefficient and reliable use of their capabilities. Oracle Secure Backup controls the tape libraryrobotics so that tapes can be managed easily.
Chapter 1Overview of Oracle Secure Backup Concepts
1-9
Oracle Secure Backup supports the following features of tape libraries:
• Automatic loading and unloading of volumes
When you add a tape library to your administrative domain, it is configured inautomount mode by default. In this mode, Oracle Secure Backup sendscommands to the robotic arm of the tape library to mount tapes for backup andrestore operations. When a new volume is needed, Oracle Secure Backup scansthe tape library until it finds a suitable volume. If sufficient eligible tapes arecontained in the tape library storage elements, then no operator intervention isrequired to load the volumes needed to store the complete backup image.
• Barcode readers
A barcode is a symbol code that is physically applied to volumes for identificationpurposes. Some tape libraries have an automated barcode reader. Oracle SecureBackup can use barcodes to identify tapes in a tape library.
• Automatic tape drive cleaning
Oracle Secure Backup checks for cleaning requirements when a tape is loadedinto or unloaded from a tape drive. If cleaning is required, then Oracle SecureBackup loads a cleaning cartridge, waits for the cleaning cycle to complete,replaces the cleaning cartridge in its original storage element, and continues withthe requested load or unload. You can also schedule a cleaning interval.
As shown in Figure 1-3, a tape library has a set of addressable elements, each ofwhich can contain or move a tape. Libraries can contain the following types ofelements:
• Storage element (se)
This element is an internal slot in a tape library where a tape cartridge can reside.
• Data transfer element (dte)
This element represents a tape device capable of reading or writing the physicalvolume. Typically, a data transfer element (DTE) is a tape drive used to back up orrestore data on a tape.
• Medium transport element (mte)
This element represents the robotics mechanism used to move tapes betweenother elements in the tape library. Typically, a medium transport element is a robotarm that moves tape cartridges from tape library slots to tape drives.
• Import/export element (iee)
This is an element by which media can be imported to and exported from the tapelibrary. Typically, an import/export element is a door-like mechanism that anoperator uses to transfer tapes into and out of the library. After the door is closed,the robotic arm transfers cartridges to internal slots in the library. Because thelibrary itself is not opened during this procedure, no re-inventory is required.
Many of the Oracle Secure Backup tape library commands require you to specify oneor more tape library elements, in particular, storage elements and import/exportelements. Except in the inventory display, media transport elements are neverreferenced. Data transfer elements are referenced only in the inventory display andindirectly by the tape drive (if any) that you select for an operation.
Oracle Secure Backup refers to elements by their abbreviation (mte, se, iee, or dte)followed by the number of the element, for example, se5, iee2, dte1. When multipleelements of a type exist, element numbering starts at 1. When only one element of a
Chapter 1Overview of Oracle Secure Backup Concepts
1-10
type exists, the number can be omitted. Thus, iee1 and iee both refer to the first and onlyimport/export element. If the abbreviation is omitted, then a storage element is assumed. Forexample, se4 and 4 both refer to the fourth storage element. For some commands, you canspecify a range of storage elements, for example, 1-5.
Oracle Secure Backup supports several tape library operations. The following operations arethe most basic:
• Inserting and extracting volumes
• Loading and unloading volumes
• Moving volumes
• Importing and exporting volumes
See Also:
• Oracle Secure Backup Reference for a description of the tape librarycommands that you can run in obtool
Virtual Tape LibrariesA virtual tape library is one or more large-capacity disk drives partitioned into virtual physicaltape volumes. To Oracle Secure Backup the virtual tape library appears to be a physical tapelibrary with at least one volume and at least one tape drive. The volumes and tape drives inthe virtual tape library can be configured to match common physical tapes and tape drives.
Backup operations performed to a virtual tape library complete faster than backup operationsto actual tape drives, because the underlying storage device is direct access media. But avirtual tape library is not suitable for long time storage, because it has limited storagecapacity. If you back up to a virtual tape library, then you can take advantage of its fasterbackup and then use the volume migration feature of Oracle Secure Backup to migrate thedata to tapes at a later point of time.
Device Names and AttachmentsBecause Oracle Secure Backup manages tape drive operations, it must be able to identifythe tape drive and determine whether the tape drive is housed in a tape library. OracleSecure Backup must further determine if a storage element is available for storing a volumewhile not in use by the tape drive. Thus, each tape device must be uniquely identified withinOracle Secure Backup by a user-defined name.
Oracle Secure Backup distinguishes a tape device and the means by which the tape deviceconnects to a host. To be usable by Oracle Secure Backup, each tape device must have atleast one attachment, which describes a data path between a host and the tape device. Anattachment usually includes the identity of a host plus an attach point name in Linux or UNIX,a device name in Windows, or a NAS device name. In rare cases, additional information isneeded for the attachment definition.
Chapter 1Overview of Oracle Secure Backup Concepts
1-11

See Also:
• "Adding Tape Devices to an Administrative Domain" to learn how toconfigure a tape device
• Oracle Secure Backup Reference for a description of the mkdevcommand aspec placeholder, which describes the syntax and namingconventions for device attachments
About Cloud Storage DevicesOracle Secure Backup cloud storage devices are used to backup and restore data toand from Oracle Cloud Infrastructure Object Storage Classic and from Oracle CloudInfrastructure Object Storage.
• When used with Oracle Cloud Infrastructure, a cloud storage device operates on acontainer in the specified Oracle Cloud Infrastructure Object Storage namespace.Each cloud storage device is associated with only one container.
Note:
The term "identity domain" is specific to Oracle Cloud InfrastructureClassic. Oracle Cloud Infrastructure uses a new term "namespace".
A container is a logical grouping of resources. A bucket, which is created in a user-specified container, acts as the repository for backup image instances. Multipleadministrative domains can use one container. However, a bucket can be used byonly one administrative domain.
The storage class for a container in Oracle Cloud Infrastructure can be standardstorage class (object), archive storage class (archive), or infrequent accessstorage class (infrequentaccess).
See Also:
Oracle Cloud Infrastructure Object Storage for more information aboutusing Oracle Cloud Infrastructure Object Storage
• When used with Oracle Cloud Infrastructure Classic, a cloud storage deviceoperates on a cloud storage container in the Oracle Cloud user’s identity domain.The cloud storage container acts as a repository for backup image instances.Each cloud storage device is associated with only one cloud container. Thestorage class for a cloud container in Oracle Cloud Infrastructure Classic can bestandard storage class (object) or archive storage class (archive).
Chapter 1Overview of Oracle Secure Backup Concepts
1-12
Note:
The term "identity domain" is specific to Oracle Cloud Infrastructure Classic.Oracle Cloud Infrastructure uses a new term "namespace".
A cloud storage device and its associated container can belong to only one OracleSecure Backup administrative domain. It cannot be shared between multiple OracleSecure Backup administrative domains.
See Also:
– Oracle Cloud Infrastructure Object Storage Classic for more informationabout the Oracle Cloud Infrastructure Object Storage Classic
– The obtool commands "mkdev"and "lsdev"for more information about Cloudstorage class options
Backups to Cloud Storage Devices
The cloud storage device is an Oracle Secure Backup device resource. Backup jobs must beexplicitly configured to use cloud storage devices. The cloud storage device can store file-system backups or RMAN backups of Oracle databases. Cloud storage devices can beaccessed concurrently by multiple backup and restore jobs. The number of concurrent jobs isdefined by the device’s concurrentjob setting. Each of the backup or restore job createsparallel data connections to Oracle Cloud storage. The number of parallel connections iscontrolled by device’s streamsperjob setting.
Oracle Secure Backup ensures that backup data is encrypted on the client before it is writtento the cloud. If the backup job does not require encryption, then Oracle Secure Backup’sclient-side software encryption is automatically forced on and the encryption policies set up inthe client are applied to the backup data written to the cloud storage device.
Oracle Secure Backup stores each backup image instance by splitting it into multiplesegments and storing each segment as a single object in the container. The segment sizedefines the size of the object and is specified by the device’s segmentsize parameter.
Backup image instances remain in the cloud container until they expire, are explicitly deleted,or are migrated to a cloud archive container. Oracle Secure Backup deletes expired backupimage instances only when the device’s free space threshold is exceeded; not immediatelyafter they expire.
Cloud Storage Devices and Staging
You can stage backup data to a disk pool and then move it to a cloud storage device usingautomated staging. The backup data in the disk pool must be encrypted in order to copy it tothe cloud storage device. However, a cloud storage device cannot be used as the sourcedevice for automated staging.
You can move a backup image instance from a standard storage class (object) container toan archive storage class (archive) container or an infrequent access storage class (infrequentaccess) container with a manual copy job. If both containers or buckets are located in thesame identity domain, Oracle Secure Backup copies data between containers or buckets. If
Chapter 1Overview of Oracle Secure Backup Concepts
1-13
both containers or buckets are located in different identify domains, the data isdownloaded from source device and then uploaded to the target device.
Cloud Storage Devices and System Memory Usage
The cloud device requires a certain amount of system memory from the media serverattached to the device. The amount of media server system memory required isderived from the cloud device's segmentsize, streamsperjob, and concurrentjobsvalues, and the number of cloud devices attached to the media server.
The total amount of system memory on the media server that is needed to supportOracle Secure Backup cloud devices is derived as follows:
(# of attached cloud devices) * (concurrentjobs) * (1 + streamsperjob) * (segmentsize)
See Also:
• Configuring Cloud Storage Devices
• Oracle Secure Backup Administrator’s Guide for information aboutmanaging cloud storage devices
Oracle Secure Backup DaemonsDaemons are background processes that perform Oracle Secure Backup operations.Some daemons run continuously while others run only to perform a particular task andthen exit when the task is complete.
A daemon can run either on the administrative server, the media server, or a client.Oracle Secure Backup uses a combination of daemons to perform a particular backup,restore, or configuration task.
The Oracle Secure Backup daemons include the following: Service daemon, Scheduledaemon, Index daemon, Apache Web Server daemon, NDMP daemon, Robotdaemon, and Proxy daemon.
See Also:
Oracle Secure Backup Administrator's Guide for more information aboutdaemons
Oracle Secure Backup InterfacesThere are four different interfaces for accessing different elements of Oracle SecureBackup:
Chapter 1Oracle Secure Backup Daemons
1-14
• The obtool command line utility provides the fundamental interface for Oracle SecureBackup functions, including configuration, media handling, and backup and restore of file-system files.
• Oracle Enterprise Manager offers access to most Oracle Secure Backup functionsavailable through obtool as part of its Cloud Control interface.
• Oracle Secure Backup includes its own Web-based interface, called the Oracle SecureBackup Web tool, which exposes all functions of obtool. The Oracle Secure Backup Webtool is primarily intended for use in situations where Oracle Secure Backup is being usedindependently of an Oracle Database instance. It does not provide access to databasebackup and recovery functions.
The Oracle Secure Backup Web tool supports Internet Protocol v4 (IPv4), InternetProtocol v6 (IPv6), and mixed IPv4/IPv6 environments on all platforms that support IPv6.
• Backup and restore operations for Oracle Database instances and configuration of theOracle Secure Backup media management layer are performed through the RMANcommand-line client or through Oracle Enterprise Manager.
Note:
Oracle Secure Backup documentation focuses on the use of Enterprise Managerwherever possible, and describes the Oracle Secure Backup Web Tool only whenthere is no equivalent functionality in Enterprise Manager, as in a file-systembackup.
See also:
• Oracle Secure Backup User Interfaces for details on using the different OracleSecure Backup interfaces.
• Oracle Database Backup and Recovery User's Guide for details on using Recovery Manager (RMAN) for Oracle database backups
Chapter 1Oracle Secure Backup Interfaces
1-15
2Oracle Secure Backup Installation Overview
This chapter provides an overview of the Oracle Secure Backup installation requirements.
This chapter contains these sections:
• Overview of Installing and Configuring Oracle Secure Backup
• Preparing to Install Oracle Secure Backup
• Overview of Customizing Configuration Parameters During Installation
Overview of Installing and Configuring Oracle Secure BackupBefore you can use Oracle Secure Backup to manage your data protection requirements, youmust install Oracle Secure Backup on all hosts and then configure the administrative domain.
About Installing Oracle Secure BackupThe Oracle Secure Backup software must be installed on all hosts, except NDMP hosts, inthe administrative domain. The administrative domain consists of one administrative server,one or more media servers, and one or more clients. The software that you install on a hostdepends on the role assigned to the host in the administrative domain. During the installation,you can specify the role for which you want to install Oracle Secure Backup.
See Also:
Oracle Secure Backup Administrator's Guide for more information about theadministrative domain
The Oracle Secure Backup installer determines if a host system has Oracle Secure Backupsoftware installed or if it contains data from an earlier Oracle Secure Backup installation. If noOracle Secure Backup software or data exists, then Oracle Secure Backup is installed. IfOracle Secure Backup software or data exists on the host, then depending on the release ofthe software or data, either an upgrade is performed or the installer exits.
See Also:
• "Steps to Install and Configure Oracle Secure Backup"
• Installing Oracle Secure Backup on Linux or UNIX
• Installing Oracle Secure Backup on Windows
• Upgrading Oracle Secure Backup
2-1
The directories containing Oracle Secure Backup data are protected by restrictingaccess to these directories to only privileged users.
About Configuring Oracle Secure BackupAfter the Oracle Secure Backup software is installed on all hosts in the administrativedomain, you must configure the administrative domain. Configuring the administrativedomain ensures that the administrative server has information about all the hosts andbackup containers (tape devices and disk pools) that are part of the administrativedomain.
Configuring Oracle Secure Backup includes the following tasks:
• Adding each host to the administrative domain
• Configuring backup containers that are attached to media servers
See Also:
Configuring and Managing the Administrative Domain
About Oracle Secure Backup Client Backward CompatibilityOracle Secure Backup client backward compatibility provides compatibility andinteroperability between a current Oracle Secure Backup version with its immediateprevious release. For instance, Oracle Secure Backup 18.1 is backward compatiblewith Oracle Secure Backup 12.2 and Oracle Secure Backup 12.1.
Client Backward Compatibility RequirementsTo use client backward compatibility, ensure that both your administrative server andmedia server have Oracle Secure Backup 18.1 installed. Only clients can use OracleSecure Backup 12.2 or Oracle Secure Backup 12.1.
To facilitate backward compatibility on your Oracle Secure Backup domain, keep thefollowing requirements in mind:
• Client backward compatibility is only supported for Oracle Secure Backup 12.2and 12.1 versions. Oracle Secure Backup 10.4 versions are not supported.
• Oracle Secure Backup 18.1 is not supported on Linux 32-bit platforms or Windows32-bit platforms. Oracle Secure Backup 18.1 does not support any clients on Linux32-bit or Windows 32-bit platforms.
See Also:
"Supported Platforms and Tape Devices" for more information aboutplatforms that support Oracle Secure Backup 18.1
• Client backward compatibility provides a restricted level of functionality for theOracle Secure Backup 12.1 client. It is recommended that all obtool commands beexecuted on a host that uses Oracle Secure Backup 18.1.
Chapter 2Overview of Installing and Configuring Oracle Secure Backup
2-2
• You can perform file-system backup and restore operations for an Oracle Secure Backup12.2 or 12.1 client added to an Oracle Secure Backup 18.1 domain, using backwardcompatibility. File-system backups to tape drives, disk pools, and cloud storage aresupported. You can perform database backup and restore operations using tape drives ordisk pools. Enhanced software compression is not supported on 12.1 clients.
You cannot specify cloud storage devices for database backups and restore from theOracle Secure Backup 12.1 client.
• Whenever possible, it is recommended that only Oracle Secure Backup 18.1 clients beadded to backup domains running Oracle Secure Backup 18.1.
About Certificate LifetimeThe Certification Authority (CA) maintains a signing certificate that authorizes the CA to signthe identity certificates for the other hosts in the domain.
Oracle Secure Backup allows you to set the duration for which each signing certificate isvalid. This duration is set using the certificate lifetime policy.
• Certificates with shorter lifetimes are more secure
• Certificates with longer lifetimes are easier to manage
Select a lifetime for certificates based on your corporate policy.
The default certificate lifetime is 10 years. To change the certificate lifetime throughout thedomain, complete the following steps:
1. Change the value of the security/certlifetime policy.
2. Run the obcm recertifydomain command.
For more information on the certificate lifetime policy and obcm recertifydomain command,see the Oracle Secure Backup Reference.
Steps to Install and Configure Oracle Secure BackupThis section lists the basic steps to install Oracle Secure Backup on all hosts. Ensure thatyou meet all requirements in the section "Preparing to Install Oracle Secure Backup" beforestarting the installation procedure.
To install Oracle Secure Backup:
1. Install Oracle Secure Backup on all hosts in the administrative domain.
• On the host designated as the administrative server, install the administrative serverrole. This is the host you use to initiate and manage backup and restore jobs.
When this step is complete, the administrative domain is initialized. But the only hostincluded in the administrative domain at this point is the administrative server
• On all hosts that contain data, both Oracle Database and file-system, that is to bebacked up using Oracle Secure Backup, install the client role.
• On the hosts designated with the media server role, install the client role. Thiscreates the software required for the client role. Additionally, you must perform thefollowing steps:
– Configure the host as a media server
– Configure backup containers that are attached to this media server
Chapter 2Overview of Installing and Configuring Oracle Secure Backup
2-3
See Also:
• Installing Oracle Secure Backup on Linux or UNIX
• Installing Oracle Secure Backup on Windows
2. Configure the Oracle Secure Backup administrative domain.
The administrative server requires complete information about all the hosts andbackup containers (tape devices and disk pools) in the administrative domain.
• For each media server, perform the following tasks:
– Add the media server to the administrative domain
– Configure the backup containers attached to this media server
This includes each tape device and each attachment that associates atape device with a media server.
• For each client, add the client to the administrative domain.
This includes any Network Data Management Protocol (NDMP) clients suchas Network Attached Storage (NAS) appliances.
See Also:
Configuring and Managing the Administrative Domain
Preparing to Install Oracle Secure BackupBefore you install Oracle Secure Backup on your hosts, certain decisions about how toconfigure and manage the administrative domain needs to be made. These decisionswill determine how the software is installed, configured, and used.
The tasks involved in preparing to install Oracle Secure Backup are described in thefollowing sections:
• System Requirements for Oracle Secure Backup
• Acquiring Oracle Secure Backup Installation Media
• Decide Which Role the Host Performs in the Administrative Domain
System Requirements for Oracle Secure BackupBefore you install Oracle Secure Backup on a host, ensure that the host satisfies thespecified system requirements.
This following topics describe the various system requirements:
• Supported Platforms and Tape Devices
• Disk Space Requirements for Oracle Secure Backup
• Other System Requirements for Oracle Secure Backup
Chapter 2Preparing to Install Oracle Secure Backup
2-4

Supported Platforms and Tape DevicesFor the list of operating systems, web browsers and Network Attached Storage (NAS)devices supported by Oracle Secure Backup, see Certify on My Oracle Support at thefollowing URL:
https://support.oracle.comInformation about every tape device supported by Oracle Secure Backup is available at thefollowing URL:
http://www.oracle.com/technetwork/products/secure-backup/learnmore/index.html
Disk Space Requirements for Oracle Secure BackupWhen you install Oracle Secure Backup on Linux or UNIX, you load an install package for aparticular operating system and perform the installation with the install package. Table 2-1describes approximate disk space requirements.
Table 2-1 Disk Space Requirements for Oracle Secure Backup on Linux and UNIX
Oracle Secure Backup Installation Disk Space forAdministrative Server
Disk Space for Clientor Media Server
Linux x86 64-bit 75 MB 75 MB
Solaris x86 64-bit 130 MB 130 MB
Solaris SPARC 64-bit 130 MB 130 MB
HP-UX 130 MB 130 MB
IBM AIX 610 MB 610 MB
Table 2-2 describes approximate disk space required for an installation of Oracle SecureBackup on Windows with and without the administrative server.
Table 2-2 Disk Space Requirements for Oracle Secure Backup on Windows
Oracle Secure Backup Installation Disk Space
Administrative server (can include the media server, client, or both) 112 MB
Media server, client, or both (no administrative server) 103 MB
The disk space required for the Oracle Secure Backup catalog depends on many factors. Butas a general rule, plan for catalog space equal to 250% of your largest index created after abackup.
See Also:
Oracle Secure Backup Administrator's Guide for guidelines on the growth of theOracle Secure Backup catalog over time
Chapter 2Preparing to Install Oracle Secure Backup
2-5
Other System Requirements for Oracle Secure BackupEach host that participates in an Oracle Secure Backup administrative domain musthave a network connection and run TCP/IP. Oracle Secure Backup uses this protocolfor all communication within each of its components and between its components andother system components.
Each appliance that employs a closed operating system, such as Network AttachedStorage (NAS) and tape servers, must support a version of Network DataManagement Protocol (NDMP) described in "Oracle Secure Backup Host AccessModes".
Each host that participates in an Oracle Secure Backup administrative domain mustalso have some preconfigured way to resolve a host name to an IP address. Mostsystems use DNS, NIS, WINS, or a local hosts file to do this. Oracle Secure Backupdoes not require a specific mechanism. Oracle Secure Backup only requires that, uponpresenting the underlying system software with an IP address you have configured, itobtains an IP address corresponding to that name.
The use of DHCP to assign IP addresses is not supported for hosts that participate inan Oracle Secure Backup administrative domain. Static IP addresses should beassigned to all hosts. If you cannot use static IP addresses, then you must ensure thatthe DHCP server guarantees that a given host is always assigned the same IPaddress.
Note:
You can change the static IP of a host from one address to another, but youmust restart the Oracle Secure Backup administrative server for the changeto take effect.
On Oracle Secure Backup network installations, it is important that there be noduplicate host names. Index catalog data is stored in a directory based on the name ofthe client host. Duplicate host names would result in information related to backupsfrom multiple clients being combined in a manner that could prevent successful restoreoperations from backup files.
You can configure Oracle Secure Backup to use WINS, the Microsoft Windows nameresolution protocol, from UNIX hosts. Although this configuration is atypical, WINSname resolution from UNIX hosts can be a practical solution.
Acquiring Oracle Secure Backup Installation MediaOracle Secure Backup installation media for each supported platform is available as aCD-ROM or as a ZIP file downloaded from the Oracle Software Delivery Cloudwebsite:
https://edelivery.oracle.com/The contents of the CD-ROM and download archive are identical.
Chapter 2Preparing to Install Oracle Secure Backup
2-6
Note:
If you have multiple platforms in your environment, then you must download the ZIPfile or acquire the CD-ROM for each platform.
To download and extract the Oracle Secure Backup installation software:
1. Log on to your host.
• On Windows, log in as a user with Administrator privileges.
• On Linux/UNIX, log in as a user with root privileges.
2. Create a directory called osbdownload on a file system with enough free space to hold thedownloaded installation file.
3. Open a Web browser and sign in to the Oracle Software Delivery Cloud website:
https://edelivery.oracle.com/4. On the Terms & Restrictions page, accept the Oracle Trial License Agreement and the
Export Restrictions.
Click Continue.
5. On the Search page, select Oracle Database from the product pack drop-down list.
From the Platform drop-down list, select the platform you intend to install Oracle SecureBackup on.
Click Go.
6. Select Oracle Secure Backup 18.1 from the product list.
Click Continue.
The Downloads page appears.
7. On the Downloads page, click Download to download the Oracle Secure Backup 18.1installation software for the required platform.
8. Save the compressed Oracle Secure Backup 18.1 installation software to a temporarydirectory.
9. Expand the compressed installation software to the osbdownload directory you created instep 2.
You now have all of the files required to install Oracle Secure Backup release 18.1.
Decide Which Role the Host Performs in the Administrative DomainThe Oracle Secure Backup administrative domain is a set of hosts that are managed as aunit to perform backup and restore operations. Each host in the administrative domain mustbe assigned one of the following roles: administrative server, media server, or client.
See Also:
"Host Roles in an Administrative Domain"
Chapter 2Preparing to Install Oracle Secure Backup
2-7
Before you install Oracle Secure Backup on a host, you must decide the role that willbe assigned to this host in the administrative domain. The software that you installdepends on the role that is assigned to the host.
When you install software for the administrative role, the software required for themedia server and client roles are also installed. The software required for the mediaserver role is also installed when you install the client role. However, the host does nothave the media server role until the admin user grants that role with the chhostcommand after Oracle Secure Backup is installed.
Note:
To add the media server role to an administrative server or client after initialinstallation, you must create attach points using makedev. See Oracle SecureBackup Reference for details.
When you install the client role, the software for the media server role is also installedon the host. However, you must configure the host as a media server.
Overview of Customizing Configuration Parameters DuringInstallation
Oracle Secure Backup enables you to customize your installation by modifying someconfiguration parameters that control the installation and administration process. Theinstallation programs provide default values for all these configuration parameters. Inmost cases, the default values are sufficient. However, you can choose to modify theconfiguration parameters while installing Oracle Secure Backup.
The following are configuration parameters that you can modify during an OracleSecure Backup installation:
• Oracle Secure Backup Temporary Directory
• Oracle Secure Backup Home Directory
• Preauthorized User for Performing Oracle Database Backup and RestoreOperations
• Length of Oracle Secure Backup User Passwords
• Identity Key Certificate Length
• Oracle Secure Backup Database Directory
Oracle Secure Backup Temporary DirectoryWhile installing Oracle Secure Backup on a host, a temporary directory is used tostore transient files. Oracle Secure Backup requires that the temporary directory beable to contain lockable files and that it be accessible during the beginning of therestart process. For these reasons, the directory must be on the local disk.
Default values are set for this parameter depending on the operating system. You canmodify the default directory and specify a different directory by specifying advancedsettings at the time of installation.
Chapter 2Overview of Customizing Configuration Parameters During Installation
2-8
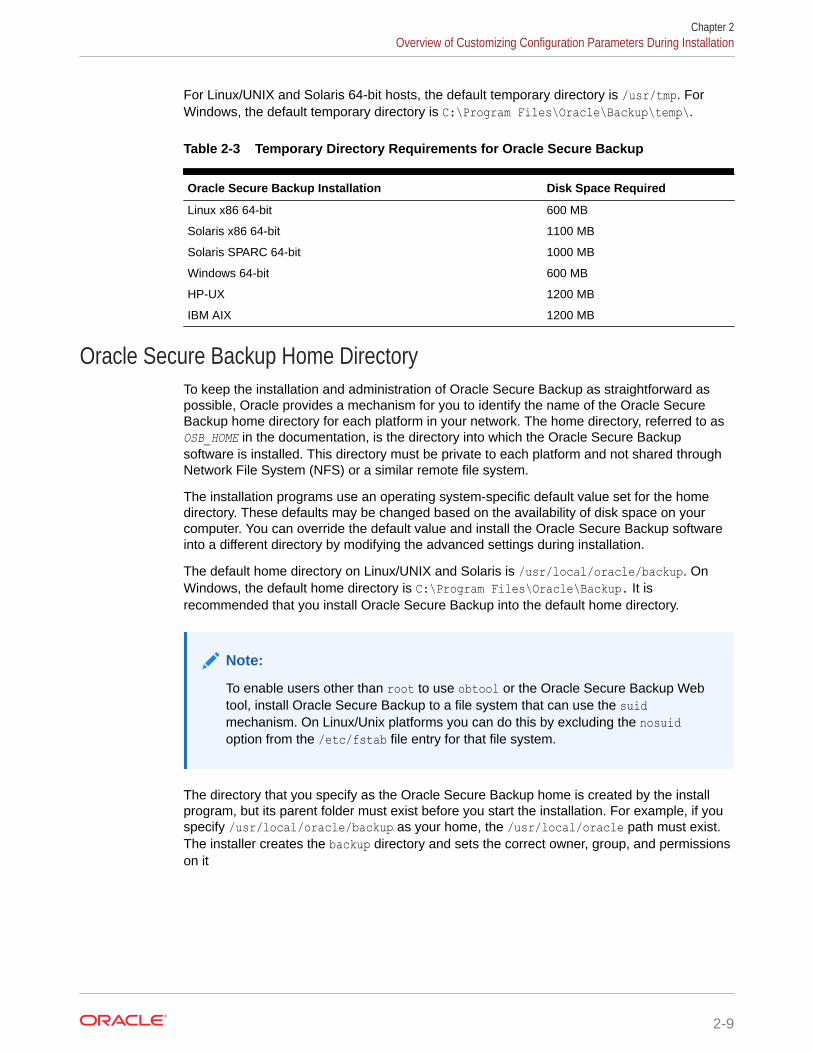
For Linux/UNIX and Solaris 64-bit hosts, the default temporary directory is /usr/tmp. ForWindows, the default temporary directory is C:\Program Files\Oracle\Backup\temp\.
Table 2-3 Temporary Directory Requirements for Oracle Secure Backup
Oracle Secure Backup Installation Disk Space Required
Linux x86 64-bit 600 MB
Solaris x86 64-bit 1100 MB
Solaris SPARC 64-bit 1000 MB
Windows 64-bit 600 MB
HP-UX 1200 MB
IBM AIX 1200 MB
Oracle Secure Backup Home DirectoryTo keep the installation and administration of Oracle Secure Backup as straightforward aspossible, Oracle provides a mechanism for you to identify the name of the Oracle SecureBackup home directory for each platform in your network. The home directory, referred to asOSB_HOME in the documentation, is the directory into which the Oracle Secure Backupsoftware is installed. This directory must be private to each platform and not shared throughNetwork File System (NFS) or a similar remote file system.
The installation programs use an operating system-specific default value set for the homedirectory. These defaults may be changed based on the availability of disk space on yourcomputer. You can override the default value and install the Oracle Secure Backup softwareinto a different directory by modifying the advanced settings during installation.
The default home directory on Linux/UNIX and Solaris is /usr/local/oracle/backup. OnWindows, the default home directory is C:\Program Files\Oracle\Backup. It isrecommended that you install Oracle Secure Backup into the default home directory.
Note:
To enable users other than root to use obtool or the Oracle Secure Backup Webtool, install Oracle Secure Backup to a file system that can use the suidmechanism. On Linux/Unix platforms you can do this by excluding the nosuidoption from the /etc/fstab file entry for that file system.
The directory that you specify as the Oracle Secure Backup home is created by the installprogram, but its parent folder must exist before you start the installation. For example, if youspecify /usr/local/oracle/backup as your home, the /usr/local/oracle path must exist.The installer creates the backup directory and sets the correct owner, group, and permissionson it
Chapter 2Overview of Customizing Configuration Parameters During Installation
2-9
Preauthorized User for Performing Oracle Database Backup andRestore Operations
Oracle Secure Backup integrates with Recovery Manager (RMAN) to enable you tobackup and restore Oracle Databases. To back up Oracle Database files using RMANwith Oracle Secure Backup, you must specify an Oracle Secure Backup user who hasthe permissions required to perform backup and restore operations with RMAN.
During the Oracle Secure Backup installation, you can create a preauthorized user,with the rights of the oracle class, that is used for Oracle Database operations. If youchoose to configure user preauthorization, the Oracle Secure Backup preauthorizeduser that you create is mapped to an operating system user whose credentials will beused to perform Oracle Database backup and restore operations. The default name forthe preauthorized user is oracle.
To back up databases on Linux/UNIX platforms, you must specify a Linux/UNIX username and a Linux/UNIX group name whose credentials will be used by thepreauthorized user. The user name must be defined in /etc/password and the groupname must be defined in /etc/group. To backup databases on Windows platforms,you must specify the domain account whose credentials are used by the preauthorizeduser.
Note:
Before you choose to create the preauthorized user, be aware that thischoice involves a trade-off between convenience and security.
If you intend to use Oracle Secure Backup to perform one-time, RMAN-initiated, or unprivileged backup operations on Windows clients, then you must modify the OracleSecure Backup admin and oracle users to assign them Windows credentials (adomain, user name and password) that are valid at the client with required privilegesafter you complete the Oracle Secure Backup installation. Otherwise, Oracle SecureBackup cannot perform these types of backup operations. This requirement appliesregardless of the platform that acts as the administrative server.
If you do not create a preauthorized user during the installation, you can set up userpreauthorization at a later stage.
See Also:
"Setting Up User Preauthorization in Oracle Secure Backup"
Length of Oracle Secure Backup User PasswordsEach user needs a valid Oracle Secure Backup user name and password to log in toOracle Secure Backup and perform operations. By default, passwords for OracleSecure Backup users must be at least 8 characters. During installation, you canmodify the advanced settings and specify a different length, between 8 characters and
Chapter 2Overview of Customizing Configuration Parameters During Installation
2-10
16 characters, for user passwords. The length specified during installation applies to thepasswords used for all Oracle Secure Backup users.
Identity Key Certificate LengthOracle Secure Backup enables secure communication between the hosts in theadministrative domain. Each host is uniquely identified by an X.509 certificate signed by theCertification Authority (CA). Connections between hosts are established only after the hostsauthenticate themselves to each other using identity certificates.
As of Oracle Secure Backup version 12.1.0.3, the installation program uses a default value of3072 bits for the identity certificate key size. You can modify this value to configure the levelof security associated with every host identity certificate issued by the administrative servicedaemon.
The values you can set for identity certificate key length, in bits, are: 512, 768, 1024, 2048,3072, and 4096. 1024 bits is the minimum length required for adequate security. A value of2048 bits offers adequate security. A very high level of security can be provided by setting thekey size to 3072 bits or 4096 bits.
Note:
Certificate key sizes smaller than 1024 are not considered secure. Certificate keysizes of 3072 or more are considered very secure.
Oracle Secure Backup Database DirectoryEach platform has a discrete directory in which Oracle Secure Backup retains host-specificinformation. This directory must be private to each platform and not shared through NetworkFile System (NFS) or a similar remote file system.
The installation program uses operating system-specific defaults for the database directory.You can modify the default values by configuring the advanced settings during an OracleSecure Backup installation.
The default database directory is for Linux/UNIX and Solaris 64-bit hosts is /usr/etc/ob. OnWindows, the default database directory is C:\Program Files\Oracle\Backup\db.
Chapter 2Overview of Customizing Configuration Parameters During Installation
2-11
3Installing Oracle Secure Backup on Linux orUNIX
This chapter explains how to install Oracle Secure Backup on hosts running Linux or UNIX.
This chapter contains the following sections:
• Prerequisites for Installing Oracle Secure Backup on Linux or UNIX
• Options for Installing Oracle Secure Backup on Linux or UNIX
• Installing Oracle Secure Backup on Linux or UNIX
• Silently Installing the Client Role on Linux or UNIX
• Configuring Platform-Specific Media Server Devices
• Additional Information for Installation of Oracle Secure Backup on Linux
• Additional Information for Installing Oracle Secure Backup on AIX
Prerequisites for Installing Oracle Secure Backup on Linux orUNIX
Before you install Oracle Secure Backup on your host system, ensure that the followingprerequisites are met:
• You must be able to log in to each host with root privileges to perform the installation.
• Preconfigure the required attach points for your tape drives and libraries on your mediaserver systems.
See Also:
"Configuring Platform-Specific Media Server Devices"
• Before adding Oracle Secure Backup tape libraries and drives to an administrativedomain, ensure that any system software that scans and opens arbitrary SCSI targets(for example, tape library monitoring software) has been disabled. If this type of softwareis running, unexpected behavior from your hardware can result.
• On a Linux host, ensure that you install the sg3_utils and the sg3_utils-libs RPMpackages. These packages are required for successfully running the sg_map commandused to identify device attach points. Please contact your system administrator or Linuxoperating system documentation for further details.
3-1
Options for Installing Oracle Secure Backup on Linux orUNIX
You can perform an interactive installation of Oracle Secure Backup. You also have theoption of performing a silent installation of an Oracle Secure Backup client host role.
These are the parameter options available when you install Oracle Secure Backup.
Parameter Description Required forSilent Installs
--addinghostidhostname
Specifies the adding host ID. Yes, if --noaddinghostidis not specified
--install_roleClient
Bypasses user prompts that are part of aninteractive installation and automatically selectsthe client host role.
Yes
--noaddinghostid Bypasses the admin host identification checkthat occurs when a client is added to thebackup domain.
Yes, if --addinghostidhostname is notspedified
--securepath Bypasses the secure location check. Thisoption should only be used when the backupadministrator has confirmed that the OracleSecure Backup path is protected against allnon-root users.
No
-t path-to-alt-install-temp-directory
Specifies an alternative install temp directory ifthe default temp directory (/usr/tmp) isunavailable or has insufficient space.
No
Installing Oracle Secure Backup on Linux or UNIX
Note:
If you are installing Oracle Secure Backup in an Oracle Real ApplicationClusters (Oracle RAC) environment, then you must install Oracle SecureBackup on each node in the cluster.
Use the following steps to install Oracle Secure Backup on your host:
1. Complete the planning tasks described in "Preparing to Install Oracle SecureBackup".
2. Verify that the prerequisites described in "Prerequisites for Installing Oracle SecureBackup on Linux or UNIX" are met.
3. If you are installing the administrative server role or the media server role, verifythat the host meets the physical and network requirements discussed in "ChoosingSecure Hosts for the Administrative and Media Servers".
Chapter 3Options for Installing Oracle Secure Backup on Linux or UNIX
3-2
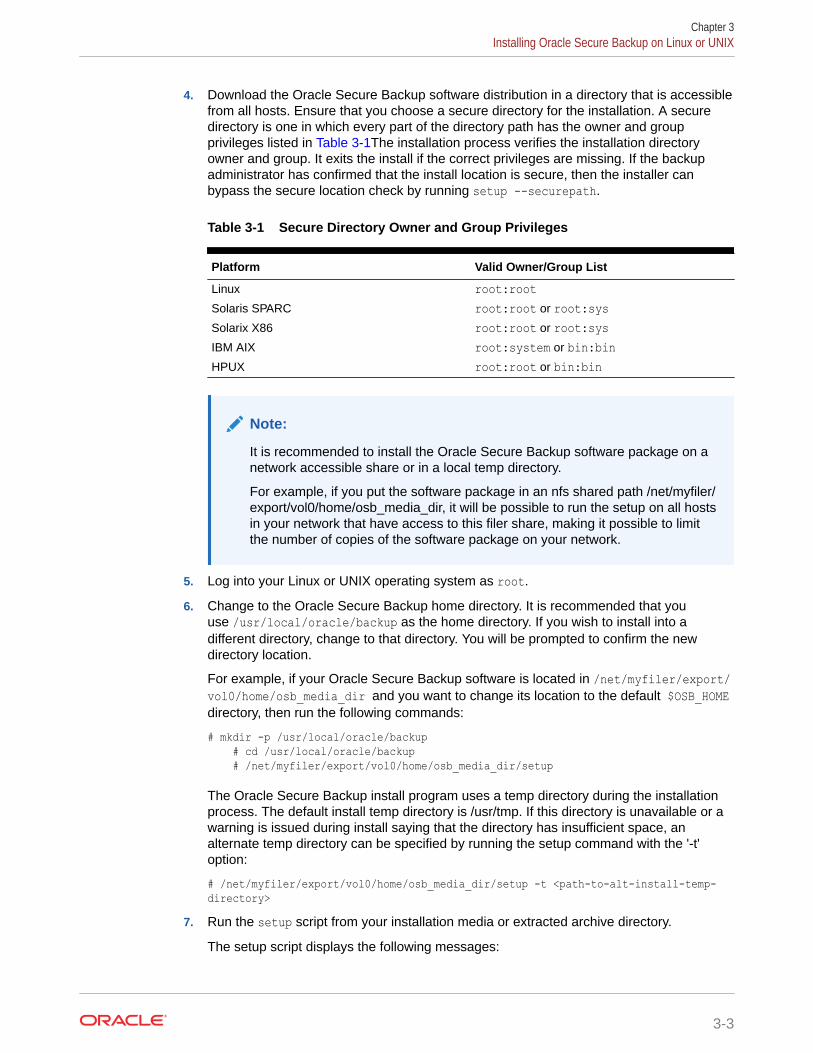
4. Download the Oracle Secure Backup software distribution in a directory that is accessiblefrom all hosts. Ensure that you choose a secure directory for the installation. A securedirectory is one in which every part of the directory path has the owner and groupprivileges listed in Table 3-1The installation process verifies the installation directoryowner and group. It exits the install if the correct privileges are missing. If the backupadministrator has confirmed that the install location is secure, then the installer canbypass the secure location check by running setup --securepath.
Table 3-1 Secure Directory Owner and Group Privileges
Platform Valid Owner/Group List
Linux root:rootSolaris SPARC root:root or root:sysSolarix X86 root:root or root:sysIBM AIX root:system or bin:binHPUX root:root or bin:bin
Note:
It is recommended to install the Oracle Secure Backup software package on anetwork accessible share or in a local temp directory.
For example, if you put the software package in an nfs shared path /net/myfiler/export/vol0/home/osb_media_dir, it will be possible to run the setup on all hostsin your network that have access to this filer share, making it possible to limitthe number of copies of the software package on your network.
5. Log into your Linux or UNIX operating system as root.
6. Change to the Oracle Secure Backup home directory. It is recommended that youuse /usr/local/oracle/backup as the home directory. If you wish to install into adifferent directory, change to that directory. You will be prompted to confirm the newdirectory location.
For example, if your Oracle Secure Backup software is located in /net/myfiler/export/vol0/home/osb_media_dir and you want to change its location to the default $OSB_HOMEdirectory, then run the following commands:
# mkdir -p /usr/local/oracle/backup # cd /usr/local/oracle/backup # /net/myfiler/export/vol0/home/osb_media_dir/setup
The Oracle Secure Backup install program uses a temp directory during the installationprocess. The default install temp directory is /usr/tmp. If this directory is unavailable or awarning is issued during install saying that the directory has insufficient space, analternate temp directory can be specified by running the setup command with the '-t'option:
# /net/myfiler/export/vol0/home/osb_media_dir/setup -t <path-to-alt-install-temp-directory>
7. Run the setup script from your installation media or extracted archive directory.
The setup script displays the following messages:
Chapter 3Installing Oracle Secure Backup on Linux or UNIX
3-3
• A welcome message stating the Oracle Secure Backup version number andthen displays progress messages
• A message stating the platform
• Various progress messages as it loads the package
Note:
If the setup script is interrupted, then some temporary files, namedOBnnnn or OBnnnn.Z, might remain in the temporary directory. You cansafely delete these files.
8. Specify the host role. Regardless of the option you choose in this step, thesoftware required for media server role is installed automatically on the host.
• Enter A to install the software for an administrative server and the client.
• Type B and press the Enter key to install the client role.
You can add a media server role later during host configuration using OracleSecure Backup web tool or the obtool command-line interface.
Note:
• Although the software required for a media server is installed, thehost does not have the media server role until the admin user grantsthat role with the chhost command after Oracle Secure Backup isinstalled.
• To add the media server role to an administrative server or clientafter initial installation, you must use the chdev command with the --addrole option.
9. If you are installing the administrative server and client roles, perform the followingsteps:
a. Enter the e-mail address for notifications. Oracle Secure Backup sendsnotifications about the administrative domain and its operations to this e-mailaddress.
Specifying an e-mail address is optional and if you do not specify one, nonotifications are sent.
b. If you want to customize configuration parameters that are used during theinstallation, then type y.
The set of parameters that can be modified and the details about how tomodify them are described in "Specifying Advanced Settings for Linux/UNIX".After you modify the required parameters, the installation program continueswith the next step.
Chapter 3Installing Oracle Secure Backup on Linux or UNIX
3-4
See Also:
"Overview of Customizing Configuration Parameters During Installation" forinformation about the installation parameters that can be customized
Note:
The keystore password must be known and safeguarded by the OracleSecure Backup Administrator. In the event of a disaster, the keystorepassword is required for recovering your Oracle Secure BackupAdministrative Server. Oracle Secure Backup cannot be prompted toretrieve the password.
c. Create a password for the Oracle Secure Backup keystore.
The keystore password is used to encrypt the keystore containing all the encryptionkeys. This password is stored in the Oracle Secure Backup wallet.
Oracle recommends that you choose a password of at least 8 characters in lengththat contains a mixture of alphabetic and numeric characters.
d. Create a password for the Oracle Secure Backup administrative server.
Oracle recommends that you choose a password containing a mixture of alphabeticand numeric characters.
The minimum password length is 8 characters. If you customized the minimum userpassword length as part of "Specifying Advanced Settings for Linux/UNIX", then thepassword length must match the new value that you specified.
10. If you are installing the client role, perform the following steps:
a. (Optional) Modify advanced settings.
• If you want to configure advanced installation settings, then type y.
The parameters that can be customized are described in "Specifying AdvancedSettings for Linux/UNIX". For a client, you can only modify the Oracle SecureBackup temporary directory and the option to start Oracle Secure Backupdaemons when the host is rebooted.
• If you want to use the default values and omit customizing advanced installationparameters, then enter n.
b. Enter the host ID that will initiate the request to the client.
The host ID is the IP address or Fully Qualified Domain Name (FQDN) of the OracleSecure Backup domain host that will use the mkhost command to initiate the requestto add the client. That host is usually the Oracle Secure Backup administrativeserver. The specified IP address or FQDN is stored in the client’s /etc/obconfig file.It is used in the initial handshake between the client and the domain host thatinitiated the request to add the client, to verify the source of the request.
Chapter 3Installing Oracle Secure Backup on Linux or UNIX
3-5
To omit the IP address check at the time of installing the client, use the --noaddinghostid option while invoking the Oracle Secure Backup installer. Forexample:
# setup --noaddinghostid
11. The installation completes and the following message is displayed after asuccessful installation:
Oracle Secure Backup was installed.A log file of the installation titled osb_install.log is stored in the Oracle SecureBackup temporary directory. The default temporary directory is /usr/tmp.
Specifying Advanced Settings for Linux/UNIXOracle Secure Backup uses default values for most configuration parameters that arerequired during the installation process. This includes parameters such as the identifycertificate key size, minimum length for user passwords, and so on. In most cases, thedefault values are sufficient. However, you can provide new values for the parametersby configuring advanced settings during the installation.
To configure advanced settings, the setup script displays a numbered list containingthe parameters that can be configured. To modify a particular parameter, enter thenumber adjacent to that parameter and provide the required values. For example, tomodify the minimum length for user passwords, type 2. The default setting is displayedin brackets beside the option name. Enter the new minimum password length that youwish to use.
Only one advanced parameter can be modified at a time. If you want to make multiplechanges, you need to enter them separately.
See Also:
"Overview of Customizing Configuration Parameters During Installation" forinformation about the installation parameters that can be modified
Silently Installing the Client Role on Linux or UNIXOracle Secure Backup supports non-interactive installs for client hosts. To use thisfeature, perform the installation using the --install_role Client option.
The --install_role Client parameter automatically selects the client hostrole. When this parameter is used, you are not prompted for advanced settings.
Note:
When you perform a silent install of the client host role, you do not receiveany warnings if the installer is run from a non-standard directory. You will alsonot be warned if remnants from a previous installation are present on thehost. (Any such remnants will be overwritten.)
Chapter 3Silently Installing the Client Role on Linux or UNIX
3-6
Use the following steps to silently install the Oracle Secure Backup client host role:
1. Complete the planning tasks described in "Preparing to Install Oracle Secure Backup".
2. Verify that the prerequisites described in "Prerequisites for Installing Oracle SecureBackup on Linux or UNIX" are met.
3. If you are planning to use the client as a media server, verify that the host meets thephysical and network requirements discussed in "Choosing Secure Hosts for theAdministrative and Media Servers".
4. Download the Oracle Secure Backup software distribution in a directory that is accessiblefrom all hosts. Ensure that you choose a secure directory for the installation. A securedirectory is one in which every part of the directory path has the owner and groupprivileges listed in Table 3-1.The installation process verifies the installation directoryowner and group. It exits the install if the correct privileges are missing. If the backupadministrator has confirmed that the install location is secure, then the installer canbypass the secure location check by running setup --securepath.
Table 3-2 Secure Directory Owner and Group Privileges
Platform Valid Owner/Group List
Linux root:rootSolaris SPARC root:root or root:sysSolarix X86 root:root or root:sysIBM AIX root:system or bin:binHPUX root:root or bin:bin
Note:
It is recommended to install the Oracle Secure Backup software package on anetwork accessible share or in a local temp directory.
For example, if you put the software package in an nfs shared path /net/myfiler/export/vol0/home/osb_media_dir, it will be possible to run the setup on all hostsin your network that have access to this filer share, making it possible to limitthe number of copies of the software package on your network.
5. Log into your Linux or UNIX operating system as root.
6. Change to the Oracle Secure Backup home directory. It is recommended that youuse /usr/local/oracle/backup as the home directory. If you wish to install into adifferent directory, change to that directory.
The Oracle Secure Backup install program uses a temp directory during the installationprocess. The default install temp directory is /usr/tmp. If this directory is unavailable or awarning is issued during install saying that the directory has insufficient space, analternate temp directory can be specified by running the setup command with the '-t'option.
7. Run the setup script from your installation media or extracted archive directory.
The following are sample executions of the setup script:
Chapter 3Silently Installing the Client Role on Linux or UNIX
3-7
• To silently install a client and set myhost.oracle.com as the adding host ID,use the following command:
setup --install_role Client --addinghostid myhost.oracle.com
• To silently install a client and disable the secure registration feature, use thefollowing command:
setup --install_role Client --noaddinghostid
The setup script displays the following messages:
• A welcome message stating the Oracle Secure Backup version number andthen displays progress messages
• A message stating the platform
• Various progress messages as it loads the package
Note:
If the setup script is interrupted, then some temporary files, namedOBnnnn or OBnnnn.Z, might remain in the temporary directory. You cansafely delete these files.
Configuring Platform-Specific Media Server DevicesThis section explains how to configure tape drives and libraries for Oracle SecureBackup to communicate with them. In versions 10.4.0.3 and earlier, the Oracle SecureBackup utility discoverdev worked only with NDMP filers. As of Oracle Secure Backup12.1 the discoverdev utility works on all media server platforms (with the exception ofHP-UX). In Oracle Secure Backup 12.1 and later discoverdev is the preferred methodof configuring devices because it is faster and it removes the possibility of user errorwhen variables are manually entered in mkdev.
Note:
In the past, makedev was used on all platforms in Oracle Secure Backup togenerate system attach points. The current practice is to use native SGENdevice drivers whenever possible (Solaris and Linux), but system attachpoints must still be created manually using makedev on HP-UX. Instructionsfor running makedev on AIX are only included in this document for situationswhere there might be a reason for doing it manually, but using discoverdevis the preferred procedure.
Device attach points must exist prior to running discoverdev in order for it to functioncorrectly. Table 3-3 lists the requirements to access device attach points, for eachplatform.
Chapter 3Configuring Platform-Specific Media Server Devices
3-8
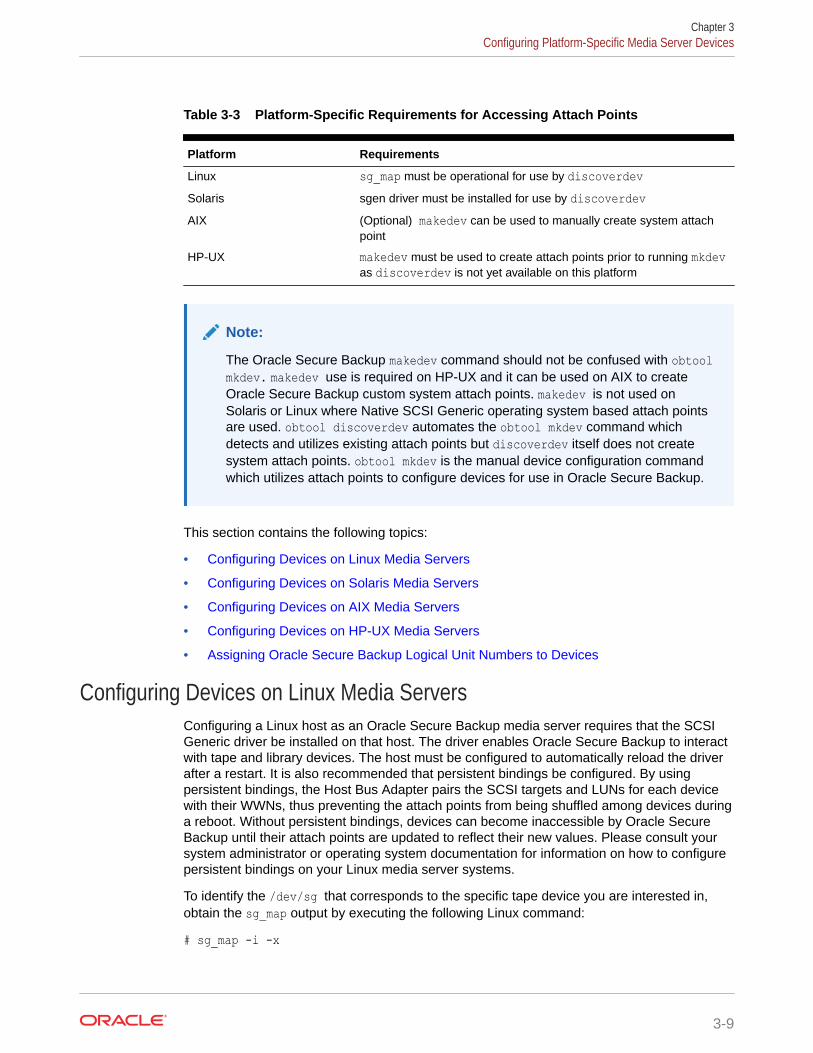
Table 3-3 Platform-Specific Requirements for Accessing Attach Points
Platform Requirements
Linux sg_map must be operational for use by discoverdevSolaris sgen driver must be installed for use by discoverdevAIX (Optional) makedev can be used to manually create system attach
point
HP-UX makedev must be used to create attach points prior to running mkdevas discoverdev is not yet available on this platform
Note:
The Oracle Secure Backup makedev command should not be confused with obtoolmkdev. makedev use is required on HP-UX and it can be used on AIX to createOracle Secure Backup custom system attach points. makedev is not used onSolaris or Linux where Native SCSI Generic operating system based attach pointsare used. obtool discoverdev automates the obtool mkdev command whichdetects and utilizes existing attach points but discoverdev itself does not createsystem attach points. obtool mkdev is the manual device configuration commandwhich utilizes attach points to configure devices for use in Oracle Secure Backup.
This section contains the following topics:
• Configuring Devices on Linux Media Servers
• Configuring Devices on Solaris Media Servers
• Configuring Devices on AIX Media Servers
• Configuring Devices on HP-UX Media Servers
• Assigning Oracle Secure Backup Logical Unit Numbers to Devices
Configuring Devices on Linux Media ServersConfiguring a Linux host as an Oracle Secure Backup media server requires that the SCSIGeneric driver be installed on that host. The driver enables Oracle Secure Backup to interactwith tape and library devices. The host must be configured to automatically reload the driverafter a restart. It is also recommended that persistent bindings be configured. By usingpersistent bindings, the Host Bus Adapter pairs the SCSI targets and LUNs for each devicewith their WWNs, thus preventing the attach points from being shuffled among devices duringa reboot. Without persistent bindings, devices can become inaccessible by Oracle SecureBackup until their attach points are updated to reflect their new values. Please consult yoursystem administrator or operating system documentation for information on how to configurepersistent bindings on your Linux media server systems.
To identify the /dev/sg that corresponds to the specific tape device you are interested in,obtain the sg_map output by executing the following Linux command:
# sg_map -i -x
Chapter 3Configuring Platform-Specific Media Server Devices
3-9
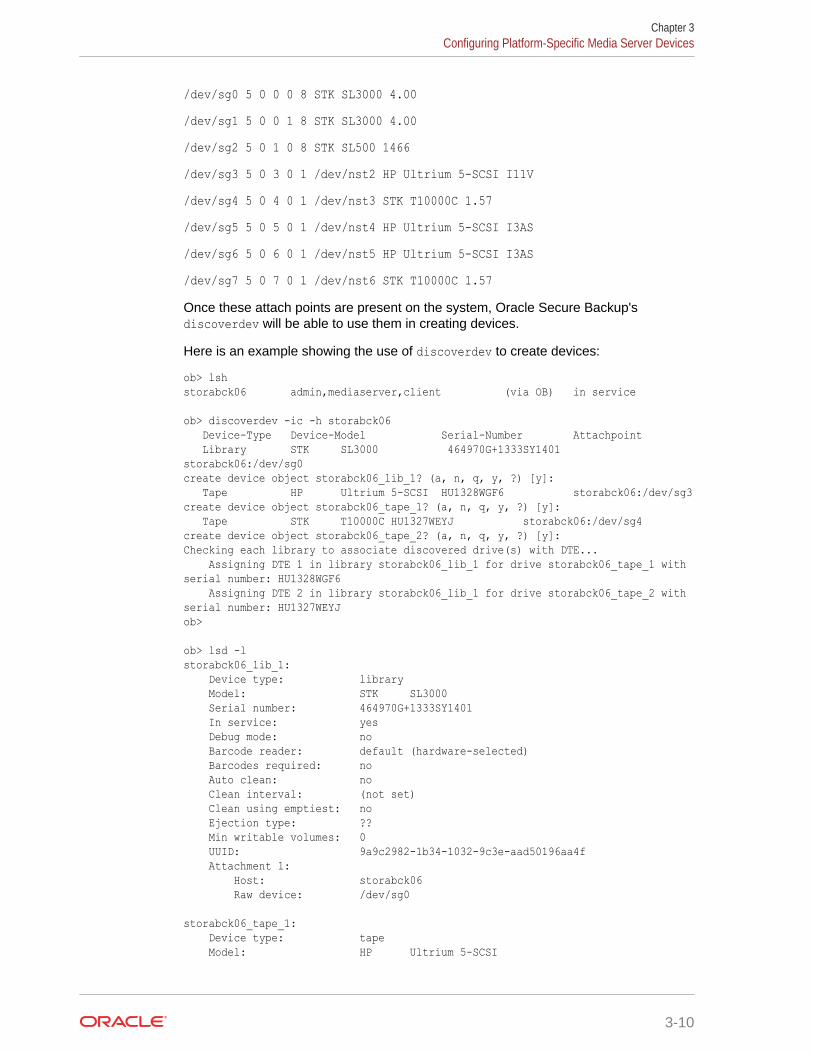
/dev/sg0 5 0 0 0 8 STK SL3000 4.00/dev/sg1 5 0 0 1 8 STK SL3000 4.00/dev/sg2 5 0 1 0 8 STK SL500 1466/dev/sg3 5 0 3 0 1 /dev/nst2 HP Ultrium 5-SCSI I11V/dev/sg4 5 0 4 0 1 /dev/nst3 STK T10000C 1.57/dev/sg5 5 0 5 0 1 /dev/nst4 HP Ultrium 5-SCSI I3AS/dev/sg6 5 0 6 0 1 /dev/nst5 HP Ultrium 5-SCSI I3AS/dev/sg7 5 0 7 0 1 /dev/nst6 STK T10000C 1.57Once these attach points are present on the system, Oracle Secure Backup'sdiscoverdev will be able to use them in creating devices.
Here is an example showing the use of discoverdev to create devices:
ob> lshstorabck06 admin,mediaserver,client (via OB) in service ob> discoverdev -ic -h storabck06 Device-Type Device-Model Serial-Number Attachpoint Library STK SL3000 464970G+1333SY1401 storabck06:/dev/sg0create device object storabck06_lib_1? (a, n, q, y, ?) [y]: Tape HP Ultrium 5-SCSI HU1328WGF6 storabck06:/dev/sg3create device object storabck06_tape_1? (a, n, q, y, ?) [y]: Tape STK T10000C HU1327WEYJ storabck06:/dev/sg4create device object storabck06_tape_2? (a, n, q, y, ?) [y]:Checking each library to associate discovered drive(s) with DTE... Assigning DTE 1 in library storabck06_lib_1 for drive storabck06_tape_1 with serial number: HU1328WGF6 Assigning DTE 2 in library storabck06_lib_1 for drive storabck06_tape_2 with serial number: HU1327WEYJob> ob> lsd -lstorabck06_lib_1: Device type: library Model: STK SL3000 Serial number: 464970G+1333SY1401 In service: yes Debug mode: no Barcode reader: default (hardware-selected) Barcodes required: no Auto clean: no Clean interval: (not set) Clean using emptiest: no Ejection type: ?? Min writable volumes: 0 UUID: 9a9c2982-1b34-1032-9c3e-aad50196aa4f Attachment 1: Host: storabck06 Raw device: /dev/sg0 storabck06_tape_1: Device type: tape Model: HP Ultrium 5-SCSI
Chapter 3Configuring Platform-Specific Media Server Devices
3-10
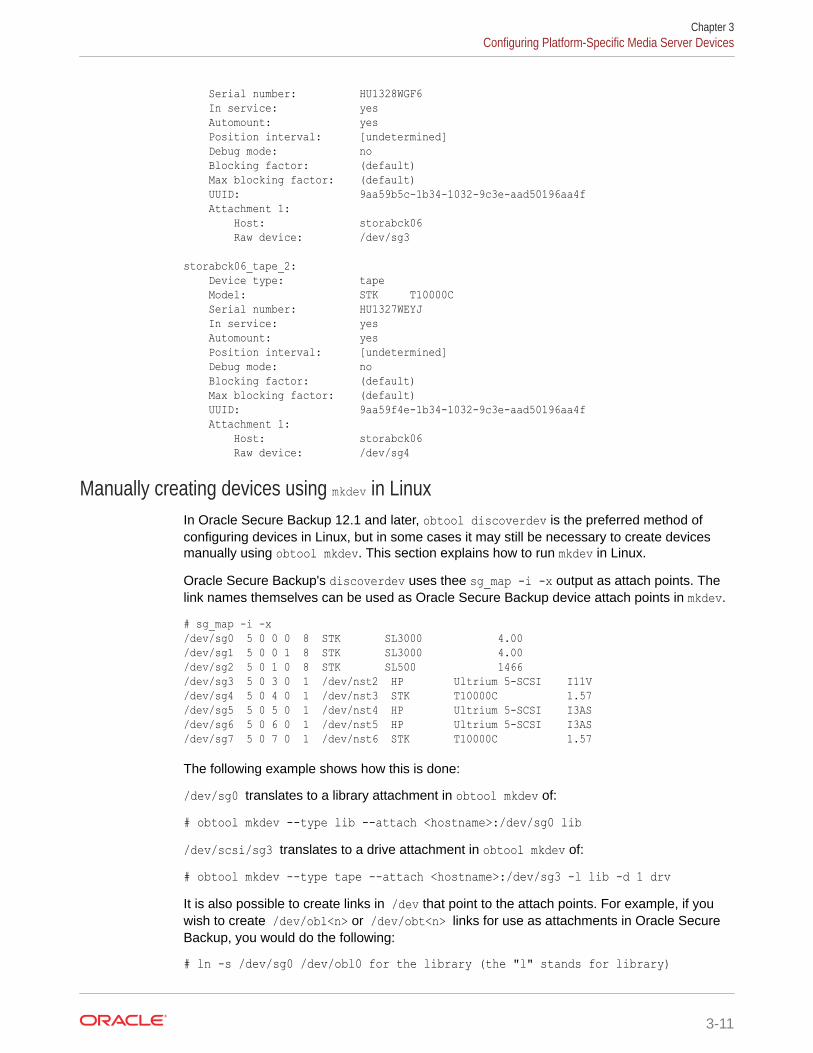
Serial number: HU1328WGF6 In service: yes Automount: yes Position interval: [undetermined] Debug mode: no Blocking factor: (default) Max blocking factor: (default) UUID: 9aa59b5c-1b34-1032-9c3e-aad50196aa4f Attachment 1: Host: storabck06 Raw device: /dev/sg3 storabck06_tape_2: Device type: tape Model: STK T10000C Serial number: HU1327WEYJ In service: yes Automount: yes Position interval: [undetermined] Debug mode: no Blocking factor: (default) Max blocking factor: (default) UUID: 9aa59f4e-1b34-1032-9c3e-aad50196aa4f Attachment 1: Host: storabck06 Raw device: /dev/sg4
Manually creating devices using mkdev in LinuxIn Oracle Secure Backup 12.1 and later, obtool discoverdev is the preferred method ofconfiguring devices in Linux, but in some cases it may still be necessary to create devicesmanually using obtool mkdev. This section explains how to run mkdev in Linux.
Oracle Secure Backup's discoverdev uses thee sg_map -i -x output as attach points. Thelink names themselves can be used as Oracle Secure Backup device attach points in mkdev.
# sg_map -i -x/dev/sg0 5 0 0 0 8 STK SL3000 4.00/dev/sg1 5 0 0 1 8 STK SL3000 4.00/dev/sg2 5 0 1 0 8 STK SL500 1466/dev/sg3 5 0 3 0 1 /dev/nst2 HP Ultrium 5-SCSI I11V/dev/sg4 5 0 4 0 1 /dev/nst3 STK T10000C 1.57/dev/sg5 5 0 5 0 1 /dev/nst4 HP Ultrium 5-SCSI I3AS/dev/sg6 5 0 6 0 1 /dev/nst5 HP Ultrium 5-SCSI I3AS/dev/sg7 5 0 7 0 1 /dev/nst6 STK T10000C 1.57
The following example shows how this is done:
/dev/sg0 translates to a library attachment in obtool mkdev of:
# obtool mkdev --type lib --attach <hostname>:/dev/sg0 lib/dev/scsi/sg3 translates to a drive attachment in obtool mkdev of:
# obtool mkdev --type tape --attach <hostname>:/dev/sg3 -l lib -d 1 drvIt is also possible to create links in /dev that point to the attach points. For example, if youwish to create /dev/obl<n> or /dev/obt<n> links for use as attachments in Oracle SecureBackup, you would do the following:
# ln -s /dev/sg0 /dev/obl0 for the library (the "l" stands for library)
Chapter 3Configuring Platform-Specific Media Server Devices
3-11
# ln -s /dev/sg3 /dev/obt0 for the drive (the "t" stands for tape drive)If you choose to do this, there must be a unique /dev/obl<n> or /dev/obt<n> entrywhere n starts at 0 and increments by 1 for each device that Oracle Secure Backupwill utilize.
The same device configurations shown earlier would now look like this:
# obtool mkdev --type lib --attach <hostname>:/dev/obl0 lib# obtool mkdev --type tape --attach <hostname>:/dev/obt0 -l lib -d 1 drv
Configuring Devices on Solaris Media ServersYou must enable the Solaris sgen driver for changer (library) and sequential (tape)devices before a host can access SCSI & Fibre Channel attached devices and beconfigured as an Oracle Secure Backup Media Server
To enable sgen drivers:
1. Enable sequential (01) and changer (01) devices by adding the following line tothe /kernel/drv/sgen.conf file:
device-type-config-list="sequential","changer";
Note:
If device-type-config-list is already defined for other devices, addsequential and changer to the existing list in the sgen.conf file.
2. Remove any old sgen drivers by using the following commands:
rm -r /dev/scsi/changerrm -r /dev/scsi/sequential
3. In the /kernel/drv/sgen.conf file, add a line for each device’s target and LUNparameters.
You can obtain these details from the output of the prtconf -Dv and dmsegcommands. An example is shown below.
name="sgen" class="scsi" target=0 lun=0; name="sgen" class="scsi" target=1 lun=0; name="sgen" class="scsi" target=2 lun=0; name="sgen" class="scsi" target=3 lun=0;.....name="sgen" class="scsi" target=13 lun=0; name="sgen" class="scsi" target=14 lun=0; name="sgen" class="scsi" target=15 lun=0;
4. Run rem_drv sgen to remove any existing sgen device configuration.
5. Use the following command, typed all on one line, to configure the sgen drivers:
add_drv -m '* 0666 bin bin' -i '"scsiclass,01" "scsiclass,08""scsa,01.bmpt" "scsa,08.bmpt"' sgen
6. To check whether the sgen attachments are created, run the following commandsas the root user:
Chapter 3Configuring Platform-Specific Media Server Devices
3-12
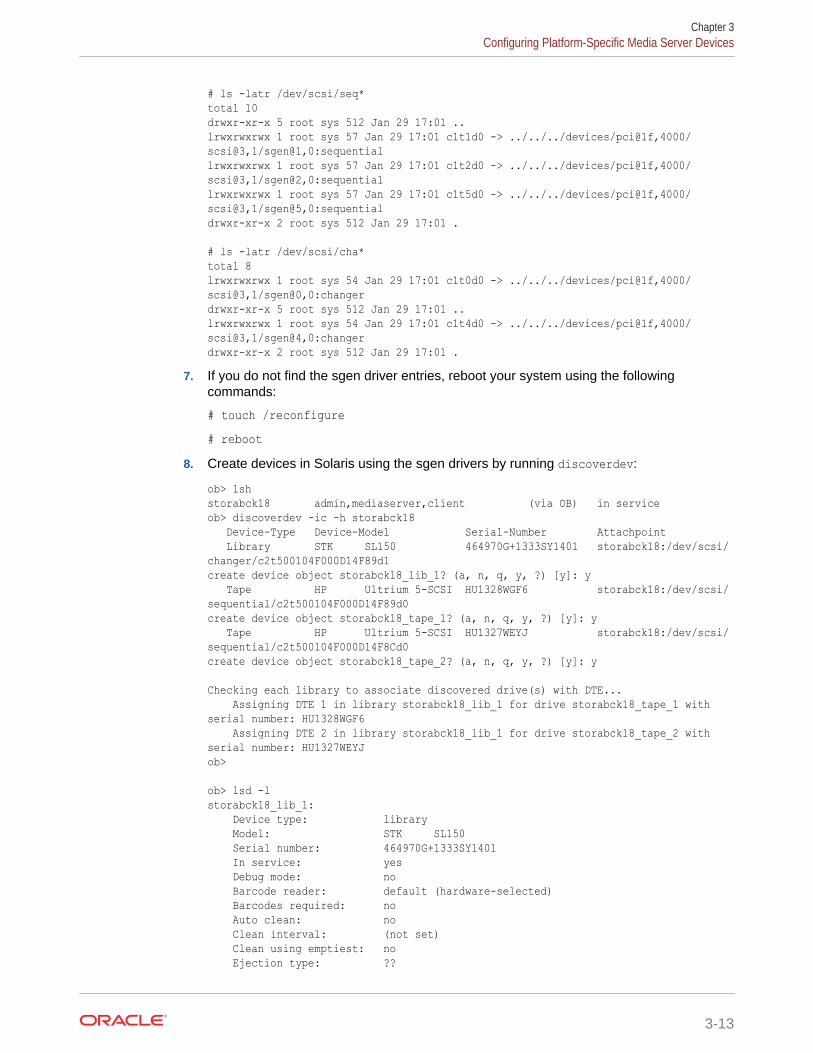
# ls -latr /dev/scsi/seq*total 10drwxr-xr-x 5 root sys 512 Jan 29 17:01 ..lrwxrwxrwx 1 root sys 57 Jan 29 17:01 c1t1d0 -> ../../../devices/pci@1f,4000/scsi@3,1/sgen@1,0:sequentiallrwxrwxrwx 1 root sys 57 Jan 29 17:01 c1t2d0 -> ../../../devices/pci@1f,4000/scsi@3,1/sgen@2,0:sequentiallrwxrwxrwx 1 root sys 57 Jan 29 17:01 c1t5d0 -> ../../../devices/pci@1f,4000/scsi@3,1/sgen@5,0:sequentialdrwxr-xr-x 2 root sys 512 Jan 29 17:01 . # ls -latr /dev/scsi/cha*total 8lrwxrwxrwx 1 root sys 54 Jan 29 17:01 c1t0d0 -> ../../../devices/pci@1f,4000/scsi@3,1/sgen@0,0:changerdrwxr-xr-x 5 root sys 512 Jan 29 17:01 ..lrwxrwxrwx 1 root sys 54 Jan 29 17:01 c1t4d0 -> ../../../devices/pci@1f,4000/scsi@3,1/sgen@4,0:changerdrwxr-xr-x 2 root sys 512 Jan 29 17:01 .
7. If you do not find the sgen driver entries, reboot your system using the followingcommands:
# touch /reconfigure# reboot
8. Create devices in Solaris using the sgen drivers by running discoverdev:
ob> lshstorabck18 admin,mediaserver,client (via OB) in serviceob> discoverdev -ic -h storabck18 Device-Type Device-Model Serial-Number Attachpoint Library STK SL150 464970G+1333SY1401 storabck18:/dev/scsi/changer/c2t500104F000D14F89d1create device object storabck18_lib_1? (a, n, q, y, ?) [y]: y Tape HP Ultrium 5-SCSI HU1328WGF6 storabck18:/dev/scsi/sequential/c2t500104F000D14F89d0create device object storabck18_tape_1? (a, n, q, y, ?) [y]: y Tape HP Ultrium 5-SCSI HU1327WEYJ storabck18:/dev/scsi/sequential/c2t500104F000D14F8Cd0create device object storabck18_tape_2? (a, n, q, y, ?) [y]: y Checking each library to associate discovered drive(s) with DTE... Assigning DTE 1 in library storabck18_lib_1 for drive storabck18_tape_1 with serial number: HU1328WGF6 Assigning DTE 2 in library storabck18_lib_1 for drive storabck18_tape_2 with serial number: HU1327WEYJob> ob> lsd -lstorabck18_lib_1: Device type: library Model: STK SL150 Serial number: 464970G+1333SY1401 In service: yes Debug mode: no Barcode reader: default (hardware-selected) Barcodes required: no Auto clean: no Clean interval: (not set) Clean using emptiest: no Ejection type: ??
Chapter 3Configuring Platform-Specific Media Server Devices
3-13
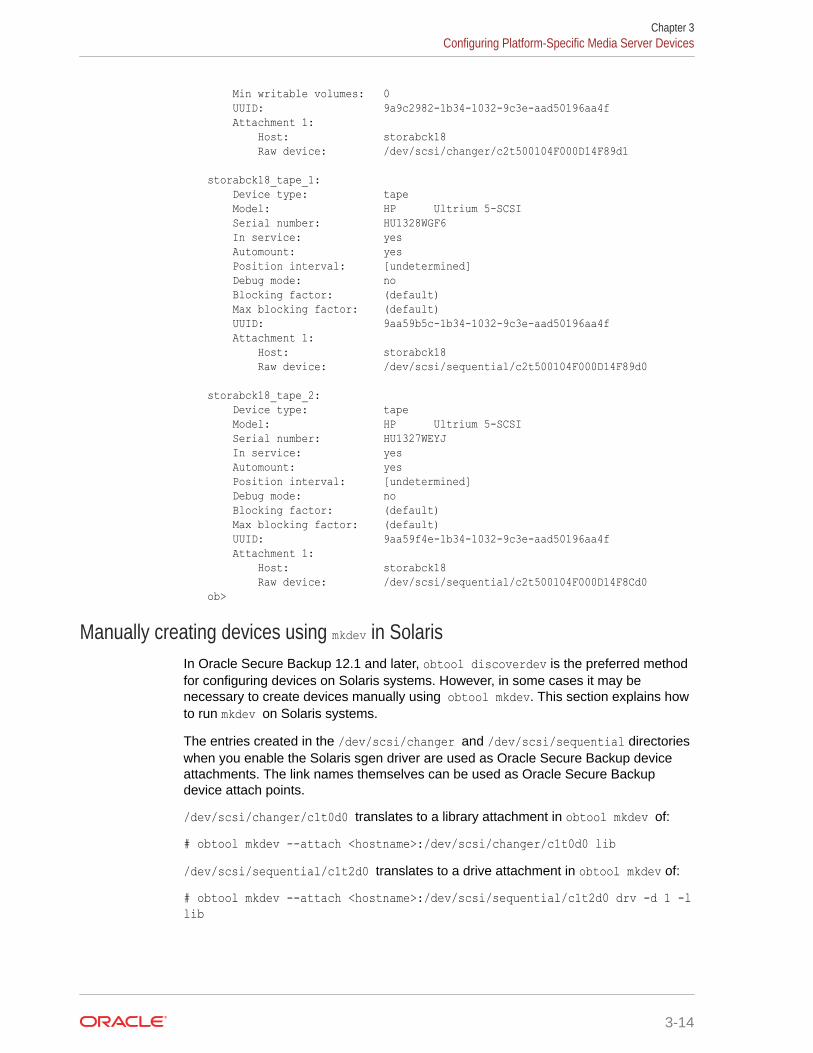
Min writable volumes: 0 UUID: 9a9c2982-1b34-1032-9c3e-aad50196aa4f Attachment 1: Host: storabck18 Raw device: /dev/scsi/changer/c2t500104F000D14F89d1 storabck18_tape_1: Device type: tape Model: HP Ultrium 5-SCSI Serial number: HU1328WGF6 In service: yes Automount: yes Position interval: [undetermined] Debug mode: no Blocking factor: (default) Max blocking factor: (default) UUID: 9aa59b5c-1b34-1032-9c3e-aad50196aa4f Attachment 1: Host: storabck18 Raw device: /dev/scsi/sequential/c2t500104F000D14F89d0 storabck18_tape_2: Device type: tape Model: HP Ultrium 5-SCSI Serial number: HU1327WEYJ In service: yes Automount: yes Position interval: [undetermined] Debug mode: no Blocking factor: (default) Max blocking factor: (default) UUID: 9aa59f4e-1b34-1032-9c3e-aad50196aa4f Attachment 1: Host: storabck18 Raw device: /dev/scsi/sequential/c2t500104F000D14F8Cd0ob>
Manually creating devices using mkdev in SolarisIn Oracle Secure Backup 12.1 and later, obtool discoverdev is the preferred methodfor configuring devices on Solaris systems. However, in some cases it may benecessary to create devices manually using obtool mkdev. This section explains howto run mkdev on Solaris systems.
The entries created in the /dev/scsi/changer and /dev/scsi/sequential directorieswhen you enable the Solaris sgen driver are used as Oracle Secure Backup deviceattachments. The link names themselves can be used as Oracle Secure Backupdevice attach points.
/dev/scsi/changer/c1t0d0 translates to a library attachment in obtool mkdev of:
# obtool mkdev --attach <hostname>:/dev/scsi/changer/c1t0d0 lib/dev/scsi/sequential/c1t2d0 translates to a drive attachment in obtool mkdev of:
# obtool mkdev --attach <hostname>:/dev/scsi/sequential/c1t2d0 drv -d 1 -llib
Chapter 3Configuring Platform-Specific Media Server Devices
3-14

In other cases, you may prefer to create links in /dev that point to the attach points. Forexample, if you wish to create /dev/obl<n> or /dev/obt<n> links for use as attachments inOracle Secure Backup, do the following:
# ln -s /dev/scsi/changer/c1t0d0 /dev/obl0 for the library (the "l" stands forlibrary)# ln -s /dev/scsi/sequential/c1t2d0 /dev/obt0 for the drive (the "t" stands fortape drive)If you choose to do this, each device that Oracle Secure Backup will utilize must have its ownunique name in the format /dev/obl<n> or /dev/obt<n>.
The same device configurations shown earlier would now look like this:
# obtool mkdev --attach <hostname>:/dev/obl0 lib# obtool mkdev --attach <hostname>:/dev/obt0 drv -d 1 -l lib
Configuring Devices on AIX Media ServersOracle Secure Backup no longer requires that AIX attach points be pre-configured usingmakedev before obtool discoverdev can find and utilize them.
To configure devices on AIX:
1. Complete the steps in
2. Add the mediaserver role to the host
ob> chhost --addrole mediaserver osblp013. Run discoverdev:
ob> discoverdev -ic -h osblp01 Device-Type Device-Model Serial-Number Attachpoint Library STK SL150 464970G+1333SY1401 osblp01:/dev/obl0create device object osblp01_lib_1? (a, n, q, y, ?) [y]: y Tape HP Ultrium 5-SCSI HU1327WEYJ osblp01:/dev/obt0create device object osblp01_tape_1? (a, n, q, y, ?) [y]: y Tape HP Ultrium 5-SCSI HU1328WGF6 osblp01:/dev/obt1create device object osblp01_tape_2? (a, n, q, y, ?) [y]: y Checking each library to associate discovered drive(s) with DTE... Assigning DTE 1 in library osblp01_lib_1 for drive osblp01_tape_2 with serial number: HU1328WGF6 Assigning DTE 2 in library osblp01_lib_1 for drive osblp01_tape_1 with serial number: HU1327WEYJ ob> lsd -losblp01_lib_1: Device type: library Model: STK SL150 Serial number: 464970G+1333SY1401 In service: no Debug mode: no Barcode reader: default (hardware-selected) Barcodes required: no Auto clean: no Clean interval: (not set) Clean using emptiest: no
Chapter 3Configuring Platform-Specific Media Server Devices
3-15
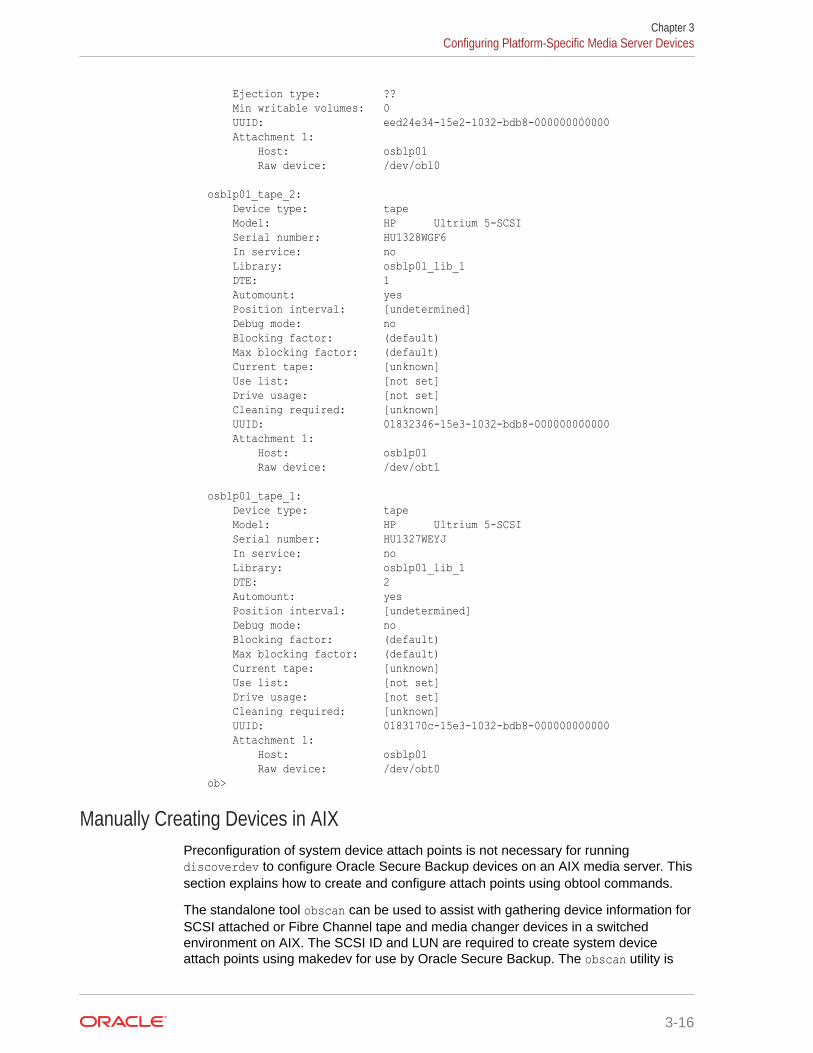
Ejection type: ?? Min writable volumes: 0 UUID: eed24e34-15e2-1032-bdb8-000000000000 Attachment 1: Host: osblp01 Raw device: /dev/obl0 osblp01_tape_2: Device type: tape Model: HP Ultrium 5-SCSI Serial number: HU1328WGF6 In service: no Library: osblp01_lib_1 DTE: 1 Automount: yes Position interval: [undetermined] Debug mode: no Blocking factor: (default) Max blocking factor: (default) Current tape: [unknown] Use list: [not set] Drive usage: [not set] Cleaning required: [unknown] UUID: 01832346-15e3-1032-bdb8-000000000000 Attachment 1: Host: osblp01 Raw device: /dev/obt1 osblp01_tape_1: Device type: tape Model: HP Ultrium 5-SCSI Serial number: HU1327WEYJ In service: no Library: osblp01_lib_1 DTE: 2 Automount: yes Position interval: [undetermined] Debug mode: no Blocking factor: (default) Max blocking factor: (default) Current tape: [unknown] Use list: [not set] Drive usage: [not set] Cleaning required: [unknown] UUID: 0183170c-15e3-1032-bdb8-000000000000 Attachment 1: Host: osblp01 Raw device: /dev/obt0ob>
Manually Creating Devices in AIXPreconfiguration of system device attach points is not necessary for runningdiscoverdev to configure Oracle Secure Backup devices on an AIX media server. Thissection explains how to create and configure attach points using obtool commands.
The standalone tool obscan can be used to assist with gathering device information forSCSI attached or Fibre Channel tape and media changer devices in a switchedenvironment on AIX. The SCSI ID and LUN are required to create system deviceattach points using makedev for use by Oracle Secure Backup. The obscan utility is
Chapter 3Configuring Platform-Specific Media Server Devices
3-16
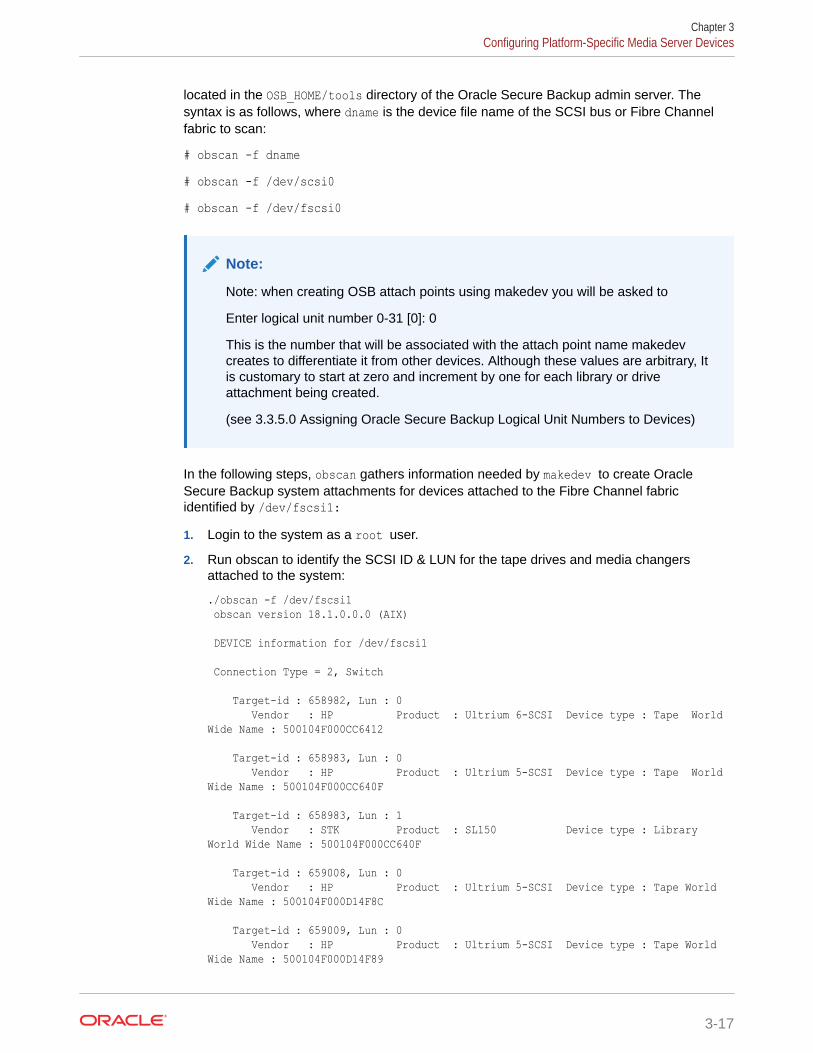
located in the OSB_HOME/tools directory of the Oracle Secure Backup admin server. Thesyntax is as follows, where dname is the device file name of the SCSI bus or Fibre Channelfabric to scan:
# obscan -f dname# obscan -f /dev/scsi0# obscan -f /dev/fscsi0
Note:
Note: when creating OSB attach points using makedev you will be asked to
Enter logical unit number 0-31 [0]: 0
This is the number that will be associated with the attach point name makedevcreates to differentiate it from other devices. Although these values are arbitrary, Itis customary to start at zero and increment by one for each library or driveattachment being created.
(see 3.3.5.0 Assigning Oracle Secure Backup Logical Unit Numbers to Devices)
In the following steps, obscan gathers information needed by makedev to create OracleSecure Backup system attachments for devices attached to the Fibre Channel fabricidentified by /dev/fscsi1:1. Login to the system as a root user.
2. Run obscan to identify the SCSI ID & LUN for the tape drives and media changersattached to the system:
./obscan -f /dev/fscsi1 obscan version 18.1.0.0.0 (AIX) DEVICE information for /dev/fscsi1 Connection Type = 2, Switch Target-id : 658982, Lun : 0 Vendor : HP Product : Ultrium 6-SCSI Device type : Tape World Wide Name : 500104F000CC6412 Target-id : 658983, Lun : 0 Vendor : HP Product : Ultrium 5-SCSI Device type : Tape World Wide Name : 500104F000CC640F Target-id : 658983, Lun : 1 Vendor : STK Product : SL150 Device type : Library World Wide Name : 500104F000CC640F Target-id : 659008, Lun : 0 Vendor : HP Product : Ultrium 5-SCSI Device type : Tape World Wide Name : 500104F000D14F8C Target-id : 659009, Lun : 0 Vendor : HP Product : Ultrium 5-SCSI Device type : Tape World Wide Name : 500104F000D14F89
Chapter 3Configuring Platform-Specific Media Server Devices
3-17
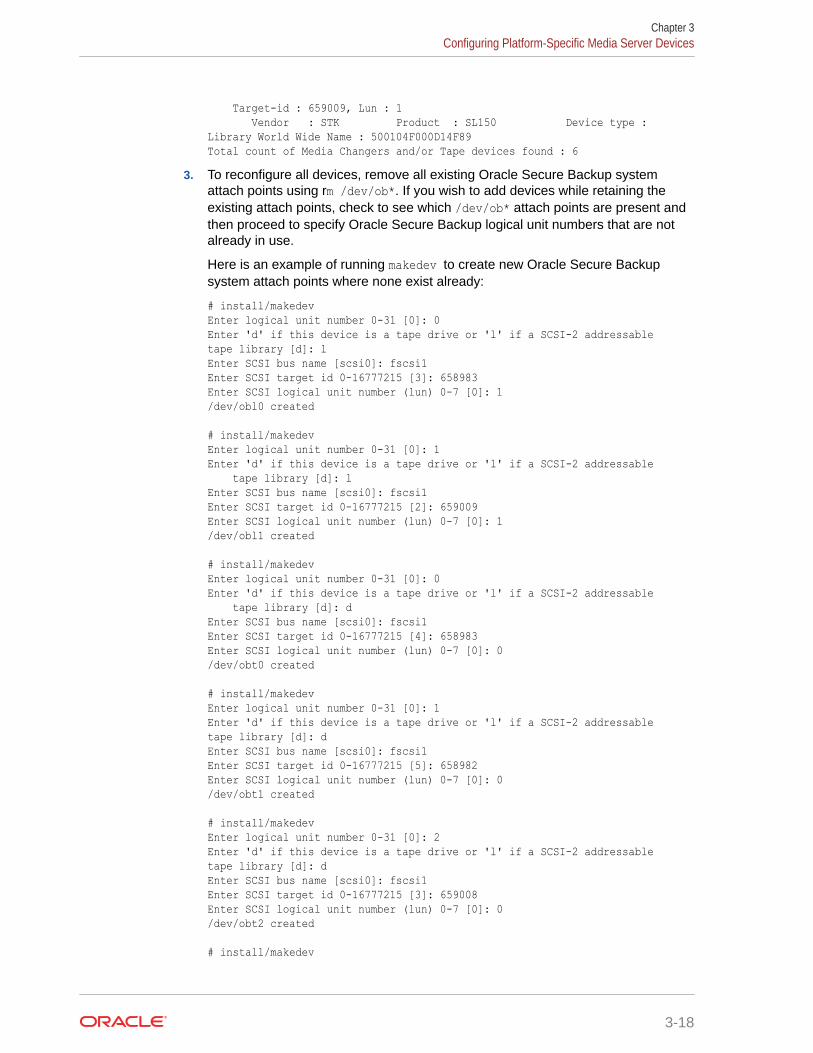
Target-id : 659009, Lun : 1 Vendor : STK Product : SL150 Device type : Library World Wide Name : 500104F000D14F89Total count of Media Changers and/or Tape devices found : 6
3. To reconfigure all devices, remove all existing Oracle Secure Backup systemattach points using rm /dev/ob*. If you wish to add devices while retaining theexisting attach points, check to see which /dev/ob* attach points are present andthen proceed to specify Oracle Secure Backup logical unit numbers that are notalready in use.
Here is an example of running makedev to create new Oracle Secure Backupsystem attach points where none exist already:
# install/makedevEnter logical unit number 0-31 [0]: 0Enter 'd' if this device is a tape drive or 'l' if a SCSI-2 addressable tape library [d]: lEnter SCSI bus name [scsi0]: fscsi1Enter SCSI target id 0-16777215 [3]: 658983Enter SCSI logical unit number (lun) 0-7 [0]: 1/dev/obl0 created # install/makedevEnter logical unit number 0-31 [0]: 1Enter 'd' if this device is a tape drive or 'l' if a SCSI-2 addressable tape library [d]: lEnter SCSI bus name [scsi0]: fscsi1Enter SCSI target id 0-16777215 [2]: 659009Enter SCSI logical unit number (lun) 0-7 [0]: 1/dev/obl1 created # install/makedevEnter logical unit number 0-31 [0]: 0Enter 'd' if this device is a tape drive or 'l' if a SCSI-2 addressable tape library [d]: dEnter SCSI bus name [scsi0]: fscsi1Enter SCSI target id 0-16777215 [4]: 658983Enter SCSI logical unit number (lun) 0-7 [0]: 0/dev/obt0 created # install/makedevEnter logical unit number 0-31 [0]: 1Enter 'd' if this device is a tape drive or 'l' if a SCSI-2 addressable tape library [d]: dEnter SCSI bus name [scsi0]: fscsi1Enter SCSI target id 0-16777215 [5]: 658982Enter SCSI logical unit number (lun) 0-7 [0]: 0/dev/obt1 created # install/makedevEnter logical unit number 0-31 [0]: 2Enter 'd' if this device is a tape drive or 'l' if a SCSI-2 addressable tape library [d]: dEnter SCSI bus name [scsi0]: fscsi1Enter SCSI target id 0-16777215 [3]: 659008Enter SCSI logical unit number (lun) 0-7 [0]: 0/dev/obt2 created # install/makedev
Chapter 3Configuring Platform-Specific Media Server Devices
3-18
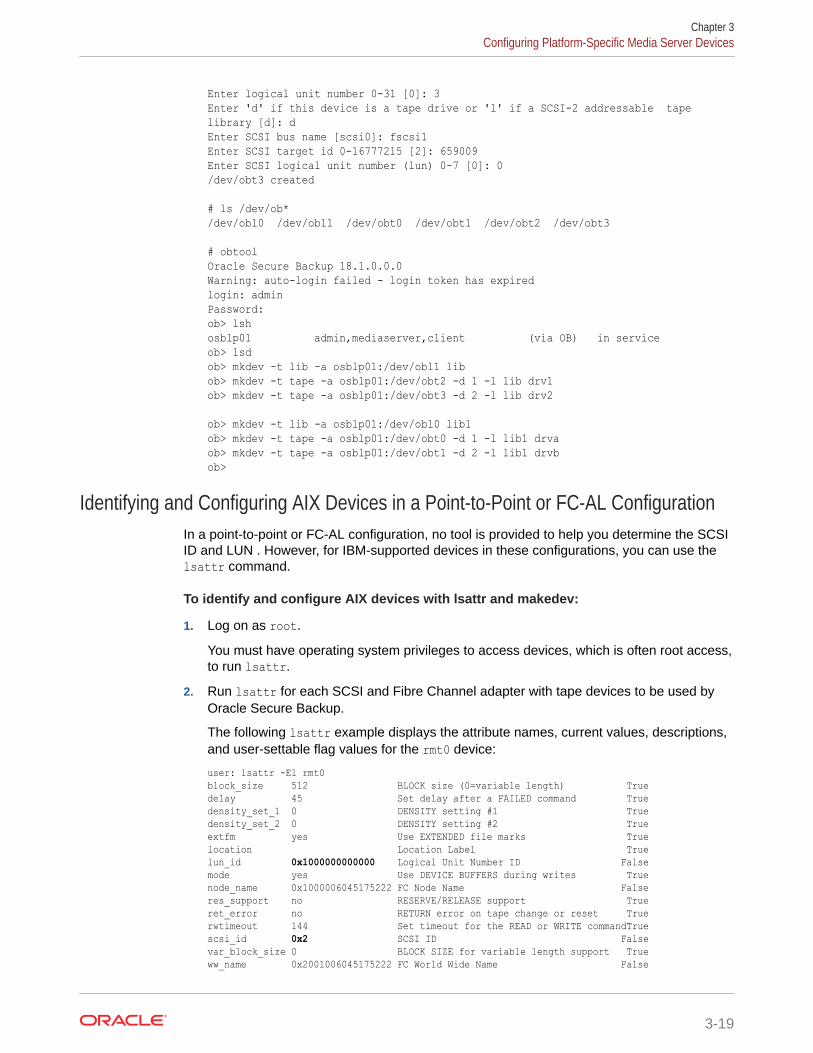
Enter logical unit number 0-31 [0]: 3Enter 'd' if this device is a tape drive or 'l' if a SCSI-2 addressable tape library [d]: dEnter SCSI bus name [scsi0]: fscsi1Enter SCSI target id 0-16777215 [2]: 659009Enter SCSI logical unit number (lun) 0-7 [0]: 0/dev/obt3 created # ls /dev/ob*/dev/obl0 /dev/obl1 /dev/obt0 /dev/obt1 /dev/obt2 /dev/obt3 # obtoolOracle Secure Backup 18.1.0.0.0Warning: auto-login failed - login token has expiredlogin: adminPassword:ob> lshosblp01 admin,mediaserver,client (via OB) in serviceob> lsdob> mkdev -t lib -a osblp01:/dev/obl1 libob> mkdev -t tape -a osblp01:/dev/obt2 -d 1 -l lib drv1ob> mkdev -t tape -a osblp01:/dev/obt3 -d 2 -l lib drv2 ob> mkdev -t lib -a osblp01:/dev/obl0 lib1ob> mkdev -t tape -a osblp01:/dev/obt0 -d 1 -l lib1 drvaob> mkdev -t tape -a osblp01:/dev/obt1 -d 2 -l lib1 drvbob>
Identifying and Configuring AIX Devices in a Point-to-Point or FC-AL ConfigurationIn a point-to-point or FC-AL configuration, no tool is provided to help you determine the SCSIID and LUN . However, for IBM-supported devices in these configurations, you can use thelsattr command.
To identify and configure AIX devices with lsattr and makedev:
1. Log on as root.
You must have operating system privileges to access devices, which is often root access,to run lsattr.
2. Run lsattr for each SCSI and Fibre Channel adapter with tape devices to be used byOracle Secure Backup.
The following lsattr example displays the attribute names, current values, descriptions,and user-settable flag values for the rmt0 device:
user: lsattr -El rmt0block_size 512 BLOCK size (0=variable length) Truedelay 45 Set delay after a FAILED command Truedensity_set_1 0 DENSITY setting #1 Truedensity_set_2 0 DENSITY setting #2 Trueextfm yes Use EXTENDED file marks Truelocation Location Label Truelun_id 0x1000000000000 Logical Unit Number ID Falsemode yes Use DEVICE BUFFERS during writes Truenode_name 0x1000006045175222 FC Node Name Falseres_support no RESERVE/RELEASE support Trueret_error no RETURN error on tape change or reset Truerwtimeout 144 Set timeout for the READ or WRITE commandTruescsi_id 0x2 SCSI ID Falsevar_block_size 0 BLOCK SIZE for variable length support Trueww_name 0x2001006045175222 FC World Wide Name False
Chapter 3Configuring Platform-Specific Media Server Devices
3-19
You can convert the hexadecimal values of lun_id and scsi_id (shown in bold) todecimal so that they are usable by the Oracle Secure Backup makdev command.After conversion, the SCSI LUN ID is 281474976710656 and the SCSI ID is 2.
3. Navigate to the install directory in your Oracle Secure Backup home. Forexample:
# cd /usr/local/oracle/backup/install4. Enter the makedev command at the shell prompt:
# makedev5. At the prompts, enter the information required to create attach points used within
Oracle Secure Backup to identify devices for backup and restore operations.
The makedev script creates the attach point, displaying messages indicating itsprogress.
Configuring Devices on HP-UX Media ServersTo access SCSI or Fibre Channel tape devices on HP-UX using the makedev script,Oracle Secure Backup requires the following identifying information about how thedevices are attached to their hosts:
• SCSI bus number instance
• Target ID
• LUN
To gather device information in HP-UX, you can use the ioscan utility located in /usr/sbin on the HP-UX operating system. The ioscan command searches the system andlists any devices that it finds. You must have root access to run ioscan.
Note:
The ioscan tool, which may be included as part of the HP-UX operatingsystem, is an optional tool for device identification.
To identify and configure HP-UX devices:
1. Log on as root.
2. Execute the following command:
/usr/sbin/ioscan -f
Running the command with the -f option displays full information about thesystem configuration including device class, instance number, device or interfacedriver, software state, and hardware type.
Example 3-1 shows sample output for ioscan -f. The bus number instance,target ID, SCSI LUN, and device description for each device are shown in bold.
3. Using the ioscan output, make a note of the bus number, target ID, and SCSI LUNfor the tape devices.
Chapter 3Configuring Platform-Specific Media Server Devices
3-20
Table 3-4 shows the relevant information from Example 3-1.
Table 3-4 Information Required by makedev
Device Type Name Bus NumberInstance
Target ID SCSI LUN
Tape library(autoch)
SCSI ADIC FastStor 2 3 1 0
Tape drive (tape) SCSI HP Ultrium 2 3 2 0
Tape library(autoch)
FC ADIC Scalar 24 9 3 0
Tape drive (tape) FC IBM ULTRIUM-TD3 9 3 1
Tape drive (tape) FC IBM ULTRIUM-TD3 9 3 2
4. Use makedev to create attach points so that Oracle Secure Backup can identify devicesfor backup and restore operations.
The following example runs makedev using the information in Table 3-4. The examplecreates the attach point /dev/obl/8 for the ADIC FastStor 2 library on SCSI bus instance3 with the target ID 1 and SCSI LUN 0.
% makedev Enter logical unit number 0-31 [0]: 8Enter 'd' if this device is a tape drive or 'l' if a SCSI-2 addressable tape library [d]: lEnter SCSI bus instance: 3Enter SCSI target id 0-16777215: 1Enter SCSI logical unit number (lun) 0-7 [0]: 0/dev/obl/8 created
The following example runs makedev using the information in Table 3-4. The examplecreates the attach point /dev/obt/9m for the HP Ultrium 2 tape drive on SCSI businstance 3 with the target ID 2 and SCSI LUN 0.
% makedev Enter logical unit number 0-31 [0]: 9Enter 'd' if this device is a tape drive or 'l' if a SCSI-2 addressable tape library [d]: dEnter SCSI bus instance: 3Enter SCSI target id 0-16777215: 2Enter SCSI logical unit number (lun) 0-7 [0]: 0/dev/obt/9m created
Example 3-1 ioscan -f
$ /usr/sbin/ioscan -f Class I H/W Path Driver S/W State H/W Type Description...ext_bus 3 0/1/1/1 mpt CLAIMED INTERFACE SCSI Ultra320target 11 0/1/1/1.1 tgt CLAIMED DEVICEautoch 4 0/1/1/1.1.0 schgr CLAIMED DEVICE ADIC FastStor 2target 10 0/1/1/1.2 tgt CLAIMED DEVICEtape 8 0/1/1/1.2.0 stape CLAIMED DEVICE HP Ultrium 2-SCSI...fcp 2 0/2/1/0.99 fcp CLAIMED INTERFACE FCP Domainext_bus 9 0/2/1/0.99.15.255.1 fcpdev CLAIMED INTERFACE FCP Device Interfacetarget 1 0/2/1/0.99.15.255.1.3 tgt CLAIMED DEVICEautoch 8 0/2/1/0.99.15.255.1.3.0 schgr CLAIMED DEVICE ADIC Scalar 24
Chapter 3Configuring Platform-Specific Media Server Devices
3-21
tape 19 0/2/1/0.99.15.255.1.3.1 stape CLAIMED DEVICE IBM ULTRIUM-TD3tape 20 0/2/1/0.99.15.255.1.3.2 stape CLAIMED DEVICE IBM ULTRIUM-TD3
Assigning Oracle Secure Backup Logical Unit Numbers to DevicesEach tape drive and tape library must be assigned an Oracle Secure Backup LUNduring the configuration process. This number is used to generate unique devicenames during device configuration. Oracle Secure Backup logical unit numbers areassigned as needed automatically on Windows. For each UNIX or Linux media server,however, you must select Oracle Secure Backup logical unit numbers for each deviceas part of planning your administrative domain.
There is no required order for assigning Oracle Secure Backup logical unit numbers.They are typically assigned sequentially, starting at 0, for each tape device of a giventype, whether tape library or tape drive. That is, tape libraries are typically numbered 0,1, 2 and so on, and tape drives are also numbered 0, 1, 2 and so on. The maximumvalue for an Oracle Secure Backup logical unit number is 31.
On Linux or UNIX, the resulting device special file names for tape libraries are /dev/obl1, /dev/obl2, /dev/obl3 and so on, and the names for tape drives are /dev/obt1, /dev/obt2, /dev/obt3 and so on. On Windows, the resulting tape library namesare //./obl1, //./obl2, //./obl3 and so on, and the names for tape drives are //./obt1, //./obt2, //./obt3 and so on, where these names are assigned automaticallyduring the installation of Oracle Secure Backup on Windows.
See Also:
"Configuring Devices on Linux Media Servers"
Note:
The Oracle Secure Backup logical unit number should not be confused withthe SCSI LUN. The latter is part of the hardware address of the tape device,while the Oracle Secure Backup logical unit number is part of the devicespecial filename.
Additional Information for Installation of Oracle SecureBackup on Linux
For each Linux media server, ensure that the SCSI Generic (SG) driver is installed.This driver is required for Oracle Secure Backup to interact with a tape device.
Kernel modules are usually loaded directly by the facility that requires them, if thecorrect settings are present in the /etc/modprobe.conf file. However, it is sometimesnecessary to explicitly force the loading of a module at start time.
For example, on RedHat Enterprise Linux, the module for the SCSI Generic driver isnamed sg. Red Hat Enterprise Linux checks at start time for the existence of the /etc/rc.modules file, which contains various commands to load modules.
Chapter 3Additional Information for Installation of Oracle Secure Backup on Linux
3-22
Note:
The rc.modules file is necessary, and not rc.local, because rc.modules runsearlier in the start process.
On RedHat Enterprise Linux, you can use the following commands to add the sg module tothe list of modules configured to load as root at start time:
# echo modprobe sg >> /etc/rc.modules# chmod +x /etc/rc.modules
An Oracle Secure Backup user must be mapped to a Linux or UNIX user that has read/writepermissions to the /dev/sg devices. One way to accomplish this goal is to set thepermissions to 666 for the /dev/sg devices.
Linux Media Server System Requirement: SCSI Generic DriverConfiguring a Linux host for the Oracle Secure Backup media server role requires that theSCSI Generic driver be installed on that host. This driver is required for Oracle SecureBackup to interact with a tape device. The host must also be configured to automaticallyreload the driver after a restart.
Additional Information for Installing Oracle Secure Backup onAIX
The installation and uninstallation procedures for AIX and Linux/UNIX are identical.
Although, to successfully install Oracle Secure Backup on AIX, you must ensure that theInput/Output Completion Port (IOCP) is configured on your system. To configure IOCP,complete the steps in "Configuring IOCP on AIX Systems".
During Oracle Secure Backup installation, the Oracle Secure Backup admin user is mappedby default to UNIX user root and UNIX group root. In this configuration, Oracle SecureBackup requires that the user root be a member of the group root to back up the file systemsuccessfully. AIX does not define a group root by default. If the group root does not exist onyour AIX system, then you must create it and make user root a member of it.
Note:
You can change this mapping of the Oracle Secure Backup admin after installation.
Chapter 3Additional Information for Installing Oracle Secure Backup on AIX
3-23
See Also:
• "Installing Oracle Secure Backup on Linux or UNIX" and "UninstallingOracle Secure Backup on Linux or UNIX"
• "Configuring Devices on AIX Media Servers"
Configuring IOCP on AIX SystemsIt is mandatory to enable IOCP on your AIX systems to be able to perform OracleSecure Backup operations successfully.
To configure IOCP:
1. Run the lslpp command to ensure that IOCP module was installed on yoursystem during the database install.
$ lslpp -l bos.iocp.rte
The output should look similar to this:
Fileset Level State Description----------------------------------------------------------------------------Path: /usr/lib/objrepos bos.iocp.rte 5.3.9.0 APPLIED I/O Completion Ports API Path: /etc/objrepos bos.iocp.rte 5.3.0.50 COMMITTED I/O Completion Ports API
2. Run the lsdev command to check the status of the IOCP port.
$ lsdev -Cc iocp
The required IOCP port status is Available.
If the IOCP port status is Defined, change this to Available by completing thefollowing steps:
a. Log on as root.
b. Run the following command:
# smitty iocpc. Select Change/Show characteristics of the I/O Completion Ports.
d. Change the configured state from Defined to Available.
e. Restart the system for this change to reflect.
Chapter 3Additional Information for Installing Oracle Secure Backup on AIX
3-24
4Installing Oracle Secure Backup on Windows
This chapter explains how to install Oracle Secure Backup on hosts that run the Windowsoperating system.
This chapter contains these sections:
• Prerequisites for Installing Oracle Secure Backup on Windows
• Installing Oracle Secure Backup on Windows
• Configuring Firewalls for Oracle Secure Backup on Windows
Prerequisites for Installing Oracle Secure Backup on WindowsPerform these preliminary steps before you begin installation of Oracle Secure Backupsoftware:
• If you are installing Oracle Secure Backup on host that will be used as a media server,physically attach each tape library and tape drive that you intend to make available foruse by Oracle Secure Backup. If prompted, restart the computer.
• Disable any system software that scans and opens arbitrary SCSI targets beforeinstalling Oracle Secure Backup. If Oracle Secure Backup has to contend with othersystem software (such as monitoring software) for access to tape libraries and drives,then unexpected behavior can result.
Note:
If you are installing Oracle Secure Backup in an Oracle Real Application Clusters(Oracle RAC) environment, then you must install Oracle Secure Backup on eachnode in the cluster.
Installing Oracle Secure Backup on WindowsYou use the Oracle Secure Backup Windows Installer to install Oracle Secure Backup onWindows.
Note:
If you are installing Oracle Secure Backup in an Oracle RAC environment, then youmust install Oracle Secure Backup on each node in the cluster.
4-1
To install Oracle Secure Backup on Windows:
1. Complete the planning tasks described in "Preparing to Install Oracle SecureBackup".
2. Ensure that the prerequisites described in "Prerequisites for Installing OracleSecure Backup on Windows" are satisfied.
3. If you are installing the administrative server or media server role, verify that thishost meets the physical and network security requirements discussed in"Choosing Secure Hosts for the Administrative and Media Servers".
4. Log on to the host as either the Administrator user or as a user that is a member ofthe Administrators group.
5. Select one of these install options:
• If you are installing Oracle Secure Backup from a CD-ROM, then insert theCD-ROM. If AutoPlay is enabled, then the setup.exe program startsautomatically and opens the Oracle Secure Backup Setup Wizard.
If Windows AutoPlay is not enabled, then open the drive containing theinstallation CD-ROM using Windows Explorer and run the setup.exe program.
• If you are installing Oracle Secure Backup from an Oracle Technology Network(OTN) download, then run the setup.exe program from the folder into whichthe download Zip file contents were extracted in "Acquiring Oracle SecureBackup Installation Media".
The Oracle Secure Backup Setup Wizard starts and the Welcome screen appears.
6. Click Next to continue.
If you have uninstalled Oracle Secure Backup software before beginning thisinstallation, or if you have never installed it on this computer, then the Clean Installpage appears.
You can upgrade only Oracle Secure Backup 12.1 or Oracle Secure Backup 12.2to Oracle Secure Backup 18.1. If you are using an earlier version of Oracle SecureBackup, then you must first upgrade to Oracle Secure Backup 12.1.0.2 or laterand then upgrade to Oracle Secure Backup 18.1.
Under certain conditions (for example, if your backup domain is currently runningOracle Secure Backup version 10.4.0.4 or earlier), you will be forced to run obcmrecertifydomain before upgrading to Oracle Secure Backup 18.1.
See Also:
• Renewing Certificates in Automated Certificate Provisioning Mode
• Upgrading Oracle Secure Backup
7. Enter your customer information as follows:
a. Enter a user name in the User Name field.
b. Enter the name of your company in the Organization field.
c. Select one of these options:
Chapter 4Installing Oracle Secure Backup on Windows
4-2
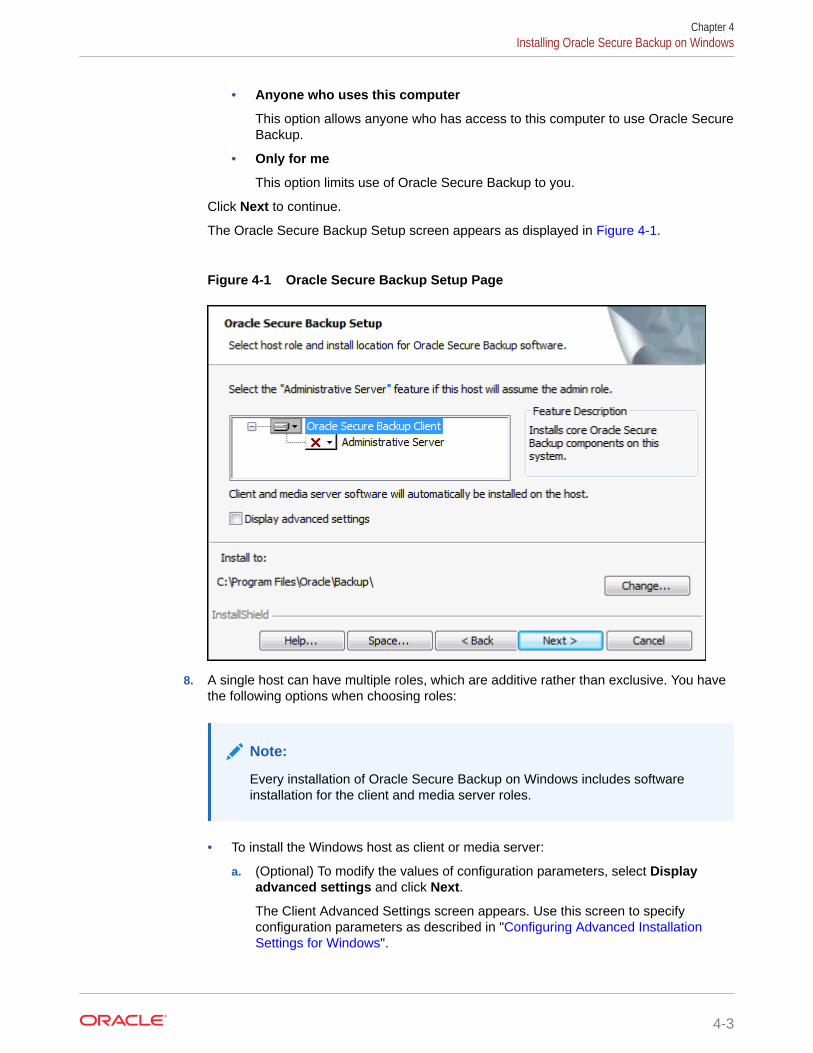
• Anyone who uses this computer
This option allows anyone who has access to this computer to use Oracle SecureBackup.
• Only for me
This option limits use of Oracle Secure Backup to you.
Click Next to continue.
The Oracle Secure Backup Setup screen appears as displayed in Figure 4-1.
Figure 4-1 Oracle Secure Backup Setup Page
8. A single host can have multiple roles, which are additive rather than exclusive. You havethe following options when choosing roles:
Note:
Every installation of Oracle Secure Backup on Windows includes softwareinstallation for the client and media server roles.
• To install the Windows host as client or media server:
a. (Optional) To modify the values of configuration parameters, select Displayadvanced settings and click Next.
The Client Advanced Settings screen appears. Use this screen to specifyconfiguration parameters as described in "Configuring Advanced InstallationSettings for Windows".
Chapter 4Installing Oracle Secure Backup on Windows
4-3
b. Click Next.
The Adding Host Initiator Name page appears.
c. Enter the IP address or Fully Qualified Domain Name (FQDN) of theOracle Secure Backup domain host that will use the mkhost command toinitiate the request to add a client. This is usually the administrative server.
The specified IP address or FQDN is stored in the C:\ProgramFiles\Oracle\Backup\db\obconfig.txt file. It is used in the initialhandshake between the client and the domain host that initiated therequest to add the client, to verify the source of the request.
To omit the server IP address verification at the time of installing the client,use the ADD_HOST_INITIATOR_ENABLE option when invoking the OracleSecure Backup installer from the command line.
For example:
msiexec /i "Oracle Secure Backup.msi" INSTALL_ROLE="Client" ADD_HOST_INITIATOR_ENABLE="No"
d. Click Next and continue with Step 16.
Oracle Secure Backup always installs the software required for the mediaserver role. But if you want this Windows host to have the media server role inyour Oracle Secure Backup administrative domain, then you must completethe Oracle Secure Backup software installation, add the media server role,and then configure any tape devices attached to this host.
See Also:
Configuring and Managing the Administrative Domain
• To install the Windows host as an administrative server, select AdministrativeServer from the dropdown menu and then select This feature will beinstalled on local hard drive.
Selecting this option removes the X from the administrative server icon andincludes the administrative server role in the installation.
9. Select Change to specify the name of the directory into which Oracle SecureBackup software is installed. The default directory is C:\ProgramFiles\Oracle\Backup.
In addition to the options described in step 7, you can perform the followingactions in the Oracle Secure Backup Setup screen:
• Click Help for detailed descriptions of the installation options.
• Click Change to change the destination folder for the installation.
• Click Space to display the disk space required for the installation.
10. (Optional) To modify the values of installation parameters, select Displayadvanced settings.
The Admin Host Advanced Settings page is displayed. Follow the steps describedin "Configuring Advanced Installation Settings for Windows" to configureinstallation parameters.
Chapter 4Installing Oracle Secure Backup on Windows
4-4
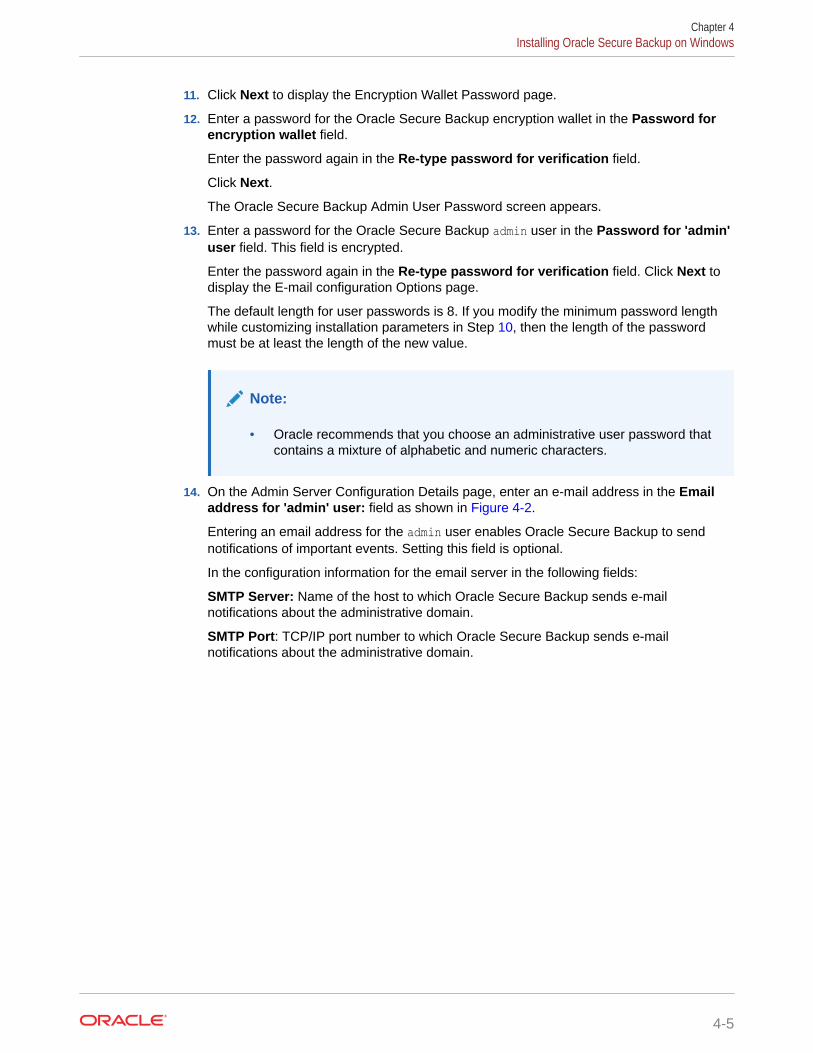
11. Click Next to display the Encryption Wallet Password page.
12. Enter a password for the Oracle Secure Backup encryption wallet in the Password forencryption wallet field.
Enter the password again in the Re-type password for verification field.
Click Next.
The Oracle Secure Backup Admin User Password screen appears.
13. Enter a password for the Oracle Secure Backup admin user in the Password for 'admin'user field. This field is encrypted.
Enter the password again in the Re-type password for verification field. Click Next todisplay the E-mail configuration Options page.
The default length for user passwords is 8. If you modify the minimum password lengthwhile customizing installation parameters in Step 10, then the length of the passwordmust be at least the length of the new value.
Note:
• Oracle recommends that you choose an administrative user password thatcontains a mixture of alphabetic and numeric characters.
14. On the Admin Server Configuration Details page, enter an e-mail address in the Emailaddress for 'admin' user: field as shown in Figure 4-2.
Entering an email address for the admin user enables Oracle Secure Backup to sendnotifications of important events. Setting this field is optional.
In the configuration information for the email server in the following fields:
SMTP Server: Name of the host to which Oracle Secure Backup sends e-mailnotifications about the administrative domain.
SMTP Port: TCP/IP port number to which Oracle Secure Backup sends e-mailnotifications about the administrative domain.
Chapter 4Installing Oracle Secure Backup on Windows
4-5
Figure 4-2 Admin Server Configuration Details Page
Note:
The default from address for e-mails generated by Oracle SecureBackup is SYSTEM@fqdn, where fqdn is the fully qualified domain name ofthe Oracle Secure Backup administrative server. You can change thisdefault from address while configuring installation parameters. See Oracle Secure Backup Reference for more information.
Click Next to display the Web Server Account Details page.
15. In the Web Server Account field, enter the Windows account that is used tolaunch the Apache daemon. Specify a value in the form of domain\user.
In the Password for Oracle Secure Backup Web server account field, enter apassword for the Apache Web user account. Re-enter the password in the Re-type password for verification field.
If the installer cannot log on to your Web server account, the Oracle SecureBackup will present an error and halt the installation process.
If you do not have a Web server account, you can choose to select the checkboxthat will use your Local System Account credentials for the installation.
Click Next to display the Ready to Install the Program screen appears.
16. Click Install to start copying files.
A progress bar appears. When the files are copied the InstallShield Completedscreen appears.
Chapter 4Installing Oracle Secure Backup on Windows
4-6
17. Click Finish.
The Oracle Secure Backup software installation on this Windows host is complete.
A log file osb_install.log of the installation is stored in the Windows temporarydirectory. An additional Windows log is created in the same directory if you have enabledWindows Installer logging.
To view the contents of the temporary directory, enter the following text at command line:
cd %temp%
See Also:
"Enabling Installer Logging on Windows" for more information on how to enableInstaller logging on Windows
Enabling Installer Logging on WindowsYou can use the Windows Installer logging to help assist in troubleshooting issues whileinstalling Oracle Secure Backup.
To enable Windows Installer logging:
1. Open the Windows registry with Regedit.exe and create the following path and keys:
HKEY_LOCAL_MACHINE\Software\Policies\Microsoft\Windows\InstallerReg_SZ: LoggingValue: voicewarmupx
2. Select the required logging mode. Table 4-1 lists the letters that can be entered, in anyorder, in the value field to enable the specified logging options.
Table 4-1 Windows Installer Logging Values
Value Description
v Verbose output
o Out-of-disk-space messages
i Status messages
c Initial UI parameters
e All error messages
w Non-fatal warnings
a Start up of actions
r Action-specific records
m Out-of-memory or fatal exit information
u User requests
p Terminal properties
+ Append to existing file
! Flush each line to the log
Chapter 4Installing Oracle Secure Backup on Windows
4-7
Table 4-1 (Cont.) Windows Installer Logging Values
Value Description
x Extra debugging information. The x flag is available only onWindows Server 2003 and later operating systems, and on the MSIredistributable version 3.0, and on later versions of the MSIredistributable.
* Wildcard, log all information except for the v and the x options. Toinclude the v and the x option, specify /l*vx.
Note:
This should be used only for troubleshooting purposes and should not beleft on because it will have adverse effects on system performance anddisk space. Each time you use the Add/Remove Programs tool inControl Panel, a new Msi*.log file is created.
Configuring Advanced Installation Settings for WindowsAdvanced settings enable you to customize the values of parameters used during theOracle Secure Backup installation. Default values are provided for each parameterand, if you do not explicitly modify the value of a parameter, then Oracle SecureBackup uses the default value.
To customize installation parameters:
1. On the Admin Host Advanced Settings page (for administrative server) or ClientHost Advanced Settings page (for clients), provide values for the installationparameters that you wish to customize.
The parameters displayed depends on the role that you are installing on the host.If you are installing the client role, then the only parameters that you can configureare the Oracle Secure Backup temporary directory and whether to start OracleSecure Backup service automatically.
• Temporary directory: Specifies the name of the directory that stores transientfiles used during Oracle Secure Backup operations.
See Also:
"Oracle Secure Backup Temporary Directory"
• Minimum User Password Length: Specifies the minimum length for OracleSecure Backup user passwords.
See Also:
"Length of Oracle Secure Backup User Passwords"
Chapter 4Installing Oracle Secure Backup on Windows
4-8
• Security Certificate Keysize: Specifies the key size of identity certificates.
See Also:
"Identity Key Certificate Length"
2. For the administrative server role, if you plan to perform Oracle Database backup andrestore operations with RMAN, then select the Create "oracle" user.
An Oracle Secure Backup user with the rights of the oracle class, whose purpose is tofacilitate Oracle Database backup and restore operations with Recovery Manager(RMAN), is created.
The default name for the preauthorized user is oracle. You can modify this name.
Note:
• You are required to create the oracle user only if you plan to use OracleSecure Backup with RMAN.
• If you intend to use Oracle Secure Backup to perform one-time, RMAN-initiated, or unprivileged backup operations on Windows clients, then youmust modify the Oracle Secure Backup admin and oracle users to assignthem Windows credentials (a domain, user name and password) that arevalid at the client with required privileges after you complete the OracleSecure Backup installation. Otherwise, Oracle Secure Backup cannotperform the backup operation. This requirement applies regardless of theplatform that acts as the administrative server.
• The installer assigns a random password to the oracle user. In most casesyou are not required to change the assigned password, because it is notusually necessary to log in to Oracle Secure Backup using this useraccount.
• Before electing to create an Oracle Secure Backup oracle user, be awarethat this choice involves a trade-off between convenience and security.
See Also:
Oracle Secure Backup Reference for more information about the oracle class
3. Select Start Oracle Secure Backup Services automatically to specify that all servicesshould be started after the system is rebooted and click Next.
4. (Administrative server only) If you chose to create a preauthorized user, then thePreauthorized User Details page is displayed. Provide information in the following fields:
• Preauthorized user account
The default name for the preauthorized user is oracle. You can modify by name byproviding a different name in this field.
• UNIX Clients
Chapter 4Installing Oracle Secure Backup on Windows
4-9
To backup a database on a Linux/UNIX host, provide the following information:
– Preauthorized User: Name of the Linux/UNIX user to which thepreauthorized user is mapped.
– Preauthorized Group: Name of the Linux/UNIX group to which thepreauthorized user is mapped.
• Windows Clients
To backup a database on a Window host, in the Preauthorized Account field,enter the domain user account to which the preauthorized user is mapped.
5. Click Next.
While installing the administrative server, the installer returns to Step 12 of thewizard. While installing a client, the installer returns to Step 16 of the wizard.
Configuring Firewalls for Oracle Secure Backup on WindowsWindows contains a built-in Windows Firewall which, in the default configuration,blocks inbound traffic on ports used by Oracle Secure Backup.
If your Windows host is protected by a firewall, then the firewall must be configured topermit Oracle Secure Backup daemons on the host to communicate with the otherhosts in your administrative domain. Oracle Secure Backup includes daemoncomponents that listen on port 400, port 10000, and other dynamically assigned ports.
Because the dynamically assigned ports used by Oracle Secure Backup span a broadrange of port numbers, your firewall must be configured to allow executables for theOracle Secure Backup daemons to listen on all ports.
The Oracle Secure Backup Windows installation provides a sample batch script calledobfirewallconfig.bat in the bin directory under the Oracle Secure Backup home.
This script contains commands that make the required configuration changes for theWindows Firewall, the built-in firewall released with Windows. Review the script todetermine whether it is suitable for your environment. You can run the script after theinstallation completes.
Local Policy for tcpkeepalive
As Oracle Secure Backup performs a backup, several network connections areopened across the nodes in the Oracle Secure Backup domain. For large backups,some of these connections may be idle for a long time. Your firewall or other networkdevices may be configured to terminate idle connections after a specific time. If abackup exceeds this time, the firewall terminates the idle connections, resulting in afailed backup.
The firewall terminates a connection in the following scenarios:
• The firewall is configured to terminate network connections which are idle for aspecified time, for example, 7200 seconds or 2 hours.
• Oracle Secure Backup is performing large backups, which takes longer than thefirewall setting for terminating connections.
Enable the local policy for tcpkeepalive to maintain the network connections andprevent idle socket timeouts, which causes failure of the backup jobs.
Chapter 4Configuring Firewalls for Oracle Secure Backup on Windows
4-10
See Also:
See "Enable tcpkeepalive on local host" for more information about how to enabletcpkeepalive for network connections.
For details on configuration of other firewalls, see the documentation provided by the vendor.You can refer to the sample script for the Windows Firewall to determine the names ofexecutables that need permission to listen on ports.
See Also:
My Oracle Support note 727528.1 for more information on how to configure firewallports for use with Oracle Secure Backup. My Oracle Support is available at http://support.oracle.com/.
Chapter 4Configuring Firewalls for Oracle Secure Backup on Windows
4-11
5Uninstalling Oracle Secure Backup
This chapter explains how to uninstall Oracle Secure Backup software from Linux, UNIX, andWindows hosts.
This chapter contains the following sections:
• Uninstalling Oracle Secure Backup on Linux or UNIX
• Uninstalling Oracle Secure Backup on Windows
Uninstalling Oracle Secure Backup on Linux or UNIXThis section explains how to uninstall Oracle Secure Backup from a Linux or UNIX host. Inthis procedure Oracle Secure Backup is uninstalled from the administrative server. Theprocedure is the same when using the administrative server to uninstall Oracle SecureBackup from other hosts.
1. Log on as root to the administrative server.
2. Change directory to the Oracle Secure Backup home directory.
# cd /usr/local/oracle/backup
Note:
If you uninstall Oracle Secure Backup from the administrative server, then theuninstallob script removes the Oracle Secure Backup home directory at theend of the uninstall process.
3. Run the uninstallob script:
# ./install/uninstallob4. If the host on which Oracle Secure Backup is being uninstalled was configured as a
client, then the uninstallob script asks you the following question:
Do you want to remove this system's identity as a member of theadministrative domain? (y or n) [n]? :Select one of the following options:
• ySelect this option to remove the system's identity as a member of the administrativedomain.
• nSelect this option to keep the system's identity as a member of the administrativedomain. This is the default option.
The uninstallob script continues with Step 6.
5-1
5. If the host from which Oracle Secure Backup is being uninstalled was configuredas an administrative server, the uninstallob script asks to save the OracleSecure Backup admin directory. Select one of these options:
• noSelect this option to remove the admin directory.
• yesSelect this option to save the admin directory. If you keep the admin directory,then you can reinstall the Oracle Secure Backup software later withoutdestroying your administrative domain.
This procedure assumes you are saving the Oracle Secure Backup admindirectory.
6. The uninstallob scripts asks if you want to continue. Enter y to continue with theuninstallation. Enter n to stop the uninstall process.
If you choose y, then a message is displayed informing you that the uninstall wascompleted successfully.
Uninstalling Oracle Secure Backup on WindowsComplete the following steps to uninstall Oracle Secure Backup on Windows:
1. Select Start > All Programs > Oracle Secure Backup > Uninstall OracleSecure Backup.
A confirmation dialog appears.
2. Click Yes to remove Oracle Secure Backup from your computer.
3. An additional window opens asking whether you want to preserve the files specificto your backup domain. Select one of these options:
• Click Delete if you do not want to retain the backup domain files.
• Click Keep to retain the backup domain files.
If you click Keep to retain the backup domain files, then the configuration ofyour backup domain is preserved. This is useful for reinstallation of the OracleSecure Backup software later.
Oracle Secure Backup is now uninstalled from your host.
Chapter 5Uninstalling Oracle Secure Backup on Windows
5-2
6Oracle Secure Backup User Interfaces
This chapter introduces the interfaces that you can use with Oracle Secure Backup. Themajor interfaces to Oracle Secure Backup are:
• Oracle Enterprise Manager
This is the primary graphical user interface for managing Oracle Secure Backup.
• Oracle Secure Backup Web tool
This interface is used to manage file-system level backups and to perform certain othertasks not possible in Oracle Enterprise Manager.
• obtool
This command line client exposes the full functionality of Oracle Secure Backup and isinvoked by the Oracle Secure Backup Web Tool and Oracle Enterprise Manager.
• Recovery Manager (RMAN)
The RMAN command-line utility can backup Oracle Databases to tape using OracleSecure Backup.
Note:
All backup and restore operations in Oracle Secure Backup ultimately call upon acommand line tool called obtar. It is generally not necessary to call obtar directly.See Oracle Secure Backup Reference for more details about obtar.
This chapter contains these sections:
• Using Oracle Secure Backup in Enterprise Manager
• Using the Oracle Secure Backup Web Tool
• Using obtool
• Using Oracle Secure Backup through Recovery Manager (RMAN)
Using Oracle Secure Backup in Enterprise ManagerYou can use Oracle Enterprise Manager 10g (10.2) or Oracle Enterprise Manager 11g toperform most Oracle Secure Backup tasks, including administrative domain and hardwareconfiguration, managing your media, and backing up and restoring databases. OracleEnterprise Manager is the preferred Web interface for Oracle Secure Backup tasks.
This document describes the use of Oracle Enterprise Manager for most tasks, and describesthe Oracle Secure Backup Web Tool only when there is no equivalent functionality inEnterprise Manager.
This section contains these topics:
6-1
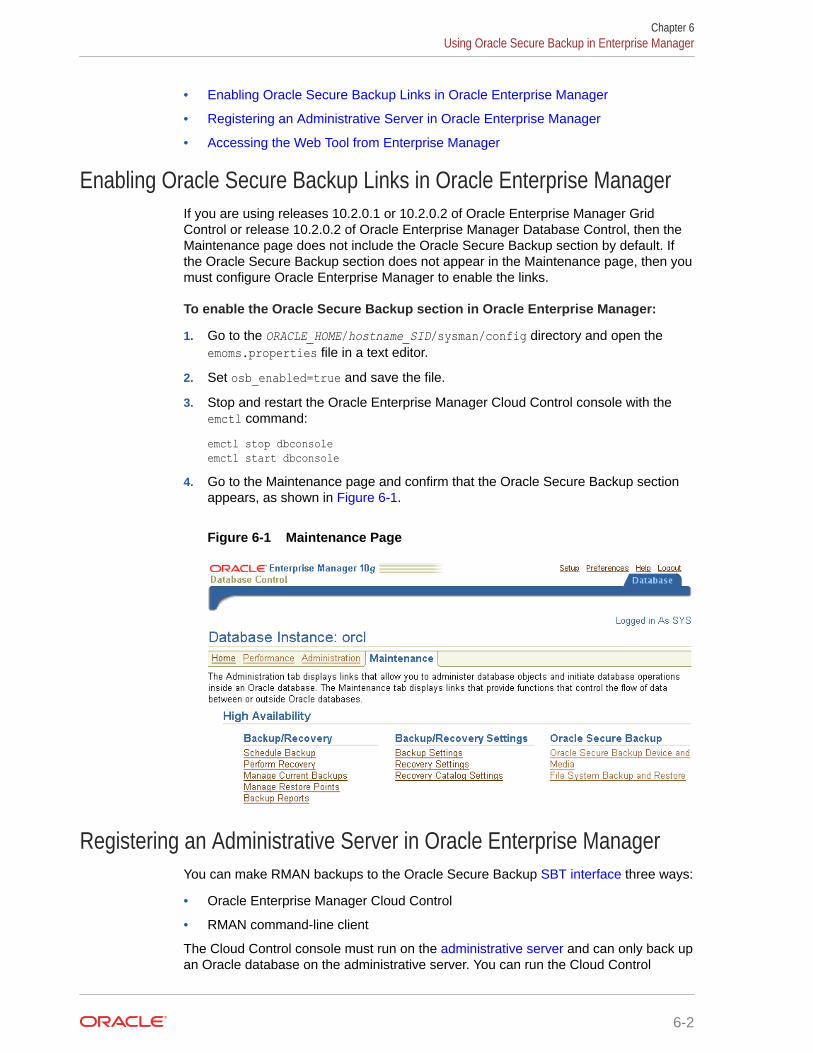
• Enabling Oracle Secure Backup Links in Oracle Enterprise Manager
• Registering an Administrative Server in Oracle Enterprise Manager
• Accessing the Web Tool from Enterprise Manager
Enabling Oracle Secure Backup Links in Oracle Enterprise ManagerIf you are using releases 10.2.0.1 or 10.2.0.2 of Oracle Enterprise Manager GridControl or release 10.2.0.2 of Oracle Enterprise Manager Database Control, then theMaintenance page does not include the Oracle Secure Backup section by default. Ifthe Oracle Secure Backup section does not appear in the Maintenance page, then youmust configure Oracle Enterprise Manager to enable the links.
To enable the Oracle Secure Backup section in Oracle Enterprise Manager:
1. Go to the ORACLE_HOME/hostname_SID/sysman/config directory and open theemoms.properties file in a text editor.
2. Set osb_enabled=true and save the file.
3. Stop and restart the Oracle Enterprise Manager Cloud Control console with theemctl command:
emctl stop dbconsoleemctl start dbconsole
4. Go to the Maintenance page and confirm that the Oracle Secure Backup sectionappears, as shown in Figure 6-1.
Figure 6-1 Maintenance Page
Registering an Administrative Server in Oracle Enterprise ManagerYou can make RMAN backups to the Oracle Secure Backup SBT interface three ways:
• Oracle Enterprise Manager Cloud Control
• RMAN command-line client
The Cloud Control console must run on the administrative server and can only back upan Oracle database on the administrative server. You can run the Cloud Control
Chapter 6Using Oracle Secure Backup in Enterprise Manager
6-2
console on any database host in the administrative domain and use it to back up anydatabase. This section describes how to get started with Cloud Control.
To use Enterprise Manager to manage your backups, you must make Enterprise Manageraware of your administrative server, which stores the configuration data and catalog for theOracle Secure Backup administrative domain.
To register the administrative server in Oracle Enterprise Manager Cloud Control:
1. Log in to the Oracle Enterprise Manager Cloud Control console as a user with databaseadministrator rights.
2. In the Oracle Secure Backup section, click Oracle Secure Backup Device and Media.
The Add Administrative Server page appears.
3. Log in to your Oracle Secure Backup administrative domain as follows:
a. Enter the Oracle Secure Backup home directory in the Oracle Secure BackupHome field. This directory is usually /usr/local/oracle/backup on UNIX and Linuxand C:\Program Files\Oracle\Backup on Windows.
b. Enter the name of an Oracle Secure Backup administrative user in the Usernamefield. For example, enter admin.
c. Enter the password for the Oracle Secure Backup administrator in the Passwordfield.
d. Click OK.
The Host Credentials page appears.
4. Enter the username and password of the operating system user on the administrativeserver. This user needs root privileges.
The Oracle Secure Backup Device and Media: Administrative Server: hostname pageappears. You can use this page to load tapes.
After you have registered the administrative server, you are ready to use Oracle EnterpriseManager with Oracle Secure Backup.
See Also:
Oracle Database 2 Day DBA for an introduction to using Oracle Enterprise Managerfor database backup and recovery with RMAN
Accessing the Web Tool from Enterprise ManagerThe Oracle Enterprise Manager console for a database provides a link to the Oracle SecureBackup Web tool. You can use this link when you need access to Oracle Secure Backup Webtool functions, such as file-system backup information.
To access the Oracle Secure Backup Web tool through Oracle Enterprise ManagerDatabase Control:
1. Log in to the Oracle Enterprise Manager Database Control as a user with databaseadministrator rights.
2. Go to the Oracle Secure Backup section of the Maintenance page.
Chapter 6Using Oracle Secure Backup in Enterprise Manager
6-3

If the Oracle Secure Backup section does not appear in the Maintenance page,then see "Enabling Oracle Secure Backup Links in Oracle Enterprise Manager".
3. Click File System Backup and Restore.
The Oracle Secure Backup Web tool interface opens, as described in "Starting aWeb Tool Session".
Using the Oracle Secure Backup Web ToolThe Oracle Secure Backup Web tool is a browser-based interface that does notrequire installation of Oracle Enterprise Manager. It is also the only graphical interfaceto the file-system backup capabilities of Oracle Secure Backup.
Note:
You can access all functionality of Oracle Secure Backup through the OracleSecure Backup Web Tool, including file-system level backups. However,Oracle Enterprise Manager is the preferred interface for most functionality,and provides the only graphical interface for Oracle Database backups totape.
You can access the Oracle Secure Backup Web tool from any supported browser thatcan connect to the administrative server through SSL. The Apache Web serversupplied with Oracle Secure Backup must be running to respond to these requests.Supported browsers are listed on Certify on My Oracle Support, at the following URL:
https://support.oracle.com/
Note:
The PHP software installed with Oracle Secure Backup is not supported fordirect use by customers. It is only supported for use in implementing theOracle Secure Backup Web tool.
This section contains these topics:
• Starting a Web Tool Session
• Web Tool Home Page
• Web Tool Configure Page
• Web Tool Manage Page
• Web Tool Backup Page
• Web Tool Restore Page
Starting a Web Tool SessionThis section explains how to use the Oracle Secure Backup Web tool to access yourOracle Secure Backup administrative domain.
Chapter 6Using the Oracle Secure Backup Web Tool
6-4
To start an Oracle Secure Backup Web tool session:
1. Launch your Web browser and supply the URL of the host running Oracle SecureBackup. Use the following syntax, where hostname can be a fully qualified domain name:
https://hostname
For example, you might invoke the following URL:
https://osblin1.oracle.com2. The browser displays a warning that the certificate is not trusted. Oracle Secure Backup
installs a self-signed certificate for the Apache Web server. The Web server requires asigned certificate for data encryption purposes. The security warning appears becausethe browser does not recognize the signer as a registered Certification Authority (CA).This alert does not mean that your data is not encrypted, only that the CA is notrecognized.
Accept the certificate. It is not necessary to view the certificate or make any configurationchanges.
The Oracle Secure Backup Login page appears.
3. Enter an Oracle Secure Backup user name in the User Name box and a password in thePassword box.
If you are logging into the Oracle Secure Backup Web tool for the first time, then log in asthe admin user. You can create additional users after you log in.
Note:
Oracle recommends that you not use browser-based password managers tostore Oracle Secure Backup passwords.
4. Click Login. The Oracle Secure Backup Home page appears.
The Home, Configure, Manage, Backup, and Restore tabs are explained in detail inthe following sections.
Web Tool Home PageAfter you log in to the Oracle Secure Backup Web tool interface, the Oracle Secure BackupHome page appears. This page provides a summary of the current status of each OracleSecure Backup job, tape device, and disk pool. Figure 6-2 shows an example of the Homepage.
Chapter 6Using the Oracle Secure Backup Web Tool
6-5
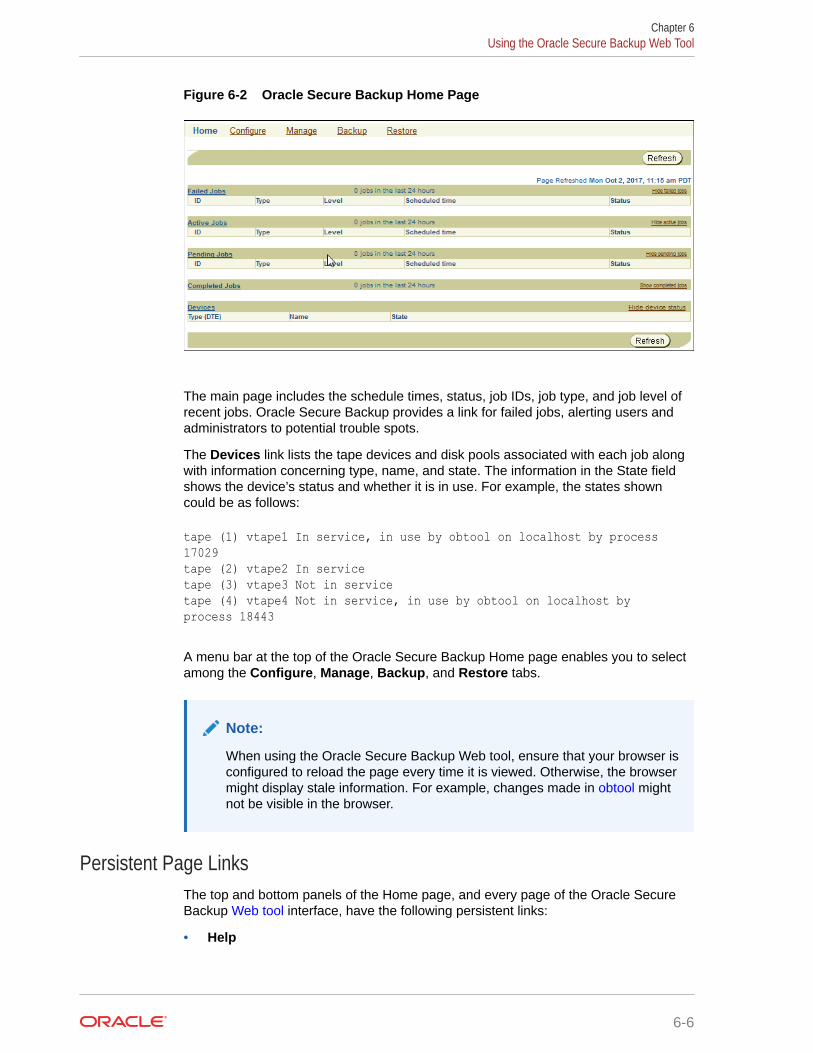
Figure 6-2 Oracle Secure Backup Home Page
The main page includes the schedule times, status, job IDs, job type, and job level ofrecent jobs. Oracle Secure Backup provides a link for failed jobs, alerting users andadministrators to potential trouble spots.
The Devices link lists the tape devices and disk pools associated with each job alongwith information concerning type, name, and state. The information in the State fieldshows the device’s status and whether it is in use. For example, the states showncould be as follows:
tape (1) vtape1 In service, in use by obtool on localhost by process 17029tape (2) vtape2 In servicetape (3) vtape3 Not in servicetape (4) vtape4 Not in service, in use by obtool on localhost by process 18443
A menu bar at the top of the Oracle Secure Backup Home page enables you to selectamong the Configure, Manage, Backup, and Restore tabs.
Note:
When using the Oracle Secure Backup Web tool, ensure that your browser isconfigured to reload the page every time it is viewed. Otherwise, the browsermight display stale information. For example, changes made in obtool mightnot be visible in the browser.
Persistent Page LinksThe top and bottom panels of the Home page, and every page of the Oracle SecureBackup Web tool interface, have the following persistent links:
• Help
Chapter 6Using the Oracle Secure Backup Web Tool
6-6
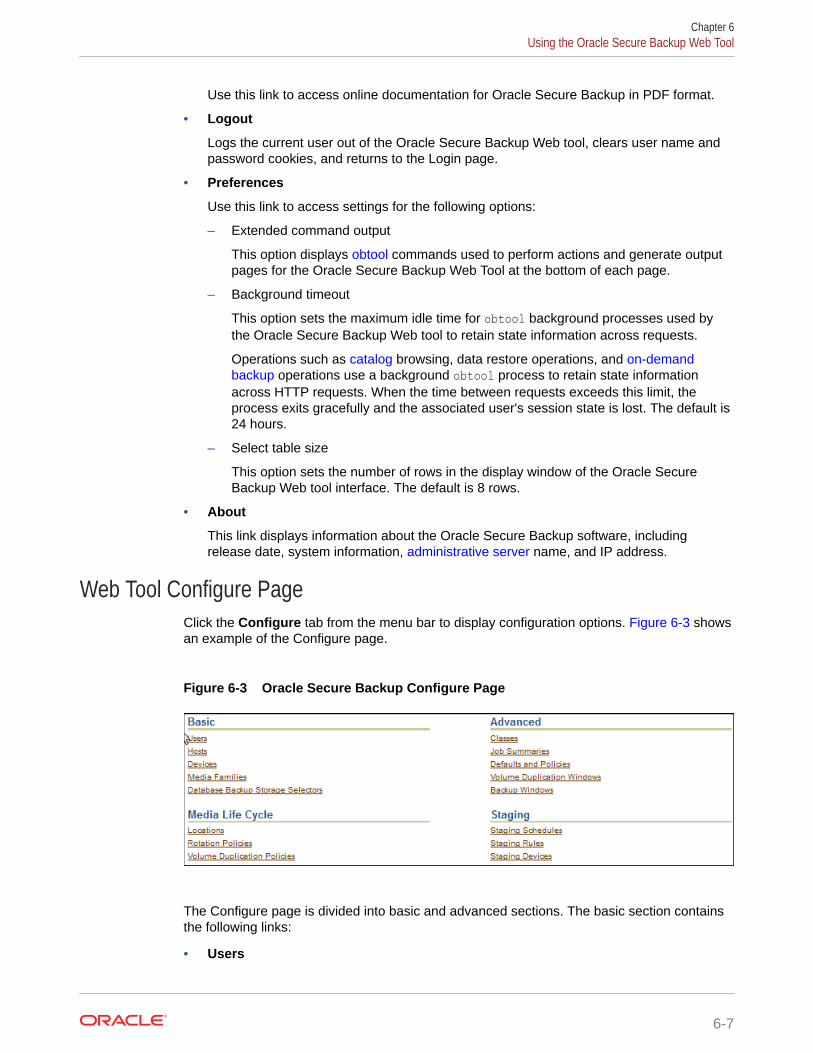
Use this link to access online documentation for Oracle Secure Backup in PDF format.
• Logout
Logs the current user out of the Oracle Secure Backup Web tool, clears user name andpassword cookies, and returns to the Login page.
• Preferences
Use this link to access settings for the following options:
– Extended command output
This option displays obtool commands used to perform actions and generate outputpages for the Oracle Secure Backup Web Tool at the bottom of each page.
– Background timeout
This option sets the maximum idle time for obtool background processes used bythe Oracle Secure Backup Web tool to retain state information across requests.
Operations such as catalog browsing, data restore operations, and on-demandbackup operations use a background obtool process to retain state informationacross HTTP requests. When the time between requests exceeds this limit, theprocess exits gracefully and the associated user's session state is lost. The default is24 hours.
– Select table size
This option sets the number of rows in the display window of the Oracle SecureBackup Web tool interface. The default is 8 rows.
• About
This link displays information about the Oracle Secure Backup software, includingrelease date, system information, administrative server name, and IP address.
Web Tool Configure PageClick the Configure tab from the menu bar to display configuration options. Figure 6-3 showsan example of the Configure page.
Figure 6-3 Oracle Secure Backup Configure Page
The Configure page is divided into basic and advanced sections. The basic section containsthe following links:
• Users
Chapter 6Using the Oracle Secure Backup Web Tool
6-7
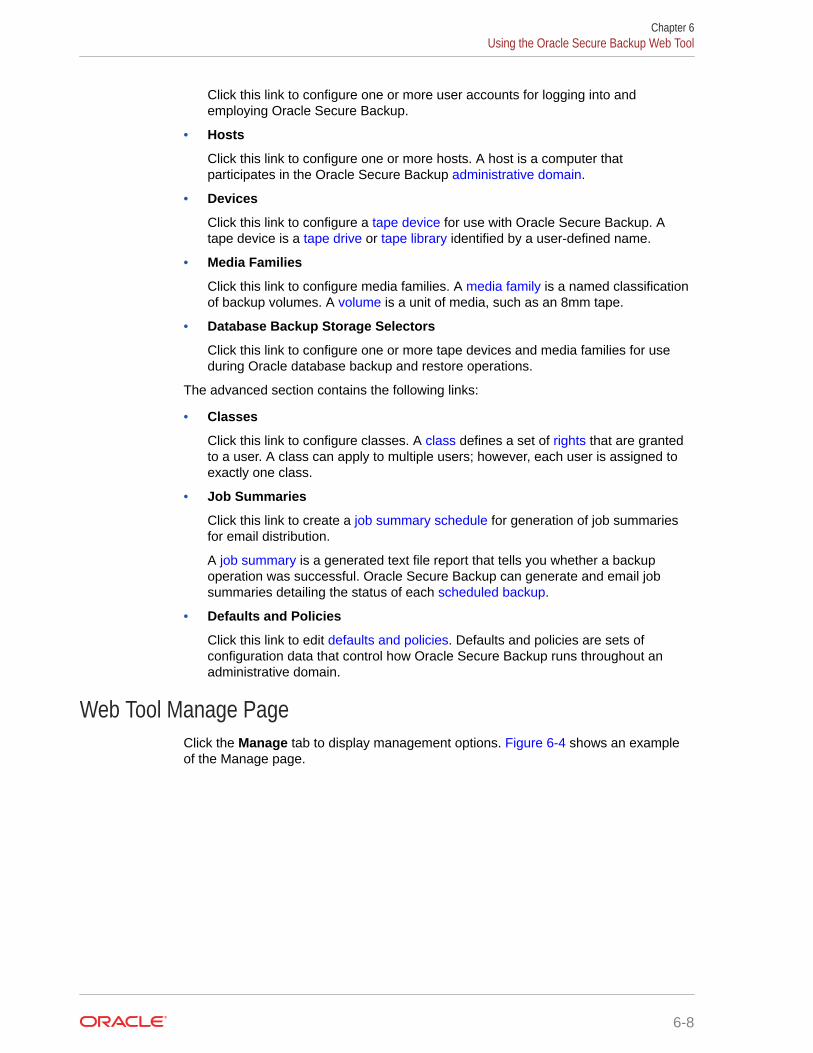
Click this link to configure one or more user accounts for logging into andemploying Oracle Secure Backup.
• Hosts
Click this link to configure one or more hosts. A host is a computer thatparticipates in the Oracle Secure Backup administrative domain.
• Devices
Click this link to configure a tape device for use with Oracle Secure Backup. Atape device is a tape drive or tape library identified by a user-defined name.
• Media Families
Click this link to configure media families. A media family is a named classificationof backup volumes. A volume is a unit of media, such as an 8mm tape.
• Database Backup Storage Selectors
Click this link to configure one or more tape devices and media families for useduring Oracle database backup and restore operations.
The advanced section contains the following links:
• Classes
Click this link to configure classes. A class defines a set of rights that are grantedto a user. A class can apply to multiple users; however, each user is assigned toexactly one class.
• Job Summaries
Click this link to create a job summary schedule for generation of job summariesfor email distribution.
A job summary is a generated text file report that tells you whether a backupoperation was successful. Oracle Secure Backup can generate and email jobsummaries detailing the status of each scheduled backup.
• Defaults and Policies
Click this link to edit defaults and policies. Defaults and policies are sets ofconfiguration data that control how Oracle Secure Backup runs throughout anadministrative domain.
Web Tool Manage PageClick the Manage tab to display management options. Figure 6-4 shows an exampleof the Manage page.
Chapter 6Using the Oracle Secure Backup Web Tool
6-8
Figure 6-4 Oracle Secure Backup Manage Page
The Manage page is divided into four sections.
The Devices section includes the following links:
• Disk Pools
Click this link to view the disk pool space utilization and to delete expired backup imageinstances from disk pools.
• Tape Drives
Click this link to determine the status of a volume or tape device or to mount or unmounta volume.
• Libraries
Click this link to view and control libraries.
• Device Reservations
Click this link to reserve and unreserve tape devices for private use.
• Cloud Storage
Click this link to view and control Oracle Secure Backup cloud storage.
The Management section includes the following links:
• Jobs
Click this link to manage jobs in an administrative domain. You can view the status ofbackup and restore jobs.
• Volumes
Click this link to filter and then view all volumes in the catalog. You can filter the results toscale down your search. A volume is a unit of media, such as 8mm tape. A volume cancontain multiple backup image instances.
• Backup Images
Click this link to manage backup images. A backup image is the work product of a singlebackup operation and stores the metadata related to the backup.
• On Demand Stage Scan
Click this link to manage on-demand stage scans.
The Advanced Section includes the following links:
Chapter 6Using the Oracle Secure Backup Web Tool
6-9
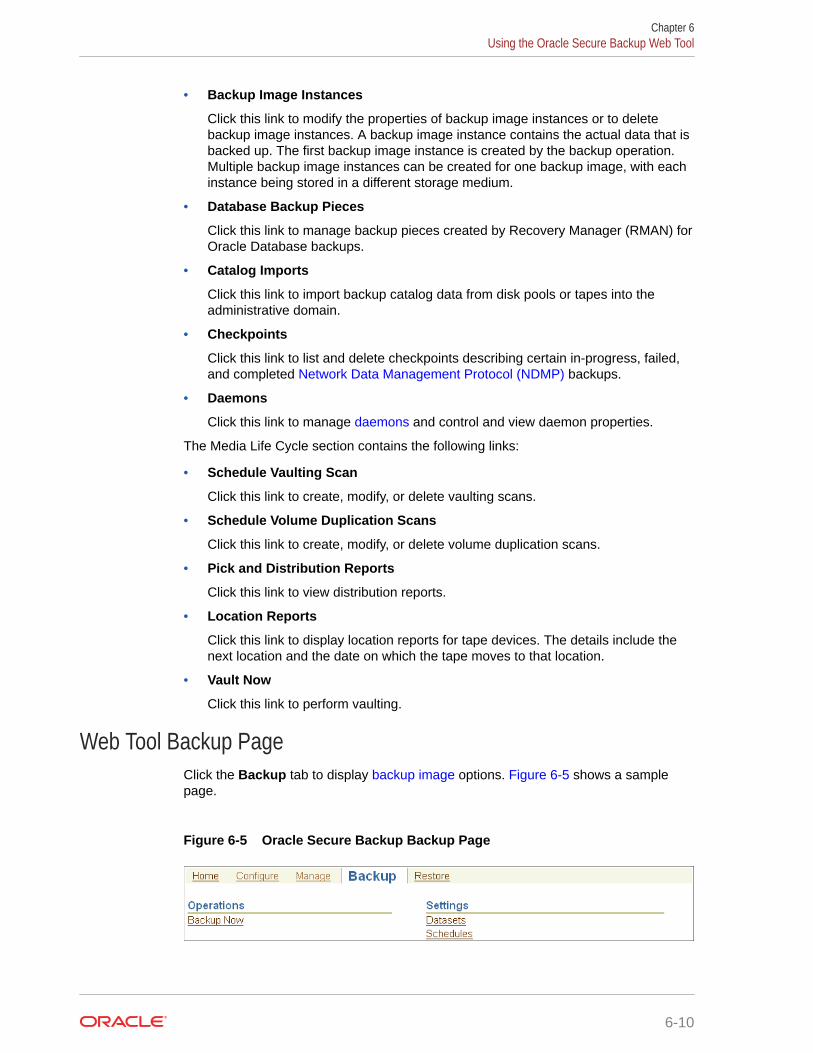
• Backup Image Instances
Click this link to modify the properties of backup image instances or to deletebackup image instances. A backup image instance contains the actual data that isbacked up. The first backup image instance is created by the backup operation.Multiple backup image instances can be created for one backup image, with eachinstance being stored in a different storage medium.
• Database Backup Pieces
Click this link to manage backup pieces created by Recovery Manager (RMAN) forOracle Database backups.
• Catalog Imports
Click this link to import backup catalog data from disk pools or tapes into theadministrative domain.
• Checkpoints
Click this link to list and delete checkpoints describing certain in-progress, failed,and completed Network Data Management Protocol (NDMP) backups.
• Daemons
Click this link to manage daemons and control and view daemon properties.
The Media Life Cycle section contains the following links:
• Schedule Vaulting Scan
Click this link to create, modify, or delete vaulting scans.
• Schedule Volume Duplication Scans
Click this link to create, modify, or delete volume duplication scans.
• Pick and Distribution Reports
Click this link to view distribution reports.
• Location Reports
Click this link to display location reports for tape devices. The details include thenext location and the date on which the tape moves to that location.
• Vault Now
Click this link to perform vaulting.
Web Tool Backup PageClick the Backup tab to display backup image options. Figure 6-5 shows a samplepage.
Figure 6-5 Oracle Secure Backup Backup Page
Chapter 6Using the Oracle Secure Backup Web Tool
6-10
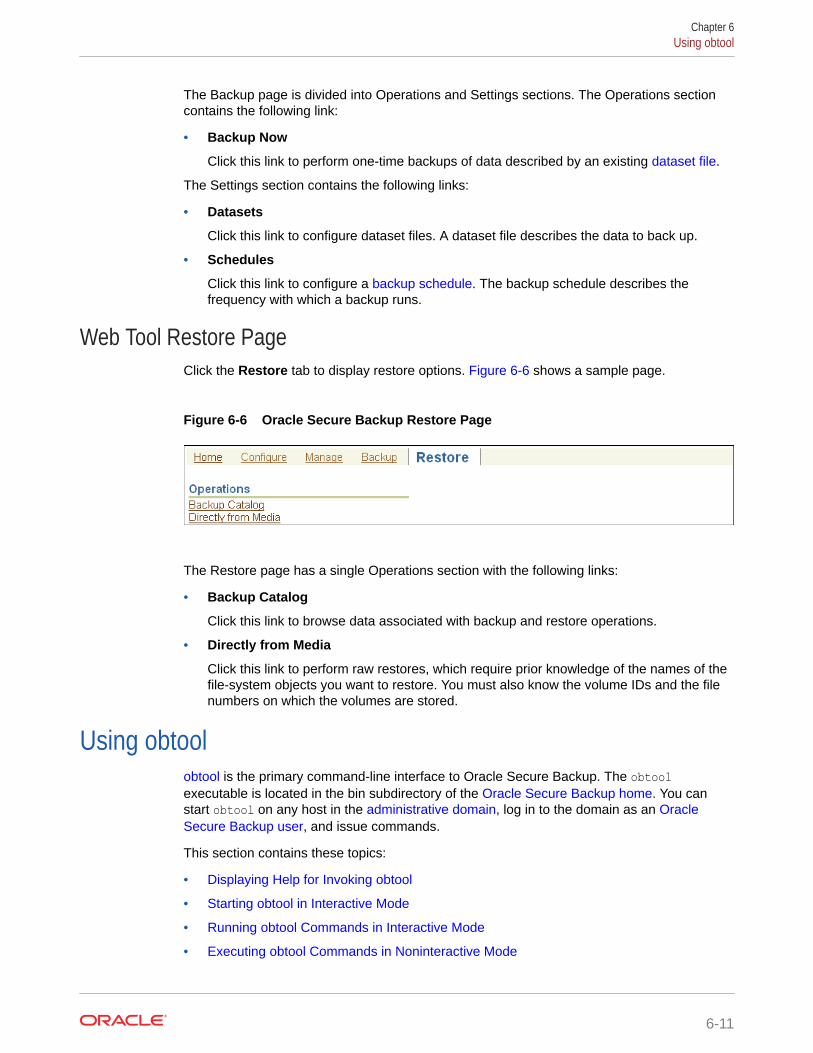
The Backup page is divided into Operations and Settings sections. The Operations sectioncontains the following link:
• Backup Now
Click this link to perform one-time backups of data described by an existing dataset file.
The Settings section contains the following links:
• Datasets
Click this link to configure dataset files. A dataset file describes the data to back up.
• Schedules
Click this link to configure a backup schedule. The backup schedule describes thefrequency with which a backup runs.
Web Tool Restore PageClick the Restore tab to display restore options. Figure 6-6 shows a sample page.
Figure 6-6 Oracle Secure Backup Restore Page
The Restore page has a single Operations section with the following links:
• Backup Catalog
Click this link to browse data associated with backup and restore operations.
• Directly from Media
Click this link to perform raw restores, which require prior knowledge of the names of thefile-system objects you want to restore. You must also know the volume IDs and the filenumbers on which the volumes are stored.
Using obtoolobtool is the primary command-line interface to Oracle Secure Backup. The obtoolexecutable is located in the bin subdirectory of the Oracle Secure Backup home. You canstart obtool on any host in the administrative domain, log in to the domain as an OracleSecure Backup user, and issue commands.
This section contains these topics:
• Displaying Help for Invoking obtool
• Starting obtool in Interactive Mode
• Running obtool Commands in Interactive Mode
• Executing obtool Commands in Noninteractive Mode
Chapter 6Using obtool
6-11
• Ending an obtool Session
• Starting obtool as a Specific User
See also:
Oracle Secure Backup Reference for a more detailed discussion of invokingobtool and for more information on obtar, which is mostly used internally byobtool
Displaying Help for Invoking obtoolAssuming that the bin subdirectory of the Oracle Secure Backup home is in yoursystem path, you can obtain online help about obtool invocation options by running thefollowing command at the operating system prompt:
% obtool help invocation
Starting obtool in Interactive ModeEnter obtool at the command line to use obtool in interactive mode.
The first time you invoke obtool, you are required to establish your identity as an Oracle Secure Backup user. If you have not yet established a user identity, thenobtool prompts you for a user name and password.
Note:
The installer for Oracle Secure Backup creates the admin user automatically,and prompts for a password. Use these credentials when you log in to OracleSecure Backup for the first time after installation.
The practice of supplying a password in clear text on a command line or in acommand script is not recommended by Oracle. It is a security vulnerability.The recommended procedure is to have the user be prompted for thepassword.
Running obtool Commands in Interactive ModeYou can enter the commands described in Oracle Secure Backup Reference at the obtool prompt. For example, the lshost command displays information about thehosts in your administrative domain:
ob> lshostbrhost2 client (via OB) in servicebrhost3 mediaserver,client (via OB) in servicebr_filer client (via NDMP) in servicestadv07 admin,mediaserver,client (via OB) in service
Chapter 6Using obtool
6-12
Redirecting obtool Input from Text FilesYou can use the < command in interactive mode to read text files containing multiple obtoolcommands. For example, you can create a file called my_script.txt with multiple obtoolcommands and redirect the obtool input to this script as follows:
ob> < /my_dir/my_script.txt
obtool runs the commands from the file and then returns to the ob> prompt for your nextcommand.
Executing obtool Commands in Noninteractive ModeYou can run obtool in noninteractive mode from the Linux or UNIX shell or from the Windowscommand prompt with arguments that specify the command to run. obtool runs the specifiedcommand immediately and exits. Use the following syntax:
obtool [ cl-option ]... command-name [ option ]... [ argument ]...
The following example runs the lshost command and then returns to the operating systemprompt:
% obtool lshostOutput of command: lshostbrhost2 client (via OB) in servicebrhost3 mediaserver,client (via OB) in servicebr_filer client (via NDMP) in servicestadv07 admin,mediaserver,client (via OB) in service%
Running Multiple Commands in Noninteractive ModeYou can run multiple commands in one invocation of obtool by separating the commands witha semicolon on the command line.
Note:
Follow the quoting conventions of your host operating system shell or command lineinterpreter when entering a semicolon in the command line. For example, in a bashshell session, quote the semicolon as follows:
$ obtool lshost ';' lsdev
Redirecting Input in Noninteractive ModeYou can use the < command in noninteractive mode to read text files containing multiple obtool commands. For example, you can create a file called my_script.txt with multipleobtool commands and redirect the obtool input to this script as follows:
% obtool < /my_dir/my_script.txt
Chapter 6Using obtool
6-13
obtool runs the commands from the file and then returns to the operating systemprompt for your next command.
Ending an obtool SessionYou can end an obtool session by using one of these commands:
• exitThis command ends the obtool session, but a login token preserves yourcredentials, so that the next time you start obtool you are not prompted for a username or password.
• quitThis command is a synonym for exit.
• logoutThis command ends the obtool session and destroys the login token, so that youare prompted for credentials at the start of your next obtool session.
In the following example, login credentials are required for the first session, becausethe login token has expired. This first session is ended with an exit command, and asecond session is started. No login credentials are required for this second session,because the login token was preserved. The second session is ended with a logoutcommand, and a third session is started. The third session requires login credentialsbecause the login token was destroyed by the logout command.
[cfoch@stbcs06-1 ~]$ obtoolOracle Secure Backup 18.1.0.0.0Warning: auto-login failed - login token has expiredlogin: adminob> exit[cfoch@stbcs06-1 ~]$ obtoolob> logout[cfoch@stbcs06-1 ~]$ obtoolOracle Secure Backup 18.1.0.0.0login: adminob>
Starting obtool as a Specific UserYou can force obtool to use different credentials when starting, destroying any existinglogin token. To do so, use the -u option with obtool, specifying the name of the userfor the session. For example:
[root@osblin1 ~]# obtool -u adminPassword:ob>
Using Oracle Secure Backup through Recovery Manager(RMAN)
Oracle Secure Backup, through the System Backup to Tape (SBT) interface, serves asa media management layer for RMAN. You can use RMAN to directly backup OracleDatabases to tape.
Chapter 6Using Oracle Secure Backup through Recovery Manager (RMAN)
6-14
You can access RMAN through one of the following interfaces: RMAN executable or OracleEnterprise Manager Cloud Control. RMAN communicates with Oracle Secure Backupthrough the SBT interface.
It is recommended that you use RMAN to perform online backups of your Oracle Database.Before you use RMAN to perform tape backups, you must configure RMAN as described in"Configuring Oracle Secure Backup for Use with RMAN".
Configuring Oracle Secure Backup for Use with RMANThis section describes the configuration steps required in order to enable RMAN to backupOracle Databases to tape through Oracle Secure Backup. Before you perform theconfiguration steps, ensure that you install the Oracle Database software and Oracle SecureBackup.
To configure Oracle Secure Backup for use with RMAN:
1. Create a preauthorized user that the RMAN server session can use to access OracleSecure Backup.
2. Create a database backup storage selector that contains details about the databases youwant to backup or restore using the SBT interface. The storage selector contains detailsabout the Oracle Database backup or restore operation.
Setting Up User Preauthorization in Oracle Secure BackupUser preauthorization enables you to use Oracle Secure Backup without going through thenormal Oracle Secure Backup login requirements. In the case of RMAN, preauthorization isused to determine the Oracle Secure Backup user under which a specific RMAN operation,such as backup or restore, is performed.
You can preauthorize access to Oracle Secure Backup services and data from specific hostsand UNIX users or Windows accounts. For each host within an Oracle Secure Backupadministrative domain, you can create one or more one-to-one mappings between theoperating system and Oracle Secure Backup user. If a preauthorization mapping is not foundfor a particular backup or restore request, the request fails.
See Also:
Oracle Secure Backup Administrator's Guide for more information on the steps forsetting preauthorized users.
Defining Backup Storage Selectors Using Oracle Secure BackupDatabase backup storage selectors enable you to provide detailed information about thebackup or restore operation that needs to be performed. A storage selector is an OracleSecure Backup object that associates an RMAN operation with storage media that ismanaged using Oracle Secure Backup.
A storage selector typically contains information such as the following:
• Oracle Databases that must be backed up or restored
• Hosts to which the database storage selector applies
Chapter 6Using Oracle Secure Backup through Recovery Manager (RMAN)
6-15
• Devices and media families that must be used for the backup or restore operation
See Also:
“Configuring Database Backup Storage Selectors" in Oracle Secure BackupAdministrator's Guide for information about defining database backupstorage selectors
Chapter 6Using Oracle Secure Backup through Recovery Manager (RMAN)
6-16
7Configuring and Managing the AdministrativeDomain
This chapter explains the basic steps involved in setting up an Oracle Secure Backup administrative domain after initial installation of the product on all of your hosts. Some steps,such as "Adding a Host to the Administrative Domain", are also useful when managing anexisting administrative domain.
This chapter contains the following sections:
• Overview of Configuring the Administrative Domain
• Configuring the Administrative Domain with Hosts
• Overview of Automatic Device Discovery
• Adding Tape Devices to an Administrative Domain
• Updating Tape Library Inventory
• Verifying and Configuring Added Tape Devices
• Configuring Disk Pools
• Managing Hosts in the Administrative Domain
• Configuring Cloud Storage Devices
Overview of Configuring the Administrative DomainThe administrative domain consists of a set of hosts and backup containers that aremanaged as a single unit by Oracle Secure Backup. The administrative domain enables youto manage backup and restore operations among diverse hosts, devices, and databases.
After you install the Oracle Secure Backup software on all the hosts, except NDMP hosts andNAS filers, in the administrative domain, you must configure the administrative domain.Configuring the administrative domain sets up the environment that is required to create andmanage backups.
The instructions in this chapter describe how to configure the administrative domain with hostand backup container information using the Web tool. It is assumed that you have installedthe Oracle Secure Backup software on each host in the domain, as described in InstallingOracle Secure Backup on Linux or UNIX or Installing Oracle Secure Backup on Windows.
See Also:
Oracle Secure Backup Reference for information about the obtool commands usedto configure the administrative domain
7-1
The administrative domain is set up using a default security configuration that shouldbe adequate for most users. Further configuration of users, user classes, securityoptions, and the Oracle Secure Backup media management layer for use with Recovery Manager (RMAN) in backing up Oracle databases might be required insome cases.
See Also:
Oracle Secure Backup Administrator's Guide for information about additionalsecurity configuration
Network Load Balancing in Oracle Secure BackupNetwork load balancing ensures that multiple network connections on a client areutilized optimally and no single connection carries the data load of all the concurrentbackup and restore jobs. The transfer load of multiple backup and restore jobs isdistributed across the network connections available on the client and media server.Load balancing is available starting with Oracle Secure Backup 10.4 and is supportedfor both file-system and Oracle Database backup and restore operations. Loadbalancing is turned off by default.
Note:
Load balancing is not supported for NDMP clients.
Oracle Secure Backup sets up a data connection between the client and the mediaserver over which the data transfer occurs. If a host contains more than one networkinterface of a particular type, Oracle Secure Backup uses all the available interfaces ofthat type for the data connections between the client and the media server. The type ofnetwork interface can be IPv4, IPv6, or RDS/RDMA (Reliable Datagram Socket overRemote Direct Memory Access) over Infiniband. Load balancing requires connectivitybetween the client and the media server on all the interfaces of the selectedconnection type.
Oracle Secure Backup selects a connection type only if both the client and the mediaserver support that connection type. Therefore, if both the client and the media serversupport RDS/RDMA over Infiniband and the IPv6 connection types, then OracleSecure Backup selects RDS/RDMA over Infiniband as the connection type.
If a Preferred Network Interface (PNI) is configured, then load balancing is disabled onthe media server and PNI takes precedence. Load balancing will still be performed onthe client.
Order of Precedence for Network Connection Types
When multiple network connections are available between a client and media server,Oracle Secure Backup decides which connection type to use based on the followingorder of precedence:
• RDS/RDMA over Infiniband
Chapter 7Overview of Configuring the Administrative Domain
7-2
• IPv6
• IPv4 (includes TCP/IP over Infiniband)
Steps to Configure the Administrative Domain1. Configure all the hosts in your administrative domain. Hosts include the administrative
server, media servers, and clients.
While configuring a host, specify the role that is assigned to the host in the administrativedomain.
See Also:
"Steps to Configure Hosts in the Administrative Domain" for information aboutconfiguring hosts
2. Add the tape devices in your network to the administrative domain. Tape devices includetape libraries and tape devices.
You can automatically discover tape devices that are attached to media servers in theadministrative domain or manually configure each tape device.
See Also:
• "Overview of Automatic Device Discovery" for information about discoveringtape devices
• "Adding Tape Devices to an Administrative Domain" for information aboutadding tape devices
3. Verify the configuration of tape devices that were added to the administrative domain.
See Also:
"Verifying and Configuring Added Tape Devices" for information about verifyingtape devices
4. Configure disk pools in your administrative domain.
See Also:
"Configuring Disk Pools" for information about configuring disk pools
The initial configuration of your administrative domain is complete.
Network communication among hosts in the administrative domain is configured with thedefault security configuration described in "Default Security Configuration".
Chapter 7Overview of Configuring the Administrative Domain
7-3
Note:
You must still identify files to be backed up in a dataset, configure at leastone backup schedule, and set up users, classes, and security policies.These tasks are described in the Oracle Secure Backup Administrator'sGuide.
Configuring the Administrative Domain with HostsAfter you install Oracle Secure Backup on all hosts in your administrative domain, youmust configure the domain with hosts. You can add hosts to your administrativedomain either during the initial administrative domain configuration or when yousubsequently define new hosts in your domain.
After the initial configuration, you can manage your hosts and perform tasks such asediting host properties, updating hosts, and removing hosts from the administrativedomain.
This section contains these topics:
• About Administrative Domain Host Configuration
• Steps to Configure Hosts in the Administrative Domain
• Adding a Host to the Administrative Domain
• Adding the Media Server Role to an Administrative Server
• Adding Backup and Restore Environment Variables to an NDMP Host
• Configuring Preferred Network Interfaces (PNI)
• Network Load Balancing in Oracle Secure Backup
• Pinging Hosts in the Administrative Domain
• Enable tcpkeepalive on local host
About Administrative Domain Host ConfigurationThe host configuration process makes the administrative server aware of a mediaserver or client to be included in the administrative domain. You must perform thisprocess for every host in the administrative domain, including each host runningOracle Secure Backup natively and each network-attached storage device managedby Network Data Management Protocol (NDMP).
For any host to be added to the administrative domain, you must provide the followingattributes:
• Host name
• IP address
• Assigned roles: client, media server or both
• Whether the host is in service or not in service at the moment
After adding a host to the administrative domain, Oracle recommends that you pingthe host to confirm that it can be accessed by the administrative server.
Chapter 7Configuring the Administrative Domain with Hosts
7-4
See Also:
"Pinging Hosts in the Administrative Domain"
For hosts that use NDMP access mode, such as network-attached storage devices, you mustconfigure the following additional attributes:
• NDMP authorization type
• NDMP password
• TCP port number for use with NDMP
See Also:
Oracle Secure Backup Reference for a complete account of host attributes
Steps to Configure Hosts in the Administrative DomainAfter you install the Oracle Secure Backup software on hosts, use the steps in this section toconfigure the administrative domain with hosts.
To configure your hosts in the administrative domain:
1. Open the Oracle Secure Backup Web tool running on the administrative server and log inas the admin user.
See Also:
"Starting a Web Tool Session" for information about accessing the Web tool
2. For each host in your administrative domain that must be set up for the role of mediaserver, perform the following steps:
a. Add the host to the administrative domain by selecting the media server role for thehost as described in "Adding a Host to the Administrative Domain".
Note:
If the administrative server is also assigned the media server role, then it ispart of the administrative domain. See "Adding the Media Server Role to anAdministrative Server" for information about assigning the media server roleto the administrative server.
b. Configure the administrative domain to include each tape device attached to this hostas described in "Adding Tape Devices to an Administrative Domain" describes thistask.
Chapter 7Configuring the Administrative Domain with Hosts
7-5
c. Configure the administrative domain to include disk pools as described in"Configuring Disk Pools".
3. (Optional) For certain NDMP hosts, you may need to define backup and restoreenvironment variables before the host can function with Oracle Secure Backup.
See Also:
"Adding Backup and Restore Environment Variables to an NDMP Host"for information about defining backup and restore environment variablesfor NDMP hosts
4. (Optional) For hosts that have multiple physical data paths with the administrativeserver or media server, you can define a Preferred Network Interface (PNI) thatwill be used while exchanging backup or restore data with another host.
See Also:
"Configuring Preferred Network Interfaces (PNI)" for information aboutdefining a PNI for your host
5. For each host that is to be set up only for the client role, add the host to theadministrative domain by selecting the client role as described in "Adding a Host tothe Administrative Domain".
6. Verify that all the hosts that you added to your administrative domain areaccessible using the IP address that was configured for the host.
See Also:
"Pinging Hosts in the Administrative Domain" for information aboutpinging hosts
After you complete the initial configuration of the hosts, you can manage hosts byperforming tasks such as editing host properties, updating hosts, and removing hostsfrom the administrative domain as described in "Managing Hosts in the AdministrativeDomain".
Adding a Host to the Administrative DomainYou can add a host (media server or client) to the administrative domain either at thetime of initial domain configuration or subsequently, when you want to configureadditional hosts in your administrative domain.
To add a host to an administrative domain:
1. Display the Hosts page as described in "Viewing the Hosts in the AdministrativeDomain".
2. Click Hosts in the Basic section to display the Hosts page.
Chapter 7Configuring the Administrative Domain with Hosts
7-6
3. Click Add to add a host.
The Configure: Hosts > New Hosts page appears.
4. In the Host field, enter the unique name of the host in the Oracle Secure Backupadministrative domain.
In most cases, this name is the host name resolvable to an IP address using the hostname resolution system (such as DNS or NIS) on your network. However, you can assigna different host name purely for use with Oracle Secure Backup.
The name you enter must start with an alphanumeric character. It can contain onlyletters, numerals, dashes, underscores, and periods. The maximum length of a hostname is 127 characters.
5. You must enter a value in the IP Interface name(s) field in the following situations:
• The name of this host cannot be resolved to an IP address using a mechanism suchas DNS or NIS
• The resolvable name of your host is different from the value entered in the Host field.
• Your host has multiple IP interface names or IP addresses to use with Oracle SecureBackup
If any of the preceding conditions apply to this host, then enter one or more IP interfacenames in this field. Valid values are either resolvable host names or IP addresses.Separate multiple values with a comma.
For example, you can use myhost.oracle.com for a host name or 141.146.8.66 for an IPaddress.
If a value is specified for this field, then Oracle Secure Backup tries the host names or IPaddresses in the order specified when it must contact this host, rather than using thename specified in the Host field.
Note:
If some hosts should contact this host using a particular network interface, thenyou can use the Preferred Network Interface (PNI) capability to override thisorder for those hosts, after completing the initial configuration of theadministrative domain. See "Configuring Preferred Network Interfaces (PNI)" fordetails.
6. In the Status list, select one of these:
• in service
Select this option to indicate that the host is available to perform backup and restoreoperations.
• not in service
Select this option to indicate that the host is unavailable to perform backup andrestore operations.
7. In the Roles list, select the roles for this host: admin, client or mediaserver.
8. In the Encryption field, specify the encryption settings for backup operations performedfor this host. Select one of the following values:
• required
Chapter 7Configuring the Administrative Domain with Hosts
7-7
• allowed
See Also:
Oracle Secure Backup Administrator's Guide for information about theencryption settings
9. In the Algorithm field, select one of the following options to specify the algorithmthat must be used to encrypt backups created for this host: aes128, aes192, oraes256.
10. In the Access method field, select one of these:
• OB
Select this option for Windows, Linux and UNIX hosts that have Oracle SecureBackup installed.
• NDMP
Select this option for devices that support NDMP without an Oracle SecureBackup installation, such as a network-attached storage device.
Note:
OB access mode is a synonym for primary access mode. See "OracleSecure Backup Host Access Modes" for a discussion of access modes.
11. In the Disable RDS field, select one of the following:
• yes
Select this option to disable the use of Reliable Datagram Socket (RDS) overInfiniband for communication between the client and media server. The defaultprotocol, TCP/IP, is used for communication.
• no
Select this option to enable the use of Reliable Datagram Socket (RDS) overInfiniband for communication between the client and media server.
• systemdefault
Select this option to specify that the administrative domain level setting, byusing the operations policy disablerds, is used to decide of RDS is enabledfor the host. For example, if you set systemdefault at the host level and thedisablerds policy is set to no, the host uses RDS for data transfer.
See Also:
Oracle Secure Backup and Reliable Datagram Socket (RDS) for moreinformation about RDS
12. In Public and private key sizes, select the size for the public/private keyassociated with the identity certificate for this host.
Chapter 7Configuring the Administrative Domain with Hosts
7-8
For hosts using the ob access mode, skip to Step 20. For hosts such as NetworkAttached Storage (NAS) devices that must use NDMP mode, continue to Step 13. Steps 13 through 18 apply only to hosts in NDMP mode.
13. In the NDMP authorization type list, select an authorization type. The authorization typedefines the way Oracle Secure Backup authenticates itself to the NDMP server. Typically,you should use the default setting.
Your choices are the following:
• default
Select this option to use the value of the Authentication type for the NDMP policy.
• none
Select this option to attempt to use the NDMP server from Oracle Secure Backup andprovide no authentication data. This technique is usually unsuccessful.
• negotiated
Select this option to negotiate with the NDMP server to determine the bestauthentication mode to use.
• text
Select this option to use unencrypted text to authenticate.
• md5
Select this option to use the MD5 digest algorithm to authenticate.
See Also:
Oracle Secure Backup Administrator's Guide to learn about NDMP-relatedpolicies
14. In the Username field, enter the name used to authenticate Oracle Secure Backup to thisNDMP server. If left blank, then Oracle Secure Backup uses the name in the NDMPpolicy.
15. In the Password list, select one of these options:
• Use default password
Select this option to use the default NDMP password.
• Use text password
Select this option to enter a password.
• Set to NULL
Check this to use a NULL password.
The password is used to authenticate Oracle Secure Backup to this NDMP server.
Chapter 7Configuring the Administrative Domain with Hosts
7-9
Note:
The practice of supplying a password in clear text on a command line orin a command script is not recommended by Oracle. It is a securityvulnerability. The recommended procedure is to have the user beprompted for the password.
16. In the Backup type field, enter an NDMP backup type. A backup type is the nameof a backup method supported by the NDMP data service running on a host.Backup types are defined by each data service provider.
17. In the Protocol Version list, select 2, 3, 4, or as proposed by server. See"Oracle Secure Backup Host Access Modes" for details on NDMP protocolversions.
18. In the Port field, enter a port number. Typically, the TCP port (10000) in the NDMPpolicy is used. You can specify another port if this server uses a port other than thedefault.
19. If required, add backup and restore environment variables as described in "AddingBackup and Restore Environment Variables to an NDMP Host".
20. In the TCP/IP buffer size field, enter the value of the buffer size in bytes.
21. If the host you are adding to the administrative domain is not currently accessibleon the network, then select the Suppress communication with host option.
22. Click OK to save your changes.
Adding the Media Server Role to an Administrative ServerIf you choose both the administrative server and media server roles when installingOracle Secure Backup on a host, then that host is automatically part of theadministrative domain. But it is not recognized as a media server until that role isexplicitly granted to it using the chhost command in obtool or the Oracle SecureBackup Web tool.
See Also:
Oracle Secure Backup Reference for complete syntax and semantics for thechhost command
To add the media server role to an administrative server using the Oracle SecureBackup Web tool:
1. On the Configure page of the Oracle Secure Backup Web tool, click Hosts.
The Configure: Hosts page appears.
2. Select the administrative server and click Edit.
The Configure: Hosts > host_name page appears.
3. In the Roles list, shift-click to add the media server role and then click OK.
Chapter 7Configuring the Administrative Domain with Hosts
7-10
The Configure: Hosts page reappears with the media server role added to theadministrative server host under the Roles column.
Adding Backup and Restore Environment Variables to an NDMP HostSome NDMP hosts might require that you add backup and restore environment variablesbefore they function with Oracle Secure Backup.
To add backup and restore environment variables:
1. In the field that appears next to the Backup environment vars or Restore environmentvars field, enter a name-value pair.
2. Click Add to add the name-value pair as an environment variable.
If an environment variable name or value includes spaces, then you must use quotesaround the name or value to ensure correct processing of the name or value. Forexample, enter A=B or "Name A"="Value B" (if the name or value includes spaces).
3. Select an existing environment variable pair and click Remove to remove the pair.
Configuring Preferred Network Interfaces (PNI)This section contains the following topics:
• About PNI
• Configuring PNI for Inbound Connections
• Configuring PNI for Outbound Connections
• Removing a PNI for Inbound Connections
• Removing a PNI for Outbound Connections
Note:
PNI configuration settings for a host are applicable only to Oracle Secure Backupservices. These settings have no impact on the network selection or usage of otherapplications running on the same host.
About PNIPNI (Preferred Network Interface) enables you to configure the network or interface that mustbe used for communication between two hosts in the administrative domain.
Multiple physical data paths can exist between a client, which contains primary storage to bebacked up or restored, a media server, which controls at least one secondary storage devicethat writes and reads the backup media, and the administrative server. For example, a hostmight have multiple network interfaces connected to the network containing the hosts in theadministrative domain. Typically, clients transfer huge amounts of backup data over thenetwork. Therefore, specifying the network/interface over which data must be sent preventsperformance issues that may be caused when production networks are used for backup data.
For each host, you can configure PNI to instruct Oracle Secure Backup services to use aspecific network or interface for sending backup data or for requesting a remote Oracle
Chapter 7Configuring the Administrative Domain with Hosts
7-11
Secure Backup service to send inbound data. PNI applies to both control connectionsand data connections. Data connections are used to transfer backup data. Backupdata is large in size and consumes considerable network bandwidth. Controlconnections are used to manage the administrative domain. The messages sent overcontrol connections are small and consume minimal bandwidth.
See Also:
Network Load Balancing in Oracle Secure Backup for information aboutnetwork load balancing and PNI
About PNI for Inbound ConnectionsConfiguring a PNI for inbound connections specifies the interface that will be usedwhen a remote host (media server or client) establishes a connection with the host.
See Also:
• Configuring PNI for Inbound Connections
• Removing a PNI for Inbound Connections
About PNI for Outbound ConnectionsConfiguring a PNI for outbound connections from a host specifies the network andinterface that must be used when this host connects to a remote host (media server orclient). The configured PNI is used for both data and control connections.
You can create one of the following to specify a PNI for outbound connections:
• Single interface only
Limits the outgoing backup and control data transfer to the interface specified inthe configured PNI. The interface must exist in the remote host to which aconnection is being established. You can configure one network/interface for eachaddress family (one for IPv4 and another for IPv6). You must not use the singleinterface for RDS connections. When you chose this type of connection, youcannot configure other networks as PNI for outbound connections for this host.
• One or more specified networks
Uses the specified network when connecting to a remote host. You can specifyone or more networks. Optionally, a bind address for each outgoing network canbe specified. If no bind address is specified, then the operating system decideswhich address to bind to. When multiple networks are specified, a connection isattempted based on the order of remote host IP names specified.
If the specified networks are not available, then you can configure Oracle SecureBackup to use any available network and interface to connect to a remote host.The following IP values are used to configure any network as PNI:
0.0.0.0/0: any IPv4 network
0::0/0: any IPv6 network
Chapter 7Configuring the Administrative Domain with Hosts
7-12
0/0: any of IPv4 or IPv6 network
See Also:
• Configuring PNI for Outbound Connections
• Removing a PNI for Outbound Connections
PNI and Network Connection TypesA host can have different types of networks. Oracle Secure Backup supports IPv4 and IPv6for control connections and IPv4, IPv6, RDS/RDMA over Infiniband for data connections.When multiple network connections exist between a client and the media server, OracleSecure Backup uses the following criteria to determine which connection type is used:
• If a PNI is configured, the network interface specified in the PNI is used to transferbackup and restore data between the client and media server. The connection typechosen is the same as the connection type of the network interface specified in PNI.
• If a PNI is not configured, Oracle Secure Backup selects the connection type as follows:
– For control connections, the order of precedence is based on the ordering of IPaddresses in the host object. Each client has a host object. The host object containsthe list of IP addresses that can be used to access that host.
– For data connections, the default connection used depends on the type ofconnection. The order of precedence is described in "Order of Precedence forNetwork Connection Types".
For a particular connection type to be used, both the client and media server mustsupport that connection type.
Configuring PNI for Inbound ConnectionsWhen you configure a PNI for inbound connections for a host, remote hosts specified ininbound PNI use the interface specified in PNI to send data to the host.
To configure a PNI for inbound connections:
1. Display the Hosts page as described in "Viewing the Hosts in the Administrative Domain".
2. Select the host for which you want to configure a PNI and click Edit.
The Configure Hosts > host_name page appears.
3. Click Preferred Network Interfaces.
The Configure Hosts > host_name > Preferred Network Interface page appears.
Ensure that Inbound is selected in the list at the top-right of the page. This is the defaultselection.
4. Select an IP address or DNS name from the Interface list.
This list shows a list of interfaces using which this host can be referenced. The IPaddress or name is used by the remote host to connect to this host.
5. From the Clients list, select one or more clients that will use this IP address or DNS namewhen creating a connection to this host.
Chapter 7Configuring the Administrative Domain with Hosts
7-13
6. Click Add.
Configuring PNI for Outbound ConnectionsWhen multiple network paths exist between hosts in the administrative domain, youcan configure a PNI to define the network/interface that must be used when creatingconnections from this host to another remote host.
To configure a PNI for outbound connections from a host:
1. Display the Hosts page as described in "Viewing the Hosts in the AdministrativeDomain".
2. Select the host for which you want to configure a PNI and click Edit.
The Configure Hosts > host_name page appears.
3. Click Preferred Network Interfaces.
The Configure Hosts > host_name > Preferred Network Interface page appears.
4. From the list at the top-right of the page, select Outbound.
The Outbound Interfaces section is displayed.
5. Depending on the type of outbound connection that you want to configure as thePNI, perform one of the following steps:
a. To configure a single interface for all outbound connections:
i. Select useonly.
ii. In the Interface column corresponding to the useonly option, select theinterface that must be used as the PNI.
Note:
Once you configure a useonly interface, you cannot configure othernetworks as PNI for this host.
b. To configure a specified network for outbound connections:
i. Select network.
ii. In the Network column corresponding to the Network option, specify thenetwork that must be used as the PNI.
iii. (Optional) In the Interface column, corresponding to the Network optionselected, select the bind address that must be used.
c. To configure any network for outbound connections:
i. Select network.
ii. In the Network column corresponding to the Network option, specify oneof the following in the network:
0.0.0.0/0: any IPv4 network
0::0/0: any IPv6 network
0/0: any of IPv4 or IPv6 network
6. Click Add to add the details provided as a PNI for outbound connections.
Chapter 7Configuring the Administrative Domain with Hosts
7-14
The specified details are added and displayed at the top the page.
7. (Optional) If you did not configure a useonly interface, configure another network as PNIby clicking Addand performing the steps listed in Step 5.
Removing a PNI for Inbound ConnectionsTo remove a PNI for inbound connections:
1. Display the Hosts page as described in "Viewing the Hosts in the Administrative Domain".
2. Select the host for which you want to remove a PNI and click Edit.
The Configure Hosts > host_name page appears.
3. Click Preferred Network Interfaces.
The Configure Hosts > host_name > Preferred Network Interface page appears.
4. Under Inbound Interfaces, click Select corresponding to the interface and client that youwant to remove as a PNI configuration.
5. Click Remove.
Removing a PNI for Outbound ConnectionsTo remove a PNI configuration for outbound connections from a host:
1. Display the Hosts page as described in "Viewing the Hosts in the Administrative Domain".
2. Select the host for which you want to remove a PNI and click Edit.
The Configure Hosts > host_name page appears.
3. Click Preferred Network Interfaces.
The Configure Hosts > host_name > Preferred Network Interface page appears.
4. Select Outbound at the top-right of the page.
The list of configured PNIs for outbound connections is displayed.
5. In the Outbound Interfaces section, click Select corresponding to the PNI configurationthat you want to remove.
6. Click Remove.
Pinging Hosts in the Administrative DomainYou can use the Oracle Secure Backup ping operation to determine whether a host respondsto requests from Oracle Secure Backup on each of its configured IP addresses.
Pinging a host attempts to establish a TCP connection to the host on each of the IPaddresses you have configured for it. For hosts running Oracle Secure Backup, theconnection occurs on TCP port 400. For hosts that use the NDMP access mode, connectionsoccur through the configured NDMP TCP port, usually 10000.
Oracle Secure Backup reports the status of each connection attempt and immediately closeseach connection that has been established successfully.
To ping a host in the administrative domain:
1. Display the Hosts page as described in "Viewing the Hosts in the Administrative Domain".
Chapter 7Configuring the Administrative Domain with Hosts
7-15
2. From the Hosts page, select a host to ping.
3. Click Ping.
A status line appears on the page with the results of the operation.
Enable tcpkeepalive on local hostEnable tcpkeepalive in the local policy to prevent idle Oracle Secure Backup networkconnections from being terminated by a proxy or firewall due to inactivity.
You can set the local policy for tcpkeepalive and configure the control connections toremain open so that the backup operations, for both file system and RecoveryManager (RMAN), complete successfully.
About tcpkeepliveOracle Secure Backup provides a local policy for tcpkeepalive.
The tcpkeepalive policy helps maintain idle TCP connections by periodicallyexchanging packets between hosts in the Oracle Secure Backup domain that have thelocal policy enabled. By default, Oracle Secure Backup has the tcpkeepalive policydisabled.
However, you can change the local policy and enable tcpkeepalive from the obtoolinterface. Since tcpkeepalive is set on the local host, you must enable it individuallyon all media servers and administrative servers in the administrative domain.
To enable the tcpkeepalive policy:
• Run the obtool commands for tcpkeepalive on the local host.
• Configure the system parameters depending on your operating system.
The Web tool does not support changing or viewing the local policies.
See Also:
Configuring Firewalls for Oracle Secure Backup on Windows for informationabout the role of Windows firewall on network connections.
Steps to enable tcpkeepaliveLog in to the obtool command-line interface and enable tcpkeepalive in the localpolicy.
Here are the obtool commands to view the local policies and to enable tcpkeepalive.
To enable tcpkeepalive:
1. Open a terminal window and enter into the obtool command-line interface.
obtool
See "obtool Login" for more details on how to log in to obtool.
Chapter 7Configuring the Administrative Domain with Hosts
7-16
2. View all defaults and policies in the administrative domain.
lsp
See "lsp" for more details on the lsp command.
3. View the policies local to the host.
lsp local
Observe that the default setting for tcpkeepalive is no.
4. Change the local policy on your host and enable the setting for tcpkeepalive.
setp local/tcpkeepalive yes 5. Optionally, run the lsp local command once again and view the new setting for
tcpkeepalive.
lsp local
Verify that you have enabled tcpkeepalive on the local host.
tcpkeepalive yes The system parameters to set the timers associated with tcpkeepalive vary for eachoperating system. After a restart, the system parameters may reset to their default values.
Tip:
Consult with your system administrators or network administrators to define thesystem parameters and control the behavior of the connection timeouts.
Overview of Automatic Device DiscoveryOracle Secure Backup allows you to discover and configure libraries and tape drives that areattached to media servers in the administrative domain.
If you choose not to discover devices automatically, then you can manually configureattached tape devices as described in "Adding Tape Devices to an Administrative Domain".
About Automatic Device DiscoveryYou can automatically discover and then configure libraries and tape drives that are attachedto media servers in the administrative domain. This includes NDMP servers and mediaservers that have Oracle Secure Backup software installed. Automated device discoverymakes the process of configuring attached libraries and drives automatic so that you canquickly add attached tape drives to the administrative domain. Its options allow you toconfigure all attached libraries and drives, or devices attached to specific hosts.
In addition to the initial configuration, automatic device discovery can also detect changes inthe configuration of libraries and tape drives. When automatic device discovery is performedfor a media server that has existing tape devices configured, devices that have already beenconfigured in Oracle Secure Backup will not be reconfigured. This information can be used toupdate the configuration information of existing tape devices. By default, Oracle Secure
Chapter 7Overview of Automatic Device Discovery
7-17

Backup discovers Solaris, Linux, and AIX attached libraries and tape devices that havetheir attachments located in the /dev directory.
Note:
It is recommended that you use the automatic device discovery feature torediscover devices only when the existing devices in the current domain arenot in use.
Tape Device Configuration Changes Oracle Secure Backup Detects
During automatic device discovery, the following media changers and tape drives canbe detected:
• Media changers and tape drives that were not previously part of the currentadministrative domain.
For each such device discovered, Oracle Secure Backup can create a device withan internally-assigned name and then configure its device attachment.
• Previously configured libraries and/or tape devices that have new attachments.
In this case, Oracle Secure Backup can add new attachments to an existingdevice configuration.
Libraries and tape devices are detected by Oracle Secure Backup by reading theserial number reported for the device by the media server's operating system.Devices having multiple attachments are detected based on their having the sameserial number reported by multiple media servers. Oracle Secure Backup willconfigure devices based on the serial number associated with its attachmentsrather than any logical name assigned by the operating system.
• Previously configured devices which have lost an attachment
Oracle Secure Backup displays information about the lost device attachment.
About Persistent Binding for SCSI Tape DevicesOracle Secure Backup uses device file names, such as /dev/sg3, to refer to the actualphysical tape devices. These device file names are specified during deviceconfiguration as part of the attach point specification. Hardware configuration changesor a system reboot may sometimes cause an existing device file name to point to adifferent tape device instead of the originally-configured tape device. To ensure thatSCSI tape device configuration remains constant across hardware configurationchanges and system reboots, the system administrator can use persistent binding toset up the tape devices. When persistent binding is used, the operating system usessymbolic links to manage the mapping of device files to the configured SCSI tapedevices. Therefore, Oracle Secure Backup device files will always map to the correcttape devices. Tape devices that use persistent binding can also be automaticallydiscovered and configured as described in "Overview of Automatic Device Discovery".
Chapter 7Overview of Automatic Device Discovery
7-18

Note:
Persistent binding is supported only for the Linux 64-bit platform.
By default, Oracle Secure Backup discovers Solaris, Linux, and AIX attached libraries andtape drives that have their attachments located in the /dev directory. However, whenpersistent binding is used, the tape device files may be located in a different directory. Youcan specify the directory from which SCSI persistent devices must be discovered by usingthe OB_DEVICE_SEARCH_PATH environment variable.
See Also:
discoverdev in the Oracle Secure Backup Reference for information about theOB_DEVICE_SEARCH_PATH environment variable
Steps to Discover and Configure Tape Devices in the AdministrativeDomain
Depending on the requirement, you can either discover tape devices attached to mediaservers in the administrative domain or you can also configure the discovered devices.
See Also:
discovereddevicestate policy in the Oracle Secure Backup Reference for moreinformation on the policy setting for managing the availability of discovered tapedevices
To automatically discover and configure tape devices:
1. Open the Oracle Secure Backup Web tool running on the administrative server and log inas the admin user.
See Also:
"Starting a Web Tool Session" for information about accessing the Web tool
2. Click the Configure tab.
The Configure page is displayed.
3. Click Discover Devices.
The Configure: Device Discovery > Discover page appears.
4. In the Media Servers field, select one of the following options:
• Specific type
Chapter 7Overview of Automatic Device Discovery
7-19

Discover all tape devices or tape devices attached to hosts of a specific type.Select one of the following:
– All: Discovers tape devices attached to all hosts in the administrativedomain.
– OSB: Discovers tape devices attached to hosts that have the OracleSecure Backup software installed.
– NDMP: Discovers tape devices attached to all NDMP devices in theadministrative domain.
• Specific host
Discovers tape devices attached to specific hosts. Multiple hosts can bespecified by holding down the Shift key while selecting the hosts.
5. If the tape devices are being set up using SCSI persistent binding, then you mustspecify the path in which Oracle Secure Backup searches for device files by usingthe OB_DEVICE_SEARCH_PATH parameter.
See Also:
Oracle Secure Backup Reference for information about theOB_DEVICE_SEARCH_PATH parameter
6. In the Options field, select one of the following options:
• Display Discovered Devices
Displays information about the attached tape devices that was discovered byOracle Secure Backup. The discovered devices are not configured in thedomain.
• Automatically Configure Discovered Devices
Discovers tape devices attached to media servers and then configures themas devices in the administrative domain.
• Only Show Missing Devices
Displays information about tape devices that were previously configured butwhose attachments are not discovered during the device discovery process.
7. Click Discover.
If changed tape devices are discovered, then the Oracle Secure Backup Web tooldisplays a message similar to the following:
Figure 7-1 Device Discovery Page
Chapter 7Overview of Automatic Device Discovery
7-20
Steps to Detect Missing Tape DevicesAutomatic device discovery can detect tape devices that were previously configured but arenow missing from the administrative domain.
To detect missing devices in the administrative domain:
1. Open the Oracle Secure Backup Web tool running on the administrative server and log inas the admin user.
See Also:
"Starting a Web Tool Session" for information about accessing the Web tool
2. Click the Configure tab.
The Configure page is displayed.
3. Click Discover Devices.
The Configure: Device Discovery > Discover page appears.
4. In the Media Servers field, select one of the following options:
• Specific type
Discovers all tape devices or tape devices attached to hosts of a specific type. Selectone of the following:
– All: Discovers tape devices attached to all hosts in the administrative domain.
– OSB: Discovers tape devices attached to hosts that have the Oracle SecureBackup software installed.
– NDMP: Discovers tape devices attached to all NDMP devices in theadministrative domain.
• Specific host
Discovers tape devices attached to the specified hosts. Multiple hosts can bespecified by holding down the Shift key while selecting the hosts.
5. In the Options field, select Only Show Missing Devices.
6. Click Discover.
Adding Tape Devices to an Administrative DomainThis section explains how to configure tape drives and tape libraries for use with OracleSecure Backup. During initial configuration of the administration domain, you must add alltape devices in your environment to the domain. Subsequently, when you add new devices toyour domain, you must configure the new tape devices using the steps described in thissection.
This section contains the following topics:
• About Tape Device Names
• About Manually Configuring Tape Drives and Libraries
Chapter 7Adding Tape Devices to an Administrative Domain
7-21
• Displaying the Devices Page
• Manually Configuring Tape Libraries
• Configuring Tape Drives
• Configuring an NDMP Copy-Enabled Virtual Tape Library
• Adding Tape Device Attachments
• Multiple Attachments for SAN-Attached Tape Devices
• Configuring Multihosted Device Objects
About Tape Device NamesA tape device can be assigned a logical name by the host operating system (such asnrst0a), but it also can have a worldwide name, such asnr.WWN[2:000:0090a5:0003f7]L1.a. On some platforms, such as a Fibre Channel tape drive or tape library connected to a Network Appliance filer, the logical namemight vary at each operating system restart. Oracle Secure Backup supports suchtape devices, but they must be referred to by their worldwide name, which does notchange across operating system restarts.
Any substring of the raw device name for the attachment that is the string $WWN isreplaced with the value of the WWN each time the tape device is opened. For examplea usable raw device name for a Storage Area Network (SAN) Network Appliance fileris nr.$WWN.a, specifying a no-rewind, best-compression tape device having the WorldWide Name found in the device object.
The WWN is usually automatically discovered by the device discovery function inOracle Secure Backup. However, you can enter it manually if necessary.
About Manually Configuring Tape Drives and LibrariesFor both tape drives and tape libraries, you can configure the following attributes:
• The name of the tape device
• The attachment, which is the description of a physical or logical connection of atape device to a host
• Whether the tape device is in service
For tape drives, you can configure the following additional attributes:
• The tape library in which the tape drive is housed, if the tape drive is notstandalone
• A storage element range that the tape device can use, if the tape drive is in a tapelibrary
Chapter 7Adding Tape Devices to an Administrative Domain
7-22
Note:
Oracle Secure Backup identifies each tape drive within a tape library by its datatransfer element (DTE) number. You must assign each tape device a DTE number ifit is installed within a tape library. DTEs are numbered 1 through n. See thedescription of the --dte option to the mkdev command in Oracle Secure BackupReference for more details on data transfer element numbers.
For tape libraries, you can configure the following additional attributes:
• Whether automatic cleaning is enabled
• The duration of a cleaning interval
• Whether a barcode reader is present
See Also:
Oracle Secure Backup Reference for a complete account of tape device attributes.
Methods of Configuring Tape DevicesYou can configure a tape drive or tape library for use with Oracle Secure Backup using one ofthe following methods:
• Automatic discovery
Oracle Secure Backup can automatically discover and configure each secondary storagedevice connected to media servers.
See Also:
"Overview of Automatic Device Discovery"
• Manually
A tape device connected to a media server on which Oracle Secure Backup is installedmust be added to the administrative domain manually.
See Also:
"Adding Tape Devices to an Administrative Domain"
Chapter 7Adding Tape Devices to an Administrative Domain
7-23
Note:
You must add the media server role to a host before adding any tape deviceswhose attachment point references that host. Oracle Secure Backup doesnot do this automatically.
Steps to Configure Tape Devices in the Administrative DomainThis section provides an overview of the steps used to configure tape devices, witheach step containing links to the sections that describe how to perform each deviceconfiguration task.
To configure your administrative domain to include tape devices:
1. Perform one of the following steps to add tape devices to the administrativedomain:
• Manually configure tape libraries and tape devices.
a. Configure tape libraries locally attached to your media servers asdescribed in "Manually Configuring Tape Libraries".
b. Configure tape drives locally attached to your media servers as describedin "Configuring Tape Drives"
c. Create an attachment between the tape device to the host to which thetape device is connected as described in "Adding Tape DeviceAttachments".
A tape device can have more than one attachment.
If your tape library is shared by multiple hosts in the administrativedomain, see "Configuring Multihosted Device Objects" for details abouthandling shared devices.
• Use automatic device discovery to add every tape device attached to hosts asdescribed in "Overview of Automatic Device Discovery" describes this task.
2. Configure tape devices that are network-accessible but are not locally attached.
You must decide which media servers should control the tape devices and, foreach media server, specify an attachment between the media server and the tapedevice. The procedure is identical to configuring a tape device attached locally to amedia server.
3. Verify each device attachment as described in "Verifying Tape DeviceConfiguration".
4. Inventory each tape library, and then list its volumes as described in "UpdatingTape Library Inventory".
Each volume in a tape library should show either a barcode or the statusunlabeled. If a library shows a slot as occupied, then this slot is in an invalid state.
Chapter 7Adding Tape Devices to an Administrative Domain
7-24
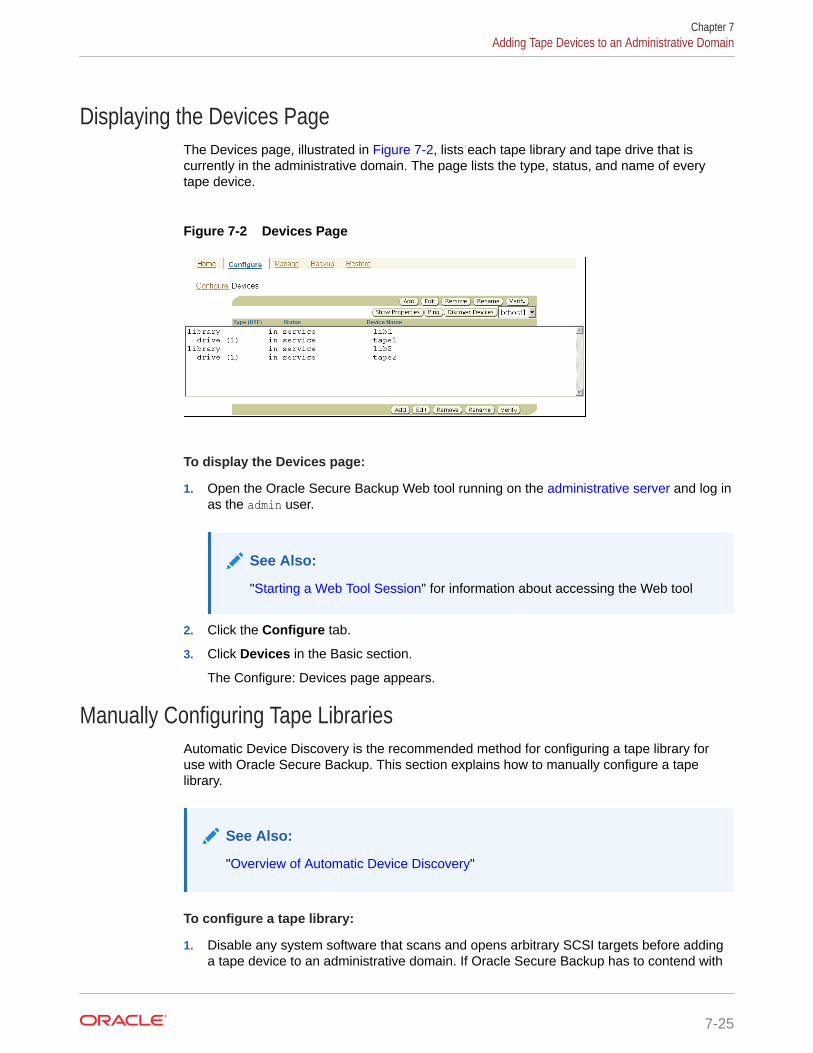
Displaying the Devices PageThe Devices page, illustrated in Figure 7-2, lists each tape library and tape drive that iscurrently in the administrative domain. The page lists the type, status, and name of everytape device.
Figure 7-2 Devices Page
To display the Devices page:
1. Open the Oracle Secure Backup Web tool running on the administrative server and log inas the admin user.
See Also:
"Starting a Web Tool Session" for information about accessing the Web tool
2. Click the Configure tab.
3. Click Devices in the Basic section.
The Configure: Devices page appears.
Manually Configuring Tape LibrariesAutomatic Device Discovery is the recommended method for configuring a tape library foruse with Oracle Secure Backup. This section explains how to manually configure a tapelibrary.
See Also:
"Overview of Automatic Device Discovery"
To configure a tape library:
1. Disable any system software that scans and opens arbitrary SCSI targets before addinga tape device to an administrative domain. If Oracle Secure Backup has to contend with
Chapter 7Adding Tape Devices to an Administrative Domain
7-25
other system software (such as monitoring software) for access to a tape library ortape drive, then unexpected behavior can result.
2. Display the Devices page as described in "Displaying the Devices Page".
3. Click Add to add a tape device.
4. In the Device field, enter a name for the tape device.
The name must start with an alphanumeric character. It can only contain letters,numerals, dashes, underscores, or periods. It can contain at most 127 characters.
The tape device name is of your choosing. It must be unique among all OracleSecure Backup device names. It is unrelated to any other name used in yourcomputing environment or the Oracle Secure Backup administrative domain.
5. In the Type list, select library.
6. In the ACSLS field, select yes if the tape library is an ACSLS library.
7. In the Status list, select one of these options:
• in service
Select this option to indicate that the tape device is available to perform OracleSecure Backup backup and restore operations.
• not in service
Select this option to indicate that the tape device is unavailable to performbackup or restore operations.
• auto not in service
This option indicates that the tape device is unavailable to perform backup orrestore operation and is set automatically for a failed operation.
8. In the Debug mode list, select yes or no. The default is yes.
9. In the World Wide Name field, enter a worldwide name for the tape device, ifrequired.
See Also:
"About Tape Device Names" for more information on World Wide Names
10. In the Barcode reader list, select one of these options to indicate whether abarcode reader is present:
• yes
Select this option to indicate that the tape library has a barcode reader.
• no
Select this option to indicate that the tape library does not have a barcodereader.
• default
Select this option to indicate that Oracle Secure Backup should automaticallydetermine the barcode reader using information reported by either the tapelibrary, the external device file, or both.
Chapter 7Adding Tape Devices to an Administrative Domain
7-26
11. In the Barcode required list, select yes or no. If you specify yes, then Oracle SecureBackup refuses to use any tape that lacks a readable barcode.
By default, Oracle Secure Backup does not discriminate between tapes with readablebarcodes and those without. This policy ensures that Oracle Secure Backup can alwayssolicit a tape needed for a restore operation by using either the barcode or the volume ID.
12. Set whether the tape library should use automatic cleaning.
See Also:
"Configuring Automatic Tape Drive Cleaning for a Library"
13. In the Unload required list, select yes or no to specify if an unload operation is requiredbefore moving a tape from a tape drive to a storage element.
The default value is no.
14. Select an ejection type. Your choices are:
• autoWhenever a volume becomes eligible to be ejected from the tape library, OracleSecure Backup moves that volume to an export element and notifies the backupoperator that it is available there. If no export elements are available, then OracleSecure Backup requests operator assistance.
• ondemandWhenever a volume becomes eligible to be ejected from the tape library, OracleSecure Backup marks the volume to that effect. A media movement job then waits forthe operator to reply to the job. The operator replies to the job through the jobtranscript. When the operator replies to the job to continue, Oracle Secure Backupejects all such volumes through export elements.
• manualNo automation is used to eject volumes from the tape library. The backup operatordetermines which storage elements contain volumes ready to be ejected andmanually removes them. This option can be useful when the tape library has noimport/export slots.
15. Enter a value in the Minimum writable volumes field.
When Oracle Secure Backup scans tape devices for volumes to be moved, it looks at thisminimum writable volume threshold. If the minimum writable volume threshold is nonzero,and if the number of writable volumes in that tape library is less than this threshold, thenOracle Secure Backup creates a media movement job for the full volumes even if theirrotation policy does not require it. When this happens, Oracle Secure Backup notes in themedia movement job transcript that volumes have been moved early.
16. Click OK to save your changes.
See Also:
"Adding Tape Device Attachments"
Chapter 7Adding Tape Devices to an Administrative Domain
7-27
Configuring Automatic Tape Drive Cleaning for a LibraryOracle Secure Backup can automatically clean each tape drive in a tape library. Acleaning cycle is initiated either when a tape drive reports that it needs cleaning orwhen a specified usage time has elapsed.
Oracle Secure Backup checks for cleaning requirements when a cartridge is eitherloaded into or unloaded from a tape drive. If at that time a cleaning is required, thenOracle Secure Backup loads a cleaning cartridge, waits for the cleaning cycle tocomplete, replaces the cleaning cartridge in its original storage element, and continueswith the requested load or unload.
To configure automatic cleaning for a tape library:
1. In the Auto clean list, select yes to enable automatic tape drive cleaning or no todisable it. You can also manually request that a cleaning be performed whenever atape drive is not in use.
Note:
Not all tape drives can report that cleaning is required. For those tapedrives, you must define a cleaning interval.
In the Clean interval (duration) field, enter a value and then select the cleaningfrequency from the adjacent list. This interval is the amount of time a tape drive isused before a cleaning cycle is initiated. If automatic tape drive cleaning isenabled, then this duration indicates the interval between cleaning cycles.
2. In the Clean using emptiest field, select one of these options:
• yes
Select this option to specify the emptiest cleaning tape, which causes cleaningtapes to "round robin" as cleanings are required.
• no
Select this option use the fullest cleaning tape, which causes each cleaningtape to be used until it fills, then the next cleaning tape fills, and so on.
If there are multiple cleaning tapes in a tape library, then Oracle Secure Backupmust decide which to use. If you do not otherwise specify, then Oracle SecureBackup chooses the cleaning tape with the fewest number of cleaning cyclesremaining.
3. Click OK to save your changes.
See Also:
"Adding Tape Device Attachments"
Chapter 7Adding Tape Devices to an Administrative Domain
7-28
Configuring Tape DrivesThe preferred method of configuring devices is by using automated device discovery. Thefollowing procedure describes the steps to configure tape drives manually.
This section explains how to configure a tape drive for use with Oracle Secure Backup. If thetape drive you want to configure is attached to a tape library, then you must configure thetape library first, as described in "Manually Configuring Tape Libraries".
To configure tape drives for use with Oracle Secure Backup:
1. Disable any system software that scans and opens arbitrary SCSI targets before addinga tape device to an administrative domain. If Oracle Secure Backup has to contend withother system software (such as monitoring software) for access to tape libraries and tapedrives, then unexpected behavior can result.
2. Display the Devices page as described in "Displaying the Devices Page".
3. Click Add to add a tape device.
4. In the Device field, enter a name for the tape device.
The name must start with an alphanumeric character. It can only contain letters,numerals, dashes, underscores, or periods. It can contain at most 127 characters.
The tape device name is of your choosing. It must be unique among all Oracle SecureBackup device names. It is unrelated to any other name used in your computingenvironment or the Oracle Secure Backup administrative domain.
5. Optionally, enter the serial number of the tape drive in the Serial Number field.
If you do not enter a serial number, then Oracle Secure Backup reads and stores the tapedrive serial number the first time it opens the tape drive.
The checkserialnumbers policy is enabled by default. If you change the tape drivehardware, then you must update the serial number of the tape drive before using it.
See Also:
• "Editing Device Properties"
• Oracle Secure Backup Reference for more information on thecheckserialnumbers policy
6. In the Type list, select tape.
7. In the ACSLS field, select yes if the tape library is an ACSLS library.
8. In the Status list, select one of these options:
• in service
Select this option to indicate that the tape device is available to perform OracleSecure Backup backup and restore operations.
• not in service
Select this option to indicate that the tape device is unavailable to perform backup orrestore operations.
Chapter 7Adding Tape Devices to an Administrative Domain
7-29
• auto not in service
This option indicates that the tape device is unavailable to perform backup orrestore operation and is set automatically for a failed operation.
9. In the Debug mode list, select yes or no. The default is no.
10. Optionally, in the World Wide Name field, enter a worldwide name for the tapedevice.
See Also:
"About Tape Device Names" for more information on World Wide Names
11. If the tape drive is located in a tape library, then select the tape library by namefrom the Library list.
12. In the DTE field, enter the data transfer element (DTE) number, only if it hasn'tbeen automatically discovered using automated device discovery.
Note:
This parameter is not available for standalone tape drives.
13. In the Automount field, select yes (default) or no to specify whether automountmode is on or off. Enable the automount mode if you want Oracle Secure Backupto mount tapes for backup and restore operations without operator intervention.
14. In the Error rate field, enter an error rate percentage or leave this field blank toaccept the default setting. The default is 8.
The error rate is the ratio of restored write errors that occur during a backup jobdivided by the total number of blocks written, multiplied by 100. If the error rate forany backup is higher than this setting, then Oracle Secure Backup displays awarning message in the backup transcript.
Oracle Secure Backup also issues a warning if it encounters a SCSI error whentrying to read or reset the tape drive error counters. Some tape drives do notsupport the SCSI commands necessary to perform these operations. To avoidthese warnings, error rate checking can be disabled by selecting None.
15. In the Blocking factor field, enter the blocking factor or leave this field blank toaccept the default setting. The default is 128 bytes.
The blocking factor value specifies how many 512-byte records to include in eachblock of data written to tape. The default value is 128, which means that OracleSecure Backup writes 64K blocks to tape.
See Also:
"Tape Drives" for more information on blocking factors and maximumblocking factors
16. In the Max Blocking factor field, enter the maximum blocking factor.
Chapter 7Adding Tape Devices to an Administrative Domain
7-30
The largest value supported for the maximum blocking factor is 4096. This represents amaximum tape block size of 2MB.
Note:
Device and operating system limitations might reduce this maximum block size.
17. In the Drive usage since last clear field, enter the amount of time the tape drive hasbeen in use since it was last cleaned and then select the time unit from the adjacent list.
18. Leave the Current tape field empty during initial configuration. Update the tape driveinventory after configuration, as described in "Updating Tape Library Inventory".
19. Oracle Secure Backup allows all tapes to be accessed by all tape drives. The use listenables you to divide the use of the tapes for tape libraries in which you are usingmultiple tape drives to perform backups. For example, you might want the tapes in halfthe storage elements to be available to the first tape drive, and those in the second half tobe available to the second tape drive.
In the Use list group, select one of these options to configure the use list:
• Storage element range or list
Select this option for a numeric range of storage element addresses. Enter a range inthe field, for example, 1-20.
• All
Select this option to specify all storage elements. For tape libraries with single tapedrives, you can select this option to use all tapes. This is the default setting.
• None
Select this option to indicate that no storage elements have yet been specified. If youselect All or Storage element range or list, then this option is no longer visible.
20. In the Enable Checksum field, select one of the following options:
• system default
Uses the setting specified by the Enable tape checksum device policy to determineif a checksum must be computed for backup image instances stored on this tapedevice. This is the default setting.
• yes
Computes a checksum for the all backup image instances that are stored on this tapedevice. The checksum is stored as part of the backup metadata.
• no
Does not compute or store a checksum for the backup image instances that arestored on this tape device.
21. Click OK to save your changes.
Configuring an NDMP Copy-Enabled Virtual Tape LibraryAn NDMP copy-enabled virtual tape library (VTL) is a virtual tape library with an embeddedNDMP server and multiple access paths. The embedded NDMP server allows offloading the
Chapter 7Adding Tape Devices to an Administrative Domain
7-31
I/O associated with volume duplication from the application running on the mediaserver to the VTL.
An NDMP copy-enabled virtual tape library (VTL) must be represented in OracleSecure Backup as a group of tape devices with multiple attach specifications. Thisensures that the inventory data coming through the multiple access paths is identical.
Two Oracle Secure Backup host objects must be created to represent the VTL. Oneobject must be associated with the media server to which the VTL is attached. Theother host object must be associated with the VTL's embedded NDMP server. Bothhost objects must be assigned the media server role in Oracle Secure Backup.
One Oracle Secure Backup library device object with two attach specifications must becreated for the virtual library. One access path is through the media server to which theVTL is attached. The other access path is through the embedded NDMP server.
An Oracle Secure Backup tape device object with two access paths must also becreated for each virtual drive contained within the virtual library. As in the virtual librarycase, one access path is through the media server, and the other is through theembedded NDMP server.
One Oracle Secure Backup library device object with a single attach specification mustbe created for the physical library. The access path is through the VTL's embeddedNDMP server. An Oracle Secure Backup tape device object with a single attachspecification must also be created for each physical drive contained within the physicallibrary. As in the physical library case, the access path is through the VTL's embeddedNDMP server.
Note:
Multiple media servers may be able to access the physical library and itsdrives if they are all connected to a shared SAN. In this case, the OracleSecure Backup device objects for the physical library and its drives must becreated with multiple attach points.
Here is an example of the obtool commands that would be used to configure anNDMP copy-enabled VTL. Many of the options that would be specified in a realenvironment have been omitted for clarity. Also, the device names shown are simplyplaceholders that may differ from the actual names in a real environment.
1. This command creates the Oracle Secure Backup host object associated with themedia server to which the VTL is attached.
mkhost --access ob --ip ipname osb_media_server2. This command creates the Oracle Secure Backup host object associated with the
embedded NDMP server contained within the VTL.
mkhost --access ndmp --ip ipname ndmp_server3. This command configures an Oracle Secure Backup device object that is
associated with the virtual library vlib.
mkdev --type library --class vtl --attach osb_media_server:/dev/obl0,ndmp_media_server:/dev/sg0 vlib
Chapter 7Adding Tape Devices to an Administrative Domain
7-32
This library and its drives are accessible through the Oracle Secure Backup media serverand the embedded NDMP server.
4. This command configures an Oracle Secure Backup device object that is associated withvirtual tape drive vdrive1, which is contained in the virtual library vlib.
mkdev --type tape --library vlib --dte 1 --attach osb_media_server:/dev/obt0,ndmp_media_server:/dev/nst0 vdrive1
This command must be repeated for each tape drive in the virtual tape library.
5. This command configures an Oracle Secure Backup device object that is associated withthe physical library plib.
mkdev --type library --attach ndmp_media_server:/dev/sg1 plib
This library and its drives are accessible only through the embedded NDMP server.
6. This command configures an Oracle Secure Backup device object that is associated withtape drive pdrive1, which is contained in the physical library plib.
mkdev --type tape --library plib --dte 1 --attach ndmp_media_server:/dev/nst1 pdrive1
See Also:
Oracle Secure Backup Administrator's Guide for more information on NDMP copy-enabled virtual tape libraries
Adding Tape Device AttachmentsOracle Secure Backup distinguishes between a tape device and a device attachment.Automated Device Discovery makes it so that it is no longer necessary to manually configuredevice attachments in Oracle Secure Backup. This section is added as a reference forsituations where detailed understanding of the process of manually configuring deviceattachments in Oracle Secure Backup is needed. A device attachment is the means by whichthat tape device is connected to a host and Oracle Secure Backup uses this attachment as adata path to communicate with the device. Each drive or library accessed by Oracle SecureBackup has one or more attachments.
Before configuring a device attachment, refer to the description of the mkdev command in Oracle Secure Backup Reference. The description of the aspec placeholder describes thesyntax and naming conventions for device attachments.
To configure device attachments:
1. After adding or editing a device, click Attachments.
2. Select a host in the Host list.
3. In the Raw device field, enter the raw device name. This is the operating system's namefor the device, such as a Linux or UNIX attach point or a Windows device file. Forexample, a tape library name might be /dev/obl0 on Linux and //./obl0 on Windows.
4. Click Add to add the attachment.
Chapter 7Adding Tape Devices to an Administrative Domain
7-33
Pinging Device AttachmentsYou can ping a device attachment to determine whether the tape device is accessibleto Oracle Secure Backup using that attachment. Pinging device attachments is a goodway to test whether you set up the attachment properly.
When you ping a device, Oracle Secure Backup performs the following steps:
1. Establishes a logical connection to the device
2. Inquires about the device's identity data with the SCSI INQUIRY command
3. Closes the connection
If the attachment is remote from the host running the Oracle Secure Backup Web tool(or obtool), then Oracle Secure Backup establishes an NDMP session with the remotemedia server to effect this function.
To ping an attachment from the Attachments page:
1. From the Oracle Secure Backup Web Tool Home Page, click Configure.
2. On the Configure page, under Basics, click Devices.
3. Select an attachment to ping.
4. Click Ping.
The Oracle Secure Backup: Devices page displays the accessibility status of theattachment.
5. Click Close to exit the page.
Displaying Device Attachment PropertiesYou can display device attachment properties from the Devices page.
To display attachment properties:
1. Select the name of the tape device whose attachment properties you want to view.
2. Click Show Properties.
The Oracle Secure Backup Web tool displays device attachments and otherproperties for the tape device you selected.
3. Click Close to exit the page.
Multiple Attachments for SAN-Attached Tape DevicesA tape device attached to a SAN often has multiple attachments, one for each hostwith local access to the tape device through its Fibre Channel interface. A tape deviceattached to a SAN is also distinguished by a World Wide Name (WWN), an internalidentifier that uniquely names the tape device on the SAN. Systems such as a NetworkAppliance filer permit access to tape devices attached to a SAN through their WWN.Oracle Secure Backup includes a reference to the WWN in the device attachment'sraw device name.
Chapter 7Adding Tape Devices to an Administrative Domain
7-34
Tape devices such as certain Quantum and SpectraLogic tape libraries appear to beconnected directly to an Ethernet LAN segment and accessed through NDMP. In fact, OracleSecure Backup views these devices as having two discrete components:
• A host, which defines the IP address and which you configure through the Oracle SecureBackup Web tool Hosts page or the mkhost command
• A tape device, which has one attachment to the single-purpose host that serves as thefront end for the tape device
Devices such as DinoStor TapeServer use a single host to service multiple tape devices.
For NDMP servers that run version 2, other data might be required to define SCSIparameters needed to access the tape device. These parameters are sent in an NDMPmessage called NDMP_SCSI_SET_TARGET. Oracle Secure Backup NDMP servers do not usethis data or this message.
See Also:
The description of the mkdev command aspec placeholder in Oracle Secure BackupReference, which describes the syntax and naming conventions for deviceattachments
Configuring Multihosted Device ObjectsA multihosted device, also known as a shared device, is a tape library shared by multiplehosts within a single administrative domain. Shared devices are common in environmentsthat deploy SAN or iSCSI-based tape equipment. These technologies give the user theflexibility to have multiple direct connections from hosts to tape devices, which enables allhosts to act as media servers.
When a device is shared by multiple hosts, a single device object is used to ensure that it isknown by its serial number across all members of the Oracle Secure Backup administrativedomain. The configuration is done behind the scenes using automated device discovery andmultiple attachments will be created, one for each device on each media server by which thedevice will be accessed.
Table 7-1 shows the correct configuration of a single tape library and tape drive shared bytwo hosts: host_a and host_b. After the devices are configured, Oracle Secure Backup isaware of the devices and handles device reservation properly.
Table 7-1 Correct Configuration for Tape Library and Tape Drive
Tape Device Object Attach Point 1 Attach Point 2
SAN_library_1 host_a:/dev/sg1 host_b:/dev/sg5SAN_tape_1 host_a:/dev/sg2 host_b:/dev/sg6
If the device is configured as two separate device objects that point to the same physicaldevice, then there is potential for contention. In this case, simultaneous backups to the thesedevices fail. Table 7-2 shows the incorrect configuration of a single tape library and tape driveshared by two hosts: host_a and host_b.
Chapter 7Adding Tape Devices to an Administrative Domain
7-35
Table 7-2 Incorrect Configuration for Tape Library and Tape Drive
Tape Device Object Attach Point
SAN_library_1a host_a:/dev/sg1SAN_library_1b host_b:/dev/sg5SAN_tape_1a host_a:/dev/sg2SAN_tape_1b host_b:/dev/sg6
Updating Tape Library InventoryAn initial inventory of the storage element contents should be taken immediately afteradding a new tape library to your Oracle Secure Backup administrative domain. This isnecessary before Oracle Secure Backup will be able to use the library.
To update a tape library or tape drive inventory using the Oracle Secure BackupWeb tool:
1. From the Oracle Secure Backup Web tool Home page, click Manage.
The Manage page appears.
2. In the Devices section, click Libraries.
The Manage: Libraries page appears as shown in Figure 7-3.
Figure 7-3 Manage: Libraries Page
3. Select the tape drive or tape library you want to inventory in the Devices table.
4. Select Inventory (Library | Drive) in the Library commands list.
In this example, lib1 is selected.
5. Click Apply.
The Manage: Libraries page appears.
6. Ensure that the Library list is set to the device you want to inventory.
7. Select the Force option.
Instead of reading from its cache, the tape library updates the inventory byphysically scanning all tape library elements.
Chapter 7Updating Tape Library Inventory
7-36
8. Click OK.
When the inventory is complete, the Manage: Libraries page reappears and displays asuccess message.
To see the results of the inventory, select the tape drive or tape library again and clickList Volumes.
Verifying and Configuring Added Tape DevicesThis section explains how to verify that tape devices are reachable, display information aboutthese devices, and configure serial number checking.
This section contains the following topics:
• Displaying Device Properties
• Pinging Tape Devices
• Editing Device Properties
• Verifying Tape Device Configuration
• Setting Serial Number Checking
Displaying Device PropertiesThe Oracle Secure Backup Web tool can display tape device properties including:
• Whether a tape device is in service
• Which host or hosts the tape device is connected to
• The tape device type
When a tape device is in service, then Oracle Secure Backup can use it; when it is not inservice, then Oracle Secure Backup cannot use it. When a tape device is taken out ofservice, no more backups are dispatched to it.
To display tape device properties:
1. Display the Devices page as described in "Displaying the Devices Page".
2. Select the name of the tape device whose properties you want to display.
3. Click Show Properties.
The Oracle Secure Backup Web tool displays a page with the properties for the tapedevice you selected.
Pinging Tape DevicesTo determine whether a tape device is reachable by Oracle Secure Backup through anyavailable attachment, ping the tape device. You should ping each tape device after it isconfigured or discovered, to check it's accessibility status.
To ping a tape device:
1. Perform the steps in "Verifying Tape Device Configuration" to ensure that the device hasbeen configured correctly.
2. Display the Devices page as described in "Displaying the Devices Page".
Chapter 7Verifying and Configuring Added Tape Devices
7-37
3. Select a tape device to ping.
4. Click the Ping button.
The Oracle Secure Backup Web tool displays the status of the operation.
Note:
Pinging a tape library causes each service member tape drive in the tapelibrary to be pinged as well.
Editing Device PropertiesIf you make an error during installation, such as not configuring every attachment for atape device or incorrectly configuring its properties, then you can edit its properties.
To edit the properties of an existing tape device:
1. Display the Devices page as described in "Displaying the Devices Page".
2. Select the name of the tape device.
3. Click Edit.
The Oracle Secure Backup Web tool displays a page with details for the tapedevice you selected.
4. Make any required changes.
See Also:
For information about the device properties, refer to the followingsections:
• "Manually Configuring Tape Libraries"
• "Configuring Tape Drives"
5. Click OK to save your changes.
Verifying Tape Device ConfigurationOracle Secure Backup provides the following method for confirming that libraries andtape devices are configured correctly.
To verify tape device configuration:
1. From the Oracle Secure Backup Web tool home page, click Configure.
The Configure page appears
2. In the Basic section click Devices.
The Configure Devices page appears.
3. Select the library whose configuration you want to check and click Verify.
Chapter 7Verifying and Configuring Added Tape Devices
7-38
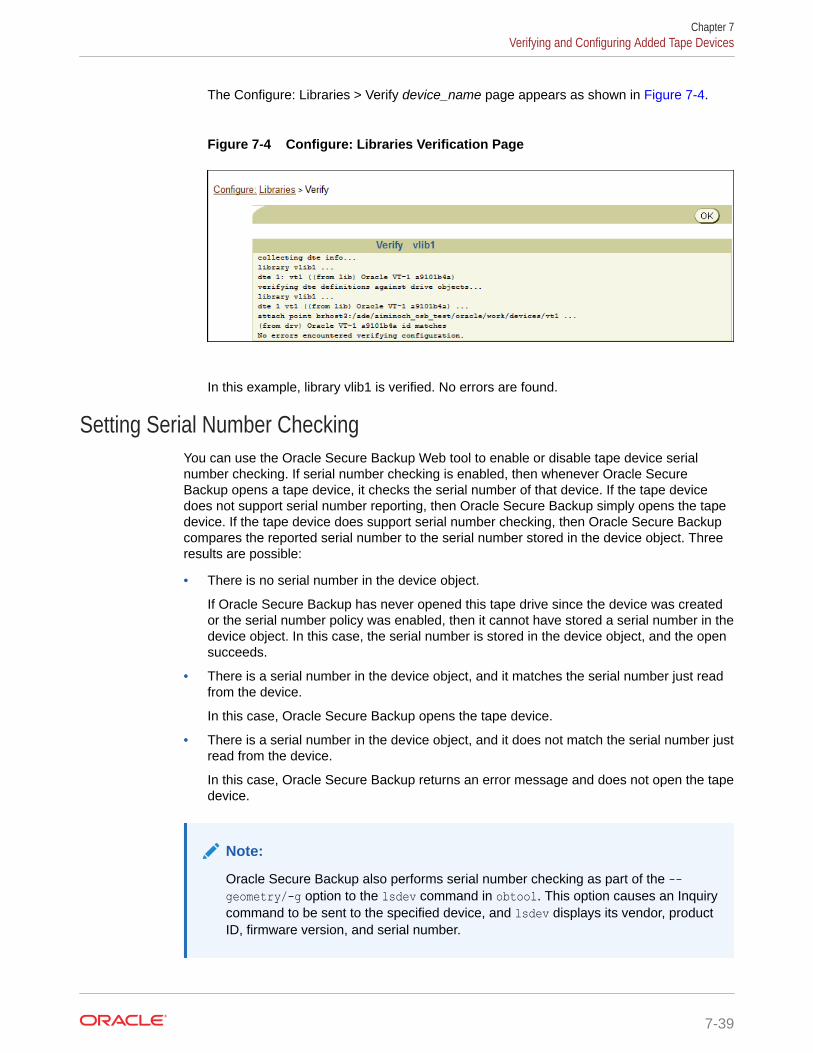
The Configure: Libraries > Verify device_name page appears as shown in Figure 7-4.
Figure 7-4 Configure: Libraries Verification Page
In this example, library vlib1 is verified. No errors are found.
Setting Serial Number CheckingYou can use the Oracle Secure Backup Web tool to enable or disable tape device serialnumber checking. If serial number checking is enabled, then whenever Oracle SecureBackup opens a tape device, it checks the serial number of that device. If the tape devicedoes not support serial number reporting, then Oracle Secure Backup simply opens the tapedevice. If the tape device does support serial number checking, then Oracle Secure Backupcompares the reported serial number to the serial number stored in the device object. Threeresults are possible:
• There is no serial number in the device object.
If Oracle Secure Backup has never opened this tape drive since the device was createdor the serial number policy was enabled, then it cannot have stored a serial number in thedevice object. In this case, the serial number is stored in the device object, and the opensucceeds.
• There is a serial number in the device object, and it matches the serial number just readfrom the device.
In this case, Oracle Secure Backup opens the tape device.
• There is a serial number in the device object, and it does not match the serial number justread from the device.
In this case, Oracle Secure Backup returns an error message and does not open the tapedevice.
Note:
Oracle Secure Backup also performs serial number checking as part of the --geometry/-g option to the lsdev command in obtool. This option causes an Inquirycommand to be sent to the specified device, and lsdev displays its vendor, productID, firmware version, and serial number.
Chapter 7Verifying and Configuring Added Tape Devices
7-39
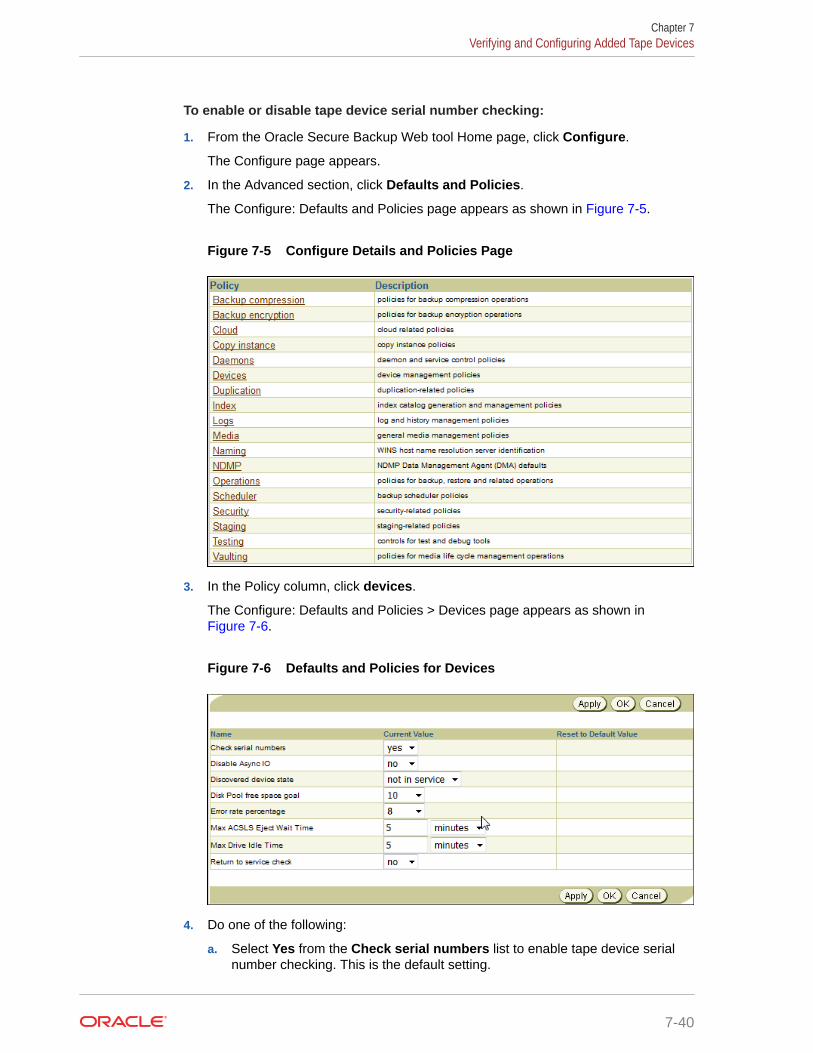
To enable or disable tape device serial number checking:
1. From the Oracle Secure Backup Web tool Home page, click Configure.
The Configure page appears.
2. In the Advanced section, click Defaults and Policies.
The Configure: Defaults and Policies page appears as shown in Figure 7-5.
Figure 7-5 Configure Details and Policies Page
3. In the Policy column, click devices.
The Configure: Defaults and Policies > Devices page appears as shown in Figure 7-6.
Figure 7-6 Defaults and Policies for Devices
4. Do one of the following:
a. Select Yes from the Check serial numbers list to enable tape device serialnumber checking. This is the default setting.
Chapter 7Verifying and Configuring Added Tape Devices
7-40
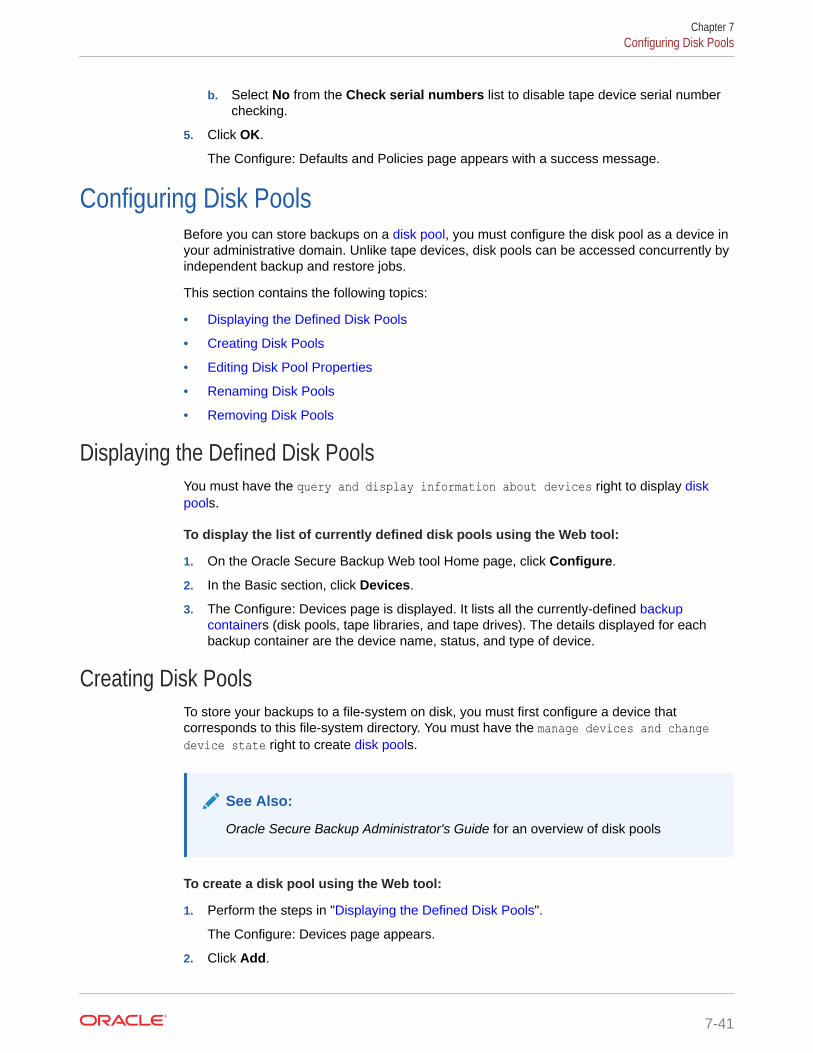
b. Select No from the Check serial numbers list to disable tape device serial numberchecking.
5. Click OK.
The Configure: Defaults and Policies page appears with a success message.
Configuring Disk PoolsBefore you can store backups on a disk pool, you must configure the disk pool as a device inyour administrative domain. Unlike tape devices, disk pools can be accessed concurrently byindependent backup and restore jobs.
This section contains the following topics:
• Displaying the Defined Disk Pools
• Creating Disk Pools
• Editing Disk Pool Properties
• Renaming Disk Pools
• Removing Disk Pools
Displaying the Defined Disk PoolsYou must have the query and display information about devices right to display diskpools.
To display the list of currently defined disk pools using the Web tool:
1. On the Oracle Secure Backup Web tool Home page, click Configure.
2. In the Basic section, click Devices.
3. The Configure: Devices page is displayed. It lists all the currently-defined backupcontainers (disk pools, tape libraries, and tape drives). The details displayed for eachbackup container are the device name, status, and type of device.
Creating Disk PoolsTo store your backups to a file-system on disk, you must first configure a device thatcorresponds to this file-system directory. You must have the manage devices and changedevice state right to create disk pools.
See Also:
Oracle Secure Backup Administrator's Guide for an overview of disk pools
To create a disk pool using the Web tool:
1. Perform the steps in "Displaying the Defined Disk Pools".
The Configure: Devices page appears.
2. Click Add.
Chapter 7Configuring Disk Pools
7-41
The Configure: Devices > New Device page appears.
3. In the Device field, enter a name for the disk pool.
The name must start with an alphanumeric character and be unique across theadministrative domain. It can contain letters, numerals, dashes, underscores, orperiods. It cannot contain spaces. The maximum character length is 127characters.
4. In the Type field, select disk.
5. In the Status field, specify if the disk pool is available for backup or restoreoperations by selecting one of the following options:
• in service
Indicates that the disk pool is available to perform Oracle Secure Backupbackup and restore operations.
• not in service
Indicates that the disk pool is unavailable to perform Oracle Secure Backupbackup and restore operations.
• auto not in service
Indicates that the disk pool is unavailable to perform backup or restoreoperation and is set automatically for a failed operation.
6. In the Debug mode field, select yes or no. The default is yes.
7. In the Capacity field, specify a value that represents the space allocated to thedisk pool. Select one of the following to specify the unit of storage space: KB, MB,GB, TB, PB, or EB. Leave the default value of (not set) to indicate that nomaximum capacity is specified for this disk pool. In this case, the capacity of thedisk pool is limited only by the underlying file system that hosts the disk pool.
If the space occupied by backups on the disk pool exceeds the capacity specified,then Oracle Secure Backup does not schedule new jobs for this disk pool until thespace utilization drops to below the specified capacity.
8. In the Concurrent Jobs field, specify the number of jobs that can be runconcurrently for this disk pool. Select unlimited to indicate that no limit is set forthe number of concurrent jobs.
This property enables you to control the concurrent usage of disk pools. The jobsinclude backup jobs, restore jobs, and media management jobs.
9. In the Free space goal percentage field, select system default or any valuebetween 1-100.
The free space goal percentage is the percentage of free space that OracleSecure Backup maintains in a disk pool. Before scheduling a backup or restore jobfor a disk pool, the Oracle Secure Backup scheduler checks the disk poolutilization. If the amount of free space is lower than the specified free space goalpercentage, then expired backup image instances are deleted.
10. In the Blocking factor field, enter a value that specifies the blocking factor for thedisk pool or leave the field blank to accept the default setting. The default is 128bytes.
Chapter 7Configuring Disk Pools
7-42

See Also:
Oracle Secure Backup Administrator's Guide for information about blockingfactor and maximum blocking factor
11. In the Max blocking factor field, enter a value for the maximum blocking factor for thedisk pool.
The largest value supported for the maximum blocking factor is 4096. This represents amaximum block size of 2MB.
12. In the Attachment field, specify the host and file-system directory that stores backupimage instances for this disk pool. Provide information in the following fields:
• Host: Base path: Enter the host name of the Oracle Secure Backup client thatstores the backups.
• Directory: Enter the name of the file-system directory that stores the backups for thisdisk pool.
• Initialize: Select yes or no.
13. In the Enable Checksum field, select one of the following options:
• system default
Uses the setting specified by the Enable disk checksum device policy to determineif a checksum must be computed for backup image instances. This is the defaultsetting.
• yes
Computes a checksum for the all backup image instances that are written to this diskpool. The checksum is stored as part of the backup metadata.
• no
Does not compute or store a checksum for the backup image instances that arewritten to this disk pool.
14. Click OK to create the disk pool.
Caution:
In a dedup filesystem, the amount of disk space occupied by a diskpool (asreported by OS commands, such as "df -h") is lower than the standard storage. Ifyou create a diskpool on a dedup filesystem and overfill the filesystem, OracleSecure Backup utilities for managing disk space will not report accurate sizes fordiskpools on dedup filesystems.
Editing Disk Pool PropertiesYou can use the Web tool to edit disk pool properties. You must have the manage devicesand change device state right to edit disk pool properties.
Chapter 7Configuring Disk Pools
7-43
To edit the properties of a disk pool:
1. Perform the steps in "Displaying the Defined Disk Pools".
The Configure: Devices page appears. The currently configured devices, tapedevices and disk pools, are listed on this page.
2. Select the disk pool whose properties need to be edited and click Edit.
The Configure: Device > disk_pool_name page is displayed.
3. Modify the required disk pool properties.
You can edit any of the following properties: Status, Debug mode, Capacity,Concurrent jobs, Free space goal percentage, Blocking factor, Max blocking factor.
See "Creating Disk Pools" for more details about each of these properties.
4. Click Save to commit the changes to disk pool properties.
Renaming Disk PoolsYou must have the manage devices and change device state right to edit disk poolproperties.
To rename a disk pool:
1. Perform the steps in "Displaying the Defined Disk Pools".
The Configure: Devices page appears. The currently configured devices, tapedevices and disk pools, are listed on this page.
2. Select the disk pool that you want to rename and click Rename.
3. In the Rename device_name to field, enter the new name of the disk pool.
Removing Disk PoolsYou need the manage devices and change device state right to remove a disk pool.
To remove a disk pool:
1. Perform the steps in "Displaying the Defined Disk Pools".
The Configure: Devices page appears. The currently configured devices, tapedevices and disk pools, are listed on this page.
2. Select the disk pool to be removed and click Remove.
A prompt is displayed asking if you want to delete all backup image instances forthe disk pool that is being removed.
3. Totalled the backup image instances stored on the selected disk pool, select Yes.
To retain the backup image instances stored on the selected disk pool, select No.
A prompt is displayed asking if you want to force a delete of backup imageinstances even if they are unexpired.
4. Click Yes to force a delete of backup image instances on the selected disk pool.Click No to retain unexpired backup image instances.
Chapter 7Configuring Disk Pools
7-44
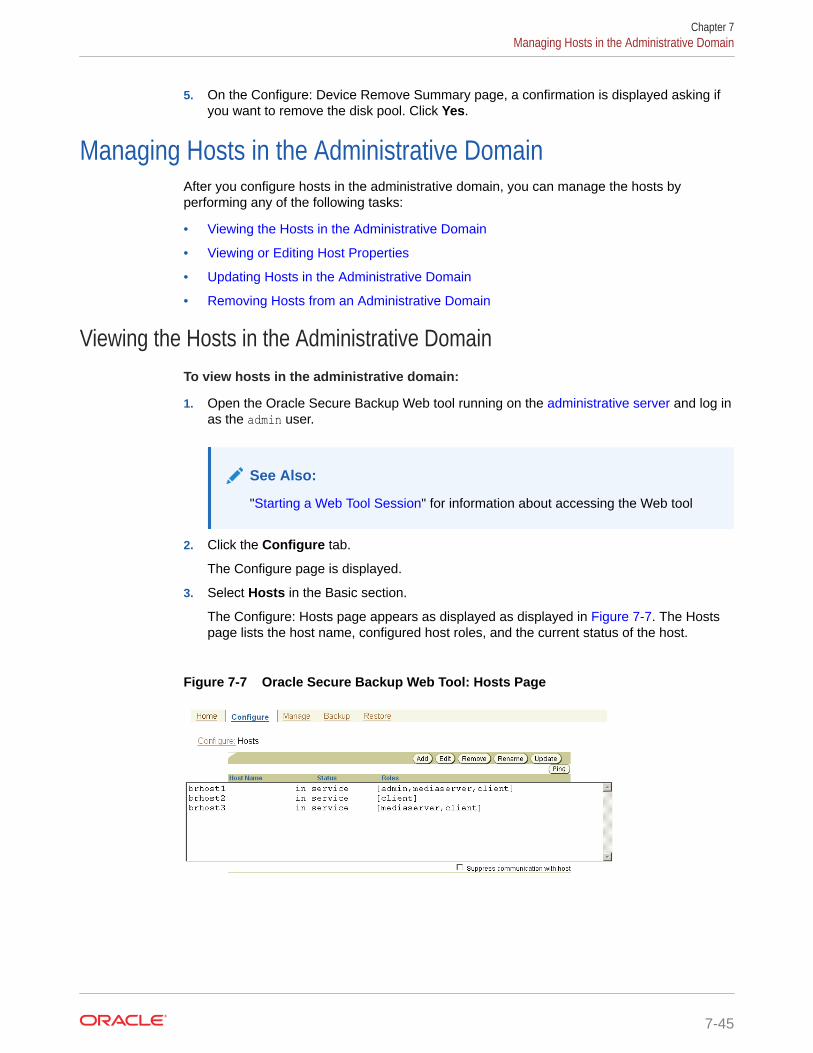
5. On the Configure: Device Remove Summary page, a confirmation is displayed asking ifyou want to remove the disk pool. Click Yes.
Managing Hosts in the Administrative DomainAfter you configure hosts in the administrative domain, you can manage the hosts byperforming any of the following tasks:
• Viewing the Hosts in the Administrative Domain
• Viewing or Editing Host Properties
• Updating Hosts in the Administrative Domain
• Removing Hosts from an Administrative Domain
Viewing the Hosts in the Administrative DomainTo view hosts in the administrative domain:
1. Open the Oracle Secure Backup Web tool running on the administrative server and log inas the admin user.
See Also:
"Starting a Web Tool Session" for information about accessing the Web tool
2. Click the Configure tab.
The Configure page is displayed.
3. Select Hosts in the Basic section.
The Configure: Hosts page appears as displayed as displayed in Figure 7-7. The Hostspage lists the host name, configured host roles, and the current status of the host.
Figure 7-7 Oracle Secure Backup Web Tool: Hosts Page
Chapter 7Managing Hosts in the Administrative Domain
7-45
Note:
You can also view the current list of hosts with the obtool lshost command.
Viewing or Editing Host PropertiesIf you are having difficulties configuring Oracle Secure Backup, you might be requiredto view and/or edit hosts that are members of the domain.
To display or edit host properties:
1. Display the Hosts page as described in "Viewing the Hosts in the AdministrativeDomain".
2. Select the name of the host whose properties require editing.
Select the Suppress communication with host option to edit a host that iscurrently not accessible through the network.
3. Click Edit.
The Oracle Secure Backup Web tool displays a page with details for the host youselected.
4. Make any desired changes to the host properties.
5. Click OK to save your changes.
Updating Hosts in the Administrative DomainWhen you add or modify a host in an Oracle Secure Backup administrative domain,Oracle Secure Backup exchanges messages with that host to inform it of its changedstate. If you make changes to your administrative host, your client will likely containoutdated configuration information. Update Host can be used to send fresh stateinformation to the client.
Updating is useful only for hosts running Oracle Secure Backup natively. Hostsaccessed in NDMP mode, such as NAS devices, do not maintain any Oracle SecureBackup state data and therefore it is not necessary to update their state information.
To update a host:
1. Display the Hosts page as described in "Viewing the Hosts in the AdministrativeDomain".
2. Select the name of the host to be updated.
3. Click Update.
Removing Hosts from an Administrative DomainThis section explains how to remove a host from an Oracle Secure Backupadministrative domain. When you remove a host, Oracle Secure Backup destroys allinformation pertinent to that host, including:
• Configuration data
Chapter 7Managing Hosts in the Administrative Domain
7-46
• Incremental backup state information
• Metadata in the backup catalog for this host
• Each device attachment
• PNI references
When you remove a host, Oracle Secure Backup contacts that host and directs it to deletethe administrative domain membership information it maintains locally. You can suppress thiscommunication if the host is no longer accessible.
To remove a host:
1. Display the Hosts page as described in "Viewing the Hosts in the Administrative Domain".
2. Select the name of the host to remove.
Check Suppress communication with host to remove a host that is not connected tothe network.
3. Click Remove.
Oracle Secure Backup prompts you to confirm the removal of the host.
4. Click Yes to remove the host or No to leave the host undisturbed.
Oracle Secure Backup removes the host and returns you to the Host page.
Configuring Cloud Storage DevicesBefore you can store backups on a cloud storage device, you must configure it as a device inyour administrative domain.
This section contains the following topics:
• Prerequisites for Configuring Storage Devices for OCI Classic
• Configuring an Authentication Object for Oracle Cloud Infrastructure
• Creating Cloud Storage Devices for Oracle Cloud Infrastructure
• Creating Cloud Storage Devices for Oracle Cloud Infrastructure Classic
• Displaying the Defined Cloud Storage Devices
• Editing Cloud Storage Device Properties
• Renaming Cloud Storage Devices
• Removing Cloud Storage Devices
• Manually Creating a Cloud Wallet
Prerequisites for Configuring Storage Devices for OCI ClassicYou must complete the following tasks before you can configure an Oracle Secure Backupcloud storage device for Oracle Cloud Infrastructure Classic:
1. Subscribe to Oracle Cloud Infrastructure Object Storage Classic.
2. Acquire your login credentials and identity domain.
The information provided in this topic explains how to perform each of these tasks.
Chapter 7Configuring Cloud Storage Devices
7-47
Subscribing to Oracle Cloud
Oracle Cloud Infrastructure Object Storage Classic offers different storage options withand without replication. In addition to object storage, Oracle provides Oracle CloudInfrastructure Archive Storage Classic which provides storage for long term retention.To access these services, you must first acquire a subscription.
See Also:
• Storage Classic for further details about these services
• Get Started with Oracle Cloud for information about free trials andsubscriptions
Acquiring Login Credentials and an Identity Domain
When you subscribe to Oracle Cloud services, a unique identifier, called an identitydomain, is created for all of your services. It is recommended that you create anidentity domain administrator user to manage your cloud services. You must have theStorage_Administrator and Storage_ReadWriteGroup roles in order to do so.
After you receive your identity domain and user credentials, you can use them tocreate login accounts for other users who need to access the services. To accessstorage services from Oracle Secure Backup, it is recommended that you createanother user that has the Storage_Administrator role.
See Also:
• Adding Users and Assigning Roles for more information about OracleCloud Storage roles and users
Configuring an Authentication Object for Oracle Cloud InfrastructureYou must create an authentication object for Oracle Cloud Infrastructure before youcan configure a cloud storage device that stores backups in Oracle CloudInfrastructure Object Storage. The authentication object contains information such asthe public key fingerprint, private key file, identity domain, and tenancy information thatis required to authenticate Oracle Secure Backup with Oracle Cloud Infrastructure.
Before configuring an authentication object for Oracle Cloud Infrastructure:
• You must have the modify domain configuration right.
• You must have an Oracle Cloud account with access to Oracle CloudInfrastructure Object Storage. See Object Storage.
• You must generate a key pair file that contains a public key and a private key usedto authenticate with Oracle Cloud Infrastructure, as described in How to Generatean API Signing Key. Both keys must be in PEM format. The private key is stored onthe media server, not in Oracle Cloud.
Chapter 7Configuring Cloud Storage Devices
7-48

• You must configure the key pair in the Oracle Cloud Infrastructure Console as describedin How to Upload the Public Key. This generates a fingerprint for the key.
To create an authentication object for Oracle Cloud Infrastructure:
1. On the Oracle Secure Backup Web tool Home page, click Configure.
2. In the Basic section, click Authetications.
The Configure: Authentications page appears.
3. Click Add.
The Configure: Authentications > New Authentications page appears.
4. In the Authentication field, enter a name for the authentication object.
The name must start with an alphanumeric character and be unique across theadministrative domain. It can contain letters, numerals, dashes, underscores, or periods.It cannot contain spaces. The maximum character length is 127 characters.
5. In the Type field, select OCI to create an Oracle Cloud Infrastructure authenticationobject.
6. In the Tenancy ocid field, specify the tenancy OCID for your Oracle Cloud Infrastructureaccount. The tenancy contains all your Oracle Cloud Infrastructure resources and isassigned a unique ID.
7. In the User ocid field, specify the user ID for your Oracle Cloud Infrastructure account.
8. In the Key field, click Browse and select the file that contains the private key that yougenerated to authenticate Oracle Secure Backup with Oracle Cloud Infrastructure.
9. In the Fingerprint field, specify the public key that you generated in the key pair file.
10. In the Identity Domain field, specify the identity domain. The identity domain is aconstruct for managing certain features of Oracle Cloud Infrastructure.
11. In the URL field, specify the endpoint URL provided by Oracle Cloud Infrastructure ObjectStorage.
The endpoint URL depends on the region. For example:
https://objectstorage.us-phoenix-1.oraclecloud.com
12. In the Comments field, enter a description of this authentication object.
This step is optional.
13. Click Apply.
Creating Cloud Storage Devices for Oracle Cloud InfrastructureUse the mkdev command or the Oracle Secure Backup Web tool to create a new cloudstorage device for Oracle Cloud Infrastructure.
You must have the manage devices and change device state rights to create cloud storagedevices for Oracle Cloud Infrastructure. An authentication object for Oracle CloudInfrastructure must also be configured.
To create a cloud storage device for Oracle Cloud Infrastructure using the Web tool:
1. Perform the steps in "Displaying the Defined Cloud Storage Devices".
Chapter 7Configuring Cloud Storage Devices
7-49
The Configure: Devices page appears.
2. Click Add.
The Configure: Devices > New Device page appears.
3. In the Device field, enter a name for the cloud storage device.
The name must start with an alphanumeric character and be unique across theadministrative domain. It can contain letters, numerals, dashes, underscores, orperiods. It cannot contain spaces. The maximum character length is 127characters.
4. In the Type field, select cloudstorage.
5. In the Status field, specify if the cloud storage device is available for backup orrestore operations by selecting one of the following options:
• in service
Indicates that the cloud storage device is available to perform Oracle SecureBackup backup and restore operations.
• not in service
Indicates that the cloud storage device is unavailable to perform OracleSecure Backup backup and restore operations.
• auto not in service
Indicates an error in the cloud storage device. Do not select this option duringconfiguration.
6. In the Debug mode field, select yes or no. The default is no.
7. In the Service Type field, select oci.
8. In the Authentication Object field, select the authentication object that containsthe information required to authenticate Oracle Secure Backup with Oracle CloudInfrastructure.
The authentication object is created as described in Configuring an AuthenticationObject for Oracle Cloud Infrastructure.
9. In the Compartment field, enter the name of the compartment that contains thebucket in which the backed up data will be stored.
10. In the Mediaserver field, specify the name of the attached media server to whichthis cloud device must be attached.
11. In the Storage class field, select archive, object, or infrequent access.
12. In the Capacity field, specify a value that represents the space allocated to thecloud storage device. Select one of the following to specify the unit of storagespace: KB, MB, GB, TB, PB, or EB. Leave the default value of (not set) to indicatethat no maximum capacity is specified for this cloud storage device. In this case,the capacity of the cloud storage device is limited by the storage capacity youpurchased or that was assigned by the account administrator.
If the space occupied by backups on the cloud storage device exceeds thecapacity specified, then Oracle Secure Backup does not schedule new jobs for thiscloud storage device until the space utilization drops to below the specifiedcapacity.
Chapter 7Configuring Cloud Storage Devices
7-50

13. In the Segment size field, enter the size of the object. (Oracle Secure Backup storeseach backup image by splitting it into multiple segments and storing each segment as asingle object in the container.)
14. In the Streams per job field, enter the number of connections to Oracle CloudInfrastructure that Oracle Secure Backup can make per job. Alternatively, you can checkthe box for streams per job system default, which is 4.
15. In the Concurrent Jobs field, specify the number of jobs that can be run concurrently forthis cloud storage device.
This property enables you to control the concurrent usage of cloud storage devices. Thejobs include backup jobs, restore jobs, and media management jobs.
16. In the Blocking factor field, the value you enter defines the block transfer size from theclient to the media server. Increasing this value may improve backup performance. Thedefault value is 128.
See Also:
Oracle Secure Backup Administrator's Guide for information about blockingfactor and maximum blocking factor
17. In the Max blocking factor field, enter a value for the maximum blocking factor for thecloud storage device.
The largest value supported for the maximum blocking factor is 4096. This represents amaximum block size of 2MB.
18. In the Free space goal percentage field, select system default or any value between1-100.
The free space goal percentage is the percentage of free space that Oracle SecureBackup maintains in a cloud storage device. Before scheduling a backup or restore jobfor a cloud storage device, the Oracle Secure Backup scheduler checks the cloudstorage device utilization. If the amount of free space is lower than the specified freespace goal percentage, then expired backup image instances are deleted.
19. In the Force field, check the box to force association of the device with an existingcontainer created by Oracle Secure Backup.
20. In the Enable Checksum field, select one of the following options:
• system default
Uses the setting specified by the Enable cloud checksum device policy todetermine if a checksum must be computed for backup image instances. This is thedefault setting.
• yes
Computes a checksum for the all backup image instances that are written to thisCloud storage device. The checksum is stored as part of the backup metadata.
• no
Does not compute or store a checksum for the backup image instances that arewritten to this Cloud storage device.
21. Click OK to create the cloud storage device.
Chapter 7Configuring Cloud Storage Devices
7-51
22. After the cloud storage device is created, it should be pinged. To do so, select thedevice from the Configure: Devices page and click on ping.
Creating Cloud Storage Devices for Oracle Cloud InfrastructureClassic
Use the mkdev command or the Oracle Secure Backup web tool to create a new cloudstorage device for Oracle Cloud Infrastructure Classic. You must have the managedevices and change device state rights to create cloud storage devices.
To create a cloud storage device using the Web tool:
1. Perform the steps in "Displaying the Defined Cloud Storage Devices".
The Configure: Devices page appears.
2. Click Add.
The Configure: Devices > New Device page appears.
3. In the Device field, enter a name for the cloud storage device.
The name must start with an alphanumeric character and be unique across theadministrative domain. It can contain letters, numerals, dashes, underscores, orperiods. It cannot contain spaces. The maximum character length is 127characters.
4. In the Type field, select cloudstorage.
5. In the Status field, specify if the cloud storage device is available for backup orrestore operations by selecting one of the following options:
• in service
Indicates that the cloud storage device is available to perform Oracle SecureBackup backup and restore operations.
• not in service
Indicates that the cloud storage device is unavailable to perform OracleSecure Backup backup and restore operations.
6. In the Debug mode field, select yes or no. The default is no.
7. In the Service Type field, select oci-classic.
8. In the Authentication Object field, select the authentication object that containsthe information required to authenticate Oracle Secure Backup with Oracle CloudInfrastructure Classic.
The authentication object is created as described in Configuring an AuthenticationObject for Oracle Cloud Infrastructure.
9. In the Mediaserver field, specify the name of the attached media server.
10. In the Storage class field, select archive or object.
11. In the Capacity field, specify a value that represents the space allocated to thecloud storage device. Select one of the following to specify the unit of storagespace: KB, MB, GB, TB, PB, or EB. Leave the default value of (not set) to indicatethat no maximum capacity is specified for this cloud storage device. In this case,
Chapter 7Configuring Cloud Storage Devices
7-52
the capacity of the cloud storage device is limited by the storage capacity you purchasedor that was assigned by the account administrator.
If the space occupied by backups on the cloud storage device exceeds the capacityspecified, then Oracle Secure Backup does not schedule new jobs for this cloud storagedevice until the space utilization drops to below the specified capacity.
12. In the Username field, enter the user name of the cloud account. Specifying a user nameis not required if you selected an authentication object.
13. In the Password field, enter the password. In the Verify password field, enter thepassword again. Specifying a password is not required if you selected an authenticationobject.
14. In the Container field, enter the name of the container. Oracle Secure Backup creates anew container in Oracle Cloud Infrastructure Object Storage Classic with the name youspecify. You cannot specify an already existing name unless you also specify the --force option. Oracle Secure Backup does not support the use of existing containers thatwere not created by Oracle Secure Backup.
15. In the Segment size field, enter the size of the object. (Oracle Secure Backup stores eachbackup image by splitting it into multiple segments and storing each segment as a singleobject in the container.)
16. In the Streams per job field, enter the number of connections to Oracle CloudInfrastructure that Oracle Secure Backup can make per job. Alternatively, you can checkthe box for streams per job system default, which is 4.
17. In the Concurrent Jobs field, specify the number of jobs that can be run concurrently forthis cloud storage device.
This property enables you to control the concurrent usage of cloud storage devices. Thejobs include backup jobs, restore jobs, and media management jobs.
18. In the Blocking factor field, the value you enter defines the block transfer size from theclient to the media server. Increasing this value may improve backup performance. Thedefault value is 128.
See Also:
Oracle Secure Backup Administrator's Guide for information about blockingfactor and maximum blocking factor
19. In the Max blocking factor field, enter a value for the maximum blocking factor for thecloud storage device.
The largest value supported for the maximum blocking factor is 4096. This represents amaximum block size of 2MB.
20. In the Free space goal percentage field, select system default or any value between1-100.
The free space goal percentage is the percentage of free space that Oracle SecureBackup maintains in a cloud storage device. Before scheduling a backup or restore jobfor a cloud storage device, the Oracle Secure Backup scheduler checks the cloudstorage device utilization. If the amount of free space is lower than the specified freespace goal percentage, then expired backup image instances are deleted.
21. In the URL field, specify the endpoint URL provided by Oracle Cloud Storage Service.This step is optional if you specified an authentication object. The endpoint URL is
Chapter 7Configuring Cloud Storage Devices
7-53
usually the following, where identity_domain_name is replaced with the name ofan actual identity domain:
identity_domain_name.storage.oraclecloud.com22. In the Identity domain field, specify the identity domain. The identity domain is a
construct for managing certain features of Oracle Cloud Infrastructure.
23. In the Force field, check the box to force association of the device with an existingcontainer created by Oracle Secure Backup.
24. In the Enable Checksum field, select one of the following options:
• system default
Uses the setting specified by the Enable cloud checksum device policy todetermine if a checksum must be computed for backup image instances. Thisis the default setting.
• yes
Computes a checksum for the all backup image instances that are written tothis Cloud storage device. The checksum is stored as part of the backupmetadata.
• no
Does not compute or store a checksum for the backup image instances thatare written to this Cloud storage device.
25. Click OK to create the cloud storage device.
26. After the cloud storage device is created, it should be pinged. To do so, select thedevice from the Configure: Devices page and click on ping.
Displaying the Defined Cloud Storage DevicesYou must have the query and display information about devices right to displaycloud storage devices.
To display the list of currently defined cloud storage devices using the Web tool:
1. On the Oracle Secure Backup Web tool Home page, click Configure.
2. In the Basic section, click Devices.
3. The Configure: Devices page is displayed. It lists all the currently-defined backupcontainers. The details displayed for each backup container are the type of device,status, and device name.
Editing Cloud Storage Device PropertiesYou can use the Web tool to edit properties of cloud storage devices. You must havethe manage devices and change device state rights to edit properties.
Using the Web tool to edit cloud storage device properties
1. Perform the steps in "Displaying the Defined Cloud Storage Devices".
The Configure: Devices page appears. The currently configured devices are listedon this page.
Chapter 7Configuring Cloud Storage Devices
7-54

2. Select the cloud storage device whose properties need to be edited and click Edit.
The Configure: Device > cloud_storage_device_name page is displayed.
3. Modify the required cloud storage device properties. Neither the container name nor thestorage class can be modified.
4. Click Save to commit the changes.
Renaming Cloud Storage DevicesYou must have the manage devices and change device state right to rename cloud storagedevices.
Using the Web tool to rename a cloud storage device
1. Perform the steps in "Displaying the Defined Cloud Storage Devices".
The Configure: Devices page appears. The currently configured devices, tape devices,and disk pools, are listed on this page.
2. Select the cloud storage device that you want to rename and click Rename.
3. In the Rename device_name to field, enter the new name of the cloud storage device.
Removing Cloud Storage DevicesYou need the manage devices and change device state rights to remove cloud storagedevice.
Using the Web tool to remove a cloud storage device
1. Perform the steps in "Displaying the Defined Cloud Storage Devices".
The Configure: Devices page appears. The currently configured devices, tape devicesand disk pools, are listed on this page.
2. Select the cloud storage device to be removed and click Remove.
A prompt is displayed asking if you want to delete all backup image instances for thedevice that is being removed.
3. To delete all backup image instances stored on the selected device, select Yes.
To retain the backup image instances stored on the selected device, select No.
A prompt is displayed asking if you want to force a delete of backup image instanceseven if they are unexpired.
4. Click Yes to force a delete of backup image instances on the selected device. Click No toretain all backup image instances.
5. On the Configure: Device Remove Summary page, a confirmation is displayed asking ifyou want to remove the device. Click Yes.
About Cloud CertificatesOracle Secure Backup uses a Cloud server CA certificate to make an SSL connection to theOracle Cloud server. Every region in the Cloud has specific certificates.
Oracle Secure Backup installation creates a Cloud wallet in Oracle Secure Backup Home andpopulates the wallet with default certificates. A Cloud wallet can contain multiple certificates.
Chapter 7Configuring Cloud Storage Devices
7-55
In certain situations, it may be required to add a new Cloud certificate to the OracleSecure Backup Cloud Wallet. For example, Oracle Cloud Infrastructure publishes anew certificate for connecting to the Cloud.
Oracle Secure Backup does not add new certificates automatically to the Cloud wallet.
This section contains the following topics:
• Adding Certificates to the Cloud Wallet
• Manually Creating a Cloud Wallet
Adding Certificates to the Cloud WalletAdd new certificates to the existing Cloud wallet, keeping the old certificates in thewallet intact.
Adding a new certificate to the wallet can resolve the ORA-29024: Certificatevalidation failure error.
Note:
Add the new certificate to the Cloud wallet on the Oracle Secure Backup administrative server and on all media servers in the domain.
To add a new certificate to the Cloud wallet:
1. Download a Cloud server Certification Authority (CA) certificate.
2. Import the certificate into the Cloud wallet.
Download a Cloud server CA certificateUse the following steps to download the required certificate.
1. Determine the Oracle Cloud Infrastructure Object Storage’s Region Identifier.
a. Log on to the Oracle Cloud Infrastructure Console.
b. Click the Region Name in the top control bar.
c. Select Manage Regions from the drop-down menu.
The Infrastructure page displays a list of regions and their Region Identifiers.
d. Use the region-identifier for the region where the object storage bucket islocated.
2. Open a web browser and go to the following URL.
https://objectstorage.region_identifier.oraclecloud.com
Replace the region_identifier with the Region Identifier from the previous step.
Chapter 7Configuring Cloud Storage Devices
7-56
Note:
In this example, the region_identifier is "us-phoenix-1".
https://objectstorage.us-phoenix-1.oraclecloud.com
Each browser, on each platform operating system, displays a slightly different message.The example below is from Firefox on a Windows 10 platform.
code: "NotFound"message: "Not Found"
3. Click the security icon (padlock) located on the left side of the address bar. It opens adrop-down to display site information.
4. Click Connection secure. It opens a drop-down to display the connection securityinformation for the site.
5. Click More Information.
It opens the Certificate Property page, which contains three tabs - General, Media, andSecurity. The Certificate Property page displays the Security tab by default.
6. On the Security tab, click the View Certificate button. It opens a Certificate page withthree certificate names on top.
7. Click the root certificate name to open the root certificate tab. It highlights the rootcertificate name.
Note:
In this example, the root certificate name is "DigiCert Global Root G2".
8. On the root certificate tab, scroll down to the Download link. Under Miscellaneous, itcontains two links, "PEM (cert)" and "PEM (chain)".
Click on the PEM (cert) link to download the certificate. In this example, the file name ofthe certificate is objectstorage-us-phoenix-1-oraclecloud-com.pem.
Note:
While downloading the certificate in Firefox, it populates the file nameautomatically and saves the certificate in *.PEM format. If you use MicrosoftEdge, it prompts you to provide a file name for the certificate. In Microsoft Edge,export the certificate file as "Base-64 encoded X.509 (.CER)"
9. Follow the download wizard and save the PEM (cert) file on your host, for example,the /tmp location.
You can now import this downloaded certificate to the Cloud wallet.
Store this certificate file on the Oracle Secure Backup administrative server and on all mediaservers in the domain.
Chapter 7Configuring Cloud Storage Devices
7-57
Import Certificate into the Cloud walletAdd new certificates to the Cloud wallet in the Oracle Secure Backup Home.
To add a certificate to the cloud wallet:
1. Import the certificate into the Cloud wallet using the Oracle Secure Backup obcmtool.
#obcm wallet --cloudwallet --add /tmp/objectstorage-us-phoenix-1-oraclecloud-com.pemTrust point has been imported into wallet.
Note:
In this example, the certificate file name is "objectstorage-us-phoenix-1-oraclecloud-com.pem".
2. Verify that the Cloud wallet displays the newly added certificate.
# obcm display --cloudwallet –v
Example output:
The output displays the new trust points in the wallet with the CN of thedownloaded certificate.
Trust point: DN: CN=DigiCert Global Root G2,OU=www.digicert.com,O=DigiCert Inc,C=US Issuer: CN=DigiCert Global Root G2,OU=www.digicert.com,O=DigiCert Inc,C=US Type: NZDST_CLEAR_PTP Public key size: 2048 Key usage: CA CERT SIGNING Serial number: 0x033AF1E6A711A9A0BB2864B11D09FAE5 Version: NZTTVERSION_X509v3 Signature algorithm: NZDCATSHA256RSA Valid from: 2013/08/01.12:00:00 (UTC) Valid to: 2038/01/15.12:00:00 (UTC)
Note:
Add the new certificate to the Cloud wallet on the Oracle Secure Backupadministrative server and on all media servers in the domain.
Chapter 7Configuring Cloud Storage Devices
7-58
Manually Creating a Cloud WalletOracle Secure Backup installation creates a Cloud Wallet automatically in the Oracle SecureBackup Home.
However, you can manually create a new Cloud Wallet with the obcm utility. When you createa new Cloud Wallet manually, Oracle Secure Backup creates an empty wallet without anycertificates.
WARNING:
Manually creating a new Cloud wallet deletes the old wallet and removes all theexisting certificates stored in it. It is not recommended to create a Cloud walletmanually.
To manually create a Cloud wallet:
1. Run the obcm utility.
# obcm wallet --create –-cloudwalletWallet has been created.
2. Display the newly created wallet.
# obcm display –cloudwallet –vThere are 0 certificate requests in the walletThere are 0 certificates in the walletThere are 0 trust points in the wallet
A new Cloud wallet contains no certificates or trust points.
Note:
Oracle Secure Backup requires a Cloud Wallet on the administrative server and onall media servers in the domain.
Chapter 7Configuring Cloud Storage Devices
7-59
8Upgrading Oracle Secure Backup
This chapter explains how to upgrade Oracle Secure Backup.
This chapter contains the following sections:
• About Upgrade Installations
• Upgrade Installation on Windows x64
• Performing an Upgrade Installation on Linux or UNIX
About Upgrade InstallationsIn an upgrade installation, the Oracle Secure Backup catalogs (contained in the admindirectory) are preserved, retaining configuration information and backup metadata for youradministrative domain. This state information for your administrative domain, such as thebackup catalog, host, user and device configuration information, and any scheduled backupjobs, is stored in the admin directory under the Oracle Secure Backup home on youradministrative server.
Note:
Oracle recommends backing up the administrative server before upgrading.
Before upgrading an existing administrative domain to Oracle Secure Backup 18.1, you mustshut down drivers and background processes related to Oracle Secure Backup on all hosts.Upgrade the administrative server host first, and then the other hosts in the domain.
Brief instructions on each step are described in the following sections.
About Upgrade RequirementsYou can upgrade only Oracle Secure Backup 12.1 or Oracle Secure Backup 12.2 to OracleSecure Backup 18.1. If you are using an earlier version, then you must upgrade to OracleSecure Backup 12.1.0.2 prior to upgrading to Oracle Secure Backup 18.1.
If your backup domain is currently running Oracle Secure Backup version 10.4.0.4 or earlier,the backup domain administrator must run obcm recertifydomain after upgrading to OracleSecure Backup 12.1.0.2. See Renewing Certificates in Automated Certificate ProvisioningMode for information about renewing certificates using the obcm recertifydomain command.
Oracle Secure Backup 18.1 is backward compatible with Oracle Secure Backup 12.2 andOracle Secure Backup 12.1 clients. Oracle Secure Backup 18.1 supports Oracle SecureBackup 12.2 and Oracle Secure Backup 12.1 features and is interoperable with theirfunctionality.
8-1

Keep the following requirements in mind while performing an upgrade to OracleSecure Backup 18.1:
• Ensure that the platform that you plan to upgrade to Oracle Secure Backup 18.1 issupported, prior to performing the upgrade. If you attempt to upgrade OracleSecure Backup on an unsupported platform, it reports an error and exits.
See Also:
"Supported Platforms and Tape Devices" for more information on OracleSecure Backup supported platforms
• Prior to upgrading the administrative server, confirm that the backup domain is notin the midst of backing up any hosts.
• Ensure that the media servers and the clients are out of service prior to performingthe upgrade.
• The installer preserves the role of each host during the upgrade process.
• Oracle Secure Backup policy settings are retained during the upgrade process.
Upgrade Installation on Windows x64You can upgrade your Windows 64-bit administrative server, media servers, andclients to Oracle Secure Backup 18.1 by running the Oracle Secure Backup 18.1installer. The installer detects the existing installation of Oracle Secure Backup andruns the uninstaller for the previous version automatically before beginning theinstallation of Oracle Secure Backup 18.1.
The uninstaller displays the following prompt:
This system was configured as an Oracle Secure Backup Administrative Server.
Oracle Secure Backup creates files specific to this administrative domain in the "admin" directory. Would you like to keep these files in case you reinstall Oracle Secure Backup?
If you choose "Delete" all files related to Oracle Secure Backup will be removed from this system. If you choose "Keep" the files specific to this administrative domain will be retained.
You must choose the Keep option for the admin directory files. Selecting the Deleteoption causes the installation to be incomplete, and then you must uninstall andreinstall Oracle Secure Backup to complete the installation. If you do not want to savethe existing admin directory files, then you must exit the installation, uninstall theexisting version of Oracle Secure Backup and select the Delete option. After you haveuninstalled the existing version of Oracle Secure Backup, you can install OracleSecure Backup 18.1 by running the Oracle Secure Backup 18.1 installer.
You can use the following procedure to upgrade a Windows x64 administrative serveror client:
1. Uninstall the existing Oracle Secure Backup software, selecting the Keep option.
Chapter 8Upgrade Installation on Windows x64
8-2
See Also:
• "Uninstalling Oracle Secure Backup on Windows"
2. Run the Oracle Secure Backup 12.2 installer.
Under some circumstances (usually on a media server), it may be necessary to reboot thehost. The 12.2 installer will notify if a reboot is required and the install will not proceed untilthe host is rebooted.
Performing an Upgrade Installation on Linux or UNIXThis section contains the recommended process for upgrading an Oracle Secure Backupinstallation on Linux or UNIX.
See Also:
"About Upgrade Requirements"
To upgrade Oracle Secure Backup on Linux or UNIX:
1. Uninstall Oracle Secure Backup 10.4 or 12.x from your system.
When uninstalling an administrative server, select y to remove the Oracle Secure Backupdirectory and select y when prompted to save the administrative directory.
See Also:
" Uninstalling Oracle Secure Backup "
2. Run the setup scripts for 18.1 from the new CD-ROM.
Chapter 8Performing an Upgrade Installation on Linux or UNIX
8-3
9Managing Security for Backup Networks
This chapter describes how to make your backup network more secure. Oracle SecureBackup is automatically configured for network security in your administrative domain, butyou can enhance that basic level of security in several ways. Secure communications amongthe nodes of your administrative domain concerns the encryption of network traffic amongyour hosts. Secure communications is distinct from Oracle Secure Backup user and rolessecurity concerns and security addressed by the encryption of backups to tape.
See Also:
Oracle Secure Backup Administrator's Guide for more information on users androles management and backup encryption
This chapter contains these sections:
• Backup Network Security Overview
• Planning Security for an Administrative Domain
• Trusted Hosts
• Host Authentication and Communication
• Encryption of Data in Transit
• Default Security Configuration
• Configuring Security for the Administrative Domain
• Managing Certificates with obcm
Backup Network Security OverviewAn Oracle Secure Backup administrative domain is a network of hosts. Any such network hasa level of vulnerability to malicious attacks. The task of the security administrator is to learnthe types of possible attacks and techniques to guard against them. Your backup networkmust meet the following requirements to be both useful and secure:
• Software components must not expose the hosts they run on to attack.
For example, daemons should be prevented from listening on a well-known port andperforming arbitrary privileged operations.
• Data managed by the backup software must not be viewable, erasable, or modifiable byunauthorized users.
• Backup software must permit authorized users to perform these tasks.
Oracle Secure Backup meets these requirements in its default configuration. By default, allhosts that run Oracle Secure Backup must have their identity verified before they can join theadministrative domain. A host within the domain uses an X.509 certificate for host
9-1

authentication. After a Secure Sockets Layer (SSL) connection is established betweenhosts, control and data messages are encrypted when transmitted over the network.SSL protects the administrative domain from eavesdropping, message tampering orforgery, and replay attacks.
Network backup software such as Oracle Secure Backup is only one component of asecure backup network. Oracle Secure Backup can supplement but not replace thephysical and network security provided by administrators.
Planning Security for an Administrative DomainIf security is of primary concern in your environment, then you might find it helpful toplan for network security in the following stages:
• Identifying Assets and Principals
• Identifying Your Backup Environment Type
• Choosing Secure Hosts for the Administrative and Media Servers
• Determining the Distribution Method of Host Identity Certificates
After completing these stages, you can proceed to the implementation phase asdescribed in "Configuring Security for the Administrative Domain".
Identifying Assets and PrincipalsThe first step in planning security for an administrative domain is determining theassets and principals associated with the domain. The assets of the domain include:
• Database and file-system data requiring backup
• Metadata about the database and file-system data
• Passwords
• Identities
• Hosts and storage devices
Principals are users who either have access to the assets associated with theadministrative domain or to a larger network that contains the domain. Principalsinclude the following users:
• Backup administrators
These Oracle Secure Backup users have administrative rights in the domain,access to the tapes containing backup data, and the rights required to performbackup and restore operations.
• Database administrators
Each database administrator has complete access to his or her own database.
• Host owners
Each host owner has complete access to its file system.
• System administrators
These users might have access to the corporate network and to the hosts in theadministrative domain (although not necessarily root access).
• Onlookers
Chapter 9Planning Security for an Administrative Domain
9-2
These users do not fall into any of the preceding categories of principals, but can accessa larger network that contains the Oracle Secure Backup domain. Onlookers might own ahost outside the domain.
The relationships between assets and principals partially determine the level of security in theOracle Secure Backup administrative domain:
• In the highest level of security, the only principal with access to an asset is the owner. Forexample, only the owner of a client host can read or modify data from this host.
• In a medium level of security, the asset owner and the administrator of the domain bothhave access to the asset.
• In the lowest level of security, any principal can access any asset in the domain.
Identifying Your Backup Environment TypeAfter you have identified the assets and principals involved in your administrative domain,you can characterize the type of environment in which you are deploying the domain. Thetype of environment partially determines which security model to use.
The following criteria partially distinguish types of network environments:
• Scale
The number of assets and principals associated with a domain plays an important role indomain security. A network that includes 1000 hosts and 2000 users has more points ofentry for an attacker than a network of 5 hosts and 2 users.
• Sensitivity of data
The sensitivity of data is measured by how dangerous it would be for the data to beaccessed by a malicious user. For example, the home directory on a rank-and-filecorporate employee's host is presumably less sensitive than a credit card company'ssubscriber data.
• Isolation of communication medium
The security of a network is contingent on the accessibility of network communicationsamong hosts and devices in the domain. A private, corporate data center is more isolatedin this sense than an entire corporate network.
The following sections describe types of network environments in which Oracle SecureBackup administrative domains are typically deployed. The sections also describe thesecurity model typical for each environment.
Single SystemThe most basic administrative domain is illustrated in Figure 9-1. It consists of an administrative server, media server, and client on a single host.
Chapter 9Planning Security for an Administrative Domain
9-3

Figure 9-1 Administrative Domain with One Host
Ta
pe
�L
ibra
ry
Ta
pe
. . .
. . .
. . .
. . .
. . .
. . .
. . .
. . .
. . .
. . .
Off
sit
e�
Sto
rag
e
Re
sto
re
Ba
cku
p
Ora
cle
�D
ata
ba
se
Lin
ux
Re
co
ve
ry �
Ma
na
ge
r
Ad
min
istr
ati
ve
Se
rve
r,
Me
dia
Se
rve
r, a
nd
Cli
en
t
This type of environment is small and isolated from the wider network. The data in thisnetwork type is probably on the low end of the sensitivity range. For example, thedomain might consist of a server used to host personal Web sites within a corporatenetwork.
The assets include only a host and a tape device. The users probably include only thebackup administrator and system administrator, who might be the same person. Thebackup administrator is the administrative user of the Oracle Secure Backup domainand is in charge of backups on the domain. The system administrator manages thehosts, tape devices, and networks used by the domain.
In this network type, the domain is fairly secure because it has one isolated hostaccessed by only a few trusted users. The administrator of the domain would probablynot make security administration a primary concern, and the backup administratorcould reasonably expect almost no overhead for maintaining and administeringsecurity in the Oracle Secure Backup domain.
Data CenterThe administrative domain illustrated in Figure 9-2 is of medium size and is deployedin a secure environment such as a data center.
Chapter 9Planning Security for an Administrative Domain
9-4
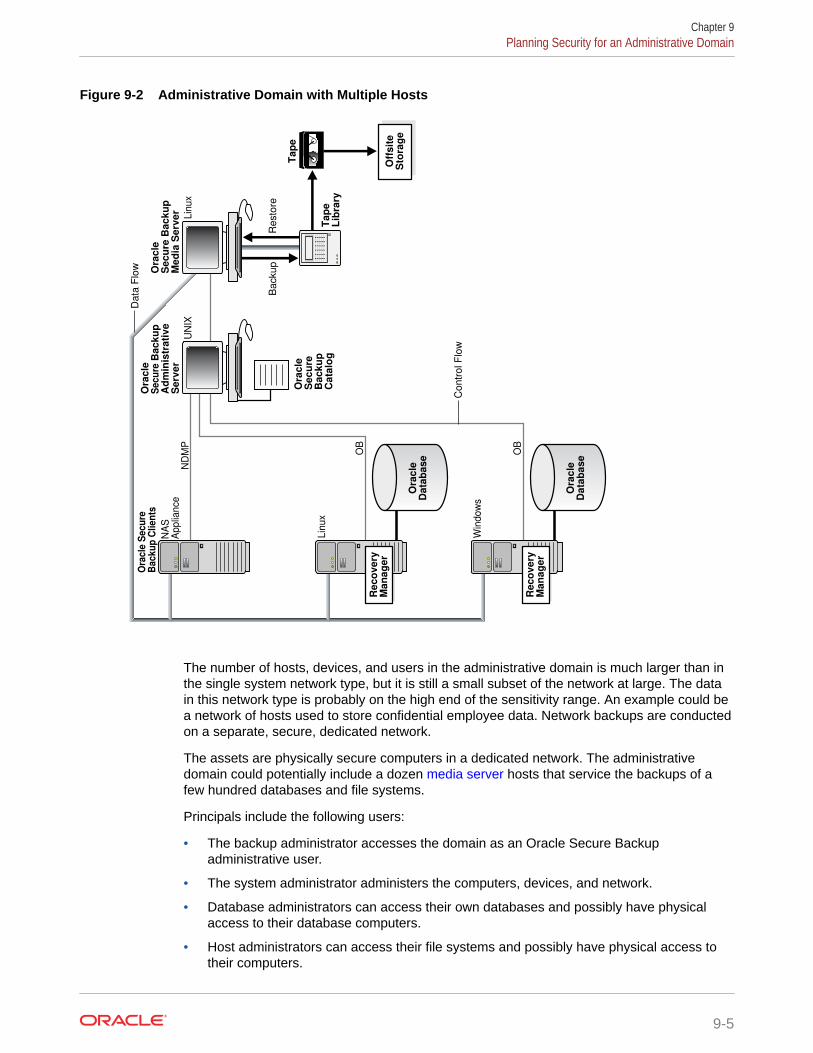
Figure 9-2 Administrative Domain with Multiple Hosts
Tap
e�
Lib
rary
Tap
e
. . .
. . .
. . .
. . .
. . .
. . .
. . .
. . .
. . .
. . .
Off
sit
e�
Sto
rag
e
Resto
reB
ackup
Ora
cle
�S
ecu
re B
acku
p�
Med
ia S
erv
er
Ora
cle
�
Se
cu
re B
acku
p�
Ad
min
istr
ati
ve �
Serv
er
Ora
cle
�D
ata
base
Ora
cle
�D
ata
base
Ora
cle
Se
cu
re
Ba
ck
up
Cli
en
ts
Data
Flo
w
Contr
ol F
low
Ora
cle
�S
ecu
re �
Backu
p�
Cata
log
ND
MP
OB
OB
NA
S�
Applia
nce
UN
IXLin
ux
Lin
ux
Win
dow
s
Reco
very
�M
an
ag
er
Reco
very
�M
an
ag
er
The number of hosts, devices, and users in the administrative domain is much larger than inthe single system network type, but it is still a small subset of the network at large. The datain this network type is probably on the high end of the sensitivity range. An example could bea network of hosts used to store confidential employee data. Network backups are conductedon a separate, secure, dedicated network.
The assets are physically secure computers in a dedicated network. The administrativedomain could potentially include a dozen media server hosts that service the backups of afew hundred databases and file systems.
Principals include the following users:
• The backup administrator accesses the domain as an Oracle Secure Backupadministrative user.
• The system administrator administers the computers, devices, and network.
• Database administrators can access their own databases and possibly have physicalaccess to their database computers.
• Host administrators can access their file systems and possibly have physical access totheir computers.
Chapter 9Planning Security for an Administrative Domain
9-5
As with the single system network type, the administrative domain exists in a networkenvironment that is secure. Administrators secure each host, tape device, and tapesby external means. Active attacks by a hacker are not likely. Administrators assumethat security maintenance and administration for the domain requires almost nooverhead. Backup and system administrators are primarily concerned with whetherOracle Secure Backup moves data between hosts efficiently.
Corporate NetworkIn this environment, multiple administrative domains, multiple media server hosts, andnumerous client hosts exist in a corporate network.
The number of hosts, devices, and users in the administrative domains is extremelylarge. Data backed up includes both highly sensitive data such as human resourcesinformation and less sensitive data such as the home directories of low-levelemployees. Backups probably occur on the same corporate network used for e-mail,and Internet access. The corporate network is protected by a firewall from the broaderInternet.
The assets include basically every piece of data and every computer in thecorporation. Each administrative domain can have multiple users. Some host ownerscan have their own Oracle Secure Backup account to initiate a restore of their filesystems or databases.
The security requirements for this backup environment are different from the singlesystem and data center examples. Given the scope and distribution of the network,compromised client hosts are highly likely. For example, someone could steal a laptopused on a business trip. Malicious employees could illicitly log in to computers or runtcpdump or similar utilities to listen to network traffic.
The compromise of a client host must not compromise an entire administrativedomain. A malicious user on a compromised computer must not be able to accessdata that was backed up by other users on other hosts. This user must also not beable to affect normal operation of the other hosts in the administrative domain.
Security administration and performance overhead is expected. Owners of sensitiveassets must encrypt their backups, so physical access to backup media does notreveal the backup contents. The encryption and decryption must be performed on theclient host itself, so sensitive data never leaves the host in unencrypted form.
Note:
Oracle Secure Backup offers an optional and highly configurable backupencryption mechanism that ensures that data stored on tape is safe fromprying eyes. Backup encryption is fully integrated with Oracle Secure Backupand is ready to use as soon as Oracle Secure Backup is installed. Backupencryption applies to both file-system data and Recovery Manager (RMAN)generated backups.
Chapter 9Planning Security for an Administrative Domain
9-6

Choosing Secure Hosts for the Administrative and Media ServersYour primary task when configuring security for your domain is providing physical andnetwork security for your hosts and determining which hosts should perform the administrative server and media server roles.
When choosing administrative and media servers, remember that a host should only be anadministrative or media server if it is protected by both physical and network security. Forexample, a host in a data center could be a candidate for an administrative server because itpresumably belongs to a private, secured network accessible to a few trusted administrators.
Oracle Secure Backup cannot itself provide physical or network security for any host norverify whether such security exists. For example, Oracle Secure Backup cannot stopmalicious users from performing the following illicit activities:
• Physically compromising a host
An attacker who gains physical access to a host can steal or destroy the primary orsecondary storage. For example, a thief could break into an office and steal servers andtapes. Encryption can reduce some threats to data, but not all. An attacker who gainsphysical access to the administrative server compromises the entire administrativedomain.
• Accessing the operating system of a host
Suppose an onlooker steals a password by observing the owner of a client host enteringhis or her password. This malicious user could telnet to this host and delete, replace, orcopy the data from primary storage. The most secure backup system in the world cannotprotect data from attackers if they can access the data in its original location.
• Infiltrating or eavesdropping on the network
Although backup software can in some instances communicate securely over insecurenetworks, it cannot always do so. Network security is an important part of a backupsystem, especially for communications based on Network Data Management Protocol(NDMP).
• Deliberately misusing an Oracle Secure Backup identity
If a person with Oracle Secure Backup administrator rights turns malicious, then he orshe can wreak havoc on the administrative domain. For example, he or she could overwrite the file system on every host in the domain. No backup software can force aperson always to behave in the best interests of your organization.
Determining the Distribution Method of Host Identity CertificatesAfter you have analyzed your backup environment and considered how to secure it, you candecide how each host in the domain obtains its identity certificate. Oracle Secure Backupuses Secure Sockets Layer (SSL) to establish a secure and trusted communication channelbetween domain hosts. Each host has an identity certificate signed by the CertificationAuthority (CA) that uniquely identifies this host within the domain. The identity certificate isrequired for authenticated SSL connections.
Chapter 9Planning Security for an Administrative Domain
9-7
See Also:
• "Host Authentication and Communication"
• "Certification Authority"
The administrative server of the administrative domain is the CA for the domain. Afteryou configure the administrative server, you can create each media server and client inthe domain in either of the following modes:
• automated certificate provisioning mode
In this case, no manual administration is required. When you configure the hosts,the CA issues identity certificates to the hosts over the network.
• manual certificate provisioning mode
In this case, you must manually import the identity certificate for each host into its wallet.
Automated mode is easier to use but is vulnerable to unlikely man-in-the-middleattacks in which an attacker steals the name of a host just before you invite it to jointhe domain. This attacker could use the stolen host identity to join the domain illicitly.Manual mode is more difficult to use than automated mode, but is not vulnerable to thesame kinds of attacks.
In manual mode, the administrative server does not transmit identity certificateresponses to the host. Instead, you must carry a copy of the signed identity certificateon physical media to the host and then use the obcm utility to import the certificate intothe wallet of the host. The obcm utility verifies that the certificate request in the walletmatches the signed identity certificate. A verification failure indicates that a rogue hostlikely attempted to masquerade as the host. You can reissue the mkhost commandafter the rogue host has been eliminated from the network.
See Also:
• "Managing Certificates with obcm"
• Oracle Secure Backup Reference for more information on the obcmutility
If you are considering manual certificate provisioning modes, then you must decide ifthe extra protection provided is worth the administrative overhead. Automated mode issafe in the single system and data center environments, because networkcommunications are usually isolated.
Automated mode is also safe in the vast majority of corporate network cases. Thecorporate network is vulnerable to man-in-the-middle attacks only if attackers caninsert themselves into the network between the administrative server and the hostbeing added. This is the only place they can intercept network traffic and act as theman in the middle. This is difficult without the assistance of a rogue employee.
Chapter 9Planning Security for an Administrative Domain
9-8
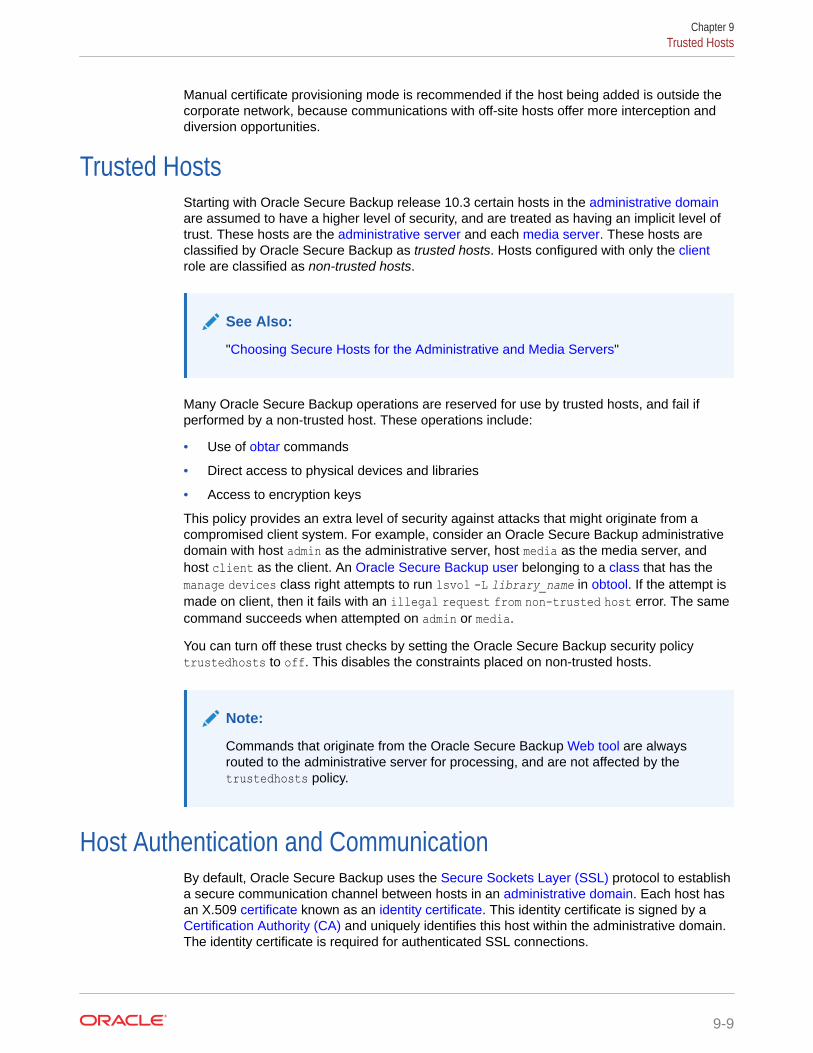
Manual certificate provisioning mode is recommended if the host being added is outside thecorporate network, because communications with off-site hosts offer more interception anddiversion opportunities.
Trusted HostsStarting with Oracle Secure Backup release 10.3 certain hosts in the administrative domainare assumed to have a higher level of security, and are treated as having an implicit level oftrust. These hosts are the administrative server and each media server. These hosts areclassified by Oracle Secure Backup as trusted hosts. Hosts configured with only the clientrole are classified as non-trusted hosts.
See Also:
"Choosing Secure Hosts for the Administrative and Media Servers"
Many Oracle Secure Backup operations are reserved for use by trusted hosts, and fail ifperformed by a non-trusted host. These operations include:
• Use of obtar commands
• Direct access to physical devices and libraries
• Access to encryption keys
This policy provides an extra level of security against attacks that might originate from acompromised client system. For example, consider an Oracle Secure Backup administrativedomain with host admin as the administrative server, host media as the media server, andhost client as the client. An Oracle Secure Backup user belonging to a class that has themanage devices class right attempts to run lsvol -L library_name in obtool. If the attempt ismade on client, then it fails with an illegal request from non-trusted host error. The samecommand succeeds when attempted on admin or media.
You can turn off these trust checks by setting the Oracle Secure Backup security policytrustedhosts to off. This disables the constraints placed on non-trusted hosts.
Note:
Commands that originate from the Oracle Secure Backup Web tool are alwaysrouted to the administrative server for processing, and are not affected by thetrustedhosts policy.
Host Authentication and CommunicationBy default, Oracle Secure Backup uses the Secure Sockets Layer (SSL) protocol to establisha secure communication channel between hosts in an administrative domain. Each host hasan X.509 certificate known as an identity certificate. This identity certificate is signed by a Certification Authority (CA) and uniquely identifies this host within the administrative domain.The identity certificate is required for authenticated SSL connections.
Chapter 9Trusted Hosts
9-9
Note:
Currently, the Network Data Management Protocol (NDMP) does not supportan SSL connection to a filer.
You can validate the authenticity of your domain by using the obtool –authenticatecommand. This command invokes obtool and requests for the domain credentials,before executing a command.
This section contains these topics:
• Identity Certificates and Public Key Cryptography
• Authenticated SSL Connections
• Certification Authority
• Oracle Wallet
• Web Server Authentication
• Revoking a Host Identity Certificate
Identity Certificates and Public Key CryptographyAn identity certificate has both a body and a digital signature. The contents of a certificate include the following:
• A public key
• The identity of the host
• What the host is authorized to do
Every host in the domain, including the administrative server, has a private key knownonly to that host that is stored with the host's identity certificate. This private keycorresponds to a public key that is made available to other hosts in the administrativedomain.
Any host in the domain can use a public key to send an encrypted message to anotherhost. But only the host with the corresponding private key can decrypt the message. Ahost can use its private key to attach a digital signature to the message. The hostcreates a digital signature by submitting the message as input to a cryptographic hashfunction and then encrypting the output hash with a private key.
The receiving host authenticates the digital signature by decrypting it with the sendinghost's public key. Afterwards, the receiving host decrypts the encrypted message withits private key, inputs the decrypted message to the same hash function used to createthe signature, and then compares the output hash to the decrypted signature. If thetwo hashes match, then the message has not been tampered with.
Figure 9-3 illustrates how host B can encrypt and sign a message to host A, which canin turn decrypt the message and verify the signature.
Chapter 9Host Authentication and Communication
9-10
Figure 9-3 Using Public and Private Keys to Encrypt and Sign Messages
Ve
rify
�S
ign
atu
re
Me
ss
ag
e�
Fro
m�
B t
o A
Pu
bli
c K
ey
�H
os
t B
De
cry
ptPri
va
te K
ey
�H
os
t A
Sig
n
Me
ss
ag
e�
Fro
m�
B t
o A
Pri
va
te K
ey
�H
os
t B
Ecry
ptP
ub
lic
Ke
y�
Ho
st
A
Ho
st
AH
os
t B
Authenticated SSL ConnectionsFor hosts to securely exchange control messages and backup data within the domain, theymust first authenticate themselves to one another. Host connections are always two-wayauthenticated except for the initial host invitation to join a domain and communication with Network Data Management Protocol (NDMP) servers.
In two-way authentication, the hosts participate in a handshake process whereby theymutually decide on a cipher suite to use, exchange identity certificates, and validate that eachother's identity certificate has been issued by a trusted Certification Authority (CA). At the endof this process, a secure and trusted communication channel is established for the exchangeof data.
The use of identity certificates and Secure Sockets Layer (SSL) prevents outside attackersfrom impersonating a client in the administrative domain and accessing backup data. Forexample, an outside attacker could not run an application on a non-domain host that sendsmessages to domain hosts that claim origin from a host within the domain.
Certification AuthorityThe service daemon (observiced) on the administrative server is the root CertificationAuthority (CA) of the administrative domain. The primary task of the CA is to issue and signan identity certificate for each host in the administrative domain. The CA's signing certificate,which it issues to itself and then signs, gives the CA the authority to sign identity certificatesfor hosts in the domain. The relationship of trust requires that all hosts in the administrativedomain can trust certificates issued by the CA.
Each host stores its own identity certificate and a trusted certificate (or set of certificates) thatestablishes a chain of trust to the CA. Like other hosts in the domain, the CA stores itsidentity certificate. The CA also maintains a signing certificate that authorizes the CA to signthe identity certificates for the other hosts in the domain.
For more information on managing CA, see Managing Certificates with obcm.
Automated and Manual Certificate Provisioning ModeOracle Secure Backup provides automated and manual modes for initializing the securitycredentials for a client host that wants to join the domain. The automated mode is easy touse, but it has potential security vulnerabilities. The manual mode is harder to use, but it isless vulnerable to tampering.
Chapter 9Host Authentication and Communication
9-11
In automated certificate provisioning mode, which is the default, adding a host to thedomain is transparent. The host generates a public key/private key pair and thensends a certificate request, which includes the public key, to the Certification Authority(CA). The CA issues the host an identity certificate, which it sends to the host alongwith any certificates required to establish a chain of trust to the CA.
The communication between the two hosts is over a secure but non-authenticated Secure Sockets Layer (SSL) connection. It is conceivable that a rogue host couldinsert itself into the network between the CA and the host, thereby masquerading asthe legitimate host and illegally entering the domain.
In manual certificate provisioning mode, the CA does not automatically transmitcertificate responses to the host.
To transfer the certificate:
1. Use the obcm utility to export a signed certificate from the CA.
2. Use a secure mechanism such as a floppy disk or USB key chain drive to transfera copy of the signed identity certificate from the CA to the host.
3. Use obcm on the host to import the transferred certificate into the host's wallet.The obcm utility verifies that the certificate request in the wallet matches thesigned identity certificate.
You must balance security and usability to determine which certificate provisioningmode is best for your administrative domain.
Oracle WalletOracle Secure Backup stores every certificate in an Oracle wallet. The wallet isrepresented on the operating system as a password-protected, encrypted file. Eachhost in the administrative domain has its own wallet in which it stores its identitycertificate, private key, and at least one trusted certificate. Oracle Secure Backup doesnot share its wallets with other Oracle products.
Besides maintaining its password-protected wallet, each host in the domain maintainsan obfuscated wallet. This version of the wallet does not require a password. Theobfuscated wallet, which is scrambled but not encrypted, enables the Oracle SecureBackup software to run without requiring a password during system startup.
Note:
To reduce risk of unauthorized access to obfuscated wallets, Oracle SecureBackup does not back them up. The obfuscated version of a wallet is namedcwallet.sso. By default, the wallet is located in /usr/etc/ob/wallet on Linuxand UNIX and C:\Program Files\Oracle\Backup\db\wallet on Windows.
The password for the password-protected wallet is generated by Oracle SecureBackup and not made available to the user. The password-protected wallet is notusually used after the security credentials for the host have been established, becausethe Oracle Secure Backup daemons use the obfuscated wallet.
Figure 9-4 illustrates the relationship between the certificate authority and other hostsin the domain.
Chapter 9Host Authentication and Communication
9-12

Figure 9-4 Oracle Wallets
SSL
Administrative
Server
(Host B)
Issues and Signs
Media
Server
or
Client
(Host A)
Chain of Trust
CertificationAuthority
observiced
Obfuscated
Wallet
Wallet
Host A Identity Certificate
Host A Private Key
Obfuscated
Wallet
Wallet
CA Signing Certificate
Host B Identity Certificate
Host B Private Key
Trusted Certificate from CA
Oracle Secure Backup Encryption WalletThe administrative server has a second wallet that is used to store the master keys thatencrypt secure data, such as the passwords for Network Data Management Protocol (NDMP)servers and the backup encryption key store. This wallet is separate from the wallet used fora host identity certificate. The key wallet is named ewallet.p12 and is located in OSB_HOME/admin/encryption/wallet.
It is a best practice to use Oracle Secure Backup catalog recovery to back up the wallet.
If you do not use Oracle Secure Backup catalog recovery to back up the wallet, then Oraclerecommends that the ewallet.p12 encryption wallet not be backed up on the same media as
Chapter 9Host Authentication and Communication
9-13
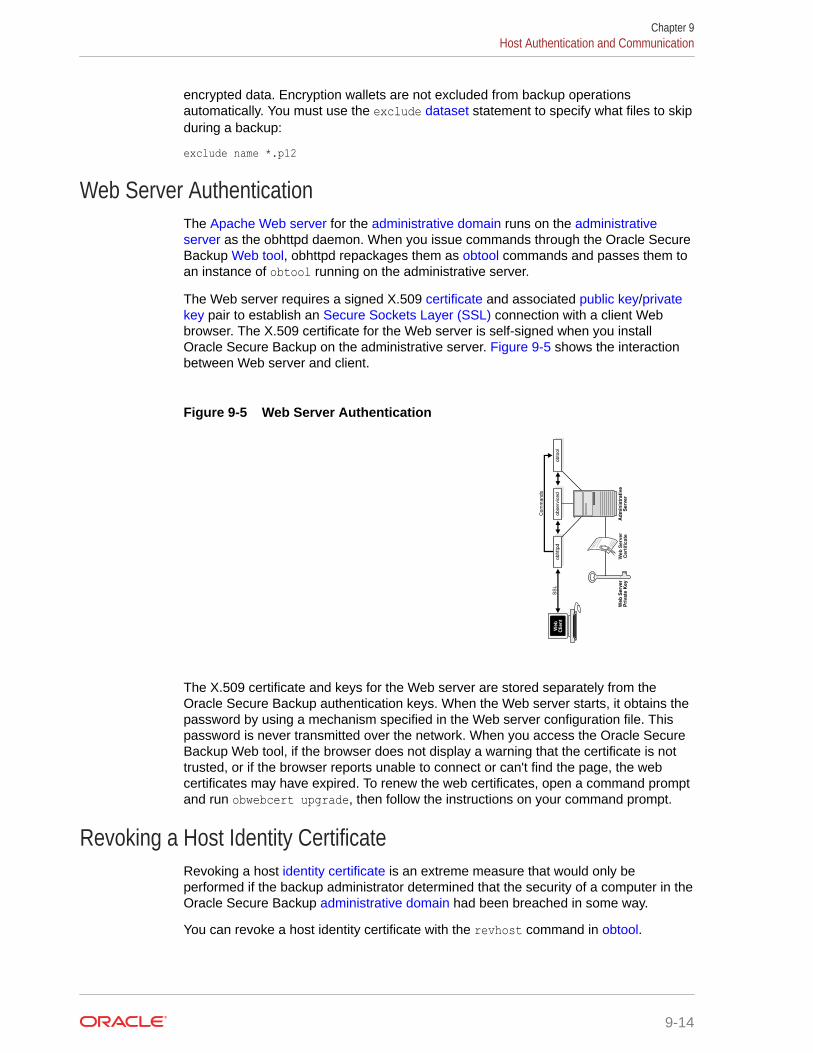
encrypted data. Encryption wallets are not excluded from backup operationsautomatically. You must use the exclude dataset statement to specify what files to skipduring a backup:
exclude name *.p12
Web Server AuthenticationThe Apache Web server for the administrative domain runs on the administrativeserver as the obhttpd daemon. When you issue commands through the Oracle SecureBackup Web tool, obhttpd repackages them as obtool commands and passes them toan instance of obtool running on the administrative server.
The Web server requires a signed X.509 certificate and associated public key/privatekey pair to establish an Secure Sockets Layer (SSL) connection with a client Webbrowser. The X.509 certificate for the Web server is self-signed when you installOracle Secure Backup on the administrative server. Figure 9-5 shows the interactionbetween Web server and client.
Figure 9-5 Web Server Authentication
SS
LW
eb
�C
lie
nt
observ
iced
obto
ol
obhttpd
Ad
min
istr
ati
ve
Serv
er
Web
Serv
er�
Cert
ific
ate
Web
Serv
er�
Pri
vate
Key
Com
mands
The X.509 certificate and keys for the Web server are stored separately from theOracle Secure Backup authentication keys. When the Web server starts, it obtains thepassword by using a mechanism specified in the Web server configuration file. Thispassword is never transmitted over the network. When you access the Oracle SecureBackup Web tool, if the browser does not display a warning that the certificate is nottrusted, or if the browser reports unable to connect or can't find the page, the webcertificates may have expired. To renew the web certificates, open a command promptand run obwebcert upgrade, then follow the instructions on your command prompt.
Revoking a Host Identity CertificateRevoking a host identity certificate is an extreme measure that would only beperformed if the backup administrator determined that the security of a computer in theOracle Secure Backup administrative domain had been breached in some way.
You can revoke a host identity certificate with the revhost command in obtool.
Chapter 9Host Authentication and Communication
9-14
See Also:
Oracle Secure Backup Reference for revhost syntax and semantics
If you revoke a host identity certificate, then none of the Oracle Secure Backup service daemons accept connections from that host. Revocation is not reversible. If you revoke ahost identity certificate and then change your mind, then you must reinstall the Oracle SecureBackup software on the affected host.
Encryption of Data in TransitFigure 1-2 illustrates the control flow and data flow within an administrative domain. Controlmessages exchanged by hosts in the administrative domain are encrypted by SecureSockets Layer (SSL).
Data flow in the domain includes both file-system and database backup data. To understandhow backup encryption affects data, it is helpful to distinguish between data at rest, which isbackup data that resides on media such as disk or tape, and data in transit, which is backupdata in the process of being transmitted over the network.
File-system backups and unencrypted RMAN backups on tape (data at rest) can beencrypted by Oracle Secure Backup. RMAN-encrypted backups made through the OracleSecure Backup SBT interface are supported, but the encryption is provided by RMAN beforethe backup is provided to the SBT interface. The Oracle Secure Backup SBT interface is theonly supported interface for making encrypted RMAN backups directly to tape.
See Also:
Oracle Secure Backup Administrator's Guide for more information on Oracle SecureBackup encryption
If you have selected RMAN or Oracle Secure Backup encryption, then Oracle Secure Backupdoes not apply additional encryption to data in transit within an administrative domain. If youhave not selected either RMAN encryption or Oracle Secure Backup encryption, then backupdata in transit, both file-system and database data, is not encrypted through SSL by default.To improve security, you can enable encryption for data in transit within the administrativedomain with the encryptdataintransit security policy.
To enable backup encryption in the encryptdataintransmit security policy:
1. Log in to obtool as a user with the modify administrative domain's configurationright.
2. Use the setp command to switch the encryptdataintransit policy to no, as shown inthe following example:
ob> cdp securityob> setp encryptdataintransit yes
Chapter 9Encryption of Data in Transit
9-15
See Also:
Oracle Secure Backup Reference for more information on theencryptdataintransit security policy
Suppose you want to back up data on client host client_host to a tape drive attachedto media server media_server. Data encryption depends on what encryption optionsyou choose and on what you are backing up, as shown in the following examples:
• Encrypted RMAN backup of a database on client_host.
RMAN encrypts the backup before it is provided to the SBT interface onclient_host. Oracle Secure Backup transfers the RMAN-encrypted data over thenetwork to media_server. Oracle Secure Backup does not apply additionalencryption to the data as it passes over the network. After Oracle Secure Backupwrites the data to tape, the data resides on tape in encrypted form.
• Unencrypted RMAN backup of a database on client_host.
Oracle Secure Backup does not encrypt the data before transferring it over thenetwork to media_server. After Oracle Secure Backup writes the data to tape, thedata resides on tape in unencrypted form.
• Unencrypted RMAN backup of a database on client_host withencryptdataintransit set to yes.
Oracle Secure Backup encrypts the data before transferring it over the network tomedia_server. The encrypted data is decrypted at media_server. After OracleSecure Backup writes the data to tape, the data resides on tape in unencryptedform.
• Encrypted Oracle Secure Backup backup of the file system on client_host.
Oracle Secure Backup transfers the encrypted backup data over the network tomedia_server. Oracle Secure Backup does not apply additional encryption to thedata as it passes over the network. After Oracle Secure Backup writes the data totape, the file-system data resides on tape in encrypted form.
• Unencrypted Oracle Secure Backup of the file system on client_host.
Oracle Secure Backup does not encrypt the data before transferring it over thenetwork to media_server. After Oracle Secure Backup writes the data to tape, thedata resides on tape in unencrypted form.
• Unencrypted Oracle Secure Backup of the file system on client_host withencryptdataintransit set to yes.
Oracle Secure Backup encrypts the data before transferring it over the network tomedia_server. The encrypted data is decrypted at media_server. After OracleSecure Backup writes the data to tape, the data resides on tape in unencryptedform.
See Also:
Oracle Database Backup and Recovery User’s Guide to learn aboutencryption of RMAN backups
Chapter 9Encryption of Data in Transit
9-16
Default Security ConfigurationWhen you install Oracle Secure Backup on the administrative server, the installation programconfigures the administrative server as the Certification Authority (CA) automatically. Bydefault, security for an administrative domain is configured as follows:
• Secure Sockets Layer (SSL) is used for host authentication and message integrity.
• The CA signs and issues the identity certificate for each domain host in automatedcertificate provisioning mode.
• The size of the public key and private key for every host in the domain is 3072 bits.
• Host communications within the domain are encrypted by SSL.
When you add hosts to the administrative domain, Oracle Secure Backup creates the wallet,keys, and certificates for each host when you create the hosts in obtool or the Oracle SecureBackup Web tool. No additional intervention or configuration is required.
You can also change the default configuration in any of the following ways:
• Disable SSL for inter-host authentication and communication by setting the securecommssecurity policy
• Transmit identity certificates in manual certificate provisioning mode
• Set the key size for a host to a value greater or less than the default of 3072 bits
• Enable encryption for backup data in transit by setting the encryptdataintransitsecurity policy
Configuring Security for the Administrative DomainThis section describes how to configure security for the administrative domain.
This section contains these topics:
• Providing Certificates for Hosts in the Administrative Domain
• Setting the Size for Public and Private Keys
• Enabling and Disabling SSL for Host Authentication and Communication
Providing Certificates for Hosts in the Administrative DomainProviding a certificate for each host in the Oracle Secure Backup administrative domainrequires that you first configure the administrative server and then configure each mediaserver and client.
Configuring the Administrative ServerIf you install Oracle Secure Backup on a host and specify this host as the administrativeserver, then this server is the Certification Authority (CA) for the Oracle Secure Backup administrative domain. Oracle Secure Backup configures the host as the CA automatically aspart of the standard installation. You are not required to take additional steps to provide asigning certificate for this server.
Oracle Secure Backup automatically creates the following items:
Chapter 9Default Security Configuration
9-17
• A host object corresponding to the administrative server in the object repository onthe administrative server.
• A wallet to contain the administrative server's certificates. The wallet resides in thedirectory tree of the Oracle Secure Backup home. Oracle Secure Backup uses thehost ID as the wallet password.
• A request for a signing certificate in the wallet.
• A signed certificate in response to the request and stores the certificate in thewallet.
• A request for an identity certificate in the wallet.
• A signed certificate in response to the request and stores it in the wallet.
• An obfuscated wallet in the local wallet directory.
The administrative server now has the signing certificate, which it must have to signthe identity certificates for other hosts, and its identity certificate, which it must have toestablish authenticated Secure Sockets Layer (SSL) connections with other hosts inthe domain.
Configuring Media Servers and ClientsOracle Secure Backup creates security credentials for a host when you use the OracleSecure Backup Web tool or run the mkhost command in obtool to configure the host.The procedure differs depending on whether you add hosts in automated or manualcertificate provisioning mode.
See Also:
"Determining the Distribution Method of Host Identity Certificates"
Automated Certificate Provisioning Mode
If you create the hosts in automated certificate provisioning mode, then you are notrequired to perform additional steps. Oracle Secure Backup creates the wallet, keys,and certificates for the host automatically as part of the normal host configuration.
Manual Certificate Provisioning Mode
You must use the obcm utility when you add hosts in the domain in manual rather than automated certificate provisioning mode. In this case, the certificate authority does notissue a signed certificate to a host over the network, so you must export the signedcertificate from the administrative server, manually transfer the certificate to the newlyconfigured host, and then import the certificate into the host's wallet.
Both an identity certificate and a wallet exist as files on the operating system. Theoperating system user running obcm must have write permissions in the walletdirectory. By default, the wallet used by Oracle Secure Backup is located in thefollowing locations:
• /usr/etc/ob/wallet (UNIX and Linux)
• C:\Program Files\Oracle\Backup\db\wallet (Windows)
Chapter 9Configuring Security for the Administrative Domain
9-18
The obcm utility always accesses the wallet in the preceding locations. You cannot overridethe default location.
If you choose to add hosts in manual certificate provisioning mode, then you must performthe following steps for each host:
1. Enter the following command to set the security policy autocertissue to No:
obtool setp security/autocertissue --no2. Log on to the administrative server.
3. Assuming that your PATH variable is set correctly, enter obcm at the operating systemcommand line to start the obcm utility. The operating system user running obcm musthave write permissions in the wallet directory.
4. Enter the following command, where hostname is the name of the host requesting thecertificate and certificate_file is the filename of the exported request:
export --certificate --file certificate_file --host hostname
For example, the following command exports the signed certificate for host brhost2 tofile /tmp/brhost2_cert.f:
export --certificate --file /tmp/brhost2_cert.f --host brhost25. Copy the signed identity certificate to some type of physical media and physically transfer
the media to the host.
6. Log on to the host whose wallet contains the certificate.
7. Assuming that your PATH variable is set correctly, enter obcm at the operating systemcommand line to start the obcm utility. The operating system user running obcm musthave write permissions in the wallet directory.
8. Copy the signed identity certificate to a temporary location on the file system.
9. Enter the following command at the obcm prompt, where signed_certificate_file isthe filename of the certificate:
import --file signed_certificate_file
Because only one Oracle Secure Backup wallet exists on the host, you are not requiredto specify the --host option. For example, the following example imports the certificatefrom /tmp/brhost2_cert.f:
import --file /tmp/brhost2_cert.f
The obcm utility issues an error message if the certificate being imported does notcorrespond to the certificate request in the wallet.
10. Remove the certificate file from its temporary location on the operating system. Forexample:
rm /tmp/brhost2_cert.f11. Enter the following command to reset the security policy:
obtool resetp security/autocertissueThe obcm utility checks that the public key associated with the certificate for the hostcorresponds to the private key stored in the wallet with the certificate request. If the keysmatch, then the host is a member of the domain. If the keys do not match, then an attackerprobably attempted to pass off their own host as the host during processing of the mkhost
Chapter 9Configuring Security for the Administrative Domain
9-19
command. You can run the mkhost command again after the rogue host has beeneliminated from the network.
Setting the Size for Public and Private KeysAs a general rule, the larger the sizes of the public key and the private key, the moresecure they are. On the other hand, the smaller the key, the better the performance.The default key size for all hosts in the domain is 3072 bits. If you accept this default,then you are not required to perform any additional configuration.
Oracle Secure Backup enables you to set the key to any of the following bit values,which are listed in descending order of security:
• 4096
• 3072
• 2048
• 1024
• 768
• 512
This section contains these topics:
• Setting the Key Size During Installation
• Setting the Key Size in the certkeysize Security Policy
• Setting the Key Size in mkhost
Setting the Key Size During InstallationThe key size in the security policy can be set when you install Oracle Secure Backupon the administrative server. Oracle Secure Backup uses the key size specified atinstallation time to set the initial value for the certkeysize security policy. This securitypolicy specifies the default security key size for hosts in the domain. You can changeor override this default when configuring an individual host.
The Oracle Secure Backup installer uses a default value for the key size. To modifythis default value, you must configure advanced installation settings during installation.
See Also:
• "Identity Key Certificate Length"
• "Specifying Advanced Settings for Linux/UNIX"
• "Configuring Advanced Installation Settings for Windows"
Chapter 9Configuring Security for the Administrative Domain
9-20
Setting the Key Size in the certkeysize Security PolicyYou can change the default certificate key size security policy at any time. This change willnot affect existing hosts. It will only affect new hosts added to the domain.
You can set the key size in the certkeysize security policy through obtool or the OracleSecure Backup Web tool. Oracle Secure Backup uses the modified key size the next timeyou configure a host. You can change the certkeysize value at any time, but the changeonly applies to the next mkhost command.
To set the certkeysize security policy:
1. Log in to obtool as a user with the modify administrative domain's configurationright.
2. Set the certkeysize policy to the desired default value. The following example showshow to use obtool to set the key size to 3072 bits:
ob> cdp securityob> setp certkeysize 3072
See Also:
Oracle Secure Backup Administrator's Guide to learn how to set a policy
Setting the Key Size in mkhostYou can override the default key size for any individual host. Different hosts in the domaincan have different key sizes.
You can set the key size when you use the mkhost command or Oracle Secure Backup Webtool to configure a host. If you specify the --certkeysize option on the mkhost command,then the specified value overrides the default certificate key size set in the security policy. Thekey size applies only to the newly configured host and does not affect the key size of anyother current or future hosts.
Because larger key sizes require more computation time to generate the key pair thansmaller key sizes, the key size setting can affect the processing time of the mkhost command.While the mkhost command is running, obtool might display a status message every 5seconds. obtool displays a command prompt when the process has completed.
To set the key size in the mkhost command:
1. Log in to obtool as a user with the modify administrative domain's configurationright.
2. Issue the mkhost command to set the key size for a host. The following example sets thekey size to 4096 bits when configuring client stadf56. This setting applies only to hoststadf56.
ob> mkhost --inservice --role client --certkeysize 4096 stadf56Info: waiting for host to update certification status...Info: waiting for host to update certification status...Info: waiting for host to update certification status...
Chapter 9Configuring Security for the Administrative Domain
9-21
Info: waiting for host to update certification status...ob> lshost stadf56stadf56 client (via OB) in service
See Also:
Oracle Secure Backup Reference to learn how to use the mkhost command
Enabling and Disabling SSL for Host Authentication andCommunication
By default Oracle Secure Backup uses authenticated and encrypted Secure SocketsLayer (SSL) connections for all control message traffic among hosts.
You can disable SSL encryption by setting the securecomms security policy to off.Disabling SSL might improve performance, but be aware of the inherent security risksin this action.
See Also:
"Host Authentication and Communication"
To set the securecomms security policy:
1. Log in to obtool as a user with the modify administrative domain'sconfiguration right.
2. Use the setp command to switch the securecomms policy to off, as shown in thefollowing example:
ob> cdp securityob> setp securecomms off
See Also:
Oracle Secure Backup Administrator's Guide to learn how to set a policy
Managing Certificates with obcmThis section explains how to use the obcm utility. You can use this utility to renewcertificates in either certification mode, import certificate chains, export certificatechains, and export certificate requests.
You must use obcm when you add hosts to the domain in manual rather than automated certificate provisioning mode. In this case, the Certification Authority (CA)does not issue a signed certificate chain to a host over the network, so you must
Chapter 9Managing Certificates with obcm
9-22
export the signed certificate chain from the administrative server, manually transfer thecertificate chain to the newly configured host, and then import the certificate chain into thehost's wallet.
Both an identity certificate and a wallet exist as files on the operating system. The operatingsystem user running obcm must have write permissions in the wallet directory. By default, thewallet used by Oracle Secure Backup is located in the following locations:
• /usr/etc/ob/wallet (UNIX and Linux)
• C:\Program Files\Oracle\Backup\db\wallet (Windows)
The obcm utility always accesses the wallet in the preceding locations. You cannot overridethe default location.
In case of any errors, use the obcm verifycomm command to diagnose any connection issuesin your domain and ensure that you describe the location of the obcm log file.
This section contains the following topics:
• Renewing Certificates in Automated Certificate Provisioning Mode
• Renewing Certificates in Manual Certificate Provisioning Mode
• Renewing Certificates in Automated Certificate Provisioning Mode on Earlier OracleSecure Backup Versions
• Renewing Certificates in Manual Certificate Provisioning Mode on Earlier Oracle SecureBackup Versions
• Manually Authenticating Hosts
• Exporting Signed Certificates
• Importing Signed Certificates
Renewing Certificates in Automated Certificate Provisioning ModeThis section lists the steps to renew the certification authority on your domain, in automatedcertificate provisioning mode.
From Oracle Secure Backup 12.1.0.2 and later, you can use obcm to renew certificates onyour domain in automated certificate provisioning mode.For more information on how to renew certificates in automated certificate provisioning mode,on Oracle Secure Backup 12.1.0.1 and 10.4 versions, see Renewing Certificates inAutomated Certificate Provisioning Mode on Earlier Versions of Oracle Secure Backup
On the administrative host, complete the following steps to renew certification authority inautomated certificate provisioning mode for your domain.
1. Enter the following command to temporarily disable your backup domain:
obtool ctldameon --command suspend2. Enter the following command to list all active jobs in your domain:
obtool lsjobs --active3. Once all active jobs have completed, enter the following command to regenerate the
signing certificates:
obcm recertifydomain4. Use the following command to identify existing unauthenticated hosts:
Chapter 9Managing Certificates with obcm
9-23
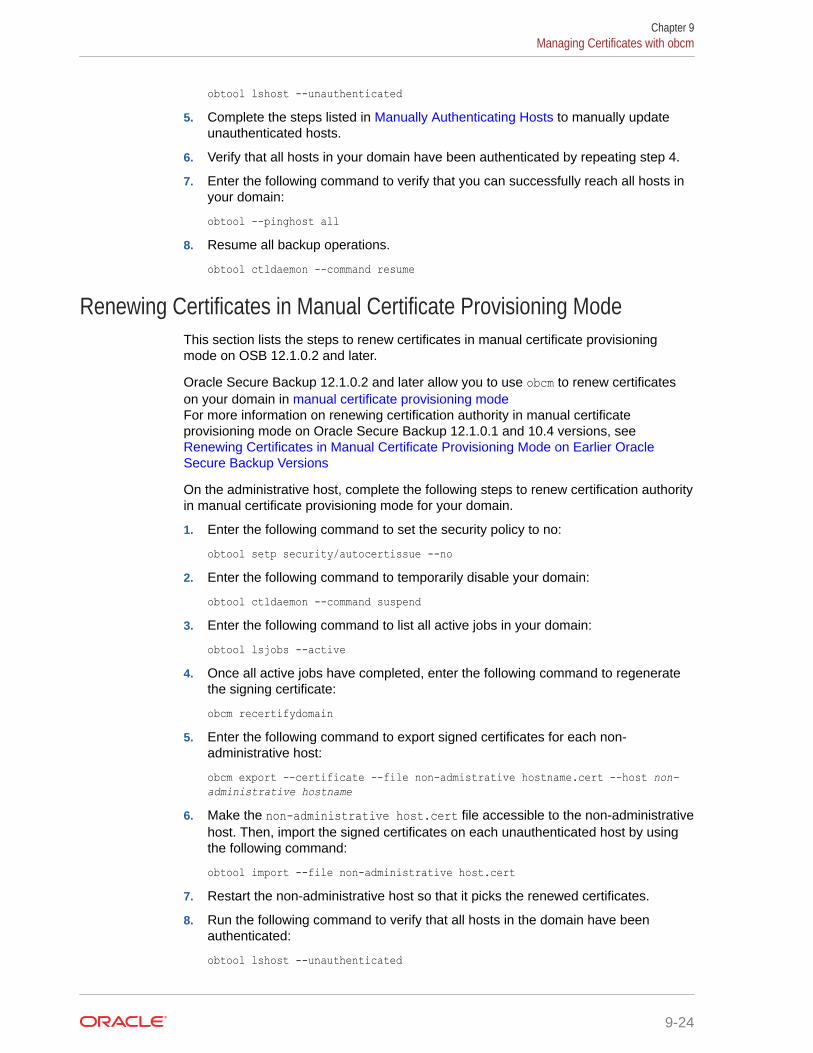
obtool lshost --unauthenticated5. Complete the steps listed in Manually Authenticating Hosts to manually update
unauthenticated hosts.
6. Verify that all hosts in your domain have been authenticated by repeating step 4.
7. Enter the following command to verify that you can successfully reach all hosts inyour domain:
obtool --pinghost all8. Resume all backup operations.
obtool ctldaemon --command resume
Renewing Certificates in Manual Certificate Provisioning ModeThis section lists the steps to renew certificates in manual certificate provisioningmode on OSB 12.1.0.2 and later.
Oracle Secure Backup 12.1.0.2 and later allow you to use obcm to renew certificateson your domain in manual certificate provisioning modeFor more information on renewing certification authority in manual certificateprovisioning mode on Oracle Secure Backup 12.1.0.1 and 10.4 versions, see Renewing Certificates in Manual Certificate Provisioning Mode on Earlier OracleSecure Backup Versions
On the administrative host, complete the following steps to renew certification authorityin manual certificate provisioning mode for your domain.
1. Enter the following command to set the security policy to no:
obtool setp security/autocertissue --no2. Enter the following command to temporarily disable your domain:
obtool ctldaemon --command suspend3. Enter the following command to list all active jobs in your domain:
obtool lsjobs --active4. Once all active jobs have completed, enter the following command to regenerate
the signing certificate:
obcm recertifydomain5. Enter the following command to export signed certificates for each non-
administrative host:
obcm export --certificate --file non-admistrative hostname.cert --host non-administrative hostname
6. Make the non-administrative host.cert file accessible to the non-administrativehost. Then, import the signed certificates on each unauthenticated host by usingthe following command:
obtool import --file non-administrative host.cert7. Restart the non-administrative host so that it picks the renewed certificates.
8. Run the following command to verify that all hosts in the domain have beenauthenticated:
obtool lshost --unauthenticated
Chapter 9Managing Certificates with obcm
9-24
9. Verify that you can reach all hosts in your domain:
obtool pinghost --all10. Enter the following command to resume all backup operations:
obtool ctldaemon --command resume11. Enter the following command to reset the security policy:
obtool resetp security/autocertissue
Renewing Certificates in Automated Certificate Provisioning Mode onEarlier Versions of Oracle Secure Backup
This section lists the steps for certificate renewal in automated certificate provisioning modefor OSB 10.4.x and 12.1.0.1.
This section lists the steps to renew certification authority in automated certificateprovisioning mode on Oracle Secure Backup 12.1.0.1 and 10.4 versions.
To regenerate signing certificates in automated certificate provisioning mode for your domain,complete the following steps:
1. Download the latest version of obcm.For more information on obcm, see the Oracle Secure Backup Reference
2. Run the following command to temporarily disable the domain:
obtool ctldaemon --command suspend3. Run the following command to list all active jobs in your domain:
obtool lsjobs --active4. Once all active jobs have completed, remove expired signed certificates on each non-
administrative host:
obcm decertify5. On the administrative host, log in as the root user.
6. Enter the following command to regenerate the signing certificate:
obcm recertifydomain --nocomm --expire months7. Stop and restart the observiced daemon.
See Also:
Oracle Secure Backup Reference for more information on observiced scripts
8. Run the following command to regenerate the signed certificates for each non-administrative host:
obtool updatehost --recertify non-administrative hostname9. Repeat step 7 on each non-administrative host.
10. Resume all host operations:
obtool ctldaemon --command resume
Chapter 9Managing Certificates with obcm
9-25
11. Verify that all hosts can be reached:
obtool pinghost --all
Renewing Certificates in Manual Provisioning Mode on EarlierVersions of Oracle Secure Backup
This section lists the steps to renew certification authority in manual provisioning modeon Oracle Secure Backup 12.1.0.1 and 10.4 versions.
This section lists the steps to renew certification authority in manual certificateprovisioning mode on Oracle Secure Backup 12.1.0.1 and 10.4 versions.
To regenerate signing certificates in manualcertificate provisioning mode for yourdomain, complete the following steps:
1. Download the latest version of obcm.For more information on obcm, see the Oracle Secure Backup Reference
2. Run the following command to temporarily disable the domain:
obtool ctldaemon --command suspend3. Run the following command to list all active jobs in your domain:
obtool lsjobs --active4. Once all active jobs have completed, remove expired signed certificates on each
non-administrative host:
obcm recertify5. On each non-administrative host, run the following scripts to stop and start the
observiced daemon:
/etc/init.d/obcerviced stop/etc/init.d/observiced start
6. On the administrative host, log in as the root user.
7. Enter the following command to regenerate the signing certificate:
obcm recertifydomain --nocomm --expire months8. Stop and restart the observiced daemon.
See Also:
Oracle Secure Backup Reference for more information on observicedscripts
9. Run the following command to regenerate the signed certificates for each non-administrative host:
obtool updatehost --recertify non-administrative hostname10. Assign the certificates using the obcm export and obcm import commands.
For more information on exporting and importing certificates, see Exporting SignedCertificates and Importing Signed Certificates, respectively.
Chapter 9Managing Certificates with obcm
9-26
11. Resume all host operations:
obtool ctldaemon --command resume12. Verify that all hosts can be reached:
obtool pinghost --all
Manually Authenticating Hosts After Certificate RenewalThis section describes how to authenticate unauthenticated, non-administrative hosts.
Ensure that you run the obcm recertifydomain command to renew certificates for your host.
To manually authenticate an unauthenticated, non-administrative hosts, complete thefollowing steps:
1. On the unauthenticated host, remove all expired signed certificates by using the followingcommand:
obcm decertify2. On the administrative host, regenerate the signed certificates by using the following
command:
obtool updatehost --recertify uncertified hostname3. Assign the certificates by using the obcm export and obcm import commands.
For more information on exporting and importing certificates using obcm, see ExportingSigned Certificates and Importing Signed Certificates, respectively.
Exporting Signed CertificatesYou can use obcm on the administrative server to export a signed certificate chain for a newlyconfigured host.
To export a signed certificate chain:
1. Log on to the administrative server.
2. Enter the following command, where hostname is the name of the host requesting thecertificate and certificate_file is the filename of the exported request:
obcm export --certificate --file certificate_file --host hostname
For example, the following command exports the signed certificate chain for host brhost2to file /tmp/brhost2_cert.f:
obcm export --certificate --file /tmp/brhost2_cert.f --host brhost2
Importing Signed Certificate ChainsYou can use obcm on the host to import a signed certificate chain into the host's wallet.
To import a signed certificate chain into the wallet of a host:
1. Log in to the host whose wallet contains the certificate.
2. Copy the signed certificate chain to a temporary location on the file system.
Chapter 9Managing Certificates with obcm
9-27
3. Enter the following command, where signed_certificate_file is the filename ofthe certificate:
obcm import --file signed_certificate_file
Because only one Oracle Secure Backup wallet exists on the host, you are notrequired to specify the --host option. For example, the following example importsthe certificate from /tmp/brhost2_cert.f:
obcm import --file /tmp/brhost2_cert.f
The obcm utility issues an error message if the certificate chain being importeddoes not correspond to the certificate request in the wallet.
4. Remove the certificate file from its temporary location on the operating system. Forexample:
rm /tmp/brhost2_cert.f
Chapter 9Managing Certificates with obcm
9-28
AOracle Secure Backup Directories and Files
This appendix explains the structure and contents of the Oracle Secure Backup directories.
This appendix contains these sections:
• Oracle Secure Backup Home Directory
• Administrative Server Directories and Files
• Media Server Directories and Files
• Client Host Directories and Files
Note:
Some of the directories and files listed in this appendix are not created until after abackup has been performed by Oracle Secure Backup.
Oracle Secure Backup Home DirectoryWhen you installed Oracle Secure Backup, you specified an Oracle Secure Backup homedirectory for the installation. Oracle recommends the following locations for the Oracle SecureBackup home:
• C:\Program Files\Oracle\Backup on Windows.
• /usr/local/oracle/backup on Linux and UNIX. Create this directory before you beginthe Oracle Secure Backup installation.
On Windows, the Oracle Secure Backup home directory is created on every host where youinstall Oracle Secure Backup, although the contents of the directory vary depending on the roles you assigned to the host.
Each host on which Oracle Secure Backup is installed contains a configuration file thatrecords details of the configuration of Oracle Secure Backup on the host. On Windows, theconfiguration file is called obconfig.txt in the db subdirectory of the Oracle Secure Backuphome. On Linux and UNIX, the file is called obconfig and is located in the /etc directory.
Administrative Server Directories and FilesAn administrative server contains a set of executables and data files for each installedoperating system, which are described in the following tables:
• Table A-1
• Table A-2
• Table A-3
A-1
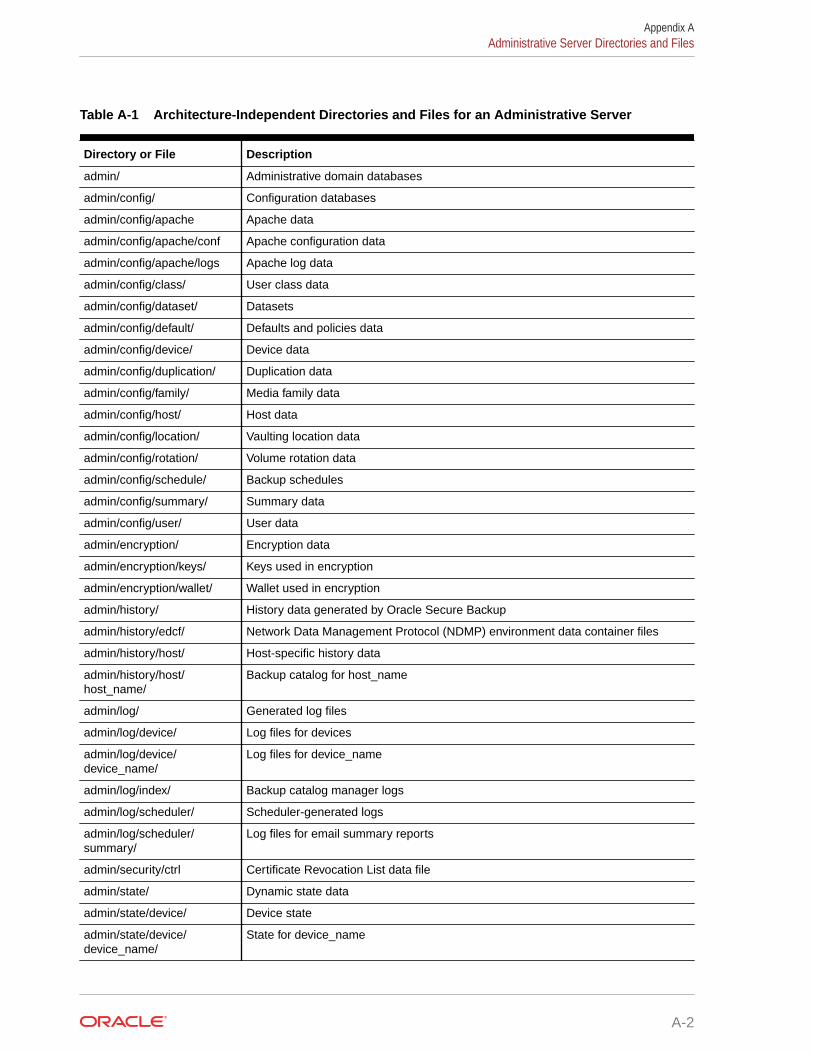
Table A-1 Architecture-Independent Directories and Files for an Administrative Server
Directory or File Description
admin/ Administrative domain databases
admin/config/ Configuration databases
admin/config/apache Apache data
admin/config/apache/conf Apache configuration data
admin/config/apache/logs Apache log data
admin/config/class/ User class data
admin/config/dataset/ Datasets
admin/config/default/ Defaults and policies data
admin/config/device/ Device data
admin/config/duplication/ Duplication data
admin/config/family/ Media family data
admin/config/host/ Host data
admin/config/location/ Vaulting location data
admin/config/rotation/ Volume rotation data
admin/config/schedule/ Backup schedules
admin/config/summary/ Summary data
admin/config/user/ User data
admin/encryption/ Encryption data
admin/encryption/keys/ Keys used in encryption
admin/encryption/wallet/ Wallet used in encryption
admin/history/ History data generated by Oracle Secure Backup
admin/history/edcf/ Network Data Management Protocol (NDMP) environment data container files
admin/history/host/ Host-specific history data
admin/history/host/host_name/
Backup catalog for host_name
admin/log/ Generated log files
admin/log/device/ Log files for devices
admin/log/device/device_name/
Log files for device_name
admin/log/index/ Backup catalog manager logs
admin/log/scheduler/ Scheduler-generated logs
admin/log/scheduler/summary/
Log files for email summary reports
admin/security/ctrl Certificate Revocation List data file
admin/state/ Dynamic state data
admin/state/device/ Device state
admin/state/device/device_name/
State for device_name
Appendix AAdministrative Server Directories and Files
A-2
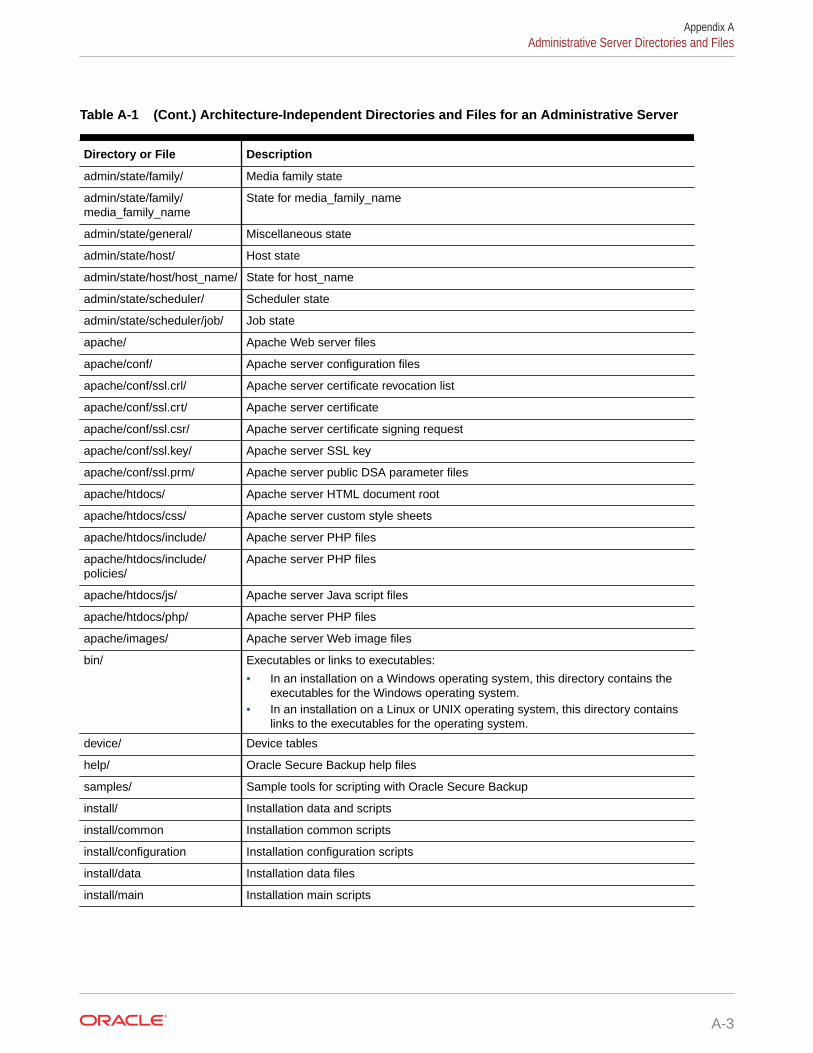
Table A-1 (Cont.) Architecture-Independent Directories and Files for an Administrative Server
Directory or File Description
admin/state/family/ Media family state
admin/state/family/media_family_name
State for media_family_name
admin/state/general/ Miscellaneous state
admin/state/host/ Host state
admin/state/host/host_name/ State for host_name
admin/state/scheduler/ Scheduler state
admin/state/scheduler/job/ Job state
apache/ Apache Web server files
apache/conf/ Apache server configuration files
apache/conf/ssl.crl/ Apache server certificate revocation list
apache/conf/ssl.crt/ Apache server certificate
apache/conf/ssl.csr/ Apache server certificate signing request
apache/conf/ssl.key/ Apache server SSL key
apache/conf/ssl.prm/ Apache server public DSA parameter files
apache/htdocs/ Apache server HTML document root
apache/htdocs/css/ Apache server custom style sheets
apache/htdocs/include/ Apache server PHP files
apache/htdocs/include/policies/
Apache server PHP files
apache/htdocs/js/ Apache server Java script files
apache/htdocs/php/ Apache server PHP files
apache/images/ Apache server Web image files
bin/ Executables or links to executables:
• In an installation on a Windows operating system, this directory contains theexecutables for the Windows operating system.
• In an installation on a Linux or UNIX operating system, this directory containslinks to the executables for the operating system.
device/ Device tables
help/ Oracle Secure Backup help files
samples/ Sample tools for scripting with Oracle Secure Backup
install/ Installation data and scripts
install/common Installation common scripts
install/configuration Installation configuration scripts
install/data Installation data files
install/main Installation main scripts
Appendix AAdministrative Server Directories and Files
A-3
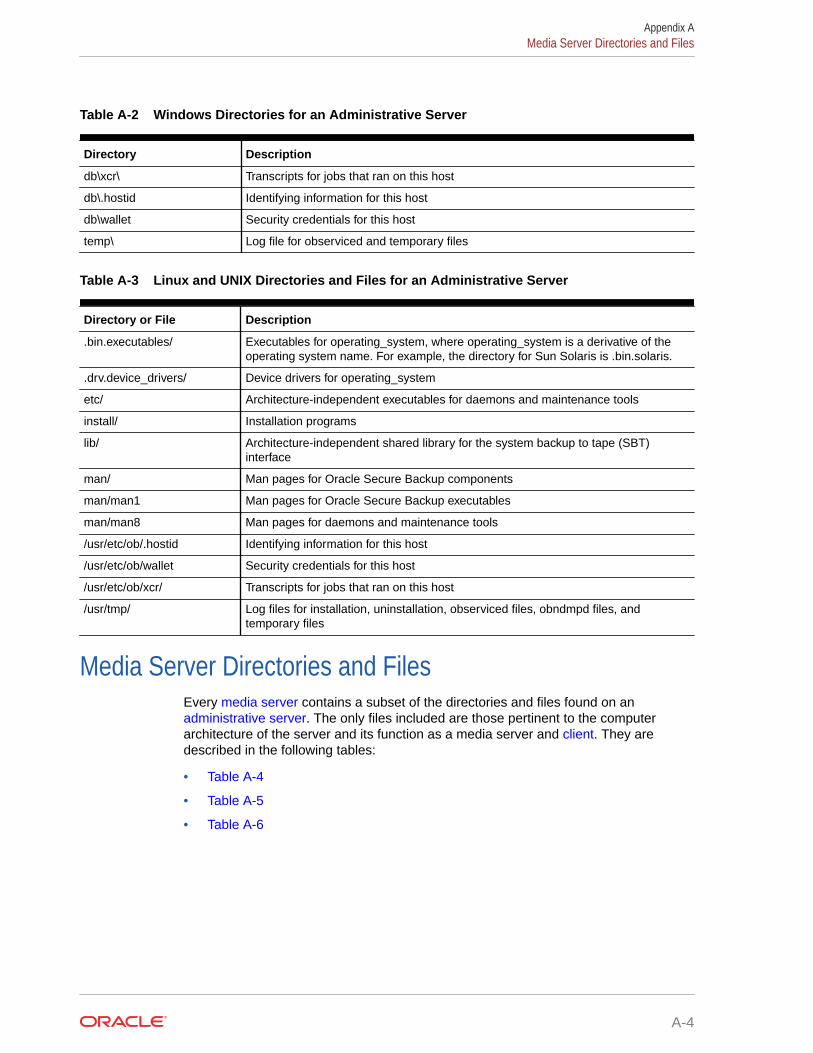
Table A-2 Windows Directories for an Administrative Server
Directory Description
db\xcr\ Transcripts for jobs that ran on this host
db\.hostid Identifying information for this host
db\wallet Security credentials for this host
temp\ Log file for observiced and temporary files
Table A-3 Linux and UNIX Directories and Files for an Administrative Server
Directory or File Description
.bin.executables/ Executables for operating_system, where operating_system is a derivative of theoperating system name. For example, the directory for Sun Solaris is .bin.solaris.
.drv.device_drivers/ Device drivers for operating_system
etc/ Architecture-independent executables for daemons and maintenance tools
install/ Installation programs
lib/ Architecture-independent shared library for the system backup to tape (SBT)interface
man/ Man pages for Oracle Secure Backup components
man/man1 Man pages for Oracle Secure Backup executables
man/man8 Man pages for daemons and maintenance tools
/usr/etc/ob/.hostid Identifying information for this host
/usr/etc/ob/wallet Security credentials for this host
/usr/etc/ob/xcr/ Transcripts for jobs that ran on this host
/usr/tmp/ Log files for installation, uninstallation, observiced files, obndmpd files, andtemporary files
Media Server Directories and FilesEvery media server contains a subset of the directories and files found on an administrative server. The only files included are those pertinent to the computerarchitecture of the server and its function as a media server and client. They aredescribed in the following tables:
• Table A-4
• Table A-5
• Table A-6
Appendix AMedia Server Directories and Files
A-4
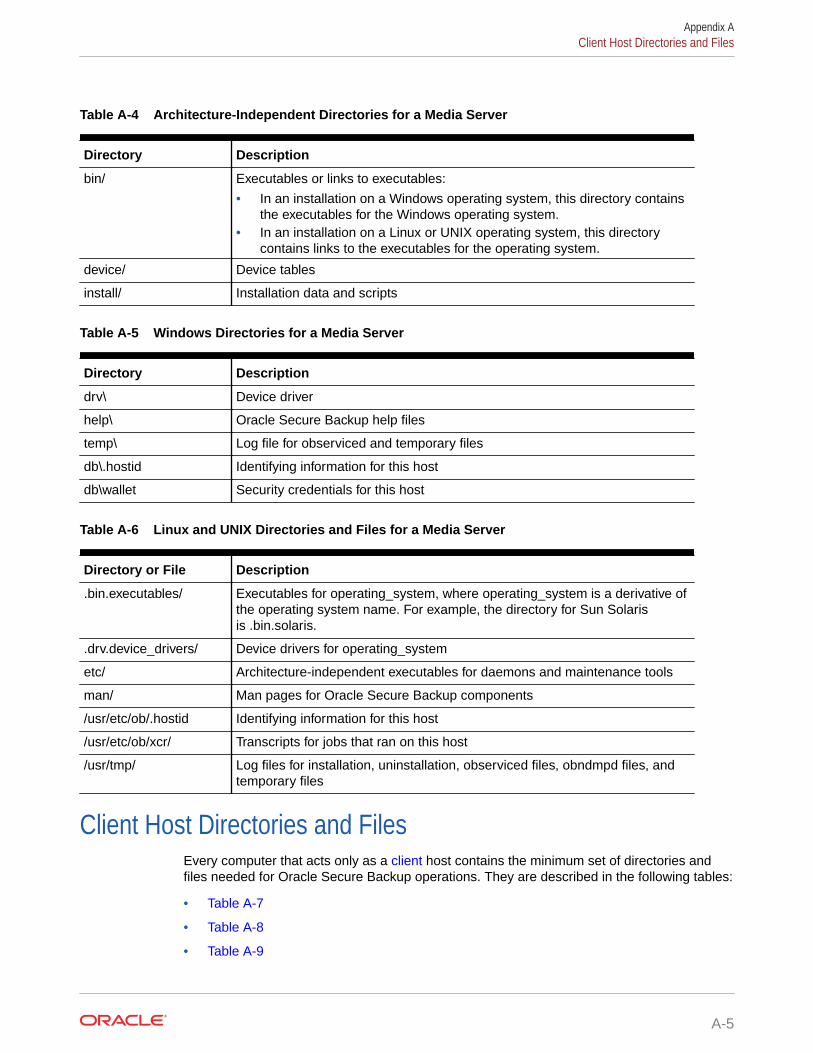
Table A-4 Architecture-Independent Directories for a Media Server
Directory Description
bin/ Executables or links to executables:
• In an installation on a Windows operating system, this directory containsthe executables for the Windows operating system.
• In an installation on a Linux or UNIX operating system, this directorycontains links to the executables for the operating system.
device/ Device tables
install/ Installation data and scripts
Table A-5 Windows Directories for a Media Server
Directory Description
drv\ Device driver
help\ Oracle Secure Backup help files
temp\ Log file for observiced and temporary files
db\.hostid Identifying information for this host
db\wallet Security credentials for this host
Table A-6 Linux and UNIX Directories and Files for a Media Server
Directory or File Description
.bin.executables/ Executables for operating_system, where operating_system is a derivative ofthe operating system name. For example, the directory for Sun Solarisis .bin.solaris.
.drv.device_drivers/ Device drivers for operating_system
etc/ Architecture-independent executables for daemons and maintenance tools
man/ Man pages for Oracle Secure Backup components
/usr/etc/ob/.hostid Identifying information for this host
/usr/etc/ob/xcr/ Transcripts for jobs that ran on this host
/usr/tmp/ Log files for installation, uninstallation, observiced files, obndmpd files, andtemporary files
Client Host Directories and FilesEvery computer that acts only as a client host contains the minimum set of directories andfiles needed for Oracle Secure Backup operations. They are described in the following tables:
• Table A-7
• Table A-8
• Table A-9
Appendix AClient Host Directories and Files
A-5
Table A-7 Architecture-Independent Directory for a Client Host
Directory Description
bin/ Executables or links to executables
• In an installation on a Windows operating system, this directory contains theexecutables for the Windows operating system.
• In an installation on a Linux or UNIX operating system, this directory containslinks to the executables for the operating system.
install/ Installation data and scripts
Table A-8 Windows Directories and Files for a Client Host
Directory Description
db\.hostid Identifying information for this host
db\wallet Security credentials for this host.
temp\ Log file for observiced and temporary files
help\ Oracle Secure Backup help files
Table A-9 Linux and UNIX Directories and Files for a Client Host
Directory or File Description
.bin.executables/ Executables for operating_system, where operating_system is a derivative of theoperating system name. For example, the directory for Sun Solaris is .bin.solaris.
etc/ Architecture-independent executables for daemons and maintenance tools
man/ Man pages for Oracle Secure Backup components
/usr/etc/ob/.hostid Identifying information for this host
/usr/etc/ob/xcr/ Transcripts for jobs that ran on this host
/usr/tmp/ Log files for installation, uninstallation, observiced files, obndmpd files, and temporaryfiles
Appendix AClient Host Directories and Files
A-6
BDetermining Linux SCSI Parameters
For the Linux and UNIX platforms, if you do not know the SCSI parameters of a tape device,then you must determine them before you begin installation. This appendix describesprocedures for determining SCSI device parameters on Linux and UNIX.
Determining SCSI Device Parameters on LinuxTo obtain tape device information on Linux, use the cat command to view the contents of /proc/scsi/scsi. For example:
# cat /proc/scsi/scsi
See Also:
"Configuring Devices on Linux Media Servers" for information about configuringattach points for Linux
Example B-1 shows sample output for a host called storabck05 with two attached tapedevices.
A device of type Sequential-Access, such as the first tape device in the list, is a tape drive. Adevice of type Medium Changer, such as the second tape device, is a tape library.
For each tape device, the information needed is found in the line that reads:
Host: scsi0 Channel: 00 Id: 02 Lun: 00
The output can be interpreted as follows:
• The host bus adapter number is the numeric part of the value scsin. For example, forboth tape devices in this output the host bus adapter number is 0.
• The value for Channel is the SCSI bus address. For example, in this output the SCSI busaddress is 0.
• The value for Id is the target ID. For example, in this output the ID of the tape drive is 2,and the ID of the tape library is 4.
• The value for Lun is the SCSI LUN. For example, in this output the SCSI LUN of bothtape devices is 0.
By convention, the tape library and tape drive can each be assigned 0 as the Oracle SecureBackup logical unit number.
Based on the output shown in Example B-1, Table B-1 summarizes the tape deviceinformation for storabck05.
B-1
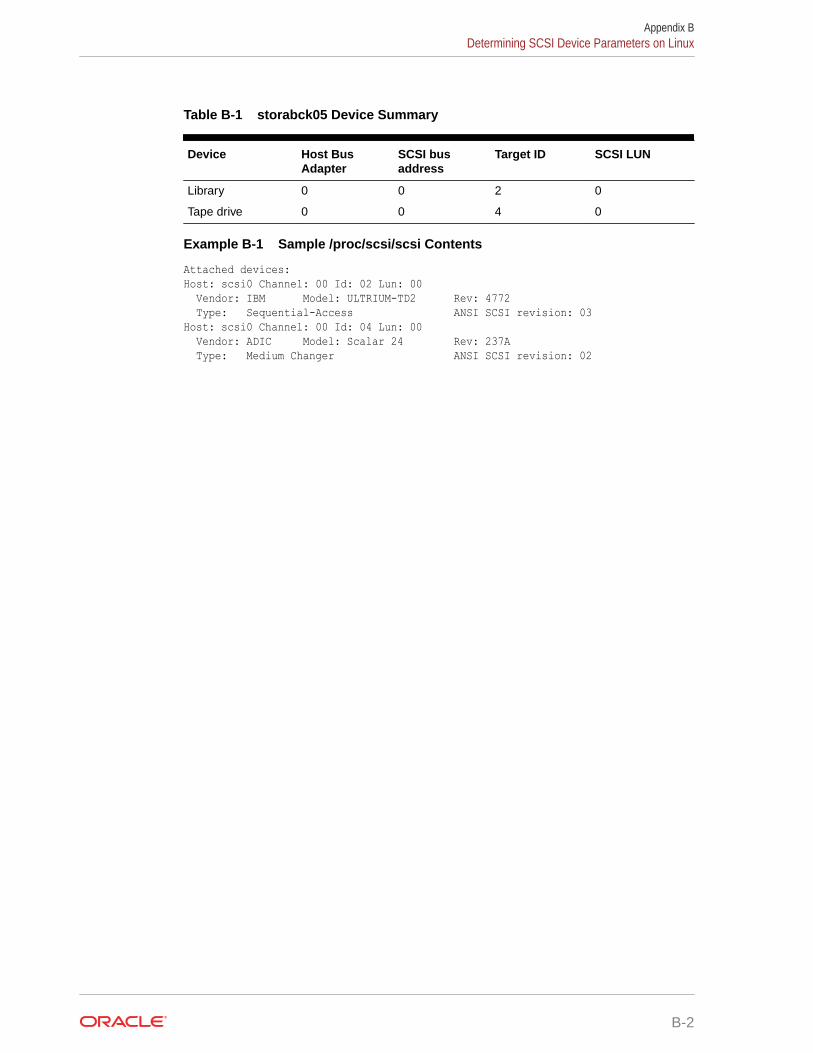
Table B-1 storabck05 Device Summary
Device Host BusAdapter
SCSI busaddress
Target ID SCSI LUN
Library 0 0 2 0
Tape drive 0 0 4 0
Example B-1 Sample /proc/scsi/scsi Contents
Attached devices:Host: scsi0 Channel: 00 Id: 02 Lun: 00 Vendor: IBM Model: ULTRIUM-TD2 Rev: 4772 Type: Sequential-Access ANSI SCSI revision: 03Host: scsi0 Channel: 00 Id: 04 Lun: 00 Vendor: ADIC Model: Scalar 24 Rev: 237A Type: Medium Changer ANSI SCSI revision: 02
Appendix BDetermining SCSI Device Parameters on Linux
B-2
COracle Secure Backup and ACSLS
This appendix describes Oracle Secure Backup support for StorageTek Automated CartridgeSystem Library Software (ACSLS). ACSLS is a package of server software that controls oneor more Automated Cartridge Systems tape library.
This appendix contains these sections:
• About ACSLS
• ACSLS and Oracle Secure Backup
• Communicating with ACSLS
• Drive Association
• Volume Loading and Unloading
• Imports and Exports
• Access Controls
• Scratch Pool Management
• Modified Oracle Secure Backup Commands
• Unsupported Oracle Secure Backup Commands
• Installation and Configuration
About ACSLSFigure C-1 shows how ACSLS fits into a configuration of client systems, Library StorageModules (LSMs), and a single Library Management Unit (LMU). The LSM is hardware thathas cartridge slots, a robotic arm, pass through ports, cartridge access ports, and the tapedrive. The LMU is the hardware interface between the ACSLS and the LSM.
C-1
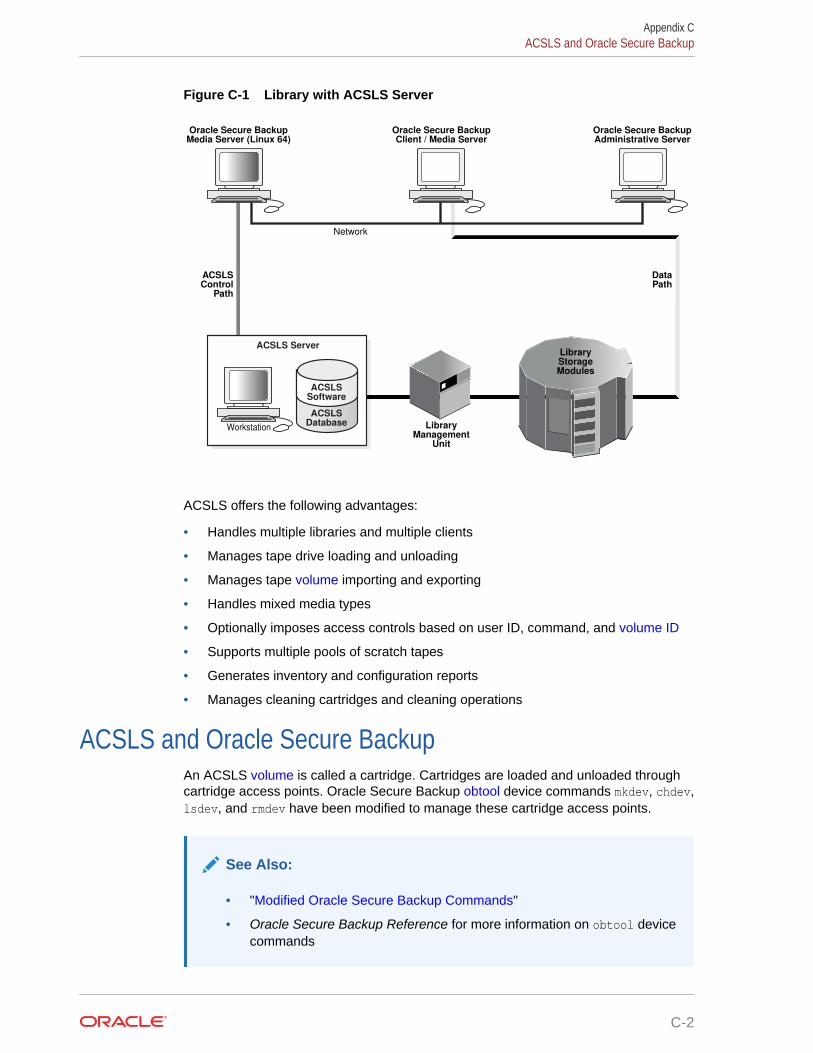
Figure C-1 Library with ACSLS Server
Oracle Secure BackupClient / Media Server
Oracle Secure BackupAdministrative Server
Oracle Secure BackupMedia Server (Linux 64)
DataPath
ACSLSControl
Path
LibraryStorageModules
LibraryManagement
Unit
ACSLS Server
ACSLSSoftware
ACSLSDatabase
ACSLSSoftware
Workstation
Network
ACSLS offers the following advantages:
• Handles multiple libraries and multiple clients
• Manages tape drive loading and unloading
• Manages tape volume importing and exporting
• Handles mixed media types
• Optionally imposes access controls based on user ID, command, and volume ID
• Supports multiple pools of scratch tapes
• Generates inventory and configuration reports
• Manages cleaning cartridges and cleaning operations
ACSLS and Oracle Secure BackupAn ACSLS volume is called a cartridge. Cartridges are loaded and unloaded throughcartridge access points. Oracle Secure Backup obtool device commands mkdev, chdev,lsdev, and rmdev have been modified to manage these cartridge access points.
See Also:
• "Modified Oracle Secure Backup Commands"
• Oracle Secure Backup Reference for more information on obtool devicecommands
Appendix CACSLS and Oracle Secure Backup
C-2
ACSLS references all of its volumes by their external barcode labels, which are required forall ACS volumes. Oracle Secure Backup continues to allow the operator to access these ACSvolumes by storage element, volume label, and barcode label.
Note:
ACSLS supports virtual tapes that do not have a physical barcode attached to them.Oracle Secure Backup does not support virtual tapes within an ACS system. OracleSecure Backup requires that all cartridges within an ACS system have properlyaffixed and readable barcodes.
The concept of a scratch pool in ACSLS is simply a blank tape. Once a tape has beenmounted in a tape drive, its scratch pool identity is removed, and it acquires a permanent media family, identical in functionality to the pre-labeling volumes. Oracle Secure Backupsupports scratch pools through an extension to the media family and retains this conceptthrough the existing media family functionality. In addition, when a volume is force unlabeledit is moved back into the scratch pool that is assigned to the media family.
ACSLS has optional access control mechanisms on commands and volumes. This optionalaccess control user ID can be defined as part of the mkdev or chdev commands.
Because an ACSLS system is meant to be shared by multiple clients, tape drive cleaning ismanaged and maintained by ACSLS.
Communicating with ACSLSOracle Secure Backup uses the obrobotd daemon when talking to a non-ACSLS tape library.When talking with an ACSLS tape library, Oracle Secure Backup uses two daemons namedobacslibd and obacsssid. The obacslibd daemon spawns obacsssid, which is responsible forcommunications with the ACSLS server.
Drive AssociationWhen you install a tape drive other than an ACS tape drive, Oracle Secure Backup requiresthat you attach the tape drive to a media server, install an appropriate operating systemdriver for the tape drive, create a device within Oracle Secure Backup, and map the operatingsystem device to the Oracle Secure Backup device. The same steps are required for ACSLS.But you must also further define the ACSLS mapping of the tape drive through the mkdev orchdev command. The additional information required is the acs, lsm, panel, and drive.
Volume Loading and UnloadingDrive identification for mounts and dismounts is by tape drive name.
ACSLS always identifies a volume by its barcode. Because Oracle Secure Backupassociates this barcode with a volume ID, you can supply either one. If a mapping is notpossible, then the request is rejected with appropriate logging.
Appendix CCommunicating with ACSLS
C-3
Imports and ExportsThe exportvol command has been modified to conform to ACSLS usage. IndividualACS cartridge access port (CAP) slots are not addressable, although an entire CAPcan be selected based on CAP name.
Once the request is made to eject the tape, the request does not return until the CAPhas been opened, the cartridge loader emptied, and the cartridge loader reinserted inthat emptied state. Because there is only one obacslibd daemon controlling each ACS tape library, no other tape library operations are permitted until the CAP is cleared.You can control how long an outstanding request waits for the CAP to be cleared withthe maxacsejectwaittime policy.
Oracle Secure Backup does not support the importvol command for ACSLS tapelibraries. You can use the ACSLS cmd_proc utility to enter a volume into the tapelibrary.
Access ControlsACSLS optionally allows fine-grained access control over the commands that a usercan issue and the volumes that can be accessed. Setting up the ACSLS accesscontrols is done at the ACSLS console. Oracle Secure Backup does not supportsetting, modifying, or displaying the ACSLS access controls.
If ACSLS access control is enabled, then a user must have the correctacsls_access_id to access the ACS device. Oracle Secure Backup maps thisacsls_access_id, which is defined on the obtool mkdev or chdev commands, to theOracle Secure Backup device object.
Scratch Pool ManagementACSLS enables you to define one or more scratch pools to which a blank or recycled volume can be assigned. Subsequent scratch mount requests are then restricted tovolumes in the pool or pools specified with the request. Oracle Secure Backup offersequivalent functionality with an optional scratch pool ID for media family objects.
When a volume is pulled from the scratch pool, Oracle Secure Backup automaticallylabels the volume with a permanent media family when its volume header is written.You are not required to label volumes with the labelvol command beforehand. Thisensure that separation of tapes within the tape libraries is persistent.
When an unlabelvol operation is performed, the tape is put back into the scratch poolthat is defined within the current definition of the media family.
Oracle Secure Backup does not support creating scratch pools, entering cartridgesinto a scratch pool, or removing cartridges from a scratch pool. These operations mustbe performed at the ACSLS console.
Modified Oracle Secure Backup CommandsThe following Oracle Secure Backup commands are modified for ACSLS tapelibraries:
Appendix CImports and Exports
C-4
• mkdev
• chdev
• lsdev
• exportvol
• mkmf
• chmf
See Also:
Oracle Secure Backup Reference for syntax and semantics for device, library, andmedia family commands
Unsupported Oracle Secure Backup CommandsThe following Oracle Secure Backup commands are not supported for ACSLS tape libraries:
• importvol• extractvol• insertvol• clean• opendoor• closedoor
Installation and ConfigurationThe Oracle Secure Backup media server attached to the ACSLS server must either be aLinux x86-64 bit media server.
Oracle Secure Backup installation assumes that the ACSLS hardware and software has beencorrectly installed and configured. Oracle Secure Backup installation procedures do notattempt to create or modify any ACSLS configuration files.
Oracle Secure Backup handles ACS tape devices no differently from other devices. TheOracle Secure Backup device driver (if any) is installed, and special device files are created.The data path is controlled solely by Oracle Secure Backup. ACSLS is not involved.
creating Oracle Secure Backup objects for ACSLS devices is performed with the mkdevcommand in obtool with the following modifications:
• For ACSLS tape libraries, the usual host:devname attach point is replaced withinformation identifying the acs of the tape library and the host name and port where theassociated ACS software is listening. A barcode reader is assumed, and barcodes arerequired.
• For each tape drive contained within an ACSLS tape library, you must specify acs, lsm,panel, and drive. The acs is obtained from the tape library in which the tape drive iscontained.
Appendix CUnsupported Oracle Secure Backup Commands
C-5

See Also:
Oracle Secure Backup Reference for mkdev syntax and semantics
Appendix CInstallation and Configuration
C-6
DOracle Secure Backup and ReliableDatagram Socket (RDS)
This appendix discusses Oracle Secure Backup support for Reliable Datagram Socket(RDS). It also describes how to use RDS for communication between a client and mediaserver.
Overview of Reliable Datagram Socket (RDS)Reliable Datagram Socket (RDS) is an open source protocol that is used for communicationover Infiniband. RDS provides a high-performance and low latency connectionless protocolfor communication. It minimizes CPU utilization and is therefore preferred for communicationover Infiniband.
Remote Direct Access Memory (RDMA) is a zero-copy extension of RDS. When anapplication performs an RDMA read or write, the application data is delivered directly to thenetwork, thus reducing latency & enabling fast transfer. Therefore, RDMA provides highthroughput. RDMA, when available, can be used with RDS for communication overInfiniband.
Using Reliable Datagram Socket (RDS) Protocol over Infinibandfor Data Transfer in Oracle Secure Backup
Starting with Oracle Secure Backup 10.4, you can use the Reliable Datagram Socket (RDS)protocol over Infiniband to transfer data between a client and media server. You can also useRemote Direct Memory Access (RDMA) with RDS, thus maximizing the benefits of usingRDS over Infiniband. Wherever it is possible, Oracle Secure Backup uses RDS with RDMA.When you set up an Infiniband network between a client and media server, Oracle SecureBackup automatically uses RDS to transfer data between them. If RDS is not enabled, thenOracle Secure Backup uses TCP/IP for interhost communication.
Note:
Oracle Secure Backup supports RDS over Infiniband for the Linux and Solaris x86platforms. Starting with Oracle Secure Backup 10.4.0.2, RDS over Infiniband is alsosupported for SPARC 11.
To transfer data using RDS, both the client and media server must use Infiniband.Additionally, RDS support must be available for the operating system used by the client andmedia server. If the operating system does not support RDS, Oracle Secure Backup revertsto TCP/IP over Infiniband for the data transfer.
You can also set up a Preferred Network Interface (PNI) on the media server that points tothe Infiniband connection.
D-1
See Also:
"Configuring Preferred Network Interfaces (PNI)" for information about PNI
Enabling RDS for Interhost CommunicationWhen an Infiniband connection is set up between a client and a media server, OracleSecure Backup automatically uses RDS to transfer data between the client and mediaserver. However, you can control the usage of RDS either at the administrative domainlevel or at the host level. The setting made at the host level takes precedence over thesetting made at the administrative-level domain level.
Enabling RDS for the Administrative Domain
You can specify if RDS must be used for data communication between a client andmedia server by using one of the following interfaces:
• obtoolTo specify that RDS must be used for data communication, ensure that theOperations policy disablerds is set to no. This setting is applicable to the entireadministrative domain. The default setting for the disablerds policy is no.
See Also:
Oracle Secure Backup Reference for information about the disablerdsoperations policy
• Oracle Secure Backup Web tool
In the Configure: Defaults and Policies page, select operations under the Policycolumn. On the Configure: Defaults and Policies > Operations page, ensure thatthe value in the Disable RDS field is set to no for RDS to be used.
Enabling RDS at the Host Level
For a particular host, you can specify the use of RDS by using one of the followinginterfaces:
• obtoolTo modify an existing host and enable the use of RDS for data transfer, set thedisablerds option of the chhost command to no. During the initial configuration ofa host, you can specify that RDS must be used for data transfer by setting thedisablerds option of the mkhost command to no.
The values you can set for the disablerds option are yes, no, or systemdefault.The default value is systemdefault.
Appendix DUsing Reliable Datagram Socket (RDS) Protocol over Infiniband for Data Transfer in Oracle Secure Backup
D-2
See Also:
Oracle Secure Backup Reference for information about the disablerds option
• Oracle Secure Backup Web tool
Use the Disable RDS field in the Configure: Defaults and Policies > Operations page tospecify the use of RDS for a particular host. To use RDS for data transfer, ensure that theDisable RDS field is set to no.
The values you can select for the Disable RDS field are yes, no, or systemdefault and thedefault value in this field is systemdefault.
See Also:
"Adding a Host to the Administrative Domain" for information about disablingthe use of RDS for a particular host
Appendix DUsing Reliable Datagram Socket (RDS) Protocol over Infiniband for Data Transfer in Oracle Secure Backup
D-3
Glossary
active locationA location in a tape library or tape drive.
administrative domainA group of computers on your network that you manage as a common unit to perform backupand restore operations. An administrative domain must include one and only one administrative server. It can include the following:
• One or more clients
• One or more media servers
An administrative domain can consist of a single host that assumes the roles ofadministrative server, media server, and client.
administrative serverThe host that stores configuration information and catalog files for hosts in the administrativedomain. There must be one and only one administrative server for each administrativedomain. One administrative server can service all clients on your network. The administrativeserver runs the scheduler, which starts and monitors backups within the administrativedomain.
Apache Web serverA public-domain Web server used by the Oracle Secure Backup Web tool.
attachmentThe physical or logical connection (the path in which data travels) of a tape device to a hostin the administrative domain.
automated certificate provisioning modeA mode of certificate management in which the Certification Authority (CA) signs and thentransfers identity certificates to hosts over the network. This mode of issuing certificates is
Glossary-1
vulnerable to a possible, although extremely unlikely, man-in-the-middle attack.Automated mode contrasts with manual certificate provisioning mode.
backup containerThe physical storage media on which a backup is stored. Backup containers can be tape devices or disk pools.
backup encryptionThe process of obscuring backup data so that it is unusable unless decrypted. Datacan be encrypted at rest, in transit, or both.
backup IDAn integer that uniquely identifies a backup section.
backup imageThe product of a backup operation. It stores metadata about the backup. This includesinformation that is independent of the storage medium on which the backup is createdsuch as the backup time, host name, backup level, and type of backup.
backup image instanceA backup image instance consists of the actual data that is backed up. A singlebackup image instance can span multiple volumes in a volume set. The part of abackup image that fits on a single volume is called a backup section.
backup image fileThe logical container of a backup image. A backup image consists of one file. Onebackup image consists of one or more backup sections.
backup jobA backup that is eligible for execution by the Oracle Secure Backup scheduler. Abackup job contrasts with a backup request, which is an on-demand backup that hasnot yet been forwarded to the scheduler with the backup --go command.
backup levelThe level of an incremental backup of file-system data. Oracle Secure Backupsupports 9 different incremental backup levels for file-system backup.
Glossary
Glossary-2
backup pieceA backup file generated by Recovery Manager (RMAN). A backup piece is stored in a logicalcontainer called a backup set.
backup requestAn on-demand backup that is held locally in obtool until you run the backup command withthe --go option. At this point Oracle Secure Backup forwards the requests to the scheduler,at which time each backup request becomes a backup job and is eligible to run.
backup scheduleA description of when and how often Oracle Secure Backup should back up the files specifiedby a dataset. The backup schedule contains the names of each dataset file and the name ofthe media family to use. The part of the schedule called the trigger defines the days andtimes when the backups should occur. In obtool, you create a backup schedule with themksched command.
backup sectionA portion of an backup image file that exists on a single tape. One backup image can containone or more backup sections. Each backup section is uniquely identified by a backup ID.
backup transcriptA file that contains the standard output from a particular backup dispatched by the OracleSecure Backup scheduler.
backup windowA time frame in which a backup operation can be run.
barcodeA symbol code, also called a tag, that is physically applied to a volume for identificationpurposes. Oracle Secure Backup supports the use of tape libraries that have an automatedmeans to read barcodes.
blocking factorThe number of 512-byte blocks to include in each block of data written to each tape drive. Bydefault, Oracle Secure Backup writes 64K blocks to tape, which is a blocking factor of 128.Because higher blocking factors usually result in better performance, you can try a blockingfactor larger than the obtar default. If you pick a value larger than is supported by theoperating system of the server, then Oracle Secure Backup fails with an error.
Glossary
Glossary-3
CASee Certification Authority (CA)
catalogA repository that records backups in an Oracle Secure Backup administrative domain.You can use the Oracle Secure Backup Web tool or obtool to browse the catalog anddetermine what files you have backed up. The catalog is stored on the administrativeserver.
certificateA digitally signed statement from a Certification Authority (CA) stating that the publickey (and possibly other information) of another entity has a value. The X.509 standardspecifies the format of a certificate and the type of information contained in it:certificate version, serial number, algorithm ID, issuer, validity, subject, subject publickey information, and extensions such as key usage (signing, encrypting, and so on). Avariety of methods are used to encode, identify, and store the certificate.
Certification Authority (CA)An authority in a network that performs the function of binding a public key pair to anidentity. The CA certifies the binding by digitally signing a certificate that contains arepresentation of the identity and a corresponding public key. The administrativeserver is the CA for an Oracle Secure Backup administrative domain.
Certificate Revocation List (CRL)A list used in a public key infrastructure that enumerates the revoked certificatesmaintained by the Certification Authority (CA).
classA named set of rights for Oracle Secure Backup users. A class can have multipleusers, but each user can belong to one and only one class.
clientAny computer or server whose files Oracle Secure Backup backs up or restores.
content-managed expiration policyA volume with this type of expiration policy expires when every backup piece on thevolume is marked as deleted. You can make Recovery Manager (RMAN) backups, butnot file-system backups, to content-managed volumes. You can use RMAN to delete a backup piece.
Glossary
Glossary-4
cryptographic hash functionA one-way function that accepts a message as input and produces an encrypted string calleda "hash" or "message digest" as output. Given the hash, it is computationally infeasible toretrieve the input. MD5 and SHA-1 are commonly used cryptographic hash functions.
cumulative incremental backupA type of incremental backup in which Oracle Secure Backup copies only data that haschanged at a lower backup level. For example, a level 3 incremental backup copies only thatdata that has changed since the most recent backup that is level 2 or lower.
daemonsBackground processes that are assigned a task by Oracle Secure Backup during theexecution of backup and restore operations. Some daemons run continually and others arestarted and stopped as required.
data management application (DMA)An application that controls a backup or restore operation over the Network DataManagement Protocol (NDMP) through connections to a data service and tape service. TheDMA is the session master, whereas the NDMP services are the slaves. In an Oracle SecureBackup administrative domain, obtar is an example of a DMA.
data serviceAn application that runs on a client and provides Network Data Management Protocol(NDMP) access to database and file-system data on the primary storage system.
data transfer element (DTE)A secondary storage device within a tape library. In tape libraries that contain multiple tapedrives, data transfer elements are sequentially numbered starting with 1.
database backup storage selectorAn Oracle Secure Backup configuration object that specifies characteristics of RecoveryManager (RMAN) SBT backups. The storage selector act as a layer between RMAN, whichaccesses the database, and the Oracle Secure Backup software, which manages the backupmedia.
datasetThe contents of a file-system backup. A dataset file describes a dataset. For example, youcould create the dataset file my_data.ds to describe a dataset that includes the /homedirectory on host brhost2.
Glossary
Glossary-5

dataset directoryA directory that contains at least one dataset file. The directory groups dataset files asa set for common reference.
dataset fileA text file that describes a dataset. The Oracle Secure Backup dataset languageprovides a text-based means to define file-system data to back up.
defaults and policiesA set of configuration data that specifies how Oracle Secure Backup runs in an administrative domain.
device discoveryThe process by which Oracle Secure Backup automatically detects devices accessedthrough Network Data Management Protocol (NDMP) and configuration changes forsuch devices.
attach pointA filename in the /dev file system on UNIX or Linux that represents a hardware tapedevice. A attach point does not specify data on disk, but identifies a hardware unit andthe device driver that handles it. The inode of the file contains the device number,permissions, and ownership data. An attachment consists of a host name and theattach point name by which that device is accessed by Oracle Secure Backup.
differential incremental backupA type of incremental backup in which Oracle Secure Backup copies only data thathas changed at the same or lower backup level. This backup is also called a level 10backup. Oracle Secure Backup does not support the level 10 backup on someplatforms, including Network Attached Storage (NAS) devices such as a NetworkAppliance filer.
digital signatureA set of bits computed by an Certification Authority (CA) to signify the validity ofspecified data. The algorithm for computing the signature makes it difficult to alter thedata without invalidating the signature.
disk poolA file-system directory that stores backups. Disk pools can be accessed concurrentlyby multiple backup or restore jobs.
Glossary
Glossary-6
DMASee data management application (DMA)
domainA group of computers and devices on a network that are administered as a unit with commonrules and procedures. Within the internet, domains are defined by the IP address. All devicessharing a common part of the IP address are said to be in the same domain.
error rateThe number of recovered write errors divided by the total blocks written, multiplied by 100.
expiration policyThe means by which Oracle Secure Backup determines how a volume in a media familyexpires, that is, when they are eligible to be overwritten. A media family can either have a content-managed expiration policy or time-managed expiration policy.
Fiber Distributed Data Interface (FDDI)A set of ANSI protocols for sending digital data over fiber optic cable. FDDI networks aretoken-passing networks, and support data rates of up to 100 Mbps. FDDI networks aretypically used as backbones for wide-area networks.
Fibre ChannelA protocol used primarily among devices in a Storage Area Network (SAN).
file-system backupA backup of files on the file system initiated by Oracle Secure Backup. A file-system backupis distinct from a Recovery Manager (RMAN) backup made through the Oracle SecureBackup SBT interface.
filerA network-attached appliance that is used for data storage.
firewallA system designed to prevent unauthorized access to or from a private network.
Glossary
Glossary-7
full backupAn operation that backs up all of the files selected on a client. Unlike in an incrementalbackup, files are backed up whether they have changed since the last backup or not.
heterogeneous networkA network made up of a multitude of computers, operating systems, and applicationsof different types from different vendors.
host authenticationThe initialization phase of a connection between two hosts in the administrativedomain. After the hosts authenticate themselves to each other with identity certificates,communications between the hosts are encrypted by Secure Sockets Layer (SSL).Almost all connections are two-way authenticated; exceptions include initial hostinvitation to join a domain and interaction with hosts that use NDMP access mode.
identity certificateAn X.509 certificate signed by the Certification Authority (CA) that uniquely identifies ahost in an Oracle Secure Backup administrative domain.
incremental backupAn operation that backs up only the files on a client that changed after a previousbackup. Oracle Secure Backup supports 9 different incremental backup levels for file-system backups. A cumulative incremental backup copies only data that changedsince the most recent backup at a lower level. A differential incremental backup, whichis equivalent to a level 10 backup, copies data that changed since an incrementalbackup at the same or lower level.
An incremental backup contrasts with a full backup, which always backs up all filesregardless of when they last changed. A full backup is equivalent to an incrementalbackup at level 0.
job listA catalog created and maintained by Oracle Secure Backup that describes past,current, and pending backup jobs.
job summaryA text file report produced by Oracle Secure Backup that describes the status ofselected backup and restore jobs. Oracle Secure Backup generates the reportaccording to a user-specified job summary schedule.
Glossary
Glossary-8
job summary scheduleA user-defined schedule for generating job summaries. You create job summary scheduleswith the mksum command in obtool.
locationA location is a place where a volume physically resides; it might be the name of a tapelibrary, a data center, or an off-site storage facility.
logical unit numberPart of the unique identifier of a tape device. See Oracle Secure Backup logical unit numberand SCSI LUN.
manual certificate provisioning modeA mode of certificate management in which you must manually export the signed identitycertificate for a host from the administrative server, transfer it to the host, and manuallyimport the certificate into the wallet of the host. Unlike automated certificate provisioningmode, this mode is not vulnerable to a possible (if extremely unlikely) man-in-the-middleattack.
media familyA named classification of backup volumes that share the same volume sequence file, expiration policy, and write window.
media serverA computer or server that has at least one tape device connected to it. A media server isresponsible for transferring data to or from the devices that are attached to it.
NASSee Network Attached Storage (NAS)
native access modeA synonym for primary access mode.
NDMPSee Network Data Management Protocol (NDMP)
NDMP access modeThe mode of access for a filer or other host that uses Network Data Management Protocol(NDMP) for communications within the administrative domain. NDMP access mode contrasts
Glossary
Glossary-9
with primary access mode, which uses the Oracle Secure Backup network protocol.Note that Oracle Secure Backup uses NDMP for data transfer among hosts regardlessof whether a host is accessed through the primary or NDMP access modes.
Network Attached Storage (NAS)A NAS server is a computer on a network that hosts file systems. The server exposesthe file systems to its clients through one or more standard protocols, most commonly Network File System (NFS) and CIFS.
Network Data Management Protocol (NDMP)An open standard protocol that defines a common architecture for backups ofheterogeneous file servers on a network. This protocol allows the creation of acommon agent used by the central backup application, called a data managementapplication (DMA), to back up servers running different operating systems. WithNDMP, network congestion is minimized because the data path and control path areseparated. Backup can occur locally—from a file server direct to a tape drive—whilemanagement can occur centrally.
network description fileA text file that lists the hosts in your network on which Oracle Secure Backup shouldbe installed. For each host, you can identify the Oracle Secure Backup installationtype, the host name, and each tape drive attached. The install subdirectory in the Oracle Secure Backup home includes a sample network description file named obndf.
Network File System (NFS)A client/server application that gives all network users access to shared files stored oncomputers of different types. NFS provides access to shared files through an interfacecalled the Virtual File System (VFS) that runs on top of TCP/IP. Users can manipulateshared files as if they were stored on local disk. With NFS, computers connected to anetwork operate as clients while accessing remote files, and as servers while providingremote users access to local shared files. The NFS standards are publicly availableand widely used.
OB access modeA synonym for primary access mode.
obfuscated walletA wallet whose data is scrambled into a form that is extremely difficult to read if thescrambling algorithm is unknown. The wallet is read-only and is not protected by apassword. An obfuscated wallet supports single sign-on (SSO).
Glossary
Glossary-10
obtarThe underlying engine of Oracle Secure Backup that moves data to and from tape. obtar is adescendent of the original Berkeley UNIX tar(2) command.Although obtar is typically notaccessed directly, you can use it to back up and restore files or directories specified on thecommand line. obtar enables the use of features not exposed through obtool or the Web tool.
obtoolThe principal command-line interface to Oracle Secure Backup. You can use this tool toperform all Oracle Secure Backup configuration, backup and restore, maintenance, andmonitoring operations. The obtool utility is an alternative to the Oracle Secure Backup Webtool.
offsite backupA backup that is equivalent to a full backup except that it does not affect the full orincremental backup schedule. An offsite backup is useful when you want to create an backupimage for offsite storage without disturbing your incremental backup schedule.
on-demand backupA file-system backup initiated through the backup command in obtool or the Oracle SecureBackup Web tool. The backup is one-time-only and either runs immediately or at a specifiedtime in the future. An on-demand backup contrasts with a scheduled backup, which isinitiated by the Oracle Secure Backup scheduler.
operatorA person whose duties include backup operations, backup schedule management, tapeswaps, and error checking.
Oracle Secure Backup homeThe directory in which the Oracle Secure Backup software is installed. The Oracle SecureBackup home is typically /usr/local/oracle/backup on UNIX/Linux and C:\ProgramFiles\Oracle\Backup on Windows. This directory contains binaries and configuration files.The contents of the directory differ depending on which role is assigned to the host within the administrative domain.
Oracle Secure Backup logical unit numberA number between 0 and 31 used to generate unique attach point names during deviceconfiguration (for example, /dev/obt0, /dev/obt1, and so on). Although it is not arequirement, unit numbers typically start at 0 and increment for each additional device of agiven type, whether tape library or tape drive.
Glossary
Glossary-11
The Oracle Secure Backup logical unit number is part of the name of the attach point.Do not confuse it with SCSI LUN, which is part of the hardware address of the device.
Oracle Secure Backup userAn account defined within an Oracle Secure Backup administrative domain. OracleSecure Backup users exist in a separate namespace from operating system users.
overwriteThe process of replacing a file on your system by restoring a file that has the same filename.
originating locationA location where a volume was first written.
Preferred Network Interface (PNI)The preferred network interface for transmitting data to be backed up or restored. Anetwork can have multiple physical connections between a client and the serverperforming a backup or restore on behalf of that client. For example, a network canhave both Ethernet and Fiber Distributed Data Interface (FDDI) connections between apair of hosts. PNI enables you to specify, on a client-by-client basis, which of theserver's network interfaces is preferred.
preauthorizationAn optional attribute of an Oracle Secure Backup user. A preauthorization gives anoperating system user access to specified Oracle Secure Backup resources.
primary access modeThe mode of access for a host that uses the Oracle Secure Backup network protocolfor communications within the administrative domain. Oracle Secure Backup must beinstalled on hosts that use primary access mode. In contrast, hosts that use NDMPaccess mode do not require Oracle Secure Backup to be installed. Note that OracleSecure Backup uses Network Data Management Protocol (NDMP) for data transferamong hosts regardless of whether a host is accessed through the primary or NDMPaccess modes.
private keyA number that corresponds to a specific public key and is known only to the owner.Private and public keys exist in pairs in all public key cryptography systems. In a
Glossary
Glossary-12
typical public key cryptosystem, such as RSA, a private key corresponds to exactly onepublic key. You can use private keys to compute signatures and decrypt data.
privileged backupA file-system backup operation initiated with the --privileged option of the backupcommand. On UNIX and Linux systems, a privileged backup runs under the root useridentity. On Windows systems, the backup runs under the same account (usually LocalSystem) as the Oracle Secure Backup service on the Windows client.
public keyA number associated with a particular entity intended to be known by everyone who musthave trusted interactions with this entity. A public key, which is used with a corresponding private key, can encrypt communication and verify signatures.
Recovery Manager (RMAN)A utility supplied with Oracle Database used for database backup, restore, and recovery.RMAN is a separate application from Oracle Secure Backup. Unlike RMAN, you can useOracle Secure Backup to back up any file on the file system—not just database files. OracleSecure Backup includes an SBT interface that RMAN can use to back up database filesdirectly to tape.
retention periodThe length of time that data in a volume set is not eligible to be overwritten. The retentionperiod is an attribute of a time-managed media family. The retention period begins at the write window close time. For example, if the write window for a media family is 7 days, then aretention period of 14 days indicates that the data is eligible to be overwritten 21 days fromthe first write to the first volume in the volume set.
rightsPrivileges within the administrative domain that are assigned to a class. For example, theperform backup as self right is assigned to the operator class by default. Every OracleSecure Backup user that belongs to a class is granted the rights associated with this class.
rolesThe functions that hosts in your network can have during backup and restore operations.There are three roles in Oracle Secure Backup: administrative server, media server, and client. A host in your network can serve in any of these roles or any combination of them. Forexample, the administrative server can also be a client and media server.
Glossary
Glossary-13

SANSee Storage Area Network (SAN)
SBT interfaceA media management software library that Recovery Manager (RMAN) can use toback up to tertiary storage. An SBT interface conforms to a published API and issupplied by a media management vendor. Oracle Secure Backup includes an SBTinterface for use with RMAN.
scheduled backupA file-system backup that is scheduled through the mksched command in obtool or theOracle Secure Backup Web tool (or is modified by the runjob command). A backupschedule describes which files should be backed up. A trigger defined in the schedulespecifies when the backup job should run.
schedulerA daemon (obscheduled) that runs on an administrative server and is responsible formanaging all backup scheduling activities. The scheduler maintains a job list of backupjob operations scheduled for execution.
service daemonA daemon (observiced) that runs on each host in the administrative domain thatcommunicates through primary access mode. The service daemon provides a widevariety of services, including certificate operations.
SCSISee Small Computer System Interface (SCSI)
SCSI LUNSCSI logical unit number. A 3-bit identifier used on a SCSI bus to distinguish betweenup to eight devices (logical units) with the same SCSI ID. Do not confuse with OracleSecure Backup logical unit number
Secure Sockets Layer (SSL)A cryptographic protocol that provides secure network communication. SSL providesendpoint authentication through a certificate. Data transmitted over SSL is protectedfrom eavesdropping, tampering or message forgery, and replay attacks.
Glossary
Glossary-14
Small Computer System Interface (SCSI)A parallel I/O bus and protocol that permits the connection of a variety of peripherals to hostcomputers. Connection to the SCSI bus is achieved through a host adapter and a peripheralcontroller.
SSLSee Secure Sockets Layer (SSL)
Storage Area Network (SAN)A high-speed subnetwork of shared storage devices. A SAN is designed to assign databackup and restore functions to a secondary network so that they do not interfere with thefunctions and capabilities of the server.
storage deviceA computer that contains disks for storing data.
storage elementA physical location within a tape library where a volume can be stored and retrieved by a tapelibrary's robotic arm.
storage locationA location outside of a tape library or tape drive where a volume can be stored.
tape deviceA tape drive or tape library identified by a user-defined device name.
tape driveA tape device that reads and writes data stored on a tape. Tape drives are sequential-access,which means that they must read all preceding data to read any particular piece of data. Thetape drives are accessible through various protocols, including Small Computer SystemInterface (SCSI) and Fibre Channel. A tape drive can exist standalone or in a tape library.
tape libraryA medium changer that accepts Small Computer System Interface (SCSI) commands tomove a volume from a storage element to a tape drive and back again.
Glossary
Glossary-15
tape serviceA Network Data Management Protocol (NDMP) service that transfers data to and fromsecondary storage and allows the data management application (DMA) to manipulateand access secondary storage.
TCP/IPTransmission Control Protocol/Internet Protocol. The suite of protocols used toconnect hosts for transmitting data over networks.
three-way backupThe process of backing up an NDMP server that supports NDMP but does not have alocally attached backup device to another NDMP server that has an attached backupdevice. The backup is performed by sending the data through a TCP/IP connection tothe NDMP server with the attached backup device. In this configuration, the NDMPdata service exists on the NDMP server that contains the data to be backed up andthe NDMP tape service exists on the NDMP server with the attached tape device.
time-managed expiration policyA media family expiration policy in which every volume in a volume set can beoverwritten when it reaches its volume expiration time. Oracle Secure Backupcomputes the volume expiration time by adding the volume creation time for the firstvolume in the set, the write window time, and the retention period.
For example, you set the write window for a media family to 7 days and the retentionperiod to 14 days. Assume that Oracle Secure Backup first wrote to the first volume inthe set on January 1 at noon and subsequently wrote data on 20 more volumes in theset. In this scenario, all 21 volumes in the set expire on January 22 at noon.
You can make a Recovery Manager (RMAN) backup or a file-system backup to a volume that use a time-managed expiration policy.
triggerThe part of a backup schedule that specifies the days and times at which the backupsshould occur.
trusted certificateA certificate that is considered valid without validation testing. Trusted certificates buildthe foundation of the system of trust. Typically, they are certificates from a trusted Certification Authority (CA).
unprivileged backupFile-system backups created with the --unprivileged option of the backup command.When you create or modify an Oracle Secure Backup user, you associate operating
Glossary
Glossary-16
system accounts with this user. Unprivileged backups of a host run under the operatingsystem account associate with Oracle Secure Backup user who initiates the backup.
volumeA volume is a unit of media, such as an 8mm tape. A volume can contain multiple backupimage instances.
volume creation timeThe time at which Oracle Secure Backup wrote backup image file number 1 to a volume.
volume expiration timeThe date and time on which a volume in a volume set expires. Oracle Secure Backupcomputes this time by adding the write window duration, if any, to the volume creation time forthe first volume in the set, then adding the volume retention period.
For example, assume that a volume set belongs to a media family with a retention period of14 days and a write window of 7 days. Assume that the volume creation time for the firstvolume in the set was January 1 at noon and that Oracle Secure Backup subsequently wrotedata on 20 more volumes in the set. In this scenario, the volume expiration time for all 21volumes in the set is January 22 at noon.
volume IDA unique alphanumeric identifier assigned by Oracle Secure Backup to a volume when it waslabeled. The volume ID usually includes the media family name of the volume, a dash, and aunique volume sequence number. For example, a volume ID in the RMAN-DEFAULT mediafamily could be RMAN-DEFAULT-000002.
volume labelThe first block of the first backup image on a volume. It contains the volume ID, the owner'sname, the volume creation time, and other information.
volume sequence fileA file that contains a unique volume ID to assign when labeling a volume.
volume sequence numberA number recorded in the volume label that indicates the order of volumes in a volume set.The first volume in a set has sequence number 1. The volume ID for a volume usuallyincludes the media family name of the volume, a dash, and a unique volume sequencenumber. For example, a volume ID for a volume in the RMAN-DEFAULT media family couldbe RMAN-DEFAULT-000002.
Glossary
Glossary-17
volume setA group of volumes spanned by a backup image. The part of the backup imageinstance that fits on a single volume is a backup section.
volume tagA field that is commonly used to hold the barcode identifier, also called a volume tag,for the volume. The volume tag is found in the volume label.
walletA password-protected encrypted file. An Oracle wallet is primarily designed to storeX.509 certificates and their associated public key/private key pair. The contents of thewallet are only available after the wallet password has been supplied, although with an obfuscated wallet no password is required.
Web toolThe browser-based GUI that enables you to configure an administrative domain,manage backup and restore operations, and browse the backup catalog.
write windowThe period for which a volume set remains open for updates, usually by appending anadditional backup image. The write window opens at the volume creation time for thefirst volume in the set and closes after the write window period has elapsed. After the write window close time, Oracle Secure Backup does not allow further updates to thevolume set until it expires (as determined by its expiration policy), or until it isrelabeled, reused, unlabeled, or forcibly overwritten.
A write window is associated with a media family. All volume sets that are members ofthe media family remain open for updates for the same time period.
write window close timeThe date and time that a volume set closes for updates. Oracle Secure Backupcomputes this time when it writes backup image file number 1 to the first volume in theset. If a volume set has a write window close time, then this information is located inthe volume section of the volume label.
write window timeThe length of time during which writing to a volume set is permitted.
Glossary
Glossary-18
Index
Aabout
PNI, 7-11access mode
about, 1-4about NDMP, 1-5about primary, 1-4selecting, 7-8
ACSLSabout, C-1access controls, C-4and obtool, C-2cartridges, C-2communicating with, C-3configuration, C-5drive association, C-3imports and exports, C-4installation, C-5modified obtool commands, C-4scratch pool, C-3scratch pool management, C-4unsupported obtool commands, C-5volume loading and unloading, C-3
addinghosts in manual certificate provisioning
mode, 9-19tape device attachments, 7-33
admin usercreating password during installation on
Windows, 4-1administrative domain
configuration overview, 7-1defined, 1-3discovering tape devices, 7-19enabling RDS, D-2host naming, 1-4
administrative serverabout, 1-3configuring security, 9-17directories, A-1files, A-1registering with Oracle Enterprise Manager,
6-2
Apache Web serverand network security, 9-14
assetsidentifying for network security, 9-2
attachmentsabout, 1-11about multiple attachments, 7-34adding for tape devices, 7-33displaying device attachment properties, 7-34pinging for tape devices, 7-34raw device names, 7-33
authentication objectconfiguring, 7-48
authorization typesNDMP servers, 7-9
automated certificate provisioning modeabout, 9-8, 9-12and network security, 9-18
automatic tape drive cleaningconfiguring, 7-28
automatic volume ejection, 7-27automount mode
about, 1-10setting for tape drive, 7-30
Bbackup encryption
enabling, 9-15backup environment
and network security, 9-3backup type
setting for NDMP hosts, 7-10barcode readers
configuring, 7-26barcodes
about, 1-10block size
about, 1-7and restore operations, 1-8
blocking factorabout, 1-7and restore operations, 1-8setting for tape drive, 7-30setting maximum for tape drive, 7-30
Index-1
Ccertificate provisioning
about automated mode, 9-8about manual mode, 9-8
Certification Authority (CA), 9-11and network security, 9-9
certkeysize policy, 9-20client
defined, 1-4installation on Windows, 4-1
client hostdirectories, A-5files, A-5
clientsconfiguring security, 9-18
cloud certificate, 7-56about, 7-55download, 7-55, 7-56import, 7-58view, 7-55, 7-56
cloud storage devicesabout, 1-12capacity
specifying, 7-52concurrent jobs
specifying, 7-53configuring, 7-47editing properties, 7-54listing currently defined, 7-54removing, 7-55renaming, 7-55space utilization
specifying, 7-51, 7-53cloud storage devices for OCI
creating, 7-49cloud storage devices for OCI Classic
creating, 7-52cloud wallet
adding certificate, 7-55, 7-56, 7-58creating, 7-59manually creating, 7-55obcm wallet, 7-58, 7-59
configuringabout tape device names, 7-22ACSLS, C-5administrative server security, 9-17barcode readers, 7-26client security, 9-18cloud storage devices, 7-47discovering tape devices, 7-19disk pools, 7-41editing host properties, 7-46host access mode, 7-8host encryption, 7-7
configuring (continued)host key sizes, 7-8host roles, 7-7host status, 7-7hosts, 7-4key sizes, 7-8media server security, 9-18naming tape drives, 7-29naming tape libraries, 7-26NDMP authorization type, 7-9NDMP host backup type, 7-10NDMP host environment variables, 7-11NDMP host password type, 7-9NDMP host port number, 7-10NDMP protocol version, 7-10pinging hosts, 7-15preferred network interfaces, 7-11removing a host, 7-46tape device attachments, 7-33tape devices, 7-22tape drive automount mode, 7-30tape drive blocking factor, 7-30tape drive data transfer element, 7-30tape drive error rate, 7-30tape drive maximum blocking factor, 7-30tape drive status, 7-29tape drive storage element use list, 7-31tape drive usage, 7-31tape drive World Wide Name (WWN), 7-30tape drives, 7-22, 7-29tape libraries, 7-22, 7-25tape library status, 7-26tape library World Wide Name (WWN), 7-26testing tape device attachments, 7-34updating hosts, 7-46viewing host properties, 7-46Web tool Hosts page, 7-45
configuring automatic tape drive cleaning, 7-28configuring for inbound connections
PNI, 7-13, 7-14configuring for outbound connections
PNI, 7-13, 7-14control connections, 7-16creating
disk pools, 7-41
Ddaemons
listening ports, 4-10obacslibd, C-3, C-4obacsssid, C-3obhttpd, 9-14obrobotd, C-3observiced, 9-11
Index
Index-2
daemons (continued)Web tool Manage page, 6-10
data communicationusing RDS, D-1
data encryptionabout, 9-15
data transfer element,defined, 1-10tape drive configuration, 7-30
device namesabout, 1-11
devicesabout discovering automatically, 7-17
directoriesadministrative server, A-1client, A-5home, A-1media server, A-4
discovering devicesabout, 7-17
disk poolscapacity
specifying, 7-42concurrent jobs
specifying, 7-42configuring, 7-41creating, 7-41displaying, 7-41modifying, 7-43renaming, 7-44space utilization
specifying, 7-42specifying attachment, 7-43
displayingdevice attachment properties, 7-34disk pools, 7-41Web tool Backup page, 6-10Web tool Configure page, 6-7Web tool Devices page, 7-25Web tool Home page, 6-5Web tool Hosts page, 7-45Web tool Manage page, 6-8Web tool Restore page, 6-11
DTESee data transfer element
Eediting
host properties, 7-46tape device properties, 7-38
enabletcpkeepalive, 7-16
encryptdataintransit policy, 9-15, 9-17encryption in transit, 9-15
encryption, host, 7-7environment variables
setting for NDMP host, 7-11error rate
setting for tape drive, 7-30exporting
identity certificates, 9-27
Ffilers
support for SSL, 9-10firewalls
configuring after installation on Windows,4-10
Hhome directory
location, A-1host
disabling RDS, 7-8hosts
about configuration, 7-4access modes, 1-4adding environment variables for NDMP
host, 7-11adding in manual certificate provisioning
mode, 9-19configuring access modes, 7-8configuring encryption, 7-7configuring key sizes, 7-8configuring preferred network interfaces, 7-11configuring roles, 7-7disabling RDS, D-2duplicate names, 2-6editing properties, 7-46IP addresses, 7-7naming, 1-4NDMP authorization type, 7-9pinging, 7-15removing, 7-46setting NDMP backup type, 7-10setting NDMP host port number, 7-10setting NDMP password type, 7-9setting NDMP protocol version, 7-10setting status, 7-7trusted, 9-9updating, 7-46viewing properties, 7-46Web tool Hosts page, 7-45
Index
Index-3
Iidentity certificates
distributing, 9-7exporting, 9-27importing, 9-27managing with obcm, 9-22revoking, 9-14
IEESee import/export element
import/export element,defined, 1-10
importingidentity certificates, 9-27
installation mediaabout, 2-6
installation on Linux/UNIXdisabling SCSI scan software, 3-1silent install of client role, 3-6with Oracle Real Application Clusters, 3-2
installation on Windowsassigning users Windows credentials, 4-9configuring firewalls, 4-10creating oracle user, 4-9creating password for admin user, 4-1creating password for key store, 4-1disabling SCSI scanning software, 4-1preliminary steps, 4-1selecting host roles, 4-1with Oracle Real Application Clusters, 4-1
installingACSLS, C-5
interfacesabout, 1-14
IP addressesconfiguring a host, 7-7requirements, 2-6
Kkey sizes
configuring, 7-8key store
creating password during installation onWindows, 4-1
keyssetting size, 9-20
LLinux
probing SCSI parameters, B-1local policy
tcpkeepalive, 4-10, 7-16
logical unit numbersprerequisites, 3-22
Mmalicious users
and network security, 9-7manage regions
region identifier, 7-56manual certificate provisioning mode, 9-12
about, 9-8adding hosts in, 9-19and network security, 9-18
manual volume ejection, 7-27maximum blocking factor
about, 1-7setting for tape drive, 7-30
media serverdefined, 1-4directories, A-4files, A-4
media serversconfiguring security, 9-18
medium transport element,defined, 1-10
modifyingdisk pools, 7-43
MTESee medium transport element
multiple attachmentsto storage area networks, 7-34
multiple data paths, 7-11multiple network interfaces
load balancing, 7-2
Nnames
tape devices, 7-22tape drives, 7-22tape libraries, 7-22
namingtape drives, 7-29tape libraries, 7-26
NDMPaccess mode, 7-8supported versions, 1-5
NDMP access modeabout, 1-5
NDMP authorization typend5, 7-6negotiated, 7-6text, 7-6
NDMP hostsadding environment variables, 7-11
Index
Index-4
NDMP hosts (continued)authorization types, 7-9nd5 authorization type, 7-6negotiated authorization type, 7-6setting backup type, 7-10setting password type, 7-9setting port number, 7-10setting protocol version, 7-10support for SSL, 9-10testing TCP connection, 7-15updating, 7-46
NDMP protocolsetting, 7-10
NDMP text authorization type, 7-6network connection types
order of precedence, 7-2PNI, 7-13
network load balancing, 7-2network security
Apache Web server, 9-14authenticated SSL connections, 9-11automated certificate provisioning mode,
9-18backup environment, 9-3Certification Authority, 9-9Certification Authority (CA), 9-11certkeysize, 9-20configuring clients, 9-18configuring media servers, 9-18configuring the administrative server, 9-17corporate network example, 9-6data center example, 9-4default configuration, 9-17disabling SSL, 9-22distributing identity certificates, 9-7enabling backup encryption, 9-15encryptdataintransit, 9-15, 9-17exporting signed certificates, 9-27host authentication, 9-1, 9-9host communication, 9-9identifying assets, 9-2identifying principals, 9-2identity certificates, 9-10importing identity certificates, 9-27levels, 9-3malicious users, 9-7manual certificate provisioning mode, 9-18obcm utility, 9-22obfuscated wallet, 9-12Oracle wallet, 9-12Oracle wallet passwords, 9-12overview, 9-1planning, 9-2public key cryptography, 9-10revoking an identity certificate, 9-14
network security (continued)Secure Sockets Layer, 9-1securecomms, 9-17, 9-22selecting administrative and media servers,
9-7setting key size, 9-20setting key size in obparameters, 9-20setting key sizes in certkeysize security
policy, 9-21single-host example, 9-3trusted certificates, 9-11trusted hosts, 9-9using obcm, 9-12X.509 certificates, 9-1
Oobcm utility
and network security, 9-12exporting certificates with, 9-27importing certificates with, 9-27in manual certificate provisioning mode, 9-19managing certificates, 9-22
obfirewallconfig.bat, 4-10obfuscated wallet
and network security, 9-12obparameters
setting key size, 9-20obtool
about, 1-15, 6-11displaying help, 6-12ending a session, 6-14modified commands for ACSLS, C-4redirecting input from text files, 6-13running commands in interactive mode, 6-12running multiple commands, 6-13starting as specific user, 6-14starting in interactive mode, 6-12starting in noninteractive mode, 6-13unsupported commands for ACSLS, C-5
on-demand volume ejection, 7-27operating systems
supported, 2-5Oracle Enterprise Manager
about, 1-15and Oracle Secure Backup, 6-1enabling OSB links, 6-2link to OSB Web tool, 6-3registering administrative server, 6-2
Oracle Secure Backup home directory, 2-9oracle user
creating during installation on Windows, 4-9Oracle wallet
and network security, 9-12obfuscated, 9-12
Index
Index-5
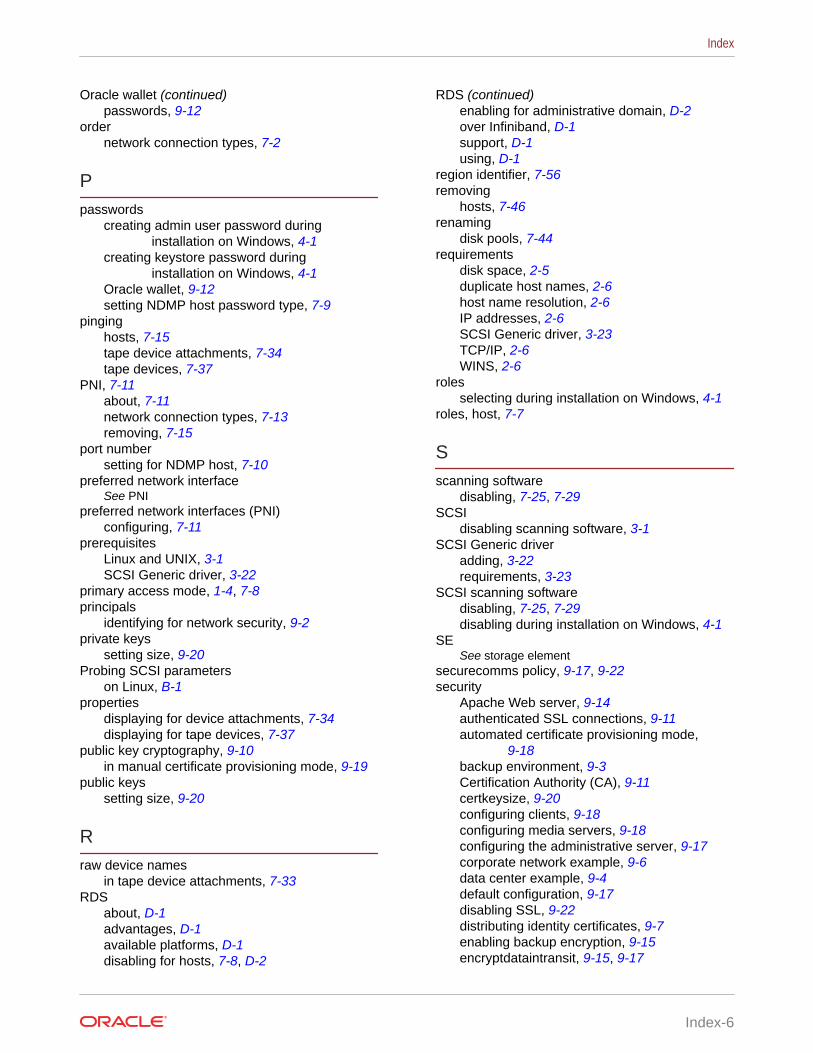
Oracle wallet (continued)passwords, 9-12
ordernetwork connection types, 7-2
Ppasswords
creating admin user password duringinstallation on Windows, 4-1
creating keystore password duringinstallation on Windows, 4-1
Oracle wallet, 9-12setting NDMP host password type, 7-9
pinginghosts, 7-15tape device attachments, 7-34tape devices, 7-37
PNI, 7-11about, 7-11network connection types, 7-13removing, 7-15
port numbersetting for NDMP host, 7-10
preferred network interfaceSee PNI
preferred network interfaces (PNI)configuring, 7-11
prerequisitesLinux and UNIX, 3-1SCSI Generic driver, 3-22
primary access mode, 1-4, 7-8principals
identifying for network security, 9-2private keys
setting size, 9-20Probing SCSI parameters
on Linux, B-1properties
displaying for device attachments, 7-34displaying for tape devices, 7-37
public key cryptography, 9-10in manual certificate provisioning mode, 9-19
public keyssetting size, 9-20
Rraw device names
in tape device attachments, 7-33RDS
about, D-1advantages, D-1available platforms, D-1disabling for hosts, 7-8, D-2
RDS (continued)enabling for administrative domain, D-2over Infiniband, D-1support, D-1using, D-1
region identifier, 7-56removing
hosts, 7-46renaming
disk pools, 7-44requirements
disk space, 2-5duplicate host names, 2-6host name resolution, 2-6IP addresses, 2-6SCSI Generic driver, 3-23TCP/IP, 2-6WINS, 2-6
rolesselecting during installation on Windows, 4-1
roles, host, 7-7
Sscanning software
disabling, 7-25, 7-29SCSI
disabling scanning software, 3-1SCSI Generic driver
adding, 3-22requirements, 3-23
SCSI scanning softwaredisabling, 7-25, 7-29disabling during installation on Windows, 4-1
SESee storage element
securecomms policy, 9-17, 9-22security
Apache Web server, 9-14authenticated SSL connections, 9-11automated certificate provisioning mode,
9-18backup environment, 9-3Certification Authority (CA), 9-11certkeysize, 9-20configuring clients, 9-18configuring media servers, 9-18configuring the administrative server, 9-17corporate network example, 9-6data center example, 9-4default configuration, 9-17disabling SSL, 9-22distributing identity certificates, 9-7enabling backup encryption, 9-15encryptdataintransit, 9-15, 9-17
Index
Index-6
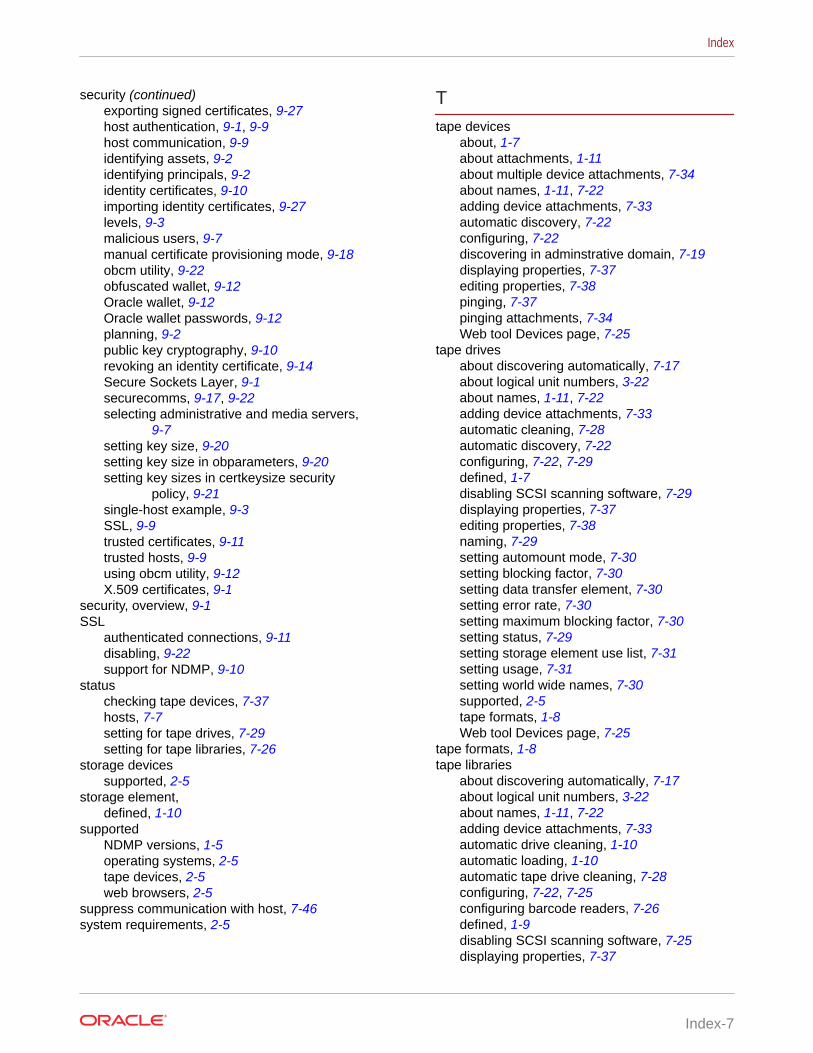
security (continued)exporting signed certificates, 9-27host authentication, 9-1, 9-9host communication, 9-9identifying assets, 9-2identifying principals, 9-2identity certificates, 9-10importing identity certificates, 9-27levels, 9-3malicious users, 9-7manual certificate provisioning mode, 9-18obcm utility, 9-22obfuscated wallet, 9-12Oracle wallet, 9-12Oracle wallet passwords, 9-12planning, 9-2public key cryptography, 9-10revoking an identity certificate, 9-14Secure Sockets Layer, 9-1securecomms, 9-17, 9-22selecting administrative and media servers,
9-7setting key size, 9-20setting key size in obparameters, 9-20setting key sizes in certkeysize security
policy, 9-21single-host example, 9-3SSL, 9-9trusted certificates, 9-11trusted hosts, 9-9using obcm utility, 9-12X.509 certificates, 9-1
security, overview, 9-1SSL
authenticated connections, 9-11disabling, 9-22support for NDMP, 9-10
statuschecking tape devices, 7-37hosts, 7-7setting for tape drives, 7-29setting for tape libraries, 7-26
storage devicessupported, 2-5
storage element,defined, 1-10
supportedNDMP versions, 1-5operating systems, 2-5tape devices, 2-5web browsers, 2-5
suppress communication with host, 7-46system requirements, 2-5
Ttape devices
about, 1-7about attachments, 1-11about multiple device attachments, 7-34about names, 1-11, 7-22adding device attachments, 7-33automatic discovery, 7-22configuring, 7-22discovering in adminstrative domain, 7-19displaying properties, 7-37editing properties, 7-38pinging, 7-37pinging attachments, 7-34Web tool Devices page, 7-25
tape drivesabout discovering automatically, 7-17about logical unit numbers, 3-22about names, 1-11, 7-22adding device attachments, 7-33automatic cleaning, 7-28automatic discovery, 7-22configuring, 7-22, 7-29defined, 1-7disabling SCSI scanning software, 7-29displaying properties, 7-37editing properties, 7-38naming, 7-29setting automount mode, 7-30setting blocking factor, 7-30setting data transfer element, 7-30setting error rate, 7-30setting maximum blocking factor, 7-30setting status, 7-29setting storage element use list, 7-31setting usage, 7-31setting world wide names, 7-30supported, 2-5tape formats, 1-8Web tool Devices page, 7-25
tape formats, 1-8tape libraries
about discovering automatically, 7-17about logical unit numbers, 3-22about names, 1-11, 7-22adding device attachments, 7-33automatic drive cleaning, 1-10automatic loading, 1-10automatic tape drive cleaning, 7-28configuring, 7-22, 7-25configuring barcode readers, 7-26defined, 1-9disabling SCSI scanning software, 7-25displaying properties, 7-37
Index
Index-7
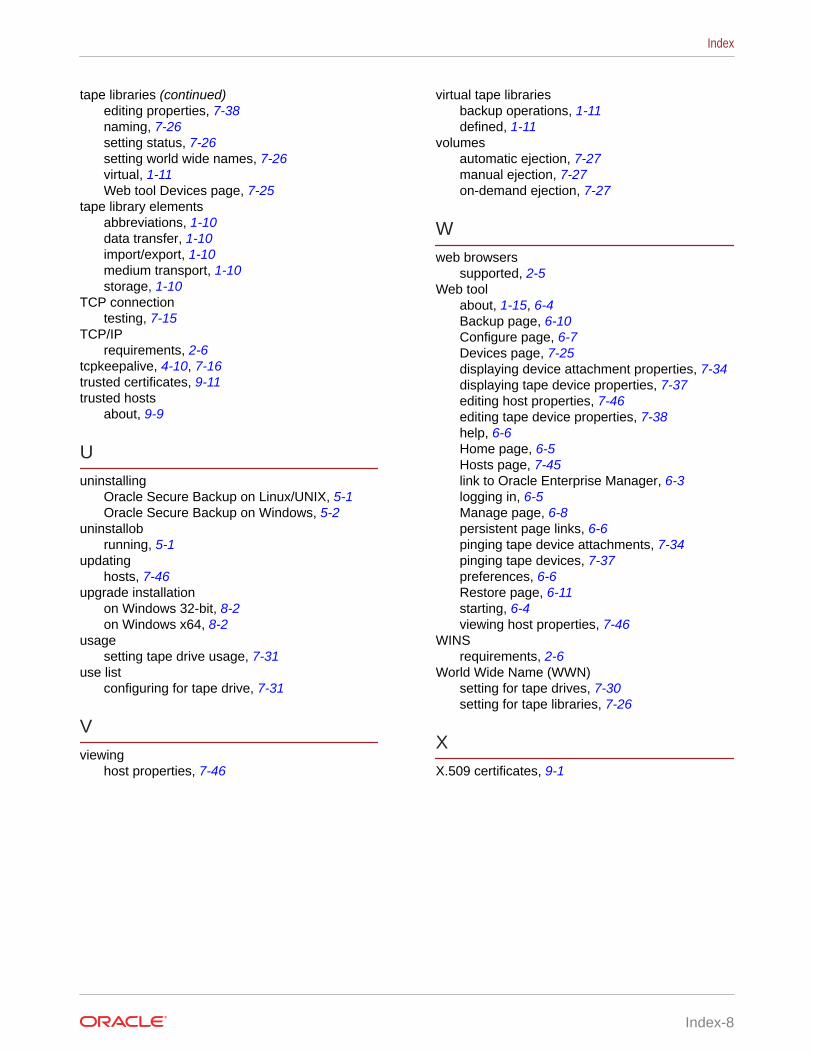
tape libraries (continued)editing properties, 7-38naming, 7-26setting status, 7-26setting world wide names, 7-26virtual, 1-11Web tool Devices page, 7-25
tape library elementsabbreviations, 1-10data transfer, 1-10import/export, 1-10medium transport, 1-10storage, 1-10
TCP connectiontesting, 7-15
TCP/IPrequirements, 2-6
tcpkeepalive, 4-10, 7-16trusted certificates, 9-11trusted hosts
about, 9-9
Uuninstalling
Oracle Secure Backup on Linux/UNIX, 5-1Oracle Secure Backup on Windows, 5-2
uninstallobrunning, 5-1
updatinghosts, 7-46
upgrade installationon Windows 32-bit, 8-2on Windows x64, 8-2
usagesetting tape drive usage, 7-31
use listconfiguring for tape drive, 7-31
Vviewing
host properties, 7-46
virtual tape librariesbackup operations, 1-11defined, 1-11
volumesautomatic ejection, 7-27manual ejection, 7-27on-demand ejection, 7-27
Wweb browsers
supported, 2-5Web tool
about, 1-15, 6-4Backup page, 6-10Configure page, 6-7Devices page, 7-25displaying device attachment properties, 7-34displaying tape device properties, 7-37editing host properties, 7-46editing tape device properties, 7-38help, 6-6Home page, 6-5Hosts page, 7-45link to Oracle Enterprise Manager, 6-3logging in, 6-5Manage page, 6-8persistent page links, 6-6pinging tape device attachments, 7-34pinging tape devices, 7-37preferences, 6-6Restore page, 6-11starting, 6-4viewing host properties, 7-46
WINSrequirements, 2-6
World Wide Name (WWN)setting for tape drives, 7-30setting for tape libraries, 7-26
XX.509 certificates, 9-1
Index
Index-8