oracle® iprocurement implementation and administration guide release 12.1
TRANSCRIPT

Oracle® iProcurementImplementation and Administration GuideRelease 12.1Part No. E13409-05
August 2010

Oracle iProcurement Implementation and Administration Guide, Release 12.1
Part No. E13409-05
Copyright © 2009, 2010, Oracle and/or its affiliates. All rights reserved.
Primary Author: Pratima Mahtani
Oracle is a registered trademark of Oracle Corporation and/or its affiliates. Other names may be trademarks of their respective owners.
This software and related documentation are provided under a license agreement containing restrictions on use and disclosure and are protected by intellectual property laws. Except as expressly permitted in your license agreement or allowed by law, you may not use, copy, reproduce, translate, broadcast, modify, license, transmit, distribute, exhibit, perform, publish or display any part, in any form, or by any means. Reverse engineering, disassembly, or decompilation of this software, unless required by law for interoperability, is prohibited.
The information contained herein is subject to change without notice and is not warranted to be error-free. If you find any errors, please report them to us in writing.
If this software or related documentation is delivered to the U.S. Government or anyone licensing it on behalf of the U.S. Government, the following notice is applicable:
U.S. GOVERNMENT RIGHTSPrograms, software, databases, and related documentation and technical data delivered to U.S. Government customers are "commercial computer software" or "commercial technical data" pursuant to the applicable Federal Acquisition Regulation and agency-specific supplemental regulations. As such, the use, duplication, disclosure, modification, and adaptation shall be subject to the restrictions and license terms set forth in the applicable Government contract, and, to the extent applicable by the terms of the Government contract, the additional rights set forth in FAR 52.227-19, Commercial Computer Software License (December 2007). Oracle USA, Inc., 500 Oracle Parkway, Redwood City, CA 94065.
This software is developed for general use in a variety of information management applications. It is not developed or intended for use in any inherently dangerous applications, including applications which may create a risk of personal injury. If you use this software in dangerous applications, then you shall be responsible to take all appropriate fail-safe, backup, redundancy and other measures to ensure the safe use of this software. Oracle Corporation and its affiliates disclaim any liability for any damages caused by use of thissoftware in dangerous applications.
This software and documentation may provide access to or information on content, products and services from third parties. Oracle Corporation and its affiliates are not responsible for and expressly disclaim all warranties of any kind with respect to third party content, products and services. Oracle Corporation and its affiliates will not be responsible for any loss, costs, or damages incurred due to your access to or use of third party content, products or services.
iii
Contents
Send Us Your Comments
Preface
1 Oracle iProcurement OverviewOracle iProcurement in Comprehensive Procure-to-Pay Flow................................................ 1-1Core Features of Oracle iProcurement...................................................................................... 1-2
Catalog Management........................................................................................................... 1-2Shopping.............................................................................................................................. 1-3Checkout.............................................................................................................................. 1-6Requisition Tracking and Management............................................................................... 1-9Desktop Receiving............................................................................................................. 1-11
Integration with E-Business Suite Applications.................................................................... 1-11Oracle Services Procurement Integration...........................................................................1-11
2 Oracle Applications SetupPrerequisites.............................................................................................................................. 2-1Setup Checklists........................................................................................................................ 2-1Set Up Function, Menu, and Data Security.............................................................................. 2-4Personalize Oracle iProcurement............................................................................................ 2-15Create Operating Unit-Specific Purchasing News ................................................................ 2-16Customize Operating Unit Purchasing Policies..................................................................... 2-17Customize Workflows............................................................................................................. 2-18Define Descriptive Flexfields on Requisitions...................................................................... 2-24Implement Custom Packages.................................................................................................. 2-26Modify Online Help................................................................................................................ 2-30
iv
Profile Options and Profile Options Categories.................................................................... 2-32
3 Content ManagementUnderstanding the Procurement Catalog................................................................................. 3-1Implementation Checklist.........................................................................................................3-4Maintaining The Catalog Schema.............................................................................................3-5
Loading Schema................................................................................................................... 3-7Online Schema Maintenance................................................................................................ 3-9
Maintaining Descriptors.............................................................................................. 3-10Maintaining Shopping Categories............................................................................... 3-12Maintaining Category Hierarchy.................................................................................3-14iProcurement Shopping Category Mapping................................................................3-17Oracle Purchasing Category Mapping........................................................................ 3-19
Maintaining Catalog Content................................................................................................. 3-21Maintaining Local Content................................................................................................ 3-21External Content................................................................................................................ 3-33Smart Forms....................................................................................................................... 3-34
Managing Content Presentation............................................................................................. 3-44Maintaining Stores............................................................................................................. 3-44Maintaining Content Zones............................................................................................... 3-49Content Translation........................................................................................................... 3-56Managing Images...............................................................................................................3-58
Managing Searching And Browsing....................................................................................... 3-63Global Agreements..................................................................................................................3-64
4 Requisitions SetupRequisitions Setup Checklist.................................................................................................... 4-1Foreign Currency Support.........................................................................................................4-3Information Templates..............................................................................................................4-4Suggested Buyer........................................................................................................................ 4-9One-Time Address.................................................................................................................. 4-10Purchase Order Grouping for Requisition Lines with One-Time Addresses....................... 4-11Hazard Information................................................................................................................. 4-14Global Requester..................................................................................................................... 4-14Displaying Charge Accounts ..................................................................................................4-17Expense Charge Account Rules...............................................................................................4-17Employee P-Cards................................................................................................................... 4-18Supplier P-Cards..................................................................................................................... 4-19Purchase Order (PO) Extract for P-Card Reconciliation......................................................... 4-28Project Accounting.................................................................................................................. 4-33

v
Grants Accounting...................................................................................................................4-34Favorite Charge Accounts....................................................................................................... 4-34Approvals................................................................................................................................ 4-36Global Approver......................................................................................................................4-46Requisition Changes............................................................................................................... 4-46Requester-Initiated Changes to Purchase Orders...................................................................4-49Requisition Cancellations....................................................................................................... 4-52Life Cycle Tracking................................................................................................................. 4-53Internal Requisitions...............................................................................................................4-55Internal Requisition Changes................................................................................................. 4-59Oracle Services Procurement.................................................................................................. 4-63
5 ReceiptsReceiving Setup Checklist........................................................................................................ 5-1Receipt Creation........................................................................................................................ 5-2Express Receiving...................................................................................................................... 5-2Blind Receiving......................................................................................................................... 5-3Receiving Against Intransit Shipments.................................................................................... 5-5Receiving Against Internal Requisitions..................................................................................5-6Requisitions to Receive............................................................................................................. 5-7Returns....................................................................................................................................... 5-8Debit Memos for Return Transactions..................................................................................... 5-9Corrections................................................................................................................................. 5-9Viewing Receipts.....................................................................................................................5-10Confirm Receipt Notifications................................................................................................ 5-10
A Search Engine LogicSearch Methods......................................................................................................................... A-1Items Displayed in Search Results........................................................................................... A-5Related Links............................................................................................................................ A-7Filtering and Sorting................................................................................................................. A-7Supported Search Methods by Content Zone.......................................................................... A-9Special Characters..................................................................................................................... A-9Search Configuration.............................................................................................................. A-10Relevance Ranking................................................................................................................. A-13Technical Details.....................................................................................................................A-13Searching in Other Languages................................................................................................A-17
B PO History Feed FileFormat and Data Elements of PO History Feed....................................................................... B-1

vi
Sample PO History Feed File..................................................................................................B-11
Index
vii
Send Us Your Comments
Oracle iProcurement Implementation and Administration Guide, Release 12.1Part No. E13409-05
Oracle welcomes customers' comments and suggestions on the quality and usefulness of this document. Your feedback is important, and helps us to best meet your needs as a user of our products. For example:
• Are the implementation steps correct and complete? • Did you understand the context of the procedures? • Did you find any errors in the information? • Does the structure of the information help you with your tasks? • Do you need different information or graphics? If so, where, and in what format? • Are the examples correct? Do you need more examples?
If you find any errors or have any other suggestions for improvement, then please tell us your name, the name of the company who has licensed our products, the title and part number of the documentation andthe chapter, section, and page number (if available).
Note: Before sending us your comments, you might like to check that you have the latest version of the document and if any concerns are already addressed. To do this, access the new Oracle E-Business Suite Release Online Documentation CD available on My Oracle Support and www.oracle.com. It contains the most current Documentation Library plus all documents revised or released recently.
Send your comments to us using the electronic mail address: [email protected]
Please give your name, address, electronic mail address, and telephone number (optional).
If you need assistance with Oracle software, then please contact your support representative or Oracle Support Services.
If you require training or instruction in using Oracle software, then please contact your Oracle local officeand inquire about our Oracle University offerings. A list of Oracle offices is available on our Web site at www.oracle.com.


ix
Preface
Intended AudienceWelcome to Release 12.1 of the Oracle iProcurement Implementation and Administration Guide.
This guide contains the information needed to implement and administer Oracle iProcurement.
See Related Information Sources on page x for more Oracle E-Business Suite product information.
Deaf/Hard of Hearing Access to Oracle Support ServicesTo reach Oracle Support Services, use a telecommunications relay service (TRS) to call Oracle Support at 1.800.223.1711. An Oracle Support Services engineer will handle technical issues and provide customer support according to the Oracle service request process. Information about TRS is available at http://www.fcc.gov/cgb/consumerfacts/trs.html, and a list of phone numbers is available at http://www.fcc.gov/cgb/dro/trsphonebk.html.
Documentation AccessibilityOur goal is to make Oracle products, services, and supporting documentation accessibleto all users, including users that are disabled. To that end, our documentation includes features that make information available to users of assistive technology. This documentation is available in HTML format, and contains markup to facilitate access bythe disabled community. Accessibility standards will continue to evolve over time, and Oracle is actively engaged with other market-leading technology vendors to address technical obstacles so that our documentation can be accessible to all of our customers. For more information, visit the Oracle Accessibility Program Web site at http://www.oracle.com/accessibility/.

x
Accessibility of Code Examples in DocumentationScreen readers may not always correctly read the code examples in this document. The conventions for writing code require that closing braces should appear on an otherwise empty line; however, some screen readers may not always read a line of text that consists solely of a bracket or brace.
Accessibility of Links to External Web Sites in DocumentationThis documentation may contain links to Web sites of other companies or organizationsthat Oracle does not own or control. Oracle neither evaluates nor makes any representations regarding the accessibility of these Web sites.
Structure1 Oracle iProcurement Overview2 Oracle Applications Setup3 Content Management4 Requisitions Setup5 ReceiptsA Search Engine LogicThis appendix describes the search engine in detail, including setup impact on searching.
B PO History Feed FileThis appendix contains detailed information about the PO reconciliation history feed file.
Related Information SourcesThis document is included on the Oracle Applications Document Library, which is supplied in the Release 12 DVD Pack. You can download soft-copy documentation as PDF files from the Oracle Technology Network at http://otn.oracle.com/documentation, or you can purchase hard-copy documentation from the Oracle Store at http://oraclestore.oracle.com. The Oracle E-Business Suite Documentation Library Release 12 contains the latest information, including any documents that have changed significantly between releases. If substantial changes to this book are necessary, a revised version will be made available on the online documentation CD on My Oracle Support.
If this guide refers you to other Oracle Applications documentation, use only the Release 12 versions of those guides.
For a full list of documentation resources for Oracle Applications Release 12, see Oracle Applications Documentation Resources, Release 12, My Oracle Support Document 394692.1.

xi
Online Documentation
All Oracle Applications documentation is available online (HTML or PDF).
• PDF - PDF documentation is available for download from the Oracle Technology Network at http://otn.oracle.com/documentation.
• Online Help - Online help patches (HTML) are available on My Oracle Support.
• About Documents - Refer to the About Document for the mini-pack or family pack that you have installed to learn about new documentation or documentation patches that you can download. About Documents are available on My Oracle Support.
• My Oracle Support Knowledge Browser - The My Oracle Support Knowledge Browser lets you browse the knowledge base, from a single product page, to find alldocuments for that product area. Use the Knowledge Browser to search for release-specific information, such as FAQs, recent patches, alerts, white papers, troubleshooting tips, and other archived documents.
• Oracle eBusiness Suite Electronic Technical Reference Manuals - Each Electronic Technical Reference Manual (eTRM) contains database diagrams and a detailed description of database tables, forms, reports, and programs for a specific Oracle Applications product. This information helps you convert data from your existing applications and integrate Oracle Applications data with non-Oracle applications, and write custom reports for Oracle Applications products. Oracle eTRM is available on My Oracle Support
Related Guides
You should have the following related books on hand. Depending on the requirements of your particular installation, you may also need additional manuals or guides.
Oracle E-Business Suite Installation Guide: Using Rapid Install
Oracle E-Business Suite Upgrade Guide: Release 11i to Release 12
Oracle E-Business Suite Patching Procedures
Oracle E-Business Suite Maintenance Utilities
Oracle E-Business Suite Maintenance Procedures
Oracle E-Business Suite Concepts
Oracle E-Business Suite Developer's Guide
Oracle E-Business Suite Flexfields Guide
Oracle Application Framework Developer's Guide
Oracle Application Framework Personalization Guide
Oracle E-Business Suite System Administrator's Guide Documentation Set

xii
Oracle E-Business Suite User's Guide
Oracle e-Commerce Gateway User's Guide
Oracle e-Commerce Gateway Implementation Guide
Oracle E-Business Suite Integrated SOA Gateway User's Guide, Oracle E-Business Suite Integrated SOA Gateway Developer's Guide and Oracle E-Business Suite Integrated SOA Gateway Implementation Guide
Oracle Web Applications Desktop Integrator Implementation and Administration Guide
Oracle Workflow Administrator's Guide
Oracle Workflow Developer's Guide
Oracle Workflow User's Guide
Oracle Workflow API Reference
Oracle XML Gateway User's Guide
Oracle E-Business Tax User Guide
Oracle E-Business Tax Implementation Guide
Oracle Financials and Oracle Procurement Functional Upgrade Guide: Release 11i to Release 12
Oracle Financials Concepts Guide
Oracle General Ledger User's Guide
Oracle Payables User Guide
Oracle Procurement Buyer's Guide to Punchout and Transparent Punchout
Oracle Purchasing User's Guide
Oracle Subledger Accounting Implementation Guide
Oracle Projects Fundamentals
Oracle Grants Accounting User Guide
Integration RepositoryThe Oracle Integration Repository is a compilation of information about the service endpoints exposed by the Oracle E-Business Suite of applications. It provides a complete catalog of Oracle E-Business Suite's business service interfaces. The tool lets users easily discover and deploy the appropriate business service interface for integration with any system, application, or business partner.
The Oracle Integration Repository is shipped as part of the E-Business Suite. As your instance is patched, the repository is automatically updated with content appropriate for the precise revisions of interfaces in your environment.

xiii
Do Not Use Database Tools to Modify Oracle E-Business Suite DataOracle STRONGLY RECOMMENDS that you never use SQL*Plus, Oracle Data Browser, database triggers, or any other tool to modify Oracle E-Business Suite data unless otherwise instructed.
Oracle provides powerful tools you can use to create, store, change, retrieve, and maintain information in an Oracle database. But if you use Oracle tools such as SQL*Plus to modify Oracle E-Business Suite data, you risk destroying the integrity of your data and you lose the ability to audit changes to your data.
Because Oracle E-Business Suite tables are interrelated, any change you make using an Oracle E-Business Suite form can update many tables at once. But when you modify Oracle E-Business Suite data using anything other than Oracle E-Business Suite, you may change a row in one table without making corresponding changes in related tables.If your tables get out of synchronization with each other, you risk retrieving erroneous information and you risk unpredictable results throughout Oracle E-Business Suite.
When you use Oracle E-Business Suite to modify your data, Oracle E-Business Suite automatically checks that your changes are valid. Oracle E-Business Suite also keeps track of who changes information. If you enter information into database tables using database tools, you may store invalid information. You also lose the ability to track whohas changed your information because SQL*Plus and other database tools do not keep arecord of changes.


Oracle iProcurement Overview 1-1
1Oracle iProcurement Overview
Oracle iProcurement in Comprehensive Procure-to-Pay FlowOracle iProcurement enables internal corporate requesters to independently order itemsfrom both local (internal) and remote (external) catalogs.
Oracle iProcurement is part of Oracle Applications, an integrated suite of E-Business solutions designed to transform your business into an E-Business. Along with the rest ofthe Oracle E-Business Suite, Oracle iProcurement helps an enterprise streamline the procurement process with end-to-end business automation. It is the starting point for the ordering process and provides powerful self-service requisitioning capability with an intuitive, Web shopping interface. In an efficient and automated manner, Oracle iProcurement:
• Constitutes a key component of the procure-to-pay business flow.
• Helps an enterprise process and manage requisitions.
• Helps an enterprise process and manage receipt of the requested goods or services.
Procure-to-Pay Flow

1-2 Oracle iProcurement Implementation and Administration Guide
Core Features of Oracle iProcurementThe core features of Oracle iProcurement that give requesters the ability to transform the procurement process into an efficient and streamlined process are:
• Catalog Management, page 1-2
• Shopping, page 1-3
• Checkout, page 1-6
• Requisition Tracking and Management, page 1-9
• Desktop Receiving, page 1-11
Catalog ManagementFor more information about catalog features, see Understanding the Procurement Catalog, page 3-1.
Catalog Types and SourcesOracle iProcurement offers a flexible solution to catalog and content management, enabling you to select from several approaches based on your business model.
• Load catalogs directly into the Oracle iProcurement catalog using the catalog bulk loader, which supports catalogs formatted in XML, standard text, catalog interchange format (CIF), or cXML. Using the catalog bulk loader, you can load newcatalogs, update existing catalogs, and delete catalog content. Oracle iProcurement also supports catalogs created in multiple languages and currencies to support requester communities worldwide.
• Perform a punchout to an Oracle Exchange marketplace, such as exchange.oracle.com, or a supplier's Web store to access their catalogs. This punchout can be a direct link to the store, where the requester searches, shops, and returns items to Oracle iProcurement. Alternatively, you and the supplier can set upa transparent punchout that works in the background to return matching items from the external site directly to the requester's search results.
• Use informational catalogs, which contain instructions or links for ordering other items or services at your company. The informational catalog enables Oracle iProcurement to be your company's portal for all ordering.
You can use any or all of these approaches for creating catalog content.

Oracle iProcurement Overview 1-3
Catalogs and StoresStores provide an way for requesters to shop among a variety of catalog types and sources. Stores are an optional part of your catalog configuration. See Shopping, page 1-3.
Category and Descriptor ManagementOracle iProcurement catalog provides uploading and online capabilities to create categories and descriptors.
SecurityYou can use content security to control what catalog content requesters can access You can also configure stores to appear only to requesters in certain operating units.
ImagesOracle iProcurement provides several options for displaying images for items. For example, you can upload or reference images. You can also provide thumbnail images that appear next to items in the search results. (These can be separate, smaller format images, or you can use profile options to automatically size them from the larger item images.)
ShoppingOracle iProcurement leverages the well-accepted model for Web shopping that top consumer Web sites use. This proven approach lets first-time, untrained requesters find desired items or services (shop) and create requisitions (check out), while also catering to experienced requesters by providing increased control and flexibility when creating requisitions.
The following figure shows the Shop home page, from which requesters can enter a search term to search all catalogs in a particular store, and view recent requisitions and notifications. See the Oracle iProcurement Help for details.

1-4 Oracle iProcurement Implementation and Administration Guide
StoresOracle iProcurement uses the concept of stores. Using stores, organizations can define an intuitive collection of their content areas. You can configure stores to include any combination of local catalogs, punchout catalogs, informational catalogs, and transparent punchout catalogs.
For most organizations, restricting access to content by role is very important. Administrators can use content security to control which catalogs and stores are made available to different groups of requesters.
Powerful Search CapabilitiesThe search capabilities of Oracle iProcurement provide support to all levels of requesters--from the casual requester browsing for items to the focused requester searching for specific products. Oracle iProcurement requesters search the catalog by entering natural language text descriptions to find the desired items or services. Requesters are not required to know the details of a classification format or catalog hierarchy. Instead, requesters enter search criteria ranging from partial item descriptions and part numbers to supplier names and specific product attributes (such as color or size). Using Oracle interMedia's technology, the search returns a list of matching items. Additional search capabilities such as comparing, sorting, filtering, andadvanced search enable requesters to refine their search.
As an alternative to performing searches, requesters can browse through the hierarchy of categories within the catalog to locate items and services. This is particularly effectivewhen the requester is familiar with the classification of the items.

Oracle iProcurement Overview 1-5
For more information about searching, see the Search Engine Logic Appendix, page A-x.
Standard (or Quick) SearchStandard search looks across all the searchable descriptors for records that match all of the entered search keywords.
Expanded SearchIf the search results show no matches from performing a standard search, requesters can find more approximate matches by using expanded search.
Advanced SearchAdvanced search enables requesters to search by specific item descriptors, such as item description, supplier, manufacturer, or price. Requesters can use advanced search operators such as with at least one of the words or with the exact phrase to search for items that match a particular description, manufacturer, and price, or other combination.
Shopping ListsRequesters can access frequently ordered items through the use of shopping lists.
Favorite ListRequesters can create their own personal favorite lists for the items they most frequently order.
Public ListsProfessional buyers in Oracle Purchasing can use requisition templates to create public lists that can be accessed by requesters.
Saved Shopping CartsRequesters can save an unlimited number of shopping carts in progress. This enables them to save selected items and return later to add more items and check out.
Non-Catalog RequestsRequesters can request items and services not found in the catalog or shopping lists by creating non-catalog requests. Using catalog administration, you can create non-catalog request templates, also known as smart forms. These templates enable you to control the non-catalog request fields that requesters complete, depending on which store or operating unit they are in. For more information, see Smart Forms, page 3-34.
If you implement Oracle Services Procurement, requesters can create fixed price service requisitions using a non-catalog request. For more information, see Oracle Services Procurement, page 4-63.

1-6 Oracle iProcurement Implementation and Administration Guide
Automatic Document CreationOracle iProcurement supports several different supplier-level document types to enablethe automated document creation process. Supplier purchase contracts and quotations can generate standard purchase orders. Supplier blanket purchase agreements can create releases. All document types support purchasing document creation without requiring buyer intervention.
Center-Led ProcurementOracle iProcurement supports requisitioning against global contract agreements and global blanket agreements. A central procurement center in your business can create these for use by other organizations. For example, a requester in the German operating unit can request an item that exists on a global blanket agreement in Ireland, as long as the global agreement is enabled in the German operating unit. Oracle Purchasing generates a standard purchase order against the global blanket agreement, and the requester receives the item.
Internally Sourced ItemsIn a buying organization, the sources of goods are from either external suppliers or internal inventory and warehouse locations.
In Oracle iProcurement:
• Users request externally sourced items using purchase requisitions. Users request internally sourced items using internal requisitions.
• The system does not convert internal requisitions to purchasing documents, such aspurchase orders or blanket releases. Rather, the system converts internal requisitions to internal sales orders. The internal sales orders undergo processing. The receiving of the requested items occurs in Oracle iProcurement.
CheckoutCheckout consists of the following basic components:
• Delivery
• Billing
• Notes and attachments
• Approvers
DeliveryEach requisition includes the need-by date and time, requester, and location. Users can

Oracle iProcurement Overview 1-7
enter these one time for the entire requisition or vary them by line. You can set most of the information to automatically be the default information. Requesters can change these delivery defaults in their Oracle iProcurement Preferences or on the requisition.
Multiple Destination TypesYou can use Oracle iProcurement to create requisitions for requester-initiated inventory replenishment requests, such as stocking a shop floor crib. Alternatively, you can specify delivery of requested items to an expense destination.
One-Time AddressesRequesters want items delivered to a location, such as a home address, that is not an office location or other location stored in the database. This is a one-time address that requesters can specify as a delivery location during the requisition creation process.
Integration to EAMOracle Enterprise Asset Management (EAM) identifies, schedules, and tracks all work activity and costs that relate to assets throughout an organization. Oracle iProcurement requisitions update EAM work orders.
Billing
Multiple Account Distributions and Account Generation WorkflowCharge accounts for requisition lines are generated using Account Generator Workflow rules. You can split charges for requested items across multiple accounting codes to let multiple departments or accounts absorb the cost of items on a single requisition line. This eliminates the need to create multiple requisition lines when the same item is beingrequested for multiple departments.
Procurement Card PurchasesOracle iProcurement automatically flags shopping cart lines for procurement card (P-Card) payment and defaults to the P-Card number depending on the requester and supplier profiles. The supported types of P-Cards are:
• Employee P-Cards: Companies maintain a separate employee P-Card for each requester in the company to make purchases.
• Supplier P-Cards: Companies maintain a single supplier P-Card for each supplier or supplier site in the system to consolidate all purchases from that supplier or supplier site.
After a requisition has been created and approved, the system creates a purchase order containing the P-Card number, and the supplier receives that information. A P-Card reconciliation process provides the capability to electronically reconcile the P-Card statements and the corresponding purchase orders in the buyer's purchasing application.

1-8 Oracle iProcurement Implementation and Administration Guide
Oracle Projects IntegrationIntegration with Oracle Projects and Oracle Project Manufacturing enables requesters tooptionally reference project and task information about shopping cart order lines.
Oracle Grants Integration Integration with Oracle Grants enables requesters to optionally reference projects, tasks,and award information about shopping cart order lines.
Encumbrance SupportFor customers using budgetary controls, Oracle iProcurement lets users view funds online before submitting requisitions. If a request carries costs past their budgetary limit, the requester is informed and can take appropriate action. Funds are automatically reserved during the requisition submit process.
In addition, fund reservation is available for Shop Floor destination type purchasing requisitions that are linked to eAM work orders and are submitted for approval in iProcurement.
Tax IntegrationOracle iProcurement enables you to specify tax information, including taxable status and tax code, if applicable. This tax information is carried forward to the purchasing document.
Notes and Attachments
Include NotesDuring checkout, requesters can include notes to buyers and approvers. The intended recipients can view the notes later in the procurement process.
Upload and View AttachmentsYou can provide additional information to approvers, buyers, suppliers, and receivers by attaching text, URLs, and other file types to the requisition. You can transfer these attachments through the system to purchase orders, blanket releases, and receipts.
In Oracle iProcurement, requesters can add attachments to a requisition during checkout. Examples of attachment types include:
• Internal to Requisition: View the attachment only from the requisition.
• To Buyer: The attachment information is passed on to the purchase order created from the requisition.
• To Approver: Appropriate approvers can view the attachment information.
• To Receiver: If the receiver is not the requester, the receiver can view the

Oracle iProcurement Overview 1-9
attachment information.
• To Supplier: Transmit text and non-image file attachments electronically by EDI or XML to the supplier when transmitting the purchase order that was automatically created from the requisition.
• Miscellaneous.
Specify ApproversApproval and workflow setup in Oracle Purchasing determines the approver list for each requisition. During checkout, the requester can add approvers and change the first approver in the approver list, depending on whether you allow access to this functionality (using function security). You can also customize the workflow to meet your business needs.
You can alternatively use Oracle Approvals Management to determine the approver list. Oracle Approvals Management provides a single approval management engine (AME) that multiple Oracle applications, including Oracle iProcurement, can use.
Integration with Oracle Advanced PricingAny item that is associated with a contract purchase agreement can reference complex pricing rules in Oracle Advanced Pricing, such as formula-based pricing, discounts, andsurcharges. If an item is associated with a contract purchase agreement, and you have set up advanced pricing, then the item's price considers the pricing rules during checkout.
Requisition Tracking and ManagementAfter the requester has created and submitted a requisition, the requester can track further processing of the requisition using Oracle iProcurement.
Requisition StatusRequesters:
• Can view the status of all of their requisitions on the Requisitions tab.
• Can perform detailed searches for requisitions. Requesters can search by many criteria, including when the requisition was created, requester, and purchase order (or sales order) number.
• The requester also receives real-time notifications to keep the requester up-to-date with actions taken against the requisition. Requesters can view notifications in either Oracle iProcurement, on the Notifications page, or in an e-mail message.

1-10 Oracle iProcurement Implementation and Administration Guide
Requisition ManagementRequesters perform all requisition management activities on the Requisitions tab:
• Complete: A saved cart becomes an Incomplete requisition on the Requisitions tab. The requester can select the requisition and click Complete to finish the checkout.
• Change: The requester can select the requisition and click Change. If the requisition is not yet placed on a purchase order, then the requisition is withdrawn from the approval process. The requester makes the desired changes and starts the checkout process. If the requisition is already placed on a purchase order, then the changes that the requester performs become change order requests that the buyer must first approve.
• Cancel: The requester can select the requisition and click Cancel to cancel the entire requisition or specific lines. If the requisition is not yet placed on a purchase order, then the cancellation occurs immediately. If the requisition is already placed on a purchase order, then the cancellation becomes a request that the buyer must first approve.
• Resubmit: If the status of the requisition is Rejected or Returned, then the requester can resubmit it by clicking Change, making the necessary changes, and starting the checkout process.
Procure-to-Pay Life Cycle TrackingRequesters can track the entire procure-to-pay life cycle of their requisitions. On the Requisitions tab, they can select the requisition, and then click the Details icon to view arequisition line. Each line shows the entire procure-to-pay life cycle of the requested item, including the purchase order, shipment, receipt, invoice, and payment.
Requisition Approval RoutingOracle iProcurement provides flexibility in streamlining the approval process:
• Vacation scheduling. Approvers can indicate dates of planned absence, specify proxy approvers for their notifications, and eliminate potential bottlenecks in the approval process.
• The approval manager can reassign, forward, or request more information during the approval process.
• Approver checkout. When the approver reviews the requisition, the approver can also make changes to the requisition before approving it.

Oracle iProcurement Overview 1-11
Desktop ReceivingIn Oracle iProcurement, requesters can receive items, return items, correct items that have been previously received, and view their receiving transaction history.
ReceiveFrom their desktop, requesters can receive internally and externally sourced items or the entire requisition. Requesters can obtain receipts for single items by using the Express Receive feature. Requesters can optionally enter additional information, such as packing slip number, waybill or airbill number, and comments using regular receiving. Oracle iProcurement automatically records the time of the receipt. (The requester can also manually enter or change the receipt date and time.)
Oracle iProcurement supports blind receiving, if it is set up in Oracle Purchasing. With blind receiving, a receiver does not see the quantity ordered, quantity already received, or the receiving tolerances that have been set up.
View ShipmentsOracle iProcurement requesters can view supplier advanced shipment notices (ASNs) as well as internal shipments. Shipment information defaults into the receipt while receiving items. For more information, see Receiving Against Intransit Shipments, page 5-5.
Return ItemsOracle iProcurement lets the receiver return items to suppliers. If set up, the system can generate debit memos during the return process. (See Debit Memos for Return Transactions, page 5-9.)
CorrectOracle iProcurement lets the receiver make corrections to the quantity received on receipts that have already been processed.
Receipt ConfirmationOracle iProcurement also provides a workflow-driven receipt confirmation mechanism that proactively sends a notification to requesters to confirm receipt on the due date.
Integration with E-Business Suite Applications
Oracle Services Procurement IntegrationYou can use Oracle iProcurement in requisitioning services and temporary labor through Oracle Services Procurement. If you have licensed and implemented Oracle

1-12 Oracle iProcurement Implementation and Administration Guide
Services Procurement, perform additional setup to requisition services and temporary labor in Oracle iProcurement. For more information, see Oracle Services Procurement, page 4-63.

Oracle Applications Setup 2-1
2Oracle Applications Setup
PrerequisitesOracle Purchasing implementation is a prerequisite.
For more information, see the Setting Up section in the Oracle Purchasing User's Guide.
Note: If you are upgrading from a previous release, you should review Oracle iProcurment Documentation Resources, Release 12 for the most current information, available on My Oracle Support.
Setup ChecklistsThe following table shows the Oracle Purchasing setup steps that are specific to implementing optional features in Oracle iProcurement. You might have already completed these steps if you have already implemented Oracle Purchasing.
Note: This table does not show all of the setup steps for Oracle iProcurement. It shows only the setup steps in Oracle Purchasing that Oracle iProcurement optionally uses.
Oracle Purchasing Setup Steps Specific to Oracle iProcurement
Step Required or Optional Information Source
Define Requisition Templates for Oracle iProcurement Public Lists
Optional Oracle Purchasing User's Guide

2-2 Oracle iProcurement Implementation and Administration Guide
Step Required or Optional Information Source
Define Information Templates Optional Define Information Templates, page 4-4
Define Global Blanket Purchase Agreements
Required for Local Content Oracle Purchasing User's Guide
Define Contract Purchase Agreements
Optional Oracle Purchasing User's Guide
Define Shipping Networks and Customer Locations for Internal Requisitions
Required for Internal Requisition Creation
Oracle Order Management User's Guide, Oracle Purchasing User's Guide, Oracle Inventory User's Guide
Internal Requisitions, page 4-55
Set Up P-Cards Optional Oracle Purchasing User's Guide
Employee P-Cards, page 4-18
Supplier P-Cards, page 4-19
PO Extract for P-Card Reconciliation, page 4-28
Set Up Content Security Optional Content Security, page 3-49
Create Commodity-Based Expense Account Rules
Optional Expense Charge Account Rules, page 4-17
Set Up Smart Forms Optional Smart Forms, page 3-34
Set Up E-Commerce Gateway Mapping
Required for Punchout Oracle Procurement Buyer's Guide to Punchout and Transparent Punchout
The following table shows the setup steps specific to implementing features of other Oracle Applications with Oracle iProcurement. You might have already completed these steps if you implemented Oracle Purchasing. These steps appear in a suggested, but not required, order.

Oracle Applications Setup 2-3
Setup Steps that Integrate with Other Oracle Applications
Step Required or Optional Information Source
Encumbrance Optional Oracle Purchasing User's Guide,
Oracle General Ledger User's Guide
Grants Accounting Optional Oracle Grants Accounting User's Guide
Grants Accounting Integration, page 4-34
Project Accounting Optional Oracle Projects Implementation Guide
Project Accounting Integration, page 4-33
Project Manufacturing Optional Oracle Project Manufacturing Implementation Manual
Project Accounting Integration, page 4-33
Advanced Pricing Optional Oracle Advanced Pricing Implementation Manual
Oracle Purchasing User's Guide
Oracle Services Procurement Optional Oracle Services Procurement, page 4-63
The following table shows the setup steps associated with administering or managing Oracle iProcurement. These include important utilities, provided with Oracle iProcurement, that can enhance the requester's experience. This chapter includes details of these steps. These steps appear in a suggested, but not required, order.
Administrative Setup Steps for Oracle iProcurement
Step Required or Optional
Information Source
Set Up Function, Menu, and Data Security
Optional Set Up Function, Menu, and Data Security, page 2-4
Personalize Oracle iProcurement Using Oracle Applications Framework
Optional Personalize Oracle iProcurement Using Oracle Applications Framework, page 2-15
2-4 Oracle iProcurement Implementation and Administration Guide
Step Required or Optional
Information Source
Create Operating Unit-Specific Purchasing News
Optional Create Operating Unit-Specific Purchasing News, page 2-16
Customize Operating Unit-Specific Purchasing Policies
Optional Customize Operating Unit-Specific Purchasing Policies, page 2-17
Customize Workflows Optional Customize Workflows, page 2-18
Define Descriptive Flexfields on Requisitions
Optional Define Descriptive Flexfields on Requisitions, page 2-24
Implement Custom Packages Optional Implement Custom Packages, page 2-26
Modify Online Help Recommended Modify Online Help, page 2-30
Set Profile Options Required Set Profile Options, page 2-32
Set Up Function, Menu, and Data SecurityFunction security can restrict requester access to certain functions and actions in variouspages throughout Oracle iProcurement. For example, you can exclude the Express Receive buttons in Receiving to prevent this type of receipt creation. Function security could also prevent access to the Corrections pages in Receiving.
An administrator also has the option of setting menu security. Menu security attribute settings tend to be more broad in the areas they restrict than function security attribute settings. With menu security, you can prevent a requester from accessing entire menus and submenus within Oracle iProcurement. With this type of setting, you can exclude the requester from accessing all of receiving or all of Oracle iProcurement workflow, as opposed to only a specific button or link within these modules. Due to their more specific nature, there are more function security attributes than menu security attributes. You define both function and menu security attributes at the responsibility level.
Setup Steps:Perform these steps to modify the default function and menu security associated with the default-provided iProcurement Procurement responsibility.
1. Define responsibility:
Oracle Applications Setup 2-5
1. Using the System Administrator responsibility navigate to the Responsibilities window. See: Defining a Responsibility, Oracle Applications System Administration.
2. Create a new responsibility related to Oracle iProcurement. This responsibility enforces function security.
3. Enter a Responsibility Name, Application, Responsibility Key, and Effective From Date.
4. Set Available From to Oracle Self Service Web Application.
5. Enter the Data Group fields for Name and Application.
6. Set the Menu field to Internet Procurement Home.
2. Exclude responsibility functions and menus:
1. On the Menu Exclusions tab of the Responsibilities window, select either the Function or Menu selection to set up either function security or menu security.
2. In the Name field, select the appropriate function or menu to exclude.
3. Assign Oracle iProcurement responsibility to a requester:
1. Using the System Administrator responsibility navigate to the Users window.
2. Search for the requester to assign to the responsibility.
3. Insert the new responsibility.
Note: If you are not implementing Oracle Services Procurement, consider excluding the Contractors tab menu and the Contractor Request sub-tab from the Internet Procurement Home menu. If youdo not implement Oracle Services Procurement, the Contractor Request link and Contractors tab still appear in Oracle iProcurement. When requesters try to access these areas, a message indicates that they cannot access the page because Oracle Services Procurement has not been enabled. To remove these areas, create a custom responsibility that excludes the Contracts menu and Contractor Request submenu from the Internet Procurement Home menu.
Oracle iProcurement Functions:The following tables show functions that can establish function security in Oracle
2-6 Oracle iProcurement Implementation and Administration Guide
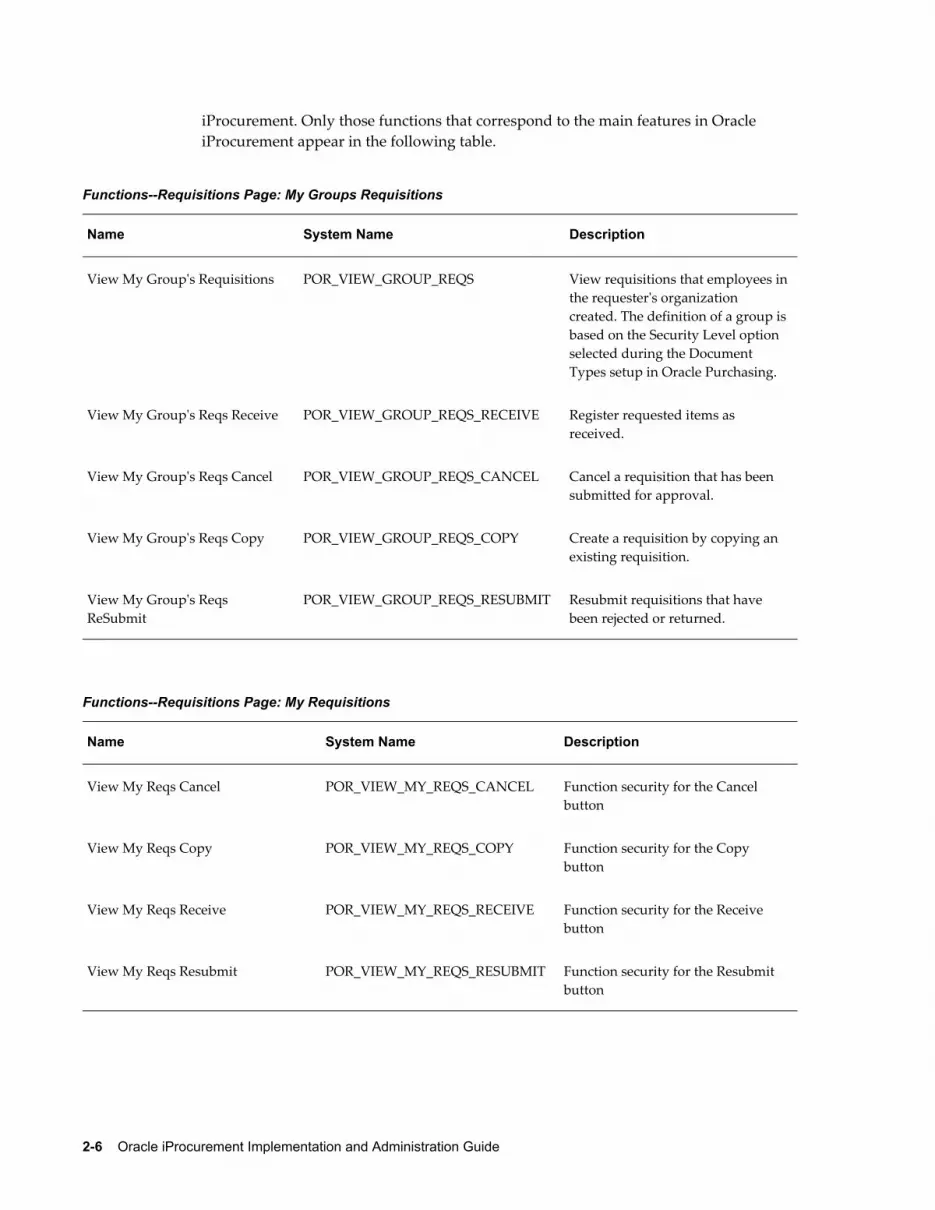
iProcurement. Only those functions that correspond to the main features in Oracle iProcurement appear in the following table.
Functions--Requisitions Page: My Groups Requisitions
Name System Name Description
View My Group's Requisitions POR_VIEW_GROUP_REQS View requisitions that employees inthe requester's organization created. The definition of a group isbased on the Security Level option selected during the Document Types setup in Oracle Purchasing.
View My Group's Reqs Receive POR_VIEW_GROUP_REQS_RECEIVE Register requested items as received.
View My Group's Reqs Cancel POR_VIEW_GROUP_REQS_CANCEL Cancel a requisition that has been submitted for approval.
View My Group's Reqs Copy POR_VIEW_GROUP_REQS_COPY Create a requisition by copying an existing requisition.
View My Group's Reqs ReSubmit
POR_VIEW_GROUP_REQS_RESUBMIT Resubmit requisitions that have been rejected or returned.
Functions--Requisitions Page: My Requisitions
Name System Name Description
View My Reqs Cancel POR_VIEW_MY_REQS_CANCEL Function security for the Cancel button
View My Reqs Copy POR_VIEW_MY_REQS_COPY Function security for the Copy button
View My Reqs Receive POR_VIEW_MY_REQS_RECEIVE Function security for the Receive button
View My Reqs Resubmit POR_VIEW_MY_REQS_RESUBMIT Function security for the Resubmit button

Oracle Applications Setup 2-7
Name System Name Description
View my Requisitions POR_VIEW_MY_REQS View requisitions that a requester owns.
View my Reqs Change Order POR_VIEW_MY_REQS_CHANGE_ORDER
Function security to request changesand cancellations to requisition lineson purchase orders
View My Reqs Withdraw POR_VIEW_MY_REQS_WITHDRAW
Function security for the Withdraw function of the Change button
Functions--Requisitions Page: All Requisitions
Name System Name Description
View All Reqs Cancel POR_VIEW_ALL_REQS_CANCEL Cancel a requisition that has been submitted for approval.
View All Reqs Copy POR_VIEW_ALL_REQS_COPY Create a requisition by copying an existing requisition.
View All Reqs Receive POR_VIEW_ALL_REQS_RECEIVE Register requested items as received.
View All Reqs ReSubmit POR_VIEW_ALL_REQS_RESUBMIT
Resubmit requisitions that have been rejected or returned.
View All Requisitions POR_VIEW_ALL_REQS View all requisitions in the requester's organization.
View Reqs Change Order History POR_VIEW_REQS_CHANGE_HISTORY
Function security for the Change History link
Functions--Approvals Status Page: Requisitions I Approved
Name System Name Description
View Reqs I Approved Cancel POR_VIEW_APPR_REQS_CANCEL Cancel a requisition that has been submitted for approval.
2-8 Oracle iProcurement Implementation and Administration Guide
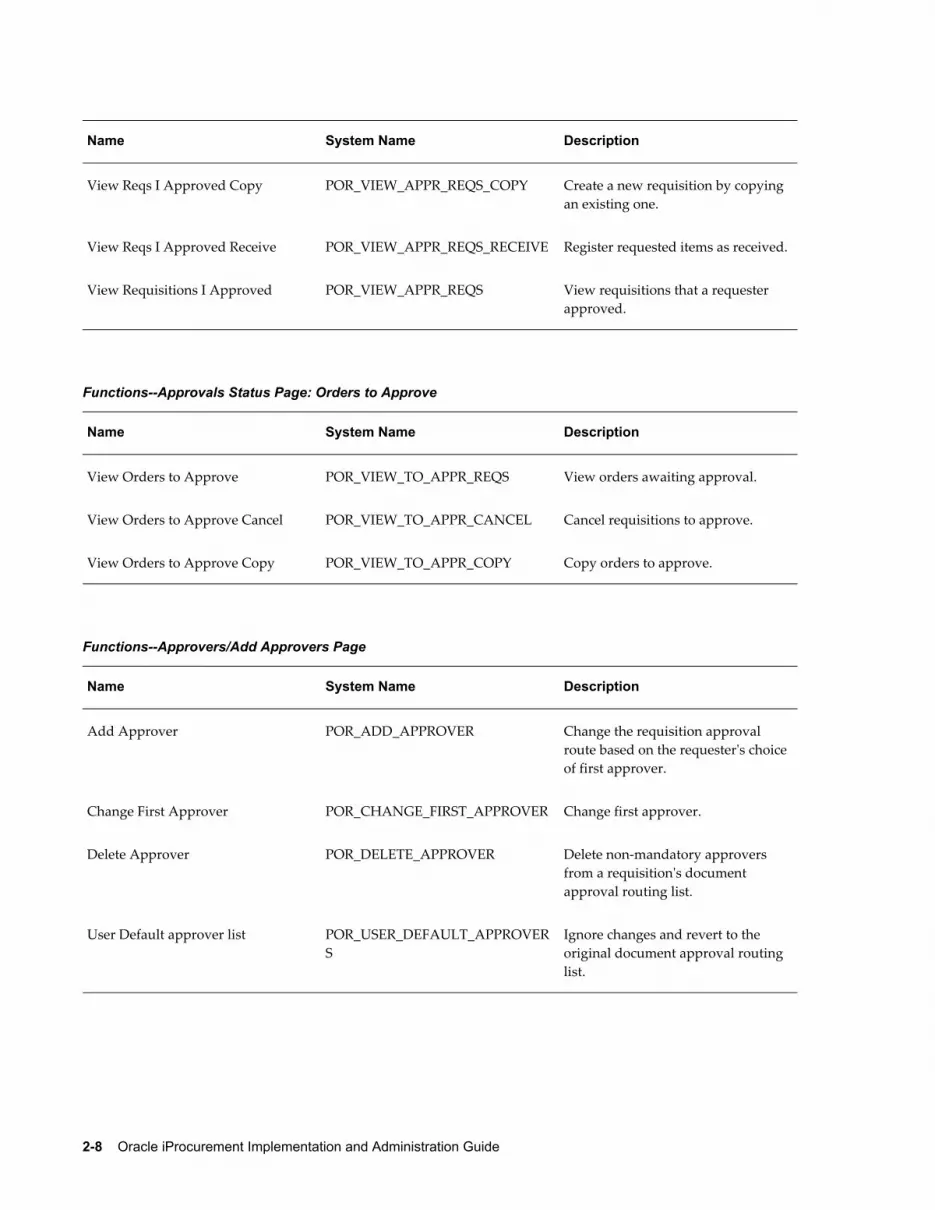
Name System Name Description
View Reqs I Approved Copy POR_VIEW_APPR_REQS_COPY Create a new requisition by copying an existing one.
View Reqs I Approved Receive POR_VIEW_APPR_REQS_RECEIVE Register requested items as received.
View Requisitions I Approved POR_VIEW_APPR_REQS View requisitions that a requester approved.
Functions--Approvals Status Page: Orders to Approve
Name System Name Description
View Orders to Approve POR_VIEW_TO_APPR_REQS View orders awaiting approval.
View Orders to Approve Cancel POR_VIEW_TO_APPR_CANCEL Cancel requisitions to approve.
View Orders to Approve Copy POR_VIEW_TO_APPR_COPY Copy orders to approve.
Functions--Approvers/Add Approvers Page
Name System Name Description
Add Approver POR_ADD_APPROVER Change the requisition approval route based on the requester's choiceof first approver.
Change First Approver POR_CHANGE_FIRST_APPROVER Change first approver.
Delete Approver POR_DELETE_APPROVER Delete non-mandatory approvers from a requisition's document approval routing list.
User Default approver list POR_USER_DEFAULT_APPROVERS
Ignore changes and revert to the original document approval routing list.

Oracle Applications Setup 2-9
Name System Name Description
Approve or Reject a Requisition POR_SHOW_APPROVE_REJECT_BTN
Approve or reject a requisition.
Functions - Receive Orders Page
Name System Name Description
All Items to Receive POR_ALL_ITEMS_TO_RECEIVE Restrict a requester from receiving all items.
Correct All Receipts POR_SHOW_ALL_RCV_CORRECTIONS
Grant or deny access to correct all receipts.
Correct Receipts POR_SHOW_RCV_CORRECTIONS Grant or deny access to correct receipts.
Express Receive POR_EXPRESS_RECEIVE Create an Express Receipt.
POR: Receive Orders POR_RECEIVE_ORDERS Let a requester receive orders.
Return All Items POR_SHOW_ALL_RCV_RETURNS Grant or deny access to return all items.
Return Items POR_SHOW_RCV_RETURNS Grant or deny access to return items.
View All Receipts POR_SHOW_ALL_RECEIPTS Grant or deny access to view all receipts.
View Receipts POR_SHOW_VIEW_RECEIPTS Grant or deny access to view receipts.
Functions - Other Functions
Name System Name Description
Express Setup Tools POR_SSP_EXP_SETUP Enable express setup of employees and locations.

2-10 Oracle iProcurement Implementation and Administration Guide
Name System Name Description
Favorite Charge Accounts POR_FAV_CHG_ACCT List of Favorite Charge Accounts
POR SSP ECManager POR_SSP_ECMANAGER Internet Procurement eContent Manager
POR SSP Home POR_SSP_HOME Internet Procurement Home Page
Functions - Requisition Checkout
Name System Name Description
Displays Check Funds Button POR_DISP_CHECKFUNDS_BUTTON
Control the display of the Check Funds button.
Create Emergency Req POR_CREATE_EMERG_REQ Create an emergency requisition.
One Time Location POR_ONE_TIME_LOCATION Enter a one-time address during checkout.
Functions - Workflow
Name System Name Description
Self-Service Purchasing Receive Orders
POR_RCV_ORDERS_WF Receive orders from workflow.
Self-Service Purchasing Resubmit Requisition
POR_RESUBMIT_URL Resubmit requisition (called from workflow).
Self-Service Purchasing Update/Cancel Requisition
POR_UPDATE_REQ Update or cancel requisition lines (called from workflow notifications).
Self-Service Purchasing View Requisition
POR_OPEN_REQ View requisition (called from workflow).
Oracle Applications Setup 2-11
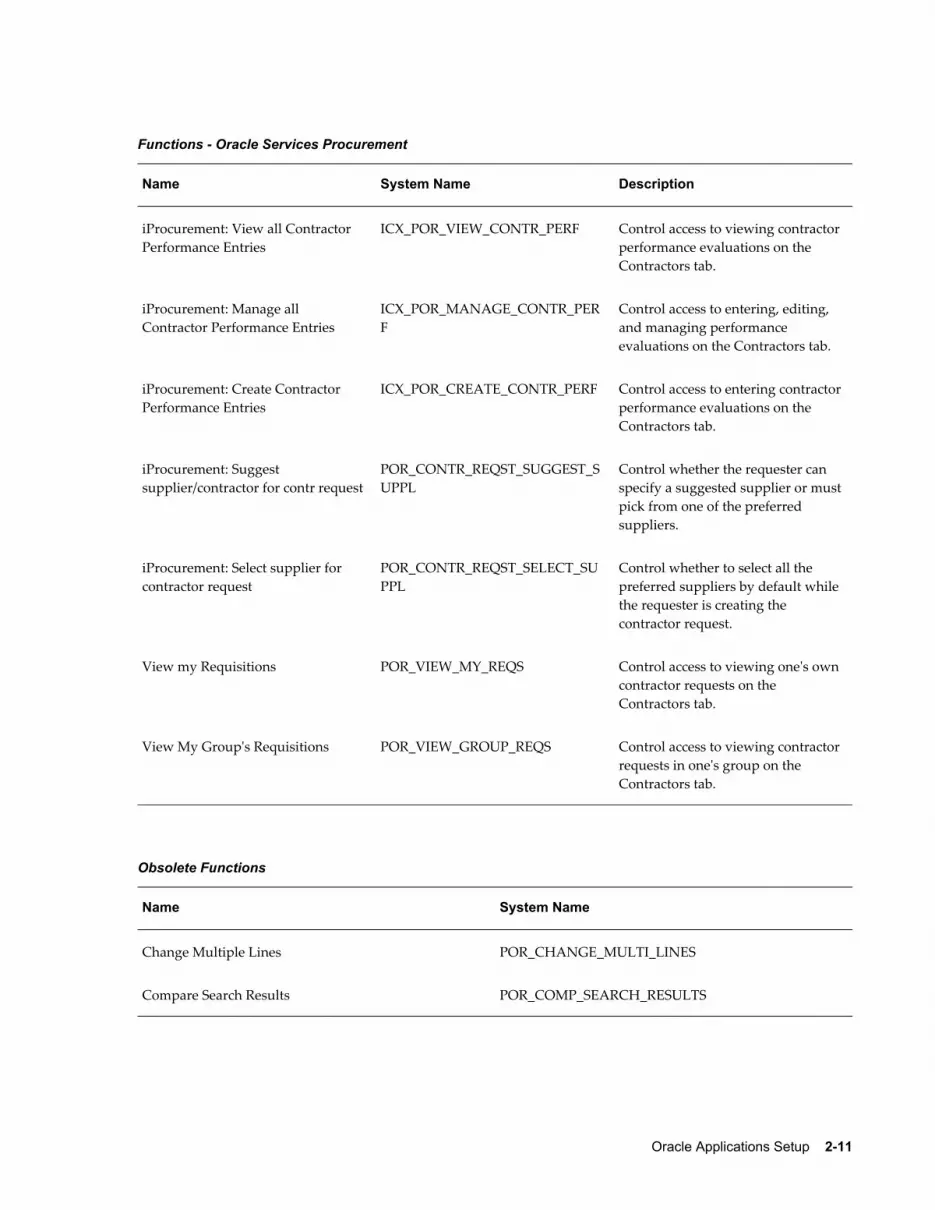
Functions - Oracle Services Procurement
Name System Name Description
iProcurement: View all Contractor Performance Entries
ICX_POR_VIEW_CONTR_PERF Control access to viewing contractorperformance evaluations on the Contractors tab.
iProcurement: Manage all Contractor Performance Entries
ICX_POR_MANAGE_CONTR_PERF
Control access to entering, editing, and managing performance evaluations on the Contractors tab.
iProcurement: Create Contractor Performance Entries
ICX_POR_CREATE_CONTR_PERF Control access to entering contractorperformance evaluations on the Contractors tab.
iProcurement: Suggest supplier/contractor for contr request
POR_CONTR_REQST_SUGGEST_SUPPL
Control whether the requester can specify a suggested supplier or mustpick from one of the preferred suppliers.
iProcurement: Select supplier for contractor request
POR_CONTR_REQST_SELECT_SUPPL
Control whether to select all the preferred suppliers by default while the requester is creating the contractor request.
View my Requisitions POR_VIEW_MY_REQS Control access to viewing one's own contractor requests on the Contractors tab.
View My Group's Requisitions POR_VIEW_GROUP_REQS Control access to viewing contractorrequests in one's group on the Contractors tab.
Obsolete Functions
Name System Name
Change Multiple Lines POR_CHANGE_MULTI_LINES
Compare Search Results POR_COMP_SEARCH_RESULTS

2-12 Oracle iProcurement Implementation and Administration Guide
Name System Name
Create Emergency Requisitions POR_EMERG_REQS
Create New Requisition ICX_REQS
eContent Manager POR_ECMANAGER
Emergency Req Add Approver POR_EMERG_ADD_APPROVER
Emergency Req Change First Approver POR_EMERG_CHANGE_FIRST_APPR
Emergency Req Change Multiple Lines POR_EMERG_CHANGE_MULTI_LINES
Emergency Req Compare POR_EMERG_COMP_SEARCH_RESULTS
Emergency Req Delete Results POR_EMERG_DELETE_APPROVER
Emergency Req Sort Approvers POR_EMERG_SORT_APPROVERS
Emergency Req Use Default Approver List POR_EMERG_USE_DEFAULT_APPROVER
Emergency Req View Approvers POR_EMERG_VIEW_APPROVERS
Express Checkout POR_EXPRESS_CHECKOUT
POR: Create New Requisition POR_NEW_REQS
POR: Receive Items POR_RECEIVE_ITEM
POR Power Checkout POR_POWER_CHECKOUT
POR Standard Checkout POR_STANDARD_CHECKOUT
Receiving Home Page POR_SHOW_RCV_HOME
Reset Password POR_RESET_PWD_FUNC
SSP Notification Reassignment POR_NOTIFY_REASSIGN
Sort Approvers POR_SORT_APPROVERS

Oracle Applications Setup 2-13
Name System Name
View Approvers POR_VIEW_APPROVERS
View All Reqs Complete POR_VIEW_ALL_REQS_COMPLETE
View All Reqs Delete POR_VIEW_ALL_REQS_DELETE
View Reqs I Approved Complete POR_VIEW_APPR_REQS_COMPLETE
View Reqs I Approved Delete POR_VIEW_APPR_REQS_DELETE
View Reqs I Approved Resubmit POR_VIEW_APPR_REQS_RESUBMIT
View My Group's Reqs Complete POR_VIEW_GROUP_REQS_COMPLETE
View My Group's Reqs Delete POR_VIEW_GROUP_REQS_DELETE
View My Reqs Complete POR_VIEW_MY_REQS_COMPLETE
View My Reqs Delete POR_VIEW_MY_REQS_DELETE
View Reqs Cancel Expand POR_VIEW_REQS_EXPAND_CANCEL
View Reqs Copy Expand POR_VIEW_REQS_COPY_EXPAND
View Reqs Receive Expand POR_VIEW_REQS_EXPAND_RECEIVE
View Reqs Resubmit Expand POR_VIEW_REQS_EXPAND_RESUBMIT
Oracle iProcurement Menus:The following table shows the settings for menu security. Only those menus that correspond to the main features in Oracle iProcurement appear.
Note: If you are upgrading from a previous release, you should review About Oracle iProcurement for your most recent release, available on My Oracle Support. This document discusses the features and setup that are new in this release. It also includes a list of new and changed menusin this release.

2-14 Oracle iProcurement Implementation and Administration Guide
Oracle iProcurement Menus
System Name Name Description
POR_SSP_ECMANAGER iProcurement eContent Manager Allows access to the Oracle iProcurement eContent Manager.
ICX_POR_SSP_HOME Internet Procurement Home Allows a requester access to the Oracle iProcurement Home page.
ICX_POR_ALL_ITEMS_TO_RECEIVE
SSP5: All Items to Receive Determines if a requester can view all items to receive.
ICX_POR_RECEIVE_ORDERS SSP5: Receiving Determines if a requester is given access to receiving.
ICX_POR_SSP5_CREATE_REQ Create Requisition Allows access to Oracle iProcurement requisition creation.
ICX_POR_SSP5_VIEW_ALL_REQS SSP5 - View All Requisitions Oracle iProcurement view all requisitions submenu.
ICX_POR_SSP5_VIEW_GROUP_REQ
SSP5 - View My Group's Requisitions
View my group's query submenu defined for function security.
ICX_POR_SSP5_VIEW_MY_REQ SSP5 - View My Requisitions Oracle iProcurement view my requisitions submenu.
ICX_POR_VIEW_TO_APPR_REQ SSP5 - View Orders to Approve Oracle iProcurement submenu for order to approve.
ICX_POR_SSP5_VIEW_APPR_REQ SSP5 - View Requisitions I Approved
Oracle iProcurement submenu for orders I have approved page.
ICX_POR_WORKFLOW Self Service Purchasing Workflow link
Allow a requester access to Oracle iProcurement workflow link.
Data Security:Data security uses securing attributes to allow rows (records) of data to be visible to specified requesters based on the specific data contained in the row. In Oracle iProcurement, securing attributes called realms restrict requester access to the catalog.
The following table shows securing attributes that can establish data security in Oracle iProcurement:

Oracle Applications Setup 2-15
Attribute Application Description
ICX_POR_ITEM_SOURCE_ID
Oracle Self Service Web Applications No longer used. (If you used it in a previous release, the current release still honors it.)
RT_CATEGORY_ID Oracle Self Service Web Applications No longer used. (If you used it in a previous release, the current release still honors it.)
ICX_POR_REALM_ID Oracle Self Service Web Applications Use this attribute to secure the responsibility for category or item source realms.
Personalize Oracle iProcurementOracle iProcurement is built upon the Oracle Applications Framework technology. Oracle Applications Framework enables system administrators to personalize the user interface in Oracle iProcurement. Examples include showing, hiding, moving, or modifying regions (such as the My Requisitions section on the shop Home page), items (such as a button), or fields (such as showing the Rate Type field, which is hidden by default in the shopping cart).
When the personalization profile option is turned on, the system administrator can log in to Oracle iProcurement, click the Personalize Page link on any page, and customize the desired regions, items, or fields. Users see these customizations. For example, if you make the customization at the responsibility level, then the changes are visible to all users who sign on using that responsibility.
By default, Oracle iProcurement is already set up to display the optimum information to requesters. You can display one or more fields that are hidden by default.
Note: The personalization profile option must be turned on to see the Personalize Page link. For more information, see the Oracle ApplicationsFramework Personalization Guide.
As you are implementing the features and setup steps described in this guide, use the personalization feature to see which fields are hidden by default or which page regions and items you want to modify.
For instructions on enabling and performing personalizations, see the Oracle Applications Framework Personalization Guide,
Note: Before using personalization to show or hide information, verify

2-16 Oracle iProcurement Implementation and Administration Guide
the function security options. You may be able to restrict access to a function instead. For more information, Setting Up Function, Menu, and Data Security, page 2-4.
Create Operating Unit-Specific Purchasing News You can create purchasing news that is specific to an operating unit. Requesters can view information that is pertinent only to their operating unit when accessing this area from the home page.
The following figure demonstrates where the Purchasing News area displays below the Shopping Cart area.
Setup Steps:1. Create a directory under OA_HTML/<language code>/.
For example: OA_HTML/US/operating_unit_1 where operating_unit_1 is your help path.
2. Copy PORPNEWS.htm from the OA_HTML/US/ directory to the directory that wascreated in step 1. Modify this file to include content specific to the operating unit.
3. Set the value for the responsibility-level profile option POR: Purchasing News Location to the location of the operating unit-specific files as specified in step 1. For
Oracle Applications Setup 2-17
more information, see Set Profile Options, page 2-32.
For the example from step 1, you would enter /operating_unit_1/ for the profile option.
Note: The POR: Purchasing News Location profile option requires a slash character / at the beginning and at the end of the string. OA_HTML is the path of all the Oracle iProcurement HTML files and is part of the Oracle Internet Application Server (iAS) setup.
4. By default, the Purchasing News area is hidden. Use Oracle Applications Framework personalization to display the Purchasing News.
For more information, see Personalize Oracle iProcurement Using Oracle Applications Framework, page 2-15.
Profile Options• POR: Purchasing News Location
Customize Operating Unit Purchasing PoliciesCustomers can provide purchasing policies that cover the same topic, but in terms appropriate to specific countries, regions, or operating units. To accomplish this, add anoptional localization code to the end of the anchor_name in the HTML online Help files.
Setup Steps:1. Determine a localization code to use, for example, ou1 for operating unit 1.
2. Copy the original PORPOLCY.htm file to a new file with the same name. Copy the file from $ICX_TOP/help/<language code>.
3. Open the new file with an HTML editor.
4. In this Help file, find the HTML anchor with the anchor_name ppolicy: < A NAME = "ppolicy"></A>
Append the localization code for the appropriate operating unit to this anchor name. For example:< A NAME="ppolicy@ou1"></A>
5. Change the PORPOLCY.htm file to include the localized information to appear for the given operating unit.
6. Save your changes.
7. Upload the localized Help file to the database using the Oracle Applications Help

2-18 Oracle iProcurement Implementation and Administration Guide
System Utility. For more information about using the Help System Utility, see the Oracle E-Business Suite System Administrator's Guide.
8. Set the profile option Help Localization Code for the appropriate responsibility to the value defined with the anchor name in the HTML code:
• Log in to Oracle Applications and choose the System Administrator responsibility.
• Navigate to the System Profiles window and search for the profile Help Localization Code and the appropriate responsibility (such as Internet Procurement).
• Set the profile value to the localization code that you appended to the anchor name (ou1 in this example) for the appropriate responsibility.
Since each responsibility is tied to an operating unit, requesters with that responsibility (such as Internet Procurement) in that operating unit see the Purchasing Policies Help file that is appended with the localization code (ou1 inthis example).
Customize WorkflowsOracle Workflow lets you automate business processes by routing information according to customized business rules. Workflows automate several procedures in Oracle Purchasing and Oracle iProcurement.
This section presents a brief description of each workflow that Oracle iProcurement uses:
• PO Requisition Approval
• PO Create Documents
• Account Generator
• PO Send Notifications for Purchasing Documents
• Confirm Receipts
• PO Change Request Tolerance Check
• Requester Change Order Approval
• PO Change Approval for Requester
Each of these workflows consists of processes that you can view in the Oracle WorkflowBuilder. Each workflow process, in turn, consists of individual function activities. You
Oracle Applications Setup 2-19
can customize the processes to support your business practices.
For more information about these workflows, see the Oracle Purchasing User's Guide. Forinformation about the procedures for setting them up, see the Oracle Workflow Guide.
PO Requisition Approval Workflow File Name: poxwfrqa.wft
Note: If you are installing and implementing Oracle iProcurement for the first time, the name of this workflow is Requisition. For upgrading customers, the name is PO Requisition Approval.
This workflow manages all requisition approvals and starts when you submit a requisition in Oracle iProcurement. Approvers, upon receipt of the approval notification (through Web or e-mail), can approve, reject, forward, or reassign the requisition. If approved, the notification passes to the next approver until all approvers have acted on the requisition. Finally, when all approvers have approved the requisition, the workflow process submits the requisition to the buyer or purchasing department. If the requester has the appropriate security access, the requester can override the default approver list. For more information, see Set Up Function, Menu, and Data Security, page 2-4.
Customize the attributes in this workflow to fit your business needs. The key attribute that requires consideration is Send PO Autocreate to Background. This attribute determines whether a deferred process is created at the very end of the requisition approval workflow. By default, the process defers the call to the PO Create Documents workflow by placing the call in Background mode. There is also an Online mode. For more information, see the PO Requisition Approval section of the Oracle Purchasing User's Guide.
PO Create Documents Workflow File Name: poxwfatc.wft
This workflow manages the automatic creation of purchasing documents. The PO Create Documents workflow starts in Oracle iProcurement when you submit a requisition associated with an existing blanket purchase agreement, contract purchase agreement, or catalog quotation in Oracle Purchasing.
Customize the attributes in this workflow to fit your business needs.
The following table shows the attributes that you must consider:

2-20 Oracle iProcurement Implementation and Administration Guide
Attributes: Display name Attributes: Internal name Description
Is Automatic Creation Allowed?
AUTOCREATE_DOC Indicator (Y for Yes or N for No) of whether thisworkflow is initiated for all approved requisition lines.
Default value: N
Is Automatic Approval Allowed?
AUTO_APPROVE_DOC Indicator of whether the purchase order approval workflow is initiated automatically after this workflow.
Default value: N
Should Workflow Create The Release?
CONT_WF_FOR_AC_REL_GEN
Indicator of whether this workflow creates, releases, or leaves them to the buyer to create using AutoCreate in Oracle Purchasing.
Default value: N
Should Contract be used to autocreate Doc?
USE_CONTRACT_FLAG Indicator of whether the workflow should autocreate standard purchase orders with contract purchase agreement references. If this attribute is set to Yes and a contract exists, then the purchase order is created with the contract reference. If a contract does not exist or cannot be found, then the buyer must use AutoCreate to create the purchase order. If this attribute is set to No, then the buyer must use AutoCreate to create the purchase order.
Default value: N
Is Contract Required on Requisition Line?
CONTRACT_REQUIRED_FLAG
Indicator of whether a contract purchase agreement must exist on the requisition line for autocreation to generate a standard purchase order. (For example, a contract purchase agreement is referenced on a requisition line by associating a contract purchase agreement with an item using bulk loading.)
Default value: N

Oracle Applications Setup 2-21
Attributes: Display name Attributes: Internal name Description
Should non-catalog requests beautosourced from contract?
INCLUDE_NON_CATALOG_REQ_FLAG
If Should Contract be used to autocreate Doc? is set to Yes and Is Contract Required on Requisition Line? is set to No, then use this attribute to indicate whether the workflow should search for a contract purchase agreement with which to associate non-catalog requests.
Default value: N
Should temp labor request be autosourced from contracts?
INCLUDE_TEMP_LABOR_FLAG
If Should Contract be used to autocreate Doc? is set to Yes andIs Contract Required on Requisition Line? is set to No, then use this attribute to indicate whether the workflow should search for a contract purchase agreement with which to associate contractor requests.
Default value: Y
Is Grouping of Requisition Line Allowed?
GROUPING_ALLOWED_FLAG
Indicator of whether the workflow should group all lines from a single requisition to a single purchase order. If this option is set to No,then each requisition line becomes a separate purchase order.
Default value: N
Is Grouping of One Time Address Line Allowed?
GROUP_ONE_ADDR_LINE_FLAG
Indicator of whether the workflow should group all requisition lines for the same one-timeaddress (on a single requisition) to a single purchase order. If this option is set to No, then each requisition line becomes a separate purchase order.
Default value: N
For more information about this workflow and these attributes, see the Workflow section of the Oracle Purchasing User's Guide.
Account GeneratorWorkflow File Name: poxwfpag.wft
During checkout, the Oracle Purchasing Account Generator builds a charge, budget, accrual, and variance account for each purchase order, release, and requisition distribution based on the distribution's destination type. When an account has been determined for a requisition distribution, the Account Generator populates all segments
2-22 Oracle iProcurement Implementation and Administration Guide
of the account.
Customize the processes in the requisitions Account Generator workflow to fit your business needs. For more information, see the Account Generator Workflow section of the Oracle Purchasing User's Guide.
PO Send Notifications for Purchasing Documents Workflow File Name: poxwfarm.wft
The PO Send Notifications for Purchasing Documents workflow searches for documents that are incomplete, rejected, or in need of reapproval and sends notifications of the document's status to the appropriate users. You can view and respond to these notifications online or through e-mail.
Customize the messages in this workflow to fit your business needs. For more information, see the PO Send Notifications for Purchasing Documents Workflow section of the Oracle Purchasing User's Guide.
Confirm Receipts Workflow File Name: poxwfrcv.wft
The Confirm Receipts workflow sends notifications that are visible online or through e-mail to requesters who create requisitions through Oracle iProcurement. (Online, requesters can see the notifications on the Notifications page in Oracle iProcurement. Buyers can see the notifications in the Notifications Summary work list in Oracle Purchasing.)
The Confirm Receipts workflow sends notifications for purchase order shipments that meet the following criteria:
• Destination or Deliver-To Type is Expense
• Destination type is Inventory, if the POR: Select Inventory Replenishment Lines for Confirm Receipts profile option is set to Y
• Receipt routing is Direct Delivery
• Matching is 3-way
• Need-By Date or Promised Date is prior to the current date, or invoice has been matched to PO
Customize the processes or messages in this workflow to fit your business needs. For more information, see the Confirm Receipts section of the Oracle Purchasing User's Guide.
Oracle Applications Setup 2-23
PO Change Request Tolerance CheckWorkflow File Name: poxrcoa.wft
The PO Change Request Tolerance Check workflow lets the administrator customize the business rules for routing of the change request through the Oracle iProcurement user's approval hierarchy. This workflow is called for changes that requesters make to arequisition after one of its requisition lines appears on an approved purchase order.
Customize the attributes in this workflow to fit your business needs. These attributes control whether the requester's approval hierarchy requires reapproval. Each attribute comes with an upper and lower tolerance limit. For example, for the unit price, you define a lower tolerance limit of 20 (percent) and an upper tolerance limit of 0 (percent). In this example, a change to the price requires reapproval whenever it is decreased by more than 20 percent or whenever it is increased.
The attributes are defined on the Requester Change Order page in Oracle Purchasing.
For instructions on opening and modifying workflows, see the Oracle Workflow Guide.
Requester Change Order ApprovalWorkflow File Name: poreqcha.wft
The Requester Change Order Approval workflow handles changes that requesters make to a requisition after one of its requisition lines appears on an approved purchase order.
This workflow performs:
1. After the requester makes the change, the workflow examines the change order attributes in the PO Change Request Tolerance workflow to see if the requisition approval hierarchy must reapprove the change. If it does not, then the requisition issubmitted directly to the buyer for approval.
2. If the requisition changes require reapproval, then the Requester Change Order Approval workflow routes the changed requisition through the requisition approval hierarchy. (Approvers receive a notification of the changes.)
3. When the requisition approval, the workflow process sends the changes to the buyer for acceptance or rejection. (The buyer receives a notification of the changes.)
4. When the buyer accepts the changes, the workflow completes and starts the PO Change Approval for Requester workflow.
Note: When users make changes to a requisition before any of its lines appear on an approved purchase order, the requisition is withdrawn from the approval process. The requisition approval workflow handles

2-24 Oracle iProcurement Implementation and Administration Guide
this withdrawal, not the Requester Change Order Approval workflow.
PO Change Approval for RequesterWorkflow File Name:porpocha.wft
When the buyer accepts a change order request, this workflow starts processes in the PO Approval workflow (poxwfpoa.wft) for determining whether the buyer's approval hierarchy must approve the changed purchase order.
For more information about workflow processes for approving change orders, see the Oracle Purchasing User's Guide.
Define Descriptive Flexfields on RequisitionsYou can define descriptive flexfields on requisition headers, lines, and distributions.
The following figure shows descriptive flexfields during the checkout process. In this example, the following header-level flexfields appear in the Requisition Information section:
• Region
• Country Name
• Country Code.
The Additional Line Information section appears only if there are line-level descriptive flexfields. The following line-level flexfields appear in an Additional Line Information section:
• Service Agreement
• Service Period
• Service Products.
Line-level descriptive flexfields can also appears in the shopping cart and in the final checkout page (before you click Submit). To see descriptive flexfields at the distribution level, click Edit Lines, Accounts, and then the Split icon. Distribution flexfields can also appear in the final checkout page (before you click Submit).
Note: When set up, flexfields appear only if you use Oracle Applications Framework to display them on the desired pages. (By default, they are hidden on all pages.)
Oracle iProcurement supports global segments and a single context field. Oracle

Oracle Applications Setup 2-25
iProcurement supports neither multiple context fields nor reference fields. Support for the single context field is possible through the context value profile options, descriptions of which follow.
For example, suppose you define the following Requisition Headers descriptive flexfields using the Descriptive Flexfield Segments window in Oracle Applications:
• Region (global segment)
• Country Name (global segment)
• Country Code (context field)
• Province (context field)
Note: The POR: Context value for Requisition header descriptive flexfield profile option setting is Country Code.
In this example, the following descriptive flexfields would appear on the requisition header:
• Region and Country Name appear because they are global segments, which always appear.
• Country Code appears because its selection in the POR: Context value for Requisition header descriptive flexfield profile option.
Note: Province would not appear because it is not a selected context field in the profile option.
In summary, for each part of the requisition--header, line, distribution--Oracle iProcurement displays all global segments that you define, plus the context field that is selected in the corresponding profile option.
Setup Steps:To define descriptive flexfields:
1. Using the System Administrator responsibility, create descriptive flexfields for any or all of the following entities:
• Requisition Headers
• Requisition Lines
• Requisition Distributions
Oracle Applications includes definitions for each of the preceding entities. In the

2-26 Oracle iProcurement Implementation and Administration Guide
Descriptive Flexfields Segments window, they appear in the Title field. Query the one you want and define the desired flexfields for it. For instructions, see the Oracle E-Business Suite Flexfields Guide.
2. For flexfields that are context fields, select the desired flexfield in the correspondingprofile option that appears in the Profile Options section, page 2-26.
3. By default, the flexfields are hidden on all pages. Use Oracle Applications Framework personalization to display the flexfields on the desired pages.
For more information, see Personalize Oracle iProcurement Using Oracle Applications Framework, page 2-15.
When you personalize a page, the descriptive flexfield name includes Flex, for example: Flex: (ReqHeaderDFF). One field is given for all flexfield segments. In the preceding examples, the Flex: (ReqHeaderDFF) field is given for all of the segments--Region, Country Name, and Country Code--on the Checkout: Requisition Information page. If you display Flex (ReqHeaderDFF), then you display Region, Country Name, and Country Code.
Profile Options• POR: Context value for Requisition header descriptive flexfield
• POR: Context value for Requisition line descriptive flexfield
• POR: Context value for Requisition distribution descriptive flexfield
Implementation Considerations• If the requisition containing the descriptive flexfields is later completed, copied,
changed (by the requester or approver), or resubmitted, then Oracle iProcurement assumes the same descriptive flexfields that were on the original requisition, even ifthe corresponding profile option contains a different value. If descriptive flexfields are set up after the requisition's original creation, then subsequent checkout of the requisition applies the descriptive flexfields, including those that the profile optionsdesignate.
Implement Custom PackagesThe following sections describe how to use a PL/SQL package to make requisition header and line customizations and how to use Oracle Applications Framework to make customizations to the default account generation and account validation procedures.
POR_CUSTOM_PKG provides customization hooks to perform the defaulting logic andvalidation of the requisition header, line, and distribution data. These procedures are invoked from CustomReqHeaderHelper, CustomReqLineHelper, and CustomReqDistHelper classes. By default, they do not affect the existing logic and validation. POR_CUSTOM_PKG is bundled in the PORCUSTB.pls file.

Oracle Applications Setup 2-27
For instructions on modifying PL/SQL packages, see the Oracle E-Business Suite Developer's Guide.
The following table describes the different procedures in POR_CUSTOM_PKG for requisition header, line, and distribution customizations and how they are triggered.
Requisition Header and Line Procedures
Procedure Name Purpose Invocation Details
CUSTOM_DEFAULT_REQ_HEADER
You can customize this procedure toinclude logic to default to the headerinformation for a given requisition.
This procedure is called from the executeCustomDefaultingLogic method in CustomReqHeaderHelper when a requisition is created.
CUSTOM_VALIDATE_REQ_HEADER
You can customize this procedure toinclude logic to validate the header information for a given requisition.
This procedure is called from the validate method in CustomReqHeaderHelper before therequisition is submitted.
CUSTOM_DEFAULT_REQ_LINE This procedure can include logic to default to the information onto a requisition line.
This procedure is called from the executeCustomDefaultingLogic method in CustomReqLineHelper when a new line is added to the shopping cart.
CUSTOM_VALIDATE_REQ_LINE This procedure can include logic to validate the information on the requisition line.
This procedure is called from the validate method in CustomReqLineHelper on every page in the checkout flow.
CUSTOM_DEFAULT_REQ_DIST This procedure can include logic to default to the information on a requisition distribution.
This procedure is called from the executeCustomDefaultingLogic method in CustomReqDistHelper when a distribution is created upon entering the checkout flow.
CUSTOM_VALIDATE_REQ_DIST This procedure can include logic to validate the information on the requisition distribution.
This procedure is called from the validate method in CustomReqDistHelper on every page in the checkout flow.
Setup Steps1. Extend the Entity Object for requisition lines or distributions.

2-28 Oracle iProcurement Implementation and Administration Guide
The Entity Object contains all of the target attributes that can potentially cause account re-defaulting. Follow these steps:
• Since you extend Entity Objects (EO) in the BC4J package oracle.apps.icx.por.schema.server, open this package in your project.
• Select the parent EO.
For requisition lines, select oracle.apps.icx.por.schema.server.PoRequisitionLineEO.
For requisition distributions, select oracle.apps.icx.por.schema.server.PoReqDistributionEO.
• For information about identifying the parent EO, see the section about modifying entity object attribute default values in the Oracle Applications Framework Developer's Guide. (For an exact reference to the correct location on My Oracle Support forum, see the Oracle E-Business Suite System Administrator's Guide.)
• In the section about modifying entity object attribute default values, follow the steps for creating a new, empty BC4J package to hold your custom BC4J objects and for creating a new entity object that extends the parent EO.
• In the second step of the Entity Object Wizard, click New from Table ... and select your target attributes.
These are the attributes, such as AMOUNT, that you want to trigger account re-defaulting when their values are changed.
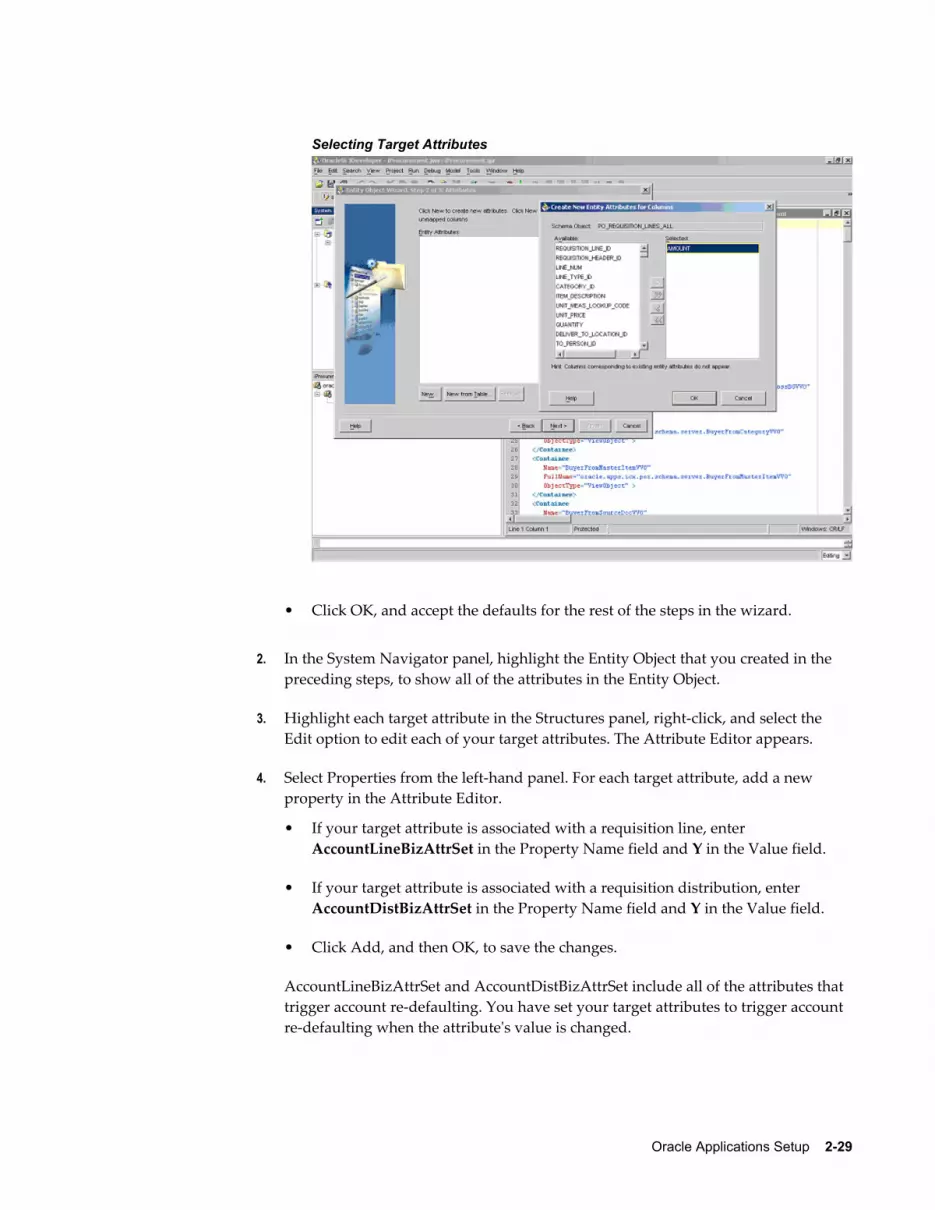
Oracle Applications Setup 2-29
Selecting Target Attributes
• Click OK, and accept the defaults for the rest of the steps in the wizard.
2. In the System Navigator panel, highlight the Entity Object that you created in the preceding steps, to show all of the attributes in the Entity Object.
3. Highlight each target attribute in the Structures panel, right-click, and select the Edit option to edit each of your target attributes. The Attribute Editor appears.
4. Select Properties from the left-hand panel. For each target attribute, add a new property in the Attribute Editor.
• If your target attribute is associated with a requisition line, enter AccountLineBizAttrSet in the Property Name field and Y in the Value field.
• If your target attribute is associated with a requisition distribution, enter AccountDistBizAttrSet in the Property Name field and Y in the Value field.
• Click Add, and then OK, to save the changes.
AccountLineBizAttrSet and AccountDistBizAttrSet include all of the attributes that trigger account re-defaulting. You have set your target attributes to trigger account re-defaulting when the attribute's value is changed.
2-30 Oracle iProcurement Implementation and Administration Guide
5. When you have completed extending the Entity Objects, see the instructions in the section Substitute Extended BC4J Objects for Parent BC4J Objects, in the Oracle Applications Framework Developer's Guide, to substitute your extended BC4J object forthe parent BC4J object.
6. Restart the Oracle Internet Application Server (iAS) after these changes.
Profile OptionsThe following profile options control whether to invoke the corresponding custom procedures:
Set the corresponding profile option to Yes to invoke your customized procedure. For more information, see Profile Options, page 2-32.
• POR: Enable Req Header Customization
• POR: Enable Requisition Line Customization
• POR: Enable Req Distribution Customization
Implementation Considerations• Performing the charge account customizations is not the same as modifying the
Account Generator workflow. The customizations in this step determine what triggers account re-defaulting. When triggered, the Account Generator workflow defaults to the correct account.
• Value changes to certain attributes on a requisition line or distribution can cause thecharge account to change to another default value. For example, a change to the Deliver-to Location can cause the charge account number to change. You can add tothe attributes that cause charge account to change.
Modify Online HelpThe online Help is available as Oracle Applications Help. All the Help documents and graphic files are stored in the database. The Help documents are in HTML format. You can modify the Help content by using any HTML editor.
For detailed instructions on modifying and updating Help files, see the Oracle E-Business Suite System Administrator's Guide.
Oracle iProcurement consists of the following sets of Help files:
• The first set appears when a requester clicks the Help icon in Oracle iProcurement.
• The second set appears when the catalog administrator clicks the Help icon in the eContent Manager. Only users who log in with the iProcurement Catalog

Oracle Applications Setup 2-31
Administration responsibility have access to this second set of Help files.
Purchasing Policies and Support Online HelpThe Oracle iProcurement online Help contains placeholder Help files for you to add instructions specific to your company's processes.
Oracle iProcurement Placeholder Help
In the Oracle iProcurement Help, the placeholder files are in an Additional Help section. The placeholder files contain temporary placeholder text. You should replace this text.
The placeholder files in the Oracle iProcurement Help are:
• Purchasing Policies (PORPOLCY.htm)
Note: You might already have customized PORPOLCY.htm by operating unit in Customize Operating Unit-Specific Purchasing Policies, page 2-17.
• Contacting the Purchasing Department (PORCPURC.htm)
• Contacting Technical Support (PORCTECH.htm)
Particularly for the Oracle iProcurement Help files, which requesters see, you should modify or replace these files with files of your own, or remove them from the Additional Help section of the Oracle iProcurement main Help page (PORINDEX.htm)

2-32 Oracle iProcurement Implementation and Administration Guide
Procurement Catalog Administratiion
Content Management Placeholder Help
The placeholder file used in the iProcurement Catalog Administration Help is Contacting Technical Support (PORCTECH.htm), in the Additional Information section.
You should modify or replace these files with files of your own, or remove them from the Additional Help section of the iProcurement Catalog Administration main Help page (PORCATIX.htm).
Oracle Services ProcurementIf you are not implementing Oracle Services Procurement, you can remove the online Help for that application.
The following figures show the Contractor Request section and Receiving Items section of the Oracle iProcurement Help. To remove access to the Contractor Request Help files,then modify the Oracle iProcurement main Help page (PORINDEX.htm) to remove the Contractor Request section and links:
• Creating Contractor Requests (PORSRVCR.htm)
• Assigning Contractors (PORSRVAS.htm)
• Finding and Tracking Contractor Requests (PORSRVTR.htm)
• Evaluating Contractors (PORSRVEV.htm)
• Receiving Contractor Requests (PORSRVRV.htm)
Profile Options and Profile Options CategoriesA number of profile options govern the behavior of Oracle iProcurement. During implementation, you must set a value for each profile option to specify how Oracle iProcurement controls access to and processes data.

Oracle Applications Setup 2-33
Note: When you update a Site-level profile option, you must restart the Oracle Internet Application Server (iAS) for the change to take effect.
For details regarding setting profile options, see: Overview of Setting User Profiles, Oracle Applications System Administration.
List Of Oracle iProcurement Profile Categories• Configuration, page 2-38
• Content Management, page 2-43
• Deployment, page 2-45
• Internal Requisition, page 2-52
• Receiving, page 2-53
• Requisition Accounting, page 2-54
• Requisition Approval, page 2-57
• Requisition Checkout, page 2-59
• Search, page 2-61
• Services Procurement, page 2-62
• User Interface, page 2-63
List Of iProcurement Related Profile Options• Application Framework Agent, page 2-48
• Apps Servlet Agent, page 2-48
• Discoverer DBC filename override, page 2-40
• ECX: Log File Path, page 2-48
• FND: Native Client Encoding, page 2-44
• Help Localization Code, page 2-48
• HR: Cross Business Groups, page 2-40

2-34 Oracle iProcurement Implementation and Administration Guide
• ICX: Client IANA Encoding, page 2-48
• ICX: Date format mask, page 2-40
• ICX: Date language, page 2-41
• ICX: Default Discoverer Workbook Owner, page 2-41
• ICX: Default Employee, page 2-41
• ICX: Default Flow Operand, page 2-41
• ICX: Default Requisition Template, page 2-44
• ICX: Discoverer Default End User Layer Schema Prefix, page 2-44
• ICX: Discoverer EBS End User Layer Schema Prefix, page 2-44
• ICX: Discoverer EDW End User Layer Schema Prefix, page 2-44
• ICX: Discoverer End User Layer Language Override, page 2-44
• ICX: Discoverer Launcher, page 2-44
• ICX: Discoverer OLTP End User Layer Schema Prefix, page 2-49
• ICX: Discoverer Parameters, page 2-49
• ICX: Discoverer Release, page 2-49
• ICX: Discoverer use Viewer, page 2-49
• ICX: Discoverer Viewer Launcher, page 2-49
• ICX: Forms Launcher, page 2-49
• ICX: HTML directory, page 2-49
• ICX: Language, page 2-49
• ICX: Limit connect, page 2-49
• ICX: Limit time, page 2-49
• ICX: Match case LOV, page 2-49
• ICX: Match case View, page 2-49
Oracle Applications Setup 2-35
• ICX: Media directory, page 2-49
• ICX: NLS Sort, page 2-49
• ICX: Numeric characters, page 2-50
• MRP: Default Sourcing Assignment Set, page 2-41
• PA: Allow Override of PA Distribution in AP/PO, page 2-56
• PO: Allow Requisition Approval Forward Action, page 2-58
• PO: Default Need-By Time, page 2-60
• PO: Enable Services Procurement, page 2-50
• PO: Legal Requisition Type, page 2-61
• PO: Notification Lines Display Limit, page 2-58
• PO: Validate Need-by Time For Requisition Submit , page 2-50
• PO:Workflow Processing Mode, page 2-58
• POR:Allow Manual Selection of Source, page 2-62
• POR: Allow pcard use with encumbrance, page 2-56
• POR : Amount Based Services Line Type, page 2-50
• POR: Apply Expense Account Rules to Favorite Charge Accounts, page 2-56
• POR: Auto Load Category Descriptors, page 2-45
• POR: Auto Load Root Descriptors, page 2-45
• POR: Auto Load Shopping Categories, page 2-45
• POR: Autocreate Shopping Category and Mapping, page 2-45
• POR: Bulk Loader Commit Size, page 2-41
• POR : CA Certificate File Name, page 2-50
• POR: Cache Time To Live Minutes, page 2-41
• POR: Catalog Result Set Size, page 2-64

2-36 Oracle iProcurement Implementation and Administration Guide
• POR: Change Catalog Language, page 2-62
• POR: Context value for Requisition distribution descriptive flexfield, page 2-41
• POR: Context value for Requisition header descriptive flexfield, page 2-41
• POR: Context value for Requisition line descriptive flexfield, page 2-42
• POR: Contractor Expense Line Type, page 2-51
• POR: Days Needed By, page 2-60
• POR: Default Currency Conversion Rate Type, page 2-51
• POR: Default Shopping Sort, page 2-64
• POR: Default Shopping Sort Order, page 2-64
• POR: Display Graphical Approval List, page 2-59
• POR: Display Legacy Accounting Flex UI, page 2-65
• POR: Display Shopping Category Count, page 2-65
• POR: Enable Advanced Search, page 2-65
• POR: Enable Automatic Debit Memo Creation for Returns, page 2-54
• POR: Enable Check Funds, page 2-56
• POR: Enable Req Distribution Customization, page 2-42
• POR: Enable Req Header Customization, page 2-42
• POR: Enable Requisition Line Customization, page 2-42
• POR: Generate and Display Account at Checkout, page 2-57
• POR : Goods Line Type, page 2-51
• POR: Hosted Images Directory, page 2-51
• POR: My Favorite Store, page 2-65
• POR: One Time Location, page 2-61
• POR: Override Location Flag, page 2-61
Oracle Applications Setup 2-37
• POR: Override Requestor, page 2-61
• POR : Override Supplier P-Card, page 2-57
• POR : Preferences - Award, page 2-57
• POR : Preferences - Deliver to Location, page 2-60
• POR: Preferences - Expenditure Item Date Offset, page 2-57
• POR: Preferences - Expenditure Org, page 2-57
• POR : Preferences - Expenditure Type, page 2-57
• POR : Preferences - Project, page 2-57
• POR : Preferences - Requester, page 2-61
• POR : Preferences - Selected Items Default to Inventory, page 2-57
• POR : Preferences - SubInventory, page 2-57
• POR : Preferences - Task, page 2-57
• POR : Proxy Server Name, page 2-51
• POR : Proxy Server Port, page 2-52
• POR: Purchasing News Location, page 2-42
• POR: Purge Jobs Older Than (days), page 2-42
• POR : Rate Based Services Line Type, page 2-52
• POR: Reapproval after Contractor Assignment, page 2-59
• POR: Require Blind Receiving, page 2-54
• POR: Result Set Size, page 2-65
• POR: Search Results Skin, page 2-65
• POR: Select Internal Requisition for Confirm Receipt, page 2-54
• POR: Select Inventory Replenishment Lines For Confirm Receipts, page 2-54
• POR: Show Thumbnail Images, page 2-66

2-38 Oracle iProcurement Implementation and Administration Guide
• POR: Support review for Express Receive, page 2-54
• POR: Sync up Need by date on IR with OM, page 4-60
• POR : System Approvers are Mandatory, page 2-59
• POR: Urgent flag maps to shipping Priority, page 4-60
• POR : Use Sequence for Requisition Numbering, page 2-52
• POR: Thumbnail Height, page 2-66
• POR: Thumbnail Width, page 2-66
• POR: Transparent Punchout Timeout Limit, page 2-42
• TAX: Allow Override of Tax Recovery Rate, page 2-61
Configuration CategoryThe table below lists the profile options that impact iProcurement Configuration.
Configuration Profile Options
Profile Option Default User Access
System Administration: Site
System Administration: Application
System Administration: Responsibility
System Administration: User
Discoverer DBC filename override, page 2-40
2500 Update Update Update Update Update
HR: Cross Business Groups, page 2-40
Yes Update
ICX: Date format mask, page 2-40
Update Update Update
ICX: Date language, page 2-41
Update Update
ICX: Default Discoverer Workbook Owner, page 2-41
Update Update Update Update Update

Oracle Applications Setup 2-39
Profile Option Default User Access
System Administration: Site
System Administration: Application
System Administration: Responsibility
System Administration: User
ICX: Default Employee, page 2-41
Update Update Update Update Update
ICX: Default Flow Operand, page 2-41
Update Update Update Update Update
MRP: Default Sourcing Assignment Set, page 2-41
Update
POR: Bulk Loader Commit Size, page 2-41
2500 Update
POR: Cache Time To Live Minutes, page 2-41
15 Update
POR: Context value for Requisition distribution descriptive flexfield, page 2-41
Update
POR: Context value for Requisition header descriptive flexfield, page 2-41
Update
POR: Context value for Requisition line descriptiveflexfield, page 2-41
Update
POR: Enable Req Distribution Customization, page 2-42
Update Update Update Update
POR: Enable Req Header Customization, page 2-42
Update Update Update Update
POR: Enable Requisition Line Customization, page 2-42
Yes Update Update Update

2-40 Oracle iProcurement Implementation and Administration Guide
Profile Option Default User Access
System Administration: Site
System Administration: Application
System Administration: Responsibility
System Administration: User
POR: Purchasing News Location, page 2-42
Update Update
POR: Purge Jobs Older Than (days), page 2-42
30 Update
POR: Transparent Punchout Timeout Limit, page 2-42
60 Update Update Update Update Update
Discoverer DBC filename overrideDetermines the batch size used to commit records to catalog tables when bulk loading or purging data. You can change the default setting depending on the volume of purchasing data and your database configuration. For example, if the commit size is exceptionally large, errors may occur. If the value is too small, there may be performance issues. Contact your database administrator to see whether you should change the default commit size.
HR: Cross Business GroupsThis profile affects the suggested buyer, global requester, and global approver features. When set to Yes:
• You can assign buyers (or establish default buyers) from different business groups to a given requisition line.
• Approval lists can include approvers outside the requester's business group.
• The requester field can include requesters outside the user's business group.
ICX: Date format maskDetermines the date format mask to use. The American English default is DD-MON-RRRR, for example, 12-NOV-2002. For year 2000 compliance, all year formatsare converted to RRRR, which accepts four-digit century and year entries verbatim (1950 is stored as 1950) and converts two-digit year entries:
• Entries of 00 to 49 are converted to 2000 to 2049, respectively.

Oracle Applications Setup 2-41
• Entries of 50 to 99 are converted to 1950 to 1999, respectively.
For example, if a requester enters 50 for the year, the year is converted and stored as 1950. If a requester enters 49, the year is converted and stored as 2049.
ICX: Date languageDetermines the date language to use. This impacts the default date format mask.
ICX: Default Discoverer Workbook OwnerIndicates the default Discoverer Workbook owner
ICX: Default EmployeeIndicates employee person id to be defaulted in for quotes and ordering.
ICX: Default Flow OperandThis profile sets the default view operand.
MRP: Default Sourcing Assignment SetSourcing rules dictate which supplier or internal organization will supply a given requisitioned item. Sourcing rules are utilized by Oracle iProcurement so that a default source can be generated by the application. In Oracle iProcurement only those sourcing rules that have been assigned to the assignment set defined in this profile will be used when the sourcing logic is called.
POR: Bulk Loader Commit SizeDetermines the batch size to commit records to catalog tables when uploading, extracting, or purging data. You can change the default setting depending on the volume of purchasing data you expect to extract or upload and your database configuration. For example, if the commit size is exceptionally large, errors may occur. If the value is too small, there may be performance issues. Contact your database administrator to see whether you should change the default commit size.
POR: Cache Time To Live MinutesTime, in minutes, until the middle tier server performs a garbage collection.
POR: Context value for Requisition distribution descriptive flexfieldDetermines which context-sensitive descriptive flexfield Oracle iProcurement uses for requisition distributions.

2-42 Oracle iProcurement Implementation and Administration Guide
POR: Context value for Requisition header descriptive flexfieldDetermines which context-sensitive descriptive flexfield Oracle iProcurement uses for requisition headers.
POR: Context value for Requisition line descriptive flexfieldDetermines which context-sensitive descriptive flexfield Oracle iProcurement uses for requisition lines.
POR: Enable Req Distribution CustomizationYes indicates that distribution level customization is enabled.
POR: Enable Req Header CustomizationYes indicates that header level customization is enabled.
POR: Enable Requisition Line CustomizationYes indicates that line level customization is enabled.
POR: Purchasing News LocationFor multi-org environments, this is the directory where operating unit-specific purchasing news is stored. Normally, this value is the name of the operating unit
POR: Purge Jobs Older Than (days)Catalog administrators can use this profile option to specify the number of days catalog loader job history is stored in the database. This setting helps minimize the amount of disk space that the loader tables use. When the catalog loader is started, it retrieves this profile option setting and purges any data older than the value in the profile option.
The tables from which the data are purged include: ICX_POR_BATCH_JOBS, ICX_POR_FAILED_LINE_MESSAGES, ICX_POR_FAILED_LINES, and ICX_POR_CONTRACT_REFERENCES.
Use the POR: Bulk Loader/Extractor Commit Size profile option to determine how many records are purged at a time.
POR: Transparent Punchout Timeout LimitSet this profile option if you are setting up a transparent punchout content zone. Enter the time, in seconds, after which you want transparent punchout catalogs to time out if the search takes longer than this time to complete. For example, if you enter 30 and a transparent punchout catalog takes longer than 30 seconds to return results, Oracle iProcurement displays a message after 30 seconds that the Web site is not responding. The timeout does not affect other catalog search results if other catalogs are in the store.

Oracle Applications Setup 2-43
It affects only the transparent punchout catalog or catalogs in the store that take longer than this timeout to return results.
Content Management CategoryThe table below lists the profile options that impact iProcurement Content Management.
Content Management Profile Options
Profile Option Default User Access
System Administration: Site
System Administration: Application
System Administration: Responsibility
System Administration: User
FND: Native Client Encoding, page 2-44
WE8MSWIN1252
Update Update Update Update Update
ICX: Default Requisition Template, page 2-44
Update Update Update Update Update
ICX: Discoverer Default End User Layer Schema Prefix, page 2-44
Update Update Update Update Update
ICX: Discoverer EBS End User Layer Schema Prefix, page 2-44
Update Update Update Update Update
ICX: Discoverer EDW End User Layer Schema Prefix, page 2-44
Update Update Update Update Update
ICX: Discoverer End User Layer Language Override, page 2-44
Update Update Update Update Update
ICX: Discoverer Launcher, page 2-44
Update Update Update Update Update
POR: Autocreate Shopping Category and Mapping, page 2-45
No Update

2-44 Oracle iProcurement Implementation and Administration Guide
Profile Option Default User Access
System Administration: Site
System Administration: Application
System Administration: Responsibility
System Administration: User
POR: Auto Load Category Descriptors, page 2-45
No Update
POR: Auto Load Root Descriptors, page 2-45
No Update
POR: Auto Load Shopping Categories, page 2-45
No Update
FND: Native Client EncodingEncoding that you want to default into the spreadsheet that you download from the Download Instructions and Templates page in the eContent Manager (accessible through the iProcurement Catalog Administration responsibility). For example, if you select the Cp1252 encoding for this profile option (also displays the technical name WE8MSWIN1252), the #ENCODING field in the spreadsheet template defaults to Cp1252.
ICX: Default Requisition TemplateIndicates the default Requisition Template for iProcurement requisitions.
ICX: Discoverer Default End User Layer Schema PrefixIndicates the Discoverer default end user layer schema prefix.
ICX: Discoverer EBS End User Layer Schema PrefixIndicates the Discoverer EBS end user layer schema prefix.
ICX: Discoverer EDW End User Layer Schema PrefixIndicates the Discoverer EDW end user layer schema prefix.
ICX: Discoverer End User Layer Language OverrideIndicates the Discoverer end user layer language override.
ICX: Discoverer LauncherThis profile identifies the URL directed to the Discoverer server.

Oracle Applications Setup 2-45
POR: Autocreate Shopping Category and MappingIf set to Yes, create shopping category and mapping automatically when Purchasing category is created.
POR: Auto Load Category DescriptorsIf set to Yes, creates a Category Descriptor if the descriptor found in the upload file doesnot exist in iProcurement.
POR: Auto Load Root DescriptorsIf set to Yes, creates a Root Descriptor if the descriptor found in the upload file does not exist in iProcurement.
POR: Auto Load Shopping CategoriesIf set to Yes, creates the Shopping Category if the category found in the upload file does not exist in iProcurement.
Deployment CategoryThe table below lists the profile options that impact iProcurement deployment.
Deployment Profile Options
Profile Option Default User Access
System Administration: Site
System Administration: Application
System Administration: Responsibility
System Administration: User
Application Framework Agent, page 2-48
WE8MSWIN1252
Update Update Update Update Update
Apps Servlet Agent, page 2-48
Update Update Update Update Update
ECX: Log File Path, page 2-48
Update
Help Localization Code, page 2-48
No Update Update Update

2-46 Oracle iProcurement Implementation and Administration Guide
Profile Option Default User Access
System Administration: Site
System Administration: Application
System Administration: Responsibility
System Administration: User
ICX: Client IANA Encoding, page 2-48
Western European (ISO-8859-1)
Update
ICX: Discoverer OLTP End User Layer Schema Prefix, page 2-49
Update Update Update Update Update
ICX: Discoverer Parameters, page 2-49
Update Update Update Update Update
ICX: Discoverer Release, page 2-49
Update Update Update Update Update
ICX: Discoverer use Viewer, page 2-49
Update Update Update Update Update
ICX: Discoverer Viewer Launcher, page 2-49
Update Update Update Update Update
ICX: Forms Launcher, page2-49
Update Update Update Update Update
ICX: HTML directory, page2-49
Default Update
ICX: Language, page 2-49 Update Update Update
ICX: Limit connect, page 2-49
1000 Update Update Update
ICX: Limit time, page 2-49 4 Update Update Update
ICX: Match case LOV, page2-49
Update Update Update Update Update

Oracle Applications Setup 2-47
Profile Option Default User Access
System Administration: Site
System Administration: Application
System Administration: Responsibility
System Administration: User
ICX: Match case View, page 2-49
Update Update Update Update Update
ICX: Media directory, page 2-49
Default Update
ICX: NLS Sort, page 2-49 Update Update Update Update Update
ICX: Numeric characters, page 2-50
Update Update
PO: Enable Services Procurement, page 2-50
No Update
PO: Validate Need-by TimeFor Requisition Submit , page 2-50
Yes Update Update Update
POR : Amount Based Services Line Type, page 2-50
Update
POR : CA Certificate File Name, page 2-50
Update
POR: Contractor Expense Line Type, page 2-51
Update Update Update Update
POR: Default Currency Conversion Rate Type, page 2-51
Update Update Update Update Update
POR : Goods Line Type, page 2-51
Update
POR: Hosted Images Directory, page 2-51
Update

2-48 Oracle iProcurement Implementation and Administration Guide
Profile Option Default User Access
System Administration: Site
System Administration: Application
System Administration: Responsibility
System Administration: User
POR : Proxy Server Name, page 2-51
Update
POR : Proxy Server Port, page 2-52
Update
POR : Rate Based Services Line Type, page 2-52
Update
POR : Use Sequence for Requisition Numbering, page 2-52
No Update
Application Framework Agent (Required)HTTP server that the Oracle Self-Service Framework application uses. The system administrator who configured Oracle Self-Service Framework should already have set this profile option. If requesters experience errors on the Search Results page after first adding an item to the cart, you may need to remove the trailing slash from this profile option value.
Apps Servlet Agent The URL, including the hostname and port number, from where the Oracle iProcurement server is running.
ECX: Log File PathDirectory where the Oracle XML Gateway engine writes its log files. The directory mustbe one of the valid directories specified in the UTL_FILE_DIR parameter in the init<SID>.ora file in your Oracle Applications instance. This must be an absolute path and cannot contain a symbolic link or other operating system specific parameters.
Help Localization CodeIndicates the localization code for localized help files. For more information, see the Oracle E-Business Suite System Administrator's Guide.

Oracle Applications Setup 2-49
ICX: Client IANA EncodingCharacter set encoding (such as UTF-8) that the application server uses to generate HTML for the browser. This encoding determines the way to send data to the browser and render the data.
ICX: Discoverer OLTP End User Layer Schema PrefixIndicates the Discoverer OLTP end user layer schema prefix.
ICX: Discoverer Parameters
ICX: Discoverer Release
ICX: Discoverer use ViewerUse Discoverer Viewer instead of Web Discoverer.
ICX: Discoverer Viewer LauncherThis profile contains the URL to launch Discoverer Viewer.
ICX: Forms Launcher
ICX: HTML directory
ICX: LanguageDetermines the default session language.
ICX: Limit connectDetermines the maximum number of page visits for each session.
ICX: Limit timeDetermines the maximum number of hours a requester can log in for each session.
ICX: Match case LOV
ICX: Match case View
ICX: Media directoryIndicates the media directory.

2-50 Oracle iProcurement Implementation and Administration Guide
ICX: NLS SortCollating sequence for the ORDER BY CLAUSE
ICX: Numeric charactersEnter the preferred decimal and group separators you want to display for numbers. For example, if you specify .. as the value for this profile option, you indicate that the decimal separator is a period and the group separator is a comma. In this example, if you enter these values at the site level, all requesters in Oracle iProcurement for the specified site see the number three thousand as 3,000.00. If the value is entered as ,. for the profile option, three thousand would appear as 3.000,00
When set to blank, the decimal and group separators are obtained from the nls_numeric_parameters setting in the database.
PO: Enable Services ProcurementThis is a separately licensed Oracle Applications product. You must have licensed and implemented this product to use this profile and any of the features that the profile enables.
When set to Yes, the Contractor Request links and tabs display the contractor entry information. When set to No, clicking these links and tabs displays the message: You cannot access this page because Oracle Services Procurement is not enabled. Contact your system administrator for help.
PO: Validate Need-by Time For Requisition Submit Option to bypass validation of time component of need-by date during requisition submit process. Value of Yes means valiate both time and date components.
POR : Amount Based Services Line TypeDetermines the line type for amount-based non-catalog requests. An amount-based request is expressed in monetary terms - for example, 500 USD worth of service.
The value selected should be distinct from the values selected for POR: Goods Line Type and POR: Rate Based Services Line Type.
You can select only line types with a Purchase Basis of Services and a Value Basis of Amount for this profile option. If Oracle Services Procurement is licensed and implemented, then you can select a Value Basis of Fixed Price or Amount.
POR : CA Certificate File NameThis profile option that punchout and transparent punchout content zones use when those catalogs reside on a secure site. ( It specifies the file name that includes the certificates your company's server accepts. This file should be readable and should be accessible from the middle tier. If you have multiple JVMs, then this directory should be
Oracle Applications Setup 2-51
accessible from all the JVMs. By default, use the file $APACHE_TOP/Apache/conf/ssl.crt/ca-bundle.crt, where $APACHE_TOP is the root directory where the Oracle Internet Application Server (iAS) is installed. The ca-bundle.crt file includes certificates from various signing authorities. For more information, see the Oracle Procurement Buyer's Guide to Punchout and Transparent Punchout.
POR: Contractor Expense Line TypeIndicates the line type that should be used for expense lines on contractor requests.
POR: Default Currency Conversion Rate TypeUse this profile option to specify the default exchange rate type. This rate applies when:
• Creating non-catalog requests.
• Converting an uploaded item's transactional price into a requester's functional price.
• Converting a punchout or transparent punchout item's transactional price into the functional price.
• Exchange rates cannot be found during contractor assignment.
If you are converting prices of punchout or transparent punchout items, you must set this profile option to either Corporate or Spot (not User). Otherwise, the requester receives an error message during checkout that no exchange rate exists and cannot check out the item.
POR : Goods Line TypeIndicates the line type to use for all uploaded items and quantity-based non-catalog requests.
The value selected should be distinct from the values selected for POR: Amount Based Services Line Type and POR: Rate Based Services Line Type.
Select only line types with a Purchase Basis of Goods and a Value Basis of Quantity for this profile option.
POR: Hosted Images DirectorySpecifies the directory where image files are stored. To associate an item with a picture, the image file must be copied to this directory to appear in Oracle iProcurement. This path usually corresponds to the /OA_MEDIA/ directory.
POR : Proxy Server NameUsed for punchout and transparent punchout catalogs. It specifies the proxy server

2-52 Oracle iProcurement Implementation and Administration Guide
(Web Server) name if your Oracle iProcurement implementation has a proxy setup. The proxy server is typically the same as the proxy server that is set up in users' browsers in your company--for example, www-proxy.company.com. For more information, see the Oracle Procurement Buyer's Guide to Punchout and Transparent Punchout.
Any time you change this profile option, you must restart the Oracle Internet Application Server (iAS) for the change to take effect.
POR : Proxy Server PortUsed for punchout and transparent punchout catalogs. It specifies the port on which theproxy server listens if your Oracle iProcurement implementation has a proxy setup. Theport is typically the same as the port that is set up in users' browsers in your company--for example, 80. For more information, see the Oracle Procurement Buyer's Guide to Punchout and Transparent Punchout.
Any time you change this profile option, you must restart the Oracle Internet Application Server (iAS) for the change to take effect.
POR : Rate Based Services Line TypeSpecifies the line type for rate-based non-catalog requests. A rate-based request is expressed as a monetary charge for each time period.
The value selected should be distinct from the values selected for POR: Goods Line Type and POR: Amount Based Services Line Type.
Select only line types with a Purchase Basis of Goods and a Value Basis of Quantity for this profile option.
POR : Use Sequence for Requisition NumberingUse this profile option to indicate whether requisitions created in Oracle iProcurement should follow the same numbering schema as Oracle Purchasing, or if requisition numbers should be generated using the database sequence, which may provide an increase in performance.
When set to Yes, requisition numbers are shared across operating units.
Internal Requisition CategoryThe table below lists the profile options that impact iProcurement Internal Requisition.

Oracle Applications Setup 2-53
Internal Requisition Profile Options
Profile Option Default User Access
System Administration: Site
System Administration: Application
System Administration: Responsibility
System Administration: User
PO: Legal Requisition Type, page 2-61
Update Update Update
POR:Allow Manual Selection of Source, page 2-62
No Update Update Update Update
POR: Select Internal Requisition for Confirm Receipt, page 2-54
Yes Update Update
POR: Sync up Need by dateon IR with OM, page 4-60
No Update
POR: Urgent flag maps to shipping Priority , page 4-60
No Update
Receiving CategoryThe table below lists the profile options that impact iProcurement Receiving.
Receiving Profile Options
Profile Option Default User Access
System Administration: Site
System Administration: Application
System Administration: Responsibility
System Administration: User
POR: Enable Automatic Debit Memo Creation for Returns, page 2-54
No Update Update Update Update Update
POR: Require Blind Receiving, page 2-54
No Update Update

2-54 Oracle iProcurement Implementation and Administration Guide
Profile Option Default User Access
System Administration: Site
System Administration: Application
System Administration: Responsibility
System Administration: User
POR: Select Internal Requisition for Confirm Receipt, page 2-54
Yes Update Update
POR: Select Inventory Replenishment Lines For Confirm Receipts, page 2-54
Update
POR: Support review for Express Receive, page 2-54
Yes Update Update Update
POR: Enable Automatic Debit Memo Creation for ReturnsYes enables automatic creation of debit memos for all return to supplier transactions.
POR: Require Blind ReceivingYes turns on Blind Receiving support in Oracle iProcurement. Blind receiving support requires corresponding setup in Oracle Purchasing. .
POR: Select Internal Requisition for Confirm ReceiptIf set to Yes, internal requisitions will be included in the confirm receipt notifications sent to the requester. If set to No, internal requisitions will not be included with the confirm receipt notifications sent to the requester.
POR: Select Inventory Replenishment Lines For Confirm ReceiptsFor Confirm Receipts set this profile option to Yes if you want the Confirm Receipts workflow process to select purchase order shipments with destination type Inventory inaddition to purchase order shipments with destination type Expense.
POR: Support review for Express ReceiveIf set to Yes, the Review and Submit page will be shown during express receiving. Otherwise, the requester will be directed to the Confirmation page directly.

Oracle Applications Setup 2-55
Requisition Accounting CategoryThe table below lists the profile options that impact iProcurement Requisition Accounting.
Requisition Accounting Profile Options
Profile Option Default User Access
System Administration: Site
System Administration: Application
System Administration: Responsibility
System Administration: User
PA: Allow Override of PA Distribution in AP/PO, page 2-56
Update Update Update
POR: Allow pcard use withencumbrance, page 2-56
Update Update
POR: Apply Expense Account Rules to Favorite Charge Accounts, page 2-56
No Update Update Update Update Update
POR: Enable Check Funds, page 2-56
No Update Update Update Update Update
POR: Generate and DisplayAccount at Checkout, page 2-57
No Update Update Update Update Update
POR : Override Supplier P-Card, page 2-57
No Update Update
POR : Preferences - Award,page 2-57
Update Update Update Update Update
POR: Preferences - Expenditure Item Date Offset, page 2-57
Update Update Update Update Update
POR: Preferences - Expenditure Org, page 2-57
Update Update Update Update Update
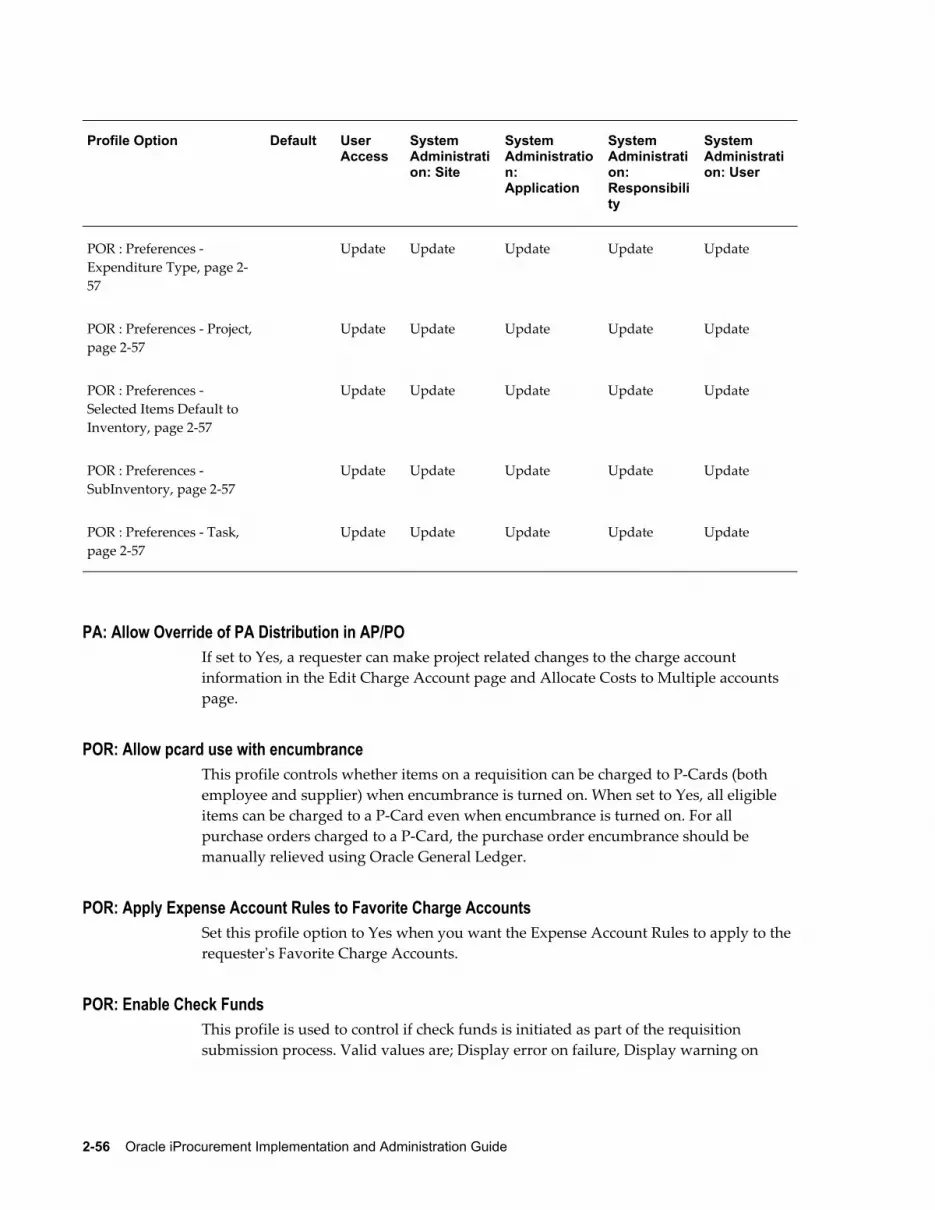
2-56 Oracle iProcurement Implementation and Administration Guide
Profile Option Default User Access
System Administration: Site
System Administration: Application
System Administration: Responsibility
System Administration: User
POR : Preferences - Expenditure Type, page 2-57
Update Update Update Update Update
POR : Preferences - Project, page 2-57
Update Update Update Update Update
POR : Preferences - Selected Items Default to Inventory, page 2-57
Update Update Update Update Update
POR : Preferences - SubInventory, page 2-57
Update Update Update Update Update
POR : Preferences - Task, page 2-57
Update Update Update Update Update
PA: Allow Override of PA Distribution in AP/POIf set to Yes, a requester can make project related changes to the charge account information in the Edit Charge Account page and Allocate Costs to Multiple accounts page.
POR: Allow pcard use with encumbranceThis profile controls whether items on a requisition can be charged to P-Cards (both employee and supplier) when encumbrance is turned on. When set to Yes, all eligible items can be charged to a P-Card even when encumbrance is turned on. For all purchase orders charged to a P-Card, the purchase order encumbrance should be manually relieved using Oracle General Ledger.
POR: Apply Expense Account Rules to Favorite Charge AccountsSet this profile option to Yes when you want the Expense Account Rules to apply to the requester's Favorite Charge Accounts.
POR: Enable Check FundsThis profile is used to control if check funds is initiated as part of the requisition submission process. Valid values are; Display error on failure, Display warning on

Oracle Applications Setup 2-57
failure, and No checkfunds.
POR: Generate and Display Account at CheckoutIf set to Yes, iProcurement generates and displays the charge account at checkout
POR : Override Supplier P-CardYes inidcates that the supplier P-Card takes precedence over employee P-Card when both P-Card types are eligible to be assigned to a requisition line.
POR : Preferences - AwardEnable requesters to set their preferred award ID.
POR: Preferences - Expenditure Item Date OffsetEnable requesters to set their Expenditure Item Date calculation as sysdate plus this profile value.
POR: Preferences - Expenditure OrgEnables requesters to set their expenditure organization for project-related requisitions.
POR : Preferences - Expenditure TypeEnables requesters to set their expenditure type for project-related requisitions.
This profile determines the iProcurement result tables.
POR : Preferences - ProjectEnables requesters to set their project number for project related requisitions.
POR : Preferences - Selected Items Default to InventoryEnables requesters to indicate whether ordered items are to replenish inventory.
POR : Preferences - SubInventoryIf items are to replenish inventory, requesters can select a default subinventory for thoseitems. This is only valid if the POR: Preferences - Inventory Replenishment profile is set to Yes.
POR : Preferences - TaskRequesters can set their task number for project related requisitions.

2-58 Oracle iProcurement Implementation and Administration Guide
Requisition Approval CategoryThe table below lists the profile options that impact iProcurement Requisition Approval.
Requisition Approval Profile Options
Profile Option Default User Access
System Administration: Site
System Administration: Application
System Administration: Responsibility
System Administration: User
PO: Allow Requisition Approval Forward Action, page 2-58
Update
PO: Notification Lines Display Limit, page 2-58
20 Update Update Update
PO:Workflow Processing Mode, page 2-58
Update Update Update Update
POR: Display Graphical Approval List, page 2-59
Yes Update Update Update Update Update
POR: Reapproval after Contractor Assignment, page 2-59
Always Update
POR : System Approvers are Mandatory, page 2-59
Yes Update
PO: Allow Requisition Approval Forward ActionWhen this profile is set to Yes; Approve, Reject, Forward, Approve and Forward actionsare allowed in a requisition approval notification. Otherwise, only Approve and Reject actions are allowed.
PO: Notification Lines Display LimitMaximum number of requisition lines to be displayed in a requisition approval notification.
Oracle Applications Setup 2-59
PO:Workflow Processing ModeDetermines the performance of the Purchasing approval workflow processes. Online completes an entire approval workflow process before letting you proceed to the next activity. Background allows you to proceed to the next activity while the approval process completes in the background. Whichever option you choose, you can always view the current status of a requisition or purchase order through the Requisitions Summary or Purchase Orders Summary windows.
When this profile option is set to Background, you must start the Workflow Background Process, using the System Administration responsibility. It is recommended that you set this process to run frequently, if you are using it for Background mode approvals.
POR: Display Graphical Approval ListIf profile is set to Yes, the approval list graph is displayed
POR: Reapproval after Contractor AssignmentSome contractor requests require contractor assignment after the requisition is created; others do not. (See the Oracle iProcurement online Help for details.) This profile option determines whether reapproval of the requisition is required after contractor assignment. Select Always to always require approval. Conditionally Required means that reapproval is required only if a change has been made that triggers reapproval - forexample, at least one line amount has changed, or the requester modified the unit price, quantity, unit of measure, account, distribution, or project information on the requisition during the checkout that follows contractor assignment.
If the new line amount is below the requester's approval limit, then only the requester's reapproval (no additional approval) is required.
POR : System Approvers are MandatoryYes indicates that the default approvers on the approver list are mandatory.
Requisition Checkout CategoryThe table below lists the profile options that impact iProcurement Requisition Checkout.

2-60 Oracle iProcurement Implementation and Administration Guide
Requisition Checkout Profile Options
Profile Option Default User Access
System Administration: Site
System Administration: Application
System Administration: Responsibility
System Administration: User
POR: Days Needed By, page 2-60
2 Update Update Update Update Update
PO: Default Need-By Time,page 2-60
Update
POR : Preferences - Deliver to Location, page 2-60
Update Update Update Update Update
POR : Preferences - Requester, page 2-61
Update Update Update Update Update
POR: One Time Location, page 2-61
Update Update Update Update
POR: Override Location Flag, page 2-61
Yes Update Update Update
POR: Override Requestor, page 2-61
No Update Update Update
TAX: Allow Override of Tax Recovery Rate, page 2-61
Update Update Update
POR: Days Needed ByIndicates the default number of days until the requester needs the order. This value is used to calculate the need by date.
PO: Default Need-By TimeYes indicates that the time is defaulted to need-by dates in purchase order.
POR : Preferences - Deliver to LocationtEnables requesters to set their preferred deliver to location.
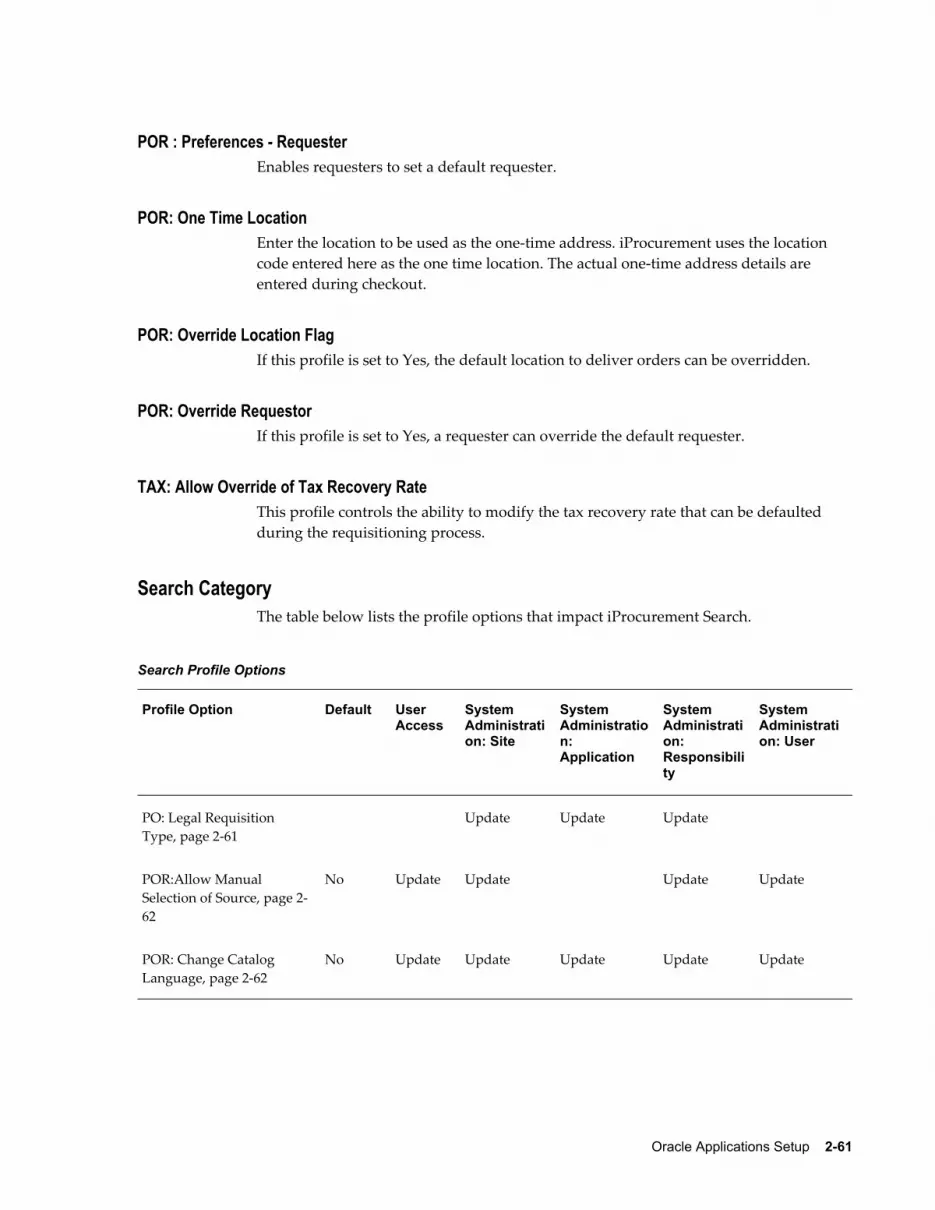
Oracle Applications Setup 2-61
POR : Preferences - RequesterEnables requesters to set a default requester.
POR: One Time LocationEnter the location to be used as the one-time address. iProcurement uses the location code entered here as the one time location. The actual one-time address details are entered during checkout.
POR: Override Location FlagIf this profile is set to Yes, the default location to deliver orders can be overridden.
POR: Override RequestorIf this profile is set to Yes, a requester can override the default requester.
TAX: Allow Override of Tax Recovery RateThis profile controls the ability to modify the tax recovery rate that can be defaulted during the requisitioning process.
Search CategoryThe table below lists the profile options that impact iProcurement Search.
Search Profile Options
Profile Option Default User Access
System Administration: Site
System Administration: Application
System Administration: Responsibility
System Administration: User
PO: Legal Requisition Type, page 2-61
Update Update Update
POR:Allow Manual Selection of Source, page 2-62
No Update Update Update Update
POR: Change Catalog Language, page 2-62
No Update Update Update Update Update

2-62 Oracle iProcurement Implementation and Administration Guide
PO: Legal Requisition TypeIndicates whether requesters can enter internal requisitions sourced from stock by means of an internal sales order, purchase requisitions sourced from a supplier by means of a purchase order, or both types. Valid values are Both, Internal, and Purchase. Impacts both Oracle Purchasing and Oracle iProcurement.
POR:Allow Manual Selection of SourceIf set to Yes and internally orderable items are displayed, then the Stocked Internally column will display the Select Source link for all internally orderable items. If set to No, then no distinction will be made between strictly purchasable items and items that are internally orderable.
POR: Change Catalog LanguageIf catalog items exist in multiple languages, requesters can search for items in a language other than their default session language. For example, if an item exists only in the German version of the catalog, requesters will not find it unless they change their search language to German, using the Change Catalog Language link on the Shop homeand search results pages. Set this profile option to Yes to enable requesters to change their search language.
Set this profile option to No to hide the Change Catalog Language link, to restrict requesters to purchasing items only in the default session language. You should set this profile option to No if you do not want requesters to purchase items that are available in languages other than their session language.
Services Procurement CategoryThe table below lists the profile options that impact iProcurement Services Procurement.
Services Procurement Profile Options
Profile Option Default User Access
System Administration: Site
System Administration: Application
System Administration: Responsibility
System Administration: User
PO: Enable Services Procurement, page 2-50
No Update
POR: Contractor Expense Line Type, page 2-51
Update Update Update Update

Oracle Applications Setup 2-63
Profile Option Default User Access
System Administration: Site
System Administration: Application
System Administration: Responsibility
System Administration: User
POR: Reapproval after Contractor Assignment, page 2-59
Always Update
User Interface CategoryThe table below lists the profile options that impact the iProcurement User Interface.
User Interface Profile Options
Profile Option Default User Access
System Administration: Site
System Administration: Application
System Administration: Responsibility
System Administration: User
ICX: Date format mask, page 2-40
Update Update Update
ICX: Language, page 2-49 Update Update Update
ICX: Numeric characters, page 2-50
Update Update
POR: Catalog Result Set Size, page 2-64
7 Update Update Update Update Update
POR: Default Shopping Sort, page 2-64
Update Update
POR: Default Shopping Sort Order, page 2-64
Ascending
Update Update
POR: Display Graphical Approval List, page 2-59
Yes Update Update Update Update Update

2-64 Oracle iProcurement Implementation and Administration Guide
Profile Option Default User Access
System Administration: Site
System Administration: Application
System Administration: Responsibility
System Administration: User
POR: Display Legacy Accounting Flex UI, page 2-65
No Update Update Update Update Update
POR: Display Shopping Category Count, page 2-65
Yes Update Update Update
POR: Enable Advanced Search, page 2-65
Update Update Update Update
POR: My Favorite Store, page 2-65
-1 Update Update Update Update Update
POR: Result Set Size, page 2-65
10 Update Update Update Update Update
POR: Search Results Skin, page 2-65
Paragraph
Update Update Update Update Update
POR: Show Thumbnail Images, page 2-66
Yes Update Update Update Update Update
POR: Thumbnail Height, page 2-66
Update Update Update Update Update
POR: Thumbnail Width, page 2-66
Update Update Update Update Update
POR: Catalog Result Set SizeThis profile determines the default number of rows shown in iProcurement catalog search result tables..
POR: Default Shopping SortDetermines the item attribute that is used to sort search results by default. Replaces POR: Sort by Relevance. Relevance may still be used here.
Oracle Applications Setup 2-65
POR: Default Shopping Sort OrderDetermines the default sort order to be ascending or descending. Used together with POR: Default Shopping Sort.
POR: Display Legacy Accounting Flex UIDetermines whether to use the charge account key flexfield user interface from previousreleases on the Edit Lines page during checkout. This user interface displays the charge account as separate segments, in separate fields. The settings are:
• Yes: The separate segments appear.
• No: The new user interface displays the segments in a single field
POR: Display Shopping Category CountIf this profile is set to Yes, Oracle iProcurement displays the count of items within each shopping category on the Shop home page. When the item count is enabled, iProcurement removes browsing categories that do not have items from the requester's view.
POR: Enable Advanced SearchSet this profile option if you are not using a local content zone, but are implementing only punchout or transparent punchout content zones. Punchout and transparent punchout content zones do not use the advanced searching feature; only local content uses these. Therefore, if you are implementing only punchout or transparent punchout content zones, you can set this profile option to No to hide all Advanced Search links. If this profile option is set to No, requesters can still use standard searching, which includes searching of punchout and transparent punchout content zones; only the advanced searching feature is disabled.
POR: My Favorite StoreSpecifies the store that always displays at the top of the Shop page. If no favorite store isspecified, or if you specify -1 for this profile option, Oracle iProcurement displays the system-assigned store as the favorite store. The system-assigned store is the store that the requester has access to that has the lowest sequence number.
POR: Result Set SizeIndicates how many records per page requesters see when viewing search results on theReceiving and Requisition Status pages.
POR: Search Results SkinInidcates the skin in which search results are displayed. Values are Paragraph or Grid.

2-66 Oracle iProcurement Implementation and Administration Guide
See the iProcurement online Help for details.
POR: Show Thumbnail ImagesSet this profile option to control whether thumbnail images loaded to the local catalog appears on the Search Results Summary and Search Results pages. For example, to wait until all thumbnail images are loaded before displaying them or, if you encounter issues, set this profile option to No to hide all thumbnail images.
To display all thumbnail images, set this profile option to Yes.
This profile option sets the default, but requesters can also choose whether to display thumbnail images using their iProcurement Preferences. For example, if this profile option is set to No, a requester can choose Yes to display them for oneself.
Note: The purpose of this profile option is to temporarily show or hide thumbnail images. This profile option does not control whether thumbnail images appears on the Compare Item page. Use schema editing to control that page.
POR: Thumbnail HeightSet this profile option if you are uploading items to the local catalog and you want to specify thumbnail images for the items. Thumbnail images appear on the Search ResultsSummary, Search Results, and Compare Items pages. Use this profile option to specify the height, in number of pixels, for all thumbnail images. Use this profile option when the size of the source file needs to be adjusted for thumbnail images. (It is recommended that you set either this or the POR: Thumbnail Width profile option rather than both profile options, to avoid fixed sizing.
POR: Thumbnail WidthSet this profile option if you are uploading items to the local catalog and you want to specify thumbnail images for the items. Thumbnail images appear on the Search ResultsSummary, Search Results, and Compare Items pages. Use this profile option to specify the width, in number of pixels, for all thumbnail images. Use this profile option when the size of the source file needs to be adjusted for thumbnail images. (It is recommended that you set either this or the POR: Thumbnail Height profile option rather than both profile options, to avoid fixed sizing
Content Management 3-1
3Content Management
Understanding the Procurement CatalogOracle iProcurement and Oracle Purchasing have a single shared catalog data model. This data model forms the basis of what can be more generally thought of as the procurement catalog which determines the types of catalog content your requesters can see and how that content is presented to them. The procurement catalog combines the best features of previous catalog models and provides a number of significant capabilities and benefits:
• Catalogs are automatically and perpetually up-to-date and based on real-time data.
• Support for extensible base and category attributes to enhance the product data catalog. Oracle iProcurement customers can define base and category attributes for their specific needs.
• Support for price breaks based on quantity, shipping organization and effective date range.
Business Flow1. Online authoring and file upload from the Oracle Purchasing Buyer's Work Center,
Oracle iSupplier Portal, and Oracle iProcurement Catalog Administration provide the content for the catalog.
2. Review changes between the content revision and the last approved version using the Difference Summary for Catalog Changes.
3. Buyer approves catalog content changes using the Oracle Purchasing approval hierarchy, revision control, and archival capabilities.
4. Approved content updates the procurement catalog in real-time.

3-2 Oracle iProcurement Implementation and Administration Guide
Implementation Flow1. Analyze the content that your requesters want to see and define the catalog schema.
2. Determine what type of container makes sense for the items and services your requesters want access to and define your content zones.
3. Create or upload the catalog data.
4. If needed, organize your content zones into stores.
Understanding Catalog SchemaAt a high level, the area that define the catalog are the catalog data and the catalog schema.
Catalog data consist of the items and services available for purchase. The associated prices for these items and services are also considered part of the catalog data.
Catalog schema is comprised of:
• A combination of categories.
• Category descriptors (sometimes known as category attributes or local attributes) used to describe items in a specific category.
• Base descriptors (sometimes known as base attributes) describe any item or service in the catalog.
The types of categories in the catalog that define the catalog's hierarchy are:
• Purchasing Item categories: Every item in the catalog must belong to a Purchasing Item category. Purchasing Item categories are recognized by many integrating Oracle Applications in addition to Oracle iProcurement. The association of Purchasing Item categories with catalog items enables a wide range of functionality in Oracle Applications.
• Shopping categories: Also known as genus categories, are used to group similar items for presentation to the iProcurement user. Shopping categories generally havenames that are more shopper friendly than Purchasing Item categories, and are displayed prominently in many iProcurement pages to help requesters find what they are shopping for. Shopping categories are not mandatory for all items in the catalog, but they are highly recommended for items that are intended for iProcurement requesters. Shopping categories are found at the lowest level of the category hierarchy; therefore a shopping category can never be a parent category to a child category.
• Browsing categories, also known as navigation categories (or master or

Content Management 3-3
intermediate level categories), define the category hierarchy. The category hierarchyhelps requesters browse for catalog items Browsing categories can be either a parentor child to another category, but cannot contain any items.
There are two types of descriptors in the catalog:
• Category descriptors (local descriptors) apply only to items within a specific shopping category. Ink Color is an example of a local descriptor for the item category Ball Point Pens. Category descriptors can vary from one item category to another, and they are always optional.
• Base descriptors apply to all items or services in the catalog. Price is an example of abase descriptor. Some base descriptors, such as Price and Unit of Measure, are required; others, such as Manufacturer, are optional.
The combination of categories and descriptor make up your catalog schema.
Catalog Content StructureCatalog is general term that refers to your online shopping content. However, you don'tdefine or setup catalogs in Oracle iProcurement. Instead you define content zones. Catalog Administrators partition local catalog content into local content zones, define punchout or transparent punchout content zones, and then assign these content zones to stores. The combination of content zones that you assign to a store determines what catalog content your users see.
Oracle iProcurement offers four types of content zones that you can set up. You can create more than one of each type of content zone.
Type Location of Content
Description
Local Oracle Purchasing Consists of items, categories, and descriptors defined in Oracle Purchasing and Oracle Inventory.
Punchout Supplier's site or Oracle Exchange
Consists of items that the supplier maintains. The requester clicks a link to the external site from the Shop store or Search Results Summary page, and adds items from the external site to the shopping cart in Oracle iProcurement.
Transparent punchout
Supplier's site or Oracle Exchange
When the requester searches for items, the transparent punchout content zone accesses the external site in the background and returns the matching items to the Search Results Summary and Search Results pages. The requester then adds the items to the shopping cart.

3-4 Oracle iProcurement Implementation and Administration Guide
Type Location of Content
Description
Informational Your company's intranet, supplier's site, or Oracle Exchange
Captures instructions, policies, and links for ordering items and services that may not be supported by the other catalog types. For example, an informational content zone can contain a link to an existing policy or instructions page in your company. Unlike the other catalog types, items purchased through the informational content zone cannot be added to the shopping cart.
See: Maintaining Catalog Content, page 3-21.
Implementation ChecklistUse the following checklist for all setup related to catalog creation and management. This is a checklist of all setup steps in this chapter.
Catalog Setup Checklist
Step Required or Optional
Information Source
Load catalog content Required Online Catalog Authoring, page 3-30
Loading Catalog Content, page 3-21
Determine catalog (content zone) types to implement.
Required Understanding the Catalog, page 3-1
Choosing a Catalog Type, page 3-3
Create one or more catalogs (contentzones): local content zone, punchoutor transparent punchout content zone, or informational content zone.
Required For local catalog information, see Creating and Maintaining Local Content, page 3-21.
For punchout or transparent punchout, see the Oracle Procurement Buyer's Guide to Punchout and TransparentPunchout.
For informational catalogs, see: Maintaining An Informational Content Zone, page 3-52.
Define access to content zones. Optional Maintaining Content Zones, page 3-49
Set up Smart Forms. Optional Smart Forms, page 3-34

Content Management 3-5
Step Required or Optional
Information Source
Decide whether to create more than one store.
Optional Managing Content Presentation, page 3-44
Create stores to group content zonesand Smart Forms.
Optional Maintaining Stores, page 3-44
Set or review search related options. Recommended Setting Search Related Options, page 3-63
Associate images with content, stores, or items.
Optional Managing Images, page 3-58
Maintaining The Catalog SchemaA catalog's schema refers to the structure and organization of the catalog. Schema consists of categories, descriptors, and category hierarchies. You can use online Schema maintenance in iProcurement Catalog Administration to manage schema online, or you can upload schema elements:
• Loading Schema,
• Online Schema Maintenance,
Both of these maintenance functions are available from iProcurement Catalog Administration by clicking the Schema tab.

3-6 Oracle iProcurement Implementation and Administration Guide
Catalog Schema ComponentsCategories
A category classifies items. There are three types of categories:
• Purchasing Item categories
• Shopping categories
• Browsing categories
Descriptors
A descriptor describes items or categories. Descriptors are of two types:
• Category descriptors
• Base descriptors
Note: For details regarding schema components see: Understanding Schema, page 3-2.
Category Hierarchies
The category hierarchy presents a hierarchical view of the catalog to requesters. Use the category hierarchy to view and create hierarchies of categories and to create browsing categories.
For example, several item categories may be grouped under browsing categories as follows:

Content Management 3-7
Office Equipment, Accessories and Supplies < - browsing category Office Supplies < - browsing category Desk Furniture < - shopping category MZ451DESK < - item MZ882DESK < - item Calendars < - item categoryWriting Instruments < - browsing category Ball Point Pens < - shopping category PA453BIC < - item PA221ROL < - item
You do not have to have the same number of levels in all categories. In the example above, Office Equipment, Accessories and Supplies contains multiple levels of categories. Writing Instruments contains just two levels (one browsing and one item category level).
Creating a category hierarchy is optional. If you create one, requesters see the hierarchy when they browse categories in a store. If you do not create one, then requesters cannot browse categories for items. (They can still find items by searching, just not by browsing.) Some companies find it useful to enable requesters to browse categories, others may not.
Note: The changes you make to the category hierarchy are visible immediately in the catalog.
Loading SchemaSchema maintenance can sometimes require a large volume of edits which is more conveniently done using a file of the commands. Oracle iProcurement provides an upload interface to satisfy this need using an XML file.
To use an XML catalog schema load:1. On the iProcurement Catalog Administration Schema page, click Upload.
2. On the Upload Schema page, click Download Resources, and save the zipped resource file to a convenient local folder.
The resource file contains a document type definition (DTD) for creating the XML file and a readme file that contains detailed instructions and examples. If you are creating an XML file to load catalog schema (categories and descriptors) for the firsttime, open and review the Readme_Schema file.
Note: If you have recently updated Oracle iProcurement, it is important to use the latest version of the DTD.
3. Once you complete your XML catalog schema file, save it to the location of your choice. Save the file with any name, using a .xml extension.
4. Return to the iProcurement Catalog Administration Schema page and click Upload.

3-8 Oracle iProcurement Implementation and Administration Guide
5. Click Browse to locate your completed file.
6. Select your file and click Open in the dialog box.
Tip: If you cannot find your file in the Open dialog box, make sure you are browsing in the correct directory, and set the File Type in the dialog box to All files.
7. Click Submit. When the loader receives your file, validation begins. A confirmation page displays the job number that is automatically assigned to your job. Check the status of your job on the iProcurement Catalog Administration View Schema Upload History page to make sure that no errors occurred during the upload.
To monitor the schema job status:• You can monitor your schema load on the View Schema Upload History page
which is the same page used to monitor catalog loading.
• Some changes that you make in online schema maintenance are delegated to a job, which runs in the background while you complete other tasks.
The following online schema changes are delegated to jobs, which you can monitor on the View Schema Upload History page, by their job name:
Job Name Description
Updating category name to your new category name
Changing an item category name launches a job to re-index the items under the new category name.
Updating descriptor searchability: your descriptor name
Changing the searchable attribute of an existing descriptor launches a job to re-index the items for future searching.
Deleting descriptor: your descriptor name
Deleting a descriptor launches a job to re-index the items without the descriptor, for future searching.
Deleting category from category hierarchy: your category name
Deleting category launches a job to update the category list for the content zone(s).
Removing category from category hierarchy: your category name
Removing categories from the hierarchy launches a job to update the category list for the content zone
Inserting child category under parent category your parent categoryname
Inserting existing child into category hierarchy launches a job to re-index

Content Management 3-9
• If you have trouble diagnosing an error in a schema job, you can monitor the job in Oracle Applications. (The job number is also its Request ID.)
Each schema job is named as follows in the Requests window:
Job Name Request Name
Inserting child category under parent category your parent category name
Update Zone For Category Hierarchy Change
Deleting category from category hierarchy: your category name
Update Zone For Category Hierarchy Change
Removing category from category hierarchy: your category name
Update Zone For Category Hierarchy Change
Updating category name to:your category name
Update Items for Category Rename
Modifying category mapping foUpdating descriptor searchability: your descriptor name
Populate And Rebuild Intermedia Index For Searchable Change
Updating descriptor searchability: your descriptor name
Populate And Rebuild Intermedia Index For Searchable Change
Related TopicsMaintaining The Catalog Schema, page 3-5
Online Schema MaintenanceOracle iProcurement Catalog Administration provides the same functionality editing schema online as uploading it. Uploading gives you the advantage of planning your categories and descriptors up front, and loading them in a single file. Online maintenance enables you to search for, view, and sort the data.
Schema maintenance online:
• Maintaining Descriptors,
• Maintaining Categories:
• Maintaining Item Categories,
• Maintaining Category Hierarchy,

3-10 Oracle iProcurement Implementation and Administration Guide
• iProcurement Shopping Category Mapping, page 3-17
• Oracle Purchasing Category Mapping, page 3-19
Maintaining DescriptorsDescriptors are the attributes of an item or service that help describe it to the requester. Base descriptors apply to all items or services in the catalog. Some base descriptors, such as Description, are required. Local descriptors apply only to items within a specificshopping category and could also be thought of as category attributes.
To create or edit base descriptors:1. In iProcurement Catalog Administration, select the Schema tab.
2. Click the Base Descriptors subtab.
3. On the Base Descriptors page click Create Descriptors.
4. See the field descriptions below.
5. Click Apply.
To create or edit category descriptors: 1. In iProcurement Catalog Administration, select the Schema tab.
2. Click the Item Categories subtab.
3. On the Item Categories page, search for the category to which you want to add descriptors. If you cannot find the category, see Category Searching, page 3-13.
4. Click Edit for the category.
5. On the Edit Item Category page, do either:
• Click Create Category.
• Click Update for an existing descriptor.
6. See the field descriptions below.
7. Click Apply.
Note: If you change the Searchable attribute of an existing descriptor, the system launches a job to handle the change.
To enter descriptor information, refer to the following fields:• Descriptor Name: Displays to requesters. For category descriptors, the name must

Content Management 3-11
be unique within its category and must not be the same as a base descriptor name. For base descriptors, the name must be unique among all descriptors in the catalog. Maximum character limit: 250 bytes.
• Descriptor Key: Internal identifier for the descriptor. The key must be unique. The key can be the same as the name, and can contain spaces. It cannot be changed once it is created, and is the same across all languages. It does not display to requesters. Maximum character limit: 250 bytes.
• Description: Description, for your own purposes. It does not display to requesters. Maximum character limit: 2,000 bytes.
• Type: Data type for the descriptor. You cannot update the type once it is specified.
• Text: numbers or text that display the same in all languages and cannot be translated.
• Translatable Text: numbers or text that can vary by language, if you translate them.
• Number: positive or negative number, with or without decimals.
• Sequence:. If the descriptor is displayed in the search results, the sequence number indicates the descriptor's display sequence on the Search Results Summary, SearchResults, Item Detail, and Compare Item pages. Category descriptors are displayed to requesters only when accessed by browsing by category or advance searches in a specific category.
Use Manage Base Descriptors to see existing descriptor sequences. (You can reuse an existing sequence number, if you need to. The descriptor will display next to the one with the same number.) If you do not specify a sequence, Oracle iProcurement displays the descriptors after the default base descriptors that Oracle iProcurement provides.
• Searchable. Indicator of whether this descriptor will be searched by the search engine. For example, the category Pens contains the descriptor Ink Color. Some pens specify blue for the Ink Color. If Ink Color is not searchable, then a search for blue will not return a match.
• Search Results Visible. Choose Yes if you want the descriptor to display in the search results. Category descriptors are displayed to requesters only when accessed by browsing by category.
• Category descriptors are displayed in Search Results Summary and Search Results when the requester browses by category or advance searches against a particular category.
If the descriptor does not display in the search or browsing results, it still displays

3-12 Oracle iProcurement Implementation and Administration Guide
in the item's details (if Item Detail Visible is Yes). Note:After the following descriptors, only the first 11 search results visible descriptors in the sequence display in the search results, for space considerations: Thumbnail Image, Description, Long Description, Unit, Unit Price, Currency, Functional Currency Price, and Functional Currency.
• Item Detail Visible. Indicator of whether you want this descriptor to display when someone in Oracle iProcurement views the details of an item or compares items.
• Category descriptors are always shown on the item detail page.
• Category descriptors are shown in the Item compare when all items being compared are of the same shopping category.
To delete a descriptor:1. Start on the iProcurement Catalog Administration Schema tab and follow the
instructions above for finding and editing a base or category descriptor.
2. On the page that displays the descriptors, click the Delete icon for the descriptor.
3. Click Yes to confirm the deletion.
Note: You can only delete a descriptor if it is not in use by any item in the catalog. For example, if you want to delete the descriptor Ink Color from category Pens, there must not be any Pens in the catalogthat has a value for Ink Color.
4. A job is created for the deletion. You can monitor it on the iProcurement Catalog Admimistration View Schema Upload History page.
Maintaining Shopping CategoriesShopping categories, also known as genus categories, group similar items. Shopping categories are at the lowest level of the category hierarchy. A shopping category can never be a parent category to a child category.
To create or edit an shopping category:1. In iProcurement Catalog Administration, select the Schema tab.
2. Click the Item Categories subtab.
3. On the Item Categories page, do either:
• Click Create Category.
• Search for the category you want to edit and click the Update icon. See: Category Searching, page 3-13.
Content Management 3-13
4. Enter the following information:
• Category Key: Internal category code. The key cannot be changed once created and is the same across all languages. It can be the same as the name and can contain spaces. It does not display to requesters. Character limit: 250 bytes.
• Category Name: Displays to requesters online when shopping for items. The name should be unique among all shopping and browsing categories. Characterlimit: 250 bytes.
• Description: Description of the category, for your own purposes. The descriptiondoes not display to requesters. Character limit: 2,000 bytes.
5. Click Apply.
6. If you want to add category descriptors, see: To create or edit category descriptors, page 3-10 .
To delete an shopping category:1. On the Item Categories page search for the category. If you cannot find the
category, see Category Searching, page 3-13.
2. Click the Delete icon.
Caution: You cannot delete a category if it is in use by any items. Mass expire these items first.
3. Click Yes to confirm the deletion.
Note: To delete browsing categories, see Maintaining Category Hierarchy, page 3-14.
To view all shopping categories in the catalog:1. In iProcurement Catalog Administration, select the Schema tab.
2. Click the Category Hierarchy subtab.
3. On the Category Hierarchy page, select any browsing category.
To search for a specific shopping category:1. On the Item Categories page, use only the following operators to search for
shopping categories
• is. Enter the exact category name if you know it.
• starts with. Enter the beginning of the category name. Do not use a wildcard (%)

3-14 Oracle iProcurement Implementation and Administration Guide
at the beginning of the search term, such as %engines.
2. Click Go. (Do not press Return on your keyboard.)
Note: Only shopping categories can be found on the Item Categories page. To find browsing categories, see Maintaining Category Hierarchy, page 3-14.
Maintaining Category HierarchyA category hierarchy is used to view and create hierarchies of categories to provide the requester with browsing categories.
Although you can have any number of categories in the system, the performance of the Category Hierarchy page may be slow if it contains too many top-level browsing categories. If you do have many browsing categories, it is best to categorize them into a manageable number of top-level browsing categories.
Note: If you plan to have a large category hierarchy, consider using the XML schema loader to expedite your schema management.
To create or modify a hierarchy of categories:1. In iProcurement Catalog Administration, select the Schema tab.
2. Click the Category Hierarchy subtab.
3. On the Category Hierarchy page, do any of the following:
• Create a topmost browsing category that will contain other categories. Click Create Top-Level Category. (If needed, you can later move this category to another level.)
• Create a new browsing category and place it under an existing browsing category. Select the existing category and click Create Child.
• Place an existing item or browsing category under an existing browsing category. Select the category and click Insert Existing Child.
• To create an item category, do not use this page. Click Item Categories to create your item category. Return to the hierarchy, select the browsing category, and click Insert Existing Child to insert your new item category.
4. If you are creating a top-level or child category, enter the following information:
• Category Key: Internal category code. The key cannot be changed once created and is the same across all languages. It can be the same bytes as the name and

Content Management 3-15
can contain spaces. It does not display to requesters. Character limit: 250 .
• Category Name: Displays to requesters online when browsing the category hierarchy. The name should be unique among all shopping and browsing categories. Character limit: 250 bytes.
• Description of the category, for your own purposes. The description does not display to requesters. Character limit: 2,000 bytes.
5. If you are inserting an existing child:
• After you click Insert Existing Child, search for the shopping or browsing category.
• Select the category and click Apply.
To find categories within the hierarchy:• The Category Hierarchy page displays all categories that you created. If you
inserted child categories, then these display under their parent browsing categories when you click the expand or focus icon.
To find an existing category that you want to insert under a browsing category, select the browsing category and click Insert Existing Child. Use the following tips to find the category:
• When searching for the Category Name, do not use contains or ends with, unless you also select a Type or Status.
• Do not use a wildcard (%) at the beginning of your search term, such as %engines, unless you also select a Type or Status.
• Use the Type to find only browsing categories, only shopping categories, or leave it blank for all types.
• Use a Status of Unconnected to find all categories that are not currently part of the hierarchy. Use Connected to find categories that are connected.
• Click Go. (Do not press Return on your keyboard.)
To create a parent category:1. Find your category hierarchy:
2. To create a topmost browsing category that will exist directly under the root category, click Create Top-Level Category. (If needed, you can later move this category to another level.)
3. To create a browsing (parent) category under an existing browsing category, select the existing category and click Create Child.
3-16 Oracle iProcurement Implementation and Administration Guide
Note: Any category created through the category hierarchy is a browsing category that can contain only other categories, not items.
To create a child category:1. Find your category hierarchy:
2. To create a child browsing category, select the category and click Create Child.
3. To create a child shopping category, do not use the category hierarchy. Click Schema then Item Categories to create your shopping category. Return to the hierarchy, select the browsing (parent) category, and click Insert Existing Child to insert your new shopping category.
To move categories around:1. On the Category Hierarchy page, select the desired category and click the Remove
icon. The category is removed from the hierarchy, but still exists in the system.
2. Select the new desired parent category and click Insert Existing Child.
3. Search for and select the removed category.
4. Click Apply.
Note: When you move a browsing category, the category and all itssubcategories, if any, are moved to the new location in the hierarchy.
To delete a browsing category:1. On the Category Hierarchy page, locate the browsing category that you want to
delete.
2. You may need to click the expand icon to find the category, if it exists under a parent category.
3. Click the Delete icon for the category.
Note: Deleting a category removes it entirely from the catalog. Deleting a category does not delete that category's subcategories, if any.
4. A job is created for deleting from category hierarchy.
To delete an item category, use Manage Item Categories.

Content Management 3-17
To remove categories from the hierarchy:To remove categories from the hierarchy:
1. On the Category Hierarchy page, locate the browsing or item category that you want to remove.
2. You may need to click the expand icon to find the category, if it exists under a parent category.
3. Click the Remove icon for the category.
Removing a category does not delete it. The category still exists, but it is no longer part of the hierarchy. If the category that you removed contains subcategories, then the subcategories are also removed from the hierarchy. (It is like removing a branch from a tree. The removed branch still contains its sub-branches.)
In the following example, removing Office Supplies disconnects it from Office Equipment, Accessories and Supplies:Office Equipment, Accessories and Supplies < - browsing category Office Supplies < - browsing category Desk Furniture < - shopping categoryWriting Instruments < - browsing category Ball Point Pens < - shopping category
When browsing categories online, requesters now see: Office Equipment, Accessories and Supplies < - browsing categoryWriting Instruments < - browsing category Ball Point Pens < - shopping category
The removed browsing category, Office Supplies, still contains Desk Furniture. The shopping category Desk Furniture still contains its items. Requesters can still search for specific items in Desk Furniture, but they cannot browse for them through the hierarchy.
A job is created for removing the category from the hierarchy.
iProcurement Shopping Category MappingUse shopping category mapping to map Oracle iProcurement catalog categories to categories defined in Oracle Purchasing. This ensures that the items you upload that arelinked to shopping categories will not error out.
Features of online shopping category mapping:
• If your requesters need to use the browsing capability, then you should use shopping category mapping.
• Oracle Purchasing and shopping categories can both be derived by the mapping when maintaining catalog content.
• You can map multiple iProcurement shopping categories to a single Oracle

3-18 Oracle iProcurement Implementation and Administration Guide
Purchasing category.
• You cannot map the same iProcurement shopping category to more than one OraclePurchasing category.
To map shopping categories:1. In iProcurement Catalog Administration, select the Schema tab.
2. Click the Category Mapping subtab.
3. On the Category Mapping page, click Shopping Category, and search for the shopping category. See: To search for a shopping category, page 3-19.
4. Select one or more shopping categories and click Map.
5. Search for the Oracle Purchasing category to which you want to map.
6. Select the Oracle Purchasing category and click Apply.
To view the current shopping mapping:1. On the Category Mapping page, select Shopping Category, and search for the
shopping category for which you want to view the mapping. See: To search for a shopping category, page 3-19.
2. Note that only shopping categories are mapped. Browsing categories cannot be mapped.
Tip: Alternatively, search for the browsing category. Use the hierarchy icon to view its shopping categories, and then search for the shopping categories.
3. Once the item category is listed, click the Oracle Purchasing category to which it is mapped.
4. The resulting page displays all of the shopping categories that are mapped to that Oracle Purchasing category.
To remove the current shopping mapping:1. On the Category Mapping page, search for the shopping category for which you
want to remove the mapping. See: To search for a shopping category, page 3-19.
2. Note that only shopping categories are mapped. Browsing categories cannot be mapped
Tip: Alternatively, search for the browsing category. Use the hierarchy icon to view its shopping categories, and then search for

Content Management 3-19
the shopping categories.
3. Once the item category is listed, click its Remove Mapping icon.
Note: There is a concurrent request for removing shopping category from the hierarchy.
To search for a shopping category:• When searching for the shopping category that you want to map, do not use
contains or ends with, unless you also select a Category Status.
• Click Go. (Do not press Return on your keyboard.)
Oracle Purchasing Category MappingUse Oracle Purchasing category mapping to map categories defined in Oracle Purchasing to categories created in Oracle iProcurement. Online Oracle Purchasing category mapping is optional, to achieve the following:
• Display different category names to requesters than are defined in Oracle Purchasing.
• Map multiple Oracle Purchasing categories to a single shopping category.
Note: You cannot map Oracle Purchasing categories to a category that contains subcategories; you can map only to the lowest-level (item) categories.
For example, the following categories are defined in Oracle Purchasing:
Category Code Category Description
0215.MISC Miscellaneous Office
0217.MISC Miscellaneous Furniture
In Oracle iProcurement, these categories display by their category description to requesters. (If no description is provided - it is optional - then the categories display by their category code to requesters.) You may wish to display a single category name that is more meaningful to requesters than its code or description. In this example, you create a category called Office Supplies in Oracle iProcurement. Then you use Oracle Purchasing category mapping to map 0215.MISC and 0217.MISC to Office Supplies.

3-20 Oracle iProcurement Implementation and Administration Guide
When requesters order items, they see the category Office Supplies, but internally this category is mapped to 0215.MISC for all miscellaneous office items and 0217.MISC for all miscellaneous furniture items. Once viewed in Oracle Purchasing, the requisition and purchase order display 0215.MISC or 0217.MISC accordingly.
If the profile POR: Autocreate Shopping Category and Mapping is set to Yes, then for any new Oracle Purchasing category, a shopping category and the corresponding mapping are automatically created. If the profile is No, then no shopping category and mapping are created. You can create them manually.
To map categories using Oracle Purchasing category mapping:1. In iProcurement Catalog Administration, select the Schema tab.
2. Click the Category Mapping subtab.
3. Click the Purchasing Category subtab and search for the Oracle Purchasing category. See: To find an Oracle Purchasing category, page 3-20.
4. Select one or more Oracle Purchasing categories and click Map.
5. Search for the shopping (Oracle iProcurement) category to which you want to map.
6. Select the shopping category and click Apply.
To view the current Purchasing mapping:1. On the Category Mapping page, search for the Oracle Purchasing category for
which you want to view the mapping. See: To find an Oracle Purchasing category, page 3-20.
2. Once the category is listed, click the shopping category to which it is mapped.
3. The resulting page displays all of the Oracle Purchasing categories that are mapped to that shopping category.
To remove the current Purchasing category mapping:1. On the Category Mapping page, search for the Oracle Purchasing category for
which you want to remove the mapping. See: To find an Oracle Purchasing category, page 3-20.
2. Select one or more Oracle Purchasing categories and click Remove Mapping.
To find an Oracle Purchasing category:• When searching for the Purchasing category that you want to map, do not use
contains or ends with, unless you also select a Category Status.
• Click Go. (Do not press Return on your keyboard.)

Content Management 3-21
Maintaining Catalog ContentIn Oracle iProcurement Catalog Administration, maintaining catalog content includes both getting the content information into the catalog and the upkeep of that catalog.
• Maintaining Local Content, page 3-21
• External Content , page 3-33
• Define Category Mapping, page 3-17
• Define Classification and Supplier Domains, page 3-44
Maintaining Local ContentFilling the local catalog with content, items and services, consists of the following activities.
1. Enabling catalog authoring is used to control who can update the catalog. See: Enabling Catalog Authoring, page 3-21.
2. Catalog load is used to load content into the catalog from data contained in files. See: Loading Catalog Content, page 3-21.
3. Online catalog authoring is used to make updates directly to the catalog using the Oracle iProcurement Catalog Administration Web interface. See: Online Catalog Authoring, page 3-30.
Other activities related to maintaining local content:
• Reviewing Catalog Changes, page 3-32
• Obtaining Change Acceptance, page 3-32
Enabling Catalog AuthoringA global purchase agreement is created by a buyer in Oracle Purchasing. The buyer selects the Enable Catalog Administrator Authoring option from the Actions list to enable the agreement for catalog administrator authoring. See: Using Agreement Actions, Oracle Purchasing User's Guide.
Loading Catalog Content Loading the catalog from existing data files involves the following tasks:
• Download the resource files which are provided in a zip file and include a catalog file example or template as well as an HTML Readme file that describes how to

3-22 Oracle iProcurement Implementation and Administration Guide
create the file. The zip file may also contain files with a list of line types, job codes and categories used by the buyer. The contents of a resource file vary with the type of file you intend to use to upload.
• Upload catalog items for blanket purchase agreements and quotations.
• Upload catalog items for global blanket purchase agreements.
To download templates and instructions: 1. On the iProcurement Catalog Admimistration home page, click the Upload subtab.
2. On the View Document Upload History page click Upload.
3. On the Upload Document page, click Download Resources to open the Download Resources page.
Note: The resources downloaded from this page and from the global purchase agreement Upload Lines page are the same.
4. Decide whether you will upload your content using text, XML, CIF, or cXML files.
5. If you are loading a spreadsheet text file and all your items are in the same category, select the appropriate category name.
• If you select a category name, you receive a spreadsheet template that the category descriptor includes fields for the category you selected. See: Catalog Schema Components, page 3-6.
• If you are loading catalog items from different categories, leave the category blank.

Content Management 3-23
6. Click Download and save the resource file to a convenient location.
The resource file contains various template files and a readme file that contains detailed instructions and examples. The template files vary depending on your choice of upload file type. If you are creating an upload for the first time, open and review the readme file first.
Note: : If you have recently updated Oracle iProcurement, it is important to use the latest version of the DTD or templates. If you upload your catalog items using an older version of a template, the loader may find errors in your file.
To load catalog items for blanket purchase agreements and quotations:1. Once you have a completed catalog item file ready to upload, save it to the location
of your choice.
2. Navigate to the iProcurement Catalog Administration home page. Click Agreement. On the View Document Upload History page click Upload.
3. On the Upload Document page:
• Select the Document Type for your upload.
• Enter or select the Document Number.
• Select the File Type for your upload.
• Click Browse and locate your completed upload file.
• Select your file and click Open in the dialog box.
Tip: If you cannot find your file in the Open dialog box, make sure you are browsing in the correct directory, and set the File Type in the dialog box to All files.
4. If you are uploading a CIF or cXML file, select a Classification Domain. See the Readme file for CIF or cXML for details: To download templates and instructions, page 3-22.
5. If you want to apply category mapping or some other code conversion to data in the file, select Yes for "Apply Oracle e-Commerce Gateway Mapping." See ApplyingCategory Mapping, page 3-26.
6. Optionally, select an error limit for "Set Error Tolerance."
7. Click Submit. When the loader receives your file, validation begins. A confirmation

3-24 Oracle iProcurement Implementation and Administration Guide
page displays the job number that is automatically assigned to your job. Check the status of your job to make sure that no errors occurred during the upload.
To load catalog items for global blanket purchase agreements:1. Once you have a completed catalog item file ready to upload, save it to the location
of your choice.
2. Return to the iProcurement Catalog Administration home page. Click Agreement. If needed, run a search for the global agreement you wish to upload items to.
3. Select your global agreement and open it for update.
4. Select Via Upload from the Add Lines list and click Go. On the Upload Lines page:
• Select the File Type you wish to upload.
• Click Browse and locate your completed upload file.
• Select your file and click Open in the dialog box.
Tip: If you cannot find your file in the Open dialog box, make sure you are browsing in the correct directory, and set the File Type in the dialog box to All files.
5. If you are uploading a CIF or cXML file, select a Classification Domain.
6. Select an option for Submit for Approval.
7. If you want to apply category mapping or some other code conversion to data in the file, select Yes for "Apply Oracle e-Commerce Gateway Mapping." See ApplyingCategory Mapping, page 3-26.
8. Optonally, select an error limit for "Set Error Tolerance."
9. Click Submit. When the loader receives your file, validation begins. A confirmation page displays the job number that is automatically assigned to your job. Check the status of your job to make sure that no errors occurred during the upload.
Providing Content TranslationFor translation details, see the Readme files when Loading Catalog Content, page 3-22
Monitoring Upload StatusTo check the status of catalog uploads:1. For blanket agreements and quotations navigate to the View Document Upload
History page to view the list of jobs.

Content Management 3-25
2. Use the raised column headings to sort by job or load date, if needed.
3. Your jobs are assigned one of the following status readings. (For file uploads, large files may take some time to load. You do not need to remain logged in while a job completes.)
• Pending: The job is waiting to be processed.
• Running: The job is in progress. For example, for file uploads, iProcurement Catalog Administration is loading the data.
• Completed: The job completed successfully. For file uploads, all of your cataloglines loaded successfully. If changes to a blanket purchase agreement price exceed the price tolerance, buyers must go to the Purchasing Exceed Price Tolerances in Oracle Purchasing to accept the lines that exceed the tolerance. In addition, for catalog administrators, new blanket purchase agreement or quotation lines always require acceptance in Purchasing Exceed Price Tolerances in Oracle Purchasing
• Error: For global purchase agreements, successful lines are loaded into staging area and then can be used in downstream processing such as buyer approval. For blanket purchase agreements and quotation uploads, if the file has one or more errors, the entire file is rejected.
4. If the job failed, try submitting it again. For file uploads, correct your file and upload it again. See: To correct catalog upload errors, page 3-25.
Upload ErrorsTo correct catalog upload errors:1. On the View Document Upload History page, find the jobs with status Error.
2. For failed jobs, click the status link.
3. On the View Upload Errors page, a description of each error displays. Edit the incorrect fields in your file. Rejected lines indicate validation errors.
• Validation Errors Validation errors occur when information in your file does not match corresponding information in Oracle iProcurement. For example, if you enter values for Unit, Category, or Currency that Oracle iProcurement doesnot recognize, a validation error occurs. The item lines on which validation errors occurred are rejected.
4. For failed jobs with no rejected lines, the file experiences a format error.
• Format Errors Format errors occur if your XML file does not conform to the DTD provided sections. Examples of format errors include extra rows or

3-26 Oracle iProcurement Implementation and Administration Guide
columns in your spreadsheet, or forgetting to include a closing tag. If you include special characters in your file, make sure they are covered by the language encoding specified at the beginning of the file. The field error in the page header displays the file format error message.
If you uploaded global blanket agreement items, you can check the job status by looking at the Upload Status column in the agreement summary (this column is hidden by default and you must personalize the page to see it). In case of and error, there is a link to see the errors. You must discard the errors before you can update the agreement.
For more information on correcting upload errors, see the Readme file that is part ofyour Resources file. See: Loading Catalog Content, page 3-22.
5. Once you have corrected the errors, save and re-upload the file.
Additional Information About The Job Or Error
If you have trouble diagnosing an error in a job, or if you want to monitor the job in Oracle Applications, use the Requests window in Oracle Applications or Oracle Purchasing. The number assigned to your job on the View Document Upload History page is the same as the Request ID in the Requests window. Use the View Log button inthe Requests window to get more details on the errors, if needed.
Note: You must be logged on as the same user who submitted the job toaccess the View Log button for the request.
Catalog load jobs are named as follows in the Requests window:
• Catalog Bulk Load - Items Upload (Catalog Bulk Load - Items Upload) for item loads.
• See also Monitor Schema Jobs, page 3-8.
Note: The Requests window uses different status readings for its jobs. For example, a file with a status of Failed on the View Document Upload History page has a status of Completed - Warning in the Requests window.
e-Commerce Gateway Category Mapping If the Apply Oracle e-Commerce Gateway Mapping option during loading is set to Yes, Oracle iProcurement checks whether category mapping is set up in Oracle e-Commerce Gateway. If the category in the file matches a category that is mapped in Oracle e-Commerce Gateway and is in the catalog, the loader adds the item to the mapped category. This option applies to all item load files.
The e-Commerce gateway category mapping always performs a look up of shopping categories from the external category provided. The loader uses this derived shopping
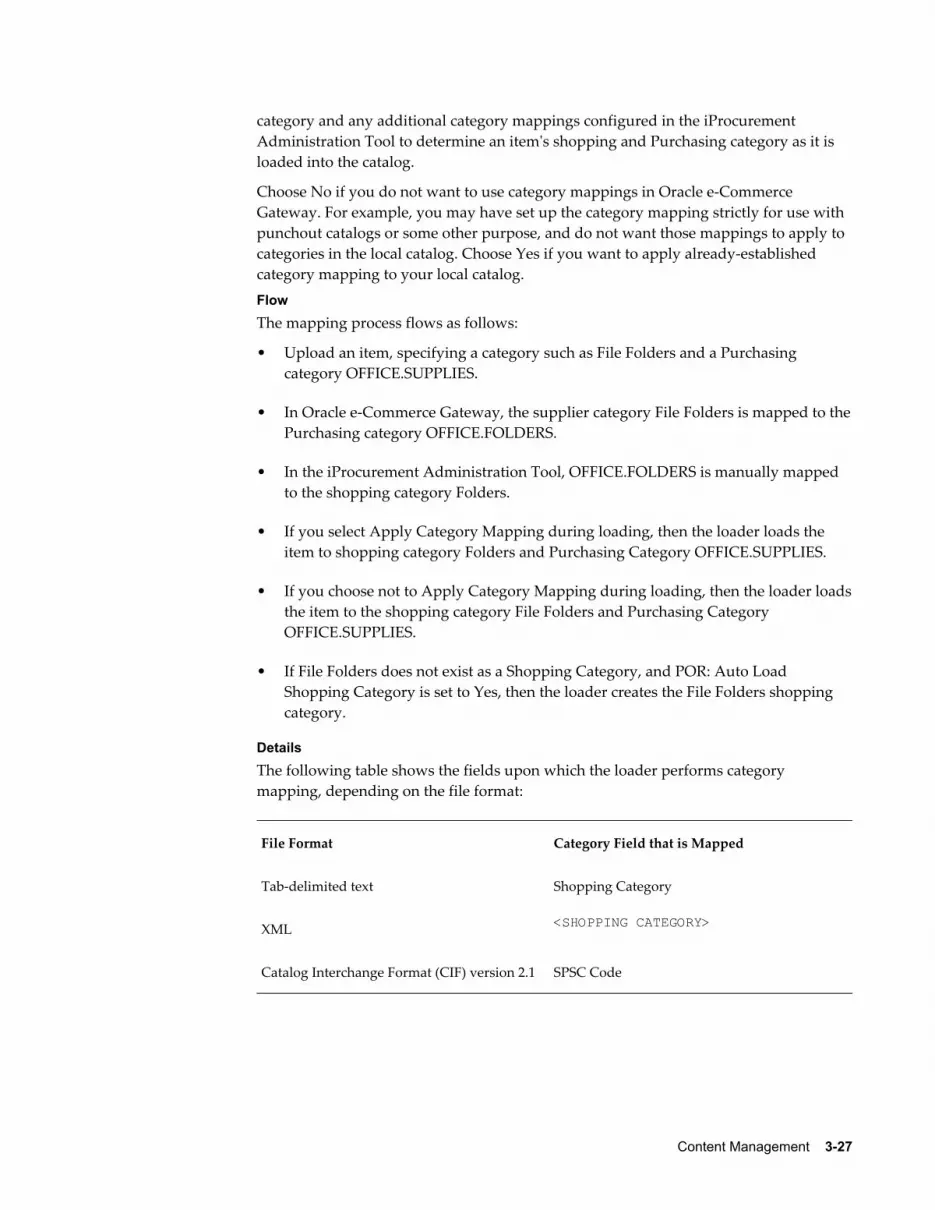
Content Management 3-27
category and any additional category mappings configured in the iProcurement Administration Tool to determine an item's shopping and Purchasing category as it is loaded into the catalog.
Choose No if you do not want to use category mappings in Oracle e-Commerce Gateway. For example, you may have set up the category mapping strictly for use with punchout catalogs or some other purpose, and do not want those mappings to apply to categories in the local catalog. Choose Yes if you want to apply already-established category mapping to your local catalog.
FlowThe mapping process flows as follows:
• Upload an item, specifying a category such as File Folders and a Purchasing category OFFICE.SUPPLIES.
• In Oracle e-Commerce Gateway, the supplier category File Folders is mapped to thePurchasing category OFFICE.FOLDERS.
• In the iProcurement Administration Tool, OFFICE.FOLDERS is manually mapped to the shopping category Folders.
• If you select Apply Category Mapping during loading, then the loader loads the item to shopping category Folders and Purchasing Category OFFICE.SUPPLIES.
• If you choose not to Apply Category Mapping during loading, then the loader loadsthe item to the shopping category File Folders and Purchasing Category OFFICE.SUPPLIES.
• If File Folders does not exist as a Shopping Category, and POR: Auto Load Shopping Category is set to Yes, then the loader creates the File Folders shopping category.
DetailsThe following table shows the fields upon which the loader performs category mapping, depending on the file format:
File Format Category Field that is Mapped
Tab-delimited text Shopping Category
XML <SHOPPING CATEGORY>
Catalog Interchange Format (CIF) version 2.1 SPSC Code

3-28 Oracle iProcurement Implementation and Administration Guide
CIF version 3.0 Classification Codes (or SPSC Code if Classification Codes is not provided)
cXML Classification
Oracle iProcurement performs the mapping on the category name specified in the file; however, if you also specified a category key, Oracle iProcurement maps the key if it can't find the name. The category mapping is case insensitive. (The supplier validation for supplier-specific mapping is case sensitive.)
Category mapping is not performed on schema files that you upload.
ExamplesScenario 1:
• You upload a file that specifies the external category File Folders for an item but nota Purchasing category..
• In e-Commerce Gateway, the supplier category File Folders is mapped to the Purchasing category OFFICE.FOLDERS.
• In the iProcurement Administration Tool, Purchasing category OFFICE.FOLDERS is mapped to Shopping category Folders.
• In the iProcurement Administration Tool, Shopping category Folders is mapped to the Purchasing category OFFICE.SUPPLIES.
• You choose to apply category mapping during the upload.
The item will be loaded to the catalog with a Shopping Category of Folders and Purchasing category OFFICE.SUPPLIES.
Scenario 2:
• You upload a file that specifies the external category File Folders for an item and a Purchasing category OFFICE.STUFF.
• In e-Commerce Gateway, the supplier category File Folders is mapped to the Purchasing category OFFICE.FOLDERS.
• In the iProcurement Administration Tool, Purchasing category OFFICE.FOLDERS is mapped to Shopping category Folders.
• In the iProcurement Administration Tool, Shopping category Folders is mapped to the Purchasing category OFFICE.SUPPLIES.
• You choose to apply category mapping during the upload.

Content Management 3-29
The item will be loaded to the catalog with a Shopping Category of Folders and Purchasing category OFFICE.STUFF.
Scenario 3:
• You upload a file that specifies Purchasing category OFFICE.SUPPLIES but not an external category.
• There is no mapping between OFFICE.SUPPLIES and any Shopping Category.
• You choose to apply category mapping during the upload.
The item will be loaded to the catalog with a Purchasing category of OFFICE.SUPPLIES and no value for Shopping Category.
Scenario 4:
Oracle e-Commerce Gateway enables you to specify mapping for a specific supplier, or for no specific supplier. The loader always chooses supplier-specific mapping over non-supplier-specific mapping.
• You upload a file that specifies the external category File Folders for an item but nota Purchasing category.
• In e-Commerce Gateway, there is a supplier specific mapping between supplier category File Folders to the Purchasing category OFFICE.FOLDERS.
• In the iProcurement Administration Tool, Purchasing category OFFICE.FOLDERS is mapped to Shopping category Folders.
• In the iProcurement Administration Tool, Shopping category Folders is mapped to the Purchasing category OFFICE.SUPPLIES.
• You choose to apply category mapping during the upload.
• You upload a file that specifics a purchasing category of OFFICE.FOLDERS.
Supplier External Category Oracle Purchasing Category
Supplier A File Folders OFFICE.FOLDERS
(no supplier specified) File Folders OFFICE.MISC
In this example, the category File Folders in the file is mapped to Purchasing category OFFICE.FOLDERS if the supplier in the Purchasing document being loaded to is Supplier A. If the supplier in the file is Supplier B, then File Folders is mapped to Purchasing Category OFFICE.SUPPLIES. A shopping category is derived from the

3-30 Oracle iProcurement Implementation and Administration Guide
Purchasing category.
If we are loading to a document associated with supplier A, the item will be loaded to the catalog with a Shopping Category of Folders and Purchasing category OFFICE.SUPPLIES.
Online Catalog AuthoringTo use online catalog authoring:1. From the iProcurement Catalog Administration Agreements tab select the
agreement to update. If the agreement you want is not visible, use a different View or Search. See: Finding Agreements, page 3-30.
2. Catalog lines can be added from existing catalog items, uploaded, or manually entered. See: Updating Agreements, page 3-31.
3. The updated agreement is submitted for approval.
4. If acceptance is defined as required for catalog administrators, the buyer will receive a notification to review and accept the changes submitted by the catalog administrator. The changes accepted by the buyer are incorporated in the documentand it is submitted for approval.
5. Once approved, the agreement content is available for requesters in Oracle iProcurement.
Finding Agreements1. From the Agreements tab of the iProcurement Catalog Administration home page
you can view your agreements using a set of predefined search parameters or click Search to enter your own.
If you click Search you can enter Agreement, Supplier, Buyer, or Approval Status information and click Go. You may also add additional search parameters and click Save Search to create your own personalized view.
You can also create your own specialized views and set the default view by clickingPersonalize. See the online help for more details.
2. From the search results you would select the agreement that you want to work on, select what you want to do with the agreement from the Select Agreement list, and click Go.
• Enable Supplier Authoring: If you want the supplier to be able to update this agreement from Oracle iSupplier Portal select this action and click Go. (If the agreement has already been enabled for supplier authoring and no longer want them to do so, select Disable Supplier Authoring and click Go.)
• Update: This selection opens the Update Blanket Purchase Agreement page

Content Management 3-31
which provides the tools to add additional lines to the agreement.
• View Difference Summary: This selection opens the Difference Summary page which displays the differences between the changes you have entered and latestversion of the agreement. The difference summary is available from the moment the administrator saves a change to the document until the buyer accepts or rejects the submitted changes. The lines of difference summary can be exported to a spreadsheet.
• View PDF: If you wish to see or save a formatted version of the current agreement select this action and click Go. The pdf does not show the not yet approved changes made by the catalog administrator.
• Export: Exports the content of the search results page as a list of agreements that you see on the page. The file shows all the columns from the page.
Updating Agreements1. Select the agreement you want to work on and choose the Update action. You will
be able to manage or add to your selected agreement.
Note: You can only update line information for the agreement. Clicking on the Header or Control tabs provides a view of that information for the agreement. Only an Oracle Purchasing buyer can make changes.
2. On the Update Blanket Purchase Agreement page you can mange existing agreement lines. You access the management tools using the icons found in the Actions column:
• Update (pencil): This selection opens the Update Line page. Here you can updatethe item and category descriptors. For details of the standard information regarding the line see the Oracle Purchasing User's Guide.
This page also provides access to the Item Attributes for this line. These are the descriptors used by the Oracle iProcurement search engine.
• Duplicate (pages): This selection opens the Update Blanket Purchase Agreementpage with the line you selected now duplicated. Make any changes needed and click Submit.
• Delete (trash can): This selection provides a warning page indicating that you areabout to delete the line.
3. On the Update Blanket Purchase Agreement page you can add new lines. You have several options for adding lines:
3-32 Oracle iProcurement Implementation and Administration Guide
• From the Add Lines list select From Catalog and click Go. The Stores page provides you with the opportunity to select any item in the catalog. Find your item, click Add to Document, and then click Complete when you are ready to return to your agreement with your new lines.
• From the Add Lines list select From Favorites and click Go. The Shopping List page provides you with the opportunity to select a list. From the list find your item, click Add to Document, and then click Complete when you are ready to return to your agreement with your new lines.
• From the Add Lines list select Via Upload and click Go. The Upload Line page isthe same page as described in Uploading Catalog Files, page 3-21.
• Click the Add 5 Rows button and the Update Blanket Purchase Agreement pageis refreshed with five empty lines that you can complete with your details. For details of the standard information for your line see the Oracle Purchasing User'sGuide.
4. Click Save to save your changes and then Submit to initiate workflow approval. If appropriate in your organization, you can provide a justification before submitting for approval by clicking Approval Options.
Reviewing Catalog ChangesThe Difference Summary page for catalog changes provides a summary between new catalog content and the last approved version. When suppliers or catalog administratorsmake changes to catalog data this summary highlights the changes. You can review andverify changes prior to submission. You can sort and drill down on the summary to view additional information as well as export changes to a spreadsheet to further manipulate the data.
Similarly, buyers can also access the Difference Summary page when reviewing changes submitted from a supplier or catalog administrator. The summary gives the buyer a clear snapshot into the requested changes, so they can judiciously accept or reject the changes.
Note: The difference summary is no longer be available after the buyer accepts the changes.
To view the Difference Summary:1. Find and select your agreement from the Agreements tab of the iProcurement
Catalog Administration home page.
2. Select View Difference Summary from the Select Agreement list, and click Go.

Content Management 3-33
Obtaining Change Acceptance Suppliers and catalog administrators can submit a global blanket purchase agreement (GBPA) for approval. When they submit the document for approval, a notification is sent to the buyer assigned to the GBPA header for acceptance. The buyer can then:
• Enter accept or reject for individual changes
• Accept or reject all the changes
• Submit the accepted changes for approval
As soon as the buyer submits the accepted changes for approval, the system will submitthe document to the approval hierarchy. From this point on, the following is true:
• The content of the GBPA is not available in the search results page for requesters until it is finally approved.
• The Difference Summary is not available for suppliers or catalog administrators.
Understanding LockingOnce a document is being edited by someone, the document becomes locked. The Purchasing buyer has the option of cancelling the pending changes in a locked document and updating the document himself.
External ContentRequesters using Oracle iProcurement can link ("punchout") using an Internet connection to external supplier catalogs. Two versions of this type of external content can be configured to access supplier hosted catalogs, punchout and transparent punchout. Brief discussions of each follow and also see Catalog Content Structure, page 3-3
Punchout Catalog Hosted by Supplier or MarketplaceWhen creating requisitions, requesters can punch out directly to an Oracle Exchange marketplace, such as Exchange.Oracle.com, or to a supplier's Web store (to access supplier-hosted catalogs). After selecting items for purchase, requesters return to OracleiProcurement to add more items to their cart and check out as they normally do. For more information about setting up punchout, see the Oracle Procurement Buyer's Guide toPunchout and Transparent Punchout. A supplier version of this guide is available, Oracle Procurement Supplier's Guide to Punchout and Transparent Punchout.
Transparent Punchout Catalog Hosted by Supplier or MarketplaceA transparent punchout catalog (also known as a distributed search) lets requesters search for items on an external site without leaving Oracle iProcurement. Unlike

3-34 Oracle iProcurement Implementation and Administration Guide
punchout, requesters do not access the site directly. Instead, when the requester searches for items, the transparent punchout works in the background to access the remote catalog and returns the matching items directly to the search results in Oracle iProcurement. Requesters do not necessarily know the items came from an external site.From the Search Results page, requesters add the items returned from the transparent punchout to their shopping cart and check out as they normally do.
From Oracle iProcurement, you can set up a transparent punchout to a supplier site or to an Oracle Exchange marketplace, such as Exchange.Oracle.com. For more information, see the Oracle Procurement Buyer's Guide to Punchout and Transparent Punchout. A supplier version of this guide is available, Oracle Procurement Supplier's Guide to Punchout and Transparent Punchout.
Related TopicsUnderstanding the Procurement Catalog, page 3-1
Maintaining Local Content, page 3-21
Smart FormsRequesters can procure an item or service that is not found in the catalog. For these cases, they can use a non-catalog request. The non-catalog request offers the ability to add an item or service to the shopping cart based on a description of the item or service.Through the use of smart forms, companies can conveniently control both the list of fields and whether a particular field is enterable or pre-defined. For example, purchasing organizations can lock-down the purchasing category for certain requests and thereby more accurately categorize spend. Similarly, purchasing administrators canensure spend is exclusively directed to preferred suppliers, and default contract numbers achieve touchless buying.
The following figure shows the non-catalog request that requesters can enter. In the Item Type field, requesters can enter goods billed by quantity, service billed by quantity, or goods or services billed as an amount.

Content Management 3-35
In addition to this standard non-catalog request, you can create different smart forms and assign them to one or more stores.
Oracle iProcurement provides a default standard smart form. The catalog administratorcan create multiple additional smart forms. For example, you can create a Computer Services smart form and an Office Services smart form. Once these smart forms are assigned to a store, both appear for the requester to select from.
To use the single, standard smart form that Oracle iProcurement provides, you do not need to perform any setup other than the profile options.
Setup Steps1. Set Profile Options (required), page 3-35
2. Define Commodities (optional), page 3-35
3. Create A Smart Form (optional), page 3-38
4. Assign A Smart Form To A Store (required, if you create new Smart Forms), page 3-42
Set Profile Options (required)Set the line types profile options listed in Profile Options, page 3-43.
Define Commodities (optional)You can define commodities for use by the non-catalog request template. Commodity isa display-only field on the non-catalog request template that defaults based on the category selected. Define commodities to provide a default category on the template,
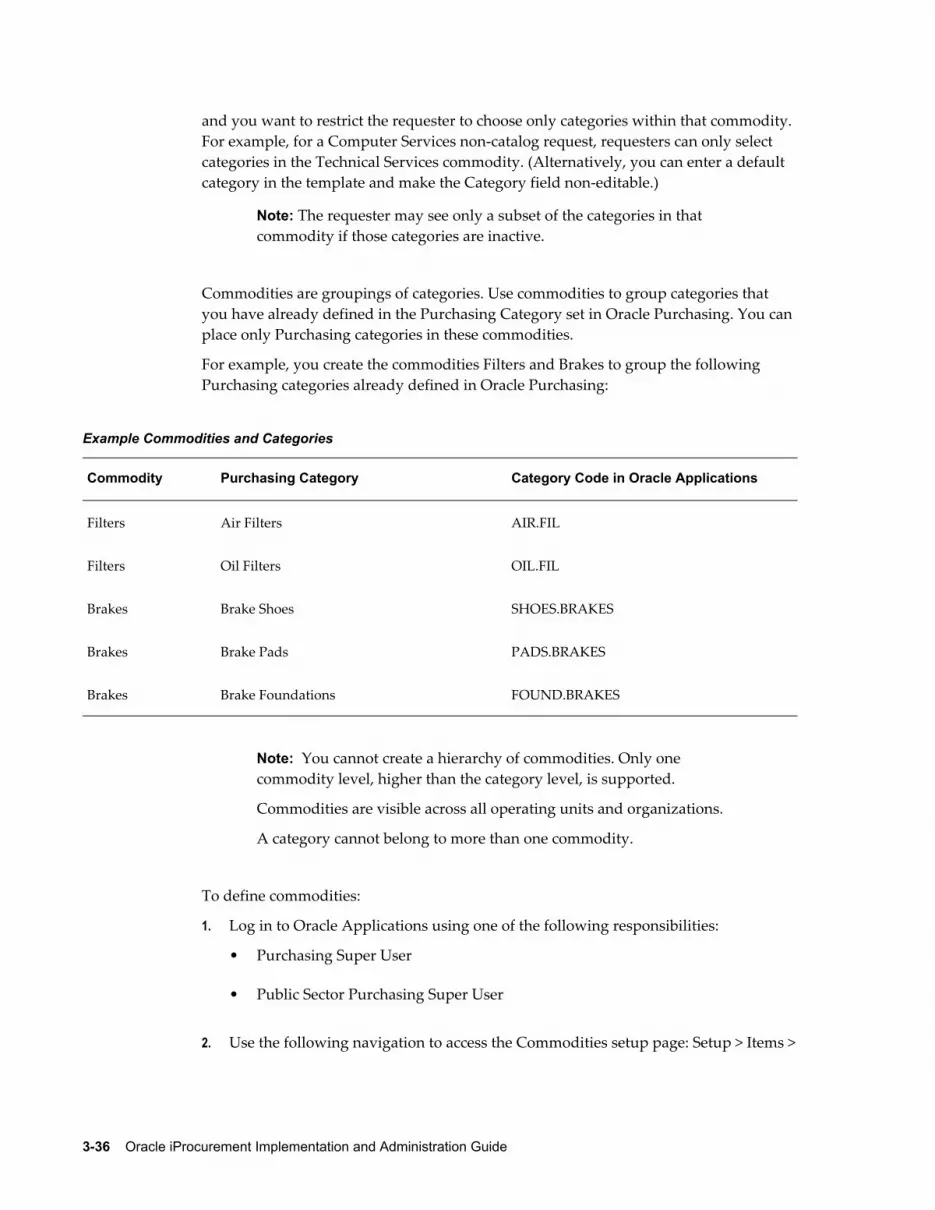
3-36 Oracle iProcurement Implementation and Administration Guide
and you want to restrict the requester to choose only categories within that commodity. For example, for a Computer Services non-catalog request, requesters can only select categories in the Technical Services commodity. (Alternatively, you can enter a default category in the template and make the Category field non-editable.)
Note: The requester may see only a subset of the categories in that commodity if those categories are inactive.
Commodities are groupings of categories. Use commodities to group categories that you have already defined in the Purchasing Category set in Oracle Purchasing. You can place only Purchasing categories in these commodities.
For example, you create the commodities Filters and Brakes to group the following Purchasing categories already defined in Oracle Purchasing:
Example Commodities and Categories
Commodity Purchasing Category Category Code in Oracle Applications
Filters Air Filters AIR.FIL
Filters Oil Filters OIL.FIL
Brakes Brake Shoes SHOES.BRAKES
Brakes Brake Pads PADS.BRAKES
Brakes Brake Foundations FOUND.BRAKES
Note: You cannot create a hierarchy of commodities. Only one commodity level, higher than the category level, is supported.
Commodities are visible across all operating units and organizations.
A category cannot belong to more than one commodity.
To define commodities:
1. Log in to Oracle Applications using one of the following responsibilities:
• Purchasing Super User
• Public Sector Purchasing Super User
2. Use the following navigation to access the Commodities setup page: Setup > Items >

Content Management 3-37
Commodities > Commodities.
Note: If you cannot find the Commodities menu, then you might be logged in with a customized responsibility. The system-provided Purchasing Super User responsibility comes with the Commodities menu built in. Use the system-provided responsibility if you cannot find the Commodities menu.
3. On the Commodities page, click Create Commodity.
4. On the Create Commodity page, enter:
• Commodity Code. A unique identifier for the commodity, such as IT or 01. Thisidentifier is the same in all languages. The maximum length of this field is 120 bytes or approximately 40 English characters. You cannot use the same code formore than one commodity. Each code must be unique. (You can use the same code that is used for a code segment in Oracle Applications.)
• Name. Commodity name, such as Information Technology, that appears in the reports. The maximum length of this field is 240 bytes or approximately 80 English characters. The name must be unique within a given language.
• Description. Optional description, for your own purposes. The description does not appear in the reports.
Note: You cannot delete commodities. Inactivating commodities does not remove them from the non-catalog request. Create only the commodities you need. You can add, update, and split commodities any time, and the changes are reflected immediately.
5. Make sure that Active is selected.
You can assign categories only to active commodities. (You can make all other changes, such as removing categories and changing person assignments, to active or inactive categories.)
Both active and inactive commodities appear in the non-catalog requests.
6. Assign the desired categories to your commodity:
• Click Assign Categories.
• On the Assign Categories page, optionally enter search criteria and click Go.
You can search on the Category Description or any of its category code (flexfield structure) segments. For example, your company created a

3-38 Oracle iProcurement Implementation and Administration Guide
two-segment structure in Oracle Applications. The first segment is the Item Category, and the second is the Commodity. An example is 451.01, where 451 isthe Item Category and 01 is the Commodity. In this example, the Assign Categories page displays the following search fields: Category Description, Item Category, and Commodity.
In this example, assume that 01 indicates the Filters commodity. Enter 01 in the Commodity search field to return all category codes that contain 01 in their Commodity flexfield segment.
Note: If Enforce List of Valid Categories is selected in the Category Sets window in Oracle Applications, then only the categories listed in that window for the Purchasing Category set are available for assignment to a commodity. If Enforce List of Valid Categories is not selected, then any category that uses the same flexfield structure as the Purchasing Category set is available for assignment.
When searching, enter the first part of the name or code, or use a wildcard character (%). For example, entering pro searches for categories that begin with pro. Entering %pro% searches for categories that contain pro. The search is caseinsensitive.
• Select the categories you want to assign to this commodity.
Clicking Select All selects only the categories on that page. If more results appear on additional search results pages, you must click Select All on each page.
• Click Apply.
If you assign a category that is already assigned to another commodity, the category is moved from that commodity to this one. (If the category is already assigned to a commodity that you are editing, it does not appear in the search results.)
7. Click Apply.
8. You do not need to perform the Assign Person functionality to use commodities with non-catalog requests.
Creating And Updating A Smart FormTo define the smart form:1. In iProcurement Catalog Administration, select Stores.
2. Click the Smart Forms subtab.

Content Management 3-39
3. On the Manage Smart Forms page, click Create Smart Form.
4. On the page for creating or editing the smart form, enter the following fields:
• Smart Form Name. Especially if you are creating several smart forms, enter a name that is meaningful to requesters - for example, Facilities Requests or Computer Services. This name appears in the Request Type field when requesters enter the request. Maximum character limit: 240 bytes.
• Organization. Select the operating unit for which the smart form is available. For example, if you want only requesters in your German operating unit to use this smart form, select Germany Operations. A smart form must be created for aspecific operating unit.
• Item Type. Select one item type for which this smart form will always be used:
• Goods billed by quantity. For example, you purchase 10 books at 25 USD each.
• Goods or services billed by amount. For example, you purchase 5,000 USD of service.
• Services billed by quantity. For example, you purchase 10 hours of service at 100 USD an hour.

3-40 Oracle iProcurement Implementation and Administration Guide
Note: Each item type is associated with a line type defined in Oracle Purchasing, using a profile option. For example, Goods or services billed by amount defaults the line type entered in the profile option POR: Amount Based Services Line Type. Line types can be set up in Oracle Purchasing todefault the category or unit of measure. The requester can change these defaults, unless you make these fields non-editable.
5. Continue with the steps below for editing the smart form fields.
To edit the smart form fields:1. On the page for creating or editing the smart form, select whether each field is User
Editable. If you de-select User Editable for a field, then the requester cannot change it.
Note: All fields in the Default Item Information section are requiredwhen the requester enters the smart form. Do not de-select User Editable for a required field, unless you enter a default value for it.
2. If you want to provide default values for any of the following fields in the smart form, enter them here. For example, if your smart form is designed for items that are typically ordered by the Box, then select Box as the Unit of Measure.
• Item Description. Maximum: 240 bytes.
• Category.
• Commodity. If the selected category has been assigned to a commodity in Oracle Purchasing, then the commodity displays. For example, the category Screwdrivers can be assigned to a Hand Tools commodity. These commodities are set up using the Commodities setup page in Oracle Purchasing. They are optional.
Note: If you change this commodity structure that is set up in Oracle Purchasing, then revisit your smart forms to ensure that they do not also need to change.
• Restrict categories to above commodity. If the category has been assigned to a commodity in Oracle Purchasing, then you can select this option. If you select this option and the Category is User Editable, then the requester can change thecategory, but only to another category within the commodity. Restricting

Content Management 3-41
categories to a commodity helps requesters more easily choose an appropriate category for the request.
• Quantity.
• Unit of Measure. This field does not display if the Item Type is Goods or services billed by amount.
• Unit Price. This field displays if the Item Type is Goods billed by quantity.
• Amount. This field displays if the Item Type is Goods or services billed by amount.
• Rate per Unit. This field displays if the Item Type is Services billed by quantity.
• Currency.
• RFQ Required. By default, this field is hidden on the page that the requester uses to enter the non-catalog request. Requesters use the RFQ flag to indicate to the buyer that he should request for a quotation for the item.
• Negotiated. By default, this field is hidden on the page that the requester uses to enter the non-catalog request. Use the "Personalize Page" link at the top of the page if you want to display this field. Use the Negotiated field if you are or will be implementing Daily Business Intelligence (DBI) for Procurement. If you select Yes, then DBI for Procurement considers all items ordered through this template to have negotiated prices, for reporting purposes. By default, this fieldis set to No. For more information, see the Oracle E-Business Intelligence Daily Business Intelligence User Guide.
• Restrict Suppliers.
• No. The list of suppliers that requesters can choose from is limited only to those whose supplier sites are valid in the requester's operating unit.
• Category ASL. The list of suppliers that requesters can choose from is additionally limited to those suppliers that exist in the approved supplier list (ASL) in Oracle Purchasing, for the selected category. (The ASL in Oracle Purchasing calls the category a "commodity.")
• Contract Number. If you want to associate a contract purchase agreement or global contract agreement in Oracle Purchasing with all items ordered through this smart form, then select the contract here.
Note: If you select a contract, then the supplier and site default.The requester cannot change the supplier and site in this case,

3-42 Oracle iProcurement Implementation and Administration Guide
even if User Editable is selected. The contact name and phone, if any, also default from the contract; however, the requester can change these, if User Editable is selected.
• Supplier Name.
• Site.
• Contact Name. Maximum character limit: 36 bytes.
• Phone. Maximum character limit: 25 bytes.
• Supplier Item. Maximum character limit: 30 bytes.
• Manufacturer. Maximum character limit: 30 bytes.
• Manufacturer Part Number. Maximum character limit: 30 bytes.
3. If you want to assign an information template to your smart form, click Add Information Template. For example, if the smart form is for business cards, assign a business card information template. This information template appears at the bottom of the non-catalog request page. In this example, the information template would include fields for a name, address, and phone number for the business card. For information on setting up information templates, see: Information Templates, page 4-4.
4. Continue with the steps below to assign the smart form to a store.
Assign A Smart Form To A Store (required)If you created a smart form, you must assign it to a store for it to be visible to requesters. Assign it to either of the following stores:
To assign the smart form to a store:1. From the Stores subtab of the Stores tab, select a store to update.
2. Assign the smart form to either the non-catalog request store provided by Oracle iProcurement or a new store that you create. See the instructions for Creating Or Editing A Store, page 3-44.
3. When you assign more than one smart form to a store, the store will prompt you to provide a sequence number for each smart form. Smart forms that are available to a requester (based on operating unit context) will appear in sequence based on their sequence numbers.
Any smart form that you add to a store appears in the Request Type drop-down menu,

Content Management 3-43
under its smart form name, when the requester accesses the non-catalog request. For example, you can create a Computer Supplies smart form and an Office Supplies smart form and assign them to the same store. Both smart forms display in the Request Type menu for that store. The fields in the request vary depending on which smart form the requester selects.
Profile OptionsFor profile setup instructions, see Set Profile Options, page 2-32. To use each of the possible item types, set the following profile options:
1. POR: Goods Line Type
2. POR: Rate Based Services Line Type
3. POR: Amount Based Services Line Type
Note: It is possible to have unit values defaulted onto the non-catalog request based on the line type. To do this, associate a unit of measure with the line type in Oracle Purchasing.
Function SecurityTo hide access to the standard non-catalog request template that Oracle iProcurement provides, exclude the submenu iProcurement: Non-catalog Request (ICXPOR_NONCATALOG) from the Internet Procurement Home menu when defining users' responsibilities.
WorkflowYou can configure the PO Create Documents workflow to automatically source non-catalog requests from a contract. The attribute name that controls this option is Should non-catalog requests be autosourced from contract? If set to Yes, then if a validcontract purchase agreement exists for the given supplier, then the system automatically creates a purchase order that references that contract. The default value for this attribute is No. For information about the PO Create Documents workflow, see Customize Workflows, page 2-18.
Implementation ConsiderationsWhen you create a smart form, you must create it for a specific Organization (operating unit).
For example:
• Store 1 contains two smart forms:
• Smart form 1, for Vision Operations

3-44 Oracle iProcurement Implementation and Administration Guide
• Smart form 2, for Vision Services.
In this example, a requester in Vision Operations sees only smart form 1.
• A user from Vision France does not see Store 1, because he cannot see any of the smart forms assigned to the store.
Managing Content PresentationOracle iProcurement uses stores and content zones to organize items for requesters. Each store contains one or more content zones. For more information, see Catalog Content Structure, page 3-3. When requesters search, Oracle iProcurement searches across all local and transparent punchout content zones in the store and displays the results. (You search one store at a time.)
Grouping similar content into a single store provides the following benefits:
• Provides logical groupings. In some cases, requesters may understand store groupings better than categories, which may be too technical or granular for requesters.
• Produces more relevant search results. For example, searching for battery can return AAA battery, industrial battery, and notebook computer battery. If, each battery is in a separate content zone and you segment the content zones by store, the notebook computer battery can belong to a Computer Supplies store. Searching for a battery in the Computer Supplies store returns only computer batteries.
Oracle iProcurement Catalog Administration provides the following tools designed to aid you in organizing your catalog content:
• Maintaining Stores, page 3-44
• Maintaining Content Zones, page 3-49
There are some additional tools available that impact the presentation of your content:
• Content Translation, page 3-56
• Managing Images, page 3-58
Maintaining StoresA store enables you to group content zones and smart forms into a single, searchable store. The store should be easy for requesters to understand - for example, a store containing all computer supplies or all office supplies.

Content Management 3-45
Maintaining A Store1. In the iProcurement Catalog Administration, select the Stores subtab from the
Stores tab.
2. On the Manage Stores page, click Create Store to create a new store. If you want to update an existing store, click the Pencil (Update) for your store.
• On the Create Store: Assign Content page, enter or edit a Store Name Maximum character limit for Store Name: 2,000 bytes
• Image: Enter or edit the name or URL of an image that you want to display next to this store. The image displays to requesters on the Shop page. If you enter an image name (such as abc.gif) rather than a full URL (such as http://www.abc.cm/abc.gif), make sure the image exists in the directory specified in POR: Hosted Images Directory. If you specify no image, the store displays its name and description only. (Behind the scenes, the store displays a blank image file if you specify no image. If desired, you can change this default blank image file to always display a standard "no store image" file or message. See the image management section of the Oracle iProcurement Implementation andAdministration Guide). Maximum character limit: 2,000 bytes.
Note: If "Hide thumbnail images" is selected in a requester's preferences, then the requester will not see the catalog's image.
• Description: Enter a short description. These appear next to the store when it

3-46 Oracle iProcurement Implementation and Administration Guide
displays to requesters on the Shop page. Maximum character limit for Short Description: 240 bytes.
• Long Description: The Long Description displays after the requester clicks the store on the Shop page. The Shop Store page displays the long description nearthe top of the page; it displays the list of content zones and their descriptions below. Maximum character limit: 2,000 bytes.
• Add Content Zone: Click Add Content Zone to select the content zones (catalogs)that you want to include in the store. See notes and tips about adding multiple local or transparent punchout content zones to a store.
Note: Removing a content zone from a store does not delete thecontent zone. You can add the removed content zone to another store.
• Add Smart Forms: Click Add Smart Forms to select the smart forms to be assigned to this store.
3. Click Continue to see if additional configuration is required for your store.
4. On the Create Store: Configuration page you can provide the store sequence, indicate if local content is to be displayed first in the search results summary screen,and only on that screen, by checking "Show local content first." Force a search results match by checking "Always Show as Match."
5. Click Apply to save your store.
6. If you want to vary language-specific fields, such as the name and description, see Translating Data, page 3-56.
7. If you want to test your store, from the Manage Stores page click Test Stores Setup. For the operating unit and responsibility combination you can see details of the stores and content zones configuration.
To sequence stores:You can sequence your stores so that they are presented in a specific order to iProcurement requesters. When a requester logs into Oracle iProcurement, stores are displayed from left to right, top to bottom, in order of sequence numbers. Stores that therequester does not have access to are omitted from the Shop home page.
1. On the Manage Stores page, click Sequence Stores. It is recommended that you sequence the order in which multiple stores display on the Shop page; otherwise, the stores display in a system-generated order.

Content Management 3-47
2. Enter sequence numbers. You can reuse sequence numbers or use decimals.
3. Click Apply.
4. The stores are sequenced horizontally, three per row. For example, stores sequenced 1 through 4 display as follows on the Shop page:
Store 1 Store 2 Store 3
Store 4
To delete a store:Deleting a store does not delete the content zones in the store; it deletes the store definition.
Note: Any content zones that are not assigned to a store are not accessible to requesters. To enable requesters to search the content zones that were in your deleted store, assign the content zone to another store.
If the store you delete is a requester's Favorite Store (requesters can select this in their preferences), then the requester's new favorite store defaults to the store with the lowestsequence.
To delete a store:
1. In the iProcurement Catalog Administration, select the Stores subtab from the Stores tab.
2. On the Manage Stores page, click the Trash Can (Delete) icon for the store.
3. Click Yes to confirm the deletion.
Profile OptionsIt is recommended that you leave POR: My Favorite Store at the default setting of -1 during implementation. When set to -1, Oracle iProcurement automatically displays the store that has the lowest sequence number (you set the sequence when defining the store) and that the requester has access to, if you use content security to control catalog access.
For a list of profile options that affect search behavior, see Search Engine Logic, page A-1.

3-48 Oracle iProcurement Implementation and Administration Guide
Note: The requester can change the default favorite store by selecting My Favorite Store in the iProcurement Preferences.
Implementation ConsiderationsNote the following about creating stores:
• Oracle iProcurement provides a default store, called the Main Store, if you do not want to set up stores.
• Every punchout, transparent punchout, or informational content zone must be assigned to a store to be searchable. A local content zone is already in the Main Store by default, although you can assign it to any store. (If you are upgrading froman earlier release, your punchout catalogs, if any, are also automatically included in the Main Store. The upgrade process also creates an additional store to house each punchout content zone. Therefore, after upgrading, existing punchout catalogs are available in both the Main Store and their own individual stores. You can change this configuration. Depending on what release you are upgrading from, your existing store and catalog configuration may be preserved. Refer to available Release Notes or About Docs on My Oracle Support forum for details.)
• A content zone or Smart Form can be in multiple stores.
• The more transparent punchout content zones in a store, the slower the search performance may be, depending on factors such as network and Internet traffic andthe external site's performance.
Note: A store can contain more than one content zone of the same type, such as two punchout content zones,or three local content zones.
• Category browsing occurs in the local content zones only.
• Advanced Search is performed on the local content zones only. A store that containstransparent punchout content zones, or that contains informational or punchout content zones, does not allow Advanced Search.
• If a store contains only punchout content zones, set at least one to always appear in the search results, to prevent the Search Results Summary page from being blank when the search returns no matching items. .
Note: A store that contains only a punchout content zone or only aninformational content zone goes directly to that catalog when you click the store's link on the Shop home page.

Content Management 3-49
• The default Main Store has no image associated with it. See: Managing Images, page 3-58.
Maintaining Content ZonesContent zones are containers for your catalog items and services. You manage your content zones from the Manage Content Zones page available as a subtab of the Stores tab.
The Manage Content Zones page provides the following information for each content zone:
• Type: Local for a local catalog, Exchange for a punchout or transparent punchout to Oracle Exchange, Punchout or Transparent Punchout to a supplier site, Contractor for the contractor request, or informational catalog. Local is the default local contentthat Oracle iProcurement provides.
• Store Assignment: Store to which the content is assigned. Content Zones must be assigned to a store to be searchable.
• Download Punchout: For punchout content you can download the punchout definition.
Maintaining A Local Content ZoneTo create a content zone:
1. In iProcurement Catalog Administration, select the Content Zones subtab from the Stores tab.

3-50 Oracle iProcurement Implementation and Administration Guide
2. On the Manage Content Zones page, select Create Local Content Zone from the drop down list and click Go.
For detail regarding the different types of catalog content see Understanding the Procurement Catalog, page 3-1.
Note: The default local content zone, All Local Content, contains items from all suppliers and categories. You can modify or delete it to fit your needs.
3. On the Create Local Content Zone page, enter a Name and Description. The name and description are used for your information only, they do not appear in the Oracle iProcurement shopping pages.
4. Suppliers: Select the suppliers whose items you want to appear in this content zone:
• Select Include items from all suppliers to do just that.
• Select Include items from specific suppliers to display the Add Suppliers region, page 3-51.
• Select Exclude items from specific suppliers to display the Add Suppliers region, page 3-51.
• Select Exclude items that are sourced from suppliers to do just that.
• Optionally select "Include items without suppliers." Items that exist only in the Master Items window in Oracle Inventory, including internally orderable items,

Content Management 3-51
often do not have external suppliers associated with them. This option enables you to associate items like these. If you do not select this option, these items are still available in the base local content zone. Master Items referenced on requisition templates (that are not assigned to suppliers) are also included in this category.
5. Categories: Select the categories whose items you want to appear in this content zone:
• Select Include items from all categories to do just that.
• Select Include items from specific categories to display the Add Categories region, page 3-52.
• Select Exclude items from specific categories to display the Add Categories region, page 3-52.
• Optionally select "Include items without shopping categories
Note: If there is a Purchasing category to Shopping category mapping for a particular Purchasing category, iProcurement considers items with that Purchasing category to be shopping categories (by way of the category mapping).
6. Assign Content Zone Security: Select the security for this content zone:
• Select Accessible to all users to do just that.
• Select Secure by operating units to display the Add Operating Units region, page 3-52.
• Select Secure by responsibilities to display the Add Responsibilities region, page 3-52.
7. Click Apply to return to the Manage Content Zones page.
To make this content zone accessible from other stores:• Click Stores. See Creating Or Editing A Store, page 3-44.
Note: When you create a local content zone, you are not "removing"those items from the base local content zone. They always exist in the base local catalog. They additionally exist in the local content zone you just created and in the store in which you place that content zone.

3-52 Oracle iProcurement Implementation and Administration Guide
To add suppliers:• Search for the supplier in the Search and Select popup.
Note: .When searching for a supplier, the system performs a begins with search. If you do not know the beginning of the name you are searching for, use a wildcard - for example, %network.
• Select one or more suppliers and click Select.
• Repeat these steps for each supplier you want to add.
To add categories:• Search for the categories in the Search and Select popup.
• Select one or more categories and click Select.
• Repeat these steps for each category you want to add.
To add operating units:• Search for the operating unit in the Search and Select popup.
• Select one or more operating unit and click Select.
• Repeat these steps for each operating unit you want to add.
To add responsibilities:• Search for the responsibility in the Search and Select popup.
• Select one or more responsibility and click Select.
• Repeat these steps for each responsibility you want to add.
Maintaining An Informational Content ZoneTo create an informational content zone:
1. In iProcurement Catalog Administration, select the Content Zones subtab from the Stores tab.
2. On the Manage Content Zones page, select Create Informational Content Zone from the drop down list and click Go.
For detail regarding the different types of content zone content see Understanding the Procurement Catalog, page 3-1.
3. On the Create Informational Content Zone page, enter the following:
• Name and Description:. (If the requester clicks a store name before searching,

Content Management 3-53
Oracle iProcurement displays the content zone names and descriptions it is searching. The Name also displays on the Search Results pages.) Maximum character limit for Name and Description: 2,000 bytes each.
• Image: Image file name or image URL that you want to display next to this content zone on the Search Results Summary page. If you enter an image name(such as abc.gif) rather than a full URL (such as http://www.abc.cm/abc.gif), make sure that the image exists in the directory specified in POR: Hosted Images Directory. If you specify no image, the content zone displays its Name and Description only. (Behind the scenes, the content zone displays a blank image file if you specify no image. If desired, you can change this default blank image file to always display a standard "no content zone image" file or message.See the image management section.). Maximum character limit: 2,000 bytes.
Note: If "Hide thumbnail images" is selected in a requester's preferences, then the requester will not see the content zone's image.
• Keywords: Keywords used for searching. For example, if you enter the keyword fruit, this content zone displays on the Search Results Summary page when therequester searches for fruit. Oracle iProcurement displays this content zone if the search matches any part of the keywords. For example, if you enter the keywords legal size paper, the Search Results Summary page displays this content zone if the requester's search includes the words legal or paper or size. Maximum character limit: 4,000 bytes
• URL:. To link the content zone name to a site, enter the site's URL here. If you do not enter a URL, requesters see just the name and description. The name anddescription may be all you need; however, if the informational content zone includes lengthy procedures or links, you may want to include a URL here or inthe Description that links to a master page that contains the information. Maximum character limit: 2,000 bytes.
4. If you want to vary language-specific fields, such as the name and description, seeTranslating Data, page 3-56.
5. Assign Content Zone Security: Select the security for this content zone:
• Select Accessible to all users to do just that.
• Select Secure by operating units to display the Add Operating Units region, page 3-52.
• Select Secure by responsibilities to display the Add Responsibilities region, page 3-52.
3-54 Oracle iProcurement Implementation and Administration Guide
6. Click Apply to return to the Manage Content Zones page.
7. Any content zone you create must be added to a store to be searchable. Either add the content zone to the default Main Store that Oracle iProcurement provides or create your own store to which to add the content zone. See: Creating Or Editing A Store, page 3-44.
Maintaining A Contractor Request Content ZoneOracle iProcurement provides the Contractor Request content zone for use by Oracle Services Procurement.
If your company has enabled Oracle Services Procurement, then requesters can click Contractor Request directly below the Shop tab and be taken to the contractor request entry page.
If desired, you can make contractor requests additionally accessible in a store. For example, you can assign the Contractor Request content zone to a store that you created. When a requester clicks the store on the Shop page, all of the content zone in that store are displayed. The requester can then click the Contractor Request content zone and be taken to the contractor request entry page. (If you create a store that contains only the Contractor Request content zone, then clicking the store takes the requester directly to the contractor request entry page.)
The method of clicking Contractor Request directly below the Shop tab always remains.Including the Contractor Request content zone in a store is an additional option for you,to make contractor requests accessible in other places.
Manage A Content Zone (Update, Copy, Delete)In iProcurement Catalog Adminstration, click the Content Zones subtab in Stores.
• Update: On the Manage Content Zones page, click the Update icon next to the content zone you want to update.
• Change the information in the content zone to suit your new needs. Refer to thetopics for creating each content zone for details..
• Click Apply.
• Copy: On the Manage Content Zones page, click the Copy icon next to the content zone you want to copy.
• Change the information in the content zone to suit your new needs. Refer to thetopics for creating each content zone for details..
• Click Apply.
• Delete: On the Manage Content Zones page, click the Delete icon next to the content
Content Management 3-55
zone you want to delete.
• Respond to the warning message by clicking Yes to delete the content zone.
Deleting a content zone does not delete its contents, it deletes the content zone definition:
• When you delete a local content zone, the items in the content zone still exist, but they are no longer visible to the requester by the local content zone definition you created. (To delete items and prices from the local content zone, item maintenance must be performed.) For example, you delete your local content zone A, which contains items from Supplier A. This content zone was assigned to a store called Travel. When requesters now search the Travel store, content zone A is no longer listed as a content zone in that store. Requesters no longer find items that were in content zone A when searching that store. Items from Supplier A are now returned in the search results only when requesters search the local content zone provided by Oracle iProcurement, if the local content zone is assigned to a store.
• You cannot delete the Contractor Request content zone that Oracle iProcurement provides.
• When you delete a punchout or transparent punchout content zone, its items still exist on the external site, but you have deleted the capability to access that content zone. Requesters cannot access the items, and you cannot access the content zone definition.
Note: If you delete a punchout to Oracle Exchange from which you downloaded punchouts, the downloaded punchouts are also deleted.
• When you delete an informational content zone, you delete the capability to access the catalog. Requesters cannot access the information in it, and you cannot access its content zone definition.
Function SecurityNone, but you can optionally control access to content zones. .
Related TopicsUnderstanding the Procurement Catalog, page 3-1
Maintaining Stores, page 3-44

3-56 Oracle iProcurement Implementation and Administration Guide
Content TranslationThe language in which you are currently viewing fields and data in Oracle iProcurement is called the session language. The language in which you first entered the data is the "initial" language.
For example, you have three language installations of Oracle iProcurement - English, French, and Japanese. The first time you enter these fields, your session language is English. The data you enter is propagated to French and Japanese as well as English. Any change you make in English is made in all languages; however, once you change your session language and change your session language, you must maintain that language separately. For example, you change your session language to French and change a catalog name. Later, you change your session language to English and change the catalog's name in English. That change is now made only in English and Japanese. The application detects that you already made a language-specific change to the French version, and no longer propagates changes to French, unless your session language is currently French.
Catalog Content That Can Vary By LanguageThe following language-specific fields can be translated in a multiple language installation of Oracle iProcurement:
Punchout catalog definition:
• Catalog Name
• Description
• Keywords
Transparent punchout catalog definition:
• Catalog Name
• Description
Local catalog definition:
• Catalog Name
• Description
Informational catalog definition:
• Catalog Name
• Description
• Keywords

Content Management 3-57
Store definition:
• Store Name
• Store Type *
• Short Description
• Long Description
• Image
Non-catalog request template:
• Template Name
• Organization *
• Item Type *
• Item Description
• Commodity *
• Unit of Measure *
• Negotiated *
• Restrict Suppliers *
• Information Template Name
Base and category descriptors:
• Descriptor name
• Description
Item and browsing categories:
• Category Name
• Description
* The options or values in these fields, such as Yes or No, vary depending on your session language.
Schema and items that you upload can also be translated. See the Readme files
Note: Translating a catalog definition does not mean that the catalog's

3-58 Oracle iProcurement Implementation and Administration Guide
contents are automatically translated. It depends on your setup. For example, data in Oracle Purchasing honors the existing translations of the data. If you provided both German and English versions of a category name when defining categories in Oracle Purchasing, then both German and English versions of the category name are available in Oracle iProcurement. In another example, you can translate a punchout catalog's name, but the supplier controls whether the data exists in a particular language.
Changing The Session Language And Translating The ContentTo vary online data by language, change the session language:
1. Enter and save the data in one language first. For example, create a store in French.
2. Click "Preferences" at the top of any page.
3. In your general preferences, select the desired language, such as English, and click Apply Changes.
4. Return to the page where you entered the data. For example, return to the page where you defined your store.
5. Translate the language-specific fields to the new language.
6. Save your changes.
Managing ImagesImages in the catalog are one of the following kinds:
• Images that appear on the Item Details page when requesters view the details of anitem. You can upload items that reference these images or they can be referenced byitems authored in the agreement.
• Smaller, thumbnail versions of the images that appear on the Search Results Summary, Search Results, and Compare Items pages for items. As above, these areimages associated with the items.
Note: Requesters can use their iProcurement Preferences to disable thumbnail images in the search results if they desire. If so, the text description of the item fills the entire horizontal space, with no thumbnail image. Punchout and informational catalog images also do not appear in the search results if the requester disables thumbnails.

Content Management 3-59
• Images associated with stores that appear on the Shop home page. See the figure at the beginning of this chapter. You can reference these images when creating your store.
• Images associated with a punchout or an informational catalog that appear on the Search Results Summary page. You can reference these images when creating the punchout or informational catalog.
Including images in the catalog is optional. If you provide images for items, the corresponding image appears when a requester searches for and views items, assisting the user in selecting the correct item for purchase. JPEG and GIF image formats are recommended.
Note: The supplier site or marketplace externally hosts images associated with transparent punchout items. For more information, see the Oracle Procurement Supplier's Guide to Punchout and Transparent Punchout.
Uploading Items With ImagesTo upload images, use the PICTURE or THUMBNAIL_IMAGE fields in an XML uploadfile, or the Image or Thumbnail Image fields in a text upload file. These images can be either internally stored files or URLs that point to an image stored remotely.
You can also use the loader to associate an image with an item you have extracted, if theitem has a supplier item number. (The loader requires a supplier item number.) See the instructions for creating thumbnail images for items.
Specifying Image Files Stored on a Local Server
To reference image files stored on the local server:
1. For the POR: Hosted Images Directory profile option, enter the directory path you use to store image files.
This path usually corresponds to the OA_MEDIA directory. Contact your database administrator or installation team for the exact location of your OA_MEDIA directory.
2. Ask your database administrator to transfer the pictures to the directory you specified.
3. Use the PICTURE descriptor in an upload file to specify a regular sized image for the Item Detail page. Use the Thumbnail Image descriptor to specify a smaller image for the search results and comparison pages
For information about preparing and uploading files, see:
• The Readme file contained in your upload resource file. See: Downloading
3-60 Oracle iProcurement Implementation and Administration Guide
Templates and Instructuins, page 3-22.
• The instructions for creating thumbnail images for items. See: Creating Thumbnail Images for Items, page 3-60.
Note: The file name for the image is case sensitive.
4. Load your catalog file. See: Loading Catalog Content, page 3-21
Specifying Image URLs
To specify the URL of the image that resides on the Internet:
1. Obtain the complete path of the image (for example, http://www.mycompany.com/toplogo2.gif).
2. Use the PICTURE field in an XML upload file (or the Image field in a text bulk load file) to specify an image URL for the Item Details page. Use the THUMBNAIL_IMAGE field in an XML upload file (or the Thumbnail Image field ina text upload file) to specify a thumbnail image URL for the search results and comparison pages.
You can use the same image for both the image and thumbnail image, or create separately sized versions. For more information, see the instructions for creating thumbnail images for items.
3. Load your catalog file. See: Loading Catalog Content, page 3-21.
Authoring Items With ImagesYou can include images in the catalog content you create using iProcurement online authoring. These images can be either internally stored files or URLs that point to an image stored remotely. See: Online Catalog Authoring, page 3-30.
1. Navigate to the Create Lines or Update Lines page for the agreement that contains the item you want to display an image.
2. In the Details region of the page enter the Image Name (file name) or the Image URL.
3. When you have completed your work on this line, click Apply.
Creating Thumbnail Images For ItemsYou can upload or author items with thumbnail images, using an image file or image URL.
You can create and size thumbnail images in the following ways:

Content Management 3-61
• Use the same image file name or URL for the Thumbnail Image (THUMBNAIL_IMAGE) field as you used for the Image (PICTURE) field.
Specify the image file names or URLs through uploading or authoring. Then set the POR: Thumbnail Width or POR: Thumbnail Height profile options to resize the thumbnails. These profile options resize all thumbnails, while leaving the original image intact. Specify the desired number of pixels in these profile options. To resizethe height and width proportionately, specify the number of pixels for only one profile option. For example, if you specify only POR: Thumbnail Width and leave POR: Thumbnail Height blank, the system automatically resizes the height proportionately to the width, for each thumbnail image. (If you specify both profile options, the sizing you specify is applied equally to all images. If the aspect ratio of an image is not the same as your sizing ratio, the thumbnail image may appear distorted.)
• If the item image and thumbnail image are different, use uploading to specify the separate image file names or URLs.
If you authored the image, which uses the same image for both item details and thumbnails, use uploading to change one image or the other. The item must have a supplier item number that the loader updates. You can use a picture editor to change the size of the thumbnail images. See: Uploading Items With Images, page 3-59.
Creating Store ImagesYou can also set up stores to display images to help guide requesters. Like item images, store images can be either internally stored files or URLs that point to an image stored remotely.
1. Follow the instructions for locating image files for items to store your images. See: Uploading Items With Images, page 3-59.
2. Select the Stores tab in iProcurement Catalog Administration.
3. If this is an existing store click the Pencil (Update) for that store. If this a new store click Create Store. See: Maintaining Stores, page 3-44.
4. Enter either an image file name or the URL that links to the image in the Image field.
5. Click Continue, then Apply when you have completed your entries.
Image Related Profile OptionsFor details on these and other Oracle iProcurement profile options see: Setting Profile Options, .
The following profile options apply to all images:

3-62 Oracle iProcurement Implementation and Administration Guide
• POR: Hosted Images Directory
The following profile options affect thumbnail images:
• POR: Thumbnail Width.
• POR: Thumbnail Height.
• POR: Show Thumbnail Images. .
See: Creating Thumbnail Images For Items, page 3-60
Function SecurityThe ICX_CAT_ARGEEMENTS_SUMMARY function controls access to the iProcurement page from which files are uploaded, and stores and catalogs are defined. Anyone assigned the iProcurement Catalog Administration responsibility already has access to this function.
Implementation ConsiderationsIf you specify both a server image and an image URL, only the server image appears in Oracle iProcurement.
Note: If your images do not appear after following the instructions in the previous sections, then verify whether you have multiple middle-tier servers, each on a different server. If you do, then you must copy the OA_MEDIA directory and your images to each server, or make the OA_MEDIA directory an nfs-mounted directory that all servers share.
You cannot extract images for master items that do not exist on a blanket agreement or catalog quotation. If the master item exists on a requisition template or ASL entry with asupplier item number, then you can use the loader to associate an image with the extracted item. (The loader requires a supplier item number.)
By default, Oracle iProcurement uses blank image files (invisible to the requester) to display items that do not have images:
• ag_placeholder_item.gif--160 by 160 pixels, used on the Item Details page for items without images.
• ag_placeholder_thumbnail.gif--100 by 100 pixels, used on the Search Results Summary, Search Results, and Compare Item pages for items without thumbnail images.
You can replace the default blank image files with different image files. For example, if most of your items have images, you can display an image with the text No Image Available for the exceptions rather than a blank space. (This text displays the same in all

Content Management 3-63
languages.) The replacement blank image files must have the same names and file format (.gif) as the default ones. You can find the default blank files in the OA_MEDIA directory.
The following functionality can also influence images, if you do not want to maintain images:
• The item detail visible descriptor property can completely hide detailed images from the Item Details pages.
• The search results visible descriptor property can completely hide thumbnails from the Search Results Summary and Search Results pages.
• The item detail visible descriptor property can completely hide thumbnail images from the Compare Item .
You can edit descriptor properties online in iProcurement Catalog Administration or through uploading schema. For more information about descriptors, see Maintaining The Catalog Schema, page 3-5.
Additional Considerations for ThumbnailsThe recommended height and width for thumbnail images is 100x100 pixels. You should not exceed a width of 280 pixels because the column width on the Compare Items page is 280 pixels. If the thumbnail image exceeds that, the image wrap.
Additional Considerations for Store ImagesThe recommended image dimensions for a store or catalog image is 70 by 55 pixels.
By default, Oracle iProcurement uses a blank image file (invisible to the requester) to display items that do not have images. For stores without images on the Shop home page, it uses ag_placeholder_store.gif (70 by 55 pixels) to display the blank image. (Punchout and informational catalogs have no default blank image. When no image is specified, they display only the catalog name and description on the Search Results Summary page.)
Tip: You can use standard clip art icons that Oracle Applications Framework provides. Look in the OA_MEDIA directory for these image files. For example, the file medicalequipment_cctitle.gif is a smallpicture of a stethoscope, which you could use as an image for a medicalsupplies store
Managing Searching And BrowsingAs part of the procurement catalog setup, you should:
• Understand how the catalog search engine works. For more information, see Search

3-64 Oracle iProcurement Implementation and Administration Guide
Engine Logic, page A-x.
• Review the profile options that affect searching. Set or change these profile options. See the list of profile options in Search Configuration, page A-10.
• Review and update descriptors and default descriptor properties. See the Schema Editing section in Search Configuration, page A-10.
• Review how requesters can adjust the presentation of their search results in Search Result Layouts, page 3-64.
Search Result LayoutsOracle iProcurement requesters can choose to display shopping search results in either an paragraph search result display format or the grid display format.
• The paragraph format provides better alignment of item attributes, more white space, and allows the truncation of long descriptions. Most organizations prefer thisformat due to its familiar look and feel similar to other eCommerceWeb sites and ease of navigation.
• The grid format presents item information in a table to show more information on apage and enable quick row-to-row comparisons. The requesters most commonly using this format are usually in specific industries like chemical engineers who are interested in a high density layout that shows them identical chemicals of different concentrations in a table format that can be scanned quickly.
To set up search result layouts:• Set the profile POR: Search Results Skin. The default layout is paragraph.
• Requesters can change the layout to grid in iProcurement Preferences.
Profile OptionsFor a list of profile options that affect search behavior, see Search Engine Logic, page A-1.
Global Agreements
OverviewUsing global agreements, purchasing professionals are able to negotiate prices on behalfof multiple organizations within an enterprise and then enable the resulting agreement to be shared by those organizations for procuring products and services.
Global Agreements allow buying organizations to negotiate pricing and define

Content Management 3-65
agreements in a centralized shared services environment. Execution against the Global Agreement can be controlled and handled in more than one operating unit. Instead of creating multiple agreements in multiple operating units, you can create a single global agreement that can be viewed and used for sourcing by multiple operating units.
In addition to the Supplier/Supplier Site with whom the agreement was negotiated by the negotiating organization, it may not be the same supplier site which processes the purchase orders from the multiple buying organizations, where the agreement is enabled.
Creating and Using a Global Agreement• Create a Global Agreement in an Operating Unit (a Contract Purchase Agreement
with the Global box and Enable All Sites box checked) - (N) Purchase Orders > Purchase Orders.
• Enable the Agreement in multiple Operating Units. (N) Purchase Orders > PurchaseOrders > Tools > Enable Organizations.
• Optionally define local attributes for each of the Operating Units. This includes buyer, supplier site, freight carrier.
• Local organizations can view and use the Global Agreement, however, they cannot make any changes to it. Only the local attributes can be changed by the buyers in the local organization.
• Standard POs are created in the local organization using the local document sequence number for Purchase Orders that gets generated and stored by the system
Global Agreements in Oracle iProcurementsThe following areas are impacted by the global agreements enhancements in Oracle iProcurements:
• Catalogs can now refer to supplier sites that are not on the Contract Purchase Agreement.
• You can bulk load content from a supplier site that is not on the Contract Purchase Agreement.
• Re-defaulting of the contract site from the contract does not take place.
• Non-catalog requests referencing a contract allow updates to supplier site.
• For the Punch Out items referring to a global contract agreement, you can reference the contract. The punch out supplier return sites are valid for the supplier but do not necessarily match the site in the contract.


Requisitions Setup 4-1
4Requisitions Setup
Requisitions Setup ChecklistUse the following checklist for all setup related to requisition creation and management.The steps are organized by functional area. For example, all steps that concern setting up delivery information on requisitions appear together. This is a checklist of all setup steps in this chapter. These steps appear in a suggested, but not required, order.
Requisitions Setup Checklist
Number Step Functional Area
Required or Optional
Information Source
1 Foreign Currency Support Shopping Optional Foreign Currency Support, page 4-3
2 Information Templates Shopping Optional Information Templates, page 4-4
3 Suggested Buyer Delivery Optional Suggested Buyer, page 4-9
4 One-Time Address Delivery Optional One-Time Address, page 4-10
5 Purchase Order Grouping for Requisition Lines with One-Time Addresses
Delivery Optional Purchase Order Grouping for Requisition Lines with One-Time Addresses, page 4-11
6 Hazard Information Delivery Optional Hazard Information, page 4-14
7 Global Requester Delivery Optional Global Requester, page 4-14
4-2 Oracle iProcurement Implementation and Administration Guide
Number Step Functional Area
Required or Optional
Information Source
8 Charge Account Displays Billing Optional Charge Account Displays, page 4-17
9 Expense Charge Account Rules
Billing Optional Expense Charge Account Rules, page 4-17
10 Employee P-Cards Billing Optional Employee P-Cards, page 4-18
11 Supplier P-Cards Billing Optional Supplier P-Cards, page 4-19
12 PO Extract for P-Card Reconciliation
Billing Optional PO Extract for P-Card Reconciliation, page 4-28
13 Project Accounting Billing Optional Project Accounting, page 4-33
14 Grants Accounting Billing Optional Grants Accounting, page 4-34
15 Favorite Charge Accounts Billing Optional Favorite Charge Accounts, page 4-34
16 Approvals Approval Required if you have not implemented Oracle Purchasing
Approvals, page 4-36
17 Global Approver Approval Optional Global Approver, page 4-46
18 Requisition Changes Requisitions Optional Requisition Changes, page 4-46
19 Requester-Initiated Changes toPurchase Orders
Requisitions Optional Requester-Initiated Changes to Purchase Orders, page 4-49
20 Requisition Cancellations Requisitions Optional Requisition Cancellations, page 4-52
21 Life Cycle Tracking Requisitions Optional Life Cycle Tracking, page 4-53
22 Internal Requisitions Requisitions Optional Internal Requisitions, page 4-55

Requisitions Setup 4-3
Number Step Functional Area
Required or Optional
Information Source
23 Oracle Services Procurement Requisitions Optional Oracle Services Procurement, page 4-63
Foreign Currency SupportEach time a requester searches for an item in a catalog, the search can display the currency associated with that item. This currency can be any valid currency defined in the application, including the functional currency. Similarly, users can make a non-catalog request in any valid currency. When these items are added to the shopping cart, the application converts the price for that item into the functional currency using the relevant exchange rate, and then displays the functional currency throughout the application.
The foreign currency feature displays the foreign currency price along with the functional currency price on key windows in the application.
The foreign currency can appear on the following pages:
• Shopping Cart
• Approver Shopping Cart
• Edit Single Account
• Edit Multiple Accounts
• Review Charge Accounts
• Edit Lines - Delivery information
• Edit Lines - Billing information
• Review and Submit - expand line details
• Printer-friendly
• Approval Notification
• Approval Notification Reminders
• Requisitions: click requisition - click Details icon - expand line details

4-4 Oracle iProcurement Implementation and Administration Guide
Setup Steps:Decide whether to display the transaction currency price to requesters during checkout.Use Oracle Applications Framework personalization to display or hide the field.
The following table shows the default settings of transaction and functional prices and amounts in the shopping cart:
Price and Amount Fields by Default
Field Name Personalization Name Displayed or Hidden by Default?
Transaction Currency Price Price Displayed by default
Functional Currency Price FuncPrice Hidden by default
Transaction Amount TxnAmountFlow This field cannot be personalized
Functional Amount FuncAmount and TxnAsFuncAmount
This field cannot be personalized
If you do not want to accept the defaults for Transaction Currency Price and Functional Currency Price, then use Oracle Applications Framework personalization to change them. For more information, see Personalize Oracle iProcurement Using Oracle Applications Framework, page 2-15.
To apply your changes to the Review and Submit page of the checkout process, apply your personalizations to that page.
Note: The Transaction Amount is hidden if the transaction currency is the same as the functional currency for all lines in the cart. It is visible ifthere is at least one foreign currency line. The Functional Amount always appears. Personalization does not control these fields.
Information TemplatesYou can set up information templates to gather additional information in Oracle iProcurement to pass necessary order processing information to suppliers. When an information template is assigned to a category or item, the application prompts requesters to provide the information specified in the template when the item is added to the shopping cart. This information becomes a line-level attachment to the requisition.
For example, you can implement information templates for items such as business cards

Requisitions Setup 4-5
that require additional information (name, address, e-mail address, phone) from the requester. Oracle iProcurement prompts for name, address, e-mail address, and phone number when you order business cards. Each information template must be associated with an Oracle Purchasing item or item category. If an information template is associated with an item category, all items belonging to that category are also associatedwith the template.
Setup Steps:
Create an information template1. Navigate to the Define Information Template window in Oracle Purchasing.
2. Give your Template a name.
This name appears as a heading during checkout.
3. Select Available in All Organizations to make the template available to requesters inall operating units. Deselect this option to make the template available only to requesters in the same operating unit in which you are creating the information template.
For example, you are logged in with a responsibility that is tied to the Vision Franceoperating unit. If you leave this option deselected, then your information template is available only to users in your French operating unit.
4. Select an Attachment Category of To Supplier or To Buyer.
To Buyer means that the requisition, when turned into a purchase order, displays the information template as an attachment to the buyer. To Supplier means that the information template also is available as an attachment to the supplier.
5. Enter an Attribute Name and Description. The Attribute Description is the actual field prompt that appears in Oracle iProcurement.

4-6 Oracle iProcurement Implementation and Administration Guide
Define Information Template Window
If you use Multilingual Support (MLS), you can enter translations for the following fields: Template, Attribute Name, Attribute Description, and Default Value. To enter the translations, select Translations from the View menu. For more information, see the Oracle E-Business Suite User's Guide.
6. Optionally, enter a default value to automatically appear in the field.
For example, for an Attribute Name of Body Color, the default value could be Black.
7. To make the template field to be a list of values from which the requester selects, see the steps for creating lists.
8. Indicate whether the field is mandatory for Oracle iProcurement requesters. If the field is mandatory, requesters must enter a value in the field before proceeding to complete the requisition.
9. Indicate whether to activate the attribute to actually appear in Oracle iProcurement.In certain circumstances, you can define an attribute, but delay enabling it for display.
10. Choose Associate Template to associate the template with an item or item category.
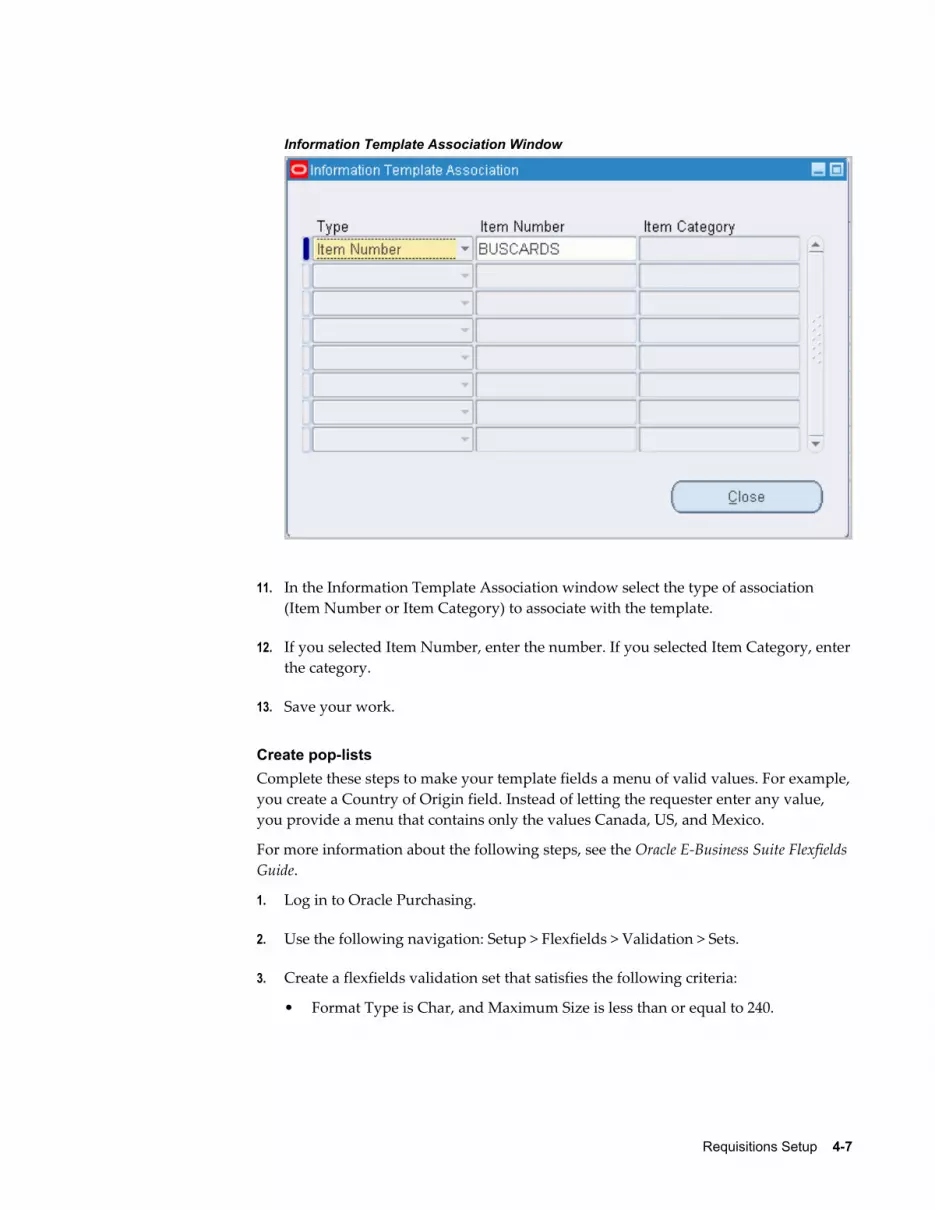
Requisitions Setup 4-7
Information Template Association Window
11. In the Information Template Association window select the type of association (Item Number or Item Category) to associate with the template.
12. If you selected Item Number, enter the number. If you selected Item Category, enterthe category.
13. Save your work.
Create pop-listsComplete these steps to make your template fields a menu of valid values. For example,you create a Country of Origin field. Instead of letting the requester enter any value, you provide a menu that contains only the values Canada, US, and Mexico.
For more information about the following steps, see the Oracle E-Business Suite Flexfields Guide.
1. Log in to Oracle Purchasing.
2. Use the following navigation: Setup > Flexfields > Validation > Sets.
3. Create a flexfields validation set that satisfies the following criteria:
• Format Type is Char, and Maximum Size is less than or equal to 240.

4-8 Oracle iProcurement Implementation and Administration Guide
• Validation Type is either Independent or Translatable Independent.
• List Type is any of the provided options.
4. Use the following navigation: Setup > Flexfields > Validation > Values.
5. Search for the validation set name that you created and add values to it.
For example, your validation set is Country of Origin, and the values are Canada, US, or Mexico.
6. Access the Information Templates window the preceding instructions for defining information templates describe
7. In the LOV field, select your validation set name.
8. Save your work.
Implementation Considerations:If information templates are created for both the item and a category that it belongs to, then both templates apply to that item.
The information template is also accessible through a Special Information link in the cart, if the requester wishes to update the fields after initially adding the items to the cart.
The preceding figure shows how information templates are associated with multiple lines in a cart, through the Special Information column. (The Special Information column appears by default.)

Requisitions Setup 4-9
Suggested BuyerAs requisitions are created in Oracle iProcurement, it is possible to indicate the suggested buyer for each requisition and requisition line. You can define a buyer for any of the following:
• Blanket purchase agreement or quotation
• Requisition template
• Item
• Category
If a buyer is found on any of the preceding items, then it becomes the default buyer in the corresponding purchase requisition based on its position in the document hierarchy.The Oracle iProcurement requester can accept this default or override it based on the list of buyers in the Suggested Buyer field on the requisition. This suggested buyer information is then passed to the resulting purchasing document and may be overridden during the document creation process.
Profile Options• The profile option HR: Cross Business Groups lets buyers be the default buyers
from other business groups. See Profile Options, page 2-32.
Workflow• The Get Buyer process of the PO Create Documents workflow retrieves buyer
information for the purchase order when it is being created. For standard purchase orders, this process retrieves the buyer from the requisition line (through the Get Buyer From Req Line function). If no buyer is defined at the requisition level, then the item master, category, source document, and contract are subsequently examined. When a blanket release is created, the process retrieves the buyer from the blanket agreement, regardless of the buyer defined on the associated requisition.
Implementation Considerations• When the profile HR: Cross Business Groups is set to Yes:
• When using the Category to determine the default buyer, Oracle iProcurement spans business group boundaries when selecting the default buyer.
• The list of values for the Suggested Buyer field crosses business groups, enabling the user to select an employee from another business group as the suggested buyer.

4-10 Oracle iProcurement Implementation and Administration Guide
One-Time AddressRequesters can specify alternate delivery locations, such as a home address, that are not an office location or other location from the database. This is a one-time address. This feature lets requesters specify the one-time address on a requisition line during the checkout process. The requester can associate the one-time address with specific requisition lines or with all requisition lines on a given requisition. One-time locations appear as line-level attachments on the resulting purchase order.
Setup StepsTo set up a default one-time address:
1. Set up a dummy HR location to use as the deliver-to location on the requisition line whenever the requester specifies a one-time location. When defining this location, itmight or might not be associated with an organization. If it is associated with an organization, then you must define a distinct location for every organization. You can set up this location on the Location window, which you can access from the Setup > Organizations > Locations...Purchasing menu.
2. Set the value of the POR: One Time Location profile option to be equal to the name of the location that you created in the preceding step. You can set this profile value at the site, responsibility, or user level.
3. By default, enter the address details. Use Oracle Applications Framework personalization to configure the address so that individual address lines are available. For more information, see Personalize Oracle iProcurement Using Oracle Applications Framework, page 2-15.
Profile OptionsPOR: One Time Location must be set to a location that has been previously defined in the Location window.
Function SecurityYou can restrict access to this functionality using menu function security. Under Menu Exclusions, exclude the function One Time Location. For information about function security setup, see Function, Menu, and Data Security, page 2-4.
WorkflowNone

Requisitions Setup 4-11
Implementation ConsiderationsNo additional considerations.
Purchase Order Grouping for Requisition Lines with One-Time AddressesAs requisitions are created in Oracle iProcurement, it is possible to assign one-time addresses as the deliver-to locations for each line. Requesters specify one-time locations (delivery addresses) when they want to have heir ordered items delivered to a location that has not been previously defined (and most likely not used again). Delivery of itemson individual requisition lines can be to distinct one-time locations. Each one-time location appears on the resulting purchase order line as an attachment.
In the case where the same item is found on two or more requisition lines, each with a separate one-time delivery address, the buyer or requester may not want these two (or more) requisition lines to be grouped onto the same purchase order line since there could be some confusion as to the quantity to be delivered to each location. The following figure details the requisition-to-purchase order process when one-time locations are employed:
As requisition lines are converted into purchase order lines, multiple requisition lines are grouped onto one purchase order line if certain characteristics, such as item and unitof measure, are the same. If one-time locations are associated with the requisition lines, each one-time location is represented on the resulting purchase order line as an

4-12 Oracle iProcurement Implementation and Administration Guide
attachment. Details of the main functional elements of the one-time location grouping functionality follow.
Grouping Options
Attributes in the PO Create Documents Workflow control the grouping feature and provide the requester the ability to not group requisition lines that contain one-time locations. The workflow looks at the available requisition lines to be converted into purchase order lines and first determines the value of these attributes to determine whether to group requisition lines with the same data.
The workflow attributes are:
• Is Grouping of Requisition Line Allowed?
• Is Grouping of One Time Address Line Allowed?
Each of these attributes can have a value of Yes or No. Depending on the value selected,the workflow PO Create Documents behaves differently:
• If the attribute Is Grouping of Requisition Line Allowed? is set to No, then no requisition lines are consolidated into a single purchase order line.
• If grouping is set to occur, but Is Grouping of One Time Address Line Allowed? is set to No, then requisitions with one-time locations are not grouped.
• If both attributes are set to Yes, then all similar requisition lines, even those with one-time locations are consolidated onto a single purchase order line. The default values for both attributes are Yes.
Note: When the attribute Is Grouping of One Time Address Line Allowed? is set to No, then no grouping of requisition lines with one-time locations occurs, even if the one-time addresses are the same.
The internal names of the preceding attributes are GROUPING_ALLOWED_FLAG and GROUP_ONE_ADDR_LINE_FLAG, respectively.
Append Quantity and UOM to Attachment
As one-time locations are converted and become attachments for the purchase order lines, these text attachments include the following information (for one-time location text attachments only):
• Unit of Measure (UOM)
• Quantity Ordered
• Location
The following is an example of the text of an attachment:

Requisitions Setup 4-13
Please ship 30 (Each) to:
100 Mason St.
Palo Alto, CA
95320
Setup Steps:1. Access the PO Create Documents Workflow. For more information, see Customize
Workflows, page 2-18.
2. Find the workflow attributes Is Grouping of Requisition Line Allowed? and Is Groupingof One Time Address Line Allowed?
3. To modify the grouping logic, change the values of these attributes from Yes to No. Yes is the default value for both attributes. The following table details the results of the various attribute setting combinations:
One-Time Location Grouping Attributes
Is Grouping of Requisition Line Allowed?
Is Grouping of One Time Address Line Allowed?
Result
YES YES Groups all similar requisition lines regardless of the existence of one-time locations.
YES NO Groups similar requisition lines unless a one-time location is found on the requisition line.
NO YES No grouping of requisition lines ever occurs.
NO NO No grouping of requisition lines ever occurs.
Profile Options• POR: One Time Location must be set. For profile setup instructions, see Set Profile
Options, page 2-32.
Workflow• The PO Create Documents workflow looks at the following attributes--Is Grouping
of Requisition Line Allowed? and Is Grouping of One Time Address Line Allowed?--when determining if requisition lines should be grouped onto a single purchase order line.

4-14 Oracle iProcurement Implementation and Administration Guide
Implementation Considerations• The automatic grouping logic only applies to the workflow PO Create Documents.
When creating purchase documents through the Autocreate window, the buyer always has the ability to control the grouping function.
• The POR: One Time Location profile option must be properly set for one-time locations to use within Oracle iProcurement.
• If the first workflow attribute Is Grouping of Requisition Line Allowed? is set to No, then no grouping occurs, regardless of the setting of Is Grouping of One Time AddressLine Allowed?
Hazard InformationRequesters can indicate hazard information for each line item of a requisition. As requesters create requisitions in Oracle iProcurement, they can associate both a hazard identification number and a hazard class with a requisition line. In addition, if an item already has a hazard identification number or a hazard class linked to it, either from a source document or the item master, then this default information is copied to the resulting requisition line.
Setup Steps:By default, the hazard fields are hidden. To display them, use Oracle Applications Framework. For more information, see Personalize Oracle iProcurement Using Oracle Applications Framework, page 2-15.
Global RequesterOracle iProcurement lets requesters create requisitions on behalf of another requester, even if that requester is in a different operating unit or business group. For example, a manager in the United Kingdom can order office supplies for a newly hired employee in the United States, even though the UK and the US represent different business groups. Possible scenarios include:
• Global preparer. The manager in the UK logs on using the US responsibility. Even though the manager is not part of the US business group, the manager can create a requisition for a US employee.
• Global requester. The manager in the UK logs on using the US responsibility and picks himself as the requester, even though the manager is not an employee in the US business group. For example, the manager is traveling to the US and needs to order supplies while in the US.
The process flow routes the resulting requisition for approval based on the preparer's approval path, when using an employee-supervisor hierarchy. When using a position

Requisitions Setup 4-15
hierarchy and the preparer or approver belongs to a different business group than the requester, then the preparer or approver must manually select an approver for the requisition. (The workflow cannot generate an approval list in this scenario.)
During Checkout, iProcurement shows the Requester field on the requisitiont. When global requester functionality is enabled, then clicking the Search icon next to this field lets you select requesters in other business groups.
Note: When you click the Flashlight icon, the list of available requestersincludes all employees in the business group associated with the login responsibility, plus the preparer. For example, a manager in the UK logs on using the US responsibility. This manager sees everyone in the US business group, plus himeself.
If the global requester functionality is enabled while searching for requisitions on the Requisitions tab, then you can select the option Include employees from other organizations to expand the search to preparers or requesters in other business groups. The list of available preparers and requesters includes all employees in the business group associated with the login responsibility, plus the preparer.
Note: You can monitor only those requisitions that were created in the operating unit associated with your login responsibility. For example, amanager in the UK logged on using the US responsibility and created a requisition. When the manager logs on using the UK responsibility, the manager does not find the requisition. The manager finds it only when logging in using the US responsibility.
Setup Steps:1. Set HR: Cross Business Group to Yes to allow the selection of requesters in other
business groups.
If this profile option is set to No, then preparers can select requesters in other operating units, but not in other business groups.
2. Set the profile option ICX: Override Requestor to either By All or Within Organization.
When ICX: Override Requestor is set to No, then the Requester field on the requisition defaults to the preparer and cannot be changed.
Profile Options• Set the following profile options as described in the preceding setup steps:
• HR: Cross Business Group
• ICX: Override Requestor

4-16 Oracle iProcurement Implementation and Administration Guide
• The following table show how Oracle iProcurement behaves depending on the setting of these profile options:
HR: Cross Business Group and ICX: Override Requestor
HR: Cross Business Group
ICX: Override Requestor
Preparer's Actions
Yes By All Preparer can select any employee in or outside one's business group.
Yes Within Organization Preparer can select any employee in or outside one's business group.
Function Security• The functions for viewing or performing actions on My Group's Requisitions, My
Requisitions, All Requisitions, Requisitions I Approved, and Orders to Approve behave the same regardless of how HR: Cross Business Group is set. For example, ifthe requester is given access to View My Group's Requisitions (and the security level access for the requisition document type in Oracle Purchasing is set to Public), then the requester can view all requisitions created in the operating unit that the requester is logged in to, regardless of whether the preparer belongs to the same business group.
Implementation Considerations• The accounting for the global requester functionality behaves no differently than it
normally does:
• If the item is an expense item and no account information is defined for the item, then the system verifies whether an account is associated with the requester (in the People window in Oracle Applications). As always, this account must share the same set of books as the operating unit in which the requisition is created.
• If the account is not valid for the set of books of the operating unit in which the requisition is being created, then the system verifies the favorite accounts that the preparer has defined in the iProcurement Preferences. If a valid account does not exist in the preferences, then the system still tries to build the account using the expense charge account rules, if set up.
• If the system cannot build the account information, then the preparer receives a prompt to enter the appropriate accounting information manually during checkout.
Requisitions Setup 4-17
Displaying Charge Accounts The following profile option determines how or whether to display charge account information at certain points during the checkout process:
• The POR: Generate and Display Account at Checkout profile option affects the first step of the checkout.
The default setting for the POR: Generate and Display Account at Checkout profile option is No. When set to No, no charge account information appears during the first step of the checkout. (Charge account information always appears when you edit lines and on the last, review-and-submit page of the checkout.)
When POR: Generate and Display Account at Checkout is set to Yes, the charge account appears during the first step of the checkout, in the Billing section of the Checkout: Requisition Information page. (If the charge account varies by line, thenthe Charge Account field displays a Multiple link.)
• The POR: Display Legacy Accounting Flex UI profile option affects the optional editlines step of the checkout.
For example, the charge account, 01-510-7530-0000-000, appears in a single field if POR: Display Legacy Accounting Flex UI profile option is set to No (its default value). The requester can edit this field.
The same charge account, 01-510-7530-0000-000, would display each segment in a separate field if the POR: Display Legacy Accounting Flex UI profile option is set to Yes. In this example, the segments appear in separate columns: Company (01), Department (510), Account (7530), and Sub-Account (0000).
Whether the account appears in a single or separate field, the names of each segment still appear, and the requester can click a search icon to search for the validaccounts for each segment. Only the method of displaying and searching the segments changes.
Profile Options• Set the following profile options to implement this feature:
• POR: Generate and Display Account at Checkout
• POR: Display Legacy Accounting Flex UI
See Profile Options, page 2-32.
Expense Charge Account RulesWhen determining the default charge account, the account generator may reference the charge account defined on the employee record. Expense Charge Account Rules enable you to override one or multiple segments of that default account based on the item

4-18 Oracle iProcurement Implementation and Administration Guide
category. This ability to override does not interfere with the action of the account generator, but replaces those segments you configure after the account generator has created a charge account.
Setup Steps:1. Log in to Oracle Applications and choose the Procure to Pay Administrator
responsibility.
2. Navigate to Purchasing Setup > Financials > Accounting > Expense Account Rules.
3. Define the rules (for each item category) in the window. Duplicate rules for the same category or account segment are not permitted.
4. Save your work.
Profile Options• Set POR: Apply Expense Account Rules to Favorite Charge Accounts to Yes. See
Profile Options, page 2-32.
Employee P-CardsEmployee P-Cards let companies incorporate electronic payment and settlement procedures to streamline their procure-to-pay processes. Employers assign each requester his or her own employee P-Card to make purchases using Oracle iProcurement.
Setup Steps:For more information about setting up procurement cards, see the sections on Setting Up Credit Card Programs and Procurement Card Management in the Oracle Payables User's Guide.
In addition to the setup steps provided in the Oracle Payables User's Guide, you must enable supplier sites to accept procurement cards.
1. Log in to Oracle Applications. From the Oracle Purchasing menu, choose Supply Base > Suppliers.
2. Query the supplier associated with the supplier site that you want to set up.
3. Choose Sites. Query the supplier site for which you want to enable procurement cards.
4. Select the Procurement Card check box to indicate that the supplier site is P-Card enabled.
5. Save the changes.

Requisitions Setup 4-19
Profile Options• POR: Override Supplier P-card must be evaluated when implementing this feature.
For profile setup instructions, see Profile Options, page 2-32.
Supplier P-CardsSupplier P-Cards (or Ghost Cards) let companies incorporate electronic payment and settlement procedures to streamline their procure-to-pay processes. Instead of having tomaintain a separate employee P-Card for each requester in the company and each requester having to use his or her own employee P-Card to make purchases, companies can maintain a single supplier P-Card for each supplier or supplier site in the system, and consolidate all purchases from that supplier or supplier site on the single P-Card. The feature lets all requisitions in Oracle iProcurement (across requesters) created against the respective supplier or supplier site be automatically charged to the single supplier P-Card. To enable the feature, the supplier P-Card must be set up and tied to the supplier or supplier site in advance. This arrangement improves control on the purchasing process and reduces maverick spending.
The following are the major business flows involved in the supplier P-Card functionality used in Oracle iProcurement:
• Supplier P-Card Setup
• Supplier P-Card Assignment For Requisitions
Supplier P-Card Setup:To enable the supplier P-Cards feature, enable supplier or supplier sites to accept procurement cards.
1. Log in to Oracle Applications. From the Oracle Purchasing menu, select Supply Base > Suppliers.
2. Query the supplier associated with the supplier site.
3. Choose Sites. Query the supplier site for which you want to enable procurement cards.
4. Select the Procurement Card check box to indicate that the supplier site is P-Card enabled.
5. Save the changes.
After the supplier or supplier sites have been enabled for P-Cards, set up supplier P-Cards in Oracle Payables using a process similar to the setup for employee P-Cards. The following diagram shows the windows that you use to set up supplierP-Cards in Oracle Payables.

4-20 Oracle iProcurement Implementation and Administration Guide
Setup for Supplier P-Card
Card Programs: On this page, set up the following information for a P-Card: See theOracle Payables User Guide for details.
• Card Brand: Card brand name (American Express, Diners, Visa, Mastercard, and so forth).
• Card Type: Select whether the card is of type Procurement, Travel, or Supplier. You can use only P-Cards of type Supplier and Employee in Oracle iProcurement. To set up a supplier P-Card, you would select a card type of Supplier.
• Card Issuer/Issuer Site: Select a card issuer or issuer site for the card program. The card issuer or issuer site needs to be an active supplier or supplier site in the system.
Card Profiles: On this page, associate card profiles to the card program. You can associate multiple credit card profiles with each card program. The profile records any transaction amount limits that are associated with a P-Card. These transaction limits are passed to the P-Cards (both employee and supplier) that you create using the profile. See the Oracle Payables User Guide for details.
Note: When using the P-Card (employee or supplier) associated with the card profile for a requisition checkout in Oracle iProcurement, the transaction limit enforcement is::
• If the aggregate amount (in functional currency for the operating unit) for all lines in the requisition checkout that can be charged to the P-Card is equal to or smaller than the transaction limit defined on the card profile, then the P-Card is assigned to all the lines.
• If the aggregate amount (in functional currency for the operating unit) for all lenses) in the requisition checkout that can be charged to the P-Card is greater than the transaction limit defined on the card profile, then the P-Card is not assigned to any of the lines.

Requisitions Setup 4-21
Credit Cards: On this page, define the P-Card and associate it with a card program and card profile. See the Oracle Payables User Guide for details.
In the Credit Cards window:
1. Enter Information for the P-Card, such as the card number and expiration date.
2. Associate the card with the card program and card profile.
3. If the card program is of type Procurement, then enter additional information about the employee who would own the P-Card.
4. If the card program selected is of type Supplier, then enter the supplier or supplier sites, which are to be associated with the supplier P-Card. The businessrules for associating the P-Card to a supplier or supplier site when the card program selected is of type Supplier are:
• You cannot complete the fields in the window that apply for a card program of type Procurement (such as Card Member Name, Employee Name, and Employee Number).
• The supplier and supplier site fields on the window are mandatory. That is,each supplier P-Card must have at least one supplier or supplier site associated with it.
• You can associate each supplier site only with a single supplier P-Card.
• You can associate a single supplier P-Card with (shared by) multiple supplier sites as long as the supplier sites belong to the same supplier.
• You can associate supplier sites within a supplier with different supplier P-Cards.
• The Select All Eligible Sites button provides the requester the ability to enter the multiple supplier sites. Clicking this button automatically completes the supplier site fields for the selected supplier with valid but unassigned (that is, the site is not assigned to another supplier P-Card) supplier sites for the selected supplier.
For additional information about setting up supplier P-Cards, see the Oracle Payables User's Guide.
Supplier P-Card Assignment for Requisitions:When the requester creates a requisition in Oracle iProcurement, one of the following payment methods can be assigned to each line on the requisition:
• Employee P-Card

4-22 Oracle iProcurement Implementation and Administration Guide
• Supplier P-Card
• No P-Card (payment method on invoice)
As the requester is checking out a requisition in Oracle iProcurement, the application verifies and determines which payment method to assign to each line on the requisition.The first payment method (employee P-Card) is an option which the requester can explicitly select during the requisition checkout. When certain conditions are met (the requester does not have to explicitly select them), the application automatically assigns the other payment methods (supplier P-Card and no P-Card) to the requisition line.
Note: A requisition in Oracle iProcurement can contain multiple lines. Depending on the source of the item or service on the line (internal or from external supplier or supplier site), the type of the item (expense orinventory) and other setup, different payment methods could apply to each line. Hence, the assignment of the payment method is done at the requisition line level, and not at the requisition header level.
The following business rules apply for the assignment of payment methods to a requisition line during checkout:
1. No P-Card (neither employee P-Card nor supplier P-Card) can be assigned to a requisition line in the following cases:
• No supplier or supplier site is available or selected for the requisition line.
• The item or service on the requisition line is sourced internally.
• The supplier or supplier site available or selected for the requisition line is not P-Card enabled.
• No employee P-Card has been set up for the requester and no supplier P-Card has been set up for the supplier or supplier site that is available or selected for the requisition line.
• The requisition line is associated with a project, in which case a P-Card (employee or supplier) cannot be assigned to the line.
• For an inventory item being delivered to a subinventory, a P-Card (employee orsupplier) cannot be assigned to the line. On the other hand, if the inventory item is not delivered to a subinventory, then a P-Card (employee or supplier) can be assigned to the line.
2. If none of the preceding cases is met, then P-Cards (employee or supplier), if set up, are eligible to be assigned to the requisition line. Only one of them can be applied, and Oracle iProcurement determines which one to apply during the requisition checkout process.

Requisitions Setup 4-23
To provide maximum flexibility, a system profile controls which P-Card (employee or supplier) gets precedence when both P-Card types are eligible to be applied to the requisition line. The profile option is POR: Override Supplier P-Card. This profile option applies to the Supplier P-Card Assignment for Requisitions business flow.
3. The following figure shows the business logic for assignment of P-Cards to a requisition line during a checkout if none of the cases mentioned in Rule #1 applies, and if the POR: Override Supplier P-Card profile option is set to No.
Supplier P-Card Assignment for Profile Set to No
4. The following figure shows the business logic for assignment of P-Cards to a requisition line during a checkout if none of the cases mentioned in Rule #1 applies and if the POR: Override Supplier P-Card profile option is set to Yes.

4-24 Oracle iProcurement Implementation and Administration Guide
Supplier P-Card Assignment for Profile Set to Yes
5. After the application has determined the payment method for the requisition lines during checkout, the information is visible to the requester. Access to this information is available on the Review and Submit page during checkout, and also on the Requisition Details page after the requisition has been submitted. If an employee P-Card has been assigned to at least one line on the requisition, then the partially masked employee P-Card number appears in the P-Card Number field at the requisition header level. At the requisition line level, the P-Card Used field indicates which payment method is assigned to that particular line. The possible values for this field are:
• Yes, when employee P-Card is assigned to the line
• Supplier P-Card, when supplier P-Card is assigned to the line
• No, when no P-Card is assigned to the line
• Only one employee P-Card can be used for each requisition, and it might or might not apply to all the lines on the requisition. The P-Card Number field at the requisition header level contains either a single partially masked employee P-Cardnumber or a blank value.

Requisitions Setup 4-25
• The requester does not see the actual supplier P-Card number (neither in the P-Card Number field at the requisition header level nor in the P-Card Used field at the requisition line level). The value of the P-Card Used field at the requisition line level (when it is Supplier P-Card) is the only indication to the requester that a supplier P-Card has been assigned to the line.
Common P-Card Logic :The requisition that is created in Oracle iProcurement is converted into a purchasing document in Oracle Purchasing. When all the necessary conditions are met, the resulting purchase order document contains the supplier P-Card number that was associated with the requisition line. The processes in Oracle Purchasing to convert a requisition into a purchase order include:
• PO Create Documents workflow: Workflow process to automatically create standard purchase orders and blanket releases from approved requisitions.
• Autocreate: Utility to manually create standard purchase orders and blanket releases from approved requisitions.
• Create Releases: Concurrent program to generate releases for existing blanket purchase agreements from approved requisitions.
Requisition-to-Purchase Order Conversion Processes
• The P-Card Used flag for the requisition lines coming from Oracle iProcurement holds the possible values: Yes, No, or Supplier P-Card. This flag determines whether and which P-Card number (employee or supplier or none) should apply tothe purchase order, which Oracle Purchasing generates.
• A P-Card (employee or supplier) can be assigned to purchase order documents of type Standard Purchase Order and Blanket Purchase Release only. Only one P-Cardnumber (employee or supplier) can be assigned for each purchase order and is applied at the header level of the purchase order only, and, unlike a requisition in Oracle iProcurement, applies to all the lines on the purchase order.
Note: If purchase orders are created directly or are created from requisitions submitted in Oracle Purchasing (that is, there is no associated requisition in Oracle iProcurement), then no P-Card can be assigned to the purchase order, even if the particular supplier or supplier site accepts P-Cards.
The logic to determine how and which P-Card number (employee or supplier or none) should be applied to the purchase order works as indicated in the following table. This

4-26 Oracle iProcurement Implementation and Administration Guide
logic applies to all the requisition-to-purchase order conversion processes.
Common P-Card Logic
Number
Value of P-Card Number for Requisition Header
Value of P-Card Used Flag for Requisition Lines
Requisition-to-Purchase Order Conversion Logic in Oracle Purchasing
1 None Yes Scenario is NOT possible. If no P-Card number is at requisition header level, all values for P-Card Used flag should be either No or Supplier.
2 None No No employee P-Card can apply to purchase orders.
For such requisition lines:
If requisition lines have same supplier or supplier site and other purchase order header level information, then requisition lines can appear on a single purchase order.
Else, requisition lines appear on different purchase orders.
3 None Supplier No employee P-Card can be applied to purchase order.
Derive supplier P-Card defined for supplier or supplier site:
If supplier P-Card is valid (see Validity Verification, page 4-27), maintain supplier P-Card for requisition lines.
If supplier P-Card is invalid, delete supplier P-Card for requisition lines.
For such requisition lines:
If requisition lines have same supplier or supplier site and other purchase order header level information, then requisition lines can be put on a single purchase order.
Else, requisition lines appear on different purchase orders.
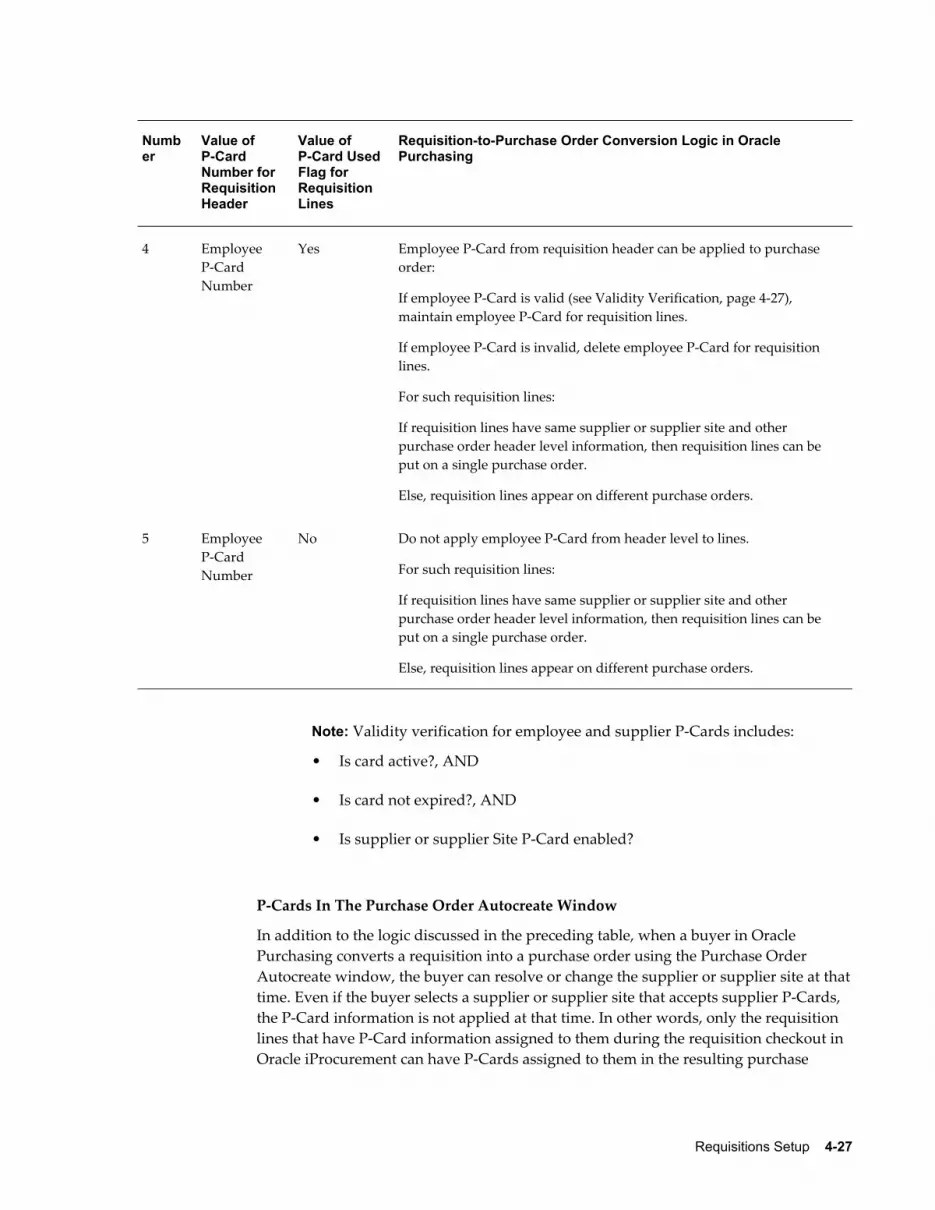
Requisitions Setup 4-27
Number
Value of P-Card Number for Requisition Header
Value of P-Card Used Flag for Requisition Lines
Requisition-to-Purchase Order Conversion Logic in Oracle Purchasing
4 Employee P-Card Number
Yes Employee P-Card from requisition header can be applied to purchase order:
If employee P-Card is valid (see Validity Verification, page 4-27), maintain employee P-Card for requisition lines.
If employee P-Card is invalid, delete employee P-Card for requisition lines.
For such requisition lines:
If requisition lines have same supplier or supplier site and other purchase order header level information, then requisition lines can be put on a single purchase order.
Else, requisition lines appear on different purchase orders.
5 Employee P-Card Number
No Do not apply employee P-Card from header level to lines.
For such requisition lines:
If requisition lines have same supplier or supplier site and other purchase order header level information, then requisition lines can be put on a single purchase order.
Else, requisition lines appear on different purchase orders.
Note: Validity verification for employee and supplier P-Cards includes:
• Is card active?, AND
• Is card not expired?, AND
• Is supplier or supplier Site P-Card enabled?
P-Cards In The Purchase Order Autocreate Window
In addition to the logic discussed in the preceding table, when a buyer in Oracle Purchasing converts a requisition into a purchase order using the Purchase Order Autocreate window, the buyer can resolve or change the supplier or supplier site at thattime. Even if the buyer selects a supplier or supplier site that accepts supplier P-Cards, the P-Card information is not applied at that time. In other words, only the requisition lines that have P-Card information assigned to them during the requisition checkout in Oracle iProcurement can have P-Cards assigned to them in the resulting purchase

4-28 Oracle iProcurement Implementation and Administration Guide
order.
Changing Supplier Or Supplier Site On A P-Card Purchase Order
Even if a P-Card is assigned to the purchase order, the buyer has the ability to change the supplier or supplier site on the purchase order. The new supplier or supplier site might not accept P-Cards (employee or supplier) and it could lead to an error condition.Hence, if a P-Card (employee or supplier) exists on a purchase order, and, if the buyer changes the supplier or supplier site on the purchase order, the application automatically deletes the P-Card number on the purchase order. Before doing so, the application generates an appropriate warning message for the buyer.
Purchase Order Communication to Supplier:When the purchase order with the assigned supplier P-Card has been created and approved, the supplier P-Card information is sent as a part of the purchase order when it is communicated to the supplier. The information sent is adequate for the supplier to charge the amount on the purchase order to the assigned supplier P-Card. Similar to theexisting support for the employee P-Card, the following information for the supplier P-Card is sent as a part of the purchase order:
• P-Card Number
• Card Member Name
• Expiration Date for P-Card
• Credit Card Brand
Also, similar to existing support for employee P-Cards, the supplier P-Card informationis included as a part of the purchase order only when the purchase order is communicated to the supplier through EDI delivery and XML delivery.
For information about purchase order communication to the supplier using EDI delivery, see the Oracle e-Commerce Gateway User's Guide. For more information about purchase order communication to the supplier through XML delivery, see the Oracle Purchasing XML Transaction Delivery Guide and the Oracle XML Gateway User's Guide.
Profile Options• POR: Override Supplier P-Card must be set. For profile setup instructions, see Set
Profile Options, page 2-32.
Purchase Order (PO) Extract for P-Card ReconciliationThe P-Card reconciliation process electronically reconciles the P-Card statements and the corresponding purchase orders in the buyer's purchasing application for both employee and supplier P-Card transactions. The card issuer typically provides the reconciliation engine, which resides in the buyer's purchasing system. To accommodate the reconciliation process, the engine needs a couple of information feeds:

Requisitions Setup 4-29
• Transaction feed from the P-Card issuer containing charges for the billing cycle.
• Purchase order history feed from the buyer's purchasing system for the billing cycle.
This reconciliation is necessary so that the buyer is able to electronically verify that only valid supplier purchase orders are included in the invoices that are paid to the card issuer. After a successful reconciliation between the PO history feed and the transaction feed, the reconciliation engine sends the reconciled data files to Oracle Payables (using the Oracle Payables Open Interface). The following figure shows the flow for the P-Cardreconciliation process:
For more information about this part of the process, see the documentation provided with the reconciliation engine and the Oracle Payables User's Guide.
At the end of the P-Card billing cycle, the buying company receives a transaction feed containing an electronic statement for all P-Card purchases that the buying company made. The Purchase Order Extract for P-Card Reconciliation feature:

4-30 Oracle iProcurement Implementation and Administration Guide
• Extracts the corresponding purchase order information for the P-Card billing cycle
• Provides the capability to prepare the purchase order history feed for the reconciliation engine. You can run the PO History Feed concurrent report or requestin Oracle Purchasing to generate the feed. For more information, see the following topic, About the PO History Feed Concurrent Report.
Major Features
PO History Feed Concurrent ReportThe concurrent report accumulates and compiles the necessary PO history data in a specific format. Upon its completion, the output file is stored in a specified directory location. The following business rules apply to the concurrent request:
• Name for the concurrent program:
• Title: Purchase Order History Feed for P-Card Reconciliation
• Description: Purchase Order History Feed for reconciling P-Card payments
• The concurrent program is a part of Oracle Purchasing.
• You can run the program at any time, but typically you run it before the end of the monthly billing cycle for the P-Card. You can also set it to run at a specified frequency through standard report submission (SRS).
• The output of the concurrent program appears in a specific directory. The directory is derived from the UTL_FILE_DIR parameter in the INIT.ORA file of the Oracle Purchasing installation. The application administrator should set up the output directory location prior to running the concurrent program.
• Specify the following parameters on the PO History Feed Report Request window before running the report:
• Card Brand Name: List of values containing all available card brand names.
• Card Issuer/Card Issuer Site: List of values containing all valid card issuer and issuer Sites.
• From Date/From Time: From Date and Time. The last_update_date for a purchase order should be on or later than the selected date and time.
After the requester has entered a valid Card Brand Name, Card Issuer and CardIssuer Site, the From Date/From Time field on the window gets automatically filled with the To Date and To Time information from the last successfully run report (report with Completed Phase with Normal status or Complete Phase
Requisitions Setup 4-31
with Warning status) for the selected card brand name and card issuer or card issuer site combination. Using this logic reduces the chances of sending duplicate PO History Feeds by running reports with overlapping dates and missing PO records by skipping intermediate dates.
Note: If the last run report for a particular card brand name and card issuer or card issuer site combination is not completedsuccessfully (the request is in any phase or status other than Completed Phase with Normal Status or Complete Phase withWarning Status), then no tracking of the To Date/Time information for that request occurs.
• To Date/To Time: To Date and Time. The last_update_date for a purchase ordershould be earlier than the selected date and time for it to be selected.
• Output Filename: The name of the file in which the PO History feed file that the report generated should be stored in the output directory location. If a file with the same filename as the one selected in the Output Filename field already exists in the output directory, then the new file overwrites the existing file in the output directory.
Criteria Selection of Purchasing RecordsOnly purchase orders that satisfy certain selection criteria are included in the PO historyfeed. Some of the selection criteria for the purchase records are entered on the PO History Feed Report Request window (as described in the preceding section), while the application automatically and internally applies the rest of the selection criteria. The internal selection criteria are:
• Only purchase orders of type Standard Purchase Order and Blanket Release are available for selection.
• Only purchase orders created against supplier or supplier sites that belong to the same operating unit as the requester's responsibility are selected.
• The different values for the Approval Status, Control Status, and On Hold Status forthe purchase order in Oracle Purchasing determine whether the purchase orders should be sent as a part of the PO History Feed. The following business rules apply:
• Only purchase orders with an approval status of Approved and Requires Reapproval are eligible for selection. Purchase orders with any other approval status do not get extracted.
• Purchase orders with an approval status of RequiresReapproval get selected only if they have been approved at least one time before they were put in the

4-32 Oracle iProcurement Implementation and Administration Guide
current approval status of RequiresReapproval.
• Based on a combination of the Approval status, Control status, and On Hold status for the purchase order, the program generates possible statuses for the Order Status field for the purchase order included in the PO History Feed:
• ON: Purchase order is open and should be reconciled with the corresponding transaction feed from the card issuer.
• HL: Purchase order is temporarily put on hold, but the hold may get released at a later time. It should not be reconciled with the corresponding transaction feed from the card issuer while it remains in the HL status.
• CN: Purchase order is permanently canceled and should not be reconciled with the corresponding transaction feed from the card issuer.
The following figure indicates the selection logic based on the Approval, Control, and On Hold statuses of the purchase order in Oracle Purchasing and the appropriate output status for the purchase order in the PO History Feed.
Status and Selection Logic
Number Approval Status
Control Status On Hold Status Selection and Status of PurchaseOrder in PO History Feed
1 Approved All except Canceled and Finally Closed
Not On Hold PO is sent with Order Status = ON
2. Approved All except Canceled and Finally Closed
On Hold PO is sent with Order Status = HL
3 Approved Canceled OR Finally Closed
Does Not Matter PO is sent with Order Status = CN
4 In Process Does Not Matter Does Not Matter PO is not sent
5 Incomplete Does Not Matter Does Not Matter PO is not sent
6 Pre-approved Does Not Matter Does Not Matter PO is not sent
7 Rejected Does Not Matter Does Not Matter PO is not sent

Requisitions Setup 4-33
Number Approval Status
Control Status On Hold Status Selection and Status of PurchaseOrder in PO History Feed
8 Requires Reapproval1.
All except Canceled and Finally Closed
Does Not Matter If (PO APPROVED_DATE ¹ NULL), PO is sent with Order Status = HL
If (PO APPROVED_DATE = NULL), PO is not sent
9 Requires Reapproval3.
Canceled or Finally Closed
Does Not Matter If (PO APPROVED_DATE ¹ NULL), PO is sent with Order Status = CN
If (PO APPROVED_DATE = NULL), PO is not sent
For information about the format and data elements of PO History Feed, see PO HistoryFeed File, page B-1.
Setup StepsThe output of the concurrent program is stored in a specific directory. The directory is derived from the UTL_FILE_DIR parameter in the INIT.ORA file of the Oracle Purchasing installation. For more information about setting the output directory location, see the Oracle e-Commerce Gateway Implementation Manual.
Project AccountingIntegration with Oracle Projects enables requesters to optionally reference project and task information on requisition lines. Cost distribution of a single requisition line can span one or more projects.
Setup StepsYou must license and implement Oracle Projects. For more information, see the Oracle Projects Implementation Guide.
When you are implementing Oracle Projects, decide whether to expose the project and task fields to requesters:
• By default, the following fields appear if Oracle Projects is installed and the destination type is Expense: Project, Task, Expenditure Type, Expenditure Organization, and Expenditure Item Date.
• If the destination type is Inventory or Shop Floor, then the Project and Task fields
4-34 Oracle iProcurement Implementation and Administration Guide
require you to enable Project Manufacturing.
To hide any of the project-related fields, then use Oracle Applications Framework. For more information, see Personalize Oracle iProcurement Using Oracle Applications Framework, page 2-15.
Note: If you have installed Oracle Projects, then the project-related fields appear in the Billing section of the requisition, even if you do not implement or use Oracle Projects. You can hide these fields if you do not use them.
Grants AccountingOracle Grants Accounting integrates with Oracle iProcurement to support the charging of requisitions and resulting purchase orders to projects that grants (awards) funded. The integration introduces the concept of an award number, which represents additional information about the source of funding associated with projects and tasks.
In addition to the standard project and task information, the Award dimension from Oracle Grants Accounting can specify the source of funding associated with projects and tasks. This helps organizations manage all aspects of the grant funding they receive. In higher education institutions, other public sector agencies, and project-intensive commercial enterprises, it is often necessary to distribute the cost of a purchase request line across multiple projects. To support this need, you can enter multiple projects and awards for each requisition line.
You must enable the Award number field if you have implemented Oracle Grants Accounting for the associated operating unit. The Award number field is only required for projects that awards in Oracle Grants Accounting fund.
Setup StepsYou must license and implement Oracle Projects and Oracle Grants Accounting. For more information, see the Oracle Grants Accounting User's Guide.
By default, the Award field appears if you have implemented Oracle Grants Accountingfor the associated operating unit. To hide this field, use Oracle Applications Framework. For more information, see Personalize Oracle iProcurement Using Oracle Applications Framework, page 2-15.
Favorite Charge AccountsThe favorite charge accounts functionality provides the requester the capability to maintain a list of up to 50 frequently used charge accounts on the iProcurement Preferences page. During the checkout process, the requester can access the favorite charge accounts list and use it to automatically complete the charge account

Requisitions Setup 4-35
information for the items, rather than having to manually enter the charge account information.
Setup Steps:1. Log in to Oracle iProcurement.
2. On the Home page, click Preferences in the upper-right corner.
3. In the Preferences area, click iProcurement Preferences.
4. Enter Favorite Charge Accounts and a nickname for each account. To add another row, click Add Another Row.
5. Select a default favorite charge account.
6. Save the changes.
Function Security• Function Security exists to disable the Favorite Charge Account List functionality.
The function is called Favorite Charge Accounts. For information about function security setup, see Set Up Function, Menu, and Data Security, page 2-4.
Implementation Considerations• The favorite charge account list is the last resort to generate the charge account
information for the item. If the Account Generator workflow engine, which includesEmployee Default Charge Account and the Commodity-based Accounting Rules, has already been set up, then the favorite charge accounts functionality does not affect it.
• The requester can add, delete, or modify accounts in the list. A nickname for an account is mandatory, and it must be unique by list. One of the accounts in the list must be selected as the default.
• The requester can have one favorite charge account list for each responsibility. If therequester has multiple responsibilities, they can choose a favorite charge account list by responsibility. The accounts maintained in one responsibility are not available in the other responsibilities. If the requester has responsibilities that roll up to multiple sets of books with different accounting structures, then the favorite charge accounts list conforms to the respective accounting structures.
• The favorite charge account functionality does not affect the system profile for Dynamic Insertion of Charge Accounts. If the profile has been turned on, requestersstill can create new charge accounts simultaneously in the preferences as well as during the edit lines step of the checkout.
• A requester can store only valid charge accounts in the favorite charge account list. If a charge account is deactivated in Oracle General Ledger after the requester has

4-36 Oracle iProcurement Implementation and Administration Guide
already stored it in the favorite charge accounts list, then an error appears when therequester resubmits the iProcurement Preferences page (by clicking Apply Changes). The requester then has the opportunity to edit or delete the charge account in the favorite charge account list. Until the deactivated account is changed,it displays an error if it is used during checkout.
ApprovalsYou can conduct requisition approvals in Oracle iProcurement in the following ways:
• Use the approval setup from Oracle Purchasing. For more information, see the Oracle Purchasing User's Guide.
• Use Oracle Approvals Management, also known as the Approvals Management Engine (AME). AME lets you define approval rules one time and leverage them across multiple applications.
The following figure shows that an employee and supervisor approval setup in Oracle Purchasing consists of:
• Define jobs
• Define document types
• Define approval groups
• Assign approval groups
• Assign employees
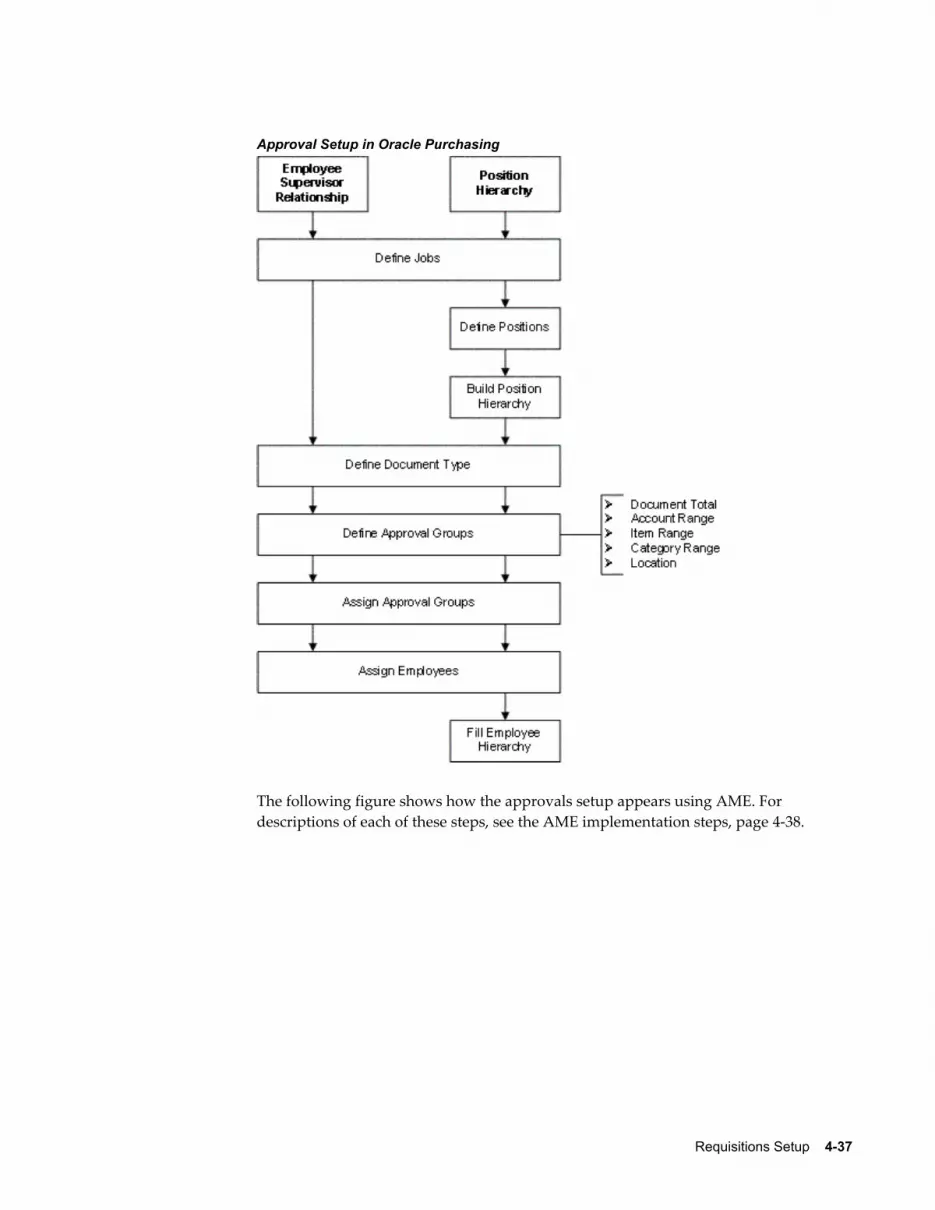
Requisitions Setup 4-37
Approval Setup in Oracle Purchasing
The following figure shows how the approvals setup appears using AME. For descriptions of each of these steps, see the AME implementation steps, page 4-38.

4-38 Oracle iProcurement Implementation and Administration Guide
Approval Setup Using AME
Whether you set up approvals in Oracle Purchasing or AME, the Requisition approval workflow in Oracle Purchasing handles the approval. For example, the Approval List Routing Using AME process in the Requisition approval workflow is initiated if AME approvals have been set up. (See the AME Implementation Steps, page 4-38.) This process uses your approval setup in AME to perform the approval, send notifications, and complete other approval tasks in Oracle iProcurement.
Implementing Oracle Purchasing Approvals:For instructions, see the approval setup information in the Oracle Purchasing User's Guide. See also information about requisition approval workflow attributes, whose defaults you can change, in the Oracle Purchasing User's Guide.
Implementing AME Approvals:1. Offline, analyze your approval structure. Determine the approval structure to use in
iProcurement
An example of Employee/Supervisor approval structure:
• Meredith Walton, Buyer, reports to
• Pat Stock, Manager, reports to
• Casey Brown, Executive
An example of Position Hierarchy approval structure:
• Shop Floor Manager reports to

Requisitions Setup 4-39
• Production Manager who reports to
• Plant Manager
2. If you are going to use the Employee/Supervisor structure you must perform the following tasks:
1. In the Human Resources responsibility, navigate to the Job Window.
2. Create a job.
3. Assign approval authority to the job.
4. Create employees and assign appropriate jobs and supervisors.
5. Create users.
6. Add appropriate responsibilities to the users.
For complete details on performing these steps, see: Oracle HRMS Enterprise and Workforce Management Guide.
3. If you are going to use the Position Hierarchy structure you must perform the following tasks:
• In the Human Resources responsibility, navigate to the Positions Window.
• Create all of your organization's positions.
• Use the Position Hierarchy window to build and administer your position hierarchies.
• Create employees and assign them to the referenced positions with the Enter Person window.
• Use the Submit Requests window to run the Fill Employee Hierarchy process.
• Create users.
• Add appropriate responsibilities to the users.
For complete details on performing these steps, see: Oracle HRMS Enterprise and Workforce Management Guide.
4. In Oracle Purchasing, navigate to the Document Types window.
5. Select a Document Type:
• Purchase Requisition

4-40 Oracle iProcurement Implementation and Administration Guide
• Internal Requisitions
• Change Order Request: Requisition
6. For the selected document type, select one of the provided Approval Transaction Types, or one that you created in AME:
• PURCHASE_REQ
• INTERNAL_REQ
• RCO
Document Types Window
Note: Use the Approval Transaction Types field to enable or disable AME. If a transaction type is selected in this field, then Oracle iProcurement uses AME to conduct approvals. If you leave the Approval Transaction Types field blank, then AME approvals are not used. Instead, the approval setup in Oracle Purchasing are used.
7. Use the Oracle Approvals Management Implementation Guide, available on My Oracle Support forum to complete the following steps:
• Create attributes. See the following list of attributes that Oracle iProcurement provides. For example:
• ITEM_CATEGORY (line level)
• REQUISITION_TOTAL (header level)

Requisitions Setup 4-41
• Create conditions using the attributes. Conditions are the "if" clause in an actionrule. They are similar to approval groups in Oracle Purchasing. For the rule to apply to a transaction, all of its conditions must be true.
For example, to enforce a rule about a requisition's total amount, you could have the following condition, where REQUISITION_AMOUNT is an attribute: USD1000 <= REQUISITION_AMOUNT < USD5000. In this example, a requisition initiates this approval rule when the requisition total amount is greater than or equal to 1000 USD and under 5000 USD.
• Create approval groups. An approval group is an ordered set or list of one or more approvers. For example, an approval rule can add an approval group's members, in order, to a transaction's approval list. Typically, approval groups represent functional approvers outside a transaction's chain of authority, such as finance or internal legal counsel, who must approve a transaction before or after management has done so. You can also insert an approval group into the chain of authority.
• Define actions. Actions generate the approval list for a transaction. If a transaction satisfies all conditions in an action rule, then the associated actions are processed to generate the approval list.
• The Action Types page is where you would define approval groups with the same order number to enable parallel approval.
• It is also the page where you define voting methods. This provides you with the ability to model group approvals more closely to the business rulesthat your organization uses. For example, you might choose First Responder Wins.
• Create action rules.
Define rules based on the conditions that result in an action. For example:
• If the condition USD1000 <= REQUISITION_AMOUNT < USD5000 is met, then require approvals up to at least level 1 approval authority.
• If the condition USD5000 <= REQUISITION_AMOUNT < USD9000 is met, then require approvals up to at least level 2 approval authority.
Example
In the following example:
1. If the condition 0 USD <= REQUISITION_TOTAL <= 100 USD, then require approvals up to at least level 1.
2. If the condition 1000 USD < REQUISITION_TOTAL <= 25000 USD, then require approvals up to at least level 2.

4-42 Oracle iProcurement Implementation and Administration Guide
3. If the condition ITEM_CATEGORY in {IT.EQUIPMENT...}, then require post-approval from IT approval group.
Example
Name Job Approval Authority
Meredith Walton Buyer 1
Pat Stock Manager 2
Casey Brown Executive 3
Connie Horton (in the IT approval group)
IT Manager 4
Provided AME AttributesOracle iProcurement provides the following types of AME attributes:
• AME mandatory attributes
• AME non-mandatory header attributes
• AME non-mandatory line attributes
The following tables display and describe the attributes that Oracle iProcurement provides for use by AME.
AME Mandatory Attributes
Mandatory Attribute Name Attribute Type Attribute Description Static Usage?
ALLOW_DELETING_RULE_GENERATED_APPROVERS
Boolean Requisition preparer allowed to delete system-generated approvers?
The value is derived from the POR: System Approvers Are Mandatory profile option, for the user or responsibility. It determines whether the user can delete mandatory approvers from the system-generated approver list during checkout.
No

Requisitions Setup 4-43
Mandatory Attribute Name Attribute Type Attribute Description Static Usage?
ALLOW_REQUESTOR_APPROVAL
Boolean Determines if preparer can approve own requisitions if preparer has enough approval authority. The value is derived from the document type setup for the requisition (Purchase, Internal, or Change Order Request).
No
AT_LEAST_ONE_RULE_MUST_APPLY
Boolean AME raise exception when no rules apply to a transaction?
Yes
EFFECTIVE_RULE_DATE Date Date that determines active rules. The default provided value assumes every rule is effective.
Yes
EVALUATE_PRIORITIES_PER_LINE_ITEM
Boolean Determines whether to evaluate rule priorities for each line item under strict line-item evaluation
Yes
REJECTION_RESPONSE String How AME responds to a rejection Yes
USE_RESTRICTIVE_LINE_ITEM_EVALUATION
Boolean Determines whether to require that the same line item satisfy all line-item conditions in a given rule
Yes
USE_WORKFLOW Boolean Determines whether Oracle Approval Manager should log exceptions to the workflow context stack
WORKFLOW_ITEM_KEY String Requisition approval workflow's item key No
WORKFLOW_ITEM_TYPE String Workflow item type No

4-44 Oracle iProcurement Implementation and Administration Guide
AME Non-Mandatory Header Attributes
Non-Mandatory Header Attribute Name
Attribute Type Attribute Description Static Usage?
REQUISITION_TOTAL Currency Total of all requisition lines that have not been canceled, given in the functional currency. Conversion method is derived fromPOR: Default Currency Conversion Rate Typefor the user. General Ledger currency conversion must be enabled.
No
JOB_LEVEL_NON_DEFAULT_STARTING_POINT_PERSON_ID
Number Person ID of non-default first approver for job-level authority approval types
Yes
INCLUDE_ALL_JOB_LEVEL_APPROVERS
Boolean Determines whether to include all approvers at a given job level
Yes
TRANSACTION_DATE Date Date when requisition was created No
TRANSACTION_GROUP_ID
Number Business group identifier (ID) of the requisition preparer
No
TRANSACTION_ORG_ID Number Operating unit in which the requisition was created
No
TRANSACTION_REQUESTOR_PERSON_ID
Number Person ID of the requisition preparer No
TRANSACTION_REQUESTER_USER_ID
Number User ID of the person initiating the transaction
No
TRANSACTION_SET_OF_BOOKS_ID
Number ID of the set of books that owns the transaction. The value is derived from the Financials System Parameters for the operating unit.
No

Requisitions Setup 4-45
AME Non-Mandatory Line Attributes
Non-Mandatory Line Attribute Name
Attribute Type Attribute Description Static Usage?
PO_NATURAL_ACCOUNT
String Natural Account: Segment of the accounting flexfield that is specified as the Natural Account Segment. The value is derived from the natural account segments for the charge accounts specified on the requisition line distributions.
No
PO_COST_CENTER String Cost Center: Segment of the accounting flexfield that isspecified as the Cost Center Segment. The value is derived from the cost center segments for the charge accounts specified on the requisition line distributions.
No
ITEM_NUMBER String Item Number: Item number composed by concatenating all segments defined on the Item key flexfield. The value is derived from the item number associated with the requisition line.
No
ITEM_CATEGORY String Item Category: Item category composed by concatenating all segments defined on the Item Category key flexfield. The value is derived from the item category associated with the requisition line.
No
DELIVER_TO_LOCATION
String Deliver-to Location: The value is derived from the deliver-to location specified on the requisition line. Thevalue is the location code in the database base language. (AME does not use multi-lingual support that is provided in the Oracle Applications setup windows.)
No
Note: A requisition has a header, lines, and distributions. AME does not support three levels of attributes. Therefore, the definition of a line is a combination of the line and distribution information. For example, a requisition line with two distributions is considered as two lines in AME approvals.
Profile Options• The following profile options affect the approval process in Oracle iProcurement:
• PO: Allow Requisition Approval Forward Action
• PO: Workflow Processing Mode

4-46 Oracle iProcurement Implementation and Administration Guide
• POR: Display Graphical Approval List.
• POR: System Approvers are Mandatory
For more information, see Set Profile Options, page 2-32.
Function Security• A number of functions control the approval process, such as whether to permit
requesters to add approvers. For more information, see the list of the functions relating to the Approvals Status page and the Approvers and Add Approvers pagesin Set Up Function, Menu, and Data Security, page 2-4
Workflow• If you do not want to accept the default setting, you can modify one workflow
attribute in the requisition approval workflow. For more information, see Customize Workflows, page 2-18.
Global ApproverAs requisitions are created in Oracle iProcurement, approval paths are generated. You can set up the list of approvers to include employees belonging to different business groups. For example, it is possible for requester A from business group 1 to have his or her requisition routed to approver B from business group 2. In addition, approvers fromdifferent business groups can be manually inserted into the approval list. As such, the list of values for approvers can include a column containing the business group of each potential approver.
Approvers can view the requisition details from the notifications pages, even if the requisition was created in a different operating unit. Requisitions that were created in a different operating unit are not available through the general requisition status pages nor are they available for modification. The approval action history display includes business group information for each approver.
Setup Steps:If any approvers in the hierarchy are employees in different business groups, then set the profile option HR: Cross Business Groups to Yes before you set up your approval hierarchy.
Profile Options• HR: Cross Business Groups
Requisition ChangesA requester in Oracle iProcurement can change a requisition after it has been submitted.Requesters can change the requisition at any time prior to its conversion to a purchase order, even though it currently is on an approver's notifications list. When the

Requisitions Setup 4-47
requisition is in the change process, it is removed from the current approver's notification list. (It is withdrawn from the approval process.)
Note: A different change process occurs if the requisition line has been placed on an approved purchase order. For more information, see Requester-Initiated Changes to Purchase Orders, page 4-49.
Either requesters or approvers can make changes to requisitions.
Requester-Initiated Changes:• The change feature was known as Requisition Withdrawal. The Change button has
replaced the Withdraw button.
• The Change button, which depending on the status of the requisition, launches the requester into either of the following flows:
• Change Requisition flow (when no lines appear on a purchase order). The requester can directly change the entire requisition or select and change individual lines on the requisition. No buyer approval is needed.
• Requester Change Order Request flow (when at least one line is placed on a purchase order). For the lines placed on a purchase order, the requester can request changes that the buyer on the purchase order may need to approve. Formore information, see Requester-Initiated Changes to Purchase Orders, page 4-49.
Approver-Initiated Changes:The approver can also make changes to a requisition while approving it. The approver can add, delete, or modify the requisition lines. When finished, the approver checks out the requisition again. The checkout is initiated from a special Approver Shopping Cart. (For more information, see the online Help.)
In some cases, the approver checkout process assumes the requisition preparer's information. In other cases, the approver's. These assumptions are taken during defaulting and validation. For example, if the approver adds a line to the requisition, the Need-By Date defaults from the preparer's preferences, not the approver's. In the Approver Shopping Cart and checkout process, all requisition lines (even the unchanged ones) are validated again. For example, the system verifies whether the account information on the requisition remains valid.
The following table shows the information that either the preparer or the approver assumes during the approver checkout.

4-48 Oracle iProcurement Implementation and Administration Guide
Information Preparer or Approver
Oracle Applications Framework personalization and page functions
Approver
Function security Approver
Favorite charge accounts list Approver
General preferences, such as Date Format Approver
iProcurement preferences, such as Need-By Date Offset Preparer
Billing and encumbrance, such as list of valid projects and tasks
Preparer
Validation (for example, that the account information remains valid)
Preparer
P-card and p-card profile Preparer
Delivery related profile options such as ICX: Override Requester
Preparer
Account generation, if the account cannot be retrieved from theitem or preparer's user definition in the People window
Approver
Function Security• The function View My Reqs Withdraw controls requisition update. See Set Up
Function, Menu, and Data Security, page 2-4.
Note: When choosing Change, the shopping cart is available to the requester to make changes.
Workflow• If the PO Create Documents workflow is running in background mode, there is
potentially a longer time period for requesters to make changes before the requisition is converted to a purchase order.
The PO Requisition Approval workflow (also known as the Requisition workflow) handles the withdrawal of the changed requisition from the requisition approval process. For example, suppose a requisition's approval list consists of approvers 1, 2, 3, and 4. When the approval is between approvers 2 and 3, the requester changes

Requisitions Setup 4-49
the requisition. The workflow withdraws the requisition as soon as the requester clicks the Change button. Approvers 3 and 4 never receive a notification request for approval. After the requester makes the changes and submits the requisition, approvers 1, 2, 3, and 4 receive a notification request for approval, as they would for any other requisition.
For more information, see Customize Workflows, page 2-18.
Requester-Initiated Changes to Purchase OrdersRequester-initiated changes to purchase orders can often be time-consuming and labor-intensive. Oracle iProcurement supports a streamlined and self-service process formaking changes. Requesters can request line cancellations, changes to the order quantity or amount, need-by date, and, under some conditions, price. This capability complements the requisition change feature. When submitted and approved, the purchasing business unit retains appropriate controls and can accept or reject proposed changes. As expected, material changes to the purchase order result in both a new revision and an immediate supplier notification.
This feature provides the Oracle iProcurement requester the ability to request attribute changes and line cancellations to purchase orders that have been created from the requisition. The following attributes on the purchase order lines are available for changes:
• Need-by Date
• Quantity ordered
• Price for non-catalog request items
• Cancel purchase order line
• Amount (on contractor requests or fixed price service lines)
• Start Date on contractor requests
• End Date on contractor requests
Oracle iProcurement allows administrators to define when a requester change request should be forwarded to the requester's approval hierarchy, or the buyer for approval. Insome cases, it is more efficient to bypass steps of the approval process if the change request is below some predefined limit. There are tolerance settings to control when requester changes are routed to the requester's approval hierarchy.
Setup Steps:Whenever the requester initiates a purchase order change order request, the change order request gets routed through the Oracle iProcurement requester's approval

4-50 Oracle iProcurement Implementation and Administration Guide
hierarchy. Since the requisition has already been through the approval hierarchy at leastonce before, some customers would not want the change order request to be routed through the approval process and others would.
To change the tolerance settings use the Setup: Tolerances and Routings function in Oracle Purchasing. See: Oracle Purchasing Users Guide.
Function Security• The View my Reqs Change Order and View Reqs Change Order History functions
control this feature. See Set Up Function, Menu, and Data Security, page 2-4.
Workflow• For more information about the PO Change Request Tolerance Check workflow, see
Customize Workflows, page 2-18.
Implementation Considerations• Buying organizations can specify whether or not the buyer should be involved in
the requester change order process. This is regardless of the data (unit price, quantity, amount, need by date, start date and end date) changed by the requester on the requisition or the magnitude of the change. In cases where the buyer is not involved in the change order approval process, the system sends an FYI notificationto the buyer when the change request is accepted.
• Administrators can setup upper and lower tolerance limits with these attributes. So, for any change to these attributes that lie within its tolerance limits, buyer approval would not be required.
• The tolerances can be defined by either % amount or absolute amount.
• There is also an option to bypass buyer's approval if the PO was originally autocreated for the requisition. These controls are defined at OU level.
• Administrators can define an Upper Tolerance limit and a Lower Tolerance limit for all these attributes in the Tolerances and Routings for Requester Change Order workflow.
• At any given time, there can be only a single change request pending for each requisition. Until the pending change request is completely acted upon, the requester cannot request any new purchase order (PO) change requests for the requisition.
• Only the preparer of the requisition can request purchase order change requests for the requisition.
• If a purchase order line contains multiple distributions corresponding to the different requisition lines, then the purchase order line is not eligible for change request and none of the Oracle iProcurement requesters who prepared the requisitions can request changes to the purchase order.
Requisitions Setup 4-51
• If the purchase order has any approval status other than Approved, then the purchase order is not eligible for a change request and none of the Oracle iProcurement requesters who prepared the requisitions associated with the purchase order can request changes to the purchase order.
• If the purchase order has a control status of Closed, Cancelled, Finally Closed, Freeze or Hold, then the purchase order is not eligible for a change request and none of the Oracle iProcurement user who prepared the requisitions associated with the purchase order can request changes to the purchase order.
• If the purchase order shipment has a control status of Closed, Cancelled, Finally Closed, Freeze or Hold, then the purchase order shipment is not eligible for a change request and none of the Oracle iProcurement requester who prepared the requisition lines associated with the purchase order shipment can request changes to the purchase order shipment.
• Price changes for non-catalog request items are not allowed for Partially Invoiced, Received, or Accrue on Receipt purchase orders, if the profile option PO: Allow Retroactive Pricing of POs is set to NEVER or OPEN RELEASES. If the profile option is set to ALL RELEASES, then the price changes are allowed, even for Partially Invoiced, Received, or Accrue on Receipt purchase orders.
• When the purchase order line contains a non-catalog request item in a foreign currency, the Oracle iProcurement requester can request a price change for that item in both the foreign currency of the item as well as the functional currency for the operating unit. In case of a price change request in the foreign currency of the item, the conversion rate used for the change request is the same as the one used at the time of purchase order creation.
• While the purchase order change request is being approved in the Oracle iProcurement requester's approval hierarchy, if the purchase order becomes ineligible for change (purchase order goes into a Cancelled control status), then the purchase order change request is automatically rejected. The buyer does not receivethe notification to process the change request. The change request does not appear on the buyer self-service window.
• After the purchase order change request has been approved in the Oracle iProcurement requester's approval hierarchy and before the request is sent to the buyer on the purchase order for processing, a verification compares the requested values for the attributes on the change request and the current values on the purchase order. If these values are same, then the purchase order change request is automatically accepted. The buyer does not receive the notification to approve the change request, nor does the request appear in the buyer self-service window.
• While the purchase order change request is being approved in the Oracle iProcurement requester's approval hierarchy, if the purchase order goes into an In Process approval status or a Requires Re-approval status, then the purchase order

4-52 Oracle iProcurement Implementation and Administration Guide
change request is deferred and is not sent to the buyer until the purchase order is in the Approved status.
• Encumbrance support (if enabled) is available for the change request. When the requester is creating the purchase order change request in Oracle iProcurement, the encumbrance funds verification runs for the revised requisition document total if there is a change (increase or decrease) to the document total. The actual funds reservation runs after the buyer responds to the purchase order change request.
• Tax support is available for the change request. While submitting the change request, the estimated tax that applies to the requisition is recomputed based on the revised requisition document total.
• If price breaks apply to the purchase order that are based on the changes that the requester has made, those price breaks apply to the purchase order.
Requisition CancellationsThis feature provides the Oracle iProcurement requester with the capability to select and cancel individual requisition lines (in addition to the entire requisition), before theyare placed on a purchase order or a sales order.
Note: After the requisition lines are placed on an order, a cancellation triggers the requester change order process. See Requester-Initiated Changes to Purchase Orders, page 4-49.
Setup Steps:Enabling the function security for a requester enables the requester to select and cancel individual lines (including all lines on the requisition, which would be equivalent to canceling the entire requisition).
Function Security• The functions View my Reqs Cancel, View All Reqs Cancel, and View My Group's
Reqs Cancel control the ability to cancel requisitions.
See Set Up Function, Menu, and Data Security, page 2-4.
Implementation Considerations• The Cancel Requisition button, depending on the status of the requisition, launches
the requester into either of the following flows:
• Requester Cancel Order Request flow (when at least one line is placed on a purchase order). For the lines placed on a purchase order, you can request cancellations that the buyer on the purchase ordermust approve. For lines that are not placed on the purchase order, the requester can directly cancel the line,
Requisitions Setup 4-53
and no buyer approval is required.
• Cancel Requisition flow (when no lines are placed on a purchase order). The requester can directly cancel the entire requisition or select and cancel individual lines on the requisition. Buyer approval is not required.
• You cannot cancel internal requisition lines after they have been linked to an internal sales order, unless the corresponding sales order is also canceled. If the sales order has already been canceled, then you can cancel the corresponding internal requisition lines.
Life Cycle TrackingRequesters can view the following information when they click the Details icon for a requisition line, as the information is updated:
• Negotiation. If your company uses Oracle Sourcing, then the buyer may have placed the requisition lines on a negotiation (such as reverse auction). If so, requesters can view the associated negotiation.
• Purchase order. After the requisition is converted to a purchase order, the requester can view the associated purchase order and purchase order status. The requester can view only those purchase order lines with at least one distribution that is associated with the requisition line.
Note: Although Oracle iSupplier Portal appears the purchase order details, you do not have to install or set up Oracle iSupplier Portal.
• Sales order. For internal requisitions, the requester can view the associated sales order number.
Note: Requesters can view the sales order number, but not click the number to For more information, see the sales order details.
• Shipment. If the supplier sends Advance Shipment Notices (ASNs), then the ASN information, such as Tracking Number, appears. If Oracle Transportation Executionis installed and implemented, then requesters can also track the progress of the shipment by the carrier.
• Receipt. After the requester or appropriate party enters a receipt for the requisitioned items, the receipt details for the requisition also appear.
• Invoice. Requesters can view the corresponding invoice created in Oracle Payables.
4-54 Oracle iProcurement Implementation and Administration Guide
• Payment. Requesters can view the corresponding payment created in Oracle Payables.
• Time card. If Oracle Services Procurement is implemented, then requesters can view the contractor's approved time card, if Oracle Time & Labor is also implemented.
Setup Steps:No setup is required for displaying the procure-to-pay life cycle details, except for the shipment information. For example, if you use Oracle Payables to create the invoice andmatch the invoice to the purchase order that corresponds to the requisition line, then the invoice appears. If the information, such as the invoice or payment, has been createdin Oracle Applications for the requisition line, then it appears.
The following steps show what needs to happen to display shipment information for a requisition line.
In the shipment details, the Shipment number, Shipment Date, Expected Receipt Date, and (optional) Freight Carrier come from the ASN that the supplier sends to Oracle Purchasing or enters in Oracle iSupplier Portal. The Track Shipment icon appears if a link is set up to the carrier. A Tracking Number appears if the carrier is set up to find the shipment by tracking number.
If ASNs are not used and carrier setup has not been performed, then the Shipment section appears with the text No data exists.
To set up a carrier (optional)1. Log in to Oracle Applications using the Procure-to-Pay Administrator
responsibility.
2. Navigate to Purchasing Setup > Shipment Tracking Setup.
3. For instructions on setting up a carrier and a carrier URL, see the Oracle Transportation Execution Implementation Manual.
The URL that you set up is accessed when the requester clicks the Track Shipment icon. If you have chosen a Tracking Number as your lookup parameter during this setup, the Tracking Number displays that shipment's information at the carrier's URL.
To populate, display, or update the shipment details (optional)1. A purchase order for the requisition line must be created in Oracle Purchasing.
2. The supplier must respond to the purchase order with an ASN. The supplier can send the ASN electronically to Oracle Purchasing, which uses the Receiving Open Interface to process the ASN, or the supplier can use Oracle iSupplier Portal to enterthe ASN.

Requisitions Setup 4-55
The Shipment number, Shipment Date, and Expected Receipt Date are required on the ASN. Freight Carrier is optional. Waybill/Airbill Number is optional. If provided, it appears as the Tracking Number in Oracle iProcurement. These are the only fields from the ASN that appears in the shipment details in Oracle iProcurement.
3. To display or update the shipment details, run the Receiving Transaction Processor:
• Log in using the Oracle Purchasing responsibility.
• Navigate to Requests to open the Submit a New Request window.
• Submit the Receiving Transaction Processor request.
• Make sure the request completed successfully.
Function Security• View Purchase Order Internal (POS_VIEW_ORDER_INT) controls whether the
requester can click the purchase order number and view the purchase order. This function is an Oracle iSupplier Portal function. It is already included in the default Internet Procurement responsibility.
• View Receipts (POR_SHOW_VIEW_RECEIPTS) and View All Receipts (POR_SHOW_ALL_RECEIPTS) control whether the requester can view the Receipt section of the life cycle details. (The Receipt section appears if at least one of these functions is assigned to the requester's responsibility.)
Internal RequisitionsIn a buying organization, the source of goods are from either:
• External suppliers.
• Internal inventory and warehouse locations.
Requests for externally sourced items use purchase requisitions. Requests for internally sourced items use internal requisitions. Oracle iProcurement supports the creation of internal requisitions. Unlike purchase requisitions, the process does not convert internalrequisitions into purchasing documents (purchase orders or blanket releases). Instead, the process converts internal requisitions into internal sales orders. Subsequent processing of these internal sales orders occurs. Receiving of the requested items occurs in Oracle iProcurement. The following is a summary diagram of the process.
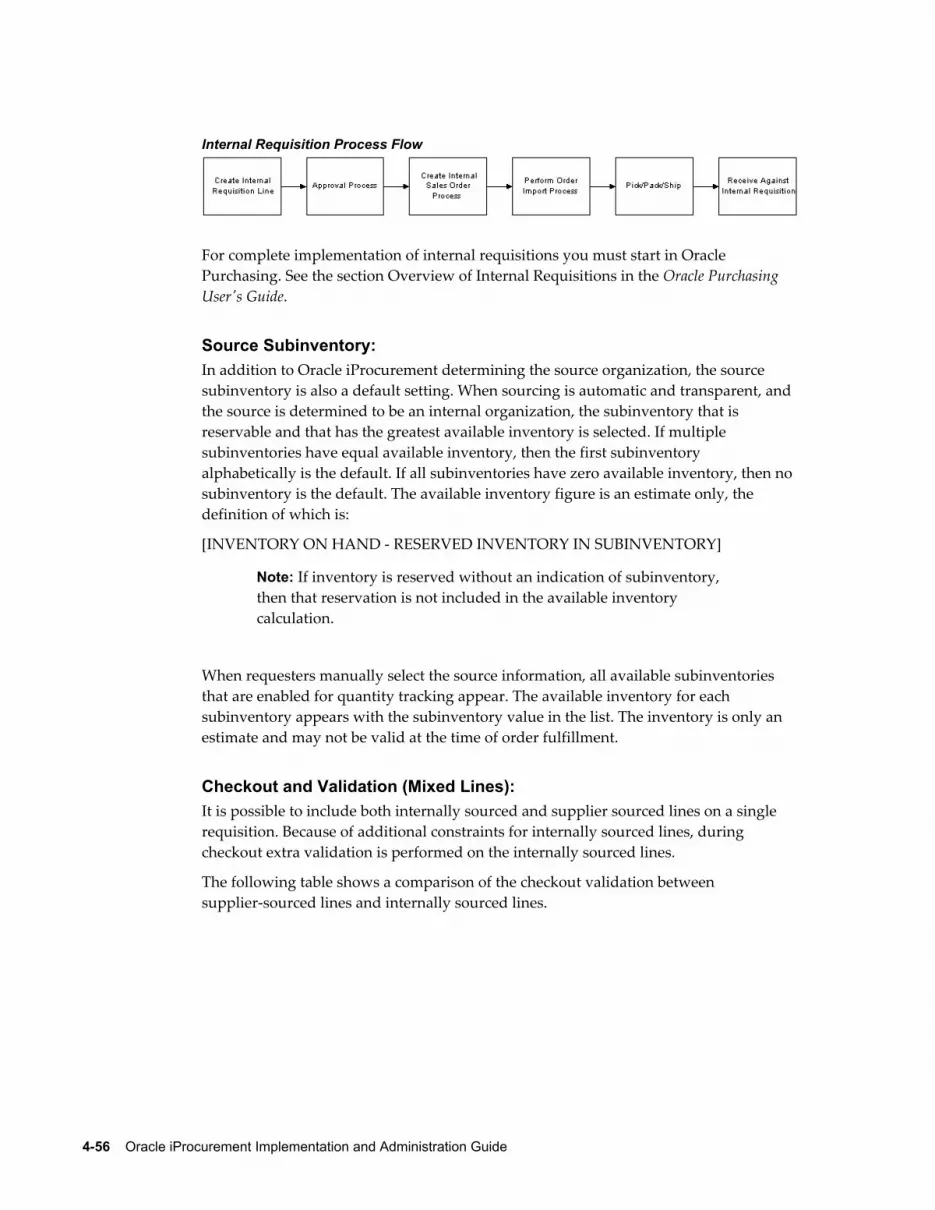
4-56 Oracle iProcurement Implementation and Administration Guide
Internal Requisition Process Flow
For complete implementation of internal requisitions you must start in Oracle Purchasing. See the section Overview of Internal Requisitions in the Oracle Purchasing User's Guide.
Source Subinventory:In addition to Oracle iProcurement determining the source organization, the source subinventory is also a default setting. When sourcing is automatic and transparent, and the source is determined to be an internal organization, the subinventory that is reservable and that has the greatest available inventory is selected. If multiple subinventories have equal available inventory, then the first subinventory alphabetically is the default. If all subinventories have zero available inventory, then no subinventory is the default. The available inventory figure is an estimate only, the definition of which is:
[INVENTORY ON HAND - RESERVED INVENTORY IN SUBINVENTORY]
Note: If inventory is reserved without an indication of subinventory, then that reservation is not included in the available inventory calculation.
When requesters manually select the source information, all available subinventories that are enabled for quantity tracking appear. The available inventory for each subinventory appears with the subinventory value in the list. The inventory is only an estimate and may not be valid at the time of order fulfillment.
Checkout and Validation (Mixed Lines):It is possible to include both internally sourced and supplier sourced lines on a single requisition. Because of additional constraints for internally sourced lines, during checkout extra validation is performed on the internally sourced lines.
The following table shows a comparison of the checkout validation between supplier-sourced lines and internally sourced lines.

Requisitions Setup 4-57
Item Checkout Validation
Field or Attribute Supplier-Sourced Line Internally Sourced Line
Deliver-to Location Item must belong to the organization associated with the deliver-to location
• Item must belong to the organization associated with the deliver-to location.
• The location must be associated with a customer.
• There is a valid shipping network between the source inventory organization and the destination inventory organization (deliver-to organization).
One-Time Address None Cannot deliver internally sourced items to a one-timeaddress.
Requester None New requester cannot result in a new deliver-to location that infringes on the preceding deliver-to location rules.
Buyer None Buyer cannot be entered.
Charge Account Non-modifiable if destination is inventory.
1. Non-modifiable if destination is inventory.
2. If destination is expense, cannot allocate to multiple charge accounts.
It is possible to create internal requisitions for both expense and inventory destinations.
At the end of the checkout process a single requisition, containing both internal and external lines is created. This requisition is then routed through the same approval path as a requisition with all purchase requisition lines. Upon approval, the internally sourced lines are converted into internal sales orders and the externally sourced lines are converted into purchasing documents (purchase orders or blanket releases).
It is possible to receive internal orders in Oracle iProcurement. For more information, see Receipt Creation, page 5-2.
Setup Steps - Profile Options• PO: Legal Requisition Type
• POR: Allow Manual Selection of Source
• POR: Select Internal Requisition for Confirm Receipts

4-58 Oracle iProcurement Implementation and Administration Guide
• POR: Select Inventory Replenishment Lines for Confirm Receipts
• POR: Urgent Flag maps to Shipping Priority
• POR: Sync up Need by date on IR with OM
• MRP: Default Sourcing Assignment Set
Workflow• In the Confirm Receipts workflow, users can select past-due shipments for internal
requisitions.
Implementation Considerations• Purchasing sourcing applies when users select an internally orderable item. If users
select a strictly purchasable item, then no sourcing applies.
• If the profile PO: Legal Requisition Type is set to Internal, then the following are true:
• It is not possible to sort by unit price.
• Strictly purchasable items do not appear.
• Display of the Click here to select a source link depends on the setting of the POR: Allow Manual Selection of Source profile option.
• Items that are both purchasable and internally orderable appear only as internally orderable.
• All prices on the catalog pages are null.
• If the profile PO: Legal Requisition Type is set to Purchase, then the following are true:
• The Click here to select a source link does not appear regardless of the setting of the POR: Allow Manual Selection of Source profile option.
• No sourcing is called.
• If the profile PO: Legal Requisition Type is set to Both, then the following are true:
• Display of the Click here to select a source link depends on the setting of the POR: Allow Manual Selection of Source profile option.
• If both internal and external items have been extracted into the catalog, then both item types appear.
• For internally sourced items, the unit of issue from the destination organization

Requisitions Setup 4-59
applies. The transfer price calculation is based on the cost price of the source organization and the unit of measure conversion rates.
• General planning information does not apply when determining the source for a given item. All sourcing is based on the defined sourcing rules.
• If a requisition has both internally and externally sourced lines and the delivery information is changed at the header level, then the deliver-to location validation is different for each line type. The list of values for the deliver-to location provides a list of all deliver-to locations. If a location that is invalid for internal line items is selected, then an error message appears for the internal line item. Requesters must select a valid location for the line before proceeding.
• It is not possible to add information templates to internally sourced lines.
• It is not possible to modify the source information during checkout. To modify the source, requesters must delete the item from the shopping cart and then re-select the item from the catalog.
• The source defined on a requisition template (public list) does not apply when Oracle iProcurement determines the source. Sourcing is strictly based on sourcing rules.
• In order to make updates to an approved Internal Requisition from iProcurement, please ensure that the value for the Order Management system parameter Schedule Lines on Hold is set to NULL or Yes
Internal Requisition ChangesYou can use Internal Requisitions/Internal Sales Orders to transfer material between warehouses / inventory organizations of the same company. The internal requisition from Oracle iProcurement generates an internal sales order in Oracle Order Management, which fulfills the transfer-shipping request.
In the Requestor Change Order window, we can specify the auto-approval tolerances for internal requisitions. Using a Purchasing responsibility, navigate to Setup > Tolerances and Routings > Requestor Change Order to change the tolerances for Need-by Date and Quantity.

4-60 Oracle iProcurement Implementation and Administration Guide
The following sections describe the ways in which changes to the Internal Requisition are synchronized with the Internal Sales Order and vice versa.
Urgent Flag and Shipment Priority Code
The Urgent flag on the Internal Requisition line determines whether the internal requisition line is urgent. Oracle Order Management tracks shipment priority differently. Shipment priority is an extensible quick code (lookup). The Urgent flag on the internal requisition line maps to the Shipment Priority field on the internal sales order line via the profile option POR: Urgent Flag maps to Shipping Priority. The valuesfor this profile option come from the Shipment Priority Code lookup. The seeded valuesof the lookup are High and Standard. If the urgent flag is checked then the Create Internal Orders concurrent program takes the value of the profile option and populates the shipping priority field in the Order Management interface tables. If the profile option value is not set, then the shipping priority for the order line remains null.
Need-by Date and Request Date
You can update the Need-By Date on the Internal Requisition to a future date only and the change will get reflected in the Request Date of the Internal Sales Order. However, the changes made in the Internal Requisition need to be approved before the change is reflected in the Internal Sales Order. Before you make the changes, the Order Management processing constraints validate the changes. The order line goes on hold until the changes are approved. Upon approval, the hold gets released and changes are reflected in Internal Sales Order.
A seeded processing constraint in Order Management prevents the update of Request Date on an Internal Sales Order line. This processing constraint has been made a non-system constraint so that you can enable or disable this processing constraint as peryour business requirement. If you change the Need-By Date in the Internal Requisition, and if this processing constraint has been disabled, the Request Date will update to the value of the Need-By Date.
If you change the Request Date on the Internal Sales Order, you can only update it as

Requisitions Setup 4-61
the Scheduled Ship Date/ Arrival Date. The profile option POR: Sync up Need by date on IR with OM ensures that the value of the Scheduled Ship Date and Scheduled Arrival Date on the Internal Sales Order line is reflected in the Need-By Date on the Internal Requisition line. If the value of the profile option is set to Yes, then the value of the Need-By Date on the Internal Requisition line is updated with the changed value of the Scheduled Ship Date / Scheduled Arrival Date. If the profile option is set to No, thenthe changed value of the Scheduled Ship Date / Scheduled Arrival Date will not be updated in the Need-By Date of the Internal Requisition.
Changing the Quantity on the Internal Requisition Line
If you change the quantity on the Internal Requisition line, you need to get the Internal Requisition re-approved. Also, the sales order line is put on hold during the re-approvalprocess. The Internal Sales Order line should not be Pick Released, Invoice Interfaced, or Closed. A seeded processing constraint in Order Management prevents update of Ordered Quantity on an Internal Sales Order line. This processing constraint has been made a non-system constraint so that you can enable or disable this processing constraint as per your business requirement.
Cancellation
If you choose to cancel the Internal Requisition, the Internal Sales Order gets cancelled provided the Order Management processing constraints allow the cancellation. Similarly if the Internal Sales Order gets cancelled, the Internal Requisition gets cancelled as well.
Making Internal Requisition changes in iProcurement
If you have created an Internal Requisition and a corresponding Internal Sales Order, you can go to the iProcurement home page to make changes to the Internal Requisition. You can also initiate changes via the Requisitions Summary form in Oracle Purchasing using the Tools > Change menu option.
The Requistions page has a change link at the bottom of the page. If you click the To Change Internal Requisition Lines, Click Here link, the Change Order page is displayed.

4-62 Oracle iProcurement Implementation and Administration Guide
The Requisitions > Requisitions tab displays the Change Order page. On this page, you can change the Need-By Date, Quantity or Cancel the line. For any changes you make, you must provide a Reason in the Reason text box on the same row.
After you have changed the Need-By Date, Quantity or cancelled the requisition line, click Next to view the Approvals.
In this example, no approvals are required; otherwise the approval details would be displayed on this page. Click Next to review the changed information on the requisitionline. Approval logic is determined by Requester Change Order Approval workflow.
The changes are indicated by a green icon next to the changed value. Click Submit to confirm your changes, the following page displays on successful submission:

Requisitions Setup 4-63
You can now view the status of the change request from the Requisition Status page. The changed quantity is also reflected in the Internal Sales Order. For more information on Internal Sales Orders, please refer to the Oracle Order Management Implementation Manual.
Oracle Services ProcurementOracle Services Procurement is a separately licensed and implemented product. Oracle Purchasing includes the following line types that Oracle iProcurement uses:
• Quantity-based or Goods. For example, for 10 books at 5 USD each, the price is 5 and the quantity is 10 on the purchase order.
• Amount-based. For example, at 500 USD for a service, the price is 1 and the quantity is 500 on the purchase order.
When you license and implement Oracle Services Procurement, Oracle iProcurement supports the following additional line types:
• Fixed price service. For example, at 500 USD for a service, the amount is 500 on the purchase order, and a quantity is not required.
• Rate-based temporary labor. For example, for a contractor at 100 USD for each hour, on the purchase order, the rate is 100 in the price field, the UOM is hour, and the amount is the agreed-upon amount for the labor, plus any additional amount to cover rate differentials such as overtime and weekend time.
• Fixed price temporary labor. For example, consulting at a fixed 15,000 USD is for the labor.
Determination of line types is based on their Purchase Basis and Value Basis in the Line

4-64 Oracle iProcurement Implementation and Administration Guide
Types window in Oracle Purchasing. The following table shows the default line types, their respective purchase and value bases, and whether or not Oracle Services Procurement is required.
Purchase and Value Bases of Provided Line Types
Line Type Purchase Basis Value Basis Oracle Services Procurement Required?
Goods Goods Quantity No
Services (Amount-Based) Services Amount No
Fixed Price Services Services Fixed Price Yes
Rate-Based Temp Labor Temp Labor Rate Yes
Fixed Price Temp Labor Temp Labor Fixed Price Yes
Create Requests:Oracle iProcurement can requisition fixed price services by using a non-catalog request. Oracle iProcurement requisitions temporary labor by using a contractor request.
Note: Oracle iProcurement is the only application in which you can create a temporary labor request.
Requesters can use a non-catalog request to create requisitions for fixed price services line types. The Item Type field is used to select Goods or services billed by amount, which uses the line type selected in the POR: Amount Based Services Line Type profile option.(The Services billed by quantity item type corresponds to the line type selected in the POR: Rate Based Services Line Type profile option.)
The Create Contractor Request page is used to create requisitions for rate-based or fixed price temporary labor line types. Some of the fields you enter on a contractor request include a job and start date, and contact information.
The second step of contractor request creation is to provide supplier information. If an approved supplier list (ASL) has been set up in Oracle Purchasing, then the ASL suppliers also appear in a preferred supplier list, from which the requester can select a supplier.
Note: Oracle iProcurement prevents combining goods and temporary labor on the same requisition. If the requester tries to create a contractor

Requisitions Setup 4-65
request while goods are in the shopping cart, Oracle iProcurement advises the requester to keep these on separate requisitions.
Contractor Request Flow:Contractor requests use either of the following flows:
• Fast-Track. Also known as a manual request, the fast-track request results in a contractor request status of Not Applicable. This flow works the same as any normal requisition. The requester completes the contractor request, checks out, and receives the required approvals. In a fast-track request, typically the requester does not care who the contractor is.
• Full-Track. A full-track request results in a contractor status of Pending. This flow starts when:
• Users select more than one preferred supplier on the contractor request
• Users select the candidate screening option on the contractor request.
• The target rate entered on the contractor request does not equal the rate on an existing contract in Oracle Purchasing.
The flow is:
• Requester completes the contractor request, checks out, and receives the required approvals.
• Oracle iProcurement sends an automated notification to the supplier or suppliers on the request.
• Requester works with the supplier or suppliers offline to choose a contractor.
• Requester assigns the contractor to the requisition, changes amounts if necessary, and checks out.
• Depending on how the POR: Reapproval after Contractor Assignment profile option is set, the requisition may require reapproval.
Note: For more information about the contractor requisitioning flow, contractor status, and contractor request fields, see the online Help in Oracle iProcurement.
The following figure shows the fast-track and full-track contractor status flows previously described. (If contractor assignment is not required, then it is a fast-track flow. If contractor assignment is required, then it is a full-track flow.)

4-66 Oracle iProcurement Implementation and Administration Guide
The following diagram also shows the following integration points with Oracle Purchasing: during creation and checkout, Oracle iProcurement verifies whether approved supplier list (ASL) entries have been defined for the job or category. For moreinformation, see Oracle iProcurement Setup, page 4-68. When the requisition is finished, Oracle Purchasing creates the purchase order.
Overview of Contractor Request Flow
The main points of receiving against Oracle Services Procurement items include:
• Can receive only fixed price services lines in Oracle iProcurement.
• Cannot receive rate-based temporary labor. (Typically, the contractors entering a timecard receive it. These timecards can be converted into receipts, for accounting purposes, by submitting a process in Oracle Purchasing. If Oracle Time & Labor is installed, then the timecard icon is available on the Contractors tab when viewing active and past contractors, or on the Requisitions tab when viewing the requisition line details.)
• You cannot create a return for fixed price temporary labor or fixed price services.
Requesters can also enter contractor performance evaluations online in Oracle iProcurement. They can also view previously entered evaluations to help them select contractors. As shown in the preceding Contractor Assignment figure, the Contractors tab enables contractor assignment and performance evaluations.
Expense Lines:If the requester enters an amount for the contractor's expenses (such as air travel) on thecontractor request, then Oracle iProcurement handles this amount as a separate line on the requisition. The following table shows the expense line numbering.
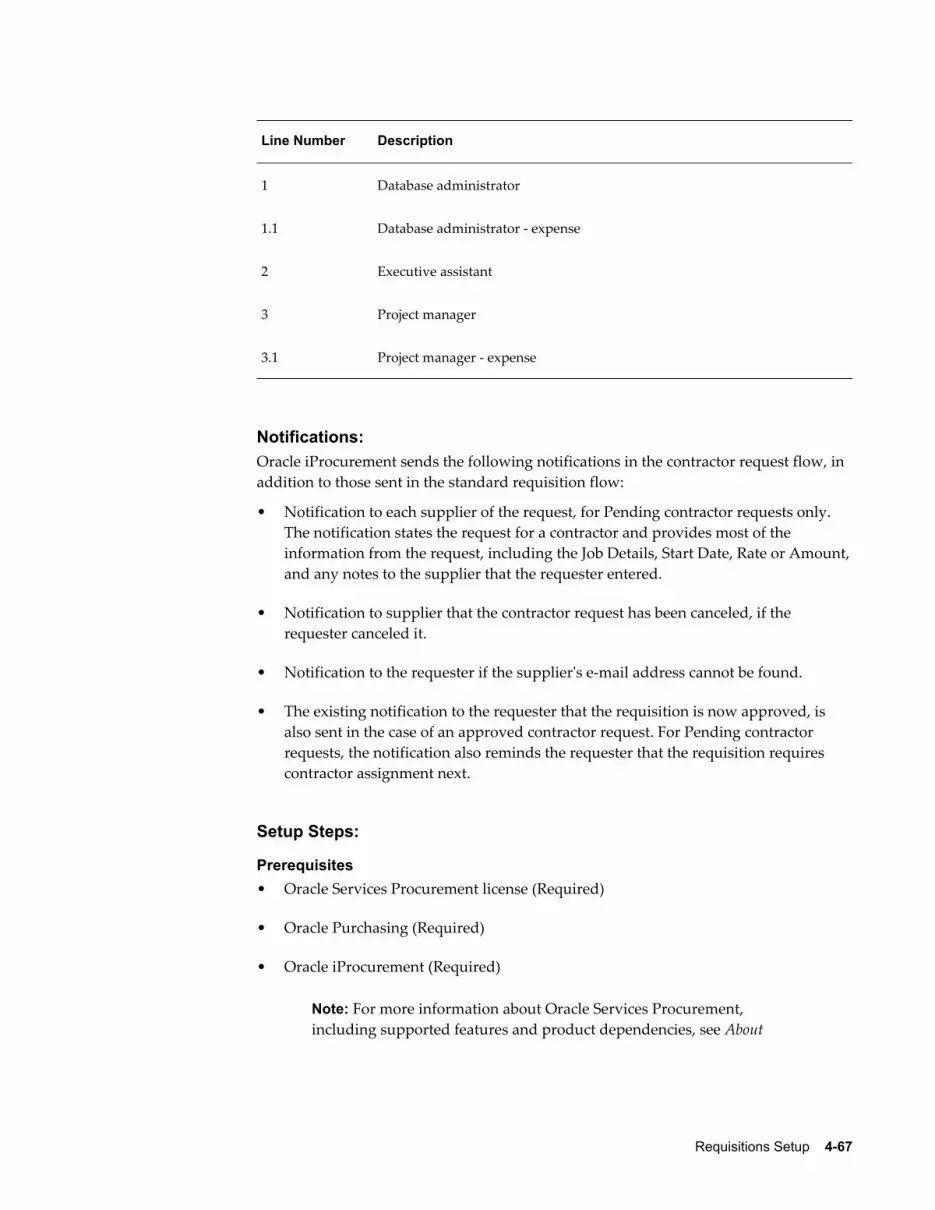
Requisitions Setup 4-67
Line Number Description
1 Database administrator
1.1 Database administrator - expense
2 Executive assistant
3 Project manager
3.1 Project manager - expense
Notifications:Oracle iProcurement sends the following notifications in the contractor request flow, in addition to those sent in the standard requisition flow:
• Notification to each supplier of the request, for Pending contractor requests only. The notification states the request for a contractor and provides most of the information from the request, including the Job Details, Start Date, Rate or Amount,and any notes to the supplier that the requester entered.
• Notification to supplier that the contractor request has been canceled, if the requester canceled it.
• Notification to the requester if the supplier's e-mail address cannot be found.
• The existing notification to the requester that the requisition is now approved, is also sent in the case of an approved contractor request. For Pending contractor requests, the notification also reminds the requester that the requisition requires contractor assignment next.
Setup Steps:
Prerequisites• Oracle Services Procurement license (Required)
• Oracle Purchasing (Required)
• Oracle iProcurement (Required)
Note: For more information about Oracle Services Procurement, including supported features and product dependencies, see About

4-68 Oracle iProcurement Implementation and Administration Guide
Oracle Services Procurement in Oracle Supply Management, available on My Oracle Support forum.
Oracle Purchasing Setup (Required)Before you can implement the services and temporary labor functionality in Oracle iProcurement, you must perform some setup in Oracle Purchasing. For more information, see the Oracle Services Procurement setup information in the Oracle Purchasing User's Guide.
Oracle iProcurement Setup (Required)1. Set the following profile options:
• POR: Contractor Expense Line Type.
• POR: Reapproval after Contractor Assignment
• POR: Amount Based Services Line Types.
You might have already set the following profile options when you performed the Oracle Purchasing setup:
• PO: Enable Services Procurement
• PO: UOM Class for Temp Labor Services
For more information, see Set Profile Options, page 2-32.
2. Assign the Contractor Request catalog to stores. (Optional)
Requesters can always click Contractor Request on the Shop tab to create a contractor request. You can make contractor requests also accessible in one or more stores. For example, you can assign the Contractor Request catalog to a store that you created. When a requester clicks the store on the Shop page, all of the catalogs in that store appear. The requester can then click the Contractor Request catalog in the store and be taken to the contractor request entry page. (If you create a store that contains only the Contractor Request catalog, then clicking the store takes the requester directly to the contractor request entry page.)
Log in using the iProcurement Catalog Administration responsibility and access theeContent Manager. For more information about adding catalogs to stores, see the online Help.
3. Create non-catalog request templates for services. (Optional)
You can create non-catalog request templates specifically for services. When requesters create a non-catalog request, they can select the desired template. You can also assign a non-catalog request template to a services-related store, so that therequester always selects the correct template when in that store. For example, for

Requisitions Setup 4-69
each service type, you can define default values for certain service attributes and optionally restrict the requester from overriding defaults.
Log in using the iProcurement Catalog Administration responsibility and access theeContent Manager. For more information about creating non-catalog request templates, see the online Help.
4. Define approved supplier list (ASL) entries. (Optional)
If you have defined ASL entries for the job category selected on the contractor request, then the contractor request displays them as preferred suppliers. The requester can then choose one or more preferred suppliers. If global blanket agreements are associated with the ASL entries, then the pricing information from those documents also appears. If contract purchase agreements are associated with the ASL entries, then the contract number appears. See the previous figure, Contractor Request Preferred Suppliers.
For instructions on setting up the ASL, see the Oracle Purchasing User's Guide.
5. Set up supplier e-mail address for temporary labor suppliers. (Required)
Provide an e-mail address for the Oracle iSupplier Portal user defined in the Users window for the supplier, supplier site, or supplier contact. For more information, see the supplier registration information in the Oracle iSupplier Portal Implementation Guide.
Source Document Setup (Optional)Temporary labor (contractor) requests in Oracle iProcurement use global blanket agreements or contract purchase agreements (global or local) for source documents. Temporary labor jobs on requisition lines can source these documents that same as any other line.
1. For instructions on setting up agreements as source documents, see Chapter 3 and the Oracle Purchasing User's Guide.
2. You can include price differentials on your global blanket agreement, at the shipment or line level. Price (or rate) differentials are overtime or holiday rates.
3. In the PO Create Documents workflow, set the following attributes to Yes, if you are using contracts as source documents:
• Should Contract be used to autocreate doc?
• Should temp labor request be autosourced from contracts? (By default, this attribute is set to Yes.)
Note: You cannot use advanced pricing for fixed price services or temporary labor line types..
4-70 Oracle iProcurement Implementation and Administration Guide
4. To prevent the requester from changing the rate or amount on the contractor request, deselect the Price Override option on the global blanket agreement line, if you are using global blanket agreements as source documents.
Profile Options• The following profile options affect Oracle Services Procurement. For more
information, see Set Profile Options, page 2-32.
• ICX: Days Needed By (The Start Date on the contractor request defaults based on this profile option, which is also part of the requester's iProcurement preferences.)
• PO: Amount Billed Threshold Percentage
• PO: Enable Services Procurement
• PO: Contractor Assignment Completion Warning Delay
• PO: UOM Class for Temp Labor Services
• POR: Reapproval after Contractor Assignment
• POR: Contractor Expense Line Type
• POR: Default Currency Conversion Rate Type
Note: Other standard Oracle iProcurement profile options, such as ICX: Override Location Flag, also affect Oracle Services Procurement requisitions. The preceding list shows those profile options that must also be considered if you are implementing Oracle Services Procurement.
Function Security• See the Oracle Services Procurement table of functions in Set Up Function, Menu,
and Data Security, page 2-4.
Workflow• In the PO Create Documents workflow, you can set the following attributes to
determine whether contract document sourcing occurs for temporary labor lines:
• Should Contract be used to autocreate doc? (By default, this attribute is set to No.)
• Should temp labor request be autosourced from contracts? (By default, this attribute is Yes. This attribute is verified only if Should Contract be used to autocreate doc is set to Yes.)

Requisitions Setup 4-71
For more information, see PO Create Documents, page 2-19.
Implementation Considerations• Encumbrance
In Oracle Purchasing, you have the choice of encumbering a blanket purchase agreement or the requisition. For Pending contractor requests, the encumbrance is always done on the requisition. During contractor assignment, Oracle iProcurementtemporarily unreserves (releases reserved) funds. The funds are re-reserved after contractor assignment is completed.
• Jobs
Oracle Human Resources jobs are specific to a business group. Therefore, the job selected on the contractor request limits the deliver-to location on the requisition to those locations that belong to the preparer's business group.
• Document Sourcing
If you have set up global blanket agreement or contract purchase agreement document sourcing, then Oracle iProcurement displays the source document information in the preferred supplier list on the contractor request if the following conditions are met. (Some of these conditions apply only to blanket, not contract, agreements.)
• The source document's supplier and supplier site match a supplier and suppliersite in the ASL for the selected job category.
• The start date entered on the contractor request must fall within the effective dates of the source document.
• Price break information from the source document is used, based on the deliver-to location selected on the contractor request and the date the request was created. That is, if the date that the request was created is within the effective dates on the price break, then that price break is used.
• The line type on the source document must match the line type on the contractor request. For example, if a Type of Fixed Price Temporary Labor is selected on the contractor request, then only source document lines with this line type appear.
Note: Oracle iProcurement does not obtain new source document information if the requester changes the start date during contractor assignment or changes the requisition later using the Change button.
If the currency on the global blanket agreement differs from the requester's functional currency, then Oracle iProcurement uses the exchange rate in the system

4-72 Oracle iProcurement Implementation and Administration Guide
to perform a currency conversion. If an exchange rate cannot be found, then Oracle iProcurement uses the exchange rate the POR: Default Currency Conversion Rate Type profile option determined.
• Descriptive Flexfields
For contractor requests, descriptive flexfields do not appear in the shopping cart, even if you use Oracle Applications Framework personalization to display them.
• Miscellaneous
See also About Oracle Services Procurement, available on My Oracle Support forum.

Receipts 5-1
5Receipts
Receiving Setup ChecklistUse the following checklist for all setup related to receiving. This is a checklist of all setup steps in this chapter. These steps appear in a suggested, but not required, order.
Number Step Required or Optional Information Source
1 Receipt Creation Optional Receipt Creation, page 5-2
2 Express Receiving Optional Express Receiving, page 5-2
3 Blind Receiving Optional Blind Receiving, page 5-3
4 Receiving Against Intransit Shipments
Optional Receiving Against Intransit Shipments, page 5-5
5 Receiving Against Internal Requisitions
Optional Receiving Against Internal Requisitions, page 5-6
6 Requisitions to Receive Optional Requisitions to Receive, page 5-7
7 Returns Optional Returns, page 5-8
8 Debit Memos for Return Transactions
Optional Debit Memos for Return Transactions, page 5-9
9 Corrections Optional Corrections, page 5-9
10 Viewing Receipts Optional Viewing Receipts, page 5-10
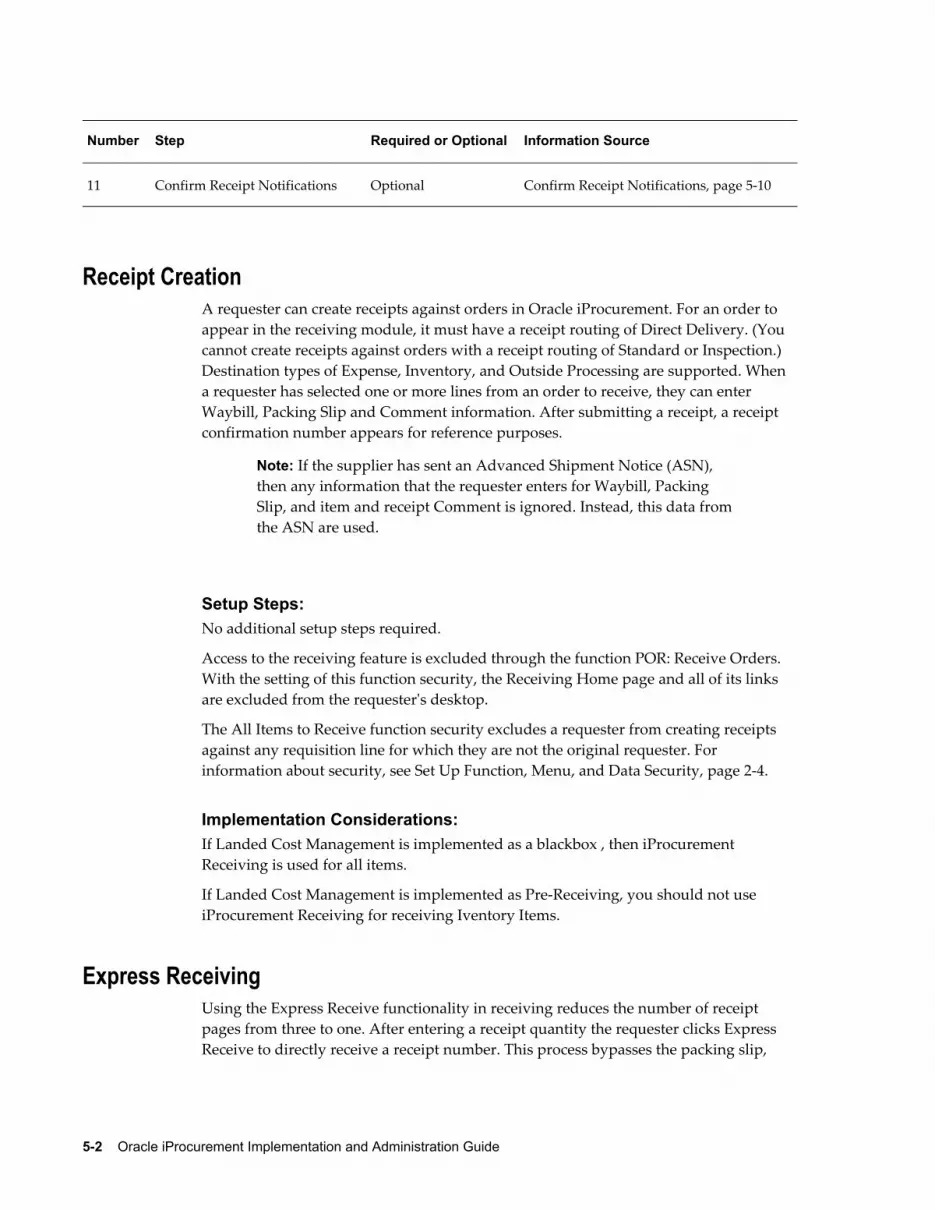
5-2 Oracle iProcurement Implementation and Administration Guide
Number Step Required or Optional Information Source
11 Confirm Receipt Notifications Optional Confirm Receipt Notifications, page 5-10
Receipt CreationA requester can create receipts against orders in Oracle iProcurement. For an order to appear in the receiving module, it must have a receipt routing of Direct Delivery. (You cannot create receipts against orders with a receipt routing of Standard or Inspection.) Destination types of Expense, Inventory, and Outside Processing are supported. When a requester has selected one or more lines from an order to receive, they can enter Waybill, Packing Slip and Comment information. After submitting a receipt, a receipt confirmation number appears for reference purposes.
Note: If the supplier has sent an Advanced Shipment Notice (ASN), then any information that the requester enters for Waybill, Packing Slip, and item and receipt Comment is ignored. Instead, this data from the ASN are used.
Setup Steps:No additional setup steps required.
Access to the receiving feature is excluded through the function POR: Receive Orders. With the setting of this function security, the Receiving Home page and all of its links are excluded from the requester's desktop.
The All Items to Receive function security excludes a requester from creating receipts against any requisition line for which they are not the original requester. For information about security, see Set Up Function, Menu, and Data Security, page 2-4.
Implementation Considerations:If Landed Cost Management is implemented as a blackbox , then iProcurement Receiving is used for all items.
If Landed Cost Management is implemented as Pre-Receiving, you should not use iProcurement Receiving for receiving Iventory Items.
Express ReceivingUsing the Express Receive functionality in receiving reduces the number of receipt pages from three to one. After entering a receipt quantity the requester clicks Express Receive to directly receive a receipt number. This process bypasses the packing slip,

Receipts 5-3
waybill, and receipt comments fields as well as the Receive Items: Review and Submit page.
Note: If you are also using blind receiving, see Blind Receiving, page 5-3 for information about the interaction of the express receiving and blind receiving features.
Profile Options• The POR: Support Review for Express Receive profile option must be evaluated
when implementing this feature. For profile setup instructions, see Set Profile Options, page 2-32.
Function Security• You can restrict access to the Express Receiving functionality by excluding the
function Express Receive. For more information, see Set Up Function, Menu, and Data Security, page 2-4.
Blind ReceivingSome enterprises have a blind receiving process for their employees (especially in the case of direct goods in a manufacturing environment). With blind receiving, a requester creating a receipt does not see the quantity ordered, quantity already received, or the default receipt quantity. This forces the person creating the receipt to count the number of items received and then enter the receipt quantity into the Quantity Received field. The receiving date and receiving quantity tolerances are ignored when blind receiving is enabled.
Setup Steps:In the Receiving Options window in Oracle Purchasing, the Allow Blind Receiving check box must be selected for Blind Receiving functionality to be enabled in Oracle iProcurement.
Profile Options• The POR: Require Blind Receiving profile option must be evaluated when
implementing this feature. For profile setup instructions, see Set Profile Options, page 2-32.
Function Security• The setting of the Express Receive function security has a receiving impact when
Blind Receiving is enabled. For more information, see the table in the Implementation Considerations, page 5-4 section. See also Set Up Function, Menu,and Data Security, page 2-4.
Implementation Considerations• With the POR: Enable Blind Receiving profile option set to Yes, the behavior for the

5-4 Oracle iProcurement Implementation and Administration Guide
Receive Items: Select Items to Receive page is:
• Receipt Quantity fields to be received are not defaulted with the quantity available.
• Quantity Received column does not appear.
• Quantity Ordered column does not appear.
• Tolerances (if set up) for the Receipt Date and Receipt Quantity are ignored.
• With the POR: Enable Blind Receiving profile option set to No, the behavior for the Receive Items: Select Items to Receive page is:
• Receipt Quantity fields are defaulted with the quantity available to be received.
• Quantity Received column appears.
• Quantity Ordered column appears.
• Tolerances (if set up) for the Receipt Date and Receipt Quantity are enforced.
• The impact of Express Receive function security setting and the POR: Enable Blind Receiving profile option is:
• The display of the Express Receive (or Receive) column in the Requisitions to Receive portlet and the Express Receive (or Receive) button on the My Requisitions to Receive - Full List page depends on the values for the following settings for the requester:
• Express Receive functional security setting.
• Value of the POR: Enable Blind Receiving profile option.
The following table summarizes the behavior for the portlet and page depending onthe combination of the Express Receive function security and the POR: Enable BlindReceiving profile option.

Receipts 5-5
Behavior of Express Receive and Blind Receiving Functionality
Setup
Express Receive functional security
POR: Enable Blind Receiving profile
Can requester Express Receive fromRequisitions to Receive portlet AND Requisitions to Receive - Full List?
Can requester Express Receive fromReceive Items: Select Items to Receive page?
1 Enabled No Yes Yes
2 Enabled Yes No Yes
3 Disabled No No No
4 Disabled Yes No No
Receiving Against Intransit ShipmentsIntransit shipments are a shipment of items from one inventory organization or supplier to a destination inventory warehouse. The goods associated with an advance shipping notice (ASN) might not yet have arrived at the destination warehouse. Intransit shipments include the following categories:
• ASN shipments that a supplier sent to a customer.
• Inter-organization transfers that are created through internal requisitions. These intransit shipments also involve the transfer of inventory items from one inventory organization to another.
• Manually created intransit shipments that are processed in the Oracle Inventory module. These intransit shipments involve the transfer of inventory items from one inventory organization to another and are not supported in Oracle iProcurement receiving.
If an intransit shipment is associated with the shipped item, then the requester can viewthe shipment details while receiving the item. The Shipment Details page includes detailed shipment information such as Expected Receipt Date, Quantity Shipped, and Freight Terms. If multiple shipments are associated with the shipped item, then requesters can view the details for all the associated shipment.
Note: If the supplier has sent an ASN, then any information that the requester enters for Waybill, Packing Slip, and item and receipt

5-6 Oracle iProcurement Implementation and Administration Guide
Comment fields is ignored. Instead, this data from the ASN are used. (The requester cannot view the ASN data, but the data are stored internally and ultimately get applied to the receipt.)
Profile Options• POR: Select Internal Requisition for Confirm Receipts
• POR: Select Inventory Replenishment Lines for Confirm Receipts
Workflow• The Confirm Receipts notification workflow selects internal requisitions that have a
need-by-date that is prior to the date of when Confirm Receipts Workflow request is submitted. See information about this workflow in Customize Workflows, page 2-18 for more details.
Implementation Considerations• When receiving against a combination of multiple intransit and purchase order
shipments, multiple receipts are created when required. The following criteria determine the creation of a new receipt:
• A separate receipt should be created for each supplier or inventory organization combination.
• All shipments from an ASN should always be received on the same receipt, even if the receiving is completed through multiple partial transactions. This is true even if the ASN consists of shipments from multiple purchase orders. A new receipt against the purchase order distribution should be created for any quantity that exceeds the quantity shipped on the ASN shipment.
• All shipments from an internal requisition must be received on the same receipt.
Receiving Against Internal RequisitionsUsers can receive internal requisitions (internal orders) in Oracle iProcurement. After the associated internal sales order has been picked, packed, and shipped (confirmed), the items are recorded as received in Oracle iProcurement. As with all requisitions, onlythose internal requisitions with a receipt routing (defined in the shipping network) of direct delivery can be received. The following restrictions exist for receiving against internal requisitions:
• Internal orders cannot be over-received.
• Internal orders cannot be returned.
• Corrections cannot be created against internal orders that are greater than the order
Receipts 5-7
amount.
• Internal orders delivered to an inventory destination cannot be corrected. Corrections can only be created against expense destinations.
You can confirm receipts for an internal order. The requester receives a notification of the internal requisition.
Setup Steps:1. Define the shipping network with the transfer type set to Intransit. If the transfer
type is not set to Intransit, then the requested items are automatically received into the destination organization upon shipment from the source organization.
2. Define the shipping network with the receipt routing set to Direct Delivery. Direct Delivery must be defined for receipts to be recorded in Oracle iProcurement.
3. If the original requisition is being delivered to an inventory destination, the destination subinventory must be indicated:
• After the items have been shipped, the shipment number appears for all internal requisitions.
• It is possible to receive against internal requisitions destined for either inventory or expense locations as long as the receipt routing is defined as Direct Delivery.
Requisitions to ReceiveRequesters can create one-click receipts for their requisitions directly from the ReceivingHome page. This is especially helpful in case of desktop receiving of indirect items suchas office supplies. The My Requisitions To Receive portlet on the Receiving Home page enables a receipt to be created directly against all eligible distributions on a requisition.
Implementation Considerations:The criteria to display purchase order-related requisitions in the Requisitions to Receiveportlet include:
• When the POR_ALL_ITEMS_TO_RECEIVE function security for the requester is enabled, Oracle iProcurement displays requisitions that the logged-in user prepared, as long as at least one receivable requisition distribution exists on the requisition. In the case where the POR_ALL_ITEMS_TO_RECEIVE function security is disabled for the requester, Oracle iProcurement displays only the receivable requisitions whose requester is the same as the logged-in user.
5-8 Oracle iProcurement Implementation and Administration Guide
• Only requisitions that have at least one line placed on purchase order, which meets the following criteria, are eligible to appear in the portlet:
• The purchase order approval status is Approved.
• The quantity ordered less the quantity delivered less the quantity cancelled is greater than zero.
• The Shipment Type is one of Standard, Blanket, or Scheduled.
• The Receipt Routing for the purchase order must be set to DirectDelivery.
• If a purchase order was created without creating a requisition and the purchase order meets the preceding criteria, page 5-7, the portlet not contain such a case.
• The five most recently created requisitions that meet the preceding criteria, page 5-7appear in the portlet. The sort order for the requisitions is descending and by requisition number.
• The Full List button on the portlet shows the user to the entire list of requisitions that satisfy the preceding criteria, page 5-7.
Note the following criteria for displaying internal order-related requisitions in the Requisitions to Receive portlet:
• Only internal requisitions that have at least one line placed on an internal sales order, which meet the following criteria, are eligible to appear in the portlet:
• The quantity ordered less the quantity delivered less the quantity cancelled is greater than zero.
• A valid shipping network has been set up.
• The Receipt Routing for the internal sales order should be set to DirectDelivery.
• The Source Type Code is set to Inventory.
ReturnsThis feature enables requesters to return items to the supplier after they have received them. Requesters can return items by clicking the appropriate link from the Receiving home page. Received items appear, and requesters can enter a quantity in the Return Quantity field. In addition, requesters can add a reason for a return, a return material authorization number, and comments to any item that is being returned. This additionalinformation is optional. Returned items add a transaction to the receiving history for that requisition. The new adjusted value is visible when the requester queries the order in the view receipts section of Oracle iProcurement.

Receipts 5-9
Setup Steps:No additional setup steps required.
Excluding the Return Items function prevents requesters from creating returns against all receipts. Excluding the Return All Items function prevents requesters from creating returns against items they did not request. See the Set Up Function, Menu, and Data Security, page 2-4.
Debit Memos for Return TransactionsWhen the Oracle iProcurement requester is creating a return transaction against the supplier this feature automatically creates a debit memo in Oracle Payables against a supplier invoice.
Setup Steps:The supplier site should be enabled for debit memo creation. To enable the supplier site,the Create Debit Memo from RTS transaction option needs to be selected in the SupplierSites window in Oracle Purchasing . If the flag is enabled, every time the Oracle iProcurement requester creates a return transaction against that supplier site, a debit memo is created against the supplier invoice (if the supplier invoice exists).
Profile Options• The POR: Enable Automatic Debit Memo Creation for Returns profile option must
be evaluated when implementing this feature. For profile setup instructions, see Set Profile Options, page 2-32.
Function Security• Excluding the Return Items function prevents requesters from creating returns
against all receipts. Excluding the Return All Items function prevents requesters from creating returns against items they did not request. See Set Up Function, Menu, and Data Security, page 2-4.
CorrectionsRequesters can make modifications to an existing receipt quantity. Normally, this is the result of human error when the wrong receipt quantity was originally entered. From theReceiving home page, requesters can select Correct Items and proceed to correct an existing receipt. It is also possible to correct the quantity of items that someone else has received.
Setup Steps:No additional setup steps required.
Excluding the Correct Receipts function prevents a requester from creating corrections

5-10 Oracle iProcurement Implementation and Administration Guide
against any receipts. Excluding the Correct All Receipt function prevents a requester from creating corrections against receipts for any requisition lines on which they are notthe original requester. See Set Up Function, Menu, and Data Security, page 2-4.
Viewing ReceiptsThis feature enables requesters to view all the relevant receiving transactions for their requisitions as well as receipts that someone else has processed.
Setup Steps:No additional setup steps required.
You can restrict access to the Receiving History functionality by excluding the View Receipts function. You can disable access to the viewing receipts that others created by excluding the View All Receipts function. See Set Up Function, Menu, and Data Security, page 2-4.
Confirm Receipt NotificationsIt is possible to have notifications sent to the requester for them to respond to the receipt status of an order. These notifications are called confirm receipt notifications. The options available to the requester who receives a notification are:
• Fully Received
• Not Received
• Partially/Over Received
• Reassign
• Receive up to amount invoiced due to an invoice match in Payables
When created, the line on the purchase order must have a matching level of 3-Way Matching. The process Confirm Receipts Workflow Select Orders must be submitted forthe notifications to be sent to the requesters. Notifications are sent when either of the following occur:
• Some amount of time must have lapsed from the need-by date found on the order line. (The standard amount of time is 1 day after the need-by date, although you could modify this in the workflow).
• An invoice is matched to the purchase order line in payables, and the invoice itself is on quantity or amount receiving hold.

Receipts 5-11
Setup Steps:1. Set the profile options, page 5-11.
2. Run Confirm Receipts Notification workflow.
Profile Options• POR: Select Internal Requisition for Confirm Receipt
• POR: Select Inventory Replenishment Lines for Confirm Receipts
Workflow• The workflow is called Confirm Receipts workflow. Its system name is
PORCPTWF. See the Confirm Receipts section in Customize Workflows, page 2-18.
Note: If you use the "receive up to amount invoiced" workflow option, iProcurement creates receipts for purchase order distributions to which invoices have been matched. If no distributions are specified in the invoice, receipts are created using the cascade option.
Implementation Considerations• If the POR: Select Internal Requisition for Confirm Receipt profile option is set to
Yes, then requesters receive internal requisition notifications in addition to standardrequisition notifications.
• If the POR: Select Inventory Replenishment Lines for Confirm Receipts profile option is set to Yes, then requesters receive inventory destination lines in addition to expense destination lines as notifications.


Search Engine Logic A-1
ASearch Engine Logic
This appendix describes the search engine in detail, including setup impact on searching.
This appendix covers the following topics:
• Search Methods
• Items Displayed in Search Results
• Related Links
• Filtering and Sorting
• Supported Search Methods by Content Zone
• Special Characters
• Search Configuration
• Relevance Ranking
• Technical Details
• Searching in Other Languages
Search MethodsThe basic search methods are:
• Standard (or quick) search
• Expanded search
• Advanced search
For standard and advanced search, the search engine returns items that exactly match the keyword. For example, searching for AB does not return item number AB22ZL. Searching for pen does not return pens. You must use wildcard characters (such as AB%) to perform a partial match.

A-2 Oracle iProcurement Implementation and Administration Guide
Searching is case insensitive. For example, entering ab22zl in the Search field finds AB22ZL.
You can also filter and sort search results, and view categories and shopping lists that match your search criteria.
Standard SearchWhen you enter keywords in a store's Search field and click Go, you are using standard search, also known as quick search.
You can perform a standard search from the Shop home page. My Favorite Store from the requester's preferences defaults in the menu next to the search field. The requester can select a different store from the menu and search it directly, or click a store.
The following figure shows how the Shop Store page appears after you click a store's link on the Shop home page.
Exact Match of All WordsIn a standard search, each keyword must be found to determine a match. For example, entering blue ballpoint pen finds items containing blue and ballpoint and pen (in any order). No stemming is performed.
Expanded Search You may optionally expand a search by clicking "Look for any of the words, similar words, or spelling variations" at the bottom of the Search Results page.
Expanded search performs the following steps concurrently:
Match of Any Words with StemmingThe search engine looks for records that match one or more of your keyword(s). The search engine also uses stemming to return any record containing at least one of the search terms or stem derivatives.
Begins With (Wild Card)The search engine appends a wildcard to the end of each keyword(s). For example, the search engine converts lead pen to lead% pen% and returns leaded pencils.
Fuzzy MatchThe search engine looks for records that closely resemble your item, but are spelled differently. For example, for telefone, the search engine returns telephone.
Note: When you use wildcards (% or *) in a keyword, stemming, beginswith, and fuzzy logic are not applied.

Search Engine Logic A-3
Advanced SearchAn "Advanced Search" link appears next to the search field. On the Advanced Search page, you can perform an advanced search on any store that does not contain a transparent punchout catalog, does not contain only a punchout catalog, or does not contain only an informational catalog.
When you click Advanced Search, the Advanced Search page appears allowing you to further refine your search.
The first four fields on the Advanced Search page always display:
• Store
• Description (item description, not long description)
• Supplier Item
• Supplier
Advanced searching allows requesters to add the following fields using the Add Another drop-down menu:
• Description (item description, not long description)
• Supplier Item
• Supplier
• Category
• Manufacturer
• Manufacturer Item
• Unit Price
• Unit
• Currency
• Internal Part Number
• Supplier Part Auxiliary ID
• Lead Time
• UNSPSC Code

A-4 Oracle iProcurement Implementation and Administration Guide
Note: You cannot customize the Advanced Search page using Oracle Applications Framework.
If you enter advanced search criteria in more than one field, the system performs an andsearch. For example, if you enter laserjet printer for Description, Acme for Manufacturer, between 500 and 1,000 for Unit Price, and USD for Currency, the search engine looks only for laserjet printers made by Acme costing between 500 and 1,000 USD.
If you search on the same criteria in more than one field, the search engine also performs an and search between the two fields. In the following example, you use two Description fields, the provided Description and a Description field you add. The table shows the results, depending on the qualifier you select from the pull-down menu:
Advanced Search Examples
First Description Second Description Result
with all of the words
tape dispenser
with the exact phrase
office supplies
Finds items containing tape and dispenser and office supplies
with at least one of the words
tape dispenser
with the exact phrase
office supplies
Finds items containing tape ordispenser and office supplies
Advanced search uses the following qualifiers:
• with all of the words performs an and search. (The words don't have to occur together.)
• with at least one of the words performs an or search.
• without the words excludes the keywords. In the following example, the search engine finds all pens not manufactured by Acme (specifically, items with pen in the Description, without Acme as the Manufacturer):
• Description: with all of the words: pen
• Manufacturer: without the words: Acme
• with the exact phrase looks for the same keywords, together, in that order.
• is between, is greater than, is, and is less than are used by Unit Price. For example, is between 500 and 1,000 looks for an item costing more than 500 and less than 1,000. (Select a Currency to avoid displaying prices in all currencies between 500 and

Search Engine Logic A-5
1,000.) The qualifier is performs an exact match. For example, entering 1.21 finds items that cost 1.21, not 1 or .21 or .1.2134. The system looks for the transaction (supplier's) price and currency.
Advanced searching does not use stemming.
Items Displayed in Search ResultsThe following examples give an idea of how items in the local catalog display in the search results depending on how they were defined.
Example 1In the following example, two items display in the search results because the supplier item number differs between them:
Source Supplier Supplier Item
Item Operating Unit
Price UOM
Blanket Purchase Agreement1234
Acme 3255156 15225 Vision Operations
1.75 EA
Blanket Purchase Agreement1234
Acme 3255157 15225 Vision Operations
15.25 BOX
Example 2In the following example, two items display in the search results, each with its own price based on the supplier site given:
Source Supplier Supplier Item
Item Operating Unit
Price Supplier Site
Blanket Purchase Agreement1234
Acme CS1234 (none) Vision Operations
11.99 San Francisco
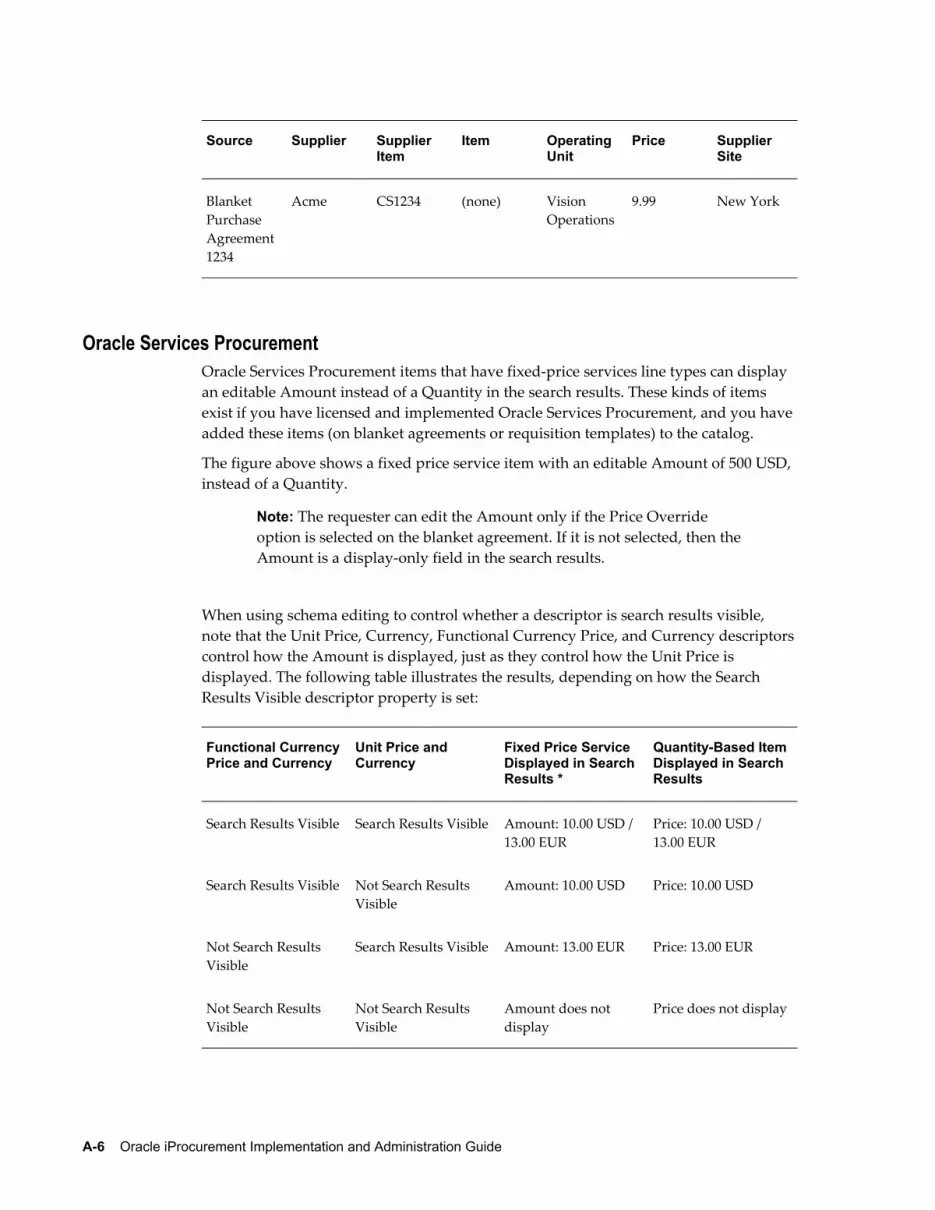
A-6 Oracle iProcurement Implementation and Administration Guide
Source Supplier Supplier Item
Item Operating Unit
Price Supplier Site
Blanket Purchase Agreement1234
Acme CS1234 (none) Vision Operations
9.99 New York
Oracle Services ProcurementOracle Services Procurement items that have fixed-price services line types can display an editable Amount instead of a Quantity in the search results. These kinds of items exist if you have licensed and implemented Oracle Services Procurement, and you have added these items (on blanket agreements or requisition templates) to the catalog.
The figure above shows a fixed price service item with an editable Amount of 500 USD, instead of a Quantity.
Note: The requester can edit the Amount only if the Price Override option is selected on the blanket agreement. If it is not selected, then theAmount is a display-only field in the search results.
When using schema editing to control whether a descriptor is search results visible, note that the Unit Price, Currency, Functional Currency Price, and Currency descriptorscontrol how the Amount is displayed, just as they control how the Unit Price is displayed. The following table illustrates the results, depending on how the Search Results Visible descriptor property is set:
Functional CurrencyPrice and Currency
Unit Price and Currency
Fixed Price Service Displayed in Search Results *
Quantity-Based ItemDisplayed in Search Results
Search Results Visible Search Results Visible Amount: 10.00 USD / 13.00 EUR
Price: 10.00 USD / 13.00 EUR
Search Results Visible Not Search Results Visible
Amount: 10.00 USD Price: 10.00 USD
Not Search Results Visible
Search Results Visible Amount: 13.00 EUR Price: 13.00 EUR
Not Search Results Visible
Not Search Results Visible
Amount does not display
Price does not display

Search Engine Logic A-7
* The Functional Currency Price and Currency for a fixed price service display as shownin this table only if Allow Price Override is not selected on the blanket agreement that contains the fixed price service. If Allow Price Override is selected, then the Functional Currency Price and Currency never display, even if set to be Search Results Visible. Instead, the Unit Price (Amount) displays in the transaction Currency (as shown in the figure above) - even if it is not set to be search results visible - and the requester can change this amount.
For more information on the Search Results Visible descriptor property, see Search Configuration, page A-10.
Related LinksAfter performing a search, the search engine provides a Related Links box on the searchresults page. The Related Links box appears only on the Search Results page for local catalogs. The Related Links box contains matching categories and a link to see matchingshopping lists.
The purpose of the Related Links is to let requesters browse categories and shopping lists that contain the items in their search results. These categories and shopping lists may contain items that did not match the requester's search, but that are related. For example, a requester searches for pen. If the category Glues contains the item refillable glue pen, then Glues appears as a related category. Not all items in the Glues category have pen in their description.
CategoriesRelated categories contain items that match the search criteria. On the Search Results page, the requester can select a related category (and its subcategories if any) to see all matching items in that category.
Filtering and SortingAfter search results are returned, requesters can further refine the results using the filtering option. Filtering allows the requester to limit the results set for the selected filtering criteria. For example, if you only want to see items from the suppliers Acme and Acme Supplier, choose to filter by Acme and Acme Supplier. All suppliers other than Acme and Acme Supplier are eliminated from the search results.
Any descriptor that is set up as search results visible can be selected as filterable criteria,except for the following descriptors:
• Unit Price
• Functional Price
• Description

A-8 Oracle iProcurement Implementation and Administration Guide
• Long Description
• Image
• Thumbnail Image
• Comments
• Attachment URL
• Supplier URL
• Manufacturer URL
• Functional Currency
• Lead Time
• Item Revision
Similar to filtering, requesters can also sort the search results. For example, a requester searches for printer paper, and a large number of search results is returned. The requester can sort by Unit Price (Ascending) to view the least expensive supplies first. Most options sort alphabetically. Options like Unit Price sort numerically. Words enclosed in quotation marks and numeric characters are listed first. (Alphabetic sorting does not apply to all languages, such as Chinese.) Sorting by relevance is an additional sorting option. See Relevance Ranking, page A-13.
Note: If you have licensed and implemented Oracle Services Procurement, then sorting by Unit Price also sorts by Amount, for services items. (If the requester enters an Amount in the search results, and then performs sorting, the requester-entered Amount is ignored. The sorting goes off the default Amount.)
Any descriptor that is set up as search results visible can be selected as a Sort By option,except for the following descriptors:
• Thumbnail Image
• Attachment URL
• Supplier URL
• Manufacturer URL
• Image
• Functional Currency

Search Engine Logic A-9
• Currency
See Search Configuration, page A-10 for more information on search results visible descriptors.
Note: Local descriptors (descriptors, such as Ink Color, that are defined only for a specific category, such as Pens) that are search results visible are sortable and filterable only if you find the items by browsing a category or by selecting a category in advanced searching.
Supported Search Methods by Content ZoneLocal content zones perform standard, expanded, and advanced searching as described earlier.
A transparent punchout sends the keywords the requester enters to the external site. The external search engine conducts the search and returns the matching results to the Search Results page.
Punchout and informational content zones use keywords defined during their setup to find matching items. When setting up a punchout or informational content zone, you associate keywords with the content zone that, when entered as search criteria, display a link to the content zone on the Search Results page.
For more details on punchout and transparent punchout, see the Oracle Procurement Buyer's Guide to Punchout and Transparent Punchout. For more details on informational content zones, see the online Help in iProcurement Catalog Administration.
Unlike local content zone searching, transparent punchout searching does not support the following features:
• Filter search results
• Add to favorites list
• Perform expanded search
• Perform advanced search
• Browse categories
In transparent punchout search results, you can sort by Price only.
Special CharactersStandard and advanced searching allows some special (non-alphanumeric) characters, as described below.

A-10 Oracle iProcurement Implementation and Administration Guide
Class I: Non-Alphanumeric Characters Interpreted as Search OperatorsThe search engine supports the following search operators, both wildcards:
• %
• *
You can use a wildcard (either the % or the *) in the middle of or after your search characters. For example, a search on o% returns Oracle and Open Markets Inc. and a search on op% returns Open Markets Inc.
You can use a wildcard at the beginning of your search characters (for example, *shop), but it slows search performance.
Class II: Non-Alphanumeric Characters Interpreted as Searchable CharactersNon-alphanumeric characters in Class II are indexed in the database and can be searched. The following is a list of Class II non-alphanumeric characters:
• Hyphen (-)
• Underscore (_)
For example, if the requester searches for item-123test, the search engine looks for items that contain both item-123 and test.
Note: Keywords with hyphens or underscores are treated as whole words. In the example above, a search on item does not find item-123. To search part of a word, use wildcards.
Class III: Non-Alphanumeric Characters Not in Class I or Class IIClass III non-alphanumeric characters are not indexed and are not searchable. If these characters appear in the search criteria, they are ignored and treated as white spaces. For example, if the requester searches for red, white & blue, the search engine ignores the comma (,) and ampersand (&), and looks for items that contain all the terms red and white and blue.
See Technical Details, page A-13 for further discussion.
Search ConfigurationSchema editing and profile options affect searching.

Search Engine Logic A-11
Schema EditingSearching is greatly influenced by schema editing. You can use schema editing to determine whether descriptors are searchable or whether they appear on the Search Results Summary and Search Results pages. A descriptor that is not searchable is ignored by the search engine. A descriptor that is not search results visible is not displayed on the Search Results Summary and Search Results pages.
See Default Base Descriptors in Appendix C for a list of the default base descriptors andtheir default searchable and search results visible property settings.
Note: Use careful judgment when deciding which descriptors to make searchable:
• The more descriptors you make searchable, the longer it takes to perform a search.
• If you make long values like Long Description searchable, the accuracy of the search is diluted. For example, a requester enters a search for computer battery. If Long Description is searchable, an item with the following Long Description would be included in the search results: This adapter works with the X Series notebook computer and can be used with or without a battery.
• If you set a descriptor as searchable, but do not make it either search results visible or item details visible, requesters may not understand why an item was included in their search results.
After the following descriptors, only the first 11 search results visible descriptors in the sequence display in the search results, for space considerations: Thumbnail Image, Description, Long Description, Unit, Unit Price, Currency, Functional Currency Price, and Functional Currency.
For instructions on using the catalog loader to create descriptors, see Appendix C. For instructions on creating or updating descriptors online in the eContent Manager, see the online Help in the eContent Manager.
Advanced SearchThe Advanced Search page's list of searchable descriptors is not affected by the schema editor. For example, if you set Manufacturer to be not searchable, it still displays as a searchable descriptor (field) on the Advanced Search page.
Although the Advanced Search page is not integrated with the schema editor in this way, setting the following descriptors to be not searchable will present an error
A-12 Oracle iProcurement Implementation and Administration Guide
message. If any of the following descriptors are set to be not searchable, they still display on the Advanced Search page, but requesters will see an error message when selecting the descriptor, saying they cannot search on it:
• Description
• Supplier Item
• Lead Time
• Price
• Manufacturer
• Manufacturer Item
• UNSPSC Code
• Supplier Part Auxiliary ID
• Internal Part Number
Profile OptionsThe following profile options are key influencers to search behavior. For descriptions, see Set Profile Options, page 2-32.
• POR: Catalog Result Set Size
• POR: Enable Advanced Search and Category Browse
• PO: Legal Requisition Type
• POR: Display Shopping Category Count
• POR: Search Results Skin
• POR: Default Shopping Sort
• POR: Default Shopping Sort Order
• POR: Show Thumbnail Images
• POR: Thumbnail Height
• POR: Thumbnail Width
• POR: Change Catalog Language

Search Engine Logic A-13
• POR: Transparent Punchout Timeout Limit (affects transparent punchout search results only)
The profile option PO: Legal Requisition Type affects whether requesters see only external supplier items, only internal items, or both.
Relevance RankingRelevance ranking is performed during standard, expanded, and advanced searching under either of two conditions:
• The POR: Default Shopping Sort profile option is set to Relevance (to always apply relevance ranking to the search results).
• The requester chooses Sort by Relevance for a specific set of search results (only possible in the Paragraph search skin).
The algorithm for the relevance calculation is complex, using scoring to rank the results.At a high level, relevance ranking does the following:
• First, how many search keywords does the item contain? An item that includes more search keywords is considered more relevant than an item that includes fewersearch keywords. For example, the requester searches for blue ballpoint pen. Item 1 contains both ballpoint and pen in its searchable descriptors. Item 2 contains only blue in its searchable descriptors. Item 1 has a higher relevance score than Item 2.
• Second, how frequently do the search keywords appear in the searchable descriptors in the entire catalog? An item that contains less frequently found search keywords is considered more relevant than an item that contains more commonly found search keywords. For example, assume the search keyword blue appears in 500 items, and the search keyword pen appears in only 100 items. Item 1 contains the search key word pen and Item 2 contains the search keyword blue. All else being equal, Item 1 has a higher relevance score than Item 2.
Note: Relevance ranking has a bigger impact on expanded searching than standard searching. Since all keywords appear in standard search results, the results aren't well differentiated by relevance, especially the first relevance algorithm described above. You can still perform relevance ranking on the standard search results, but the ranking is not as obvious as it may be in expanded search results.
Technical DetailsOracle iProcurement leverages the powerful technology of Oracle interMedia to store,
A-14 Oracle iProcurement Implementation and Administration Guide
manage, search, and access text with relational data using standard SQL and powerful text-based retrieval.
The Oracle iProcurement search engine converts the search text entered by the requesterinto a query expression to be used in an interMedia CONTAINS query. Depending on the search, the appropriate CONTAINS query is used.
Standard Search: match all search terms - and search1. The search words are formed by splitting the search text with spaces. For example,
when the requester searches for ball point pen, the search words are ball and point and pen.
2. Any interMedia reserved characters in the search words are escaped. (See Reserved Characters later in this chapter.)
3. The search words are joined with interMedia's AND (&) operator.
For example, when the requester searches for ball point pen, the query expression in the interMedia CONTAINS query for this search phase would be as follows:{ball}&{point}&{pen}
The query finds all the items that contain the words ball and point and pen.
Relevance is calculated during this search only if POR: Sort by Relevance is set to Yes. See Relevance Ranking, page A-13.
Expanded Search: stemming, begins with, and fuzzy search1. The search words are formed by splitting the search text with spaces. For example,
when the requester searches for ball point pen, the search words are ball and point and pen.
2. Any interMedia reserved characters in the search words are escaped. (See Reserved Characters later in this chapter.)
3. All search words without search operators are applied with an interMedia STEM ($)operator, suffixed with an interMedia wildcard (%) character, and applied with an interMedia FUZZY (?) operator.
4. The search words are joined with interMedia's ACCUM (,) operator.
For example, when the requester searches for ball point pen, the query expression in the interMedia CONTAINS query for this search phase would be as follows:${ball},${point},${pen},ball%,point%,pen%,?{ball},?{point},?{pen}
The query finds all items that contain any of the words ball or point or pen, including their interMedia stem derivatives, any word that starts with ball or point or pen, and any word in the fuzzy expansion of ball or point or pen.

Search Engine Logic A-15
Relevance is calculated during this search only if POR: Sort by Relevance is set to Yes. See Relevance Ranking, page A-13.
Fuzzy ExpansionThe interMedia fuzzy operator expands the search words to take care of things such as spelling mistakes, typing mistakes, and errors by scanning machines.
Each letter in a language is associated with a set of alterations. For example, lower case letter L (l) might be associated with digit one (1), since it looks similar to letter l. The letter l might be also associated with the similar-looking letter i, or it might be associated with the letter k, which is next to the letter l in a keyboard. Each of the alternate letters is assigned a weight. For example, for the letter l, the digit 1 may be given a weight of 50 and the letter i may be given a weight of 10; digit l appears more like letter l than the letter i.
All of the search words in the search text are expanded using alterations of the letters in the search words. For all of the letters in a search word, the alterations are used to arriveat several permutations of the search word. A weight is calculated for those permutations of the search word. All the permutations that have a weight more than a predefined threshold are considered in the fuzzy expansion for the search word.
For a detailed description of how fuzzy expansion works, please find the public patent at http://www.uspto.gov/patft/index.html.
Advanced SearchAdvanced search uses specific attribute fields to find items that match the keywords. Advanced searching does not use stemming.
Advanced search is implemented in interMedia by using sections for each of the searchable text attributes. For example, when the requester searches on the Description attribute, advanced search looks within the Description section in interMedia. Advanced search returns only items with a Description matching the keyword. For numeric attributes, advanced search does not use interMedia sections, but uses standardqueries.
See Advanced Search, page A-3 for information on how advanced search operators, such as with the exact phrase, work.
Reserved Characters Reserved characters are non-alphanumeric characters that carry special meaning in interMedia. To properly classify them into the appropriate non-alphanumeric character classes (Class I, II or III, described earlier), they are escaped when entered as part of the search criteria. For example, a hyphen (-) is a searchable character; however, it also carries special meaning for interMedia. To interpret a hyphen as a searchable, rather than an interMedia, character, interMedia escapes the character.

A-16 Oracle iProcurement Implementation and Administration Guide
The reserved characters are escaped by enclosing the search word within braces {}. If there is a % in the search word, either explicitly entered by the requester or introduced automatically by the search engine in a begins with search, {} cannot be used to escape reserved characters. In this case, each reserved character is escaped separately with a backslash \ character.
The following 19 reserved characters are escaped:
, & ? { } \ ( ) [ ] - ; ~ | $ ! > _ =
Here are a few examples to illustrate how Class II and Class III non-alphanumeric characters are handled in the iProcurement search:
For Class II Non-Alphanumeric Characters:The requester searches for item_1% test. In a standard search, the query expression in the interMedia CONTAINS query would be as follows:item\_1%&{test}
In an expanded search, the query expression in the interMedia CONTAINS query would be as follows:item\_1%,${test},item\_1%,test%,item\_1%,?{test}
The requester searches for item-123 test. In a standard search, the query expression in the interMedia CONTAINS query would be as follows: {item-123}&{test}
In an expanded search, the query expression in the interMedia CONTAINS query would be as follows:${item-123},${test},item\-123%,test%,?{item-123},?{test}
For Class III Non-Alphanumeric Characters:The requester searches for red+pen point. In a standard search, the query expression in the interMedia CONTAINS query would be as follows:{red+pen}&{point}
The interMedia parser treats + as a white space character because it is a non-alphanumeric character not defined as a printjoin. The matching items contain the phrase red pen and the word point.
The requester searches for red&%. In a standard search, the query expression in the interMedia CONTAINS query would be as follows:red\&%
The interMedia parser treats the escaped & as a white space character because it is a non-alphanumeric character not defined as a printjoin. The search engine treats this search term as red % and usually results in an error message to refine the search criteria because of the presence of % as a separate word.

Search Engine Logic A-17
Searching in Other LanguagesCatalog content is partitioned by language:
• When you upload content, you specify a language in the catalog file. The content is loaded to that language version of the catalog.
• When you extract content, master items that were translated in other languages are extracted to the corresponding language versions of the catalog. (Categories are extracted to all installed languages, regardless of whether they were translated.)
• Items returned from a transparent punchout should match the requester's search language, if the external site honors the search language.
If POR: Change Catalog Language is set to Yes, the requester can click a "Change Catalog Language" link on the Shop or search results pages to select a search language. The system then searches that language version of the catalog.
Note: When modifying catalog content, the system also rebuilds the search index. Each language has its own search index, and the index is rebuilt differently depending on the language. Therefore, you should not load content to the wrong language version of the catalog.

PO History Feed File B-1
BPO History Feed File
This appendix contains detailed information about the PO reconciliation history feed file.
This appendix covers the following topics:
• Format and Data Elements of PO History Feed
• Sample PO History Feed File
Format and Data Elements of PO History FeedAfter the appropriate purchase orders have been extracted using the selection criteria, the data elements for the purchase orders are compiled in the correct format and included in the output PO History Feed file. The PO History Feed file structure containsthe following levels of information, called records:
• Control Record: Transaction information about the complete PO History Feed file aswell as summary information about all purchase orders included in the feed.
• Header Record: Header-level information for each purchase order included in the PO History Feed.
• Detail Record: Line-level and distribution-level information for each purchase orderincluded in the PO History Feed.
The following sections describe the data elements that are included in each of the records in the PO History Feed file.
Control RecordThe following table shows the data elements that are the Control Record:

B-2 Oracle iProcurement Implementation and Administration Guide
Control Record Layout
Field Required
Length
StartingPosition
Data Type Action
1 - Record Type Indicator
Yes 1 1 Alpha C (for Control)
2 - Creation Date Prefix
Yes 15 2 Alpha Creation Date
3 - File Creation Date Yes 8 17 Numeric YYYYMMDD - File Creation Date (system date when the PO History Feed request wascompleted)
4 - Total File Amount Prefix
Yes 19 25 Alpha Total File Amount
5 - Sum of All PO Amounts
Yes 15 (12.2)
44 Numeric Total Sum of all PO Amounts in file in functional currency of operating unit. Format for Number is 12.2.
Send first 15 characters only and truncate if necessary.
Should include purchase orders with all statuses (ON, CN, OH) for calculation.
For more information, see the following business rules, page B-3.
6 - Credit/Debit Indicator
Yes 1 59 Alpha D for Debit, C for Credit
7 - Header Record Prefix
Yes 14 60 Alpha Total Header
8 - Total Header Records
Yes 5 74 Numeric Total Number of Header Records in file.
Should include purchase orders with all statuses (ON, CN, OH) for calculation.
For more information, see the following business rules, page B-3.
9 - Detail Record Prefix Yes 14 79 Alpha Total Detail
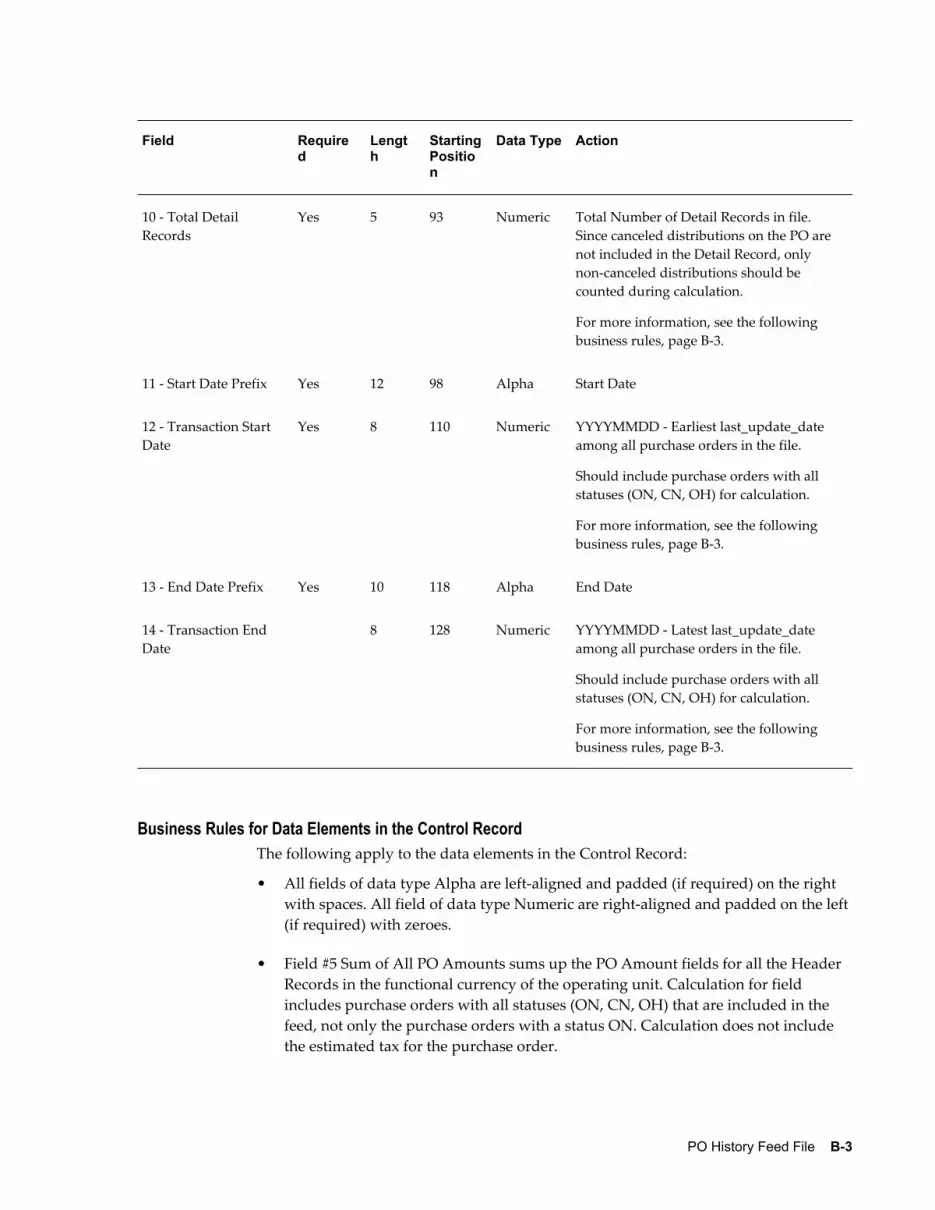
PO History Feed File B-3
Field Required
Length
StartingPosition
Data Type Action
10 - Total Detail Records
Yes 5 93 Numeric Total Number of Detail Records in file. Since canceled distributions on the PO are not included in the Detail Record, only non-canceled distributions should be counted during calculation.
For more information, see the following business rules, page B-3.
11 - Start Date Prefix Yes 12 98 Alpha Start Date
12 - Transaction Start Date
Yes 8 110 Numeric YYYYMMDD - Earliest last_update_date among all purchase orders in the file.
Should include purchase orders with all statuses (ON, CN, OH) for calculation.
For more information, see the following business rules, page B-3.
13 - End Date Prefix Yes 10 118 Alpha End Date
14 - Transaction End Date
8 128 Numeric YYYYMMDD - Latest last_update_date among all purchase orders in the file.
Should include purchase orders with all statuses (ON, CN, OH) for calculation.
For more information, see the following business rules, page B-3.
Business Rules for Data Elements in the Control RecordThe following apply to the data elements in the Control Record:
• All fields of data type Alpha are left-aligned and padded (if required) on the right with spaces. All field of data type Numeric are right-aligned and padded on the left (if required) with zeroes.
• Field #5 Sum of All PO Amounts sums up the PO Amount fields for all the Header Records in the functional currency of the operating unit. Calculation for field includes purchase orders with all statuses (ON, CN, OH) that are included in the feed, not only the purchase orders with a status ON. Calculation does not include the estimated tax for the purchase order.
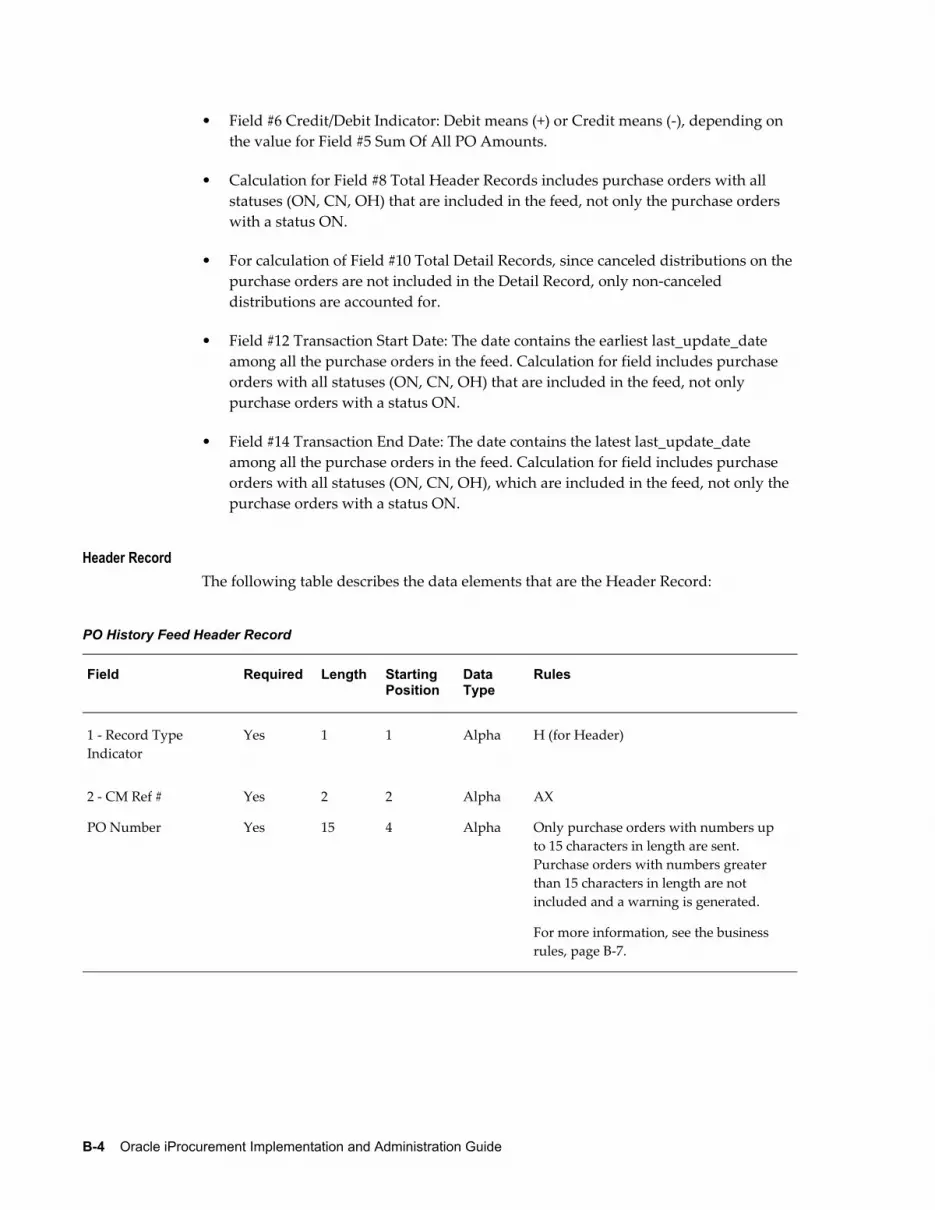
B-4 Oracle iProcurement Implementation and Administration Guide
• Field #6 Credit/Debit Indicator: Debit means (+) or Credit means (-), depending on the value for Field #5 Sum Of All PO Amounts.
• Calculation for Field #8 Total Header Records includes purchase orders with all statuses (ON, CN, OH) that are included in the feed, not only the purchase orders with a status ON.
• For calculation of Field #10 Total Detail Records, since canceled distributions on the purchase orders are not included in the Detail Record, only non-canceled distributions are accounted for.
• Field #12 Transaction Start Date: The date contains the earliest last_update_date among all the purchase orders in the feed. Calculation for field includes purchase orders with all statuses (ON, CN, OH) that are included in the feed, not only purchase orders with a status ON.
• Field #14 Transaction End Date: The date contains the latest last_update_date among all the purchase orders in the feed. Calculation for field includes purchase orders with all statuses (ON, CN, OH), which are included in the feed, not only the purchase orders with a status ON.
Header RecordThe following table describes the data elements that are the Header Record:
PO History Feed Header Record
Field Required Length Starting Position
Data Type
Rules
1 - Record Type Indicator
Yes 1 1 Alpha H (for Header)
2 - CM Ref #
PO Number
Yes
Yes
2
15
2
4
Alpha
Alpha
AX
Only purchase orders with numbers up to 15 characters in length are sent. Purchase orders with numbers greater than 15 characters in length are not included and a warning is generated.
For more information, see the business rules, page B-7.

PO History Feed File B-5
Field Required Length Starting Position
Data Type
Rules
3 - Card Number Yes 16 19 Alpha Number of P-Card being charged.
Numeric only. Non-numeric characters from the P-Card number are removed before sending.
Only purchase orders with P-Card numbers up to 16 characters in length aresent. Purchase orders with P-Card numbers greater than 16 characters are not included and a warning is generated.
See the business rules, page B-7 that follow this table.
4 - Cardmember Name Yes 35 35 Alpha In case of employee P-Cards: Card Member Name.
In case of supplier P-Cards: Supplier Name.
For both, only first 35 characters are included.
5 - Requestor Name No 25 70 Alpha In case of supplier P-Cards: send blank. In case of employee P-Cards: Card Member Name. Only first 25 characters are included.
6 - Requestor ID No 10 95 Alpha Employee ID for requester.
Only first 10 characters are included.
7 - Payment Type Indicator
Yes 1 105 Alpha P for Employee P-Card.
O for Supplier P-Card.
8 - Supplier Name Yes 100 106 Alpha Field that sends both Supplier Name and Supplier Site Name.
Format of the field is Supplier Name-Supplier Site Name.
Only first 100 characters are included.

B-6 Oracle iProcurement Implementation and Administration Guide
Field Required Length Starting Position
Data Type
Rules
9 - Client Supplier Number 1
No 30 206 Alpha Vendor ID (po_headers.vendor_id)
Only first 30 characters are included.
10 - Client Supplier Number 2
No 25 236 Alpha Vendor Site ID (po_headers.vendor_site_id)
Only first 25 characters are included.
11 - Order Date Yes 8 261 Numeric last_update_date from PO Header in YYYYMMDD format.
12 - Order Status No 2 269 Alpha Two-letter codes (ON, CN, OH).
13 - Total Lines in PO Yes 4 271 Numeric Total number of details records included.
Since canceled distributions on the purchase order are not included as Detail Records, only non-canceled distributions are accounted for.
If purchase order has a control status of Canceled or Finally Closed, no distributions are included as detail records. See the business rules, page B-7 that follow this table.
14 - PO Amount Yes 15 (12.2) 275 Numeric Total Amount of purchase order in functional currency for operating unit. Even for purchase orders created in a currency different from functional currency for operating unit, the field is calculated in the functional currency.
See the business rules, page B-7 that follow this table.
Only first 15 characters are included.
15 - Credit/Debit Indicator
Yes 1 290 Alpha D for Debit, C for Credit.

PO History Feed File B-7
Field Required Length Starting Position
Data Type
Rules
16 - PO Currency Yes 3 291 Alpha Always functional currency for operatingunit.
Uses three-letter ISO acronym.
17 - Local Currency Amount
Yes 15 (12.2) 294 Numeric Purchase order amount in PO Header Currency.
Only first 15 characters are included.
18 - Local Currency Code
Yes 3 309 Alpha Currency in which purchase order is created (po_headers_all.currency.code)·
Uses three-letter ISO acronym.
19 - Header Miscellaneous
No 40 312 Alpha Field not used.
Business Rules for Data Elements in the Header RecordThe following business rules apply to the data elements in the Header Record:
• All fields of data type Alpha are left-aligned and padded (if required) on the right with spaces. All field of data type Numeric are right-aligned and padded on the left (if required) with zeroes.
• For Field #2 PO Number, only purchase orders with numbers of length equal to or smaller than 15 characters are included in the PO History Feed. If the purchase orders have numbers greater than 15 characters in length, then they are not included in the PO History Feed. In this case, the concurrent request completes witha Complete Phase with Warning Status and generates a warning message in the log file.
• For field #3 Card Number, only numeric card numbers of length equal to or smaller than 16 characters are extracted. The card number on the purchase order document is stripped of all special characters or alphabets, which are used as separators (such as a space or '-'.), so that only the numeric portion of the card number for the card isincluded. If after stripping the non-numeric portion of the card number, the length of the card number is greater than 16 digits, then the associated purchase order is not included in the PO History Feed. In this case, the concurrent request completes with a Complete Phase with Warning Status and generates a warning message in the log file.
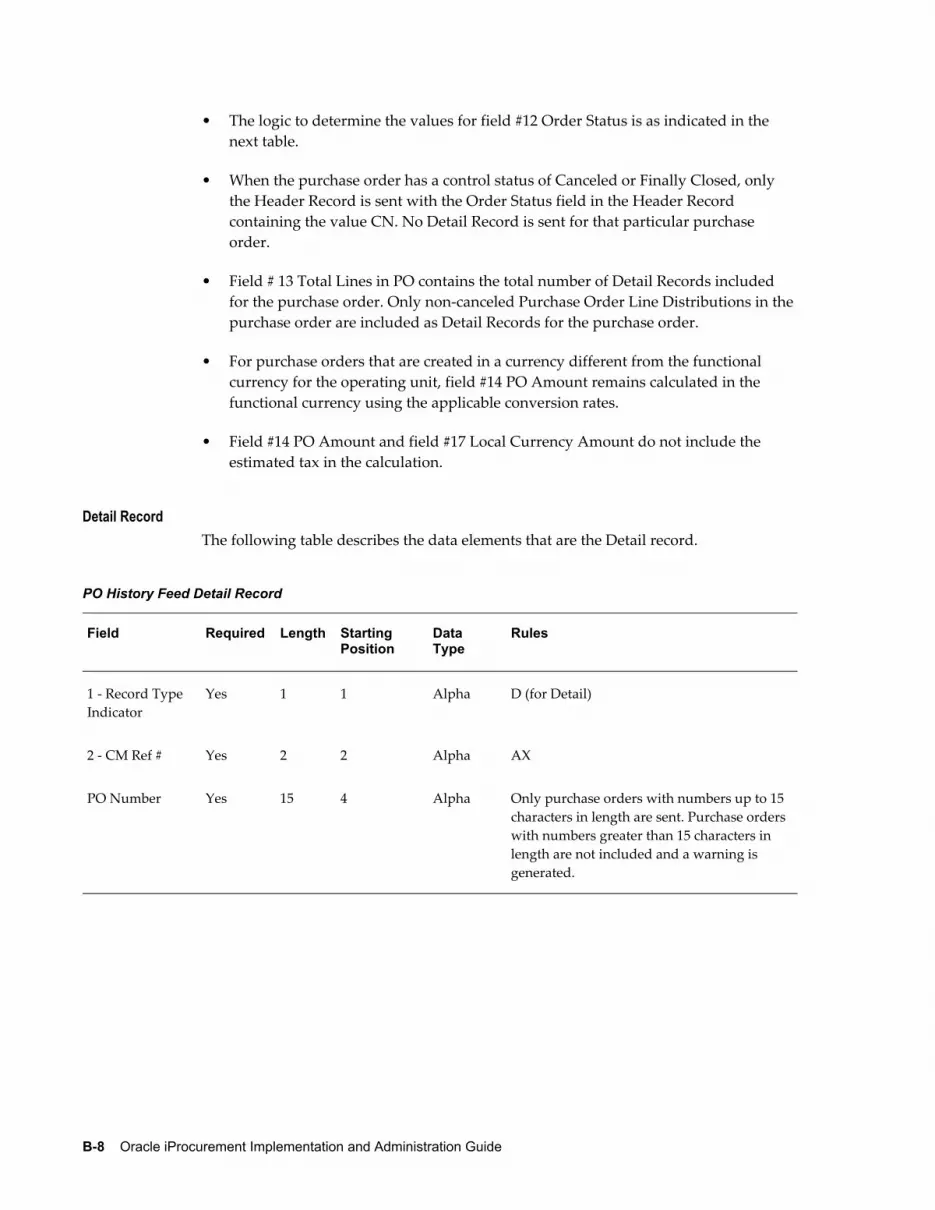
B-8 Oracle iProcurement Implementation and Administration Guide
• The logic to determine the values for field #12 Order Status is as indicated in the next table.
• When the purchase order has a control status of Canceled or Finally Closed, only the Header Record is sent with the Order Status field in the Header Record containing the value CN. No Detail Record is sent for that particular purchase order.
• Field # 13 Total Lines in PO contains the total number of Detail Records included for the purchase order. Only non-canceled Purchase Order Line Distributions in the purchase order are included as Detail Records for the purchase order.
• For purchase orders that are created in a currency different from the functional currency for the operating unit, field #14 PO Amount remains calculated in the functional currency using the applicable conversion rates.
• Field #14 PO Amount and field #17 Local Currency Amount do not include the estimated tax in the calculation.
Detail RecordThe following table describes the data elements that are the Detail record.
PO History Feed Detail Record
Field Required Length Starting Position
Data Type
Rules
1 - Record Type Indicator
Yes 1 1 Alpha D (for Detail)
2 - CM Ref # Yes 2 2 Alpha AX
PO Number Yes 15 4 Alpha Only purchase orders with numbers up to 15 characters in length are sent. Purchase orderswith numbers greater than 15 characters in length are not included and a warning is generated.
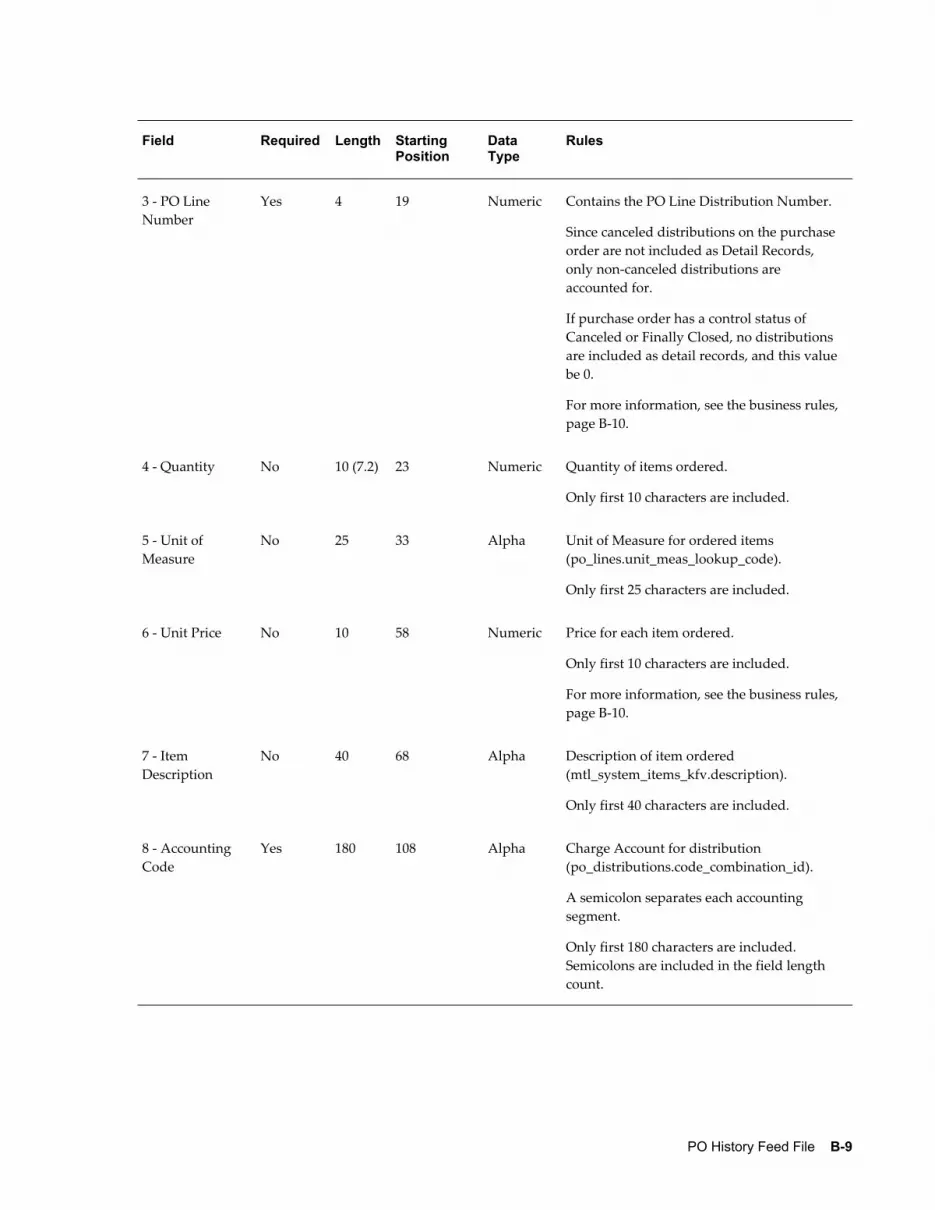
PO History Feed File B-9
Field Required Length Starting Position
Data Type
Rules
3 - PO Line Number
Yes 4 19 Numeric Contains the PO Line Distribution Number.
Since canceled distributions on the purchase order are not included as Detail Records, only non-canceled distributions are accounted for.
If purchase order has a control status of Canceled or Finally Closed, no distributions are included as detail records, and this value be 0.
For more information, see the business rules, page B-10.
4 - Quantity No 10 (7.2) 23 Numeric Quantity of items ordered.
Only first 10 characters are included.
5 - Unit of Measure
No 25 33 Alpha Unit of Measure for ordered items (po_lines.unit_meas_lookup_code).
Only first 25 characters are included.
6 - Unit Price No 10 58 Numeric Price for each item ordered.
Only first 10 characters are included.
For more information, see the business rules, page B-10.
7 - Item Description
No 40 68 Alpha Description of item ordered (mtl_system_items_kfv.description).
Only first 40 characters are included.
8 - Accounting Code
Yes 180 108 Alpha Charge Account for distribution (po_distributions.code_combination_id).
A semicolon separates each accounting segment.
Only first 180 characters are included. Semicolons are included in the field length count.
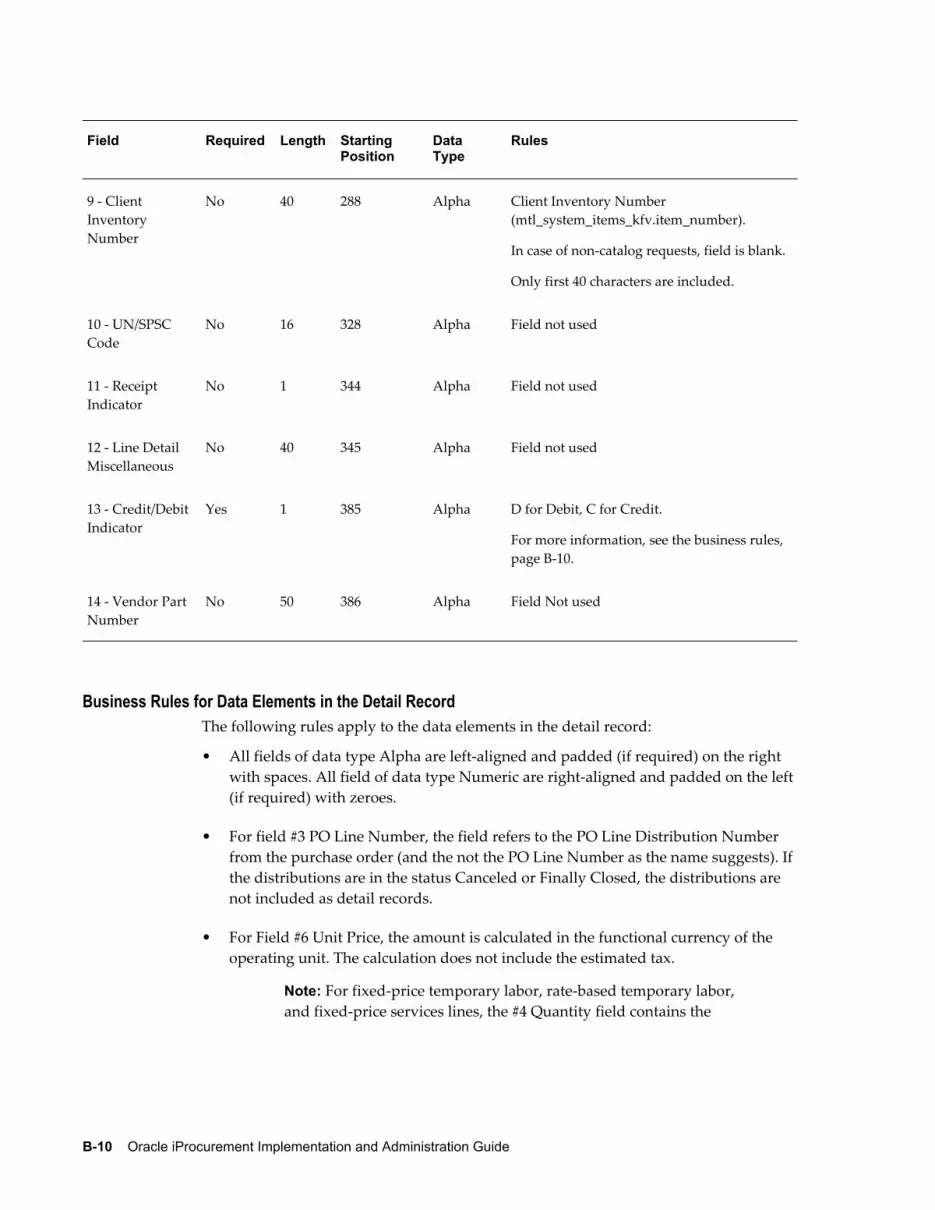
B-10 Oracle iProcurement Implementation and Administration Guide
Field Required Length Starting Position
Data Type
Rules
9 - Client Inventory Number
No 40 288 Alpha Client Inventory Number (mtl_system_items_kfv.item_number).
In case of non-catalog requests, field is blank.
Only first 40 characters are included.
10 - UN/SPSC Code
No 16 328 Alpha Field not used
11 - Receipt Indicator
No 1 344 Alpha Field not used
12 - Line Detail Miscellaneous
No 40 345 Alpha Field not used
13 - Credit/DebitIndicator
Yes 1 385 Alpha D for Debit, C for Credit.
For more information, see the business rules, page B-10.
14 - Vendor Part Number
No 50 386 Alpha Field Not used
Business Rules for Data Elements in the Detail RecordThe following rules apply to the data elements in the detail record:
• All fields of data type Alpha are left-aligned and padded (if required) on the right with spaces. All field of data type Numeric are right-aligned and padded on the left (if required) with zeroes.
• For field #3 PO Line Number, the field refers to the PO Line Distribution Number from the purchase order (and the not the PO Line Number as the name suggests). If the distributions are in the status Canceled or Finally Closed, the distributions are not included as detail records.
• For Field #6 Unit Price, the amount is calculated in the functional currency of the operating unit. The calculation does not include the estimated tax.
Note: For fixed-price temporary labor, rate-based temporary labor, and fixed-price services lines, the #4 Quantity field contains the

PO History Feed File B-11
Amount from these lines. The #6 Unit Price field is set to 1. Temporary labor and fixed price services lines are used only if you have licensed and implemented Oracle Services Procurement.
• Field #13 Credit/Debit Indicator is either a Debit (D = +) or a Credit (C = -) depending on the value of Quantity multiplied by Unit Price.
Sample PO History Feed FileCCreation Date: 20020416Total File Amount: 000000000480.00DTotal Header: 00002Total Detail: 00007Start Date: 20020416End Date: 20020416
HAX4426-15 478904789047890 Andrew Smith Andrew Smith 0000005841PEPC TEST1 Supplier-SITE 1 000000000000000000000000001466000000000000000000000245020020416ON0002000000000060.00DUSL000000000060.00USL
DAX4426-15 00010000001.00Each 0000010.00SL Test Expense Item 1 01;510;7530;0000;000 SL Test Expense Item 1 D
DAX4426-15 00020000001.00Each 0000010.00SL Test Expense Item 1 01;740;7330;0000;000 SL Test Expense Item 1 D
HAX4680 849748497484974 SPC TEST1 Supplier 0000000000OSPC TEST1 Supplier-SITE 1 000000000000000000000000001511000000000000000000000249620020416ON0005000000000420.00DUSL000000000420.00USL
DAX4680 00010000001.00Each 0000040.00SL Test Expense Item 4 01;510;7530;0000;000 SL Test Expense Item 4 D
DAX4680 00020000001.00Each 0000040.00SL Test Expense Item 4 01;510;7530;0000;000 SL Test Expense Item 4 D
DAX4680 00030000001.00Each 0000050.00SL Test Expense Item 5 01;510;7530;0000;000 SL Test Expense Item 5 D
DAX4680 00040000001.00Each 0000050.00SL Test Expense Item 5 01;510;7530;0000;000 SL Test Expense Item 5 D
DAX4680 00050000001.00Each 0000050.00SL Test Expense Item 5 01;520;5360;0000;000 SL Test Expense Item 5 D


Index-1
Index
AAccount Generation Workflow, 1-7Account generator, 2-21Accounting
global requesters, 4-16Accounts, 4-34
See also Charge accounts.Addresses
function security for one-time, 4-10one-time, 4-10one-time, append quantity and UOM, 4-12one-time, grouping purchase order, 4-11one-time, implementation considerations, 4-14one-time, profile options, 4-13one-time, purchase order grouping, 4-12one-time, workflows, 4-13profile options for one-time, 4-10
Addresses, one-time, 1-7advanced pricing
setup, 2-3Advanced pricing
integration, 1-9Advanced searches
availability in catalogs, 3-48advanced shipment notices (ASN)
view supplier, 1-11Advance Shipment Notices
view from requisition lines, 4-53AME
See Approvals or Approvals Management Engine
AME mandatory attributes, 4-42AME non-mandatory header attributes, 4-43AME non-mandatory line attributes, 4-44Application Framework Agent, 2-48Approval management engine (AME), 1-9Approvals
about, 4-36AME mandatory attributes, 4-42AME non-mandatory header attributes, 4-43AME non-mandatory line attributes, 4-44function security, 4-46in Oracle Purchasing, 4-36profile options, 4-46requisition, routing, 1-10set up AME, 4-38set up in AME, 4-37set up Oracle Purchasing, 4-38workflows, 4-46
Approvals Management Engineabout and setup, 4-36AME non-mandatory line attributes, 4-44mandatory attributes, 4-42non-mandatory header attributes, 4-43
Approver checkout, 1-10Approvers
global, 4-46list, modify, 1-9profile options for global, 4-46proxy, 1-10requisition changes, 4-47set up global, 4-46specify, 1-9
Apps Servlet Agent , 2-48

Index-2
Attachmentsappend quantity and UOM, 4-12Upload and view, 1-8
Awardsintegration with grants and, 4-34
BBilling
Account Generation Workflow, 1-7Multiple Account Distributions, 1-7Procurement Card Purchases, 1-7
Billing cycle, P-Card, 4-29Blank image files, 3-62blind receiving, 1-11Blind Receiving
function security, 5-3implementation considerations, 5-4profile options, 5-3setup steps, 5-3what is, 5-3
Business flowssupplier P-Card functionality, 4-19
Business rulescontrol record data elements, B-3control record data elements, header record, B-7detail record data elements, B-10
Buyersprofile options for suggested, 4-9suggested, 4-9workflow for suggested, 4-9
CCancel Requisition flow, 4-53Carriers, set up, 4-54Catalog Management, 1-2Catalogs
punchout, hosted, 3-33transparent punchout, hosted, 3-33
Category browsing, 3-48Category Hierarchy, 3-14
child, 3-16delete, 3-16edit, 3-14find, 3-15move, 3-16
parent, 3-15remove, 3-16
center-led procurement, 1-6Change Requisition flow, 4-47Charge accounts, 4-34
create, 4-35defaulting, 4-16disable, favorites, 4-35displaying during checkout, 4-17expense rules, 4-17favorites, 4-34function security, 4-35implementation considerations, 4-35nicknames, 4-35profile options, 4-17profile options for expense rules, 4-18
checkoutabout, 1-6delivery, 1-6
CheckoutConfirm Receipts workflow, 4-58implementation considerations, 4-58profile options, 4-58
Checkout and validationcomparison of sources, 4-56
Commodities, define, 3-35Commodity Codes, 3-37Completed Phase with Normal status, 4-30Complete Phase with Warning status, 4-30Confirm receipt notifications, what are, 5-10Confirm receipts, 2-22Confirm Receipts workflow, 4-58Content Translation, 3-56
session language, 3-58translated content, 3-56
Contractor performance evaluations, 4-66Contractor requests
creation of, 4-64fast-track, 4-65flow, notifications in, 4-67flows, 4-65full-track, 4-65use of, 4-64
Control recordsbusiness rules, data elements, B-3data elements, B-1what are, B-1

Index-3
Core Features of Oracle iProcurement, 1-2Corrections
function security, receipt quantity, 5-10to receipt quantity, 5-9
Cost distributionawards and grants, requisition lines, 4-34on requisition lines, 4-33
Currenciesexchange rate used, 4-71
customizationOperating unit purchasing policies, 2-17using personalization, 2-15
Customizationpackages, implement, 2-26requisition header and line, 2-27
Custom packages, implement, 2-26
DData elements
business rules, control record, B-3business rules, detail record, B-10business rules, header record, B-7detail record, B-8header record, B-4PO history feed file, B-1PO history feed file, control record, B-1
data security, 2-14Debit memos for return transactions, 5-9Descriptive flexfields, 4-72Descriptive flexfields, defining, 2-24Descriptors, 3-10
base, 3-10category, 3-10delete, 3-12key fields, 3-10
Desktop receiving, 1-11Detail records
data elements of, B-8what are, B-1
Direct Delivery, receipt routing of, 5-2Discoverer DBC filename override, 2-40distributed searches
See Transparent punchout.Document sourcing, 4-71
Oracle Services Procurement, 4-69Dynamic Insertion of Charge Accounts, 4-35
EEAM, integration to, 1-7ECX: Log File Path, 2-48Employee P-Cards, 1-7, 4-18Encumbrance, 4-71Encumbrance support, 1-8, 4-52Enterprise Asset Management integration, 1-7Expense lines, 4-66Express Receive, 1-11Express Receiving
function security, 5-3profile options, 5-3what is, 5-2
External Content, 3-33
FFast-Track flow, 4-65Favorite charge accounts, 4-34Fixed price service, 4-63Fixed price temporary labor, 4-63Flexfields
define, on requisitions, 2-24flows
procure-to-pay, 1-1FND: Native Client Encoding, 2-44Foreign currencies
non-catalog requests, 4-51Full-Track flow, 4-65Functional currencies, 4-3, 4-4function security, 2-4
establish, 2-6Function security
approval process, 4-46blind receiving, 5-3cancel requisitions, 4-52corrections to receipt quantity, 5-10debit memos for return transactions, 5-9Express Receiving, 5-3global requesters, 4-16one-time addresses, 4-10receipt creation, 5-2requester-initiated changes to purchase orders, 4-50requisition changes, 4-48return receipts, 5-9
Index-4
smart form, 3-43view purchase order, 4-55view receipts, 5-10
GGhost cards
See P-CardsGlobal Agreements, 3-64Global approvers
about, 4-46profile options, 4-46set up, 4-46
Global preparers, 4-14Global requesters, 4-14Global Segments, support for, 2-24Grants Accounting
integration, 4-34set up, 4-34
HHazard information, 4-14Header records
data element business rules, B-7data elements of PO history feed, B-4what are, B-1
Helpmodify online, 2-30Oracle Services Procurement, 2-32placeholder files, 2-31
Help Localization Code, 2-48History feed files
See PO history feed filesHR: Cross Business Groups, 2-40
IICX: Client IANA Encoding, 2-48ICX: Date format mask, 2-40ICX: Date language, 2-41ICX: Default Discoverer Workbook Owner, 2-41ICX: Default Employee, 2-41ICX: Default Flow Operand, 2-41ICX: Discoverer OLTP End User Layer Schema Prefix, 2-49ICX: Discoverer Parameters, 2-49ICX: Discoverer Release, 2-49
ICX: Discoverer use Viewer, 2-49ICX: Discoverer Viewer Launcher, 2-49ICX: Forms Launcher, 2-49ICX: HTML directory, 2-49ICX: Language, 2-49ICX: Limit connect, 2-49ICX: Limit time, 2-49ICX: Match case LOV, 2-49ICX: Match case View, 2-49ICX: Media directory, 2-49ICX: NLS Sort, 2-49ICX: Numeric characters, 2-50Images
creating store or catalog, 3-61creating thumbnail images, 3-60files, blank, 3-62profile options for, 3-61specifying URLs of, 3-60thumbnail, 3-59uploading items with, 3-59
Information templatesabout, 4-4create, 4-5translations and multilingual support, 4-6
IntegrationGrants Accounting, 4-34Oracle Grants, 1-8Oracle Projects, 1-8, 4-33project accounting, 4-33Tax, 1-8
Integration with E-Business Suite Applications, 1-11Internal Requisition Process flow, 4-55internal requisitions, 1-6Internal requisitions
receiving against, 5-6See also Requisitions or Receiving.
Internal Requisitions and Internal Sales OrdersInternal Requisition Changes, 4-59
internal sales orders, 1-6Intransit shipments
receiving against, 5-5Inventories
sources of sub-, 4-56Invoices
view from requisition lines, 4-53Item Categories

Index-5
See Shopping Categories
LLabor
temporary, requisitioning, 1-11Line types
Amount-based, 4-63Fixed price service, 4-63Fixed price temporary labor, 4-63matching, 4-71Oracle Purchasing and Oracle iProcurment, 4-63Purchase basis, 4-63Quantity-based or Goods, 4-63Rate-based temporary labor, 4-63service requisitions, 4-63Value basis, 4-63
List Of iProcurement Related Profile Options, 2-33List Of Oracle iProcurement Profile Categories, 2-33Local catalogs
category browsing, 3-48Localization code, add, 2-17
MMain Store, 3-48Maintaining Catalog Content, 3-21
external content, 3-33local content, 3-21smart forms, 3-34
Maintaining Content Zones, 3-49contractor request, 3-54informational, 3-52local, 3-49manage, 3-54
Maintaining Local Content, 3-21accept changes, 3-32e-Commerce mapping, 3-26enable authoring, 3-21job status, 3-24locking, 3-33online authoring, 3-30translation, 3-24upload content, 3-21
blanket purchase agreements, 3-23
global blanket purchase agreements, 3-24quotations, 3-23
upload errors, 3-25view changes, 3-32
Maintaining Stores, 3-44define stores, 3-44delete, 3-47sequence stores, 3-46
Maintaining The Catalog Schema, 3-5Managing Content
images, 3-58Managing Content Presentation, 3-44Managing Images, 3-58
authoring images, 3-60store images, 3-61thumbnail images, 3-60upload, 3-59
Managing Searching And Browsing, 3-63search results layout, 3-64
Manual request flow, 4-65menu security, 2-4
names and descriptions, 2-13MRP: Default Sourcing Assignment Set, 2-41Multi-Operating Unit Purchasing News, 2-16Multiple Account Distributions, 1-7Multiple context fields, not supported, 2-24Multiple Destination Types, 1-7
NNicknames, favorite charge accounts, 4-35Non-Catalog Request, 3-34Non-catalog requests, 4-64
foreign currency, 4-51price changes allowed, 4-51
Non-catalog request templatesdefine commodities, 3-35
NotesIncluding, during checkout, 1-8
OOne-time addresses, 1-7, 4-10Online Help, modify, 2-30
See also Helpoperating units
smart form, 3-43Oracle Advanced Pricing

Index-6
integration with, 1-9Oracle Approvals Management, 1-9, 4-36Oracle Grants
Integration, 1-8Oracle iProcurement Functions, 2-6Oracle iProcurement Menus, 2-13Oracle Projects
Integration, 1-8Oracle Services Procurement
contractor requests, 4-65excluding tabs, 2-5functions, 2-11implementation considerations, 4-71integration, 1-11online Help, 2-32search results, A-6setup, 4-63set up, 4-67workflows, 4-70
Organizing Content, 3-44maintaining content zones, 3-49maintaining stores, 3-44searching, 3-63translation, 3-56
overview, 1-1
PPA: Allow Override of PA Distribution in AP/PO, 2-56Payments
view from requisition lines, 4-54P-Card
billing cycle, 4-29P-Cards
See Procurement Cardsbusiness flows, 4-19employee, 4-18PO extract for reconciliation, 4-28profile options for employee, 4-18supplier, about, 4-19supplier, assignments for requisitions, 4-21supplier, business rules, conversion, 4-25supplier, card profiles, 4-20supplier, card programs, 4-20supplier, carryover from requisitions to purchase orders, 4-25
supplier, credit cards, 4-20supplier, logic, 4-26supplier, profile options, 4-28supplier, purchase order communication, 4-28supplier, setup, 4-19
personalization, 2-15PO: Allow Requisition Approval Forward Action, 2-58PO: Default Need-By Time, 2-60PO: Enable Services Procurement, 2-50PO: Legal Requisition Type, 2-61PO: Notification Lines Display Limit, 2-58PO: Validate Need-by Time For Requisition Submit , 2-50PO:Workflow Processing Mode, 2-58PO Change Approval for Requester, 2-24PO Change Request Tolerance Check, 2-22PO Change Request Tolerance Check workflow, 4-49PO Create Documents, 2-19PO History Feed
business rules, 4-30criteria, 4-31statuses, 4-32what is, 4-29
PO history feed filesabout, B-1control record, B-1data element business rules, control record, B-3data element business rules, detail record, B-10data element business rules, header record, B-7data elements, B-1detail record, B-8format, B-1header record, B-4sample, B-11
POR:Allow Manual Selection of Source, 2-62POR: Allow pcard use with encumbrance, 2-56POR : Amount Based Services Line Type, 2-50POR: Apply Expense Account Rules to Favorite Charge Accounts, 2-56POR: Autocreate Shopping Category and Mapping, 2-45POR: Auto Load Category Descriptors, 2-45
Index-7
POR: Auto Load Root Descriptors, 2-45POR: Auto Load Shopping Categories, 2-45POR: Bulk Loader Commit Size, 2-41POR : CA Certificate File Name, 2-50POR: Cache Time To Live Minutes, 2-41POR: Catalog Result Set Size, 2-64POR: Change Catalog Language, 2-62POR: Context value for Requisition distribution descriptive flexfield, 2-41POR: Context value for Requisition header descriptive flexfield, 2-41POR: Context value for Requisition line descriptive flexfield, 2-42POR: Contractor Expense Line Type, 2-51POR: Days Needed By, 2-60POR: Default Currency Conversion Rate Type, 2-51POR: Default Shopping Sort, 2-64POR: Default Shopping Sort Order, 2-64POR: Display Graphical Approval List, 2-59POR: Display Legacy Accounting Flex UI, 2-65POR: Display Shopping Category Count, 2-65POR: Enable Advanced Search, 2-65POR: Enable Automatic Debit Memo Creation forReturns, 2-54POR: Enable Check Funds, 2-56POR: Enable Req Distribution Customization, 2-42POR: Enable Req Header Customization, 2-42POR: Enable Requisition Line Customization, 2-42POR: Generate and Display Account at Checkout, 2-57POR : Goods Line Type, 2-51POR: Hosted Images Directory, 2-51POR: My Favorite Store, 2-65POR: One Time Location, 2-61POR: Override Location Flag, 2-61POR: Override Requestor, 2-61POR : Override Supplier P-Card, 2-57POR : Preferences - Award, 2-57POR : Preferences - Deliver to Location, 2-60POR: Preferences - Expenditure Item Date Offset,2-57POR: Preferences - Expenditure Org, 2-57POR : Preferences - Expenditure Type, 2-57POR : Preferences - Project, 2-57
POR : Preferences - Requester, 2-61POR : Preferences - Selected Items Default to Inventory, 2-57POR : Preferences - SubInventory, 2-57POR : Preferences - Task, 2-57POR : Proxy Server Name, 2-51POR : Proxy Server Port, 2-52POR: Purchasing News Location, 2-42POR: Purge Jobs Older Than (days), 2-42POR : Rate Based Services Line Type, 2-52POR: Reapproval after Contractor Assignment, 2-59POR: Require Blind Receiving, 2-54POR: Result Set Size, 2-65POR: Search Results Skin, 2-65POR: Select Internal Requisition for Confirm Receipt, 2-54POR: Select Inventory Replenishment Lines For Confirm Receipts, 2-54POR: Show Thumbnail Images, 2-66POR: Support review for Express Receive, 2-54POR : System Approvers are Mandatory, 2-59POR: Thumbnail Height, 2-66POR: Thumbnail Width, 2-66POR: Transparent Punchout Timeout Limit, 2-42POR : Use Sequence for Requisition Numbering, 2-52PO Requisition Approval, 2-19PO Send Notifications for Purchasing Documents, 2-22Price breaks, 4-71Procurement Cards
Employee, 1-7Purchases, 1-7Supplier, 1-7
Procurement Catalog, 3-1business flow, 3-1category hierarchy, 3-14descriptors, 3-10implementation flow, 3-2maintaining catalog content, 3-21Purchasing categories, 3-19schema, 3-2, 3-5schema loading, 3-7schema online maint, 3-9setup checklist, 3-4shopping categories, 3-17

Index-8
shopping categories, 3-12structure, 3-3
Procure-to-pay flow, 1-1Procure-to-Pay Life Cycle Tracking, 1-10Profile Categories
list, 2-33profile option categories
Configuration, 2-38Content Management, 2-43Deployment, 2-45Internal Requisition, 2-52Receiving, 2-53Requisition Accounting, 2-54Requisition Approval, 2-57Requisition Checkout, 2-59Search, 2-61Services Procurement, 2-62User Interface, 2-63
Profile optionsapproval process, 4-46blind receiving, 5-3change accounts, displaying, 4-17checkout and validation of sources, 4-58confirm receipt notifications, 5-11debit memos for return transactions, 5-9employee P-Cards, 4-18Express Receiving, 5-3for expense charge account rules, 4-18for global requesters, 4-15for images, 3-61for Oracle Services Procurement, 4-70for setting suggested buyers, 4-9global approvers, 4-46one-time addresses, 4-10receiving against intransit shipments, 5-6requisition lines and one-time addresses, 4-13services procurement related, 4-68smart form, 3-43supplier P-Cards, 4-28
Profile Options, 2-32list, 2-33
Profile Options Categories, 2-32Project accounting integration, 4-33Punchout catalogs, 3-33Purchase basis, 4-63Purchase Order Extract for P-Card Reconciliation, 4-29
Purchase ordersappend quantity, UOM to attachments, 4-12changes to, 4-49control status, 4-51encumbrance, change request, 4-52extract for P-Card reconciliation, 4-28function security to view, 4-55grouping, requisition lines, 4-11grouping options, 4-12history feed, 4-29implementation considerations, 4-14PO History Feed, 4-29price breaks, change requests, 4-52profile options for requisition lines, 4-13rejected change requests, 4-51requester-initiated changes to, function security, 4-50requester initiated changes to, set up, 4-49requester-initiated changes to, set up, 4-50status, view from, 4-53status when changing, 4-51tax support, change requests, 4-52workflow, requisition lines, 4-13
Purchasing Category Mapping, 3-19find, 3-20map steps, 3-20remove, 3-20view map, 3-20
RRate-based temporary labor, 4-63Reapproval, required in workflow, 2-22Receipt notifications
confirmation of, 5-10implementation considerations, confirmation of, 5-11profile options, confirmation of, 5-11set up, confirmation of, 5-10workflow, confirmation of, 5-11
Receipts, 5-1confirm, 2-22corrections to, function security, 5-10creation, 5-2creation, function security, 5-2notifications, 5-10
See also Receipt notifications
Index-9
one-click, 5-7quantity, corrections to, 5-9routing, Direct Delivery, 5-2view, function security for, 5-10view from requisition lines, 4-53viewing, 5-10
Receiving, 5-1, 5-2about, 1-11against internal requisitions, 5-6against intransit shipments, 5-5blind, 1-11, 5-3checklist, set up, 5-1Express, 5-2implementation considerations, receiving against intransit shipments, 5-6items, 1-11requisitions, 1-11, 5-7set up, against internal requisitions, 5-7
Receiving against internal requisitions, 5-6Receiving Transaction Processor:, 4-55Reconciliation
purchase order extract and flow, 4-28Reference fields, not supported, 2-24Requester Cancel Order Request flow, 4-52Requester Change Order Approval, 2-23Requester Change Order Request flow, 4-47Requesters
changes to purchase orders, 4-49function security, changes to purchase orders, 4-50requisition changes, 4-47set up changes to purchase orders, 4-49
Requestscontractor, 4-64create, 4-64non-catalog, 4-64
Requisition linescancel internal, 4-53cost distribution, 4-33cost distribution, awards and grants, 4-34cost distribution on, 4-33expenses, line numbering, 4-66invoices, view from, 4-53negotiation, view from, 4-53payments, view from, 4-54receipts, view from, 4-53referencing project and task information, 4-33
sales order, view from, 4-53shipments, view from, 4-53time cards, view from, 4-54
requisitionsinternal, 1-6
Requisitions, 4-63accounting for global requesters, 4-16addresses, one-time, 4-10Approval Routing, 1-10cancel, 1-10cancel, about, 4-52cancel, function security, 4-52cancel, implementation considerations, 4-52cancel, set up, 4-52change, 1-10changes, 4-46changes, approver-initiated, 4-47changes, requester-initiated, 4-47changes, workflows, 4-49charge accounts , 4-17
See also Charge accountscharge accounts, displaying, 4-17define flexfields on, 2-24foreign currency support, 4-3functional currencies, 4-4function security, 4-48function security for global requesters, 4-16function security for one-time addresses, 4-10hazard fields, hidden, 4-14implementation considerations for global requesters, 4-16incomplete, 1-10information templates, 4-4information templates, create, 4-5internal, 4-55lines, append quantity and UOM, 4-12lines, grouping with addresses, 4-11lines, hazard information, 4-14lines, implementation considerations, 4-14lines, profile options, 4-13lines, purchase order grouping options, 4-12lines, workflows, 4-13management, 1-10P-Cards, employee, 4-18profile options for addresses, 4-10profile options for expense charge account rules , 4-18

Index-10
profile options for global requesters, 4-15profile options for supplier P-Cards, 4-28receive, implementation considerations, 5-7receiving against internal, 5-6resubmit Rejected or Returned, 1-10set up, receiving against internal, 5-7setup checklist, 4-1status, 1-9suggested buyers, 4-9supplier P-Cards, 4-19
See also P-Cards.to receive, 5-7tracking, life cycle, 4-53tracking and management, 1-9translations and multilingual support, 4-6
ResponsibilitiesProcure to Pay Administrator, 4-18
Return receipts, 5-8Returns
about, 1-11receipts, 5-8receipts, function security, 5-9transactions, debit memos for, 5-9
See also Return transactionsReturn transactions
function security, debit memos for, 5-9profile options, debit memos for, 5-9set up debit memos for, 5-9
Ssales orders
internal, 1-6search
advanced searching, A-3Search Engine Logic, A-x
content zones, A-9filtering and sorting, A-7items display, A-5language, A-17Related Links, A-7relevance ranking, A-13search methods, A-1special (non-alphanumeric) characters, A-9technical details, A-13
Searchessetting related options, 3-63
Searchingprofile option setup , 3-64
Search Result Layouts, 3-64Service requisitions, 4-63
line types, 4-63Services
requisitioning, 1-11Services Procurement
See Oracle Services Procurementsetup
administrative, 2-3checklists, 2-1function security, 2-4menu security, 2-4Oracle Purchasing, 2-1other Oracle Applications, 2-2
shipmentsview, 1-11
Shipmentsdetails, display, 4-54details, populate, 4-54details, update, 4-54receiving against intransit, 5-5view from requisition lines, 4-53
Shipment tracking, 4-54Shopping, 1-3Shopping Categories, 3-12
delete, 3-13edit, 3-12find, 3-13view, 3-13
Shopping Category Mapping, 3-17find, 3-19map steps, 3-18remove, 3-18view map, 3-18
Shopping Lists, 1-5Single Context field, support for, 2-24Smart Form
assign to store, 3-42function security, 3-43operating units, 3-43profile options for, 3-43workflow, 3-43
Smart Forms, 3-34Sources
Confirm Receipts workflow, 4-58

Index-11
implementation considerations, 4-58internal, 4-56subinventory, 4-56supplier or external, 4-56
StatusApproved, 4-31Cancelled control, 4-51Completed Phase with Normal, 4-30Complete Phase with Warning, 4-30Control, 4-32On Hold, 4-32requisitions, 1-9
StatusesNot Applicable, 4-65Pending, 4-65purchase orders and receiving, 5-8
Status Requires Reapproval, 4-31Stores
default, 3-48profile option setup , 3-47set default favorite, 3-48
Supplier P-Cards, 1-7about, 4-19set up, 4-19
Supplierspreferred, 4-64
TTAX: Allow Override of Tax Recovery Rate, 2-61Taxes
Integration, 1-8purchase order change requests, 4-52
Thumbnail images, 3-59creating, 3-60profile options for, 3-61
Time cards, view from requisition lines, 4-54Tolerance, upper and lower limit, 2-22Tolerance Check, PO Change Request, 2-22tracking
shipments, 4-54Transaction currencies, 4-4translation
searching by language, A-17Translations
multilingual support, 4-6Transparent punchout catalogs, 3-33
UUnderstanding the Procurement Catalog, 3-1
VVacation scheduling, 1-10Validation
comparision of sources, 4-56Confirm Receipts workflow, 4-58implementation considerations, 4-58profile options, 4-58
Value basis, 4-63
WWorkflow, 2-18Workflows
approval process, 4-46confirm receipt notifications, 5-11confirm receipts notification, 5-6for setting suggested buyers, 4-9group options for one-time addresses, 4-12Oracle Services Procuremen, 4-70PO Change Request Tolerance Check, 4-49PO Create Documents, 4-49PO Requisition Approval, 4-49requester-initiated changes to purchase orders, 4-50requisition changes, 4-49smart form, 3-43
