non-contact infrared thermometer user's manual
TRANSCRIPT
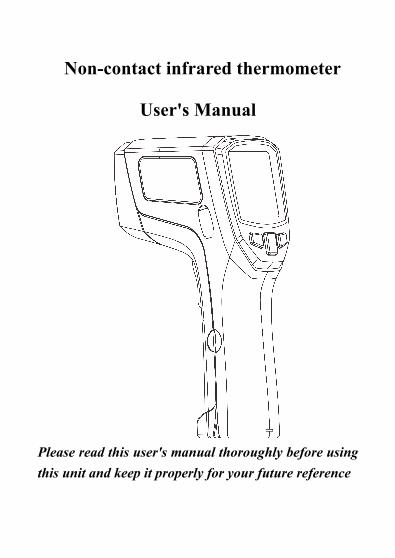
Non-contact infrared thermometer
User's Manual
Please read this user's manual thoroughly before using this unit and keep it properly for your future reference
1
Contents
1. Introduction ................................................................. 2
2. Features ....................................................................... 2
3. Application .................................................................. 3
4. Safety .......................................................................... 4
5. Distance & Spot Size .................................................. 5
6. Specifications .............................................................. 6
7. Meter Description ....................................................... 7
8. LCD display Description ............................................ 8
9. Operating Instruction .................................................. 9
10. Software installation ............................................... 12
11. Software interface introduction ............................... 12
12. Notes ....................................................................... 14
13.Accessories .............................................................. 16
2
1. Introduction Congratulations on your purchase of our professional non-contact
infrared thermometer. These units can provide fast, easy and
accurate temperature readings. With the non-contact (infrared)
technology, they can be used to measure the surface temperature
of hard-to-reach objects like electrified equipment or moving
objects, without any damage or pollution to them.
2. Features
Ø Fast and precise non contact measurement and K
temperature measurement
Ø Built in laser circle with 13 laser spots increase the target
accuracy
Ø SD card to store data, Format: CSV
Ø Records IR and TK data transfer to PC in real time by USB
Ø Adjustable emissivity: 0.1~1.0
Ø MAX, MIN, DIF, AVG temperature display
3
Ø LCD display with backlight
Ø Automatic measurement range selection with
resolution 0.1℃/℉
Ø Trigger lock
Ø High/Low Alarm
Ø Auto power off
3. Application
These units are widely used in Food preparation, Safety and Fire
inspection, Plastic molding, Asphalt, Marine, Printing ink and
dryer temperature, Diesel and Fleet maintenance, etc.
4
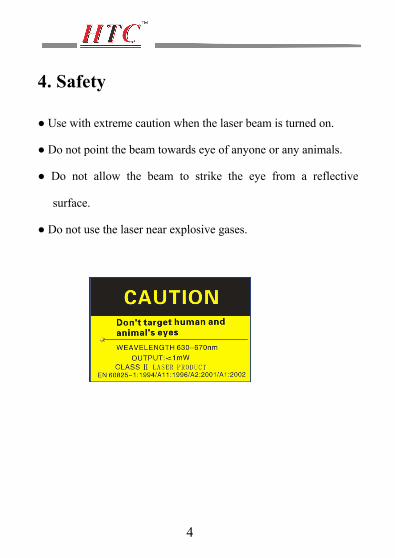
4. Safety
● Use with extreme caution when the laser beam is turned on.
● Do not point the beam towards eye of anyone or any animals.
● Do not allow the beam to strike the eye from a reflective
surface.
● Do not use the laser near explosive gases.
5
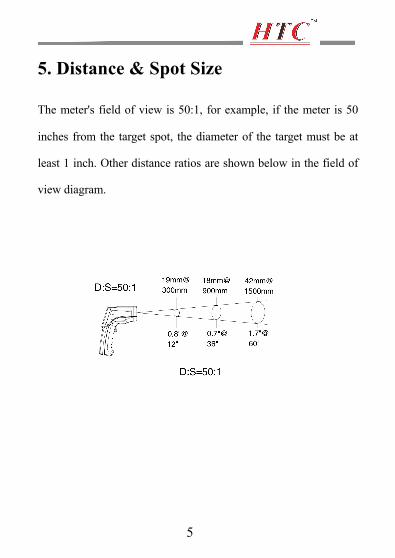
5. Distance & Spot Size
The meter's field of view is 50:1, for example, if the meter is 50
inches from the target spot, the diameter of the target must be at
least 1 inch. Other distance ratios are shown below in the field of
view diagram.
6
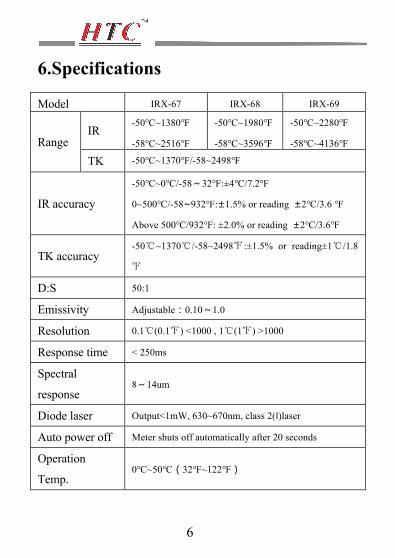
6.Specifications
Model IRX-67 IRX-68 IRX-69
Range IR
-50℃~1380℉
-58℃~2516℉
-50℃~1980℉
-58℃~3596℉
-50℃~2280℉
-58℃~4136℉
TK -50℃~1370℉/-58~2498℉
IR accuracy
-50℃~0℃/-58~32℉:±4℃/7.2℉
0~500℃/-58~932℉:±1.5% or reading ±2℃/3.6 ℉
Above 500℃/932℉: ±2.0% or reading ±2℃/3.6℉
TK accuracy -50℃~1370℃/-58~2498℉:±1.5% or reading±1℃/1.8
℉
D:S 50:1
Emissivity Adjustable:0.10~1.0
Resolution 0.1℃(0.1℉) <1000 , 1℃(1℉) >1000
Response time < 250ms
Spectral
response 8~14um
Diode laser Output<1mW, 630~670nm, class 2(ǁ)laser
Auto power off Meter shuts off automatically after 20 seconds
Operation
Temp. 0℃~50℃(32℉~122℉)
7
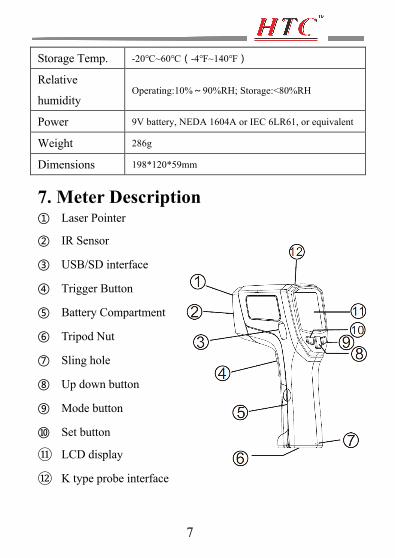
Storage Temp. -20℃~60℃(-4℉~140℉)
Relative
humidity Operating:10%~90%RH; Storage:<80%RH
Power 9V battery, NEDA 1604A or IEC 6LR61, or equivalent
Weight 286g
Dimensions 198*120*59mm
7. Meter Description ① Laser Pointer
② IR Sensor
③ USB/SD interface
④ Trigger Button
⑤ Battery Compartment
⑥ Tripod Nut
⑦ Sling hole
⑧ Up down button
⑨ Mode button
⑩ Set button
⑪ LCD display
⑫ K type probe interface

8
8. LCD display Description ① Measurement Icon and Data hold Icon ② Current temperature value ③ Functions Icon ④ Date. Time ⑤ Low Battery Icon ⑥ USB symbol ⑦ SD symbol ⑧ High/Low Alarm Icon ⑨ Temp. values for the MAX, MIN, DIF, AVG, HAL,
LAL. and TK ⑩ Temperature Unit(℃/℉) ⑪ Backlit Icon ⑫ Laser Icon ⑬ Emissivity value
9
9. Operating Instruction
1. Operating steps:
① Hold the meter by its handle grip and point it toward the
surface to be measured.
② Pull and hold the Trigger to turn the meter on, the "SCAN"
icon will appear and begin testing.
③ The surface temperature being tested will be displayed on the
LCD screen.
④ Release the trigger, the "HOLD" icon will appear, the readings
will be frozen
⑤ The meter will automatically shut off after 7 seconds after the
trigger is released.(Unless the unit is locked on)
Measurement Note:If the meter used in an ambient temperature
with wide temperature change, wait it at least 30 minutes to
adjust it.
The laser is designed for aiming only; it can be shut off while
operating in short distance to save the battery.
10
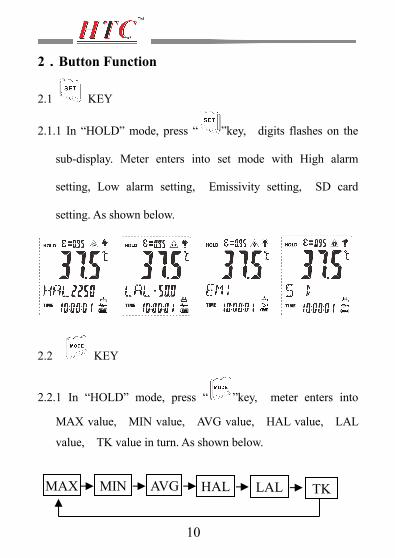
2.Button Function
2.1 KEY
2.1.1 In “HOLD” mode, press “ ”key, digits flashes on the
sub-display. Meter enters into set mode with High alarm
setting, Low alarm setting, Emissivity setting, SD card
setting. As shown below.
2.2 KEY
2.2.1 In “HOLD” mode, press “ ”key, meter enters into
MAX value, MIN value, AVG value, HAL value, LAL
value, TK value in turn. As shown below.
MIN MAX AVG HAL LAL TK
11
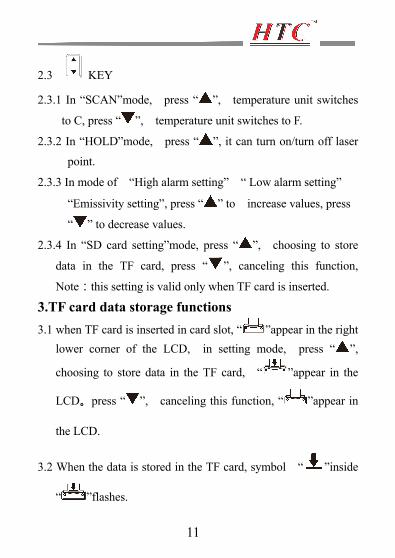
2.3 KEY
2.3.1 In “SCAN”mode, press “ ”, temperature unit switches
to C, press “ ”, temperature unit switches to F.
2.3.2 In “HOLD”mode, press “ ”, it can turn on/turn off laser
point.
2.3.3 In mode of “High alarm setting” “ Low alarm setting”
“Emissivity setting”, press “ ” to increase values, press
“ ” to decrease values.
2.3.4 In “SD card setting”mode, press “ ”, choosing to store
data in the TF card, press “ ”, canceling this function,
Note:this setting is valid only when TF card is inserted.
3.TF card data storage functions 3.1 when TF card is inserted in card slot, “ ”appear in the right
lower corner of the LCD, in setting mode, press “ ”,
choosing to store data in the TF card, “ ”appear in the
LCD。press “ ”, canceling this function, “ ”appear in
the LCD.
3.2 When the data is stored in the TF card, symbol “ ”inside
“ ”flashes.
12
4.Battery Replacement
4.1 When the battery is not sufficient, “ ” appears in the LCD,
one new 9V battery is required.
4.2 Open the battery compartment, replace the 9V battery and
close the battery compartment.
10. Software installation Insert the CD into the CD-driver, the software will run the setup
file directly, pls follow the installation tips to install software. if
the software do not run the setup file directly, pls Eject the CD
content and double click to install. pls follow the
installation tips to install software after running.
Note: After the installation is complete. Need to run the software
as “administrator” when you open the software at first time.
Note: USB driver need to be installed after install the PC software successfully
Open the installation disk file, find“Silabs-CDC-Install” and open it, select the corresponding drive application based on the PC system, double-click the file to install the driver.
13
11. Software interface introduction 11.1 Toolbar functions introduction:
11.1.1 open file
Open the saved data file, after opening, data and graphs presented
on the surface of the PC interface, so that the staff can analyze the
data and make assessments
11.1.2 save file
Save the current measured data to a PC’s hard drive, you can
customize the address and name of file to be saved.
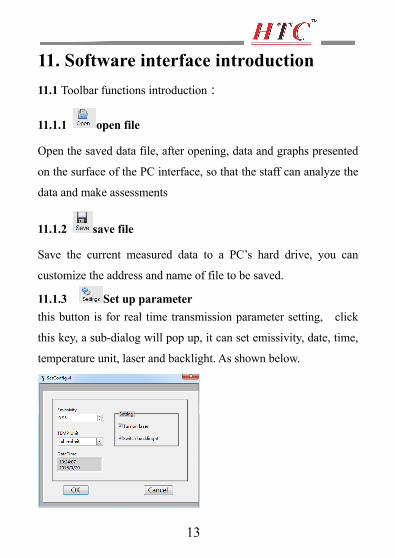
11.1.3 Set up parameter this button is for real time transmission parameter setting, click
this key, a sub-dialog will pop up, it can set emissivity, date, time,
temperature unit, laser and backlight. As shown below.
14
11.1.4 print file
Click this key, it can print the graph curve of the software interface
11.1.5 Start
Click this key, the meter begin to transmit data to the PC in real time. Note: pls set up required parameter before performing this function
11.1.6 Turn off
Click this key, the meter shuts off real time data transmission.
12. Notes ⑴ Work principle ! The infrared thermometer is designed for measuring
surface temperature of an object.
! The optical sensor can emit, reflect and transmit energy,
which is collected and focused on a detector, then
translate it into the temperature reading by electronics and
displayed on the LCD screen.
! The laser is used for aiming the target object only.
15
⑵ Field of View
! The object under test should be larger than the spot size
calculated by the field of view diagram.
! The smaller the target object is, the closer the meter
should be to it for accurate measuring.
! When accuracy is critical, make sure the target is at least
twice as large as the spot size.
⑶ Distance& Spot Size
As distance (D) from the object increases, the spot size (S) of
the area measured by the unit becomes larger.
⑷ Locating a hot Spot
To find a hot spot, first aim the thermometer to the outside of
target area, then scan across in an up and down motion until
the hot spot is located.
⑸ Notice
! Not recommend for measuring shiny or polished metal
surfaces like stainless steel, aluminum, etc.
! Do not make measurement through transparent surface
such as glass
! If the surface of the object under test is covered with frost,
oil, grease, etc., clean it before taking measurement.

16
⑹ Maintenance
! Do not use volatile liquids to clean the unit, wipe it with
dry soft cloth.
! Do not disassemble the unit, repair it by qualified
person
! Do not immerse it in water.
! Do not store it in high temperature or humidity.
⑺ Emissivity
Emissivity is a term used to describe the energy-emitting
characteristics of materials. Most (90%) organic materials and
painted or oxidized surfaces have an emissivity of 0.95
(pre-set in the unit).
13.Accessories
① User's Manual
② Tripod
③ 9V Battery
④ USB Cable
17
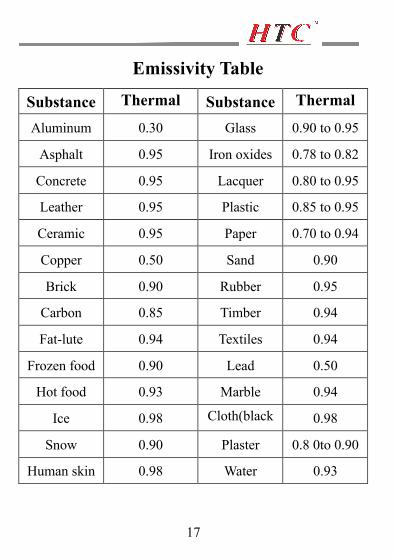
Emissivity Table
Substance Thermal emissivity
Substance Thermal emissivity Aluminum 0.30 Glass 0.90 to 0.95
Asphalt 0.95 Iron oxides 0.78 to 0.82
Concrete 0.95 Lacquer 0.80 to 0.95
Leather 0.95 Plastic 0.85 to 0.95
Ceramic 0.95 Paper 0.70 to 0.94
Copper 0.50 Sand 0.90
Brick 0.90 Rubber 0.95
Carbon 0.85 Timber 0.94
Fat-lute 0.94 Textiles 0.94
Frozen food 0.90 Lead 0.50
Hot food 0.93 Marble 0.94
Ice 0.98 Cloth(black)
0.98
Snow 0.90 Plaster 0.8 0to 0.90
Human skin 0.98 Water 0.93

18