nissan np300
TRANSCRIPT
NISSAN NP300QUICK REFERENCE GUIDE
CONTENTSDRIVING PREPARATION
Doors - Remotely Unlocking and Locking........................................................... 4Intelligent Key System............................................................................................................. 4Seat Adjustment.......................................................................................................................... 4Rear Seat Folding/Location of Jack and Tools (Double Cab Model). 5Jump Seat Folding/Location of Tools (King Cab Model)........................ 5Front Seat Folding/Location of Tools (Single Cab Model)..................... 5Passenger Airbag Deactivation..................................................................................... 5Steering Wheel Adjustment............................................................................................... 6Headlights.......................................................................................................................................... 6Automatic Anti-Glare Rearview Mirror..................................................................... 6Automatic Sunroof and Sunshade............................................................................. 6Climate Control.............................................................................................................................. 7Steering Wheel Controls....................................................................................................... 8Audio System.................................................................................................................................. 9Combined Audio and Navigation System (Nissan Connect)............. 9Connecting your Mobile Phone or Audio Device via Bluetooth...... 10Connecting an External Audio or Memory Device...................................... 11Connected Services.................................................................................................................. 11
DRIVING
Starting & Stopping the Engine with the Intelligent Key............................. 12Driving the Automatic Transmission Vehicle in Manual Shift Mode. 12ESP OFF switch................................................................................................................................... 12Cruise Control and Speed Limiter Switches........................................................... 13Four Wheel Drive Mode Control........................................................................................... 14Rear Di erential Locking System ..................................................................................... 15Forward Emergency Braking System........................................................................... 15Hill Start Assist..................................................................................................................................... 15Hill Descent Control........................................................................................................................ 16Fuel Gauge.............................................................................................................................................. 16Diesel Particulate Filter................................................................................................................ 16
AUXILIARY FUNCTIONS
Vehicle Information Display.................................................................................................... 17Instrument Brightness Control........................................................................................... 18Parking Sensor System............................................................................................................... 18Rear/Around View Monitor System................................................................................. 18
WELCOME TO YOUR NEW NISSAN NP300This guide provides a quick reference to several useful features of your new NP300.
Note that some of these features are optional and may not apply to your vehicle. For a complete description of all
systems and features of your vehicle, please refer to your vehicle’s Owner’s Manual.ENJOY YOUR DRIVE!
4 5
DR
IVIN
G P
RE
PA
RA
TIO
ND
RIV
ING
PR
EP
AR
AT
ION
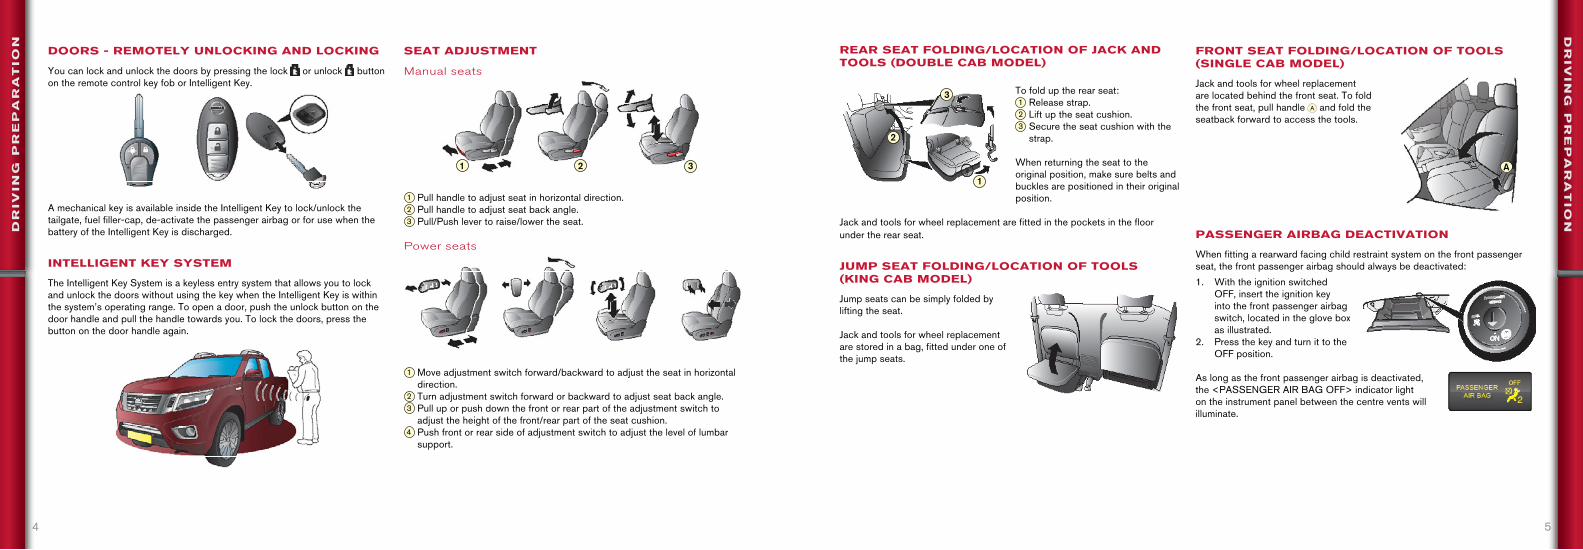
DOORS - REMOTELY UNLOCKING AND LOCKING
You can lock and unlock the doors by pressing the lock or unlock button on the remote control key fob or Intelligent Key.
A mechanical key is available inside the Intelligent Key to lock/unlock the tailgate, fuel filler-cap, de-activate the passenger airbag or for use when the battery of the Intelligent Key is discharged.
INTELLIGENT KEY SYSTEM
The Intelligent Key System is a keyless entry system that allows you to lock and unlock the doors without using the key when the Intelligent Key is within the system’s operating range. To open a door, push the unlock button on the door handle and pull the handle towards you. To lock the doors, press the button on the door handle again.
SEAT ADJUSTMENT
Manual seats
Pull handle to adjust seat in horizontal direction. Pull handle to adjust seat back angle. Pull/Push lever to raise/lower the seat.
Power seats
Move adjustment switch forward/backward to adjust the seat in horizontal direction.
Turn adjustment switch forward or backward to adjust seat back angle. Pull up or push down the front or rear part of the adjustment switch to adjust the height of the front/rear part of the seat cushion.
Push front or rear side of adjustment switch to adjust the level of lumbar support.
REAR SEAT FOLDING/LOCATION OF JACK AND TOOLS (DOUBLE CAB MODEL)
To fold up the rear seat: Release strap. Lift up the seat cushion. Secure the seat cushion with the strap.
When returning the seat to the original position, make sure belts and buckles are positioned in their original position.
Jack and tools for wheel replacement are fitted in the pockets in the floor under the rear seat.
JUMP SEAT FOLDING/LOCATION OF TOOLS (KING CAB MODEL)
Jump seats can be simply folded by lifting the seat.
Jack and tools for wheel replacement are stored in a bag, fitted under one of the jump seats.
FRONT SEAT FOLDING/LOCATION OF TOOLS (SINGLE CAB MODEL)
Jack and tools for wheel replacement are located behind the front seat. To fold the front seat, pull handle and fold the seatback forward to access the tools.
PASSENGER AIRBAG DEACTIVATION
When fitting a rearward facing child restraint system on the front passenger seat, the front passenger airbag should always be deactivated:1. With the ignition switched
OFF, insert the ignition key into the front passenger airbag switch, located in the glove box as illustrated.
2. Press the key and turn it to the OFF position.
As long as the front passenger airbag is deactivated, the <PASSENGER AIR BAG OFF> indicator light on the instrument panel between the centre vents will illuminate.
6 7
DR
IVIN
G P
RE
PA
RA
TIO
ND
RIV
ING
PR
EP
AR
AT
ION
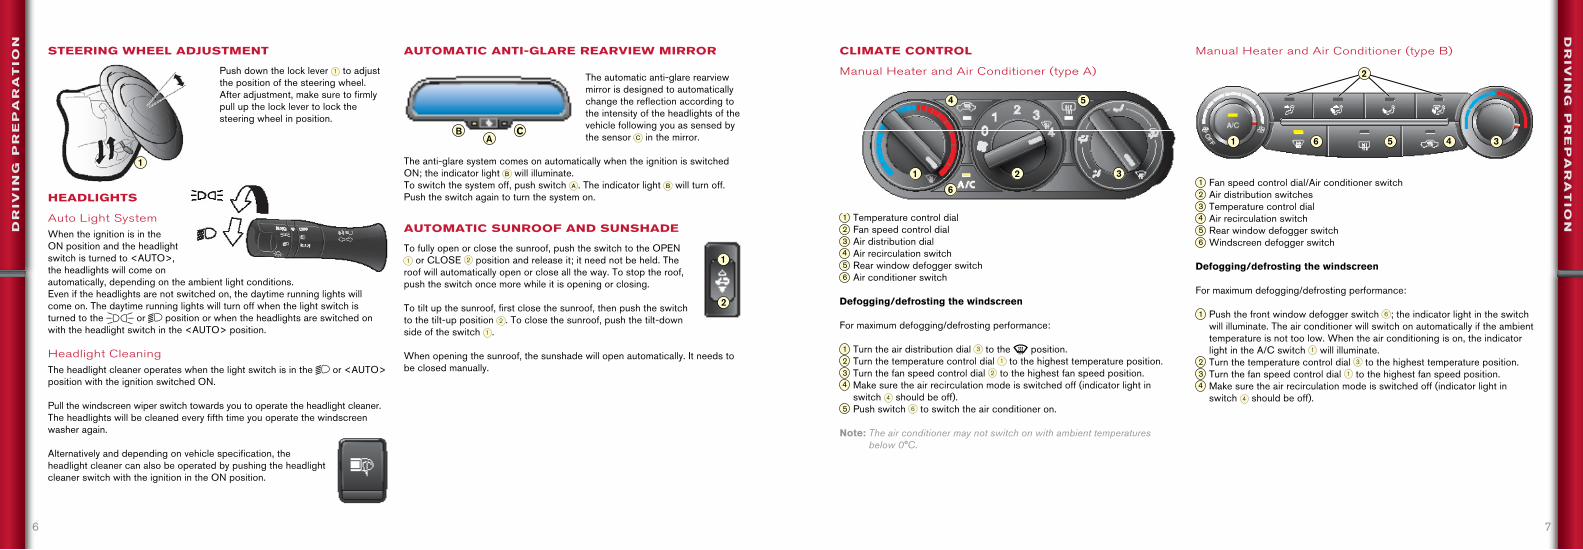
STEERING WHEEL ADJUSTMENT
Push down the lock lever to adjust the position of the steering wheel. After adjustment, make sure to firmly pull up the lock lever to lock the steering wheel in position.
HEADLIGHTS
Auto Light SystemWhen the ignition is in the ON position and the headlight switch is turned to <AUTO>, the headlights will come on automatically, depending on the ambient light conditions.Even if the headlights are not switched on, the daytime running lights will come on. The daytime running lights will turn off when the light switch is turned to the or position or when the headlights are switched on with the headlight switch in the <AUTO> position.
Headlight CleaningThe headlight cleaner operates when the light switch is in the or <AUTO> position with the ignition switched ON.
Pull the windscreen wiper switch towards you to operate the headlight cleaner. The headlights will be cleaned every fifth time you operate the windscreen washer again.
Alternatively and depending on vehicle specification, the headlight cleaner can also be operated by pushing the headlight cleaner switch with the ignition in the ON position.
AUTOMATIC ANTI-GLARE REARVIEW MIRROR
The automatic anti-glare rearview mirror is designed to automatically change the reflection according to the intensity of the headlights of the vehicle following you as sensed by the sensor in the mirror.
The anti-glare system comes on automatically when the ignition is switched ON; the indicator light will illuminate.To switch the system off, push switch . The indicator light will turn off. Push the switch again to turn the system on.
AUTOMATIC SUNROOF AND SUNSHADE
To fully open or close the sunroof, push the switch to the OPEN or CLOSE position and release it; it need not be held. The
roof will automatically open or close all the way. To stop the roof, push the switch once more while it is opening or closing.
To tilt up the sunroof, first close the sunroof, then push the switch to the tilt-up position . To close the sunroof, push the tilt-down side of the switch .
When opening the sunroof, the sunshade will open automatically. It needs to be closed manually.
CLIMATE CONTROL
Manual Heater and Air Conditioner (type A)
Temperature control dial Fan speed control dial Air distribution dial Air recirculation switch Rear window defogger switch Air conditioner switch
Defogging/defrosting the windscreen
For maximum defogging/defrosting performance:
Turn the air distribution dial to the position. Turn the temperature control dial to the highest temperature position. Turn the fan speed control dial to the highest fan speed position. Make sure the air recirculation mode is switched off (indicator light in switch should be off).
Push switch to switch the air conditioner on.
Note: The air conditioner may not switch on with ambient temperatures below 0°C.
Manual Heater and Air Conditioner (type B)
Fan speed control dial/Air conditioner switch Air distribution switches Temperature control dial Air recirculation switch Rear window defogger switch Windscreen defogger switch
Defogging/defrosting the windscreen
For maximum defogging/defrosting performance:
Push the front window defogger switch ; the indicator light in the switch will illuminate. The air conditioner will switch on automatically if the ambient temperature is not too low. When the air conditioning is on, the indicator light in the A/C switch will illuminate.
Turn the temperature control dial to the highest temperature position. Turn the fan speed control dial to the highest fan speed position. Make sure the air recirculation mode is switched off (indicator light in switch should be off).
8 9
DR
IVIN
G P
RE
PA
RA
TIO
ND
RIV
ING
PR
EP
AR
AT
ION
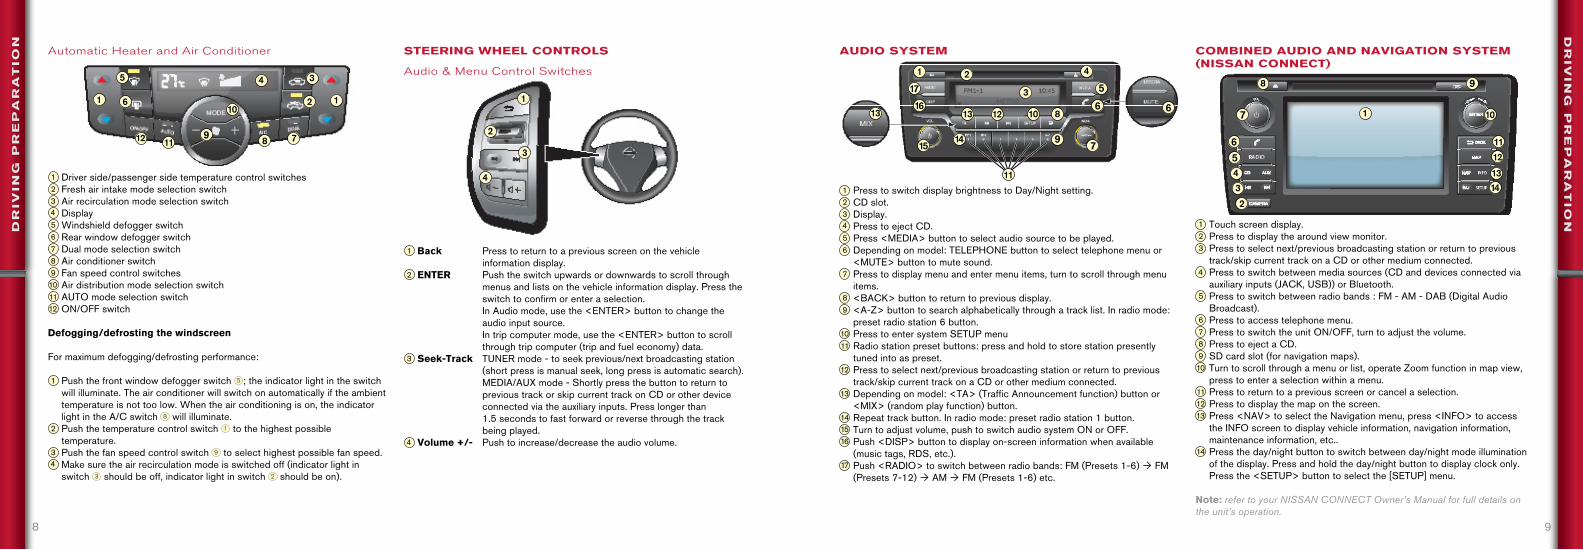
Automatic Heater and Air Conditioner
Driver side/passenger side temperature control switches Fresh air intake mode selection switch Air recirculation mode selection switch Display Windshield defogger switch Rear window defogger switch Dual mode selection switch Air conditioner switch Fan speed control switches Air distribution mode selection switch AUTO mode selection switch ON/OFF switch
Defogging/defrosting the windscreen
For maximum defogging/defrosting performance:
Push the front window defogger switch ; the indicator light in the switch will illuminate. The air conditioner will switch on automatically if the ambient temperature is not too low. When the air conditioning is on, the indicator light in the A/C switch will illuminate.
Push the temperature control switch to the highest possible temperature.
Push the fan speed control switch to select highest possible fan speed. Make sure the air recirculation mode is switched off (indicator light in switch should be off, indicator light in switch should be on).
STEERING WHEEL CONTROLS
Audio & Menu Control Switches
Back Press to return to a previous screen on the vehicle information display.
ENTER Push the switch upwards or downwards to scroll through menus and lists on the vehicle information display. Press the switch to confirm or enter a selection. In Audio mode, use the <ENTER> button to change the audio input source. In trip computer mode, use the <ENTER> button to scroll through trip computer (trip and fuel economy) data.
Seek-Track TUNER mode - to seek previous/next broadcasting station (short press is manual seek, long press is automatic search).
MEDIA/AUX mode - Shortly press the button to return to previous track or skip current track on CD or other device connected via the auxiliary inputs. Press longer than 1.5 seconds to fast forward or reverse through the track being played.
Volume +/- Push to increase/decrease the audio volume.
COMBINED AUDIO AND NAVIGATION SYSTEM (NISSAN CONNECT)
Touch screen display. Press to display the around view monitor. Press to select next/previous broadcasting station or return to previous track/skip current track on a CD or other medium connected.
Press to switch between media sources (CD and devices connected via auxiliary inputs (JACK, USB)) or Bluetooth.
Press to switch between radio bands : FM - AM - DAB (Digital Audio Broadcast).
Press to access telephone menu. Press to switch the unit ON/OFF, turn to adjust the volume. Press to eject a CD. SD card slot (for navigation maps). Turn to scroll through a menu or list, operate Zoom function in map view, press to enter a selection within a menu.
Press to return to a previous screen or cancel a selection. Press to display the map on the screen. Press <NAV> to select the Navigation menu, press <INFO> to access the INFO screen to display vehicle information, navigation information, maintenance information, etc..
Press the day/night button to switch between day/night mode illumination of the display. Press and hold the day/night button to display clock only.Press the <SETUP> button to select the [SETUP] menu.
Note: refer to your NISSAN CONNECT Owner’s Manual for full details on the unit’s operation.
AUDIO SYSTEM
Press to switch display brightness to Day/Night setting. CD slot. Display. Press to eject CD. Press <MEDIA> button to select audio source to be played. Depending on model: TELEPHONE button to select telephone menu or <MUTE> button to mute sound.
Press to display menu and enter menu items, turn to scroll through menu items.
<BACK> button to return to previous display. <A-Z> button to search alphabetically through a track list. In radio mode: preset radio station 6 button.
Press to enter system SETUP menu Radio station preset buttons: press and hold to store station presently tuned into as preset.
Press to select next/previous broadcasting station or return to previous track/skip current track on a CD or other medium connected.
Depending on model: <TA> (Traffic Announcement function) button or <MIX> (random play function) button.
Repeat track button. In radio mode: preset radio station 1 button. Turn to adjust volume, push to switch audio system ON or OFF. Push <DISP> button to display on-screen information when available (music tags, RDS, etc.).
Push <RADIO> to switch between radio bands: FM (Presets 1-6) Ò FM (Presets 7-12) Ò AM Ò FM (Presets 1-6) etc.
10 11
DR
IVIN
G P
RE
PA
RA
TIO
ND
RIV
ING
PR
EP
AR
AT
ION
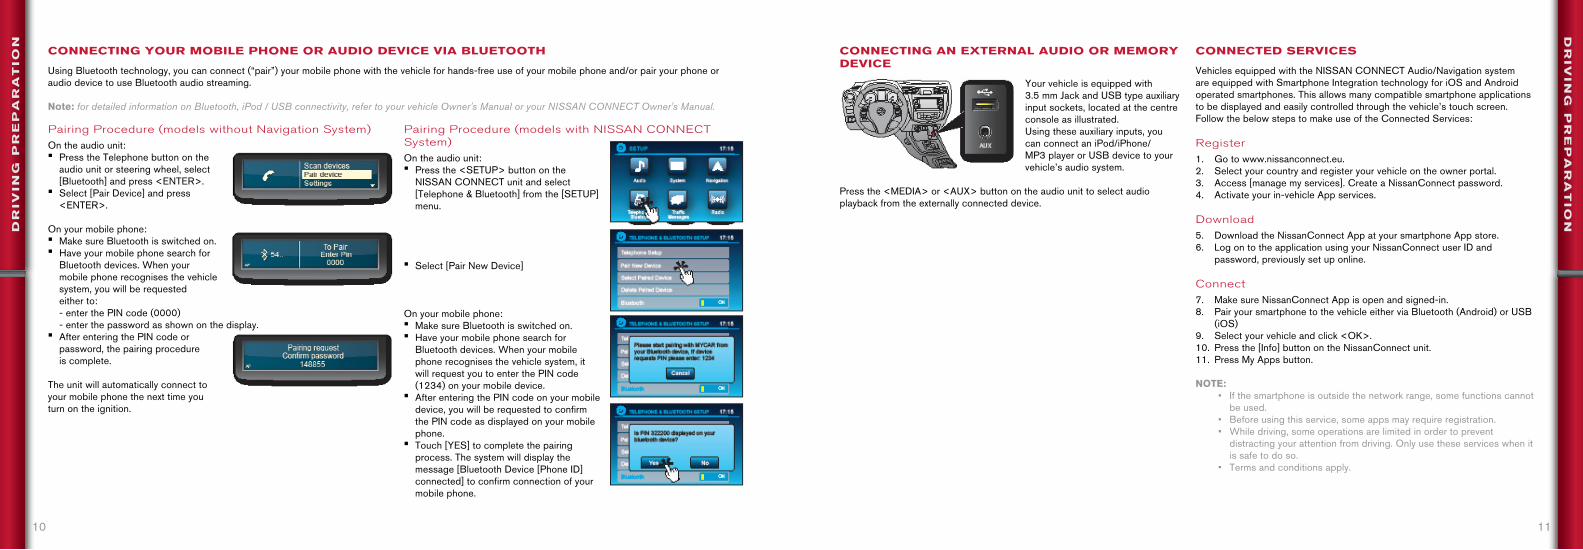
CONNECTING YOUR MOBILE PHONE OR AUDIO DEVICE VIA BLUETOOTH
Using Bluetooth technology, you can connect (“pair”) your mobile phone with the vehicle for hands-free use of your mobile phone and/or pair your phone or audio device to use Bluetooth audio streaming.
Note: for detailed information on Bluetooth, iPod / USB connectivity, refer to your vehicle Owner's Manual or your NISSAN CONNECT Owner's Manual.
Pairing Procedure (models without Navigation System)On the audio unit:• Press the Telephone button on the
audio unit or steering wheel, select [Bluetooth] and press <ENTER>.
• Select [Pair Device] and press <ENTER>.
On your mobile phone:• Make sure Bluetooth is switched on.• Have your mobile phone search for
Bluetooth devices. When your mobile phone recognises the vehicle system, you will be requested either to: - enter the PIN code (0000) - enter the password as shown on the display.
• After entering the PIN code or password, the pairing procedure is complete.
The unit will automatically connect to your mobile phone the next time you turn on the ignition.
Pairing Procedure (models with NISSAN CONNECT System)On the audio unit:• Press the <SETUP> button on the
NISSAN CONNECT unit and select [Telephone & Bluetooth] from the [SETUP] menu.
• Select [Pair New Device]
On your mobile phone:• Make sure Bluetooth is switched on.• Have your mobile phone search for
Bluetooth devices. When your mobile phone recognises the vehicle system, it will request you to enter the PIN code (1234) on your mobile device.
• After entering the PIN code on your mobile device, you will be requested to confirm the PIN code as displayed on your mobile phone.
• Touch [YES] to complete the pairing process. The system will display the message [Bluetooth Device [Phone ID] connected] to confirm connection of your mobile phone.
CONNECTED SERVICES
Vehicles equipped with the NISSAN CONNECT Audio/Navigation system are equipped with Smartphone Integration technology for iOS and Android operated smartphones. This allows many compatible smartphone applications to be displayed and easily controlled through the vehicle’s touch screen.Follow the below steps to make use of the Connected Services:
Register1. Go to www.nissanconnect.eu.2. Select your country and register your vehicle on the owner portal.3. Access [manage my services]. Create a NissanConnect password.4. Activate your in-vehicle App services.
Download5. Download the NissanConnect App at your smartphone App store.6. Log on to the application using your NissanConnect user ID and
password, previously set up online.
Connect7. Make sure NissanConnect App is open and signed-in.8. Pair your smartphone to the vehicle either via Bluetooth (Android) or USB
(iOS)9. Select your vehicle and click <OK>.10. Press the [Info] button on the NissanConnect unit. 11. Press My Apps button.
NOTE: • If the smartphone is outside the network range, some functions cannot
be used. • Before using this service, some apps may require registration. • While driving, some operations are limited in order to prevent
distracting your attention from driving. Only use these services when it is safe to do so.
• Terms and conditions apply.
CONNECTING AN EXTERNAL AUDIO OR MEMORY DEVICE
Your vehicle is equipped with 3.5 mm Jack and USB type auxiliary input sockets, located at the centre console as illustrated.Using these auxiliary inputs, you can connect an iPod/iPhone/MP3 player or USB device to your vehicle’s audio system.
Press the <MEDIA> or <AUX> button on the audio unit to select audio playback from the externally connected device.
12 13
DR
IVIN
GD
RIV
ING
STARTING & STOPPING THE ENGINE WITH THE INTELLIGENT KEY
To start the engine using the Intelligent Key:1. Manual transmission models:
Depress the clutch pedal with the shift lever in the N (Neutral) position. Automatic transmission models: DEPRESS THE BRAKE PEDAL WHILE THE SHIFT LEVER IS IN THE P (PARK) OR N (NEUTRAL) POSITION.
Depress the brake pedal while the shift lever is in the P (Park) or N (Neutral) position.
2. Push the push-button ignition switch. The engine will start or the glow plug indicator light will come on when pre-heating of the diesel engine is required.
3. If the glow plug indicator light came on, wait until the light turns off, then push the push-button ignition switch once again to start the engine.
To stop the engine using the Intelligent Key:
1. Stop the vehicle.
2. Manual transmission models: Depress the clutch pedal and move the shift lever to the N (Neutral) position. Automatic transmission models: Depress the brake pedal and move the shift lever to the P (Park) or N (Neutral) position.
3. Push the push-button ignition switch to stop the engine. The ignition switch is now in the OFF position.
4. After opening the door, the ignition switch position will change from OFF to LOCK and the steering lock will be activated.
DRIVING THE AUTOMATIC TRANSMISSION VEHICLE IN MANUAL SHIFT MODE
When the shift lever is shifted into the manual (+/-) shift gate, the transmission can be shifted as a 7-gears sequential gearbox. To shift up, move the shift lever to the + (up) side. To shift down, move the shift lever to the – (down) side.
In the manual shift mode, the actual transmission position is displayed in the vehicle information display.
ESP OFF SWITCH
The Electronic Stability Program (ESP) monitors driver inputs and vehicle motion. Under certain driving conditions, the ESP system will help you to control the vehicle by applying braking force to one or more road wheels and adjust engine output in order to retain or regain vehicle stability.Under certain conditions, for example when freeing the vehicle from mud or snow, you may want to deactivate the ESP system in order to have full engine output on the wheels to free the vehicle.
To switch off the ESP system, push the ESP <OFF> switch: the ESP OFF indicator light in the combination meter will illuminate. Push the switch again to switch on the ESP system; the ESP OFF indicator light in the combination meter will turn off.
When the ESP system is switched off, it will automatically be switched on again after the ignition switch is switched from OFF to ON, next time you start the vehicle.
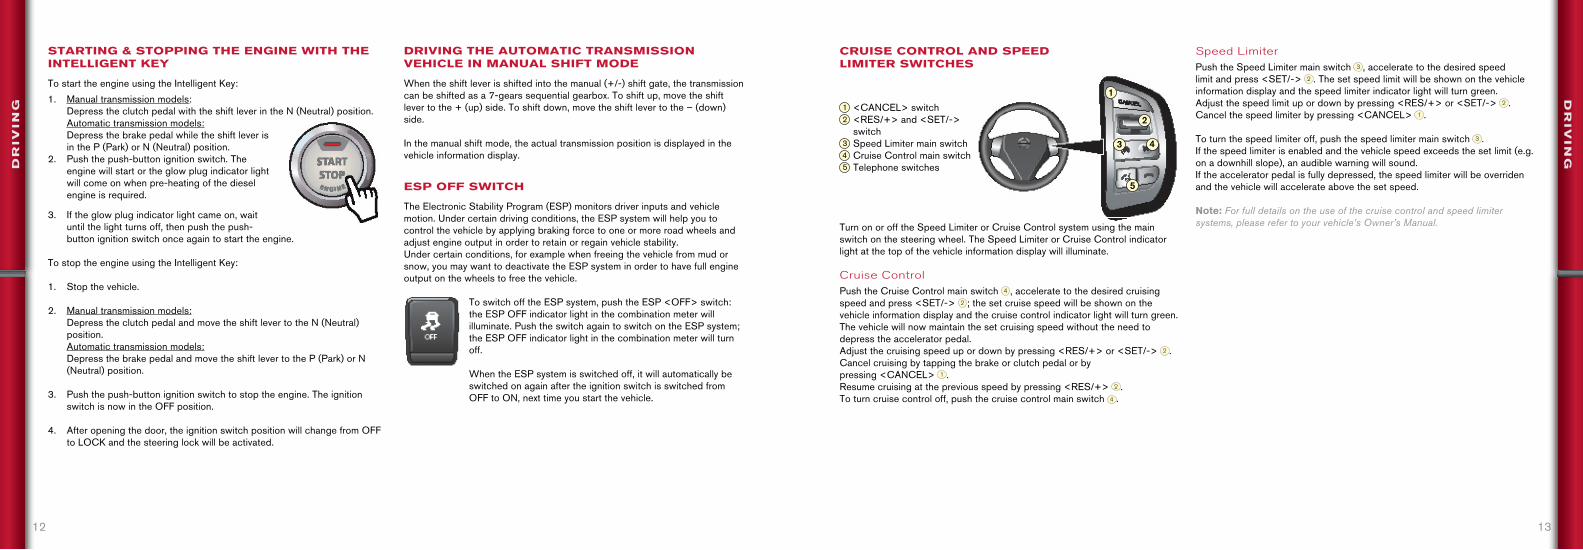
CRUISE CONTROL AND SPEED LIMITER SWITCHES
<CANCEL> switch <RES/+> and <SET/-> switch
Speed Limiter main switch Cruise Control main switch Telephone switches
Turn on or off the Speed Limiter or Cruise Control system using the main switch on the steering wheel. The Speed Limiter or Cruise Control indicator light at the top of the vehicle information display will illuminate.
Cruise ControlPush the Cruise Control main switch , accelerate to the desired cruising speed and press <SET/-> ; the set cruise speed will be shown on the vehicle information display and the cruise control indicator light will turn green.The vehicle will now maintain the set cruising speed without the need to depress the accelerator pedal.Adjust the cruising speed up or down by pressing <RES/+> or <SET/-> .Cancel cruising by tapping the brake or clutch pedal or by pressing <CANCEL> .Resume cruising at the previous speed by pressing <RES/+> .To turn cruise control off, push the cruise control main switch .
Speed LimiterPush the Speed Limiter main switch , accelerate to the desired speed limit and press <SET/-> . The set speed limit will be shown on the vehicle information display and the speed limiter indicator light will turn green.Adjust the speed limit up or down by pressing <RES/+> or <SET/-> .Cancel the speed limiter by pressing <CANCEL> .
To turn the speed limiter off, push the speed limiter main switch .If the speed limiter is enabled and the vehicle speed exceeds the set limit (e.g. on a downhill slope), an audible warning will sound.If the accelerator pedal is fully depressed, the speed limiter will be overriden and the vehicle will accelerate above the set speed.
Note: For full details on the use of the cruise control and speed limiter systems, please refer to your vehicle’s Owner’s Manual.
14 15
DR
IVIN
GD
RIV
ING
WARNING
The forward emergency brake system is a supplemental aid to the driver. It is not a substitute for the driver's attention to traffic conditions or his responsibility to drive safely. It cannot prevent accidents due to carelessness or dangerous driving.
The forward emergency brake system may not function under all driving, traffic, weather and road conditions.
Note: Refer to your vehicle's Owner's Manual for full details on the functioning of the Forward Emergency Brake system.
HILL START ASSIST
The Hill Start Assist (HSA) system automatically keeps the brakes applied for 2 seconds to prevent the vehicle from rolling as you start to drive away on a hill.Hill Start Assist will operate automatically under the following conditions:
• The shift lever is shifted into a forward (vehicle facing uphill) or reverse (vehicle facing downhill) gear,
• The vehicle is stopped completely on a hill by applying the foot brake,• The slope exceeds 3 degrees.
REAR DIFFERENTIAL LOCKING SYSTEM
The rear differential locking system is designed to transmit engine power equally to the left hand and right hand rear wheels.
If your vehicle is stuck in sand, mud, snow, etc. and the differential lock is not activated, all engine power is transmitted
to the wheel that encounters the least resistance, thus causing it to spin. In such case, switch on the rear differential locking system as follows:
1. Completely stop the vehicle.
2. Turn the 4WD mode switch to the <4LO> position.
3. Push the differential lock switch to the ON position. The differential lock indicator light will first blink and then remain on when the differential gear is locked.
FORWARD EMERGENCY BRAKING SYSTEM
The Forward Emergency Brake system assists you in avoiding frontal collisions. The system operates at speeds above approx. 5 km/h.The system uses a radar sensor behind the front bumper to calculate the distance between your vehicle and the vehicle in front of you.If the distance becomes too small, the vehicle ahead indicator light will flash and a chime will sound. If the distance becomes even smaller, the beep will sound more frequently and the forward collision avoidance system warning light will start flashing. If finally the distance becomes even smaller, active braking will be applied to avoid or reduce the impact of a collision with the vehicle in front of you.
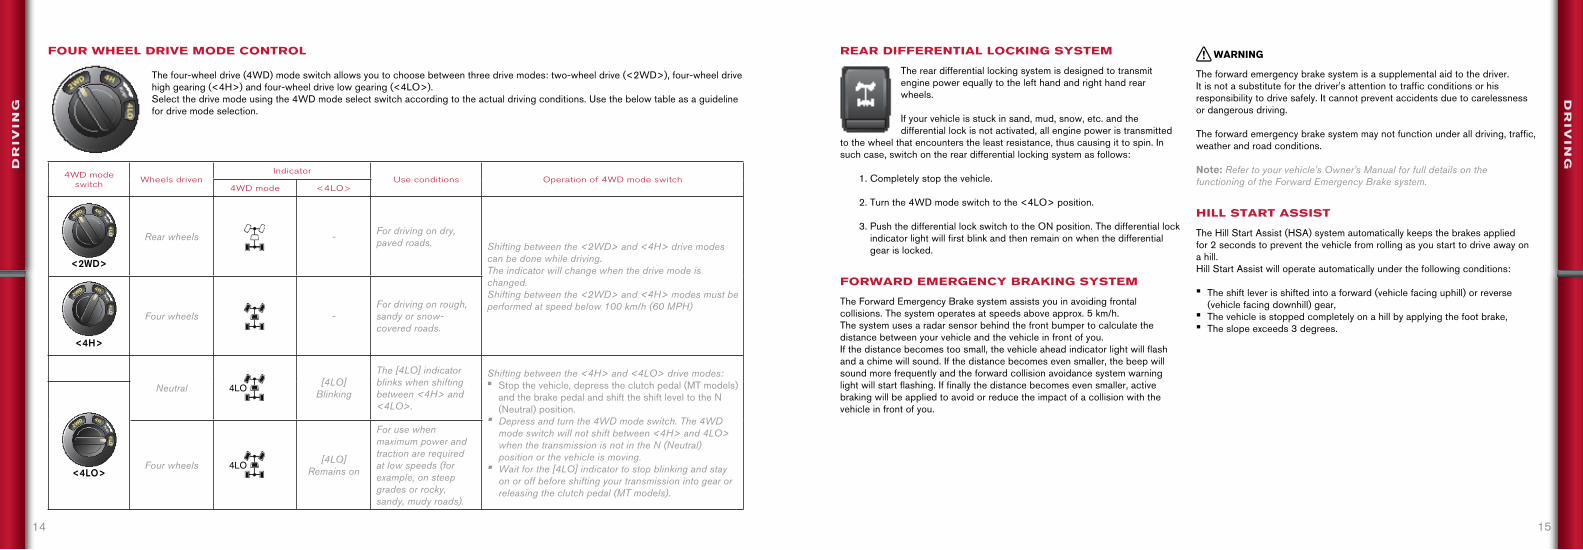
FOUR WHEEL DRIVE MODE CONTROL
The four-wheel drive (4WD) mode switch allows you to choose between three drive modes: two-wheel drive (<2WD>), four-wheel drive high gearing (<4H>) and four-wheel drive low gearing (<4LO>).Select the drive mode using the 4WD mode select switch according to the actual driving conditions. Use the below table as a guideline for drive mode selection.
4WD mode switch Wheels driven
IndicatorUse conditions Operation of 4WD mode switch
4WD mode <4LO>
<2WD>
Rear wheels - For driving on dry, paved roads. Shifting between the <2WD> and <4H> drive modes
can be done while driving.The indicator will change when the drive mode is changed.Shifting between the <2WD> and <4H> modes must be performed at speed below 100 km/h (60 MPH)
<4H>
Four wheels -For driving on rough, sandy or snow-covered roads.
Neutral 4LO[4LO]
Blinking
The [4LO] indicator blinks when shifting between <4H> and <4LO>.
Shifting between the <4H> and <4LO> drive modes:• Stop the vehicle, depress the clutch pedal (MT models)
and the brake pedal and shift the shift level to the N (Neutral) position.
• Depress and turn the 4WD mode switch. The 4WD mode switch will not shift between <4H> and 4LO> when the transmission is not in the N (Neutral) position or the vehicle is moving.
• Wait for the [4LO] indicator to stop blinking and stay on or off before shifting your transmission into gear or releasing the clutch pedal (MT models).
<4LO>Four wheels 4LO
[4LO] Remains on
For use when maximum power and traction are required at low speeds (for example, on steep grades or rocky, sandy, mudy roads).
16 17
HILL DESCENT CONTROL
The Hill Descent Control system provides automatic additional braking on steep hills below 25-35 km/h, e.g. during off-road driving. It is a useful feature when engine braking alone is not sufficient to control the desired vehicle speed.
To most efficiently use the Hill Descent Control system:
1. Turn the 4WD mode switch to the <4LO> position.
2. Push the Hill Descent Control switch, located on the centre console, to the ON position; The Hill Descent Control light on the instrument panel will illuminate and the system will automatically maintain a low descending speed.
If you depress either the accelerator pedal or the brake pedal when the Hill Descent Control system is active, the system will be temporarily deactivated. As soon as you release the accelerator or brake pedal, the Hill Descent Control function will be restored.
To turn off the Hill Descent Control system, push the Hill Descent Control switch again; the indicator light on the instrument panel will turn off.
FUEL GAUGE
The fuel gauge indicates the approximate level of fuel in the tank when the ignition is ON.
A low fuel warning appears on the vehicle information display when the fuel level in the tank is getting low. Refuel as soon as it is convenient.
The arrow with the fuel pump symbol reminds you that the fuel-filler lid is located on the left hand side of the vehicle.
To open the fuel-filler lid, push the fuel-filler opener switch on the lower instrument panel. While refuelling, put the fuel filler cap on the cap holder as illustrated.After refuelling, turn the fuel cap clockwise until you hear the ratchet clicks and firmly close the fuel-filler lid.
DIESEL PARTICULATE FILTER
Driving conditions such as frequent short journeys or stop/start driving can result in excessive build up of carbon in the filter.
When this happens, the Diesel Particulate Filter (DPF) warning light will illuminate to inform you that the vehicle must be driven in a particular manner to start regeneration of the DPF filter.
When the DPF warning light is illuminated, provided that legal and safety conditions allow, the vehicle should be driven at a speed of over 80 km/h until the DPF warning light turns off.
DR
IVIN
GA
UX
ILIA
RY
FU
NC
TIO
NS
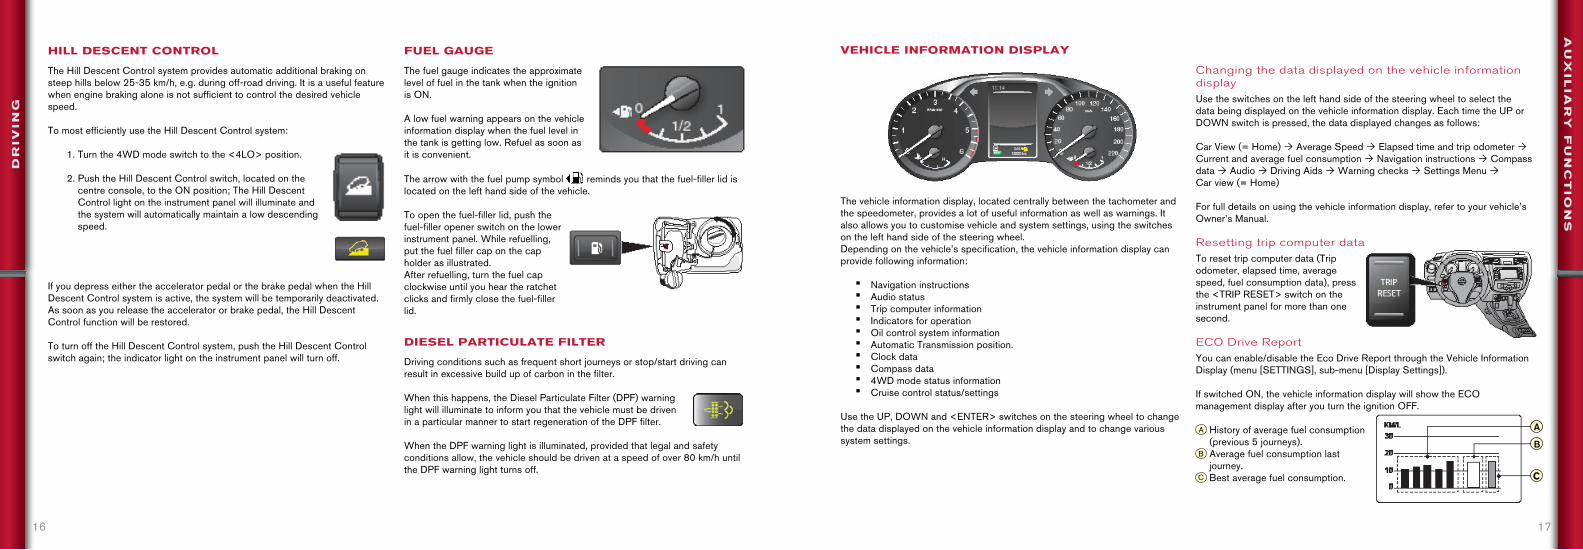
VEHICLE INFORMATION DISPLAY
The vehicle information display, located centrally between the tachometer and the speedometer, provides a lot of useful information as well as warnings. It also allows you to customise vehicle and system settings, using the switches on the left hand side of the steering wheel.Depending on the vehicle’s specification, the vehicle information display can provide following information:
• Navigation instructions• Audio status• Trip computer information• Indicators for operation• Oil control system information• Automatic Transmission position.• Clock data• Compass data• 4WD mode status information• Cruise control status/settings
Use the UP, DOWN and <ENTER> switches on the steering wheel to change the data displayed on the vehicle information display and to change various system settings.
Changing the data displayed on the vehicle information displayUse the switches on the left hand side of the steering wheel to select the data being displayed on the vehicle information display. Each time the UP or DOWN switch is pressed, the data displayed changes as follows:
Car View (= Home) Ò Average Speed Ò Elapsed time and trip odometer Ò Current and average fuel consumption Ò Navigation instructions Ò Compass data Ò Audio Ò Driving Aids Ò Warning checks Ò Settings Menu Ò Car view (= Home)
For full details on using the vehicle information display, refer to your vehicle’s Owner’s Manual.
Resetting trip computer dataTo reset trip computer data (Trip odometer, elapsed time, average speed, fuel consumption data), press the <TRIP RESET> switch on the instrument panel for more than one second.
ECO Drive ReportYou can enable/disable the Eco Drive Report through the Vehicle Information Display (menu [SETTINGS], sub-menu [Display Settings]).
If switched ON, the vehicle information display will show the ECO management display after you turn the ignition OFF.
History of average fuel consumption (previous 5 journeys).
Average fuel consumption last journey.
Best average fuel consumption.
18
REAR/AROUND VIEW MONITOR SYSTEM
The rear/around view monitor is designed to assist you visually in becoming aware of objects behind/around the vehicle while reversing.It uses one or more cameras in combination with sonar sensors in the rear bumper (around view monitor system only).
The rear/around view monitor is automatically activated when you shift into reverse gear.
You can also activate the around view monitor by pressing the <CAMERA> button on the NISSAN CONNECT unit.
Apart from the visual display of the area around the vehicle, the around view monitor system uses the parking sensor system to provide audible warnings when you approach an object behind the vehicle.
INSTRUMENT BRIGHTNESS CONTROL
The brightness of the instrument panel lighting can be adjusted using the instrument brightness control switch on the instrument panel.
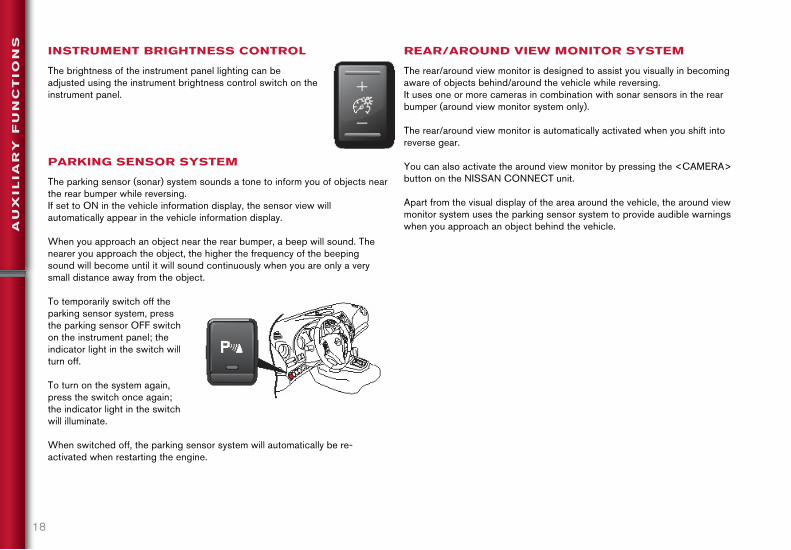
PARKING SENSOR SYSTEM
The parking sensor (sonar) system sounds a tone to inform you of objects near the rear bumper while reversing.If set to ON in the vehicle information display, the sensor view will automatically appear in the vehicle information display.
When you approach an object near the rear bumper, a beep will sound. The nearer you approach the object, the higher the frequency of the beeping sound will become until it will sound continuously when you are only a very small distance away from the object.
To temporarily switch off the parking sensor system, press the parking sensor OFF switch on the instrument panel; the indicator light in the switch will turn off.
To turn on the system again, press the switch once again; the indicator light in the switch will illuminate.
When switched off, the parking sensor system will automatically be re-activated when restarting the engine.
AU
XIL
IAR
Y F
UN
CT
ION
S