nextgen® ehr charting a telephone call
TRANSCRIPT

10.8.2015 5.7/8.1 Page 1 of 4
NextGen® EHR Charting a Telephone Call Quick Reference
Overview
This guide covers how to chart, respond to and complete a telephone call in the Hill EHR.
Telephone Calls & Tasking
Adding a New Telephone Call
1. Search for the patient by clicking the icon.
2. Enter the appropriate criteria (last name, first name, DOB, etc.) and select the desired patient.
3. Perform a 4 point check (Patient Name, Location, Provider, Encounter Date).
4. Click to create an encounter for today’s telephone call.
5. Select the Telephone Call template from your preferred templates icon

10.8.2015 v.5.7/KBM 8.1 Page 2 of 4
6. Select Specialty if there is no default. Visit Type will auto-populate as Patient Communication.
7. Select the appropriate Communications Link (i.e., Medical Question).
8. Starting from the top, fill in the applicable fields (none of the fields are required).
9. Click either Save & Send to task to someone (i.e., a provider) or Save & Close if no further action
is required.
Note: Reply & Close is selected if you want to task back to the user that sent you the telephone call
message (i.e., the provider usually is the one to utilize this button to task back his/her
answer/orders to a telephone call).

10.8.2015 v.5.7/KBM 8.1 Page 3 of 4
Responding to a Telephone Call Task
1. Click the Inbox icon to see appointments and tasks .
2. Highlight the item in your task list and click .
3. Review the details of the task and click to open the patient’s chart to the main
telephone call template.
4. Review the Communications grid in the center of the main template.
5. Click on the Purple Communications Link (e.g., ) to take you to the
appropriate response pop up.
6. Fill in the desired response(s) (i.e., type directions in the Comments field and/or select one or
more of the Action Item checkboxes.

10.8.2015 v.5.7/KBM 8.1 Page 4 of 4
7. Click the desired Response button:
Button Functionality
Will save the info entered and send a task back to the user
that sent you the task.
Will save the info entered and allow you to send a task to a
different user or group of users.
Will save the info entered and is used when no further action
is needed.
8. Click Save & Close on the main telephone call template to generate the Telephone Call
Document.
Note: The document will be updated with the newly entered information each time a user
selects Save & Close on the Main Telephone Call Template.
9. Go back to your inbox and mark the task as complete by selecting the Completed checkbox.

3.25.2014 v.5.8/KBM 8.3 Page 1 of 3
NextGen® EHR Prescribe a Medication User Guide
Overview
This user guide covers how to add a medication to a patient’s chart and send it to the pharmacy.
Access the Medication Module
Open the Medication Module by clicking on the Rx icon on the History Bar or the Meds Icon on the bottom of the
SOAP Tab.
Perform a Medication Search
1. Click Prescribe New to open the Medication Search Dialog.
2. Click in the Find Field and start typing the name of the desired medication.
3. Double Click on the desired Medication and Dosage to add it to the medication cart below.
4. Drug Interaction Warning Screen May Appear.
a. Click the Acknowledge Button to acknowledge each interaction individually.
b. When all precautions are acknowledged, click Done Button.
5. Repeat the steps above for additional medications
6. When all desired meds are in the cart, click Select Button to move all of them into the temporary status within the patient’s chart.
This med list includes all Active, Inactive, Temporary, and Future medications entered by practices using the Hill EHR
Click Eligibility to see a patient’s
medication history and to see if they are eligible for an
expensive med
Access internet resources on highlighted med
Add new medications here
Prescription Details Area

3.25.2014 Page 2 of 3
Modify the Prescription Details for a Medication
Once a medication has been selected and appears in the Temporary Status of the Medication Grid, the
prescription details can now be modified.
Modify the Sig
1. Click on Edit Sig to activate the sig builder. a. Change each part of the sig item by item or use the dropdown menu for common sigs.
2. Click Done to save changes
Search for new medications here.
--New Medication Cart Feature--
Click View>Display Options... to activate: Generic for Brand Option & Medication Cart Feature
Double-click on desired dosage to add to the cart below
Use Formulary activates a search
box that gives additional formulary details regarding a
medication based on patient’s eligibility
Right click on tab to edit name
Drag-and-drop dosage/medications to save in favorites
area.
Add patient notes such as side effects or patient is not taking consistently. Medication reconciliation
comments show up here as well.
Access the sig editor
Associate Diagnoses
with a Med Use this area for tapers
Click here for more prescription options
Red = Required fields
Add number of days and click here to auto-calculate quantity and stop date
Prescribed Elsewhere for medications
managed elsewhere

3.25.2014 Page 3 of 3
Modify the remaining prescription fields as needed
3. Adjust quantity, refills, and other desired fields as needed.
4. Click the Accept Button to move the medication into the active column.
Send a Medication (eRx or Fax)
1. Highlight the desired medications from the active medication list by holding down the Ctrl key on the
keyboard and clicking on the desired medication(s). 2. Click the Send icon from the Action Bar. 3. Check the box next to the desired medications that you want sent. 4. Choose the pharmacy. 5. Click Send to eRx to the pharmacy.
Check box to activate the corresponding field above
The choices from the picklists below build the sig here
140 character limit
Click dropdown to choose from a list of common sigs
Click Done to finish
Choose patient’s alternate pharmacy here
Add a New Pharmacy
Choose which Medication(s) to send
Skip eRx option and force prescription to fax
See patient and prescriber information along with last visit and next appointment

5.6.2016 v.5.8/KBM 8.3 Page 1 of 2
Checking the box activates the reaction
picklist. Hit the escape key if reaction
is unknown
NextGen® EHR Manage Patient Allergies User Guide
Overview
This guide covers how to add allergies for a patient and modify existing allergies. The Medication Allergies Module
is an enterprise chart feature which means that it is shared between Hill EHR practices.
Review Allergies (Meaningful Use Measure)
There is an Allergies section under both the Home Tab and the Intake Tab where allergies can be reviewed and
added as needed
1. Check No Known allergies if there are no allergies to add.
2. Choose Reviewed, no change if the patient’s allergies were reviewed without changes.
3. You won’t have to choose the Allergies added this encounter option because it will auto-populate if new
allergies are entered for today’s visit.
Add Allergy with Pop-up Dialog
1. Go to the Allergies section under the Intake Tab.
2. Click the Add Button under the allergies grid.
3. Check the box next to any patient allergies.
*Optional: Pick an associated reaction from the
picklist or hit escape key.
4. Select Save & Close to add the medication allergies
to the grid.
Access the Allergy Module
Open the Medication Allergy Module by clicking on the Flower Icon on the History Bar or Top
Toolbar.
These boxes are an important part of meaningful use to show that the allergies were reviewed, even if none are added.
New Allergy Comments Link

5.6.2016 v.5.8/KBM 8.3 Page 2 of 2
Partial descriptions are ok
These filters will focus the
results to one allergy type
Add an Allergy
1. Click on the Magnifying Glass icon to begin a search. 2. Click “Contains” radio button. 3. Type the name of the allergy in the description field. 4. Highlight the allergen and click OK. 5. Fill out other pertinent fields as desired (optional). 6. Click Add Button to add it to the grid above.
Resolve an Allergy
1. Highlight an existing allergy. 2. Click on the magnifying glass icon next to the Resolved
Field. 3. Choose a resolution date from the calendar (click on the year to scroll to previous years).
4. Select the Update Button.
--Add an Allergy-- Lookup a new allergy
here and then click the Add Button to move it
to the grid above
Resolve /Stop an allergy here
-- Optional -- Choose Severity and Reaction from a picklist by
clicking the dropdown menu. The reaction picklist will move by typing a letter (e.g. R for Rash)
Right click on an allergy to access more information from the web
Access the Clinical Reconciliation Module
--- Delete an Allergy ---
While deleting an allergy is not recommended, the encounter where the allergy was entered must be unlocked in order to delete an allergy

10.14.2015 Page 1 of 4
NextGen® EHR 8.3.8 Charting Reason for Visit User Guide
Overview
This user guide covers how to chart a reason for visit.
Review/Update Reason for Visit and History of Present Illness
Add a Reason for Visit (4 options)
Table 1: Option 1 & Option 2
Option 1 - Top 14 (Orange Numbered Steps) Option 2 – Additional/Manage (Red Lettered Steps)
1. Optional: Select Do Not Launch HPI Checkbox
if you are only entering the reason for visit and
do not wish to add any HPI specific
information (usually MA’s)
2. Select a Reason for Visit from the Top 14 List.
A. Click Additional/Manage Link.
B. Optional: Select All HPI’s if you would like to view
reasons for visit for all specialties in the enterprise.
C. Select a Reason for Visit from this list.
Note: Add an “*” at the end of it if you would like
the Generic HPI Template to launch.
D. Click Save & Close.

10.14.2015 v.5.7/KBM 8.1 Page 2 of 4
*Please note that if there are any free text comments associated with this reason,
the comments must be removed first
Click Clear to remove a reason for visit or edit it with
free text
Table 2: Option 3 & Option 4
Option 3 – Filtered Search (Blue Numbered Steps) Option 4 – Manual Entry/Free Text (Pink Lettered Steps)
1. Enter a Partial Term in the Other Field.
2. Click the Blue Drop Down Arrow to generate a list
of reasons that match your search criteria.
3. Select a Reason for Visit from the Filtered List.
A. Enter a complete reason for visit in the Other Field.
B. Click the Add Button.
Delete existing “Reason for Visit”
1. Select the “Additional/Manage” link from
the blue link area.
2. Click Clear next to the “Reason for Visit”
that you would like to remove.

10.14.2015 v.5.7/KBM 8.1 Page 3 of 4
Chart the History of Present Illness for using specific HPI Templates
1. The most applicable HPI template (if one exists) will open when the reason for visit is clicked on
once (either from the Top List or the summary grid).
2. Chart findings on the HPI Template provided.
3. Click Save and Close.
4. Open and chart the HPI for the remaining “Reasons for Visits.”
5. The information is then converted into paragraph form.
Quick Saves
Disk Icon: Saves current Template
Starburst Icon: Retrieves saved template
New Onset/Duration Screen
Caution: Any charting done here will transfer over to the Review of
Systems section, but changes MUST be updated here only.

10.14.2015 v.5.7/KBM 8.1 Page 4 of 4
Chart the History of Present Illness for using the Generic HPI Template
If a specific HPI template does not exist for a particular reason for visit and/or an asterisks was
appended to the end of the reason for visit entered, the Generic HPI Template will appear.
1. Click on a Reason for Visit that is linked to the Generic HPI Template.
2. Select any desired items from top portion of the template (e.g., Onset, Severity, Frequency etc.)
3. Free text and/or use “My Phrases” to enter in the desired narrative in the HPI free text field.
4. Click Save & Close.

12.22.2015 Page 1 of 2
Kept = Patient check-in
process was started
Choose Providers to view schedule(s)
The encounter should have been created when the patient was checked in. Do not create a new
encounter. Please call the support desk (800-280-0083) if you don’t see an open encounter for
today’s date
NextGen® Begin Charting a Patient Visit User Guide
Overview
This guide covers how to begin charting a patient’s visit to the office.
Access the Patient’s Chart
Access the Patient’s Chart from the Inbox (Scheduled Visit)
1. Open Inbox.
2. Check the appointment area of the inbox for the desired patient’s name and double-click on a patient’s name to
open the chart.
Perform the 4 Point Check - Extremely Important!!
3. Verify the following information using the 4 Point Check to avoid common errors while charting:
a. Patient Name - verify the patient’s name and DOB. b. Office Location - If you have more than one location, verify that the correct location is selected. c. Rendering Provider - It is extremely important to verify that you are charting under the correct provider. d. Date-of-service - the encounter (yellow folder) should have been created at check-in.

12.22.2015 v.5.8/KBM 8.3 Page 2 of 2
Intake should be
added as a preferred
template in your
user preferences
(Tools >
Preferences>
Templates Tab)
Open the Intake Template
In order to begin an office visit, you must start by
opening the Intake Template.
4. Click on the Template Icon on the Top Toolbar
or on the bottom of the History Bar.
5. Select the Intake Template from the list of
preferred Medical Records Templates.
Choose Specialty, Visit Type, and New or Established Patient
6. Click in the Specialty field to choose the Specialty (e.g. Family Practice, Pediatrics, or Internal Medicine).
*Practices can set this to pre-populate by default to one specialty.
7. Click in the Visit Type field to choose the Visit Type (e.g. Nurse Visit, Office Visit, or Preventative Medicine).
*Please consult your biller regarding appropriate visit types.
8. Choose Established or New Patient.
*You can enter a historian as well if indicated.
Specialty determines Reason for Visit options and
template set
Add Alerts
Visit Type determines EM Code options
Activate Protocols
Sub-navigation links
Risk Factors
If a provider is doing their own intake charting, they only need to visit the Medication Panel and
Allergies Panels on the Home or Intake tab to mark that the medications and allergies have been
reviewed before moving on to the SOAP tab.

12.22.2015 Page 1 of 4
NextGen® 8.3.8 EHR Vital Signs User Guide
Overview
This user guide covers how to add vital signs for your patient. The Vital Signs template changes based on the age of the
patient and also includes a number of unique items including: BMI plan, LMP, vision test (incl. colorblindness), and an
audiometry test.
Adding Vital Signs
The Vital Signs panel is available on both the Intake and the SOAP tab. The Vital Signs grid only displays today’s vitals.
1. Click Add.
2. Fill in applicable vital signs.
3. Click Save, then Close.
12.22.2015 v.5.8/KBM 8.3.8 Page 2 of 4
Different Vital Sign Templates
There are three different vital signs templates depending on the age of the patient. Table of Vital Signs Template Features
Pediatric = under 2 years old Pediatric = over 2 years old Adult = approx. 18 (as determined by practice setting)
Features
Gestational age More weight context Growth Charts
Features
LMP - female Waist/hip measurements BMI/BMI Plan Audiometry/Vision Growth Charts
Features
LMP - female Waist/hip measurements BMI/BMI Plan Audiometry/Vision HAQ-Disability link
Chart Audiometry Exam or Vision Screening
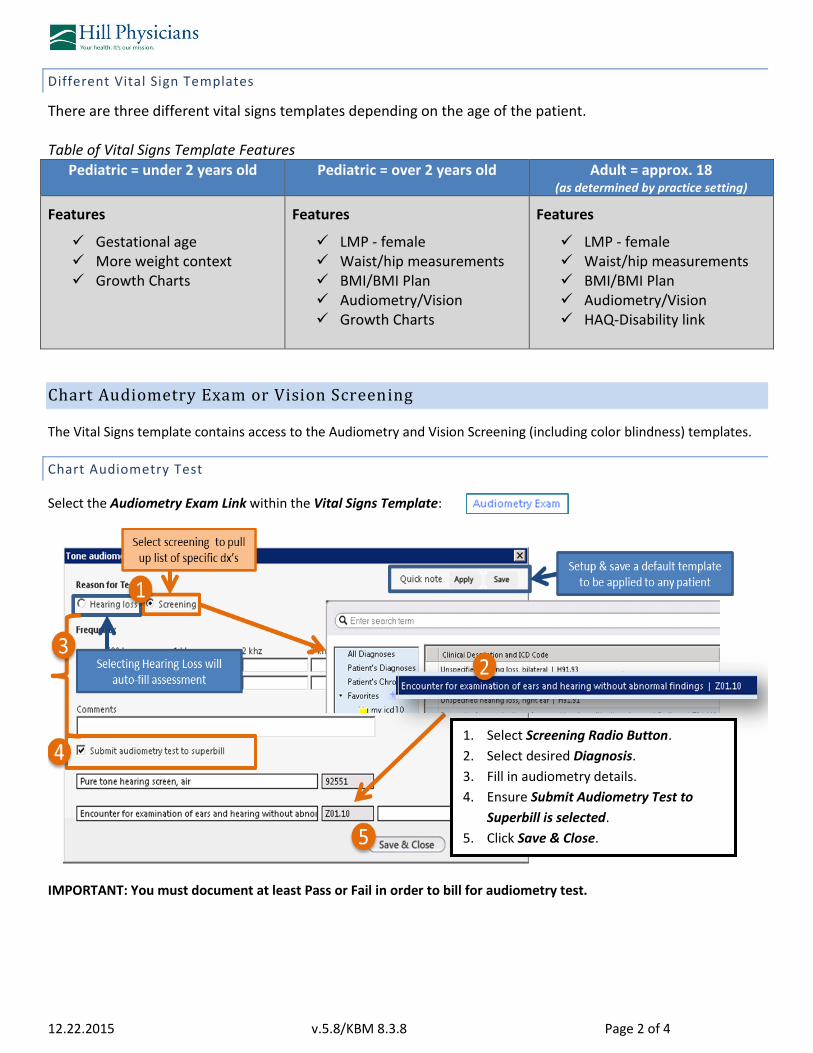
The Vital Signs template contains access to the Audiometry and Vision Screening (including color blindness) templates.
Chart Audiometry Test
Select the Audiometry Exam Link within the Vital Signs Template:
IMPORTANT: You must document at least Pass or Fail in order to bill for audiometry test.
1. Select Screening Radio Button.
2. Select desired Diagnosis.
3. Fill in audiometry details.
4. Ensure Submit Audiometry Test to
Superbill is selected.
5. Click Save & Close.

12.22.2015 v.5.8/KBM 8.3.8 Page 3 of 4
Vision Screening and Ishihara Test for Color Blindness
The “Vision Screening” template is accessible from the “Vital Signs” template and it also includes a test for color blindness.
Chart Visual Acuity
Select the Vision Screening Link within the Vital Signs Template:
IMPORTANT: You must document some results in order to bill the vision test.
Chart Color Vision Test
1. Select the Ishihara Test for Color Blindness link within the Vision Screening Template.
2. *You could use your own paper test as well
a. Click Yes button on Script Error.
b. Scroll through pictures for patient to identify until you get to the bottom to identify test results and
close the browser window.
Results for Ishihara Test in the Website
Normal Color Vision Red-Green Color Blind
Left Right
Left Right
Top 25 29 Top 25 Spots
Middle 45 56 Middle Spots 56
Bottom 6 8 Bottom Spots Spots
3. Document results under “Color Vision Test Results” section.
1. Click inside Assessment Field.
2. Search for desired Vision Exam
Diagnosis.
3. Select Diagnosis.
4. Fill in vision exam details.
5. Ensure Submit Vision Screening to
Superbill Checkbox is selected.
6. Click Save & Close.

12.22.2015 v.5.8/KBM 8.3.8 Page 4 of 4
4. Click on “Save & Close” button to save documentation and return to the “Vital Signs” template.

3.11.2015 Page 1 of 3
NextGen® EHR Review Medications and Allergies User Guide
Overview
This user guide covers how to indicate that the medications and allergies have been reviewed with the patient.
Documenting that you reviewed the medications and allergies is a key part of meeting a meaningful use measure (talk
with your Client Account Specialist for more information.
Access the Medications and Allergies Panel
The Medications Panel and Allergies Panels are both only available on the Intake tab. If you are a provider doing your
own intake charting, please visit these panels first before moving to the SOAP tab.
1. Navigate to the Intake tab.
a. Click on the Template icon on the History Bar or Top Toolbar.
b. Double-click on the *Intake template.
c. The intake template is the first tab on the Pill bar.
2. Scroll down to the Medications and Allergies panel…
You can only mark that the medications and allergies were
reviewed on the Intake tab.
Open the Medication
Review template to
verify medications and
add comments
Click Add button
to open the
Medication
Module
Click Add button to
open common allergy
picklist (Adult and Peds)

3.11.2015 v.5.8/KBM 8.1 Page 2 of 3
Only on the Intake Tab
Mark Medications and Allergies Revie wed
Use the Add buttons under the respective grids to make changes to the medication and/or allergy list (see user guides
on adding allergies and medications to a patient’s chart). Then mark that you reviewed the medications and allergies
with the patient.
3. Review the medication list with the patient and check the box, “Medications reviewed.”
4. Review the allergy list with the patient and choose “Reviewed, no change” or “Allergies added today.”
Perform Medication Review for Transition of Care
The medication review template allows you to compare the patient’s current list of medications with an outside source
for transition of care. This template also allows you to quickly add comments to a patient’s medications.
Reconcile Medications with an Outside Source
1. Click on the Reconcile button under the Medications grid.
2. Click on the blue arrow to choose the medication
reconciliation source.
3. Click Verify Mode checkbox to start verifying the current
medications.
4. Choose the desired medications from the Medication Module grid and they will push down to the Medication
Reconcile grid.
5. Optional: The External Source grid will populate if the Medication History is run successfully for a patient in the
Medication Module.
a. Click the Add radio button first.
b. Click on the Medications that you would like to add to the patient’s chart.
6. Optional: Check the completed for transition of care checkbox if applicable.
7. Click the Save & Close button when finished.

3.11.2015 v.5.8/KBM 8.1 Page 3 of 3
Add Medication Comments Regarding Patient Compliance
1. Click on a medication that has been added to the Medication Reconcile grid.
2. Click inside the Comment box to activate a picklist of compliance options and choose the applicable option
choose the blank line to free text a comment.
3. Click on the Save button to add the comments to the grid.
4. Click the Save & Close button to exit the template.
This list will populate when the Medication History
is run successfully in the Medication Module (see
import medications guide)
Check this box for transition of care

6.11.2015 v.5.8/KBM 8.3 Page 1 of 4
NextGen® EHR 8.3.8 Care Guidelines User Guide
Overview
The former Guidelines tab has been changed to the Care Guidelines link. This guide will cover the new 8.3.8
process for adding & addressing protocols/guidelines (i.e., health maintenance/disease management).
Care Guidelines Panel Default
It is suggested that users move the Recent Orders Panel down to the Bottom of All Panels as a Default.
Adding Care Guidelines
Starting the Process
To add either Health Maintenance or other Disease Management Protocols (e.g., diabetes):

6.11.2015 Page 2 of 4
1. From any main tab (e.g., Intake, SOAP etc.), click on the Care Guidelines link.
2. Expand the Clinical Guidelines Panel.
3. Optional: Select the Detailed Document Radio Button if you would like the guidelines to display in the
Chart Note.
4. Scroll to bottom and click Add/Update. This will take you to the Activate Clinical Guidelines window.
Health Maintenance Care Guidelines
Health Maintenance and Peds Guidelines are the only two that do not require a diagnosis.
1. From the Activate Clinical Guidelines Window, expand the Active Guidelines Panel.
2. Click in the Condition field and select Health Maintenance from the pick list.
3. Fill in appropriate Risk Factors or if none, select the No Risk Indicators checkbox.
4. Click Save & Close on the risk factors popup.
5. Click Save & Close at the bottom of the Activate Clinical Guidelines window to take you back to the Care
Guidelines popup window where your health maintenance protocols/guidelines will display.
NOTE: Users may need to Collapse All Panels in order to see the Save & Close Button at the bottom.

6.11.2015 Page 3 of 4
Disease Protocols
All other disease protocols require a diagnosis.
1. From the Activate Clinical Guidelines window, expand the Active Guidelines panel.
2. Click in the Condition field and select the appropriate Protocol from the pick list (e.g., Diabetes).
3. Click inside the Diagnosis field to pull up the Diagnosis Search window.
a. Filter your search by highlighting the desired Filter (the system will auto highlight Chronic
Conditions filter. Click on All Diagnoses to broaden the filter).
b. Enter the Description or ICD Code that you are looking for and click Search.
c. Highlight the desired Diagnosis from the results and click Select.
4. Click Add to add the associated Disease Management Protocols/Clinical Guidelines to the grid.
5. Click Save & Close to take you back to the main Care Guidelines popup window and highlight the newly
added Protocol Link to see associated items in the grid.

6.11.2015 Page 4 of 4
Manually Addressing Guidelines
Many of the added Care Guidelines will update automatically with completed and new due dates as you
complete items during a regular encounter (e.g., if you order and result the flu immunization during a visit, the
status within the Care Guidelines will display as Completed and the due date for the next flu shot will be one year
later).
Follow the steps below to manually update a care guideline that has not automatically updated.
1. Expand the Clinical Guidelines Panel.
2. Highlight the desired Outstanding Guideline Link (e.g., Diabetes). This filters the guidelines grid to only
display those items that are associated with the link that was selected.
3. Highlight the desired Guideline to be addressed in the Guidelines Display Grid (e.g., Dilated Eye Exam).
4. Click inside the Status field and select the appropriate Status from the pick list (e.g., Performed
Elsewhere). This will auto populate the Action field with the date and status selected.
5. Click Update to push the new status and due date to the grid (see completed item in screen shot above).

3.3.2015 Page 1 of 3
NextGen® EHR Review of Systems and PHQ User Guide
Overview
This user guide covers how to chart the patient’s Review of Systems. Please note that this template may populate
associated symptoms and pertinent negatives from the HPI template (if applicable). Each specific system template (e.g.
Genitourinary) has a free text field and a “See HPI” checkbox.
Chart Review of Systems (ROS)
Access the One-page ROS Template
1. Scroll to the Review of Systems area and select the one-page ROS for your specialty.
2. Indicate positive and negative findings using the radio button next to the associated symptoms. (Use the blue links for more in-depth charting).
Patient Health Questionnaire was completed
This link will change based on specialty, but
will still open a one-page ROS

3.3.2015 v.5.8/KBM 8.1 Page 2 of 3
Note: Associated symptoms and pertinent negatives will pull
back and forth from the HPI template to the ROS template.
3. Select “Save & Close” button until all
ROS templates are closed.
Caution: Please read the User Guide on Quick Saves before
using them
Use “Quick Saves” to keep a library of your most common visits
Free Text Area
Positive indications will activate
additional options
Blue links will open larger system templates

3.3.2015 v.5.8/KBM 8.1 Page 3 of 3
Patient Health Questionaire (PHQ) Button - Depression Screening
There is a PHQ (Depression Screening) button under the Review of Systems panel that allows you to document the
answer to specific questions regarding the patient’s feelings and interest level.
1. Click on the PHQ button
2. Indicate findings using the radio buttons on the template.
a. If positive findings are documented, a Patient Health Questionnaire link will appear.
3. Click “OK” button to close the dialog and save the additions.
The link appears when a positive indication
is documented

5.29.2014 v.5.8/KBM 8.1 Page 1 of 3
Search for Mail Order Only
Less likely to have duplicate pharmacies
Differentiate Retail from Mail Order
Look for Additional Pharmacies to Add
Labeled Fields
NextGen® EHR Pharmacy Management User Guide
Add a Pharmacy in the eRx Screen in the Medication Module (Preferred)
The Medication Module Pharmacy Search Allows One to:
Differentiate mail-order from retail pharmacies Add pharmacies that may not be in the system
1. Highlight desired medications and click on the Send Button within the Medication Module.
2. Click on the Manage Patient Pharmacies Link.
3. Click on the Ellipses Button next to the
desired field.
4. Search for pharmacy (see above) and
click OK.
**If you are unable to find a
pharmacy, use the Add Pharmacy to
System Button**(see below)
5. Once the desired pharmacy is in the
correct area, click Save to make it
available for use.
Click on the ellipses button to activate the
pharmacy search window
Add a Mail Order Pharmacy Here

5.29.2014 v.5.8/KBM 8.1 Page 2 of 3
Optional: Add a Pharmacy to the System
6. Click on Add Pharmacy to System Button.
7. Lookup desired pharmacy
8. Highlight the desired pharmacy under the New to the System
Category.
9. Click Select and the following alert will appear.
10. The pharmacy will then appear in the desired field.
Adding a Pharmacy Using Demographics Template
1. Access the Patient Demographics template using the Demographics link on the
Navigation Bar.
2. Navigate to the pharmacy field.
3. Click inside the Pharmacy #1 field to pull up the Pharmacy Search window.
4. Search by entering criteria in any of the fields (e.g., The example shows searching
for “Wal” pharmacies that are located in a city that begins with “Sac”) and clicking
Search.
5. Double-click the desired pharmacy to select it and pull it into the Pharmacy #1 field.
Search for a pharmacy. Wildcard search is available (e.g. wal*)
Highlight the pharmacy in the
New to the System Category
Note that these ones have already
been mapped

5.29.2014 v.5.8/KBM 8.1 Page 3 of 3
Search with just a few characters under name and city. Some search using the phone number
Click in the first text field to activate the
search pop-up
Clear an existing pharmacy
Add a second pharmacy here

10.19.2015 v.5.8/KBM 8.3 Page 1 of 3
NextGen® EHR 8.3.8 Medical/Surgical/Interim History User Guide
Overview
This guide covers how to document the patient’s medical, surgical and interim history.
History Review Link
Items marked in the History Review Link determine whether or not the medical, surgical, interim, family and
social history documented on today’s encounter displays in the master document. In addition, the E&M System
Calculated Coding Points on the Finalize Tab are also dependent upon History Review Link selections.
The History Review Link is located at the top of the Histories Tab, as well as at the top of each of the affected
panels.
1. Click any of the History Review Links (each opens the same window).
2. Select a desired Radio Button for each of the three histories.
3. Click Save & Close.
Following is a table that describes each radio button.
History Review Radio Button Notes
Detailed Document All entered information in that panel will display on the master document.
Reviewed, Updated All entered changes will display on the master document.
Reviewed, No Changes The words “Reviewed, No Changes” will display on the master document
History Unobtainable The words “History Unobtainable,” along with any entered reason will display
on the master document.

10.19.2015 Page 2 of 3
Entering Past Medical/Surgical History
1. Click Add at the bottom of the Medical/Surgical/Interim History Panel.
2. Select Blue and Black Checkboxes in the Medical Sub-Panel.
Note: Select all desired Black Checkboxes prior to selecting any Blue Checkboxes.
A separate window will appear for all Blue Checkboxes selected:
a. Select appropriate specific medical condition.
b. Click Save To Grid & Close.
3. Click Add to Grid to add all remaining black Items to the patient’s chart.
4. Repeat the process in the Surgical Sub-Panel.
5. Click Add to Grid at the bottom of the Surgical Panel to add all remaining black Items to the patient’s
chart.
6. Click Save & Close to close the sub-panels.

10.19.2015 Page 3 of 3
Entering Interim History
Interim History is for those items that occur between patient visits to your office (e.g., hospital admission).
1. Click Interim History at the bottom of the Medical/Surgical/Interim History Panel.
2. Enter Interim History Details.
3. Click Save, then Close.

10.19.2015 Page 1 of 2
NextGen® EHR 8.3.8 Charting Diagnostic & Lab Histories User Guide
Overview
This guide covers how to chart both diagnostic histories (i.e., a past mammogram) as well as historical lab results
(includes lab ordered elsewhere).
Add a New Diagnostic History Entry
Diagnostic Histories and Labs (both non-electronic and/or labs ordered elsewhere) are documented in the Diagnostic
Studies panel on the Histories tab. Clicking Add will open a two panel popup that includes both Diagnostic History
Entry and Office Services sub-panels. For more information on the Office Services Panel, please read that specific guide.
Note: steps 2-5 are required in order for the system to allow you to add the study to the grid (step 6).
1. Click Add at the bottom of the Diagnostic Studies Panel.
2. In the Diagnostic History Entry Sub-Panel, select the desired
Study Type, which will determine the diagnostic study pick
list (e.g., if Labs is selected, then the diagnostic study picklist
will consist of lab test selections).
3. Select the desired Diagnostic Study.
4. Enter Date Performed (this can be
approximate).
5. Enter Study Result (See Scanned Report
Checkbox can also fulfill this step).
6. Click Add to Grid.
7. Click Save & Close.

10.19.2015 v.5.8/KBM 8.3.8 Page 2 of 2
Help Finding a Diagnostic Study
If you are having trouble finding a diagnostic study, consider following the steps below to search your entire Service Item
Library.
1. In the Diagnostic Entry Sub-Panel, instead of selecting a specific Diagnostic Study Type, select All.
2. Click inside the Diagnostic Study field to activate a search box.
3. Enter a diagnostic description or CPT code (Procedure field).
4. Click Search button.
5. Double-click on the item in the grid to add it to the the template.
Note: The All Search will not work for Labs.
Search Tips
The procedure code is fastest
Keep a list of common CPT codes
Keep SIM Library descript. consistent

10.19.2015 Page 1 of 2
NextGen® EHR 8.3.8 Charting Family History User Guide
Overview
This guide covers how to chart family history.
History Review Link
Items marked in the History Review Link determine whether or not the medical, surgical, interim, family and social
history documented on today’s encounter displays in the master document. In addition, the E&M System Calculated
Coding Points on the Finalize Tab are also dependent upon History Review Link selections.
The History Review Link is located at the top of the Histories Tab, as well as at the top of each of the affected panels.
1. Click any of the History Review Links (each opens the same window).
2. Select a desired Radio Button for each of the three histories.
3. Click Save & Close.
Following is a table that describes each radio button.
History Review Radio Button Notes
Detailed Document All entered information in that panel will display on the master document.
Reviewed, Updated All entered changes will display on the master document.
Reviewed, No Changes The words “Reviewed, No Changes” will display on the master document
History Unobtainable The words “History Unobtainable,” along with any entered reason will display on
the master document.

10.19.2015 v.5.8/KBM 8.3.8 Page 2 of 2
Adding Family History
1. On Histories Tab > Family History Panel, click Add.
2. Select either No Family History Of Checkbox or Select a Relationship from the picklist.
3. Select desired Black and Blue Checkboxes, making sure to select all the desired Black Items First.
For Blue Items, users will need to select a more specific form of the family history item:
a. Click inside the Condition Field.
b. Select the appropriate item from the picklist.
c. Click Save to Grid & Close.
Steps a-c will need to be performed for all blue items.
4. Click Save to Grid to push all remaining black items to the summary grid.
**Repeat steps 2-4 for each desired family member**
5. When finished entering all family history items, click Save & Close.

10.20.2015 Page 1 of 2
NextGen® EHR 8.3.8 Charting Social History & Tobacco Use User Guide
Overview
This guide covers how to chart social history, which includes items such as tobacco, alcohol and caffeine use in adults
and nutrition, home environment and relationship elements for pediatric patients (tobacco & caffeine category will also
appear for children 13 and over.
History Review Link
Items marked in the History Review Link determine whether or not the medical, surgical, interim, family and social
history documented on today’s encounter displays in the master document. In addition, the E&M System Calculated
Coding Points on the Finalize Tab are also dependent upon History Review Link selections.
The History Review Link is located at the top of the Histories Tab, as well as at the top of each of the affected panels.
1. Click any of the History Review Links (each opens the same window).
2. Select a desired Radio Button for each of the three histories.
3. Click Save & Close.
Following is a table that describes each radio button.
History Review Radio Button Notes
Detailed Document All entered information in that panel will display on the master document.
Reviewed, Updated All entered changes will display on the master document.
Reviewed, No Changes The words “Reviewed, No Changes” will display on the master document
History Unobtainable The words “History Unobtainable,” along with any entered reason will display on
the master document.

10.20.2015 v.5.8/KBM 8.3.8 Page 2 of 2
Adding Social History
Adding Tobacco Usage
Note: Smoking Status will auto-populate based on selections made in this template.
1. In the Social Panel on the Histories Tab,
select any item in the Social History List.
2. Click Add to be taken to the associated
template.
3. Fill in the desired details.
4. Click on any other desired Social History
Items & chart the details in associated
templates.
Note: Information in the previous templates
will save automatically.
5. When done with all desired templates,
go to the bottom of the current
template and click Save & Close.
1. Select appropriate “have you ever used
tobacco?” radio button.
2. If answer to #1 is yes, fill in desired details.

12.22.2015 Page 1 of 2
NextGen® EHR 8.3.8 Finish Intake Charting User Guide
Overview
This user guide covers how to finish performing the intake tasks for a patient’s office visit and preparing the electronic
chart for the provider to review and begin their portion of the charting process.
Generate the Intake Note
The intake note is a document that summarizes the documentation that the medical assistant (MA) has entered into the
system as part of the intake charting process (reason for visit, vitals, chronic conditions, standing orders, ROS, etc.).
Click on the Intake Note button at the button of the Intake tab or the Histories tab to generate the intake_note.
Update the Patient’s Status and Room Number
1. Select the Patient Tracking Icon in the Patient Information Bar.
2. Click inside the blank field under Room to choose the room from the available picklist.
3. Click inside the blank field under Status and choose, “Waiting for Provider.”
4. Click the Save & Close button to update the patient’s status.

12.22.2015 v.5.8/KBM 8.3.8 Page 2 of 2
The new status will
appear in the
appointments section
of the inbox and let
the provider know
that the patient is
ready to be seen.
Open the SOAP Template
It is also recommended that the medical assistant click on the SOAP tab so that it will be
easily accessible for the provider in the Patient History Bar.
Perform a Soft Logout for Shared Computers
Click on the Logout icon if the computer is a shared computer to do a
“soft” logout.
*This will allow the provider to login and go directly to the patient’s chart
Optional - Activate Protocols
This step is optional based on whether or not your practice uses the Guidelines and Protocols section of the EHR. There
is a one-time process of activating each patient’s protocols that may be utilized by your practice to keep track of a
patient’s health maintenance and chronic conditions.
See the Activate Protocols user guide for more information.

12.29.2015 Page 1 of 2
NextGen® EHR 8.3.8 Ordering Diagnostic Tests Quick Reference
Overview
The diagnostic tab within the assessment tab set is where practices will order diagnostic tests to be performed
outside the office (e.g., ultrasound, mammogram, colonoscopy, etc.). This guide will cover how to order the
test and how to generate the requisition.
Ordering a Diagnostic Test
Note: This order will flow to the Checkout Tab automatically, so there is no need to task if your staff has been
trained to generate all requisitions upon checkout.
1. In the Assessment/Plan Tab Set, click Diagnostics.
2. Highlight the desired Assessment (click Add if the
appropriate assessment does not already exist).
3. Click on the desired Link and select the
appropriate Test from the list.
4. Fill in any other details, if necessary (e.g., location
of radiology facility).
5. Click Place Order.
6. Task a staff member if desired or click Cancel.

12.29.2015 v.5.8/KBM 8.3.8 Page 2 of 2
7. Optional: If you need to enter more information about the ordered test, Double-click the test to modify it.
a. Enter any desired additional information in the Clinical Information/Comments Field.
b. Click Save, then Close.
8. Click Save & Close to exit the assessment/plan tab set.
Generating the Diagnostic Requisition
1. On the Checkout Tab in the Today’s Orders Panel, click on the
Diagnostics Link.
2. Highlight the Diagnostic Order.
3. Click Requisition.
4. Highlight the generated Requisition in the Patient History Bar.
a. Option 1: go to File > Fax to fax.
b. Option 2: click the Print Icon to Print.
c. Option 3: Right-click the Requisition and Send to
Patient Portal.

12.22.2015 Page 1 of 4
NextGen® EHR 8.3.8 Checking Out Patients Quick Reference
Overview
The Checkout tab is the main location for users to process orders that were created during the visit.
Items on the Checkout Tab include:
Diagnostic Requisitions Patient Plan Processing Printing a Medication List
Completing/Generating
Referral Requisitions
Viewing Procedures Printing Education Materials
Viewing/Completing Office
Services
Viewing Follow Up Orders
Checkout Tab
To process checkout items, click the Checkout Tab. The Checkout tab is divided into two sections:
Today’s Orders & Given to Patient/Verified Items
Today’s Orders
The items listed in the overview section of this guide can be accessed from the Today’s Orders area. The
number listed in parenthesis next to an item indicates how many of that item has been ordered.
Labs

12.22.2015 v.5.8/KBM 8.3.8 Page 2 of 4
Diagnostics
For each diagnostic test ordered, you will need to print out a requisition for the patient to take to the
appropriate location (e.g., radiology center).
1. Highlight a diagnostic test in the grid.
2. Click the Requisition button and Print the requisition out for the patient.
A separate document will automatically be added to the patient’s chart for each generated
requisition.
Processing Referrals
Refer to specific referrals guide for detailed steps on how to update the referral by adding a provider.
Office Services & Procedures
Refer to specific office services/standing orders guide for detailed steps on completing/resulting a
standing order.

12.22.2015 v.5.8/KBM 8.3.8 Page 3 of 4
Viewing Follow Ups
For appointment follow up items, access EPM to make the desired appointment (see EPM Scheduling
Appointments user guide for further details).
Printing Medication List
Patient Education
Pulling up items in the Healthwise Patient Education Browser will count toward meaningful use.
1. Select the Patient Education Link in the Today’s Orders Section
2. Select the Patient Education Button.

12.22.2015 v.5.8/KBM 8.3.8 Page 4 of 4
3. Enter key words into the Search Criteria field and click Search.
4. Highlight the desired result.
5. Optional: Click the Print icon at the top of the topic if you want to print a copy for the patient.
6. Optional: Click Send to Patient Portal if you want to send the topic to the patient through the portal.
Note: Clicking either send to patient portal or save to encounter will take you to the patient chart with
the selected item displayed. You may then right-click to print out a copy for the patient.
Given To Patient/Verified Items Section
The bottom portion of the checkout tab is where you can indicate that all orders/items have been given
to the patient and/or that you have verified that the patient is aware of them.
1. Select “Yes” or “Refused” for each ordered item (items that have been ordered will have numbers in
parenthesis) and add Comments if desired.
2. Click Patient Plan to print the patient plan document if it has not already been generated.
NOTE: The patient portal upload button does not currently work. Instead, right-click the patient plan
document in the encounter to send it through the patient portal.

4.20.2015 Page 1 of 3
NextGen® Standard Document Library User Guide
Overview
The 8.1 Release contains a new Standard Document Library that has a modified look and functionality. Practices will
now be able to manage their list of Enterprise Documents and Education topics as well as add as many customized
letters as they want to their document library.
Access the Standard Document Library
Option #1 Option #2
Document Library Link on the Left Hand Navigation Bar
Standard Document Library Template accessed from the Template Icon on the History Bar
Standard Document Library Layout
Enterprise Documents, Patient Education, and Custom Letters are the three general sections contained in the new
Standard Document Library
*The Ophthalmology practices will have a smaller subset that just includes their specialty specific Healthwise
educational topics.
Patient Education Documents
A subset of Healthwise educational
materials*
Enterprise Documents
Helpful forms and letters that are
available enterprise-wide
Custom Letters
Letters created by the practice

4.20.2015 v.5.8/KBM 8.1 Page 2 of 3
Generate an Enterprise Document, Custom Letter or Patient Education
Warning: Once a document is generated, it cannot be removed. Please generate any unfamiliar documents within
a test patient’s chart first to ensure that you are generating the desired item.
1. Search for the desired document, form or education topic using the scroll bar or one of the filter options.
2. Highlight the document or education item that you would like to generate.
3. Select the Print Document button underneath the grid. See below for additional steps based on the item selected.
a. Custom Letters - If the item is a custom letter, it will generate a document that can be faxed, printed, or
sent through the Patient Portal.
Type in all or part of the document or topic name
and click the magnifying glass icon to search
Click in Specialty field to find
specialty-specific topics
Click in Age field to filter topics
by Peds, Adult, and All
Click button to
remove filter
Print Review and edit
Right-click item on History Bar
to send through Patient Portal

4.20.2015 v.5.8/KBM 8.1 Page 3 of 3
b. Enterprise documents (forms and letters) - If the item is an enterprise document, it will generate a document that can be faxed, printed, or sent through the Patient Portal. Some forms and letters require additional information and a pop-up will appear (see below).
i. Fill out the information in the pop-up and click OK button to generate the document with selected information.
c. Patient Education items - If the item is an education topic, the education item will appear in the Healthwise education browser where it can be printed, saved or sent to the patient through the Patient Portal secure messaging system.
Demographics
Return to work/school
Print in English or Spanish
Save to this Encounter on the
History Bar
Send item through Patient Portal
Return to
Document Library

7.26.2013 Page 1 of 1
C:\Sandys Docs\LessonPlans\8.1 user guides\RosettaHoldingTank.docx
NextGen® EHR Using the Rosetta Holding Tank Quick Reference
Rosetta Holding Tank
Rosetta Holding Tank is used to match lab results, radiology reports and hospital reports from interfaced facilities. Rosetta Holding Tank is accessible from the Application Launcher.
Staff should match labs several times daily.
1. Sort by patient last name by clicking the Last Name column. 2. Select all of one patient’s lab results:
a. Highlight the first result for that patient. b. Hold down the Shift Key and simultaneously highlight the last result for that patient.
3. Press the Match Demographic button to search for the appropriate patient.
4. Repeat steps 2-3 to until all desired patients have been matched. 5. Once the results are matched for all desired patients, press the Commit
button to send the results to the patients’ charts. Note: Users may click the Refresh button to update the screen.

AAddddiinngg aa NNeeww PPaattiieenntt//PPeerrssoonn AA Quick Reference Sheet Quick Reference Sheet
Within the NextGen system, you should always make sure that the patient you are adding is not already present within the enterprise. Failing to do this may create duplicate patients in the database. Follow the steps using secure fields to lookup a patient.
Within the NextGen system, you should always make sure that the patient you are adding is not already present within the enterprise. Failing to do this may create duplicate patients in the database. Follow the steps using secure fields to lookup a patient.
Step 1: Click on the People Lookup icon. Step 1: Click on the People Lookup icon.
ddddiinngg aa NNeeww PPaattiieenntt//PPeerrssoonn
This will open the “People Lookup” window.
Step 2: The Secure Lookup is for patient/person demographics in practices outside
your practice. To look up these patients requires an entry in the secure Birth Date or L4DSSN fields and a partial first and partial last name on the people/patient lookup screen. You cannot use wildcards (“*” or “%”) in a secure lookup.
Step 3: If the patient is a member of the enterprise, they will appear in the list as a
globe. Verify with the patient this is their correct information. Double-click on the globe to open the “Add Person Information” window. A chart will automatically be created for this patient and they will be added to your practice Association.
Step 4: If you find that the patient is not already present within the enterprise after
carefully doing the secure look up, click the “New” button. This will open the “Add Person Information” window and you will be adding a new record to the enterprise database. A chart will automatically be created for this patient.

Step 5: From the “Add Person Information” window fill in the required fields (in red),
and any other demographics information for the patient. Step 6: To add insurance for your new patient, click the Insurance button at the bottom
of the “Patient Information” window. This will open the “Insurance Listing” window for your patient. The system will always default the patient as the insured. You will need to add all other patient insurance.
2

Step 4: To add insurance, click the “Norton” button and select “New Insurance”. This
will open the “Payer Lookup” window.
Step 5: Enter in your search criteria and click “Find”. When you find the payer from
the matching records, double click. This will open the “Insurance Maintenance” window.
Note: The best method for checking to see if the correct insurance is in the database is to search by address. Remember if the address is a PO Box, then type this with no periods as shown.
Step 6: Enter in the policy information for the patient on the Ins. Detail tab.
3

Step 7: If you have the actual insurance card available to scan, click on the Ins Cards
tab. From that tab, click the “Norton” button and selecte “New Insurance Card”.
This will open the “Scanning Device Input” window. Click the “Norton” button for both the front and back (one at a time) and select “Acquire”. Proceed to scan the insurance card front and back and when finished select “Ok”.
4

Step 8: If your patient requires an authorization, click on the “Authorizations” tab,
then within the white space, right mouse click and select “New Authorization”. This will open the “Authorization Code Tracking” window.
Step 9: Fill in the authorization information and click “OK”. Note: Use the preceding method of attaching insurance to a person only if the patient is the insured party. If the person is covered by another person’s insurance, such as a child covered by a parent’s policy, then the insurance is listed under the policy holder (see Adding a Relationship Quick Reference Sheet). Once the insurance is listed under the relation, it can then be attached to the patient on a per-encounter basis (typically through the check-in process). For more information on attaching insurance at the encounter level, see the Checking In a Patient Quick Reference Sheet.
5

AAddddiinngg//DDiissccoonnttiinnuuiinngg IInnssuurraannccee aatt CChheecckk--IInn AAQuick Reference Sheet Quick Reference Sheet
Adding New Insurance Adding New Insurance
One of the most common ways that insurance is added is during the check-in process. This is done from the Insurance Selection window, which should be part of every practice’s auto flow check-in process.
One of the most common ways that insurance is added is during the check-in process. This is done from the Insurance Selection window, which should be part of every practice’s auto flow check-in process. Step 1: Step 1: At the insurance selection window, highlight and right-click the SUBSCRIBERAt the insurance selection window, highlight and right-click the
ddddiinngg//DDiissccoonnttiinnuuiinngg IInnssuurraannccee aatt CChheecckk--IInn
SUBSCRIBER of the insurance, which may be the patient or a relationship that the patient has such as a spouse or a parent, and select New Insurance. Note: You may have to attach and/or create the insurance subscriber if they are not already in your practice. This can be done from the insurance selection screen as well by selecting “New Relation” (see Adding a Relationship quick guide for further details).
The spouse is the subscriber of the insurance in the above example.
Step 2: Enter your search criteria in the Payor Lookup window and click Find. When you find the payer from the matching records, double click. This will open the “Insurance Maintenance” window. Note: The best method for checking to see if the correct insurance is in the database is to search by address. Remember if the address is a PO Box, then type this with no periods as shown.

Step 4: Enter in the policy information for the patient on the Ins. Detail tab. Note: It is very important to enter a copay if it applies.
Step 5: If you have the actual insurance card available to scan, click on the Ins Cards tab. From that tab, click the “Norton” button and select New Insurance Card.
2

This will open the “Scanning Device Input” window. Click the Norton button for both the front and back (one at a time) and select Acquire. Proceed to scan the insurance card front and back and when finished select “Ok”.
Step 6: If your patient requires an authorization, click on the Authorizations tab, then within the white space, right mouse click and select New Authorization. This will open the Authorization Code Tracking window. Note: You will have to save the insurance first and reopen it in order to active the New Authorization selection when you right-click the white space on the Authorization tab.
Step 7: Fill in the authorization information and click OK. Step 8: Ensure that the correct insurance for this encounter is in the Selected Insurance section on the right side of the Encounter Insurance Selection window.
3
Otherwise remove those insurances that should not be attached and move the correct insurance(s) to the Selected Insurance section by highlighting each and clicking on the appropriate arrow.

Discontinuing Insurance
You can also discontinue an insurance that is no longer valid (expired or insurance changed etc.) during the check-in process: Step 1: From the Available Insurance section (located on the left side of the Encounter Insurance Selection screen), right-click the invalid insurance and select Open Insurance Information.
Only insurance on this side will be attached to the encounter.
Insurance can only be opened from the Available Insurance section on the left.
4

Step 3: Deselect the Active checkbox in the Insurance Maintenance screen. Enter Effective and Expiration Dates, if desired.
Step 4: Click Ok on the Insurance Maintenance screen. The inactive insurance will no longer be available on the left side of the Encounter Insurance Selection window. Note: Be sure to remove the invalid insurance from the Selected Insurance in the right pane of the Encounter Insurance Selection window.
Once inactivated on the Available Insurance, make sure to remove the invalid insurance from the encounter.
Step 5: Once the invalid insurance has been removed from both the Available Insurance(s) and the Selected Insurance(s), click AutoFlow to go to the next step in your practice’s check-in process.
5

8.7.2014 v.5.8 Page 1 of 5
NextGen® EPM Adding/Modifying Appointments User Guide
Overview
This guide will cover how to add, cancel, reschedule or modify an appointment.
Adding an Appointment
There are two ways to add an appointment. The most common way is to search the appointment book for an
empty spot and the other was is to use the appointment search button.
Empty Slot Method
Locate the” Appt Book” Icon.
Your Appointment Book will show up. Click on the appointment date and time you wish to book, then right-click,
and select new.
The Add Appointment window will show up. Click on the Norton Button and select “Lookup…” to look up patient.
(See Patient Lookup User Guide, if you are not familiar with looking up a patient.)
Once you have selected your patient, their information will populate. Next you will select the Event/Event Chain.

8.7.2014 Page 2 of 5
1. Optional: Enter the description of the appointment (e.g., Blood Pressure) to the right of the patient’s
name. This will display in your appointment book.
2. Optional: Copy and paste the description into the Details field. This will display as the Reason for Visit in
EHR.
3. Click “OK”
The Appointment Confirmation window will pop up, you can click “Print” if you wish to provide a copy of the
appointment to your patient or click “Close” if done.
Your appointment has now been scheduled and will display in the appointment book.

8.7.2014 Page 3 of 5
Appointment Search Ahead Method
Locate the” Appt Book” Icon.
Your Appointment Book will show up. Click on the Appointment Search Button .
The Appointment Search Window will appear.
Search Criteria (RED) Fields in red MUST be filled in.
Search Criteria (GREEN) Fields in Green are optional.
1. Event type – (eg. New Patient, Follow up, Px) 1. Date/Time Range you want to search for.
2. Service Location – (Location you want for the
appointment.)
2. Day if the week your patient prefers .
3. Resouces/Classes – Select only one resource
(e.g., provider) or only one class (e.g., group of
providers)
Removed # 3 as it does not seem to work properly
and it also relies on you selecting the patient
Once you have entered your search criteria, click “Find”. The system will search for the next available
appointment that fits the criteria you entered.

8.7.2014 Page 4 of 5
Choose the appointment time and date, then right-click and select “Book Appointment”, to schedule the
appointment.
Canceling an Appointment
There are two ways to cancel an appointment.
A. Locate the appointment you wish to cancel and right-click on it. Select “Mark as Canceled…” The “Reason
for appointment cancellation” window will pop up, select the reason and click “OK”.
B. Double-click of the appointment to open it up. Check mark the cancelled box and select a reason for
cancellation. Click “OK”.
Rescheduling an Appointment
Locate the appointment and right click on it, select “Cut”. Then click on the new appointment date and time, right
click and select “Paste”.
The edit appointment window will pop up, click “OK”, the reason window will pop up, select a reason for
rescheduling and click “OK”.

8.7.2014 Page 5 of 5
Your new appointment date and time will be on your appointment book.
Modifying an Appointment
Locate the appointment on your appointment book you wish to modify. Double-Click on it.
The “Edit Appointment” window will pop-up. Make any necessary changes and Click “OK”.
The changes will be saved and will show on your appointment.

4.11.2014 v.5.7 Page 1 of 2
NextGen® EPM Checking-in a Patient/Creating an Encounter User Guide
Overview
For each patient visit, an Encoutner will be created. When the encounter is created, users are able to add
charges, transactions (i.e. payments), and create claims. The most common method to create an encounter is
during the Check-in process.
1. In the Appointment Book, find the scheduled patient, right-click on the appointment/patient name and
select Check In/Create Encoutner
2. The Create Encounter window will display.
Note: When checking-in a New Patient in EPM, click the Chart button first in order to create an Encounter.
(Encoutners can only be created for patients that have a Chart within the Practice).

4.11.2014 Page 2 of 2
3. In the Create Encoutner window, complete fields that are Required (red text). Then click OK.
4. The Modify Patient Information window will display next. Verify information within the Demographics tab
and then click the AutoFlow button
5. The AutoFlow process will begin. The process will take users through the steps apprpopriate for the the
practice during the registration process.
6. When the AutoFlow process is completed, the appointment will show as “Kept” on the Appointment Book