mis adjustment what you can “adjust” and functions
TRANSCRIPT

MIS Adjustment
What you can “adjust” and functions
Aous TAMIMI – ICT Expert v. 16 April 2021

Goal of the presentation
• Ensuring that LBs know-how to proceed in filling in theadjustment section from its opening until thesubmission in the MIS.
• What you can modify in the project and when
2

Whenever needed, you may ask your corresponding JTS Expert to enable adjustment at any moment for:1. Simple adjustment, like adding new contact person, synergy….2. Minor adjustment, like budget shift within programme rules, WPs
output…3. Major adjustment, like partner withdrawal, change…
P.S.: The adjustment procedure blocks the reporting until it’s finalized and validated by JTS/MA
Adjustment - creation
3
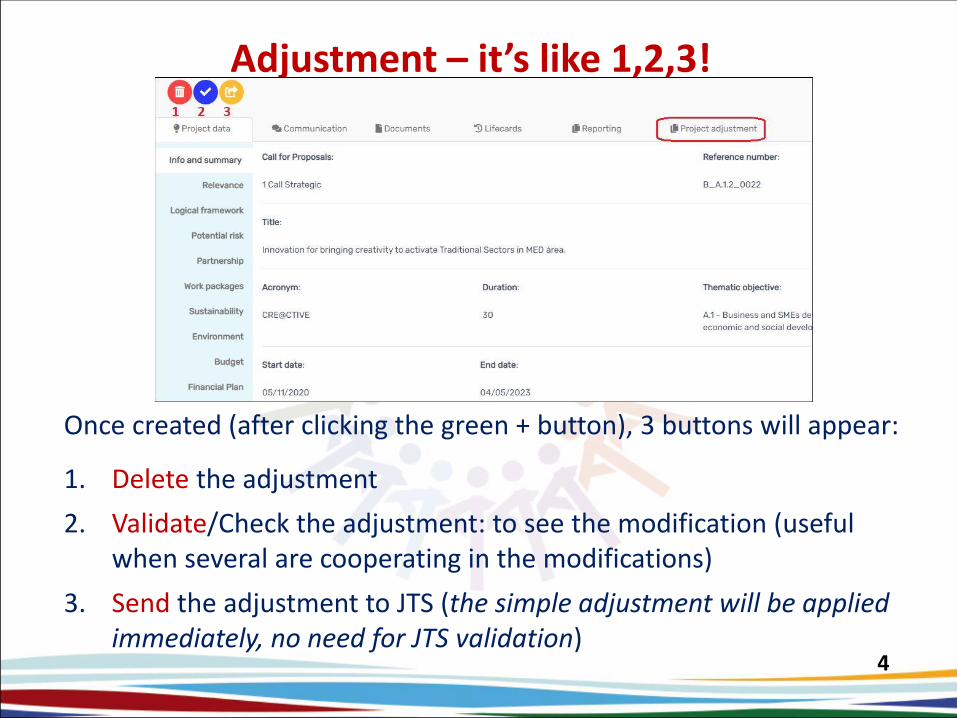
Once created (after clicking the green + button), 3 buttons will appear:
1. Delete the adjustment
2. Validate/Check the adjustment: to see the modification (useful when several are cooperating in the modifications)
3. Send the adjustment to JTS (the simple adjustment will be applied immediately, no need for JTS validation)
Adjustment – it’s like 1,2,3!
4

KEEP Keywords only (EU Database of projects).
1. You can search for keywords2. Add them to the list
3. Delete (hint : if you delete by error, just don’t save!)
4. Save
Adjustment – What can you modify in
Info and Summary
5

In this section, you may:1. Add new synergy2. Edit the newly added synergy3. Delete the newly added synergy
Note that Edit and delete functions are available only for the newly created synergy
Adjustment – What can you modify in
Relevance
6

For newly added synergy, all fields, including the Comment, need to be filled
Adjustment – What can you modify in
Relevance – adding synergy
7

In logical framework section, you can edit the project target only.
Comment field need to be filled when you modify the target prior to confirming.
Adjustment – What can you modify in
Logical framework
8
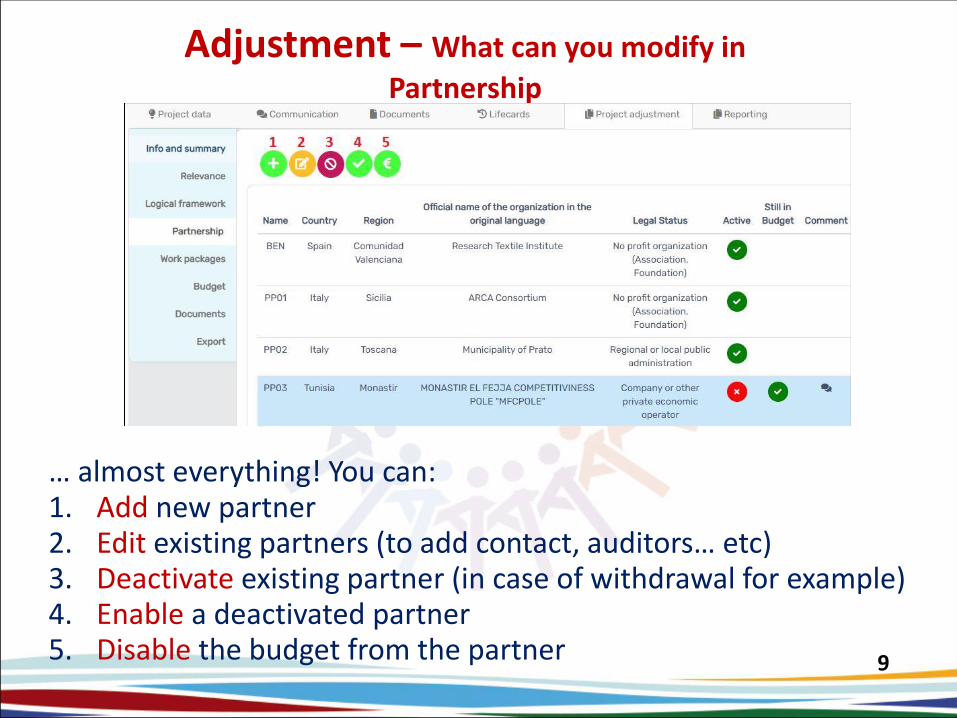
… almost everything! You can:1. Add new partner2. Edit existing partners (to add contact, auditors… etc)3. Deactivate existing partner (in case of withdrawal for example)4. Enable a deactivated partner5. Disable the budget from the partner
Adjustment – What can you modify in
Partnership
9
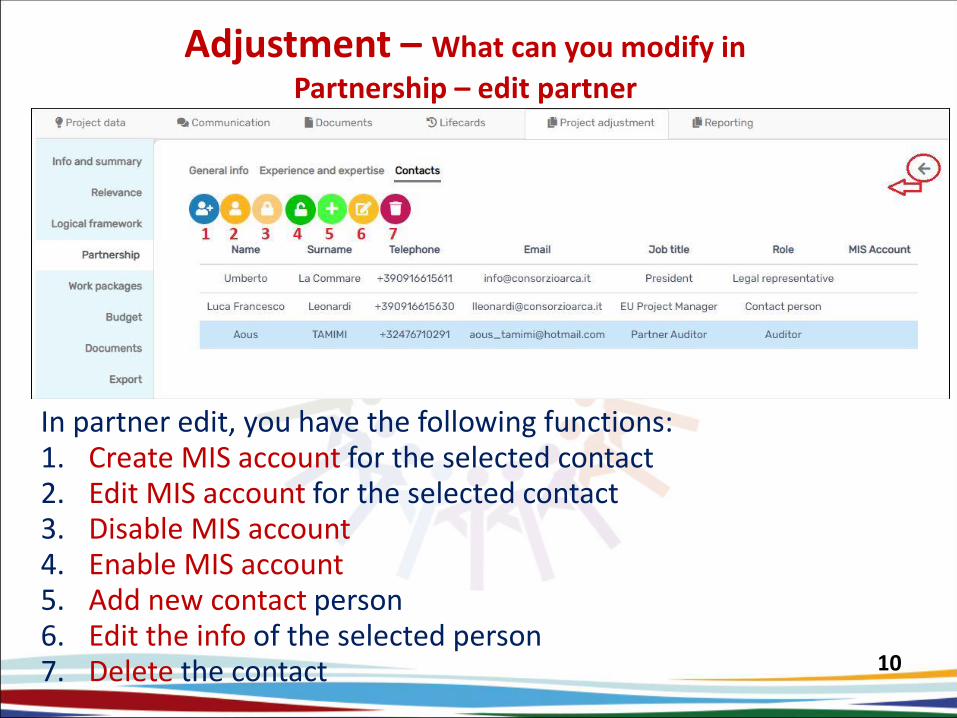
In partner edit, you have the following functions:1. Create MIS account for the selected contact2. Edit MIS account for the selected contact3. Disable MIS account4. Enable MIS account5. Add new contact person6. Edit the info of the selected person7. Delete the contact
Adjustment – What can you modify in
Partnership – edit partner
10

Main Page: Edit (to enter the selected WP)
• Outputs: You may add/edit/delete new outputs
only, existing Outputs can’t be edited!!
• Activities: Add/edit/delete activities, and undelete
• Indicators (from WP3 onward): Add/edit/delete
• Target (from WP2 onward): Add/edit
Adjustment – What can you modify in
Work Packages
11

To introduce a budget shift , you have the following functions:
1. Add budget shift2. View budget shift (available when original budget is selected)3. Edit budget shift4. Delete budget shift5. Export the selected budget 6. Edit Total budget per sub-grants (text only)
Adjustment – What can you modify in
Budget
12

Budget lines modifications have similar functions as reporting:1. Add budget line2. Edit budget line3. Clone Budget line4. Delete budget shift5. Export the selected budget 6. Unselect lines
Adjustment – What can you modify in
Budget Lines
13

Other helpful functions:1. Indication that the BL was edited2. Indication that the BL was deleted3. Indication that the BL was added4. BL Code search5. Back to previous page6. Difference between contracted amount and the current amount
Adjustment – What can you modify in
Budget lines - functions
14

Adjustment related documents upload are with the usual functions/limits:1. Download the selected document2. Delete selected file 3. Upload adjustment document(s) – limited to 30M4. Upload Major adjustment required document(s) – 30M
Adjustment – What can you modify in
Documents
15

You may export the project narrative in *.doc format and the project budget in xls format
Adjustment – What can you modify in
Export
16

Prior to sending to JTS (button 3 in the image), it’s always useful to click on “validate” (button 2) to check what modifications were done & if no errors are present…
Adjustment – Final step
17

… and you can see if it’s minor or major adjustment…
Adjustment – Final step
18

THANK YOU FOR YOUR ATTENTION
MERCI
شكرا ً