kofax ecopy sharescan 6.2 - installation guide for fuji xerox
TRANSCRIPT

Kofax eCopy ShareScan6.2Installation Guide for Fuji Xerox Devices
iEN-EC-FXX-IG--6.2-20190707
Licensing, Copyright, and TrademarkInformation
© 2019 Kofax. All rights reserved. Kofax is a trademark of Kofax, Inc., registered in the U.S. and/or other countries. All othertrademarks are the property of their respective owners. No part of this publication may be reproduced, stored, or transmitted inany form without the prior written permission of Kofax.
OpenText, eDOCS, OpenText Fax Server, and RightFax are registered trademarks or trademarks of Open Text Corporation inthe United States and/or other countries.
EMC, Documentum, and ISIS are registered trademarks of EMC Corporation.
IBM, Lotus, Lotus Notes, and Lotus Domino are trademarks and/or registered trademarks of Lotus Development Corporationand/or IBM Corporation in the United States, other countries or both.
Intel and Pentium are registered trademarks of Intel Corporation.
Microsoft, Windows, Windows NT, Outlook, SharePoint, and MS-DOS are registered trademarks and Windows Server istrademark of Microsoft Corporation in the USA and in other countries.
Autonomy and the Autonomy logo, iManage, Interwoven, and WorkSite are registered trademarks or trademarks of AutonomyCorporation plc.
All Xerox and Fuji Xerox product names are either registered trademarks or trademarks of Xerox Corporation or Fuji Xerox Co.,Ltd.
eCopy ShareScan 6.2 Fuji Xerox Installation Guide
iiEN-EC-FXX-IG--6.2-20190707
Customer Support Services
The support services are available to registered users of the software during the warranty period or for the duration of yoursoftware Maintenance and Support (M&S) agreement. Contact your supplier for details, as described in the M&S agreement.
In addition to support provided by your dealer or distributor, the eCopy Support website provides 24x7 access to a knowledgebase. To access it, click the link on the main Support page.
eCopy ShareScan 6.2 Fuji Xerox Installation Guide
iiiEN-EC-FXX-IG--6.2-20190707
Contents
Contents iiiShareScan Installation Guide 1ShareScan Documentation 2Typical Installation Workflow 3Pre-install Considerations 4System Requirements for the ShareScanManager PC 4
Operating Systems 5
Database 5
Virtual Environments 5
Memory Configuration 5
Checklist for the ShareScanManager PC 6
Ports to be left open 7
Database Permissions 7
Network 7
Support Information 9
Languages 9
Supported Devices 9
Supported Backend Services 9
Installing ShareScan 10Basic Workflow 10
Installing ShareScan 10
ShareScan Installation Scenarios 11
Installing ShareScan to a Clean System 12
eCopy ShareScan 6.2 Fuji Xerox Installation Guide
ivEN-EC-FXX-IG--6.2-20190707
Complete Installation 12
Custom Installation 13
ALL four components are installed (withWebClient optionally skipped) 14
Microsoft SQL Server database engine NOT installed (withWebClient optionally skipped) 15
ONLY eCopy ShareScan 6.2 Server and eCopy ShareScan 6.2WebClient (optionally skipped) are installed 17
User rights necessary for ShareScan database creation 18
Administrative account with 'sysadmin' fixed server-level role (e.g. 'sa') 18
Administrative account with ‘dbcreator’ and ‘securityadmin’ fixed server-level roles 18
Administrative account ONLY with ‘dbcreator’ fixed server-level role 18
Most restrictive environment 19
Upgrading previous version to 6.2 19
Upgrade from previous version to 6.2 19
Custom upgrade from previous version to 6.2 20
Maintenance 21
UpgradingMultiple Managers 21
Profile Tool 23
Client-side Installation 25Configuring the Fuji Xerox device 25
Adding Devices with Installed ShareScan Client 26
Batch Adding Devices 27
eCopy Connectors 29eCopy Connector for Microsoft Exchange (Mail and/or Fax) 29
Supported Versions 29
Installation Prerequisites and Suggestions 29
eCopy Connector for IBM Lotus Notes (Mail and/or Fax) 29
Supported Versions 29
Installation Prerequisites and Suggestions 30
eCopy Connector for LDAP/SMTP (Mail and/or Fax) 30
eCopy ShareScan 6.2 Fuji Xerox Installation Guide

vEN-EC-FXX-IG--6.2-20190707
Supported Versions 30
Installation Prerequisites and Suggestions 30
eCopy Scan to Desktop 30
Installation Prerequisites and Suggestions 30
eCopy Quick Connect 32
Supported Versions 32
Installation Prerequisites and Suggestions 32
eCopy Connector for OpenText Fax Server (RightFax Edition) 32
Supported Versions 32
Installation Prerequisites and Suggestions 32
eCopy Scan to Printer 33
Installation Prerequisites and Suggestions 33
eCopy Connector for Microsoft SharePoint 33
Supported Versions 33
Installation Prerequisites and Suggestions 33
eCopy Connector for EMC Documentum 33
Supported Versions 33
Installation Prerequisites and Suggestions 34
eCopy Connector for Autonomy iManageWorkSite 34
Supported Versions 34
Installation Prerequisites and Suggestions 35
eCopy Connector for Open Text Content Server - eDOCS Edition 35
Supported Versions 35
Installation Prerequisites and Suggestions 35
eCopy Connector for Open Text Content Server 36
Supported Versions 36
Installation Prerequisites and Suggestions 36
Licensing Devices 38
eCopy ShareScan 6.2 Fuji Xerox Installation Guide
viEN-EC-FXX-IG--6.2-20190707
Loading Licenses 38
Activating Licenses 39
Loading Activated Licenses 39
Removing Licenses 39
Generating a license report 40
ShareScan Post-install 41Configuring ShareScan (examples) 41
To Configure a Service (example – Activity Tracking) 41
To Configure an Extender (example – Forms Processing Extender) 42
To Configure aQuick Connect Connector Profile to Use Forms Processing Extender data 42
To Test the Configuration of a Profile 43
Next Steps 44Best Practices 44
Technical Support 45
Troubleshooting Tips 47
Re-enable SSLv3 in Tomcat and Java 48
eCopy ShareScan 6.2 Fuji Xerox Installation Guide
1EN-EC-FXX-IG--6.2-20190707
ShareScan Installation Guide
The eCopy ShareScan software extends the capabilities of digital copiers and scanners. When installing and setting up aShareScan system, you must be familiar with the scanning devices that you will use with ShareScan, the ShareScan softwarecomponents, and the basic installation and configuration workflow.
This guide is intended for administrators responsible for the initial installation, configuration, and licensing of ShareScan. Forthe device-specific Pre-Installation Checklist (PICL), see the relevant vendor-specific Pre-Installation Checklist and SizingGuide.For information pertaining to the ShareScan (pre)install, see this guide. For configuration and Administration Consoleusage, refer to the Administration Console Help (accessible via pressing F1 on the Administration Console).
This document is written under the assumption that readers are familiar with working in a server-client architecture andenvironment.
eCopy ShareScan 6.2 Fuji Xerox Installation Guide
2EN-EC-FXX-IG--6.2-20190707
ShareScan Documentation
The following documentation is available for your perusal with ShareScan:
– eCopy ShareScan Pre-installation Checklist and Sizing Guide (PDF) – provides info on the issues to be addressedbefore deploying ShareScan
– eCopy ShareScan Installation Guide (this document) - contains information on installing eCopy ShareScan, includinghardware and software prerequisites
– eCopy ShareScan Administration Console Help – the integrated help of the application, covering the use ofShareScan beyond installation, and provides configuration information. The help is accessible by pressing F1 on theShareScan Administration Console
– eCopy ShareScan Troubleshooter User Guide (PDF) – contains information on how to use the ShareScanTroubleshooter, a built-in diagnostic tool of the product
– eCopy ShareScan Release Notes (PDF) – contains an overview of the changes for the given ShareScan release
– eCopy ShareScan High Availability and Load Balancing Deployment Guide (PDF) - provides guidance on how todeploy ShareScan to function in high availability mode
– eCopy ShareScan Glossary Editor Recommendations (PDF) - contains information on how to handle GlossaryEditor Tool properly
eCopy ShareScan 6.2 Fuji Xerox Installation Guide
3EN-EC-FXX-IG--6.2-20190707
Typical Installation Workflow
ShareScan 6.2 installation has three typical scenarios, which are briefly outlined below. For a more detailed description, readthe Installing ShareScan section of this document.
Installing ShareScan 6.2 to a clean system
1. Ensure that the ShareScan prerequisites (listed in the following chapter) are installed.
2. Start the ShareScan 6.2 installer, and click through the Installation Wizard.
Upgrading from ShareScan 5.x to 6.2
Important!ShareScan v5.0, v5.1 and v5.2 are not supported in an 5.x to 6.2 upgrade scenario.
Before you start the upgrade process, ensure that your current ShareScan installation is working properly. The easiest way todo this is starting the Administration Console and verifying that it launches error-free.
Upgrading from versions pre-dating v5.4
If you are upgrading from a software version earlier than v5.4 - that is from v5.0, v5.1 or from v5.2 - first you need to upgrade to5.4. Once you have a verified working installation of ShareScan v5.4 you are ready to proceed to upgrade to v6.2.
Upgrading from v5.4 or higher to 6.2
1. Exit ShareScan 5.x Administration Console.
2. Ensure that the ShareScan prerequisites (listed in the following chapter) are installed.
3. Run eCopy ShareScan 6.2 installer.
4. Choose Upgrade ShareScan 5.x to 6.2 or Custom upgrade from previous version to 6.2 after theWelcome screenand click through the upgrade workflow.
eCopy ShareScan 6.2 Fuji Xerox Installation Guide
4EN-EC-FXX-IG--6.2-20190707
Pre-install Considerations
The following chapter contains information on the various tasks to be performed prior to installing ShareScan, as well as therequirements that must be met before product installation.
System Requirements for the ShareScan Manager PCThe ShareScan 6.2 install media contains all the required dependency installer files underInstall\ShareScan\SetupPrerequisites\ in separate folders that must be installed to ensure ShareScan functions properly.These are the following:
– Java SE Runtime Environment 8 Update 192 (x86)
– Microsoft .NET Framework 4.6.2
– Microsoft Visual C++ 2012 Redistributable (x86) – version 11.0.61030
– Microsoft Visual C++ 2015 Redistributable (x86) – version 14.0.24123
– Microsoft Visual C++ 2015 Redistributable (x64) – version 14.0.24123
– Microsoft Visual J# 2.0 Redistributable
Important!If Windows security update KB3000483 is not installed on the target system, Microsoft Visual C++ 2015 runtime installermight freeze without completing installation, unable to function properly. Follow the steps below to resolve the issue:
1. Uninstall Microsoft Visual C++ 2015 runtime redistributable (x86 / x64).
2. Install KB3000483 Windows security update (https://www.microsoft.com/en-us/download/details.aspx?id=45570) onthe target system
3. Choose Restart from the dialog that appears.
4. Re-run the Microsoft Visual C++ 2015 runtime redistributable (x86 / x64) installer.
The installer skips any of the above listed dependencies if they are already installed on the target system, with this considerablyshortening install time.
Note:Microsoft Visual J# 2.0 Redistributable must be manually installed from the installation media. Before installing thisdependency, Microsoft .NET Framework 3.5 SP1 must also be manually installed.
eCopy ShareScan 6.2 Fuji Xerox Installation Guide
5EN-EC-FXX-IG--6.2-20190707
Operating Systems– Windows 7 SP1 Home Premium, Professional and Ultimate Editions
– Windows 8.1
– Windows 10 Anniversary Update or later
– Windows Server 2008 R2 SP1*
– Windows Server 2012 R2*
– Windows Server 2016**64 bit support as a 32 bit application
– The ShareScan Administration Console and the ShareScan Manager cannot be installed on Linux, Solaris orMacintosh operating systems.
Note:The ShareScan 6.2 installer cannot be launched unless Microsoft .NET Framework 4.6.2 or a later 4.x version is installedon the target system. When trying to launch the installer with no .NET Framework or any version older than v4.6.2installed, an error message pops up detailing the dependency and the install media path for the offline .NET Frameworkinstaller. This warning message must be closed by clicking OK and the installer quits. For more information on.NET Framework versions and their operating system related dependencies click here.
Database– SQL server 2008 or above, express and non-express editions
Virtual Environments
Important!Installing eCopy ShareScan on a virtual machine with a Microsoft operating system has always been supported but Kofax doesnot certify virtual platforms. As long as adequate resources are allocated to the virtual machine, eCopy ShareScan shouldfunction as expected. Ultimately, it is the customer's responsibility to ensure their virtual environment is configured correctly.Avoid desktop class machines, since they do not have enough resources to support heavy processing.
– VMware ESX Server 4.x and 5.x or higher
– VMware Workstation 7.x, 8.x, 9.x, 10.x, 11.x and 12.x or higher
– Microsoft Hyper Visor (Hyper-V) Server 2012 or higher
Memory Configuration– 4GB physical memory (minimum); 6 GB recommended (8 GB recommended for systems using 100+ MFPs)
– 5GB disk space (including SQL server and prerequisites)
eCopy ShareScan 6.2 Fuji Xerox Installation Guide
6EN-EC-FXX-IG--6.2-20190707
For more details on recommended memory configuration, see the Sizing recommendations for embedded configurationssection of the Pre-Installation Checklist and Sizing Guide document.
Checklist for the ShareScan Manager PC– Ensure you are about to install the ShareScanManager to a dedicated PC (that is, a PC exclusively tasked withthe running of the ShareScanManager).
– Run the Automatic Updates before you start installing ShareScan. Pay extra attention that you haveAutomatic Updates of the operating system TURNED OFF during the installation.
– ShareScan 6.2 installs a customized Apache Tomcat web service. Already existing Tomcat installations are notsupported.
Note:The original version of the Apache Tomcat web service is 8.5.42. This is a 32-bit installer.
–When designing the network architecture, note that Windows 7 can handle amaximum number of 20 concurrentnetwork connections. If you plan to havemore than 10 devices, you needWindows Server as an operatingsystem.
– If you havemultiple NIC cards, you need to select an IP address for ShareScan that will be used for device-server communication.
– Check if your file system format is NTFS.
– Ensure that Microsoft IIS is not installed or is not listening to the ports used by ShareScan (listed below).
– ShareScan 6.x licenses are installed to a SQL Server to allow easy management of devices. Prior to installingShareScan 6.x, it is important to determine if licenses will bemanaged individually from each ShareScanManager,or if you would like tomanage all licenses from a single SQL Server. The ShareScan installer can install a local copy of SQL Server 2014 Express for managing licenses (in addition tostoring configuration data). It can also create the appropriate database structure on an existing SQL server forconsolidated key management.
– ShareScan license keys must be activated against an Activation Server. License keys can only be activated once, soinspect the setup carefully prior to activation. All license keys provide a 30-day grace period before activation to ensurethe license setup is as intended. Manual activation is available for servers that are unable to communicate directly withthe Activation Server.As licenses are tied to the ShareScan database, it is not recommended tochange databases after ShareScaninstallation.
– If you plan to use the Single Sign-On feature of the Session Logon service, ensure that the ShareScan Manager PC isa member of the domain for which Session Logon is configured. The logged in user running and configuring the SessionLogon must be an Active Directory user with the necessary rights to read properties in Active Directory (this is a defaultvalue). Ensure that you use the Active Directory user account to log in into this domain (and not into the local system).This Active Directory user must have the necessary rights to read Active Directory properties (generally this is a defaultbehavior; however this can be modified in Active Directory).
eCopy ShareScan 6.2 Fuji Xerox Installation Guide
7EN-EC-FXX-IG--6.2-20190707
Ports to be left openIf you are planning to have firewalls enabled, leave the following ports open (between ShareScan Manager and themultifunctional device) for both inbound and outbound network traffic:
Inbound traffic:
– 443, 8080, 9600, 9650, 9700, 9610,
– UDP: 9650
Outbound traffic:
– TCP: 443, 1433 (SQL server default port, custom port can also be used instead), 8080, 9650,
– UDP: 161 (SNMP), 8899, 9650
If any of these ports are in use, ShareScan displays a warning. Ports in use do not block installation, but must be openedlater for proper functionality.
Database Permissions– For working with the ShareScan databases in case of upgrading, you must use an account that has db_ownerDatabase-Level Role permissions for the eCopy ShareScan database. An account with sysadmin Server-Level Role canbe used, but it is not mandatory. For clean installation scenario related database permissions, see the User rightsnecessary for ShareScan database creation section in your eCopy ShareScan Installation Guide.
– Do not use an sa account as a ShareScan runtime account for database connection, it does not work. Use only theeCopy account created by the ShareScan database installer, or a user having the same user rights as the eCopyaccount. If you use Integrated Windows Authentication for database connection, the user accounts specifed duringinstallation should have the proper rights.
Note:If Integrated Windows Authentication is used to connect to the database, and FPE (Form Processing Extender) or SFE(SmartForms Extender) profile is edited in the Administration Console (by using the template editor of the extenders), ProfileExport/Import is used in the Administration Console, then the database administrator must add the user (or users) to theallowed users of the ShareScan database. These users should have db_owner rights and must have their default schema setto 'ShareScan'.
Network–Domains and Workgroups:ShareScan can be configured to run in either domain-based networks or workgroup
eCopy ShareScan 6.2 Fuji Xerox Installation Guide
8EN-EC-FXX-IG--6.2-20190707
environments. Windows 2008 or later domain environments are supported.It is recommended to use a domain environment.
–Subnets and VLANs: The ShareScanManager PC can be on different subnets or VLANs from themultifunctiondevices, provided that themultifunction devices can communicate with theManager PC using an IP address. Ifyour multifunction devices spanmultiple subnets or VLANs, a router is required to pass packets back and forth.However, in these situations the UDP and the SNMP based device discovery mechanisms may not be functional.Also, consider that duplex communication is required between the ShareScanManager and theMFPs (meaningboth the devices shall be able to send TCP messages to theManager and vice versa), on the ports listed in sectionChecklist for the ShareScanManager PC.
– IP Addresses:Use static IP addresses for both the ShareScanManager PC and theMFPs. To change the IPaddress of theManager PC:
a. remove all devices from the Manager
b. stop all ShareScan related services
c. change the IP address of the NIC and make sure the network adapters use the new IP (ipconfig command)
d. start the services stopped in (b)
e. re-add the devices
If your devices require a certificate to work, the workflow changes slightly when changing the Manager IP address:
a. remove all devices from the Manager
b. change the IP address
c. reboot the Manager PC
d. start the ShareScan Administration Console, and confirm the IP address change on the dialog thatautomatically opens
e. recreate the certificate(s)
f. re-add the devices to the Manager
–Gateway Address: ShareScan does not require a gateway address.
–Host Name: The host namemust not exceed 60 characters. Device host names are resolved using DNS. Thishappens once you have added a device and confirmed it. If the device is not registered in the DNS, then its namein theDevices tab (Administration Console) may change after confirmation.Note that changing the host name after installation can cause licensing and database issues, and is therefore notsupported. If youmust change the host name, youmust do a full reinstallation of ShareScan.
–Network Attached Storage Devices (NAS): ShareScan 6.2 supports NAS drives and folders that are fullycompatible with NTFS file system andWindows access control mechanisms.
–Novell:ShareScan does not support direct communication between a ShareScanManager PC and amultifunction device on Novell networks. However, when Novell client software is installed on theManager PC
eCopy ShareScan 6.2 Fuji Xerox Installation Guide
9EN-EC-FXX-IG--6.2-20190707
someConnectors (eCopy Quick Connect, and the eCopy Scan to Desktop) can bridge to a Novell server. A Novellclient must be installed on the ShareScanManager PC if Novell authentication of Scan Inboxes is required.The eCopy Connector for LDAP/SMTP requires a Novell client to work properly with Session Logon.
– Local Security Policy: In order to use the Administration Console on the ShareScanManager PC, you requirelocal administrator-level credentials. ShareScanManager cannot be installed on a Domain Controller.
Support InformationThis section contains information on the various languages and third-party software supported by ShareScan.
LanguagesShareScan 6.2 supports the following languages:
– English
– Brazilian Portuguese
– Dutch
– French
– German
– Italian
– Spanish
– Catalan (client only)
– Simplified Chinese (client only)
– Japanese (client only)
Note:This list only refers to the languages available for the user interface. For the OCR process, the language support is much wider,comprising over 100 languages.
Supported DevicesFor the most current information on supported devices, go to the Support Website.
Supported Backend ServicesFor a detailed list of connector-specific backend version, see section eCopy connectors in this Installation Guide.
eCopy ShareScan 6.2 Fuji Xerox Installation Guide
10EN-EC-FXX-IG--6.2-20190707
Installing ShareScan
The following chapter contains information on the various tasks associated with installing ShareScan.
Basic WorkflowTo install, configure, and license ShareScan:
1. Install the ShareScan software on a network computer. You have the option to customize the database installation. Formore information, see the Custom installation chapter of this guide.
2. Install ShareScan Client, if needed (for more information on installing the client, see the Client-side installation chapterof this guide).
3. Start the Administration Console.
4. Add licenses, add devices (if they do not appear automatically on the Devices tab), and/or set up scanners. The Modelname (in the dialog that appears as part of device addition procedure) differs from the name of the Device (displayedin the tree control on the Device tab). The tree control on the Device tab contains the network (host) name of thedevices (or the IP address of the devices, if the host name cannot be resolved). This ID is used as a unique identifierfor the devices in the ShareScan system. This cannot be changed in the Administration Console, only via the Deviceadministration user interface and / or in the network DNS (Domain name server).
Note:The Model name specified during device addition can be changed anytime via the Modify Model Name menu item inthe Administration Console: Devices tab > <<right click device name>> > Modify Model Name).
5. Install and configure Services, Connectors, and Devices.
When you open the Administration Console, theWelcome page displays a list of the main feature highlights of the currentversion.
For in-depth information about configuring and managing the Services, Connectors, and Devices that ShareScan uses, refer tothe ShareScan Help. To access the Help, click F1 or click the Help button that is located in the upper-right corner of theShareScan Administration Console.
Installing ShareScanIf you are about to deploy ShareScan as a High Availability system or want to enable ShareScan load balancing, consult theeCopy ShareScan High Availability and Load Balancing Deployment Guide.
The present guide gives you guidance on installation in a basic or multi-manager setup.
Use the ShareScan installation program to install the software components on a network computer.
eCopy ShareScan 6.2 Fuji Xerox Installation Guide
11EN-EC-FXX-IG--6.2-20190707
Notes:ShareScan is only compatible with the Apache Tomcat version included in the installation program. If you have Apache Tomcatalready installed, remove it prior to installing ShareScan.If you have Skype installed, it can conflict with the Apache Tomcat installed by ShareScan. To avoid this, ensure that the Useport 80 and 443 as alternatives for incoming connections option is unchecked in Skype.
Important!Ensure that the ports used for both inbound and outbound network traffic are left open. See Ports to be left open topic.
ShareScan Installation Scenarios
Important!The eCopy ShareScan 6.2 installer uninstalls previous version of ShareScan. With this, any separate eCopy products (XeroxTWAIN, ScanStation, Advanced FPE) are also uninstalled to facilitate proper operation of ShareScan 6.2. You have to manuallyre-install any of these required components.
Before running the ShareScan installer, ensure that you have the latest system updates on your machine and that AutomaticWindows Updates are turned off.
Important!Installing ShareScan to folders belonging to individual user profiles (e.g.: My Documents, Documents and Settings onolder systems) is NOT recommended. When upgrading existing ShareScan versions using the relevant Upgrade optionsof the installer, ShareScan 6.2 always performs a complete installation; you can only customize the installation location(Destination Folder screen) and database access and Service account credentials (Service Credentials screen) insuch cases. When you perform an upgrade on amulti-manager deployment, it is recommended that you upgrade theindividual ShareScanManagers one by one. If you plan to deploy ShareScan in a High Availability cluster with multipleShareScan server nodes, follow the instructions in the eCopy ShareScan High Availability and Load BalancingDeployment Guide. It is recommended to set up the individual ShareScan server nodes first, test their basic behaviorand thenmove them into the High Availability cluster as described in the eCopy ShareScan High Availability andLoad Balancing Deployment Guide.
Note:Do not use square brackets ( [ and ] ) in
– user identifiers
– passwords
– database name fields
since they are not handled correctly and are removed. If you need to use these characters in the password, please considerchanging it for the time of the installation.
Follow these two basic scenarios when installing ShareScan.
eCopy ShareScan 6.2 Fuji Xerox Installation Guide
12EN-EC-FXX-IG--6.2-20190707
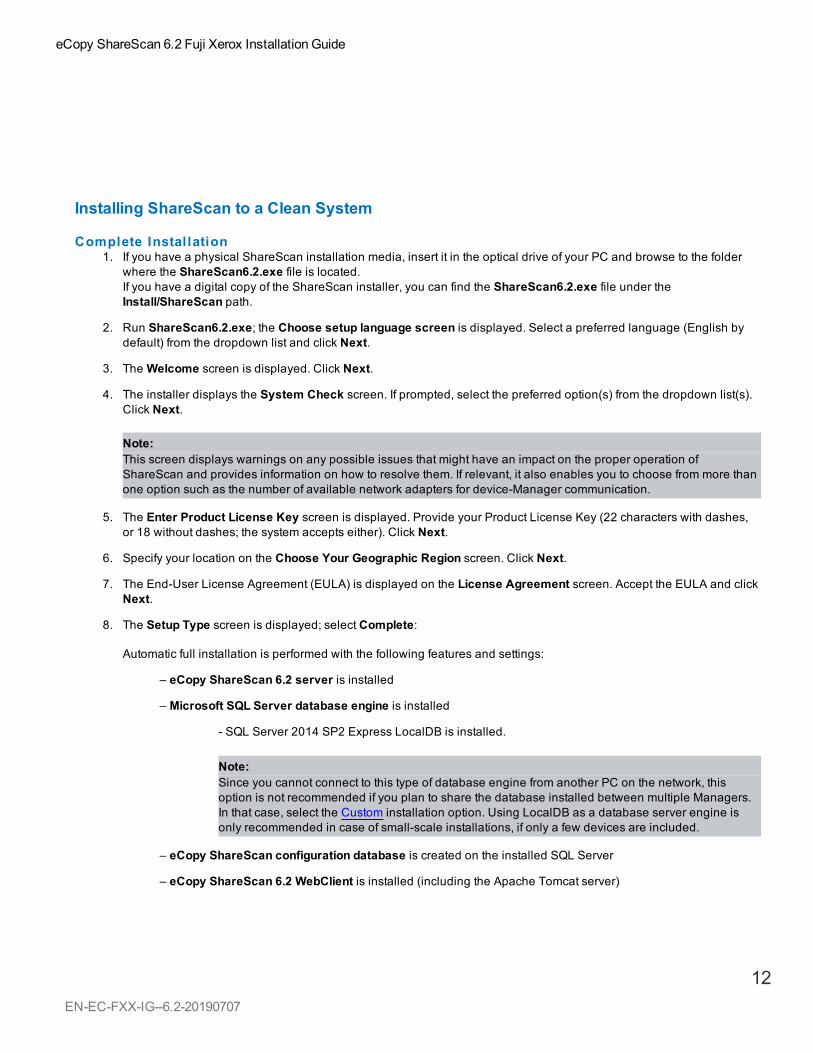
Installing ShareScan to a Clean System
Complete Installation1. If you have a physical ShareScan installation media, insert it in the optical drive of your PC and browse to the folder
where the ShareScan6.2.exe file is located.If you have a digital copy of the ShareScan installer, you can find the ShareScan6.2.exe file under theInstall/ShareScan path.
2. Run ShareScan6.2.exe; the Choose setup language screen is displayed. Select a preferred language (English bydefault) from the dropdown list and click Next.
3. TheWelcome screen is displayed. Click Next.
4. The installer displays the System Check screen. If prompted, select the preferred option(s) from the dropdown list(s).Click Next.
Note:This screen displays warnings on any possible issues that might have an impact on the proper operation ofShareScan and provides information on how to resolve them. If relevant, it also enables you to choose from more thanone option such as the number of available network adapters for device-Manager communication.
5. The Enter Product License Key screen is displayed. Provide your Product License Key (22 characters with dashes,or 18 without dashes; the system accepts either). Click Next.
6. Specify your location on the Choose Your Geographic Region screen. Click Next.
7. The End-User License Agreement (EULA) is displayed on the License Agreement screen. Accept the EULA and clickNext.
8. The Setup Type screen is displayed; select Complete:
Automatic full installation is performed with the following features and settings:
– eCopy ShareScan 6.2 server is installed
– Microsoft SQL Server database engine is installed
- SQL Server 2014 SP2 Express LocalDB is installed.
Note:Since you cannot connect to this type of database engine from another PC on the network, thisoption is not recommended if you plan to share the database installed between multiple Managers.In that case, select the Custom installation option. Using LocalDB as a database server engine isonly recommended in case of small-scale installations, if only a few devices are included.
– eCopy ShareScan configuration database is created on the installed SQL Server
– eCopy ShareScan 6.2 WebClient is installed (including the Apache Tomcat server)
eCopy ShareScan 6.2 Fuji Xerox Installation Guide
13EN-EC-FXX-IG--6.2-20190707
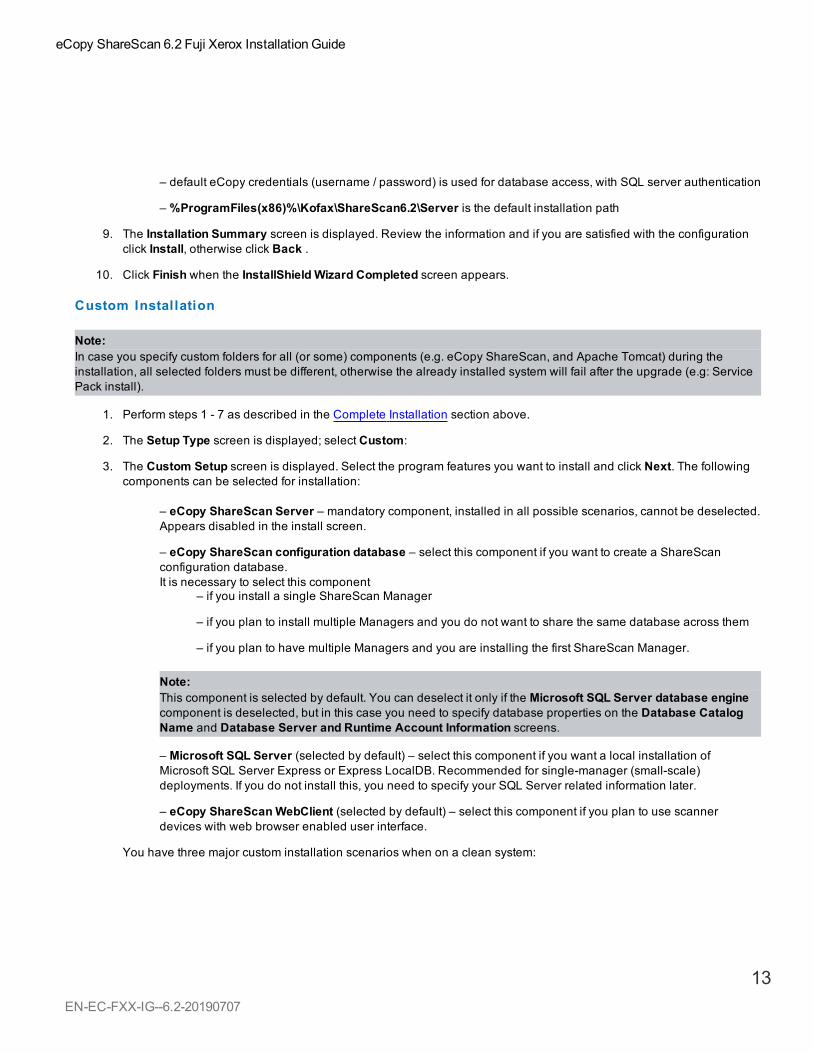
– default eCopy credentials (username / password) is used for database access, with SQL server authentication
– %ProgramFiles(x86)%\Kofax\ShareScan6.2\Server is the default installation path
9. The Installation Summary screen is displayed. Review the information and if you are satisfied with the configurationclick Install, otherwise click Back .
10. Click Finish when the InstallShield Wizard Completed screen appears.
Custom Installation
Note:In case you specify custom folders for all (or some) components (e.g. eCopy ShareScan, and Apache Tomcat) during theinstallation, all selected folders must be different, otherwise the already installed system will fail after the upgrade (e.g: ServicePack install).
1. Perform steps 1 - 7 as described in the Complete Installation section above.
2. The Setup Type screen is displayed; select Custom:
3. The Custom Setup screen is displayed. Select the program features you want to install and click Next. The followingcomponents can be selected for installation:
– eCopy ShareScan Server – mandatory component, installed in all possible scenarios, cannot be deselected.Appears disabled in the install screen.
– eCopy ShareScan configuration database – select this component if you want to create a ShareScanconfiguration database.It is necessary to select this component
– if you install a single ShareScan Manager
– if you plan to install multiple Managers and you do not want to share the same database across them
– if you plan to have multiple Managers and you are installing the first ShareScan Manager.
Note:This component is selected by default. You can deselect it only if the Microsoft SQL Server database enginecomponent is deselected, but in this case you need to specify database properties on the Database CatalogName and Database Server and Runtime Account Information screens.
– Microsoft SQL Server (selected by default) – select this component if you want a local installation ofMicrosoft SQL Server Express or Express LocalDB. Recommended for single-manager (small-scale)deployments. If you do not install this, you need to specify your SQL Server related information later.
– eCopy ShareScanWebClient (selected by default) – select this component if you plan to use scannerdevices with web browser enabled user interface.
You have three major custom installation scenarios when on a clean system:
eCopy ShareScan 6.2 Fuji Xerox Installation Guide
14EN-EC-FXX-IG--6.2-20190707
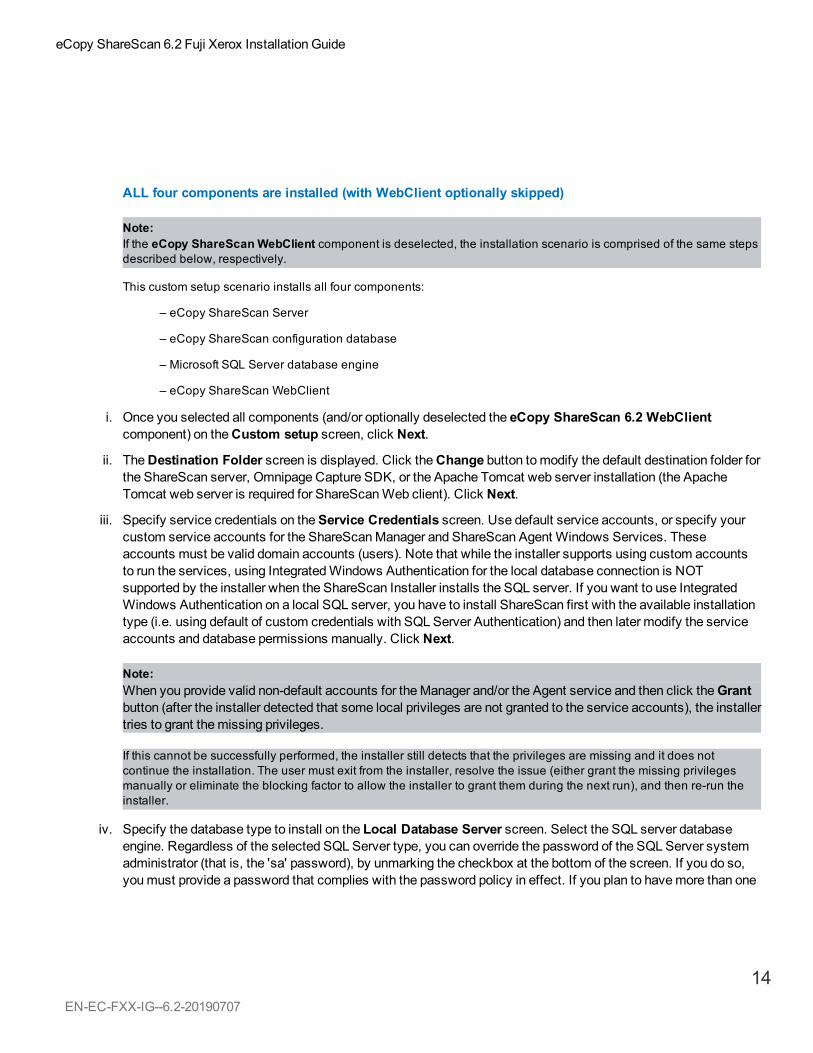
ALL four components are installed (with WebClient optionally skipped)
Note:If the eCopy ShareScanWebClient component is deselected, the installation scenario is comprised of the same stepsdescribed below, respectively.
This custom setup scenario installs all four components:
– eCopy ShareScan Server
– eCopy ShareScan configuration database
– Microsoft SQL Server database engine
– eCopy ShareScan WebClient
i. Once you selected all components (and/or optionally deselected the eCopy ShareScan 6.2 WebClientcomponent) on theCustom setup screen, click Next.
ii. TheDestination Folder screen is displayed. Click theChange button tomodify the default destination folder forthe ShareScan server, Omnipage Capture SDK, or the Apache Tomcat web server installation (the ApacheTomcat web server is required for ShareScanWeb client). Click Next.
iii. Specify service credentials on theService Credentials screen. Use default service accounts, or specify yourcustom service accounts for the ShareScanManager and ShareScan Agent Windows Services. Theseaccounts must be valid domain accounts (users). Note that while the installer supports using custom accountsto run the services, using IntegratedWindows Authentication for the local database connection is NOTsupported by the installer when the ShareScan Installer installs the SQL server. If you want to use IntegratedWindows Authentication on a local SQL server, you have to install ShareScan first with the available installationtype (i.e. using default of custom credentials with SQL Server Authentication) and then later modify the serviceaccounts and database permissions manually. Click Next.
Note:When you provide valid non-default accounts for theManager and/or the Agent service and then click theGrantbutton (after the installer detected that some local privileges are not granted to the service accounts), the installertries to grant themissing privileges.
If this cannot be successfully performed, the installer still detects that the privileges are missing and it does notcontinue the installation. The user must exit from the installer, resolve the issue (either grant the missing privilegesmanually or eliminate the blocking factor to allow the installer to grant them during the next run), and then re-run theinstaller.
iv. Specify the database type to install on the Local Database Server screen. Select the SQL server databaseengine. Regardless of the selected SQL Server type, you can override the password of the SQL Server systemadministrator (that is, the 'sa' password), by unmarking the checkbox at the bottom of the screen. If you do so,youmust provide a password that complies with the password policy in effect. If you plan to havemore than one
eCopy ShareScan 6.2 Fuji Xerox Installation Guide
15EN-EC-FXX-IG--6.2-20190707
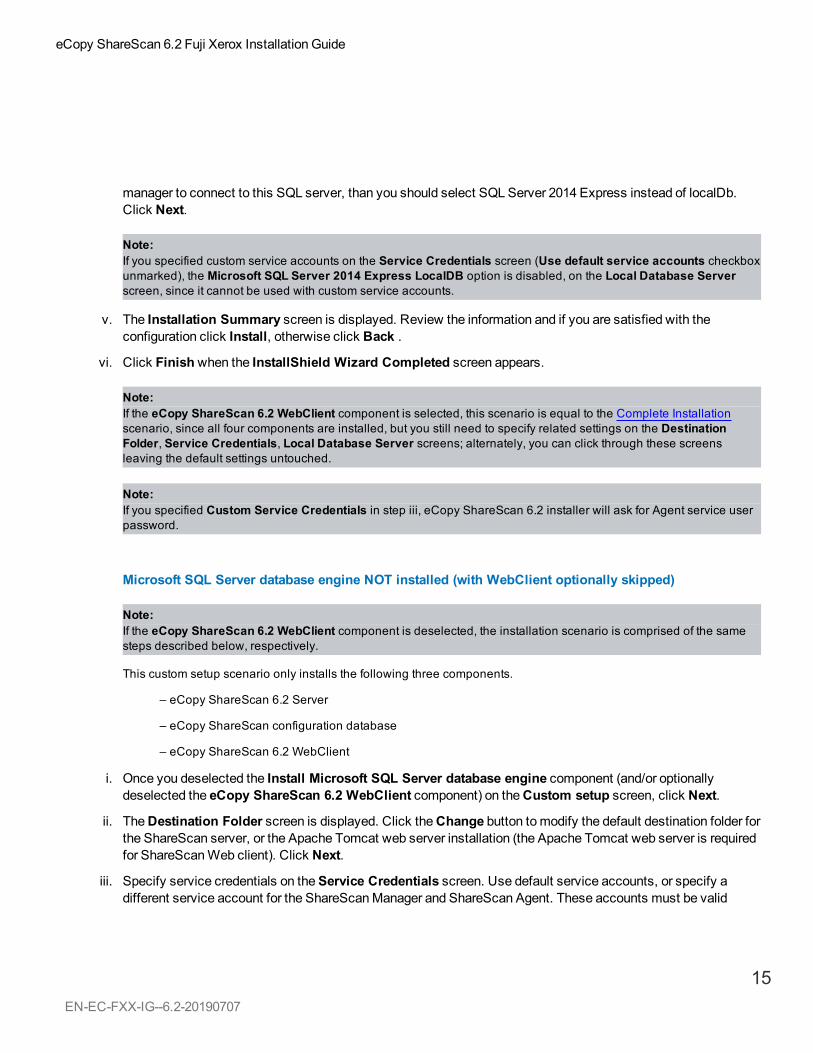
manager to connect to this SQL server, than you should select SQL Server 2014 Express instead of localDb.Click Next.
Note:If you specified custom service accounts on the Service Credentials screen (Use default service accounts checkboxunmarked), the Microsoft SQL Server 2014 Express LocalDB option is disabled, on the Local Database Serverscreen, since it cannot be used with custom service accounts.
v. The Installation Summary screen is displayed. Review the information and if you are satisfied with theconfiguration click Install, otherwise click Back .
vi. Click Finishwhen the InstallShield Wizard Completed screen appears.
Note:If the eCopy ShareScan 6.2 WebClient component is selected, this scenario is equal to the Complete Installationscenario, since all four components are installed, but you still need to specify related settings on the DestinationFolder, Service Credentials, Local Database Server screens; alternately, you can click through these screensleaving the default settings untouched.
Note:If you specified Custom Service Credentials in step iii, eCopy ShareScan 6.2 installer will ask for Agent service userpassword.
Microsoft SQL Server database engine NOT installed (with WebClient optionally skipped)
Note:If the eCopy ShareScan 6.2 WebClient component is deselected, the installation scenario is comprised of the samesteps described below, respectively.
This custom setup scenario only installs the following three components.
– eCopy ShareScan 6.2 Server
– eCopy ShareScan configuration database
– eCopy ShareScan 6.2 WebClient
i. Once you deselected the Install Microsoft SQL Server database engine component (and/or optionallydeselected the eCopy ShareScan 6.2 WebClient component) on theCustom setup screen, click Next.
ii. TheDestination Folder screen is displayed. Click theChange button tomodify the default destination folder forthe ShareScan server, or the Apache Tomcat web server installation (the Apache Tomcat web server is requiredfor ShareScanWeb client). Click Next.
iii. Specify service credentials on theService Credentials screen. Use default service accounts, or specify adifferent service account for the ShareScanManager and ShareScan Agent. These accounts must be valid
eCopy ShareScan 6.2 Fuji Xerox Installation Guide
16EN-EC-FXX-IG--6.2-20190707
domain accounts (users). Click Next.
Note:When you plan to use a SQL Server on a different PC than the one used for ShareScan Manager installation (remoteSQL Server) with Integrated Windows Authentication for the database connection, you must use (custom) domainaccounts as service accounts, because the default (local) accounts cannot connect to a remote database viaIntegrated Windows Authentication. Using the default accounts with a remote SQL Server is still possible if (username /password based) SQL Server Authentication is used.
iv. TheAdministrative Credentials for Database Creation screen is displayed. On this screen, the hostname orIP (and optionally, the instance name) of the SQL Server must be specified.The credentials entered on this screen are required while installing or upgrading the database. The information isnot stored, it is only required during the installation or upgrade process, for the database connection. Thefollowing options are displayed:
– SQL Server host / instance name input box: the host name and (optionally) the instance name of the SQLServer to use must be specified: e.g. SQLSRV-01, CORPSQL1\SHARESCAN, 10.140.1.23\SSCAN1
You need to choose one from the following three options:
– The default sa account and the default password used by ShareScan
– The Windows identity of the user running the ShareScan installer
– Specifying a user ID and the corresponding password (use SQL Server authentication). This can be an saaccount with the corresponding password, or it can be a completely different user ID that is valid on the SQLServer having the proper rights for the ShareScan database creation.
Click Next.
Note:If the runtime database user (eCopy by default) already exists on a remote SQL server (either from a previousinstallation or because it is created by the database administrator manually), a valid password must be specified forlogin.
v. TheDatabase Catalog Name screen is displayed. Specify the ShareScan database name here or leave thedefault name. Click Next.
vi. TheDatabase Server and Runtime Account Information screen is displayed. You can specify a runtimeaccount for the configuration database.You need to select a method how the ShareScan services connect to the SQL Server database:
– via SQL Server authentication, using the default user name 'eCopy' and the default password
– via Integrated Windows Authentication, using the identity of the accounts running the services (available onlyif custom accounts were specified on the previous wizard screen)
Note:If this option is selected (the Use specified credentials given to Service Accounts for database connectionradio button) and the administrative database user has no db_securityadmin database-level role (cannot
eCopy ShareScan 6.2 Fuji Xerox Installation Guide
17EN-EC-FXX-IG--6.2-20190707
create logins), the database administrator has to create the database users manually, otherwise the installedsystem will not operate properly.
– via SQL Server Authentication, using specified user name and password
Note:If the runtime user (SQL server user or Windows login) exists on the SQL Server specified for any reason, you mustprovide the same user credentials / account existing on the SQL Server. If the provided credentials are valid, these areused during installation and as runtime connection accounts.
Click Next.
vii. The Installation Summary screen is displayed. Review the information and if you are satisfied with theconfiguration click Install, otherwise click Back .
viii. Click Finishwhen the InstallShield Wizard Completed screen appears.
Note:If you specified Custom Service Credentials in step iii, eCopy ShareScan 6.2 installer will ask for Agent service userpassword.
ONLY eCopy ShareScan 6.2 Server and eCopy ShareScan 6.2 WebClient (optionally skipped) areinstalled
Note:If the eCopy ShareScan 6.2 WebClient component is deselected, the installation scenario is comprised of the samesteps described below, respectively.
This custom setup scenario only installs the following two components:
– eCopy ShareScan 6.2 Server
– eCopy ShareScan 6.2 WebClient
i. Once you deselected the Install Microsoft SQL Server database engine and eCopy ShareScanconfiguration database components (and/or optionally deselected the eCopy ShareScan 6.2 WebClientcomponent) on theCustom setup screen, click Next.
ii. TheDestination Folder screen is displayed. Click theChange button tomodify the default destination folder forthe ShareScan server, or the Apache Tomcat web server installation (the Apache Tomcat web server is requiredfor ShareScanWeb client). Click Next.
iii. Specify service credentials on theService Credentials screen. Use default service accounts, or specify adifferent service account for the ShareScanManager and ShareScan Agent. These accounts must be validdomain accounts (users). Click Next.
eCopy ShareScan 6.2 Fuji Xerox Installation Guide
18EN-EC-FXX-IG--6.2-20190707
iv. TheDatabase Catalog Name screen is displayed. On this screen, youmust specify the hostname or IP (andoptionally, the instance name) of the SQL Server where the existing 6.2 ShareScan database is hosted. Youmust also specify the existing database name. Click Next.
v. TheDatabase Server and Runtime Account Information screen is displayed.You need to provide the runtime account information for the configuration database. Click Next.
Note:If the Use specified credentials given to Service Accounts for database connection radio button is selected, thedatabase administrator has to create the database users manually, otherwise the installed system will not operateproperly.
vi. The Installation Summary screen is displayed. Review the information and if you are satisfied with theconfiguration click Install, otherwise click Back .
vii. Click Finishwhen the InstallShield Wizard Completed screen appears.
Note:If you specified Custom Service Credentials in step iii, eCopy ShareScan 6.2 installer will ask for Agent service userpassword.
You are now ready to configure a connector profile.
User rights necessary for ShareScan database creationThis section lists the supported user right scenarios ShareScan database creation, from the least restrictive to the mostrestrictive.
Administrative account with 'sysadmin' fixed server-level role (e.g. 'sa')
Note:Since ShareScan 5.1, sa rights are not required anymore for database installation, allowing the cases below. Having sa rightssimplifies the process, as in that case you do not need to set anything on the SQL server.
Administrative account with ‘dbcreator’ and ‘securityadmin’ fixed server-level roles
These rights are enough to create both the ShareScan database and the login ID of the runtime account. If you are connectingto a corporate database server, and your database administrator is not providing you the credentials of the sa account, then thedatabase administrator needs to provide another account for the ShareScan database installation (practically with lowerprivileges), having the dbcreator and the securityadmin fixed server-level roles.
This administrative user will be a db_owner on the created eCopyShareScan database.
Administrative account ONLY with ‘dbcreator’ fixed server-level role
If security policy is stricter, the login ID in SQL Server for the ShareScan runtime account must be created by the databaseadministrator manually. This manually created SQL Server login ID or Windows user name (if Integrated Authentication is used)must be used on the Database Server and Runtime Account Information screen of the ShareScan Installation Wizard. This
eCopy ShareScan 6.2 Fuji Xerox Installation Guide
19EN-EC-FXX-IG--6.2-20190707
manually created login needs to have a public fixed server-level role and it is not required to have it mapped to any database (itwill be mapped to the eCopyShareScan database with a minimal set of user rights necessary for the proper operation of theShareScan server).
This administrative user will be a db_owner on the created eCopyShareScan database.
Most restrictive environment
The most restrictive scenario (if database access is considered) the ShareScan installer supports is similar to the previousscenario, with the following additional restrictions:
– The database administrator must create the empty ShareScan database. Any name can be chosen.
– An account must be provided (on the Administrative Credentials for Database Creation screen) to enable thecreation of the ShareScan database content – for this, the account needs to be a db_owner on the empty database.
– The account does not need to be a member of the dbcreator or securityadmin fixed server-level roles.
In any of the above cases, the Installer Wizard checks the server connection and the provided credentials, and it also checks ifthe accounts or users provided have the necessary rights granted. If the user rights are not set properly, the corresponding errormessage is displayed.
On the Administrative Credentials for Database Creation screen you can select an option when the database creation isperformed in the name of the Windows user currently running the ShareScan installer. In case of a centralized corporatedatabase server, this option allows the database administrator to use a Windows (domain) account as the database creator,using any of the above options according to the security policy in place.
Upgrading previous version to 6.2When the ShareScan 6.2 installer is run on a machine which has a previous version of ShareScan installed, it offers twoupgrade options.
Note:If Custom Service Credentials is set for the Agent and Manager service, the eCopy ShareScan 6.2 installer will ask for theAgent service user password.
Note:Optimal performance is not guaranteed in case the eCopy 6.2 server is used with devices that have v5.2 JAR clients installedon them. Background Processing must be enabled for a functioning configuration of the different version server and client. Thissetup with legacy clients is only recommended until full transition from v5.2 to 6.2 happens.
Upgrade from previous version to 6.2
Important!ShareScan v5.0, v5.1 and v5.2 are not supported in an 5.x to 6.2 upgrade scenario.
1. If you have a physical ShareScan installation media, insert it in the optical drive of your PC and browse to the folderwhere the ShareScan6.2.exe file is located.If you have a digital copy of the ShareScan installer, you can find the ShareScan6.2.exe file under theInstall/ShareScan path.
eCopy ShareScan 6.2 Fuji Xerox Installation Guide
20EN-EC-FXX-IG--6.2-20190707
2. Run ShareScan6.2.exe; the Choose setup language screen is displayed. Select a preferred language (English bydefault) from the dropdown list and click Next.
3. TheWelcome screen is displayed. Click Next.
4. The Setup Type screen is displayed; select Upgrade from ShareScan 5.x to 6.2:
This option removes the older ShareScan version, then proceeds to install the new one, preserving configuration data.
– eCopy ShareScan 6.2 server is installed
– existing eCopy ShareScan configuration database is updated to the 6.2 schema
– eCopy ShareScan 6.2 WebClient is installed (including the Apache Tomcat server)
5. If the installer is not able to use the default ‘sa’ credentials and the current Windows user does not have the necessaryrights granted for database access, then the Administrative Credentials for Database Creation screen appears,where the proper (administrator level) credentials must be provided.
6. The Installation Summary screen is displayed. Review the information and if you are satisfied with the configurationclick Install, otherwise click Back .
7. Click Finish when the InstallShield Wizard Completed screen appears.
Custom upgrade from previous version to 6.2
Important!ShareScan v5.0, v5.1 and v5.2 are not supported in an 5.x to 6.2 upgrade scenario
1. If you have a physical ShareScan installation media, insert it in the optical drive of your PC and browse to the folderwhere the ShareScan6.2.exe file is located.If you have a digital copy of the ShareScan installer, you can find the ShareScan6.2.exe file under theInstall/ShareScan path.
2. Run ShareScan6.2.exe; the Choose setup language screen is displayed. Select a preferred language (English bydefault) from the dropdown list and click Next.
3. TheWelcome screen is displayed. Click Next.
4. The Setup Type screen is displayed; select Custom upgrade from previous version to 6.2: the installer performs acomplete installation, preserving configuration data:
– eCopy ShareScan 6.2 server is installed
– existing eCopy ShareScan configuration database is updated to the 6.2 schema
– eCopy ShareScan 6.2 WebClient is installed (including the Apache Tomcat server)
5. The Destination Folder screen is displayed. Click the Change button to modify the default destination folder for theShareScan server, or the Apache Tomcat web server installation (the Apache Tomcat web server is required forShareScan Web client). Click Next.
6. Specify service credentials on the Service Credentials screen. Use default service accounts, or specify a differentShareScan Manager and ShareScan Agent. Click Next.
eCopy ShareScan 6.2 Fuji Xerox Installation Guide
21EN-EC-FXX-IG--6.2-20190707
Note:If the installer detects a LocalDB SQL server connection from the previous ShareScan installation, the ServiceCredentials screen is not displayed.
7. At this point, the user can be presented with the following options:– If the installer is not able to use the default ‘sa’ credentials and the current Windows user does not have thenecessary rights granted for database access, then the Administrative Credentials for Database Creationscreen appears, where the proper (administrator level) credentials must be provided.
– the Database Server and Runtime Account Information screen: in case the user selected custom serviceaccounts, as in this case the user is necessary to specify what connection method / account should be used fordatabase connection.
Note:If the Use specified credentials given to Service Accounts for database connection radio button is selected andthe administrative database user has no db_securityadmin database-level role (cannot create logins), the databaseadministrator has to create the database users manually, otherwise the installed system will not operate properly.
Note:If the connection type is not changed to Integrated Windows Authentication, then the user name / password should notbe changed, otherwise the database connection may fail after installation. The reason is that in case of upgrade,existing users will not be recreated or their passwords changed.
8. The Installation Summary screen is displayed. Review the information and if you are satisfied with the configurationclick Install, otherwise click Back .
9. Click Finish when the InstallShield Wizard Completed screen appears.
MaintenanceIf you re-launch the ShareScan installer after the successful installation of ShareScan 6.2, the Program Maintenance screen isdisplayed after you select a preferred language from the dropdown list on the Choose setup language screen and click Next.The the following options are available:
– RemoveRemoves all ShareScan features (Server, WebClient). The so-called dependency packages (SQL Server,.NET runtimes, and so forth) can be removed from the Programs / Features manager of Windows.Note that if you installed ShareScan 6.2 over an existing ShareScan version, removing ShareScan 6.2 DOES NOT bringback the previously existing ShareScan version.Removing the WebClient feature of ShareScan also removes the Apache Tomcat server.
Upgrading Multiple Managers
Important!When performingmulti-manager upgrade and you start to use IntegratedWindows Authentication (instead of the ExistingSQL Server type database authentication), then you need to use:
eCopy ShareScan 6.2 Fuji Xerox Installation Guide
22EN-EC-FXX-IG--6.2-20190707
– Integrated Windows Authentication on all the managers you connect to the same 6.2 database
– the same windows service accounts on all the Managers you upgrade.
After you upgraded the first Manager to 6.2 with Integrated Windows Authentication, you cannot use the default serviceaccounts for the Agent and Manager services when you upgrade the second one, but you have to specify the same Windowsusers you used on the 1st Manager.
Note:For the time of upgrading multiple managers in any environment (NLB or standard), all managers should be stopped for thetime of upgrading the first manager. Database modification is also done during the upgrade. When this is complete, the rest oftha managers can be started and upgraded one by one.
Performing a multi-manager setup (when more than one ShareScan Manager connect to the same database catalog) and thenupgrading from version 5.x is similar to the Custom upgrade scenario.
1. If you have a physical ShareScan installation media, insert it in the optical drive of your PC and browse to the folderwhere the ShareScan6.2.exe file is located.If you have a digital copy of the ShareScan installer, you can find the ShareScan6.2.exe file under theInstall/ShareScan path.
2. Run ShareScan6.2.exe; the Choose setup language screen is displayed. Select a preferred language (English bydefault) from the dropdown list and click Next.
3. TheWelcome screen is displayed. Click Next.
4. The Setup Type screen is displayed; select Custom upgrade from previous version to 6.2: the installer performs acomplete installation, preserving configuration data:
– eCopy ShareScan 6.2 server is installed
– existing eCopy ShareScan configuration database is updated to the 6.2 schema or a clone (copy) of thecurrently used ShareScan database is updated to the 6.2 schema and put in use for the upgraded installation(the actual behavior is specified on the screen detailed in step 8 below)
– eCopy ShareScan 6.2 WebClient is installed (including the Apache Tomcat server)
5. The Destination Folder screen is displayed. Click the Change button to modify the default destination folder for theShareScan server, or the Apache Tomcat web server installation (the Apache Tomcat web server is required forShareScan Web client). Click Next.
6. Specify service credentials on the Service Credentials screen. Use default service accounts, or specify a differentservice account for the ShareScan Manager and ShareScan Agent services. These accounts must be valid domainaccounts (users). Click Next.
7. The Administrative Credentials for Database Creation screen is displayed, if the default 'sa' credentials do not work,or the actual Windows user running the installer does not have rights to update the database. Otherwise this screen isnot shown.
8. The Database Catalog Name screen is displayed. You have three basic scenarios:i. If you select the Use current catalog for database upgrade radio button in the first manager upgrade
installation sequence, the procedure is identical with the single manager Custom upgrade from ShareScan
eCopy ShareScan 6.2 Fuji Xerox Installation Guide
23EN-EC-FXX-IG--6.2-20190707
5.x to 6.2 installation scenario. In this case, the name of the database catalog remains the same(eCopyShareScan), but its structure changes hence if there are multiple managers, only the first Managercurrently upgraded will be able to operate correctly, while the other Managers will not, until they are upgradedas well. As a consequence, selecting this option is recommended if all the Managers connecting to the samedatabase are stopped during the whole upgrade process (of all the Managers).
Note:This option is also useful in scenarios when your database administrator (DBA) does not provide anadministrative account eligible for backup/restore operations. In such case, the DBA must create a copy of theeCopyShareScan database catalog (with a different name) on the same database server (and on the sameinstance). Then you need to switch one of your Managers to this copied database (via the Databaseconfiguration option of the ShareScan Administration Console), and upgrade it by selecting this option.Further Managers can then be upgraded by selecting Option iii described below.
ii. When upgrading the first Manager, select the Copy current catalog to perform the upgrade on the followingone radio button and specify a database name. This option makes a copy of the already existing databasecatalog with outdated structure and upgrades the copy reconfiguring the Manager to use it. This way the otherManagers are able to use the old catalog without any hindrance. To perform this successfully, the user musthave db_backupoperator database-level role and DBCREATOR server level permission since these allowbackup and restore operations.
iii. When upgrading the second and all further Managers, select the Use a different existing ShareScancatalog radio button and select the newly created / updated database, already upgraded to 6.2 level. Youhave to select the database catalog name provided during the upgrade the first Manager.
Note:The dropdown list only contains catalog names that are not the original ones and the ShareScan Manager tobe currently updated is also listed; the Manager is reconfigured to use the new database catalog name.
Click Next.
9. The Database Server and Runtime Account Information screen is displayed if the service credentials were modified.You need to provide the runtime account information for the configuration database. Click Next.
10. The Installation Summary screen is displayed. Review the information and if you are satisfied with the configurationclick Install, otherwise click Back .
11. Click Finish when the InstallShield Wizard Completed screen appears.
Profile ToolThe Profile Tool allows you to manage connector, service profile information, watchers and Data Publishing maps betweenShareScan 6.2 Managers. You can export such profile information from a Manager, then start up another Manager, and importthe profile information.
Unlike connector profiles, newly imported watchers do not automatically overwrite watchers with the same name alreadyexisting on the target machine. (These imported watchers are created as new ones.) To update a watcher via import, first youhave to delete the current watcher (on the target machine) and then do the import.
eCopy ShareScan 6.2 Fuji Xerox Installation Guide
24EN-EC-FXX-IG--6.2-20190707
To access the tool, go to Administration Console > Advanced tab > Tools > Profile Tool.
To perform an export, do as follows:
1. Start the Administration Console.
2. Start the Profile Tool.
3. Remain on the Export pane.
4. Use the dropdown icons to browse to the connector or service whose profile information you want to export.
5. Right-click on the connector or service in question.
6. Select Export connector profiles or Export service profiles (as appropriate).
7. Browse to the location where you want to save the file; the generated file automatically has the .profile extension.
To perform an import, do as follows:
1. Start the Administration Console.
2. Start the Profile Tool.
3. Switch to the Import pane.
4. Click the Browse button to locate the profile file you want to import.
5. Double-click the file to start the import process.
eCopy ShareScan 6.2 Fuji Xerox Installation Guide

25EN-EC-FXX-IG--6.2-20190707
Client-side Installation
The following chapter contains information on installing device-specific embedded clients.
Configuring the Fuji Xerox deviceShareScan supports JavaScript-capable Fuji Xerox devices. For a list of supported devices, see the Supported Device lists.
Before you can use eCopy ShareScan with Fuji Xerox devices, you must install and/or enable the following components.
HTTPS
1. Navigate to the proper page of the device’s Web Administration application (usually Properties > Security > SSL /TSL Settings).
2. Enable HTTP - SSL / TLS Communication option.
3. Disable Verify Remote Server Certificate option.
Note:You may need to create a certificate and install it onto the device before you can turn on Secure HTTP.
Simple Network Management Protocol (SNMP)
1. Navigate to the proper page of the device’s Web Administration application.
2. Enable SNMP v1/v2c protocols.
Default MFP UI language
1. At the device login as administrator by pressing Log in/out button and entering administrator credentials (default is:11111).
2. Press Services Home button and navigate to Tools > System Settings > Common Service Settings and pressScreen / Button Settings…
3. Check 10. Default Language setting and make sure it is set to English.
eCopy icon manual registration
1. After all devices are registered to eCopy ShareScan Administration Console in the current deployment, it must befinalized with the eCopy icon manual registration.
2. Ask your Fuji Xerox professional for the External Access Extension Tool (EAET) and make sure the 1.0.15.0 version orabove provided.
eCopy ShareScan 6.2 Fuji Xerox Installation Guide
26EN-EC-FXX-IG--6.2-20190707
3. Since EAET is not part of the eCopy deployment, other system requirements must be met while running it. CheckEAET Release Notes and start the tool on a x86 machine.
4. Repeat the following steps on each device in your deployment:1. Copy aip.config.xml and aip.smallicon.png into the same folder where EAET executable is started
from.
2. Start EAET on a x86 Microsoft Windows OS.
3. Enter the ApeosPort’s IP address, and click Next.
4. Enter MFP administration Username (default is 11111) and Password (default is x-admin), and click Next.
5. EnterWeb Application Server URL: http://<eCopyShareScanServerIP>:8080/ShareScan/Intro.html
6. Select Authentication Information: None, and click Next.
7. Make sure Set Index is not activated and click Next.
8. Click Finish and EAET will close.
9. At the device login as administrator by pressing Log in/out button and entering administrator credentials(default is: 11111).
10. Press Services Home button and navigate to Tools > System Settings > Common Service Settings andpress Screen / Button Settings…
11. Select the 5. Custom Button 2 line and press Change Settings button.
12. Select the Custom Service N. – Web Application Server line and press Save button.
13. Select the 7. Service Home line press Change Settings button.
14. Reorganize the list you have to display the first line 1. (Not Assigned).
15. Press 1. (Not Assigned).
16. On the next screen select the Custom Service N. – Web Application Server line and press Save button.
17. Press Save button.
18. Press Close button.
19. Press Close button.
5. Make sure you have configured the ShareScan application reachable from the Home screen and the eCopy icon isdisplayed according to design guideline.
Adding Devices with Installed ShareScan ClientAfter adding a license file to the ShareScan system, you can add one or more embedded or integrated devices.
eCopy ShareScan 6.2 Fuji Xerox Installation Guide
27EN-EC-FXX-IG--6.2-20190707
1. Start ShareScan Administration Console.
2. Click Add Device on the toolbar. You can also select Devices on theWelcome page and then right-click in theDevice Configuration window and select Add Device. The Add Devices window opens.
3. If your device does not appear in the list, select the instead of the option from the Discovery list. If the autodiscoverydoes not succeed, use TCP/IP to add it manually.
4. Select the device you want to add.
5. Click OK. The device registration wizard opens.
6. Enter the device administrator credentials and specify Device Settings.
7. Click Register.
8. When the system prompts you to confirm the device that you want to add to the device list, click OK.
Troubleshooting tip: If your device(s) cannot be discovered and are not shown in the list on the Add device dialog with any ofthe protocols, then make sure that:
- The device is up and running.
- It is connected to the network (use the ping <IP-address> command in a command window).
- The required ports are open on the firewalls/routers.
Note:The automatic device discovery is supported via and . If the autodiscovery does not succeed, use TCP/IP to add the devicemanually. If the device model cannot be detected due to firewall/network restriction, a pre-populated dropdown list pops up theuser can select from.
Batch Adding DevicesIf you want to add multiple devices in a batch, follow the instructions below:
1. Start the ShareScan Administration Console.
2. Click Add Device, or select Add device from the context menu (by right-clicking in the Device Configuration window).
3. Select Import... from the Discovery dropdown list; a standard Open file dialog is displayed and you need to select afile that describes the devices to add. The file must be a .csv file, containing data in the following format:
IP/host, FujiXerox, model, username(string), password(string), SNMPGet(string), HTTPSforUI(bool), HTTPSforFileTransfer(bool)
Example: 10.140.202.222,FujiXerox,*,11111,x-admin,public,false,false
eCopy ShareScan 6.2 Fuji Xerox Installation Guide
28EN-EC-FXX-IG--6.2-20190707
– IP/host: device IP address (or host name)
– FujiXerox: must be FujiXerox
– model (or *): specific device model name (or * to get the model name automatically from the device)
– username(string): device administrator username used for device registration
– password(string):
– SNMPGet(string): SNMP get community name (public by default; if otherwise specified on the device webadministration page, the same must be included here)
– HTTPSforUI(bool): true or false (whether to use secure channel for device-server communication)
– HTTPSforFileTransfer(bool): true or false (whether to use secure channel for image transfer)
Note:It is recommended to manually add a device to the Administration Console for a proper understanding of the .csv filecontent describing the devices.
4. The Administration Console displays the file content in the Batch add devices progress window and starts adding thedevices one by one.
5. When the processing is finished, the results are displayed in the Batch add devices progress window.
6. When you are done, click Close to exit the window and check the devices on the Devices tab.
Note:For instructions about removing devices, refer to the ShareScan Help.
eCopy ShareScan 6.2 Fuji Xerox Installation Guide
29EN-EC-FXX-IG--6.2-20190707
eCopy Connectors
It is recommended that application credentials (for Lotus Notes, Microsoft Outlook, SMTP, LDAP, and so forth) should bematched with the PC login credentials. Creating a generic, email-enabled “ShareScan” account for use by ShareScan is arecommended practice.
The backend applications listed in this section belong to their respective owners, and as such, any further, in-depth informationyou may need on the workings of these applications can be found in the application's own documentation, NOT in theShareScan documentation.
eCopy Connector for Microsoft Exchange (Mail and/or Fax)
Supported Versions– Microsoft Exchange 2007 / 2010 / 2013 / 2016 / Exchange Online for Office 365
– For information on supported Microsoft Exchange versions, consult the Compatibility Matrix available at the KofaxNavigator website.
Installation Prerequisites and Suggestions– If configuring the Exchange connector using EWS or WebDAV protocols, the Exchange server SSL certificate must beinstalled on the PC running ShareScan Manager. Certificates should be installed to the Trusted Root CertificationAuthorities on the Local Computer.
– To configure and use EWS/EWS protocol, the user's logon name and alias must correspond, due to limitations of theExchange web services. For this reason, using LDAP/EWS protocol is recommended.
eCopy Connector for IBM Lotus Notes (Mail and/or Fax)
Supported Versions– IBM® Lotus Notes® 8.0 / 8.5 / 9.0.1
– Lotus Domino 8.0 / 8.5
– For information on supported Lotus Notes versions, consult the Compatibility Matrix available at the Kofax Navigatorwebsite.
eCopy ShareScan 6.2 Fuji Xerox Installation Guide

30EN-EC-FXX-IG--6.2-20190707
Installation Prerequisites and Suggestions– The connector requires a Lotus Notes client to be installed on the PC running the ShareScan Manager.
– At the time of configuration, the end user should be prepared to provide an Active ID File, user name, password, andDomino server name.
– When the installer of the Lotus Notes client prompts you to choose between the Multi-User Install option and theSingle User Install option, make sure that you select the Single User Install option.
Note:If Sendmessages from personal mail account is not enabled, all emails will be sent from the user name and passwordsupplied for configuration purposes. Before sending email from a personal Lotus Notes account, the eCopy Mail pass-throughdatabase on a Domino HTTP server must be configured.
eCopy Connector for LDAP/SMTP (Mail and/or Fax)
Supported Versions– Microsoft LDAP v3
– Open LDAP v2.4
– For information on supported LDAP versions, consult the Compatibility Matrix available at the Kofax Navigator website.
Installation Prerequisites and Suggestions– You will be prompted to enter the following information when configuring the eCopy connector for LDAP: User name,password and IP address, DNS name or URL for the directory being used, search criteria for users and recipients, LDAPAttributes, LDAP port number, and Base DN of the base or root directory in which to search.
– For configuring the eCopy connector for SMTP, you will need to enter the SMTP server IP address or DNS name thatwill be used for outgoing messages, user name and password, and the SMTP port number.
eCopy Scan to Desktop
Installation Prerequisites and Suggestions– Scan to Desktop involves several different components to enable users to scan and send documents to a designatednetwork folder location for modification and storage. A “Scan Inbox” subfolder may be added to existing network homedirectories or the ShareScan software can create Scan Inbox folder locations. The Inbox Root (Inbox Managementdirectory) stores the user list (userdirs.txt) that indicates which users have scan inboxes using Scan to Desktop andwhether ShareScan has created Inbox folders; these folders would also reside under this directory.
– For detailed information on configuring Scan to Desktop, see the ShareScan Help, accessible via pressing F1 on theAdministration Console.
eCopy ShareScan 6.2 Fuji Xerox Installation Guide
31EN-EC-FXX-IG--6.2-20190707
Note:The Inbox Alternate path for folder root - DO NOT set it to the user's HOME folder: (see documentation) path pointing to theexisting Network Home Directory Root Folder is NOT supported, since ShareScan modifies the permissions on the root folder.
Inbox Root Directory
The Inbox Root Directory can reside on the ShareScan Services Manager PC or on a network server. If the directoryresides locally, it must be configured as a share on an NTFS drive. If the directory resides on a network server, it must beconfigured as a share on an NTFS drive or on a NetWare drive.
The Inbox Root Directory should not be pointing to a user’s home directory. Choose the Scan to DesktopHomeDirectory option in the connector instead.
Note:Network home directories configured through a login script are not supported.
ShareScanAdmin Group
An Administrative Groupmust be used to implement the required security. In previous versions of ShareScan, this grouprequired the name “ShareScanAdmin”. This Administrative Group can now be given any name; however, if multipleServices Managers are pointing to the same userdirs.txt file in the lnbox Root Directory, the group to which theservice account belongs must be identical on all those Services Managers.
The group usedmust be created on the domain controller for domain-based networks, on NDS for Novell networks, or onthe local machine if the customer is in a workgroup environment. ShareScan uses this group when assigning permissionsto the inbox Root Directory and scan inboxes and requires Full Control. Permissions assigned to the directory are asfollows:
Windows (NTFS)
– Administrators – Full Control
– Domain Administrators – Full Control (not used in workgroup configurations) ShareScanAdmin – Full Control
– Inbox Owner – Read or Delete
Novell (Netware)
– Administrators – Full Control
– ShareScanAdmin – Full Control
– Inbox Owner – Read or Delete
An account for an administrative user should also be created and added to the Administrative Group to be used as theService Account. This user should have a standard user profile with a user name and password. If running in a workgroupenvironment, a local account should be created for each Scan to Desktop user on the PC where the Inbox locationresides.
eCopy ShareScan 6.2 Fuji Xerox Installation Guide
32EN-EC-FXX-IG--6.2-20190707
eCopy Quick Connect
Supported Versions– Quick Connect supports Oracle® Database 10g and 11g. When you install Oracle Client 10g/11g, select the CustomInstallation option and then make sure that you select the Oracle Provider for OLE DB component. This enables QuickConnect to connect to the Oracle database and store scanned documents and other information.
– Databases: for more information about supported databases, see the eCopyShareScan 6.2 Software CompatibilityMatrix available at the Kofax Navigator website.
– For additional information on supported configurations of eCopy Quick Connect to Database, reference the QuickConnect Database Recommended Usage document available for download from eSPN.
Installation Prerequisites and Suggestions– When selecting a network location as a Quick Connect destination, make sure that the future users have access to thefolder or folders being used as storage options. Alternatively, the administrator can use the Logon As function to supplylogin credentials.
– To deliver scanned documents to an Access database, you must disable User Account Control (UAC) on Windows 7,Windows Server 2008 or later. To disable UAC, type c:\windows\System32\UserAccountControlSettings.exe tothe command line, and select the appropriate slider setting.
eCopy Connector for OpenText Fax Server (RightFax Edition)
Supported Versions– OpenText Fax Server 9.0/9.3/9.4/10/10.5/10.6/16 EP2 / 16 EP4
– For information on supported RightFax versions, consult the Compatibility Matrix available at the Kofax Navigatorwebsite.
Installation Prerequisites and Suggestions– The administrator will be prompted to enter a valid RightFax or NT Authentication user name and password. TheRightFax server name will also need to be entered.
– The RightFax client software must NOT be installed on the system where the ShareScan Manager is installed.
– Delegation privileges, phone books, cover sheets, and billing codes must be configured on the RightFax server inorder to be utilized by the eCopy connector for RightFax.
Note:If “Send from personal account” is not enabled, all faxes will be sent from the user name and password supplied forconfiguration purposes.
eCopy ShareScan 6.2 Fuji Xerox Installation Guide
33EN-EC-FXX-IG--6.2-20190707
eCopy Scan to Printer
Installation Prerequisites and Suggestions– In order for a printer to be configured for use with Scan to Print, the appropriate print driver must be installed whereShareScan is installed.
eCopy Connector for Microsoft SharePoint
Supported Versions–Microsoft SharePoint 2007, 2010, 2013, 2016, SharePoint Online for Office 365 / Microsoft SharePoint Server 2007,2010, 2013, 2016, (includes support for SharePoint BDC/BCS)
– For more information on supported Microsoft SharePoint versions, consult the Compatibility Matrix available at theKofax Navigator website.
Installation Prerequisites and Suggestions– The administrator should enter a user name and password that will enable browsing to all destination locations,display all index fields, and store documents if “Login As” authentication is used.
– If you are using SharePoint 2007: Microsoft Office SharePoint Server (MOSS) 2007 orWindows SharePoint2007 Services.
– If you are using SharePoint 2010: Microsoft SharePoint Server 2010.
– If your company uses a secure SharePoint site, youmust install an SSL certificate on the ShareScan server.
– Dates are validated by the client regional settings; invalid date formats are not accepted.
– The connector does not fully support storing to workspaces. Storing to an Attendees location is inconsistent and mayresult in failure to store the scanned document.
– The All Day Event, Recurrence, and Workspace checkboxes will not appear in the calendar list.
eCopy Connector for EMC Documentum
Supported Versions– EMC® Documentum® 6.6, 6.7, 7.0, 7.1, 7.2
– For more information on supported EMC Documentum versions, consult the Compatibility Matrix available at the KofaxNavigator website.
eCopy ShareScan 6.2 Fuji Xerox Installation Guide
34EN-EC-FXX-IG--6.2-20190707
Installation Prerequisites and Suggestions– The eCopy connector for EMC Documentum uses the Documentum Foundation Classes (DFC) to connect to theDocumentum Server. While all of the necessary DFC files are included with the connector, DFC needs to be configuredas part of the installation process.
– For Configuring DFC the following information is required:
- The Primary Connection Broker Host Name: Broker Server Name
- Port number: Default = 1489
- Repository Name
- Login Name and Password to that Repository
- The DFC should be in the same domain as Documentum server
– The eCopy connector for EMC Documentum will then need the Repository chosen from the drop-down menu, as wellas a user name and password. In the connector Administration, all Repositories available through that ConnectionBroker will now be available. The administrator should then enter a user name and password that enables browsing toall desired destination locations within the selected repository and store documents if “Login As” authentication is used.
– If you are using a firewall, you must add SQLSERVER.exe and UDP port 1434 to the exceptions list.
– It is strongly recommended that you store documents using the doctype named dm_document or a customized doctypethat is based on dm_document.
–Connection Broker – NamedDocBroker in previous versions of Documentum. Connection Broker is a servicethat runs on a Documentum server; it is a connection point from the client.
–Repository - NamedDocbase in previous versions of Documentum. It is a document database on theDocumentum server. The Connection Broker establishes the connection between the connector and theRepository.
eCopy Connector for Autonomy iManage WorkSite
Supported Versions– Autonomy (Interwoven) iManage (WorkSite) 8.0-9.0, 9.0SP1, 9.1, 9.2, 9.3, 9.5, 10, 10.1, 10.2
– For more information on supported Worksite versions, consult the Compatibility Matrix available at the Kofax Navigatorwebsite.
eCopy ShareScan 6.2 Fuji Xerox Installation Guide
35EN-EC-FXX-IG--6.2-20190707
Note:If the Worksite server version is 8.5 or higher, the old iManage.dll file (provided by Kofax) must be replaced by a new one toavoid unsuccessful document storing related error message.
Installation Prerequisites and Suggestions– The administrator should enter a user name and password that enables browsing to all destination locations, displayall index fields, and store documents if Login As authentication is used.
– For more information on Impersonation passwords, the administrator should refer to the WorkSite documentation. Notethat Impersonation is only available when using Trusted Login and authenticating against Novell.
– When you use Novell Trusted Login, make sure that the Novell Client configuration on the computer running theShareScan Manager includes a value for the Preferred Server option. If you leave this field blank or you enter anincorrect value, users will not be able to store scanned documents.
eCopy Connector for Open Text Content Server - eDOCS Edition
Supported Versions– Open Text Document Management, eDOCS Edition/(Hummingbird) 5.1.05, 5.2, 5.3, 6.0.5, 10, 16.1
– For more information on supported eDOCS versions, consult the Compatibility Matrix available at the Kofax Navigatorwebsite.
Installation Prerequisites and Suggestions– Before installing the eCopy connector for Open Text Content Server, the Administrator must install and configure theWindows Explorer DM Extension software for Open Text Document Management, eDOCS Edition 5.1, 5.2 SP1, 6.0 orlater or Hummingbird DM 5.1, 5.2 SP1, and 6.0 on the same PC as the eCopyShareScan Manager. After that, run the DMConnection Wizard.All versions of the DM Extension software include the required DM API and the DM Connection Wizard.
– Install theWindows Explorer DM Extension component only (under 'Optional Components').
– Youmust select 'Intranet Mode' (the default mode). Do not select 'Internet Mode'.
– After installation, launch the DM ConnectionWizard and enter the name of your DM server.
– The eCopy ShareScan Services Manager must be on the same domain as the DM server, for the DM ConnectionWizard to establish a connection with the server.
– The Administrator will need to enter a valid eDOCS DM user name and password that has the ability to storedocuments if 'Login As' authentication is used.
– It is recommended that you add the eCopy Document Type and Application ID to your eDOCS (Hummingbird)server. See your server documentation for details.
eCopy ShareScan 6.2 Fuji Xerox Installation Guide
36EN-EC-FXX-IG--6.2-20190707
– When the eDOCS DM Extension Client v 5.1.0.5 SR6 or later is installed on the same computer as the ShareScanManager (not in the same domain as the DM server), you cannot configure the eCopy connector.
– Default values that are assigned by the eDOCS DM server appear in the Client. To use a different value, you mustremove the default value and then use the Search feature or the 'Search while typing' option to specify the new value.
– If a profile for an application does not appear, contact your administrator. The application may be disabled from withinthe eDOCS DM software.
– For instructions about installing the DM Extension software, refer to your eDOCS documentation.
eCopy Connector for Open Text Content Server
Supported Versions– Livelink (Enterprise Server) 9.7, 10.0, 10.5, 16, 16.2
– For more information on supported Open Text Content Server versions, consult the Compatibility Matrix available atthe Kofax Navigator website.
Installation Prerequisites and Suggestions– The administrator must enter a user name and password that enables browsing to all destination locations, display allindex fields, and store documents if 'Login As' authentication is used.
– The eCopy connector for Livelink ECM uses the Web services protocol and / or Livelink API (LAPI) for communicationwith Open Text Content Server.
– LAPI supports TCP/IP direct connections with native Livelink authentication. It does not support HTTP or HTTPSconnections or non-native authentication methods. Native authentication using LAPI supports Livelink authentication,NTLM authentication, and LDAP authentication. The Livelink server is responsible for managing the authenticationsettings and the connector works transparently with the selected authentication mode.
– In Protocol section of Database & authentication settings in the Connector configuration window, the Administratorwill need to provide the following information to properly configure the connector:
– IfWeb services is selected: – Root URL: The root URL of the web service granting access to the Livelink server. E.g.:https://TestContentServer:443/cws
Note:Web services protocol supports Table Key Lookup attributes only in case of an OpenText Content Server(Livelink) 16.2 or later.
– If LAPI is selected:– Livelink server: The Open Text Content Server-Enterprise Server name. The server entered in theLivelink Server field must be on the same network (LAN) or connected via a VPN (WAN) as the ServicesManager. It cannot be a web-only connected server. The Livelink connector does not communication overHTTP or HTTPS; instead it uses TCP/IP and LAPI over the specified port. Even if port 80 is entered in theport field, it will not force the connector tocommunicate over HTTP or HTTPS.
eCopy ShareScan 6.2 Fuji Xerox Installation Guide
37EN-EC-FXX-IG--6.2-20190707
– Database: The Livelink database name. The Livelink Database information can be found on the LivelinkAdministrative Site under the Database Administration section.
– Port: The port used by the server. The default is 2099.
Note:LAPI protocol is not supported by OpenText Content Server (Livelink) version 16 or higher.
– IfWeb services and LAPI is selected: – All the options can be configured that are listed inWeb services and LAPI protocol sections above.
Note:IfWeb services and LAPI protocol is selected, LAPI is used only for supporting Table Key Lookup attributes.SinceWeb services protocol supports Table Key Lookup attributes only in case of an OpenText Content Server(Livelink) 16.2 or later, LAPI is used only for supporting Table Key Lookup attributes ifWeb services and LAPIprotocol is selected in Protocol section of Database & authentication settings in the Connector configurationwindow.The eCopy Connector for Open Text Content Server does not support Table Key Lookup attributes for OpenTextContent Server (Livelink) version 16 or higher since LAPI protocol itself is not supported by this server.
– If the Open Text Content Server environment requires a user to change password at the next logon to the system, theuser must change the password at the workstation before using ShareScan. If the user does not do this, the system willdisplay a message that the password has expired and that the user will not be able to store the scanned documents.
– For authentication methods outside of these constraints, refer to your eCopy Technical Consultant.
Note:.NET Framework 3.5 SP1 and Microsoft Visual J# 2.0 Redistributable must be installed for proper functioning of this connector.The connector main screen in the Administration Console displays a warning message if .NET Framework 3.5 SP1 andMicrosoft Visual J# 2.0 Redistributable are not installed.
eCopy ShareScan 6.2 Fuji Xerox Installation Guide
38EN-EC-FXX-IG--6.2-20190707
Licensing Devices
ShareScan 6.2 includes a Licensing Wizard, which handles the following license-related tasks.
Every device that you use with Kofax software requires a valid license. ShareScan 6.2 uses a digitally signed license file, whichcontains a unique license key generated by Manufacturing. The license key is a unique ID that is associated with the hardwareID (HID) of the PC where the ShareScan database is installed.
Site licenses, valid for activation with a predefined number of devices, are also available. After a license file is created for thespecified number of devices, it cannot be modified to increase the number of devices; if you purchase additional devices, youneed to purchase additional license(s), and those license(s) will be delivered as separate license files. When you load the newlicense file, the Administration Console can merge the original license file with the new file.
After adding a license, you can add one or more embedded or integrated devices to the Manager. (You can add these devicesat any time. However, if you add them before activating the license, a 30-day grace period starts for the license.)
ShareScan includes a Licensing Wizard, which handles the following license-related tasks:
– loading licenses,
– activating licenses,
– loading activated licenses,
– reactivating licenses,
– removing licenses.
Loading LicensesYou can use the automatic license download function, or import the license file(s). If no internet connection can be detected,only the second option is available.
1. Click the Load license button of the License Wizard. The Welcome screen is displayed.
2. Click Next to continue.
3. Select Download license automatically when specifying the source. The Automatic license download screen isdisplayed.
4. Copy the license keys of the licenses to download in the text box. Click Add after each. When the list below iscomplete, click Next. The Select license files to load screen is displayed.
5. Click the Browse button to add new files to the list of files to be imported. When finished, click Start import.
eCopy ShareScan 6.2 Fuji Xerox Installation Guide
39EN-EC-FXX-IG--6.2-20190707
6. Click Start to begin loading licenses.
7. Click Finish to close the License Wizard.
Activating LicensesYou need to activate a license only once; thereafter, it is associated with the PC where the ShareScan database is installed.
1. Click the Activate button of the License Wizard. The Welcome screen is displayed.
2. Click Next to continue.
3. Specify the hardware ID. Click Next to continue.
4. Select Automatic activation on the Select activation mode screen.
5. Click Next to continue. The Output file creation / Activation screen is displayed.
6. Click Start to begin activation. The Specify file output screen is displayed.
7. Click Next to continue.
8. Click Finish to close the License Wizard.
Loading Activated LicensesUse this option when importing already activated licenses to ShareScan.
1. Click the Load activated button of the License Wizard. The Welcome screen is displayed.
2. Click Next to continue. The Select license files to load screen is displayed.
3. Click the Browse button to add new files to the list of files to be imported. When finished, click Start import.
4. Click Start to begin loading licenses.
5. Click Finish to close the License Wizard.
Removing LicensesUse this option when transferring licenses from the current ShareScan installation. After the removal is complete, the licensescan be safely transferred and reactivated.
1. Click the Remove button of the License Wizard. The Welcome screen is displayed.
2. Click Next to continue. The Select licenses screen is displayed.
3. Select the license(s) you want to remove and then click Next.
4. Click Start to remove the selected license(s).
5. Click Finish to close the License Wizard.
eCopy ShareScan 6.2 Fuji Xerox Installation Guide
40EN-EC-FXX-IG--6.2-20190707
Generating a license reportThe license report helps you create a report of the installed licenses. It is recommended to generate a license report wheneveryou activate your licenses. Keep the report in a safe place in case you need to restore the license information or fortroubleshooting purposes.
1. Click the License report button of the License Wizard. A Save As dialog box is displayed.
2. Browse to a preferred location where you want store license report file (optional).
3. Specify the name of the license report file in the File name field.
4. Click Save to save the license report file.
eCopy ShareScan 6.2 Fuji Xerox Installation Guide
41EN-EC-FXX-IG--6.2-20190707
ShareScan Post-install
Now that you have completed the basic installation, configuration, and licensing steps, you are ready to perform other tasks,including:
– Configuring system settings.
– Installing and configuring additional connectors, services, and extenders.
– Licensing additional devices and monitoring activity between devices and the Manager.
– Accessing and configuring other Managers.
– Configuring, backing up, and restoring the ShareScan database.
Configuring ShareScan (examples)This section outlines the basic process to
– Configure a service (Activity Tracking)
– Configure an Extender (Forms Processing Extender)
– Configure a connector profile (QuickConnect) using the already configured service and extender
– Test your saved profile in the built-in simulator
When a user presses a connector button, the connector uses the settings specified in the connector profile that is associatedwith the button, such as the button label and image, encryption of scanned documents, and the services to use with theconnector.
The recommended workflow is to configure services and extenders first, so that they are available when you configure aconnector profile, and then configure connector profiles.
You have the option to set up any connector with the Bypass redirect screen option. Using this option navigates the user backto the Main Form at the end of the session or logout automatically if Session Logon is enabled.
The procedure in this section provides you with enough information to complete the basic configuration process. For in-depthinformation, refer to the ShareScan Help.
To Configure a Service (example – Activity Tracking)1. Start the ShareScan Administration Console by clicking Start > Programs > eCopy Applications > ShareScan 6.2 >
ShareScan Administration Console.The system initializes the .NET framework, retrieves configuration information from the ShareScan database, and then
eCopy ShareScan 6.2 Fuji Xerox Installation Guide
42EN-EC-FXX-IG--6.2-20190707
displays the ShareScan Administration Console.
2. Select the Services tab.The Configure Services pane displays a list of the installed services, including connector services, device services,and common services.
3. In the Device Services list, select Activity Tracking. The Configure Activity Tracking Service pane opens.
4. Select Yes for the Configured setting and then click Save. For more information about configuring the Activity Trackingservice, search for the Activity Tracking service topic in the Help.
To Configure an Extender (example – Forms Processing Extender)In this example, this Extender is used to process scanned forms, extract form data, and make it available for Quick Connect viadata publishing (using batching).
1. Configure the Extender. Then create a template library, and a template. Make sure your template contains at least oneuniquely named zone from which content can be passed to Quick Connect.
2. Test your template.
3. After you have finished designing and testing your template, make sure you enable batching in the Extender bymarking the Batch on Matched Templates checkbox.
4. Save your configuration.
To Configure a Quick Connect Connector Profile to Use Forms Processing Extender data1. Select the Connectors tab.
The Configure Connectors pane displays a list of the available connectors.
2. SelectQuickConnect.
3. The Configure Connector (Quick Connect) pane and the Settings pane open.
4. Select the Destinations tab and then click New. Name the destination, set its Type, Location and specifyAuthentication options.
5. Select the File name tab, and set the file naming convention for the connector.
6. Optionally, select the Index file tab, and set the index file attributes.
7. Use the Settings pane to configure the following:– display settings,
– document settings,
– service to be associated,
– extender to be associated,
– scanner settings, and
– background processing settings.
eCopy ShareScan 6.2 Fuji Xerox Installation Guide
43EN-EC-FXX-IG--6.2-20190707
8. Click the Save Current Profile button. For more information about configuring the settings for a connector, open therelevant Help topic.
To Test the Configuration of a Profile1. In the Administration Console, select the Devices tab.
The Device Configuration pane displays the simulator and any installed devices.
2. Select the device simulator.The Configure Connectors for Device - Simulator pane lists the available profiles.
3. In the Select Profile(s) column, select the profile that you created for the Quick Connect connector, and then clickSave.
4. On the Ribbon, click the Simulator button. The simulated Client screen displays the button for the connector youconfigured.
5. Click the Quick Connect icon on the simulated client screen. The Preview screen is displayed.
6. Click Next to continue. The Forms Processing Extender screen is displayed.
7. Check the field values and then click Next to continue.
8. Select a Destination and then click Send to continue.
9. Select the post-processing option you want to use.
eCopy ShareScan 6.2 Fuji Xerox Installation Guide
44EN-EC-FXX-IG--6.2-20190707
Next Steps
After finishing the basic installation and configuration tasks, you can start using and customizing ShareScan via theAdministration Console.
In the Administration Console, all system functions are available on the Ribbon and there are separate tabs for configuringservices, connectors and devices.
System functions are available on the Home tab and the Advanced tab. The Home tab contains the most frequently usedfunctions, such as managing the ShareScan Manager; the Advanced tab contains less frequently used functions and severalnew functions, such as managing the ShareScan database.
When you open the Administration Console, theWelcome page lists the main functions in the recommended order forperforming each function:
– Configure one or more installed services, so that they will be available when you configure connectors and devices.There are three types of services: services that you apply to a connector, services that you apply to devices or devicegroups, and services that you apply to connectors and devices.
– Configure one or more profiles for the installed connectors that will be used on the scanning devices. You can createmultiple profiles for each connector and you can activate each connector profile on multiple devices.
– Register ShareScan online.
When you click the Services, Connectors, or Devices links, a pane lists the items that you can configure. After you select anitem, such as Session Logon, ShareScan opens one or more panes where you specify the appropriate settings.
When registering a Fuji Xerox device in the Administration Console, a dialog box is displayed, with the following options:
– Use secure channel for browser communication (unchecked by default)
– Use HTTPS for image transfer (unchecked by default)
These options allow you to regulate the connection type between ShareScan and the Fuji Xerox device.
Best Practices– Ensure that the %temp% environment variable is set.
– Ensure that all critical automatic updates are applied to target systems and that automatic updates are turned off for thetime of installation.
– Do not wait too long to click the Install button; otherwise, the increased storage usage in the temp folder can trigger acleanup process that causes installation failure.
– After installation you may check to see whether the following services are running:
eCopy ShareScan 6.2 Fuji Xerox Installation Guide
45EN-EC-FXX-IG--6.2-20190707
- Apache Tomcat 8.5
- ShareScan Agent
- ShareScan Manager
- ShareScan WatcherService
- ShareScan Web Admin Host
- PushKeyService
– There are other services which may not run by default, only if the respective functionality demands it:
- Kofax Documentum API
- Kofax Printer API
- S2D Inbox Agent
– Tomcat service settings can be viewed/modified via:%programfiles%\Kofax\Tomcat 8.5\bin\tomcat8w.exe
– During the entire installation process, do not remove the original installation media from your optical drive, eventhough the installer has already extracted and decompressed the required components to a temporary location. Thisaction can cause multiple failures depending on the stage of the installation during which the removal happens.
– To configure the Lotus Notes connectors (both Mail and Fax), you have to install the Lotus Notes Client on the PC.After installing, quit the client before running the ShareScan Administration Console, as the client locks the ID file, and arunning client may cause issues with ShareScan.
– Ensure that there is no Apache Tomcat on the PC you want to install ShareScan on.
– Ensure that no ports used by ShareScan (listed in the Installation Guide) are used by other web services, as that maycause connectivity issues.
– Deploying the RightFax FaxUtil on the same machine on which ShareScan is running may cause issues, therefore it isnot advised.
– If you are planning to use SharePoint Online with Windows Server 2012 as the operating system, ensure that you settheWindows Identity Foundation 3.5 feature to ON.
– If the Apache Tomcat component does not start after a Java update, a PC reboot solves the issue.
– If you have multiple ShareScan Manager PCs in your deployment, it is recommended that you always use the sameinstance of the Administration Console to add, modify or remove connector profiles regardless of whether you areworking in a cluster environment or not.
Technical SupportThis chapter contains guidelines on what information to provide to technical support if you encounter issues when using eCopyShareScan.
eCopy ShareScan 6.2 Fuji Xerox Installation Guide
46EN-EC-FXX-IG--6.2-20190707
When contacting Technical Support (if a reseller) or your eCopy dealer (if an end-user), provide the following information tofacilitate better and quicker interworking with Kofax Technical Support
– eCopy system details:
- ShareScan version number
- Service Pack number (if applicable)
- Product key and serial number
- Approximate daily scanning load (pages/day)
- Backend versions for all used connectors (for example, Exchange, Lotus Notes, or SharePoint)
– System specifications:
- Server OS
- Machine types
- Jar versions
- NIC speed settings
- IP Addresses
– The exact workflow performed when the issue happens
– Does it happen to all users or just specific user accounts? (if specific only, please specify in details)
– A detailed description of the workflow which helps reproducing the issue
– The following files:
- msinfo32.nfo
- license dump (for license-related issues)
- Logs from the ShareScan Troubleshooter Tool
- Verbose trace file for the workflow
- Client logs
- If possible, the Wireshark logs
The Tracing service gives you the option to collect a variety of system data. On trace export, you can specify which sources toinclude in the output zip file (Troubleshooter log, configuration profiles and several other sources), which processes to dumpand which device logs to pick.
eCopy ShareScan 6.2 Fuji Xerox Installation Guide
47EN-EC-FXX-IG--6.2-20190707
Troubleshooting Tips
Note:Should you experience any of the following issues, consult the eCopy ShareScan Troubleshooter User Guide documentfor a solution:
– devices cannot be added in the Administration Console after upgrading to eCopy ShareScan 6.2
– Administration Console does not work with devices added before the upgrade to 6.2
– Administration Console simulator does not work
Below, you can find a number of known possible problem sources and solution tips:
– Ensure that there is no Apache Tomcat on the PC you want to install ShareScan on.
– Ensure that no ports used by ShareScan (listed in the Installation Guide) are used by other web services, as that maycause connectivity issues.
– Deploying the RightFax FaxUtil on the same machine on which ShareScan is running may cause issues, therefore it isnot advised.
– If the Apache Tomcat component does not start after a Java update, a PC reboot solves the issue.
– Restoring database backups created via the ShareScan Troubleshooter is not possible via the ShareScanAdministration Console. Use the relevant scripts for restoring such databases.
– If you experience delayed reactions on the MFP UI, ensure that the network settings of the device are correct. You cancontact your administrator, who can check the settings:
- via the Web interface:– Browse to http://<device IP>
– Navigate to Properties > Connectivity > Protocols.
– Check the following network protocol pages: TCP/IP, Proxy Server, Microsoft networking,SMTP Server, LDP, SIP, LDAP, POP3.
- on the device UI:– Press the Login button on the device, and provide the administrator credentials as needed.
– Press the Tools button on the touch screen.
– Navigate to System Settings > Connectivity & Network Setup > Protocols…
– Check each specific network protocol page, disable all unused protocols and use IPaddresses where possible.
– When upgrading an existing ShareScan 5 installation that has CAC configured, you must disable and re-enable CACvia the Administration Console after the upgrade process to ShareScan 6.2 has finished.
eCopy ShareScan 6.2 Fuji Xerox Installation Guide

48EN-EC-FXX-IG--6.2-20190707
– If you experience an infinite rebooting loop on your target machine, look for and delete the following registry keys:
- HKEY_LOCAL_MACHINE\SYSTEM\CurrentControlSet\Control\Session ManagerValue:PendingFileRenameOperations
- HKEY_LOCAL_MACHINE\SOFTWARE\Microsoft\Windows\CurrentVersion\WindowsUpdate\AutoUpdateValue: RebootRequired
– When you are installing ShareScan in a Windows Server 2008 R2 environment, and the process fails due to thepassword being too short, do the following:
1. Download SQL Server 2012 Express from Microsoft.
2. Install it, and specify mixed mode authentication (this way, both SQL server authentication and IntegratedWindows Authentication are enabled), and specify an sa-level password that complies with your passwordpolicy.
3. Install ShareScan by selection Custom installation, with no SQL server installation (uncheck the MicrosoftSQL Server database engine option), and install the ShareScan database. For more information, see sectionCustom Installation.
4. During the ShareScan installation process, specify the SQL Server Express you installed, and provide the saaccount and password you selected for your SQL Server Express.
5. When the Installer Wizard asks for the runtime user credentials (the ecopy user), you can provide credentialsthat comply with your password policy.
– On certain FujiXerox devices, loading the ShareScan forms in the first workflow takes considerable time. The issue canbe solved in the following way:
1. Access the device web administration page
2. Select Properties\General Setup\Web Browser Setup and configure the following settings as describedbelow:
– Web Applications Version: V4
– Clear Cache Upon Closing Browser: Enabled
– Accept Cookies: Warn user when cookie is offered
– Use TLS1.0: Enabled
– Use TLS3.0: Enabled
– When SSL Certificate Verification Fails: Warn user before accessing
– File Printing: Enabled
Re-enable SSLv3 in Tomcat and JavaCertain web-based MFP devices do not support TLSv1 or higher security protocols when communicating with the ShareScanManager via HTTPS.
There are two approaches to work around this problem. Both require expert configuration skills.
1. Upgrade your device’s firmware to the latest available version and verify if the desired security protocols are available.
eCopy ShareScan 6.2 Fuji Xerox Installation Guide
49EN-EC-FXX-IG--6.2-20190707
If not, proceed as follows:
1. In Tomcat:
a. Launch the Tomcat8w.exe from%PROGRAMFILES%\Kofax\Tomcat 8.5\bin
b. Select the Java tab
c. Add the -Djdk.tls.client.protocols=SSLv3,SSLv2Hello,TLSv1 line to Java Options
d. Click OK
e. Go to%PROGRAMFILES%\Kofax\Tomcat 8.5\conf folder
f. Open the sharescan.java.security file for editing
g. Change the jdk.tls.disabledAlgorithms=SSLv3, RC4, DH keySize < 768 line tojdk.tls.disabledAlgorithms=
h. Save the file
i. Restart services in the Administration Console.
Check if ShareScan works properly on the device after registration.
If not, then proceed to the following step:
You need to re-activate SSLv3 in Java (deactivated by default in Java Runtime Environment from ver. 1.7upd75) and inShareScan/Tomcat as well. Exercise caution when doing these modifications.
2. In Java:
a. Go to the <JRE_HOME> folder and open the java.security file for editing under \lib\security\
b. RemoveSSLv3 from the "jdk.tls.disabledAlgorithms" property. For example, change"jdk.tls.disabledAlgorithms=SSLv3" to "jdk.tls.disabledAlgorithms="
3. In Tomcat:
a. Go to the <TOMCAT_HOME> folder and open the server.xml file for editing under \conf\
b. Locate "<Connector port=443"
c. Insert SSLv3 into sslEnabledProtocols. For example, change "sslEnabledProtocols="TLSv1, TLSv1.1,TLSv1.2, SSLv2Hello"" to "sslEnabledProtocols="SSLv3, TLSv1, TLSv1.1, TLSv1.2, SSLv2Hello"
4. Restart your system.
eCopy ShareScan 6.2 Fuji Xerox Installation Guide