introducing adafruit crickit #makerobotfriend - mouser
TRANSCRIPT
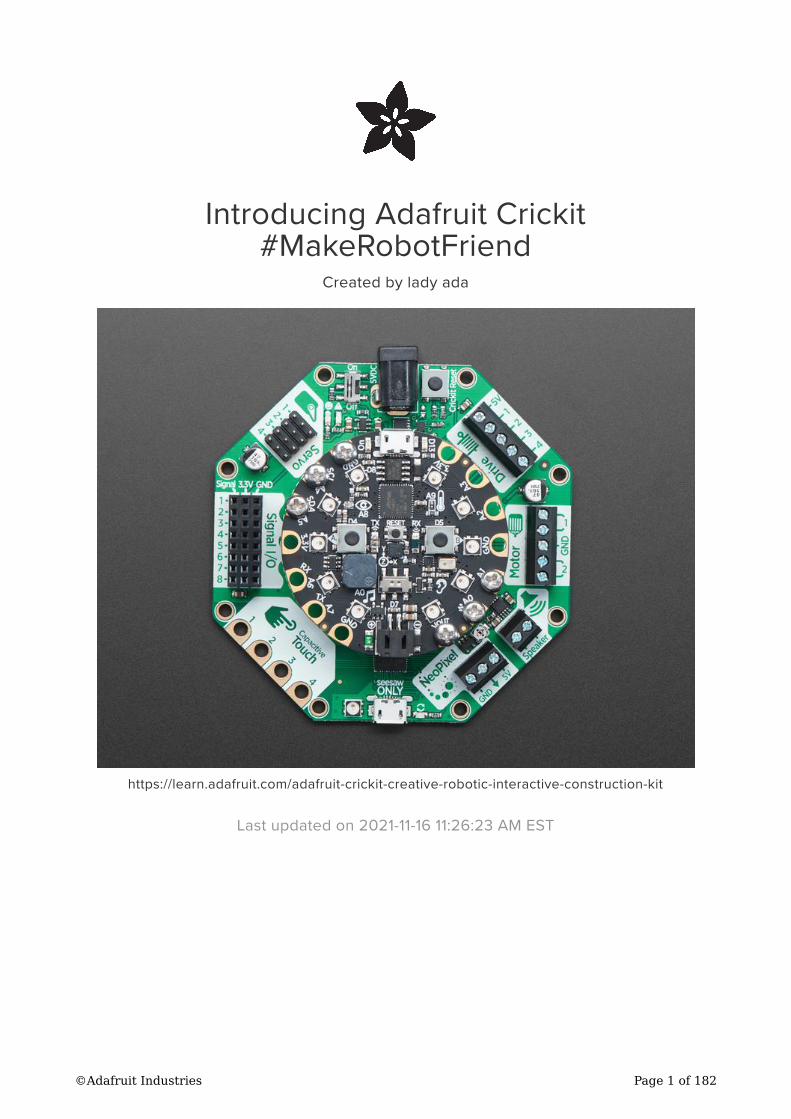
Introducing Adafruit Crickit#MakeRobotFriend
Created by lady ada
https://learn.adafruit.com/adafruit-crickit-creative-robotic-interactive-construction-kit
Last updated on 2021-11-16 11:26:23 AM EST
©Adafruit Industries Page 1 of 182
7
10
11
12
14
15
17
18
18
19
21
23
24
24
25
25
26
26
27
27
28
28
29
29
30
31
31
34
35
35
35
35
36
36
37
37
38
39
39
40
41
42
43
Table of Contents
Overview
Crickit Tour
• Power Input
• 4 x Hobby Servos
• 2 x DC Motors
• 4 x High Power Drivers
• 8 x Signal I/O
• 4 x Capacitive Touch
• NeoPixel Drive
• Speaker Drive
• Connecting Your Microcontroller to your Crickit Board
• seesaw USB Debug and Indicators
Update Your Crickit
• Step 1. Plug in USB cable into seesaw/Crickit
• Step 2. Double-click the Crickit Reset button
• Step 3. Look for pulsing yellow LED and green NeoPixel
• Step 4. Look for a New Disk on Your Computer
• Step 5. Download the latest firmware
• Step 6. Drag UF2 file onto CRICKITBOOT
Powering Crickit
• How to Power your Crickit
• Plug In DC Power Supplies
• AA Battery Packs
• 4 x AA Battery Packs for NiMH ONLY
• 3 x AA Battery Packs for Alkaline ONLY
• Not Recommended Power supplies
Assembly
Troubleshooting Crickit
• My Crickit Is Doing Something Wrong
• My Crickit Motors Aren't Moving!
• My Crickit Keeps Resetting, It Works For a Bit... Then Fails!
• HELP! My Crickit isn't working in MakeCode, and in Python I see a message "No I2C Device at Address: 49"
• Python: No Pullups found on SDL and SCL
• micro:bit Crickit does not work
Recommended Motors
• DC Gearbox Motors
• Servo-style DC motor
• Non-Geared DC Motor
Recommended Chassis
Recommended Servos
• Servo Extensions
• Popular plastic-gear servos
• Continuous Rotation Servos
©Adafruit Industries Page 2 of 182
44
45
45
46
47
48
48
49
49
51
52
53
53
54
54
55
55
55
57
58
60
61
63
64
65
66
67
67
68
69
69
70
71
72
72
73
73
74
75
76
77
78
78
• High Torque Servos
Recommended Speakers
• 4Ω Speakers
• 8Ω Speakers
• Wall or Bone Transducers
Recommended Drives
• Solenoids
• Vibration Motors
Recommended Capacitive Touch
Programming Options
• Crickit with Circuit Playground Express
• Crickit with Feather M0/M4 Express CircuitPython Supported Feather
• Crickit with micro:bit Support
• Crickit HAT for Raspberry Pi
MakeCode
• Get Comfy With MakeCode
• Adding Crickit Extension
• For Circuit Playground Express and Feather Crickit (micro:bit is below)
• For micro:bit Crickit
MakeCode Servos
• Precise Pulses
MakeCode Drives
• Changing the Drive Analog/PWM Frequency
MakeCode DC Motors
• Setting Motor Speed
MakeCode Steppers
• MakeCode for Using a Stepper on the Motor Port
• Move the Motor Port Stepper One Direction Forever
• Using a Stepper on the Drive Port in MakeCode
• Move the Drive Port Stepper One Direction Forever
MakeCode Signals
• Using Signals in MakeCode
• Digital Reads and Writes
• Analog Reads
• For Crickit and Circuit Playground Express
• For Crickit and micro:bit
MakeCode Touch
• Example for Crickit plus Circuit Playground Express or Feather
• Example for Crickit and micro:bit
MakeCode Audio
• Amplifier Details
• Playing Sounds on Crickit with MakeCode
• Circuit Playground and Feather Crickit Version (micro:bit below)
©Adafruit Industries Page 3 of 182
79
81
82
82
82
84
84
85
85
87
88
89
89
90
91
91
92
93
94
94
94
95
97
97
98
99
102
103
105
105
105
106
107
109
110
110
111
111
112
112
113
114
116
117
117
• micro:bit Version
MakeCode NeoPixels
• MakeCode for Crickit NeoPixels
• Using the Crickit Onboard Single NeoPixel
• Crickit for Circuit Playground Express and Feather (micro:bit is below)
• For micro:bit + Crickit
• For More Information
CircuitPython Code
• Install CPX Special Build
CircuitPython Servos
• Test Servos
• Control Servo
• More Servos!
• Min/Max Pulse control
• Continuous Rotation Servos
• Disconnecting Servos or Custom Pulses
CircuitPython Drives
• Test Drive
• Set PWM Frequency
• Control Drive Output
• More Drivers!
CircuitPython DC Motors
• Import Libraries
• Control Motor
CircuitPython Steppers
• Bi-Polar or Uni-Polar Motor Port
• Uni-Polar Only Drive Port
CircuitPython Signals
• Digital Pin Modes
• Digital Read
• Digital Write
• Analog Reads
CircuitPython Touch
CircuitPython Audio
• Audio File Formats
• Amplifier Details
• Basic Audio Playback
• Import Libraries
• Create wave file and audio output
• Interactive Audio
CircuitPython NeoPixels
• NeoPixels with Circuit Playground Express + Crickit
• NeoPixels and the Crickit FeatherWing or Crickit Hat
• Crickit for micro:bit
• For More Information
©Adafruit Industries Page 4 of 182
117
117
118
118
119
119
121
121
122
123
124
125
125
127
127
129
129
130
131
131
133
134
135
136
139
139
141
141
142
142
143
143
144
145
146
147
147
150
150
152
152
154
155
155
Python Docs
CircuitPython Examples
Bubble Bot
• Parts List
• Wiring Diagram
• Code
Feynman Simulator
• Parts List
• Wiring Diagram
• Code
Slime Night
• How to Make Slime
• Parts Used
• Wiring Diagram
• CircuitPython Code
Flying Trapeze
• Parts List
• Wiring
• Boot.py
• CircuitPython Code
R.O.B. GyroBot
• Parts List
• Wiring Diagram
• Code!
Gear Tower
• Parts List
• Wiring
• CircuitPython Code For "Force Wave" demo
• CircuitPython Code For "Theremin" demo
CPX-1701
• Parts List
• Wiring Diagram
• CircuitPython Code
Mag Neat-o
• Parts List
• Wiring Diagram
• Code!
(Don't Fear) The Crickit
• Parts List
• Wiring Diagram
• CircuitPython Code
Arduino Code
• Download Adafruit_Seesaw library
• Arduino with micro:bit
©Adafruit Industries Page 5 of 182
156
157
158
159
160
160
161
162
163
164
165
168
170
171
172
172
173
173
173
176
176
177
178
179
179
179
179
181
• Pin Definitions for Seesaw and Crickit
Arduino Servos
• Test Servos
• More Servos!
• Min/Max Pulse control
• Continuous Rotation Servos
• Disconnecting Servos or Custom Pulses
Arduino Drives
• Test Drive
• More Drivers!
Arduino DC Motors
Arduino Signals
Arduino Capacitive Touch
Arduino NeoPixels
• Crickit for Circuit Playground Express
• Crickit Wing for Feather
• Crickit for micro:bit
• Crickit HAT for Raspberry Pi
• Advanced Use - Using Seesaw to Control NeoPixels
Hacks & Upgrades
• Speeding up many requests from Raspberry Pi to CRICKIT
• Brown Outs?
F.A.Q.
Downloads
• Files
• Datasheets
• Circuit Playground Crickit Schematics
• Crickit HAT Schematics
©Adafruit Industries Page 6 of 182
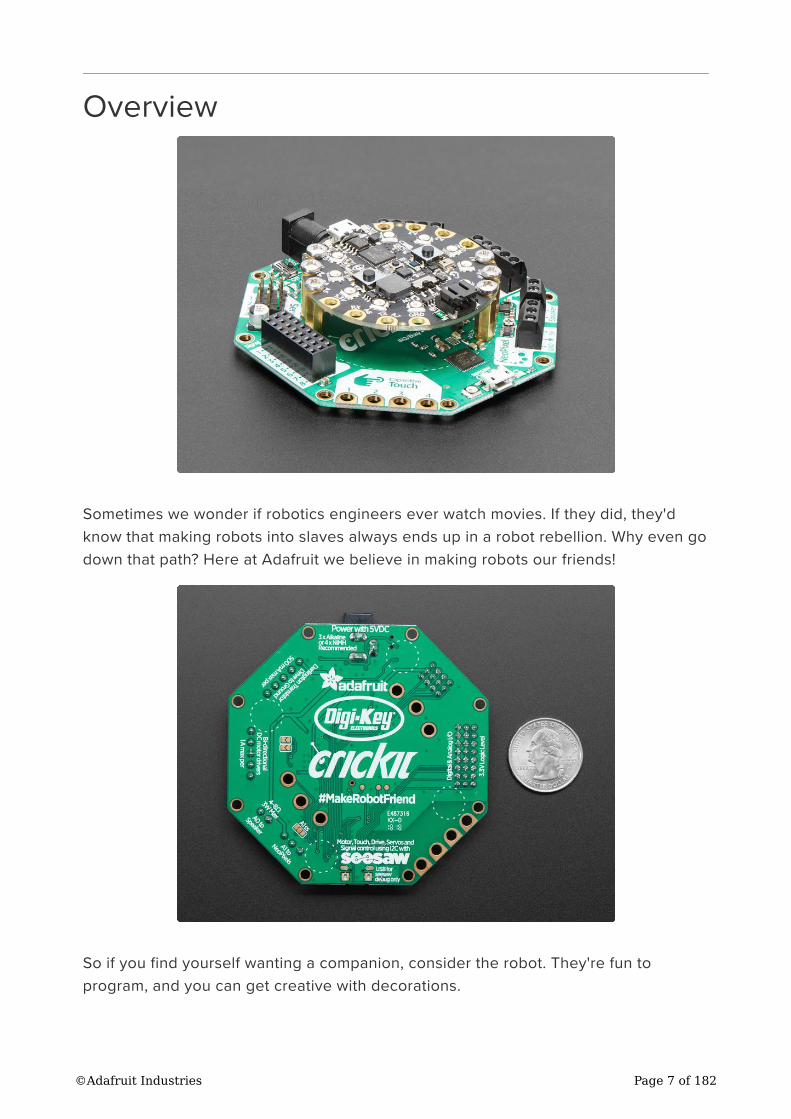
Overview
Sometimes we wonder if robotics engineers ever watch movies. If they did, they'd
know that making robots into slaves always ends up in a robot rebellion. Why even go
down that path? Here at Adafruit we believe in making robots our friends!
So if you find yourself wanting a companion, consider the robot. They're fun to
program, and you can get creative with decorations.
©Adafruit Industries Page 7 of 182
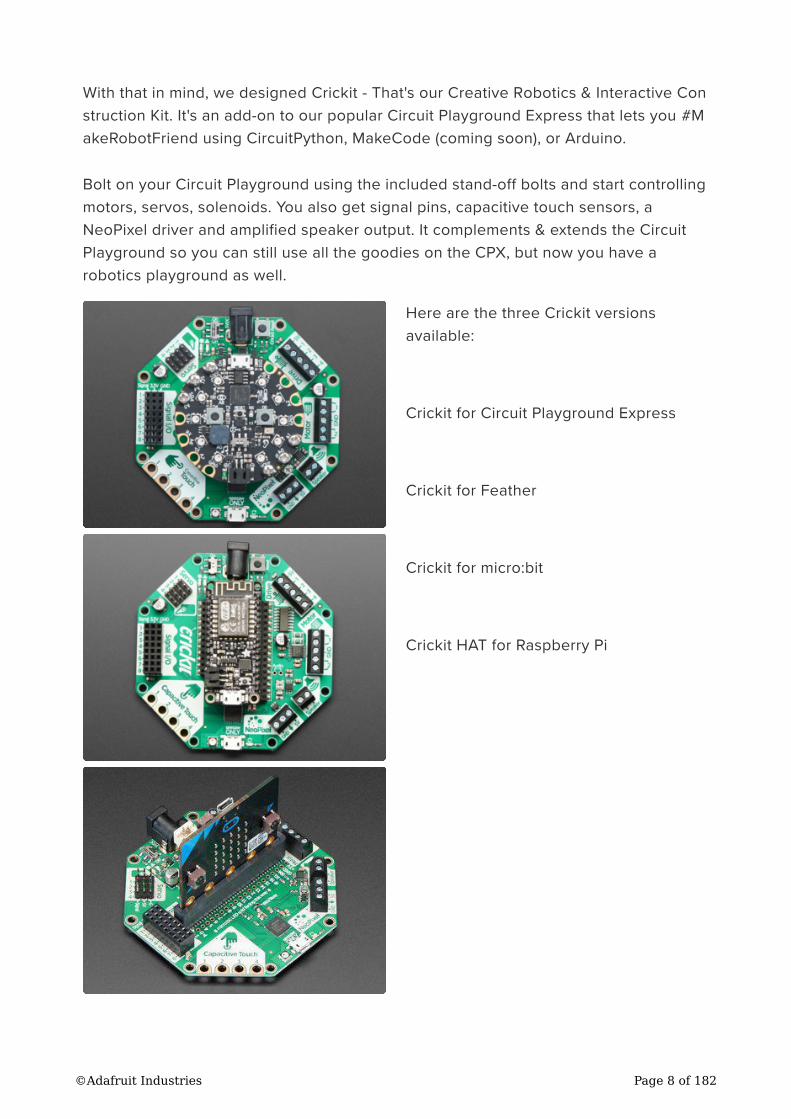
With that in mind, we designed Crickit - That's our Creative Robotics & Interactive Con
struction Kit. It's an add-on to our popular Circuit Playground Express that lets you #M
akeRobotFriend using CircuitPython, MakeCode (coming soon), or Arduino.
Bolt on your Circuit Playground using the included stand-off bolts and start controlling
motors, servos, solenoids. You also get signal pins, capacitive touch sensors, a
NeoPixel driver and amplified speaker output. It complements & extends the Circuit
Playground so you can still use all the goodies on the CPX, but now you have a
robotics playground as well.
Here are the three Crickit versions
available:
Crickit for Circuit Playground Express
Crickit for Feather
Crickit for micro:bit
Crickit HAT for Raspberry Pi
©Adafruit Industries Page 8 of 182

The Crickit is powered by seesaw, our I2C-to-whatever bridge firmware. So you only
need to use two data pins to control the huge number of inputs and outputs on the
Crickit. All those timers, PWMs, sensors are offloaded to the co-processor.
You get:
4 x Analog or Digital Servo control, with precision 16-bit timers
2 x Bi-directional brushed DC motor control, 1 Amp current limited each, with 8-
bit PWM speed control (or one stepper)
4 x High current "Darlington" 500mA drive outputs with kick-back diode
protection. For solenoids, relays, large LEDs, or one uni-polar stepper
4 x Capacitive touch sensors with alligator-pads
8 x Signal pins, digital in/out or analog inputs
1 x NeoPixel driver with 5V level shifter
1 x Class D, 4-8 ohm speaker, 3W-max audio amplifier
All are powered via 5V DC, so you can use any 5V-powered servos, DC motors,
steppers, solenoids, relays etc. To keep things simple and safe, we don't support
mixing voltages, so only 5V, not for use with 9V or 12V robotic components.
•
•
•
•
•
•
•
©Adafruit Industries Page 9 of 182
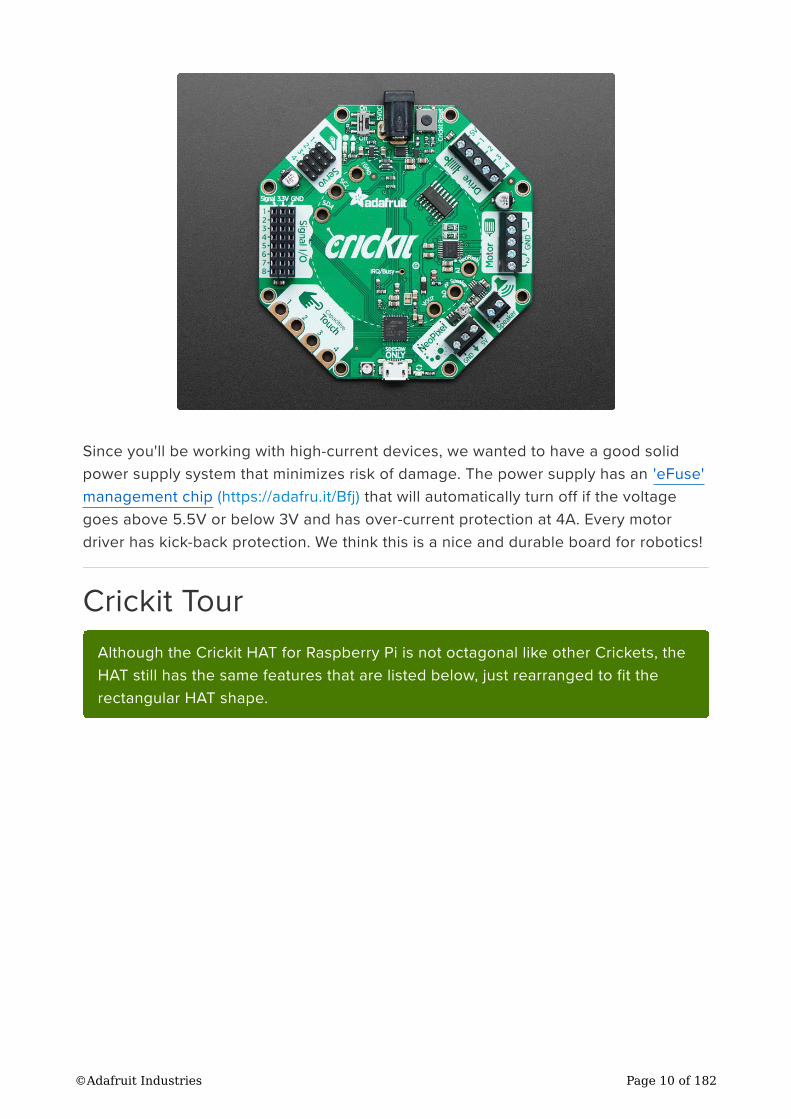
Since you'll be working with high-current devices, we wanted to have a good solid
power supply system that minimizes risk of damage. The power supply has an 'eFuse'
management chip (https://adafru.it/Bfj) that will automatically turn off if the voltage
goes above 5.5V or below 3V and has over-current protection at 4A. Every motor
driver has kick-back protection. We think this is a nice and durable board for robotics!
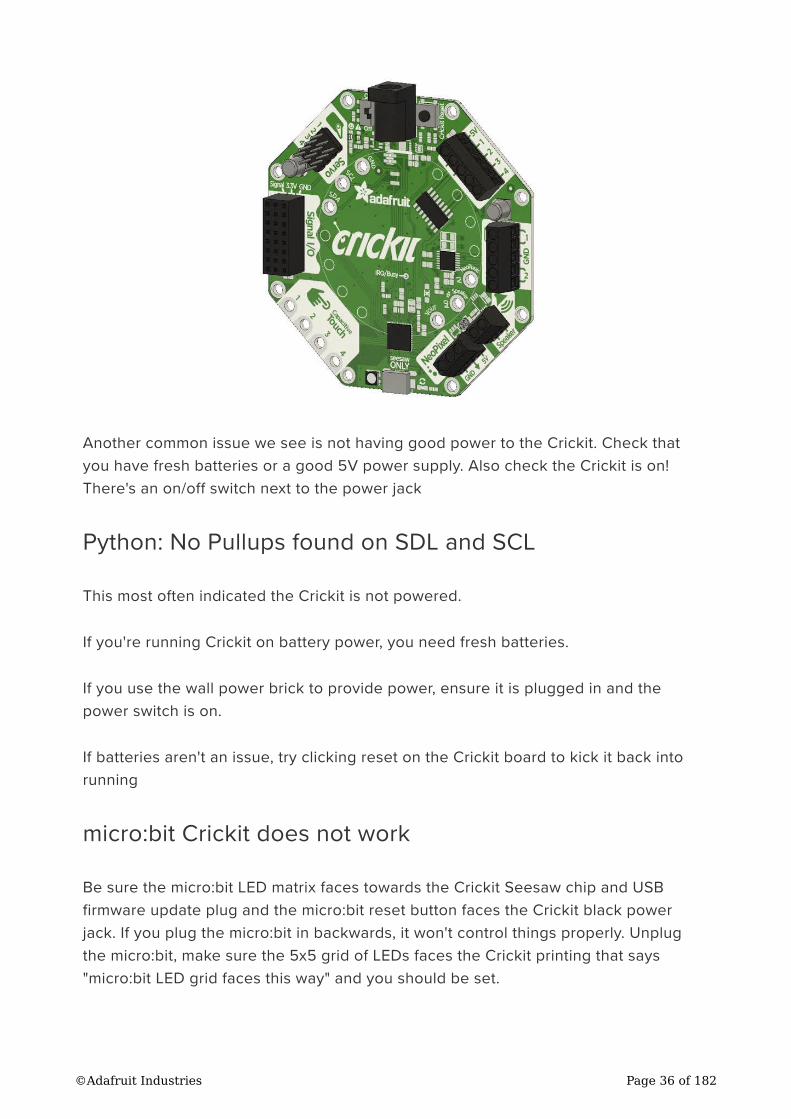
Crickit Tour
Although the Crickit HAT for Raspberry Pi is not octagonal like other Crickets, the
HAT still has the same features that are listed below, just rearranged to fit the
rectangular HAT shape.
©Adafruit Industries Page 10 of 182

Power Input
Your project start here, where power
comes into the Crickit and is then used to
control various motors and parts. We
cover the various ways you can power
your Crickit in the next section, since
there's a lot of flexibility depending on
the budget, portability and complexity of
your project.
For now, assume you will plug in a 5V wall adapter to the 2.1mm DC jack. This DC jack
is the only way to provide power to Crickit. There's a USB jack (covered at the bottom
of this section) but you cannot power the Crickit that way (the USB jack is only for
debugging seesaw!)
Use 5V DC (4V to 5.5VDC range works) with positive-center voltage. If you try to plug
in a negative-center power supply, the polarity-protection will kick in and you will not
see any lights on the Crickit.
©Adafruit Industries Page 11 of 182
The Crickit uses a power management chip to keep you from accidentally powering it
from 9V or 12V, damaging your electronics. Look for the OK and /!\ warning LEDs. If
you see the green OK LED, the power is fine! If you see the red warning LED, the
voltage is too low, too high, or too much current is being used.
You can turn off the Crickit at any time with the On/Off switch. This will turn off the 5V
power, completely disabling all motors, as well as turning off the seesaw control chip.
There's also a Reset button. This button will reset the seesaw chip, and can be used
to load new seesaw firmware (you won't likely have to do that). On the Feather Crickit,
this button also connects to the Feather reset pin. On the Circuit Playground Crickit, it
does not connect to the Playground Reset button.
On the Feather Crickit only, if you double-click the Feather reset button to load new
firmware, such as a new version of CircuitPython, the Crickit will also go into double-
click firmware-update mode. After you load the new firmware on the Feather, wait for
the firmware to start up, and then click the reset button again, once, to get the Crickit
back into regular operation mode.
Power options to consider:
3 x AA Battery Holder (https://adafru.it/BzH) with On/Off Switch (needs JST to
5.5/2.1 adapters)
Wall power supply (https://adafru.it/BzI) - 5V, 2A, US
And more options in the https://www.adafruit.com/categories (https://adafru.it/
BzC)!
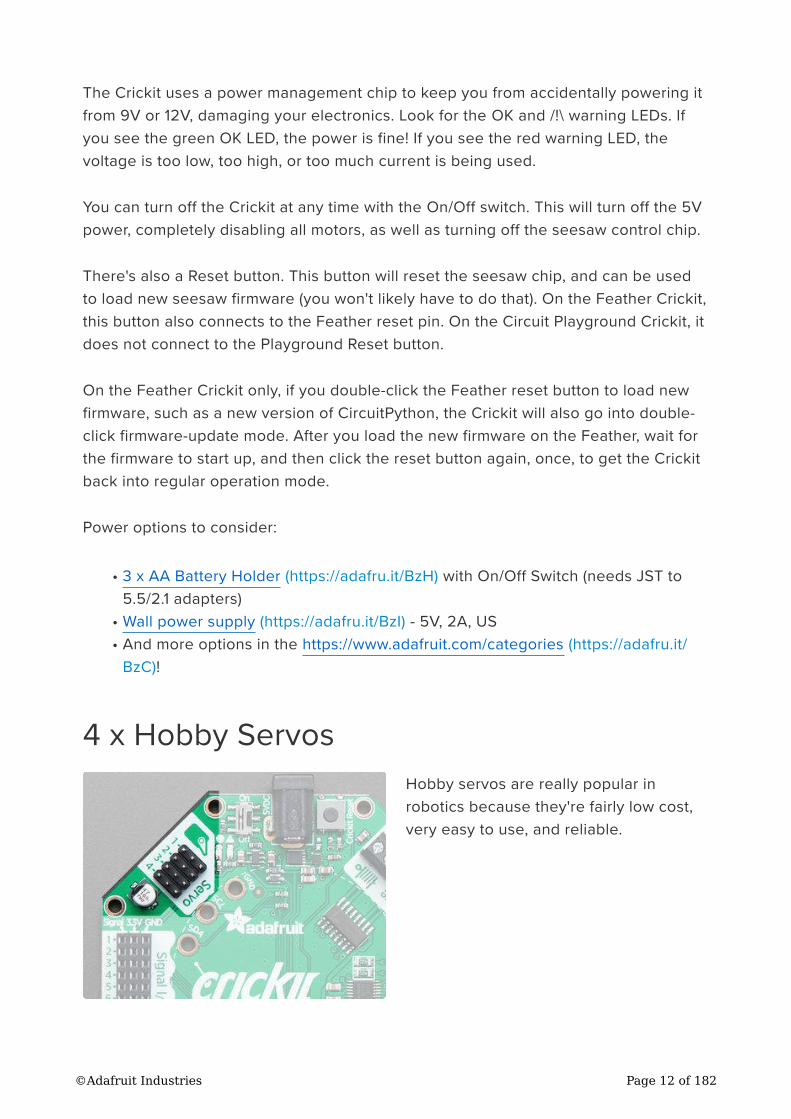
4 x Hobby Servos
Hobby servos are really popular in
robotics because they're fairly low cost,
very easy to use, and reliable.
•
•
•
©Adafruit Industries Page 12 of 182
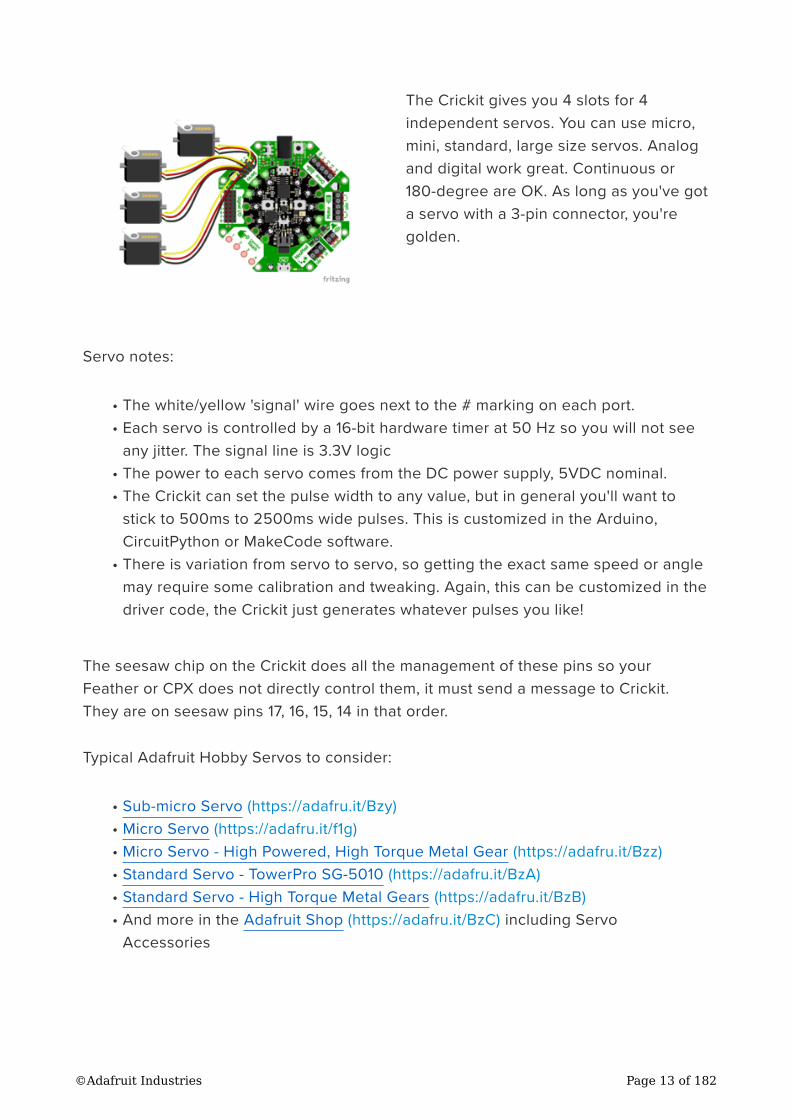
The Crickit gives you 4 slots for 4
independent servos. You can use micro,
mini, standard, large size servos. Analog
and digital work great. Continuous or
180-degree are OK. As long as you've got
a servo with a 3-pin connector, you're
golden.
Servo notes:
The white/yellow 'signal' wire goes next to the # marking on each port.
Each servo is controlled by a 16-bit hardware timer at 50 Hz so you will not see
any jitter. The signal line is 3.3V logic
The power to each servo comes from the DC power supply, 5VDC nominal.
The Crickit can set the pulse width to any value, but in general you'll want to
stick to 500ms to 2500ms wide pulses. This is customized in the Arduino,
CircuitPython or MakeCode software.
There is variation from servo to servo, so getting the exact same speed or angle
may require some calibration and tweaking. Again, this can be customized in the
driver code, the Crickit just generates whatever pulses you like!
The seesaw chip on the Crickit does all the management of these pins so your
Feather or CPX does not directly control them, it must send a message to Crickit.
They are on seesaw pins 17, 16, 15, 14 in that order.
Typical Adafruit Hobby Servos to consider:
Sub-micro Servo (https://adafru.it/Bzy)
Micro Servo (https://adafru.it/f1g)
Micro Servo - High Powered, High Torque Metal Gear (https://adafru.it/Bzz)
Standard Servo - TowerPro SG-5010 (https://adafru.it/BzA)
Standard Servo - High Torque Metal Gears (https://adafru.it/BzB)
And more in the Adafruit Shop (https://adafru.it/BzC) including Servo
Accessories
•
•
•
•
•
•
•
•
•
•
•
©Adafruit Industries Page 13 of 182
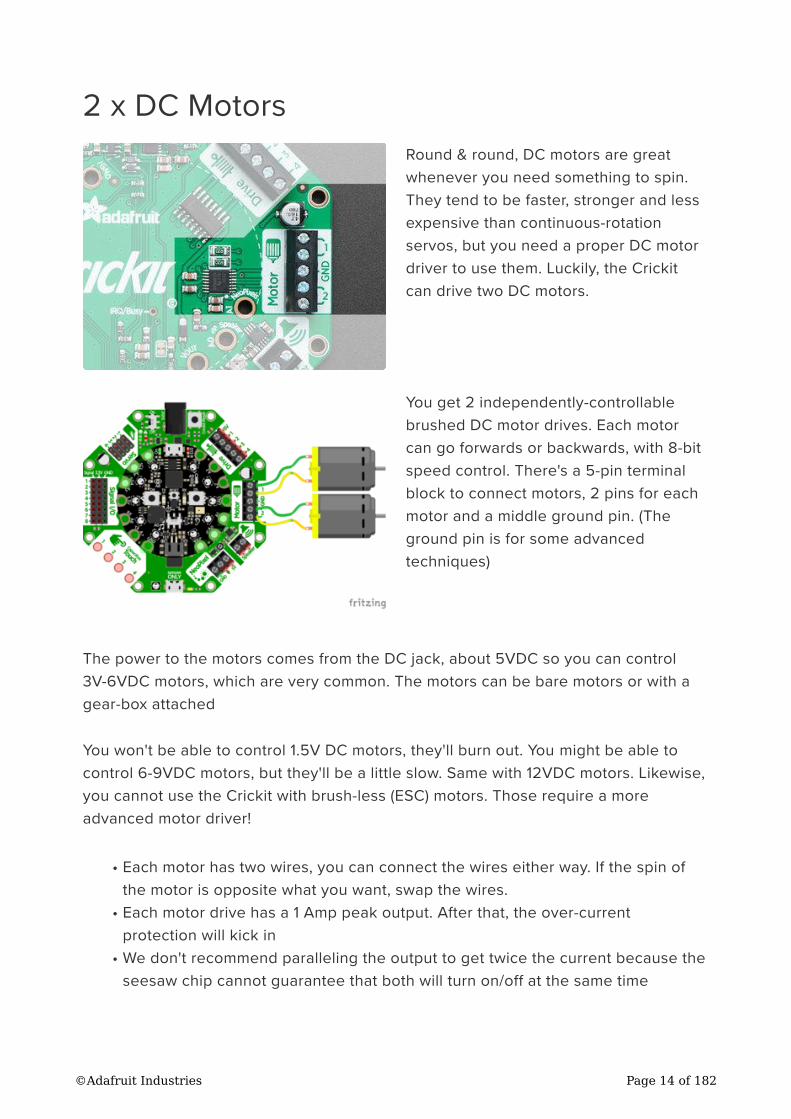
2 x DC Motors
Round & round, DC motors are great
whenever you need something to spin.
They tend to be faster, stronger and less
expensive than continuous-rotation
servos, but you need a proper DC motor
driver to use them. Luckily, the Crickit
can drive two DC motors.
You get 2 independently-controllable
brushed DC motor drives. Each motor
can go forwards or backwards, with 8-bit
speed control. There's a 5-pin terminal
block to connect motors, 2 pins for each
motor and a middle ground pin. (The
ground pin is for some advanced
techniques)
The power to the motors comes from the DC jack, about 5VDC so you can control
3V-6VDC motors, which are very common. The motors can be bare motors or with a
gear-box attached
You won't be able to control 1.5V DC motors, they'll burn out. You might be able to
control 6-9VDC motors, but they'll be a little slow. Same with 12VDC motors. Likewise,
you cannot use the Crickit with brush-less (ESC) motors. Those require a more
advanced motor driver!
Each motor has two wires, you can connect the wires either way. If the spin of
the motor is opposite what you want, swap the wires.
Each motor drive has a 1 Amp peak output. After that, the over-current
protection will kick in
We don't recommend paralleling the output to get twice the current because the
seesaw chip cannot guarantee that both will turn on/off at the same time
•
•
•
©Adafruit Industries Page 14 of 182
Instead of 2 DC motors, you could also control a single bi-polar stepper motor
(5VDC power) or single uni-polar stepper motor. You'll use the ground pin for the
5th (and 6th, if it exists) wire of the uni-polar stepper.
Uses the DRV8833 dual H-Bridge motor driver chip (https://adafru.it/Bfk)
The seesaw chip on the Crickit does all the management of these pins so your
Feather or CPX does not directly control them, it must send a message to Crickit.
They are on seesaw pins 22 + 23 (motor 1) and 19 + 18 (motor 2)
Typical Adafruit Motors to consider:
DC Toy Hobby Motor (https://adafru.it/xan)
DC Motor in Servo Body (https://adafru.it/BzD)
DC Gearbox Motor (https://adafru.it/BzE) - "TT Motor"
TT Motor All-Metal Gearbox (https://adafru.it/BzF)
TT Motor Bi-Metal Gearbox (https://adafru.it/BzG)
And more including accessories in the Adafruit Shop (https://adafru.it/BzC)!
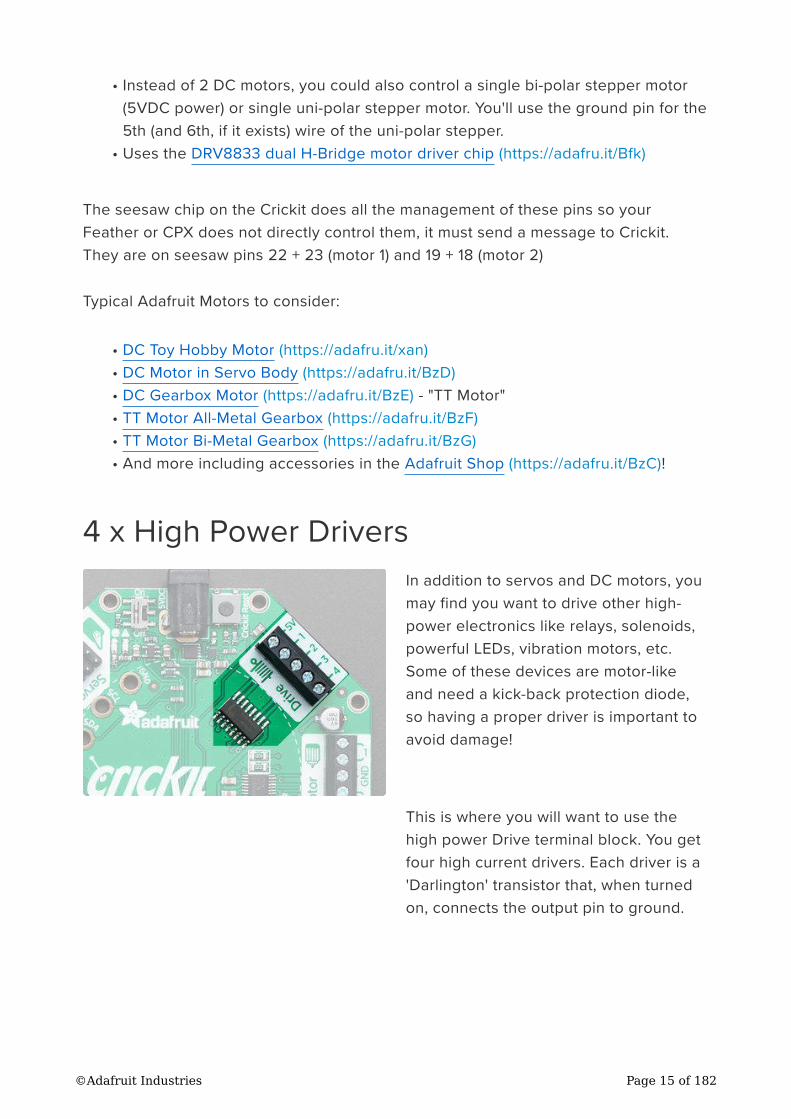
4 x High Power Drivers
In addition to servos and DC motors, you
may find you want to drive other high-
power electronics like relays, solenoids,
powerful LEDs, vibration motors, etc.
Some of these devices are motor-like
and need a kick-back protection diode,
so having a proper driver is important to
avoid damage!
This is where you will want to use the
high power Drive terminal block. You get
four high current drivers. Each driver is a
'Darlington' transistor that, when turned
on, connects the output pin to ground.
•
•
•
•
•
•
•
•
©Adafruit Industries Page 15 of 182
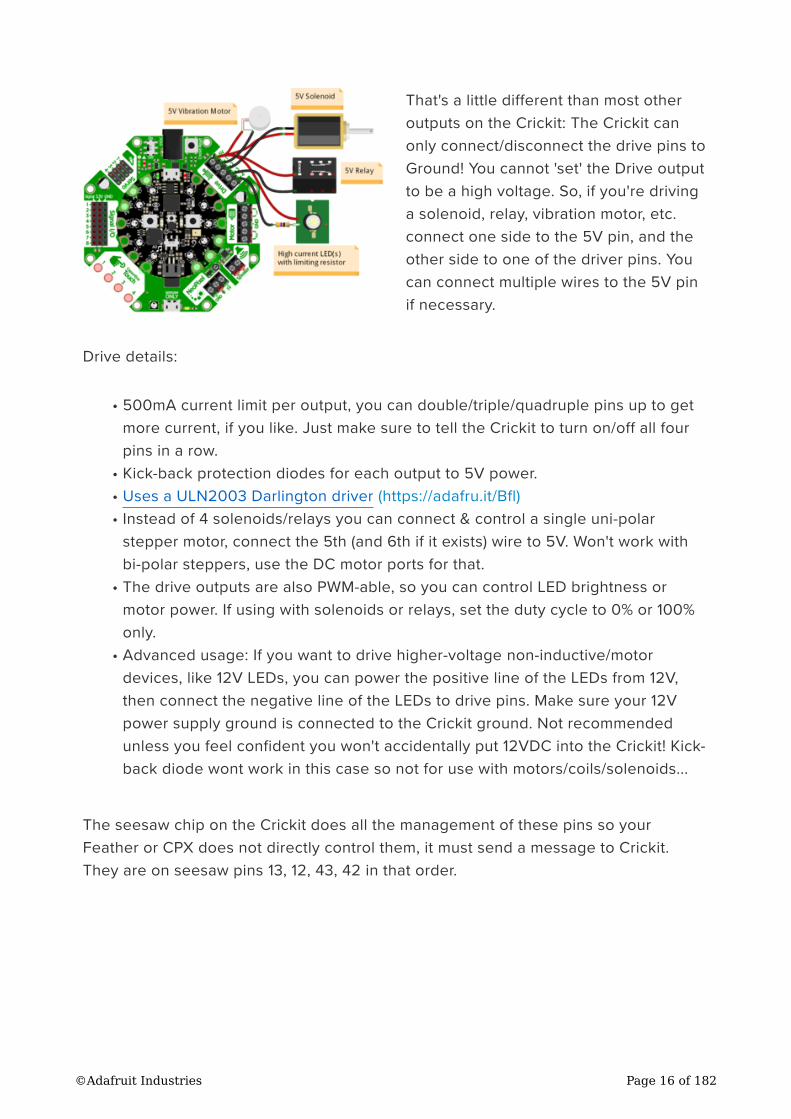
That's a little different than most other
outputs on the Crickit: The Crickit can
only connect/disconnect the drive pins to
Ground! You cannot 'set' the Drive output
to be a high voltage. So, if you're driving
a solenoid, relay, vibration motor, etc.
connect one side to the 5V pin, and the
other side to one of the driver pins. You
can connect multiple wires to the 5V pin
if necessary.
Drive details:
500mA current limit per output, you can double/triple/quadruple pins up to get
more current, if you like. Just make sure to tell the Crickit to turn on/off all four
pins in a row.
Kick-back protection diodes for each output to 5V power.
Uses a ULN2003 Darlington driver (https://adafru.it/Bfl)
Instead of 4 solenoids/relays you can connect & control a single uni-polar
stepper motor, connect the 5th (and 6th if it exists) wire to 5V. Won't work with
bi-polar steppers, use the DC motor ports for that.
The drive outputs are also PWM-able, so you can control LED brightness or
motor power. If using with solenoids or relays, set the duty cycle to 0% or 100%
only.
Advanced usage: If you want to drive higher-voltage non-inductive/motor
devices, like 12V LEDs, you can power the positive line of the LEDs from 12V,
then connect the negative line of the LEDs to drive pins. Make sure your 12V
power supply ground is connected to the Crickit ground. Not recommended
unless you feel confident you won't accidentally put 12VDC into the Crickit! Kick-
back diode wont work in this case so not for use with motors/coils/solenoids...
The seesaw chip on the Crickit does all the management of these pins so your
Feather or CPX does not directly control them, it must send a message to Crickit.
They are on seesaw pins 13, 12, 43, 42 in that order.
•
•
•
•
•
•
©Adafruit Industries Page 16 of 182
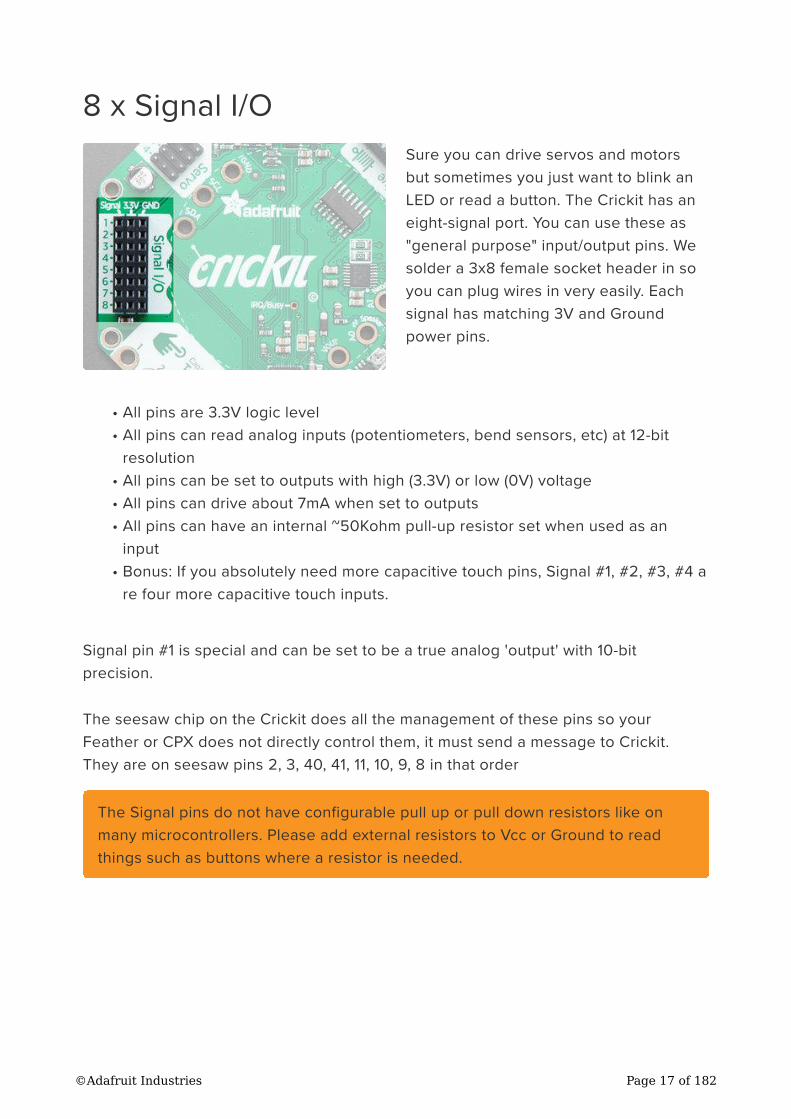
8 x Signal I/O
Sure you can drive servos and motors
but sometimes you just want to blink an
LED or read a button. The Crickit has an
eight-signal port. You can use these as
"general purpose" input/output pins. We
solder a 3x8 female socket header in so
you can plug wires in very easily. Each
signal has matching 3V and Ground
power pins.
All pins are 3.3V logic level
All pins can read analog inputs (potentiometers, bend sensors, etc) at 12-bit
resolution
All pins can be set to outputs with high (3.3V) or low (0V) voltage
All pins can drive about 7mA when set to outputs
All pins can have an internal ~50Kohm pull-up resistor set when used as an
input
Bonus: If you absolutely need more capacitive touch pins, Signal #1, #2, #3, #4 a
re four more capacitive touch inputs.
Signal pin #1 is special and can be set to be a true analog 'output' with 10-bit
precision.
The seesaw chip on the Crickit does all the management of these pins so your
Feather or CPX does not directly control them, it must send a message to Crickit.
They are on seesaw pins 2, 3, 40, 41, 11, 10, 9, 8 in that order
•
•
•
•
•
•
The Signal pins do not have configurable pull up or pull down resistors like on
many microcontrollers. Please add external resistors to Vcc or Ground to read
things such as buttons where a resistor is needed.
©Adafruit Industries Page 17 of 182
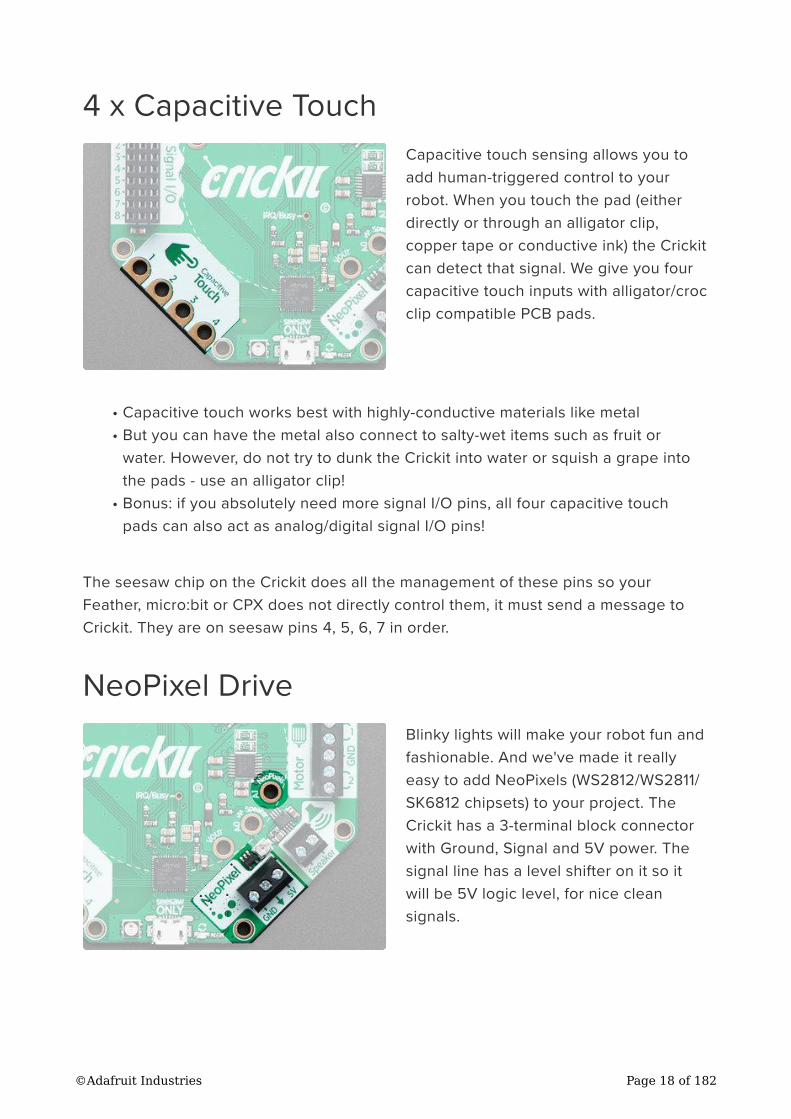
4 x Capacitive Touch
Capacitive touch sensing allows you to
add human-triggered control to your
robot. When you touch the pad (either
directly or through an alligator clip,
copper tape or conductive ink) the Crickit
can detect that signal. We give you four
capacitive touch inputs with alligator/croc
clip compatible PCB pads.
Capacitive touch works best with highly-conductive materials like metal
But you can have the metal also connect to salty-wet items such as fruit or
water. However, do not try to dunk the Crickit into water or squish a grape into
the pads - use an alligator clip!
Bonus: if you absolutely need more signal I/O pins, all four capacitive touch
pads can also act as analog/digital signal I/O pins!
The seesaw chip on the Crickit does all the management of these pins so your
Feather, micro:bit or CPX does not directly control them, it must send a message to
Crickit. They are on seesaw pins 4, 5, 6, 7 in order.
NeoPixel Drive
Blinky lights will make your robot fun and
fashionable. And we've made it really
easy to add NeoPixels (WS2812/WS2811/
SK6812 chipsets) to your project. The
Crickit has a 3-terminal block connector
with Ground, Signal and 5V power. The
signal line has a level shifter on it so it
will be 5V logic level, for nice clean
signals.
•
•
•
©Adafruit Industries Page 18 of 182
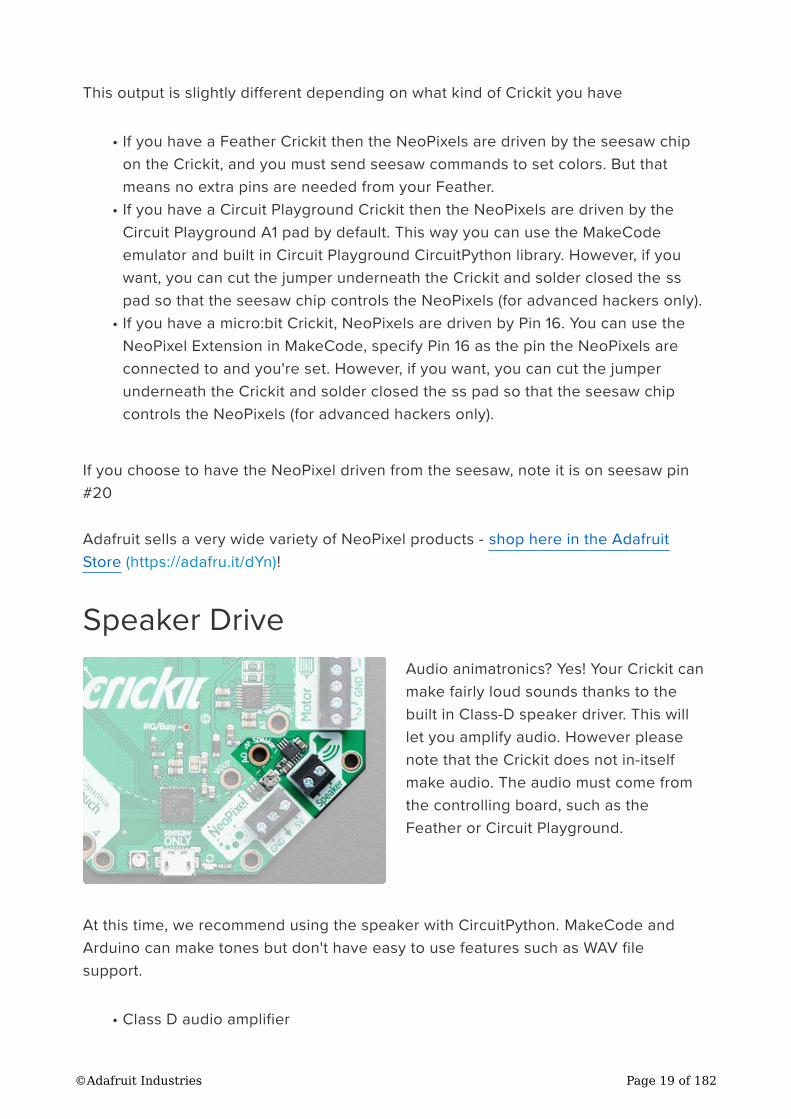
This output is slightly different depending on what kind of Crickit you have
If you have a Feather Crickit then the NeoPixels are driven by the seesaw chip
on the Crickit, and you must send seesaw commands to set colors. But that
means no extra pins are needed from your Feather.
If you have a Circuit Playground Crickit then the NeoPixels are driven by the
Circuit Playground A1 pad by default. This way you can use the MakeCode
emulator and built in Circuit Playground CircuitPython library. However, if you
want, you can cut the jumper underneath the Crickit and solder closed the ss
pad so that the seesaw chip controls the NeoPixels (for advanced hackers only).
If you have a micro:bit Crickit, NeoPixels are driven by Pin 16. You can use the
NeoPixel Extension in MakeCode, specify Pin 16 as the pin the NeoPixels are
connected to and you're set. However, if you want, you can cut the jumper
underneath the Crickit and solder closed the ss pad so that the seesaw chip
controls the NeoPixels (for advanced hackers only).
If you choose to have the NeoPixel driven from the seesaw, note it is on seesaw pin
#20
Adafruit sells a very wide variety of NeoPixel products - shop here in the Adafruit
Store (https://adafru.it/dYn)!
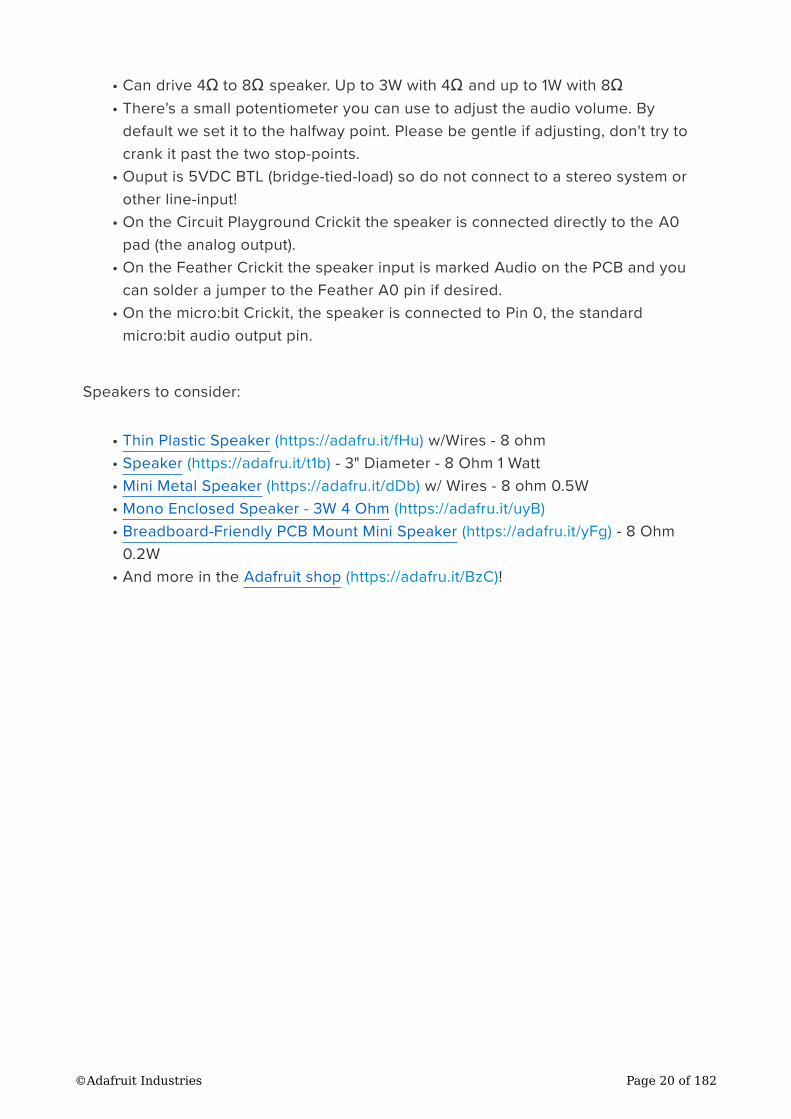
Speaker Drive
Audio animatronics? Yes! Your Crickit can
make fairly loud sounds thanks to the
built in Class-D speaker driver. This will
let you amplify audio. However please
note that the Crickit does not in-itself
make audio. The audio must come from
the controlling board, such as the
Feather or Circuit Playground.
At this time, we recommend using the speaker with CircuitPython. MakeCode and
Arduino can make tones but don't have easy to use features such as WAV file
support.
Class D audio amplifier
•
•
•
•
©Adafruit Industries Page 19 of 182
Can drive 4Ω to 8Ω speaker. Up to 3W with 4Ω and up to 1W with 8Ω
There's a small potentiometer you can use to adjust the audio volume. By
default we set it to the halfway point. Please be gentle if adjusting, don't try to
crank it past the two stop-points.
Ouput is 5VDC BTL (bridge-tied-load) so do not connect to a stereo system or
other line-input!
On the Circuit Playground Crickit the speaker is connected directly to the A0
pad (the analog output).
On the Feather Crickit the speaker input is marked Audio on the PCB and you
can solder a jumper to the Feather A0 pin if desired.
On the micro:bit Crickit, the speaker is connected to Pin 0, the standard
micro:bit audio output pin.
Speakers to consider:
Thin Plastic Speaker (https://adafru.it/fHu) w/Wires - 8 ohm
Speaker (https://adafru.it/t1b) - 3" Diameter - 8 Ohm 1 Watt
Mini Metal Speaker (https://adafru.it/dDb) w/ Wires - 8 ohm 0.5W
Mono Enclosed Speaker - 3W 4 Ohm (https://adafru.it/uyB)
Breadboard-Friendly PCB Mount Mini Speaker (https://adafru.it/yFg) - 8 Ohm
0.2W
And more in the Adafruit shop (https://adafru.it/BzC)!
•
•
•
•
•
•
•
•
•
•
•
•
©Adafruit Industries Page 20 of 182

Connecting Your Microcontroller to yourCrickit Board
If you have a Circuit Playground Crickit,
you can attach the Playground in the
middle using 6 standoff bolts that come
with the kit. Make sure you tighten these
as loose bolts can cause connection
issues.
There's six connections to make
Ground - signal and power ground
between Crickit and Playground
SDA and SCL - the I2C data
connection used to send/receive
data from the Crickit
A1 - Used for the NeoPixel output
default
A0 - Used for the speaker output
VOUT - This bolt lets you safely
power the Circuit Playground from
the Crickit so you don't need to
separately power the Playground
with batteries
•
•
•
•
•
©Adafruit Industries Page 21 of 182
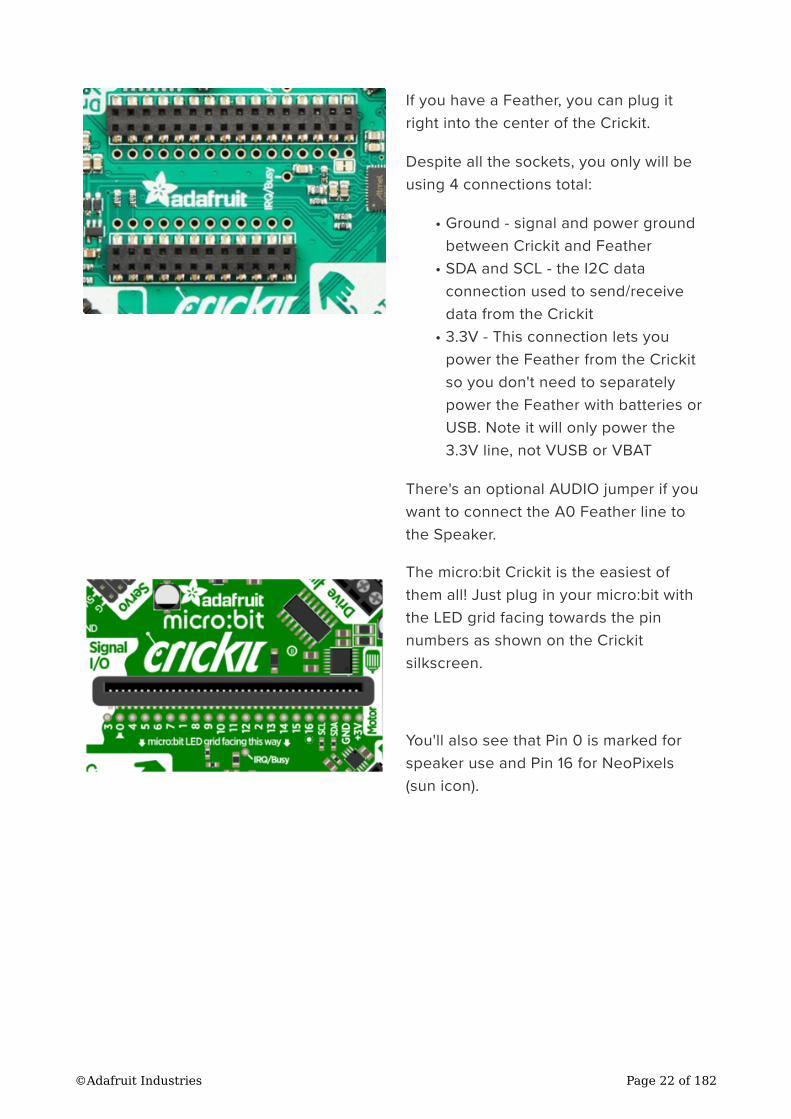
If you have a Feather, you can plug it
right into the center of the Crickit.
Despite all the sockets, you only will be
using 4 connections total:
Ground - signal and power ground
between Crickit and Feather
SDA and SCL - the I2C data
connection used to send/receive
data from the Crickit
3.3V - This connection lets you
power the Feather from the Crickit
so you don't need to separately
power the Feather with batteries or
USB. Note it will only power the
3.3V line, not VUSB or VBAT
There's an optional AUDIO jumper if you
want to connect the A0 Feather line to
the Speaker.
The micro:bit Crickit is the easiest of
them all! Just plug in your micro:bit with
the LED grid facing towards the pin
numbers as shown on the Crickit
silkscreen.
You'll also see that Pin 0 is marked for
speaker use and Pin 16 for NeoPixels
(sun icon).
•
•
•
©Adafruit Industries Page 22 of 182
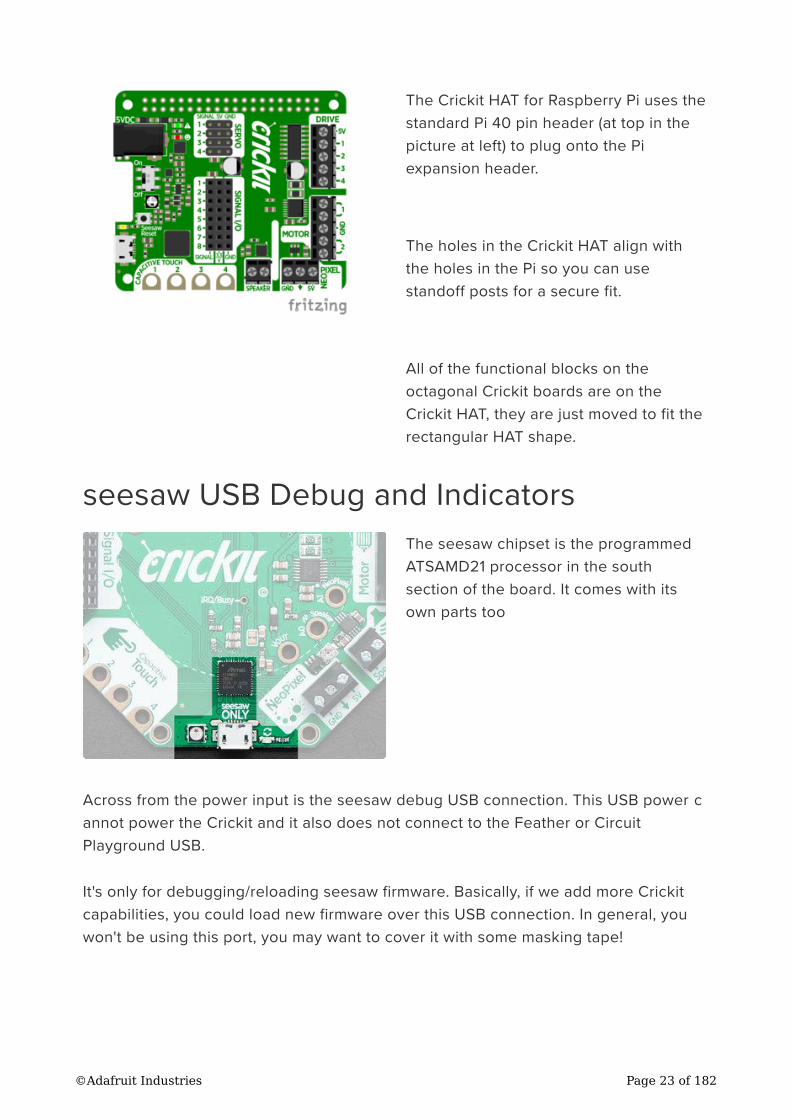
The Crickit HAT for Raspberry Pi uses the
standard Pi 40 pin header (at top in the
picture at left) to plug onto the Pi
expansion header.
The holes in the Crickit HAT align with
the holes in the Pi so you can use
standoff posts for a secure fit.
All of the functional blocks on the
octagonal Crickit boards are on the
Crickit HAT, they are just moved to fit the
rectangular HAT shape.
seesaw USB Debug and Indicators
The seesaw chipset is the programmed
ATSAMD21 processor in the south
section of the board. It comes with its
own parts too
Across from the power input is the seesaw debug USB connection. This USB power c
annot power the Crickit and it also does not connect to the Feather or Circuit
Playground USB.
It's only for debugging/reloading seesaw firmware. Basically, if we add more Crickit
capabilities, you could load new firmware over this USB connection. In general, you
won't be using this port, you may want to cover it with some masking tape!
©Adafruit Industries Page 23 of 182

To the right is a yellow Activity LED, which will flash when seesaw sends/receives
commands from your Circuit Playground or Feather. To the left is a seesaw NeoPixel.
You can control this NeoPixel if you like, to give you status information, as an
advanced usage
The internal NeoPixel is on seesaw pin #27
Update Your Crickit
Your Crickit contains a special interface chip we call seesaw. Like a see-saw you see
in a playground, it goes up/down back/forth. In this case, instead of holding children,
it sends commands and responses back and forth - motor movement, sensors inputs,
signal i/o...
The seesaw code is contained in a microcontroller near the bottom of the Crickit, and
that chip comes with the seesaw firmware on it already when you get it!
But we do make improvements to the seesaw firmware, fix bugs, and improve
performance
So its a good idea to update your Crickit when you get it! It's easy and only takes a
few seconds.
Step 1. Plug in USB cable into seesaw/Crickit
There's a little USB connector at the bottom of your Crickit labeled seesaw only! Plug
a standard data-sync USB cable into that port and into your computer. You do not
need to plug in the DC power jack or power the Feather/CircuitPlayground.
Do check that the switch on the Crickit is switched to ON
©Adafruit Industries Page 24 of 182
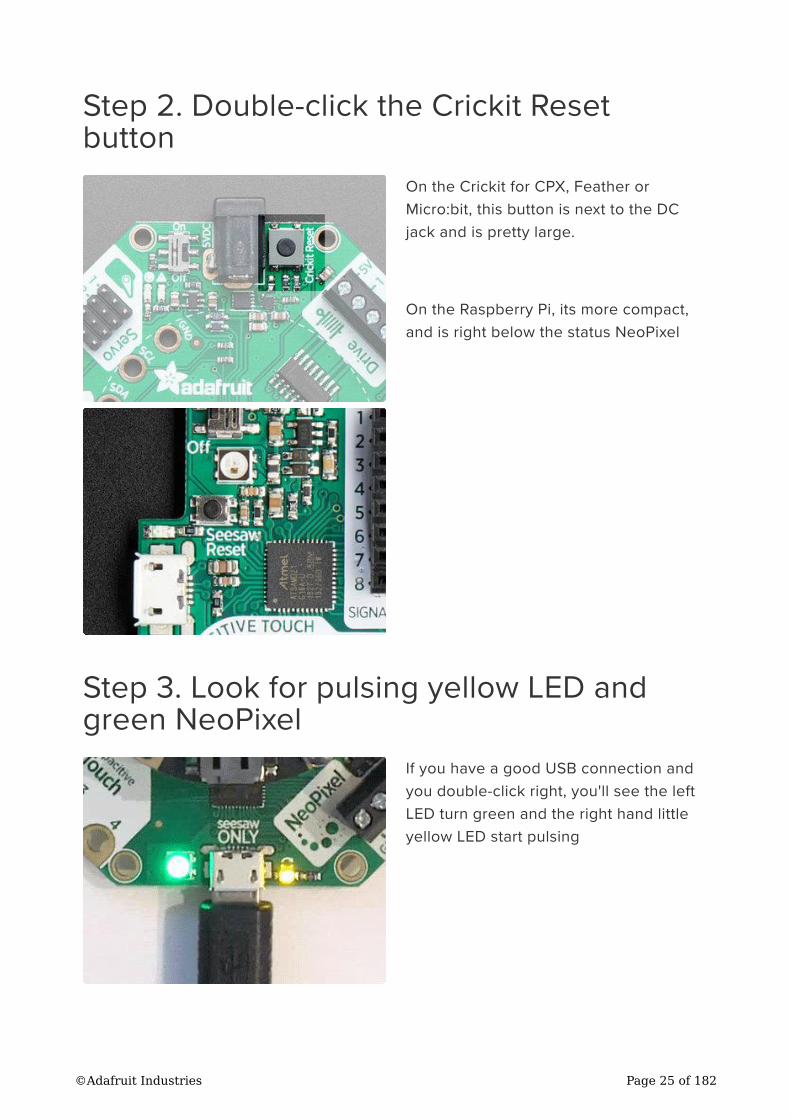
Step 2. Double-click the Crickit Resetbutton
On the Crickit for CPX, Feather or
Micro:bit, this button is next to the DC
jack and is pretty large.
On the Raspberry Pi, its more compact,
and is right below the status NeoPixel
Step 3. Look for pulsing yellow LED andgreen NeoPixel
If you have a good USB connection and
you double-click right, you'll see the left
LED turn green and the right hand little
yellow LED start pulsing
©Adafruit Industries Page 25 of 182
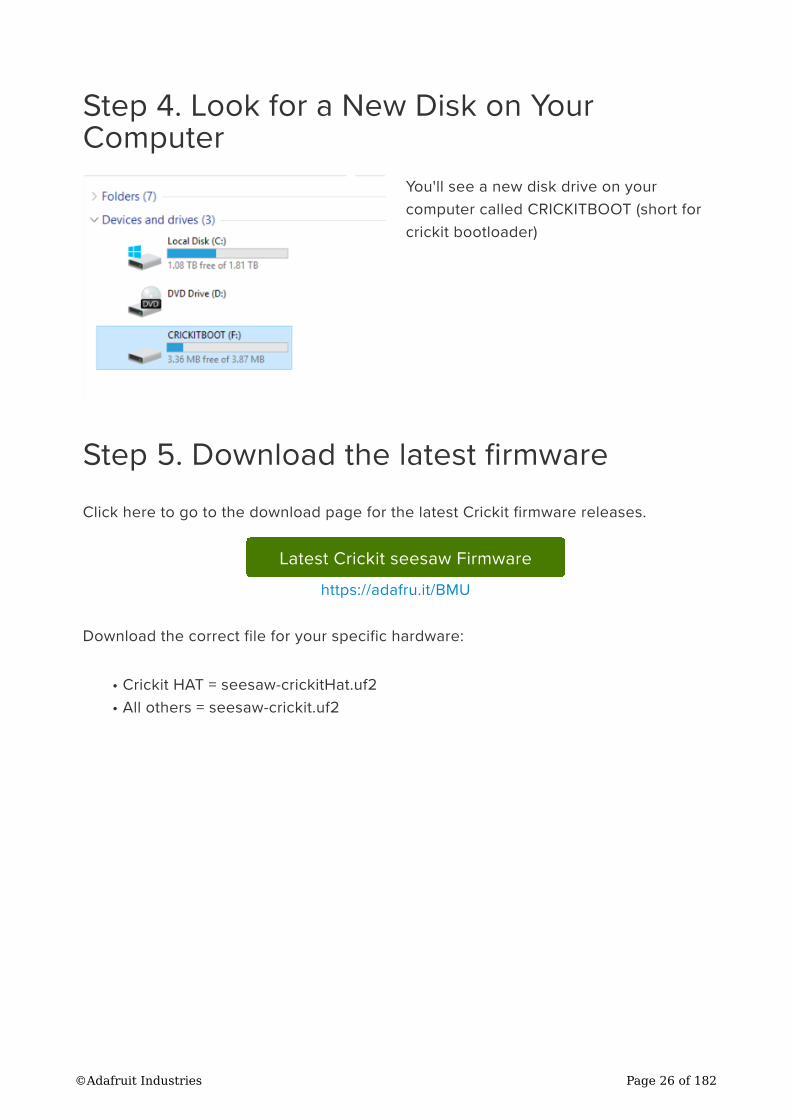
Step 4. Look for a New Disk on YourComputer
You'll see a new disk drive on your
computer called CRICKITBOOT (short for
crickit bootloader)
Step 5. Download the latest firmware
Click here to go to the download page for the latest Crickit firmware releases.
Latest Crickit seesaw Firmware
https://adafru.it/BMU
Download the correct file for your specific hardware:
Crickit HAT = seesaw-crickitHat.uf2
All others = seesaw-crickit.uf2
•
•
©Adafruit Industries Page 26 of 182
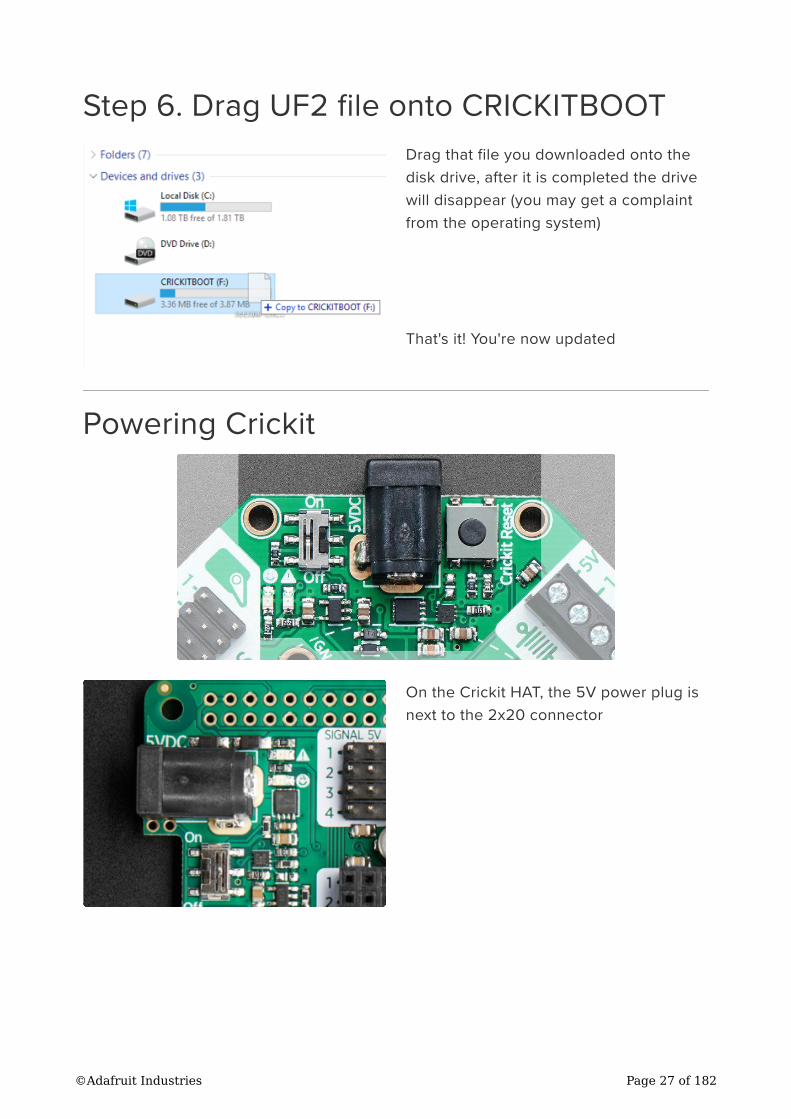
Step 6. Drag UF2 file onto CRICKITBOOT
Drag that file you downloaded onto the
disk drive, after it is completed the drive
will disappear (you may get a complaint
from the operating system)
That's it! You're now updated
Powering Crickit
On the Crickit HAT, the 5V power plug is
next to the 2x20 connector
©Adafruit Industries Page 27 of 182
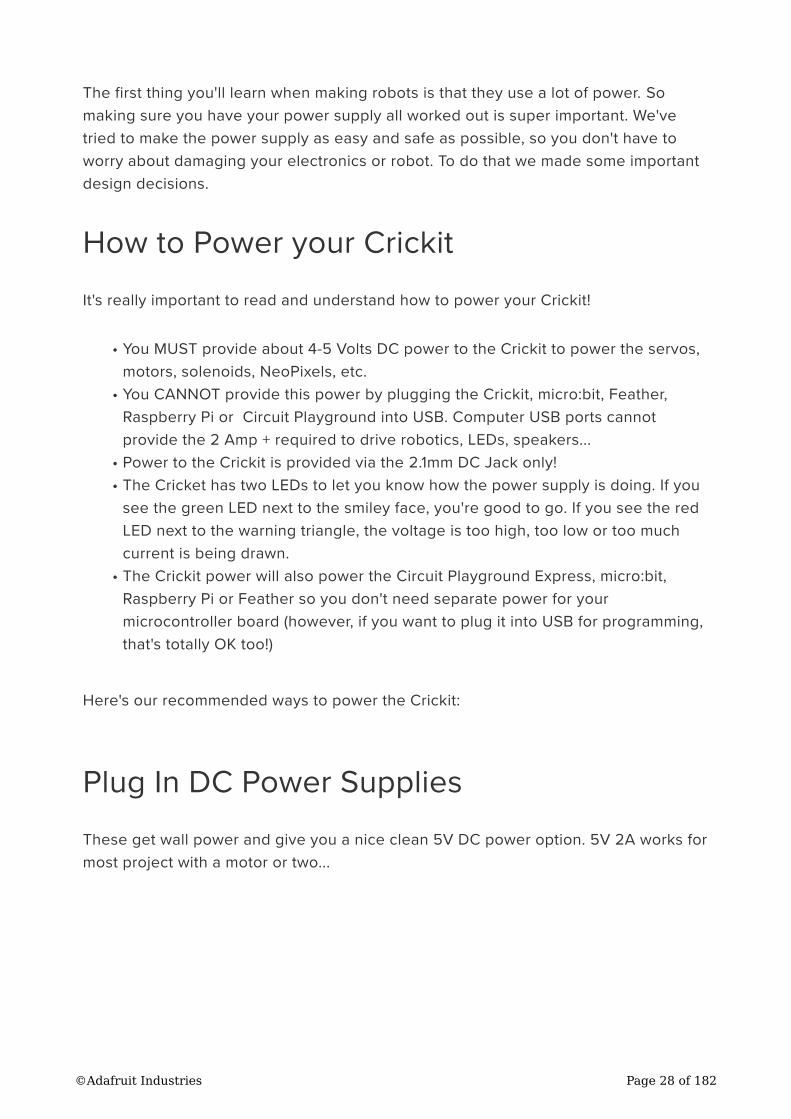
The first thing you'll learn when making robots is that they use a lot of power. So
making sure you have your power supply all worked out is super important. We've
tried to make the power supply as easy and safe as possible, so you don't have to
worry about damaging your electronics or robot. To do that we made some important
design decisions.
How to Power your Crickit
It's really important to read and understand how to power your Crickit!
You MUST provide about 4-5 Volts DC power to the Crickit to power the servos,
motors, solenoids, NeoPixels, etc.
You CANNOT provide this power by plugging the Crickit, micro:bit, Feather,
Raspberry Pi or Circuit Playground into USB. Computer USB ports cannot
provide the 2 Amp + required to drive robotics, LEDs, speakers...
Power to the Crickit is provided via the 2.1mm DC Jack only!
The Cricket has two LEDs to let you know how the power supply is doing. If you
see the green LED next to the smiley face, you're good to go. If you see the red
LED next to the warning triangle, the voltage is too high, too low or too much
current is being drawn.
The Crickit power will also power the Circuit Playground Express, micro:bit,
Raspberry Pi or Feather so you don't need separate power for your
microcontroller board (however, if you want to plug it into USB for programming,
that's totally OK too!)
Here's our recommended ways to power the Crickit:
Plug In DC Power Supplies
These get wall power and give you a nice clean 5V DC power option. 5V 2A works for
most project with a motor or two...
•
•
•
•
•
©Adafruit Industries Page 28 of 182
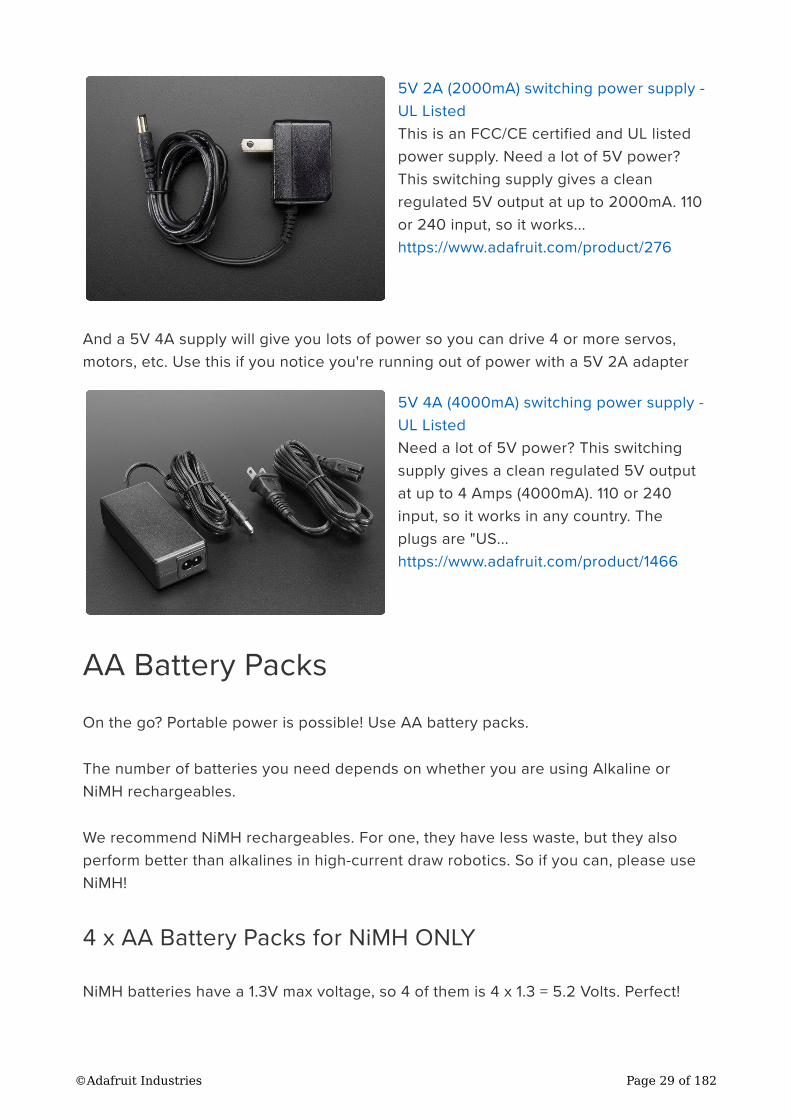
5V 2A (2000mA) switching power supply -
UL Listed
This is an FCC/CE certified and UL listed
power supply. Need a lot of 5V power?
This switching supply gives a clean
regulated 5V output at up to 2000mA. 110
or 240 input, so it works...
https://www.adafruit.com/product/276
And a 5V 4A supply will give you lots of power so you can drive 4 or more servos,
motors, etc. Use this if you notice you're running out of power with a 5V 2A adapter
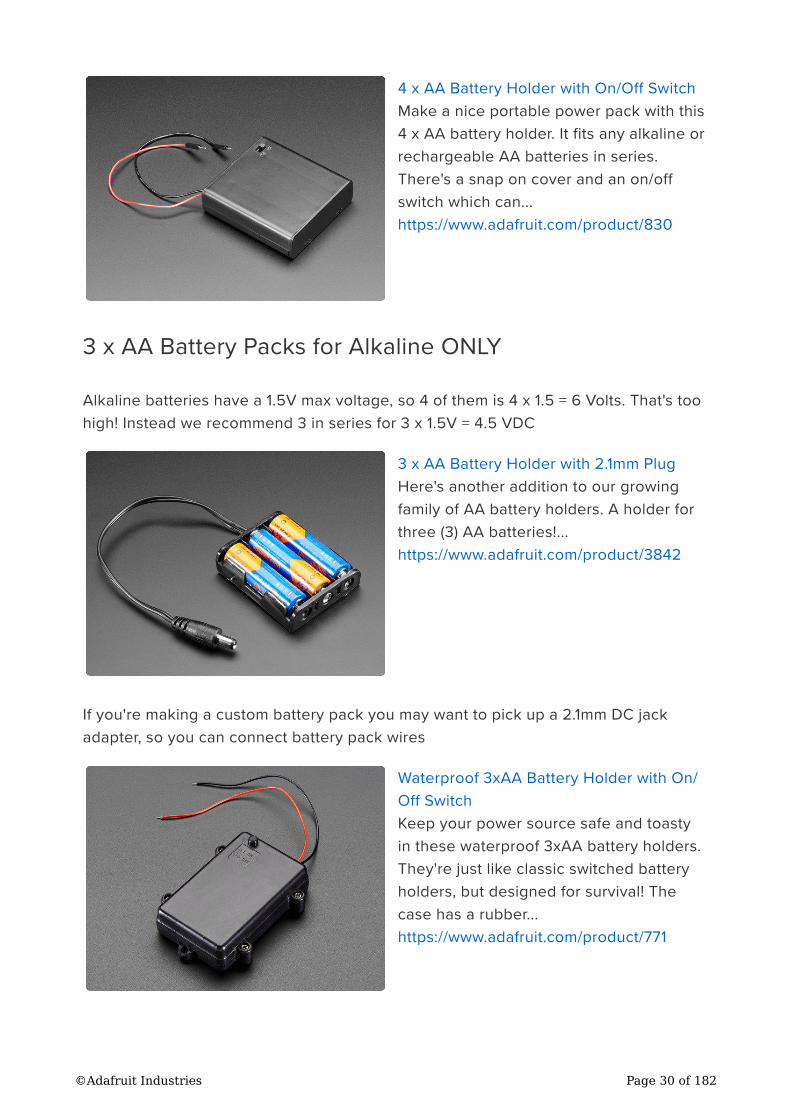
5V 4A (4000mA) switching power supply -
UL Listed
Need a lot of 5V power? This switching
supply gives a clean regulated 5V output
at up to 4 Amps (4000mA). 110 or 240
input, so it works in any country. The
plugs are "US...
https://www.adafruit.com/product/1466
AA Battery Packs
On the go? Portable power is possible! Use AA battery packs.
The number of batteries you need depends on whether you are using Alkaline or
NiMH rechargeables.
We recommend NiMH rechargeables. For one, they have less waste, but they also
perform better than alkalines in high-current draw robotics. So if you can, please use
NiMH!
4 x AA Battery Packs for NiMH ONLY
NiMH batteries have a 1.3V max voltage, so 4 of them is 4 x 1.3 = 5.2 Volts. Perfect!
©Adafruit Industries Page 29 of 182
4 x AA Battery Holder with On/Off Switch
Make a nice portable power pack with this
4 x AA battery holder. It fits any alkaline or
rechargeable AA batteries in series.
There's a snap on cover and an on/off
switch which can...
https://www.adafruit.com/product/830
3 x AA Battery Packs for Alkaline ONLY
Alkaline batteries have a 1.5V max voltage, so 4 of them is 4 x 1.5 = 6 Volts. That's too
high! Instead we recommend 3 in series for 3 x 1.5V = 4.5 VDC
3 x AA Battery Holder with 2.1mm Plug
Here's another addition to our growing
family of AA battery holders. A holder for
three (3) AA batteries!...
https://www.adafruit.com/product/3842
If you're making a custom battery pack you may want to pick up a 2.1mm DC jack
adapter, so you can connect battery pack wires
Waterproof 3xAA Battery Holder with On/
Off Switch
Keep your power source safe and toasty
in these waterproof 3xAA battery holders.
They're just like classic switched battery
holders, but designed for survival! The
case has a rubber...
https://www.adafruit.com/product/771
©Adafruit Industries Page 30 of 182

Male DC Power adapter - 2.1mm plug to
screw terminal block
If you need to connect a battery pack or
wired power supply to a board that has a
DC jack - this adapter will come in very
handy! There is a 2.1mm DC plug on one
end, and a screw...
https://www.adafruit.com/product/369
Not Recommended Power supplies
LiPoly Batteries - 1 battery is 3.7V, too low. 2 batteries is 7.2V, too high! You could
possibly use a 7.2V pack and then a UBEC to step down to 5V (https://adafru.it/
efD) but its not recommended
Lead Acid Batteries - These are heavy and you'll need a custom charging
solution. You can probably get away with a 2 x 2V cell pack, or a 3 x 2V cell
pack and then add some 1N4001 diodes to drop the voltage, but it's for
advanced hacking!
USB Power Packs - In theory you can use a USB to 2.1mm DC power adapter (ht
tps://adafru.it/Bfm), but power packs sometimes dislike the kinds of current draw
that motors have (high current peaks for short amounts of time) So
experimentation is key!
Assembly
Only the Circuit Playground Express + Crickit combination needs assembly, the
Feather and micro:bit Crickits have sockets which the microcontroller plugs into.
The Crickit HAT for Raspberry Pi does not need assembly either, it has female
receptors for a male Raspberry Pi header.
•
•
•
©Adafruit Industries Page 31 of 182
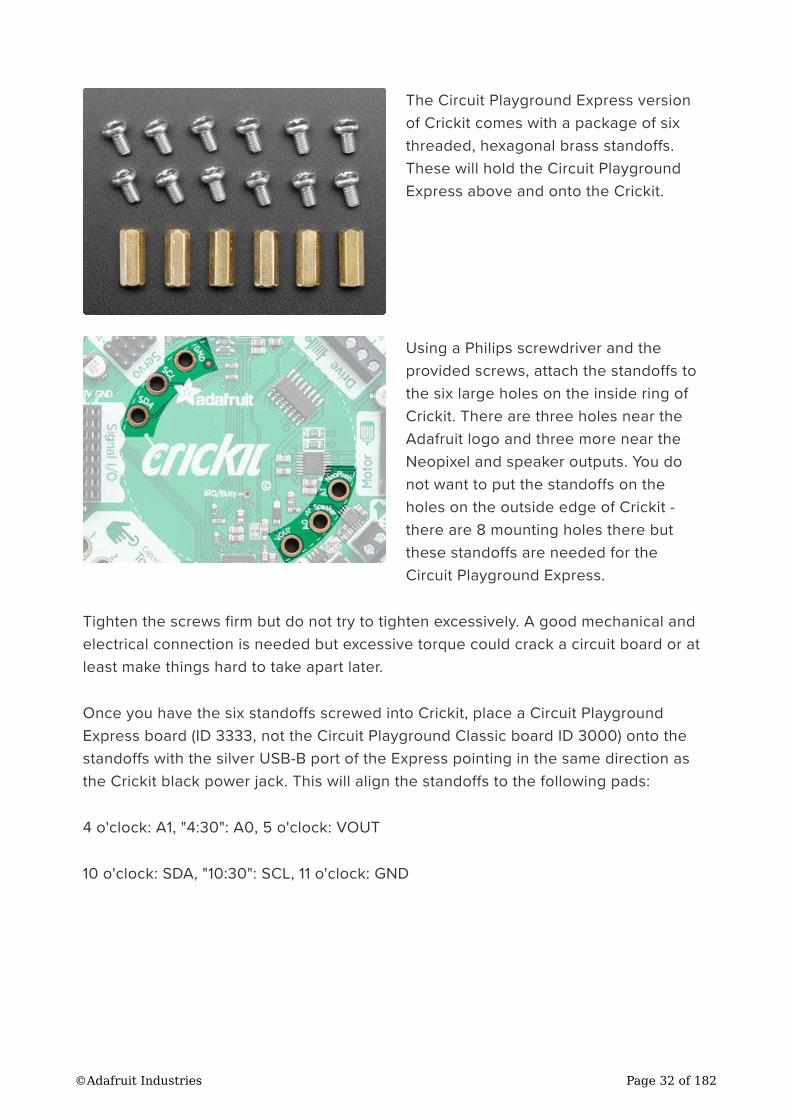
The Circuit Playground Express version
of Crickit comes with a package of six
threaded, hexagonal brass standoffs.
These will hold the Circuit Playground
Express above and onto the Crickit.
Using a Philips screwdriver and the
provided screws, attach the standoffs to
the six large holes on the inside ring of
Crickit. There are three holes near the
Adafruit logo and three more near the
Neopixel and speaker outputs. You do
not want to put the standoffs on the
holes on the outside edge of Crickit -
there are 8 mounting holes there but
these standoffs are needed for the
Circuit Playground Express.
Tighten the screws firm but do not try to tighten excessively. A good mechanical and
electrical connection is needed but excessive torque could crack a circuit board or at
least make things hard to take apart later.
Once you have the six standoffs screwed into Crickit, place a Circuit Playground
Express board (ID 3333, not the Circuit Playground Classic board ID 3000) onto the
standoffs with the silver USB-B port of the Express pointing in the same direction as
the Crickit black power jack. This will align the standoffs to the following pads:
4 o'clock: A1, "4:30": A0, 5 o'clock: VOUT
10 o'clock: SDA, "10:30": SCL, 11 o'clock: GND
©Adafruit Industries Page 32 of 182

Once you have the Circuit Playground
Express lined up correctly, use the
remaining screws to attach the boards
together. Start with one screw into one
standoff, say GND, leave it loose a bit,
then put in the VOUT screw, loose, then
the others loosely. Ensure things are
lined up, then carefully tighten each
screw. Again, a firm connection but not
overly tight.
Now the two boards should be attached
to one another.
Watch out, the CircuitPlayground Express (CPX) can go on 'backwards' and it
won't work. Make sure the USB connector on the CPX is right below the DC jack,
and the labels on the silkscreen of the Crickit match the ones on the CPX! See
the images below!
©Adafruit Industries Page 33 of 182
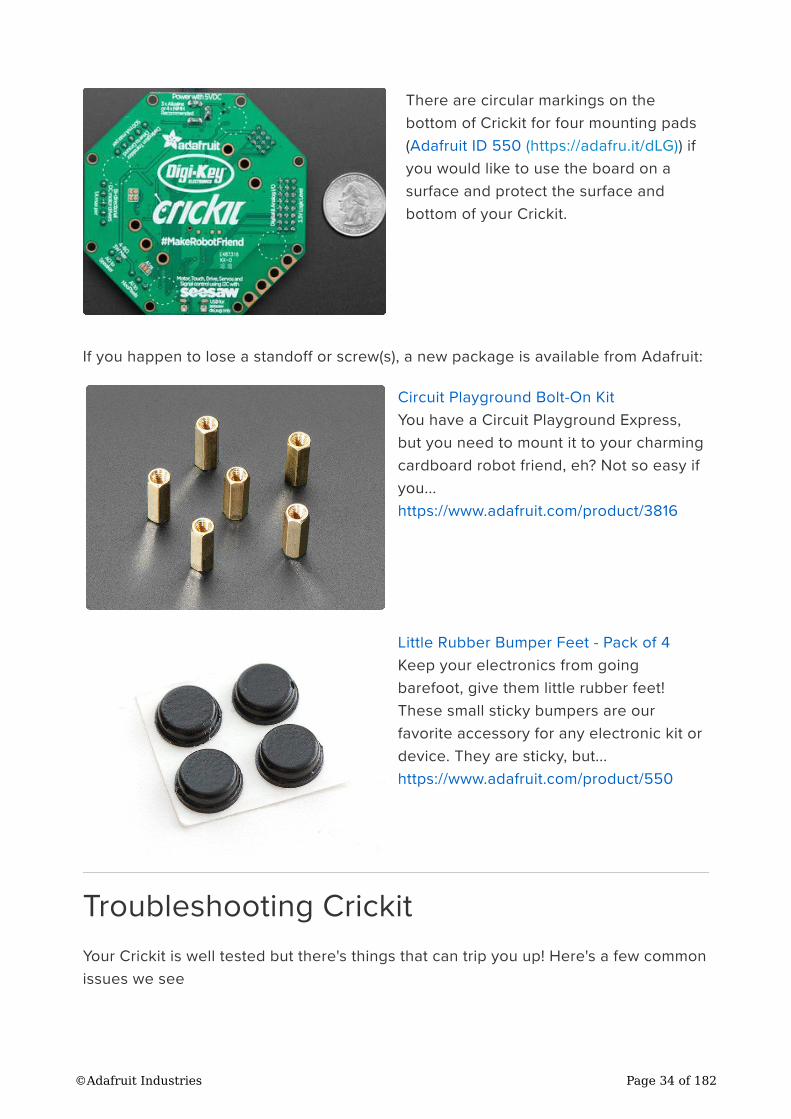
There are circular markings on the
bottom of Crickit for four mounting pads
(Adafruit ID 550 (https://adafru.it/dLG)) if
you would like to use the board on a
surface and protect the surface and
bottom of your Crickit.
If you happen to lose a standoff or screw(s), a new package is available from Adafruit:
Circuit Playground Bolt-On Kit
You have a Circuit Playground Express,
but you need to mount it to your charming
cardboard robot friend, eh? Not so easy if
you...
https://www.adafruit.com/product/3816
Little Rubber Bumper Feet - Pack of 4
Keep your electronics from going
barefoot, give them little rubber feet!
These small sticky bumpers are our
favorite accessory for any electronic kit or
device. They are sticky, but...
https://www.adafruit.com/product/550
Troubleshooting Crickit
Your Crickit is well tested but there's things that can trip you up! Here's a few common
issues we see
©Adafruit Industries Page 34 of 182
My Crickit Is Doing Something Wrong
We do have bugs once in a while, so please always try updating to the latest Crickit
seesaw firmware (https://adafru.it/BMV) - then see if the bug persists
My Crickit Motors Aren't Moving!
My Crickit Keeps Resetting, It Works For a Bit... Then Fails!
Check the power supply. There's a few ways to know that power is good:
Check the "Happy Face" green LED below the power switch, it should stay lit!
Check the "Warning Symbol" red LED below the power switch, it should be off
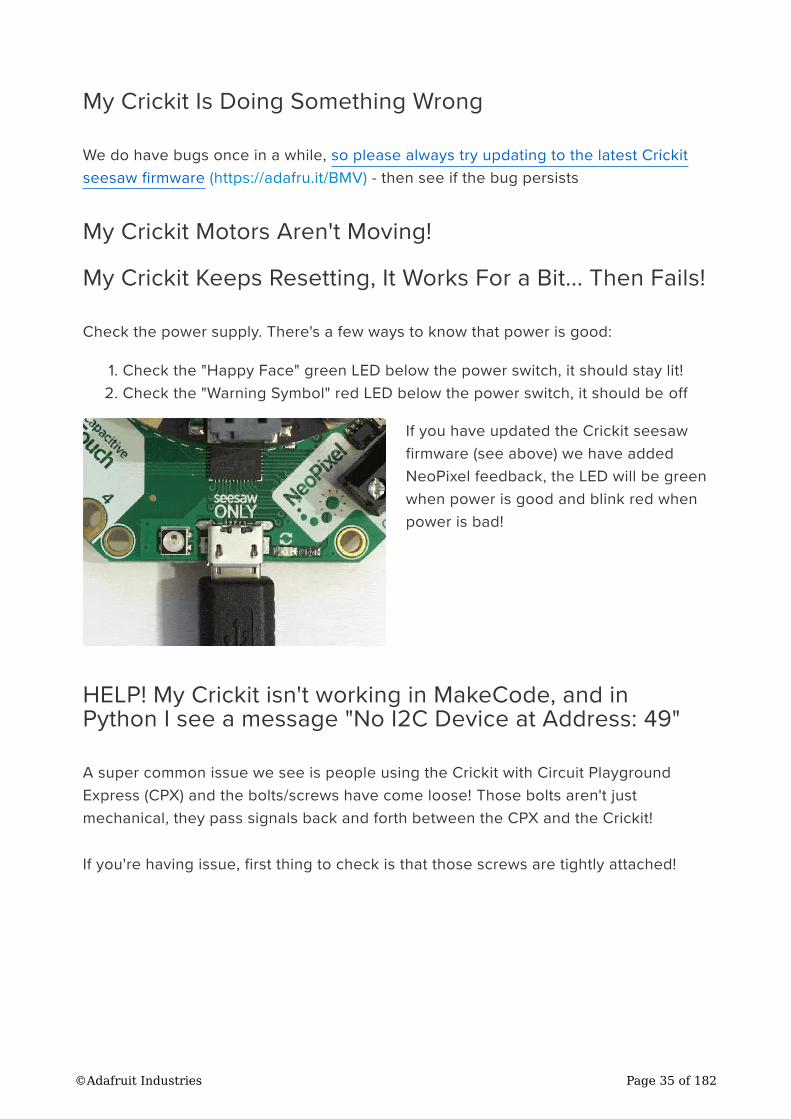
If you have updated the Crickit seesaw
firmware (see above) we have added
NeoPixel feedback, the LED will be green
when power is good and blink red when
power is bad!
HELP! My Crickit isn't working in MakeCode, and inPython I see a message "No I2C Device at Address: 49"
A super common issue we see is people using the Crickit with Circuit Playground
Express (CPX) and the bolts/screws have come loose! Those bolts aren't just
mechanical, they pass signals back and forth between the CPX and the Crickit!
If you're having issue, first thing to check is that those screws are tightly attached!
1.
2.
©Adafruit Industries Page 35 of 182
Another common issue we see is not having good power to the Crickit. Check that
you have fresh batteries or a good 5V power supply. Also check the Crickit is on!
There's an on/off switch next to the power jack
Python: No Pullups found on SDL and SCL
This most often indicated the Crickit is not powered.
If you're running Crickit on battery power, you need fresh batteries.
If you use the wall power brick to provide power, ensure it is plugged in and the
power switch is on.
If batteries aren't an issue, try clicking reset on the Crickit board to kick it back into
running
micro:bit Crickit does not work
Be sure the micro:bit LED matrix faces towards the Crickit Seesaw chip and USB
firmware update plug and the micro:bit reset button faces the Crickit black power
jack. If you plug the micro:bit in backwards, it won't control things properly. Unplug
the micro:bit, make sure the 5x5 grid of LEDs faces the Crickit printing that says
"micro:bit LED grid faces this way" and you should be set.
©Adafruit Industries Page 36 of 182
Recommended Motors
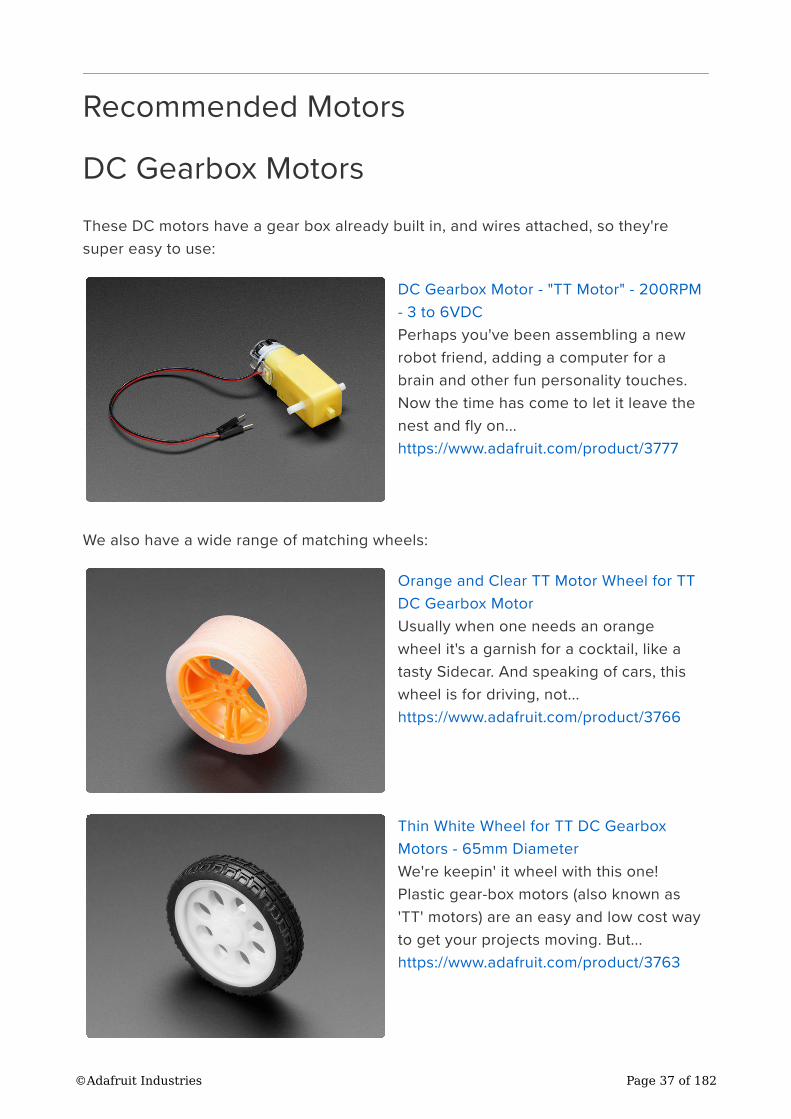
DC Gearbox Motors
These DC motors have a gear box already built in, and wires attached, so they're
super easy to use:
DC Gearbox Motor - "TT Motor" - 200RPM
- 3 to 6VDC
Perhaps you've been assembling a new
robot friend, adding a computer for a
brain and other fun personality touches.
Now the time has come to let it leave the
nest and fly on...
https://www.adafruit.com/product/3777
We also have a wide range of matching wheels:
Orange and Clear TT Motor Wheel for TT
DC Gearbox Motor
Usually when one needs an orange
wheel it's a garnish for a cocktail, like a
tasty Sidecar. And speaking of cars, this
wheel is for driving, not...
https://www.adafruit.com/product/3766
Thin White Wheel for TT DC Gearbox
Motors - 65mm Diameter
We're keepin' it wheel with this one!
Plastic gear-box motors (also known as
'TT' motors) are an easy and low cost way
to get your projects moving. But...
https://www.adafruit.com/product/3763
©Adafruit Industries Page 37 of 182
Skinny Wheel for TT DC Gearbox Motors
Plastic gear-box motors (also known as
'TT' motors) are an easy and low cost way
to get your projects moving. But we've
noticed that there are not a lot of nice TT
motor...
https://www.adafruit.com/product/3757
Other accessories are available, check the Adafruit shop for "TT Motor" items (https://
adafru.it/Bfn) for the wide range of add-ons available.
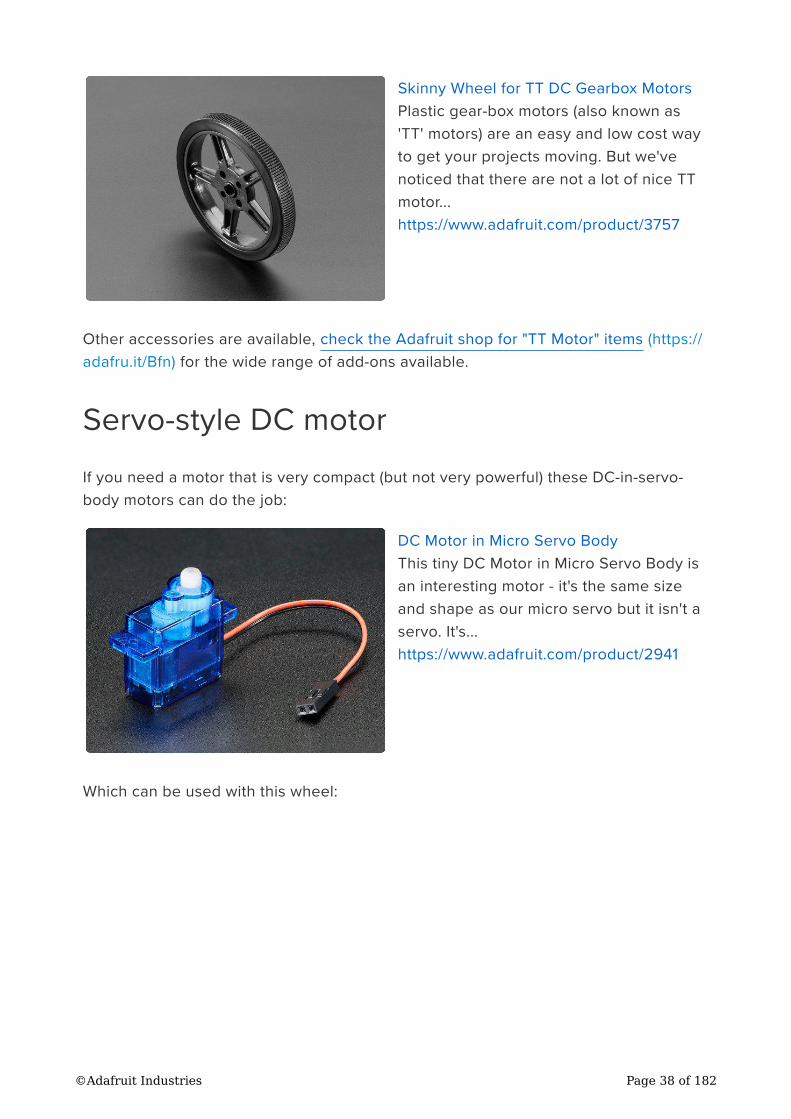
Servo-style DC motor
If you need a motor that is very compact (but not very powerful) these DC-in-servo-
body motors can do the job:
DC Motor in Micro Servo Body
This tiny DC Motor in Micro Servo Body is
an interesting motor - it's the same size
and shape as our micro servo but it isn't a
servo. It's...
https://www.adafruit.com/product/2941
Which can be used with this wheel:
©Adafruit Industries Page 38 of 182
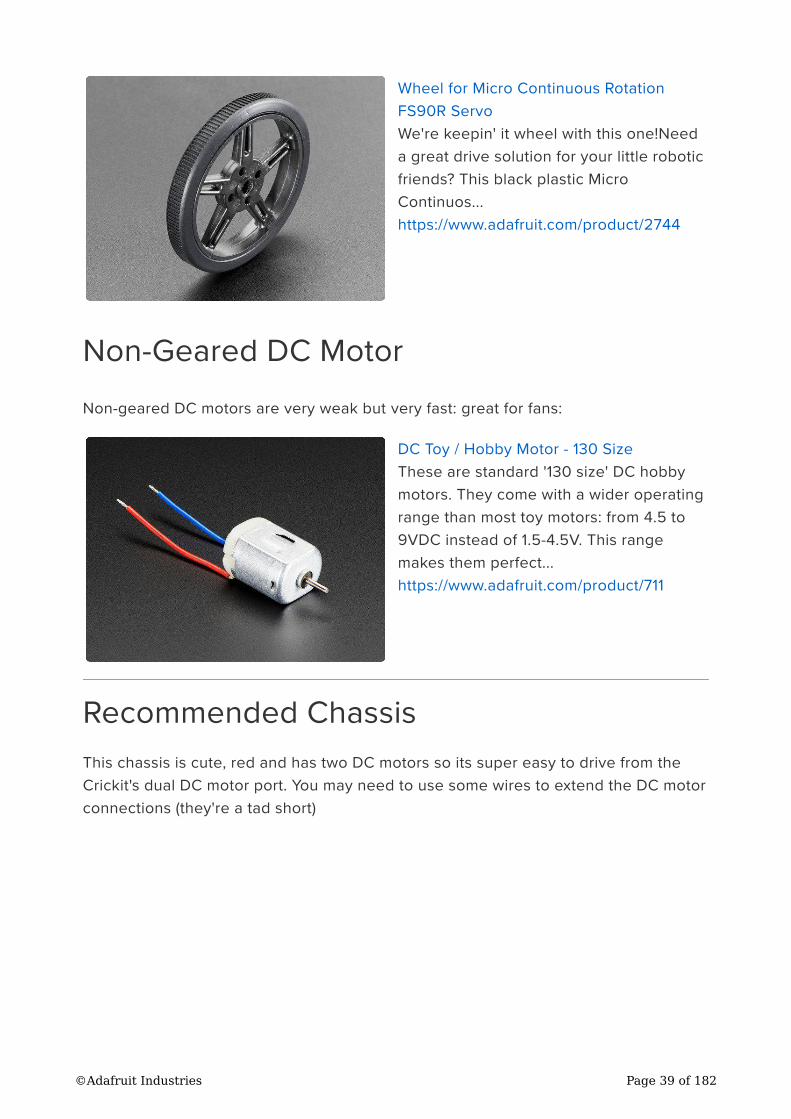
Wheel for Micro Continuous Rotation
FS90R Servo
We're keepin' it wheel with this one!Need
a great drive solution for your little robotic
friends? This black plastic Micro
Continuos...
https://www.adafruit.com/product/2744
Non-Geared DC Motor
Non-geared DC motors are very weak but very fast: great for fans:
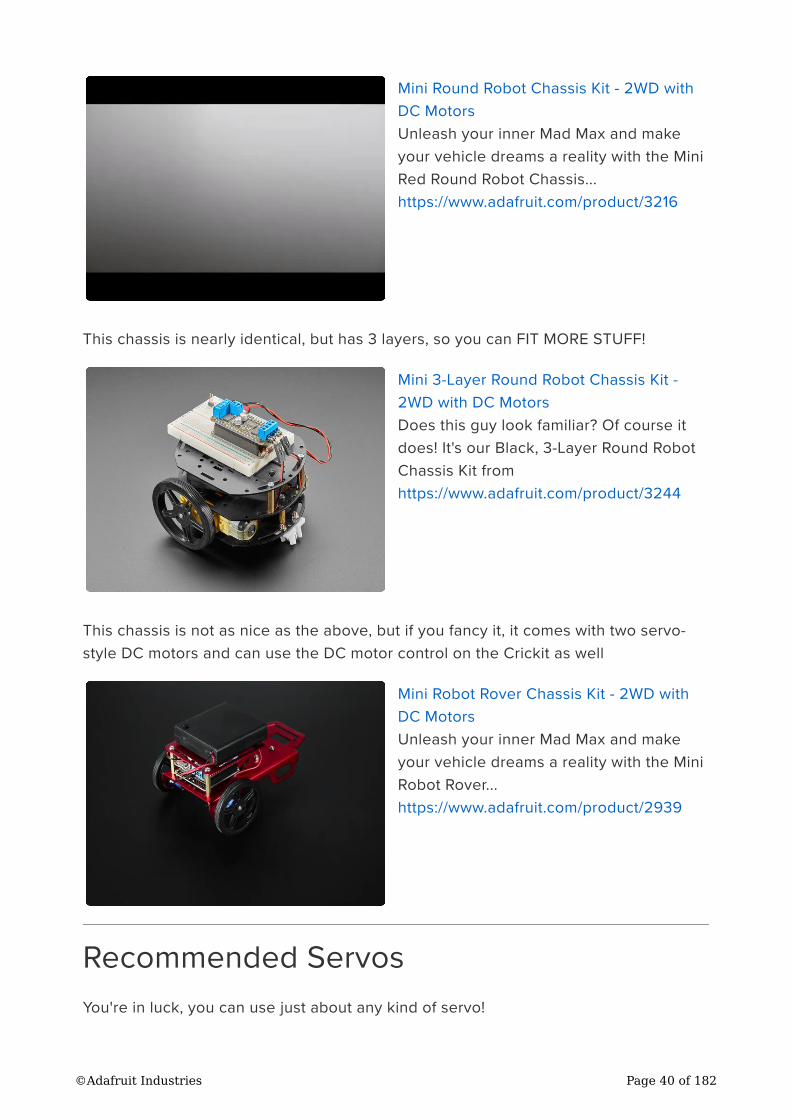
DC Toy / Hobby Motor - 130 Size
These are standard '130 size' DC hobby
motors. They come with a wider operating
range than most toy motors: from 4.5 to
9VDC instead of 1.5-4.5V. This range
makes them perfect...
https://www.adafruit.com/product/711
Recommended Chassis
This chassis is cute, red and has two DC motors so its super easy to drive from the
Crickit's dual DC motor port. You may need to use some wires to extend the DC motor
connections (they're a tad short)
©Adafruit Industries Page 39 of 182
Mini Round Robot Chassis Kit - 2WD with
DC Motors
Unleash your inner Mad Max and make
your vehicle dreams a reality with the Mini
Red Round Robot Chassis...
https://www.adafruit.com/product/3216
This chassis is nearly identical, but has 3 layers, so you can FIT MORE STUFF!
Mini 3-Layer Round Robot Chassis Kit -
2WD with DC Motors
Does this guy look familiar? Of course it
does! It's our Black, 3-Layer Round Robot
Chassis Kit from
https://www.adafruit.com/product/3244
This chassis is not as nice as the above, but if you fancy it, it comes with two servo-
style DC motors and can use the DC motor control on the Crickit as well
Mini Robot Rover Chassis Kit - 2WD with
DC Motors
Unleash your inner Mad Max and make
your vehicle dreams a reality with the Mini
Robot Rover...
https://www.adafruit.com/product/2939
Recommended Servos
You're in luck, you can use just about any kind of servo!
©Adafruit Industries Page 40 of 182
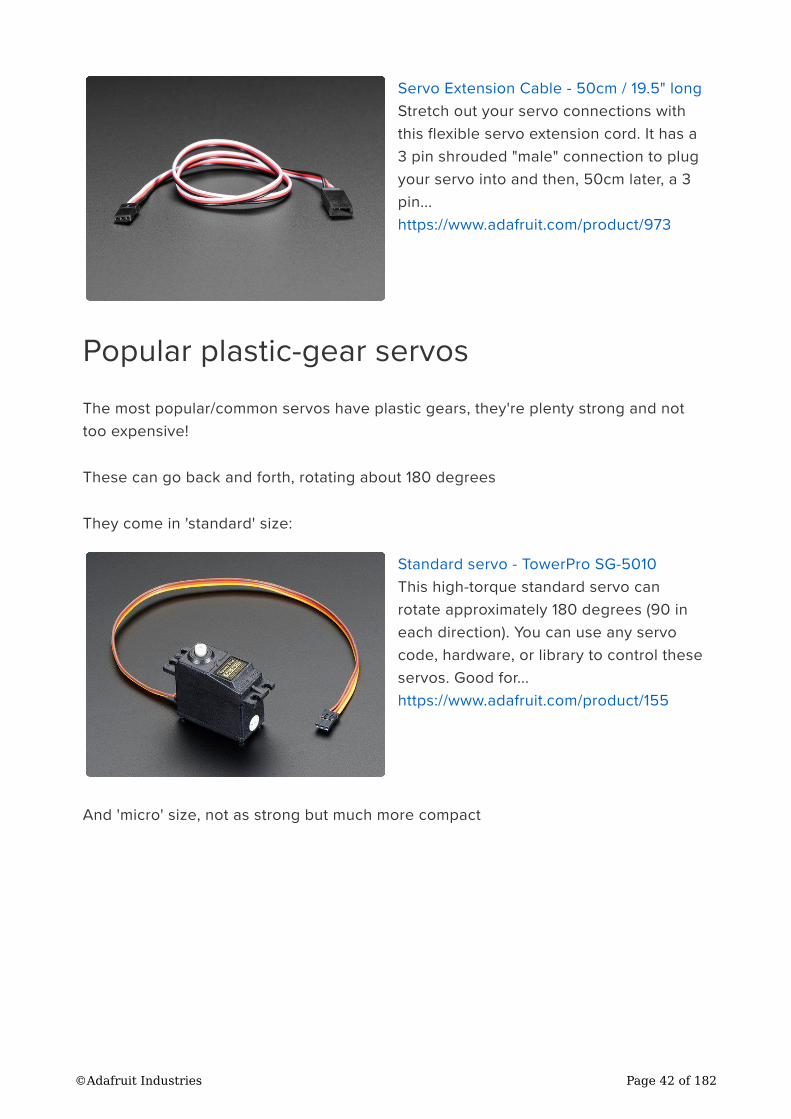
Note that many of the photos below don't show the additional motor horns, but every
servo comes with plastic clip-on parts!
Servo Extensions
People often ask us what they can do if the wire to their Servo is to short for their
project. Not a problem! These cables act as extension cords - now you've got plenty
of room.
Servo Extension Cable - 30cm / 12" long -
Stretch out your servo connections with
this flexible servo extension cord. It has a
3 pin shrouded "male" connection to plug
your servo into and then, 30cm later, a 3
pin...
https://www.adafruit.com/product/972
©Adafruit Industries Page 41 of 182
Servo Extension Cable - 50cm / 19.5" long
Stretch out your servo connections with
this flexible servo extension cord. It has a
3 pin shrouded "male" connection to plug
your servo into and then, 50cm later, a 3
pin...
https://www.adafruit.com/product/973
Popular plastic-gear servos
The most popular/common servos have plastic gears, they're plenty strong and not
too expensive!
These can go back and forth, rotating about 180 degrees
They come in 'standard' size:
Standard servo - TowerPro SG-5010
This high-torque standard servo can
rotate approximately 180 degrees (90 in
each direction). You can use any servo
code, hardware, or library to control these
servos. Good for...
https://www.adafruit.com/product/155
And 'micro' size, not as strong but much more compact
©Adafruit Industries Page 42 of 182
Micro servo
Tiny little servo can rotate approximately
180 degrees (90 in each direction) and
works just like the standard kinds you're
used to but smaller. You can use any
servo...
https://www.adafruit.com/product/169
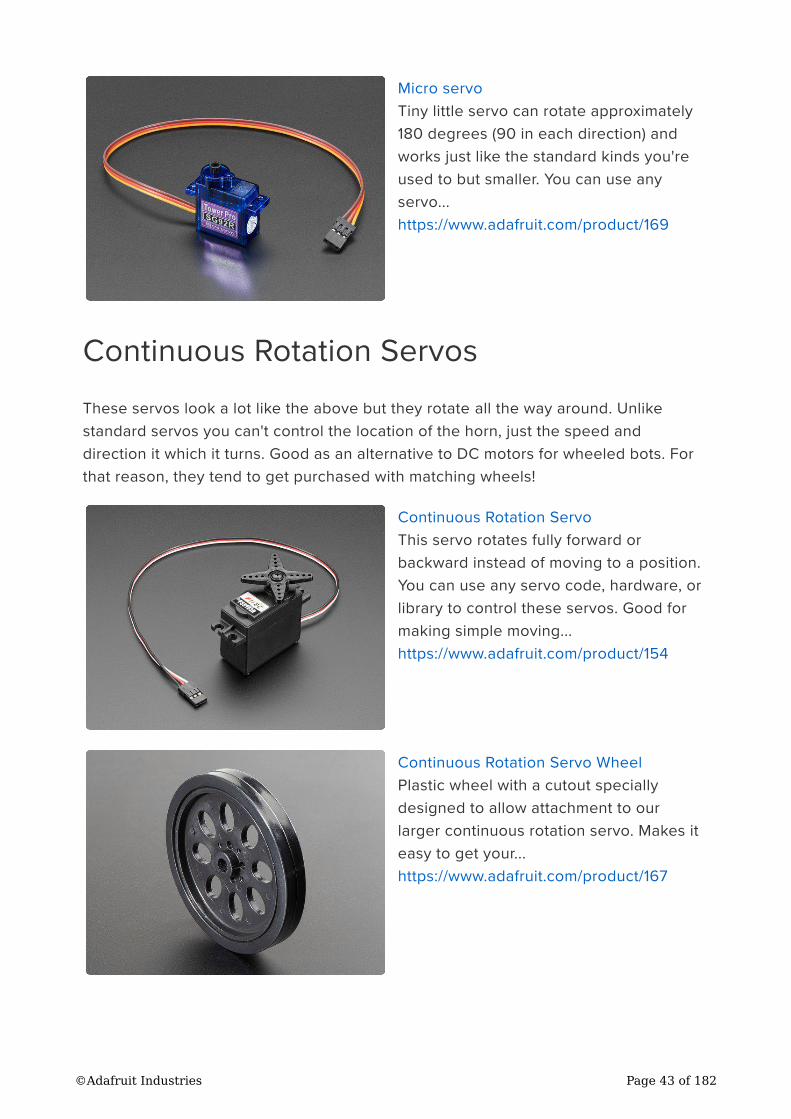
Continuous Rotation Servos
These servos look a lot like the above but they rotate all the way around. Unlike
standard servos you can't control the location of the horn, just the speed and
direction it which it turns. Good as an alternative to DC motors for wheeled bots. For
that reason, they tend to get purchased with matching wheels!
Continuous Rotation Servo
This servo rotates fully forward or
backward instead of moving to a position.
You can use any servo code, hardware, or
library to control these servos. Good for
making simple moving...
https://www.adafruit.com/product/154
Continuous Rotation Servo Wheel
Plastic wheel with a cutout specially
designed to allow attachment to our
larger continuous rotation servo. Makes it
easy to get your...
https://www.adafruit.com/product/167
©Adafruit Industries Page 43 of 182
Continuous Rotation Micro Servo
Need to make a tiny robot? This little
micro servo rotates 360 degrees fully
forward or backward, instead of moving to
a single position. You can use any servo
code, hardware,...
https://www.adafruit.com/product/2442
Wheel for Micro Continuous Rotation
FS90R Servo
We're keepin' it wheel with this one!Need
a great drive solution for your little robotic
friends? This black plastic Micro
Continuos...
https://www.adafruit.com/product/2744
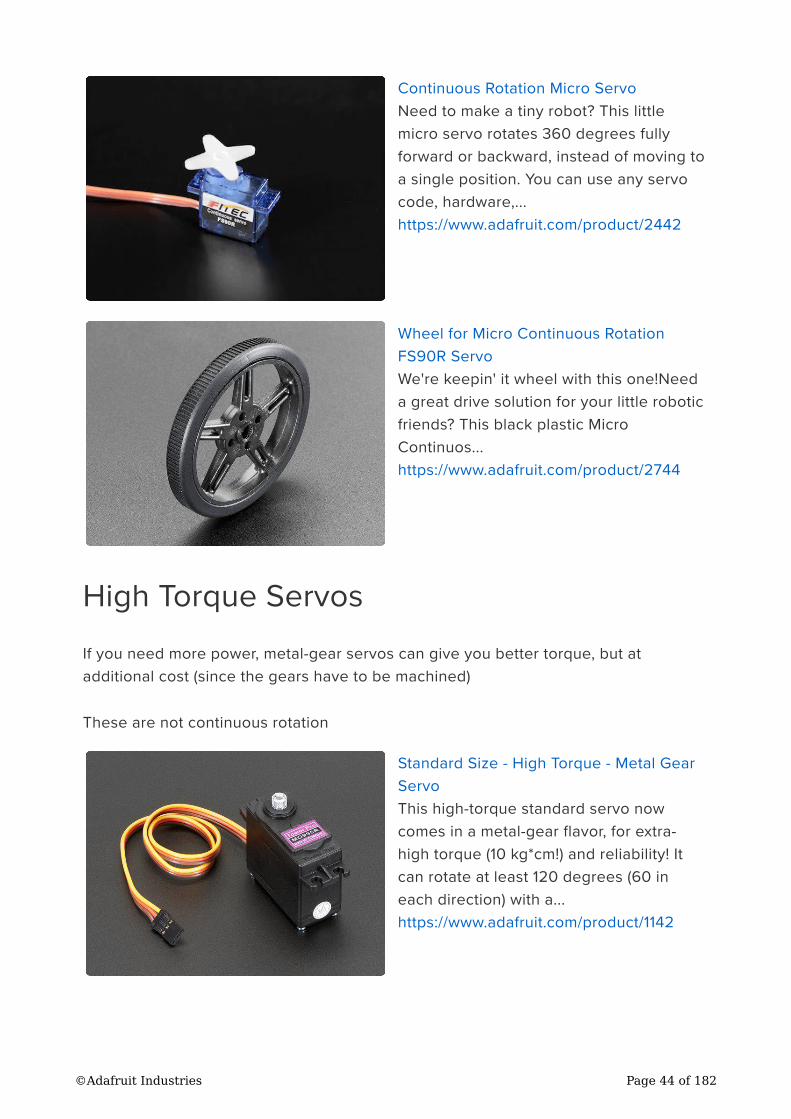
High Torque Servos
If you need more power, metal-gear servos can give you better torque, but at
additional cost (since the gears have to be machined)
These are not continuous rotation
Standard Size - High Torque - Metal Gear
Servo
This high-torque standard servo now
comes in a metal-gear flavor, for extra-
high torque (10 kg*cm!) and reliability! It
can rotate at least 120 degrees (60 in
each direction) with a...
https://www.adafruit.com/product/1142
©Adafruit Industries Page 44 of 182
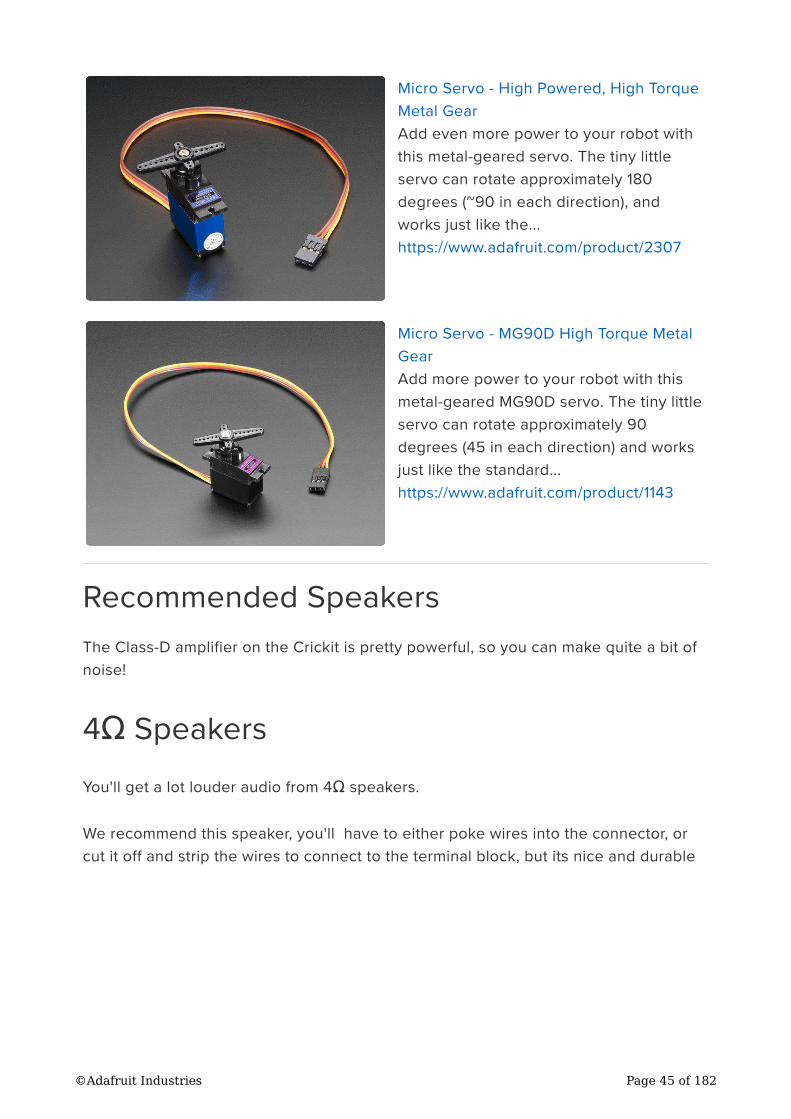
Micro Servo - High Powered, High Torque
Metal Gear
Add even more power to your robot with
this metal-geared servo. The tiny little
servo can rotate approximately 180
degrees (~90 in each direction), and
works just like the...
https://www.adafruit.com/product/2307
Micro Servo - MG90D High Torque Metal
Gear
Add more power to your robot with this
metal-geared MG90D servo. The tiny little
servo can rotate approximately 90
degrees (45 in each direction) and works
just like the standard...
https://www.adafruit.com/product/1143
Recommended Speakers
The Class-D amplifier on the Crickit is pretty powerful, so you can make quite a bit of
noise!
4Ω Speakers
You'll get a lot louder audio from 4Ω speakers.
We recommend this speaker, you'll have to either poke wires into the connector, or
cut it off and strip the wires to connect to the terminal block, but its nice and durable
©Adafruit Industries Page 45 of 182

Mono Enclosed Speaker - 3W 4 Ohm
Listen up! This 2.8" x 1.2"
speaker is a great addition to any audio
project where you need 4 ohm
impedance and 3W or less of power. We
particularly like...
https://www.adafruit.com/product/3351
This speaker is less expensive but you'll need to solder wires to the back
Speaker - 3" Diameter - 4 Ohm 3 Watt
Listen up! This 3" diameter speaker cone
is the perfect addition to any audio
project where you need an 4 ohm
impedance and 3W or less of power. We
particularly like this cone as...
https://www.adafruit.com/product/1314
8Ω Speakers
8 ohm speakers won't be as loud, but that's OK!
This speaker is inexpensive, but you'll need to solder wires to the back
Speaker - 3" Diameter - 8 Ohm 1 Watt
Listen up! This 3" diameter speaker cone
is the perfect addition to any audio
project where you need an 8 ohm
impedance and 1W or less of power. We
particularly like this cone as...
https://www.adafruit.com/product/1313
©Adafruit Industries Page 46 of 182
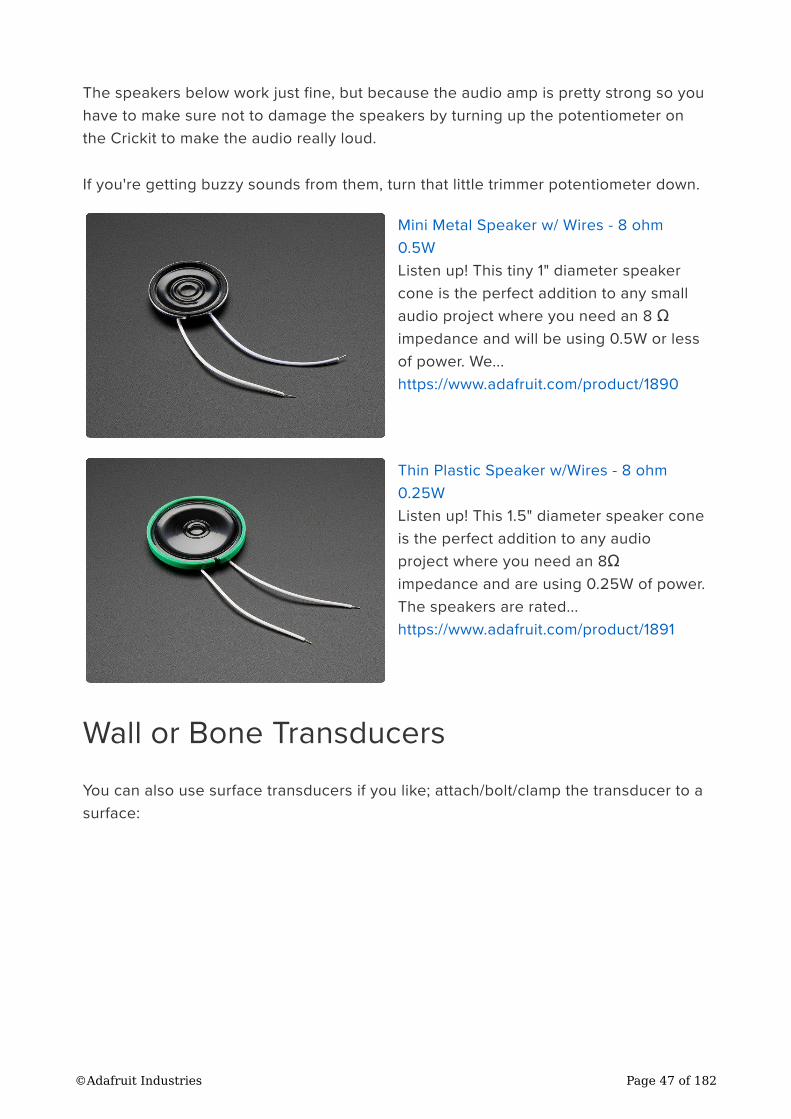
The speakers below work just fine, but because the audio amp is pretty strong so you
have to make sure not to damage the speakers by turning up the potentiometer on
the Crickit to make the audio really loud.
If you're getting buzzy sounds from them, turn that little trimmer potentiometer down.
Mini Metal Speaker w/ Wires - 8 ohm
0.5W
Listen up! This tiny 1" diameter speaker
cone is the perfect addition to any small
audio project where you need an 8 Ω
impedance and will be using 0.5W or less
of power. We...
https://www.adafruit.com/product/1890
Thin Plastic Speaker w/Wires - 8 ohm
0.25W
Listen up! This 1.5" diameter speaker cone
is the perfect addition to any audio
project where you need an 8Ω
impedance and are using 0.25W of power.
The speakers are rated...
https://www.adafruit.com/product/1891
Wall or Bone Transducers
You can also use surface transducers if you like; attach/bolt/clamp the transducer to a
surface:
©Adafruit Industries Page 47 of 182
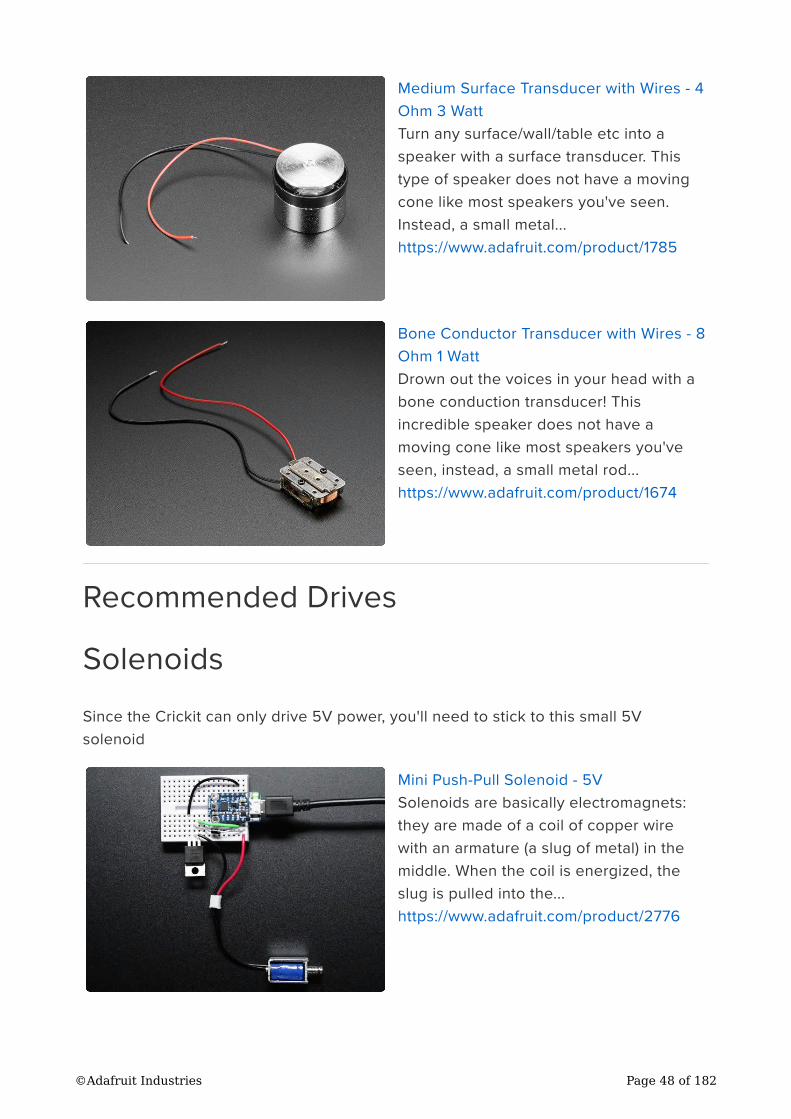
Medium Surface Transducer with Wires - 4
Ohm 3 Watt
Turn any surface/wall/table etc into a
speaker with a surface transducer. This
type of speaker does not have a moving
cone like most speakers you've seen.
Instead, a small metal...
https://www.adafruit.com/product/1785
Bone Conductor Transducer with Wires - 8
Ohm 1 Watt
Drown out the voices in your head with a
bone conduction transducer! This
incredible speaker does not have a
moving cone like most speakers you've
seen, instead, a small metal rod...
https://www.adafruit.com/product/1674
Recommended Drives
Solenoids
Since the Crickit can only drive 5V power, you'll need to stick to this small 5V
solenoid
Mini Push-Pull Solenoid - 5V
Solenoids are basically electromagnets:
they are made of a coil of copper wire
with an armature (a slug of metal) in the
middle. When the coil is energized, the
slug is pulled into the...
https://www.adafruit.com/product/2776
©Adafruit Industries Page 48 of 182

Vibration Motors
You'll need to extend these wires but they'll work great at 5V and buzz very strongly
Vibrating Mini Motor Disc
*BZZZZZZZZZZ* Feel that? That's your
little buzzing motor, and for any haptic
feedback project you'll want to pick up a
few of them. These vibe motors are tiny
discs,...
https://www.adafruit.com/product/1201
Recommended Capacitive Touch
The capacitive touch pads on the Crickit have large holes so its easy to connect
alligator/croc clips. That's how we recommend you attach to them. The "small" size
clips work best:
Small Alligator Clip Test Lead (set of 12)
Connect this to that without soldering
using these handy mini alligator clip test
leads. 15" cables with alligator clip on
each end, color coded. You get 12 pieces
in 6 colors....
https://www.adafruit.com/product/1008
©Adafruit Industries Page 49 of 182
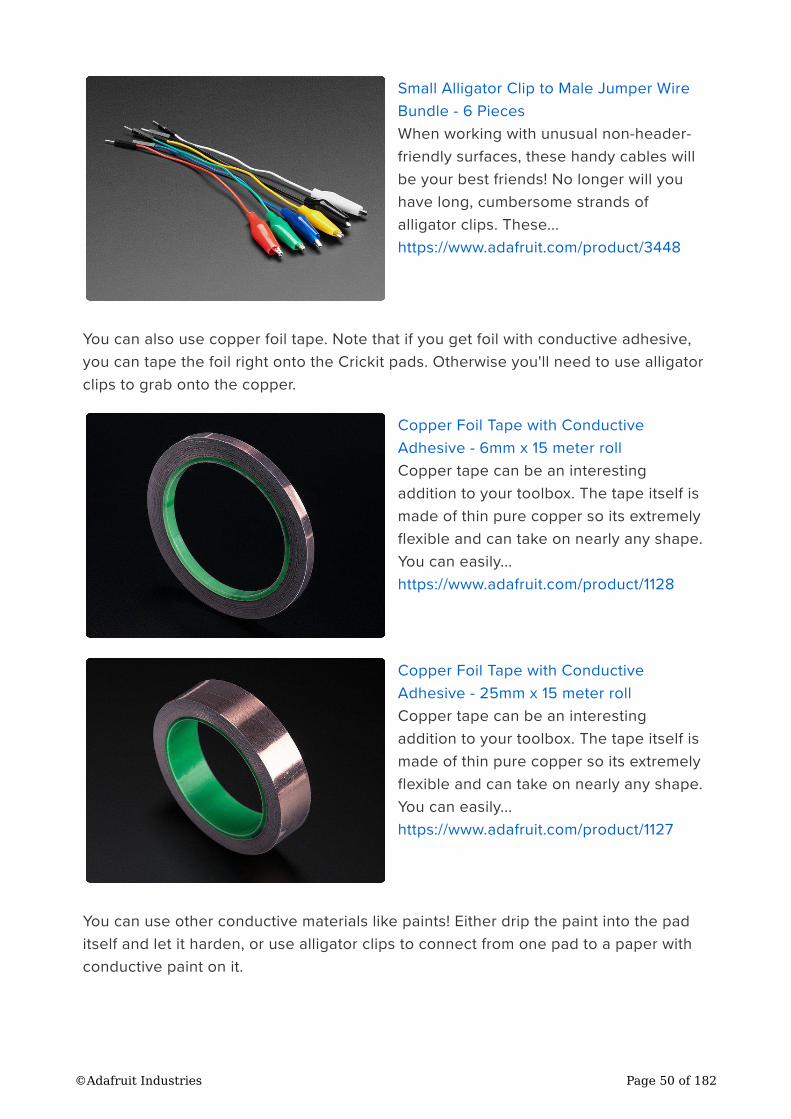
Small Alligator Clip to Male Jumper Wire
Bundle - 6 Pieces
When working with unusual non-header-
friendly surfaces, these handy cables will
be your best friends! No longer will you
have long, cumbersome strands of
alligator clips. These...
https://www.adafruit.com/product/3448
You can also use copper foil tape. Note that if you get foil with conductive adhesive,
you can tape the foil right onto the Crickit pads. Otherwise you'll need to use alligator
clips to grab onto the copper.
Copper Foil Tape with Conductive
Adhesive - 6mm x 15 meter roll
Copper tape can be an interesting
addition to your toolbox. The tape itself is
made of thin pure copper so its extremely
flexible and can take on nearly any shape.
You can easily...
https://www.adafruit.com/product/1128
Copper Foil Tape with Conductive
Adhesive - 25mm x 15 meter roll
Copper tape can be an interesting
addition to your toolbox. The tape itself is
made of thin pure copper so its extremely
flexible and can take on nearly any shape.
You can easily...
https://www.adafruit.com/product/1127
You can use other conductive materials like paints! Either drip the paint into the pad
itself and let it harden, or use alligator clips to connect from one pad to a paper with
conductive paint on it.
©Adafruit Industries Page 50 of 182
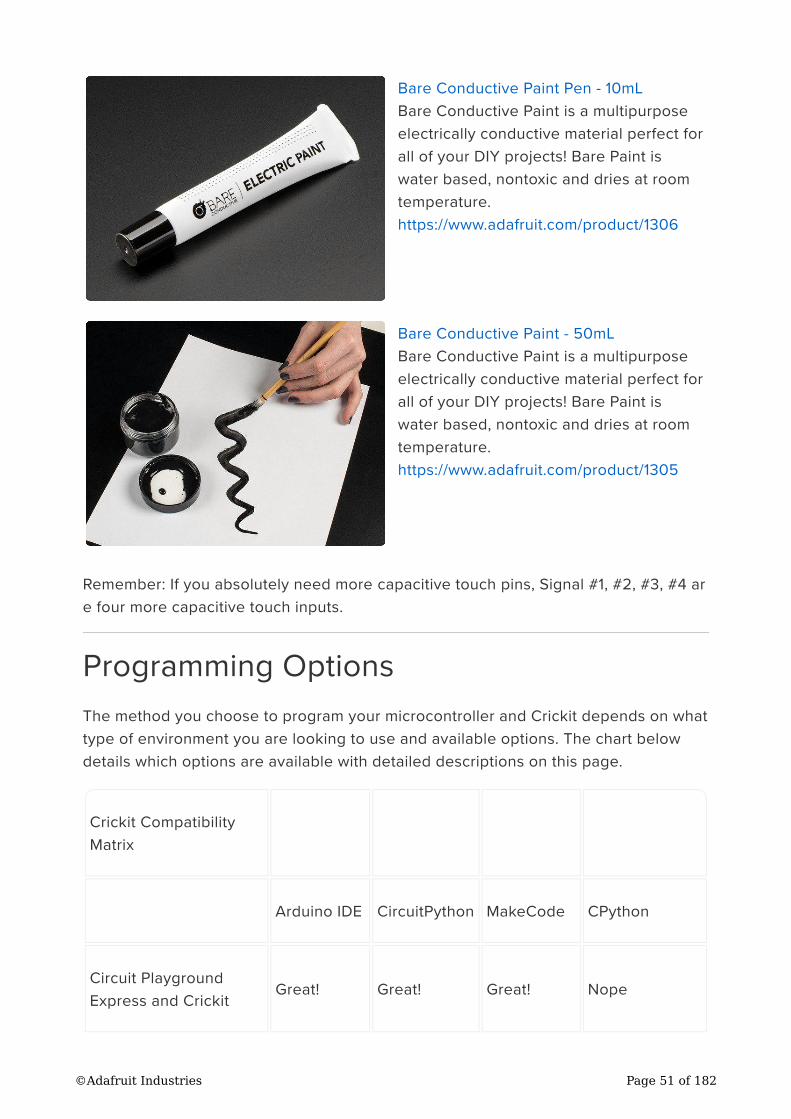
Bare Conductive Paint Pen - 10mL
Bare Conductive Paint is a multipurpose
electrically conductive material perfect for
all of your DIY projects! Bare Paint is
water based, nontoxic and dries at room
temperature.
https://www.adafruit.com/product/1306
Bare Conductive Paint - 50mL
Bare Conductive Paint is a multipurpose
electrically conductive material perfect for
all of your DIY projects! Bare Paint is
water based, nontoxic and dries at room
temperature.
https://www.adafruit.com/product/1305
Remember: If you absolutely need more capacitive touch pins, Signal #1, #2, #3, #4 ar
e four more capacitive touch inputs.
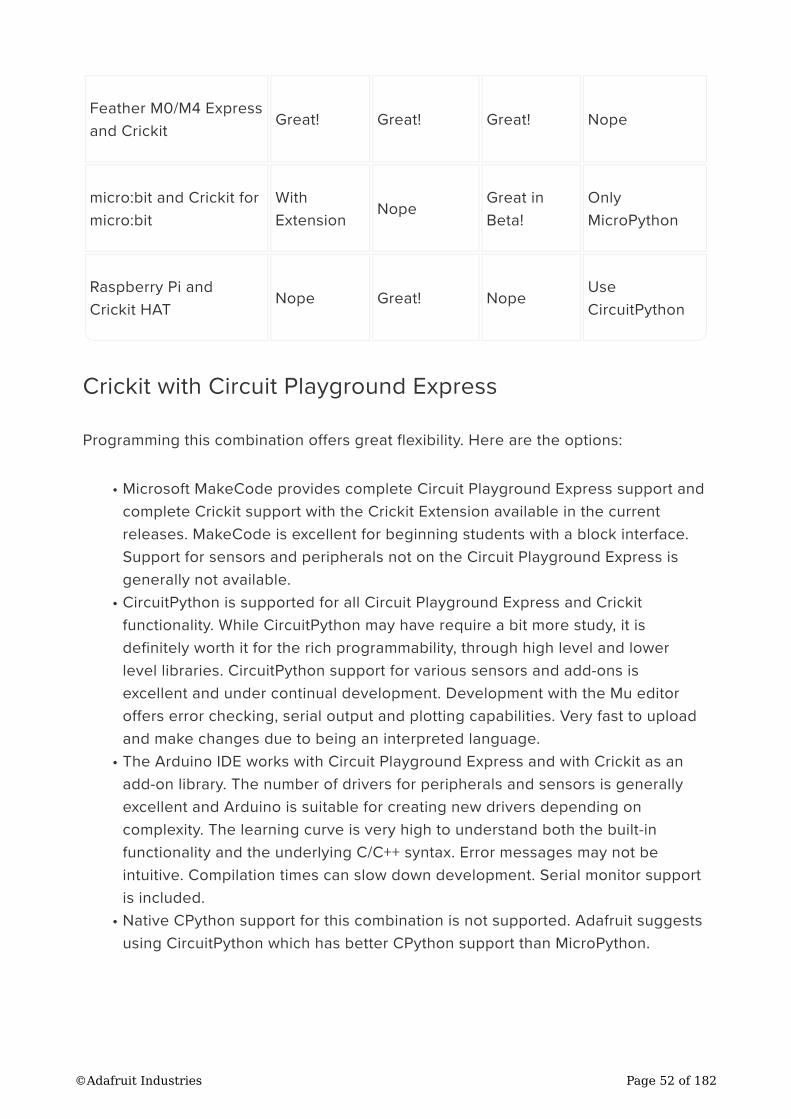
Programming Options
The method you choose to program your microcontroller and Crickit depends on what
type of environment you are looking to use and available options. The chart below
details which options are available with detailed descriptions on this page.
Crickit Compatibility
Matrix
Arduino IDE CircuitPython MakeCode CPython
Circuit Playground
Express and CrickitGreat! Great! Great! Nope
©Adafruit Industries Page 51 of 182
Crickit with Circuit Playground Express
Programming this combination offers great flexibility. Here are the options:
Microsoft MakeCode provides complete Circuit Playground Express support and
complete Crickit support with the Crickit Extension available in the current
releases. MakeCode is excellent for beginning students with a block interface.
Support for sensors and peripherals not on the Circuit Playground Express is
generally not available.
CircuitPython is supported for all Circuit Playground Express and Crickit
functionality. While CircuitPython may have require a bit more study, it is
definitely worth it for the rich programmability, through high level and lower
level libraries. CircuitPython support for various sensors and add-ons is
excellent and under continual development. Development with the Mu editor
offers error checking, serial output and plotting capabilities. Very fast to upload
and make changes due to being an interpreted language.
The Arduino IDE works with Circuit Playground Express and with Crickit as an
add-on library. The number of drivers for peripherals and sensors is generally
excellent and Arduino is suitable for creating new drivers depending on
complexity. The learning curve is very high to understand both the built-in
functionality and the underlying C/C++ syntax. Error messages may not be
intuitive. Compilation times can slow down development. Serial monitor support
is included.
Native CPython support for this combination is not supported. Adafruit suggests
using CircuitPython which has better CPython support than MicroPython.
Feather M0/M4 Express
and CrickitGreat! Great! Great! Nope
micro:bit and Crickit for
micro:bit
With
ExtensionNope
Great in
Beta!
Only
MicroPython
Raspberry Pi and
Crickit HATNope Great! Nope
Use
CircuitPython
•
•
•
•
©Adafruit Industries Page 52 of 182
Crickit with Feather M0/M4 Express CircuitPythonSupported Feather
Programming this combination offers great flexibility. Here are the options:
Microsoft MakeCode requires a beta version which includes support for other
processors.
CircuitPython is supported for all CircuitPython compatible Feather boards and
Crickit functionality. CircuitPython will NOT work on non-CircuitPython Feather
boards such as the 32u4 Feathers, 328P Feather, M0 Basic Feathers. nRF52
support is still in development. ESP8266 support is limited. While CircuitPython
may have require a bit more study, it is definitely worth it for the rich
programmability, through high level and lower level libraries. CircuitPython
support for various sensors and add-ons is excellent and under continual
development. Development with the Mu editor offers error checking, serial
output and plotting capabilities. Very fast to upload and make changes due to
being an interpreted language.
The Arduino IDE works with all Feather boards and with Crickit as an add-on
library. The number of drivers for peripherals and sensors is generally excellent
and Arduino is suitable for creating new drivers depending on complexity. The
learning curve is very high to understand both the built-in functionality and the
underlying C/C++ syntax. Error messages may not be intuitive. Compilation times
can slow down development. Serial monitor support is included.
Native CPython support for this combination is not supported. Adafruit suggests
using CircuitPython which has better CPython support than MicroPython.
Crickit with micro:bit Support
Programming this combination is good but is very limited for Python:
Microsoft MakeCode provides complete micro:bit support and complete Crickit
support with the Crickit Extension available in the current beta release.
MakeCode is excellent for beginning students with a block interface. Support for
sensors and peripherals not on the Circuit Playground Express is generally not
available.
CircuitPython is not currently supported for micro:bit. There is MicroPython for
micro:bit. See this Adafruit Guide for using CRICKIT with MicroPython and the
micro:bit (https://adafru.it/EP2).
The Arduino IDE works with Circuit Playground Express and with Crickit as an
add-on library. The number of drivers for peripherals and sensors is generally
•
•
•
•
•
•
•
©Adafruit Industries Page 53 of 182
excellent and Arduino is suitable for creating new drivers depending on
complexity. The learning curve is very high to understand both the built-in
functionality and the underlying C/C++ syntax. Error messages may not be
intuitive. Compilation times can slow down development. Serial monitor support
is included.
Native CPython support for this combination is not supported. Adafruit suggests
using MicroPython if Python programmability is needed, but there is no Crickit
or driver support from Adafruit.
Crickit HAT for Raspberry Pi
Programming this combination offers flexibility for CPython only.
Microsoft MakeCode support is not available.
CircuitPython is supported for Raspberry Pi and Crickit HAT. CircuitPython
requiresa bit of study, but it is definitely worth it for the rich programmability,
through high level and lower level libraries. CircuitPython support for various
sensors and add-ons is excellent and under continual development.
Development with the Mu editor offers error checking, serial output and plotting
capabilities. Very fast to upload and make changes due to being an interpreted
language.
The Arduino IDE does not work with the Raspberry Pi and Crickit HAT.
Native CPython does not provide the library for Crickit. You should consider
CircuitPython which is a subset of CPython with support for the Crickit HAT
capabilities.
MakeCode
With MakeCode, you can create robots simply and easily, using a drag-and-drop block
interface. It's perfect for first time robot-makers, people who don't have a lot of coding
experience, or even programmers who just want to get something going fast
•
•
•
•
•
MakeCode is currently not available for Crickit for micro:bit or the Crickit HAT for
Raspberry Pi.
©Adafruit Industries Page 54 of 182
MakeCode uses a web browser only, so no IDE is required to install. When you
download a binary from MakeCode it is compiled for the Circuit Playground Express
and you will overwrite any Arduino code or the CircuitPython runtime. You can always
go back to programming other ways including Arduino (just use the Arduino IDE) or
CircuitPython (by re-installing CircuitPython as shown here (https://adafru.it/Bfh))
Get Comfy With MakeCode
We recommend starting out by trying out the simple blinking NeoPixel example in our
MakeCode guide, so you get a hang of how to install MakeCode apps on your Circuit
Playground Express (https://adafru.it/wWd)
Once you feel comfortable with MakeCode, come back here and we'll add Crickit
support!
Adding Crickit Extension
Now you're a MakeCode'r and you are ready to add Crickit support.
At this time, MakeCode support is being worked on and we're improving it every day,
but it is Beta
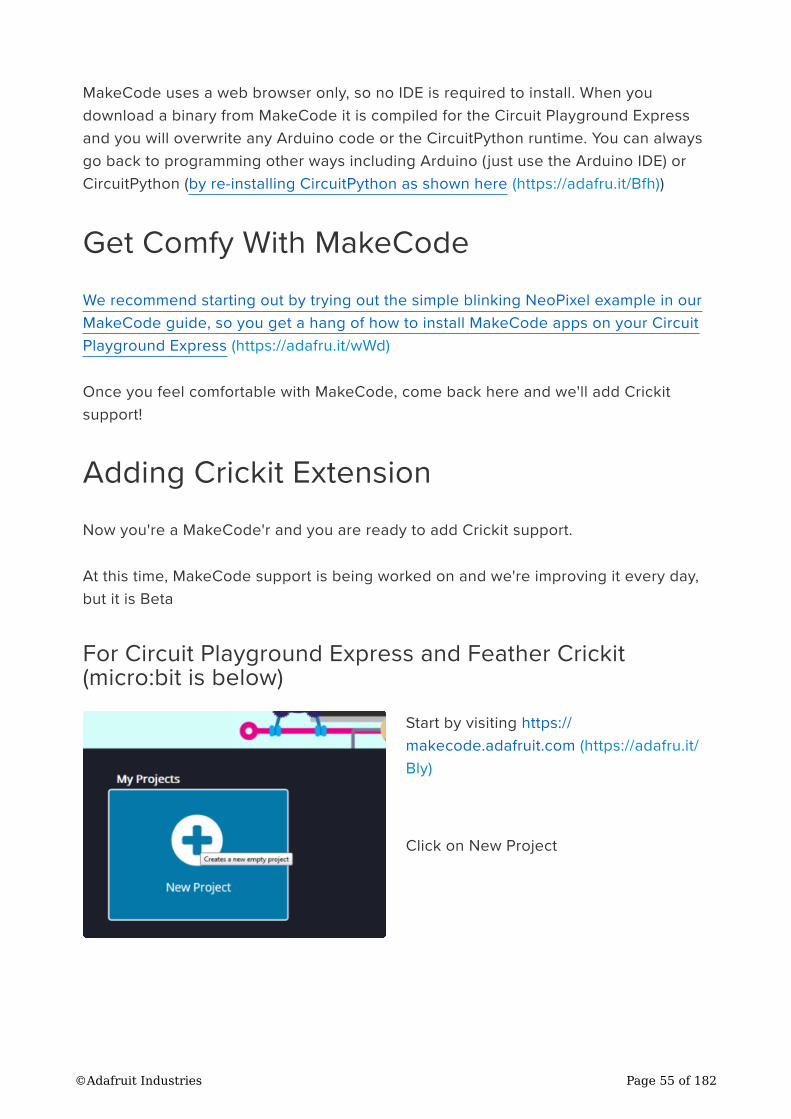
For Circuit Playground Express and Feather Crickit(micro:bit is below)
Start by visiting https://
makecode.adafruit.com (https://adafru.it/
Bly)
Click on New Project
©Adafruit Industries Page 55 of 182
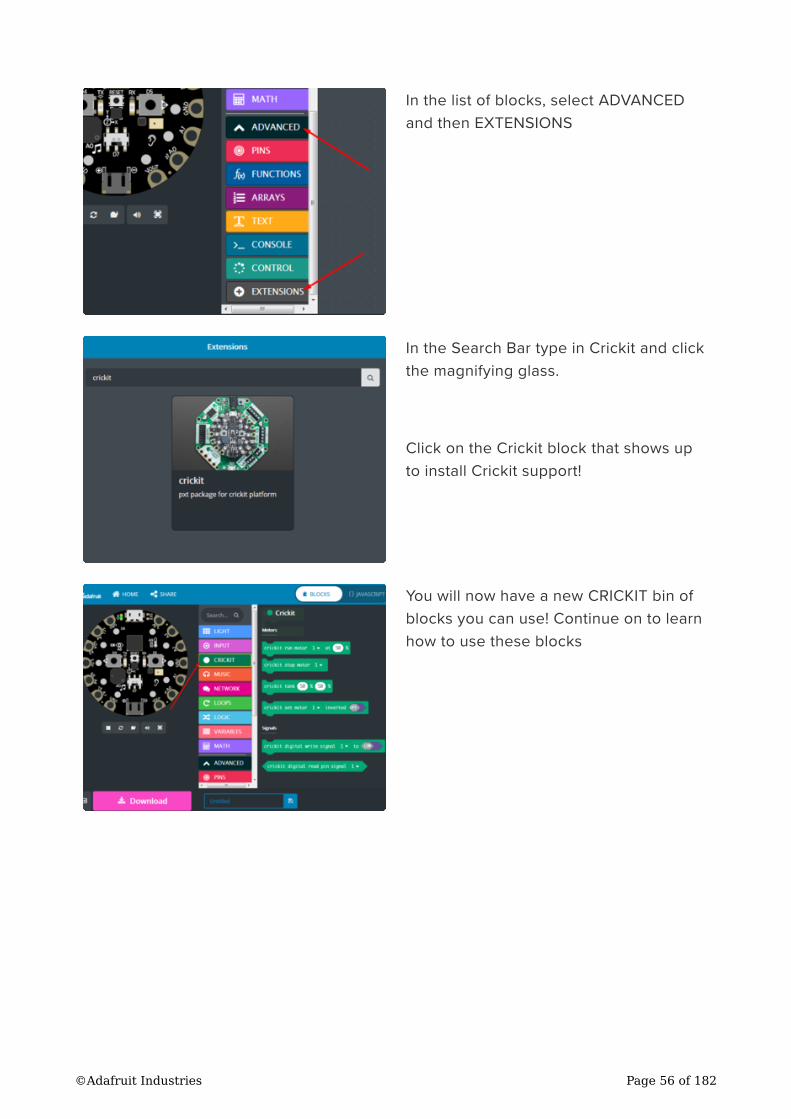
In the list of blocks, select ADVANCED
and then EXTENSIONS
In the Search Bar type in Crickit and click
the magnifying glass.
Click on the Crickit block that shows up
to install Crickit support!
You will now have a new CRICKIT bin of
blocks you can use! Continue on to learn
how to use these blocks
©Adafruit Industries Page 56 of 182
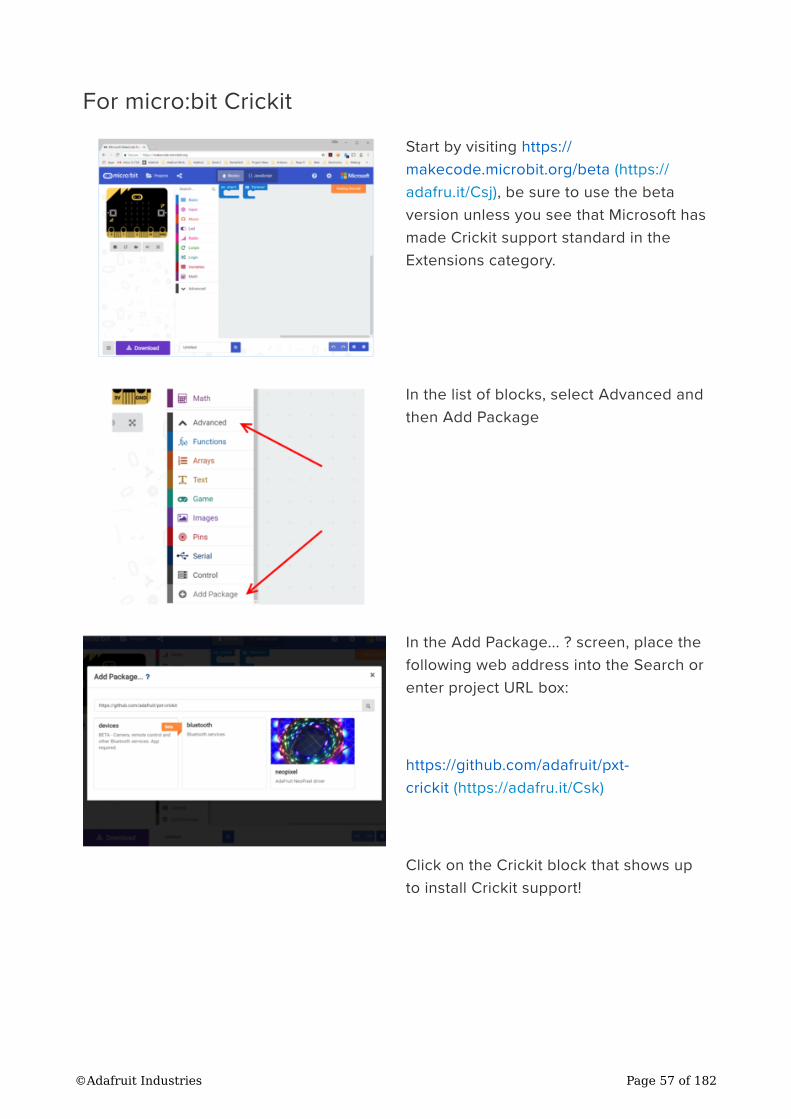
For micro:bit Crickit
Start by visiting https://
makecode.microbit.org/beta (https://
adafru.it/Csj), be sure to use the beta
version unless you see that Microsoft has
made Crickit support standard in the
Extensions category.
In the list of blocks, select Advanced and
then Add Package
In the Add Package... ? screen, place the
following web address into the Search or
enter project URL box:
https://github.com/adafruit/pxt-
crickit (https://adafru.it/Csk)
Click on the Crickit block that shows up
to install Crickit support!
©Adafruit Industries Page 57 of 182
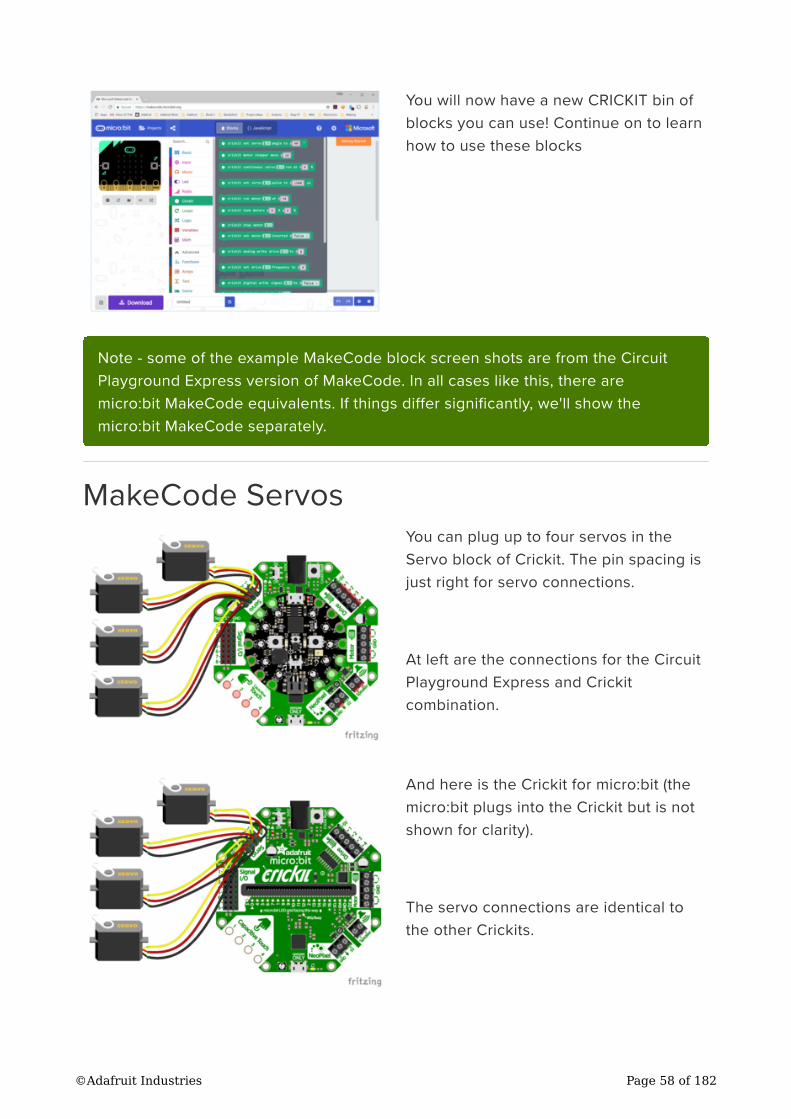
You will now have a new CRICKIT bin of
blocks you can use! Continue on to learn
how to use these blocks
MakeCode Servos
You can plug up to four servos in the
Servo block of Crickit. The pin spacing is
just right for servo connections.
At left are the connections for the Circuit
Playground Express and Crickit
combination.
And here is the Crickit for micro:bit (the
micro:bit plugs into the Crickit but is not
shown for clarity).
The servo connections are identical to
the other Crickits.
Note - some of the example MakeCode block screen shots are from the Circuit
Playground Express version of MakeCode. In all cases like this, there are
micro:bit MakeCode equivalents. If things differ significantly, we'll show the
micro:bit MakeCode separately.
©Adafruit Industries Page 58 of 182
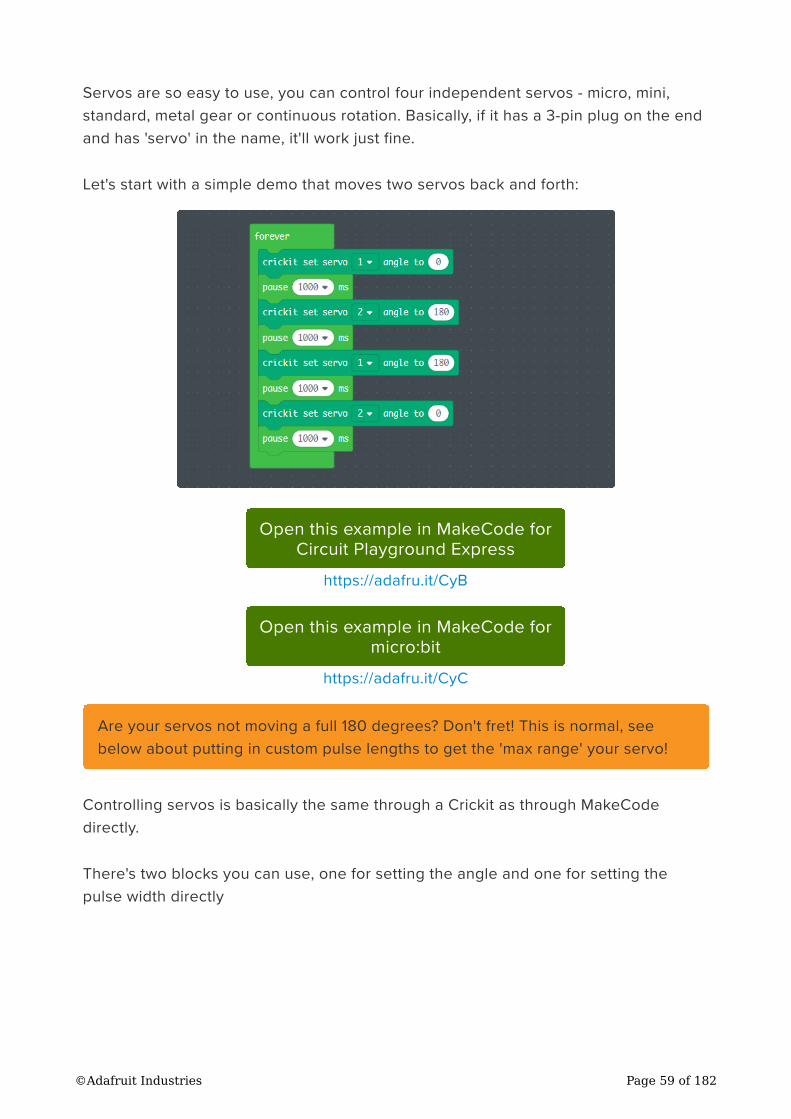
Servos are so easy to use, you can control four independent servos - micro, mini,
standard, metal gear or continuous rotation. Basically, if it has a 3-pin plug on the end
and has 'servo' in the name, it'll work just fine.
Let's start with a simple demo that moves two servos back and forth:
Open this example in MakeCode for
Circuit Playground Express
https://adafru.it/CyB
Open this example in MakeCode for
micro:bit
https://adafru.it/CyC
Controlling servos is basically the same through a Crickit as through MakeCode
directly.
There's two blocks you can use, one for setting the angle and one for setting the
pulse width directly
Are your servos not moving a full 180 degrees? Don't fret! This is normal, see
below about putting in custom pulse lengths to get the 'max range' your servo!
©Adafruit Industries Page 59 of 182
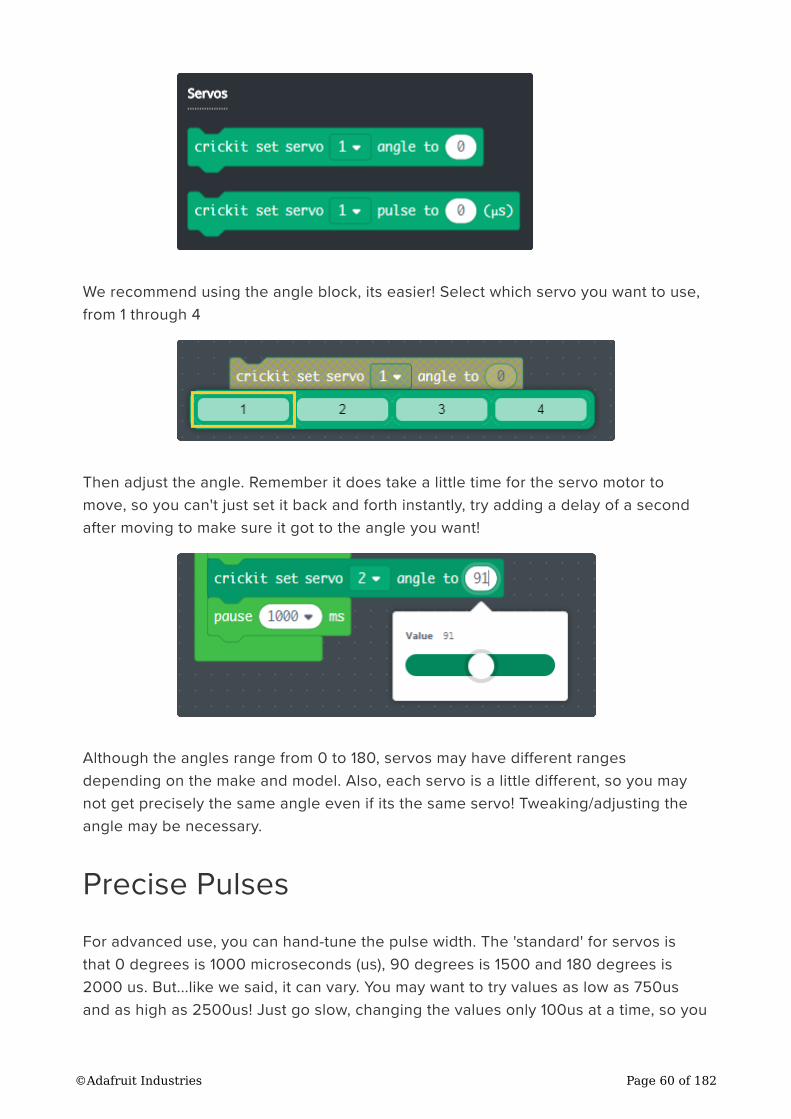
We recommend using the angle block, its easier! Select which servo you want to use,
from 1 through 4
Then adjust the angle. Remember it does take a little time for the servo motor to
move, so you can't just set it back and forth instantly, try adding a delay of a second
after moving to make sure it got to the angle you want!
Although the angles range from 0 to 180, servos may have different ranges
depending on the make and model. Also, each servo is a little different, so you may
not get precisely the same angle even if its the same servo! Tweaking/adjusting the
angle may be necessary.
Precise Pulses
For advanced use, you can hand-tune the pulse width. The 'standard' for servos is
that 0 degrees is 1000 microseconds (us), 90 degrees is 1500 and 180 degrees is
2000 us. But...like we said, it can vary. You may want to try values as low as 750us
and as high as 2500us! Just go slow, changing the values only 100us at a time, so you
©Adafruit Industries Page 60 of 182
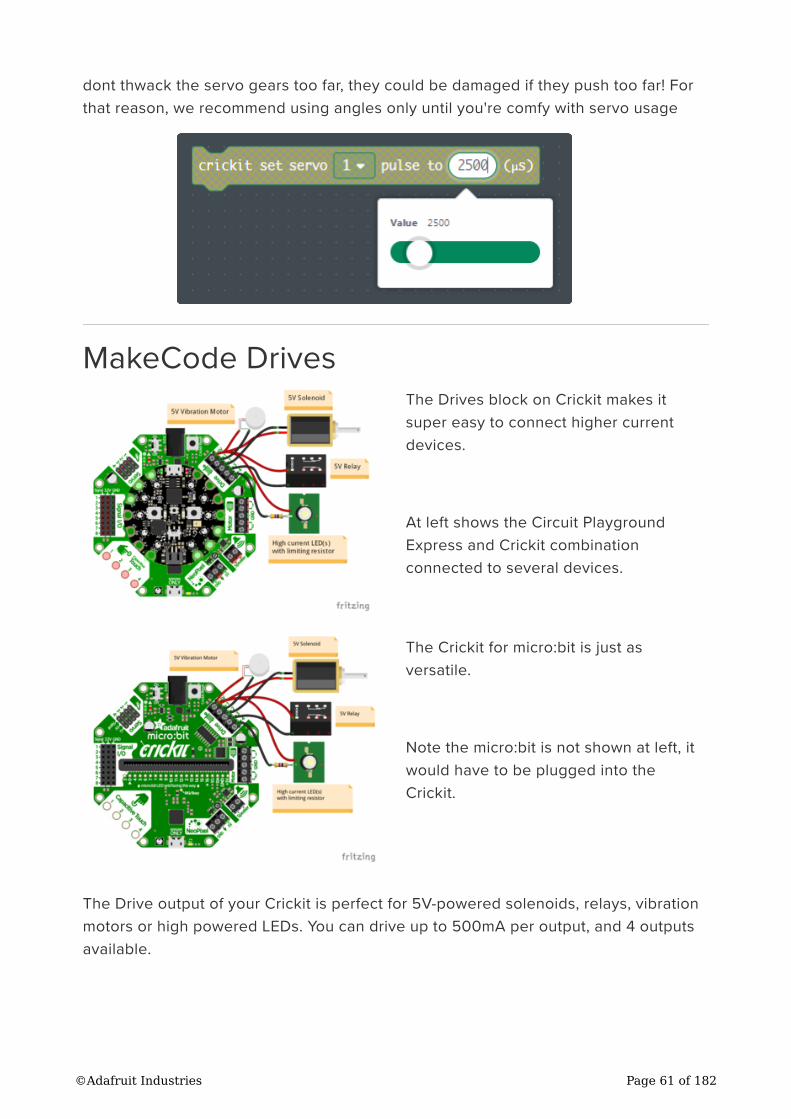
dont thwack the servo gears too far, they could be damaged if they push too far! For
that reason, we recommend using angles only until you're comfy with servo usage
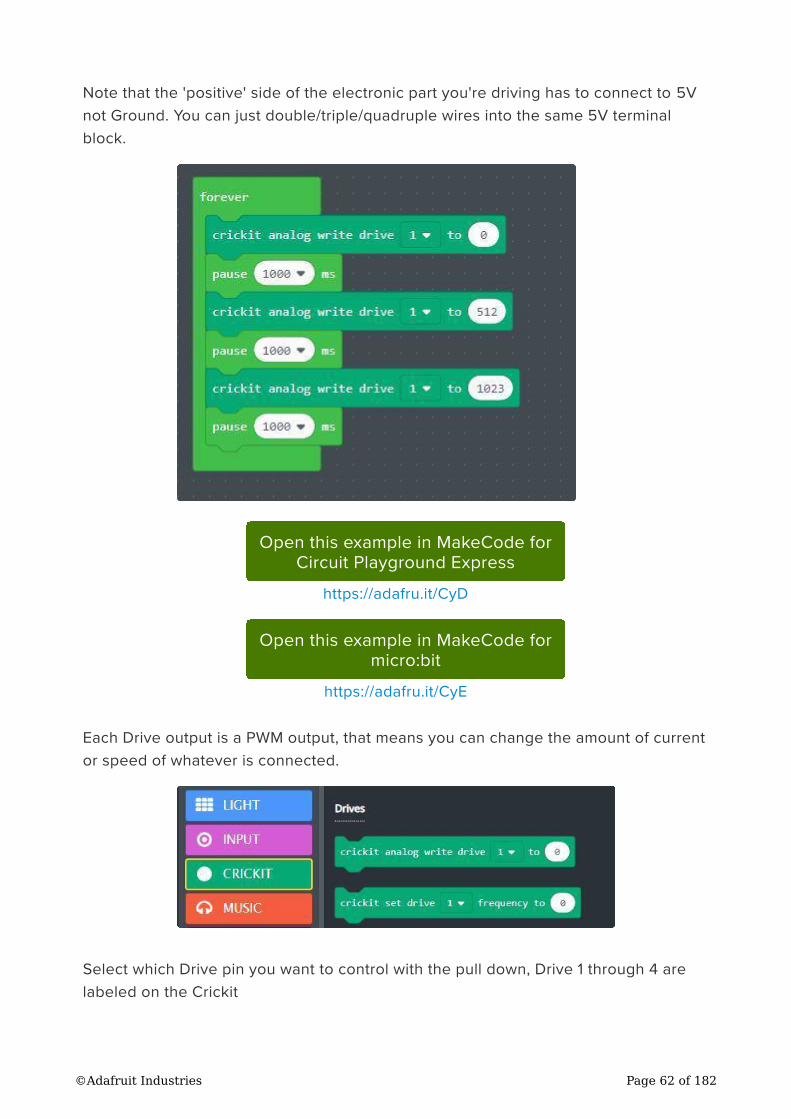
MakeCode Drives
The Drives block on Crickit makes it
super easy to connect higher current
devices.
At left shows the Circuit Playground
Express and Crickit combination
connected to several devices.
The Crickit for micro:bit is just as
versatile.
Note the micro:bit is not shown at left, it
would have to be plugged into the
Crickit.
The Drive output of your Crickit is perfect for 5V-powered solenoids, relays, vibration
motors or high powered LEDs. You can drive up to 500mA per output, and 4 outputs
available.
©Adafruit Industries Page 61 of 182
Note that the 'positive' side of the electronic part you're driving has to connect to 5V
not Ground. You can just double/triple/quadruple wires into the same 5V terminal
block.
Open this example in MakeCode for
Circuit Playground Express
https://adafru.it/CyD
Open this example in MakeCode for
micro:bit
https://adafru.it/CyE
Each Drive output is a PWM output, that means you can change the amount of current
or speed of whatever is connected.
Select which Drive pin you want to control with the pull down, Drive 1 through 4 are
labeled on the Crickit
©Adafruit Industries Page 62 of 182
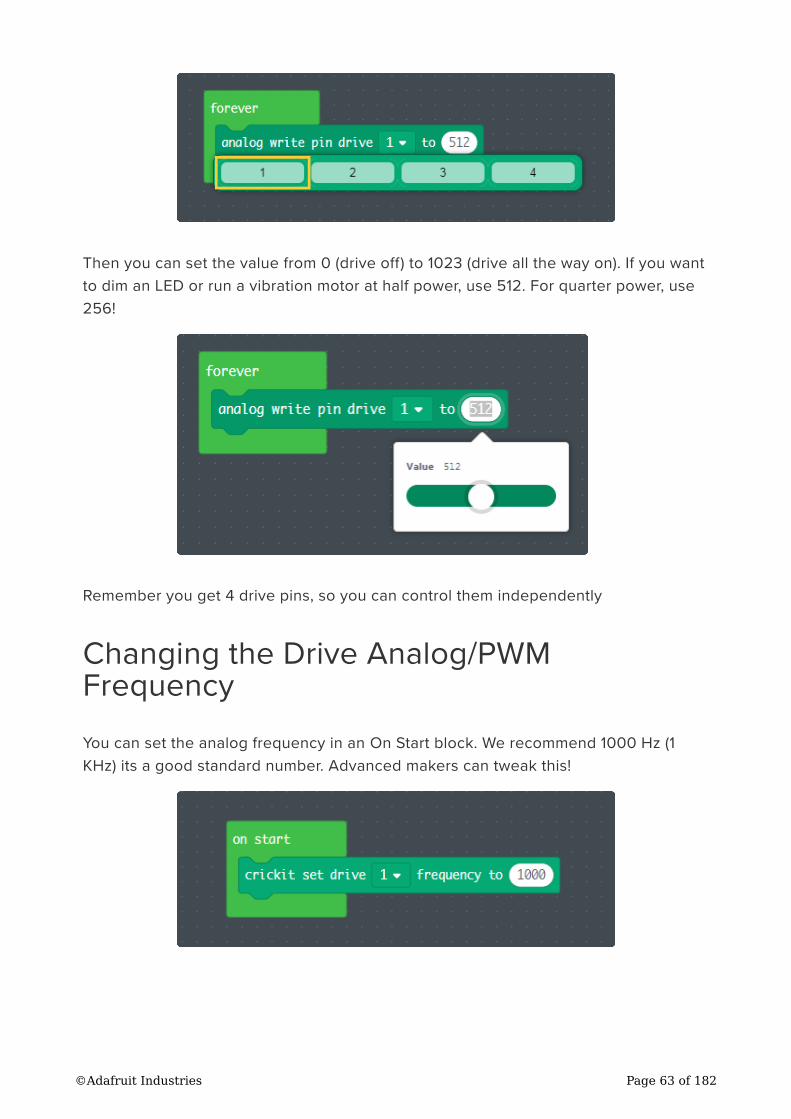
Then you can set the value from 0 (drive off) to 1023 (drive all the way on). If you want
to dim an LED or run a vibration motor at half power, use 512. For quarter power, use
256!
Remember you get 4 drive pins, so you can control them independently
Changing the Drive Analog/PWMFrequency
You can set the analog frequency in an On Start block. We recommend 1000 Hz (1
KHz) its a good standard number. Advanced makers can tweak this!
©Adafruit Industries Page 63 of 182
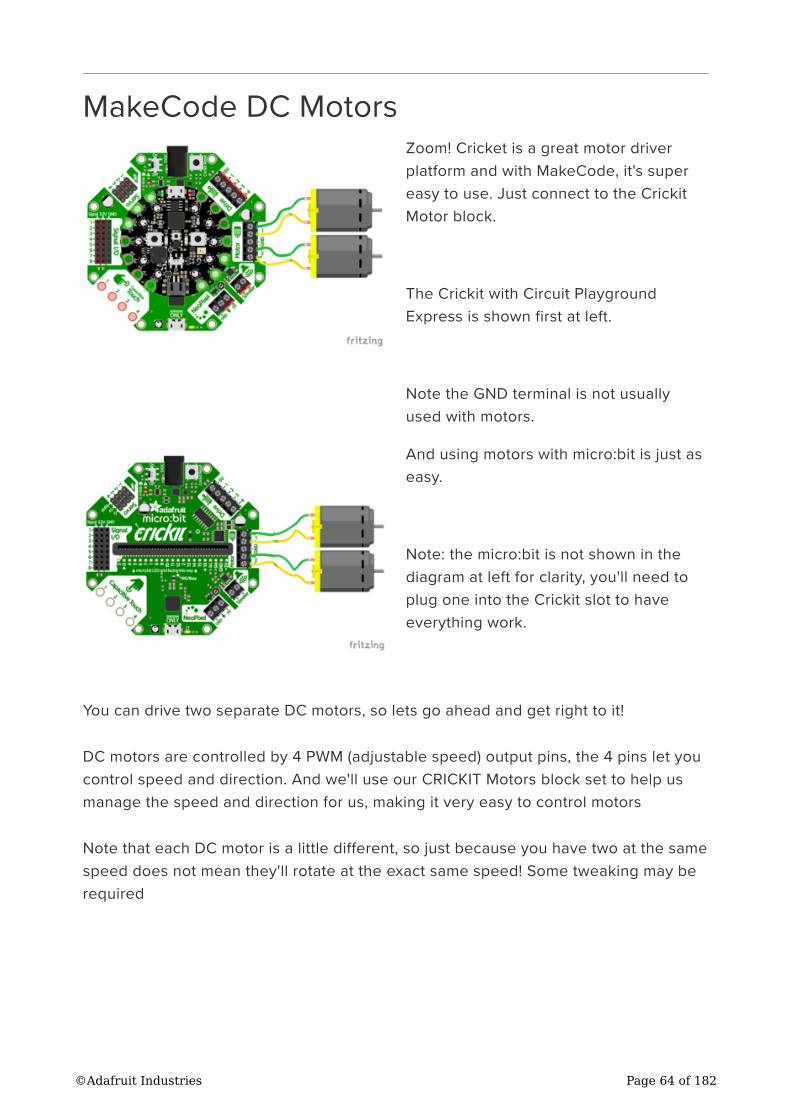
MakeCode DC Motors
Zoom! Cricket is a great motor driver
platform and with MakeCode, it's super
easy to use. Just connect to the Crickit
Motor block.
The Crickit with Circuit Playground
Express is shown first at left.
Note the GND terminal is not usually
used with motors.
And using motors with micro:bit is just as
easy.
Note: the micro:bit is not shown in the
diagram at left for clarity, you'll need to
plug one into the Crickit slot to have
everything work.
You can drive two separate DC motors, so lets go ahead and get right to it!
DC motors are controlled by 4 PWM (adjustable speed) output pins, the 4 pins let you
control speed and direction. And we'll use our CRICKIT Motors block set to help us
manage the speed and direction for us, making it very easy to control motors
Note that each DC motor is a little different, so just because you have two at the same
speed does not mean they'll rotate at the exact same speed! Some tweaking may be
required
©Adafruit Industries Page 64 of 182
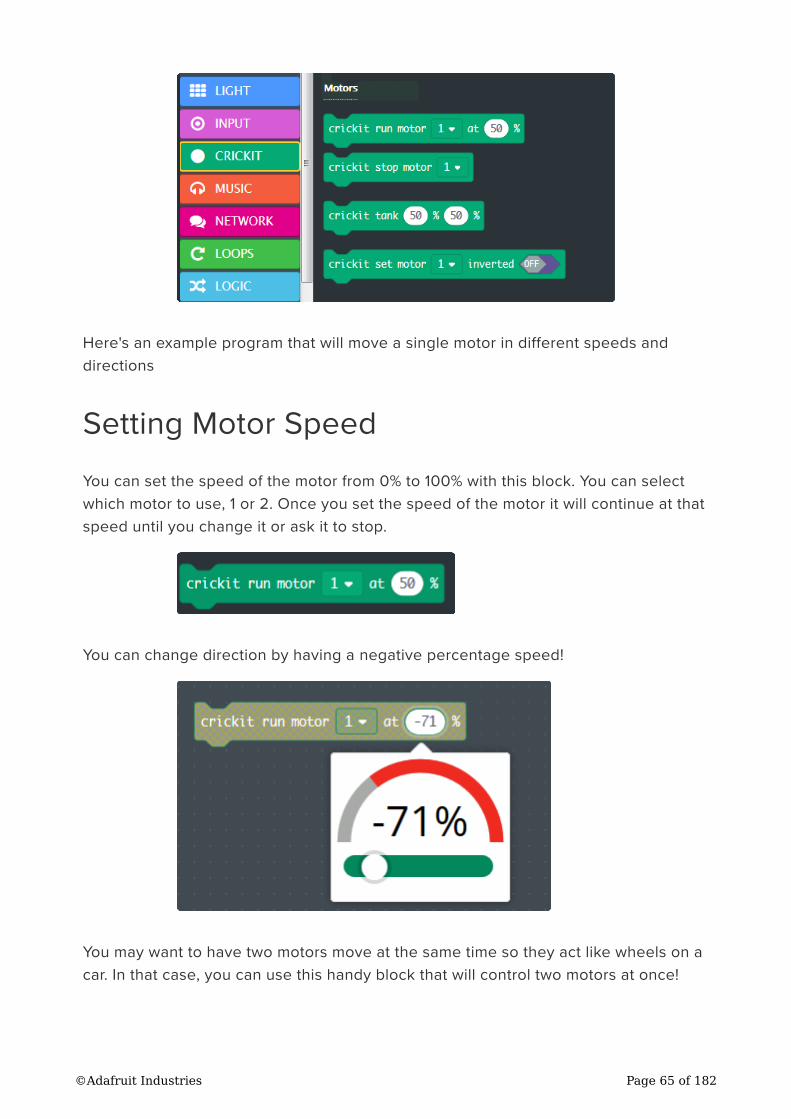
Here's an example program that will move a single motor in different speeds and
directions
Setting Motor Speed
You can set the speed of the motor from 0% to 100% with this block. You can select
which motor to use, 1 or 2. Once you set the speed of the motor it will continue at that
speed until you change it or ask it to stop.
You can change direction by having a negative percentage speed!
You may want to have two motors move at the same time so they act like wheels on a
car. In that case, you can use this handy block that will control two motors at once!
©Adafruit Industries Page 65 of 182
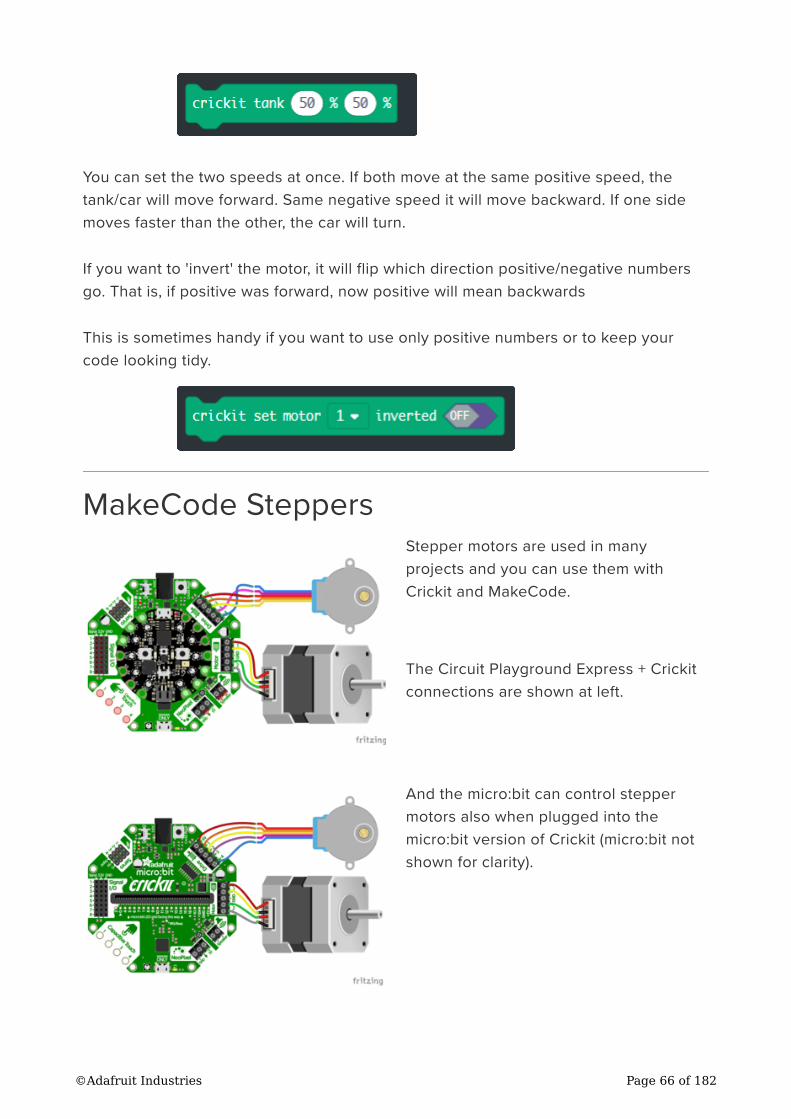
You can set the two speeds at once. If both move at the same positive speed, the
tank/car will move forward. Same negative speed it will move backward. If one side
moves faster than the other, the car will turn.
If you want to 'invert' the motor, it will flip which direction positive/negative numbers
go. That is, if positive was forward, now positive will mean backwards
This is sometimes handy if you want to use only positive numbers or to keep your
code looking tidy.
MakeCode Steppers
Stepper motors are used in many
projects and you can use them with
Crickit and MakeCode.
The Circuit Playground Express + Crickit
connections are shown at left.
And the micro:bit can control stepper
motors also when plugged into the
micro:bit version of Crickit (micro:bit not
shown for clarity).
©Adafruit Industries Page 66 of 182
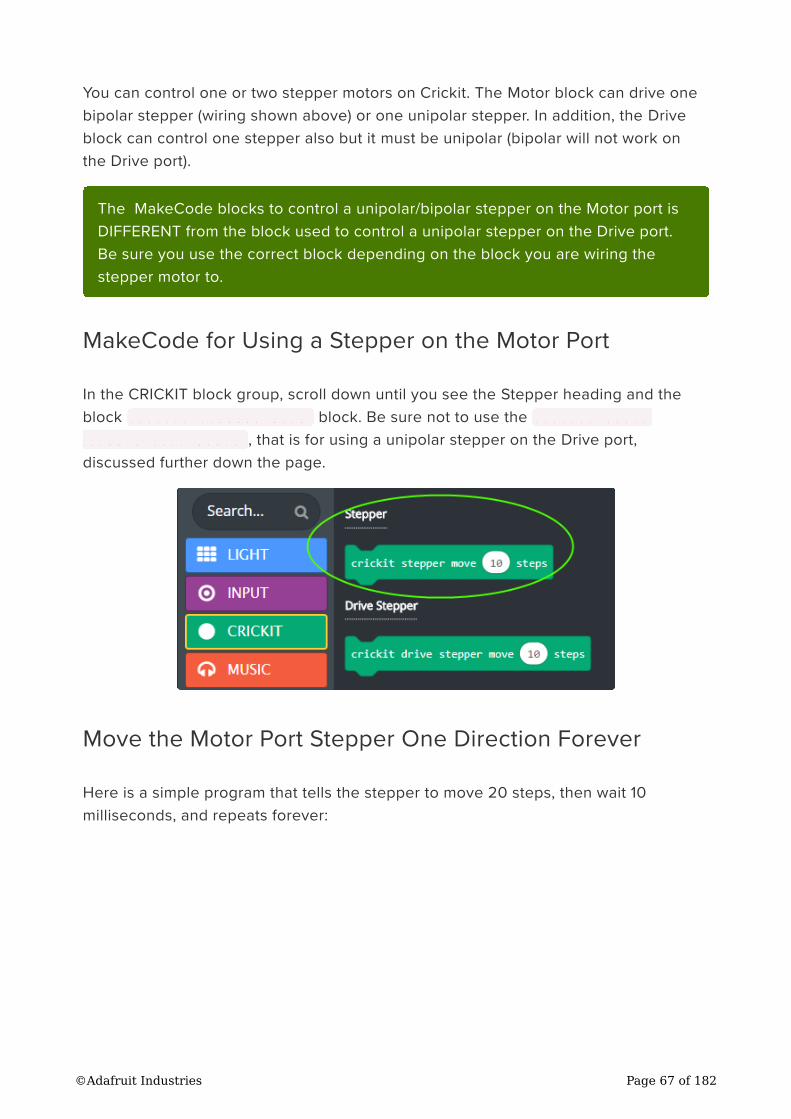
You can control one or two stepper motors on Crickit. The Motor block can drive one
bipolar stepper (wiring shown above) or one unipolar stepper. In addition, the Drive
block can control one stepper also but it must be unipolar (bipolar will not work on
the Drive port).
MakeCode for Using a Stepper on the Motor Port
In the CRICKIT block group, scroll down until you see the Stepper heading and the
block crickit stepper move block. Be sure not to use the crickit drive
stepper move block , that is for using a unipolar stepper on the Drive port,
discussed further down the page.
Move the Motor Port Stepper One Direction Forever
Here is a simple program that tells the stepper to move 20 steps, then wait 10
milliseconds, and repeats forever:
The MakeCode blocks to control a unipolar/bipolar stepper on the Motor port is
DIFFERENT from the block used to control a unipolar stepper on the Drive port.
Be sure you use the correct block depending on the block you are wiring the
stepper motor to.
©Adafruit Industries Page 67 of 182
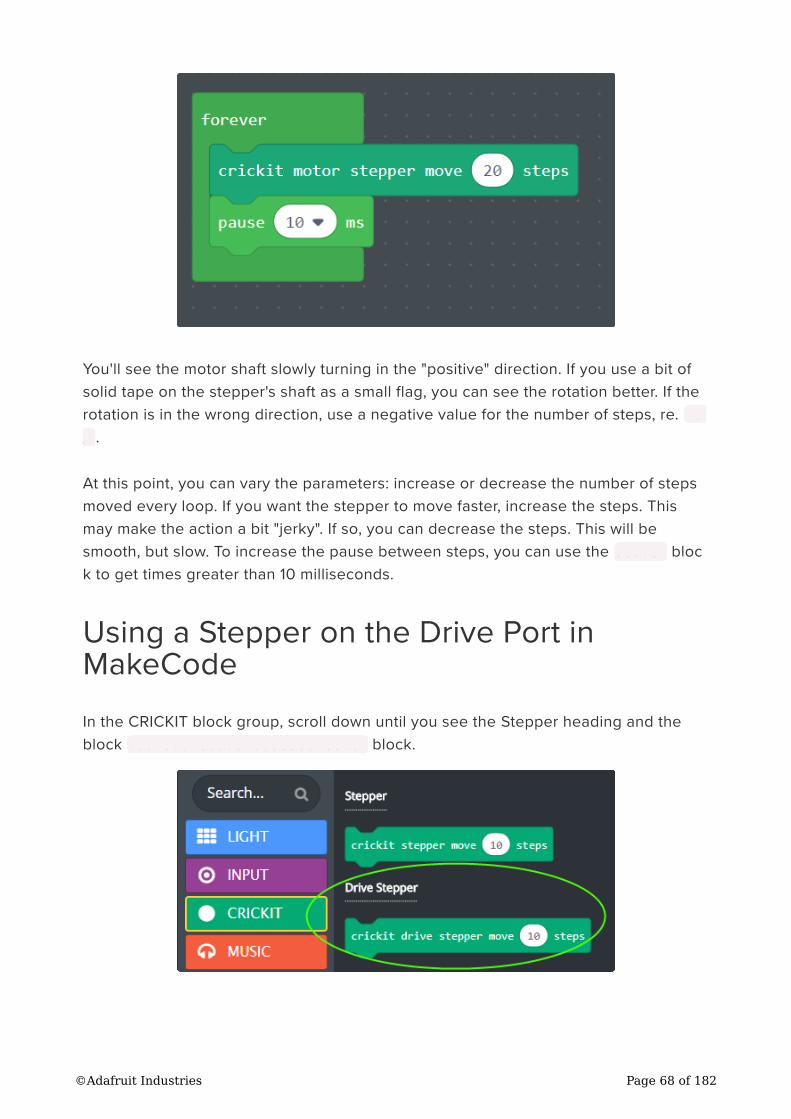
You'll see the motor shaft slowly turning in the "positive" direction. If you use a bit of
solid tape on the stepper's shaft as a small flag, you can see the rotation better. If the
rotation is in the wrong direction, use a negative value for the number of steps, re. -2
0 .
At this point, you can vary the parameters: increase or decrease the number of steps
moved every loop. If you want the stepper to move faster, increase the steps. This
may make the action a bit "jerky". If so, you can decrease the steps. This will be
smooth, but slow. To increase the pause between steps, you can use the pause bloc
k to get times greater than 10 milliseconds.
Using a Stepper on the Drive Port inMakeCode
In the CRICKIT block group, scroll down until you see the Stepper heading and the
block crickit drive stepper move block.
©Adafruit Industries Page 68 of 182
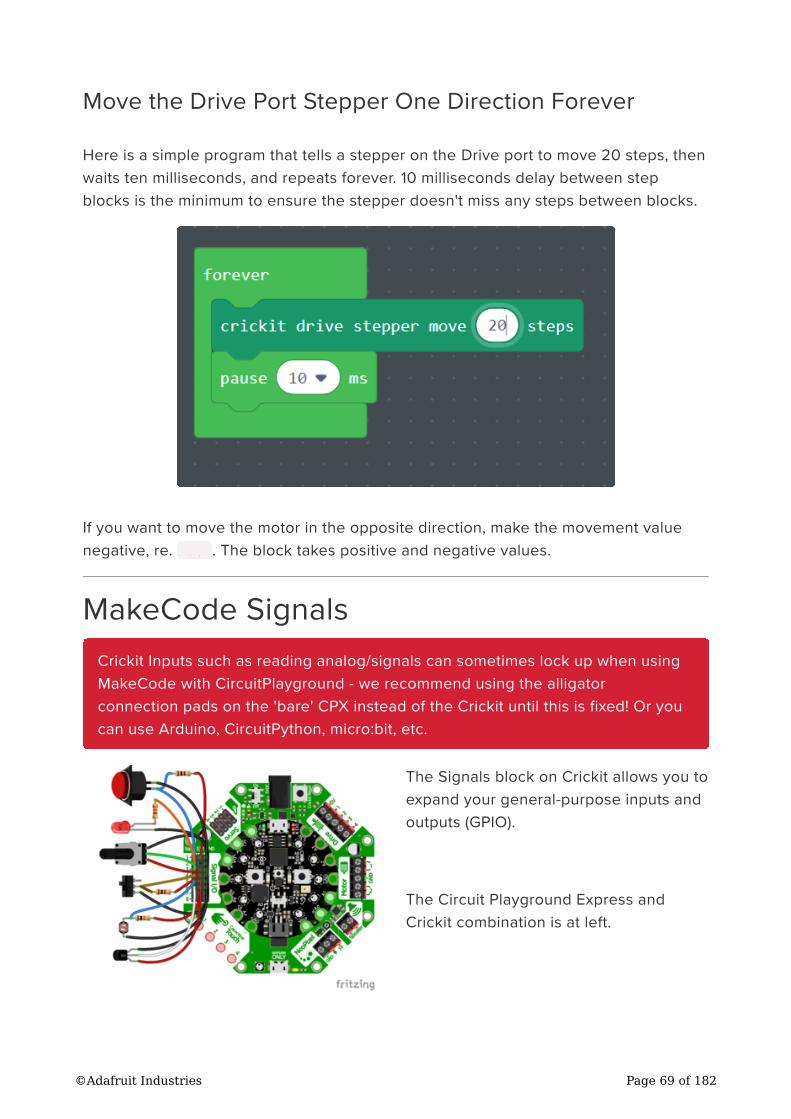
Move the Drive Port Stepper One Direction Forever
Here is a simple program that tells a stepper on the Drive port to move 20 steps, then
waits ten milliseconds, and repeats forever. 10 milliseconds delay between step
blocks is the minimum to ensure the stepper doesn't miss any steps between blocks.
If you want to move the motor in the opposite direction, make the movement value
negative, re. -20 . The block takes positive and negative values.
MakeCode Signals
The Signals block on Crickit allows you to
expand your general-purpose inputs and
outputs (GPIO).
The Circuit Playground Express and
Crickit combination is at left.
Crickit Inputs such as reading analog/signals can sometimes lock up when using
MakeCode with CircuitPlayground - we recommend using the alligator
connection pads on the 'bare' CPX instead of the Crickit until this is fixed! Or you
can use Arduino, CircuitPython, micro:bit, etc.
©Adafruit Industries Page 69 of 182
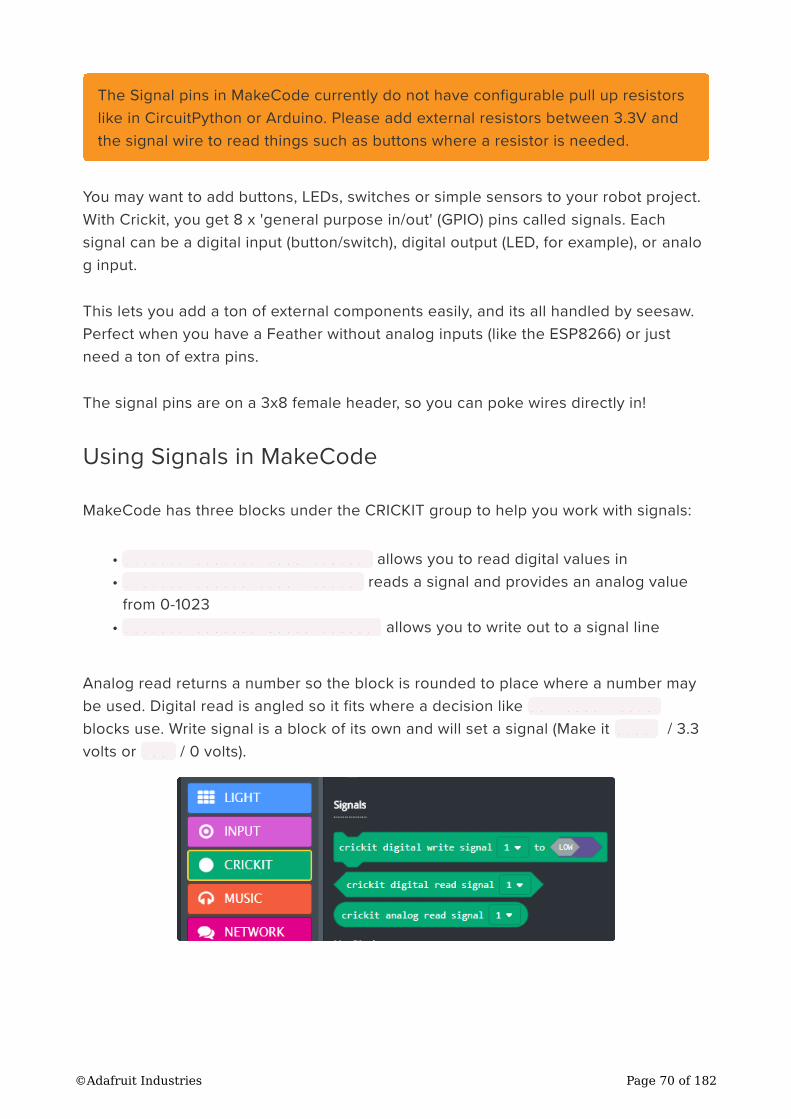
You may want to add buttons, LEDs, switches or simple sensors to your robot project.
With Crickit, you get 8 x 'general purpose in/out' (GPIO) pins called signals. Each
signal can be a digital input (button/switch), digital output (LED, for example), or analo
g input.
This lets you add a ton of external components easily, and its all handled by seesaw.
Perfect when you have a Feather without analog inputs (like the ESP8266) or just
need a ton of extra pins.
The signal pins are on a 3x8 female header, so you can poke wires directly in!
Using Signals in MakeCode
MakeCode has three blocks under the CRICKIT group to help you work with signals:
crickit digital read signal allows you to read digital values in
crickit analog read signal reads a signal and provides an analog value
from 0-1023
crickit digital write signal allows you to write out to a signal line
Analog read returns a number so the block is rounded to place where a number may
be used. Digital read is angled so it fits where a decision like if..then..else
blocks use. Write signal is a block of its own and will set a signal (Make it HIGH / 3.3
volts or LOW / 0 volts).
The Signal pins in MakeCode currently do not have configurable pull up resistors
like in CircuitPython or Arduino. Please add external resistors between 3.3V and
the signal wire to read things such as buttons where a resistor is needed.
•
•
•
©Adafruit Industries Page 70 of 182
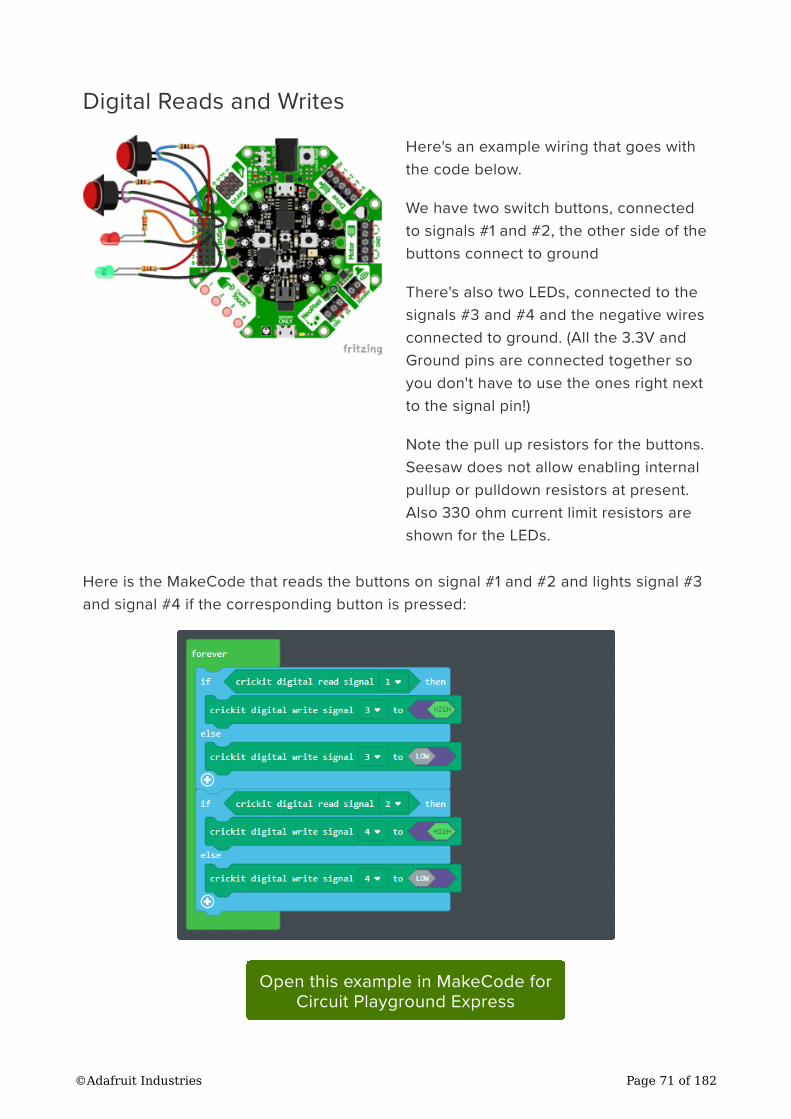
Digital Reads and Writes
Here's an example wiring that goes with
the code below.
We have two switch buttons, connected
to signals #1 and #2, the other side of the
buttons connect to ground
There's also two LEDs, connected to the
signals #3 and #4 and the negative wires
connected to ground. (All the 3.3V and
Ground pins are connected together so
you don't have to use the ones right next
to the signal pin!)
Note the pull up resistors for the buttons.
Seesaw does not allow enabling internal
pullup or pulldown resistors at present.
Also 330 ohm current limit resistors are
shown for the LEDs.
Here is the MakeCode that reads the buttons on signal #1 and #2 and lights signal #3
and signal #4 if the corresponding button is pressed:
Open this example in MakeCode for
Circuit Playground Express
©Adafruit Industries Page 71 of 182
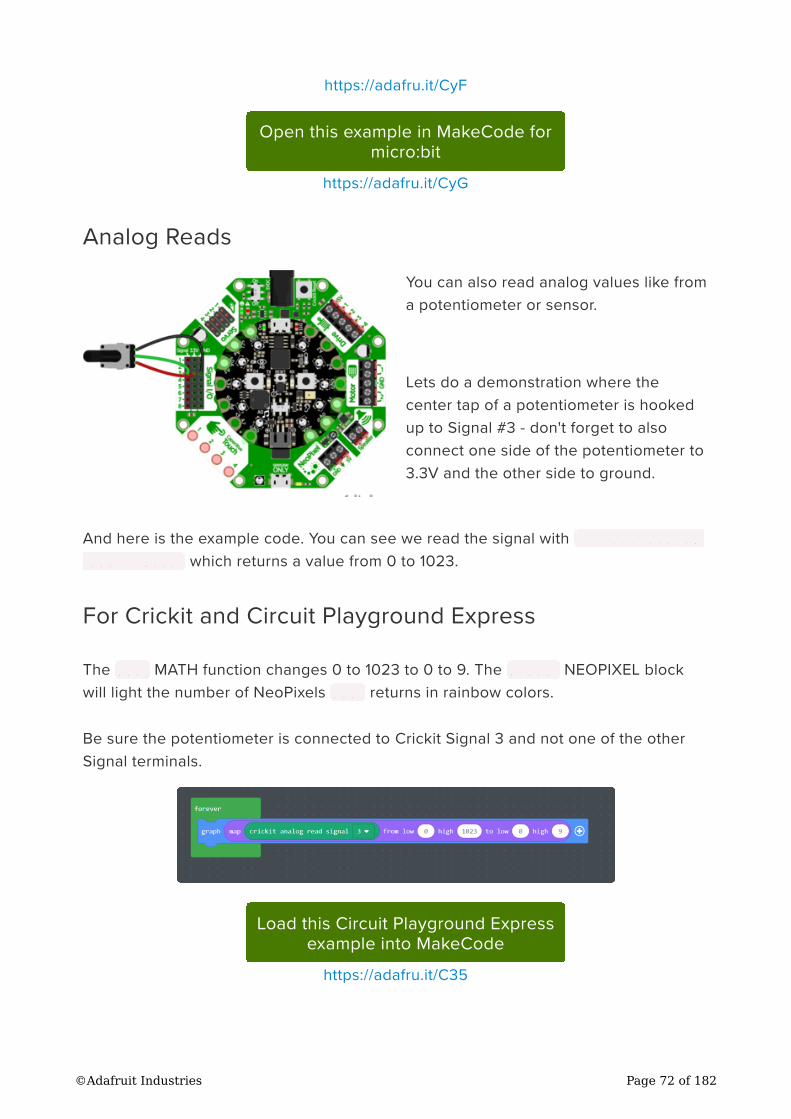
https://adafru.it/CyF
Open this example in MakeCode for
micro:bit
https://adafru.it/CyG
Analog Reads
You can also read analog values like from
a potentiometer or sensor.
Lets do a demonstration where the
center tap of a potentiometer is hooked
up to Signal #3 - don't forget to also
connect one side of the potentiometer to
3.3V and the other side to ground.
And here is the example code. You can see we read the signal with crickit analog
read signal which returns a value from 0 to 1023.
For Crickit and Circuit Playground Express
The map MATH function changes 0 to 1023 to 0 to 9. The graph NEOPIXEL block
will light the number of NeoPixels map returns in rainbow colors.
Be sure the potentiometer is connected to Crickit Signal 3 and not one of the other
Signal terminals.
Load this Circuit Playground Express
example into MakeCode
https://adafru.it/C35
©Adafruit Industries Page 72 of 182
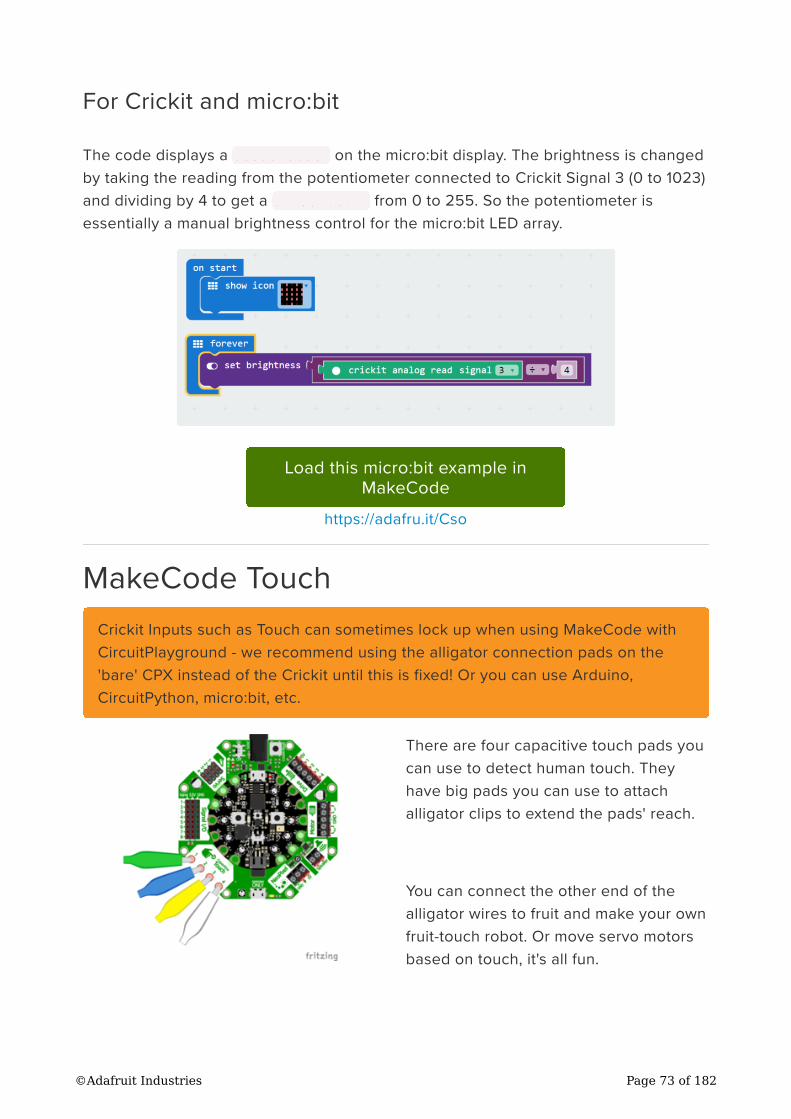
For Crickit and micro:bit
The code displays a heart icon on the micro:bit display. The brightness is changed
by taking the reading from the potentiometer connected to Crickit Signal 3 (0 to 1023)
and dividing by 4 to get a brightness from 0 to 255. So the potentiometer is
essentially a manual brightness control for the micro:bit LED array.
Load this micro:bit example in
MakeCode
https://adafru.it/Cso
MakeCode Touch
There are four capacitive touch pads you
can use to detect human touch. They
have big pads you can use to attach
alligator clips to extend the pads' reach.
You can connect the other end of the
alligator wires to fruit and make your own
fruit-touch robot. Or move servo motors
based on touch, it's all fun.
Crickit Inputs such as Touch can sometimes lock up when using MakeCode with
CircuitPlayground - we recommend using the alligator connection pads on the
'bare' CPX instead of the Crickit until this is fixed! Or you can use Arduino,
CircuitPython, micro:bit, etc.
©Adafruit Industries Page 73 of 182
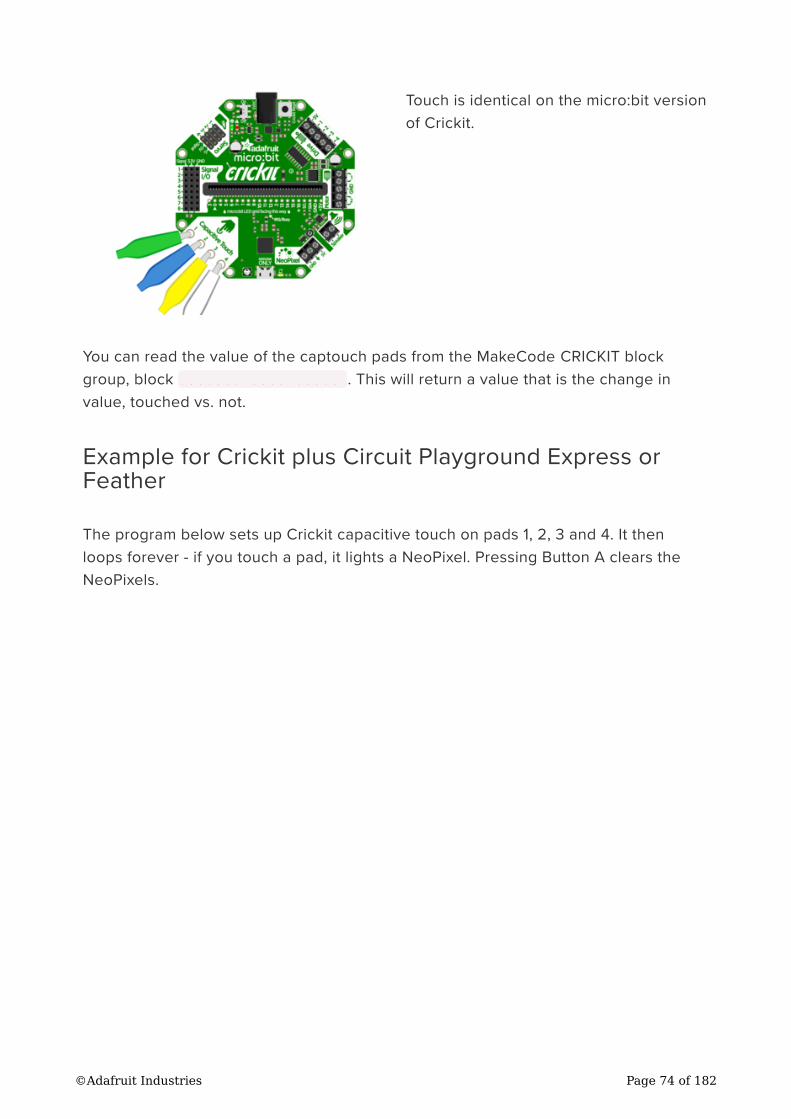
Touch is identical on the micro:bit version
of Crickit.
You can read the value of the captouch pads from the MakeCode CRICKIT block
group, block crickit read touch . This will return a value that is the change in
value, touched vs. not.
Example for Crickit plus Circuit Playground Express orFeather
The program below sets up Crickit capacitive touch on pads 1, 2, 3 and 4. It then
loops forever - if you touch a pad, it lights a NeoPixel. Pressing Button A clears the
NeoPixels.
©Adafruit Industries Page 74 of 182
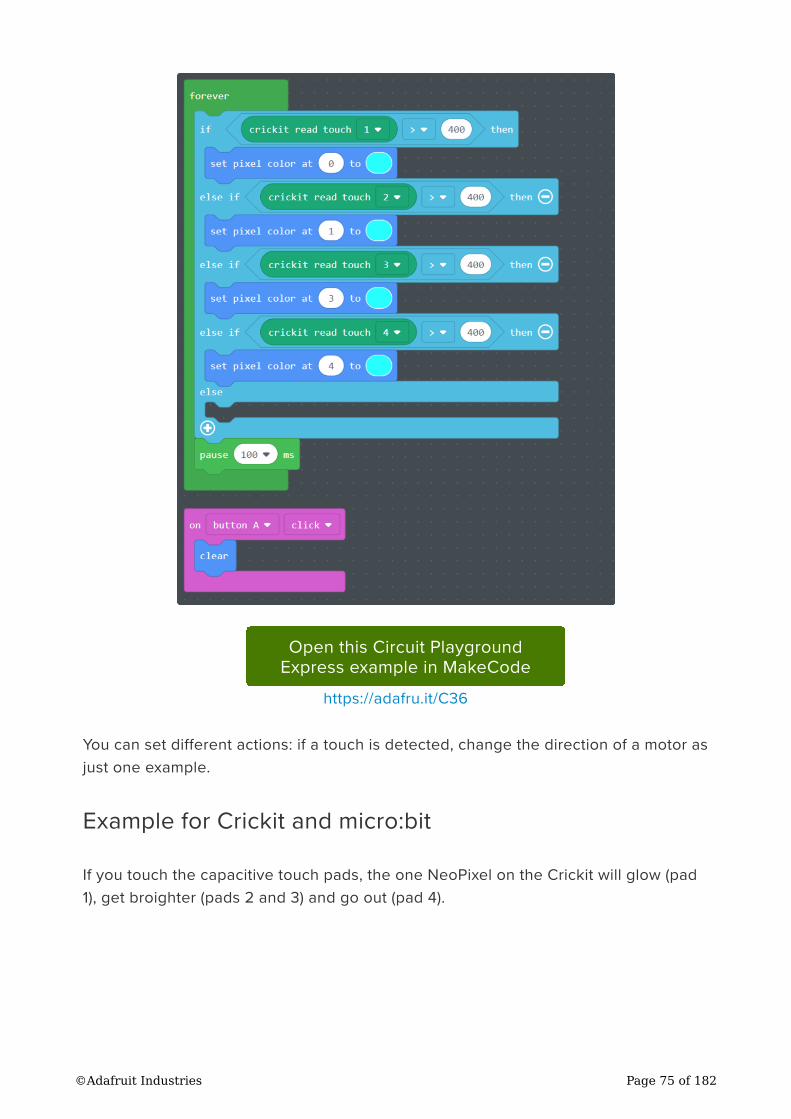
Open this Circuit Playground
Express example in MakeCode
https://adafru.it/C36
You can set different actions: if a touch is detected, change the direction of a motor as
just one example.
Example for Crickit and micro:bit
If you touch the capacitive touch pads, the one NeoPixel on the Crickit will glow (pad
1), get broighter (pads 2 and 3) and go out (pad 4).
©Adafruit Industries Page 75 of 182
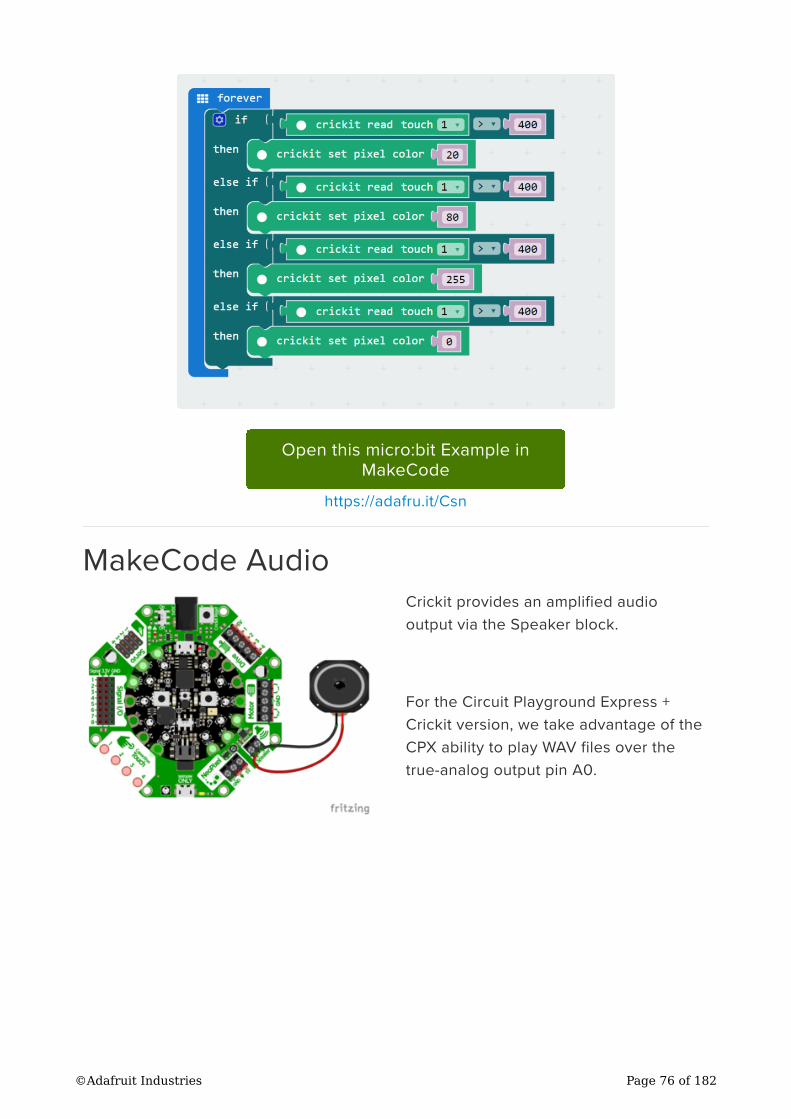
Open this micro:bit Example in
MakeCode
https://adafru.it/Csn
MakeCode Audio
Crickit provides an amplified audio
output via the Speaker block.
For the Circuit Playground Express +
Crickit version, we take advantage of the
CPX ability to play WAV files over the
true-analog output pin A0.
©Adafruit Industries Page 76 of 182
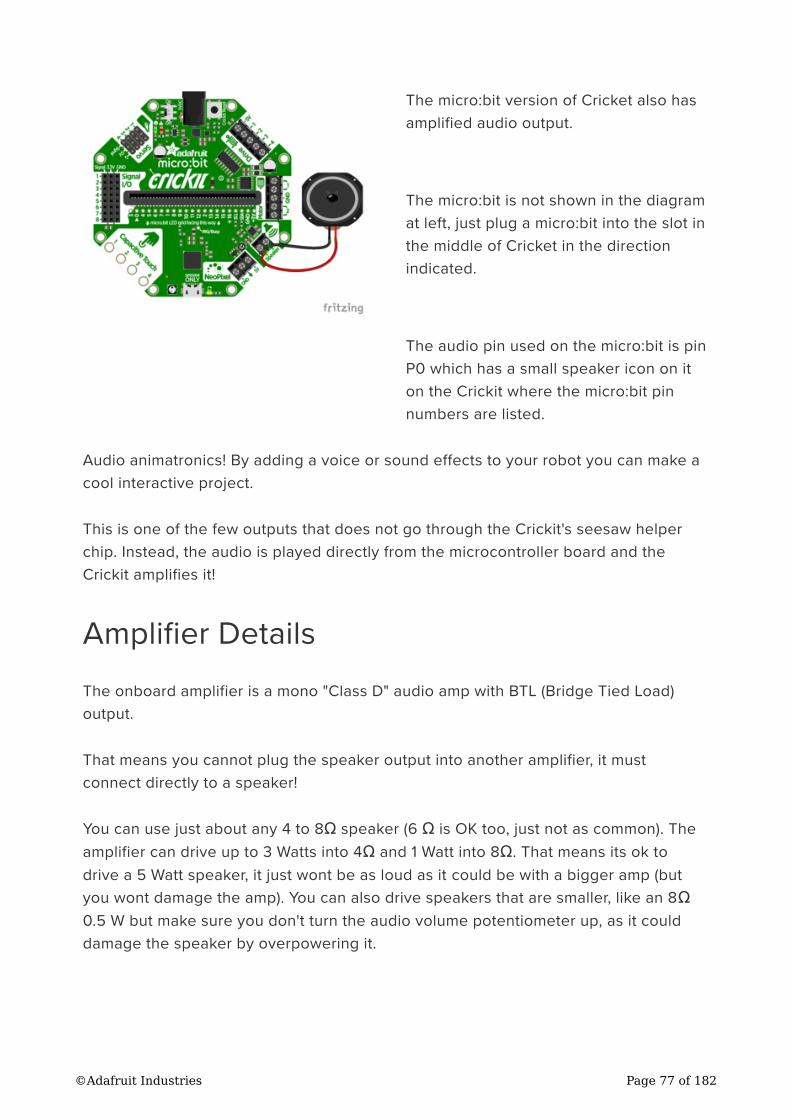
The micro:bit version of Cricket also has
amplified audio output.
The micro:bit is not shown in the diagram
at left, just plug a micro:bit into the slot in
the middle of Cricket in the direction
indicated.
The audio pin used on the micro:bit is pin
P0 which has a small speaker icon on it
on the Crickit where the micro:bit pin
numbers are listed.
Audio animatronics! By adding a voice or sound effects to your robot you can make a
cool interactive project.
This is one of the few outputs that does not go through the Crickit's seesaw helper
chip. Instead, the audio is played directly from the microcontroller board and the
Crickit amplifies it!
Amplifier Details
The onboard amplifier is a mono "Class D" audio amp with BTL (Bridge Tied Load)
output.
That means you cannot plug the speaker output into another amplifier, it must
connect directly to a speaker!
You can use just about any 4 to 8Ω speaker (6 Ω is OK too, just not as common). The
amplifier can drive up to 3 Watts into 4Ω and 1 Watt into 8Ω. That means its ok to
drive a 5 Watt speaker, it just wont be as loud as it could be with a bigger amp (but
you wont damage the amp). You can also drive speakers that are smaller, like an 8Ω
0.5 W but make sure you don't turn the audio volume potentiometer up, as it could
damage the speaker by overpowering it.
©Adafruit Industries Page 77 of 182
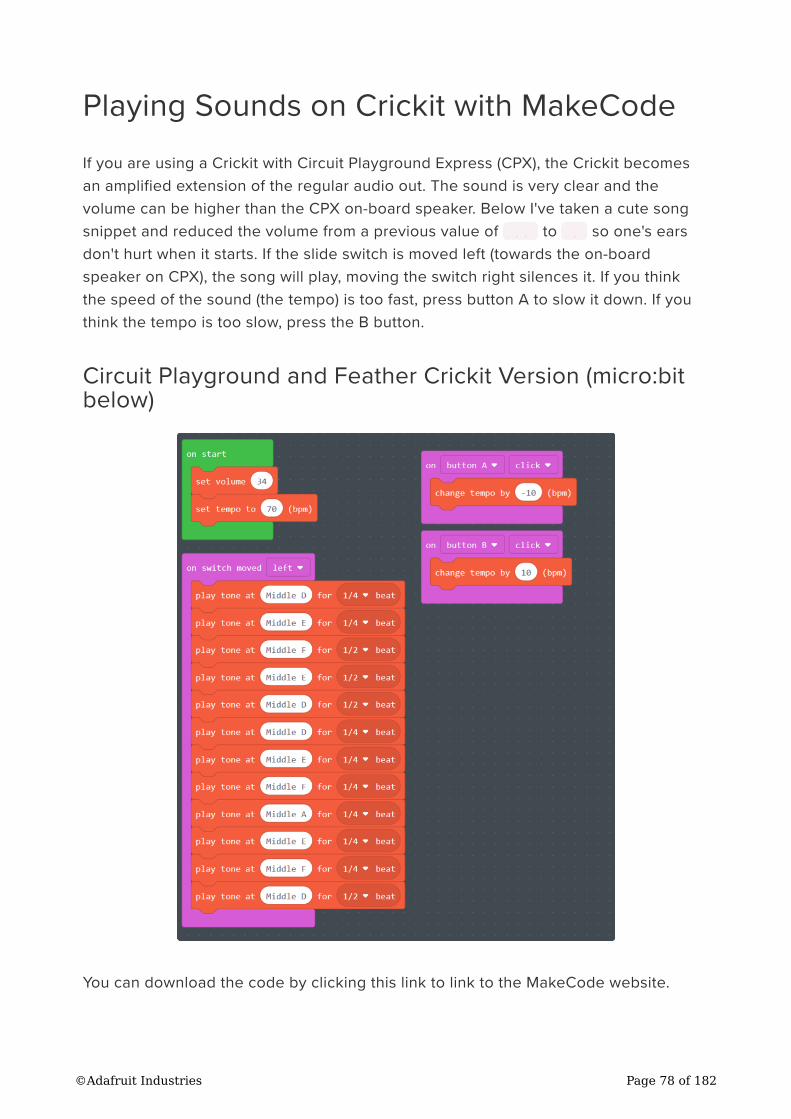
Playing Sounds on Crickit with MakeCode
If you are using a Crickit with Circuit Playground Express (CPX), the Crickit becomes
an amplified extension of the regular audio out. The sound is very clear and the
volume can be higher than the CPX on-board speaker. Below I've taken a cute song
snippet and reduced the volume from a previous value of 100 to 34 so one's ears
don't hurt when it starts. If the slide switch is moved left (towards the on-board
speaker on CPX), the song will play, moving the switch right silences it. If you think
the speed of the sound (the tempo) is too fast, press button A to slow it down. If you
think the tempo is too slow, press the B button.
Circuit Playground and Feather Crickit Version (micro:bitbelow)
You can download the code by clicking this link to link to the MakeCode website.
©Adafruit Industries Page 78 of 182
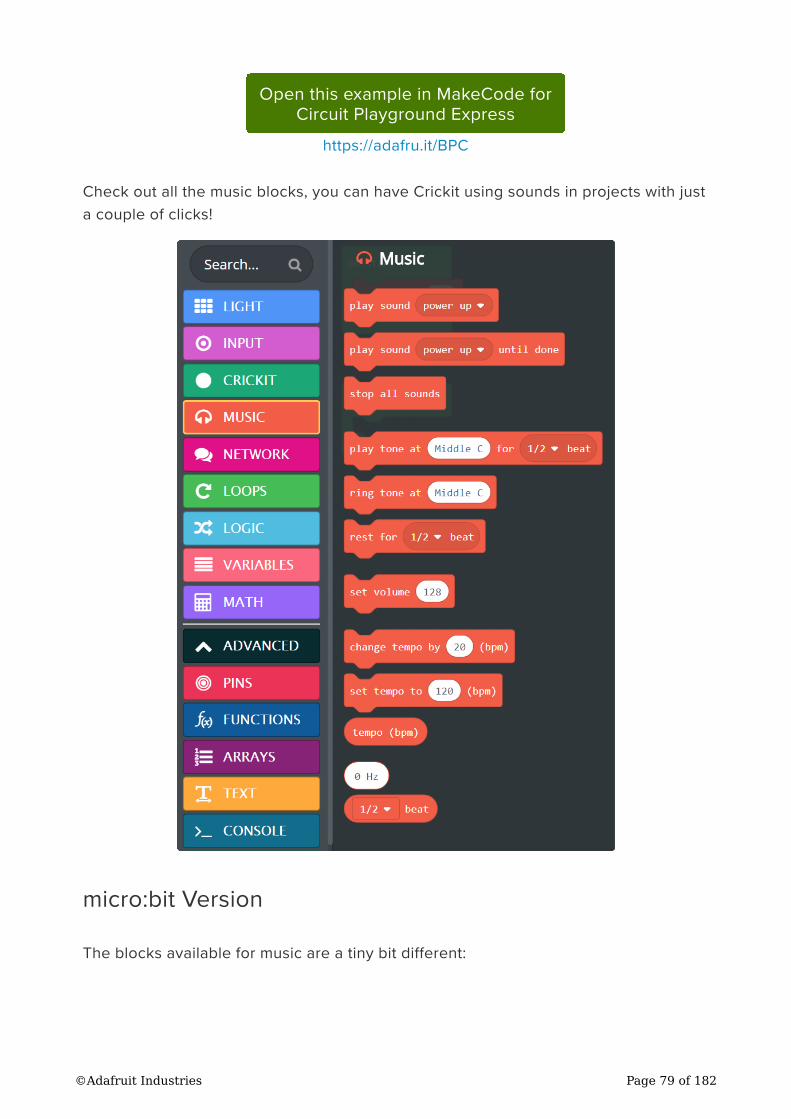
Open this example in MakeCode for
Circuit Playground Express
https://adafru.it/BPC
Check out all the music blocks, you can have Crickit using sounds in projects with just
a couple of clicks!
micro:bit Version
The blocks available for music are a tiny bit different:
©Adafruit Industries Page 79 of 182
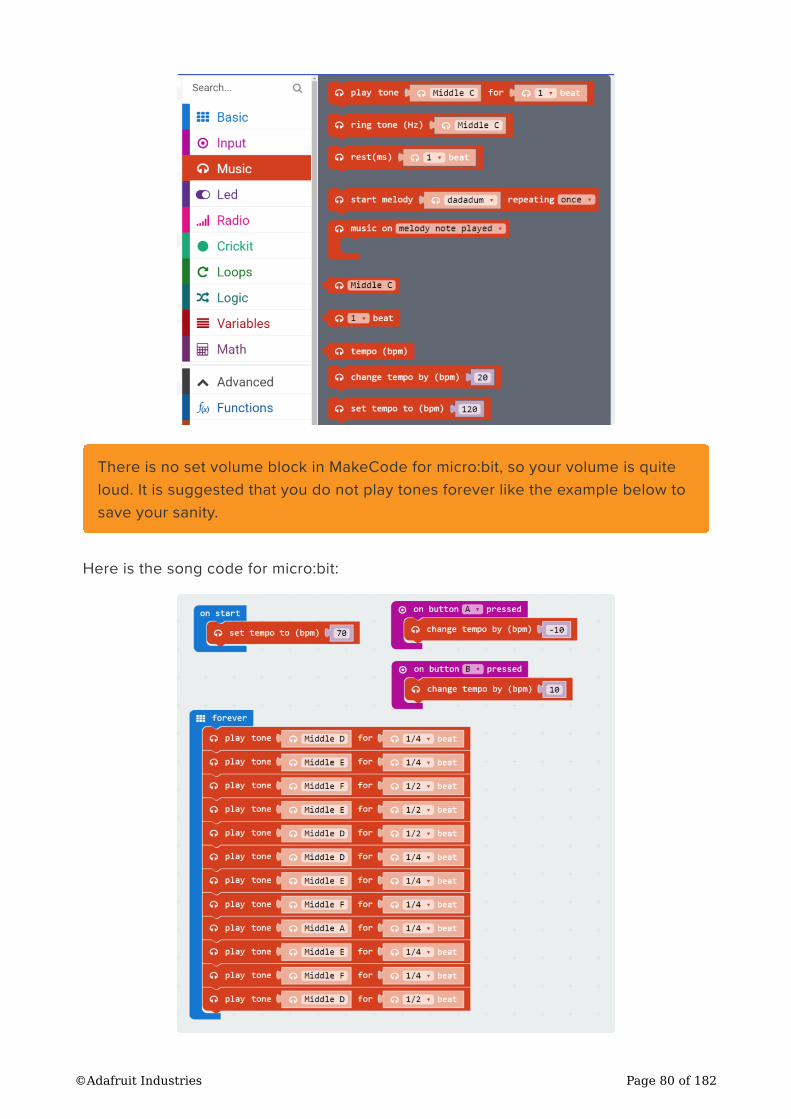
Here is the song code for micro:bit:
There is no set volume block in MakeCode for micro:bit, so your volume is quite
loud. It is suggested that you do not play tones forever like the example below to
save your sanity.
©Adafruit Industries Page 80 of 182

Load this example in MakeCode for
micro:bit
https://adafru.it/Csl
MakeCode NeoPixels
The Circuit Playground Express version
of Crickit hardwires the NeoPixel control
to Circuit Playground Express pad A1 as
shown at left.
MakeCode knows all about it and
provides support via the LIGHTS block
group which will show a NEOPIXELS sub
block group for handling strips and other
"off-board" NeoPixels like the NeoPixel
terminal on Crickit.
There is also one Crickit NeoPixel
MakeCode allows you to control.
Cricket connected NeoPixels are
connected to the three terminals on the
NeoPixel block as shown at left for the
micro:bit version of Crickit.
GND is connected to GND, +5V to 5V,
and the middle arrow terminal to the
NeoPixel's Din pin.
You will need to add the appropriate
microcontroller (Circuit Playground
Express or micro:bit) to the appropriate
version of Crickit to control things, of
course (they are not shown for clarity).
©Adafruit Industries Page 81 of 182
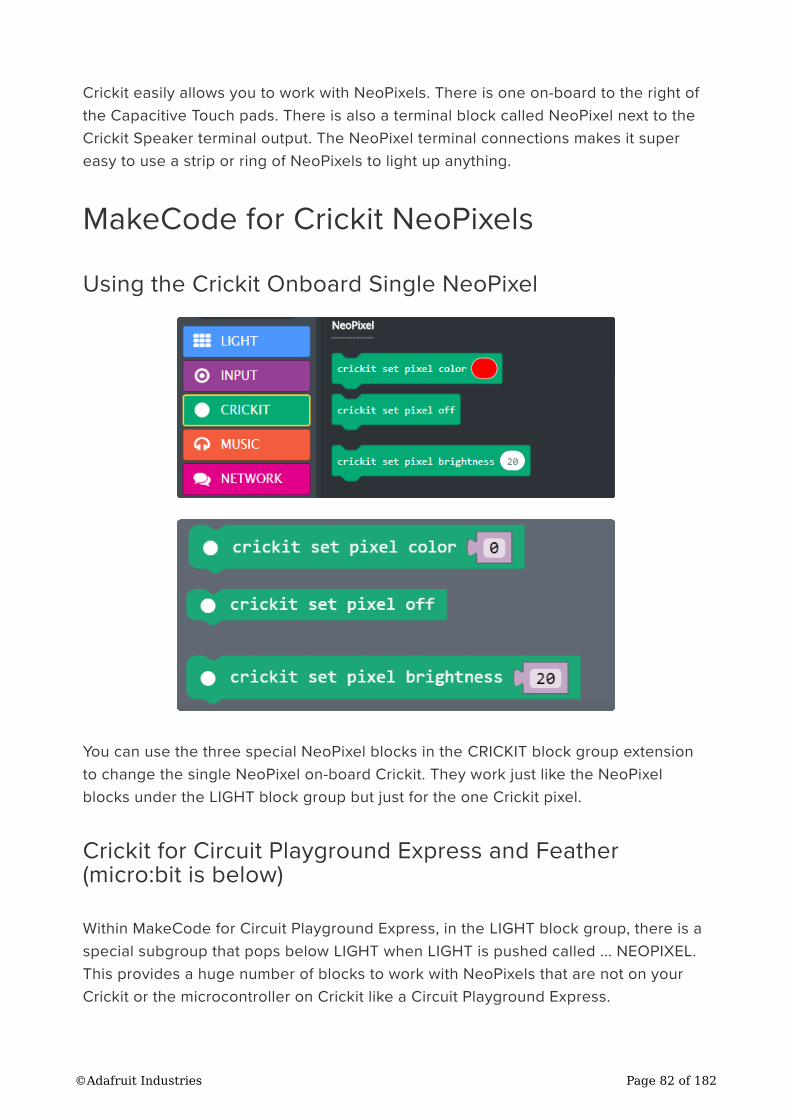
Crickit easily allows you to work with NeoPixels. There is one on-board to the right of
the Capacitive Touch pads. There is also a terminal block called NeoPixel next to the
Crickit Speaker terminal output. The NeoPixel terminal connections makes it super
easy to use a strip or ring of NeoPixels to light up anything.
MakeCode for Crickit NeoPixels
Using the Crickit Onboard Single NeoPixel
You can use the three special NeoPixel blocks in the CRICKIT block group extension
to change the single NeoPixel on-board Crickit. They work just like the NeoPixel
blocks under the LIGHT block group but just for the one Crickit pixel.
Crickit for Circuit Playground Express and Feather(micro:bit is below)
Within MakeCode for Circuit Playground Express, in the LIGHT block group, there is a
special subgroup that pops below LIGHT when LIGHT is pushed called ... NEOPIXEL.
This provides a huge number of blocks to work with NeoPixels that are not on your
Crickit or the microcontroller on Crickit like a Circuit Playground Express.
©Adafruit Industries Page 82 of 182
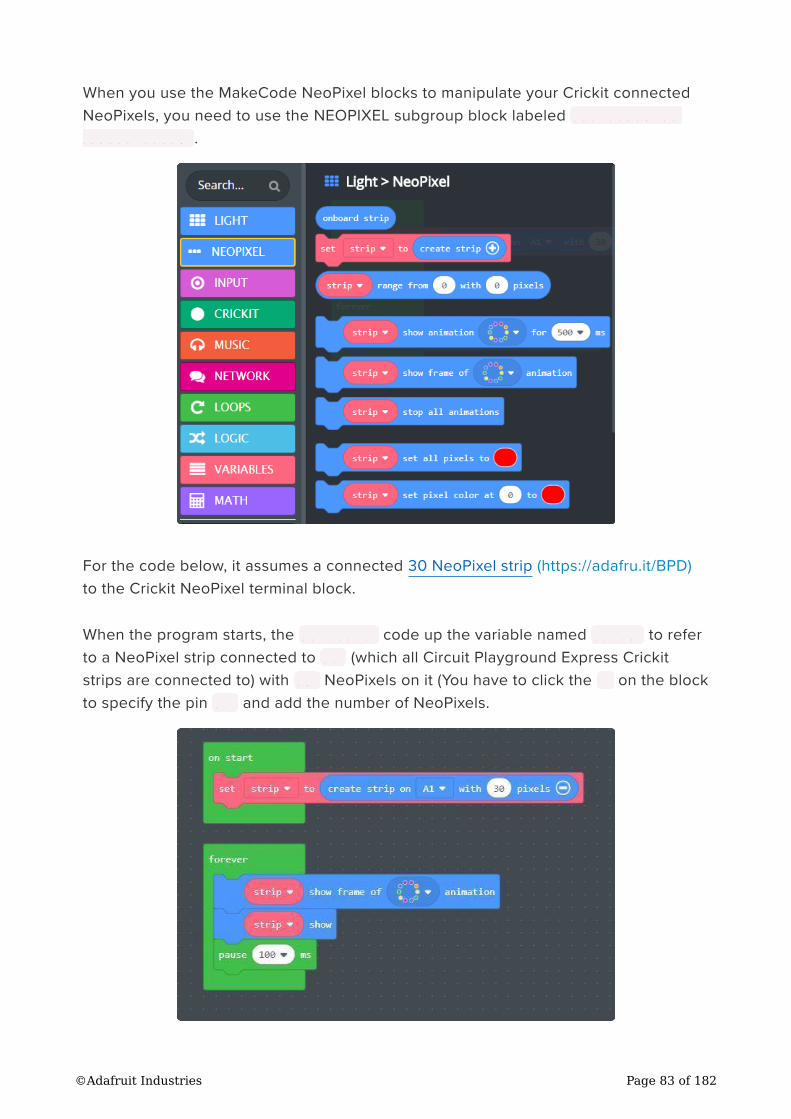
When you use the MakeCode NeoPixel blocks to manipulate your Crickit connected
NeoPixels, you need to use the NEOPIXEL subgroup block labeled set strip to
create strip .
For the code below, it assumes a connected 30 NeoPixel strip (https://adafru.it/BPD)
to the Crickit NeoPixel terminal block.
When the program starts, the on start code up the variable named strip to refer
to a NeoPixel strip connected to A1 (which all Circuit Playground Express Crickit
strips are connected to) with 30 NeoPixels on it (You have to click the + on the block
to specify the pin A1 and add the number of NeoPixels.
©Adafruit Industries Page 83 of 182
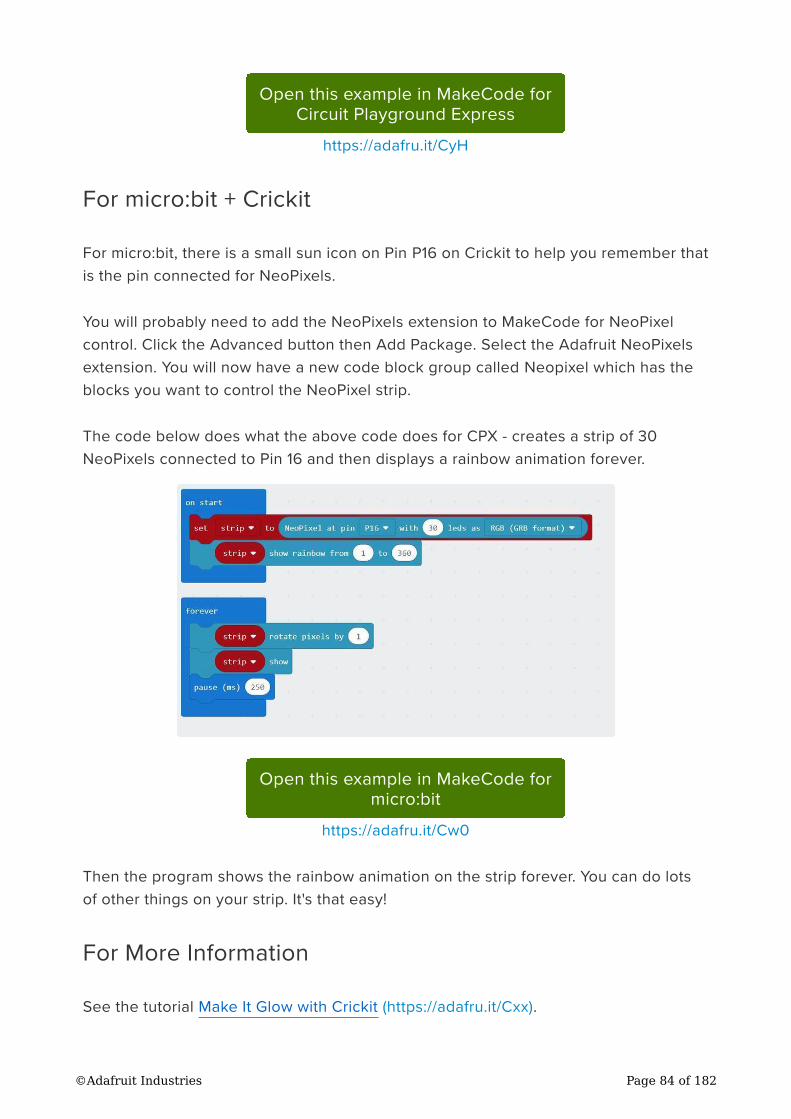
Open this example in MakeCode for
Circuit Playground Express
https://adafru.it/CyH
For micro:bit + Crickit
For micro:bit, there is a small sun icon on Pin P16 on Crickit to help you remember that
is the pin connected for NeoPixels.
You will probably need to add the NeoPixels extension to MakeCode for NeoPixel
control. Click the Advanced button then Add Package. Select the Adafruit NeoPixels
extension. You will now have a new code block group called Neopixel which has the
blocks you want to control the NeoPixel strip.
The code below does what the above code does for CPX - creates a strip of 30
NeoPixels connected to Pin 16 and then displays a rainbow animation forever.
Open this example in MakeCode for
micro:bit
https://adafru.it/Cw0
Then the program shows the rainbow animation on the strip forever. You can do lots
of other things on your strip. It's that easy!
For More Information
See the tutorial Make It Glow with Crickit (https://adafru.it/Cxx).
©Adafruit Industries Page 84 of 182
CircuitPython Code
To use Crickit, we recommend CircuitPython. Python is an easy programming
language to use, programming is fast, and its easy to read.
Install CPX Special Build
If you're using Circuit Playground Express (CPX), Please install this special 'seesaw'
version of the CPX firmware. Plug the USB cable into the CPX, double click the reset
button until you see CPLAYBOOT drive, then drag the UF2 file onto the disk drive:
Download the special version of
CircuitPython for CPX mounted on
Crickit
https://adafru.it/Fj6
What's nice about this special version is that the adafruit_crickit, adafruit_seesaw and
adafruit_motor library is built in, which saves you tons of space and makes it really
fast to get started
Click the link above to download the
latest UF2 file
Download and save it to your Desktop (or
wherever is handy)
The Crickit for micro:bit is not programmable in CircuitPython.
As this version of CircuitPython already has the Crickit and Seesaw libraries
"baked in", ensure that the /lib directory on your CircuitPython device
(CIRCUITPY) does NOT contain the adafruit_crickit or adafruit_seesaw library as
they may conflict and it could unnecessarily use additional memory.
©Adafruit Industries Page 85 of 182
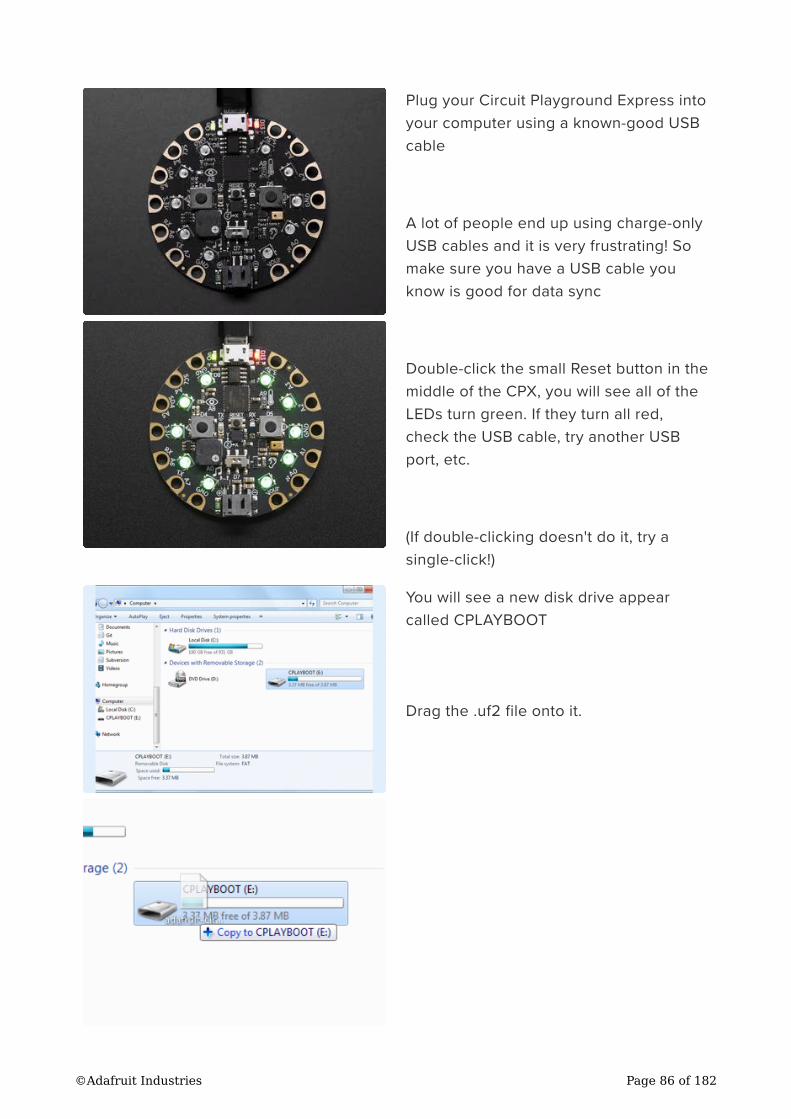
Plug your Circuit Playground Express into
your computer using a known-good USB
cable
A lot of people end up using charge-only
USB cables and it is very frustrating! So
make sure you have a USB cable you
know is good for data sync
Double-click the small Reset button in the
middle of the CPX, you will see all of the
LEDs turn green. If they turn all red,
check the USB cable, try another USB
port, etc.
(If double-clicking doesn't do it, try a
single-click!)
You will see a new disk drive appear
called CPLAYBOOT
Drag the .uf2 file onto it.
©Adafruit Industries Page 86 of 182
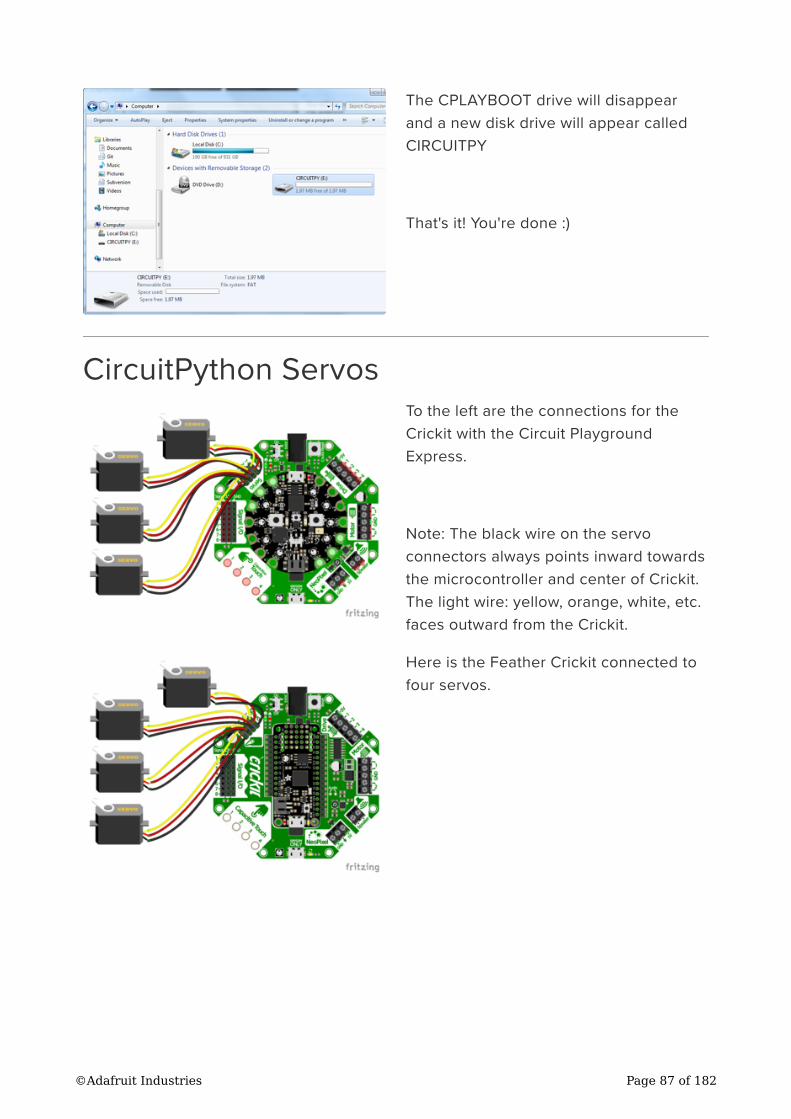
The CPLAYBOOT drive will disappear
and a new disk drive will appear called
CIRCUITPY
That's it! You're done :)
CircuitPython Servos
To the left are the connections for the
Crickit with the Circuit Playground
Express.
Note: The black wire on the servo
connectors always points inward towards
the microcontroller and center of Crickit.
The light wire: yellow, orange, white, etc.
faces outward from the Crickit.
Here is the Feather Crickit connected to
four servos.
©Adafruit Industries Page 87 of 182
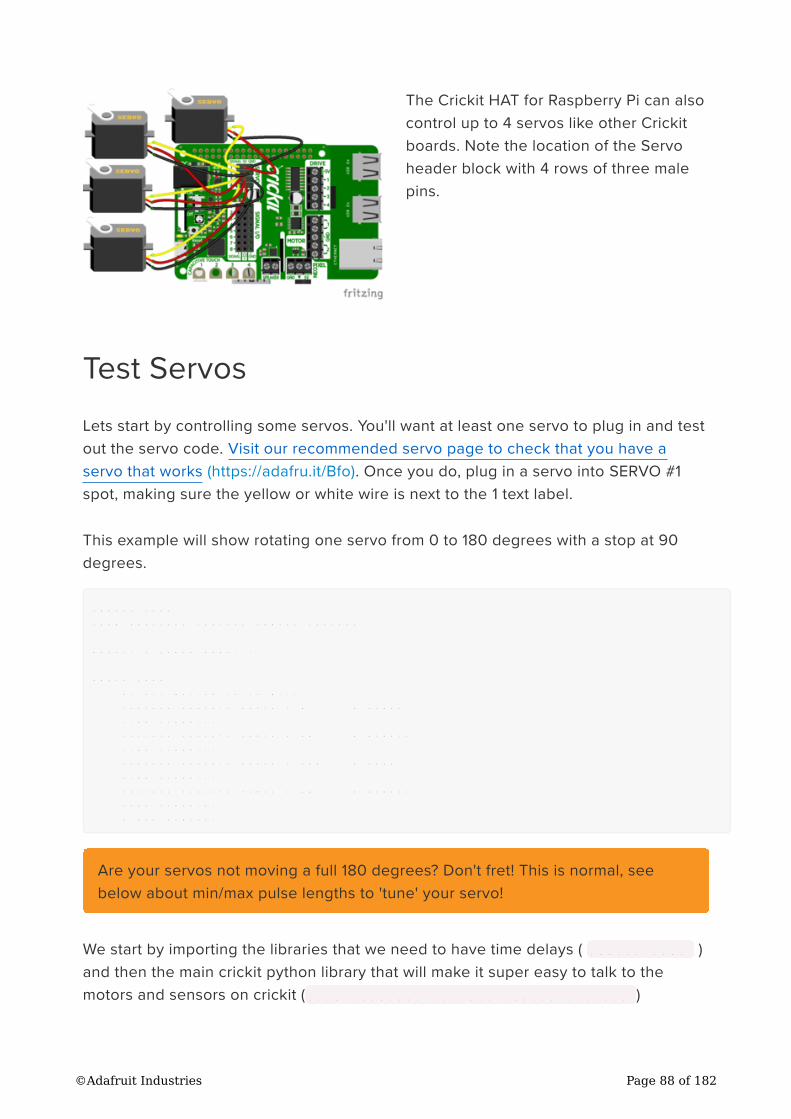
The Crickit HAT for Raspberry Pi can also
control up to 4 servos like other Crickit
boards. Note the location of the Servo
header block with 4 rows of three male
pins.
Test Servos
Lets start by controlling some servos. You'll want at least one servo to plug in and test
out the servo code. Visit our recommended servo page to check that you have a
servo that works (https://adafru.it/Bfo). Once you do, plug in a servo into SERVO #1
spot, making sure the yellow or white wire is next to the 1 text label.
This example will show rotating one servo from 0 to 180 degrees with a stop at 90
degrees.
import time
from adafruit_crickit import crickit
print("1 Servo demo!")
while True:
print("Moving servo #1")
crickit.servo_1.angle = 0 # right
time.sleep(1)
crickit.servo_1.angle = 90 # middle
time.sleep(1)
crickit.servo_1.angle = 180 # left
time.sleep(1)
crickit.servo_1.angle = 90 # middle
time.sleep(1)
# and repeat!
We start by importing the libraries that we need to have time delays ( import time )
and then the main crickit python library that will make it super easy to talk to the
motors and sensors on crickit ( from adafruit_crickit import crickit )
Are your servos not moving a full 180 degrees? Don't fret! This is normal, see
below about min/max pulse lengths to 'tune' your servo!
©Adafruit Industries Page 88 of 182
The crickit object represents the motors and servos available for control. The
servos are available on the sub-objects named servo_1 , servo_2 , servo_3 , serv
o_4
Each of these are adafruit_motor.servo (https://adafru.it/BMX) type objects for the
curious
Control Servo
Now that we know the servo objects, we can simply assign the angle! crickit.serv
o_1.angle = 0 is all the way to the left, crickit.servo_1.angle = 90 is in the
middle, and crickit.servo_1.angle = 180 is all the way to the right. You'll want
to test this to ensure it works with your specific servo, as 0 might be to the right and
180 to the left if it was geared differently.
More Servos!
OK that was fun but you want MORE servos right? You can control up to four!
import time
from adafruit_crickit import crickit
print("4 Servo demo!")
# make a list of all the servos
servos = (crickit.servo_1, crickit.servo_2, crickit.servo_3, crickit.servo_4)
while True:
# Repeat for all 4 servos
for my_servo in servos:
# Do the wave!
print("Moving servo #", servos.index(my_servo)+1)
my_servo.angle = 0 # right
time.sleep(0.25)
my_servo.angle = 90 # middle
time.sleep(0.25)
my_servo.angle = 180 # left
time.sleep(0.25)
my_servo.angle = 90 # middle
time.sleep(0.25)
my_servo.angle = 0 # right
This example is similar to the 1 servo example, but instead of accessing the crickit.
servo_1 object directly, we'll make a list called servos that contains 4 servo objects
with
servos = (crickit.servo_1, crickit.servo_2, crickit.servo_3,
crickit.servo_4)
©Adafruit Industries Page 89 of 182
Then we can access the individual using servo[0].angle = 90 or iterate through
them as we do in the loop. You don't have to do it this way, but its very compact and
doesn't take a lot of code lines to create all 4 servos at once!
Min/Max Pulse control
Originally servos were defined to use 1.0 millisecond to 2.0 millisecond pulses, at 50
Hz to set the 0 and 180 degree locations. However, as more companies started
making servos they changed the pulse ranges to 0.5ms to 2.5ms or even bigger
ranges. So, not all servos have their full range at thoe 'standard' pulse widths. You can
easily tweak your code to change the min and max pulse widths, which will let your
servo turn more left and right. But don't set the widths too small/large or you can hit
the hard stops of the servo which could damage it, so try tweaking the numbers
slowly until you get a sense of what the limits are for your motor.
All you need to do is add a line at the top of your code like this
crickit.servo_1.set_pulse_width_range(min_pulse=500, max_pulse=2500)
The above is for Crickit Servo #1, you'll need to duplicate and adjust for all other
servos, but that way you can customize the range uniquely per servo!
Here we've change the minimum pulse from the default ~750 microseconds to 500,
and the default maximum pulse from 2250 microseconds to 2500. Again, each servo
differs. Some experimentation may be required!
import time
from adafruit_crickit import crickit
print("1 Servo demo with custom pulse widths!")
crickit.servo_1.set_pulse_width_range(min_pulse=500, max_pulse=2500)
while True:
print("Moving servo #1")
crickit.servo_1.angle = 0 # right
time.sleep(1)
crickit.servo_1.angle = 180 # left
time.sleep(1)
One thing to watch for is that if you use a list like this, servo[0] is the name of the
Servo #1 and servo[3] is Servo #4!
©Adafruit Industries Page 90 of 182
Continuous Rotation Servos
If you're using continuous servos, you can use the angle assignments and just
remember that 0 is rotating one way, 90 is 'stopped' and 180 and rotating the other
way. Or, better yet, you can use the crickit.continuous_servo_1 object instead
of the plain servo_1
Again, you get up to 4 servos. You can mix 'plain' and 'continuous' servos
import time
from adafruit_crickit import crickit
print("1 Continuous Servo demo!")
while True:
crickit.continuous_servo_1.throttle = 1.0 # Forwards
time.sleep(2)
crickit.continuous_servo_1.throttle = 0.5 # Forwards halfspeed
time.sleep(2)
crickit.continuous_servo_1.throttle = 0 # Stop
time.sleep(2)
crickit.continuous_servo_1.throttle = -0.5 # Backwards halfspeed
time.sleep(2)
crickit.continuous_servo_1.throttle = -1 # Forwards
time.sleep(2)
crickit.continuous_servo_1.throttle = 0 # Stop
time.sleep(2)
If your continuous servo doesn't stop once the loop is finished you may need to tune
the min_pulse and max_pulse timings so that the center makes the servo stop. Or
check if the servo has a center-adjustment screw you can tweak.
Disconnecting Servos or Custom Pulses
If you want to 'disconnect' the Servo by sending it 0-length pulses, you can do that by
'reaching in' and adjusting the underlying PWM duty cycle with:
crickit.servo_1._pwm_out.duty_cycle = 0
or
crickit.servo_1._pwm_out.fraction = 0
Likewise you can set the duty cycle to a custom value with
crickit.servo_1._pwm_out.duty_cycle = number
©Adafruit Industries Page 91 of 182
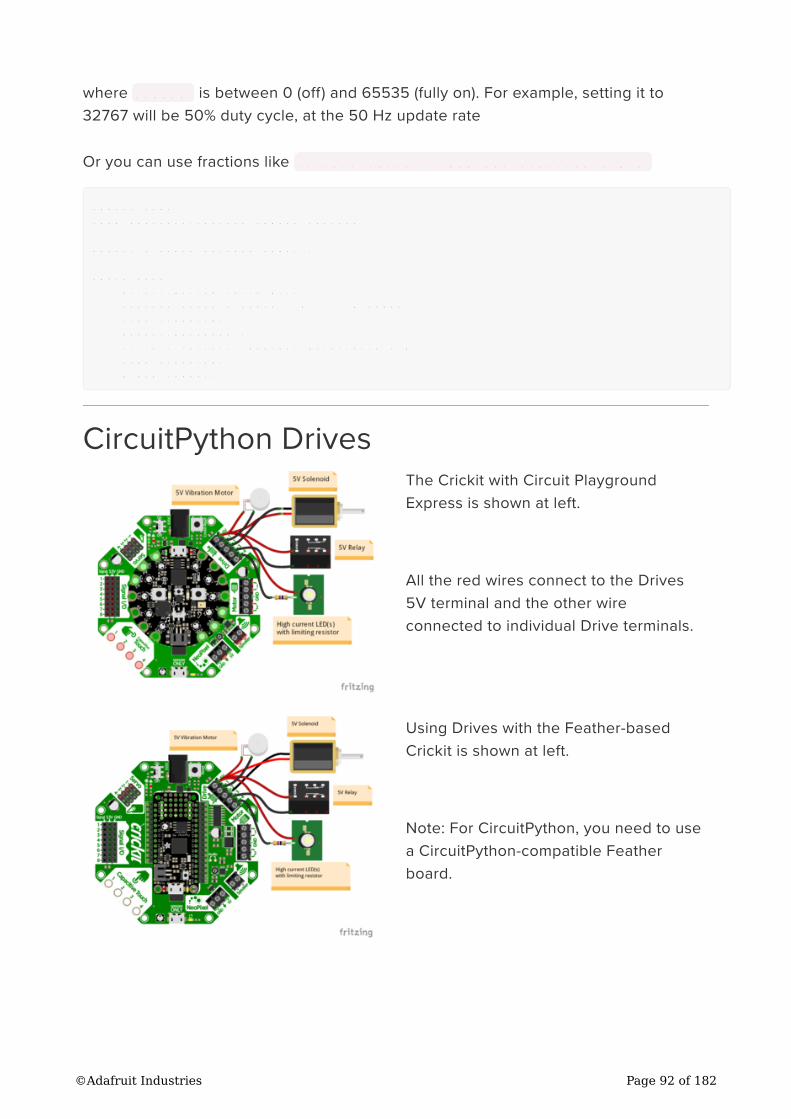
where number is between 0 (off) and 65535 (fully on). For example, setting it to
32767 will be 50% duty cycle, at the 50 Hz update rate
Or you can use fractions like crickit.servo_1._pwm_out.fraction = 0.5
import time
from adafruit_crickit import crickit
print("1 Servo release demo!")
while True:
print("Moving servo #1")
crickit.servo_1.angle = 0 # right
time.sleep(10)
print("Released")
crickit.servo_1._pwm_out.duty_cycle = 0
time.sleep(10)
# and repeat!
CircuitPython Drives
The Crickit with Circuit Playground
Express is shown at left.
All the red wires connect to the Drives
5V terminal and the other wire
connected to individual Drive terminals.
Using Drives with the Feather-based
Crickit is shown at left.
Note: For CircuitPython, you need to use
a CircuitPython-compatible Feather
board.
©Adafruit Industries Page 92 of 182
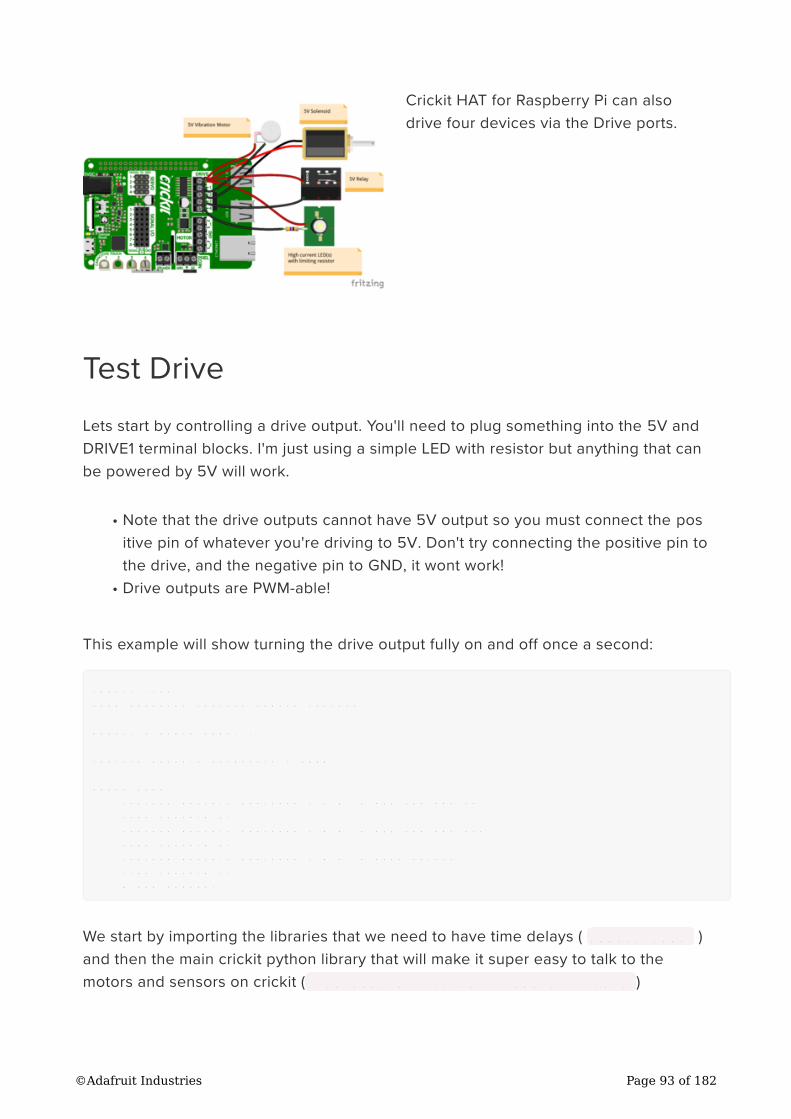
Crickit HAT for Raspberry Pi can also
drive four devices via the Drive ports.
Test Drive
Lets start by controlling a drive output. You'll need to plug something into the 5V and
DRIVE1 terminal blocks. I'm just using a simple LED with resistor but anything that can
be powered by 5V will work.
Note that the drive outputs cannot have 5V output so you must connect the pos
itive pin of whatever you're driving to 5V. Don't try connecting the positive pin to
the drive, and the negative pin to GND, it wont work!
Drive outputs are PWM-able!
This example will show turning the drive output fully on and off once a second:
import time
from adafruit_crickit import crickit
print("1 Drive demo!")
crickit.drive_1.frequency = 1000
while True:
crickit.drive_1.fraction = 1.0 # all the way on
time.sleep(0.5)
crickit.drive_1.fraction = 0.0 # all the way off
time.sleep(0.5)
crickit.drive_1.fraction = 0.5 # half on/off
time.sleep(0.5)
# and repeat!
We start by importing the libraries that we need to have time delays ( import time )
and then the main crickit python library that will make it super easy to talk to the
motors and sensors on crickit ( from adafruit_crickit import crickit )
•
•
©Adafruit Industries Page 93 of 182
The crickit object represents the drive outputs available for control. The drives are
available on the sub-objects named drive_1 , drive_2 , drive_3 , drive_4
Note that for the Feather Crickit, these are feather_drive_1 , feather_drive_2 ,
feather_drive_3 , and feather_drive_4 .
Set PWM Frequency
Drive outputs are all PWM outputs too, so not only can they turn fully on and off, but
you can also set it half-way on. In general, the default frequency for PWM outputs on
seesaw is 1000 Hz, so set the frequency to 1 KHz with crickit.drive_1.frequency
= 1000 . Even if you aren't planning to use the PWM output, please set the frequency!
Note that all the Drive outputs share the same timer so if you set the frequency for
one, it will be the same for all of them.
Control Drive Output
Now that we have a drive pwm object, we can simply assign the PWM duty cycle with
the fraction property!
crickit.drive_1.fraction = 0.0 turns the output completely off (no drive
to ground, no current draw).
crickit.drive_1.fraction = 1.0 turns the output completely on (fully drive
to ground)
And, not surprisingly crickit.drive_1.fraction = 0.5 sets it to 1/2 on and
1/2 off at the PWM frequency set above.
More Drivers!
OK that was fun but you want MORE drives right? You can control up to four!
import time
from adafruit_crickit import crickit
print("4 Drive demo!")
drives = (crickit.drive_1, crickit.drive_2, crickit.drive_3, crickit.drive_4)
for drive in drives:
drive.frequency = 1000
while True:
•
•
•
©Adafruit Industries Page 94 of 182
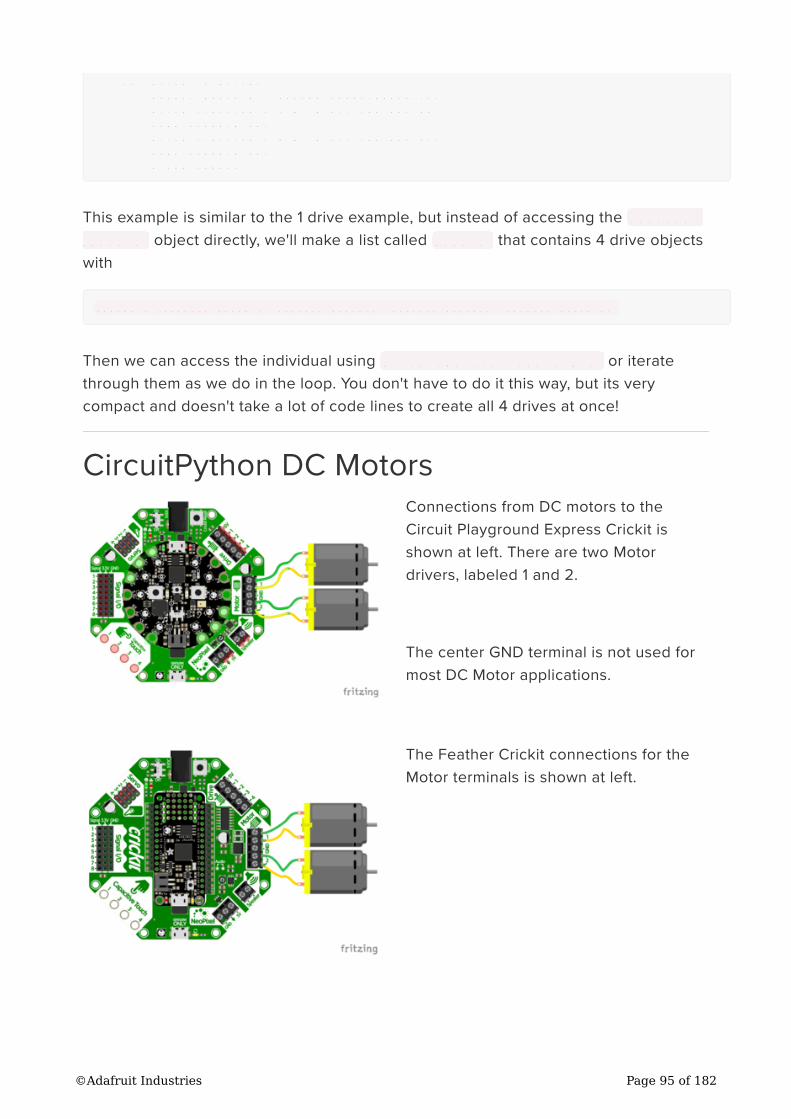
for drive in drives:
print("Drive #", drives.index(drive)+1)
drive.fraction = 1.0 # all the way on
time.sleep(0.25)
drive.fraction = 0.0 # all the way off
time.sleep(0.25)
# and repeat!
This example is similar to the 1 drive example, but instead of accessing the crickit.
drive_1 object directly, we'll make a list called drives that contains 4 drive objects
with
drives = (crickit.drive_1, crickit.drive_2, crickit.drive_3, crickit.drive_4)
Then we can access the individual using drives[0].fraction = 0.5 or iterate
through them as we do in the loop. You don't have to do it this way, but its very
compact and doesn't take a lot of code lines to create all 4 drives at once!
CircuitPython DC Motors
Connections from DC motors to the
Circuit Playground Express Crickit is
shown at left. There are two Motor
drivers, labeled 1 and 2.
The center GND terminal is not used for
most DC Motor applications.
The Feather Crickit connections for the
Motor terminals is shown at left.
©Adafruit Industries Page 95 of 182
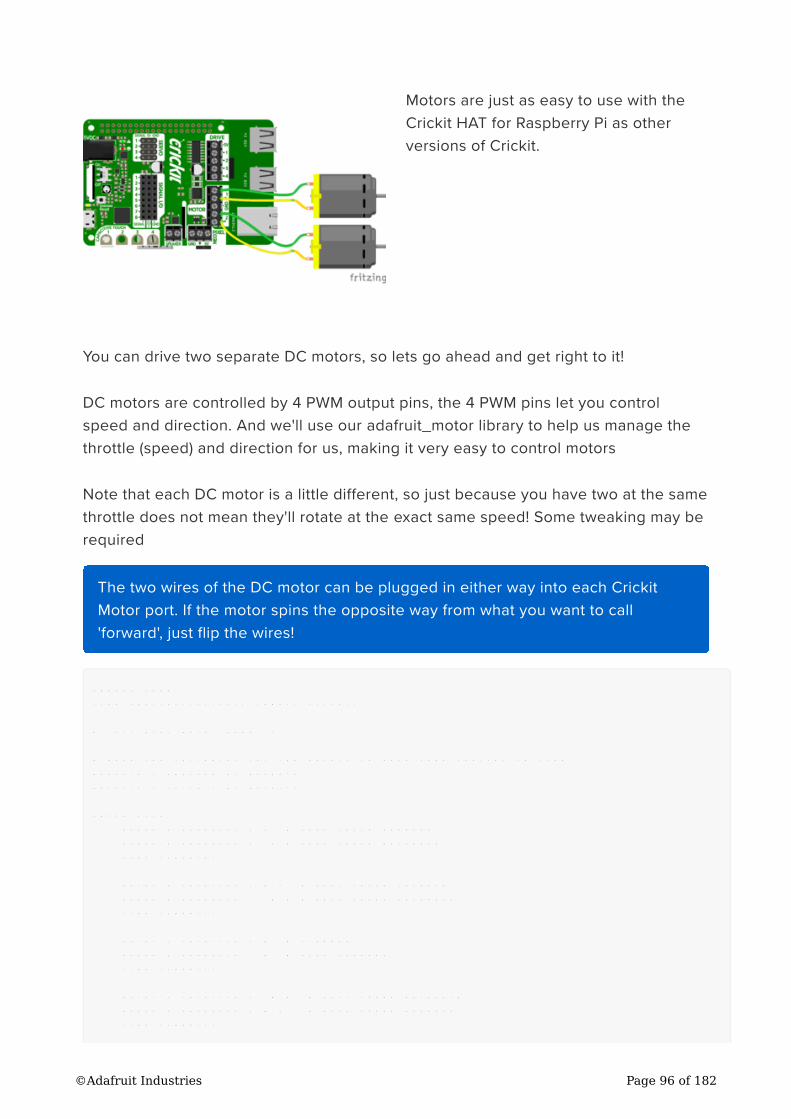
Motors are just as easy to use with the
Crickit HAT for Raspberry Pi as other
versions of Crickit.
You can drive two separate DC motors, so lets go ahead and get right to it!
DC motors are controlled by 4 PWM output pins, the 4 PWM pins let you control
speed and direction. And we'll use our adafruit_motor library to help us manage the
throttle (speed) and direction for us, making it very easy to control motors
Note that each DC motor is a little different, so just because you have two at the same
throttle does not mean they'll rotate at the exact same speed! Some tweaking may be
required
import time
from adafruit_crickit import crickit
print("Dual motor demo!")
# make two variables for the motors to make code shorter to type
motor_1 = crickit.dc_motor_1
motor_2 = crickit.dc_motor_2
while True:
motor_1.throttle = 1 # full speed forward
motor_2.throttle = -1 # full speed backward
time.sleep(1)
motor_1.throttle = 0.5 # half speed forward
motor_2.throttle = -0.5 # half speed backward
time.sleep(1)
motor_1.throttle = 0 # stopped
motor_2.throttle = 0 # also stopped
time.sleep(1)
motor_1.throttle = -0.5 # half speed backward
motor_2.throttle = 0.5 # half speed forward
time.sleep(1)
The two wires of the DC motor can be plugged in either way into each Crickit
Motor port. If the motor spins the opposite way from what you want to call
'forward', just flip the wires!
©Adafruit Industries Page 96 of 182
motor_1.throttle = -1 # full speed backward
motor_2.throttle = 1 # full speed forward
time.sleep(1)
motor_1.throttle = 0 # stopped
motor_2.throttle = 0 # also stopped
time.sleep(0.5)
# and repeat!
Import Libraries
We start by importing the libraries that we need to have time delays ( import time )
and then the main crickit python library that will make it super easy to talk to the
motors and sensors on crickit ( from adafruit_crickit import crickit )
The crickit object represents the motors and servos available for control. The
motors are available on the sub-objects named dc_motor_1 and dc_motor_2
Each of these are adafruit_motor.motor (https://adafru.it/BNE) type objects for the
curious
To make our code easier to read, we'll make new names for each motor:
# make two variables for the motors to make code shorter to type
motor_1 = crickit.dc_motor_1
motor_2 = crickit.dc_motor_2
Control Motor
Now that we have our motor objects, we can simply assign the throttle, this will set
the direction and speed. For example, to set the speed to full forward, use motor_1.
throttle = 1 and to set to full speed backward use motor_1.throttle = -1 . For
speeds in between, use a fraction, such as 0.5 (half speed) or 0.25 (quarter speed).
Setting the throttle = 0 will stop the motor.
©Adafruit Industries Page 97 of 182
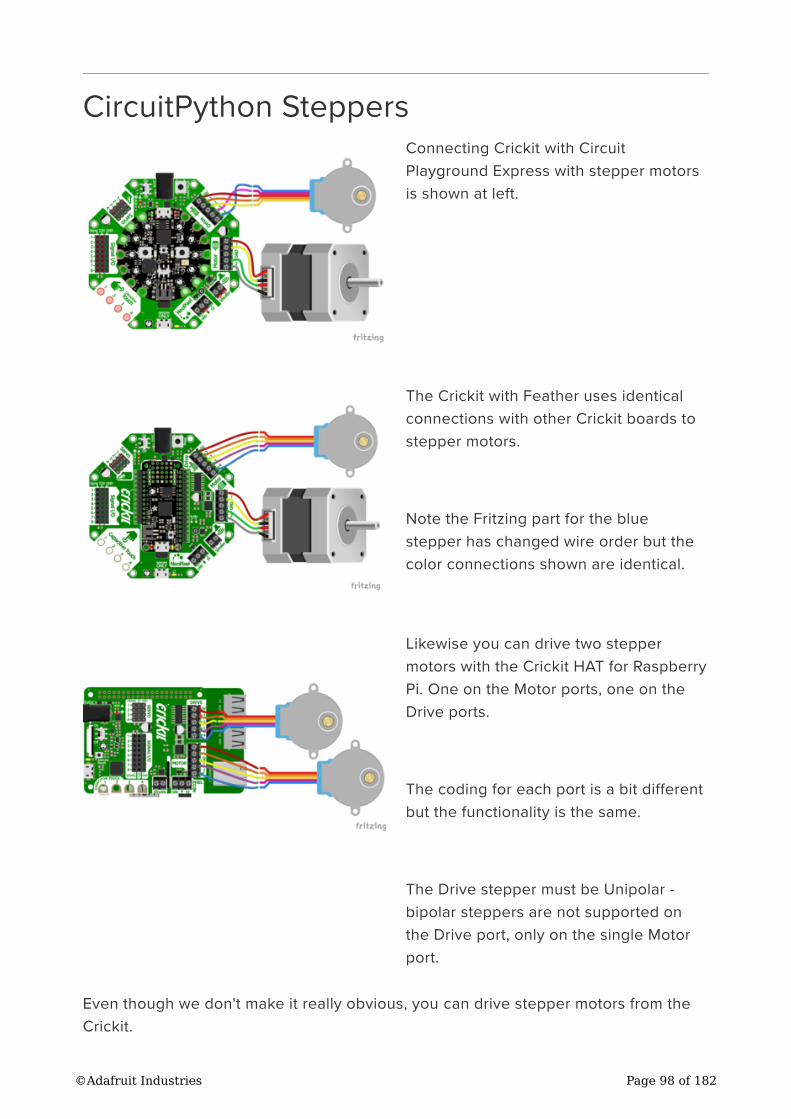
CircuitPython Steppers
Connecting Crickit with Circuit
Playground Express with stepper motors
is shown at left.
The Crickit with Feather uses identical
connections with other Crickit boards to
stepper motors.
Note the Fritzing part for the blue
stepper has changed wire order but the
color connections shown are identical.
Likewise you can drive two stepper
motors with the Crickit HAT for Raspberry
Pi. One on the Motor ports, one on the
Drive ports.
The coding for each port is a bit different
but the functionality is the same.
The Drive stepper must be Unipolar -
bipolar steppers are not supported on
the Drive port, only on the single Motor
port.
Even though we don't make it really obvious, you can drive stepper motors from the
Crickit.
©Adafruit Industries Page 98 of 182
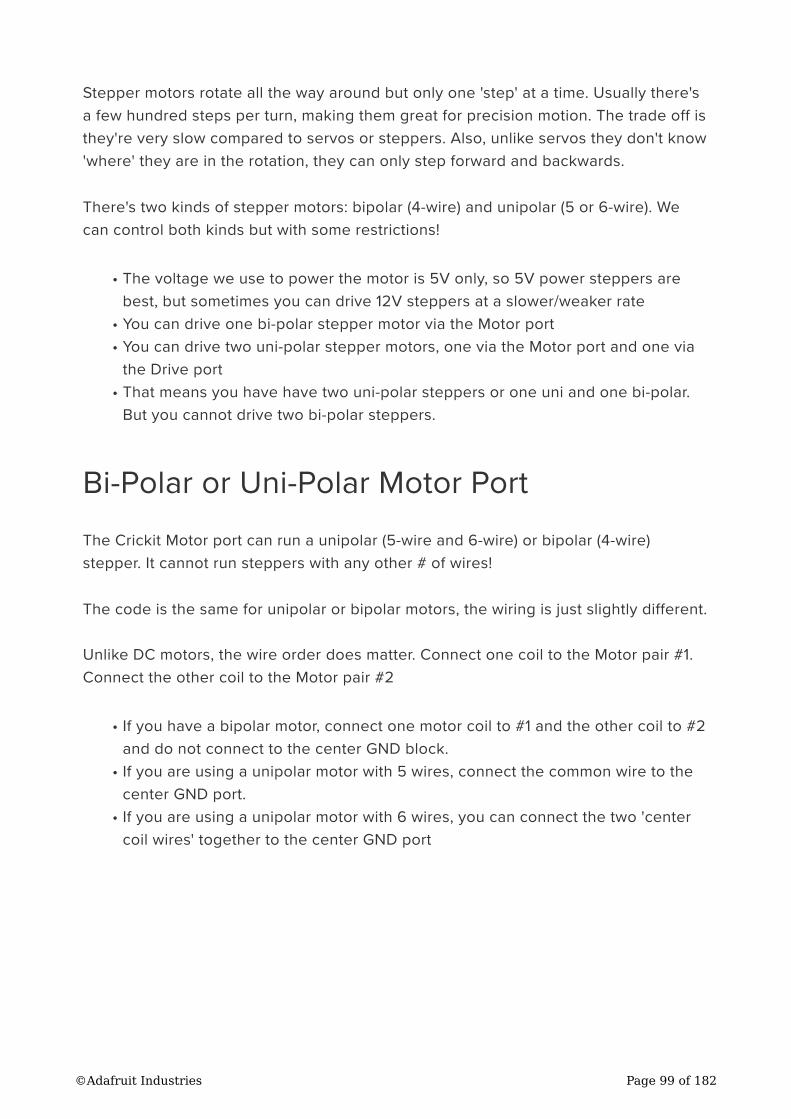
Stepper motors rotate all the way around but only one 'step' at a time. Usually there's
a few hundred steps per turn, making them great for precision motion. The trade off is
they're very slow compared to servos or steppers. Also, unlike servos they don't know
'where' they are in the rotation, they can only step forward and backwards.
There's two kinds of stepper motors: bipolar (4-wire) and unipolar (5 or 6-wire). We
can control both kinds but with some restrictions!
The voltage we use to power the motor is 5V only, so 5V power steppers are
best, but sometimes you can drive 12V steppers at a slower/weaker rate
You can drive one bi-polar stepper motor via the Motor port
You can drive two uni-polar stepper motors, one via the Motor port and one via
the Drive port
That means you have have two uni-polar steppers or one uni and one bi-polar.
But you cannot drive two bi-polar steppers.
Bi-Polar or Uni-Polar Motor Port
The Crickit Motor port can run a unipolar (5-wire and 6-wire) or bipolar (4-wire)
stepper. It cannot run steppers with any other # of wires!
The code is the same for unipolar or bipolar motors, the wiring is just slightly different.
Unlike DC motors, the wire order does matter. Connect one coil to the Motor pair #1.
Connect the other coil to the Motor pair #2
If you have a bipolar motor, connect one motor coil to #1 and the other coil to #2
and do not connect to the center GND block.
If you are using a unipolar motor with 5 wires, connect the common wire to the
center GND port.
If you are using a unipolar motor with 6 wires, you can connect the two 'center
coil wires' together to the center GND port
•
•
•
•
•
•
•
©Adafruit Industries Page 99 of 182
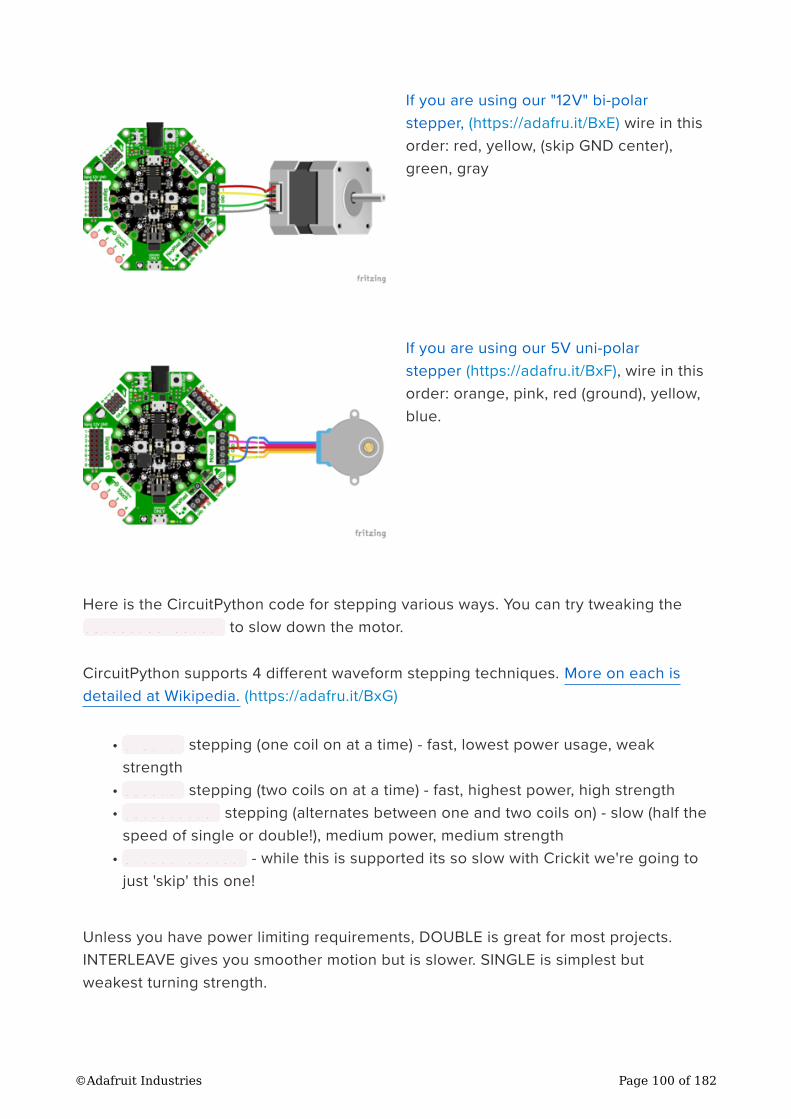
If you are using our "12V" bi-polar
stepper, (https://adafru.it/BxE) wire in this
order: red, yellow, (skip GND center),
green, gray
If you are using our 5V uni-polar
stepper (https://adafru.it/BxF), wire in this
order: orange, pink, red (ground), yellow,
blue.
Here is the CircuitPython code for stepping various ways. You can try tweaking the
INTERSTEP_DELAY to slow down the motor.
CircuitPython supports 4 different waveform stepping techniques. More on each is
detailed at Wikipedia. (https://adafru.it/BxG)
SINGLE stepping (one coil on at a time) - fast, lowest power usage, weak
strength
DOUBLE stepping (two coils on at a time) - fast, highest power, high strength
INTERLEAVE stepping (alternates between one and two coils on) - slow (half the
speed of single or double!), medium power, medium strength
MICROSTEPPING - while this is supported its so slow with Crickit we're going to
just 'skip' this one!
Unless you have power limiting requirements, DOUBLE is great for most projects.
INTERLEAVE gives you smoother motion but is slower. SINGLE is simplest but
weakest turning strength.
•
•
•
•
©Adafruit Industries Page 100 of 182
import time
from adafruit_crickit import crickit
from adafruit_motor import stepper
print("Bi-Polar or Uni-Polar Stepper motor demo!")
# make stepper motor a variable to make code shorter to type!
stepper_motor = crickit.stepper_motor
# increase to slow down, decrease to speed up!
INTERSTEP_DELAY = 0.01
while True:
print("Single step")
for i in range(200):
stepper_motor.onestep(direction=stepper.FORWARD)
time.sleep(INTERSTEP_DELAY)
for i in range(200):
stepper_motor.onestep(direction=stepper.BACKWARD)
time.sleep(INTERSTEP_DELAY)
print("Double step")
for i in range(200):
stepper_motor.onestep(direction=stepper.FORWARD, style=stepper.DOUBLE)
time.sleep(INTERSTEP_DELAY)
for i in range(200):
stepper_motor.onestep(direction=stepper.BACKWARD, style=stepper.DOUBLE)
time.sleep(INTERSTEP_DELAY)
print("Interleave step")
for i in range(200):
stepper_motor.onestep(direction=stepper.FORWARD, style=stepper.INTERLEAVE)
time.sleep(INTERSTEP_DELAY)
for i in range(200):
stepper_motor.onestep(direction=stepper.BACKWARD, style=stepper.INTERLEAVE)
time.sleep(INTERSTEP_DELAY)
CircuitPython stepper motor control is pretty simple - you can access the motor port
for stepper control via the crickit.stepper_motor object (it's an adafruit_motor.
stepper type object (https://adafru.it/BNE)).
With that object, you can call onestep() to step once, with the direction and
stepping style included. The default direction is FORWARD and the default style is S
INGLE .
Note that 'forward' and 'backward' are, like DC motors, dependent on your wiring and
coil order so you can flip around the coil wiring if you want to change what direction
'forward' and 'backward' means.
Putting time.sleep() 's between steps will let you slow down the stepper motor,
however most steppers are geared so you may not want any delays.
©Adafruit Industries Page 101 of 182
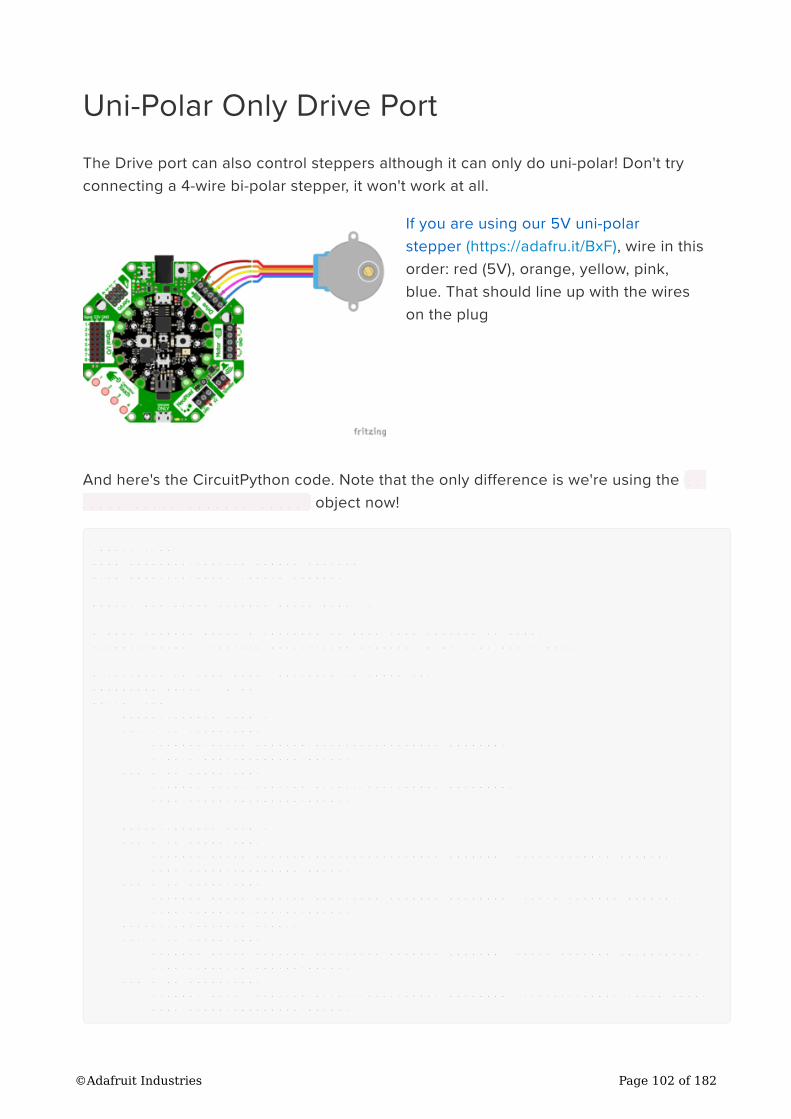
Uni-Polar Only Drive Port
The Drive port can also control steppers although it can only do uni-polar! Don't try
connecting a 4-wire bi-polar stepper, it won't work at all.
If you are using our 5V uni-polar
stepper (https://adafru.it/BxF), wire in this
order: red (5V), orange, yellow, pink,
blue. That should line up with the wires
on the plug
And here's the CircuitPython code. Note that the only difference is we're using the cr
ickit.drive_stepper_motor object now!
import time
from adafruit_crickit import crickit
from adafruit_motor import stepper
print("Uni-Polar Stepper motor demo!")
# make stepper motor a variable to make code shorter to type!
stepper_motor = crickit.drive_stepper_motor # Use the drive port
# increase to slow down, decrease to speed up!
INTERSTEP_DELAY = 0.02
while True:
print("Single step")
for i in range(200):
stepper_motor.onestep(direction=stepper.FORWARD)
time.sleep(INTERSTEP_DELAY)
for i in range(200):
stepper_motor.onestep(direction=stepper.BACKWARD)
time.sleep(INTERSTEP_DELAY)
print("Double step")
for i in range(200):
stepper_motor.onestep(direction=stepper.FORWARD, style=stepper.DOUBLE)
time.sleep(INTERSTEP_DELAY)
for i in range(200):
stepper_motor.onestep(direction=stepper.BACKWARD, style=stepper.DOUBLE)
time.sleep(INTERSTEP_DELAY)
print("Interleave step")
for i in range(200):
stepper_motor.onestep(direction=stepper.FORWARD, style=stepper.INTERLEAVE)
time.sleep(INTERSTEP_DELAY)
for i in range(200):
stepper_motor.onestep(direction=stepper.BACKWARD, style=stepper.INTERLEAVE)
time.sleep(INTERSTEP_DELAY)
©Adafruit Industries Page 102 of 182
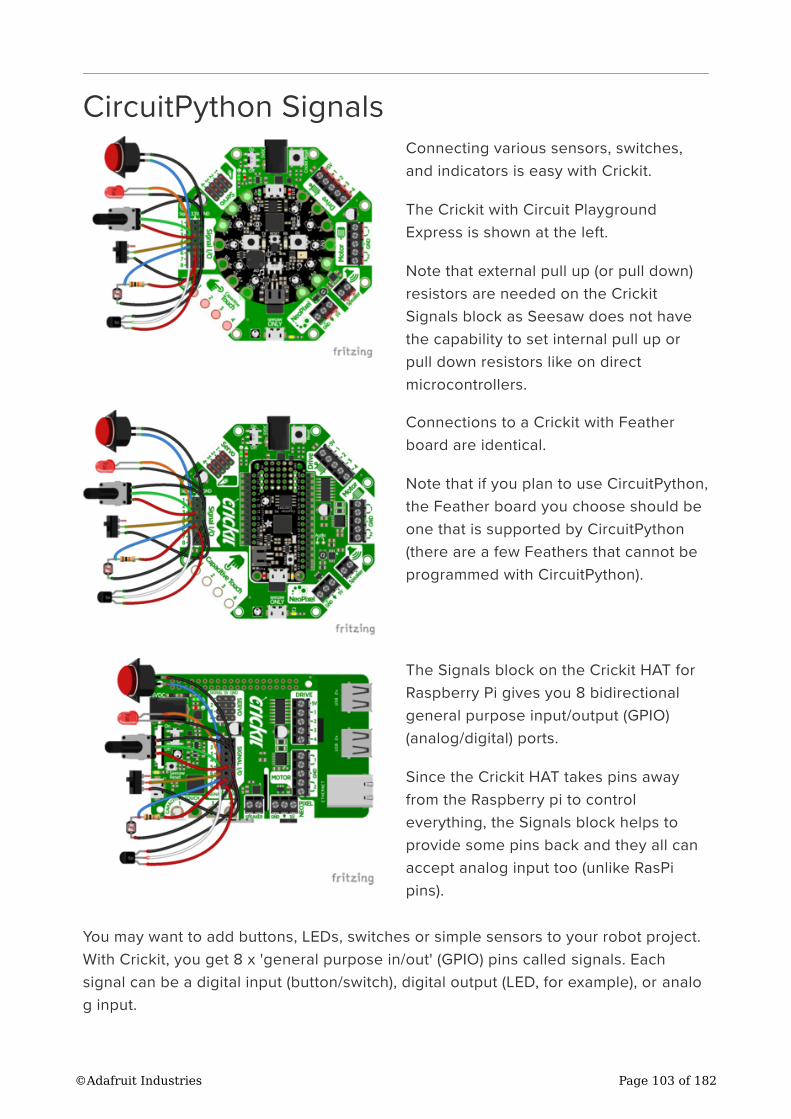
CircuitPython Signals
Connecting various sensors, switches,
and indicators is easy with Crickit.
The Crickit with Circuit Playground
Express is shown at the left.
Note that external pull up (or pull down)
resistors are needed on the Crickit
Signals block as Seesaw does not have
the capability to set internal pull up or
pull down resistors like on direct
microcontrollers.
Connections to a Crickit with Feather
board are identical.
Note that if you plan to use CircuitPython,
the Feather board you choose should be
one that is supported by CircuitPython
(there are a few Feathers that cannot be
programmed with CircuitPython).
The Signals block on the Crickit HAT for
Raspberry Pi gives you 8 bidirectional
general purpose input/output (GPIO)
(analog/digital) ports.
Since the Crickit HAT takes pins away
from the Raspberry pi to control
everything, the Signals block helps to
provide some pins back and they all can
accept analog input too (unlike RasPi
pins).
You may want to add buttons, LEDs, switches or simple sensors to your robot project.
With Crickit, you get 8 x 'general purpose in/out' (GPIO) pins called signals. Each
signal can be a digital input (button/switch), digital output (LED, for example), or analo
g input.
©Adafruit Industries Page 103 of 182
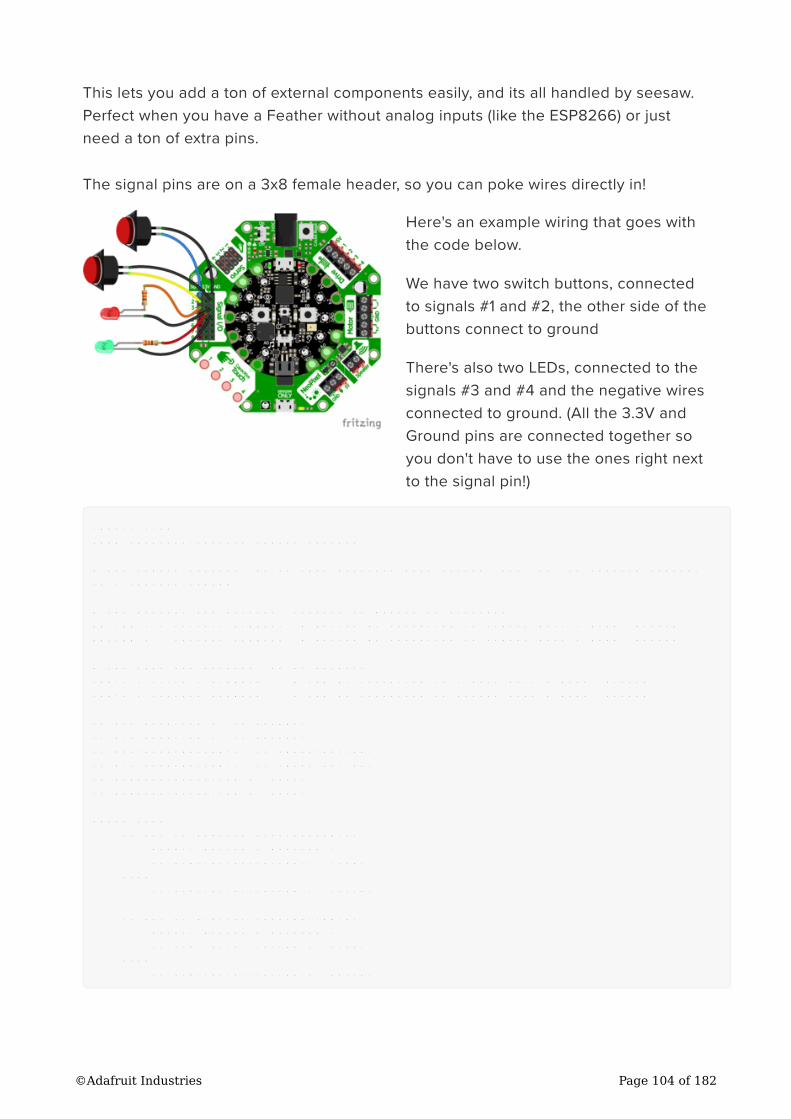
This lets you add a ton of external components easily, and its all handled by seesaw.
Perfect when you have a Feather without analog inputs (like the ESP8266) or just
need a ton of extra pins.
The signal pins are on a 3x8 female header, so you can poke wires directly in!
Here's an example wiring that goes with
the code below.
We have two switch buttons, connected
to signals #1 and #2, the other side of the
buttons connect to ground
There's also two LEDs, connected to the
signals #3 and #4 and the negative wires
connected to ground. (All the 3.3V and
Ground pins are connected together so
you don't have to use the ones right next
to the signal pin!)
import time
from adafruit_crickit import crickit
# For signal control, we'll chat directly with seesaw, use 'ss' to shorted typing!
ss = crickit.seesaw
# Two buttons are pullups, connect to ground to activate
BUTTON_1 = crickit.SIGNAL1 # button #1 connected to signal port 1 & ground
BUTTON_2 = crickit.SIGNAL2 # button #2 connected to signal port 2 & ground
# Two LEDs are outputs, on by default
LED_1 = crickit.SIGNAL3 # LED #1 connected to signal port 3 & ground
LED_2 = crickit.SIGNAL4 # LED #2 connected to signal port 4 & ground
ss.pin_mode(LED_1, ss.OUTPUT)
ss.pin_mode(LED_2, ss.OUTPUT)
ss.pin_mode(BUTTON_1, ss.INPUT_PULLUP)
ss.pin_mode(BUTTON_2, ss.INPUT_PULLUP)
ss.digital_write(LED_1, True)
ss.digital_write(LED_2, True)
while True:
if not ss.digital_read(BUTTON_1):
print("Button 1 pressed")
ss.digital_write(LED_1, True)
else:
ss.digital_write(LED_1, False)
if not ss.digital_read(BUTTON_2):
print("Button 2 pressed")
ss.digital_write(LED_2, True)
else:
ss.digital_write(LED_2, False)
©Adafruit Industries Page 104 of 182
Each of the 8 signal pin numbers is available under the crickit object as SIGNAL1
through SIGNAL8 . Note these are not DigitalInOut or Pin objects! We need to use the
crickit.seesaw object to set the mode, direction, and readings
To simplify our code we shorted the crickit.seesaw object to just ss
# For signal control, we'll chat directly with seesaw, use 'ss' to shorted typing!
ss = crickit.seesaw
Digital Pin Modes
You can set the mode of each signal pin with ss.pin_mode(signal, mode) where
signal is the crickit.SIGNAL# from above and mode can be ss.OUTPUT , ss.IN
PUT or ss.INPUT_PULLUP .
ss.pin_mode(BUTTON_1, ss.INPUT_PULLUP)
ss.pin_mode(BUTTON_2, ss.INPUT_PullUP)
...
ss.pin_mode(LED_1, ss.OUTPUT)
ss.pin_mode(LED_2, ss.OUTPUT)
Digital Read
Then, you can read the values True or False with ss.digital_read(signal)
Don't forget you have to set it to be an INPUT first! And if you don't have an external
pull up resistor, you'll need to set it in the code.
ss.digital_read(BUTTON_1)
Digital Write
Or, you can set the signal you want to a high value with ss.digital_write(signal,
True) , or set to low value with ss.digital_write(signal, False) . Don't forget
you have to set it to be an OUTPUT first!
# LED On
ss.digital_write(LED_2, True)
# LED Off
ss.digital_write(LED_2, False)
©Adafruit Industries Page 105 of 182
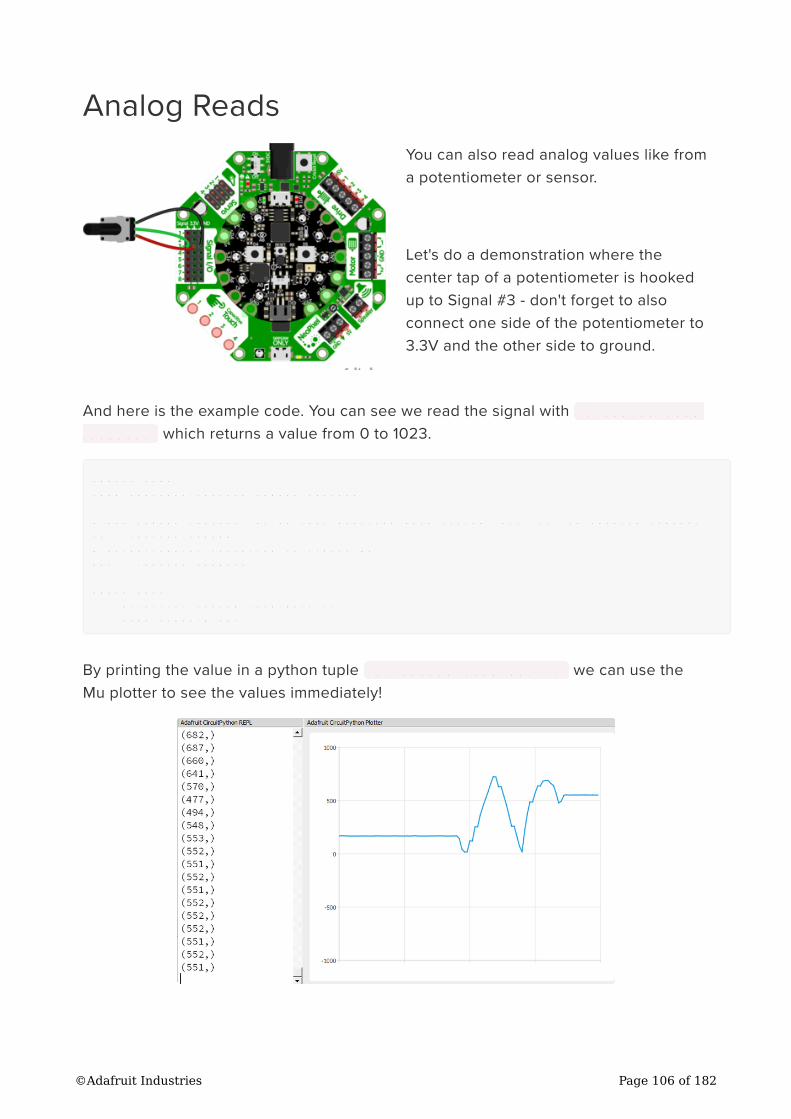
Analog Reads
You can also read analog values like from
a potentiometer or sensor.
Let's do a demonstration where the
center tap of a potentiometer is hooked
up to Signal #3 - don't forget to also
connect one side of the potentiometer to
3.3V and the other side to ground.
And here is the example code. You can see we read the signal with ss.analog_read
(signal) which returns a value from 0 to 1023.
import time
from adafruit_crickit import crickit
# For signal control, we'll chat directly with seesaw, use 'ss' to shorted typing!
ss = crickit.seesaw
# potentiometer connected to signal #3
pot = crickit.SIGNAL3
while True:
print((ss.analog_read(pot),))
time.sleep(0.25)
By printing the value in a python tuple (ss.analog_read(pot),) we can use the
Mu plotter to see the values immediately!
©Adafruit Industries Page 106 of 182
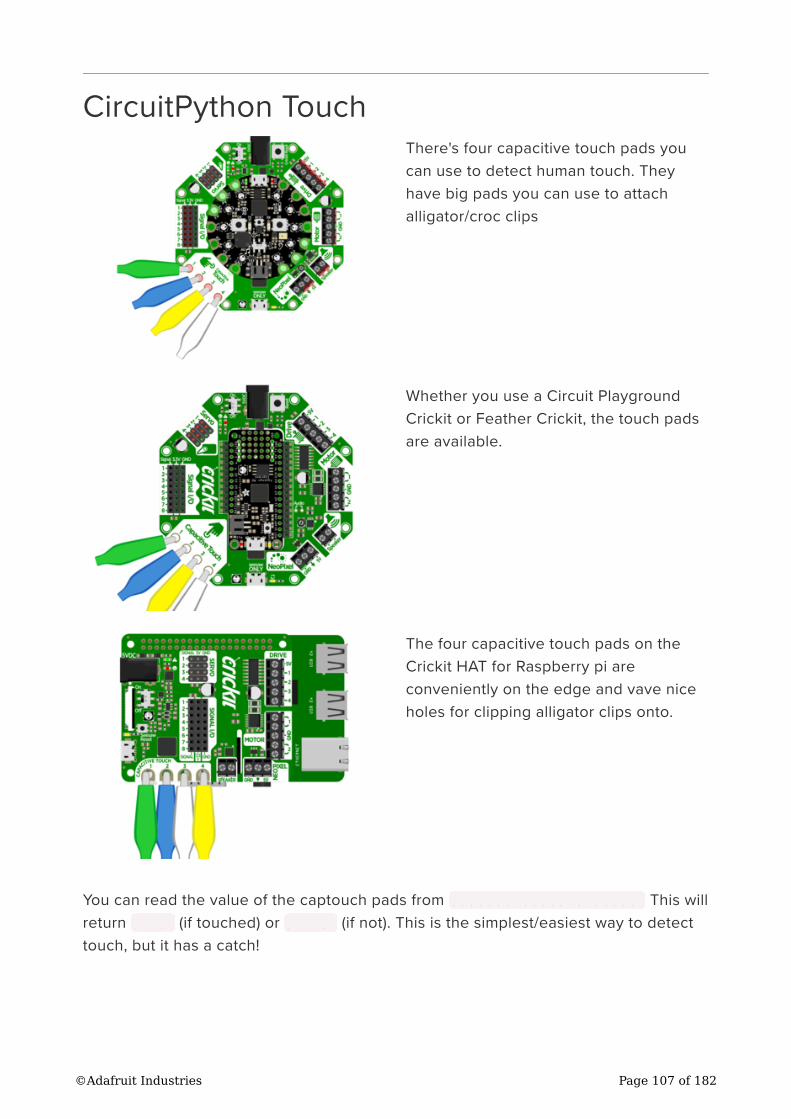
CircuitPython Touch
There's four capacitive touch pads you
can use to detect human touch. They
have big pads you can use to attach
alligator/croc clips
Whether you use a Circuit Playground
Crickit or Feather Crickit, the touch pads
are available.
The four capacitive touch pads on the
Crickit HAT for Raspberry pi are
conveniently on the edge and vave nice
holes for clipping alligator clips onto.
You can read the value of the captouch pads from crickit.touch_#.value This will
return True (if touched) or False (if not). This is the simplest/easiest way to detect
touch, but it has a catch!
©Adafruit Industries Page 107 of 182
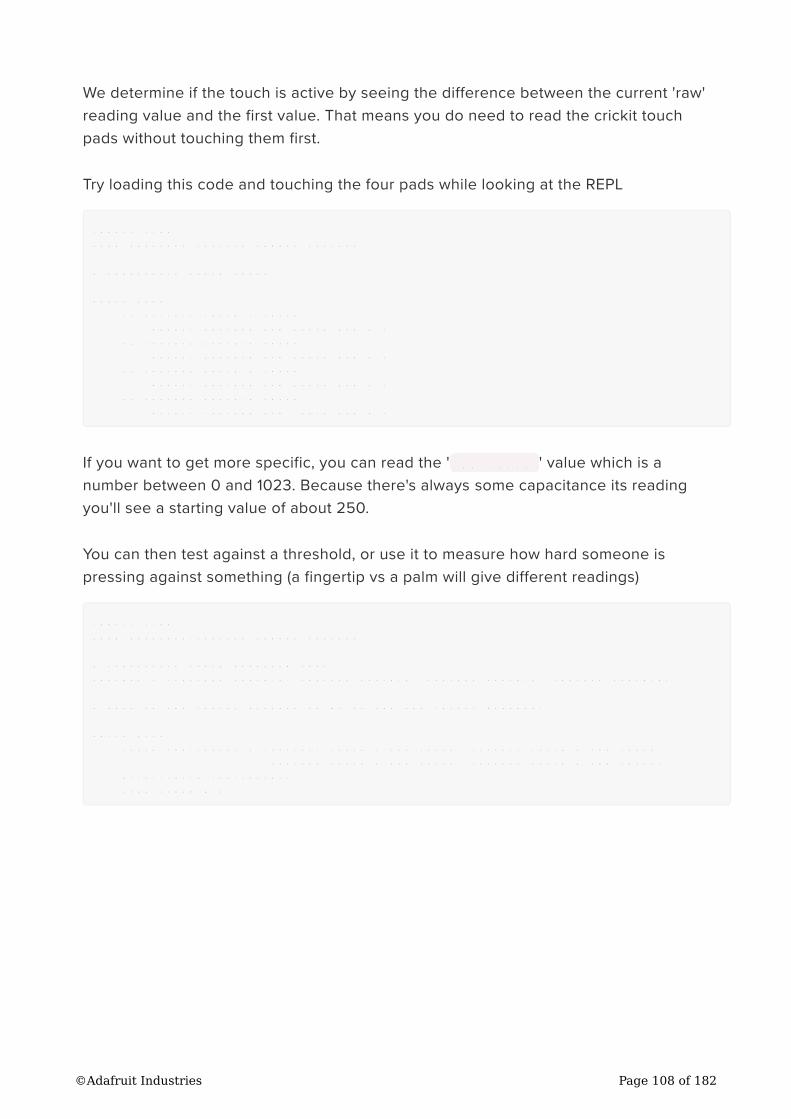
We determine if the touch is active by seeing the difference between the current 'raw'
reading value and the first value. That means you do need to read the crickit touch
pads without touching them first.
Try loading this code and touching the four pads while looking at the REPL
import time
from adafruit_crickit import crickit
# Capacitive touch tests
while True:
if crickit.touch_1.value:
print("Touched Cap Touch Pad 1")
if crickit.touch_2.value:
print("Touched Cap Touch Pad 2")
if crickit.touch_3.value:
print("Touched Cap Touch Pad 3")
if crickit.touch_4.value:
print("Touched Cap Touch Pad 4")
If you want to get more specific, you can read the ' raw_value ' value which is a
number between 0 and 1023. Because there's always some capacitance its reading
you'll see a starting value of about 250.
You can then test against a threshold, or use it to measure how hard someone is
pressing against something (a fingertip vs a palm will give different readings)
import time
from adafruit_crickit import crickit
# Capacitive touch graphing test
touches = (crickit.touch_1, crickit.touch_2, crickit.touch_3, crickit.touch_4)
# Open up the serial Plotter in Mu to see the values graphed!
while True:
touch_raw_values = (crickit.touch_1.raw_value, crickit.touch_2.raw_value,
crickit.touch_3.raw_value, crickit.touch_4.raw_value)
print(touch_raw_values)
time.sleep(0.1)
©Adafruit Industries Page 108 of 182
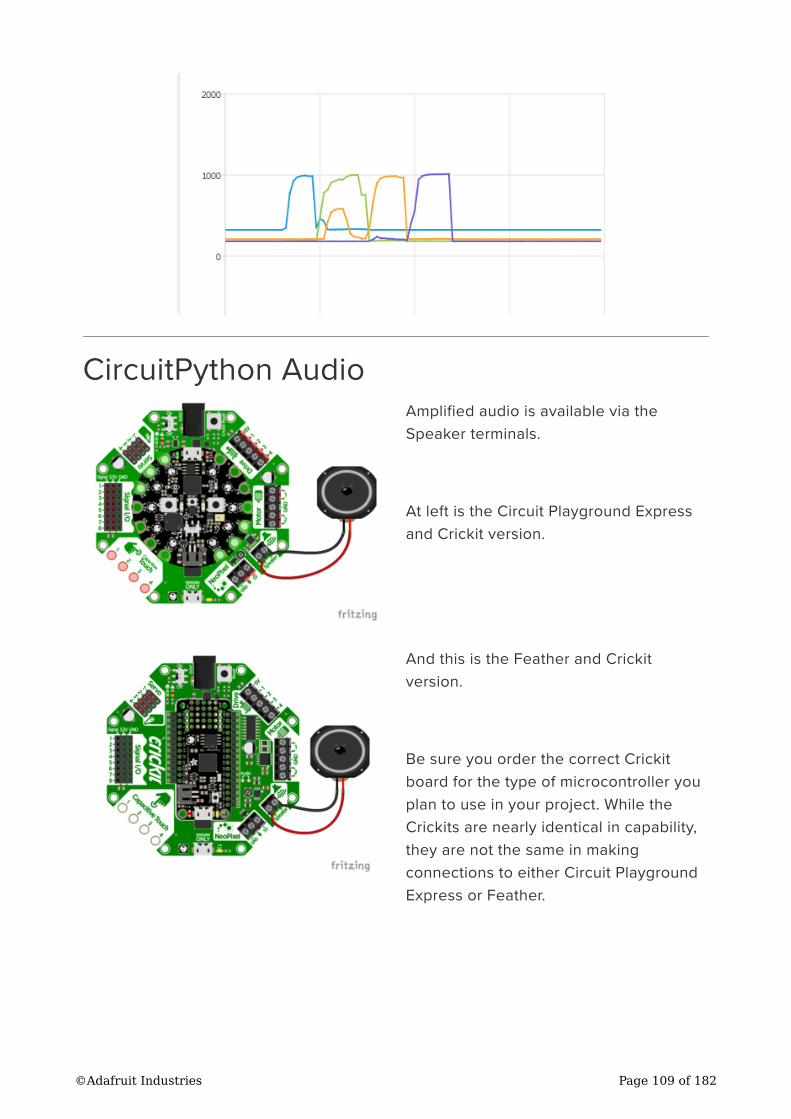
CircuitPython Audio
Amplified audio is available via the
Speaker terminals.
At left is the Circuit Playground Express
and Crickit version.
And this is the Feather and Crickit
version.
Be sure you order the correct Crickit
board for the type of microcontroller you
plan to use in your project. While the
Crickits are nearly identical in capability,
they are not the same in making
connections to either Circuit Playground
Express or Feather.
©Adafruit Industries Page 109 of 182
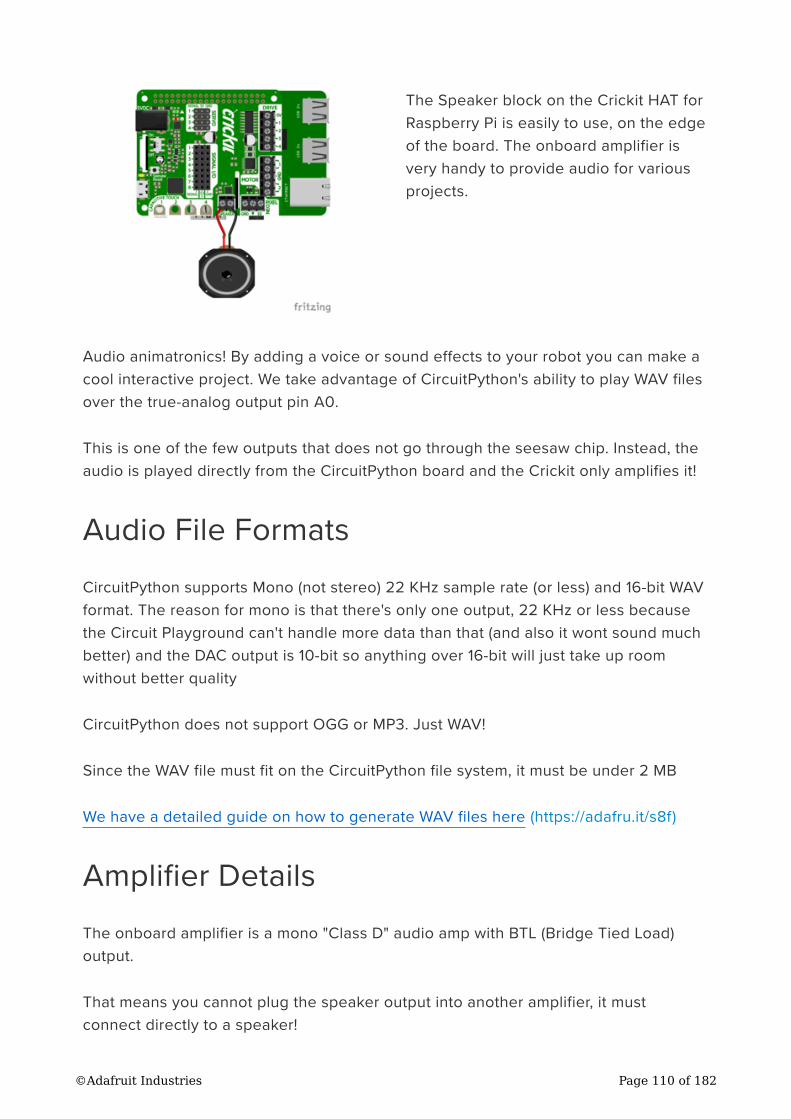
The Speaker block on the Crickit HAT for
Raspberry Pi is easily to use, on the edge
of the board. The onboard amplifier is
very handy to provide audio for various
projects.
Audio animatronics! By adding a voice or sound effects to your robot you can make a
cool interactive project. We take advantage of CircuitPython's ability to play WAV files
over the true-analog output pin A0.
This is one of the few outputs that does not go through the seesaw chip. Instead, the
audio is played directly from the CircuitPython board and the Crickit only amplifies it!
Audio File Formats
CircuitPython supports Mono (not stereo) 22 KHz sample rate (or less) and 16-bit WAV
format. The reason for mono is that there's only one output, 22 KHz or less because
the Circuit Playground can't handle more data than that (and also it wont sound much
better) and the DAC output is 10-bit so anything over 16-bit will just take up room
without better quality
CircuitPython does not support OGG or MP3. Just WAV!
Since the WAV file must fit on the CircuitPython file system, it must be under 2 MB
We have a detailed guide on how to generate WAV files here (https://adafru.it/s8f)
Amplifier Details
The onboard amplifier is a mono "Class D" audio amp with BTL (Bridge Tied Load)
output.
That means you cannot plug the speaker output into another amplifier, it must
connect directly to a speaker!
©Adafruit Industries Page 110 of 182
You can use just about any 4 to 8Ω speaker (6 Ω is OK too, just not as common). The
amplifier can drive up to 3 Watts into 4Ω and 1 Watt into 8Ω. That means its ok to
drive a 5 Watt speaker, it just wont be as loud as it could be with a bigger amp (but
you wont damage the amp). You can also drive speakers that are smaller, like an 8Ω
0.5 W but make sure you don't turn the audio volume potentiometer up, as it could
damage the speaker by overpowering it.
Basic Audio Playback
import audioio
import audiocore
import board
wavfile = "howto.wav"
f = open(wavfile, "rb")
wav = audiocore.WaveFile(f)
a = audioio.AudioOut(board.A0)
a.play(wav)
# You can now do all sorts of stuff here while the audio plays
# such as move servos, motors, read sensors...
# Or wait for the audio to finish playing:
while a.playing:
pass
f.close()
Here is the audio file we're using for this example
howto.wav
https://adafru.it/Be4
You must drag/copy this onto your CIRCUITPY disk drive, it's a big file so it will take a
minute to copy over
Import Libraries
We start by importing the libraries that we need to make audio output import
audioio and import audiocore Then we import board , our standard hardware
library.
©Adafruit Industries Page 111 of 182
Create wave file and audio output
Next we set the name of the file we want to open, which is a wave file wavfile =
"howto.wav" and then open the file as a readable binary and store the file object in f
which is what we use to actually read audio from: f = open(wavfile, "rb")
Now we will ask the audio playback system to load the wave data from the file wav =
audiocore.WaveFile(f) and finally request that the audio is played through the A0
analog output pin a = audioio.AudioOut(board.A0)
The audio file is now locked-and-loaded, and can be played at any time with a.play
(wav)
Audio playback occurs in the background, using "DMA" (direct memory access) so you
can control servos, motors, read sensors, whatever you like, while the DMA is
happening. Since it happens asynchronously, you may want to figure out when its
done playing. You can do that by checking the value of a.playing if it's True then
its still processing audio, it will return False when complete.
Interactive Audio
OK just playing an audio file is one thing, but maybe you want to have some
interactivity, such as waiting for the person to touch something or press a button?
Here's an example of using a time-delay and then pausing until something occurs:
from busio import I2C
from adafruit_seesaw.seesaw import Seesaw
import audioio
import audiocore
import board
import time
# Create seesaw object
i2c = I2C(board.SCL, board.SDA)
seesaw = Seesaw(i2c)
# what counts as a 'touch'
CAPTOUCH_THRESH = 500
wavfile = "howto.wav"
f = open(wavfile, "rb")
wav = audiocore.WaveFile(f)
a = audioio.AudioOut(board.A0)
a.play(wav)
t = time.monotonic() # this is the time when we started
# wait until we're at timecode 5.5 seconds into the audio
while time.monotonic() - t < 5.5:
©Adafruit Industries Page 112 of 182
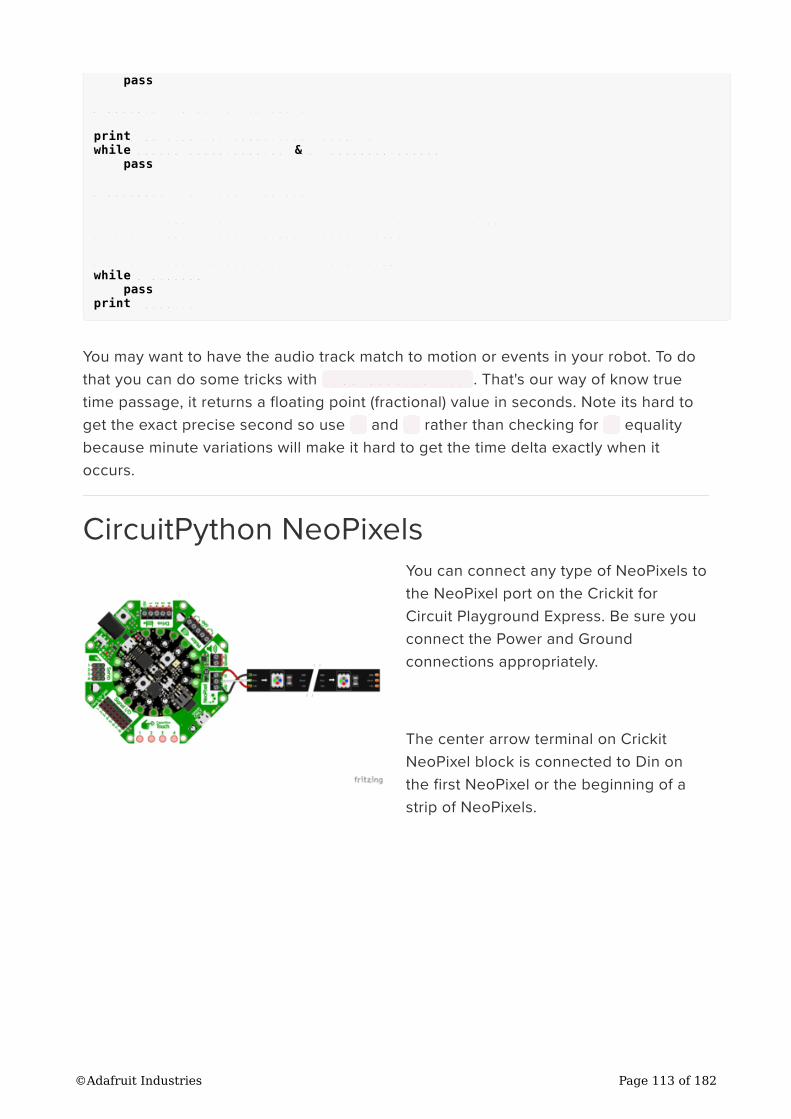
pass
a.pause() # pause the audio
print("Waiting for Capacitive touch!")
while seesaw.touch_read(0) < CAPTOUCH_THRESH:
pass
a.resume() # resume the audio
# You can now do all sorts of stuff here while the audio plays
# such as move servos, motors, read sensors...
# Or wait for the audio to finish playing:
while a.playing:
pass
print("Done!")
You may want to have the audio track match to motion or events in your robot. To do
that you can do some tricks with time.monotonic() . That's our way of know true
time passage, it returns a floating point (fractional) value in seconds. Note its hard to
get the exact precise second so use > and < rather than checking for = equality
because minute variations will make it hard to get the time delta exactly when it
occurs.
CircuitPython NeoPixels
You can connect any type of NeoPixels to
the NeoPixel port on the Crickit for
Circuit Playground Express. Be sure you
connect the Power and Ground
connections appropriately.
The center arrow terminal on Crickit
NeoPixel block is connected to Din on
the first NeoPixel or the beginning of a
strip of NeoPixels.
©Adafruit Industries Page 113 of 182
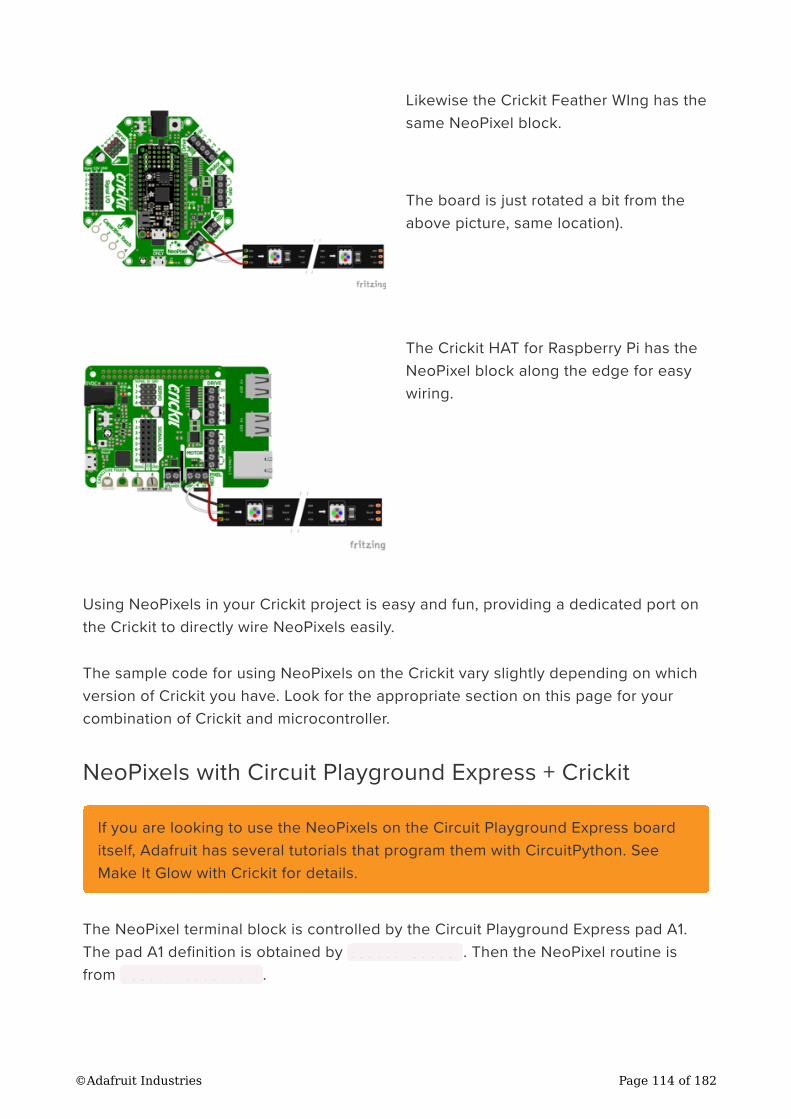
Likewise the Crickit Feather WIng has the
same NeoPixel block.
The board is just rotated a bit from the
above picture, same location).
The Crickit HAT for Raspberry Pi has the
NeoPixel block along the edge for easy
wiring.
Using NeoPixels in your Crickit project is easy and fun, providing a dedicated port on
the Crickit to directly wire NeoPixels easily.
The sample code for using NeoPixels on the Crickit vary slightly depending on which
version of Crickit you have. Look for the appropriate section on this page for your
combination of Crickit and microcontroller.
NeoPixels with Circuit Playground Express + Crickit
The NeoPixel terminal block is controlled by the Circuit Playground Express pad A1.
The pad A1 definition is obtained by import board . Then the NeoPixel routine is
from import neopixel .
If you are looking to use the NeoPixels on the Circuit Playground Express board
itself, Adafruit has several tutorials that program them with CircuitPython. See
Make It Glow with Crickit for details.
©Adafruit Industries Page 114 of 182
Various animations are provided by def ined
functions wheel , color_chase and rainbow_cycle . Various solid colors are then
defined, you are free to use whichever colors you wish.
You can define a new color variable as a Python tuple with three values for red,
green, blue, for example WHITE = (255, 255, 255) .
# Drive NeoPixels on the NeoPixels Block on Crickit for
# Circuit Playground Express
import time
from rainbowio import colorwheel
import neopixel
import board
num_pixels = 30 # Number of pixels driven from Crickit NeoPixel terminal
# The following line sets up a NeoPixel strip on Crickit CPX pin A1
pixels = neopixel.NeoPixel(board.A1, num_pixels, brightness=0.3,
auto_write=False)
def color_chase(color, wait):
for i in range(num_pixels):
pixels[i] = color
time.sleep(wait)
pixels.show()
time.sleep(0.5)
def rainbow_cycle(wait):
for j in range(255):
for i in range(num_pixels):
rc_index = (i * 256 // num_pixels) + j
pixels[i] = colorwheel(rc_index & 255)
pixels.show()
time.sleep(wait)
RED = (255, 0, 0)
YELLOW = (255, 150, 0)
GREEN = (0, 255, 0)
CYAN = (0, 255, 255)
BLUE = (0, 0, 255)
PURPLE = (180, 0, 255)
while True:
print("fill")
pixels.fill(RED)
pixels.show()
# Increase or decrease to change the speed of the solid color change.
time.sleep(1)
pixels.fill(GREEN)
pixels.show()
time.sleep(1)
pixels.fill(BLUE)
pixels.show()
time.sleep(1)
print("chase")
color_chase(RED, 0.1) # Increase the number to slow down the color chase
color_chase(YELLOW, 0.1)
color_chase(GREEN, 0.1)
color_chase(CYAN, 0.1)
color_chase(BLUE, 0.1)
color_chase(PURPLE, 0.1)
©Adafruit Industries Page 115 of 182
print("rainbow")
rainbow_cycle(0) # Increase the number to slow down the rainbow
NeoPixels and the Crickit FeatherWing or Crickit Hat
The NeoPixel block signal wire is connected to the Crickit Seesaw control chip pin
#20. The following code sets up an external 30 NeoPixel strip connected to the
Crickit FeatherWing or HAT
On Raspberry Pi, you'll also need to add the library: from your command line run the
following command:
sudo pip3 install rpi_ws281x adafruit-circuitpython-neopixel
# Drive NeoPixels on the NeoPixels Block on Crickit FeatherWing
import time
from rainbowio import colorwheel
from adafruit_crickit import crickit
from adafruit_seesaw.neopixel import NeoPixel
num_pixels = 30 # Number of pixels driven from Crickit NeoPixel terminal
# The following line sets up a NeoPixel strip on Seesaw pin 20 for Feather
pixels = NeoPixel(crickit.seesaw, 20, num_pixels)
def color_chase(color, wait):
for i in range(num_pixels):
pixels[i] = color
time.sleep(wait)
pixels.show()
time.sleep(0.5)
def rainbow_cycle(wait):
for j in range(255):
for i in range(num_pixels):
rc_index = (i * 256 // num_pixels) + j
pixels[i] = colorwheel(rc_index & 255)
pixels.show()
time.sleep(wait)
RED = (255, 0, 0)
YELLOW = (255, 150, 0)
GREEN = (0, 255, 0)
CYAN = (0, 255, 255)
BLUE = (0, 0, 255)
PURPLE = (180, 0, 255)
while True:
print("fill")
pixels.fill(RED)
pixels.show()
# Increase or decrease to change the speed of the solid color change.
time.sleep(1)
pixels.fill(GREEN)
pixels.show()
time.sleep(1)
pixels.fill(BLUE)
pixels.show()
©Adafruit Industries Page 116 of 182
time.sleep(1)
print("chase")
color_chase(RED, 0.1) # Increase the number to slow down the color chase
color_chase(YELLOW, 0.1)
color_chase(GREEN, 0.1)
color_chase(CYAN, 0.1)
color_chase(BLUE, 0.1)
color_chase(PURPLE, 0.1)
print("rainbow")
rainbow_cycle(0) # Increase the number to slow down the rainbow
Crickit for micro:bit
Currently the micro:bit is not supported in CircuitPython. The micro:bit is
programmable in MicroPython but there is no Crickit drive support for MicroPython at
present.
For More Information
See the tutorial Make It Glow with Crickit (https://adafru.it/Cxx).
Python Docs
Python Docs (https://adafru.it/CAJ)
CircuitPython Examples
Need some...err...inspiration? Here's some example projects with CircuitPython code
and wiring diagrams. They're not full-featured guides but they provide a good basis
for seeing how to use Crickit!
Most of the examples use the Circuit Playground Express version of Crickit as that
was the first Crickit released.
For CircuitPython based projects, the Feather Crickit should work fine as long as the
project does not use Circuit Playground Express based hardware. There are a couple
of differences noted in this guide for things like audio use.
Also you must choose a Feather that is compatible with CircuitPython.
©Adafruit Industries Page 117 of 182
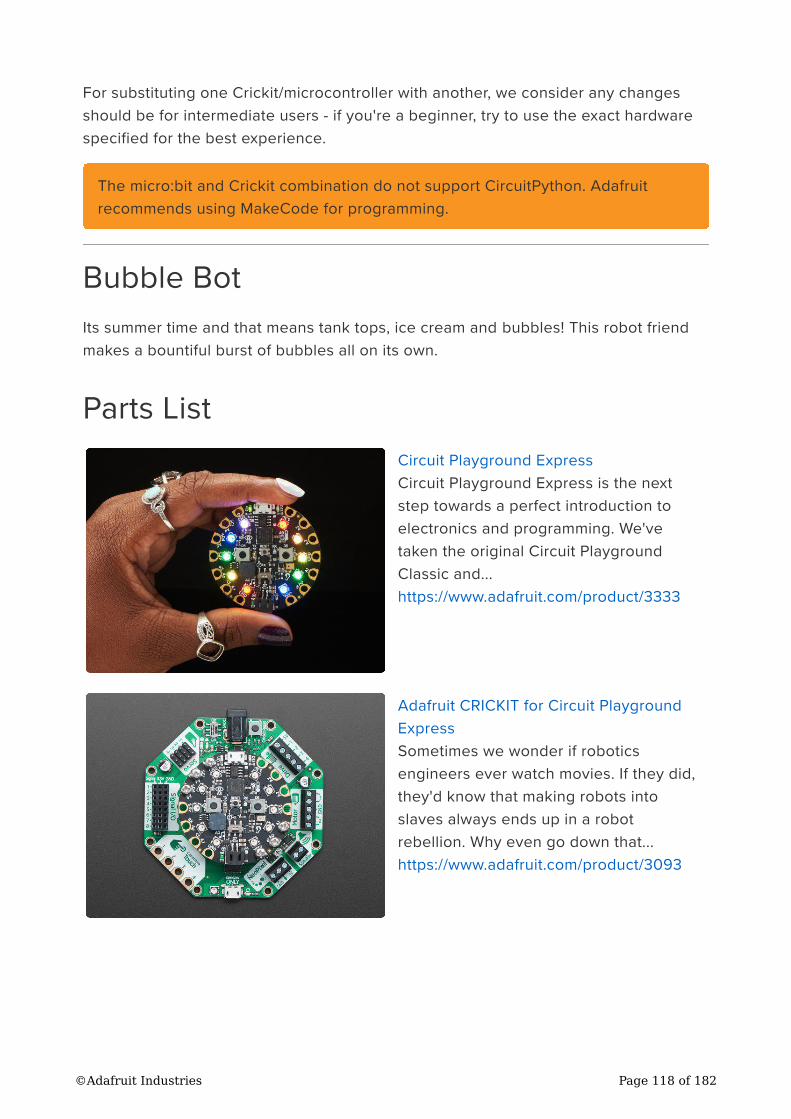
For substituting one Crickit/microcontroller with another, we consider any changes
should be for intermediate users - if you're a beginner, try to use the exact hardware
specified for the best experience.
Bubble Bot
Its summer time and that means tank tops, ice cream and bubbles! This robot friend
makes a bountiful burst of bubbles all on its own.
Parts List
Circuit Playground Express
Circuit Playground Express is the next
step towards a perfect introduction to
electronics and programming. We've
taken the original Circuit Playground
Classic and...
https://www.adafruit.com/product/3333
Adafruit CRICKIT for Circuit Playground
Express
Sometimes we wonder if robotics
engineers ever watch movies. If they did,
they'd know that making robots into
slaves always ends up in a robot
rebellion. Why even go down that...
https://www.adafruit.com/product/3093
The micro:bit and Crickit combination do not support CircuitPython. Adafruit
recommends using MakeCode for programming.
©Adafruit Industries Page 118 of 182

Standard servo - TowerPro SG-5010
This high-torque standard servo can
rotate approximately 180 degrees (90 in
each direction). You can use any servo
code, hardware, or library to control these
servos. Good for...
https://www.adafruit.com/product/155
DC Toy / Hobby Motor - 130 Size
These are standard '130 size' DC hobby
motors. They come with a wider operating
range than most toy motors: from 4.5 to
9VDC instead of 1.5-4.5V. This range
makes them perfect...
https://www.adafruit.com/product/711
Wiring Diagram
Code
This simple robot doesn't do a lot but it does it very well!
©Adafruit Industries Page 119 of 182
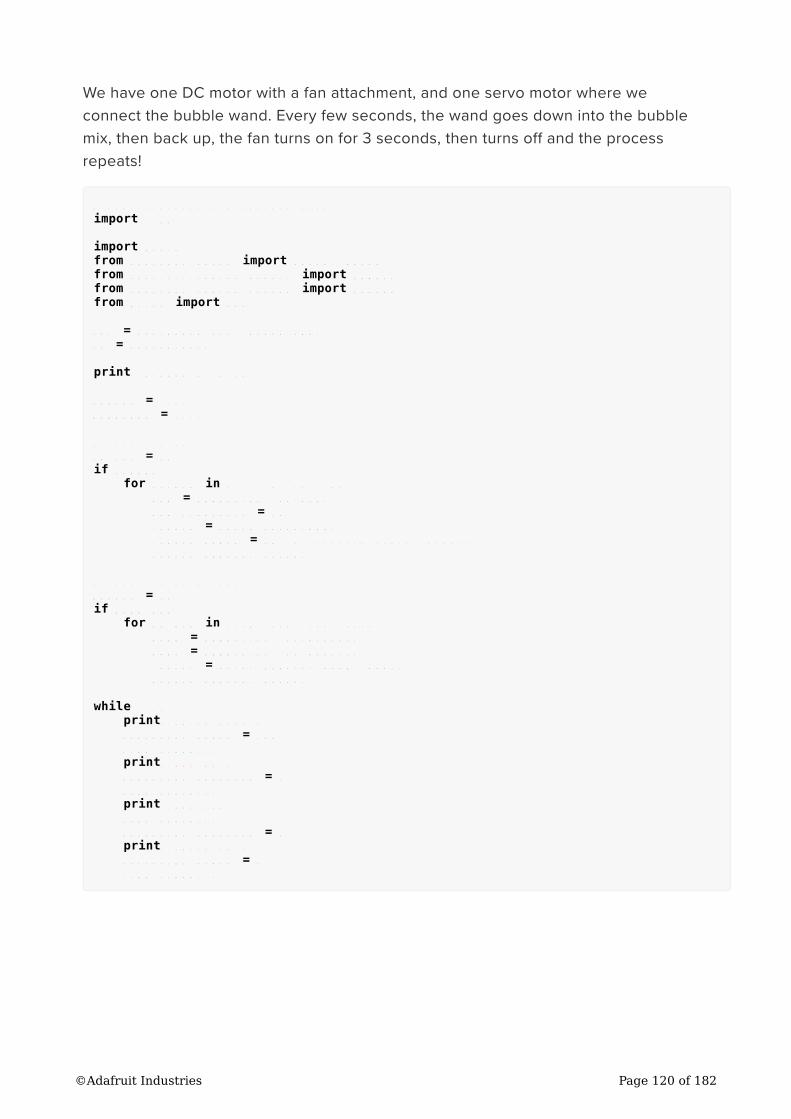
We have one DC motor with a fan attachment, and one servo motor where we
connect the bubble wand. Every few seconds, the wand goes down into the bubble
mix, then back up, the fan turns on for 3 seconds, then turns off and the process
repeats!
# CircuitPython 3.0 CRICKIT demo
import time
import board
from adafruit_motor import servo, motor
from adafruit_seesaw.pwmout import PWMOut
from adafruit_seesaw.seesaw import Seesaw
from busio import I2C
i2c = I2C(board.SCL, board.SDA)
ss = Seesaw(i2c)
print("Bubble machine!")
SERVOS = True
DCMOTORS = True
# Create 4 Servos
servos = []
if SERVOS:
for ss_pin in (17, 16, 15, 14):
pwm = PWMOut(ss, ss_pin)
pwm.frequency = 50
_servo = servo.Servo(pwm)
_servo.angle = 90 # starting angle, middle
servos.append(_servo)
# Create 2 DC motors
motors = []
if DCMOTORS:
for ss_pin in ((18, 19), (22, 23)):
pwm0 = PWMOut(ss, ss_pin[0])
pwm1 = PWMOut(ss, ss_pin[1])
_motor = motor.DCMotor(pwm0, pwm1)
motors.append(_motor)
while True:
print("servo down")
servos[0].angle = 180
time.sleep(1)
print("fan on")
motors[0].throttle = 1
time.sleep(3)
print("fan off")
time.sleep(1)
motors[0].throttle = 0
print("servo up")
servos[0].angle = 0
time.sleep(1)
©Adafruit Industries Page 120 of 182

Feynman Simulator
If you are a fan of physics wunderkind Richard Feynman and you like bongo drums,
this Feynman simulator will satisfy your every desire. Between wise quips, this Feyn-
bot will dazzle you with its drumming expertise (https://adafru.it/BxR).
Parts List
Circuit Playground Express
Circuit Playground Express is the next
step towards a perfect introduction to
electronics and programming. We've
taken the original Circuit Playground
Classic and...
https://www.adafruit.com/product/3333
Adafruit CRICKIT for Circuit Playground
Express
Sometimes we wonder if robotics
engineers ever watch movies. If they did,
they'd know that making robots into
slaves always ends up in a robot
rebellion. Why even go down that...
https://www.adafruit.com/product/3093
Mini Push-Pull Solenoid - 5V
Solenoids are basically electromagnets:
they are made of a coil of copper wire
with an armature (a slug of metal) in the
middle. When the coil is energized, the
slug is pulled into the...
https://www.adafruit.com/product/2776
©Adafruit Industries Page 121 of 182
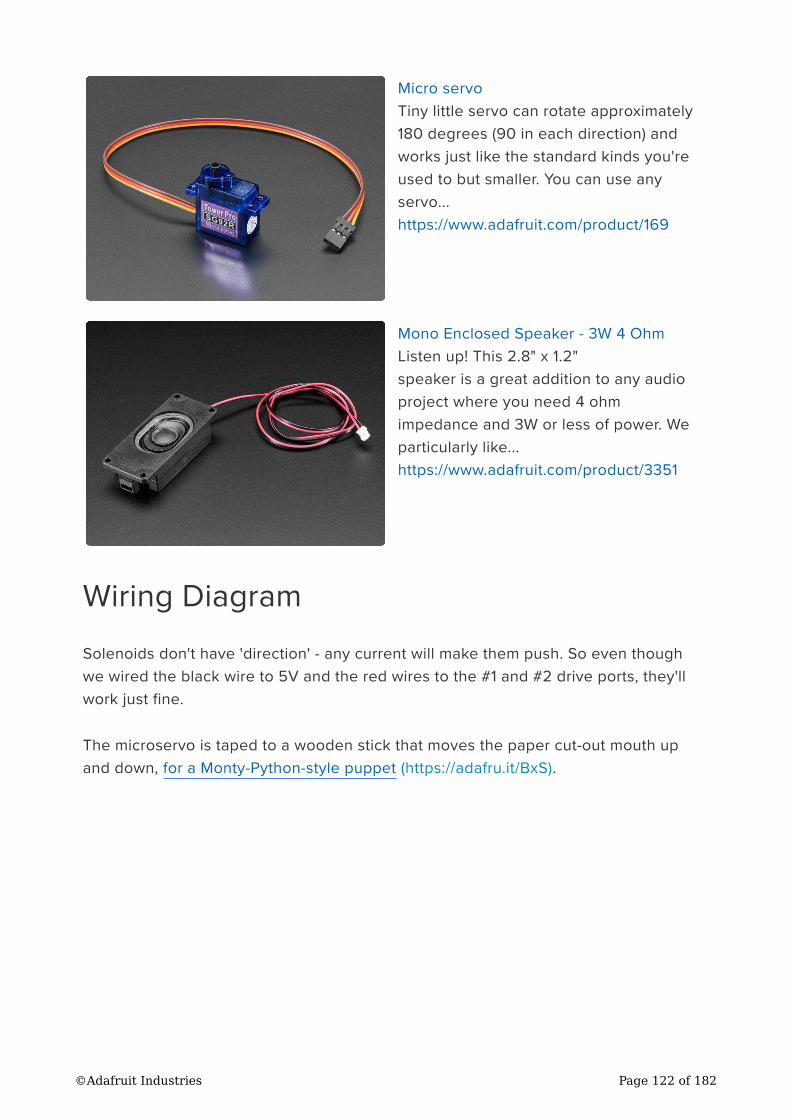
Micro servo
Tiny little servo can rotate approximately
180 degrees (90 in each direction) and
works just like the standard kinds you're
used to but smaller. You can use any
servo...
https://www.adafruit.com/product/169
Mono Enclosed Speaker - 3W 4 Ohm
Listen up! This 2.8" x 1.2"
speaker is a great addition to any audio
project where you need 4 ohm
impedance and 3W or less of power. We
particularly like...
https://www.adafruit.com/product/3351
Wiring Diagram
Solenoids don't have 'direction' - any current will make them push. So even though
we wired the black wire to 5V and the red wires to the #1 and #2 drive ports, they'll
work just fine.
The microservo is taped to a wooden stick that moves the paper cut-out mouth up
and down, for a Monty-Python-style puppet (https://adafru.it/BxS).
©Adafruit Industries Page 122 of 182
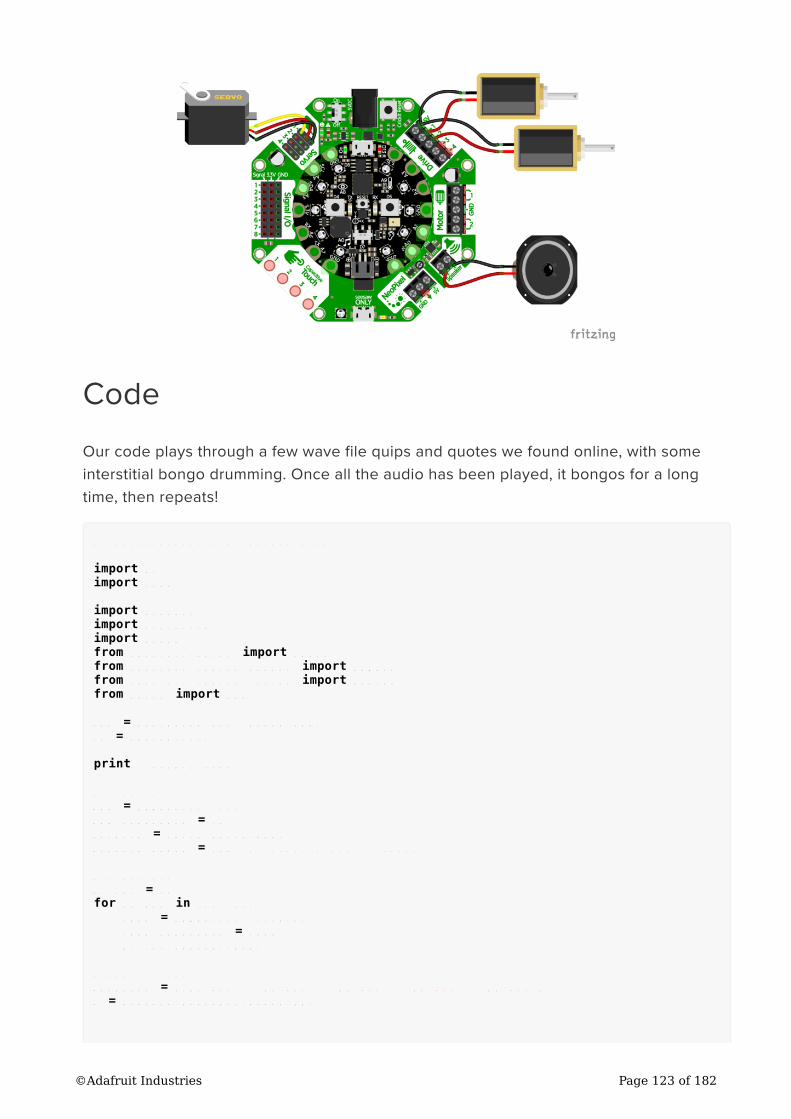
Code
Our code plays through a few wave file quips and quotes we found online, with some
interstitial bongo drumming. Once all the audio has been played, it bongos for a long
time, then repeats!
# CircuitPython 3.0 CRICKIT demo
import gc
import time
import audioio
import audiocore
import board
from adafruit_motor import servo
from adafruit_seesaw.pwmout import PWMOut
from adafruit_seesaw.seesaw import Seesaw
from busio import I2C
i2c = I2C(board.SCL, board.SDA)
ss = Seesaw(i2c)
print("Feynbot demo!")
# 1 Servo
pwm = PWMOut(ss, 17)
pwm.frequency = 50
myservo = servo.Servo(pwm)
myservo.angle = 180 # starting angle, highest
# 2 Drivers
drives = []
for ss_pin in (13, 12):
_pwm = PWMOut(ss, ss_pin)
_pwm.frequency = 1000
drives.append(_pwm)
# Audio files
wavfiles = ["01.wav", "02.wav", "03.wav", "04.wav", "05.wav"]
a = audioio.AudioOut(board.A0)
©Adafruit Industries Page 123 of 182
# Start playing the file (in the background)
def play_file(wavfile):
f = open(wavfile, "rb")
wav = audiocore.WaveFile(f)
a.play(wav)
# Tap the solenoids back and forth
def bongo(t):
for _ in range(t):
drives[0].duty_cycle = 0xFFFF
time.sleep(0.1)
drives[0].duty_cycle = 0
time.sleep(0.1)
drives[1].duty_cycle = 0xFFFF
time.sleep(0.1)
drives[1].duty_cycle = 0
time.sleep(0.1)
# Move mouth back and forth
def talk(t):
for _ in range(t):
myservo.angle = 150
time.sleep(0.1)
myservo.angle = 180
time.sleep(0.1)
filenum = 0 # counter to play all files
while True:
gc.collect()
print(gc.mem_free())
# time to play the bongos!
bongo(5)
time.sleep(1)
# OK say something insightful
play_file(wavfiles[filenum])
# and move the mouth while it does
while a.playing:
talk(1)
# Done being insightful, take a break
time.sleep(1)
# If we went thru all the files, JAM OUT!
filenum += 1
if filenum >= len(wavfiles):
bongo(20)
filenum = 0
Slime Night
Ladyada was unable to get to sleep. Feeling restless she decided to visit her
workshop and make some slime to help soothe her soul. Then her companion
showed up to lend a hand and have fun together!
©Adafruit Industries Page 124 of 182
How to Make Slime
1 Bottle Elmers Glue - we like the glitter glue but you can use plain white glue
and add food coloring!
1/2 Tablespoon Baking Soda - not baking powder! You probably have some in
your freezer, fridge, or baking cabinet
1 Tablespoon Contact Lens Solution - make sure to get the stuff with Boric Acid!
Put glue in a glass container, add soda and solution, mix & enjoy!
The quantities are flexible and you don't have to be exact. Add a little more or less to
change gooeyness.
Parts Used
Adafruit CRICKIT for Circuit Playground
Express
Sometimes we wonder if robotics
engineers ever watch movies. If they did,
they'd know that making robots into
slaves always ends up in a robot
rebellion. Why even go down that...
https://www.adafruit.com/product/3093
Circuit Playground Express
Circuit Playground Express is the next
step towards a perfect introduction to
electronics and programming. We've
taken the original Circuit Playground
Classic and...
https://www.adafruit.com/product/3333
•
•
•
©Adafruit Industries Page 125 of 182
DC Gearbox Motor - "TT Motor" - 200RPM
- 3 to 6VDC
Perhaps you've been assembling a new
robot friend, adding a computer for a
brain and other fun personality touches.
Now the time has come to let it leave the
nest and fly on...
https://www.adafruit.com/product/3777
Foot Pedal Potentiometer - Sewing
Machine Speed Controller
We've had a foot pedal switch in the store
for a while but some people have
contacted us asking if there was a way to
retrofit it to perform variable speed
control, like a...
https://www.adafruit.com/product/3739
3.5mm (1/8") Stereo Audio Jack Terminal
Block
One truth about working with audio is you
always need the cable or adapter you
don't have in your toolbox. That's why we
love these terminal-block audio
connectors so...
https://www.adafruit.com/product/2791
Mono Enclosed Speaker - 3W 4 Ohm
Listen up! This 2.8" x 1.2"
speaker is a great addition to any audio
project where you need 4 ohm
impedance and 3W or less of power. We
particularly like...
https://www.adafruit.com/product/3351
©Adafruit Industries Page 126 of 182
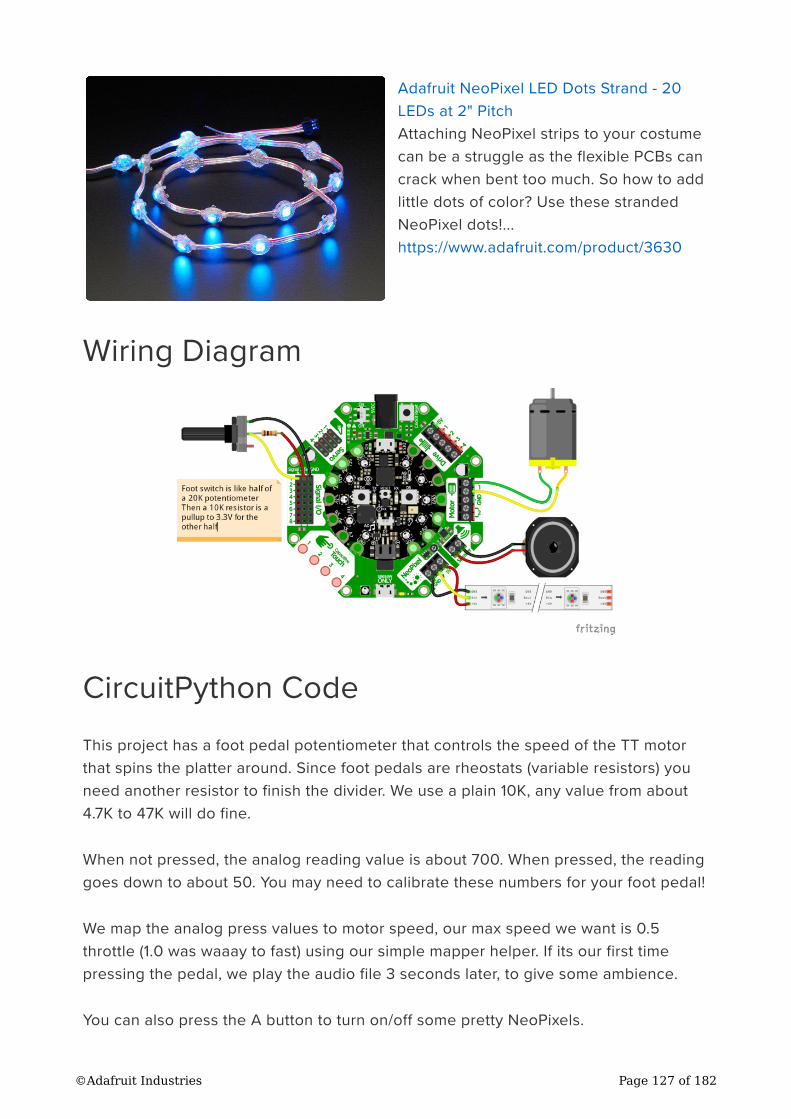
Adafruit NeoPixel LED Dots Strand - 20
LEDs at 2" Pitch
Attaching NeoPixel strips to your costume
can be a struggle as the flexible PCBs can
crack when bent too much. So how to add
little dots of color? Use these stranded
NeoPixel dots!...
https://www.adafruit.com/product/3630
Wiring Diagram
CircuitPython Code
This project has a foot pedal potentiometer that controls the speed of the TT motor
that spins the platter around. Since foot pedals are rheostats (variable resistors) you
need another resistor to finish the divider. We use a plain 10K, any value from about
4.7K to 47K will do fine.
When not pressed, the analog reading value is about 700. When pressed, the reading
goes down to about 50. You may need to calibrate these numbers for your foot pedal!
We map the analog press values to motor speed, our max speed we want is 0.5
throttle (1.0 was waaay to fast) using our simple mapper helper. If its our first time
pressing the pedal, we play the audio file 3 seconds later, to give some ambience.
You can also press the A button to turn on/off some pretty NeoPixels.
©Adafruit Industries Page 127 of 182
import time
from digitalio import DigitalInOut, Direction, Pull
from adafruit_seesaw.seesaw import Seesaw
from adafruit_seesaw.analoginput import AnalogInput
from adafruit_seesaw.pwmout import PWMOut
from adafruit_motor import motor
from busio import I2C
import neopixel
import audioio
import audiocore
import board
# Create seesaw object
i2c = I2C(board.SCL, board.SDA)
seesaw = Seesaw(i2c)
# built in CPX button A
button = DigitalInOut(board.BUTTON_A)
button.direction = Direction.INPUT
button.pull = Pull.DOWN
# NeoPixels
pixels = neopixel.NeoPixel(board.A1, 10, brightness=0)
pixels.fill((0,0,250))
# Analog reading from Signal #1 (ss. #2)
foot_pedal = AnalogInput(seesaw, 2)
# Create one motor on seesaw PWM pins 22 & 23
motor_a = motor.DCMotor(PWMOut(seesaw, 22), PWMOut(seesaw, 23))
motor_a.throttle = 0
def map_range(x, in_min, in_max, out_min, out_max):
# Maps a number from one range to another.
mapped = (x-in_min) * (out_max - out_min) / (in_max-in_min) + out_min
if out_min <= out_max:
return max(min(mapped, out_max), out_min)
return min(max(mapped, out_max), out_min)
# Get the audio file ready
wavfile = "unchained.wav"
f = open(wavfile, "rb")
wav = audiocore.WaveFile(f)
a = audioio.AudioOut(board.A0)
time_to_play = 0 # when to start playing
played = False # have we played audio already? only play once!
while True:
# Foot pedal ranges from about 700 (unpressed) to 50 (pressed)
# make that change the speed of the motor from 0 (stopped) to 0.5 (half)
press = foot_pedal.value
speed = map_range(press, 700, 50, 0, 0.5)
print("%d -> %0.3f" % (press, speed))
motor_a.throttle = speed
if not time_to_play and speed > 0.1:
print("Start audio in 3 seconds")
time_to_play = time.monotonic() + 3
elif time_to_play and time.monotonic() > time_to_play and not played:
print("Playing audio")
a.play(wav)
played = True
# turn on/off blue LEDs
if button.value:
if pixels.brightness < 0.1:
pixels.brightness = 1
else:
©Adafruit Industries Page 128 of 182
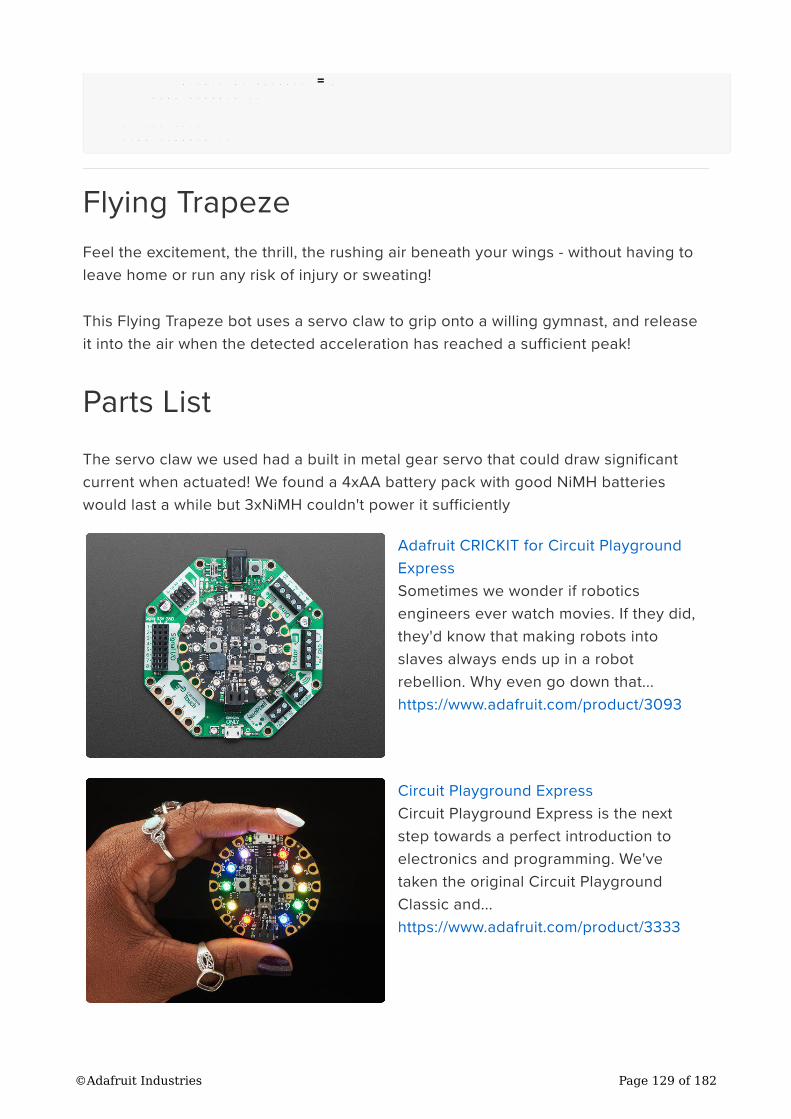
pixels.brightness = 0
time.sleep(0.5)
# loop delay
time.sleep(0.1)
Flying Trapeze
Feel the excitement, the thrill, the rushing air beneath your wings - without having to
leave home or run any risk of injury or sweating!
This Flying Trapeze bot uses a servo claw to grip onto a willing gymnast, and release
it into the air when the detected acceleration has reached a sufficient peak!
Parts List
The servo claw we used had a built in metal gear servo that could draw significant
current when actuated! We found a 4xAA battery pack with good NiMH batteries
would last a while but 3xNiMH couldn't power it sufficiently
Adafruit CRICKIT for Circuit Playground
Express
Sometimes we wonder if robotics
engineers ever watch movies. If they did,
they'd know that making robots into
slaves always ends up in a robot
rebellion. Why even go down that...
https://www.adafruit.com/product/3093
Circuit Playground Express
Circuit Playground Express is the next
step towards a perfect introduction to
electronics and programming. We've
taken the original Circuit Playground
Classic and...
https://www.adafruit.com/product/3333
©Adafruit Industries Page 129 of 182
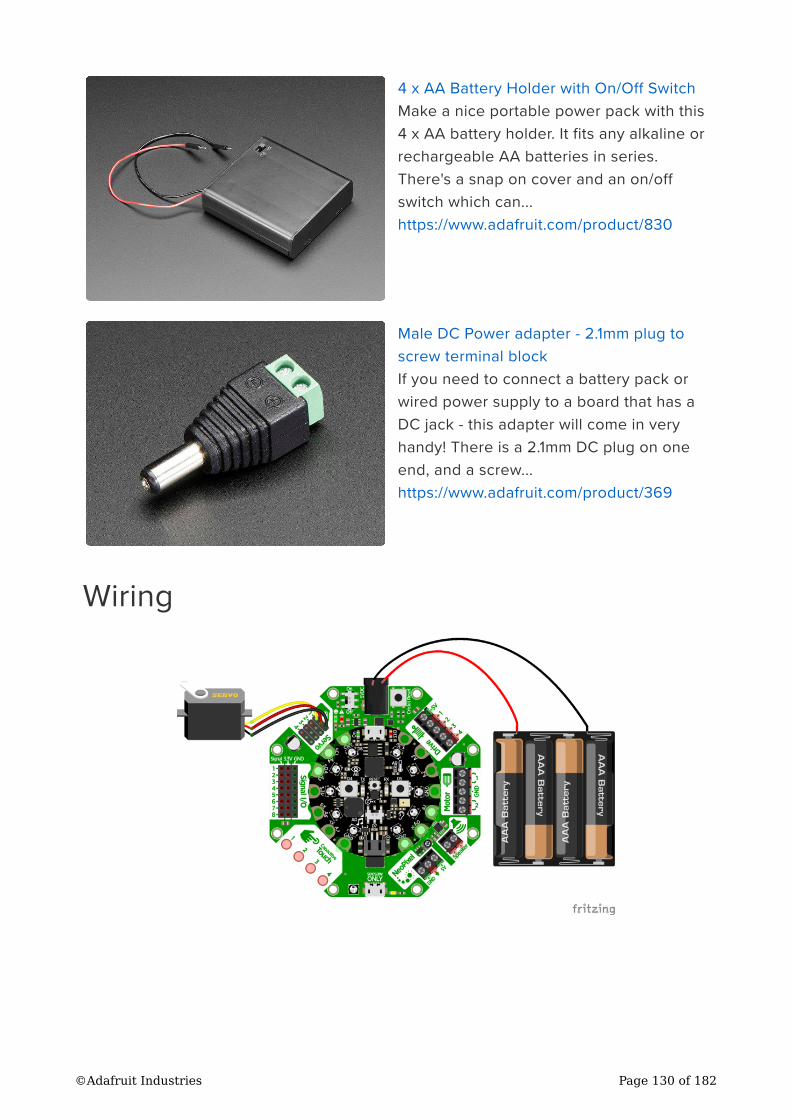
4 x AA Battery Holder with On/Off Switch
Make a nice portable power pack with this
4 x AA battery holder. It fits any alkaline or
rechargeable AA batteries in series.
There's a snap on cover and an on/off
switch which can...
https://www.adafruit.com/product/830
Male DC Power adapter - 2.1mm plug to
screw terminal block
If you need to connect a battery pack or
wired power supply to a board that has a
DC jack - this adapter will come in very
handy! There is a 2.1mm DC plug on one
end, and a screw...
https://www.adafruit.com/product/369
Wiring
©Adafruit Industries Page 130 of 182
Boot.py
Since we want to have the ability to data log the accelerometer, we need to put the
CPX into 'filesystem write mode' - this boot.py will let you use the switch on the CPX
to select whether you want to log data or go into trapeze-release mode
# Save as boot.py to turn on/off datalogging capability
import digitalio
import board
import storage
switch = digitalio.DigitalInOut(board.D7) # For Circuit Playground Express
switch.direction = digitalio.Direction.INPUT
switch.pull = digitalio.Pull.UP
# If the switch pin is connected to ground CircuitPython can write to the drive
storage.remount("/", switch.value)
CircuitPython Code
Our Python code is dual use. You can use the slide switch to select whether you want
to log the accelerometer data to the onboard storage. If you do, its easy to plot it and
see the magnitude of the forces on your trapeze artist!
We mostly used data log mode to calibrate how 'hard' we required the person to push
the trapeze to make the servo release the gymnast-stand-in.
We also have two buttons on the CPX we use for different tasks. In logging mode, you
use button A to turn on/off logging. The red LED blinks to let you know logging is
occuring. In trapeze mode, A and B let you manually open/close the servo gripper so
you can have it grab the gymnasts head. Hey life's tough all around!
Finally, if we're in trapeze mode, we look for when we're at the beginning of a swing,
that's when the Z axis acceleration drops below 3 m/s2
and the Y axis has positive
acceleration (we used the data log info to figure this out!) If so, the next time we reach
max-acceleration, at the lowest point of the swing, we start opening the gripper,
which takes a little time so that when we are at the end of the swing, it's opened
enough for the gymnast to be released!
We change the NeoPixel colors to help debug, by flashing when we reach the
different sensor states, since we don't have wireless data transfer on the CPX.
©Adafruit Industries Page 131 of 182
import time
from digitalio import DigitalInOut, Direction, Pull
import adafruit_lis3dh
from busio import I2C
from adafruit_seesaw.seesaw import Seesaw
from adafruit_seesaw.pwmout import PWMOut
from adafruit_motor import servo
import neopixel
import board
# create accelerometer
i2c1 = I2C(board.ACCELEROMETER_SCL, board.ACCELEROMETER_SDA)
lis3dh = adafruit_lis3dh.LIS3DH_I2C(i2c1, address=0x19)
lis3dh.range = adafruit_lis3dh.RANGE_8_G
# Create seesaw object
i2c = I2C(board.SCL, board.SDA)
seesaw = Seesaw(i2c)
# Create servo object
pwm = PWMOut(seesaw, 17) # Servo 1 is on s.s. pin 17
pwm.frequency = 50 # Servos like 50 Hz signals
my_servo = servo.Servo(pwm) # Create my_servo with pwm signal
# LED for debugging
led = DigitalInOut(board.D13)
led.direction = Direction.OUTPUT
# two buttons!
button_a = DigitalInOut(board.BUTTON_A)
button_a.direction = Direction.INPUT
button_a.pull = Pull.DOWN
button_b = DigitalInOut(board.BUTTON_B)
button_b.direction = Direction.INPUT
button_b.pull = Pull.DOWN
# NeoPixels!
pixels = neopixel.NeoPixel(board.NEOPIXEL, 10, brightness=1)
pixels.fill((0,0,0))
#################### log file for logging mode!
logfile = "/log.csv"
# check that we could append if wanted to
try:
fp = None
fp = open(logfile, "a")
print("File system writable!")
# pylint: disable=bare-except
except:
print("Not logging, trapeeze mode!")
# If we log, have some helper variables
logging = False
logpoints = 0
outstr = ""
# When its time to release the trapeze
release = False
while True:
if button_a.value: # A pressed
while button_a.value: # wait for release
pass
if fp: # start or stop logging
logging = not logging
print("Logging: ", logging)
time.sleep(0.25)
else:
©Adafruit Industries Page 132 of 182
my_servo.angle = 180 # open
if button_b.value: # B pressed
while button_b.value: # wait for release
pass
my_servo.angle = 0 # close
x, y, z = lis3dh.acceleration
# To keep from corrupting the filesys, take 25 readings at once
if logging and fp:
outstr += "%0.2F, %0.2F, %0.2F\n" % (x, y, z)
logpoints += 1
if logpoints > 25:
led.value = True
#print("Writing: "+outstr)
fp.write(outstr+"\n")
fp.flush()
led.value = False
logpoints = 0
else:
# display some neopixel output!
if z > 20:
# MAXIMUM EFFORT!
pixels.fill((0, 255, 0))
if release:
my_servo.angle = 180
elif z < 3 and y > 0: # means at the outer edge
release = True
# flash red when we peak
pixels.fill((255, 0, 0))
else:
pixels.fill((0,0,int(abs(z)*2)))
time.sleep(0.05)
For the curious, our data log file is here! (https://adafru.it/BkU)
R.O.B. GyroBot
We picked up a Nintendo R.O.B. robot from our local online auction site and when it
appeared we decided to figure out how to get it working. There's 3 motors inside, and
the R.O.B. already comes with motor drivers and end-stops, so instead of driving the
robot directly, we decided to control the R.O.B. using Circuit Playground Express
(CPX) and Crickit!
The code is all in CircuitPython.
We use the Crickit for the amplified audio effects (we snagged some audio from
gameplay to give it that authentic chiptune sound), driving an IR LED for signalling at
500mA burst current so we could have it a few feet away, and the capacitive touch
inputs for our desk controller.
©Adafruit Industries Page 133 of 182
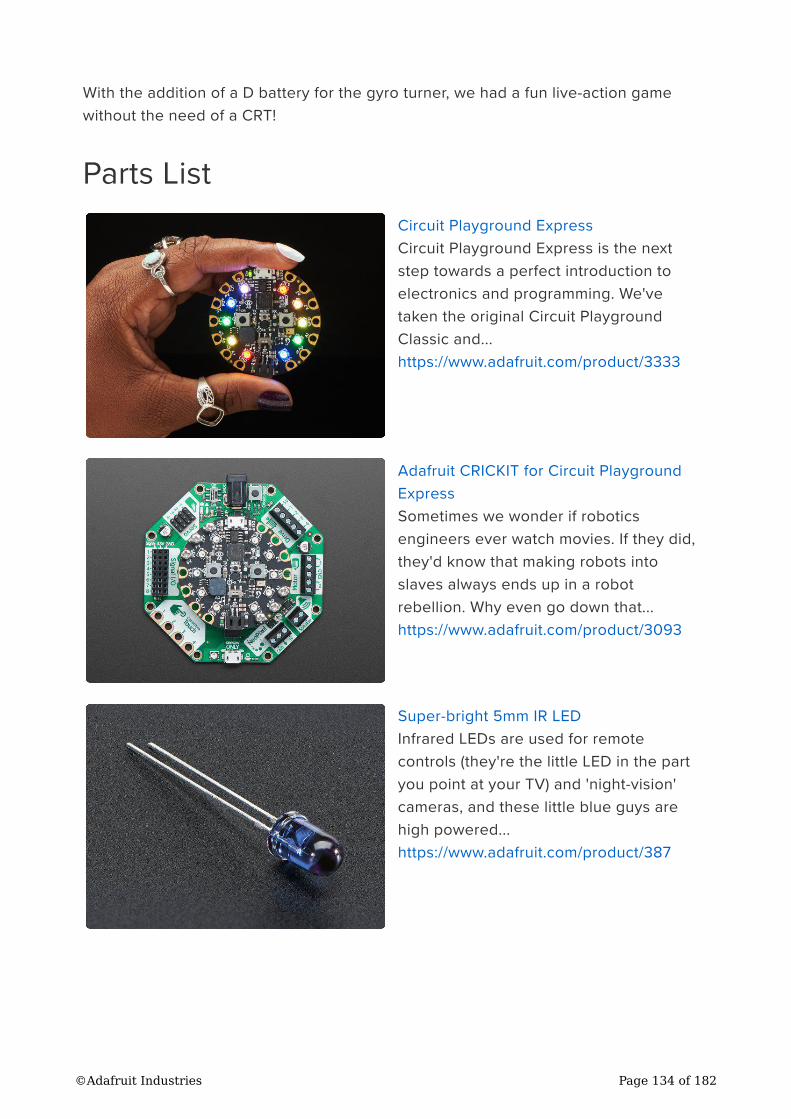
With the addition of a D battery for the gyro turner, we had a fun live-action game
without the need of a CRT!
Parts List
Circuit Playground Express
Circuit Playground Express is the next
step towards a perfect introduction to
electronics and programming. We've
taken the original Circuit Playground
Classic and...
https://www.adafruit.com/product/3333
Adafruit CRICKIT for Circuit Playground
Express
Sometimes we wonder if robotics
engineers ever watch movies. If they did,
they'd know that making robots into
slaves always ends up in a robot
rebellion. Why even go down that...
https://www.adafruit.com/product/3093
Super-bright 5mm IR LED
Infrared LEDs are used for remote
controls (they're the little LED in the part
you point at your TV) and 'night-vision'
cameras, and these little blue guys are
high powered...
https://www.adafruit.com/product/387
©Adafruit Industries Page 134 of 182

Small Alligator Clip Test Lead (set of 12)
Connect this to that without soldering
using these handy mini alligator clip test
leads. 15" cables with alligator clip on
each end, color coded. You get 12 pieces
in 6 colors....
https://www.adafruit.com/product/1008
Mono Enclosed Speaker - 3W 4 Ohm
Listen up! This 2.8" x 1.2"
speaker is a great addition to any audio
project where you need 4 ohm
impedance and 3W or less of power. We
particularly like...
https://www.adafruit.com/product/3351
Wiring Diagram
The IR LED can handle up to 1 Amp peak current, so don't use a resistor, just wire it up
to Drive 1 directly!
We use 4 capacitive touch sensors from the Crickit and 2 from CPX for 6 total (there's
more capacitive touch inputs available on Crickit Signal pins but we wanted to use
plain alligator pads!)
©Adafruit Industries Page 135 of 182
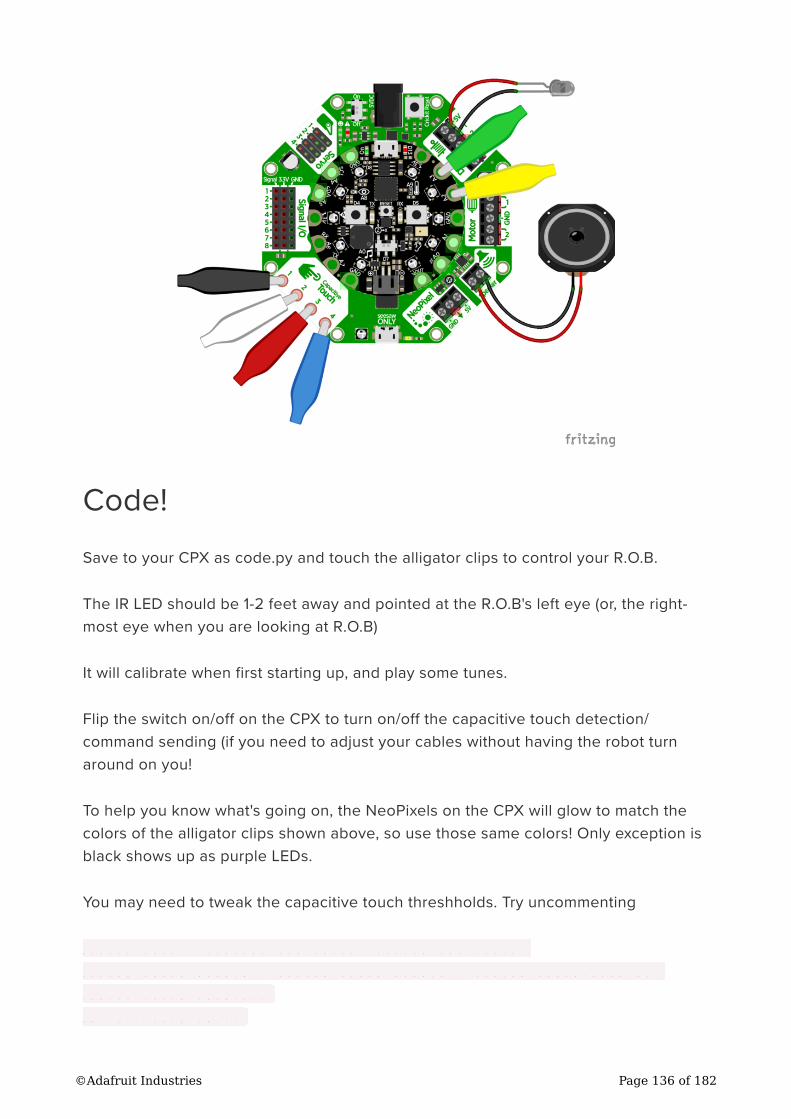
Code!
Save to your CPX as code.py and touch the alligator clips to control your R.O.B.
The IR LED should be 1-2 feet away and pointed at the R.O.B's left eye (or, the right-
most eye when you are looking at R.O.B)
It will calibrate when first starting up, and play some tunes.
Flip the switch on/off on the CPX to turn on/off the capacitive touch detection/
command sending (if you need to adjust your cables without having the robot turn
around on you!
To help you know what's going on, the NeoPixels on the CPX will glow to match the
colors of the alligator clips shown above, so use those same colors! Only exception is
black shows up as purple LEDs.
You may need to tweak the capacitive touch threshholds. Try uncommenting
#touch_vals = (touch2.raw_value, touch3.raw_value,
seesaw.touch_read(0), seesaw.touch_read(1), seesaw.touch_read(2),
seesaw.touch_read(3))
#print(touch_vals)
©Adafruit Industries Page 136 of 182
And watching the REPL to see what the values read are.
import time
import gc
from digitalio import DigitalInOut, Direction, Pull
from busio import I2C
from adafruit_seesaw.seesaw import Seesaw
from adafruit_seesaw.pwmout import PWMOut
import touchio
import audioio
import audiocore
import neopixel
import board
pixels = neopixel.NeoPixel(board.NEOPIXEL, 10, brightness=1)
pixels.fill((0,0,0))
# Create seesaw object
i2c = I2C(board.SCL, board.SDA)
seesaw = Seesaw(i2c)
# switch
switch = DigitalInOut(board.SLIDE_SWITCH)
switch.direction = Direction.INPUT
switch.pull = Pull.UP
# We need some extra captouches
touch2 = touchio.TouchIn(board.A2)
touch3 = touchio.TouchIn(board.A3)
# LED for debugging
led = DigitalInOut(board.D13)
led.direction = Direction.OUTPUT
# Create drive (PWM) object
INFRARED_LED_SS = 13
my_drive = PWMOut(seesaw, INFRARED_LED_SS) # Drive 1 is on s.s. pin 13
my_drive.frequency = 1000 # Our default frequency is 1KHz
CAPTOUCH_THRESH = 850
# Commands, each 8 bit command is preceded by the 5 bit Init sequence
Init = [0, 0, 0, 1, 0] # This must precede any command
Calibrate = [1, 0, 1, 0, 1, 0, 1, 1] # the initial calibration
Up = [1, 0, 1, 1, 1, 0, 1, 1] # Move arms/body down
Down = [1, 1, 1, 1, 1, 0, 1, 1] # Move arms/body up
Left = [1, 0, 1, 1, 1, 0, 1, 0] # Twist body left
Right = [1, 1, 1, 0, 1, 0, 1, 0] # Twist body right
Close = [1, 0, 1, 1, 1, 1, 1, 0] # Close arms
Open = [1, 1, 1, 0, 1, 1, 1, 0] # Open arms
Test = [1, 1, 1, 0, 1, 0, 1, 1] # Turns R.O.B. head LED on
print("R.O.B. Start")
def IR_Command(cmd):
print("Sending ", cmd)
gc.collect() # collect memory now, timing specific!
# Output initialization and then command cmd
for val in Init+cmd: # For each value in initial+command
if val: # if it's a one, flash the IR LED
seesaw.analog_write(INFRARED_LED_SS, 65535) # on
seesaw.analog_write(INFRARED_LED_SS, 0) # off 2ms later
time.sleep(0.013) # 17 ms total
# pylint: disable=useless-else-on-loop
else:
time.sleep(0.015) # 17 ms total
©Adafruit Industries Page 137 of 182
a = audioio.AudioOut(board.A0)
startfile = "startup.wav"
loopfile = "loop.wav"
with open(startfile, "rb") as f:
wav = audiocore.WaveFile(f)
a.play(wav)
for _ in range(3):
IR_Command(Calibrate)
time.sleep(0.5)
while a.playing:
IR_Command(Open)
time.sleep(1)
IR_Command(Close)
time.sleep(1)
f = open(loopfile, "rb")
wav = audiocore.WaveFile(f)
a.play(wav, loop=True)
while True: # Main Loop poll switches, do commands
led.value = switch.value # easily tell if we're running
if not switch.value:
continue
#touch_vals = (touch2.raw_value, touch3.raw_value, seesaw.touch_read(0),
seesaw.touch_read(1),
# seesaw.touch_read(2), seesaw.touch_read(3))
#print(touch_vals)
if touch2.raw_value > 3000:
print("Open jaws")
pixels.fill((50,50,0))
IR_Command(Open) # Button A opens arms
elif touch3.raw_value > 3000:
print("Close jaws")
pixels.fill((0,50,0))
IR_Command(Close) # Button B closes arms
elif seesaw.touch_read(0) > CAPTOUCH_THRESH:
print("Up")
pixels.fill((50,0,50))
IR_Command(Up)
elif seesaw.touch_read(1) > CAPTOUCH_THRESH:
print("Down")
pixels.fill((50,50,50))
IR_Command(Down)
elif seesaw.touch_read(2) > CAPTOUCH_THRESH:
print("Left")
pixels.fill((50,0,0))
IR_Command(Left)
elif seesaw.touch_read(3) > CAPTOUCH_THRESH:
print("Right")
pixels.fill((0,0,50))
IR_Command(Right)
time.sleep(0.1)
pixels.fill((0,0,0))
©Adafruit Industries Page 138 of 182
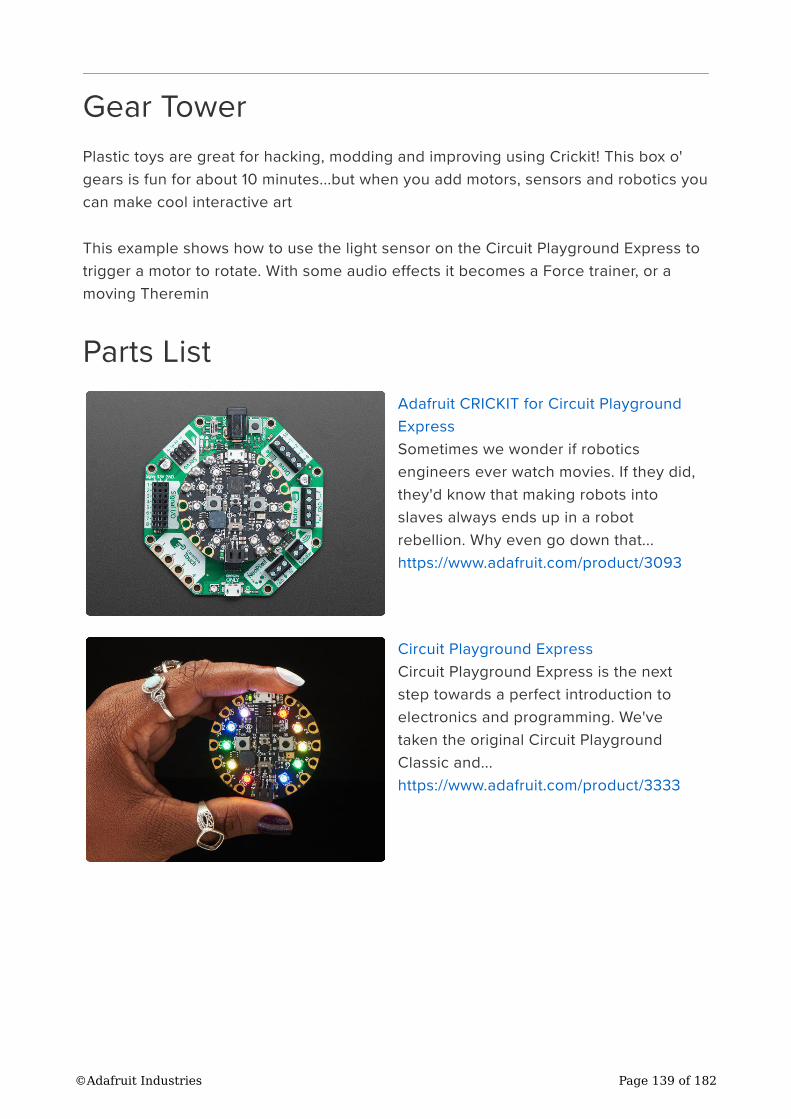
Gear Tower
Plastic toys are great for hacking, modding and improving using Crickit! This box o'
gears is fun for about 10 minutes...but when you add motors, sensors and robotics you
can make cool interactive art
This example shows how to use the light sensor on the Circuit Playground Express to
trigger a motor to rotate. With some audio effects it becomes a Force trainer, or a
moving Theremin
Parts List
Adafruit CRICKIT for Circuit Playground
Express
Sometimes we wonder if robotics
engineers ever watch movies. If they did,
they'd know that making robots into
slaves always ends up in a robot
rebellion. Why even go down that...
https://www.adafruit.com/product/3093
Circuit Playground Express
Circuit Playground Express is the next
step towards a perfect introduction to
electronics and programming. We've
taken the original Circuit Playground
Classic and...
https://www.adafruit.com/product/3333
©Adafruit Industries Page 139 of 182
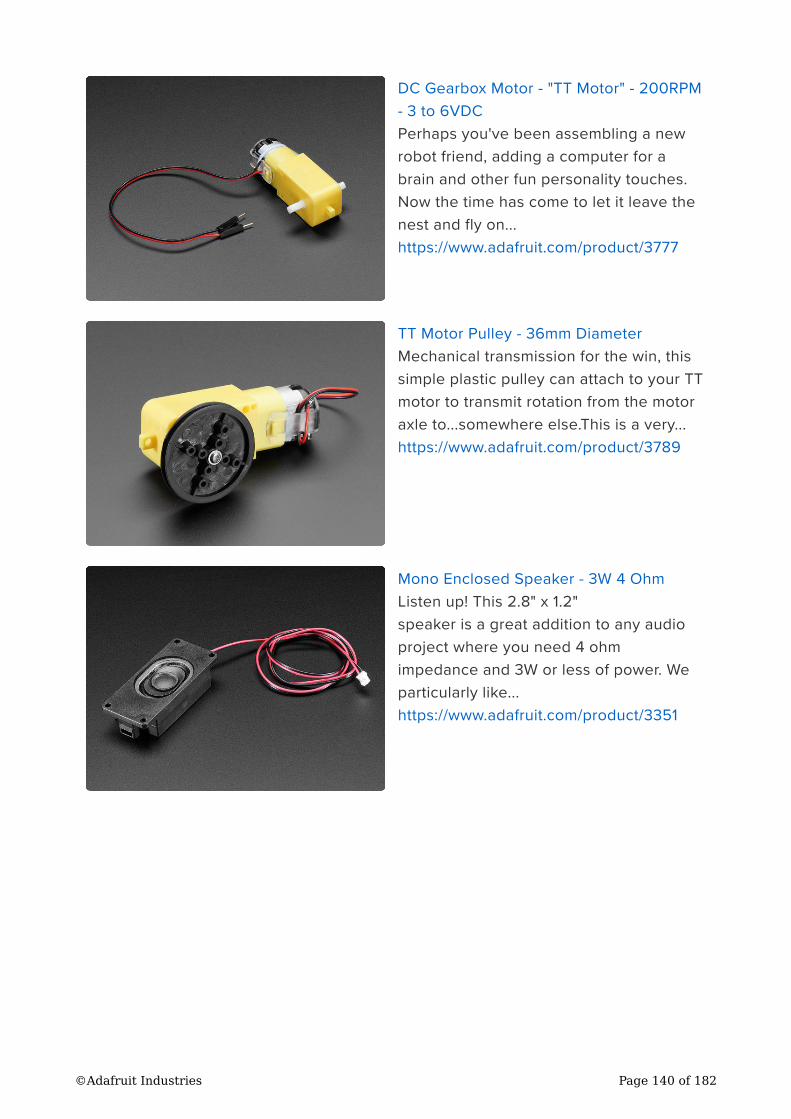
DC Gearbox Motor - "TT Motor" - 200RPM
- 3 to 6VDC
Perhaps you've been assembling a new
robot friend, adding a computer for a
brain and other fun personality touches.
Now the time has come to let it leave the
nest and fly on...
https://www.adafruit.com/product/3777
TT Motor Pulley - 36mm Diameter
Mechanical transmission for the win, this
simple plastic pulley can attach to your TT
motor to transmit rotation from the motor
axle to...somewhere else.This is a very...
https://www.adafruit.com/product/3789
Mono Enclosed Speaker - 3W 4 Ohm
Listen up! This 2.8" x 1.2"
speaker is a great addition to any audio
project where you need 4 ohm
impedance and 3W or less of power. We
particularly like...
https://www.adafruit.com/product/3351
©Adafruit Industries Page 140 of 182
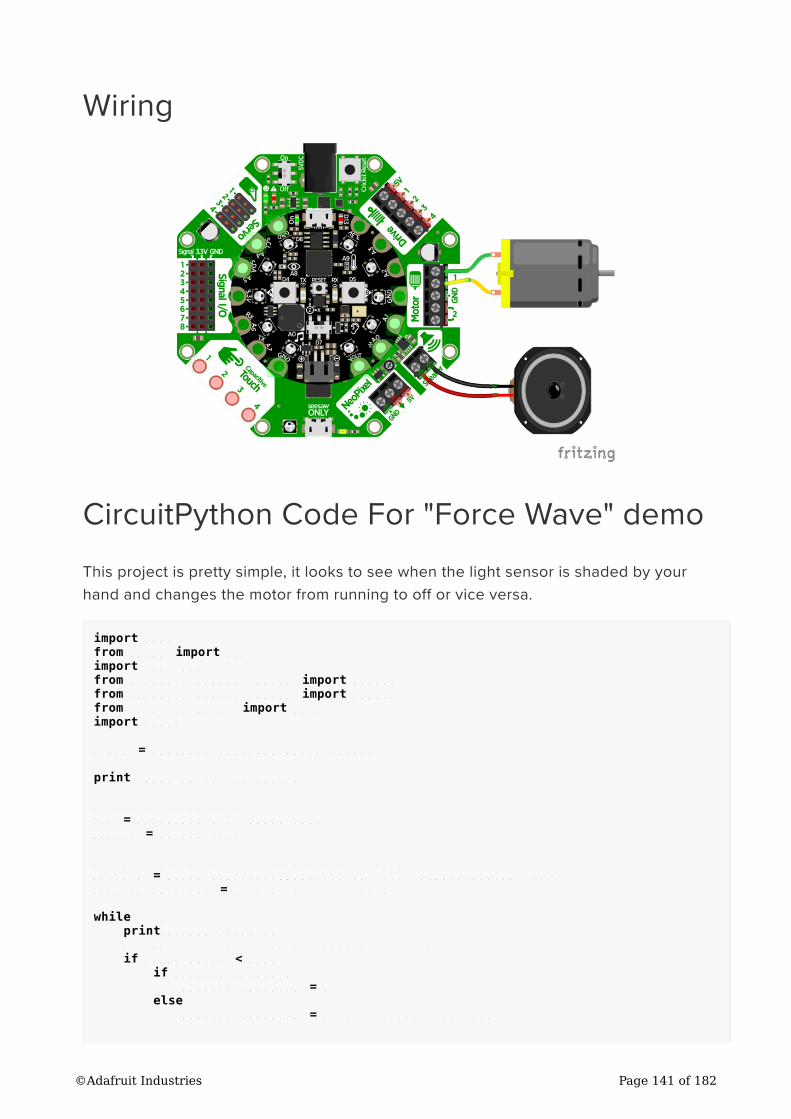
Wiring
CircuitPython Code For "Force Wave" demo
This project is pretty simple, it looks to see when the light sensor is shaded by your
hand and changes the motor from running to off or vice versa.
import time
from busio import I2C
import analogio
from adafruit_seesaw.seesaw import Seesaw
from adafruit_seesaw.pwmout import PWMOut
from adafruit_motor import motor
import board
light = analogio.AnalogIn(board.LIGHT)
print("Wave on/off to turn")
# Create seesaw object
i2c = I2C(board.SCL, board.SDA)
seesaw = Seesaw(i2c)
# Create one motor on seesaw PWM pins 22 & 23
motor_a = motor.DCMotor(PWMOut(seesaw, 22), PWMOut(seesaw, 23))
motor_a.throttle = 0 # motor is stopped
while True:
print((light.value,))
# light value drops when a hand passes over
if light.value < 4000:
if motor_a.throttle:
motor_a.throttle = 0
else:
motor_a.throttle = 1 # full speed forward
©Adafruit Industries Page 141 of 182
while light.value < 5000:
# wait till hand passes over completely
pass
time.sleep(0.1)
CircuitPython Code For "Theremin" demo
We can adapt the code above to speed up or slow down the motor based on how far
our hand is. The darker the sensor, the faster the motor spins!
import time
from busio import I2C
import analogio
from adafruit_seesaw.seesaw import Seesaw
from adafruit_seesaw.pwmout import PWMOut
from adafruit_motor import motor
import board
light = analogio.AnalogIn(board.LIGHT)
print("Theramin-like turning")
# Create seesaw object
i2c = I2C(board.SCL, board.SDA)
seesaw = Seesaw(i2c)
# Create one motor on seesaw PWM pins 22 & 23
motor_a = motor.DCMotor(PWMOut(seesaw, 22), PWMOut(seesaw, 23))
motor_a.throttle = 0 # motor is stopped
def map_range(x, in_min, in_max, out_min, out_max):
# Maps a number from one range to another.
mapped = (x-in_min) * (out_max - out_min) / (in_max-in_min) + out_min
if out_min <= out_max:
return max(min(mapped, out_max), out_min)
return min(max(mapped, out_max), out_min)
while True:
print((light.value,))
motor_a.throttle = map_range(light.value, 500, 8000, 1.0, 0)
time.sleep(0.1)
CPX-1701
This is the adventure of the United Space Ship CircuitPlayground.
Assigned a five year galaxy patrol, the bold crew of the giant starship
explores the excitement of strange new worlds, uncharted civilizations, and
exotic code. These are its voyages and its adventures.
Explore exciting new modes of propulsion by creating a really big vibrating motor.
This Crickit project attaches a bunch of CD's to an up-cycled CD-ROM motor for a cool
©Adafruit Industries Page 142 of 182
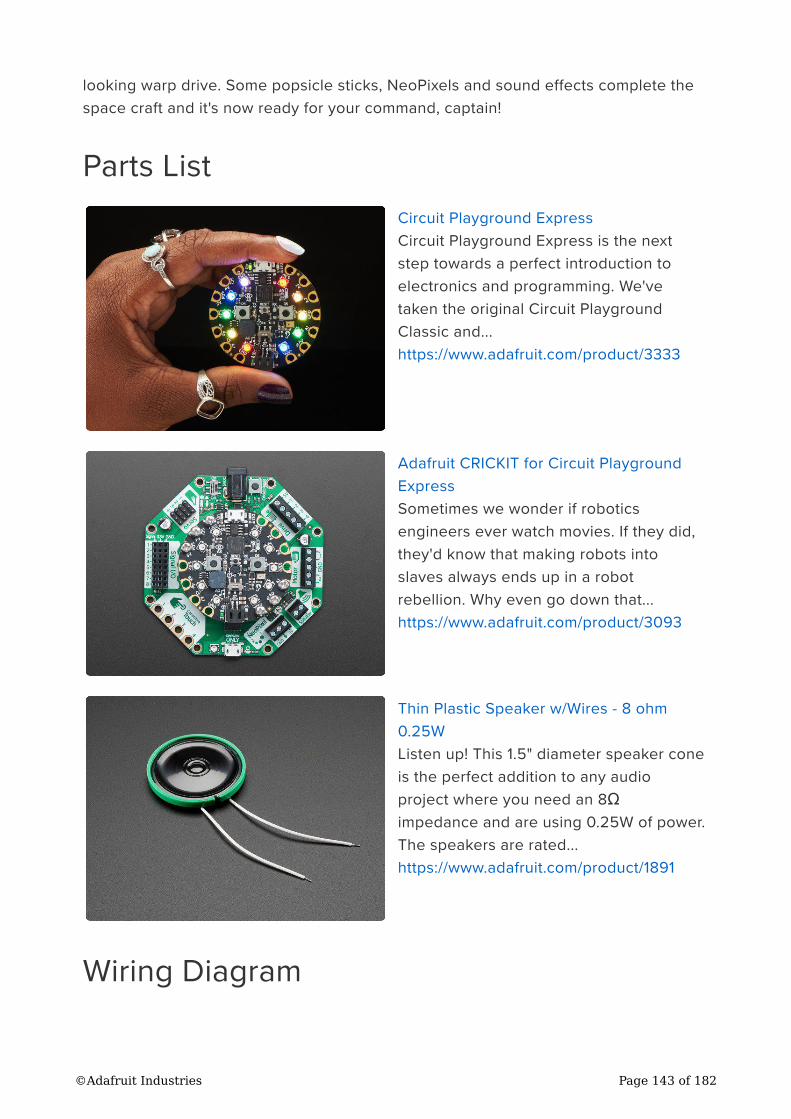
looking warp drive. Some popsicle sticks, NeoPixels and sound effects complete the
space craft and it's now ready for your command, captain!
Parts List
Circuit Playground Express
Circuit Playground Express is the next
step towards a perfect introduction to
electronics and programming. We've
taken the original Circuit Playground
Classic and...
https://www.adafruit.com/product/3333
Adafruit CRICKIT for Circuit Playground
Express
Sometimes we wonder if robotics
engineers ever watch movies. If they did,
they'd know that making robots into
slaves always ends up in a robot
rebellion. Why even go down that...
https://www.adafruit.com/product/3093
Thin Plastic Speaker w/Wires - 8 ohm
0.25W
Listen up! This 1.5" diameter speaker cone
is the perfect addition to any audio
project where you need an 8Ω
impedance and are using 0.25W of power.
The speakers are rated...
https://www.adafruit.com/product/1891
Wiring Diagram
©Adafruit Industries Page 143 of 182
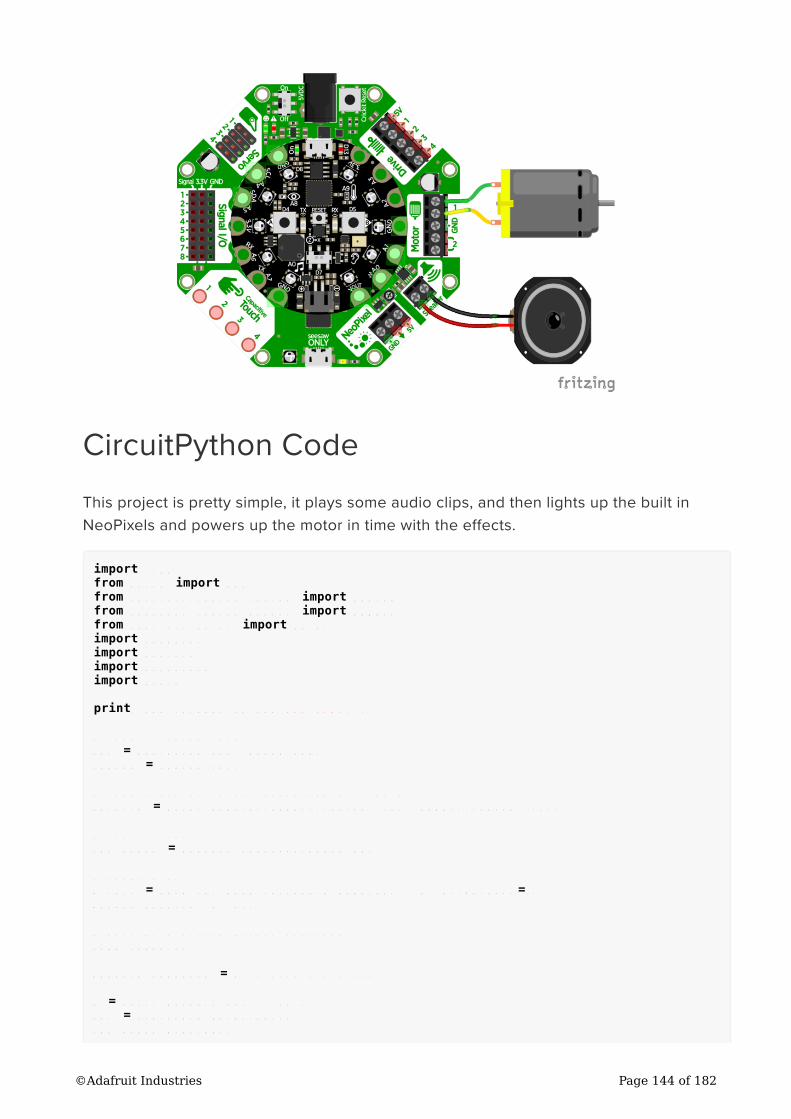
CircuitPython Code
This project is pretty simple, it plays some audio clips, and then lights up the built in
NeoPixels and powers up the motor in time with the effects.
import time
from busio import I2C
from adafruit_seesaw.seesaw import Seesaw
from adafruit_seesaw.pwmout import PWMOut
from adafruit_motor import motor
import neopixel
import audioio
import audiocore
import board
print("The voyages of the CPX-1701!")
# Create seesaw object
i2c = I2C(board.SCL, board.SDA)
seesaw = Seesaw(i2c)
# Create one motor on seesaw PWM pins 22 & 23
motor_a = motor.DCMotor(PWMOut(seesaw, 22), PWMOut(seesaw, 23))
# audio output
cpx_audio = audioio.AudioOut(board.A0)
# neopixels!
pixels = neopixel.NeoPixel(board.NEOPIXEL, 10, brightness=1)
pixels.fill((0, 0, 0))
# give me a second before starting
time.sleep(1)
motor_a.throttle = 0 # warp drive off
f = open("01space.wav", "rb")
wav = audiocore.WaveFile(f)
cpx_audio.play(wav)
©Adafruit Industries Page 144 of 182
t = time.monotonic() # take a timestamp
# slowly power up the dilithium crystals
for i in range(50):
pixels.fill((0, 0, i))
time.sleep(0.05)
# 6 seconds after audio started...
while time.monotonic() - t < 6:
pass
motor_a.throttle = 1 # full warp drive on!
# wait for music to end
while cpx_audio.playing:
pass
f.close()
# play the warp drive and theme music!
f = open("02warp.wav", "rb")
wav = audiocore.WaveFile(f)
cpx_audio.play(wav)
time.sleep(1)
# blast off!
pixels.fill((255, 0, 0))
# pulse the warp core
while True:
for i in range(255, 0, -5):
pixels.fill((i, 0, 0))
for i in range(0, 255, 5):
pixels.fill((i, 0, 0))
# wait for music to end
while cpx_audio.playing:
pass
f.close()
Mag Neat-o
We picked up a magnetic foam shape kit, to make a fridge-mounted marble run. But
picking up the marble after each run is such a drag - wouldn't it be fun if you could
use your Crickit to help lift the ball back up and re-start the marble run?
With an electromagnet, we can pick up the stainless steel balls. A DC motor acts as a
pulley, and a servo helps align the electromagnet so it can navigate around the foam.
You can DIY, as we did, using the two Circuit Playground Express buttons and switch
to control the motors - or you could even automate the whole thing!
©Adafruit Industries Page 145 of 182

Parts List
Circuit Playground Express
Circuit Playground Express is the next
step towards a perfect introduction to
electronics and programming. We've
taken the original Circuit Playground
Classic and...
https://www.adafruit.com/product/3333
Adafruit CRICKIT for Circuit Playground
Express
Sometimes we wonder if robotics
engineers ever watch movies. If they did,
they'd know that making robots into
slaves always ends up in a robot
rebellion. Why even go down that...
https://www.adafruit.com/product/3093
DC Gearbox Motor - "TT Motor" - 200RPM
- 3 to 6VDC
Perhaps you've been assembling a new
robot friend, adding a computer for a
brain and other fun personality touches.
Now the time has come to let it leave the
nest and fly on...
https://www.adafruit.com/product/3777
©Adafruit Industries Page 146 of 182
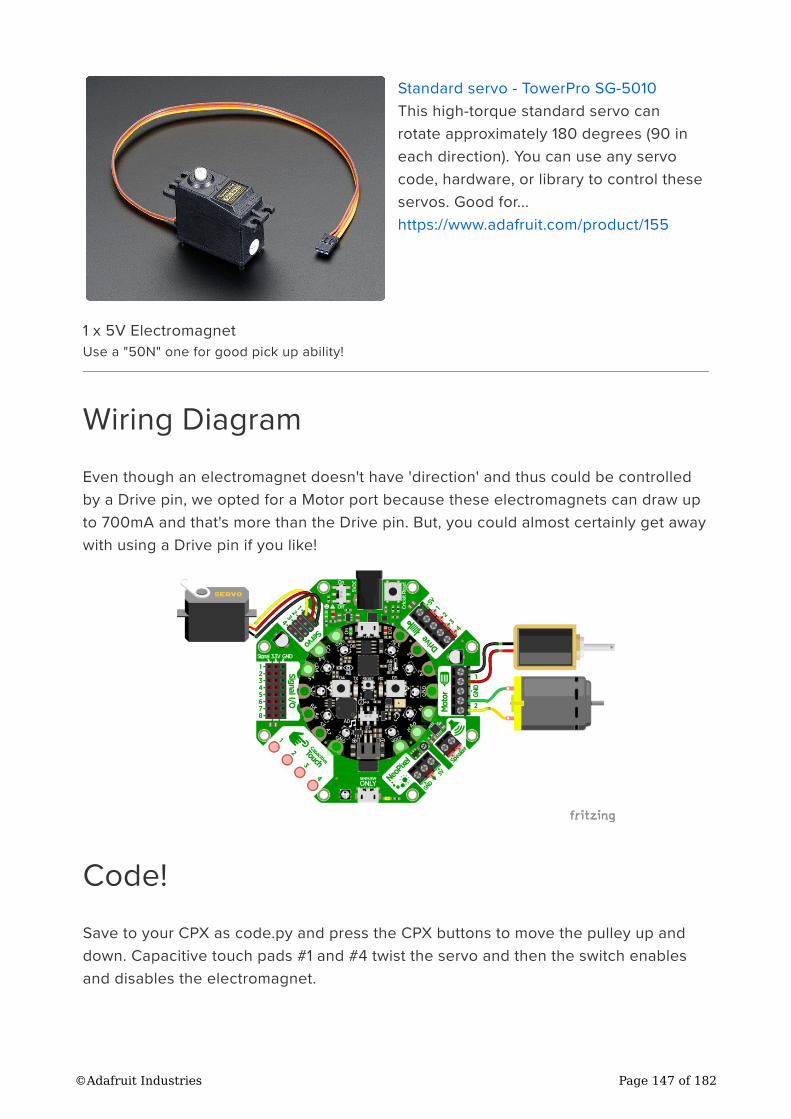
1 x 5V Electromagnet
Use a "50N" one for good pick up ability!
Standard servo - TowerPro SG-5010
This high-torque standard servo can
rotate approximately 180 degrees (90 in
each direction). You can use any servo
code, hardware, or library to control these
servos. Good for...
https://www.adafruit.com/product/155
Wiring Diagram
Even though an electromagnet doesn't have 'direction' and thus could be controlled
by a Drive pin, we opted for a Motor port because these electromagnets can draw up
to 700mA and that's more than the Drive pin. But, you could almost certainly get away
with using a Drive pin if you like!
Code!
Save to your CPX as code.py and press the CPX buttons to move the pulley up and
down. Capacitive touch pads #1 and #4 twist the servo and then the switch enables
and disables the electromagnet.
©Adafruit Industries Page 147 of 182
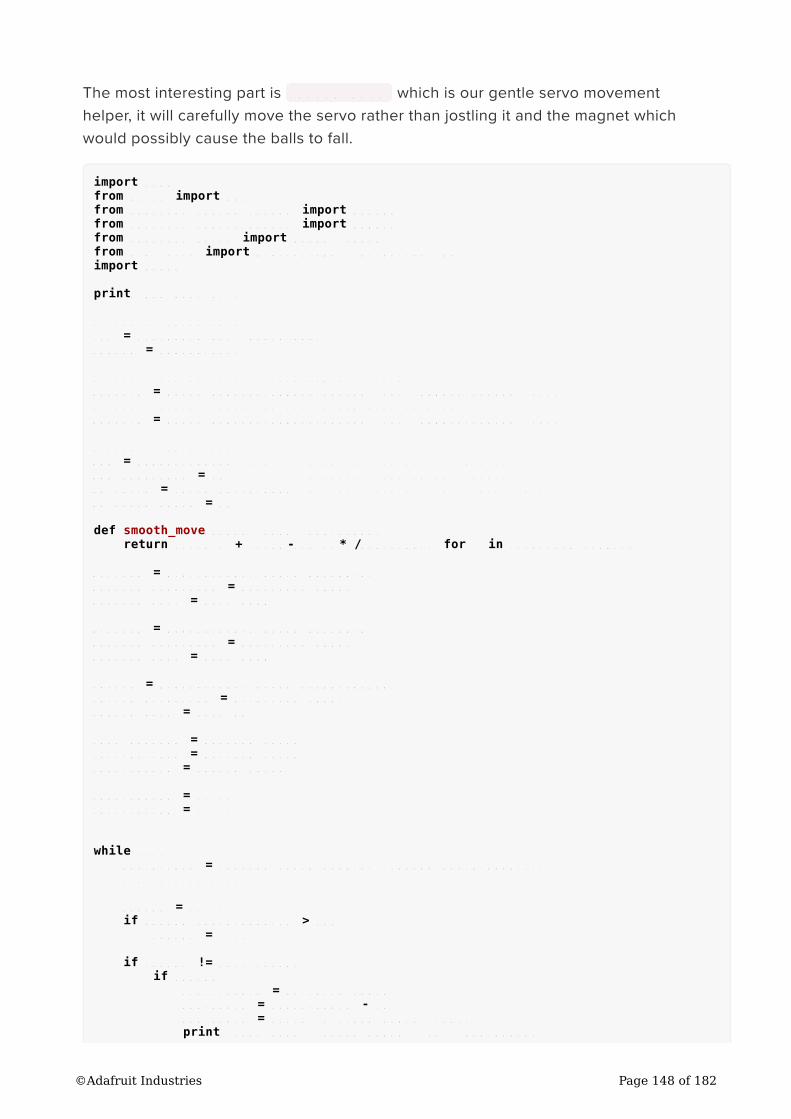
The most interesting part is smooth_move which is our gentle servo movement
helper, it will carefully move the servo rather than jostling it and the magnet which
would possibly cause the balls to fall.
import time
from busio import I2C
from adafruit_seesaw.seesaw import Seesaw
from adafruit_seesaw.pwmout import PWMOut
from adafruit_motor import motor, servo
from digitalio import DigitalInOut, Direction, Pull
import board
print("Mag Neat-o!")
# Create seesaw object
i2c = I2C(board.SCL, board.SDA)
seesaw = Seesaw(i2c)
# Create one motor on seesaw PWM pins 22 & 23
motor_a = motor.DCMotor(PWMOut(seesaw, 22), PWMOut(seesaw, 23))
# Create another motor on seesaw PWM pins 19 & 18
motor_b = motor.DCMotor(PWMOut(seesaw, 19), PWMOut(seesaw, 18))
# Create servo object
pwm = PWMOut(seesaw, 17) # Servo 1 is on s.s. pin 17
pwm.frequency = 50 # Servos like 50 Hz signals
my_servo = servo.Servo(pwm) # Create my_servo with pwm signa
my_servo.angle = 90
def smooth_move(start, stop, num_steps):
return [(start + (stop-start)*i/num_steps) for i in range(num_steps)]
buttona = DigitalInOut(board.BUTTON_A)
buttona.direction = Direction.INPUT
buttona.pull = Pull.DOWN
buttonb = DigitalInOut(board.BUTTON_B)
buttonb.direction = Direction.INPUT
buttonb.pull = Pull.DOWN
switch = DigitalInOut(board.SLIDE_SWITCH)
switch.direction = Direction.INPUT
switch.pull = Pull.UP
last_buttona = buttona.value
last_buttonb = buttonb.value
last_switch = switch.value
last_touch1 = False
last_touch4 = False
while True:
touch_vals = (seesaw.touch_read(0), seesaw.touch_read(3))
# print(touch_vals)
touch1 = False
if seesaw.touch_read(0) > 500:
touch1 = True
if touch1 != last_touch1:
if touch1:
start_angle = my_servo.angle
end_angle = start_angle - 20
end_angle = max(0, min(end_angle, 180))
print("left from", start_angle, "to", end_angle)
©Adafruit Industries Page 148 of 182

for a in smooth_move(start_angle, end_angle, 25):
my_servo.angle = a
time.sleep(0.03)
last_touch1 = touch1
touch4 = False
if seesaw.touch_read(3) > 500:
touch4 = True
if touch4 != last_touch4:
if touch4:
start_angle = my_servo.angle
end_angle = start_angle + 20
end_angle = max(0, min(end_angle, 180))
print("right from", start_angle, "to", end_angle)
for a in smooth_move(start_angle, end_angle, 25):
my_servo.angle = a
time.sleep(0.03)
last_touch4 = touch4
if buttona.value != last_buttona:
if buttona.value:
print("down")
if motor_a.throttle:
print("haulin!")
motor_b.throttle = -0.1
else:
motor_b.throttle = -0.1
else:
motor_b.throttle = 0
last_buttona = buttona.value
if buttonb.value != last_buttonb:
if buttonb.value:
print("up")
if motor_a.throttle:
print("haulin!")
motor_b.throttle = 0.4
else:
motor_b.throttle = 0.3
else:
motor_b.throttle = 0
last_buttonb = buttonb.value
if switch.value != last_switch:
motor_a.throttle = switch.value
if motor_a.throttle:
print("GRAB")
else:
print("RELEASE")
last_switch = switch.value
time.sleep(0.01)
©Adafruit Industries Page 149 of 182
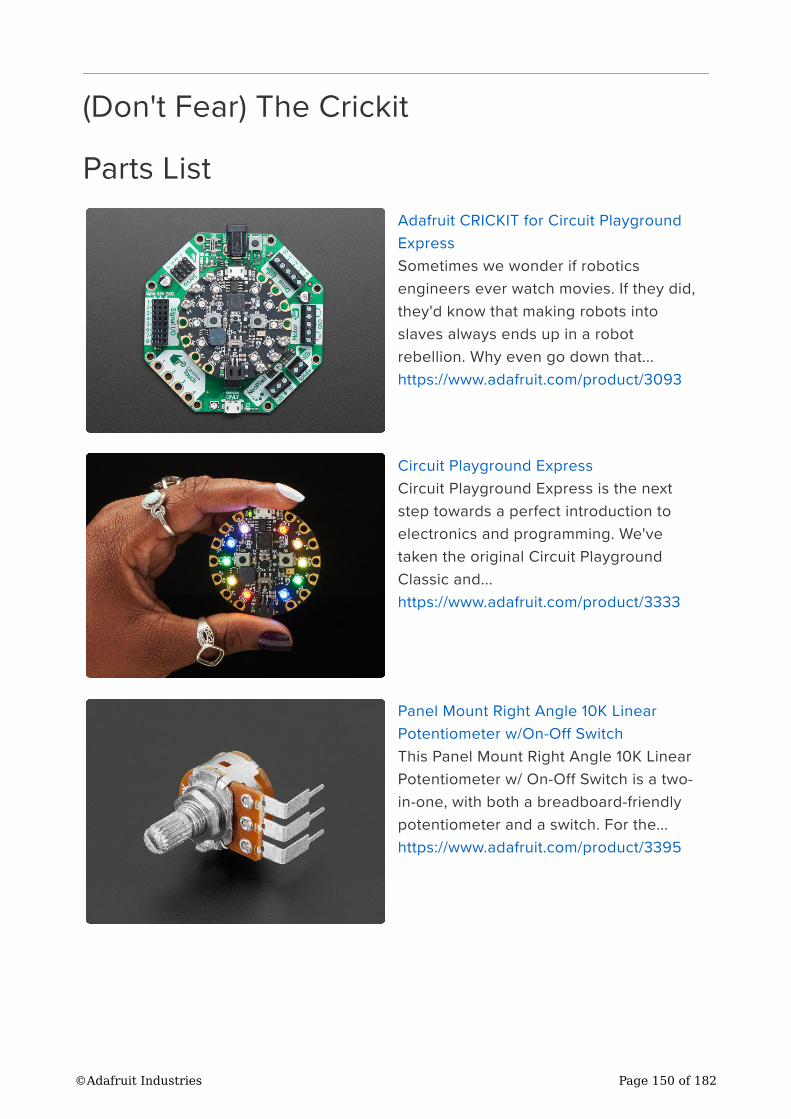
(Don't Fear) The Crickit
Parts List
Adafruit CRICKIT for Circuit Playground
Express
Sometimes we wonder if robotics
engineers ever watch movies. If they did,
they'd know that making robots into
slaves always ends up in a robot
rebellion. Why even go down that...
https://www.adafruit.com/product/3093
Circuit Playground Express
Circuit Playground Express is the next
step towards a perfect introduction to
electronics and programming. We've
taken the original Circuit Playground
Classic and...
https://www.adafruit.com/product/3333
Panel Mount Right Angle 10K Linear
Potentiometer w/On-Off Switch
This Panel Mount Right Angle 10K Linear
Potentiometer w/ On-Off Switch is a two-
in-one, with both a breadboard-friendly
potentiometer and a switch. For the...
https://www.adafruit.com/product/3395
©Adafruit Industries Page 150 of 182
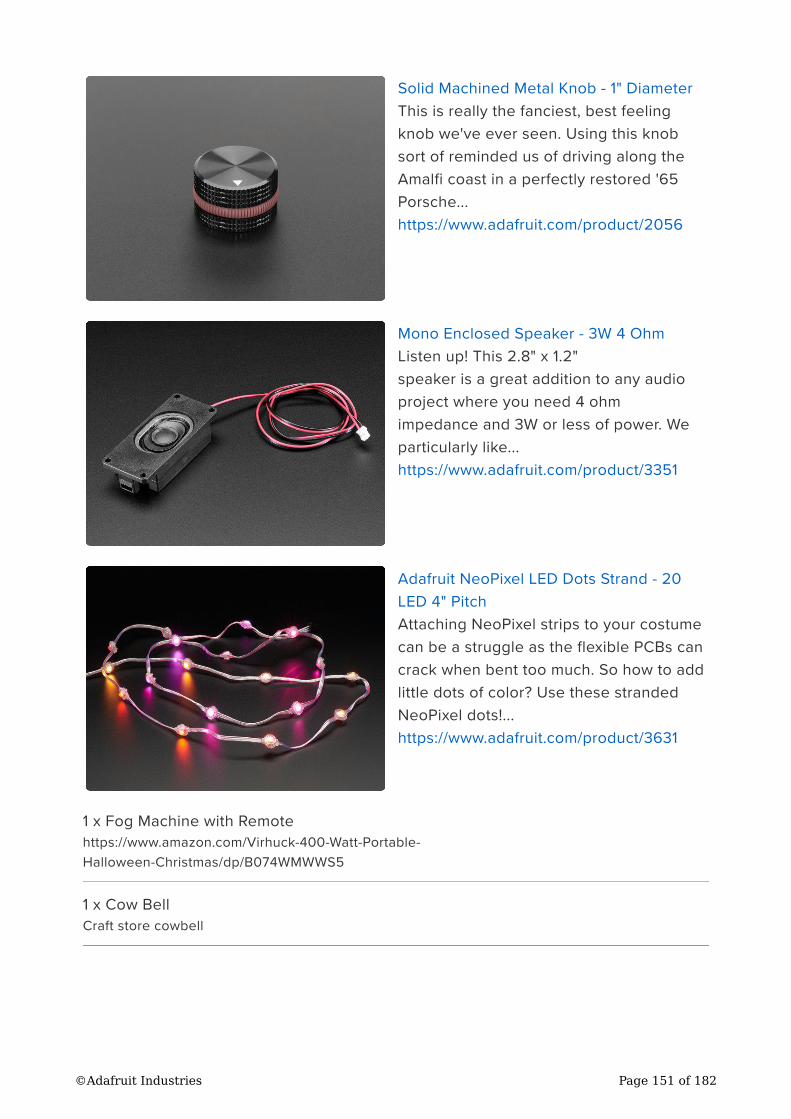
1 x Fog Machine with Remote
https://www.amazon.com/Virhuck-400-Watt-Portable-
Halloween-Christmas/dp/B074WMWWS5
1 x Cow Bell
Craft store cowbell
Solid Machined Metal Knob - 1" Diameter
This is really the fanciest, best feeling
knob we've ever seen. Using this knob
sort of reminded us of driving along the
Amalfi coast in a perfectly restored '65
Porsche...
https://www.adafruit.com/product/2056
Mono Enclosed Speaker - 3W 4 Ohm
Listen up! This 2.8" x 1.2"
speaker is a great addition to any audio
project where you need 4 ohm
impedance and 3W or less of power. We
particularly like...
https://www.adafruit.com/product/3351
Adafruit NeoPixel LED Dots Strand - 20
LED 4" Pitch
Attaching NeoPixel strips to your costume
can be a struggle as the flexible PCBs can
crack when bent too much. So how to add
little dots of color? Use these stranded
NeoPixel dots!...
https://www.adafruit.com/product/3631
©Adafruit Industries Page 151 of 182
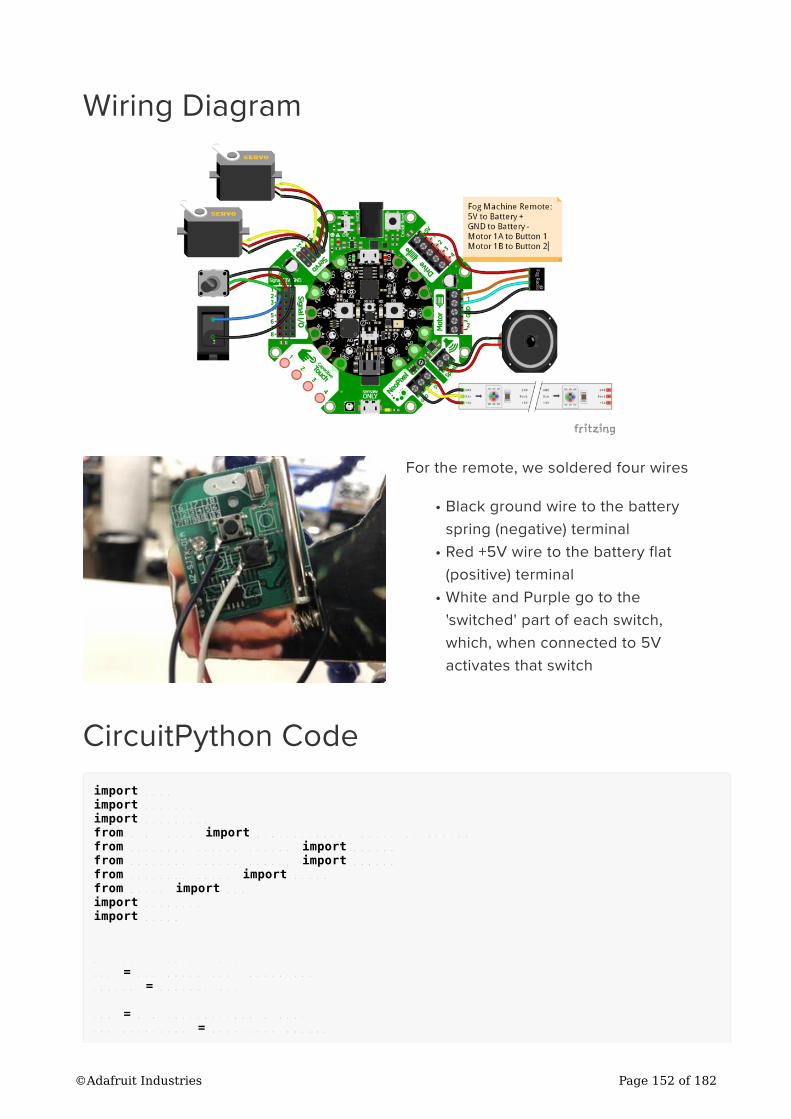
Wiring Diagram
For the remote, we soldered four wires
Black ground wire to the battery
spring (negative) terminal
Red +5V wire to the battery flat
(positive) terminal
White and Purple go to the
'switched' part of each switch,
which, when connected to 5V
activates that switch
CircuitPython Code
import time
import audioio
import audiocore
from digitalio import DigitalInOut, Pull, Direction
from adafruit_seesaw.seesaw import Seesaw
from adafruit_seesaw.pwmout import PWMOut
from adafruit_motor import servo
from busio import I2C
import neopixel
import board
# Create seesaw object
i2c = I2C(board.SCL, board.SDA)
seesaw = Seesaw(i2c)
led = DigitalInOut(board.D13)
led.direction = Direction.OUTPUT
•
•
•
©Adafruit Industries Page 152 of 182

# Two onboard CPX buttons for FOG
buttona = DigitalInOut(board.BUTTON_A)
buttona.direction = Direction.INPUT
buttona.pull = Pull.DOWN
buttonb = DigitalInOut(board.BUTTON_B)
buttonb.direction = Direction.INPUT
buttonb.pull = Pull.DOWN
# Use the signal port for potentiometer w/switch
MORECOW = 2 # A switch on Signal #1
SWITCH = 3 # A potentiometer on Signal #2
# Add a pullup on the switch
seesaw.pin_mode(SWITCH, seesaw.INPUT_PULLUP)
# Servo angles
BELL_START = 60
BELL_END = 75
MOUTH_START = 95
MOUTH_END = 105
# Create servos list
servos = []
for ss_pin in (17, 16): #17 is labeled 1 on CRICKIT, 16 is labeled 2
pwm = PWMOut(seesaw, ss_pin)
pwm.frequency = 50 #must be 50 cannot change
_servo = servo.Servo(pwm, min_pulse=400, max_pulse=2500)
servos.append(_servo)
# Starting servo locations
servos[0].angle = BELL_START
servos[1].angle = MOUTH_START
# For the fog machine we actually use the PWM on the motor port cause it really
needs 5V!
fog_off = PWMOut(seesaw, 22)
fog_off.duty_cycle = 0
fog_on = PWMOut(seesaw, 23)
fog_on.duty_cycle = 0
# Audio playback object and helper to play a full file
a = audioio.AudioOut(board.A0)
def play_file(wavfile):
with open(wavfile, "rb") as file:
wavf = audiocore.WaveFile(file)
a.play(wavf)
while a.playing:
servos[1].angle = MOUTH_START
time.sleep(.2)
servos[1].angle = MOUTH_END
time.sleep(.2)
# NeoPixels for EYES
pixels = neopixel.NeoPixel(board.A1, 9, brightness=0.5)
pixels[8] = (255, 255, 0)
pixels[7] = (255, 255, 0)
# Maps a number from one range to another.
def map_range(x, in_min, in_max, out_min, out_max):
mapped = (x-in_min) * (out_max - out_min) / (in_max-in_min) + out_min
if out_min <= out_max:
return max(min(mapped, out_max), out_min)
return min(max(mapped, out_max), out_min)
# Wait before starting up
©Adafruit Industries Page 153 of 182
time.sleep(3)
play_file("i-gotta-have-more-cowbell.wav")
# a pause between audio clips
time.sleep(1)
play_file("only-prescription-more-cowbell.wav")
while seesaw.digital_read(SWITCH):
pass
print("Ready for playing audio")
time.sleep(1)
f = open("fear11.wav", "rb")
wav = audiocore.WaveFile(f)
a.play(wav)
while True:
if seesaw.digital_read(SWITCH):
break # time to bail!
pot = seesaw.analog_read(MORECOW)
print(pot)
eyecolor = (int(map_range(pot, 0, 1023, 255, 0)), int(map_range(pot, 0, 1023, 0,
255)), 0)
pixels[8] = eyecolor
pixels[7] = eyecolor
if buttonb.value:
fog_on.duty_cycle = 65535
else:
fog_on.duty_cycle = 0
if buttona.value:
fog_off.duty_cycle = 65535
else:
fog_off.duty_cycle = 0
if pot < 200: # wait for a bit before we start
continue
delay = map_range(pot, 200, 1023, 1.0, 0.1)
servos[0].angle = BELL_END
time.sleep(0.1)
servos[0].angle = BELL_START
time.sleep(delay)
a.stop()
f.close()
# Fog machine test
fog_off.duty_cycle = 65535
fog_on.duty_cycle = 0
time.sleep(0.1)
fog_off.duty_cycle = 0
pixels[8] = (255, 255, 0)
pixels[7] = (255, 255, 0)
time.sleep(1.5)
play_file("i-coulda-used-more-cow-bell.wav")
Arduino Code
The Crickit HAT for Raspberry Pi is not programmable in Arduino.
©Adafruit Industries Page 154 of 182
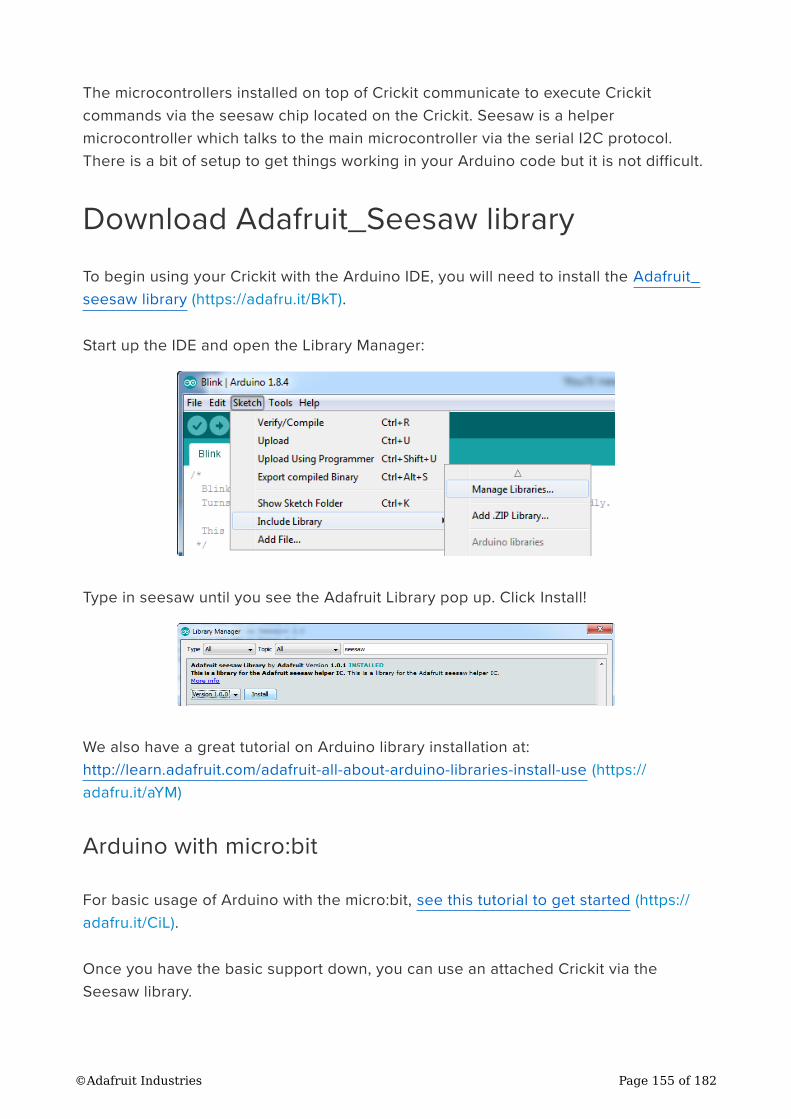
The microcontrollers installed on top of Crickit communicate to execute Crickit
commands via the seesaw chip located on the Crickit. Seesaw is a helper
microcontroller which talks to the main microcontroller via the serial I2C protocol.
There is a bit of setup to get things working in your Arduino code but it is not difficult.
Download Adafruit_Seesaw library
To begin using your Crickit with the Arduino IDE, you will need to install the Adafruit_
seesaw library (https://adafru.it/BkT).
Start up the IDE and open the Library Manager:
Type in seesaw until you see the Adafruit Library pop up. Click Install!
We also have a great tutorial on Arduino library installation at:
http://learn.adafruit.com/adafruit-all-about-arduino-libraries-install-use (https://
adafru.it/aYM)
Arduino with micro:bit
For basic usage of Arduino with the micro:bit, see this tutorial to get started (https://
adafru.it/CiL).
Once you have the basic support down, you can use an attached Crickit via the
Seesaw library.
©Adafruit Industries Page 155 of 182
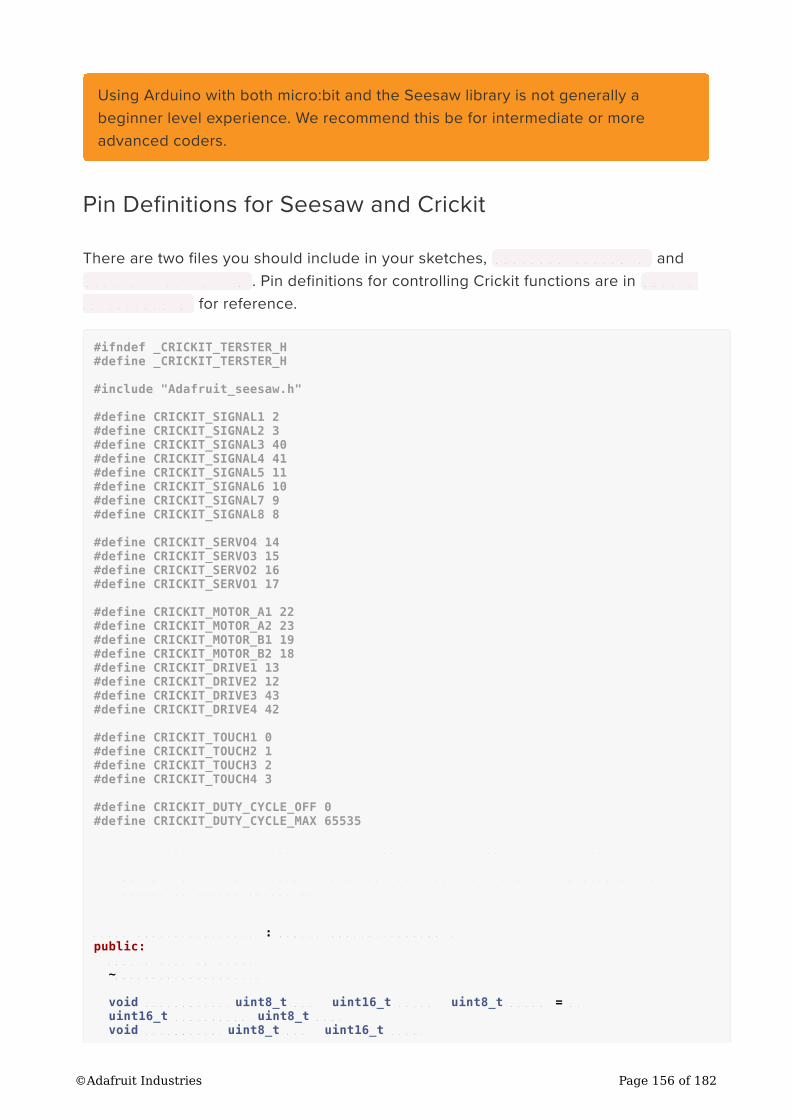
Pin Definitions for Seesaw and Crickit
There are two files you should include in your sketches, Adafruit_seesaw.h and
Adafruit_Crickit.h . Pin definitions for controlling Crickit functions are in Adafru
it_Crickit.h for reference.
#ifndef _CRICKIT_TERSTER_H
#define _CRICKIT_TERSTER_H
#include "Adafruit_seesaw.h"
#define CRICKIT_SIGNAL1 2
#define CRICKIT_SIGNAL2 3
#define CRICKIT_SIGNAL3 40
#define CRICKIT_SIGNAL4 41
#define CRICKIT_SIGNAL5 11
#define CRICKIT_SIGNAL6 10
#define CRICKIT_SIGNAL7 9
#define CRICKIT_SIGNAL8 8
#define CRICKIT_SERVO4 14
#define CRICKIT_SERVO3 15
#define CRICKIT_SERVO2 16
#define CRICKIT_SERVO1 17
#define CRICKIT_MOTOR_A1 22
#define CRICKIT_MOTOR_A2 23
#define CRICKIT_MOTOR_B1 19
#define CRICKIT_MOTOR_B2 18
#define CRICKIT_DRIVE1 13
#define CRICKIT_DRIVE2 12
#define CRICKIT_DRIVE3 43
#define CRICKIT_DRIVE4 42
#define CRICKIT_TOUCH1 0
#define CRICKIT_TOUCH2 1
#define CRICKIT_TOUCH3 2
#define CRICKIT_TOUCH4 3
#define CRICKIT_DUTY_CYCLE_OFF 0
#define CRICKIT_DUTY_CYCLE_MAX 65535
/**************************************************************************/
/*!
@brief Class that stores state and functions for interacting with Crickit
variant of seesaw helper IC
*/
/**************************************************************************/
class Adafruit_Crickit : public Adafruit_seesaw {
public:
Adafruit_Crickit(){};
~Adafruit_Crickit(){};
void analogWrite(uint8_t pin, uint16_t value, uint8_t width = 8);
uint16_t analogRead(uint8_t pin);
void setPWMFreq(uint8_t pin, uint16_t freq);
Using Arduino with both micro:bit and the Seesaw library is not generally a
beginner level experience. We recommend this be for intermediate or more
advanced coders.
©Adafruit Industries Page 156 of 182
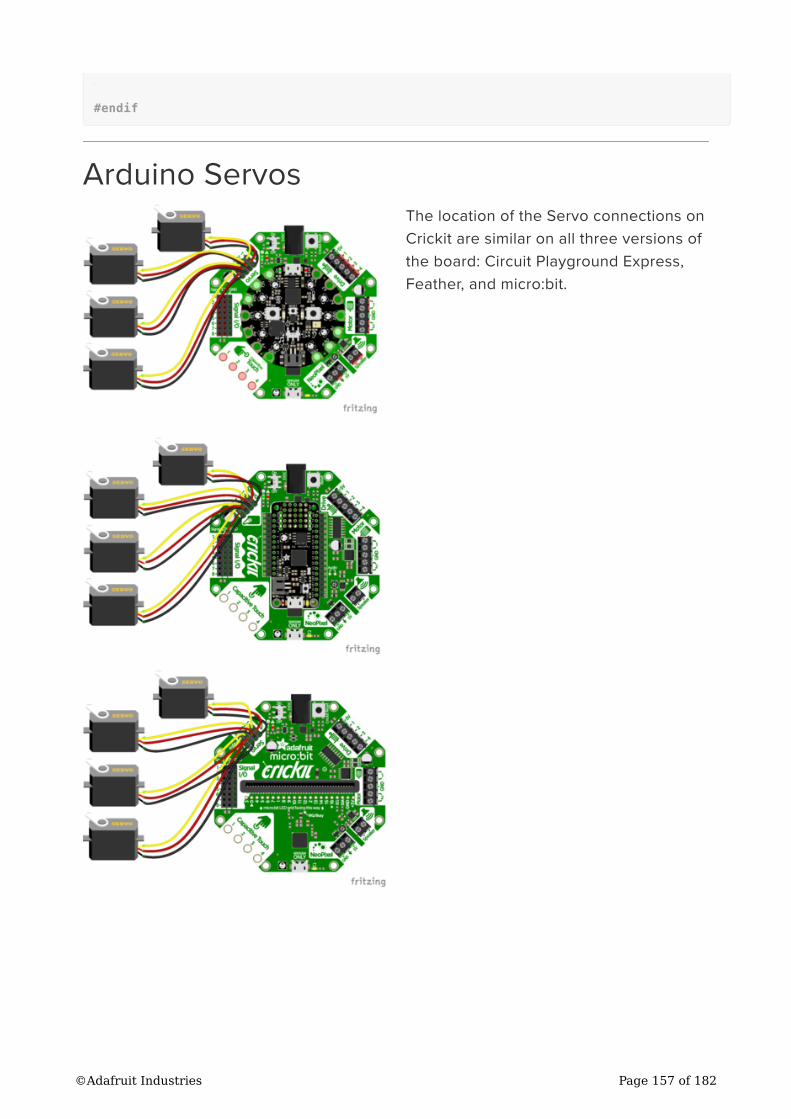
};
#endif
Arduino Servos
The location of the Servo connections on
Crickit are similar on all three versions of
the board: Circuit Playground Express,
Feather, and micro:bit.
©Adafruit Industries Page 157 of 182
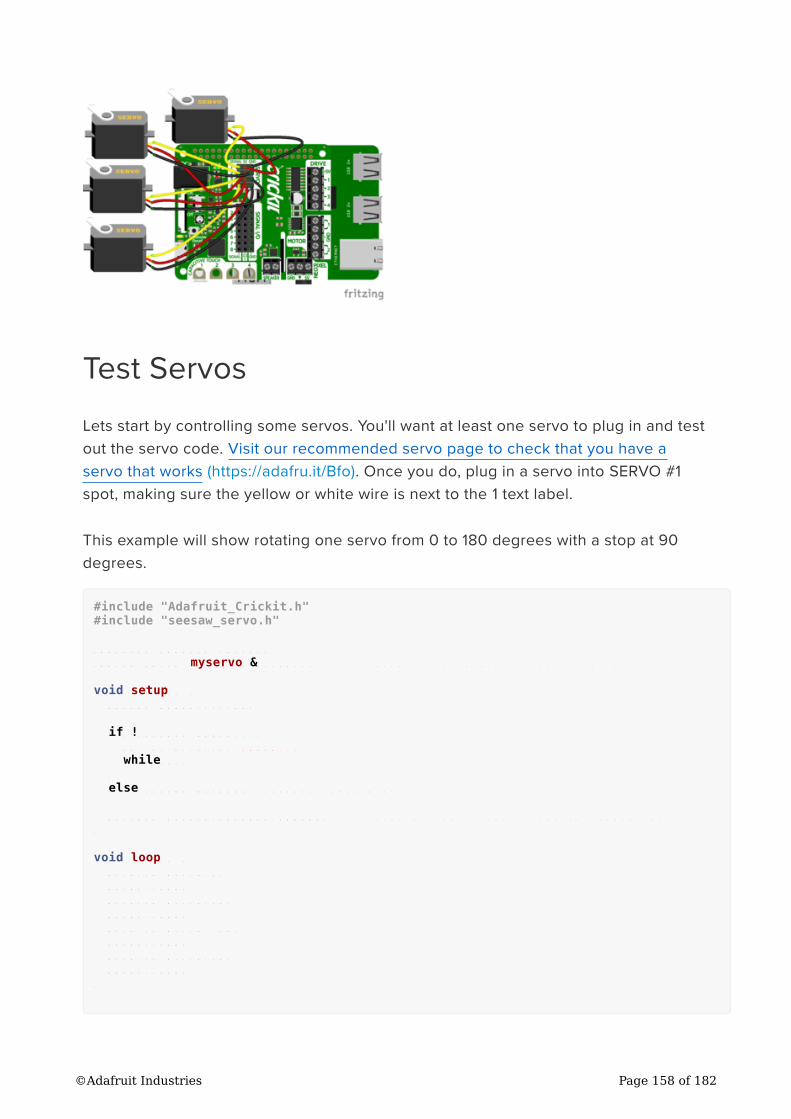
Test Servos
Lets start by controlling some servos. You'll want at least one servo to plug in and test
out the servo code. Visit our recommended servo page to check that you have a
servo that works (https://adafru.it/Bfo). Once you do, plug in a servo into SERVO #1
spot, making sure the yellow or white wire is next to the 1 text label.
This example will show rotating one servo from 0 to 180 degrees with a stop at 90
degrees.
#include "Adafruit_Crickit.h"
#include "seesaw_servo.h"
Adafruit_Crickit crickit;
seesaw_Servo myservo(&crickit); // create servo object to control a servo
void setup() {
Serial.begin(115200);
if(!crickit.begin()){
Serial.println("ERROR!");
while(1);
}
else Serial.println("Crickit started");
myservo.attach(CRICKIT_SERVO1); // attaches the servo to CRICKIT_SERVO1 pin
}
void loop() {
myservo.write(0);
delay(1000);
myservo.write(90);
delay(1000);
myservo.write(180);
delay(1000);
myservo.write(90);
delay(1000);
}
©Adafruit Industries Page 158 of 182
More Servos!
OK that was fun but you want MORE servos right? You can control up to four! The
servos are on the seesaw pins 17 (CIRCKIT_SERVO1), 16 (CIRCKIT_SERVO2), 15 (CIRC
KIT_SERVO3), 14 (CIRCKIT_SERVO4)
This example is similar to the 1 servo example, but instead of creating one myservo
object, we'll make an array called servos that contains 4 servo objects. Then we can
assign them using servo[0].write(90); or iterate through them as we do in the
loop. You don't have to do it this way, but its very compact and doesn't take a lot of
code lines to create all 4 servos at once!
#include "Adafruit_Crickit.h"
#include "seesaw_servo.h"
Adafruit_Crickit crickit;
#define NUM_SERVOS 4
//create an array of 4 servos with our crickit object
seesaw_Servo servos[] = { seesaw_Servo(&crickit),
seesaw_Servo(&crickit),
seesaw_Servo(&crickit),
seesaw_Servo(&crickit) };
//these are the pins they will be attached to
int servoPins[] = { CRICKIT_SERVO1, CRICKIT_SERVO2, CRICKIT_SERVO3,
CRICKIT_SERVO4 };
void setup() {
Serial.begin(115200);
//begin the crickit
if(!crickit.begin()){
Serial.println("ERROR!");
while(1);
}
else Serial.println("Crickit started");
//attach the servos to their pins
for(int i=0; i<NUM_SERVOS; i++)
servos[i].attach(servoPins[i]); // attaches the servo to the pin
}
void loop() {
//repeat for all 4 servos
for(int i=0; i<NUM_SERVOS; i++){
servos[i].write(0);
delay(1000);
servos[i].write(90);
delay(1000);
servos[i].write(180);
delay(1000);
Are your servos not moving a full 180 degrees? Don't fret! This is normal, see
below about min/max pulse lengths to 'tune' your servo!
©Adafruit Industries Page 159 of 182
servos[i].write(90);
delay(1000);
}
}
Min/Max Pulse control
In theory, servos should all use 1ms to 2ms long pulses, at 50 Hz to set the 0 and 180
degree locations. However, not all servos have their full range at those pulse widths.
You can easily tweak your code to change the min and max pulse widths, which will
let your servo turn more left and right. But don't set the widths too small/large or you
can hit the hard stops of the servo which could damage it, so try tweaking the
numbers slowly until you get a sense of what the limits are for your motor.
All you need to do is change the
myservo.attach(CRICKIT_SERVO1);
to, say,
myservo.attach(CRICKIT_SERVO1, 750, 2250);
Here we've change the minimum pulse from the default 1000 microseconds to 750,
and the default maximum pulse from 2000 microseconds to 2250. Again, each servo
differs. Some experimentation may be required!
Continuous Rotation Servos
If you're using continuous servos, you can use the angle assignments and just
remember that 0 is rotating one way, 90 is 'stopped' and 180 and rotating the other
way.
If your continuous servo doesn't stop once the script is finished you may need to tune
the min and max pulse timings so that the center makes the servo stop. Or check if
the servo has a center-adjustment screw you can tweak.
©Adafruit Industries Page 160 of 182
Disconnecting Servos or Custom Pulses
If you want to 'disconnect' the Servo by sending it 0-length pulses, you can do that by
'reaching in' and adjusting the underlying PWM duty cycle with:
myservo.writeMicroseconds(0);
Likewise you can set the duty cycle to a custom value with
myservo.writeMicroseconds(number);
where number is the pulse length is microseconds between 0 (off) and 20000 (fully
on). For example, setting it to 10000 will be 50% duty cycle, at the 50 Hz update rate
©Adafruit Industries Page 161 of 182
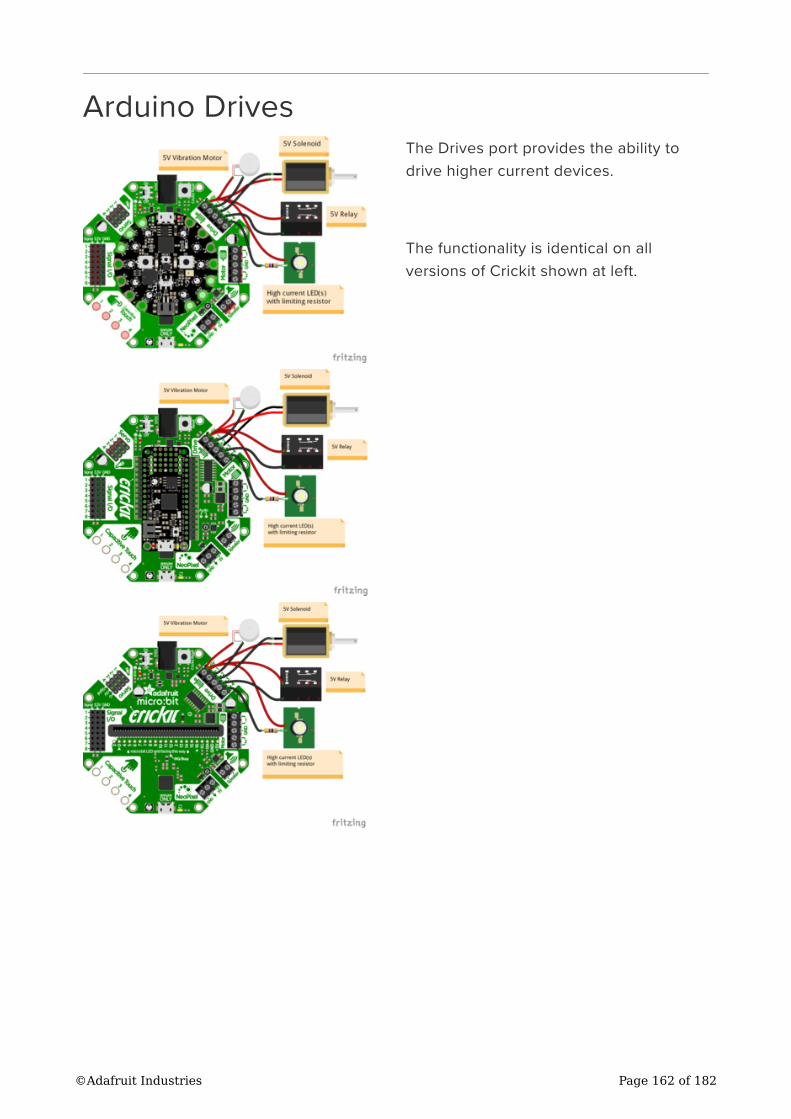
Arduino Drives
The Drives port provides the ability to
drive higher current devices.
The functionality is identical on all
versions of Crickit shown at left.
©Adafruit Industries Page 162 of 182
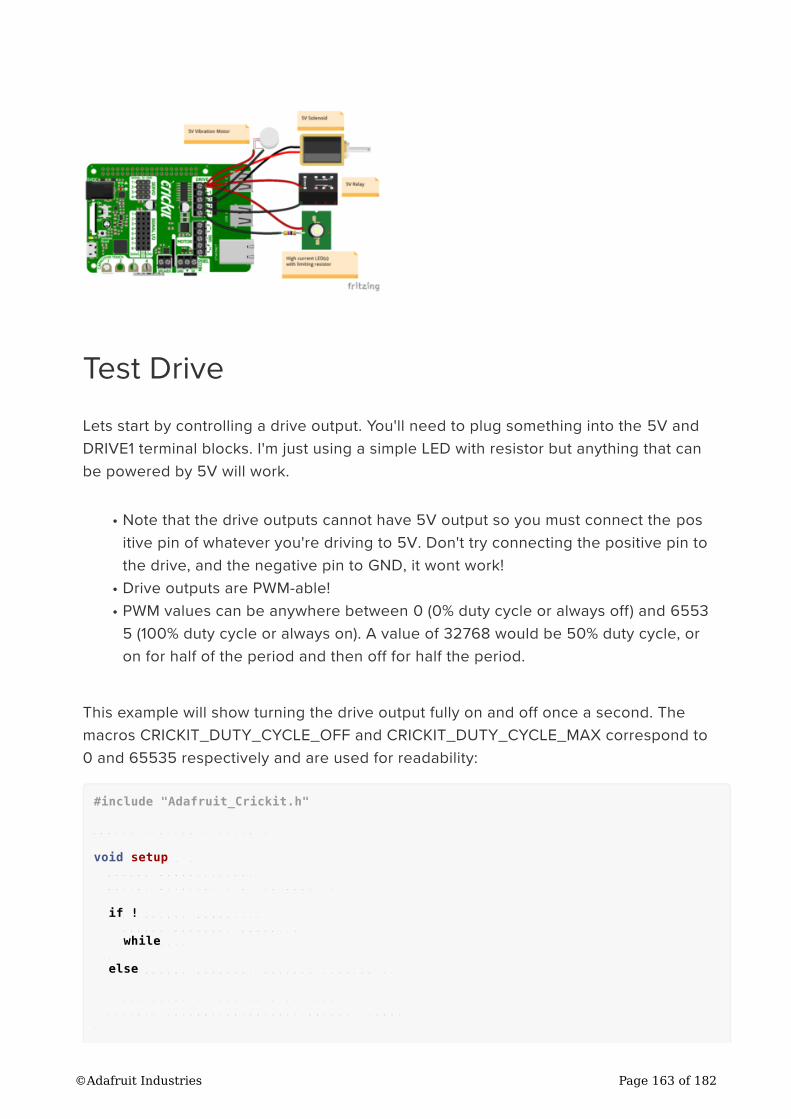
Test Drive
Lets start by controlling a drive output. You'll need to plug something into the 5V and
DRIVE1 terminal blocks. I'm just using a simple LED with resistor but anything that can
be powered by 5V will work.
Note that the drive outputs cannot have 5V output so you must connect the pos
itive pin of whatever you're driving to 5V. Don't try connecting the positive pin to
the drive, and the negative pin to GND, it wont work!
Drive outputs are PWM-able!
PWM values can be anywhere between 0 (0% duty cycle or always off) and 6553
5 (100% duty cycle or always on). A value of 32768 would be 50% duty cycle, or
on for half of the period and then off for half the period.
This example will show turning the drive output fully on and off once a second. The
macros CRICKIT_DUTY_CYCLE_OFF and CRICKIT_DUTY_CYCLE_MAX correspond to
0 and 65535 respectively and are used for readability:
#include "Adafruit_Crickit.h"
Adafruit_Crickit crickit;
void setup() {
Serial.begin(115200);
Serial.println("1 Drive demo!");
if(!crickit.begin()){
Serial.println("ERROR!");
while(1);
}
else Serial.println("Crickit started");
//our default frequency is 1khz
crickit.setPWMFreq(CRICKIT_DRIVE1, 1000);
}
•
•
•
©Adafruit Industries Page 163 of 182
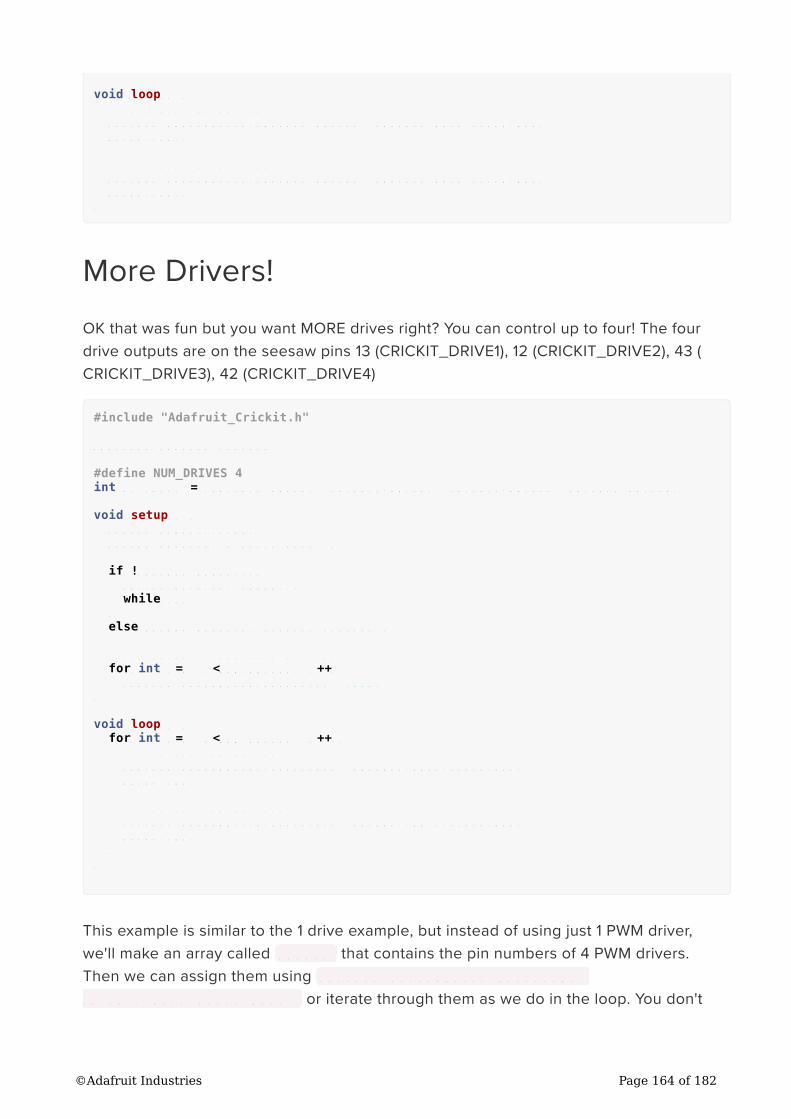
void loop() {
//turn all the way on
crickit.analogWrite(CRICKIT_DRIVE1, CRICKIT_DUTY_CYCLE_OFF);
delay(500);
//turn all the way off
crickit.analogWrite(CRICKIT_DRIVE1, CRICKIT_DUTY_CYCLE_MAX);
delay(500);
}
More Drivers!
OK that was fun but you want MORE drives right? You can control up to four! The four
drive outputs are on the seesaw pins 13 (CRICKIT_DRIVE1), 12 (CRICKIT_DRIVE2), 43 (
CRICKIT_DRIVE3), 42 (CRICKIT_DRIVE4)
#include "Adafruit_Crickit.h"
Adafruit_Crickit crickit;
#define NUM_DRIVES 4
int drives[] = {CRICKIT_DRIVE1, CRICKIT_DRIVE2, CRICKIT_DRIVE3, CRICKIT_DRIVE4};
void setup() {
Serial.begin(115200);
Serial.println("4 Drive demo!");
if(!crickit.begin()){
Serial.println("ERROR!");
while(1);
}
else Serial.println("Crickit started");
//our default frequency is 1khz
for(int i=0; i<NUM_DRIVES; i++)
crickit.setPWMFreq(drives[i], 1000);
}
void loop() {
for(int i=0; i<NUM_DRIVES; i++){
//turn all the way on
crickit.analogWrite(drives[i], CRICKIT_DUTY_CYCLE_OFF);
delay(100);
//turn all the way off
crickit.analogWrite(drives[i], CRICKIT_DUTY_CYCLE_MAX);
delay(100);
}
}
This example is similar to the 1 drive example, but instead of using just 1 PWM driver,
we'll make an array called drives that contains the pin numbers of 4 PWM drivers.
Then we can assign them using crickit.analogWrite(drives[0],
CRICKIT_DUTY_CYCLE_MAX); or iterate through them as we do in the loop. You don't
©Adafruit Industries Page 164 of 182
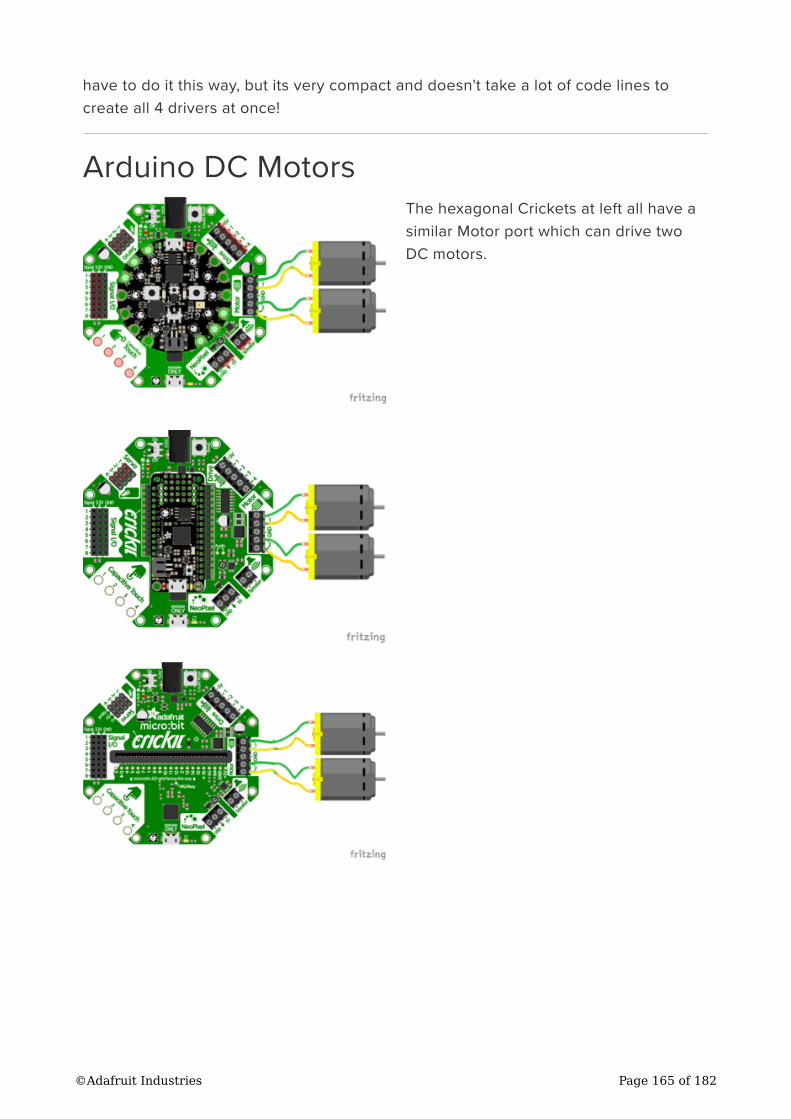
have to do it this way, but its very compact and doesn't take a lot of code lines to
create all 4 drivers at once!
Arduino DC Motors
The hexagonal Crickets at left all have a
similar Motor port which can drive two
DC motors.
©Adafruit Industries Page 165 of 182

DC motors are controlled by 4 PWM output pins, the 4 PWM pins let you control
speed and direction. And we'll use our seesaw_Motor library to help us manage the
throttle (speed) and direction for us, making it very easy to control motors
Note that each DC motor is a little different, so just because you have two at the same
throttle does not mean they'll rotate at the exact same speed! Some tweaking may be
required
#include "Adafruit_Crickit.h"
#include "seesaw_motor.h"
Adafruit_Crickit crickit;
seesaw_Motor motor_a(&crickit);
seesaw_Motor motor_b(&crickit);
void setup() {
Serial.begin(115200);
Serial.println("Dual motor demo!");
if(!crickit.begin()){
Serial.println("ERROR!");
while(1);
}
else Serial.println("Crickit started");
//attach motor a
motor_a.attach(CRICKIT_MOTOR_A1, CRICKIT_MOTOR_A2);
//attach motor b
motor_b.attach(CRICKIT_MOTOR_B1, CRICKIT_MOTOR_B2);
}
void loop() {
motor_a.throttle(1);
motor_b.throttle(-1);
delay(1000);
The two wires of the DC motor can be plugged in either way into each Crickit
Motor port. If the motor spins the opposite way from what you want to call
'forward', just flip the wires!
©Adafruit Industries Page 166 of 182

motor_a.throttle(.5);
motor_b.throttle(-.5);
delay(1000);
motor_a.throttle(0);
motor_b.throttle(0);
delay(1000);
motor_a.throttle(-.5);
motor_b.throttle(.5);
delay(1000);
motor_a.throttle(-1);
motor_b.throttle(1);
delay(1000);
motor_a.throttle(0);
motor_b.throttle(0);
delay(500);
}
©Adafruit Industries Page 167 of 182
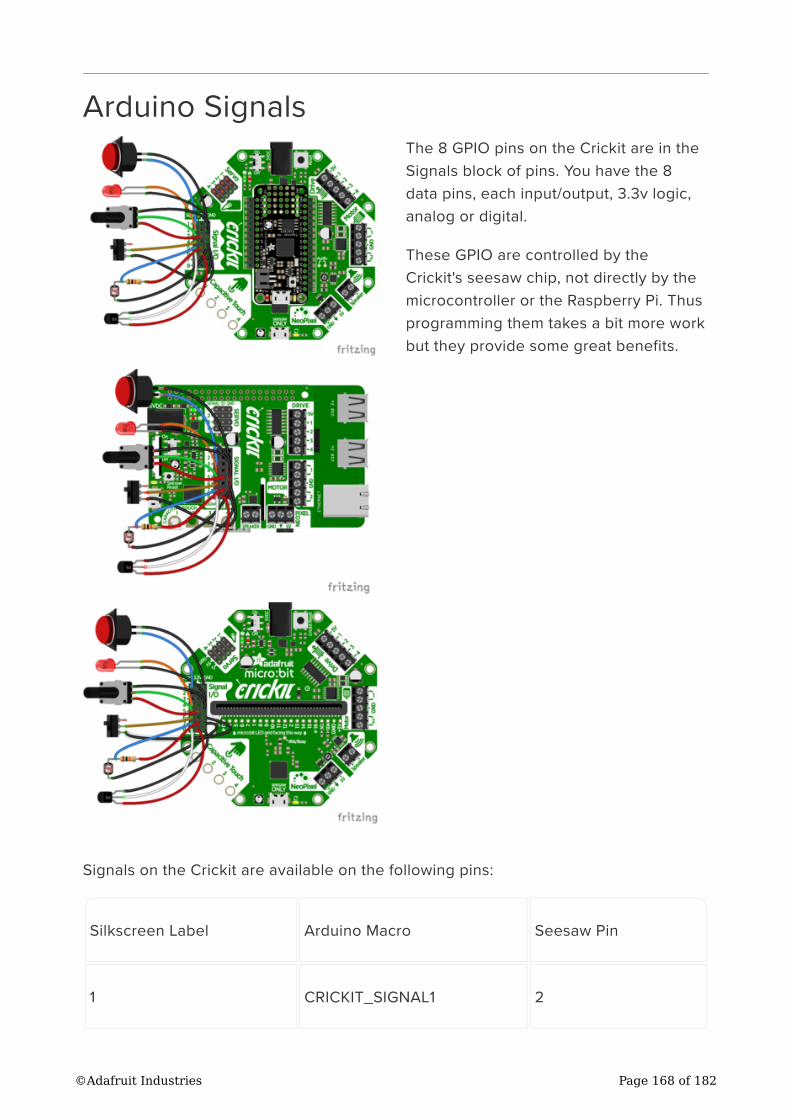
Arduino Signals
The 8 GPIO pins on the Crickit are in the
Signals block of pins. You have the 8
data pins, each input/output, 3.3v logic,
analog or digital.
These GPIO are controlled by the
Crickit's seesaw chip, not directly by the
microcontroller or the Raspberry Pi. Thus
programming them takes a bit more work
but they provide some great benefits.
Signals on the Crickit are available on the following pins:
Silkscreen Label Arduino Macro Seesaw Pin
1 CRICKIT_SIGNAL1 2
©Adafruit Industries Page 168 of 182
You can use these as analog or digital I/O pins, setting the mode, value and reading
with the seesaw library directly:
#include "Adafruit_Crickit.h"
Adafruit_Crickit crickit;
#define BUTTON_1 CRICKIT_SIGNAL1
#define BUTTON_2 CRICKIT_SIGNAL2
#define LED_1 CRICKIT_SIGNAL3
#define LED_2 CRICKIT_SIGNAL4
void setup() {
Serial.begin(9600);
if(!crickit.begin()){
Serial.println("ERROR!");
while(1);
}
else Serial.println("Crickit started");
//Two buttons are pullups, connect to ground to activate
crickit.pinMode(BUTTON_1, INPUT_PULLUP);
crickit.pinMode(BUTTON_2, INPUT_PULLUP);
// Two LEDs are outputs, on by default
crickit.pinMode(LED_1, OUTPUT);
crickit.pinMode(LED_2, OUTPUT);
crickit.digitalWrite(LED_1, HIGH);
crickit.digitalWrite(LED_2, HIGH);
}
2 CRICKIT_SIGNAL2 3
3 CRICKIT_SIGNAL3 40
4 CRICKIT_SIGNAL4 41
5 CRICKIT_SIGNAL5 11
6 CRICKIT_SIGNAL6 10
7 CRICKIT_SIGNAL7 9
8 CRICKIT_SIGNAL8 8
©Adafruit Industries Page 169 of 182
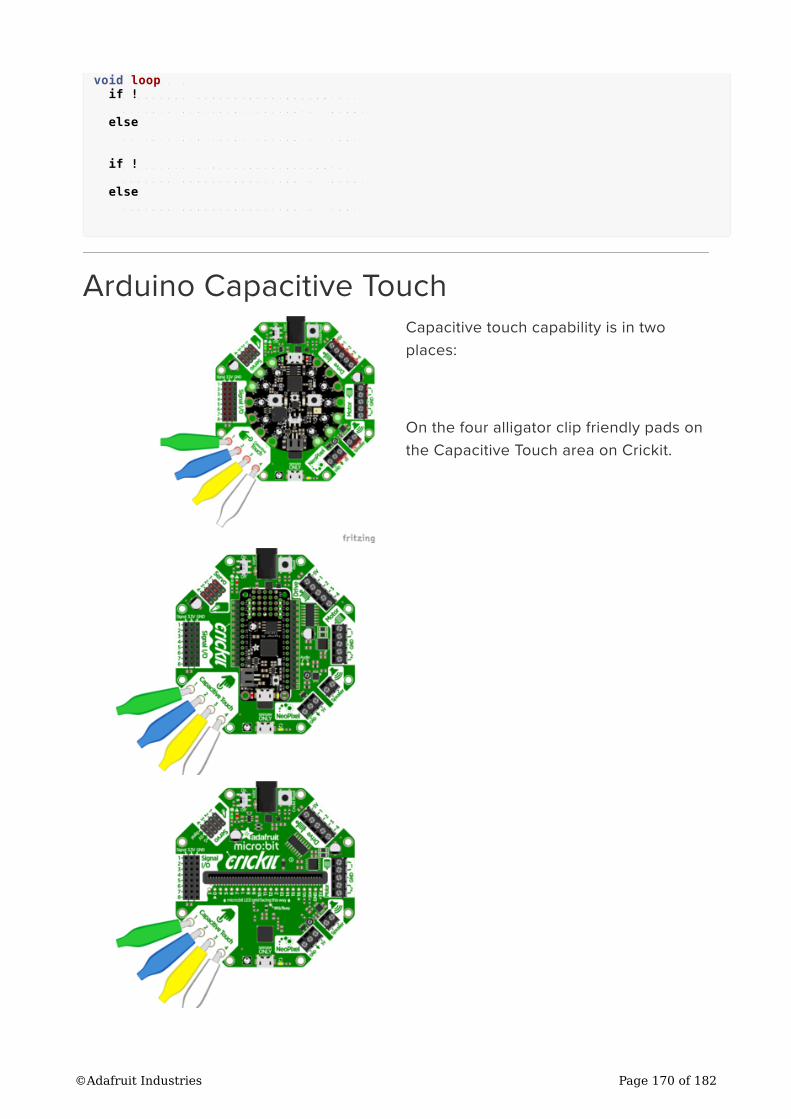
void loop() {
if(!crickit.digitalRead(BUTTON_1))
crickit.digitalWrite(LED_1, HIGH);
else
crickit.digitalWrite(LED_1, LOW);
if(!crickit.digitalRead(BUTTON_2))
crickit.digitalWrite(LED_2, HIGH);
else
crickit.digitalWrite(LED_2, LOW);
}
Arduino Capacitive Touch
Capacitive touch capability is in two
places:
On the four alligator clip friendly pads on
the Capacitive Touch area on Crickit.
©Adafruit Industries Page 170 of 182
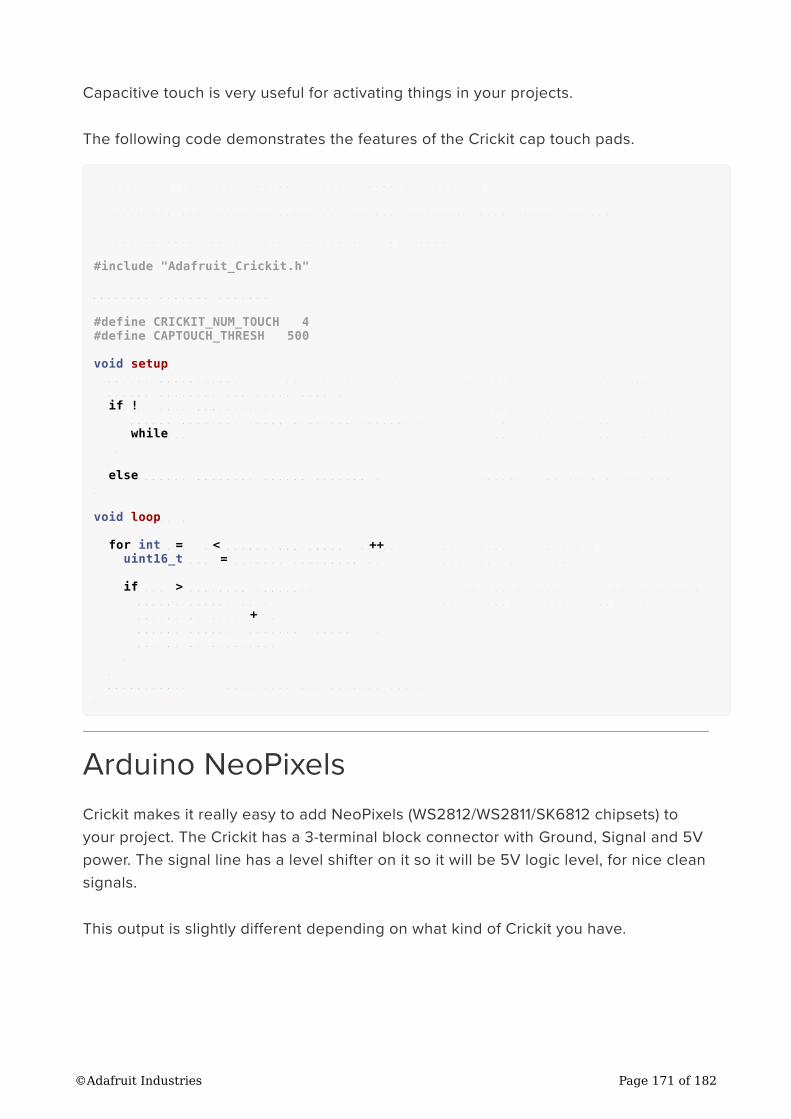
Capacitive touch is very useful for activating things in your projects.
The following code demonstrates the features of the Crickit cap touch pads.
// Adafruit Crickit Capacitive Touch Demo for Arduino
//
// Displays the value of Adafruit Crickit touchpad values when touched
//
// Tested with the Crickit + micro:bit, all good
#include "Adafruit_Crickit.h"
Adafruit_Crickit crickit;
#define CRICKIT_NUM_TOUCH 4
#define CAPTOUCH_THRESH 500
void setup() {
Serial.begin(9600); // Set up serial monitor - be sure it is set to 9600
Serial.println("Cap Touch Demo");
if(!crickit.begin()) { // Check if Crickit is attached
Serial.println("ERROR Starting crickit"); // If an error, print and
while(1) ; // go to a infinite loop to
stop
}
else Serial.println("seesaw started"); // success, we have a Crickit
}
void loop() {
for(int i=0; i<CRICKIT_NUM_TOUCH; i++){ // check each touch input
uint16_t val = crickit.touchRead(i); // read the touch input
if(val > CAPTOUCH_THRESH){ // if the value read is > the threshold
Serial.print("CT"); // print info to serial monitor
Serial.print(i + 1);
Serial.print(" touched! value: ");
Serial.println(val);
}
}
delay(100); // wait tiny bit between checks
}
Arduino NeoPixels
Crickit makes it really easy to add NeoPixels (WS2812/WS2811/SK6812 chipsets) to
your project. The Crickit has a 3-terminal block connector with Ground, Signal and 5V
power. The signal line has a level shifter on it so it will be 5V logic level, for nice clean
signals.
This output is slightly different depending on what kind of Crickit you have.
©Adafruit Industries Page 171 of 182
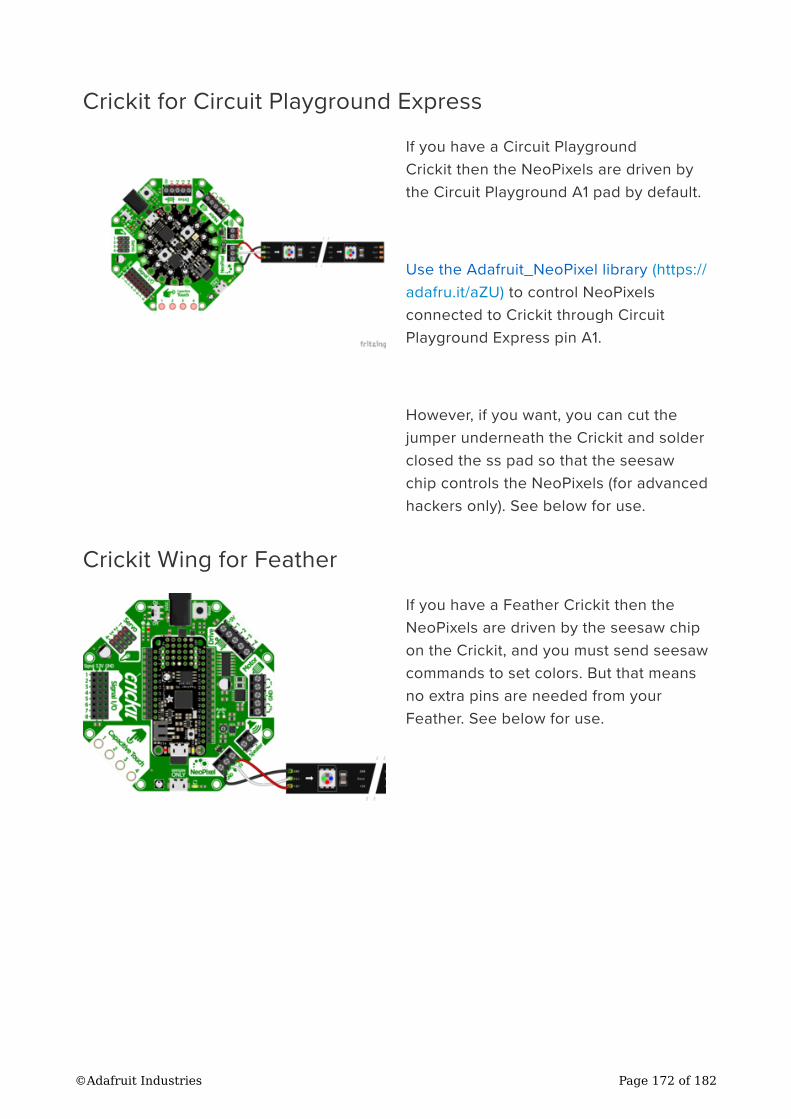
Crickit for Circuit Playground Express
If you have a Circuit Playground
Crickit then the NeoPixels are driven by
the Circuit Playground A1 pad by default.
Use the Adafruit_NeoPixel library (https://
adafru.it/aZU) to control NeoPixels
connected to Crickit through Circuit
Playground Express pin A1.
However, if you want, you can cut the
jumper underneath the Crickit and solder
closed the ss pad so that the seesaw
chip controls the NeoPixels (for advanced
hackers only). See below for use.
Crickit Wing for Feather
If you have a Feather Crickit then the
NeoPixels are driven by the seesaw chip
on the Crickit, and you must send seesaw
commands to set colors. But that means
no extra pins are needed from your
Feather. See below for use.
©Adafruit Industries Page 172 of 182
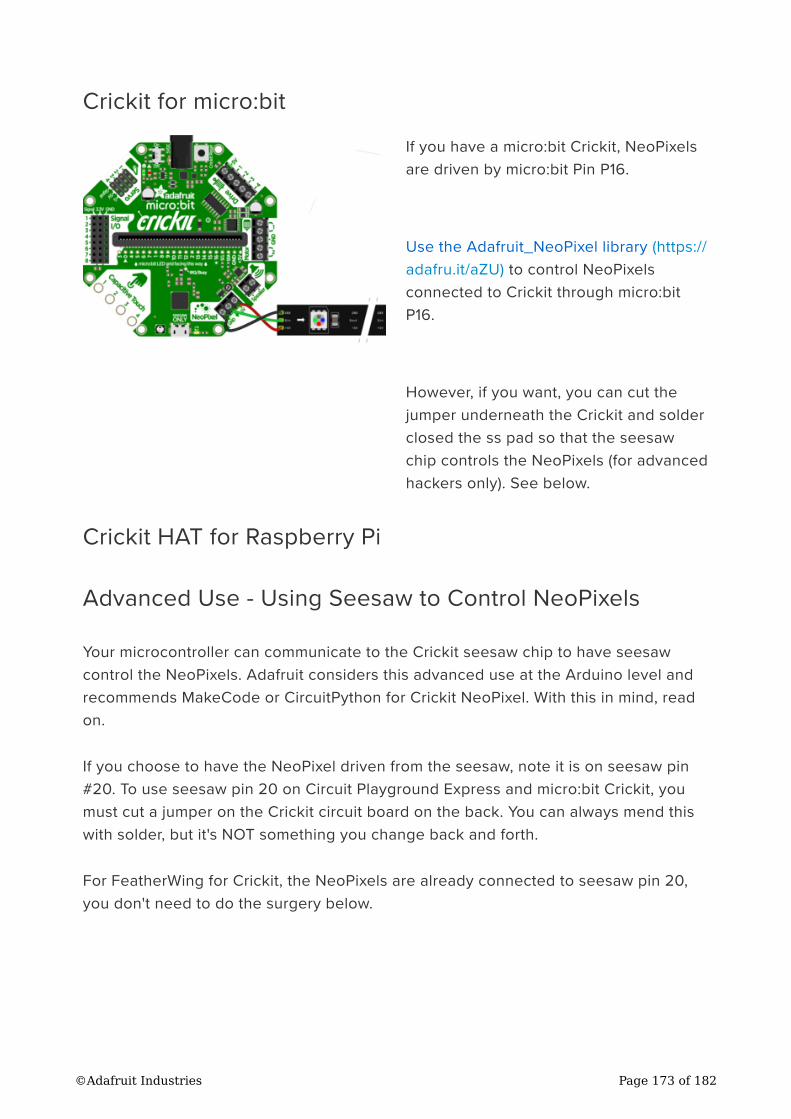
Crickit for micro:bit
If you have a micro:bit Crickit, NeoPixels
are driven by micro:bit Pin P16.
Use the Adafruit_NeoPixel library (https://
adafru.it/aZU) to control NeoPixels
connected to Crickit through micro:bit
P16.
However, if you want, you can cut the
jumper underneath the Crickit and solder
closed the ss pad so that the seesaw
chip controls the NeoPixels (for advanced
hackers only). See below.
Crickit HAT for Raspberry Pi
Advanced Use - Using Seesaw to Control NeoPixels
Your microcontroller can communicate to the Crickit seesaw chip to have seesaw
control the NeoPixels. Adafruit considers this advanced use at the Arduino level and
recommends MakeCode or CircuitPython for Crickit NeoPixel. With this in mind, read
on.
If you choose to have the NeoPixel driven from the seesaw, note it is on seesaw pin
#20. To use seesaw pin 20 on Circuit Playground Express and micro:bit Crickit, you
must cut a jumper on the Crickit circuit board on the back. You can always mend this
with solder, but it's NOT something you change back and forth.
For FeatherWing for Crickit, the NeoPixels are already connected to seesaw pin 20,
you don't need to do the surgery below.
©Adafruit Industries Page 173 of 182
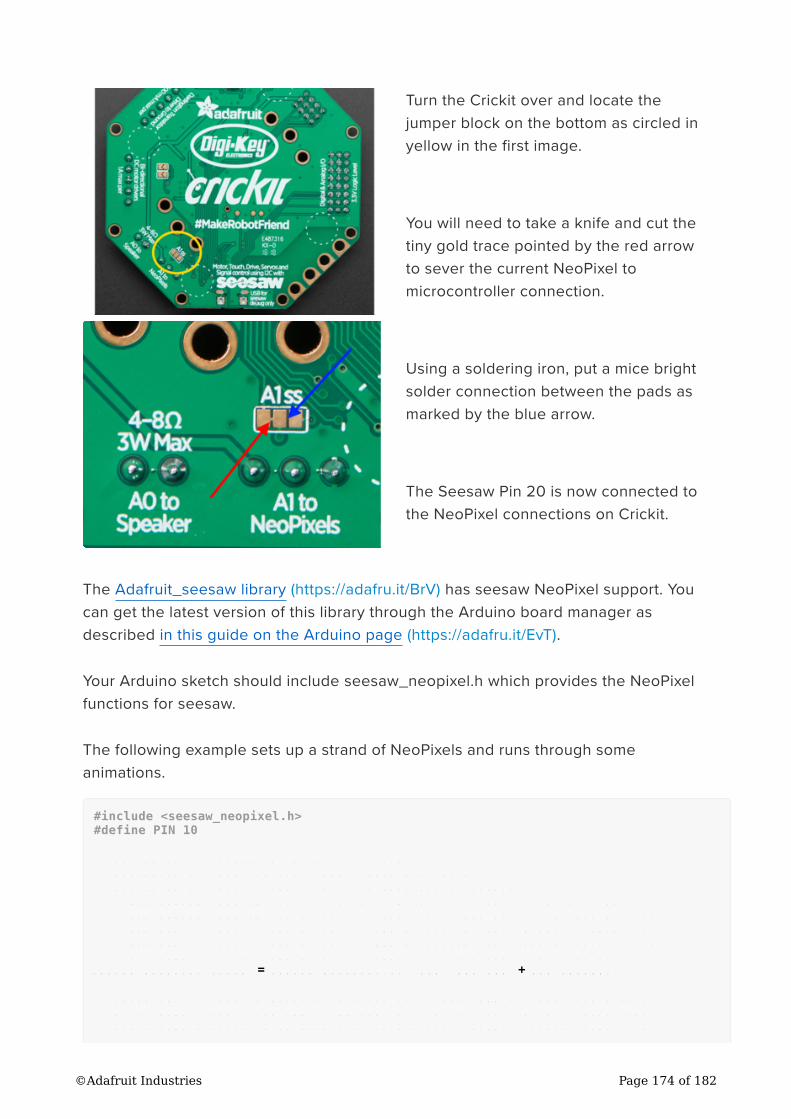
Turn the Crickit over and locate the
jumper block on the bottom as circled in
yellow in the first image.
You will need to take a knife and cut the
tiny gold trace pointed by the red arrow
to sever the current NeoPixel to
microcontroller connection.
Using a soldering iron, put a mice bright
solder connection between the pads as
marked by the blue arrow.
The Seesaw Pin 20 is now connected to
the NeoPixel connections on Crickit.
The Adafruit_seesaw library (https://adafru.it/BrV) has seesaw NeoPixel support. You
can get the latest version of this library through the Arduino board manager as
described in this guide on the Arduino page (https://adafru.it/EvT).
Your Arduino sketch should include seesaw_neopixel.h which provides the NeoPixel
functions for seesaw.
The following example sets up a strand of NeoPixels and runs through some
animations.
#include <seesaw_neopixel.h>
#define PIN 10
// Parameter 1 = number of pixels in strip
// Parameter 2 = Arduino pin number (most are valid)
// Parameter 3 = pixel type flags, add together as needed:
// NEO_KHZ800 800 KHz bitstream (most NeoPixel products w/WS2812 LEDs)
// NEO_KHZ400 400 KHz (classic 'v1' (not v2) FLORA pixels, WS2811 drivers)
// NEO_GRB Pixels are wired for GRB bitstream (most NeoPixel products)
// NEO_RGB Pixels are wired for RGB bitstream (v1 FLORA pixels, not v2)
// NEO_RGBW Pixels are wired for RGBW bitstream (NeoPixel RGBW products)
seesaw_NeoPixel strip = seesaw_NeoPixel(12, PIN, NEO_GRB + NEO_KHZ800);
// IMPORTANT: To reduce NeoPixel burnout risk, add 1000 uF capacitor across
// pixel power leads, add 300 - 500 Ohm resistor on first pixel's data input
// and minimize distance between Arduino and first pixel. Avoid connecting
©Adafruit Industries Page 174 of 182
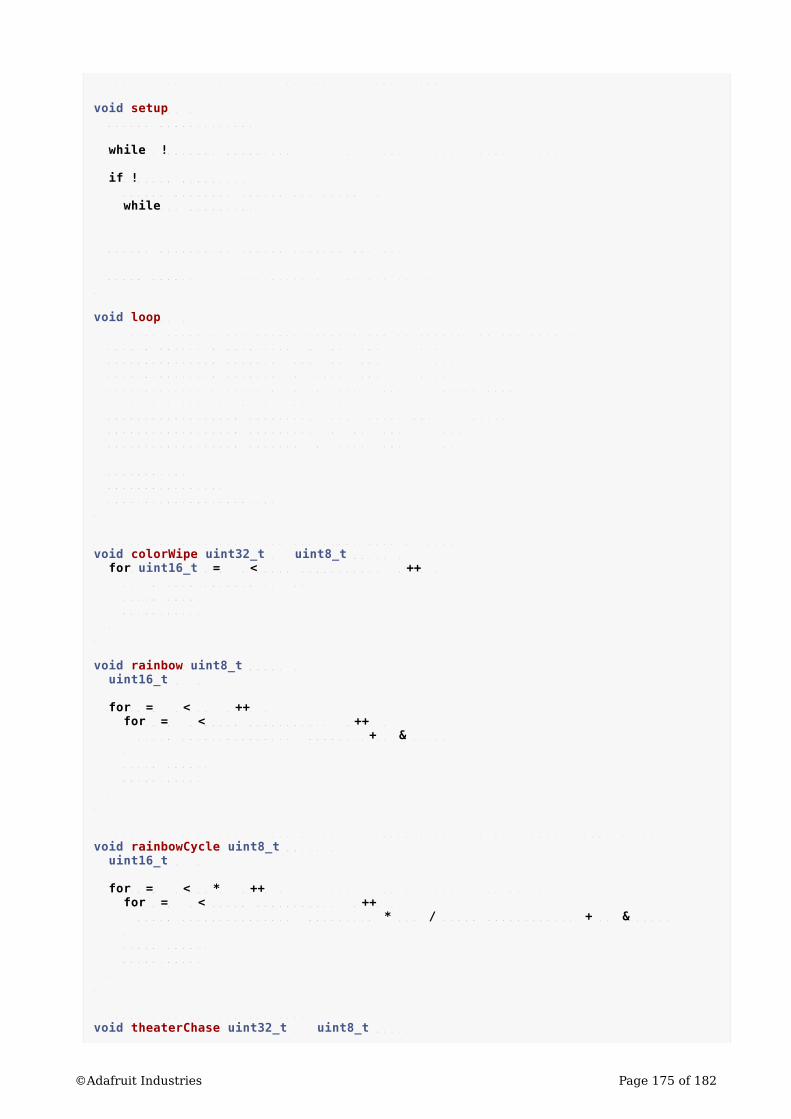
// on a live circuit...if you must, connect GND first.
void setup() {
Serial.begin(115200);
while (!Serial) delay(10); // wait until serial port is opened
if(!strip.begin()){
Serial.println("seesaw not found!");
while(1) delay(10);
}
Serial.println(F("seesaw started OK!"));
strip.show(); // Initialize all pixels to 'off'
}
void loop() {
// Some example procedures showing how to display to the pixels:
colorWipe(strip.Color(255, 0, 0), 50); // Red
colorWipe(strip.Color(0, 255, 0), 50); // Green
colorWipe(strip.Color(0, 0, 255), 50); // Blue
//colorWipe(strip.Color(0, 0, 0, 255), 50); // White RGBW
// Send a theater pixel chase in...
theaterChase(strip.Color(127, 127, 127), 50); // White
theaterChase(strip.Color(127, 0, 0), 50); // Red
theaterChase(strip.Color(0, 0, 127), 50); // Blue
rainbow(20);
rainbowCycle(20);
theaterChaseRainbow(50);
}
// Fill the dots one after the other with a color
void colorWipe(uint32_t c, uint8_t wait) {
for(uint16_t i=0; i<strip.numPixels(); i++) {
strip.setPixelColor(i, c);
strip.show();
delay(wait);
}
}
void rainbow(uint8_t wait) {
uint16_t i, j;
for(j=0; j<256; j++) {
for(i=0; i<strip.numPixels(); i++) {
strip.setPixelColor(i, Wheel((i+j) & 255));
}
strip.show();
delay(wait);
}
}
// Slightly different, this makes the rainbow equally distributed throughout
void rainbowCycle(uint8_t wait) {
uint16_t i, j;
for(j=0; j<256*5; j++) { // 5 cycles of all colors on wheel
for(i=0; i< strip.numPixels(); i++) {
strip.setPixelColor(i, Wheel(((i * 256 / strip.numPixels()) + j) & 255));
}
strip.show();
delay(wait);
}
}
//Theatre-style crawling lights.
void theaterChase(uint32_t c, uint8_t wait) {
©Adafruit Industries Page 175 of 182
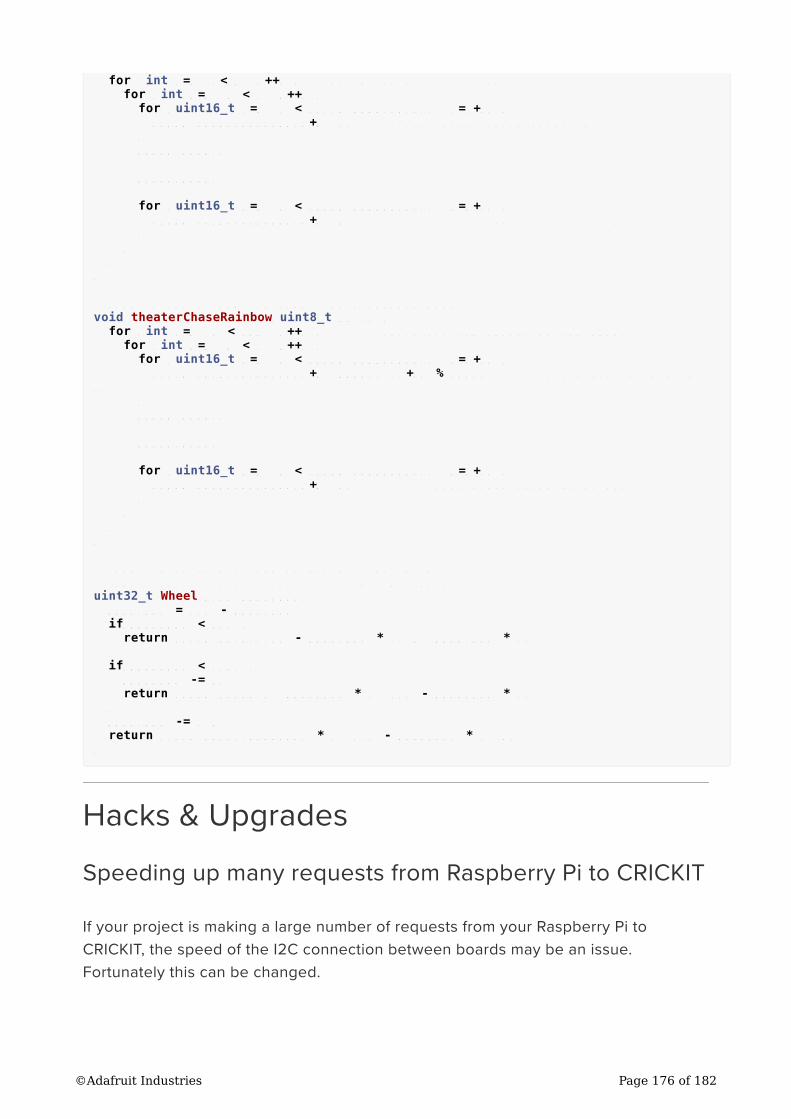
for (int j=0; j<10; j++) { //do 10 cycles of chasing
for (int q=0; q < 3; q++) {
for (uint16_t i=0; i < strip.numPixels(); i=i+3) {
strip.setPixelColor(i+q, c); //turn every third pixel on
}
strip.show();
delay(wait);
for (uint16_t i=0; i < strip.numPixels(); i=i+3) {
strip.setPixelColor(i+q, 0); //turn every third pixel off
}
}
}
}
//Theatre-style crawling lights with rainbow effect
void theaterChaseRainbow(uint8_t wait) {
for (int j=0; j < 256; j++) { // cycle all 256 colors in the wheel
for (int q=0; q < 3; q++) {
for (uint16_t i=0; i < strip.numPixels(); i=i+3) {
strip.setPixelColor(i+q, Wheel( (i+j) % 255)); //turn every third pixel
on
}
strip.show();
delay(wait);
for (uint16_t i=0; i < strip.numPixels(); i=i+3) {
strip.setPixelColor(i+q, 0); //turn every third pixel off
}
}
}
}
// Input a value 0 to 255 to get a color value.
// The colours are a transition r - g - b - back to r.
uint32_t Wheel(byte WheelPos) {
WheelPos = 255 - WheelPos;
if(WheelPos < 85) {
return strip.Color(255 - WheelPos * 3, 0, WheelPos * 3);
}
if(WheelPos < 170) {
WheelPos -= 85;
return strip.Color(0, WheelPos * 3, 255 - WheelPos * 3);
}
WheelPos -= 170;
return strip.Color(WheelPos * 3, 255 - WheelPos * 3, 0);
}
Hacks & Upgrades
Speeding up many requests from Raspberry Pi to CRICKIT
If your project is making a large number of requests from your Raspberry Pi to
CRICKIT, the speed of the I2C connection between boards may be an issue.
Fortunately this can be changed.
©Adafruit Industries Page 176 of 182
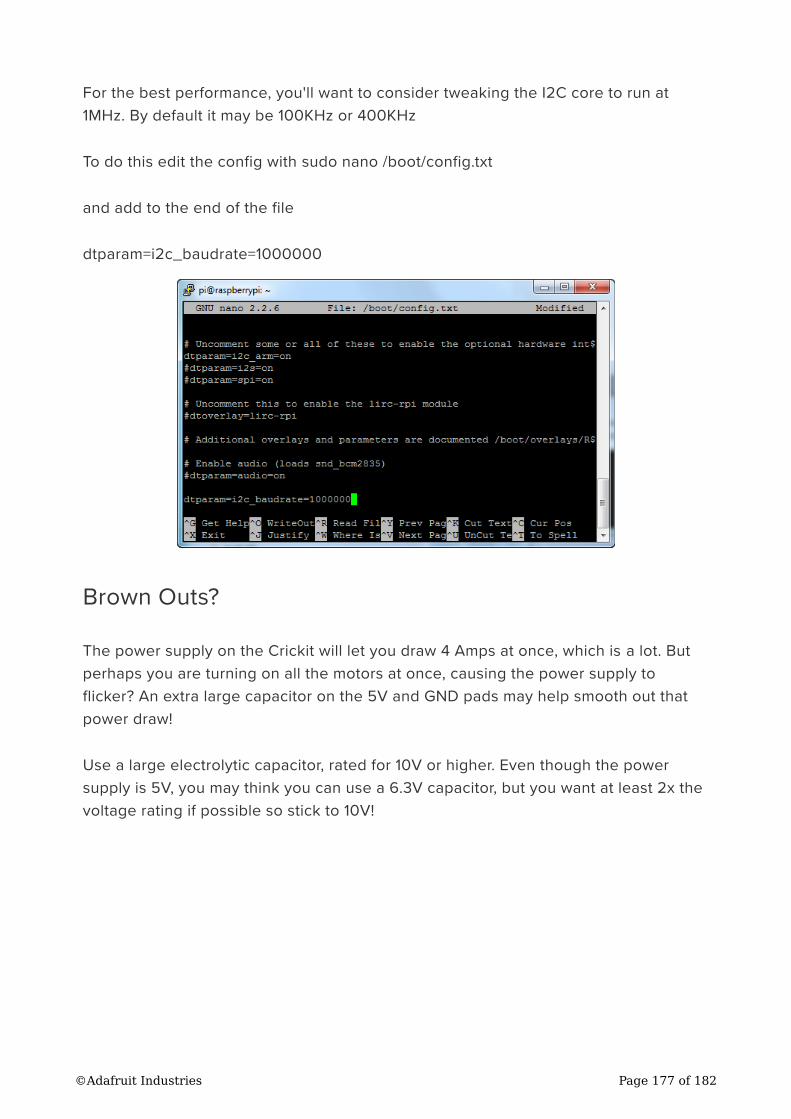
For the best performance, you'll want to consider tweaking the I2C core to run at
1MHz. By default it may be 100KHz or 400KHz
To do this edit the config with sudo nano /boot/config.txt
and add to the end of the file
dtparam=i2c_baudrate=1000000
Brown Outs?
The power supply on the Crickit will let you draw 4 Amps at once, which is a lot. But
perhaps you are turning on all the motors at once, causing the power supply to
flicker? An extra large capacitor on the 5V and GND pads may help smooth out that
power draw!
Use a large electrolytic capacitor, rated for 10V or higher. Even though the power
supply is 5V, you may think you can use a 6.3V capacitor, but you want at least 2x the
voltage rating if possible so stick to 10V!
©Adafruit Industries Page 177 of 182
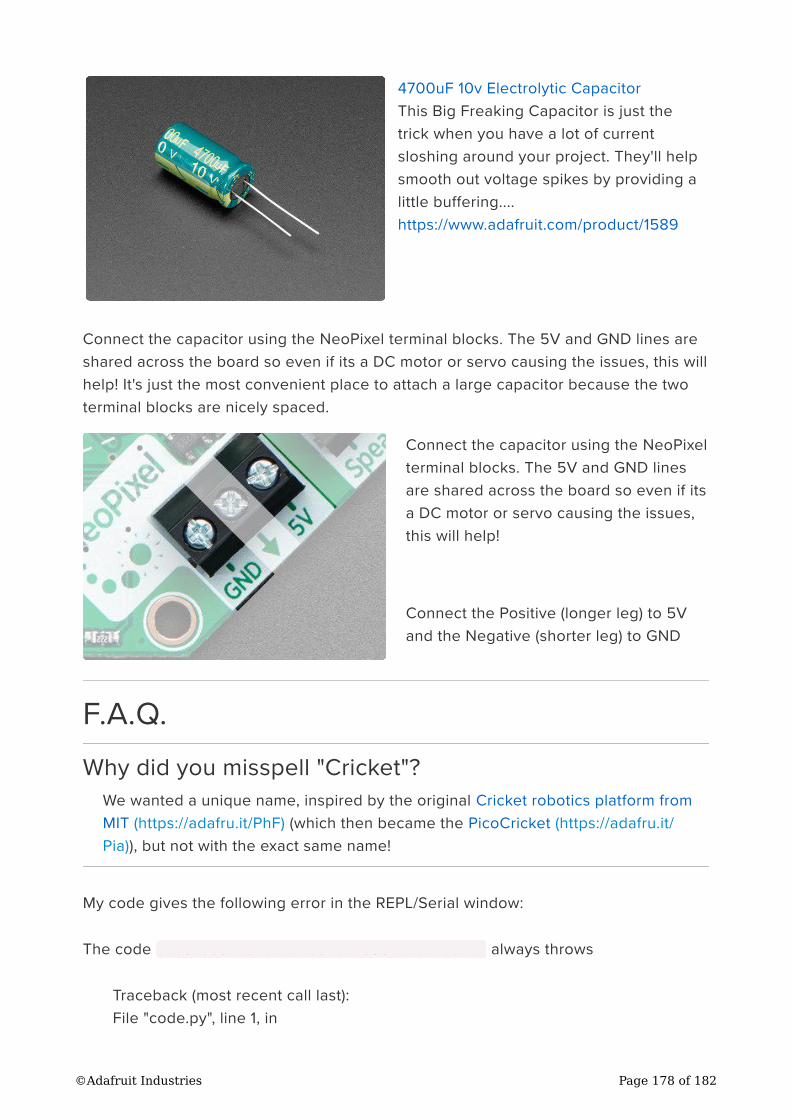
4700uF 10v Electrolytic Capacitor
This Big Freaking Capacitor is just the
trick when you have a lot of current
sloshing around your project. They'll help
smooth out voltage spikes by providing a
little buffering....
https://www.adafruit.com/product/1589
Connect the capacitor using the NeoPixel terminal blocks. The 5V and GND lines are
shared across the board so even if its a DC motor or servo causing the issues, this will
help! It's just the most convenient place to attach a large capacitor because the two
terminal blocks are nicely spaced.
Connect the capacitor using the NeoPixel
terminal blocks. The 5V and GND lines
are shared across the board so even if its
a DC motor or servo causing the issues,
this will help!
Connect the Positive (longer leg) to 5V
and the Negative (shorter leg) to GND
F.A.Q.
Why did you misspell "Cricket"?
We wanted a unique name, inspired by the original Cricket robotics platform from
MIT (https://adafru.it/PhF) (which then became the PicoCricket (https://adafru.it/
Pia)), but not with the exact same name!
My code gives the following error in the REPL/Serial window:
The code from adafruit_crickit import crickit always throws
Traceback (most recent call last):
File "code.py", line 1, in
©Adafruit Industries Page 178 of 182
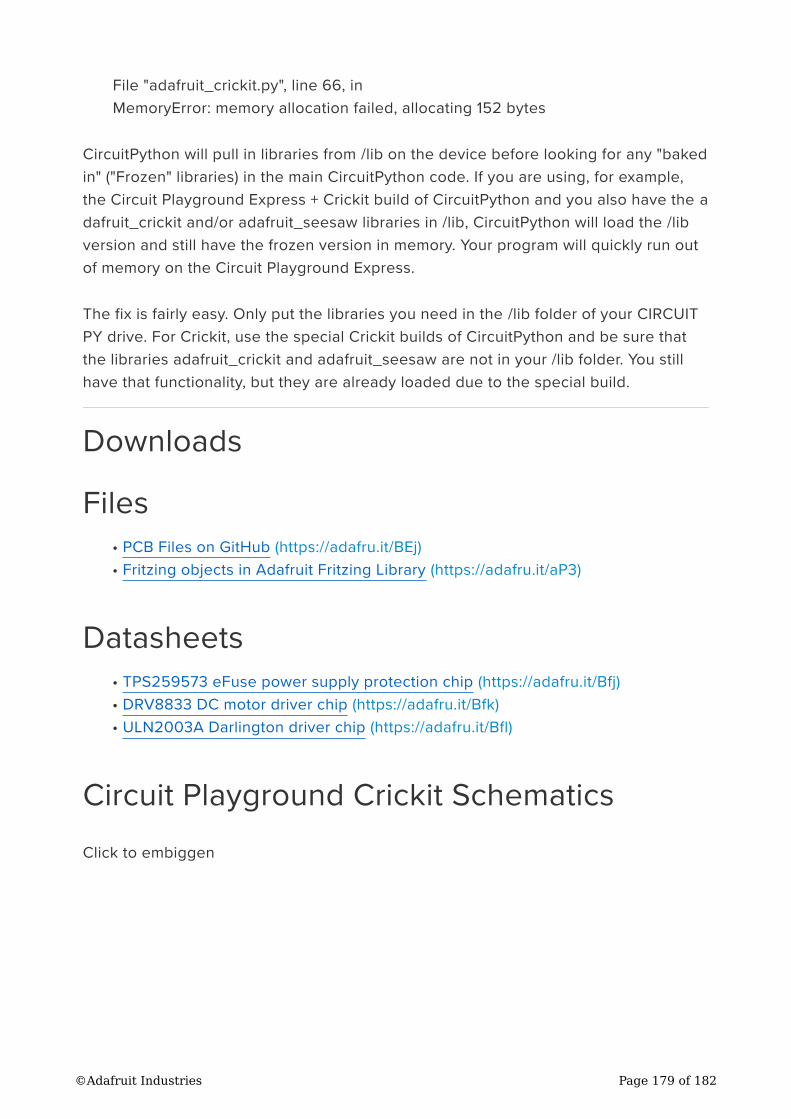
File "adafruit_crickit.py", line 66, in
MemoryError: memory allocation failed, allocating 152 bytes
CircuitPython will pull in libraries from /lib on the device before looking for any "baked
in" ("Frozen" libraries) in the main CircuitPython code. If you are using, for example,
the Circuit Playground Express + Crickit build of CircuitPython and you also have the a
dafruit_crickit and/or adafruit_seesaw libraries in /lib, CircuitPython will load the /lib
version and still have the frozen version in memory. Your program will quickly run out
of memory on the Circuit Playground Express.
The fix is fairly easy. Only put the libraries you need in the /lib folder of your CIRCUIT
PY drive. For Crickit, use the special Crickit builds of CircuitPython and be sure that
the libraries adafruit_crickit and adafruit_seesaw are not in your /lib folder. You still
have that functionality, but they are already loaded due to the special build.
Downloads
Files
PCB Files on GitHub (https://adafru.it/BEj)
Fritzing objects in Adafruit Fritzing Library (https://adafru.it/aP3)
Datasheets
TPS259573 eFuse power supply protection chip (https://adafru.it/Bfj)
DRV8833 DC motor driver chip (https://adafru.it/Bfk)
ULN2003A Darlington driver chip (https://adafru.it/Bfl)
Circuit Playground Crickit Schematics
Click to embiggen
•
•
•
•
•
©Adafruit Industries Page 179 of 182
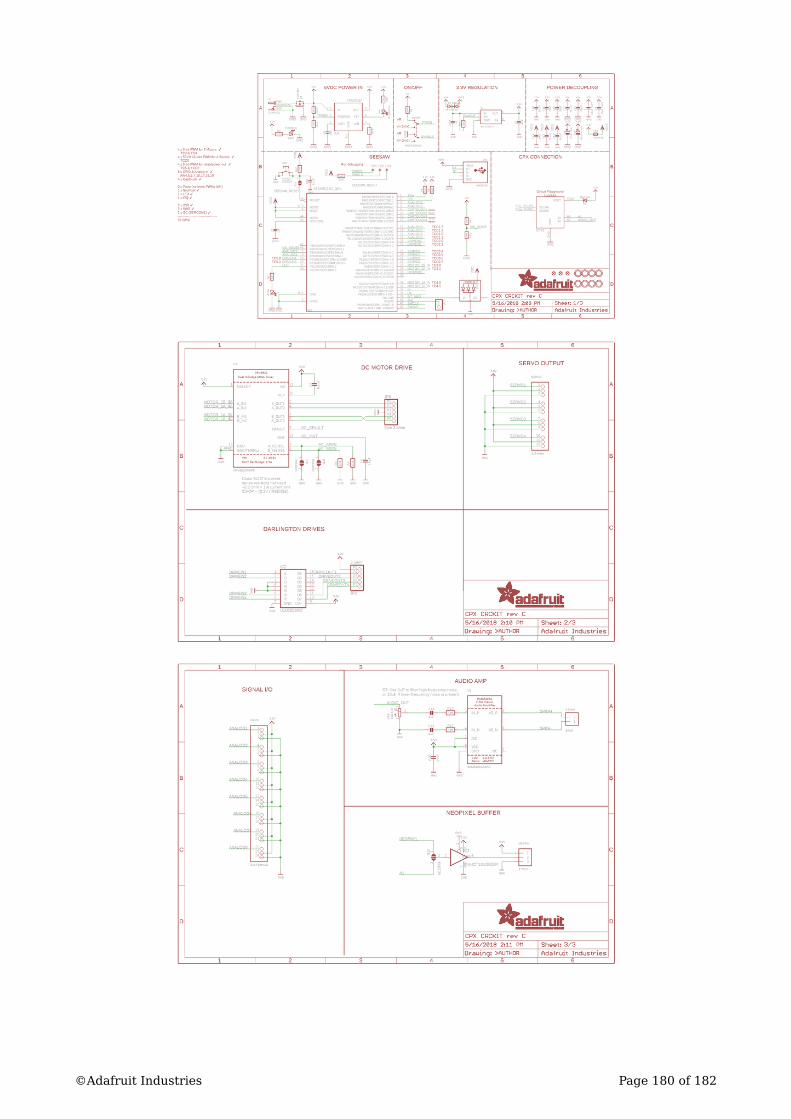
©Adafruit Industries Page 180 of 182

Crickit HAT Schematics
©Adafruit Industries Page 181 of 182

©Adafruit Industries Page 182 of 182

Mouser Electronics
Authorized Distributor
Click to View Pricing, Inventory, Delivery & Lifecycle Information: Adafruit:
3093 3343 3928