integrating and extending oracle content management
TRANSCRIPT
Oracle® CloudIntegrating and Extending Oracle ContentManagement
F24100-50July 2022

Oracle Cloud Integrating and Extending Oracle Content Management,
F24100-50
Copyright © 2017, 2022, Oracle and/or its affiliates.
Primary Author: Clare Yan
Contributors: Bruce Silver, Bonnie Vaughan, Sarah Bernau, Promila Chitkara, Kannan Appachi, RobertBriggs, David Jones, Bob Lies, Keith MacDonald, Mark Paterson, Angelo Santagata, Ankur Saxena, KeithSholes, Ron van de Crommert, Archana Vishnu, Igor Polyakov
This software and related documentation are provided under a license agreement containing restrictions onuse and disclosure and are protected by intellectual property laws. Except as expressly permitted in yourlicense agreement or allowed by law, you may not use, copy, reproduce, translate, broadcast, modify, license,transmit, distribute, exhibit, perform, publish, or display any part, in any form, or by any means. Reverseengineering, disassembly, or decompilation of this software, unless required by law for interoperability, isprohibited.
The information contained herein is subject to change without notice and is not warranted to be error-free. Ifyou find any errors, please report them to us in writing.
If this is software or related documentation that is delivered to the U.S. Government or anyone licensing it onbehalf of the U.S. Government, then the following notice is applicable:
U.S. GOVERNMENT END USERS: Oracle programs (including any operating system, integrated software,any programs embedded, installed or activated on delivered hardware, and modifications of such programs)and Oracle computer documentation or other Oracle data delivered to or accessed by U.S. Government endusers are "commercial computer software" or "commercial computer software documentation" pursuant to theapplicable Federal Acquisition Regulation and agency-specific supplemental regulations. As such, the use,reproduction, duplication, release, display, disclosure, modification, preparation of derivative works, and/oradaptation of i) Oracle programs (including any operating system, integrated software, any programsembedded, installed or activated on delivered hardware, and modifications of such programs), ii) Oraclecomputer documentation and/or iii) other Oracle data, is subject to the rights and limitations specified in thelicense contained in the applicable contract. The terms governing the U.S. Government’s use of Oracle cloudservices are defined by the applicable contract for such services. No other rights are granted to the U.S.Government.
This software or hardware is developed for general use in a variety of information management applications.It is not developed or intended for use in any inherently dangerous applications, including applications thatmay create a risk of personal injury. If you use this software or hardware in dangerous applications, then youshall be responsible to take all appropriate fail-safe, backup, redundancy, and other measures to ensure itssafe use. Oracle Corporation and its affiliates disclaim any liability for any damages caused by use of thissoftware or hardware in dangerous applications.
Oracle, Java, and MySQL are registered trademarks of Oracle and/or its affiliates. Other names may betrademarks of their respective owners.
Intel and Intel Inside are trademarks or registered trademarks of Intel Corporation. All SPARC trademarks areused under license and are trademarks or registered trademarks of SPARC International, Inc. AMD, Epyc,and the AMD logo are trademarks or registered trademarks of Advanced Micro Devices. UNIX is a registeredtrademark of The Open Group.
This software or hardware and documentation may provide access to or information about content, products,and services from third parties. Oracle Corporation and its affiliates are not responsible for and expresslydisclaim all warranties of any kind with respect to third-party content, products, and services unless otherwiseset forth in an applicable agreement between you and Oracle. Oracle Corporation and its affiliates will not beresponsible for any loss, costs, or damages incurred due to your access to or use of third-party content,products, or services, except as set forth in an applicable agreement between you and Oracle.
Contents
Preface
Audience xii
Documentation Accessibility xii
Diversity and Inclusion xii
Related Resources xii
Conventions xiii
Part I Introduction
1 Get Started
Understand Integrations 1-1
Integration Interfaces 1-3
Part II Enabling Oracle Content Management Integrations
2 Integrate with Other Applications and Services
Integrate with Oracle Business Intelligence Publisher 2-2
Integrate with Oracle Cobrowse Cloud Service 2-3
Integrate with Oracle Developer Cloud Service 2-4
Integrate with Oracle Eloqua 2-4
Choose an Asset Repository and Create a Publishing Channel 2-5
Provide Oracle Content Management Information for the Eloqua Integration 2-5
Enable Oracle Content Management Embedded Content 2-6
Use an Asset in an Eloqua Landing Page 2-6
Integrate with Oracle Integration 2-9
Configure Oracle Integration Settings in Oracle Content Management 2-10
Oracle Integration with Assets 2-12
Oracle Integration with Documents 2-16
Oracle Integration with Sites 2-17
iii
Pass a CSS Style Sheet to Oracle Integration 2-18
Start the Default Version of an Oracle Integration Process 2-18
Integrate with Oracle Intelligent Advisor 2-19
Integrate with Oracle JD Edwards 2-19
Integrate with Oracle Logistics Cloud 2-20
Integrate with Oracle Responsys 2-21
Choose an Asset Repository and Create Two Publishing Channels 2-21
Enable the Integration 2-22
Create and Publish Assets in Oracle Content Management 2-22
View Images in Responsys Message Preview 2-24
Integrate with Oracle Visual Builder 2-26
Use Oracle Content Management Components in Oracle Visual Builder Applications 2-28
Embed Oracle Visual Builder Applications in an Oracle Content Management Site Page 2-30
Embed a VBCS Visual App in an Oracle Content Management Page 2-30
Embed a VBCS Page in a Site Page 2-34
Build an Oracle Content Management VBCS Form and Data Report Components 2-38
Build an Oracle Content Management VBCS Public Form Component 2-38
Build an Oracle Content Management VBCS Secure Form Component 2-46
Build an Oracle Content Management VBCS Public Gated Form Component 2-56
Build an Oracle Content and Experience VBCS Data Report Component 2-66
Build an Oracle Content Management VBCS Multipage Form As a Web AppComponent 2-70
Provide a VBCS Endpoint As a URL for Select Menus 2-77
Integrate with Oracle WebCenter Content 2-79
3 Use Content Connectors
Enable a Content Connector 3-2
Disable a Content Connector 3-3
Configure a Google Drive Content Connector 3-3
Configure a Microsoft OneDrive Content Connector 3-6
Configure a Dropbox Content Connector 3-8
Enable Jax-WS 3-10
Configure a WordPress.org Content Connector 3-10
Configure a YouTube Content Connector 3-11
Configure a Microsoft SharePoint Online Content Connector 3-13
Configure a Contentful Content Connector 3-16
Configure a Drupal Content Connector 3-17
Configure Oracle WebCenter Content Server and Oracle Content Management for theWCC Connector v2.0 3-18
Verify Network Accessibility for a WCC Connector v2.0 3-18
Check WebCenter Content Server Readiness 3-18
iv
Enable SSL 3-19
Enable Jax-WS 3-19
Set Up a Security Policy 3-19
Run the Indexer and File Formats Wizard 3-23
Check Oracle Content Management Readiness 3-24
Configure the Oracle WebCenter Content Connector v2.0 3-24
Specify WebCenter Content Connector v2.0 Mappings 3-25
Enable Oracle WebCenter Content Connector v2.0 for an Asset Repository 3-26
Use Oracle WebCenter Content Connector v2.0 3-27
Map to a Custom Asset Type 3-29
Revoke Authorized Users 3-30
Use Custom Digital Asset Types in Content Connectors 3-30
Import Assets Mapped to Digital Asset Types 3-30
Create and Configure a Custom Content Connector 3-31
Create Content Types for a Connector 3-32
Map Source Metadata to Fields in a Content Type 3-32
Provide Configuration Parameter Values for a Content Connector 3-33
Delete a Content Connector 3-33
Part III Developing Oracle Content Management Extensions
4 Develop Custom Actions with Application Integration Framework (AIF)
Understand the Application Integration Framework (AIF) 4-1
Manage Custom Applications 4-4
Configuration File Format 4-5
Application Properties 4-7
Action Command 4-8
Invoke Command 4-9
Presentation Command 4-10
Expressions 4-11
Variables 4-12
Localization 4-15
5 Develop Content Connectors
Connector REST API Interface 5-1
Connector SDK 5-1
Build a New Content Connector 5-2
REST Interfaces for Configuration, Authorization, and Fetching Content 5-4
REST Interfaces for File System Browsing and Searching 5-9
v
Content Picker 5-11
Authorization 5-17
Content Connector Configuration and Registration 5-21
Content Connector Execution Flow 5-21
Pexels Content Connector Sample Implementation 5-22
Install the Content Connector 5-22
Check Prerequisites for Installation 5-22
Build the Content Connector WAR File 5-23
Register the Content Connector 5-23
Test the Content Connector 5-24
Understand the Content Connector Source Code 5-25
Custom Picker UI 5-25
Pexels REST APIs 5-26
Change and Test the Content Connector Code 5-26
Download the CEC Content Connector Sample and SDK 5-26
6 Develop Custom Field Editors
Create a Custom Field Editor 6-1
Configure Content Type to Use Custom Field Editor 6-2
Edit a Custom Field Editor 6-2
appinfo.json for Custom Field Editors 6-3
edit.html for Custom Field Editor 6-6
view.html for Custom Field Editor 6-9
Sample Content Field Editors 6-10
Slider 6-11
Location Selector 6-11
Content Field Editor SDK Reference 6-11
Content Field Editor SDK Object 6-12
sdk.getField() 6-12
sdk.getFields() 6-12
sdk.getLocale() 6-13
getSetting(setting) 6-13
getSettings() 6-13
registerDisable(callback) 6-14
setValidation(callback) 6-15
resize(size) 6-15
openContentPicker() 6-15
Custom Content Field Object 6-16
getName() 6-16
getDefaultValue() 6-16
vi
getDataType() 6-17
setValue(value) 6-17
getValue() 6-17
on(event, callback) 6-18
7 Develop Custom Content Forms
Create a Custom Content Form 7-1
Configure a Content Type to Use a Custom Content Form 7-1
Edit a Custom Content Form 7-2
appinfo.json 7-2
edit.html for Custom Content Forms 7-4
Content Form SDK Reference 7-8
Custom Content Form SDK Object 7-8
Custom Content Form Type Object 7-14
Custom Content Form Item Object 7-16
Form Options 7-29
Custom Content Form Field Object 7-31
CustomEditor Object 7-39
Sample Custom Form 7-41
Get Custom Form Sample 7-42
Add OCE Image Picker and Link Dialog Plug-ins for Rich Text Editor 7-42
8 Develop Translation Connectors for Language Service Providers
Overview of the Translation Connector Framework 8-2
Translation Connector SDK 8-2
Translation Connector REST APIs 8-3
Request a Lingotek Trial Connector for Content Translation 8-4
Enable a Lingotek LSP Translation Connector 8-6
Delete a Lingotek LSP Translation Connector 8-7
Register Multiple Lingotek Connectors 8-7
Add Custom Locales to a Lingotek Translation Connector 8-10
Translate Native Files in Assets 8-11
Build a New Translation Connector 8-11
REST Interfaces for Configuration and Authorization 8-12
REST Interfaces for Creating Translation Jobs and Returning Translated Content 8-18
Authorization for Translation Connectors 8-19
No Auth 8-19
OAuth 8-20
Basic 8-22
vii
Configure and Register a Translation Connector 8-23
Translation Connector Execution Flow 8-23
Translation Job Editor 8-24
Sample Translation Connector Implementation 8-27
Create the Sample Translation Connector with Content Toolkit 8-27
Register the Sample Translation Connector 8-28
Test the Sample Translation Connector 8-29
Understand the Sample Translation Connector Source Code 8-30
Translation Job Original Zip File Format 8-32
Translation Job Translated Zip File Format 8-32
9 Develop External Processors
External Processor Execution Flow 9-1
Push Model 9-2
Pull Model 9-3
REST API for Content Capture 9-3
External Processor REST API (Push Mode) 9-4
External Processor SDK 9-7
External Processor Examples 9-8
10
Compile Content Layouts as HTML
Part IV Developing Oracle Content Management Integrations
11
Understand Cross-Origin Resource Sharing (CORS)
12
Embed the Web User Interface in Other Applications
13
Oracle Content Management REST APIs
Integrate with Oracle Content Management Using OAuth 13-2
Cloud Account Using IAM Identity Domain 13-4
Access Using 2-Legged OAuth (Identity Domain) 13-4
Access Using Authorization Code (3-Legged OAuth Flow Identity Domain) 13-7
Access Using Resource Owner (Identity Domain) 13-11
viii
Cloud Account Using IDCS 13-14
Access Using Client Credentials (2-Legged OAuth Flow) 13-14
Access Using Authorization Code (3-Legged OAuth Flow) 13-17
Access Using Resource Owner 13-21
Download the Swagger File for a REST API 13-24
REST API for Activity Log 13-25
REST API for Content Capture 13-26
REST API for Content Delivery 13-26
REST API for Content Management 13-27
REST API for Content Preview 13-30
REST API for Conversations 13-30
REST API Features for Conversations 13-31
API Security 13-32
API Versioning 13-32
Case Sensitivity 13-33
HTTP Methods 13-33
Optional Fields and Default Values for JSON Data Representations 13-34
Return Values 13-34
Name Patterns 13-34
URL Encoding 13-35
Pagination 13-35
Filters 13-36
Sort Order 13-36
Localization 13-36
Name Field Length Limit 13-37
HTTP Status Codes and Error Handling 13-38
Collaboration Resource 13-38
Configuration Resource for Conversations 13-39
Security Resource 13-39
Social Resource 13-39
REST API for Documents 13-39
Version History 13-40
REST API Features for Documents 13-42
REST Overview 13-42
Service Call URI and Version 13-43
Service Request 13-43
Service Response 13-44
Security 13-44
Sort Order 13-48
Pagination 13-48
Links Identification 13-48
ix
HTTP Methods 13-50
HTTP Status Codes 13-50
Error Codes 13-50
Applinks Resource 13-51
Catalog Resource 13-53
Collections Resource 13-53
Configuration Resource for Documents 13-54
Files Resource 13-54
Folders Resource 13-54
Metadata Collection Resource 13-55
Publiclinks Resource 13-55
Shares Resource 13-56
Sites Resource 13-56
Templates Resource 13-56
Users Resource 13-57
REST API for Self-Management 13-57
REST API for Sites Management 13-57
REST API for Users and Groups 13-58
REST API for Webhooks Management 13-59
Use REST APIs for Content Searching 13-59
Search Query Operators 13-59
Search Queries 13-66
Supported Date and Time Formats 13-70
Search with the Querytext Parameter 13-70
Set Up Searches on Metadata Fields 13-71
Search Request Parameters 13-72
Two-Level Deep Search 13-84
Search JSON Data in JSON Fields 13-85
Search Across Types 13-86
The fields Parameter 13-87
The orderBy Parameter 13-88
Dynamic Count of Assets per Taxonomy Category 13-88
The AGGS Query Parameter 13-89
Aggregation Cache 13-90
Using Dynamic Asset Counts per Category API 13-90
An e-commerce Use Case 13-92
A General Use Case 13-105
Scroll API 13-109
Custom Ranking Policies 13-110
Built-in Ranking Policy 13-110
Custom Ranking Policies 13-111
x
Custom Ranking Policies Lifecycle 13-111
Supported Ranking Methods 13-112
Create and Use Applinks for File and Folder Access 13-121
Provide Access to Files and Folders with Public Links 13-122
Upload a REST API Swagger File into Mobile Cloud Service 13-124
14
Oracle Content Management SDKs
Content SDK 14-1
Mobile SDKs 14-1
15
GraphQL Support in Oracle Content Management
Getting Started with GraphQL 15-1
GraphQL Schema 15-3
GraphQL Queries 15-5
GraphQL Support for Content Preview 15-14
GraphQL Samples 15-14
16
Use Webhooks
Outgoing Webhooks 16-1
Configure Outgoing Webhooks 16-1
Monitor Webhook Events 16-2
Use Endpoints for Push Notifications of Content Lifecycle, Content Publishing, SitePublishing, and Prerendering Events 16-5
Receive Push Notifications from a Prerender Webhook 16-6
Receive Push Notifications from a Content Lifecycle Webhook 16-6
Receive Push Notifications from a Content Publishing Webhook 16-7
Receive Push Notifications from a Site Publishing Webhook 16-8
Receive Push Notifications from a Prerender Webhook 16-8
Incoming Webhooks 16-8
Configure an Incoming Webhook 16-9
Use the CAL-Based Webhook Adapter 16-10
17
Set Proxies
Configure Proxy Service Settings 17-1
Add Logged User Data to a Request Through a Secure Proxy Endpoint 17-3
Debug Proxy Service Endpoints 17-4
xi
Preface
Integrating and Extending Oracle Content Management describes how to configureOracle Content Management and combine it with other services to create customintegrations and to extend the capabilities of Oracle Content Management.
AudienceThis publication is intended for Oracle Content Management administrators anddevelopers who want information about integrating Oracle Content Management withother services to provide custom applications.
Documentation AccessibilityFor information about Oracle's commitment to accessibility, visit the OracleAccessibility Program website at http://www.oracle.com/pls/topic/lookup?ctx=acc&id=docacc.
Access to Oracle Support
Oracle customers that have purchased support have access to electronic supportthrough My Oracle Support. For information, visit http://www.oracle.com/pls/topic/lookup?ctx=acc&id=info or visit http://www.oracle.com/pls/topic/lookup?ctx=acc&id=trsif you are hearing impaired.
Diversity and InclusionOracle is fully committed to diversity and inclusion. Oracle respects and values havinga diverse workforce that increases thought leadership and innovation. As part of ourinitiative to build a more inclusive culture that positively impacts our employees,customers, and partners, we are working to remove insensitive terms from ourproducts and documentation. We are also mindful of the necessity to maintaincompatibility with our customers' existing technologies and the need to ensurecontinuity of service as Oracle's offerings and industry standards evolve. Because ofthese technical constraints, our effort to remove insensitive terms is ongoing and willtake time and external cooperation.
Related ResourcesFor more information, see these Oracle resources:
• Getting Started with Oracle Cloud
• Administering Oracle Content Management
• Building Sites with Oracle Content Management
Preface
xii
• Collaborating on Documents with Oracle Content Management
• Developing with Oracle Content Management As a Headless CMS
• Managing Assets with Oracle Content Management
• Building Sites with Oracle Content Management
• What's New for Oracle Content Management
• Known Issues for Oracle Content Management
ConventionsThe following text conventions are used in this document.
Convention Meaning
boldface Boldface type indicates graphical user interface elements associated with anaction, or terms defined in text or the glossary.
italic Italic type indicates book titles, emphasis, or placeholder variables for whichyou supply particular values.
monospace Monospace type indicates commands within a paragraph, URLs, code inexamples, text that appears on the screen, or text that you enter.
Preface
xiii
Part IIntroduction
Oracle Content Management (OCM) is a cloud-based content hub to drive omni-channelcontent management and accelerate experience delivery. It offers powerful collaboration,workflow management, and development capabilities to streamline the creation and deliveryof content and improve customer and employee engagement.
As an Oracle Platform-as-a-Service (PaaS), Oracle Content Management works seamlesslywith other Oracle Cloud services and applications. The integration features are keycomponents in several Oracle offerings and make it easy for you to leverage the service inyour own applications.
These are some prerequisites if you want to integrate and extend Oracle ContentManagement:
• An active Oracle Cloud account with an OCM instance. See Overview of Oracle ContentManagement.
• You need to be assigned with the right access role for integrations. See TypicalOrganization Roles.
Note:
To access integration features, you need to be assigned with the right role.There are different types of roles in Oracle Content Management.Understanding how roles work is essential for accessing integration features.
Explore this part further for conceptual information on integrating and extending with OracleContent Management. It includes the following chapter:
• Get Started
1Get Started
The following topics gives you an overview of Oracle Content Management integrations withother applications and services:
• Understand Integrations
• Integration Interfaces
Understand IntegrationsOracle Content Management provides multiple ways to integrate its functionality, whether youwant to incorporate your processes or apps into Oracle Content Management, or simply useOracle Content Management in your enterprise application.
Oracle Content Management
Oracle Content Management provides rich content management features, from folder and fileviewing and sharing, to conversations, to websites that deliver your message and contentsecurely.
• Integrations with JD Edwards, Oracle Business Intelligence, and other services show thatOracle Content Management is a key component in a number of Oracle integrations.
• An embeddable version of the web user interface and website components for interactingwith folders, files, conversations, and processes provide ready-to-use integrations.
• Oracle Content Management REST APIs and the Oracle Content Management SDKs letyou access Oracle Content Management functionality to create your own integrationswithin the service or across services.
• Single Sign-On (SSO) authentication provides a seamless user experience acrossservices.
Available Integrations
Oracle Content Management is a key component in a number of Oracle integrations. Withsome integrations, Oracle Content Management is provided “out of the box” as part of theservice. For others, you must enable or configure the integration.
Note:
A number of the integrations described in this guide require that integrated servicesbe in the same identity domain. For that reason, those integrations work only ontraditional cloud accounts.
1-1
Category Integrations
Middleware Oracle WebCenter Content: Use Oracle Content Management toprovide a truly comprehensive hybrid enterprise contentmanagement (ECM) integration, with a unified ECM infrastructureand security from a single vendor. It combines anywhere accessfrom the cloud with content retention and archiving from on-premiseinstallations.
Applications Oracle JD Edwards: Use Oracle Content Management to attachmanaged documents to transactions and collaborate throughconversations.
Software as a Service(SaaS)
Oracle Cobrowse Cloud Service: Use Oracle Content Managementto work with a site and add the Cobrowse Launcher component to asite page.
Oracle Eloqua: Use Oracle Content Management to enable Eloquausers to insert published images from Oracle Content Management'sasset repository into Eloqua responsive emails and landing pages.The integration also allows users to upload images to OracleContent Management directly from within Eloqua. This allows Eloquausers to leverage Oracle Content Management's extensive assetrepository capabilities to store content, while using Eloqua to designmarketing assets.
Oracle Intelligent Advisor: Use Oracle Content Management to addan Intelligent Advisor component to site pages.
Oracle Logistics Cloud: Use Oracle Content Management to storeand manage documents.
Oracle Responsys: Use Oracle Content Management to enableResponsys users to insert content assets from Oracle ContentManagement's asset repository into Responsys Email and Mobilecampaigns. This allows Responsys users to leverage Oracle ContentManagement's extensive asset repository capabilities to storecontent, while using Responsys to design campaigns.
Platform as a Service(PaaS)
Oracle Business Intelligence Publisher: Use Oracle ContentManagement for managed folders as a destination for generatedreports.
Oracle Developer Cloud Service: Use project templates and tools tocreate, test, and package your own site templates, themes, andcomponents for use in Oracle Content Management.
Note:
This integration is available withtraditional cloud accounts.
Oracle Integration, Oracle Process Cloud Service: Automatebusiness-driven, company-specific processes, such as employee on-boarding or IT service requests, and incorporate those processesinto Oracle Content Management.
Oracle Visual Builder: Rapidly create web and mobile applicationswith minimal to no coding using an open-source, standards-basedintegration to develop, collaborate on, and deploy applications withinOracle Content Management.
Chapter 1Understand Integrations
1-2
Category Integrations
Third-party applications Oracle Content Management includes integrations for several third-party applications, such as Microsoft Office Online and Kaltura VideoManagement - Video Plus. You just need to enable the integration inyour instance. Additionally Oracle Cloud Marketplace listsapplications created by partners using the integration featuresprovided with Oracle Content Management.
Custom applications Use options such as REST APIs, Java services, and the ApplicationIntegration Framework (AIF) to create any number of applications.
Use Apps and Services in Oracle Content Management
If you want to expand the service to include your own apps or to communicate with otherservices, the following text discusses what you can do:
• The open architecture for site components means you can register and deliver hostedapps and create your own components using your preferred platform. For details abouthow to create your own components, see Develop Components.
• Cross-Origin Resource Sharing (CORS) allows a web page to make requests such asXMLLHttpRequest to another domain. If you have a browser application that integrateswith Oracle Content Management but is hosted in a different domain, add the browserapplication domain to Oracle Content Management’s CORS origins list. See UnderstandCross-Origin Resource Sharing (CORS).
• If you use REST services that do not support Cross-Origin Resource Sharing (CORS) orthat require service account credentials, you can use the Oracle Content Managementproxy service. See Configure Proxy Service Settings.
• You can use Application Integration Framework (AIF) to create your own customapplications that define the actions that are exposed in the web interface, respond to userselections, call third-party services, and specify how the results are presented to the user.The framework supports variables and expressions and provides multiple languagesupport. See Understand the Application Integration Framework (AIF).
• You can modify the web interface and menus to provide access to your applications andfeatures. See Manage Custom Applications.
Use Oracle Content Management with Other Services
The Oracle Platform as a Service (PaaS) architecture means you can leverage the OracleContent Management functionality where you need it:
• Provide direct interaction with Oracle Content Management in another web applicationwith the embedded version of the web user interface.
• Specify a list of domains where you allow content from Oracle Content Management tobe displayed using either the embedded web user interface or REST calls. See EmbedUI API V2 for Oracle Content Management.
Integration InterfacesFrom the Integrations page in the Oracle Content Management (OCM) Administration webuser interface, you can select an application for integration, configure content connectors tothird-party content repositories, and configure proxy service settings.
Integrations are configured in various places:
Chapter 1Integration Interfaces
1-3
• Some integrations need to be enabled in the OCM web interface on theIntegrations page before they're available. There may be configuration steps thatneed to be done on the Oracle Content Management side.
• Other configurations steps may need to be performed on the "other side" (i.e.within the service that OCM is being integrated).
Note:
Whenever one application is to be configured to integrate with anotherapplication (i.e. the target application), the user needs to have the targetapplication’s server connection information such as username, usercredential, and service URL. Depending on the integration scenario, you mayhave a different set of user credentials and service URL.
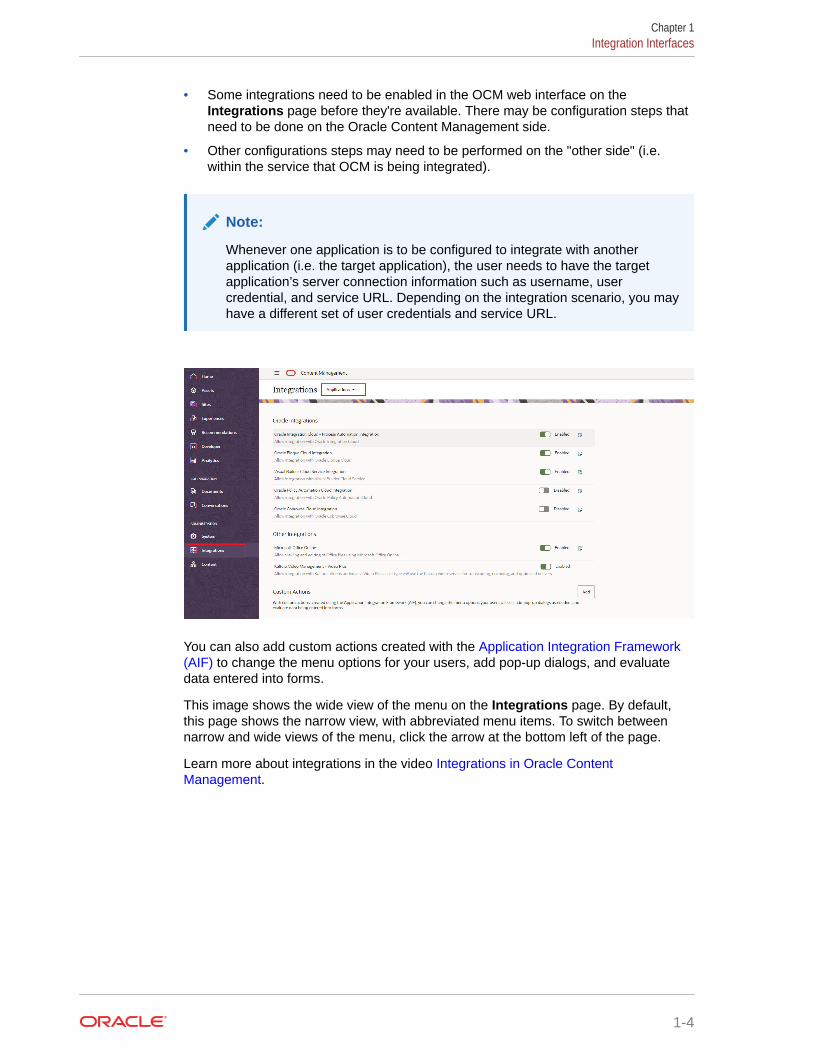
You can also add custom actions created with the Application Integration Framework(AIF) to change the menu options for your users, add pop-up dialogs, and evaluatedata entered into forms.
This image shows the wide view of the menu on the Integrations page. By default,this page shows the narrow view, with abbreviated menu items. To switch betweennarrow and wide views of the menu, click the arrow at the bottom left of the page.
Learn more about integrations in the video Integrations in Oracle ContentManagement.
Chapter 1Integration Interfaces
1-4
Part IIEnabling Oracle Content ManagementIntegrations
This part focuses on enabling Oracle Content Management (OCM) integrations so you canbegin integrating with other applications and services.
While some integrations with Oracle applications are enabled from the Oracle ContentManagement web interface, some integrations are enabled from other Oracle applicationsand services before integration functionalities can be utilized.
You can use Oracle Content Management’s content connectors to connect to third-partyrepositories like Dropbox, Google Drive, or WordPress, and import content from therepository into Oracle Content Management.
Explore more on the topics in the following chapters:
• Integrate with Other Applications and Services
• Use Content Connectors
2Integrate with Other Applications andServices
You can integrate Oracle Content Management (OCM) with many Oracle applications andservices, as well as third-party applications. Generally, configurations are needed on bothsystems that are being integrated. Please refer to the specific product for detailed integrationinstructions.
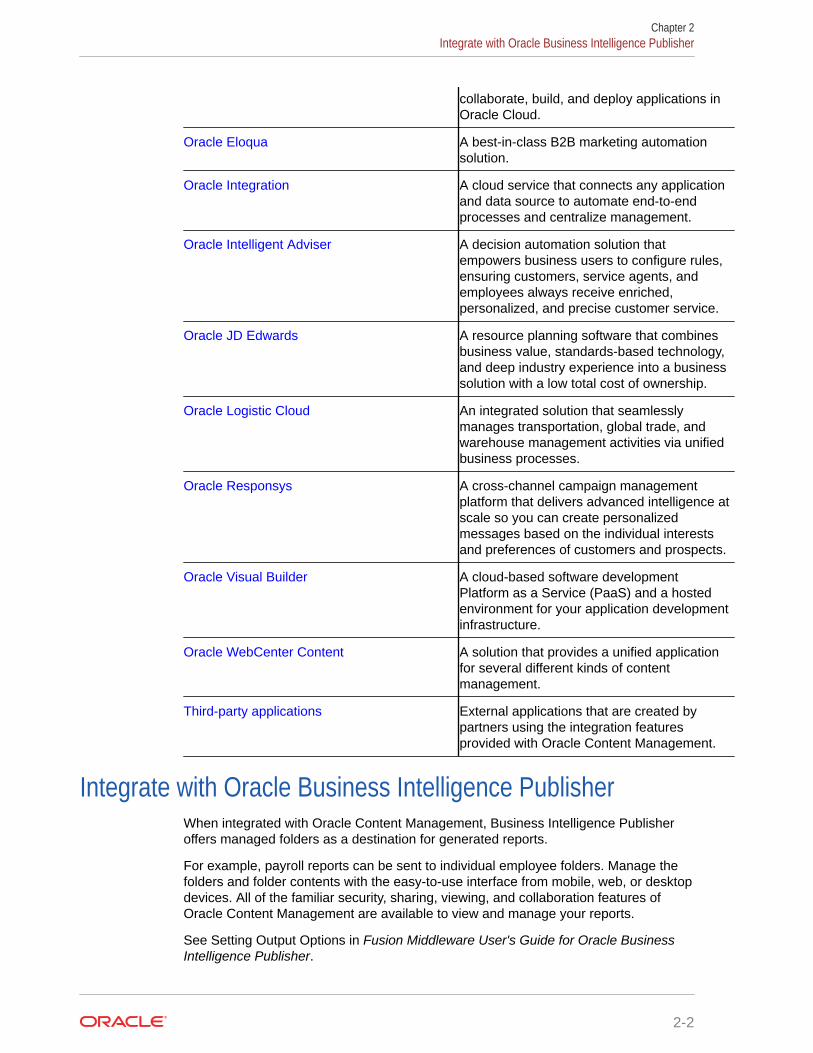
The screen capture shows the integrations that are available from the OCM web interface,which include some Oracle integrations and other (third-party) integrations.
The following is a full list of applications and services that are available for OCM integration:
Oracle Business Intelligence Publisher An enterprise reporting solution for authoring,managing, and delivering all your highlyformatted documents, such as operationalreports, electronic funds transfer documents,government PDF forms, shipping labels,checks, sales and marketing letters, andmuch more.
Oracle Cobrowse Cloud Service A collaboration tool for providing onlinecustomers on any device with real-timeassisted service or guidance.
Oracle Developer Cloud Service A cloud-based software developmentPlatform as a Service (PaaS) and a hostedenvironment for your application developmentinfrastructure. It provides an open-sourcestandards-based solution to plan, develop,
2-1
collaborate, build, and deploy applications inOracle Cloud.
Oracle Eloqua A best-in-class B2B marketing automationsolution.
Oracle Integration A cloud service that connects any applicationand data source to automate end-to-endprocesses and centralize management.
Oracle Intelligent Adviser A decision automation solution thatempowers business users to configure rules,ensuring customers, service agents, andemployees always receive enriched,personalized, and precise customer service.
Oracle JD Edwards A resource planning software that combinesbusiness value, standards-based technology,and deep industry experience into a businesssolution with a low total cost of ownership.
Oracle Logistic Cloud An integrated solution that seamlesslymanages transportation, global trade, andwarehouse management activities via unifiedbusiness processes.
Oracle Responsys A cross-channel campaign managementplatform that delivers advanced intelligence atscale so you can create personalizedmessages based on the individual interestsand preferences of customers and prospects.
Oracle Visual Builder A cloud-based software developmentPlatform as a Service (PaaS) and a hostedenvironment for your application developmentinfrastructure.
Oracle WebCenter Content A solution that provides a unified applicationfor several different kinds of contentmanagement.
Third-party applications External applications that are created bypartners using the integration featuresprovided with Oracle Content Management.
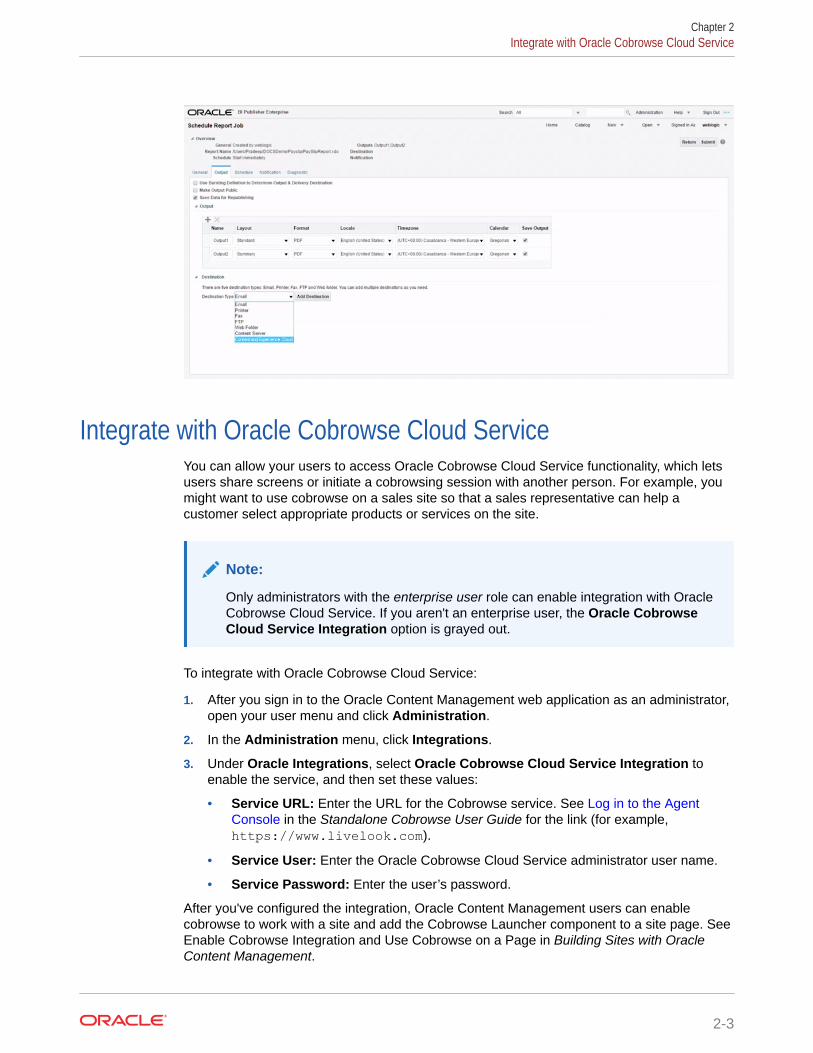
Integrate with Oracle Business Intelligence PublisherWhen integrated with Oracle Content Management, Business Intelligence Publisheroffers managed folders as a destination for generated reports.
For example, payroll reports can be sent to individual employee folders. Manage thefolders and folder contents with the easy-to-use interface from mobile, web, or desktopdevices. All of the familiar security, sharing, viewing, and collaboration features ofOracle Content Management are available to view and manage your reports.
See Setting Output Options in Fusion Middleware User's Guide for Oracle BusinessIntelligence Publisher.
Chapter 2Integrate with Oracle Business Intelligence Publisher
2-2
Integrate with Oracle Cobrowse Cloud ServiceYou can allow your users to access Oracle Cobrowse Cloud Service functionality, which letsusers share screens or initiate a cobrowsing session with another person. For example, youmight want to use cobrowse on a sales site so that a sales representative can help acustomer select appropriate products or services on the site.
Note:
Only administrators with the enterprise user role can enable integration with OracleCobrowse Cloud Service. If you aren't an enterprise user, the Oracle CobrowseCloud Service Integration option is grayed out.
To integrate with Oracle Cobrowse Cloud Service:
1. After you sign in to the Oracle Content Management web application as an administrator,open your user menu and click Administration.
2. In the Administration menu, click Integrations.
3. Under Oracle Integrations, select Oracle Cobrowse Cloud Service Integration toenable the service, and then set these values:
• Service URL: Enter the URL for the Cobrowse service. See Log in to the AgentConsole in the Standalone Cobrowse User Guide for the link (for example,https://www.livelook.com).
• Service User: Enter the Oracle Cobrowse Cloud Service administrator user name.
• Service Password: Enter the user’s password.
After you've configured the integration, Oracle Content Management users can enablecobrowse to work with a site and add the Cobrowse Launcher component to a site page. See Enable Cobrowse Integration and Use Cobrowse on a Page in Building Sites with OracleContent Management.
Chapter 2Integrate with Oracle Cobrowse Cloud Service
2-3
Note:
If you later decide to disable cobrowse, you must disable the option on theIntegrations page and in the site settings for any sites that use cobrowse. Ifyou disable only the option on the Integrations page, any sites that usecobrowse will continue to do so, but users won't be able to add newcobrowse functionality.
Integrate with Oracle Developer Cloud ServiceOracle Developer Cloud Service is a cloud-based software development platform thatprovides an open source, standards-based integration to develop, test, and deployapplications into other cloud services such as Oracle Content Management.
Note:
This integration works only on traditional cloud accounts because it requiresthat the service be in the same identity domain as Oracle ContentManagement.
With Developer Cloud Service, you can develop with Content Toolkit and for OracleContent Management.
Integrate with Oracle EloquaWhy Integrate with Eloqua?
Integration with Eloqua lets you insert published assets from an Oracle ContentManagement asset repository into Eloqua responsive emails, forms, and landingpages. Using Oracle Content Management as a single source for all images savesrework because you can find your images easily.
Eloqua users can leverage the extensive asset repository capabilities in OracleContent Management to store content for use in Eloqua marketing assets. When youdesign emails, forms, or landing pages, this integration gives you the option to insertpublished image assets from Oracle Content Management into your Eloqua assets.
Prerequisites
• Create and activate an Oracle cloud account before you begin.
• Review Overview of Oracle Content Management, which provides information oninteracting with OCM and concepts on access roles for performing certain tasks.
• Compare the starter vs. the premium edition edition of Oracle ContentManagement. Only the premium edition has all the features.
• Create an Oracle Content Management instance.
• Take a guided tour of repositories in Oracle Content Management.
• Create an Asset Repository. You must have a content administrator role to createa repository.
Chapter 2Integrate with Oracle Developer Cloud Service
2-4
Overview
The high-level workflow of Eloqua integration with Oracle Content Management is as follows:
• Choose an Asset Repository and Create a Publishing Channel
• Provide Oracle Content Management Information for the Eloqua Integration
• Enable Oracle Content Management Embedded Content
• Use an Asset in an Eloqua Landing Page
For more detailed information, see the Oracle Eloqua Help Center.
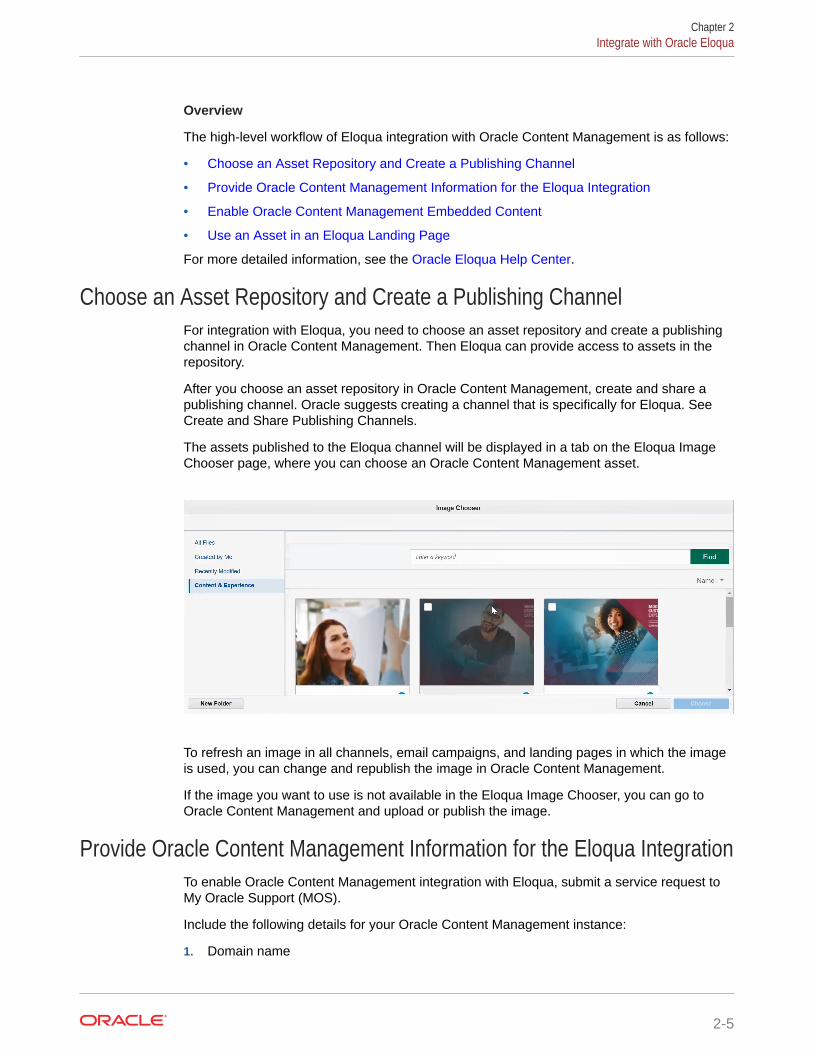
Choose an Asset Repository and Create a Publishing ChannelFor integration with Eloqua, you need to choose an asset repository and create a publishingchannel in Oracle Content Management. Then Eloqua can provide access to assets in therepository.
After you choose an asset repository in Oracle Content Management, create and share apublishing channel. Oracle suggests creating a channel that is specifically for Eloqua. See Create and Share Publishing Channels.
The assets published to the Eloqua channel will be displayed in a tab on the Eloqua ImageChooser page, where you can choose an Oracle Content Management asset.
To refresh an image in all channels, email campaigns, and landing pages in which the imageis used, you can change and republish the image in Oracle Content Management.
If the image you want to use is not available in the Eloqua Image Chooser, you can go toOracle Content Management and upload or publish the image.
Provide Oracle Content Management Information for the Eloqua IntegrationTo enable Oracle Content Management integration with Eloqua, submit a service request toMy Oracle Support (MOS).
Include the following details for your Oracle Content Management instance:
1. Domain name
Chapter 2Integrate with Oracle Eloqua
2-5
For example, if you sign in to Oracle Content Management at the URL https://eloquaoce.oraclecloud.com/documents/assets, the domain name iseloquaoce.oraclecloud.com.
2. Repository IDTo retrieve your repository ID:
a. In Oracle Content Management, navigate to Administration > Assets.
b. Select the repository you want to use for storing your Eloqua images.
c. The repository ID is appended to the URL. For example, if the full URL ishttps://eloquaoce.oraclecloud.com/documents/repository/ABC6F858251160CC3000A497C0C07C96651BA6F0BE73, the repository IDis ABC6F858251160CC3000A497C0C07C96651BA6F0BE73.
3. Channel ID and channel tokenTo retrieve your channel ID and channel token:
a. In Oracle Content Management, navigate to Administration > Assets.
b. From the Repositories drop-down menu, choose Publishing Channels.
c. Select the publishing channel you intend to use for Eloqua images.
d. The channel ID and channel Token are listed under API Information.
e. Ensure that Access is set to Public.
Enable Oracle Content Management Embedded ContentIn Oracle Content Management administration security settings, enable embeddedcontent and add the Eloqua URL.
Then you can embed the Oracle Content Management web UI in Eloqua. See EmbedContent in Other Domains.
Use an Asset in an Eloqua Landing PageAfter the Oracle Content Management Cloud integration with Eloqua is enabled, youcan choose a digital asset from Oracle Content Management to use in an Eloquaresponsive landing page.
1. On the Oracle Eloqua home page, choose Landing Pages from a drop-downmenu on the right.
Chapter 2Integrate with Oracle Eloqua
2-6
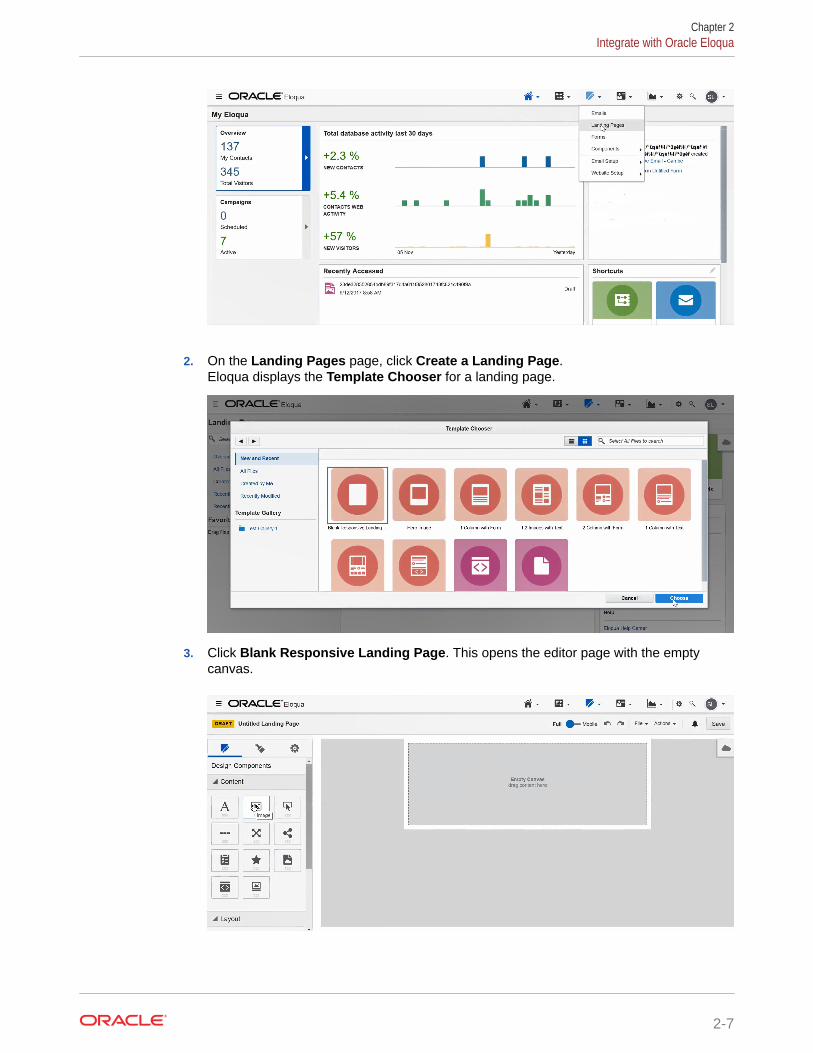
2. On the Landing Pages page, click Create a Landing Page.Eloqua displays the Template Chooser for a landing page.
3. Click Blank Responsive Landing Page. This opens the editor page with the emptycanvas.
Chapter 2Integrate with Oracle Eloqua
2-7
4. Drag and drop the image symbol from under Content on the left onto the blankcanvas.You can upload the image or browse for it.
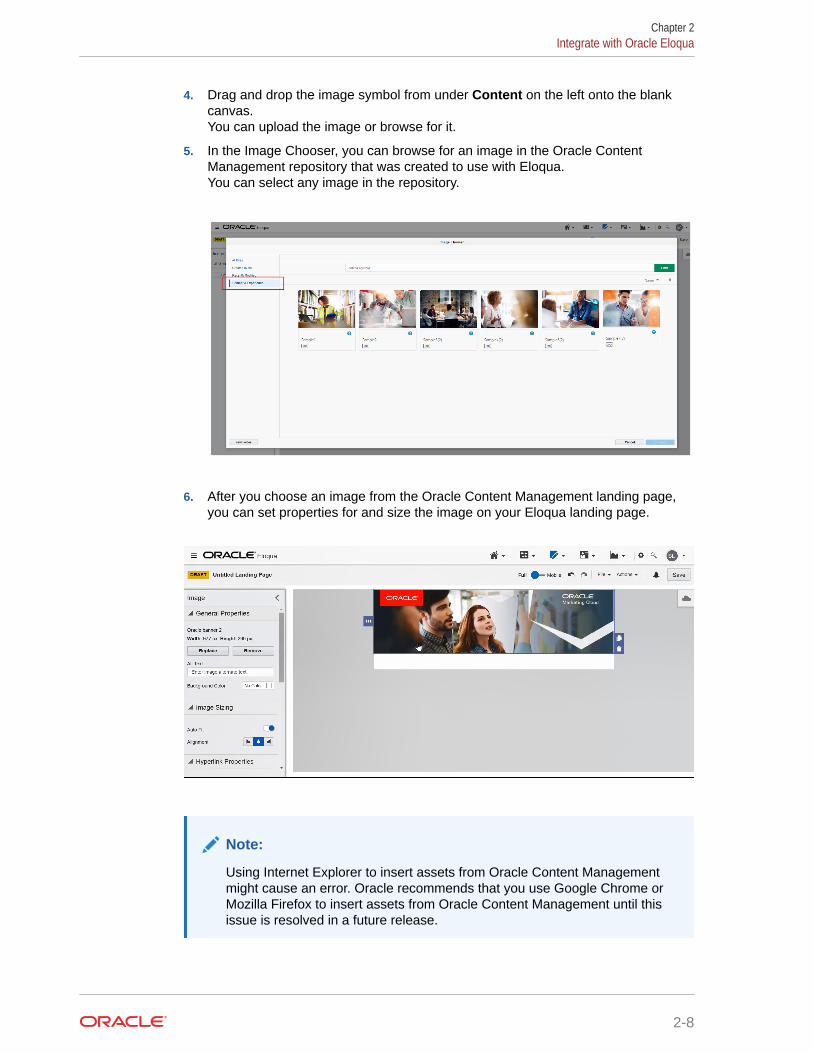
5. In the Image Chooser, you can browse for an image in the Oracle ContentManagement repository that was created to use with Eloqua.You can select any image in the repository.
6. After you choose an image from the Oracle Content Management landing page,you can set properties for and size the image on your Eloqua landing page.
Note:
Using Internet Explorer to insert assets from Oracle Content Managementmight cause an error. Oracle recommends that you use Google Chrome orMozilla Firefox to insert assets from Oracle Content Management until thisissue is resolved in a future release.
Chapter 2Integrate with Oracle Eloqua
2-8
Integrate with Oracle IntegrationYou can allow your users to access Oracle Integration functionality within Oracle ContentManagement, letting users manage business processes in the cloud, such as contentworkflows to route content for approval or review.
Note:
Oracle Content Management Starter Edition has a limited feature set. To takeadvantage of the full feature set, upgrade to the Premium.
Integrating Oracle Content Management with Oracle Integration benefits document-intensiveprocesses by organizing, managing, and restricting access to documents that must besubmitted, reviewed, and approved or rejected by different roles and organizations during thebusiness process. Conversations enable users to easily discuss things that come up duringthe process.
Oracle Content Management integrates assets, content workflows, documents, andconversations with your process applications.
• Assets: You can enable structured multistep workflows for review and approval of contentitems and digital assets that you manage in Oracle Content Management assetrepositories.
• Content workflows: Oracle Content Management includes a workflow managementsystem that supports business process-based integration. This enables modeling,automation, and continuous improvement of business processes and routing informationaccording to user-defined business rules.
• Documents: Oracle Integration provides simple file-attachment functionality, but if youneed something more robust to handle document-intensive processes, you can integrateOracle Content Management. This service enables you to organize files into folders,manage access to each folder, and even start a process when you upload a document.For example, if you’re processing a home loan, you need to manage documents such asloan applications, employment histories, and house appraisals, making sure that the rightusers see the documents they need to submit, review, or approve, but they don’t getaccess to restricted information.
• Conversations: When you integrate conversations, users can easily discuss things thatcome up during the process. This provides a record of what happened, enabling you toquickly bring new stakeholders up to speed or refer back to things as necessary. Plus,the conversation tools work like the social media tools users regularly use, but withenterprise-wide security and controls. For example, if you’re working on a contract, youmight need to discuss some of the terms while still making sure your discussion isconfidential.
• Document- and Folder-Initiated Processes: You can automatically start a process whensomeone uploads a document (or folder of documents) to a chosen document folder.
Before users can take advantage of the integrated functionality, a service administrator mustconfigure settings in both Oracle Integration (described in Integrate Documents andConversations in Using Processes in Oracle Integration) and Oracle Content Management(described in Configure Oracle Integration Settings in Oracle Content Management).
Chapter 2Integrate with Oracle Integration
2-9

Integration between these services requires SSO sign-ons, so both services must alsobe in the same identity domain.
After both services have been configured:
• Oracle Integration users can take actions (such as approvals) on the files directlyin Oracle Integration.
• Oracle Content Management content administrators can use the Oracle ContentManagement web interface to manage the workflows created in Oracle Integration,registering them, assigning them to repositories, adding members, and assigningworkflow roles.
• Oracle Content Management content contributors can use workflows to getapproval for their content.
• Oracle Content Management documents users can upload files into folders toinitiate a workflow associated with the folder.
• Oracle Content Management site designers can create web pages with ready-to-use components that provide folder and file access, process selection andinitiation, associated conversation display and interaction, and much more.
The following sections provide more details about integrating with Oracle Integration:
• Configure Oracle Integration Settings in Oracle Content Management
• Oracle Integration with Assets
• Oracle Integration with Documents
• Oracle Integration with Sites
• Pass a CSS Style Sheet to Oracle Integration
• Start the Default Version of an Oracle Integration Process
Configure Oracle Integration Settings in Oracle Content ManagementTo configure Oracle Content Management to integrate with Oracle Integration and toenable content workflows:
1. Enable the integration and enter connection information.
a. Sign in to the Oracle Content Management web interface as a serviceadministrator.
b. In the Settings menu, click Integrations.
c. Under Oracle Integrations, select Oracle Integration Cloud - ProcessAutomation Integration to enable the service.
Chapter 2Integrate with Oracle Integration
2-10
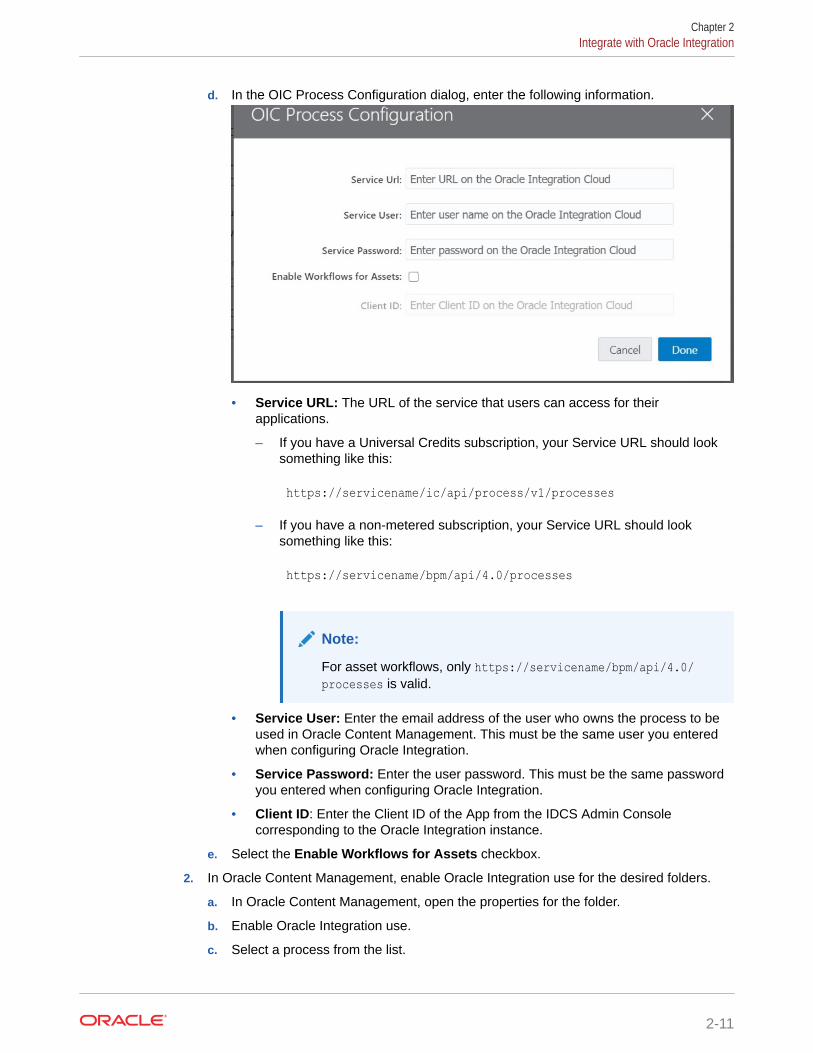
d. In the OIC Process Configuration dialog, enter the following information.
• Service URL: The URL of the service that users can access for theirapplications.
– If you have a Universal Credits subscription, your Service URL should looksomething like this:
https://servicename/ic/api/process/v1/processes
– If you have a non-metered subscription, your Service URL should looksomething like this:
https://servicename/bpm/api/4.0/processes
Note:
For asset workflows, only https://servicename/bpm/api/4.0/processes is valid.
• Service User: Enter the email address of the user who owns the process to beused in Oracle Content Management. This must be the same user you enteredwhen configuring Oracle Integration.
• Service Password: Enter the user password. This must be the same passwordyou entered when configuring Oracle Integration.
• Client ID: Enter the Client ID of the App from the IDCS Admin Consolecorresponding to the Oracle Integration instance.
e. Select the Enable Workflows for Assets checkbox.
2. In Oracle Content Management, enable Oracle Integration use for the desired folders.
a. In Oracle Content Management, open the properties for the folder.
b. Enable Oracle Integration use.
c. Select a process from the list.
Chapter 2Integrate with Oracle Integration
2-11
If the process list is blank, it's caused by one of the following issues:
• The Oracle Integration user you specified doesn't have rights to see theprocesses.
• The Oracle Integration URL you specified isn't correct.
• The Oracle Integration user/password combination you specified isn't correct.
• The Oracle Integration service doesn't have a process that uses a DocumentsStart Event. To create a process with a Document Start Event, see Creating aDocument- or Folder-Initiated Process in Using Processes in OracleIntegration.
Oracle Integration with AssetsAfter integrating Oracle Integration – Process Automation with Oracle ContentManagement, you can create structured multistep workflows for review and approvalof content items and digital assets that you manage in Oracle Content Managementasset repositories.
Oracle Content Management provides a quick start application package with severalmultistep processes that you can deploy to your Oracle Integration instance and startusing for asset review and approvals. Alternatively, you can use these processes assamples to develop custom processes that meet specific requirements in yourorganization. For example use cases, see Use Seeded Content Workflows inManaging Assets with Oracle Content Management.
To download the quick start application package and set up the processes for use:
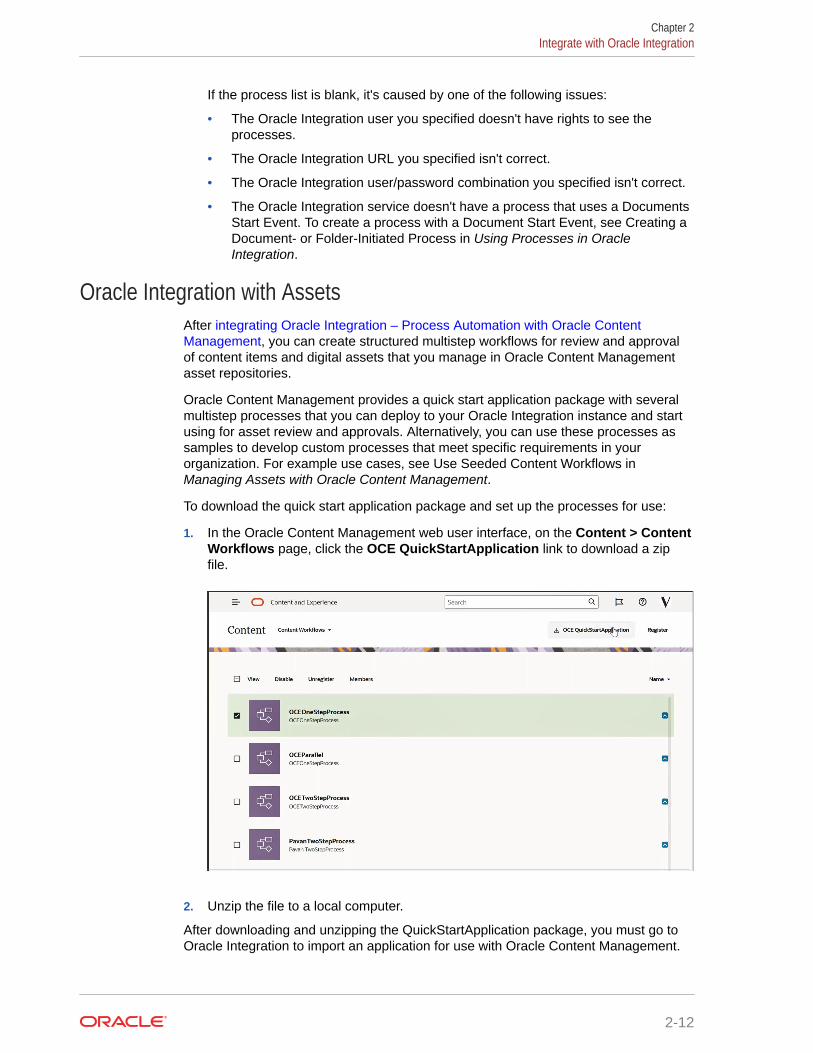
1. In the Oracle Content Management web user interface, on the Content > ContentWorkflows page, click the OCE QuickStartApplication link to download a zipfile.
2. Unzip the file to a local computer.
After downloading and unzipping the QuickStartApplication package, you must go toOracle Integration to import an application for use with Oracle Content Management.
Chapter 2Integrate with Oracle Integration
2-12
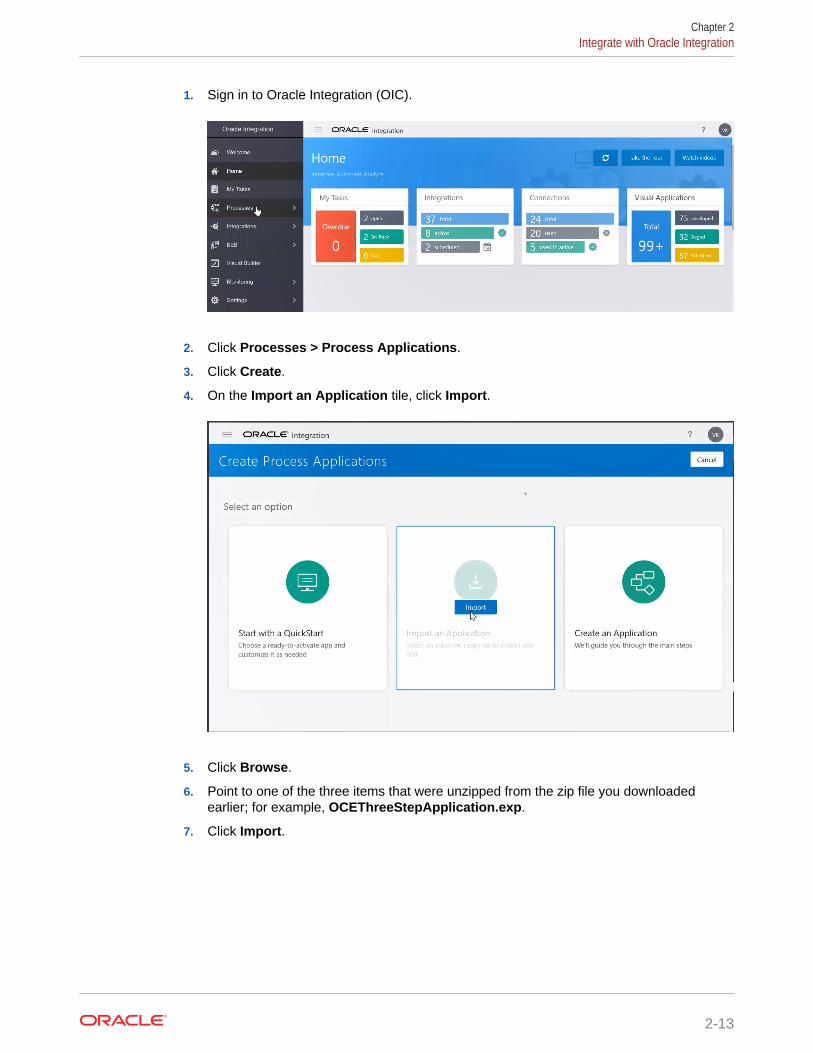
1. Sign in to Oracle Integration (OIC).
2. Click Processes > Process Applications.
3. Click Create.
4. On the Import an Application tile, click Import.
5. Click Browse.
6. Point to one of the three items that were unzipped from the zip file you downloadedearlier; for example, OCEThreeStepApplication.exp.
7. Click Import.
Chapter 2Integrate with Oracle Integration
2-13
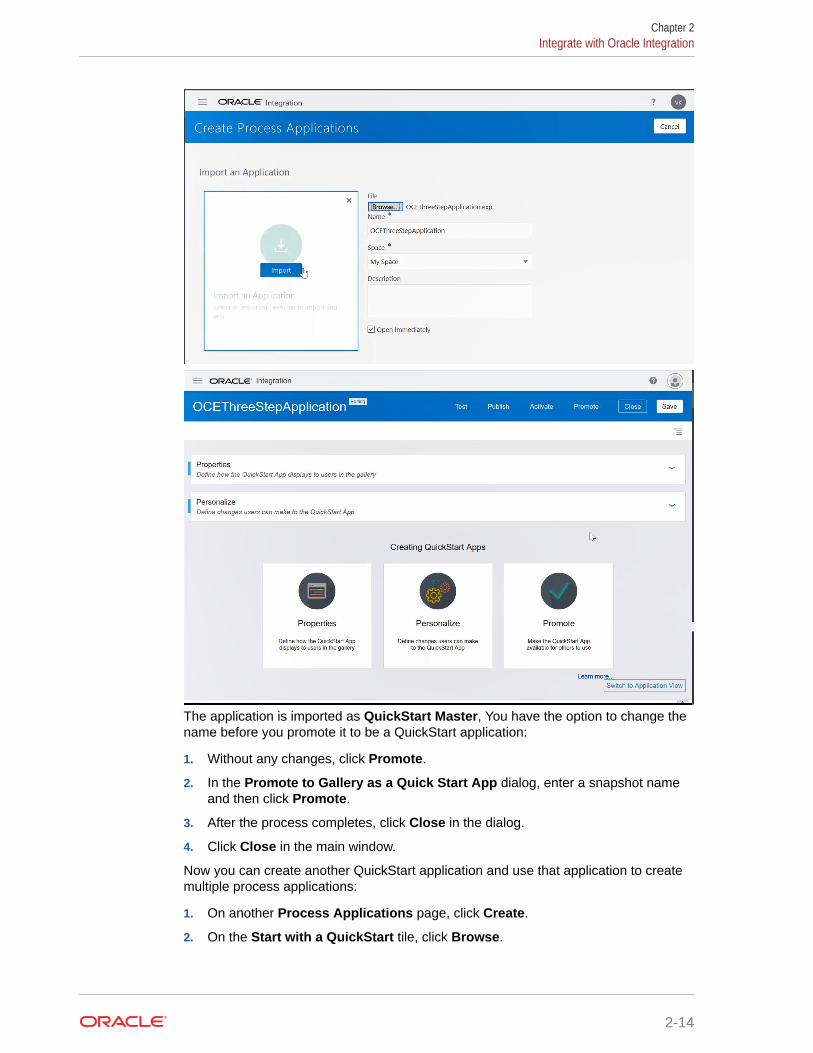
The application is imported as QuickStart Master, You have the option to change thename before you promote it to be a QuickStart application:
1. Without any changes, click Promote.
2. In the Promote to Gallery as a Quick Start App dialog, enter a snapshot nameand then click Promote.
3. After the process completes, click Close in the dialog.
4. Click Close in the main window.
Now you can create another QuickStart application and use that application to createmultiple process applications:
1. On another Process Applications page, click Create.
2. On the Start with a QuickStart tile, click Browse.
Chapter 2Integrate with Oracle Integration
2-14
In the Gallery, you should now see the application sample you just created (for example,OCEThreeStepApplication).
3. Click Create for that application. Enter a name, and then click Create.An overview page for the new application displays.
4. Click Configure.
5. Click Update your OCE Connection URL here. This is mandatory.
6. In the Address field, replace OCEURL with your Oracle Content Management instanceURL (copy and paste from your instance in a web browser).So you'll end up with something like https://instance.url.oraclecloud.example.com/content/management/api/v1.1 .
7. Click X to close the page.
There is no need to modify anything else at this point. You can click Switch to ApplicationView and then click the name of an application (for example, OCEThreeStepProcess). Theapplication process opens in a process flow visualizer.
You could modify the roles here. Make sure to click Save if you make any changes.
To deploy an application, click the house icon in the top left to go to the OIC home page, andthen follow these steps:
1. Click My Tasks in the left navigation pane.
2. Click Administration in the left navigation pane.
3. Click Manage Credentials.
4. Click Add new credential. Enter the user name and password for your Oracle ContentManagement repository administrator. You'll use this keystore when you activate theapplication.
5. Go back to the home page.
6. Click Processes > Process Applications.
7. Click the name of a QuickStart application.
8. On the application overview page, click Publish.
9. In the Publish Application dialog, enter a comment, if necessary, and then clickPublish.
To activate the application, follow these steps:
1. Click Switch to Application View.
2. Click Activate.
3. On the Activation tab, click Activate new version.
4. In the Activate Application to My Server dialog, click Customize.
5. Select the keystore credential you created for the Oracle Content Management repositoryadministrator.This will populate the user and password fields.
6. Click Validate.
7. If there are no errors, click Options.
8. Add the version (for example, 1.0) and then click Activate.
Chapter 2Integrate with Oracle Integration
2-15
This will deploy the process application in Oracle Integration and make it availablein Oracle Content Management.
9. Click Finish after the application is activated successfully.
After the application is registered, have your Oracle Content Management contentadministrator use the Oracle Content Management web interface to make the workflowavailable for use, registering it, assigning it to a repository, adding members, andassigning workflow roles. Then Oracle Content Management content contributors can use the workflow to get approval for their content.
Oracle Integration with DocumentsManage workflows for business applications, such as document routing for review orapproval, with Oracle Integration enabled for documents in Oracle ContentManagement.
You can allow your users to access Oracle Integration functionality, which lets usersmanage business processes in the cloud, such as document routing for approval orreview.
This feature might not be available, depending on the Oracle Content Managementsubscription type and start date of your service.
You must configure settings in both Oracle Integration and Oracle ContentManagement before users can take advantage of the integrated functionality.
1. In Oracle Integration, sign in as an administrator and enter connection informationfor Oracle Content Management. See Integrating Documents and Conversationsin Using Oracle Process Cloud Service.
2. In Oracle Content Management, enable Oracle Integration and enter connectioninformation:
a. Sign in to Oracle Content Management as an administrator.
b. From the Administration menu, choose Integrations.
c. Under Applications, select Oracle Integration to enable the service, andthen set these values:
• Service URL: The URL of the REST service that users can access fortheir applications, ending with bpm/api/4.0/processes (for example,https://servicename/bpm/api/4.0/processes).
• Service User: Enter the email address of the user who owns the processto be used in Oracle Content Management.
• Service Password: Enter the user password.
3. To create a process with a Document Start event, see Creating a Document- orFolder-Initiated Process in Using Oracle Process Cloud Service.
When a task step is complete, the file can be managed according to the definedprocess. For an incoming document, a user can perform actions based on theassigned role for that document: Contributor, Downloader, or Viewer.
Chapter 2Integrate with Oracle Integration
2-16
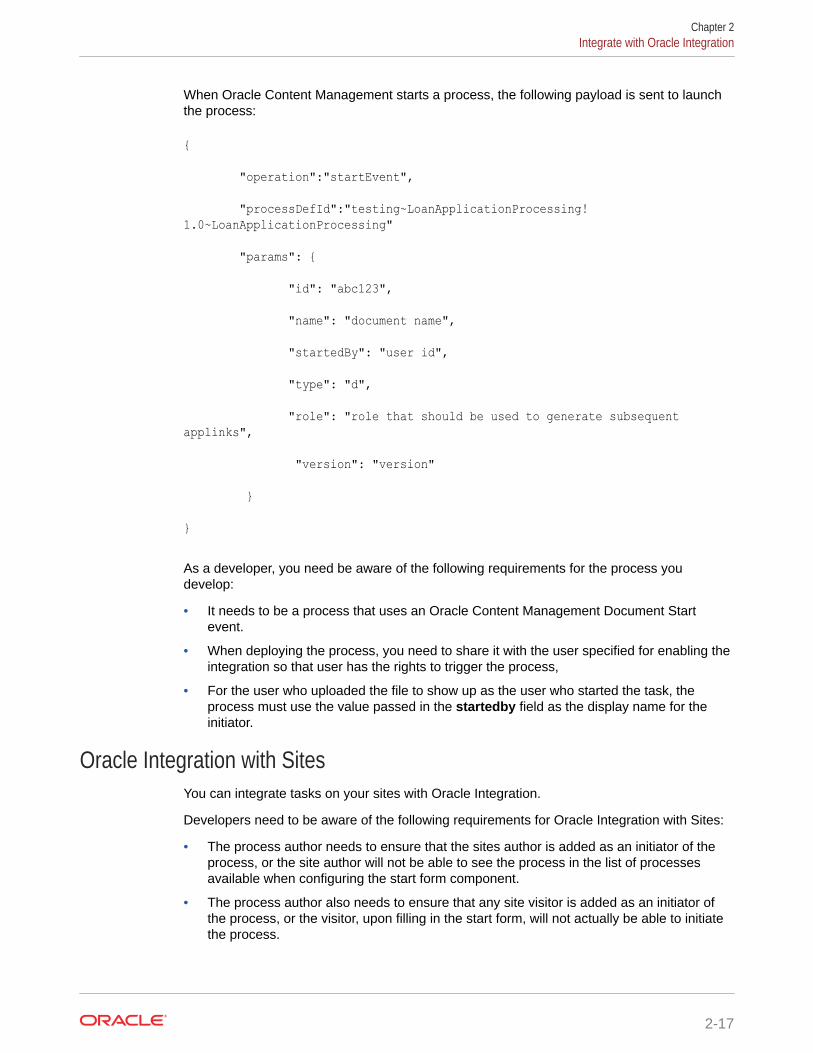
When Oracle Content Management starts a process, the following payload is sent to launchthe process:
{
"operation":"startEvent",
"processDefId":"testing~LoanApplicationProcessing!1.0~LoanApplicationProcessing"
"params": {
"id": "abc123",
"name": "document name",
"startedBy": "user id",
"type": "d",
"role": "role that should be used to generate subsequent applinks",
"version": "version"
}
}
As a developer, you need be aware of the following requirements for the process youdevelop:
• It needs to be a process that uses an Oracle Content Management Document Startevent.
• When deploying the process, you need to share it with the user specified for enabling theintegration so that user has the rights to trigger the process,
• For the user who uploaded the file to show up as the user who started the task, theprocess must use the value passed in the startedby field as the display name for theinitiator.
Oracle Integration with SitesYou can integrate tasks on your sites with Oracle Integration.
Developers need to be aware of the following requirements for Oracle Integration with Sites:
• The process author needs to ensure that the sites author is added as an initiator of theprocess, or the site author will not be able to see the process in the list of processesavailable when configuring the start form component.
• The process author also needs to ensure that any site visitor is added as an initiator ofthe process, or the visitor, upon filling in the start form, will not actually be able to initiatethe process.
Chapter 2Integrate with Oracle Integration
2-17
Pass a CSS Style Sheet to Oracle IntegrationAs a developer, you can control the look of an Oracle Integration start form in a site bypassing CSS information through the design.css file in a theme.
To do this, you need to place the CSS style inside of the design.css file that is withinthe theme of the site. The style sheet would most likely be related to the theme.
On a site page, you can drop an Oracle Integration form with Name and Addressfields. There is no styling for the fields.
1. Click Edit in the top right menu to go into edit mode.
2. On the Process Start Form menu, choose Settings.
3. In the Process Start Form Settings dialog, click Custom Settings.
4. In the Properties panel, you can choose a control class under Control ClassName for each field in the Oracle Integration form. Each control class specifies aCSS style.
5. In the design.css file for the theme of a site, you can specify properties for eachcontrol class, such as a bold label.When developing a form, you can specify the control class name on a field-by-fieldbasis.
On the Style tab in the Button Settings panel, contributers can choose styles thatcome with a theme. You can set options for a custom style in Site Builder for editing asite.
In the CKEditor toolbar for both paragraphs and titles, you can choose styles fortoolbar groups. The specifications for these style options go in the components.jsonfile for the theme.
Start the Default Version of an Oracle Integration ProcessYou can start the default version of an Oracle Integration process and view a sorted listof Oracle Integration start forms to choose from.
The Oracle Integration start form is part of a process, and the process is anapplication. When you activate the application package, it has an associated versionnumber.
1. Each time you change and publish an Oracle Integration process, click Activate inthe top menu to activate the latest version of the process, which becomes thedefault version.
2. Under Select a Process in the Custom Settings panel, check Use default processversion.
3. Select a process, and choose a start form from the list.
Note:
Only one experience connection can be created on an Oracle ContentManagement Starter Edition instance. For unlimited connections, upgrade toPremium Edition.
Chapter 2Integrate with Oracle Integration
2-18
Integrate with Oracle Intelligent AdvisorYou can give users access to Intelligent Advisor functionality, which implements online"interview" scenarios, such as feedback for troubleshooting or eligibility assessments forservices. Intelligent Advisor delivers advice across channels by capturing rules in MicrosoftWord and Excel documents, then building interactive customer service experiences calledinterviews around those rules.
Note:
Only administrators with the enterprise user role can enable integration withIntelligent Advisor. If you aren't an enterprise user, the Intelligent Advisor CloudService Integration option is grayed out.
On the Intelligent Advisor side, interviews must be created and stored on the host site. Inaddition, the Intelligent Advisor administrator must add the Oracle Content Managementdomains (*.documents.* and *.sites.*) to the list of hosts authorized to embed interviews. See Configure security for embedded interviews in the Intelligent Advisor documentation.
On the Oracle Content Management side, you need to configure integration with IntelligentAdvisor:
1. After you sign in to the Oracle Content Management web application as an administrator,open your user menu and click Administration.
2. In the Administration menu, click Integrations.
3. Under Oracle Integrations, select Intelligent Advisor Cloud Service Integration toenable the service, and then set these values:
• Service URL: Enter the URL of the Intelligent Advisor Cloud Service.
• Service User: Enter the name of the Intelligent Advisor user. This user must be anIntegration user and must have the Deploy Admin role for the Intelligent Advisorcollections. See Create an account for application integration in the IntelligentAdvisor Documentation Library.
• Service Password: Enter the user password.
After both services have been configured for integration, Oracle Content Management userscan add an Intelligent Advisor component to site pages.
Integrate with Oracle JD EdwardsOracle JD Edwards EnterpriseOne integrates with Oracle Content Management, letting youattach managed documents to transactions and collaborate through conversations.
With content stored in Oracle Content Management, you can:
• Access documents using web, desktop devices, and mobile devices
• View, search, and manage documents directly in the web interface
• Collaborate through conversations, and conversations about specific transactions ordocuments
Chapter 2Integrate with Oracle Intelligent Advisor
2-19
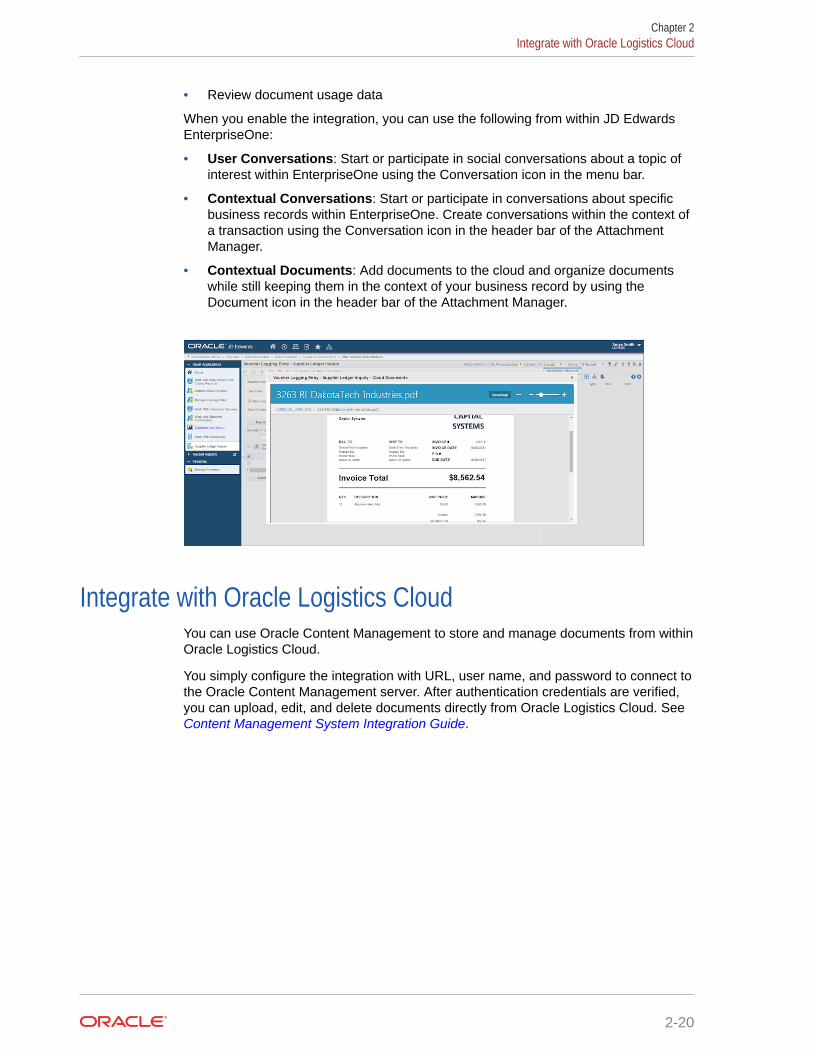
• Review document usage data
When you enable the integration, you can use the following from within JD EdwardsEnterpriseOne:
• User Conversations: Start or participate in social conversations about a topic ofinterest within EnterpriseOne using the Conversation icon in the menu bar.
• Contextual Conversations: Start or participate in conversations about specificbusiness records within EnterpriseOne. Create conversations within the context ofa transaction using the Conversation icon in the header bar of the AttachmentManager.
• Contextual Documents: Add documents to the cloud and organize documentswhile still keeping them in the context of your business record by using theDocument icon in the header bar of the Attachment Manager.
Integrate with Oracle Logistics CloudYou can use Oracle Content Management to store and manage documents from withinOracle Logistics Cloud.
You simply configure the integration with URL, user name, and password to connect tothe Oracle Content Management server. After authentication credentials are verified,you can upload, edit, and delete documents directly from Oracle Logistics Cloud. See Content Management System Integration Guide.
Chapter 2Integrate with Oracle Logistics Cloud
2-20

Integrate with Oracle ResponsysIntegration with Oracle Responsys lets you insert published assets from an Oracle ContentManagement asset repository into Responsys Email and Mobile campaigns. Using OracleContent Management as a single source for all images saves rework because you can findyour images easily.
Responsys users can leverage the extensive asset repositories in Oracle ContentManagement to store content while using Responsys to design campaigns. When you designEmail and Mobile campaigns, this integration gives you the option to insert published imageassets from Oracle Content Management into your campaigns. You can choose digital assetsfrom an Oracle Content Management publishing channel through the Responsys application.
This is an overview of the Responsys integration with Oracle Content Management:
• Choose an Asset Repository and Create Two Publishing Channels
• Enable the Integration
Then you can create and publish assets in Oracle Content Management and view images inResponsys Message preview.
For more detailed information, see the Responses documentation in the Oracle Help Center.
Choose an Asset Repository and Create Two Publishing ChannelsWhen you design an Email or Mobile campaign, you will choose assets from the publishingchannel for the appropriate campaign type. Responsys will automatically filter content assetsin Oracle Content Management according to the campaign you are designing.
Chapter 2Integrate with Oracle Responsys
2-21
After you choose an asset repository in Oracle Content Management, create andshare two publishing channels: a mobile channel and an email channel. Oraclesuggests creating channels that are specifically for Responsys. See Create and SharePublishing Channels.
In Responsys, you can choose Oracle Content Management assets from thesechannels.
Enable the IntegrationYou can enable the integration between Oracle Responsys and the Oracle ContentManagement account from Responsys.
In Oracle Responsys, choose Oracle Content Management Cloud Integration fromthe Integrate menu.
This feature is available only if it is enabled for your account.
Configure an Oracle Content Management Cloud account
1. From the side navigation bar in Responsys, select Account.
2. Select Integration settings, and then choose Content Management Cloudsettings.
3. Provide the following details about your Oracle Content Management instance toconfigure your publishing channels:
• CEC API Version: Your Oracle Content Management version.
• CEC Publish Server URL Prefix: The URL of your Oracle ContentManagement instance.
• Email Channel ID: The ID of the Email channel, which is automaticallygenerated when you create the channel.
• Email Channel Token: The Email channel token, which is automaticallygenerated when you create the channel.
• Mobile Channel ID: The Mobile channel ID, which is automatically generatedwhen you create the channel.
• Mobile Channel Token: The Mobile channel token,which is automaticallygenerated when you create the channel.
4. Click Save.
Enable Oracle Content Management Embedded Content
In Oracle Content Management administration security settings, enable embeddedcontent and add the Responsys URL. Then you can embed the Oracle ContentManagement web UI in Responsys.
See Embed UI API V2 for Oracle Content Management.
Create and Publish Assets in Oracle Content ManagementYou can create and publish assets in Oracle Content Management to use inResponsys.
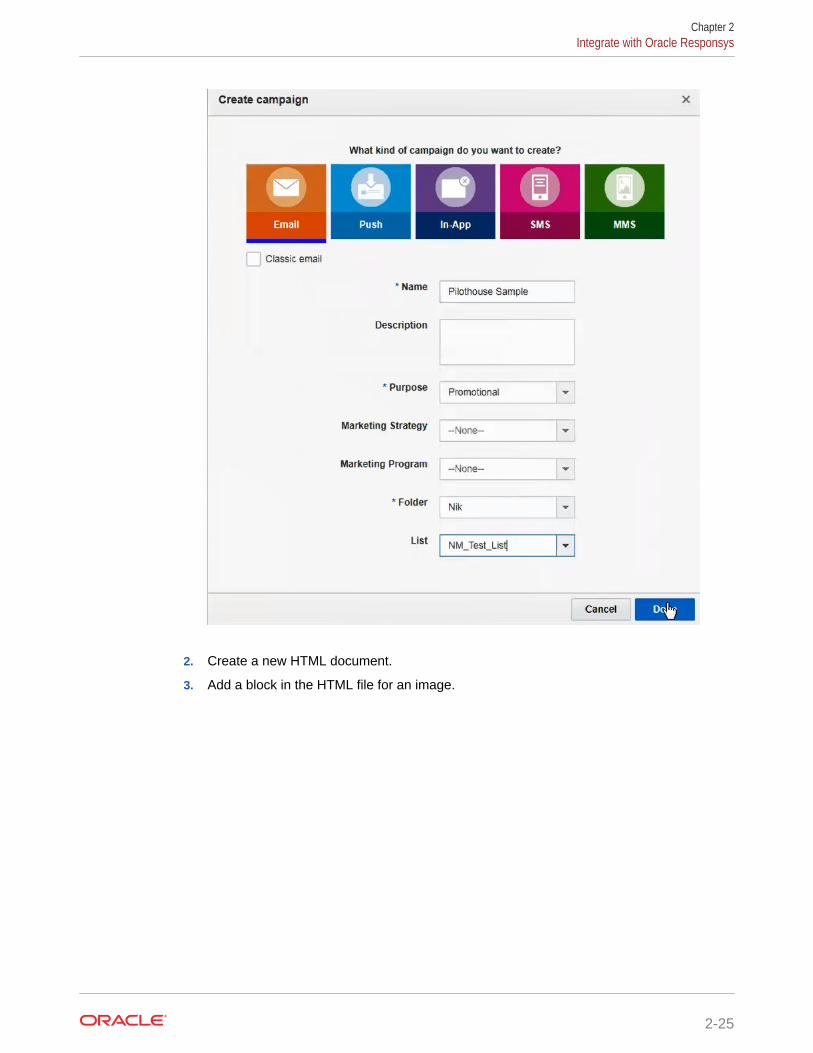
1. Create an HTML file.
Chapter 2Integrate with Oracle Responsys
2-22
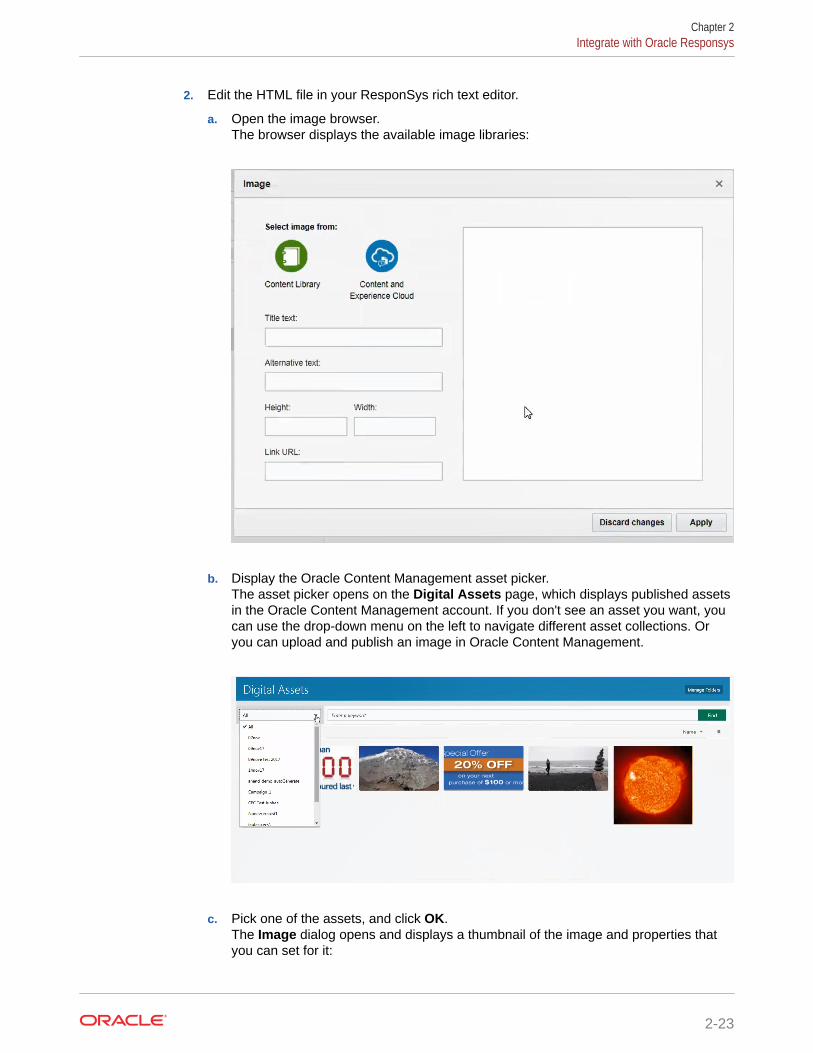
2. Edit the HTML file in your ResponSys rich text editor.
a. Open the image browser.The browser displays the available image libraries:
b. Display the Oracle Content Management asset picker.The asset picker opens on the Digital Assets page, which displays published assetsin the Oracle Content Management account. If you don't see an asset you want, youcan use the drop-down menu on the left to navigate different asset collections. Oryou can upload and publish an image in Oracle Content Management.
c. Pick one of the assets, and click OK.The Image dialog opens and displays a thumbnail of the image and properties thatyou can set for it:
Chapter 2Integrate with Oracle Responsys
2-23
• Title text
• Alternative text
• Height
• Width
• Link URL, which makes the image clickable.
d. Set the properties you want.
e. Click Apply to insert the image into your content.To view the URL to the image in Content Management, you can click Source.In a live production environment, this would be an asset pointing directly to thecontent delivery network, so that the asset is accessible.
View Images in Responsys Message PreviewTo preview Oracle Content Management images in Responsys, you can use theResponsys Message Preview.
1. On the Oracle Responsys Manage campaigns page, choose Create campaignfrom the drop-down menu on the right, and create an Email or Mobile campaign.
Chapter 2Integrate with Oracle Responsys
2-24
2. Create a new HTML document.
3. Add a block in the HTML file for an image.
Chapter 2Integrate with Oracle Responsys
2-25
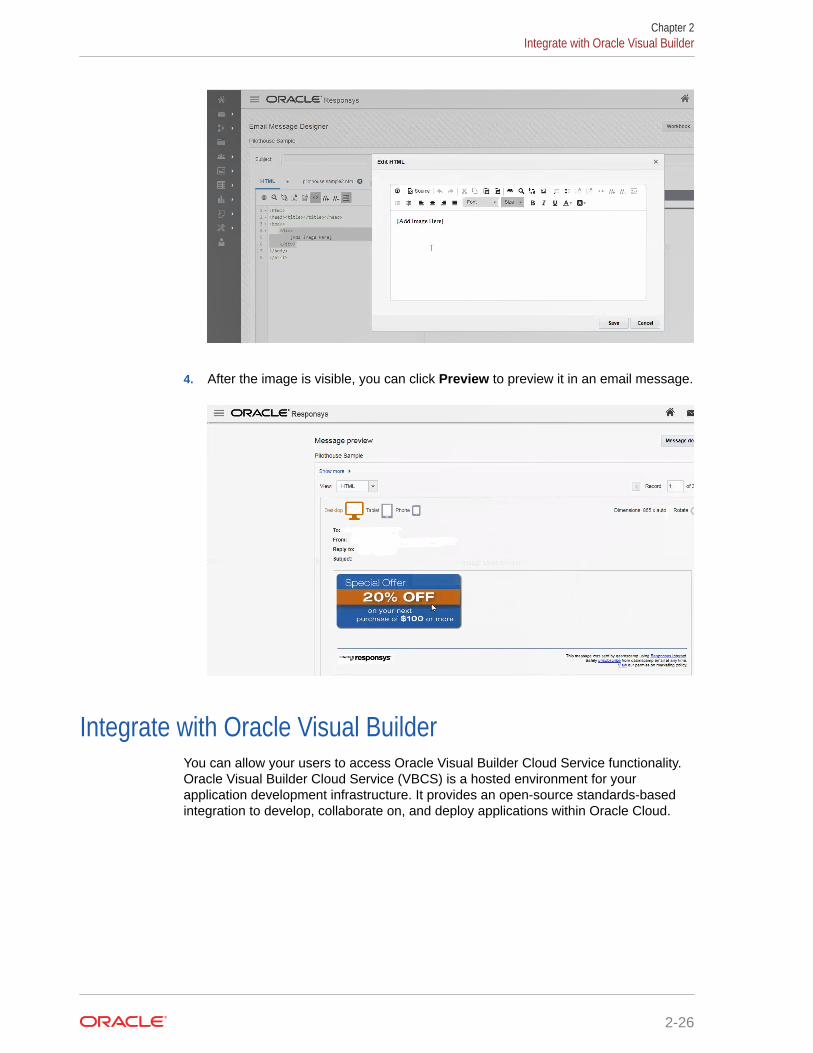
4. After the image is visible, you can click Preview to preview it in an email message.
Integrate with Oracle Visual BuilderYou can allow your users to access Oracle Visual Builder Cloud Service functionality.Oracle Visual Builder Cloud Service (VBCS) is a hosted environment for yourapplication development infrastructure. It provides an open-source standards-basedintegration to develop, collaborate on, and deploy applications within Oracle Cloud.
Chapter 2Integrate with Oracle Visual Builder
2-26
This enables users to rapidly create web and mobile applications with minimal to no coding.
Note:
• Integration between these services requires SSO, so both services must be inthe same identity domain.
• Only administrators with the enterprise user role can enable integration withVBCS. If you aren’t an enterprise user, the Visual Builder Cloud ServiceIntegration option is grayed out.
On the VBCS side, the following must be done before this feature can be used with OracleContent Management:
• Cross-Origin Resource Sharing (CORS) must be enabled on the VBCS site. See AllowOther Domains Access to Services in Administering Visual Builder in Oracle IntegrationCloud.
• Apps must be created and made available for embedding. See Creating a New WebApplication in Using Visual Builder in Oracle Integration Cloud.
• The apps must be configured for use with Oracle Content Management. See Embeddingthe Application in Using Visual Builder in Oracle Integration Cloud.
• Web applications must be created and made available for embedding in an iframe.
• The Sites SDK must be imported.
• The Sites SDK must be referenced in the web applications.
• A page URL parameter called “id” must be added to the web applications.
On the Oracle Content Management side, you need to configure integration with VBCS:
1. After you sign in to the Oracle Content Management web application as an administrator,click System in the Administration area of the navigation menu.
2. In the Settings menu, click Integrations.
3. Under Oracle Integrations, select Visual Builder Cloud Service Integration to enablethe service.
4. Enter the Service URL of the Oracle Visual Builder Cloud Service.
Note:
If you have Universal Credits subscription, you must include ic/builder inyour Service URL. For example, https://vbcsserver.example.com/ic/builder.
After both services have been configured for integration, Oracle Content Management userscan create components for your VBCS apps and add them to site pages. See Oracle VisualBuilder Cloud Service in Building Sites with Oracle Content Management.
• Use Oracle Content Management Components in Oracle Visual Builder Applications
• Embed Oracle Visual Builder Applications in an Oracle Content Management Site Page
Chapter 2Integrate with Oracle Visual Builder
2-27
• Build an Oracle Content Management VBCS Form and Data Report Components
• Build an Oracle Content Management VBCS Secure Form Component
• Provide a VBCS Endpoint As a URL for Select Menus
Use Oracle Content Management Components in Oracle VisualBuilder Applications
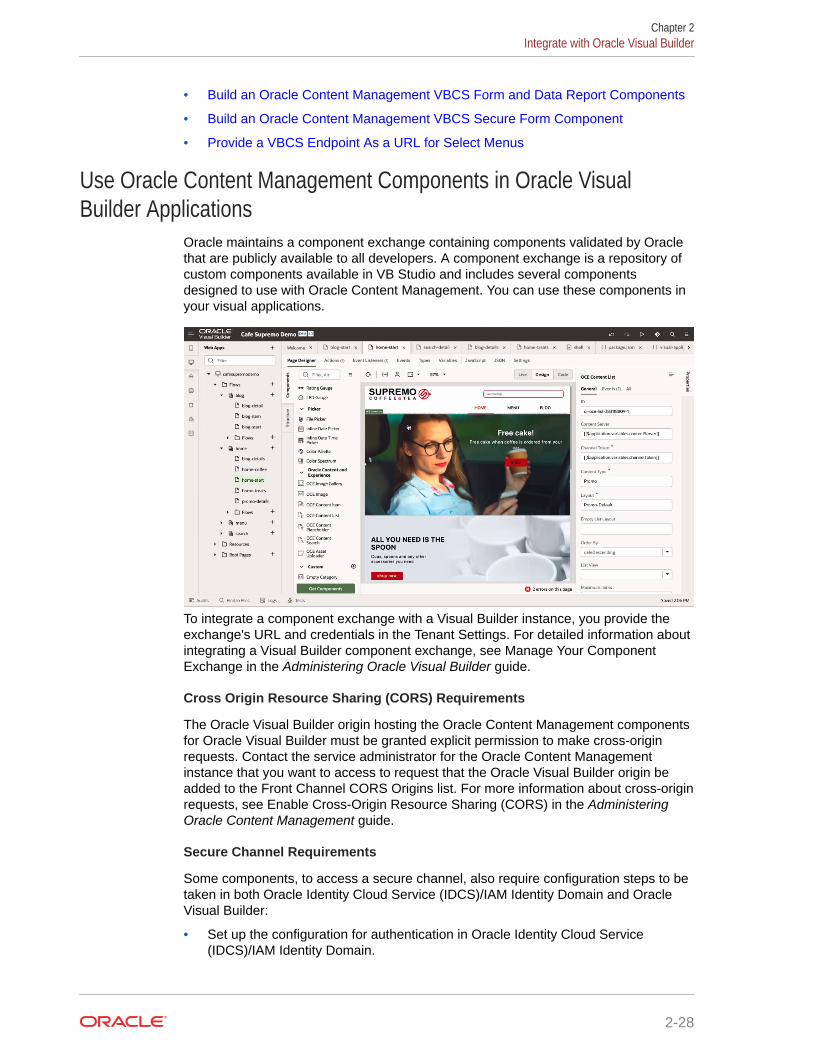
Oracle maintains a component exchange containing components validated by Oraclethat are publicly available to all developers. A component exchange is a repository ofcustom components available in VB Studio and includes several componentsdesigned to use with Oracle Content Management. You can use these components inyour visual applications.
To integrate a component exchange with a Visual Builder instance, you provide theexchange's URL and credentials in the Tenant Settings. For detailed information aboutintegrating a Visual Builder component exchange, see Manage Your ComponentExchange in the Administering Oracle Visual Builder guide.
Cross Origin Resource Sharing (CORS) Requirements
The Oracle Visual Builder origin hosting the Oracle Content Management componentsfor Oracle Visual Builder must be granted explicit permission to make cross-originrequests. Contact the service administrator for the Oracle Content Managementinstance that you want to access to request that the Oracle Visual Builder origin beadded to the Front Channel CORS Origins list. For more information about cross-originrequests, see Enable Cross-Origin Resource Sharing (CORS) in the AdministeringOracle Content Management guide.
Secure Channel Requirements
Some components, to access a secure channel, also require configuration steps to betaken in both Oracle Identity Cloud Service (IDCS)/IAM Identity Domain and OracleVisual Builder:
• Set up the configuration for authentication in Oracle Identity Cloud Service(IDCS)/IAM Identity Domain.
Chapter 2Integrate with Oracle Visual Builder
2-28
• Configure the service connection in Oracle Visual Builder.
This grants the authentication token used to access secure Oracle Content Managementendpoints. Once this is completed, the component will be able to consume the serviceconnections created.
Detailed information about if a component needs to access a secure channel and theconfiguration steps needed to do so can be found in each component Read Me file.
Connecting to Oracle Content Management
To use Oracle Content Management components for your Visual Builder application, youneed to provide the Oracle Content Management URL. This can be provided by the OracleContent Management service administrator, or you can navigate to the instance and copy theURL. Don't worry about subdirectories. For example, both of these will work:
• https://sample.cec.ocp.oraclecloud.com/documents/home
• https://sample.cec.ocp.oraclecloud.com
This property will be initialized as an application-level variable by default when you add thecomponent to your page. You can then go to your application-level variables and change thedefault value to your actual value. Once the variable is updated in Oracle Visual Builder,when you add another OCE component that requires this attribute, the attribute will default tothe same variable initiated by the first component that was imported.
Provide a Channel Token
OCE components that place assets on an Oracle Visual Builder application page work onlyfor published content items. Content items must be published through a publishing channel.When you publish a content item, you'll be forced to choose a publishing channel. To get thechannel token, you can do the following:
1. Log in to the Oracle Content Management web interface as an administrator.
2. Click Content in the left navigation panel (under "Administration").
3. Choose Publishing Channels from the dropdown list.
4. Select the publishing channel you'll be using, or create a new one.
5. Choose Edit from the list of available actions.
6. Refer to the Channel Token value in the API Information section.
Additional Requirements
Other OCE components for Oracle Visual Builder applications may have additionalrequirements. Detailed component configuration instructions, including requirements andoptions, are found in the Read Me file of each component.
Add a Component to a Visual Builder Application Page
To add a component to an Oracle Visual Builder application page, you will need to first installthe OCE component from a component exchange connected to your Oracle Visual Builderinstance. For information on how to connect a component exchange, see Add a Connectionto the Component Exchange in the Administering Oracle Visual Builder guide.
Once an OCE component has been installed from the component exchange, click-and-dragthe component from the component tab of the Oracle Visual Builder page designer into thedesired slot on the page of the application and configure the component as required. For
Chapter 2Integrate with Oracle Visual Builder
2-29
example, some components require an asset ID from Oracle Content Management.Some require a content type or layout.
Note:
Detailed information about what a component requires and how to configureit can be found in each component Read Me file once Oracle Visual Builderis installed and you're connected to the component exchange.
The following components are designed to integrate Oracle Content Managementfeatures into your Visual Builder applications and are available in the public componentexchanges.
Component Description
Content Item Use a content item component to add a specific content item to anapplication page.
Content List Use a content list component to dynamically display content items basedon various filter criteria.
Content Search Use a content search component to allow the user to dynamically controlwhat items are shown for a content list component, and what happenswhen the results are selected. For example, insert a customized searchbar to change or refresh the content that’s displayed on an applicationpage, or choose another action, such as opening a search results popup.
Content PlaceHolder
Use a content placeholder component to dynamically display a contentitem of one or more types. For example, use a content item placeholderon a designated detail page so that when a user clicks a link to get moredetailed information for a particular content item, it will automatically loadthe detail view for the associated content item.
Image Use an image component to display a single approved and publishedOracle Content Management image.
Gallery Use a gallery component to present a set of approved and publishedOracle Content Management images.
Asset Uploader Use an asset uploader component to offer a simplified way to uploaddocuments from a local machine and add them to a chosen OracleContent Management asset repository.
Embed Oracle Visual Builder Applications in an Oracle ContentManagement Site Page
You can embed a Visual Builder Cloud Service (VBCS) visual app or VBCS page in anOracle Content Management site page.
• Embed a VBCS Visual App in an Oracle Content Management Page
• Embed a VBCS Page in a Site Page
Embed a VBCS Visual App in an Oracle Content Management PageTo embed a visual app in a site page, you need to create the app in VBCS and thenadd the app to the page.
Chapter 2Integrate with Oracle Visual Builder
2-30
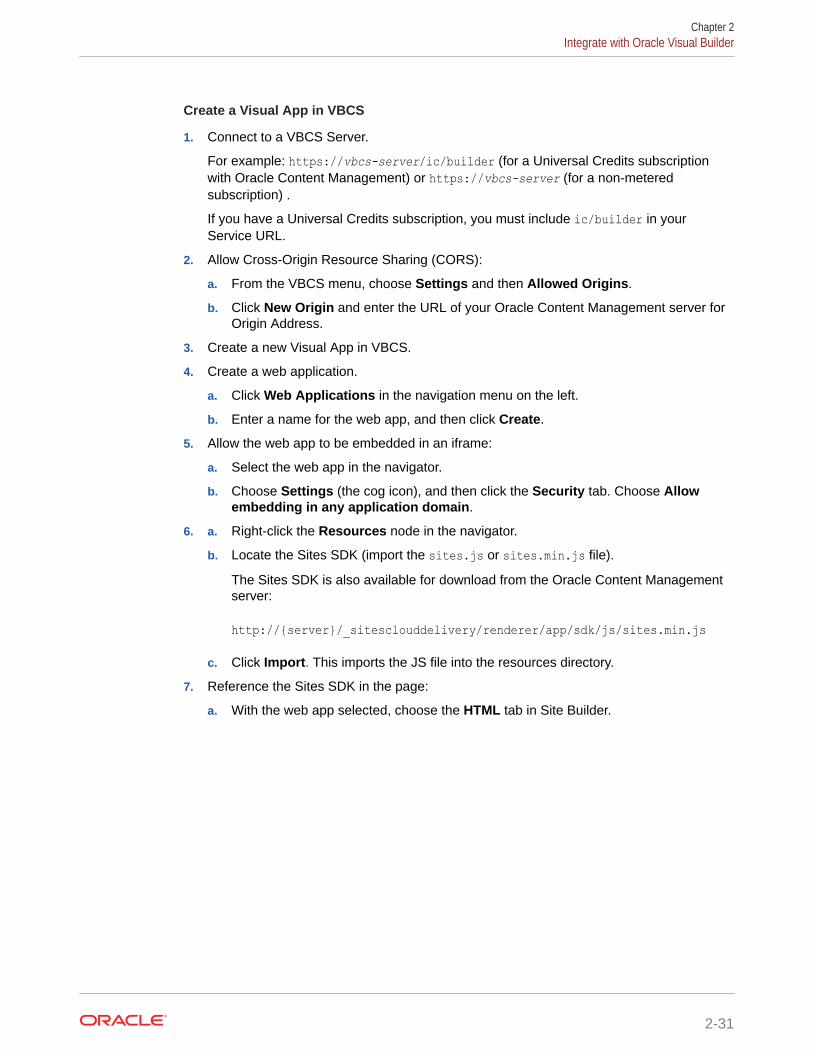
Create a Visual App in VBCS
1. Connect to a VBCS Server.
For example: https://vbcs-server/ic/builder (for a Universal Credits subscriptionwith Oracle Content Management) or https://vbcs-server (for a non-meteredsubscription) .
If you have a Universal Credits subscription, you must include ic/builder in yourService URL.
2. Allow Cross-Origin Resource Sharing (CORS):
a. From the VBCS menu, choose Settings and then Allowed Origins.
b. Click New Origin and enter the URL of your Oracle Content Management server forOrigin Address.
3. Create a new Visual App in VBCS.
4. Create a web application.
a. Click Web Applications in the navigation menu on the left.
b. Enter a name for the web app, and then click Create.
5. Allow the web app to be embedded in an iframe:
a. Select the web app in the navigator.
b. Choose Settings (the cog icon), and then click the Security tab. Choose Allowembedding in any application domain.
6. a. Right-click the Resources node in the navigator.
b. Locate the Sites SDK (import the sites.js or sites.min.js file).
The Sites SDK is also available for download from the Oracle Content Managementserver:
http://{server}/_sitesclouddelivery/renderer/app/sdk/js/sites.min.js
c. Click Import. This imports the JS file into the resources directory.
7. Reference the Sites SDK in the page:
a. With the web app selected, choose the HTML tab in Site Builder.
Chapter 2Integrate with Oracle Visual Builder
2-31
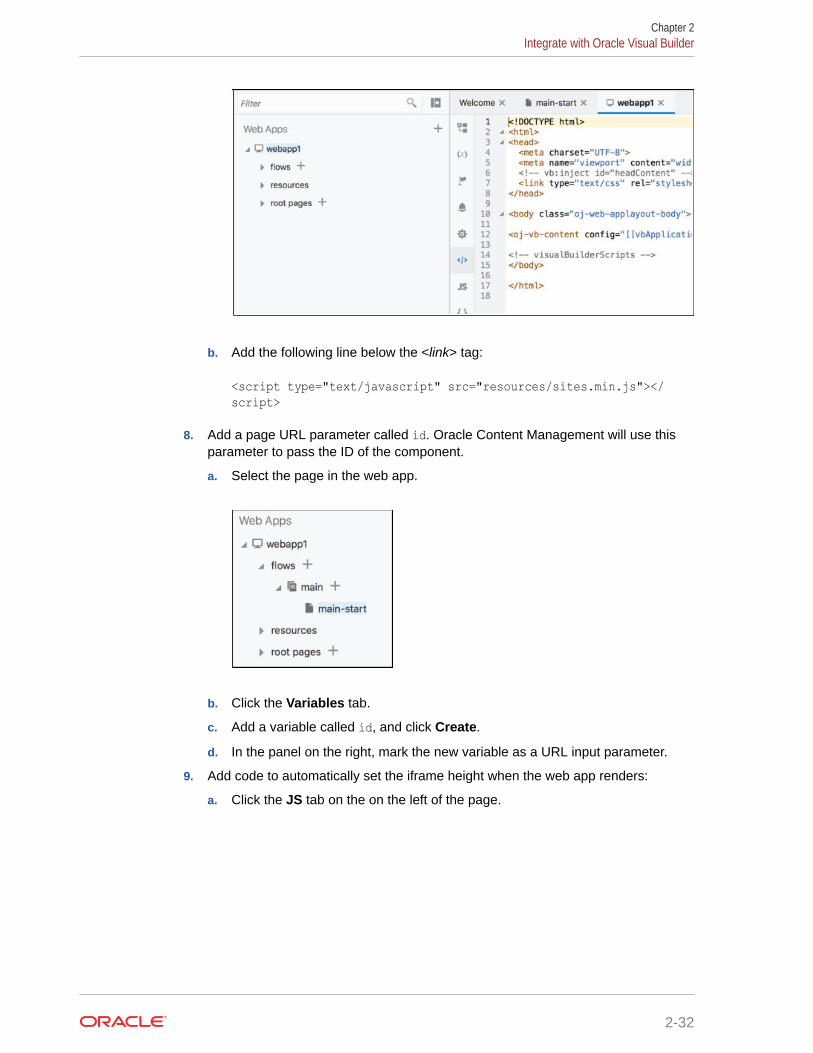
b. Add the following line below the <link> tag:
<script type="text/javascript" src="resources/sites.min.js"></script>
8. Add a page URL parameter called id. Oracle Content Management will use thisparameter to pass the ID of the component.
a. Select the page in the web app.
b. Click the Variables tab.
c. Add a variable called id, and click Create.
d. In the panel on the right, mark the new variable as a URL input parameter.
9. Add code to automatically set the iframe height when the web app renders:
a. Click the JS tab on the on the left of the page.
Chapter 2Integrate with Oracle Visual Builder
2-32
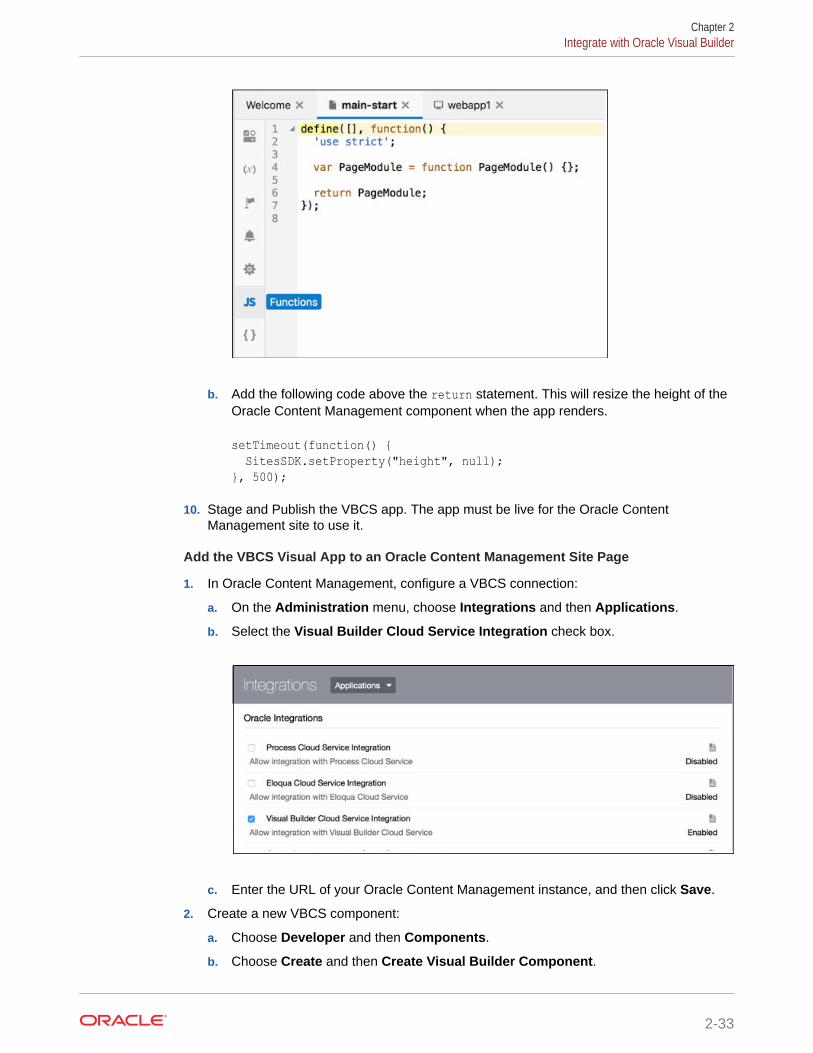
b. Add the following code above the return statement. This will resize the height of theOracle Content Management component when the app renders.
setTimeout(function() { SitesSDK.setProperty("height", null);}, 500);
10. Stage and Publish the VBCS app. The app must be live for the Oracle ContentManagement site to use it.
Add the VBCS Visual App to an Oracle Content Management Site Page
1. In Oracle Content Management, configure a VBCS connection:
a. On the Administration menu, choose Integrations and then Applications.
b. Select the Visual Builder Cloud Service Integration check box.
c. Enter the URL of your Oracle Content Management instance, and then click Save.
2. Create a new VBCS component:
a. Choose Developer and then Components.
b. Choose Create and then Create Visual Builder Component.
Chapter 2Integrate with Oracle Visual Builder
2-33
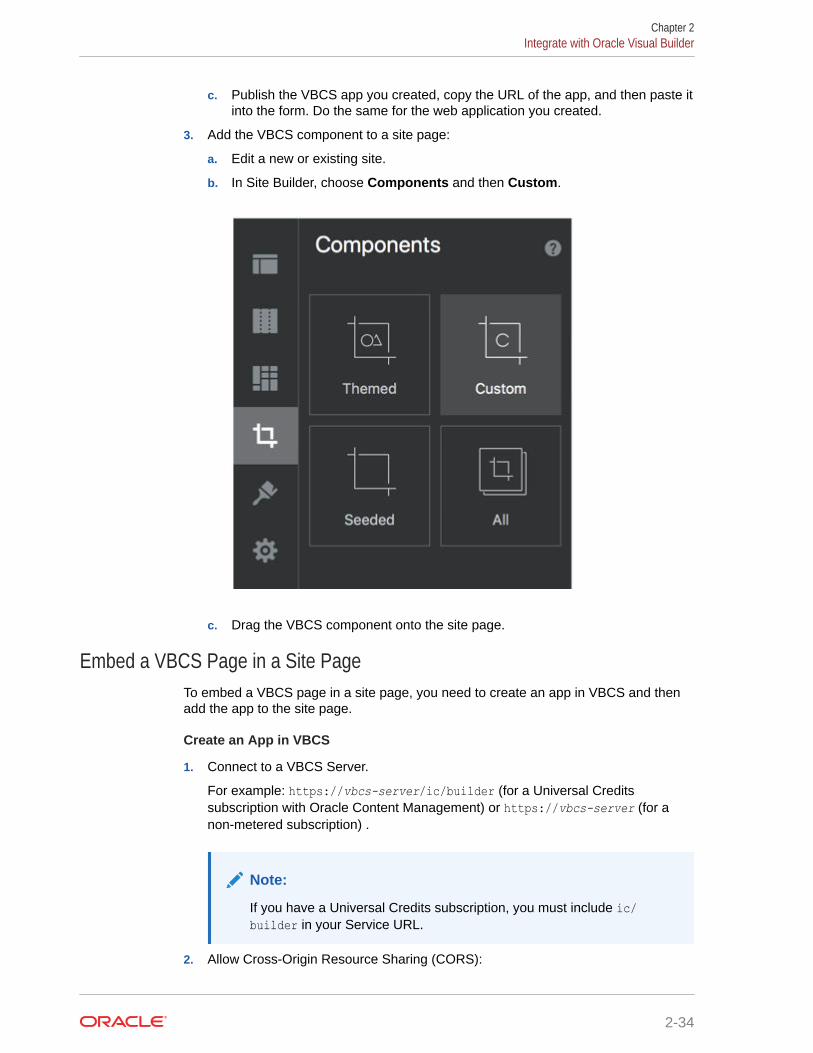
c. Publish the VBCS app you created, copy the URL of the app, and then paste itinto the form. Do the same for the web application you created.
3. Add the VBCS component to a site page:
a. Edit a new or existing site.
b. In Site Builder, choose Components and then Custom.
c. Drag the VBCS component onto the site page.
Embed a VBCS Page in a Site PageTo embed a VBCS page in a site page, you need to create an app in VBCS and thenadd the app to the site page.
Create an App in VBCS
1. Connect to a VBCS Server.
For example: https://vbcs-server/ic/builder (for a Universal Creditssubscription with Oracle Content Management) or https://vbcs-server (for anon-metered subscription) .
Note:
If you have a Universal Credits subscription, you must include ic/builder in your Service URL.
2. Allow Cross-Origin Resource Sharing (CORS):
Chapter 2Integrate with Oracle Visual Builder
2-34

a. Choose Administer Visual Builder, then Global Settings, and then AllowedOrigins.
b. Click New Origin, and enter the URL of your Oracle Content Use Oracle ContentManagement Components in Oracle Visual Builder Applications server for OriginAddress.
3. Create a new app in VBCS.
4. Allow the new app to be embedded.
a. Choose Application Settings, then Security, and then Embedding.
b. Select Allow embedding in any domain.
5. Use Data Designer and Page Designer to build your app.
6. Add a custom component to the bottom of your page.
7. Select the Custom Component. Enter the following in the Template section:
<div data-bind="html: script"></div>
8. Enter the following code in the Model section, substituting your own Oracle ContentManagement server.
define([], function () {
'use strict';
/** * Inject the SitesSDK and set the Component Height. */ var CustomComponentViewModel = function (params, componentInfo) { this.script = ko.observable( '<script type="text/javascript">\n' + '(function(d, s, id) {\n' + ' var js, fjs = d.getElementsByTagName(s)[0];\n' + ' if (d.getElementById(id))\n' + ' return;\n' + ' js = d.createElement(s);\n' + ' js.id = id;\n' + ' js.src = "https://oracle-content-management-server + ' fjs.parentNode.insertBefore(js, fjs);\n' + ' }(document, "script", "sites-sdk"));\n' + ' setTimeout(function() {\n' + ' SitesSDK.setProperty("height", null);\n' + ' }, 500);\n' + '</script>'); };
Chapter 2Integrate with Oracle Visual Builder
2-35
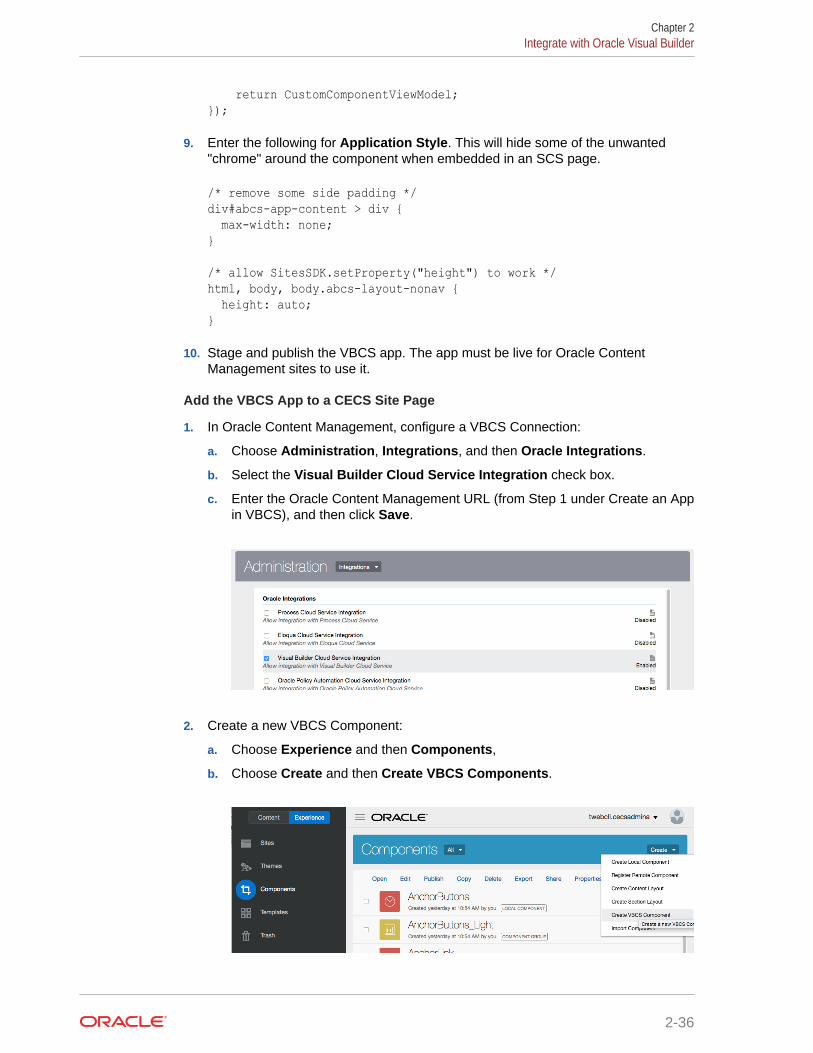
return CustomComponentViewModel;});
9. Enter the following for Application Style. This will hide some of the unwanted"chrome" around the component when embedded in an SCS page.
/* remove some side padding */div#abcs-app-content > div { max-width: none;}
/* allow SitesSDK.setProperty("height") to work */html, body, body.abcs-layout-nonav { height: auto;}
10. Stage and publish the VBCS app. The app must be live for Oracle ContentManagement sites to use it.
Add the VBCS App to a CECS Site Page
1. In Oracle Content Management, configure a VBCS Connection:
a. Choose Administration, Integrations, and then Oracle Integrations.
b. Select the Visual Builder Cloud Service Integration check box.
c. Enter the Oracle Content Management URL (from Step 1 under Create an Appin VBCS), and then click Save.
2. Create a new VBCS Component:
a. Choose Experience and then Components,
b. Choose Create and then Create VBCS Components.
Chapter 2Integrate with Oracle Visual Builder
2-36
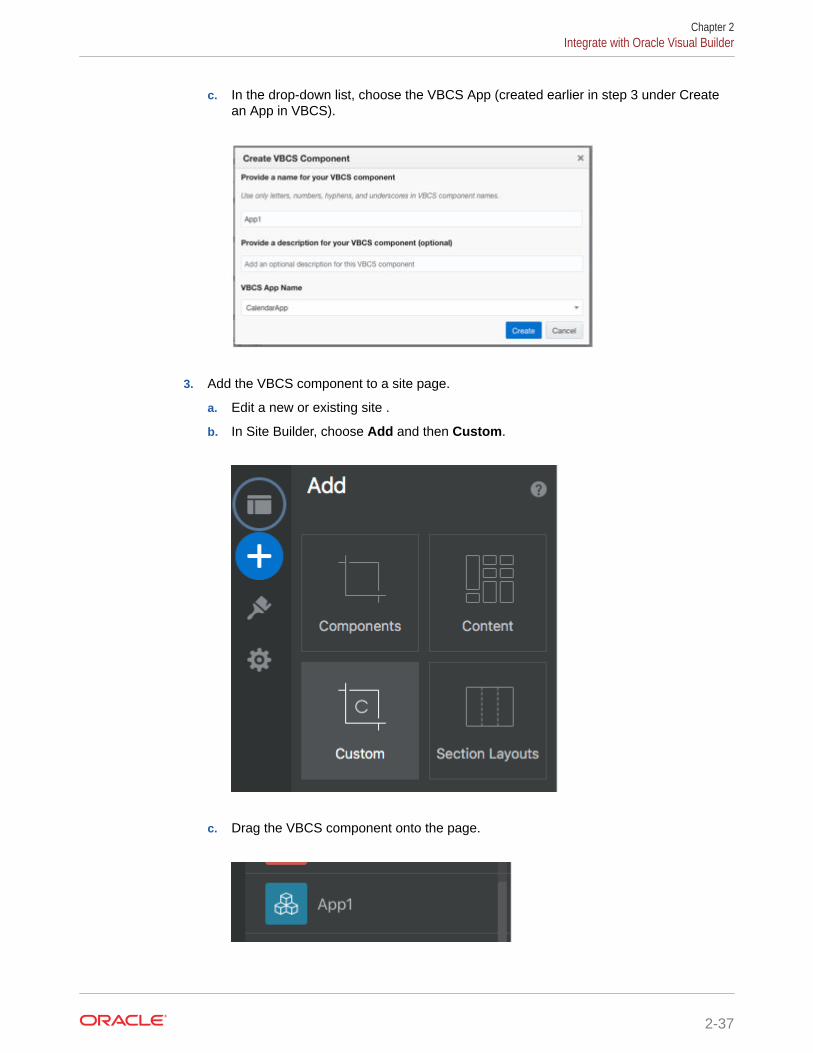
c. In the drop-down list, choose the VBCS App (created earlier in step 3 under Createan App in VBCS).
3. Add the VBCS component to a site page.
a. Edit a new or existing site .
b. In Site Builder, choose Add and then Custom.
c. Drag the VBCS component onto the page.
Chapter 2Integrate with Oracle Visual Builder
2-37
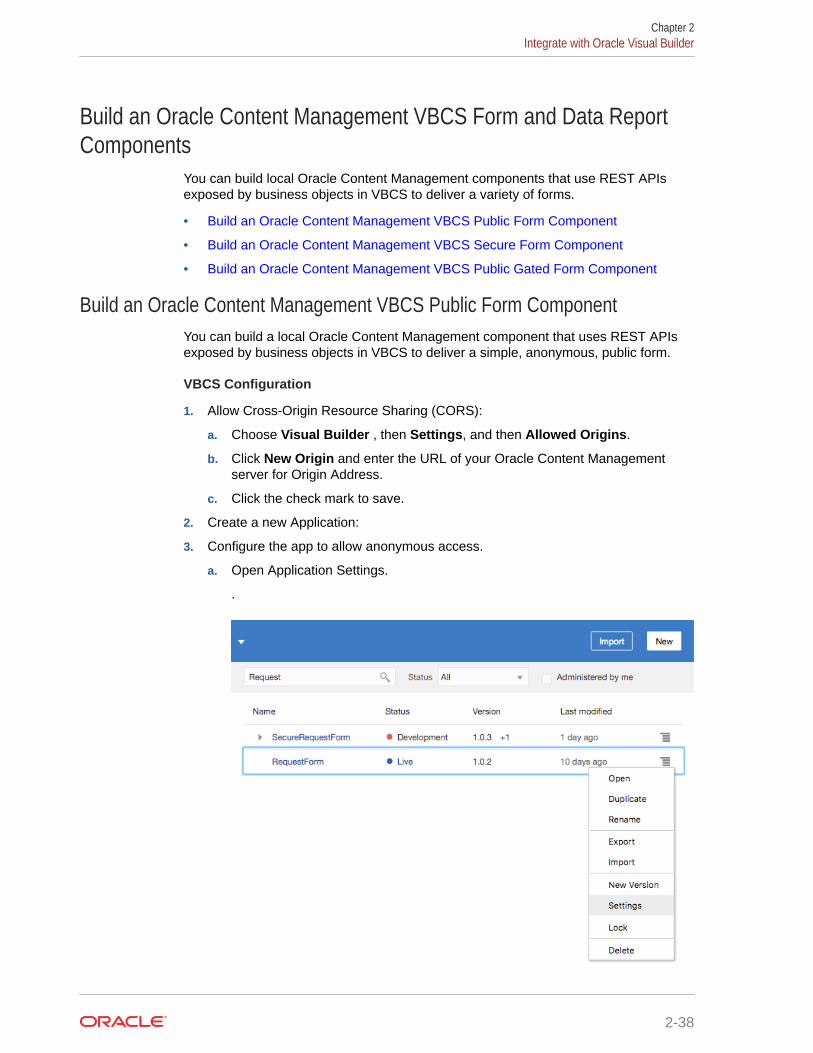
Build an Oracle Content Management VBCS Form and Data ReportComponents
You can build local Oracle Content Management components that use REST APIsexposed by business objects in VBCS to deliver a variety of forms.
• Build an Oracle Content Management VBCS Public Form Component
• Build an Oracle Content Management VBCS Secure Form Component
• Build an Oracle Content Management VBCS Public Gated Form Component
Build an Oracle Content Management VBCS Public Form ComponentYou can build a local Oracle Content Management component that uses REST APIsexposed by business objects in VBCS to deliver a simple, anonymous, public form.
VBCS Configuration
1. Allow Cross-Origin Resource Sharing (CORS):
a. Choose Visual Builder , then Settings, and then Allowed Origins.
b. Click New Origin and enter the URL of your Oracle Content Managementserver for Origin Address.
c. Click the check mark to save.
2. Create a new Application:
3. Configure the app to allow anonymous access.
a. Open Application Settings.
.
Chapter 2Integrate with Oracle Visual Builder
2-38
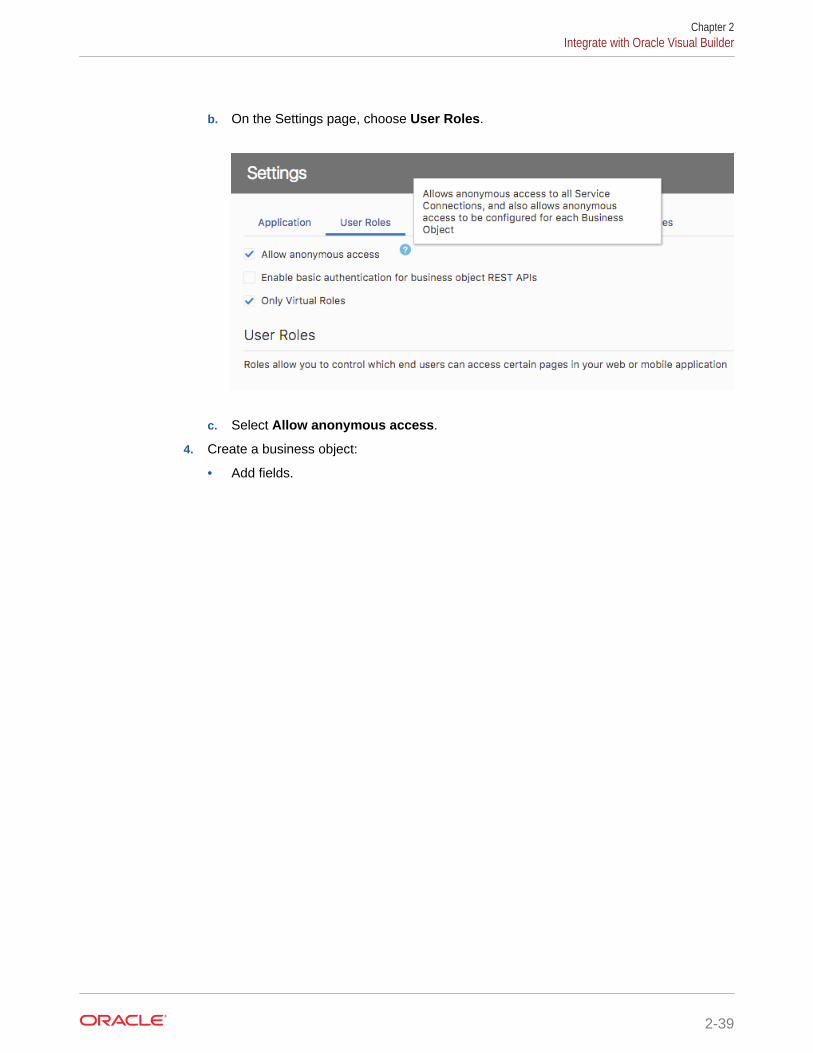
b. On the Settings page, choose User Roles.
c. Select Allow anonymous access.
4. Create a business object:
• Add fields.
Chapter 2Integrate with Oracle Visual Builder
2-39
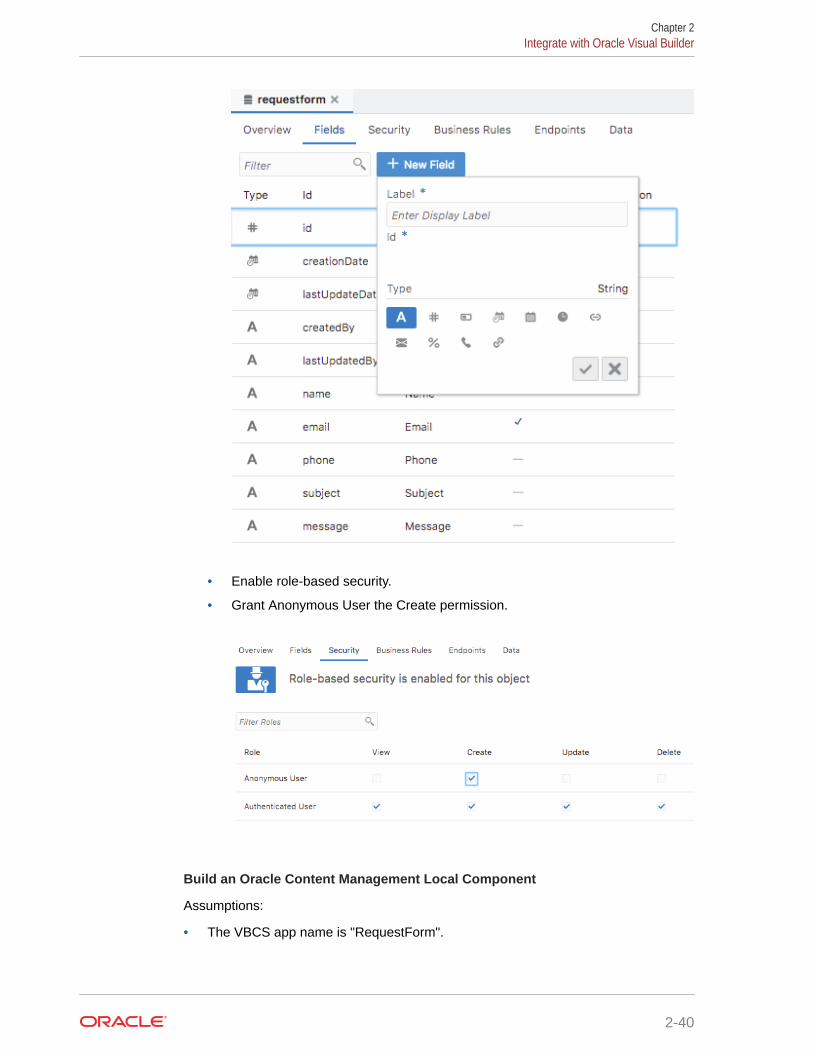
• Enable role-based security.
• Grant Anonymous User the Create permission.
Build an Oracle Content Management Local Component
Assumptions:
• The VBCS app name is "RequestForm".
Chapter 2Integrate with Oracle Visual Builder
2-40
• The business object name is "requestform" and it contains the following custom fields:
– name (required)
– email (required)
– phone
– subject
– message
Modify assets/render.js
1. Define the component template as follows.
<!-- ko if: initialized --><div class="form">
<!-- ko if: requestSuccessMsg --> <div class="request-msg green" data-bind="text: requestSuccessMsg"></div> <!-- /ko --> <!-- ko if: requestFailMsg --> <div class="request-msg red" data-bind="text: requestFailMsg"></div> <!-- /ko -->
<label class="required-field" for="name">Name</label> <input type="text" id="name" name="name" required placeholder="Your name. . ." data-bind="value: name"/>
<label class="required-field" for="email">Email</label> <input type="text" id="email" name="email" required placeholder="Your email. . ." data-bind="value: email"/>
<label for="phone"></label>Phone</label> <input type="text" id="phone" name="phone" data-bind="value: phone"/> <label for="subject">Subject</label> <input type="text" id="subject" name="subject" data-bind="value: subject"/>
<label for="message"></label>Message</label> <textarea id="message" name="message" rows="6" data-bind="value: message"/>
<button data-bind="click: sendRequest, , enable: canSubmit">Send Request</button></div>
<!-- note that the component has completed rendering into the page --><div class="scs-hidden" data-bind="scsRenderStatus: {'id': id, 'status': 'complete'}"></div><!-- /ko -->
Chapter 2Integrate with Oracle Visual Builder
2-41
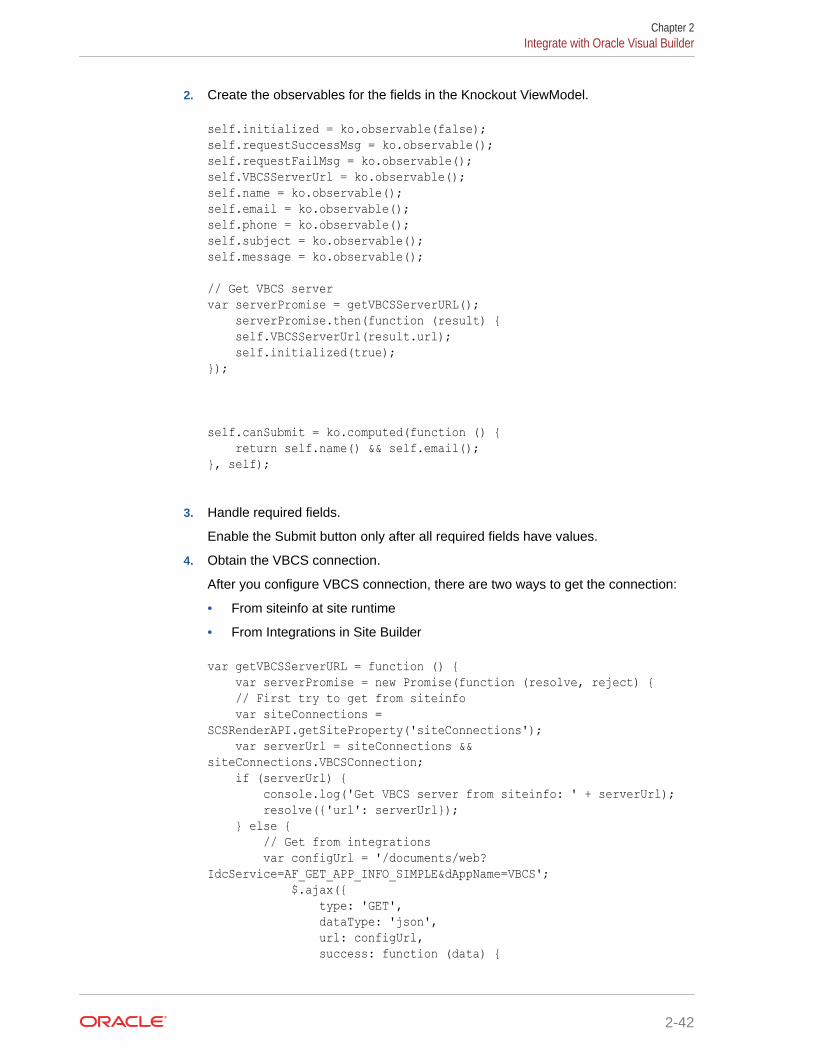
2. Create the observables for the fields in the Knockout ViewModel.
self.initialized = ko.observable(false);self.requestSuccessMsg = ko.observable();self.requestFailMsg = ko.observable();self.VBCSServerUrl = ko.observable();self.name = ko.observable();self.email = ko.observable();self.phone = ko.observable();self.subject = ko.observable();self.message = ko.observable();
// Get VBCS servervar serverPromise = getVBCSServerURL(); serverPromise.then(function (result) { self.VBCSServerUrl(result.url); self.initialized(true);});
self.canSubmit = ko.computed(function () { return self.name() && self.email();}, self);
3. Handle required fields.
Enable the Submit button only after all required fields have values.
4. Obtain the VBCS connection.
After you configure VBCS connection, there are two ways to get the connection:
• From siteinfo at site runtime
• From Integrations in Site Builder
var getVBCSServerURL = function () { var serverPromise = new Promise(function (resolve, reject) { // First try to get from siteinfo var siteConnections = SCSRenderAPI.getSiteProperty('siteConnections'); var serverUrl = siteConnections && siteConnections.VBCSConnection; if (serverUrl) { console.log('Get VBCS server from siteinfo: ' + serverUrl); resolve({'url': serverUrl}); } else { // Get from integrations var configUrl = '/documents/web?IdcService=AF_GET_APP_INFO_SIMPLE&dAppName=VBCS'; $.ajax({ type: 'GET', dataType: 'json', url: configUrl, success: function (data) {
Chapter 2Integrate with Oracle Visual Builder
2-42
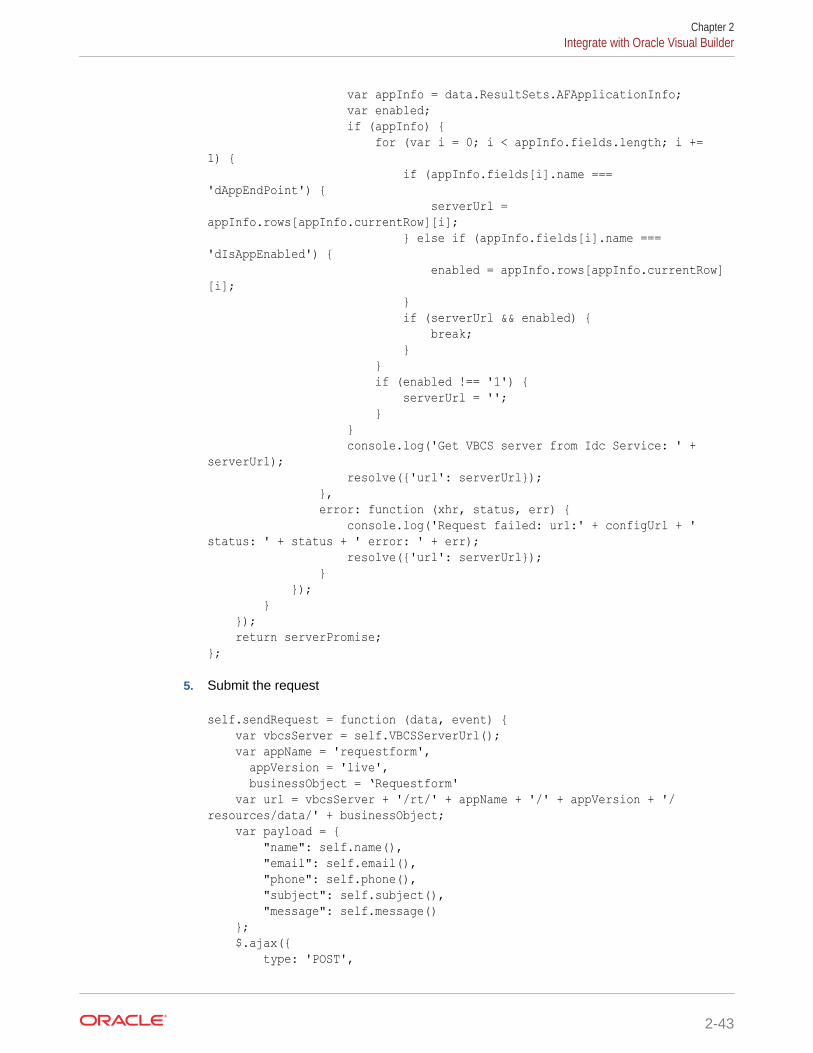
var appInfo = data.ResultSets.AFApplicationInfo; var enabled; if (appInfo) { for (var i = 0; i < appInfo.fields.length; i += 1) { if (appInfo.fields[i].name === 'dAppEndPoint') { serverUrl = appInfo.rows[appInfo.currentRow][i]; } else if (appInfo.fields[i].name === 'dIsAppEnabled') { enabled = appInfo.rows[appInfo.currentRow][i]; } if (serverUrl && enabled) { break; } } if (enabled !== '1') { serverUrl = ''; } } console.log('Get VBCS server from Idc Service: ' + serverUrl); resolve({'url': serverUrl}); }, error: function (xhr, status, err) { console.log('Request failed: url:' + configUrl + ' status: ' + status + ' error: ' + err); resolve({'url': serverUrl}); } }); } }); return serverPromise;};
5. Submit the request
self.sendRequest = function (data, event) { var vbcsServer = self.VBCSServerUrl(); var appName = 'requestform', appVersion = 'live', businessObject = ‘Requestform' var url = vbcsServer + '/rt/' + appName + '/' + appVersion + '/resources/data/' + businessObject; var payload = { "name": self.name(), "email": self.email(), "phone": self.phone(), "subject": self.subject(), "message": self.message() }; $.ajax({ type: 'POST',
Chapter 2Integrate with Oracle Visual Builder
2-43
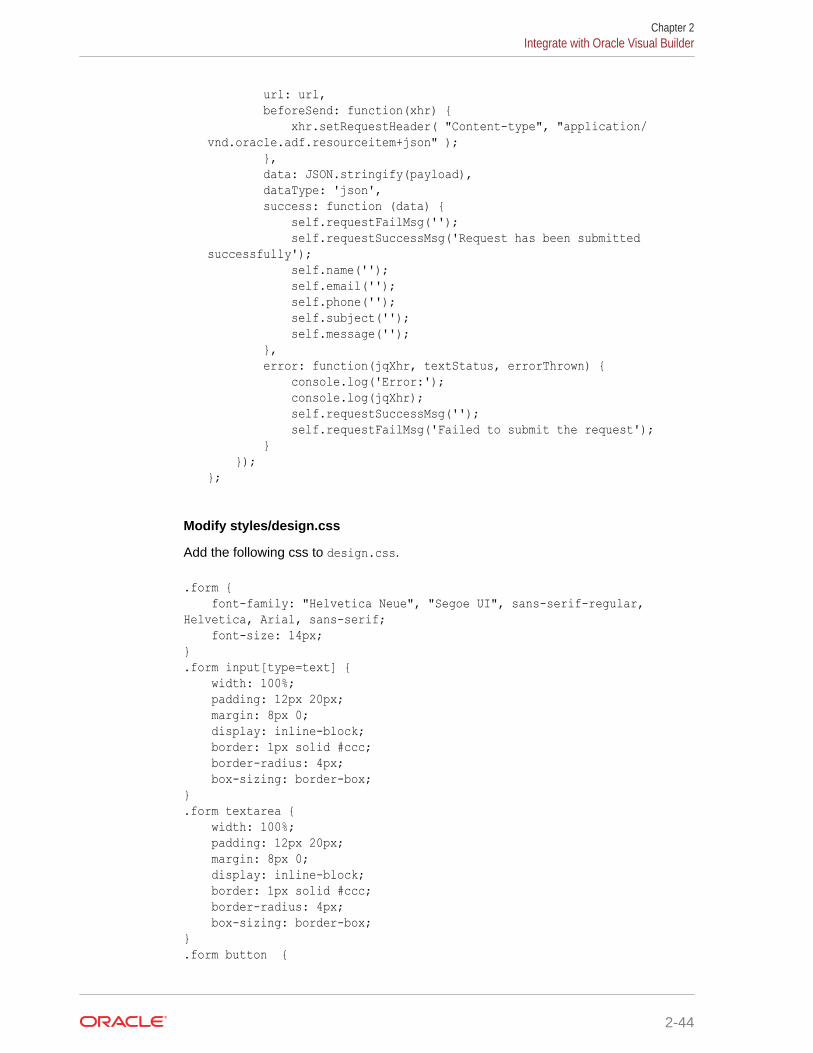
url: url, beforeSend: function(xhr) { xhr.setRequestHeader( "Content-type", "application/vnd.oracle.adf.resourceitem+json" ); }, data: JSON.stringify(payload), dataType: 'json', success: function (data) { self.requestFailMsg(''); self.requestSuccessMsg('Request has been submitted successfully'); self.name(''); self.email(''); self.phone(''); self.subject(''); self.message(''); }, error: function(jqXhr, textStatus, errorThrown) { console.log('Error:'); console.log(jqXhr); self.requestSuccessMsg(''); self.requestFailMsg('Failed to submit the request'); } });};
Modify styles/design.css
Add the following css to design.css.
.form { font-family: "Helvetica Neue", "Segoe UI", sans-serif-regular, Helvetica, Arial, sans-serif; font-size: 14px;}.form input[type=text] { width: 100%; padding: 12px 20px; margin: 8px 0; display: inline-block; border: 1px solid #ccc; border-radius: 4px; box-sizing: border-box;}.form textarea { width: 100%; padding: 12px 20px; margin: 8px 0; display: inline-block; border: 1px solid #ccc; border-radius: 4px; box-sizing: border-box;}.form button {
Chapter 2Integrate with Oracle Visual Builder
2-44
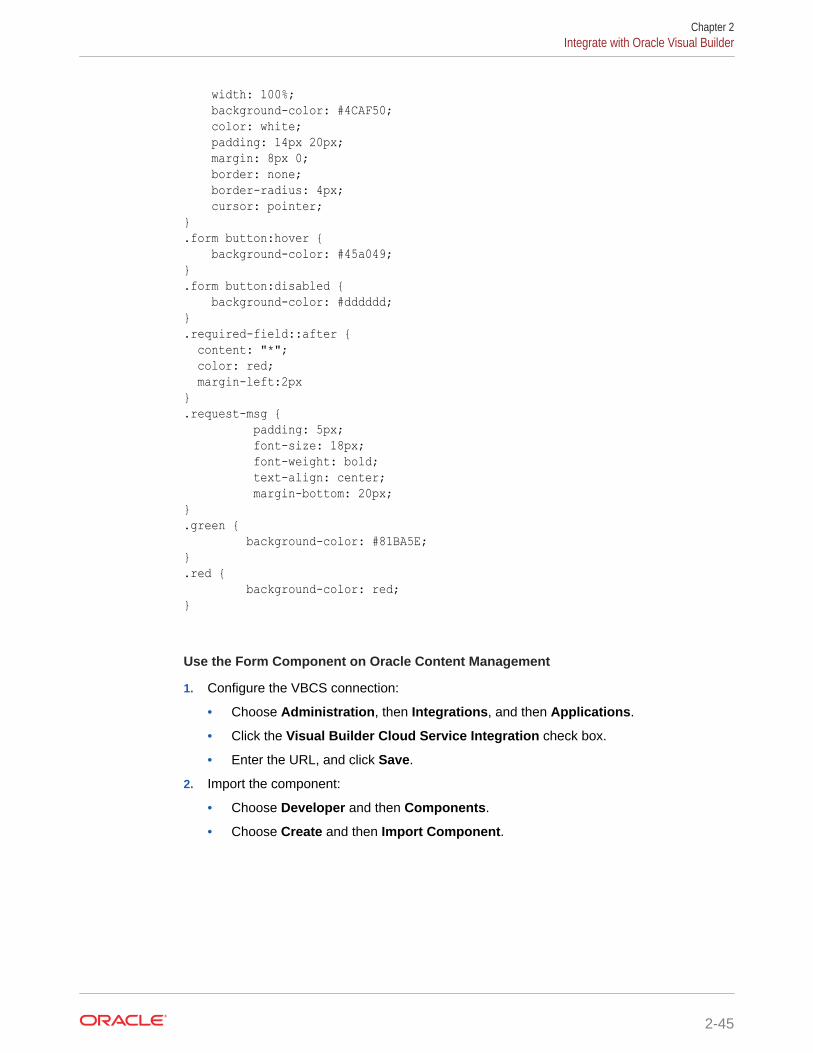
width: 100%; background-color: #4CAF50; color: white; padding: 14px 20px; margin: 8px 0; border: none; border-radius: 4px; cursor: pointer;}.form button:hover { background-color: #45a049;}.form button:disabled { background-color: #dddddd;}.required-field::after { content: "*"; color: red; margin-left:2px}.request-msg { padding: 5px; font-size: 18px; font-weight: bold; text-align: center; margin-bottom: 20px;}.green { background-color: #81BA5E;}.red { background-color: red;}
Use the Form Component on Oracle Content Management
1. Configure the VBCS connection:
• Choose Administration, then Integrations, and then Applications.
• Click the Visual Builder Cloud Service Integration check box.
• Enter the URL, and click Save.
2. Import the component:
• Choose Developer and then Components.
• Choose Create and then Import Component.
Chapter 2Integrate with Oracle Visual Builder
2-45
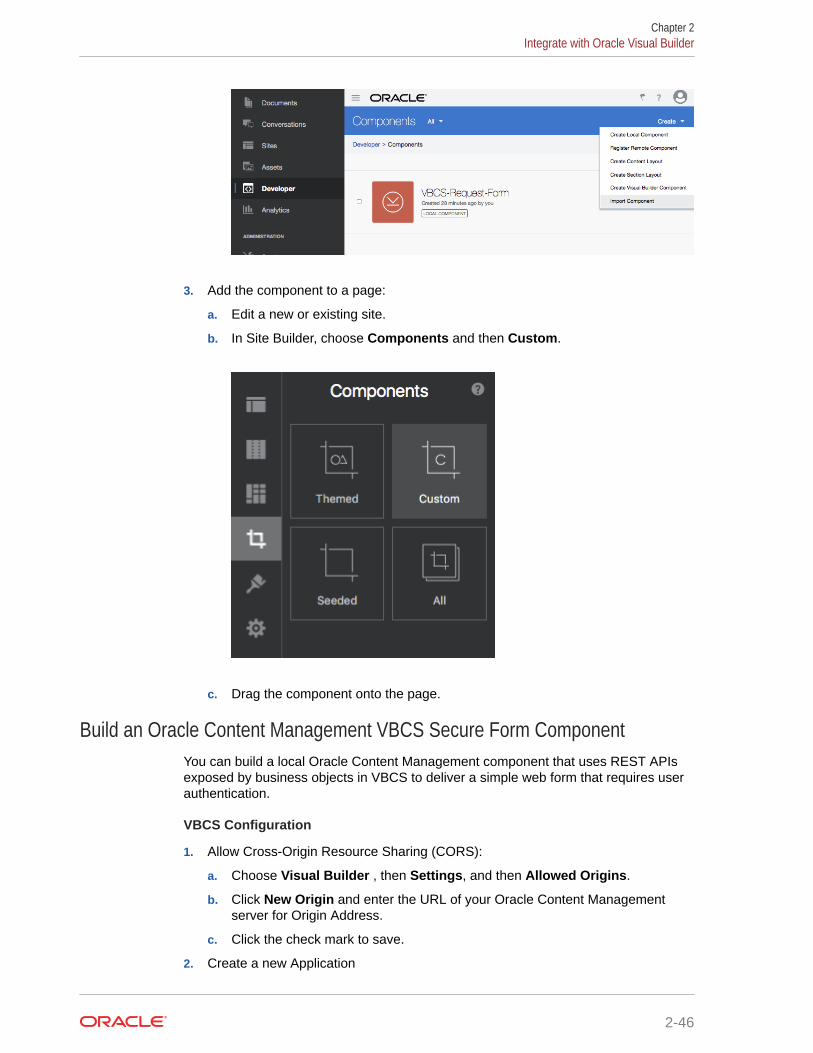
3. Add the component to a page:
a. Edit a new or existing site.
b. In Site Builder, choose Components and then Custom.
c. Drag the component onto the page.
Build an Oracle Content Management VBCS Secure Form ComponentYou can build a local Oracle Content Management component that uses REST APIsexposed by business objects in VBCS to deliver a simple web form that requires userauthentication.
VBCS Configuration
1. Allow Cross-Origin Resource Sharing (CORS):
a. Choose Visual Builder , then Settings, and then Allowed Origins.
b. Click New Origin and enter the URL of your Oracle Content Managementserver for Origin Address.
c. Click the check mark to save.
2. Create a new Application
Chapter 2Integrate with Oracle Visual Builder
2-46
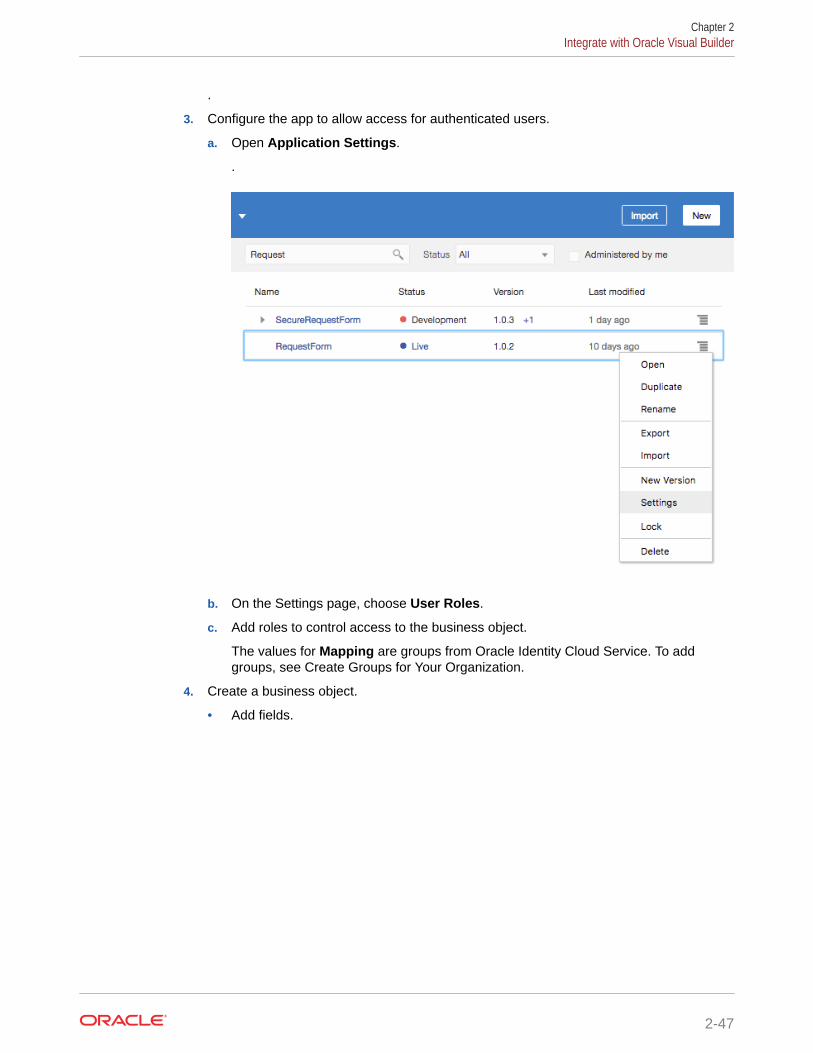
.
3. Configure the app to allow access for authenticated users.
a. Open Application Settings.
.
b. On the Settings page, choose User Roles.
c. Add roles to control access to the business object.
The values for Mapping are groups from Oracle Identity Cloud Service. To addgroups, see Create Groups for Your Organization.
4. Create a business object.
• Add fields.
Chapter 2Integrate with Oracle Visual Builder
2-47
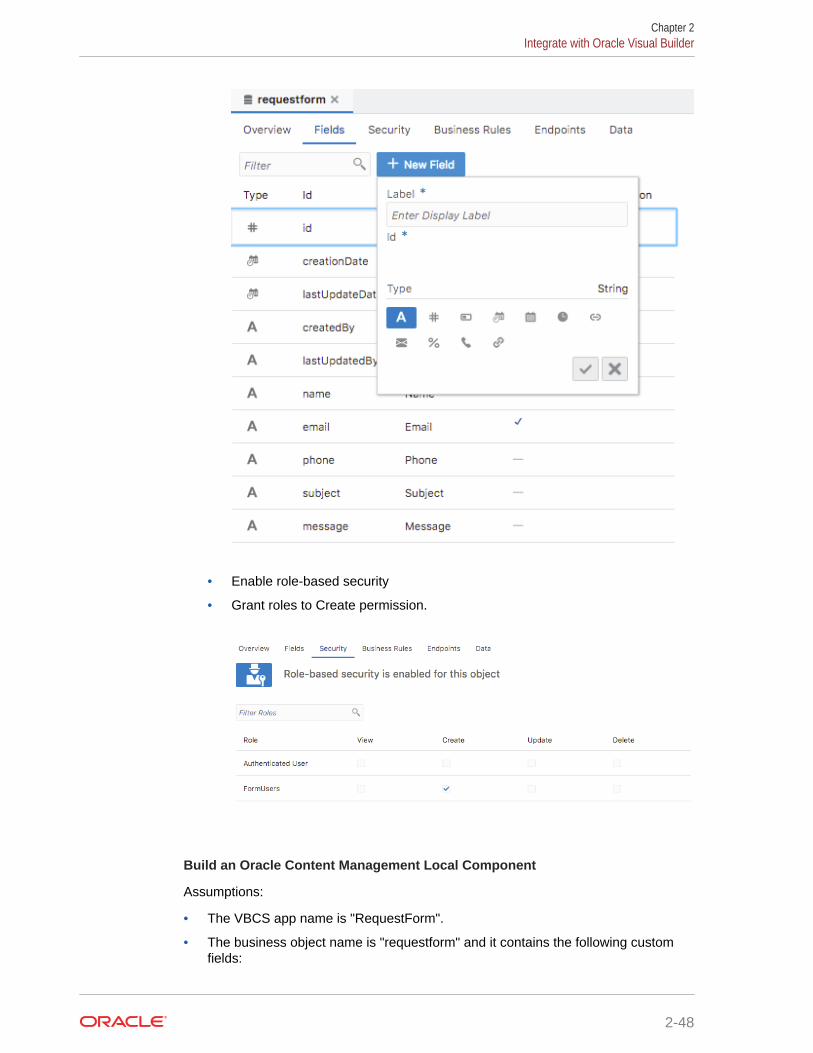
• Enable role-based security
• Grant roles to Create permission.
Build an Oracle Content Management Local Component
Assumptions:
• The VBCS app name is "RequestForm".
• The business object name is "requestform" and it contains the following customfields:
Chapter 2Integrate with Oracle Visual Builder
2-48
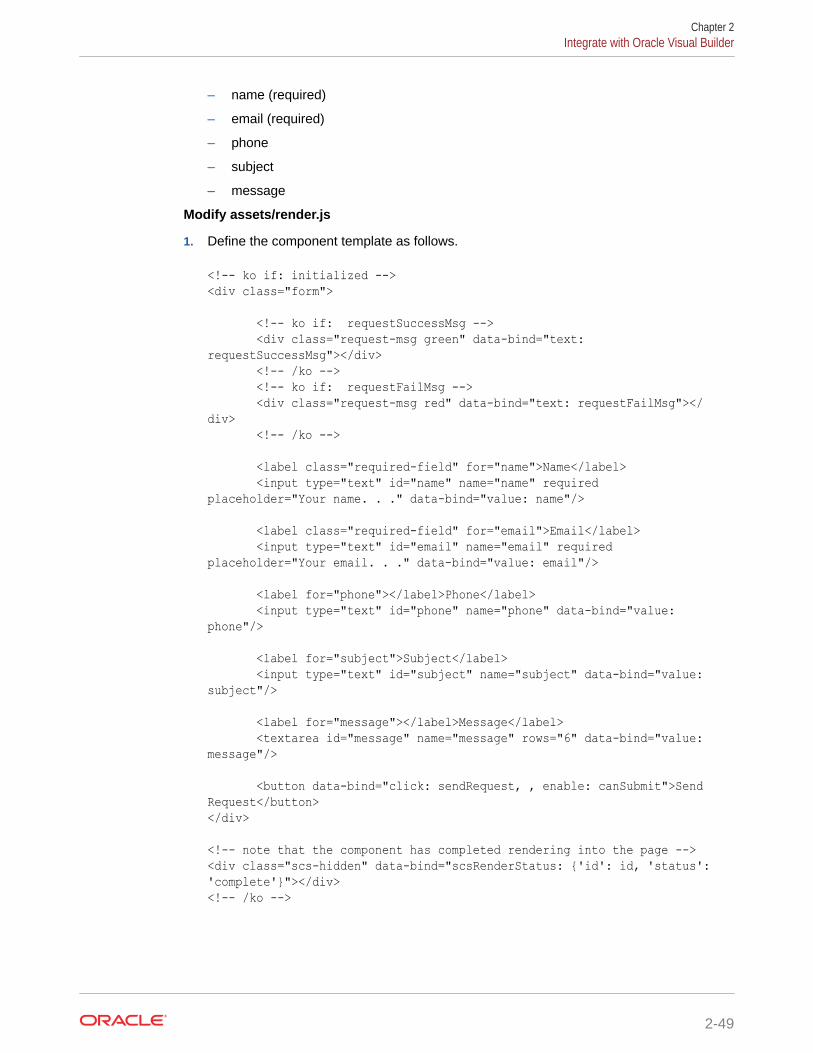
– name (required)
– email (required)
– phone
– subject
– message
Modify assets/render.js
1. Define the component template as follows.
<!-- ko if: initialized --><div class="form">
<!-- ko if: requestSuccessMsg --> <div class="request-msg green" data-bind="text: requestSuccessMsg"></div> <!-- /ko --> <!-- ko if: requestFailMsg --> <div class="request-msg red" data-bind="text: requestFailMsg"></div> <!-- /ko -->
<label class="required-field" for="name">Name</label> <input type="text" id="name" name="name" required placeholder="Your name. . ." data-bind="value: name"/>
<label class="required-field" for="email">Email</label> <input type="text" id="email" name="email" required placeholder="Your email. . ." data-bind="value: email"/>
<label for="phone"></label>Phone</label> <input type="text" id="phone" name="phone" data-bind="value: phone"/>
<label for="subject">Subject</label> <input type="text" id="subject" name="subject" data-bind="value: subject"/>
<label for="message"></label>Message</label> <textarea id="message" name="message" rows="6" data-bind="value: message"/>
<button data-bind="click: sendRequest, , enable: canSubmit">Send Request</button></div>
<!-- note that the component has completed rendering into the page --><div class="scs-hidden" data-bind="scsRenderStatus: {'id': id, 'status': 'complete'}"></div><!-- /ko -->
Chapter 2Integrate with Oracle Visual Builder
2-49
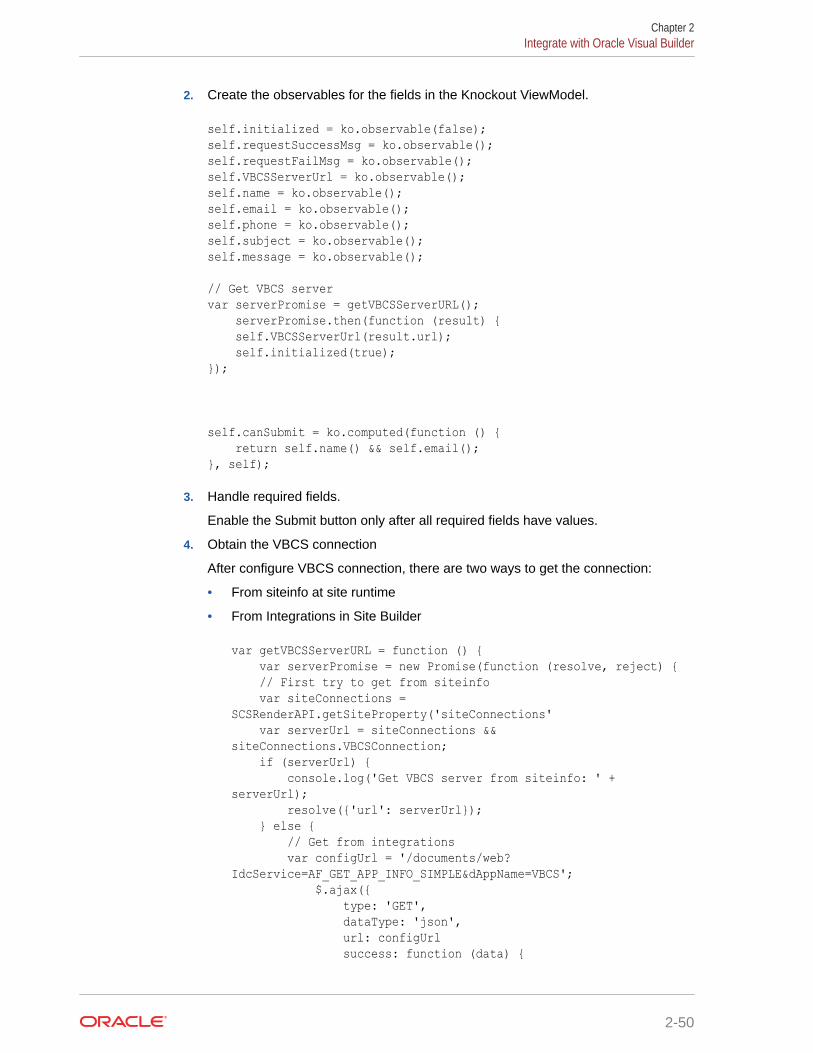
2. Create the observables for the fields in the Knockout ViewModel.
self.initialized = ko.observable(false);self.requestSuccessMsg = ko.observable();self.requestFailMsg = ko.observable();self.VBCSServerUrl = ko.observable();self.name = ko.observable();self.email = ko.observable();self.phone = ko.observable();self.subject = ko.observable();self.message = ko.observable();
// Get VBCS servervar serverPromise = getVBCSServerURL(); serverPromise.then(function (result) { self.VBCSServerUrl(result.url); self.initialized(true);});
self.canSubmit = ko.computed(function () { return self.name() && self.email();}, self);
3. Handle required fields.
Enable the Submit button only after all required fields have values.
4. Obtain the VBCS connection
After configure VBCS connection, there are two ways to get the connection:
• From siteinfo at site runtime
• From Integrations in Site Builder
var getVBCSServerURL = function () { var serverPromise = new Promise(function (resolve, reject) { // First try to get from siteinfo var siteConnections = SCSRenderAPI.getSiteProperty('siteConnections' var serverUrl = siteConnections && siteConnections.VBCSConnection; if (serverUrl) { console.log('Get VBCS server from siteinfo: ' + serverUrl); resolve({'url': serverUrl}); } else { // Get from integrations var configUrl = '/documents/web?IdcService=AF_GET_APP_INFO_SIMPLE&dAppName=VBCS'; $.ajax({ type: 'GET', dataType: 'json', url: configUrl success: function (data) {
Chapter 2Integrate with Oracle Visual Builder
2-50

var appInfo = data.ResultSets.AFApplicationInfo; var enabled; if (appInfo) { for (var i = 0; i < appInfo.fields.length; i += 1) { if (appInfo.fields[i].name === 'dAppEndPoint') { serverUrl = appInfo.rows[appInfo.currentRow][i]; } else if (appInfo.fields[i].name === 'dIsAppEnabled') { enabled = appInfo.rows[appInfo.currentRow][i]; } if (serverUrl && enabled) { break; } } console.log('Get VBCS server from Idc Service: ' + serverUrl); resolve({'url': serverUrl}); }, error: function (xhr, status, err) { console.log('Request failed: url:' + configUrl + ' status: ' + status + ' error: ' + err); resolve({'url': serverUrl}); } }); } }); return serverPromise;};
5. Get an authorization token.
Requirement: Oracle Content Management and VBCS are deployed in the same identitydomain.
var getAuthToken = function (args) { // dummy function if callbacks not supplied var dummyCallback = function () {};
// extract the args and create the server URL var serverURL = (args.serverURL || '/').split('/ic/')[0], successCallback = args.successCallback || dummyCallback, errorCallback = args.errorCallback || dummyCallback, tokenURL = serverURL + ‘/ic/builder/resources/security/token’;
// For VBCS to get the authtoken: // - make a POST call to /ic/builder/resources/security/token // - include scope=run-time form parameter var getToken = function (tokenURL, successCallback, errorCallback) { $.ajax({ 'type': 'POST', 'url': tokenURL,
Chapter 2Integrate with Oracle Visual Builder
2-51
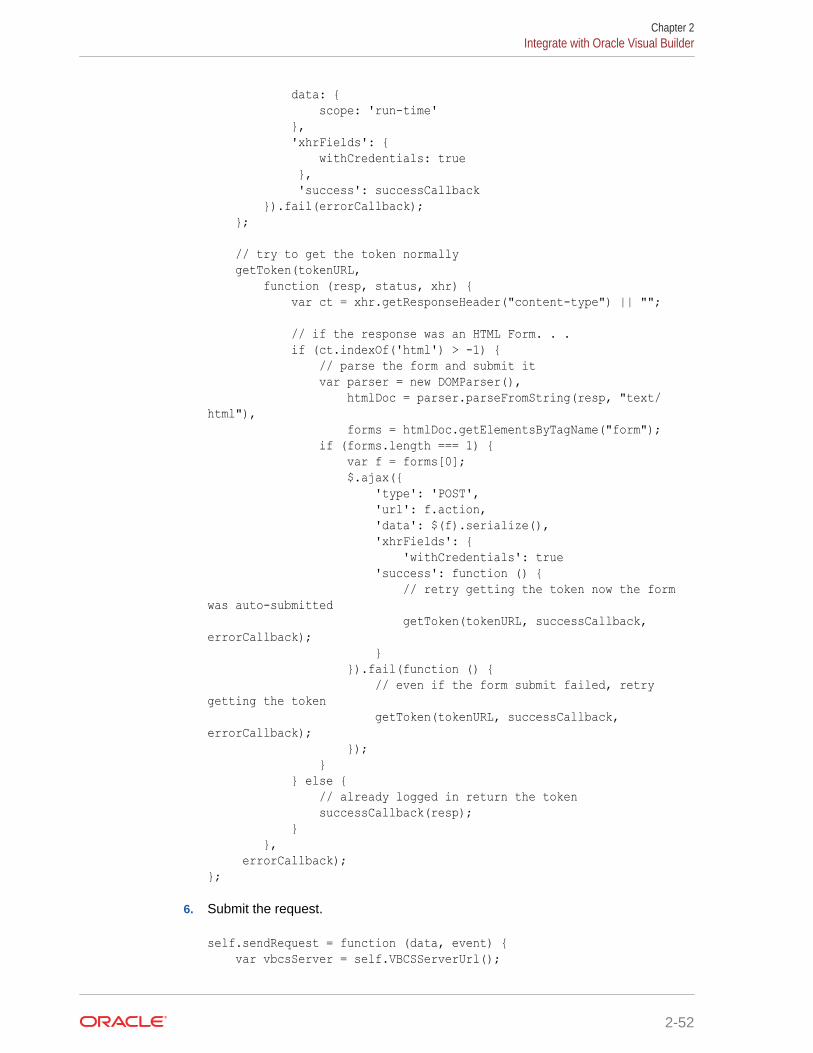
data: { scope: 'run-time' }, 'xhrFields': { withCredentials: true }, 'success': successCallback }).fail(errorCallback); };
// try to get the token normally getToken(tokenURL, function (resp, status, xhr) { var ct = xhr.getResponseHeader("content-type") || "";
// if the response was an HTML Form. . . if (ct.indexOf('html') > -1) { // parse the form and submit it var parser = new DOMParser(), htmlDoc = parser.parseFromString(resp, "text/html"), forms = htmlDoc.getElementsByTagName("form"); if (forms.length === 1) { var f = forms[0]; $.ajax({ 'type': 'POST', 'url': f.action, 'data': $(f).serialize(), 'xhrFields': { 'withCredentials': true 'success': function () { // retry getting the token now the form was auto-submitted getToken(tokenURL, successCallback, errorCallback); } }).fail(function () { // even if the form submit failed, retry getting the token getToken(tokenURL, successCallback, errorCallback); }); } } else { // already logged in return the token successCallback(resp); } }, errorCallback);};
6. Submit the request.
self.sendRequest = function (data, event) { var vbcsServer = self.VBCSServerUrl();
Chapter 2Integrate with Oracle Visual Builder
2-52
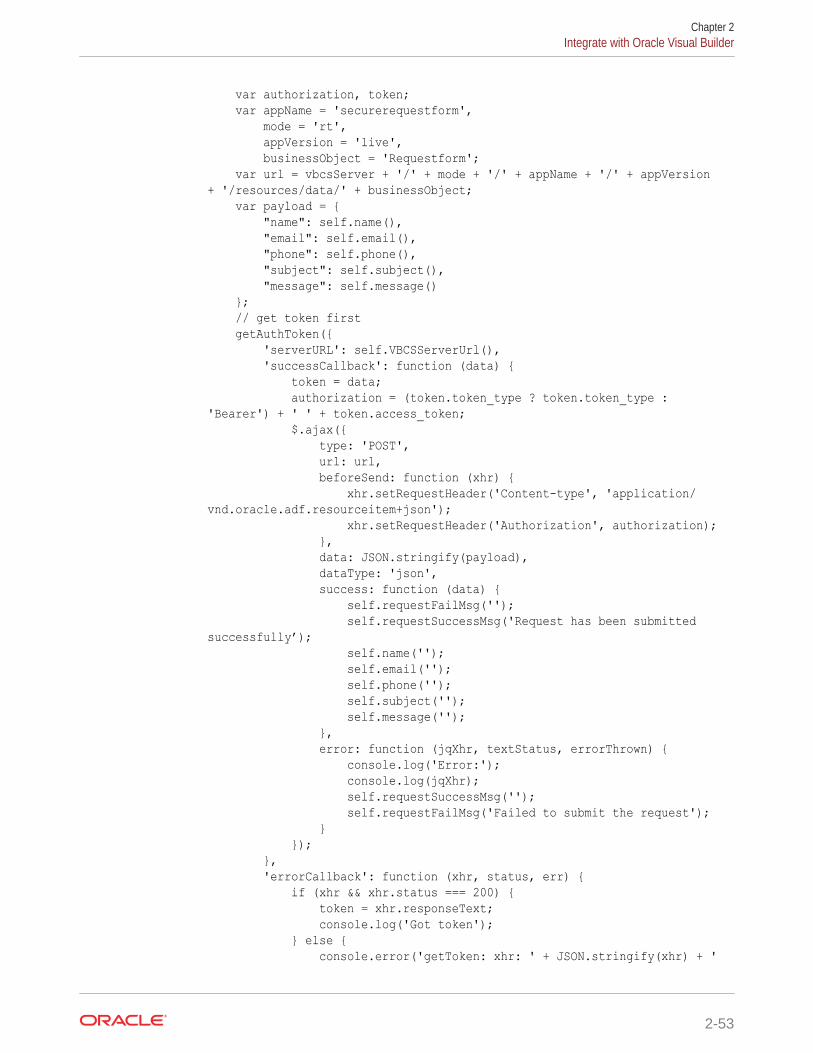
var authorization, token; var appName = 'securerequestform', mode = 'rt', appVersion = 'live', businessObject = 'Requestform'; var url = vbcsServer + '/' + mode + '/' + appName + '/' + appVersion + '/resources/data/' + businessObject; var payload = { "name": self.name(), "email": self.email(), "phone": self.phone(), "subject": self.subject(), "message": self.message() }; // get token first getAuthToken({ 'serverURL': self.VBCSServerUrl(), 'successCallback': function (data) { token = data; authorization = (token.token_type ? token.token_type : 'Bearer') + ' ' + token.access_token; $.ajax({ type: 'POST', url: url, beforeSend: function (xhr) { xhr.setRequestHeader('Content-type', 'application/vnd.oracle.adf.resourceitem+json'); xhr.setRequestHeader('Authorization', authorization); }, data: JSON.stringify(payload), dataType: 'json', success: function (data) { self.requestFailMsg(''); self.requestSuccessMsg('Request has been submitted successfully’); self.name(''); self.email(''); self.phone(''); self.subject(''); self.message(''); }, error: function (jqXhr, textStatus, errorThrown) { console.log('Error:'); console.log(jqXhr); self.requestSuccessMsg(''); self.requestFailMsg('Failed to submit the request'); } }); }, 'errorCallback': function (xhr, status, err) { if (xhr && xhr.status === 200) { token = xhr.responseText; console.log('Got token'); } else { console.error('getToken: xhr: ' + JSON.stringify(xhr) + '
Chapter 2Integrate with Oracle Visual Builder
2-53
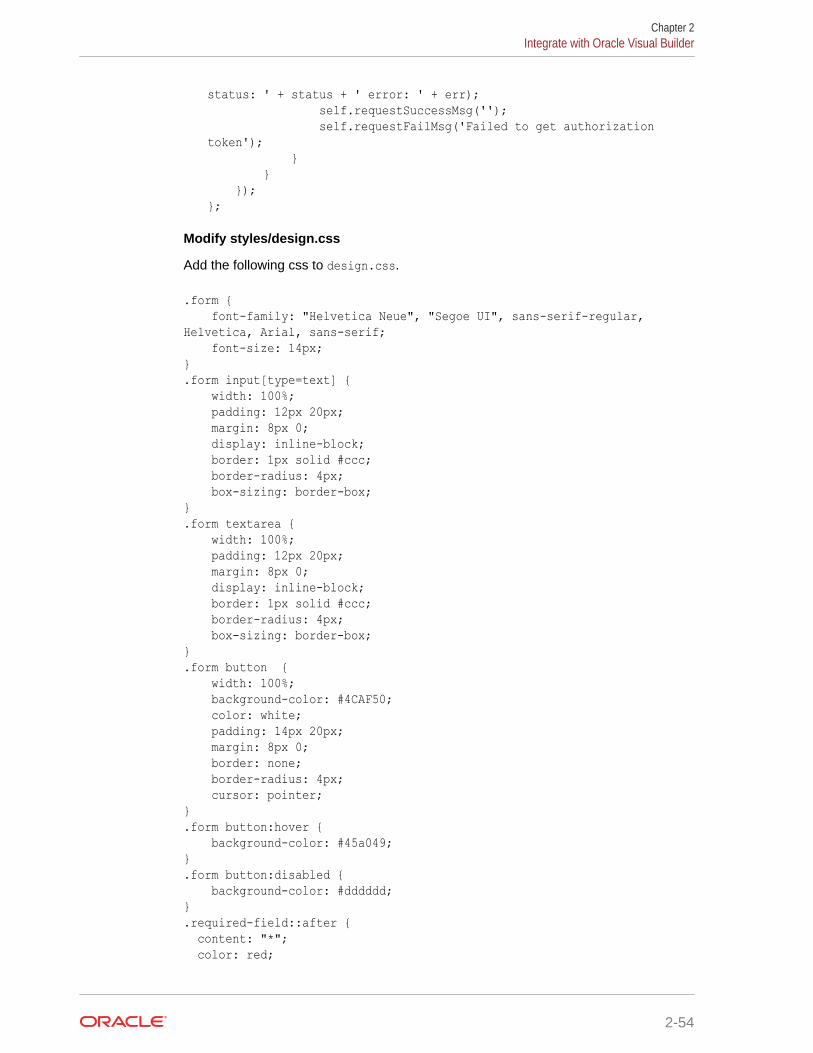
status: ' + status + ' error: ' + err); self.requestSuccessMsg(''); self.requestFailMsg('Failed to get authorization token'); } } });};
Modify styles/design.css
Add the following css to design.css.
.form { font-family: "Helvetica Neue", "Segoe UI", sans-serif-regular, Helvetica, Arial, sans-serif; font-size: 14px;}.form input[type=text] { width: 100%; padding: 12px 20px; margin: 8px 0; display: inline-block; border: 1px solid #ccc; border-radius: 4px; box-sizing: border-box;}.form textarea { width: 100%; padding: 12px 20px; margin: 8px 0; display: inline-block; border: 1px solid #ccc; border-radius: 4px; box-sizing: border-box;}.form button { width: 100%; background-color: #4CAF50; color: white; padding: 14px 20px; margin: 8px 0; border: none; border-radius: 4px; cursor: pointer;}.form button:hover { background-color: #45a049;}.form button:disabled { background-color: #dddddd;}.required-field::after { content: "*"; color: red;
Chapter 2Integrate with Oracle Visual Builder
2-54
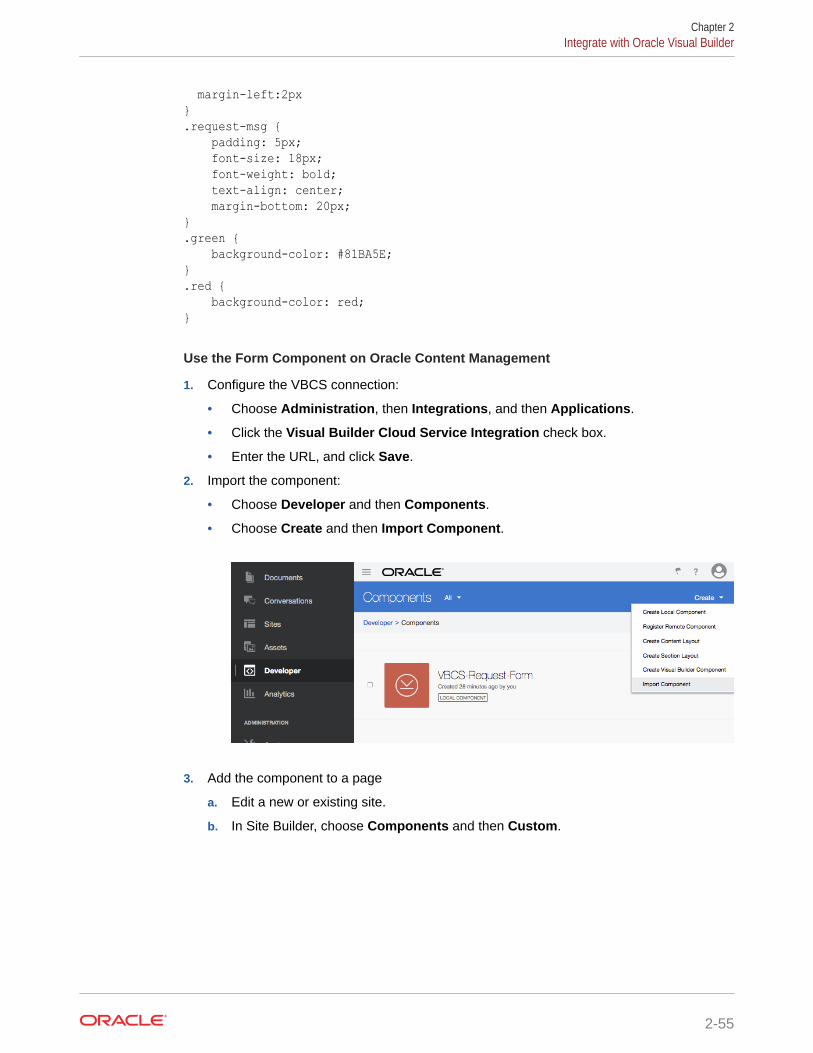
margin-left:2px}.request-msg { padding: 5px; font-size: 18px; font-weight: bold; text-align: center; margin-bottom: 20px;}.green { background-color: #81BA5E;}.red { background-color: red;}
Use the Form Component on Oracle Content Management
1. Configure the VBCS connection:
• Choose Administration, then Integrations, and then Applications.
• Click the Visual Builder Cloud Service Integration check box.
• Enter the URL, and click Save.
2. Import the component:
• Choose Developer and then Components.
• Choose Create and then Import Component.
3. Add the component to a page
a. Edit a new or existing site.
b. In Site Builder, choose Components and then Custom.
Chapter 2Integrate with Oracle Visual Builder
2-55
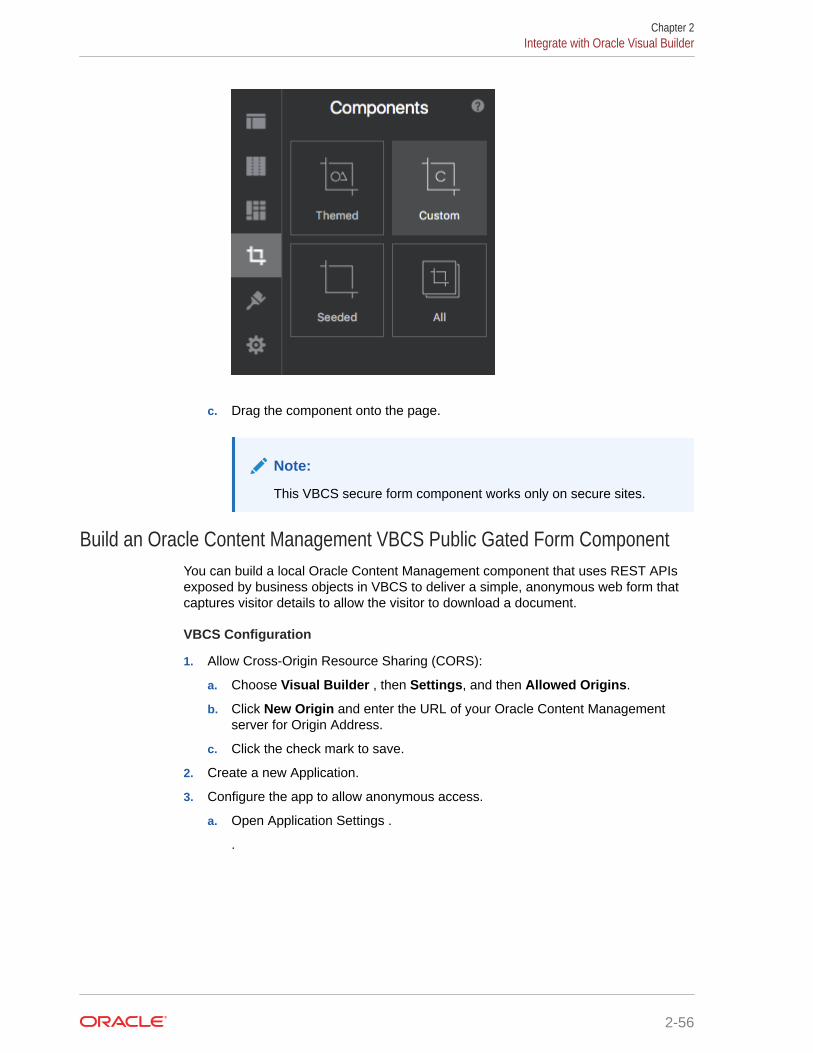
c. Drag the component onto the page.
Note:
This VBCS secure form component works only on secure sites.
Build an Oracle Content Management VBCS Public Gated Form ComponentYou can build a local Oracle Content Management component that uses REST APIsexposed by business objects in VBCS to deliver a simple, anonymous web form thatcaptures visitor details to allow the visitor to download a document.
VBCS Configuration
1. Allow Cross-Origin Resource Sharing (CORS):
a. Choose Visual Builder , then Settings, and then Allowed Origins.
b. Click New Origin and enter the URL of your Oracle Content Managementserver for Origin Address.
c. Click the check mark to save.
2. Create a new Application.
3. Configure the app to allow anonymous access.
a. Open Application Settings .
.
Chapter 2Integrate with Oracle Visual Builder
2-56
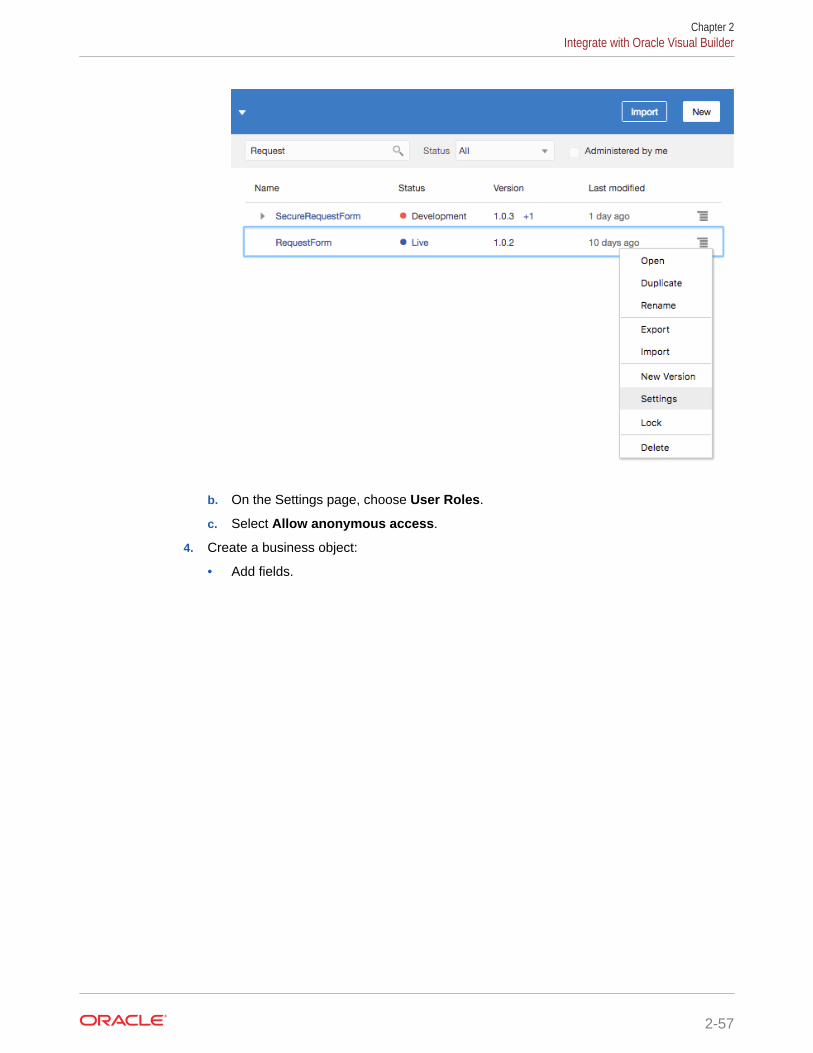
b. On the Settings page, choose User Roles.
c. Select Allow anonymous access.
4. Create a business object:
• Add fields.
Chapter 2Integrate with Oracle Visual Builder
2-57
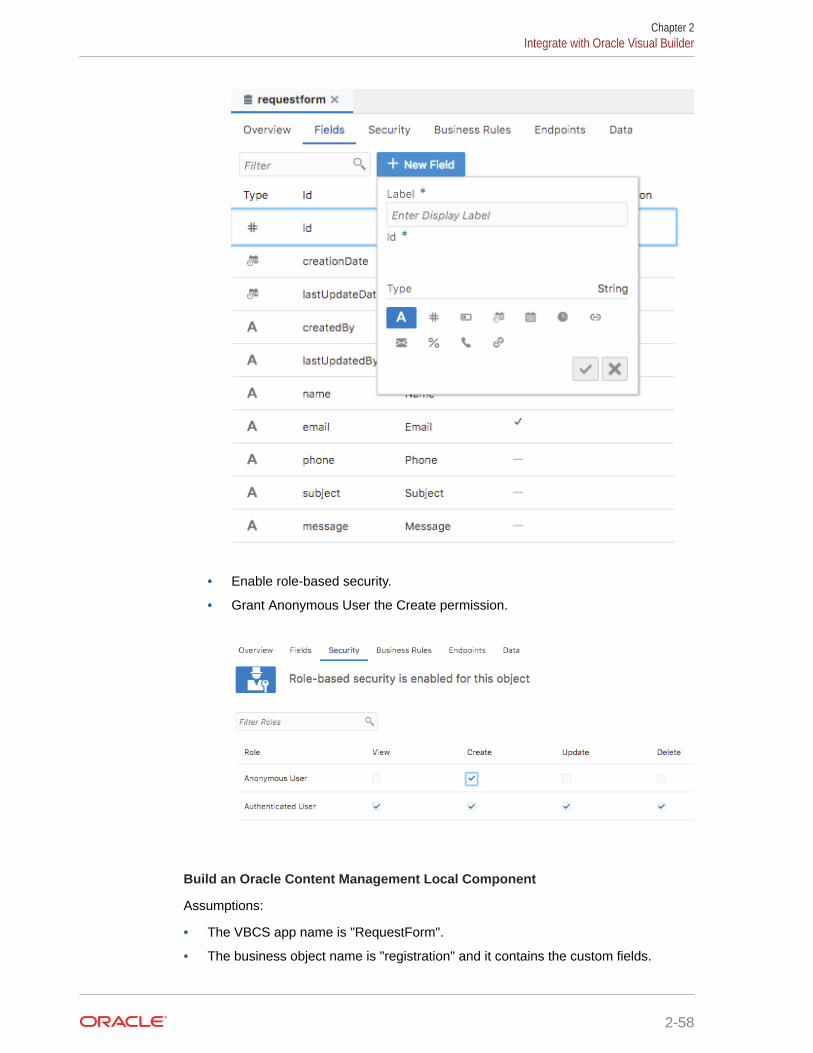
• Enable role-based security.
• Grant Anonymous User the Create permission.
Build an Oracle Content Management Local Component
Assumptions:
• The VBCS app name is "RequestForm".
• The business object name is "registration" and it contains the custom fields.
Chapter 2Integrate with Oracle Visual Builder
2-58
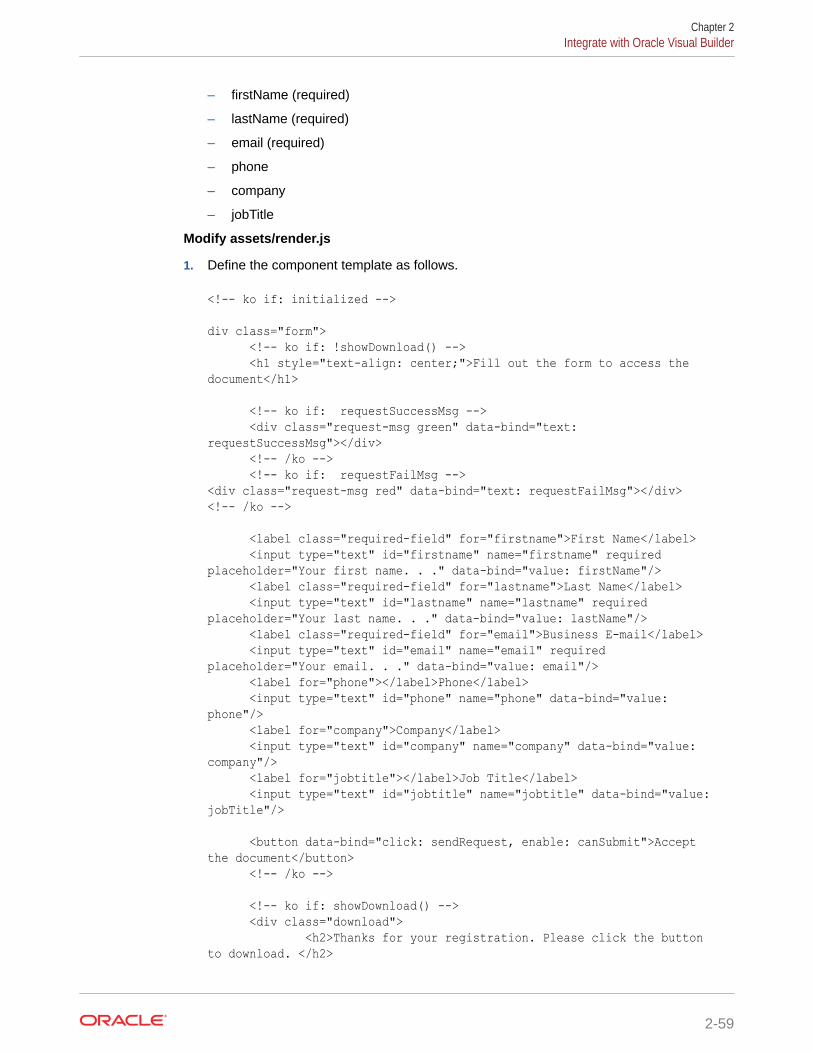
– firstName (required)
– lastName (required)
– email (required)
– phone
– company
– jobTitle
Modify assets/render.js
1. Define the component template as follows.
<!-- ko if: initialized -->
div class="form"> <!-- ko if: !showDownload() --> <h1 style="text-align: center;">Fill out the form to access the document</h1>
<!-- ko if: requestSuccessMsg --> <div class="request-msg green" data-bind="text: requestSuccessMsg"></div> <!-- /ko --> <!-- ko if: requestFailMsg --><div class="request-msg red" data-bind="text: requestFailMsg"></div><!-- /ko -->
<label class="required-field" for="firstname">First Name</label> <input type="text" id="firstname" name="firstname" required placeholder="Your first name. . ." data-bind="value: firstName"/> <label class="required-field" for="lastname">Last Name</label> <input type="text" id="lastname" name="lastname" required placeholder="Your last name. . ." data-bind="value: lastName"/> <label class="required-field" for="email">Business E-mail</label> <input type="text" id="email" name="email" required placeholder="Your email. . ." data-bind="value: email"/> <label for="phone"></label>Phone</label> <input type="text" id="phone" name="phone" data-bind="value: phone"/> <label for="company">Company</label> <input type="text" id="company" name="company" data-bind="value: company"/> <label for="jobtitle"></label>Job Title</label> <input type="text" id="jobtitle" name="jobtitle" data-bind="value: jobTitle"/>
<button data-bind="click: sendRequest, enable: canSubmit">Accept the document</button> <!-- /ko -->
<!-- ko if: showDownload() --> <div class="download"> <h2>Thanks for your registration. Please click the button to download. </h2>
Chapter 2Integrate with Oracle Visual Builder
2-59
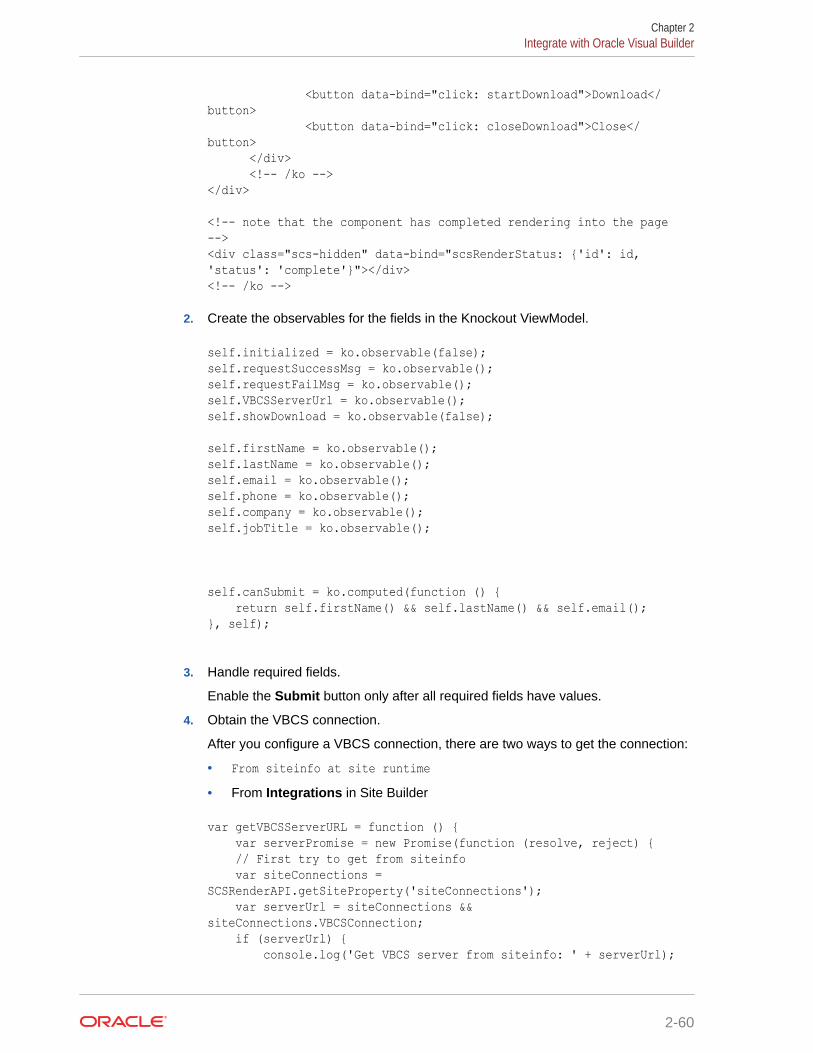
<button data-bind="click: startDownload">Download</button> <button data-bind="click: closeDownload">Close</button> </div> <!-- /ko --></div>
<!-- note that the component has completed rendering into the page --><div class="scs-hidden" data-bind="scsRenderStatus: {'id': id, 'status': 'complete'}"></div><!-- /ko -->
2. Create the observables for the fields in the Knockout ViewModel.
self.initialized = ko.observable(false);self.requestSuccessMsg = ko.observable();self.requestFailMsg = ko.observable();self.VBCSServerUrl = ko.observable();self.showDownload = ko.observable(false);
self.firstName = ko.observable();self.lastName = ko.observable();self.email = ko.observable();self.phone = ko.observable();self.company = ko.observable();self.jobTitle = ko.observable();
self.canSubmit = ko.computed(function () { return self.firstName() && self.lastName() && self.email();}, self);
3. Handle required fields.
Enable the Submit button only after all required fields have values.
4. Obtain the VBCS connection.
After you configure a VBCS connection, there are two ways to get the connection:
• From siteinfo at site runtime• From Integrations in Site Builder
var getVBCSServerURL = function () { var serverPromise = new Promise(function (resolve, reject) { // First try to get from siteinfo var siteConnections = SCSRenderAPI.getSiteProperty('siteConnections'); var serverUrl = siteConnections && siteConnections.VBCSConnection; if (serverUrl) { console.log('Get VBCS server from siteinfo: ' + serverUrl);
Chapter 2Integrate with Oracle Visual Builder
2-60
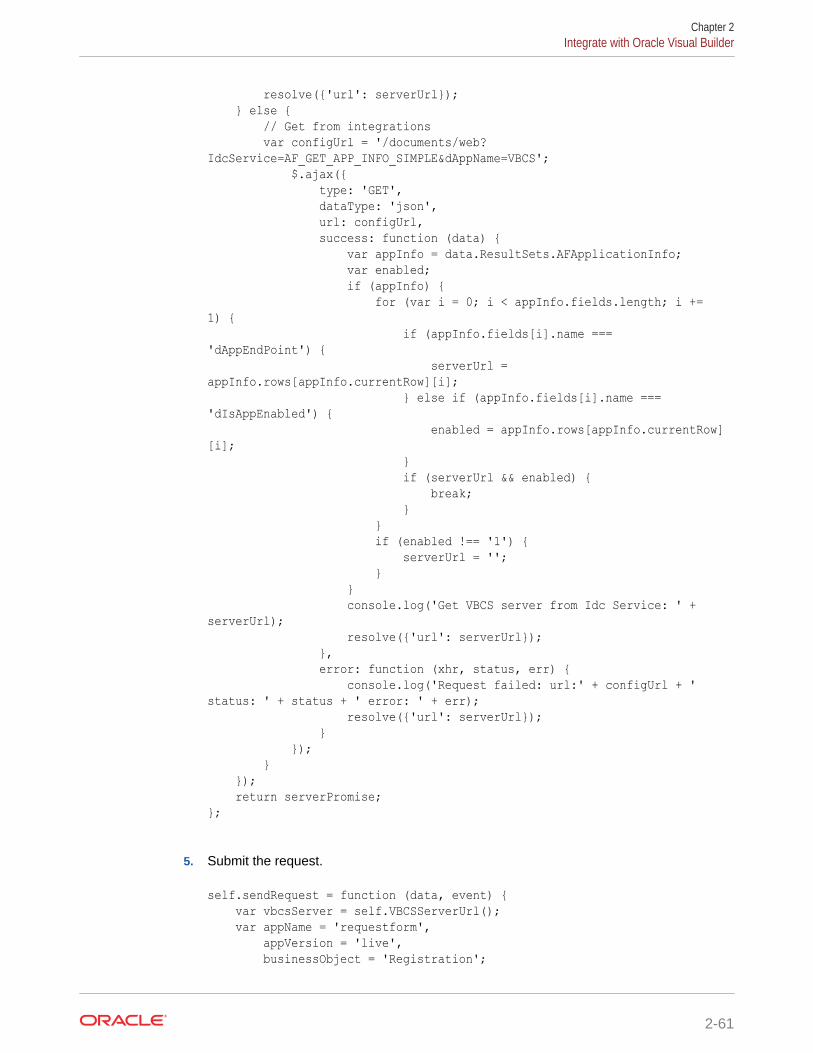
resolve({'url': serverUrl}); } else { // Get from integrations var configUrl = '/documents/web?IdcService=AF_GET_APP_INFO_SIMPLE&dAppName=VBCS'; $.ajax({ type: 'GET', dataType: 'json', url: configUrl, success: function (data) { var appInfo = data.ResultSets.AFApplicationInfo; var enabled; if (appInfo) { for (var i = 0; i < appInfo.fields.length; i += 1) { if (appInfo.fields[i].name === 'dAppEndPoint') { serverUrl = appInfo.rows[appInfo.currentRow][i]; } else if (appInfo.fields[i].name === 'dIsAppEnabled') { enabled = appInfo.rows[appInfo.currentRow][i]; } if (serverUrl && enabled) { break; } } if (enabled !== '1') { serverUrl = ''; } } console.log('Get VBCS server from Idc Service: ' + serverUrl); resolve({'url': serverUrl}); }, error: function (xhr, status, err) { console.log('Request failed: url:' + configUrl + ' status: ' + status + ' error: ' + err); resolve({'url': serverUrl}); } }); } }); return serverPromise;};
5. Submit the request.
self.sendRequest = function (data, event) { var vbcsServer = self.VBCSServerUrl(); var appName = 'requestform', appVersion = 'live', businessObject = 'Registration';
Chapter 2Integrate with Oracle Visual Builder
2-61
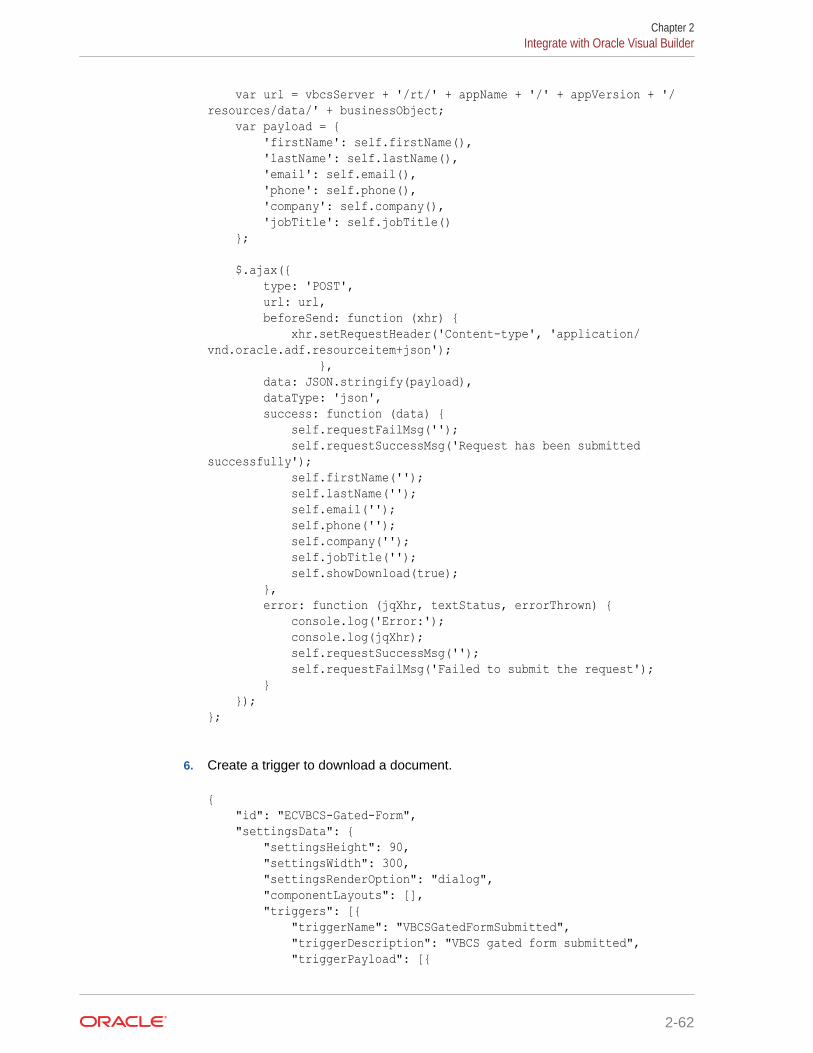
var url = vbcsServer + '/rt/' + appName + '/' + appVersion + '/resources/data/' + businessObject; var payload = { 'firstName': self.firstName(), 'lastName': self.lastName(), 'email': self.email(), 'phone': self.phone(), 'company': self.company(), 'jobTitle': self.jobTitle() };
$.ajax({ type: 'POST', url: url, beforeSend: function (xhr) { xhr.setRequestHeader('Content-type', 'application/vnd.oracle.adf.resourceitem+json'); }, data: JSON.stringify(payload), dataType: 'json', success: function (data) { self.requestFailMsg(''); self.requestSuccessMsg('Request has been submitted successfully'); self.firstName(''); self.lastName(''); self.email(''); self.phone(''); self.company(''); self.jobTitle(''); self.showDownload(true); }, error: function (jqXhr, textStatus, errorThrown) { console.log('Error:'); console.log(jqXhr); self.requestSuccessMsg(''); self.requestFailMsg('Failed to submit the request'); } });};
6. Create a trigger to download a document.
{ "id": "ECVBCS-Gated-Form", "settingsData": { "settingsHeight": 90, "settingsWidth": 300, "settingsRenderOption": "dialog", "componentLayouts": [], "triggers": [{ "triggerName": "VBCSGatedFormSubmitted", "triggerDescription": "VBCS gated form submitted", "triggerPayload": [{
Chapter 2Integrate with Oracle Visual Builder
2-62

"name": "payloadData", "displayName": "Document URL" }] }], "actions": [] },}
Register the trigger in appinfo.json.
self.raiseTrigger = function (triggerName) { SitesSDK.publish(SitesSDK.MESSAGE_TYPES.TRIGGER_ACTIONS, { 'triggerName': triggerName, 'triggerPayload': { 'payloadData': 'https://docs.oracle.com/en/cloud/paas/content-cloud/developer/developing-oracle-content-management-cloud.pdf' } });};
self.startDownload = function (data, event) { console.log('Raise trigger: VBCSGatedFormSubmitted'); self.raiseTrigger("VBCSGatedFormSubmitted"); // matches appinfo.json};
• Raise the trigger in render.js.
\
Modify styles/design.css
Add the following css to design.css.
.form { font-family: "Helvetica Neue", "Segoe UI", sans-serif-regular, Helvetica, Arial, sans-serif; font-size: 14px;}.form input[type=text] { width: 100%; padding: 12px 20px; margin: 8px 0; display: inline-block; border: 1px solid #ccc; border-radius: 4px; box-sizing: border-box;}.form textarea { width: 100%; padding: 12px 20px; margin: 8px 0; display: inline-block; border: 1px solid #ccc; border-radius: 4px; box-sizing: border-box;
Chapter 2Integrate with Oracle Visual Builder
2-63
}.form button { width: 100%; background-color: #4CAF50; color: white; padding: 14px 20px; margin: 8px 0; border: none; border-radius: 4px; cursor: pointer;}.form button:hover { background-color: #45a049;}.form button:disabled { background-color: #dddddd;}.required-field::after { content: "*"; color: red; margin-left:2px}.request-msg { padding: 5px; font-size: 18px; font-weight: bold; text-align: center; margin-bottom: 20px;}.green { background-color: #81BA5E;}.red { background-color: red;}
Use the Form Component on Oracle Content Management
1. Configure the VBCS connection:
• Choose Administration, then Integrations, and then Applications.
• Click the Visual Builder Cloud Service Integration check box.
• Enter the URL, and click Save.
2. Import the component:
• Choose Developer and then Components.
• Choose Create and then Import Component.
Chapter 2Integrate with Oracle Visual Builder
2-64
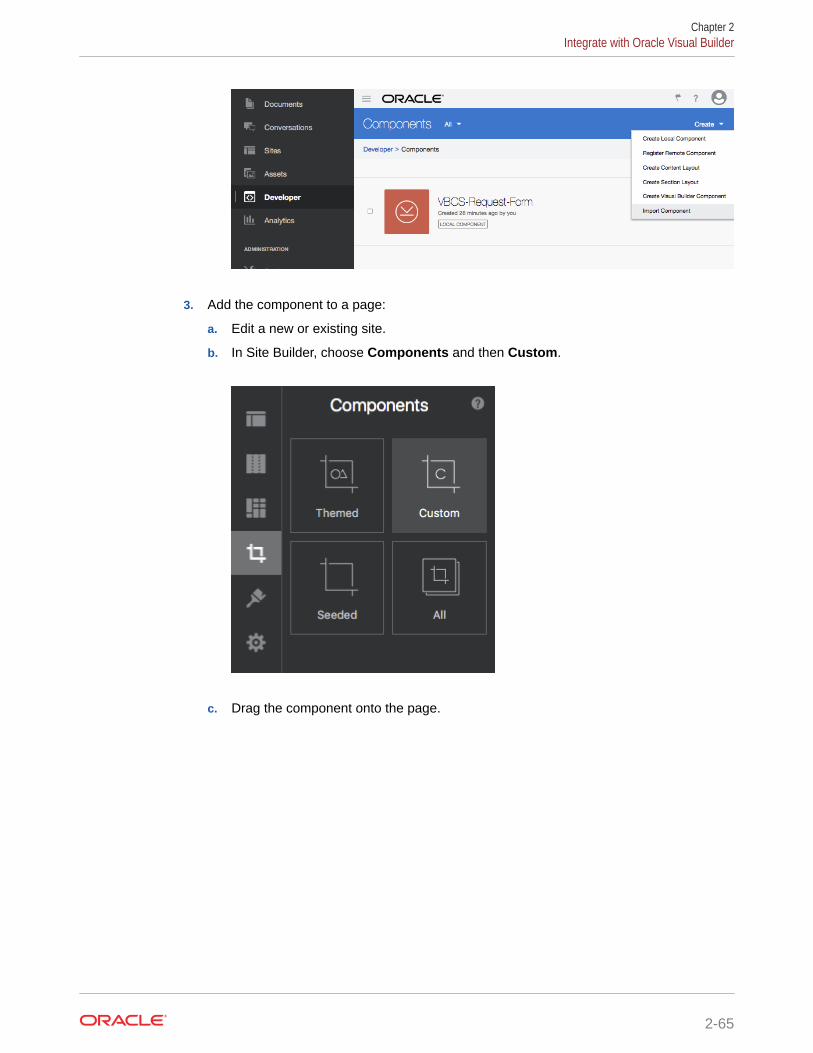
3. Add the component to a page:
a. Edit a new or existing site.
b. In Site Builder, choose Components and then Custom.
c. Drag the component onto the page.
Chapter 2Integrate with Oracle Visual Builder
2-65
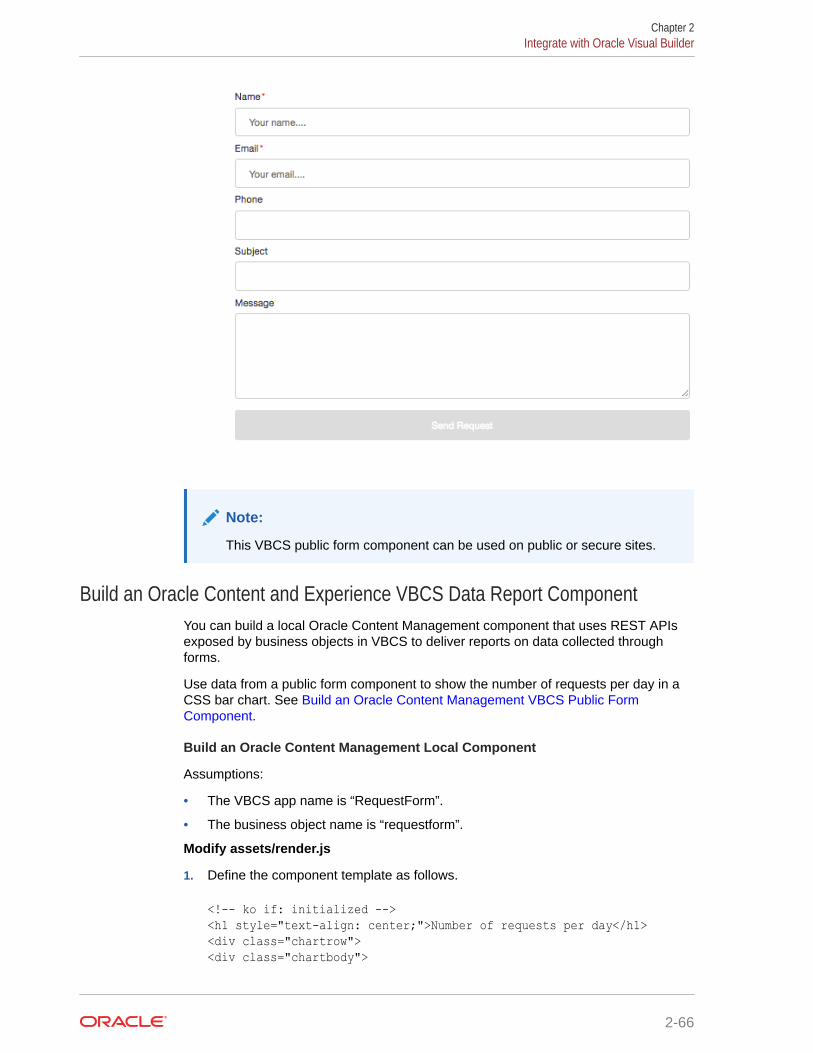
Note:
This VBCS public form component can be used on public or secure sites.
Build an Oracle Content and Experience VBCS Data Report ComponentYou can build a local Oracle Content Management component that uses REST APIsexposed by business objects in VBCS to deliver reports on data collected throughforms.
Use data from a public form component to show the number of requests per day in aCSS bar chart. See Build an Oracle Content Management VBCS Public FormComponent.
Build an Oracle Content Management Local Component
Assumptions:
• The VBCS app name is “RequestForm”.
• The business object name is “requestform”.
Modify assets/render.js
1. Define the component template as follows.
<!-- ko if: initialized --><h1 style="text-align: center;">Number of requests per day</h1><div class="chartrow"><div class="chartbody">
Chapter 2Integrate with Oracle Visual Builder
2-66
<div class="chartbody"> <table id="q-graph"> <tbody data-bind="foreach: requests"> <tr class="qtr" data-bind="css: barcss"> <td class="day bar" data-bind="style: {height: height}"> <p><span data-bind="text: value"></span></p> </td> </tr> </tbody> </table>
<div id="ticks" data-bind="foreach: ticks"> <div class="tick" style="height: 59px;"> <p><span data-bind="text: value"></span></p> </div> </div> </div> <div class="chartlabel"> <div class="labelrow"> <div class="colorindex sunday"></div> <span>Sunday</span> </div> <div class="labelrow"> <div class="colorindex monday"></div> <span>Monday</span> </div> <div class="labelrow"> <div class="colorindex tuesday"></div> <span>Tuesday</span> </div> <div class="labelrow"> <div class="colorindex wednesday"></div> <span>Wednesday</span> </div> <div class="labelrow"> <div class="colorindex thursday"></div> <span>Thursday</span> </div> <div class="labelrow"> <div class="colorindex friday"></div> <span>Friday</span> </div> <div class="labelrow"> <div class="colorindex saturday"></div> <span>Saturday</span> </div> </div></div><!-- note that the component has completed rendering into the page --><div class="scs-hidden" data-bind="scsRenderStatus: {'id': id, 'status': 'complete'}"></div><!-- /ko -->
Chapter 2Integrate with Oracle Visual Builder
2-67
2. Create the observables for the fields in the Knockout ViewModel.
self.initialized = ko.observable(false);self.VBCSServerUrl = ko.observable();
self.requests = ko.observableArray();self.ticks = ko.observableArray(); // Get VBCS servervar serverPromise = getVBCSServerURL();serverPromise.then(function (result) { self.VBCSServerUrl(result.url); self.initialized(true); self.getRequests();});
3. Obtain the VBCS connection.
See Build an Oracle Content Management VBCS Public Form Component.
4. Get an Authorization Token.
Requirement: Oracle Content Management and VBCS are deployed in the sameidentity domain. See Build an Oracle Content Management VBCS Secure FormComponent.
5. Get requests.
Use a business object endpoint:
/Requestform
self.getRequests = function () { var vbcsServer = self.VBCSServerUrl(); var authorization, token; var appName = 'requestform', mode = 'rt', appVersion = 'live' businessObject = 'Requestform'; var url = vbcsServer + '/' + mode + '/' + appName + '/' + appVersion + '/resources/data/' + businessObject;
// get token first getAuthToken({ 'serverURL': self.VBCSServerUrl(), successCallback': function (data) { token = data; authorization = (token.token_type ? token.token_type : 'Bearer') + ' ' + token.access_token; url = url + '?limit=999&orderBy=creationDate:desc'; $.ajax({ type: 'GET', url: url, beforeSend: function (xhr) { xhr.setRequestHeader('Authorization', authorization);
Chapter 2Integrate with Oracle Visual Builder
2-68
}, success: function (data) { if (data && data.count > 0) { self.showChart(data.items); } }, error: function (jqXhr, textStatus, errorThrown) { console.log('Error:'); console.log(jqXhr); } }); }, 'errorCallback': function (xhr, status, err) { if (xhr && xhr.status === 200) { token = xhr.responseText; console.log('Got token'); } else { console.error('getToken: xhr: ' + JSON.stringify(xhr) + ' status: ' + status + ' error: ' + err); } } });};
6. Set up chart data.
self.showChart = function (items) { var weekDayCounts = [0, 0, 0, 0, 0, 0, 0]; var weekDayNames = ['Sunday', 'Monday', 'Tuesday', 'Wednesday', 'Thursday', 'Friday', 'Saturday']; for(var i = 0; i < items.length; i++) { var d = new Date(items[i].creationDate); var day = d.getDay(); if (day >= 0 && day < 7) { weekDayCounts[day] = weekDayCounts[day] + 1; } } var max = 0; var results = []; for(var i = 0; i < weekDayCounts.length; i++) { if (max < weekDayCounts[i]) { max = weekDayCounts[i]; } } var lines = 7, buckets = 5; var gap = Math.round(max / buckets); var top = gap * (lines - 1); if (max > top) { gap += 1; } var ticks = []; for(var i = 0; i < lines; i++) { ticks[i] = { value: i * gap
Chapter 2Integrate with Oracle Visual Builder
2-69
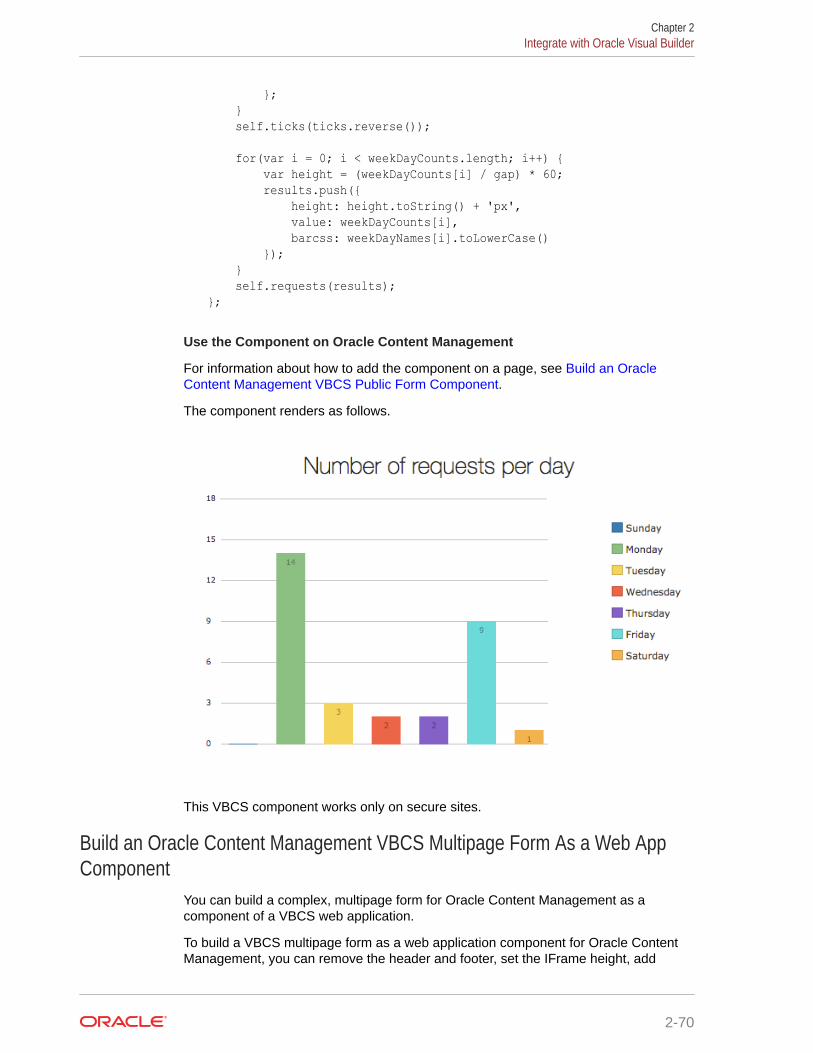
}; } self.ticks(ticks.reverse()); for(var i = 0; i < weekDayCounts.length; i++) { var height = (weekDayCounts[i] / gap) * 60; results.push({ height: height.toString() + 'px', value: weekDayCounts[i], barcss: weekDayNames[i].toLowerCase() }); } self.requests(results);};
Use the Component on Oracle Content Management
For information about how to add the component on a page, see Build an OracleContent Management VBCS Public Form Component.
The component renders as follows.
This VBCS component works only on secure sites.
Build an Oracle Content Management VBCS Multipage Form As a Web AppComponent
You can build a complex, multipage form for Oracle Content Management as acomponent of a VBCS web application.
To build a VBCS multipage form as a web application component for Oracle ContentManagement, you can remove the header and footer, set the IFrame height, add
Chapter 2Integrate with Oracle Visual Builder
2-70
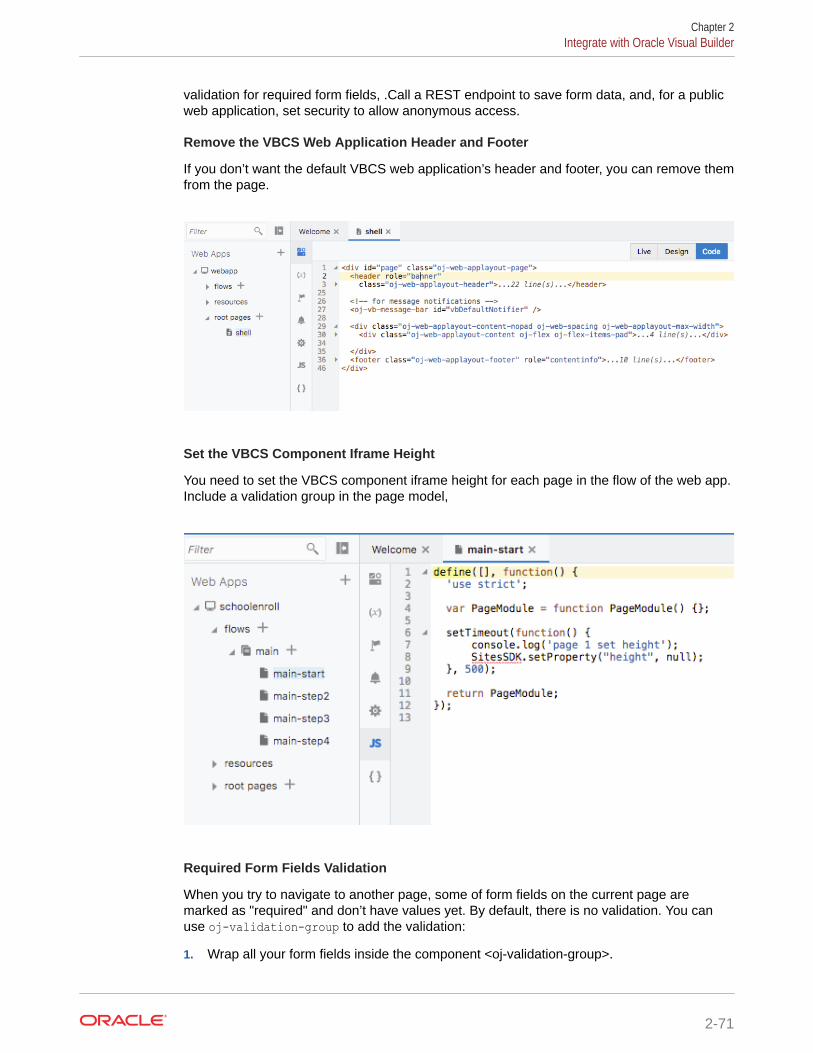
validation for required form fields, .Call a REST endpoint to save form data, and, for a publicweb application, set security to allow anonymous access.
Remove the VBCS Web Application Header and Footer
If you don’t want the default VBCS web application’s header and footer, you can remove themfrom the page.
Set the VBCS Component Iframe Height
You need to set the VBCS component iframe height for each page in the flow of the web app.Include a validation group in the page model,
Required Form Fields Validation
When you try to navigate to another page, some of form fields on the current page aremarked as "required" and don’t have values yet. By default, there is no validation. You canuse oj-validation-group to add the validation:
1. Wrap all your form fields inside the component <oj-validation-group>.
Chapter 2Integrate with Oracle Visual Builder
2-71
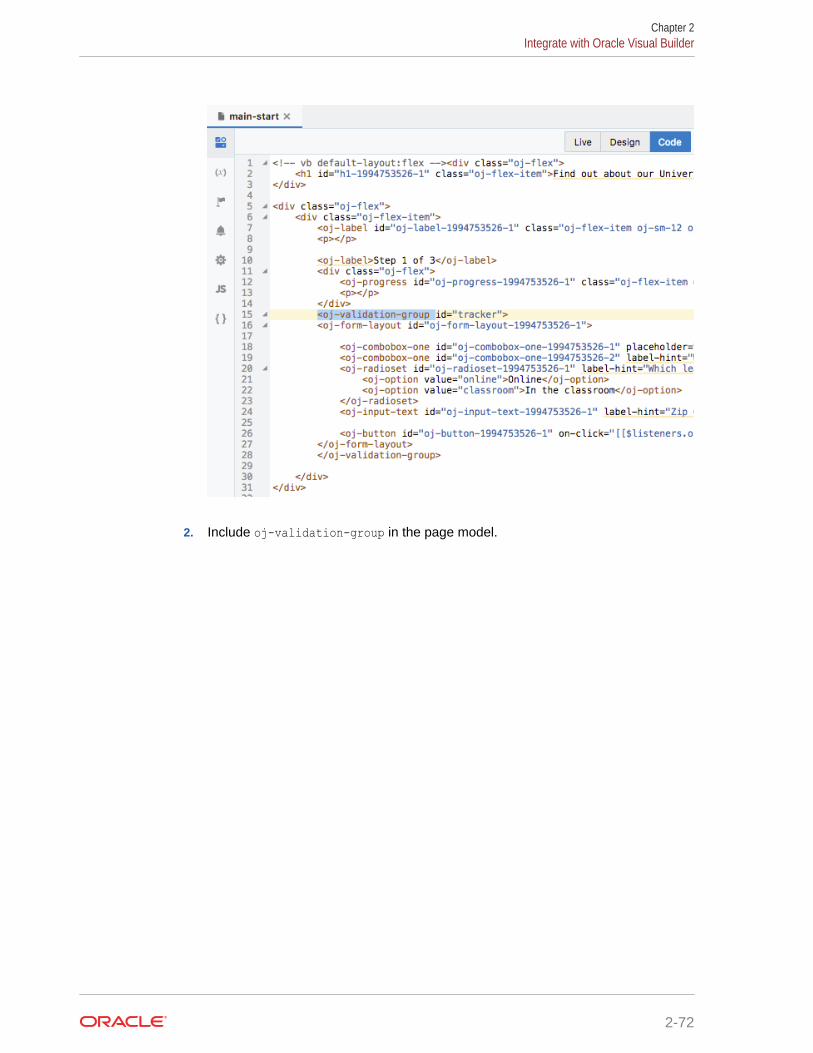
2. Include oj-validation-group in the page model.
Chapter 2Integrate with Oracle Visual Builder
2-72

3. Create a Flow module function .
Chapter 2Integrate with Oracle Visual Builder
2-73
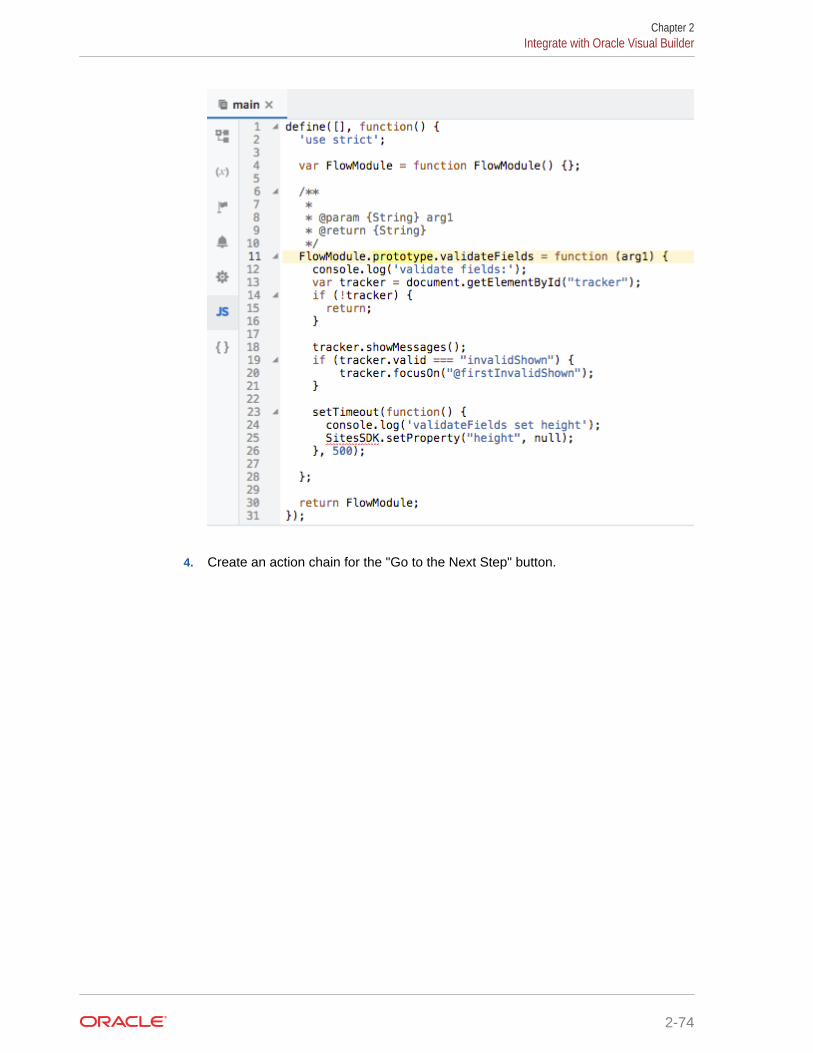
4. Create an action chain for the "Go to the Next Step" button.
Chapter 2Integrate with Oracle Visual Builder
2-74
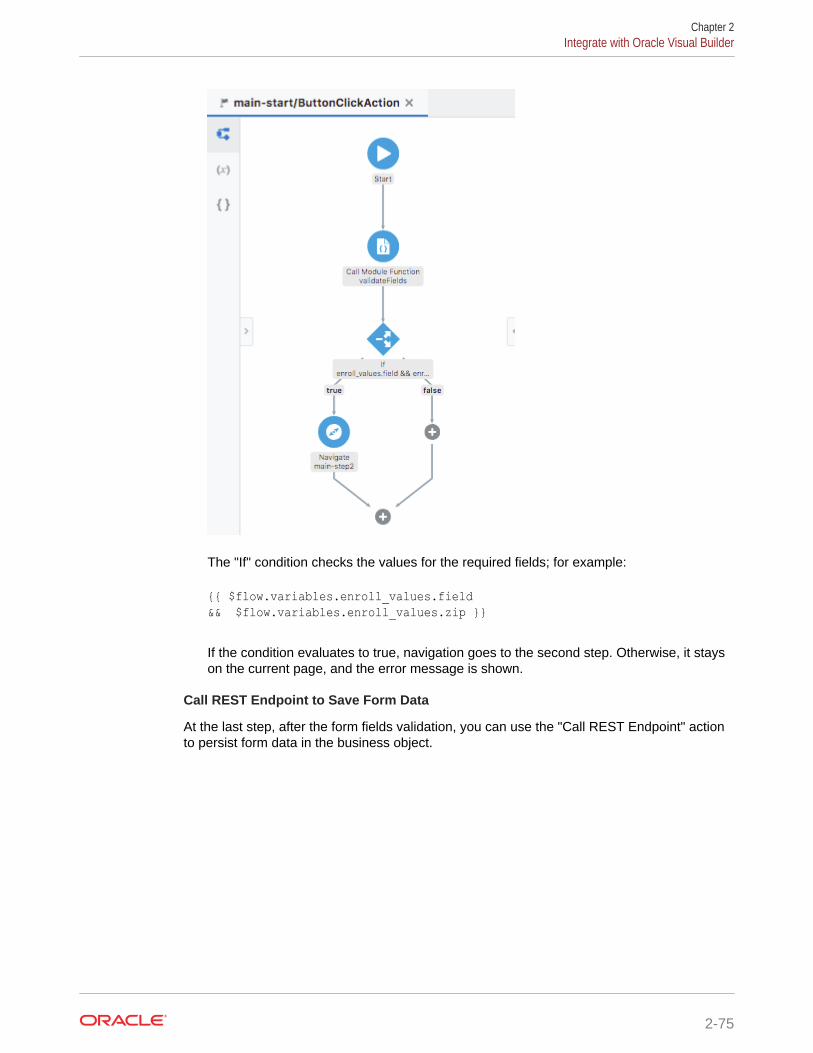
The "If" condition checks the values for the required fields; for example:
{{ $flow.variables.enroll_values.field && $flow.variables.enroll_values.zip }}
If the condition evaluates to true, navigation goes to the second step. Otherwise, it stayson the current page, and the error message is shown.
Call REST Endpoint to Save Form Data
At the last step, after the form fields validation, you can use the "Call REST Endpoint" actionto persist form data in the business object.
Chapter 2Integrate with Oracle Visual Builder
2-75
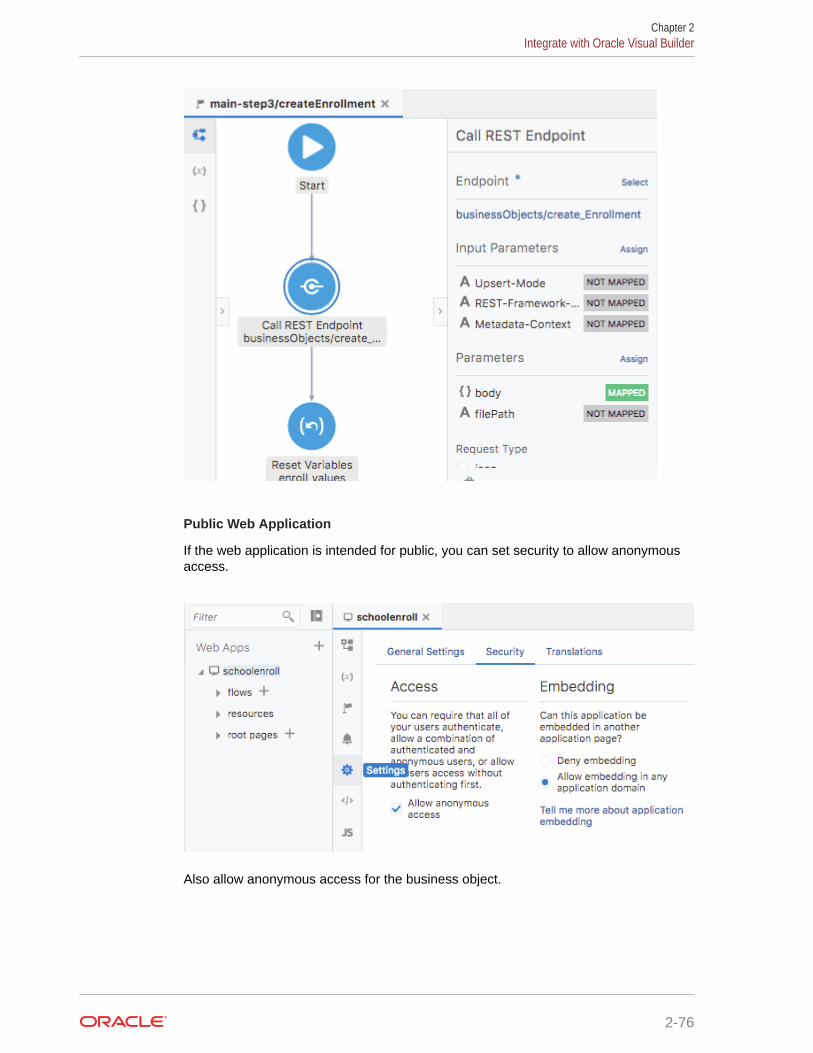
Public Web Application
If the web application is intended for public, you can set security to allow anonymousaccess.
Also allow anonymous access for the business object.
Chapter 2Integrate with Oracle Visual Builder
2-76
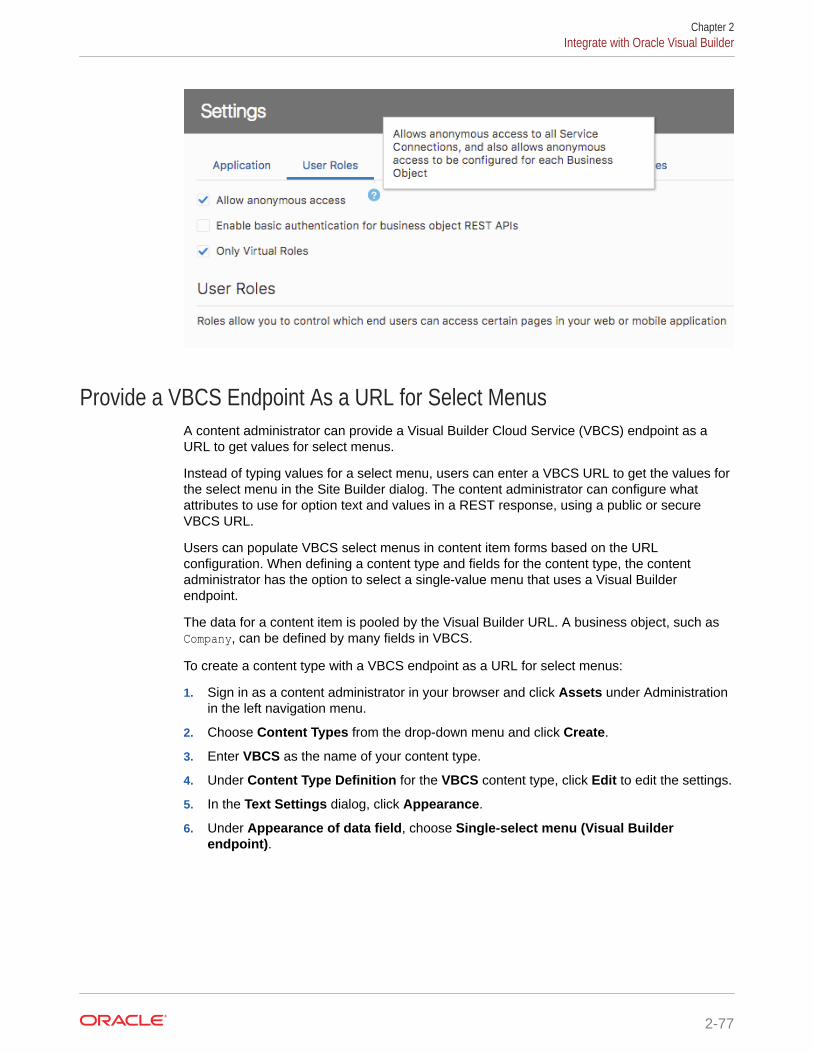
Provide a VBCS Endpoint As a URL for Select MenusA content administrator can provide a Visual Builder Cloud Service (VBCS) endpoint as aURL to get values for select menus.
Instead of typing values for a select menu, users can enter a VBCS URL to get the values forthe select menu in the Site Builder dialog. The content administrator can configure whatattributes to use for option text and values in a REST response, using a public or secureVBCS URL.
Users can populate VBCS select menus in content item forms based on the URLconfiguration. When defining a content type and fields for the content type, the contentadministrator has the option to select a single-value menu that uses a Visual Builderendpoint.
The data for a content item is pooled by the Visual Builder URL. A business object, such asCompany, can be defined by many fields in VBCS.
To create a content type with a VBCS endpoint as a URL for select menus:
1. Sign in as a content administrator in your browser and click Assets under Administrationin the left navigation menu.
2. Choose Content Types from the drop-down menu and click Create.
3. Enter VBCS as the name of your content type.
4. Under Content Type Definition for the VBCS content type, click Edit to edit the settings.
5. In the Text Settings dialog, click Appearance.
6. Under Appearance of data field, choose Single-select menu (Visual Builderendpoint).
Chapter 2Integrate with Oracle Visual Builder
2-77
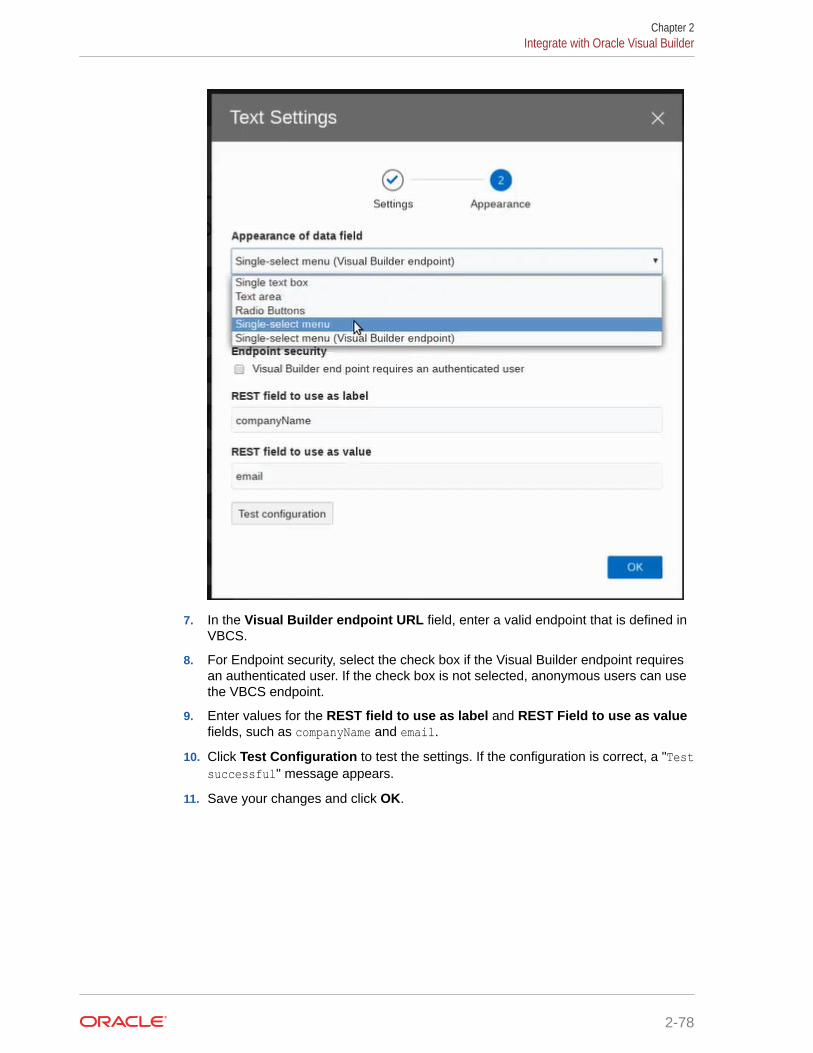
7. In the Visual Builder endpoint URL field, enter a valid endpoint that is defined inVBCS.
8. For Endpoint security, select the check box if the Visual Builder endpoint requiresan authenticated user. If the check box is not selected, anonymous users can usethe VBCS endpoint.
9. Enter values for the REST field to use as label and REST Field to use as valuefields, such as companyName and email.
10. Click Test Configuration to test the settings. If the configuration is correct, a "Testsuccessful" message appears.
11. Save your changes and click OK.
Chapter 2Integrate with Oracle Visual Builder
2-78
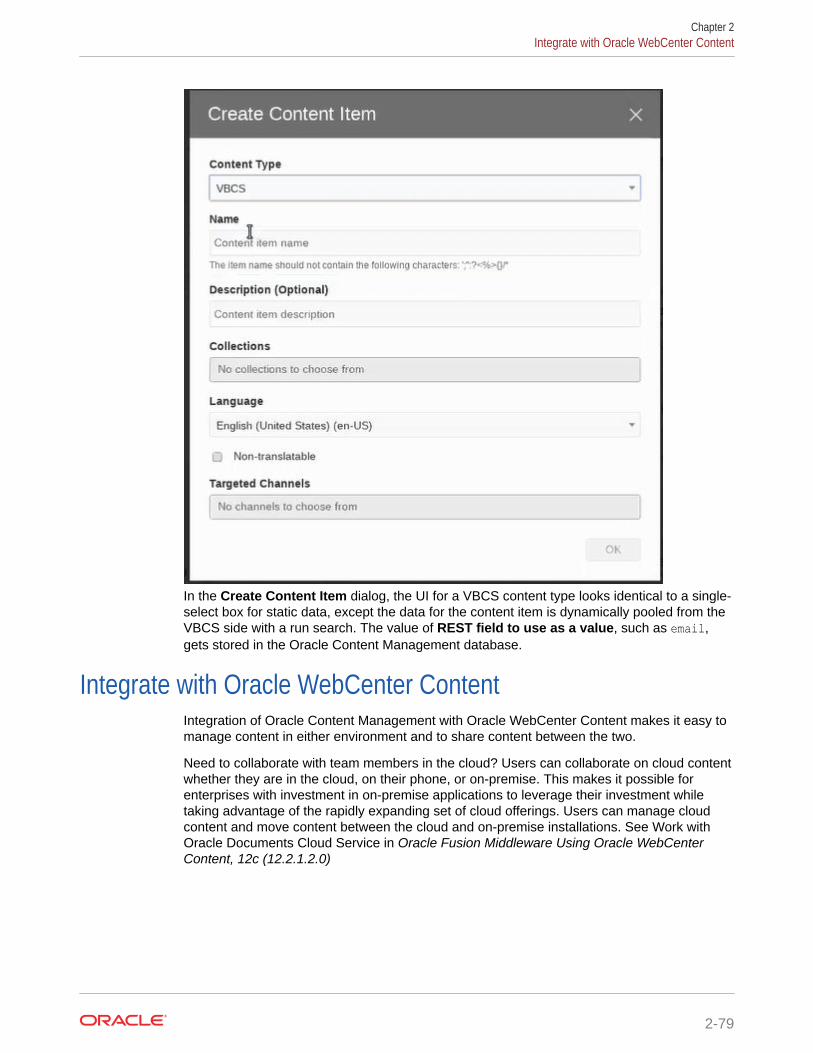
In the Create Content Item dialog, the UI for a VBCS content type looks identical to a single-select box for static data, except the data for the content item is dynamically pooled from theVBCS side with a run search. The value of REST field to use as a value, such as email,gets stored in the Oracle Content Management database.
Integrate with Oracle WebCenter ContentIntegration of Oracle Content Management with Oracle WebCenter Content makes it easy tomanage content in either environment and to share content between the two.
Need to collaborate with team members in the cloud? Users can collaborate on cloud contentwhether they are in the cloud, on their phone, or on-premise. This makes it possible forenterprises with investment in on-premise applications to leverage their investment whiletaking advantage of the rapidly expanding set of cloud offerings. Users can manage cloudcontent and move content between the cloud and on-premise installations. See Work withOracle Documents Cloud Service in Oracle Fusion Middleware Using Oracle WebCenterContent, 12c (12.2.1.2.0)
Chapter 2Integrate with Oracle WebCenter Content
2-79

When Oracle Content Management is enabled with Oracle WebCenter Content, youhave a truly comprehensive hybrid enterprise content management (ECM) integration,with a unified ECM infrastructure and security from a single vendor. It combinesanywhere access from the cloud with content retention and archiving from on-premiseinstallations.
Setting up the integration in Oracle WebCenter Content is as easy as 1–2–3:
• Enable the component
• Configure the server connection
• Configure the host name verifier
See Configure Document Cloud Service Integration Settings in Oracle FusionMiddleware Administering Oracle WebCenter Content, 12c (12.2.1.2.0)
Chapter 2Integrate with Oracle WebCenter Content
2-80
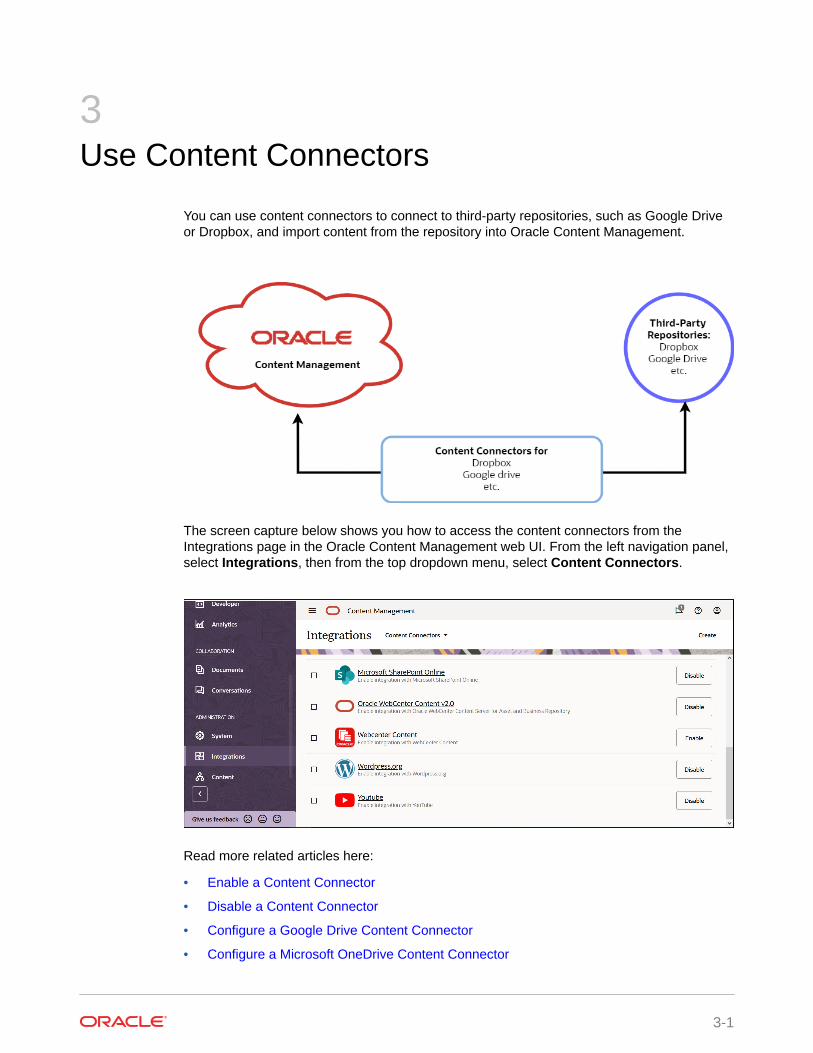
3Use Content Connectors
You can use content connectors to connect to third-party repositories, such as Google Driveor Dropbox, and import content from the repository into Oracle Content Management.
The screen capture below shows you how to access the content connectors from theIntegrations page in the Oracle Content Management web UI. From the left navigation panel,select Integrations, then from the top dropdown menu, select Content Connectors.
Read more related articles here:
• Enable a Content Connector
• Disable a Content Connector
• Configure a Google Drive Content Connector
• Configure a Microsoft OneDrive Content Connector
3-1
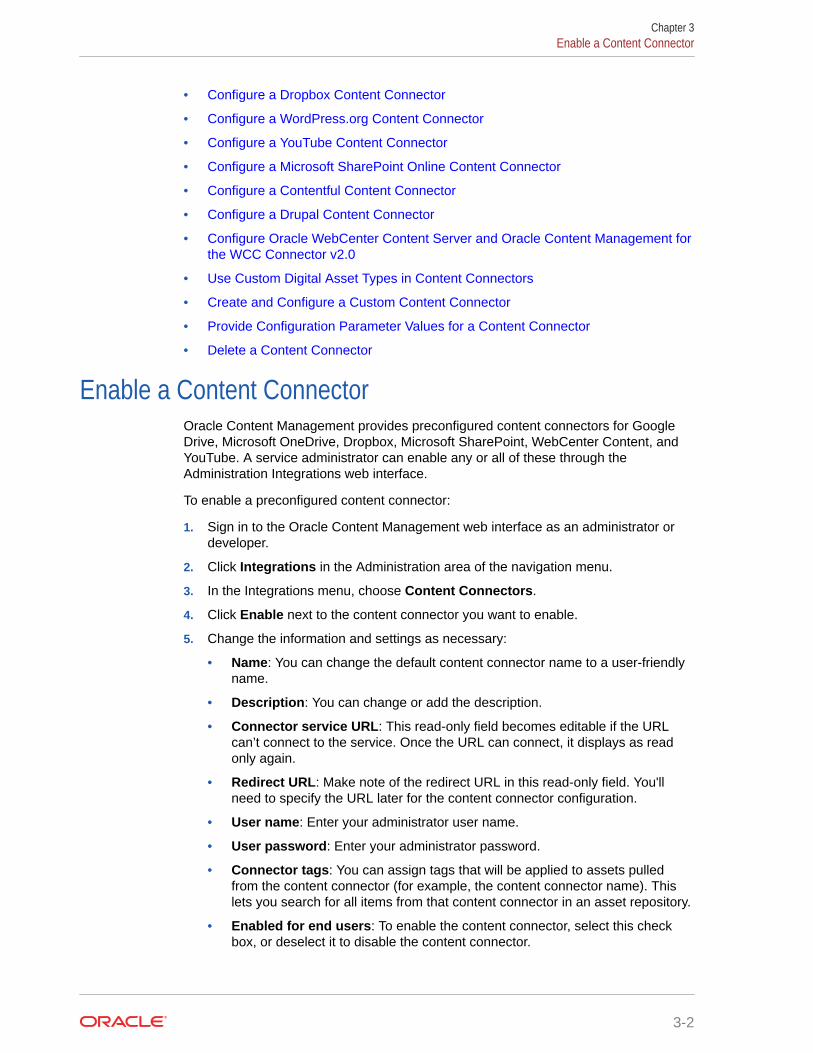
• Configure a Dropbox Content Connector
• Configure a WordPress.org Content Connector
• Configure a YouTube Content Connector
• Configure a Microsoft SharePoint Online Content Connector
• Configure a Contentful Content Connector
• Configure a Drupal Content Connector
• Configure Oracle WebCenter Content Server and Oracle Content Management forthe WCC Connector v2.0
• Use Custom Digital Asset Types in Content Connectors
• Create and Configure a Custom Content Connector
• Provide Configuration Parameter Values for a Content Connector
• Delete a Content Connector
Enable a Content ConnectorOracle Content Management provides preconfigured content connectors for GoogleDrive, Microsoft OneDrive, Dropbox, Microsoft SharePoint, WebCenter Content, andYouTube. A service administrator can enable any or all of these through theAdministration Integrations web interface.
To enable a preconfigured content connector:
1. Sign in to the Oracle Content Management web interface as an administrator ordeveloper.
2. Click Integrations in the Administration area of the navigation menu.
3. In the Integrations menu, choose Content Connectors.
4. Click Enable next to the content connector you want to enable.
5. Change the information and settings as necessary:
• Name: You can change the default content connector name to a user-friendlyname.
• Description: You can change or add the description.
• Connector service URL: This read-only field becomes editable if the URLcan’t connect to the service. Once the URL can connect, it displays as readonly again.
• Redirect URL: Make note of the redirect URL in this read-only field. You'llneed to specify the URL later for the content connector configuration.
• User name: Enter your administrator user name.
• User password: Enter your administrator password.
• Connector tags: You can assign tags that will be applied to assets pulledfrom the content connector (for example, the content connector name). Thislets you search for all items from that content connector in an asset repository.
• Enabled for end users: To enable the content connector, select this checkbox, or deselect it to disable the content connector.
Chapter 3Enable a Content Connector
3-2
6. Enter custom field values on the Additional Fields tab. How to get the values for thecustom fields varies, depending on the content connector:
• Configure a Google Drive Content Connector
• Configure a Dropbox Content Connector
• Configure a Microsoft OneDrive Content Connector
• Configure a YouTube Content Connector
• Configure a Microsoft SharePoint Online Content Connector
• Configure Oracle WebCenter Content Server and Oracle Content Management forthe WCC Connector v2.0
7. Click Save.
After a content connector is configured to connect to a third-party content provider, you canenable it by clicking Enable next to the connector on the Content Connectors page.
Disable a Content ConnectorA service administrator can use the connector framework to disable a content connector in anOracle Content Management instance at any time.
To disable a content connector:
1. Sign in to the Oracle Content Management web interface as an administrator ordeveloper.
2. Click Integrations in the Administration area of the navigation menu.
3. In the Integrations menu, choose Content Connectors.
4. Click Disable next to the content connector you want to disable.
After a content connector is disabled, it's no longer available on the Add From drop-downmenu on the Assets page, until it is enabled again. You can now click the Enable button toenable the content connector again.
Configure a Google Drive Content ConnectorAfter you configure and enable a Google Drive content connector, you can connect to GoogleDrive and pull required content from it into Oracle Content Management.
To configure a Google Drive content connector:
1. Get the Oracle Content Management host name and authorization URL details.
a. Sign in to Oracle Content Management as an Administrator or Developer.
b. Click Integrations in the Administration area of the navigation menu on the left.
c. In the Integrations menu, choose Content Connectors.
d. Click the check box next to the Google Drive content connector.
e. Click Create.
Chapter 3Disable a Content Connector
3-3
f. On the General tab, note the Redirect URL, which will be in this format:
https://<hostname>.<domainname>.com:<port>/documents/web/AR_COMPLETE_AUTHORIZATION
The Redirect URL field is truncated. Double-click the field to copy the value toyour clipboard.
2. Create a Google Drive app:
a. Go to https://console.developers.google.com/project in a browserwindow.
b. Sign in with a Google user name and password.If you've already created projects in the Google Developers Console, you willsee the list of created projects. If not, the Manage resources screen willappear.
c. Click Create Project.You’ll be redirected to a page where you can enter Project Name and ProjectID values to help you recognize your project in the console.
d. Click Create.Your project will be created, and you'll be redirected to your projects list in theconsole.
e. Go to the dashboard through menu navigation, APIs & Services >Dashboard, from the left corner icon.
f. Click the name of the project you recently created to go to your projectdashboard.
g. Select a library. Go to Library page through menu navigation, APIs &Services > Library, from the left corner icon.
h. Search for the "Google Drive API" library, then select and enable it.
i. Search for the "Google Picker API" library, then select and enable it.
j. From the left corner icon, navigate to APIs & Services > Credentials >OAuth Consent Screen tab. Check your email address and enter yourproduct name, GDrivePickerApp, and save it.
k. Publish the application.
l. Click the Credentials tab to open a popup in which you can select an OAuthclient ID option under the Create credentials select box.
m. Select your application type, Web application.
n. Name the client and add the Authorized redirect URIs.
i. In Authorized redirect URI, paste the redirect URL you copied fromOracle Content Management.The redirect URI must be the same as your application installation URL.
ii. In Authorized Javascript Origins, paste the redirect URL, but removeeverything after the port.If you get the message "Invalid Origin", click the authorized domains listand add your domain.
iii. Press ENTER, and then click Save.
Chapter 3Configure a Google Drive Content Connector
3-4
Once you have added to the authorized domains, you should be able to create anOAuth ID. Note the values of Client ID and Client Secret.
3. Create credentials to get the API key (Developer Key). Click Create Credentials andthen API key in the drop-down menu. Note the value of API Key. This is the DeveloperKey you'll enter in the Oracle Content Management when you configure the Google Driveconnector.
4. Get the App ID.
a. From the left corner icon, navigate to IAM & admin > Settings.
b. From that page note the value of Project Number. This is the App ID you'll enter inthe Oracle Content Management when you configure the Google Drive connector.
5. Configure the connector in Oracle Content Management.
a. Go back to configuring the Google Drive content connector in Oracle ContentManagement.
b. On the General tab:
• In the Connector tags field, you can assign tags that will be applied to assetspulled from the content connector (for example, the content connector name).This lets you search for all items from that content connector in an assetrepository.
• Make sure Enabled for end users is selected.You can review the Terms of use and Privacy Policy below the Enable for endusers button.
c. Click the Additional Fields tab, and enter the following information:
• Client ID
• Client Secret
• Developer Key (API Key)
• App Id (Project Number)
d. When you're done, click Save.
6. Associate the connector with one or more asset repositories.
a. Click Assets in the Administration area of the navigation menu on the left.
b. Open an existing repository or click Create to create a new one.
c. If you're creating a new repository, specify the repository name, publishing channels,languages, and other options.
d. Under Connectors, select one or more connectors to associate with the repository.This menu lists all the content connectors that have been configured and enabled inyour Oracle Content Management instance.
If any of the connectors you select have content types associated with them, thetypes appear under Content Types.
After a Google Drive content connector is enabled, configured, and associated with arepository, it's available in the asset repository for Oracle Content Management users toimport content, through the Add drop-down menu, Import from Google Drive option on theAssets page.
Chapter 3Configure a Google Drive Content Connector
3-5
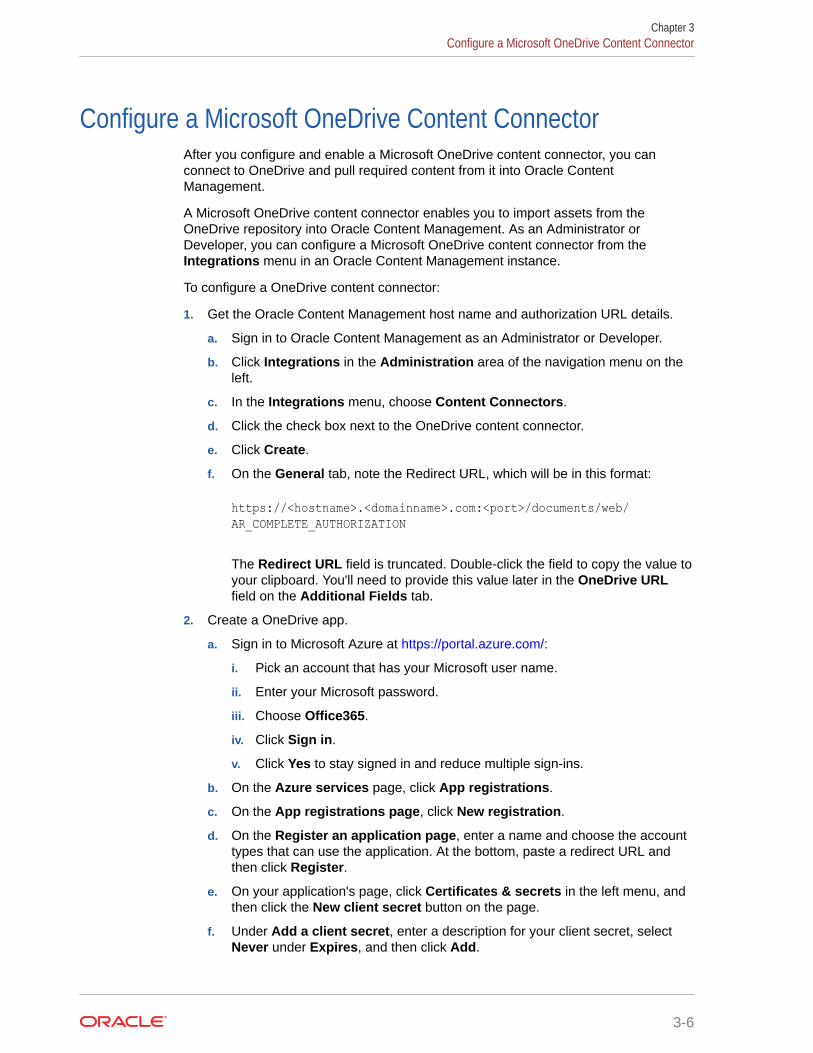
Configure a Microsoft OneDrive Content ConnectorAfter you configure and enable a Microsoft OneDrive content connector, you canconnect to OneDrive and pull required content from it into Oracle ContentManagement.
A Microsoft OneDrive content connector enables you to import assets from theOneDrive repository into Oracle Content Management. As an Administrator orDeveloper, you can configure a Microsoft OneDrive content connector from theIntegrations menu in an Oracle Content Management instance.
To configure a OneDrive content connector:
1. Get the Oracle Content Management host name and authorization URL details.
a. Sign in to Oracle Content Management as an Administrator or Developer.
b. Click Integrations in the Administration area of the navigation menu on theleft.
c. In the Integrations menu, choose Content Connectors.
d. Click the check box next to the OneDrive content connector.
e. Click Create.
f. On the General tab, note the Redirect URL, which will be in this format:
https://<hostname>.<domainname>.com:<port>/documents/web/AR_COMPLETE_AUTHORIZATION
The Redirect URL field is truncated. Double-click the field to copy the value toyour clipboard. You'll need to provide this value later in the OneDrive URLfield on the Additional Fields tab.
2. Create a OneDrive app.
a. Sign in to Microsoft Azure at https://portal.azure.com/:
i. Pick an account that has your Microsoft user name.
ii. Enter your Microsoft password.
iii. Choose Office365.
iv. Click Sign in.
v. Click Yes to stay signed in and reduce multiple sign-ins.
b. On the Azure services page, click App registrations.
c. On the App registrations page, click New registration.
d. On the Register an application page, enter a name and choose the accounttypes that can use the application. At the bottom, paste a redirect URL andthen click Register.
e. On your application's page, click Certificates & secrets in the left menu, andthen click the New client secret button on the page.
f. Under Add a client secret, enter a description for your client secret, selectNever under Expires, and then click Add.
Chapter 3Configure a Microsoft OneDrive Content Connector
3-6
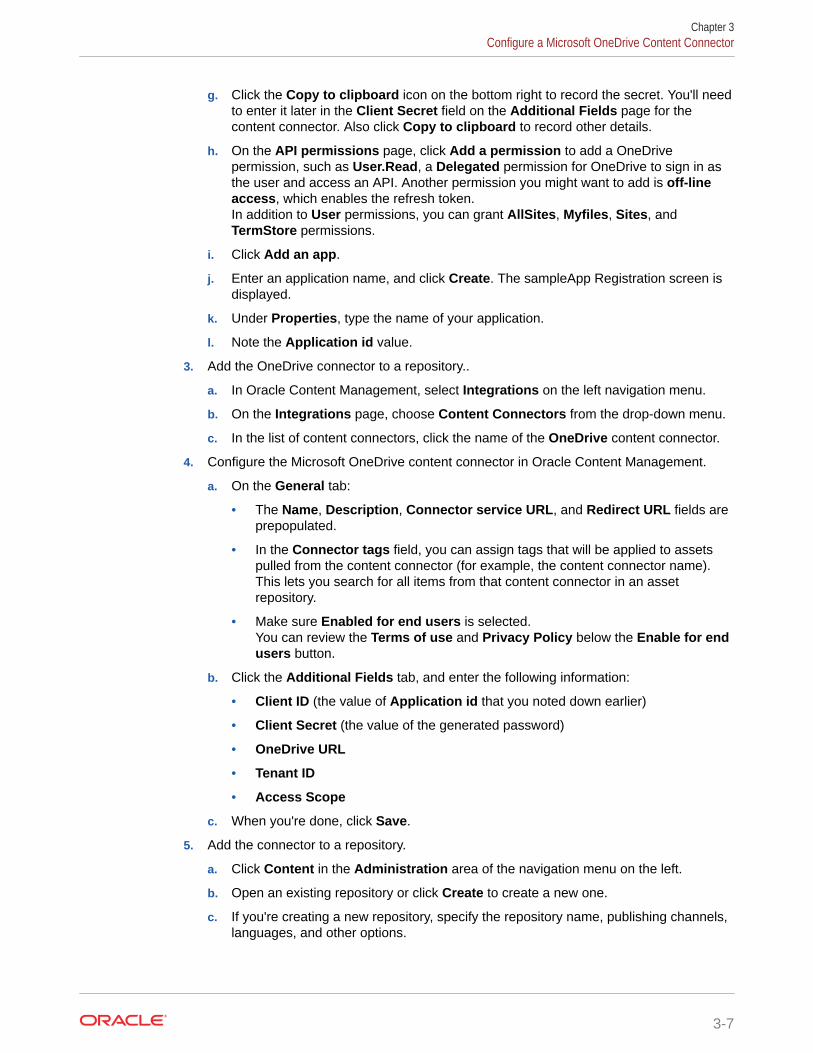
g. Click the Copy to clipboard icon on the bottom right to record the secret. You'll needto enter it later in the Client Secret field on the Additional Fields page for thecontent connector. Also click Copy to clipboard to record other details.
h. On the API permissions page, click Add a permission to add a OneDrivepermission, such as User.Read, a Delegated permission for OneDrive to sign in asthe user and access an API. Another permission you might want to add is off-lineaccess, which enables the refresh token.In addition to User permissions, you can grant AllSites, Myfiles, Sites, andTermStore permissions.
i. Click Add an app.
j. Enter an application name, and click Create. The sampleApp Registration screen isdisplayed.
k. Under Properties, type the name of your application.
l. Note the Application id value.
3. Add the OneDrive connector to a repository..
a. In Oracle Content Management, select Integrations on the left navigation menu.
b. On the Integrations page, choose Content Connectors from the drop-down menu.
c. In the list of content connectors, click the name of the OneDrive content connector.
4. Configure the Microsoft OneDrive content connector in Oracle Content Management.
a. On the General tab:
• The Name, Description, Connector service URL, and Redirect URL fields areprepopulated.
• In the Connector tags field, you can assign tags that will be applied to assetspulled from the content connector (for example, the content connector name).This lets you search for all items from that content connector in an assetrepository.
• Make sure Enabled for end users is selected.You can review the Terms of use and Privacy Policy below the Enable for endusers button.
b. Click the Additional Fields tab, and enter the following information:
• Client ID (the value of Application id that you noted down earlier)
• Client Secret (the value of the generated password)
• OneDrive URL
• Tenant ID
• Access Scope
c. When you're done, click Save.
5. Add the connector to a repository.
a. Click Content in the Administration area of the navigation menu on the left.
b. Open an existing repository or click Create to create a new one.
c. If you're creating a new repository, specify the repository name, publishing channels,languages, and other options.
Chapter 3Configure a Microsoft OneDrive Content Connector
3-7
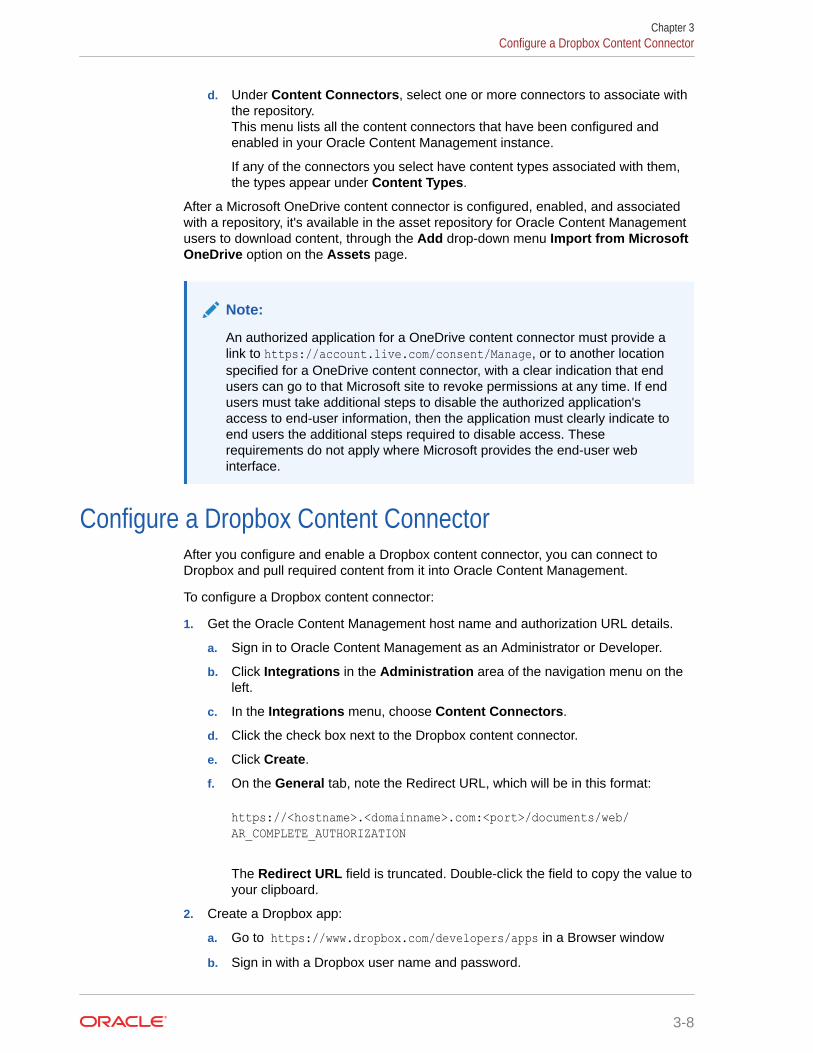
d. Under Content Connectors, select one or more connectors to associate withthe repository.This menu lists all the content connectors that have been configured andenabled in your Oracle Content Management instance.
If any of the connectors you select have content types associated with them,the types appear under Content Types.
After a Microsoft OneDrive content connector is configured, enabled, and associatedwith a repository, it's available in the asset repository for Oracle Content Managementusers to download content, through the Add drop-down menu Import from MicrosoftOneDrive option on the Assets page.
Note:
An authorized application for a OneDrive content connector must provide alink to https://account.live.com/consent/Manage, or to another locationspecified for a OneDrive content connector, with a clear indication that endusers can go to that Microsoft site to revoke permissions at any time. If endusers must take additional steps to disable the authorized application'saccess to end-user information, then the application must clearly indicate toend users the additional steps required to disable access. Theserequirements do not apply where Microsoft provides the end-user webinterface.
Configure a Dropbox Content ConnectorAfter you configure and enable a Dropbox content connector, you can connect toDropbox and pull required content from it into Oracle Content Management.
To configure a Dropbox content connector:
1. Get the Oracle Content Management host name and authorization URL details.
a. Sign in to Oracle Content Management as an Administrator or Developer.
b. Click Integrations in the Administration area of the navigation menu on theleft.
c. In the Integrations menu, choose Content Connectors.
d. Click the check box next to the Dropbox content connector.
e. Click Create.
f. On the General tab, note the Redirect URL, which will be in this format:
https://<hostname>.<domainname>.com:<port>/documents/web/AR_COMPLETE_AUTHORIZATION
The Redirect URL field is truncated. Double-click the field to copy the value toyour clipboard.
2. Create a Dropbox app:
a. Go to https://www.dropbox.com/developers/apps in a Browser window
b. Sign in with a Dropbox user name and password.
Chapter 3Configure a Dropbox Content Connector
3-8
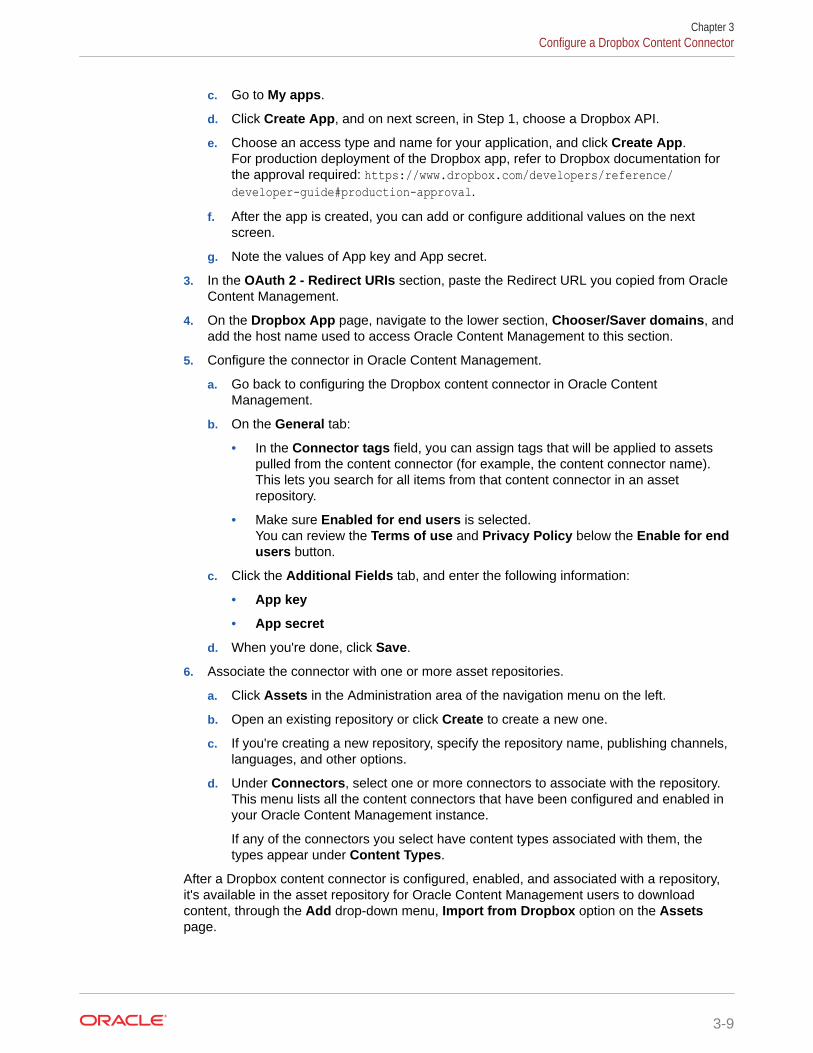
c. Go to My apps.
d. Click Create App, and on next screen, in Step 1, choose a Dropbox API.
e. Choose an access type and name for your application, and click Create App.For production deployment of the Dropbox app, refer to Dropbox documentation forthe approval required: https://www.dropbox.com/developers/reference/developer-guide#production-approval.
f. After the app is created, you can add or configure additional values on the nextscreen.
g. Note the values of App key and App secret.
3. In the OAuth 2 - Redirect URIs section, paste the Redirect URL you copied from OracleContent Management.
4. On the Dropbox App page, navigate to the lower section, Chooser/Saver domains, andadd the host name used to access Oracle Content Management to this section.
5. Configure the connector in Oracle Content Management.
a. Go back to configuring the Dropbox content connector in Oracle ContentManagement.
b. On the General tab:
• In the Connector tags field, you can assign tags that will be applied to assetspulled from the content connector (for example, the content connector name).This lets you search for all items from that content connector in an assetrepository.
• Make sure Enabled for end users is selected.You can review the Terms of use and Privacy Policy below the Enable for endusers button.
c. Click the Additional Fields tab, and enter the following information:
• App key
• App secret
d. When you're done, click Save.
6. Associate the connector with one or more asset repositories.
a. Click Assets in the Administration area of the navigation menu on the left.
b. Open an existing repository or click Create to create a new one.
c. If you're creating a new repository, specify the repository name, publishing channels,languages, and other options.
d. Under Connectors, select one or more connectors to associate with the repository.This menu lists all the content connectors that have been configured and enabled inyour Oracle Content Management instance.
If any of the connectors you select have content types associated with them, thetypes appear under Content Types.
After a Dropbox content connector is configured, enabled, and associated with a repository,it's available in the asset repository for Oracle Content Management users to downloadcontent, through the Add drop-down menu, Import from Dropbox option on the Assetspage.
Chapter 3Configure a Dropbox Content Connector
3-9
Enable Jax-WSJAX-WS should be enabled on Oracle Content Server for the connector to work. Thisis the basic prerequisite.
JAX-WS should be enabled on Oracle Content Server for the connector to work. Thisis the basic prerequisite. To verify this, access the content server instance using thefollowing URL. This will render the WSDL in the browser.
https://<host_name>:<port>/idcnativews/IdcWebLoginPort?WSDL
Configure a WordPress.org Content ConnectorAfter you configure and enable a WordPress.org content connector, you can connectto WordPress.org and pull required content from it into Oracle Content Management.
To create and configure a custom content connector:
1. Locate the base URL for your WordPress.org instance. For example, https://wordpress.mycompany.com/.
2. Create the connector in Oracle Content Management.
a. Sign in to Oracle Content Management as an Administrator or Developer.
b. Click Integrations in the Administration area of the navigation menu on theleft.
c. In the Integrations menu, choose Content Connectors.
d. Click the check box next to the WordPres.org content connector and then clickCreate.
e. On the Connector Settings page, provide information for registration of yourWordPress.org content connector. If you want to accept a certificate signed bythe third-party provider, select Accept self-signed certificate.
f. Click Next. Once the details are verified, select the Custom Fields tab.
g. Click the Custom Fields tab, and fill the WordPress URL field.
3. When you are done, click Save.
4. On the Content Connectors page, click the Enable button next to theWordPress.org content connector you created.
5. Associate the connector with one or more asset repositories:
a. Click Content in the Administration area of the navigation menu on the left.
b. Open an existing repository or click Create to create a new one.
c. If you're creating a new repository, specify the repository name, publishingchannels, languages, and other options.
d. Under Content Connectors, select one or more connectors to associate withthe repository.This menu lists all the content connectors that have been configured andenabled in your Oracle Content and Experience instance. If any of the
Chapter 3Configure a WordPress.org Content Connector
3-10
connectors have content types associated with them, the types appear underContent Types.
After a WordPress.org content connector is enabled, configured, and associated with arepository, it's available in the asset repository for Oracle Content and Experience users toimport content. To import content, click the Add drop-down menu and select Import fromWordPress.org option on the Assets page.
Configure a YouTube Content ConnectorAfter you configure and enable a YouTube content connector, you can connect to YouTubeand pull required content from it into Oracle Content Management.
To configure a YouTube content connector:
1. Get the Oracle Content Management host name and authorization URL details.
a. Sign in to Oracle Content Management as an Administrator or Developer.
b. Click Integrations in the Administration area of the navigation menu on the left.
c. In the Integrations menu, choose Content Connectors.
d. Click the check box next to the Youtube content connector.
e. Click Create.
f. You can override the default content connector settings, as described in Enable aContent Connector.
2. Enter any name and give the Connector Service URL.
3. Click Verify Settings.This lists the custom fields of the YouTube content connector.
In the Connector Tags field, you can assign tags for assets that the content connectorpulls into Oracle Content Management.
4. Sign in to https://console.developers.google.com/ and create a new project.Give your project a name, and click CREATE.
5. Go to the project and the Library page from the left corner icon in the navigation menu,and click ENABLE APIS AND SERVICES.
6. Search for the Youtube Data API v3 library, select it, and enable it.
7. Click Create Credentials and then API key in the drop-down menu. Note the value ofAPI Key. This is the Developer Key you'll enter in Oracle Content Management whenyou configure the YouTube connector.
8. Specify a value for Application Name, which can be anything.
9. Click Save.
10. Make sure Enabled for end users is selected.You can review the Terms of use and Privacy Policy below the Enable for end usersbutton.
11. Map source metadata to content types for the connector.When you configure a content connector, you can do field mapping from source metadatato content type fields. A repository administrator or system administrator can allowcreation of content types for a connector. You can create content types on the Mappingstab of the Connector Settings page. To map source metadata to a content type:
Chapter 3Configure a YouTube Content Connector
3-11

a. Sign in to Oracle Content Management as a system administrator and clickIntegrations under Administration in the left navigation menu.
b. On the Assets page, click Create.
c. On the Create Repository page, define your repository.
i. Specify the connector name, publishing channels, languages, and otheroptions.
ii. Under the Connectors option, select Youtube from the drop-down menuto associate the YouTube content connector with the repository. On theCreate/Edit Repository page, if you add the connector 'Youtube', thecontent type 'YoutubeVideos' will automatically be assigned.If the YouTube connector has content types associated with it, the typesappear under the Content Types option. If you want the contentconnector to have additional fields, you can add them on the Mappingstab of the Connector Settings page.
If the Allow Content Type Creation check box on the General tab isselected, the mapping of source metadata to Oracle Content Managementcontent types will be automatically populated. You can change theautomatic mapping on the Connector Settings page.
d. If the Allow Content Type Creation check box on the General tab is notselected, you need to map the source metadata to Oracle ContentManagement content types on the Connector Settings page:
i. On the Mappings tab, choose a source type from the Source ContentType drop-down menu and an Oracle Content Management type from theOCE Content Type drop-down menu, such as YoutubeVideos, to mapthe Source Data Field to the Target Data Field.
ii. Repeat for each source content type.
iii. Click Save.
iv. Enable a Content Connector.This type mapping must be done for all source types before the contentconnector is enabled. If you want to change the mapping, you need todisable the connector, make your changes, and then enable the connectoragain. Whenever an administrator saves the connector after modifying acontent type, the connector framework will attempt to seed the contenttype again. If you remove any associated content type that is required forthe selected connector, the save will fail.
12. Associate the connector with one or more asset repositories.
a. Click Assets in the Administration area of the navigation menu on the left.
b. Open an existing repository, or click Create to create a new one.
c. If you're creating a new repository, specify the repository name, publishingchannels, languages, and other options. You need to configure the languagesthat are expected from the connector. For example, some of the languagesthat YouTube supports are en, en-CB, and en-AU. If these are not configured,content item creation may fail.
d. Under Connectors, select Youtube to associate the YouTube contentconnector with the repository.This menu lists all the content connectors that have been configured andenabled in your Oracle Content Management instance.
Chapter 3Configure a YouTube Content Connector
3-12
If any of the connectors you select have content types associated with them, thetypes appear under Content Types. On the Create/Edit Repository page, if you addthe connector 'Youtube', the content type 'YoutubeVideos' will be automaticallyassigned.
Configure a Microsoft SharePoint Online Content ConnectorMicrosoft SharePoint Online is a web-based document management and storage system.After you configure and enable a Microsoft SharePoint Online content connector, you canconnect to it and pull content from Microsoft SharePoint Online into Oracle ContentManagement.
A Microsoft SharePoint Online content connector enables you to import assets from theMicrosoft SharePoint Online repository into Oracle Content Management. As anAdministrator or Developer, you can configure a Microsoft SharePoint Online ContentConnector from the Integrations menu in an Oracle Content Management instance.
To configure a Microsoft SharePoint Online content connector:
1. Get the Oracle Content Management host name and authorization URL details.
a. Sign in to Oracle Content Management as an Administrator or Developer.
b. Click Integrations in the Administration area of the navigation menu on the left.
c. In the Integrations menu, choose Content Connectors.
d. Click the check box next to the Microsoft SharePoint Online content connector.
e. Click Edit, or you can click the link to get to the Edit page.
f. On the General tab, note the Redirect URL, which will be in this format:
https://<hostname>.<domainname>.com:<port>/documents/web/AR_COMPLETE_AUTHORIZATION
The Redirect URL field is truncated. Double-click the field to copy the value to yourclipboard. You'll need to provide this value later in the SharePoint URL field on theAdditional Fields tab.
2. Create a SharePoint Online app:
a. Sign in to Microsoft Azure at https://portal.azure.com/:
i. Pick an account that has your Microsoft user name.
ii. Enter your Microsoft password.
iii. Choose Office365.
iv. Click Sign in.
v. Click Yes to stay signed in and reduce multiple sign-ins.
b. On the Azure services page, click App registrations.
c. On the App registrations page, click New registration.
d. On the Register an application page, enter a name and choose the account typesthat can use the application. At the bottom, paste a redirect URL and then clickRegister.
Chapter 3Configure a Microsoft SharePoint Online Content Connector
3-13
e. On your application's page, click Certificates & secrets in the left menu, andthen click the New client secret button on the page.
f. Under Add a client secret, enter a description for your client secret, selectNever under Expires, and then click Add.
g. Click the Copy to clipboard icon on the bottom right to record the secret.You'll need to enter it later in the Client Secret field on the Additional Fieldspage for the content connector. Also click Copy to clipboard to record otherdetails.
h. On the API permissions page, click Add a permission to add a SharePointOnline permission, such as User.Read, a Delegated permission forSharePoint Online to sign in as the user and access an API. Anotherpermission you might want to add is off-line access, which enables therefresh token.In addition to User permissions, you can grant AllSites, Myfiles, Sites, andTermStore permissions.
3. Add the SharePoint Online connector to a repository.
a. In Oracle Content Management, select Integrations on the left navigationmenu.
b. On the Integrations page, choose Content Connectors from the drop-downmenu.
c. In the list of content connectors, click the name of the Sharepoint Onlinecontent connector.
4. Configure the Microsoft SharePoint Online content connector in Oracle ContentManagement.
a. On the General tab:
• The Name, Description, Connector service URL, and Redirect URLfields are prepopulated.
• In the Connector tags field, you can assign tags that will be applied toassets pulled from the content connector (for example, the contentconnector name). This lets you search for all items from that contentconnector in an asset repository.
• Make sure Enabled for end users is selected.You can review the Terms of use and Privacy Policy below the Enablefor end users button.
b. Click the Additional Fields tab.
Chapter 3Configure a Microsoft SharePoint Online Content Connector
3-14
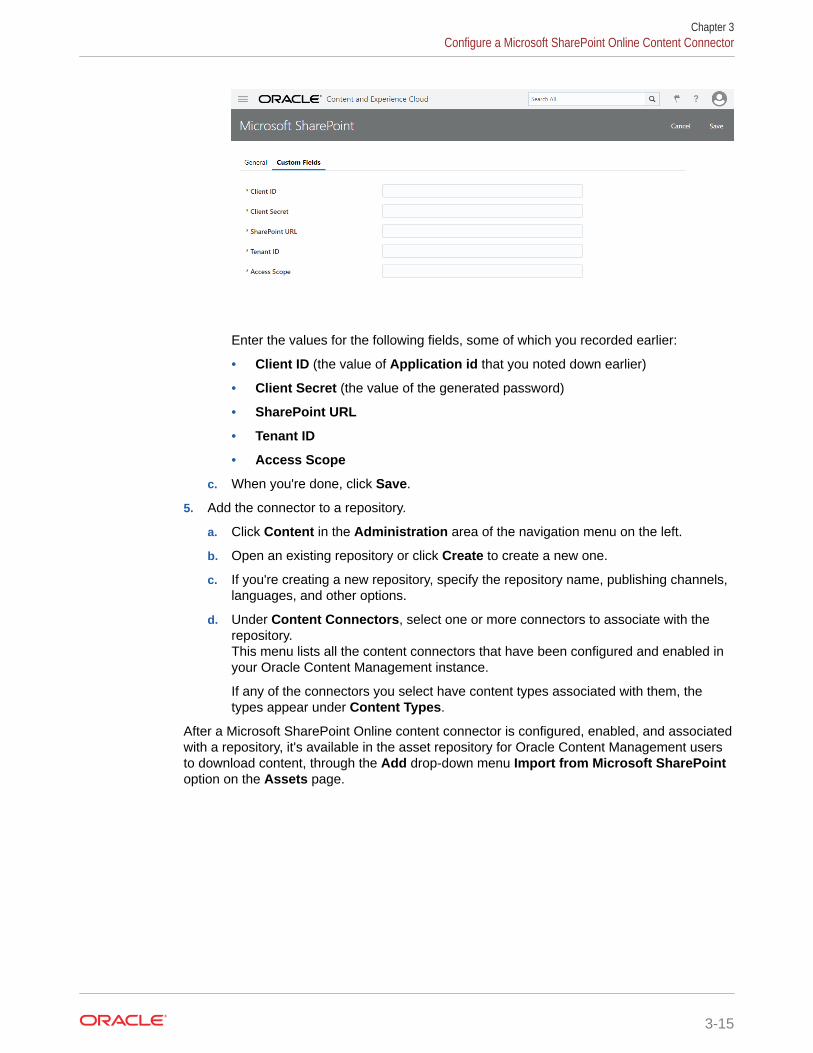
Enter the values for the following fields, some of which you recorded earlier:
• Client ID (the value of Application id that you noted down earlier)
• Client Secret (the value of the generated password)
• SharePoint URL
• Tenant ID
• Access Scope
c. When you're done, click Save.
5. Add the connector to a repository.
a. Click Content in the Administration area of the navigation menu on the left.
b. Open an existing repository or click Create to create a new one.
c. If you're creating a new repository, specify the repository name, publishing channels,languages, and other options.
d. Under Content Connectors, select one or more connectors to associate with therepository.This menu lists all the content connectors that have been configured and enabled inyour Oracle Content Management instance.
If any of the connectors you select have content types associated with them, thetypes appear under Content Types.
After a Microsoft SharePoint Online content connector is configured, enabled, and associatedwith a repository, it's available in the asset repository for Oracle Content Management usersto download content, through the Add drop-down menu Import from Microsoft SharePointoption on the Assets page.
Chapter 3Configure a Microsoft SharePoint Online Content Connector
3-15
Note:
An authorized application for a Microsoft SharePoint Online contentconnector must provide a link to https://account.live.com/consent/Manage, or to another location specified for a SharePoint Online contentconnector, with a clear indication that end users can go to that Microsoft siteto revoke permissions at any time. If end users must take additional steps todisable the authorized application's access to end-user information, then theapplication must clearly indicate to end users the additional steps required todisable access. These requirements do not apply where Microsoft providesthe end-user web interface.
Configure a Contentful Content ConnectorAfter you configure and enable a Contentful content connector, you can connect toContentful and pull required content from it into Oracle Content Management.
To configure a Contentful content connector:
1. Get the Contentful API key:
a. Locate the base URL for your Contentful instance. For example, https://contentful.company.example.com /.
b. Click Settings in the top menu. Click API keys. Click Add API key.
c. Add a name to the Name field.
d. Note the Space ID, Content Delivery API Access Token, Content Preview APIAccess Token, and Environment. You will need them later.
e. Click Save.
2. Configure the Contentful connector in Oracle Content Management.
a. Sign in to Oracle Content Management as an Administrator or Developer.
b. Click Integrations in the Administration area of the navigation menu on theleft.
c. In the Integrations menu, choose Content Connectors.
d. Click the check box next to the Contentful content connector, and then clickEdit.
e. On the Connector Settings page, on the General tab, in the Connector tagsfield, you can assign tags that will be applied to assets pulled from the contentconnector (for example, the content connector name).This lets you search for all items from that content connector in an assetrepository.
Make sure Enabled for end users is selected. You can review the Terms ofuse and Privacy Policy below the Enabled for end users button.
f. Click the Additional Fields tab, and enter the following information:If you want to import Draft content, select the Draft Content check box andset Authentication Key to the Content Preview API Access Token. Otherwise,enter the Content Delivery API Access Token.
Enter your Space ID and your Environment.
Chapter 3Configure a Contentful Content Connector
3-16
After a Contentful content connector is enabled, configured, and associated with a repository,it's available in the asset repository for Oracle Content Management users to import content.To import content, click the Add drop-down menu and select the Import from Contentfuloption on the Assets page.
Configure a Drupal Content ConnectorAfter you configure and enable a Drupal content connector, you can connect to Drupal andpull required content from it into Oracle Content Management.
To configure a Drupal content connector:
1. Sign in to the Drupal site.
a. Click Extend on the menu.
b. On the Extend page, search for JSON and then select JSON:API and Serializationcheckboxes.
c. Select HTTP Basic Authentication.
i. You must have the HTTP Basic Authentication module enabled.
ii. Click People.
iii. Click Permissions.
iv. Dselect checkboxes under Anonymous to protect resources with BasicAuthenticaiton.
d. Click Install.
2. Locate the base URL for your Drupal instance. For example, https://drupal.mycompany.com/.
3. Get the Oracle Content Management host name and authorization URL details.
a. Sign in to Oracle Content Management as an Administrator or Developer.
b. Click Integrations in the Administration area of the navigation menu on the left.
c. In the Integrations menu, choose Content Connectors.
d. Click the check box next to the Drupal content connector and then click Create.
e. On the Connector Settings page, provide information for registration of your Drupalcontent connector.
f. Click Next. Once the details are verified, select the Custom Fields tab.
g. On the Custom Fields page, enter the base URL of Drupal instance and click Save.
4. On the Content Connectors page, click the Enable button next to the Drupal contentconnector you created.
5. Associate the connector with one or more asset repositories:
a. Click Content in the Administration area of the navigation menu on the left.
b. Open an existing repository or click Create to create a new one.
c. If you're creating a new repository, specify the repository name, publishing channels,languages, and other options.
d. Under Content Connectors, select one or more connectors to associate with therepository.
Chapter 3Configure a Drupal Content Connector
3-17
This menu lists all the content connectors that have been configured andenabled in your Oracle Content Management instance. If any of theconnectors have content types associated with them, the types appear underContent Types.
After a Drupal content connector is enabled, configured, and associated with arepository, it's available in the asset repository for Oracle Content Management usersto import content. To import content, click the Add drop-down menu and then selectImport from Drupal option on the Assets page.
Configure Oracle WebCenter Content Server and OracleContent Management for the WCC Connector v2.0
An Administrator can register and configure Oracle WebCenter Content (WCC) andOracle Content Management for the WCC connector v2.0 so site users can pullcontent from the WebCenter Content server into their sites.
The following topics describe the WebCenter Content connector v2.0 and how to useit:
• Verify Network Accessibility for a WCC Connector v2.0
• Check WebCenter Content Server Readiness
• Check Oracle Content Management Readiness
• Configure the Oracle WebCenter Content Connector v2.0
• Specify WebCenter Content Connector v2.0 Mappings
• Enable Oracle WebCenter Content Connector v2.0 for an Asset Repository
• Use Oracle WebCenter Content Connector v2.0
• Map to a Custom Asset Type
• Revoke Authorized Users
Verify Network Accessibility for a WCC Connector v2.0The communication between Oracle Content Management and WebCenter ContentServer takes place over JAX-WS protocol, so the Oracle Content Managementinstance and WebCenter Content Server need to be on the same network for them towork together.
• For the Oracle Content Management public cloud, the WebCenter Content Servershould be accessible from the Public networks.
• For the Oracle Content Management private cloud, the WebCenter Content Servershould be accessible from that private network.
Check WebCenter Content Server Readiness• Enable SSL
• Enable Jax-WS
• Set Up a Security Policy
• Run the Indexer and File Formats Wizard
Chapter 3Configure Oracle WebCenter Content Server and Oracle Content Management for the WCC Connector v2.0
3-18
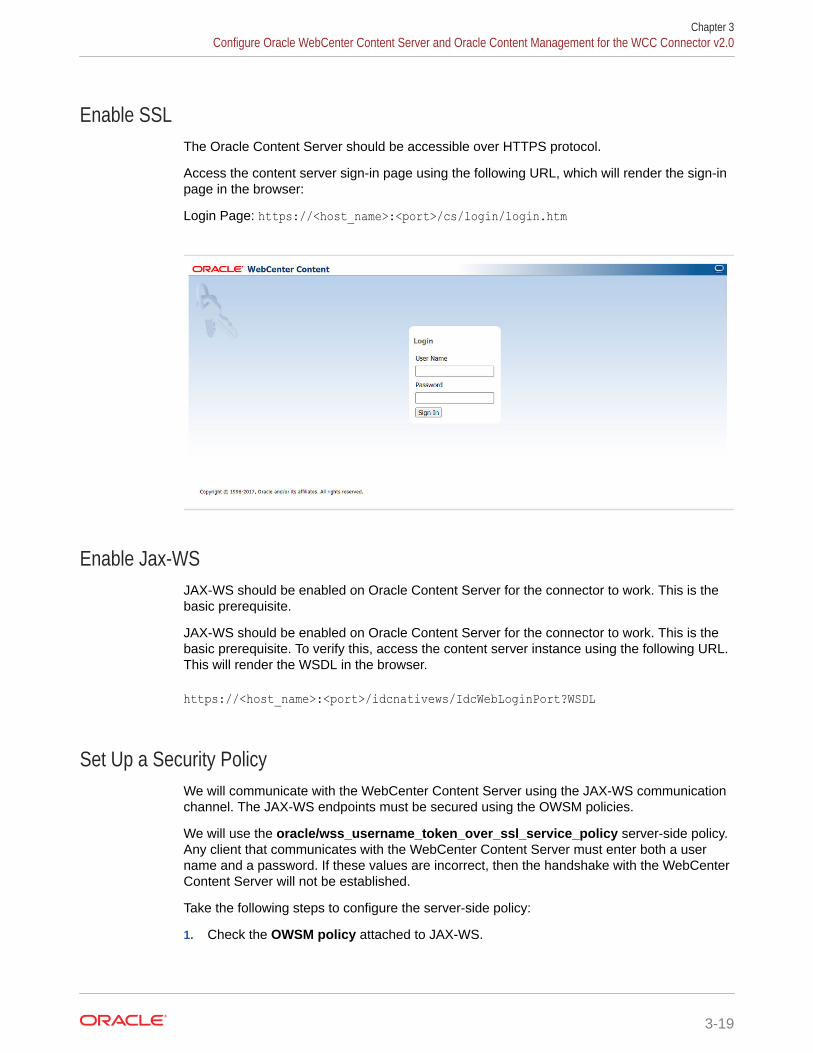
Enable SSLThe Oracle Content Server should be accessible over HTTPS protocol.
Access the content server sign-in page using the following URL, which will render the sign-inpage in the browser:
Login Page: https://<host_name>:<port>/cs/login/login.htm
Enable Jax-WSJAX-WS should be enabled on Oracle Content Server for the connector to work. This is thebasic prerequisite.
JAX-WS should be enabled on Oracle Content Server for the connector to work. This is thebasic prerequisite. To verify this, access the content server instance using the following URL.This will render the WSDL in the browser.
https://<host_name>:<port>/idcnativews/IdcWebLoginPort?WSDL
Set Up a Security PolicyWe will communicate with the WebCenter Content Server using the JAX-WS communicationchannel. The JAX-WS endpoints must be secured using the OWSM policies.
We will use the oracle/wss_username_token_over_ssl_service_policy server-side policy.Any client that communicates with the WebCenter Content Server must enter both a username and a password. If these values are incorrect, then the handshake with the WebCenterContent Server will not be established.
Take the following steps to configure the server-side policy:
1. Check the OWSM policy attached to JAX-WS.
Chapter 3Configure Oracle WebCenter Content Server and Oracle Content Management for the WCC Connector v2.0
3-19
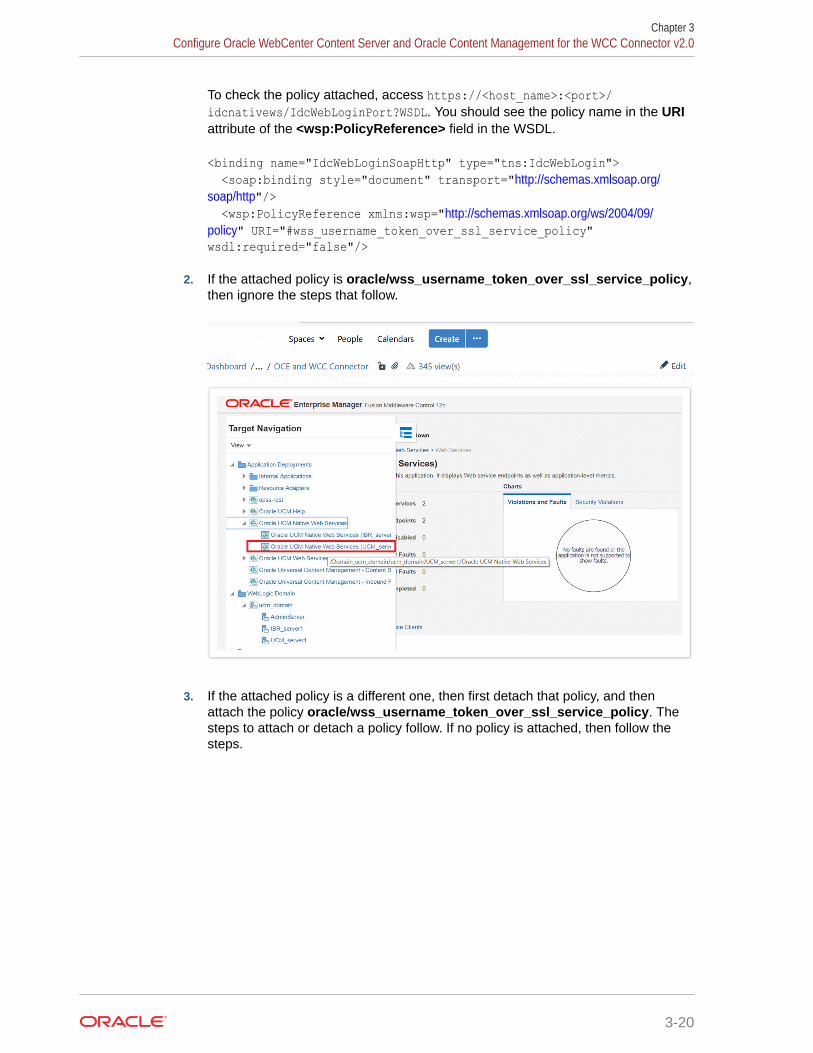
To check the policy attached, access https://<host_name>:<port>/idcnativews/IdcWebLoginPort?WSDL. You should see the policy name in the URIattribute of the <wsp:PolicyReference> field in the WSDL.
<binding name="IdcWebLoginSoapHttp" type="tns:IdcWebLogin"> <soap:binding style="document" transport="http://schemas.xmlsoap.org/soap/http"/> <wsp:PolicyReference xmlns:wsp="http://schemas.xmlsoap.org/ws/2004/09/policy" URI="#wss_username_token_over_ssl_service_policy" wsdl:required="false"/>
2. If the attached policy is oracle/wss_username_token_over_ssl_service_policy,then ignore the steps that follow.
3. If the attached policy is a different one, then first detach that policy, and thenattach the policy oracle/wss_username_token_over_ssl_service_policy. Thesteps to attach or detach a policy follow. If no policy is attached, then follow thesteps.
Chapter 3Configure Oracle WebCenter Content Server and Oracle Content Management for the WCC Connector v2.0
3-20
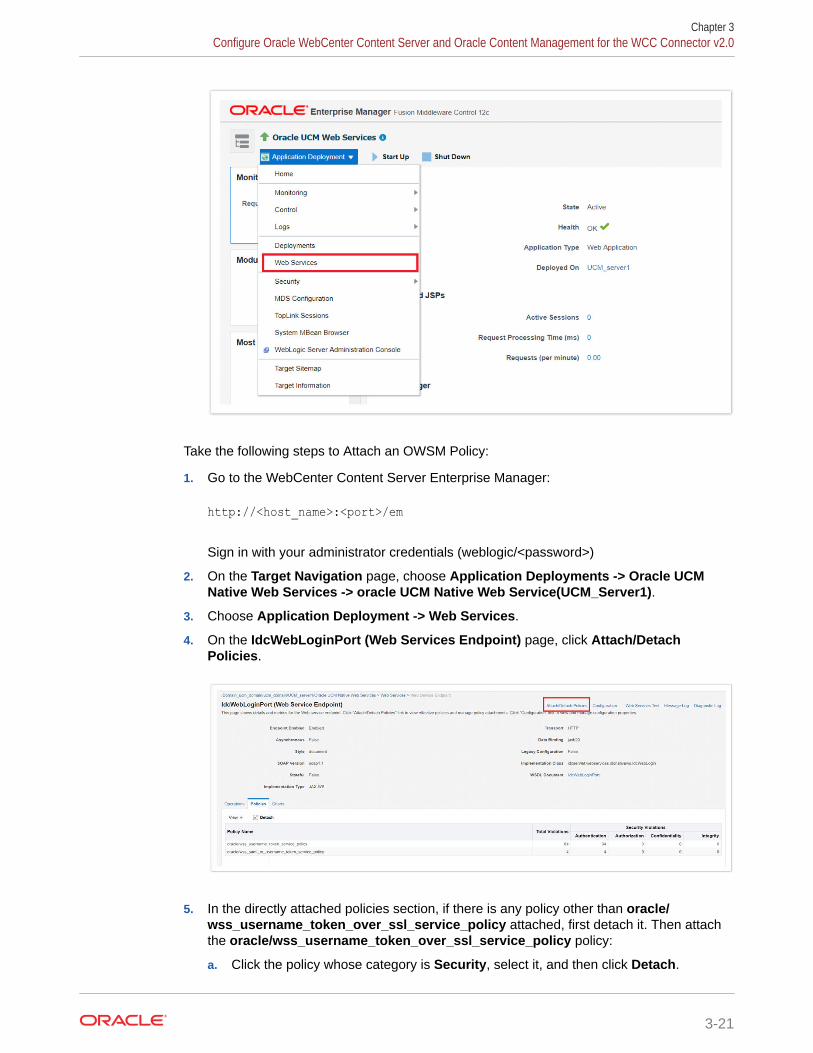
Take the following steps to Attach an OWSM Policy:
1. Go to the WebCenter Content Server Enterprise Manager:
http://<host_name>:<port>/em
Sign in with your administrator credentials (weblogic/<password>)
2. On the Target Navigation page, choose Application Deployments -> Oracle UCMNative Web Services -> oracle UCM Native Web Service(UCM_Server1).
3. Choose Application Deployment -> Web Services.
4. On the IdcWebLoginPort (Web Services Endpoint) page, click Attach/DetachPolicies.
5. In the directly attached policies section, if there is any policy other than oracle/wss_username_token_over_ssl_service_policy attached, first detach it. Then attachthe oracle/wss_username_token_over_ssl_service_policy policy:
a. Click the policy whose category is Security, select it, and then click Detach.
Chapter 3Configure Oracle WebCenter Content Server and Oracle Content Management for the WCC Connector v2.0
3-21
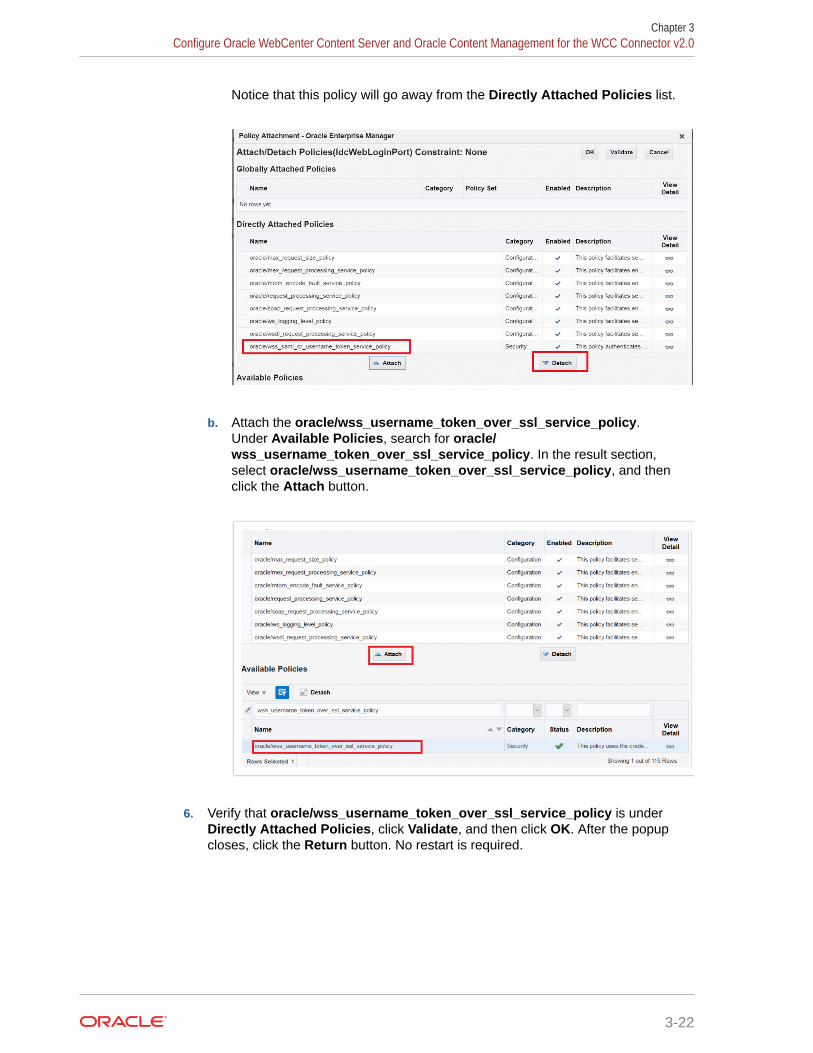
Notice that this policy will go away from the Directly Attached Policies list.
b. Attach the oracle/wss_username_token_over_ssl_service_policy.Under Available Policies, search for oracle/wss_username_token_over_ssl_service_policy. In the result section,select oracle/wss_username_token_over_ssl_service_policy, and thenclick the Attach button.
6. Verify that oracle/wss_username_token_over_ssl_service_policy is underDirectly Attached Policies, click Validate, and then click OK. After the popupcloses, click the Return button. No restart is required.
Chapter 3Configure Oracle WebCenter Content Server and Oracle Content Management for the WCC Connector v2.0
3-22
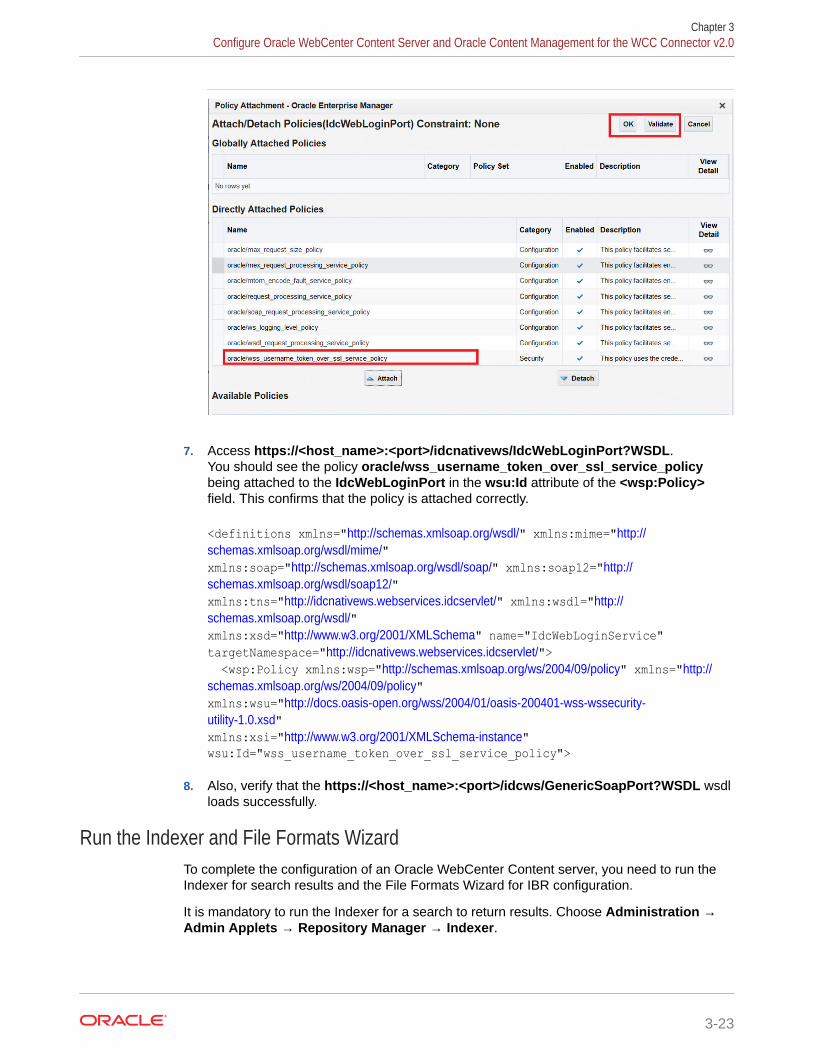
7. Access https://<host_name>:<port>/idcnativews/IdcWebLoginPort?WSDL.You should see the policy oracle/wss_username_token_over_ssl_service_policybeing attached to the IdcWebLoginPort in the wsu:Id attribute of the <wsp:Policy>field. This confirms that the policy is attached correctly.
<definitions xmlns="http://schemas.xmlsoap.org/wsdl/" xmlns:mime="http://schemas.xmlsoap.org/wsdl/mime/" xmlns:soap="http://schemas.xmlsoap.org/wsdl/soap/" xmlns:soap12="http://schemas.xmlsoap.org/wsdl/soap12/" xmlns:tns="http://idcnativews.webservices.idcservlet/" xmlns:wsdl="http://schemas.xmlsoap.org/wsdl/" xmlns:xsd="http://www.w3.org/2001/XMLSchema" name="IdcWebLoginService" targetNamespace="http://idcnativews.webservices.idcservlet/"> <wsp:Policy xmlns:wsp="http://schemas.xmlsoap.org/ws/2004/09/policy" xmlns="http://schemas.xmlsoap.org/ws/2004/09/policy" xmlns:wsu="http://docs.oasis-open.org/wss/2004/01/oasis-200401-wss-wssecurity-utility-1.0.xsd" xmlns:xsi="http://www.w3.org/2001/XMLSchema-instance" wsu:Id="wss_username_token_over_ssl_service_policy">
8. Also, verify that the https://<host_name>:<port>/idcws/GenericSoapPort?WSDL wsdlloads successfully.
Run the Indexer and File Formats WizardTo complete the configuration of an Oracle WebCenter Content server, you need to run theIndexer for search results and the File Formats Wizard for IBR configuration.
It is mandatory to run the Indexer for a search to return results. Choose Administration →Admin Applets → Repository Manager → Indexer.
Chapter 3Configure Oracle WebCenter Content Server and Oracle Content Management for the WCC Connector v2.0
3-23
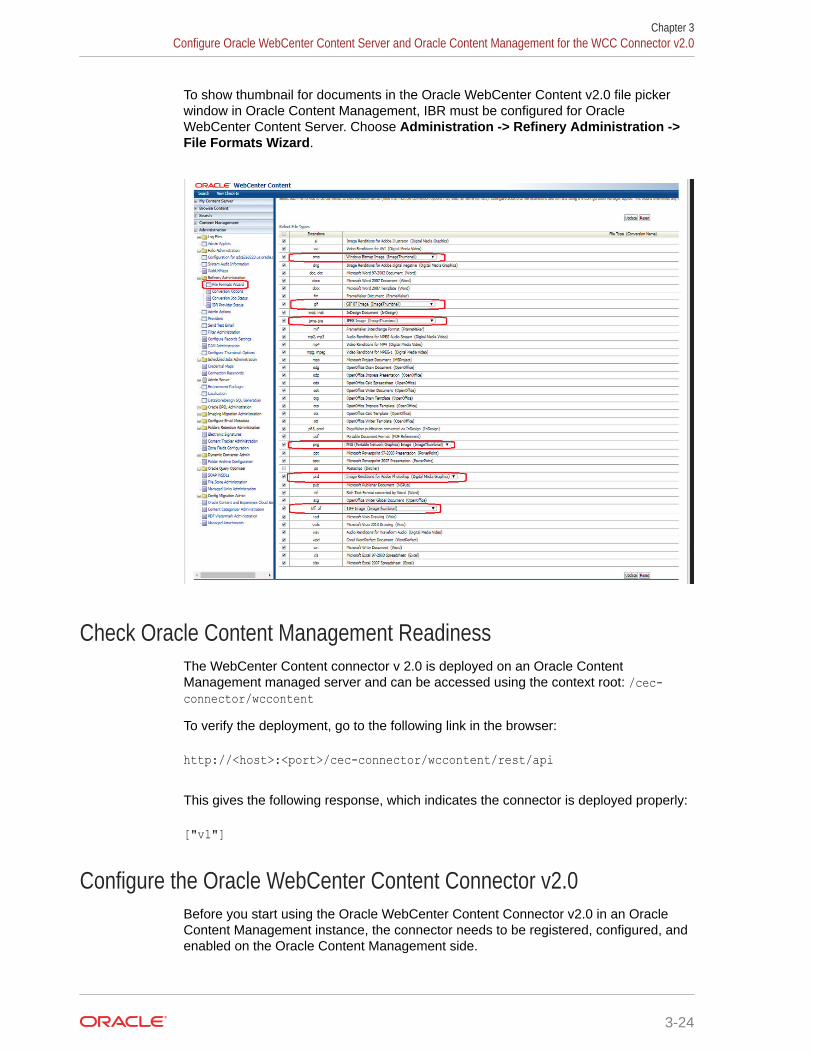
To show thumbnail for documents in the Oracle WebCenter Content v2.0 file pickerwindow in Oracle Content Management, IBR must be configured for OracleWebCenter Content Server. Choose Administration -> Refinery Administration ->File Formats Wizard.
Check Oracle Content Management ReadinessThe WebCenter Content connector v 2.0 is deployed on an Oracle ContentManagement managed server and can be accessed using the context root: /cec-connector/wccontentTo verify the deployment, go to the following link in the browser:
http://<host>:<port>/cec-connector/wccontent/rest/api
This gives the following response, which indicates the connector is deployed properly:
["v1"]
Configure the Oracle WebCenter Content Connector v2.0Before you start using the Oracle WebCenter Content Connector v2.0 in an OracleContent Management instance, the connector needs to be registered, configured, andenabled on the Oracle Content Management side.
Chapter 3Configure Oracle WebCenter Content Server and Oracle Content Management for the WCC Connector v2.0
3-24
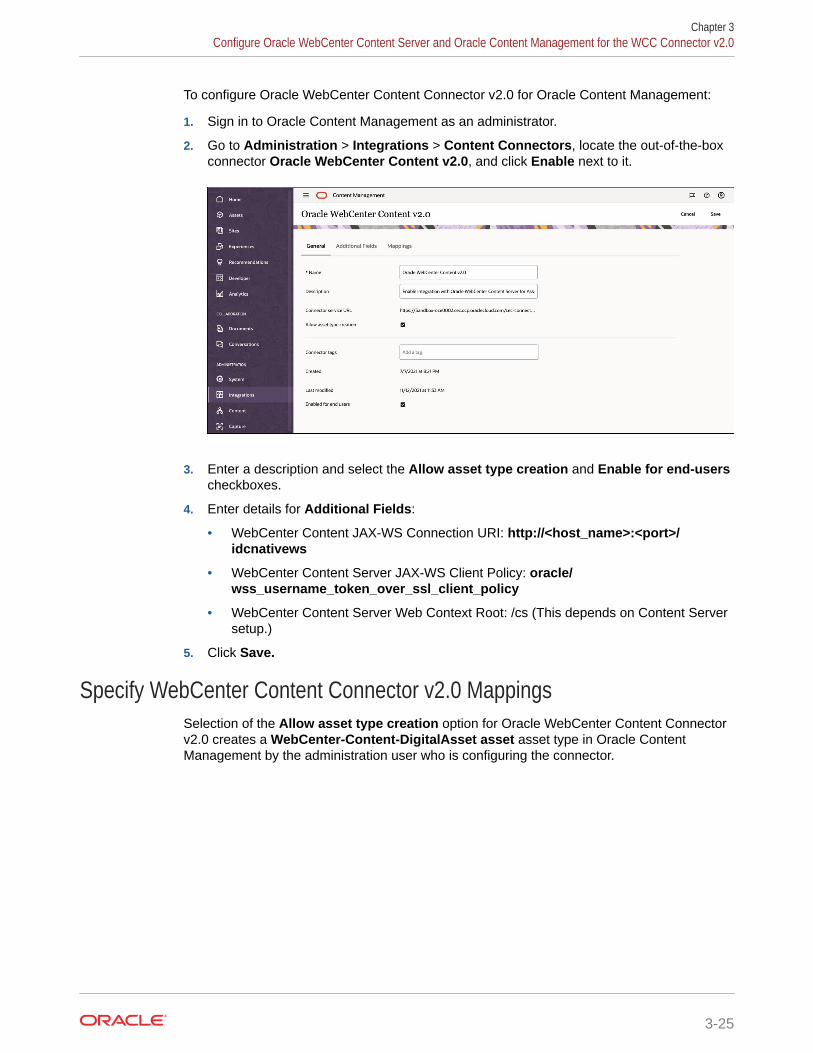
To configure Oracle WebCenter Content Connector v2.0 for Oracle Content Management:
1. Sign in to Oracle Content Management as an administrator.
2. Go to Administration > Integrations > Content Connectors, locate the out-of-the-boxconnector Oracle WebCenter Content v2.0, and click Enable next to it.
3. Enter a description and select the Allow asset type creation and Enable for end-userscheckboxes.
4. Enter details for Additional Fields:
• WebCenter Content JAX-WS Connection URI: http://<host_name>:<port>/idcnativews
• WebCenter Content Server JAX-WS Client Policy: oracle/wss_username_token_over_ssl_client_policy
• WebCenter Content Server Web Context Root: /cs (This depends on Content Serversetup.)
5. Click Save.
Specify WebCenter Content Connector v2.0 MappingsSelection of the Allow asset type creation option for Oracle WebCenter Content Connectorv2.0 creates a WebCenter-Content-DigitalAsset asset asset type in Oracle ContentManagement by the administration user who is configuring the connector.
Chapter 3Configure Oracle WebCenter Content Server and Oracle Content Management for the WCC Connector v2.0
3-25

You can view the asset type on the Administration > Content > Asset Types page.
As an administrator for the asset repository, you can specify mappings for theconnector type.
Enable Oracle WebCenter Content Connector v2.0 for an AssetRepository
Once the connector is configured and enabled, we need to enable it for the assetrepository.
Selecting the connector automatically adds the associated asset type to the repository.
Chapter 3Configure Oracle WebCenter Content Server and Oracle Content Management for the WCC Connector v2.0
3-26

Use Oracle WebCenter Content Connector v2.0To use Oracle WebCenter Content Connector v2.0, follow these steps:
1. Go to the asset repository for which you have configured the connector, and click Add >Import from Oracle WebCenter Content v2.0This launches a WebCenter Content Sign In dialog.
2. Enter your WebCenter Content Server credentials.These credentials will be securely stored on Oracle Content Management and can bereused for subsequent access. To clear the credentials, go to Add > Manage Sources >Connector > Revoke.
After your credentials are authenticated, you will see a connector-picker dialog that listscontent from the content server.
Chapter 3Configure Oracle WebCenter Content Server and Oracle Content Management for the WCC Connector v2.0
3-27
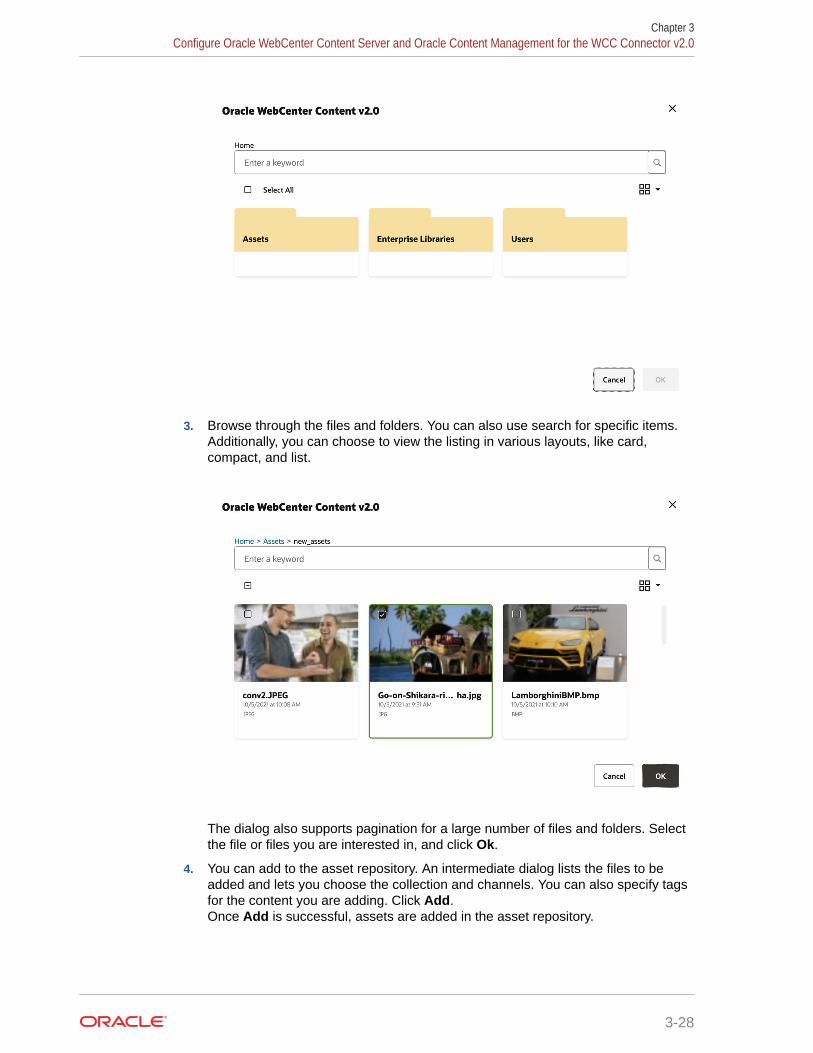
3. Browse through the files and folders. You can also use search for specific items.Additionally, you can choose to view the listing in various layouts, like card,compact, and list.
The dialog also supports pagination for a large number of files and folders. Selectthe file or files you are interested in, and click Ok.
4. You can add to the asset repository. An intermediate dialog lists the files to beadded and lets you choose the collection and channels. You can also specify tagsfor the content you are adding. Click Add.Once Add is successful, assets are added in the asset repository.
Chapter 3Configure Oracle WebCenter Content Server and Oracle Content Management for the WCC Connector v2.0
3-28
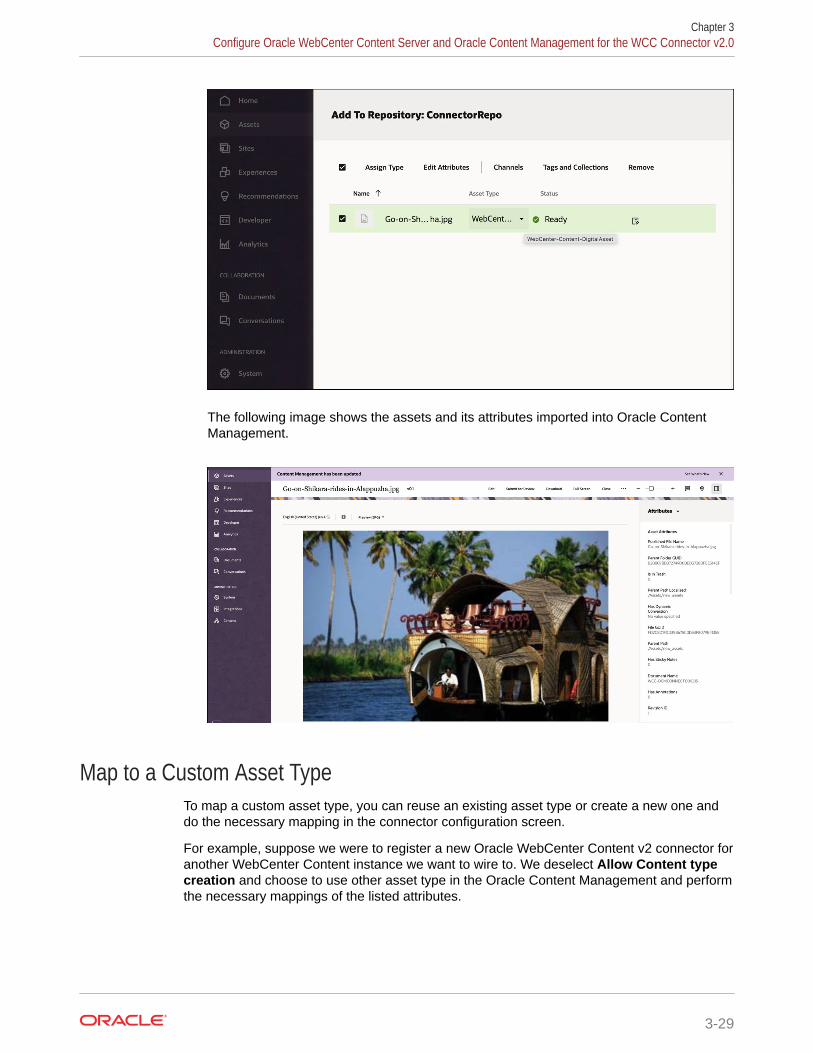
The following image shows the assets and its attributes imported into Oracle ContentManagement.
Map to a Custom Asset TypeTo map a custom asset type, you can reuse an existing asset type or create a new one anddo the necessary mapping in the connector configuration screen.
For example, suppose we were to register a new Oracle WebCenter Content v2 connector foranother WebCenter Content instance we want to wire to. We deselect Allow Content typecreation and choose to use other asset type in the Oracle Content Management and performthe necessary mappings of the listed attributes.
Chapter 3Configure Oracle WebCenter Content Server and Oracle Content Management for the WCC Connector v2.0
3-29
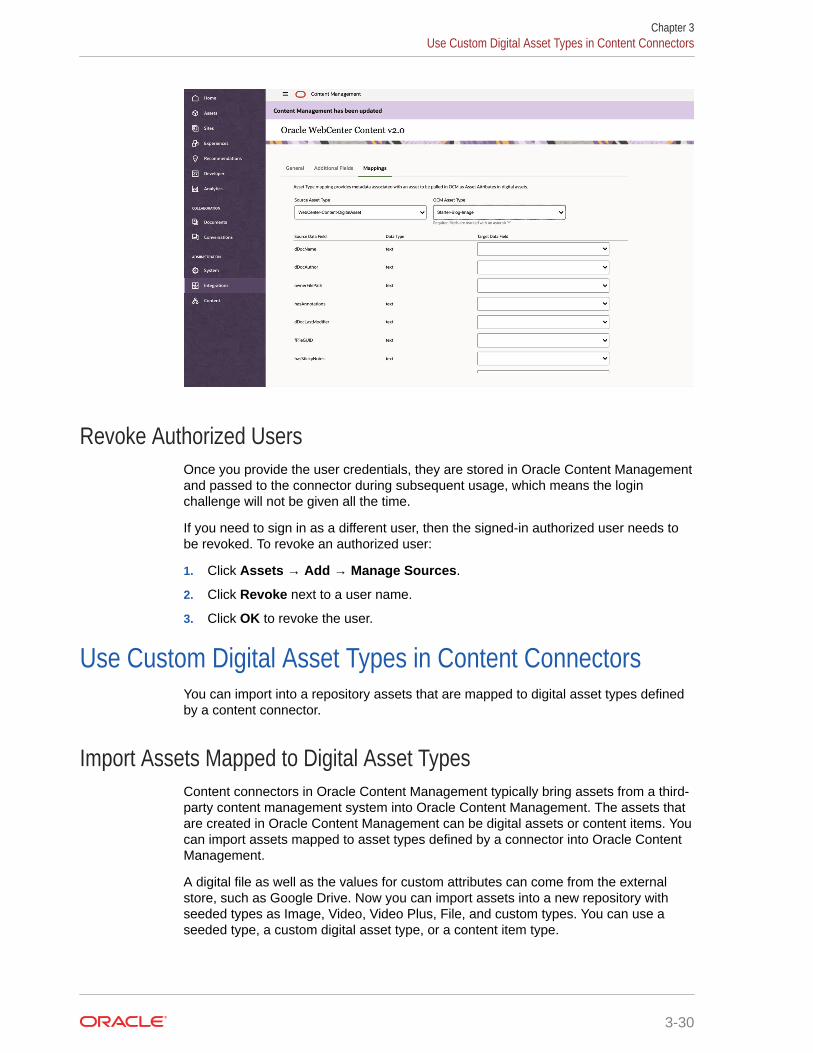
Revoke Authorized UsersOnce you provide the user credentials, they are stored in Oracle Content Managementand passed to the connector during subsequent usage, which means the loginchallenge will not be given all the time.
If you need to sign in as a different user, then the signed-in authorized user needs tobe revoked. To revoke an authorized user:
1. Click Assets → Add → Manage Sources.
2. Click Revoke next to a user name.
3. Click OK to revoke the user.
Use Custom Digital Asset Types in Content ConnectorsYou can import into a repository assets that are mapped to digital asset types definedby a content connector.
Import Assets Mapped to Digital Asset TypesContent connectors in Oracle Content Management typically bring assets from a third-party content management system into Oracle Content Management. The assets thatare created in Oracle Content Management can be digital assets or content items. Youcan import assets mapped to asset types defined by a connector into Oracle ContentManagement.
A digital file as well as the values for custom attributes can come from the externalstore, such as Google Drive. Now you can import assets into a new repository withseeded types as Image, Video, Video Plus, File, and custom types. You can use aseeded type, a custom digital asset type, or a content item type.
Chapter 3Use Custom Digital Asset Types in Content Connectors
3-30
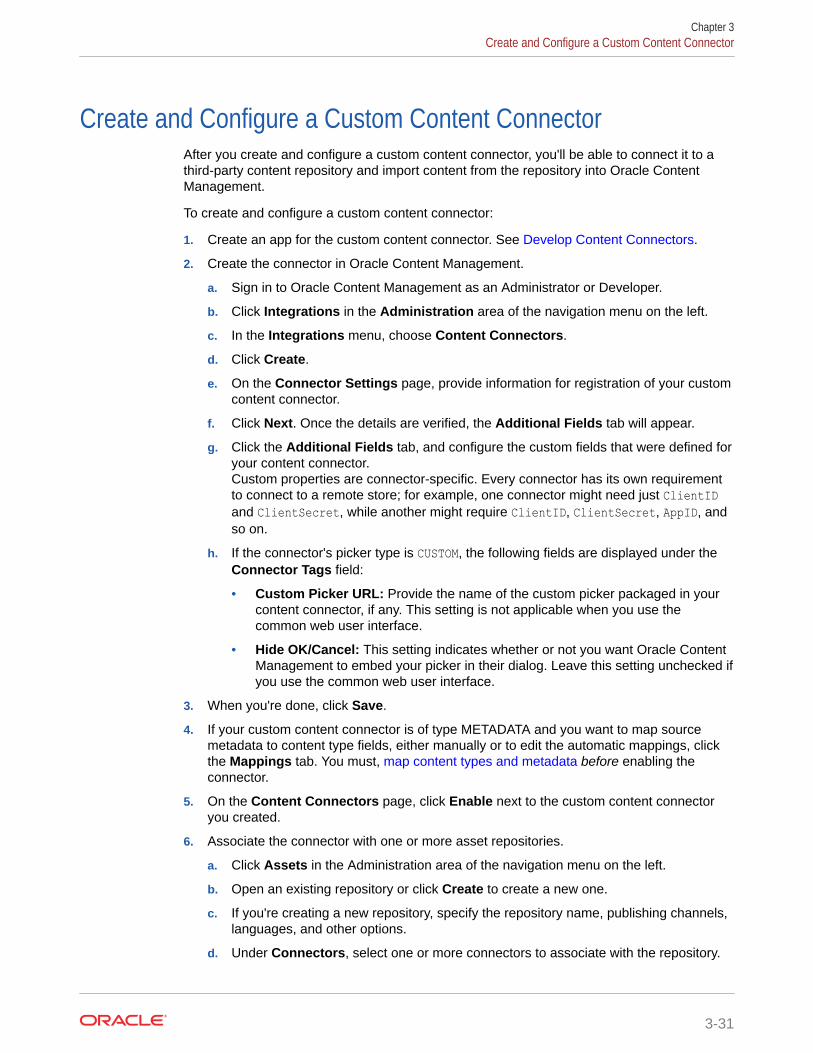
Create and Configure a Custom Content ConnectorAfter you create and configure a custom content connector, you'll be able to connect it to athird-party content repository and import content from the repository into Oracle ContentManagement.
To create and configure a custom content connector:
1. Create an app for the custom content connector. See Develop Content Connectors.
2. Create the connector in Oracle Content Management.
a. Sign in to Oracle Content Management as an Administrator or Developer.
b. Click Integrations in the Administration area of the navigation menu on the left.
c. In the Integrations menu, choose Content Connectors.
d. Click Create.
e. On the Connector Settings page, provide information for registration of your customcontent connector.
f. Click Next. Once the details are verified, the Additional Fields tab will appear.
g. Click the Additional Fields tab, and configure the custom fields that were defined foryour content connector.Custom properties are connector-specific. Every connector has its own requirementto connect to a remote store; for example, one connector might need just ClientIDand ClientSecret, while another might require ClientID, ClientSecret, AppID, andso on.
h. If the connector's picker type is CUSTOM, the following fields are displayed under theConnector Tags field:
• Custom Picker URL: Provide the name of the custom picker packaged in yourcontent connector, if any. This setting is not applicable when you use thecommon web user interface.
• Hide OK/Cancel: This setting indicates whether or not you want Oracle ContentManagement to embed your picker in their dialog. Leave this setting unchecked ifyou use the common web user interface.
3. When you're done, click Save.
4. If your custom content connector is of type METADATA and you want to map sourcemetadata to content type fields, either manually or to edit the automatic mappings, clickthe Mappings tab. You must, map content types and metadata before enabling theconnector.
5. On the Content Connectors page, click Enable next to the custom content connectoryou created.
6. Associate the connector with one or more asset repositories.
a. Click Assets in the Administration area of the navigation menu on the left.
b. Open an existing repository or click Create to create a new one.
c. If you're creating a new repository, specify the repository name, publishing channels,languages, and other options.
d. Under Connectors, select one or more connectors to associate with the repository.
Chapter 3Create and Configure a Custom Content Connector
3-31
This menu lists all the content connectors that have been configured andenabled in your Oracle Content Management instance.
If any of the connectors you select have content types associated with them,the types appear under Content Types.
Create Content Types for a ConnectorA repository administrator or system administrator can allow creation of content typesfor a content connector.
You can create content types for a connector on the Mappings tab of the ConnectorSettings page.
Map Source Metadata to Fields in a Content TypeThe WebCenter Content v2.0 connector and some custom content connectors(connectors with type METADATA) allow you to map source metadata to OracleContent Management content type fields.
Typically a source system has metadata associated with each content file. When youimport a content file to an asset repository, you can use that source metadata topopulate the fields in a content item, such as an employee record.
You can have the connector automatically create a content type for the contentimported through a connector, with each piece of source metadata automaticallymapped to a field in the content type. You can also customize the automatic mappingsor map your own content type to the source content type. If you want to use your owncontent type, you must create it before creating mappings in the connector.
If your source content repository has multiple content types, you can select a differentOracle Content Management v2.0 content type to map to each source type.
Content type and field mapping must be done for all source types before the contentconnector is enabled. If you want to change the mappings, you need to disable theconnector, make your changes, and then enable the connector again. Whenever anadministrator saves the connector after modifying a mapping, the connector frameworkwill attempt to seed the content type again. If you remove any associated content typethat is required for the selected connector, the save will fail.
To map source metadata to fields in a content type:
1. Sign in to Oracle Content Management as an Administrator or Developer.
2. Click Integrations in the Administration area of the navigation menu on the left.
3. In the Integrations menu, choose Content Connectors.
4. Click Configure next to the connector you want to add mappings to.
5. If you want to automatically create a content type for imported content, withcontent type fields that are automatically mapped to the source metadata, selectAllow content type creation. You can change the automatic mappings on theMappings tab.
6. To create manual mappings or to edit the automatic mappings, click the Mappingstab:
a. Select a Source Content Type, then select the Oracle Content Managementv2.0 content type you want to map to it.
Chapter 3Create and Configure a Custom Content Connector
3-32
b. Map each Source Data Field to a Target Data Field.
c. Repeat for each source content type.
7. When you're done, click Save.
Provide Configuration Parameter Values for a ContentConnector
A service administrator can register a content connector on the cloud storage provider’swebsite to get configuration parameter values to enter for the content connector in OracleContent Management.
Only one set of user credentials is stored for a signed-in Oracle Content Management user. Ifyou need to use a separate user to fetch data, use Manage Sources and revoke theauthorization for the existing user. Then you can use credentials for a second user.
Before you configure the content connector in Oracle Content Management, you need to getcustom field information from the third-party content repository's website (such as GoogleDevelopers) by registering the content connector as an application that you want to integrate.
Here's the information you'll need for the various content connectors:
• Google Drive: Client ID, Client Secret, Developer Key, and App Id
• Microsoft OneDrive: Client ID and Client Secret
• Dropbox: App Key and App Secret
• Microsoft SharePoint Online: Client ID, Client Secret, Sharepoint URL, Tenant ID, andAccess Scope
• WebCenter Content: WebCenter Content Server JAX-WS Connection URI, WebCenterContent Server JAX-WS Client Policy, and WebCenter Content Server Web Context Root
1. Click Integrations in the Administration area of the navigation menu.
2. In the Integrations menu, choose Content Connectors.
3. Click the Configure button next to a content connector.
4. Click the Additional Fields tab, and enter the information you collected from the third-party content repository's website.
5. Click Save to save the configuration parameter values.
After a content connector is configured and enabled, it's available in the asset repository forOracle Content Management users to download content, through the Add From drop-downmenu on the Assets page.
Delete a Content ConnectorA service administrator can delete a disabled custom content connector in an Oracle ContentManagement instance at any time.
You cannot delete a preconfigured content connector. You can delete only newly addedcontent connectors (custom content connectors).
To delete a content connector:
1. Click Integrations in the Administration area of the navigation menu.
Chapter 3Provide Configuration Parameter Values for a Content Connector
3-33
2. In the Integrations menu, choose Content Connectors.
3. If the content connector is enabled, click Disable next to it.
4. Click Delete next to the custom content connector.
Chapter 3Delete a Content Connector
3-34
Part IIIDeveloping Oracle Content ManagementExtensions
This part provides information on developing Oracle Content Management extensions. Itincludes the following chapters:
• Develop Custom Actions with Application Integration Framework (AIF)
• Develop Content Connectors
• Develop Custom Field Editors
• Develop Custom Content Forms
• Develop Translation Connectors for Language Service Providers
• Develop External Processors
• Compile Content Layouts as HTML
4Develop Custom Actions with ApplicationIntegration Framework (AIF)
You can use Application Integration Framework (AIF) to define actions that are exposed inthe web interface, respond to user selections, call third-party services, and specify how theresults are presented to the user.
• Understand the Application Integration Framework (AIF)
• Manage Custom Applications
• Configuration File Format
• Application Properties
• Action Command
• Invoke Command
• Presentation Command
• Expressions
• Variables
• Localization
Understand the Application Integration Framework (AIF)Application Integration Framework (AIF) provides a simple and effective way to integratethird-party services and applications into the Oracle Content Management web interface.
Using AIF, you can quickly define the actions that are exposed in the web interface, respondto user selections, call third-party services, and specify how the results are presented to theuser. The framework supports variables and expressions and provides multiple languagesupport.
Custom AIF applications are not applied when you access them through an applink or publiclink.
The definition for one or more integrations is stored in a single file in JSON format. As adeveloper, you can upload the configuration file and add it to a list of available applications.You can also edit and validate the configuration file directly in the web interface, enable ordisable the app for general use, set preferences, or delete the app.
The definition for one or more integrations is stored in a single configuration file in JSONformat. The configuration file defines and manages the interactions between the app, nativeobjects and web interface elements. The configuration file includes:
• App properties including tenant and user preferences
• Actions that are exposed in the web interface and the service calls they make
• How the results are presented to the user
• Interface strings with support for multiple languages
4-1
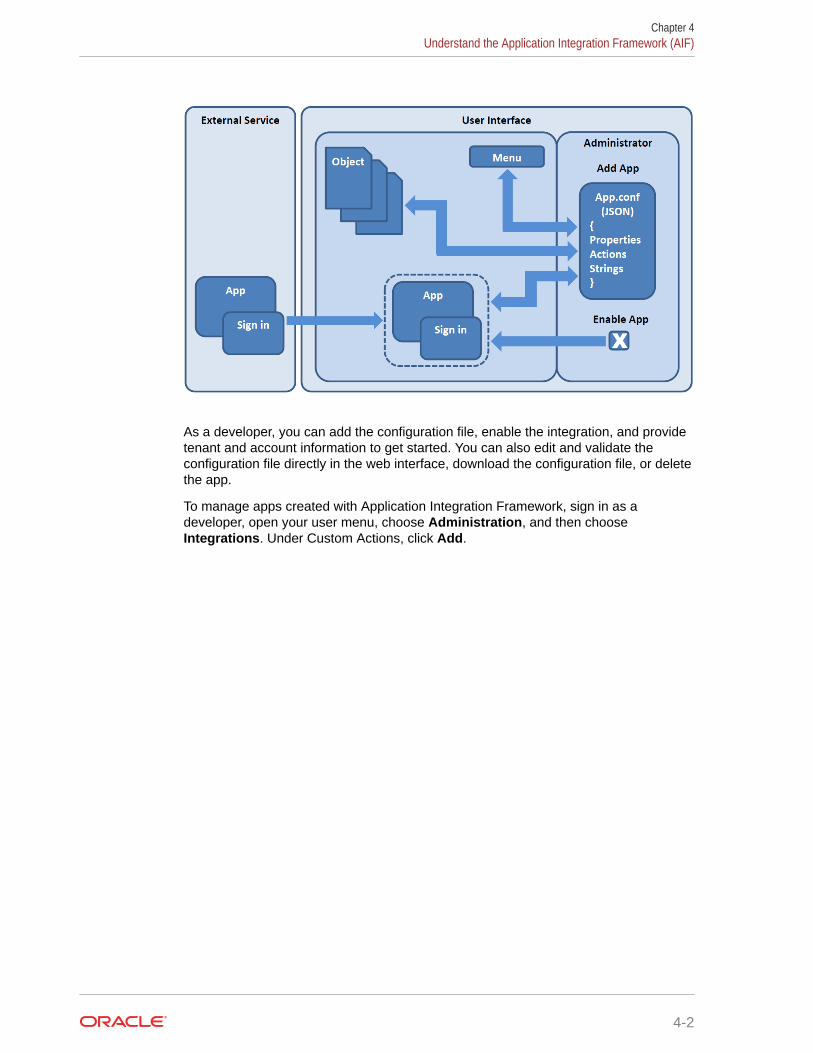
As a developer, you can add the configuration file, enable the integration, and providetenant and account information to get started. You can also edit and validate theconfiguration file directly in the web interface, download the configuration file, or deletethe app.
To manage apps created with Application Integration Framework, sign in as adeveloper, open your user menu, choose Administration, and then chooseIntegrations. Under Custom Actions, click Add.
Chapter 4Understand the Application Integration Framework (AIF)
4-2
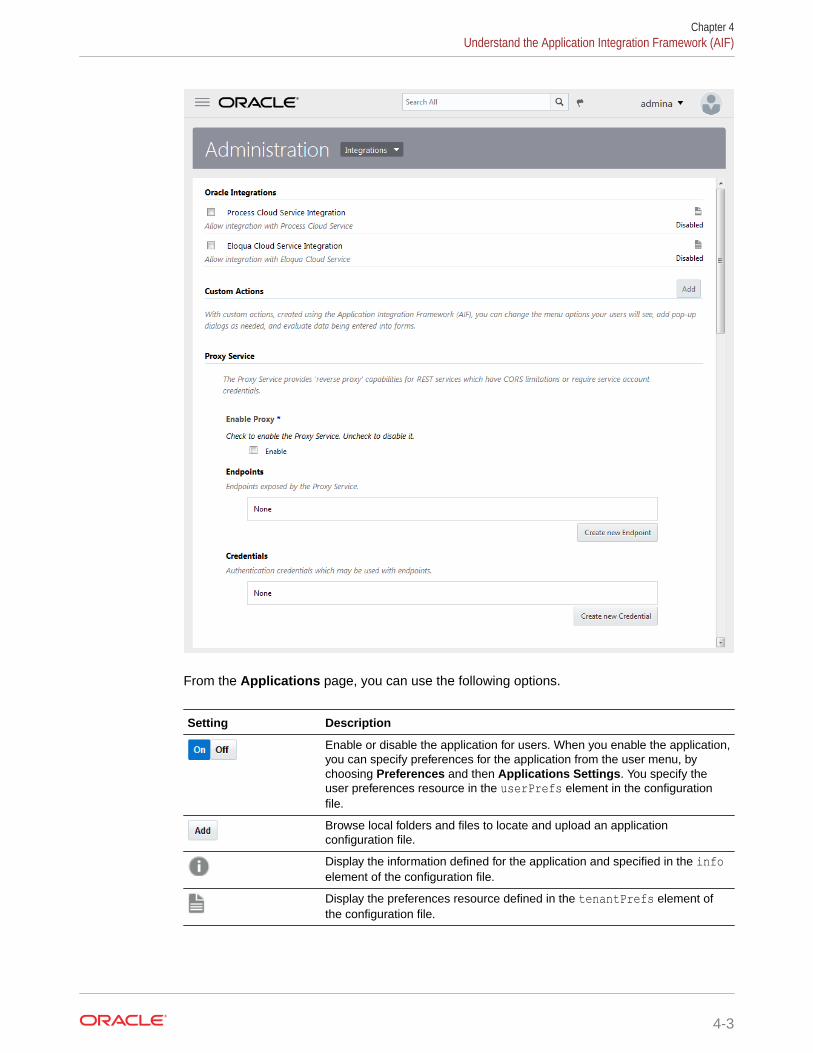
From the Applications page, you can use the following options.
Setting Description
Enable or disable the application for users. When you enable the application,you can specify preferences for the application from the user menu, bychoosing Preferences and then Applications Settings. You specify theuser preferences resource in the userPrefs element in the configurationfile.
Browse local folders and files to locate and upload an applicationconfiguration file.
Display the information defined for the application and specified in the infoelement of the configuration file.
Display the preferences resource defined in the tenantPrefs element ofthe configuration file.
Chapter 4Understand the Application Integration Framework (AIF)
4-3
Setting Description
Open the configuration file in the integrated JSON editor. The editorvalidates the syntax of the file to ensure that the file contains valid JSONcode. Changes you make to the configuration file are immediately availablein the enabled application.
Changes you make to the configuration file are stored only in the server copyof the file. To back up your changes, use the Download icon to save the filelocally.
Download the file from the server to a local destination.
Delete the configuration permanently.
When you delete a configuration file, the deletion is permanent. The file can’tbe restored from the trash.
Manage Custom ApplicationsYou can create custom applications using the Application Integration Framework (AIF).
With custom applications, you can change the menu options your users will see, addpop-up dialogs as needed, call third-party services, and specify how the results arepresented to the user.
For details about creating applications using AIF, see Understand the ApplicationIntegration Framework (AIF) .
After creating an application, you can add it to Oracle Content Management andmanage it from the Administration web interface.
1. After you sign in to the Oracle Content Management web application as anadministrator, click System in the Administration area of the navigation menu.
2. In the Settings menu, click Integrations.
3. To add an application, under Custom Actions, click Add and navigate to thelocation where the configuration file that contains the application information isstored and select it.
4. After adding the application, you can enable or disable it by selecting or clearingthe check box.
After you add your application and enable it, you can manage it by clicking theappropriate icon for any of the following actions:
• View information about the application. What is shown is set by the application’sinfo application property (for example, a popup window).
• Set the preferences for the application. What is shown is set by the application’stenantPrefs property.
• Edit the application. You can alter the application’s code and click Load to test theapplication, save the application, or cancel your edit. If an action isn’t allowed inthe code, an error message is displayed, describing the error.
• Download the application. You can save the application or open it using an editorof your choice.
Chapter 4Manage Custom Applications
4-4
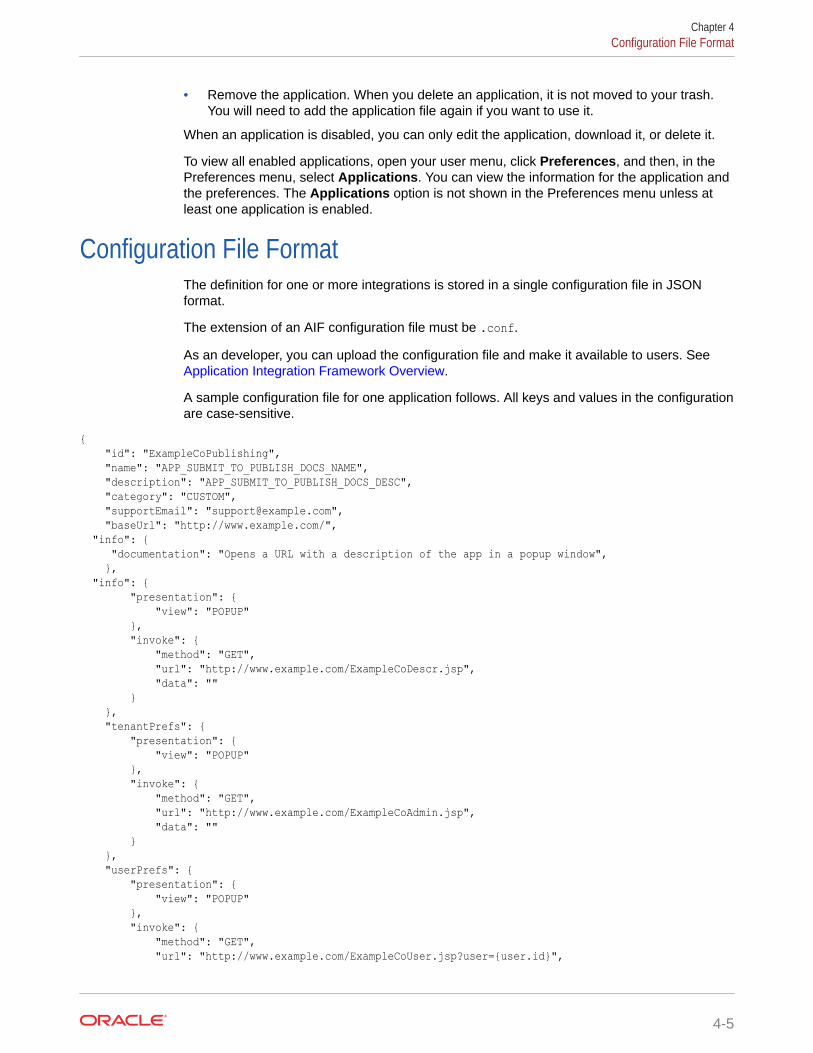
• Remove the application. When you delete an application, it is not moved to your trash.You will need to add the application file again if you want to use it.
When an application is disabled, you can only edit the application, download it, or delete it.
To view all enabled applications, open your user menu, click Preferences, and then, in thePreferences menu, select Applications. You can view the information for the application andthe preferences. The Applications option is not shown in the Preferences menu unless atleast one application is enabled.
Configuration File FormatThe definition for one or more integrations is stored in a single configuration file in JSONformat.
The extension of an AIF configuration file must be .conf.
As an developer, you can upload the configuration file and make it available to users. See Application Integration Framework Overview.
A sample configuration file for one application follows. All keys and values in the configurationare case-sensitive.
{ "id": "ExampleCoPublishing", "name": "APP_SUBMIT_TO_PUBLISH_DOCS_NAME", "description": "APP_SUBMIT_TO_PUBLISH_DOCS_DESC", "category": "CUSTOM", "supportEmail": "[email protected]", "baseUrl": "http://www.example.com/", "info": { "documentation": "Opens a URL with a description of the app in a popup window", }, "info": { "presentation": { "view": "POPUP" }, "invoke": { "method": "GET", "url": "http://www.example.com/ExampleCoDescr.jsp", "data": "" } }, "tenantPrefs": { "presentation": { "view": "POPUP" }, "invoke": { "method": "GET", "url": "http://www.example.com/ExampleCoAdmin.jsp", "data": "" } }, "userPrefs": { "presentation": { "view": "POPUP" }, "invoke": { "method": "GET", "url": "http://www.example.com/ExampleCoUser.jsp?user={user.id}",
Chapter 4Configuration File Format
4-5
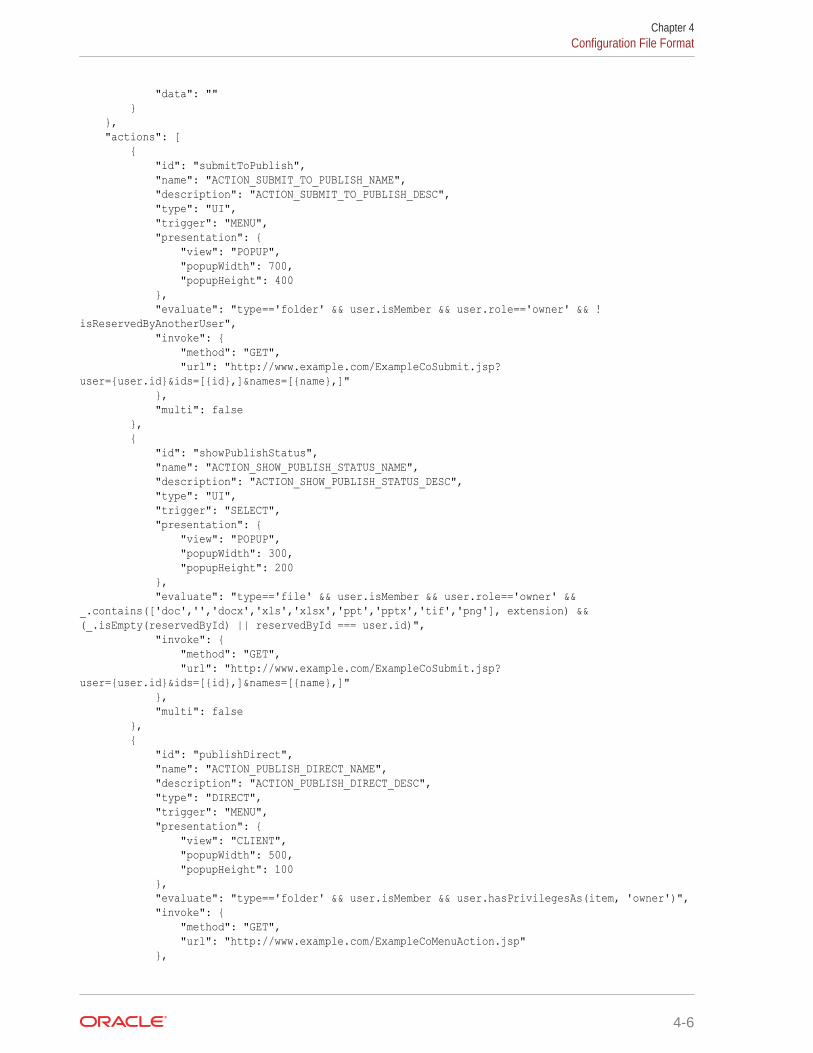
"data": "" } }, "actions": [ { "id": "submitToPublish", "name": "ACTION_SUBMIT_TO_PUBLISH_NAME", "description": "ACTION_SUBMIT_TO_PUBLISH_DESC", "type": "UI", "trigger": "MENU", "presentation": { "view": "POPUP", "popupWidth": 700, "popupHeight": 400 }, "evaluate": "type=='folder' && user.isMember && user.role=='owner' && !isReservedByAnotherUser", "invoke": { "method": "GET", "url": "http://www.example.com/ExampleCoSubmit.jsp?user={user.id}&ids=[{id},]&names=[{name},]" }, "multi": false }, { "id": "showPublishStatus", "name": "ACTION_SHOW_PUBLISH_STATUS_NAME", "description": "ACTION_SHOW_PUBLISH_STATUS_DESC", "type": "UI", "trigger": "SELECT", "presentation": { "view": "POPUP", "popupWidth": 300, "popupHeight": 200 }, "evaluate": "type=='file' && user.isMember && user.role=='owner' && _.contains(['doc','','docx','xls','xlsx','ppt','pptx','tif','png'], extension) && (_.isEmpty(reservedById) || reservedById === user.id)", "invoke": { "method": "GET", "url": "http://www.example.com/ExampleCoSubmit.jsp?user={user.id}&ids=[{id},]&names=[{name},]" }, "multi": false }, { "id": "publishDirect", "name": "ACTION_PUBLISH_DIRECT_NAME", "description": "ACTION_PUBLISH_DIRECT_DESC", "type": "DIRECT", "trigger": "MENU", "presentation": { "view": "CLIENT", "popupWidth": 500, "popupHeight": 100 }, "evaluate": "type=='folder' && user.isMember && user.hasPrivilegesAs(item, 'owner')", "invoke": { "method": "GET", "url": "http://www.example.com/ExampleCoMenuAction.jsp" },
Chapter 4Configuration File Format
4-6
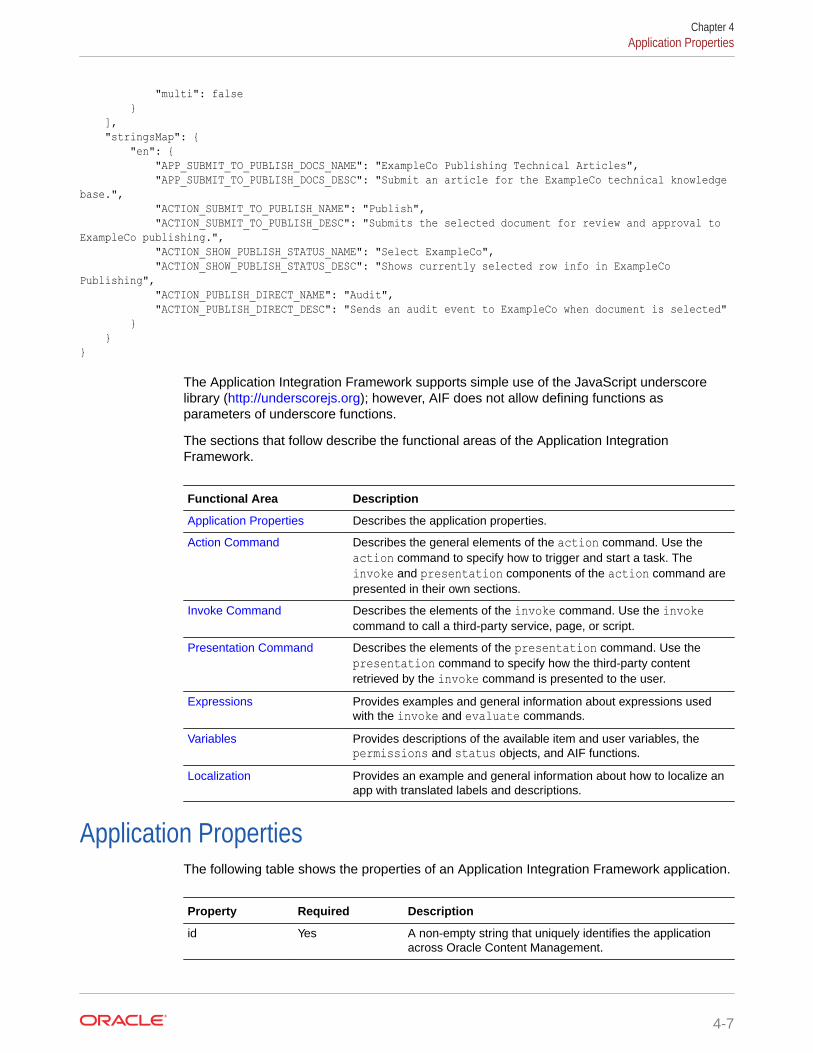
"multi": false } ], "stringsMap": { "en": { "APP_SUBMIT_TO_PUBLISH_DOCS_NAME": "ExampleCo Publishing Technical Articles", "APP_SUBMIT_TO_PUBLISH_DOCS_DESC": "Submit an article for the ExampleCo technical knowledge base.", "ACTION_SUBMIT_TO_PUBLISH_NAME": "Publish", "ACTION_SUBMIT_TO_PUBLISH_DESC": "Submits the selected document for review and approval to ExampleCo publishing.", "ACTION_SHOW_PUBLISH_STATUS_NAME": "Select ExampleCo", "ACTION_SHOW_PUBLISH_STATUS_DESC": "Shows currently selected row info in ExampleCo Publishing", "ACTION_PUBLISH_DIRECT_NAME": "Audit", "ACTION_PUBLISH_DIRECT_DESC": "Sends an audit event to ExampleCo when document is selected" } }}
The Application Integration Framework supports simple use of the JavaScript underscorelibrary (http://underscorejs.org); however, AIF does not allow defining functions asparameters of underscore functions.
The sections that follow describe the functional areas of the Application IntegrationFramework.
Functional Area Description
Application Properties Describes the application properties.
Action Command Describes the general elements of the action command. Use theaction command to specify how to trigger and start a task. Theinvoke and presentation components of the action command arepresented in their own sections.
Invoke Command Describes the elements of the invoke command. Use the invokecommand to call a third-party service, page, or script.
Presentation Command Describes the elements of the presentation command. Use thepresentation command to specify how the third-party contentretrieved by the invoke command is presented to the user.
Expressions Provides examples and general information about expressions usedwith the invoke and evaluate commands.
Variables Provides descriptions of the available item and user variables, thepermissions and status objects, and AIF functions.
Localization Provides an example and general information about how to localize anapp with translated labels and descriptions.
Application PropertiesThe following table shows the properties of an Application Integration Framework application.
Property Required Description
id Yes A non-empty string that uniquely identifies the applicationacross Oracle Content Management.
Chapter 4Application Properties
4-7
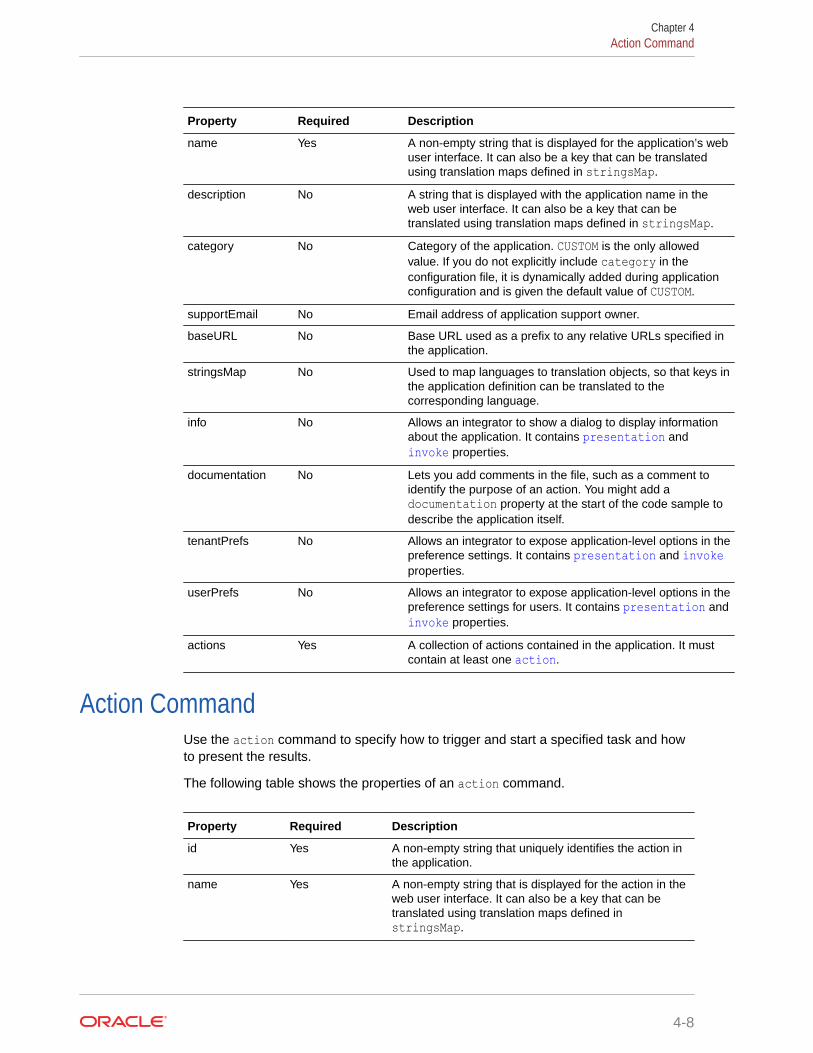
Property Required Description
name Yes A non-empty string that is displayed for the application’s webuser interface. It can also be a key that can be translatedusing translation maps defined in stringsMap.
description No A string that is displayed with the application name in theweb user interface. It can also be a key that can betranslated using translation maps defined in stringsMap.
category No Category of the application. CUSTOM is the only allowedvalue. If you do not explicitly include category in theconfiguration file, it is dynamically added during applicationconfiguration and is given the default value of CUSTOM.
supportEmail No Email address of application support owner.
baseURL No Base URL used as a prefix to any relative URLs specified inthe application.
stringsMap No Used to map languages to translation objects, so that keys inthe application definition can be translated to thecorresponding language.
info No Allows an integrator to show a dialog to display informationabout the application. It contains presentation and invoke properties.
documentation No Lets you add comments in the file, such as a comment toidentify the purpose of an action. You might add adocumentation property at the start of the code sample todescribe the application itself.
tenantPrefs No Allows an integrator to expose application-level options in thepreference settings. It contains presentation and invokeproperties.
userPrefs No Allows an integrator to expose application-level options in thepreference settings for users. It contains presentation and invoke properties.
actions Yes A collection of actions contained in the application. It mustcontain at least one action.
Action CommandUse the action command to specify how to trigger and start a specified task and howto present the results.
The following table shows the properties of an action command.
Property Required Description
id Yes A non-empty string that uniquely identifies the action inthe application.
name Yes A non-empty string that is displayed for the action in theweb user interface. It can also be a key that can betranslated using translation maps defined instringsMap.
Chapter 4Action Command
4-8
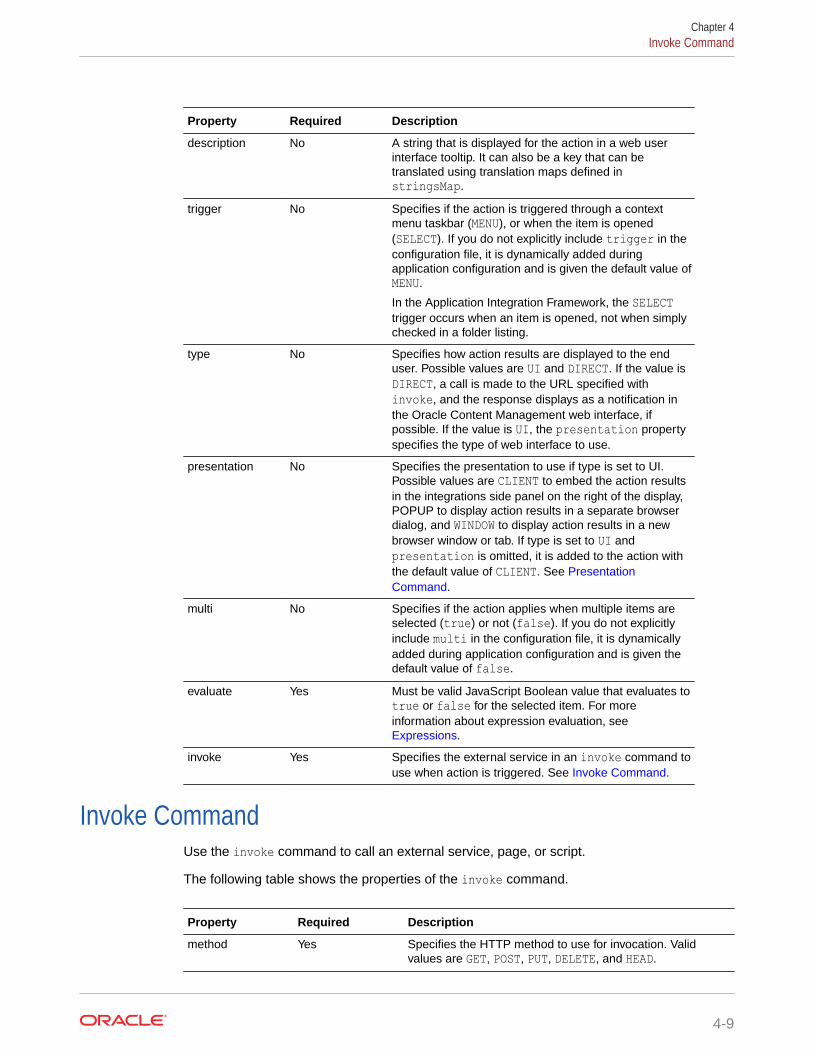
Property Required Description
description No A string that is displayed for the action in a web userinterface tooltip. It can also be a key that can betranslated using translation maps defined instringsMap.
trigger No Specifies if the action is triggered through a contextmenu taskbar (MENU), or when the item is opened(SELECT). If you do not explicitly include trigger in theconfiguration file, it is dynamically added duringapplication configuration and is given the default value ofMENU.
In the Application Integration Framework, the SELECTtrigger occurs when an item is opened, not when simplychecked in a folder listing.
type No Specifies how action results are displayed to the enduser. Possible values are UI and DIRECT. If the value isDIRECT, a call is made to the URL specified withinvoke, and the response displays as a notification inthe Oracle Content Management web interface, ifpossible. If the value is UI, the presentation propertyspecifies the type of web interface to use.
presentation No Specifies the presentation to use if type is set to UI.Possible values are CLIENT to embed the action resultsin the integrations side panel on the right of the display,POPUP to display action results in a separate browserdialog, and WINDOW to display action results in a newbrowser window or tab. If type is set to UI andpresentation is omitted, it is added to the action withthe default value of CLIENT. See PresentationCommand.
multi No Specifies if the action applies when multiple items areselected (true) or not (false). If you do not explicitlyinclude multi in the configuration file, it is dynamicallyadded during application configuration and is given thedefault value of false.
evaluate Yes Must be valid JavaScript Boolean value that evaluates totrue or false for the selected item. For moreinformation about expression evaluation, see Expressions.
invoke Yes Specifies the external service in an invoke command touse when action is triggered. See Invoke Command.
Invoke CommandUse the invoke command to call an external service, page, or script.
The following table shows the properties of the invoke command.
Property Required Description
method Yes Specifies the HTTP method to use for invocation. Validvalues are GET, POST, PUT, DELETE, and HEAD.
Chapter 4Invoke Command
4-9

Property Required Description
url Yes A URL expression to specify the URL for the third-partyservice. It can be an absolute or relative URL. If a relativeURL is specified, it will be added to the baseUrl of theapplication, if specified.
data No An expression that specifies data to be sent with the URL.See Expressions.
A JSON payload can added to the request body as a stringobject.
appLinkRole No If the action is a request to create an application link(applink), use appLinkRole to specify the role to use for theapplink. Valid values are contributor, downloader, andviewer.
header No A custom header to include when making POST calls.
token No Specifies if any special security token needs to be passed.Valid values are PCS (PCS OAUTH token) and NONE.
Presentation CommandUse the presentation command to specify how the third-party content retrieved by theinvoke command is presented to the user.
The following table shows the properties of the presentation command.
Property Required Description
view No Specifies how action response content is displayed tothe user. Use CLIENT to embed results in theapplication, POPUP to display results in a separatebrowser dialog, or WINDOW to display results in a newbrowser window or tab.
If you use CLIENT with the SELECT trigger, action resultsare displayed in the integrations side panel on the rightof the display. The integrations panel must be open forthe results to display. The SELECT trigger occurs whenan item is opened, not when simply checked in a folderlisting. If you use CLIENT with the MENU trigger, actionresults are displayed in a pop-up dialog. If you do notexplicitly include view in the configuration file, it isdynamically added during application configuration andis given the default value of CLIENT.
popupWidth No A number specifying the width of the container. If noneis specified, a default value is used, depending on thecontext.
popupHeight No A number specifying the height of the container. If noneis specified, a default value is used, depending on thecontext.
Chapter 4Presentation Command
4-10
ExpressionsThe invoke and evaluate commands accept expressions, which can include variables andoperators that are evaluated at runtime.
Invoke Expressions
An invoke expression is a template used to generate URL and data values at runtime byreplacing the variables specified in the template with their runtime values. Variables canreference one or more selected items, information about the current user, and other systeminformation.
• Anything enclosed in a brace { } is considered to be a key value that is mapped to thecorresponding attribute of a file, folder, or the currently signed-in user. User attributes areprefixed by user.
For example, if John Smith is the current user, userid={user.name} resolves to this:
userid=John Smith• For multiselection, use the [repeated template separator] syntax. The repeated template
is resolved for each selected item, and resolved strings for items are separated by thespecified delimiter.
For example, for items with GUIDs x189 and y234, item=[{id},] resolves to this:
item=x189,y234
Evaluate Expressions
An evaluate expression determines if the item or items selected by the user qualify for aparticular action. The expression can contain zero or more variables that are replaced withtheir runtime values before the expression is evaluated. This expression must be a validJavaScript expression after all the values of the variables are replaced with their values atruntime.
The expression must evaluate to true or false. If the result is true, the action is madeavailable as specified by the trigger property. If the result is false, the action is not madeavailable to the user.
For example, the following expression returns a true value only if all three conditionsevaluate to true: the item selected in the interface is a file, the user is signed in (notaccessing the file using a public link or applink), and the user is the owner of the file.
"evaluate": "type=='file' && user.isMember && user.role=='owner'Antother example is item.meta.<custom property group name>.<custom property groupfield name>.
Some commonly used JavaScript comparison and logical operators follow.
Operator Description
== equal to
!= not equal to
> greater than
< less than
Chapter 4Expressions
4-11
Operator Description
= greater than or equal to
<= less than or equal to
&& logical and
|| logical or
! logical not
VariablesYou can use variables in applications to dynamically provide information about thecurrent user, the currently selected item or items, and other types of information.Variables are evaluated at runtime when the application is used.
You can use a category prefix (item or user) with variable names to make therelationship explicit, especially in cases where variable names are the same, such asname. If a variable is not prefixed by any category, item is used as the category.
For example, to specify the folder or file name, use item.name. To specify the username, use user.name. If you specify name without the category, then item.name (thefolder or file name) is assumed.
Folder and File Item Variables
The following variables are specific to a folder or file item that is currently selected bythe user. Folder and file variables belong to the item category. The following table listsvariables that apply to both folder and file items.
Folder or FileVariable
Description
id Item GUID
name Item name
description Item description
type Item type
parentid Item parent ID
ownerId Item owner GUID
ownername Item owner name
creatorname Item creator name
createdat Date and time item was created
lastmodifierid GUID of the user who most recently modified the item
lastmodifiername Name of the user who most recently modified the item
modifiedat Date and time the item was last modified
size Size of the item
permissions Actions the user is allowed to perform on the item
state State of the item
Chapter 4Variables
4-12
Folder or FileVariable
Description
applink Applink created by AIF for this user to access the item, ifappLinkRole was specified in the invoke command
The appLink object has id, url, and accessToken properties thatcan be passed in the URL or data as {appLink.id},{appLink.url}, and {appLink.accessToken}, respectively.
favorite Whether the item is a favorite of the user or not
File-Item Specific Variables
The following variables are specific to a file item that is currently selected by the user. Filevariables belong to the item category. The table lists variables that apply to file items only.
File Variable Description
originalname Original name of the item
extension Extension of the item
revision Item’s revision
mimetype Mime type of the item
reservedbyid GUID of the user who reserved the item
reservedbyname Name of the user who reserved the item
reservedat Date and time when the item was reserved
isreservedbyanotheruser Whether the item is reserved by a user other than the current user
Item Permissions
Permissions is a JSON object that you can query to determine the permissions associatedwith an item. The properties return a Boolean value.
Permission Properties Description
annotationDelete User has delete permission for annotations on the item.
annotationRead User has read permission for annotations on the item.
annotationUpdate User has update permission for annotations on the item.
annotationWrite User has write permission for annotations on the item.
directShareDelete User has delete permission for the item shared with the user.
directShareRead User has read permission for the item shared with the user.
directShareUpdate User has update permission for the item shared with the user.
directShareWrite User has write permission for the item shared with user.
fileDelete User has delete permission for the file.
filePreview User has preview permission for the file.
fileRead User has read permission for the file.
fileUpdate User has update permission for the file.
fileWrite User has write permission for the file.
Chapter 4Variables
4-13

Permission Properties Description
folderDelete User has delete permission for the folder.
folderPreview User has preview permission for the folder.
folderRead User has read permission for the folder.
folderUpdate User has update permission for the folder.
folderWrite User has write permission for the folder.
linkShareDelete User has delete permission for the item shared with the user through a link.
linkShareRead User has read permission for the item shared with the user through a link.
linkShareUpdate User has update permission for the item shared with the user through a link.
linkShareWrite User has write permission for the item shared with the user through a link.
Item State
State is a JSON object that you can query to determine certain states of an item. Theproperties return a Boolean value.
State Property Description
isAnnotated The item has annotations.
isAnnotatedLatest The item has the most recent annotations.
isLinked The item has named sharing links defined for it.
isShared The item is directly shared with specified users.
isSyncd The item is included in the content synced through the desktop client.
isInTrash The item is currently in the trash.
User Variables
The following variables are relative to the current user or session, or both.
Variable Description
id User’s GUID
name User’s name
loginname User’s sign in name
email User’s email address
timezone User’s time zone
ismember Returns true if the user is not accessing an item through public link orapp link and false otherwise
ispubliclink Returns true if the user is accessing the item through a public link andfalse otherwise
isapplink Returns true if the user is accessing the item through an applink andfalse otherwise
role Current user's role for an item
hasprivilegesas Specified with a user role as a string argument to determine if the userhas the specified role
Chapter 4Variables
4-14
API Functions
Use the following utility functions with evaluate or invoke expressions to return informationabout a specified item.
Variable Description
isReservedByAnotherUser(item) Returns true if the item is reserved by another user, or returnsfalse otherwise
hasPrivilegesAs(item, role) Returns true if the user has role privileges for the item, or returnsfalse otherwise
getUserRole(item) Returns the user’s role for the item
LocalizationUse the stringsMap element to provide localized versions of labels and descriptions usedin the integration.
The following example shows sample application and action names and descriptions inEnglish and German.
"stringsMap": { "en": { "APPLICATION_NAME": "Localization Test", "APPLICATION_DESCRIPTION": "This example provides translated content.", "ACTION1": "Action1", "ACTION2": "Action2", "ACTION1DESC": "Action1 description", "ACTION2DESC": "Action2 description" }, "de": { "APPLICATION_NAME": "Lokalisierung Beispiel", "APPLICATION_DESCRIPTION": "Dieses Beispiel liefert übersetzten Inhalte.", "ACTION1": "Aktion1", "ACTION2": "Aktion2", "ACTION1DESC": "Aktion1 Beschreibung", "ACTION2DESC": "Aktion2 Beschreibung" }
Chapter 4Localization
4-15
5Develop Content Connectors
You can use the Oracle Content Management connector framework to develop your owncontent connectors to bring content you have already created elsewhere into Oracle ContentManagement, manage it centrally, and use it in new experiences across multiple channels.
The Oracle Content Management connector framework enables you to bring content youhave already created elsewhere into Oracle Content Management, manage it centrally, anduse it in new experiences across multiple channels.
Part of Oracle Content Management, the connector framework integrates with remote contentstores to let you bring content into Oracle Content Management as easily as uploading filesfrom your desktop. You can plug in any type of content store to Oracle Content Management,making it a content hub.
The connector framework abstracts the functionality that is provided and implemented by endconnectors. It does so by providing the REST API interface to configure a content connectoras well as to call content-related APIs on the end store, like browsing the remote file systemand copying the files from a remote store to Oracle Content Management.
The following sections describe how to develop custom content connectors:
• Connector REST API Interface
• Connector SDK
• Build a New Content Connector
• Content Connector Configuration and Registration
• Content Connector Execution Flow
• Pexels Content Connector Sample Implementation
• Download the CEC Content Connector Sample and SDK
Connector REST API InterfaceYou can deploy and run content connectors anywhere and implement them with anytechnology stack, as long as they can be called from Oracle Content Management throughREST APIs.
Content connectors are deployable binaries that use Restful services for the remote storesimplementing the REST interfaces (SPIs/SDK) defined by Oracle Content Management. Theyinternally use cloud store native SDKs to connect to remote systems.
Connector SDKTo help you build a new content connector, Oracle Content Management provides theConnector SDK
This SDK contains:
• A javadoc
5-1
• A JAR file containing DTO and REST interfaces
• The connector.yaml file, which documents the REST APIs and the payloads
The Connector SDK is in the cec-connector-sdk.zip file.
Build a New Content ConnectorTo build a new content connector as a Restful service, a developer needs toimplement the Restful interfaces provided by the connector framework.
The Oracle Content Management connector framework has the following interfaces.
• APIResource Interface: This interface is the starting point of the contentconnector. You simply return the version that's supported.
• ServerResource Interface: When a developer or administrator registers acontent connector in the Oracle Content Management server, Oracle ContentManagement calls this service to get the basic details about the connector server,such as these:
– Authorization type:
* OAUTH: If the remote cloud store supports 3-legged OAuth authentication
* BASIC_AUTH: If the remote cloud store supports Basic authentication
Note:
Oracle no longer supports Basic authentication for generalconsumption.
* NO_AUTH: If the remote store doesn’t require any authentication
– Picker type: Oracle Content Management supports the Oracle ContentManagement generic picker to list the file system. If the content connectorsupports the native picker, then the content connector implementer canimplement JavaScript APIs to integrate that picker with the Oracle ContentManagement UI. The picker type can be one of three values:
1. COMMON, using the common UI
2. CUSTOM, using a custom UI
3. NATIVE, using a native UI like Google Drive or Microsoft OneDrive
– Also use this Interface to define custom fields for the content connector.Custom properties are connector specific, so the connector framework can’tprovide such a properties list by itself. Every content connector has its ownrequirement to connect to a remote store; for example, one content connectormight need just ClientID and ClientSecret, while another might requireClientID, ClientSecret, AppID, and so on. Each content connector canprovide a custom properties list to the Oracle Content Management server byServerResource. If any of these properties need to be filled in by a developeror administrator during configuration, the connector framework will surfacethem in the administration UI.
This service will be called only once, at the time of registration.
Chapter 5Build a New Content Connector
5-2
• AuthorizationResource Interface: Used to complete the authorization before contentfrom the remote store can be copied to the Oracle Content Management repository. Thisinterface has support for both OAuth and Basic authentication protocols.
– 3-legged OAuth authentication
* In the OAuth flow, the Oracle Content Management UI, based on the customproperty value provided by the content connector, supports OAuth authentication.It triggers an OAuth flow by calling the connector framework, which in turn callsthe /authorization/authorization URLs service on the content connector toget the authorization URL.
* The Oracle Content Management UI renders the authorization URL in a browser,where the user authorizes the application and gives Oracle Content Managementpermission to access the token for further communication. To complete theauthorization and get the OAuth token, the Oracle Content Management serverwill call the /authorization/completedAuthorizations service on the contentconnector. To complete 3-legged OAuth, the Oracle Content Management serveralso provides the redirect callback servlet, which the remote store will call tocomplete the authorization process.
– Basic authentication: In case the content connector supports Basic authentication,the Oracle Oracle Content Management UI will prompt the user to enter a user nameand password, which it will pass to the Oracle Oracle Content Management(connector framework). The connector framework will call the /authorization/basicAuthorization service to pass the credentials and will expect the contentconnector to validate with the remote store if the credentials are correct.
• FileSystemResource Interface: The connector framework supports the generic filepicker, which can be used by content connectors to render the file-system information fora user to browse the files. But, the content connector needs to implement the /filesystem service to use this functionality. Highlights of this service follow:
– The user can browse the file system like any other file picker; for example, theGoogle Drive or Microsoft OneDrive picker.
– This supports pagination.
– The user can also specify the search criteria to get the filtered result.
• ContentResource Interface: The connector framework uses the service /content to getthe actual content (the bytes of the files) stored in the cloud store.
This service returns javax.ws.rs.core.Response as a response, and the response entityis the content of the file. The response should include the following headers:
– Content-Length: Set to the entity length, or -1 if unknown.
– Content-Type: Set to the content type, or application/octet-stream if a moreaccurate type is not possible.
– Content-Disposition: Set to the disposition type of attachment, and includes afilename parameter (for example, Content-Disposition: attachment;filename="meeting agenda.doc"). Note that file names with spaces must be inquotation marks. See RFC 6266 for details about the format and encoding of theheader.
Each of these interfaces is described in more detail, with examples of REST payloads, in thefollowing sections:
• REST Interfaces for Configuration, Authorization, and Fetching Content
Chapter 5Build a New Content Connector
5-3
• REST Interfaces for File System Browsing and Searching
• Content Picker
• Authorization
REST Interfaces for Configuration, Authorization, and FetchingContent
A content connector needs to implement he following REST APIs for defining theconnector configuration, setting up authorization, and fetching content.
/rest/api
Implements intradoc.connectorcommon.server.APIResourceHere you return the latest version supported by the content connector.
GET http://host:port/connector/rest/api
[ "v1"]
/rest/api/v1/server
Implements intradoc.connectorcommon.server.ServerResourceThis returns information about the content connector configuration, like theauthentication type, picker type, and custom fields it exposes.
GET http://host:port/connector/rest/api/v1/server
{ "name": "Pexels Connector", "nameLocalizations": [ { "locale": "en", "localizedString": "Pexels Connector" } ], "version": " (, , )", "about": "Pexels Connector.<br>Copyright (c) 2019, Oracle and/or its affiliates. All rights reserved.", "aboutLocalizations": [ { "locale": "en", "localizedString": "Pexels Connector.<br>Copyright (c) 2019, Oracle and/or its affiliates. All rights reserved." } ], "authenticationType": "NO_AUTH", "pickerType": "CUSTOM", "enableMultiUserCopyBack": false, "maxUploadSize": 1073741824, "fields": [ {
Chapter 5Build a New Content Connector
5-4
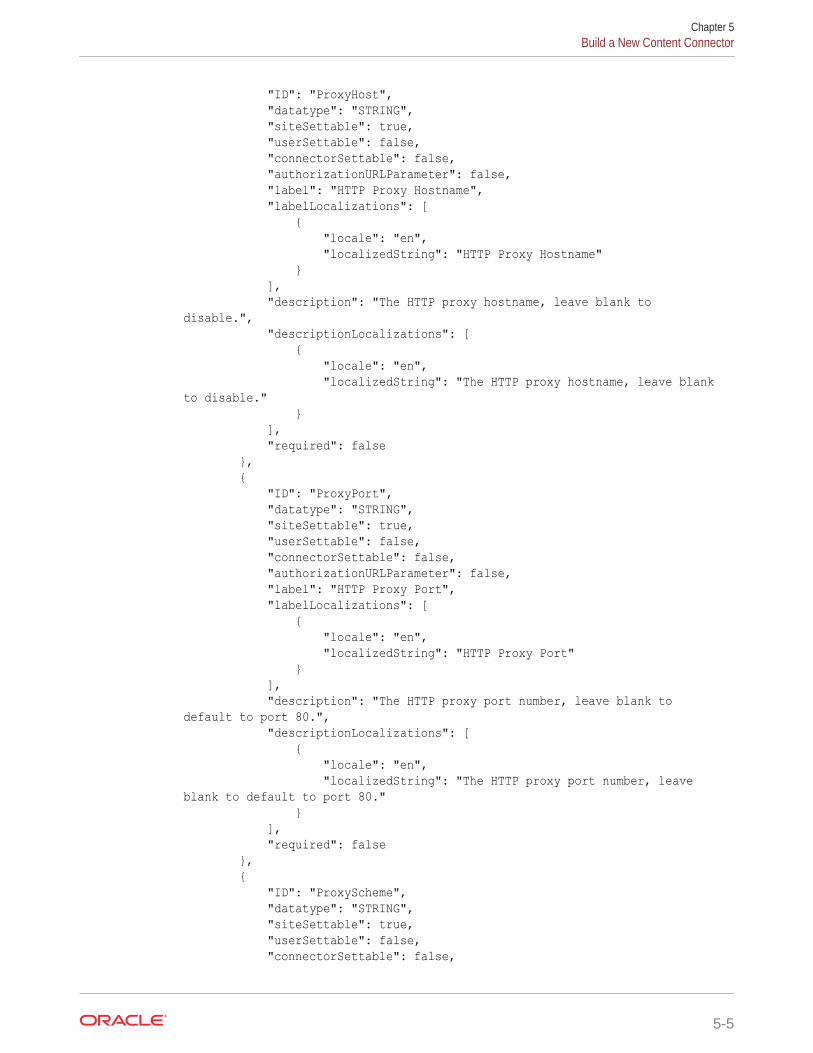
"ID": "ProxyHost", "datatype": "STRING", "siteSettable": true, "userSettable": false, "connectorSettable": false, "authorizationURLParameter": false, "label": "HTTP Proxy Hostname", "labelLocalizations": [ { "locale": "en", "localizedString": "HTTP Proxy Hostname" } ], "description": "The HTTP proxy hostname, leave blank to disable.", "descriptionLocalizations": [ { "locale": "en", "localizedString": "The HTTP proxy hostname, leave blank to disable." } ], "required": false }, { "ID": "ProxyPort", "datatype": "STRING", "siteSettable": true, "userSettable": false, "connectorSettable": false, "authorizationURLParameter": false, "label": "HTTP Proxy Port", "labelLocalizations": [ { "locale": "en", "localizedString": "HTTP Proxy Port" } ], "description": "The HTTP proxy port number, leave blank to default to port 80.", "descriptionLocalizations": [ { "locale": "en", "localizedString": "The HTTP proxy port number, leave blank to default to port 80." } ], "required": false }, { "ID": "ProxyScheme", "datatype": "STRING", "siteSettable": true, "userSettable": false, "connectorSettable": false,
Chapter 5Build a New Content Connector
5-5
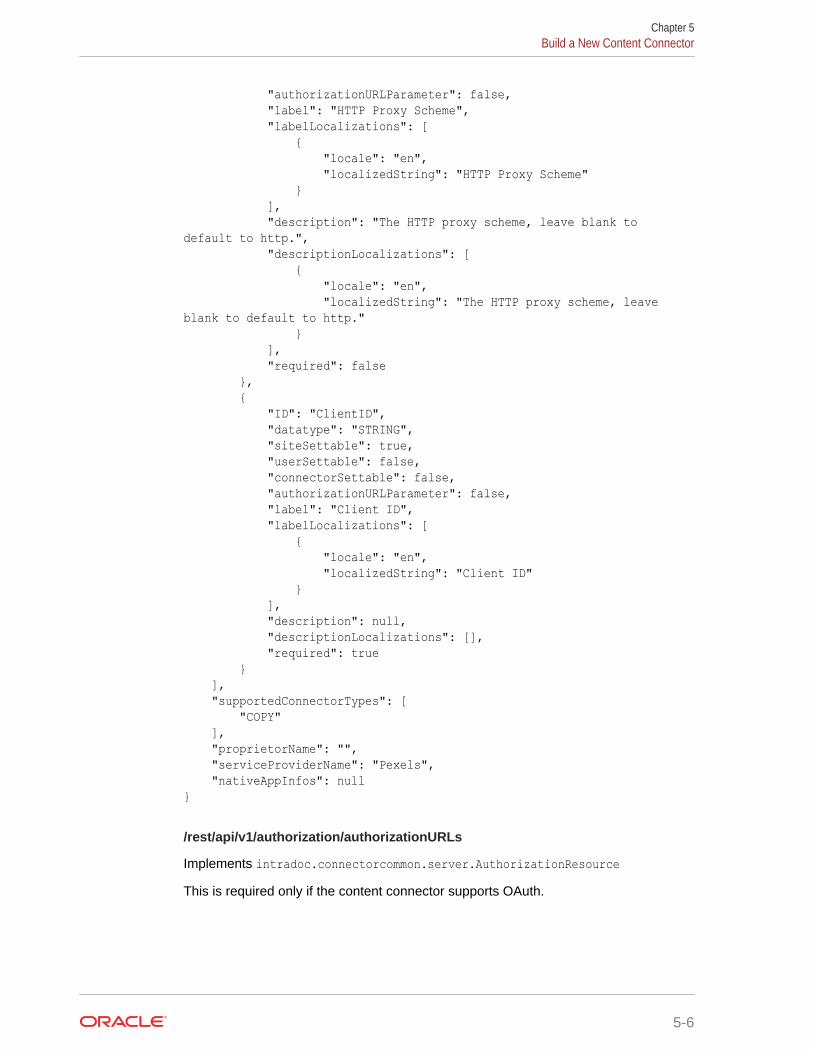
"authorizationURLParameter": false, "label": "HTTP Proxy Scheme", "labelLocalizations": [ { "locale": "en", "localizedString": "HTTP Proxy Scheme" } ], "description": "The HTTP proxy scheme, leave blank to default to http.", "descriptionLocalizations": [ { "locale": "en", "localizedString": "The HTTP proxy scheme, leave blank to default to http." } ], "required": false }, { "ID": "ClientID", "datatype": "STRING", "siteSettable": true, "userSettable": false, "connectorSettable": false, "authorizationURLParameter": false, "label": "Client ID", "labelLocalizations": [ { "locale": "en", "localizedString": "Client ID" } ], "description": null, "descriptionLocalizations": [], "required": true } ], "supportedConnectorTypes": [ "COPY" ], "proprietorName": "", "serviceProviderName": "Pexels", "nativeAppInfos": null}
/rest/api/v1/authorization/authorizationURLs
Implements intradoc.connectorcommon.server.AuthorizationResourceThis is required only if the content connector supports OAuth.
Chapter 5Build a New Content Connector
5-6
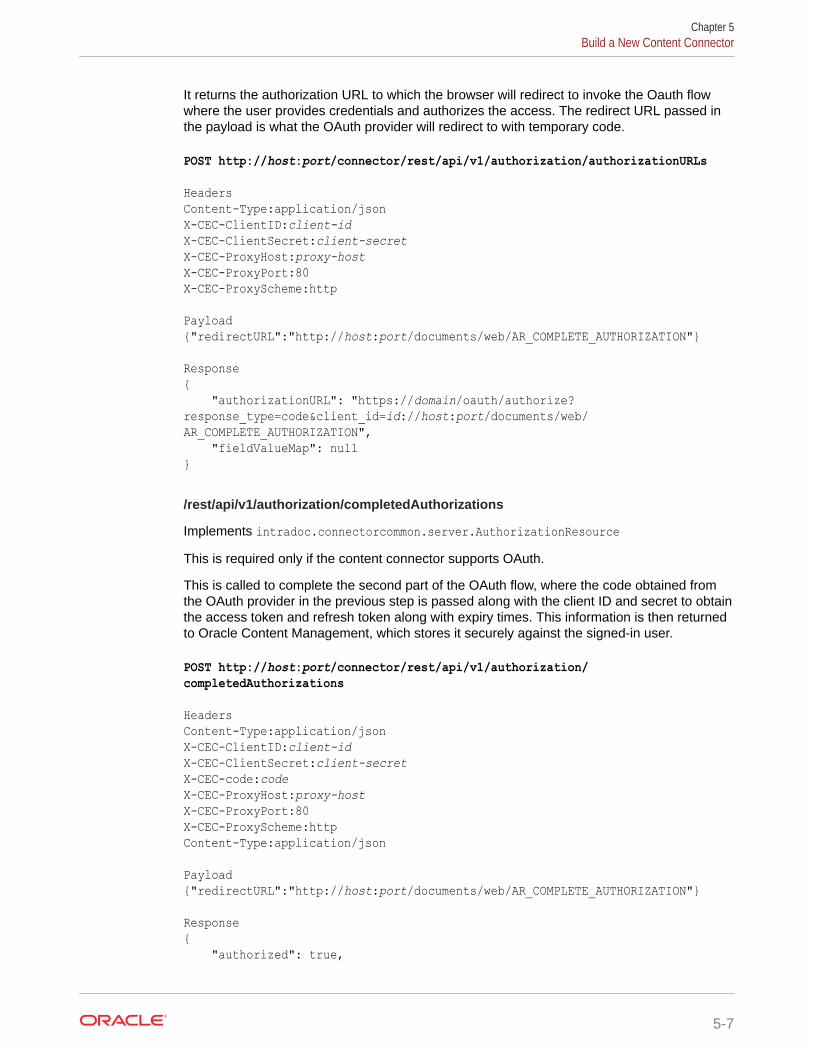
It returns the authorization URL to which the browser will redirect to invoke the Oauth flowwhere the user provides credentials and authorizes the access. The redirect URL passed inthe payload is what the OAuth provider will redirect to with temporary code.
POST http://host:port/connector/rest/api/v1/authorization/authorizationURLs
HeadersContent-Type:application/jsonX-CEC-ClientID:client-idX-CEC-ClientSecret:client-secretX-CEC-ProxyHost:proxy-hostX-CEC-ProxyPort:80X-CEC-ProxyScheme:http Payload{"redirectURL":"http://host:port/documents/web/AR_COMPLETE_AUTHORIZATION"} Response{ "authorizationURL": "https://domain/oauth/authorize?response_type=code&client_id=id://host:port/documents/web/AR_COMPLETE_AUTHORIZATION", "fieldValueMap": null}
/rest/api/v1/authorization/completedAuthorizations
Implements intradoc.connectorcommon.server.AuthorizationResourceThis is required only if the content connector supports OAuth.
This is called to complete the second part of the OAuth flow, where the code obtained fromthe OAuth provider in the previous step is passed along with the client ID and secret to obtainthe access token and refresh token along with expiry times. This information is then returnedto Oracle Content Management, which stores it securely against the signed-in user.
POST http://host:port/connector/rest/api/v1/authorization/completedAuthorizations
HeadersContent-Type:application/jsonX-CEC-ClientID:client-idX-CEC-ClientSecret:client-secretX-CEC-code:codeX-CEC-ProxyHost:proxy-hostX-CEC-ProxyPort:80X-CEC-ProxyScheme:httpContent-Type:application/json Payload{"redirectURL":"http://host:port/documents/web/AR_COMPLETE_AUTHORIZATION"} Response{ "authorized": true,
Chapter 5Build a New Content Connector
5-7
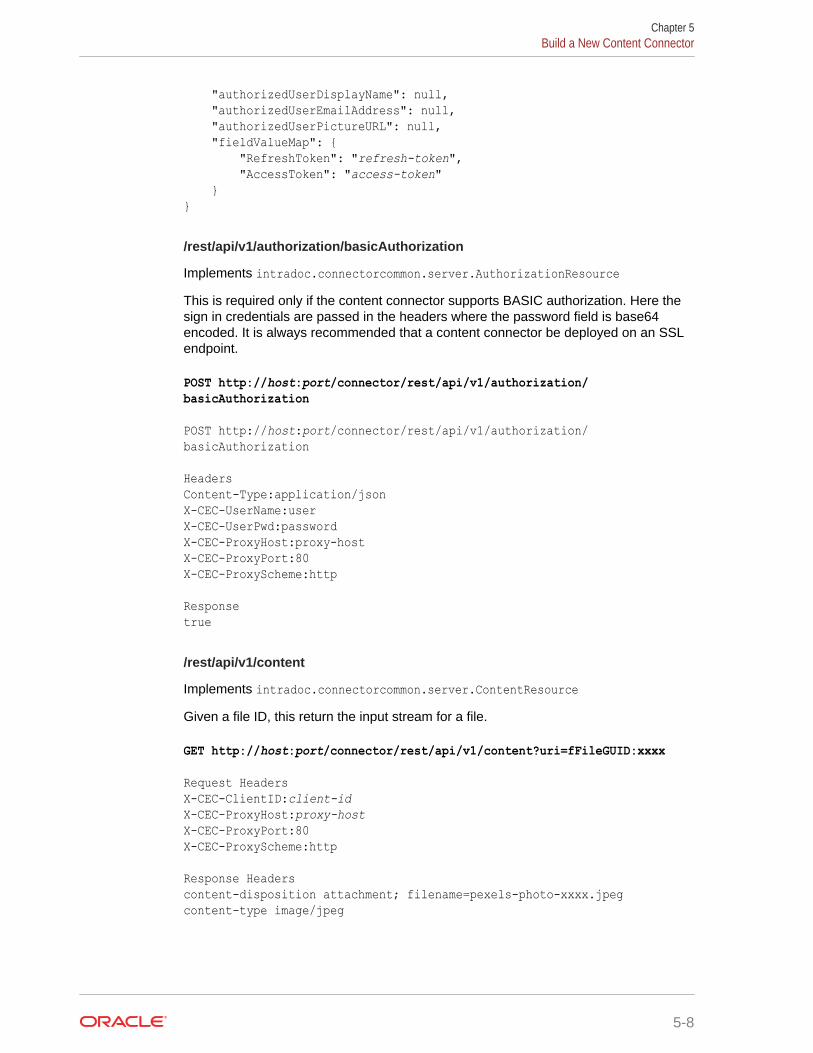
"authorizedUserDisplayName": null, "authorizedUserEmailAddress": null, "authorizedUserPictureURL": null, "fieldValueMap": { "RefreshToken": "refresh-token", "AccessToken": "access-token" }}
/rest/api/v1/authorization/basicAuthorization
Implements intradoc.connectorcommon.server.AuthorizationResourceThis is required only if the content connector supports BASIC authorization. Here thesign in credentials are passed in the headers where the password field is base64encoded. It is always recommended that a content connector be deployed on an SSLendpoint.
POST http://host:port/connector/rest/api/v1/authorization/basicAuthorization
POST http://host:port/connector/rest/api/v1/authorization/basicAuthorization
HeadersContent-Type:application/jsonX-CEC-UserName:userX-CEC-UserPwd:passwordX-CEC-ProxyHost:proxy-hostX-CEC-ProxyPort:80X-CEC-ProxyScheme:http
Responsetrue
/rest/api/v1/content
Implements intradoc.connectorcommon.server.ContentResourceGiven a file ID, this return the input stream for a file.
GET http://host:port/connector/rest/api/v1/content?uri=fFileGUID:xxxx
Request HeadersX-CEC-ClientID:client-idX-CEC-ProxyHost:proxy-hostX-CEC-ProxyPort:80X-CEC-ProxyScheme:http Response Headerscontent-disposition attachment; filename=pexels-photo-xxxx.jpegcontent-type image/jpeg
Chapter 5Build a New Content Connector
5-8
Response BodyFile Content
REST Interfaces for File System Browsing and SearchingIf a content connector uses the common picker available out of the box with Oracle ContentManagement, then the content connector needs to implement the following REST API.
This REST API is required for the Common UI.
/api/v1/filesystem
Implements intradoc.connectorcommon.server.FilesystemResourceThis interface supports search as well as where queryText is passed.
POST http://host:port/connector/rest/api/v1/filesystem
Request HeadersX-CEC-ClientID:client-idX-CEC-ProxyHost:proxyX-CEC-ProxyPort:80X-CEC-ProxyScheme:httpContent-Type:application/json Request Body{ "itemCount": "50", "itemStartRow": "0", "itemsSortField": "ASC", "queryText": "animals"} Response{ "numItems": 50, "hasMoreItems": true, "totalItemsCount": 7190, "fileSystemInfo": { "uri": "fFolderGUID:null", "parentUri": "fFolderGUID:null", "name": "/", "description": null, "isDirectory": true, "size": null, "mimeType": null, "extension": null, "creator": null, "createdTimeStamp": null, "lastModifiedBy": null, "lastModifiedTimeStamp": null, "browseURL": null, "thumbnailURL": null, "directoryContents": [ {
Chapter 5Build a New Content Connector
5-9
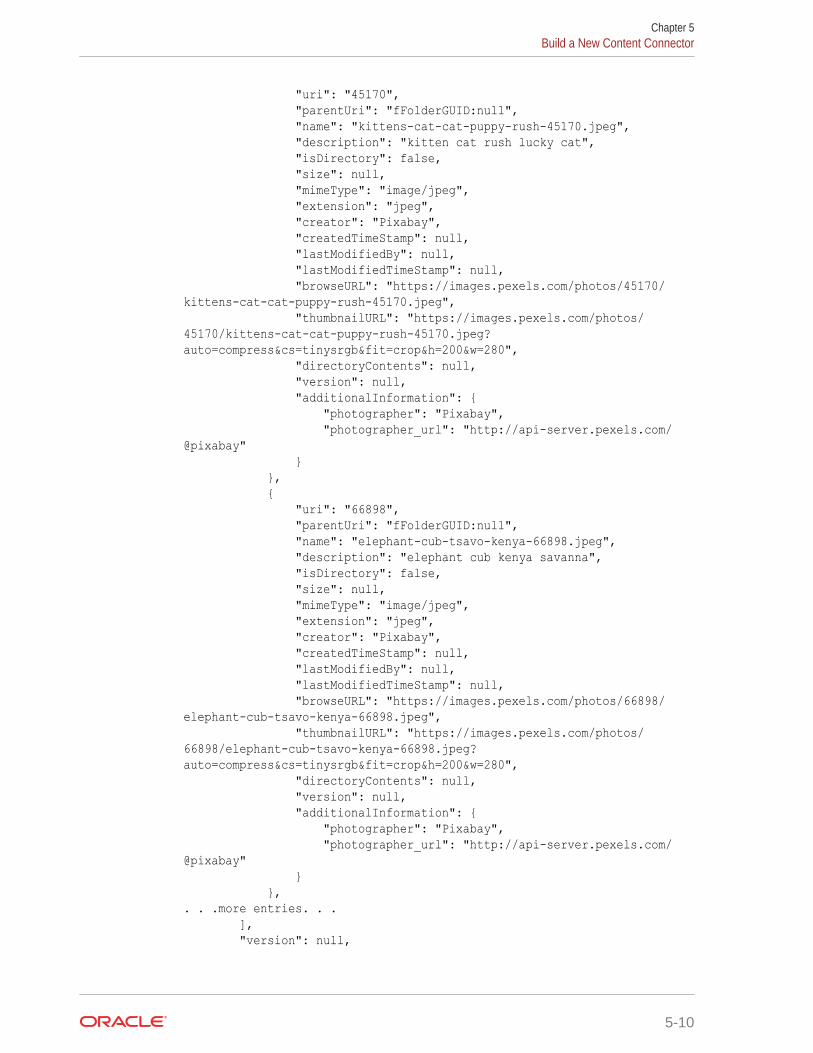
"uri": "45170", "parentUri": "fFolderGUID:null", "name": "kittens-cat-cat-puppy-rush-45170.jpeg", "description": "kitten cat rush lucky cat", "isDirectory": false, "size": null, "mimeType": "image/jpeg", "extension": "jpeg", "creator": "Pixabay", "createdTimeStamp": null, "lastModifiedBy": null, "lastModifiedTimeStamp": null, "browseURL": "https://images.pexels.com/photos/45170/kittens-cat-cat-puppy-rush-45170.jpeg", "thumbnailURL": "https://images.pexels.com/photos/45170/kittens-cat-cat-puppy-rush-45170.jpeg?auto=compress&cs=tinysrgb&fit=crop&h=200&w=280", "directoryContents": null, "version": null, "additionalInformation": { "photographer": "Pixabay", "photographer_url": "http://api-server.pexels.com/@pixabay" } }, { "uri": "66898", "parentUri": "fFolderGUID:null", "name": "elephant-cub-tsavo-kenya-66898.jpeg", "description": "elephant cub kenya savanna", "isDirectory": false, "size": null, "mimeType": "image/jpeg", "extension": "jpeg", "creator": "Pixabay", "createdTimeStamp": null, "lastModifiedBy": null, "lastModifiedTimeStamp": null, "browseURL": "https://images.pexels.com/photos/66898/elephant-cub-tsavo-kenya-66898.jpeg", "thumbnailURL": "https://images.pexels.com/photos/66898/elephant-cub-tsavo-kenya-66898.jpeg?auto=compress&cs=tinysrgb&fit=crop&h=200&w=280", "directoryContents": null, "version": null, "additionalInformation": { "photographer": "Pixabay", "photographer_url": "http://api-server.pexels.com/@pixabay" } },. . .more entries. . . ], "version": null,
Chapter 5Build a New Content Connector
5-10
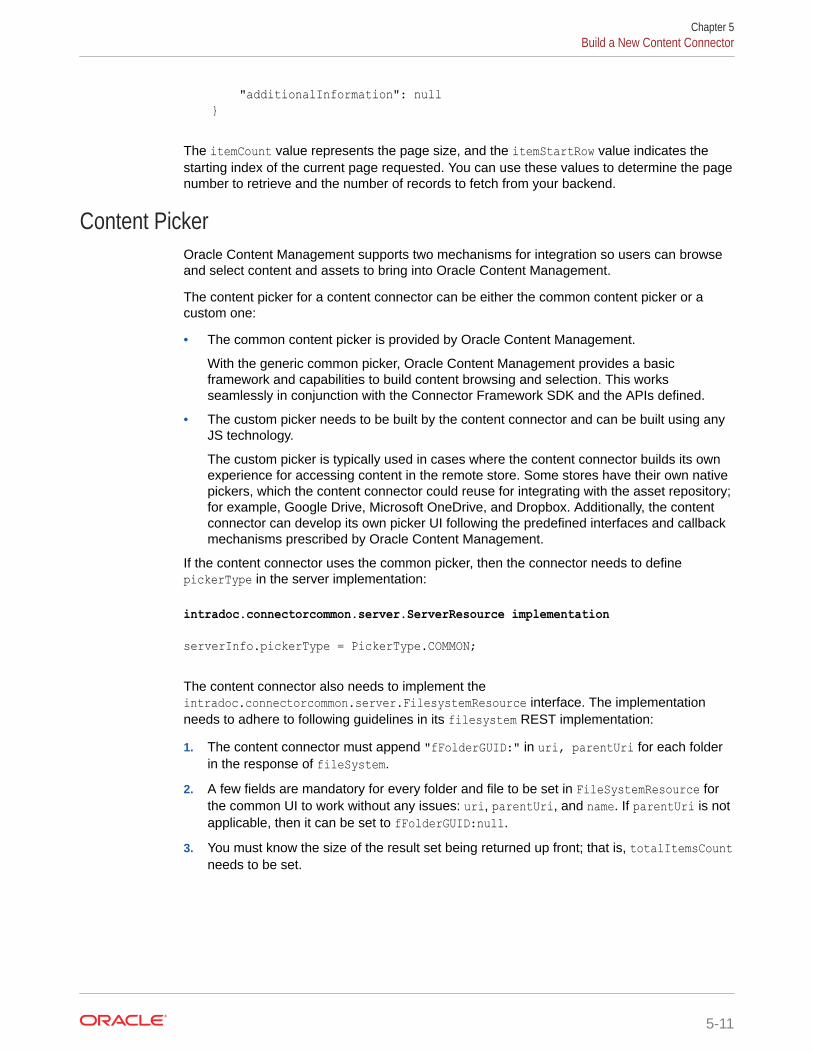
"additionalInformation": null }
The itemCount value represents the page size, and the itemStartRow value indicates thestarting index of the current page requested. You can use these values to determine the pagenumber to retrieve and the number of records to fetch from your backend.
Content PickerOracle Content Management supports two mechanisms for integration so users can browseand select content and assets to bring into Oracle Content Management.
The content picker for a content connector can be either the common content picker or acustom one:
• The common content picker is provided by Oracle Content Management.
With the generic common picker, Oracle Content Management provides a basicframework and capabilities to build content browsing and selection. This worksseamlessly in conjunction with the Connector Framework SDK and the APIs defined.
• The custom picker needs to be built by the content connector and can be built using anyJS technology.
The custom picker is typically used in cases where the content connector builds its ownexperience for accessing content in the remote store. Some stores have their own nativepickers, which the content connector could reuse for integrating with the asset repository;for example, Google Drive, Microsoft OneDrive, and Dropbox. Additionally, the contentconnector can develop its own picker UI following the predefined interfaces and callbackmechanisms prescribed by Oracle Content Management.
If the content connector uses the common picker, then the connector needs to definepickerType in the server implementation:
intradoc.connectorcommon.server.ServerResource implementation
serverInfo.pickerType = PickerType.COMMON;
The content connector also needs to implement theintradoc.connectorcommon.server.FilesystemResource interface. The implementationneeds to adhere to following guidelines in its filesystem REST implementation:
1. The content connector must append "fFolderGUID:" in uri, parentUri for each folderin the response of fileSystem.
2. A few fields are mandatory for every folder and file to be set in FileSystemResource forthe common UI to work without any issues: uri, parentUri, and name. If parentUri is notapplicable, then it can be set to fFolderGUID:null.
3. You must know the size of the result set being returned up front; that is, totalItemsCountneeds to be set.
Chapter 5Build a New Content Connector
5-11
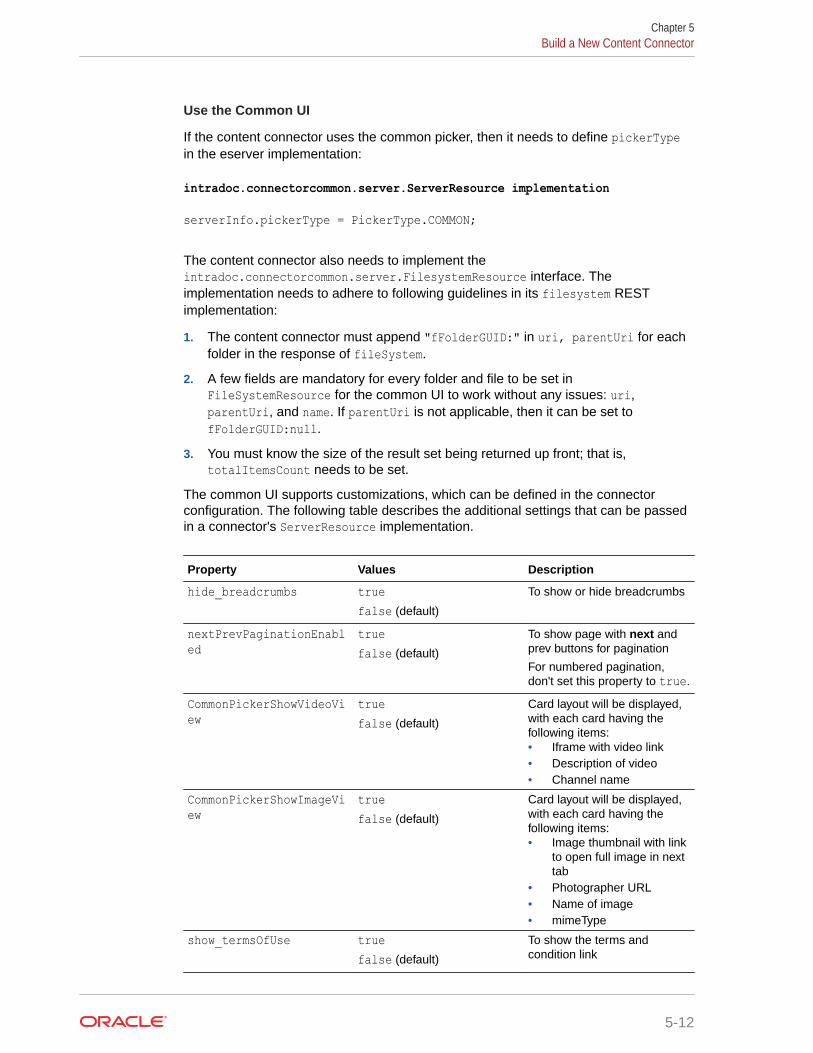
Use the Common UI
If the content connector uses the common picker, then it needs to define pickerTypein the eserver implementation:
intradoc.connectorcommon.server.ServerResource implementation
serverInfo.pickerType = PickerType.COMMON;
The content connector also needs to implement theintradoc.connectorcommon.server.FilesystemResource interface. Theimplementation needs to adhere to following guidelines in its filesystem RESTimplementation:
1. The content connector must append "fFolderGUID:" in uri, parentUri for eachfolder in the response of fileSystem.
2. A few fields are mandatory for every folder and file to be set inFileSystemResource for the common UI to work without any issues: uri,parentUri, and name. If parentUri is not applicable, then it can be set tofFolderGUID:null.
3. You must know the size of the result set being returned up front; that is,totalItemsCount needs to be set.
The common UI supports customizations, which can be defined in the connectorconfiguration. The following table describes the additional settings that can be passedin a connector's ServerResource implementation.
Property Values Description
hide_breadcrumbs truefalse (default)
To show or hide breadcrumbs
nextPrevPaginationEnabled
truefalse (default)
To show page with next andprev buttons for pagination
For numbered pagination,don't set this property to true.
CommonPickerShowVideoView
truefalse (default)
Card layout will be displayed,with each card having thefollowing items:• Iframe with video link• Description of video• Channel name
CommonPickerShowImageView
truefalse (default)
Card layout will be displayed,with each card having thefollowing items:• Image thumbnail with link
to open full image in nexttab
• Photographer URL• Name of image• mimeType
show_termsOfUse truefalse (default)
To show the terms andcondition link
Chapter 5Build a New Content Connector
5-12
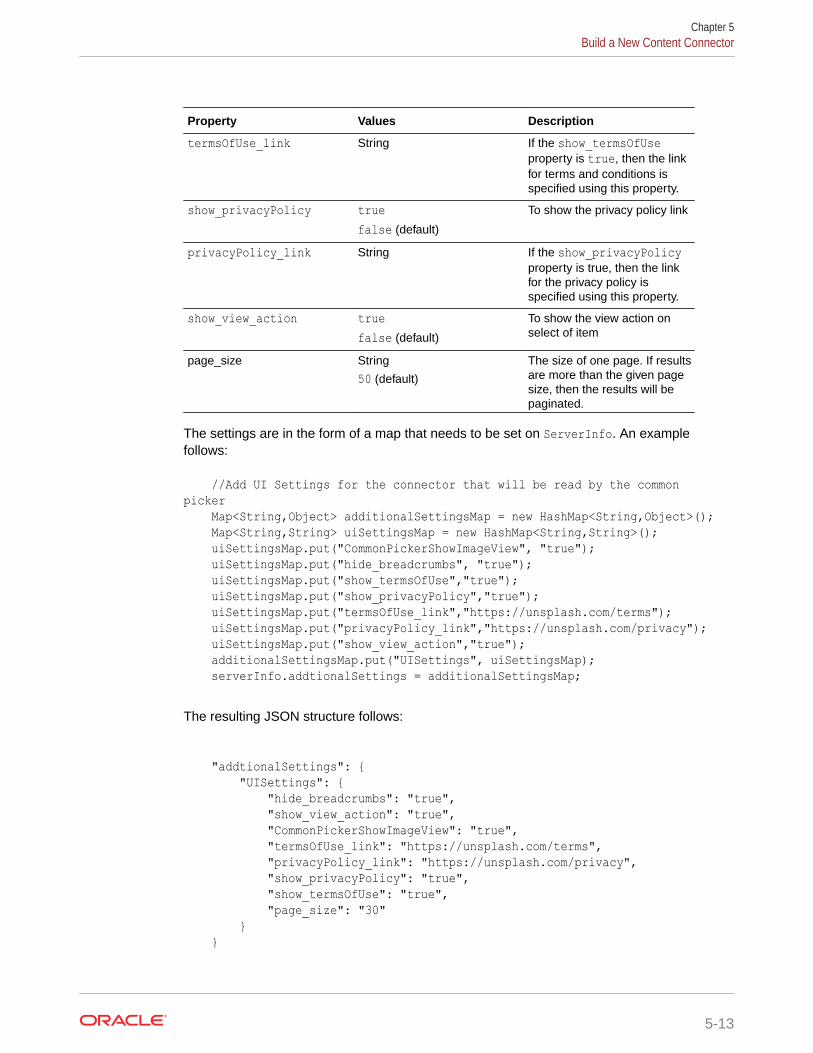
Property Values Description
termsOfUse_link String If the show_termsOfUseproperty is true, then the linkfor terms and conditions isspecified using this property.
show_privacyPolicy truefalse (default)
To show the privacy policy link
privacyPolicy_link String If the show_privacyPolicyproperty is true, then the linkfor the privacy policy isspecified using this property.
show_view_action truefalse (default)
To show the view action onselect of item
page_size String
50 (default)
The size of one page. If resultsare more than the given pagesize, then the results will bepaginated.
The settings are in the form of a map that needs to be set on ServerInfo. An examplefollows:
//Add UI Settings for the connector that will be read by the common picker Map<String,Object> additionalSettingsMap = new HashMap<String,Object>(); Map<String,String> uiSettingsMap = new HashMap<String,String>(); uiSettingsMap.put("CommonPickerShowImageView", "true"); uiSettingsMap.put("hide_breadcrumbs", "true"); uiSettingsMap.put("show_termsOfUse","true"); uiSettingsMap.put("show_privacyPolicy","true"); uiSettingsMap.put("termsOfUse_link","https://unsplash.com/terms"); uiSettingsMap.put("privacyPolicy_link","https://unsplash.com/privacy"); uiSettingsMap.put("show_view_action","true"); additionalSettingsMap.put("UISettings", uiSettingsMap); serverInfo.addtionalSettings = additionalSettingsMap;
The resulting JSON structure follows:
"addtionalSettings": { "UISettings": { "hide_breadcrumbs": "true", "show_view_action": "true", "CommonPickerShowImageView": "true", "termsOfUse_link": "https://unsplash.com/terms", "privacyPolicy_link": "https://unsplash.com/privacy", "show_privacyPolicy": "true", "show_termsOfUse": "true", "page_size": "30" } }
Chapter 5Build a New Content Connector
5-13
Use a Custom UI
A content connector can implement a custom UI for its picker. This can be built usingany JS technology. However, it needs to invoke some predefined methods in OracleContent Management to obtain connector configuration and to pass back selections.The custom picker can be built to expose its own OK and Cancel buttons, in whichcase it needs to invoke the appropriate handlers. If the picker doesn't expose its ownOK and Cancel buttons, Oracle Content Management will provide this.
The pickerType needs to be defined as CUSTOM in the server implementation:
intradoc.connectorcommon.server.ServerResource implementation
serverInfo.pickerType = PickerType.CUSTOM;
The custom implementation needs to include the following JS file in its library:
oracle-oce-custompicker.js
/*global window:true*/(function() { 'use strict'; var name = window.name; // name set on iframe element to uniquely identify the instance var receiver = window.opener || window.parent; var origin = "*"; function _postMessage(msg) { msg.name = name; receiver.postMessage(msg, origin); } var namespace = "OCE"; //todo: allow passing in data attribute if (!window[namespace]) { window[namespace] = {}; } var OCE = window[namespace]; if (!OCE.CustomPicker) { OCE.CustomPicker = { selection: [], addItem: function(id, name, type, size) { var item = {id: id, name: name, type: type, size: size}; this.selection.push(item); this.onChange(); }, removeItem: function(id) { this.selection = this.selection.filter(function(item) { return item.id !== id; });
Chapter 5Build a New Content Connector
5-14
this.onChange(); }, onInit: function(cbInit) { var msg = { message: 'init', needAuthToken: true }; _postMessage(msg); this.messageListener = this.onPostMessage.bind(this); window.addEventListener('message', this.messageListener, false); this.cbInit = cbInit; }, onClose: function() { window.removeEventListener('message', this.messageListener, false); }, onPostMessage: function(event) { if (event.data && event.data.message === "init") { if (this.cbInit) { this.cbInit(event.data); } } }, onChange: function() { var msg = { message: 'change', selection: this.selection }; _postMessage(msg); }, onOk: function(selection) { selection = selection || this.selection; var msg = { message: 'ok', selection: this.selection }; _postMessage(msg); }, onCancel: function() { var msg = { message: 'cancel' }; _postMessage(msg); } }; } })();
This JS file needs to be packaged in a content connector.
Chapter 5Build a New Content Connector
5-15
This library follows the JS postMessaging paradigm to pass information. The followingmethods are of interest.
onInit
The custom picker needs to invoke this method during its initialization. This is wherethe custom picker can get connector configuration information, like client ID andaccess token. The attributes defined in the connector configuration (/rest/api/v1/server) are passed via this method.
OCE.CustomPicker.onInit(function(data) { { if (data != null) { self.clientId = data.ClientID; //If connector uses OAuth self.AccessToken = data.AccessToken; //If connector uses BASIC auth self.user = data.UserName; self.password = Base64.decode(data.UserPwd); } //Use client id and access token to fetch data from back end. }})
onOk
If the custom picker exposes its own OK button, then it needs to invoke this method topass back the event to Oracle Content Management.
function pickerCallback(data) { if (data[google.picker.Response.ACTION] === google.picker.Action.PICKED) { data[google.picker.Response.DOCUMENTS].forEach(function(doc) { OCE.CustomPicker.addItem(doc.id, doc.name, "file", doc.sizeBytes); }); OCE.CustomPicker.onOk(); } else if (data[google.picker.Response.ACTION] === google.picker.Action.CANCEL) { OCE.CustomPicker.onCancel(); }}
onCancel
If the custom picker exposes its own Cancel button, then it needs to invoke thismethod to pass back the event to Oracle Content Management, like the onOk methoddoes for the OK button in the preceding snippet.
addItem
Chapter 5Build a New Content Connector
5-16
This method needs to be invoked to pass back selections from the custom picker to OracleContent Management so that it displays the list of selected items in the Add to repositorydialog. The IDs passed here are then used to fetch content with /rest/api/v1/content whileadding an item to the asset repository.
addImage(selectedImages: Image[]) { selectedImages.forEach(o => { var name = "PexelsImages_" + o.uri; OCE.CustomPicker.addItem(o.uri, name, o.thumbnail, o.size); });}
removeItem
This method needs to be invoked when an item is unselected from a custom picker so thatthe list maintained by Oracle Content Management is up to date. The final list is shown in theAdd to repository dialog. The ID passed here is the same as the ID passed in the addItemcall.
removeImage(image: Image) { OCE.CustomPicker.removeItem(image);}
Package the custom picker in the connector. While registering the content connector, specifythe following values:
1. Custom Picker URL: Such as http://host:port/pexels-picker/web (This is thecustom picker packaged in the content connector.)
2. Custom Picker uses its own OK/Cancel buttons: Leave it unchecked. (This indicatesthat you want Oracle Content Management to embed your picker in their dialog.)
If the custom picker implements its own OK and Cancel buttons, then check this.
AuthorizationA content connector can support one of the following authorization models.
• No Auth
• OAuth
• Basic
No Auth
This is used when the content connector does not require any authorization. In this case, theconnector picker is launched directly without invoking any authorization screen.
ServerResource Implementation
serverInfo.authenticationType = AuthenticationType.NO_AUTH
Chapter 5Build a New Content Connector
5-17
OAuth
This is used when a content connector supports OAuth. In this case, OCE ensuresthat the OAuth flow is invoked to fetch the access token. For subsequent access, thealready fetched token is used until it expires.
serverResource Implementation
serverInfo.authenticationType = AuthenticationType.OAUTH
The content connector also needs to define the required custom fields used in theOAuth flow.
ServerResource Implementation
{ FieldInfo field = new FieldInfo(); field.ID = UnsplashAdapter.FIELD_ID_REFRESH_TOKEN; field.label = ResourceBundleUtil.getDefaultLocalizedString("cds.unsplash.adapter.field.refreshtoken.label"); field.labelLocalizations = ResourceBundleUtil.getLocalizedData("cds.unsplash.adapter.field.refreshtoken.label"); field.datatype = FieldDatatype.STRING; field.userSettable = false; field.siteSettable = false; field.connectorSettable = true; field.authorizationURLParameter = false; serverInfo.fields.add(field);} { FieldInfo field = new FieldInfo(); field.ID = UnsplashAdapter.FIELD_ID_ACCESS_TOKEN; field.label = ResourceBundleUtil.getDefaultLocalizedString("cds.unsplash.adapter.field.accesstoken.label"); field.labelLocalizations = ResourceBundleUtil.getLocalizedData("cds.unsplash.adapter.field.accesstoken.label"); field.datatype = FieldDatatype.STRING; field.userSettable = false; field.siteSettable = false; field.connectorSettable = true; field.authorizationURLParameter = false; serverInfo.fields.add(field);}
Chapter 5Build a New Content Connector
5-18
{ FieldInfo field = new FieldInfo(); field.ID = UnsplashAdapter.FIELD_ID_AUTHORIZATION_URL_PARAMETER_CODE; field.label = ResourceBundleUtil.getDefaultLocalizedString("cds.unsplash.adapter.field.authurl.code.label"); field.labelLocalizations = ResourceBundleUtil.getLocalizedData("cds.unsplash.adapter.field.authurl.code.label"); field.datatype = FieldDatatype.STRING; field.userSettable = false; field.siteSettable = false; field.connectorSettable = false; field.authorizationURLParameter = true; serverInfo.fields.add(field);} { FieldInfo field = new FieldInfo(); field.ID = UnsplashAdapter.FIELD_ID_AUTHORIZATION_URL_PARAMETER_ERROR; field.label = ResourceBundleUtil.getDefaultLocalizedString("cds.unsplash.adapter.field.authurl.error.label"); field.labelLocalizations = ResourceBundleUtil.getLocalizedData("cds.unsplash.adapter.field.authurl.error.label"); field.datatype = FieldDatatype.STRING; field.userSettable = false; field.siteSettable = false; field.connectorSettable = false; field.authorizationURLParameter = true; serverInfo.fields.add(field);
And also implement the following interfaces documented in the preceding text:
1. /rest/api/v1/authorization/authorizationURLs2. /rest/api/v1/authorization/completedAuthorizations
Basic
This is used when content connector requires login credentials to connect to the back end.Here OCE will prompt you to enter sign-in details before launching the picker for the first time.If the credentials are available, then they will be used.
Chapter 5Build a New Content Connector
5-19
Note:
Oracle no longer supports Basic authorization for external consumption.
ServerResource Implementation
serverInfo.authenticationType = AuthenticationType.BASIC
You also need to define all the login fields in the server implementation. These fieldswill display in the login screen.
// custom field for User Name{FieldInfo field = new FieldInfo();field.ID = "UserName";field.label = ResourceBundleUtil.getDefaultLocalizedString("cds.unsplash.adapter.field.username.label");field.labelLocalizations = ResourceBundleUtil.getLocalizedData("cds.unsplash.adapter.field.username.label");field.description = ResourceBundleUtil.getDefaultLocalized-String("cds.unsplash.adapter.field.username.desc");field.descriptionLocalizations = ResourceBundleUtil.getLocalizedData("cds.unsplash.adapter.field.username.desc");field.datatype = FieldDatatype.STRING;field.userSettable = true;field.siteSettable = false;field.connectorSettable = false;field.authorizationURLParameter = false;field.required = true;serverInfo.fields.add(field);}// custom field for password{FieldInfo field = new FieldInfo();field.ID = "UserPwd";field.label = ResourceBundleUtil.getDefaultLocalizedString("cds.unsplash.adapter.field.password.label");field.labelLocalizations = ResourceBundleUtil.getLocalizedData("cds.unsplash.adapter.field.password.label");field.description = ResourceBundleUtil.getDefaultLocalized-String("cds.unsplash.adapter.field.password.desc");field.descriptionLocalizations = ResourceBundleUtil.getLocalizedData("cds.unsplash.adapter.field.password.desc");field.datatype = FieldDatatype.PASSWORD;field.userSettable = true;field.siteSettable = false;field.connectorSettable = false;field.authorizationURLParameter = false;field.required = true;
Chapter 5Build a New Content Connector
5-20
serverInfo.fields.add(field);}
Besides this, the content connector needs to implement the following interface, as describedin the preceding text.
/rest/api/v1/authorization/basicAuthorization
Subsequently the user credentials (password base64 encoded) will be passed via headersfor other calls, like filesystem and get content.
Content Connector Configuration and RegistrationOnce you have built your content connector, you need to register it in Oracle ContentManagement. You can register a content connector through the Oracle Content Managementadministration web interface.
The minimum properties you are required to add to a content connector follow:
• Content connector name
• Content connector service URL
• User name and password, if the preceding URL access requires it
Once a content connector gets registered successfully and the content connector serviceURL is reachable, the Oracle Content Management server will call a server service on thecontent connector to get the custom properties and show those in the administration UI. Anadministrator or developer can add values for those properties (for example, clientid andclientsecret for OAuth flows or the user name and password for a Basic authorizationcentral account). Clicking Save saves all these properties with the connector framework.After you enable it, the content connector becomes available in the Add menu item of theOracle Content Management UI Assets page.
See Create and Configure a Custom Content Connector in Administering Oracle ContentManagement and Register the Content Connector, which describes how to register andconfigure a Pexel content connector.
Content Connector Execution FlowFrom the Oracle Content Management UI Assets page, the user can click Add and choose acontent connector from the menu.
Based on the authorization type defined, the OAuth flow triggers or the user is prompted toadd a user name and password for the Basic Auth flow (if a central account has not beenconfigured in the administration UI). For No Auth, the content connector picker is launcheddirectly without invoking any authorization screen.
After successful authorization, the configured file picker (either common or custom) islaunched. It lists the files available to the user from the remote store.
The user can select one or more files. The selected files list is passed to the connectorframework. The connector framework then makes REST API calls to the remote contentconnector to fetch the content of the assets being added and copies them into the Assetrepository. This happens as a background process; however, the status of the add is
Chapter 5Content Connector Configuration and Registration
5-21
displayed in the UI where success and failure can be tracked for each asset added.Refer to the diagnostic logs for any failures.
Pexels Content Connector Sample ImplementationYou can use this sample implementation of a Pexels content connector to help buildyour own custom content connectors. The Pexels content connector lets contentcreators bring rich, high-quality images from the Pexels library into an Oracle ContentManagement asset repository.
Pexels is a stock photography site where designers, bloggers, and others find photosto use for free. The Pexels content connector is built using the Connector FrameworkSDK provided by Oracle Content Management. Two versions of this content connectorare available:
1. A content connector that uses a custom picker built using Angular JS. This versionis built by default.
2. A content connector that uses the common picker provided by Oracle ContentManagement.
The following sections describe how to develop a Pexels content connector.
• Install the Content Connector
• Register the Content Connector
• Test the Content Connector
• Understand the Content Connector Source Code
• Custom Picker UI
• Pexels REST APIs
• Change and Test the Content Connector Code
Install the Content ConnectorTo install the Pexels content connector, you need to meet the installation prerequisitesand then build the content connector WAR file.
The following sections describe the prerequisites and how to build the WAR file.
Check Prerequisites for InstallationYour system needs to be set up with node, npm, JDK, and Apache Maven before youinstall the Pexels content connector.
1. Ensure you have node and npm installed on your machine and set in PATH.Configure proxy if required.
See Configure Proxy Service Settings.
2. Ensure you have latest JDK installed and set in PATH.
3. Ensure you have Apache Maven installed and set in PATH, with proxy configured ifrequired.
Chapter 5Pexels Content Connector Sample Implementation
5-22
Build the Content Connector WAR FileDownload the content connector source bundle, unzip the bundle into a location on yourmachine, and follow the instructions in the Readme file to generate the WAR file.
You can download the Oracle Content Management content connector sample and SDK fromhere:
https://your-cec-service/_sitesclouddelivery/renderer/app/sdk/connector/cec-connector-sample.zip
https://your-cec-service/_sitesclouddelivery/renderer/app/sdk/connector/cec-connector-sdk.zip
Briefly, the instructions are as follows:
1. In a command-line interface, go to pexelsPickerWeb\src\main\webapp.
2. Run pexels_setup.bat or pexels_setup.sh (based on your environment).
3. If the run is successful, pexels-picker.war file will be available in thepexelsPickerWeb\target folder.
The WAR file generated is the one that uses the custom picker UI, which was built usingAngular JS.
Deploy this WAR file to your server. Run the following URLs to test that it works well:
1. GET http://host:port/pexels-picker/rest/api
2. GET http://host:port/pexels-picker/rest/api/v1/server
For expected output, see Understand the Content Connector Source Code.
Register the Content ConnectorTo use a Pexels content connector, you first need to access to the Pexels API. For this youneed to register with Pexels and request access.
Follow the instructions in the Pexels API documentation to register the content connector andrequest access. After you make the request, you will be provided with an API key that youneed to capture. The Pexels API is rate-limited to 200 requests per hour and 20,000 requestsper month. If you need higher limits, contact Pexels.
1. Sign in to your Oracle Content Management instance as a developer or administrator.
2. Go to Administration > Integration > Content Connectors and click Create.
3. Enter the details to register your Pexels content connector.
a. Name: Pexelsb. Description: Connector to bring Pexels images into Oracle Content
Management asset repositoryc. Connector Service URL: http://host:port/pexels-picker/rest/api (a URL
tested previously)
4. Click Verify Settings and then Save.
Chapter 5Pexels Content Connector Sample Implementation
5-23
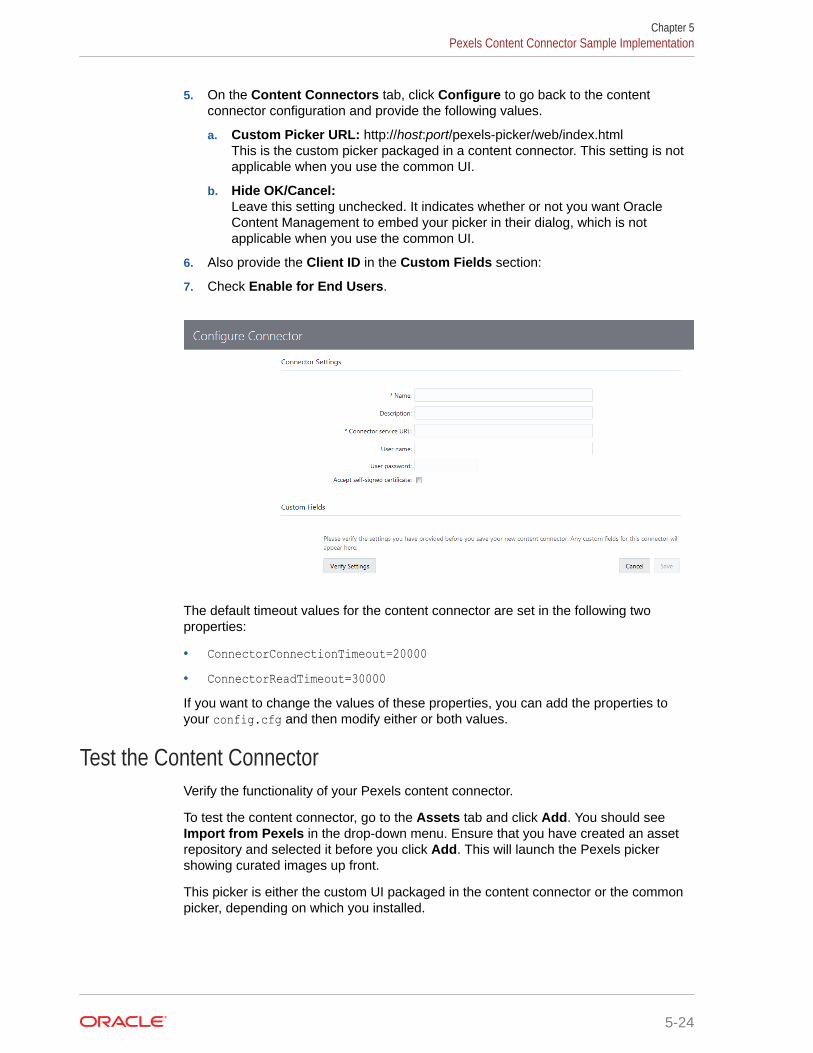
5. On the Content Connectors tab, click Configure to go back to the contentconnector configuration and provide the following values.
a. Custom Picker URL: http://host:port/pexels-picker/web/index.htmlThis is the custom picker packaged in a content connector. This setting is notapplicable when you use the common UI.
b. Hide OK/Cancel:Leave this setting unchecked. It indicates whether or not you want OracleContent Management to embed your picker in their dialog, which is notapplicable when you use the common UI.
6. Also provide the Client ID in the Custom Fields section:
7. Check Enable for End Users.
The default timeout values for the content connector are set in the following twoproperties:
• ConnectorConnectionTimeout=20000• ConnectorReadTimeout=30000If you want to change the values of these properties, you can add the properties toyour config.cfg and then modify either or both values.
Test the Content ConnectorVerify the functionality of your Pexels content connector.
To test the content connector, go to the Assets tab and click Add. You should seeImport from Pexels in the drop-down menu. Ensure that you have created an assetrepository and selected it before you click Add. This will launch the Pexels pickershowing curated images up front.
This picker is either the custom UI packaged in the content connector or the commonpicker, depending on which you installed.
Chapter 5Pexels Content Connector Sample Implementation
5-24
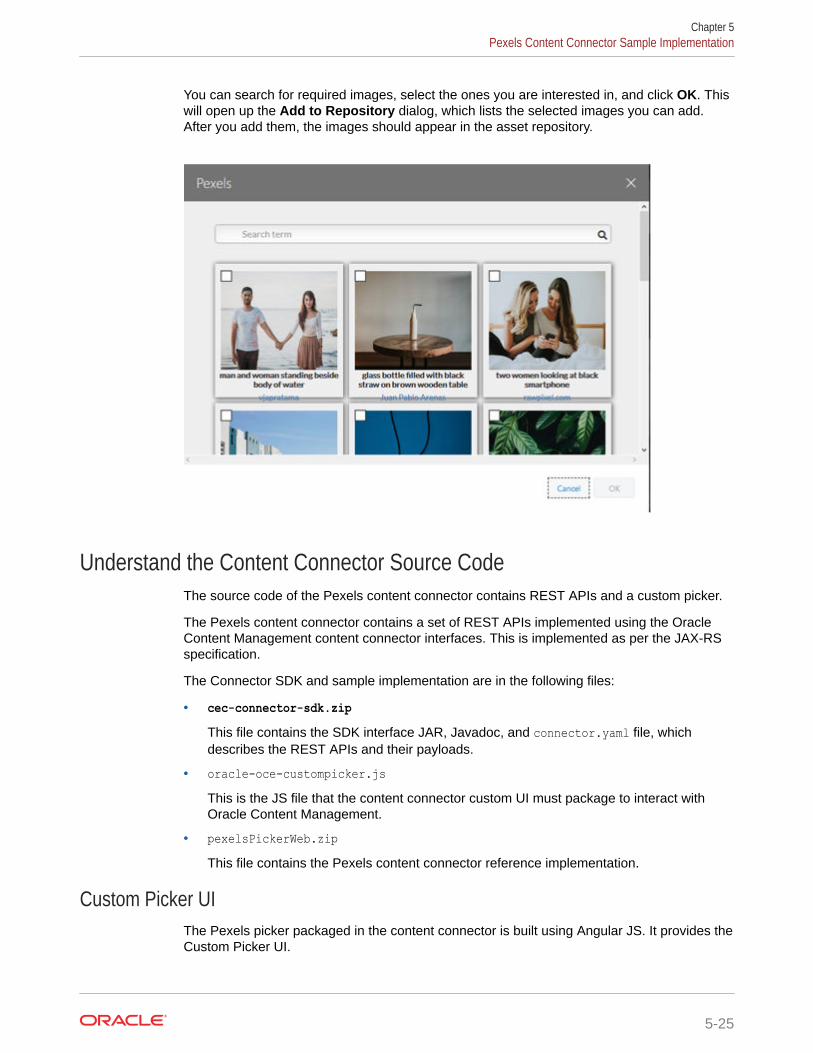
You can search for required images, select the ones you are interested in, and click OK. Thiswill open up the Add to Repository dialog, which lists the selected images you can add.After you add them, the images should appear in the asset repository.
Understand the Content Connector Source CodeThe source code of the Pexels content connector contains REST APIs and a custom picker.
The Pexels content connector contains a set of REST APIs implemented using the OracleContent Management content connector interfaces. This is implemented as per the JAX-RSspecification.
The Connector SDK and sample implementation are in the following files:
• cec-connector-sdk.zipThis file contains the SDK interface JAR, Javadoc, and connector.yaml file, whichdescribes the REST APIs and their payloads.
• oracle-oce-custompicker.jsThis is the JS file that the content connector custom UI must package to interact withOracle Content Management.
• pexelsPickerWeb.zipThis file contains the Pexels content connector reference implementation.
Custom Picker UIThe Pexels picker packaged in the content connector is built using Angular JS. It provides theCustom Picker UI.
Chapter 5Pexels Content Connector Sample Implementation
5-25
The Pexels picker files are in pexelsPickerWeb\src\main\webapp\src.
Pexels REST APIsThe Pexels content connector contains a set of REST APIs.
Change and Test the Content Connector CodeIf you make changes to the content connector code, you can run commands frompexelsPickerWeb\src\main\webapp to test the changes and rebuild the WAR file.
1. If you modify package.json to include additional libraries, run the followingcommand from pexelsPickerWeb\src\main\webapp:
npm install
2. If you make UI code changes, run the following command frompexelsPickerWeb\src\main\webapp:
ng build
3. Finally, run mvn from pexelsPickerWeb to rebuild the WAR file:
mvn clean install
Download the CEC Content Connector Sample and SDKA sample content connector and SDK are available for downlooad
You can download the following ZIP files, which contain the CEC content connectorsample and SDK:
• https://your-cec-service/_sitesclouddelivery/renderer/app/sdk/connector/cec-connector-sample.zip
• https://your-cec-service/_sitesclouddelivery/renderer/app/sdk/connector/cec-connector-sdk.zip
Chapter 5Download the CEC Content Connector Sample and SDK
5-26
6Develop Custom Field Editors
Oracle Content Management provides a large selection of field editors out of the box for datafields that you can use to enable contributors to assign values to the field. Oracle ContentManagement also allows you to extend beyond out of the box editors with the help of the fieldeditor SDK.
With the Oracle Content Management field editor SDK, you can develop and use your owncustom field editors for any field. The main purpose of the SDK is to facilitate communicationbetween the custom editor component and the content item form. To develop a custom fieldeditor, you first need to create the custom field editor. Once created, you must promote it sothat it can be used when creating content types. Once promoted, the field editor is availablefor use when a data type named when creating the editor is used to define a content type.Lastly, you can open and edit the files associated with the custom field editor to fit yourpurpose.
You can make custom field editors and forms available to everyone:
1. Update existing content forms and field editors to public during server upgrade in thebackground.
2. Add the service SCS_SET_CONTENT_FORMS_FIELD_EDITORS_PUBLIC to set all formand editor folders to public.
3. In SCS_CREATE_COMPONENT, mark content form/field editor as public oncreation.
4. Mark content form/field editor as public on import.
The following sections provide more information about custom field editors.
• Create a Custom Field Editor
• Configure Content Type to Use Custom Field Editor
• Edit a Custom Field Editor
• Sample Content Field Editors
• Content Field Editor SDK Reference
Create a Custom Field EditorTo create a custom field editor:
1. Log in to your instance of Oracle Content Management using the web interface and clickDeveloper in the side navigation.
2. Click View All Components.
3. Click Create and select Create Content Field Editor.
4. Enter a name and optional description for the field editor.
5. If your field editor can hande multiple values, such as multi-valued select boxes or tagcloud editors, enable Handles multiple values.
6-1
6. Select the data fields to used with the field editor. The following data types aresupported:
• Text
• Large Text
• Date
• Number
• Decimal
• Boolean
• Embedded Content
7. Click Create. A new plain text field editor is created and listed on the Componentspage.
8. To make the field editor available for use, select it and click Promote.
9. Confirm you want to proceed and click OK.
The custom field editor is now available for use with supported data fields whendefining content types.
Configure Content Type to Use Custom Field EditorOnce a custom field editor has been created and promoted, it is available for use whensupported data types are used to define a content type.
1. In Oracle Content Management, click Content in the side navigation.
2. Select Content Types from the page menu and click Create.
3. Enter a name and optional description and click OK.
4. Select a data field the custom editor can be used with and add it to the definition.
5. Enter the desired information and click Next.
6. Select the custom field editor from the Appearance of data field and click OK.
Any content items created using this content type will make use of the custom fieldeditor.
Edit a Custom Field EditorOnce you've created a custom field editor, the files needed to adapt it to your needsare available when you select and open the component.
1. Click Developer in the side navigation.
2. Click View All Components.
3. Select the custom field editor component and click Open.
By default, a custom field editor comes with the following content:
• appinfo.json - contains the metadata of the editor
• assets folder that includes two files which implement the custom field editor:
– edit.html
Chapter 6Configure Content Type to Use Custom Field Editor
6-2

– view.html
• folder_icon.png - this icon the editor uses when displayed on the components page.
appinfo.json for Custom Field EditorsThis file is a required and includes the configuration metadata needed for the editor. Someproperties are necessary for the editor to function, some are optional, and some are to thecustome editor. Following is a sample appinfo.json :
{ "type":"fieldeditor", "name":"Sample Text field", "single":true, "multiple":true, "handlesMultiple":false, "supportedDatatypes":["text"], "autoresize":true, "validation":true, "useDefaultFormView":false}
Table 6-1 appinfo.json Configuration Properties
Property Value Required Type
type The component type. For custom fieldeditors, the type is fieldeditor and is thesame for all editors. It should not bechanged.
required string
name The name displayed in the Content Typefield settings editor list. By default the nameentered when the custom field editor iscreated.
required string
single Specifies if this editor will be listed in theeditor list when the field is a single valuedfield.
Either single ormultiple isrequired andset to true
Boolean
multiple Specifies if this editor will be listed in theeditor list when the field is multivalued field.
Either single ormultiple isrequired andset to true
Boolean
handlesMultiple Speicifies if this editor can handle more thanone value.
required Boolean
supportedDataTypes List of data types for which this editor can beused.
required Array of datatypes
autoresize Specifies whether or not to send resizenotification to the content item form whenthis editor is resized. Custom editors arerendered inside an iframe in the content itemform. When this property is set to true, thefield editor SDK will notify the form to adjustthe iframe size when the editor's sizechanges.
optional Boolean
Chapter 6Edit a Custom Field Editor
6-3

Table 6-1 (Cont.) appinfo.json Configuration Properties
Property Value Required Type
validation Specifies whether or not the value entered inthis editor needs to be validated in thecontent item editor form. When set to true,the editor needs to register and provide acall back function to be called by the contentitem form for validation.
optional Boolean
useDefaultFormView Speicifies whether or not to use the systemdefault form view when viewing the contentitem that has this editor. If this property is notpresent or is set to false, the view.htmlimplementation will be used to render theview mode of the field.
optional Boolean
In addition to the above properties, you can also define settings that can be used torender the editor configuration view when this editor is selected while defining acontent type. For example, if you are writing an editor to handle a phone number inyour field and want to set up a few formats to pick during field definition time:
{ "type": "fieldeditor", "name": "Phone Number", "single": true, "multiple": true, "handlesMultiple": false, "supportedDatatypes": ["text"], "autoresize": true, "useDefaultFormView": false, "settings":[ { "id": "mask", "type": "list", "name": "Phone number format", "options": [ { "label": "+1(999)-999-9999", "value": "+1(999)-999-9999" }, { "label": "+44(999)-9999-9999", "value": "+44(999)-9999-9999" }, { "label": "+49 999 99999999", "value": "+49 999 99999999" } ] } ]}
Chapter 6Edit a Custom Field Editor
6-4
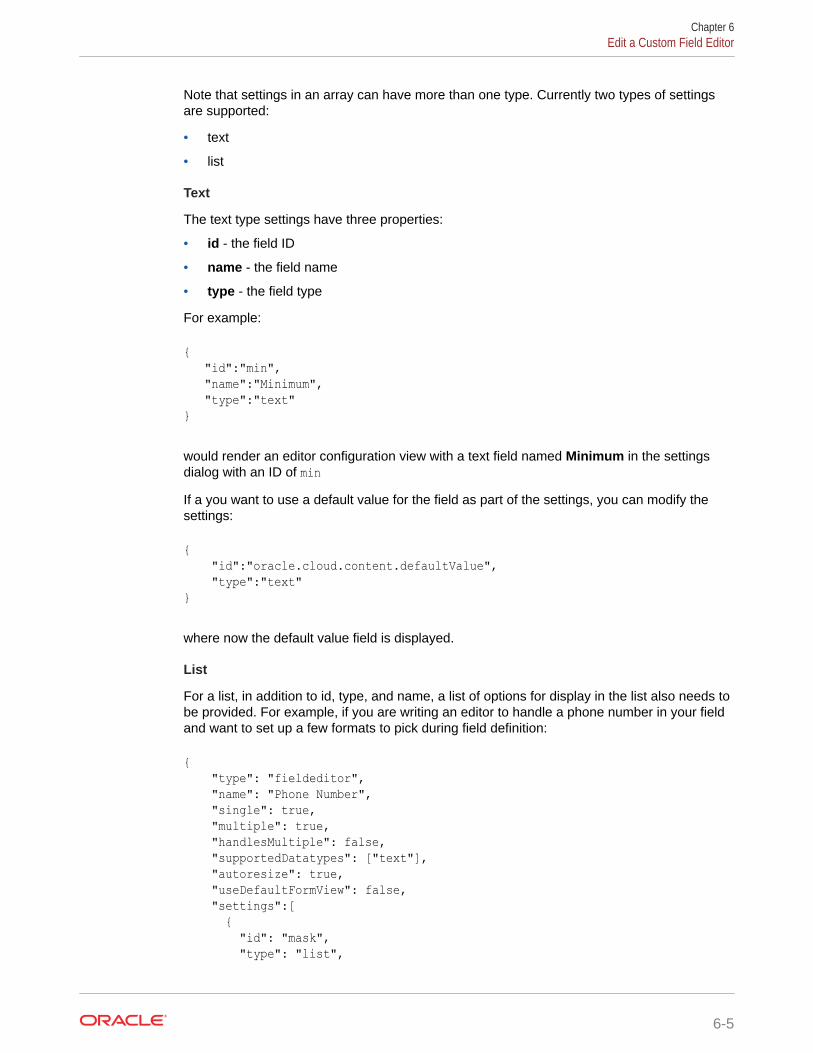
Note that settings in an array can have more than one type. Currently two types of settingsare supported:
• text
• list
Text
The text type settings have three properties:
• id - the field ID
• name - the field name
• type - the field type
For example:
{ "id":"min", "name":"Minimum", "type":"text"}
would render an editor configuration view with a text field named Minimum in the settingsdialog with an ID of minIf a you want to use a default value for the field as part of the settings, you can modify thesettings:
{ "id":"oracle.cloud.content.defaultValue", "type":"text"}
where now the default value field is displayed.
List
For a list, in addition to id, type, and name, a list of options for display in the list also needs tobe provided. For example, if you are writing an editor to handle a phone number in your fieldand want to set up a few formats to pick during field definition:
{ "type": "fieldeditor", "name": "Phone Number", "single": true, "multiple": true, "handlesMultiple": false, "supportedDatatypes": ["text"], "autoresize": true, "useDefaultFormView": false, "settings":[ { "id": "mask", "type": "list",
Chapter 6Edit a Custom Field Editor
6-5
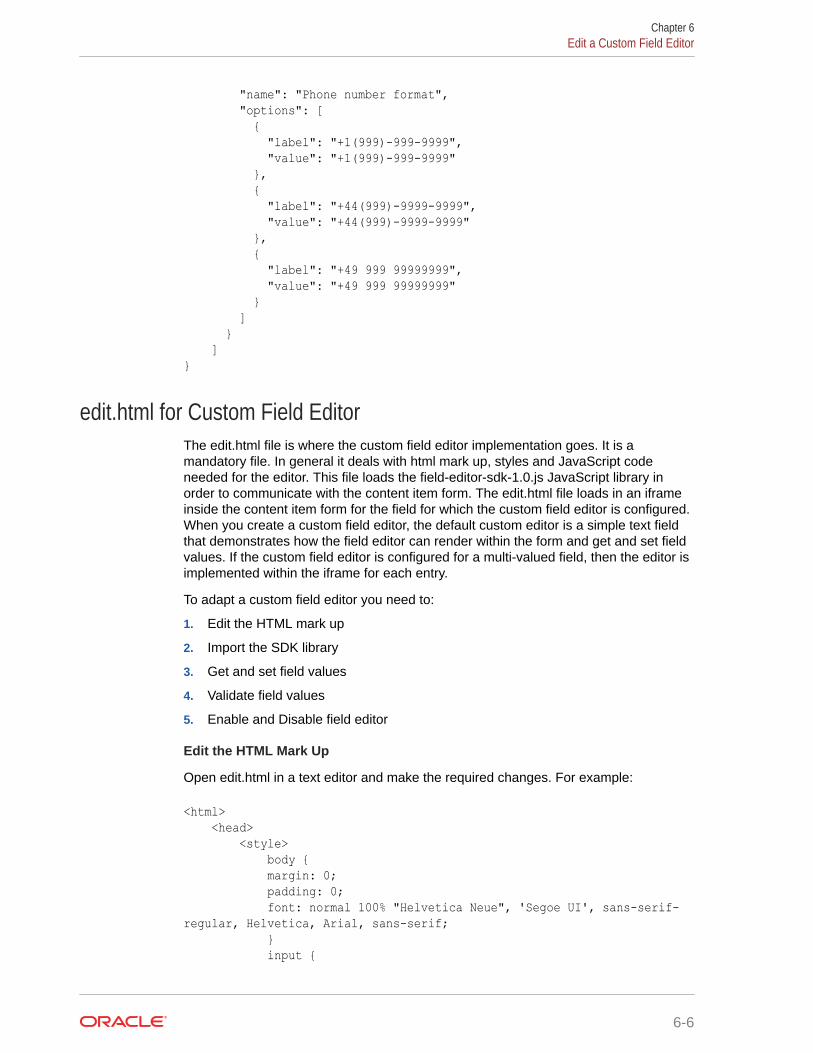
"name": "Phone number format", "options": [ { "label": "+1(999)-999-9999", "value": "+1(999)-999-9999" }, { "label": "+44(999)-9999-9999", "value": "+44(999)-9999-9999" }, { "label": "+49 999 99999999", "value": "+49 999 99999999" } ] } ]}
edit.html for Custom Field EditorThe edit.html file is where the custom field editor implementation goes. It is amandatory file. In general it deals with html mark up, styles and JavaScript codeneeded for the editor. This file loads the field-editor-sdk-1.0.js JavaScript library inorder to communicate with the content item form. The edit.html file loads in an iframeinside the content item form for the field for which the custom field editor is configured.When you create a custom field editor, the default custom editor is a simple text fieldthat demonstrates how the field editor can render within the form and get and set fieldvalues. If the custom field editor is configured for a multi-valued field, then the editor isimplemented within the iframe for each entry.
To adapt a custom field editor you need to:
1. Edit the HTML mark up
2. Import the SDK library
3. Get and set field values
4. Validate field values
5. Enable and Disable field editor
Edit the HTML Mark Up
Open edit.html in a text editor and make the required changes. For example:
<html> <head> <style> body { margin: 0; padding: 0; font: normal 100% "Helvetica Neue", 'Segoe UI', sans-serif-regular, Helvetica, Arial, sans-serif; } input {
Chapter 6Edit a Custom Field Editor
6-6
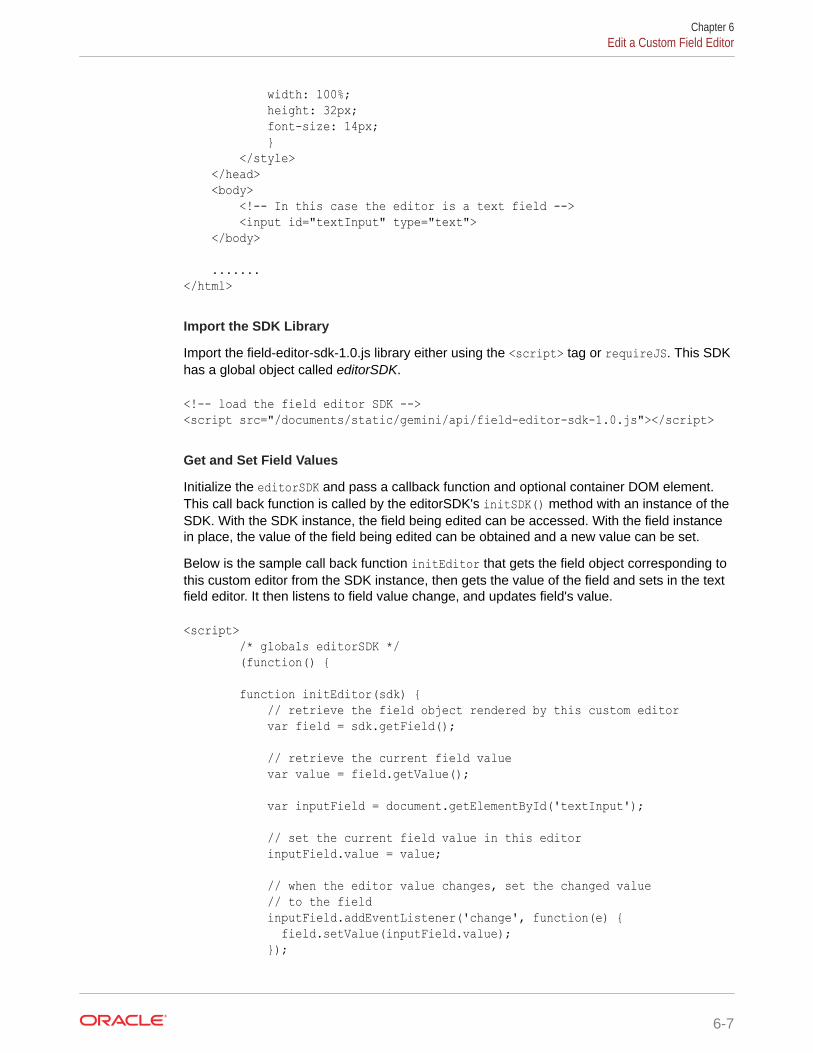
width: 100%; height: 32px; font-size: 14px; } </style> </head> <body> <!-- In this case the editor is a text field --> <input id="textInput" type="text"> </body>
.......</html>
Import the SDK Library
Import the field-editor-sdk-1.0.js library either using the <script> tag or requireJS. This SDKhas a global object called editorSDK.
<!-- load the field editor SDK --><script src="/documents/static/gemini/api/field-editor-sdk-1.0.js"></script>
Get and Set Field Values
Initialize the editorSDK and pass a callback function and optional container DOM element.This call back function is called by the editorSDK's initSDK() method with an instance of theSDK. With the SDK instance, the field being edited can be accessed. With the field instancein place, the value of the field being edited can be obtained and a new value can be set.
Below is the sample call back function initEditor that gets the field object corresponding tothis custom editor from the SDK instance, then gets the value of the field and sets in the textfield editor. It then listens to field value change, and updates field's value.
<script> /* globals editorSDK */ (function() {
function initEditor(sdk) { // retrieve the field object rendered by this custom editor var field = sdk.getField();
// retrieve the current field value var value = field.getValue();
var inputField = document.getElementById('textInput');
// set the current field value in this editor inputField.value = value;
// when the editor value changes, set the changed value // to the field inputField.addEventListener('change', function(e) { field.setValue(inputField.value); });
Chapter 6Edit a Custom Field Editor
6-7
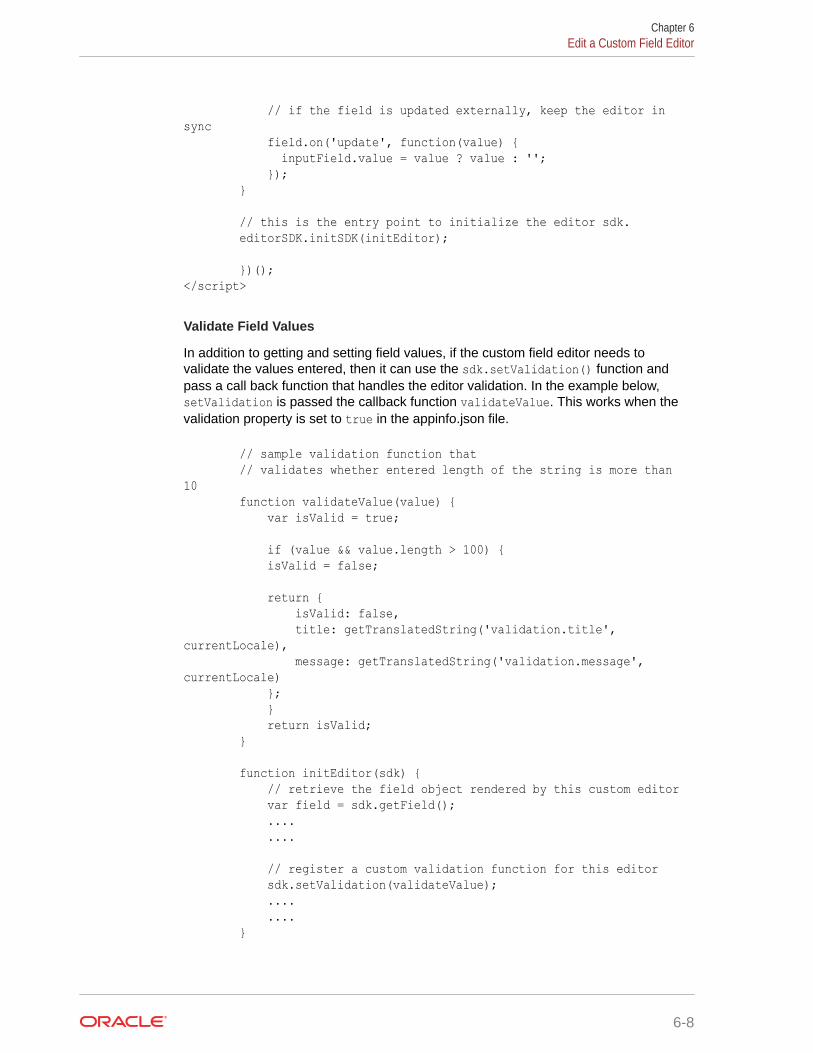
// if the field is updated externally, keep the editor in sync field.on('update', function(value) { inputField.value = value ? value : ''; }); }
// this is the entry point to initialize the editor sdk. editorSDK.initSDK(initEditor);
})();</script>
Validate Field Values
In addition to getting and setting field values, if the custom field editor needs tovalidate the values entered, then it can use the sdk.setValidation() function andpass a call back function that handles the editor validation. In the example below,setValidation is passed the callback function validateValue. This works when thevalidation property is set to true in the appinfo.json file.
// sample validation function that // validates whether entered length of the string is more than 10 function validateValue(value) { var isValid = true;
if (value && value.length > 100) { isValid = false;
return { isValid: false, title: getTranslatedString('validation.title', currentLocale), message: getTranslatedString('validation.message', currentLocale) }; } return isValid; }
function initEditor(sdk) { // retrieve the field object rendered by this custom editor var field = sdk.getField(); .... ....
// register a custom validation function for this editor sdk.setValidation(validateValue); .... .... }
Chapter 6Edit a Custom Field Editor
6-8
// this is the entry point to initialize the editor sdk. editorSDK.initSDK(initEditor);
Enable and Disable Field Editor
Content item form field editors get enabled and disabled. For example, each field editor goesinto the disabled mode when annotation starts, and when the user comes out of annotationmode the form field editors get enabled again. Custom field editors also need to follow thisrule, so the custom field editor implementation should handle the enabling and disabling ofthe editors when the form broadcasts to do so. This is handled by calling theregisterDisable method of the SDK and passing a callback function that handles enablingthe editor.
// // disable/enable call back that gets called if the content form // needs to enable/disable this editor function renderDisabled(value) { if (value) { document.getElementById('textInput').disabled = true; } else { document.getElementById('textInput').disabled = false; } }
function initEditor(sdk) { // retrieve the field object rendered by this custom editor var field = sdk.getField(); .... ....
//register render disabled function for this editor sdk.registerDisable(renderDisabled); .... .... }
// this is the entry point to initialize the editor sdk. editorSDK.initSDK(initEditor);
view.html for Custom Field EditorThe view.html contains html mark up, styles and javascript code for the custom viewerimplementation. This file is executed for the field using the custom field editor when the userswitches the content form to view mode. The view.html file gets called only whenuseDefaultFormView is not present or set to false in the appinfo.json file, otherwise thesystem default viewer is used for the custom field editor. Unlike the edit.html file, theview.html file is invoked only once whether or not the field is single valued or multi-valued.
Below is a sample view.html file that displays the field value within an inner HTML of a divelement.
<!DOCTYPE html><html> <head>
Chapter 6Edit a Custom Field Editor
6-9
<meta charset="utf-8"> <style type="text/css"> body { margin: 0; padding: 0; font: normal 100% "Helvetica Neue", 'Segoe UI', sans-serif-regular, Helvetica, Arial, sans-serif; color: #666; } div { font-size: .875rem; } span { font-style: italic; } </style> </head><body> <div id="inputValue"></div></body>
<!-- load the attribute editor SDK --><script src="/documents/static/gemini/api/field-editor-sdk-1.0.js"></script><script>/* globals editorSDK */(function() {var textElement = document.getElementById('inputValue');
function initEditor(sdk) { // retrieve the field object rendered by this custom editor var field = sdk.getField();
// retrieve the current field value var value = field.getValue();
if (value) { textElement.innerText = value; } else { textElement.innerHTML = '<span>No value specified</span>'; }}editorSDK.initSDK(initEditor);})();</script>
Sample Content Field EditorsOracle Content Management provides 2 sample content field editors available fromContent Toolkit.
• Slider
• Location Selector
Chapter 6Sample Content Field Editors
6-10
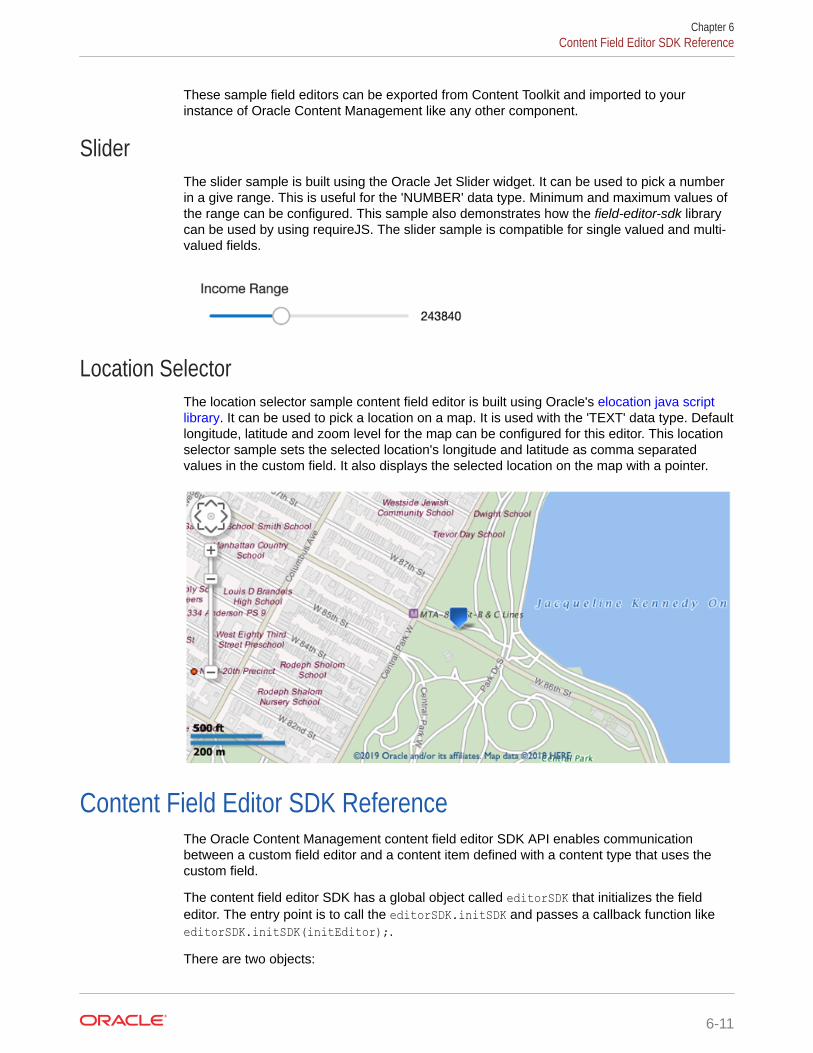
These sample field editors can be exported from Content Toolkit and imported to yourinstance of Oracle Content Management like any other component.
SliderThe slider sample is built using the Oracle Jet Slider widget. It can be used to pick a numberin a give range. This is useful for the 'NUMBER' data type. Minimum and maximum values ofthe range can be configured. This sample also demonstrates how the field-editor-sdk librarycan be used by using requireJS. The slider sample is compatible for single valued and multi-valued fields.
Location SelectorThe location selector sample content field editor is built using Oracle's elocation java scriptlibrary. It can be used to pick a location on a map. It is used with the 'TEXT' data type. Defaultlongitude, latitude and zoom level for the map can be configured for this editor. This locationselector sample sets the selected location's longitude and latitude as comma separatedvalues in the custom field. It also displays the selected location on the map with a pointer.
Content Field Editor SDK ReferenceThe Oracle Content Management content field editor SDK API enables communicationbetween a custom field editor and a content item defined with a content type that uses thecustom field.
The content field editor SDK has a global object called editorSDK that initializes the fieldeditor. The entry point is to call the editorSDK.initSDK and passes a callback function likeeditorSDK.initSDK(initEditor);.
There are two objects:
Chapter 6Content Field Editor SDK Reference
6-11
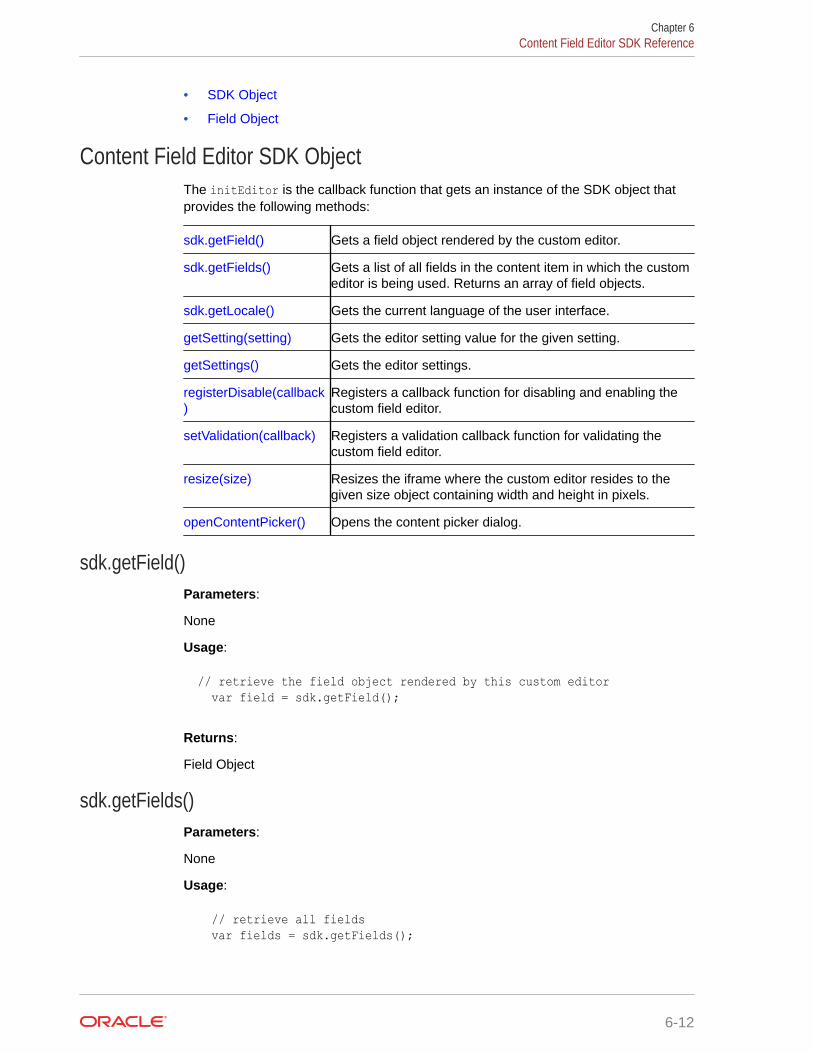
• SDK Object
• Field Object
Content Field Editor SDK ObjectThe initEditor is the callback function that gets an instance of the SDK object thatprovides the following methods:
sdk.getField() Gets a field object rendered by the custom editor.
sdk.getFields() Gets a list of all fields in the content item in which the customeditor is being used. Returns an array of field objects.
sdk.getLocale() Gets the current language of the user interface.
getSetting(setting) Gets the editor setting value for the given setting.
getSettings() Gets the editor settings.
registerDisable(callback)
Registers a callback function for disabling and enabling thecustom field editor.
setValidation(callback) Registers a validation callback function for validating thecustom field editor.
resize(size) Resizes the iframe where the custom editor resides to thegiven size object containing width and height in pixels.
openContentPicker() Opens the content picker dialog.
sdk.getField()Parameters:
None
Usage:
// retrieve the field object rendered by this custom editor var field = sdk.getField();
Returns:
Field Object
sdk.getFields()Parameters:
None
Usage:
// retrieve all fields var fields = sdk.getFields();
Chapter 6Content Field Editor SDK Reference
6-12
Returns:
Array of Field objects
sdk.getLocale()Parameters:
None
Usage:
// get the locale the ui is currently in currentLocale = sdk.getLocale();
Returns:
The language code of the user that is logged in
getSetting(setting)
Name Type Description
setting string Name of the setting
Usage:
// get the initial latitude from settings var latitude = sdk.getSetting('init-lat');
Returns:
Value of the setting. For example if the settings property for custom editor in appinfo.json is:
"settings":[ { "id": "foo", "type": "text", "name": "Foo", }, ... ... ]
Then this 'foo' setting will appear in the field definition for content administrator to configure.Suppose if the content admin configured this setting to have a value 'bar', thensdk.getSetting('foo') will return 'bar'.
getSettings()Parameters:
None
Chapter 6Content Field Editor SDK Reference
6-13
Usage:
//get editor settings var settings = sdk.getSettings();
Returns:
Editor settings configured by content admin for the custom field editor. For example, inthe case of the sample location selection editor, if the setting is:
"settings": [{ "id": "init-long", "name": "Initial longitude", "type": "text" }, { "id": "init-lat", "name": "Initial latitude", "type": "text" }, { "id": "zoom-level", "name": "Zoom level", "type": "text" }]
and if the content admin entered an initial longitude of -73.96 and an initial latitude of40.78, with a zoom level of 18, then sdk.getSettings() will return:
{zoom-level: "18", init-long: "-73.96", init-lat: "40.78"}
registerDisable(callback)
Name Type Description
callback function Function that handles theenabling and disabling of theeditor
Usage:
//register render disabled function for this editor sdk.registerDisable(function renderDisabled(value){ if(value){ document.getElementById("phoneNumber").disabled = true; }else { document.getElementById('phoneNumber').disabled = false; } });
Chapter 6Content Field Editor SDK Reference
6-14

setValidation(callback)
Name Type Description
callback function Function that handles field valuevalidation
Usage:
// register a custom validation function for this editor sdk.setValidation(function validateValue(value) { // sample validation function that // validates whether entered number of characters is more than 100 var isValid = true; if (value && value.length > 100) { isValid = false;
return { isValid: false, title: 'Invalid value', message: 'You have entered more than 100 characters' }; } return isValid; });
resize(size)
Name Type Description
size Object with height and width Object with height and width inpixels. For example:
{ height:'20px', width:'60px'}
If no size is given then the size ofthe editor will be used.
Usage:
sdk.resize({width: ‘100px’, height: ‘20px’});
openContentPicker()Opens the content picker dialog.
Chapter 6Content Field Editor SDK Reference
6-15
Usage:
sdk.openContentPicker().then(function(data) { // use data returned from content picker // sample data {id: 'assetId', type: 'assetType', name: 'assetName'} console.log(data) }).catch(function(error){ // handle error console.log("Error:", error); });
Returns:
A Promise object.
Custom Content Field ObjectThe Field object is the representation of the content field that is returned bygetField() and getFields() methods. The object has the following methods:
getName() Gets the name of the field.
getDefaultValue() Gets the default value of the field.
getDataType() Gets the data type of the field.
setValue(value) Sets the value of the field.
getValue() Gets the value of the field.
on(event, callback) Attaches an event handler function to the field for the event.Currently update is the only event supported.
getName()Parameters:
None
Usage:
// retrieve the field object rendered by this custom editor and get its name var field = sdk.getField(); var fieldName = field.getName();
Returns:
Name of field
getDefaultValue()Parameters:
Chapter 6Content Field Editor SDK Reference
6-16
None
Usage:
// retrieve the field object rendered by this custom editor and get its default value var field = sdk.getField(); var fieldDefaultValue = field.geDefaultValue();
Returns:
Default value if one is set for the field.
getDataType()Parameters:
None
Usage:
// retrieve the field’s data type var field = sdk.getField(); var dataType = field.getDataType ();
Returns:
Data type of the field, for example, text or number
setValue(value)
Name Type Description
value string, number, or object, depending onthe data type of the field
Varies depending on the data type ofthe field
Usage:
// when the editor value changes, set the changed value // to the field inputField.addEventListener('change', function(e) { field.setValue(inputField.value); });
getValue()Parameters:
None
Usage:
// retrieve the field object rendered by this custom editor and get its value
Chapter 6Content Field Editor SDK Reference
6-17
var field = sdk.getField();
var fieldValue = field.getValue();
Returns:
Value of the field
on(event, callback)
Name Type Description
event Event string Event string. Currently only the event update issupported.
callback Function Event handler function to be attached to the event
Usage:
// if the field is updated externally, keep the editor in sync field.on('update', function(value) { inputField.value = value ? value : ''; });
Chapter 6Content Field Editor SDK Reference
6-18
7Develop Custom Content Forms
Oracle Content Management allows you to extend beyond out of the box forms with the helpof the content form SDK.
With the Oracle Content Management content form SDK, you can develop and use your owncustom form. The main purpose of the SDK is to facilitate communication between thecustom form component and the content item form. To develop a custom form, you first needto create the custom form then promote it so that it can be used when creating content types.Once promoted, the form is available for use. Lastly, you can open and edit the filesassociated with the custom form to fit your purpose.
• Create a Custom Content Form
• Configure a Content Type to Use a Custom Content Form
• Edit a Custom Content Form
• Content Form SDK Reference
• Sample Custom Form
Create a Custom Content FormTo create a custom content form:
1. Log in to your instance of Oracle Content Management using the web interface, and clickDeveloper in the side navigation.
2. Click View All Components.
3. Click Create, and select Create Content Form.
4. Enter a name and optional description for the form.
5. Pick a size of the drawer for the content form.
6. Click Create. A new starter form component is created and listed on the Componentspage.
7. To make the form available for use, select it and click Promote.
8. Confirm you want to proceed, and click OK.
The custom form is now available for use for the selected content type(s).
Configure a Content Type to Use a Custom Content FormOnce a content form has been created and promoted, it is available for use when defining acontent type.
1. In Oracle Content Management, click Content in the side navigation.
2. Select Content Types from the page menu, click one of the content types, and click Edit.
7-1
• To edit an existing type, select the content type to use the content form andclick Edit.
• To create a new content type, enter a name and optional description and clickOK. Then define the content type.
3. On the Content Layout tab, select the content form from the Content Form field.
4. Make any additional changes to the content type and when finished, click Save.
Any content items created or edited of this content type will make use of the contentform.
Edit a Custom Content FormOnce you've created a custom content form, the files needed to implement the formare available when you select and open the component.
1. Click Developer in the side navigation.
2. Click View All Components.
3. Select the custom content form component and click Open.
By default, a custom content form comes with the following content:
• appinfo.json - contains the metadata of the content form
• assets folder, which includes files that implement the custom content form:edit.html
• folder_icon.png - the icon the content form uses when displayed on thecomponents page.
appinfo.jsonThis file is a required file and includes the configuration metadata needed for thecontent form.
{ "type":"contentform", "name":"Sample form",}
Property Value Required Type
type The component type. For custom contentforms, the type is contentform and isthe same for all forms. It should not bechanged.
required string
name Name of the custom content form required string
Chapter 7Edit a Custom Content Form
7-2
Property Value Required Type
drawerSize Size of the drawer in which the customform will appear. It can be one of thefollowing Oracle Content ManagementUI's predefined drawer sizes:Default - Responsive at 90% of window
Full - Responsive at 100% of window
Half - Responsive at 50% of window
Small - Fixed width of 840px, expands/collapses when sidebar opens/closes.
Medium - Fixed width of 1140px,expands/collapses when sidebar opens/closes.
Large - Fixed width of 1296px, expands/collapses when sidebar opens/closes.
When the drawerSize property is notpresent or when no value is specified,'Default' will be used.
optionalDefault valueis
'Default'
string
create The optional create property can be usedto control the behavior of the sidebarswhile creating content items. The onlyvalid property of the create object is asidebar object. The valid properties forsidebar are the same as thecontentItemCreate sidebar object fromthe Embed UI API V2 Reference.A shortcut to disable all the sidebarsduring create is to provide an emptysidebar object.
create: { sidebar: {}}
As all values are initialized, only thesidebar properties that are changed fromthe default value of the property need tobe supplied in the sidebar object.
optional object
Chapter 7Edit a Custom Content Form
7-3
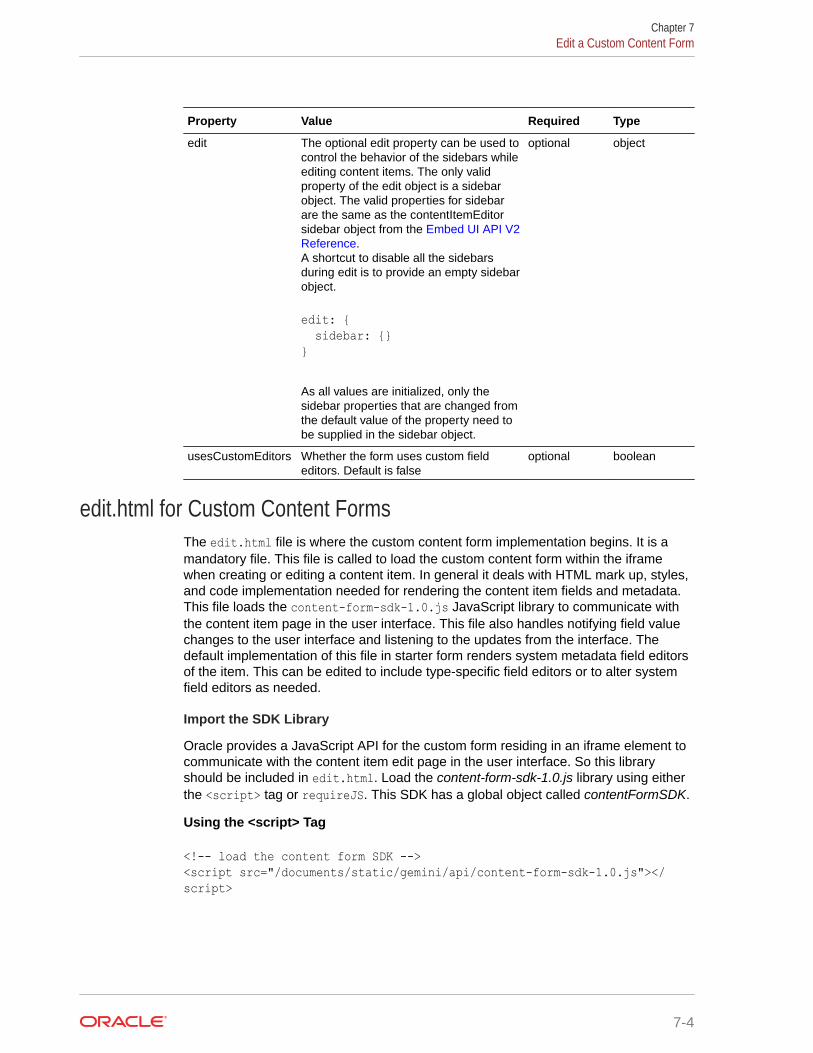
Property Value Required Type
edit The optional edit property can be used tocontrol the behavior of the sidebars whileediting content items. The only validproperty of the edit object is a sidebarobject. The valid properties for sidebarare the same as the contentItemEditorsidebar object from the Embed UI API V2Reference.A shortcut to disable all the sidebarsduring edit is to provide an empty sidebarobject.
edit: { sidebar: {}}
As all values are initialized, only thesidebar properties that are changed fromthe default value of the property need tobe supplied in the sidebar object.
optional object
usesCustomEditors Whether the form uses custom fieldeditors. Default is false
optional boolean
edit.html for Custom Content FormsThe edit.html file is where the custom content form implementation begins. It is amandatory file. This file is called to load the custom content form within the iframewhen creating or editing a content item. In general it deals with HTML mark up, styles,and code implementation needed for rendering the content item fields and metadata.This file loads the content-form-sdk-1.0.js JavaScript library to communicate withthe content item page in the user interface. This file also handles notifying field valuechanges to the user interface and listening to the updates from the interface. Thedefault implementation of this file in starter form renders system metadata field editorsof the item. This can be edited to include type-specific field editors or to alter systemfield editors as needed.
Import the SDK Library
Oracle provides a JavaScript API for the custom form residing in an iframe element tocommunicate with the content item edit page in the user interface. So this libraryshould be included in edit.html. Load the content-form-sdk-1.0.js library using eitherthe <script> tag or requireJS. This SDK has a global object called contentFormSDK.
Using the <script> Tag
<!-- load the content form SDK --><script src="/documents/static/gemini/api/content-form-sdk-1.0.js"></script>
Chapter 7Edit a Custom Content Form
7-4
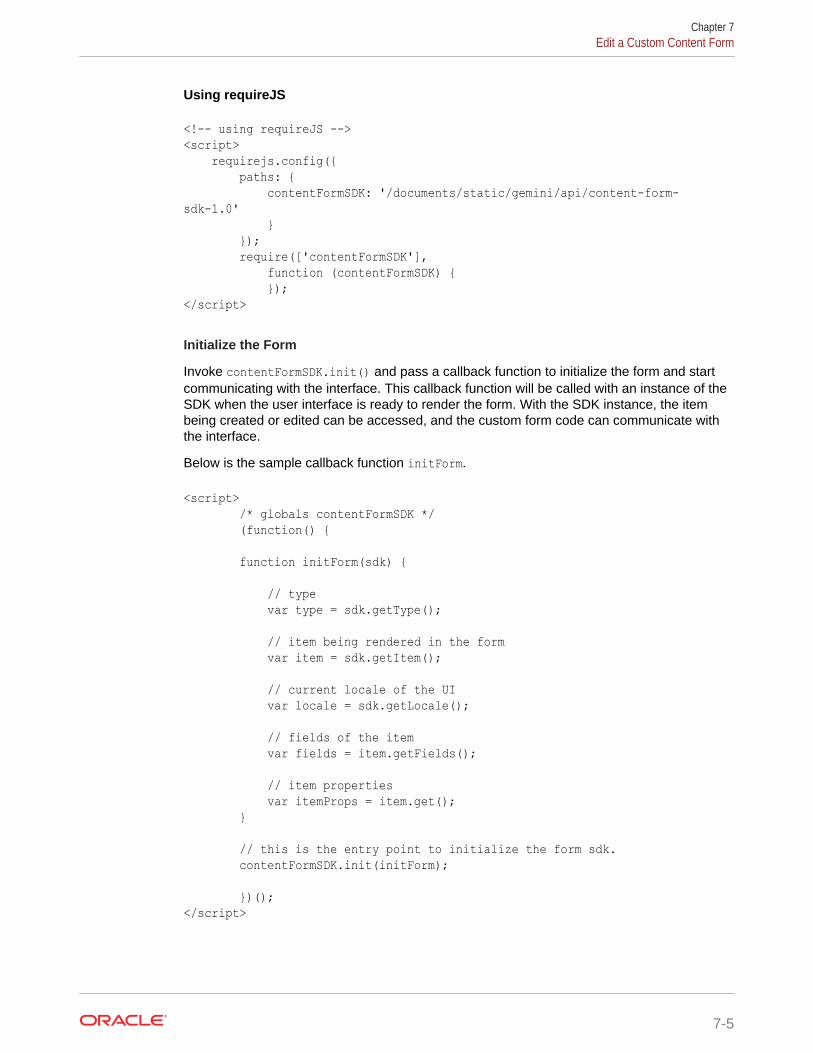
Using requireJS
<!-- using requireJS --><script> requirejs.config({ paths: { contentFormSDK: '/documents/static/gemini/api/content-form-sdk-1.0' } }); require(['contentFormSDK'], function (contentFormSDK) { });</script>
Initialize the Form
Invoke contentFormSDK.init() and pass a callback function to initialize the form and startcommunicating with the interface. This callback function will be called with an instance of theSDK when the user interface is ready to render the form. With the SDK instance, the itembeing created or edited can be accessed, and the custom form code can communicate withthe interface.
Below is the sample callback function initForm.
<script> /* globals contentFormSDK */ (function() {
function initForm(sdk) {
// type var type = sdk.getType();
// item being rendered in the form var item = sdk.getItem();
// current locale of the UI var locale = sdk.getLocale();
// fields of the item var fields = item.getFields();
// item properties var itemProps = item.get(); }
// this is the entry point to initialize the form sdk. contentFormSDK.init(initForm);
})();</script>
Chapter 7Edit a Custom Content Form
7-5
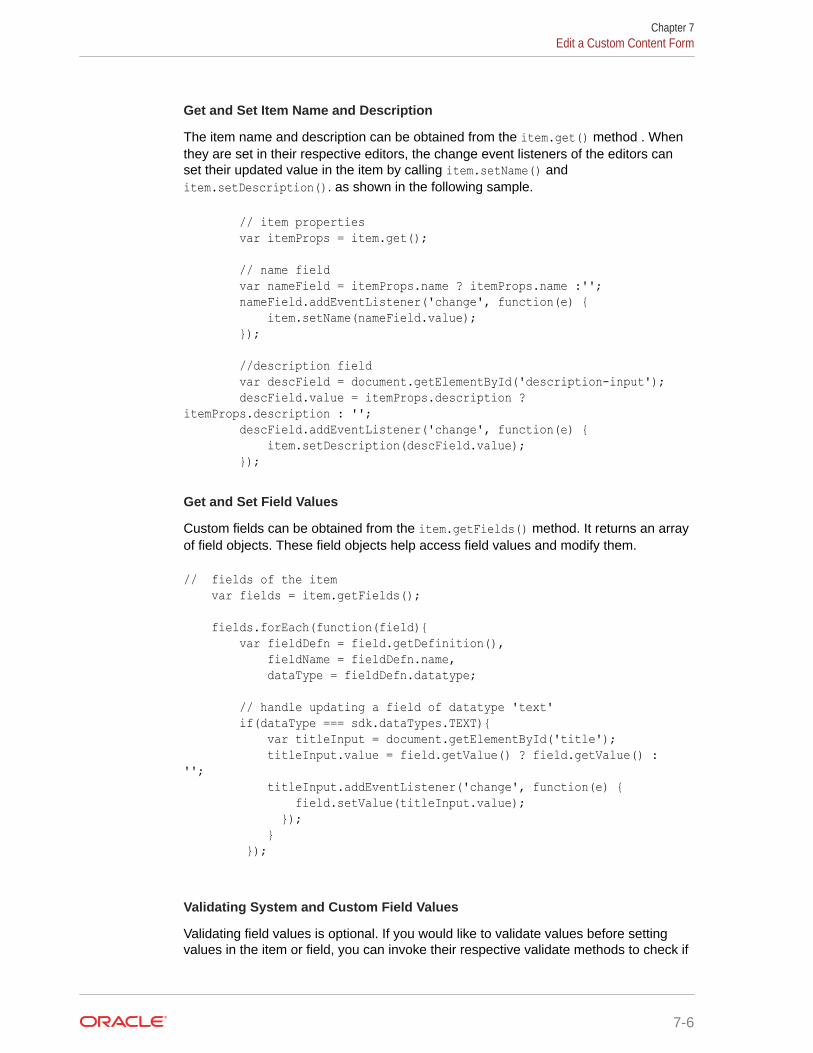
Get and Set Item Name and Description
The item name and description can be obtained from the item.get() method . Whenthey are set in their respective editors, the change event listeners of the editors canset their updated value in the item by calling item.setName() anditem.setDescription(). as shown in the following sample.
// item properties var itemProps = item.get();
// name field var nameField = itemProps.name ? itemProps.name :''; nameField.addEventListener('change', function(e) { item.setName(nameField.value); });
//description field var descField = document.getElementById('description-input'); descField.value = itemProps.description ? itemProps.description : ''; descField.addEventListener('change', function(e) { item.setDescription(descField.value); });
Get and Set Field Values
Custom fields can be obtained from the item.getFields() method. It returns an arrayof field objects. These field objects help access field values and modify them.
// fields of the item var fields = item.getFields();
fields.forEach(function(field){ var fieldDefn = field.getDefinition(), fieldName = fieldDefn.name, dataType = fieldDefn.datatype;
// handle updating a field of datatype 'text' if(dataType === sdk.dataTypes.TEXT){ var titleInput = document.getElementById('title'); titleInput.value = field.getValue() ? field.getValue() : ''; titleInput.addEventListener('change', function(e) { field.setValue(titleInput.value); }); } });
Validating System and Custom Field Values
Validating field values is optional. If you would like to validate values before settingvalues in the item or field, you can invoke their respective validate methods to check if
Chapter 7Edit a Custom Content Form
7-6
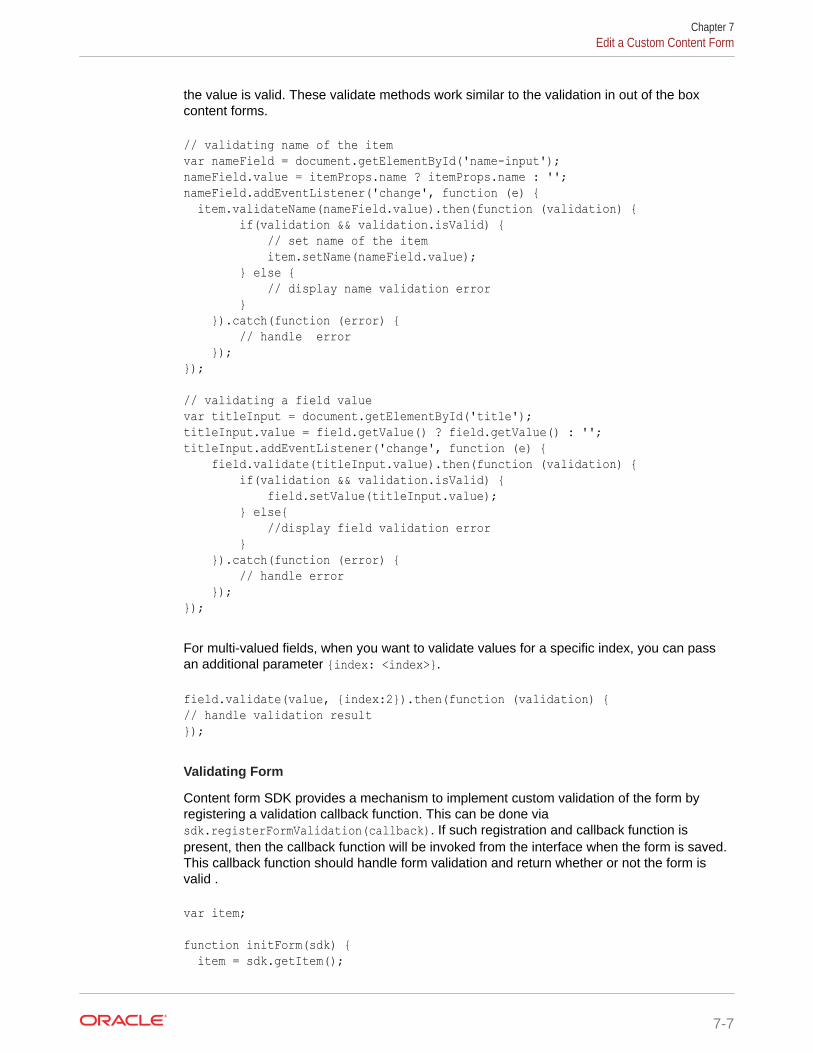
the value is valid. These validate methods work similar to the validation in out of the boxcontent forms.
// validating name of the itemvar nameField = document.getElementById('name-input');nameField.value = itemProps.name ? itemProps.name : '';nameField.addEventListener('change', function (e) { item.validateName(nameField.value).then(function (validation) { if(validation && validation.isValid) { // set name of the item item.setName(nameField.value); } else { // display name validation error } }).catch(function (error) { // handle error });});
// validating a field valuevar titleInput = document.getElementById('title');titleInput.value = field.getValue() ? field.getValue() : '';titleInput.addEventListener('change', function (e) { field.validate(titleInput.value).then(function (validation) { if(validation && validation.isValid) { field.setValue(titleInput.value); } else{ //display field validation error } }).catch(function (error) { // handle error });});
For multi-valued fields, when you want to validate values for a specific index, you can passan additional parameter {index: <index>}.
field.validate(value, {index:2}).then(function (validation) {// handle validation result});
Validating Form
Content form SDK provides a mechanism to implement custom validation of the form byregistering a validation callback function. This can be done viasdk.registerFormValidation(callback). If such registration and callback function ispresent, then the callback function will be invoked from the interface when the form is saved.This callback function should handle form validation and return whether or not the form isvalid .
var item; function initForm(sdk) { item = sdk.getItem();
Chapter 7Edit a Custom Content Form
7-7
// validation callback registration sdk.registerFormValidation(validateForm); // ... rest of the form init code} function validateForm() { var isValid = true, message = ''; if (!item.get().name) { isValid = false; message = 'Name is required' } return { isValid: isValid, message: message }}
Previewing Assets from the Form
Content form SDK provides an option to preview other assets the item references.This can be done by invoking sdk.previewAsset({id: <assetId>}) and passing an idof the asset you want to preview. This opens up the asset in preview drawer.
sdk.previewAsset({id: <asset_id>});
Content Form SDK ReferenceThe Oracle Content Management content form SDK API content-form-sdk-1.0.js isthe library that handles the communication between the custom form component andthe interface. This has a global variable called contentFormSDK. Custom formimplementation should invoke contentFormSDK.init() method and pass a callbackfunction to begin the communication between the interface and the custom form.
• Custom Content Form SDK Object
• Custom Content Form Type Object
• Custom Content Form Item Object
• Custom Content Form Field Object
• CustomEditor Object
Custom Content Form SDK ObjectThe callback function passed to contentFormSDK.init() gets an instance of the SDKobject that provides following methods:
Chapter 7Content Form SDK Reference
7-8
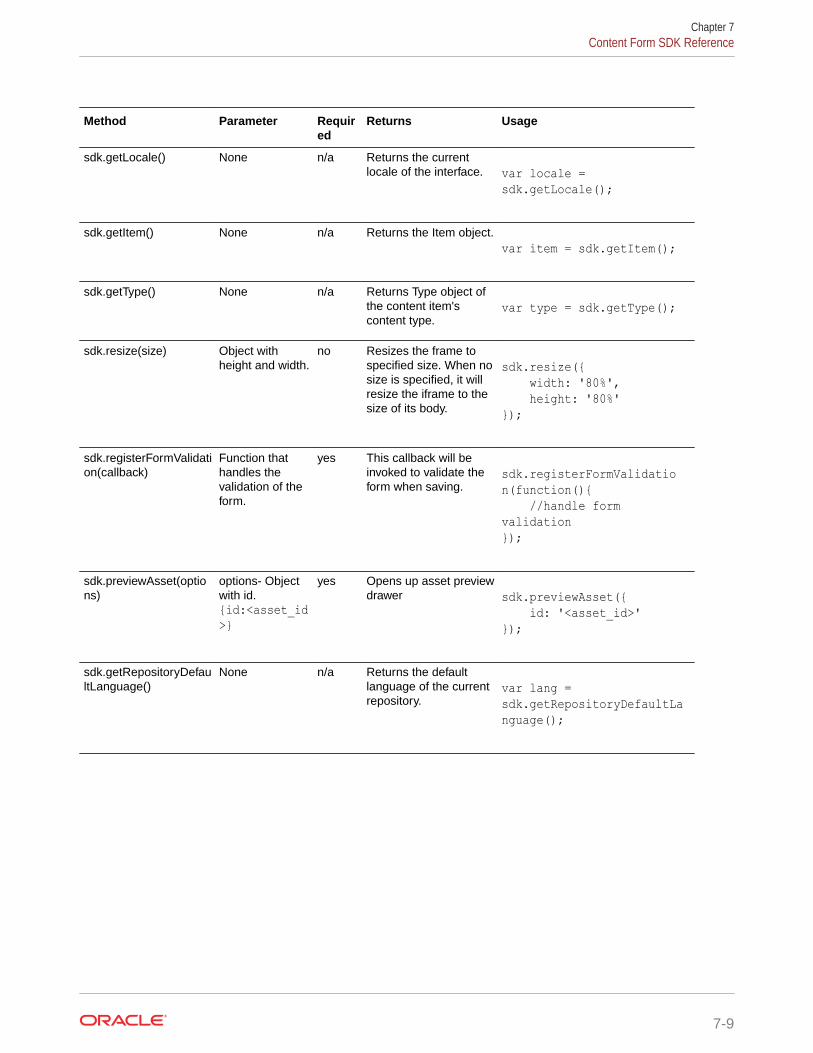
Method Parameter Required
Returns Usage
sdk.getLocale() None n/a Returns the currentlocale of the interface. var locale =
sdk.getLocale();
sdk.getItem() None n/a Returns the Item object.var item = sdk.getItem();
sdk.getType() None n/a Returns Type object ofthe content item'scontent type.
var type = sdk.getType();
sdk.resize(size) Object withheight and width.
no Resizes the frame tospecified size. When nosize is specified, it willresize the iframe to thesize of its body.
sdk.resize({ width: '80%', height: '80%'});
sdk.registerFormValidation(callback)
Function thathandles thevalidation of theform.
yes This callback will beinvoked to validate theform when saving.
sdk.registerFormValidation(function(){ //handle form validation});
sdk.previewAsset(options)
options- Objectwith id.{id:<asset_id>}
yes Opens up asset previewdrawer sdk.previewAsset({
id: '<asset_id>'});
sdk.getRepositoryDefaultLanguage()
None n/a Returns the defaultlanguage of the currentrepository.
var lang = sdk.getRepositoryDefaultLanguage();
Chapter 7Content Form SDK Reference
7-9
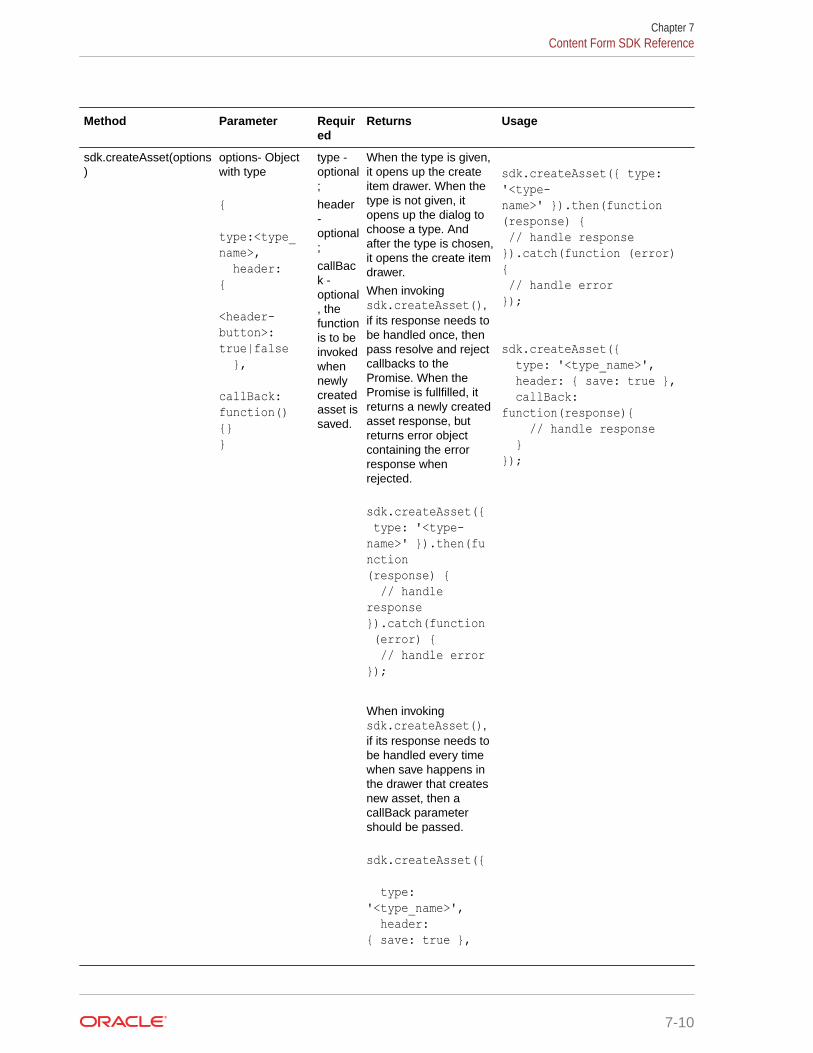
Method Parameter Required
Returns Usage
sdk.createAsset(options)
options- Objectwith type
{ type:<type_name>, header: { <header-button>: true|false }, callBack: function(){} }
type -optional;
header-optional;
callBack -optional, thefunctionis to beinvokedwhennewlycreatedasset issaved.
When the type is given,it opens up the createitem drawer. When thetype is not given, itopens up the dialog tochoose a type. Andafter the type is chosen,it opens the create itemdrawer.
When invokingsdk.createAsset(),if its response needs tobe handled once, thenpass resolve and rejectcallbacks to thePromise. When thePromise is fullfilled, itreturns a newly createdasset response, butreturns error objectcontaining the errorresponse whenrejected.
sdk.createAsset({ type: '<type-name>' }).then(function (response) { // handle response }).catch(function (error) { // handle error});
When invokingsdk.createAsset(),if its response needs tobe handled every timewhen save happens inthe drawer that createsnew asset, then acallBack parametershould be passed.
sdk.createAsset({ type: '<type_name>', header: { save: true },
sdk.createAsset({ type: '<type-name>' }).then(function (response) { // handle response}).catch(function (error) { // handle error});
sdk.createAsset({ type: '<type_name>', header: { save: true }, callBack: function(response){ // handle response } });
Chapter 7Content Form SDK Reference
7-10
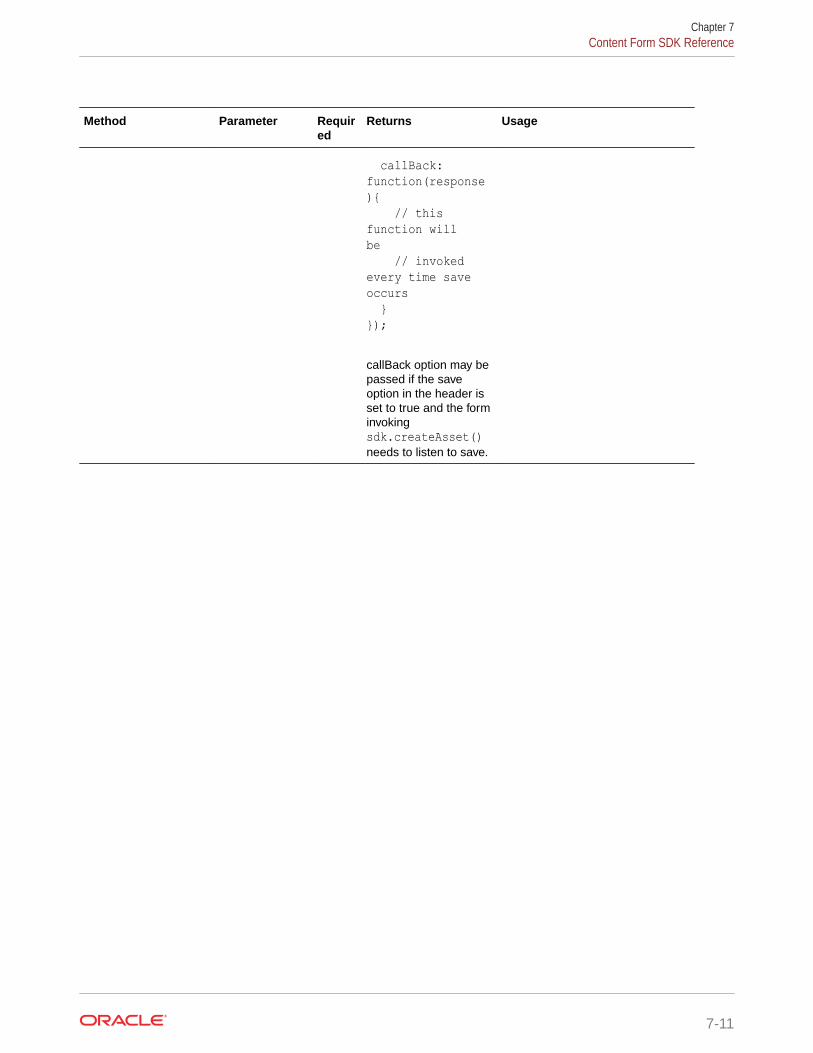
Method Parameter Required
Returns Usage
callBack: function(response){ // this function will be // invoked every time save occurs }});
callBack option may bepassed if the saveoption in the header isset to true and the forminvokingsdk.createAsset()needs to listen to save.
Chapter 7Content Form SDK Reference
7-11
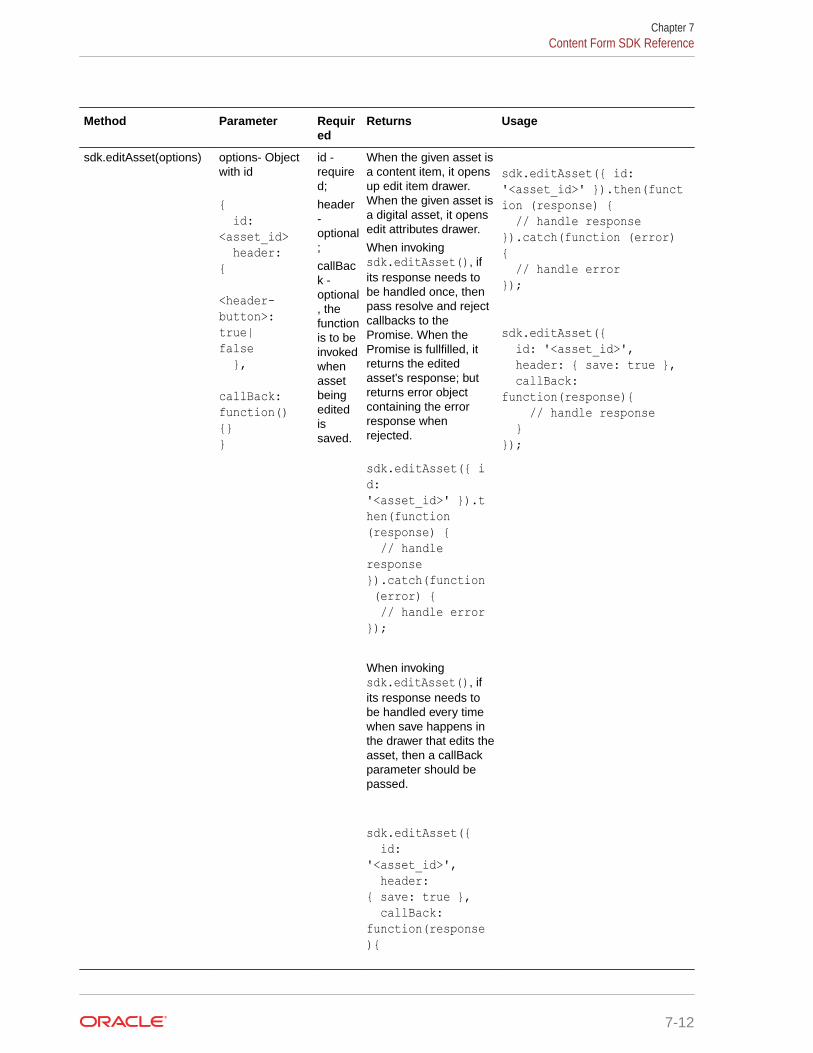
Method Parameter Required
Returns Usage
sdk.editAsset(options) options- Objectwith id
{ id: <asset_id> header: { <header-button>: true|false }, callBack: function(){}}
id -required;
header-optional;
callBack -optional, thefunctionis to beinvokedwhenassetbeingeditedissaved.
When the given asset isa content item, it opensup edit item drawer.When the given asset isa digital asset, it opensedit attributes drawer.
When invokingsdk.editAsset(), ifits response needs tobe handled once, thenpass resolve and rejectcallbacks to thePromise. When thePromise is fullfilled, itreturns the editedasset's response; butreturns error objectcontaining the errorresponse whenrejected.
sdk.editAsset({ id: '<asset_id>' }).then(function (response) { // handle response}).catch(function (error) { // handle error});
When invokingsdk.editAsset(), ifits response needs tobe handled every timewhen save happens inthe drawer that edits theasset, then a callBackparameter should bepassed.
sdk.editAsset({ id: '<asset_id>', header: { save: true }, callBack: function(response){
sdk.editAsset({ id: '<asset_id>' }).then(function (response) { // handle response}).catch(function (error) { // handle error});
sdk.editAsset({ id: '<asset_id>', header: { save: true }, callBack: function(response){ // handle response } });
Chapter 7Content Form SDK Reference
7-12
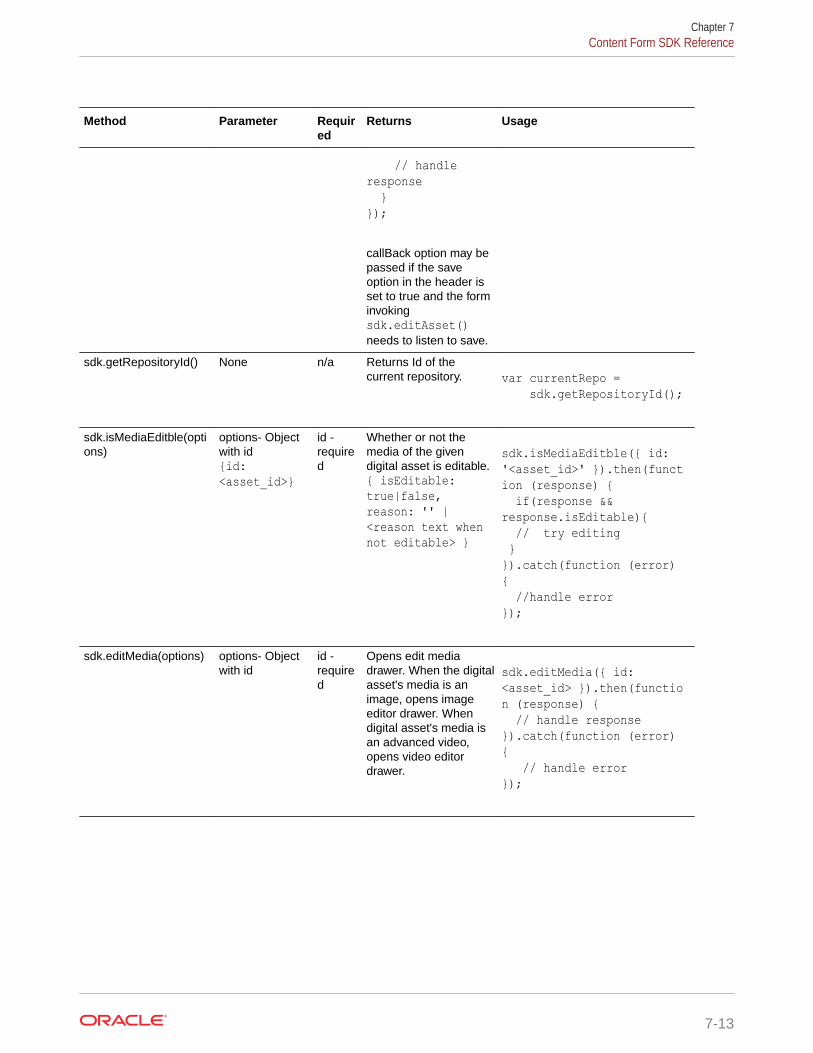
Method Parameter Required
Returns Usage
// handle response } });
callBack option may bepassed if the saveoption in the header isset to true and the forminvokingsdk.editAsset()needs to listen to save.
sdk.getRepositoryId() None n/a Returns Id of thecurrent repository. var currentRepo =
sdk.getRepositoryId();
sdk.isMediaEditble(options)
options- Objectwith id{id:<asset_id>}
id -required
Whether or not themedia of the givendigital asset is editable.{ isEditable:true|false,reason: '' |<reason text whennot editable> }
sdk.isMediaEditble({ id: '<asset_id>' }).then(function (response) { if(response && response.isEditable){ // try editing }}).catch(function (error) { //handle error});
sdk.editMedia(options) options- Objectwith id
id -required
Opens edit mediadrawer. When the digitalasset's media is animage, opens imageeditor drawer. Whendigital asset's media isan advanced video,opens video editordrawer.
sdk.editMedia({ id: <asset_id> }).then(function (response) { // handle response}).catch(function (error) { // handle error});
Chapter 7Content Form SDK Reference
7-13
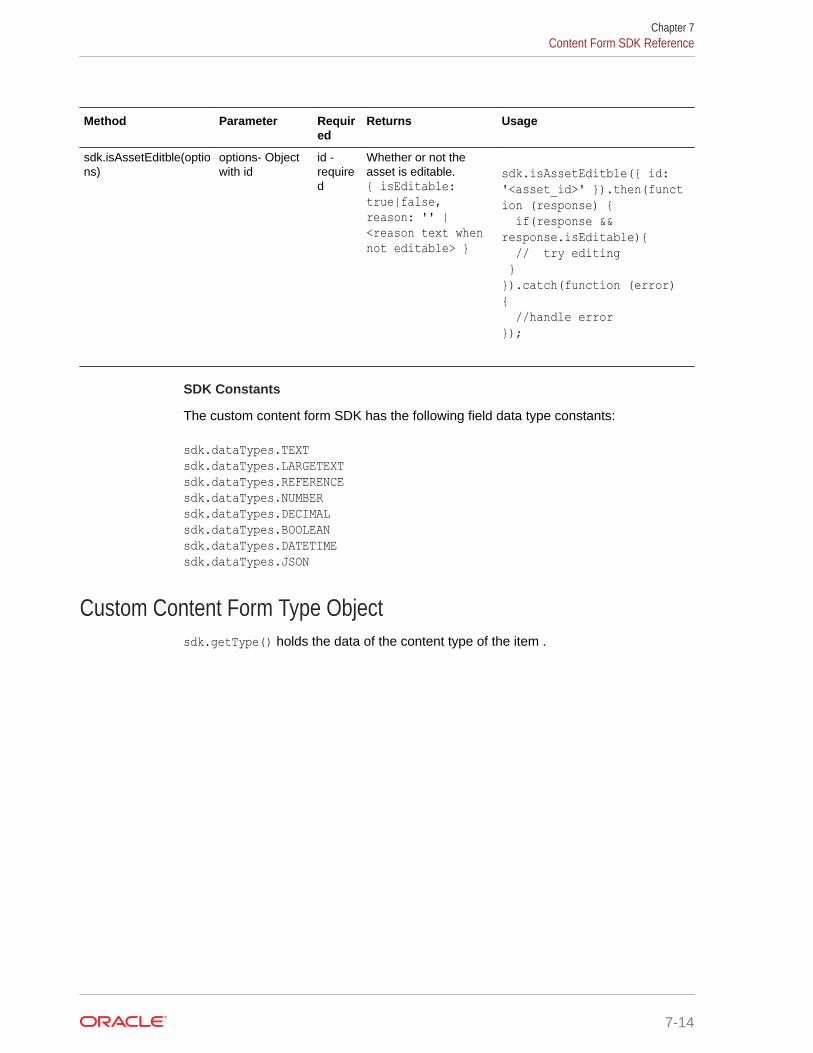
Method Parameter Required
Returns Usage
sdk.isAssetEditble(options)
options- Objectwith id
id -required
Whether or not theasset is editable.{ isEditable:true|false,reason: '' |<reason text whennot editable> }
sdk.isAssetEditble({ id: '<asset_id>' }).then(function (response) { if(response && response.isEditable){ // try editing }}).catch(function (error) { //handle error});
SDK Constants
The custom content form SDK has the following field data type constants:
sdk.dataTypes.TEXTsdk.dataTypes.LARGETEXTsdk.dataTypes.REFERENCEsdk.dataTypes.NUMBERsdk.dataTypes.DECIMALsdk.dataTypes.BOOLEANsdk.dataTypes.DATETIMEsdk.dataTypes.JSON
Custom Content Form Type Objectsdk.getType() holds the data of the content type of the item .
Chapter 7Content Form SDK Reference
7-14
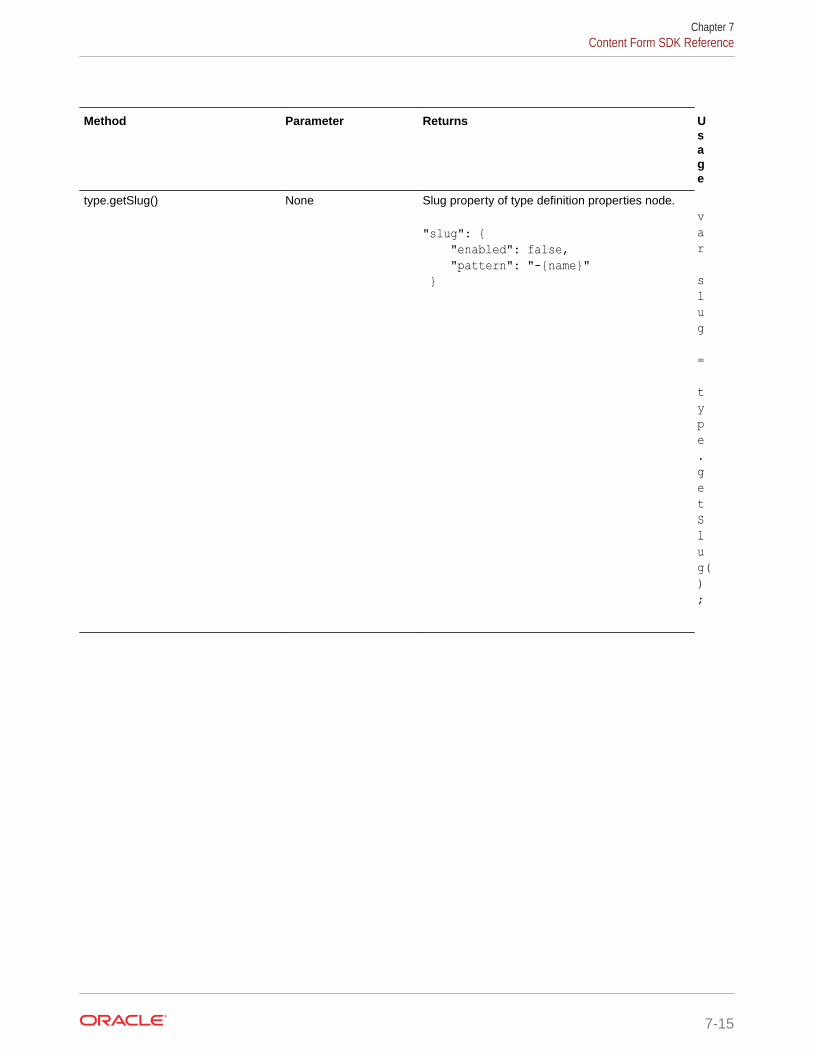
Method Parameter Returns Usage
type.getSlug() None Slug property of type definition properties node.
"slug": { "enabled": false, "pattern": "-{name}" }
var slug = type.getSlug();
Chapter 7Content Form SDK Reference
7-15
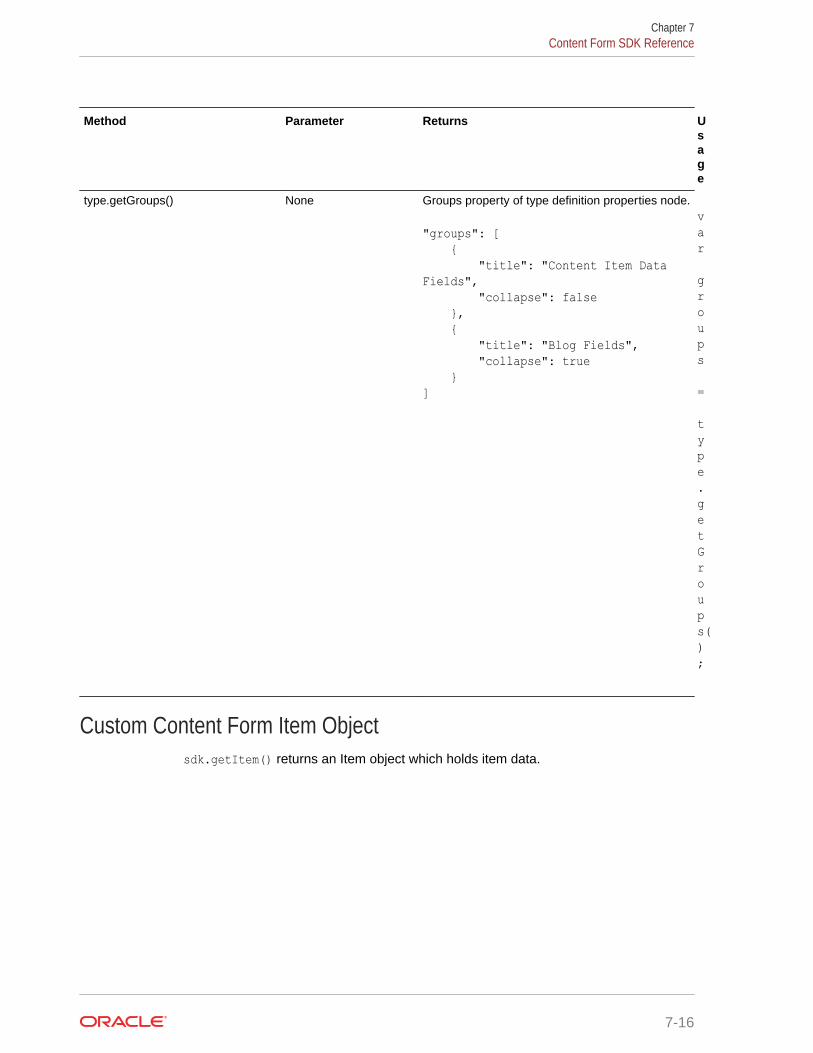
Method Parameter Returns Usage
type.getGroups() None Groups property of type definition properties node.
"groups": [ { "title": "Content Item Data Fields", "collapse": false }, { "title": "Blog Fields", "collapse": true }]
var groups = type.getGroups();
Custom Content Form Item Objectsdk.getItem() returns an Item object which holds item data.
Chapter 7Content Form SDK Reference
7-16
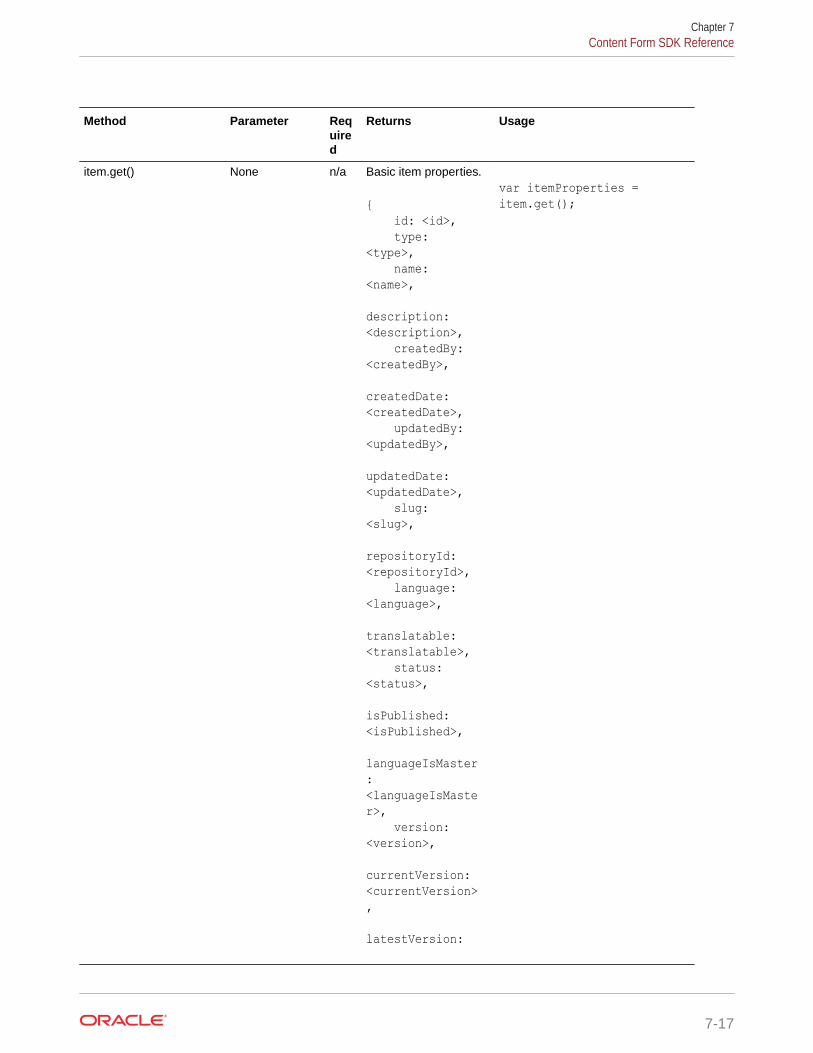
Method Parameter Required
Returns Usage
item.get() None n/a Basic item properties.
{ id: <id>, type: <type>, name: <name>, description: <description>, createdBy: <createdBy>, createdDate: <createdDate>, updatedBy: <updatedBy>, updatedDate: <updatedDate>, slug: <slug>, repositoryId: <repositoryId>, language: <language>, translatable: <translatable>, status: <status>, isPublished: <isPublished>, languageIsMaster: <languageIsMaster>, version: <version>, currentVersion: <currentVersion>, latestVersion:
var itemProperties = item.get();
Chapter 7Content Form SDK Reference
7-17
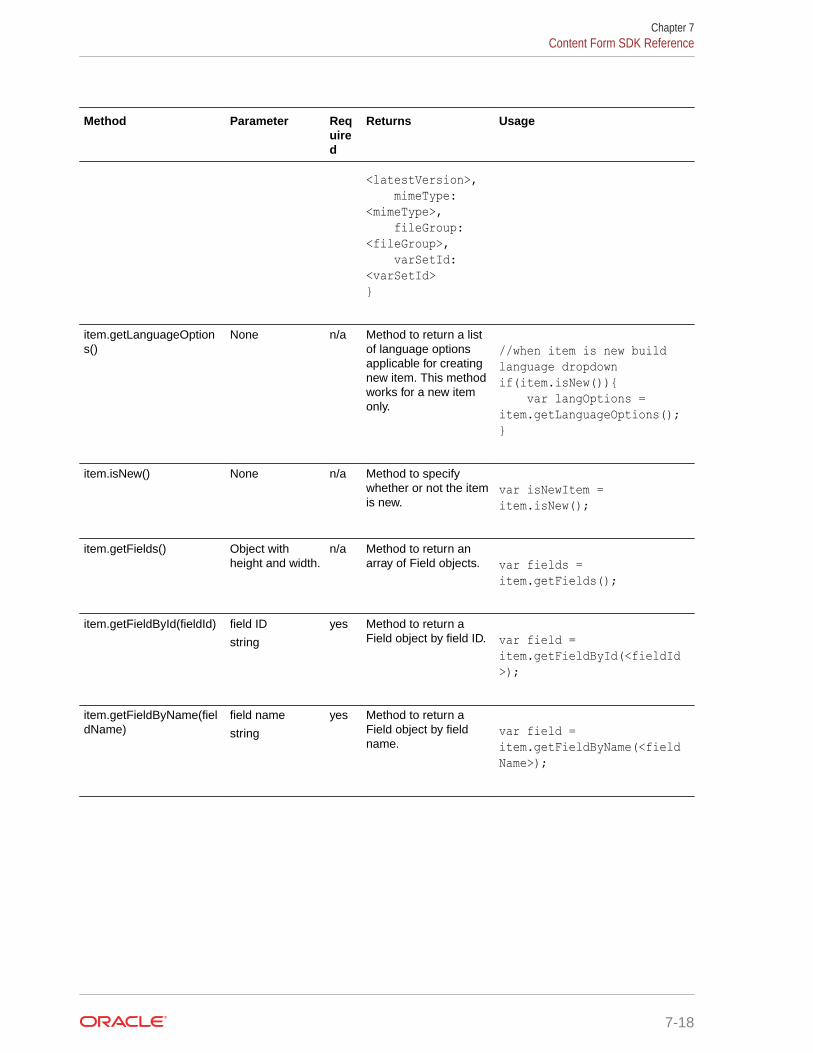
Method Parameter Required
Returns Usage
<latestVersion>, mimeType: <mimeType>, fileGroup: <fileGroup>, varSetId: <varSetId>}
item.getLanguageOptions()
None n/a Method to return a listof language optionsapplicable for creatingnew item. This methodworks for a new itemonly.
//when item is new build language dropdownif(item.isNew()){ var langOptions = item.getLanguageOptions();}
item.isNew() None n/a Method to specifywhether or not the itemis new.
var isNewItem = item.isNew();
item.getFields() Object withheight and width.
n/a Method to return anarray of Field objects. var fields =
item.getFields();
item.getFieldById(fieldId) field ID
string
yes Method to return aField object by field ID. var field =
item.getFieldById(<fieldId>);
item.getFieldByName(fieldName)
field name
string
yes Method to return aField object by fieldname.
var field = item.getFieldByName(<fieldName>);
Chapter 7Content Form SDK Reference
7-18
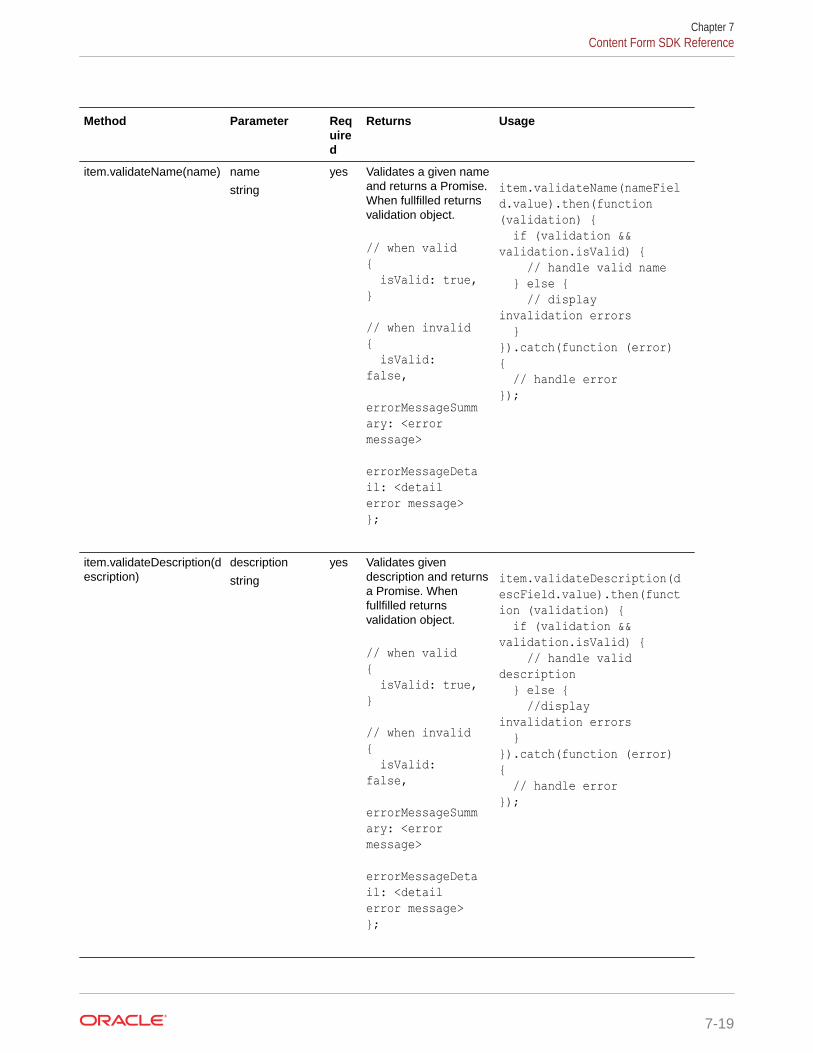
Method Parameter Required
Returns Usage
item.validateName(name) name
string
yes Validates a given nameand returns a Promise.When fullfilled returnsvalidation object.
// when valid{ isValid: true,} // when invalid{ isValid: false, errorMessageSummary: <error message> errorMessageDetail: <detail error message>};
item.validateName(nameField.value).then(function (validation) { if (validation && validation.isValid) { // handle valid name } else { // display invalidation errors }}).catch(function (error) { // handle error});
item.validateDescription(description)
description
string
yes Validates givendescription and returnsa Promise. Whenfullfilled returnsvalidation object.
// when valid{ isValid: true,} // when invalid{ isValid: false, errorMessageSummary: <error message> errorMessageDetail: <detail error message>};
item.validateDescription(descField.value).then(function (validation) { if (validation && validation.isValid) { // handle valid description } else { //display invalidation errors }}).catch(function (error) { // handle error});
Chapter 7Content Form SDK Reference
7-19
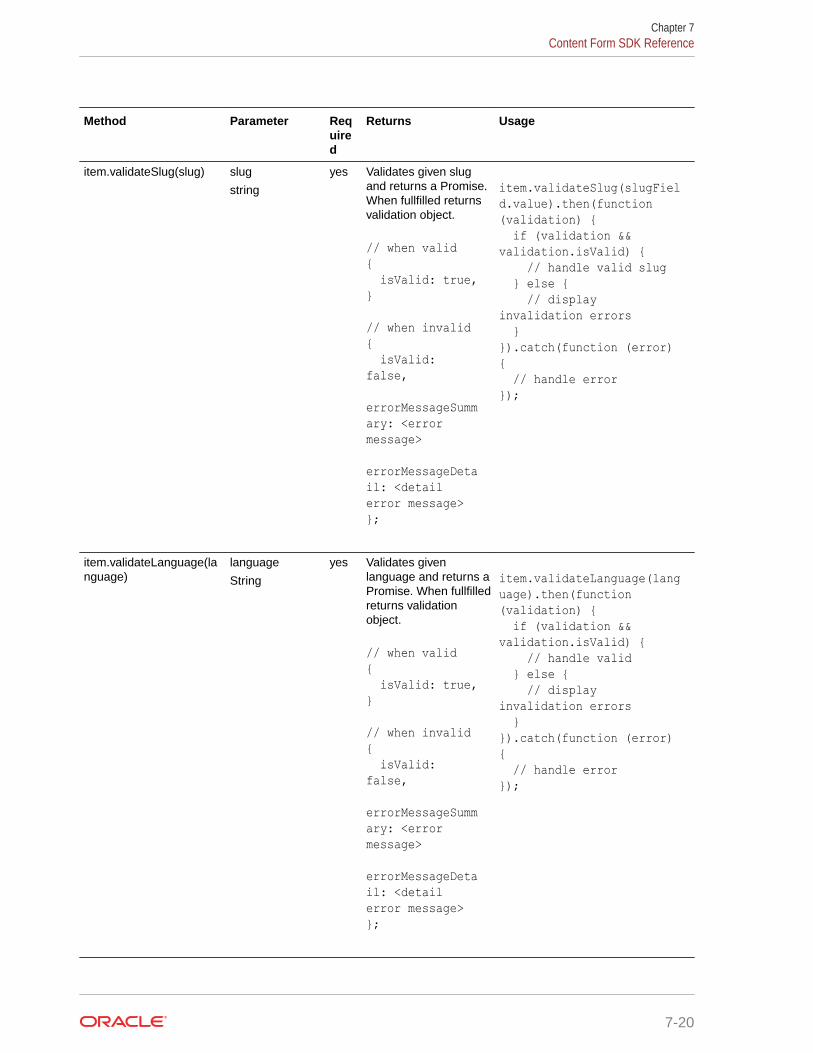
Method Parameter Required
Returns Usage
item.validateSlug(slug) slug
string
yes Validates given slugand returns a Promise.When fullfilled returnsvalidation object.
// when valid{ isValid: true,} // when invalid{ isValid: false, errorMessageSummary: <error message> errorMessageDetail: <detail error message>};
item.validateSlug(slugField.value).then(function (validation) { if (validation && validation.isValid) { // handle valid slug } else { // display invalidation errors }}).catch(function (error) { // handle error});
item.validateLanguage(language)
language
String
yes Validates givenlanguage and returns aPromise. When fullfilledreturns validationobject.
// when valid{ isValid: true,} // when invalid{ isValid: false, errorMessageSummary: <error message> errorMessageDetail: <detail error message>};
item.validateLanguage(language).then(function (validation) { if (validation && validation.isValid) { // handle valid } else { // display invalidation errors }}).catch(function (error) { // handle error});
Chapter 7Content Form SDK Reference
7-20

Method Parameter Required
Returns Usage
item.setName(name,options)
name - string
options - objectwith {silent:true|false}
name -yes
options -optional
Sets item name. Whenoptions withsilent:true propertyis passed, form doesn'tbecome dirty.
// sets name and form becomes dirtyitem.setName(name);
// sets name and form doesn't become dirtyitem.setName(name, {silent: true});
item.setDescription(description,options)
description -string
options - objectwith {silent:true|false}
description- yes
options -optional
Sets item description.When options withsilent: true property ispassed, form doesn'tbecome dirty.
item.setDescription(description);item.setDescription(description, {silent: true});
item.setSlug(slug,options) description -string
options - objectwith {silent:true|false}
slug -yes
options -optional
Sets slug value. Whenoptions with silent: trueproperty is passed,form doesn't becomedirty.
item.setSlug(slug);item.setSlug(slug, {silent: true});
item.setLanguage(language,options)
languageCode -string
options - objectwith {silent:true|false}
language -yes
options -optional
Sets language. Worksfor new items only.When options withsilent: true property ispassed, form doesn'tbecome dirty.
item.setLanguage('en-US');item.setLanguage('en-US', {silent: true});
item.setTranslatable(isTranslatable,options)
isTranslatable -boolean
options - objectwith {silent:true|false}
setTranslatable- yes
options -optional
Sets whether or not theitem is translatable. Willwork only if the item isa new master. Whenoptions with silent: trueproperty is passed,form doesn't becomedirty.
item.setTranslatable(isTranslatable);item.setTranslatable(isTranslatable, {silent: true});
item.on(event, handler) event - string
handler - functionthat handles theevent
yes Currently only 'update'event is supported. item.on('update',
function(value){ // called if the item values change in the UI // update item properties with latest value itemProps = value;});
Chapter 7Content Form SDK Reference
7-21
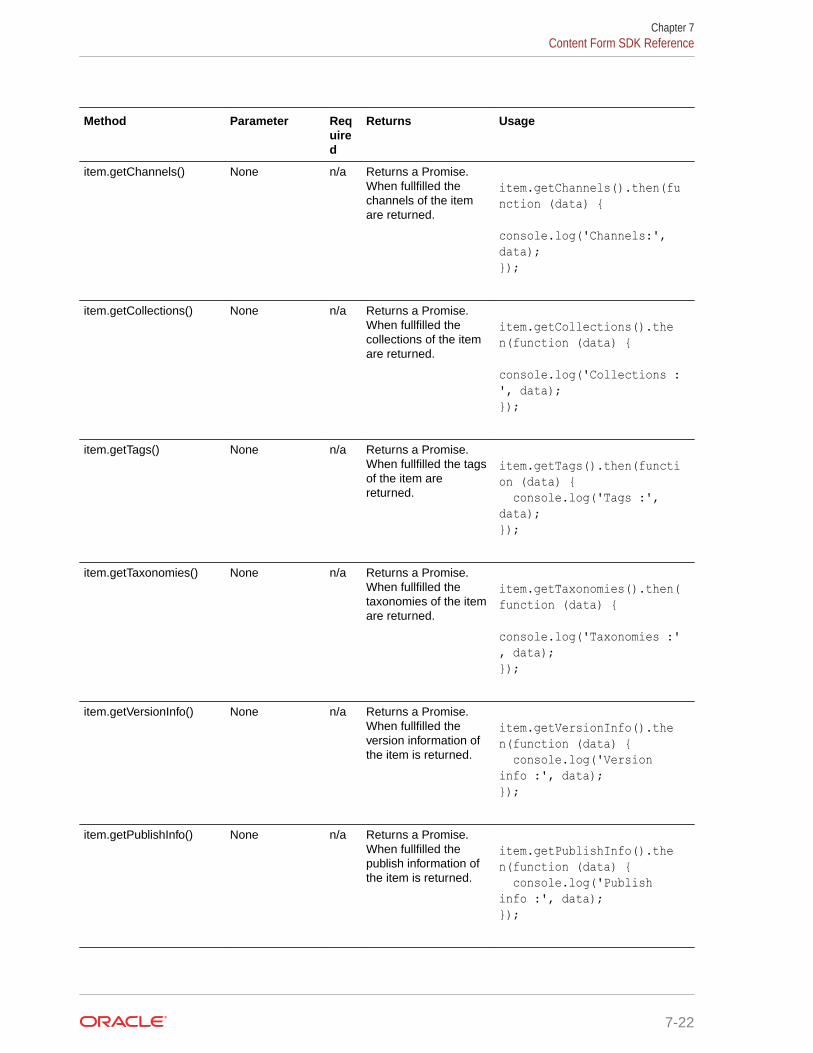
Method Parameter Required
Returns Usage
item.getChannels() None n/a Returns a Promise.When fullfilled thechannels of the itemare returned.
item.getChannels().then(function (data) { console.log('Channels:', data);});
item.getCollections() None n/a Returns a Promise.When fullfilled thecollections of the itemare returned.
item.getCollections().then(function (data) { console.log('Collections :', data);});
item.getTags() None n/a Returns a Promise.When fullfilled the tagsof the item arereturned.
item.getTags().then(function (data) { console.log('Tags :', data);});
item.getTaxonomies() None n/a Returns a Promise.When fullfilled thetaxonomies of the itemare returned.
item.getTaxonomies().then(function (data) { console.log('Taxonomies :', data);});
item.getVersionInfo() None n/a Returns a Promise.When fullfilled theversion information ofthe item is returned.
item.getVersionInfo().then(function (data) { console.log('Version info :', data);});
item.getPublishInfo() None n/a Returns a Promise.When fullfilled thepublish information ofthe item is returned.
item.getPublishInfo().then(function (data) { console.log('Publish info :', data);});
Chapter 7Content Form SDK Reference
7-22
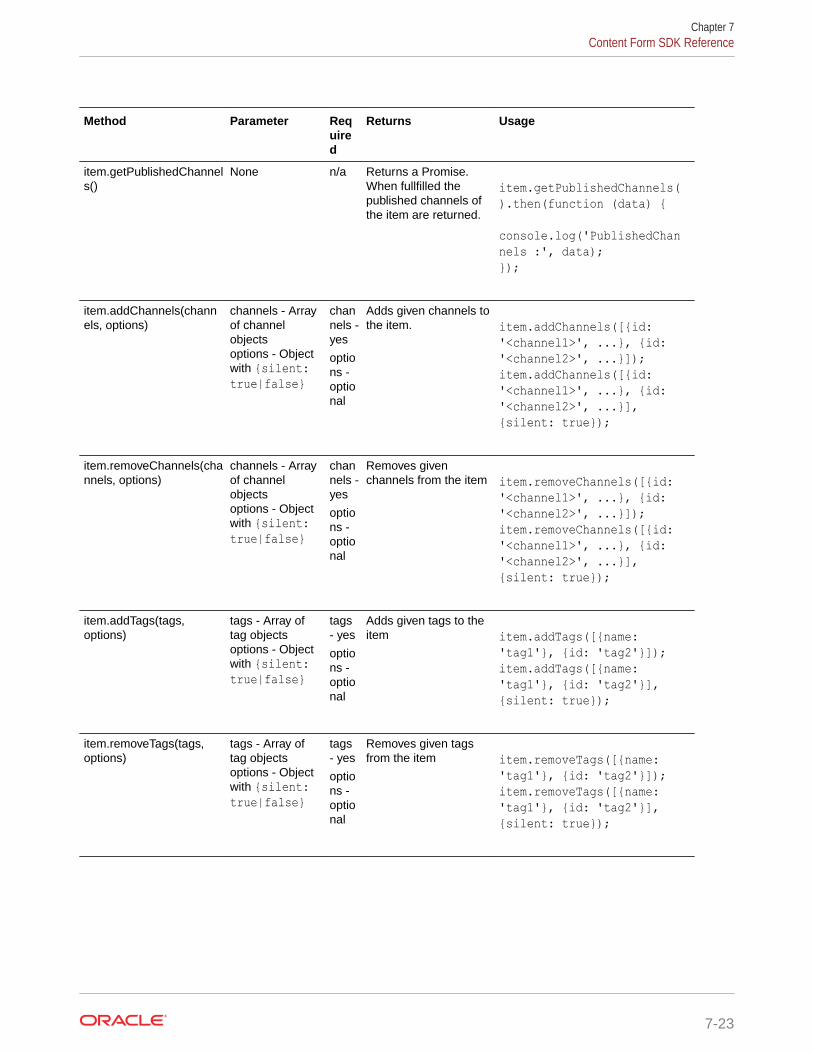
Method Parameter Required
Returns Usage
item.getPublishedChannels()
None n/a Returns a Promise.When fullfilled thepublished channels ofthe item are returned.
item.getPublishedChannels().then(function (data) { console.log('PublishedChannels :', data);});
item.addChannels(channels, options)
channels - Arrayof channelobjectsoptions - Objectwith {silent:true|false}
channels -yes
options -optional
Adds given channels tothe item. item.addChannels([{id:
'<channel1>', ...}, {id: '<channel2>', ...}]);item.addChannels([{id: '<channel1>', ...}, {id: '<channel2>', ...}], {silent: true});
item.removeChannels(channels, options)
channels - Arrayof channelobjectsoptions - Objectwith {silent:true|false}
channels -yes
options -optional
Removes givenchannels from the item item.removeChannels([{id:
'<channel1>', ...}, {id: '<channel2>', ...}]);item.removeChannels([{id: '<channel1>', ...}, {id: '<channel2>', ...}], {silent: true});
item.addTags(tags,options)
tags - Array oftag objectsoptions - Objectwith {silent:true|false}
tags- yes
options -optional
Adds given tags to theitem item.addTags([{name:
'tag1'}, {id: 'tag2'}]);item.addTags([{name: 'tag1'}, {id: 'tag2'}], {silent: true});
item.removeTags(tags,options)
tags - Array oftag objectsoptions - Objectwith {silent:true|false}
tags- yes
options -optional
Removes given tagsfrom the item item.removeTags([{name:
'tag1'}, {id: 'tag2'}]);item.removeTags([{name: 'tag1'}, {id: 'tag2'}], {silent: true});
Chapter 7Content Form SDK Reference
7-23

Method Parameter Required
Returns Usage
item.addCollections(collections, options)
collections -Array ofcollection objectsoptions - Objectwith {silent:true|false}
collections -yes
options -optional
Adds given collectionsto the item item.addCollections([{id:
'<collection1>', ...}, {id: '<collection2>', ...}]);item.addCollections([{id: '<collection1>', ...}, {id: '<collection2>', ...}], {silent: true});
item.removeCollections(collections, options)
collections -Array ofcollection objectsoptions - Objectwith {silent:true|false}
collections -yes
options -optional
Removes givencollections from theitem
item.removeCollections([{id: '<collection1>', ...}, {id: '<collection2>', ...}]);item.removeCollections([{id: '<collection1>', ...}, {id: '<collection2>', ...}], {silent: true});
item.addCategories(taxonomy, categories, options)
taxonomy -taxonomy underwhich categoriesfallcategories -Array of categoryobjects
options - Objectwith {silent:true|false}
taxonomy -yescategories- yes
options -optional
Adds given categoriesunder given taxonomyto the item
item.addCategories(<taxonomy>, [{id: '<category1>', ...}, {id: '<category2>', ...}]);item.addCategories(<taxonomy>, [{id: '<category1>', ...}, {id: '<category2>', ...}], {silent: true});
item.removeCategories(taxonomy, categories,options)
taxonomy -taxonomy underwhich categoriesfallcategories -Array of categoryobjects
options - Objectwith {silent:true|false}
taxonomy -yes
categories- yes
options -optional
Removes givencategories under giventaxonomy from the item
item.removeCategories(<taxonomy>, [{id: '<category1>', ...}, {id: '<category2>', ...}]);item.removeCategories(<taxonomy>, [{id: '<category1>', ...}, {id: '<category2>', ...}], {silent: true});
Chapter 7Content Form SDK Reference
7-24
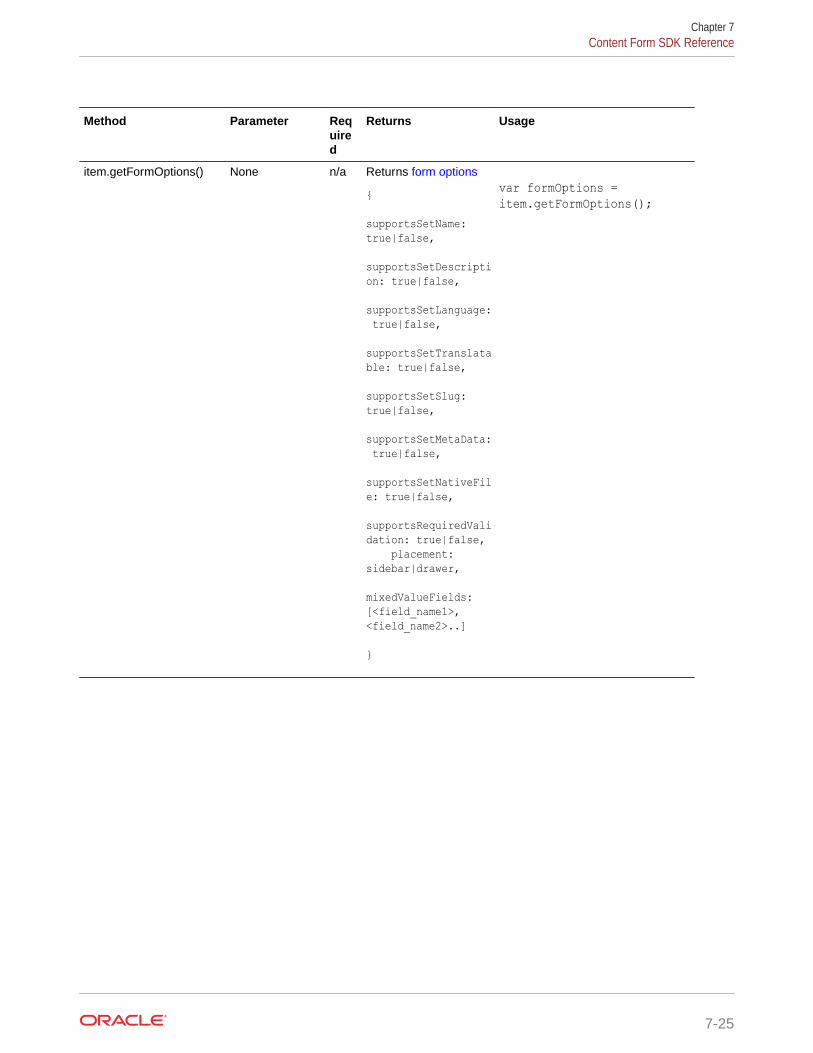
Method Parameter Required
Returns Usage
item.getFormOptions() None n/a Returns form options
{ supportsSetName: true|false, supportsSetDescription: true|false, supportsSetLanguage: true|false, supportsSetTranslatable: true|false, supportsSetSlug: true|false, supportsSetMetaData: true|false, supportsSetNativeFile: true|false, supportsRequiredValidation: true|false, placement: sidebar|drawer, mixedValueFields: [<field_name1>, <field_name2>..] }
var formOptions = item.getFormOptions();
Chapter 7Content Form SDK Reference
7-25
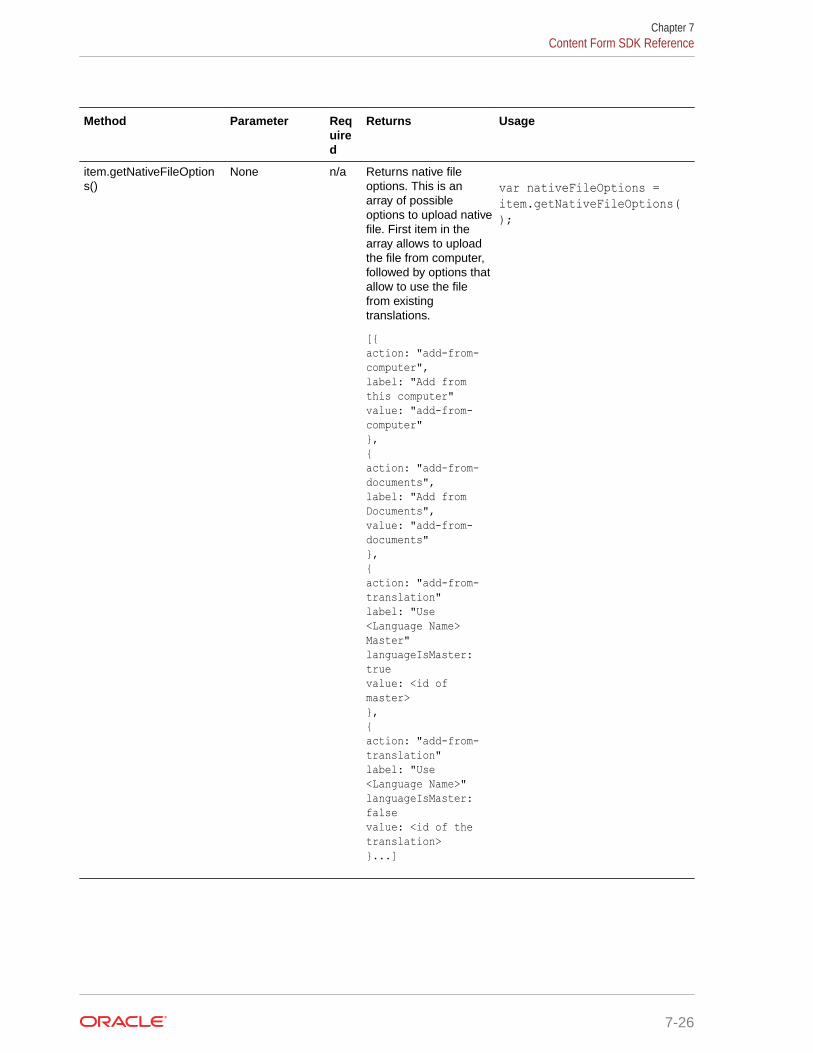
Method Parameter Required
Returns Usage
item.getNativeFileOptions()
None n/a Returns native fileoptions. This is anarray of possibleoptions to upload nativefile. First item in thearray allows to uploadthe file from computer,followed by options thatallow to use the filefrom existingtranslations.
[{action: "add-from-computer",label: "Add from this computer"value: "add-from-computer"},{action: "add-from-documents",label: "Add from Documents",value: "add-from-documents"},{action: "add-from-translation"label: "Use <Language Name> Master"languageIsMaster: truevalue: <id of master>},{action: "add-from-translation"label: "Use <Language Name>"languageIsMaster: falsevalue: <id of the translation>}...]
var nativeFileOptions = item.getNativeFileOptions();
Chapter 7Content Form SDK Reference
7-26
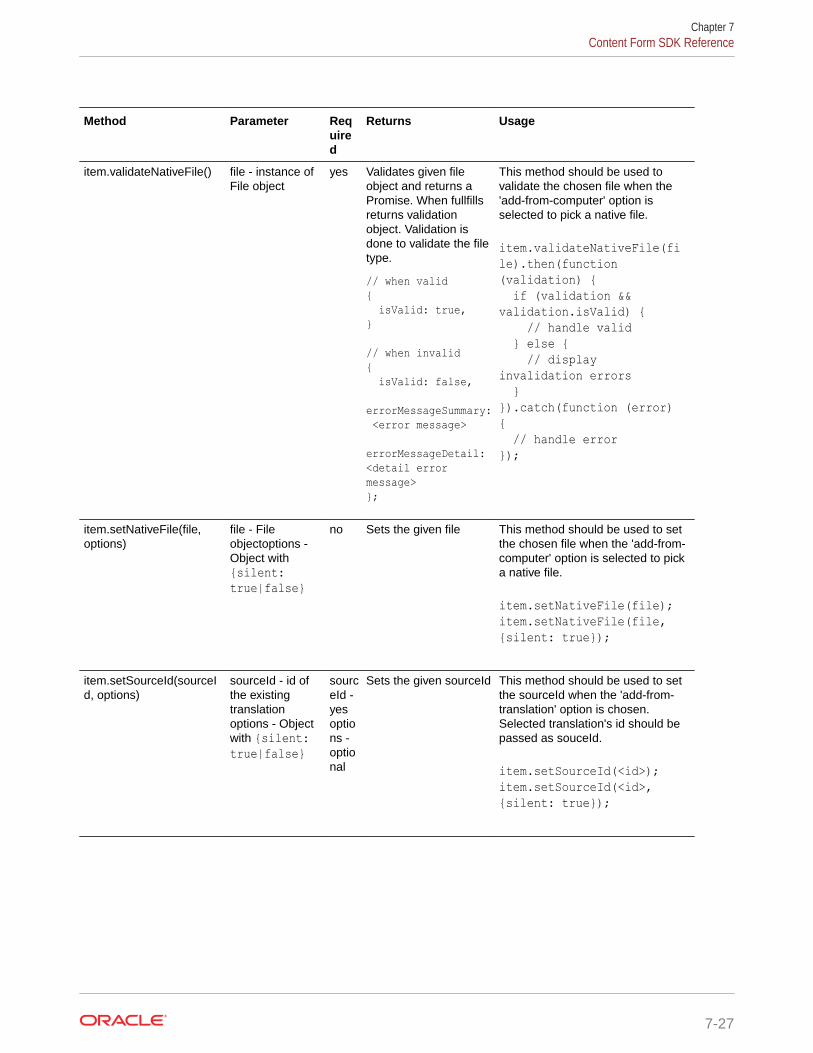
Method Parameter Required
Returns Usage
item.validateNativeFile() file - instance ofFile object
yes Validates given fileobject and returns aPromise. When fullfillsreturns validationobject. Validation isdone to validate the filetype.
// when valid{ isValid: true,} // when invalid{ isValid: false, errorMessageSummary: <error message> errorMessageDetail: <detail error message>};
This method should be used tovalidate the chosen file when the'add-from-computer' option isselected to pick a native file.
item.validateNativeFile(file).then(function (validation) { if (validation && validation.isValid) { // handle valid } else { // display invalidation errors }}).catch(function (error) { // handle error});
item.setNativeFile(file,options)
file - Fileobjectoptions -Object with{silent:true|false}
no Sets the given file This method should be used to setthe chosen file when the 'add-from-computer' option is selected to picka native file.
item.setNativeFile(file);item.setNativeFile(file, {silent: true});
item.setSourceId(sourceId, options)
sourceId - id ofthe existingtranslationoptions - Objectwith {silent:true|false}
sourceId -yesoptions -optional
Sets the given sourceId This method should be used to setthe sourceId when the 'add-from-translation' option is chosen.Selected translation's id should bepassed as souceId.
item.setSourceId(<id>);item.setSourceId(<id>, {silent: true});
Chapter 7Content Form SDK Reference
7-27
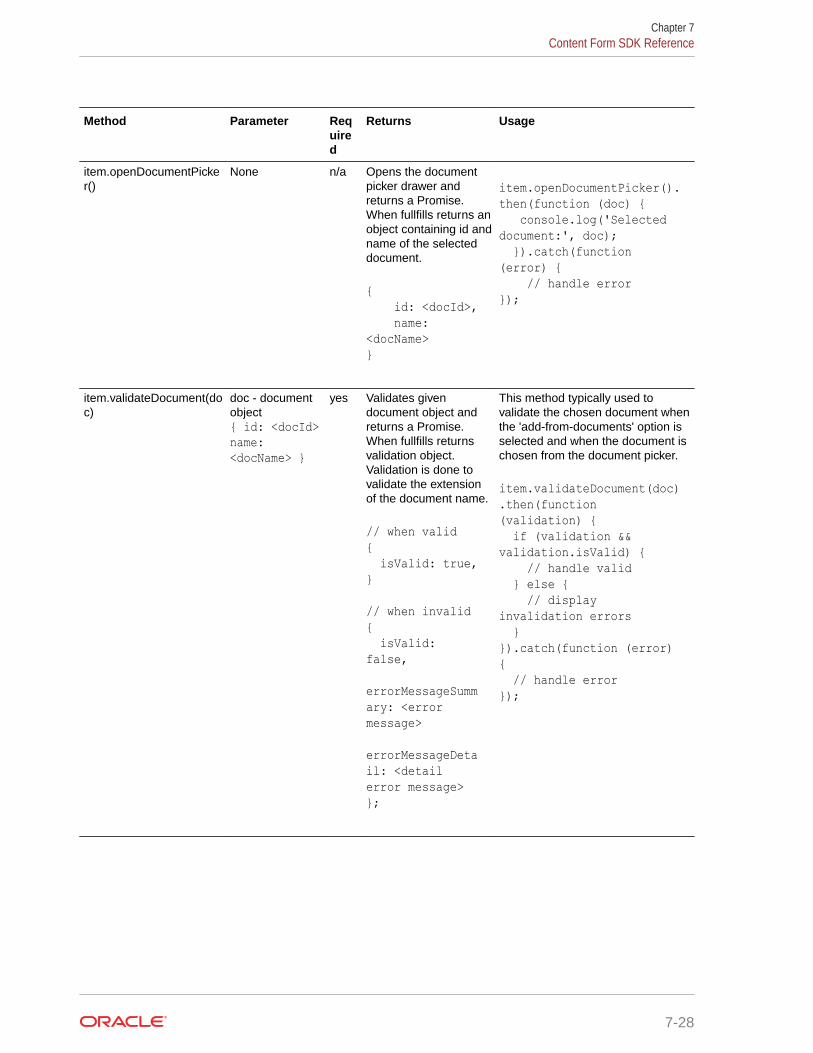
Method Parameter Required
Returns Usage
item.openDocumentPicker()
None n/a Opens the documentpicker drawer andreturns a Promise.When fullfills returns anobject containing id andname of the selecteddocument.
{ id: <docId>, name: <docName>}
item.openDocumentPicker().then(function (doc) { console.log('Selected document:', doc); }).catch(function (error) { // handle error});
item.validateDocument(doc)
doc - documentobject{ id: <docId>name:<docName> }
yes Validates givendocument object andreturns a Promise.When fullfills returnsvalidation object.Validation is done tovalidate the extensionof the document name.
// when valid{ isValid: true,} // when invalid{ isValid: false, errorMessageSummary: <error message> errorMessageDetail: <detail error message>};
This method typically used tovalidate the chosen document whenthe 'add-from-documents' option isselected and when the document ischosen from the document picker.
item.validateDocument(doc).then(function (validation) { if (validation && validation.isValid) { // handle valid } else { // display invalidation errors }}).catch(function (error) { // handle error});
Chapter 7Content Form SDK Reference
7-28
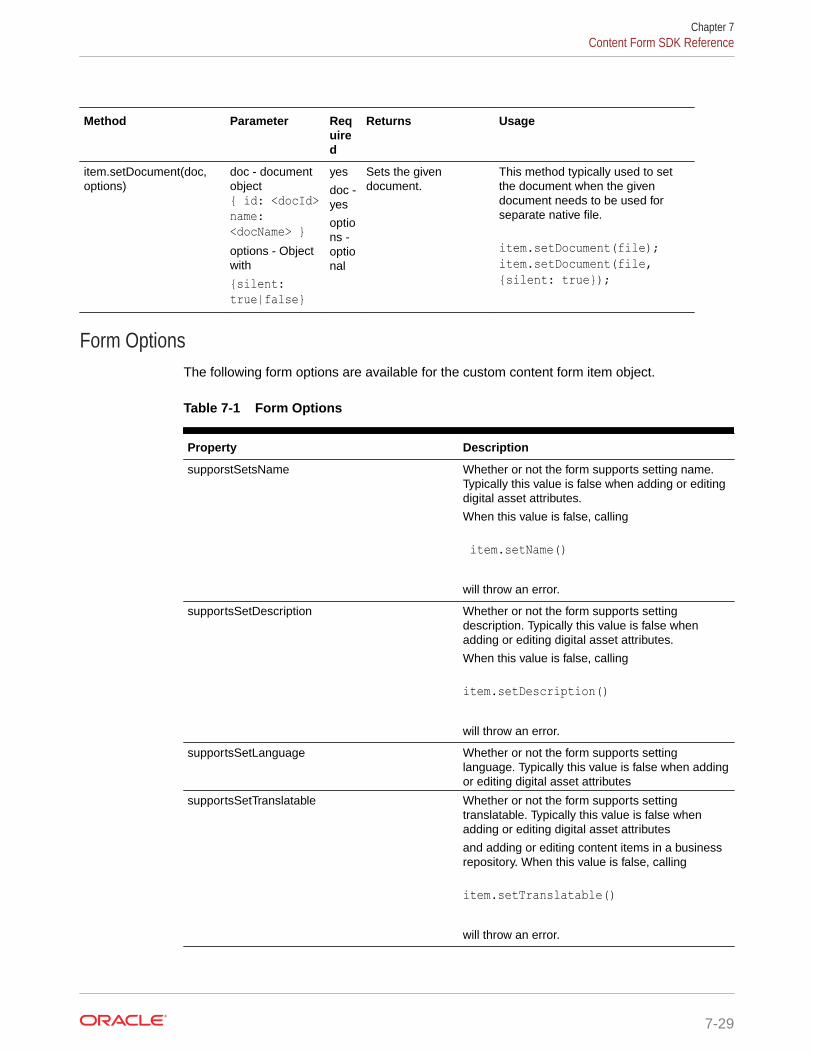
Method Parameter Required
Returns Usage
item.setDocument(doc,options)
doc - documentobject{ id: <docId>name:<docName> }options - Objectwith
{silent:true|false}
yes
doc -yes
options -optional
Sets the givendocument.
This method typically used to setthe document when the givendocument needs to be used forseparate native file.
item.setDocument(file);item.setDocument(file, {silent: true});
Form OptionsThe following form options are available for the custom content form item object.
Table 7-1 Form Options
Property Description
supporstSetsName Whether or not the form supports setting name.Typically this value is false when adding or editingdigital asset attributes.
When this value is false, calling
item.setName()
will throw an error.
supportsSetDescription Whether or not the form supports settingdescription. Typically this value is false whenadding or editing digital asset attributes.
When this value is false, calling
item.setDescription()
will throw an error.
supportsSetLanguage Whether or not the form supports settinglanguage. Typically this value is false when addingor editing digital asset attributes
supportsSetTranslatable Whether or not the form supports settingtranslatable. Typically this value is false whenadding or editing digital asset attributes
and adding or editing content items in a businessrepository. When this value is false, calling
item.setTranslatable()
will throw an error.
Chapter 7Content Form SDK Reference
7-29
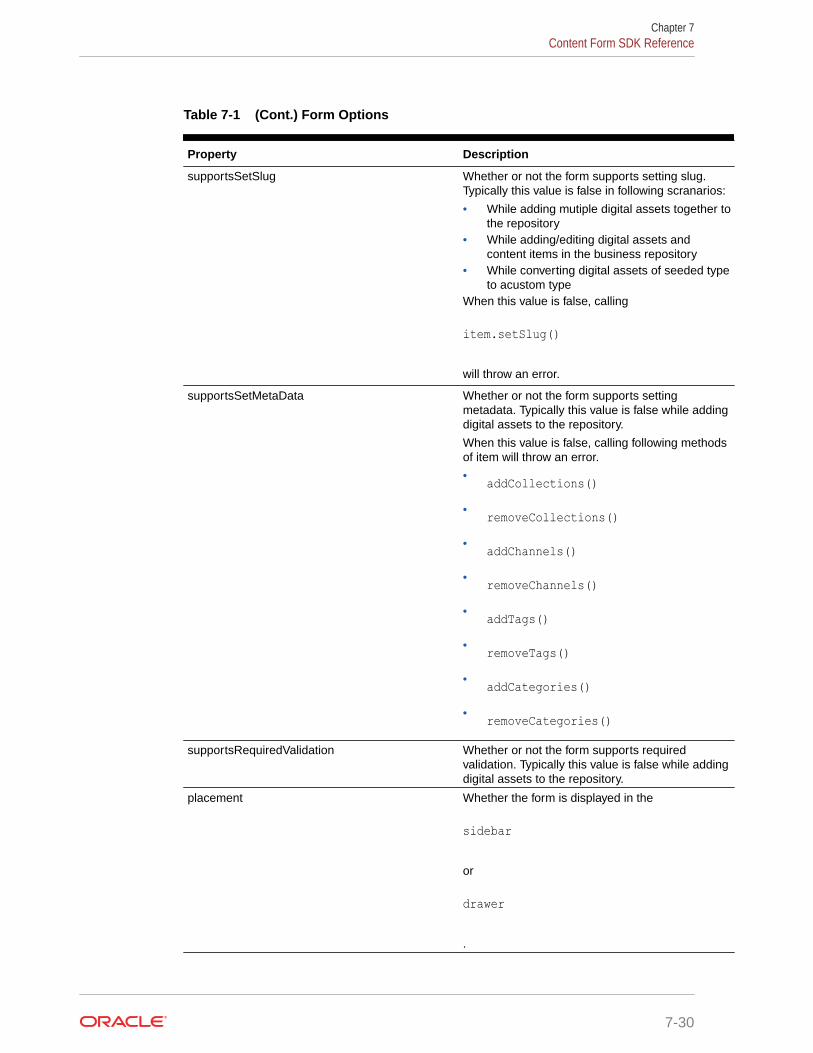
Table 7-1 (Cont.) Form Options
Property Description
supportsSetSlug Whether or not the form supports setting slug.Typically this value is false in following scranarios:
• While adding mutiple digital assets together tothe repository
• While adding/editing digital assets andcontent items in the business repository
• While converting digital assets of seeded typeto acustom type
When this value is false, calling
item.setSlug()
will throw an error.
supportsSetMetaData Whether or not the form supports settingmetadata. Typically this value is false while addingdigital assets to the repository.
When this value is false, calling following methodsof item will throw an error.
• addCollections()• removeCollections()• addChannels()• removeChannels()• addTags()• removeTags()• addCategories()• removeCategories()
supportsRequiredValidation Whether or not the form supports requiredvalidation. Typically this value is false while addingdigital assets to the repository.
placement Whether the form is displayed in the
sidebar
or
drawer
.
Chapter 7Content Form SDK Reference
7-30

Table 7-1 (Cont.) Form Options
Property Description
mixedValueFields Array of field names that has mixed values whileediting attributes across multiple selected assetswhen adding assets to repository.
supportsSetNativeFile Whether or not the form supports adding a nativefile from the form for custom digital assettranslations. Typically this value is true for newtranslations of custom digital assets whose AssetType's file field is not inherit from master. In allother cases it is false.
Custom Content Form Field Objectitem.getFields() returns the Array of Field object. The Field object holds field data.
Chapter 7Content Form SDK Reference
7-31
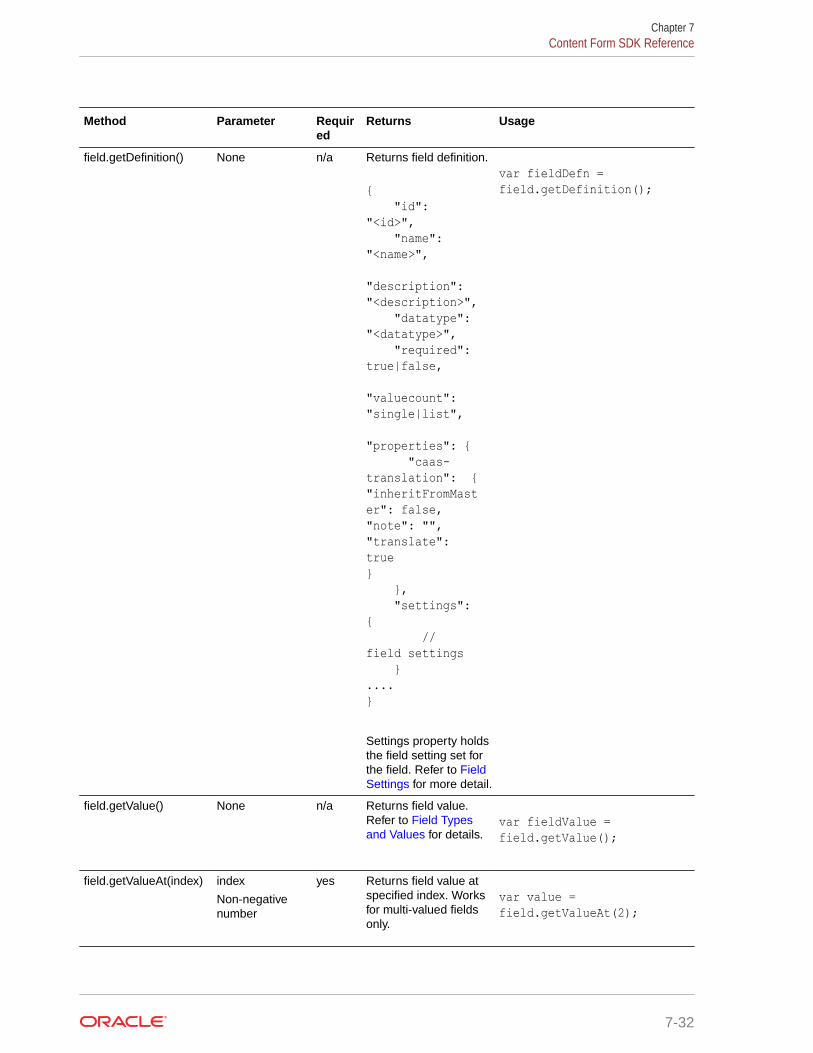
Method Parameter Required
Returns Usage
field.getDefinition() None n/a Returns field definition.
{ "id": "<id>", "name": "<name>", "description": "<description>", "datatype": "<datatype>", "required": true|false, "valuecount": "single|list", "properties": { "caas-translation": {"inheritFromMaster": false,"note": "","translate": true} }, "settings": { // field settings }....}
Settings property holdsthe field setting set forthe field. Refer to FieldSettings for more detail.
var fieldDefn = field.getDefinition();
field.getValue() None n/a Returns field value.Refer to Field Typesand Values for details.
var fieldValue = field.getValue();
field.getValueAt(index) index
Non-negativenumber
yes Returns field value atspecified index. Worksfor multi-valued fieldsonly.
var value = field.getValueAt(2);
Chapter 7Content Form SDK Reference
7-32
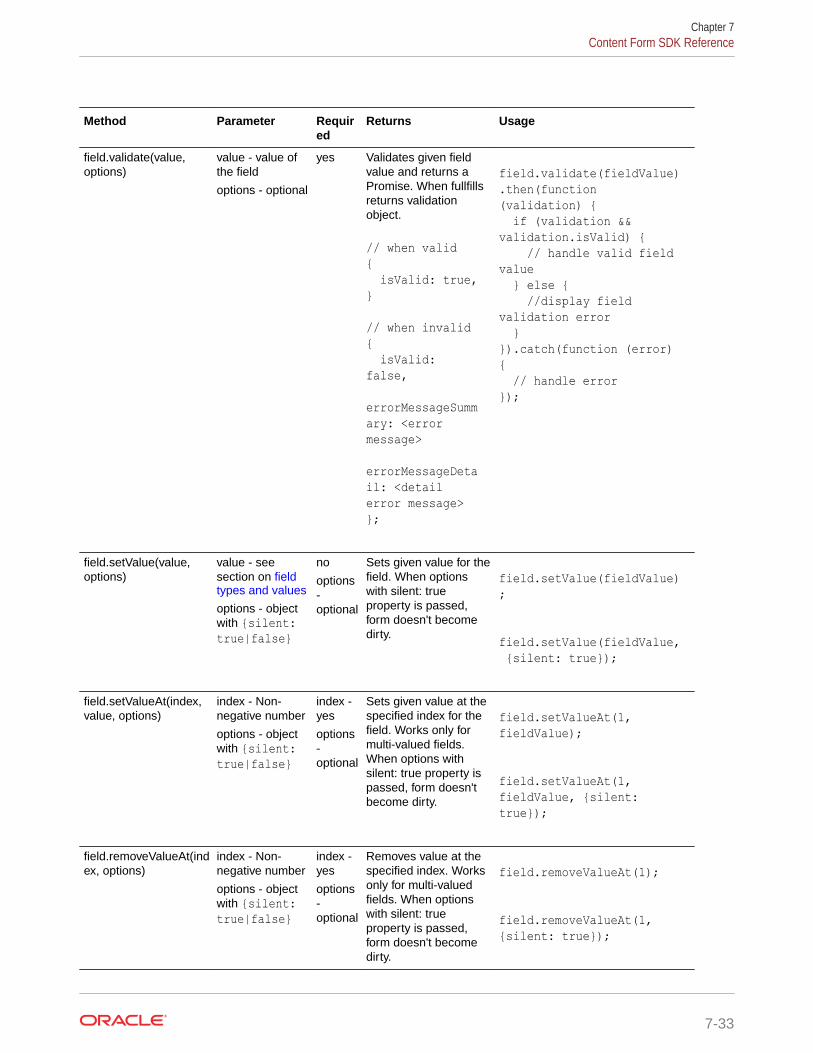
Method Parameter Required
Returns Usage
field.validate(value,options)
value - value ofthe field
options - optional
yes Validates given fieldvalue and returns aPromise. When fullfillsreturns validationobject.
// when valid{ isValid: true,} // when invalid{ isValid: false, errorMessageSummary: <error message> errorMessageDetail: <detail error message>};
field.validate(fieldValue).then(function (validation) { if (validation && validation.isValid) { // handle valid field value } else { //display field validation error }}).catch(function (error) { // handle error});
field.setValue(value,options)
value - seesection on fieldtypes and values
options - objectwith {silent:true|false}
no
options-optional
Sets given value for thefield. When optionswith silent: trueproperty is passed,form doesn't becomedirty.
field.setValue(fieldValue);
field.setValue(fieldValue, {silent: true});
field.setValueAt(index,value, options)
index - Non-negative number
options - objectwith {silent:true|false}
index -yes
options-optional
Sets given value at thespecified index for thefield. Works only formulti-valued fields.When options withsilent: true property ispassed, form doesn'tbecome dirty.
field.setValueAt(1, fieldValue);
field.setValueAt(1, fieldValue, {silent: true});
field.removeValueAt(index, options)
index - Non-negative number
options - objectwith {silent:true|false}
index -yes
options-optional
Removes value at thespecified index. Worksonly for multi-valuedfields. When optionswith silent: trueproperty is passed,form doesn't becomedirty.
field.removeValueAt(1);
field.removeValueAt(1, {silent: true});
Chapter 7Content Form SDK Reference
7-33
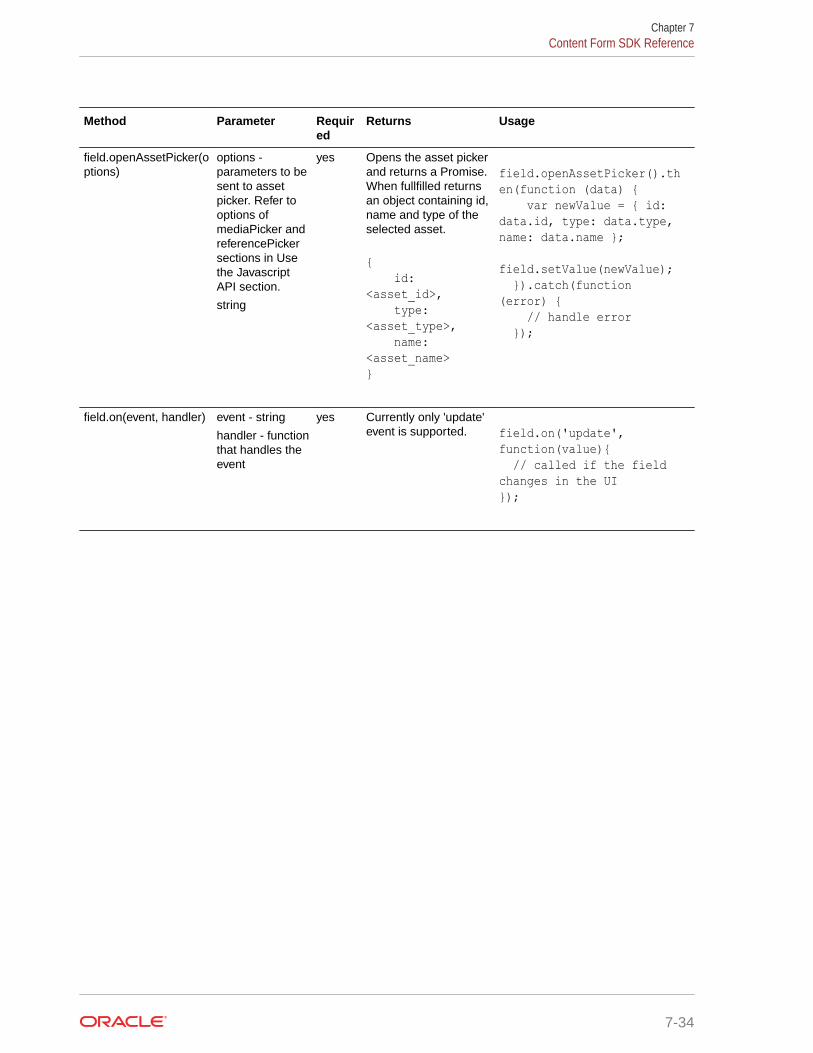
Method Parameter Required
Returns Usage
field.openAssetPicker(options)
options -parameters to besent to assetpicker. Refer tooptions ofmediaPicker andreferencePickersections in Usethe JavascriptAPI section.
string
yes Opens the asset pickerand returns a Promise.When fullfilled returnsan object containing id,name and type of theselected asset.
{ id: <asset_id>, type: <asset_type>, name: <asset_name>}
field.openAssetPicker().then(function (data) { var newValue = { id: data.id, type: data.type, name: data.name }; field.setValue(newValue); }).catch(function (error) { // handle error });
field.on(event, handler) event - string
handler - functionthat handles theevent
yes Currently only 'update'event is supported. field.on('update',
function(value){ // called if the field changes in the UI});
Chapter 7Content Form SDK Reference
7-34
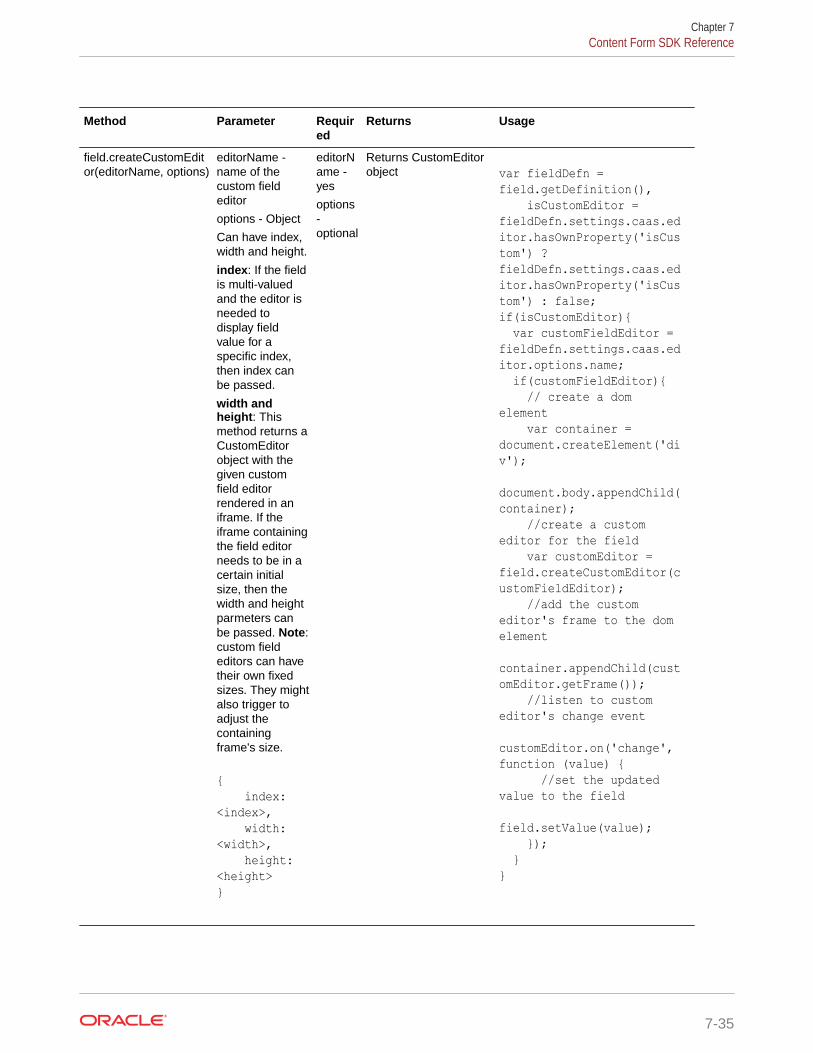
Method Parameter Required
Returns Usage
field.createCustomEditor(editorName, options)
editorName -name of thecustom fieldeditor
options - Object
Can have index,width and height.
index: If the fieldis multi-valuedand the editor isneeded todisplay fieldvalue for aspecific index,then index canbe passed.
width andheight: Thismethod returns aCustomEditorobject with thegiven customfield editorrendered in aniframe. If theiframe containingthe field editorneeds to be in acertain initialsize, then thewidth and heightparmeters canbe passed. Note:custom fieldeditors can havetheir own fixedsizes. They mightalso trigger toadjust thecontainingframe's size.
{ index: <index>, width: <width>, height: <height>}
editorName -yes
options-optional
Returns CustomEditorobject var fieldDefn =
field.getDefinition(), isCustomEditor = fieldDefn.settings.caas.editor.hasOwnProperty('isCustom') ? fieldDefn.settings.caas.editor.hasOwnProperty('isCustom') : false;if(isCustomEditor){ var customFieldEditor = fieldDefn.settings.caas.editor.options.name; if(customFieldEditor){ // create a dom element var container = document.createElement('div'); document.body.appendChild(container); //create a custom editor for the field var customEditor = field.createCustomEditor(customFieldEditor); //add the custom editor's frame to the dom element container.appendChild(customEditor.getFrame()); //listen to custom editor's change event customEditor.on('change', function (value) { //set the updated value to the field field.setValue(value); }); }}
Chapter 7Content Form SDK Reference
7-35
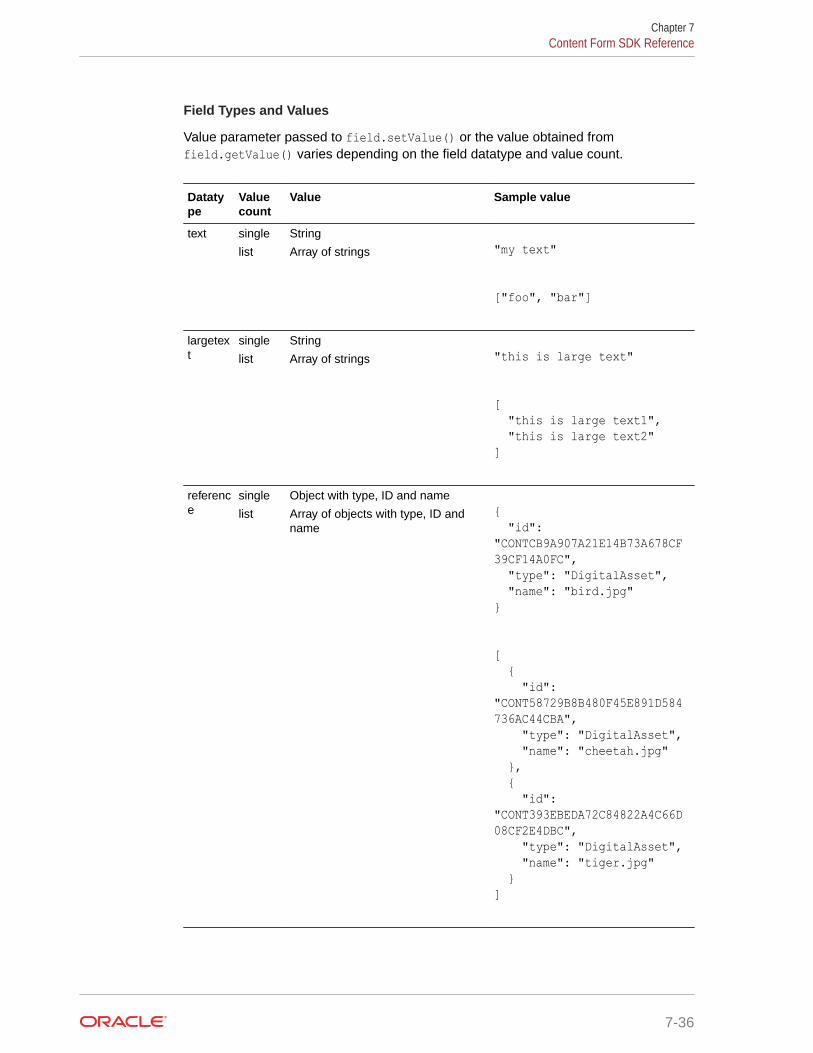
Field Types and Values
Value parameter passed to field.setValue() or the value obtained fromfield.getValue() varies depending on the field datatype and value count.
Datatype
Valuecount
Value Sample value
text single
list
String
Array of strings "my text"
["foo", "bar"]
largetext
single
list
String
Array of strings "this is large text"
[ "this is large text1", "this is large text2"]
reference
single
list
Object with type, ID and name
Array of objects with type, ID andname
{ "id": "CONTCB9A907A21E14B73A678CF39CF14A0FC", "type": "DigitalAsset", "name": "bird.jpg"}
[ { "id": "CONT58729B8B480F45E891D584736AC44CBA", "type": "DigitalAsset", "name": "cheetah.jpg" }, { "id": "CONT393EBEDA72C84822A4C66D08CF2E4DBC", "type": "DigitalAsset", "name": "tiger.jpg" }]
Chapter 7Content Form SDK Reference
7-36
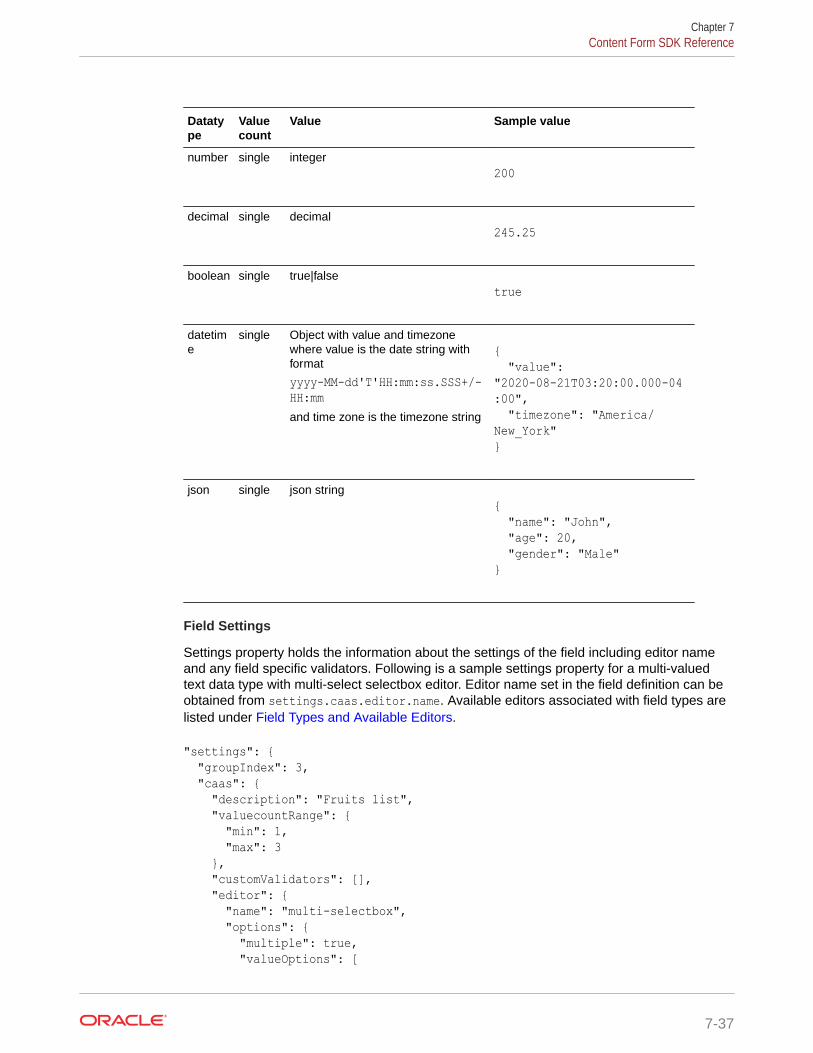
Datatype
Valuecount
Value Sample value
number single integer200
decimal single decimal245.25
boolean single true|falsetrue
datetime
single Object with value and timezonewhere value is the date string withformat
yyyy-MM-dd'T'HH:mm:ss.SSS+/-HH:mmand time zone is the timezone string
{ "value": "2020-08-21T03:20:00.000-04:00", "timezone": "America/New_York"}
json single json string{ "name": "John", "age": 20, "gender": "Male"}
Field Settings
Settings property holds the information about the settings of the field including editor nameand any field specific validators. Following is a sample settings property for a multi-valuedtext data type with multi-select selectbox editor. Editor name set in the field definition can beobtained from settings.caas.editor.name. Available editors associated with field types arelisted under Field Types and Available Editors.
"settings": { "groupIndex": 3, "caas": { "description": "Fruits list", "valuecountRange": { "min": 1, "max": 3 }, "customValidators": [], "editor": { "name": "multi-selectbox", "options": { "multiple": true, "valueOptions": [
Chapter 7Content Form SDK Reference
7-37
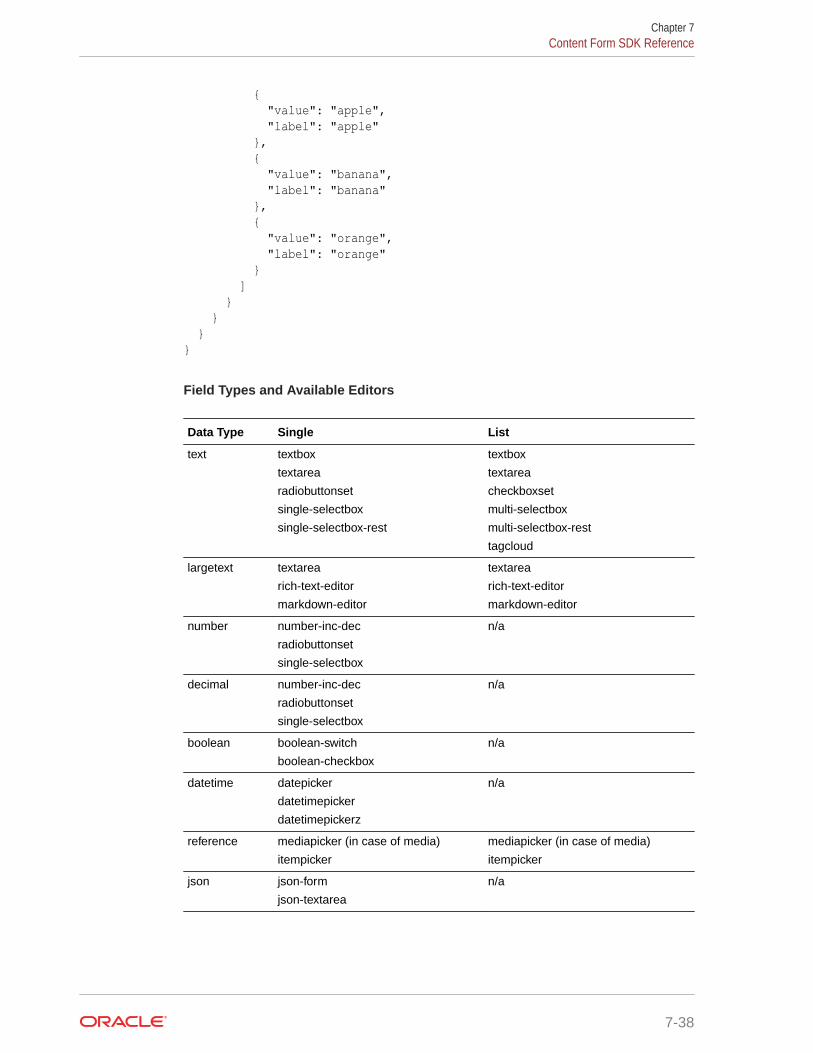
{ "value": "apple", "label": "apple" }, { "value": "banana", "label": "banana" }, { "value": "orange", "label": "orange" } ] } } }}
Field Types and Available Editors
Data Type Single List
text textbox
textarea
radiobuttonset
single-selectbox
single-selectbox-rest
textbox
textarea
checkboxset
multi-selectbox
multi-selectbox-rest
tagcloud
largetext textarea
rich-text-editor
markdown-editor
textarea
rich-text-editor
markdown-editor
number number-inc-dec
radiobuttonset
single-selectbox
n/a
decimal number-inc-dec
radiobuttonset
single-selectbox
n/a
boolean boolean-switch
boolean-checkbox
n/a
datetime datepicker
datetimepicker
datetimepickerz
n/a
reference mediapicker (in case of media)
itempicker
mediapicker (in case of media)
itempicker
json json-form
json-textarea
n/a
Chapter 7Content Form SDK Reference
7-38
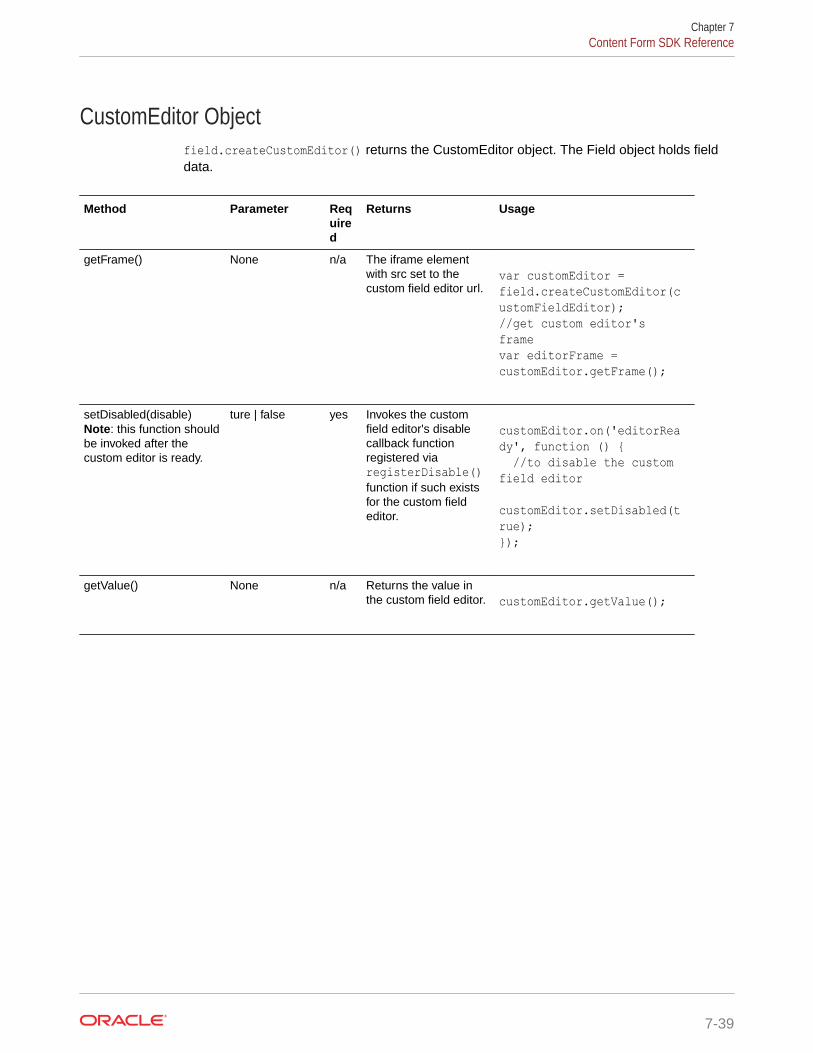
CustomEditor Objectfield.createCustomEditor() returns the CustomEditor object. The Field object holds fielddata.
Method Parameter Required
Returns Usage
getFrame() None n/a The iframe elementwith src set to thecustom field editor url.
var customEditor = field.createCustomEditor(customFieldEditor);//get custom editor's framevar editorFrame = customEditor.getFrame();
setDisabled(disable)Note: this function shouldbe invoked after thecustom editor is ready.
ture | false yes Invokes the customfield editor's disablecallback functionregistered viaregisterDisable()function if such existsfor the custom fieldeditor.
customEditor.on('editorReady', function () { //to disable the custom field editor customEditor.setDisabled(true);});
getValue() None n/a Returns the value inthe custom field editor. customEditor.getValue();
Chapter 7Content Form SDK Reference
7-39
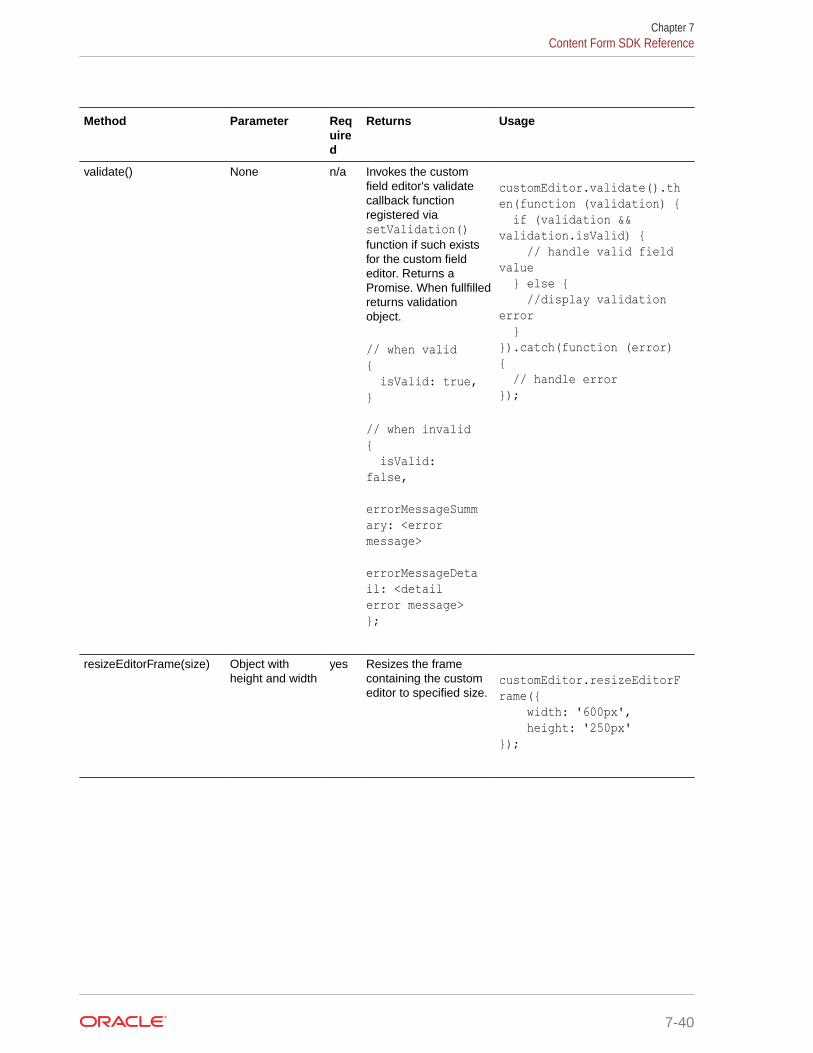
Method Parameter Required
Returns Usage
validate() None n/a Invokes the customfield editor's validatecallback functionregistered viasetValidation()function if such existsfor the custom fieldeditor. Returns aPromise. When fullfilledreturns validationobject.
// when valid{ isValid: true,} // when invalid{ isValid: false, errorMessageSummary: <error message> errorMessageDetail: <detail error message>};
customEditor.validate().then(function (validation) { if (validation && validation.isValid) { // handle valid field value } else { //display validation error }}).catch(function (error) { // handle error});
resizeEditorFrame(size) Object withheight and width
yes Resizes the framecontaining the customeditor to specified size.
customEditor.resizeEditorFrame({ width: '600px', height: '250px'});
Chapter 7Content Form SDK Reference
7-40
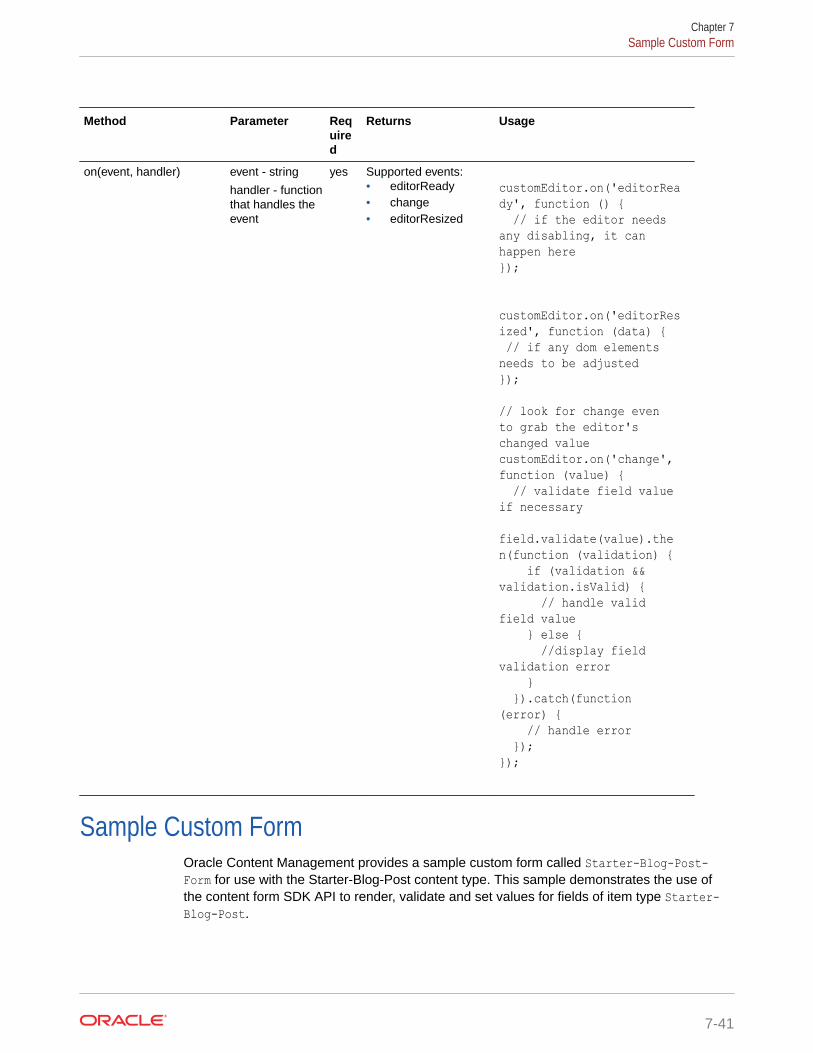
Method Parameter Required
Returns Usage
on(event, handler) event - string
handler - functionthat handles theevent
yes Supported events:• editorReady• change• editorResized
customEditor.on('editorReady', function () { // if the editor needs any disabling, it can happen here}); customEditor.on('editorResized', function (data) { // if any dom elements needs to be adjusted}); // look for change even to grab the editor's changed valuecustomEditor.on('change', function (value) { // validate field value if necessary field.validate(value).then(function (validation) { if (validation && validation.isValid) { // handle valid field value } else { //display field validation error } }).catch(function (error) { // handle error });});
Sample Custom FormOracle Content Management provides a sample custom form called Starter-Blog-Post-Form for use with the Starter-Blog-Post content type. This sample demonstrates the use ofthe content form SDK API to render, validate and set values for fields of item type Starter-Blog-Post.
Chapter 7Sample Custom Form
7-41
This sample also uses plug-ins for ckeditor version 4.15.0 that can be configured toprovide image picker and link dialog functionality for custom forms. See Add OCEImage Picker and Link Dialog Plug-ins for Rich Text Editor.
The Starter-Blog-Post-Form sample is available in Content Toolkit .
Get Custom Form SampleTo get the custom form sample, you must install and configure Content Toolkit if it isnot yet installed.
https://github.com/oracle/content-and-experience-toolkit/blob/master/sites/README.MD
Once Content Toolkit is installed, you must use it to create a site template and uploadthe template to the Oracle Content Management server.
1. Create a site template.
cec create-template BlogTemplate -f BlogTemplate
This template includes content type Starter-Blog-Post and content formStarter-Blog-Post-Form.
2. Upload the template to an Oracle Content Management server.
cec upload-template BlogTemplate -s <registered server name>
Now when you use this template to create a site and create or edit an item of typeStarter-Blog-Post, the custom content form sample Starter-Blog-Post-Form will beused.
Add OCE Image Picker and Link Dialog Plug-ins for Rich Text EditorTo use ckeditor for displaying large text fields in a custom form and have image andlink functionality similar to a standard form, you must add external plug-ins with someadditional configuration. These plug-ins are compatible with ckeditor version 4.15.0.
To add and configure the plug-ins:
1. Load ckeditor from CDN.
<script src="https://cdn.ckeditor.com/4.15.0/standard/ckeditor.js"></script>
2. Add OCE customized link and image2 plug-ins to ckeditor.
//add additional extra OCE customized link and image2 plug-ins to CK editor var pluginPath = window.origin + '/documents/static/gemini/api/ckeditor-plugins/'; CKEDITOR.plugins.addExternal('link_docs', pluginPath+'link_docs/', 'plugin.js');
Chapter 7Sample Custom Form
7-42
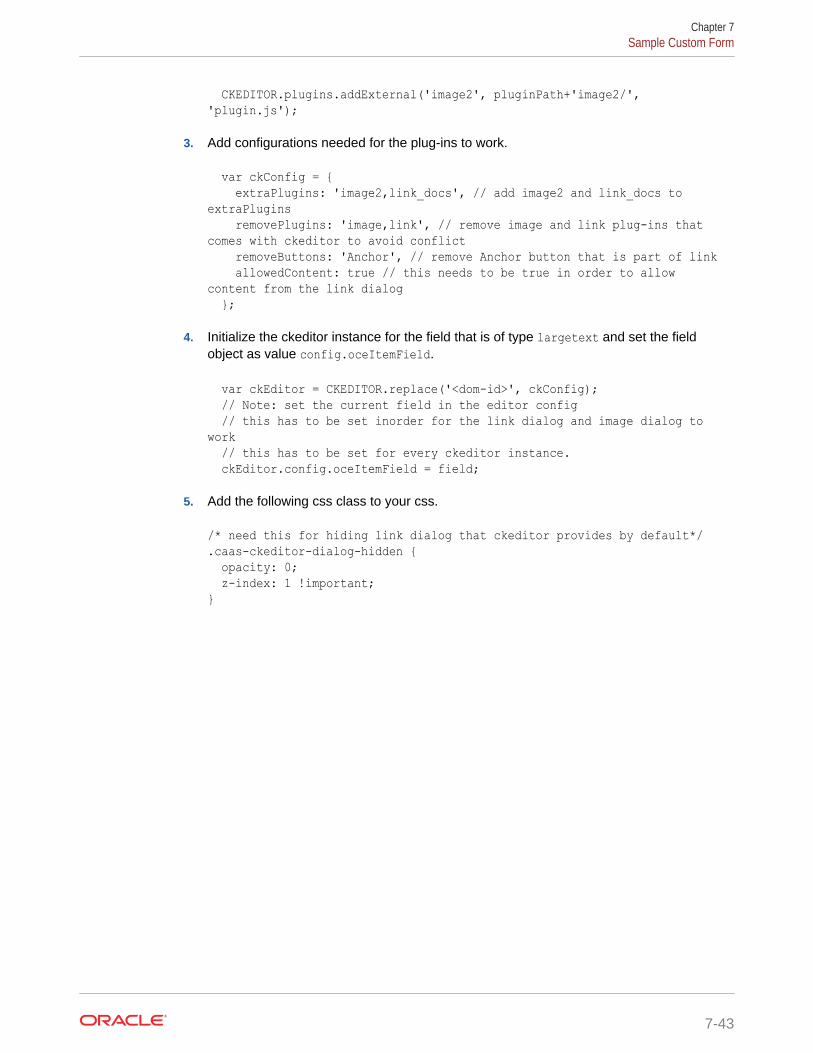
CKEDITOR.plugins.addExternal('image2', pluginPath+'image2/', 'plugin.js');
3. Add configurations needed for the plug-ins to work.
var ckConfig = { extraPlugins: 'image2,link_docs', // add image2 and link_docs to extraPlugins removePlugins: 'image,link', // remove image and link plug-ins that comes with ckeditor to avoid conflict removeButtons: 'Anchor', // remove Anchor button that is part of link allowedContent: true // this needs to be true in order to allow content from the link dialog };
4. Initialize the ckeditor instance for the field that is of type largetext and set the fieldobject as value config.oceItemField.
var ckEditor = CKEDITOR.replace('<dom-id>', ckConfig); // Note: set the current field in the editor config // this has to be set inorder for the link dialog and image dialog to work // this has to be set for every ckeditor instance. ckEditor.config.oceItemField = field;
5. Add the following css class to your css.
/* need this for hiding link dialog that ckeditor provides by default*/.caas-ckeditor-dialog-hidden { opacity: 0; z-index: 1 !important;}
Chapter 7Sample Custom Form
7-43
8Develop Translation Connectors for LanguageService Providers
Oracle Content Management provides a connector framework for developers to develop theircustom translation connectors. The connector framework is extensible, and a developer orpartner can build a translation connector to work against any Language Service Provider(LSP).
For translation by an LSP, Oracle Content Management converts a translation zip file into theformat expected by the vendor and then packages up the response from the vendor into a zipfile that Oracle Content Management can consume.
A custom translation connector needs to implement the following artifacts:
• REST interfaces for defining configuration, providing authorization, and translatingcontent.
• Logic to create and manage a translation job, accept a translation job zip file, and returna translated version of the translation zip file
Oracle Content Management provides a sample translation connector implementation thatruns against an included mock server to get you started.
Oracle Content Management provides the following tools for site and asset translations:
• A translation connector framework, a translation SDK, and command-line interface (CLI)utilities in Content Toolkit
• An administration web interface for creating a custom translation connector
• A translation job web interface that lets contributors submit assets or sites for translationby an LSP and import translations into Oracle Content Management
Note:
This chapter does not provide details on how to deploy or manage your connector.The model you choose for deployment will depend on the technology you use toimplement the connector and the server you choose to deploy the connector.
The following topics describe how to develop custom translation connectors for OracleContent Management and to translate Oracle Content Management sites and assets usingLSPs:
• Overview of the Translation Connector Framework
• Request a Lingotek Trial Connector for Content Translation
• Enable a Lingotek LSP Translation Connector
• Delete a Lingotek LSP Translation Connector
• Register Multiple Lingotek Connectors
8-1
• Add Custom Locales to a Lingotek Translation Connector
• Translate Native Files in Assets
• Build a New Translation Connector
• Configure and Register a Translation Connector
• Translation Connector Execution Flow
• Sample Translation Connector Implementation
• Understand the Sample Translation Connector Source Code
Overview of the Translation Connector FrameworkThe Oracle Content Management translation framework enables you to translate sitesand assets using external Language Service Providers.
To help you build a new translation connector, Oracle Content Management providesthe Translation Connector SDK.
The connector framework abstracts the functionality that is provided and implementedby end connectors. It does so by providing the REST API interface for configuring atranslation connector and for calling translation connector functionality to downloadtranslation jobs from sites and upload the resulting translations back into OracleContent Management.
Translation Connector SDKThe Translation Connector SDK for Oracle Content Management is a sample NodeJSimplementation of the Translation Connector REST APIs. The sample accepts atranslation job zip file, translates all the resources in the file, which includes metadatafile of site pages and both metadata file and native file of assets, and then returns anew zip file containing all the translations.
The Translation Connector SDK is part of Content Toolkit, which is available from GitHub. To help you build a new translation connector, this SDK contains a sampletranslation connector:
• JSDoc for the sample translation connector
• A NodeJS sample translation connector implementation of the REST interfaces
• A NodeJS mock Language Server Provider that the sample runs against
Note:
The Translation Connector SDK requires the user to have access to alanguage service provider (LSP) to do the actual string translations. A mockLSP server is included in the SDK to mimic the responses from the LSP bysimply prepending the targeted locales onto the strings.
This SDK consists of three main modules:
• SampleConnector: A sample translation connector that implements the requiredOracle Content Management Translation Connector API.
Chapter 8Overview of the Translation Connector Framework
8-2

• SampleJobManager: A file-system based sample job manager that maintains the stateof the connector jobs while they are translated.
• TranslationProviderInterface: A set of APIs used to call the Language Service Providerto submit documents for translation and retrieve the translated documents.
The Sample Translation Connector code is split up into three areas:
• /translation-connector:
– /connector: Implements the required Oracle Content Management Cloud TranslationConnector APIs.
– /job-manager: This sample implementation of a file-based persistence store unzipsthe translation job, translates it, and then zips up the translations.
– /provider: Implements the Language Service Provider APIs to upload, translate, anddownload documents.
In addition, you can use the mock LSP for testing:
• /mockserver: A mock LSP, which simply adds the requested translation locale to all thestrings.
Translation connectors are deployable packages that use Restful services for the remotestores implementing the REST interfaces (SPIs/SDK) defined by Oracle ContentManagement. They internally use cloud store native SDKs to connect to remote systems.
Translation Connector REST APIsYou can deploy and run translation connectors anywhere and implement them with anytechnology stack, as long as they can be called from Oracle Content Management throughREST APIs.
The Translation Connector SDK includes the following API classes:
• ConnectorApi
• MockTranslationProvider
• PersistenceStoreInterface
• SampleBasicAuth
• SampleConnector
• SampleConnectorRouter
• SampleFileDownloader
• SampleFileImporter
• SampleFilePersistenceStore
• SampleFileTranslator
• SampleJobManager
• TranslationFilter
• TranslationProviderInterface
Your translation connector needs to support the translation connector REST APIs.
The following table describes the REST APIs for Oracle Content Management translationconnectors.
Chapter 8Overview of the Translation Connector Framework
8-3
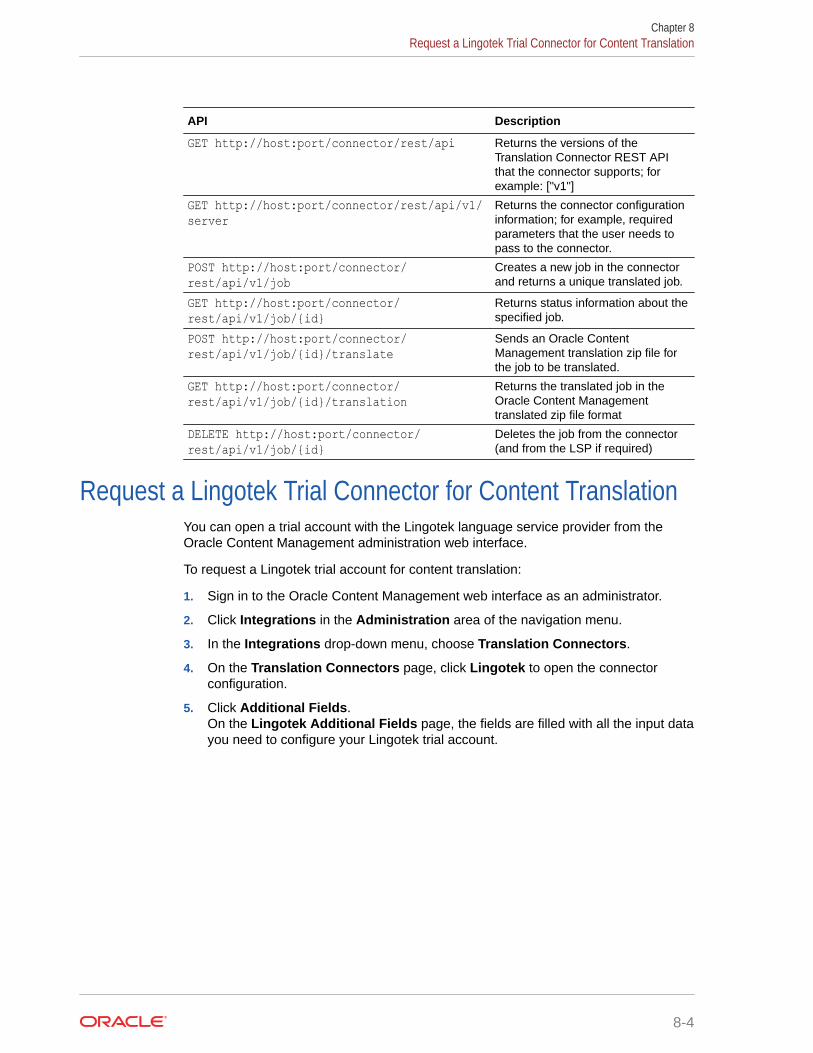
API Description
GET http://host:port/connector/rest/api Returns the versions of theTranslation Connector REST APIthat the connector supports; forexample: ["v1"]
GET http://host:port/connector/rest/api/v1/server
Returns the connector configurationinformation; for example, requiredparameters that the user needs topass to the connector.
POST http://host:port/connector/rest/api/v1/job
Creates a new job in the connectorand returns a unique translated job.
GET http://host:port/connector/rest/api/v1/job/{id}
Returns status information about thespecified job.
POST http://host:port/connector/rest/api/v1/job/{id}/translate
Sends an Oracle ContentManagement translation zip file forthe job to be translated.
GET http://host:port/connector/rest/api/v1/job/{id}/translation
Returns the translated job in theOracle Content Managementtranslated zip file format
DELETE http://host:port/connector/rest/api/v1/job/{id}
Deletes the job from the connector(and from the LSP if required)
Request a Lingotek Trial Connector for Content TranslationYou can open a trial account with the Lingotek language service provider from theOracle Content Management administration web interface.
To request a Lingotek trial account for content translation:
1. Sign in to the Oracle Content Management web interface as an administrator.
2. Click Integrations in the Administration area of the navigation menu.
3. In the Integrations drop-down menu, choose Translation Connectors.
4. On the Translation Connectors page, click Lingotek to open the connectorconfiguration.
5. Click Additional Fields.On the Lingotek Additional Fields page, the fields are filled with all the input datayou need to configure your Lingotek trial account.
Chapter 8Request a Lingotek Trial Connector for Content Translation
8-4
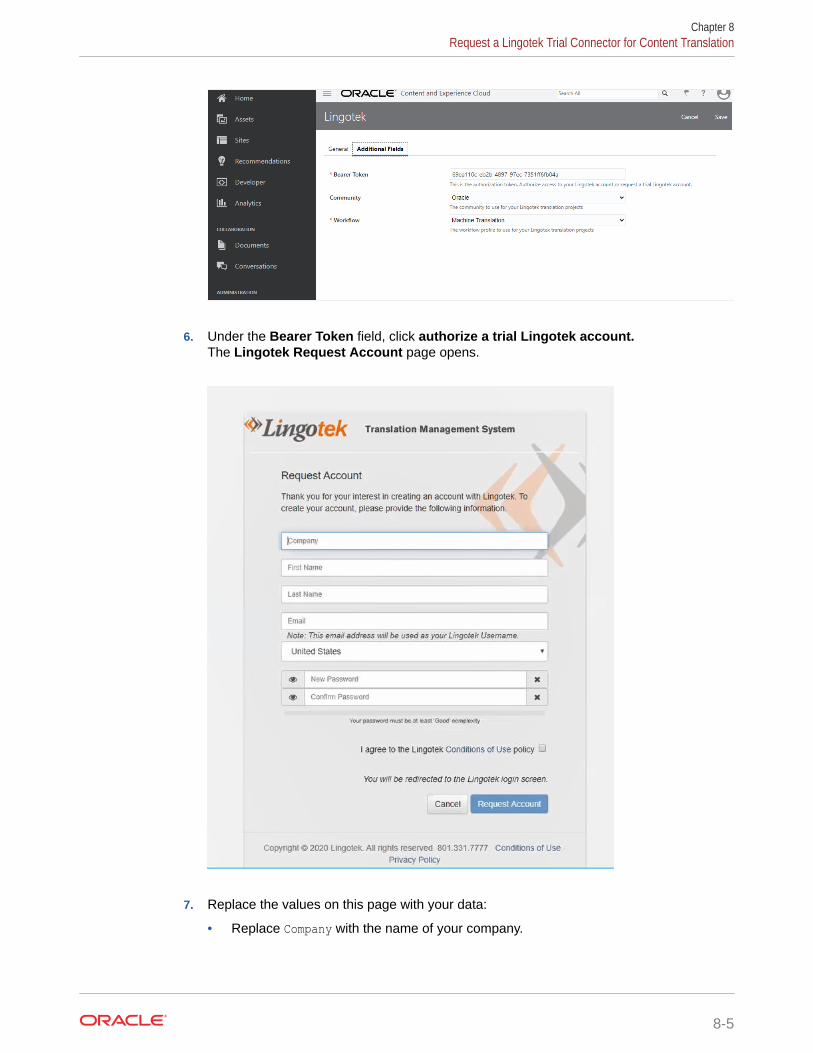
6. Under the Bearer Token field, click authorize a trial Lingotek account.The Lingotek Request Account page opens.
7. Replace the values on this page with your data:
• Replace Company with the name of your company.
Chapter 8Request a Lingotek Trial Connector for Content Translation
8-5
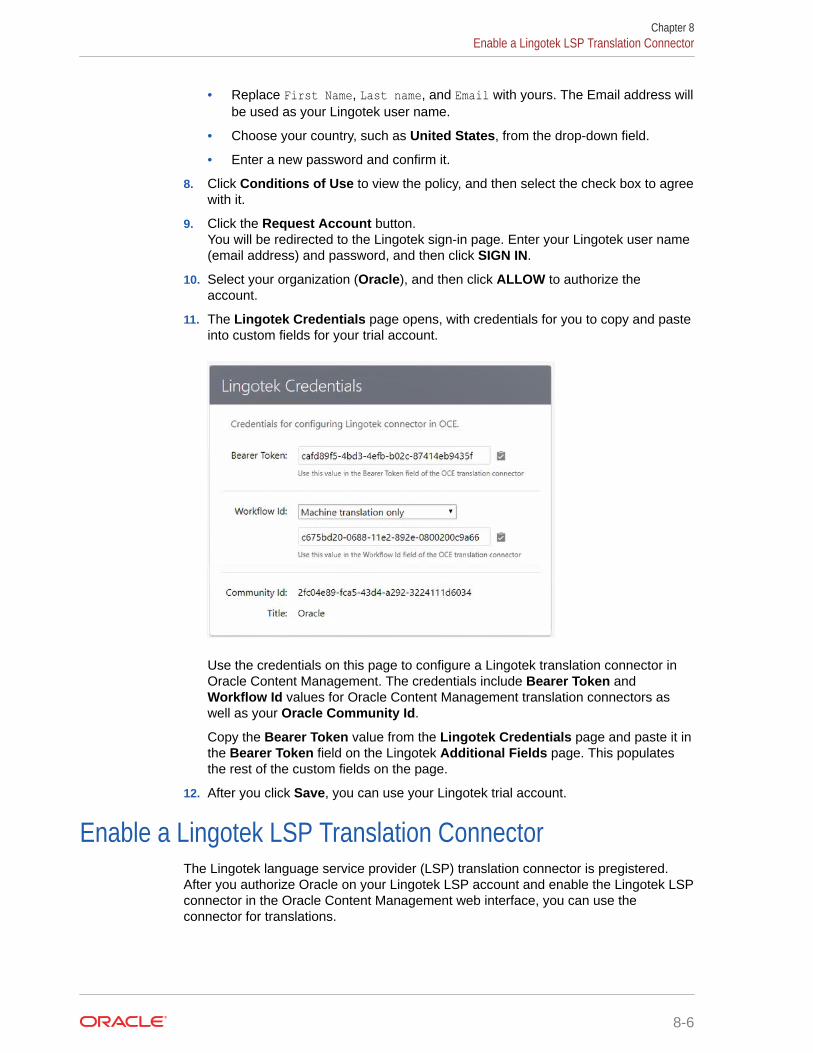
• Replace First Name, Last name, and Email with yours. The Email address willbe used as your Lingotek user name.
• Choose your country, such as United States, from the drop-down field.
• Enter a new password and confirm it.
8. Click Conditions of Use to view the policy, and then select the check box to agreewith it.
9. Click the Request Account button.You will be redirected to the Lingotek sign-in page. Enter your Lingotek user name(email address) and password, and then click SIGN IN.
10. Select your organization (Oracle), and then click ALLOW to authorize theaccount.
11. The Lingotek Credentials page opens, with credentials for you to copy and pasteinto custom fields for your trial account.
Use the credentials on this page to configure a Lingotek translation connector inOracle Content Management. The credentials include Bearer Token andWorkflow Id values for Oracle Content Management translation connectors aswell as your Oracle Community Id.
Copy the Bearer Token value from the Lingotek Credentials page and paste it inthe Bearer Token field on the Lingotek Additional Fields page. This populatesthe rest of the custom fields on the page.
12. After you click Save, you can use your Lingotek trial account.
Enable a Lingotek LSP Translation ConnectorThe Lingotek language service provider (LSP) translation connector is pregistered.After you authorize Oracle on your Lingotek LSP account and enable the Lingotek LSPconnector in the Oracle Content Management web interface, you can use theconnector for translations.
Chapter 8Enable a Lingotek LSP Translation Connector
8-6
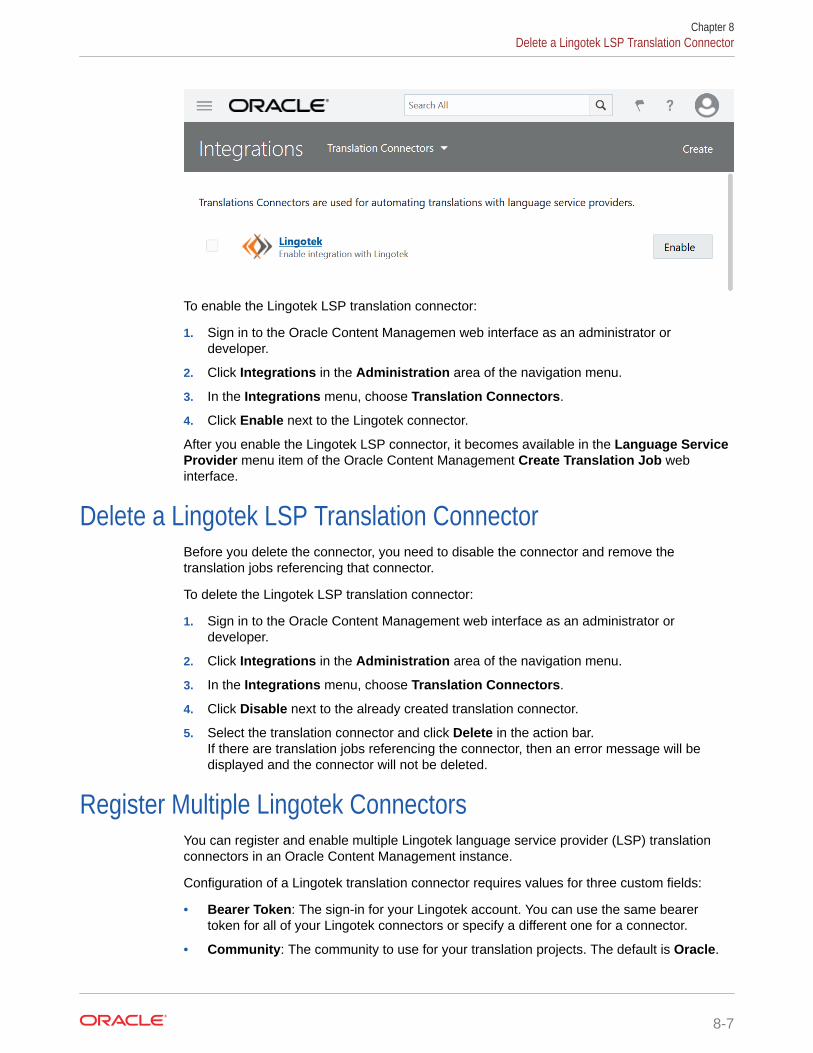
To enable the Lingotek LSP translation connector:
1. Sign in to the Oracle Content Managemen web interface as an administrator ordeveloper.
2. Click Integrations in the Administration area of the navigation menu.
3. In the Integrations menu, choose Translation Connectors.
4. Click Enable next to the Lingotek connector.
After you enable the Lingotek LSP connector, it becomes available in the Language ServiceProvider menu item of the Oracle Content Management Create Translation Job webinterface.
Delete a Lingotek LSP Translation ConnectorBefore you delete the connector, you need to disable the connector and remove thetranslation jobs referencing that connector.
To delete the Lingotek LSP translation connector:
1. Sign in to the Oracle Content Management web interface as an administrator ordeveloper.
2. Click Integrations in the Administration area of the navigation menu.
3. In the Integrations menu, choose Translation Connectors.
4. Click Disable next to the already created translation connector.
5. Select the translation connector and click Delete in the action bar.If there are translation jobs referencing the connector, then an error message will bedisplayed and the connector will not be deleted.
Register Multiple Lingotek ConnectorsYou can register and enable multiple Lingotek language service provider (LSP) translationconnectors in an Oracle Content Management instance.
Configuration of a Lingotek translation connector requires values for three custom fields:
• Bearer Token: The sign-in for your Lingotek account. You can use the same bearertoken for all of your Lingotek connectors or specify a different one for a connector.
• Community: The community to use for your translation projects. The default is Oracle.
Chapter 8Delete a Lingotek LSP Translation Connector
8-7
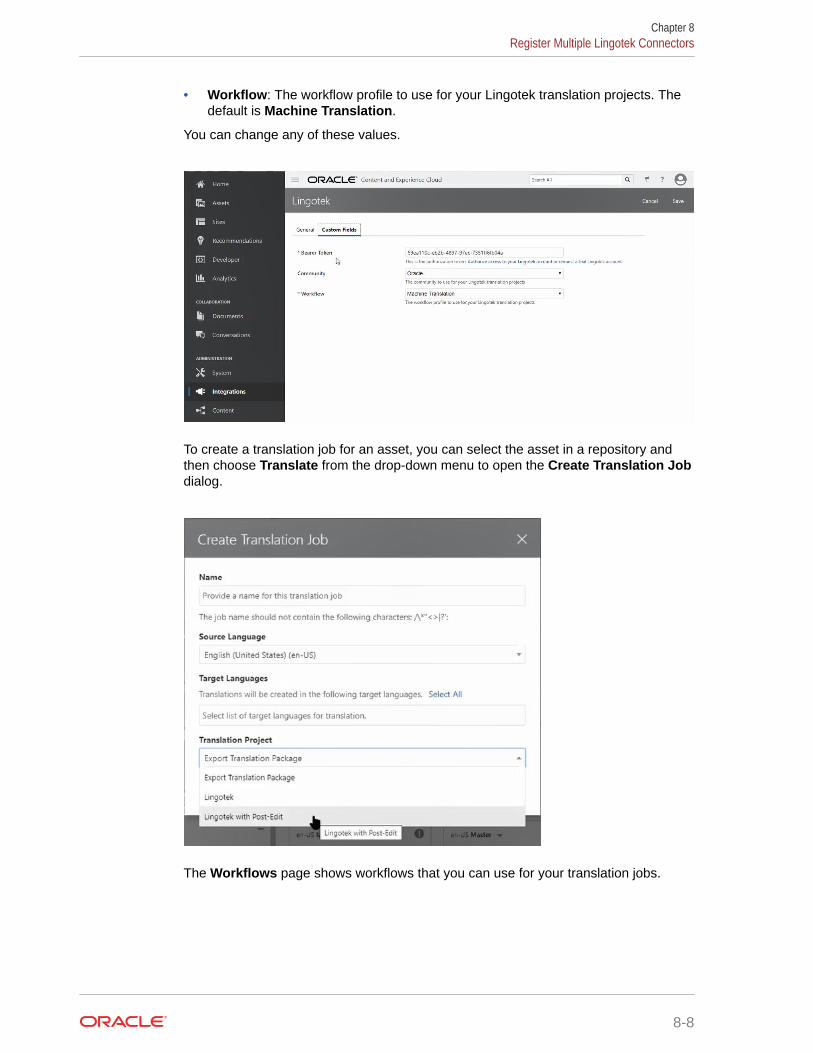
• Workflow: The workflow profile to use for your Lingotek translation projects. Thedefault is Machine Translation.
You can change any of these values.
To create a translation job for an asset, you can select the asset in a repository andthen choose Translate from the drop-down menu to open the Create Translation Jobdialog.
The Workflows page shows workflows that you can use for your translation jobs.
Chapter 8Register Multiple Lingotek Connectors
8-8
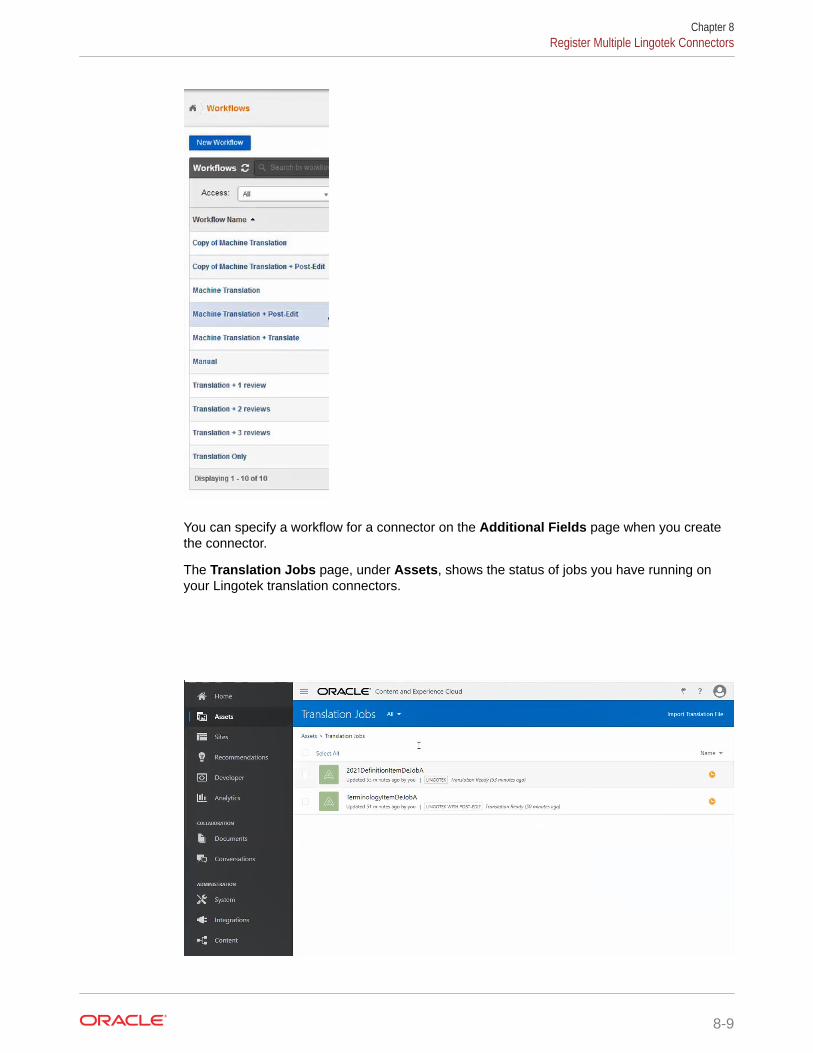
You can specify a workflow for a connector on the Additional Fields page when you createthe connector.
The Translation Jobs page, under Assets, shows the status of jobs you have running onyour Lingotek translation connectors.
Chapter 8Register Multiple Lingotek Connectors
8-9
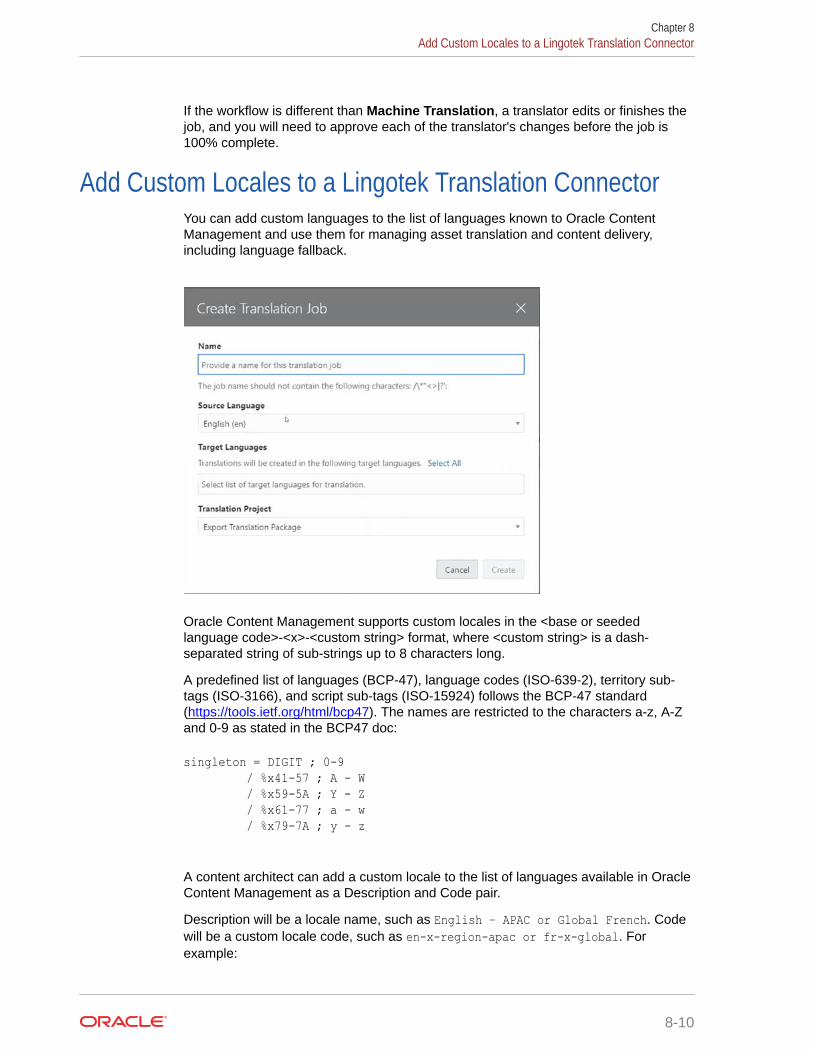
If the workflow is different than Machine Translation, a translator edits or finishes thejob, and you will need to approve each of the translator's changes before the job is100% complete.
Add Custom Locales to a Lingotek Translation ConnectorYou can add custom languages to the list of languages known to Oracle ContentManagement and use them for managing asset translation and content delivery,including language fallback.
Oracle Content Management supports custom locales in the <base or seededlanguage code>-<x>-<custom string> format, where <custom string> is a dash-separated string of sub-strings up to 8 characters long.
A predefined list of languages (BCP-47), language codes (ISO-639-2), territory sub-tags (ISO-3166), and script sub-tags (ISO-15924) follows the BCP-47 standard(https://tools.ietf.org/html/bcp47). The names are restricted to the characters a-z, A-Zand 0-9 as stated in the BCP47 doc:
singleton = DIGIT ; 0-9 / %x41-57 ; A - W / %x59-5A ; Y - Z / %x61-77 ; a - w / %x79-7A ; y - z
A content architect can add a custom locale to the list of languages available in OracleContent Management as a Description and Code pair.
Description will be a locale name, such as English – APAC or Global French. Codewill be a custom locale code, such as en-x-region-apac or fr-x-global. Forexample:
Chapter 8Add Custom Locales to a Lingotek Translation Connector
8-10
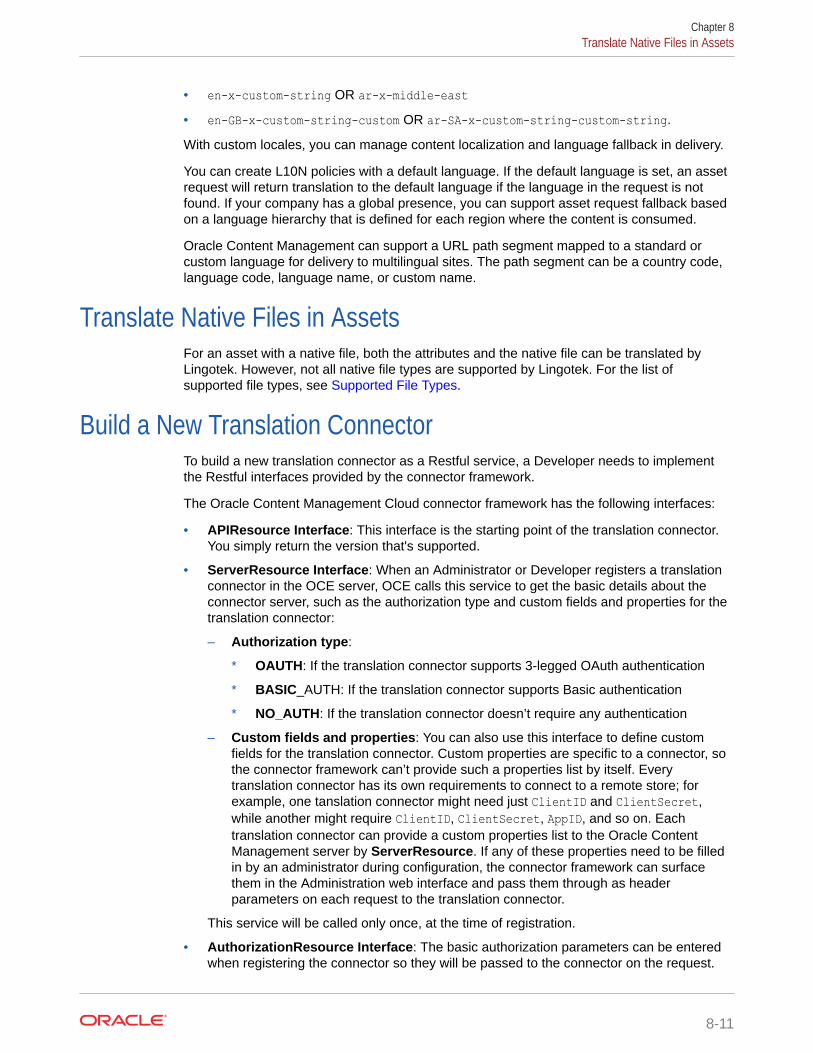
• en-x-custom-string OR ar-x-middle-east• en-GB-x-custom-string-custom OR ar-SA-x-custom-string-custom-string.
With custom locales, you can manage content localization and language fallback in delivery.
You can create L10N policies with a default language. If the default language is set, an assetrequest will return translation to the default language if the language in the request is notfound. If your company has a global presence, you can support asset request fallback basedon a language hierarchy that is defined for each region where the content is consumed.
Oracle Content Management can support a URL path segment mapped to a standard orcustom language for delivery to multilingual sites. The path segment can be a country code,language code, language name, or custom name.
Translate Native Files in AssetsFor an asset with a native file, both the attributes and the native file can be translated byLingotek. However, not all native file types are supported by Lingotek. For the list ofsupported file types, see Supported File Types.
Build a New Translation ConnectorTo build a new translation connector as a Restful service, a Developer needs to implementthe Restful interfaces provided by the connector framework.
The Oracle Content Management Cloud connector framework has the following interfaces:
• APIResource Interface: This interface is the starting point of the translation connector.You simply return the version that's supported.
• ServerResource Interface: When an Administrator or Developer registers a translationconnector in the OCE server, OCE calls this service to get the basic details about theconnector server, such as the authorization type and custom fields and properties for thetranslation connector:
– Authorization type:
* OAUTH: If the translation connector supports 3-legged OAuth authentication
* BASIC_AUTH: If the translation connector supports Basic authentication
* NO_AUTH: If the translation connector doesn’t require any authentication
– Custom fields and properties: You can also use this interface to define customfields for the translation connector. Custom properties are specific to a connector, sothe connector framework can’t provide such a properties list by itself. Everytranslation connector has its own requirements to connect to a remote store; forexample, one tanslation connector might need just ClientID and ClientSecret,while another might require ClientID, ClientSecret, AppID, and so on. Eachtranslation connector can provide a custom properties list to the Oracle ContentManagement server by ServerResource. If any of these properties need to be filledin by an administrator during configuration, the connector framework can surfacethem in the Administration web interface and pass them through as headerparameters on each request to the translation connector.
This service will be called only once, at the time of registration.
• AuthorizationResource Interface: The basic authorization parameters can be enteredwhen registering the connector so they will be passed to the connector on the request.
Chapter 8Translate Native Files in Assets
8-11
• This interface has support for both OAuth and Basic authentication protocols.
– 3-legged OAuth authentication
* In the OAuth flow, the Oracle Content Management web interface, basedon the custom property value provided by the translation connector,supports OAuth authentication. It triggers an OAuth flow by calling theconnector framework, which in turn calls the /authorization/authorization URL's service on the translation connector to get theauthorization URL.
* The Oracle Content Management web interface renders the authorizationURL in a browser, where the user authorizes the application and givesOracle Content Management permission to access the token for furthercommunications. To complete the authorization and get the OAuth token,the Oracle Content Management server will call the /authorization/completedAuthorizations service on the translation connector. Tocomplete 3-legged OAuth, the Oracle Content Management server alsoprovides the redirect callback servlet, which the remote store can call tocomplete the authorization process.
– Basic authentication: In case the translation connector supports Basicauthentication, the Oracle Content Management web interface will prompt theuser to enter a user name and password, which it will pass to the OracleContent Management server (connector framework). The connectorframework will call the /authorization/basicAuthorization service to passthe credentials and will expect the translation connector to validate with theremote store if the credentials are correct.
• TranslationResource Interface: The connector framework uses this service tosubmit an Oracle Content Management translation job to the translation connector.The translation connector then calls the Language Service Provider totranslate ,the zip file provided for the job and returns the translated zip.
Each of these interfaces is described in more detail, with examples of REST payloads,in the following sections:
• REST Interfaces for Configuration and Authorization
• REST Interfaces for Creating Translation Jobs and Returning Translated Content
• Authorization for Translation Connectors
REST Interfaces for Configuration and AuthorizationA translation connector needs to implement the following REST APIs for defining theconnector configuration and setting up authorization.
/rest/apiImplements intradoc.connectorcommon.server.APIResourceHere you return the latest version supported by the content connector.
GET http://host:port/connector/rest/api
[ "v1"]
Chapter 8Build a New Translation Connector
8-12
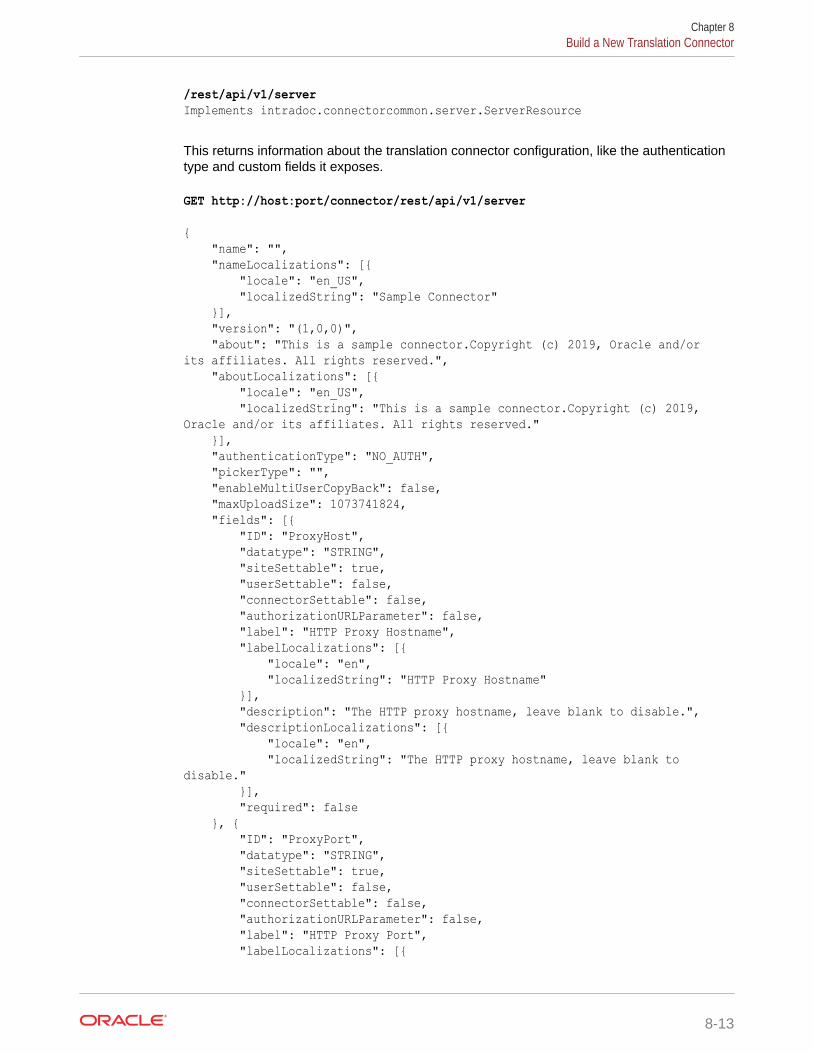
/rest/api/v1/serverImplements intradoc.connectorcommon.server.ServerResource
This returns information about the translation connector configuration, like the authenticationtype and custom fields it exposes.
GET http://host:port/connector/rest/api/v1/server
{ "name": "", "nameLocalizations": [{ "locale": "en_US", "localizedString": "Sample Connector" }], "version": "(1,0,0)", "about": "This is a sample connector.Copyright (c) 2019, Oracle and/or its affiliates. All rights reserved.", "aboutLocalizations": [{ "locale": "en_US", "localizedString": "This is a sample connector.Copyright (c) 2019, Oracle and/or its affiliates. All rights reserved." }], "authenticationType": "NO_AUTH", "pickerType": "", "enableMultiUserCopyBack": false, "maxUploadSize": 1073741824, "fields": [{ "ID": "ProxyHost", "datatype": "STRING", "siteSettable": true, "userSettable": false, "connectorSettable": false, "authorizationURLParameter": false, "label": "HTTP Proxy Hostname", "labelLocalizations": [{ "locale": "en", "localizedString": "HTTP Proxy Hostname" }], "description": "The HTTP proxy hostname, leave blank to disable.", "descriptionLocalizations": [{ "locale": "en", "localizedString": "The HTTP proxy hostname, leave blank to disable." }], "required": false }, { "ID": "ProxyPort", "datatype": "STRING", "siteSettable": true, "userSettable": false, "connectorSettable": false, "authorizationURLParameter": false, "label": "HTTP Proxy Port", "labelLocalizations": [{
Chapter 8Build a New Translation Connector
8-13
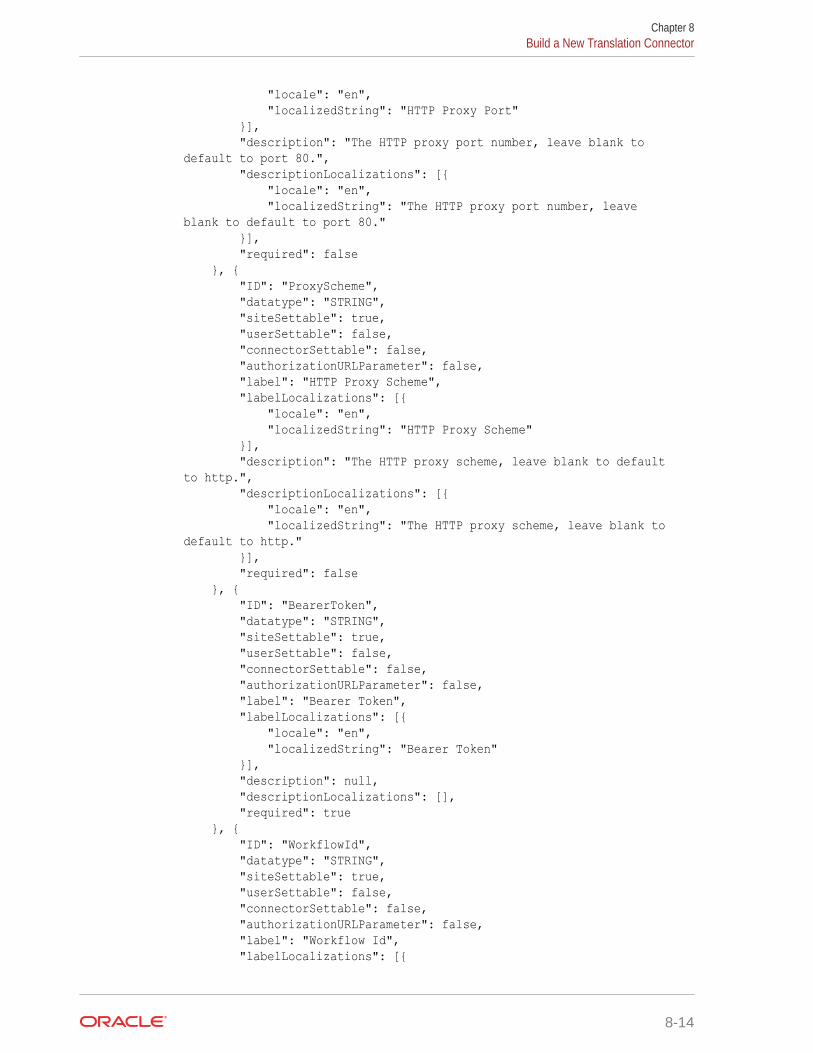
"locale": "en", "localizedString": "HTTP Proxy Port" }], "description": "The HTTP proxy port number, leave blank to default to port 80.", "descriptionLocalizations": [{ "locale": "en", "localizedString": "The HTTP proxy port number, leave blank to default to port 80." }], "required": false }, { "ID": "ProxyScheme", "datatype": "STRING", "siteSettable": true, "userSettable": false, "connectorSettable": false, "authorizationURLParameter": false, "label": "HTTP Proxy Scheme", "labelLocalizations": [{ "locale": "en", "localizedString": "HTTP Proxy Scheme" }], "description": "The HTTP proxy scheme, leave blank to default to http.", "descriptionLocalizations": [{ "locale": "en", "localizedString": "The HTTP proxy scheme, leave blank to default to http." }], "required": false }, { "ID": "BearerToken", "datatype": "STRING", "siteSettable": true, "userSettable": false, "connectorSettable": false, "authorizationURLParameter": false, "label": "Bearer Token", "labelLocalizations": [{ "locale": "en", "localizedString": "Bearer Token" }], "description": null, "descriptionLocalizations": [], "required": true }, { "ID": "WorkflowId", "datatype": "STRING", "siteSettable": true, "userSettable": false, "connectorSettable": false, "authorizationURLParameter": false, "label": "Workflow Id", "labelLocalizations": [{
Chapter 8Build a New Translation Connector
8-14
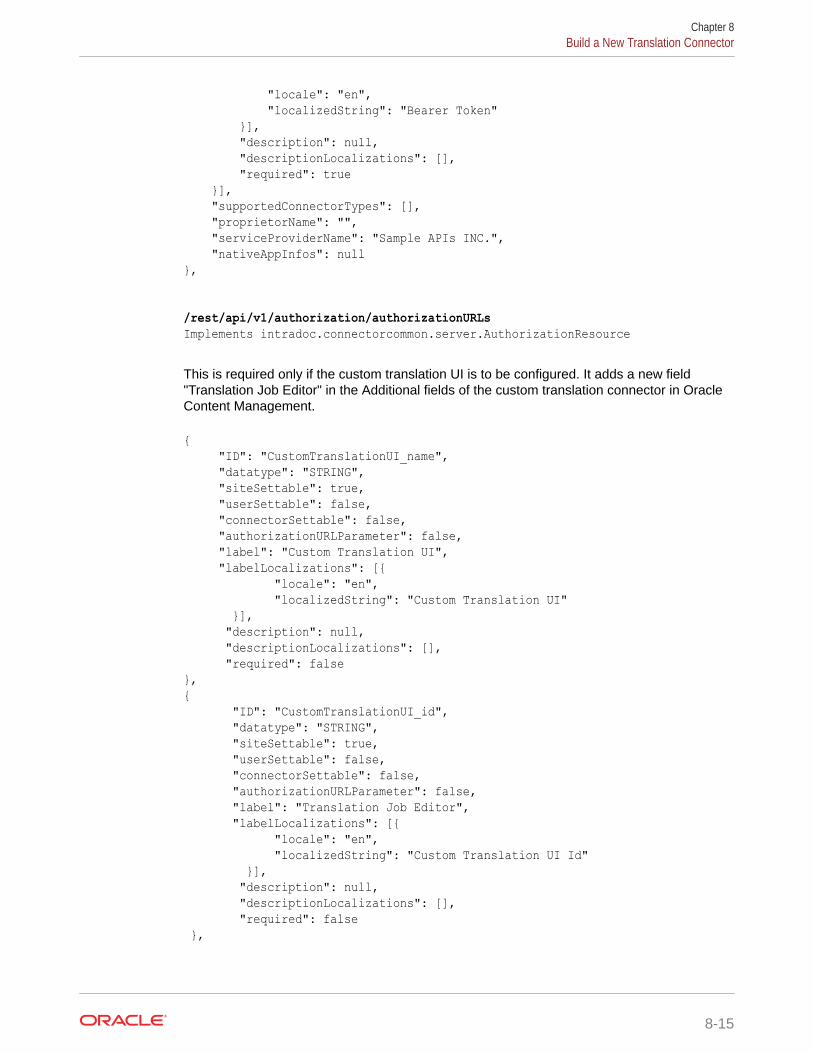
"locale": "en", "localizedString": "Bearer Token" }], "description": null, "descriptionLocalizations": [], "required": true }], "supportedConnectorTypes": [], "proprietorName": "", "serviceProviderName": "Sample APIs INC.", "nativeAppInfos": null},
/rest/api/v1/authorization/authorizationURLsImplements intradoc.connectorcommon.server.AuthorizationResource
This is required only if the custom translation UI is to be configured. It adds a new field"Translation Job Editor" in the Additional fields of the custom translation connector in OracleContent Management.
{ "ID": "CustomTranslationUI_name", "datatype": "STRING", "siteSettable": true, "userSettable": false, "connectorSettable": false, "authorizationURLParameter": false, "label": "Custom Translation UI", "labelLocalizations": [{ "locale": "en", "localizedString": "Custom Translation UI" }], "description": null, "descriptionLocalizations": [], "required": false},{ "ID": "CustomTranslationUI_id", "datatype": "STRING", "siteSettable": true, "userSettable": false, "connectorSettable": false, "authorizationURLParameter": false, "label": "Translation Job Editor", "labelLocalizations": [{ "locale": "en", "localizedString": "Custom Translation UI Id" }], "description": null, "descriptionLocalizations": [], "required": false },
Chapter 8Build a New Translation Connector
8-15
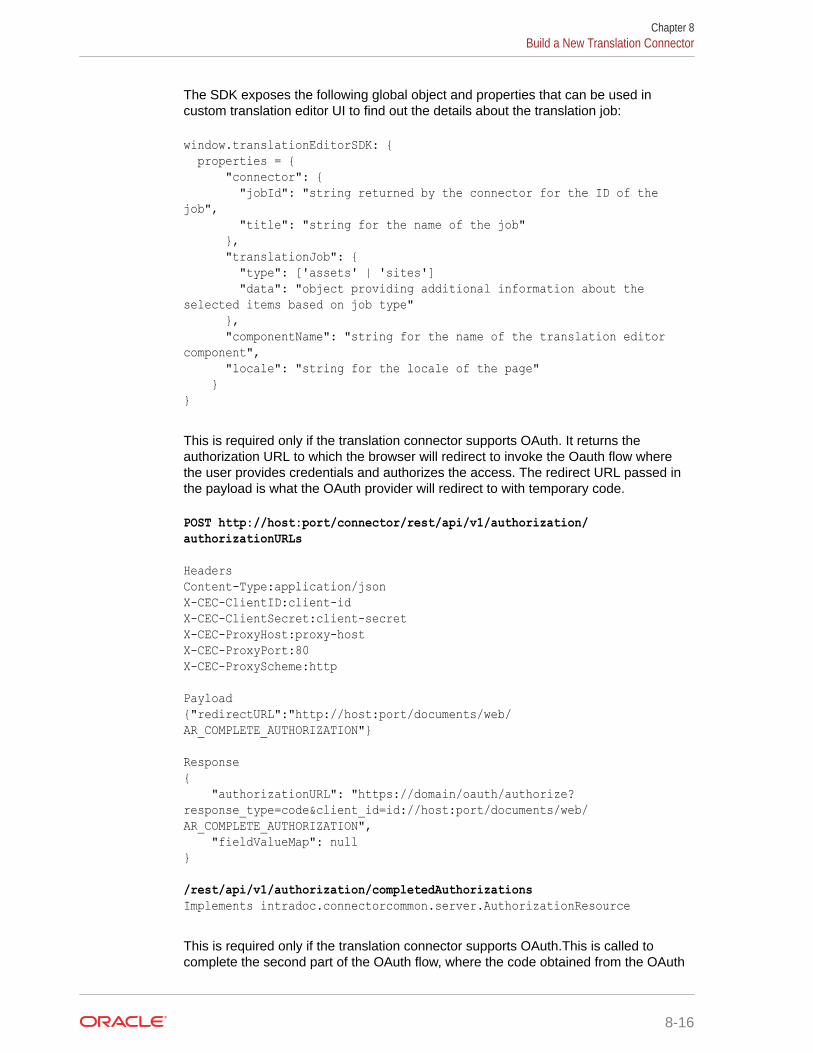
The SDK exposes the following global object and properties that can be used incustom translation editor UI to find out the details about the translation job:
window.translationEditorSDK: { properties = { "connector": { "jobId": "string returned by the connector for the ID of the job", "title": "string for the name of the job" }, "translationJob": { "type": ['assets' | 'sites'] "data": "object providing additional information about the selected items based on job type" }, "componentName": "string for the name of the translation editor component", "locale": "string for the locale of the page" }}
This is required only if the translation connector supports OAuth. It returns theauthorization URL to which the browser will redirect to invoke the Oauth flow wherethe user provides credentials and authorizes the access. The redirect URL passed inthe payload is what the OAuth provider will redirect to with temporary code.
POST http://host:port/connector/rest/api/v1/authorization/authorizationURLs
HeadersContent-Type:application/jsonX-CEC-ClientID:client-idX-CEC-ClientSecret:client-secretX-CEC-ProxyHost:proxy-hostX-CEC-ProxyPort:80X-CEC-ProxyScheme:http Payload{"redirectURL":"http://host:port/documents/web/AR_COMPLETE_AUTHORIZATION"} Response{ "authorizationURL": "https://domain/oauth/authorize?response_type=code&client_id=id://host:port/documents/web/AR_COMPLETE_AUTHORIZATION", "fieldValueMap": null}
/rest/api/v1/authorization/completedAuthorizationsImplements intradoc.connectorcommon.server.AuthorizationResource
This is required only if the translation connector supports OAuth.This is called tocomplete the second part of the OAuth flow, where the code obtained from the OAuth
Chapter 8Build a New Translation Connector
8-16
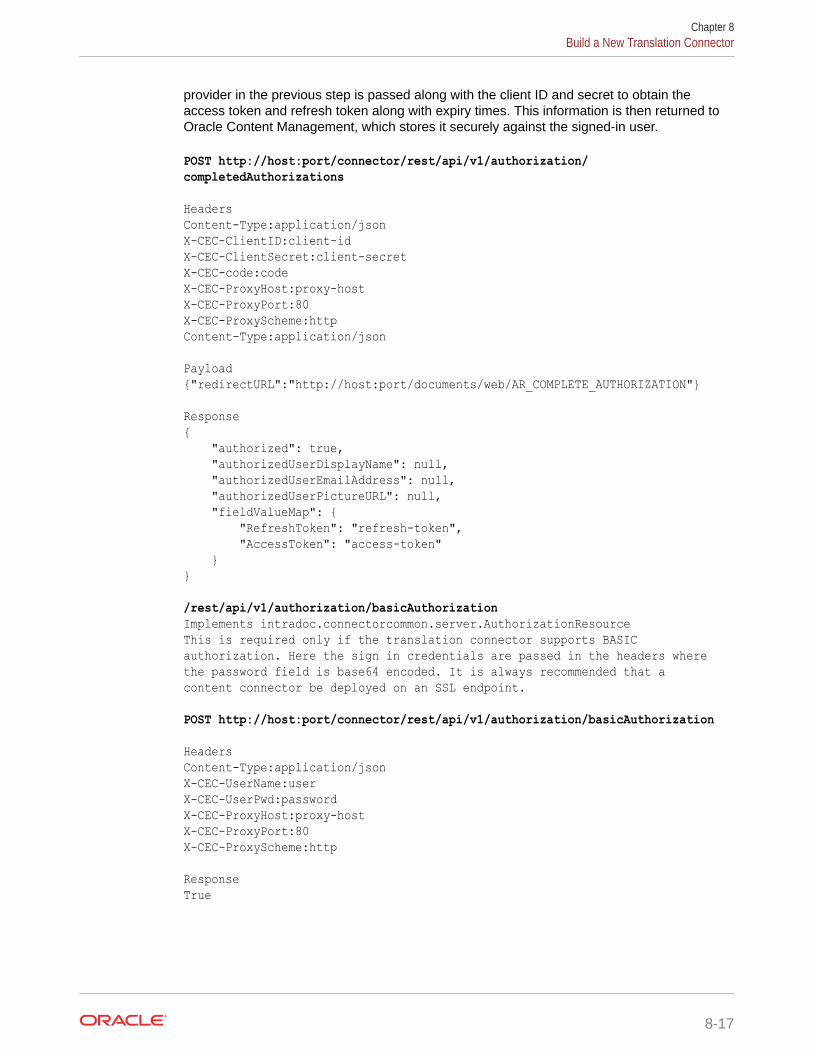
provider in the previous step is passed along with the client ID and secret to obtain theaccess token and refresh token along with expiry times. This information is then returned toOracle Content Management, which stores it securely against the signed-in user.
POST http://host:port/connector/rest/api/v1/authorization/completedAuthorizations
HeadersContent-Type:application/jsonX-CEC-ClientID:client-idX-CEC-ClientSecret:client-secretX-CEC-code:codeX-CEC-ProxyHost:proxy-hostX-CEC-ProxyPort:80X-CEC-ProxyScheme:httpContent-Type:application/json Payload{"redirectURL":"http://host:port/documents/web/AR_COMPLETE_AUTHORIZATION"} Response{ "authorized": true, "authorizedUserDisplayName": null, "authorizedUserEmailAddress": null, "authorizedUserPictureURL": null, "fieldValueMap": { "RefreshToken": "refresh-token", "AccessToken": "access-token" }}
/rest/api/v1/authorization/basicAuthorizationImplements intradoc.connectorcommon.server.AuthorizationResourceThis is required only if the translation connector supports BASIC authorization. Here the sign in credentials are passed in the headers where the password field is base64 encoded. It is always recommended that a content connector be deployed on an SSL endpoint.
POST http://host:port/connector/rest/api/v1/authorization/basicAuthorization
HeadersContent-Type:application/jsonX-CEC-UserName:userX-CEC-UserPwd:passwordX-CEC-ProxyHost:proxy-hostX-CEC-ProxyPort:80X-CEC-ProxyScheme:http ResponseTrue
Chapter 8Build a New Translation Connector
8-17
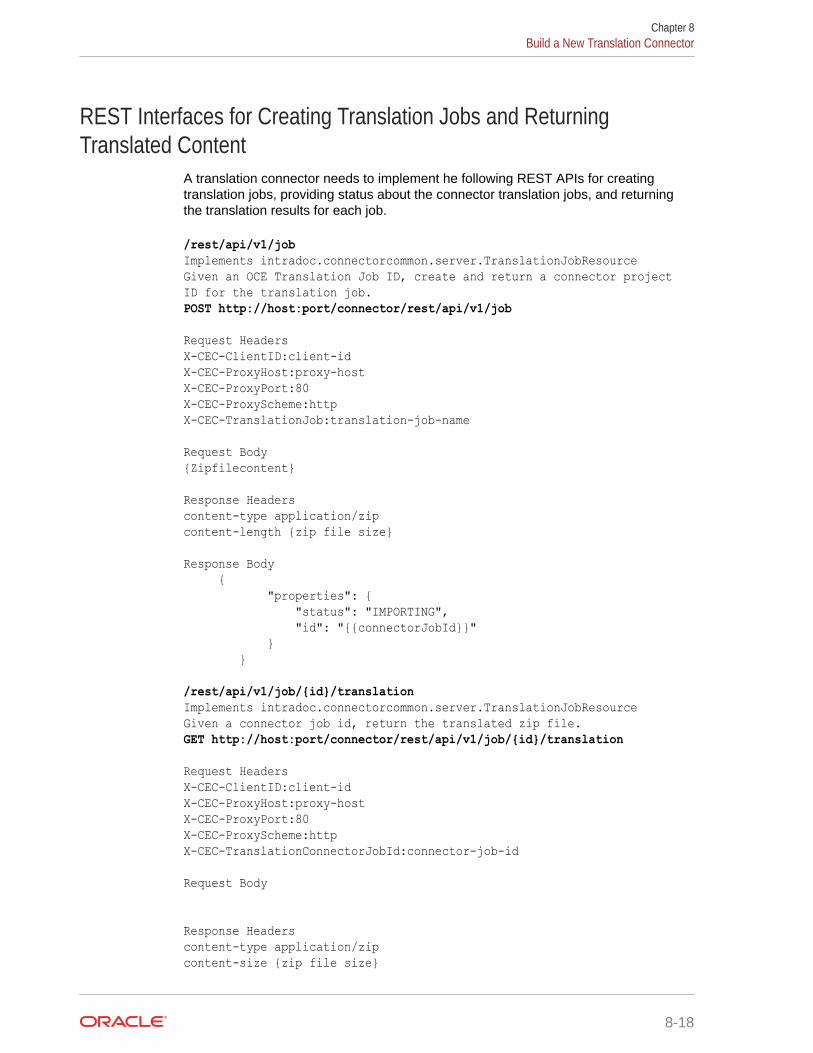
REST Interfaces for Creating Translation Jobs and ReturningTranslated Content
A translation connector needs to implement he following REST APIs for creatingtranslation jobs, providing status about the connector translation jobs, and returningthe translation results for each job.
/rest/api/v1/jobImplements intradoc.connectorcommon.server.TranslationJobResourceGiven an OCE Translation Job ID, create and return a connector project ID for the translation job.POST http://host:port/connector/rest/api/v1/job
Request HeadersX-CEC-ClientID:client-idX-CEC-ProxyHost:proxy-hostX-CEC-ProxyPort:80X-CEC-ProxyScheme:httpX-CEC-TranslationJob:translation-job-name
Request Body{Zipfilecontent}
Response Headerscontent-type application/zipcontent-length {zip file size} Response Body { "properties": { "status": "IMPORTING", "id": "{{connectorJobId}}" } }
/rest/api/v1/job/{id}/translationImplements intradoc.connectorcommon.server.TranslationJobResourceGiven a connector job id, return the translated zip file. GET http://host:port/connector/rest/api/v1/job/{id}/translation
Request HeadersX-CEC-ClientID:client-idX-CEC-ProxyHost:proxy-hostX-CEC-ProxyPort:80X-CEC-ProxyScheme:httpX-CEC-TranslationConnectorJobId:connector-job-id
Request Body
Response Headerscontent-type application/zipcontent-size {zip file size}
Chapter 8Build a New Translation Connector
8-18
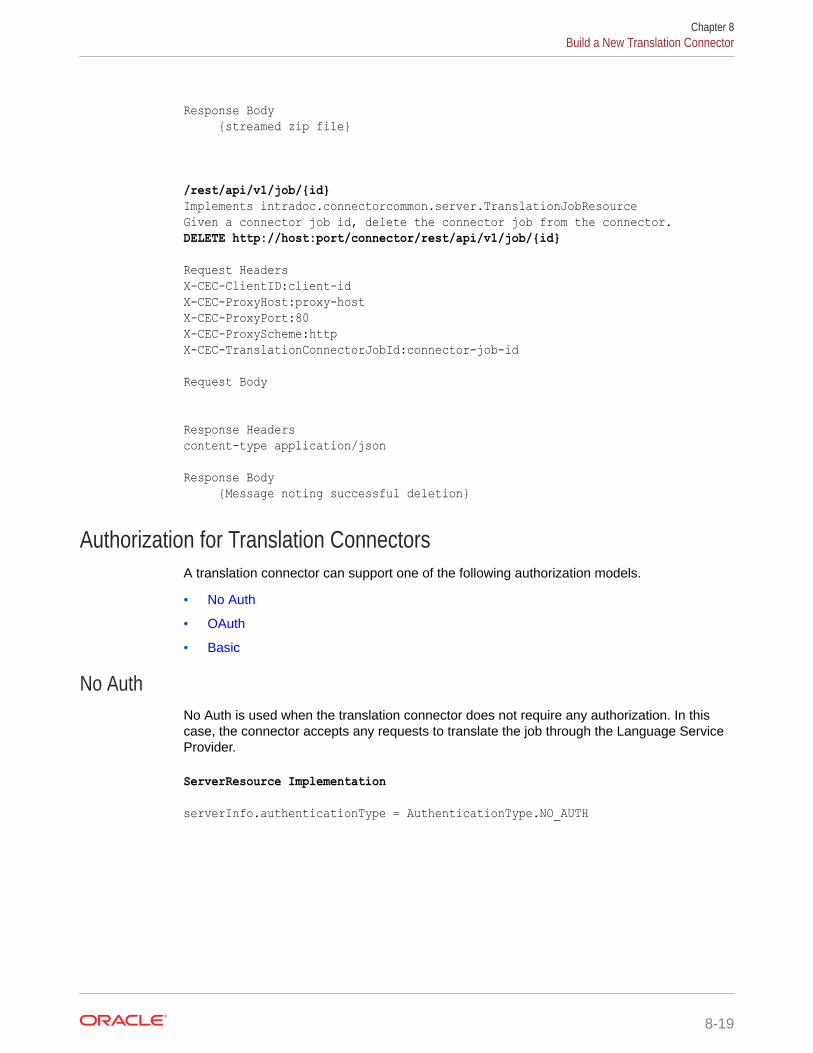
Response Body {streamed zip file}
/rest/api/v1/job/{id}Implements intradoc.connectorcommon.server.TranslationJobResourceGiven a connector job id, delete the connector job from the connector. DELETE http://host:port/connector/rest/api/v1/job/{id}
Request HeadersX-CEC-ClientID:client-idX-CEC-ProxyHost:proxy-hostX-CEC-ProxyPort:80X-CEC-ProxyScheme:httpX-CEC-TranslationConnectorJobId:connector-job-id
Request Body
Response Headerscontent-type application/json Response Body {Message noting successful deletion}
Authorization for Translation ConnectorsA translation connector can support one of the following authorization models.
• No Auth
• OAuth
• Basic
No AuthNo Auth is used when the translation connector does not require any authorization. In thiscase, the connector accepts any requests to translate the job through the Language ServiceProvider.
ServerResource Implementation
serverInfo.authenticationType = AuthenticationType.NO_AUTH
Chapter 8Build a New Translation Connector
8-19
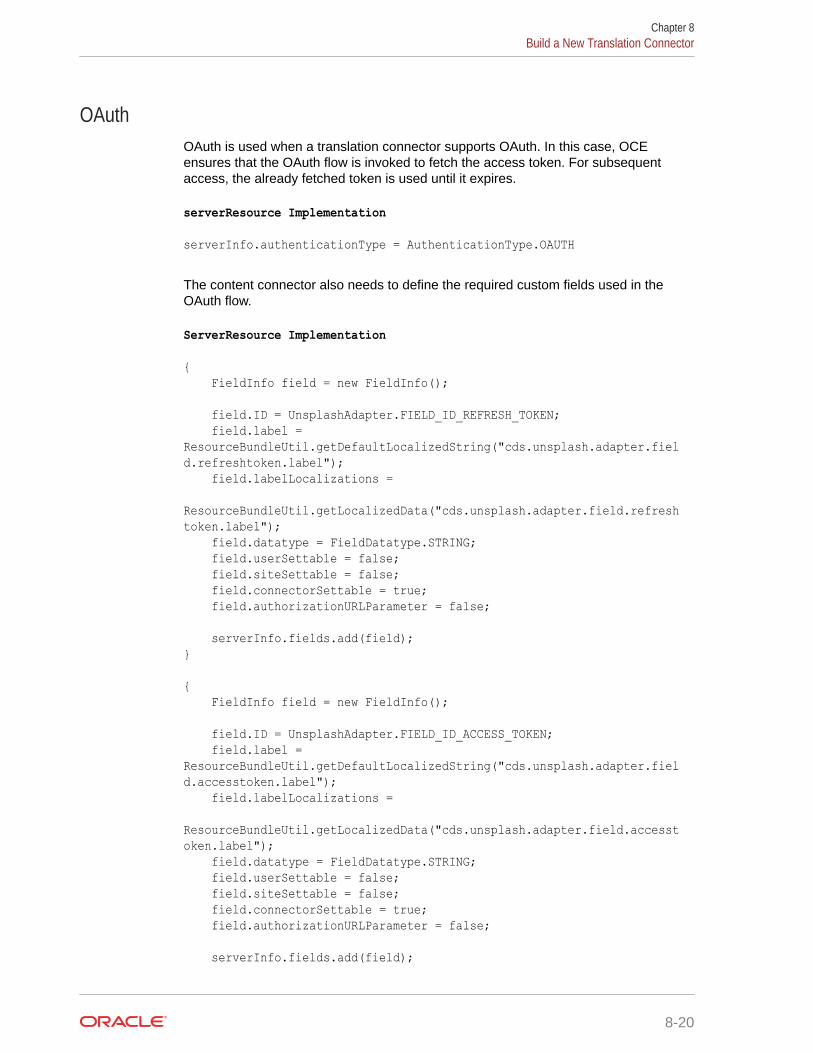
OAuthOAuth is used when a translation connector supports OAuth. In this case, OCEensures that the OAuth flow is invoked to fetch the access token. For subsequentaccess, the already fetched token is used until it expires.
serverResource Implementation
serverInfo.authenticationType = AuthenticationType.OAUTH
The content connector also needs to define the required custom fields used in theOAuth flow.
ServerResource Implementation
{ FieldInfo field = new FieldInfo(); field.ID = UnsplashAdapter.FIELD_ID_REFRESH_TOKEN; field.label = ResourceBundleUtil.getDefaultLocalizedString("cds.unsplash.adapter.field.refreshtoken.label"); field.labelLocalizations = ResourceBundleUtil.getLocalizedData("cds.unsplash.adapter.field.refreshtoken.label"); field.datatype = FieldDatatype.STRING; field.userSettable = false; field.siteSettable = false; field.connectorSettable = true; field.authorizationURLParameter = false; serverInfo.fields.add(field);} { FieldInfo field = new FieldInfo(); field.ID = UnsplashAdapter.FIELD_ID_ACCESS_TOKEN; field.label = ResourceBundleUtil.getDefaultLocalizedString("cds.unsplash.adapter.field.accesstoken.label"); field.labelLocalizations = ResourceBundleUtil.getLocalizedData("cds.unsplash.adapter.field.accesstoken.label"); field.datatype = FieldDatatype.STRING; field.userSettable = false; field.siteSettable = false; field.connectorSettable = true; field.authorizationURLParameter = false; serverInfo.fields.add(field);
Chapter 8Build a New Translation Connector
8-20
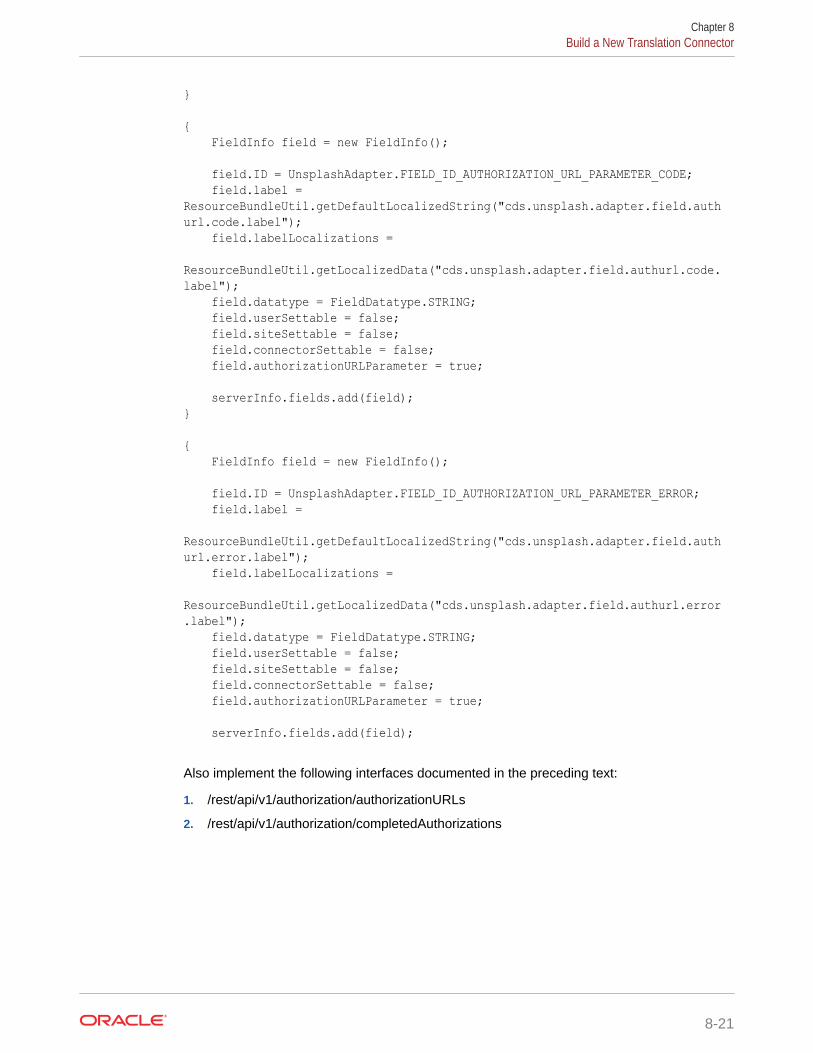
} { FieldInfo field = new FieldInfo(); field.ID = UnsplashAdapter.FIELD_ID_AUTHORIZATION_URL_PARAMETER_CODE; field.label = ResourceBundleUtil.getDefaultLocalizedString("cds.unsplash.adapter.field.authurl.code.label"); field.labelLocalizations = ResourceBundleUtil.getLocalizedData("cds.unsplash.adapter.field.authurl.code.label"); field.datatype = FieldDatatype.STRING; field.userSettable = false; field.siteSettable = false; field.connectorSettable = false; field.authorizationURLParameter = true; serverInfo.fields.add(field);} { FieldInfo field = new FieldInfo(); field.ID = UnsplashAdapter.FIELD_ID_AUTHORIZATION_URL_PARAMETER_ERROR; field.label = ResourceBundleUtil.getDefaultLocalizedString("cds.unsplash.adapter.field.authurl.error.label"); field.labelLocalizations = ResourceBundleUtil.getLocalizedData("cds.unsplash.adapter.field.authurl.error.label"); field.datatype = FieldDatatype.STRING; field.userSettable = false; field.siteSettable = false; field.connectorSettable = false; field.authorizationURLParameter = true; serverInfo.fields.add(field);
Also implement the following interfaces documented in the preceding text:
1. /rest/api/v1/authorization/authorizationURLs
2. /rest/api/v1/authorization/completedAuthorizations
Chapter 8Build a New Translation Connector
8-21
BasicBasic is used when translation connector requires sign-in credentials.
ServerResource Implementation
serverInfo.authenticationType = AuthenticationType.BASIC
You also need to define all the sign-in fields in the server implementation.
// custom field for User Name{ FieldInfo field = new FieldInfo(); field.ID = "UserName"; field.label = ResourceBundleUtil.getDefaultLocalizedString("cds.unsplash.adapter.field.username.label"); field.labelLocalizations = ResourceBundleUtil.getLocalizedData("cds.unsplash.adapter.field.username.label"); field.description = ResourceBundleUtil.getDefaultLocalizedString("cds.unsplash.adapter.field.username.desc"); field.descriptionLocalizations = ResourceBundleUtil.getLocalizedData("cds.unsplash.adapter.field.username.desc"); field.datatype = FieldDatatype.STRING; field.userSettable = true; field.siteSettable = false; field.connectorSettable = false; field.authorizationURLParameter = false; field.required = true; serverInfo.fields.add(field);} // custom field for password{ FieldInfo field = new FieldInfo(); field.ID = "UserPwd"; field.label = ResourceBundleUtil.getDefaultLocalizedString("cds.unsplash.adapter.field.password.label"); field.labelLocalizations = ResourceBundleUtil.getLocalizedData("cds.unsplash.adapter.field.password.label"); field.description = ResourceBundleUtil.getDefaultLocalizedString("cds.unsplash.adapter.field.password.desc"); field.descriptionLocalizations = ResourceBundleUtil.getLocalizedData("cds.unsplash.adapter.field.password.desc");
Chapter 8Build a New Translation Connector
8-22
field.datatype = FieldDatatype.PASSWORD; field.userSettable = true; field.siteSettable = false; field.connectorSettable = false; field.authorizationURLParameter = false; field.required = true; serverInfo.fields.add(field);}
Besides this, the translation connector needs to implement the following interface, asdescribed in the preceding text.
/rest/api/v1/authorization/basicAuthorizationSubsequently the user credentials (password base64 encoded) will be passed via headers for other calls, like create connector translation job and translate connector job.
Configure and Register a Translation ConnectorOnce you have built your translation connector, you need to register it through the OracleContent Management administration interface.
The minimum properties you are required to add to a translation connector follow:
• Translation connector name
• Translation connector service URL
• User name and password, if the preceding URL access requires it
Once a translation connector gets registered successfully and the translation connectorservice URL is reachable, the Oracle Content Management server will call a server serviceon the translation connector to get the custom properties and show those in theAdministration web interface. An administrator or developer can add values for thoseproperties (for example, clientid and clientsecret for OAuth flows or the user name andpassword for a Basic authorization central account).
Clicking Save saves all these properties with the connector framework.
You need to select the registered connector in the repository before you can use it in the restof the UI. Once you select the connector in the repository, then any asset in that repositorycan use this connector to translate.
After you enable it, the translation connector becomes available in the Language ServiceProvider menu item of the Oracle Content Management Create Translation Job webinterface.
Translation Connector Execution FlowFrom the Oracle Content Management web interface Assets page of the Sites page, youcan click translate and choose a translation connector as an option from the CreateTranslation Job web interface.
During creation of the translation job, the connector framework makes REST API calls to theremote translation connector to create a corresponding job in the connector. The zip file for
Chapter 8Configure and Register a Translation Connector
8-23
the translation job is then submitted to the connector. Once the connector successfullyreceives the translation zip file, the job creation process is complete.
The user can now see the status of the job within the connector when viewing the listof translation jobs, or on the job detail page. Once the status moves to 100%, the usercan ask Oracle Content Management to ingest the translated zip. Oracle ContentManagement will call the connector to retrieve the translated zip and ingest it.
Whenever a translation job is deleted that is using a translation connector, thetranslation connector is also told to delete the associated job in the connector.
Since a lot of the calls to the translation connector occur as a background process, theweb interface will indicate only the percent complete or failure of the connector job.Refer to the diagnostic logs for any failures.
Translation Job EditorA Translation Job Editor is a UI component that lets you edit translation jobs, manageand monitor the status of your translation job assets. The editor is where youcommunicate your translation job requirements to the translation connector.
Note:
The editor is an optional component of a translation connector. On theConnector Settings’ page, the option to add the Translation Job Editor isshown to you if you configured custom translation UI. Without the editor, thestatus of the job within the connector is available to you after the connectorsuccessfully completes the job creation process.
Oracle Content Management (OCM) comes with an out-of-box Translation Job Editorin the OCM web UI. The underlying code implementation is inwindow.translationEditorSDK, which can be downloaded through the command-lineinterface (CLI) utilities in Content Toolkit. You can modify the JavaScript code tocustomize the Translation Job Editor.
Note:
Customizing the editor in the provided code through the Content Toolkit willbe available in the spring of 2023.
The following section covers the steps on how to create a Translation Job Editor in theOCM web UI. The high-level workflow is as follows:
• Create the UI component called Translation Job Editor
• Configure the Component for the Custom Connector
• Create a Translation Job and Render the Editor
• Customize the Translation Job Editor
Create the UI component called Translation Job Editor
Chapter 8Translation Job Editor
8-24
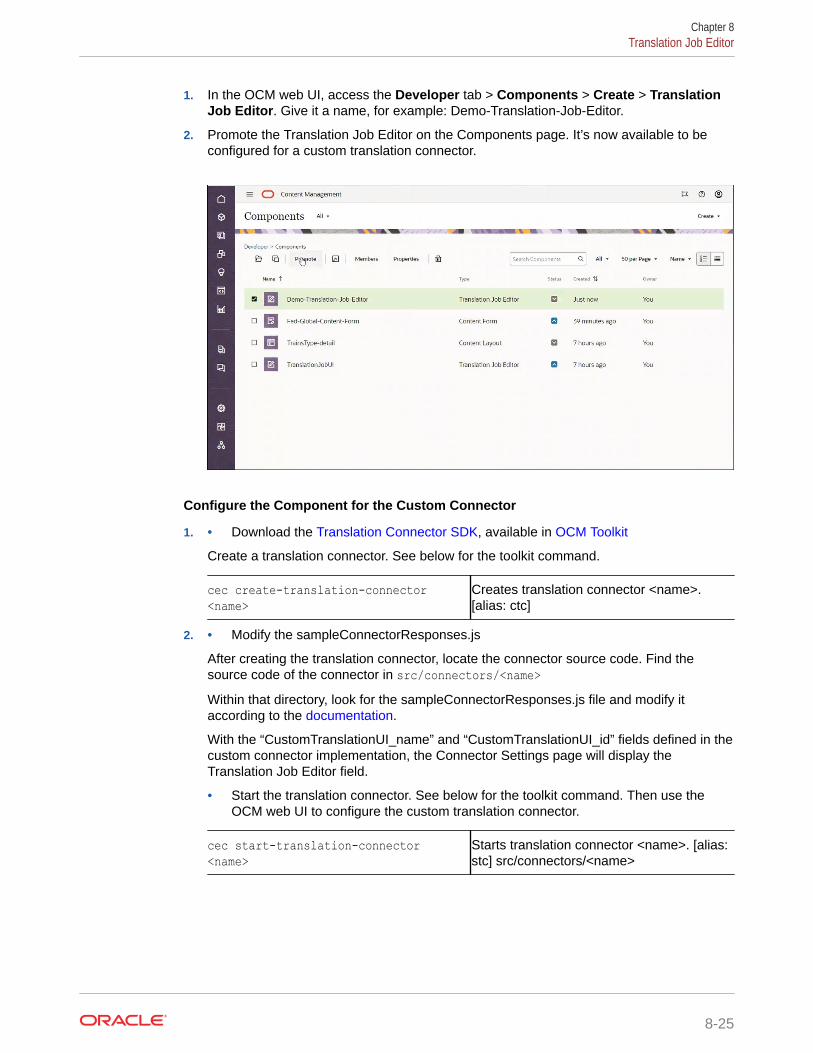
1. In the OCM web UI, access the Developer tab > Components > Create > TranslationJob Editor. Give it a name, for example: Demo-Translation-Job-Editor.
2. Promote the Translation Job Editor on the Components page. It’s now available to beconfigured for a custom translation connector.
Configure the Component for the Custom Connector
1. • Download the Translation Connector SDK, available in OCM Toolkit
Create a translation connector. See below for the toolkit command.
cec create-translation-connector<name>
Creates translation connector <name>.[alias: ctc]
2. • Modify the sampleConnectorResponses.js
After creating the translation connector, locate the connector source code. Find thesource code of the connector in src/connectors/<name>Within that directory, look for the sampleConnectorResponses.js file and modify itaccording to the documentation.
With the “CustomTranslationUI_name” and “CustomTranslationUI_id” fields defined in thecustom connector implementation, the Connector Settings page will display theTranslation Job Editor field.
• Start the translation connector. See below for the toolkit command. Then use theOCM web UI to configure the custom translation connector.
cec start-translation-connector<name>
Starts translation connector <name>. [alias:stc] src/connectors/<name>
Chapter 8Translation Job Editor
8-25
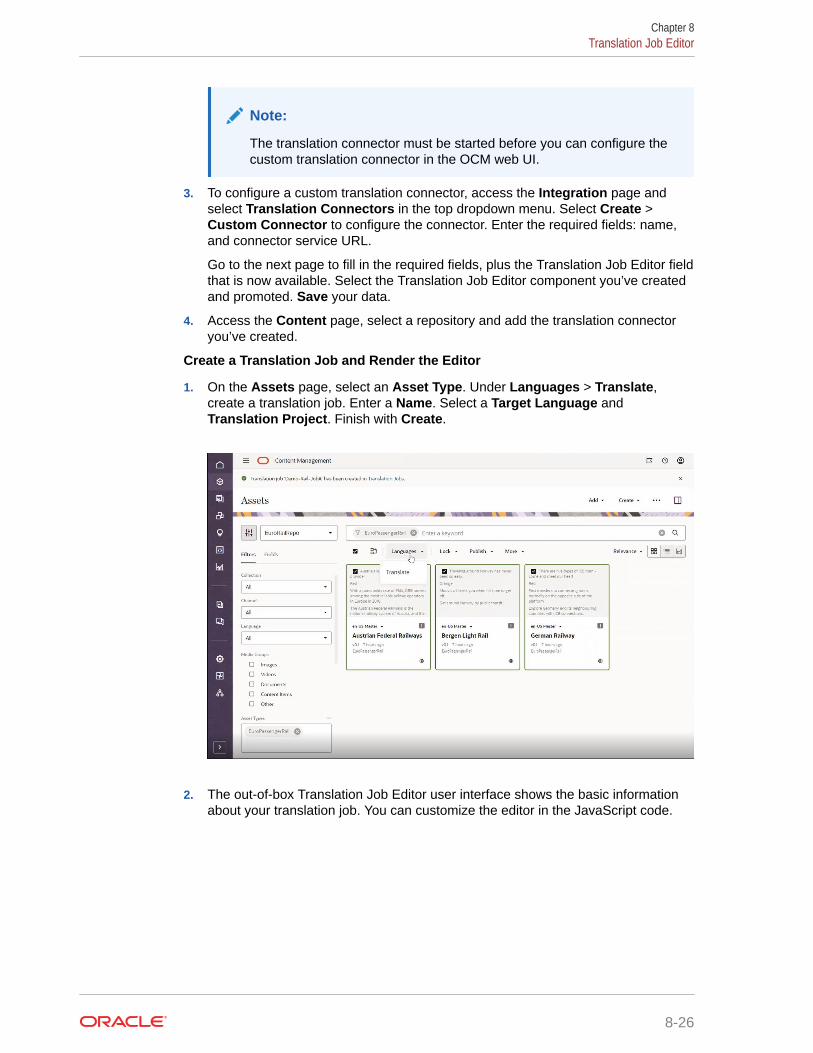
Note:
The translation connector must be started before you can configure thecustom translation connector in the OCM web UI.
3. To configure a custom translation connector, access the Integration page andselect Translation Connectors in the top dropdown menu. Select Create >Custom Connector to configure the connector. Enter the required fields: name,and connector service URL.
Go to the next page to fill in the required fields, plus the Translation Job Editor fieldthat is now available. Select the Translation Job Editor component you’ve createdand promoted. Save your data.
4. Access the Content page, select a repository and add the translation connectoryou’ve created.
Create a Translation Job and Render the Editor
1. On the Assets page, select an Asset Type. Under Languages > Translate,create a translation job. Enter a Name. Select a Target Language andTranslation Project. Finish with Create.
2. The out-of-box Translation Job Editor user interface shows the basic informationabout your translation job. You can customize the editor in the JavaScript code.
Chapter 8Translation Job Editor
8-26
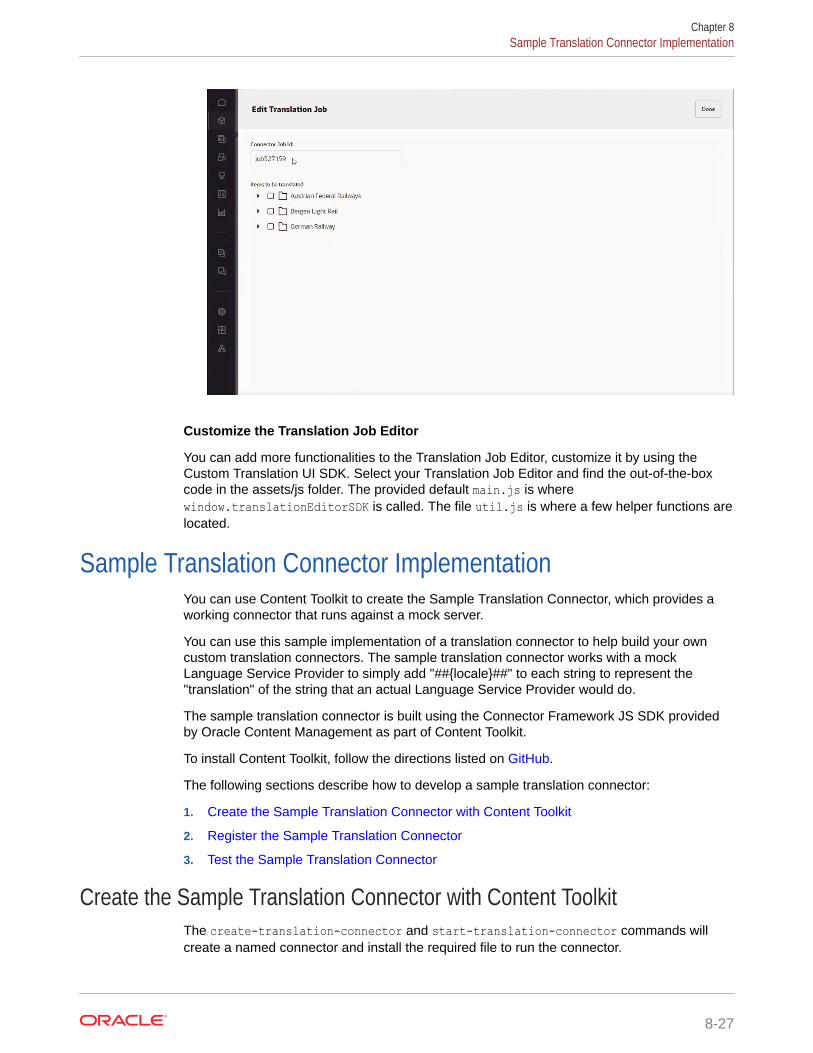
Customize the Translation Job Editor
You can add more functionalities to the Translation Job Editor, customize it by using theCustom Translation UI SDK. Select your Translation Job Editor and find the out-of-the-boxcode in the assets/js folder. The provided default main.js is wherewindow.translationEditorSDK is called. The file util.js is where a few helper functions arelocated.
Sample Translation Connector ImplementationYou can use Content Toolkit to create the Sample Translation Connector, which provides aworking connector that runs against a mock server.
You can use this sample implementation of a translation connector to help build your owncustom translation connectors. The sample translation connector works with a mockLanguage Service Provider to simply add "##{locale}##" to each string to represent the"translation" of the string that an actual Language Service Provider would do.
The sample translation connector is built using the Connector Framework JS SDK providedby Oracle Content Management as part of Content Toolkit.
To install Content Toolkit, follow the directions listed on GitHub.
The following sections describe how to develop a sample translation connector:
1. Create the Sample Translation Connector with Content Toolkit
2. Register the Sample Translation Connector
3. Test the Sample Translation Connector
Create the Sample Translation Connector with Content ToolkitThe create-translation-connector and start-translation-connector commands willcreate a named connector and install the required file to run the connector.
Chapter 8Sample Translation Connector Implementation
8-27

The connector contains a NodeJS server.js that you can use to run the SampleTranslation Connector.
Register the Sample Translation ConnectorNow that you've created the Sample Translation Connector, you can register it.
The registration of the connector can point to any Oracle Content Management server,such as the sample server:
> cec register-translation-connector connector1-auto -c connector1 -s http://localhost:8084/connector/rest/api -u admin -p <password> -f "BearerToken:Bearertoken1,WorkflowId:machine-workflow-id"
To register the translation connector through the Oracle Content ManagementAdministration web interface:
1. Sign in to your Oracle Content Management instance as an administrator ordeveloper.
2. Go to Administration > Integration > Translation Connectors and click Create.
3. Enter the details to register your sample translation content connector.
a. Name: Sample Connector – Machine Translation
b. Description: Connector to translate OCE assets and sites
c. Connector Service URL: http://host:port/sample-connector/rest/api (a URLtested previously)
4. Click Verify Settings and then Save.
5. Click the Additional Fields section:
a. BearerToken: Bearer token1b. WorkflowId: machine-workflow-idc. Translation Job Editor: In the dropdown menu, find the name of
Translation Job Editor that you've created and promoted.
Note:
This field is optional and will appear only if you have configuredcustom translation UI. For details, see REST Interfaces forConfiguration and Authorization.
6. Check Enable for End Users.
The default timeout values for the translation connector are set in the following twoproperties:
ConnectorConnectionTimeout=20000ConnectorReadTimeout=30000
If you want to change the values of these properties, you can add the properties toyour config.cfg file and then modify either or both values.
Chapter 8Sample Translation Connector Implementation
8-28
Test the Sample Translation ConnectorAfter you create and test a translation connector in Content Toolkit, you can register, enable,and test it in the Administration web interface.
To test the translation connector:
1. Sign in to Oracle Content Management as an Administrator or Developer.
2. In the navigation menu for the Administration web interface, click Assets on the top left,and then click an asset to select it.
3. Click Translate in the context menu.
4. In the create dialog, choose < Sample Connector – Machine Translation > in the drop-down menu.
5. Complete the create dialog.
6. Navigate to the Translation Jobs page.When you view the translation job, it will now show you the % complete for the job.
7. Refresh the page until it shows 100% complete.
8. Import the translations from the connector.Upon successful import, your asset will be translated into your selected language orlanguages.
Content Toolkit also provides a framework to test your Sample Translation Connector. TheSample Translation Connector itself comes with a sample Oracle Content Managementtranslation job file under data/translationBundle.zip, which you can use for testing.
To run your Sample Translation Connector, bring up the Content Toolkit develop pages, selectthe connector, and then click through each of the steps:
> cec develop &> open http://localhost:8085/public/translationconnections.html
Select the Sample Translation Connector you registered, and it will lead you to a page thatlists the following steps to test the connector:
1. Get Server Config returns information about your connector that will be used to registerthe connector with Oracle Content Management.
2. Create a job creates a unique ID for the job. The sample connector creates an outfolder with the same name as the job ID in the connector.
3. Send zipfile to job submits data/translationBundle.zip to the job for translation.The sample connector saves this file in the out/{jobid} folder, extracts the files, andthen submits them for translation.
4. Get the details of the job asks for the status of the job.
5. Get the translated zip returns the created OCE Translation Job Translated ZipFile, with the translation, once the job has moved to TRANSLATED.
6. Delete the job removes the out/{jobid} folder.
Chapter 8Sample Translation Connector Implementation
8-29
Understand the Sample Translation Connector Source CodeThe source code of the sample translation connector contains REST APIs and a jobmanager to handle creation and persistence of the connector jobs.
The sample translation connector contains a set of REST APIs implemented using theOracle Content Management connector interfaces. This is implemented as per theJAX-RS specification.
The job manager uses persistenceApi to store the following resources:
• Metadata about the job in the connector and the project created in the LanguageService Provider
• Contents of the translation zip file from Oracle Content Management
• Metadata about each file and the corresponding document in the LanguageService Provider
• Combination of the translations with the original files
• Creation of the translated zip file for the connector
The persistenceApi included in the sample simply uses the files system to managethese resources. A full translation connector implementation will need to make surethat the persistence layer will continue to work during failover and upgrade as well asprovide secure access to the resources stored.
The job manager also maintains information in the connector job metadata file aboutthe status of a translation job in the Language Service Provider by querying theinformation back either via polling or via a callback.
Code Structure:
connector:
• SampleConnectorRouter.js
– Authenticates the request
– Extracts parameters from the request URL
– Maps the request URL to the corresponding SampleConnector function:
GET: /api/connector/v1/server => getServer() – metadata about the connector POST: /api/connector/v1/job => createJob() GET: /api/connector/v1/job/:id => getJob() POST: /api/connector/v1/job/:id/translate => translateJob() – accepts a zipfile GET: /api/connector/v1/job/:id/translation => getTranslation – get translated zip DELETE: /api/connector/v1/job/:id => deleteJob()
• SampleConnector.js
– Validates the request parameters
– Calls the appropriate connector code
Chapter 8Understand the Sample Translation Connector Source Code
8-30
– Formats the response
• SampleBasicAuth.js
connector/job-manager:
• sampleJobManager.js
– Expand the zip file and then, for each file:
* Filter the file to include only translatable fields
* Submit the translatable fields to the LSP
* Wait for the translations to come back (either by polling or by callbacks)
* Recombine the translatable fields with the original files
* Create a zip file of all the translations
– Also restarts any running jobs on startup to support failover
• sampleFileImporter.js
– Imports the filtered document into the LSP specifying the source language
• sampleFileTranslator.js
– Asks the LSP to translate the documents into the target languages
• sampleFileDownloader.js
– Downloads translations for a document
connector/apis:
• persistenceApi.js
– Basic implementation using the filesystem to:
* Unpack the zip file and maintaining the source
* Accept translated files and creates the expected zip structure
* Zip up and return the translated files
• filterApi.js
– Extracts translatable strings from the source files based on file type
– Recombines the translated strings with the source file
• connectorApi.js
– Constructs the requests to the LSP
• httpApi.js
– Makes the actual GET/POST requests to the LSP
MockServer:
• mockLSPServer.js
• mockBearerAuth.js
– A mock LSP server
– It expects the following headers:
* BearerToken – can be any Bearer #### value
* WorkflowId – supports only machine-workflow-id
Chapter 8Understand the Sample Translation Connector Source Code
8-31
Translation Job Original Zip File FormatThe connector is responsible for extracting the files to be translated from thetranslation zip file, filtering them, and sending them to the LSP. To do this, theconnnector needs to understand the format of the zip file.
There are two types of translation jobs in Oracle Content Management, so there aretwo file structures possible in the zip file:
• Asset Translation
– Zip file format
* "job.json" - Contains details on the source & target languages.
* "root"
* <asset files to be translated>
• Site Translation
– Zip file format
* "site"
* "job.json" - Contains details on the source and target languages.
* "root"
* <site files to be translated>
* "assets"
* "job.json" - Contains details on the source and target languages.
* "root"
* <asset files in the site to be translated>
Translation Job Translated Zip File FormatOn successful translation, the connector must recombine the translations with theoriginal files and create a zip file in the following format, which is based on the originalformat.
• Asset Translation
– Zip file format:
* "job.json"
* "de-DE"
* <asset files>
* "fr-FR"
* <asset files>
* "it-IT"
* <asset files>
* "root" (Original files can optionally be included. The directories also needto be included, and not just the files.)
Chapter 8Understand the Sample Translation Connector Source Code
8-32
* <asset files>
• Site Translation
– Zip file format:
* "site"
* "job.json"
* "de-DE"
* <site files>
* "fr-FR"
* <site files>
* "it-IT"
* <site files>
* "root" (Original files can optionally be included. The directories also need tobe included, and not just the files.)
* <site files>
* "assets"
* "job.json"
* "de-DE"
* <asset files>
* "fr-FR"
* <asset files>
* "it-IT"
* <asset files>
* "root" (Original files can optionally be included. The directories also need tobe included, and not just the files.)
* <asset files>
Chapter 8Understand the Sample Translation Connector Source Code
8-33
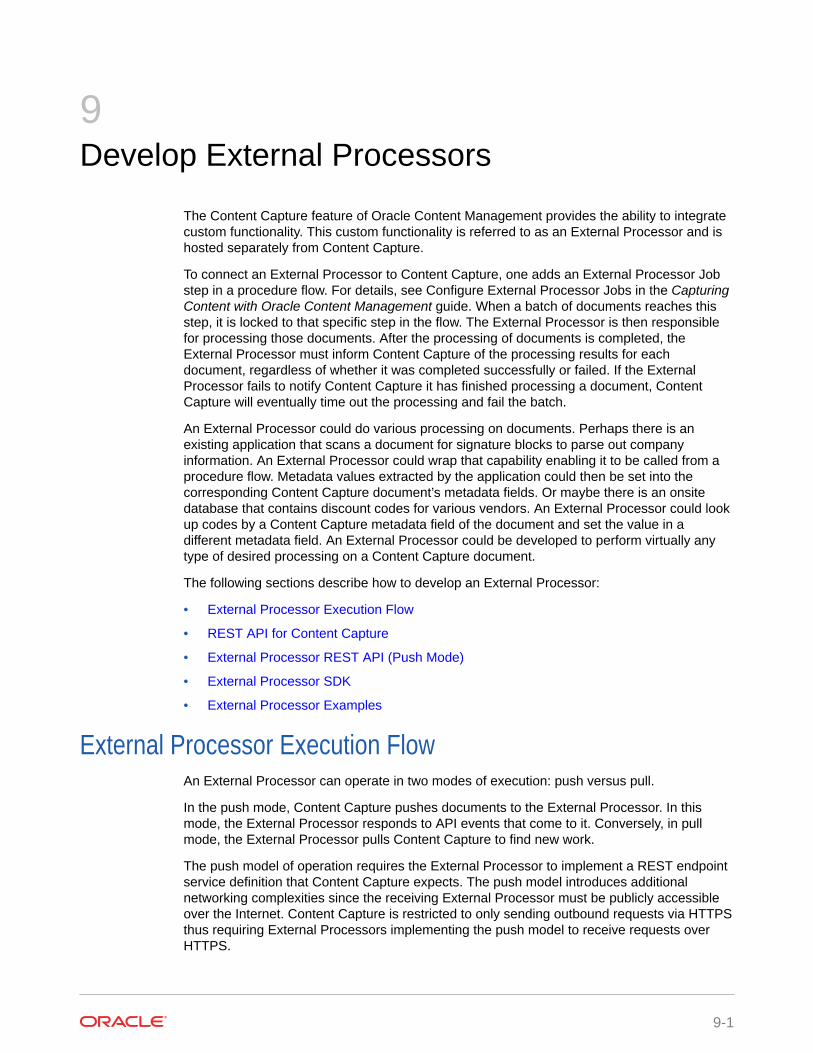
9Develop External Processors
The Content Capture feature of Oracle Content Management provides the ability to integratecustom functionality. This custom functionality is referred to as an External Processor and ishosted separately from Content Capture.
To connect an External Processor to Content Capture, one adds an External Processor Jobstep in a procedure flow. For details, see Configure External Processor Jobs in the CapturingContent with Oracle Content Management guide. When a batch of documents reaches thisstep, it is locked to that specific step in the flow. The External Processor is then responsiblefor processing those documents. After the processing of documents is completed, theExternal Processor must inform Content Capture of the processing results for eachdocument, regardless of whether it was completed successfully or failed. If the ExternalProcessor fails to notify Content Capture it has finished processing a document, ContentCapture will eventually time out the processing and fail the batch.
An External Processor could do various processing on documents. Perhaps there is anexisting application that scans a document for signature blocks to parse out companyinformation. An External Processor could wrap that capability enabling it to be called from aprocedure flow. Metadata values extracted by the application could then be set into thecorresponding Content Capture document’s metadata fields. Or maybe there is an onsitedatabase that contains discount codes for various vendors. An External Processor could lookup codes by a Content Capture metadata field of the document and set the value in adifferent metadata field. An External Processor could be developed to perform virtually anytype of desired processing on a Content Capture document.
The following sections describe how to develop an External Processor:
• External Processor Execution Flow
• REST API for Content Capture
• External Processor REST API (Push Mode)
• External Processor SDK
• External Processor Examples
External Processor Execution FlowAn External Processor can operate in two modes of execution: push versus pull.
In the push mode, Content Capture pushes documents to the External Processor. In thismode, the External Processor responds to API events that come to it. Conversely, in pullmode, the External Processor pulls Content Capture to find new work.
The push model of operation requires the External Processor to implement a REST endpointservice definition that Content Capture expects. The push model introduces additionalnetworking complexities since the receiving External Processor must be publicly accessibleover the Internet. Content Capture is restricted to only sending outbound requests via HTTPSthus requiring External Processors implementing the push model to receive requests overHTTPS.
9-1
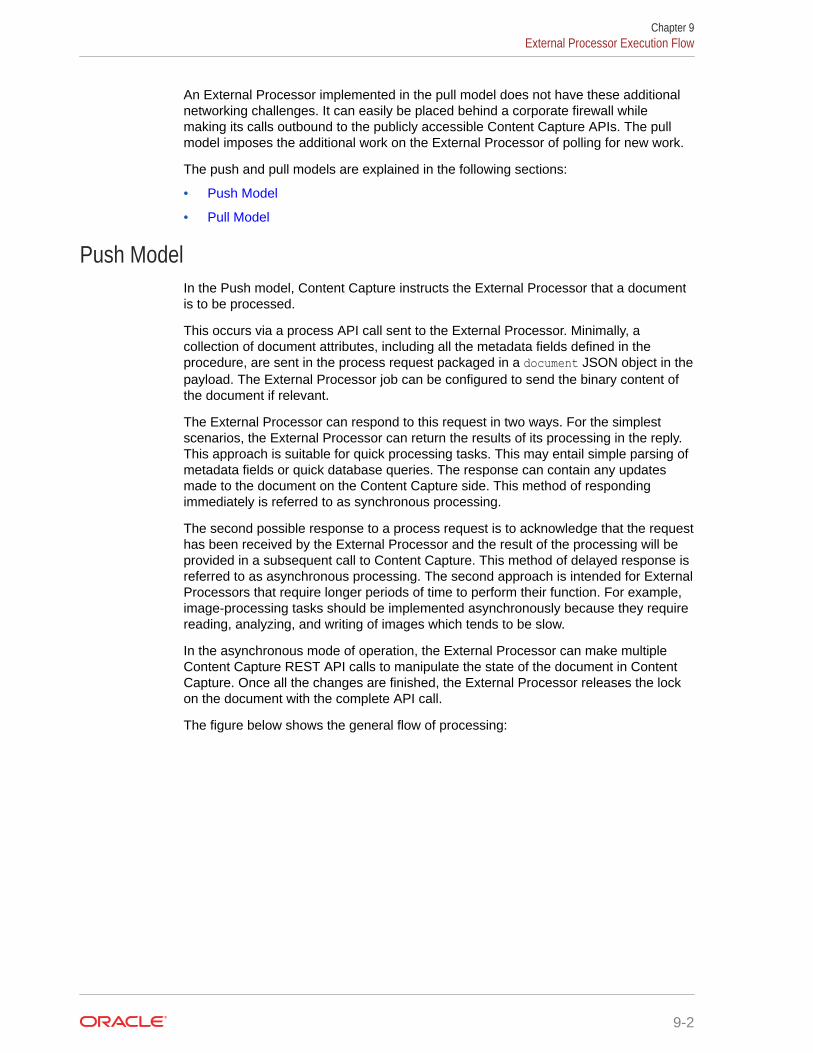
An External Processor implemented in the pull model does not have these additionalnetworking challenges. It can easily be placed behind a corporate firewall whilemaking its calls outbound to the publicly accessible Content Capture APIs. The pullmodel imposes the additional work on the External Processor of polling for new work.
The push and pull models are explained in the following sections:
• Push Model
• Pull Model
Push ModelIn the Push model, Content Capture instructs the External Processor that a documentis to be processed.
This occurs via a process API call sent to the External Processor. Minimally, acollection of document attributes, including all the metadata fields defined in theprocedure, are sent in the process request packaged in a document JSON object in thepayload. The External Processor job can be configured to send the binary content ofthe document if relevant.
The External Processor can respond to this request in two ways. For the simplestscenarios, the External Processor can return the results of its processing in the reply.This approach is suitable for quick processing tasks. This may entail simple parsing ofmetadata fields or quick database queries. The response can contain any updatesmade to the document on the Content Capture side. This method of respondingimmediately is referred to as synchronous processing.
The second possible response to a process request is to acknowledge that the requesthas been received by the External Processor and the result of the processing will beprovided in a subsequent call to Content Capture. This method of delayed response isreferred to as asynchronous processing. The second approach is intended for ExternalProcessors that require longer periods of time to perform their function. For example,image-processing tasks should be implemented asynchronously because they requirereading, analyzing, and writing of images which tends to be slow.
In the asynchronous mode of operation, the External Processor can make multipleContent Capture REST API calls to manipulate the state of the document in ContentCapture. Once all the changes are finished, the External Processor releases the lockon the document with the complete API call.
The figure below shows the general flow of processing:
Chapter 9External Processor Execution Flow
9-2
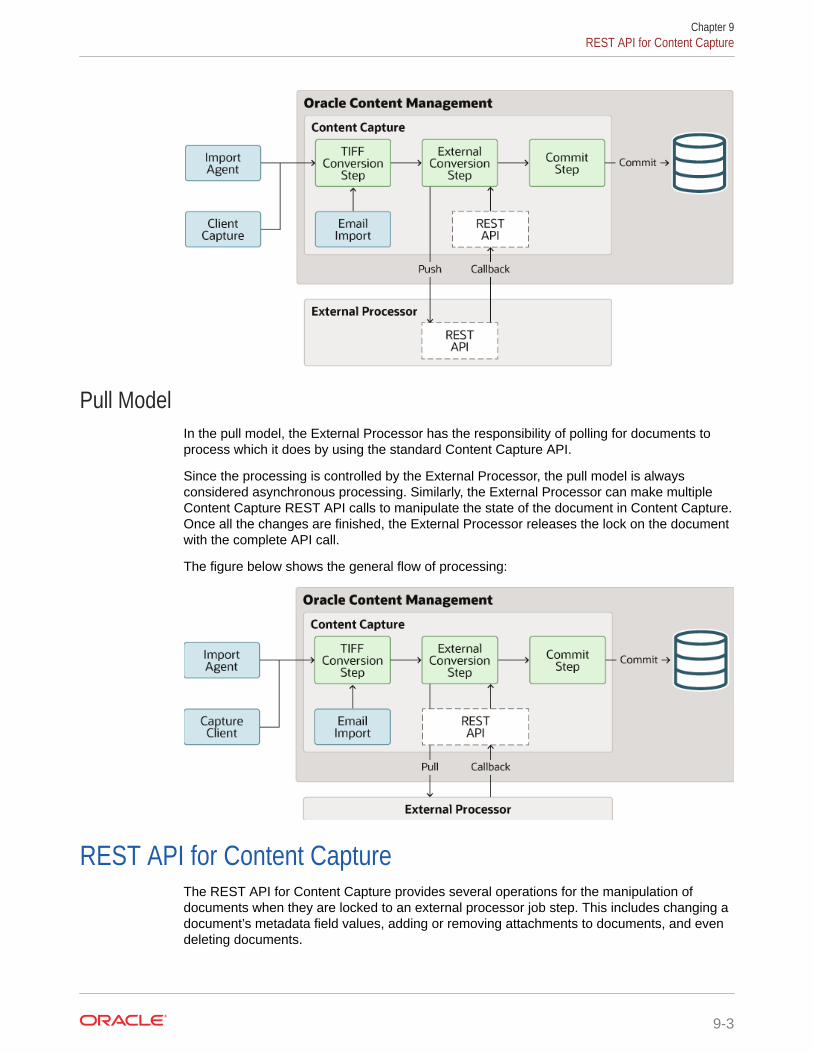
Pull ModelIn the pull model, the External Processor has the responsibility of polling for documents toprocess which it does by using the standard Content Capture API.
Since the processing is controlled by the External Processor, the pull model is alwaysconsidered asynchronous processing. Similarly, the External Processor can make multipleContent Capture REST API calls to manipulate the state of the document in Content Capture.Once all the changes are finished, the External Processor releases the lock on the documentwith the complete API call.
The figure below shows the general flow of processing:
REST API for Content CaptureThe REST API for Content Capture provides several operations for the manipulation ofdocuments when they are locked to an external processor job step. This includes changing adocument’s metadata field values, adding or removing attachments to documents, and evendeleting documents.
Chapter 9REST API for Content Capture
9-3
The REST API for Content Capture has several categories of endpoints. The followingtable describes them.
Table 9-1 REST API for Content Capture
Name Description
Attachments Manages document attachments in Capture
Auditing Queries and analyzes batch and documentprocessing
Batches Manages batches in Content Capture
Documents Manages documents in Capture
Steps Queries and updates processing task queues
System Provides system-level operations
External Processor REST API (Push Mode)An External Processor that operates in push mode must implement a REST API. ASwagger specification version is available in the External Processor SDK.
For details, see External Processor SDK.
/v1/auth
It returns the authentication methods supported by the External Processor.
The External Processor must, at a minimum, support Basic Authentication. Currently,Content Capture only supports Basic Authentication. In the future, additionalauthentication options may be supported.
The HTTP status code of 200 is used for a successful response. The specification onlysupports an error response of HTTP status code 500.
Note:
The Content Capture will use Basic Authentication while pushing to theExternal Processor. However, the External Processor has the responsibilityof the actual Basic Authentication implementation. Many web servers offerthis capability out-of-the-box.
Example
GET http://host:port/rest/v1/auth{ "auth": [ { "type": "BASIC" } ]}
/v1/systemInfo
A verification test against the External Processor.
Chapter 9External Processor REST API (Push Mode)
9-4
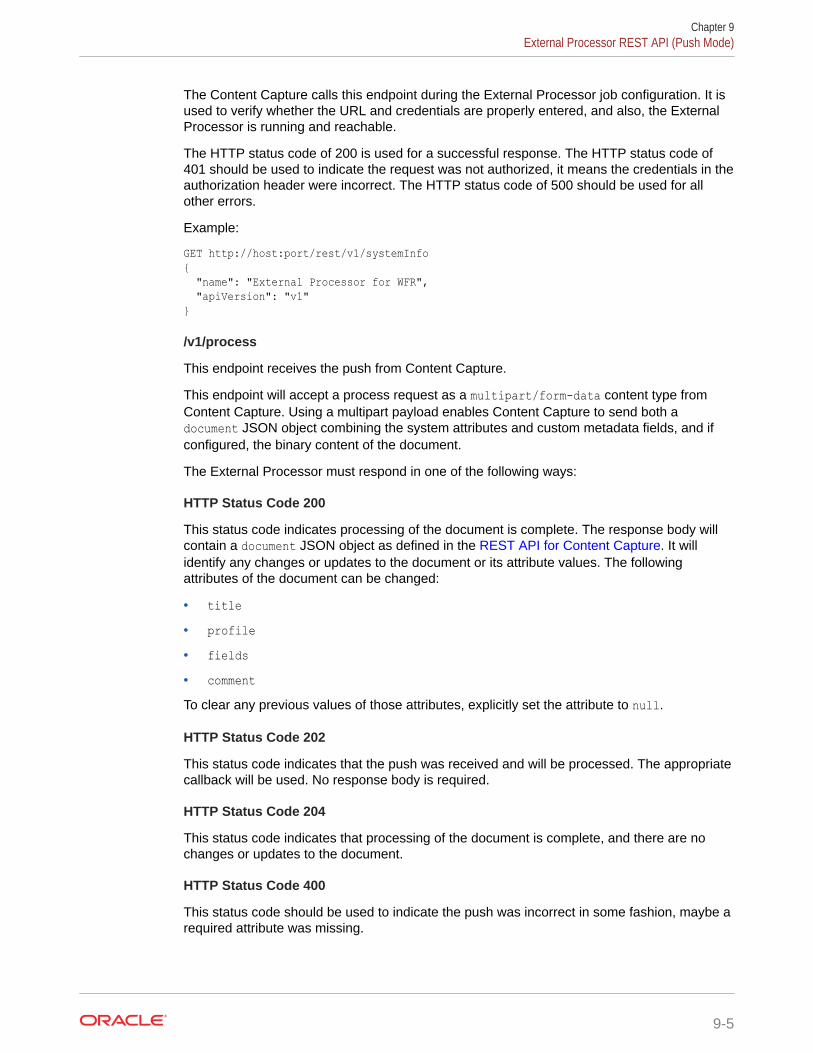
The Content Capture calls this endpoint during the External Processor job configuration. It isused to verify whether the URL and credentials are properly entered, and also, the ExternalProcessor is running and reachable.
The HTTP status code of 200 is used for a successful response. The HTTP status code of401 should be used to indicate the request was not authorized, it means the credentials in theauthorization header were incorrect. The HTTP status code of 500 should be used for allother errors.
Example:
GET http://host:port/rest/v1/systemInfo{ "name": "External Processor for WFR", "apiVersion": "v1"}
/v1/process
This endpoint receives the push from Content Capture.
This endpoint will accept a process request as a multipart/form-data content type fromContent Capture. Using a multipart payload enables Content Capture to send both adocument JSON object combining the system attributes and custom metadata fields, and ifconfigured, the binary content of the document.
The External Processor must respond in one of the following ways:
HTTP Status Code 200
This status code indicates processing of the document is complete. The response body willcontain a document JSON object as defined in the REST API for Content Capture. It willidentify any changes or updates to the document or its attribute values. The followingattributes of the document can be changed:
• title• profile• fields• commentTo clear any previous values of those attributes, explicitly set the attribute to null.
HTTP Status Code 202
This status code indicates that the push was received and will be processed. The appropriatecallback will be used. No response body is required.
HTTP Status Code 204
This status code indicates that processing of the document is complete, and there are nochanges or updates to the document.
HTTP Status Code 400
This status code should be used to indicate the push was incorrect in some fashion, maybe arequired attribute was missing.
Chapter 9External Processor REST API (Push Mode)
9-5
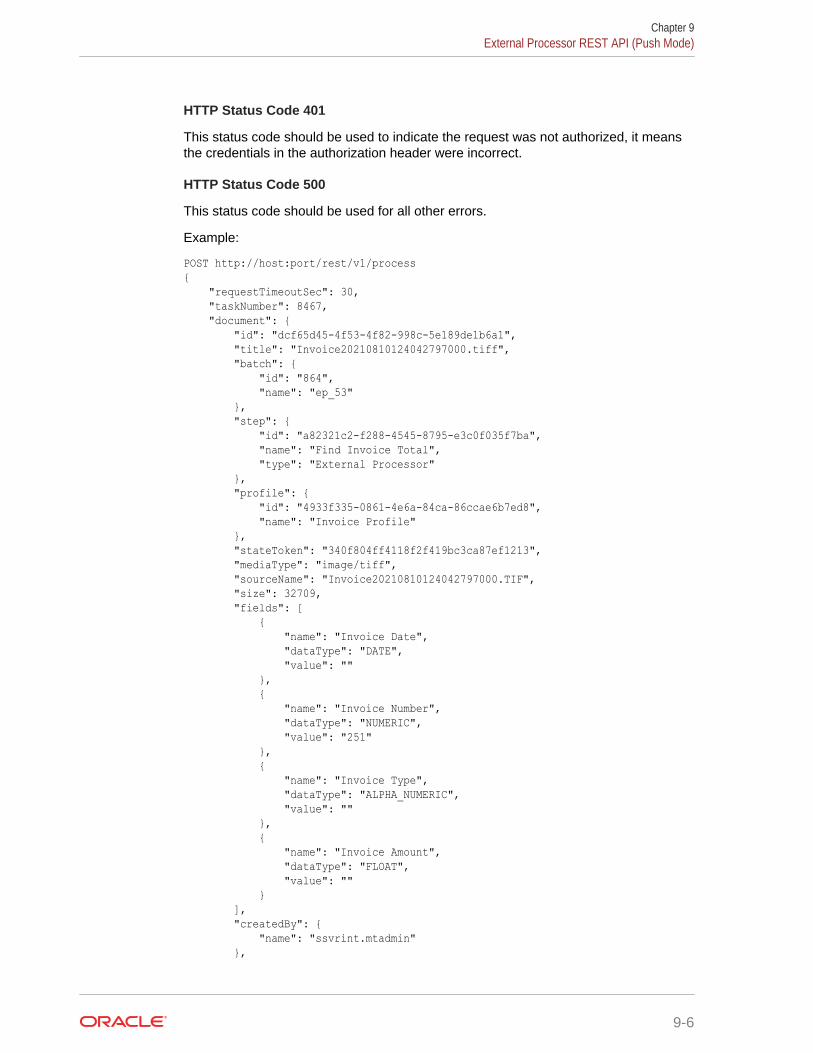
HTTP Status Code 401
This status code should be used to indicate the request was not authorized, it meansthe credentials in the authorization header were incorrect.
HTTP Status Code 500
This status code should be used for all other errors.
Example:
POST http://host:port/rest/v1/process{ "requestTimeoutSec": 30, "taskNumber": 8467, "document": { "id": "dcf65d45-4f53-4f82-998c-5e189de1b6a1", "title": "Invoice20210810124042797000.tiff", "batch": { "id": "864", "name": "ep_53" }, "step": { "id": "a82321c2-f288-4545-8795-e3c0f035f7ba", "name": "Find Invoice Total", "type": "External Processor" }, "profile": { "id": "4933f335-0861-4e6a-84ca-86ccae6b7ed8", "name": "Invoice Profile" }, "stateToken": "340f804ff4118f2f419bc3ca87ef1213", "mediaType": "image/tiff", "sourceName": "Invoice20210810124042797000.TIF", "size": 32709, "fields": [ { "name": "Invoice Date", "dataType": "DATE", "value": "" }, { "name": "Invoice Number", "dataType": "NUMERIC", "value": "251" }, { "name": "Invoice Type", "dataType": "ALPHA_NUMERIC", "value": "" }, { "name": "Invoice Amount", "dataType": "FLOAT", "value": "" } ], "createdBy": { "name": "ssvrint.mtadmin" },
Chapter 9External Processor REST API (Push Mode)
9-6
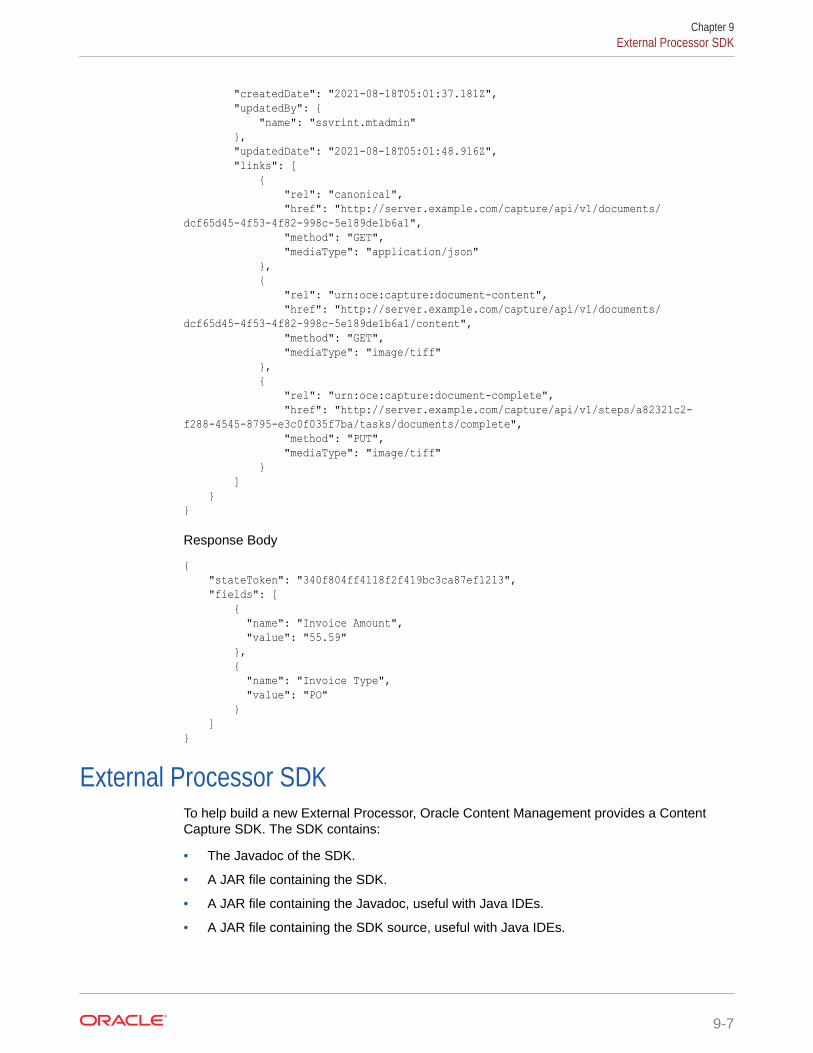
"createdDate": "2021-08-18T05:01:37.181Z", "updatedBy": { "name": "ssvrint.mtadmin" }, "updatedDate": "2021-08-18T05:01:48.916Z", "links": [ { "rel": "canonical", "href": "http://server.example.com/capture/api/v1/documents/dcf65d45-4f53-4f82-998c-5e189de1b6a1", "method": "GET", "mediaType": "application/json" }, { "rel": "urn:oce:capture:document-content", "href": "http://server.example.com/capture/api/v1/documents/dcf65d45-4f53-4f82-998c-5e189de1b6a1/content", "method": "GET", "mediaType": "image/tiff" }, { "rel": "urn:oce:capture:document-complete", "href": "http://server.example.com/capture/api/v1/steps/a82321c2-f288-4545-8795-e3c0f035f7ba/tasks/documents/complete", "method": "PUT", "mediaType": "image/tiff" } ] }}
Response Body
{ "stateToken": "340f804ff4118f2f419bc3ca87ef1213", "fields": [ { "name": "Invoice Amount", "value": "55.59" }, { "name": "Invoice Type", "value": "PO" } ]}
External Processor SDKTo help build a new External Processor, Oracle Content Management provides a ContentCapture SDK. The SDK contains:
• The Javadoc of the SDK.
• A JAR file containing the SDK.
• A JAR file containing the Javadoc, useful with Java IDEs.
• A JAR file containing the SDK source, useful with Java IDEs.
Chapter 9External Processor SDK
9-7
• The capture-rest-api-v1.yaml file, which documents the REST API for ContentCapture.
• The external-processor-rest-api-v1.yaml file, which documents the REST APIfor External Processors.
The Content Capture SDK is in the file capture-sdk.zip or capture-sdk.tgz. You candownload the file from here: https://your-ocm-service/capture/api/sdk/capture-sdk.tgz or https://your-ocm-service/capture/api/sdk/capture-sdk.zip.
For more details, see REST API for Content Capture.
The SDK is only provided in Java. It requires JAX-RS 2.1 for the RESTful services, Eclipse Jersey 2.31 for the implementation, and the JSON library Jackson 2.12.3 formapping between JSON and Java classes.
External Processor ExamplesThree examples of the External Processors can be downloaded. The examples filecontains:
• The Java source code of the External Processors.
• The External-Processor-Examples.xml file, which provides an exported sampleContent Capture Procedure.
The examples are in the file capture-examples.zip or capture-examples.tgz. Youcan download the file from here: https://your-ocm-service/capture/api/sdk/capture-examples.tgz or https://your-ocm-service/capture/api/sdk/capture-examples.zip.
The examples illustrate three different models of interaction between Content Captureand an External Processor. The first two examples are of the push model and illustrateboth the synchronous and asynchronous response types. The third is an example ofthe pull model.
The included Content Capture Procedure provides sample configurations for callingthe examples. It contains the necessary metadata fields, document profiles, and jobdefinitions. It also provides a Capture client profile to create and release documentsinto the Procedure flow.
Note:
After the Content Capture Procedure is imported:
• The External Processor Job definitions for Example 1 and Example 2require updates to set the correct service endpoint and credentials forthe hosted example.
• In the Example 3 code, the unique Processor Step identifier will beupdated by the import and its new value will need to specify on thecommand line as a standard Java property (i.e. -Doracle.ocm.capture.examples.externalprocessor.step-id=54cd7e16-5440-46a7-a5d4-6878b38c8b97).
Chapter 9External Processor Examples
9-8
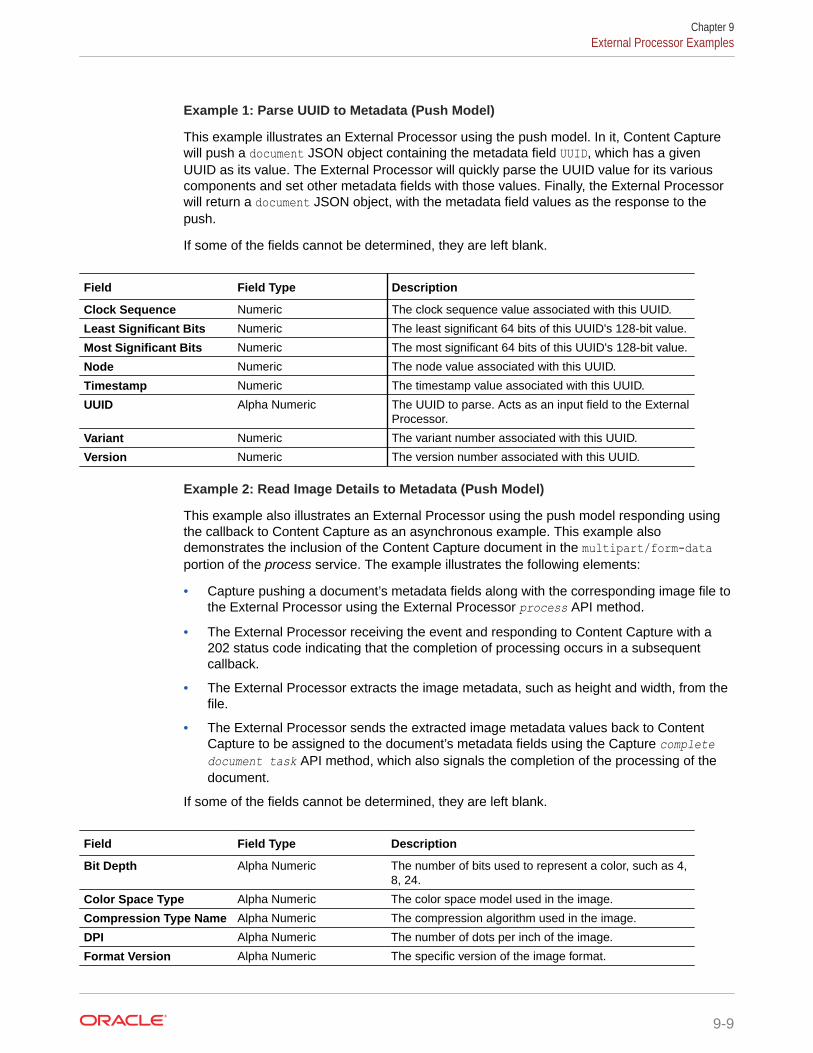
Example 1: Parse UUID to Metadata (Push Model)
This example illustrates an External Processor using the push model. In it, Content Capturewill push a document JSON object containing the metadata field UUID, which has a givenUUID as its value. The External Processor will quickly parse the UUID value for its variouscomponents and set other metadata fields with those values. Finally, the External Processorwill return a document JSON object, with the metadata field values as the response to thepush.
If some of the fields cannot be determined, they are left blank.
Field Field Type Description
Clock Sequence Numeric The clock sequence value associated with this UUID.
Least Significant Bits Numeric The least significant 64 bits of this UUID's 128-bit value.
Most Significant Bits Numeric The most significant 64 bits of this UUID's 128-bit value.
Node Numeric The node value associated with this UUID.
Timestamp Numeric The timestamp value associated with this UUID.
UUID Alpha Numeric The UUID to parse. Acts as an input field to the ExternalProcessor.
Variant Numeric The variant number associated with this UUID.
Version Numeric The version number associated with this UUID.
Example 2: Read Image Details to Metadata (Push Model)
This example also illustrates an External Processor using the push model responding usingthe callback to Content Capture as an asynchronous example. This example alsodemonstrates the inclusion of the Content Capture document in the multipart/form-dataportion of the process service. The example illustrates the following elements:
• Capture pushing a document’s metadata fields along with the corresponding image file tothe External Processor using the External Processor process API method.
• The External Processor receiving the event and responding to Content Capture with a202 status code indicating that the completion of processing occurs in a subsequentcallback.
• The External Processor extracts the image metadata, such as height and width, from thefile.
• The External Processor sends the extracted image metadata values back to ContentCapture to be assigned to the document’s metadata fields using the Capture completedocument task API method, which also signals the completion of the processing of thedocument.
If some of the fields cannot be determined, they are left blank.
Field Field Type Description
Bit Depth Alpha Numeric The number of bits used to represent a color, such as 4,8, 24.
Color Space Type Alpha Numeric The color space model used in the image.
Compression Type Name Alpha Numeric The compression algorithm used in the image.
DPI Alpha Numeric The number of dots per inch of the image.
Format Version Alpha Numeric The specific version of the image format.
Chapter 9External Processor Examples
9-9
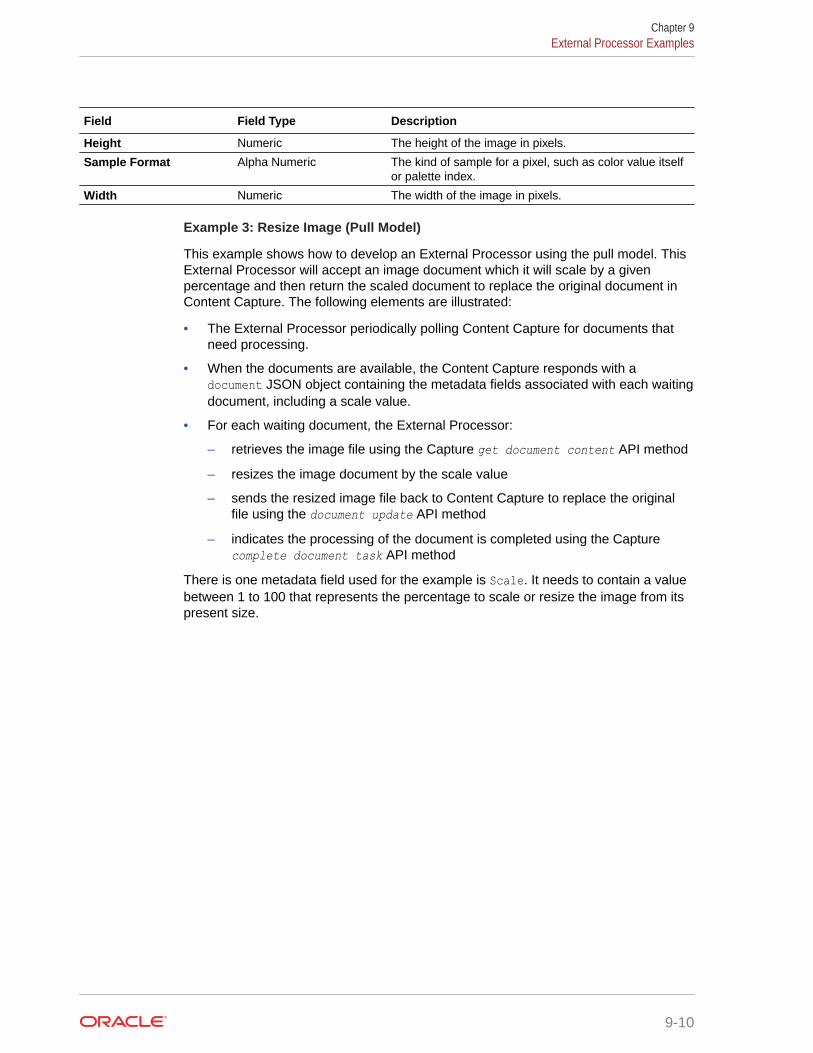
Field Field Type Description
Height Numeric The height of the image in pixels.
Sample Format Alpha Numeric The kind of sample for a pixel, such as color value itselfor palette index.
Width Numeric The width of the image in pixels.
Example 3: Resize Image (Pull Model)
This example shows how to develop an External Processor using the pull model. ThisExternal Processor will accept an image document which it will scale by a givenpercentage and then return the scaled document to replace the original document inContent Capture. The following elements are illustrated:
• The External Processor periodically polling Content Capture for documents thatneed processing.
• When the documents are available, the Content Capture responds with adocument JSON object containing the metadata fields associated with each waitingdocument, including a scale value.
• For each waiting document, the External Processor:
– retrieves the image file using the Capture get document content API method
– resizes the image document by the scale value
– sends the resized image file back to Content Capture to replace the originalfile using the document update API method
– indicates the processing of the document is completed using the Capturecomplete document task API method
There is one metadata field used for the example is Scale. It needs to contain a valuebetween 1 to 100 that represents the percentage to scale or resize the image from itspresent size.
Chapter 9External Processor Examples
9-10
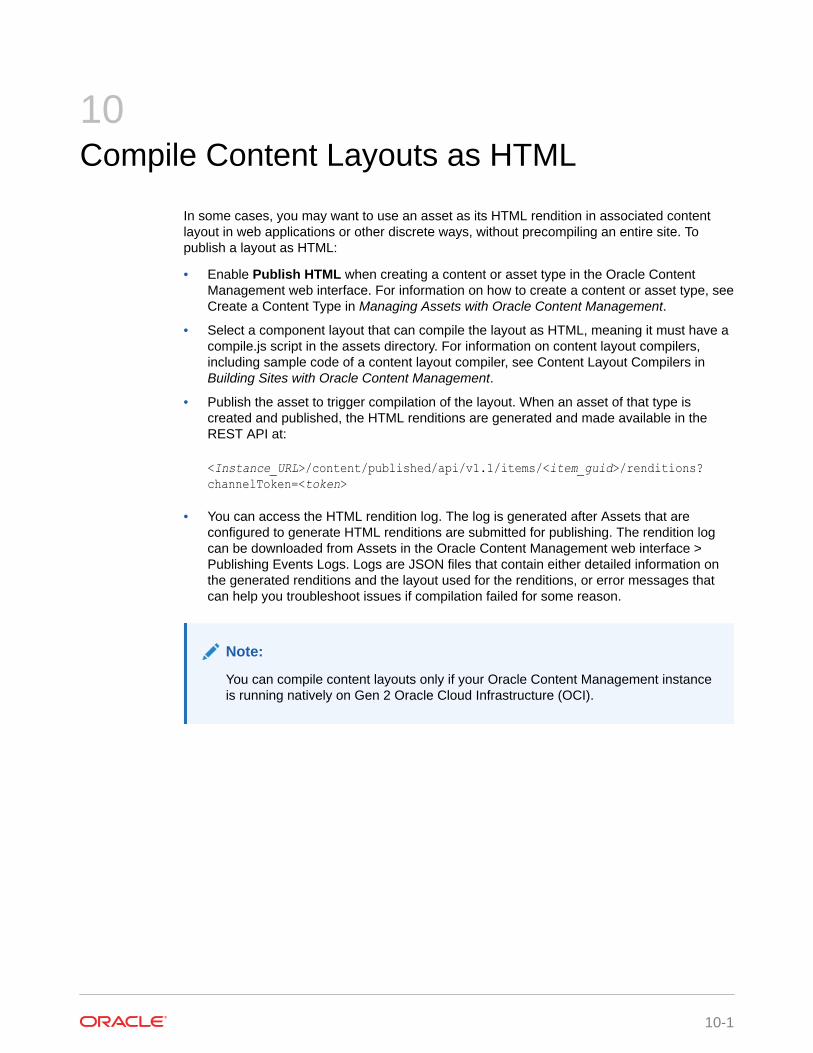
10Compile Content Layouts as HTML
In some cases, you may want to use an asset as its HTML rendition in associated contentlayout in web applications or other discrete ways, without precompiling an entire site. Topublish a layout as HTML:
• Enable Publish HTML when creating a content or asset type in the Oracle ContentManagement web interface. For information on how to create a content or asset type, see Create a Content Type in Managing Assets with Oracle Content Management.
• Select a component layout that can compile the layout as HTML, meaning it must have acompile.js script in the assets directory. For information on content layout compilers,including sample code of a content layout compiler, see Content Layout Compilers inBuilding Sites with Oracle Content Management.
• Publish the asset to trigger compilation of the layout. When an asset of that type iscreated and published, the HTML renditions are generated and made available in theREST API at:
<Instance_URL>/content/published/api/v1.1/items/<item_guid>/renditions?channelToken=<token>
• You can access the HTML rendition log. The log is generated after Assets that areconfigured to generate HTML renditions are submitted for publishing. The rendition logcan be downloaded from Assets in the Oracle Content Management web interface >Publishing Events Logs. Logs are JSON files that contain either detailed information onthe generated renditions and the layout used for the renditions, or error messages thatcan help you troubleshoot issues if compilation failed for some reason.
Note:
You can compile content layouts only if your Oracle Content Management instanceis running natively on Gen 2 Oracle Cloud Infrastructure (OCI).
10-1
Part IVDeveloping Oracle Content ManagementIntegrations
This part provides information on developing Oracle Content Management integrations. Itincludes the following chapters:
• Understand Cross-Origin Resource Sharing (CORS)
• Embed the Web User Interface in Other Applications
• Oracle Content Management REST APIs
• Oracle Content Management SDKs
• GraphQL Support in Oracle Content Management
• Use Webhooks
• Set Proxies
11Understand Cross-Origin Resource Sharing(CORS)
Cross-Origin Resource Sharing (CORS) allows a web page to make requests such asXMLLHttpRequest to another domain. If you have a browser application that integrates withOracle Content Management Cloud but is hosted in a different domain, add the browserapplication domain to Oracle Content Management Cloud’s CORS origins list.
The REST APIs use CORS because they're called from JavaScript code that runs in abrowser and the REST APIs and Oracle Content Management are hosted in differentdomains.
If your browser application needs to use a REST endpoint that doesn't support CORS or thatneeds service account credentials, you can instead register and use the endpoint via OracleContent Management’s integrated proxy service. See Configure Proxy Service Settings.
In general, inline frames can host content if the protocol, domain, and port of the inline frameare identical to those for the content it displays. For example, by default, an inline frame onthe page http://www.example.com:12345/home.html can host content only if the content'sprotocol is also http, the domain is www.example.com and the port is 12345.
However, if the application is in a different domain than Oracle Content Management, youneed to need to add the application’s host machine information to the list of front channelCORS origins, back channel CORS origins, or both.
• If the request is a cross-domain request (not originating from Oracle ContentManagement's domain) that will be served by Oracle Content Management, you need toadd a front channel CORS origin. Front channel CORS is typically useful for customapplication integration. For example, the REST APIs interact with the front channel.
• If the request is directly from Oracle Content Management to a connected client inanother domain, you need to add a back channel CORS origin. For example, OracleContent Management can send back-channel messages (real-time updates) to anapplication.
• If an application gets both front-channel and back-channel communication from OracleContent Management, you need to add the domain to both the front and back channelCORS origins lists.
The CORS settings apply to all Oracle Content Management calls (documents, social, andcontent as a service).
11-1

See Enable Cross-Origin Resource Sharing (CORS) in Administering Oracle ContentManagement.
Chapter 11
11-2
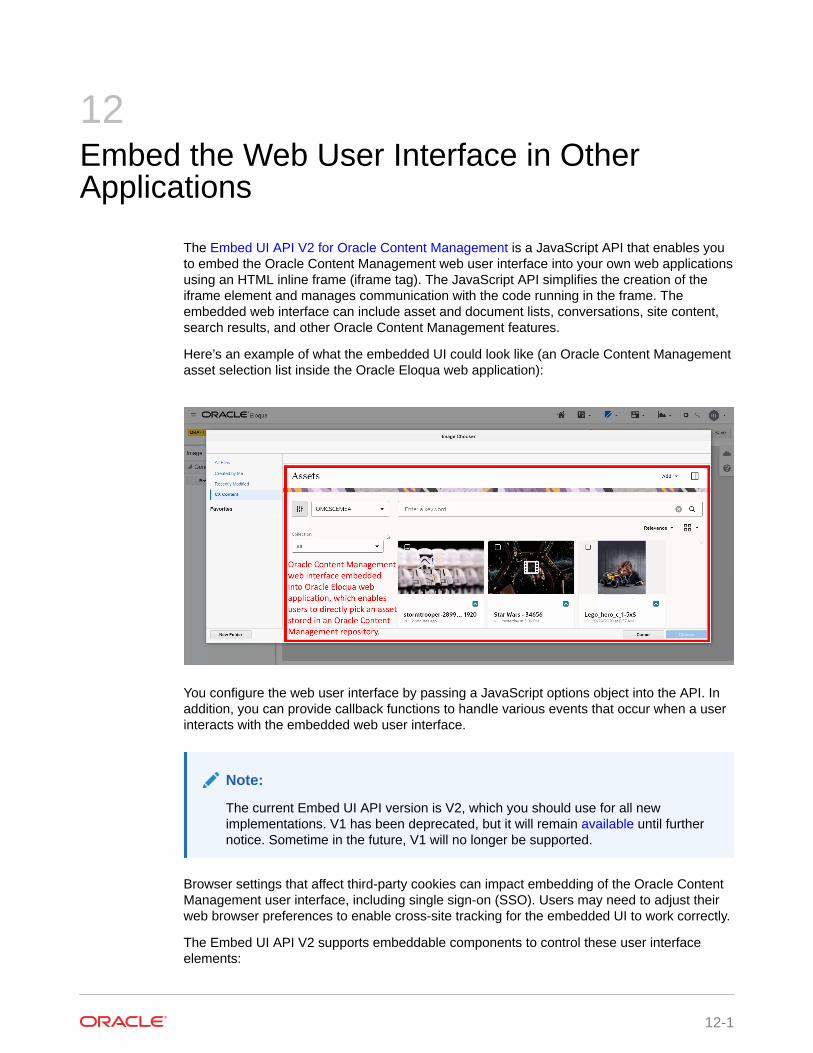
12Embed the Web User Interface in OtherApplications
The Embed UI API V2 for Oracle Content Management is a JavaScript API that enables youto embed the Oracle Content Management web user interface into your own web applicationsusing an HTML inline frame (iframe tag). The JavaScript API simplifies the creation of theiframe element and manages communication with the code running in the frame. Theembedded web interface can include asset and document lists, conversations, site content,search results, and other Oracle Content Management features.
Here’s an example of what the embedded UI could look like (an Oracle Content Managementasset selection list inside the Oracle Eloqua web application):
You configure the web user interface by passing a JavaScript options object into the API. Inaddition, you can provide callback functions to handle various events that occur when a userinteracts with the embedded web user interface.
Note:
The current Embed UI API version is V2, which you should use for all newimplementations. V1 has been deprecated, but it will remain available until furthernotice. Sometime in the future, V1 will no longer be supported.
Browser settings that affect third-party cookies can impact embedding of the Oracle ContentManagement user interface, including single sign-on (SSO). Users may need to adjust theirweb browser preferences to enable cross-site tracking for the embedded UI to work correctly.
The Embed UI API V2 supports embeddable components to control these user interfaceelements:
12-1
• Assets view
• Asset viewer
• Content item editor
• Content item create
• Documents view
• Document viewer
• Conversations list
• Conversation view
In addition, you can set a number of general options and also customize dialogs in theembedded web user interface.
See Embed UI API V2 for Oracle Content Management to learn more includingtutorials and reference materials.
Chapter 12
12-2
13Oracle Content Management REST APIs
REST APIs are available in Oracle Content Management for content delivery and formanagement of content, conversations, documents, and users and groups.
Oracle Content Management has several REST APIs, listed in the following table.
API Name Description
REST API for Activity Log Provides the ability to search activities in OracleContent Management.
REST API for Content Delivery Provides access to published assets in OracleContent Management. Published assets includecontent items and digital assets, as well as theirrenditions.
REST API for Content Capture Provides several operations for the manipulation ofdocuments when they are locked to an externalprocessor job step. This includes changing adocument’s metadata field values, adding orremoving attachments to documents, and evendeleting documents.
REST API for Content Management Provides access to manage assets in OracleContent Management. Assets include contentitems and digital assets and their renditions.
REST API for Content Preview Provides the ability to preview items, itemvariations, items by slug, renditions, and renditionsby slug.
REST API for Conversations Enables interaction with your cloud resources forreal-time collaboration between individuals andteams to connect your business processes,enterprise applications, and content.
REST API for Documents Enables you to interact with folders and filesstored in Oracle Content Management and tocreate sites from templates and other sites.
REST API for Self-Management Provides the ability to view the authenticated userdetails.
13-1
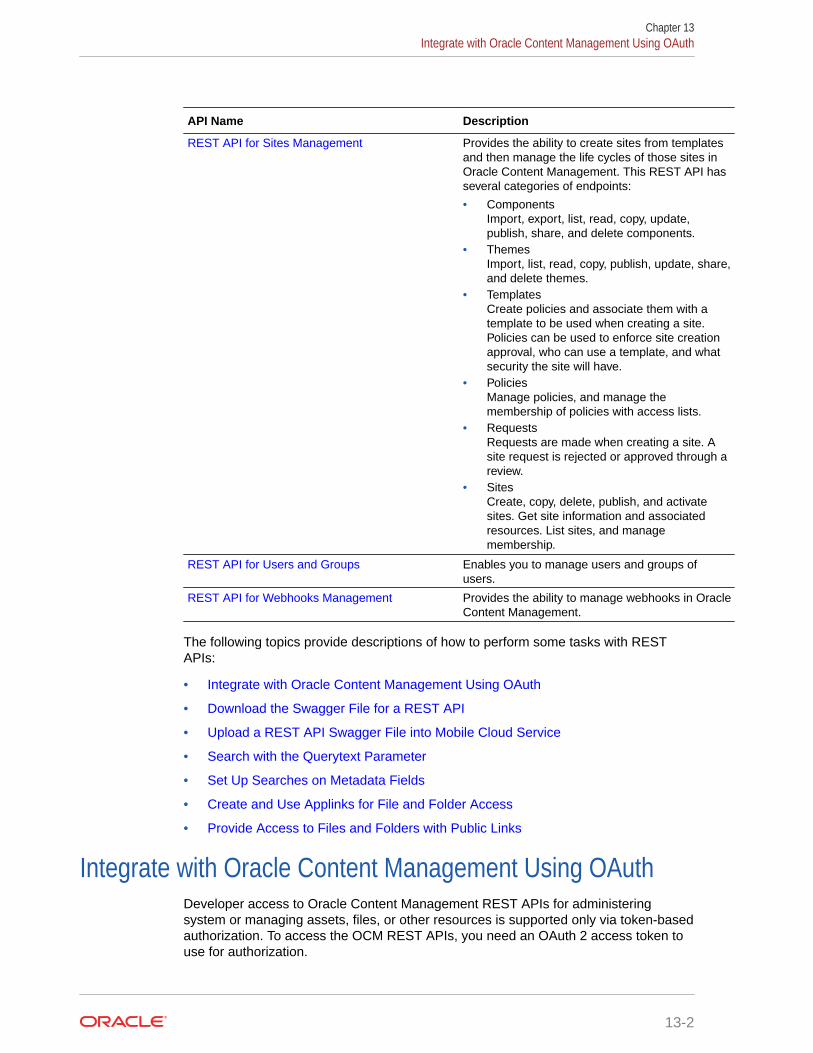
API Name Description
REST API for Sites Management Provides the ability to create sites from templatesand then manage the life cycles of those sites inOracle Content Management. This REST API hasseveral categories of endpoints:
• ComponentsImport, export, list, read, copy, update,publish, share, and delete components.
• ThemesImport, list, read, copy, publish, update, share,and delete themes.
• TemplatesCreate policies and associate them with atemplate to be used when creating a site.Policies can be used to enforce site creationapproval, who can use a template, and whatsecurity the site will have.
• PoliciesManage policies, and manage themembership of policies with access lists.
• RequestsRequests are made when creating a site. Asite request is rejected or approved through areview.
• SitesCreate, copy, delete, publish, and activatesites. Get site information and associatedresources. List sites, and managemembership.
REST API for Users and Groups Enables you to manage users and groups ofusers.
REST API for Webhooks Management Provides the ability to manage webhooks in OracleContent Management.
The following topics provide descriptions of how to perform some tasks with RESTAPIs:
• Integrate with Oracle Content Management Using OAuth
• Download the Swagger File for a REST API
• Upload a REST API Swagger File into Mobile Cloud Service
• Search with the Querytext Parameter
• Set Up Searches on Metadata Fields
• Create and Use Applinks for File and Folder Access
• Provide Access to Files and Folders with Public Links
Integrate with Oracle Content Management Using OAuthDeveloper access to Oracle Content Management REST APIs for administeringsystem or managing assets, files, or other resources is supported only via token-basedauthorization. To access the OCM REST APIs, you need an OAuth 2 access token touse for authorization.
Chapter 13Integrate with Oracle Content Management Using OAuth
13-2
You need to create an OAuth client application to be able to request the access token. OAuthclient is simply an HTTP client that must be registered as an OAuth 2 client using the OracleIdentity Cloud Service (IDCS) or IAM Identity Domain administration console.
If SSO is already established with IDCS (the same that OCM points to), then we do not needOAuth. The SSO should be sufficient since OCM REST APIs support SSO as well. If the UIwill not have an active SSO session, then OAuth should be used.
Applications can request an access token to access OCM REST APIs in different waysdepending on the grant type specified in the client application. A grant is a credentialrepresenting the resource owner's authorization to access a protected resource. The OCMREST APIs have been certified to work with the following three grant types:
• Client Credentials: When using the Client Credentials grant type, the clientauthenticates with the OAuth service and then requests an access token. With this granttype, the OAuth client application presents its own credentials to obtain an access tokenfor the client-initiated requests to access a protected resource. This access token iseither associated with the client’s own resources, and not a particular resource owner, oris associated with a resource owner for whom the client is otherwise authorized to act.Trusted applications (such as back-end services) may request access tokens directly onbehalf of users. This is an OAuth two-legged authorization flow. Another use case of thisflow or grant type is when integrating application users are not users of OCM, (i.e. theyreside in a different identity store other than OCM service’s identity store and henceOAuth application client credentials are used to make API calls to OCM).
To know more about Client Credentials grant type, see Client Credentials Grant Type.
• Authorization Code: The OAuth web applications typically need to first validate theuser's identity and optionally obtain the user's consent. This is an OAuth three-leggedauthorization flow and in this case, the Authorization Code grant type is used.In this case, you want to obtain an authorization code first by using an authorizationserver as an intermediary between the client application and the resource owner. Anauthorization code is returned to the client through a browser redirect after the resourceowner gives consent to the authorization server. The client then exchanges theauthorization code for an access (and often a refresh) token. The resource ownercredentials are never exposed to the client. To know more about Authorization Codegrant type, see Authorization Code Grant Type.
• Resource Owner: When using the Resource Owner grant type, the resource owner'spassword credentials (user name and password) can be used directly as an authorizationgrant to obtain an access token. Therefore, this grant type is used when the resourceowner has a trust relationship with the client, such as a computer operating system or ahighly privileged application, because the client must discard the password afterobtaining the access token.To know more about Resource Owner grant type, see Resource Owner PasswordCredentials Grant Type.
There are four steps that you must perform to use an OAuth client to access OCM RESTAPIs:
1. Log in to the Oracle Identity Cloud Service (IDCS) or IAM Identity Domain administrationconsole.
2. Create an OAuth client application and make note of the client ID and client secret.
3. Use the client ID and client secret to request an access token from the Oracle IdentityCloud Service OAuth Service.
4. Include the access token in the appropriate HTTP header when you make REST APIcalls.
Chapter 13Integrate with Oracle Content Management Using OAuth
13-3
For content management and sites management REST APIs, you acquire the client IDand secret required to get the access token from Oracle Identity Cloud Service (IDCS)or IAM Identity Domain. For the 2-legged OAuth, you use client credentials to acquirethe client ID and secret. For the 3-legged OAuth, you use an Authorization code toacquire the client ID and secret.
Note:
The Oracle Cloud Console is merging IDCS into Identity and AccessManagement (IAM) Identity Domain. You can check if your cloud account isusing Identity Domain or not.Sign in to the Oracle Cloud Console. In the navigation menu, click Identity &Security. Under Identity, check for Domains. If you see Domains, then yourcloud account has been updated. For details, see Oracle Cloud InfrastructureDocumentation.
The following topics describe how to use your account:
• Cloud Account Using IAM Identity Domain
• Cloud Account Using IDCS
Cloud Account Using IAM Identity Domain
The following sections describe how to use your cloud account:
• Access Using 2-Legged OAuth (Identity Domain)
• Access Using Authorization Code (3-Legged OAuth Flow Identity Domain)
• Access Using Resource Owner (Identity Domain)
Access Using 2-Legged OAuth (Identity Domain)For this OAuth flow, the token is requested for the client application and calls to OCMAPIs are made using this client application’s token. This OAuth client applicationneeds to be added to the OCM roles to have appropriate OCM access.
The Identity Domain Administrator or Application Administrator of the tenantcreates an OAuth client for the developer with the required privileges.
The Identity Domain Administrator performs the following steps to get an accesstoken:
1. Create an OAuth Client and Acquire a Client ID and Secret
2. Grant the Required Oracle Content Management Roles to the Client
3. Acquire an Access Token from Identity Domain for the Required Resource
4. Use the Access Token to Access the Oracle Content Management Resource
Chapter 13Integrate with Oracle Content Management Using OAuth
13-4

Create an OAuth Client and Acquire a Client ID and SecretThe Identity Domain Administrator or an Application Administrator of the tenant creates anOAuth client for the developer with the required privileges. To do this, perform the followingsteps:
1. Sign in to the Oracle Cloud Console.
https://cloud.oracle.com
Navigate to Identity & Security. Under Identity, check for Domains. Select the domain(default or newly created) while creating an application, you will see the Applicationsoption in the left menu as shown in the figure below.
2. Click to add a new application in the Applications section.
3. Select Confidential Application. The Confidential Applications use OAuth 2.0 and canprotect their OAuth client ID and client secret. To know more about ConfidentialApplications, see Add a Confidential Application.
4. Give the application a name and, optionally, a description, and click Next.
5. Choose to configure this application as a client.
6. Select the client credentials grant type on the Authorization screen.
7. Scroll down to the Token Issuance Policy section and, under Resources, click addscope to give the application access to the required Oracle Content Managementinstance.
8. Click the right arrow to select the scope.The only scope required is the one ending in urn:opc:cec:all.
Select the checkbox next to it and then click Add.
9. Click Next until the end of the train.The Resources, Web Tier Policy, and Authorization stops are related to applicationsthat have some resource authenticated or authorized by Identity Domain; for example, aweb application. This isn’t relevant in the case of a simple server-server client, which isdiscussed here.
10. Click Finish.
11. Note the Client ID and Client Secret values because you’ll need those to get a tokenlater.
Chapter 13Integrate with Oracle Content Management Using OAuth
13-5
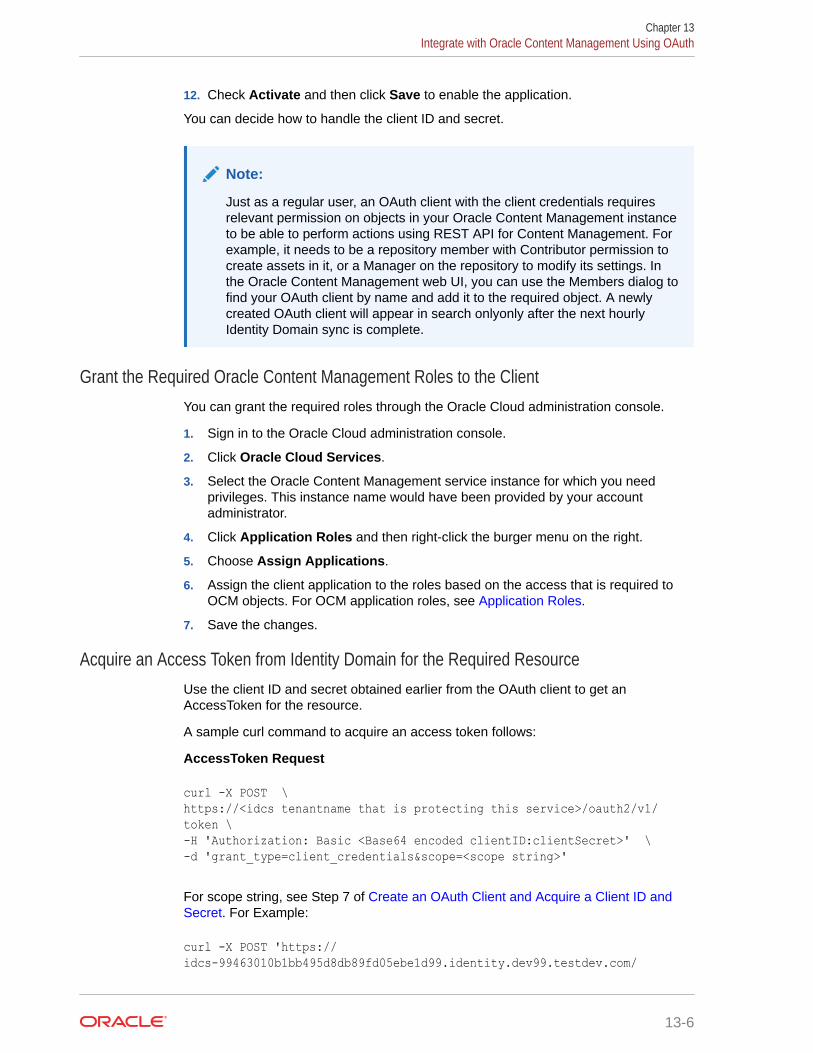
12. Check Activate and then click Save to enable the application.
You can decide how to handle the client ID and secret.
Note:
Just as a regular user, an OAuth client with the client credentials requiresrelevant permission on objects in your Oracle Content Management instanceto be able to perform actions using REST API for Content Management. Forexample, it needs to be a repository member with Contributor permission tocreate assets in it, or a Manager on the repository to modify its settings. Inthe Oracle Content Management web UI, you can use the Members dialog tofind your OAuth client by name and add it to the required object. A newlycreated OAuth client will appear in search onlyonly after the next hourlyIdentity Domain sync is complete.
Grant the Required Oracle Content Management Roles to the ClientYou can grant the required roles through the Oracle Cloud administration console.
1. Sign in to the Oracle Cloud administration console.
2. Click Oracle Cloud Services.
3. Select the Oracle Content Management service instance for which you needprivileges. This instance name would have been provided by your accountadministrator.
4. Click Application Roles and then right-click the burger menu on the right.
5. Choose Assign Applications.
6. Assign the client application to the roles based on the access that is required toOCM objects. For OCM application roles, see Application Roles.
7. Save the changes.
Acquire an Access Token from Identity Domain for the Required ResourceUse the client ID and secret obtained earlier from the OAuth client to get anAccessToken for the resource.
A sample curl command to acquire an access token follows:
AccessToken Request
curl -X POST \https://<idcs tenantname that is protecting this service>/oauth2/v1/token \-H 'Authorization: Basic <Base64 encoded clientID:clientSecret>' \-d 'grant_type=client_credentials&scope=<scope string>'
For scope string, see Step 7 of Create an OAuth Client and Acquire a Client ID andSecret. For Example:
curl -X POST 'https://idcs-99463010b1bb495d8db89fd05ebe1d99.identity.dev99.testdev.com/
Chapter 13Integrate with Oracle Content Management Using OAuth
13-6
oauth2/v1/token' \ -H 'Authorization: Basic Y2RlNGQyMDZjYTE1NGM2Yjg2NGMyMTJiMjVmMTY3MmE6MWM0ZTAyNGQtZDU4MC00MzEzLWJkZjMtZTQyMGQzMzgzZTY2' \ -d'grant_type=client_credentials&scope=https://50B904E53A6F4EA1B45F30E225EA99B.cec.ocp.oc-test.com:443/urn:opc:cec:all'
Identity Domain returns the key and value for an access token:
{"access_token":"<access-token-value>}"
You can copy the access token value.
Note:
The refresh token is not included in the Client Credentials grant type flow.
Use the Access Token to Access the Oracle Content Management ResourceOnce the access token is acquired, call the Oracle Content Management endpoint to accessthe resource.
A sample curl command follows.
curl -X GET <Oracle-Content-Management-URL>/sites/management/api/v1/sites \-H 'Authorization: Bearer <Access Token acquired from previous step>'\-H 'Content-Type: application/json'
Access Using Authorization Code (3-Legged OAuth Flow Identity Domain)In this flow, a client application is created to acquire the client ID and secret, a client browseruses these and redirects the user to Identity Domain to login with their username andpassword and on successful authentication, an authorization code is sent on the redirectURL. An access token is requested from Identity Domain using this authorization code. Thus,the Resource owner credentials are never exposed to the client in this flow.
As this is a user token, the user requesting the token needs to have relevant OCM roles asthe user’s access to the OCM objects will be checked against assigned roles.
The Identity Domain Administrator performs the following steps to get an access token:
1. Create an OAuth Client and Acquire a Client ID and Secret
2. Grant the Required Oracle Content Management Roles to the Client
3. Acquire an Access Token from Identity Domain for the Required Resource
4. Use the Access Token to Access the Oracle Content Management Resource
Create an OAuth Client and Acquire a Client ID and SecretThe Identity Domain Administrator or an Application Administrator of the tenant creates anOAuth client for the developer with the required privileges. To do this, perform the followingsteps:
Chapter 13Integrate with Oracle Content Management Using OAuth
13-7
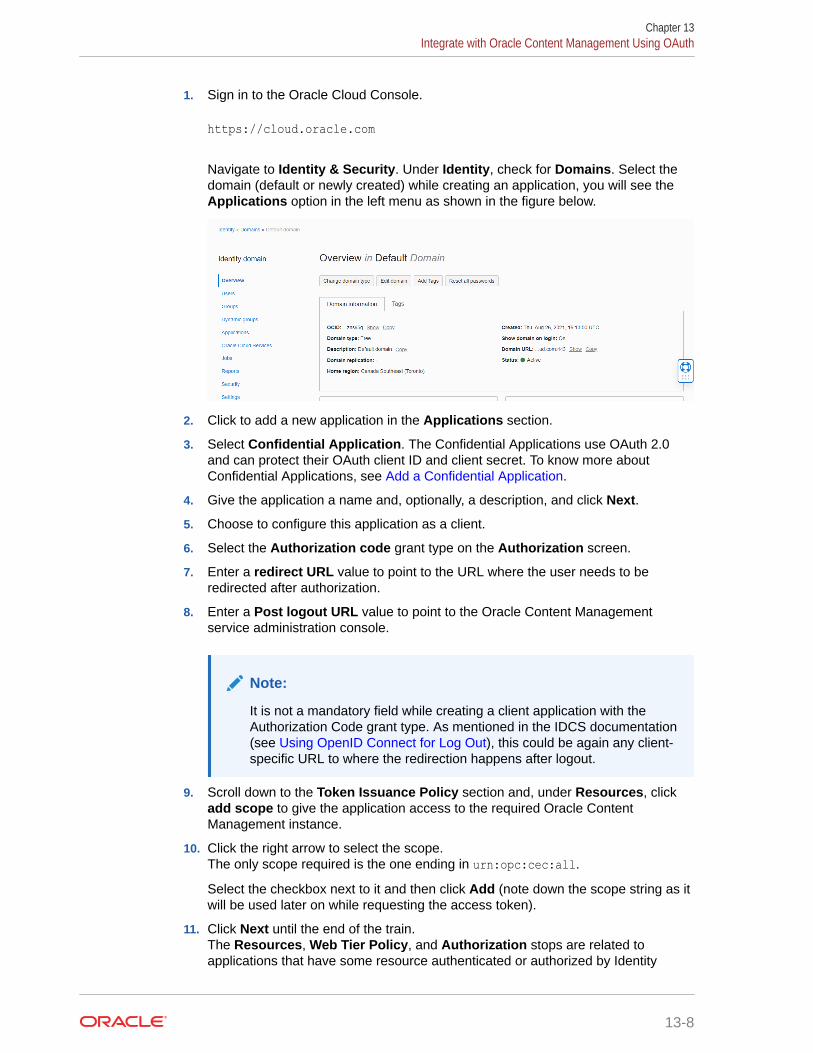
1. Sign in to the Oracle Cloud Console.
https://cloud.oracle.com
Navigate to Identity & Security. Under Identity, check for Domains. Select thedomain (default or newly created) while creating an application, you will see theApplications option in the left menu as shown in the figure below.
2. Click to add a new application in the Applications section.
3. Select Confidential Application. The Confidential Applications use OAuth 2.0and can protect their OAuth client ID and client secret. To know more aboutConfidential Applications, see Add a Confidential Application.
4. Give the application a name and, optionally, a description, and click Next.
5. Choose to configure this application as a client.
6. Select the Authorization code grant type on the Authorization screen.
7. Enter a redirect URL value to point to the URL where the user needs to beredirected after authorization.
8. Enter a Post logout URL value to point to the Oracle Content Managementservice administration console.
Note:
It is not a mandatory field while creating a client application with theAuthorization Code grant type. As mentioned in the IDCS documentation(see Using OpenID Connect for Log Out), this could be again any client-specific URL to where the redirection happens after logout.
9. Scroll down to the Token Issuance Policy section and, under Resources, clickadd scope to give the application access to the required Oracle ContentManagement instance.
10. Click the right arrow to select the scope.The only scope required is the one ending in urn:opc:cec:all.
Select the checkbox next to it and then click Add (note down the scope string as itwill be used later on while requesting the access token).
11. Click Next until the end of the train.The Resources, Web Tier Policy, and Authorization stops are related toapplications that have some resource authenticated or authorized by Identity
Chapter 13Integrate with Oracle Content Management Using OAuth
13-8

Domain; for example, a web application. This isn’t relevant in the case of a simple server-server client, which is discussed here.
12. Click Finish.
13. Note the Client ID and Client Secret values because you’ll need those to get a tokenlater.
14. Check Activate and then click Save to enable the application.
The client can store the Client ID and Client Secret values securely in a credential store.
Grant the Required Oracle Content Management Roles to the ClientYou can grant the required OCM roles to the user through the Oracle Cloud administrationconsole.
1. Sign in to the Oracle Cloud administration console.
2. Click Oracle Cloud Services.
3. Select the Oracle Content Management service instance for which you need privileges.This instance name would have been provided by your account administrator.
4. Click Application Roles.
5. Right-click the burger menu on the right. Choose Assign Users.
6. Assign the user to the roles based on the access that is required to OCM objects. Forinformation about OCM application roles, see Application Roles.
7. Save the changes.
Acquire an Access Token from Identity Domain for the Required ResourceAcquisition of the access token consists of multiple steps:
1. The UI of the customer’s application makes authorization code requests for the user toIdentity Domain.
a. The UI makes a GET call to Identity Domain with the URL given below. Noauthorization is required (this needs to be accessed via browser as this will openlogin UI, Postman will not work in this case).
https://<IDCS-service-instance>/oauth2/v1/authorize?client_id=<clientid>&response_type=code&redirect_uri=<client-redirect-uri>&scope=<scope string from Step 9 of Create oauth client>&nonce=<nonce-value>&state=1234
Where nonce-value and state are optional.Example:
https://idcs-4c463010b1bb495d8db89fd05ebe1d99.identity.dev99.testdev.com/oauth2/v1/authorize?client_id=51d06799e2aa4c749a79276cf7d24ca7&response_type=code&redirect_uri=https://p2qaextradp1srvc1-qucm2019927ac99.cec.ocp.oc-test.com/documents&scope=https://50B904E53A6F4EA1B45F30E225E6C99B.cec.ocp.oc-test.com:443/urn:opc:cec:all&nonce=12345&state=12345
Chapter 13Integrate with Oracle Content Management Using OAuth
13-9
b. Identity Domain shows the login UI.
c. The user logs in to the login UI. The Identity Domain redirects to redirect URLwith the Authorization code as shown below:
<redirection_url>?code=<auth_code>&state=12345
Example:
https://p2qaextradp1srvc1-qucm2019927ac99.cec.ocp.oc-test.com/documents?code=AgAgZTM5MGMzODVjNzY3NGZhNzgzMmExMTI0YmU1ZDBiOTYIABC_fyt25KEcHP9-Hmjkh9y1AAAAMPia8fMCbuzkdk10_CzsrqZ-EtGwsI_MCPFr1Y3gt25EhrhYH65mb7vkJmPvUeKdTg&state=12345
2. The UI makes a call to Identity Domain to get the user token, passing auth_codeobtained in the previous step with the following payload:
Authorization: Basic <Base64 encoded clientID:clientSecret>Method: PostURL: https://<IDCS-service-instance>/oauth2/v1/tokenBODY (as form data): grant_type=authorization_code&code=<auth_code>
Example:
curl -X POST 'https://idcs-4c463010b1bb495d8db89fd05ebe1d99.identity.dev99.testdev.com/oauth2/v1/token' \ -H 'Authorization: Basic NTFkMDY3OTllMmFhNGM3NDlhNzkyNzZjZjdkMjRjYTY6YjZhMzc4ZmQtZjk2Mi00MTg3LWE2NzctYTBmMGI3NmEzODhj' \ -d 'grant_type=authorization_code&code=AgAgZTM5MGMzODVjNzY3NGZhNzgzMmExMTI0YmU1ZDBiOTYIABC_fyt25KEcHP9-Hmjkh9y1AAAAMPia8fMCbuzkdk10_CzsrqZ-EtGwsI_MCPFr1Y3gt25EhrhYH65mb7vkJmPvUeKdTg'
Identity Domain returns the key and value for an access token:
{"access_token":"<access-token-value>"}
You can copy the access token value (the expiry of the access token is set to 7days and refresh token’s to 14 days).
Chapter 13Integrate with Oracle Content Management Using OAuth
13-10
Note:
If one desires to create a refresh token along with access token, two additionaltasks need to be performed:
• While creating OAuth client, in addition to selecting grant type AuthorizationCode (see step 5 in Create an OAuth Client and Acquire a Client ID andSecret), you will also have to choose Refresh.
• While requesting for authorization code, you will have to specify theadditional scope offline_access along with urn:opc:cec:all (scopes arespace separated) as shown below:
https://idcs-4c463010b1bb495d8db89fd05ebe1d99.identity.dev99.testdev.com/oauth2/v1/authorize?client_id=51d06799e2aa4c749a79276cf7d24ca7&response_type=code&redirect_uri=https://p2qaextradp1srvc1-qucm2019927ac99.cec.ocp.oc-test.com/documents&scope=https://50B904E53A6F4EA1B45F30E225E6C99B.cec.ocp.oc-test.com:443/urn:opc:cec:all offline_access&nonce=12345&state=12345
Then using this authorization code in /oauth2/v1/token will return refreshtoken along with access token.
Use the Access Token to Access the Oracle Content Management ResourceOnce the access token is acquired, call the Oracle Content Management endpoint to accessthe resource.
A sample curl command follows.
curl -X GET <Oracle-Content-Management-URL>/content/management/api/v1.1/channels \-H 'Authorization: Bearer <Access Token acquired from previous step>'\-H 'Content-Type: application/json'
Access Using Resource Owner (Identity Domain)In this flow, the resource owner credentials are exposed to the client. The credentials arepassed in /oauth2/v1/token API to get the token so it is important that the resource ownerhas a trust relationship with the client making this API call as the client must discard thepassword after obtaining the access token.
As this is a user token, the user requesting the token needs to have relevant OCM roles asthe user’s access to the OCM objects will be checked against assigned roles.
To configure a confidential application to authorize a Resource Owner grant:
1. Sign in to the Oracle Cloud admin console: https://cloud.oracle.com2. Click to add a new application in the Applications section.
Chapter 13Integrate with Oracle Content Management Using OAuth
13-11
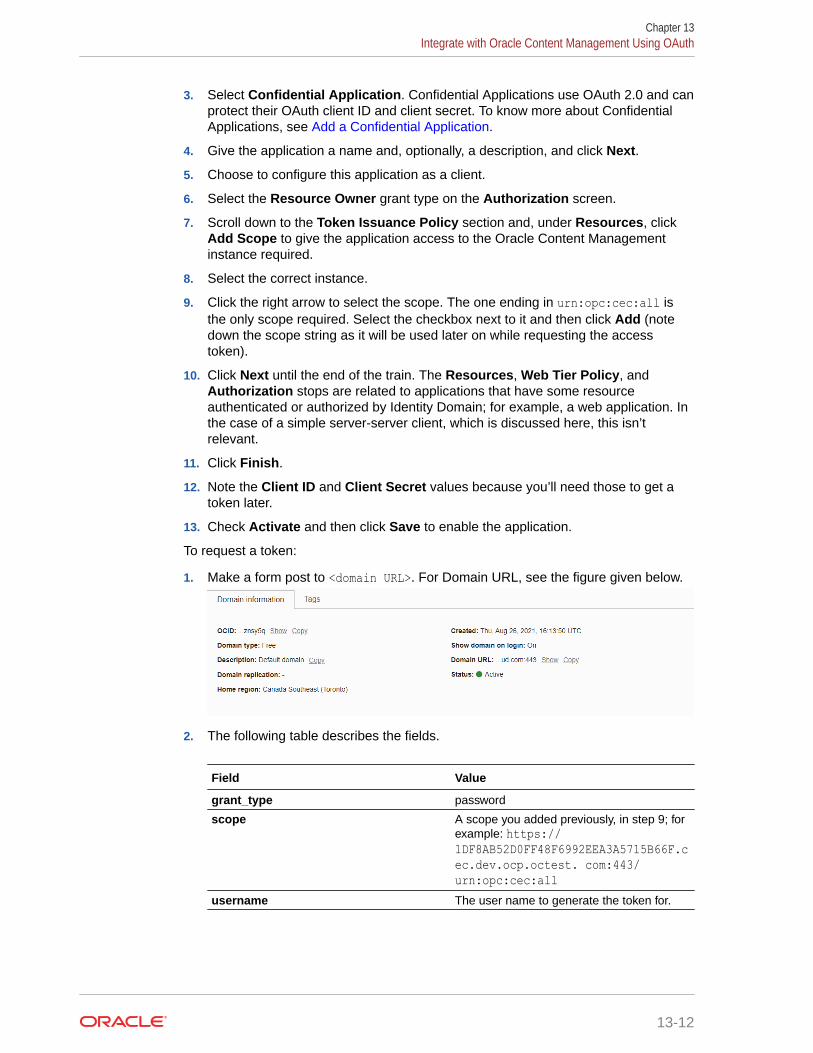
3. Select Confidential Application. Confidential Applications use OAuth 2.0 and canprotect their OAuth client ID and client secret. To know more about ConfidentialApplications, see Add a Confidential Application.
4. Give the application a name and, optionally, a description, and click Next.
5. Choose to configure this application as a client.
6. Select the Resource Owner grant type on the Authorization screen.
7. Scroll down to the Token Issuance Policy section and, under Resources, clickAdd Scope to give the application access to the Oracle Content Managementinstance required.
8. Select the correct instance.
9. Click the right arrow to select the scope. The one ending in urn:opc:cec:all isthe only scope required. Select the checkbox next to it and then click Add (notedown the scope string as it will be used later on while requesting the accesstoken).
10. Click Next until the end of the train. The Resources, Web Tier Policy, andAuthorization stops are related to applications that have some resourceauthenticated or authorized by Identity Domain; for example, a web application. Inthe case of a simple server-server client, which is discussed here, this isn’trelevant.
11. Click Finish.
12. Note the Client ID and Client Secret values because you’ll need those to get atoken later.
13. Check Activate and then click Save to enable the application.
To request a token:
1. Make a form post to <domain URL>. For Domain URL, see the figure given below.
2. The following table describes the fields.
Field Value
grant_type password
scope A scope you added previously, in step 9; forexample: https://1DF8AB52D0FF48F6992EEA3A5715B66F.cec.dev.ocp.octest. com:443/urn:opc:cec:all
username The user name to generate the token for.
Chapter 13Integrate with Oracle Content Management Using OAuth
13-12
Field Value
password The password for the user name in thepreceding field.
POST /oauth2/v1/token HTTP/1.1Host: <iam-domain-host>Authorization: BasicNTZkZWJjY2EzYjc0NDRlMWFhNjg4OGQ0ZTYzY2Y1M2Y6NDYxYzM5YjctMzJiZC00NGE0LTk4NTctNWM1NzAyMWMzNDg4Accept: */*Content-Type: application/x-www-form-urlencodedContent-Length: 162grant_type=password&scope=https%3A%2F%2F1DF8AB52D0FF48F6992EEA3A5715B66F.cec.dev.ocp.octest.com%3A443%2Furn%3Aopc%3Acec%3Aall&username=<user-name>&password=<password>
This results in JSON text where the token is the value of the access_token field:
{"access_token":"eyJ4NXQjUzI1NiI6IkhoRktIMFFGeHR1UDkxLWg3QlJKSUFDMU50V2R...HUQmto_oELyjRaBpqhI75hQJYLWRKm6ozPS57tR1EYHmWABgYw_XALMT1kMuIuRxpGB2ozngpajzNNBBu2qtKg10-RzBTulKaxD25vKK1rznQ3p_XAOLK4CUUM-uG_PUOk49-JDgJjuSI74hLC1kagIlM93A2jUG3g3gdUpUCZPg","token_type": "Bearer","expires_in": 604800}
The token expiration time is given in seconds and is typically 7 days.
To use the token and access REST API endpoints, use the Bearer Authorization headeras before.
Chapter 13Integrate with Oracle Content Management Using OAuth
13-13
Note:
If one desires to create a refresh token along with access token, twoadditional tasks need to be performed:
1. While creating OAuth client, in addition to selecting grant type ResourceOwner (See step 6 in Create an OAuth Client and Acquire a Client IDand Secret), you will also have to choose Refresh Token.
2. While requesting for token, you will have to specify additional scopeoffline_access along with urn:opc:cec:all (scopes are spaceseparated) as shown below:
curl -X POST 'https://idcs-4c463010b1bb495d8db89fd05ebe1d99.identity.dev99.testdev.com/oauth2/v1/token' \ -H 'Authorization: Basic NTFkMDY3OTllMmFhNGM3NDlhNzkyNzZjZjdkMjRjYTY6YjZhMzc4ZmQtZjk2Mi00MTg3LWE2NzctYTBmMGI3NmEzODhj' \ -d 'grant_type=password&scope=https://50B904E53A6F4EA1B45F30E225EA99B.cec.ocp.oc-test.com:443/urn:opc:cec:all offline_access&[email protected]&password=johndoepassword#3’
This will return a refresh token along with access token.
Cloud Account Using IDCSThe following sections describe how to use your cloud account:
• Access Using Client Credentials (2-Legged OAuth Flow)
• Access Using Authorization Code (3-Legged OAuth Flow)
• Access Using Resource Owner
Access Using Client Credentials (2-Legged OAuth Flow)For this OAuth flow, the token is requested for the client application and calls to OCMAPIs are made using this client application’s token. This OAuth client applicationneeds to be added to OCM roles in IDCS to have appropriate OCM access.
The Identity Domain Administrator or Application Administrator of the tenantcreates an OAuth client for the developer with the required privileges and performs thefollowing steps to get an access token:
1. Create an OAuth Client and Acquire a Client ID and Secret
2. Grant the Required Oracle Content Management Roles to the Client
3. Acquire an Access Token from Oracle Identity Cloud Service (IDCS) for theRequired Resource
4. Use the Access Token to Access the Oracle Content Management Resource
Chapter 13Integrate with Oracle Content Management Using OAuth
13-14
Create an OAuth Client and Acquire a Client ID and SecretThe Identity Domain Administrator or an Application Administrator of the tenant creates anOAuth client for the developer with the required privileges. To do this, perform the followingsteps:
1. Go to the IDCS administration console:
https://<IDCS BaseURL>/ui/v1/adminconsole
2. Click to add a new application in the Applications section.
3. Select Confidential Application. The Confidential Applications use OAuth 2.0 and canprotect their OAuth client ID and client secret. To know more about ConfidentialApplications, see Add a Confidential Application.
4. Give the application a name and, optionally, a description, and click Next.
5. Choose to configure this application as a client.
6. Select the client credentials grant type on the Authorization screen.
7. Scroll down to the Token Issuance Policy section and, under Resources, click addscope to give the application access to the required Oracle Content Managementinstance.
8. Click the right arrow to select the scope.The only scope required is the one ending in urn:opc:cec:all.
Select the checkbox next to it and then click Add.
9. Click Next until the end of the train.The Resources, Web Tier Policy, and Authorization stops are related to applicationsthat have some resource authenticated or authorized by IDCS; for example, a webapplication. This isn’t relevant in the case of a simple server-server client, which isdiscussed here.
10. Click Finish.
11. Note the Client ID and Client Secret values because you’ll need those to get a tokenlater.
12. Check Activate and then click Save to enable the application.
Note:
Just as a regular user, an OAuth client with the client credentials requires relevantpermission on objects in your Oracle Content Management instance to be able toperform actions using REST API for Content Management. For example, it needs tobe a repository member with Contributor permission to create assets in it, or aManager on the repository to modify its settings. In the Oracle ContentManagement web UI, you can use the Members dialog to find your OAuth client byname and add it to the required object. A newly created OAuth client will appear insearch only after the next hourly IDCS sync is complete.
Chapter 13Integrate with Oracle Content Management Using OAuth
13-15
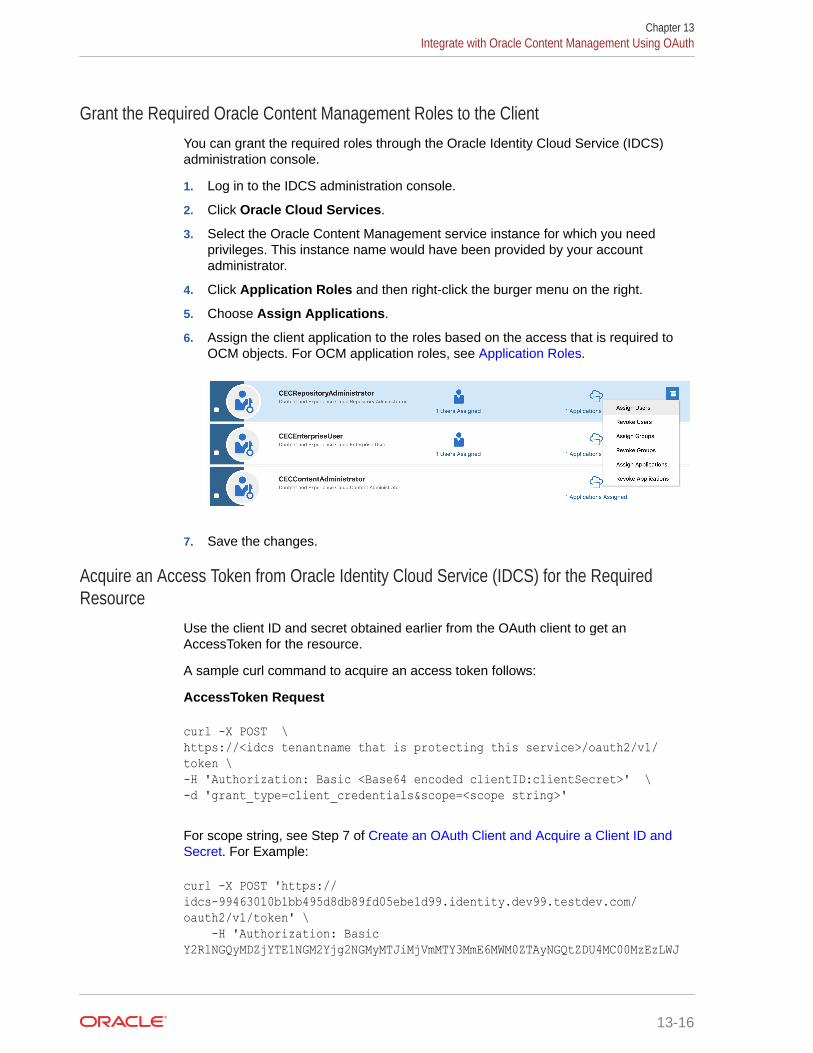
Grant the Required Oracle Content Management Roles to the ClientYou can grant the required roles through the Oracle Identity Cloud Service (IDCS)administration console.
1. Log in to the IDCS administration console.
2. Click Oracle Cloud Services.
3. Select the Oracle Content Management service instance for which you needprivileges. This instance name would have been provided by your accountadministrator.
4. Click Application Roles and then right-click the burger menu on the right.
5. Choose Assign Applications.
6. Assign the client application to the roles based on the access that is required toOCM objects. For OCM application roles, see Application Roles.
7. Save the changes.
Acquire an Access Token from Oracle Identity Cloud Service (IDCS) for the RequiredResource
Use the client ID and secret obtained earlier from the OAuth client to get anAccessToken for the resource.
A sample curl command to acquire an access token follows:
AccessToken Request
curl -X POST \https://<idcs tenantname that is protecting this service>/oauth2/v1/token \-H 'Authorization: Basic <Base64 encoded clientID:clientSecret>' \-d 'grant_type=client_credentials&scope=<scope string>'
For scope string, see Step 7 of Create an OAuth Client and Acquire a Client ID andSecret. For Example:
curl -X POST 'https://idcs-99463010b1bb495d8db89fd05ebe1d99.identity.dev99.testdev.com/oauth2/v1/token' \ -H 'Authorization: Basic Y2RlNGQyMDZjYTE1NGM2Yjg2NGMyMTJiMjVmMTY3MmE6MWM0ZTAyNGQtZDU4MC00MzEzLWJ
Chapter 13Integrate with Oracle Content Management Using OAuth
13-16
kZjMtZTQyMGQzMzgzZTY2' \ -d'grant_type=client_credentials&scope=https://50B904E53A6F4EA1B45F30E225EA99B.cec.ocp.oc-test.com:443/urn:opc:cec:all'
IDCS returns the key and value for an access token (access token expiry is set to 7 days):
{"access_token":"<access-token-value>}"
You can copy the access token value.
Note:
The refresh token is not included in the Client Credentials grant type flow.
Use the Access Token to Access the Oracle Content Management ResourceOnce the access token is acquired, call the Oracle Content Management endpoint to accessthe resource.
A sample curl command follows.
curl -X GET <Oracle-Content-Management-URL>/sites/management/api/v1/sites \-H 'Authorization: Bearer <Access Token acquired from previous step>'\-H 'Content-Type: application/json'
Access Using Authorization Code (3-Legged OAuth Flow)In this flow, a client application is created to acquire the client ID and secret, a client browseruses these and redirects the user to IDCS to login with their username and password and onsuccessful authentication, an authorization code is sent on the redirect URL. An access tokenis requested from IDCS using this authorization code. Thus, the Resource owner credentialsare never exposed to the client in this flow.
As this is a user token, the user requesting the token needs to have relevant OCM roles asthe user’s access to the OCM objects will be checked against assigned roles.
The Identity Domain Administrator performs the following steps to get an access token:
1. Create an OAuth Client and Acquire a Client ID and Secret
2. Grant the Required Oracle Content Management Roles to the Client
3. Acquire an Access Token from Oracle Identity Cloud Service (IDCS) for the RequiredResource
4. Use the Access Token to Access the Oracle Content Management Resource
Create an OAuth Client and Acquire a Client ID and SecretThe Identity Domain Administrator or an Application Administrator of the tenant creates anOAuth client for the developer with the required privileges. To do this, perform the followingsteps:
Chapter 13Integrate with Oracle Content Management Using OAuth
13-17
1. Go to the IDCS administration console:
https://<IDCS BaseURL>/ui/v1/adminconsole
2. Click to add a new application in the Applications section.
3. Select Confidential Application. The Confidential Applications use OAuth 2.0and can protect their OAuth client ID and client secret. To know more aboutConfidential Applications, see Add a Confidential Application.
4. Give the application a name and, optionally, a description, and click Next.
5. Choose to configure this application as a client.
6. Select the Authorization code grant type on the Authorization screen.
7. Enter a redirect URL value to point to the URL where the user needs to beredirected after authorization. It can be any URL pointing to customer’sapplication.
8. Enter a Post logout URL value to point to the Oracle Content Managementservice administration console.
Note:
It is not a mandatory field while creating a client application with theAuthorization Code grant type. As mentioned in the IDCS documentation(see Using OpenID Connect for Log Out), this could be again any client-specific URL to where the redirection happens after logout.
9. Scroll down to the Token Issuance Policy section and, under Resources, clickadd scope to give the application access to the required Oracle ContentManagement instance.
10. Click the right arrow to select the scope.The only scope required is the one ending in urn:opc:cec:all.
Select the checkbox next to it and then click Add (note down the scope string as itwill be used later on while requesting the access token).
11. Click Next until the end of the train.The Resources, Web Tier Policy, and Authorization stops are related toapplications that have some resource authenticated or authorized by IDCS; forexample, a web application. This isn’t relevant in the case of a simple server-server client, which is discussed here.
12. Click Finish.
13. Note the Client ID and Client Secret values because you’ll need those to get atoken later.
14. Check Activate and then click Save to enable the application.
The client can store the Client ID and Client Secret values securely in a credentialstore.
Grant the Required Oracle Content Management Roles to the ClientYou can grant the required OCM roles to the user through the Oracle Identity CloudService (IDCS) administration console.
Chapter 13Integrate with Oracle Content Management Using OAuth
13-18
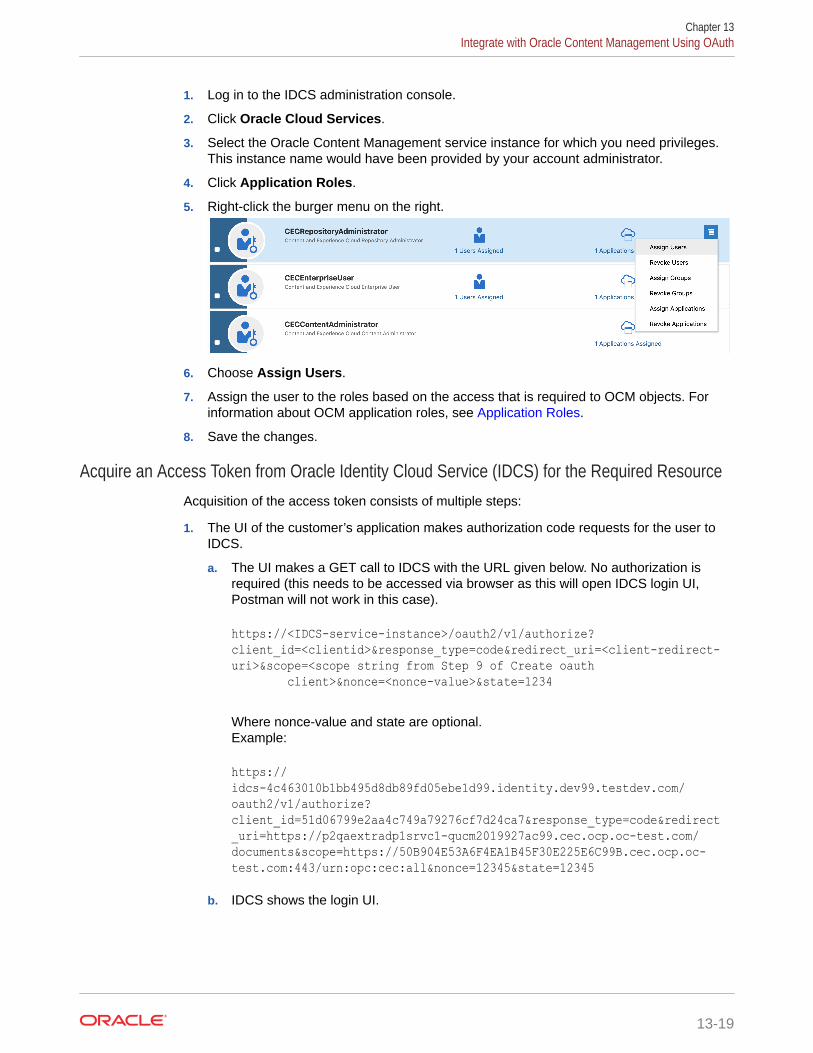
1. Log in to the IDCS administration console.
2. Click Oracle Cloud Services.
3. Select the Oracle Content Management service instance for which you need privileges.This instance name would have been provided by your account administrator.
4. Click Application Roles.
5. Right-click the burger menu on the right.
6. Choose Assign Users.
7. Assign the user to the roles based on the access that is required to OCM objects. Forinformation about OCM application roles, see Application Roles.
8. Save the changes.
Acquire an Access Token from Oracle Identity Cloud Service (IDCS) for the Required ResourceAcquisition of the access token consists of multiple steps:
1. The UI of the customer’s application makes authorization code requests for the user toIDCS.
a. The UI makes a GET call to IDCS with the URL given below. No authorization isrequired (this needs to be accessed via browser as this will open IDCS login UI,Postman will not work in this case).
https://<IDCS-service-instance>/oauth2/v1/authorize?client_id=<clientid>&response_type=code&redirect_uri=<client-redirect-uri>&scope=<scope string from Step 9 of Create oauth client>&nonce=<nonce-value>&state=1234
Where nonce-value and state are optional.Example:
https://idcs-4c463010b1bb495d8db89fd05ebe1d99.identity.dev99.testdev.com/oauth2/v1/authorize?client_id=51d06799e2aa4c749a79276cf7d24ca7&response_type=code&redirect_uri=https://p2qaextradp1srvc1-qucm2019927ac99.cec.ocp.oc-test.com/documents&scope=https://50B904E53A6F4EA1B45F30E225E6C99B.cec.ocp.oc-test.com:443/urn:opc:cec:all&nonce=12345&state=12345
b. IDCS shows the login UI.
Chapter 13Integrate with Oracle Content Management Using OAuth
13-19
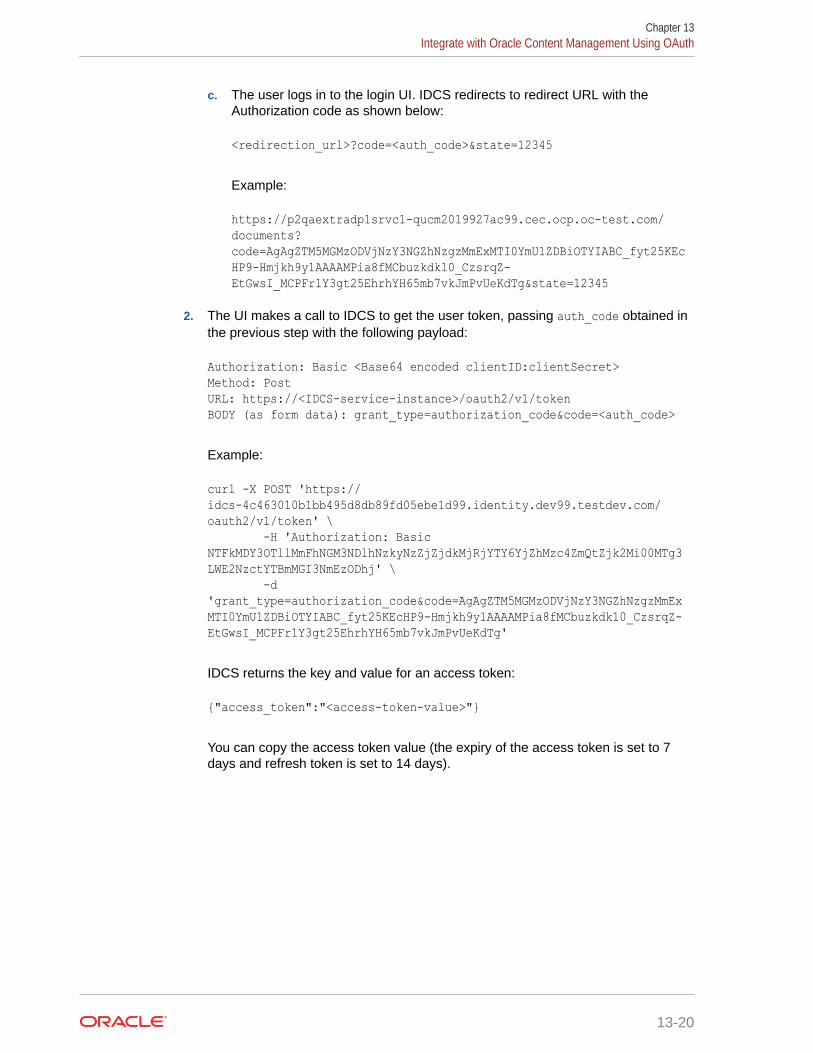
c. The user logs in to the login UI. IDCS redirects to redirect URL with theAuthorization code as shown below:
<redirection_url>?code=<auth_code>&state=12345
Example:
https://p2qaextradp1srvc1-qucm2019927ac99.cec.ocp.oc-test.com/documents?code=AgAgZTM5MGMzODVjNzY3NGZhNzgzMmExMTI0YmU1ZDBiOTYIABC_fyt25KEcHP9-Hmjkh9y1AAAAMPia8fMCbuzkdk10_CzsrqZ-EtGwsI_MCPFr1Y3gt25EhrhYH65mb7vkJmPvUeKdTg&state=12345
2. The UI makes a call to IDCS to get the user token, passing auth_code obtained inthe previous step with the following payload:
Authorization: Basic <Base64 encoded clientID:clientSecret>Method: PostURL: https://<IDCS-service-instance>/oauth2/v1/tokenBODY (as form data): grant_type=authorization_code&code=<auth_code>
Example:
curl -X POST 'https://idcs-4c463010b1bb495d8db89fd05ebe1d99.identity.dev99.testdev.com/oauth2/v1/token' \ -H 'Authorization: Basic NTFkMDY3OTllMmFhNGM3NDlhNzkyNzZjZjdkMjRjYTY6YjZhMzc4ZmQtZjk2Mi00MTg3LWE2NzctYTBmMGI3NmEzODhj' \ -d 'grant_type=authorization_code&code=AgAgZTM5MGMzODVjNzY3NGZhNzgzMmExMTI0YmU1ZDBiOTYIABC_fyt25KEcHP9-Hmjkh9y1AAAAMPia8fMCbuzkdk10_CzsrqZ-EtGwsI_MCPFr1Y3gt25EhrhYH65mb7vkJmPvUeKdTg'
IDCS returns the key and value for an access token:
{"access_token":"<access-token-value>"}
You can copy the access token value (the expiry of the access token is set to 7days and refresh token is set to 14 days).
Chapter 13Integrate with Oracle Content Management Using OAuth
13-20
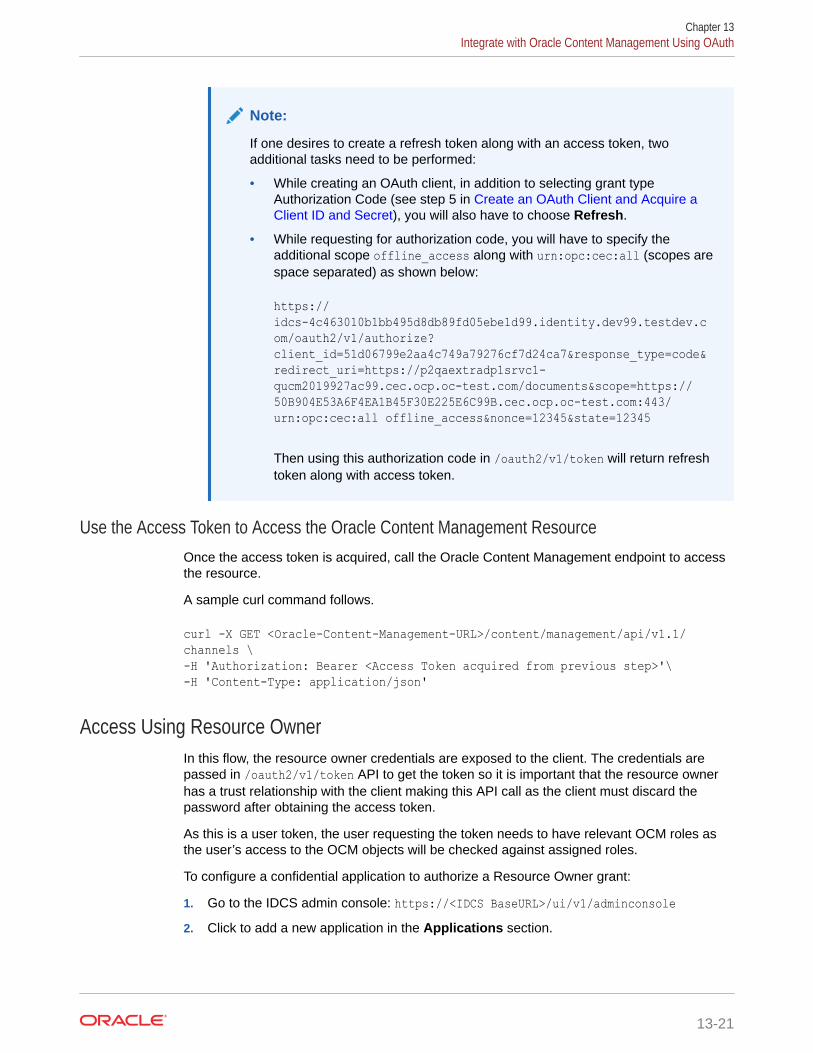
Note:
If one desires to create a refresh token along with an access token, twoadditional tasks need to be performed:
• While creating an OAuth client, in addition to selecting grant typeAuthorization Code (see step 5 in Create an OAuth Client and Acquire aClient ID and Secret), you will also have to choose Refresh.
• While requesting for authorization code, you will have to specify theadditional scope offline_access along with urn:opc:cec:all (scopes arespace separated) as shown below:
https://idcs-4c463010b1bb495d8db89fd05ebe1d99.identity.dev99.testdev.com/oauth2/v1/authorize?client_id=51d06799e2aa4c749a79276cf7d24ca7&response_type=code&redirect_uri=https://p2qaextradp1srvc1-qucm2019927ac99.cec.ocp.oc-test.com/documents&scope=https://50B904E53A6F4EA1B45F30E225E6C99B.cec.ocp.oc-test.com:443/urn:opc:cec:all offline_access&nonce=12345&state=12345
Then using this authorization code in /oauth2/v1/token will return refreshtoken along with access token.
Use the Access Token to Access the Oracle Content Management ResourceOnce the access token is acquired, call the Oracle Content Management endpoint to accessthe resource.
A sample curl command follows.
curl -X GET <Oracle-Content-Management-URL>/content/management/api/v1.1/channels \-H 'Authorization: Bearer <Access Token acquired from previous step>'\-H 'Content-Type: application/json'
Access Using Resource OwnerIn this flow, the resource owner credentials are exposed to the client. The credentials arepassed in /oauth2/v1/token API to get the token so it is important that the resource ownerhas a trust relationship with the client making this API call as the client must discard thepassword after obtaining the access token.
As this is a user token, the user requesting the token needs to have relevant OCM roles asthe user’s access to the OCM objects will be checked against assigned roles.
To configure a confidential application to authorize a Resource Owner grant:
1. Go to the IDCS admin console: https://<IDCS BaseURL>/ui/v1/adminconsole2. Click to add a new application in the Applications section.
Chapter 13Integrate with Oracle Content Management Using OAuth
13-21
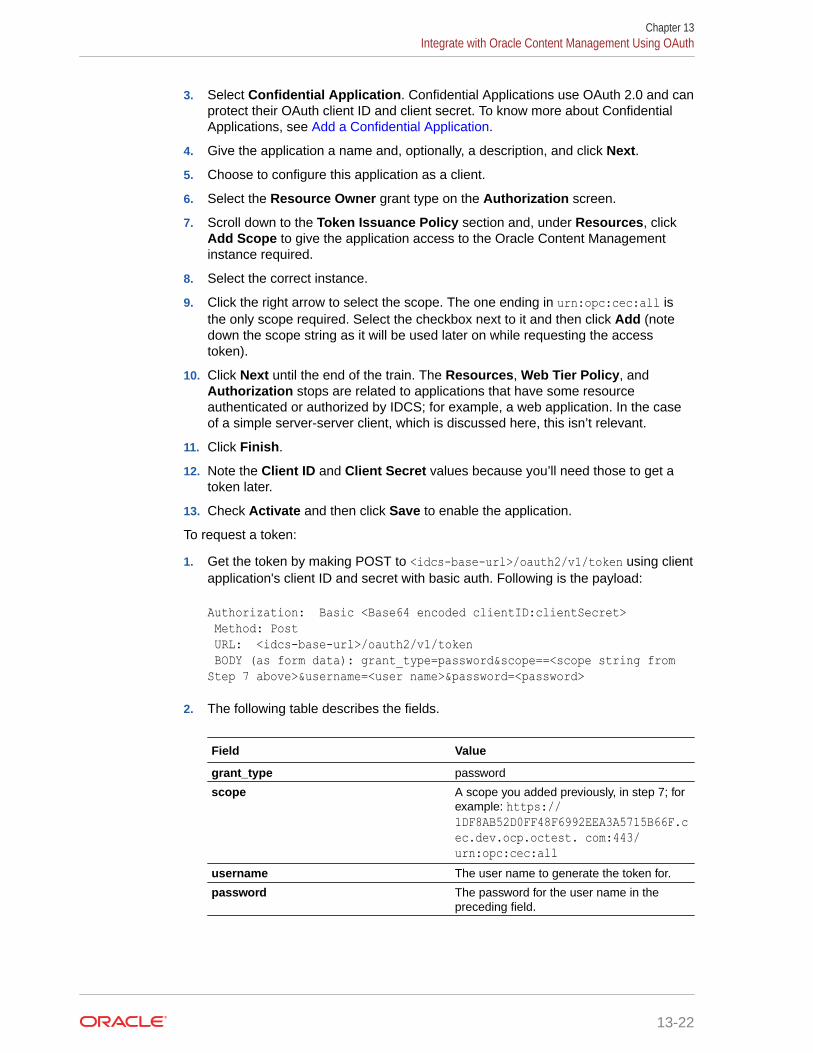
3. Select Confidential Application. Confidential Applications use OAuth 2.0 and canprotect their OAuth client ID and client secret. To know more about ConfidentialApplications, see Add a Confidential Application.
4. Give the application a name and, optionally, a description, and click Next.
5. Choose to configure this application as a client.
6. Select the Resource Owner grant type on the Authorization screen.
7. Scroll down to the Token Issuance Policy section and, under Resources, clickAdd Scope to give the application access to the Oracle Content Managementinstance required.
8. Select the correct instance.
9. Click the right arrow to select the scope. The one ending in urn:opc:cec:all isthe only scope required. Select the checkbox next to it and then click Add (notedown the scope string as it will be used later on while requesting the accesstoken).
10. Click Next until the end of the train. The Resources, Web Tier Policy, andAuthorization stops are related to applications that have some resourceauthenticated or authorized by IDCS; for example, a web application. In the caseof a simple server-server client, which is discussed here, this isn’t relevant.
11. Click Finish.
12. Note the Client ID and Client Secret values because you’ll need those to get atoken later.
13. Check Activate and then click Save to enable the application.
To request a token:
1. Get the token by making POST to <idcs-base-url>/oauth2/v1/token using clientapplication's client ID and secret with basic auth. Following is the payload:
Authorization: Basic <Base64 encoded clientID:clientSecret> Method: Post URL: <idcs-base-url>/oauth2/v1/token BODY (as form data): grant_type=password&scope==<scope string from Step 7 above>&username=<user name>&password=<password>
2. The following table describes the fields.
Field Value
grant_type password
scope A scope you added previously, in step 7; forexample: https://1DF8AB52D0FF48F6992EEA3A5715B66F.cec.dev.ocp.octest. com:443/urn:opc:cec:all
username The user name to generate the token for.
password The password for the user name in thepreceding field.
Chapter 13Integrate with Oracle Content Management Using OAuth
13-22

Example:
curl -X POST 'https://idcs-4c463010b1bb495d8db89fd05ebe1d99.identity.dev99.testdev.com/oauth2/v1/token' \ -H 'Authorization: Basic NTFkMDY3OTllMmFhNGM3NDlhNzkyNzZjZjdkMjRjYTY6YjZhMzc4ZmQtZjk2Mi00MTg3LWE2NzctYTBmMGI3NmEzODhj' \ -d 'grant_type=password&scope=https://50B904E53A6F4EA1B45F30E225EA99B.cec.ocp.oc-test.com:443/urn:opc:cec:all&[email protected]&password=johndoepassword#3’
This results in JSON text where the token is the value of the access_token field:
{"access_token":"eyJ4NXQjUzI1NiI6IkhoRktIMFFGeHR1UDkxLWg3QlJKSUFDMU50V2R...HUQmto_oELyjRaBpqhI75hQJYLWRKm6ozPS57tR1EYHmWABgYw_XALMT1kMuIuRxpGB2ozngpajzNNBBu2qtKg10-RzBTulKaxD25vKK1rznQ3p_XAOLK4CUUM-uG_PUOk49-JDgJjuSI74hLC1kagIlM93A2jUG3g3gdUpUCZPg","token_type": "Bearer","expires_in": 604800}
The token expiration time is given in seconds and is typically 7 days.
To use the token and access REST API endpoints, use the Bearer Authorization asbefore.
Chapter 13Integrate with Oracle Content Management Using OAuth
13-23

Note:
If one desires to create a refresh token along with access token, twoadditional tasks need to be performed:
1. While creating OAuth client, in addition to selecting grant type ResourceOwner (See step 6 in Create an OAuth Client and Acquire a Client IDand Secret), you will also have to choose Refresh Token.
2. While requesting for token, you will have to specify additional scopeoffline_access along with urn:opc:cec:all (scopes are spaceseparated) as shown below:
curl -X POST 'https://idcs-4c463010b1bb495d8db89fd05ebe1d99.identity.dev99.testdev.com/oauth2/v1/token' \ -H 'Authorization: Basic NTFkMDY3OTllMmFhNGM3NDlhNzkyNzZjZjdkMjRjYTY6YjZhMzc4ZmQtZjk2Mi00MTg3LWE2NzctYTBmMGI3NmEzODhj' \ -d 'grant_type=password&scope=https://50B904E53A6F4EA1B45F30E225EA99B.cec.ocp.oc-test.com:443/urn:opc:cec:all offline_access&[email protected]&password=johndoepassword#3’
This will return a refresh token along with access token.
Download the Swagger File for a REST APIDownload a REST API Swagger file for use in your development project.
The Swagger file for each REST API is part of the published REST API document. Youcan download it from the left Navigation tree.
For example, to download and copy the Swagger file for the REST API for Documents:
1. On docs.oracle.com, open the REST API document at REST API for Documents.
2. On the left, click the download symbol:
3. Click the Swagger button:
Chapter 13Download the Swagger File for a REST API
13-24
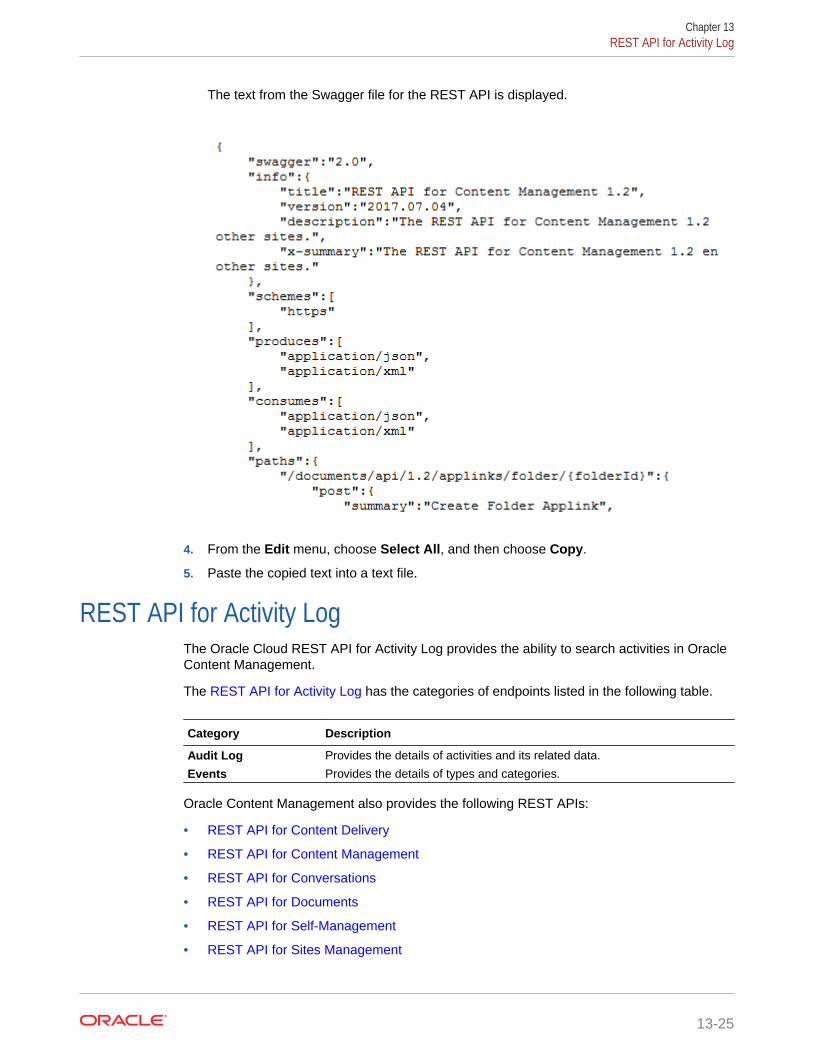
The text from the Swagger file for the REST API is displayed.
4. From the Edit menu, choose Select All, and then choose Copy.
5. Paste the copied text into a text file.
REST API for Activity LogThe Oracle Cloud REST API for Activity Log provides the ability to search activities in OracleContent Management.
The REST API for Activity Log has the categories of endpoints listed in the following table.
Category Description
Audit Log Provides the details of activities and its related data.
Events Provides the details of types and categories.
Oracle Content Management also provides the following REST APIs:
• REST API for Content Delivery
• REST API for Content Management
• REST API for Conversations
• REST API for Documents
• REST API for Self-Management
• REST API for Sites Management
Chapter 13REST API for Activity Log
13-25
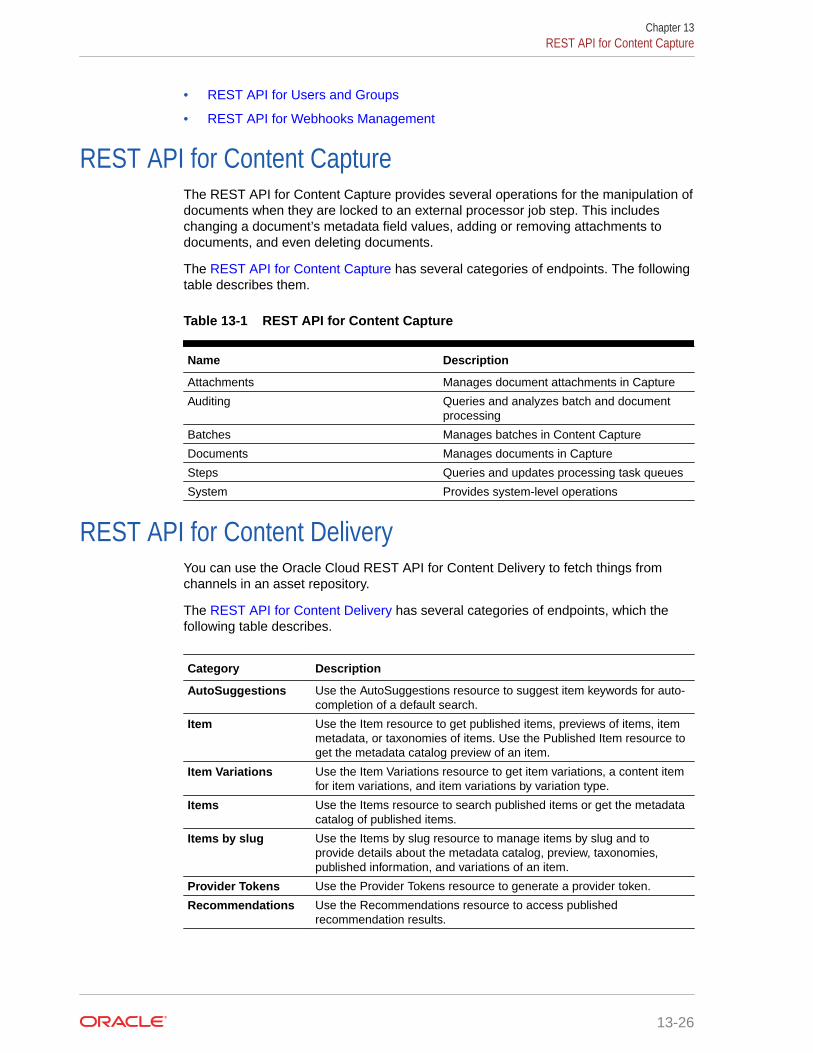
• REST API for Users and Groups
• REST API for Webhooks Management
REST API for Content CaptureThe REST API for Content Capture provides several operations for the manipulation ofdocuments when they are locked to an external processor job step. This includeschanging a document’s metadata field values, adding or removing attachments todocuments, and even deleting documents.
The REST API for Content Capture has several categories of endpoints. The followingtable describes them.
Table 13-1 REST API for Content Capture
Name Description
Attachments Manages document attachments in Capture
Auditing Queries and analyzes batch and documentprocessing
Batches Manages batches in Content Capture
Documents Manages documents in Capture
Steps Queries and updates processing task queues
System Provides system-level operations
REST API for Content DeliveryYou can use the Oracle Cloud REST API for Content Delivery to fetch things fromchannels in an asset repository.
The REST API for Content Delivery has several categories of endpoints, which thefollowing table describes.
Category Description
AutoSuggestions Use the AutoSuggestions resource to suggest item keywords for auto-completion of a default search.
Item Use the Item resource to get published items, previews of items, itemmetadata, or taxonomies of items. Use the Published Item resource toget the metadata catalog preview of an item.
Item Variations Use the Item Variations resource to get item variations, a content itemfor item variations, and item variations by variation type.
Items Use the Items resource to search published items or get the metadatacatalog of published items.
Items by slug Use the Items by slug resource to manage items by slug and toprovide details about the metadata catalog, preview, taxonomies,published information, and variations of an item.
Provider Tokens Use the Provider Tokens resource to generate a provider token.
Recommendations Use the Recommendations resource to access publishedrecommendation results.
Chapter 13REST API for Content Capture
13-26
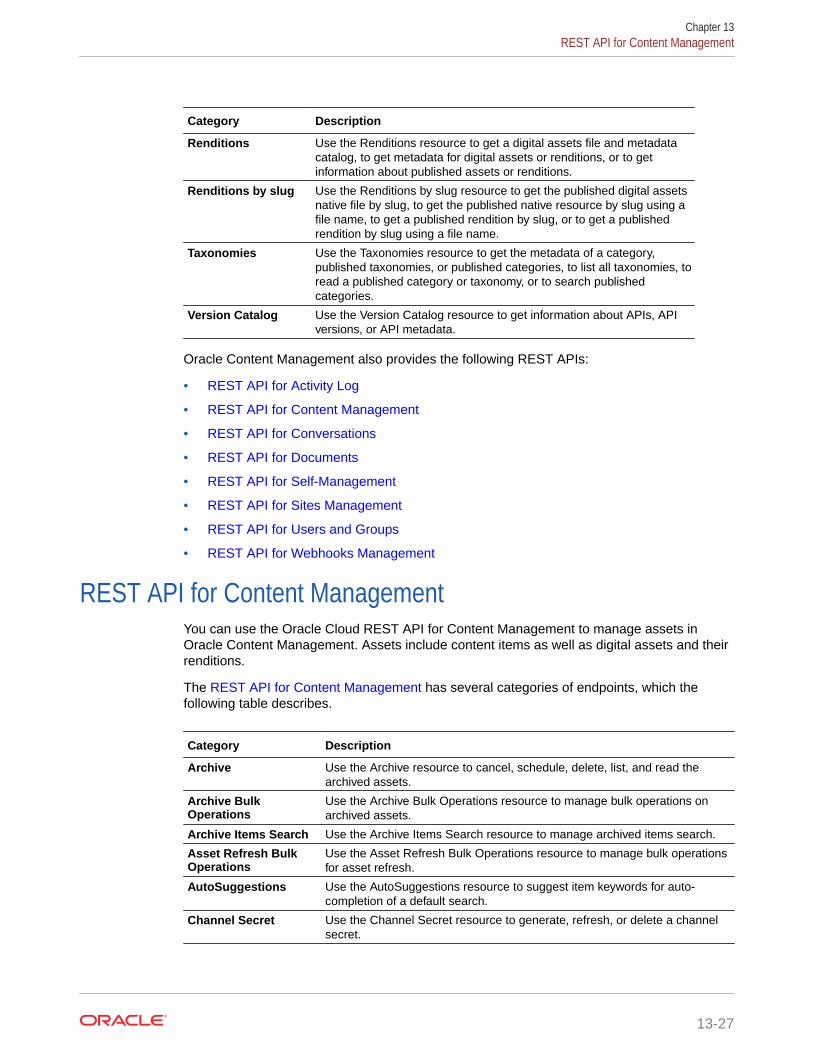
Category Description
Renditions Use the Renditions resource to get a digital assets file and metadatacatalog, to get metadata for digital assets or renditions, or to getinformation about published assets or renditions.
Renditions by slug Use the Renditions by slug resource to get the published digital assetsnative file by slug, to get the published native resource by slug using afile name, to get a published rendition by slug, or to get a publishedrendition by slug using a file name.
Taxonomies Use the Taxonomies resource to get the metadata of a category,published taxonomies, or published categories, to list all taxonomies, toread a published category or taxonomy, or to search publishedcategories.
Version Catalog Use the Version Catalog resource to get information about APIs, APIversions, or API metadata.
Oracle Content Management also provides the following REST APIs:
• REST API for Activity Log
• REST API for Content Management
• REST API for Conversations
• REST API for Documents
• REST API for Self-Management
• REST API for Sites Management
• REST API for Users and Groups
• REST API for Webhooks Management
REST API for Content ManagementYou can use the Oracle Cloud REST API for Content Management to manage assets inOracle Content Management. Assets include content items as well as digital assets and theirrenditions.
The REST API for Content Management has several categories of endpoints, which thefollowing table describes.
Category Description
Archive Use the Archive resource to cancel, schedule, delete, list, and read thearchived assets.
Archive BulkOperations
Use the Archive Bulk Operations resource to manage bulk operations onarchived assets.
Archive Items Search Use the Archive Items Search resource to manage archived items search.
Asset Refresh BulkOperations
Use the Asset Refresh Bulk Operations resource to manage bulk operationsfor asset refresh.
AutoSuggestions Use the AutoSuggestions resource to suggest item keywords for auto-completion of a default search.
Channel Secret Use the Channel Secret resource to generate, refresh, or delete a channelsecret.
Chapter 13REST API for Content Management
13-27
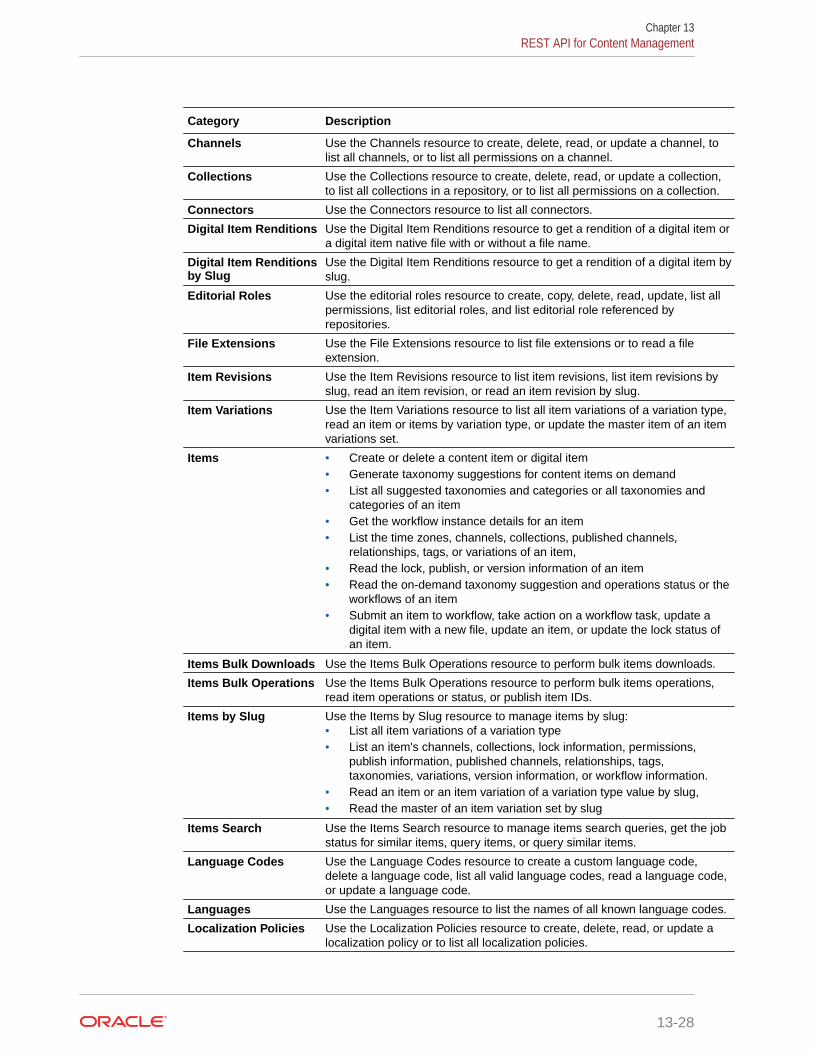
Category Description
Channels Use the Channels resource to create, delete, read, or update a channel, tolist all channels, or to list all permissions on a channel.
Collections Use the Collections resource to create, delete, read, or update a collection,to list all collections in a repository, or to list all permissions on a collection.
Connectors Use the Connectors resource to list all connectors.
Digital Item Renditions Use the Digital Item Renditions resource to get a rendition of a digital item ora digital item native file with or without a file name.
Digital Item Renditionsby Slug
Use the Digital Item Renditions resource to get a rendition of a digital item byslug.
Editorial Roles Use the editorial roles resource to create, copy, delete, read, update, list allpermissions, list editorial roles, and list editorial role referenced byrepositories.
File Extensions Use the File Extensions resource to list file extensions or to read a fileextension.
Item Revisions Use the Item Revisions resource to list item revisions, list item revisions byslug, read an item revision, or read an item revision by slug.
Item Variations Use the Item Variations resource to list all item variations of a variation type,read an item or items by variation type, or update the master item of an itemvariations set.
Items • Create or delete a content item or digital item• Generate taxonomy suggestions for content items on demand• List all suggested taxonomies and categories or all taxonomies and
categories of an item• Get the workflow instance details for an item• List the time zones, channels, collections, published channels,
relationships, tags, or variations of an item,• Read the lock, publish, or version information of an item• Read the on-demand taxonomy suggestion and operations status or the
workflows of an item• Submit an item to workflow, take action on a workflow task, update a
digital item with a new file, update an item, or update the lock status ofan item.
Items Bulk Downloads Use the Items Bulk Operations resource to perform bulk items downloads.
Items Bulk Operations Use the Items Bulk Operations resource to perform bulk items operations,read item operations or status, or publish item IDs.
Items by Slug Use the Items by Slug resource to manage items by slug:• List all item variations of a variation type• List an item's channels, collections, lock information, permissions,
publish information, published channels, relationships, tags,taxonomies, variations, version information, or workflow information.
• Read an item or an item variation of a variation type value by slug,• Read the master of an item variation set by slug
Items Search Use the Items Search resource to manage items search queries, get the jobstatus for similar items, query items, or query similar items.
Language Codes Use the Language Codes resource to create a custom language code,delete a language code, list all valid language codes, read a language code,or update a language code.
Languages Use the Languages resource to list the names of all known language codes.
Localization Policies Use the Localization Policies resource to create, delete, read, or update alocalization policy or to list all localization policies.
Chapter 13REST API for Content Management
13-28
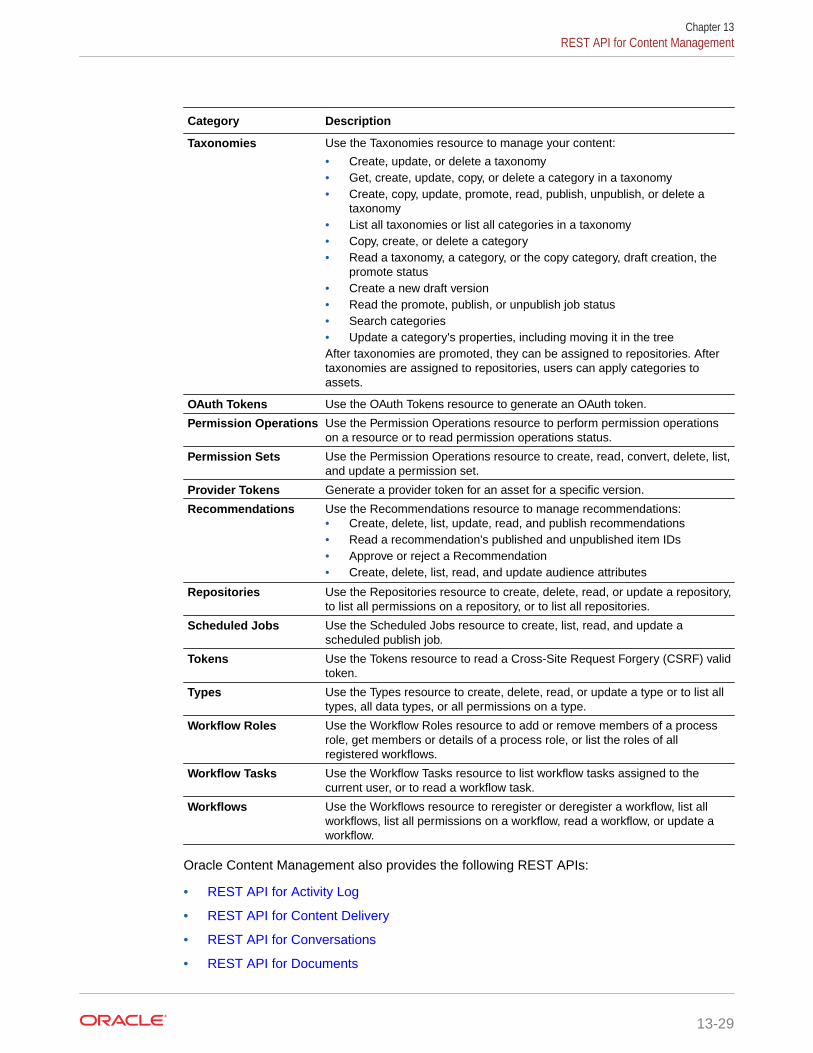
Category Description
Taxonomies Use the Taxonomies resource to manage your content:
• Create, update, or delete a taxonomy• Get, create, update, copy, or delete a category in a taxonomy• Create, copy, update, promote, read, publish, unpublish, or delete a
taxonomy• List all taxonomies or list all categories in a taxonomy• Copy, create, or delete a category• Read a taxonomy, a category, or the copy category, draft creation, the
promote status• Create a new draft version• Read the promote, publish, or unpublish job status• Search categories• Update a category's properties, including moving it in the treeAfter taxonomies are promoted, they can be assigned to repositories. Aftertaxonomies are assigned to repositories, users can apply categories toassets.
OAuth Tokens Use the OAuth Tokens resource to generate an OAuth token.
Permission Operations Use the Permission Operations resource to perform permission operationson a resource or to read permission operations status.
Permission Sets Use the Permission Operations resource to create, read, convert, delete, list,and update a permission set.
Provider Tokens Generate a provider token for an asset for a specific version.
Recommendations Use the Recommendations resource to manage recommendations:• Create, delete, list, update, read, and publish recommendations• Read a recommendation's published and unpublished item IDs• Approve or reject a Recommendation• Create, delete, list, read, and update audience attributes
Repositories Use the Repositories resource to create, delete, read, or update a repository,to list all permissions on a repository, or to list all repositories.
Scheduled Jobs Use the Scheduled Jobs resource to create, list, read, and update ascheduled publish job.
Tokens Use the Tokens resource to read a Cross-Site Request Forgery (CSRF) validtoken.
Types Use the Types resource to create, delete, read, or update a type or to list alltypes, all data types, or all permissions on a type.
Workflow Roles Use the Workflow Roles resource to add or remove members of a processrole, get members or details of a process role, or list the roles of allregistered workflows.
Workflow Tasks Use the Workflow Tasks resource to list workflow tasks assigned to thecurrent user, or to read a workflow task.
Workflows Use the Workflows resource to reregister or deregister a workflow, list allworkflows, list all permissions on a workflow, read a workflow, or update aworkflow.
Oracle Content Management also provides the following REST APIs:
• REST API for Activity Log
• REST API for Content Delivery
• REST API for Conversations
• REST API for Documents
Chapter 13REST API for Content Management
13-29
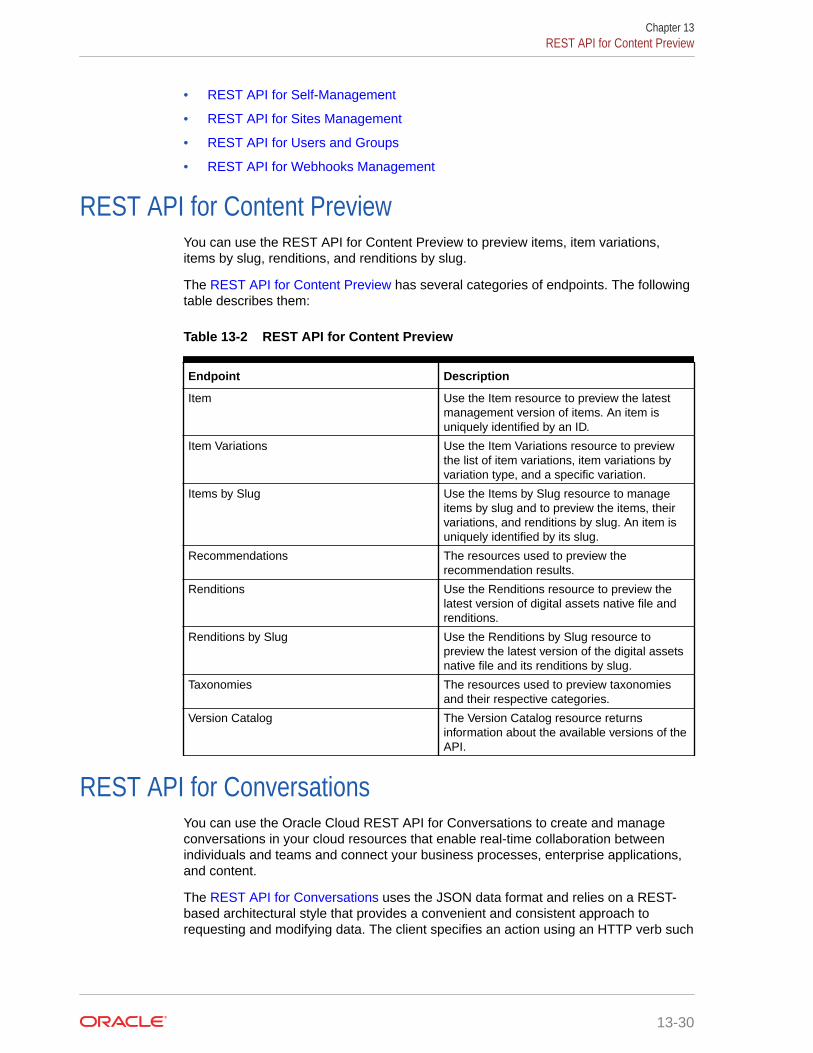
• REST API for Self-Management
• REST API for Sites Management
• REST API for Users and Groups
• REST API for Webhooks Management
REST API for Content PreviewYou can use the REST API for Content Preview to preview items, item variations,items by slug, renditions, and renditions by slug.
The REST API for Content Preview has several categories of endpoints. The followingtable describes them:
Table 13-2 REST API for Content Preview
Endpoint Description
Item Use the Item resource to preview the latestmanagement version of items. An item isuniquely identified by an ID.
Item Variations Use the Item Variations resource to previewthe list of item variations, item variations byvariation type, and a specific variation.
Items by Slug Use the Items by Slug resource to manageitems by slug and to preview the items, theirvariations, and renditions by slug. An item isuniquely identified by its slug.
Recommendations The resources used to preview therecommendation results.
Renditions Use the Renditions resource to preview thelatest version of digital assets native file andrenditions.
Renditions by Slug Use the Renditions by Slug resource topreview the latest version of the digital assetsnative file and its renditions by slug.
Taxonomies The resources used to preview taxonomiesand their respective categories.
Version Catalog The Version Catalog resource returnsinformation about the available versions of theAPI.
REST API for ConversationsYou can use the Oracle Cloud REST API for Conversations to create and manageconversations in your cloud resources that enable real-time collaboration betweenindividuals and teams and connect your business processes, enterprise applications,and content.
The REST API for Conversations uses the JSON data format and relies on a REST-based architectural style that provides a convenient and consistent approach torequesting and modifying data. The client specifies an action using an HTTP verb such
Chapter 13REST API for Content Preview
13-30
as POST, GET, PUT, or DELETE. It specifies a resource using a unique URL in this format:
https://oracleContentInstance-identityName.network.dataCenter.oraclecloud.com/osn/social/api/v1/resource-path
In the URL:
• oracleContentInstance is the name you chose for your Oracle Content ManagementCloud instance when it was provisioned.
• identityName is the identity name you chose when you signed up with Oracle PublicCloud.
• network is the name of your network.
• dataCenter is the data center that Oracle Content Management Cloud is set up to use.
• resource-path is the relative path that defines the resource.
The following topics provide overview information about developing with the REST API forConversations:
• REST API Features for Conversations
• Collaboration Resource
• Configuration Resource for Conversations
• Security Resource
• Social Resource
Oracle Content Management also provides the following REST APIs:
• REST API for Activity Log
• REST API for Content Delivery
• REST API for Content Management
• REST API for Documents
• REST API for Self-Management
• REST API for Sites Management
• REST API for Users and Groups
• REST API for Webhooks Management
REST API Features for ConversationsFeatures of the REST API for Conversations help you develop custom integrations withconversation objects in Oracle Content Management.
• API Security
• API Versioning
• Case Sensitivity
• HTTP Methods
• Optional Fields and Default Values for JSON Data Representations
Chapter 13REST API for Conversations
13-31
• Return Values
• Name Patterns
• URL Encoding
• Pagination
• Filters
• Sort Order
• Localization
• Name Field Length Limit
• HTTP Status Codes and Error Handling
API SecurityAll API invocations happen in the security context of the signed-in user.
Agent users can do actions on the system, either independently or on behalf of aparticular user. In specific situations you might need to use one of the followingproperties. Among agent user techniques, as a best practice you should useImpersonate. Use On Behalf Of or Bypass only on the advice of Oracle support or theOracle integration team.
• Impersonate (in XV1ConnectionUpdateInfo)
During the connection to the server, the impersonation sign in is recorded. Theserver also tracks when the impersonation ends. The audit log tracks the actionsas being done by the user being impersonated; it does not track the impersonatingagent for each action.
The permissions for actions are based on the permission level of the user beingimpersonated.Impersonate is intended for use only in automated processes, suchas for conversation object updates where you want to show that the update wasmade by a particular user. Keep in mind that using Impersonate can degradeanalytics accuracy because it associates actions with the impersonated user.
• On Behalf Of (in XV1ConnectionUpdateInfo) - Allows a user to do a limitednumber of end-user functions on behalf of another user, such as posting amessage to a Conversation or uploading a document. When this privilege is used,the audit log indicates both the user who performed the action and the user onwhose behalf it was performed; in clients, the action is labeled as having beenperformed by the user the action was performed for.
• Bypass (in XV1SocialObjectRole, XV1ConversationRole, andXV1SocialObjectRole) - Allows the user to do any action without failing due toinadequate permissions (although a request might fail for another reason, such asnot being a member of the Conversation being acted on). The Bypass privilege isintended for use only in certain automated processes in a highly secureenvironment.
API VersioningThe current version of the REST API for Conversations is v1. API versions are not tiedto releases of Oracle Content Management.
Chapter 13REST API for Conversations
13-32
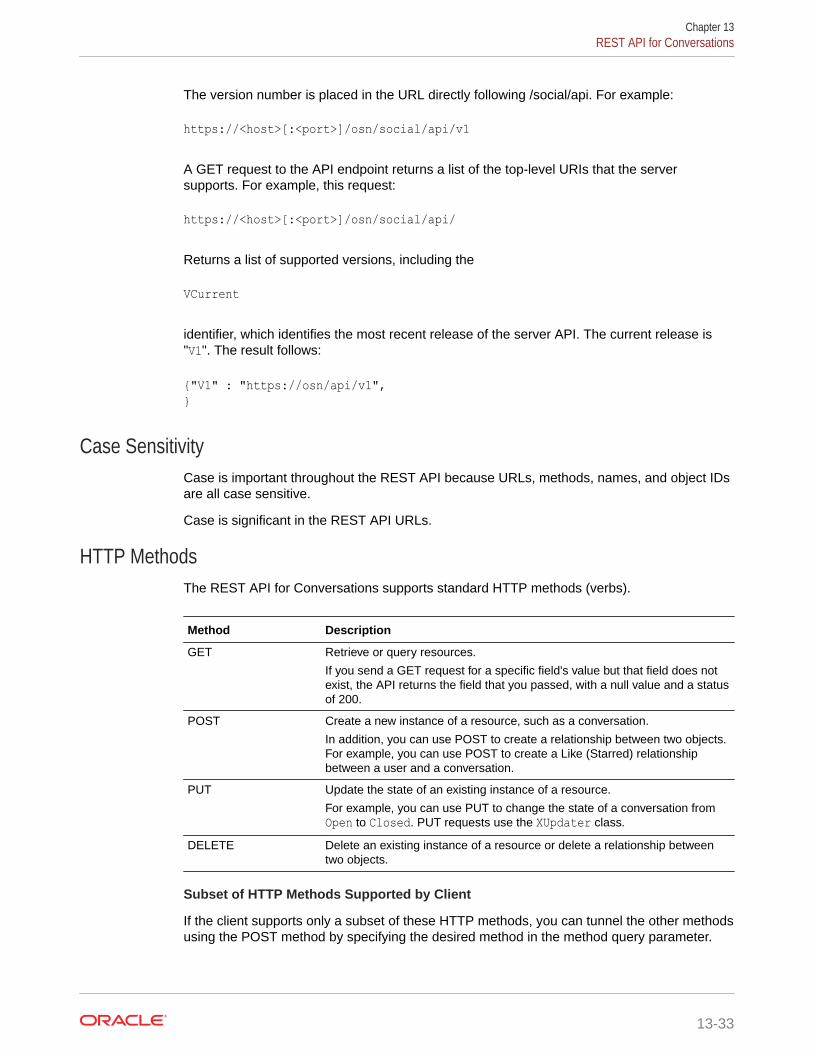
The version number is placed in the URL directly following /social/api. For example:
https://<host>[:<port>]/osn/social/api/v1
A GET request to the API endpoint returns a list of the top-level URIs that the serversupports. For example, this request:
https://<host>[:<port>]/osn/social/api/
Returns a list of supported versions, including the
VCurrent
identifier, which identifies the most recent release of the server API. The current release is"V1". The result follows:
{"V1" : "https://osn/api/v1",}
Case SensitivityCase is important throughout the REST API because URLs, methods, names, and object IDsare all case sensitive.
Case is significant in the REST API URLs.
HTTP MethodsThe REST API for Conversations supports standard HTTP methods (verbs).
Method Description
GET Retrieve or query resources.
If you send a GET request for a specific field's value but that field does notexist, the API returns the field that you passed, with a null value and a statusof 200.
POST Create a new instance of a resource, such as a conversation.
In addition, you can use POST to create a relationship between two objects.For example, you can use POST to create a Like (Starred) relationshipbetween a user and a conversation.
PUT Update the state of an existing instance of a resource.
For example, you can use PUT to change the state of a conversation fromOpen to Closed. PUT requests use the XUpdater class.
DELETE Delete an existing instance of a resource or delete a relationship betweentwo objects.
Subset of HTTP Methods Supported by Client
If the client supports only a subset of these HTTP methods, you can tunnel the other methodsusing the POST method by specifying the desired method in the method query parameter.
Chapter 13REST API for Conversations
13-33
For example, the DELETE operation can be achieved by doing a POST on a resourcewith "method=delete" in the query string portion of the URL.
PUT Requests with XUpdater
When updating an object using a PUT request, such as with XConversationUpdater,you can use XUpdater to specify the value that you want to change. XUpdater is aclass that represents the DTO for updating objects; the updater field actuallyrepresents a map of field values. For example, XUpdater can be reresented as follows:
{"updater": "XUpdater"}
For example, you can use a PUT request to . . ./social/api/v1/conversations/ObjectID with the request payload {"updater":{"SHORT_NAME":"String for shortname"}} to change the short name.
XUpdater is used with Collections, Conversations, Groups, People, and Collaborationobjects.
Optional Fields and Default Values for JSON Data RepresentationsThe API reference documentation uses the term optional in describing JSON datarepresentation fields.
Optional has a slightly different meaning depending on the data type:
• String: default is null if not specified.
• int: default is zero (0) if not specified.
• boolean: default is false if not specified.
Return ValuesYou can control the response payload's content type by specifying the JSON or HTMLMIME type in the "Accept" HTTP header.
The content type defaults to 'application/json'. Examples are presented in JSON.
You can specify the value 'text/html' to get an HTML version of the JSON that isreturned.
Name PatternsAll external class names begin with the letter X, followed by the version number,followed by a noun (for example, Conversation, Message, or People), followed by oneor more modifiers, depending on the function of the class.
The following table describes the class name conventions and the associatedfunctions, using the Conversation resource type as an example.
XV1Conversation. . . Action
Info Get information about a Conversation (GET).
Chapter 13REST API for Conversations
13-34

XV1Conversation. . . Action
CreateInfo Create a Conversation and set properties (POST).
FilterInfo Get Conversations that meet the filter criteria (GET).
MemberCreateInfo Add a member to a Conversation and set properties (POST).
MemberInfo Get information about a member of a Conversation (GET).
MessageCreateInfo Add a message in a Conversation (POST).
PropertyCreateInfo Set properties for a Conversation (POST).
PropertyInfo Get a property for an existing Conversation (GET).
PropertyUpdateInfo Set a property for a Conversation (PUT).
UpdateInfo Update attributes for a Conversation (PUT).
ListInfo Get a list of all Conversations (GET).
MemberListInfo Get a list of all direct members of the Conversation (GET).
PropertyListInfo Get a list of all properties for the Conversation (GET) .
StarListInfo Get a list of starred Conversations and their messages (GET) .
XObjectID
Each object in the REST API for Conversations has a unique ID. From that ID, you can loadthe object, if you have sufficient permissions. Many data transfer objects (DTOs) specify IDsof other objects related to the current object. Some examples include ParentID,ModifiedByUserID, CreatedByUserID, and ConversationID. These are all links or referencesto other objects in the system.
Note that the ID parameter represents a name for fields, an ObjectID or an External ID forConversation objects, and an Object ID or sign in name for users.
URL EncodingFor readability, examples might be shown in literal text, but your requests should always beURL-encoded (percent-encoded).
For example:
/conversations?filter={"LimitToStarred":true,"ExcludeMuted":true}
This example should be URL-encoded as follows:
/conversations?filter=%7B%22LimitToStarred%22%3Atrue%2C%22ExcludeMuted%22%3Atrue%7D
PaginationPagination capabilities are supported by default on all GET operations that have a responsepayload of XV1*ListInfo (for example, XV1ConversationListInfo), unless otherwisespecified.
Chapter 13REST API for Conversations
13-35
You can use offset and count in the query argument, where the default values are 0and 20 respectively. For example:
https://<host:[<port>]/osn/social/api/conversations/<conversationID>/messages?offset=0&count=25
This request gets the first 25 messages, returning them with the newest message first.You can send additional requests to get incrementally older posts in the Conversation.
FiltersFilter capabilities are supported where specified.
To use a filter, specify the filter query argument in JSON format, using URL encodingas appropriate. For example, this request returns starred Conversations but no mutedConversations:
/conversations?filter={"LimitToStarred":true,"ExcludeMuted":true}
Sort OrderThe currently assigned sort order determines the order in which results are returned.
You can change the sort order using the SortField field, which is available inXV1ConversationFilterInfo, XV1SocialObjectFilterInfo, and others. For example, thisrequest returns results sorted by Conversation age, with the newest Conversation first:
/conversations?filter={"LimitToStarred":true,"ExcludeMuted":true,"SortField":CONVERSATION_IS_NEW}
LocalizationThis background information about localization might be useful as you areimplementing or troubleshooting an Oracle Content Management integration.
Some of the concepts described in this section go beyond the REST API.
Localization is performed according to the following steps:
1. Choose a language locale.
a. If an HTTP request exists and has an X-Waggle-ForceLanguage header, thenuse the X-Waggle-ForceLanguage header value as the language locale andgo to step 2.
b. If a particular user is signed in or otherwise identified, check to see if the userhas set a preferred language locale in their user profile. If set, use it and go toStep 2.
A language locale from LDAP will be copied to the user profile in OracleContent Management. If the LDAP realm has sync-on-authenticationenabled, then for each sign in, the LDAP values will overwrite the user profilesettings. However, if the user changes the value in their Oracle Content
Chapter 13REST API for Conversations
13-36
Management profile, it is not written back to LDAP; Oracle Content Managementdoes not write any attributes to LDAP.
If the LDAP Preferred Language is not supported in Oracle Content Management (forexample, ar), English is displayed regardless of the application default languagesetting.
c. If an HTTP request exists and has an Accept-Language header, use the Accept-Language header to select the language locale.
Using the Accept-Language header, perform a lookup as described in RFC-4647section 3.4. This will result in a language locale being chosen based on an exact orpartial match of the header, the available translation bundles, and the bundle of lastresort.
d. If the server has a language locale set, use it.
e. Select the host machine default language locale.
2. Choose a translation bundle with the exact or longest possible partial match of thechosen language locale. If no exact or partial match exists, then choose the bundle forEnglish.
Supported Locale Codes
The currently supported locale codes are:
cs (Czech)da (Danish)de (German)en (English)es (Spanish))fi (Finnish)fr (French)fr-CA (French-Canadian)hu (Hungarian)it (Italian)ja (Japanese)ko (Korean)nl (Dutch)no (Norwegian)pl (Polish)pt-br or pt_BR (Portuguese-Brazilian)ro (Romanian)ru (Russian)sv (Swedish)tr (Turkish)zh-CN or zh_CN (Chinese-Simplified)zh-TW or zh_TW (Chinese-Traditional)
Name Field Length LimitThe Name field for objects, such as Conversation names or User names, has a length limit of256 characters.
Chapter 13REST API for Conversations
13-37
HTTP Status Codes and Error HandlingHTTP status codes for the Collaboration REST API follow.
Status Code Description
200 Request Successful.
4xx Bad requests. Invalid URI, invalid body format.
401 Unauthorized. Should sign in or get a security token.
403 Forbidden. Access denied.
5xx Internal server error.
For all responses, the status code is also available in the actual payload in theStatusCode field. For all non-HTTP Status 200 responses, a message explaining thecause of the error is available in the return value. For example:
{"StatusCode" : "401","StatusCode" : "Unauthorized","ResourceID" : "waggle.modules.realm.InvalidLogin","ResourceMessage" : "Login required."}
Exception Response Fields
Field Description
statusCode The HTTP status code.
statusMessage The HTTP status message.
exceptionID The exception ID.
exceptionClass The exception class.
exceptionMessage The exception message.
exceptionDate The exception date.
Collaboration ResourceUse the Collaboration resource API endpoints to interact with your cloud resourcesthat enable real-time collaboration between individuals and teams and connect yourbusiness processes, enterprise applications, and content.
With the Collaboration resource, you can manage these objects:
• Conversations
• Members of conversations (direct and indirect)
• Documents associated with conversations
• Messages and replies to messages in conversations
• Followups on messages for users
• Applinks and hybrid links for conversations
• Inbound mail tokens
Chapter 13REST API for Conversations
13-38
• Properties and user properties of conversations
• Likes for conversations and messages
• Stars for conversations and messages
Also, you can list folder IDs that have associated conversations.
For endpoint descriptions and examples, see "Collaboration" in REST API for Conversations.
Configuration Resource for ConversationsUse the Configuration resource API endpoints to configure resources and services.
With the Configuration resource, you can manage these configuration properties:
• hasMore
• items
• nextURL
• previousURL
• total (number of available items)
For endpoint descriptions and examples, see "Configuration" in REST API for Conversations.
Security ResourceUse the Security resource API endpoints to manage connections and access.
With the Security resource, you can manage connections for users and conversations.
For endpoint descriptions and examples, see "Security" in REST API for Conversations.
Social ResourceUse the API endpoints of the Social resource to help users mark favorite conversations anddocuments and collaborate with each other.
With the Social resource, you can manage followups and stars for users.
To manage collaboration for other users, you need to have a dedicated "Integration User"role. See Functionality Provided Through User Roles in Administering Oracle ContentManagement.
For endpoint descriptions and examples, see "Social" in REST API for Conversations.
REST API for DocumentsYou can use the Oracle Cloud REST API for Documents to create client applications thatinteract with folders and files stored on an Oracle Content Management server.
The following topics provide overview information about developing with the REST API forDocuments:
• Version History
• REST API Features for Documents
Chapter 13REST API for Documents
13-39
• Applinks Resource
• Catalog Resource
• Collections Resource
• Configuration Resource for Documents
• Files Resource
• Folders Resource
• Metadata Collection Resource
• Publiclinks Resource
• Shares Resource
• Sites Resource
• Templates Resource
• Users Resource
Oracle Content Management also provides the following REST APIs:
• REST API for Activity Log
• REST API for Content Delivery
• REST API for Content Management
• REST API for Conversations
• REST API for Self-Management
• REST API for Sites Management
• REST API for Users and Groups
• REST API for Webhooks Management
Version HistoryThe REST API for Documents identifies its version by including a version number inthe URI in the form of /x.y/ folders, such as /1.2/.
To use a particular implementation of the API, you must reference that version in theURI. For more information about referencing a particular version of the API, see Service Call URI and Version.
Version 1.0
Version 1.0 provides basic folder, file, resource, and version identification services andtheir methods.
Version 1.1
Version 1.1 adds the following major services and their methods:
• Metadata Collection Resource
A metadata collection is a simple way of managing custom metadata fields thatyou can then use to store and retrieve metadata values for individual folders andfiles.
• Users Resource
Chapter 13REST API for Documents
13-40
Service requests and responses that referenced the simple user string in version 1.0 nowreference the user object.
These search requests were added:
– User email search
– Fulltext search for a folder in the user’s home directory
– Fulltext search for a file in the user’s home directory
• Applinks Resource
• Publiclinks Resource
• Shares Resource
• Collections Resource
The Files Resource service includes these additional calls:
• Reserve File (POST)• Unreserve File (POST)• Get File Thumbnail (GET)• Get File Rendition Page Count (GET)• Generate File Renditions (POST)• Get File Page Rendition (GET)The Files Resource also supports additional mimeType, reservedBy, and reservationTimeelements.
Requests were added to the Metadata Collection Resource for these tasks:
• Enable or disable a metadata collection
• Enable or disable fields in a metadata collection
• Get a metadata collection definition
• Get user metadata
• Get share metadata
• Get application links metadata
• Get public links metadata
• Get assigned metadata collections to a file showing enabled or disabled field status
• Get assigned metadata collections to a folder showing enabled or disabled field status
• Delete a metadata collection
The Folders Resource includes additional createdby and modifiedby elements in responses.
The Applinks Resource supports an additional userLocale element.
The Upload File Version (POST) method no longer requires the use of parentID in themultipart request.
An errorKey field was added to responses.
The catalog category was renamed metadata-catalog. The catalog name will continue tobe supported as an alias for metadata-catalog.
Chapter 13REST API for Documents
13-41
Version 1.1 of the REST API for Content Management provides a Web ApplicationDefinition Language (WADL) definition file. Oracle JDeveloper uses this file to interfacewith the API.
The REST API for Content Management 1.1 is the legacy version of the REST API forDocuments.
Version 1.2
Version 1.2 includes all the functionality of Version 1.1 and adds the following majorservices and their methods:
• Sites Resource, for creating a site from an existing site.
• Templates Resource, for creating a site from a template.
The REST API for Documents, Version 1.2, is the ongoing version of the REST API forDocuments.
REST API Features for DocumentsFeatures of the REST API for Documents apply to all services.
The following topics describe these common features:
• REST Overview
• Service Call URI and Version
• Service Request
• Service Response
• Security
• Sort Order
• Pagination
• Links Identification
• HTTP Methods
• HTTP Status Codes
• Error Codes
REST OverviewREST, or Representational State Transfer, uses basic methods such as GET, POST,PUT, and DELETE over a standard protocol, such as HTTPS, to submit requests froma client application to operate on objects stored on a server.
A request is in the form of a uniform resource identifier (URI) that identifies theresource, such as a file or folder, on which to operate and includes any parametersnecessary for the operation. The resource itself is represented by a globally uniqueidentifier (GUID).
Each request from the client to a server contains all of the information necessary tounderstand the request and does not rely on the server to store information about theindividual request or about any relationship between requests. Session state is stored(cached) entirely on the client.
Chapter 13REST API for Documents
13-42
You can use the REST API for Documents to create client applications to interact with foldersand files stored on an Oracle Content Management server.
For information about the hierarchy of the REST API objects and methods, see REST API forDocuments.
Service Call URI and VersionA service call includes an HTTPS method, such as POST, GET, PUT, or DELETE, and aresource identified by a Uniform Resource Identifier (URI).
The URI is in this format:
https://{host}[:port]/serviceid/api/version/resourcePath
Note:
HTTPS is supported. HTTP is not supported.
The REST API identifies its version by including a version number in the URI in the formof /x.y/ folders, where x is incremented for subtractive changes or modifications to existingfunctionality and y is incremented when new features are added. For example:
https://www.example.com/documents/api/1.1
The Catalog Resource lists the currently supported API versions for the instance.
Service RequestA REST API supports a direct URL and JSON data format for service requests.
REST API for Documents includes examples of service requests.
URL Parameters
Unless otherwise noted, you can include service request parameters directly in the URL. Thefollowing example of the Query User (GET) service call includes the required infoparameter in the URL itself:
https://www.example.com/documents/api/1.1/users/items?info=smith
JSON Parameters
Unless otherwise noted, you can submit service request parameters in JSON format. Thefollowing example shows a simple service call and the info parameter in a JSON-formattedrequest:
https://www.example.com/documents/api/1.1/users/items
{ "info": "smith"}
Chapter 13REST API for Documents
13-43
Multipart Requests
Some service calls require a multipart request. For these types of requests, you mustinclude the parameters in a JSON-formatted request. For an example of a multipartrequest, see the Examples tab of "Upload File Version" under "Files" in REST API forDocuments.
Header Parameters
Some types of information, such as authentication information, are passed in therequest header rather than in the body of the request. This is also true for servicerequests that use an application link (applink). An applink grants access to a particularfile or folder resource for a particular user. The applink enables you toprogrammatically carry out other operations on that resource on behalf of theassociated user for a period of time. A service call that uses an applink includes theapplink identifier and its access token in the header.
For an example, see the applink header parameters on the Examples tab of "RefreshApplink Token" under "Applinks" in REST API for Documents.
For more information about applinks, see Applinks Resource.
Service ResponseThe REST API supports the JSON and XML data formats for service responses.
The Download File (GET) service call returns the contents of a specified file.
You can specify the data format for the response using the Accept HTTP header. If youdon't specify a data format, JSON is used by default for the response. For example:
Accept: application/xml
The service response includes a general status code and, in some cases, a faultresponse body to help diagnose the issue. This information is returned in the specifiedJSON or XML format.
Requests that do not reach a valid API endpoint, such as improperly formed requests,may return a response in a format other than JSON or XML. These types of errorstypically occur during code development, not with properly tested and deployedapplications.
Examples of service responses are included with the API descriptions in REST API forDocuments.
SecurityOracle Content Management uses a multilayered approach to protect your system andcontent.
Security Feature Description Who Manages It and Where
User accounts You need an account with a username and password to accessOracle Content Management.
Identity domain administratorsmanage user accounts in theInfrastructure Classic Console.
Chapter 13REST API for Documents
13-44
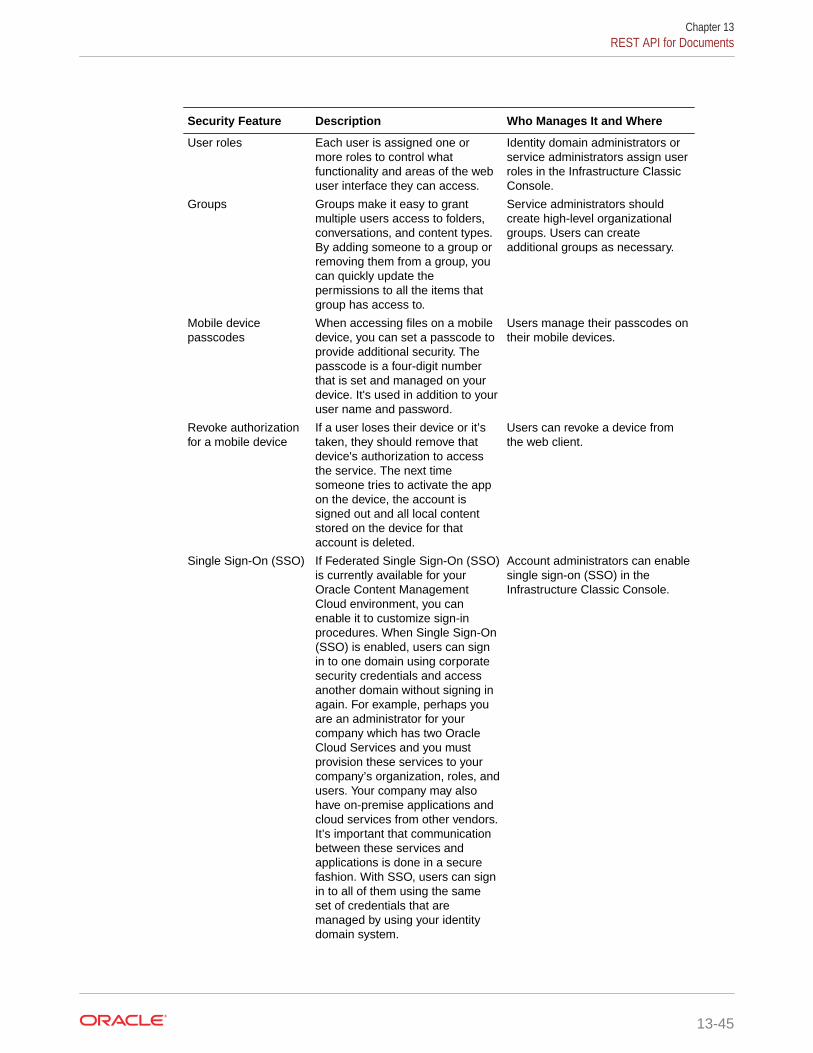
Security Feature Description Who Manages It and Where
User roles Each user is assigned one ormore roles to control whatfunctionality and areas of the webuser interface they can access.
Identity domain administrators orservice administrators assign userroles in the Infrastructure ClassicConsole.
Groups Groups make it easy to grantmultiple users access to folders,conversations, and content types.By adding someone to a group orremoving them from a group, youcan quickly update thepermissions to all the items thatgroup has access to.
Service administrators shouldcreate high-level organizationalgroups. Users can createadditional groups as necessary.
Mobile devicepasscodes
When accessing files on a mobiledevice, you can set a passcode toprovide additional security. Thepasscode is a four-digit numberthat is set and managed on yourdevice. It's used in addition to youruser name and password.
Users manage their passcodes ontheir mobile devices.
Revoke authorizationfor a mobile device
If a user loses their device or it’staken, they should remove thatdevice's authorization to accessthe service. The next timesomeone tries to activate the appon the device, the account issigned out and all local contentstored on the device for thataccount is deleted.
Users can revoke a device fromthe web client.
Single Sign-On (SSO) If Federated Single Sign-On (SSO)is currently available for yourOracle Content ManagementCloud environment, you canenable it to customize sign-inprocedures. When Single Sign-On(SSO) is enabled, users can signin to one domain using corporatesecurity credentials and accessanother domain without signing inagain. For example, perhaps youare an administrator for yourcompany which has two OracleCloud Services and you mustprovision these services to yourcompany’s organization, roles, andusers. Your company may alsohave on-premise applications andcloud services from other vendors.It’s important that communicationbetween these services andapplications is done in a securefashion. With SSO, users can signin to all of them using the sameset of credentials that aremanaged by using your identitydomain system.
Account administrators can enablesingle sign-on (SSO) in theInfrastructure Classic Console.
Chapter 13REST API for Documents
13-45
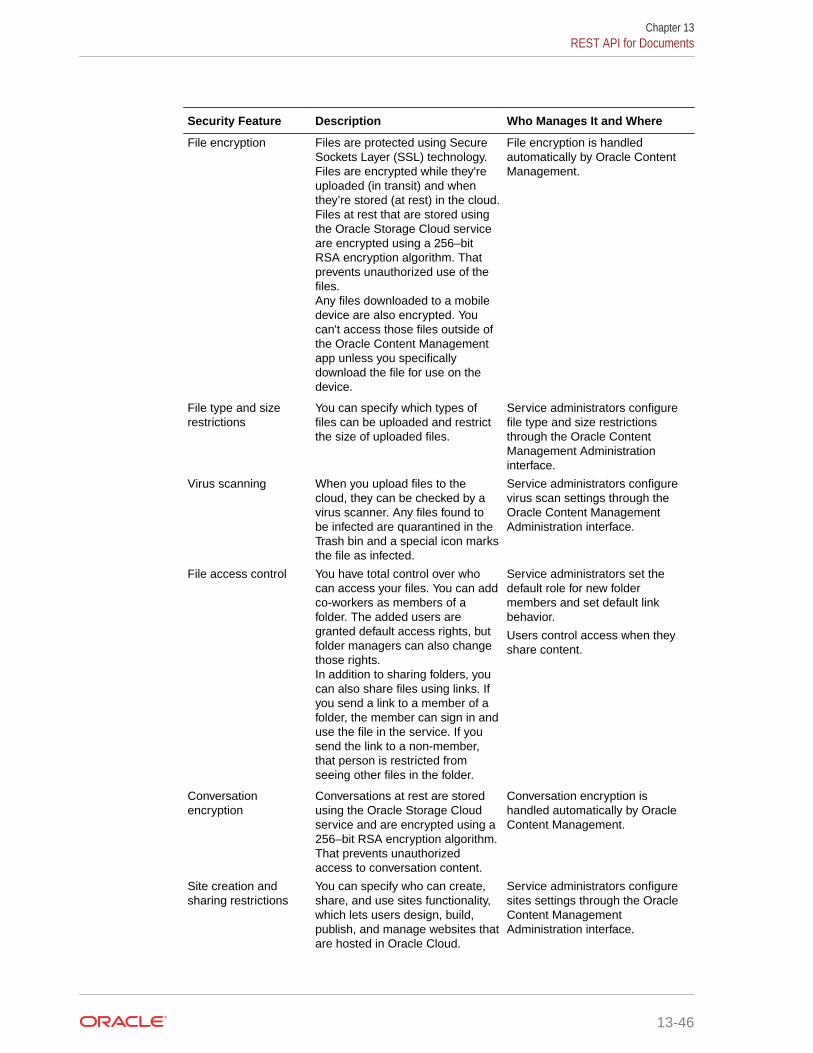
Security Feature Description Who Manages It and Where
File encryption Files are protected using SecureSockets Layer (SSL) technology.Files are encrypted while they'reuploaded (in transit) and whenthey’re stored (at rest) in the cloud.Files at rest that are stored usingthe Oracle Storage Cloud serviceare encrypted using a 256–bitRSA encryption algorithm. Thatprevents unauthorized use of thefiles.Any files downloaded to a mobiledevice are also encrypted. Youcan't access those files outside ofthe Oracle Content Managementapp unless you specificallydownload the file for use on thedevice.
File encryption is handledautomatically by Oracle ContentManagement.
File type and sizerestrictions
You can specify which types offiles can be uploaded and restrictthe size of uploaded files.
Service administrators configurefile type and size restrictionsthrough the Oracle ContentManagement Administrationinterface.
Virus scanning When you upload files to thecloud, they can be checked by avirus scanner. Any files found tobe infected are quarantined in theTrash bin and a special icon marksthe file as infected.
Service administrators configurevirus scan settings through theOracle Content ManagementAdministration interface.
File access control You have total control over whocan access your files. You can addco-workers as members of afolder. The added users aregranted default access rights, butfolder managers can also changethose rights.In addition to sharing folders, youcan also share files using links. Ifyou send a link to a member of afolder, the member can sign in anduse the file in the service. If yousend the link to a non-member,that person is restricted fromseeing other files in the folder.
Service administrators set thedefault role for new foldermembers and set default linkbehavior.
Users control access when they share content.
Conversationencryption
Conversations at rest are storedusing the Oracle Storage Cloudservice and are encrypted using a256–bit RSA encryption algorithm.That prevents unauthorizedaccess to conversation content.
Conversation encryption ishandled automatically by OracleContent Management.
Site creation andsharing restrictions
You can specify who can create,share, and use sites functionality,which lets users design, build,publish, and manage websites thatare hosted in Oracle Cloud.
Service administrators configuresites settings through the OracleContent ManagementAdministration interface.
Chapter 13REST API for Documents
13-46
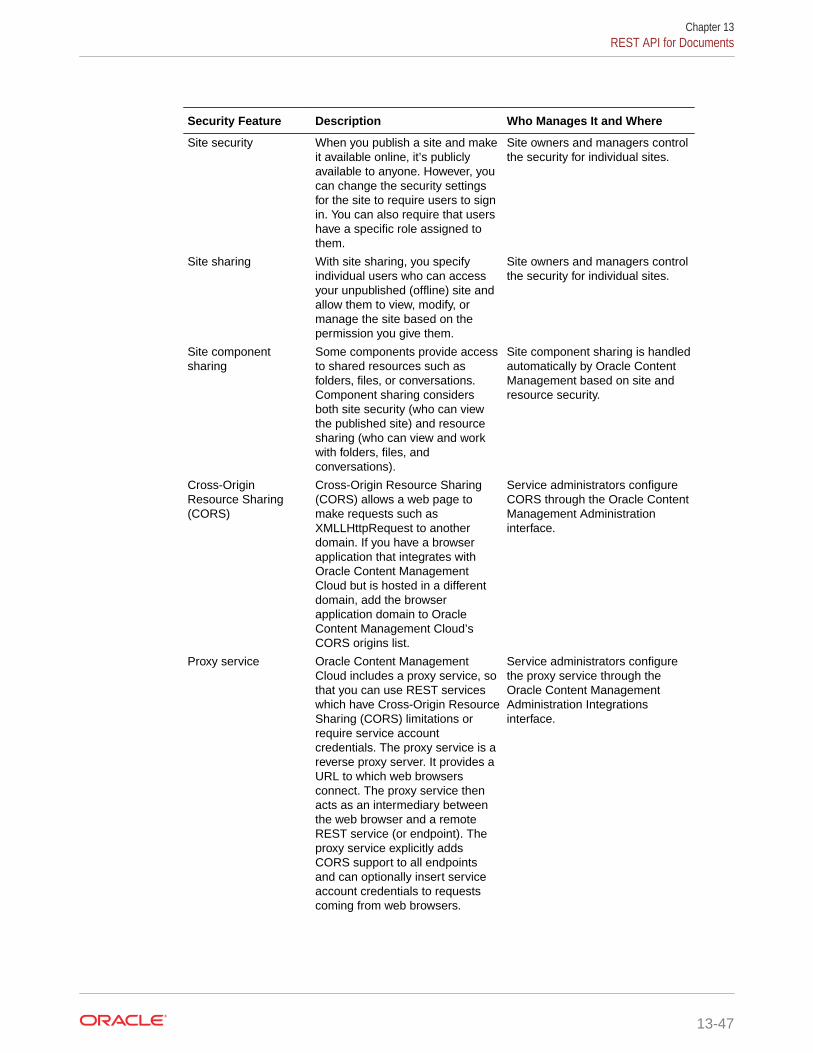
Security Feature Description Who Manages It and Where
Site security When you publish a site and makeit available online, it’s publiclyavailable to anyone. However, youcan change the security settingsfor the site to require users to signin. You can also require that usershave a specific role assigned tothem.
Site owners and managers controlthe security for individual sites.
Site sharing With site sharing, you specifyindividual users who can accessyour unpublished (offline) site andallow them to view, modify, ormanage the site based on thepermission you give them.
Site owners and managers controlthe security for individual sites.
Site componentsharing
Some components provide accessto shared resources such asfolders, files, or conversations.Component sharing considersboth site security (who can viewthe published site) and resourcesharing (who can view and workwith folders, files, andconversations).
Site component sharing is handledautomatically by Oracle ContentManagement based on site andresource security.
Cross-OriginResource Sharing(CORS)
Cross-Origin Resource Sharing(CORS) allows a web page tomake requests such asXMLLHttpRequest to anotherdomain. If you have a browserapplication that integrates withOracle Content ManagementCloud but is hosted in a differentdomain, add the browserapplication domain to OracleContent Management Cloud’sCORS origins list.
Service administrators configureCORS through the Oracle ContentManagement Administrationinterface.
Proxy service Oracle Content ManagementCloud includes a proxy service, sothat you can use REST serviceswhich have Cross-Origin ResourceSharing (CORS) limitations orrequire service accountcredentials. The proxy service is areverse proxy server. It provides aURL to which web browsersconnect. The proxy service thenacts as an intermediary betweenthe web browser and a remoteREST service (or endpoint). Theproxy service explicitly addsCORS support to all endpointsand can optionally insert serviceaccount credentials to requestscoming from web browsers.
Service administrators configurethe proxy service through theOracle Content ManagementAdministration Integrationsinterface.
Chapter 13REST API for Documents
13-47
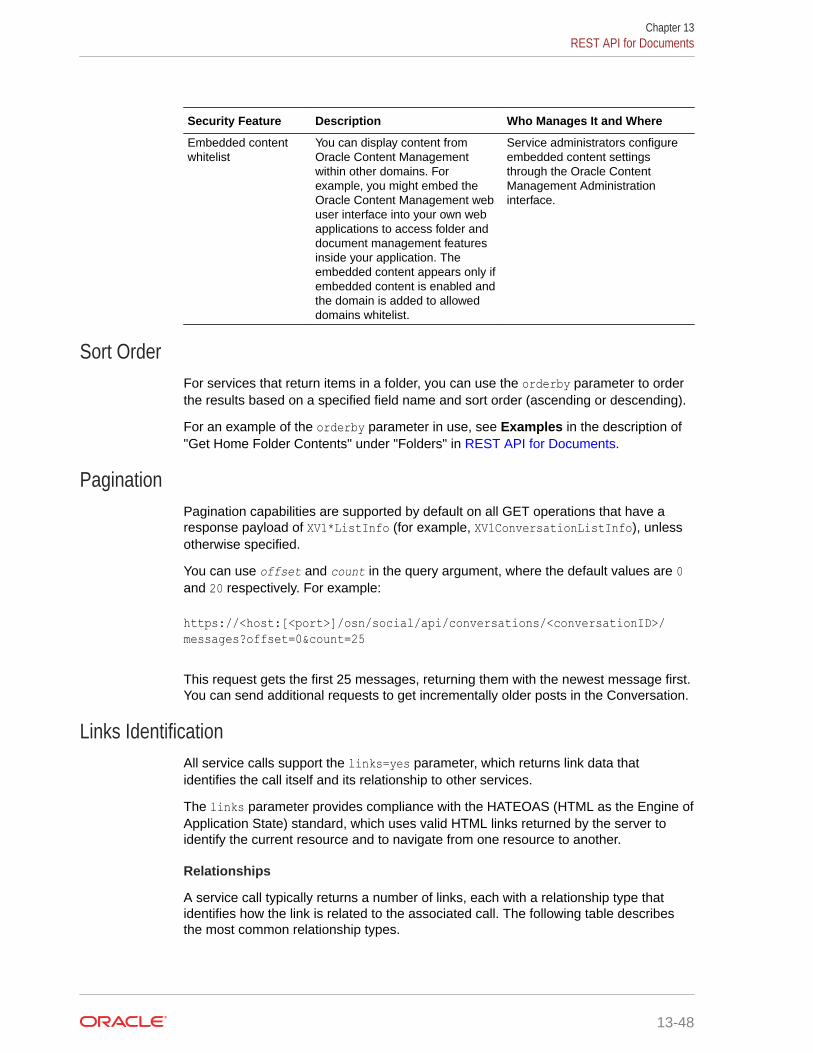
Security Feature Description Who Manages It and Where
Embedded contentwhitelist
You can display content fromOracle Content Managementwithin other domains. Forexample, you might embed theOracle Content Management webuser interface into your own webapplications to access folder anddocument management featuresinside your application. Theembedded content appears only ifembedded content is enabled andthe domain is added to alloweddomains whitelist.
Service administrators configureembedded content settingsthrough the Oracle ContentManagement Administrationinterface.
Sort OrderFor services that return items in a folder, you can use the orderby parameter to orderthe results based on a specified field name and sort order (ascending or descending).
For an example of the orderby parameter in use, see Examples in the description of"Get Home Folder Contents" under "Folders" in REST API for Documents.
PaginationPagination capabilities are supported by default on all GET operations that have aresponse payload of XV1*ListInfo (for example, XV1ConversationListInfo), unlessotherwise specified.
You can use offset and count in the query argument, where the default values are 0and 20 respectively. For example:
https://<host:[<port>]/osn/social/api/conversations/<conversationID>/messages?offset=0&count=25
This request gets the first 25 messages, returning them with the newest message first.You can send additional requests to get incrementally older posts in the Conversation.
Links IdentificationAll service calls support the links=yes parameter, which returns link data thatidentifies the call itself and its relationship to other services.
The links parameter provides compliance with the HATEOAS (HTML as the Engine ofApplication State) standard, which uses valid HTML links returned by the server toidentify the current resource and to navigate from one resource to another.
Relationships
A service call typically returns a number of links, each with a relationship type thatidentifies how the link is related to the associated call. The following table describesthe most common relationship types.
Chapter 13REST API for Documents
13-48
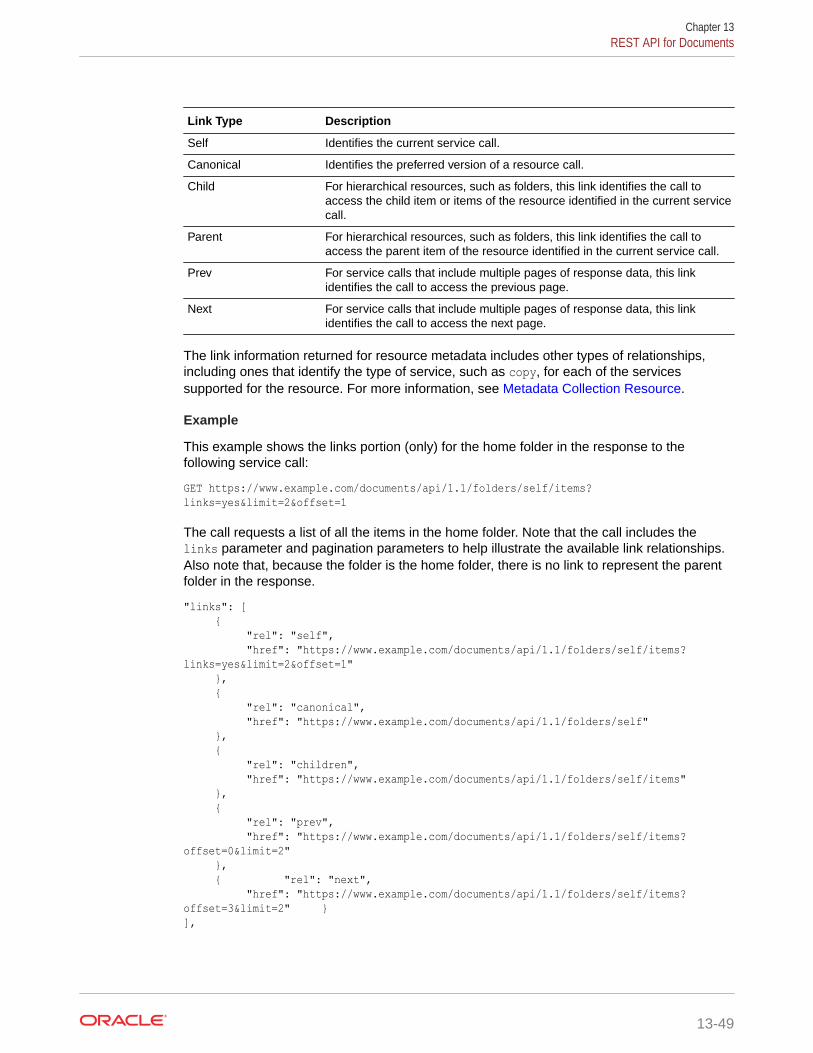
Link Type Description
Self Identifies the current service call.
Canonical Identifies the preferred version of a resource call.
Child For hierarchical resources, such as folders, this link identifies the call toaccess the child item or items of the resource identified in the current servicecall.
Parent For hierarchical resources, such as folders, this link identifies the call toaccess the parent item of the resource identified in the current service call.
Prev For service calls that include multiple pages of response data, this linkidentifies the call to access the previous page.
Next For service calls that include multiple pages of response data, this linkidentifies the call to access the next page.
The link information returned for resource metadata includes other types of relationships,including ones that identify the type of service, such as copy, for each of the servicessupported for the resource. For more information, see Metadata Collection Resource.
Example
This example shows the links portion (only) for the home folder in the response to thefollowing service call:
GET https://www.example.com/documents/api/1.1/folders/self/items?links=yes&limit=2&offset=1
The call requests a list of all the items in the home folder. Note that the call includes thelinks parameter and pagination parameters to help illustrate the available link relationships.Also note that, because the folder is the home folder, there is no link to represent the parentfolder in the response.
"links": [ { "rel": "self", "href": "https://www.example.com/documents/api/1.1/folders/self/items?links=yes&limit=2&offset=1" }, { "rel": "canonical", "href": "https://www.example.com/documents/api/1.1/folders/self" }, { "rel": "children", "href": "https://www.example.com/documents/api/1.1/folders/self/items" }, { "rel": "prev", "href": "https://www.example.com/documents/api/1.1/folders/self/items?offset=0&limit=2" }, { "rel": "next", "href": "https://www.example.com/documents/api/1.1/folders/self/items?offset=3&limit=2" }],
Chapter 13REST API for Documents
13-49

HTTP MethodsThe REST API for Documents supports the following standard HTTP methods.
Method Description
GET Request information from the specified resource.
POST Create a new instance of a resource.
PUT Update an existing resource.
DELETE Delete a resource.
HTTP Status CodesA REST action returns a general status code.
For descriptions of the HTTP status codes that the REST API for Documents provides,see "Status Codes" under "Get Started" in REST API for Documents.
Error CodesSome status codes are accompanied by a fault response body to help you diagnosethe issue.
The following table describes general error codes returned by the errorCode field inthe fault response body for an action. The errorMessage field in the response providesa more detailed description of the error.
Error Code Description
0 The action was successful.
-1 General failure. This code is returned when a more specific statuscode is not available.
-16 A folder or file with the specified name or ID does not exist in thespecified location. This is typically returned as an HTTP 404 responsecode.
-17 A folder or file with the same name already exists in the target location.
-20 The user does not have sufficient privileges to perform the requestedoperation. This is typically returned as an HTTP 403 response code.
-26 The link is invalid or expired. This is typically returned as an HTTP 400response code.
The following example shows the error code and message portion of a response:
{ "errorCode": "-16", "errorMessage": "Security validation failed. 'FABCDEFGHIJKLMNOPQRSTUVWT0000000000100000001' does not exist. The error was caused by an internally generated issue. The error has been logged."}
Chapter 13REST API for Documents
13-50
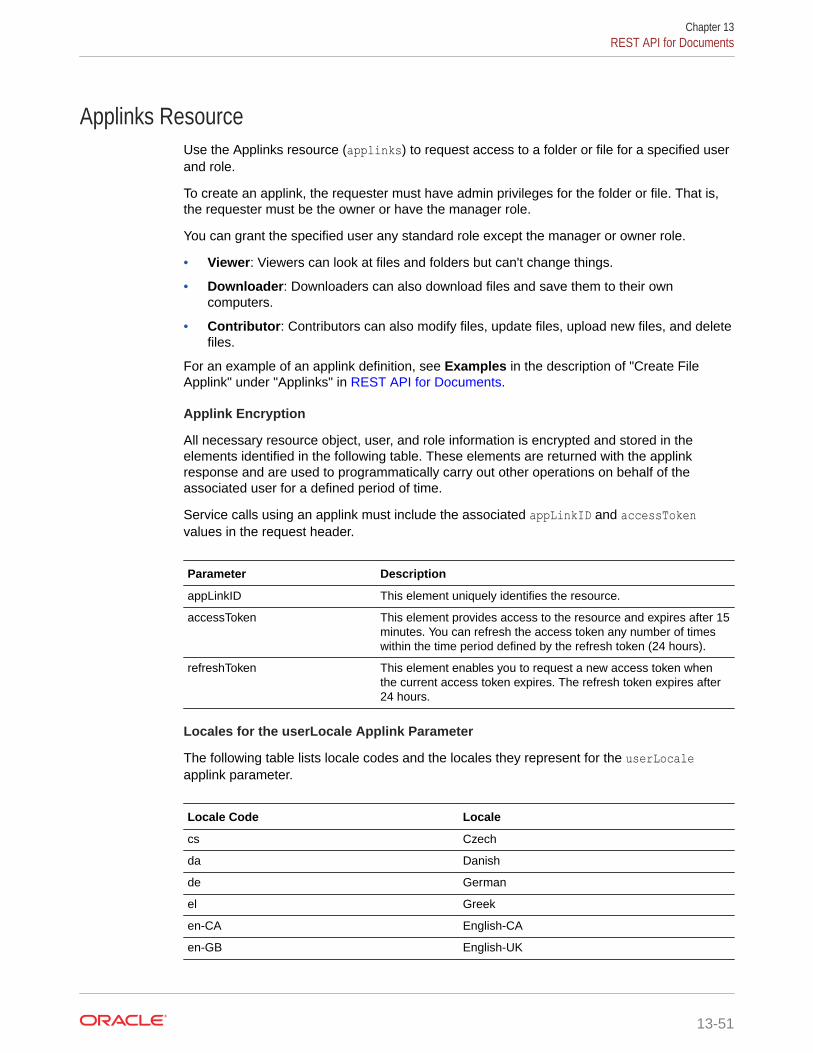
Applinks ResourceUse the Applinks resource (applinks) to request access to a folder or file for a specified userand role.
To create an applink, the requester must have admin privileges for the folder or file. That is,the requester must be the owner or have the manager role.
You can grant the specified user any standard role except the manager or owner role.
• Viewer: Viewers can look at files and folders but can't change things.
• Downloader: Downloaders can also download files and save them to their owncomputers.
• Contributor: Contributors can also modify files, update files, upload new files, and deletefiles.
For an example of an applink definition, see Examples in the description of "Create FileApplink" under "Applinks" in REST API for Documents.
Applink Encryption
All necessary resource object, user, and role information is encrypted and stored in theelements identified in the following table. These elements are returned with the applinkresponse and are used to programmatically carry out other operations on behalf of theassociated user for a defined period of time.
Service calls using an applink must include the associated appLinkID and accessTokenvalues in the request header.
Parameter Description
appLinkID This element uniquely identifies the resource.
accessToken This element provides access to the resource and expires after 15minutes. You can refresh the access token any number of timeswithin the time period defined by the refresh token (24 hours).
refreshToken This element enables you to request a new access token whenthe current access token expires. The refresh token expires after24 hours.
Locales for the userLocale Applink Parameter
The following table lists locale codes and the locales they represent for the userLocaleapplink parameter.
Locale Code Locale
cs Czech
da Danish
de German
el Greek
en-CA English-CA
en-GB English-UK
Chapter 13REST API for Documents
13-51
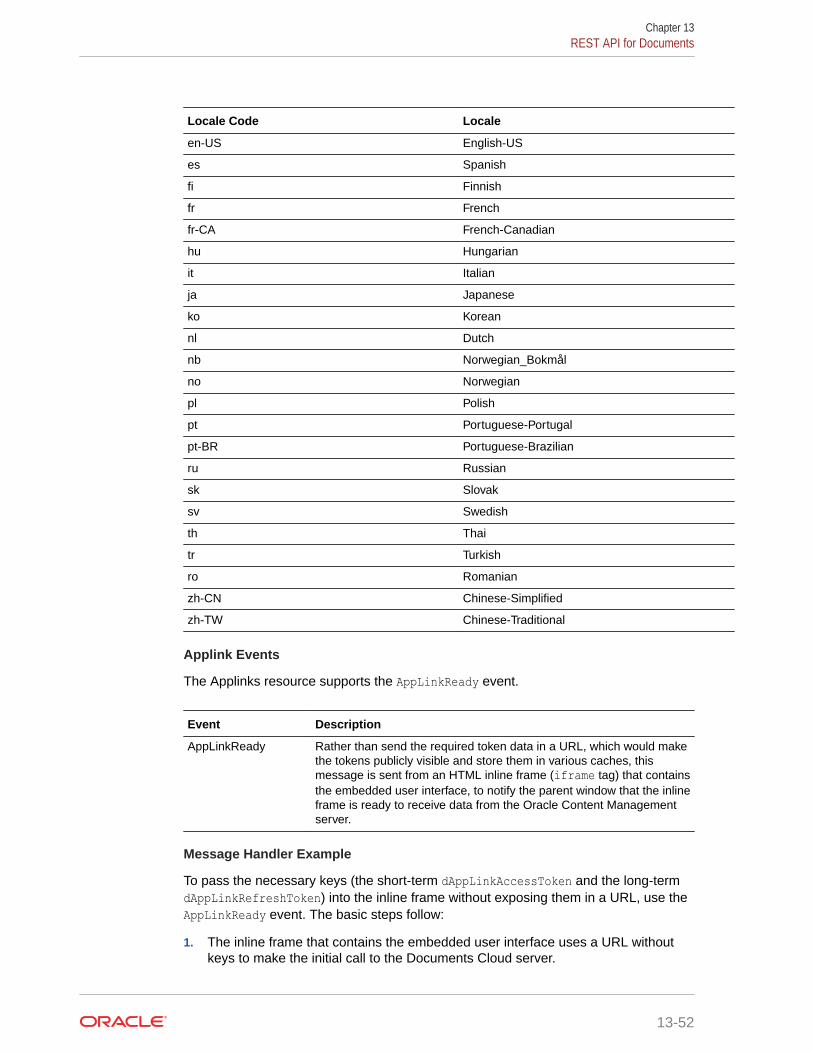
Locale Code Locale
en-US English-US
es Spanish
fi Finnish
fr French
fr-CA French-Canadian
hu Hungarian
it Italian
ja Japanese
ko Korean
nl Dutch
nb Norwegian_Bokmål
no Norwegian
pl Polish
pt Portuguese-Portugal
pt-BR Portuguese-Brazilian
ru Russian
sk Slovak
sv Swedish
th Thai
tr Turkish
ro Romanian
zh-CN Chinese-Simplified
zh-TW Chinese-Traditional
Applink Events
The Applinks resource supports the AppLinkReady event.
Event Description
AppLinkReady Rather than send the required token data in a URL, which would makethe tokens publicly visible and store them in various caches, thismessage is sent from an HTML inline frame (iframe tag) that containsthe embedded user interface, to notify the parent window that the inlineframe is ready to receive data from the Oracle Content Managementserver.
Message Handler Example
To pass the necessary keys (the short-term dAppLinkAccessToken and the long-termdAppLinkRefreshToken) into the inline frame without exposing them in a URL, use theAppLinkReady event. The basic steps follow:
1. The inline frame that contains the embedded user interface uses a URL withoutkeys to make the initial call to the Documents Cloud server.
Chapter 13REST API for Documents
13-52
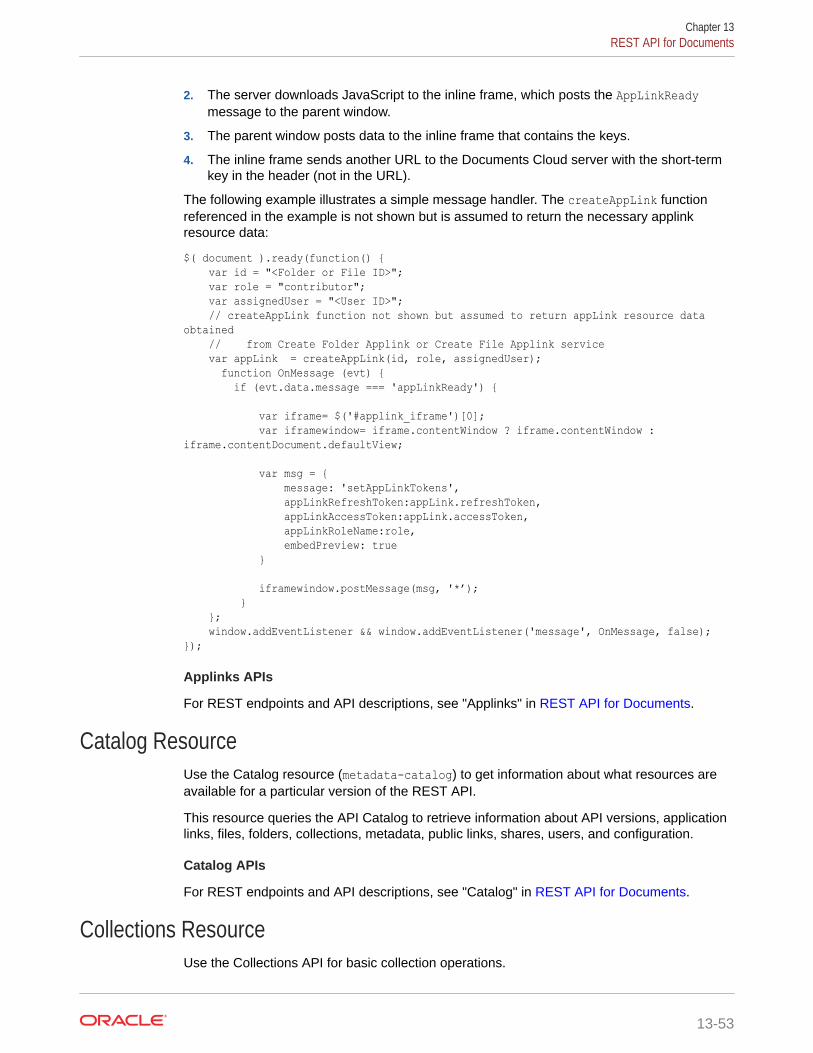
2. The server downloads JavaScript to the inline frame, which posts the AppLinkReadymessage to the parent window.
3. The parent window posts data to the inline frame that contains the keys.
4. The inline frame sends another URL to the Documents Cloud server with the short-termkey in the header (not in the URL).
The following example illustrates a simple message handler. The createAppLink functionreferenced in the example is not shown but is assumed to return the necessary applinkresource data:
$( document ).ready(function() { var id = "<Folder or File ID>"; var role = "contributor"; var assignedUser = "<User ID>"; // createAppLink function not shown but assumed to return appLink resource data obtained // from Create Folder Applink or Create File Applink service var appLink = createAppLink(id, role, assignedUser); function OnMessage (evt) { if (evt.data.message === 'appLinkReady') { var iframe= $('#applink_iframe')[0]; var iframewindow= iframe.contentWindow ? iframe.contentWindow : iframe.contentDocument.defaultView;
var msg = { message: 'setAppLinkTokens', appLinkRefreshToken:appLink.refreshToken, appLinkAccessToken:appLink.accessToken, appLinkRoleName:role, embedPreview: true } iframewindow.postMessage(msg, '*’); } }; window.addEventListener && window.addEventListener('message', OnMessage, false);});
Applinks APIs
For REST endpoints and API descriptions, see "Applinks" in REST API for Documents.
Catalog ResourceUse the Catalog resource (metadata-catalog) to get information about what resources areavailable for a particular version of the REST API.
This resource queries the API Catalog to retrieve information about API versions, applicationlinks, files, folders, collections, metadata, public links, shares, users, and configuration.
Catalog APIs
For REST endpoints and API descriptions, see "Catalog" in REST API for Documents.
Collections ResourceUse the Collections API for basic collection operations.
Chapter 13REST API for Documents
13-53
You can create and delete collections, add assets to collections, remove assets, andretrieve a list of collections.
Collections Endpoints
For Collections REST endpoints and API descriptions, see "Collections" in REST APIfor Documents.
Configuration Resource for DocumentsThe Configuration resource for documents provides information about theCollaboration and Content Delivery Network (CDN) configurations.
The Get Collaboration Configuration endpoint retrieves the client URL, cList URL,OAuth client URL, OAuth cList URL, REST URL, and Service URL.
The Get CDN Configuration endpoint retrieves the CDN URL and description.
For REST endpoints and API descriptions, see "Configuration" in REST API forDocuments.
Files ResourceUse the Files resource (files) to manage files in a file system. A file is a uniquelyidentified item associated with a folder (or parent). The parameters of the resourcedefinition describe a physical file object.
Most operations, such as copy, move, and delete, are performed using only theinformation in the file resource definition. Actions that upload a new file or a new filerevision require a multipart request that also identifies the content of the physical fileobject.
For an example of a file definition, see the Examples tab in the description of "Get FileInformation" under "Files" in REST API for Documents.
Files Endpoints
For Files REST endpoints and API descriptions, see "Files" in REST API forDocuments.
Folders ResourceUse the Folders resource (folders) to manage folders in a file system. A folder is auniquely identified item associated with a "parent" folder and optionally with folder andfile "child" items.
These parent and child relationships create a hierarchy similar to the familiar folderstructure in a conventional file system.
For an example of a folder definition, see the "Examples" tab in the description of "GetFolder" under "Folders" in REST API for Documents.
Folders APIs
For REST endpoints and API descriptions, see "Folders" in REST API for Documents.
Chapter 13REST API for Documents
13-54
Metadata Collection ResourceUse the Metadata Collection resource (metadata) to manage folder and file metadata. Ametadata collection is a simple way of managing custom metadata fields that you can thenuse to store and retrieve metadata values for individual folders and files.
Within a collection, you can create one or more fields. To assign values to the fields in ametadata collection, you must first assign the collection to a particular folder or file. You canassign a collection to one or more folders or files, and any folder or file can have one or morecollections assigned to it.
With a collection, you can add or remove fields and manage the group of fields as a whole.When you assign a collection to a folder or file, you effectively add the fields to the metadatafor the folder or file. The values you assign to the fields are stored and retrieved as part of themetadata for the folder or file itself.
Metadata Inheritance
Custom metadata fields that you create and manage in a collection follow the same rules ofinheritance that standard metadata fields follow. Metadata fields assigned to a folder areavailable to all folders and files in the hierarchy beneath that folder. Similarly, the values youassign to those fields are inherited by all folders and files nested beneath that folder unlessexplicitly defined for a nested folder or file. Metadata values specified for a folder or filereplace the inherited value for that folder and, by the same rules of inheritance, for anyfolders or files in the hierarchy nested beneath that folder.
Field References
When setting or removing field values within a collections, there are two ways to referencecollections and fields.
You can reference the collection and field names independently. Field references on thesame service call use the specified collection implicitly:
/metadata?collection={collection name}&{field name}={field value}[&{field name}={field value}]
Alternatively, you can specify the collection and field name with each field reference:
/metadata?{collection name}.{field name}={field value}[&{collection name}.{field name}={field value}]
Metadata Collection APIs
For REST endpoints and API descriptions, see "Metadata Collection" in REST API forDocuments.
Publiclinks ResourceUse the Publiclinks resource (publiclinks) to request access to a folder or file for any user,whether the user has an account or not.
Chapter 13REST API for Documents
13-55
You can have multiple, named links for the same resource with different access roles,expiration dates, and so on. You can also edit some of the information for an existingpublic link.
For an example of a publiclinks definition, see the Examples tab in the definition of"Get Public Link" under "Publiclinks" in REST API for Documents.
Publiclinks APIs
For REST endpoints and API descriptions, see "Publiclinks" in REST API forDocuments.
Shares ResourceUse the Shares resource (shares) to share a folder and its contents with a specifieduser.
For information about finding users, see “Get Users" or "Get User with Email Address"under "Users" in REST API for Documents.
When you share folders, you control the permissions each person has for the folderand its files by assigning a role to the person. The different roles determine what aperson can do with a shared file.
• Viewer: Viewers can look at files and folders but can't change things.
• Downloader: Downloaders can also download files and save them to their owncomputers.
• Contributor: Contributors can also modify files, update files, upload new files, anddelete files.
• Manager: Managers have all the privileges of the other roles and can add orremove other people as members.
Shares APIs
For REST endpoints and API descriptions, see "Shares" in REST API for Documents.
Sites ResourceUse the Sites resource (sites) to create an Oracle Content Management site fromanother site.
The Sites API provides basic site operations.
Sites APIs
For REST endpoints and API descriptions, see "Sites" in REST API for Documents.
Templates ResourceUse the Templates resource (templates) to create a site from a template.
The Templates API provides basic template operations.
Chapter 13REST API for Documents
13-56

Templates APIs
For REST endpoints and API descriptions, see "Templates" in REST API for Documents.
Users ResourceThe Users resource (users) provides basic information about users to identify them for foldersharing and file sharing.
Users APIs
For REST endpoints and API descriptions, see "Users" in REST API for Documents.
REST API for Self-ManagementThe Oracle Cloud REST API for Self-Management provides the ability to view authenticateduser details.
The REST API for Self-Management has a category for you to view user details:
Self-Management: Get details about an authenticated user.
REST API for Sites ManagementThe Oracle Cloud REST API for Sites Management provides the ability to create sites fromtemplates and then manage the life cycle of those sites in Oracle Content Management.
The REST API for Sites Management has several categories of endpoints, which thefollowing table describes.
Category Description
Components Import, export, list, read, copy, update, publish, share, delete, restore, andshare components.
Content Cache Force a refresh of the prerendered site content cache.
Policies Manage policies and manage the membership of policies with access lists.You can read and edit policies associated with site management operationsand control who can perform site management operations using access lists.
Requests Requests are made when creating a site. A site request is rejected orapproved through a review. You can list requests relating to sites editrequests that have been rejected, and retry failed requests. Also, you canview reviews for site requests. Approve or reject requests for new sites orrequests to copy sites.
Sites Create, list, read, copy, share, delete, restore, publish, activate, anddeactivate sites. Get the progress of site-related jobs and information suchas the associated repository and the user that created or last modified aresource. List sites and requests of a site.
Templates Import, export, list, read, copy, share, delete, and restore templates. List sitetemplates and images. Get the progress of template-related jobs.
You can also create policies and associate them with a template to be usedwhen creating a site, or delete policies associated with templates. You canuse policies to enforce site-creation approval, who can use a template, andwhat security the site will have.
Themes Import, list, read, copy, publish, update, share, delete, and restore themes.
Chapter 13REST API for Self-Management
13-57
Category Description
Vanity Domain Configure the vanity domain used by a site. A customer that owns a domaincan configure a site to use the domain as its vanity domain.
Oracle Content Management also provides the following REST APIs:
• REST API for Activity Log
• REST API for Content Delivery
• REST API for Content Management
• REST API for Conversations
• REST API for Documents
• REST API for Users and Groups
• REST API for Self-Management
• REST API for Webhooks Management
REST API for Users and GroupsYou can use the Oracle Cloud REST API for Users and Groups to manage users,groups, one-on-one conversations, and pictures.
With the REST API for Users and Groups, you can manage this object:
• People
The REST API for Users and Groups uses the JSON data format and relies on aREST-based architectural style that provides a convenient and consistent approach torequesting and modifying data. The client specifies an action using an HTTP verb suchas POST, GET, PUT, or DELETE. It specifies a resource using a unique URL in thisformat:
https://oracleContentInstance-identityName.network.dataCenter.oraclecloud.com/osn/social/api/v1/resource-path
In the URI:
• oracleContentInstance is the name you chose for your Oracle ContentManagement Cloud instance when it was provisioned.
• identityName is the identity name you chose when you signed up with OraclePublic Cloud.
• network is the name of your network.
• dataCenter is the data center that Oracle Content Management Cloud is set up touse.
• resource-path is the relative path that defines the resource.
Oracle Content Management also provides the following REST APIs:
• REST API for Activity Log
Chapter 13REST API for Users and Groups
13-58

• REST API for Content Delivery
• REST API for Content Management
• REST API Features for Conversations
• REST API for Documents
• REST API for Self-Management
• REST API for Sites Management
• REST API for Webhooks Management
REST API for Webhooks ManagementThe Oracle Cloud REST API for Webhooks Management provides the ability to managewebhooks in Oracle Content Management.
The REST API for Webhooks Management has the categories of endpoints listed in thefollowing table.
Category Description
CSRF Token Returns a CSRF token.
Webhooks Create, delete, read, update, list logs, and list all webhooks.
Oracle Content Management also provides the following REST APIs:
• REST API for Activity Log
• REST API for Content Delivery
• REST API for Content Management
• REST API for Conversations
• REST API for Documents
• REST API for Self-Management
• REST API for Sites Management
• REST API for Users and Groups
Use REST APIs for Content SearchingOracle Content Management REST APIs allow you to search published or managementcontent (content items and digital assets) by fetching items matching a search querysubmitted to the /items resource:
Search Query Operators• /content/published/api/v1.1/items
The search query scope in the REST API for Content Delivery is a publish target which isspecified by its channel token. A channel token must be provided as either a queryparameter or a request header.
• /content/management/api/v1.1/items
Chapter 13REST API for Webhooks Management
13-59
The search query scope is controlled by editorial permissions granted to the APIclient users. A search query will fetch only items that users can see based on therepository membership and granular editorial permissions on assets in it.
If the publish target that you selected for a request to the REST API for ContentDelivery is secure (that is, assets are published to a secure publishing channel), thesearch request that you send requires using OAuth for authorization. Any searchrequest that you send to the REST API for Content Management requires using OAuthfor authorization.
Item searches in the REST API for Content Management and the REST API forContent Delivery share query parameters and use the same syntax for building asearch query expression. Therefore, a single term, the Search API is used below torefer to item searches in either REST API.
The Search API allows you to specify a search query expression as a value of the qparameter in requests submitted to the /items resource. The Search query expressionsyntax supports various operators to define match conditions (for example, eq, ne, co,or sw) plus AND, OR, and () operators to combine match conditions into a complexquery expression that can match the field values within a single asset type or acrossmultiple types. Extra search query request parameters allow you to control the numberof matching items to be fetched, how matching items are paginated and sorted, orwhat data fields are returned for matching items.
Two generic forms of search queries are supported in the Search API:
• Query within an asset type: Query expression requires you to specify an assettype and allows references to both standard and user-defined data fields of thistype in query conditions.For example: /api/v1.1/items?q=(type eq "Employee" AND fields.role eq"Senior Developer"). Here, the role is a field of type Employee.
• Query across asset types: Depending on how a query expression is formulated,the Search API supports two types of cross-type queries:
– Global query on standard fields: Query expression allows you to specifymore than one asset type using parentheses () or no type at all. Such query istreated as a global (untyped) query with the ability to reference standard fieldsonly in query conditions.For example: /api/v1.1/items?q=(name eq "John" or description co"John" and (type eq "t1" or type eq "t2"))
– Query across specific types: Query expression allows you to specify morethan one asset type using curly brackets {}. Such query is treated as a genericquery across specified asset types with the ability to reference both standardand user-defined fields in query conditions. For more information, see SearchAcross Types.For example: /api//v1.1/items?q=(name eq "John" and {type eq "t1"and fields.ud1 eq "ud1val"} or {type eq "t2" and fields.ud2 eq"ud2val"}
Currently, the following standard data fields are supported on asset types:
• In Management API:id, type, name, description, typeCategory, slug, translatable,language, createdBy, createdDate, updatedBy, updatedDate,repositoryId, channels, collections, status, tags, isPublished,languageIsMaster, taxonomies
Chapter 13Use REST APIs for Content Searching
13-60
• In Delivery API:id, type, name, description, typeCategory, slug, translatable, language,createdDate, updatedDate, taxonomies
While querying using standard fields in either search query form, the various data fields aretreated differently:
Data Fields Data Type
name, description, type, typeCategory,slug, language, status
text data type (single valued)
id, repositoryId reference (single valued)
createdDate, updatedDate datetime (single valued)
translatable,isPublished,languageIsMaster
boolean (single valued)
collections, channels, tags, taxonomies,suggestedTaxonomies
reference data type (multi valued)
In either search query form, it is possible to search by matching items anywhere (that is,matching any standard or user-defined data field) by specifying a match criteria via the queryparameter default on request. Such a criteria is treated as a generic query that matchesvalues of the items across all fields that are indexed as an aggregate text data. For example:
• /api/v1.1/items?default="coffee"• /api/v1.1/items?q=(type eq "Employee")&default="senior"Find more details about the following:
• Search operators and query parameters that are supported in the Search API.
• Two-level deep search and related options that are supported for order matching items bya reference field.
• Search on custom fields across type and related to that order by parameter.
• Getting dynamic asset counts on a taxonomy category and using this API to supportfaceted search.
Search in the REST API for Content Management or REST API for Content Delivery allowsyou to create a search query expression using a rich set of operators to define field matchconditions plus, AND, OR, and () operators to combine them into a complex query expressionthat can match the field values within a single asset type or across multiple types. The tablebelow lists search query operators that are currently supported in the Search API.
Chapter 13Use REST APIs for Content Searching
13-61
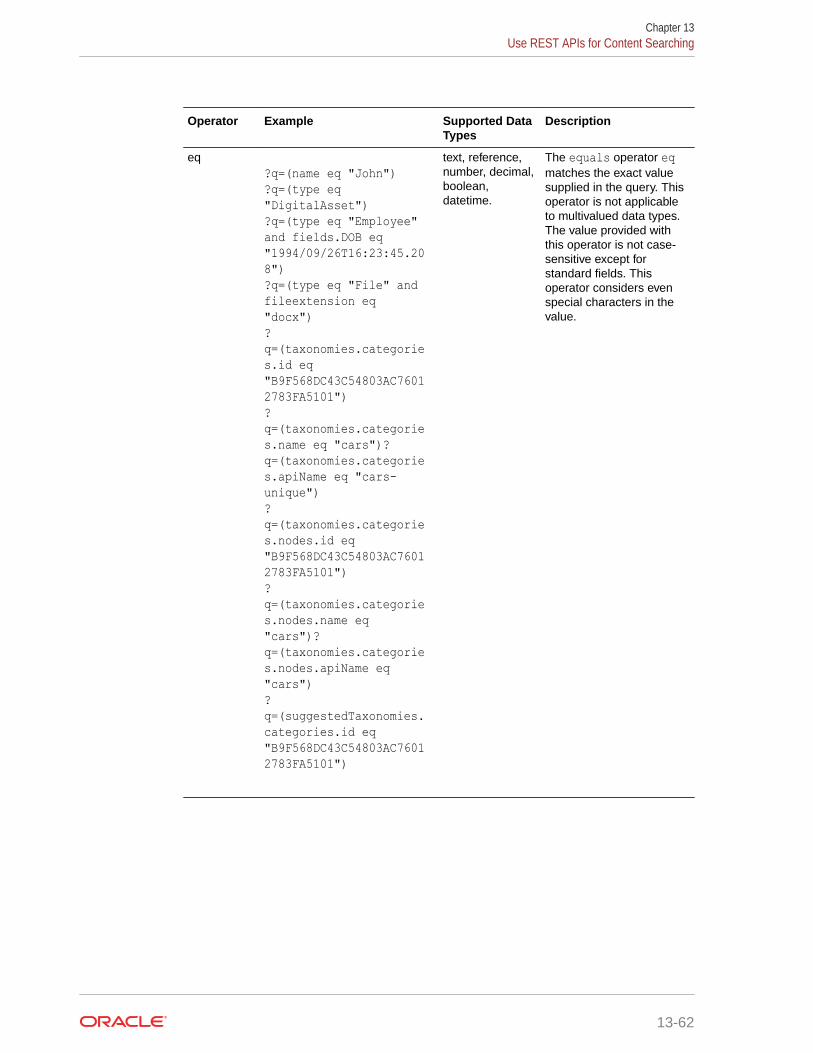
Operator Example Supported DataTypes
Description
eq?q=(name eq "John")?q=(type eq "DigitalAsset")?q=(type eq "Employee" and fields.DOB eq "1994/09/26T16:23:45.208")?q=(type eq "File" and fileextension eq "docx")?q=(taxonomies.categories.id eq "B9F568DC43C54803AC76012783FA5101")?q=(taxonomies.categories.name eq "cars")?q=(taxonomies.categories.apiName eq "cars-unique")?q=(taxonomies.categories.nodes.id eq "B9F568DC43C54803AC76012783FA5101")?q=(taxonomies.categories.nodes.name eq "cars")?q=(taxonomies.categories.nodes.apiName eq "cars")?q=(suggestedTaxonomies.categories.id eq "B9F568DC43C54803AC76012783FA5101")
text, reference,number, decimal,boolean,datetime.
The equals operator eqmatches the exact valuesupplied in the query. Thisoperator is not applicableto multivalued data types.The value provided withthis operator is not case-sensitive except forstandard fields. Thisoperator considers evenspecial characters in thevalue.
Chapter 13Use REST APIs for Content Searching
13-62
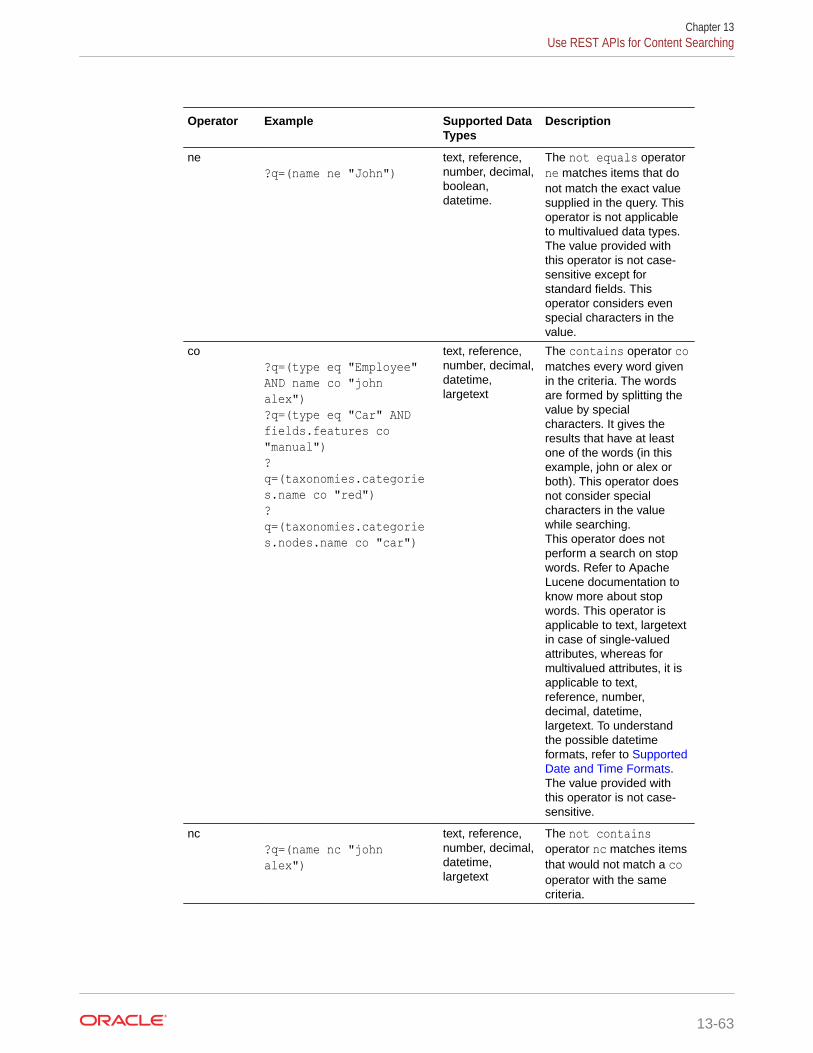
Operator Example Supported DataTypes
Description
ne?q=(name ne "John")
text, reference,number, decimal,boolean,datetime.
The not equals operatorne matches items that donot match the exact valuesupplied in the query. Thisoperator is not applicableto multivalued data types.The value provided withthis operator is not case-sensitive except forstandard fields. Thisoperator considers evenspecial characters in thevalue.
co?q=(type eq "Employee" AND name co "john alex")?q=(type eq "Car" AND fields.features co "manual")?q=(taxonomies.categories.name co "red")?q=(taxonomies.categories.nodes.name co "car")
text, reference,number, decimal,datetime,largetext
The contains operator comatches every word givenin the criteria. The wordsare formed by splitting thevalue by specialcharacters. It gives theresults that have at leastone of the words (in thisexample, john or alex orboth). This operator doesnot consider specialcharacters in the valuewhile searching.This operator does notperform a search on stopwords. Refer to ApacheLucene documentation toknow more about stopwords. This operator isapplicable to text, largetextin case of single-valuedattributes, whereas formultivalued attributes, it isapplicable to text,reference, number,decimal, datetime,largetext. To understandthe possible datetimeformats, refer to SupportedDate and Time Formats.The value provided withthis operator is not case-sensitive.
nc?q=(name nc "john alex")
text, reference,number, decimal,datetime,largetext
The not containsoperator nc matches itemsthat would not match a cooperator with the samecriteria.
Chapter 13Use REST APIs for Content Searching
13-63
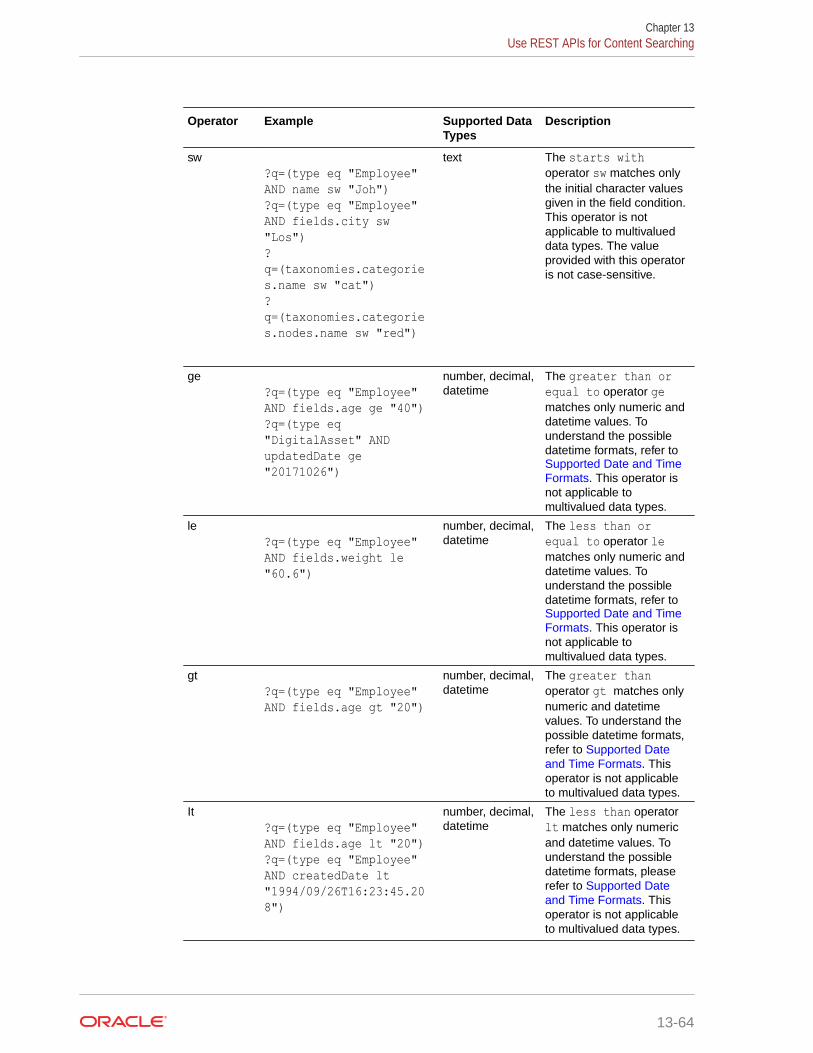
Operator Example Supported DataTypes
Description
sw?q=(type eq "Employee" AND name sw "Joh")?q=(type eq "Employee" AND fields.city sw "Los")?q=(taxonomies.categories.name sw "cat")?q=(taxonomies.categories.nodes.name sw "red")
text The starts withoperator sw matches onlythe initial character valuesgiven in the field condition.This operator is notapplicable to multivalueddata types. The valueprovided with this operatoris not case-sensitive.
ge?q=(type eq "Employee" AND fields.age ge "40")?q=(type eq "DigitalAsset" AND updatedDate ge "20171026")
number, decimal,datetime
The greater than orequal to operator gematches only numeric anddatetime values. Tounderstand the possibledatetime formats, refer to Supported Date and TimeFormats. This operator isnot applicable tomultivalued data types.
le?q=(type eq "Employee" AND fields.weight le "60.6")
number, decimal,datetime
The less than orequal to operator lematches only numeric anddatetime values. Tounderstand the possibledatetime formats, refer to Supported Date and TimeFormats. This operator isnot applicable tomultivalued data types.
gt?q=(type eq "Employee" AND fields.age gt "20")
number, decimal,datetime
The greater thanoperator gt matches onlynumeric and datetimevalues. To understand thepossible datetime formats,refer to Supported Dateand Time Formats. Thisoperator is not applicableto multivalued data types.
It?q=(type eq "Employee" AND fields.age lt "20")?q=(type eq "Employee" AND createdDate lt "1994/09/26T16:23:45.208")
number, decimal,datetime
The less than operatorlt matches only numericand datetime values. Tounderstand the possibledatetime formats, pleaserefer to Supported Dateand Time Formats. Thisoperator is not applicableto multivalued data types.
Chapter 13Use REST APIs for Content Searching
13-64
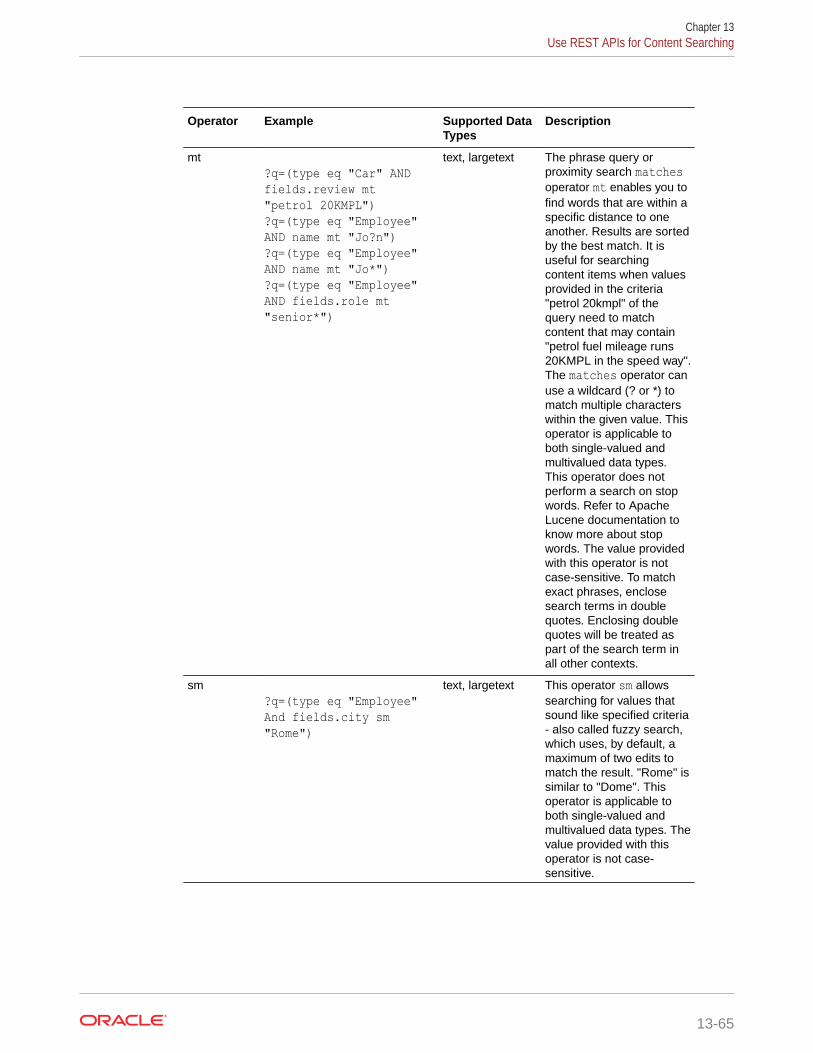
Operator Example Supported DataTypes
Description
mt?q=(type eq "Car" AND fields.review mt "petrol 20KMPL")?q=(type eq "Employee" AND name mt "Jo?n")?q=(type eq "Employee" AND name mt "Jo*")?q=(type eq "Employee" AND fields.role mt "senior*")
text, largetext The phrase query orproximity search matchesoperator mt enables you tofind words that are within aspecific distance to oneanother. Results are sortedby the best match. It isuseful for searchingcontent items when valuesprovided in the criteria"petrol 20kmpl" of thequery need to matchcontent that may contain"petrol fuel mileage runs20KMPL in the speed way".The matches operator canuse a wildcard (? or *) tomatch multiple characterswithin the given value. Thisoperator is applicable toboth single-valued andmultivalued data types.This operator does notperform a search on stopwords. Refer to ApacheLucene documentation toknow more about stopwords. The value providedwith this operator is notcase-sensitive. To matchexact phrases, enclosesearch terms in doublequotes. Enclosing doublequotes will be treated aspart of the search term inall other contexts.
sm?q=(type eq "Employee" And fields.city sm "Rome")
text, largetext This operator sm allowssearching for values thatsound like specified criteria- also called fuzzy search,which uses, by default, amaximum of two edits tomatch the result. "Rome" issimilar to "Dome". Thisoperator is applicable toboth single-valued andmultivalued data types. Thevalue provided with thisoperator is not case-sensitive.
Chapter 13Use REST APIs for Content Searching
13-65
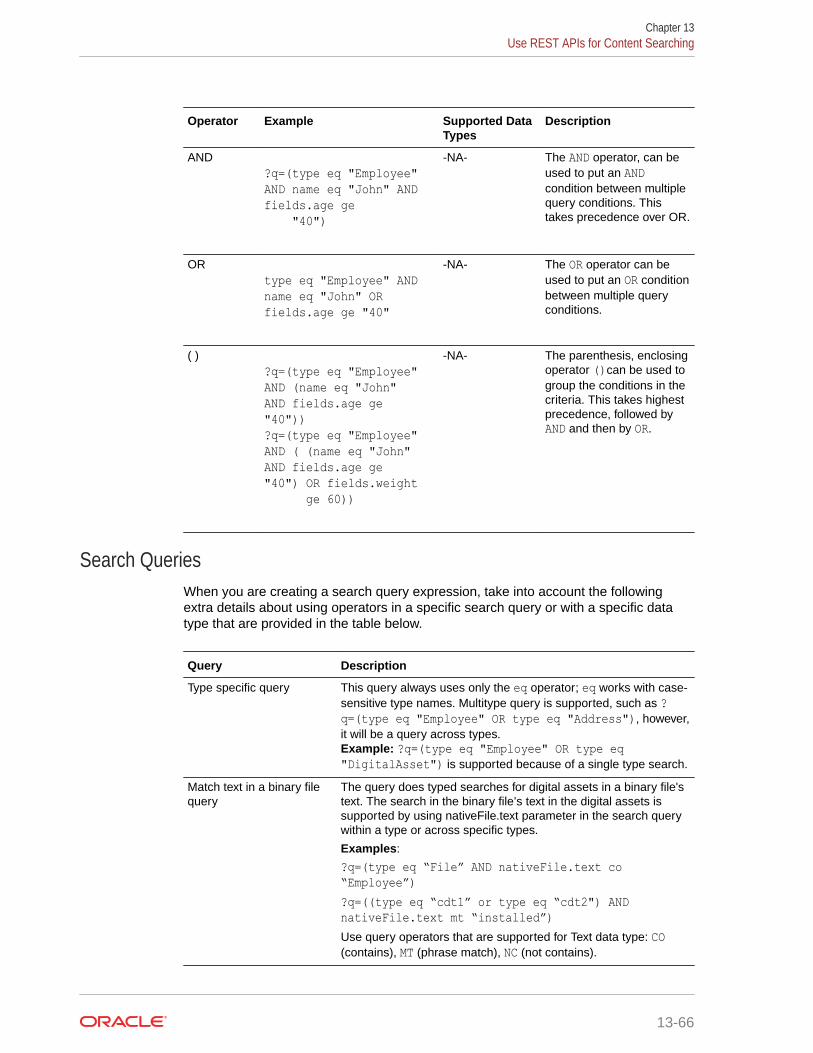
Operator Example Supported DataTypes
Description
AND?q=(type eq "Employee" AND name eq "John" AND fields.age ge "40")
-NA- The AND operator, can beused to put an ANDcondition between multiplequery conditions. Thistakes precedence over OR.
ORtype eq "Employee" AND name eq "John" OR fields.age ge "40"
-NA- The OR operator can beused to put an OR conditionbetween multiple queryconditions.
( )?q=(type eq "Employee" AND (name eq "John" AND fields.age ge "40"))?q=(type eq "Employee" AND ( (name eq "John" AND fields.age ge "40") OR fields.weight ge 60))
-NA- The parenthesis, enclosingoperator ()can be used togroup the conditions in thecriteria. This takes highestprecedence, followed byAND and then by OR.
Search QueriesWhen you are creating a search query expression, take into account the followingextra details about using operators in a specific search query or with a specific datatype that are provided in the table below.
Query Description
Type specific query This query always uses only the eq operator; eq works with case-sensitive type names. Multitype query is supported, such as ?q=(type eq "Employee" OR type eq "Address"), however,it will be a query across types.Example: ?q=(type eq "Employee" OR type eq"DigitalAsset") is supported because of a single type search.
Match text in a binary filequery
The query does typed searches for digital assets in a binary file'stext. The search in the binary file’s text in the digital assets issupported by using nativeFile.text parameter in the search querywithin a type or across specific types.
Examples:
?q=(type eq “File” AND nativeFile.text co“Employee”)?q=((type eq “cdt1” or type eq “cdt2") ANDnativeFile.text mt “installed”)Use query operators that are supported for Text data type: CO(contains), MT (phrase match), NC (not contains).
Chapter 13Use REST APIs for Content Searching
13-66
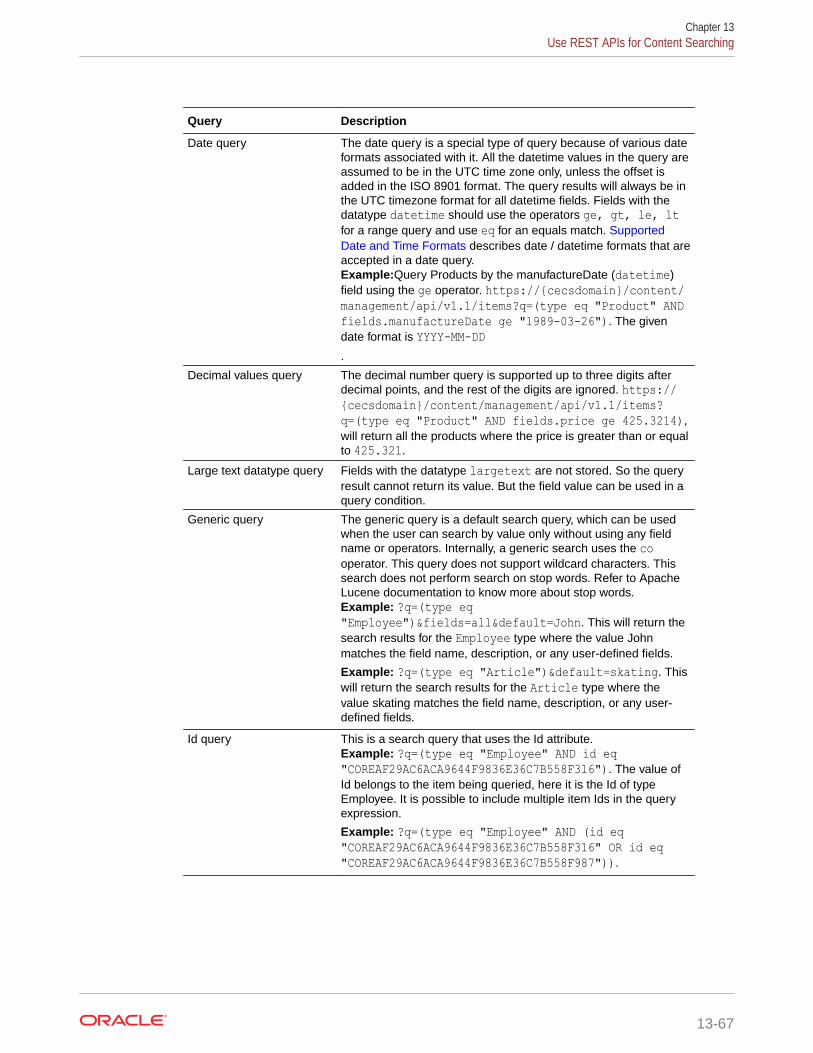
Query Description
Date query The date query is a special type of query because of various dateformats associated with it. All the datetime values in the query areassumed to be in the UTC time zone only, unless the offset isadded in the ISO 8901 format. The query results will always be inthe UTC timezone format for all datetime fields. Fields with thedatatype datetime should use the operators ge, gt, le, ltfor a range query and use eq for an equals match. SupportedDate and Time Formats describes date / datetime formats that areaccepted in a date query.Example:Query Products by the manufactureDate (datetime)field using the ge operator. https://{cecsdomain}/content/management/api/v1.1/items?q=(type eq "Product" ANDfields.manufactureDate ge "1989-03-26"). The givendate format is YYYY-MM-DD.
Decimal values query The decimal number query is supported up to three digits afterdecimal points, and the rest of the digits are ignored. https://{cecsdomain}/content/management/api/v1.1/items?q=(type eq "Product" AND fields.price ge 425.3214),will return all the products where the price is greater than or equalto 425.321.
Large text datatype query Fields with the datatype largetext are not stored. So the queryresult cannot return its value. But the field value can be used in aquery condition.
Generic query The generic query is a default search query, which can be usedwhen the user can search by value only without using any fieldname or operators. Internally, a generic search uses the cooperator. This query does not support wildcard characters. Thissearch does not perform search on stop words. Refer to ApacheLucene documentation to know more about stop words.Example: ?q=(type eq"Employee")&fields=all&default=John. This will return thesearch results for the Employee type where the value Johnmatches the field name, description, or any user-defined fields.
Example: ?q=(type eq "Article")&default=skating. Thiswill return the search results for the Article type where thevalue skating matches the field name, description, or any user-defined fields.
Id query This is a search query that uses the Id attribute.Example: ?q=(type eq "Employee" AND id eq"COREAF29AC6ACA9644F9836E36C7B558F316"). The value ofId belongs to the item being queried, here it is the Id of typeEmployee. It is possible to include multiple item Ids in the queryexpression.
Example: ?q=(type eq "Employee" AND (id eq"COREAF29AC6ACA9644F9836E36C7B558F316" OR id eq"COREAF29AC6ACA9644F9836E36C7B558F987")).
Chapter 13Use REST APIs for Content Searching
13-67
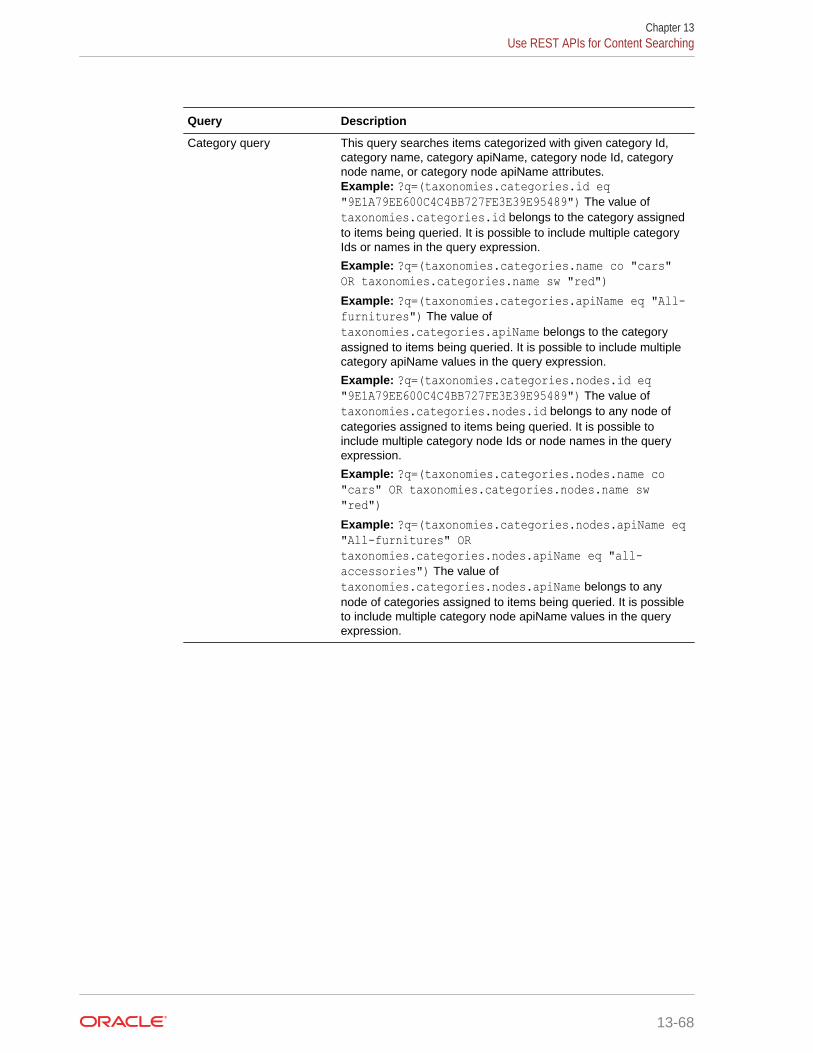
Query Description
Category query This query searches items categorized with given category Id,category name, category apiName, category node Id, categorynode name, or category node apiName attributes.Example: ?q=(taxonomies.categories.id eq"9E1A79EE600C4C4BB727FE3E39E95489") The value oftaxonomies.categories.id belongs to the category assignedto items being queried. It is possible to include multiple categoryIds or names in the query expression.
Example: ?q=(taxonomies.categories.name co "cars"OR taxonomies.categories.name sw "red")Example: ?q=(taxonomies.categories.apiName eq "All-furnitures") The value oftaxonomies.categories.apiName belongs to the categoryassigned to items being queried. It is possible to include multiplecategory apiName values in the query expression.
Example: ?q=(taxonomies.categories.nodes.id eq"9E1A79EE600C4C4BB727FE3E39E95489") The value oftaxonomies.categories.nodes.id belongs to any node ofcategories assigned to items being queried. It is possible toinclude multiple category node Ids or node names in the queryexpression.
Example: ?q=(taxonomies.categories.nodes.name co"cars" OR taxonomies.categories.nodes.name sw"red")Example: ?q=(taxonomies.categories.nodes.apiName eq"All-furnitures" ORtaxonomies.categories.nodes.apiName eq "all-accessories") The value oftaxonomies.categories.nodes.apiName belongs to anynode of categories assigned to items being queried. It is possibleto include multiple category node apiName values in the queryexpression.
Chapter 13Use REST APIs for Content Searching
13-68
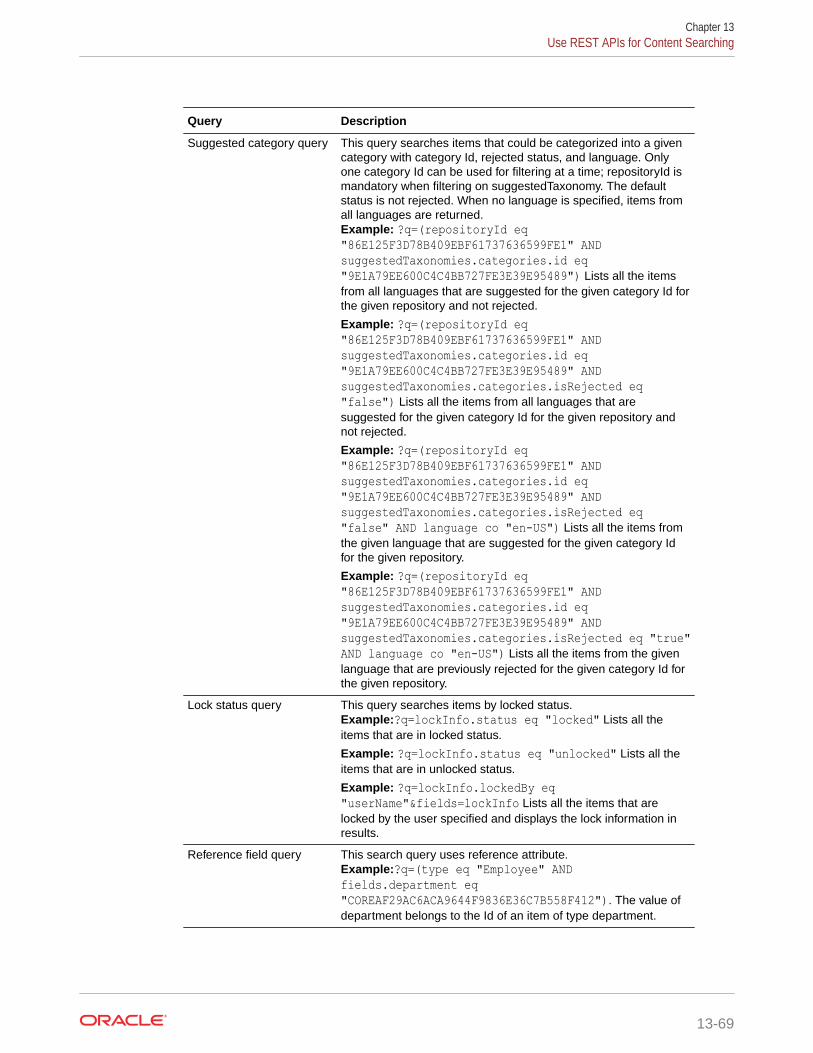
Query Description
Suggested category query This query searches items that could be categorized into a givencategory with category Id, rejected status, and language. Onlyone category Id can be used for filtering at a time; repositoryId ismandatory when filtering on suggestedTaxonomy. The defaultstatus is not rejected. When no language is specified, items fromall languages are returned.Example: ?q=(repositoryId eq"86E125F3D78B409EBF61737636599FE1" ANDsuggestedTaxonomies.categories.id eq"9E1A79EE600C4C4BB727FE3E39E95489") Lists all the itemsfrom all languages that are suggested for the given category Id forthe given repository and not rejected.
Example: ?q=(repositoryId eq"86E125F3D78B409EBF61737636599FE1" ANDsuggestedTaxonomies.categories.id eq"9E1A79EE600C4C4BB727FE3E39E95489" ANDsuggestedTaxonomies.categories.isRejected eq"false") Lists all the items from all languages that aresuggested for the given category Id for the given repository andnot rejected.
Example: ?q=(repositoryId eq"86E125F3D78B409EBF61737636599FE1" ANDsuggestedTaxonomies.categories.id eq"9E1A79EE600C4C4BB727FE3E39E95489" ANDsuggestedTaxonomies.categories.isRejected eq"false" AND language co "en-US") Lists all the items fromthe given language that are suggested for the given category Idfor the given repository.
Example: ?q=(repositoryId eq"86E125F3D78B409EBF61737636599FE1" ANDsuggestedTaxonomies.categories.id eq"9E1A79EE600C4C4BB727FE3E39E95489" ANDsuggestedTaxonomies.categories.isRejected eq "true"AND language co "en-US") Lists all the items from the givenlanguage that are previously rejected for the given category Id forthe given repository.
Lock status query This query searches items by locked status.Example:?q=lockInfo.status eq "locked" Lists all theitems that are in locked status.
Example: ?q=lockInfo.status eq "unlocked" Lists all theitems that are in unlocked status.
Example: ?q=lockInfo.lockedBy eq"userName"&fields=lockInfo Lists all the items that arelocked by the user specified and displays the lock information inresults.
Reference field query This search query uses reference attribute.Example:?q=(type eq "Employee" ANDfields.department eq"COREAF29AC6ACA9644F9836E36C7B558F412"). The value ofdepartment belongs to the Id of an item of type department.
Chapter 13Use REST APIs for Content Searching
13-69
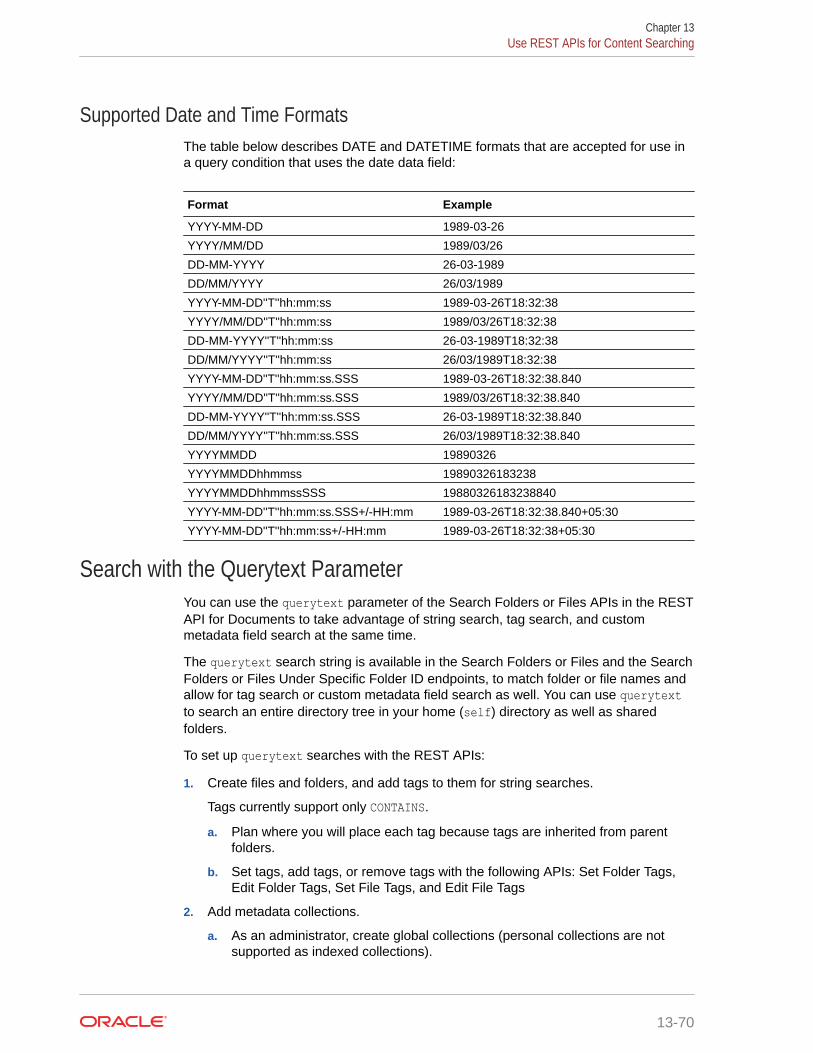
Supported Date and Time FormatsThe table below describes DATE and DATETIME formats that are accepted for use ina query condition that uses the date data field:
Format Example
YYYY-MM-DD 1989-03-26
YYYY/MM/DD 1989/03/26
DD-MM-YYYY 26-03-1989
DD/MM/YYYY 26/03/1989
YYYY-MM-DD''T''hh:mm:ss 1989-03-26T18:32:38
YYYY/MM/DD''T''hh:mm:ss 1989/03/26T18:32:38
DD-MM-YYYY''T''hh:mm:ss 26-03-1989T18:32:38
DD/MM/YYYY''T''hh:mm:ss 26/03/1989T18:32:38
YYYY-MM-DD''T''hh:mm:ss.SSS 1989-03-26T18:32:38.840
YYYY/MM/DD''T''hh:mm:ss.SSS 1989/03/26T18:32:38.840
DD-MM-YYYY''T''hh:mm:ss.SSS 26-03-1989T18:32:38.840
DD/MM/YYYY''T''hh:mm:ss.SSS 26/03/1989T18:32:38.840
YYYYMMDD 19890326
YYYYMMDDhhmmss 19890326183238
YYYYMMDDhhmmssSSS 19880326183238840
YYYY-MM-DD''T''hh:mm:ss.SSS+/-HH:mm 1989-03-26T18:32:38.840+05:30
YYYY-MM-DD''T''hh:mm:ss+/-HH:mm 1989-03-26T18:32:38+05:30
Search with the Querytext ParameterYou can use the querytext parameter of the Search Folders or Files APIs in the RESTAPI for Documents to take advantage of string search, tag search, and custommetadata field search at the same time.
The querytext search string is available in the Search Folders or Files and the SearchFolders or Files Under Specific Folder ID endpoints, to match folder or file names andallow for tag search or custom metadata field search as well. You can use querytextto search an entire directory tree in your home (self) directory as well as sharedfolders.
To set up querytext searches with the REST APIs:
1. Create files and folders, and add tags to them for string searches.
Tags currently support only CONTAINS.
a. Plan where you will place each tag because tags are inherited from parentfolders.
b. Set tags, add tags, or remove tags with the following APIs: Set Folder Tags,Edit Folder Tags, Set File Tags, and Edit File Tags
2. Add metadata collections.
a. As an administrator, create global collections (personal collections are notsupported as indexed collections).
Chapter 13Use REST APIs for Content Searching
13-70
b. Determine which fields you will need to support the search, and call APIs in themetadata resource to index those fields.
There is a limit of 100 fields to be indexed. You cannot remove fields from the index.The search is done on Favorite shared folders first and then other shared folders, upto 100. You may want to designate some folders as Favorites before searching, toensure better search results.
c. Metadata fields of an integer type cannot be searched as a number.
d. You can search metadata fields of a Date type in a search API from the REST API forDocuments. This enables you to search for exact date matches or for a range ofdates (that is, files where the date falls between a specific start date and a specificend date).
3. Build your query.
a. Use a search strings in the querytext parameter of the Search Folders or Files andthe Search Folders or Files Under Specific Folder ID endpoints to search your folderand file names, tags, and indexed metadata fields.
For examples of tags and custom metadata searches, see the descriptions of theendpoints in the REST API for Documents.
b. Search queries require URL encoding of the single-quotation-mark character ( ') into%60. For example, Collection1.field1<CONTAINS>'myValue' turns intoCollection1.field1<CONTAINS>%60myValue%60.
c. Start with simple queries to validate that your conditions do indeed find results.
d. You can build more complex queries by combining parentheses, <AND> clauses, and<OR> clauses.
Set Up Searches on Metadata FieldsSet up searchable metadata fields with the Metadata Collection resource of the REST API forDocuments. Then you can run text searches with custom fields.
To search metadata fields:
1. Sign in to Oracle Content Management as an administrator and create a metadatacollection.
See Metadata Collection Resource.
2. As an administrator, check which metatdata fields are already searchable with the GetSearchable Metadata Fields endpoint, so you can determine how many fields you canadd to the search index.
This REST API call retrieves all metadata fields currently available for searching content,The result list includes all metadata fields prefixed with their respective global metadatacollection for the tenant. Each tenant is limited to 100 searchable fields.
3. Use the Set Searchable Metadata Fields endpoint of the REST API for Documents tospecify metadata fields that are searchable.
After you reach 100 fields, you cannot index new fields to become searchable. Fieldscannot be deleted from the search index.
For custom metadata searches, the REST API for Documents supports only text searchesusing CONTAINS. It does not support numeric or date searches. For example, custom
Chapter 13Use REST APIs for Content Searching
13-71

metadata fields created through the web user interface are not searchable becausethey are numeric or date type fields.
For more information about these endpoints and examples of using them, see "SetSearchable Metadata Fields" and "Get Searchable Metadata Fields" under "MetadataCollection" in REST API for Documents.
Search Request ParametersIn addition to q or default parameters, a search request submitted to the /itemsresource allows you to use other request parameters to control number of items oritem fields returned in response. The tables below provide details about requestsaccepted by the REST API for Content Delivery and REST API for ContentManagement.
REST API for Content Delivery
QueryParameter
Type Description
channelToken
string Channel token of the publish target. A channel token must beprovided as either a query parameter or a request header.
default string Default search query expression that matches the values of itemsacross all fields.
Chapter 13Use REST APIs for Content Searching
13-72
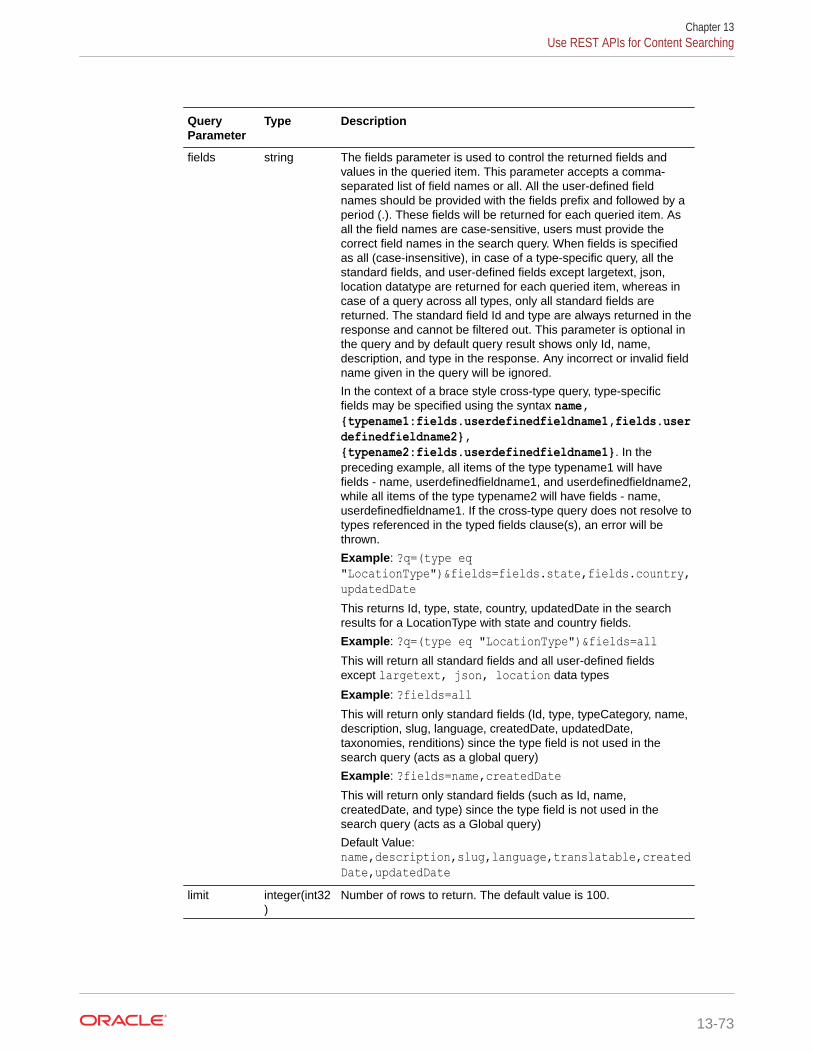
QueryParameter
Type Description
fields string The fields parameter is used to control the returned fields andvalues in the queried item. This parameter accepts a comma-separated list of field names or all. All the user-defined fieldnames should be provided with the fields prefix and followed by aperiod (.). These fields will be returned for each queried item. Asall the field names are case-sensitive, users must provide thecorrect field names in the search query. When fields is specifiedas all (case-insensitive), in case of a type-specific query, all thestandard fields, and user-defined fields except largetext, json,location datatype are returned for each queried item, whereas incase of a query across all types, only all standard fields arereturned. The standard field Id and type are always returned in theresponse and cannot be filtered out. This parameter is optional inthe query and by default query result shows only Id, name,description, and type in the response. Any incorrect or invalid fieldname given in the query will be ignored.
In the context of a brace style cross-type query, type-specificfields may be specified using the syntax name,{typename1:fields.userdefinedfieldname1,fields.userdefinedfieldname2},{typename2:fields.userdefinedfieldname1}. In thepreceding example, all items of the type typename1 will havefields - name, userdefinedfieldname1, and userdefinedfieldname2,while all items of the type typename2 will have fields - name,userdefinedfieldname1. If the cross-type query does not resolve totypes referenced in the typed fields clause(s), an error will bethrown.
Example: ?q=(type eq"LocationType")&fields=fields.state,fields.country,updatedDateThis returns Id, type, state, country, updatedDate in the searchresults for a LocationType with state and country fields.
Example: ?q=(type eq "LocationType")&fields=allThis will return all standard fields and all user-defined fieldsexcept largetext, json, location data types
Example: ?fields=allThis will return only standard fields (Id, type, typeCategory, name,description, slug, language, createdDate, updatedDate,taxonomies, renditions) since the type field is not used in thesearch query (acts as a global query)
Example: ?fields=name,createdDateThis will return only standard fields (such as Id, name,createdDate, and type) since the type field is not used in thesearch query (acts as a Global query)
Default Value:name,description,slug,language,translatable,createdDate,updatedDate
limit integer(int32)
Number of rows to return. The default value is 100.
Chapter 13Use REST APIs for Content Searching
13-73
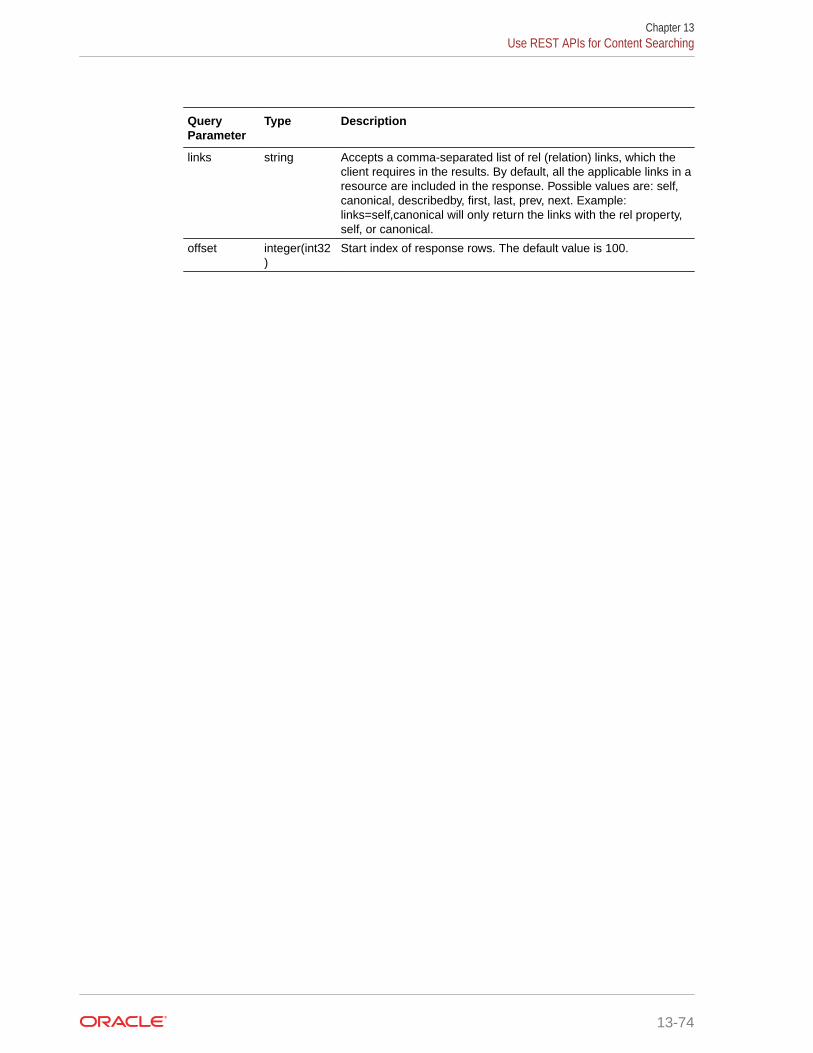
QueryParameter
Type Description
links string Accepts a comma-separated list of rel (relation) links, which theclient requires in the results. By default, all the applicable links in aresource are included in the response. Possible values are: self,canonical, describedby, first, last, prev, next. Example:links=self,canonical will only return the links with the rel property,self, or canonical.
offset integer(int32)
Start index of response rows. The default value is 100.
Chapter 13Use REST APIs for Content Searching
13-74
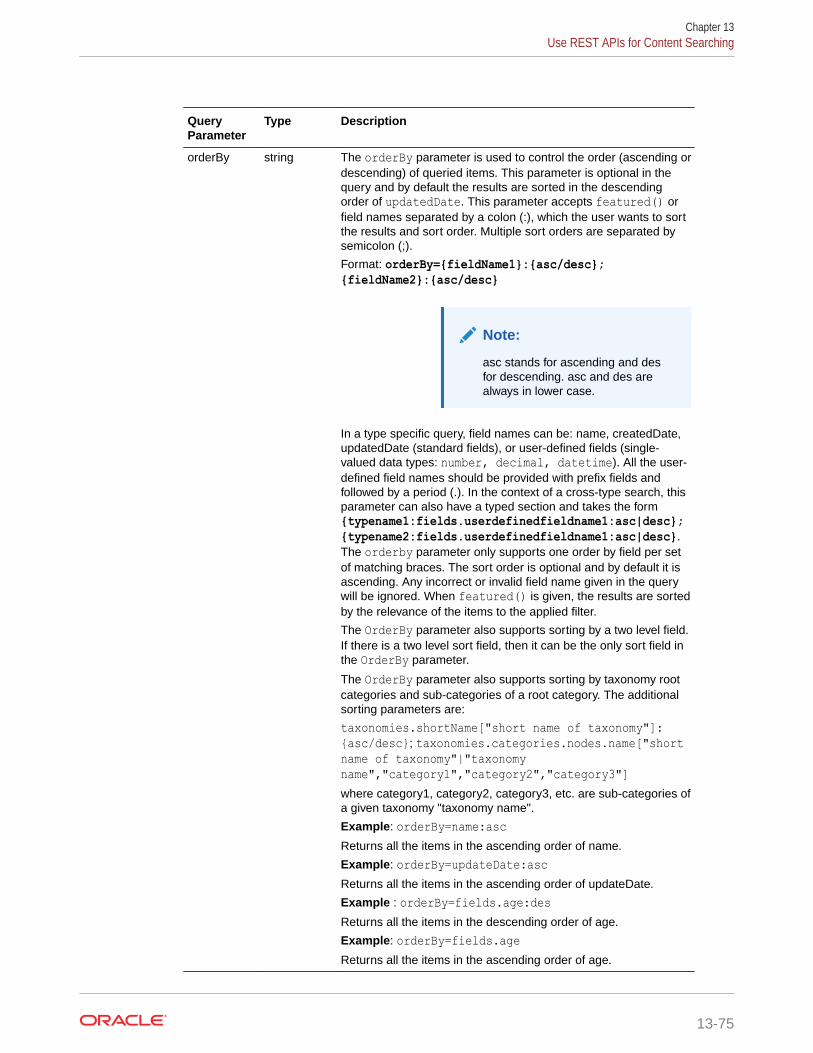
QueryParameter
Type Description
orderBy string The orderBy parameter is used to control the order (ascending ordescending) of queried items. This parameter is optional in thequery and by default the results are sorted in the descendingorder of updatedDate. This parameter accepts featured() orfield names separated by a colon (:), which the user wants to sortthe results and sort order. Multiple sort orders are separated bysemicolon (;).
Format: orderBy={fieldName1}:{asc/desc};{fieldName2}:{asc/desc}
Note:
asc stands for ascending and desfor descending. asc and des arealways in lower case.
In a type specific query, field names can be: name, createdDate,updatedDate (standard fields), or user-defined fields (single-valued data types: number, decimal, datetime). All the user-defined field names should be provided with prefix fields andfollowed by a period (.). In the context of a cross-type search, thisparameter can also have a typed section and takes the form{typename1:fields.userdefinedfieldname1:asc|desc};{typename2:fields.userdefinedfieldname1:asc|desc}.The orderby parameter only supports one order by field per setof matching braces. The sort order is optional and by default it isascending. Any incorrect or invalid field name given in the querywill be ignored. When featured() is given, the results are sortedby the relevance of the items to the applied filter.
The OrderBy parameter also supports sorting by a two level field.If there is a two level sort field, then it can be the only sort field inthe OrderBy parameter.
The OrderBy parameter also supports sorting by taxonomy rootcategories and sub-categories of a root category. The additionalsorting parameters are:
taxonomies.shortName["short name of taxonomy"]:{asc/desc}; taxonomies.categories.nodes.name["shortname of taxonomy"|"taxonomyname","category1","category2","category3"]where category1, category2, category3, etc. are sub-categories ofa given taxonomy "taxonomy name".
Example: orderBy=name:ascReturns all the items in the ascending order of name.
Example: orderBy=updateDate:ascReturns all the items in the ascending order of updateDate.
Example : orderBy=fields.age:desReturns all the items in the descending order of age.
Example: orderBy=fields.ageReturns all the items in the ascending order of age.
Chapter 13Use REST APIs for Content Searching
13-75
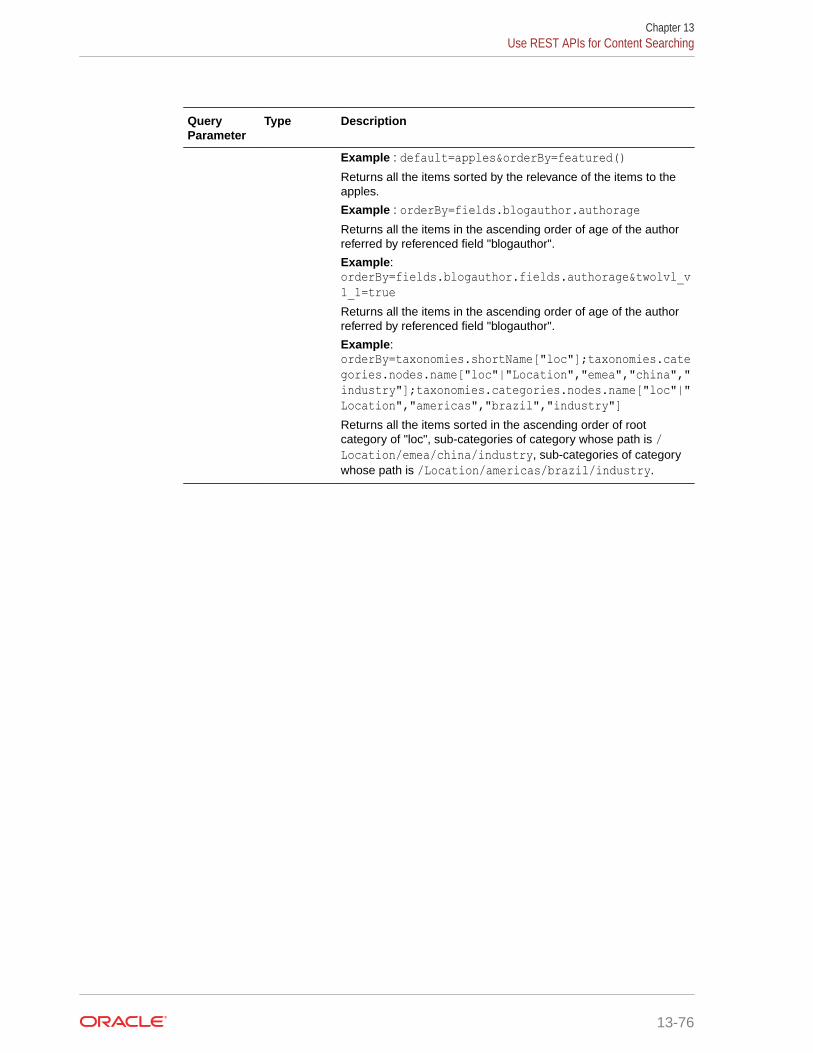
QueryParameter
Type Description
Example : default=apples&orderBy=featured()Returns all the items sorted by the relevance of the items to theapples.
Example : orderBy=fields.blogauthor.authorageReturns all the items in the ascending order of age of the authorreferred by referenced field "blogauthor".
Example:orderBy=fields.blogauthor.fields.authorage&twolvl_v1_1=trueReturns all the items in the ascending order of age of the authorreferred by referenced field "blogauthor".
Example:orderBy=taxonomies.shortName["loc"];taxonomies.categories.nodes.name["loc"|"Location","emea","china","industry"];taxonomies.categories.nodes.name["loc"|"Location","americas","brazil","industry"]Returns all the items sorted in the ascending order of rootcategory of "loc", sub-categories of category whose path is /Location/emea/china/industry, sub-categories of categorywhose path is /Location/americas/brazil/industry.
Chapter 13Use REST APIs for Content Searching
13-76

QueryParameter
Type Description
q string This parameter accepts a query expression condition thatmatches the field values. Many such query conditions can bejoined using AND/OR operators and grouped with parentheses.The value of query condition follows the format of {fieldName}{operator} "{fieldValue}".In the case of a query across type, the field names are limited tostandard fields (Id, type, name, description, typeCategory, slug,language, createdDate, updatedDate, taxonomies). However inthe case of a type-specific query, the field names are limited tostandard fields and user-defined fields (except fields of largeTextdata type). The only values allowed in the operator are eq(Equals), co (Contains), sw (Startswith), ge (greater than orequals to), le (less than or equals to), gt (Greater than), lt (lessthan), mt (Matches), sm (Similar).
Example: https://{cecsdomain}/content/published/api/v1.1/items?q=(name eq "John")Example: https://{cecsdomain}/content/published/api/v1.1/items?q=(type eq "Employee" ANDname eq "John")Example: https://{cecsdomain}/content/published/api/v1.1/items?q=(type eq "Employee" AND((name eq "John" AND field.age ge "40") ORfields.weight gt "70"))Example: https://{cecsdomain}/content/published/api/v1.1/items?q=(taxonomies.categories.id eq"9E1A79EE600C4C4BB727FE3E39E95489" OR(taxonomies.categories.name co "cat" ANDtaxonomies.categories.name co "red"))Example: https://{cecsdomain}/content/published/api/v1.1/items?q=(taxonomies.categories.nodes.id eq"9E1A79EE600C4C4BB727FE3E39E95489" ORtaxonomies.categories.nodes.name co "cars")
scroll boolean Specifying this parameter indicates that the scroll behavior isexpected from the Search API. Scrolling is the recommendedmethod for retrieving large result sets. Scrolling is not availablewhen returnMaster is enabled. hasMore will always return falsewhen scrolling is enabled. The offset parameter value, if specified,will be ignored on scroll requests. The limit parameter value willbe interpreted in the context of scroll and be fixed for a scrollsession. Subsequent changes to limit will be ignored for the scrollsession. A limit that results in too large a response will result in a413 (Payload Too Large) response status.
Default Value: false
scrollId string This parameter is used to specify the scroll Id. scrollTTL and theoriginal value of the q parameter are always required withrequests that use a scrollId to get consistent results. Note that therequirement to always include the q parameter in subsequentscroll requests is currently not validated against previous requestsand changes to the parameter within the same scroll session areignored.
Chapter 13Use REST APIs for Content Searching
13-77
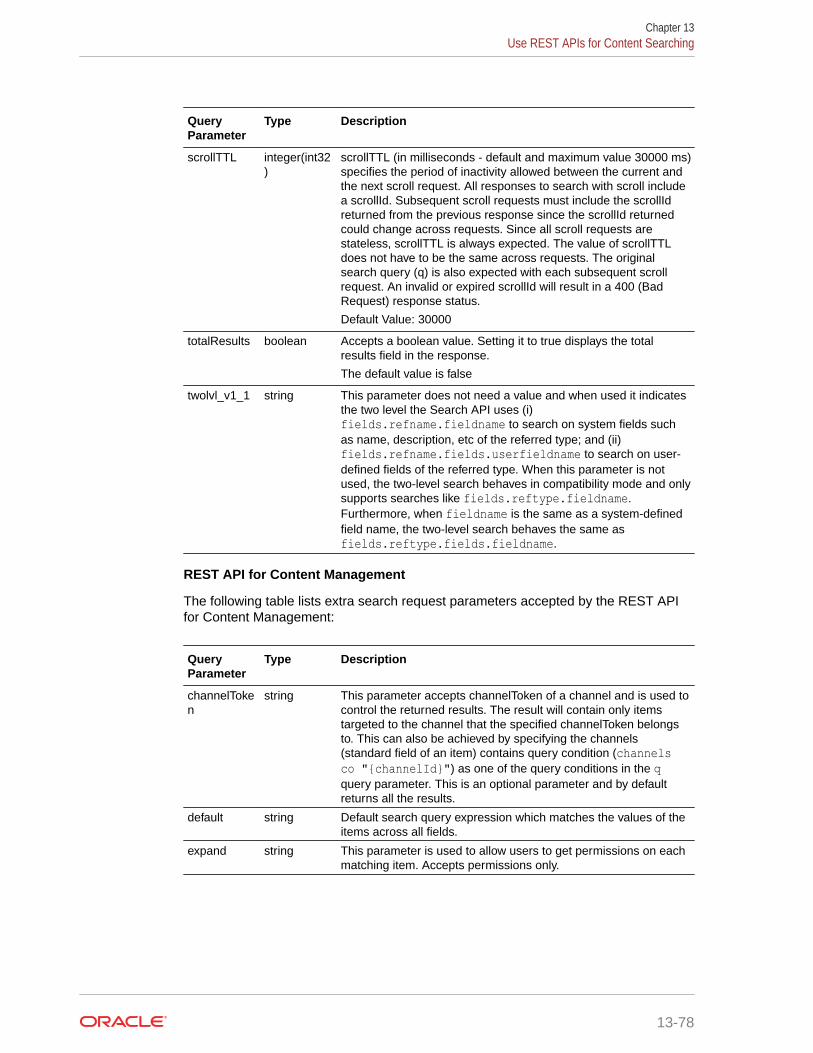
QueryParameter
Type Description
scrollTTL integer(int32)
scrollTTL (in milliseconds - default and maximum value 30000 ms)specifies the period of inactivity allowed between the current andthe next scroll request. All responses to search with scroll includea scrollId. Subsequent scroll requests must include the scrollIdreturned from the previous response since the scrollId returnedcould change across requests. Since all scroll requests arestateless, scrollTTL is always expected. The value of scrollTTLdoes not have to be the same across requests. The originalsearch query (q) is also expected with each subsequent scrollrequest. An invalid or expired scrollId will result in a 400 (BadRequest) response status.
Default Value: 30000
totalResults boolean Accepts a boolean value. Setting it to true displays the totalresults field in the response.
The default value is false
twolvl_v1_1 string This parameter does not need a value and when used it indicatesthe two level the Search API uses (i)fields.refname.fieldname to search on system fields suchas name, description, etc of the referred type; and (ii)fields.refname.fields.userfieldname to search on user-defined fields of the referred type. When this parameter is notused, the two-level search behaves in compatibility mode and onlysupports searches like fields.reftype.fieldname.Furthermore, when fieldname is the same as a system-definedfield name, the two-level search behaves the same asfields.reftype.fields.fieldname.
REST API for Content Management
The following table lists extra search request parameters accepted by the REST APIfor Content Management:
QueryParameter
Type Description
channelToken
string This parameter accepts channelToken of a channel and is used tocontrol the returned results. The result will contain only itemstargeted to the channel that the specified channelToken belongsto. This can also be achieved by specifying the channels(standard field of an item) contains query condition (channelsco "{channelId}") as one of the query conditions in the qquery parameter. This is an optional parameter and by defaultreturns all the results.
default string Default search query expression which matches the values of theitems across all fields.
expand string This parameter is used to allow users to get permissions on eachmatching item. Accepts permissions only.
Chapter 13Use REST APIs for Content Searching
13-78
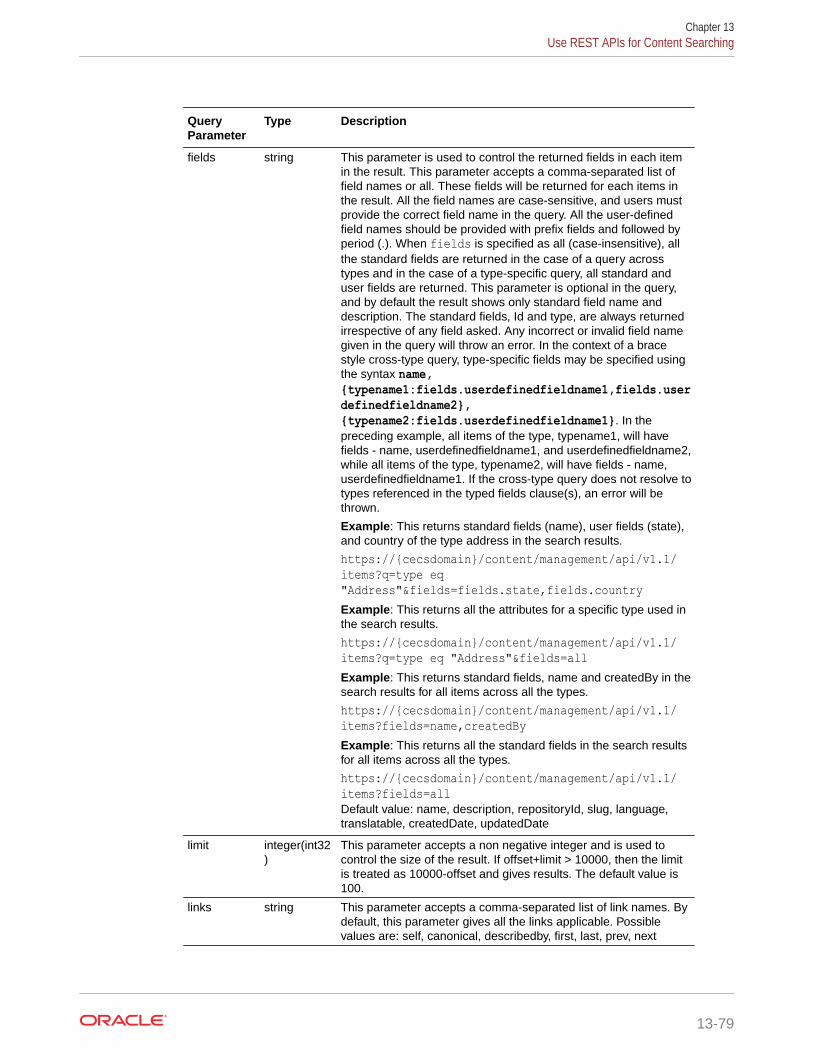
QueryParameter
Type Description
fields string This parameter is used to control the returned fields in each itemin the result. This parameter accepts a comma-separated list offield names or all. These fields will be returned for each items inthe result. All the field names are case-sensitive, and users mustprovide the correct field name in the query. All the user-definedfield names should be provided with prefix fields and followed byperiod (.). When fields is specified as all (case-insensitive), allthe standard fields are returned in the case of a query acrosstypes and in the case of a type-specific query, all standard anduser fields are returned. This parameter is optional in the query,and by default the result shows only standard field name anddescription. The standard fields, Id and type, are always returnedirrespective of any field asked. Any incorrect or invalid field namegiven in the query will throw an error. In the context of a bracestyle cross-type query, type-specific fields may be specified usingthe syntax name,{typename1:fields.userdefinedfieldname1,fields.userdefinedfieldname2},{typename2:fields.userdefinedfieldname1}. In thepreceding example, all items of the type, typename1, will havefields - name, userdefinedfieldname1, and userdefinedfieldname2,while all items of the type, typename2, will have fields - name,userdefinedfieldname1. If the cross-type query does not resolve totypes referenced in the typed fields clause(s), an error will bethrown.
Example: This returns standard fields (name), user fields (state),and country of the type address in the search results.
https://{cecsdomain}/content/management/api/v1.1/items?q=type eq"Address"&fields=fields.state,fields.countryExample: This returns all the attributes for a specific type used inthe search results.
https://{cecsdomain}/content/management/api/v1.1/items?q=type eq "Address"&fields=allExample: This returns standard fields, name and createdBy in thesearch results for all items across all the types.
https://{cecsdomain}/content/management/api/v1.1/items?fields=name,createdByExample: This returns all the standard fields in the search resultsfor all items across all the types.
https://{cecsdomain}/content/management/api/v1.1/items?fields=allDefault value: name, description, repositoryId, slug, language,translatable, createdDate, updatedDate
limit integer(int32)
This parameter accepts a non negative integer and is used tocontrol the size of the result. If offset+limit > 10000, then the limitis treated as 10000-offset and gives results. The default value is100.
links string This parameter accepts a comma-separated list of link names. Bydefault, this parameter gives all the links applicable. Possiblevalues are: self, canonical, describedby, first, last, prev, next
Chapter 13Use REST APIs for Content Searching
13-79

QueryParameter
Type Description
offset integer(int32)
This parameter accepts a non negative integer less than 10000and is used to control the start index of the result. The defaultvalue is 0.
Chapter 13Use REST APIs for Content Searching
13-80
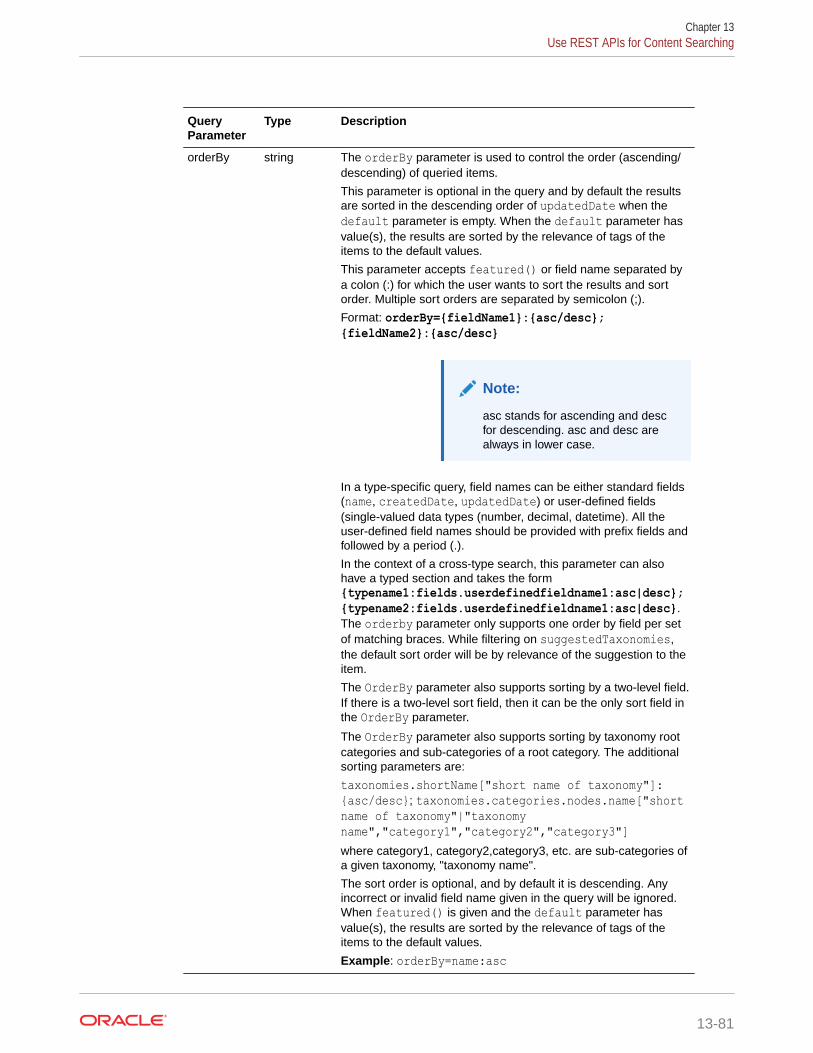
QueryParameter
Type Description
orderBy string The orderBy parameter is used to control the order (ascending/descending) of queried items.
This parameter is optional in the query and by default the resultsare sorted in the descending order of updatedDate when thedefault parameter is empty. When the default parameter hasvalue(s), the results are sorted by the relevance of tags of theitems to the default values.
This parameter accepts featured() or field name separated bya colon (:) for which the user wants to sort the results and sortorder. Multiple sort orders are separated by semicolon (;).
Format: orderBy={fieldName1}:{asc/desc};{fieldName2}:{asc/desc}
Note:
asc stands for ascending and descfor descending. asc and desc arealways in lower case.
In a type-specific query, field names can be either standard fields(name, createdDate, updatedDate) or user-defined fields(single-valued data types (number, decimal, datetime). All theuser-defined field names should be provided with prefix fields andfollowed by a period (.).
In the context of a cross-type search, this parameter can alsohave a typed section and takes the form{typename1:fields.userdefinedfieldname1:asc|desc};{typename2:fields.userdefinedfieldname1:asc|desc}.The orderby parameter only supports one order by field per setof matching braces. While filtering on suggestedTaxonomies,the default sort order will be by relevance of the suggestion to theitem.
The OrderBy parameter also supports sorting by a two-level field.If there is a two-level sort field, then it can be the only sort field inthe OrderBy parameter.
The OrderBy parameter also supports sorting by taxonomy rootcategories and sub-categories of a root category. The additionalsorting parameters are:
taxonomies.shortName["short name of taxonomy"]:{asc/desc}; taxonomies.categories.nodes.name["shortname of taxonomy"|"taxonomyname","category1","category2","category3"]where category1, category2,category3, etc. are sub-categories ofa given taxonomy, "taxonomy name".
The sort order is optional, and by default it is descending. Anyincorrect or invalid field name given in the query will be ignored.When featured() is given and the default parameter hasvalue(s), the results are sorted by the relevance of tags of theitems to the default values.
Example: orderBy=name:asc
Chapter 13Use REST APIs for Content Searching
13-81
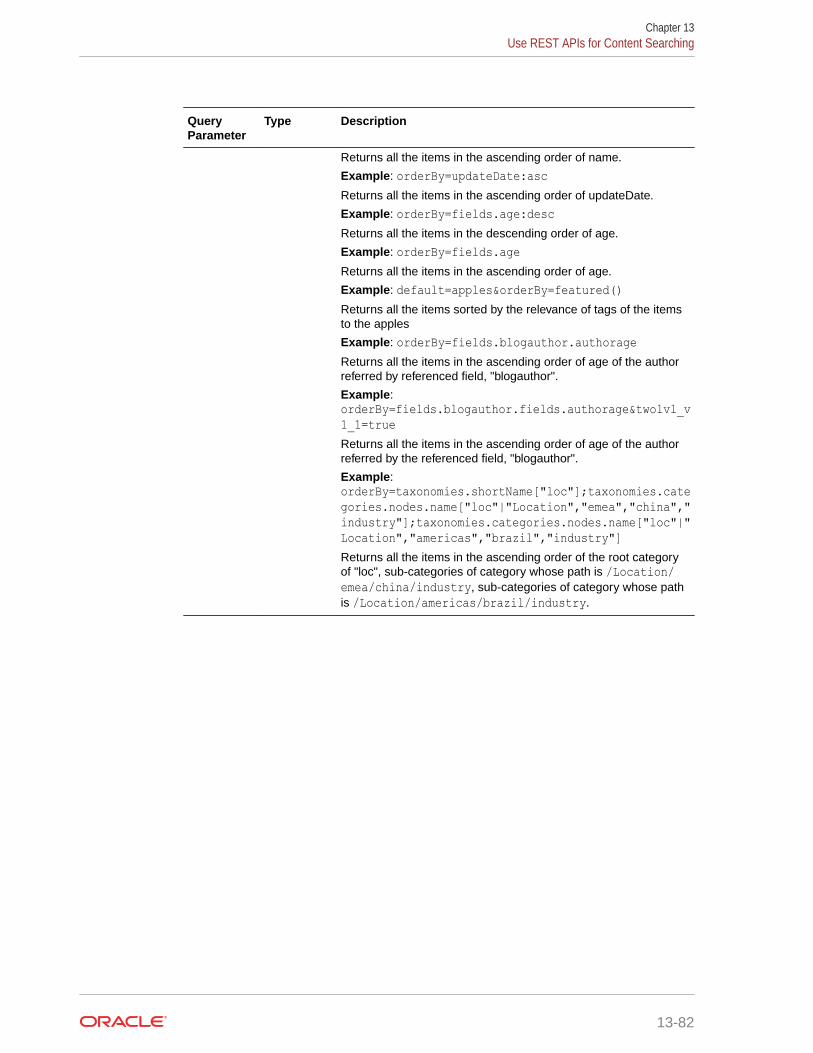
QueryParameter
Type Description
Returns all the items in the ascending order of name.
Example: orderBy=updateDate:ascReturns all the items in the ascending order of updateDate.
Example: orderBy=fields.age:descReturns all the items in the descending order of age.
Example: orderBy=fields.ageReturns all the items in the ascending order of age.
Example: default=apples&orderBy=featured()Returns all the items sorted by the relevance of tags of the itemsto the apples
Example: orderBy=fields.blogauthor.authorageReturns all the items in the ascending order of age of the authorreferred by referenced field, "blogauthor".
Example:orderBy=fields.blogauthor.fields.authorage&twolvl_v1_1=trueReturns all the items in the ascending order of age of the authorreferred by the referenced field, "blogauthor".
Example:orderBy=taxonomies.shortName["loc"];taxonomies.categories.nodes.name["loc"|"Location","emea","china","industry"];taxonomies.categories.nodes.name["loc"|"Location","americas","brazil","industry"]Returns all the items in the ascending order of the root categoryof "loc", sub-categories of category whose path is /Location/emea/china/industry, sub-categories of category whose pathis /Location/americas/brazil/industry.
Chapter 13Use REST APIs for Content Searching
13-82
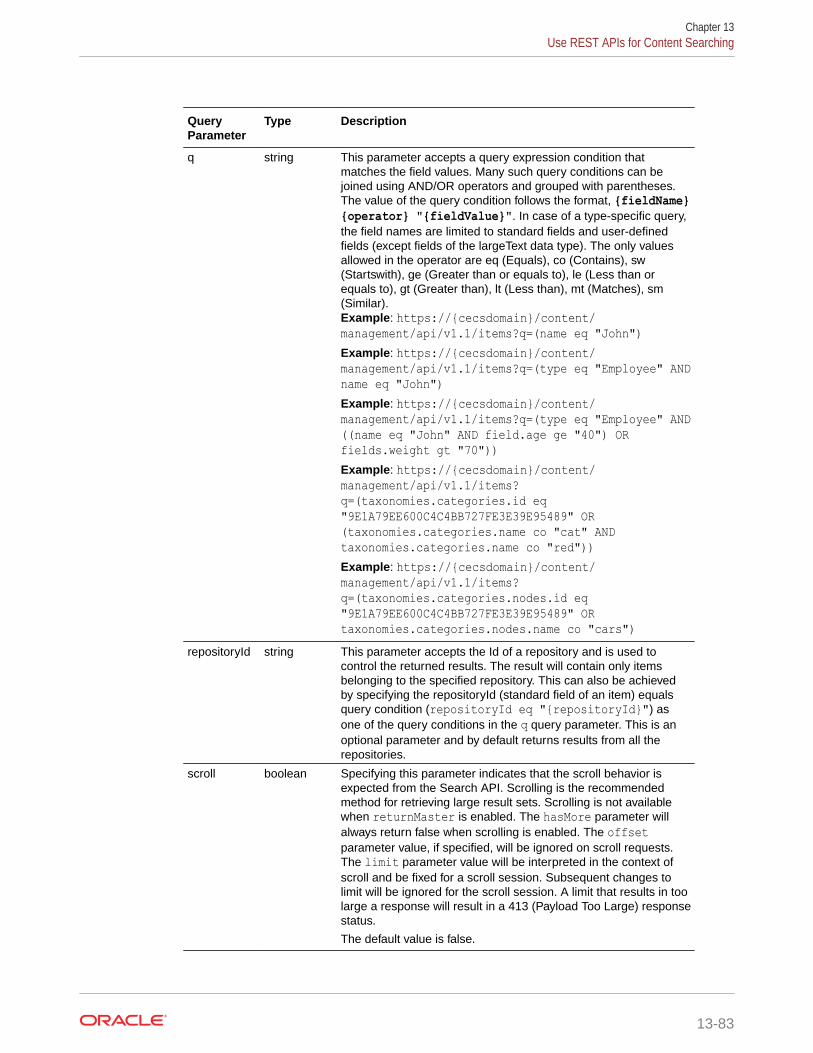
QueryParameter
Type Description
q string This parameter accepts a query expression condition thatmatches the field values. Many such query conditions can bejoined using AND/OR operators and grouped with parentheses.The value of the query condition follows the format, {fieldName}{operator} "{fieldValue}". In case of a type-specific query,the field names are limited to standard fields and user-definedfields (except fields of the largeText data type). The only valuesallowed in the operator are eq (Equals), co (Contains), sw(Startswith), ge (Greater than or equals to), le (Less than orequals to), gt (Greater than), lt (Less than), mt (Matches), sm(Similar).Example: https://{cecsdomain}/content/management/api/v1.1/items?q=(name eq "John")Example: https://{cecsdomain}/content/management/api/v1.1/items?q=(type eq "Employee" ANDname eq "John")Example: https://{cecsdomain}/content/management/api/v1.1/items?q=(type eq "Employee" AND((name eq "John" AND field.age ge "40") ORfields.weight gt "70"))Example: https://{cecsdomain}/content/management/api/v1.1/items?q=(taxonomies.categories.id eq"9E1A79EE600C4C4BB727FE3E39E95489" OR(taxonomies.categories.name co "cat" ANDtaxonomies.categories.name co "red"))Example: https://{cecsdomain}/content/management/api/v1.1/items?q=(taxonomies.categories.nodes.id eq"9E1A79EE600C4C4BB727FE3E39E95489" ORtaxonomies.categories.nodes.name co "cars")
repositoryId string This parameter accepts the Id of a repository and is used tocontrol the returned results. The result will contain only itemsbelonging to the specified repository. This can also be achievedby specifying the repositoryId (standard field of an item) equalsquery condition (repositoryId eq "{repositoryId}") asone of the query conditions in the q query parameter. This is anoptional parameter and by default returns results from all therepositories.
scroll boolean Specifying this parameter indicates that the scroll behavior isexpected from the Search API. Scrolling is the recommendedmethod for retrieving large result sets. Scrolling is not availablewhen returnMaster is enabled. The hasMore parameter willalways return false when scrolling is enabled. The offsetparameter value, if specified, will be ignored on scroll requests.The limit parameter value will be interpreted in the context ofscroll and be fixed for a scroll session. Subsequent changes tolimit will be ignored for the scroll session. A limit that results in toolarge a response will result in a 413 (Payload Too Large) responsestatus.
The default value is false.
Chapter 13Use REST APIs for Content Searching
13-83
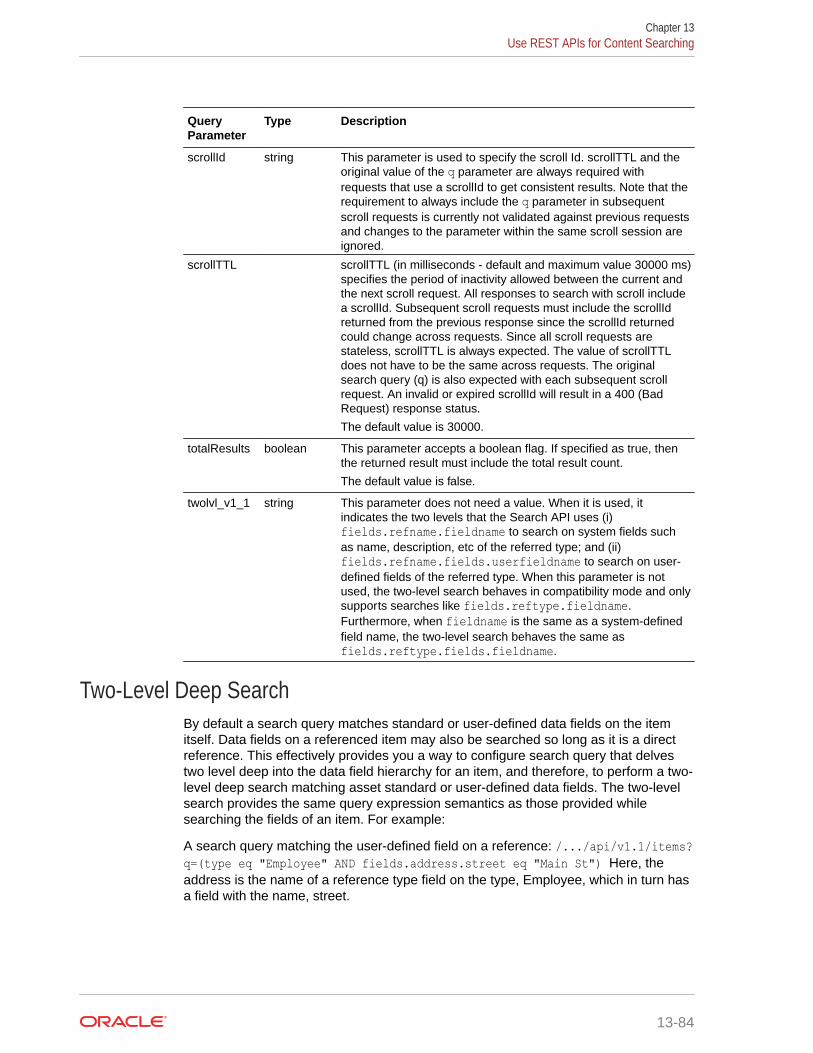
QueryParameter
Type Description
scrollId string This parameter is used to specify the scroll Id. scrollTTL and theoriginal value of the q parameter are always required withrequests that use a scrollId to get consistent results. Note that therequirement to always include the q parameter in subsequentscroll requests is currently not validated against previous requestsand changes to the parameter within the same scroll session areignored.
scrollTTL scrollTTL (in milliseconds - default and maximum value 30000 ms)specifies the period of inactivity allowed between the current andthe next scroll request. All responses to search with scroll includea scrollId. Subsequent scroll requests must include the scrollIdreturned from the previous response since the scrollId returnedcould change across requests. Since all scroll requests arestateless, scrollTTL is always expected. The value of scrollTTLdoes not have to be the same across requests. The originalsearch query (q) is also expected with each subsequent scrollrequest. An invalid or expired scrollId will result in a 400 (BadRequest) response status.
The default value is 30000.
totalResults boolean This parameter accepts a boolean flag. If specified as true, thenthe returned result must include the total result count.
The default value is false.
twolvl_v1_1 string This parameter does not need a value. When it is used, itindicates the two levels that the Search API uses (i)fields.refname.fieldname to search on system fields suchas name, description, etc of the referred type; and (ii)fields.refname.fields.userfieldname to search on user-defined fields of the referred type. When this parameter is notused, the two-level search behaves in compatibility mode and onlysupports searches like fields.reftype.fieldname.Furthermore, when fieldname is the same as a system-definedfield name, the two-level search behaves the same asfields.reftype.fields.fieldname.
Two-Level Deep SearchBy default a search query matches standard or user-defined data fields on the itemitself. Data fields on a referenced item may also be searched so long as it is a directreference. This effectively provides you a way to configure search query that delvestwo level deep into the data field hierarchy for an item, and therefore, to perform a two-level deep search matching asset standard or user-defined data fields. The two-levelsearch provides the same query expression semantics as those provided whilesearching the fields of an item. For example:
A search query matching the user-defined field on a reference: /.../api/v1.1/items?q=(type eq "Employee" AND fields.address.street eq "Main St") Here, theaddress is the name of a reference type field on the type, Employee, which in turn hasa field with the name, street.
Chapter 13Use REST APIs for Content Searching
13-84

Note:
Searching recursively down an item's reference hierarchy past the first levelreference is not supported. Sorting by second level fields is not supported either.
Two-level deep search supports two ways to configure a search query on standard and user-defined fields on a referenced item:
• Compatibility mode
This is a default mode. In the compatibility mode, a query expression supports fieldnotations like fields.ref-field.field-name, where ref-field is the name of areference or a media field and field-name is the name of a field on the referred assettype. Furthermore, when field-name is the same as the name of a standard field (Forexample, Id, name, or description), the two-level deep search behaves the same asfields.ref-field.fields.field-name, that is, it treats field-name as the name of auser-defined field. For example:
– Query (type eq "parent-type" AND fields.ref-field.field-name eq "blah")will match items of the type parent-type(parent item) that have the value blahassigned to the user-defined field field-name on the child item, which is set as areference on the field ref-field.
– Query (type eq "parent-type" AND fields.ref-field.name eq "blah") will matchitems of type parent-type (parent item) that have the value blah assigned to thestandard field, name on the child item, which is set as reference on the field, ref-field.
• Two-level mode
This mode is activated by setting the query parameter, twolvl_v1_1 mode to true. In thismode the two-level search query expression uses fields.ref-field.field-name tosearch on standard fields, such as Id, name, or description and fields.ref-field.fields.field-name to search on user-defined fields of the referenced asset type.For example:
– Query (type eq "parent-type" AND fields.ref-field.field-name eq "blah")will match items of the type parent-type (parent item) that have the value blahassigned to a standard field, field-name on the child item, which is set as areference on the field, ref-field.
– Query (type eq "parent-type" AND fields.ref-field.fields.field-name eq"blah") will match items of the type, parent-type (parent item) that have the valueblah assigned to a user-defined field, field-name on the child item, which is set as areference on the field, ref-field.
Search JSON Data in JSON FieldsSearch API allows you to return content items, or digital assets of custom digital asset types,based on search terms matching values assigned to attributes in JSON data that is stored inJSON fields on the item. In the Oracle Content Mangement web interface, the data field forstoring JSON formatted data on an asset type is called Embedded Content. The API supportssearch terms that match base attributes, array elements, or attributes in a JSON object,including an array of objects. JSON data indexing currently imposes the following limitations
Chapter 13Use REST APIs for Content Searching
13-85
on the total size of the indexed JSON field (< 2.5MB), JSON field key length (< 512B),and depth to match field in JSON object (10 levels).
Query syntax uses dot notation for field names to reference any key in the arbitraryJSON content, i.e. you can use fields.<json_field_name>.value to query customtext field or you can havefields.<json_field_name>.value.key1.subkey1.subsubkey3, etc. In a searchcondition, you can use all existing operators that are supported by Search API forregular custom fields, for example:
q=(type eq "Employee" AND fields.<json_field_name>.value.street eq "Main St¿)q=(type eq "Employee" AND fields.<json_field_name>.value.age gt ¿20")q=(type eq "Employee" AND fields.<json_field_name>.value.proper`es eq ¿office=HQ¿ AND fields.<json_field_name>.value.proper`es eq ¿building=100¿)
Similarly, for two-level deep search:
q=(type eq "Employee" AND fields.<ref_field_name>.fields.<json_field_name>.value.street eq "Main St¿)q=(type eq "Employee" AND fields.<ref_field_name>.fields.<json_field_name>.value.age gt ¿20")q=(type eq "Employee" AND fields.<ref_field_name>.fields.<json_field_name>.value.proper`es eq ¿office=HQ¿ AND fields.<ref_field_name>.fields.<json_field_name>.value.proper`es eq ¿building=100¿)
Use of wildcards in search conditions, such asfields.<json_field_name>.value.*.subsubkey3 and such are not supported forperformance reasons.
The Search API also allows you to sort returned search results by JSON Keyes/subkeys, for example:
orderBy= fields.<json_field_name>.value.name:ascorderBy= fields.<json_field_name>.value.name:descorderBy= fields.<ref_field_name>.fields.<json_field_name>.value.name:asc orderBy= fields.<ref_field_name>.fields.<json_field_name>.value.name:desc
Search Across TypesPrior to the 21.6.1 release of Oracle Content Management (June 2021), specifyingmultiple asset types in a search query made it a global (untyped) query that onlyallows you to reference standard fields on an asset type in query conditions and inorderBy specifications. An asset type specific predicates like fields.custom-filed-name,which could not be used in the untyped query conditions, fields specification, ororderBy specification. The new cross-type search API and search query syntaxassociated with it removes these restrictions.
Chapter 13Use REST APIs for Content Searching
13-86

A search query on custom data fields across multiple asset types requires you to use a newsyntax for building a search query expression. A query across multiple types is formulated byenclosing asset type predicates with curly brackets {}. The Search query is validated tocomply with the following restrictions:
• Only one asset type may be specified within a matching pair of curly brackets. The {} pairdefines a type scope.
• Nested asset type scope delimiters are not allowed, for example, {...{...}..}expression would fail validation.
• Curly brackets {} can be combined with square brackets [] when defining a typedexpression for the fields or orderBy parameters.
• Predicates specified outside a type scope behave like they were specified using squarebrackets, that is, like a non-multi-type search query parameter.
Examples of search query on custom data fields across multiple asset types:
• {type eq "t1" AND fields.ud1 eq "ud1"}ud1 has to be a field on the type, t1. Query will fail validation if that is not the case.
• {type eq "t1" AND fields.ud1 eq "ud1"} AND name eq "John"Same as above with a standard field outside the type delimiter.
• {type eq "t1" AND fields.ud1 eq "ud1"} OR {type eq "t2" AND fields.ud2 eq"ud2"}ud1 has to be a field on the type, t1 and ud2 has to be a field on the type, t2.
• {type eq "t1" AND and fields.ud1 eq "ud1"} AND {type eq "t2" AND fields.ud2eq "ud2"}Similar to the previous query and valid, but it will return zero results due to the ANDoperator.
• {type eq "t1" OR type eq "t2"}Invalid query, since two types are specified within a type delimiter.
• type eq “t1” OR type eq “t2”Un-scoped style search that resolves to an untyped query.
• type eq “t1” OR type eq “t2” AND fields.ud1 eq “ud1”Un-scoped style search that resolves to untyped and will throw a validation error.
• type eq “t1” AND fields.ud1 eq “ud1”Un-scoped style search that resolves to the type, t1. It is valid as long as ud1 is a field ont1.
• {type eq “t2” AND fields.ud2 eq “ud2”} OR type eq “t1” AND fields.ud1 eq“ud1”Un-scoped style search that resolves to the type, t1, and scoped search that resolves tot2. Query is valid if ud1 is a field on t1 and ud2 is a field on t2.
The fields ParameterThe untyped way of configuring the fields parameter on request to return standard anduser-defined data fields for a single type uses the form Id, name, type, updatedDate,fields.ud1,fields.ud2. The fields parameter can be typed as well and takes the form{<typename1>:fields.<userdefinedfieldname>,[fields.<userdefinedfieldname>]},{<typename2>:fields.<userdefinedfieldname>,[fields.<userdefinedfieldname>]}.
Chapter 13Use REST APIs for Content Searching
13-87
If an untyped expression is used as the fields parameter value in a combination witha typed query, the q parameter has to resolve to a single un-scoped asset type (a typepredicate specified outside {} delimiters), otherwise an exception will be thrown.
Some examples of the typed expression set as the fields parameter value:
• fields=id,name,type,updatedDate,{t1:fields.ud1},{t2:fields.ud2,fields.ud3}The typed way to request system-defined fields (Id, name, type, updatedDate) anduser defined fields ud1 for type t1 and ud2 and ud3 for type t2. An exception willbe thrown during validation if types and user defined fields don’t match.
• fields=id,name,type,updatedDate,{t1:fields.ud1},{t2:fields.ud2},fields.ud3The typed way to request system-defined fields (id, name, type, updatedDate) anduser defined fields ud1 for type t1 and ud2 for type t2. The user-defined field, ud3,must resolve to an unscoped type, otherwise an exception will be thrown duringvalidation.
The orderBy ParameterThe orderBy parameter can also have a typed section, and it takes the form{<typename1>:fields.<userdefinedfieldname>[:asc|desc]};{<typename2>:fields.<userdefinedfieldname>[:asc|desc]}. The orderByparameter only supports one order by field per type scope.
Dynamic Count of Assets per Taxonomy CategoryThe dynamic assets per category category count is a named aggregation, where itemsmatching a search query are further analyzed to answer the question: “How manyitems in the result set are assigned to a specific category?”. It should be noted that theanalyzer needs to reflect direct and indirect category assignments. For example, if anitem is assigned to a leaf level category, the item count should propagate to all parentlevel categories. If the same item is assigned to multiple leaf level categories, it shouldbe counted as one item on the common parent category (and all its parent categories).In other words, duplicate assignments should not be counted. Consider the followingexample:
Given the following category tree in yourtaxonomy:
Item count per category should account fora product item D500 assigned to bothDSLR and Nikon as follows:
Cameras Type DSLR Brand Nikon
Cameras (1) Type (1) DSLR (1) Brand (1) Nikon (1)
The same result is expected if the item, D500, is also directly assigned to the Camerascategory.
If you use taxonomy to allow end-users of a website or application to browsecategorized items (for example, in a product catalog on your website), you can use the
Chapter 13Use REST APIs for Content Searching
13-88

item count per category to dynamically filter out and hide categories which have no itemsassigned, while leaving categories that do have assigned items plus, you can display theactual count of assets on each category. Here is how your API client can do that by goingthrough the following repeating cycle to narrow down category listing:
• Start with an initial filter query
• End-user adds a filter term or selects a category
• Run modified filter query plus, an aggregation query(s) as required
• Narrow down the category listing based on the returned aggregated counts
• Cycle repeats from #2 as end-user continues with filtering items
The AGGS Query ParameterTo execute a search query that returns an aggregated item count per category, you need touse the aggs query parameters that takes JSON array as a value. Each element in this arrayrepresents an aggregation which is defined by required and optional attributes described inthe table below. The /items resource supports the aggs parameter in both the REST API forContent Delivery and REST API for Content Management.
QueryParameter
Type Aggregation Attributes
aggs JSON array • name (required): item_count_per_category• field (optional): Takes either Id, or apiname to specify if Id or
apiName is returned for a category. By default, the category Id isreturned.
• size (optional): Takes a number in the [1...1000] range. By default1000 is used.
Some examples of search queries with aggregations:
• A query with a single aggregation.../api/v1.1/items?fields=name&aggs={"name":"item_count_per_category"}&q=(type eq"ContentType1" AND fields.simple_text_value mt “brown")
• A query with a single aggregation and with the query parameter, limit=0 will return nosearch results. Aggregated counts will be returned from the Elasticsearch aggregationcache.../api/v1.1/items?fields=name&aggs={"name":"item_count_per_category"}&q=(type eq"ContentType1" AND fields.simple_text_value mt “brown")&limit=0
• A query with two aggregations.../api/v1.1/items?fields=name&aggs=[{"name":"item_count_per_category"},{"name":"item_count_per_category","field":"apiname"}]&q=(type eq"ContentType1" AND fields.simple_text_value mt "brown")
The aggregation section in the response to the search request for the above sample querywith two aggregations is shown below:
"aggregationResults": [{ "itemCountPerCategory": [ {
Chapter 13Use REST APIs for Content Searching
13-89
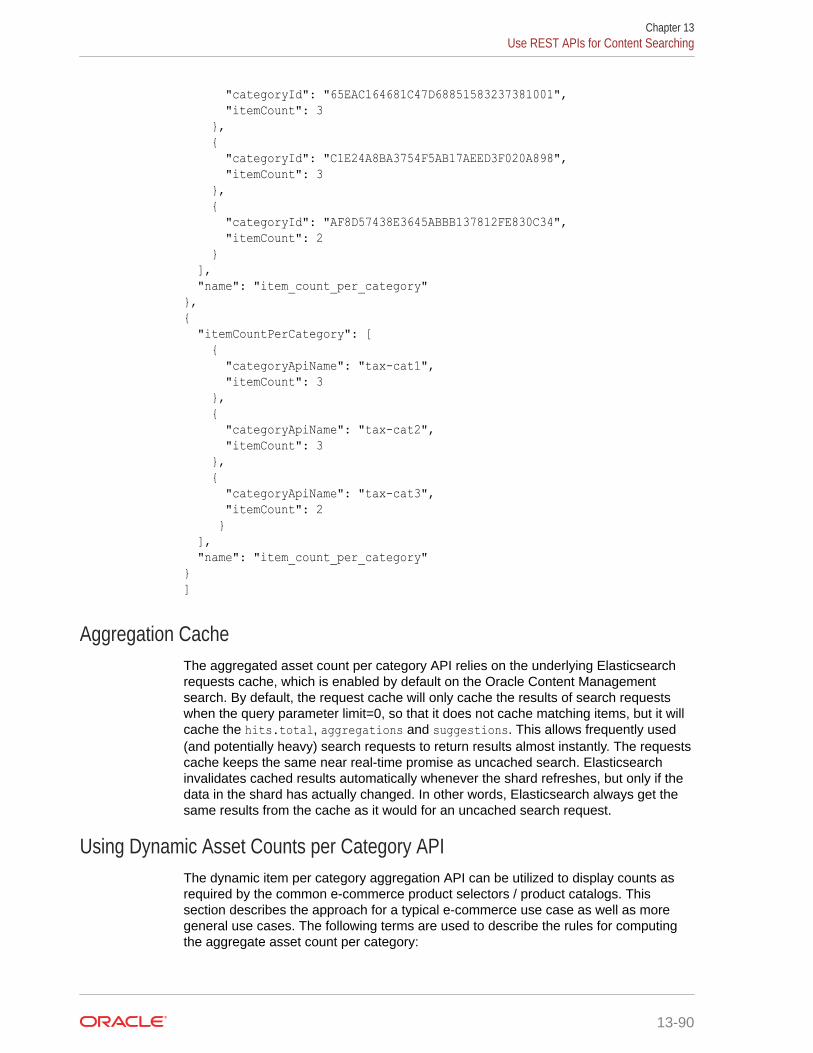
"categoryId": "65EAC164681C47D68851583237381001", "itemCount": 3 }, { "categoryId": "C1E24A8BA3754F5AB17AEED3F020A898", "itemCount": 3 }, { "categoryId": "AF8D57438E3645ABBB137812FE830C34", "itemCount": 2 } ], "name": "item_count_per_category"},{ "itemCountPerCategory": [ { "categoryApiName": "tax-cat1", "itemCount": 3 }, { "categoryApiName": "tax-cat2", "itemCount": 3 }, { "categoryApiName": "tax-cat3", "itemCount": 2 } ], "name": "item_count_per_category"}]
Aggregation CacheThe aggregated asset count per category API relies on the underlying Elasticsearchrequests cache, which is enabled by default on the Oracle Content Managementsearch. By default, the request cache will only cache the results of search requestswhen the query parameter limit=0, so that it does not cache matching items, but it willcache the hits.total, aggregations and suggestions. This allows frequently used(and potentially heavy) search requests to return results almost instantly. The requestscache keeps the same near real-time promise as uncached search. Elasticsearchinvalidates cached results automatically whenever the shard refreshes, but only if thedata in the shard has actually changed. In other words, Elasticsearch always get thesame results from the cache as it would for an uncached search request.
Using Dynamic Asset Counts per Category APIThe dynamic item per category aggregation API can be utilized to display counts asrequired by the common e-commerce product selectors / product catalogs. Thissection describes the approach for a typical e-commerce use case as well as moregeneral use cases. The following terms are used to describe the rules for computingthe aggregate asset count per category:
Chapter 13Use REST APIs for Content Searching
13-90
• User query: A user-specified search query expression of arbitrary complexity conformingto Oracle Content Management Search A{I query syntax requirements. This is a free formsearch query on whatever an end-user entered in the input, such as (name eq "car").
• Category node query: A form of Oracle Content Management Search API queryexpressed as ‘(taxonomies.categories.nodes.id eq “<id_1>" ORtaxonomies.categories.nodes.id eq “<id_2>” OR ... ORtaxonomies.categories.nodes.id eq “<id_N>”)’, where id_X is the Id of one of theuser-selected categories under a particular taxonomy.
• Search query: One or more search queries intended to fetch results for display to end-users. It can be a user query, one or more category node queries, or a combination ofthose.
• Aggregation query: A variant of user query, generated to compute the aggregated itemcount for a specific search facet.
Computing Aggregate Asset CountsNo user-selected categories: With no user-selected categories you can use a user query toget matching items and compute aggregated counts:
• Search query: q=<user_query>• Aggregation query (all taxonomies): q=<user_query>User selects one or more categories from one taxonomy - taxonomy-1:
• Search query: q=<user_query> AND <category_node_query_1>• Aggregation query(taxonomy-1): q=<user_query>• Aggregation query (all other taxonomies): q=<search_query>User selects categories from two taxonomy - taxonomy-1 and taxonomy-2:
• Search query: q=<user_query> AND <category_node_query_1> AND<category_node_query_2>
• Aggregation query (taxonomy-1): q=<user_query> AND <category_node_query_2>• Aggregation query (taxonomy-2): q=<user_query> AND <category_node_query_1>• Aggregation query (all other taxonomies): q=<search_query>User selects categories from three taxonomy - taxonomy-1, taxonomy-2 andtaxonomy-3:
• Search query: q=<user_query> AND <category_node_query_1> AND<category_node_query_2> AND <category_node_query_3>
• Aggregation query(taxonomy-1): q=<user_query> AND <category_node_query_2> AND<category_node_query_3>
• Aggregation query (taxonomy-2): q=<user_query> AND <category_node_query_1> AND<category_node_query_3>
• Aggregation query (taxonomy-3): q=<user_query> AND <category_node_query_1> AND<category_node_query_2>
A general rule, where user selects categories from N taxonomies:
• Search query: q=<user_query> AND <category_node_query_1> AND<category_node_query_2> ... AND <category_node_query_N>
Chapter 13Use REST APIs for Content Searching
13-91
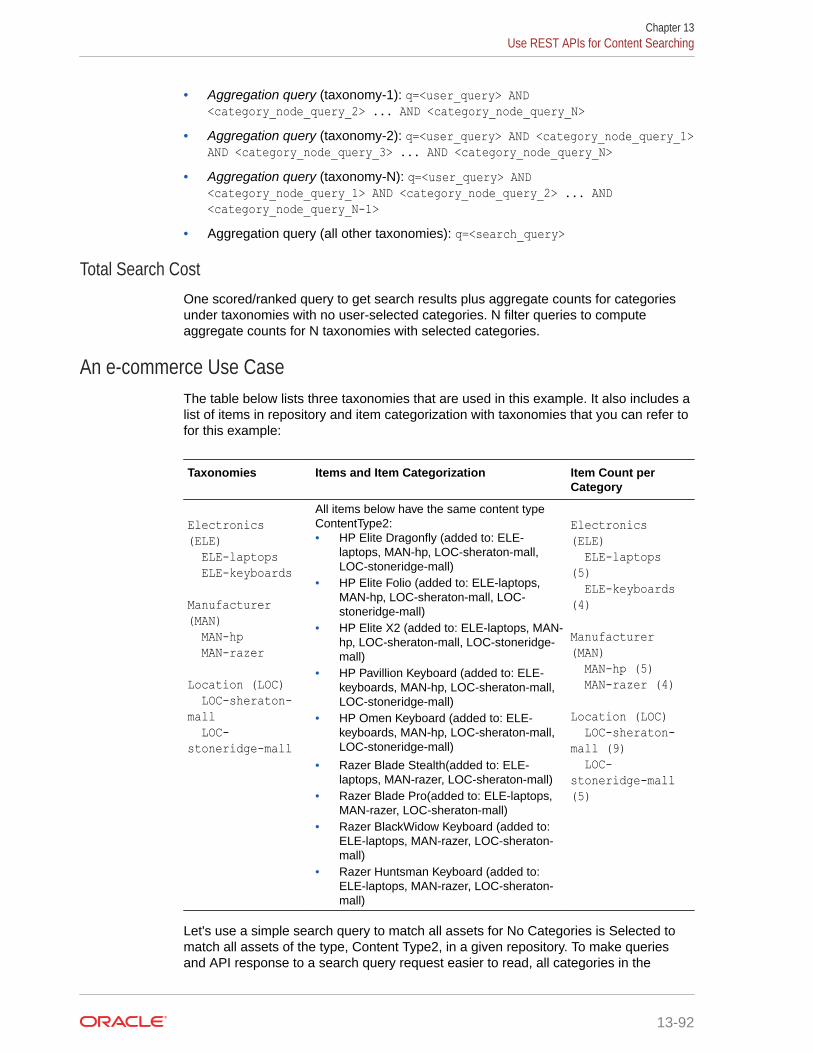
• Aggregation query (taxonomy-1): q=<user_query> AND<category_node_query_2> ... AND <category_node_query_N>
• Aggregation query (taxonomy-2): q=<user_query> AND <category_node_query_1>AND <category_node_query_3> ... AND <category_node_query_N>
• Aggregation query (taxonomy-N): q=<user_query> AND<category_node_query_1> AND <category_node_query_2> ... AND<category_node_query_N-1>
• Aggregation query (all other taxonomies): q=<search_query>
Total Search CostOne scored/ranked query to get search results plus aggregate counts for categoriesunder taxonomies with no user-selected categories. N filter queries to computeaggregate counts for N taxonomies with selected categories.
An e-commerce Use CaseThe table below lists three taxonomies that are used in this example. It also includes alist of items in repository and item categorization with taxonomies that you can refer tofor this example:
Taxonomies Items and Item Categorization Item Count perCategory
Electronics (ELE) ELE-laptops ELE-keyboards
Manufacturer (MAN) MAN-hp MAN-razer
Location (LOC) LOC-sheraton-mall LOC-stoneridge-mall
All items below have the same content typeContentType2:• HP Elite Dragonfly (added to: ELE-
laptops, MAN-hp, LOC-sheraton-mall,LOC-stoneridge-mall)
• HP Elite Folio (added to: ELE-laptops,MAN-hp, LOC-sheraton-mall, LOC-stoneridge-mall)
• HP Elite X2 (added to: ELE-laptops, MAN-hp, LOC-sheraton-mall, LOC-stoneridge-mall)
• HP Pavillion Keyboard (added to: ELE-keyboards, MAN-hp, LOC-sheraton-mall,LOC-stoneridge-mall)
• HP Omen Keyboard (added to: ELE-keyboards, MAN-hp, LOC-sheraton-mall,LOC-stoneridge-mall)
• Razer Blade Stealth(added to: ELE-laptops, MAN-razer, LOC-sheraton-mall)
• Razer Blade Pro(added to: ELE-laptops,MAN-razer, LOC-sheraton-mall)
• Razer BlackWidow Keyboard (added to:ELE-laptops, MAN-razer, LOC-sheraton-mall)
• Razer Huntsman Keyboard (added to:ELE-laptops, MAN-razer, LOC-sheraton-mall)
Electronics (ELE) ELE-laptops (5) ELE-keyboards (4)
Manufacturer (MAN) MAN-hp (5) MAN-razer (4)
Location (LOC) LOC-sheraton-mall (9) LOC-stoneridge-mall (5)
Let's use a simple search query to match all assets for No Categories is Selected tomatch all assets of the type, Content Type2, in a given repository. To make queriesand API response to a search query request easier to read, all categories in the
Chapter 13Use REST APIs for Content Searching
13-92
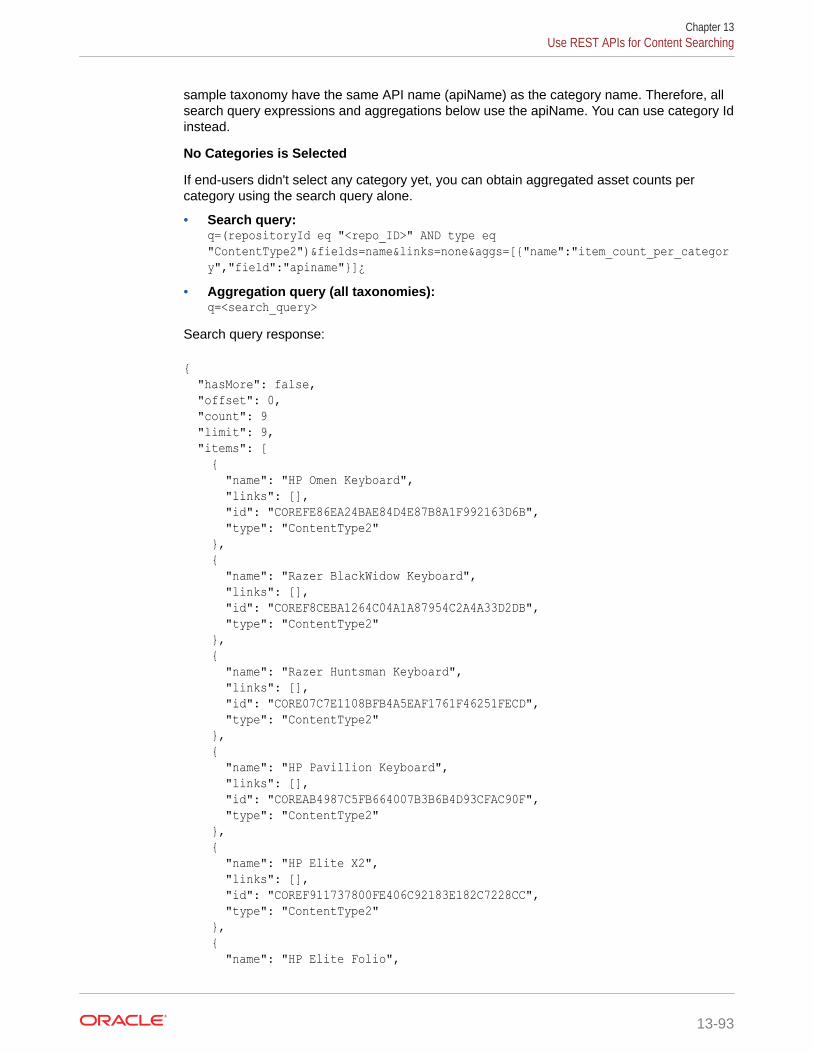
sample taxonomy have the same API name (apiName) as the category name. Therefore, allsearch query expressions and aggregations below use the apiName. You can use category Idinstead.
No Categories is Selected
If end-users didn't select any category yet, you can obtain aggregated asset counts percategory using the search query alone.
• Search query:q=(repositoryId eq "<repo_ID>" AND type eq"ContentType2")&fields=name&links=none&aggs=[{"name":"item_count_per_category","field":"apiname"}]¿
• Aggregation query (all taxonomies):q=<search_query>
Search query response:
{ "hasMore": false, "offset": 0, "count": 9 "limit": 9, "items": [ { "name": "HP Omen Keyboard", "links": [], "id": "COREFE86EA24BAE84D4E87B8A1F992163D6B", "type": "ContentType2" }, { "name": "Razer BlackWidow Keyboard", "links": [], "id": "COREF8CEBA1264C04A1A87954C2A4A33D2DB", "type": "ContentType2" }, { "name": "Razer Huntsman Keyboard", "links": [], "id": "CORE07C7E1108BFB4A5EAF1761F46251FECD", "type": "ContentType2" }, { "name": "HP Pavillion Keyboard", "links": [], "id": "COREAB4987C5FB664007B3B6B4D93CFAC90F", "type": "ContentType2" }, { "name": "HP Elite X2", "links": [], "id": "COREF911737800FE406C92183E182C7228CC", "type": "ContentType2" }, { "name": "HP Elite Folio",
Chapter 13Use REST APIs for Content Searching
13-93
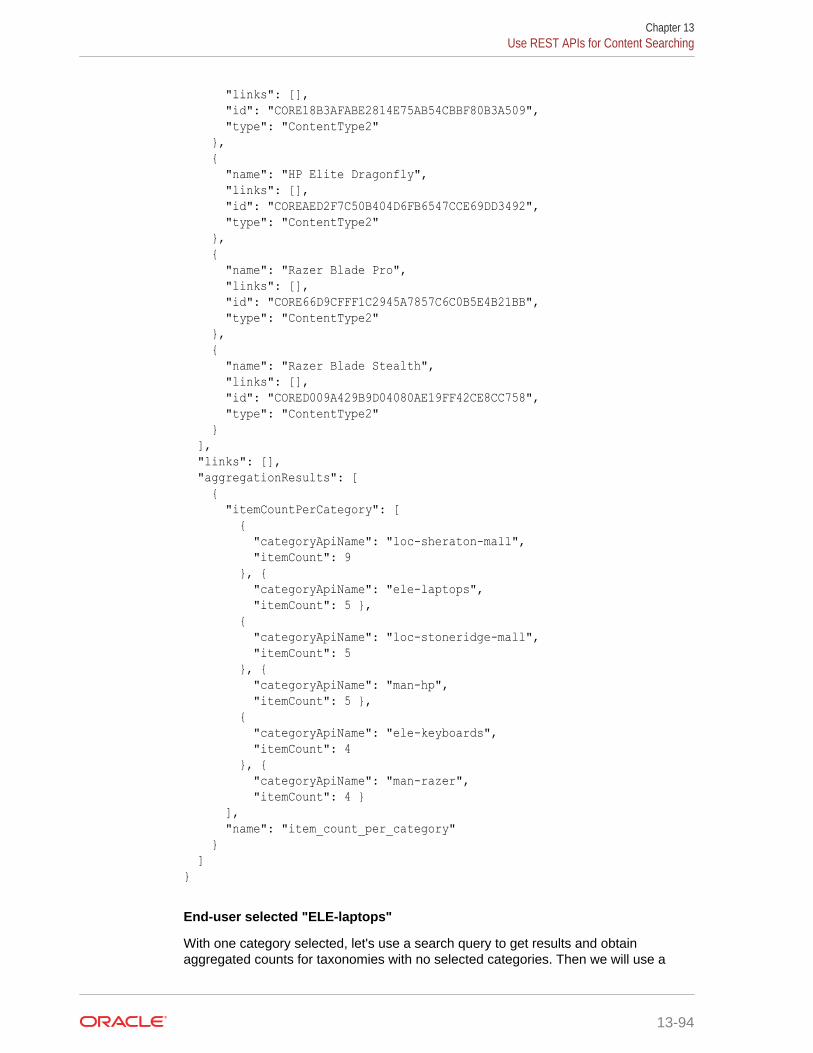
"links": [], "id": "CORE18B3AFABE2814E75AB54CBBF80B3A509", "type": "ContentType2" }, { "name": "HP Elite Dragonfly", "links": [], "id": "COREAED2F7C50B404D6FB6547CCE69DD3492", "type": "ContentType2" }, { "name": "Razer Blade Pro", "links": [], "id": "CORE66D9CFFF1C2945A7857C6C0B5E4B21BB", "type": "ContentType2" }, { "name": "Razer Blade Stealth", "links": [], "id": "CORED009A429B9D04080AE19FF42CE8CC758", "type": "ContentType2" } ], "links": [], "aggregationResults": [ { "itemCountPerCategory": [ { "categoryApiName": "loc-sheraton-mall", "itemCount": 9 }, { "categoryApiName": "ele-laptops", "itemCount": 5 }, { "categoryApiName": "loc-stoneridge-mall", "itemCount": 5 }, { "categoryApiName": "man-hp", "itemCount": 5 }, { "categoryApiName": "ele-keyboards", "itemCount": 4 }, { "categoryApiName": "man-razer", "itemCount": 4 } ], "name": "item_count_per_category" } ]}
End-user selected "ELE-laptops"
With one category selected, let's use a search query to get results and obtainaggregated counts for taxonomies with no selected categories. Then we will use a
Chapter 13Use REST APIs for Content Searching
13-94
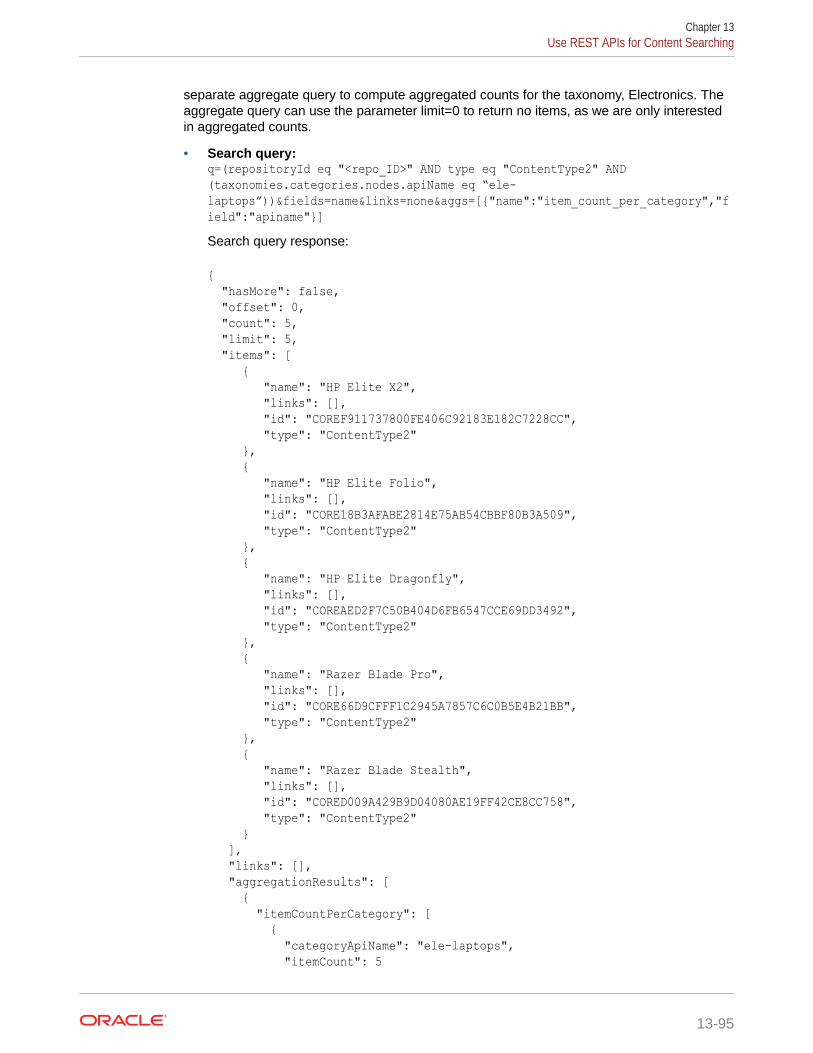
separate aggregate query to compute aggregated counts for the taxonomy, Electronics. Theaggregate query can use the parameter limit=0 to return no items, as we are only interestedin aggregated counts.
• Search query:q=(repositoryId eq "<repo_ID>" AND type eq "ContentType2" AND(taxonomies.categories.nodes.apiName eq “ele-laptops”))&fields=name&links=none&aggs=[{"name":"item_count_per_category","field":"apiname"}]Search query response:
{ "hasMore": false, "offset": 0, "count": 5, "limit": 5, "items": [ { "name": "HP Elite X2", "links": [], "id": "COREF911737800FE406C92183E182C7228CC", "type": "ContentType2" }, { "name": "HP Elite Folio", "links": [], "id": "CORE18B3AFABE2814E75AB54CBBF80B3A509", "type": "ContentType2" }, { "name": "HP Elite Dragonfly", "links": [], "id": "COREAED2F7C50B404D6FB6547CCE69DD3492", "type": "ContentType2" }, { "name": "Razer Blade Pro", "links": [], "id": "CORE66D9CFFF1C2945A7857C6C0B5E4B21BB", "type": "ContentType2" }, { "name": "Razer Blade Stealth", "links": [], "id": "CORED009A429B9D04080AE19FF42CE8CC758", "type": "ContentType2" } ], "links": [], "aggregationResults": [ { "itemCountPerCategory": [ { "categoryApiName": "ele-laptops", "itemCount": 5
Chapter 13Use REST APIs for Content Searching
13-95
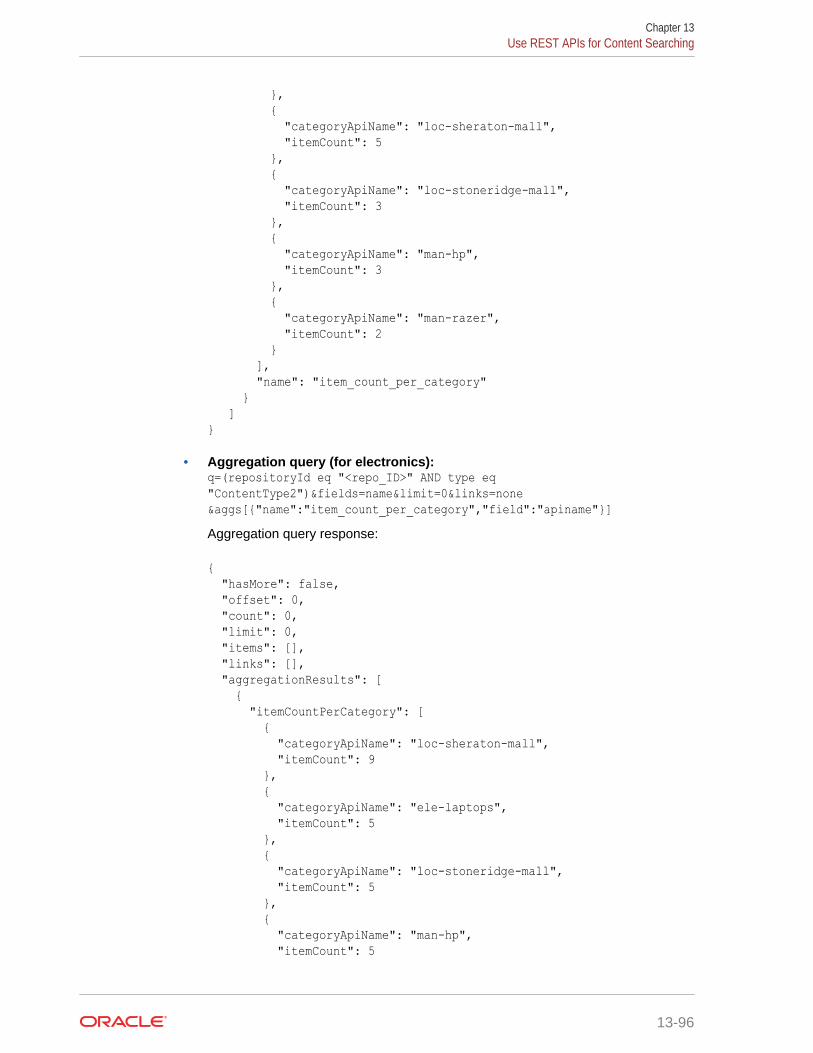
}, { "categoryApiName": "loc-sheraton-mall", "itemCount": 5 }, { "categoryApiName": "loc-stoneridge-mall", "itemCount": 3 }, { "categoryApiName": "man-hp", "itemCount": 3 }, { "categoryApiName": "man-razer", "itemCount": 2 } ], "name": "item_count_per_category" } ]}
• Aggregation query (for electronics):q=(repositoryId eq "<repo_ID>" AND type eq"ContentType2")&fields=name&limit=0&links=none&aggs[{"name":"item_count_per_category","field":"apiname"}]Aggregation query response:
{ "hasMore": false, "offset": 0, "count": 0, "limit": 0, "items": [], "links": [], "aggregationResults": [ { "itemCountPerCategory": [ { "categoryApiName": "loc-sheraton-mall", "itemCount": 9 }, { "categoryApiName": "ele-laptops", "itemCount": 5 }, { "categoryApiName": "loc-stoneridge-mall", "itemCount": 5 }, { "categoryApiName": "man-hp", "itemCount": 5
Chapter 13Use REST APIs for Content Searching
13-96
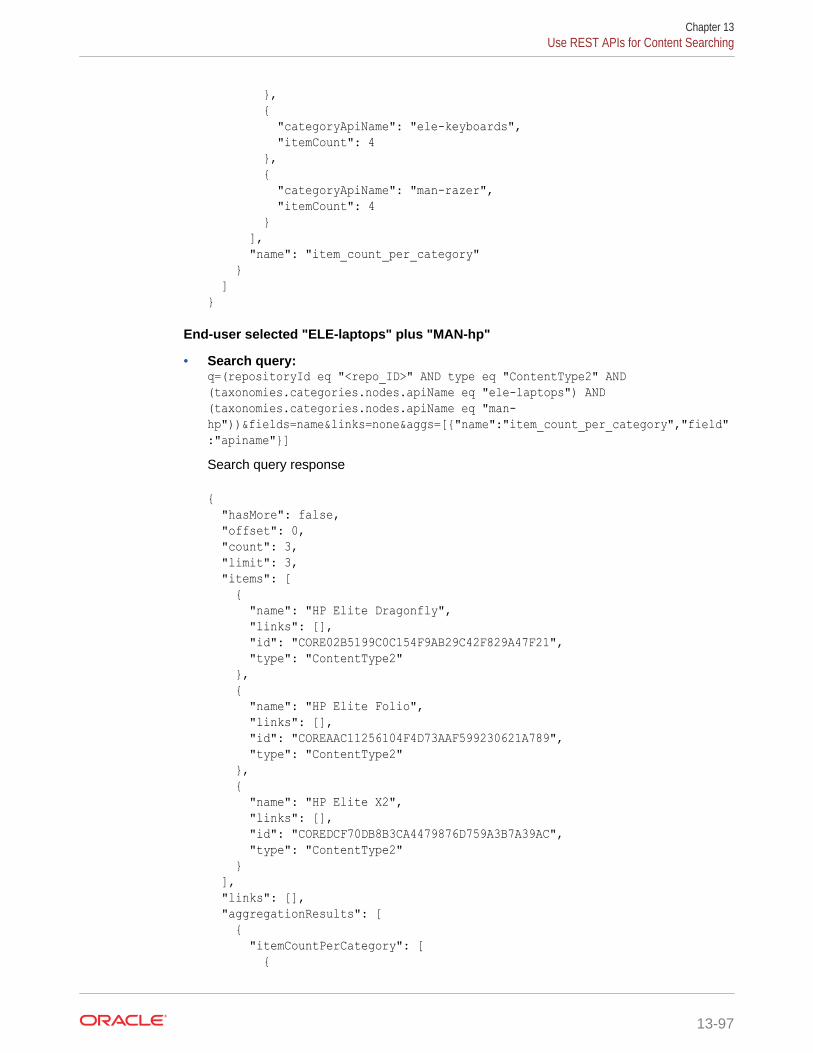
}, { "categoryApiName": "ele-keyboards", "itemCount": 4 }, { "categoryApiName": "man-razer", "itemCount": 4 } ], "name": "item_count_per_category" } ]}
End-user selected "ELE-laptops" plus "MAN-hp"
• Search query:q=(repositoryId eq "<repo_ID>" AND type eq "ContentType2" AND(taxonomies.categories.nodes.apiName eq "ele-laptops") AND(taxonomies.categories.nodes.apiName eq "man-hp"))&fields=name&links=none&aggs=[{"name":"item_count_per_category","field":"apiname"}]Search query response
{ "hasMore": false, "offset": 0, "count": 3, "limit": 3, "items": [ { "name": "HP Elite Dragonfly", "links": [], "id": "CORE02B5199C0C154F9AB29C42F829A47F21", "type": "ContentType2" }, { "name": "HP Elite Folio", "links": [], "id": "COREAAC11256104F4D73AAF599230621A789", "type": "ContentType2" }, { "name": "HP Elite X2", "links": [], "id": "COREDCF70DB8B3CA4479876D759A3B7A39AC", "type": "ContentType2" } ], "links": [], "aggregationResults": [ { "itemCountPerCategory": [ {
Chapter 13Use REST APIs for Content Searching
13-97
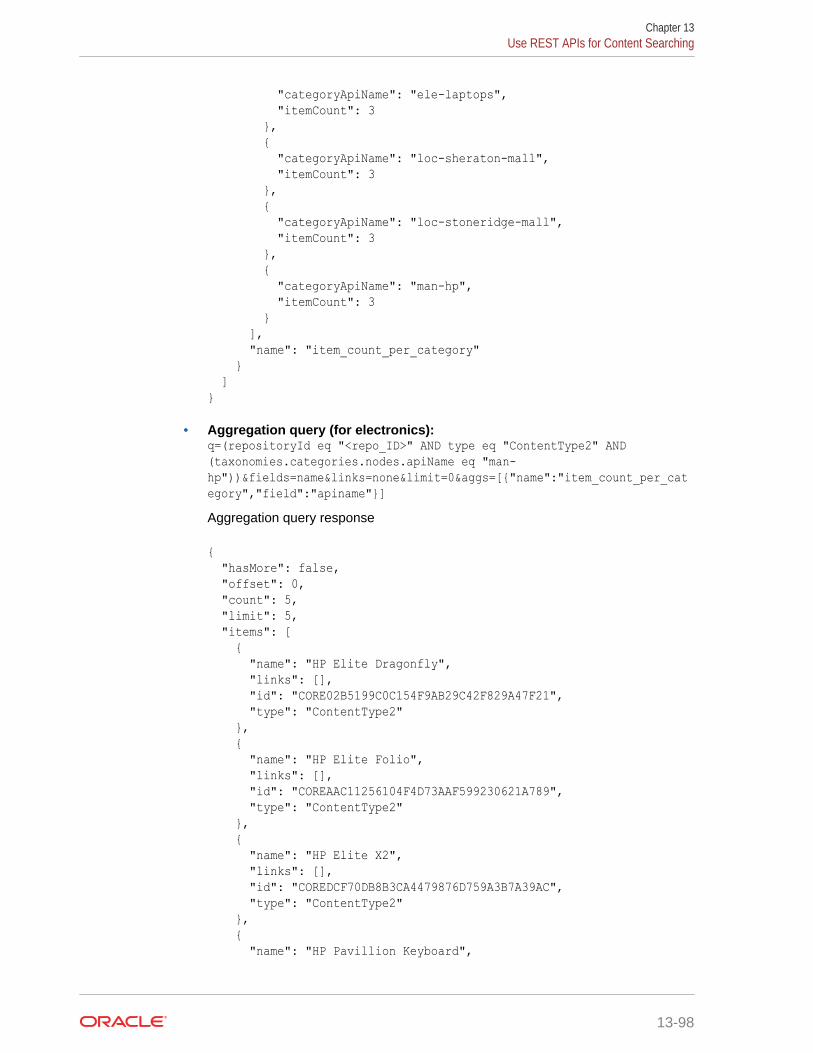
"categoryApiName": "ele-laptops", "itemCount": 3 }, { "categoryApiName": "loc-sheraton-mall", "itemCount": 3 }, { "categoryApiName": "loc-stoneridge-mall", "itemCount": 3 }, { "categoryApiName": "man-hp", "itemCount": 3 } ], "name": "item_count_per_category" } ]}
• Aggregation query (for electronics):q=(repositoryId eq "<repo_ID>" AND type eq "ContentType2" AND(taxonomies.categories.nodes.apiName eq "man-hp"))&fields=name&links=none&limit=0&aggs=[{"name":"item_count_per_category","field":"apiname"}]Aggregation query response
{ "hasMore": false, "offset": 0, "count": 5, "limit": 5, "items": [ { "name": "HP Elite Dragonfly", "links": [], "id": "CORE02B5199C0C154F9AB29C42F829A47F21", "type": "ContentType2" }, { "name": "HP Elite Folio", "links": [], "id": "COREAAC11256104F4D73AAF599230621A789", "type": "ContentType2" }, { "name": "HP Elite X2", "links": [], "id": "COREDCF70DB8B3CA4479876D759A3B7A39AC", "type": "ContentType2" }, { "name": "HP Pavillion Keyboard",
Chapter 13Use REST APIs for Content Searching
13-98
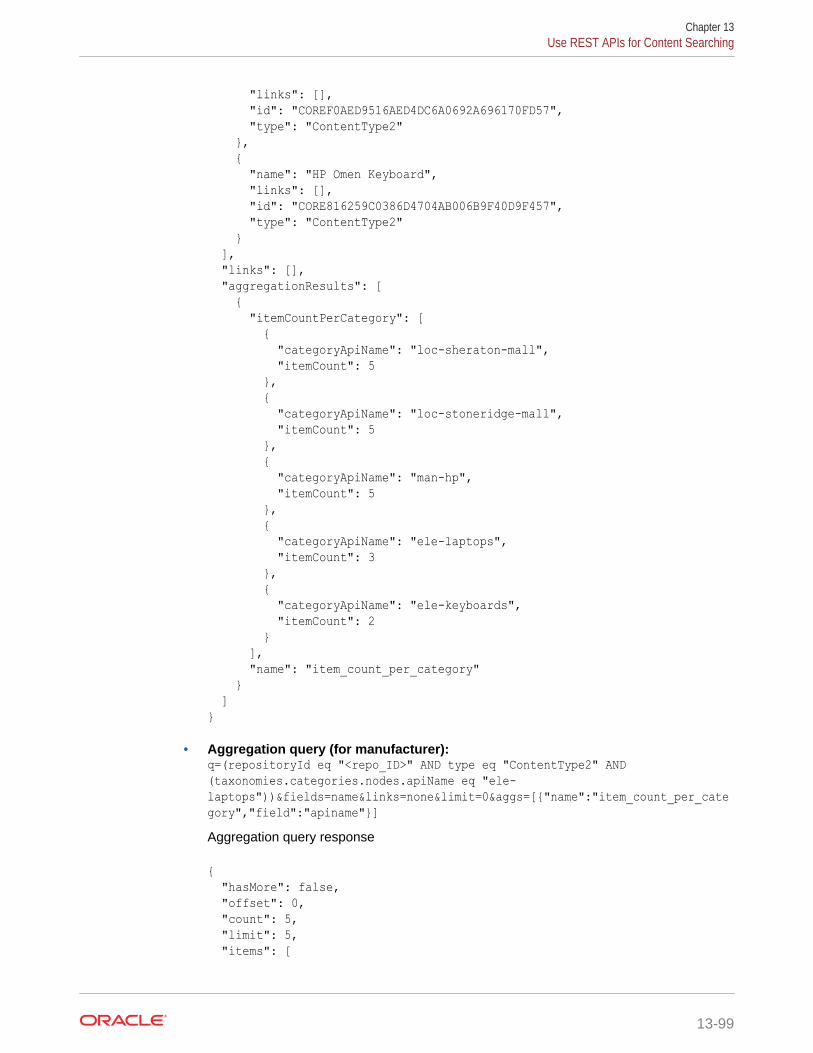
"links": [], "id": "COREF0AED9516AED4DC6A0692A696170FD57", "type": "ContentType2" }, { "name": "HP Omen Keyboard", "links": [], "id": "CORE816259C0386D4704AB006B9F40D9F457", "type": "ContentType2" } ], "links": [], "aggregationResults": [ { "itemCountPerCategory": [ { "categoryApiName": "loc-sheraton-mall", "itemCount": 5 }, { "categoryApiName": "loc-stoneridge-mall", "itemCount": 5 }, { "categoryApiName": "man-hp", "itemCount": 5 }, { "categoryApiName": "ele-laptops", "itemCount": 3 }, { "categoryApiName": "ele-keyboards", "itemCount": 2 } ], "name": "item_count_per_category" } ]}
• Aggregation query (for manufacturer):q=(repositoryId eq "<repo_ID>" AND type eq "ContentType2" AND(taxonomies.categories.nodes.apiName eq "ele-laptops"))&fields=name&links=none&limit=0&aggs=[{"name":"item_count_per_category","field":"apiname"}]Aggregation query response
{ "hasMore": false, "offset": 0, "count": 5, "limit": 5, "items": [
Chapter 13Use REST APIs for Content Searching
13-99
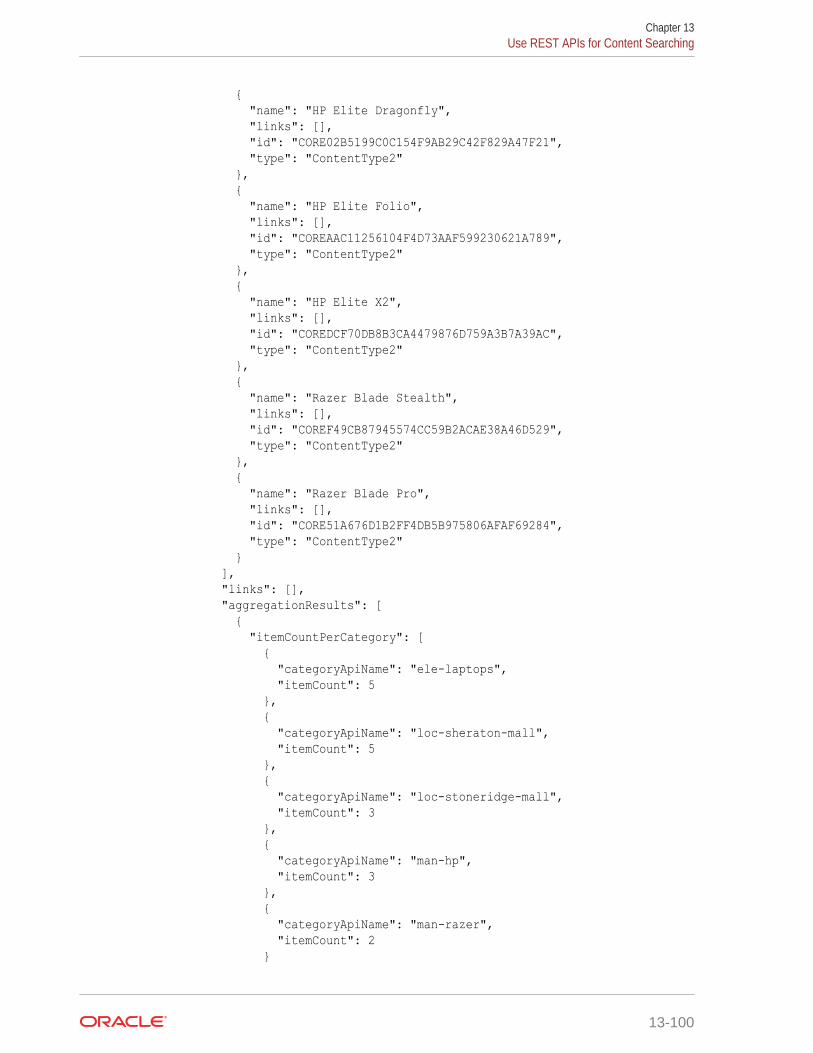
{ "name": "HP Elite Dragonfly", "links": [], "id": "CORE02B5199C0C154F9AB29C42F829A47F21", "type": "ContentType2" }, { "name": "HP Elite Folio", "links": [], "id": "COREAAC11256104F4D73AAF599230621A789", "type": "ContentType2" }, { "name": "HP Elite X2", "links": [], "id": "COREDCF70DB8B3CA4479876D759A3B7A39AC", "type": "ContentType2" }, { "name": "Razer Blade Stealth", "links": [], "id": "COREF49CB87945574CC59B2ACAE38A46D529", "type": "ContentType2" }, { "name": "Razer Blade Pro", "links": [], "id": "CORE51A676D1B2FF4DB5B975806AFAF69284", "type": "ContentType2" } ], "links": [], "aggregationResults": [ { "itemCountPerCategory": [ { "categoryApiName": "ele-laptops", "itemCount": 5 }, { "categoryApiName": "loc-sheraton-mall", "itemCount": 5 }, { "categoryApiName": "loc-stoneridge-mall", "itemCount": 3 }, { "categoryApiName": "man-hp", "itemCount": 3 }, { "categoryApiName": "man-razer", "itemCount": 2 }
Chapter 13Use REST APIs for Content Searching
13-100

], "name": "item_count_per_category" } ]}
End-user selected "ELE-laptops" plus "MAN-hp" and "LOC-stonebrifge-mall"
• Search query:q=(repositoryId eq "<repo_ID>" AND type eq "ContentType2" AND(taxonomies.categories.nodes.apiName eq "ele-laptops") AND(taxonomies.categories.nodes.apiName eq "man-hp") AND(taxonomies.categories.nodes.apiName eq "loc-stoneridge-mall"))&fields=name&links=none&aggs=[{"name":"item_count_per_category","field":"apiname"}]Search query response
{ "hasMore": false, "offset": 0, "count": 3, "limit": 3, "items": [ { "name": "HP Elite Dragonfly", "links": [], "id": "CORE02B5199C0C154F9AB29C42F829A47F21", "type": "ContentType2" }, { "name": "HP Elite Folio", "links": [], "id": "COREAAC11256104F4D73AAF599230621A789", "type": "ContentType2" }, { "name": "HP Elite X2", "links": [], "id": "COREDCF70DB8B3CA4479876D759A3B7A39AC", "type": "ContentType2" } ], "links": [], "aggregationResults": [ { "itemCountPerCategory": [ { "categoryApiName": "ele-laptops", "itemCount": 3 }, { "categoryApiName": "loc-sheraton-mall", "itemCount": 3 }, {
Chapter 13Use REST APIs for Content Searching
13-101

"categoryApiName": "loc-stoneridge-mall", "itemCount": 3 }, { "categoryApiName": "man-hp", "itemCount": 3 } ], "name": "item_count_per_category" } ]}
• Aggregation query (for electronics):q=(repositoryId eq "<repo_ID>" AND type eq "ContentType2" AND(taxonomies.categories.nodes.apiName eq "man-hp") AND(taxonomies.categories.nodes.apiName eq "loc-stoneridge-mall"))&fields=name&links=none&limit=0&aggs=[{"name":"item_count_per_category","field":"apiname"}]Aggregation query response
{ "hasMore": false, "offset": 0, "count": 5, "limit": 5, "items": [ { "name": "HP Elite Dragonfly", "links": [], "id": "CORE02B5199C0C154F9AB29C42F829A47F21", "type": "ContentType2" }, { "name": "HP Elite Folio", "links": [], "id": "COREAAC11256104F4D73AAF599230621A789", "type": "ContentType2" }, { "name": "HP Elite X2", "links": [], "id": "COREDCF70DB8B3CA4479876D759A3B7A39AC", "type": "ContentType2" }, { "name": "HP Pavillion Keyboard", "links": [], "id": "COREF0AED9516AED4DC6A0692A696170FD57", "type": "ContentType2" }, { "name": "HP Omen Keyboard", "links": [],
Chapter 13Use REST APIs for Content Searching
13-102
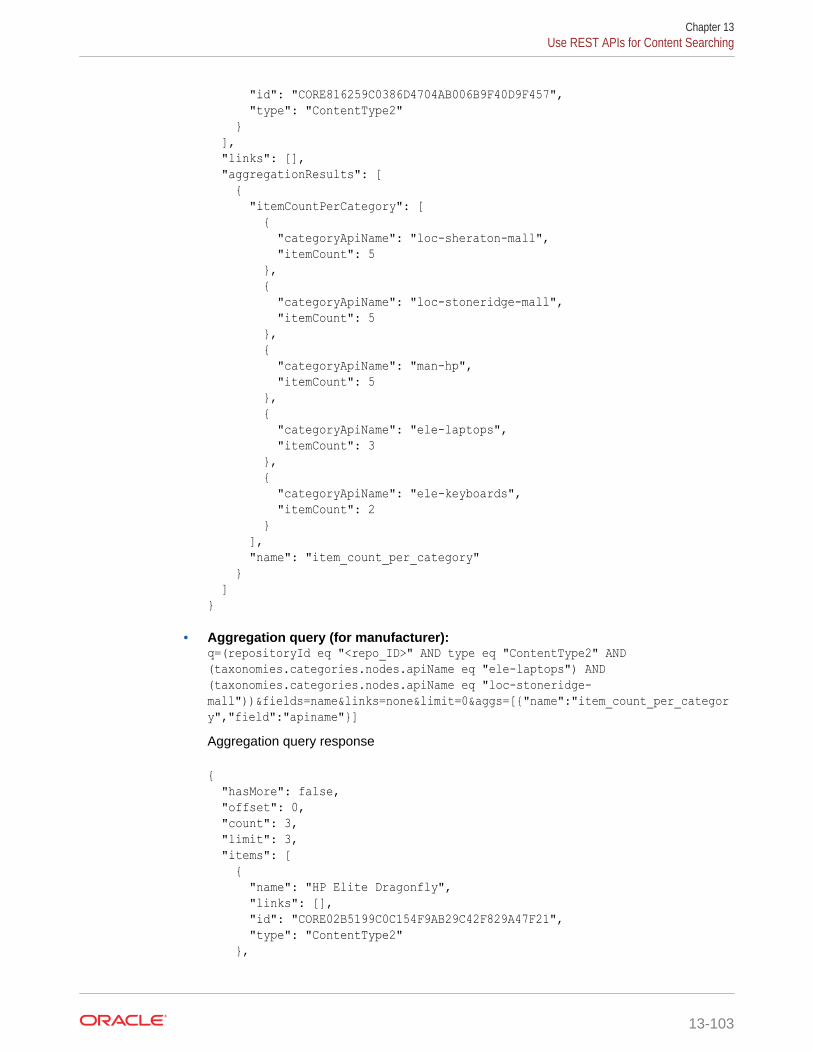
"id": "CORE816259C0386D4704AB006B9F40D9F457", "type": "ContentType2" } ], "links": [], "aggregationResults": [ { "itemCountPerCategory": [ { "categoryApiName": "loc-sheraton-mall", "itemCount": 5 }, { "categoryApiName": "loc-stoneridge-mall", "itemCount": 5 }, { "categoryApiName": "man-hp", "itemCount": 5 }, { "categoryApiName": "ele-laptops", "itemCount": 3 }, { "categoryApiName": "ele-keyboards", "itemCount": 2 } ], "name": "item_count_per_category" } ]}
• Aggregation query (for manufacturer):q=(repositoryId eq "<repo_ID>" AND type eq "ContentType2" AND(taxonomies.categories.nodes.apiName eq "ele-laptops") AND(taxonomies.categories.nodes.apiName eq "loc-stoneridge-mall"))&fields=name&links=none&limit=0&aggs=[{"name":"item_count_per_category","field":"apiname"}]Aggregation query response
{ "hasMore": false, "offset": 0, "count": 3, "limit": 3, "items": [ { "name": "HP Elite Dragonfly", "links": [], "id": "CORE02B5199C0C154F9AB29C42F829A47F21", "type": "ContentType2" },
Chapter 13Use REST APIs for Content Searching
13-103
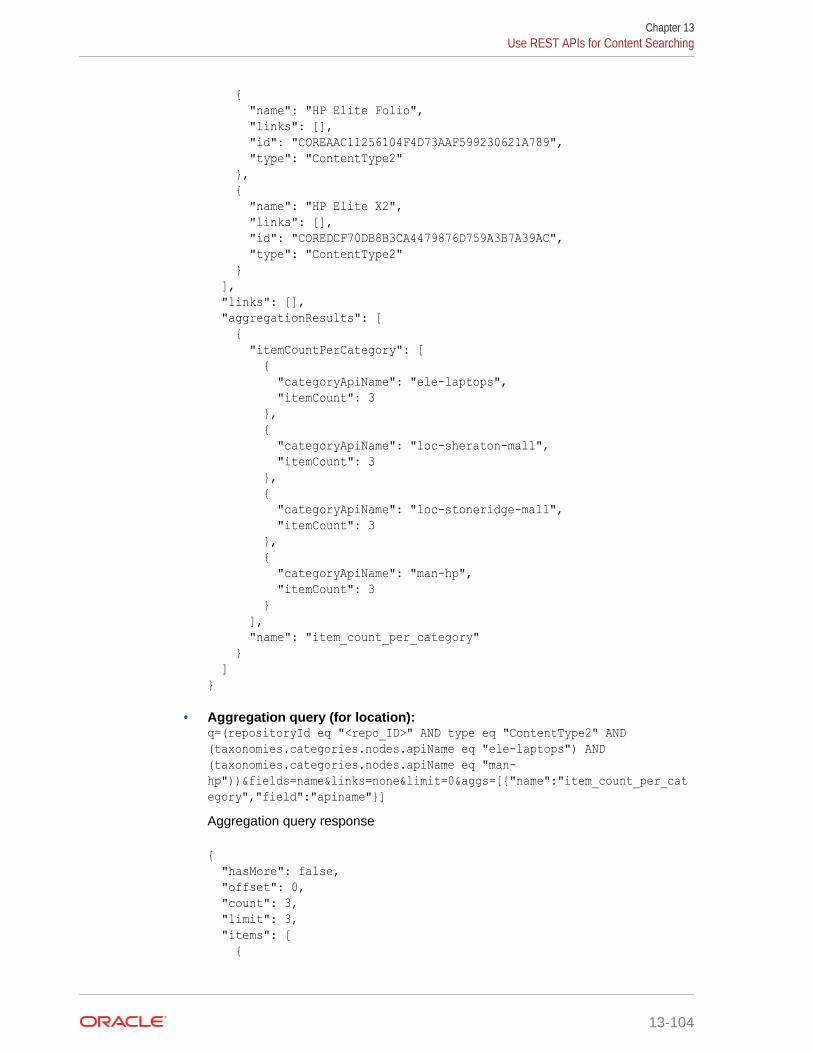
{ "name": "HP Elite Folio", "links": [], "id": "COREAAC11256104F4D73AAF599230621A789", "type": "ContentType2" }, { "name": "HP Elite X2", "links": [], "id": "COREDCF70DB8B3CA4479876D759A3B7A39AC", "type": "ContentType2" } ], "links": [], "aggregationResults": [ { "itemCountPerCategory": [ { "categoryApiName": "ele-laptops", "itemCount": 3 }, { "categoryApiName": "loc-sheraton-mall", "itemCount": 3 }, { "categoryApiName": "loc-stoneridge-mall", "itemCount": 3 }, { "categoryApiName": "man-hp", "itemCount": 3 } ], "name": "item_count_per_category" } ]}
• Aggregation query (for location):q=(repositoryId eq "<repo_ID>" AND type eq "ContentType2" AND(taxonomies.categories.nodes.apiName eq "ele-laptops") AND(taxonomies.categories.nodes.apiName eq "man-hp"))&fields=name&links=none&limit=0&aggs=[{"name":"item_count_per_category","field":"apiname"}]Aggregation query response
{ "hasMore": false, "offset": 0, "count": 3, "limit": 3, "items": [ {
Chapter 13Use REST APIs for Content Searching
13-104
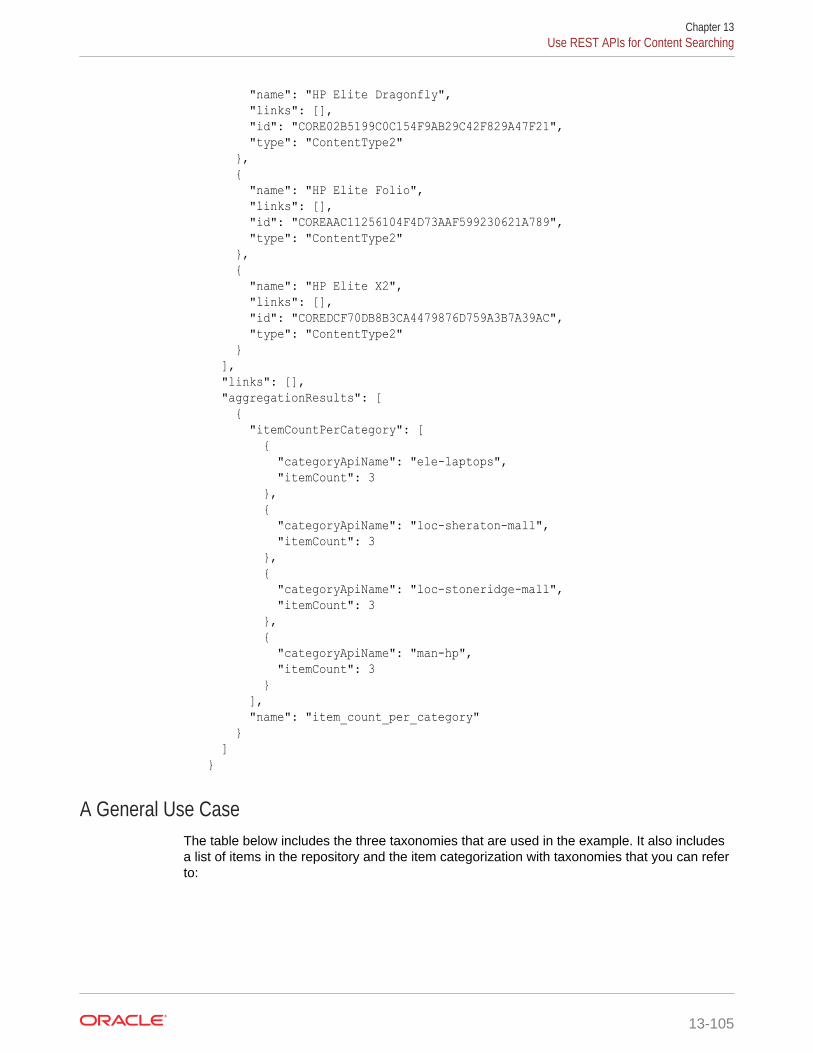
"name": "HP Elite Dragonfly", "links": [], "id": "CORE02B5199C0C154F9AB29C42F829A47F21", "type": "ContentType2" }, { "name": "HP Elite Folio", "links": [], "id": "COREAAC11256104F4D73AAF599230621A789", "type": "ContentType2" }, { "name": "HP Elite X2", "links": [], "id": "COREDCF70DB8B3CA4479876D759A3B7A39AC", "type": "ContentType2" } ], "links": [], "aggregationResults": [ { "itemCountPerCategory": [ { "categoryApiName": "ele-laptops", "itemCount": 3 }, { "categoryApiName": "loc-sheraton-mall", "itemCount": 3 }, { "categoryApiName": "loc-stoneridge-mall", "itemCount": 3 }, { "categoryApiName": "man-hp", "itemCount": 3 } ], "name": "item_count_per_category" } ]}
A General Use CaseThe table below includes the three taxonomies that are used in the example. It also includesa list of items in the repository and the item categorization with taxonomies that you can referto:
Chapter 13Use REST APIs for Content Searching
13-105
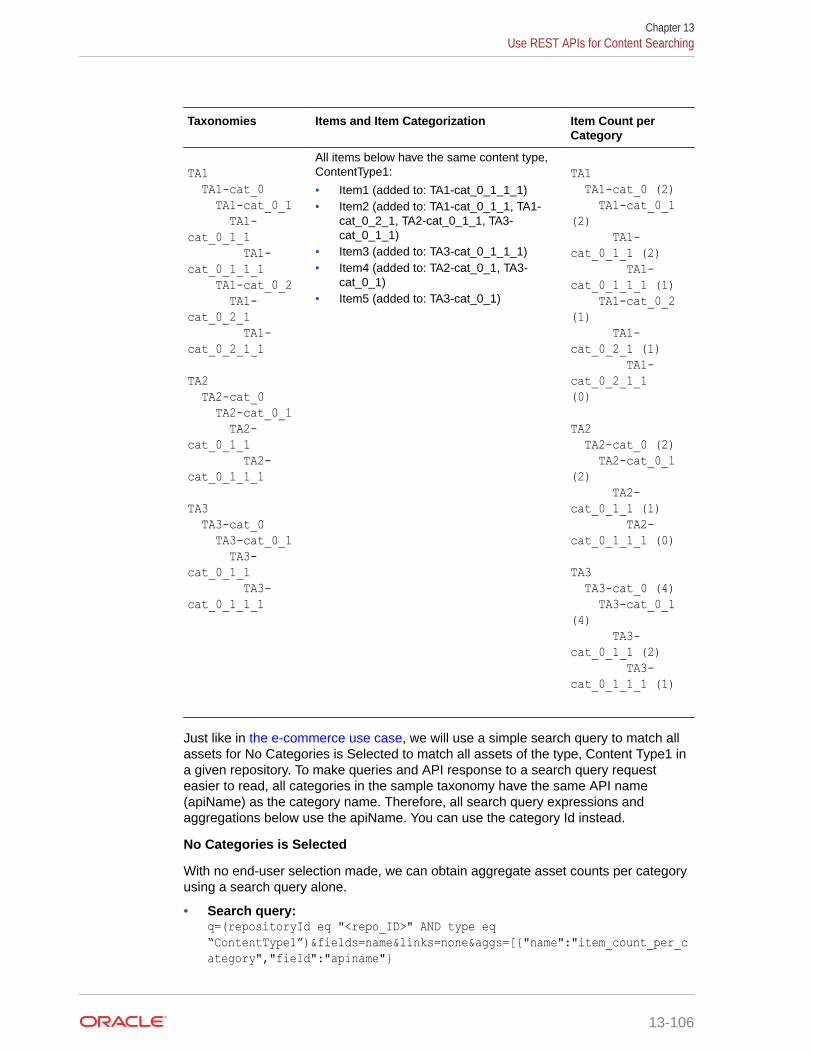
Taxonomies Items and Item Categorization Item Count perCategory
TA1 TA1-cat_0 TA1-cat_0_1 TA1-cat_0_1_1 TA1-cat_0_1_1_1 TA1-cat_0_2 TA1-cat_0_2_1 TA1-cat_0_2_1_1 TA2 TA2-cat_0 TA2-cat_0_1 TA2-cat_0_1_1 TA2-cat_0_1_1_1 TA3 TA3-cat_0 TA3-cat_0_1 TA3-cat_0_1_1 TA3-cat_0_1_1_1
All items below have the same content type,ContentType1:
• Item1 (added to: TA1-cat_0_1_1_1)• Item2 (added to: TA1-cat_0_1_1, TA1-
cat_0_2_1, TA2-cat_0_1_1, TA3-cat_0_1_1)
• Item3 (added to: TA3-cat_0_1_1_1)• Item4 (added to: TA2-cat_0_1, TA3-
cat_0_1)• Item5 (added to: TA3-cat_0_1)
TA1 TA1-cat_0 (2) TA1-cat_0_1 (2) TA1-cat_0_1_1 (2) TA1-cat_0_1_1_1 (1) TA1-cat_0_2 (1) TA1-cat_0_2_1 (1) TA1-cat_0_2_1_1 (0) TA2 TA2-cat_0 (2) TA2-cat_0_1 (2) TA2-cat_0_1_1 (1) TA2-cat_0_1_1_1 (0) TA3 TA3-cat_0 (4) TA3-cat_0_1 (4) TA3-cat_0_1_1 (2) TA3-cat_0_1_1_1 (1)
Just like in the e-commerce use case, we will use a simple search query to match allassets for No Categories is Selected to match all assets of the type, Content Type1 ina given repository. To make queries and API response to a search query requesteasier to read, all categories in the sample taxonomy have the same API name(apiName) as the category name. Therefore, all search query expressions andaggregations below use the apiName. You can use the category Id instead.
No Categories is Selected
With no end-user selection made, we can obtain aggregate asset counts per categoryusing a search query alone.
• Search query:q=(repositoryId eq "<repo_ID>" AND type eq“ContentType1”)&fields=name&links=none&aggs=[{"name":"item_count_per_category","field":"apiname"}
Chapter 13Use REST APIs for Content Searching
13-106
• Aggergate query:q=<search_query>
End-user delected TA1-cat_0_1_1 plus TA1-cat_0_2_1
• Search query:q=(repositoryId eq "<repo_ID>" AND type eq "ContentType1" AND(taxonomies.categories.nodes.apiName eq "ta1-cat_0_1_1" ORtaxonomies.categories.nodes.apiName eq “ta1-cat_0_2_1"))&fields=name&links=none&aggs=[{"name":"item_count_per_category","field":"apiname"}]
• Aggregation query (for TA1):q=(repositoryId eq "<repo_ID>" AND type eq"ContentType1"&fields=name&links=none&limit=0&aggs=[{"name":"item_count_per_category","field":"apiname"}
• Aggregation query (taxonomies with no category selected):q=<search_query>
End-user selected TA2-cat_0_1_1
• Search query:q=(repositoryId eq "<repo_ID>" AND type eq "ContentType1" AND(taxonomies.categories.nodes.apiName eq "ta2-cat_0_1_1"))&fields=name&links=none&aggs=[{"name":"item_count_per_category","field":"apiname"}]
• Aggregation query (for TA2):q=(repositoryId eq "<repo_ID>" AND type eq"ContentType1"&fields=name&links=none&limit=0&aggs=[{"name":"item_count_per_category","field":"apiname"}
• Aggregation query (taxonomies with no category selected):q=<search_query>
End-user selected TA3-cat_0_1_1
• Search query:q=(repositoryId eq "<repo_ID>" AND type eq "ContentType1" AND(taxonomies.categories.nodes.apiName eq "ta3-cat_0_1_1"))&fields=name&links=none&aggs=[{"name":"item_count_per_category","field":"apiname"}]
• Aggregation query (for TA3):q=(repositoryId eq "<repo_ID>" AND type eq"ContentType1"&fields=name&links=none&limit=0&aggs=[{"name":"item_count_per_category","field":"apiname"}
• Aggregation query (taxonomies with no category selected):q=<search_query>
End-user selected TA1-cat_0_1_1, TA1-cat_0_2_1 plus TA2-cat_0_1_1
• Search query:q=(repositoryId eq "<repo_ID>" AND type eq "ContentType1" AND(taxonomies.categories.nodes.apiName eq "ta1-cat_0_1_1" ORtaxonomies.categories.nodes.apiName eq "ta1-cat_0_2_1") AND(taxonomies.categories.nodes.apiName eq “ta2-cat_0_1_1”))&fields=name&links=none&aggs=[{"name":"item_count_per_category","field":"apiname"}]
Chapter 13Use REST APIs for Content Searching
13-107
• Aggregation query (for TA1):q=(repositoryId eq "<repo_ID>" AND type eq "ContentType1"AND(taxonomies.categories.nodes.apiName eq "ta2-cat_0_1_1"))&fields=name&links=none&limit=0&aggs=[{"name":"item_count_per_category","field":"apiname"}]
• Aggregation query (for TA2):q=(repositoryId eq "<repo_ID>" AND type eq "ContentType1"AND(taxonomies.categories.nodes.apiName eq "ta1-cat_0_1_1" ORtaxonomies.categories.nodes.apiName eq "ta1-cat_0_2_1"))&fields=name&links=none&limit=0&aggs=[{"name":"item_count_per_category","field":"apiname"}]
• Aggregation query (taxonomies with no category selected):q=<search_query>
End-user selected TA2-cat_0_1 plus TA3-cat_0_1
• Search query:q=(repositoryId eq "<repo_ID>" AND type eq "ContentType1" AND(taxonomies.categories.nodes.apiName eq "ta2-cat_0_1") AND(taxonomies.categories.nodes.apiName eq “ta3-cat_0_1”))&fields=name&links=none&aggs=[{"name":"item_count_per_category","field":"apiname"}]
• Aggregation query (for TA2):q=(repositoryId eq "<repo_ID>" AND type eq "ContentType1" AND(taxonomies.categories.nodes.apiName eq "ta3-cat_0_1"))&fields=name&links=none&limit=0&aggs=[{"name":"item_count_per_category","field":"apiname"}]
• Aggregation query (for TA3):q=(repositoryId eq "<repo_ID>" AND type eq "ContentType1" AND(taxonomies.categories.nodes.apiName eq "ta2-cat_0_1"))&fields=name&links=none&limit=0&aggs=[{"name":"item_count_per_category","field":"apiname"}]
• Aggregation query (taxonomies with no selected categories):q=<search_query>
End-user selected TA1-cat_0_1_1, TA1-cat_0_2_1, TA2-cat_0_1_1 plus TA3-cat_0_1_1
• Search query:q=(repositoryId eq "<repo_ID>" AND type eq "ContentType1" AND(taxonomies.categories.nodes.apiName eq "ta1-cat_0_1_1" ORtaxonomies.categories.nodes.apiName eq "ta1-cat_0_2_1") AND(taxonomies.categories.nodes.apiName eq "ta2-cat_0_1_1") AND(taxonomies.categories.nodes.apiName eq “ta3-cat_0_1_1”))&fields=name&links=none&aggs=[{"name":"item_count_per_category","field":"apiname"}]
• Aggregation query(for TA1):q=(repositoryId eq "<repo_ID>" AND type eq "ContentType1" AND(taxonomies.categories.nodes.apiName eq "ta2-cat_0_1_1") AND(taxonomies.categories.nodes.apiName eq "ta3-cat_0_1_1"))&fields=name&links=none&limit=0&aggs=[{"name":"item_count_per_category","field":"apiname"}]
• Aggregation query(for TA2):
Chapter 13Use REST APIs for Content Searching
13-108
q=(repositoryId eq "<repo_ID>" AND type eq "ContentType1" AND(taxonomies.categories.nodes.apiName eq "ta1-cat_0_1_1" ORtaxonomies.categories.nodes.apiName eq "ta1-cat_0_2_1") AND(taxonomies.categories.nodes.apiName eq "ta3-cat_0_1_1"))&fields=name&links=none&limit=0&aggs=[{"name":"item_count_per_category","field":"apiname"}]
• Aggregation query(for TA3):q=(repositoryId eq "<repo_ID>" AND type eq "ContentType1" AND(taxonomies.categories.nodes.apiName eq "ta1-cat_0_1_1" ORtaxonomies.categories.nodes.apiName eq "ta1-cat_0_2_1") AND(taxonomies.categories.nodes.apiName eq "ta2-cat_0_1_1"))&fields=name&links=none&limit=0&aggs=[{"name":"item_count_per_category","field":"apiname"}]
• Aggregation query (taxonomies with no selected categories):q=<search_query>
Scroll APIScrolling or a scroll request is the recommended way of retrieving enormous search resultsets. It is invoked by adding the boolean parameter, scroll=true, to a search request. Theresult of the first scroll search request, if successful, returns a scrollId in the response. Allsubsequent scroll requests of a first scroll request must supply the returned scrollId as aparameter, scrollId=<scrollId value>. The scrollId may change across subsequent scrollrequests, so clients should always send the scrollId returned by the previous scroll responsein a session. The q parameter specified with the first scroll request must also be specifiedwith each subsequent scroll request. All results matched by a scroll search will have beenretrieved when a scroll request returns 0 results or no scrollId is set on the response.
The number of results returned per page of a scroll search request is determined by thelimit parameter. The limit parameter specified for the first scroll request will stay in effectfor the life of the scroll session. As in other cases, a limit value that results in too large of asearch response will result in a HTTP status code 413.
Scrolling is an expensive operation for the search server, so scroll sessions are aggressivelycleaned up. If more than scrollTTL milliseconds elapse between subsequent scroll requests,the scroll session is cleaned up and any further usage of the session scrollId will result in anerror. The maximum (and default) value for scrollTTL is 30000 ms (30s). It is recommendedto have shorter scrollTTL values if feasible.
Note:
The hasMore parameter will always return false for scroll searches. Scroll cannot beused when the returnMaster parameter is set to true.
Example of a Scroll API SessionFirst scroll request: /api/v1.1/items?q=(type eq "Employee" AND fields.role eq"Senior Developer")&scroll=true&scrollTTL=5000• Truncated first scroll response with scrollId: scrollId=abcdefghij
Chapter 13Use REST APIs for Content Searching
13-109
Subsequent scroll request: /api/v1.1/items?q=(type eq "Employee" ANDfields.role eq "Senior Developer")&scrollId=abcdefghij&scrollTTL=3000(note scrollTTL can change)• Truncated subsequent scroll response with scrollId: scrollId=pqrstuvwSubsequent scroll request: /api/v1.1/items?q=(type eq "Employee" ANDfields.role eq "Senior Developer")&scrollId=pqrstuvw&scrollTTL=3000• Truncated final scroll response: count=0
Custom Ranking PoliciesThe REST API for Content Delivery, by default, applies a built-in ranking policydescribed below to calculate the relevance score for items matching a search query.Oracle Content Management allows you to override a built-in policy and control therelevance score of items matching a search query in the REST API for ContentDelivery by defining a custom ranking policy, which contains a collection of rankingmethods with configurable properties that relate to:
• Searchable standard and custom fields on content items or attributes on digitalassets
• Indexed items to ranking method matching condition
• Impact on the item relevance score impact: Score increase or decay.
• Decay function
The search in the REST API for Content Management, by default, applies a built-inranking policy to calculate the relevance score for items matching a search query. Theuse of custom ranking policies in the management search is not supported.
The search in the REST API for Content Delivery allows you to use a custom rankingpolicy as:
• Global Default: A ranking policy set as the global default overrides a built-inranking policy and is applied by default to calculate the relevance score for itemsmatching a search query.
• Channel Default : A ranking policy set as the channel default overrides a built-inranking policy or the global default and is applied by default to calculate therelevance score for items matching a search query for this channel.
• rankBy parameter value: A ranking policy set as the value of the rankByparameter on a search query request overrides any default policy and is applied tocalculate the relevance score for items returned in the response.
Built-in Ranking PolicyThe built-in ranking policy uses the following similarity ranking to calculate therelevance score for matched items:
• Elasticsearch Relevance Score: By default items matching a search query areranked by the Elasticsearch similarity relevance score (the Okapi BM25 algorithm).
• Term Frequency in a Multi-Term Query: For a multi-term search query, theElasticsearch relevance score algorithm will take into account the term frequency(tf) when calculating the score for items matching either type-specific searches, ordefault (no type specified) searches.
Chapter 13Use REST APIs for Content Searching
13-110
• Stemmed Matches: The scoring algorithm will apply the same rank to non-stemmed andstemmed matches (for example, OCI compute topology and OCI compute topologies areequivalent). Within the group of matches with the same stem, the rank of non-stemmedmatches is higher than the rank of stemmed matches.
Custom Ranking PoliciesCustom ranking policies in Oracle Content Management allow you to change relevancescores of items matching a search query using the settings specified in the policy,independently from the structure of the submitted search query. That is achieved by givingyou ability to define methods on a ranking policy to control:
• Matching Rule: What standard or user-defined fields on an asset type require matching(exact term - EQ or phrase match - MT) to given values for the ranking method to apply.
• Score Change: The impact a matching data field will have on the relevance score of anitem (boost its original score or decrease it over time).
The two types of ranking methods available are boost and pin methods. These methods allowyou to increase an item's relevance score, while decay methods decrease the score over aperiod of time.
To understand how ranking policy works, consider a simple example which uses items of thecontent type, automotive:
• Item 1: (name: Ferrari, description: Ferrari)
• Item 2: (name: Bugatti, description: Bugatti)
The following search queries will match and return both items, but the relevance scorescalculated by the built-in ranking policy will be different. Thus, items will be returned in adifferent order with neither item potentially returned at the top by query 2.
• Query 1: q=type eq “Automotive” and (description eq “Ferrari” or name eq“Bugatti”)
• Query 2: q=type eq “Automotive”If you want search queries to always return items about Bugatti cars at the top (pinned) anditems about Ferrari cars among the top matching items, you can define a custom rankingpolicy with two rules: boost - description (weight: 10, value: Ferrari) and pin - name (value:Bugatti). If this policy is used, either query will consistently return item 2 at the top and boostthe relevance score of item 1 from the structure of the query:
• Query 1 result: Item 1 (Ferrari) boosted to 10 and Item 2 (Bugatti) is pinned
• Query 2 result: Item 1 (Ferrari) boosted to 10 and Item 2 (Bugatti) is pinned
Custom Ranking Policies LifecycleA new ranking policy is created as a draft version, which you can promote. Promoting a draftversion of a ranking policy creates a promoted version. Users with the Content Administratorrole can set a promoted ranking policy as the global default. A manager on a publishingchannel can assign the promoted version as a channel default policy to it. Just as thelocalization policy, only one ranking policy can be assigned to a channel at a time.
To make a ranking policy available in the REST API for Content Delivery, it needs to bepublished to create a published version. Content administrators can publish a ranking policyon the ranking policies page.
Chapter 13Use REST APIs for Content Searching
13-111
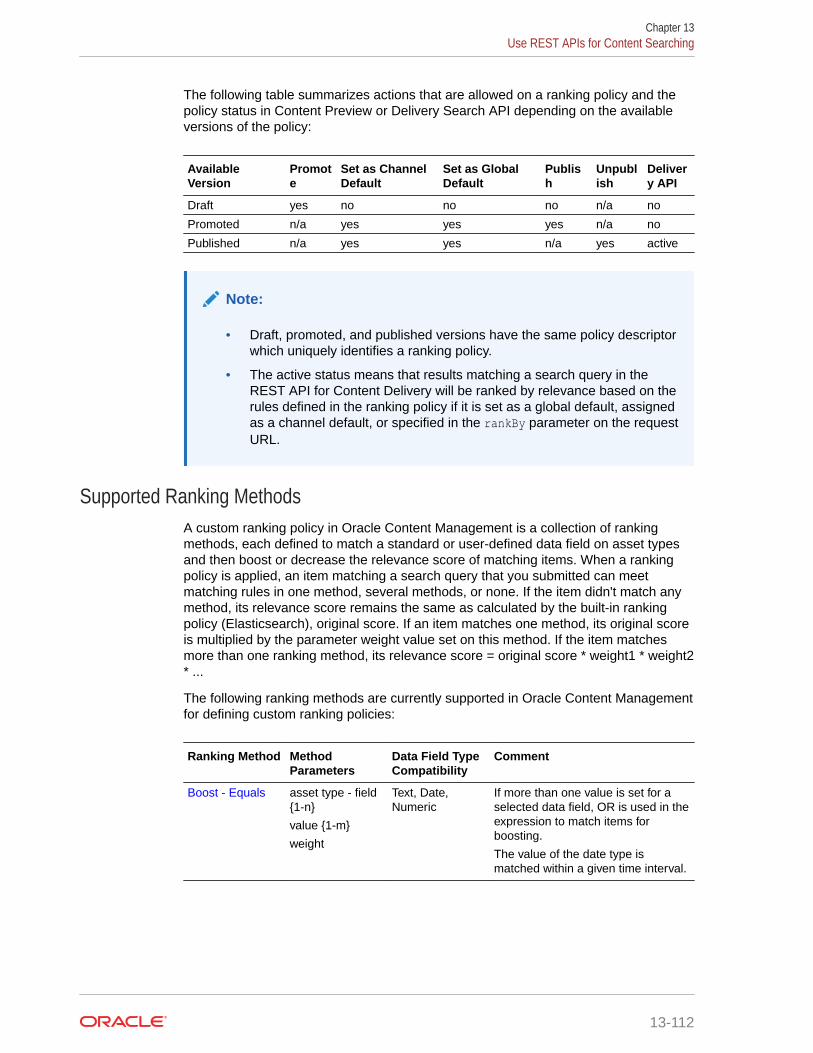
The following table summarizes actions that are allowed on a ranking policy and thepolicy status in Content Preview or Delivery Search API depending on the availableversions of the policy:
AvailableVersion
Promote
Set as ChannelDefault
Set as GlobalDefault
Publish
Unpublish
Delivery API
Draft yes no no no n/a no
Promoted n/a yes yes yes n/a no
Published n/a yes yes n/a yes active
Note:
• Draft, promoted, and published versions have the same policy descriptorwhich uniquely identifies a ranking policy.
• The active status means that results matching a search query in theREST API for Content Delivery will be ranked by relevance based on therules defined in the ranking policy if it is set as a global default, assignedas a channel default, or specified in the rankBy parameter on the requestURL.
Supported Ranking MethodsA custom ranking policy in Oracle Content Management is a collection of rankingmethods, each defined to match a standard or user-defined data field on asset typesand then boost or decrease the relevance score of matching items. When a rankingpolicy is applied, an item matching a search query that you submitted can meetmatching rules in one method, several methods, or none. If the item didn't match anymethod, its relevance score remains the same as calculated by the built-in rankingpolicy (Elasticsearch), original score. If an item matches one method, its original scoreis multiplied by the parameter weight value set on this method. If the item matchesmore than one ranking method, its relevance score = original score * weight1 * weight2* ...
The following ranking methods are currently supported in Oracle Content Managementfor defining custom ranking policies:
Ranking Method MethodParameters
Data Field TypeCompatibility
Comment
Boost - Equals asset type - field{1-n}
value {1-m}
weight
Text, Date,Numeric
If more than one value is set for aselected data field, OR is used in theexpression to match items forboosting.
The value of the date type ismatched within a given time interval.
Chapter 13Use REST APIs for Content Searching
13-112
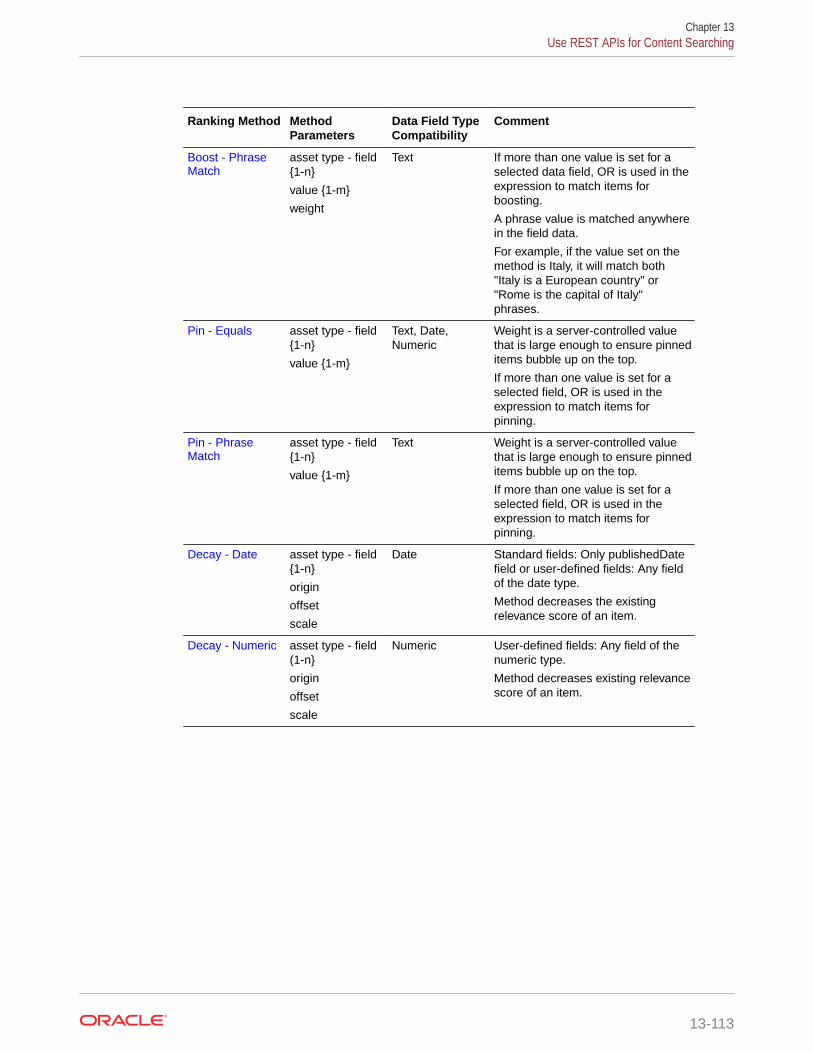
Ranking Method MethodParameters
Data Field TypeCompatibility
Comment
Boost - PhraseMatch
asset type - field{1-n}
value {1-m}
weight
Text If more than one value is set for aselected data field, OR is used in theexpression to match items forboosting.
A phrase value is matched anywherein the field data.
For example, if the value set on themethod is Italy, it will match both"Italy is a European country" or"Rome is the capital of Italy"phrases.
Pin - Equals asset type - field{1-n}
value {1-m}
Text, Date,Numeric
Weight is a server-controlled valuethat is large enough to ensure pinneditems bubble up on the top.
If more than one value is set for aselected field, OR is used in theexpression to match items forpinning.
Pin - PhraseMatch
asset type - field{1-n}
value {1-m}
Text Weight is a server-controlled valuethat is large enough to ensure pinneditems bubble up on the top.
If more than one value is set for aselected field, OR is used in theexpression to match items forpinning.
Decay - Date asset type - field{1-n}
origin
offset
scale
Date Standard fields: Only publishedDatefield or user-defined fields: Any fieldof the date type.
Method decreases the existingrelevance score of an item.
Decay - Numeric asset type - field(1-n}
origin
offset
scale
Numeric User-defined fields: Any field of thenumeric type.
Method decreases existing relevancescore of an item.
Chapter 13Use REST APIs for Content Searching
13-113

Note:
• In Typed searches, that is, for search requests that explicitly specifyasset types in the search query expression, Boost, Pin or Decay rankingmethods will use both standard and user-defined data fields on assettypes to match items for boosting, pinning, or decreasing their relevancescore.
• In Untyped or Default searches, that is, for search requests that do notspecify asset types in the search query expression, Boost, Pin or Decayranking methods will use only standard data fields on asset types tomatch items for boosting, pinning, or decreasing their relevance score.
• Multiple matching fields : If a ranking method is configured to matchseveral fields on an asset type, then the relevance score of the itemsthat match several or all fields will be a multiple of weights set on themethod. For example, if two fields in ranking method with weight 20 arematched, then the item score will be 20 x 20 = 400.
The Boost - Equals Method
The Boost - Equals method allows you to increase the relevance score of an item thatmatches the submitted search request so long as the item has the asset types set inthe method and its fields match the exact value set in the method ( the EQ operator isapplied for matching the field value). The original relevance score of an item ismultiplied by the weight defined in the method.
If the item matches more than one field defined on the Boost - Equals or Boost -Phrase Match method, its relevance score is calculated as follows:
• Item matches single field: Item score = original score * weight
• Item matches several fields: Item score = original score * weight * weight * ...
Note:
The field value of the date type on an asset matches the value set in theBoost - Equals method within time interval from Value to Value + Offset.
Sample request
PUT /content/management/api/v1.1/search/rankingPolicies/5A487437500042849B54FE3BA4EC80C2?q=(status%20eq%20%22draft%22)&fields=all { "name": "rp1", "description": "", "apiName": "rp1", "entries": [ { "key": { "name": "myBoostEquals",
Chapter 13Use REST APIs for Content Searching
13-114
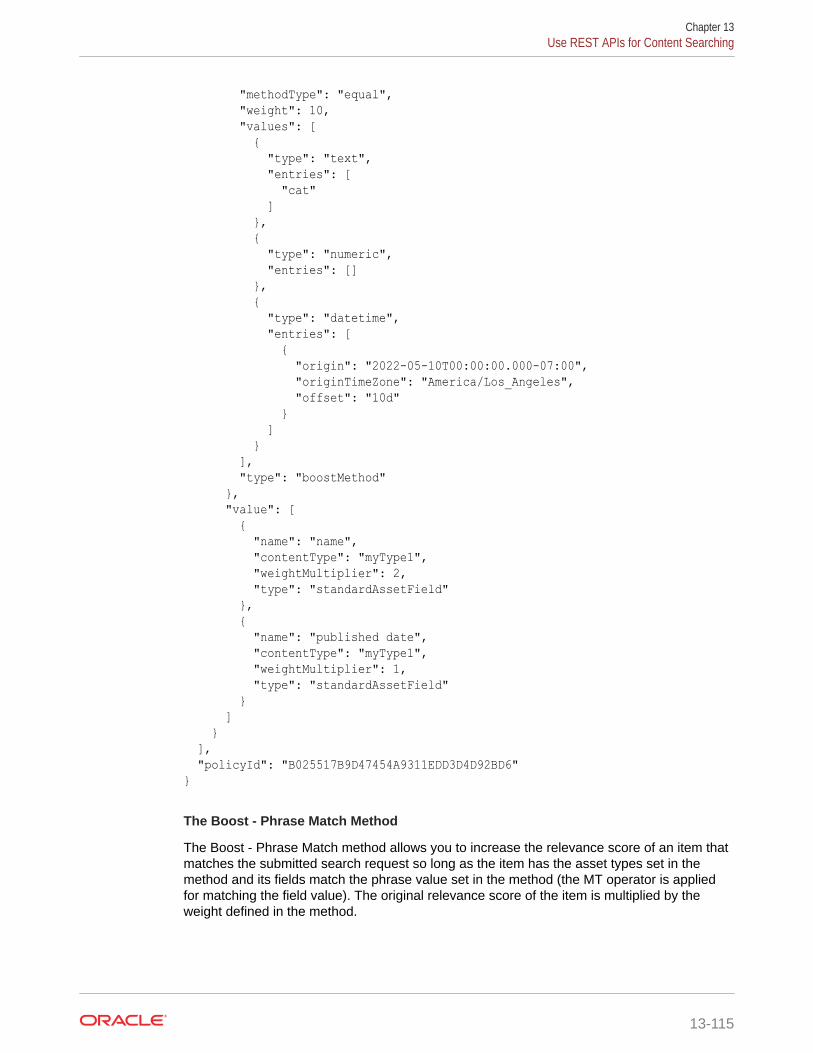
"methodType": "equal", "weight": 10, "values": [ { "type": "text", "entries": [ "cat" ] }, { "type": "numeric", "entries": [] }, { "type": "datetime", "entries": [ { "origin": "2022-05-10T00:00:00.000-07:00", "originTimeZone": "America/Los_Angeles", "offset": "10d" } ] } ], "type": "boostMethod" }, "value": [ { "name": "name", "contentType": "myType1", "weightMultiplier": 2, "type": "standardAssetField" }, { "name": "published date", "contentType": "myType1", "weightMultiplier": 1, "type": "standardAssetField" } ] } ], "policyId": "B025517B9D47454A9311EDD3D4D92BD6"}
The Boost - Phrase Match Method
The Boost - Phrase Match method allows you to increase the relevance score of an item thatmatches the submitted search request so long as the item has the asset types set in themethod and its fields match the phrase value set in the method (the MT operator is appliedfor matching the field value). The original relevance score of the item is multiplied by theweight defined in the method.
Chapter 13Use REST APIs for Content Searching
13-115
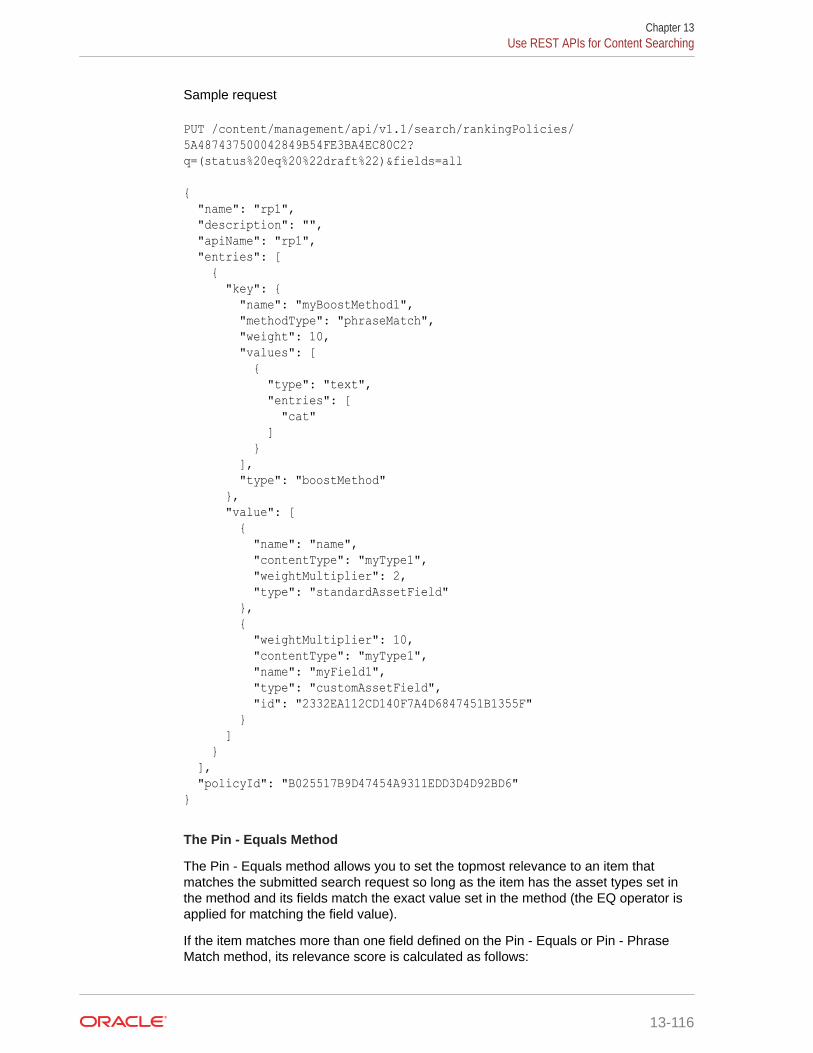
Sample request
PUT /content/management/api/v1.1/search/rankingPolicies/5A487437500042849B54FE3BA4EC80C2?q=(status%20eq%20%22draft%22)&fields=all { "name": "rp1", "description": "", "apiName": "rp1", "entries": [ { "key": { "name": "myBoostMethod1", "methodType": "phraseMatch", "weight": 10, "values": [ { "type": "text", "entries": [ "cat" ] } ], "type": "boostMethod" }, "value": [ { "name": "name", "contentType": "myType1", "weightMultiplier": 2, "type": "standardAssetField" }, { "weightMultiplier": 10, "contentType": "myType1", "name": "myField1", "type": "customAssetField", "id": "2332EA112CD140F7A4D6847451B1355F" } ] } ], "policyId": "B025517B9D47454A9311EDD3D4D92BD6"}
The Pin - Equals Method
The Pin - Equals method allows you to set the topmost relevance to an item thatmatches the submitted search request so long as the item has the asset types set inthe method and its fields match the exact value set in the method (the EQ operator isapplied for matching the field value).
If the item matches more than one field defined on the Pin - Equals or Pin - PhraseMatch method, its relevance score is calculated as follows:
Chapter 13Use REST APIs for Content Searching
13-116

• Item matches single field: Item score = original score * 5000
• Item matches several fields: Item score = original score * 5000 * 5000 * ...
Note:
The field value of the date type on an asset is matched to the value set in the Pin -Equals method within the time interval from Value to Value + Offset.
Sample request
PUT /content/management/api/v1.1/search/rankingPolicies/5A487437500042849B54FE3BA4EC80C2?q=(status%20eq%20%22draft%22)&fields=all { "name": "rp1", "description": "", "apiName": "rp1", "entries": [ { "key": { "values": [ { "type": "text" }, { "type": "numeric" }, { "type": "datetime", "entries": [ { "origin": "2022-05-10T00:00:00.000-07:00", "originTimeZone": "America/Los_Angeles", "offset": "12h" } ] } ], "name": "myPinEquals1", "type": "pinMethod", "methodType": "equal" }, "value": [ { "contentType": "myType1", "name": "name", "type": "standardAssetField" }, { "contentType": "myType1", "name": "published date", "type": "standardAssetField"
Chapter 13Use REST APIs for Content Searching
13-117
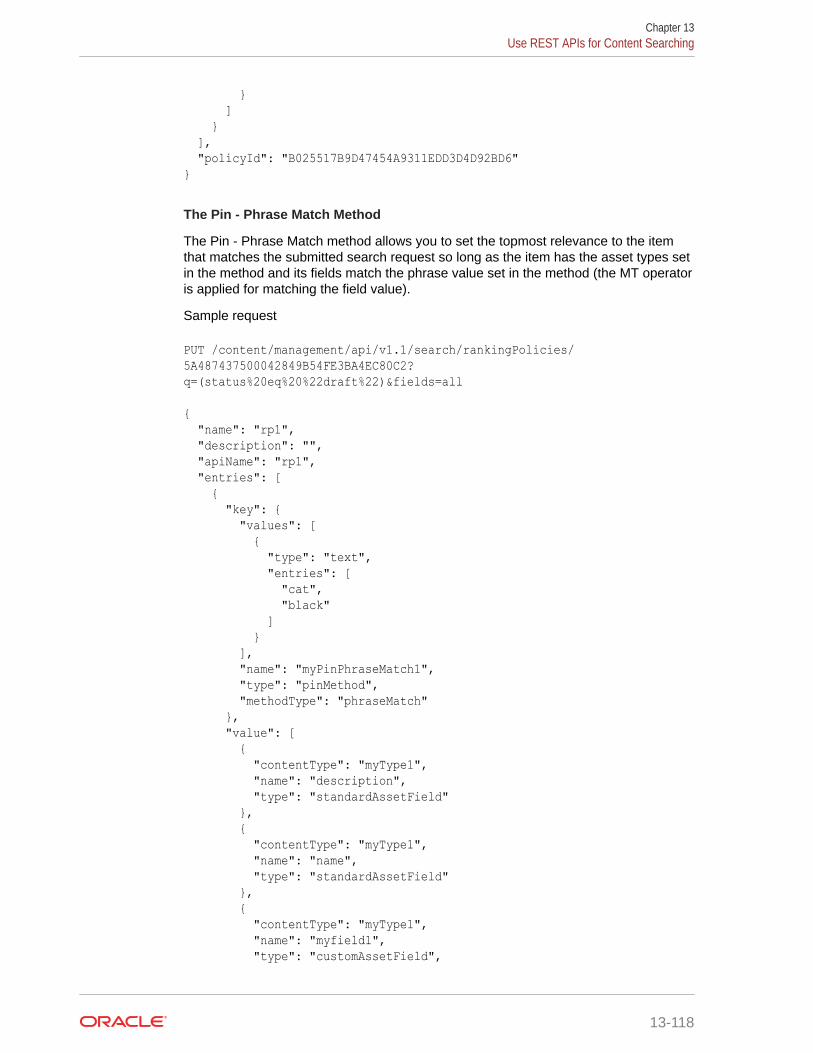
} ] } ], "policyId": "B025517B9D47454A9311EDD3D4D92BD6"}
The Pin - Phrase Match Method
The Pin - Phrase Match method allows you to set the topmost relevance to the itemthat matches the submitted search request so long as the item has the asset types setin the method and its fields match the phrase value set in the method (the MT operatoris applied for matching the field value).
Sample request
PUT /content/management/api/v1.1/search/rankingPolicies/5A487437500042849B54FE3BA4EC80C2?q=(status%20eq%20%22draft%22)&fields=all { "name": "rp1", "description": "", "apiName": "rp1", "entries": [ { "key": { "values": [ { "type": "text", "entries": [ "cat", "black" ] } ], "name": "myPinPhraseMatch1", "type": "pinMethod", "methodType": "phraseMatch" }, "value": [ { "contentType": "myType1", "name": "description", "type": "standardAssetField" }, { "contentType": "myType1", "name": "name", "type": "standardAssetField" }, { "contentType": "myType1", "name": "myfield1", "type": "customAssetField",
Chapter 13Use REST APIs for Content Searching
13-118
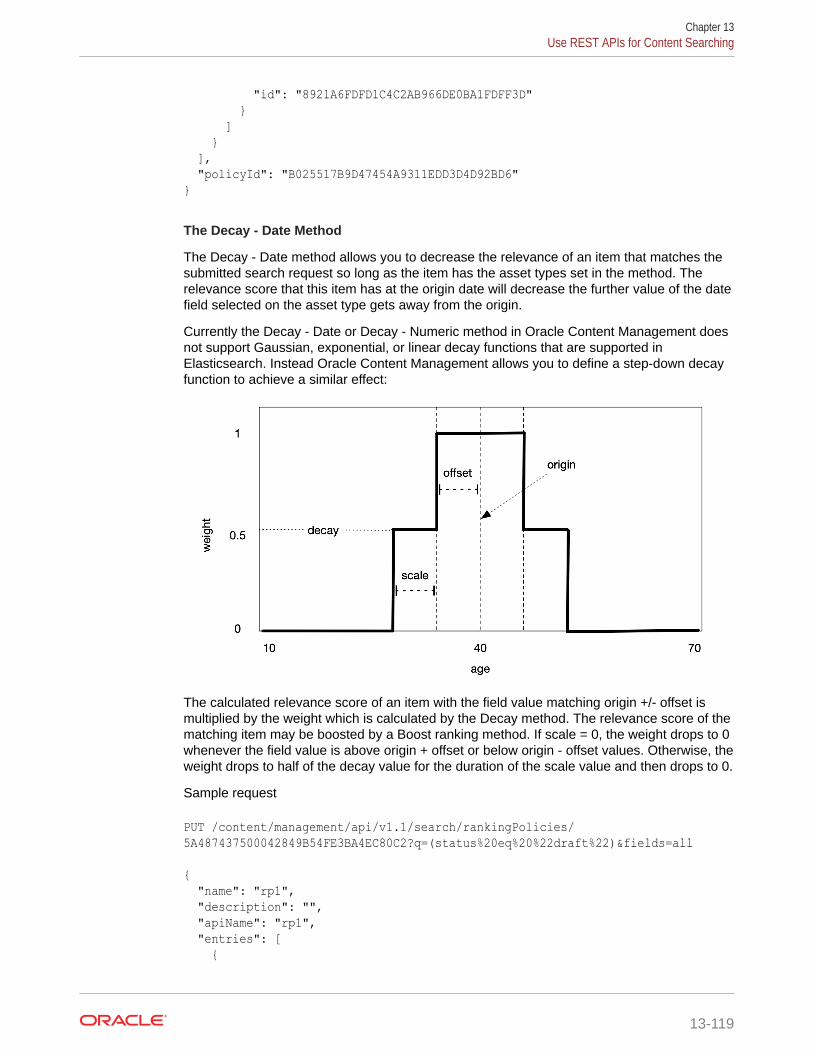
"id": "8921A6FDFD1C4C2AB966DE0BA1FDFF3D" } ] } ], "policyId": "B025517B9D47454A9311EDD3D4D92BD6"}
The Decay - Date Method
The Decay - Date method allows you to decrease the relevance of an item that matches thesubmitted search request so long as the item has the asset types set in the method. Therelevance score that this item has at the origin date will decrease the further value of the datefield selected on the asset type gets away from the origin.
Currently the Decay - Date or Decay - Numeric method in Oracle Content Management doesnot support Gaussian, exponential, or linear decay functions that are supported inElasticsearch. Instead Oracle Content Management allows you to define a step-down decayfunction to achieve a similar effect:
The calculated relevance score of an item with the field value matching origin +/- offset ismultiplied by the weight which is calculated by the Decay method. The relevance score of thematching item may be boosted by a Boost ranking method. If scale = 0, the weight drops to 0whenever the field value is above origin + offset or below origin - offset values. Otherwise, theweight drops to half of the decay value for the duration of the scale value and then drops to 0.
Sample request
PUT /content/management/api/v1.1/search/rankingPolicies/5A487437500042849B54FE3BA4EC80C2?q=(status%20eq%20%22draft%22)&fields=all { "name": "rp1", "description": "", "apiName": "rp1", "entries": [ {
Chapter 13Use REST APIs for Content Searching
13-119
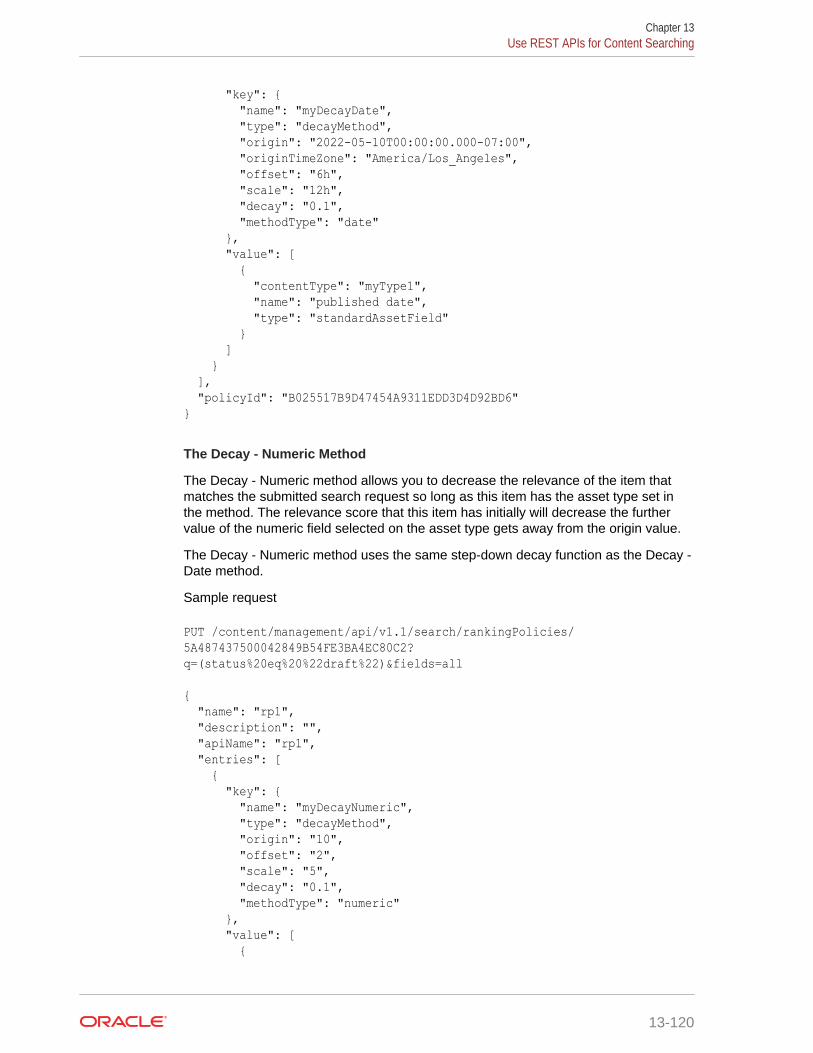
"key": { "name": "myDecayDate", "type": "decayMethod", "origin": "2022-05-10T00:00:00.000-07:00", "originTimeZone": "America/Los_Angeles", "offset": "6h", "scale": "12h", "decay": "0.1", "methodType": "date" }, "value": [ { "contentType": "myType1", "name": "published date", "type": "standardAssetField" } ] } ], "policyId": "B025517B9D47454A9311EDD3D4D92BD6"}
The Decay - Numeric Method
The Decay - Numeric method allows you to decrease the relevance of the item thatmatches the submitted search request so long as this item has the asset type set inthe method. The relevance score that this item has initially will decrease the furthervalue of the numeric field selected on the asset type gets away from the origin value.
The Decay - Numeric method uses the same step-down decay function as the Decay -Date method.
Sample request
PUT /content/management/api/v1.1/search/rankingPolicies/5A487437500042849B54FE3BA4EC80C2?q=(status%20eq%20%22draft%22)&fields=all { "name": "rp1", "description": "", "apiName": "rp1", "entries": [ { "key": { "name": "myDecayNumeric", "type": "decayMethod", "origin": "10", "offset": "2", "scale": "5", "decay": "0.1", "methodType": "numeric" }, "value": [ {
Chapter 13Use REST APIs for Content Searching
13-120
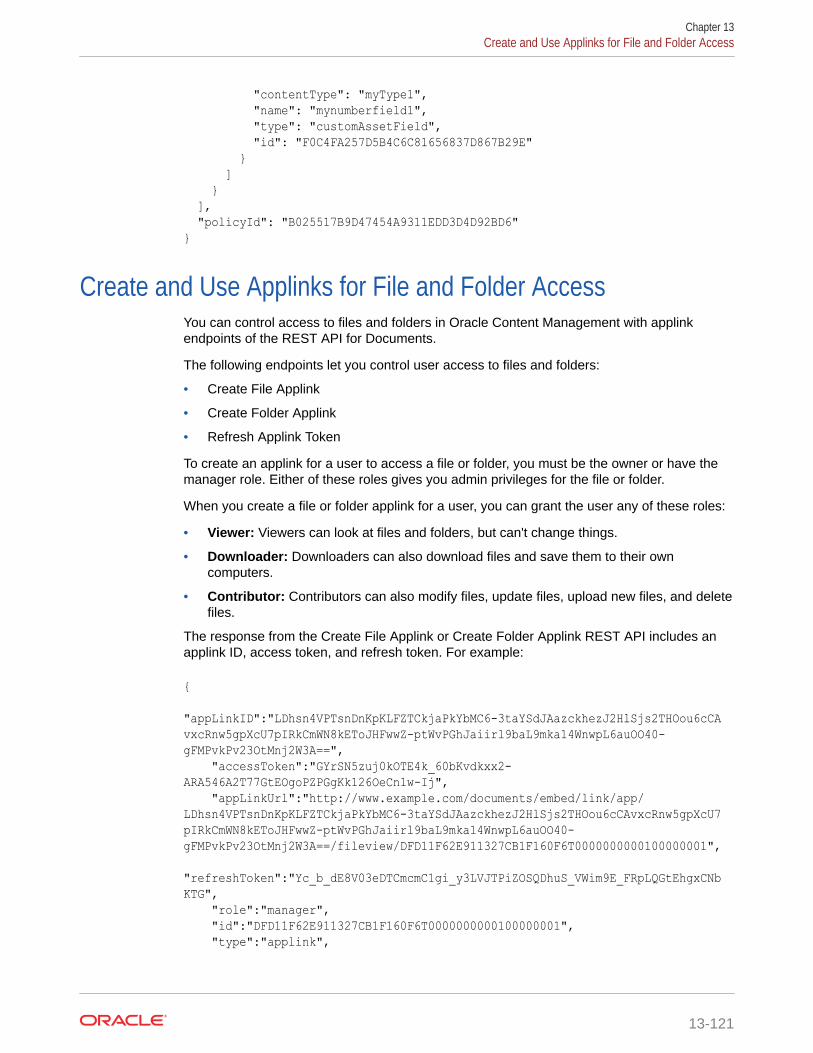
"contentType": "myType1", "name": "mynumberfield1", "type": "customAssetField", "id": "F0C4FA257D5B4C6C81656837D867B29E" } ] } ], "policyId": "B025517B9D47454A9311EDD3D4D92BD6"}
Create and Use Applinks for File and Folder AccessYou can control access to files and folders in Oracle Content Management with applinkendpoints of the REST API for Documents.
The following endpoints let you control user access to files and folders:
• Create File Applink
• Create Folder Applink
• Refresh Applink Token
To create an applink for a user to access a file or folder, you must be the owner or have themanager role. Either of these roles gives you admin privileges for the file or folder.
When you create a file or folder applink for a user, you can grant the user any of these roles:
• Viewer: Viewers can look at files and folders, but can't change things.
• Downloader: Downloaders can also download files and save them to their owncomputers.
• Contributor: Contributors can also modify files, update files, upload new files, and deletefiles.
The response from the Create File Applink or Create Folder Applink REST API includes anapplink ID, access token, and refresh token. For example:
{ "appLinkID":"LDhsn4VPTsnDnKpKLFZTCkjaPkYbMC6-3taYSdJAazckhezJ2HlSjs2THOou6cCAvxcRnw5gpXcU7pIRkCmWN8kEToJHFwwZ-ptWvPGhJaiirl9baL9mka14WnwpL6auOO40-gFMPvkPv23OtMnj2W3A==", "accessToken":"GYrSN5zuj0kOTE4k_60bKvdkxx2-ARA546A2T77GtEOgoPZPGgKk126OeCn1w-Ij", "appLinkUrl":"http://www.example.com/documents/embed/link/app/LDhsn4VPTsnDnKpKLFZTCkjaPkYbMC6-3taYSdJAazckhezJ2HlSjs2THOou6cCAvxcRnw5gpXcU7pIRkCmWN8kEToJHFwwZ-ptWvPGhJaiirl9baL9mka14WnwpL6auOO40-gFMPvkPv23OtMnj2W3A==/fileview/DFD11F62E911327CB1F160F6T0000000000100000001", "refreshToken":"Yc_b_dE8V03eDTCmcmC1gi_y3LVJTPiZOSQDhuS_VWim9E_FRpLQGtEhgxCNbKTG", "role":"manager", "id":"DFD11F62E911327CB1F160F6T0000000000100000001", "type":"applink",
Chapter 13Create and Use Applinks for File and Folder Access
13-121
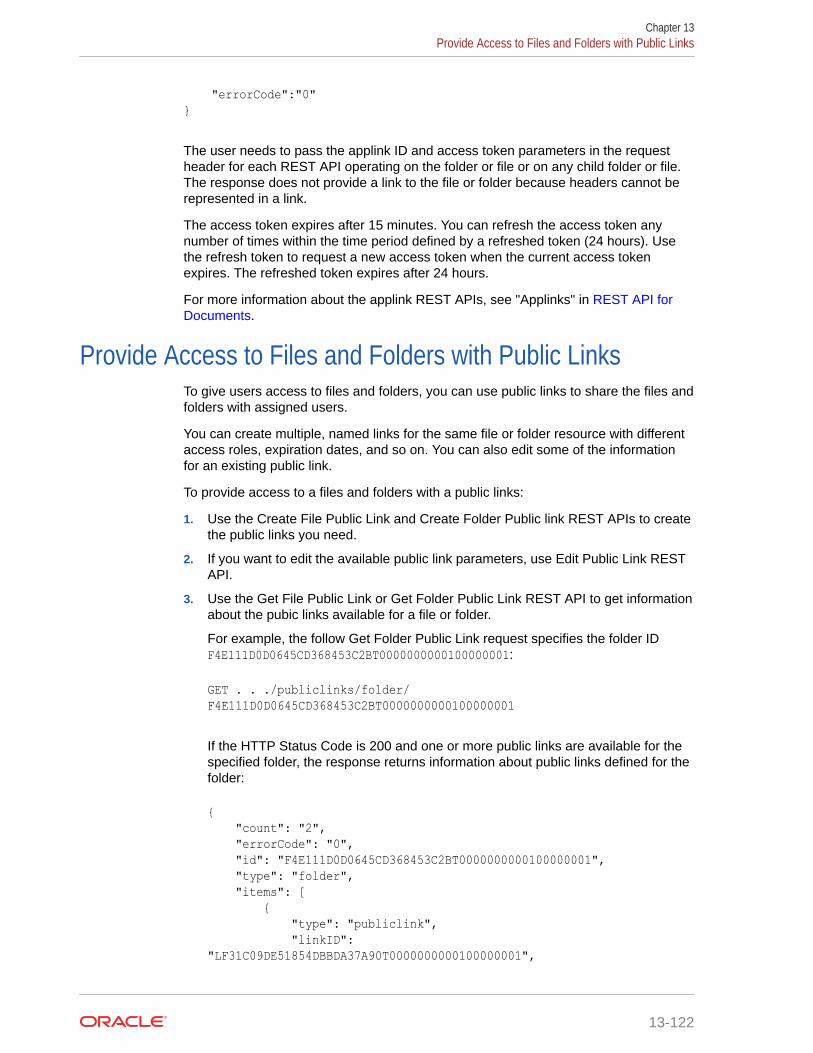
"errorCode":"0"}
The user needs to pass the applink ID and access token parameters in the requestheader for each REST API operating on the folder or file or on any child folder or file.The response does not provide a link to the file or folder because headers cannot berepresented in a link.
The access token expires after 15 minutes. You can refresh the access token anynumber of times within the time period defined by a refreshed token (24 hours). Usethe refresh token to request a new access token when the current access tokenexpires. The refreshed token expires after 24 hours.
For more information about the applink REST APIs, see "Applinks" in REST API forDocuments.
Provide Access to Files and Folders with Public LinksTo give users access to files and folders, you can use public links to share the files andfolders with assigned users.
You can create multiple, named links for the same file or folder resource with differentaccess roles, expiration dates, and so on. You can also edit some of the informationfor an existing public link.
To provide access to a files and folders with a public links:
1. Use the Create File Public Link and Create Folder Public link REST APIs to createthe public links you need.
2. If you want to edit the available public link parameters, use Edit Public Link RESTAPI.
3. Use the Get File Public Link or Get Folder Public Link REST API to get informationabout the pubic links available for a file or folder.
For example, the follow Get Folder Public Link request specifies the folder IDF4E111D0D0645CD368453C2BT0000000000100000001:
GET . . ./publiclinks/folder/F4E111D0D0645CD368453C2BT0000000000100000001
If the HTTP Status Code is 200 and one or more public links are available for thespecified folder, the response returns information about public links defined for thefolder:
{ "count": "2", "errorCode": "0", "id": "F4E111D0D0645CD368453C2BT0000000000100000001", "type": "folder", "items": [ { "type": "publiclink", "linkID": "LF31C09DE51854DBBDA37A90T0000000000100000001",
Chapter 13Provide Access to Files and Folders with Public Links
13-122
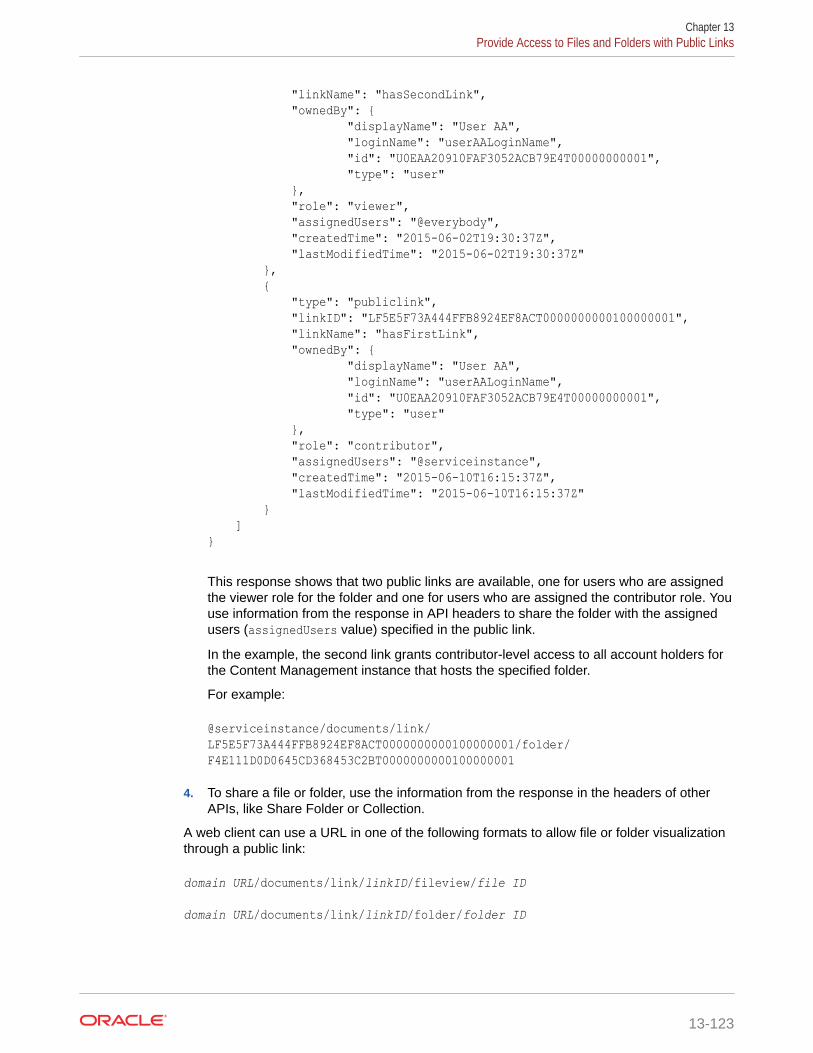
"linkName": "hasSecondLink", "ownedBy": { "displayName": "User AA", "loginName": "userAALoginName", "id": "U0EAA20910FAF3052ACB79E4T00000000001", "type": "user" }, "role": "viewer", "assignedUsers": "@everybody", "createdTime": "2015-06-02T19:30:37Z", "lastModifiedTime": "2015-06-02T19:30:37Z" }, { "type": "publiclink", "linkID": "LF5E5F73A444FFB8924EF8ACT0000000000100000001", "linkName": "hasFirstLink", "ownedBy": { "displayName": "User AA", "loginName": "userAALoginName", "id": "U0EAA20910FAF3052ACB79E4T00000000001", "type": "user" }, "role": "contributor", "assignedUsers": "@serviceinstance", "createdTime": "2015-06-10T16:15:37Z", "lastModifiedTime": "2015-06-10T16:15:37Z" } ]}
This response shows that two public links are available, one for users who are assignedthe viewer role for the folder and one for users who are assigned the contributor role. Youuse information from the response in API headers to share the folder with the assignedusers (assignedUsers value) specified in the public link.
In the example, the second link grants contributor-level access to all account holders forthe Content Management instance that hosts the specified folder.
For example:
@serviceinstance/documents/link/LF5E5F73A444FFB8924EF8ACT0000000000100000001/folder/F4E111D0D0645CD368453C2BT0000000000100000001
4. To share a file or folder, use the information from the response in the headers of otherAPIs, like Share Folder or Collection.
A web client can use a URL in one of the following formats to allow file or folder visualizationthrough a public link:
domain URL/documents/link/linkID/fileview/file ID
domain URL/documents/link/linkID/folder/folder ID
Chapter 13Provide Access to Files and Folders with Public Links
13-123
For more information about public links, see Publiclinks Resource or "Publiclinks" in REST API for Documents.
Upload a REST API Swagger File into Mobile Cloud ServiceIn Oracle Mobile Cloud Service (MCS), you can create a REST connector API toconnect to the REST API for Documents.
If you provide a Swagger descriptor URL, the REST Connector API wizard canexamine the descriptive metadata and obtain resources and fields from it.
Only Swagger metadata in JSON format is currently supported.
A REST connector API is a configuration for communicating with a specific externalservice to send and receive data. REST connector APIs give you a standard way toconnect a mobile app to existing REST services and at the same time benefit from theOracle Mobile Cloud Service's built-in security, diagnostics, and analytics features.
The connector API communicates and passes information between the client and theserver using the HTTPS protocol. The information passed can be in the form of XMLor JSON (JavaScript Object Notation). REST doesn’t contain a messaging layer. Ituses a set of rules to create a stateless service.
The REST Connector API wizard walks you through creating REST connector APIs,from specifying a remote service and setting security policies to testing your endpoints.Additionally, the wizard supports Swagger. When you provide a Swagger descriptorURL, the wizard introspects the endpoints available from that file. The availableresources are identified and displayed. You simply select the resources of the externalservice.
Only standard internet access ports 80 and 443 are supported. Connection to aservice can't be made using a custom port.
Use the REST Connector API wizard to quickly configure your connector API byproviding a name and description, specifying timeout settings, adding rules, setting asecurity policy, and testing it.
Creating a connection to an existing REST service can be a simple two-step operation:
1. Name your REST connector API.
2. Provide the URL to the external service.
In the REST Connector API wizard, on the page where the you would provide theURL to the Swagger file, there’s a link to the internal Oracle API catalog. You canget the Swagger URL from there and paste it in the field provided for thedescriptor.
You have the option of applying rules to form specific requests or responses for thedata that you want to access. In addition, you have the ability to configure client-sidesecurity policies for the service that you’re accessing and test and check the results ofyour connection.
As soon as it’s created, your REST connector API is listed on the Connectors page.When at least one REST connector API exists, you’ll be taken directly to theConnectors page when you click Connectors from the side menu. From the catalog,you can select the REST connector API and edit it, publish it, create a new version orupdate an existing version, deploy it if it has a Published state, or move it to the trash.
Chapter 13Upload a REST API Swagger File into Mobile Cloud Service
13-124

For more information, see "REST Connector APIs" in Developing Applications with OracleMobile Cloud, Enterprise.
Chapter 13Upload a REST API Swagger File into Mobile Cloud Service
13-125
14Oracle Content Management SDKs
Oracle Content Management provides software development kits (SDKs) that help youintegrate and extend Oracle Content Management functionality:
• Content SDK
• Mobile SDKs
Content SDKThe Content SDK for Oracle Content Management is a light-weight JavaScript wrapper thatinteracts with the Content REST APIs.
This read-only SDK retrieves structured content, digital assets, and content layouts that aremanaged in Oracle Content Management. The SDK can be used in web browsers or NodeJSprojects.
The Content SDK consists of three main modules:
• ContentSDK: The main entry-point object. The ContentSDK object lets you create clientobjects to access content based on your requirements.
• ContentDeliveryClient : A client object that is set up to access published content itemsand digital assets.
• ContentPreviewClient : A client object that is set up to access content types, draftcontent items, and draft digital assets.
The Content SDK is made available as an Oracle open-source project on GitHub:
https://github.com/oracle/content-management-sdk
It can be installed via the NPM package manager:
npm install @oracle/content-management-sdk
Detailed descriptions of the ContentSDK, ContentDeliveryClient, andContentPreviewClient classes are available at Content SDK.
Mobile SDKsThe Mobile SDKs for Oracle Content Management are read-only SDKs for retrievingpublished content items, digital assets, and content layouts that are managed in OracleContent Management.
The Mobile SDKs are light-weight iOS and Android bindings that interact with the REST APIfor Content Delivery. These SDKs can easily be integrated with any third-party iOS orAndroid mobile application. The Mobile SDKs let you fetch content from the server on the fly,without the need for rebuilding the app to modify content. The SDKs also provide a wide
14-1
range of advanced utilities and features such as response caching, a search requestbuilder, and request/response modeling.
You can download the SDKs for iOS and Android on the Oracle Content Managementdownloads page. Each SDK includes a readme file that provides instructions on howto use the SDK in your projects.
Mobile SDK downloads are here:
https://www.oracle.com/middleware/technologies/content-experience-downloads.html
Chapter 14Mobile SDKs
14-2
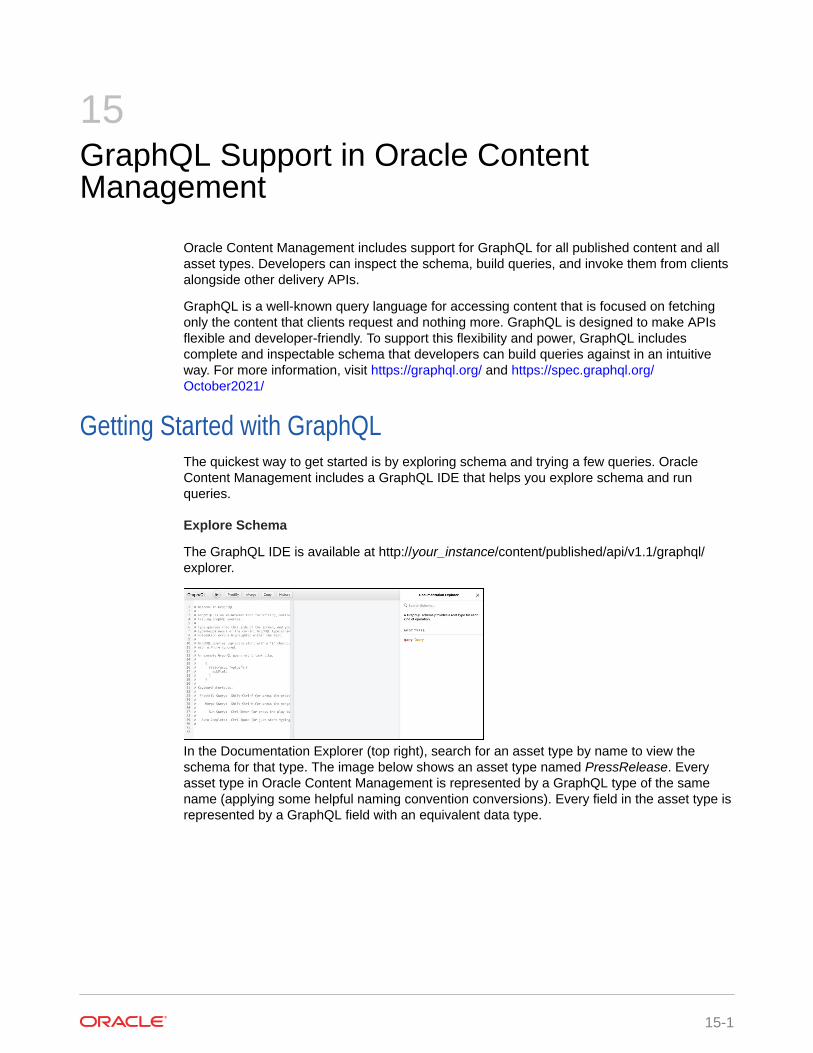
15GraphQL Support in Oracle ContentManagement
Oracle Content Management includes support for GraphQL for all published content and allasset types. Developers can inspect the schema, build queries, and invoke them from clientsalongside other delivery APIs.
GraphQL is a well-known query language for accessing content that is focused on fetchingonly the content that clients request and nothing more. GraphQL is designed to make APIsflexible and developer-friendly. To support this flexibility and power, GraphQL includescomplete and inspectable schema that developers can build queries against in an intuitiveway. For more information, visit https://graphql.org/ and https://spec.graphql.org/October2021/
Getting Started with GraphQLThe quickest way to get started is by exploring schema and trying a few queries. OracleContent Management includes a GraphQL IDE that helps you explore schema and runqueries.
Explore Schema
The GraphQL IDE is available at http://your_instance/content/published/api/v1.1/graphql/explorer.
In the Documentation Explorer (top right), search for an asset type by name to view theschema for that type. The image below shows an asset type named PressRelease. Everyasset type in Oracle Content Management is represented by a GraphQL type of the samename (applying some helpful naming convention conversions). Every field in the asset type isrepresented by a GraphQL field with an equivalent data type.
15-1
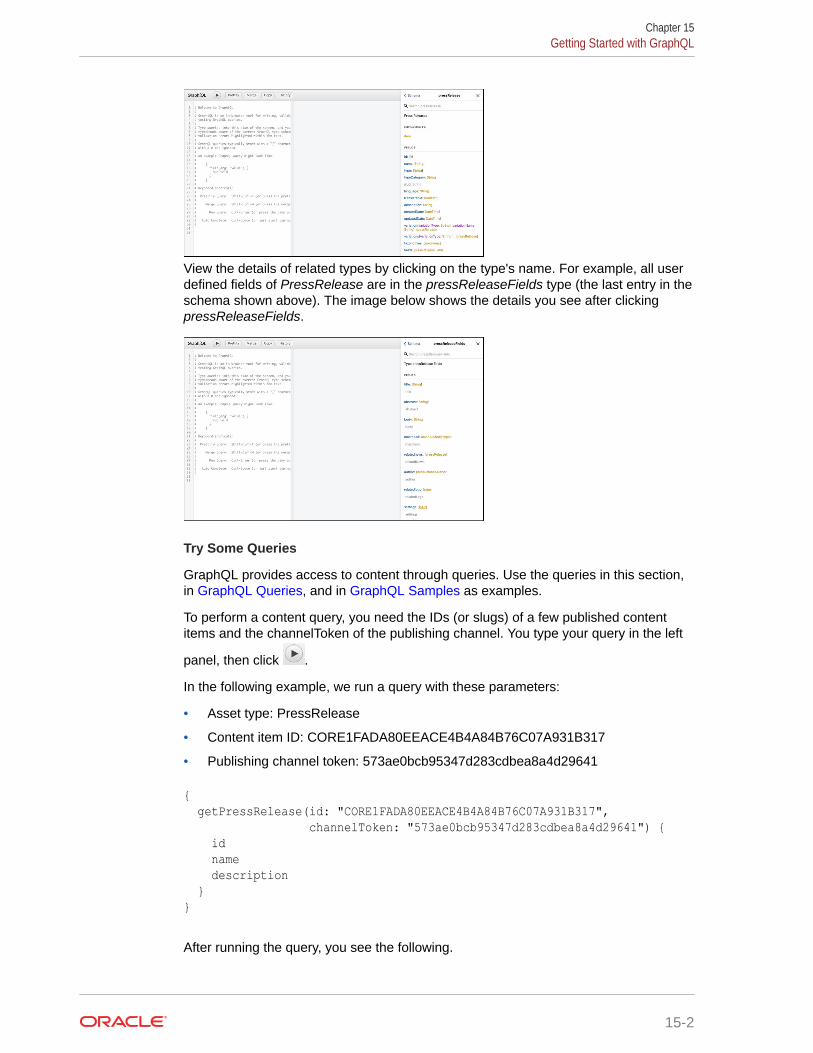
View the details of related types by clicking on the type's name. For example, all userdefined fields of PressRelease are in the pressReleaseFields type (the last entry in theschema shown above). The image below shows the details you see after clickingpressReleaseFields.
Try Some Queries
GraphQL provides access to content through queries. Use the queries in this section,in GraphQL Queries, and in GraphQL Samples as examples.
To perform a content query, you need the IDs (or slugs) of a few published contentitems and the channelToken of the publishing channel. You type your query in the left
panel, then click .
In the following example, we run a query with these parameters:
• Asset type: PressRelease
• Content item ID: CORE1FADA80EEACE4B4A84B76C07A931B317
• Publishing channel token: 573ae0bcb95347d283cdbea8a4d29641
{ getPressRelease(id: "CORE1FADA80EEACE4B4A84B76C07A931B317", channelToken: "573ae0bcb95347d283cdbea8a4d29641") { id name description }}
After running the query, you see the following.
Chapter 15Getting Started with GraphQL
15-2
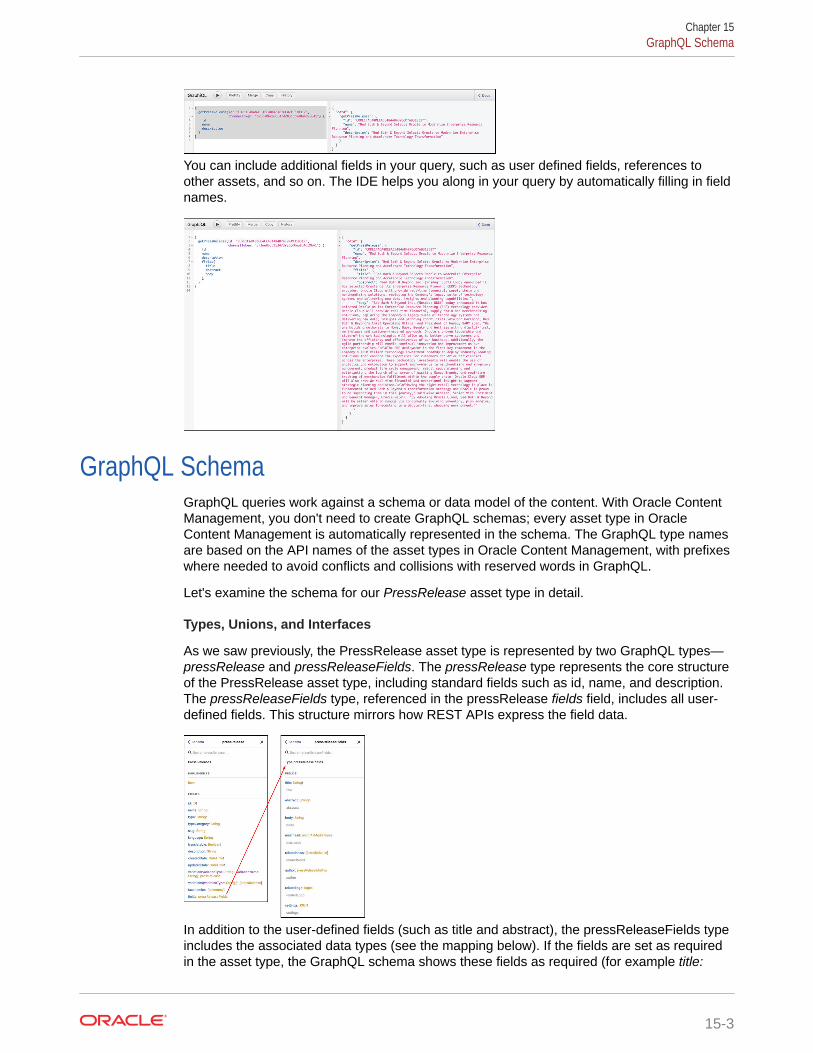
You can include additional fields in your query, such as user defined fields, references toother assets, and so on. The IDE helps you along in your query by automatically filling in fieldnames.
GraphQL SchemaGraphQL queries work against a schema or data model of the content. With Oracle ContentManagement, you don't need to create GraphQL schemas; every asset type in OracleContent Management is automatically represented in the schema. The GraphQL type namesare based on the API names of the asset types in Oracle Content Management, with prefixeswhere needed to avoid conflicts and collisions with reserved words in GraphQL.
Let's examine the schema for our PressRelease asset type in detail.
Types, Unions, and Interfaces
As we saw previously, the PressRelease asset type is represented by two GraphQL types—pressRelease and pressReleaseFields. The pressRelease type represents the core structureof the PressRelease asset type, including standard fields such as id, name, and description.The pressReleaseFields type, referenced in the pressRelease fields field, includes all user-defined fields. This structure mirrors how REST APIs express the field data.
In addition to the user-defined fields (such as title and abstract), the pressReleaseFields typeincludes the associated data types (see the mapping below). If the fields are set as requiredin the asset type, the GraphQL schema shows these fields as required (for example title:
Chapter 15GraphQL Schema
15-3
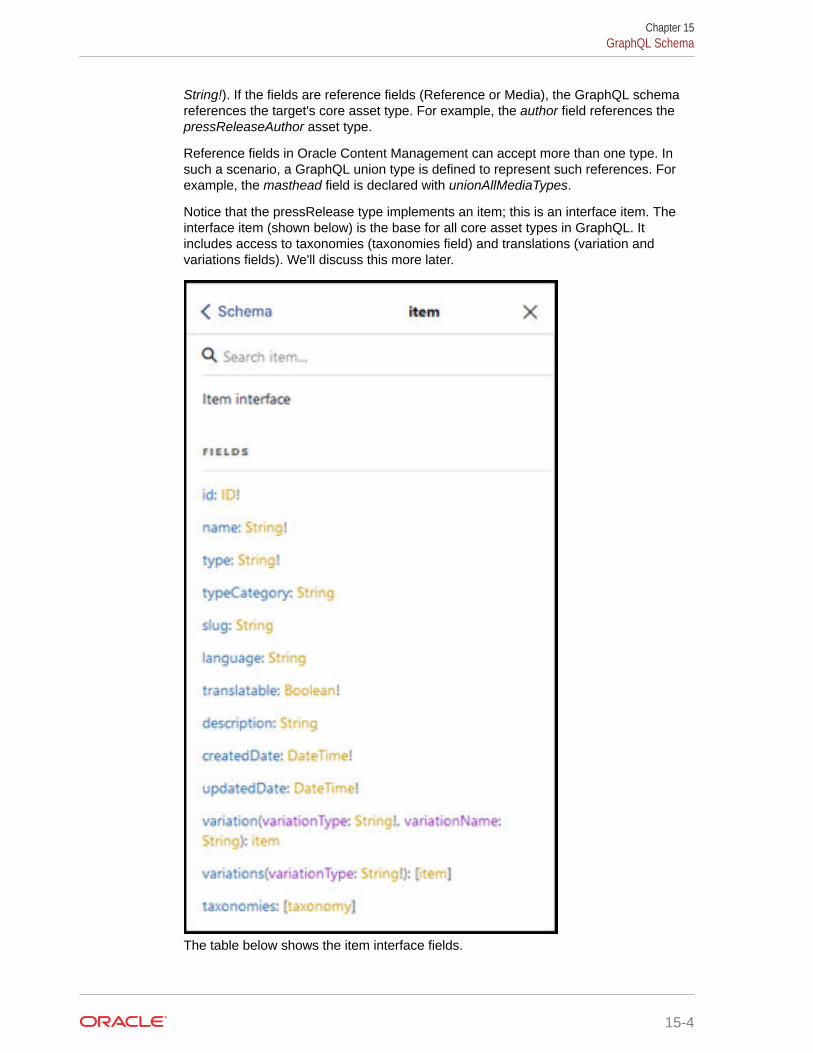
String!). If the fields are reference fields (Reference or Media), the GraphQL schemareferences the target's core asset type. For example, the author field references thepressReleaseAuthor asset type.
Reference fields in Oracle Content Management can accept more than one type. Insuch a scenario, a GraphQL union type is defined to represent such references. Forexample, the masthead field is declared with unionAllMediaTypes.
Notice that the pressRelease type implements an item; this is an interface item. Theinterface item (shown below) is the base for all core asset types in GraphQL. Itincludes access to taxonomies (taxonomies field) and translations (variation andvariations fields). We'll discuss this more later.
The table below shows the item interface fields.
Chapter 15GraphQL Schema
15-4
Schema item
id: ID!
name: String!
type: String!
typeCategory: String
slug: String
language: String
translatable: Boolean!
description: String
createdDate: DateTime!
updatedDate: DateTime!
variation(variationType: String!, variationName: String): item
variations(variationType: String!): [item]
taxonomies: [taxonomy]
Data Types
Oracle Content Management data types are mapped to equivalent GraphQL types, nativetypes where appropriate and scalars when needed. DateTime and JSON are scalars includedautomatically in the schema.
Oracle Content Management Data Type GraphQL Field Type
Boolean Boolean
Date DateTime
Decimal Float
JSON JSON
Large Text String
Media target asset type or union
Number Int
Reference target asset type or union
Text String
In addition to these data types, the Oracle Content Management ID for each asset is mappedto the ID field type in GraphQL.
GraphQL QueriesOracle Content Management automatically generates queries for accessing assets. There isa generic item query (getItem(..)), and each core asset type gets a corresponding query (forexample, getPressRelease(..)).
As previously mentioned, you type your query in the left panel, then click The IDE willhelp you write your query, but here is the basic format you'll use to get an item, replacing thetext in italics with the appropriate values. You must include a channelToken, either as an
Chapter 15GraphQL Queries
15-5
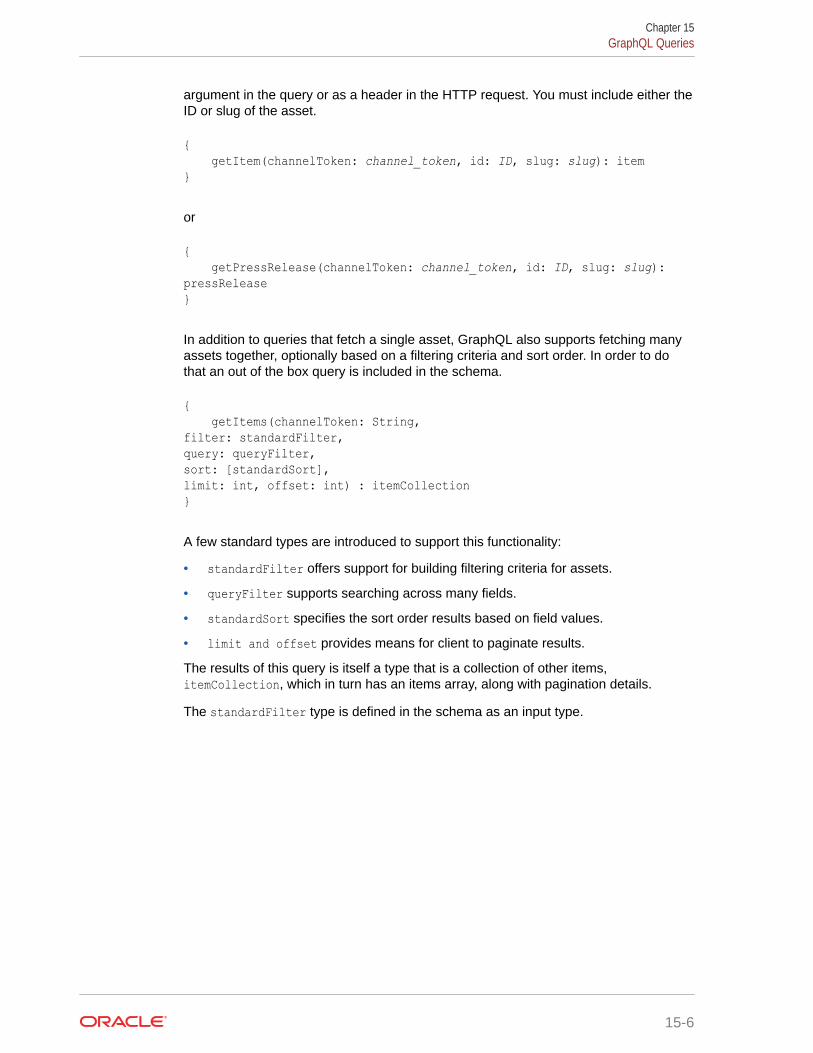
argument in the query or as a header in the HTTP request. You must include either theID or slug of the asset.
{ getItem(channelToken: channel_token, id: ID, slug: slug): item}
or
{ getPressRelease(channelToken: channel_token, id: ID, slug: slug): pressRelease}
In addition to queries that fetch a single asset, GraphQL also supports fetching manyassets together, optionally based on a filtering criteria and sort order. In order to dothat an out of the box query is included in the schema.
{ getItems(channelToken: String, filter: standardFilter, query: queryFilter, sort: [standardSort], limit: int, offset: int) : itemCollection}
A few standard types are introduced to support this functionality:
• standardFilter offers support for building filtering criteria for assets.
• queryFilter supports searching across many fields.
• standardSort specifies the sort order results based on field values.
• limit and offset provides means for client to paginate results.
The results of this query is itself a type that is a collection of other items,itemCollection, which in turn has an items array, along with pagination details.
The standardFilter type is defined in the schema as an input type.
Chapter 15GraphQL Queries
15-6
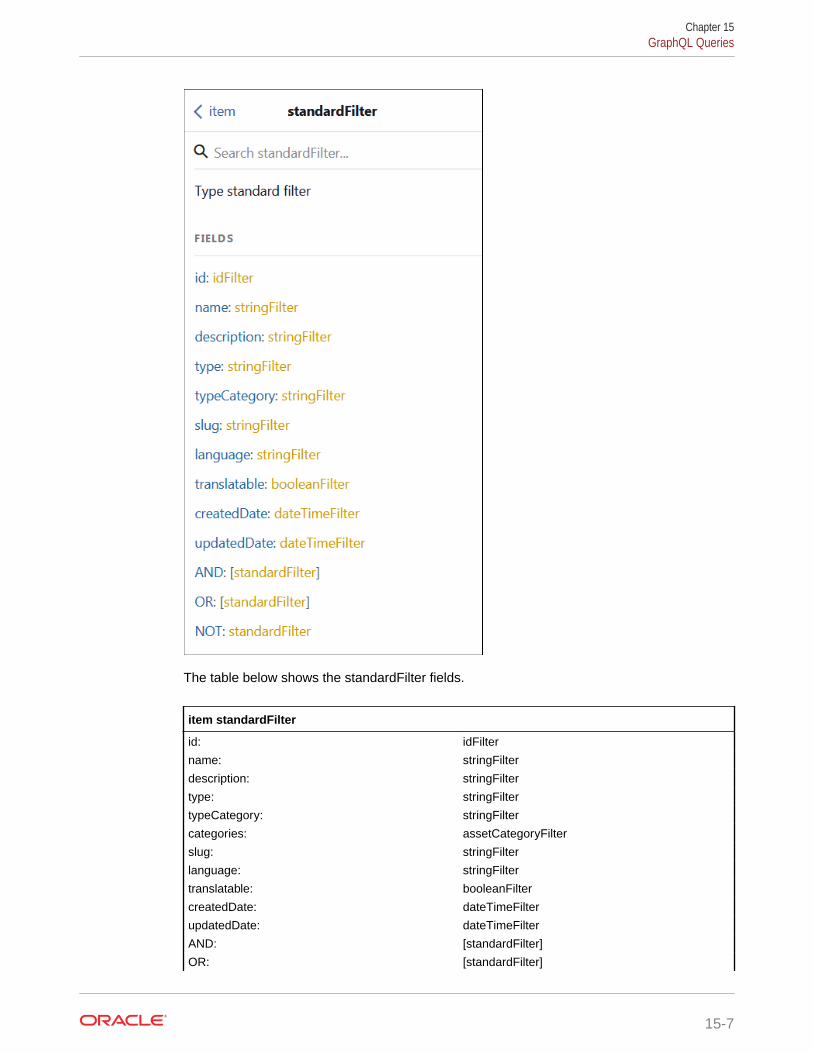
The table below shows the standardFilter fields.
item standardFilter
id: idFilter
name: stringFilter
description: stringFilter
type: stringFilter
typeCategory: stringFilter
categories: assetCategoryFilter
slug: stringFilter
language: stringFilter
translatable: booleanFilter
createdDate: dateTimeFilter
updatedDate: dateTimeFilter
AND: [standardFilter]
OR: [standardFilter]
Chapter 15GraphQL Queries
15-7
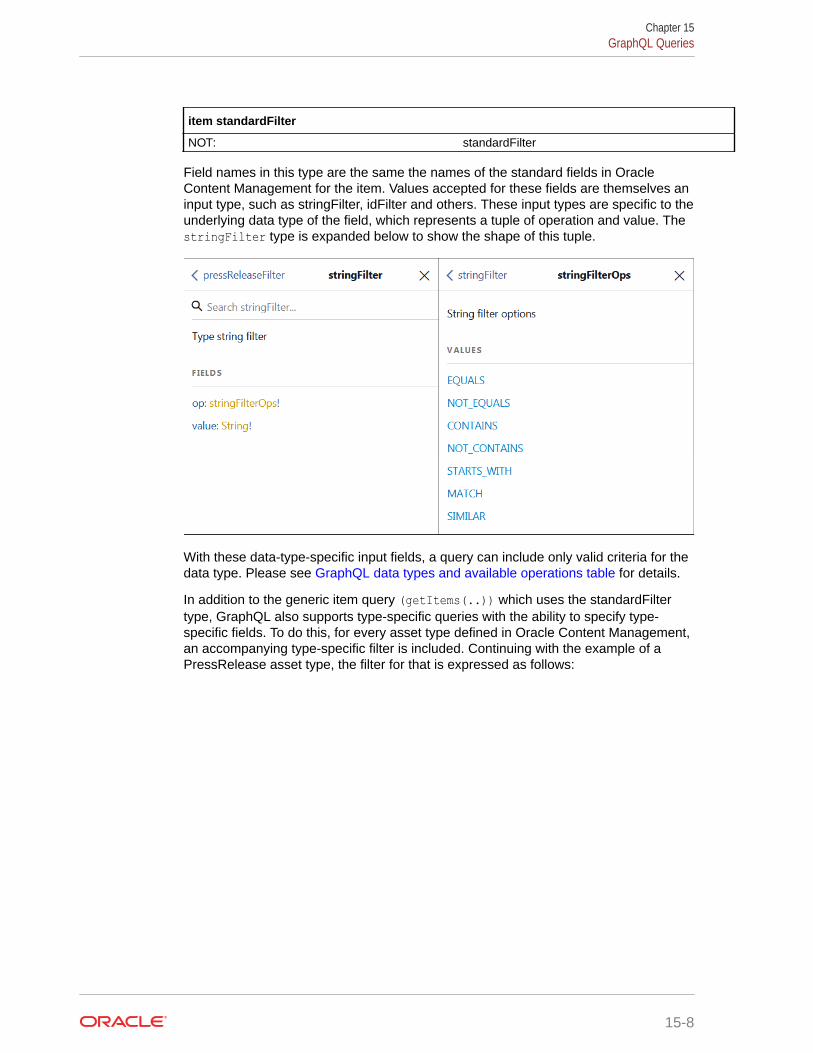
item standardFilter
NOT: standardFilter
Field names in this type are the same the names of the standard fields in OracleContent Management for the item. Values accepted for these fields are themselves aninput type, such as stringFilter, idFilter and others. These input types are specific to theunderlying data type of the field, which represents a tuple of operation and value. ThestringFilter type is expanded below to show the shape of this tuple.
With these data-type-specific input fields, a query can include only valid criteria for thedata type. Please see GraphQL data types and available operations table for details.
In addition to the generic item query (getItems(..)) which uses the standardFiltertype, GraphQL also supports type-specific queries with the ability to specify type-specific fields. To do this, for every asset type defined in Oracle Content Management,an accompanying type-specific filter is included. Continuing with the example of aPressRelease asset type, the filter for that is expressed as follows:
Chapter 15GraphQL Queries
15-8
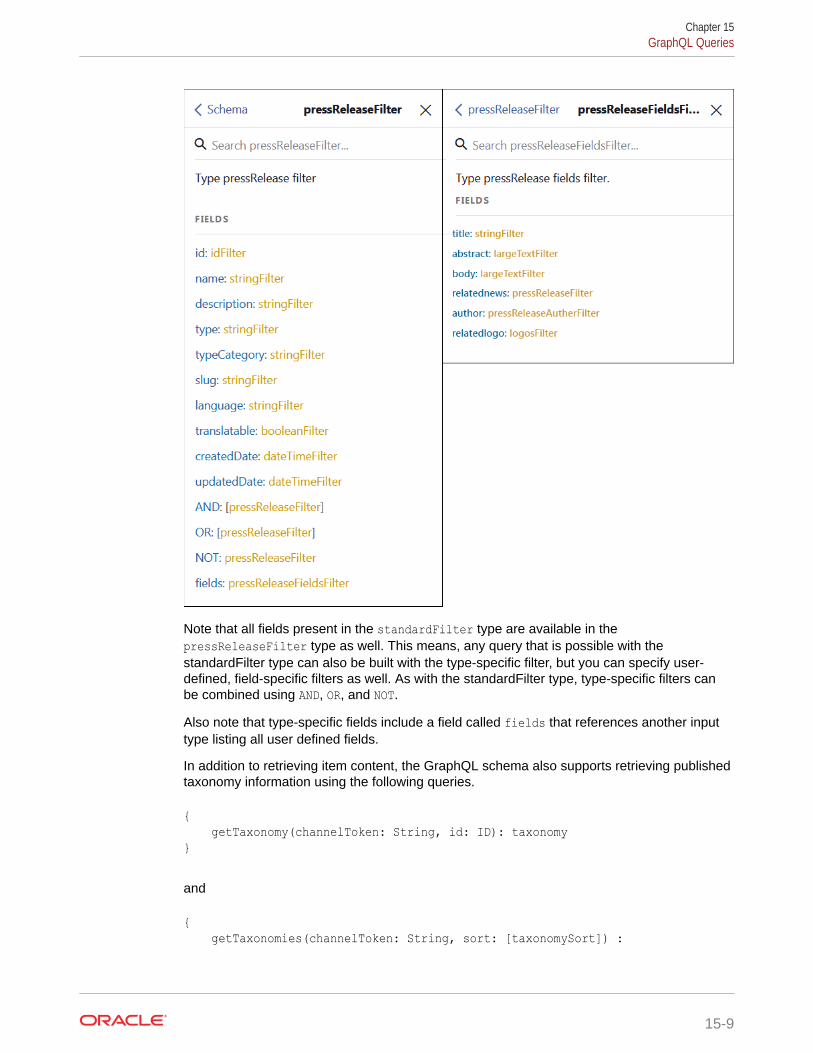
Note that all fields present in the standardFilter type are available in thepressReleaseFilter type as well. This means, any query that is possible with thestandardFilter type can also be built with the type-specific filter, but you can specify user-defined, field-specific filters as well. As with the standardFilter type, type-specific filters canbe combined using AND, OR, and NOT.
Also note that type-specific fields include a field called fields that references another inputtype listing all user defined fields.
In addition to retrieving item content, the GraphQL schema also supports retrieving publishedtaxonomy information using the following queries.
{ getTaxonomy(channelToken: String, id: ID): taxonomy}
and
{ getTaxonomies(channelToken: String, sort: [taxonomySort]) :
Chapter 15GraphQL Queries
15-9
taxonomyCollection}
Categories can be fetched either from a taxonomy or directly, using the followingqueries.
{ getCategory(id: ID, taxonomyId: ID, channelToken: String, apiName: String): category}
{ getCategories(id: ID, taxonomyId: ID, channelToken: String, limit: int, offset: int): categoryCollection}
Examples
Retrieve Assets: Filter and Sort Assets by Standard Fields
Retrieving assets by filtering using standard fields (name, id, description, type, andso on) is accomplished by the use of standardFilter. For example, retrieving assetsof a specific type is accomplished by standardFilter using criteria based on the typefield’s value.
{ getItems(channelToken: "573ae0bcb95347d283cdbea8a4d29641", filter: {type: {op:EQUALS, value: "MyType"}}) { totalResults items { id name description } }}
You could just as easily retrieve assets of more than one type by creating an ORcondition in the standardFilter.
{ getItems(channelToken: "573ae0bcb95347d283cdbea8a4d29641", filter: { OR: [ {type: {op: EQUALS, value: "myType1"}}, {type: {op: EQUALS, value: "myType2"}} ] } ) { totalResults items { id name description }
Note that filtering is possible on any standard fields present in the Item interface. Eachfield offers various operations (such as EQUALS and NOT_EQUALS) depending onthe data type. See the following table for available operations for each data type.
Chapter 15GraphQL Queries
15-10
In addition to filtering, clients can specify sorting criteria for the query. The following examplesorts the results by the name field’s value.
{ getItems(channelToken: "573ae0bcb95347d283cdbea8a4d29641", filter: {type: {op: EQUALS, value: "MyType"}} sort: {name :DESC} ) { totalResults items { id name description } }}
In addition to the filtering and sorting, clients can specify pagination instructions by usinglimit and offset. The following example shows how a client can fetch up to 10 results (limit)after the first 20 (offset).
{ getItems(channelToken: "573ae0bcb95347d283cdbea8a4d29641", filter: {type: {op: EQUALS, value: "myType"}} sort: {name :DESC} limit: 10 offset: 20 ) { totalResults count items { id name description } }}
Retrieving Assets of a Specific Type by Specifying a Type-Specific Filter
The filtering criteria in the following example includes a user-defined field title and queries forall PressRelease assets that have Oracle in the title field.
{ getPressReleaseCollection(channelToken: "573ae0bcb95347d283cdbea8a4d29641", filter: {fields: {title: {op: CONTAINS, value: "Oracle"}}}) { items { name id } }}
Chapter 15GraphQL Queries
15-11
As with any filters, type-specific filters can be nested.
{ getPressReleaseCollection(channelToken: "573ae0bcb95347d283cdbea8a4d29641", filter: {fields: {title: {op: CONTAINS, value: "Oracle"}}, AND: {language: {op: EQUALS, value: "en-US"}}}) { items { name id language fields { title } } }}
Retrieve Taxonomy and Category Information
Just as in a single asset retrieval, taxonomy can be retrieved using getTaxonomy. Thefollowing example shows how a published taxonomy, along with the first 3 levels ofcategory information, can retrieved.
{ getTaxonomy(channelToken: "573ae0bcb95347d283cdbea8a4d29641", id: "F95CD0EB0E02427C9A3B7F1B8F33645C") { id name categories { id name children { id name children { id name } } } }}
Likewise, it is possible to retrieve every published taxonomy by using getTaxonomies.The following example shows how to get every published taxonomy with first 3 levelsof categories under each of them.
{ getTaxonomies(channelToken: "573ae0bcb95347d283cdbea8a4d29641") { taxonomies { id name categories {
Chapter 15GraphQL Queries
15-12
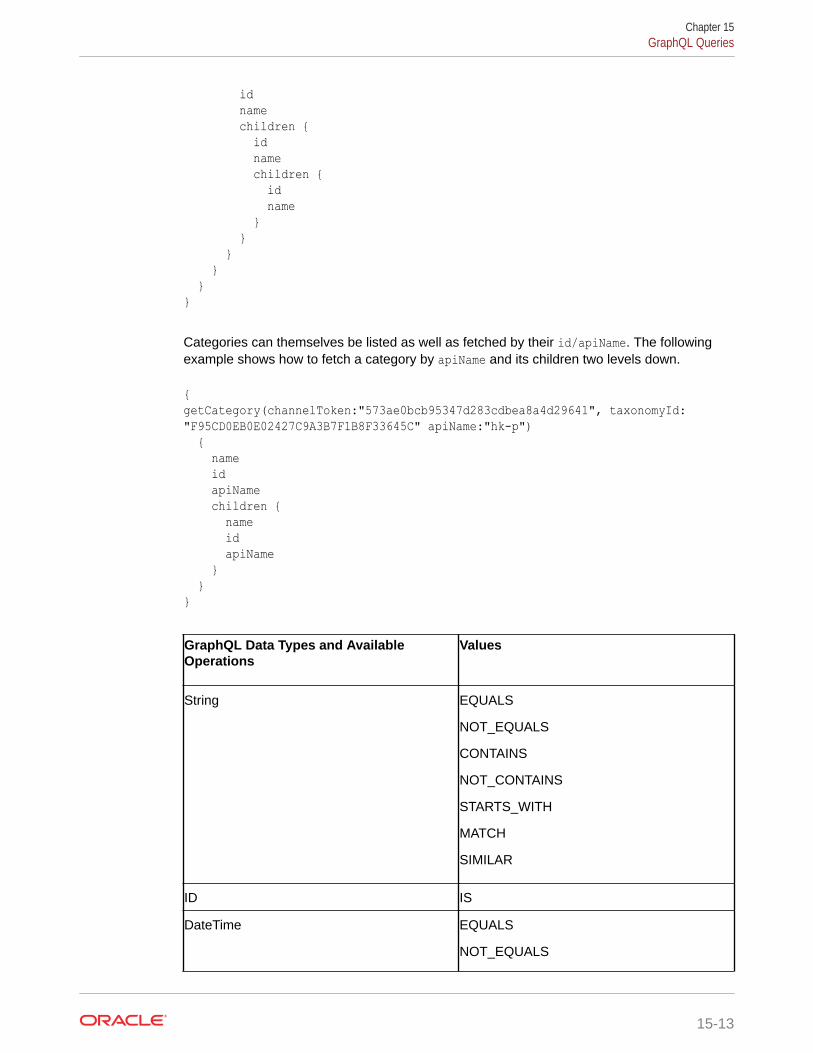
id name children { id name children { id name } } } } }}
Categories can themselves be listed as well as fetched by their id/apiName. The followingexample shows how to fetch a category by apiName and its children two levels down.
{getCategory(channelToken:"573ae0bcb95347d283cdbea8a4d29641", taxonomyId: "F95CD0EB0E02427C9A3B7F1B8F33645C" apiName:"hk-p") { name id apiName children { name id apiName } }}
GraphQL Data Types and AvailableOperations
Values
String EQUALS
NOT_EQUALS
CONTAINS
NOT_CONTAINS
STARTS_WITH
MATCH
SIMILAR
ID IS
DateTime EQUALS
NOT_EQUALS
Chapter 15GraphQL Queries
15-13
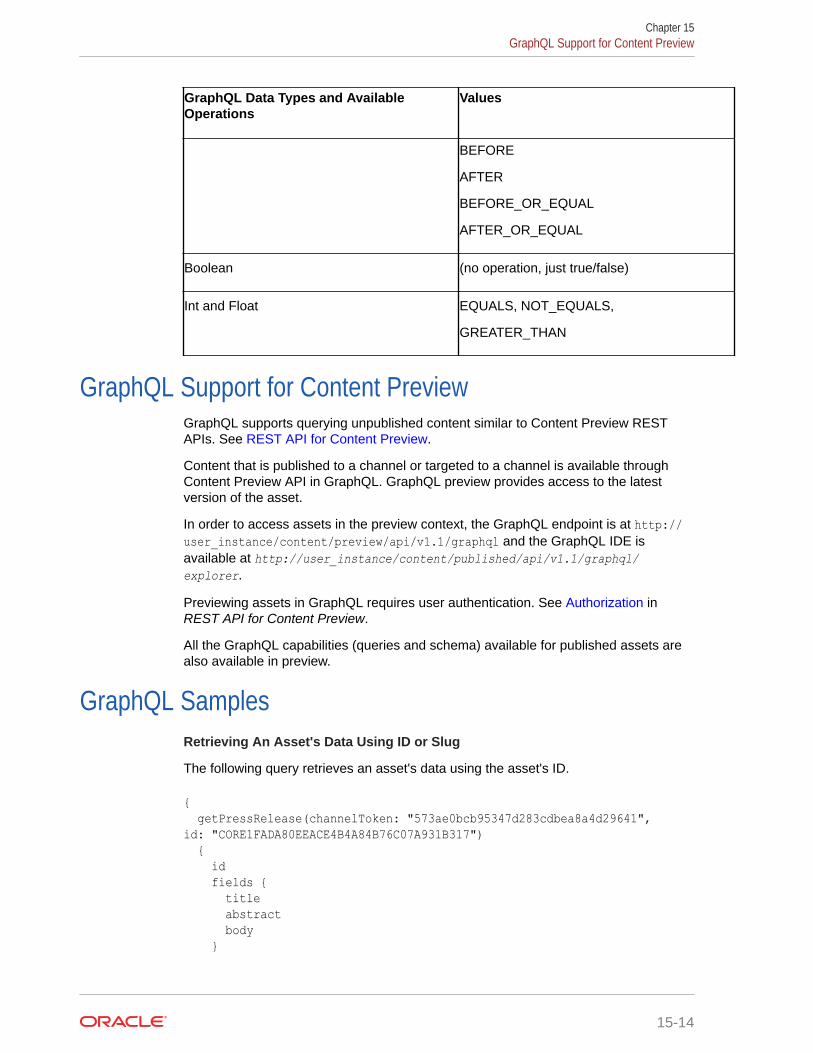
GraphQL Data Types and AvailableOperations
Values
BEFORE
AFTER
BEFORE_OR_EQUAL
AFTER_OR_EQUAL
Boolean (no operation, just true/false)
Int and Float EQUALS, NOT_EQUALS,
GREATER_THAN
GraphQL Support for Content PreviewGraphQL supports querying unpublished content similar to Content Preview RESTAPIs. See REST API for Content Preview.
Content that is published to a channel or targeted to a channel is available throughContent Preview API in GraphQL. GraphQL preview provides access to the latestversion of the asset.
In order to access assets in the preview context, the GraphQL endpoint is at http://user_instance/content/preview/api/v1.1/graphql and the GraphQL IDE isavailable at http://user_instance/content/published/api/v1.1/graphql/explorer.
Previewing assets in GraphQL requires user authentication. See Authorization inREST API for Content Preview.
All the GraphQL capabilities (queries and schema) available for published assets arealso available in preview.
GraphQL SamplesRetrieving An Asset's Data Using ID or Slug
The following query retrieves an asset's data using the asset's ID.
{ getPressRelease(channelToken: "573ae0bcb95347d283cdbea8a4d29641", id: "CORE1FADA80EEACE4B4A84B76C07A931B317") { id fields { title abstract body }
Chapter 15GraphQL Support for Content Preview
15-14
}}
The following query produces identical results to the one above, using the slug instead of theID.
{ getPressRelease(channelToken: "573ae0bcb95347d283cdbea8a4d29641", slug: "bed-bath-beyond-selects-oracle-to-modernize-enterprise") { id fields { title abstract body } }}
Retrieving a Referenced Asset's Data
The following query retrieves the referenced author type's fields along with the pressReleasefields.
{ getPressRelease(channelToken: "573ae0bcb95347d283cdbea8a4d29641", slug: "bed-bath-beyond-selects-oracle-to-modernize-enterprise") { id fields { title abstract body author { fields { firstname lastname bio } } } }}
Retrieving Renditions of Digital Assets
An out-of-the-box type called rendition is included in the schema to represent various mediarenditions. It provides easy access to URLs of the renditions so you can easily include themin your code. For example, the following query returns a large rendition of an image.
{ getPressRelease(channelToken: "573ae0bcb95347d283cdbea8a4d29641", slug: "bed-bath-beyond-selects-oracle-to-modernize-enterprise") { id fields {
Chapter 15GraphQL Samples
15-15
title abstract body masthead { ...headerImage } } }} fragment headerImage on image { id fields { rendition(name: "Large", format: "jpg") { file { url } } }}
Instead of retrieving a specific rendition, you can retrieve a list of renditions (with bothjpg and webp formats) with the renditions parameter.
{ getPressRelease(channelToken: "573ae0bcb95347d283cdbea8a4d29641", slug: "bed-bath-beyond-selects-oracle-to-modernize-enterprise") { id fields { title abstract body masthead { ...headerImages } } }} fragment headerImages on image { id fields { renditions { file { url } } }}
Chapter 15GraphQL Samples
15-16
16Use Webhooks
Oracle Content Management provides incoming webhooks you can use to receive eventnotifications from external applications.
You can also use outgoing webhooks to automatically push notifications of contentpublishing, content lifecycle, site publishing, and prerendering events to other applications.
Outgoing WebhooksYou can use outgoing webhook endpoints for push notifications of content publishing, contentlifecycle, site publishing, and prerendering events.
Configure Outgoing WebhooksYou can use outgoing webhooks to have Oracle Content Management automatically postnotifications based on asset and site events.
For example, you might want to post a notification to an application when new content ispublished, so that the application can consume the new content.
To create an outgoing webhook:
1. After you sign in to the Oracle Content Management web application as an administrator,click Integrations in the Administration area of the navigation menu on the left.
2. In the Integrations menu, click Webhooks.
3. Click Create.
4. Select the type of webhook you want to create:
• Asset Lifecycle Webhook: Receive push notifications about asset lifecycle changesin a repository.
• Asset Publishing Webhook: Receive push notifications about assets published to achannel or unpublished from a channel.
• Site Publishing Webhook: Receive push notifications about site publishing.
• Prerender Webhook: Receive push notifications about the need to render and cachea site detail page.
5. Enter a name and description for the webhook. This name appears as a heading for theposted conversation message.
6. Enable the webhook.
7. Provide information for webhook monitoring:
• If you're creating an asset lifecycle webhook, select the repository you want tomonitor for asset events.
• If you're creating a site publishing webhook, specify the name of the site you want tomonitor for site events.
16-1
• If you're creating a prerender webhook, notify Prerender about the need torender and cache a Detail page.
8. Select the events you want to generate notifications.
9. Select whether you want brief or detailed information about each event. For a sitepublishing webhook, you can also select an empty notification.
• For asset lifecycle webhooks, brief notifications include who triggered event,what was the event, what item was involved with the event, in which repositorythe event occurred, and when the event occurred. Detailed notificationsinclude the same information listed in brief plus a list of all the fields in eachcontent item or digital asset.
• For asset publishing webhooks, brief notifications include the ID of eachpublished asset. Detailed notifications include the same information listed inbrief notitfications plus a list of all the fields in each published asset.
10. Enter the target URL (endpoint) to which you want to post notifications.
11. If the endpoint requires authentication, select what type of authentication, and thenclick Details to enter the authentication information.Oracle Content Management webhooks support the following options to configureauthentication for the webhook notification receiver:
• None: The receiver does not require authentication.
• Basic: The receiver requires Basic Auth.
• Header: The receiver requires a Secure Header.
• Self-signed SSL certificate: The receiver accepts a self-signed SSLcertificate.
12. Click Save.
To delete a webhook, click Delete next to the webhook.
To edit a webhook, click Edit next to the webhook.
Monitor Webhook EventsAs an administrator or developer, you can access a log of events posted to aWebhook. The Events Log displays the Object IDs, Event IDs, and Published datesand times for webhook activities in an Oracle Content Management instance.
To monitor Webhook events:
1. After you sign in to the Oracle Content Management web application as anadministrator or developer, click Integrations in the Administration area of thenavigation menu on the left.
2. In the Integrations menu, click Webhooks admin UI.
3. On the Settings view for a webhook instance, choose the option to open theEvents log page.The Events log page displays a list of all the events published to this webhook.Recent posts are shown at the top.
Chapter 16Outgoing Webhooks
16-2
For each event, the log also shows its response status (Success or Failure). You canexpand a posted event to see details about notifications sent to a webhooks client.
The following table shows the details of the events that are triggered:
Event Details
SCHEDULEDPUBLISHING_PARENTCREATED -create a recurring scheduled publishing job
Key:cec.event.scheduledpublishing.parentcreated.name
Display Name: Scheduled publishing job created
Message Detail: Scheduled publishing recurringjob '{job-name}' '{job-id}' created at '{datetime}'
Chapter 16Outgoing Webhooks
16-3
Event Details
SCHEDULEDPUBLISHING_PARENTUPDATED -properties of the whole recurring job is updated(for example, the series name or description isupdated, job manager is added or removed)
Key:cec.event.scheduledpublishing.parentupdated.name
Display Name: Scheduled publishing job updated
Message Detail: Scheduled publishing recurringjob '{job-name}' '{job-id}' updated at '{datetime}'
SCHEDULEDPUBLISHING_CREATED - create ascheduled publishing job
Key: cec.event.scheduledpublishing.created.name
Display Name: Scheduled publishing job created
Message Detail: Scheduled publishing job '{job-name}' '{job-id}' with assets '{the-first-10-asset-guids}' created at '{datetime}'
SCHEDULEDPUBLISHING_UPDATED - update ascheduled publishing job
Key: cec.event.scheduledpublishing.updated.name
Display Name: Scheduled publishing job updated
Message Detail: Scheduled publishing job '{job-name}' '{job-id}' with assets '{the-first-10-asset-guids}' updated at '{datetime}'
SCHEDULEDPUBLISHING_CANCELLED - cancel ascheduled publishing job
Key:cec.event.scheduledpublishing.cancelled.name
Display Name: Scheduled publishing job cancelled
Message Detail: Scheduled publishing job '{job-name}' '{job-id}' with assets '{the-first-10-asset-guids}' cancelled at '{datetime}'
SCHEDULEDPUBLISHING_STARTED - scheduledpublishing job is started
Key: cec.event.scheduledpublishing.started.name
Display Name: Scheduled publishing job started
Message Detail: Scheduled publishing job '{job-name}' '{job-id}' with assets '{the-first-10-asset-guids}' started at '{datetime}'
SCHEDULEDPUBLISHING_COMPLETED - scheduledpublishing job is completed
Key:cec.event.scheduledpublishing.completed.name
Display Name: Scheduled publishing jobcompleted
Message Detail: Scheduled publishing job '{job-name}' '{job-id}' with assets '{the-first-10-asset-guids}' completed at '{datetime}'
A failed reason will be appended if the job is failed.
Message Detail: Scheduled publishing job '{job-name}' '{job-id}' with assets '{the-first-10-asset-guids}' completed at '{datetime}'. {if-failed-failed-reason}
The Oracle Cloud REST API for Activity Log provides the ability to search activities inOracle Content Management. This API has the following endpoints:
• Audit Log, which provides the details of activities and related data.
• Events, which provides the details of types and categories.
Chapter 16Outgoing Webhooks
16-4
Use Endpoints for Push Notifications of Content Lifecycle, ContentPublishing, Site Publishing, and Prerendering Events
Oracle Content Management automatically delivers notifications to webhook endpoints aboutcontent publishing, content lifecycle, site publishing, and prerendering events.
You subscribe to events for your webhooks to receive notification when the events happen, inthe payloads for the endpoints. For example, if your endpoint subscribes to an event calledDIGITALASSET_CREATED, when a digital asset is created in a repository you specified, thewebhook payload can tell you the name of the webhook, what time the event happened, andwho did the event.
You can use an endpoint to be notified when some action happens. Then Oracle ContentManagement calls that endpoint. You can create webhooks using REST endpoints, similar toother REST APIs. You need to specify a server URL for each webhook endpoint. The GET,POST, PUT, and DELETE endpoints are hosted on the Oracle Content Management server,so the same host name, port, and system is the context for all the webhook endpoints.
You can create all the content items with the REST API headless endpoints. You can alsocreate webhooks using the REST API, and listen to the events.
The webhook endpoints are as follows:
GET /webhooks Lists all webhooks.POST /webhooks Creates a webhook with the given information in the payload.GET /webhooks/{id} Reads a webhook with the given ID.PUT /webhooks/{id} Updates a webhook with the given information in the payload.DELETE /webhooks/{id} Deletes a webhook with the given ID.
Or you can create, configure, enable, or disable webhooks in the Oracle ContentManagement web UI at Administration > Integrations > Webhooks > Settings. See Configure Webhooks.
You can view event payloads, with Brief or Detailed output. Webhook payloads contain thefollowing data:
• Which webhook got invoked
• What event got triggered (maybe CONTENTITEM_UPDATED orCHANNEL_ASSETPUBLISHED)
• When the event was registered, and which user triggered it
• What entity is the subject of the event:
– For content lifecycle webhooks, it can be a content item or digital asset.
– For content publishing events, it will be a list of the identifiers of all published content.
Webhooks have three different formats, as the following table describes.
Chapter 16Outgoing Webhooks
16-5
Format Output
Brief Output includes only basic information in thepayload. The output gives you details like whatthe action is, when it happened, in whatrepository, and who did the action.
Detailed Output includes all content information in thepayload. The output gives you the wholecontent item data, in a URL that you specify.
Empty Available only for content publishingwebhooks. If you specify Empty for the output,the payload contains only an identifierrepresenting the publish session ID.
If the endpoint requires authentication, you can select what type of authentication andthen enter the authentication information.
Receive Push Notifications from a Prerender WebhookA prerender webhook can send you push notifications for prerender events in OracleContent Management.
A site manager can create a new prerender webhook with a REST API endpoint or onthe Administration > Integrations > Webhooks > Settings page in the OracleContent Management web interface.
This outgoing webhook for the prerenderer enables you to set up anotification about aaprerender event, which enhances the prerender server to allow prerendering andcaching of a Detail page after an asset is published to the site's channel.
As an administrator, you can create a Site Detail Page Refresh Webhook to notifyPrerender about the need to render and cache a Detail page.
Receive Push Notifications from a Content Lifecycle WebhookA content lifecycle webhook can send you push notifications about content lifecycleevents in an Oracle Content Management repository for content items andtaxonomies.
You can receive information about the following events from a content lifecyclewebhook:
• Content Item Created
• Content Item Updated
• Content Item Deleted
• Content Item Approved
• Content Item Published
• Content Item Republished
• Content Item Unpublished
• Digital Asset Created
• Digital Asset Updated
Chapter 16Outgoing Webhooks
16-6
• Digital Asset Deleted
• Digital Asset Approved
• Digital Asset Published
• Digital Asset Republished
• Digital Asset Unpublished
• Collection Created
• Collection Deleted
A respository manager can create a content lifecycle webhook with a REST API endpoint oron the Administration > Integrations > Webhooks > Settings page in the Oracle ContentManagement web interface. On the Settings page for a webhook, users can configure thefollowing settings:
• Name: A webhook name
• Description: A webhook description
• Status: An enabled or disabled status for the webhook. The default is disabled
• Repository: A repository to scope events for the webhook
• Events: A list of events for the webhook to send notifications
• Target URL: The URL of the endpoint to which notifications should be posted
• Authentication: A callback receiver security (None, Basic, or Header)
• Payload: The type of payload to send to the endpoint. (Brief or Detailed)
Name, Description, Status, Target URL, and Authentication are standard settings for awebhook. For the repository setting, pick a repository for which you have Managerpermission.
Receive Push Notifications from a Content Publishing WebhookA content publishing webhook can send you push notifications for asset and taxonomypublishing events in Oracle Content Management.
You can receive information about the following events from a content publishing webhook:
• Asset Published to Channel
• Asset Republished to Channel
• Asset Unpublished to Channel
• Taxonomy Published
• Taxonomy Republished
• Taxonomy Unpublished
A channel manager can create a new content publishing webhook with a REST API endpointor on the Administration > Integrations > Webhooks > Settings page in the OracleContent Management web interface. This enables notifications about content published to thefollowing channels:
• Public or secure custom publishing channels
• Publishing channels that Oracle Content Management creates for public or secureenterprise sites
Chapter 16Outgoing Webhooks
16-7
You can receive notifications about the following activities in the scope of a channel:
• Publish: A new content item, digital asset, or taxonomy is published.
• Republish A new version of a content item, digital asset, or taxonomy ispublished.
• Unpublish: A content item, digital asset, or taxonomy is unpublished.
Receive Push Notifications from a Site Publishing WebhookA site publishing webhook can send you push notifications for site publishing events inOracle Content Management.
A site manager can create a new site publishing webhook with a REST API endpointor on the Administration > Integrations > Webhooks > Settings page in the OracleContent Management web interface. This enables notifications about site publish,republish, and unpublish events.
Receive Push Notifications from a Prerender WebhookA prerender webhook can send you push notifications for prerender events in OracleContent Management.
A site manager can create a new prerender webhook with a REST API endpoint or onthe Administration > Integrations > Webhooks > Settings page in the OracleContent Management web interface.
This outgoing webhook for the prerenderer enables you to set up anotification about aaprerender event, which enhances the prerender server to allow prerendering andcaching of a Detail page after an asset is published to the site's channel.
As an administrator, you can create a Site Detail Page Refresh Webhook to notifyPrerender about the need to render and cache a Detail page.
Incoming WebhooksYou can use webhooks to have Oracle Content Management automatically receive anotification based on various events happening in the external services.
The incoming webhooks framework provides a way with which external applications orservices can call and notify Oracle Content Management about various events that arerequired by Oracle Content Management. The webhook framework provides a meansfor validating the incoming request with token-based authentication.
1. After you sign in to the Oracle Content Management web application as anadministrator or developer, click Integrations in the Administration area of thenavigation menu on the left.
2. The Oracle Content Management components that need webhook support willcreate an incoming webhook instance. For example, when you create a Lingotektranslation connector, as Request a Lingotek Trial Connector for ContentTranslation describes, the connector framework in the background creates aninstance of the incoming webhook that gets associated with that connector. In theIntegrations menu, click Webhooks to see the list of webhook instances ofLingotek translation connectors.
Chapter 16Incoming Webhooks
16-8

3. On creating a webhook instance, the framework generates a security token with aconfigurable duration of validity. Every incoming request should have this token. Theframework validates the incoming request by verifying the token and its expiry.The component submits a callback URL and token to the external application. When anyevent in which the component has subscribed to the external application occurs, thecomponent makes a call back to Oracle Content Management over the same URL.
Click the check box next to your incoming webhook instance, and then select Edit fromthe action toolbar. Or, you can click on the clickable name of the incoming webhook to getto the Edit page. On the General page, you can specify the values for Service Valid Forand Security. Name and Description are populated at the time the incoming webhook iscreated, but you can change these values if you want to.The Target URL field is read-only. The server generates the URL when the webhook instance is created.
After clicking the checkbox you'll need to select Edit from the action toolbar. Or, you canclick on the clickable name of the incoming webhook to get to the Edit page.
4. The Event Log page displays a list of all the events. The list displays the login ID, dateand time when the event occurred, status (success or failure), and download icon (todownload the event log).
Configure an Incoming WebhookUse the Oracle Content Management web interface to configure adapter fields and the CALadapter for an incoming Webhook.
To configure a Lingotek Incoming Webhook:
1. After you sign in to the Oracle Content Management web application as an administrator,click Integrations in the Administration area of the navigation menu on the left.
2. In the Integrations menu, click Webhooks.
3. Fill in the following fields for the Lingotek-Incoming Webhook.The Name and Description fields are populated at the time the Incoming Webhook iscreated. You can edit and change these values if you want to.
Chapter 16Incoming Webhooks
16-9
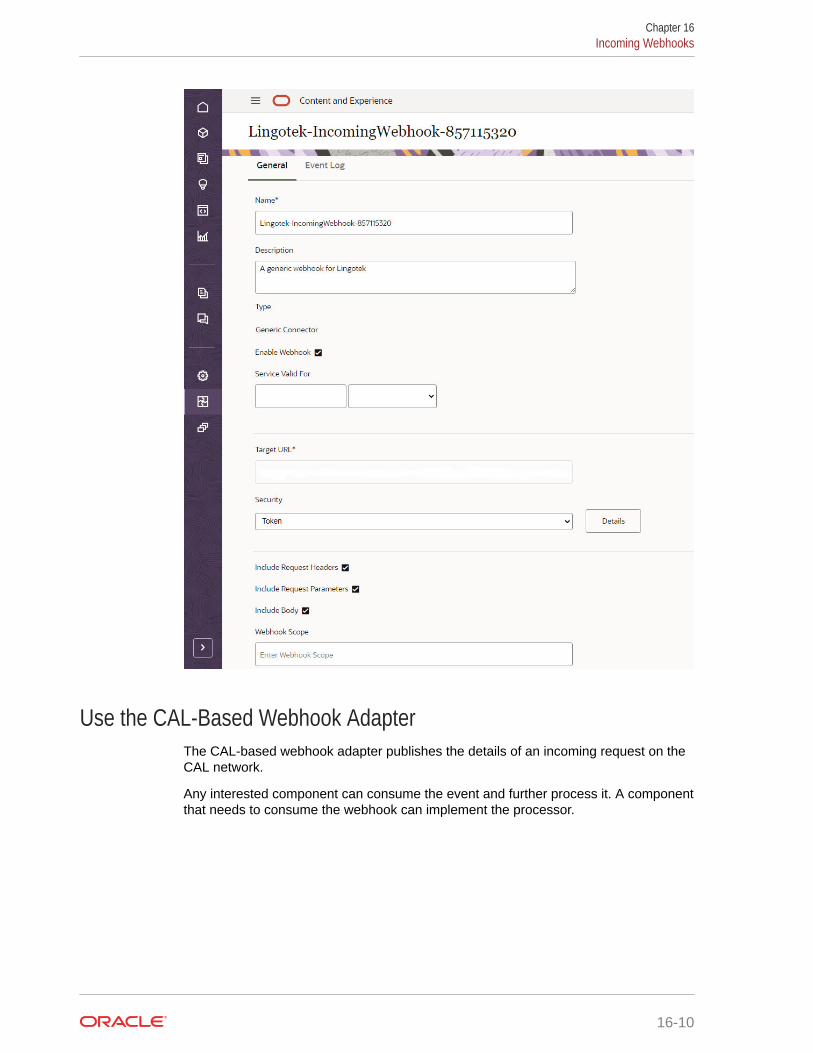
Use the CAL-Based Webhook AdapterThe CAL-based webhook adapter publishes the details of an incoming request on theCAL network.
Any interested component can consume the event and further process it. A componentthat needs to consume the webhook can implement the processor.
Chapter 16Incoming Webhooks
16-10
17Set Proxies
To set proxies, you can configure a proxy server that provides a URL to which web browserscan connect.
• Configure Proxy Service Settings
• Add Logged User Data to a Request Through a Secure Proxy Endpoint
• Debug Proxy Service Endpoints
Configure Proxy Service SettingsOracle Content Management includes a proxy service, so that you can use REST servicesthat have Cross-Origin Resource Sharing (CORS) limitations or require service accountcredentials.
The proxy service is a reverse proxy server. It provides a URL to which web browsersconnect. The proxy service then acts as an intermediary between the web browser and aremote REST service (or endpoint). The proxy service explicitly adds CORS support to allendpoints and can optionally insert service account credentials to requests coming from webbrowsers.
If you are using a REST server (or endpoint) that already supports CORS and doesn't requirethe use of service account credentials, you don't need to register it with the proxy service.You can instead register it directly with the Oracle Cloud REST API for Content Management.
1. After you sign in to the Oracle Content Management web application as an administrator,click Integrations in the Administration area of the navigation menu.
2. Under Proxy Service, select Enable.
3. Using the following steps, define any credentials needed by your endpoints, and definethe endpoints you want to use the proxy service.
Credentials
When an endpoint uses a credential, the proxy service adds basic access authentication (viathe HTTP Authorization header) to requests made by web browsers. If the browser requestalready includes the Authorization header, the browser request Authorization header will beused instead of the one in the credential.
This gives you the flexibility to provide a read-only credential for most requests, but allowindividual requests to provide their own write-capable authentication as needed.
Providing a credential to an endpoint gives all users of the endpoint the same effectivepermissions granted to the user defined in that credential. To ensure you don’t inadvertentlycreate a security risk, take the following precautions:
• Don’t provide a credential for an endpoint unless absolutely necessary. If possible, let thebrowser requests provide their own Authorization header instead.
• If you must provide a credential, try to use one which has read-only access on the targetendpoint.
17-1
• Limit the allowed methods on the endpoint to what is actually required. Unlessabsolutely necessary, always disable the PUT, POST, and DELETE methods onan endpoint.
• When possible, limit the Target URI for the endpoint to a specific area offunctionality. For example, rather than providing the base URI to the full API suchas http://example.api/, you might be able to limit it to a specific area such ashttp://example.api/weather/ (for weather-related requests) or http://example.api/date/ (for date-related requests).
If an endpoint requires credentials, define a credential and select it in the endpointdefinition:
1. Click Create new Credential, and complete the following information.
2. In the Credential Name box, enter a name for the credential that will make clearto other users what the credential is for (for example, DocsAPIUser).
3. In the Username box, enter the user that should be used to authenticate allrequests with the endpoint.
4. In the Password box, enter the password for the user you entered.
5. In the Keywords box, optionally provide space-delimited keywords for thecredential. Keywords are purely informational for your own needs and do not alterthe functionality of the credential. Keywords can include alphanumeric characters,periods, hyphens, and underscores.
The Keywords field is exposed by the proxy service API and can be viewed bynon-administrator users. Never include user names, passwords, API keys, or othersensitive information in the Keywords field.
6. Click Save.
The new credential is available to use with one or more endpoints. It appears in theCredential drop-down list when you create or edit an endpoint.
Endpoints
1. Define the remote API endpoint you want to use the proxy service. Click Createnew Endpoint, and complete the following information:
a. In the Endpoint Name box, enter a name for the endpoint that will make clearto other users what this endpoint is (for example, Content Management API1.1).
b. Under Enable Endpoint, select Enabled.
You can disable individual endpoints as necessary, rather than disabling thewhole proxy service.
c. Under Secure Endpoint, select Secure Endpoint. You can secure anendpoint by allowing only authenticated user to access the endpoint. If youselect this check box, anonymous users are required to authenticatethemselves via a sign-in page.
d. In the Path Name box, enter a path name for the endpoint (for example,docs). This will become part of the URL path to access the endpoint (forexample, /pxysvc/proxy/docs).
The name must be unique, URL-safe, and lowercase, and it must start with aletter. It can include alphanumeric characters, hyphens, and underscores.
Chapter 17Configure Proxy Service Settings
17-2
e. In the Target URI box, enter the URI for the endpoint (for example, http://service.example.com/documents/api/1.1).
f. Under Credential, if necessary, select the credentials to use for this endpoint. Thislist is populated by the credentials you created using the steps above.
g. Under HTTP Methods, select the HTTP methods you want to enable for thisendpoint.
GET and OPTIONS methods are always enabled.
h. In the Keywords box, optionally provide space-delimited keywords for the endpoint.Keywords are purely informational for your own needs and do not alter thefunctionality of the endpoint. Keywords can include alphanumeric characters, periods,hyphens, and underscores.
The Keywords field is exposed by the proxy service API and can be viewed by non-administrator users. Never include user names, passwords, API keys, or othersensitive information in the Keywords field.
i. Under Additional Headers, you can define multiple custom headers to be sent to thetarget endpoint. For example:
CustomHeader1: Value1CustomHeader2: Value2
The following example from a debug interface shows all the headers sent to a target:
idcs_cloudgate_id: internal_APPIDidcs_client_id: internal_APPIDCustomHeader1: Value1CustomHeader2: Value2Authorization: ********
The proxy service will add these headers for each request sent to target URI. Theywill be part of every request header sent to target URI when a proxy URL isrequested.
j. In the Connection Timeout box, enter the maximum number of seconds to waitwhen trying to make a connection with the target URI.
k. In the Socket Timeout box, enter the maximum number of seconds to wait for apooled connection in the proxy service.
l. In the Connection Request Timeout box, enter the maximum number of seconds towait when trying to make a connection with the proxy service.
m. Test your endpoint, by clicking Save and Debug. See Debug Proxy ServiceEndpoints.
n. When you’re satisfied with the result, click Save and Close.
Add Logged User Data to a Request Through a Secure ProxyEndpoint
You can add user data to an external service call with the Oracle Content ManagementProxy.
Chapter 17Add Logged User Data to a Request Through a Secure Proxy Endpoint
17-3
As a system administrator, you can add user profile information including user ID, fullname, and email to an external service call with the Oracle Content ManagementProxy. You can secure an endpoint only for authenticated users and proxyautomatically passes their profile information to the external system. The externalsystem can then assume that the users are authenticated, and it accesses othersystems on their behalf.
An anonymous user is navigated to the sign-in page for authentication if a securedendpoint is configured.
Debug Proxy Service EndpointsYou can quickly test a proxy service endpoint without writing any test code. This canbe a valuable tool to see how requests and responses are handled between your webbrowser, the proxy service, and the target URI of the endpoint.
1. After defining the endpoint, test it by clicking Save and Debug.
Alternatively, in the list of endpoints, click next to the endpoint you want todebug.
At the top of the Debug Endpoint section, you see the URI mapping, whichshows how the endpoint’s local path name is mapped to the target URI of theendpoint. Both the local path and the target URI are links so you can make surethey are pointing to the correct locations.
2. Optionally, enter a user name and password and additional headers to use for thetest request. These credentials will be used in lieu of any credential already set onthe endpoint. This enables you to test or verify the use of credentials withoutmaking them available to all users of the endpoint.
3. Optionally, enter additional headers to use for the test request. Enter one headerper line, using the standard format Name: Value. For example: Content-Type:application/json.
4. Select an HTTP method, then provide a complete path for the request.
If you select POST or PUT, in the Data box, enter the content which should besent in the POST or PUT request body.
5. Click Submit Request.
6. In the Debug Result section, expand the panels to see the detailed results:
• Browser Request to Proxy: Displays the HTTP request headers and bodysent by the web browser to the proxy service.
• Proxy Request to Endpoint: Displays the HTTP request headers and bodysent by the proxy service to the target URI of the endpoint. If the endpointuses a credential, an authorization header is inserted in the request, but theheader value isn’t shown in the debug results.
• Endpoint Response to Proxy: Displays the HTTP response headers andbody sent by the target URI of the endpoint back to the proxy service.
• Proxy Response to the Browser: Displays the HTTP response headers sentby the proxy service back to the web browser. If the target URI of the endpointdoesn’t return CORS headers, the proxy service inserts them in its responseto the browser.
7. If necessary, change the debug request and submit the request again.
Chapter 17Debug Proxy Service Endpoints
17-4
Note:
The old debug results are overwritten with the new results.
8. When you’re satisfied with the result, click Close.
Chapter 17Debug Proxy Service Endpoints
17-5