implementing the read and react for youth teams - ngin
TRANSCRIPT


What is the Read and
React?
• Created by Coach Rick Torbettwww.betterbasketball.com
• System focused on spacing, player movement and ball movement
• Comprised of layers that build on each other to create a complete offense system
• Ball movement dictates (Read) the players actions (React)

Why the Read and React?
Position-less basketball: Every player gets to pass, dribble, and shoot
Emphasizes spacing and movement
Can be tailored to different age and skill levels

Key Principles
PRACTICE THE FUNDAMENTALS!
IF YOUR PLAYERS CAN’T DRIBBLE AND PASS, THE OFFENSE THEY RUN DOESN’T
MAKE ANY DIFFERENCE
ATTACK THE RIM!
THE TEAM THAT SHOOTS THE MOST SHOTS FROM THE CLOSEST DISTANCE
USUALLY WINS
BEST PLAYERS HAVE TO WORK HARDEST!
PLAYERS THAT WORK THE HARDEST TO HELP THEIR TEAMMATES GET OPEN
WILL TOUCH THE BALL MORE

Coaching Thoughts
R&R provides a structure to let PLAYERS PLAY!
It will be messy! Mistakes happen!
Different parts of the system will work better for different teams – Emphasize what works for your team
Don’t introduce new concepts until they have mastered the current one. Building blocks – layers approach

TERMINOLOGY

Above and Below• ABOVE is anything between you and the half
court line
• BELOW is anything between you and the basket
• Above and below have nothing to do with the lines on the court- it’s relative to the player
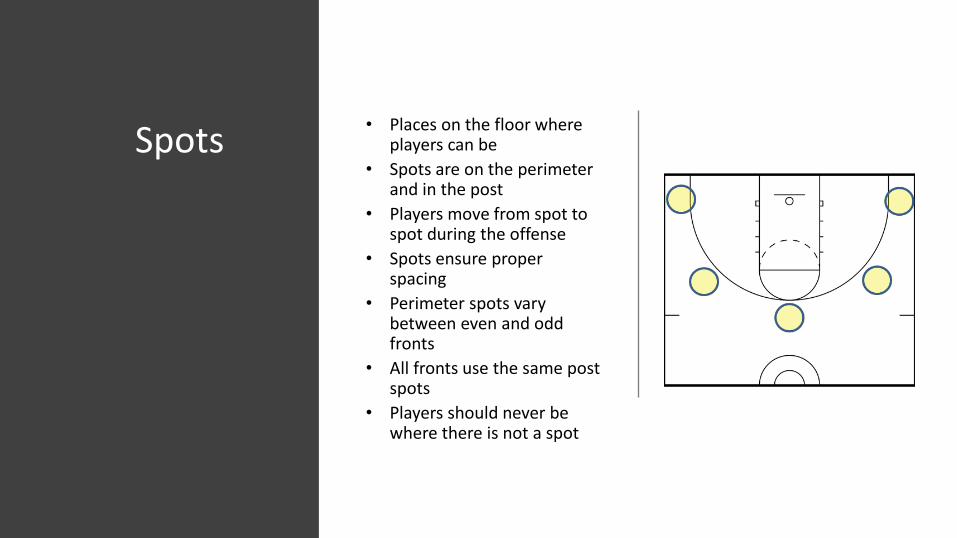
Spots• Places on the floor where
players can be
• Spots are on the perimeter and in the post
• Players move from spot to spot during the offense
• Spots ensure proper spacing
• Perimeter spots vary between even and odd fronts
• All fronts use the same post spots
• Players should never be where there is not a spot
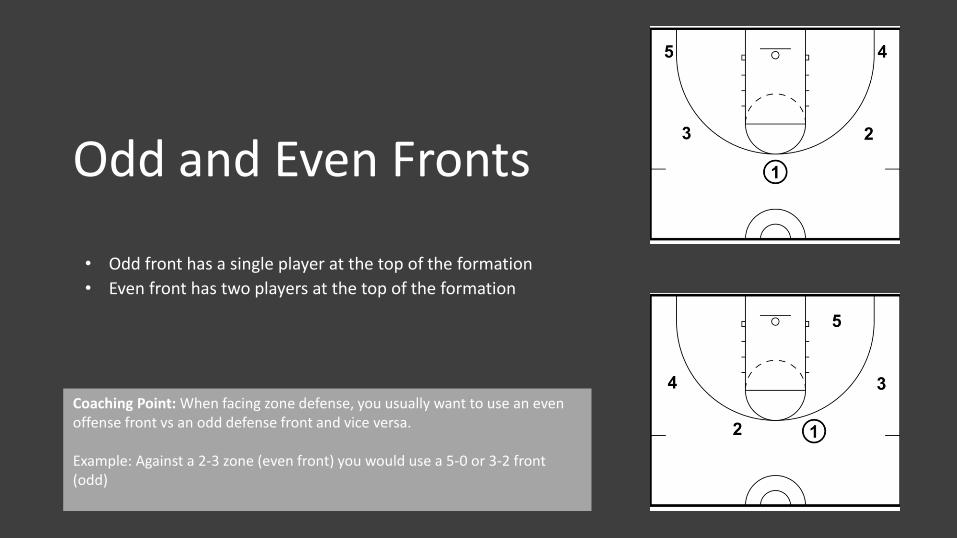
Odd and Even Fronts
• Odd front has a single player at the top of the formation
• Even front has two players at the top of the formation
Coaching Point: When facing zone defense, you usually want to use an even offense front vs an odd defense front and vice versa.
Example: Against a 2-3 zone (even front) you would use a 5-0 or 3-2 front (odd)

Practicing with Floor Spots
• Use portable sports spots/markers to show spots on the floor
• Players run from spot to spot
• Place a spot at the front of the rim and have players step on it when training cutting to the basket
• Players need to run over empty spots when filling multiple spots

Odd Front Spots
• Five perimeter spots
• Wings are a step above foul line
• Corners are even with the basket
• Spots are one-and-a-half big steps outside 3 point line – corners split distance between arc and boundary

Event Front Spots
• Six perimeter spots
• Guards are outside the lane
• Wings are a step below foul line. The wider the guards the deeper the wings
• Corners are even with the basket
• All spots are one-and-a-half big steps outside 3 point line

Post Spots • All formations have the same six post spots
• Short corner is halfway between 3 point line and basket – even with the basket
• Mid post is between the bottom two pips – ABOVE THE BLOCK
• High post is the elbow area

Three Screen Types
• Simplifies traditional terminology to three types:
– Back: Player receiving screen is freed going towards basket/lane
– Pin: Player receiving screen is freed going away from basket/lane
– Ball: Screen for ball handler
Back Screen
Pin Screen
Ball Screen

DECISION BOX
• Perimeter player’s actions are determined automatically by the ball and offensive rules.– Pass, I Cut. Dribble At – I Cut. Open space between myself and ball – Fill It.
• Any player that is in the lane is in the Decision Box (including posts spots)
• Players in Decision Box can make their own choices regardless of what the ball does– Fill Out to an Empty Spot
– Back screen for another player
– Post up
Decision Box

BASE FORMATIONS
50 and 41
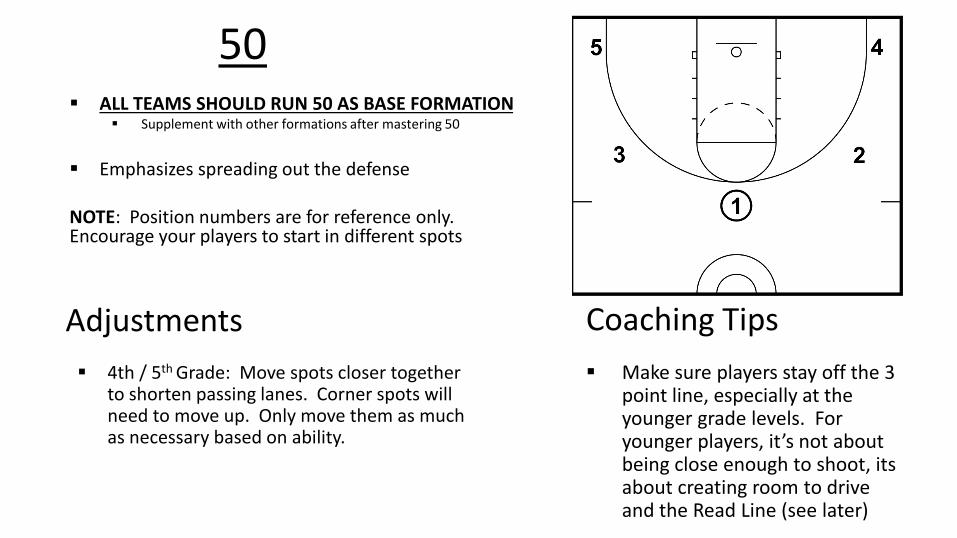
50▪ ALL TEAMS SHOULD RUN 50 AS BASE FORMATION
▪ Supplement with other formations after mastering 50
▪ Emphasizes spreading out the defense
NOTE: Position numbers are for reference only. Encourage your players to start in different spots
▪ Make sure players stay off the 3 point line, especially at the younger grade levels. For younger players, it’s not about being close enough to shoot, its about creating room to drive and the Read Line (see later)
Coaching Tips
▪ 4th / 5th Grade: Move spots closer together to shorten passing lanes. Corner spots will need to move up. Only move them as much as necessary based on ability.
Adjustments

Coaching TipsAdjustments▪ 4th Grade: Stick to one side and one spot – typically right side
mid-post▪ 4th & 5th Grade:
▪ Always post ball side. Best starting spots are mid-post and short corner.▪ Move spots closer together to shorten passing lanes. Corner spots will
need to move up. Don’t let wings creep to far above foul line
▪ 5th+ Grade: Use Ringo or Lucky coaching calls to tell players which side you want the post on (right or left)
▪ 7th+ Grade: Incorporate use of high post and introduce screening for cutters
▪ If your team struggles passing with odd fronts due to spacing, the even front is a good option
▪ Use the T-Bar to get good post position (see description later)
▪ One corner player moves into any of the post spots
▪ Usually same side as vacant corner to maintain balance but can overload to one side if desired
▪ Green spot is a reminder that players can still fill that spot when they move
NOTE: Position numbers are for reference only. Encourage your players to start in different spots
41 – Odd Front

41 – Even Front▪ Ball can come up either side▪ Green spot is a reminder that players can
still fill that spot when they move
NOTE: Position numbers are for reference only. Encourage your players to start in different spots
▪ If your team struggles passing with odd fronts due to distance between spaces, the even front is a good option
▪ Use the T-Bar to get good post position (see description later in this document)
Coaching TipsAdjustments▪ 4th Grade: Stick to one side and one spot – typically right side
mid-post▪ 4th & 5th Grade:
▪ Always post ball side. Best starting spots are mid-post and short corner.▪ Move spots closer together to shorten passing lanes. Corner spots will
need to move up. Don’t let wings creep to far above foul line. Never let guards play inside the lane when adjusting spacing
▪ 5th+ Grade: Use Ringo or Lucky coaching calls to tell players which side you want the post on (right or left)
▪ 7th+ Grade: Incorporate use of high post and introduce screening for cutters

Pass and Cut
Dribble At
Pass Cut and Post
Post Feeds
Post Movement
Circle Movement on Dribble Drives
The Core▪ Teach in This Order▪ Only Move to Next Layer When
Current Layer has been Mastered

THE RULES
• If I pass the ball, I ALWAYS cut to the basket
• If I SEE AN OPEN SPOT above me, I should FILL IT
• If I DON’T KNOW what to do, CUT TO THE BASKET and then fill an open spot
• If I am STANDING STILL when the BALL MOVES, I am probably WRONG

PASS AND CUTThe Foundation for Everything

Pass and Cut (Odd)▪ Any player that passes ball always cuts through lane to
area in front of basket
▪ Players “behind” the pass fill to open spots
▪ Example: 3 fills to spot vacated by 1 cutting to basket. 5 fills to spot vacated by 3
▪ Ball can be passed to cutter if open.
▪ If cutter accidently fills to an occupied spot, the cutter should just cut to the basket again (see Back Screening for alternate action)
NOTE: Position numbers are for reference only. Encourage your players to start in different spots
▪ A lot of games, especially with older players, the cutter is rarely open. Some games the cutter is open all day (younger levels usually). If you don’t practice it consistently, you will NEVER hit the cutter. Play 3-on-3 where teams can only score by hitting cutters, for example
▪ Make sure the fillers follow the arc and don’t run in a straight line from spot to spot. Stay the same distance from the arc all the time.
▪ Run the Pass and Cut drills every practice in the pre-season and at least once a week once the season starts. It must become a habit and players need to react FAST! This must become automatic!
▪ CUT FAST AND HARD!!! Emphasize this over and over.▪ When passing to cutter, ball should arrive BEFORE the cutter
gets past the bottom of the circle / middle of lane
Coaching Tips
▪ See Back Screening section and teach that as the default “fill out” action instead of going to an open spot
▪ Sagging help defenses will clog the lane and take away the cutter. See Pin Screens for how to counter.
▪ See Variations section for Open and Screening alternatives
Adjustments
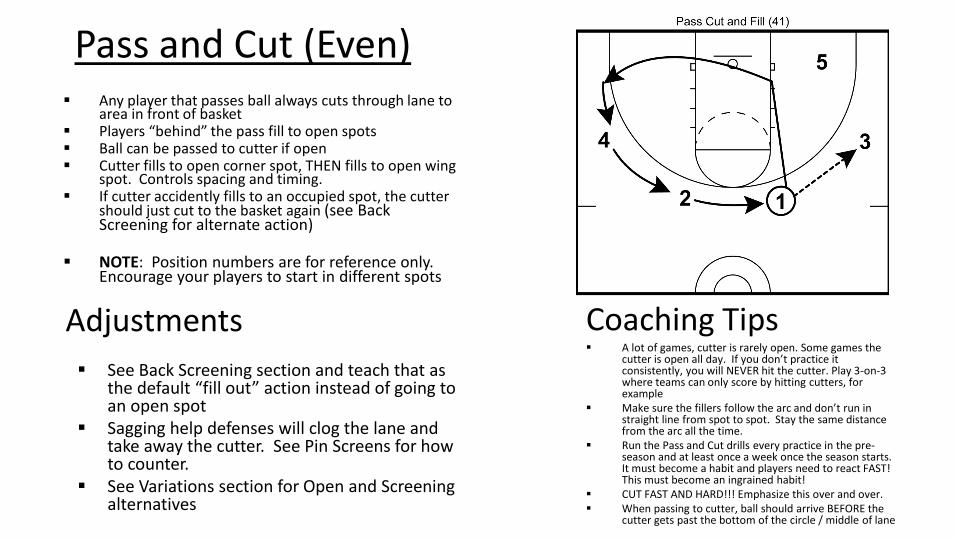
Pass and Cut (Even)▪ Any player that passes ball always cuts through lane to
area in front of basket▪ Players “behind” the pass fill to open spots▪ Ball can be passed to cutter if open▪ Cutter fills to open corner spot, THEN fills to open wing
spot. Controls spacing and timing.▪ If cutter accidently fills to an occupied spot, the cutter
should just cut to the basket again (see Back Screening for alternate action)
▪ NOTE: Position numbers are for reference only. Encourage your players to start in different spots
Coaching Tips
▪ See Back Screening section and teach that as the default “fill out” action instead of going to an open spot
▪ Sagging help defenses will clog the lane and take away the cutter. See Pin Screens for how to counter.
▪ See Variations section for Open and Screening alternatives
Adjustments▪ A lot of games, cutter is rarely open. Some games the
cutter is open all day. If you don’t practice it consistently, you will NEVER hit the cutter. Play 3-on-3 where teams can only score by hitting cutters, for example
▪ Make sure the fillers follow the arc and don’t run in straight line from spot to spot. Stay the same distance from the arc all the time.
▪ Run the Pass and Cut drills every practice in the pre-season and at least once a week once the season starts. It must become a habit and players need to react FAST! This must become an ingrained habit!
▪ CUT FAST AND HARD!!! Emphasize this over and over.▪ When passing to cutter, ball should arrive BEFORE the
cutter gets past the bottom of the circle / middle of lane

Pass and Cut Wing Example
▪ Cutting player fills to open corner

Pass and Cut Corner Example
▪ This is a “weird” action
▪ Odd Front: Cutting player fills back to same corner since it is the open corner
▪ Even front – cutter has option of filling either corner if both are open
▪ One of the rare times players stand still on a pass
▪ Back screening is a great way to avoid the “filling back” action
Coaching Tips▪ See Back Screening section and teach that as
the default “fill out” action
▪ See Variations section for Open and Screening alternatives
Adjustments

Cutting and the Defender
▪ Players should be taught to cut between their defender and the ball
▪ If the defender “jumps to the ball” or “jams” the cutter, go behind the defender
▪ Emphasize cutting in straight lines! Players will start to “banana” their way over the top of aggressive defenders. Bananas slow cuts and takes away scoring opportunities
▪ Don’t think - Go! Find fastest way to the basket.▪ When drilling and scrimmaging, make sure
cutter and passer always make eye contact even when ball is not passed
▪ CUT HARD AND FAST!!! Always emphasize this.
Coaching Tips
▪ NA
Adjustments

The Read Line▪ Anytime a defender crosses the 3 point line, or the “read
line”, it is an automatic read by the offensive player to cut to the basket
▪ Same action would occur if x3 pressed out on 3 AFTER filling the open spot.
▪ If the defender puts even one toe across the Read Line –CUT! This rule / action emphasizes player movement over standing still
▪ The diagram shows x3 trying to deny the pass on the filling action by 3. Player 3 should immediately back cut as soon as x3 crosses the read line – even if its only a toe!
▪ Run the Read Line drill every practice in the pre-season and once a week once the season starts. It must become a habit!
▪ Passers can call for a back cut by faking a pass to an over-defended player. This is an automatic signal to back cut.
Adjustments Coaching Tips

Puppy Dog Cut▪ If defender of a player filling an open spot
next to the ball trails the filler, instead of getting to the gap, curl the cut
▪ Called the puppy dog cut because the defender follows the filling player like a puppy dog instead of filling to gap
▪ In diagram, 1 has passed to 2 and cut to the basket. 3 is filling but defender is slow to defend so 3 curls to the basket
▪ Introduce concept and practice from time to time. Some players naturally get it.
▪ 4th/5th Grade – Optional. May be too much to learn on top of Read Line action
▪ 6th+ Grade - Give players two spots away from ball same opportunity even if not filling. Essentially, flashing to the lane when defender falls asleep. Fill or back screen back out if player does not get the ball
Adjustments Coaching Tips

Back Screening▪ Cutters or Post Players can set back screens instead of filling
open spots▪ After setting back screen, the screener fills out to open spot
created by the player receiving the back screen▪ Cutter can back screen for any player in any spot!
▪ In diagram A, 1 passes and sets back screen for 4 instead of filling open spot created by 5 filling. 1 would fill the corner spot that 4 was in
▪ In diagram B, 1 passes and sets back screen for 5 in short corner instead of immediately filling open spot on weak side. 1 can remain in short corner post spot of fill out to perimeter spot on weak side. Fill to corner then rotate up!
▪ In Diagram C, 5 brings a long back screen to free 2 to the basket for a pass from 1. 5 remains on perimeter
▪ Back screens can take a long time to happen. Emphasize the speed of basket cuts to reduce time.
▪ Back screens for players two or more spots from ball are less effective if defense is in good help position. You can emphasize mixing in back screen one pass away or see Pin Screens for alternatives. This becomes a lot like a pass and screen away action, except you can screen to either side.
▪ All Grades: Teach this immediately as part of pass and cut if you want to use it a lot. Trying to add it later after teaching pass-cut-fill out is harder since players become conditioned quickly to pass-cut-fill out
▪ 4th – 6th Grade: Stop the cuts just below the circle to speed up the time it takes to get out to set a back screen
Adjustments Coaching Tips
A B
C

DRIBBLE AT
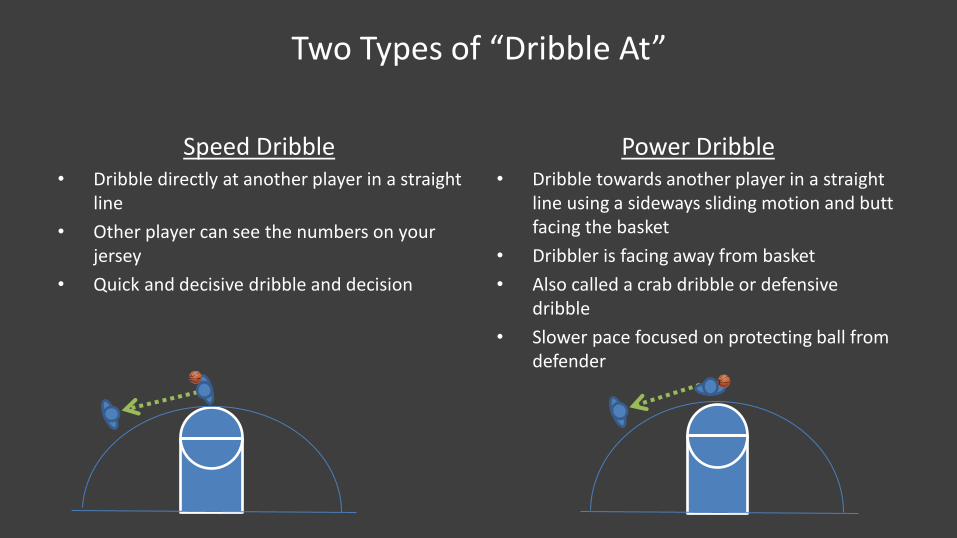
Two Types of “Dribble At”
Speed Dribble• Dribble directly at another player in a straight
line
• Other player can see the numbers on your jersey
• Quick and decisive dribble and decision
Power Dribble• Dribble towards another player in a straight
line using a sideways sliding motion and butt facing the basket
• Dribbler is facing away from basket
• Also called a crab dribble or defensive dribble
• Slower pace focused on protecting ball from defender

Dribble At Speed Dribble
▪ A player is considered to be speed “dribbling at” someone when dribbling directly at another player and that player can see the numbers on the ball handler’s jersey – anything else is not a Speed “Dribble At”
▪ When a player speed dribbles at another player, the player without the ball MUST cut to the basket
▪ Player Dribbled At NEVER sets a ball screen
▪ Player Dribbled At NEVER cuts behind the ball handler
▪ The cutting player must cut IMMEDIATELY – before the second dribble!
▪ NOTE: ALL TEAMS MUST USE THE SPEED DRIBBLE AT
▪ Run the Dribble At drill every practice in the pre-season and once a week (or more) in season.
▪ It must become a habit and players need to react FAST!
▪ Use at all grade levels!
Coaching Tips
▪ NONE!
Adjustments

Dribble At Power Dribble
▪ A player is considered to be power “dribbling at” someone when dribbling directly at the another player but the dribbler is facing away from basket, protecting ball, and using a sliding motion towards the other player
▪ When a player power dribbles at another player, the player without the ball goes behind the dribbler for a dribble hand off
▪ Players should meet roughly halfway between their two starting spots
▪ Dribbler has the option of handing off the ball or not. The off-ball player only gets the ball if the dribbler hands him/her the ball
▪ Player Dribbled At NEVER sets a ball screen
▪ Make sure the off-ball player does not take the ball from the dribbler – can lead to turnovers
▪ Off ball player must come around dribbler quickly and tightly to prevent defender from disrupting the exchange
▪ You can teach the Power Dribble as a bail out action for players under duress that still have their dribble.
▪ Dribbler can use an inside back pivot on hand-off to act as screener to imped defender from going under the exchange
Coaching Tips▪ Optional Dribble At action – implement if
desired.
▪ 4th & 5th Grade: Always hand the ball off
▪ 6th+ Grade: 6th+ Grade: Can be used as a way to run a “pick and roll”-like action. Original ball handler rolls to basket off hand-off
Adjustments

Dribble At vs.
Dribble Drive
• Dribble At is a dribble between perimeter spots
• Does not / should not penetrate 3 point line
• Diagram below shows a couple of examples
• Dribble Drive is a drive that penetrates the 3 point line
• Emphasize dribble drives in straight lines towards basket
• Player 2’s drive is bad because it can confuse 1 on intent – dribble at or dribble drive?

PASS CUT AND POST
Attacking Inside

Posting Action▪ Passer basket cuts, takes a step or two towards open
spot, then fills back to the ball and posts
▪ Player can post to any of the six post spots
▪ No more than two players on post spots at a time
▪ Player can leave post by filling to an open perimeter spot or back screening for another player
▪ Players can move between post spots at any time
▪ Players in post spots do not affect players that cut later – still cut to the basket
▪ See T-Bar for the correct way to post at the youth level (mid and high post)
▪ Stress that all the post spots are available – players can to comfortable with always going to mid-post
▪ Mid-post is the mid-post – we don’t post on the block! Need room to go left or right
▪ Players can post weak side, but ball reversals are hard at the youth level so emphasize posting ball side
• If you have guards that can post and bigs that can feed the ball, it’s a create way to invert the offense
Coaching Tips▪ 4th – 6th Grade: Always post ball side▪ 6th+ Grade:
▪ Players can back screen their way out of post. See Back Screening for more information
▪ Post players can leave post by receiving a Pin Screen – see Pin Screening for more information
▪ 7th+ Grade: ▪ Post any spot▪ Post players can/should screen for cutters – either on the cutters
way into or out of the lane▪ Post weak side and work on perimeter player recognition and ball
reversal
Adjustments
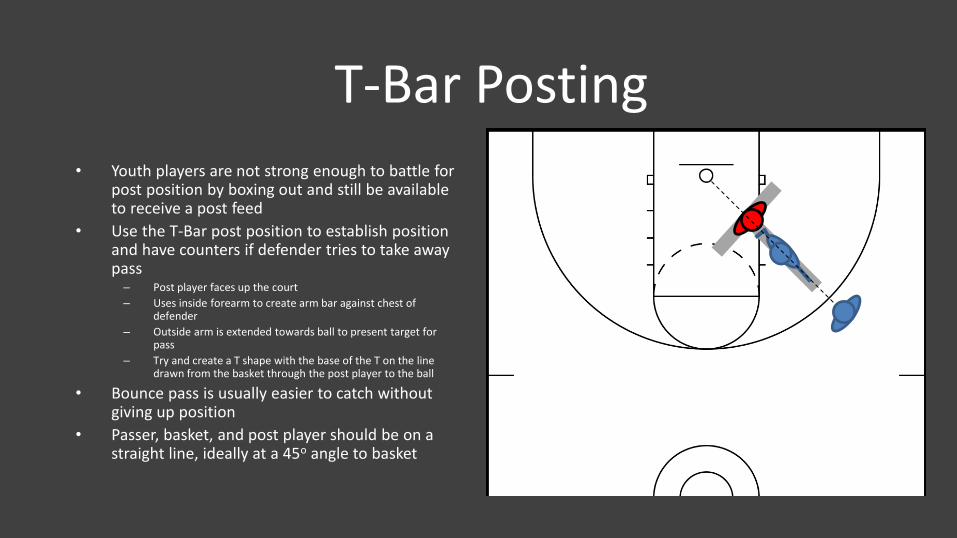
T-Bar Posting
• Youth players are not strong enough to battle for post position by boxing out and still be available to receive a post feed
• Use the T-Bar post position to establish position and have counters if defender tries to take away pass– Post player faces up the court
– Uses inside forearm to create arm bar against chest of defender
– Outside arm is extended towards ball to present target for pass
– Try and create a T shape with the base of the T on the line drawn from the basket through the post player to the ball
• Bounce pass is usually easier to catch without giving up position
• Passer, basket, and post player should be on a straight line, ideally at a 45o angle to basket

T-Bar Counters – Defender Over
• Defender will usually try and come across the face of the post player to take away the pass
• When the post feels the arm bar disappear and sees the defender coming in front of him/her, the post counters:– Inside back pivot 180 degrees to face towards the
baseline
– Seal the defender on the high side
– Ball handler “shoots” an easy lob to the space between the post player and the basket. “Lob it into a trash can” is a good mental image for the passer

T-Bar Counters – Defender Under
• If defender tries to come under post player to take away pass, its an easy bounce pass to the middle of the lane– Post player has to “go get the ball” on this pass
due to the angle
– Post player should catch and shoot immediately –almost like a lay up motion
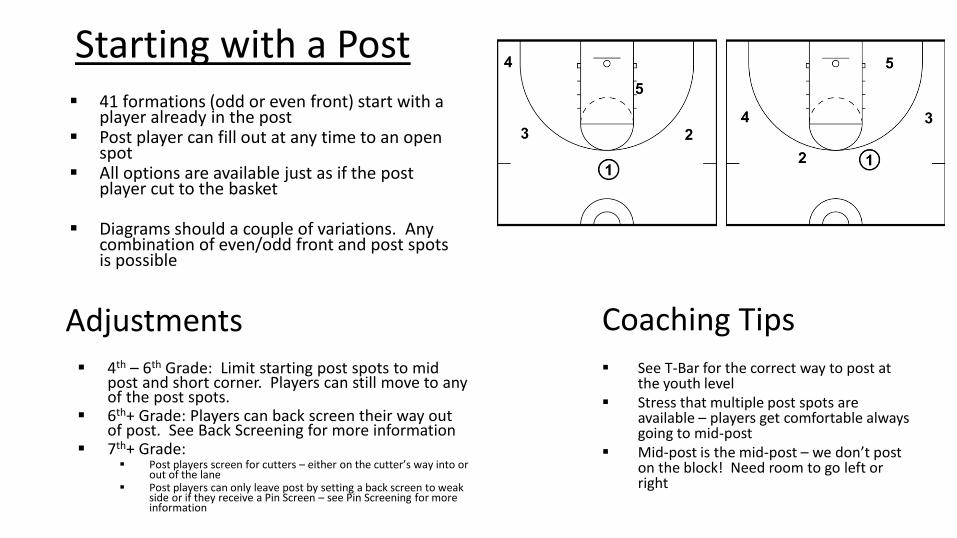
Starting with a Post▪ 41 formations (odd or even front) start with a
player already in the post▪ Post player can fill out at any time to an open
spot ▪ All options are available just as if the post
player cut to the basket
▪ Diagrams should a couple of variations. Any combination of even/odd front and post spots is possible
▪ See T-Bar for the correct way to post at the youth level
▪ Stress that multiple post spots are available – players get comfortable always going to mid-post
▪ Mid-post is the mid-post – we don’t post on the block! Need room to go left or right
Coaching Tips▪ 4th – 6th Grade: Limit starting post spots to mid
post and short corner. Players can still move to any of the post spots.
▪ 6th+ Grade: Players can back screen their way out of post. See Back Screening for more information
▪ 7th+ Grade: ▪ Post players screen for cutters – either on the cutter’s way into or
out of the lane▪ Post players can only leave post by setting a back screen to weak
side or if they receive a Pin Screen – see Pin Screening for more information
Adjustments

POST FEEDSWhen you pass, you cut - ALWAYS

Basic Laker Action▪ Any pass to the post is followed by a “Laker” cut▪ Passer cuts either high or low▪ Low cut goes TO THE SHORT CORNER, and then to
the basket▪ High cut goes TO THE NAIL, and then to the basket▪ Post player can make a move before or after Laker
cut
▪ Passer needs to cut immediately. Young players like to watch and see if the pass was caught. CUT! You can’t help your teammate catch the ball.
▪ Cutter must move quickly and away from his/her defender – path of least resistance
▪ If ball defender starts to sag to take away post entry, drive the basket if you still have a dribble!
Coaching Tips▪ 4th & 5th Grade: The Laker cut can be right
off the shoulder of the post player, high or low, for a hand-off
Adjustments

Advanced Laker Action
▪ For older teams with 3 point shooters▪ Passer has 3rd option in addition to two
types of Laker cuts▪ Passer sets screen for filling player,
then dives to basket▪ Post player can hit dive, kick out for a
3, or make a move to the basket
▪ Patience is needed to hit the dive but the pass needs to come quick in case of help defense
Coaching Tips▪ 4th & 5th Grade: Don’t use
▪ 6th+ Grade: May need to make call from the bench to get this action – “Laker 3”, for example
Adjustments

POST MOVEMENT

POST MOVEMENT ON DRIBBLE PENETRATION▪ THIS IS A FOUNDATIONAL ELEMENT!!!!
▪ If a player drives to the basket – GET OUT OF THE WAY!!!
▪ Move to an open post spot away from the drive
▪ If ball goes under post, go up. If ball goes over post, go down.
▪ If ball goes left of post, go right. If ball does right post, go left.
▪ Diagram A: 2 drives under 5, so 5 slides to high post spot
▪ Diagram B: 2 drives over/left of 5, so 5 moves down/right to short corner post spot
▪ Diagram C: 1 drives left of 5, so 5 moves right to the short corner spot
▪ NOTE: This rule applies to any player on a post spot. So if 1 pass cuts and posts, and ball handler drives, 1 MUST GET OUT OF THE WAY!
▪ Drill post moves on dribble penetration every practice in pre-season and once a week after that.
▪ Make it part of other offensive drill combinations – not stand alone – after first few practices
Coaching Tips
▪ 4th – 5th Grade: Hard for them to get this right, especially left/right decisions. Up/down seems to be easier
Adjustments
A B
C

CHANGING SPOTS▪ Post players can move from weak side spots to
strong side spots▪ Players do not have to change sides just
because the ball does – leaves lane clear for cutter and/or drive
▪ Diagram A: 5 goes from weak mid-post to strong side mid-post using 1 as a brush screen
▪ Diagram B: 1 sets back screen on 5 in weak side short corner so 5 can cut to strong mid-post
▪ You can have a little more flexibility on spots when cutting from weak to strong side. Player looks for open area first. If they don’t get ball, relocate to a spot.
▪ Best place to wait for a ball reversal is weak side short corner. Post is out of way and encourages defender to lose sight of where he/she is if defender plays good help side defense.
Coaching Tips
▪ 4th - 5th Grade: Do not worry about teaching cutters to screen for post player. Teach post player to run off cutter as brush screen
▪ 6th – 8th Grade: Post players should not always go weak to strong. Incorporate staying weak side and waiting for ball reversal
Adjustments
A B

LEAVING THE POST▪ Post players can leave the post by filling open spots or back
screening▪ Post players usually leave when ball goes opposite side▪ Back screens are usually to the weak side
▪ Diagram A: 1 starts offense with dribble at 3. 5 leaves post be filling guard spot vacated by 2 filling up
▪ Diagram B: 1 has passed to 3 and cut to the basket. 2 fills up. Instead of filling to open spot, 5 sets back screen for 2. 2 cuts to the basket and 5 fills spot vacated by 2
▪ Back screening one spot away from ball is usually easiest since defender is usually guarding man or in gap creating better back screen angles/opportunities
▪ If defense does not play good help position, back screening two or more spots away from ball can also be effective
Coaching Tips
▪ 4th & 5th Grade: Fill out only
▪ 7th – 8th Grade: See Pin Screening for another way to get players out of the post
Adjustments
A B

DRIBBLE DRIVE CIRCLE MOVEMENT

CIRCLE MOVEMENT▪ TOUGHEST PART OF THE OFFENSE!▪ Players move with the ball handler on dribble penetration to
provide passing angles▪ All players move in same direction as ball handler – PUSHED or
PULLED▪ There should always be a player for the 45 degree natural pitch▪ There should always be a player directly behind the drive
▪ Players have to move immediately on the drive▪ Ball handler must be DECISIVE when driving the ball – North and
South!!!
▪ Diagram A: Player 1 drives right. All players move to their right. Players “ahead” are pushed. Players “behind” are pulled.
▪ Diagram B: Player 2 drives left. All players move to their left.
▪ If you are working on it, drill it every practice in pre-season and once a week in season
▪ Focus on moving towards spots while still being available for the pass – always see the dribbler’s eyes/chest at all times
▪ Move fast! Get away from the defender –especially if the natural pitch (stress gap defender)
▪ Players can sink inside 3 point line if they can’t shoot that far
▪ Call mistakes out during Small Games and scrimmaging (ex: automatic turnover)
Coaching Tips
▪ 4th Grade: Probably not worth working on. If you can get the drive side player (natural pitch) to move that’s great!
▪ 5th – 6th Grade: Players should sink inside 3 point line while rotating. Catch and drive the kick pass if made. May not want to work on it a lot with 5th grade outside of natural pitch, if that.
Adjustments
A B

CIRCLE MOVEMENT –ADVANCED
▪ If the ball handler changes direction on drive, players reverse direction as well
▪ Diagram A: Player 2 starts to drive left but gets stopped. Other players have started to left.
▪ Diagram B: Player 2 drives crosses over to the right. All players move to their right.
▪ If you are working on it, drill it every practice in pre-season and once a week in season
▪ Focus on moving towards spots while still being available for the pass – always see the dribbler’s eyes/chest at all times
▪ Move fast! Get away from the defender –especially if the natural pitch (stress gap defender)
▪ Players can sink inside 3 point line if they can’t shoot that far
▪ Call mistakes out during Small Games and scrimmaging (ex: automatic turnover)
Coaching Tips
▪ 4th : Do not work on it
▪ 5th - 6th : Work on it but don’t expect most to get it. Some will. Focus on player next to ball and behind ball.
Adjustments
A B
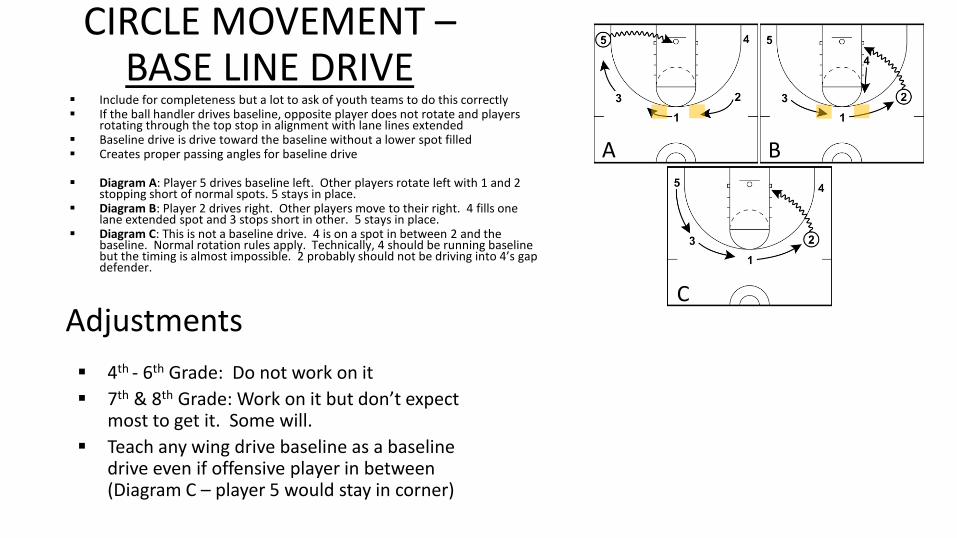
CIRCLE MOVEMENT –BASE LINE DRIVE
▪ Include for completeness but a lot to ask of youth teams to do this correctly▪ If the ball handler drives baseline, opposite player does not rotate and players
rotating through the top stop in alignment with lane lines extended▪ Baseline drive is drive toward the baseline without a lower spot filled▪ Creates proper passing angles for baseline drive
▪ Diagram A: Player 5 drives baseline left. Other players rotate left with 1 and 2 stopping short of normal spots. 5 stays in place.
▪ Diagram B: Player 2 drives right. Other players move to their right. 4 fills one lane extended spot and 3 stops short in other. 5 stays in place.
▪ Diagram C: This is not a baseline drive. 4 is on a spot in between 2 and the baseline. Normal rotation rules apply. Technically, 4 should be running baseline but the timing is almost impossible. 2 probably should not be driving into 4’s gap defender.
▪ 4th - 6th Grade: Do not work on it
▪ 7th & 8th Grade: Work on it but don’t expect most to get it. Some will.
▪ Teach any wing drive baseline as a baseline drive even if offensive player in between (Diagram C – player 5 would stay in corner)
Adjustments
BA
C

WHEN PENETRATION IS STOPPPED
▪ 1 drives right and players rotate as required
▪ 1 is stopped by defender and picks up ball (happens a lot with younger players)
▪ 3 is now in the same position as if she/he had passed into the post
▪ 3 can Laker cut to become available to 1
▪ 7th & 8th Grade: Can incorporate Advanced Laker screen
Adjustments
BA
▪ Practice this action or incorporate into a starting condition of a Small Game
Coaching Tips

OTHER ACTIONSPin Screens, Skip Passes ,Ball Screens, Drag Drives

PIN SCREENS▪ Mostly used when defense is playing aggressive
help defense▪ Ideally, players recognize when there are
opportunities to pin screen▪ Screening player fills to spot vacated by player
receiving screen
▪ Diagram: x4 is in deep help defense. 2 pins x4 with a down screen and 4 rotates to open space for potential drive opportunity (Advanced teams could also have 4 curl the pin by 2). 2 would then fill to corner
▪ Drill it every practice using Small Games▪ When pining the corners, teach screener to roll to
the basket instead of filling to have built in counter to switches – great for younger teams that play “stand next to your man” defense
▪ Can work on counters to account for switching defense. Example: 2 seals on post to get pass from 1 when there is a switch. This action is made even better by playing your bigs at the 2/3 spots so they are posting on smaller guards if there is a switch
Coaching Tips▪ 4th - 5th Grade: Usually needs a call from the
coach or as part of a Starter action (see later)
▪ 6th+ Grade: Early part of season may need coaching calls / Starter actions, but should be able to do independently by middle of season
Adjustments

PIN SCREENS FOR CUTTERS
▪ Use to free up cutters and create post opportunities
▪ Pin screen for cutters as the fill to the outside
▪ Diagram A: 4 sets simple pin screen for 1 after cut to basket
▪ Diagram B: 3 and 5 set a double pin screen for 1 after cut to basket
Coaching Tips
▪ 4th - 5th Grade: Usually needs a call from the coach or as part of a Starter action
▪ 6th+ Grade: Early part of season may need coaching calls / Starter actions, but should be able to do independently by middle of season.
▪ 7th & 8th Grade: Can incorporate skip passing (see later) to make back side pin screens more effective
Adjustments
A B
▪ Drill it every practice using Small Games
▪ Can work on counters to account for switching defense. Example: 2 seals on post to get pass from 1 when there is a switch. This action is made even better by playing your bigs at the 2/3 spots so they are posting on smaller guards if there is a switch

SKIP PASSING▪ Throwing a pass from one outside third of court to the other
outside third of court▪ Skip passer does not need to cut (coach or player option)▪ Hard for younger players to do▪ Younger teams need to execute “baby skips” when a real
skip pass is called for (see later)
▪ Diagram A: 1 comes off a double pin and receives a skip pass directly from 2
▪ Diagram B: 1 comes off a double pin, 2 dribbles towards 1 and throws baby pin as soon as possible
▪ Diagram C: 1 comes off a pin, 2 dribbles at 3. Player 3 cuts to basket when dribbled at. Player 2 throws baby skip as soon as possible
▪ Drill pins and skips together each practice in pre-season and at least once a week after that
Coaching Tips
▪ 4th – 5th Grade: Needs to be part of a Starter action
▪ 4th - 6th Grade: Will probably need to use dribble at action to get the ball back to a weak side pin – to far to skip pass. See Baby Skip Passing.
Adjustments
A

BABY SKIP PASSING▪ Younger players do not have strength/skill to pass ball
from outer 1/3 of court to opposite 1/3.
▪ Use dribble at combined with pass to create a Baby Skip Pass
▪ Diagram A: 1 has passed to 2 and cuts. 3 pins 5’s defender. 2 dribbles towards top and passes to 5 filling open wing
▪ Diagram B: Simple Starter Action with pin screen by 4 for 2. 1 dribbles up and passes to open wing area.
▪ Diagram C: 2 dribbles at 1. 1 receives a double pin from 3 and 5. 2 throws baby skip pass.
▪ Drill pins and skips together each practice in pre-season and at least once a week after that
▪ Very effective action vs. zone defenses. Pin the top defenders to get wings open and defense distorted. See Zone Offense.
Coaching Tips
▪ 4th – 5th Grade: Needs to be part of a Starter action
Adjustments
A B
C

Ball Screens in R&R
Static• Coach defines where ball
screens occur• Example: Always screen when
ball is on the wing• Example: Always screen when
ball is at the top
Dynamic• Ball handler calls for ball
screen at any time• Can tap head if not dribbling• Retreat dribble when dribbling• Use Power Dribble At as
automatic ball screen
Usually player coming out of post spot sets screen

Static Ball Screen ▪ Ball screens start as a rule, a call from bench or as
a Starter action – decide which of these you want to use
▪ Typically Big screening for Small▪ Screener can pick and roll or pop (not shown in
diagrams)
▪ Diagram A: Ball screen any time ball goes to wing. See Royal Starter action.
▪ Diagram B: Ball screen any time ball goes to top after first pass
▪ Recommend a flat ball screen (butt to basket) when screening the top. Gives the ball handler the ability to go either way
▪ Great opportunity for Twist action by “screener”
Coaching Tips
▪ 4th - 5th Grade: Pick one spot and only ball screen from there. Top or left wing are best.
Adjustments
A B

Dynamic Ball Screen ▪ Player calls for ball screen with head tap or
retreat dribble▪ Retreat dribbles are dribbles that take the ball
handler away from basket and defender to create space and set angles
▪ Pick and roll or pick and pop (not shown)
▪ Diagram A: 1 has passed to 3. Player 3 retreat dribbles which signals 5 to come with the side ball screen
▪ Recommend a flat ball screen (butt to basket) when screening the top. Gives the ball handler the ability to go either way
▪ Great opportunity for Twist action by “screener”
Coaching Tips
▪ 4th - 6th Grade: Don’t use retreat dribble. Other players don’t recognize it fast enough, if at all.
Adjustments
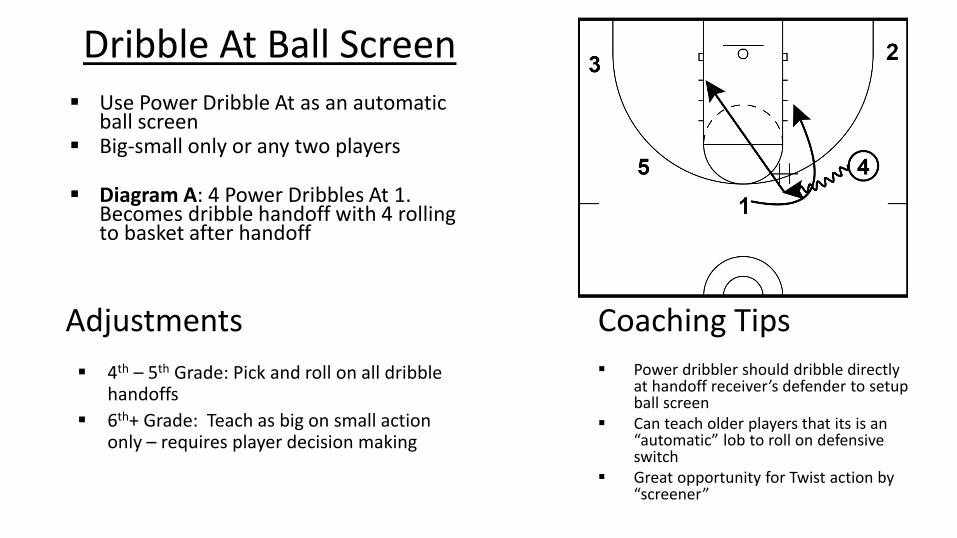
Dribble At Ball Screen ▪ Use Power Dribble At as an automatic
ball screen▪ Big-small only or any two players
▪ Diagram A: 4 Power Dribbles At 1. Becomes dribble handoff with 4 rolling to basket after handoff
▪ Power dribbler should dribble directly at handoff receiver’s defender to setup ball screen
▪ Can teach older players that its is an “automatic” lob to roll on defensive switch
▪ Great opportunity for Twist action by “screener”
Coaching Tips
▪ 4th – 5th Grade: Pick and roll on all dribble handoffs
▪ 6th+ Grade: Teach as big on small action only – requires player decision making
Adjustments

Sneaky Ball Screen ▪ Technically not a Read and React
action
▪ Diagram A: 1 passes to 5 and cuts through lane as normal. 3 loops behind 5 for handoff. 3 attacks off dribble while 5 rolls to basket
▪ Recommend a flat ball screen (butt to basket) when screening the top. Gives the ball handler the ability to go either way
▪ Great opportunity for Twist action by “screener”
Coaching Tips
▪ 4th – 5th Grade: Probably needs to be a set play call
▪ 6th+ Grade: Can only
Adjustments
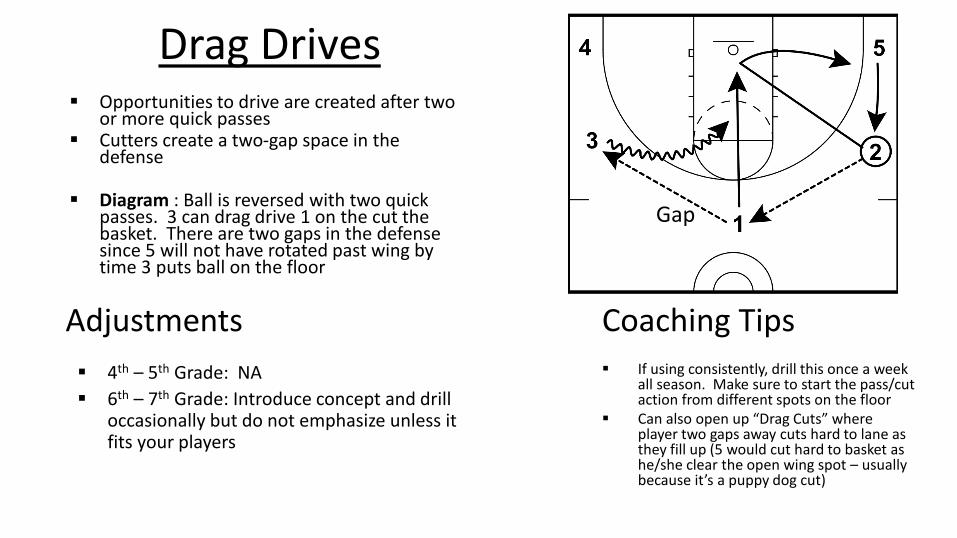
Drag Drives▪ Opportunities to drive are created after two
or more quick passes▪ Cutters create a two-gap space in the
defense
▪ Diagram : Ball is reversed with two quick passes. 3 can drag drive 1 on the cut the basket. There are two gaps in the defense since 5 will not have rotated past wing by time 3 puts ball on the floor
▪ If using consistently, drill this once a week all season. Make sure to start the pass/cut action from different spots on the floor
▪ Can also open up “Drag Cuts” where player two gaps away cuts hard to lane as they fill up (5 would cut hard to basket as he/she clear the open wing spot – usually because it’s a puppy dog cut)
Coaching Tips
▪ 4th – 5th Grade: NA
▪ 6th – 7th Grade: Introduce concept and drill occasionally but do not emphasize unless it fits your players
Adjustments
Gap

Other Thoughts

General
• R&R is position-less, but you will need a player to play point to bring up the ball when under pressure– If no pressure, you can have different players play point
– You will need to develop every player’s ability to dribble –which is a good thing!
• Not every action works for every team. For example, some teams get a lot of use out of Pass Cut and Post, some don’t.

4th-5th Grade
• Focus on Pass & Cut and Dribble At initially
• Choose Starter Actions that add some mix of Pass, Cut and Post, Laker action and/or Ball Screen
• Scrimmage 3v3 as much as possible. Spend less time 5v0 or 5v5 to train back side players on filling open spots, work on read line, and defensive positioning
• Add one defender to drills as soon as possible to teach decision making

6th – 8th Grade• Pass, Cut and Post is a great way to invert your offense when you have a
small team– Opposing bigs forced to guard perimeter and you can attack smaller players
not used to guarding the post
• Even though 3 pointers become viable, ALWAYS emphasize getting to the rim – The team that shoots the most shots from layup range usually wins
• Play 3v3 and 4v4 games that emphasize players pinning and back screening as part of the natural flow of the offense– It will be UGLY at first– By end of season, lots of good things will happen– Example: 4v4 – offense must start with dribble at and backside pin screen of
cutter with a ball reversal to the open player before the offense can score.

ZONE OFFENSEUse What You Already Know
Zone Concepts• Based on R&R Core
Principles• Some tweaks for various
age levels from standard R&R
• Looking to attack the rim for easy shots by creating 3 v 2 situations
• Odd vs Even Concept– If defense is an odd front
(1-3-1 / 1-2-2) use an even offensive front (40)
– If defense is an even front (2-3 / 2-1-2), use an odd front (50 or 32)
• All non-trapping zones essentially turn into 23 zone after first pass

50 for Zone R&R Hook and Look
• Technically a 32 alignment
– Wings should be step below foul line
• Movement is called R&R Hook and Look
– Corner spots still available
• Passer cuts to lane then hooks into open space
– Open space is somewhere around elbow
– Tell players to get open, not focus on a spot
• If there is a player in high post at the time of a pass, she/he will relocate to another post spot ON THE PASS
▪ Make sure the wings do not start to play to high – need to pressure the seam on pass to wing
▪ When ball is at the top vs. even front, dribble into the top gap to force top defenders to open up wing pass
• Player receiving pass should look to pass with this progression: – Short corner (if present) to hooking player
back to short corner (if present)
– None of those options are open, drive gap or pass ball
– Immediate drive is always an option
Coaching Tips
▪ 4th – 5th Grade: NA – its to hard for them to learn. See 32 Switch later in this section.
▪ 6th – 7th Grade: Introduce concept and drill occasionally but do not emphasize unless it fits your players
Adjustments

Hook and Look –Wing to Top Pass
• Diagram starts after 1 has passed to 2 and hooked and looked
• Nail player should cut to ball side short corner if possible – 1 could have gone to either side because ball went to
the top– This example shows creating an overload on opposite
side
• Diagram A: 2 passes back to top. 1 fills either deep short corner because ball is at top. 2 hooks and looks.
• Diagram B: Ball goes to wing. 1 fills out to corner. 2 fills ball side short corner. 3 hooks and looks.
• Note: If, in Diagram A, 1 had filled to right short corner instead of left, he/she would be filling to the right wing in Diagram B when the ball is passed from 3 to 5
A B
▪ If players fill to a spot already filled, just continue to fill to the next open spot. Usually happens when filling to an occupied short corner
Coaching Tips
Passing to the Short Corner
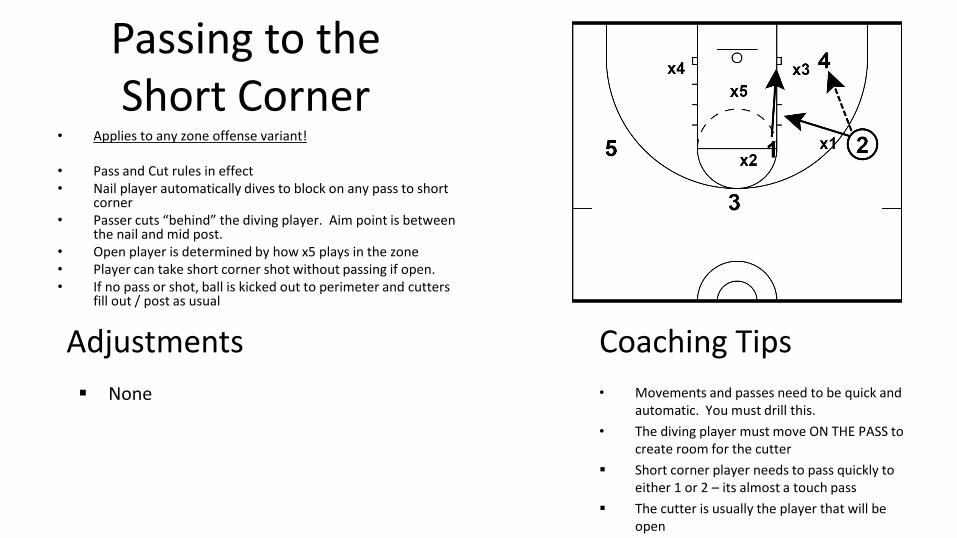
• Applies to any zone offense variant!
• Pass and Cut rules in effect• Nail player automatically dives to block on any pass to short
corner• Passer cuts “behind” the diving player. Aim point is between
the nail and mid post.• Open player is determined by how x5 plays in the zone• Player can take short corner shot without passing if open.• If no pass or shot, ball is kicked out to perimeter and cutters
fill out / post as usual
• Movements and passes need to be quick and automatic. You must drill this.
• The diving player must move ON THE PASS to create room for the cutter
▪ Short corner player needs to pass quickly to either 1 or 2 – its almost a touch pass
▪ The cutter is usually the player that will be open
Coaching Tips
▪ None
Adjustments

Passing to the Nail• Applies to any zone offense variant!• Pass and Cut rules in effect• Similar action to Short Corner pass• 2 cuts towards block• 4 comes from under and behind X3 to rim as 3 reaches lane
– Go to open spot
• Player can take shot from nail without passing if open.• If no pass or shot, ball is kicked out to perimeter and cutters
fill out / post as usual
• Movements and passes need to be quick and automatic. You must drill this.
• The short corner player must move ON THE PASS to create room for the cutter
▪ Nail corner player needs to pass quickly to either 4 or 2 – its almost a touch pass
▪ The short corner player is usually the one that is open
▪ 1 can often drag drive behind 2 for layup
Coaching Tips
▪ None
Adjustments

Zone R&R – Wing to Corner Pass
• Diagrams start after 1 has passed to 2 and hooked and looked
• Short corner player can fill out to corner when ball goes to wing
• Diagram: 4 filled out to corner when 2 received initial pass to setup for an overload. 2 passes to 4 and cuts to basket. 1 fills short corner after 2 cuts. 2 curls back to elbow.
▪ If the action from 4 to corner, pass from 2 to 4, and cut by 2 happens quickly, 2 is often open for layup
▪ Movements and passes need to be quick and automatic. You must drill this.
Coaching Tips
▪ 4th – 6th Grade: Do not have short corner fill to corner. Its not a good shot at that age and adds more complexity than needed
Adjustments
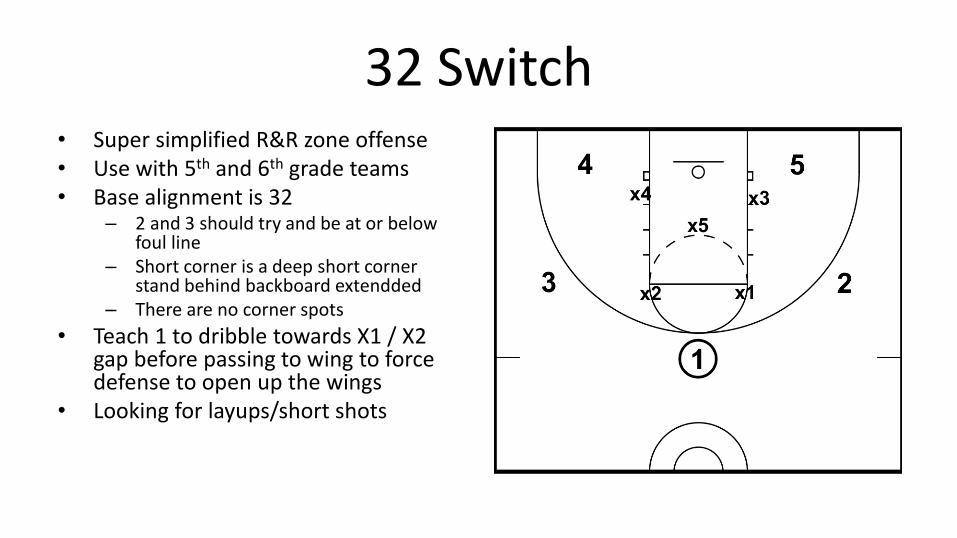
32 Switch• Super simplified R&R zone offense • Use with 5th and 6th grade teams• Base alignment is 32
– 2 and 3 should try and be at or below foul line
– Short corner is a deep short corner stand behind backboard extendded
– There are no corner spots
• Teach 1 to dribble towards X1 / X2 gap before passing to wing to force defense to open up the wings
• Looking for layups/short shots

32 Switch – Basic Action• Opposite short corner fills to open
hole– Not the high post– Not the nail– Wherever he/she can find an open spot
anywhere between mid-post and elbow
• If ball had gone to 3, 5 would fill
▪ It can get crowded with the cutters and post players. 4 should usually wait for 1 to get below the circle before filling to high post
Coaching Tips
▪ 4th – 5th Grade: No cutting by top three players on perimeter pass (still cut on inside passes – see later) if a bad passing team
Adjustments

32 Switch – Swinging Ball• Player at top of the key does not hold ball – pass quickly from
side to side
• Feeding 4 from 1 is a tough spot for young players as defense collapses quickly
• 4 to short corner on the pass from 1 to 3, 5 fills “slowly” to open spot– Wait a beat or two for cutters to clear and defense to shift
to wing ball position then fill to open hole
• Note: Diagram does not show cutting by the two passers
▪ Teach wings on catch to check the short corner cut, look cross fill, back to see if short corner is open, then reverse ball or penetrate
Coaching Tips
▪ 4th – 5th Grade: No cutting by top three players on perimeter pass (still cut on inside passes – see later) if weak passing team
▪ All Grades: Reversals cause a lot of cutting! Limit cutting by only cutting when ball is passed from top to wing. Wing to top passer does not cut.
Adjustments

41 Slide• Simplified Hook and Look action• Wings should be below foul line• The normal corner spots are available• On pass, perimeter player cuts and hooks in open
spot around foul line– Leaves on next pass
• 5 slides back and forth to ball side deep short corner
• Other perimeter players fill open spots per R&R
▪ Movements and passes need to be quick and automatic. You must drill this.
Coaching Tips
▪ 4th: Use 32 Switch
▪ 5th – 6th Grade: Add to 32 Switch if they cannot do Hook and Look
Adjustments

41 Slide – Wing Pass• Hooking player fills to backside
short corner then out to perimeter
• Ball should still move quickly from side to side
• 5 starts to change sides as ball gets to 4
• 1 could fill to any open perimeter spot directly – fill to corner and out is just an example
• Repeat pass-cut-hook-look as basic movement

Zone Baby Pin• 6th+ Grade• Wing pins top defender to free up pass to gap area• Screener rolls to deep short corner on the catch• Weak side short corner fills vacated nail• Passer does not need to cut because it’s a skip pass
(optional)• Diagrams A: 3 pins top defender and 4 fills to open spot
for pass. 3 dives to ball side short corner and 5 fills.• Diagram B: Same action as Diagram A but out of an even
front• Diagram C: Uses Hook and Look. 5 sets back screen on top
defender and 3 sinks halfway between corner and wing spots. Note how 5 dives to block before filling short corner. X2 and x4 stressed to cover 3 correctly.
• Diagram D: (7th+ Grade) Shows using pin as part of ball reversal. 5 pins for 2. 3 dribbles up to shorten skip pass. 5 rolls on catch. 3 fills to open spot. 1 clears to back side and 4 fills up and around.
A B
C D

Zone Dribble At• Diagram A: Example when playing
simplified Zone using 32 Switch (applies to 41 Slide also). 1 dribbles at 2. 2 cuts through lane and fills back side wing. 3 rotates to top.
• Diagram B: Example when using Hook and Look. 1 dribbles at 2. 2 cuts to lane then hooks into elbow area. 3 fills to top. If player was already in high post area, that player would treat dribble at as a pass and clear to make room for 2.
A B

Driving the Gap• Applies to any zone
offense variant!• 2 has attacked gap after
slow or high close out by x1.
• Nail player (1) dives to opposite block.
• Ball side short corner stays in place
▪ This action is especially good against defenses that like the middle defender to take away the nail so the back side guard can guard/deny the top. Notice how it is important that the top player 3 maintains proper spacing so x2 could not guard both top and nail effectively
Coaching Tips

STARTERSStructure out of chaos

Starters
• An initial pattern to get a certain action at the start of a play
• More or may not result in a shot (i.e., quick hitter)
• Flow into standard Read and React when action is completed
• Gives some structure like a set play, but offense never stops if play doesn’t work
• Can call these from sideline with formation and play – 40 Lucky Laker, 50 Purple, etc.

Pin▪ Wings pin for corners
▪ 4th – 5th Grade: A great starter to have against defenses that press out on wings and corners
▪ 5th+ Grade: Players receiving pin screens can be taught to either fill to wing spot (defender in deep help position) or curl the screen to the middle (defender pressing out to corner)
▪ 6th+ Grade: Teach pin screens to pin and post against switches
▪ 6th+ Grade: Counter with guards through (no pins) and pin screens from corner players after they rotate up. Example: 2 and 3 cut as if setting pin screens but then fill to opposite wings. 4 and 5 do not wait for screens, instead they rotate up immediately and then pin screen for 2/3 as they fill out
Adjustments
▪ Can use 1 to set back screens for weak side pin screener or receive another pin screen from strong side wing when filling strong side corner
▪ Can also use a dribble at 2 to open up weak side more and create double gap
Coaching Tips
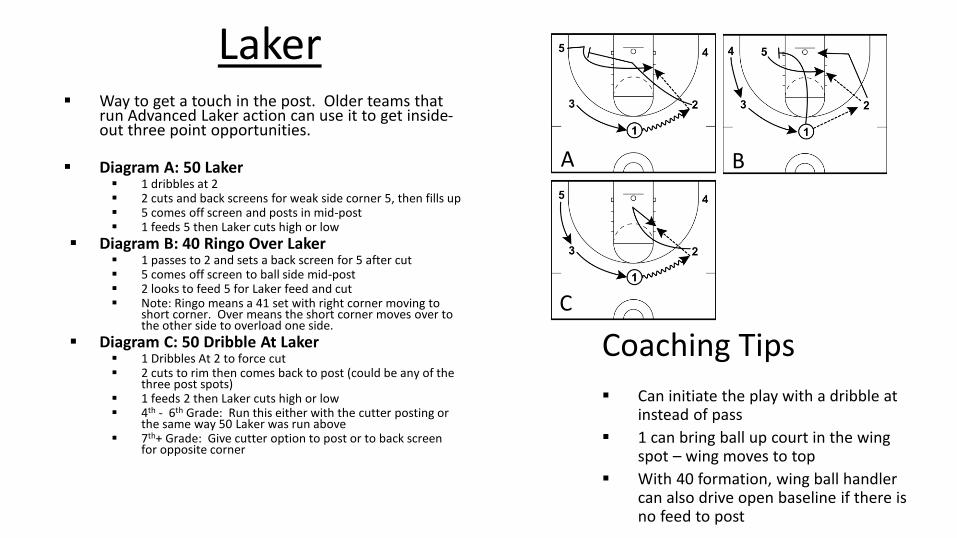
Laker▪ Way to get a touch in the post. Older teams that
run Advanced Laker action can use it to get inside-out three point opportunities.
▪ Diagram A: 50 Laker▪ 1 dribbles at 2▪ 2 cuts and back screens for weak side corner 5, then fills up▪ 5 comes off screen and posts in mid-post▪ 1 feeds 5 then Laker cuts high or low
▪ Diagram B: 40 Ringo Over Laker▪ 1 passes to 2 and sets a back screen for 5 after cut▪ 5 comes off screen to ball side mid-post▪ 2 looks to feed 5 for Laker feed and cut▪ Note: Ringo means a 41 set with right corner moving to
short corner. Over means the short corner moves over to the other side to overload one side.
▪ Diagram C: 50 Dribble At Laker▪ 1 Dribbles At 2 to force cut▪ 2 cuts to rim then comes back to post (could be any of the
three post spots)▪ 1 feeds 2 then Laker cuts high or low▪ 4th - 6th Grade: Run this either with the cutter posting or
the same way 50 Laker was run above▪ 7th+ Grade: Give cutter option to post or to back screen
for opposite corner
A B
▪ Can initiate the play with a dribble at instead of pass
▪ 1 can bring ball up court in the wing spot – wing moves to top
▪ With 40 formation, wing ball handler can also drive open baseline if there is no feed to post
Coaching Tips
C

Purple▪ Diagram A: 50 Purple
▪ 1 passes to 2 then cuts and fills out towards weak side wing
▪ 3 and 5 fill up▪ 5 sets pin screen for 1 as 1 fills out▪ 2 dribbles at 3 forcing cut. ▪ 2 passes to 1 for 3 point shot
▪ Diagram B: 40 Lucky Purple▪ 1 passes to 2 and cuts to basket▪ 3 fills up ▪ 4 sets pin screen as 1 fills out▪ Ball reverses from 2 to 3 to 1 for 3 point shot
▪ 4th – 5th Grade: Don’t use since it very rare they can shoot a 3 point shot with good form. Doesn’t matter if they can make it –focus on shooting with good form!
Adjustments
▪ With 50 formation, 3 and 5 can set double pin with 2 dribbling ball back to top before passing to 1
▪ With 40 formation, 3 can set a staggered pin screen with 4 as 1 fills out. 2 dribbles ball back to top before passing to 1
▪ 1 also can drive open baseline if no 3 point shot
Coaching Tips
A B
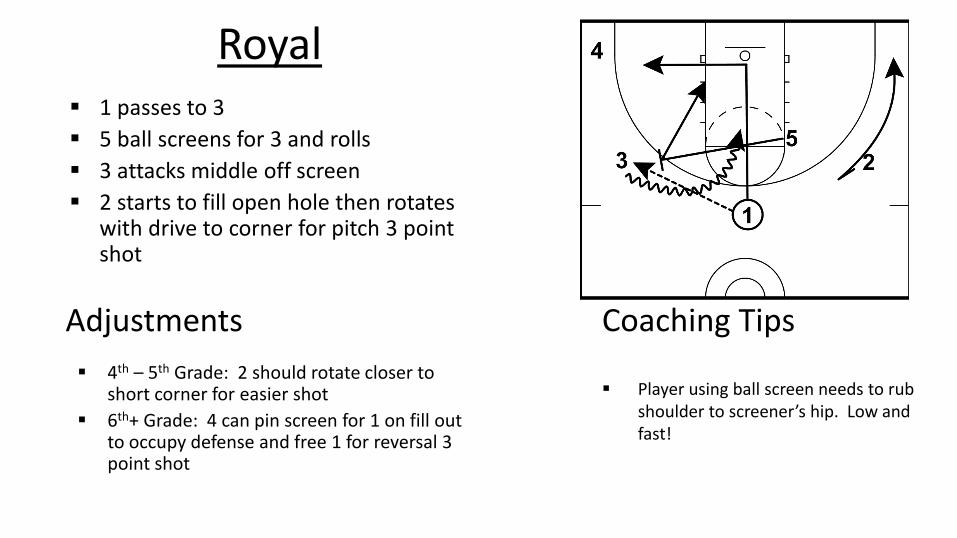
Royal▪ 1 passes to 3
▪ 5 ball screens for 3 and rolls
▪ 3 attacks middle off screen
▪ 2 starts to fill open hole then rotates with drive to corner for pitch 3 point shot
▪ 4th – 5th Grade: 2 should rotate closer to short corner for easier shot
▪ 6th+ Grade: 4 can pin screen for 1 on fill out to occupy defense and free 1 for reversal 3 point shot
Adjustments
▪ Player using ball screen needs to rub shoulder to screener’s hip. Low and fast!
Coaching Tips

VARIATIONSOpen, Pass Cut Back Screen, Horns Flex, Swing

A Word About Variations• This section is for three purposes:
– Provided alternate actions to maximize your teams capabilities
– Expose teams that have been in the R&R for two+ years to other concepts
– Show coaches that have favorite systems how they can adapt R&R to provide the foundation for those systems
• There are many ways of adapting other offensive plays/systems to the R&R – feel free to create your own variations
• Variations are for use by teams that have already mastered R&R
• Do not use variations with any team that has been running R&R for two years or less (exception: Open Post)

Open Post▪ Instead of filling top spot on an arc, fill
to the nail
▪ If defender is below foul line, fill up
▪ If defender above foul line, basket cut
▪ Applies to the top spot only
▪ Only used with 50 formation
▪ NA
Adjustments
A B
▪ Can either make this have players stay in Open Post movement throughout a possession or each player decides on how to fill as they like
▪ This takes away some Read Line opportunities against aggressive defenses but may open up more puppy dog opportunities against lazy defenses
Coaching Tips

Pass Cut Back Screen▪ Cutter get below foul line, then back screens
for closest player behind the pass▪ Different than pass and screen away since
cutter goes to lane first▪ Weak side fillers don’t fill immediately
▪ NOTE: DO NOT MAKE THIS YOUR PRIMARY ACTION! Teach players traditional R&R Pass Cut Fill and ingrain as a habit first. This is a variation - use 20% or less of possessions
▪ Fillers can fill immediately, but move slower so back screen hits closer to middle of gap
Adjustments
A B

Horns Flex▪ Run the Flex offense using Horns formation and
R&R principles
▪ A: Post players fill to open spots. Dribble across just one of many ways to initiate offense
▪ B: Weak side post back screens for 1 on basket cut
▪ C: 1 back screens for 3 for “flex” cut to strong side
▪ D: 4 pin screens for 1 then fills out▪ E: 5 passes to 1. 3 back screens for flex cut by
2. Note that 2 anticipates the pass to 1 and comes to the screen more than 3 goes to set it. This also helps avoid 2 and 5 filling passing area at same time.
▪ F: 5 cuts then sets pin screen for 3. The further out 3 goes to screen, the harder to get a good pin screen from 5 without 3 setting it up.
Read and React starts after running the flex series
A B
C D
E F
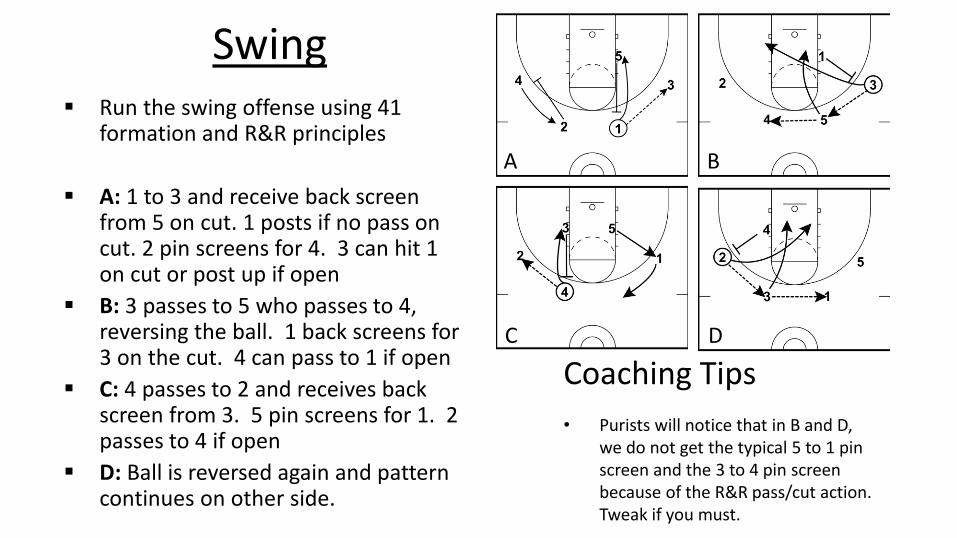
Swing▪ Run the swing offense using 41
formation and R&R principles
▪ A: 1 to 3 and receive back screen from 5 on cut. 1 posts if no pass on cut. 2 pin screens for 4. 3 can hit 1 on cut or post up if open
▪ B: 3 passes to 5 who passes to 4, reversing the ball. 1 back screens for 3 on the cut. 4 can pass to 1 if open
▪ C: 4 passes to 2 and receives back screen from 3. 5 pin screens for 1. 2 passes to 4 if open
▪ D: Ball is reversed again and pattern continues on other side.
A B
C D
• Purists will notice that in B and D, we do not get the typical 5 to 1 pin screen and the 3 to 4 pin screen because of the R&R pass/cut action. Tweak if you must.
Coaching Tips

DRILLSBuilding Habits and Skills

Thoughts on Running
Drills
• Mix in various skills along with the basic patterns. Examples:– All drives must start with a pivot, pass fake, and step
through or cross over
– Different layup finishes – two foot pump fake finish, stop and back foot front pivot shot, stop and back foot front pivot fake and step through (i.e., Villanova series)
• Run the same drill using different starting spots on the floor
• Add one or two defenders – see Training Decision Making
• Use a coach and an extra ball to get shots up for multiple players. – In basic Pass and Cut for older players, coach passes to
player filling the open spot for a catch and shoot three point shot
• More variations than what are shown here. Create your own, find more on YouTube, etc.

Basic Pass and Cut
• Add coach or player to force 1 to react to different defensive position (front cut vs. back cut)
• Cutter gets to work on layups – better than a traditional layup line
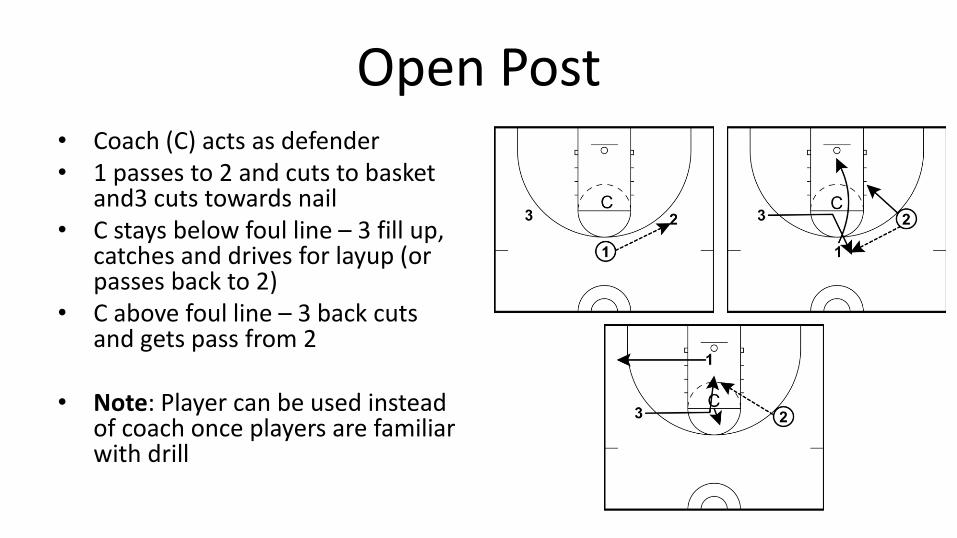
Open Post• Coach (C) acts as defender• 1 passes to 2 and cuts to basket
and3 cuts towards nail• C stays below foul line – 3 fill up,
catches and drives for layup (or passes back to 2)
• C above foul line – 3 back cuts and gets pass from 2
• Note: Player can be used instead of coach once players are familiar with drill

Dribble At Pass and Cut
• Same as Basic Pass and Cut but started with a Dribble At instead of pass A B

Power Dribble At Roll and Pitch• Diagram A: 1 starts power dribble at
2. 3 starts to fill open space.• Diagram B: As 1 nears 2, 2 goes over
top for dribble hand off and attacks lane. 1 “rolls” to basket. 3 reverses and moves with the drive. 2 can finish or pass to 1 or 3.
• Variation 1: Run a simple version where 2 just dribbles at 3 who cuts. 1 and 3 would cut to lane and fill out.
• Variation 2: Same as Variation 1, but 2 bounces passes to 3 on the dribble at cut
A B
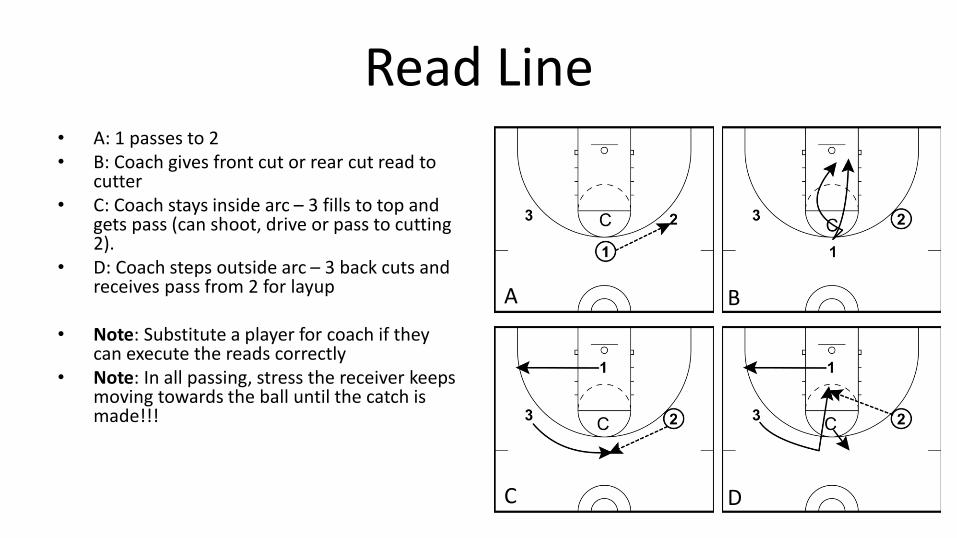
Read Line • A: 1 passes to 2• B: Coach gives front cut or rear cut read to
cutter• C: Coach stays inside arc – 3 fills to top and
gets pass (can shoot, drive or pass to cutting 2).
• D: Coach steps outside arc – 3 back cuts and receives pass from 2 for layup
• Note: Substitute a player for coach if they can execute the reads correctly
• Note: In all passing, stress the receiver keeps moving towards the ball until the catch is made!!!
A B
C D

Pass Cut Close Out• A: 1 passes to 2 and closes out • B: 2 passes to 3 and cuts correctly
based on 1’s defense. 3 passes to 2 for the layup
• C & D: Play repeats to wing• Can have baseline passer close out to
the player NOT receiving the pass to work on passing while defended
• Note: Great pre-game warm up drill –run on both sides of floor at same time
A B
C D

Pass Cut Shoot
• 1 passes to 2
• 2 tries to pass back before 1 gets to bottom of circle
• 3 slow closes with hands up on 1 after the catch
• 1 shoots
• Variation: Shot fake and finish

Laker Drill• A: Pass Cut and Post
– After pass from 2 to 1, 2 Laker cuts high or low for pass from 1 and layup (not shown)
• B: Pass Cut Back Screen Post– After pass from 2 to 3, 3 Laker
cuts high or low for pass from 1 and layup (not shown)
– Can also run this drill starting with 1 Dribble At 2 with 2 setting screen for 3
A B

Laker Post Drill• A: Can run using any variation to get
ball to post• B: Post waits for Laker cutter to clear
– Option 1: Inside foot front pivot sweep and drive behind the cutter
– Option 2: Outside foot back pivot sweep and baseline drive
• Variation: Have post player catch ball off their spot (forced off by defender). This tightens passing window to cutter and is usually an instance where the post player has to kick out or drive.
A B

Advanced Laker Drill
• A: Hitting the dive off the screen
• B: Kick out to the player receiving the screen A B

Drive and Pitch• 1 drives • X3 either stops drive or guards
wing (simulating help defense)• 1 passes to wing (X3 stops drive)
or finishes at rim (X3 covers wing)
Adjustments• For younger players, start with X3
always stopping drive• For older players, X3 closes out
on 2 and 2 must shoot or attack close out

Drive and Bounce• Helps players not give up their dribble• Make use of dribbles moves to counter attack
defender• A: 1 dribbles at X2 and meets chest to chest
(roughly). 1 then bounce dribbles away to create space. 3 fills up.
• B: X2 closes out on 1. 1 reads X2 close out and drives the open side. 3 push/pulls with 1’s drive. 1 can finish at rim or pass (natural pitch or back safety valve) to 3
Adjustments• For younger players, have X2 close out in one of two
ways: 1. Trail 1 “flat” – this signals 1 to push the ball out and
drive straight from the wing. 2. Deny 1 w/ small angle drop – this signals 1 to
counter dribble (mix it up) and attack to the front of the rim
A B
• How to execute a bounce dribble:• Remember that offense has advantage when playing shoulder to defender’s
chest – go to the rim!• Defense has advantage when chest-to-chest (roughly) – counter!• To bounce dribble, inside foot and ball hit floor together as offense player gets
into defender• Next dribble is a large lateral move that covers as much space as possible,
while also turning to face the basket• Offense player should create space and be able to attack either direction
equally
Coaching Tips
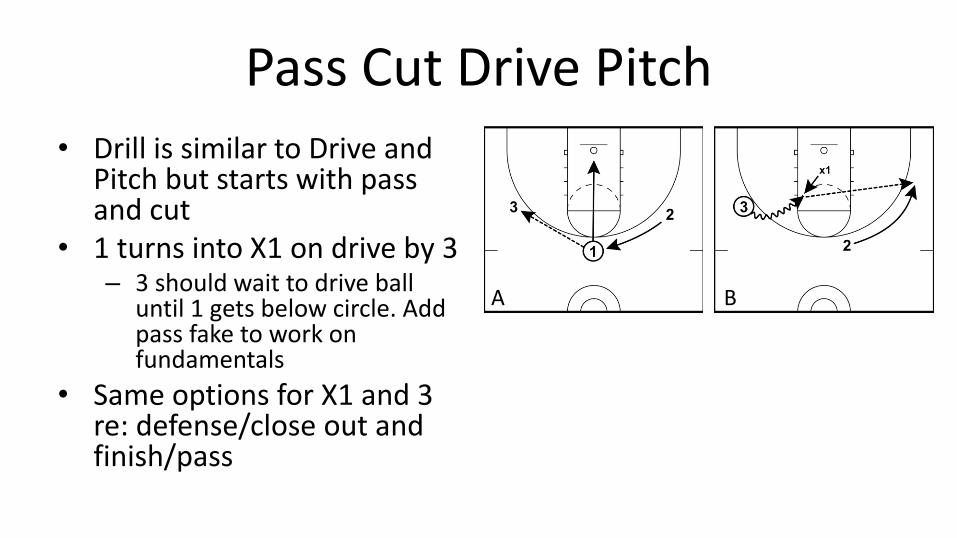
Pass Cut Drive Pitch• Drill is similar to Drive and
Pitch but starts with pass and cut
• 1 turns into X1 on drive by 3– 3 should wait to drive ball
until 1 gets below circle. Add pass fake to work on fundamentals
• Same options for X1 and 3 re: defense/close out and finish/pass
A B

Battle Pitch• Drill is similar to Drive and Pitch but starts
with X2 starting behind 1• 1 drives basket and X2 provides physical
resistance• Same options for X2 and 3 re: defense/close
out and finish/pass
Adjustments:• Younger players, run drill and always pitch
until they are comfortable with defense –then add option to finish instead
• Older players, 1 can finish, Villanova finish, or pass depending on X2

Dribble At Pass Cut Drive Pitch• A: 1 dribbles at 2. 2 cuts • B: 1 passes to 3. 1 cuts to
basket. 2 fills to ball side. Can simulate back screen if desired.
• C: 3 drives lane. 1 “gets out of the way”. 3 natural pitches to 2. 2 should sink to effective shooting range on 3 drive.
A B
C

Push Pull Circle Movement• 1 can drive either side• 2 and 3 circle move
(push/pull) correctly• 1 natural pitches to play
side team mate
Adjustments:• Younger players should sink
to proper shooting distance
A B

Baseline Drive Movement• This drill is for for older players
learning baseline drive movement
• A: 1 passes to 2 and cuts. 3 starts to fill up.
• B: On catch, 2 rips and drives baseline. 1 “gets out of the way” since in post area, 3 reverses and fills to deep or short corner depending on shooting ability
A B

Back Screens
• Lots of variations to run this drill
• Stress the actions you like the best
• Start the ball in spots other than top or middle of three players

Post Back Screens• A: 2 passes to 1. On the pass
(not the catch), 3 back screens for 2 who can go either side of screen. 1 to 2 for layup.
• B: Starts just like A.• C: 1 passes to 3 and 3
immediately baseline dribbles. 2 “gets out of the way” (up or over) and 1 stops cut in lane.
A
B C

Pin Screens• Lots of variations to run this
drill• Stress the actions you like
the best• Start the ball in spots other
than top or middle of three players
• Player receiving screen can either shoot or pass to cutter

Side Ball Screen Drill• Work both sides of floor• Emphasize explosive first step
from 1 and shoulder to hip contact (1 on 3)
• Vary drill finish – layup, hit roll, hit natural pitch
• 2 should rotate to a spot where he/she can make the shot (short corner vs. 3 point arc)
• Same concept for Top Ball Screen

Super Combo Drill• Lots of variations to run this
drill• A: 2 passes to 1. 2 cuts off
back screen by 3• B: 1 dribbles at 3 who cuts
and fills opposite.• C: As 1 reaches spot, 2 runs
side ball screen. 1 drives lane. 3 circle moves (push) with 1.
A B
C

Zone Passing Drill• Work both sides of floor• Emphasize quick cutting and passing• Emphasize spacing! Deep short
corner and wing below foul line• Remember – passer goes first and
dive comes behind• Have player that catches ball change
which player gets the pass to score
• Note: Also run the Pin Screen drills for zone offense practice
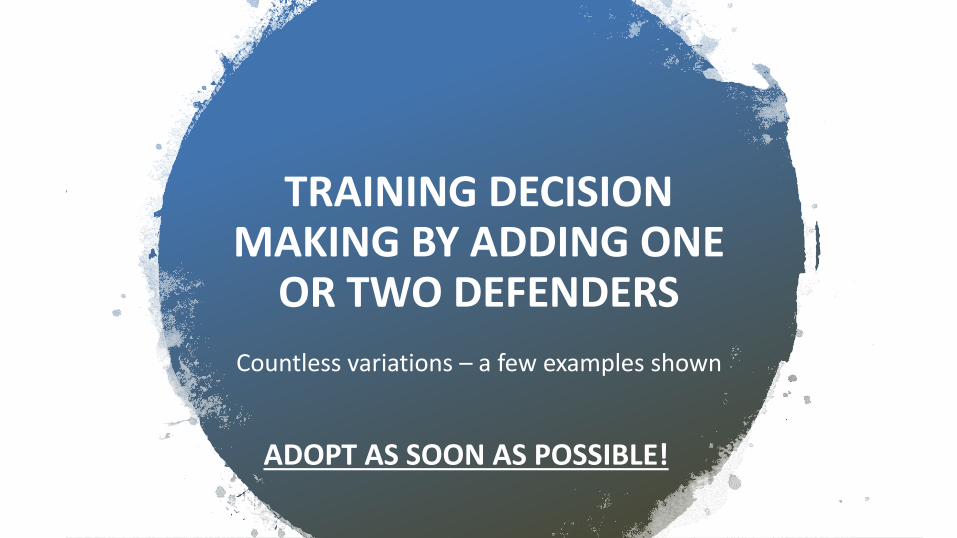
TRAINING DECISION MAKING BY ADDING ONE
OR TWO DEFENDERS
Countless variations – a few examples shown
ADOPT AS SOON AS POSSIBLE!
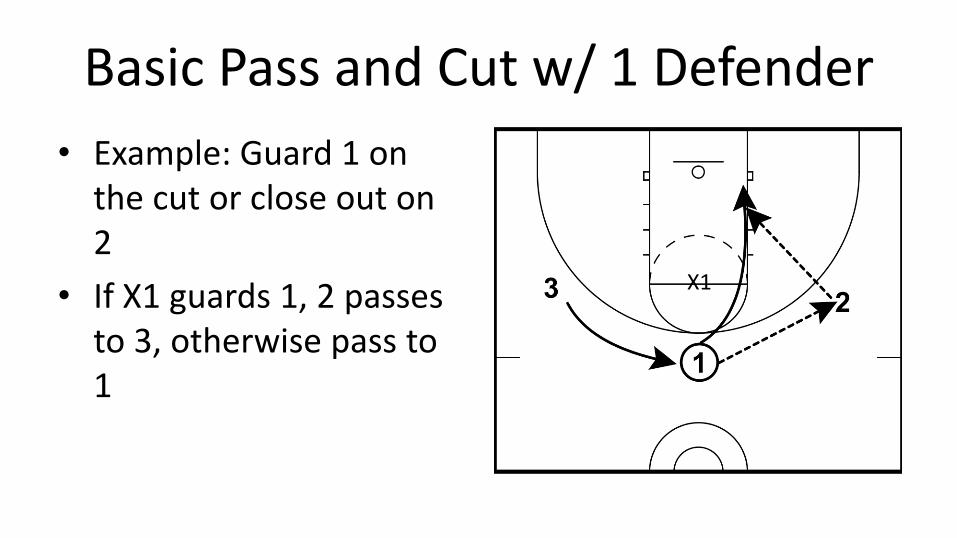
Basic Pass and Cut w/ 1 Defender
• Example: Guard 1 on the cut or close out on 2
• If X1 guards 1, 2 passes to 3, otherwise pass to 1
X1

Basic Pass and Cut w/ 2 Defenders• X1 guards either 1 or 2 on
first pass• X2 guards one of
remaining two players– 1 and 2 guarded – 2 passes
to 3 for shot/drive– 1 and 3 guarded – 2
shoots/dribes– 2 and 3 guarded – 2 should
pass to 1 on the cut
X1X2

Laker Drill w/ 1 Defender• Example A: X3 must defend 3 through
1’s screen. If open 2 feeds post. If not, 2 drives/shoots
• Example B: 3 starts in post with X3 guarding. If 2 can feed post, do so. If not, drive baseline and 3 executes post slide (get out of the way). – X3 goes with 3 – 2 finishes w/ layup– X3 stops 2’s drive. 2 passes to 3 for
shot/drive– Can also be a continuation of Example A
A
B

Laker Drill w/ 2 Defenders
• X3 always starts guarding 3
• On first pass, X1 guards either 1 or 2
• Play proceeds similar to 1 Defender version of drill
• Can have X3 switch to another player
• Can have rule where 2 can only drive after checking post if left unguarded
A
B

Side Ball Screen Drill w/ 1 Defender• X1 either stops drive or bails to one of
the two other players• Two ways to handle 1 decision when X1
stops drive– For younger players, tell them in the drill
for that day to work on always passing to the roll (or to the corner) if X1 stops drive
– For older players, decision can be made on when X1 plays defense (stops drive early, hit roll. Stops drive late – hit pitch)
• Same concept for top ball screen

Side Ball Screen Drill w/ 2 Defenders
• 3 is not actually screen X1 – X1 should start with 3 and trail his top shoulder to be in the right spot for the rest of the drill
• On “ball screen”, X1 either switches to 1 or stays with 3 to defend roll
• X2 can either guard 1 (on X1 roll defense or if X1 is beat off dribble) or X2 can guard 2
• 1 reads each option in turn

Zone Passing Drill w/ 1 Defender
• X1 guards 1 or 3 on the pass to 2
• 2 passes to open player

Zone Passing Drill w/ 2 Defenders
• X1 guards 1 or 2
• X2 guards one of remaining players
• 2 can shoot if left open
• Variation: 2 can drive or hit open player on close out by X2

SMALL GAMES

Turn Drills into Games
• Play with even matchups or with one player advantage for the offense
• Add different rules to the game that emphasize things you want to work on
• Game ends with basket or defensive rebound/turnover

Example 1: Pass and Cut Game
• Goal– Develop ability to hit open cutter
• Rules– Can only play on the left side of the floor
– Dribble At allowed
– Only way to score is layup by pass to cutter
– If playing offensive advantage, defense must always guard the ball

Example 2: Laker Game
• Goal– Develop Laker and work on ball reversal
• Rules– Start with Dribble At to right side
– Scoring only allowed off of feed to post (pass to cutter or score by post player)
– If no post feed or ball passed back out of the post, ball must be reversed to opposite side and Laker run again
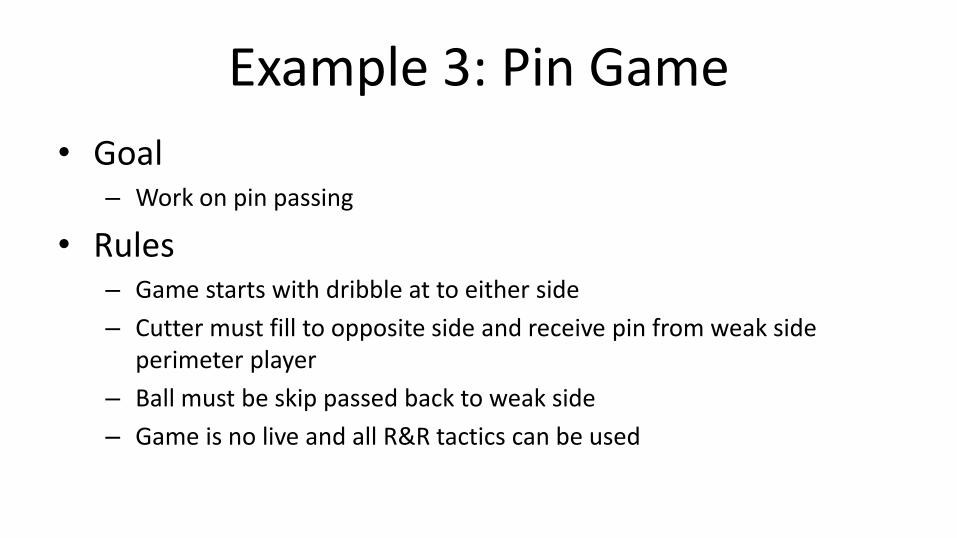
Example 3: Pin Game
• Goal– Work on pin passing
• Rules– Game starts with dribble at to either side
– Cutter must fill to opposite side and receive pin from weak side perimeter player
– Ball must be skip passed back to weak side
– Game is no live and all R&R tactics can be used

Example 4: Laker Pin Game
• Goal– Work on pin passing and feeding post
• Rules– Same rules as Example 3
– Player receiving pass of pin screen must feed the post (pin screener)

Example 5:Drive and Pitch Game
• Goal– Work on moving with drive and finishing / hitting open players
• Rules– Players can only pass around perimeter and drive
• No dribble at, no passes to cutters or player receiving back screens
– Can only score off a drive or a drive and pass for a shot

PRESS BREAK

Breaking the Press with
R&R
Same principles apply
• We are running 50 but with an imaginary basket halfway between 3 point line and half court – yellow spots show the formation
• Starting alignment is different to get defense distorted and set up screening angles
• 2 screens for 3 (or vice versa). In general, we want to in-bound the ball to the wide side of the court whenever possible
• 1 “basket cuts” to the middle of the court above the ball
• 3 rotates to fill the “top” of the formation. 4 rotates to fill open spot
• Rotation creates a “passing triangle” for ball handler : behind to 3, over the top to 5, or diagonal to middle 1
• Keep an eye on spacing! • On the catch, 2 has four options:
– Hit 1 cutting to the middle (this is open A LOT if hard cut is made)
– Dribble attack if room– Reverse pass to 3– Over top to 5 (not open often)
Basket
Basket

Breaking the Press with
R&R
Same principles apply
• If pass is made to 1 on the middle cut, off to the races. This pass is usually quick before 4 has rotated all the way up. The press should be broken with 1 pushing middle and 4 and 5 on wings.
• Diagram A: If ball is reversed to 3, R&R rules apply
– 2 cuts to the middle on the pass
– 1 fills the open spot
• Diagram B: 5 fills open spot to create passing triangle.
• Diagram C: As a rule, if ball is reversed middle, 3 should immediately dribble at 4 (45o angle towards sideline) to take advantage of rotated defense
• 4 will cut up the court due to dribble at action. 5 rotates to empty spot behind. 2 fills to outside empty spot
• Note: As the ball gets up the court, the 50 spacing moves up the floor as well. Always create a triangle around the ball handler (one behind, one in the middle, one up the side)
A
B
C

TRANSITION

General Thoughts
R&R has transition concepts, but after a lot of coaching I like a littlemore structure
On make or miss, get the ball to point guard
Younger teams –always outlet to the right side
Older teams –point guard goes to ball side alley
Transition structure is more applicable the older/better your team gets
Teach on misses AND makes

Numbered Transition• Based on Michigan State transition • Wings run to corners – 2 runs right side, 3 runs left
– GET WIDE FIRST!!! Younger players, just outside the middle of the alley. Older players just inside the sidelines
– Fill to corners if you don’t get the ball on a kick ahead– Younger players fill to short corners
• 1 DOES NOT come down the middle of the floor• Outlet to foul line extended (Red dashed line)• Push on diagonal looking to pitch ahead as soon as possible
to wings if open • Look for up the alley to 2 first (easiest)• Diagonal dribble makes pass to 3 easier if open
• Dribble from catch towards three-point arc - lane line extended on the opposite side (green arrow)
• Advanced: First two dribbles directly up the side looking for ball side hit ahead, then angle towards target spot looking for two-side hit ahead
• 5 runs to the front of the rim• 4 trails and fills opposite the 1 on perimeter• 4 and 5 can switch roles if 5 is the rebounder

Transition
• All players need to know that first three steps after rebound are the most important– GO HARD!!!
• 1 looks to Hit Ahead or Hit Across early, if possible
• Can hit either wing anytime• Player receiving pass can drive or shoot
– Younger players should almost always drive

BLOBS AND SLOBSThe Best Of…

BLOBs and SLOBsPlays that have worked for my teams.
BLOBS
• Elevator
• Twins
• Zone Dive
• Flat
SLOBS
• Go
• Razorback
• Spartan Iz
• Curl

Elevator▪ A: 1 screens for 5 diving to block▪ B: 2 and 4 set elevator door screen
for 1. 1 finds fastest way through or over. Up to 2 and 4 to headhunt defender.
▪ C: After 1 clears, 2 sets screen for 4 diving to opposite block. 2 dives to ball side block
A
B
C
▪ 4th – 6th Grade: Note: Have 1 curl to short corner area for shot.
▪ 7th – 8th Grade: 1 can go to the 3 point line.
Adjustments

Twins▪ A: 5 comes off screen of 4 (can also have 2
screen as well) and goes to deep wing (not corner). 1 moves up lane but leaves space between him/her and 4 (ticks worth). 2 moves up lane and replaces 4. 3 passes to 5 and clears weak side.
▪ B: 1 receives stagger screens from 4 and 2 on curl to basket. 1 immediately clears area if no pass. 2 waits a beat then dives behind 1.
A B
▪ Probably a 5A or 6th grade level play
Adjustments

Zone Dive▪ Player 4 can go to either side
▪ 5 goes to opposite side of 4
▪ NA
Adjustments

Flat▪ Inbounder should be best 3-point shooter
▪ A: 1 can go outside or inside of 5 –whatever sets up 5 for the best screen. 3 lobs ball ahead of 1 to open space. 2 comes to stand with 4
▪ B: 2 and 4 set double screen for 3. 1 passes to 3 for shot. 1 can dribble towards 3 to close distance A B
▪ 4th-5th Grade: 3 should go to mid-range area for jump shot. Always dribble towards opposite side to shorten pass
▪ 6th+ Grade: Can be a three point shot for players that can shoot that shot with good form
Adjustments

Go▪ A: 5 back screens for 2 (decoy). 3 back
screens for 1 (decoy)
▪ B: 3 back screen for 5 to the rim. 4 passes to 5
A B
▪ 4th-5th Grade: Slide the formation closer to the near sideline. 1 starts on block – 3 in short corner. 2 at top of key, 5 at near lane line extended. Makes the throw shorter but the angle harder so if you have a inbounderstrong enough to throw the longer pass, do that instead.
Adjustments
• Timing is important. Tell 3 that his/her screen is really just a brush screen and that he/she needs to get out to 5 as fast as possible.
Coaching Tips

RazorBack▪ A: 5 and 3 pin screen for 2 and 4
▪ B: 1 passes to 2. 5 sprints out and back screens for 1 going to basket. 2 passes to 1
A B
▪ 4th Grade: Slide the formation closer to the near sideline and move players up, closer to midcourt to shorten passing lanes
Adjustments
• Note where 3 sets the back screen –closer to elbow. Helps keep defenders away from basket
• If you can set personnel, put players guarded by the tallest players at the 3 and 4 position to take away rim defenders
Coaching Tips

Curl▪ A: 1 screens for 3 on sprint break away.
5 sprints towards ball for pass. On catch, 5 immediately looks to hit 3 going to the basket
B▪ Counter would be for 4 to butt
screen and 1 back screen for 5 on dive to the rim
Coaching TipsA

SPECIAL SITUATIONS
The Best Of…

12 Plays Every Coach Should HaveMan and Zone Plays for:• BLOB for Winner – Man and Zone - 2 & 3 pts• SLOB for Winner – Man and Zone - 2 & 3 pts• Full Court Score – Man and Zone - 2 & 3 pts
Your players don’t need to know these plays – there is only so much time in practice so spend it on base skills/system/plays and not special situations.
I like to have different plays for special situations than what I normally run during games. An alternative is to have an additional counter to your normal plays. That will be easier for your players to execute, but I like to challenge both the defense and my players with something completely different.

Things to Include
• BLOB for Winner (2 & 3 pts)
• SLOB for Winner (2 & 3 pts)
• SLOB vs. Pressure
• Full Court Score (2 & 3 pts)

BLOB for 2 vs Man▪ 5 Should Be Rim Finisher
▪ A: 4 and 5 set screens for 2 and 3. Important that 5 set screen outside the lane. Halfway between short corner and block is a good reference
▪ B: 3 pins down on 5 who goes up then curls down. Tell 5 to not curl too soon – get the defender chasing vertically through the screen even if just for a step or two A B
• 1 should bounce to 5 if possible
Coaching Tips
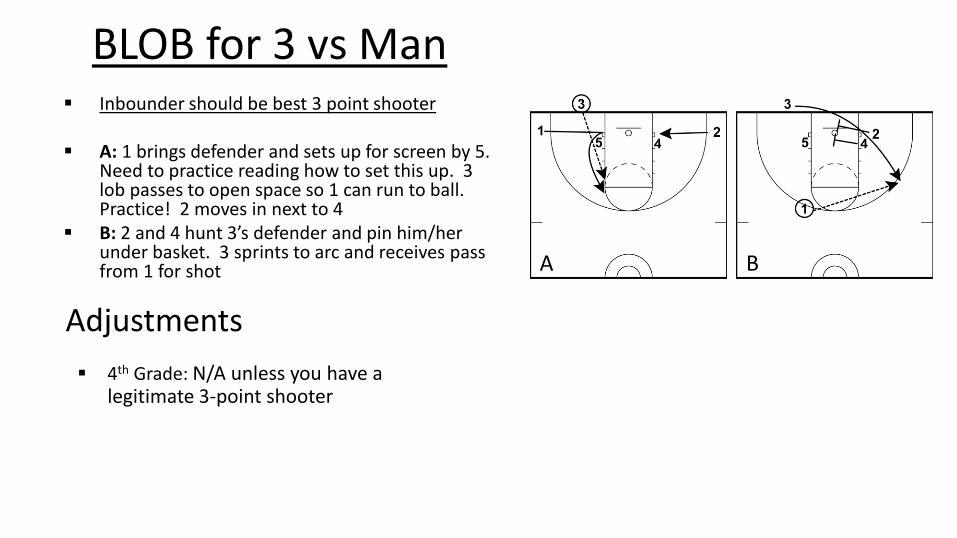
BLOB for 3 vs Man▪ Inbounder should be best 3 point shooter
▪ A: 1 brings defender and sets up for screen by 5. Need to practice reading how to set this up. 3 lob passes to open space so 1 can run to ball. Practice! 2 moves in next to 4
▪ B: 2 and 4 hunt 3’s defender and pin him/her under basket. 3 sprints to arc and receives pass from 1 for shot A B
▪ 4th Grade: N/A unless you have a legitimate 3-point shooter
Adjustments

SLOB for 2 vs Man▪ A: 5 sets pin for 2 who sprints to
ball. 3 sets a screen for 4 going to weak side wing
▪ B: 1 passes to 2 and breaks to basket underneath 5. After setting pin screen, 5 immediately sprints back out towards 1 and backscreens for 1.
A B
• Remind 2 to keep sprinting all the way to the catch.• 3 does not really move off of elbow when setting
screen. 4’s job is to run off the screen. • The entire backside action is intended to clear the
lane of defenders • 2 needs to pass quickly to 1 or immediately follow
the cut with a drive to basket on his/her own
Coaching Tips

SLOB for 3 vs Man▪ 1 is Best 3-point shooter
▪ A: 1 sprints to ball side block. 4 pin screens for 3. 3 sprints out get the pass from 2. 5 slides down to mid post. After pass, 2 cuts to ball side corner
▪ B: 1 reverses and comes off double screen from 4 and 5. 3 dribbles towards top of key and passes to 1 for shot.
A B
• Remind 3 to keep sprinting all the way to the catch.
• 4 and 5 must make 1’s defender go under screens.
• 1 can curl off of double screen as tight as necessary to trap defender
Coaching Tips

BLOB for 2 vs Zone▪ 5 Should Be Rim Finisher
▪ A: 4 and 5 set screens for 2 and 3. Important that 5 set screen outside the lane. Halfway between short corner and block is a good reference
▪ B: 3 pins down on 5 who goes up then curls down. Tell 5 to not curl too soon – get the defender chasing vertically through the screen even if just for a step or two A B
• 1 should bounce to 5 if possible
Coaching Tips
• For younger teams, 2 should go to short corner and not full corner. Needs be close enough to a shooting threat in order to draw out defender.
• 4th – 5th Grade: Tell inbounder to throw bounce pass unless they are good passers with some feel for where to throw the ball
Adjustments

BLOB for 3 vs Zone▪ Diagram A: 5 and 3 hard seal bottom
defender and 1 seals top defender 2 crosses to ball side corner. 4 passes to 2 for shot.
▪ Diagram B: If 2 is defended (usually top defender covering due to 5/3 screen), 4 cuts up lane. 3 screens top weakside defender and 1 looks to rescreen defender that prevented shot. 2 passes to 4 to shoot
• Stress that 3 and 5 cannot let defender get to corner. 5 and 3 should start outside the lane by a step or two to encourage baseline defender to align inside the offense
• 4 needs to look for biggest open spot to run to –not straight up the lane line
Coaching Tips
• 4th – 5th Grade: N/A unless you have a 3-point shooter
• 6th Grade+: Have 1 align based on moving to a spot that forces the top ball side defender to play inside her/him
Adjustments
A B

SLOB vs Man Pressure to Score
▪ 1 screens for 3 on sprint break away. 5 sprints towards ball for pass. On catch, 5 immediately looks to hit 3 going to the basket for a layup
B• This play works best against inbound pressure by defense
• Acting helps on this one. Tell 5 to act tired (hands on knees, breath heavy, etc.). 3 should signal 2 that HE/SHE will be setting a screen for 2.
• 3 acts like he/she is setting screen until 2 is a step away, then sprints toward weak side elbow.
• 2 should call for the ball and act ready to receive a pass
Coaching Tips

QUICK HITTERSPlays that Work

General Notes• There a lot of plays you can run to get a quick score.
Find ones you like if you don’t like these.• Most of my quick hitters run out of the Horns set (not
all). I like it because it creates unique spacing and youth teams do not see it often which helps get the defense off balance
• You can run almost any 1-4 set out of a Horns alignment so if you have favorite 1-4 plays, think about running them out of Horns
Coach’s Side Out
I recommend you challenge your players (even 4th graders) and give them a “set play” to run after every time out. Teach them how
to focus on a coach drawing up a play and trying to “go and do
it” on the court. Great skill for young players
to develop.

Horns DHO SeriesTop
Best 3-point shoot in right corner
▪ A: Pass from 1 to 2. Sooner the better to give more room for dribble action
▪ B: 2 power dribbles SLOWLY towards 1 for DHO. 2 should not get higher than the post players at the foul line. If possible, 2 should dribble at 1’s defender. 2 dives to basket after handoff and 3 SLOWLY rotates up (can also have 3 cut baseline to ball side).
▪ C:4 and 5 come down and set elevator door screen for 2. 1 passes to 2 for shot
BA
C
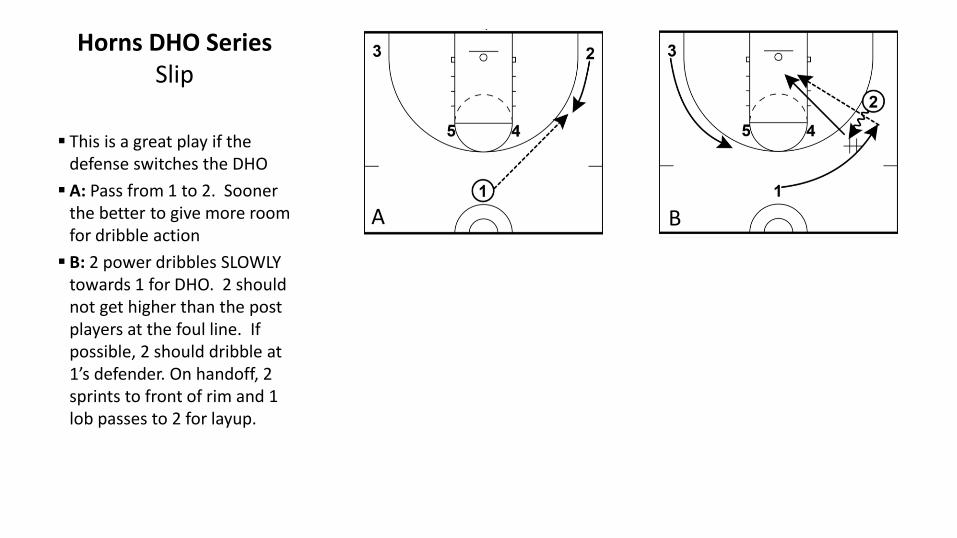
Horns DHO SeriesSlip
▪ This is a great play if the defense switches the DHO
▪ A: Pass from 1 to 2. Sooner the better to give more room for dribble action
▪ B: 2 power dribbles SLOWLY towards 1 for DHO. 2 should not get higher than the post players at the foul line. If possible, 2 should dribble at 1’s defender. On handoff, 2 sprints to front of rim and 1 lob passes to 2 for layup.
BA

Horns DHO SeriesDive
▪ This is a great play if the defense switches the DHO
▪ A: Pass from 1 to 2. Sooner the better to give more room for dribble action
▪ B: 2 power dribbles SLOWLY towards 1 for DHO. 3 must rotate up from corner to above foul line
▪ C: 2 continues to top of key then dives to basket getting elevator screen from 4 and 5. You can even have 2 pretend to start to set a screen for 3.
▪ D: Shows a counter you can run after running Dive a couple times.
BA
C D

PRACTICE PLAN

General Notes• Practices are fast paced with little down time moving from one drill to the next.
– Be prepared – use your assistants – best to meet before each practice and review plan– Plans assume 90 minute practice… most have 5 minutes of slack time for water break and
buffer– For 3-player drills, work groups of players on multiple baskets to maximize reps – even if you
don’t have an assistant to watch each basket
• Not all practices accomplished everything that is shown on the plan. I typically sacrifice “Scrimmage” time to get all drills / small games work in– Full scrimmage used mostly for defense and transition rather than offense if you structure
your R&R work correctly.
• When practicing things like BLOBs/SLOBS, one coach introduces and runs offense. Other works with defense to install how you defend BLOB/SLOB

First Year Plan• For teams starting off for the first year of R&R• Based on actual plan used for 5th grade Boys team – B level
– Used in pre-season in prep for first tournament– Regular season practices similar but with additional
skills/concepts added as players master basics– Amount of time spent on press / press break depends on league
rules. If no pressing allowed, then focus time on full / half court scrimmage and/or breaking half court traps (if necessary)

Practice 1
Teammate Talk 0:05
Dribbling 0:15
- Pound and Walk 2
- Pound Cross Overs 3
- Chaos Cross Overs 3
- 1v1 Bounce and Counter 5
Shooting 0:15
- Basic Layups 3
- Contested Layups 3
- Form Shooting 5
- Dribble, Change, Natural Pitch Shot 3
Intro Learning 0:20
- Starting Positions - 50 5
- Basic Pass Cut Drill 5
- Dribble At Pass Cut Drill 5
- Backscreen Drill 5
3 v 1 (or 2) Decision Drills (Always guard ball) 0:20
- Pass Cut Back Screen 6
- Pass Cut Back Screen w/ Dribble At 6
- Pass Cut Drive 6
BLOB 1 0:10
* Include points on how to play BLOB D

Practice 2
Leadership Talk 0:05
Dribbling 0:15
- Two Ball Pound and Walk 2
- Pound Cross Overs 3
- Chaos Cross Overs 3
- Full Court Speed Dribble Layups 3
Shooting 0:15
- Basic Layups 3
- Contested Layups 3
- Form Shooting 5
- Dribble, Change, Natural Pitch Shot 3
Drills 0:20
- Pass Cut 5
- Dribble At Cut 5
- Pass Cut Backscreen 5
- Read Line Drill 5
3 v 1 (or 2) Decision Drills (Always guard ball) 0:15
- Pass Cut Back Screen 5
- Pass Cut Back Screen w/ Dribble At 5
- Pass Cut Readline 5
BLOB 1 Review 0:05
Half Court Scrimmage 0:10
- Initial Ball-Gap-Help D Concepts
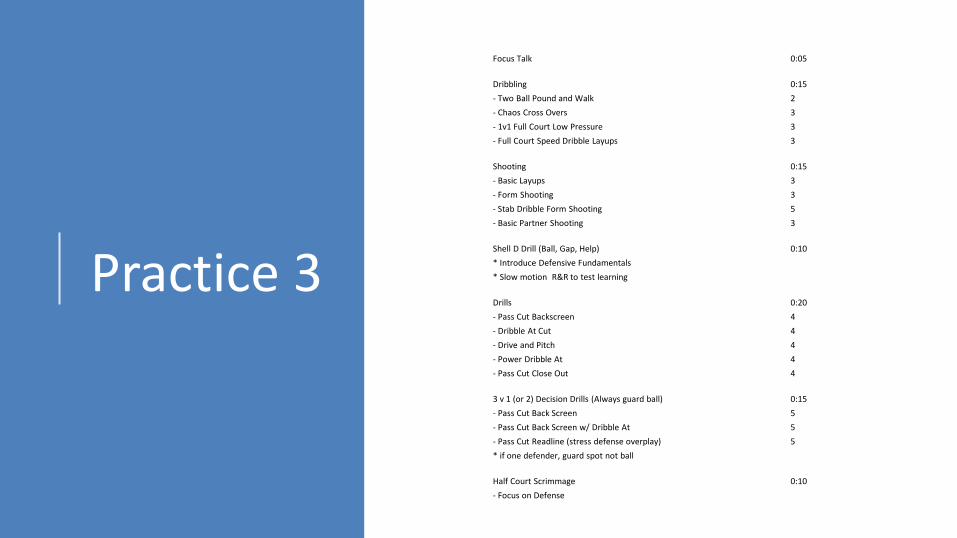
Practice 3
Focus Talk 0:05
Dribbling 0:15
- Two Ball Pound and Walk 2
- Chaos Cross Overs 3
- 1v1 Full Court Low Pressure 3
- Full Court Speed Dribble Layups 3
Shooting 0:15
- Basic Layups 3
- Form Shooting 3
- Stab Dribble Form Shooting 5
- Basic Partner Shooting 3
Shell D Drill (Ball, Gap, Help) 0:10
* Introduce Defensive Fundamentals
* Slow motion R&R to test learning
Drills 0:20
- Pass Cut Backscreen 4
- Dribble At Cut 4
- Drive and Pitch 4
- Power Dribble At 4
- Pass Cut Close Out 4
3 v 1 (or 2) Decision Drills (Always guard ball) 0:15
- Pass Cut Back Screen 5
- Pass Cut Back Screen w/ Dribble At 5
- Pass Cut Readline (stress defense overplay) 5
* if one defender, guard spot not ball
Half Court Scrimmage 0:10
- Focus on Defense

Practice 4
Accountability Talk 0:05
Dribbling 0:15
- Pound and Walk 2
- Chaos Cross Overs 3
- Between the Legs 3
- Chaos Between the Legs 3
- Full Court Speed Dribble Layups 3
Shooting 0:15
- Contested Layups 3
- Form Shooting 3
- Partner Decision Shooting Intro 5
- Partner Decision Shooting - Basic 3
Drills 0:15
- Pass Cut Backscreen 3
- Dribble At Cut Backscreen 3
- ReadLine 3
- Drive and Pitch 3
3 v 2 Decision Drills (always guard ball) 0:15
- Pass Cut & Dribble At - Back Screen 5
- Pass Cut Readline 5
- Drive and Pitch 5
3v3 Small Games 0:10
* Continuation of 3v2 Decision
BLOB 1 0:10
* Cover BLOB D as well

Practice 5
Character Talk 0:05
Dribbling 0:15
- Pound and Walk 2
- Chaos Cross Overs 2
- Chaos Between the Legs 2
- Chaos Mix 2
- Full Court Speed Dribble Layups 3
Shooting 0:15
- Form Shooting 3
- Partner Decision Shooting - Basic 5
- Partner Decision Shooting Intro Close outs 3
- Free Throw Shooting 4
Shell D Drill (Ball, Gap, Help) 0:10
* Medium speed R&R to test learning
Drills 0:10
- Pass Cut Backscreen 3
- Power Dribble At Cut Backscreen 3
- Dribble At Pass Cut Drive and Kick 3
3 v 3 Decision Drills 0:10
- Pass Cut Back Screen 3
- Pass Cut Back Screen w/ Dribble At 3
- Pass Cut Drive and Finish/Kick 3
- Press / Press Break Intro 0:20
BLOB 1 Review 0:05

Practice 6
Sportsmanship Talk 0:05
Dribbling 0:10
- Pound and Walk 2
- Chaos Mix 2
- 1v1 Full Court Medium Pressure 2
- Full Court Speed Dribble Layups 2
Shooting 0:15
- Villanova Series Layups 4
- Contested Layups 3
- Stab Dribble Form Shooting 3
- Partner Decision Shooting w/ Close outs 4
Drills 0:15
- Player Choice Pass Cut / Dribble At - Backscreen 5
- Dribble At Pass Cut Drive and Kick 5
- Drill that supports a desired Starter Action 5
3 v 2 Decision Drills (always guard ball) 0:15
- Pass Cut Back Screen w/ Dribble At 5
- Pass Cut Drive and Finish/Kick 5
- Starter Action 5
- 3v3 Small Games 0:15
* Continuation of 3v2 Decision
BLOB 2 0:10

Practice 7
Adversity Talk 0:05
Dribbling 0:10
- Pound and Walk 2
- Chaos Mix 3
- 1v1 Full Court 2
- Full Court Speed Dribble Layups 3
Shooting 0:10
- Stab Dribble Form Shooting 3
- Partner Decision Shooting - Basic 3
- Partner Decision Shooting w/ Close outs 3
Shell D Drill (Ball, Gap, Help) 0:15
* Introduce ball screen and screen defense
Rebounding / Transition Drills 10
- Rebound Drill 5
- Rebound and Transition vs. Air Drill 3
- D Transition Drill 3
3 v 3 Decision Drills 0:15
- Pass Cut Back Screen 5
- Pass Cut Post 5
- Starter Action 5
- Press / Press Break 0:10
BLOB 1/2 Review 0:10

Practice 8
Dribbling 0:05
- Pound and Walk 2
- 1v1 Full Court 2
Shooting 0:20
- Villanova Series Layups 5
- Contested Layups 5
- Partner Decision Shooting w/ Close outs 5
* Free Throws Intermixed Dynamically
- Intro 2v1 Partner Decision Shooting 5
Rebounding / Transition Drills 0:15
- Rebound Drill 5
- Rebound and Transition vs. Air Drill 5
- D Transition Drill 5
Drills 0:10
- Pass Cut Drive Pitch 3
- Power Dribble At Roll and Pitch 3
- Starter Action 3
3 v 3 0:25
- Pass Cut Drive Pitch 5
- Pass Cut Post w/ Dribble At 5
- Power Dribble At Roll and Pitch 5
- Read Line 5
* Play Any Decision Drill but emphasis on D jumping passing lanes
- Starter Action 5
- 3v3 Small Games 0:15

Practice 9
Dribbling 0:10
- Pound and Walk 2
- Chaos Mix 2
- 1v1 Full Court Pressure 2
- Full Court Speed Layups 2
Shooting 0:15
- Contested Villanova Layups 5
- Partner Decision Shooting 2v1 5
- Intro Partner Decision - Counter 5
Drills 0:10
- Pass Cut Close Out 3
- Back Screen 3
- Starter Action 3
3 v 2 Decision Drills (always guard ball) 0:15
- Pass Cut Back Screen w/ Dribble At 5
- Pass Cut Drive and Finish/Kick 5
- Starter Action 5
3v3 Small Games 0:15
- Pass Cut Back Screen w/ Dribble At 5
- Pass Cut Drive and Finish/Kick 5
- Starter Action 5
- Full Court Scrimmage 0:10
- BLOB 1 / 2 Review 0:10

Practice 10
Dribbling 0:10
- Pound and Walk 2
- Chaos Mix 2
- 1v1 Full Court Pressure 2
- Full Court Speed Dribble Layups 2
Shooting 0:10
- Partner Decision Shooting- 2v1 5
- Free Throws 5
Shell D Drill 0:10
3 v 2 Decision Drills (always guard ball) 0:10
- Pass Cut Back Screen 5
- Pass Cut Drive and Finish/Kick 5
3v3 Game Play 0:10
- Pass Cut Back Screen
- Dribble At Back Screen
- Press / Press Break 0:10
BLOBS and SLOBS 0:15
* Full Review including D

Veteran Team Plan• The following shows the practice plans used for pre-
season practice for 7th Grade Boys A/B Team– Third year of R&R for these players– Basketball IQ above average
• Not all practices accomplished everything that is shown on the plan. Typically sacrificed “scrimmage” time to get all drills / small games work in. – Full scrimmage used mostly for defense rather than
offense if you structure your R&R work correctly.
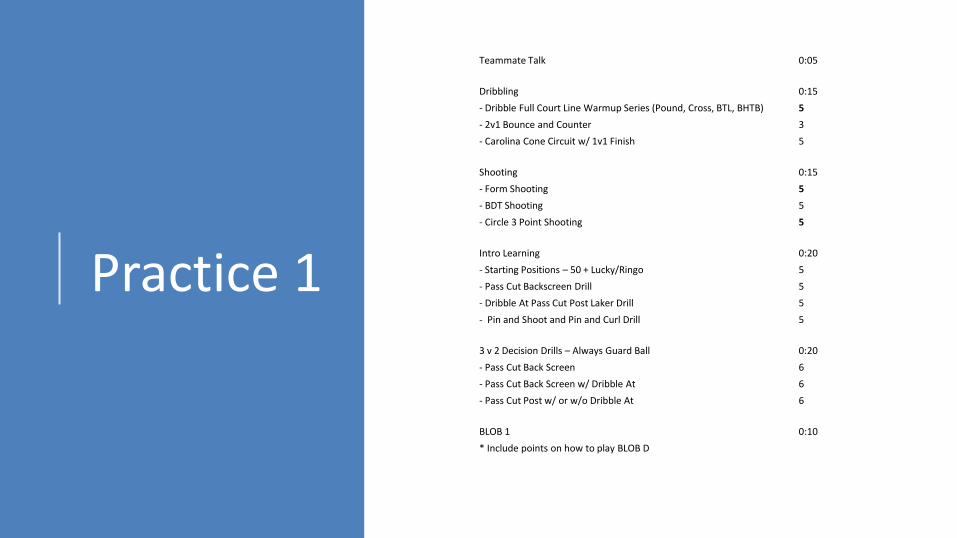
Practice 1
Teammate Talk 0:05
Dribbling 0:15
- Dribble Full Court Line Warmup Series (Pound, Cross, BTL, BHTB) 5
- 2v1 Bounce and Counter 3
- Carolina Cone Circuit w/ 1v1 Finish 5
Shooting 0:15
- Form Shooting 5
- BDT Shooting 5
- Circle 3 Point Shooting 5
Intro Learning 0:20
- Starting Positions – 50 + Lucky/Ringo 5
- Pass Cut Backscreen Drill 5
- Dribble At Pass Cut Post Laker Drill 5
- Pin and Shoot and Pin and Curl Drill 5
3 v 2 Decision Drills – Always Guard Ball 0:20
- Pass Cut Back Screen 6
- Pass Cut Back Screen w/ Dribble At 6
- Pass Cut Post w/ or w/o Dribble At 6
BLOB 1 0:10
* Include points on how to play BLOB D
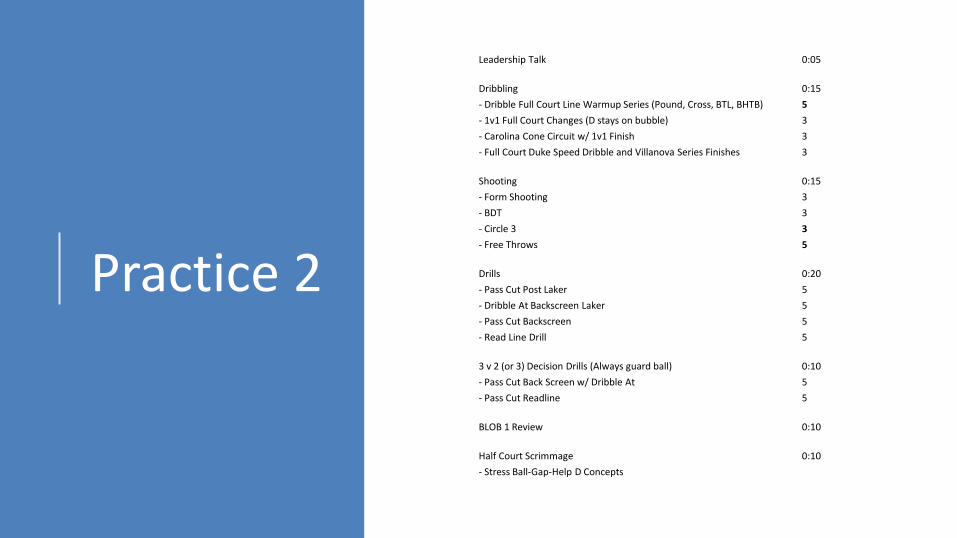
Practice 2
Leadership Talk 0:05
Dribbling 0:15
- Dribble Full Court Line Warmup Series (Pound, Cross, BTL, BHTB) 5
- 1v1 Full Court Changes (D stays on bubble) 3
- Carolina Cone Circuit w/ 1v1 Finish 3
- Full Court Duke Speed Dribble and Villanova Series Finishes 3
Shooting 0:15
- Form Shooting 3
- BDT 3
- Circle 3 3
- Free Throws 5
Drills 0:20
- Pass Cut Post Laker 5
- Dribble At Backscreen Laker 5
- Pass Cut Backscreen 5
- Read Line Drill 5
3 v 2 (or 3) Decision Drills (Always guard ball) 0:10
- Pass Cut Back Screen w/ Dribble At 5
- Pass Cut Readline 5
BLOB 1 Review 0:10
Half Court Scrimmage 0:10
- Stress Ball-Gap-Help D Concepts

Practice 3
Focus Talk 0:05
Dribbling 0:10
- Dribble Full Court Line Warmup Series (Pound, Cross, BTL, BHTB) 3
- 1v1 Full Court Changes (D stays on bubble) 3
- Full Court Duke Speed Dribble – Villanova Finishes 3
Shooting 0:15
- 1v1 Contested Layups 3
- Form Shooting 3
- Stab Dribble Form Shooting 3
- BDT 5
Shell D Drill (Ball, Gap, Zone Help) 0:15
* Review Defensive Fundamentals 10
* Slow motion R&R to test 5
Drills 0:20
- Pass Cut Backscreen 4
- Dribble At Cut Post 4
- Drive and Pitch 4
- Power Dribble At 4
3 v 3 Drills 0:15
- Pass Cut Back Screen 5
- Pass Cut Back Screen w/ Dribble At 5
- Pass Cut Readline (stress defense overplay) 5
Half Court Scrimmage 0:10
- Focus on Defense

Practice 4
Accountability Talk 0:05
Dribbling 0:15
- Pound and Walk 2
- Chaos Cross Overs 3
- Between the Legs 3
- Chaos Between the Legs 3
- Full Court Speed Dribble Layups 3
Shooting 0:15
- Contested Layups 3
- Form Shooting 3
- Partner Decision Shooting Intro 5
- Partner Decision Shooting - Basic 3
Drills 0:15
- Pass Cut Backscreen 3
- Dribble At Cut Backscreen 3
- ReadLine 3
- Drive and Pitch 3
3 v 2 Decision Drills (always guard ball) 0:15
- Pass Cut & Dribble At - Back Screen 5
- Pass Cut Readline 5
- Drive and Pitch 5
3v3 Small Games 0:10
* Continuation of 3v2 Decision
BLOB 1 0:10
* Cover BLOB D as well

Practice 5
Character Talk 0:05
Dribbling 0:15
- Pound and Walk 2
- Chaos Cross Overs 2
- Chaos Between the Legs 2
- Chaos Mix 2
- Full Court Speed Dribble Layups 3
Shooting 0:15
- Form Shooting 3
- Partner Decision Shooting - Basic 5
- Partner Decision Shooting Intro Close outs 3
- Free Throw Shooting 4
Shell D Drill (Ball, Gap, Help) 0:10
* Medium speed R&R to test learning
Drills 0:15
- Pass Cut Backscreen 3
- Power Dribble At Cut Backscreen 3
- Dribble At Pass Cut Drive and Kick 3
3 v 2 Decision Drills (always guard ball) 0:15
- Pass Cut Back Screen 5
- Pass Cut Back Screen w/ Dribble At 5
- Pass Cut Drive and Finish/Kick 5
- Half Court Scrimmage 0:10
BLOB 1 Review 0:05

Practice 6
Sportsmanship Talk 0:05
Dribbling 0:10
- Pound and Walk 2
- Chaos Mix 2
- 1v1 Full Court Medium Pressure 2
- Full Court Speed Dribble Layups 2
Shooting 0:15
- Villanova Series Layups 4
- Contested Layups 3
- Stab Dribble Form Shooting 3
- Partner Decision Shooting w/ Close outs 4
Drills 0:15
- Player Choice Pass Cut / Dribble At - Backscreen 5
- Dribble At Pass Cut Drive and Kick 5
- Drill that supports a desired Starter Action 5
3 v 2 Decision Drills (always guard ball) 0:15
- Pass Cut Back Screen w/ Dribble At 5
- Pass Cut Drive and Finish/Kick 5
- Starter Action 5
- 3v3 Small Games 0:15
* Continuation of 3v2 Decision
BLOB 2 0:10

Practice 7
Adversity Talk 0:05
Dribbling 0:10
- Pound and Walk 2
- Chaos Mix 3
- 1v1 Full Court 2
- Full Court Speed Dribble Layups 3
Shooting 0:10
- Stab Dribble Form Shooting 3
- Partner Decision Shooting - Basic 3
- Partner Decision Shooting w/ Close outs 3
Shell D Drill (Ball, Gap, Help) 0:15
* Introduce ball screen and screen defense
Rebounding / Transition Drills 0:15
- Rebound Drill 5
- Rebound and Transition vs. Air Drill 5
- D Transition Drill 5
3 v 2 Decision Drills (always guard ball) 0:15
- Pass Cut Back Screen 5
- Pass Cut Post 5
- Starter Action 5
- Full Court Scrimmage 0:10
BLOB 1/2 Review 0:10

Practice 8
Dribbling 0:05
- Pound and Walk 2
- 1v1 Full Court 2
Shooting 0:20
- Villanova Series Layups 5
- Contested Layups 5
- Partner Decision Shooting w/ Close outs 5
* Free Throws Intermixed Dynamically
- Intro 2v1 Partner Decision Shooting 5
Rebounding / Transition Drills 0:15
- Rebound Drill 5
- Rebound and Transition vs. Air Drill 5
- D Transition Drill 5
Drills 0:10
- Pass Cut Drive Pitch 3
- Power Dribble At Roll and Pitch 3
- Starter Action 3
3 v 2 Decision 0:25
- Pass Cut Drive Pitch 5
- Pass Cut Post w/ Dribble At 5
- Power Dribble At Roll and Pitch 5
- Read Line 5
* Play Any Decision Drill but emphasis on D jumping passing lanes
- Starter Action 5
- 3v3 Small Games 0:15
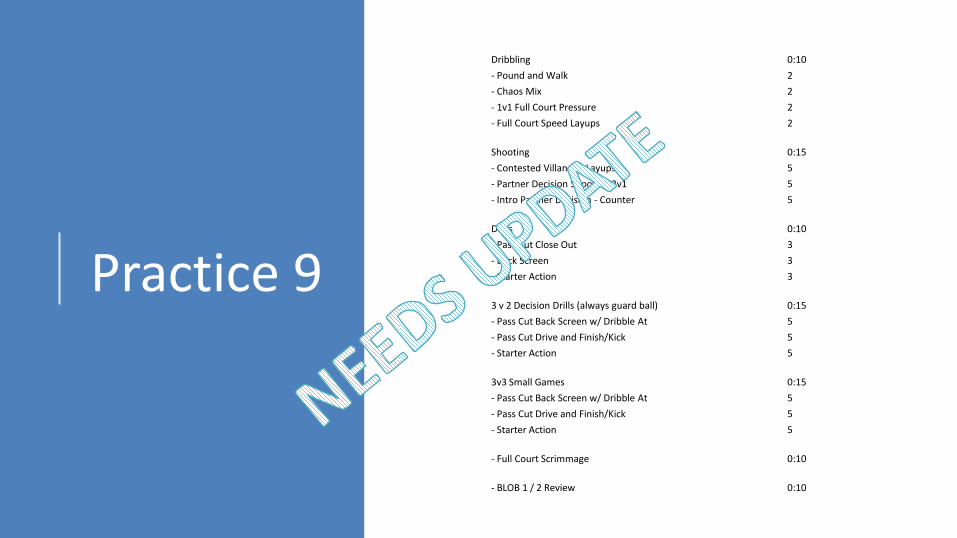
Practice 9
Dribbling 0:10
- Pound and Walk 2
- Chaos Mix 2
- 1v1 Full Court Pressure 2
- Full Court Speed Layups 2
Shooting 0:15
- Contested Villanova Layups 5
- Partner Decision Shooting 2v1 5
- Intro Partner Decision - Counter 5
Drills 0:10
- Pass Cut Close Out 3
- Back Screen 3
- Starter Action 3
3 v 2 Decision Drills (always guard ball) 0:15
- Pass Cut Back Screen w/ Dribble At 5
- Pass Cut Drive and Finish/Kick 5
- Starter Action 5
3v3 Small Games 0:15
- Pass Cut Back Screen w/ Dribble At 5
- Pass Cut Drive and Finish/Kick 5
- Starter Action 5
- Full Court Scrimmage 0:10
- BLOB 1 / 2 Review 0:10

Practice 10
Dribbling 0:10
- Pound and Walk 2
- Chaos Mix 2
- 1v1 Full Court Pressure 2
- Full Court Speed Dribble Layups 2
Shooting 0:10
- Partner Decision Shooting- 2v1 5
- Free Throws 5
Shell D Drill 0:10
3 v 2 Decision Drills (always guard ball) 0:10
- Pass Cut Back Screen 5
- Pass Cut Drive and Finish/Kick 5
3v3 Game Play 0:10
- Pass Cut Back Screen
- Dribble At Back Screen
- Half Court Scrimmage 0:10
BLOBS and SLOBS 0:15
* Full Review including D