get started : set up and administration - product documentation
TRANSCRIPT
Get started
Set up and administrationNetAppAugust 03, 2022
This PDF was generated from https://docs.netapp.com/us-en/cloud-manager-setup-admin/concept-overview.html on August 03, 2022. Always check docs.netapp.com for the latest.
Table of Contents
Get started . . . . . . . . . . . . . . . . . . . . . . . . . . . . . . . . . . . . . . . . . . . . . . . . . . . . . . . . . . . . . . . . . . . . . . . . . . . . . . 1
Learn about Cloud Manager . . . . . . . . . . . . . . . . . . . . . . . . . . . . . . . . . . . . . . . . . . . . . . . . . . . . . . . . . . . . . . 1
Getting started checklist . . . . . . . . . . . . . . . . . . . . . . . . . . . . . . . . . . . . . . . . . . . . . . . . . . . . . . . . . . . . . . . . . . 2
Signing up to NetApp Cloud Central . . . . . . . . . . . . . . . . . . . . . . . . . . . . . . . . . . . . . . . . . . . . . . . . . . . . . . . . 6
Logging in to Cloud Manager . . . . . . . . . . . . . . . . . . . . . . . . . . . . . . . . . . . . . . . . . . . . . . . . . . . . . . . . . . . . . . 7
Set up a NetApp account . . . . . . . . . . . . . . . . . . . . . . . . . . . . . . . . . . . . . . . . . . . . . . . . . . . . . . . . . . . . . . . . . 9
Set up a Connector . . . . . . . . . . . . . . . . . . . . . . . . . . . . . . . . . . . . . . . . . . . . . . . . . . . . . . . . . . . . . . . . . . . . 17
Where to go next . . . . . . . . . . . . . . . . . . . . . . . . . . . . . . . . . . . . . . . . . . . . . . . . . . . . . . . . . . . . . . . . . . . . . . 57

Get started
Learn about Cloud Manager
Cloud Manager enables IT experts and cloud architects to centrally manage their hybrid multi-cloud
infrastructure using NetApp’s cloud solutions.
Features
Cloud Manager is an enterprise-class, SaaS-based management platform that keeps you in control of your
data no matter where it is.
• Set up and use Cloud Volumes ONTAP for efficient, multi-protocol data management across clouds.
• Set up and use file-storage services:
◦ Azure NetApp Files
◦ Amazon FSx for ONTAP
◦ Cloud Volumes Service for AWS
◦ Cloud Volumes Service for Google Cloud
• Discover and manage your on-prem ONTAP clusters by creating volumes, backing up to the cloud,
replicating data across your hybrid cloud, and tiering cold data to the cloud.
• Enable integrated cloud services such as:
◦ Cloud Data Sense
◦ Cloud Insights
◦ Cloud Backup
Learn more about Cloud Manager.
Supported object storage providers
Cloud Manager enables you to manage cloud storage and use cloud services in Amazon Web Services,
Microsoft Azure, and Google Cloud.
Cost
Cloud Manager software is free of charge from NetApp.
For most tasks, Cloud Manager prompts you to deploy a Connector in your cloud network, which results in
charges from your cloud provider for the compute instance and associated storage. You do have the option to
run the Connector software on your premises.
Learn about the default configuration for the Connector.
How Cloud Manager works
Cloud Manager includes a SaaS-based interface that is integrated with NetApp Cloud Central, and Connectors
that manage Cloud Volumes ONTAP and other cloud services.
1
Software-as-a-service
Cloud Manager is accessible through a SaaS-based user interface and APIs. This SaaS experience enables
you to automatically access the latest features as they’re released and to easily switch between your NetApp
accounts and Connectors.
NetApp Cloud Central
NetApp Cloud Central provides a centralized location to access and manage NetApp cloud services. With
centralized user authentication, you can use the same set of credentials to access Cloud Manager and other
cloud services like Cloud Insights.
NetApp account
When you log in to Cloud Manager for the first time, you’re prompted to create a NetApp account. This account
provides multi-tenancy and enables you to organize users and resources in isolated workspaces.
Connectors
In most cases, a Cloud Manager Account Admin will need to deploy a Connector in your cloud or on-premises
network. The Connector enables Cloud Manager to manage resources and processes within your public cloud
environment.
A Connector should remain running at all times. It’s important for the continued health and operation of the
services that you enable.
For example, a Connector is a key component in the health and operation of Cloud Volumes ONTAP. If a
Connector is powered down, Cloud Volumes ONTAP PAYGO systems with node-based licensing will shut
down after losing communication with a Connector for longer than 14 days.
Learn more about when Connectors are required and how they work.
SOC 2 Type 2 certification
An independent certified public accountant firm and services auditor examined Cloud Manager, Cloud Sync,
Cloud Tiering, Cloud Data Sense, and Cloud Backup (Cloud Manager platform), and affirmed that they have
achieved SOC 2 Type 2 reports based on the applicable Trust Services criteria.
View NetApp’s SOC 2 reports
Getting started checklist
Use this checklist to understand what’s needed to get up and running with Cloud
Manager in a typical deployment where the Connector has outbound internet access.
A NetApp Cloud Central login
You need to sign up to NetApp Cloud Central so that you can access Cloud Manager and other cloud
services.
Network access from a web browser to several endpoints
The Cloud Manager user interface is accessible from a web browser. As you use the Cloud Manager user
interface, it contacts several endpoints to complete data management tasks. The machine running the web
browser must have connections to the following endpoints.
2
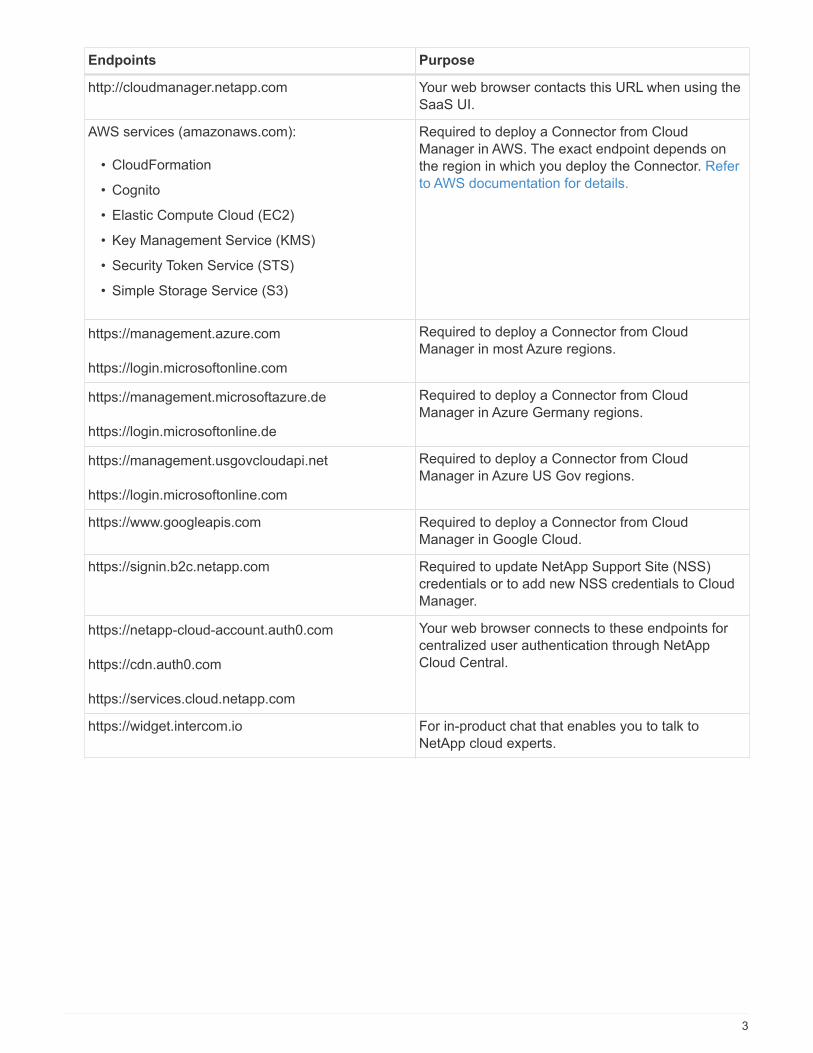
Endpoints Purpose
http://cloudmanager.netapp.com Your web browser contacts this URL when using the
SaaS UI.
AWS services (amazonaws.com):
• CloudFormation
• Cognito
• Elastic Compute Cloud (EC2)
• Key Management Service (KMS)
• Security Token Service (STS)
• Simple Storage Service (S3)
Required to deploy a Connector from Cloud
Manager in AWS. The exact endpoint depends on
the region in which you deploy the Connector. Refer
to AWS documentation for details.
https://management.azure.com
https://login.microsoftonline.com
Required to deploy a Connector from Cloud
Manager in most Azure regions.
https://management.microsoftazure.de
https://login.microsoftonline.de
Required to deploy a Connector from Cloud
Manager in Azure Germany regions.
https://management.usgovcloudapi.net
https://login.microsoftonline.com
Required to deploy a Connector from Cloud
Manager in Azure US Gov regions.
https://www.googleapis.com Required to deploy a Connector from Cloud
Manager in Google Cloud.
https://signin.b2c.netapp.com Required to update NetApp Support Site (NSS)
credentials or to add new NSS credentials to Cloud
Manager.
https://netapp-cloud-account.auth0.com
https://cdn.auth0.com
https://services.cloud.netapp.com
Your web browser connects to these endpoints for
centralized user authentication through NetApp
Cloud Central.
https://widget.intercom.io For in-product chat that enables you to talk to
NetApp cloud experts.
3
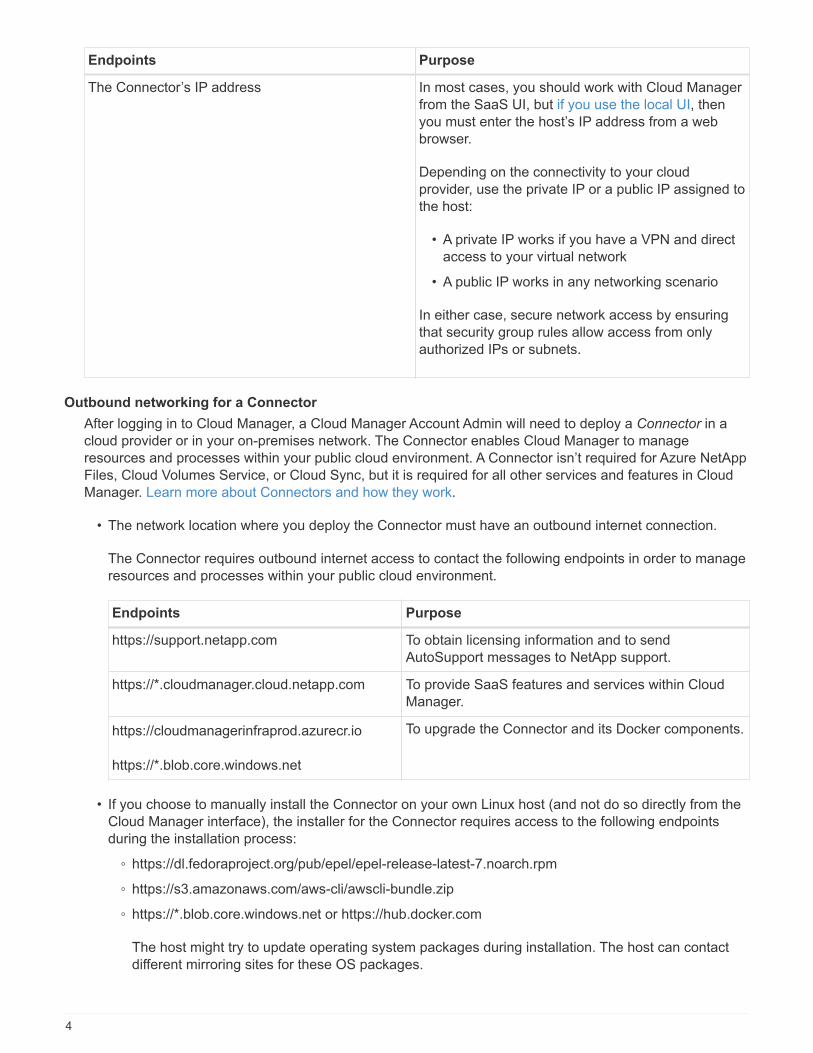
Endpoints Purpose
The Connector’s IP address In most cases, you should work with Cloud Manager
from the SaaS UI, but if you use the local UI, then
you must enter the host’s IP address from a web
browser.
Depending on the connectivity to your cloud
provider, use the private IP or a public IP assigned to
the host:
• A private IP works if you have a VPN and direct
access to your virtual network
• A public IP works in any networking scenario
In either case, secure network access by ensuring
that security group rules allow access from only
authorized IPs or subnets.
Outbound networking for a Connector
After logging in to Cloud Manager, a Cloud Manager Account Admin will need to deploy a Connector in a
cloud provider or in your on-premises network. The Connector enables Cloud Manager to manage
resources and processes within your public cloud environment. A Connector isn’t required for Azure NetApp
Files, Cloud Volumes Service, or Cloud Sync, but it is required for all other services and features in Cloud
Manager. Learn more about Connectors and how they work.
• The network location where you deploy the Connector must have an outbound internet connection.
The Connector requires outbound internet access to contact the following endpoints in order to manage
resources and processes within your public cloud environment.
Endpoints Purpose
https://support.netapp.com To obtain licensing information and to send
AutoSupport messages to NetApp support.
https://*.cloudmanager.cloud.netapp.com To provide SaaS features and services within Cloud
Manager.
https://cloudmanagerinfraprod.azurecr.io
https://*.blob.core.windows.net
To upgrade the Connector and its Docker components.
• If you choose to manually install the Connector on your own Linux host (and not do so directly from the
Cloud Manager interface), the installer for the Connector requires access to the following endpoints
during the installation process:
◦ https://dl.fedoraproject.org/pub/epel/epel-release-latest-7.noarch.rpm
◦ https://s3.amazonaws.com/aws-cli/awscli-bundle.zip
◦ https://*.blob.core.windows.net or https://hub.docker.com
The host might try to update operating system packages during installation. The host can contact
different mirroring sites for these OS packages.
4

• There’s no incoming traffic to the Connector, unless you initiate it.
HTTP (80) and HTTPS (443) provide access to the local UI, which you’ll use in rare circumstances.
SSH (22) is only needed if you need to connect to the host for troubleshooting.
Cloud provider permissions
You need an account that has permissions to deploy the Connector in your cloud provider directly from
Cloud Manager.
There are alternate ways to create a Connector: you can create a Connector from the AWS
Marketplace, the Azure Marketplace, or you can manually install the software.
Location High-level steps Detailed steps
AWS 1. Use a JSON file that includes the required
permissions to create an IAM policy in AWS.
2. Attach the policy to an IAM role or IAM user.
3. When you create the Connector, provide Cloud
Manager with the ARN of the IAM role or the AWS
access key and secret key for the IAM user.
Click here to view detailed
steps.
Azure 1. Use a JSON file that includes the required
permissions to create a custom role in Azure.
2. Assign the role to the user who will create the
Connector from Cloud Manager.
3. When you create the Connector, log in with the
Microsoft account that has the required permissions
(the login prompt that is owned and hosted by
Microsoft).
Click here to view detailed
steps.
Google Cloud 1. Use a YAML file that includes the required
permissions to create a custom role in Google Cloud.
2. Attach that role to the user who will create the
Connector from Cloud Manager.
3. If you plan to use Cloud Volumes ONTAP, set up a
service account that has the required permissions.
4. Enable Google Cloud APIs.
5. When you create the Connector, log in with the
Google account that has the required permissions
(the login prompt is owned and hosted by Google).
Click here to view detailed
steps.
Networking for individual services
Now that your setup is complete, you’re ready to start using the services available from Cloud Manager.
Note that each service has its own networking requirements. Refer to the following pages for more details.
• Cloud Volumes ONTAP for AWS
• Cloud Volumes ONTAP for Azure
5
• Cloud Volumes ONTAP for GCP
• Data replication between ONTAP systems
• Deploying Cloud Data Sense
• On-prem ONTAP clusters
• Cloud Tiering
• Cloud Backup
Signing up to NetApp Cloud Central
Sign up to NetApp Cloud Central so you can access NetApp’s cloud services.
You can use single sign-on to log in using credentials from your corporate directory (federated
identity). To learn more, go to the Cloud Central Help Center and then click Cloud Central sign-
in options.
Requirements
Note that only English characters are allowed in the sign up form.
Steps
1. Open a web browser and go to NetApp Cloud Central
2. Click Sign Up.
3. You have two options:
a. Fill out the form and click Sign Up.
6

b. If you have a registered NetApp Support Site account, click Log in with NetApp and then enter your
NetApp Support Site credentials.
Each time that you log in, you’ll need to use the option that you chose during this sign up process.
When you log in with NetApp, your NetApp Support Site credentials are not added to
Cloud Manager in the Support Dashboard.
4. Wait for an email from NetApp Cloud Central.
5. Click the link in the email to verify your email address.
Result
You now have an active Cloud Central user login.
Logging in to Cloud Manager
The Cloud Manager interface is accessible through a SaaS-based user interface by going
to https://cloudmanager.netapp.com.
7

If you’re accessing Cloud Manager from a Government region or a site that doesn’t have outbound internet
access, then you need to log in to the local user interface running on the Connector. Learn how to access the
local UI on the Connector.
You can use single sign-on to log in using credentials from your corporate directory (federated
identity). To learn more, go to the Cloud Central Help Center and then click Cloud Central sign-
in options.
Steps
1. Open a web browser and go to https://cloudmanager.netapp.com.
2. Log in by entering your NetApp Cloud Central credentials or by clicking Log in with NetApp and entering
your NetApp Support Site credentials.
You need to choose the option that you used when you signed up to Cloud Central.
◦ If you signed up by entering your email and password, then you need to enter those credentials each
time that you log in.
◦ If you registered by logging in with your NetApp Support Site credentials, then you need to use that log
in option each time.
Result
8
You’re now logged in and can start using Cloud Manager to manage your hybrid multi-cloud infrastructure.
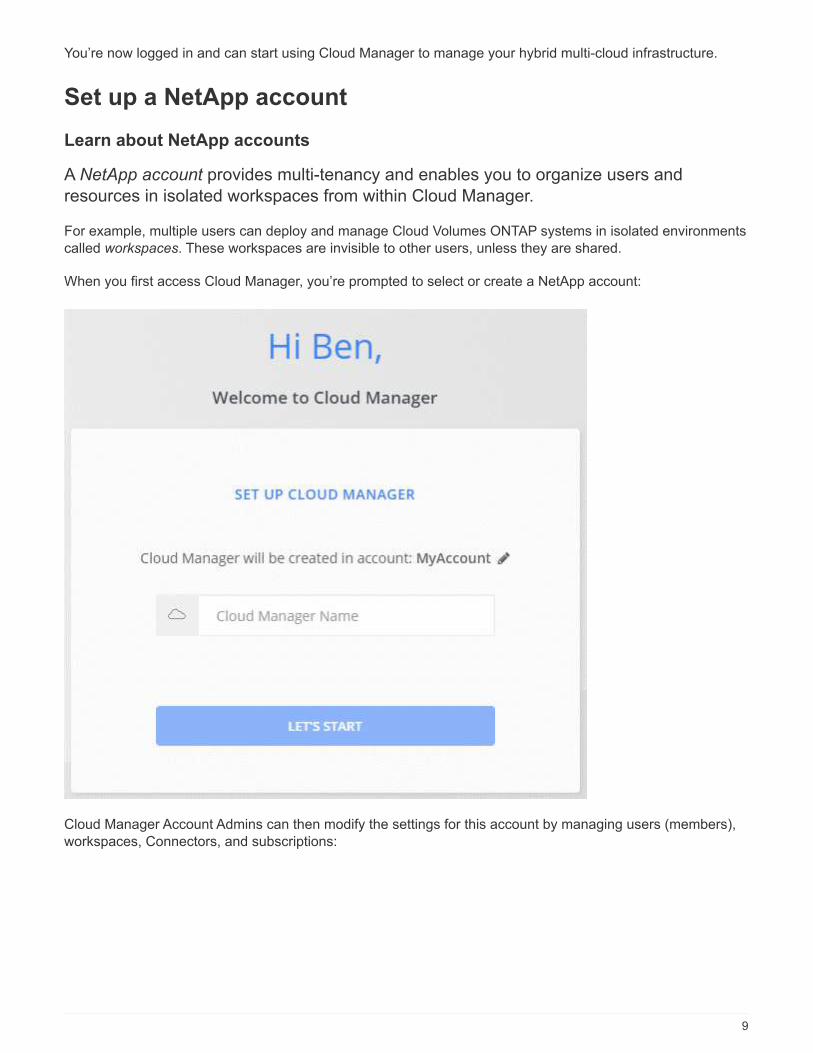
Set up a NetApp account
Learn about NetApp accounts
A NetApp account provides multi-tenancy and enables you to organize users and
resources in isolated workspaces from within Cloud Manager.
For example, multiple users can deploy and manage Cloud Volumes ONTAP systems in isolated environments
called workspaces. These workspaces are invisible to other users, unless they are shared.
When you first access Cloud Manager, you’re prompted to select or create a NetApp account:
Cloud Manager Account Admins can then modify the settings for this account by managing users (members),
workspaces, Connectors, and subscriptions:
9
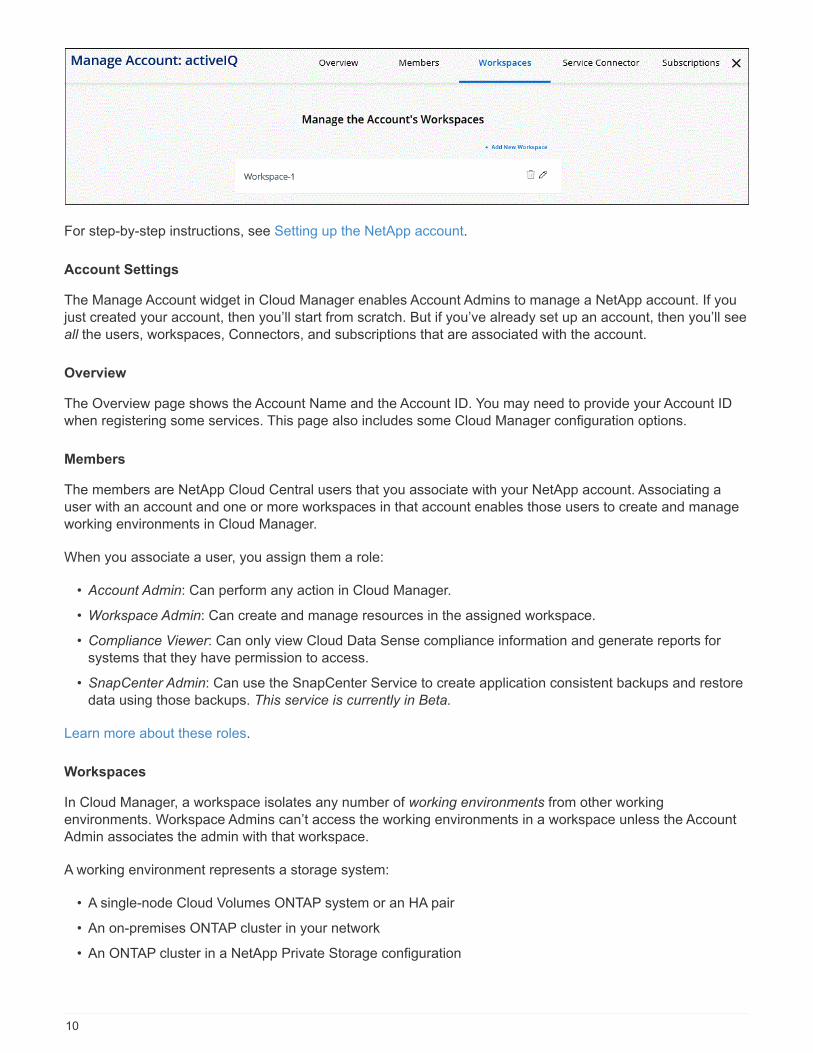
For step-by-step instructions, see Setting up the NetApp account.
Account Settings
The Manage Account widget in Cloud Manager enables Account Admins to manage a NetApp account. If you
just created your account, then you’ll start from scratch. But if you’ve already set up an account, then you’ll see
all the users, workspaces, Connectors, and subscriptions that are associated with the account.
Overview
The Overview page shows the Account Name and the Account ID. You may need to provide your Account ID
when registering some services. This page also includes some Cloud Manager configuration options.
Members
The members are NetApp Cloud Central users that you associate with your NetApp account. Associating a
user with an account and one or more workspaces in that account enables those users to create and manage
working environments in Cloud Manager.
When you associate a user, you assign them a role:
• Account Admin: Can perform any action in Cloud Manager.
• Workspace Admin: Can create and manage resources in the assigned workspace.
• Compliance Viewer: Can only view Cloud Data Sense compliance information and generate reports for
systems that they have permission to access.
• SnapCenter Admin: Can use the SnapCenter Service to create application consistent backups and restore
data using those backups. This service is currently in Beta.
Learn more about these roles.
Workspaces
In Cloud Manager, a workspace isolates any number of working environments from other working
environments. Workspace Admins can’t access the working environments in a workspace unless the Account
Admin associates the admin with that workspace.
A working environment represents a storage system:
• A single-node Cloud Volumes ONTAP system or an HA pair
• An on-premises ONTAP cluster in your network
• An ONTAP cluster in a NetApp Private Storage configuration
10
Learn how to add a workspace.
Connectors
A Connector enables Cloud Manager to manage resources and processes within your public cloud
environment. The Connector runs on a virtual machine instance that you deploy in your cloud provider, or on
an on-prem host that you configured.
You can use a Connector with more than one NetApp cloud data service. For example, if you already have a
Connector for Cloud Manager, you can select it when you set up the Cloud Tiering service.
Learn more about Connectors.
Subscriptions
These are the NetApp subscriptions associated with the selected account.
When you subscribe to Cloud Manager from a cloud provider’s marketplace, you’re redirected to Cloud Central
where you need to save your subscription and associate it with specific accounts.
After you’ve subscribed, each subscription is available from the Manage Account widget. You’ll only see the
subscriptions that are associated with the account that you’re currently viewing.
You have the option to rename a subscription and to disassociate the subscription from one or more accounts.
For example, let’s say that you have two accounts and each is billed through separate subscriptions. You might
disassociate a subscription from one of the accounts so the users in that account don’t accidentally choose the
wrong subscription when creating a Cloud Volume ONTAP working environment.
Learn how to manage subscriptions.
Examples
The following examples depict how you might set up your accounts.
In both example images that follow, the Connector and the Cloud Volumes ONTAP systems
don’t actually reside in the NetApp account—they’re running in a cloud provider. This is a
conceptual representation of the relationship between each component.
Example 1
The following example shows an account that uses two workspaces to create isolated environments. The first
workspace is for a production environment and the second is for a dev environment.
11

Example 2
Here’s another example that shows the highest level of multi-tenancy by using two separate NetApp accounts.
For example, a service provider might use Cloud Manager in one account to provide services for their
customers, while using another account to provide disaster recovery for one of their business units.
Note that account 2 includes two separate Connectors. This might happen if you have systems in separate
regions or in separate cloud providers.
12

Set up workspaces and users in your NetApp account
When you log in to Cloud Manager for the first time, you’re prompted to create a NetApp
account. This account provides multi-tenancy and enables you to organize users and
resources in isolated workspaces.
Learn more about how NetApp accounts work.
Set up your NetApp account so users can access Cloud Manager and access the working environments in a
workspace. Just add a single user or add multiple users and workspaces.
Add workspaces
In Cloud Manager, workspaces enable you to isolate a set of working environments from other working
environments and from other users. For example, you can create two workspaces and associate separate
users with each workspace.
Steps
1. From the top of Cloud Manager, click the Account drop-down.
2. Click Manage Account next to the currently selected account.
13
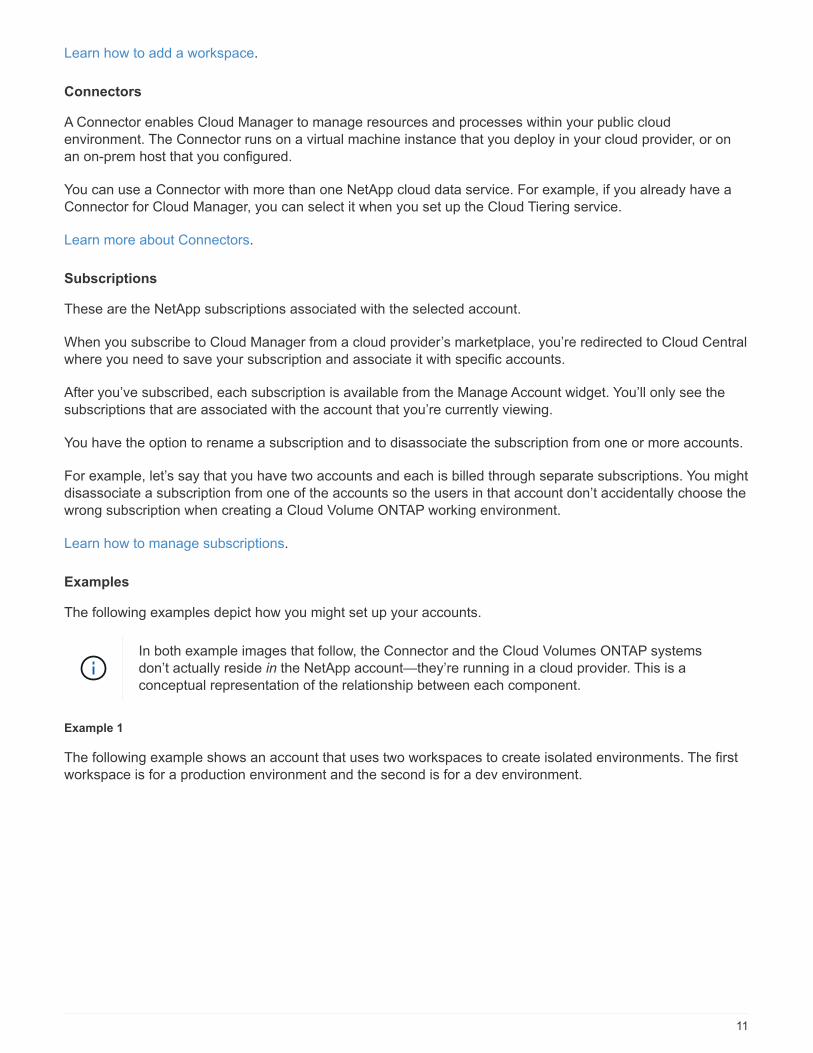
3. Click Workspaces.
4. Click Add New Workspace.
5. Enter a name for the workspace and click Add.
After you finish
If a Workspace Admin needs access to this workspace, then you’ll need to associate the user. You’ll also need
to associate Connectors with the workspace so Workspace Admins can use those Connectors.
Add users
Associate Cloud Central users with the NetApp account so those users can create and manage working
environments in Cloud Manager.
Steps
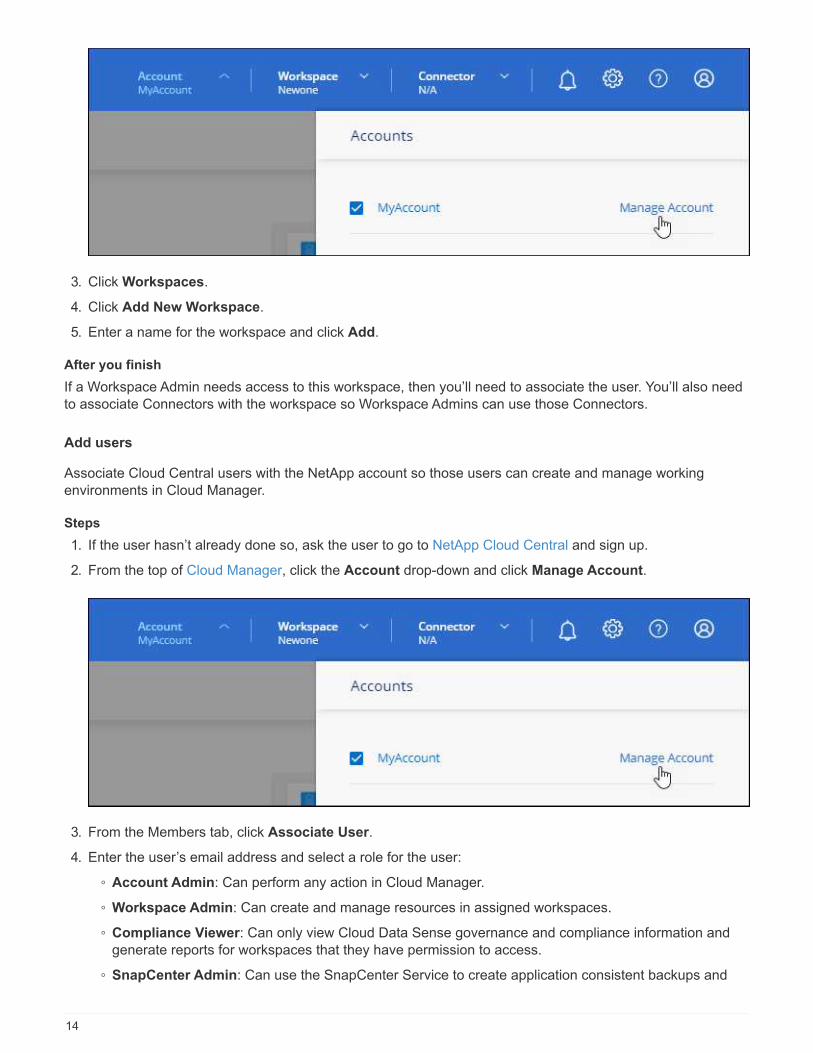
1. If the user hasn’t already done so, ask the user to go to NetApp Cloud Central and sign up.
2. From the top of Cloud Manager, click the Account drop-down and click Manage Account.
3. From the Members tab, click Associate User.
4. Enter the user’s email address and select a role for the user:
◦ Account Admin: Can perform any action in Cloud Manager.
◦ Workspace Admin: Can create and manage resources in assigned workspaces.
◦ Compliance Viewer: Can only view Cloud Data Sense governance and compliance information and
generate reports for workspaces that they have permission to access.
◦ SnapCenter Admin: Can use the SnapCenter Service to create application consistent backups and
14
restore data using those backups. This service is currently in Beta.
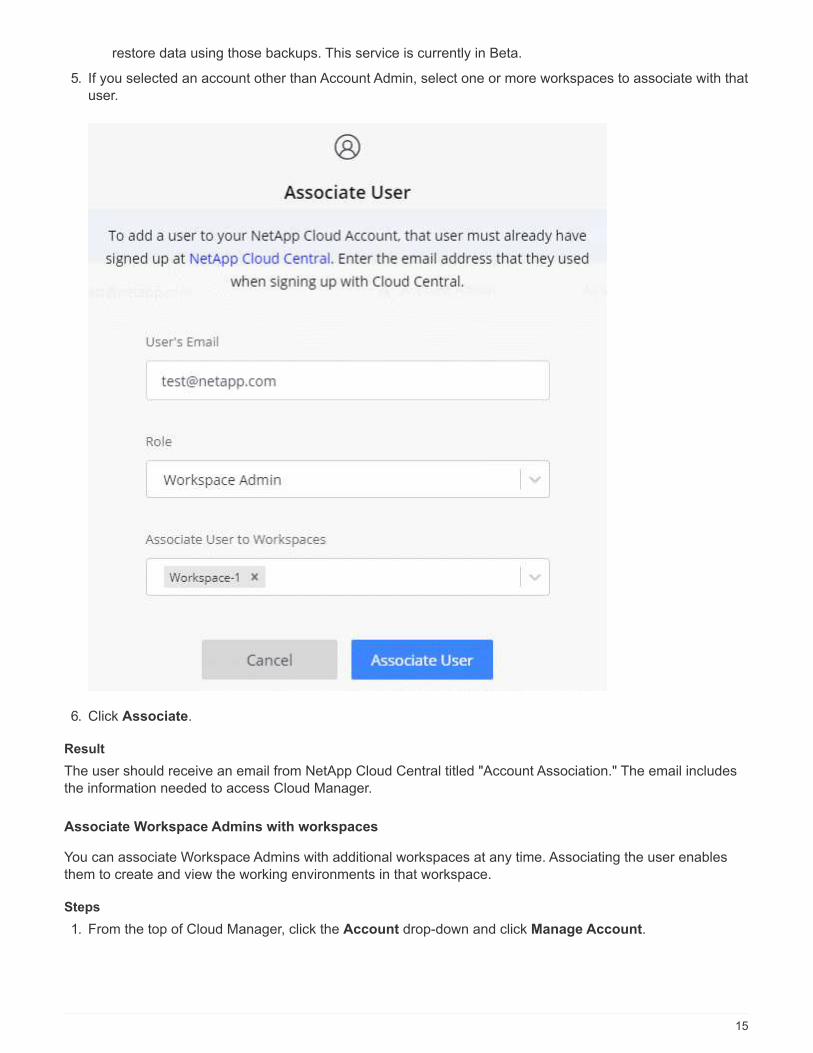
5. If you selected an account other than Account Admin, select one or more workspaces to associate with that
user.
6. Click Associate.
Result
The user should receive an email from NetApp Cloud Central titled "Account Association." The email includes
the information needed to access Cloud Manager.
Associate Workspace Admins with workspaces
You can associate Workspace Admins with additional workspaces at any time. Associating the user enables
them to create and view the working environments in that workspace.
Steps
1. From the top of Cloud Manager, click the Account drop-down and click Manage Account.
15
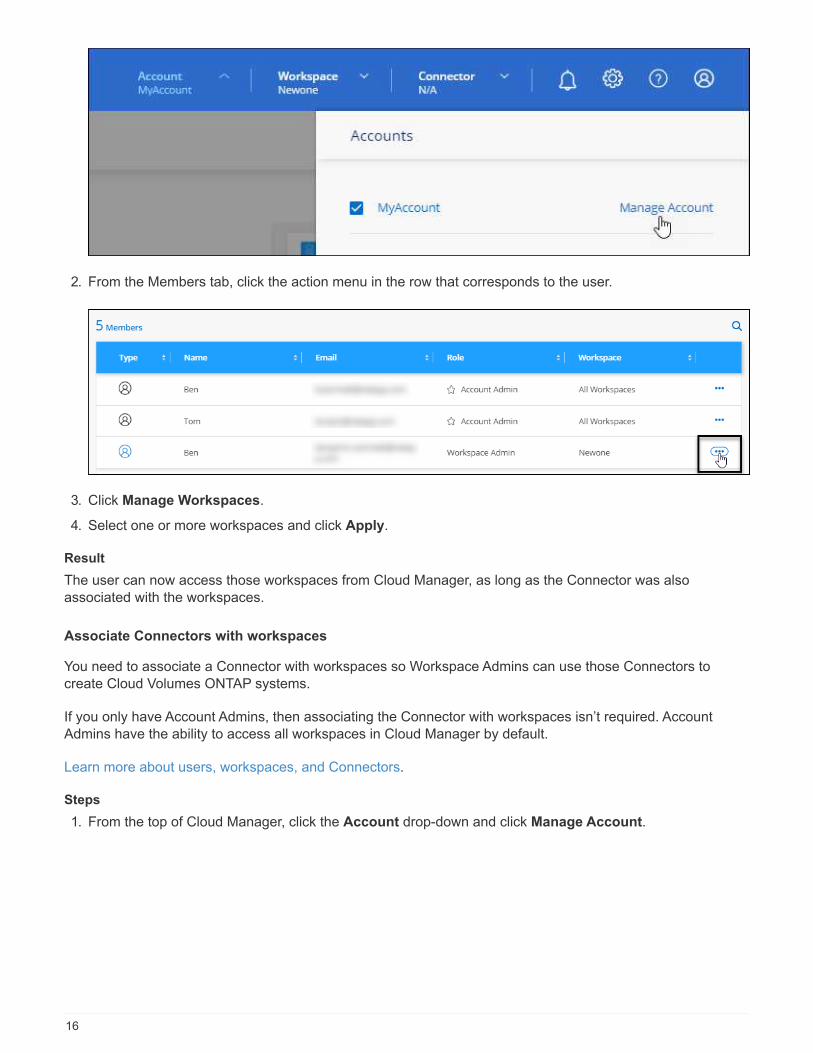
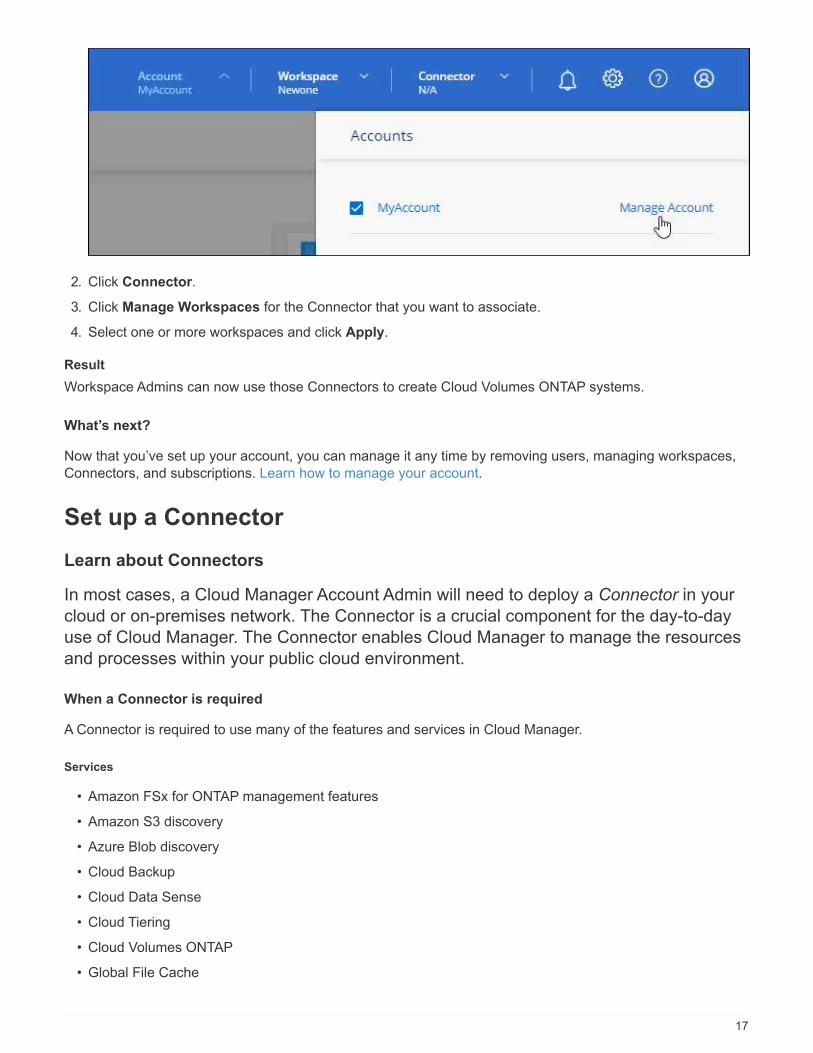
2. From the Members tab, click the action menu in the row that corresponds to the user.
3. Click Manage Workspaces.
4. Select one or more workspaces and click Apply.
Result
The user can now access those workspaces from Cloud Manager, as long as the Connector was also
associated with the workspaces.
Associate Connectors with workspaces
You need to associate a Connector with workspaces so Workspace Admins can use those Connectors to
create Cloud Volumes ONTAP systems.
If you only have Account Admins, then associating the Connector with workspaces isn’t required. Account
Admins have the ability to access all workspaces in Cloud Manager by default.
Learn more about users, workspaces, and Connectors.
Steps
1. From the top of Cloud Manager, click the Account drop-down and click Manage Account.
16
2. Click Connector.
3. Click Manage Workspaces for the Connector that you want to associate.
4. Select one or more workspaces and click Apply.
Result
Workspace Admins can now use those Connectors to create Cloud Volumes ONTAP systems.
What’s next?
Now that you’ve set up your account, you can manage it any time by removing users, managing workspaces,
Connectors, and subscriptions. Learn how to manage your account.
Set up a Connector
Learn about Connectors
In most cases, a Cloud Manager Account Admin will need to deploy a Connector in your
cloud or on-premises network. The Connector is a crucial component for the day-to-day
use of Cloud Manager. The Connector enables Cloud Manager to manage the resources
and processes within your public cloud environment.
When a Connector is required
A Connector is required to use many of the features and services in Cloud Manager.
Services
• Amazon FSx for ONTAP management features
• Amazon S3 discovery
• Azure Blob discovery
• Cloud Backup
• Cloud Data Sense
• Cloud Tiering
• Cloud Volumes ONTAP
• Global File Cache
17

• Google Cloud Storage discovery
• Kubernetes clusters
• Monitoring
• On-premises ONTAP clusters
A Connector is not required for the following services:
• Active IQ Digital Advisor
• Amazon FSx for ONTAP working environment creation
While a Connector isn’t required to create a working environment, it is required to create and manage
volumes, replicate data, and integrate FSx for ONTAP with NetApp cloud services, such as Data Sense
and Cloud Sync.
• Azure NetApp Files
While a Connector isn’t required to set up and manage Azure NetApp Files, a Connector is required if you
want to use Cloud Data Sense to scan Azure NetApp Files data.
• Cloud Volumes Service for Google Cloud
• Cloud Sync
Digital Wallet
In almost all cases, you can add a license to the Digital Wallet without a Connector.
The only time that a Connector is required to add a license to the Digital Wallet is for Cloud Volumes ONTAP
node-based licenses. A Connector is required in this case because the data is taken from the licenses installed
on Cloud Volumes ONTAP systems.
Supported locations
A Connector is supported in the following locations:
• Amazon Web Services
• Microsoft Azure
• Google Cloud
• On your premises
• On your premises, without internet access
Note about Azure deployments
If you deploy the Connector in Azure, it should be deployed in the same Azure region as the Cloud Volumes
ONTAP systems that it manages, or in the Azure region pair for the Cloud Volumes ONTAP systems. This
requirement ensures that an Azure Private Link connection is used between Cloud Volumes ONTAP and its
associated storage accounts. Learn how Cloud Volumes ONTAP uses an Azure Private Link.
Note about Google Cloud deployments
If you want to create a Cloud Volumes ONTAP system in Google Cloud, then you must have a Connector that’s
running in Google Cloud as well. You can’t use a Connector that’s running in AWS, Azure, or on-prem.
18

Connectors should remain running
A Connector should remain running at all times. It’s important for the continued health and operation of the
services that you enable.
For example, a Connector is a key component in the health and operation of Cloud Volumes ONTAP. If a
Connector is powered down, Cloud Volumes ONTAP PAYGO systems with node-based licensing will shut
down after losing communication with a Connector for longer than 14 days.
How to create a Connector
A Cloud Manager Account Admin needs to create a Connector before a Workspace Admin can create a Cloud
Volumes ONTAP working environment and use any of the other services listed above. An admin can create a
Connector in a number of ways:
• Directly from Cloud Manager (recommended)
◦ Create in AWS
◦ Create in Azure
◦ Create in GCP
• By manually installing the software on your own Linux host
◦ On a host that has internet access
◦ On an on-prem host that doesn’t have internet access
• From your cloud provider’s marketplace
◦ AWS Marketplace
◦ Azure Marketplace
Cloud Manager will prompt you to create a Connector if one is needed to complete an action.
Permissions
Specific permissions are needed to create the Connector and another set of permissions are needed for the
Connector instance itself.
Permissions to create a Connector
The user who creates a Connector from Cloud Manager needs specific permissions to deploy the instance in
your cloud provider of choice. Cloud Manager will remind you of the permissions requirements when you
create a Connector.
• View the required AWS permissions
• View the required Azure permissions
• View the required Google Cloud permissions
Permissions for the Connector instance
The Connector needs specific cloud provider permissions to perform operations on your behalf. For example,
to deploy and manage Cloud Volumes ONTAP.
When you create a Connector directly from Cloud Manager, Cloud Manager creates the Connector with the
permissions that it needs. There’s nothing that you need to do.
19
If you create the Connector yourself from the AWS Marketplace, the Azure Marketplace, or by manually
installing the software, then you’ll need to make sure that the right permissions are in place.
• Learn how the Connector uses AWS permissions
• Learn how the Connector uses Azure permissions
• Learn how the Connector uses Google Cloud permissions
Connector upgrades
We typically update the Connector software each month to introduce new features and to provide stability
improvements. While most of the services and features in the Cloud Manager platform are offered through
SaaS-based software, a few features and functionalities are dependent on the version of the Connector. That
includes Cloud Volumes ONTAP management, on-prem ONTAP cluster management, settings, and help.
The Connector automatically updates its software to the latest version, as long as it has outbound internet
access to obtain the software update.
Number of working environments per Connector
A Connector can manage multiple working environments in Cloud Manager. The maximum number of working
environments that a single Connector should manage varies. It depends on the type of working environments,
the number of volumes, the amount of capacity being managed, and the number of users.
If you have a large-scale deployment, work with your NetApp representative to size your environment. If you
experience any issues along the way, reach out to us by using the in-product chat.
When to use multiple Connectors
In some cases, you might only need one Connector, but you might find yourself needing two or more
Connectors.
Here are a few examples:
• You’re using a multi-cloud environment (AWS and Azure), so you have one Connector in AWS and another
in Azure. Each manages the Cloud Volumes ONTAP systems running in those environments.
• A service provider might use one NetApp account to provide services for their customers, while using
another account to provide disaster recovery for one of their business units. Each account would have
separate Connectors.
Using multiple Connectors with the same working environment
You can manage a working environment with multiple Connectors at the same time for disaster recovery
purposes. If one Connector goes down, you can switch to the other Connector to immediately manage the
working environment.
To set up this configuration:
1. Switch to another Connector
2. Discover the existing working environment.
◦ Add existing Cloud Volumes ONTAP systems to Cloud Manager
◦ Discover ONTAP clusters
20
3. Set the Capacity Management Mode
Only the main Connector should be set to Automatic Mode. If you switch to another Connector for DR
purposes, then you can change the Capacity Management Mode as needed.
When to switch between Connectors
When you create your first Connector, Cloud Manager automatically uses that Connector for each additional
working environment that you create. Once you create an additional Connector, you’ll need to switch between
them to see the working environments that are specific to each Connector.
Learn how to switch between Connectors.
The local user interface
While you should perform almost all tasks from the SaaS user interface, a local user interface is still available
on the Connector. This interface is needed if you install the Connector in an environment that doesn’t have
internet access, and for a few tasks that need to be performed from the Connector itself, instead of the SaaS
interface:
• Setting a proxy server
• Installing a patch (you’ll typically work with NetApp personnel to install a patch)
• Downloading AutoSupport messages (usually directed by NetApp personnel when you have issues)
Learn how to access the local UI.
Set up networking for the Connector
Set up your networking so the Connector can manage resources and processes within
your public cloud environment. The most important step is ensuring outbound internet
access to various endpoints.
The information on this page is for a typical deployment where the Connector has outbound internet access.
If your network uses a proxy server for all communication to the internet, you can specify the
proxy server from the Settings page. Refer to Configuring the Connector to use a proxy server.
Connection to target networks
A Connector requires a network connection to the type of working environment that you’re creating and the
services that you’re planning to enable.
For example, if you install a Connector in your corporate network, then you must set up a VPN connection to
the VPC or VNet in which you launch Cloud Volumes ONTAP.
Possible conflict with IP addresses in the 172 range
Cloud Manager deploys the Connector with two interfaces that have IP addresses in the 172.17.0.0/16 and
172.18.0.0/16 ranges.
If your network has a subnet configured with either of these ranges, then you might experience connectivity
failures from Cloud Manager. For example, discovering on-prem ONTAP clusters in Cloud Manager might fail.
21

See Knowledge Base article Cloud Manager Connector IP conflict with existing network for instructions on how
to change the IP address of the Connector’s interfaces.
Outbound internet access
Outbound internet access is required from the Connector.
Endpoints to manage resources in your public cloud environment
The Connector requires outbound internet access to manage resources and processes within your public cloud
environment.
Endpoints Purpose
https://support.netapp.com To obtain licensing information and to send AutoSupport
messages to NetApp support.
https://*.cloudmanager.cloud.netapp.com To provide SaaS features and services within Cloud
Manager.
https://cloudmanagerinfraprod.azurecr.io
https://*.blob.core.windows.net
To upgrade the Connector and its Docker components.
Endpoints to install the Connector on a Linux host
You have the option to manually install the Connector software on your own Linux host. If you do, the installer
for the Connector must access the following URLs during the installation process:
• https://dl.fedoraproject.org/pub/epel/epel-release-latest-7.noarch.rpm
• https://s3.amazonaws.com/aws-cli/awscli-bundle.zip
• https://*.blob.core.windows.net or https://hub.docker.com
The host might try to update operating system packages during installation. The host can contact different
mirroring sites for these OS packages.
Ports and security groups
There’s no incoming traffic to the Connector, unless you initiate it or if the Connector is used as a proxy for
AutoSupport messages. HTTP and HTTPS provide access to the local UI, which you’ll use in rare
circumstances. SSH is only needed if you need to connect to the host for troubleshooting.
Proxy server for AutoSupport messages
If an outbound internet connection isn’t available for Cloud Volumes ONTAP to send AutoSupport messages,
Cloud Manager automatically configures Cloud Volumes ONTAP to use the Connector as a proxy server.
The only requirement is to ensure that the Connector’s security group allows inbound connections over port
3128. You’ll need to open this port after you deploy the Connector.
If you defined strict outbound rules for Cloud Volumes ONTAP, then you’ll also need to ensure that the Cloud
Volumes ONTAP security group allows outbound connections over port 3128.
22

Rules for the Connector in AWS
The security group for the Connector requires both inbound and outbound rules.
Inbound rules
Protocol Port Purpose
SSH 22 Provides SSH access to the Connector host
HTTP 80 Provides HTTP access from client web browsers to the local user interface
HTTPS 443 Provides HTTPS access from client web browsers to the local user interface, and
connections from the Cloud Data Sense instance
TCP 3128 Provides Cloud Volumes ONTAP with internet access to send AutoSupport messages
to NetApp Support. You must manually open this port after deployment. Learn more
about the Connector’s proxy server.
TCP 9060 Provides the ability to enable and use Cloud Data Sense (required only for GovCloud
deployments)
Outbound rules
The predefined security group for the Connector opens all outbound traffic. If that is acceptable, follow the
basic outbound rules. If you need more rigid rules, use the advanced outbound rules.
Basic outbound rules
The predefined security group for the Connector includes the following outbound rules.
Protocol Port Purpose
All TCP All All outbound traffic
All UDP All All outbound traffic
Advanced outbound rules
If you need rigid rules for outbound traffic, you can use the following information to open only those ports that
are required for outbound communication by the Connector.
The source IP address is the Connector host.
Service Prot
ocol
Po
rt
Destination Purpose
API calls and
AutoSupport
HTT
PS
44
3
Outbound internet and
ONTAP cluster
management LIF
API calls to AWS and ONTAP, to Cloud Data Sense, to
the Ransomware service, and sending AutoSupport
messages to NetApp
API calls TCP 30
00
ONTAP HA mediator Communication with the ONTAP HA mediator
TCP 80
88
Backup to S3 API calls to Backup to S3
23
Service Prot
ocol
Po
rt
Destination Purpose
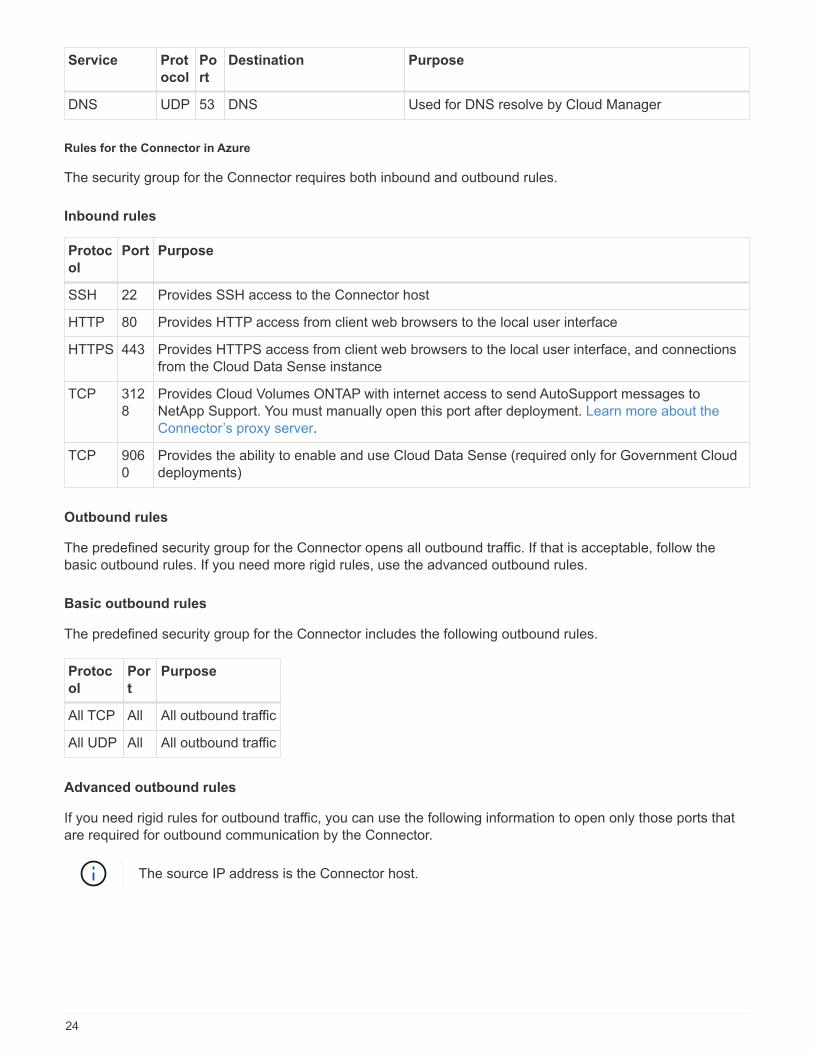
DNS UDP 53 DNS Used for DNS resolve by Cloud Manager
Rules for the Connector in Azure
The security group for the Connector requires both inbound and outbound rules.
Inbound rules
Protoc
ol
Port Purpose
SSH 22 Provides SSH access to the Connector host
HTTP 80 Provides HTTP access from client web browsers to the local user interface
HTTPS 443 Provides HTTPS access from client web browsers to the local user interface, and connections
from the Cloud Data Sense instance
TCP 312
8
Provides Cloud Volumes ONTAP with internet access to send AutoSupport messages to
NetApp Support. You must manually open this port after deployment. Learn more about the
Connector’s proxy server.
TCP 906
0
Provides the ability to enable and use Cloud Data Sense (required only for Government Cloud
deployments)
Outbound rules
The predefined security group for the Connector opens all outbound traffic. If that is acceptable, follow the
basic outbound rules. If you need more rigid rules, use the advanced outbound rules.
Basic outbound rules
The predefined security group for the Connector includes the following outbound rules.
Protoc
ol
Por
t
Purpose
All TCP All All outbound traffic
All UDP All All outbound traffic
Advanced outbound rules
If you need rigid rules for outbound traffic, you can use the following information to open only those ports that
are required for outbound communication by the Connector.
The source IP address is the Connector host.
24

Service Prot
ocol
Po
rt
Destination Purpose
API calls and
AutoSupport
HTT
PS
44
3
Outbound internet and
ONTAP cluster
management LIF
API calls to AWS and ONTAP, to Cloud Data Sense, to
the Ransomware service, and sending AutoSupport
messages to NetApp
DNS UDP 53 DNS Used for DNS resolve by Cloud Manager
Rules for the Connector in GCP
The firewall rules for the Connector requires both inbound and outbound rules.
Inbound rules
Protocol Port Purpose
SSH 22 Provides SSH access to the Connector host
HTTP 80 Provides HTTP access from client web browsers to the local user interface
HTTPS 443 Provides HTTPS access from client web browsers to the local user interface
TCP 3128 Provides Cloud Volumes ONTAP with internet access to send AutoSupport messages
to NetApp Support. You must manually open this port after deployment. Learn more
about the Connector’s proxy server.
Outbound rules
The predefined firewall rules for the Connector opens all outbound traffic. If that is acceptable, follow the basic
outbound rules. If you need more rigid rules, use the advanced outbound rules.
Basic outbound rules
The predefined firewall rules for the Connector includes the following outbound rules.
Protocol Port Purpose
All TCP All All outbound traffic
All UDP All All outbound traffic
Advanced outbound rules
If you need rigid rules for outbound traffic, you can use the following information to open only those ports that
are required for outbound communication by the Connector.
The source IP address is the Connector host.
Service Prot
ocol
Po
rt
Destination Purpose
API calls and
AutoSupport
HTT
PS
44
3
Outbound internet and
ONTAP cluster
management LIF
API calls to GCP and ONTAP, to Cloud Data Sense, to
the Ransomware service, and sending AutoSupport
messages to NetApp
25

Service Prot
ocol
Po
rt
Destination Purpose
DNS UDP 53 DNS Used for DNS resolve by Cloud Manager
Ports for the on-prem Connector
The Connector uses the following inbound ports when installed manually on an on-premises Linux host.
These inbound rules apply to both deployment models for the on-prem Connector: installed with internet
access or without internet access.
Protocol Port Purpose
HTTP 80 Provides HTTP access from client web browsers to the local user interface
HTTPS 443 Provides HTTPS access from client web browsers to the local user interface
Create a Connector in AWS from Cloud Manager
A Cloud Manager Account Admin needs to deploy a Connector before you can use most
Cloud Manager features. The Connector enables Cloud Manager to manage resources
and processes within your public cloud environment. Learn when a Connector is required.
This page describes how to create a Connector in AWS directly from Cloud Manager. Learn about other ways
to deploy a Connector.
These steps must be completed by a user who has the Account Admin role. A Workspace Admin can’t create a
Connector.
Set up AWS authentication
Cloud Manager needs to authenticate with AWS before it can deploy the Connector instance in your VPC. You
can choose one of these authentication methods:
• Let Cloud Manager assume an IAM role that has the required permissions
• Provide an AWS access key and secret key for an IAM user who has the required permissions
With either option, you first need to start by creating an IAM policy that includes the required permissions.
Create an IAM policy
This policy contains only the permissions needed to launch the Connector instance in AWS from Cloud
Manager. Don’t use this policy for other situations.
When Cloud Manager creates the Connector, it applies a new set of permissions to the Connector instance
that enables the Connector to manage the resources in your public cloud environment.
Steps
1. Go to the AWS IAM console.
2. Click Policies > Create policy.
3. Click JSON.
26
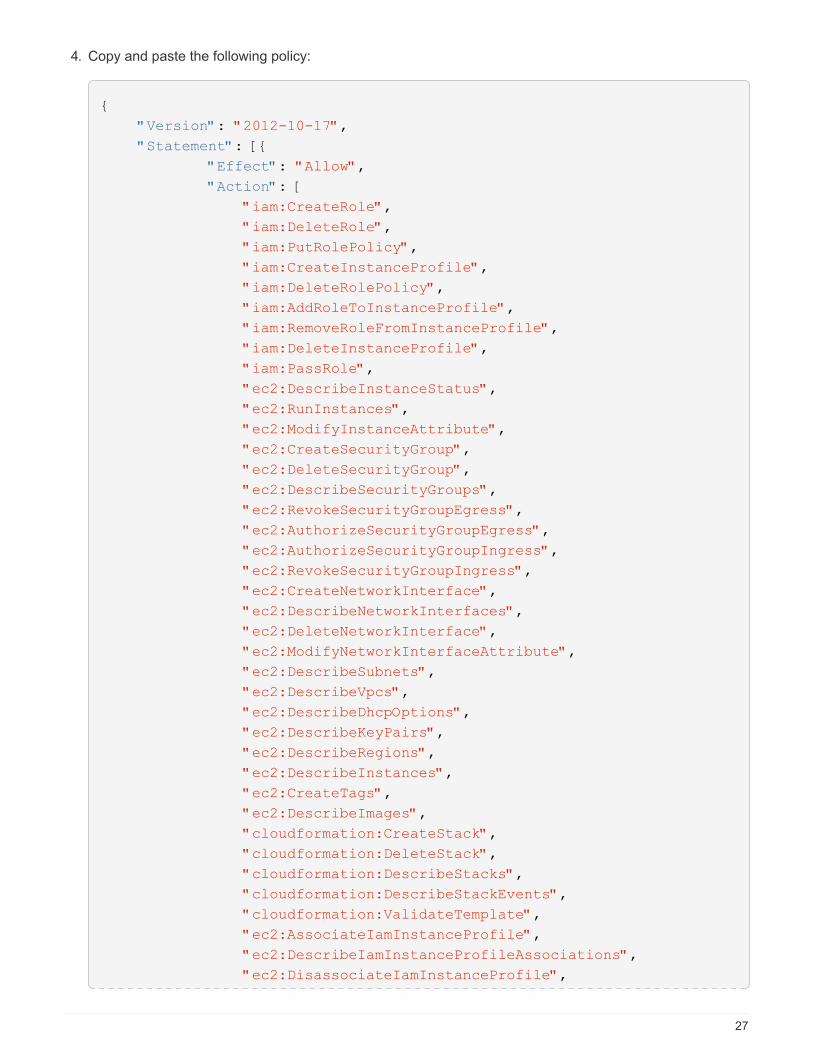
4. Copy and paste the following policy:
{
"Version": "2012-10-17",
"Statement": [{
"Effect": "Allow",
"Action": [
"iam:CreateRole",
"iam:DeleteRole",
"iam:PutRolePolicy",
"iam:CreateInstanceProfile",
"iam:DeleteRolePolicy",
"iam:AddRoleToInstanceProfile",
"iam:RemoveRoleFromInstanceProfile",
"iam:DeleteInstanceProfile",
"iam:PassRole",
"ec2:DescribeInstanceStatus",
"ec2:RunInstances",
"ec2:ModifyInstanceAttribute",
"ec2:CreateSecurityGroup",
"ec2:DeleteSecurityGroup",
"ec2:DescribeSecurityGroups",
"ec2:RevokeSecurityGroupEgress",
"ec2:AuthorizeSecurityGroupEgress",
"ec2:AuthorizeSecurityGroupIngress",
"ec2:RevokeSecurityGroupIngress",
"ec2:CreateNetworkInterface",
"ec2:DescribeNetworkInterfaces",
"ec2:DeleteNetworkInterface",
"ec2:ModifyNetworkInterfaceAttribute",
"ec2:DescribeSubnets",
"ec2:DescribeVpcs",
"ec2:DescribeDhcpOptions",
"ec2:DescribeKeyPairs",
"ec2:DescribeRegions",
"ec2:DescribeInstances",
"ec2:CreateTags",
"ec2:DescribeImages",
"cloudformation:CreateStack",
"cloudformation:DeleteStack",
"cloudformation:DescribeStacks",
"cloudformation:DescribeStackEvents",
"cloudformation:ValidateTemplate",
"ec2:AssociateIamInstanceProfile",
"ec2:DescribeIamInstanceProfileAssociations",
"ec2:DisassociateIamInstanceProfile",
27

"iam:GetRole",
"iam:TagRole",
"iam:ListRoles",
"kms:ListAliases"
],
"Resource": "*"
},
{
"Effect": "Allow",
"Action": [
"ec2:TerminateInstances"
],
"Condition": {
"StringLike": {
"ec2:ResourceTag/OCCMInstance": "*"
}
},
"Resource": [
"arn:aws:ec2:*:*:instance/*"
]
}
]
}
5. Click Next and add tags, if needed.
6. Click Next and enter a name and description.
7. Click Create policy.
What’s next?
Either attach the policy to an IAM role that Cloud Manager can assume or to an IAM user.
Set up an IAM role
Set up an IAM role that Cloud Manager can assume in order to deploy the Connector in AWS.
Steps
1. Go to the AWS IAM console in the target account.
2. Under Access Management, click Roles > Create Role and follow the steps to create the role.
Be sure to do the following:
◦ Under Trusted entity type, select AWS account.
◦ Select Another AWS account and enter the ID of the Cloud Manager SaaS account: 952013314444
◦ Select the policy that you created in the previous section.
3. After you create the role, copy the Role ARN so that you can paste it in Cloud Manager when you create
the Connector.
28
Result
The IAM role now has the required permissions.
Set up permissions for an IAM user
When you create a Connector, you can provide an AWS access key and secret key for an IAM user who has
the required permissions to deploy the Connector instance.
Steps
1. From the AWS IAM console, click Users and then select the user name.
2. Click Add permissions > Attach existing policies directly.
3. Select the policy that you created.
4. Click Next and then click Add permissions.
5. Ensure that you have access to an access key and secret key for the IAM user.
Result
The AWS user now has the permissions required to create the Connector from Cloud Manager. You’ll need to
specify AWS access keys for this user when you’re prompted by Cloud Manager.
Create a Connector
Cloud Manager enables you to create a Connector in AWS directly from its user interface.
What you’ll need
• An AWS authentication method: either the ARN of an IAM role that Cloud Manager can assume, or an
AWS access key and secret key for an IAM user.
• A VPC, subnet, and keypair in your AWS region of choice.
• If you don’t want Cloud Manager to automatically create an IAM role for the Connector, then you’ll need to
create your own using the policy on this page.
These are the permissions that the Connector needs to manage resources in your public cloud
environment. It’s a different set of permissions than what you provided to create the Connector instance.
Steps
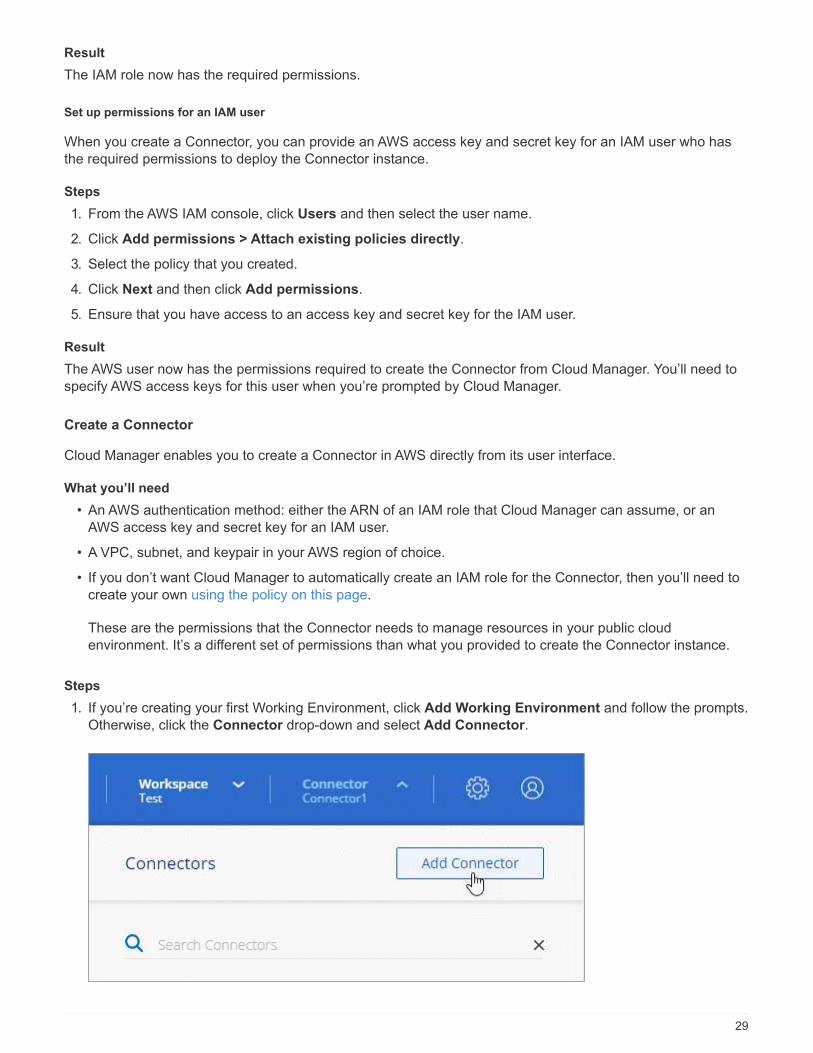
1. If you’re creating your first Working Environment, click Add Working Environment and follow the prompts.
Otherwise, click the Connector drop-down and select Add Connector.
29
2. Choose Amazon Web Services as your cloud provider and click Continue.
Remember that the Connector must have a network connection to the type of working environment that
you’re creating and the services that you’re planning to enable.
Learn more about networking requirements for the Connector.
3. Follow the steps in the wizard to create the Connector:
◦ Get Ready: Review what you’ll need.
◦ AWS Credentials: Specify your AWS region and then choose an authentication method, which is
either an IAM role that Cloud Manager can assume or an AWS access key and secret key.
If you choose Assume Role, you can create the first set of credentials from the
Connector deployment wizard. Any additional set of credentials must be created from
the Credentials page. They will then be available from the wizard in a drop-down list.
Learn how to add additional credentials.
◦ Details: Provide details about the Connector.
▪ Enter a name for the instance.
▪ Add custom tags (metadata) to the instance.
▪ Choose whether you want Cloud Manager to create a new role that has the required permissions,
or if you want to select an existing role that you set up with the required permissions.
▪ Choose whether you want to encrypt the Connector’s EBS disks. You have the option to use the
default encryption key or to use a custom key.
◦ Network: Specify a VPC, subnet, and key pair for the instance, choose whether to enable a public IP
address, and optionally specify a proxy configuration.
◦ Security Group: Choose whether to create a new security group or whether to select an existing
security group that allows inbound HTTP, HTTPS, and SSH access.
There’s no incoming traffic to the Connector, unless you initiate it. HTTP and HTTPS
provide access to the local UI, which you’ll use in rare circumstances. SSH is only
needed if you need to connect to the host for troubleshooting.
◦ Review: Review your selections to verify that your set up is correct.
4. Click Add.
The instance should be ready in about 7 minutes. You should stay on the page until the process is
complete.
After you finish
You need to associate a Connector with workspaces so Workspace Admins can use those Connectors to
create Cloud Volumes ONTAP systems. If you only have Account Admins, then associating the Connector with
workspaces isn’t required. Account Admins have the ability to access all workspaces in Cloud Manager by
default. Learn more.
If you have Amazon S3 buckets in the same AWS account where you created the Connector, you’ll see an
Amazon S3 working environment appear on the Canvas automatically. Learn more about what you can do with
this working environment.
30
Open port 3128 for AutoSupport messages
If you plan to deploy Cloud Volumes ONTAP systems in a subnet where an outbound internet connection won’t
be available, then Cloud Manager automatically configures Cloud Volumes ONTAP to use the Connector as a
proxy server.
The only requirement is to ensure that the Connector’s security group allows inbound connections over port
3128. You’ll need to open this port after you deploy the Connector.
If you use the default security group for Cloud Volumes ONTAP, then no changes are needed to its security
group. But if you plan to define strict outbound rules for Cloud Volumes ONTAP, then you’ll also need to ensure
that the Cloud Volumes ONTAP security group allows outbound connections over port 3128.
Create a Connector in Azure from Cloud Manager
A Cloud Manager Account Admin needs to deploy a Connector before you can use most
Cloud Manager features. The Connector enables Cloud Manager to manage resources
and processes within your public cloud environment. Learn when a Connector is required.
This page describes how to create a Connector in Azure directly from Cloud Manager. Learn about other ways
to deploy a Connector.
These steps must be completed by a user who has the Account Admin role. A Workspace Admin can’t create a
Connector.
Overview
To deploy a Connector, you need to provide Cloud Manager with a login that has the required permissions to
create the Connector VM in Azure.
You have two options:
1. Sign in with your Microsoft account when prompted. This account must have specific Azure permissions.
This is the default option.
Follow the steps below to get started.
2. Provide details about an Azure AD service principal. This service principal also requires specific
permissions.
Follow the steps below to get started.
A note about Azure regions
The Connector should be deployed in the same Azure region as the Cloud Volumes ONTAP systems that it
manages, or in the Azure region pair for the Cloud Volumes ONTAP systems. This requirement ensures that an
Azure Private Link connection is used between Cloud Volumes ONTAP and its associated storage accounts.
Learn how Cloud Volumes ONTAP uses an Azure Private Link.
Create a Connector using your Azure account
The default way to create a Connector in Azure is by logging in with your Azure account when prompted. The
login form is owned and hosted by Microsoft. Your credentials are not provided to NetApp.
31
Set up permissions for your Azure account
Before you can deploy a Connector from Cloud Manager, you need to ensure that your Azure account has the
correct permissions.
Steps
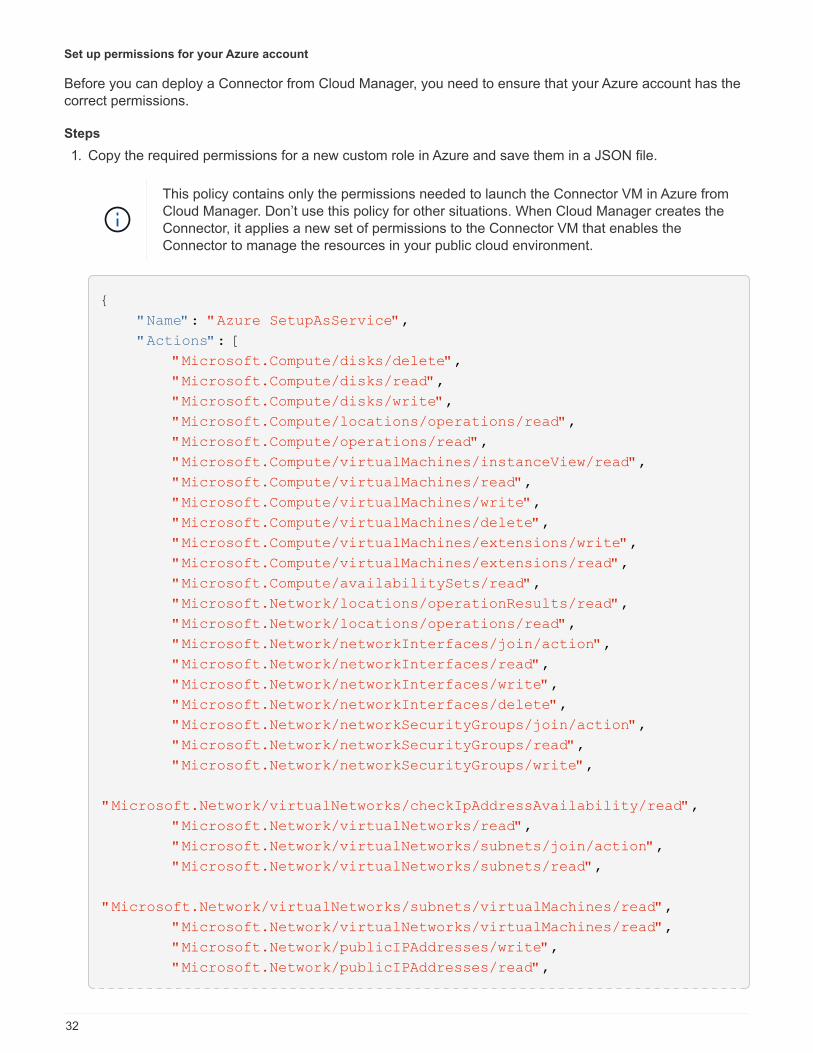
1. Copy the required permissions for a new custom role in Azure and save them in a JSON file.
This policy contains only the permissions needed to launch the Connector VM in Azure from
Cloud Manager. Don’t use this policy for other situations. When Cloud Manager creates the
Connector, it applies a new set of permissions to the Connector VM that enables the
Connector to manage the resources in your public cloud environment.
{
"Name": "Azure SetupAsService",
"Actions": [
"Microsoft.Compute/disks/delete",
"Microsoft.Compute/disks/read",
"Microsoft.Compute/disks/write",
"Microsoft.Compute/locations/operations/read",
"Microsoft.Compute/operations/read",
"Microsoft.Compute/virtualMachines/instanceView/read",
"Microsoft.Compute/virtualMachines/read",
"Microsoft.Compute/virtualMachines/write",
"Microsoft.Compute/virtualMachines/delete",
"Microsoft.Compute/virtualMachines/extensions/write",
"Microsoft.Compute/virtualMachines/extensions/read",
"Microsoft.Compute/availabilitySets/read",
"Microsoft.Network/locations/operationResults/read",
"Microsoft.Network/locations/operations/read",
"Microsoft.Network/networkInterfaces/join/action",
"Microsoft.Network/networkInterfaces/read",
"Microsoft.Network/networkInterfaces/write",
"Microsoft.Network/networkInterfaces/delete",
"Microsoft.Network/networkSecurityGroups/join/action",
"Microsoft.Network/networkSecurityGroups/read",
"Microsoft.Network/networkSecurityGroups/write",
"Microsoft.Network/virtualNetworks/checkIpAddressAvailability/read",
"Microsoft.Network/virtualNetworks/read",
"Microsoft.Network/virtualNetworks/subnets/join/action",
"Microsoft.Network/virtualNetworks/subnets/read",
"Microsoft.Network/virtualNetworks/subnets/virtualMachines/read",
"Microsoft.Network/virtualNetworks/virtualMachines/read",
"Microsoft.Network/publicIPAddresses/write",
"Microsoft.Network/publicIPAddresses/read",
32
"Microsoft.Network/publicIPAddresses/delete",
"Microsoft.Network/networkSecurityGroups/securityRules/read",
"Microsoft.Network/networkSecurityGroups/securityRules/write",
"Microsoft.Network/networkSecurityGroups/securityRules/delete",
"Microsoft.Network/publicIPAddresses/join/action",
"Microsoft.Network/locations/virtualNetworkAvailableEndpointServices/rea
d",
"Microsoft.Network/networkInterfaces/ipConfigurations/read",
"Microsoft.Resources/deployments/operations/read",
"Microsoft.Resources/deployments/read",
"Microsoft.Resources/deployments/delete",
"Microsoft.Resources/deployments/cancel/action",
"Microsoft.Resources/deployments/validate/action",
"Microsoft.Resources/resources/read",
"Microsoft.Resources/subscriptions/operationresults/read",
"Microsoft.Resources/subscriptions/resourceGroups/delete",
"Microsoft.Resources/subscriptions/resourceGroups/read",
"Microsoft.Resources/subscriptions/resourcegroups/resources/read",
"Microsoft.Resources/subscriptions/resourceGroups/write",
"Microsoft.Authorization/roleDefinitions/write",
"Microsoft.Authorization/roleAssignments/write",
"Microsoft.MarketplaceOrdering/offertypes/publishers/offers/plans/agreem
ents/read",
"Microsoft.MarketplaceOrdering/offertypes/publishers/offers/plans/agreem
ents/write",
"Microsoft.Network/networkSecurityGroups/delete",
"Microsoft.Storage/storageAccounts/delete",
"Microsoft.Storage/storageAccounts/write",
"Microsoft.Resources/deployments/write",
"Microsoft.Resources/deployments/operationStatuses/read",
"Microsoft.Authorization/roleAssignments/read"
],
"NotActions": [],
"AssignableScopes": [],
"Description": "Azure SetupAsService",
"IsCustom": "true"
}
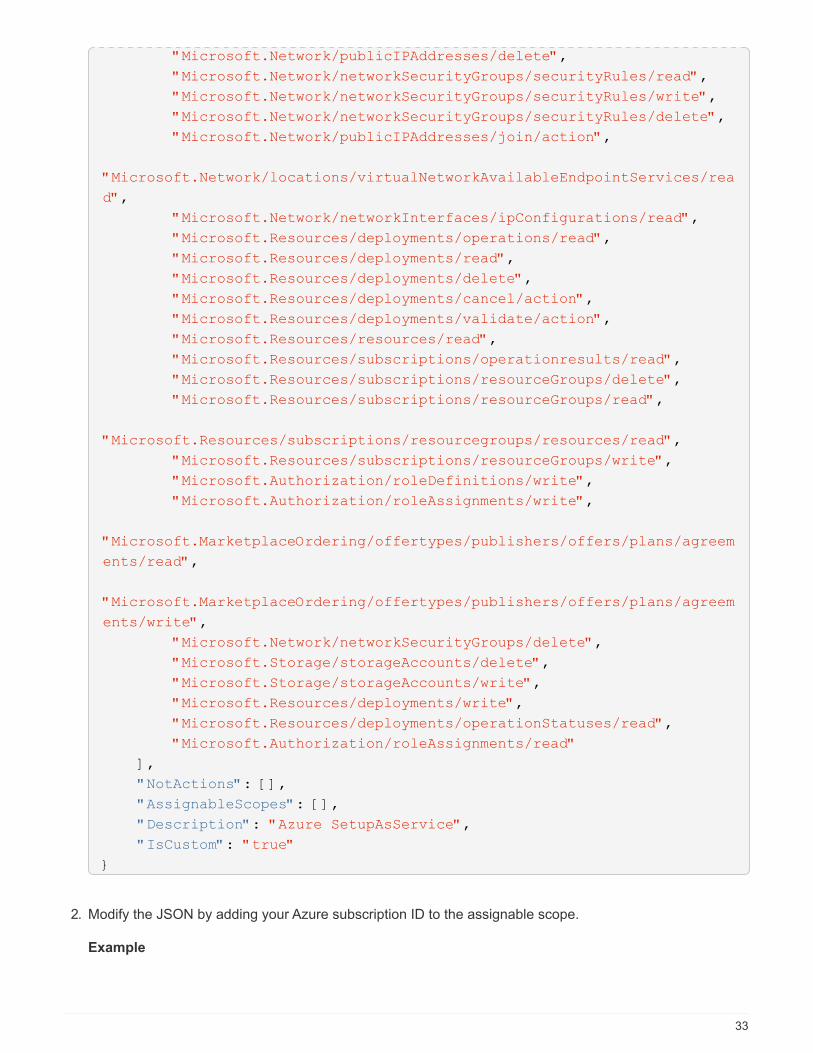
2. Modify the JSON by adding your Azure subscription ID to the assignable scope.
Example
33
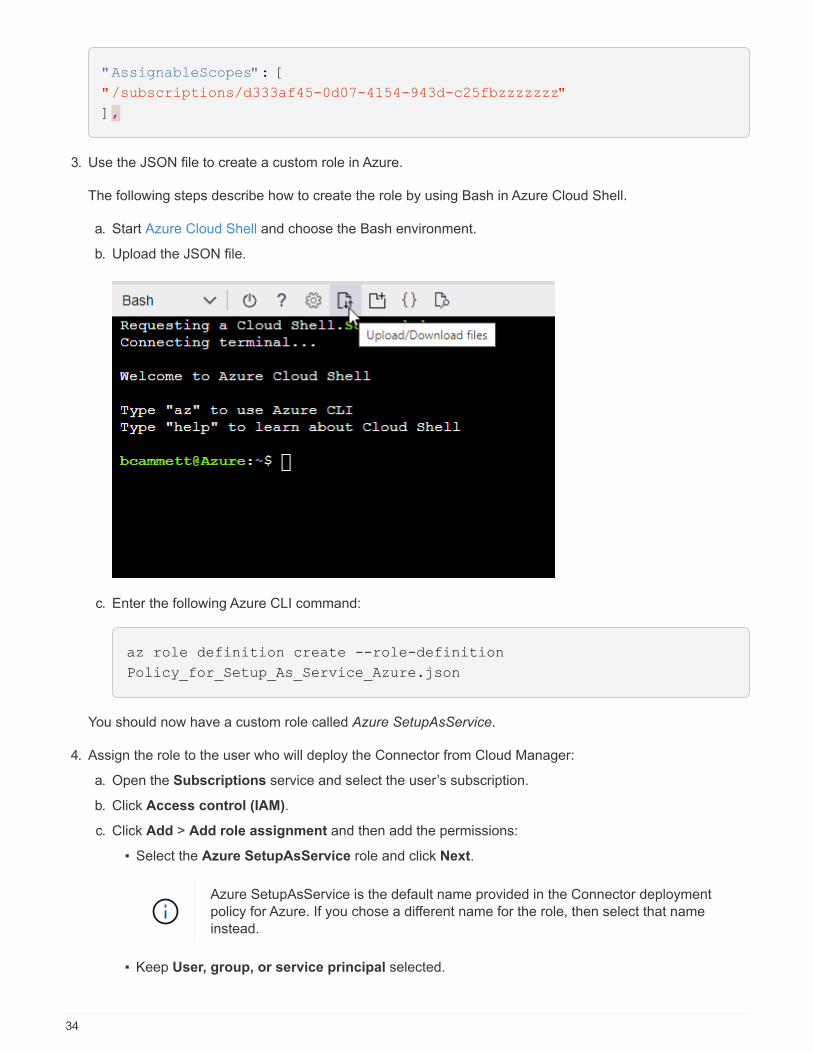
"AssignableScopes": [
"/subscriptions/d333af45-0d07-4154-943d-c25fbzzzzzzz"
],
3. Use the JSON file to create a custom role in Azure.
The following steps describe how to create the role by using Bash in Azure Cloud Shell.
a. Start Azure Cloud Shell and choose the Bash environment.
b. Upload the JSON file.
c. Enter the following Azure CLI command:
az role definition create --role-definition
Policy_for_Setup_As_Service_Azure.json
You should now have a custom role called Azure SetupAsService.
4. Assign the role to the user who will deploy the Connector from Cloud Manager:
a. Open the Subscriptions service and select the user’s subscription.
b. Click Access control (IAM).
c. Click Add > Add role assignment and then add the permissions:
▪ Select the Azure SetupAsService role and click Next.
Azure SetupAsService is the default name provided in the Connector deployment
policy for Azure. If you chose a different name for the role, then select that name
instead.
▪ Keep User, group, or service principal selected.
34
▪ Click Select members, choose your user account, and click Select.
▪ Click Next.
▪ Click Review + assign.
Result
The Azure user now has the permissions required to deploy the Connector from Cloud Manager.
Create the Connector by logging in with your Azure account
Cloud Manager enables you to create a Connector in Azure directly from its user interface.
What you’ll need
• An Azure subscription.
• A VNet and subnet in your Azure region of choice.
• If you don’t want Cloud Manager to automatically create an Azure role for the Connector, then you’ll need
to create your own using the policy on this page.
These permissions are for the Connector instance itself. It’s a different set of permissions than what you
previously set up to simply deploy the Connector.
Steps
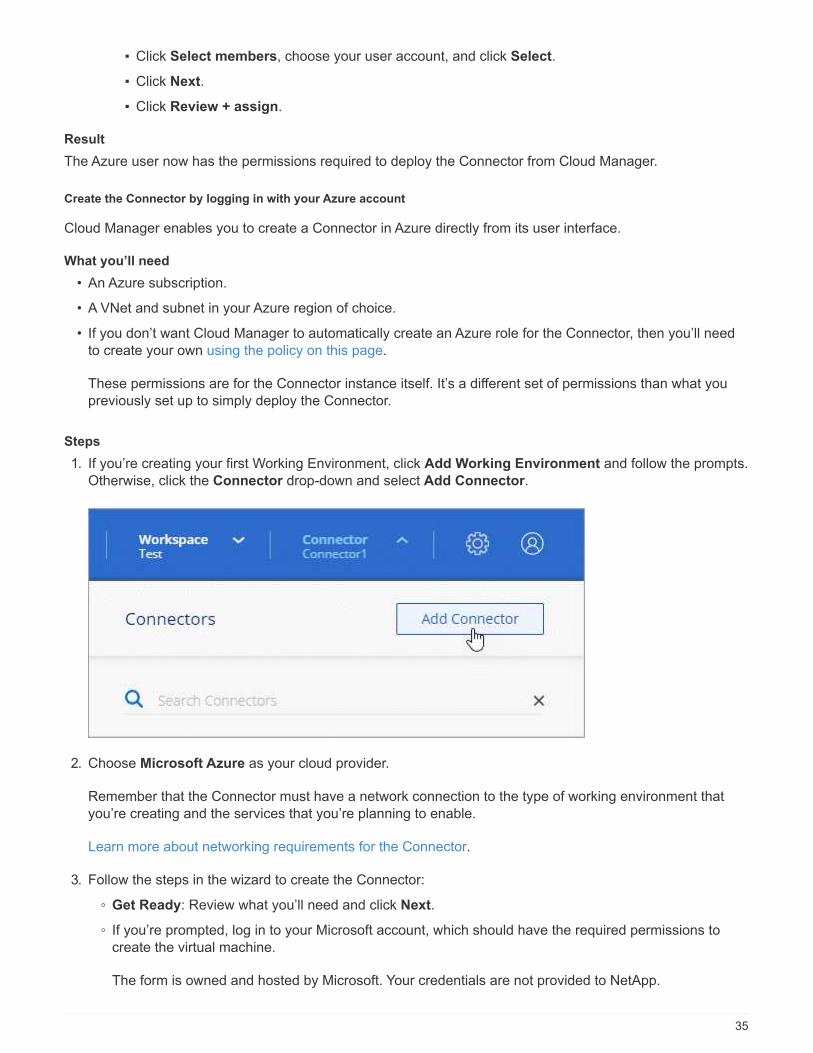
1. If you’re creating your first Working Environment, click Add Working Environment and follow the prompts.
Otherwise, click the Connector drop-down and select Add Connector.
2. Choose Microsoft Azure as your cloud provider.
Remember that the Connector must have a network connection to the type of working environment that
you’re creating and the services that you’re planning to enable.
Learn more about networking requirements for the Connector.
3. Follow the steps in the wizard to create the Connector:
◦ Get Ready: Review what you’ll need and click Next.
◦ If you’re prompted, log in to your Microsoft account, which should have the required permissions to
create the virtual machine.
The form is owned and hosted by Microsoft. Your credentials are not provided to NetApp.
35
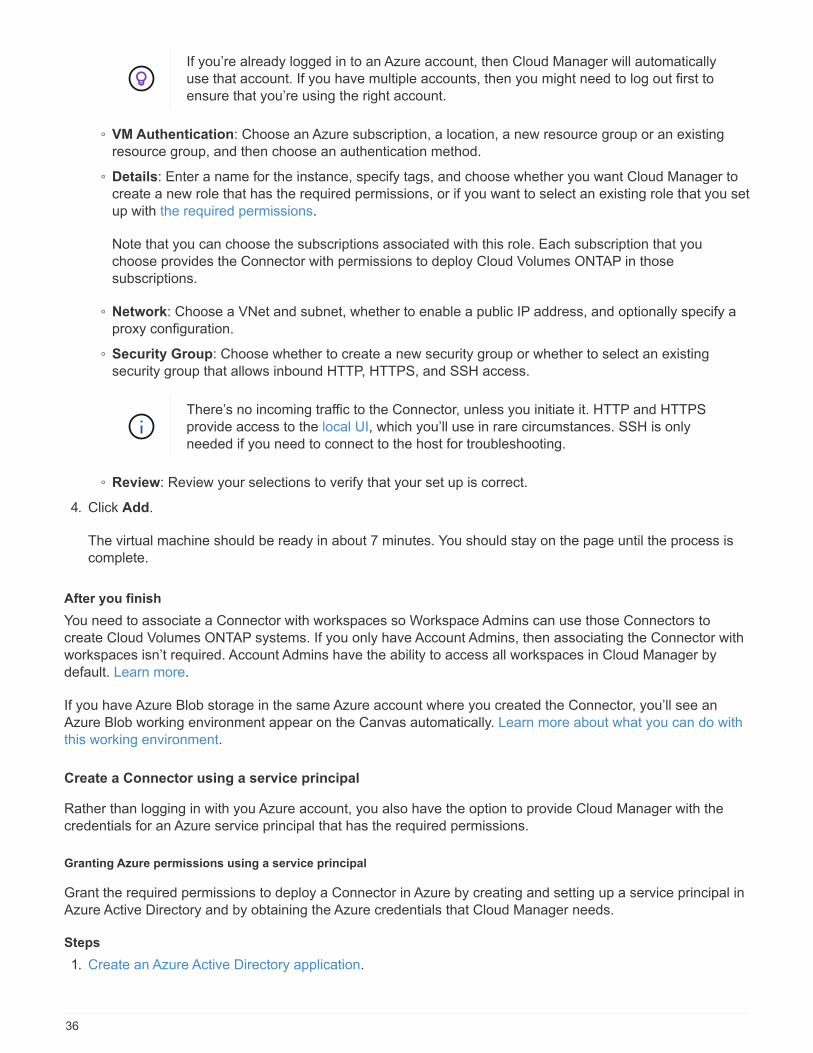
If you’re already logged in to an Azure account, then Cloud Manager will automatically
use that account. If you have multiple accounts, then you might need to log out first to
ensure that you’re using the right account.
◦ VM Authentication: Choose an Azure subscription, a location, a new resource group or an existing
resource group, and then choose an authentication method.
◦ Details: Enter a name for the instance, specify tags, and choose whether you want Cloud Manager to
create a new role that has the required permissions, or if you want to select an existing role that you set
up with the required permissions.
Note that you can choose the subscriptions associated with this role. Each subscription that you
choose provides the Connector with permissions to deploy Cloud Volumes ONTAP in those
subscriptions.
◦ Network: Choose a VNet and subnet, whether to enable a public IP address, and optionally specify a
proxy configuration.
◦ Security Group: Choose whether to create a new security group or whether to select an existing
security group that allows inbound HTTP, HTTPS, and SSH access.
There’s no incoming traffic to the Connector, unless you initiate it. HTTP and HTTPS
provide access to the local UI, which you’ll use in rare circumstances. SSH is only
needed if you need to connect to the host for troubleshooting.
◦ Review: Review your selections to verify that your set up is correct.
4. Click Add.
The virtual machine should be ready in about 7 minutes. You should stay on the page until the process is
complete.
After you finish
You need to associate a Connector with workspaces so Workspace Admins can use those Connectors to
create Cloud Volumes ONTAP systems. If you only have Account Admins, then associating the Connector with
workspaces isn’t required. Account Admins have the ability to access all workspaces in Cloud Manager by
default. Learn more.
If you have Azure Blob storage in the same Azure account where you created the Connector, you’ll see an
Azure Blob working environment appear on the Canvas automatically. Learn more about what you can do with
this working environment.
Create a Connector using a service principal
Rather than logging in with you Azure account, you also have the option to provide Cloud Manager with the
credentials for an Azure service principal that has the required permissions.
Granting Azure permissions using a service principal
Grant the required permissions to deploy a Connector in Azure by creating and setting up a service principal in
Azure Active Directory and by obtaining the Azure credentials that Cloud Manager needs.
Steps
1. Create an Azure Active Directory application.
36
2. Assign the application to a role.
3. Add Windows Azure Service Management API permissions.
4. Get the application ID and directory ID.
5. Create a client secret.
Create an Azure Active Directory application
Create an Azure Active Directory (AD) application and service principal that Cloud Manager can use to deploy
the Connector.
Before you begin
You must have the right permissions in Azure to create an Active Directory application and to assign the
application to a role. For details, refer to Microsoft Azure Documentation: Required permissions.
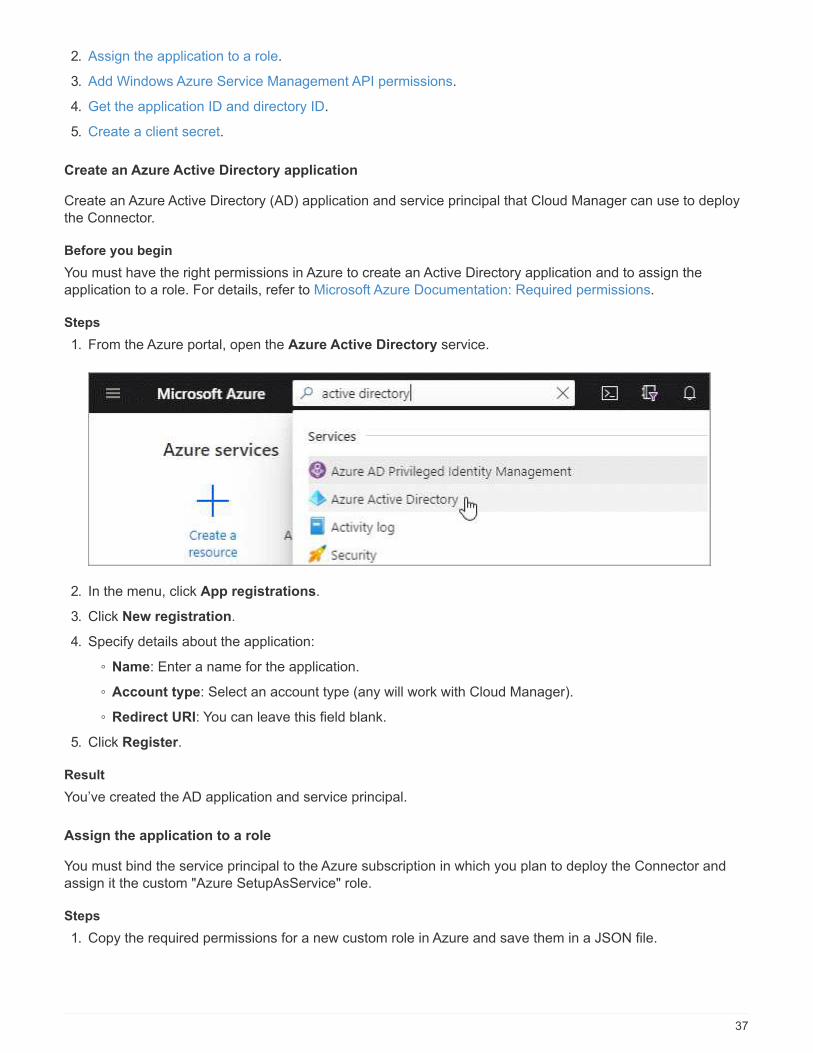
Steps
1. From the Azure portal, open the Azure Active Directory service.
2. In the menu, click App registrations.
3. Click New registration.
4. Specify details about the application:
◦ Name: Enter a name for the application.
◦ Account type: Select an account type (any will work with Cloud Manager).
◦ Redirect URI: You can leave this field blank.
5. Click Register.
Result
You’ve created the AD application and service principal.
Assign the application to a role
You must bind the service principal to the Azure subscription in which you plan to deploy the Connector and
assign it the custom "Azure SetupAsService" role.
Steps
1. Copy the required permissions for a new custom role in Azure and save them in a JSON file.
37
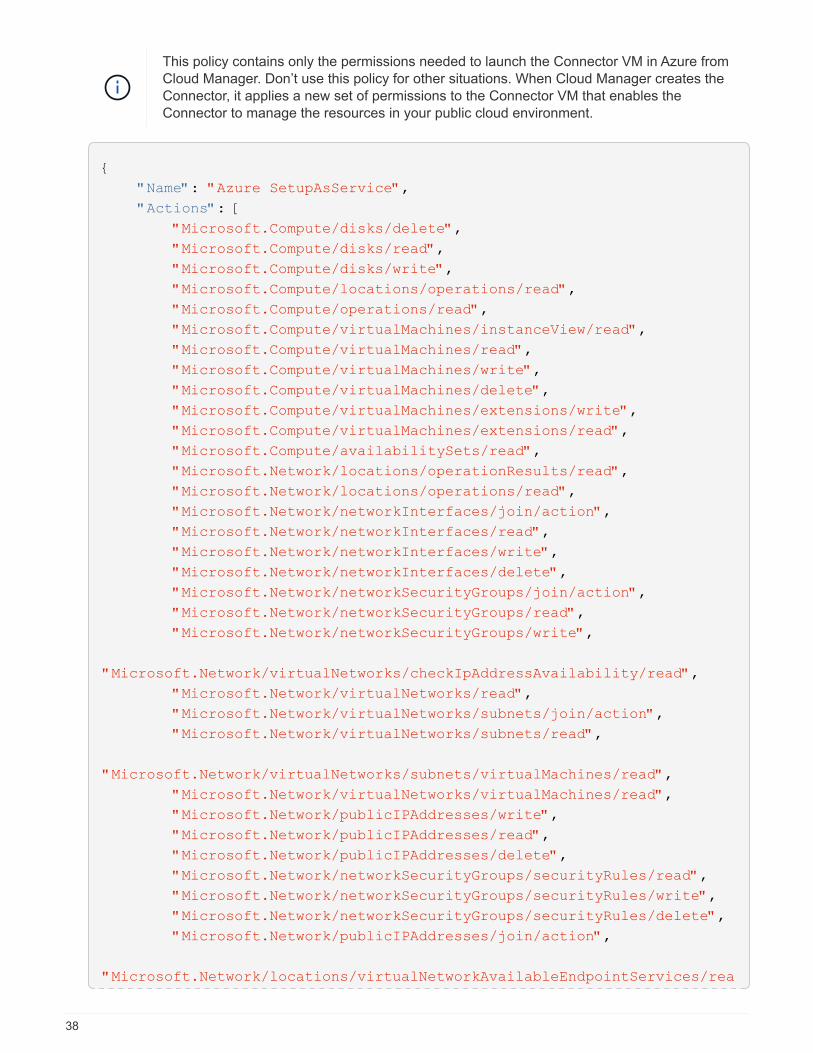
This policy contains only the permissions needed to launch the Connector VM in Azure from
Cloud Manager. Don’t use this policy for other situations. When Cloud Manager creates the
Connector, it applies a new set of permissions to the Connector VM that enables the
Connector to manage the resources in your public cloud environment.
{
"Name": "Azure SetupAsService",
"Actions": [
"Microsoft.Compute/disks/delete",
"Microsoft.Compute/disks/read",
"Microsoft.Compute/disks/write",
"Microsoft.Compute/locations/operations/read",
"Microsoft.Compute/operations/read",
"Microsoft.Compute/virtualMachines/instanceView/read",
"Microsoft.Compute/virtualMachines/read",
"Microsoft.Compute/virtualMachines/write",
"Microsoft.Compute/virtualMachines/delete",
"Microsoft.Compute/virtualMachines/extensions/write",
"Microsoft.Compute/virtualMachines/extensions/read",
"Microsoft.Compute/availabilitySets/read",
"Microsoft.Network/locations/operationResults/read",
"Microsoft.Network/locations/operations/read",
"Microsoft.Network/networkInterfaces/join/action",
"Microsoft.Network/networkInterfaces/read",
"Microsoft.Network/networkInterfaces/write",
"Microsoft.Network/networkInterfaces/delete",
"Microsoft.Network/networkSecurityGroups/join/action",
"Microsoft.Network/networkSecurityGroups/read",
"Microsoft.Network/networkSecurityGroups/write",
"Microsoft.Network/virtualNetworks/checkIpAddressAvailability/read",
"Microsoft.Network/virtualNetworks/read",
"Microsoft.Network/virtualNetworks/subnets/join/action",
"Microsoft.Network/virtualNetworks/subnets/read",
"Microsoft.Network/virtualNetworks/subnets/virtualMachines/read",
"Microsoft.Network/virtualNetworks/virtualMachines/read",
"Microsoft.Network/publicIPAddresses/write",
"Microsoft.Network/publicIPAddresses/read",
"Microsoft.Network/publicIPAddresses/delete",
"Microsoft.Network/networkSecurityGroups/securityRules/read",
"Microsoft.Network/networkSecurityGroups/securityRules/write",
"Microsoft.Network/networkSecurityGroups/securityRules/delete",
"Microsoft.Network/publicIPAddresses/join/action",
"Microsoft.Network/locations/virtualNetworkAvailableEndpointServices/rea
38

d",
"Microsoft.Network/networkInterfaces/ipConfigurations/read",
"Microsoft.Resources/deployments/operations/read",
"Microsoft.Resources/deployments/read",
"Microsoft.Resources/deployments/delete",
"Microsoft.Resources/deployments/cancel/action",
"Microsoft.Resources/deployments/validate/action",
"Microsoft.Resources/resources/read",
"Microsoft.Resources/subscriptions/operationresults/read",
"Microsoft.Resources/subscriptions/resourceGroups/delete",
"Microsoft.Resources/subscriptions/resourceGroups/read",
"Microsoft.Resources/subscriptions/resourcegroups/resources/read",
"Microsoft.Resources/subscriptions/resourceGroups/write",
"Microsoft.Authorization/roleDefinitions/write",
"Microsoft.Authorization/roleAssignments/write",
"Microsoft.MarketplaceOrdering/offertypes/publishers/offers/plans/agreem
ents/read",
"Microsoft.MarketplaceOrdering/offertypes/publishers/offers/plans/agreem
ents/write",
"Microsoft.Network/networkSecurityGroups/delete",
"Microsoft.Storage/storageAccounts/delete",
"Microsoft.Storage/storageAccounts/write",
"Microsoft.Resources/deployments/write",
"Microsoft.Resources/deployments/operationStatuses/read",
"Microsoft.Authorization/roleAssignments/read"
],
"NotActions": [],
"AssignableScopes": [],
"Description": "Azure SetupAsService",
"IsCustom": "true"
}
2. Modify the JSON file by adding your Azure subscription ID to the assignable scope.
Example
"AssignableScopes": [
"/subscriptions/398e471c-3b42-4ae7-9b59-ce5bbzzzzzzz"
3. Use the JSON file to create a custom role in Azure.
The following steps describe how to create the role by using Bash in Azure Cloud Shell.
39
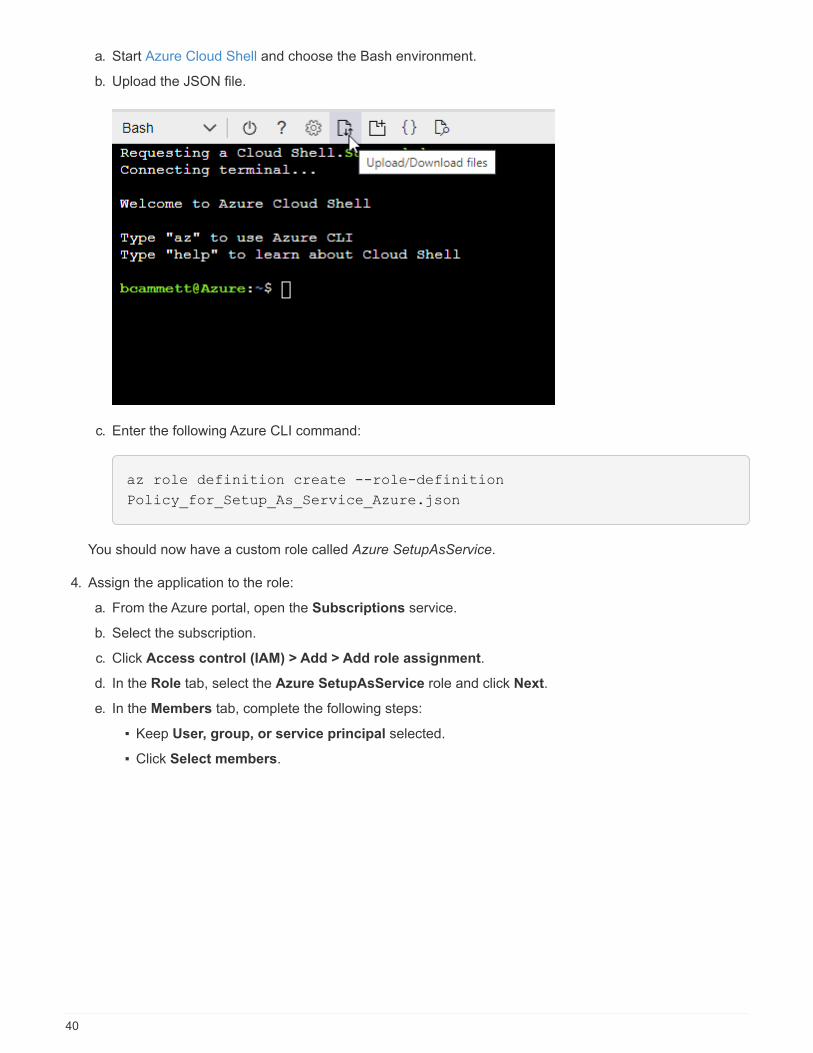
a. Start Azure Cloud Shell and choose the Bash environment.
b. Upload the JSON file.
c. Enter the following Azure CLI command:
az role definition create --role-definition
Policy_for_Setup_As_Service_Azure.json
You should now have a custom role called Azure SetupAsService.
4. Assign the application to the role:
a. From the Azure portal, open the Subscriptions service.
b. Select the subscription.
c. Click Access control (IAM) > Add > Add role assignment.
d. In the Role tab, select the Azure SetupAsService role and click Next.
e. In the Members tab, complete the following steps:
▪ Keep User, group, or service principal selected.
▪ Click Select members.
40

▪ Search for the name of the application.
Here’s an example:
▪ Select the application and click Select.
▪ Click Next.
f. Click Review + assign.
The service principal now has the required Azure permissions to deploy the Connector.
Add Windows Azure Service Management API permissions
The service principal must have "Windows Azure Service Management API" permissions.
Steps
1. In the Azure Active Directory service, click App registrations and select the application.
2. Click API permissions > Add a permission.
3. Under Microsoft APIs, select Azure Service Management.
41

4. Click Access Azure Service Management as organization users and then click Add permissions.
42
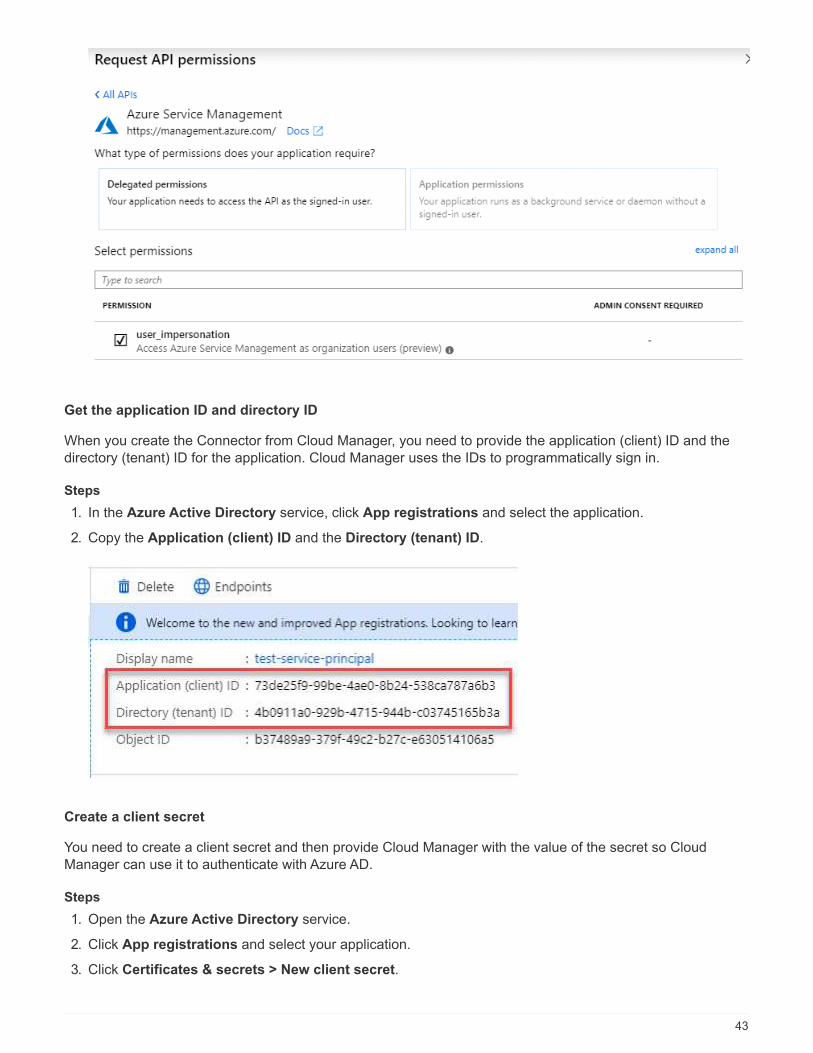
Get the application ID and directory ID
When you create the Connector from Cloud Manager, you need to provide the application (client) ID and the
directory (tenant) ID for the application. Cloud Manager uses the IDs to programmatically sign in.
Steps
1. In the Azure Active Directory service, click App registrations and select the application.
2. Copy the Application (client) ID and the Directory (tenant) ID.
Create a client secret
You need to create a client secret and then provide Cloud Manager with the value of the secret so Cloud
Manager can use it to authenticate with Azure AD.
Steps
1. Open the Azure Active Directory service.
2. Click App registrations and select your application.
3. Click Certificates & secrets > New client secret.
43

4. Provide a description of the secret and a duration.
5. Click Add.
6. Copy the value of the client secret.
Result
Your service principal is now setup and you should have copied the application (client) ID, the directory (tenant)
ID, and the value of the client secret. You need to enter this information in Cloud Manager when you create the
Connector.
Create the Connector by logging in with the service principal
Cloud Manager enables you to create a Connector in Azure directly from its user interface.
What you’ll need
• An Azure subscription.
• A VNet and subnet in your Azure region of choice.
• If you don’t want Cloud Manager to automatically create an Azure role for the Connector, then you’ll need
to create your own using the policy on this page.
These permissions are for the Connector instance itself. It’s a different set of permissions than what you
previously set up to simply deploy the Connector.
Steps
1. If you’re creating your first Working Environment, click Add Working Environment and follow the prompts.
Otherwise, click the Connector drop-down and select Add Connector.
2. Choose Microsoft Azure as your cloud provider.
44

Remember that the Connector must have a network connection to the type of working environment that
you’re creating and the services that you’re planning to enable.
Learn more about networking requirements for the Connector.
3. Follow the steps in the wizard to create the Connector:
◦ Get Ready: Click Azure AD service principal and enter information about the Azure Active Directory
service principal that grants the required permissions:
▪ Application (client) ID: See Get the application ID and directory ID.
▪ Directory (tenant) ID: See Get the application ID and directory ID.
▪ Client Secret: See Create a client secret.
◦ VM Authentication: Choose an Azure subscription, a location, a new resource group or an existing
resource group, and then choose an authentication method.
◦ Details: Enter a name for the instance, specify tags, and choose whether you want Cloud Manager to
create a new role that has the required permissions, or if you want to select an existing role that you set
up with the required permissions.
Note that you can choose the subscriptions associated with this role. Each subscription that you
choose provides the Connector with permissions to deploy Cloud Volumes ONTAP in those
subscriptions.
◦ Network: Choose a VNet and subnet, whether to enable a public IP address, and optionally specify a
proxy configuration.
◦ Security Group: Choose whether to create a new security group or whether to select an existing
security group that allows inbound HTTP, HTTPS, and SSH access.
There’s no incoming traffic to the Connector, unless you initiate it. HTTP and HTTPS
provide access to the local UI, which you’ll use in rare circumstances. SSH is only
needed if you need to connect to the host for troubleshooting.
◦ Review: Review your selections to verify that your set up is correct.
4. Click Add.
The virtual machine should be ready in about 7 minutes. You should stay on the page until the process is
complete.
After you finish
You need to associate a Connector with workspaces so Workspace Admins can use those Connectors to
create Cloud Volumes ONTAP systems. If you only have Account Admins, then associating the Connector with
workspaces isn’t required. Account Admins have the ability to access all workspaces in Cloud Manager by
default. Learn more.
If you have Azure Blob storage in the same Azure account where you created the Connector, you’ll see an
Azure Blob working environment appear on the Canvas automatically. Learn more about what you can do with
this working environment.
Open port 3128 for AutoSupport messages
If you plan to deploy Cloud Volumes ONTAP systems in a subnet where an outbound internet connection won’t
be available, then Cloud Manager automatically configures Cloud Volumes ONTAP to use the Connector as a
45
proxy server.
The only requirement is to ensure that the Connector’s security group allows inbound connections over port
3128. You’ll need to open this port after you deploy the Connector.
If you use the default security group for Cloud Volumes ONTAP, then no changes are needed to its security
group. But if you plan to define strict outbound rules for Cloud Volumes ONTAP, then you’ll also need to ensure
that the Cloud Volumes ONTAP security group allows outbound connections over port 3128.
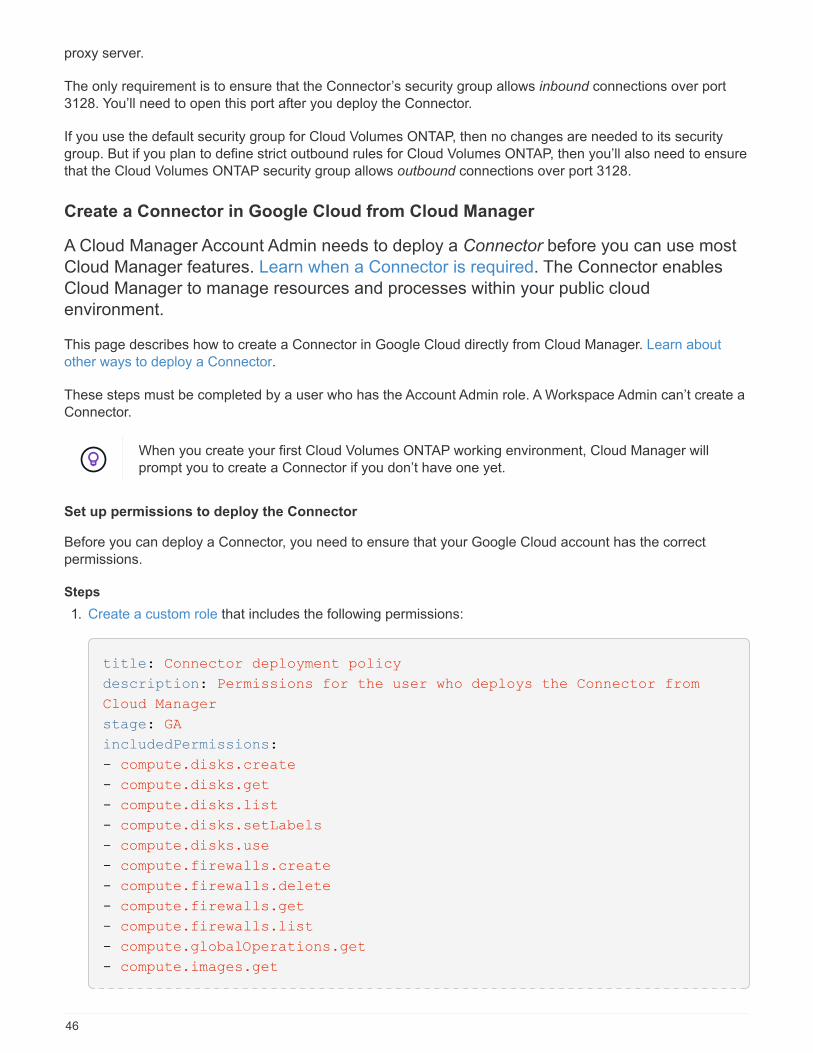
Create a Connector in Google Cloud from Cloud Manager
A Cloud Manager Account Admin needs to deploy a Connector before you can use most
Cloud Manager features. Learn when a Connector is required. The Connector enables
Cloud Manager to manage resources and processes within your public cloud
environment.
This page describes how to create a Connector in Google Cloud directly from Cloud Manager. Learn about
other ways to deploy a Connector.
These steps must be completed by a user who has the Account Admin role. A Workspace Admin can’t create a
Connector.
When you create your first Cloud Volumes ONTAP working environment, Cloud Manager will
prompt you to create a Connector if you don’t have one yet.
Set up permissions to deploy the Connector
Before you can deploy a Connector, you need to ensure that your Google Cloud account has the correct
permissions.
Steps
1. Create a custom role that includes the following permissions:
title: Connector deployment policy
description: Permissions for the user who deploys the Connector from
Cloud Manager
stage: GA
includedPermissions:
- compute.disks.create
- compute.disks.get
- compute.disks.list
- compute.disks.setLabels
- compute.disks.use
- compute.firewalls.create
- compute.firewalls.delete
- compute.firewalls.get
- compute.firewalls.list
- compute.globalOperations.get
- compute.images.get
46

- compute.images.getFromFamily
- compute.images.list
- compute.images.useReadOnly
- compute.instances.attachDisk
- compute.instances.create
- compute.instances.get
- compute.instances.list
- compute.instances.setDeletionProtection
- compute.instances.setLabels
- compute.instances.setMachineType
- compute.instances.setMetadata
- compute.instances.setTags
- compute.instances.start
- compute.instances.updateDisplayDevice
- compute.machineTypes.get
- compute.networks.get
- compute.networks.list
- compute.networks.updatePolicy
- compute.projects.get
- compute.regions.get
- compute.regions.list
- compute.subnetworks.get
- compute.subnetworks.list
- compute.zoneOperations.get
- compute.zones.get
- compute.zones.list
- deploymentmanager.compositeTypes.get
- deploymentmanager.compositeTypes.list
- deploymentmanager.deployments.create
- deploymentmanager.deployments.delete
- deploymentmanager.deployments.get
- deploymentmanager.deployments.list
- deploymentmanager.manifests.get
- deploymentmanager.manifests.list
- deploymentmanager.operations.get
- deploymentmanager.operations.list
- deploymentmanager.resources.get
- deploymentmanager.resources.list
- deploymentmanager.typeProviders.get
- deploymentmanager.typeProviders.list
- deploymentmanager.types.get
- deploymentmanager.types.list
- resourcemanager.projects.get
- compute.instances.setServiceAccount
- iam.serviceAccounts.list
47

2. Attach the custom role to the user who will deploy the Connector from Cloud Manager.
Result
The Google Cloud user now has the permissions required to create the Connector.
Set up a service account for the Connector
A service account is required to provide the Connector with the permission that it needs to manage resources
in Google Cloud. You’ll associate this service account with the Connector VM when you create it.
The permissions for the service account are different than the permissions that you set up in the previous
section.
Steps
1. Create a custom role that includes the following permissions:
title: NetApp Cloud Manager
description: Permissions for the service account associated with the
Connector instance.
stage: GA
includedPermissions:
- iam.serviceAccounts.actAs
- compute.regionBackendServices.create
- compute.regionBackendServices.get
- compute.regionBackendServices.list
- compute.networks.updatePolicy
- compute.backendServices.create
- compute.addresses.list
- compute.disks.create
- compute.disks.createSnapshot
- compute.disks.delete
- compute.disks.get
- compute.disks.list
- compute.disks.setLabels
- compute.disks.use
- compute.firewalls.create
- compute.firewalls.delete
- compute.firewalls.get
- compute.firewalls.list
- compute.globalOperations.get
- compute.images.get
- compute.images.getFromFamily
- compute.images.list
- compute.images.useReadOnly
- compute.instances.addAccessConfig
- compute.instances.attachDisk
- compute.instances.create
- compute.instances.delete
48
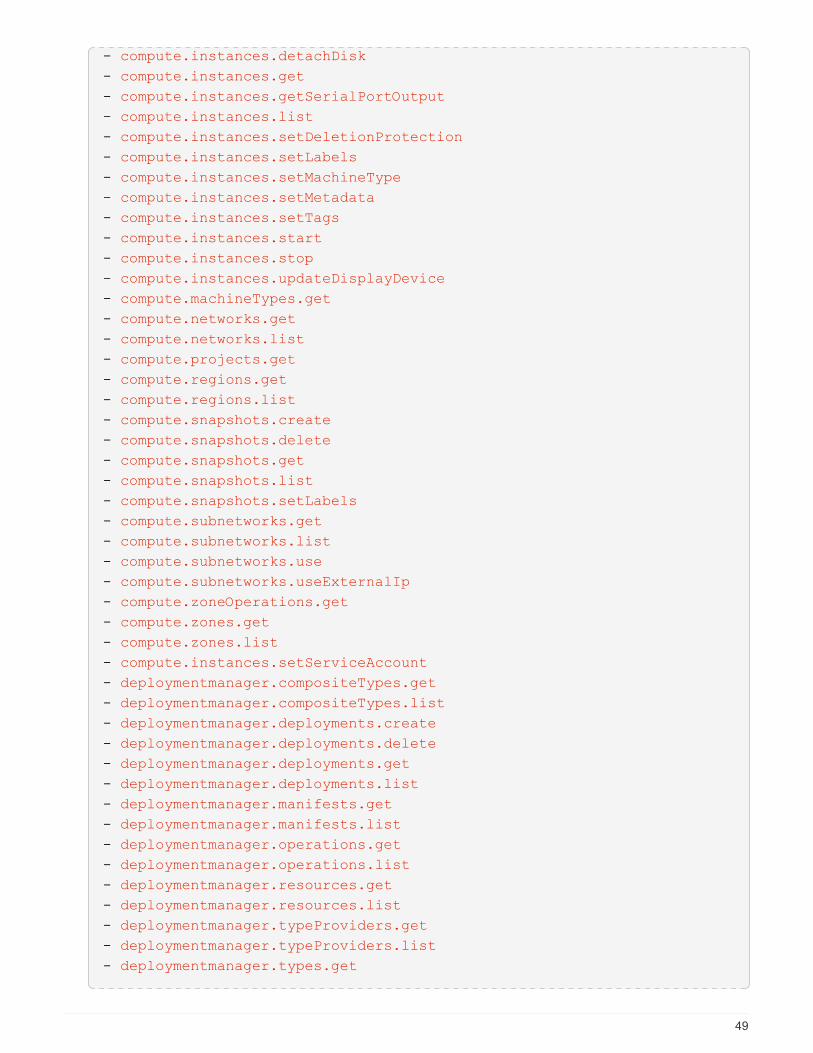
- compute.instances.detachDisk
- compute.instances.get
- compute.instances.getSerialPortOutput
- compute.instances.list
- compute.instances.setDeletionProtection
- compute.instances.setLabels
- compute.instances.setMachineType
- compute.instances.setMetadata
- compute.instances.setTags
- compute.instances.start
- compute.instances.stop
- compute.instances.updateDisplayDevice
- compute.machineTypes.get
- compute.networks.get
- compute.networks.list
- compute.projects.get
- compute.regions.get
- compute.regions.list
- compute.snapshots.create
- compute.snapshots.delete
- compute.snapshots.get
- compute.snapshots.list
- compute.snapshots.setLabels
- compute.subnetworks.get
- compute.subnetworks.list
- compute.subnetworks.use
- compute.subnetworks.useExternalIp
- compute.zoneOperations.get
- compute.zones.get
- compute.zones.list
- compute.instances.setServiceAccount
- deploymentmanager.compositeTypes.get
- deploymentmanager.compositeTypes.list
- deploymentmanager.deployments.create
- deploymentmanager.deployments.delete
- deploymentmanager.deployments.get
- deploymentmanager.deployments.list
- deploymentmanager.manifests.get
- deploymentmanager.manifests.list
- deploymentmanager.operations.get
- deploymentmanager.operations.list
- deploymentmanager.resources.get
- deploymentmanager.resources.list
- deploymentmanager.typeProviders.get
- deploymentmanager.typeProviders.list
- deploymentmanager.types.get
49
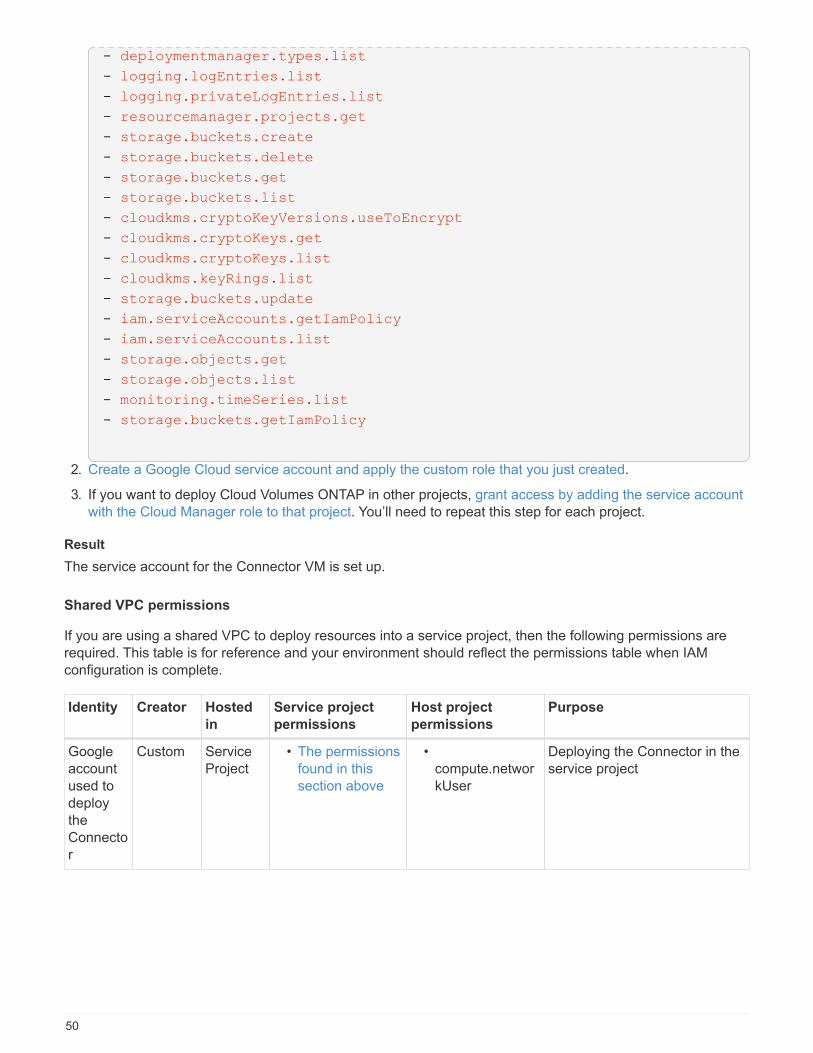
- deploymentmanager.types.list
- logging.logEntries.list
- logging.privateLogEntries.list
- resourcemanager.projects.get
- storage.buckets.create
- storage.buckets.delete
- storage.buckets.get
- storage.buckets.list
- cloudkms.cryptoKeyVersions.useToEncrypt
- cloudkms.cryptoKeys.get
- cloudkms.cryptoKeys.list
- cloudkms.keyRings.list
- storage.buckets.update
- iam.serviceAccounts.getIamPolicy
- iam.serviceAccounts.list
- storage.objects.get
- storage.objects.list
- monitoring.timeSeries.list
- storage.buckets.getIamPolicy
2. Create a Google Cloud service account and apply the custom role that you just created.
3. If you want to deploy Cloud Volumes ONTAP in other projects, grant access by adding the service account
with the Cloud Manager role to that project. You’ll need to repeat this step for each project.
Result
The service account for the Connector VM is set up.
Shared VPC permissions
If you are using a shared VPC to deploy resources into a service project, then the following permissions are
required. This table is for reference and your environment should reflect the permissions table when IAM
configuration is complete.
Identity Creator Hosted
in
Service project
permissions
Host project
permissions
Purpose
account
used to
deploy
the
Connecto
r
Custom Service
Project
• The permissions
found in this
section above
•
compute.networ
kUser
Deploying the Connector in the
service project
50

Identity Creator Hosted
in
Service project
permissions
Host project
permissions
Purpose
Connecto
r service
account
Custom Service
project
• The permissions
found in this
section above
•
compute.networ
kUser
•
deploymentman
ager.editor
Deploying and maintaining
Cloud Volumes ONTAP and
services in the service project
Cloud
Volumes
ONTAP
service
account
Custom Service
project
• storage.admin
• member: Cloud
Manager service
account as
serviceAccount.
user
N/A (Optional) For data tiering and
Cloud Backup
APIs
service
agent
Cloud
Service
project
• (Default) Editor •
compute.networ
kUser
Interacts with Google Cloud
APIs on behalf of deployment.
Allows Cloud Manager to use
the shared network.
Compute
Engine
default
service
account
Cloud
Service
project
• (Default) Editor •
compute.networ
kUser
Deploys Google Cloud
instances and compute
infrastructure on behalf of
deployment. Allows Cloud
Manager to use the shared
network.
Notes:
1. deploymentmanager.editor is only required at the host project if you are not passing firewall rules to the
deployment and are choosing to let Cloud Manager create them for you. Cloud Manager will create a
deployment in the host project which contains the VPC0 firewall rule if no rule is specified.
2. firewall.create and firewall.delete are only required if you are not passing firewall rules to the deployment
and are choosing to let Cloud Manager create them for you. These permissions reside in the Cloud
Manager service account .yaml file. If you are deploying an HA pair using a shared VPC, these
permissions will be used to create the firewall rules for VPC1, 2 and 3. For all other deployments, these
permissions will also be used to create rules for VPC0.
3. For data tiering, the tiering service account must have the serviceAccount.user role on the service account,
not just at the project level. Currently if you assign serviceAccount.user at the project level, the permissions
don’t show when you query the service account with getIAMPolicy.
Enabling Google Cloud APIs
Several APIs are required to deploy the Connector and Cloud Volumes ONTAP.
Step
1. Enable the following Google Cloud APIs in your project.
◦ Cloud Deployment Manager V2 API
◦ Cloud Logging API
51
◦ Cloud Resource Manager API
◦ Compute Engine API
◦ Identity and Access Management (IAM) API
Creating a Connector in Google Cloud
Create a Connector in Google Cloud directly from the Cloud Manager user interface or by using gcloud.
What you’ll need
• The required permissions for your Google Cloud account, as described in the first section of this page.
• A Google Cloud project.
• A service account that has the required permissions to create and manage Cloud Volumes ONTAP, as
described in the first section of this page.
• A VPC and subnet in your Google Cloud region of choice.
52
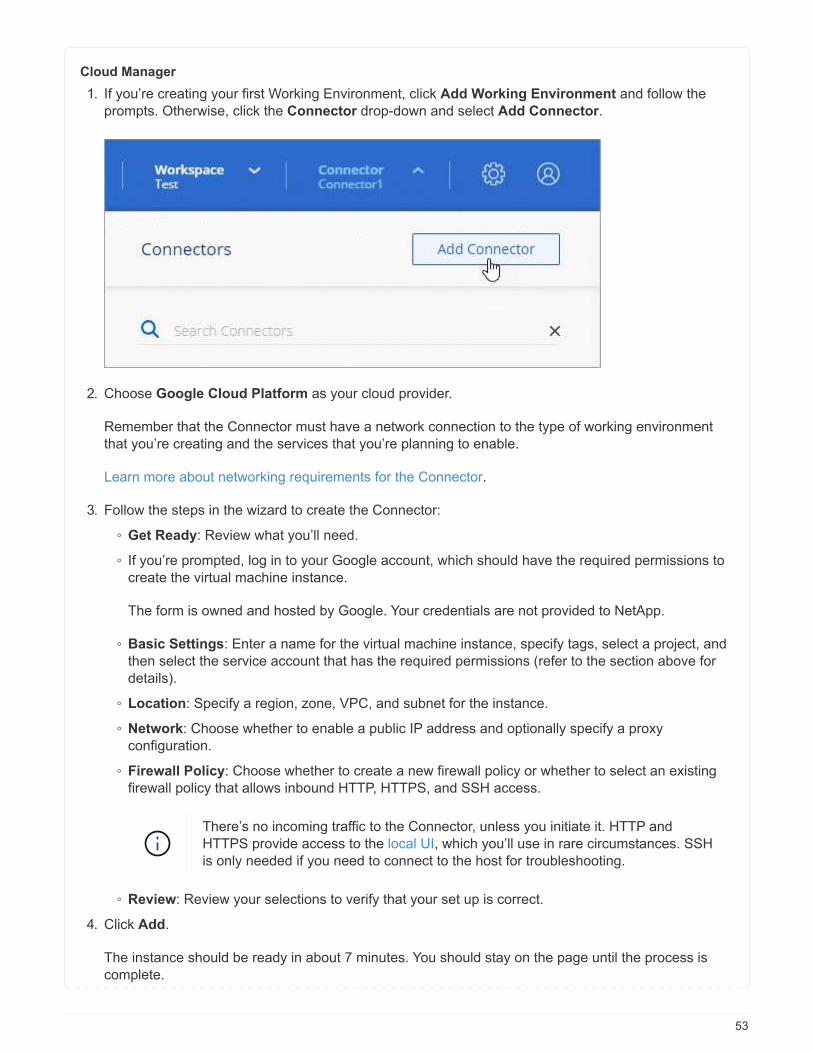
Cloud Manager
1. If you’re creating your first Working Environment, click Add Working Environment and follow the
prompts. Otherwise, click the Connector drop-down and select Add Connector.
2. Choose Google Cloud Platform as your cloud provider.
Remember that the Connector must have a network connection to the type of working environment
that you’re creating and the services that you’re planning to enable.
Learn more about networking requirements for the Connector.
3. Follow the steps in the wizard to create the Connector:
◦ Get Ready: Review what you’ll need.
◦ If you’re prompted, log in to your Google account, which should have the required permissions to
create the virtual machine instance.
The form is owned and hosted by Google. Your credentials are not provided to NetApp.
◦ Basic Settings: Enter a name for the virtual machine instance, specify tags, select a project, and
then select the service account that has the required permissions (refer to the section above for
details).
◦ Location: Specify a region, zone, VPC, and subnet for the instance.
◦ Network: Choose whether to enable a public IP address and optionally specify a proxy
configuration.
◦ Firewall Policy: Choose whether to create a new firewall policy or whether to select an existing
firewall policy that allows inbound HTTP, HTTPS, and SSH access.
There’s no incoming traffic to the Connector, unless you initiate it. HTTP and
HTTPS provide access to the local UI, which you’ll use in rare circumstances. SSH
is only needed if you need to connect to the host for troubleshooting.
◦ Review: Review your selections to verify that your set up is correct.
4. Click Add.
The instance should be ready in about 7 minutes. You should stay on the page until the process is
complete.
53

gcloud
1. Log in to the gcloud SDK using your preferred methodology.
In our examples, we’ll use a local shell with the gcloud SDK installed, but you could use the native
Google Cloud Shell in the Google Cloud console.
For more information about the Google Cloud SDK, visit the Google Cloud SDK documentation page.
2. Verify that you are logged in as a user who has the required permissions that are defined in the
section above:
gcloud auth list
The output should show the following where the * user account is the desired user account to be
logged in as:
Credentialed Accounts
ACTIVE ACCOUNT
To set the active account, run:
$ gcloud config set account `ACCOUNT`
Updates are available for some Cloud SDK components. To install
them,
please run:
$ gcloud components update
3. Run the gcloud compute instances create command:
gcloud compute instances create <instance-name>
--machine-type=n1-standard-4
--image-project=netapp-cloudmanager
--image-family=cloudmanager
--scopes=cloud-platform
--project=<project>
--service-account=<<service-account>
--zone=<zone>
--no-address
--tags <network-tag>
--network <network-path>
--subnet <subnet-path>
--boot-disk-kms-key <kms-key-path>
54
instance-name
The desired instance name for the VM instance.
project
(Optional) The project where you want to deploy the VM.
service-account
The service account specified in the output from step 2.
zone
The zone where you want to deploy the VM
no-address
(Optional) No external IP address is used (you need a cloud NAT or proxy to route traffic to the
public internet)
network-tag
(Optional) Add network tagging to link a firewall rule using tags to the Connector instance
network-path
(Optional) Add the name of the network to deploy the Connector into (for a Shared VPC, you need
the full path)
subnet-path
(Optional) Add the name of the subnet to deploy the Connector into (for a Shared VPC, you need
the full path)
kms-key-path
(Optional) Add a KMS key to encrypt the Connector’s disks (IAM permissions also need to be
applied)
For more information about these flags, visit the Google Cloud compute SDK documentation.
Running the command deploys the Connector using the NetApp golden image. The Connector
instance and software should be running in approximately five minutes.
4. Open a web browser from a host that has a connection to the Connector instance and enter the
following URL:
http://ipaddress:80
5. After you log in, set up the Connector:
a. Specify the NetApp account to associate with the Connector.
Learn about NetApp accounts.
b. Enter a name for the system.
55
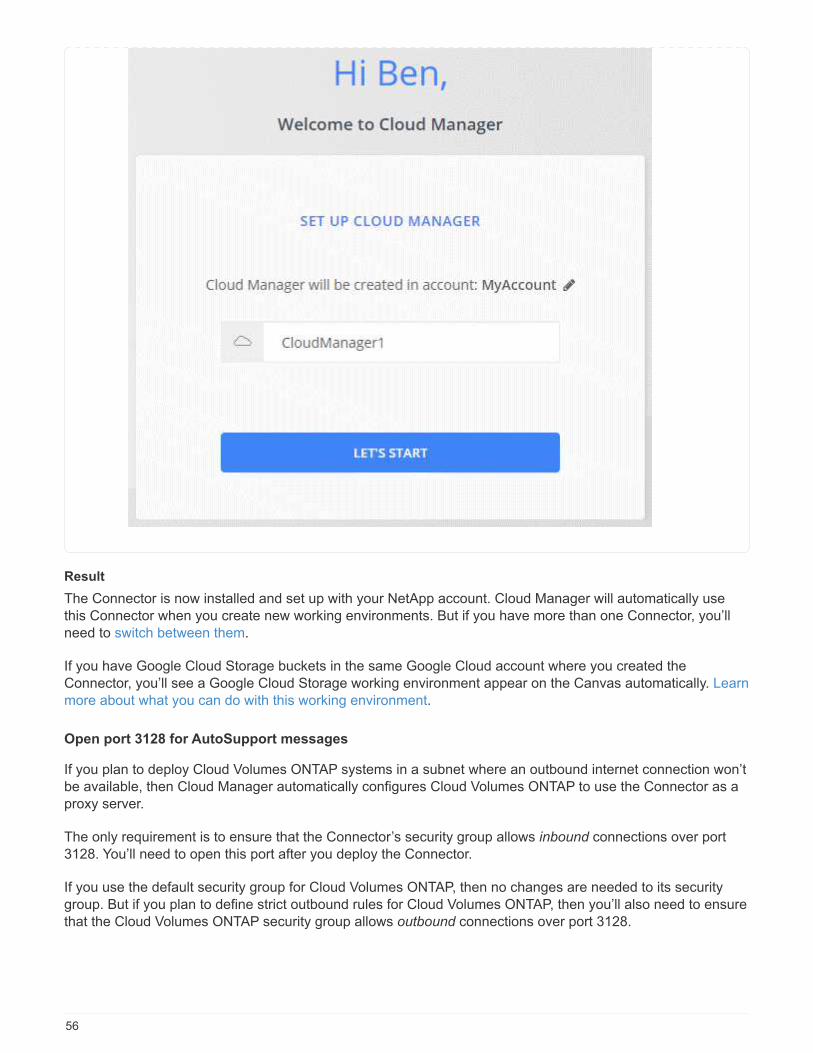
Result
The Connector is now installed and set up with your NetApp account. Cloud Manager will automatically use
this Connector when you create new working environments. But if you have more than one Connector, you’ll
need to switch between them.
If you have Google Cloud Storage buckets in the same Google Cloud account where you created the
Connector, you’ll see a Google Cloud Storage working environment appear on the Canvas automatically. Learn
more about what you can do with this working environment.
Open port 3128 for AutoSupport messages
If you plan to deploy Cloud Volumes ONTAP systems in a subnet where an outbound internet connection won’t
be available, then Cloud Manager automatically configures Cloud Volumes ONTAP to use the Connector as a
proxy server.
The only requirement is to ensure that the Connector’s security group allows inbound connections over port
3128. You’ll need to open this port after you deploy the Connector.
If you use the default security group for Cloud Volumes ONTAP, then no changes are needed to its security
group. But if you plan to define strict outbound rules for Cloud Volumes ONTAP, then you’ll also need to ensure
that the Cloud Volumes ONTAP security group allows outbound connections over port 3128.
56

Where to go next
Now that you’ve logged in and set up Cloud Manager, users can start creating and
discovering working environments.
• Get started with Cloud Volumes ONTAP for AWS
• Get started with Cloud Volumes ONTAP for Azure
• Get started with Cloud Volumes ONTAP for Google Cloud
• Set up Azure NetApp Files
• Set up Amazon FSx for ONTAP
• Set up Cloud Volumes Service for AWS
• Discover an on-premises ONTAP cluster
• Discover your Amazon S3 buckets
57
Copyright Information
Copyright © 2022 NetApp, Inc. All rights reserved. Printed in the U.S. No part of this document
covered by copyright may be reproduced in any form or by any means-graphic, electronic, or
mechanical, including photocopying, recording, taping, or storage in an electronic retrieval system-
without prior written permission of the copyright owner.
Software derived from copyrighted NetApp material is subject to the following license and disclaimer:
THIS SOFTWARE IS PROVIDED BY NETAPP “AS IS” AND WITHOUT ANY EXPRESS OR IMPLIED
WARRANTIES, INCLUDING, BUT NOT LIMITED TO, THE IMPLIED WARRANTIES OF
MERCHANTABILITY AND FITNESS FOR A PARTICULAR PURPOSE, WHICH ARE HEREBY
DISCLAIMED. IN NO EVENT SHALL NETAPP BE LIABLE FOR ANY DIRECT, INDIRECT,
INCIDENTAL, SPECIAL, EXEMPLARY, OR CONSEQUENTIAL DAMAGES (INCLUDING, BUT NOT
LIMITED TO, PROCUREMENT OF SUBSTITUTE GOODS OR SERVICES; LOSS OF USE, DATA, OR
PROFITS; OR BUSINESS INTERRUPTION) HOWEVER CAUSED AND ON ANY THEORY OF
LIABILITY, WHETHER IN CONTRACT, STRICT LIABILITY, OR TORT (INCLUDING NEGLIGENCE OR
OTHERWISE) ARISING IN ANY WAY OUT OF THE USE OF THIS SOFTWARE, EVEN IF ADVISED OF
THE POSSIBILITY OF SUCH DAMAGE.
NetApp reserves the right to change any products described herein at any time, and without notice.
NetApp assumes no responsibility or liability arising from the use of products described herein,
except as expressly agreed to in writing by NetApp. The use or purchase of this product does not
convey a license under any patent rights, trademark rights, or any other intellectual property
rights of NetApp.
The product described in this manual may be protected by one or more U.S. patents,
foreign patents, or pending applications.
RESTRICTED RIGHTS LEGEND: Use, duplication, or disclosure by the government is subject to
restrictions as set forth in subparagraph (c)(1)(ii) of the Rights in Technical Data and
Computer Software clause at DFARS 252.277-7103 (October 1988) and FAR 52-227-19 (June 1987).
Trademark Information
NETAPP, the NETAPP logo, and the marks listed at http://www.netapp.com/TM are trademarks of
NetApp, Inc. Other company and product names may be trademarks of their respective owners.
58