fpcs1800 b&q chainsaw barcode 5052931013876
TRANSCRIPT
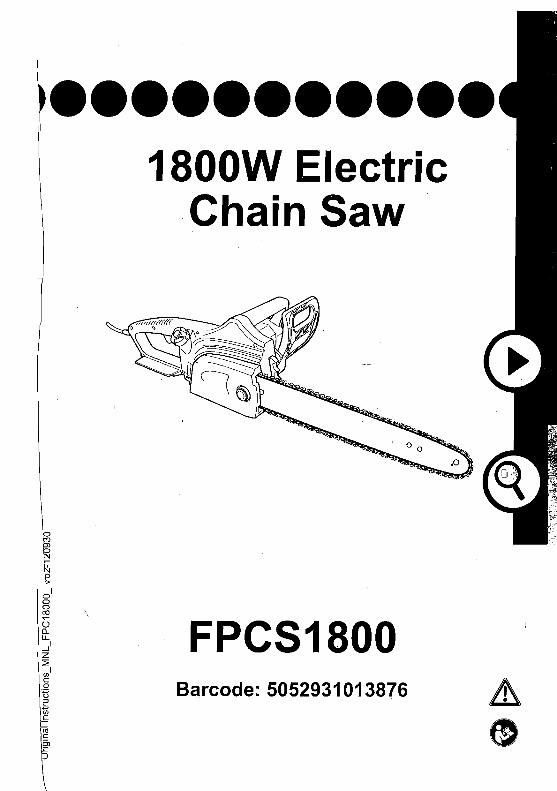
1800W Electric Chain Saw
FPCS1800 Barcode: 5052931013876

02
Let's get started ...
These instructions are for your safety. Please read through them thoroughly before use and retain them for future reference.
®
Getting started ...
Before you start Safety
In more detail ...
Product functions Operation Care and maintenance Trouble shooting Recycling and disposal Technical and legal information Guarantee EC declaration of conformity
03
03 12
13
14 17 25 32 33 34 45 46
FPCS1800 Before you start
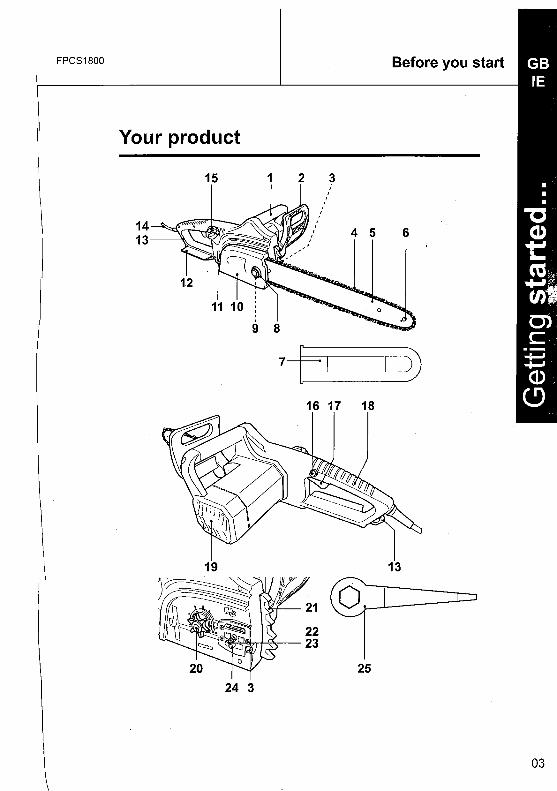
Your product
15 1 2 3
14 13
24 3
7-FI D 16 17 18
03

04
FPCS1800 Before you start
Your product
1 . Front handle 14. Power cord with plug 2. Front guard/chain brake 15. Oil tank cap 3. Tension screw 16. Lock-off button 4. Saw chain 17. On/off switch 5. Guide bar 18. Rear handle 6. Sprocket nose 19. Air vents 7. Guide bar cover 20. Drive sprocket 8. Cap 21. Spike bumper 9. Retaining nut 22. Oiling port 10. Cover 23. Bolt 11. Oil level window 24. Tension pin 12. Rear guard 25. Wrench 13. Cable strain relief
Unpack
> Unpack all parts and lay them on a flat, stable surface. > Remove all packing materials and shipping devices if
applicable. > Make sure the delivery contents are complete and free of any
damage. If you find that parts are missing or show damage do not use the product but contact your dealer. Using an incomplete or damaged product represents a hazard to people and property.
> Ensure that you have all the accessories and tools needed for assembly and operation. This also includes suitable personal protective equipment.
You will need
(items not supplied) Saw chain oil
(items supplied) Saw chain Guide bar cover
FPCS1800 Before you start
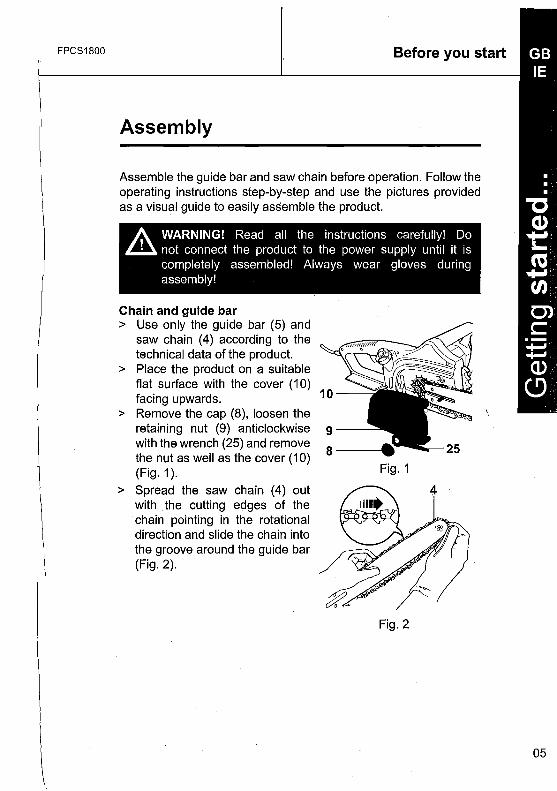
Assembly
Assemble the guide bar and saw chain before operation. Follow the operating instructions step-by-step and use the pictures provided as a visual guide to easily assemble the product.
A. WARNING! Read all the instructions carefully! Do £ll not connect the product to the power supply until it is
completely assembled! Always wear gloves during assembly!
Chain and guide bar > Use only the guide bar (5) and
saw chain (4) according to the technical data of the product.
> Place the product on a suitable flat surface with the cover (10) facing upwards.
> Remove the cap (8), loosen the retaining nut (9) anticlockwise with the wrench (25) and remove the nut as well as the cover (1 0) (Fig. 1 ).
> Spread the saw chain (4) out with the cutting edges of the chain pointing in the rotational direction and slide the chain into the groove around the guide bar (Fig. 2).
Fig. 1
Fig. 2
05
06
FPCS1800 Before you start
Assembly
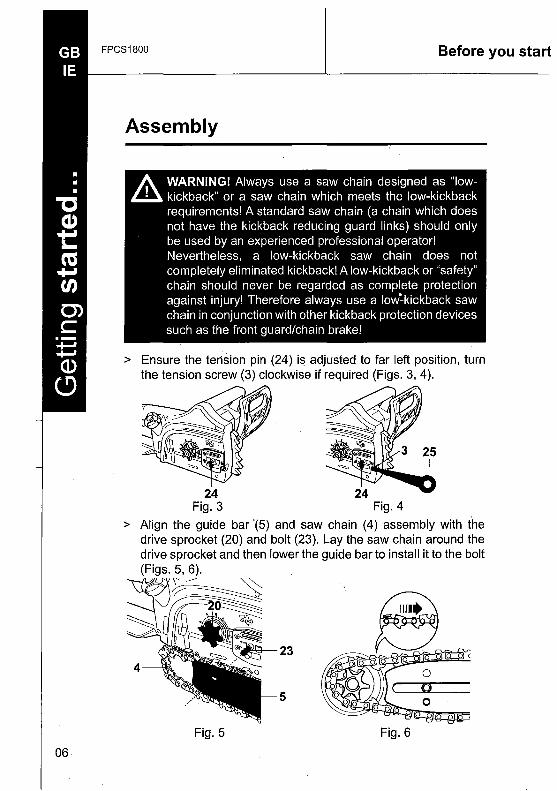
A WARNING! Always use a saw chain designed as "low~ kickback" or a saw chain which meets the low-kickback
requirements! A standard saw chain (a chain which does not have the kickback reducing guard links) should only be used by an experienced professional operator! Nevertheless, a low-kickback saw chain does not completely eliminated kickback! A low-kickback or "safety" chain should never be regarded as complete protection against injury! Therefore always use a low:kickback saw chain in conjunction with other kickback protection devices such as the front guard/chain brake!
> Ensure the tei1sion pin (24) is adjusted to far left position, turn the tension screw (3) clockwise if required (Figs. 3, 4).
24 Fig. 3
> Align the guide bar '(5) and saw chain (4) assembly with the drive sprocket (20) and bolt (23). Lay the saw chain around the drive sprocket and then lower the guide bar to install it to the bolt
. 5, 6).
5
Fig. 5 Fig. 6
FPCS1800
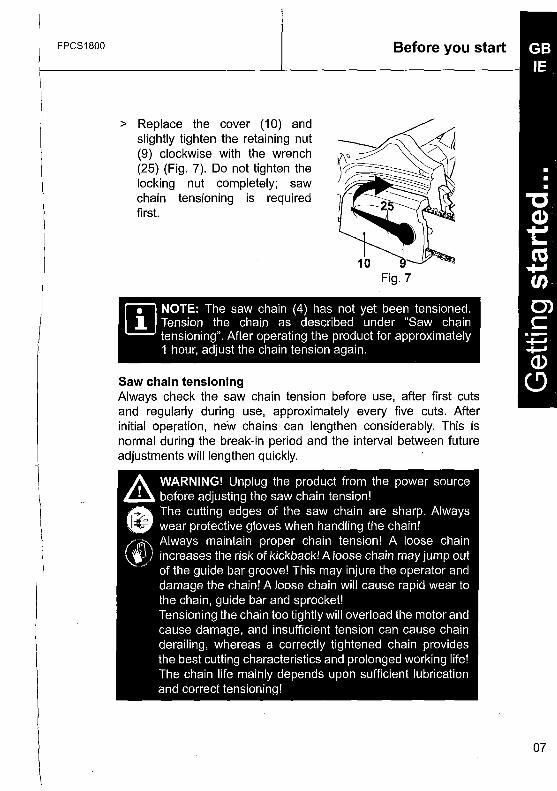
> Replace the cover (10) and slightly tighten the retaining nut (9) clockwise with the wrench (25) (Fig. 7). Do not tighten the locking nut completely; saw chain tensioning is required first.
Before you start
Fig. 7
l!l NOTE: The saw chain (4) has not yet been tensioned. ~ Tension the chain as described under "Saw chain
tensioning". After operating the product for approximately 1 hour, adjust the chain tension again.
Saw chain tensioning Always check the saw chain tension before use, after first cuts and regularly during use, approximately every five cuts. After initial operation, ne"w chains can lengthen considerably. This is normal during the break-in period and the interval between future adjustments will lengthen quickly.
A WARNING! Unplug the product from the power source ~ before adjusting the saw chain tension!
•~ The cutting .edges of the saw ch~in are sh~rp. Always
wear protect1ve gloves when handling the cham! rih Always maintain proper chain tension! A loose chain \!:) increases the risk of kickback! A loose chain may jump out
- of the guide bar groove! This may injure the operator and damage the chain! A loose chain will cause rapid wear to the chain, guide bar and sprocket! Tensioning the chain too tightly will overload the motor and cause damage, and insufficient tension can cause chain derailing, whereas a correctly tightened chain provides the best cutting characteristics and prolonged working life! The chain life mainly depends upon sufficient lubrication and correct tensioning!
07
08
FPCS1800
Assembly
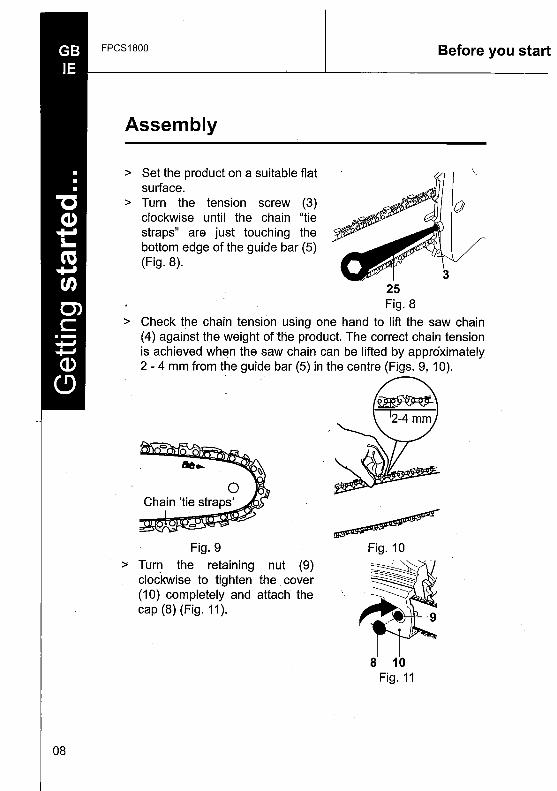
> Set the product on a suitable flat surface.
> Turn the tension screw (3) clockwise until the chain "tie straps" are just touching the bottom edge of the guide bar (5) (Fig. 8).
25 Fig. 8
Before you start
\
> Check the chain tension using one hand to lift the saw chain (4) against the weight of the product. The correct chain tension is achieved when the saw chain can be lifted by approximately 2 - 4 mm from the guide bar (5) in the centre (Figs. 9, 1 0).
Fig. 9 > Turn the retaining nut (9)
clockwise to tighten the cover (10) completely and attach the cap (8) (Fig. 11 ).
8 10 Fig. 11

FPCS1800 Before you start
Lubrication
A WARNING! The product is not filled w~h oil. It is essential £ll to fill the product with oil before using it! Never operate the
•, ... ~.~-. p~oduct w~thout ch~in oil-or with an empty oil tank, as this "· ·~,. w1ll result 1n extensive damage to the product! ~ Never operate the bar and chain ~ithout lubrication oil! ~ Operating the product dry or with too little oil will decrease
- cutting efficiency, shorten the product life span and cause rapid wear to the chain and bar from overheating! Insufficient oil is evident by smoke or bar discoloration! Adequate lubrication of the saw chain during cutting operations is essential to minimise friction with the guide bar. Your product is equipped with an automatic oiling system! The oiling system automatically delivers the proper amount of oil to the bar and chain!
> Set the product on any suitable surface with the tank cap (15) facing upwards.
> Unscrew and remove the tank cap (15), then add the lubricant J into the tank. Use a proper funnel with a filter to prevent debris entering the tank and to avoid spilling and overfilling the tank. Do not overfill and leave approximately 5 mm of space to the lower edge to allow the lubricant to expand (Fig. 12). Fig. 12
l!l NOTE: In summer use SAE #30; in winter, or if the trees ~ have excessive sap, use SAE #1 0.
09

10
FPCS1800
Lubrication
> Check the oil level window (11) prior to start-up and regularly during operation. Refill oil when the oil level is lower than "MIN" marking (Fig. 13).
> Wipe up spilled lubricant with a soft cloth and refit the tank cap (15).
Before you start
Fig. 13
J!l NOTE: Always dispose of lubricant, used oil and objects L!J contaminated with them in accordance with local
regulations.
FPCS1800 Before you start
Connection to the power supply
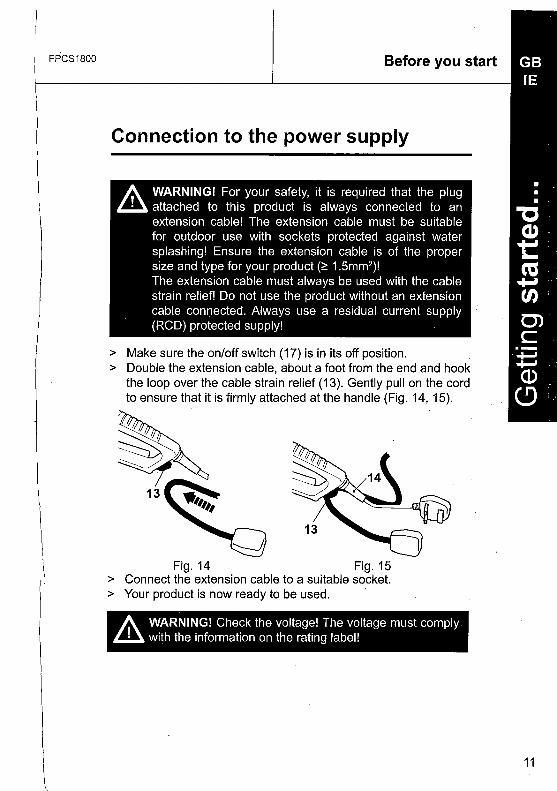
A WARNING! For your safety, it is required that the plug ~ attached to this product is always connected to an
extension cable! The extension cable must be suitable for outdoor use with sockets protected against water splashing! Ensure the extension cable is of the proper size and type for your product (<:: 1.5mm2)! The extension cable must always be used with the cable strain relief! Do not use the product without an extension cable connected. Always use a residual current supply (RCD) protected supply!
> Make sure the on/off switch (17) is in its off position. > Double the extension cable, about a foot from the end and hook
the loop over the cable strain relief (13). Gently pull on the cord to ensure that it is firmly attached at the handle (Fig. 14, 15).
Fig. 14 Fig. 15 > Connect the extension cable to a suitable socket. > Your product is now ready to be used.
A WARNING! Check the voltage! The voltage must comply ~ with the information on the rating label!
11
12
FPCS1800 Safety
Check that you have noted all the following instructions:
Before starting you must have fully read and understood the entire instruction manual.
Working with this product is demanding; therefore ensure you are physically and mentally fit to complete the job safely.
Ensure that you have all the accessories and tools needed for assembly and operation.
Make sure that you wear suitable personal protective equipment.
Ensure that no unauthorised people, especially children, and pets are nearby or could enter the working area.
Ensure that the product is free from damage and that it is not worn.
Make sure that safety devices and accessories are correctly fixed.
Double check that all assembly tools have been removed from the product before use.
Undertake periodic structural checks of this product; do not use it if you have any doubts about its suitability for its intended purpose.
A. WARNING! For your own and the safety of other people ~ you must read and follow the safety instructions in section
"In more detail -Technical and legal information -Safety warnings".

FPCS1800
In more detail ...
Product functions 14
Operation 17
Care and maintenance 25
Trou.ble shooting 32
Recycling and disposal 33
Technical and legal information 34
Guarantee 45
EC declaration of conformity 46

14
FPCS1800 Product functions
Intended use
This chain saw FPCS1800 is designated with a rated input of 1800 Watts. The product is intended for cutting logs with a thickness of max. 326 mm. It must not be used for cutting other materials, such as plastic, stone, metal or wood that contains foreign objects. The product may only be used with the guide bar/saw chain combination stated in these instructions. It is not permitted to use other types or sizes. Vertical and horizontal cuts can be performed with this product. Longitudinal sections can only be cut by professionals. This product should not be used outside of domestic premises e.g. for cutting firewood in forested areas. The product should not be used on masonry and materials that are harmful to health. This product is intended for private domestic use only, not for any commercial trade use. It must not be used for any purposes other than those described.
Chain brake
Fig. 16 The chain brake (2) in the disengaged position, the product can be operated (Fig. 16).
Fig. 17 The chain brake (2) in the engaged position, the saw chain is stopped as soon as the chain brake is activated (Fig. 17).
FPCS1800 Product functions
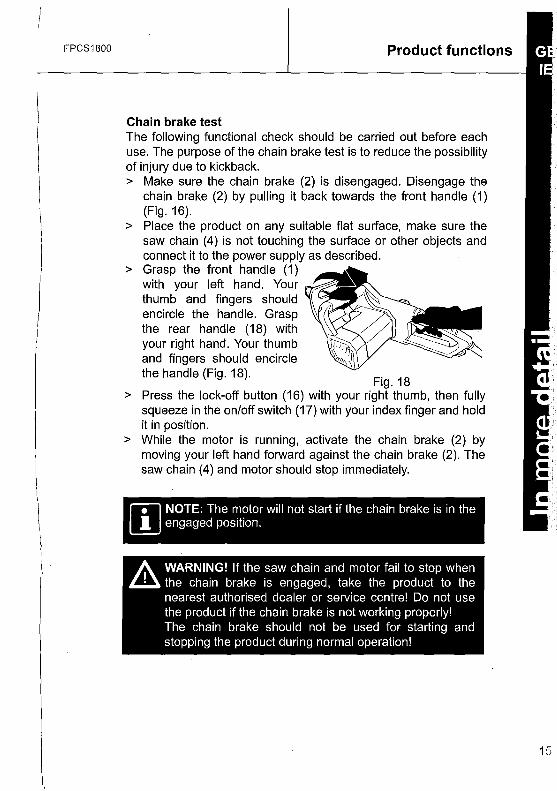
Chain brake test The following functional check should be carried out before each use. The purpose of the chain brake test is to reduce the possibility of injury due to kickback. > Make sure the chain brake (2) is disengaged. Disengage the
chain brake (2) by pulling it back towards the front handle (1) (Fig. 16).
> Place the product on any suitable flat surface, make sure the saw chain (4) is not touching the surface or other objects and connect it to the power supply as described.
> Grasp the front handle (1) with your left hand. Your thumb and fingers should encircle the handle. Grasp the rear handle (18) with your right hand. Your thumb and fingers should encircle the handle (Fig. 18).
Fig. 18 > Press the lock-off button (16) with your right thumb, then fully
squeeze in the on/off switch (17) with your index finger and hold it in position.
> While the motor is running, activate the chain brake (2) by moving your left hand forward against the chain brake (2). The saw chain (4) and motor should stop immediately.
l!l NOTE: The motor will not start if the chain brake is in the ~engaged position.
A. WARNING! If the saw chain and motor fail to stop when £ll the chain brake is engaged, take the product to the
nearest authorised dealer or service centre! Do not use the product if the chain brake is not working properly! The chain brake should not be used for starting and stopping the product during normal operation!
15
16
FPCS1800 Product functions
On/off switch
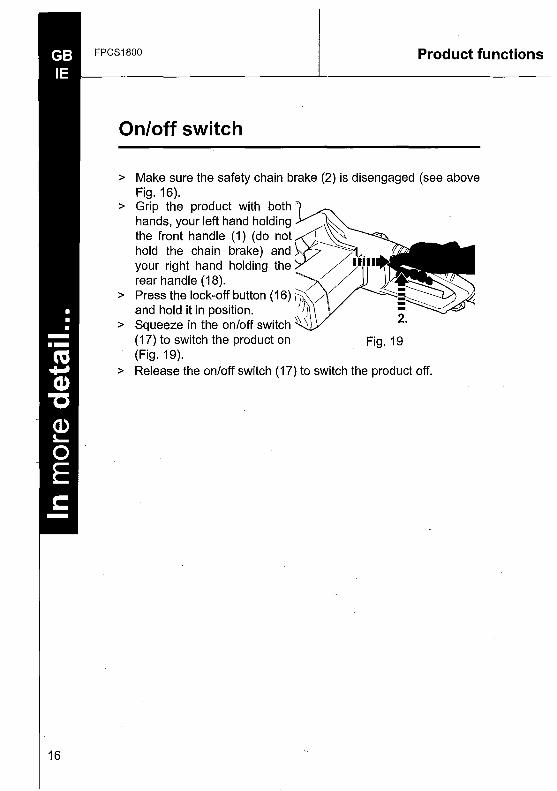
> Make sure the safety chain brake (2) is disengaged (see above Fig. 16).
> Grip the product with both hands, your left hand holding the front handle (1) (do not hold the chain brake) and your right hand holding the rear handle (18).
> Press the lock-off button (16) , and hold it in position.
> Squeeze in the on/off switch (17) to switch the product on Fig. 19 (Fig. 19).
> Release the on/off switch ( 17) to switch the product off.
FPCS1800 Operation
General operation
> Check the product, its power cord and plug as well as accessories for damage before each use. Do not use the product if it is damaged or shows wear.
> Double check that accessories and the guide bar/saw chain are properly fixed.
> Always hold the product by its handle. Keep the handle dry to ensure safe support.
> Ensure that the air vents are always unobstructed and clear. Clean them if necessary with a soft brush. Blocked air vents may lead to overheating and damage the product.
> Switch the product off immediately if you are disturbed while working by other people entering the working area. Always let . the product come to complete stop before putting it down.
> Do not overwork yourself. Take regular breaks to ensure you can concentrate on the work and have full control over the product.
Basic operating I cutting procedure
> To become proficient attend a recognised chain saw training course to learn how to operate chain saws s<;~fely and effectively. Familiarise yourself with all the controls and switches. Practise all movements with the product switched off:
> Always hold the product firmly with both hands. Hold the front grip with your left hand and the rear grip with your right hand. Fully grip both handles at all times during operation. Never operate the product using only one hand.
> Ensure the power cord is located to the rear, away from the chain and the wood and is positioned so that it cannot be caught on branches or similar objects during cutting.
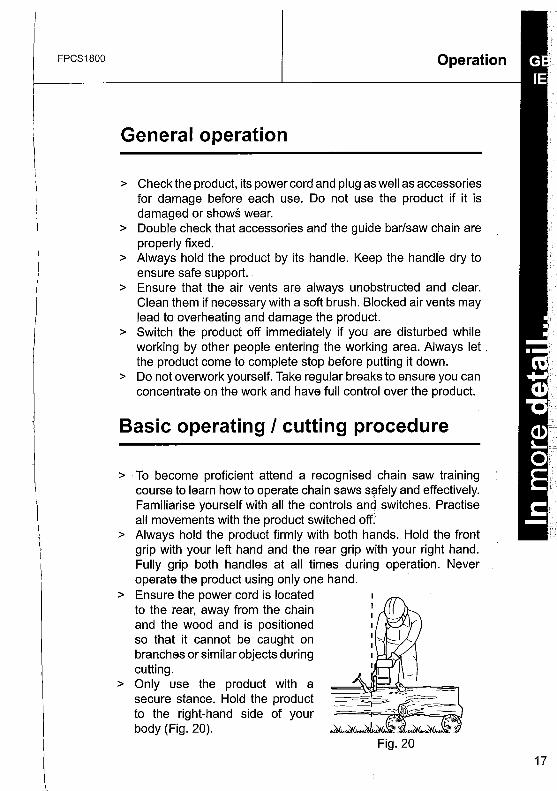
> Only use the product with a secure stance. Hold the product to the right-hand side of your body (Fig. 20).
17
18
FPCS1800
Basic operating I cutting procedure
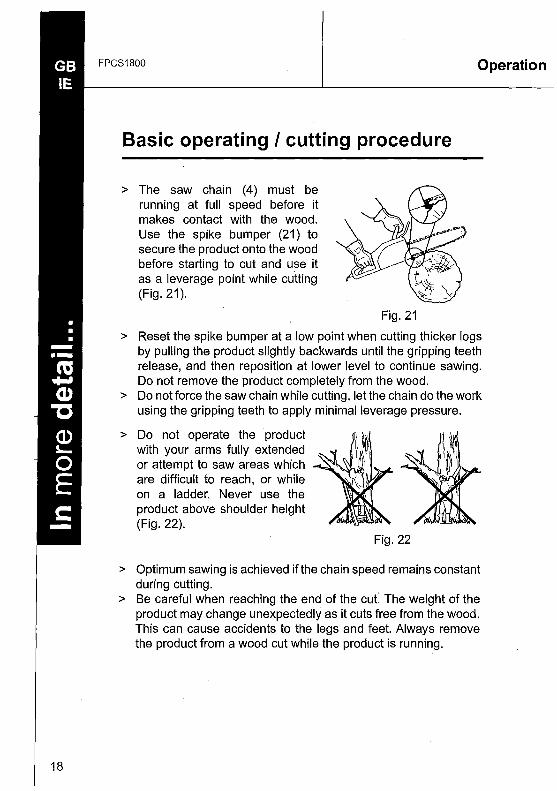
> The saw chain (4) must be running at full speed before it makes contact with the wood. Use the spike bumper (21) to secure the product onto the wood before starting to cut and use it as a leverage point while cutting (Fig. 21).
Fig. 21
Operation
> Reset the spike bumper at a low point when cutting thicker logs by pulling the product slightly backwards until the gripping teeth release, and then reposition at lower level to continue sawing. Do not remove the product completely from the wood.
> Do not force the saw chain while cutting, let the chain do the work using the gripping teeth to apply minimal leverage pressure.
> Do not operate the product with your arms fully extended or attempt to saw areas which are difficult to reach, or while on a ladder. Never use the product above shoulder height (Fig. 22).
Fig. 22
> Optimum sawing is achieved if the chain speed remains constant during cutting.
> Be careful when reaching the end of the cuf The weight of the product may change unexpectedly as it cuts free from the wood. This can cause accidents to the legs and feet. Always remove the product from a wood cut while the product is running.
FPCS1800 Operation
Kickback
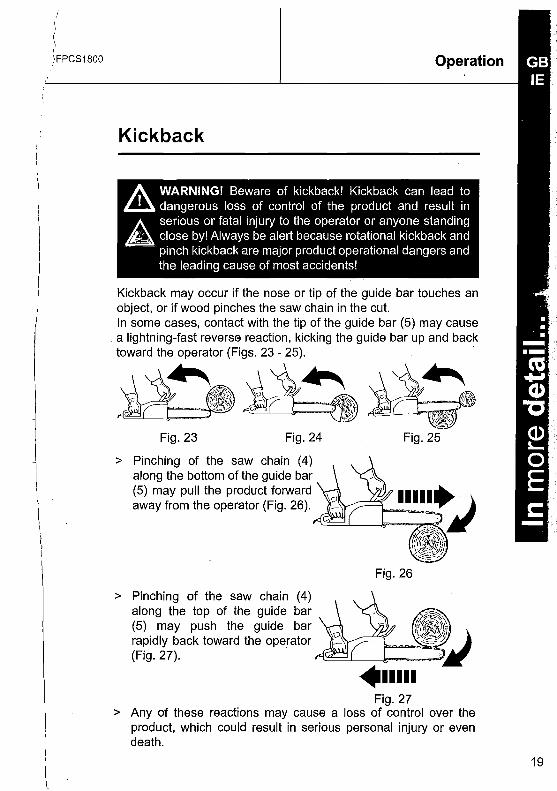
A. WARNING! Beware of kickback! Kickback can lead to ~ dangerous loss of control of the product and result in A serious or fatal injury to the operator or anyone standing ~ close by! Always be alert because rotational kickback and ·· - pinch kickback are major product operational dangers and
the leading cause of most accidents!
Kickback may occur if the nose or tip of the guide bar touches an object, or if wood pinches the saw chain in the cut. In some cases, contact with the tip of the guide bar (5) may cause a lightning-fast reverse reaction, kicking the guide bar up and back toward the operator (Figs. 23 - 25).
-~
Fig. 23 Fig. 24
> Pinching of the saw chain (4) along the bottom of the guide bar (5) may pull the product forward away from the operator (Fig. 26).
> Pinching of the saw chain (4) along the top of the guide bar (5) may push the guide bar rapidly back toward the operator (Fig. 27).
Fig. 25
IIIII~) . ~'
"
Fig. 26
Fig. 27 > Any of these reactions may cause a loss of control over the
product, which could result in serious personal injury or even death.
19
20
FPCS1800 Operation
Kickback
> With a basic understanding of 'kickback', the element of surprise can be reduced or eliminated. Sudden surprise contributes to the majority of accidents.
> Keep a good firm grip on the product with both hands, your right hand on the rear handle (18) and your left hand on the front handle (1 ), when the motor is running. Maintain a firm grip with your thumbs and fingers encircling the handles. A firm grip will help you reduce 'kickback' and maintain control of the product.
> You should read all the safety warnings and user instructions carefully before attempting to operate this product.
To avoid kickback: • Saw with the guide bar at a flat angle. • Never work with a loose, widely stretched or heavily worn
chain. • Ensure the chain is sharpened correctly. • Never saw above shoulder height. • Never work with the tip of the guide bar. • Always hold the product firmly with both hands. • Always use a low kickback chain. • Apply the metal gripping teeth for leverage. • Ensure correct chain tension.
Felling a tree
> When bucking and felling operations are being performed by two or more persons at the same time, the felling operations should be separated from the bucking operation by a distance of at least twice the height of the tree being felled. Trees should not be felled in a manner that would endanger any person, strike any utility line or cause any property damage. If the tree does make contact with any utility line, the company should be notified immediately.
> The product operator should keep on the uphill side of the terrain as the tree is likely to roll or slide downhill after it is felled.
,: FPCS1800
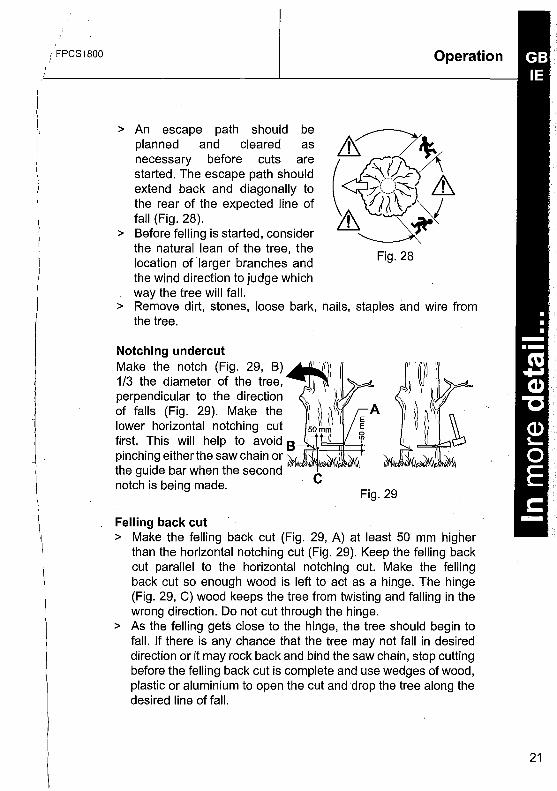
> An escape path should be planned and cleared as necessary before cuts are started. The escape path should extend back and diagonally to the rear of the expected line of fall (Fig. 28).
> Before felling is started, consider the natural lean of the tree, the location of larger branches and the wind direction to judge which way the tree will fall.
Operation
Fig. 28
> Remove dirt, stones, loose bark, nails, staples imd wire from the tree.
Notching undercut Make the notch (Fig. 29, B) 1/3 the diameter of the tree, perpendicular to the direction of falls (Fig. 29). Make the lower horizontal notching cut
__ .. / first. This will help to avoid 8 ~T---lll------+ pinching either the saw chain or the guide bar when the second notch is being made.
Fig. 29
Felling back cut > Make the felling back cut (Fig. 29, A) at least 50 mm higher
than the horizontal notching cut (Fig. 29). Keep the felling back cut parallel to the horizontal notching cut. Make the felling back cut so enough wood is left to act as a hinge. The hinge (Fig. 29, C) wood keeps the tree from twisting and falling in the wrong direction. Do not cut through the hinge.
> As the felling gets close to the hinge, the tree should begin to fall. If there is any chance that the tree may not fall in desired direction or it may rock back and bind the saw chain, stop cutting before the felling back cut is complete and use wedges of wood, plastic or aluminium to open the cut and drop the tree along the desired line of fall.
21
22
FPCS1800 Operation
Limbing and pruning
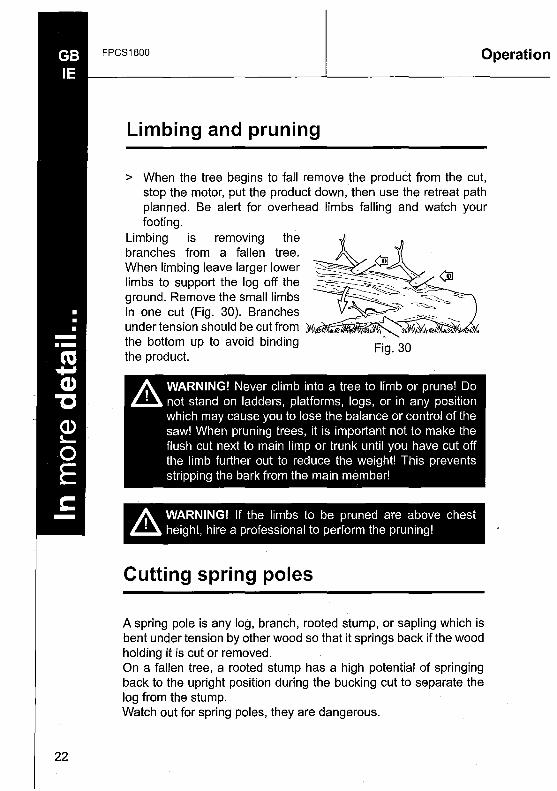
> When the tree begins to fall remove the product from the cut, stop the motor, put the product down, then use the retreat path planned. Be alert for overhead limbs falling and watch your footing.
Limbing is removing the branches from a fallen tree. When limbing leave larger lower limbs to support the log off the ground. Remove the small limbs in one cut (Fig. 30). Branches under tension should be cut from lM.··d ~~~(;' the bottom up to avoid binding the product.
Fig. 30
A WARNING! Never climb into a tree to limb or prune! Do ~ not stand on ladders, platforms, logs, or in any position
which may cause you to lose the balance or control of the saw! When pruning trees, it is important not to make the flush cut next to main limp or trunk until you have cut off the limb further out to reduce the weight! This prevents stripping the bark from the main member!
A WARNING! If the limbs to be pruned are above chest ~ height, hire a professional to perform the pruning!
Cutting spring poles
A spring pole is any log, branch, rooted stump, or sapling which is bent under tension by other wood so that it springs back if the wood holding it is cut or removed. On a fallen tree, a rooted stump has a high potential of springing back to the upright position during the bucking cut to separate the log from the stump. Watch out for spring poles, they are dangerous.
Operation
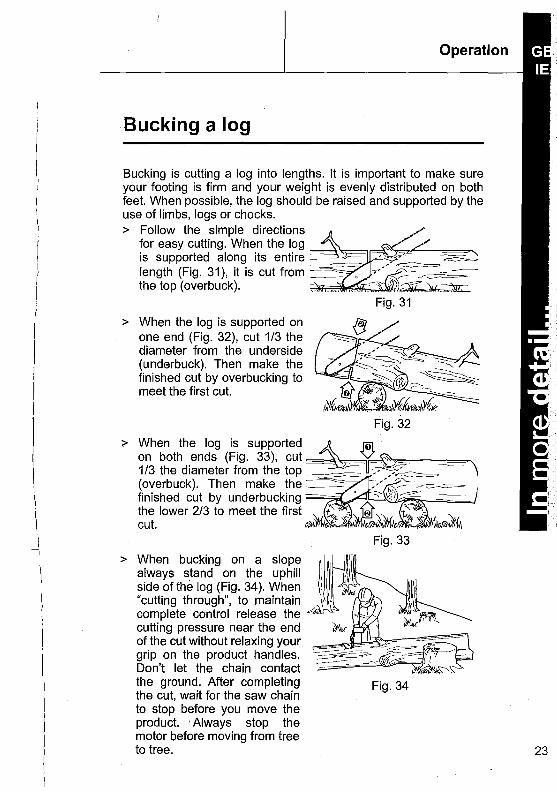
Bucking a log
Bucking is cutting a log into lengths. It is important to make sure your footing is firm and your weight is evenly distributed on both feet. When possible, the log should be raised and supported by the use of limbs, logs or chocks. > Follow the simple directions
for easy cutting. When the log ===~'==·~ ">=.-"---~="' is supported along its entire -- ,__-length (Fig. 31), it is cut from~ the top (overbuck).
> When the log is supported on one end (Fig. 32), cut 1/3 the diameter from the underside (underbuck). Then make the finished cut by overbucking to meet the first cut.
> When the log is supported
> When bucking on a slope always stand on the uphill side of the log (Fig. 34 ). When "cutting through", to maintain complete control release the cutting pressure near the end of the cut without relaxing your grip on the product handles. Don't let the chain contact the ground. After completing the cut, wait for the saw chain to stop before you move the product. , Always stop the motor before moving from tree to tree.
Fig. 33
Fig. 34
23
24
FPCS1800
Bucking a log
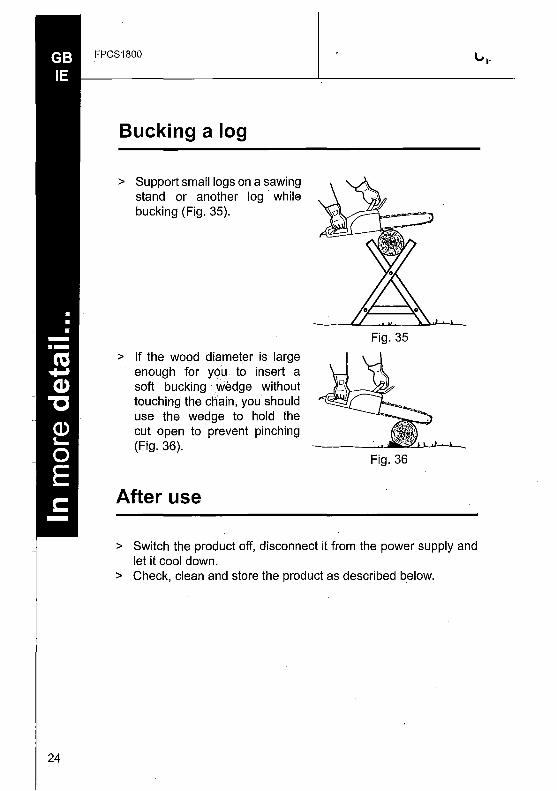
> Support small logs on a sawing stand or another log while bucking (Fig. 35).
> If the wood diameter is large enough for you to insert a soft bucking wedge without touching the chain, you should use the wedge to hold the cut open to prevent pinching (Fig. 36).
After use
Fig. 35
Fig. 36
> Switch the product off, disconnect it from the power supply and let it cool down.
> Check, clean and store the product as described below.
FPCS1800 Care and maintenance
The golden rules for care
A. . WARNING! Always switch the product off, disconnect it ~ from power supply and let the product cool down before • performing inspection, maintenance and cleaning work!
> Keep the product clean. Remove debris from it after each use and before storage.
> Regular and proper cleaning will help ensure safe use and prolong the life of the product.
> Inspect the product before each use for worn and damaged parts. Do not operate it if you find broken and worn parts.
A.· WARNING! Only perform repairs and maintenance work ~ according to these instructions! All further works must be
performed by a qualified specialist!
General cleaning
> Clean the product with a dry cloth. Use a brush for areas that are hard to reach.
> In particular cleari the air vents (19) after every use with a cloth and brush.
> Remove stubborn dirt with high pressure air (max. 3 bar).
l!l NOTE: Do not use chemical, alkaline, abrasive or other ~ aggressive detergents or disinfectants to clean this
product as they might be harmful to its surfaces.
> Check for worn or damaged parts. Replace worn parts as necessary or contact an authorised service centre for repair before using the product again.
25
26
FPCS1800 Care and maintenance
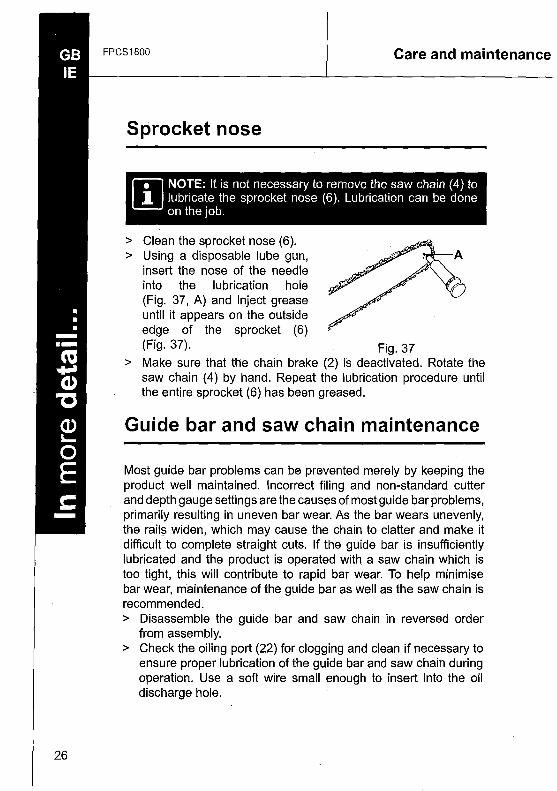
Sprocket nose
l!l NOTE: It is not necessary to remove the saw chain (4) to L.!J lubricate the sprocket nose (6). Lubrication can be done
on the job.
> Clean the sprocket nose (6). > Using a disposable lube gun,
insert the nose of the needle into the lubrication hole (Fig. 37, A) and inject grease until it appears on the outside edge of the sprocket (6) (Fig. 37). Fig. 37 .
> Make sure that the chain brake (2) is deactivated. Rotate the saw chain (4) by hand. Repeat the lubrication procedure until the entire sprocket (6) has been greased.
Guide bar and saw chain maintenance
Most guide bar problems can be prevented merely by keeping the product well maintained. Incorrect filing and non-standard cutter and depth gauge settings are the causes.of most guide bar problems, primarily resulting in uneven bar wear. As the bar wears unevenly, the rails widen, which may cause the chain to clatter and make it difficult to complete straight cuts. If the guide bar is insufficiently lubricated and the product is operated with a saw chain which is too tight, this will contribute to rapid bar wear. To help minimise bar wear, maintenance of the guide bar as well as the saw chain is recommended. > Disassemble the guide bar and saw chain in reversed order
from assembly. > Check the oiling port (22) for clogging and clean if necessary to
ensure proper lubrication of the guide bar and saw chain during operation. Use a soft wire small enough to insert into the oil discharge hole.
FPCS1800 Care and maintenance
l!l NOTE: The condition of the oil passages can be easily ~checked. If the passages are clear, the chain will
automatically give off a spray of oil within seconds of the product starting. Your product is equipped with an automatic oiling system.
> Check the drive sprocket (20). If it is worn or damaged due to strain, have it replaced by an authorised service agent.
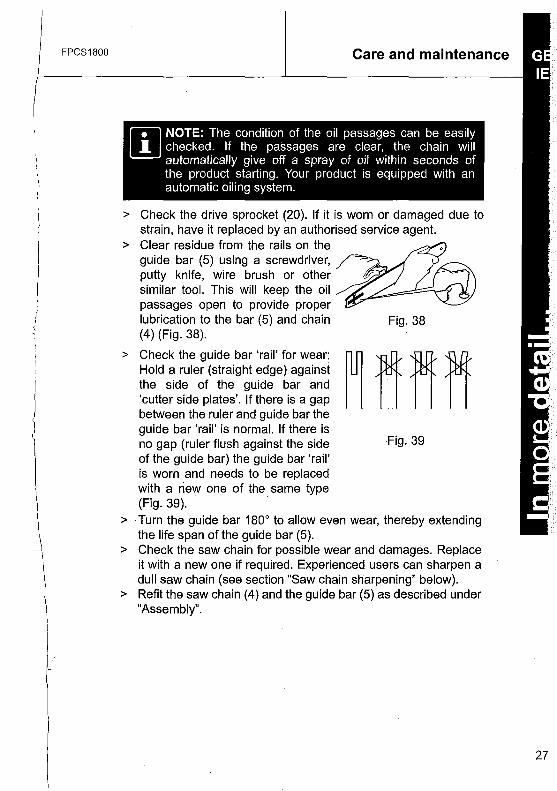
> Clear residue from the rails on the guide bar (5) using a screwdriver, putty knife, wire brush or other similar tool. This will keep the oil passages open to provide proper lubrication to the bar (5) and chain Fig. 38 (4) (Fig. 38).
> Check the guide bar 'rail' for wear: M n n ff Hold a ruler (straight edge) against the side of the guide bar and 'cutter side plates'. If there is a gap between the ruler and guide bar the guide bar 'rail' is normal. If there is no gap (ruler flush against the side Fig. 39 of the guide bar) the guide bar 'rail' is worn and needs to be replaced with a riew one of the same type (Fig. 39). .
> ·Turn the guide bar 180° to allow even wear, thereby extending the life span of the guide bar (5).
> Check the saw chain for possible wear and damages. Replace it with a new one if required. Experienced users can sharpen a dull saw chain (see section "Saw chain sharpening" below).
> Refit the saw chain (4) and the guide bar (5) as described under "Assembly".
27
28
FPCS1800 Care and maintenance
Guide bar and saw chain maintenance
Saw chain sharpening
l!l NOTE: Never saw with a blunt chain. The saw chain is L!J blunt if you have to push the product into the tree and the
chips are very small.
> Have your chain (4) sharpened professionally at an authorised service centre or sharpen the chain yourself using a proper sharpening kit. Also observe the sharpening instructions supplied with the sharpening kit.
A. WARNING! Only sharpen the saw chain yourself if you ~ are trained and have experience! Use proper tools to
sharpen the saw chain!
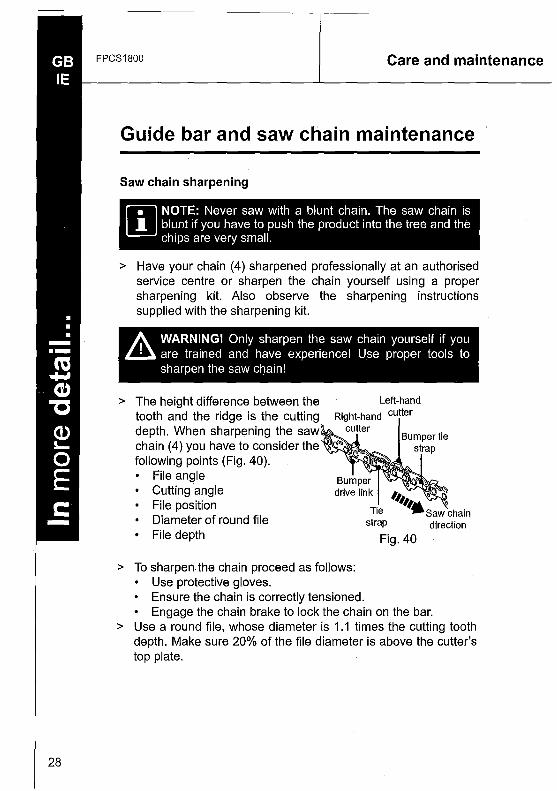
> The height difference between the tooth and the ridge is the cutting depth. When sharpening the saw chain (4) you have to consider the following points (Fig. 40). o File angle o Cutting angle o File position o Diameter of round file o File depth
> To sharpen the chain proceed as follows: o Use protective gloves. o Ensure the chain is correctly tensioned.
Fig. 40
o Engage the chain brake to lock the chain on the bar. > Use a round file, whose diameter is 1.1 times the cutting tooth
depth. Make sure 20% of the file diameter is above the cutter's top plate.
FPCS1800 Care and maintenance
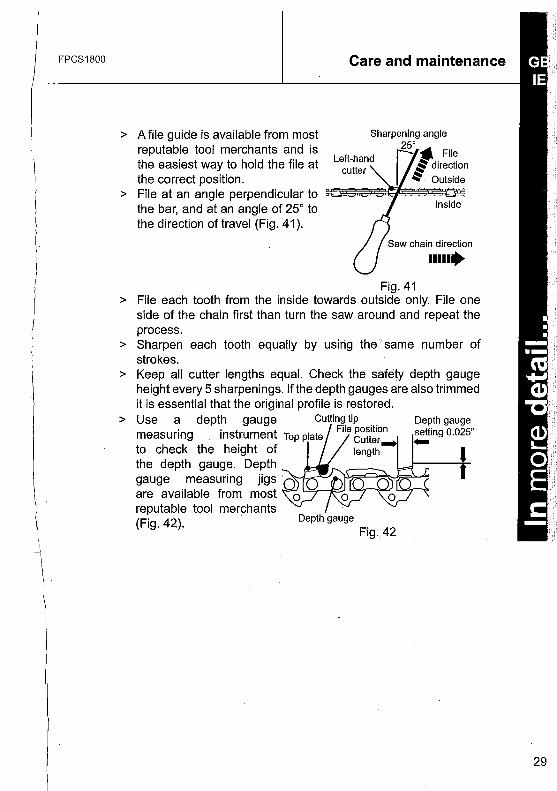
> A file guide is available from most reputable tool merchants and is the easiest way to hold the file at the correct position.
> File at an angle perpendicular to the bar, and at an angle of 25° to the direction of travel (Fig. 41 ).
Sharpening angle 25' <Jl File
S direction
~ Outside
Inside
Saw chain direction ...... Fig. 41
> File each tooth from the inside towards outside only. File one side of the chain first than turn the saw around and repeat the process.
> Sharpen each tooth equally by usirig the same number of strokes.
> Keep all cutter lengths equal. Check the safety depth gauge height every 5 sharpenings. If the depth gauges are also trimmed it is essential that the original profile is restored.
> Use a depth gauge Cutting tip
measuring instrument Top plate
to check the height of the depth gauge. Depth gauge measuring jigs ·o are available from most 0 reputable tool merchants (Fig. 42). Depth gauge
Fig.42
29
30
FPCS1800 Care and maintenance
Power cord
> If the power cord is damaged, it must be replaced by the manufacturer, its service agent or similarly qualified persons in order to avoid a safety hazard.
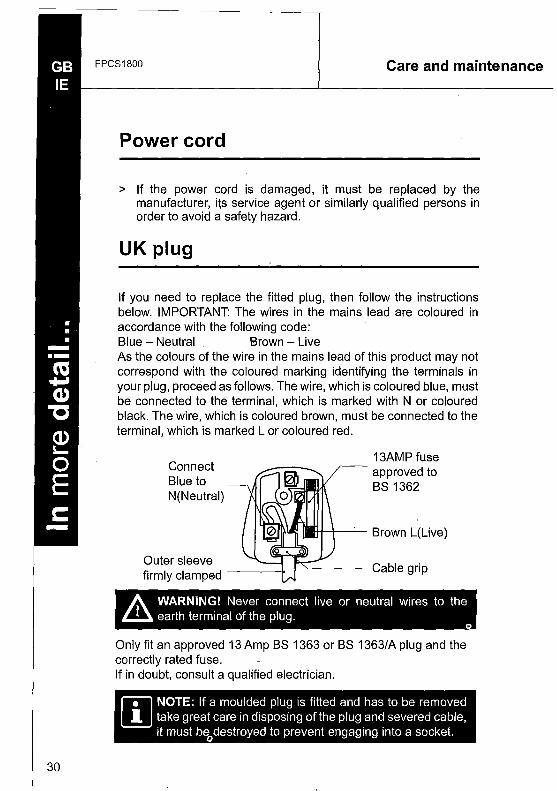
UK plug
If you need to replace the fitted plug, then follow the instructions below. IMPORTANT: The wires in the mains lead are coloured in accordance with the following code: Blue - Neutral Brown - Live As the colours of the wire in the mains lead of this product may not correspond with the coloured marking identifying the terminals in your plug, proceed as follows. The wire, which is coloured blue, must be connected to the terminal, which is marked with N or coloured black. The wire, which is coloured brown, must be connected to the terminal, which is marked L or coloured red.
Connect Blue to N(Neutral)
Outer sleeve firmly clamped
13AMP fuse approved to BS 1362
A WARNING! Never connect live or neutral wires to the ~ earth terminal of the plug.
0
Only fit an approved 13 Amp BS 1363 or BS 1363/A plug and the correctly rated fuse. If in doubt, consult a qualified electrician.
f!l NOTE: If a moulded plug is fitted and has to be removed L:!J take great care in disposing of the plug and severed cable,
it must be0destroyed to prevent engaging into a socket.

FPCS1800 Care and maintenance
Repair
> This product does not contain any parts that can be repaired by the consumer. Contact a qualified specialist to have it checked and repaired.
Storage
> Clean the product as described above. > Store the product and its accessories in a dry, frost-free place. > Always store the product in a place that is inaccessible to children.
The ideal storage temperature is between 10 and 30°C. > We recommend using the original package for storage or
covering the product with a suitable cloth to protect it against dust.
Transportation
> Switch the product off and disconnect it from power supply before transporting it anywhere.
> Attach transportation guards, if applicable. > Always carry the product by its handle. > Protect the product from any heavy impact or strong vibrations
which may occur during transportation in vehicles. > Secure the product to prevent it from slipping or falling over.
31

32
FPCS1800 Trouble shooting
Trouble shooting
Suspected malfunctions are often due to causes that the users can fix themselves. Therefore check the product using this section. In most cases the problem can be solved quickly.
· A WARNING! Only perform the steps describedwithin these £ll instructions! All further inspection, maintenance' and repair
work must be performed by an authorised service centre or a similarly qualified specialist if you cannot solve the problem yourself!
Problem Possible cause Solution
1. Product does 1.1 Not connected to 1.1 Connect to power not start power supply supply
1.2 Power cord or plug 1.2. Check by is defective a specialist
electrician 1.3 Other electrical 1.3. Check by
defect. to the a specialist product electrician
2. Product does 2.1 Extension cord 2.1 Use a proper not reach full not suitable for extension cord power operation with this
product 2.2 Power source (e.g. 2.2. Connect to another
generator) has too power source low voltage
2.3 Air vents are 2.3. Clean the air vents blocked
3. Unsatisfactory 3.1. Saw chain not 3.1. Tension properly cutting tensioned properly performance 3.2 Blunt saw chain 3.2 Sharpen or replace
the saw chain

FPCS1800 Recycling and disposal
Recycling and disposal
.
> Waste electrical products should not be disposed of with household waste. Please recycle where facilities exist. Check with your Local Authority or local store for
- recycling advice. > Petrol, oil, old oil, a mixture of oil and petrol and objects
soiled with oil e.g. cleaning cloths do not belong in the household rubbish. Dispose of oily items in accordance with local guidelines and hand them in at recycling centres.
33

' 34
FPCS1800 Technical and legal information
Technical specifications
General
> Rated voltage
> Rated input
> Rated no load speed n0
> Guide bar length
> Guide bar type
> Saw chain type
> Volume of oil tank
> Chain oil type
> Protection class
230- 240 v-, so Hz
1800 w 8400 min·1
356 mm (14 ")
OREGON 140SDEA041
OREGON 91 PJ052X
100 ml
SAE #30 in summer and SAE #1 0 in winter
u§ > Net Weight approx. 4.4 kg Sound level according to EN60745-1, EN60745-2-13 and 2000/14/EC
> Sound pressure level LPA
> Sound power level LwA > Uncertainty KpA' KwA
> Guaranteed power level LwA Hand arm vibration according to EN607 45-2-13
> Front handle ah
> Rear handle ah
> Uncertainty K
84.70 dB(A)
104.70 dB(A)
2.5 dB(A)
109 dB(A)
EN60745-1 and
4.733 m/s2
6.127 m/s2
1.5 m/s 2
The declared vibration value has been measured in accordance with a standard test method and may be used for comparing one product with another. The declared vibration value may also be used to evaluate the exposure.
WARNING! The vibration emission value during actual use of the tool can differ from the declared value depending on the ways
in which the tool is used. identify safety measures to protect the
operator that are based on an estimation of exposure in the actual
conditions of use (taking account of all parts of the operating cycle
such as the times when the tool is switched off and when it is
running idle in addition to the trigger time).

FPCS1800
A WARNING! The sound intensity level for the operator ~may exceed 85 dB(A) and ear protection measures
are necessary
Symbols
On the product, the rating label and within these instructions you will find among others the following symbols and abbreviations. Familiarise yourself with them to reduce hazards like personal injuries and damage to property.
v- Volt, (alternating voltage) min·1 Per minute w Watt mm Millimetre A Ampere kg Kilogram Hz Hertz dB(A) Decibel (A-rated) kW Kilowatt m/s2 Metres per seconds
squared cm3 Cubic centimetre
yyWxx Manufacturing date code; year of manufacturing (20yy) and week of manufacturing (Wxx);
35

36
FPCS1800 Technical and legal information
Symbols
Caution l Warning.
Read the instruction manual.
Wear hearing protection.
Wear eye protection.
Wear respiratory protection.
i) Wear safety helmet!
8) Wear face protection!
1:11
8 Wear protective
0 gloves.
() Wear safety footwear.
Switch the product off and disconnect it from the power supply before assembly, cleaning, adjustments, maintenance, storage and transportation. Remove plug from the mains immediately if the cable is damaged or cut.
Tip contact may cause the guide bar to move suddenly upward and backwards what may cause serious injury to user. Contact of the guide bar tip with any object should be avoided.
~ ~ .. Always use the product with two hands. Do not use ~· ~ one handed when operating the product.
c::::::::> Correct direction of cutting-teeth.
laB a<: CO) Chain brake.
® £ ~
Do not expose to rain.
Objects thrown by the product could hit the user or other bystanders. Always ensure that other people and pets remain at a safe distance from the product when it is in operation. In general, children must not come near the area where the product is.
FPCS1800
-
Technical and legal information
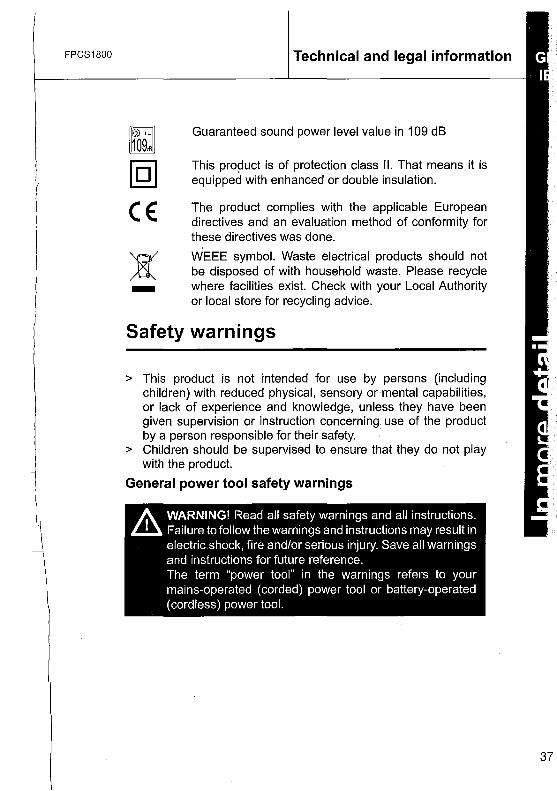
Guaranteed sound power level value in 109 dB
This pro~uct is of protection class II. That means it is equipped with enhanced or double insulation.
The product complies with the applicable European directives and an evaluation method of conformity for these directives was done.
WEEE symbol. Waste electrical products should not be disposed of with household waste. Please recycle where facilities exist. Check with your Local Authority or local store for recycling advice.
Safety warnings
> This product is not intended for use by persons (including children) with reduced physical, sensory or mental capabilities, or lack of experience and knowledge, unless they have been given supervision or instruction concerning. use of the product by a person responsible for their safety.
> Children should be supeniised to ensure that they do not play with the product.
General power tool safety warnings
A WARNING! Read all safety warnings and all instructions. £ll Failure to follow the warnings and instructions may result in
electric shock, fire and/or serious injury. Save all warnings and instructions for future reference. The term "power tool" in the warnings refers to your mains-operated (corded) power tool or battery-operated (cordless) power tool.
37

38
FPCS1800 Technical and legal information
Safety warnings
Work area safety > Keep work area clean and well lit. Cluttered or dark areas
invite accidents. > Do not operate power tools in explosive atmospheres, such
as in the presence of flammable liquids, gases or dust. Power tools create sparks which may ignite the dust or fumes.
> Keep children and bystanders away while operating a power tool. Distractions can cause you to lose control.
Electrical safety > Power tool plugs must match the outlet. Never modify the
plug in any way. Do not use any adapter plugs with earthed (grounded) power tools. Unmodified plugs and matching outlets will reduce risk of electric shock.
> Avoid body contact with earthed or grounded surfaces, such as pipes, radiators, ranges and refrigerators. There is an increased risk of electric shock if your body is earthed or grounded.
> Do not expose power tools to rain or wet condi\ions. Water entering a power tool will increase. the risk of electric shock.
> Do not abuse the cord. Never use the cord for carrying, pulling or unplugging the power tool. Keep cord away from heat, oil, sharp edges or moving parts. Damaged or entangled cords increase the risk of electric shock.
> When operating a power tool outdoors, use an extension cord suitable for outdoor use. Use of a cord suitable for outdoor use reduces the risk of electric shock.
> If operating a power tool in a damp location is unavoidable, use a residual current device (RCD) protected supply. Use of an RCD reduces the risk of electric shock.
Personal safety > Stay alert, watch what you are doing and use common
sense when operating a power tool. Do not use a power tool while you are tired or under the influence of drugs, alcohol or medication. A moment of inattention while operating power tools may result in serious personal injury.
FPCS1800 Technical and legal information
> Use personal protective equipment. Always wear eye protection. Protective equipment such as dust mask, non-skid safety shoes, hard hat, or hearing protection used for appropriate conditions will reduce personal injuries.
> Prevent unintentional starting. Ensure the switch is in the off-position before connecting to power source and/or battery pack, picking up or carrying the tool. Carrying power tools with your finger on the switch or energising power tools that have the switch on invites accidents.
> Remove any adjusting key or wrench before turning the power tool on. A wrench or a key left attached to a rotating part of the power tool may result in personal injury.
> Do not overreach. Keep proper footing and balance at all times. This enables better control of the power tool in unexpected situations.
> Dress properly. Do not wear loose clothing or jewellery. Keep your hair, clothing and gloves away from moving parts. Loose clothes, jewellery or long hair can be caught in moving parts.
> If devices are provided for the connection of dust extraction and collection facilities, ensure these are connected and properly used. Use of dust collection can reduce dust-related hazards.
Power tool use and care > Do not force the power tool. Use .the correct power tool for
your application. The correct power tool will do the job better and safer at the rate for which it was designed.
> Do not use the power tool if the switch does not turn it on and off. Any power tool that cannot be controlled with the switch is dangerous and must be repaired.
> Disconnect the plug from the power source and/or the battery pack from the power tool before making any adjustments, changing accessories, or storing power tools. Such preventive safety measures reduce the risk of starting the power tool accidentally.
> Store idle power tools out of the reach of children and do not allow persons unfamiliar with the power tool or these instructions to operate the power tool. Power tools are dangerous in the hands of untrained users.
39

40
FPCS1800 Technical and legal information
Safety warnings
> Maintain power tools. Check for misalignment or binding of moving parts, breakage of parts and any other condition that may affect the power tool's operation. If damaged, have the power tool repaired before use. Many accidents are caused by poorly maintained power tools.
> Keep cutting tools sharp and clean. Properly maintained cutting tools with sharp cutting edges are less likely to bind and are easier to control.
> Use the power tool, accessories and tool bits etc. in accordance with these instructions, taking into account the working conditions and the work to be performed. Use of the power tool for operations different from those intended could
-result in a hazardous situation.
Service > Have your power tools serviced by a qualified repair person
using only identical replacement parts. This will ensure that safety of the power tool is maintained.
Chain saw safety warnings > Keep all parts of the body away from the saw chain when
the chain saw is operating. Before you start the chain saw, make sure the saw chain is not contacting anything. A moment of inattention while operating chain saws may cause entanglement of your clothing or body with the saw chain.
> Always hold the chain saw with your right hand on the rear handle and your left hand on the front handle. Holding the chain saw with a reversed hand configuration increases the risk of personal injury and should never be done.
> Wear safety glasses and hearing protection. Further protective equipment for head, hands, legs and feet is recommended. Adequate protective clothing will reduce personal injury by flying debris or accidental contact with the saw chain.
> Do not operate a chain saw in a tree. Operation of a chain saw while up in a tree may result in personal injury.
FPCS1800 Technical and legal information
> Always keep proper footing and operate the chain saw only when standing on fixed, secure and level surface. Slippery or unstable surfaces such as ladders may cause a loss of balance or control of the chain saw.
> When cutting a limb that is under tension be alert for spring back. When the tension in the wood fibres is released the spring loaded limb may strike the operator and/or throw the chain saw out of control.
> Use extreme caution when cutting brush and saplings. The slender material may catch the saw chain and be whipped toward you or pull you off balance.
> Carry the chain saw by the front handle with the chain saw switched off and away from your body. When transporting or storing the chain saw always fit the guide bar cover. Proper handling of the chain saw will reduce the likelihood of accidental contact with the moving saw chain.
> Follow instructions for lubricating, chain tensioning and changing accessories. Improperly tensioned or lubricated chain may either break or increase the chance for kickback.
> Keep handles dry, clean, and free from oil and grease. Greasy, oily handles are slippery causing loss of control.
> Cut wood only. Do not use chain saw for purposes not intended. For example: do not use chain saw for cutting plastic, masonry or non-wood building materials. Use of the chain saw for operations different than intended could result in a hazardous situation.
Causes and operator prevention of kickback Kickback may occur when the nose or tip of the guide bar touches an object, or when the wood closes in and pinches the saw chain in the cut. Tip contact in some cases may cause a sudden reverse reaction, kicking the guide bar up and back towards the operator. Pinching the saw chain along the top of the guide bar may push the guide bar rapidly back towards the operator. Either of these reactions may cause you to lose control of the saw which could result in serious personal injury. Do not rely exclusively upon the safety devices built into your saw. As a chain saw user, you should take several steps to keep your cutting jobs free from accident or injury. Kickback is the result of tool misuse and/or incorrect operating procedures or conditions and can be avoided by taking proper precautions as given below: 41
42
FPCS1800 Technical and legal information
Safety warnings
Maintain a firm grip, with thumbs and fingers encircling the chain saw handles, with both hands on the saw and position your body and arm to allow you to resist kickback force~. Kickback forces can be controlled by the operator, if proper precautions are taken. Do not let go of the chain saw. > Do not overreach and do not cut above shoulder height.
This helps prevent unintended tip contact and enables better control of the chain saw in unexpected situations.
> Only use replacement bars and chains specified by the manufacturer. Incorrect replacement bars and chains may cause chain breakage and/or kickba.ck.
> Follow the manufacturer's sharpening and maintenance instructions for the saw chain. Decreasing the depth gauge height can lead to increased kickback.
Additional safety warnings > The product should be supplied via a residual current device
(RCD) with a tripping current of not more than 30 mA. > Position the cord so that it will not be caught on branches and
the like, during cutting. > It is recommended that first-time user should, as a minimum
practice, cutting logs on a saw-horse or cradle.
Clothing and protective equipment > Do secure long hair so that it is above shoulder level. > Do not wear loose fitting clothing or jewellery as this could be
drawn into the engine, catch the chain or undergrowth. > Use the following safety clothing and protective equipment when
operating the product: • Helmet with visor and neck guard - (EN397 compliant), • Hearing protectors, • Breathing mask, • Gloves with approved saw protection (compliant to EN 381-
4, EN 381-7, EN420:1, EN 388 Class 0), • Protective leggings with approved saw protection (compliant
to EN 381-5, EN 340 Class 1), • Steel toe cap boots with approved saw protection (compliant
to EN 345-2 Class 2), • First Aid kit in case of injury.

FPCS1800 . Technical and legal information
Vibration and noise reduction To reduce the impact of noise and vibration emission, limit the time of operation, use low-vibration and low-noise operating modes as well as wear personal protective equipment. Take the following points into account to minimize the vibration and noise exposure risks: > Only use the product as intended by its design and these
instructions. > Ensure that the product is in good condition and well
maintained. > Use correct application tools for the product and ensure they in
good condition. > Keep tight grip on the handles/grip surface. ·> Maintain this product in accordance with these instructions and
keep it well lubricated (where appropriate). > Plan your work schedule to spread any high vibration tool use
across a number of days.
Emergency Familiarise yourself with the use of this product by means of this instruction manual. Memorise the safety directions and follow them to the letter. This will help to prevent risks and hazards. > Always be alert when using this product, so that you can
recognise and handle risks early. Fast intervention can prevent serious injury and damage to property.
> Switch off and disconnect from the power supply if there is any malfunction. Have the product checked by a qualified specialist and repaired, if necessary, before you put it into operation again.
Residual risks Even if you are operating this product in· accordance with all the safety requirements, potential risks of injury and damage remain. The following dangers can arise in connection with the structure and design of this product: > Health defects resulting from vibration emission if the product is
being used over long periods of time or not adequately managed and properly maintained.
> Injuries and damage to property due to broken application tools or the sudden impact of hidden objects during use.
43

44
FPCS1800 Technical and legal information
Safety warnings
> Danger of injury and property damage caused by flying objects. > Injuries and damage to property to due to thrown and fallen
objects. > Prolonged use of this product expose the operator to vibrations
and may produce 'whitefinger' disease. In order to reduce the risk, please wear gloves and keep your hands warm. If any of the 'whitefinger' symptoms appear, seek medical advice immediately. 'Whitefinger' symptoms include: numbness.. loss of feeling, tingling, pricking, pain, loss of strength, changes in skin colour or condition. These symptoms normally appear in the fingers, · hands or wrists. The risk increases at low temperatures.
A. WARNING! This product produces an electromagnetic £ll field during operation! This field may under some
circumstances interfere with active or passive medical implants! To reduce the risk of serious or fatal injury, we recommend persons with medical implants to consult their doctor and the medical implant manufacturer before operating this product!

FPCS1800 Guarantee
Guarantee
> This product has been manufactured to a high quality standard. It is guaranteed against faulty materials and workmanship for 12 months from purchase, please retain your till receipt as proof of purchase.
> If the product is found to be defective within the relevant time period, we will either replace all defective parts or, at our discretion, replace the unit free of charge with the same item or items pf a greater value and/or specification.
> This guarantee does not cover defects caused by or resulting from: • Misuse, abuse or neglect, • Trade, professional or hire use, • Repairs attempted by anyone other than our authorised repair
centre (call 0845 300 2577); • Damage caused by foreign objects, substances or accident.
> In the unlikely event that this product does develop a fault please call the helpline on 0845 300 2577.
> This guarantee does not affect your statutory rights. B&Q pic. Chandlers Ford,Hants,S053 3LE (Registered in England under no. 973387)
www.diy.com B&Q pic
Chandlers Ford, Hants, 8053 3LE, United Kingdom
45

46
FPCS1800 EC declaration of conformity
B & Q Pic CHANDLERS FORD, HANTS,
S053 3LE
Declare that the product FPCS1800 Electric Chain Saw 230-240V- 50Hz 1800w
Serial number: from 000001 to 999999
. Complies with the essential health and safety requirements of the following directives: The Machinery Directive 2006/42/EC
The Low Voltage Directive 2006/95/EC • EN60745-1 :2009 e EN60745-2-13:2009 • Notified body: TOV Rheinland LGA Products GmbH;
Nurnberg, Germany; 0197 • Number of the EC type-examination certificate:
BM 50191513 0002
The EMC Directive 2004/1 08/EC e EN55014-1/A1:2009 • EN55014-2/A2:2008 e EN61000-3-2/A2:2009 e EN61 000-3-11 :2000
The Outdoor Noise-Directive 2000/14/EC & 2005/88/EC • Measured Sound Power Level: 104.7 dB(A) • Guaranteed Sound Power Level: 109 dB(A) • The conformity assessment followed was according to
Annex V of the directive e Notified body: SNCH, LUXEMBOURG
The RoHS directive 2011/65/EU
Authorized Signatory and technical file holder
Name: Peter Brownhill QA Product Development Manager
For and on behalf of B&Q pic Date: 30/09/2012
All technical information is held at the address detailed above
B&Q PLC. CHANDLERS FORD,
HANTS, 5053 3LE, UNITED KINGDOM


www.diy.com B&Q pic. Chandlers Ford, Hants, 8053 3LE, United Kingdom