experiments by paul beck - smartlab toys
TRANSCRIPT
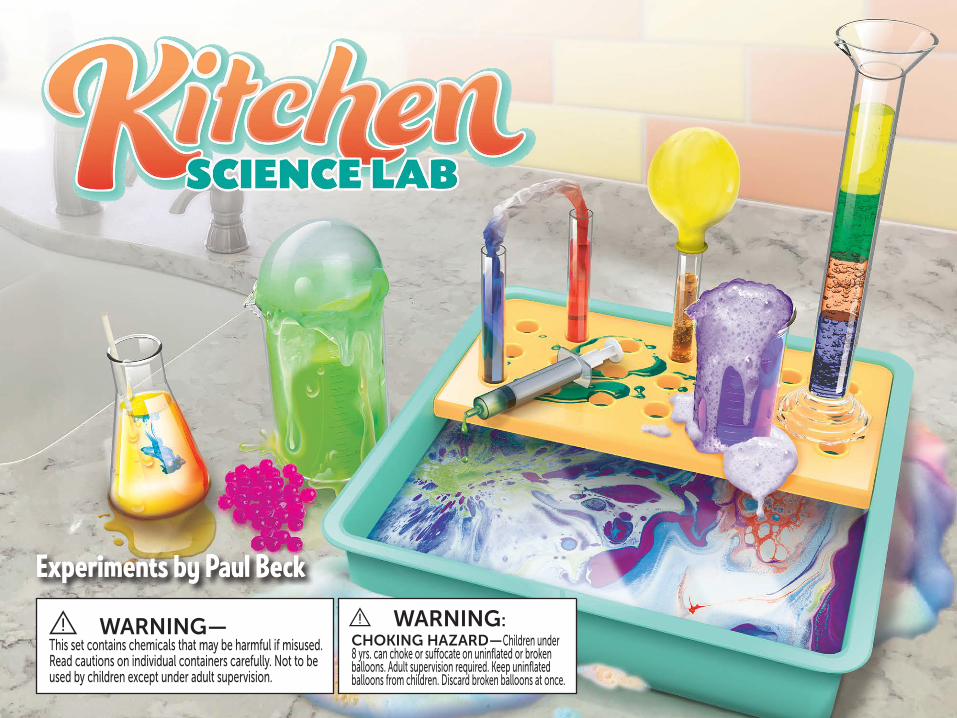
WARNING— This set contains chemicals that may be harmful if misused.Read cautions on individual containers carefully. Not to beused by children except under adult supervision.
WWARNING:CHOKING HAZARD— Children under 8 yrs. can choke or suffocate on uninflated or broken balloons. Adult supervision required. Keep uninflated balloons from children. Discard broken balloons at once.
Experiments by Paul Beck
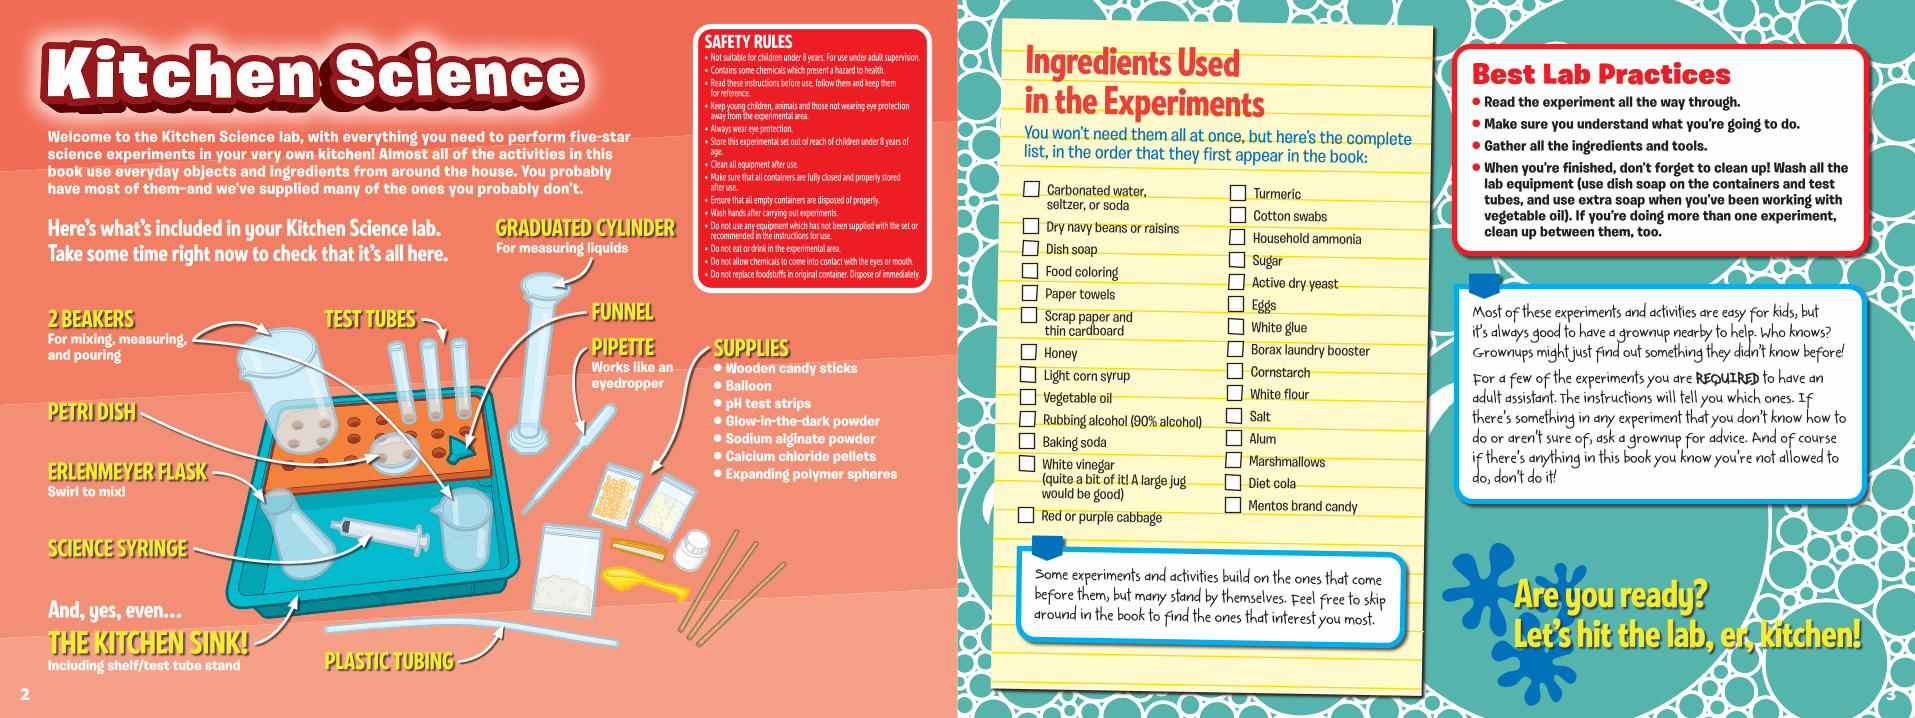
THE KITCHEN SINK!Including shelf/test tube stand
And, yes, even...
Welcome to the Kitchen Science lab, with everything you need to perform five-star science experiments in your very own kitchen! Almost all of the activities in this book use everyday objects and ingredients from around the house. You probably have most of them—and we’ve supplied many of the ones you probably don’t.
Ingredients Used in the ExperimentsYou won’t need them all at once, but here’s the complete list, in the order that they first appear in the book:
Carbonated water, seltzer, or soda
Dry navy beans or raisins Dish soap Food coloring Paper towels Scrap paper and
thin cardboard Honey Light corn syrup Vegetable oil Rubbing alcohol (90% alcohol) Baking soda White vinegar
(quite a bit of it! A large jug would be good)
Red or purple cabbage
Turmeric Cotton swabs Household ammonia Sugar Active dry yeast Eggs
White glue Borax laundry booster Cornstarch White flour Salt
Alum
Marshmallows Diet cola Mentos brand candy
Some experiments and activities build on the ones that come before them, but many stand by themselves. Feel free to skip around in the book to find the ones that interest you most.
Most of these experiments and activities are easy for kids, but it’s always good to have a grownup nearby to help. Who knows? Grownups might just find out something they didn’t know before!
For a few of the experiments you are REQUIREDREQUIRED to have an adult assistant. The instructions will tell you which ones. If there’s something in any experiment that you don’t know how to do or aren’t sure of, ask a grownup for advice. And of course if there’s anything in this book you know you’re not allowed to do, don’t do it!
Best Lab Practices Read the experiment all the way through. Make sure you understand what you’re going to do. Gather all the ingredients and tools. When you’re finished, don’t forget to clean up! Wash all the
lab equipment (use dish soap on the containers and test tubes, and use extra soap when you’ve been working with vegetable oil). If you’re doing more than one experiment, clean up between them, too.
Are you ready? Let’s hit the lab, er, kitchen!
FUNNEL
PLASTIC TUBING
SCIENCE SYRINGE
SUPPLIES Wooden candy sticks Balloon pH test strips Glow-in-the-dark powder Sodium alginate powder Calcium chloride pellets Expanding polymer spheres
PETRI DISH
TEST TUBES
Here’s what’s included in your Kitchen Science lab. Take some time right now to check that it’s all here.
PIPETTEWorks like an eyedropper
2 BEAKERSFor mixing, measuring, and pouring
SAFETY RULES • Not suitable for children under 8 years. For use under adult supervision.• Contains some chemicals which present a hazard to health. • Read these instructions before use, follow them and keep them
for reference.• Keep young children, animals and those not wearing eye protection
away from the experimental area.• Always wear eye protection.• Store this experimental set out of reach of children under 8 years of
age.• Clean all equipment after use.• Make sure that all containers are fully closed and properly stored
after use.• Ensure that all empty containers are disposed of properly.• Wash hands after carrying out experiments.• Do not use any equipment which has not been supplied with the set or
recommended in the instructions for use.• Do not eat or drink in the experimental area.• Do not allow chemicals to come into contact with the eyes or mouth.• Do not replace foodstuffs in original container. Dispose of immediately.
32
GRADUATED CYLINDERFor measuring liquids
ERLENMEYER FLASKSwirl to mix!
Fill the graduated cylinder with water to the top of the straight part.
Set the cylinder in the Kitchen Sink to catch any splashes.
Attach the plastic tubing to the syringe. Pull the plunger out to its farthest point.
1
2
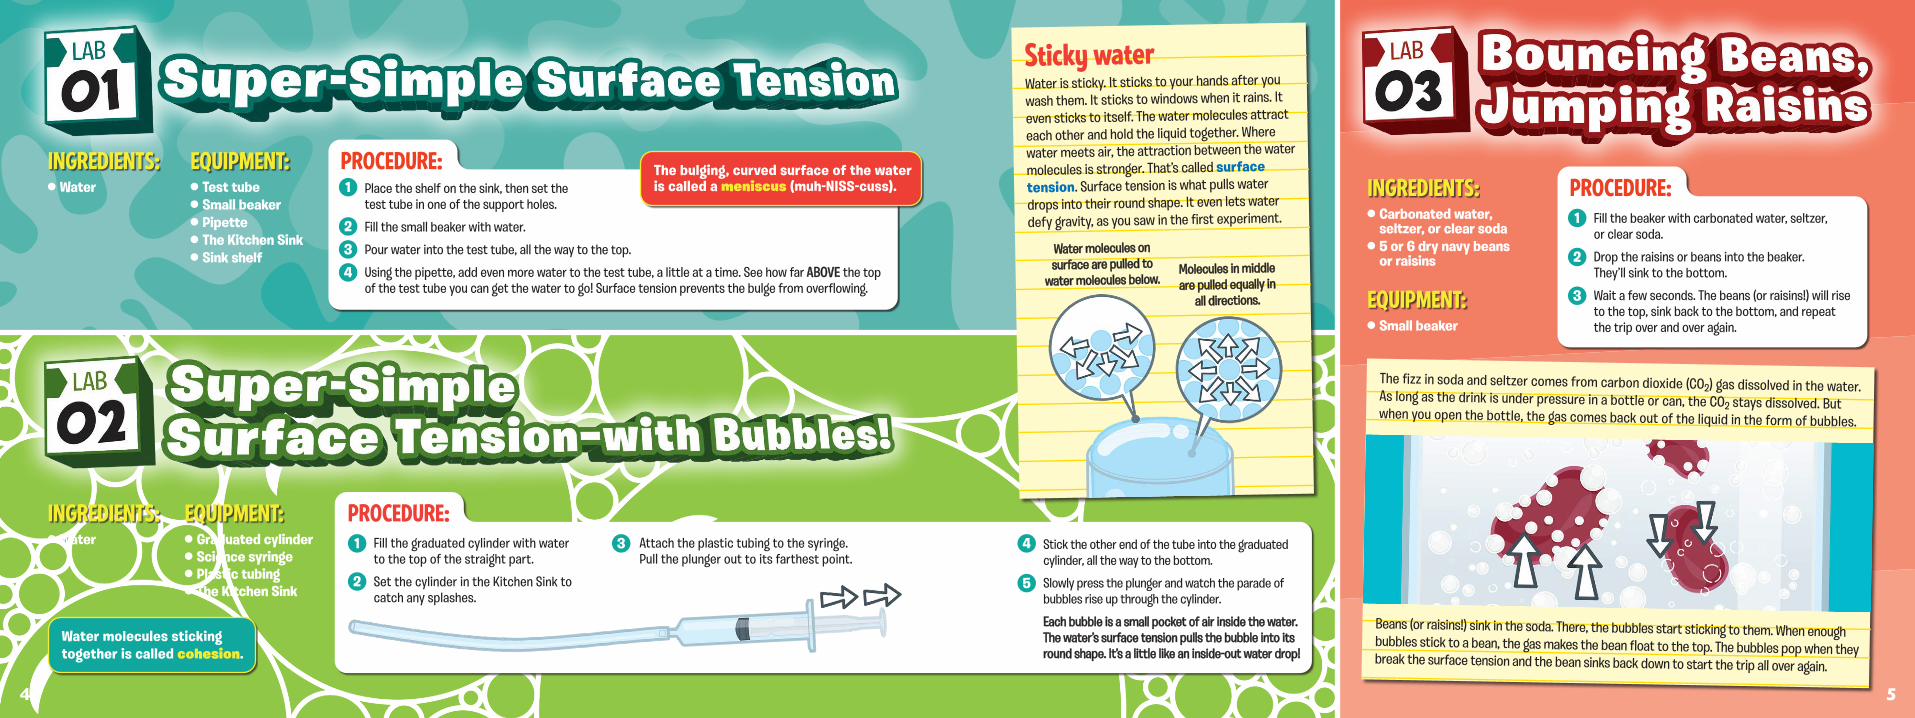
Water molecules sticking together is called cohesion.
The fizz in soda and seltzer comes from carbon dioxide (CO2) gas dissolved in the water. As long as the drink is under pressure in a bottle or can, the CO2 stays dissolved. But when you open the bottle, the gas comes back out of the liquid in the form of bubbles.
Beans (or raisins!) sink in the soda. There, the bubbles start sticking to them. When enough bubbles stick to a bean, the gas makes the bean float to the top. The bubbles pop when they break the surface tension and the bean sinks back down to start the trip all over again.
Test tube Small beaker Pipette The Kitchen Sink Sink shelf
EQUIPMENT: Water
INGREDIENTS:Place the shelf on the sink, then set the test tube in one of the support holes.
Fill the small beaker with water.
Pour water into the test tube, all the way to the top.
Using the pipette, add even more water to the test tube, a little at a time. See how far ABOVEABOVE the top of the test tube you can get the water to go! Surface tension prevents the bulge from overflowing.
1
2
3
4
PROCEDURE: The bulging, curved surface of the water is called a meniscus (muh-NISS-cuss).
Fill the beaker with carbonated water, seltzer, or clear soda.
Drop the raisins or beans into the beaker. They’ll sink to the bottom.
Wait a few seconds. The beans (or raisins!) will rise to the top, sink back to the bottom, and repeat the trip over and over again.
1
2
3
PROCEDURE:
Stick the other end of the tube into the graduated cylinder, all the way to the bottom.
Slowly press the plunger and watch the parade of bubbles rise up through the cylinder.
Each bubble is a small pocket of air inside the water. Each bubble is a small pocket of air inside the water. The water’s surface tension pulls the bubble into its The water’s surface tension pulls the bubble into its round shape. It’s a little like an inside-out water drop!round shape. It’s a little like an inside-out water drop!
4
5
Water
INGREDIENTS: Graduated cylinder Science syringe Plastic tubing The Kitchen Sink
EQUIPMENT:
Small beaker
EQUIPMENT:
Carbonated water, seltzer, or clear soda
5 or 6 dry navy beans or raisins
INGREDIENTS:
3
PROCEDURE:
Sticky waterWater is sticky. It sticks to your hands after you wash them. It sticks to windows when it rains. It even sticks to itself. The water molecules attract
each other and hold the liquid together. Where water meets air, the attraction between the water
molecules is stronger. That’s called surface tension. Surface tension is what pulls water drops into their round shape. It even lets water defy gravity, as you saw in the first experiment.
Water molecules on Water molecules on surface are pulled to surface are pulled to
water molecules below.water molecules below.Molecules in middle Molecules in middle are pulled equally in are pulled equally in
all directions.all directions.
54
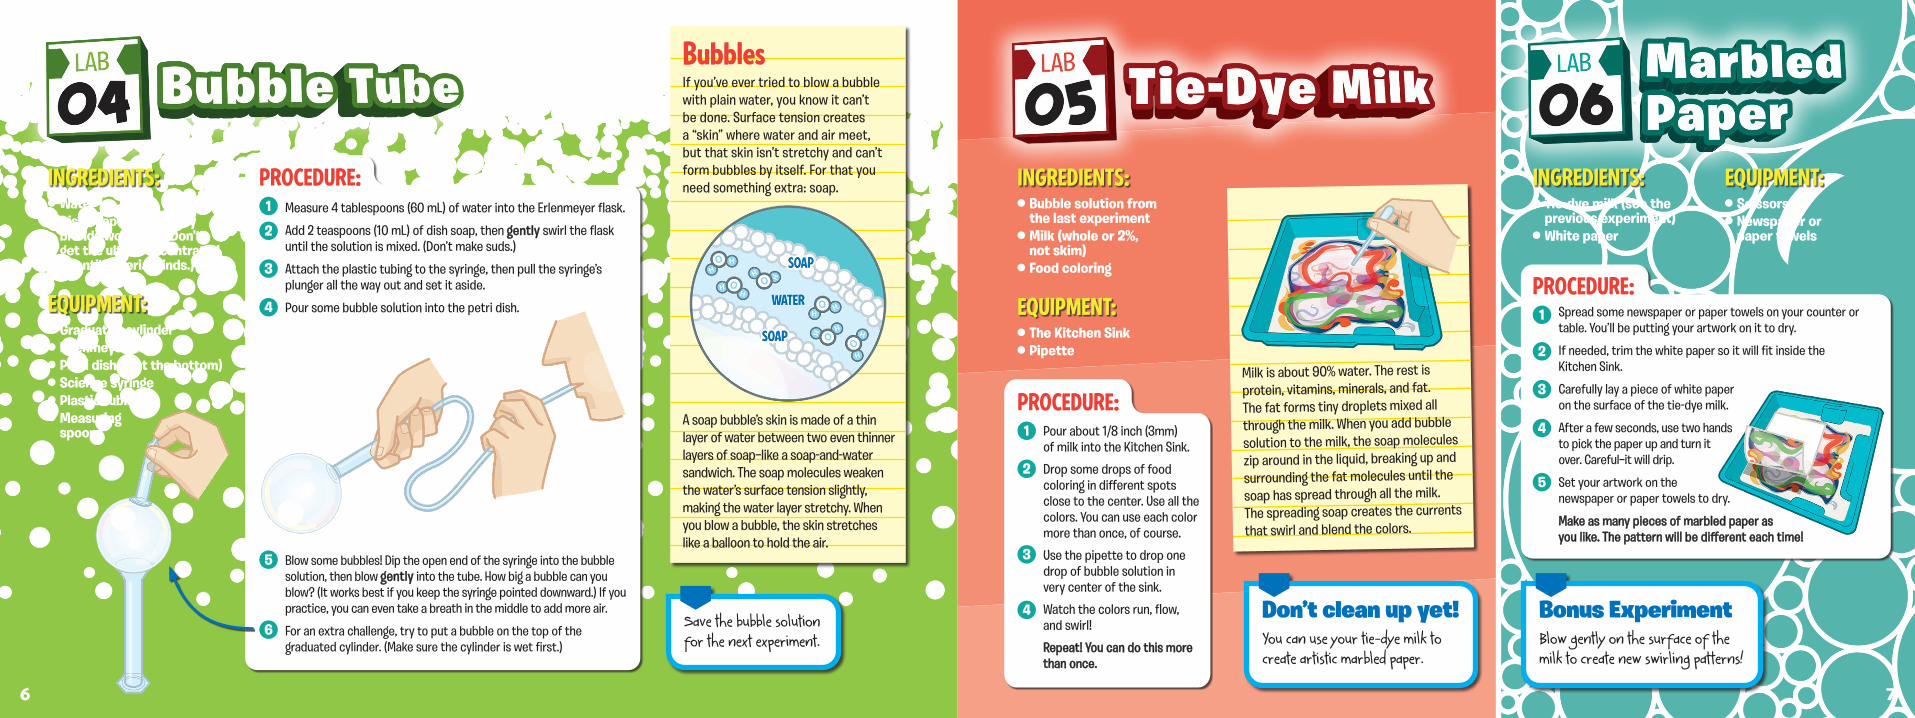
Scissors Newspaper or paper towels
Water Dish soap (Dawn or Joy brands work best. Don’t get the ultra-concentrated or antibacterial kinds.)
5
6
Tie-dye milk (see the previous experiment)
White paper
Bonus ExperimentBlow gently on the surface of the milk to create new swirling patterns!
Don’t clean up yet!You can use your tie-dye milk to create artistic marbled paper.
Spread some newspaper or paper towels on your counter or table. You’ll be putting your artwork on it to dry.
If needed, trim the white paper so it will fit inside the Kitchen Sink.
Carefully lay a piece of white paper on the surface of the tie-dye milk.
After a few seconds, use two hands to pick the paper up and turn it over. Careful—it will drip.
Set your artwork on the newspaper or paper towels to dry.
Make as many pieces of marbled paper as Make as many pieces of marbled paper as you like. The pattern will be different each time!you like. The pattern will be different each time!
1
2
3
4
5
PROCEDURE:
Pour about 1/8 inch (3mm) of milk into the Kitchen Sink.
Drop some drops of food coloring in different spots close to the center. Use all the colors. You can use each color more than once, of course.
Use the pipette to drop one drop of bubble solution in very center of the sink.
Watch the colors run, flow, and swirl!
Repeat! You can do this more Repeat! You can do this more than once.than once.
1
2
3
4
PROCEDURE:
Blow some bubbles! Dip the open end of the syringe into the bubble solution, then blow gentlygently into the tube. How big a bubble can you blow? (It works best if you keep the syringe pointed downward.) If you practice, you can even take a breath in the middle to add more air.
For an extra challenge, try to put a bubble on the top of the graduated cylinder. (Make sure the cylinder is wet first.)
Graduated cylinder Erlenmeyer flask Petri dish (just the bottom) Science syringe Plastic tubing Measuring spoons
EQUIPMENT:
INGREDIENTS:Measure 4 tablespoons (60 mL) of water into the Erlenmeyer flask.
Add 2 teaspoons (10 mL) of dish soap, then gentlygently swirl the flask until the solution is mixed. (Don’t make suds.)
Attach the plastic tubing to the syringe, then pull the syringe’s plunger all the way out and set it aside.
Pour some bubble solution into the petri dish.
1
2
3
4
BubblesIf you’ve ever tried to blow a bubble with plain water, you know it can’t be done. Surface tension creates a “skin” where water and air meet, but that skin isn’t stretchy and can’t form bubbles by itself. For that you need something extra: soap.
A soap bubble’s skin is made of a thin layer of water between two even thinner layers of soap—like a soap-and-water sandwich. The soap molecules weaken the water’s surface tension slightly, making the water layer stretchy. When you blow a bubble, the skin stretches like a balloon to hold the air.
The Kitchen Sink Pipette
EQUIPMENT:
Bubble solution from the last experiment
Milk (whole or 2%, not skim)
Food coloring
INGREDIENTS:
Milk is about 90% water. The rest is protein, vitamins, minerals, and fat. The fat forms tiny droplets mixed all through the milk. When you add bubble solution to the milk, the soap molecules zip around in the liquid, breaking up and surrounding the fat molecules until the soap has spread through all the milk. The spreading soap creates the currents that swirl and blend the colors.
Save the bubble solution for the next experiment.
76
PROCEDURE: EQUIPMENT:INGREDIENTS:
Capillary action rests on three principles of water:
Cohesion When water molecules stick together.Adhesion When water molecules stick to other substances. Surface Tension When water molecules at the surface create a barrier between the atmosphere and the water.
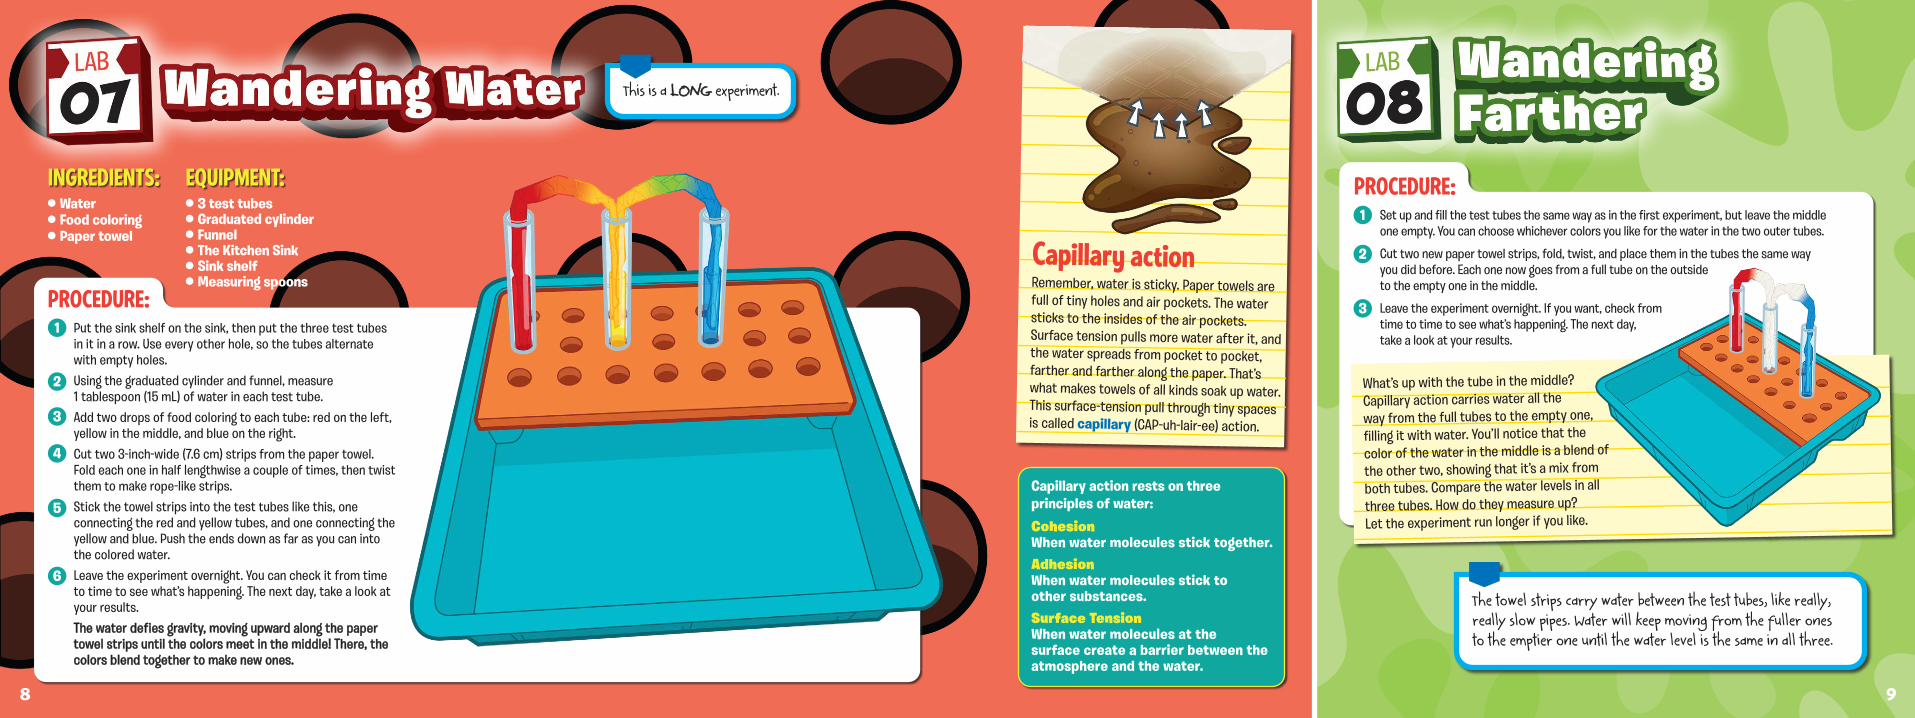
Set up and fill the test tubes the same way as in the first experiment, but leave the middle one empty. You can choose whichever colors you like for the water in the two outer tubes.
Cut two new paper towel strips, fold, twist, and place them in the tubes the same way you did before. Each one now goes from a full tube on the outside to the empty one in the middle.
Leave the experiment overnight. If you want, check from time to time to see what’s happening. The next day, take a look at your results.
1
2
3
PROCEDURE:
What’s up with the tube in the middle? Capillary action carries water all the way from the full tubes to the empty one, filling it with water. You’ll notice that the color of the water in the middle is a blend of
the other two, showing that it’s a mix from both tubes. Compare the water levels in all three tubes. How do they measure up? Let the experiment run longer if you like.
The towel strips carry water between the test tubes, like really, really slow pipes. Water will keep moving from the fuller ones to the emptier one until the water level is the same in all three.
2
3
4
1 Put the sink shelf on the sink, then put the three test tubes in it in a row. Use every other hole, so the tubes alternate with empty holes.Using the graduated cylinder and funnel, measure 1 tablespoon (15 mL) of water in each test tube.Add two drops of food coloring to each tube: red on the left, yellow in the middle, and blue on the right.Cut two 3-inch-wide (7.6 cm) strips from the paper towel. Fold each one in half lengthwise a couple of times, then twist them to make rope-like strips.Stick the towel strips into the test tubes like this, one connecting the red and yellow tubes, and one connecting the yellow and blue. Push the ends down as far as you can into the colored water.Leave the experiment overnight. You can check it from time to time to see what’s happening. The next day, take a look at your results.The water defies gravity, moving upward along the paper The water defies gravity, moving upward along the paper towel strips until the colors meet in the middle! There, the towel strips until the colors meet in the middle! There, the colors blend together to make new ones.colors blend together to make new ones.
3 test tubes Graduated cylinder Funnel The Kitchen Sink Sink shelf Measuring spoons
Water Food coloring Paper towel
PROCEDURE:
Capillary actionRemember, water is sticky. Paper towels are full of tiny holes and air pockets. The water sticks to the insides of the air pockets. Surface tension pulls more water after it, and the water spreads from pocket to pocket, farther and farther along the paper. That’s what makes towels of all kinds soak up water. This surface-tension pull through tiny spaces is called capillary (CAP-uh-lair-ee) action.
This is a LONGLONG experiment.
98
EQUIPMENT:INGREDIENTS:
5
6
4
5
1
2
3
Test tube Erlenmeyer flask The Kitchen Sink Real sink Drinking glass Scissors Ruler (optional)
Water A piece of thick paper (Scrap paper such as a used envelope is fine.)
A piece of thin cardboard or cardstock (Scrap is fine, such as an old cereal box or junk-mail postcard.)
1
2
3
4
5
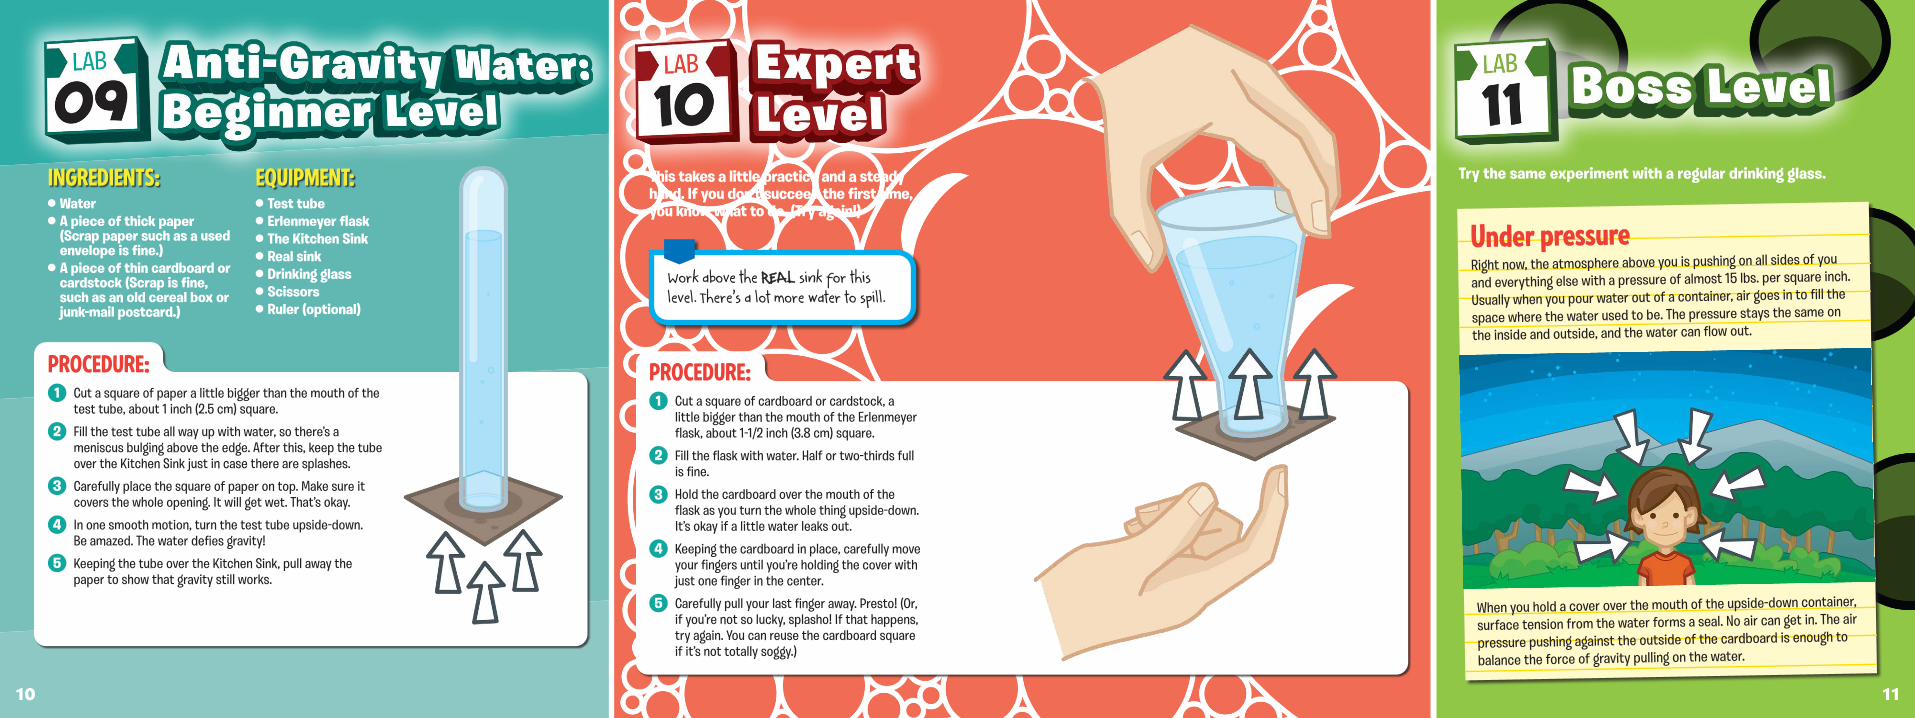
Cut a square of paper a little bigger than the mouth of the test tube, about 1 inch (2.5 cm) square.
Fill the test tube all way up with water, so there’s a meniscus bulging above the edge. After this, keep the tube over the Kitchen Sink just in case there are splashes.
Carefully place the square of paper on top. Make sure it covers the whole opening. It will get wet. That’s okay.
In one smooth motion, turn the test tube upside-down. Be amazed. The water defies gravity!
Keeping the tube over the Kitchen Sink, pull away the paper to show that gravity still works.
This takes a little practice and a steady hand. If you don’t succeed the first time, you know what to do. (Try again!)
Try the same experiment with a regular drinking glass.
Work above the REALREAL sink for this level. There’s a lot more water to spill.
Under pressureRight now, the atmosphere above you is pushing on all sides of you
and everything else with a pressure of almost 15 lbs. per square inch.
Usually when you pour water out of a container, air goes in to fill the
space where the water used to be. The pressure stays the same on
the inside and outside, and the water can flow out.
When you hold a cover over the mouth of the upside-down container,
surface tension from the water forms a seal. No air can get in. The air
pressure pushing against the outside of the cardboard is enough to
balance the force of gravity pulling on the water.
Cut a square of cardboard or cardstock, a little bigger than the mouth of the Erlenmeyer flask, about 1-1/2 inch (3.8 cm) square.
Fill the flask with water. Half or two-thirds full is fine.
Hold the cardboard over the mouth of the flask as you turn the whole thing upside-down. It’s okay if a little water leaks out.
Keeping the cardboard in place, carefully move your fingers until you’re holding the cover with just one finger in the center.
Carefully pull your last finger away. Presto! (Or, if you’re not so lucky, splasho! If that happens, try again. You can reuse the cardboard square if it’s not totally soggy.)
1110
EQUIPMENT:INGREDIENTS:
PROCEDURE:PROCEDURE:

Graduated cylinder Small beaker 2 test tubes Funnel The Kitchen Sink
Graduated cylinder Pipette
Honey Light corn syrup Water Vegetable oil Food coloring
Water Vegetable oil Rubbing alcohol (90% alcohol gives the best results, but 70% will do in a pinch.)
Food coloring
Place the graduated cylinder in the Kitchen Sink so you can catch any messy spills.
Scientists measure density in units like grams per cubic centimeter or kilograms per cubic meter.
1
2
3
4
Pour honey into the graduated cylinder to the 15 mL mark.
Use the funnel to pour corn syrup into one of the test tubes. Fill it almost all the way to the top.
Pour the syrup from the test tube into the small beaker. Add 1 drop of blue food coloring, then stir.
Slowly pour the colored syrup onto the flared rim of the cylinder so it runs down the inside wall of the cylinder.
1
2
3
4
5
Pour water into the graduated cylinder to the 15 mL mark. Add 1 drop of red food coloring.
Add vegetable oil to the 45 mL mark.
Slowly and carefully pour alcohol down the inner wall of the cylinder until it reaches the 60 mL mark. Add 2 drops of blue or green food coloring and let it spread through the alcohol. Eventually you’ll have three layers of different-colored liquids.
Fill the pipette with plain water and squirt it all at once into the cylinder. Watch what happens!
Keep squirting in pipettes of water until whole top layer moves below the oil layer.
Use the funnel to pour water into a second test tube. Add 1 drop of red food coloring, then pour the mixture carefully into the cylinder.
Finally, add vegetable oil to the 60 mL mark. Hold the cylinder up to the light and admire your liquid layers!
Each liquid in the stack has a different density. Each liquid in the stack has a different density. A liquid with a lower density floats on top of A liquid with a lower density floats on top of one with a higher density.one with a higher density.
5
6
DensityWhen people say air is lighter than water, or that helium is lighter than air, what they really mean is that a volume (space of a certain size) of air weighs less than the same volume of water. That is, a gallon of air weighs less than a gallon of water, and a gallon of helium weighs less than a gallon of air. The measurement of how much material (weight) is in a particular amount of space (volume) is called density.
HELIUM
AIR
WATER
Oil and water don’t mix. Oil is less dense than water, so it floats on top. Oil and alcohol don’t
mix, either. Alcohol is less dense, so it floats on top of the oil. Alcohol and water DODO mix, but
the oil keeps the alcohol and water layers separate. Squirting water into the alcohol increases
its density. When you add enough water, the alcohol becomes denser than the oil and sinks.
Because it can’t mix with the oil, the alcohol forms into round globs as it passes through.
1312
PROCEDURE:
EQUIPMENT:
PROCEDURE:
INGREDIENTS:EQUIPMENT:INGREDIENTS:
1
2
3
4
5
6
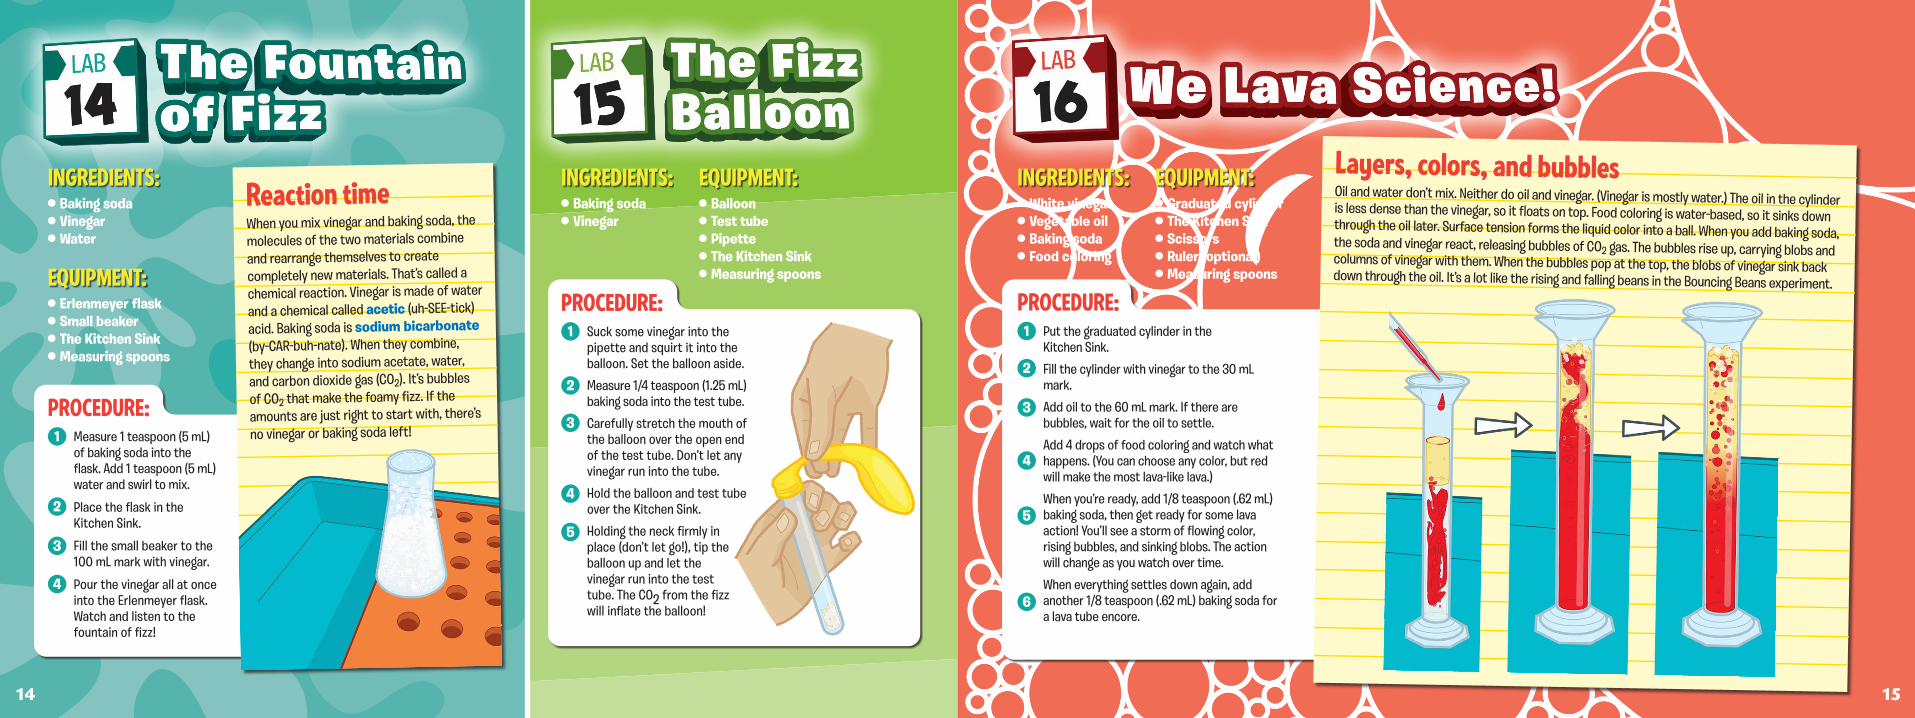
Put the graduated cylinder in the Kitchen Sink.
Fill the cylinder with vinegar to the 30 mL mark.
Add oil to the 60 mL mark. If there are bubbles, wait for the oil to settle.
Add 4 drops of food coloring and watch what happens. (You can choose any color, but red will make the most lava-like lava.)
When you’re ready, add 1/8 teaspoon (.62 mL) baking soda, then get ready for some lava action! You’ll see a storm of flowing color, rising bubbles, and sinking blobs. The action will change as you watch over time.
When everything settles down again, add another 1/8 teaspoon (.62 mL) baking soda for a lava tube encore.
1
2
3
4
Measure 1 teaspoon (5 mL) of baking soda into the flask. Add 1 teaspoon (5 mL) water and swirl to mix.
Place the flask in the Kitchen Sink.
Fill the small beaker to the 100 mL mark with vinegar.
Pour the vinegar all at once into the Erlenmeyer flask. Watch and listen to the fountain of fizz!
Erlenmeyer flask Small beaker The Kitchen Sink Measuring spoons
Balloon Test tube Pipette The Kitchen Sink Measuring spoons
Graduated cylinder The Kitchen Sink Scissors Ruler (optional) Measuring spoons
Baking soda Vinegar Water
Baking soda Vinegar
White vinegar Vegetable oil Baking soda Food coloring
EQUIPMENT:
INGREDIENTS: EQUIPMENT:INGREDIENTS:
4
5
1
2
3
Suck some vinegar into the pipette and squirt it into the balloon. Set the balloon aside.
Measure 1/4 teaspoon (1.25 mL) baking soda into the test tube.
Carefully stretch the mouth of the balloon over the open end of the test tube. Don’t let any vinegar run into the tube.
Hold the balloon and test tube over the Kitchen Sink.
Holding the neck firmly in place (don’t let go!), tip the balloon up and let the vinegar run into the test tube. The CO2 from the fizz will inflate the balloon!
EQUIPMENT:INGREDIENTS:Reaction timeWhen you mix vinegar and baking soda, the molecules of the two materials combine and rearrange themselves to create completely new materials. That’s called a chemical reaction. Vinegar is made of water and a chemical called acetic (uh-SEE-tick) acid. Baking soda is sodium bicarbonate (by-CAR-buh-nate). When they combine, they change into sodium acetate, water, and carbon dioxide gas (CO2). It’s bubbles of CO2 that make the foamy fizz. If the amounts are just right to start with, there’s no vinegar or baking soda left!
Layers, colors, and bubblesOil and water don’t mix. Neither do oil and vinegar. (Vinegar is mostly water.) The oil in the cylinder is less dense than the vinegar, so it floats on top. Food coloring is water-based, so it sinks down through the oil later. Surface tension forms the liquid color into a ball. When you add baking soda, the soda and vinegar react, releasing bubbles of CO2 gas. The bubbles rise up, carrying blobs and columns of vinegar with them. When the bubbles pop at the top, the blobs of vinegar sink back down through the oil. It’s a lot like the rising and falling beans in the Bouncing Beans experiment.
1514
PROCEDURE:
PROCEDURE:
PROCEDURE:
Adult assistant required!Adult assistant required!
Save some baking soda solution for the next experiment.
Microwave-safe mixing bowl Colander or strainer A second mixing bowl Storage container (optional) Microwave oven Measuring spoons
5 raw leaves of red or purple cabbage
Water
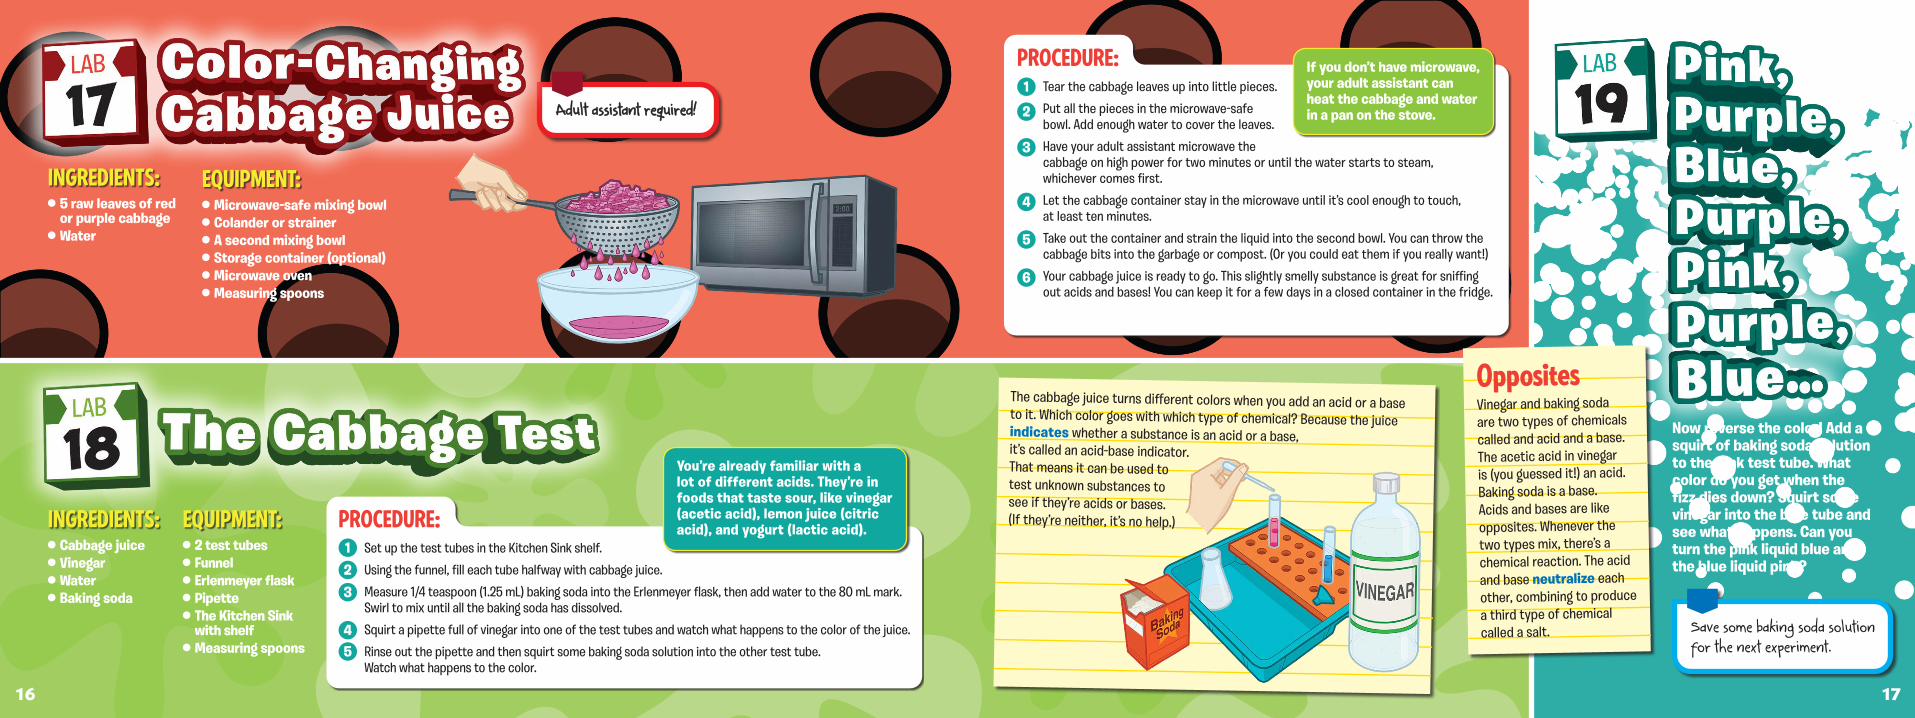
Now reverse the color! Add a squirt of baking soda solution to the pink test tube. What color do you get when the fizz dies down? Squirt some vinegar into the blue tube and see what happens. Can you turn the pink liquid blue and the blue liquid pink?
The cabbage juice turns different colors when you add an acid or a base to it. Which color goes with which type of chemical? Because the juice indicates whether a substance is an acid or a base, it’s called an acid-base indicator. That means it can be used to test unknown substances to see if they’re acids or bases. (If they’re neither, it’s no help.)
OppositesVinegar and baking soda are two types of chemicals called and acid and a base. The acetic acid in vinegar is (you guessed it!) an acid. Baking soda is a base. Acids and bases are like opposites. Whenever the two types mix, there’s a chemical reaction. The acid and base neutralize each other, combining to produce a third type of chemical called a salt.
You’re already familiar with a lot of different acids. They’re in foods that taste sour, like vinegar (acetic acid), lemon juice (citric acid), and yogurt (lactic acid).
2 test tubes Funnel Erlenmeyer flask Pipette The Kitchen Sink with shelf
Measuring spoons
Cabbage juice Vinegar Water Baking soda
1
123
45
Set up the test tubes in the Kitchen Sink shelf.
Using the funnel, fill each tube halfway with cabbage juice.
Measure 1/4 teaspoon (1.25 mL) baking soda into the Erlenmeyer flask, then add water to the 80 mL mark. Swirl to mix until all the baking soda has dissolved.
Squirt a pipette full of vinegar into one of the test tubes and watch what happens to the color of the juice.
Rinse out the pipette and then squirt some baking soda solution into the other test tube. Watch what happens to the color.
2
3
4
5
6
Tear the cabbage leaves up into little pieces.
Put all the pieces in the microwave-safe bowl. Add enough water to cover the leaves.
Have your adult assistant microwave the cabbage on high power for two minutes or until the water starts to steam, whichever comes first.
Let the cabbage container stay in the microwave until it’s cool enough to touch, at least ten minutes.
Take out the container and strain the liquid into the second bowl. You can throw the cabbage bits into the garbage or compost. (Or you could eat them if you really want!)
Your cabbage juice is ready to go. This slightly smelly substance is great for sniffing out acids and bases! You can keep it for a few days in a closed container in the fridge.
If you don’t have microwave, your adult assistant can heat the cabbage and water in a pan on the stove.
PROCEDURE:
EQUIPMENT:INGREDIENTS:
1716
EQUIPMENT:INGREDIENTS: PROCEDURE:
1
2
3
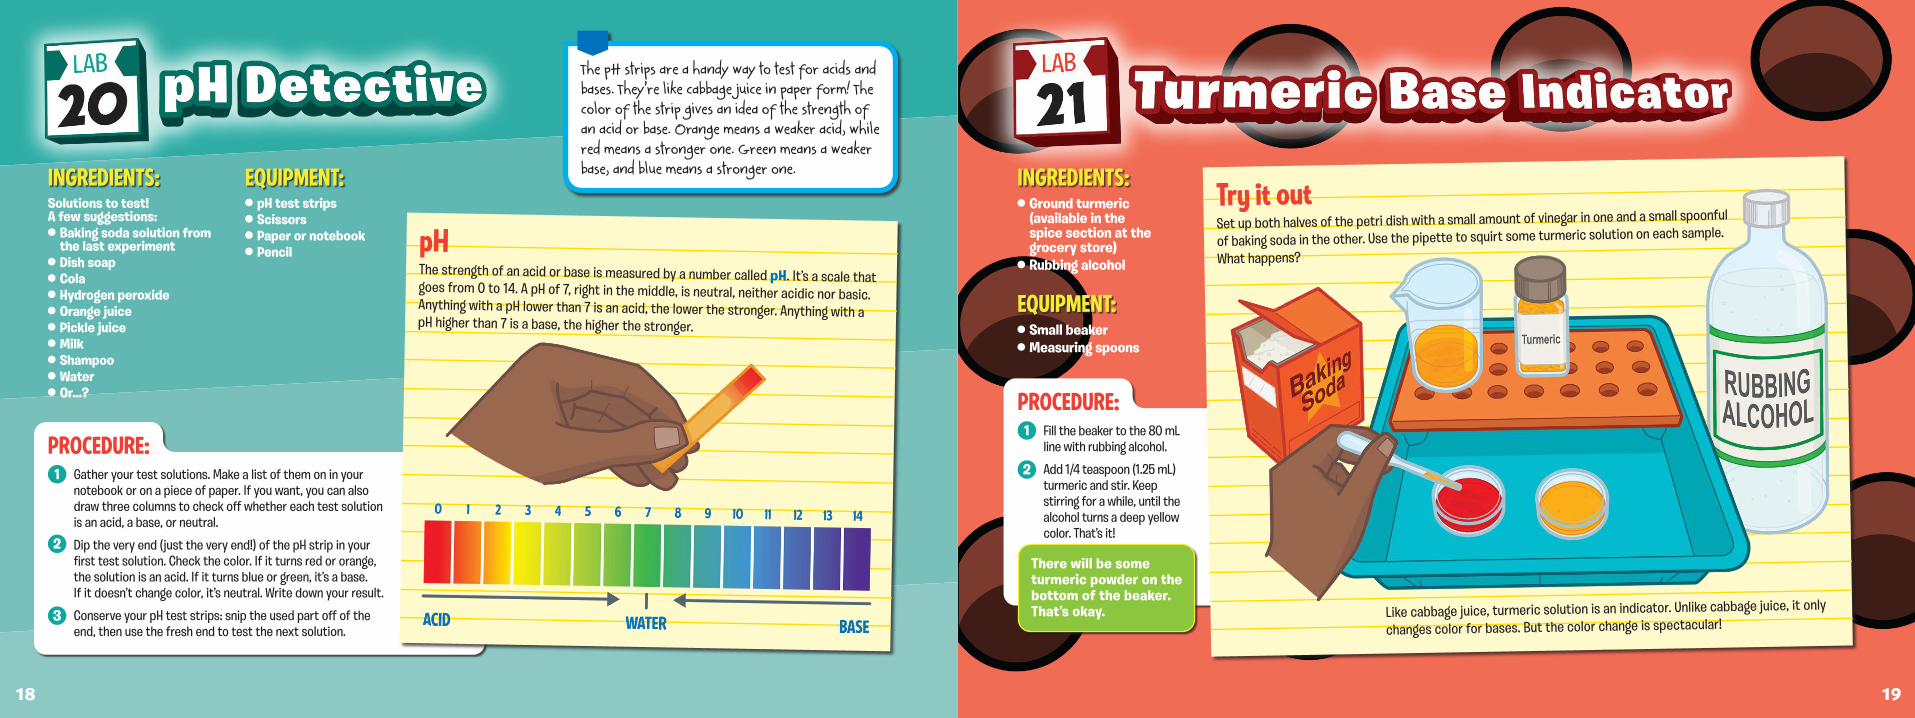
Gather your test solutions. Make a list of them on in your notebook or on a piece of paper. If you want, you can also draw three columns to check off whether each test solution is an acid, a base, or neutral.
Dip the very end (just the very end!) of the pH strip in your first test solution. Check the color. If it turns red or orange, the solution is an acid. If it turns blue or green, it’s a base. If it doesn’t change color, it’s neutral. Write down your result.
Conserve your pH test strips: snip the used part off of the end, then use the fresh end to test the next solution.
The pH strips are a handy way to test for acids and bases. They’re like cabbage juice in paper form! The color of the strip gives an idea of the strength of an acid or base. Orange means a weaker acid, while red means a stronger one. Green means a weaker base, and blue means a stronger one.
There will be some turmeric powder on the bottom of the beaker. That’s okay.
Small beaker Measuring spoons
Ground turmeric (available in the spice section at the grocery store)
Rubbing alcohol
1
2
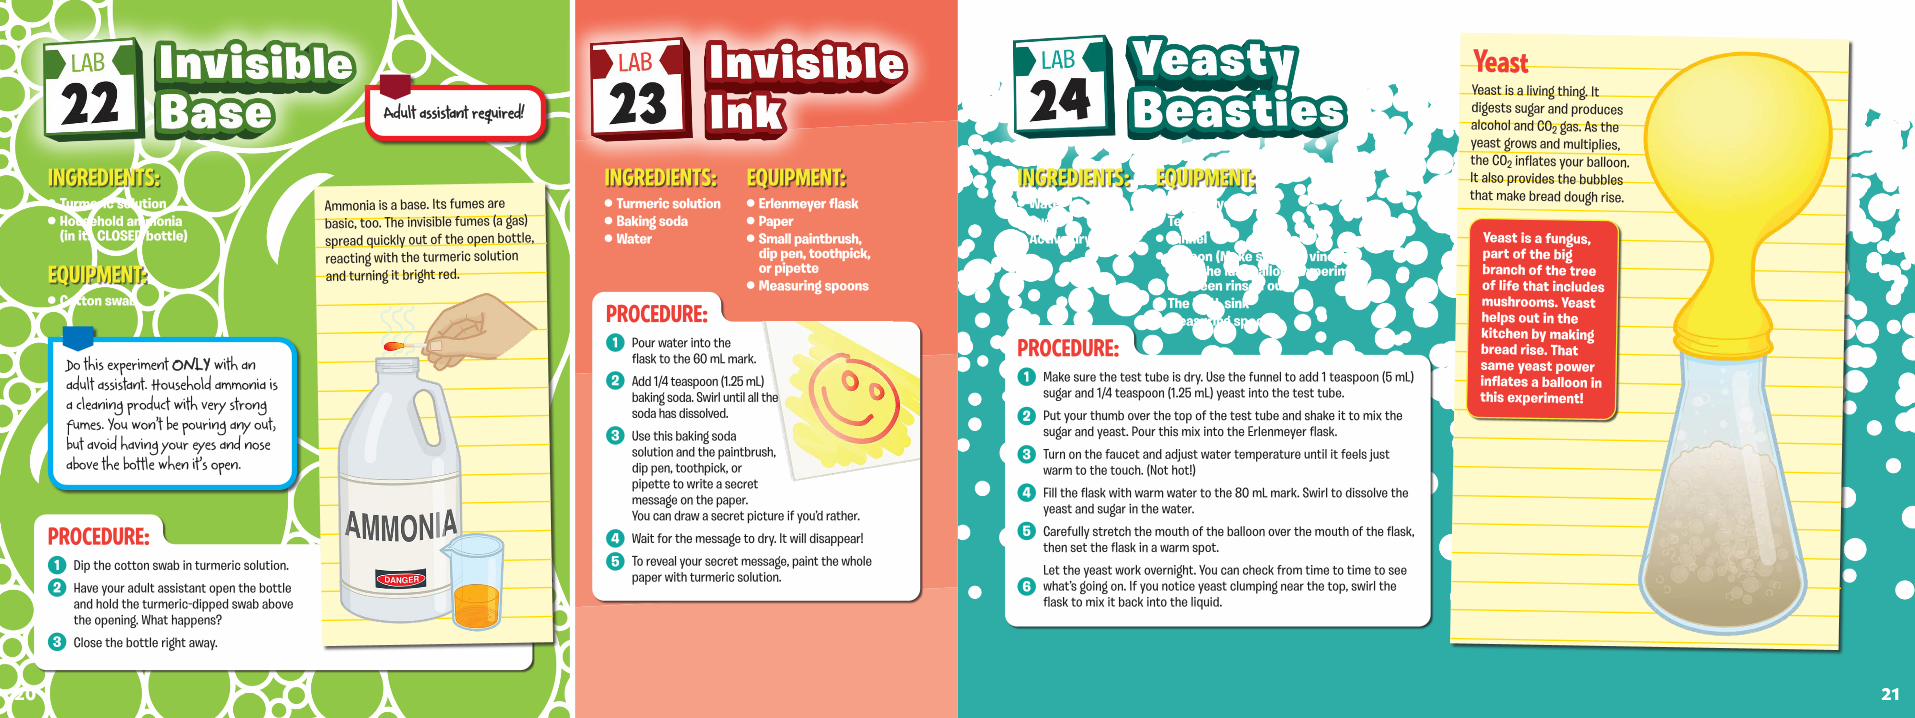
Fill the beaker to the 80 mL line with rubbing alcohol.
Add 1/4 teaspoon (1.25 mL) turmeric and stir. Keep stirring for a while, until the alcohol turns a deep yellow color. That’s it!
pH test strips Scissors Paper or notebook Pencil
Solutions to test! A few suggestions:
Baking soda solution from the last experiment
Dish soap Cola Hydrogen peroxide Orange juice Pickle juice Milk Shampoo Water Or…?
EQUIPMENT:INGREDIENTS:
pHThe strength of an acid or base is measured by a number called pH. It’s a scale that goes from 0 to 14. A pH of 7, right in the middle, is neutral, neither acidic nor basic. Anything with a pH lower than 7 is an acid, the lower the stronger. Anything with a pH higher than 7 is a base, the higher the stronger.
Try it outSet up both halves of the petri dish with a small amount of vinegar in one and a small spoonful
of baking soda in the other. Use the pipette to squirt some turmeric solution on each sample.
What happens?
Like cabbage juice, turmeric solution is an indicator. Unlike cabbage juice, it only
changes color for bases. But the color change is spectacular!
1918
PROCEDURE:
EQUIPMENT:
INGREDIENTS:
PROCEDURE:
Erlenmeyer flask Paper Small paintbrush, dip pen, toothpick, or pipette
Measuring spoons
Erlenmeyer flask Test tube Funnel Balloon (Make sure the vinegar from the last balloon experiment has been rinsed out.)
The REAL sink Measuring spoons
Turmeric solution Baking soda Water
Water Sugar Active dry yeast
Adult assistant required!Adult assistant required!
Do this experiment ONLYONLY with an adult assistant. Household ammonia is a cleaning product with very strong fumes. You won’t be pouring any out, but avoid having your eyes and nose above the bottle when it’s open.
Cotton swab
Turmeric solution Household ammonia (in its CLOSED bottle)
1
2
3
Dip the cotton swab in turmeric solution.
Have your adult assistant open the bottle and hold the turmeric-dipped swab above the opening. What happens?
Close the bottle right away.
PROCEDURE:
INGREDIENTS:
EQUIPMENT:
1
2
3
4
5
Pour water into the flask to the 60 mL mark.
Add 1/4 teaspoon (1.25 mL) baking soda. Swirl until all the soda has dissolved.
Use this baking soda solution and the paintbrush, dip pen, toothpick, or pipette to write a secret message on the paper. You can draw a secret picture if you’d rather.
Wait for the message to dry. It will disappear!
To reveal your secret message, paint the whole paper with turmeric solution.
PROCEDURE:
Ammonia is a base. Its fumes are basic, too. The invisible fumes (a gas) spread quickly out of the open bottle, reacting with the turmeric solution and turning it bright red.
1
2
3
4
5
6
Make sure the test tube is dry. Use the funnel to add 1 teaspoon (5 mL) sugar and 1/4 teaspoon (1.25 mL) yeast into the test tube.
Put your thumb over the top of the test tube and shake it to mix the sugar and yeast. Pour this mix into the Erlenmeyer flask.
Turn on the faucet and adjust water temperature until it feels just warm to the touch. (Not hot!)
Fill the flask with warm water to the 80 mL mark. Swirl to dissolve the yeast and sugar in the water.
Carefully stretch the mouth of the balloon over the mouth of the flask, then set the flask in a warm spot.
Let the yeast work overnight. You can check from time to time to see what’s going on. If you notice yeast clumping near the top, swirl the flask to mix it back into the liquid.
PROCEDURE:
EQUIPMENT:INGREDIENTS:EQUIPMENT:INGREDIENTS:
YeastYeast is a living thing. It digests sugar and produces alcohol and CO2 gas. As the yeast grows and multiplies, the CO2 inflates your balloon. It also provides the bubbles that make bread dough rise.
Yeast is a fungus, part of the big branch of the tree of life that includes mushrooms. Yeast helps out in the kitchen by making bread rise. That same yeast power inflates a balloon in this experiment!
2120
3
4
5
1
2
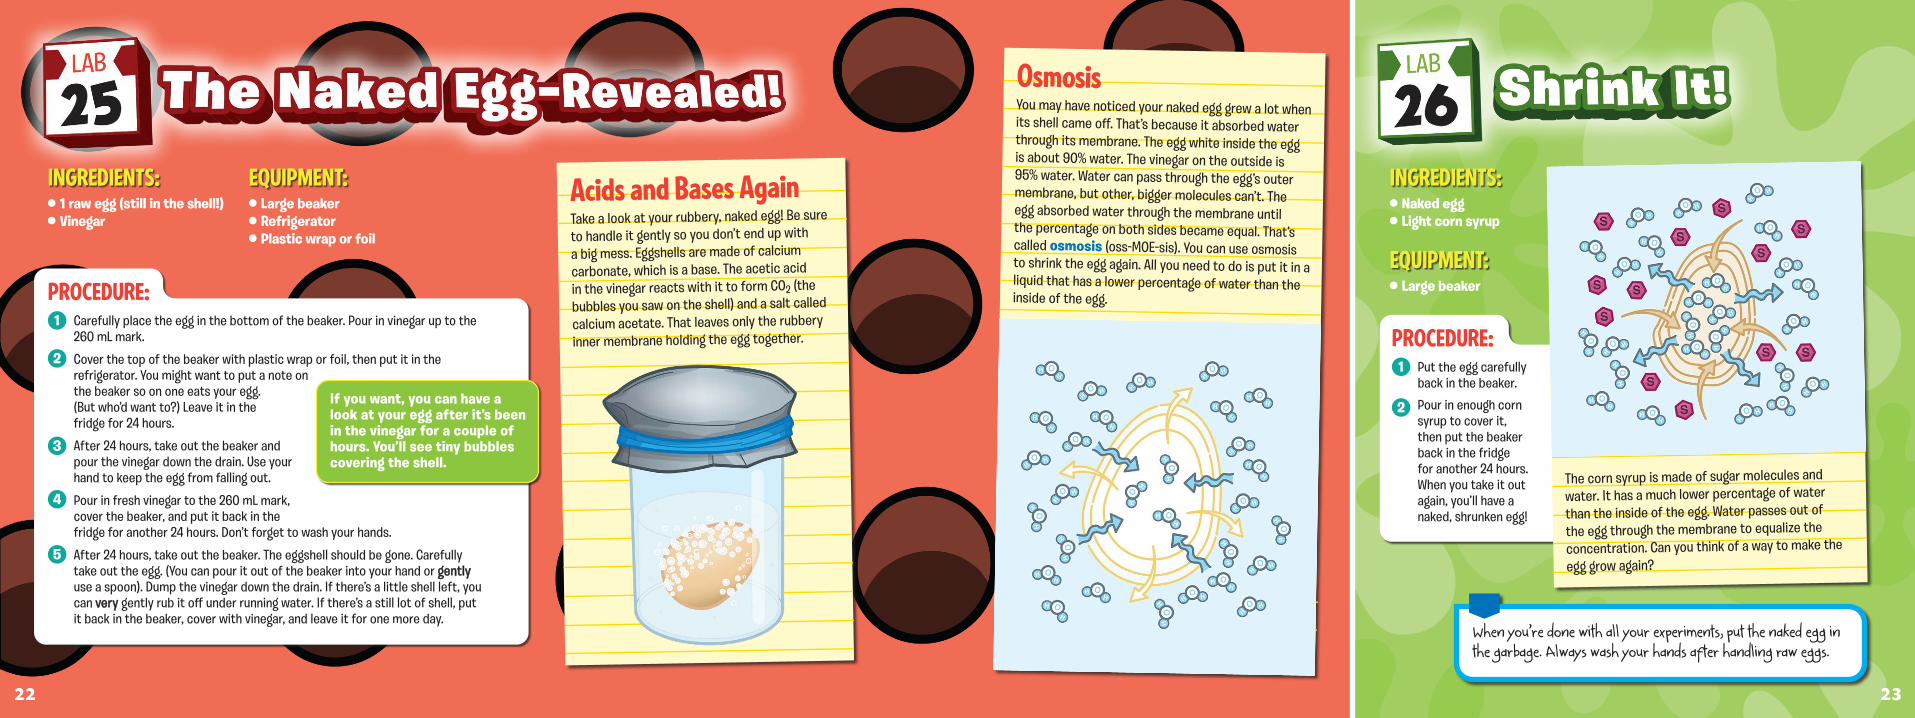
Carefully place the egg in the bottom of the beaker. Pour in vinegar up to the 260 mL mark.
Cover the top of the beaker with plastic wrap or foil, then put it in the refrigerator. You might want to put a note on the beaker so on one eats your egg. (But who’d want to?) Leave it in the fridge for 24 hours.
After 24 hours, take out the beaker and pour the vinegar down the drain. Use your hand to keep the egg from falling out.
Pour in fresh vinegar to the 260 mL mark, cover the beaker, and put it back in the fridge for another 24 hours. Don’t forget to wash your hands.
After 24 hours, take out the beaker. The eggshell should be gone. Carefully take out the egg. (You can pour it out of the beaker into your hand or gentlygently use a spoon). Dump the vinegar down the drain. If there’s a little shell left, you can veryvery gently rub it off under running water. If there’s a still lot of shell, put it back in the beaker, cover with vinegar, and leave it for one more day.
PROCEDURE:
Large beaker Refrigerator Plastic wrap or foil
1 raw egg (still in the shell!) Vinegar
Large beaker
Naked egg Light corn syrup
When you’re done with all your experiments, put the naked egg in the garbage. Always wash your hands after handling raw eggs.
1
2
Put the egg carefully back in the beaker.
Pour in enough corn syrup to cover it, then put the beaker back in the fridge for another 24 hours. When you take it out again, you’ll have a naked, shrunken egg!
INGREDIENTS: EQUIPMENT:
EQUIPMENT:
INGREDIENTS:
PROCEDURE:
Acids and Bases AgainTake a look at your rubbery, naked egg! Be sure
to handle it gently so you don’t end up with a big mess. Eggshells are made of calcium carbonate, which is a base. The acetic acid in the vinegar reacts with it to form CO2 (the
bubbles you saw on the shell) and a salt called
calcium acetate. That leaves only the rubbery
inner membrane holding the egg together.
If you want, you can have a look at your egg after it’s been in the vinegar for a couple of hours. You’ll see tiny bubbles covering the shell.
OsmosisYou may have noticed your naked egg grew a lot when its shell came off. That’s because it absorbed water through its membrane. The egg white inside the egg is about 90% water. The vinegar on the outside is 95% water. Water can pass through the egg’s outer membrane, but other, bigger molecules can’t. The egg absorbed water through the membrane until the percentage on both sides became equal. That’s called osmosis (oss-MOE-sis). You can use osmosis to shrink the egg again. All you need to do is put it in a liquid that has a lower percentage of water than the inside of the egg.
The corn syrup is made of sugar molecules and
water. It has a much lower percentage of water
than the inside of the egg. Water passes out of
the egg through the membrane to equalize the
concentration. Can you think of a way to make the
egg grow again?
2322
1
2
3
4
5
Use the graduated cylinder to measure 90 mL of warm water into the small beaker. Add 1 teaspoon (5 mL) borax powder and stir until it has dissolved.
In the large beaker, mix together 4 tablespoons (60 mL) each of white glue and warm water. Add a few drops of food color if you like.
Use the pipette to squirt borax solution into the glue mixture and stir. Keep stirring and adding borax solution until the mixture gets too stiff to stir.
When you can’t stir any more, take your slime out of the beaker and knead it by hand until smooth.
Your slime is ready to go!
PROCEDURE:
Large beaker Measuring spoons
Polymer jelly beads Water
Large beaker Small beaker Graduated cylinder Pipette Measuring spoons Spoon
White glue Borax laundry powder
Warm water Food color (optional)
Bonus ExperimentDrain your beads in a colander or strainer, then spread them out on a plate to let them dry out. After a few days, they’ll shrink back to their original size.
Always keep jelly beads away Always keep jelly beads away from small children and pets. from small children and pets.
Don’t play with your slime on upholstery or carpet. It’s next to impossible to get slime out of cloth!
For slime that glows in the dark, follow the regular slime recipe, but stir 1/8 teaspoon (.62 mL) glow powder into the glue mixture before adding the borax. Charge your slime under a bright light, then take it into the dark to see its slimy glow.
EQUIPMENT:INGREDIENTS:
INGREDIENTS:
EQUIPMENT:
The jelly beads are made of a polymer that absorbs water. They can absorb a huge amount—as much as 300 times their own weight. In fact, the expanded beads are more than 99% water! That’s why you can’t see them in the water: they’re practically water themselves.
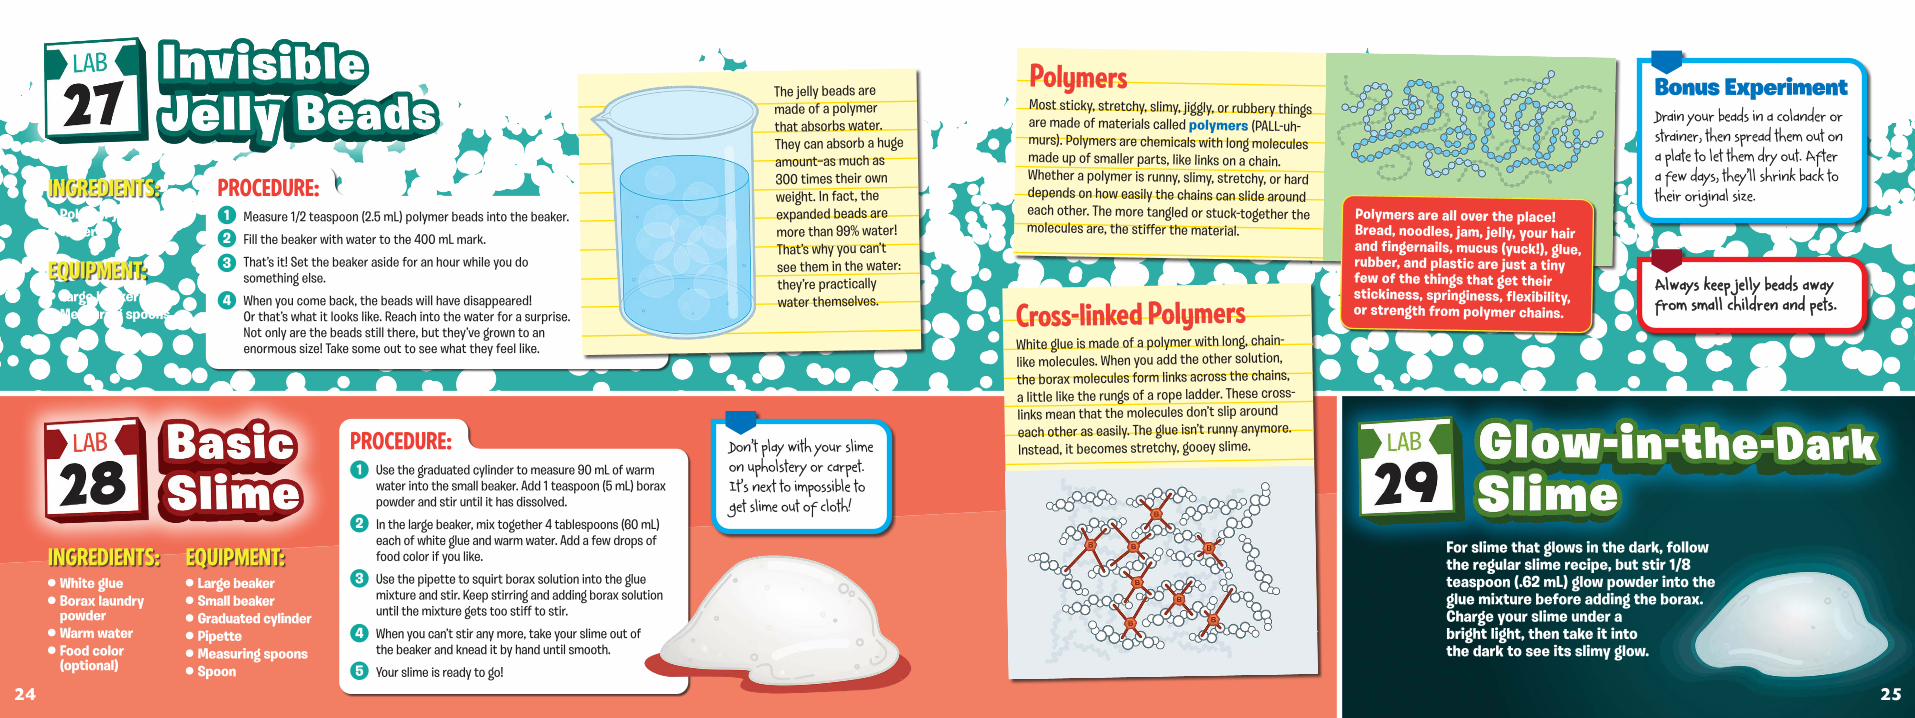
PolymersMost sticky, stretchy, slimy, jiggly, or rubbery things are made of materials called polymers (PALL-uh-murs). Polymers are chemicals with long molecules made up of smaller parts, like links on a chain. Whether a polymer is runny, slimy, stretchy, or hard depends on how easily the chains can slide around each other. The more tangled or stuck-together the molecules are, the stiffer the material.
Cross-linked PolymersWhite glue is made of a polymer with long, chain-
like molecules. When you add the other solution,
the borax molecules form links across the chains,
a little like the rungs of a rope ladder. These cross-
links mean that the molecules don’t slip around
each other as easily. The glue isn’t runny anymore.
Instead, it becomes stretchy, gooey slime.
1
2
3
4
Measure 1/2 teaspoon (2.5 mL) polymer beads into the beaker.
Fill the beaker with water to the 400 mL mark.
That’s it! Set the beaker aside for an hour while you do something else.
When you come back, the beads will have disappeared! Or that’s what it looks like. Reach into the water for a surprise. Not only are the beads still there, but they’ve grown to an enormous size! Take some out to see what they feel like.
Polymers are all over the place! Bread, noodles, jam, jelly, your hair and fingernails, mucus (yuck!), glue, rubber, and plastic are just a tiny few of the things that get their stickiness, springiness, flexibility, or strength from polymer chains.
2524
PROCEDURE:
1
2
3
4
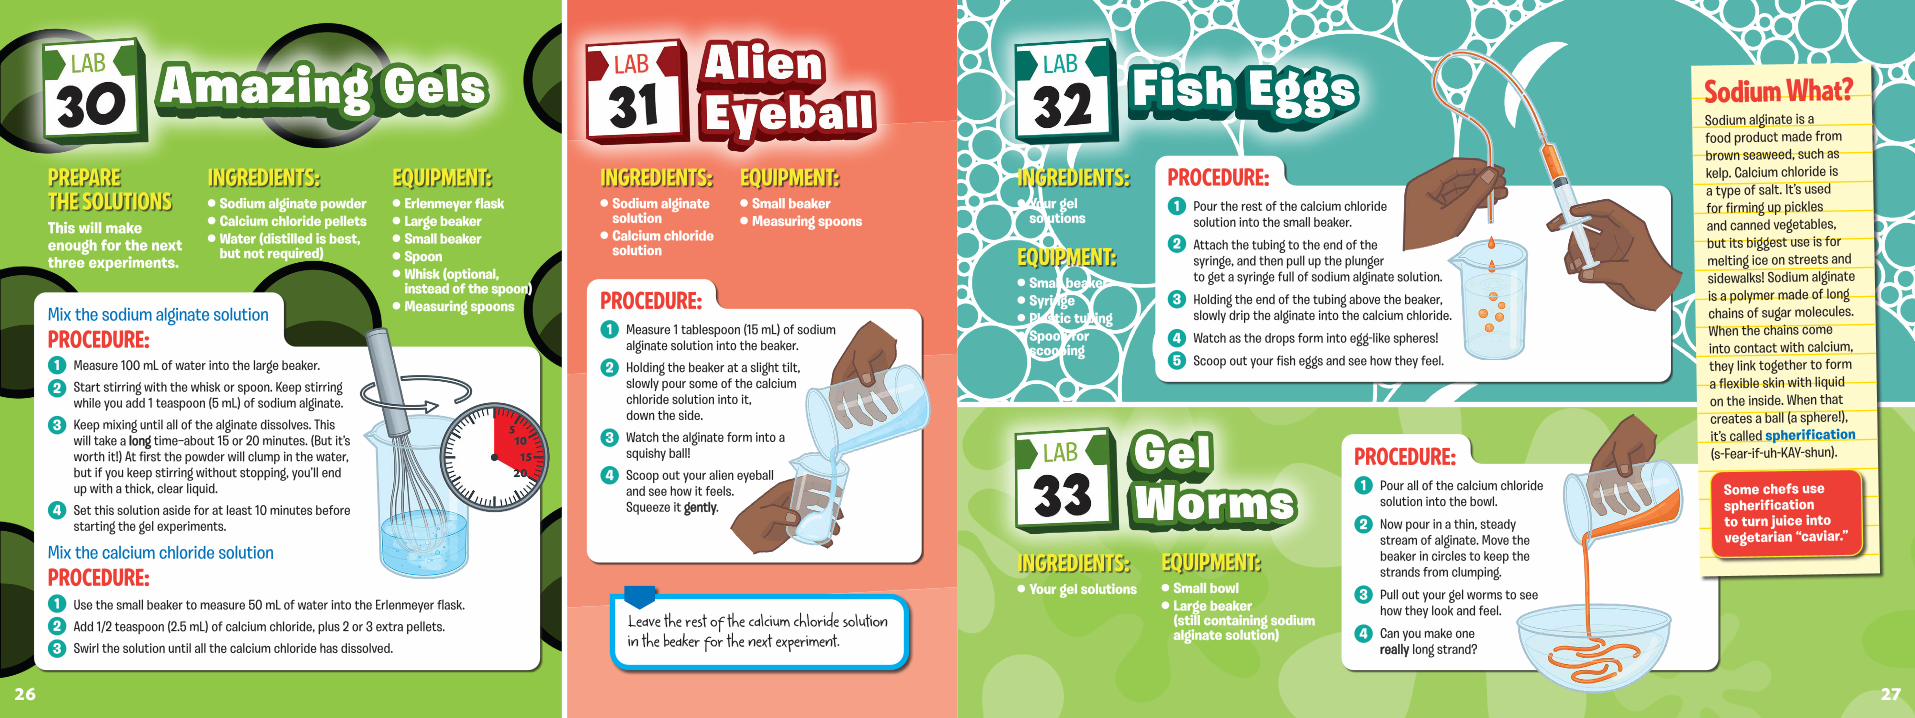
Pour all of the calcium chloride solution into the bowl.
Now pour in a thin, steady stream of alginate. Move the beaker in circles to keep the strands from clumping.
Pull out your gel worms to see how they look and feel.
Can you make one reallyreally long strand?
PROCEDURE:
Erlenmeyer flask Large beaker Small beaker Spoon Whisk (optional, instead of the spoon)
Measuring spoons
Sodium alginate powder Calcium chloride pellets Water (distilled is best, but not required)
Small beaker Measuring spoons
Sodium alginate solution
Calcium chloride solution
Small beaker Syringe Plastic tubing Spoon for scooping
Your gel solutions
Leave the rest of the calcium chloride solution in the beaker for the next experiment.
Small bowl Large beaker (still containing sodium alginate solution)
Your gel solutions
PREPARE THE SOLUTIONSThis will make enough for the next three experiments.
1
2
3
4
Measure 100 mL of water into the large beaker.
Start stirring with the whisk or spoon. Keep stirring while you add 1 teaspoon (5 mL) of sodium alginate.
Keep mixing until all of the alginate dissolves. This will take a longlong time—about 15 or 20 minutes. (But it’s worth it!) At first the powder will clump in the water, but if you keep stirring without stopping, you’ll end up with a thick, clear liquid.
Set this solution aside for at least 10 minutes before starting the gel experiments.
PROCEDURE:Mix the sodium alginate solution
1
2
3
Use the small beaker to measure 50 mL of water into the Erlenmeyer flask.
Add 1/2 teaspoon (2.5 mL) of calcium chloride, plus 2 or 3 extra pellets.
Swirl the solution until all the calcium chloride has dissolved.
Mix the calcium chloride solutionPROCEDURE:
EQUIPMENT:INGREDIENTS: EQUIPMENT:INGREDIENTS: INGREDIENTS:
EQUIPMENT:
1
2
3
45
Pour the rest of the calcium chloride solution into the small beaker.
Attach the tubing to the end of the syringe, and then pull up the plunger to get a syringe full of sodium alginate solution.
Holding the end of the tubing above the beaker, slowly drip the alginate into the calcium chloride.
Watch as the drops form into egg-like spheres!
Scoop out your fish eggs and see how they feel.
PROCEDURE:
INGREDIENTS: EQUIPMENT:
1
2
3
4
Measure 1 tablespoon (15 mL) of sodium alginate solution into the beaker.
Holding the beaker at a slight tilt, slowly pour some of the calcium chloride solution into it, down the side.
Watch the alginate form into a squishy ball!
Scoop out your alien eyeball and see how it feels. Squeeze it gentlygently.
PROCEDURE:
Sodium What?Sodium alginate is a food product made from brown seaweed, such as kelp. Calcium chloride is a type of salt. It’s used for firming up pickles and canned vegetables, but its biggest use is for melting ice on streets and sidewalks! Sodium alginate is a polymer made of long chains of sugar molecules. When the chains come into contact with calcium, they link together to form a flexible skin with liquid on the inside. When that creates a ball (a sphere!), it’s called spherification (s-Fear-if-uh-KAY-shun).
Some chefs use spherification to turn juice into vegetarian “caviar.”
2726
Graduated cylinder Small mixing bowl Measuring cups Mixing spoon
Cornstarch Water Food coloring (optional)
For glow-in-the-dark oobleck, add a little glow powder to the regular oobleck recipe. Let the powder charge up in the light, then turn off the lights and try the tests again on your gloobleck!
When you’re finished with your oobleck, put it in the garbage or compost. DO NOTDO NOT pour it down the drain or toilet. It can clog the pipes.
Oobleck is named after the oozy, gooey stuff in the Dr. Seuss book Bartholomew and the Oobleck.
The perfect oobleckThe usual oobleck recipe is 2 parts cornstarch to 1 part water. It should be thin enough to pour like honey but thick enough to feel solid when tap its surface. If it’s too runny, add a little more cornstarch. If it’s too thick to stir, add a little more water.
1
2
3
4
Fill the graduated cylinder with water to the 60 mL mark.
Measure 1/2 cup (120 mL) cornstarch into the bowl.
Slowly stir the water into the cornstarch. Stop adding water when the mixture pours off the spoon like honey. Add a couple of drops of food coloring if you like.
Your oobleck is ready to go!
PROCEDURE:
EQUIPMENT:
INGREDIENTS:OOBLECK TESTS:The drizzle test Drizzle some oobleck from the spoon back into the bowl. Notice how it flows. Liquid, right?The tap test Tap your fingers hard on the surface of the oobleck in the bowl. Hey, wait a minute! Feels pretty solid and rubbery, right?The grab test Grab a handful of oobleck. Grip it firmly and be sure to keep your hand over the bowl. No matter how hard you grab at first, eventually it will slip right through your fingers.The oozing slime ball Scoop up a small amount of oobleck and roll it into a ball. As long as you keep rolling, it will keep its shape. But try to hold it on your open palm, and it oozes into a puddle.
The splat surpriseHave your friends and family gather closely around you as you pour the bowl of oobleck out into a puddle on a cookie sheet. You can even say something like, “Look how runny and gooey this stuff is!” Then slap your hand down on the puddle and watch them jump back. Hey! What happened to the splat?
Strange fluidsOobleck is a liquid that acts like a solid. More than 300 years ago, the English scientist and super-genius Isaac Newton studied fluids. He discovered that the only way to make a liquid thicker or thinner was to cool or heat it. (Think of the way honey and maple syrup behave if you cool or heat them.) But oobleck is different. It changes with force, getting thicker when you push or squeeze it, and thinner when you let go. Because oobleck doesn’t behave like the fluids Sir Isaac studied, it’s called a non-Newtonian fluid.
Ketchup is a non-Newtonian fluid, too. But it’s like the opposite of oobleck. It’s usually thick and gloopy, but it turns runny if you stir it or shake the bottle.
2928
Small beaker Graduated cylinder Mixing bowl Wooden spoon for stirring Waxed paper Storage container (optional) The Kitchen Sink (clean and dry) Measuring spoons
White flour Salt Cornstarch Water Food coloring (optional)
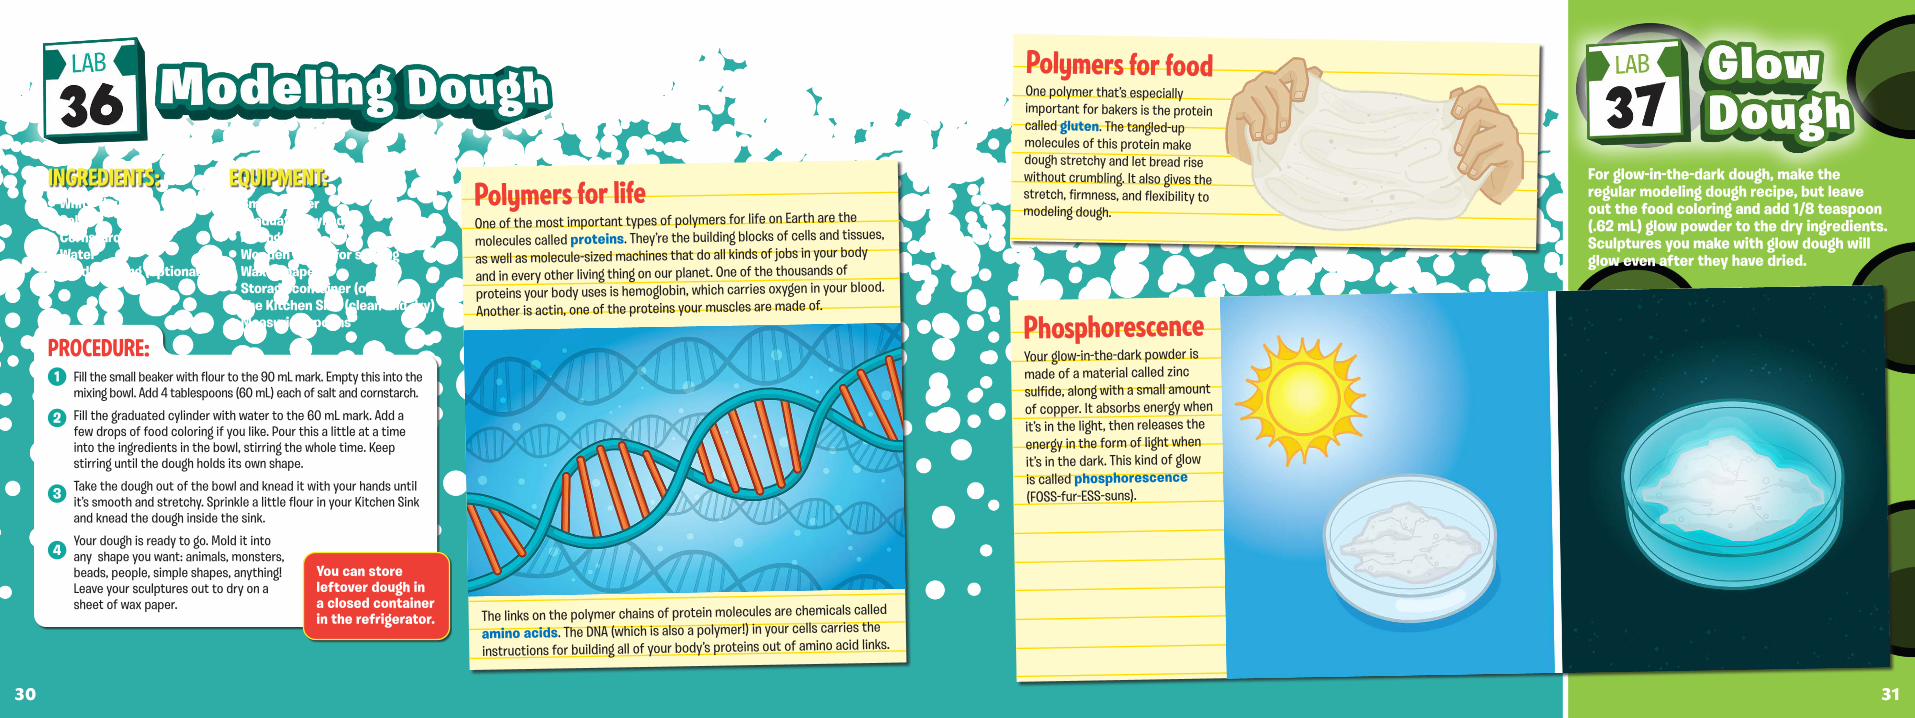
For glow-in-the-dark dough, make the regular modeling dough recipe, but leave out the food coloring and add 1/8 teaspoon (.62 mL) glow powder to the dry ingredients. Sculptures you make with glow dough will glow even after they have dried.
1
2
3
4
Fill the small beaker with flour to the 90 mL mark. Empty this into the mixing bowl. Add 4 tablespoons (60 mL) each of salt and cornstarch.
Fill the graduated cylinder with water to the 60 mL mark. Add a few drops of food coloring if you like. Pour this a little at a time into the ingredients in the bowl, stirring the whole time. Keep stirring until the dough holds its own shape.
Take the dough out of the bowl and knead it with your hands until it’s smooth and stretchy. Sprinkle a little flour in your Kitchen Sink and knead the dough inside the sink.
Your dough is ready to go. Mold it into any shape you want: animals, monsters, beads, people, simple shapes, anything! Leave your sculptures out to dry on a sheet of wax paper.
PROCEDURE:
INGREDIENTS: EQUIPMENT:Polymers for lifeOne of the most important types of polymers for life on Earth are the
molecules called proteins. They’re the building blocks of cells and tissues,
as well as molecule-sized machines that do all kinds of jobs in your body
and in every other living thing on our planet. One of the thousands of
proteins your body uses is hemoglobin, which carries oxygen in your blood.
Another is actin, one of the proteins your muscles are made of.
The links on the polymer chains of protein molecules are chemicals called
amino acids. The DNA (which is also a polymer!) in your cells carries the
instructions for building all of your body’s proteins out of amino acid links.
You can store leftover dough in a closed container in the refrigerator.
Polymers for foodOne polymer that’s especially important for bakers is the protein called gluten. The tangled-up molecules of this protein make dough stretchy and let bread rise without crumbling. It also gives the stretch, firmness, and flexibility to modeling dough.
PhosphorescenceYour glow-in-the-dark powder is made of a material called zinc sulfide, along with a small amount of copper. It absorbs energy when it’s in the light, then releases the energy in the form of light when it’s in the dark. This kind of glow is called phosphorescence (FOSS-fur-ESS-suns).
3130
Large beaker Small beaker Wooden candy sticks Small glass jars, about 4 inches (10 cm) tall Clothespins Saucepan Stove Wooden stirring spoon Food coloring (optional)
Water Sugar
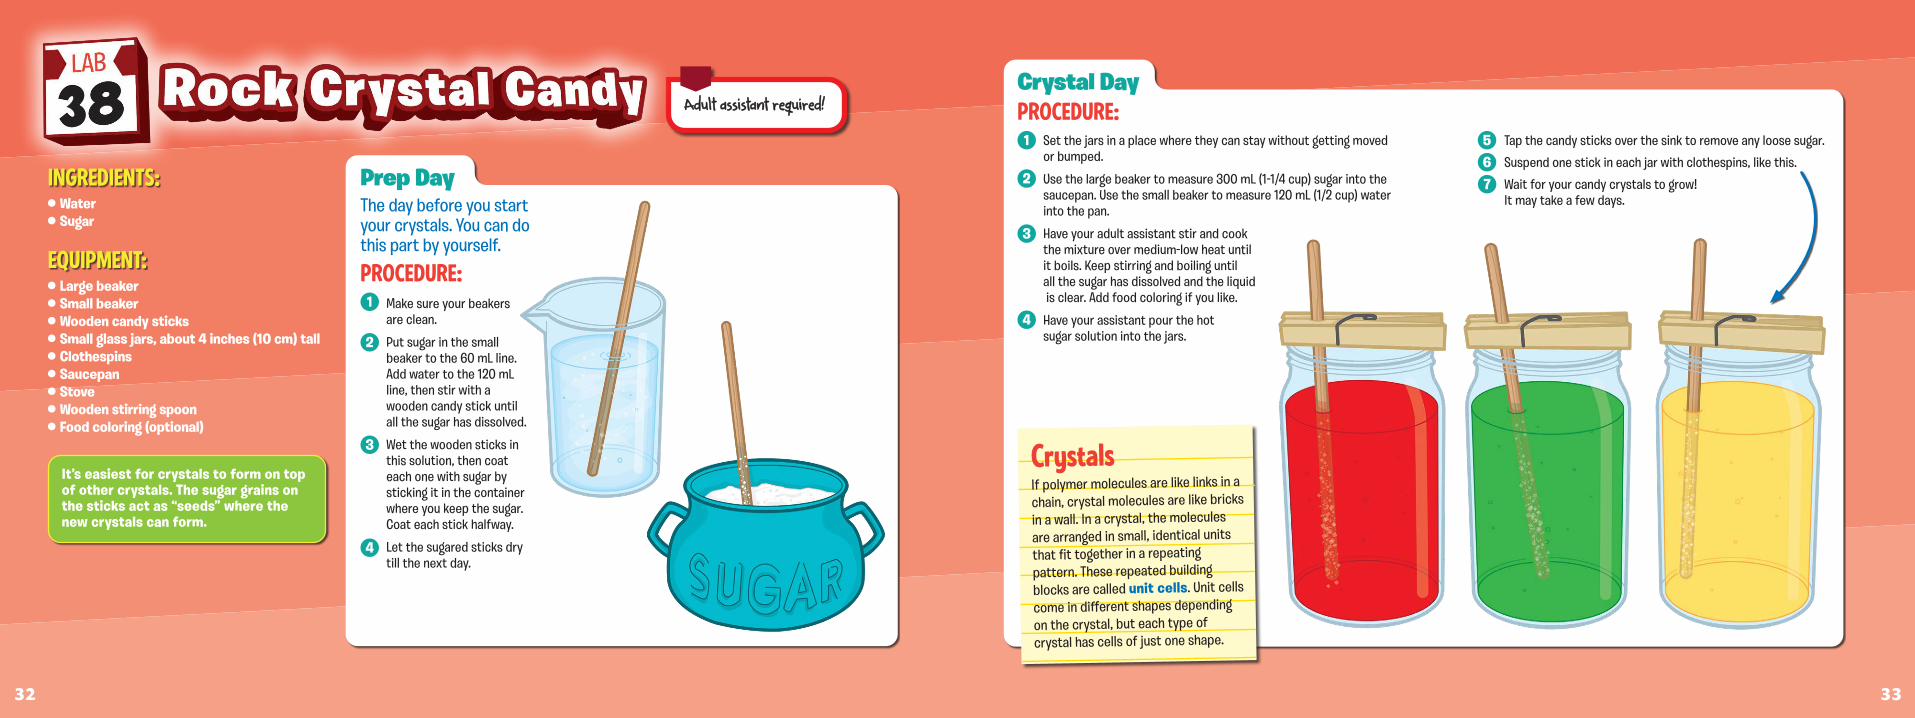
Adult assistant required!Adult assistant required!Crystal Day
It’s easiest for crystals to form on top of other crystals. The sugar grains on the sticks act as “seeds” where the new crystals can form.
7
56
1
2
3
4
Set the jars in a place where they can stay without getting moved or bumped.
Use the large beaker to measure 300 mL (1-1/4 cup) sugar into the saucepan. Use the small beaker to measure 120 mL (1/2 cup) water into the pan.
Have your adult assistant stir and cook the mixture over medium-low heat until it boils. Keep stirring and boiling until all the sugar has dissolved and the liquid is clear. Add food coloring if you like.
Have your assistant pour the hot sugar solution into the jars.
Tap the candy sticks over the sink to remove any loose sugar.
Suspend one stick in each jar with clothespins, like this.
Wait for your candy crystals to grow! It may take a few days.
PROCEDURE:
EQUIPMENT:
INGREDIENTS: Prep DayThe day before you start your crystals. You can do this part by yourself.
1
2
3
4
Make sure your beakers are clean.
Put sugar in the small beaker to the 60 mL line. Add water to the 120 mL line, then stir with a wooden candy stick until all the sugar has dissolved.
Wet the wooden sticks in this solution, then coat each one with sugar by sticking it in the container where you keep the sugar. Coat each stick halfway.
Let the sugared sticks dry till the next day.
PROCEDURE:
CrystalsIf polymer molecules are like links in a chain, crystal molecules are like bricks in a wall. In a crystal, the molecules are arranged in small, identical units that fit together in a repeating pattern. These repeated building blocks are called unit cells. Unit cells come in different shapes depending on the crystal, but each type of crystal has cells of just one shape.
3332
1 letter-sized sheet of paper Tape A small, thin piece of cardboard
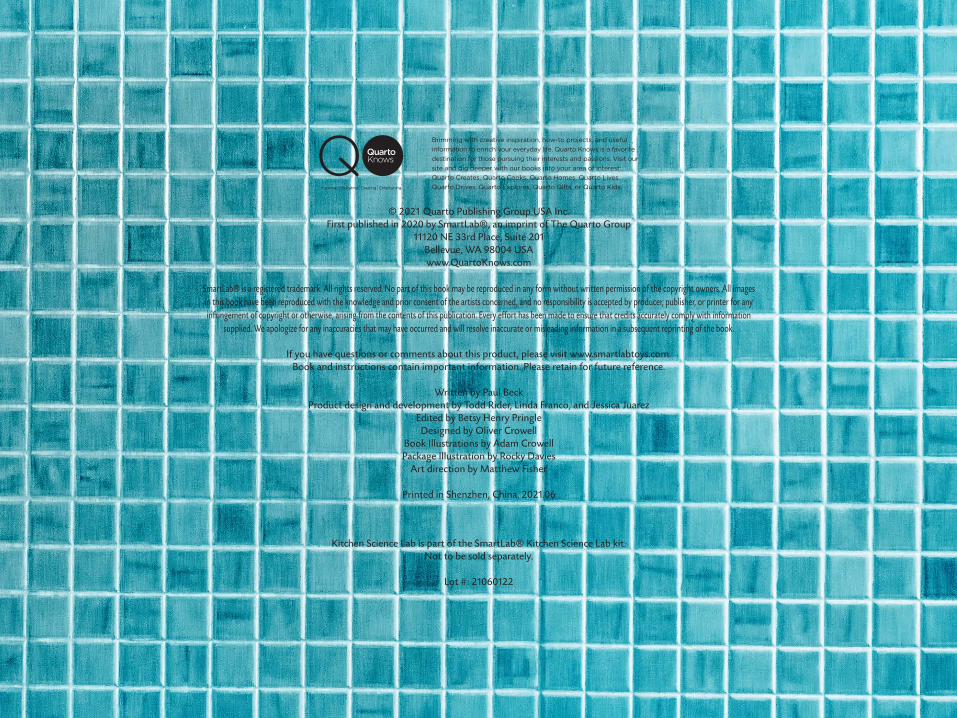
1 two-liter bottle of DIET cola 1 roll of Mentos brand candy, any flavor
Adult assistant required!Adult assistant required!
It’s all about the bubblesIf you put a rough object in the cola, bubbles will form and stick to the surface. (Remember the
Bouncing Beans and Jumping Raisins?) The candy coating on Mentos is rough, so bubbles form on
it. The coating also contains an ingredient called gum arabic, which makes bubbles form more
easily. This creates a huge number of bubbles all at once. More bubbles form on those bubbles,
the gas pressure rises quickly, and whoosh! A fountain of foam!
1
2
3
4
5
6
Don’t open the Mentos yet. Roll the sheet of paper into a tube around the roll of candy and tape it. Make sure it’s just big enough to let the Mentos package slide out easily. Test it to make sure.
Place the cola bottle upright on the ground and take off the cap.
Now open the roll of Mentos. Hold the cardboard over the bottom of the tube and load the tube with all 12 pieces of candy.
Keeping the cardboard on the bottom, place the candy tube upright on the mouth of the cola bottle. Line everything up so when you slip the cardboard out of the way, the candies will slide into the bottle.
Hold the tube in place with one hand and slide the cardboard out from under it with the other. Let all the candies slide into the bottle.
Stand back!
Microwave-safe plate Paper plate
EQUIPMENT:
1 large-size marshmallow
INGREDIENTS:
1
2
3
4
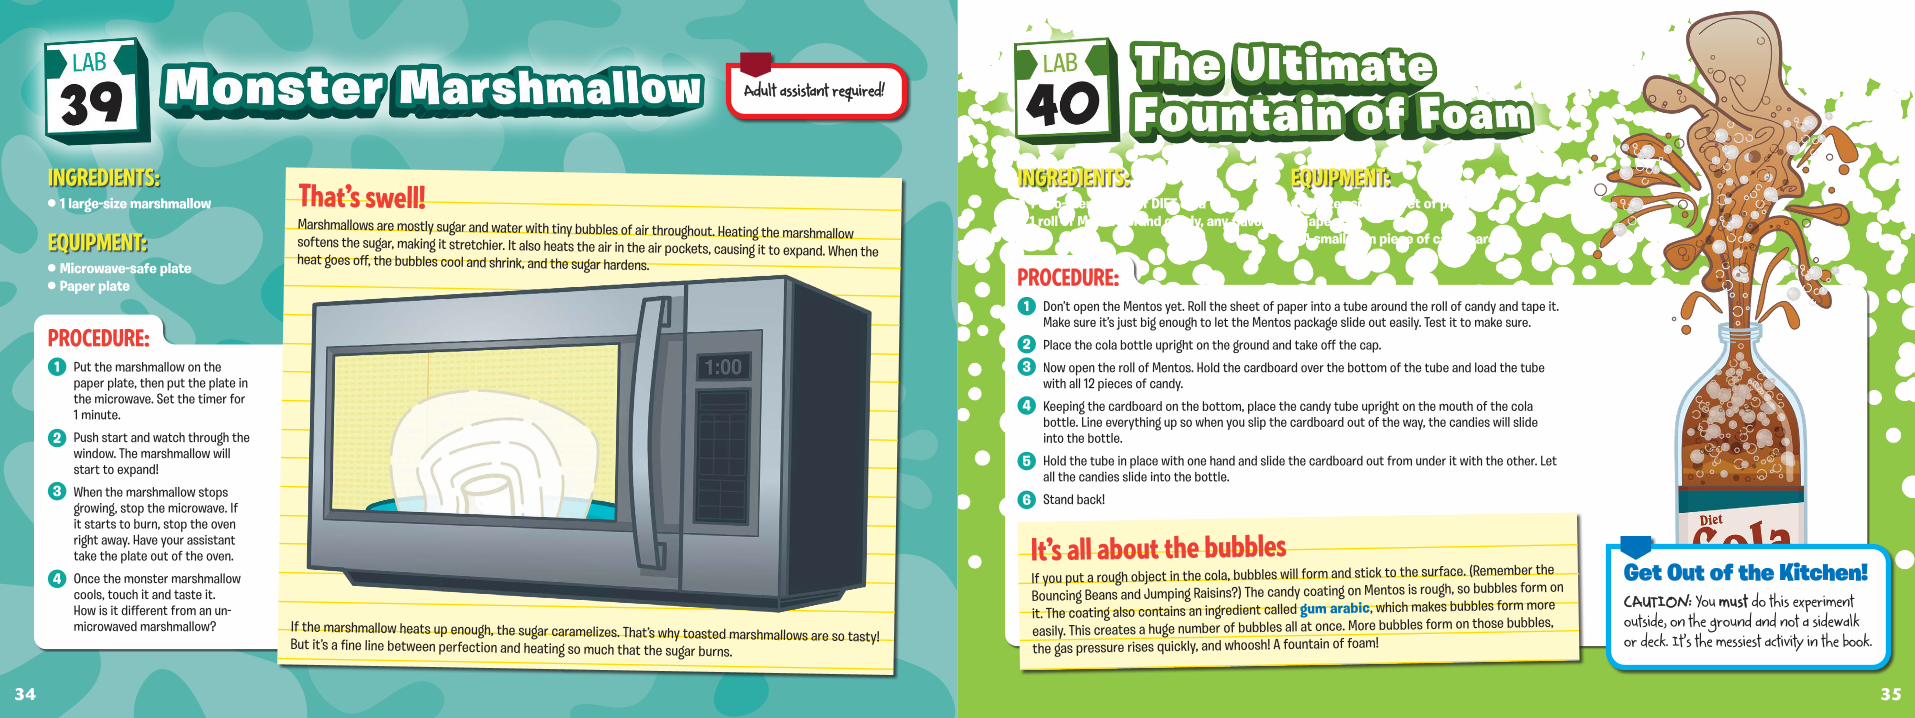
Put the marshmallow on the paper plate, then put the plate in the microwave. Set the timer for 1 minute.
Push start and watch through the window. The marshmallow will start to expand!
When the marshmallow stops growing, stop the microwave. If it starts to burn, stop the oven right away. Have your assistant take the plate out of the oven.
Once the monster marshmallow cools, touch it and taste it. How is it different from an un-microwaved marshmallow?
PROCEDURE:
INGREDIENTS: EQUIPMENT:
PROCEDURE:
That’s swell!Marshmallows are mostly sugar and water with tiny bubbles of air throughout. Heating the marshmallow softens the sugar, making it stretchier. It also heats the air in the air pockets, causing it to expand. When the heat goes off, the bubbles cool and shrink, and the sugar hardens.
If the marshmallow heats up enough, the sugar caramelizes. That’s why toasted marshmallows are so tasty! But it’s a fine line between perfection and heating so much that the sugar burns.
Get Out of the Kitchen!CAUTION:CAUTION: You mustmust do this experiment outside, on the ground and not a sidewalk or deck. It’s the messiest activity in the book.
3534
© 2021 Quarto Publishing Group USA Inc.First published in 2020 by SmartLab®, an imprint of The Quarto Group
11120 NE 33rd Place, Suite 201Bellevue, WA 98004 USAwww.QuartoKnows.com
SmartLab® is a registered trademark. All rights reserved. No part of this book may be reproduced in any form without written permission of the copyright owners. All images in this book have been reproduced with the knowledge and prior consent of the artists concerned, and no responsibility is accepted by producer, publisher, or printer for any infringement of copyright or otherwise, arising from the contents of this publication. Every effort has been made to ensure that credits accurately comply with information
supplied. We apologize for any inaccuracies that may have occurred and will resolve inaccurate or misleading information in a subsequent reprinting of the book.
If you have questions or comments about this product, please visit www.smartlabtoys.com.Book and instructions contain important information. Please retain for future reference.
Written by Paul BeckProduct design and development by Todd Rider, Linda Franco, and Jessica Juarez
Edited by Betsy Henry PringleDesigned by Oliver Crowell
Book Illustrations by Adam CrowellPackage Illustration by Rocky Davies
Art direction by Matthew Fisher
Printed in Shenzhen, China. 2021.06
Kitchen Science Lab is part of the SmartLab® Kitchen Science Lab kit. Not to be sold separately.
Lot #: 21060122