dvd micro theatre - support location selector
TRANSCRIPT
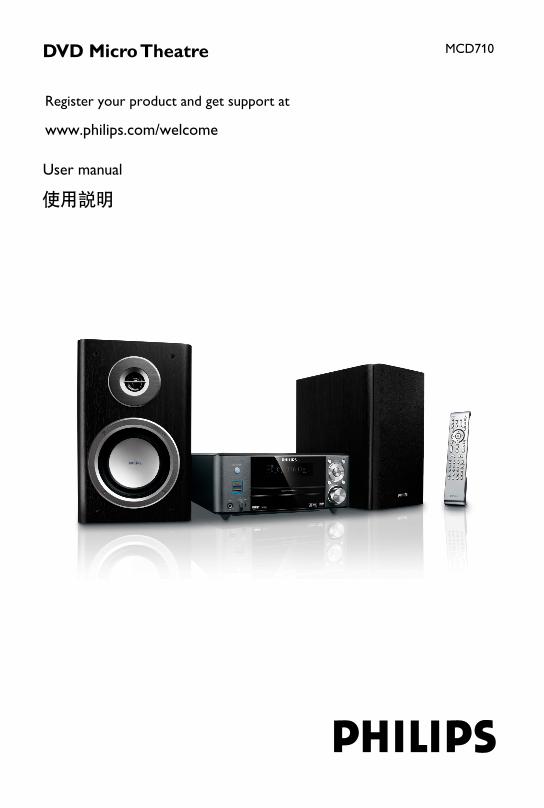
Register your product and get support at
www.philips.com/welcome
MCD710DVD Micro Theatre
pg 001-019_MCD710_98_Eng 2007.12.27, 16:401
2
Manufactured under license from DolbyLaboratories.
"Dolby", "Pro-logic", “Pro-logic II” and the double-D symbol are trademarks of Dolby Laboratories.
MANUFACTURED UNDER LICENSE FROMDIGITAL THEATER SYSTEMS, INC. US PAT. NO5,451,942,5,956,674, 5,974,380, 5,978,762 ANDOTHER WORLDWIDE
This product incorporates copyright protectiontechnology that is protected by method claims ofcertain U.S. patents and other intellectualproperty rights owned by MacrovisionCorporation and other rights owners. Use of thiscopyright protection technology must beauthorized by Macrovision Corporation, and isintended for home and other limited viewinguses only unless otherwise authorized byMacrovision Corporation. Reserve engineeringor disassembly is prohibited.
DivX, DivX Certified, and associatedlogos are trademarks of DivXNetworks,Inc and are used under license.
Windows Media is atrademark of MicrosoftCorporation.
pg 001-019_MCD710_98_Eng 2007.12.27, 16:402
En
glis
h
3
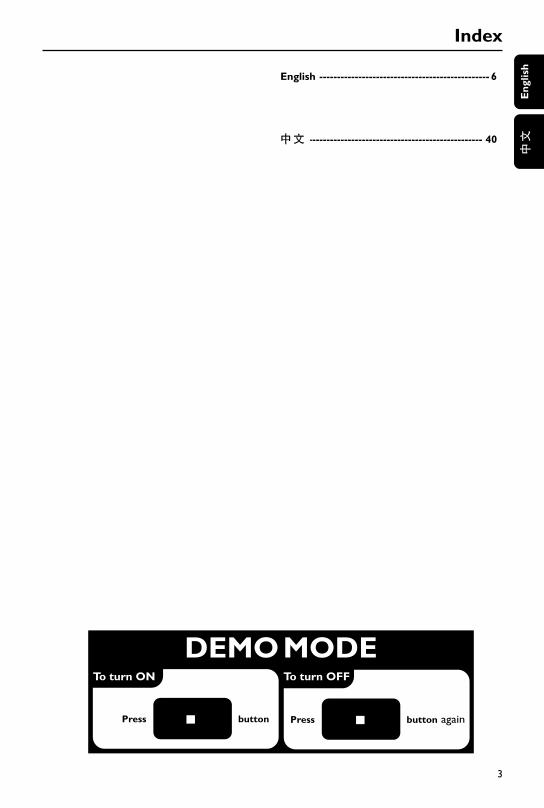
English ------------------------------------------------ 6
-------------------------------------------------------- 40
Index
pg 001-019_MCD710_98_Eng 2007.12.27, 16:403
4
En
glish
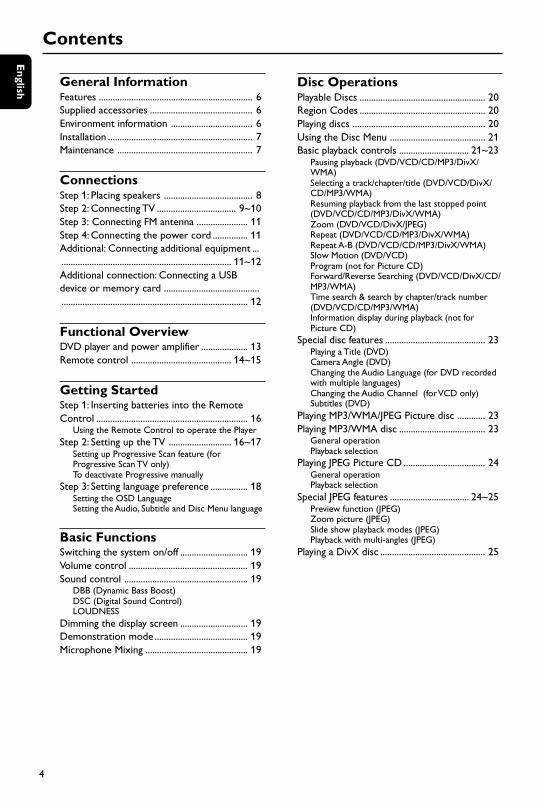
General InformationFeatures .................................................................. 6Supplied accessories ............................................ 6Environment information ................................... 6Installation .............................................................. 7Maintenance .......................................................... 7
ConnectionsStep 1: Placing speakers ...................................... 8Step 2: Connecting TV .................................. 9~10Step 3: Connecting FM antenna ...................... 11Step 4: Connecting the power cord ............... 11Additional: Connecting additional equipment ............................................................................ 11~12Additional connection: Connecting a USBdevice or memory card ......................................................................................................................... 12
Functional OverviewDVD player and power amplifier .................... 13Remote control ........................................... 14~15
Getting StartedStep 1: Inserting batteries into the RemoteControl ................................................................. 16
Using the Remote Control to operate the PlayerStep 2: Setting up the TV ........................... 16~17
Setting up Progressive Scan feature (forProgressive Scan TV only)To deactivate Progressive manually
Step 3: Setting language preference ................ 18Setting the OSD LanguageSetting the Audio, Subtitle and Disc Menu language
Basic FunctionsSwitching the system on/off ............................. 19Volume control ................................................... 19Sound control ..................................................... 19
DBB (Dynamic Bass Boost)DSC (Digital Sound Control)LOUDNESS
Dimming the display screen ............................. 19Demonstration mode ........................................ 19Microphone Mixing ............................................ 19
Disc OperationsPlayable Discs ...................................................... 20Region Codes ...................................................... 20Playing discs ......................................................... 20Using the Disc Menu ......................................... 21Basic playback controls .............................. 21~23
Pausing playback (DVD/VCD/CD/MP3/DivX/WMA)Selecting a track/chapter/title (DVD/VCD/DivX/CD/MP3/WMA)Resuming playback from the last stopped point(DVD/VCD/CD/MP3/DivX/WMA)Zoom (DVD/VCD/DivX/JPEG)Repeat (DVD/VCD/CD/MP3/DivX/WMA)Repeat A-B (DVD/VCD/CD/MP3/DivX/WMA)Slow Motion (DVD/VCD)Program (not for Picture CD)Forward/Reverse Searching (DVD/VCD/DivX/CD/MP3/WMA)Time search & search by chapter/track number(DVD/VCD/CD/MP3/WMA)Information display during playback (not forPicture CD)
Special disc features ........................................... 23Playing a Title (DVD)Camera Angle (DVD)Changing the Audio Language (for DVD recordedwith multiple languages)Changing the Audio Channel (for VCD only)Subtitles (DVD)
Playing MP3/WMA/JPEG Picture disc ............ 23Playing MP3/WMA disc ..................................... 23
General operationPlayback selection
Playing JPEG Picture CD ................................... 24General operationPlayback selection
Special JPEG features .................................. 24~25Preview function (JPEG)Zoom picture (JPEG)Slide show playback modes (JPEG)Playback with multi-angles (JPEG)
Playing a DivX disc ............................................. 25
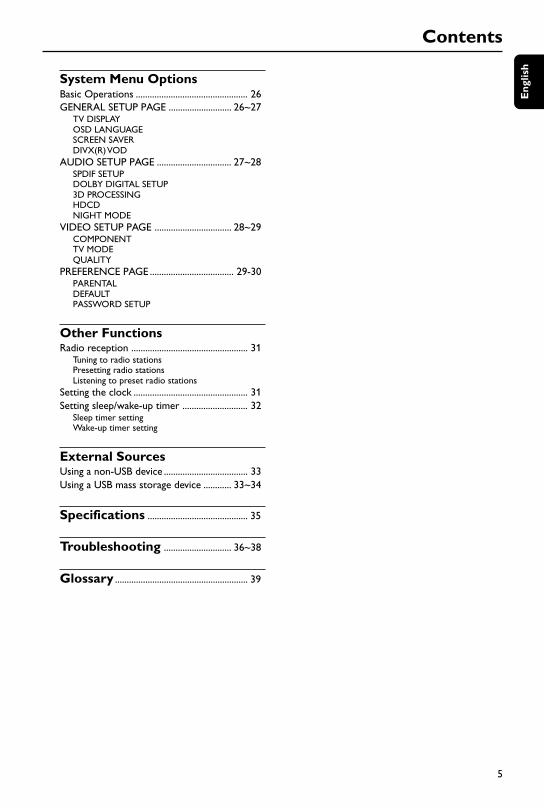
Contents
pg 001-019_MCD710_98_Eng 2007.12.27, 16:404
En
glis
h
5
Contents
System Menu OptionsBasic Operations ................................................ 26GENERAL SETUP PAGE ........................... 26~27
TV DISPLAYOSD LANGUAGESCREEN SAVERDIVX(R) VOD
AUDIO SETUP PAGE ................................ 27~28SPDIF SETUPDOLBY DIGITAL SETUP3D PROCESSINGHDCDNIGHT MODE
VIDEO SETUP PAGE ................................. 28~29COMPONENTTV MODEQUALITY
PREFERENCE PAGE .................................... 29-30PARENTALDEFAULTPASSWORD SETUP
Other FunctionsRadio reception .................................................. 31
Tuning to radio stationsPresetting radio stationsListening to preset radio stations
Setting the clock ................................................. 31Setting sleep/wake-up timer ............................ 32
Sleep timer settingWake-up timer setting
External SourcesUsing a non-USB device .................................... 33Using a USB mass storage device ............ 33~34
Specifications ........................................... 35
Troubleshooting ............................. 36~38
Glossary ......................................................... 39
pg 001-019_MCD710_98_Eng 2007.12.27, 16:405
6
En
glish
Congratulations on your purchase and welcometo Philips!
To fully benefit from the support that Philipsoffers, register your product atwww.philips.com/welcome.
FeaturesYour DVD Micro Theatre with 2.0 channel fulldigital amplifier creates the same dynamic soundqualities that you find in full-fledged cinemas andincorporates some of the best features in hometheater technology.
Other features include:Built-in Dolby Digital decoder, supportingIncredible Surround and DSC sound setting.
Additional Component ConnectionsLets you connect other audio and audio/visualcomponents to the DVD micro theatre.
Night modeLets you compress the dynamic range, reducingthe difference in loudness between differentsounds in Dolby Digital mode.
Parental Control (Rating Level)Lets you set a ratings level so that your childrencannot watch a DVD that has a rating higherthan you set.
Sleep/Wake-up TimerEnables the system to switch on/off automaticallyat a preset time.
Progressive ScanProvides high quality flicker-free images for filmbased sources. When a picture refreshes, itsvertical resolution can double to 525 lines.
Note:To fully enjoy the progressive scan feature, youneed a progressive scan TV.
Supplied accessories– Remote control with two AAA batteries– FM wire antenna– Composite video (yellow) cable– This instruction booklet and a Quick Start
Guide
If any item is damaged or missing, contactyour retailer or Philips.
Environmental information
All unnecessary packaging has been omitted. Wehave tried to make the packaging easy toseparate into three materials: cardboard (box),polystyrene foam (buffer) and polyethylene (bags,protective foam sheet).
Your system consists of materials which can berecycled and reused if disassembled by aspecialised company. Please observe the localregulations regarding the disposal of packagingmaterials, exhausted batteries and oldequipment.
Installation Place the player on a flat, hard, and stable surface.
In a cabinet, allow about 10cm (4 inches) of freespace all around the player for adequateventilation.
Do not expose your player to extremetemperatures or humidity.
The apparatus shall not be exposed to drippingor splashing.
No objects filled with liquids, such as vases, shallbe placed on the apparatus.
No naked flame sources, such as lighted candles,shall be placed on the apparatus.
Install this unit near the AC outlet and where theAC power plug can be reached easily.
The ventilation should not be impeded bycovering the ventilation openings with items,such as newpapers, table-cloths, cur tains, etc.
General Information
pg 001-019_MCD710_98_Eng 2007.12.27, 16:406
En
glis
h
7
General Information
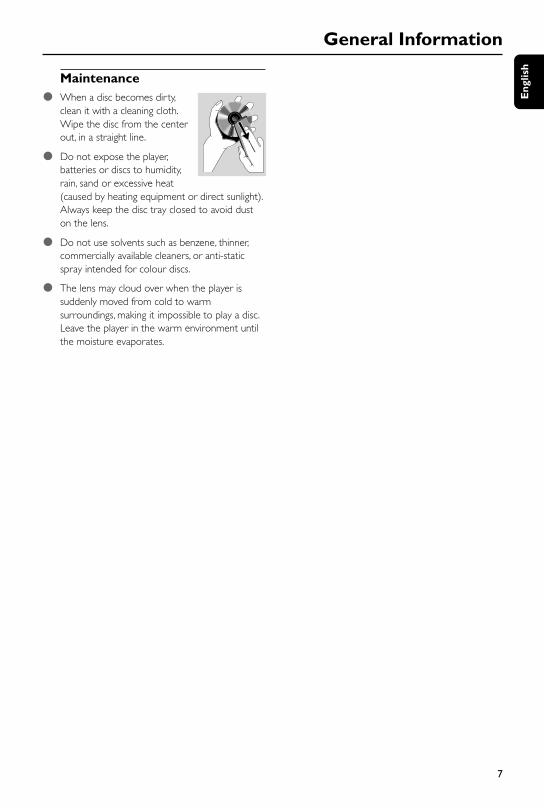
Maintenance When a disc becomes dir ty,
clean it with a cleaning cloth.Wipe the disc from the centerout, in a straight line.
Do not expose the player,batteries or discs to humidity,rain, sand or excessive heat(caused by heating equipment or direct sunlight).Always keep the disc tray closed to avoid duston the lens.
Do not use solvents such as benzene, thinner,commercially available cleaners, or anti-staticspray intended for colour discs.
The lens may cloud over when the player issuddenly moved from cold to warmsurroundings, making it impossible to play a disc.Leave the player in the warm environment untilthe moisture evaporates.
pg 001-019_MCD710_98_Eng 2007.12.27, 16:407
8
En
glish
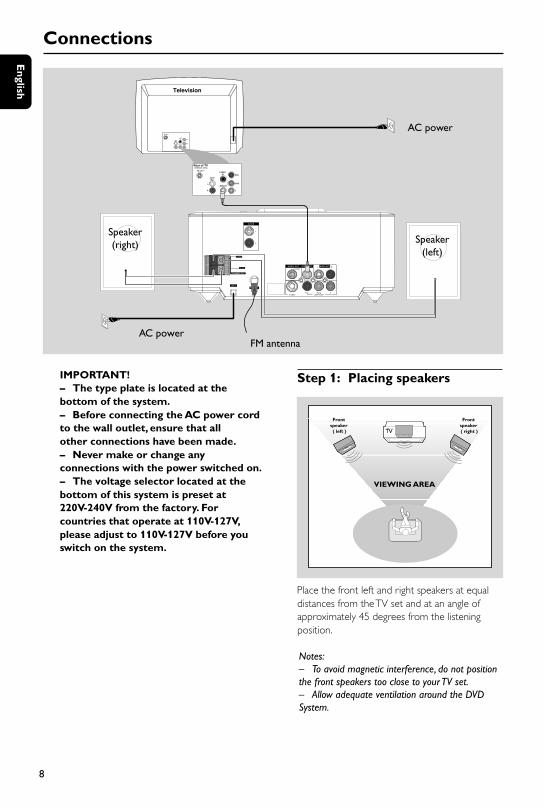
IMPORTANT!– The type plate is located at thebottom of the system.– Before connecting the AC power cordto the wall outlet, ensure that allother connections have been made.– Never make or change anyconnections with the power switched on.– The voltage selector located at thebottom of this system is preset at220V-240V from the factory. Forcountries that operate at 110V-127V,please adjust to 110V-127V before youswitch on the system.
Connections
Speaker(right) Speaker
(left)
FM antenna
AC power
Step 1: Placing speakers
Front speaker ( left )
Front speaker ( right )
VIEWING AREA
Place the front left and right speakers at equaldistances from the TV set and at an angle ofapproximately 45 degrees from the listeningposition.
Notes:– To avoid magnetic interference, do not positionthe front speakers too close to your TV set.– Allow adequate ventilation around the DVDSystem.
AC power
pg 001-019_MCD710_98_Eng 2007.12.27, 16:408
En
glis
h
9
Connections
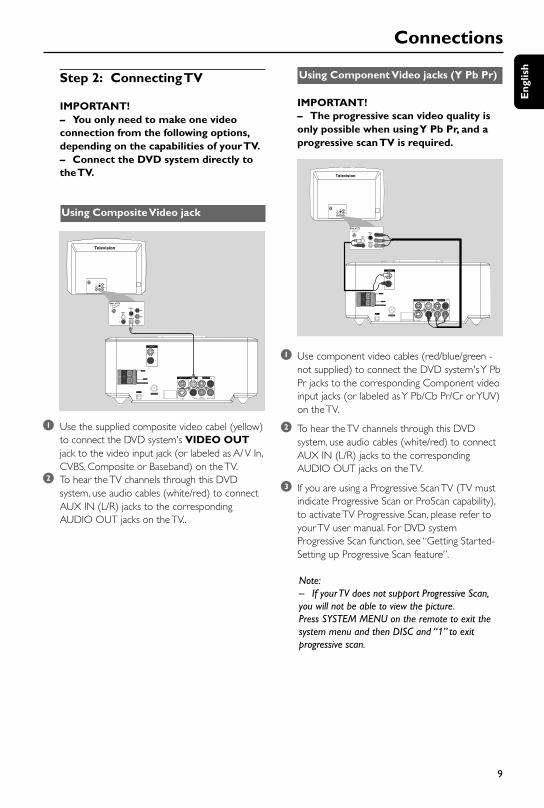
Step 2: Connecting TV
IMPORTANT!– You only need to make one videoconnection from the following options,depending on the capabilities of your TV.– Connect the DVD system directly tothe TV.
Using Composite Video jack
1 Use the supplied composite video cabel (yellow)to connect the DVD system's VIDEO OUTjack to the video input jack (or labeled as A/ V In,CVBS, Composite or Baseband) on the TV.
2 To hear the TV channels through this DVDsystem, use audio cables (white/red) to connectAUX IN (L/R) jacks to the correspondingAUDIO OUT jacks on the TV..
Using Component Video jacks (Y Pb Pr)
IMPORTANT!– The progressive scan video quality isonly possible when using Y Pb Pr, and aprogressive scan TV is required.
1 Use component video cables (red/blue/green -not supplied) to connect the DVD system's Y PbPr jacks to the corresponding Component videoinput jacks (or labeled as Y Pb/Cb Pr/Cr or YUV)on the TV.
2 To hear the TV channels through this DVDsystem, use audio cables (white/red) to connectAUX IN (L/R) jacks to the correspondingAUDIO OUT jacks on the TV.
3 If you are using a Progressive Scan TV (TV mustindicate Progressive Scan or ProScan capability),to activate TV Progressive Scan, please refer toyour TV user manual. For DVD systemProgressive Scan function, see “Getting Started-Setting up Progressive Scan feature”.
Note:– If your TV does not support Progressive Scan,you will not be able to view the picture.Press SYSTEM MENU on the remote to exit thesystem menu and then DISC and “1” to exitprogressive scan.
pg 001-019_MCD710_98_Eng 2007.12.27, 16:409
10
En
glish
Connections
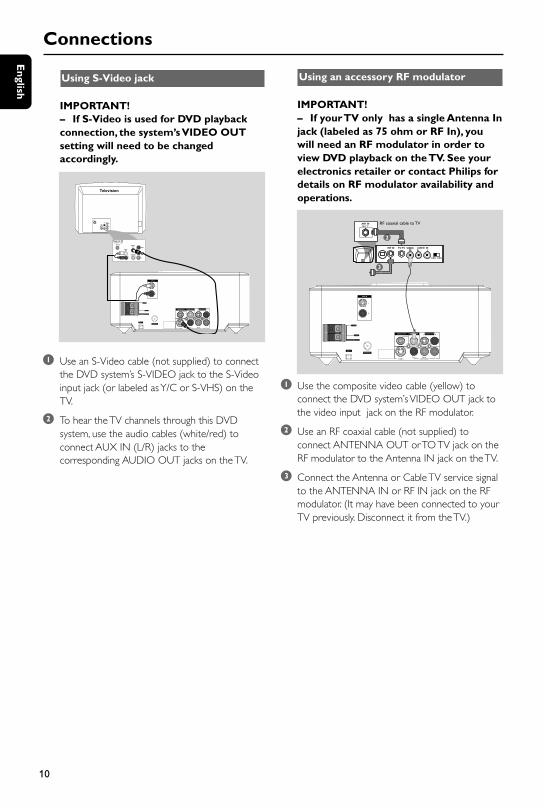
Using S-Video jack
IMPORTANT!– If S-Video is used for DVD playbackconnection, the system’s VIDEO OUTsetting will need to be changedaccordingly.
1 Use an S-Video cable (not supplied) to connectthe DVD system’s S-VIDEO jack to the S-Videoinput jack (or labeled as Y/C or S-VHS) on theTV.
2 To hear the TV channels through this DVDsystem, use the audio cables (white/red) toconnect AUX IN (L/R) jacks to thecorresponding AUDIO OUT jacks on the TV.
Using an accessory RF modulator
IMPORTANT!– If your TV only has a single Antenna Injack (labeled as 75 ohm or RF In), youwill need an RF modulator in order toview DVD playback on the TV. See yourelectronics retailer or contact Philips fordetails on RF modulator availability andoperations.
3
2
AUDIO INR L
VIDEOIN
TO TVINT IN
CH3 CH4
ANT IN RF coaxial cable to TV
1 Use the composite video cable (yellow) toconnect the DVD system’s VIDEO OUT jack tothe video input jack on the RF modulator.
2 Use an RF coaxial cable (not supplied) toconnect ANTENNA OUT or TO TV jack on theRF modulator to the Antenna IN jack on the TV.
3 Connect the Antenna or Cable TV service signalto the ANTENNA IN or RF IN jack on the RFmodulator. (It may have been connected to yourTV previously. Disconnect it from the TV.)
pg 001-019_MCD710_98_Eng 2007.12.27, 16:4010
En
glis
h
11
Connections
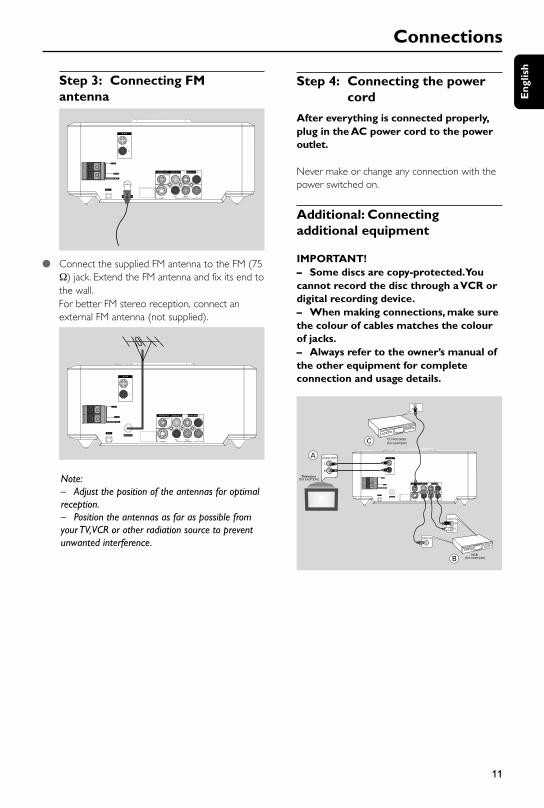
Step 3: Connecting FMantenna
Connect the supplied FM antenna to the FM (75Ω) jack. Extend the FM antenna and fix its end tothe wall.For better FM stereo reception, connect anexternal FM antenna (not supplied).
Note:– Adjust the position of the antennas for optimalreception.– Position the antennas as far as possible fromyour TV, VCR or other radiation source to preventunwanted interference.
Step 4: Connecting the powercord
After everything is connected properly,plug in the AC power cord to the poweroutlet.
Never make or change any connection with thepower switched on.
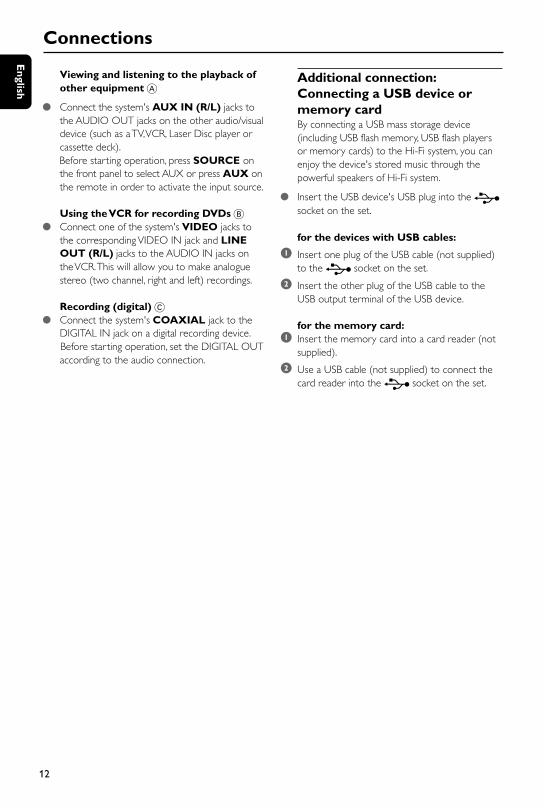
Additional: Connectingadditional equipment
IMPORTANT!– Some discs are copy-protected. Youcannot record the disc through a VCR ordigital recording device.– When making connections, make surethe colour of cables matches the colourof jacks.– Always refer to the owner’s manual ofthe other equipment for completeconnection and usage details.
AUDIO OUT
L
R
Television
A
C
VCR
B
VIDEO IN
AUDIO IN
L
R
pg 001-019_MCD710_98_Eng 2007.12.27, 16:4011
12
En
glish
Connections
Viewing and listening to the playback ofother equipment A
Connect the system's AUX IN (R/L) jacks tothe AUDIO OUT jacks on the other audio/visualdevice (such as a TV, VCR, Laser Disc player orcassette deck).Before starting operation, press SOURCE onthe front panel to select AUX or press AUX onthe remote in order to activate the input source.
Using the VCR for recording DVDs B Connect one of the system's VIDEO jacks to
the corresponding VIDEO IN jack and LINEOUT (R/L) jacks to the AUDIO IN jacks onthe VCR. This will allow you to make analoguestereo (two channel, right and left) recordings.
Recording (digital) C Connect the system's COAXIAL jack to the
DIGITAL IN jack on a digital recording device. Before star ting operation, set the DIGITAL OUT
according to the audio connection.
Additional connection:Connecting a USB device ormemory cardBy connecting a USB mass storage device(including USB flash memory, USB flash playersor memory cards) to the Hi-Fi system, you canenjoy the device's stored music through thepowerful speakers of Hi-Fi system.
Insert the USB device's USB plug into the socket on the set.
for the devices with USB cables:
1 Insert one plug of the USB cable (not supplied)to the socket on the set.
2 Insert the other plug of the USB cable to theUSB output terminal of the USB device.
for the memory card:1 Insert the memory card into a card reader (not
supplied).
2 Use a USB cable (not supplied) to connect thecard reader into the socket on the set.
pg 001-019_MCD710_98_Eng 2007.12.27, 16:4012
En
glis
h
13
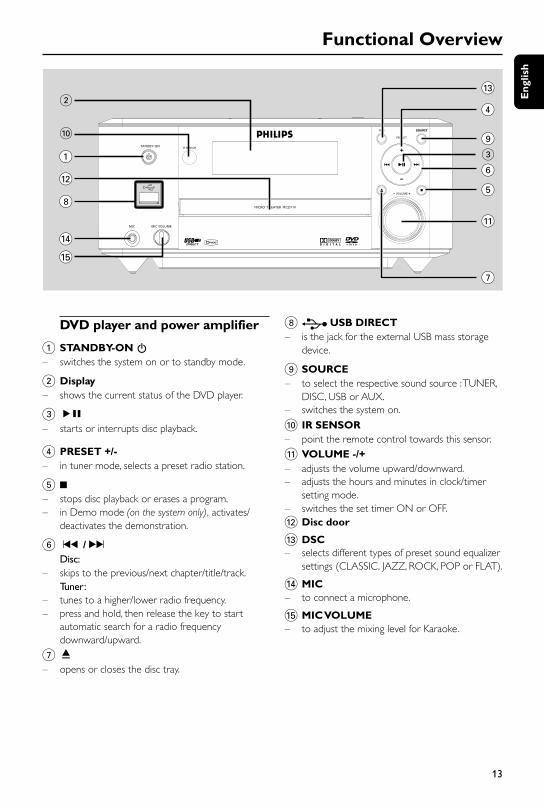
Functional Overview
DVD player and power amplifier
1 STANDBY-ON B– switches the system on or to standby mode.
2 Display– shows the current status of the DVD player.
3 ÉÅ
– starts or interrupts disc playback.
4 PRESET +/-– in tuner mode, selects a preset radio station.
5 9
– stops disc playback or erases a program.– in Demo mode (on the system only), activates/
deactivates the demonstration.
6 ¡1 / 2™
Disc:– skips to the previous/next chapter/title/track.
Tuner:– tunes to a higher/lower radio frequency.– press and hold, then release the key to start
automatic search for a radio frequencydownward/upward.
7 ç
– opens or closes the disc tray.
8 USB DIRECT– is the jack for the external USB mass storage
device.
9 SOURCE– to select the respective sound source : TUNER,
DISC, USB or AUX.– switches the system on.
0 IR SENSOR– point the remote control towards this sensor.
! VOLUME -/+– adjusts the volume upward/downward.– adjusts the hours and minutes in clock/timer
setting mode.– switches the set timer ON or OFF.@ Disc door
# DSC– selects different types of preset sound equalizer
settings (CLASSIC, JAZZ, ROCK, POP or FLAT).
$ MIC– to connect a microphone.
% MIC VOLUME– to adjust the mixing level for Karaoke.
1
8
@
$
%
7
!
5
6
9
4
#
0
2
3
pg 001-019_MCD710_98_Eng 2007.12.27, 16:4013
14
En
glish
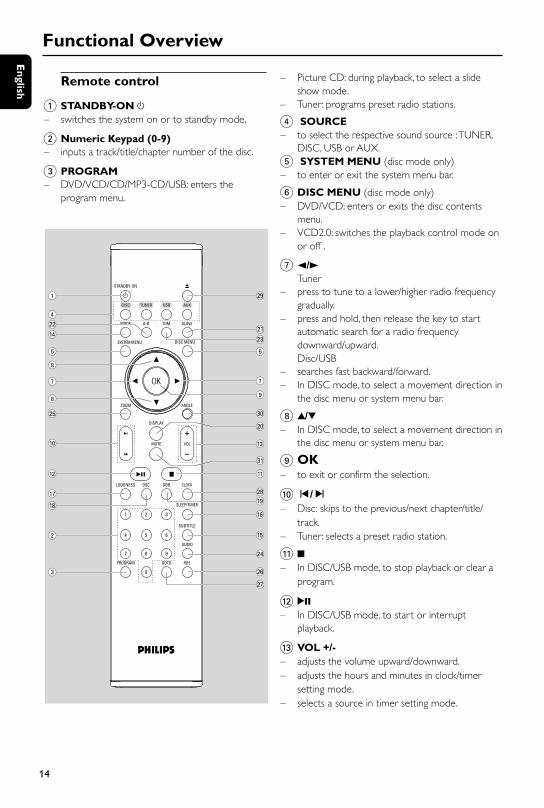
Remote control
1 STANDBY-ON y– switches the system on or to standby mode.
2 Numeric Keypad (0-9)– inputs a track/title/chapter number of the disc.
3 PROGRAM– DVD/VCD/CD/MP3-CD/USB: enters the
program menu.
Functional Overview
– Picture CD: during playback, to select a slideshow mode.
– Tuner: programs preset radio stations.
4 SOURCE– to select the respective sound source : TUNER,
DISC, USB or AUX.5 SYSTEM MENU (disc mode only)– to enter or exit the system menu bar.
6 DISC MENU (disc mode only)– DVD/VCD: enters or exits the disc contents
menu.– VCD2.0: switches the playback control mode on
or off .
7 2/3Tuner
– press to tune to a lower/higher radio frequencygradually.
– press and hold, then release the key to startautomatic search for a radio frequencydownward/upward.Disc/USB
– searches fast backward/forward.– In DISC mode, to select a movement direction in
the disc menu or system menu bar.
8 3/4– In DISC mode, to select a movement direction in
the disc menu or system menu bar.
9 OK– to exit or confirm the selection.
0í/ë– Disc: skips to the previous/next chapter/title/
track.– Tuner: selects a preset radio station.
! 9
– In DISC/USB mode, to stop playback or clear aprogram.
@ 2;
– In DISC/USB mode, to start or interruptplayback.
# VOL +/-– adjusts the volume upward/downward.– adjusts the hours and minutes in clock/timer
setting mode.– selects a source in timer setting mode.
ª
¡
6
7
9
!
•(
§
≤
%
^
º
#
)
⁄
1
™4
$
5
7
∞
0
@
2
3
&
≥
£
*
8
8
pg 001-019_MCD710_98_Eng 2007.12.27, 16:4014
En
glis
h
15
Functional Overview
$ MODE– selects various repeat modes or the shuffle play
mode for a disc.
% SUBTITLE– selects a subtitle language.
^ SLEEP/TIMERStandby mode
– sets time for switching on the systemautomatically.
Power-on mode– sets the sleep timer function (auto off).
& LOUDNESS– enables or disables automatic loudness
adjustment.
* DSC– selects different types of preset sound equalizer
settings (CLASSIC, JAZZ, ROCK, POP or FLAT).
( DBB– enables or disables bass enhancement.
) DISPLAY– displays information on TV screen during
playback.
¡ SLOW– selects different slow playback modes for a
VCD/SVCD/DVD.
™ A-B– for VCD/CD/USB: to repeat a specific section
within the same track.– for DVD: to repeat a specific section in a disc.
£ DIM– selects different levels of brightness for the
display screen.
≤ AUDIOfor VCD
– sets Stereo, Mono-Left or Mono-Right soundmode.for DVD
– selects an audio language.
∞ ZOOM– DVD/VCD/Picture CD: enlarges or reduces a
picture or active image on the TV screen.
§ RDS (unavailable for this version)
≥ GOTO– In DISC mode, to fast search in a disc by
entering a time, title, chapter or track.• CLOCK
Standby mode*– sets the system clock. Playback mode– displays the system clock.
ª 0
– opens or closes the disc tray.
º ANGLE– selects a DVD camera angle.
⁄ MUTE– to interrupt or resume sound reproduction.
Notes for remote control:– First, select the source you wish tocontrol by pressing one of the source selectkeys on the remote control (DISC orTUNER, for example).– Then select the desired function ( 2;, í,ë for example).
pg 001-019_MCD710_98_Eng 2007.12.27, 16:4015
16
En
glish
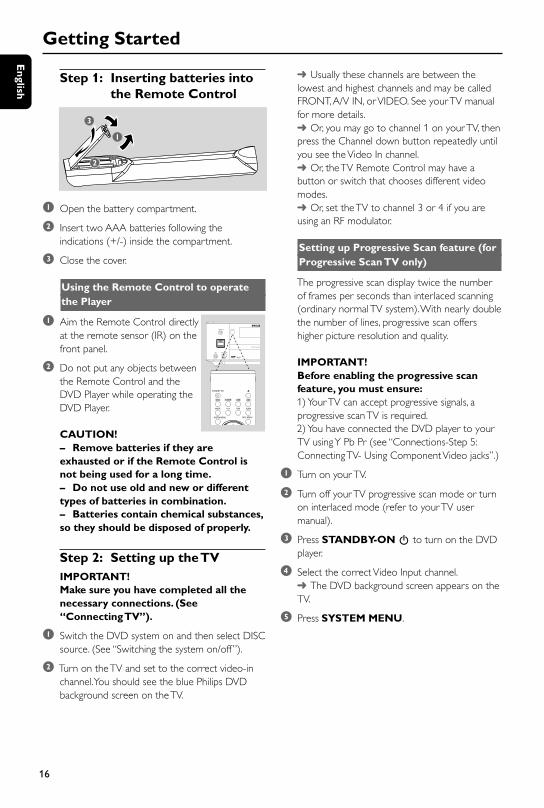
Step 1: Inserting batteries intothe Remote Control
1
3
2
1 Open the battery compartment.
2 Insert two AAA batteries following theindications (+/-) inside the compartment.
3 Close the cover.
Using the Remote Control to operatethe Player
1 Aim the Remote Control directlyat the remote sensor (IR) on thefront panel.
2 Do not put any objects betweenthe Remote Control and theDVD Player while operating theDVD Player.
CAUTION!– Remove batteries if they areexhausted or if the Remote Control isnot being used for a long time.– Do not use old and new or differenttypes of batteries in combination.– Batteries contain chemical substances,so they should be disposed of properly.
Step 2: Setting up the TVIMPORTANT!Make sure you have completed all thenecessary connections. (See“Connecting TV”).
1 Switch the DVD system on and then select DISCsource. (See “Switching the system on/off ”).
2 Turn on the TV and set to the correct video-inchannel. You should see the blue Philips DVDbackground screen on the TV.
Usually these channels are between thelowest and highest channels and may be calledFRONT, A/V IN, or VIDEO. See your TV manualfor more details. Or, you may go to channel 1 on your TV, thenpress the Channel down button repeatedly untilyou see the Video In channel. Or, the TV Remote Control may have abutton or switch that chooses different videomodes. Or, set the TV to channel 3 or 4 if you areusing an RF modulator.
Setting up Progressive Scan feature (forProgressive Scan TV only)
The progressive scan display twice the numberof frames per seconds than interlaced scanning(ordinary normal TV system). With nearly doublethe number of lines, progressive scan offershigher picture resolution and quality.
IMPORTANT!Before enabling the progressive scanfeature, you must ensure:1) Your TV can accept progressive signals, aprogressive scan TV is required.2) You have connected the DVD player to yourTV using Y Pb Pr (see “Connections-Step 5:Connecting TV- Using Component Video jacks”.)
1 Turn on your TV.
2 Turn off your TV progressive scan mode or turnon interlaced mode (refer to your TV usermanual).
3 Press STANDBY-ON B to turn on the DVDplayer.
4 Select the correct Video Input channel. The DVD background screen appears on theTV.
5 Press SYSTEM MENU.
Getting Started
pg 001-019_MCD710_98_Eng 2007.12.27, 16:4016
En
glis
h
17
Getting Started
6 Press 1 2 repeatedly to select "VIDEO SETUPPAGE".
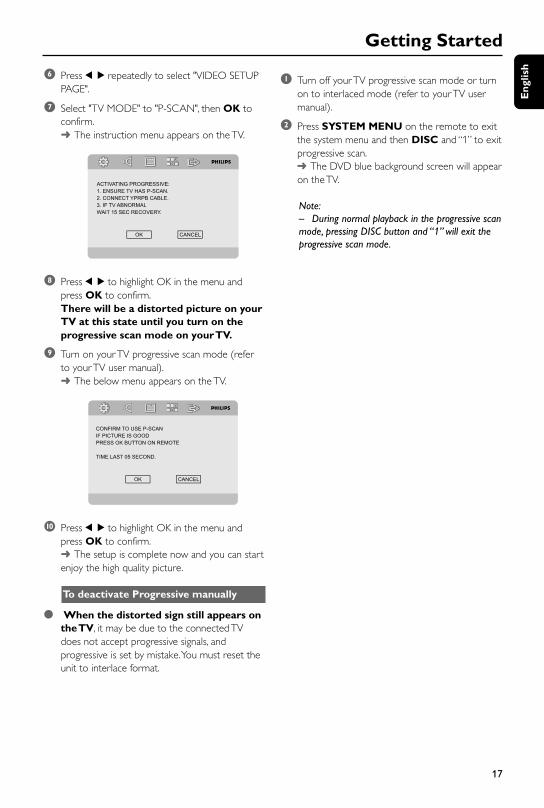
7 Select "TV MODE" to "P-SCAN", then OK toconfirm. The instruction menu appears on the TV.
8 Press 1 2 to highlight OK in the menu andpress OK to confirm.There will be a distorted picture on yourTV at this state until you turn on theprogressive scan mode on your TV.
9 Turn on your TV progressive scan mode (referto your TV user manual). The below menu appears on the TV.
0 Press 1 2 to highlight OK in the menu andpress OK to confirm. The setup is complete now and you can startenjoy the high quality picture.
To deactivate Progressive manually
When the distorted sign still appears onthe TV, it may be due to the connected TVdoes not accept progressive signals, andprogressive is set by mistake. You must reset theunit to interlace format.
1 Turn off your TV progressive scan mode or turnon to interlaced mode (refer to your TV usermanual).
2 Press SYSTEM MENU on the remote to exitthe system menu and then DISC and “1” to exitprogressive scan. The DVD blue background screen will appearon the TV.
Note:– During normal playback in the progressive scanmode, pressing DISC button and “1” will exit theprogressive scan mode.
pg 001-019_MCD710_98_Eng 2007.12.27, 16:4017
18
En
glish
Step 3: Setting languagepreference
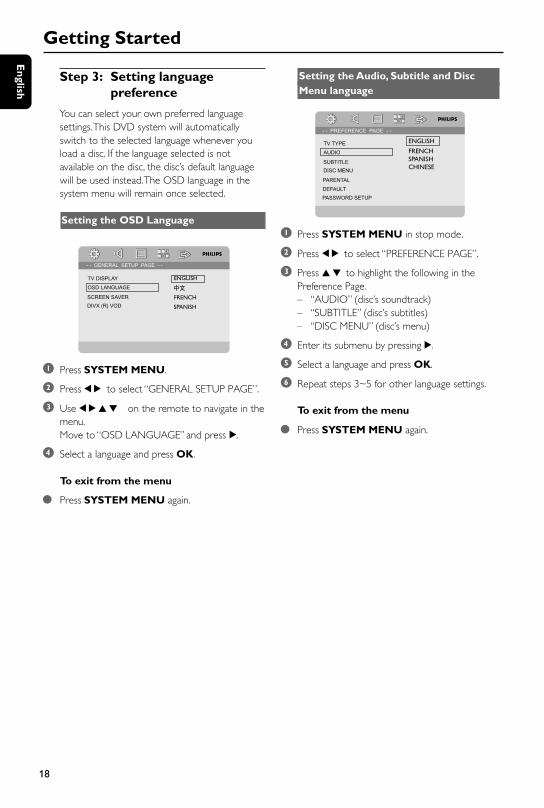
You can select your own preferred languagesettings. This DVD system will automaticallyswitch to the selected language whenever youload a disc. If the language selected is notavailable on the disc, the disc’s default languagewill be used instead. The OSD language in thesystem menu will remain once selected.
Setting the OSD Language
DIVX (R) VOD
ENGLISH
FRENCH
SPANISH
1 Press SYSTEM MENU.
2 Press 1 2 to select “GENERAL SETUP PAGE”.
3 Use 1 2 3 4 on the remote to navigate in themenu.Move to “OSD LANGUAGE” and press 2.
4 Select a language and press OK.
To exit from the menu
Press SYSTEM MENU again.
Getting Started
Setting the Audio, Subtitle and DiscMenu language
ENGLISH
FRENCHSPANISHCHINESE
1 Press SYSTEM MENU in stop mode.
2 Press 1 2 to select “PREFERENCE PAGE”.
3 Press 3 4 to highlight the following in thePreference Page.– “AUDIO” (disc’s soundtrack)– “SUBTITLE” (disc’s subtitles)– “DISC MENU” (disc’s menu)
4 Enter its submenu by pressing 2.
5 Select a language and press OK.
6 Repeat steps 3~5 for other language settings.
To exit from the menu
Press SYSTEM MENU again.
pg 001-019_MCD710_98_Eng 2007.12.27, 16:4018
En
glis
h
19
Switching the system on/off
Press STANDBY-ONB. “HELLO” is displayed briefly. The system willswitch to the last selected source.
Press DISC, TUNER, USB or AUX on theremote. The system will switch to the selected source.
To switch the system to standby mode
Press STANDBY-ONB.
Volume controlTurn VOLUME (-/+) clockwise or anticlockwise(or press VOL +/- on the remote) to increaseor decrease the volume level. ”VOL XX” is displayed on the display panel.“XX” denotes the volume level.
To switch off the volume temporarily Press MUTE on the remote.
Playback will continue without sound and“MUTING” flashes.
To activate sound reproduction, you can:– press MUTE again;– adjust the volume controls;– change source.
Sound controlDBB, DSC and LOUDNESS sound featurescannot be activated at the same time.
DBB (Dynamic Bass Boost)
DBB enhances the bass response.
Press DBB on the remote control to enable/disable DBB feature. Some discs might be recorded in highmodulation, which causes a distortion at highvolume. If this occurs, switch off DBB or reducethe volume.DSC (Digital Sound Control)
DSC provides a different type of preset soundequalizer setting.
Press DSC on the remote control repeatedly toselect: FLAT, POP, JAZZ, CLASSIC or ROCK.
LOUDNESS
LOUDNESS feature enables the system toautomatically increase the treble and bass soundeffect at low volume (the higher the volume, thelower the treble and bass increase).
Press LOUDNESS on the remote to enable ordisable LOUDNESS feature. icon appears/disappears after this featureis enabled/disabled.
Dimming the display screen
Press DIM repeatedly to select different levelsof brightness for the display screen.
Demonstration modeThe system has a demonstration mode thatshows the various features offered by thesystem.
To activate the demonstration In standby mode, press 9 on the system to
activate the demo mode. Demonstration will begin.
To deactivate the demonstration Press 9 on the system again.
“DEMO OFF” is displayed.
Note:– Even if you remove the AC power cord andreconnect it to the wall socket, the demonstrationwill remain off until you activate it again.
Microphone Mixing
Connect a microphone (not supplied) to thesystem to sing along with the music source.
1 Connect a microphone to the MIC jack.
Before connecting the microphone, set themicrophone volume to a lower level to preventhowling sound by turning the MIC VOLUMEknob.
2 Start singing or talking through the microphone.
Note:– Keep the microphones away from the speakersto prevent howling.
Basic Operations
pg 001-019_MCD710_98_Eng 2007.12.27, 16:4019
20
En
glish
IMPORTANT!– Depending on the DVD or VIDEO CD,some operations may be different orrestricted.– Do not push on the disc tray or putany objects other than disc on the disctray. Doing so may cause the disc playermalfunction.– If the inhibit icon (ø) appears on theTV screen when a button is pressed, itmeans the function is not available onthe current disc or at the current time.
Playable DiscsYour DVD Player will play:– Digital Video Discs (DVDs)– Video CDs (VCDs)– Super Video CDs (SVCDs)– Digital Video Discs + Rewritable (DVD+RW)– Compact Discs (CDs)– Picture (Kodak, JPEG) files on CDR(W)– DivX(R) disc on CD-R(W):– DivX 3.11, 4.x and 5.x– WMA– Supported MP3-CD format.• ISO 9660 / UDF format• Max. title/album name –12 characters
Max. title number plus album is 255.• Max. nested directory is 8 levels.• The max. album number is 32.• The max. MP3 track number is 999.• Supported sampling frequencies for MP3 disc:
32 kHz, 44.1 kHz, 48 kHz.• Supported Bit-rates of MP3 disc are: 32, 64,
96, 128, 192, 256 (kbps).– Following formats can’t be supported• The files like *.VMA, *.AAC, *.DLF, *.M3U,
*.PLS, *.WAV• Non-English Album/Title name• The discs recorded under Joliet format• MP3 Pro and MP3 with ID3 tag
Disc Operations
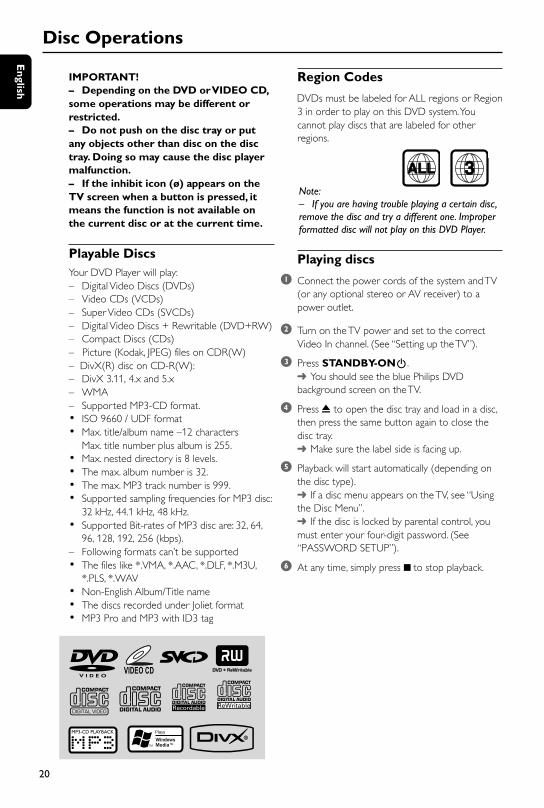
Region Codes
DVDs must be labeled for ALL regions or Region3 in order to play on this DVD system. Youcannot play discs that are labeled for otherregions.
Note:– If you are having trouble playing a certain disc,remove the disc and try a different one. Improperformatted disc will not play on this DVD Player.
Playing discs
1 Connect the power cords of the system and TV(or any optional stereo or AV receiver) to apower outlet.
2 Turn on the TV power and set to the correctVideo In channel. (See “Setting up the TV”).
3 Press STANDBY-ONB. You should see the blue Philips DVDbackground screen on the TV.
4 Press 0 to open the disc tray and load in a disc,then press the same button again to close thedisc tray. Make sure the label side is facing up.
5 Playback will start automatically (depending onthe disc type). If a disc menu appears on the TV, see “Usingthe Disc Menu”. If the disc is locked by parental control, youmust enter your four-digit password. (See“PASSWORD SETUP”).
6 At any time, simply press 9 to stop playback.
ALL 3
pg 020-039_MCD710_98_Eng 2007.12.27, 16:2820

En
glis
h
21
Disc Operations
Using the Disc Menu
Depending on the disc, a menu may appear onthe TV screen once you load the disc.
To select a playback feature or item
Use 1 2 3 4 and OK or Numeric Keypad(0-9) on the remote. Playback will start automatically.
To access or exit from the menu
Press DISC MENU on the remote.
For VCD with Playback Control (PBC)feature (version 2.0 only)
PBC playback allows you to play Video CDsinteractively, following the menu on the display.
During playback, press DISC MENU. If PBC was ON, it will switch to OFF andcontinue playback. If PBC was OFF, it will switch to ON andreturn to menu screen.
Basic playback controls
Pausing playback (DVD/VCD/CD/MP3/DivX/WMA)
1 During playback, press ÉÅ . Playback will pause and sound will be muted.
2 Press ÉÅ again to resume.
Selecting a track/chapter/title (DVD/VCD/DivX/CD)
1 Press 2™ on the system (or ™ on the remotecontrol) during playback to go to the nextchapter/track
2 Press ¡1 on the system (or ¡ on the remotecontrol) to go to the previous chapter/track.
3 To go directly to any chapter/track/title, enter thechapter/track/title number using the NumericKeypad (0-9).
Resuming playback from the laststopped point (DVD/VCD/CD/MP3/DivX/WMA)
In stop mode and when a disc has not beenremoved, press ÉÅ.
To cancel resume mode
In stop mode, press 9 again.
Zoom (DVD/VCD/DivX/JPEG)
Zooming allows you to enlarge or reduce thevideo image during playback.
1 Press ZOOM repeatedly to enlarge or reducethe playback video image.
2 Press 1 2 3 4 to pan across the TV screen.
Repeat (DVD/VCD/CD/MP3/DivX/WMA)
For DVD/VCD/CD Press MODE repeatedly to choose a repeat
mode during playback.
CHAPTER (DVD)– to repeat playback of the current chapter.
TRACK (CD/VCD)/TITLE (DVD)– to repeat playback of the current track (CD/SVCD/VCD)/title (DVD).
ALL– to repeat playback of all the disc.
SHUFFLE– to repeat playback at random order.
For MP3/WMA/DivX Press MODE continuously to access different
repeat modes. Shuffle: play all files in the selected folder inrandom order. Repeat One: play an MP3/WMA filerepeatedly. Repeat All: play all files repeatedly. Off: switches off the shuffle or repeat mode.
pg 020-039_MCD710_98_Eng 2007.12.27, 16:2821
22
En
glish
Disc Operations
Repeat A-B (DVD/VCD/CD/MP3/DivX/WMA)
1 Press A-B at your chosen starting point.
2 Press A-B again at your chosen end point. The section A and B can be set only withinthe same chapter/track. The section will now repeat continuously.
3 To exit the sequence, press A-B again.
Slow Motion (DVD/VCD)
1 Press SLOW during playback to select therequired speed: 1/2, 1/4, 1/8 or 1/16 (backwardor forward). Sound will be muted.
2 To return to normal speed, press ÉÅ.
Note:– Slow backward is not possible on VCDs.
Program (not for Picture CD)
To select favourite tracks/chapters for playback inpreferred sequence.
For DVD/VCD/CD
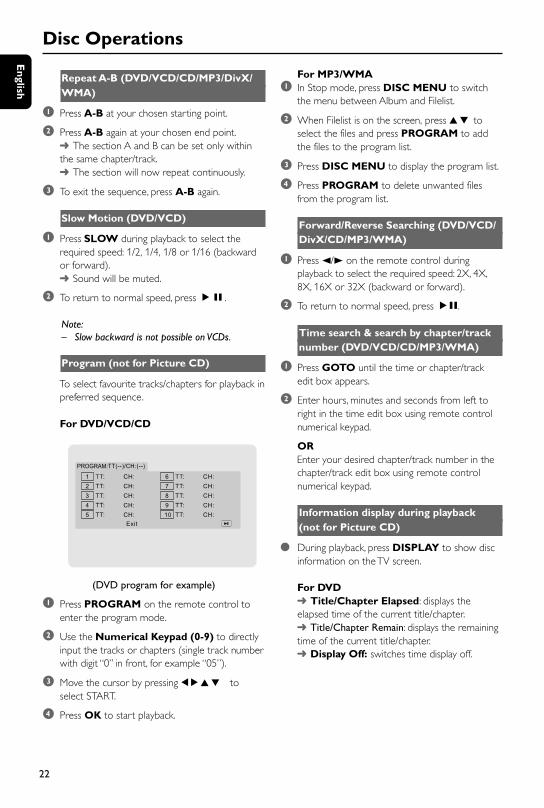
PROGRAM:
(DVD program for example)
1 Press PROGRAM on the remote control toenter the program mode.
2 Use the Numerical Keypad (0-9) to directlyinput the tracks or chapters (single track numberwith digit “0” in front, for example “05”).
3 Move the cursor by pressing 1 2 3 4 toselect START.
4 Press OK to start playback.
For MP3/WMA1 In Stop mode, press DISC MENU to switch
the menu between Album and Filelist.
2 When Filelist is on the screen, press 3 4 toselect the files and press PROGRAM to addthe files to the program list.
3 Press DISC MENU to display the program list.
4 Press PROGRAM to delete unwanted filesfrom the program list.
Forward/Reverse Searching (DVD/VCD/DivX/CD/MP3/WMA)
1 Press 2/3 on the remote control duringplayback to select the required speed: 2X, 4X,8X, 16X or 32X (backward or forward).
2 To return to normal speed, press ÉÅ.
Time search & search by chapter/tracknumber (DVD/VCD/CD/MP3/WMA)
1 Press GOTO until the time or chapter/trackedit box appears.
2 Enter hours, minutes and seconds from left toright in the time edit box using remote controlnumerical keypad.
OREnter your desired chapter/track number in thechapter/track edit box using remote controlnumerical keypad.
Information display during playback(not for Picture CD)
During playback, press DISPLAY to show discinformation on the TV screen.
For DVD Title/Chapter Elapsed: displays theelapsed time of the current title/chapter. Title/Chapter Remain: displays the remainingtime of the current title/chapter. Display Off: switches time display off.
pg 020-039_MCD710_98_Eng 2007.12.27, 16:2822

En
glis
h
23
Disc Operations
For Super VCD/VCD/DivX/CD Single/Total Elapsed: displays the elapsedtime of the current single/total track. Single/Total Remain: displays theremaining time of the current single/total track. Display Off: switches time display off.
Special disc features
Playing a Title (DVD)
1 Press DISC MENU. The disc title menu appears on the TV screen.
2 Use 1 2 3 4 or Numeric Keypad (0-9) toselect a play option.
3 Press OK to confirm.
Camera Angle (DVD)
Press ANGLE repeatedly to select differentdesired angle.
Changing the Audio Language (forDVD recorded with multiple languages)
Press AUDIO repeatedly to select differentaudio languages.
Changing the Audio Channel (for VCD)
Press AUDIO to select the available audiochannels provided by the disc (Mono Left, MonoRight or Stereo).
Subtitles (DVD)
Press SUBTITLE repeatedly to select differentsubtitle languages.
Playing MP3/WMA/JPEG PictureCD
IMPORTANT!You have to turn on your TV and set tothe correct Video In channel. (See“Setting up the TV”).
Playing MP3/WMA disc
IMPORTANT!For DRM protected WMA files, useWindows Media Player 10 (or later) forCD burning/conversion. Visitwww.microsoft.com for details aboutWindows Media Player and WM DRM(Windows Media Digital RightsManagement).
General operation
1 Load an MP3/WMA disc. The data disc menu appears on the TVscreen.
2 Use 3 4 to select an album and press OK toopen the album.
3 Press 3 4 or use the Numeric Keypad (0-9)to highlight a track.
4 Press OK to confirm. The playback will start from the selectedtrack to the end of the album.
Note:– The disc reading time may exceed 10 secondsdue to large number of songs compiled onto thedisc.
Playback selection
During playback, you can:
Press ¡1/2™ on the system (or ¡/™ on theremote control) to select another track in thecurrent album.
Press ÉÅ repeatedly to pause/resumeplayback.
Press DISC MENU on the remote to switchbetween Album and Filelist.
pg 020-039_MCD710_98_Eng 2007.12.27, 16:2823
24
En
glish
Disc Operations
Playing JPEG Picture CD
General operation
1 Load a JPEG Picture CD. The data disc menu appears on the TVscreen.
2 Use 3 4 to select a folder and press OK toopen the folder.
3 Press 3 4 or use the Numeric Keypad (0-9)to highlight a picture file.
4 Press OK to confirm. The playback will start from the selectedpicture to the end of the folder.
Playback selection
During playback, you can: Press ¡1/2™ on the system (or ¡/™ on the
remote control) to select another file in thecurrent folder.
Use 1 2 3 4 on the remote to rotate/flip thepicture files.
Press ÉÅ repeatedly to pause/resumeplayback.
Press DISC MENU on the remote to switchbetween Folder and Filelist.
Special JPEG features
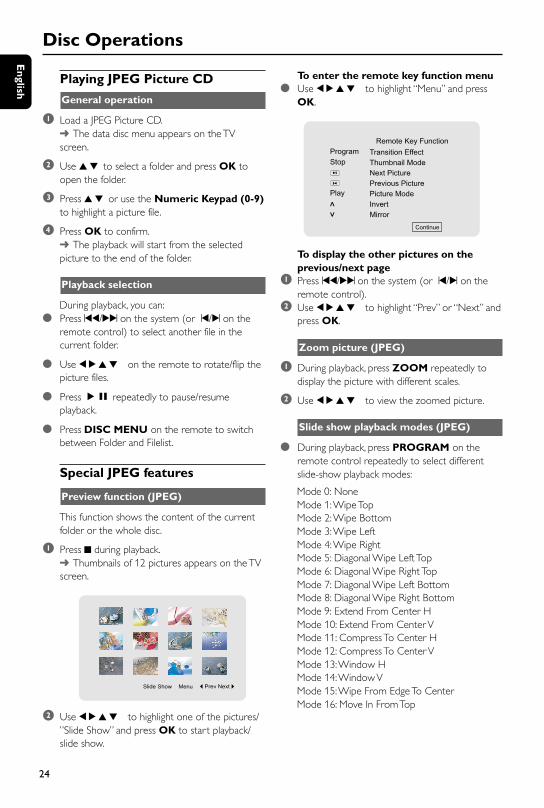
Preview function (JPEG)
This function shows the content of the currentfolder or the whole disc.
1 Press 9 during playback. Thumbnails of 12 pictures appears on the TVscreen.
2 Use 1 2 3 4 to highlight one of the pictures/”Slide Show” and press OK to start playback/slide show.
To enter the remote key function menu Use 1 2 3 4 to highlight “Menu” and press
OK.
To display the other pictures on theprevious/next page
1 Press ¡1/2™ on the system (or ¡/™ on theremote control).
2 Use 1 2 3 4 to highlight “Prev” or “Next” andpress OK.
Zoom picture (JPEG)
1 During playback, press ZOOM repeatedly todisplay the picture with different scales.
2 Use 1 2 3 4 to view the zoomed picture.
Slide show playback modes (JPEG)
During playback, press PROGRAM on theremote control repeatedly to select differentslide-show playback modes:
Mode 0: NoneMode 1: Wipe TopMode 2: Wipe BottomMode 3: Wipe LeftMode 4: Wipe RightMode 5: Diagonal Wipe Left TopMode 6: Diagonal Wipe Right TopMode 7: Diagonal Wipe Left BottomMode 8: Diagonal Wipe Right BottomMode 9: Extend From Center HMode 10: Extend From Center VMode 11: Compress To Center HMode 12: Compress To Center VMode 13: Window HMode 14: Window VMode 15: Wipe From Edge To CenterMode 16: Move In From Top
pg 020-039_MCD710_98_Eng 2007.12.27, 16:2824
En
glis
h
25
Disc Operations
Playback with multi-angles (JPEG)
During playback, press 1 2 3 4 to rotate thepicture on the TV screen.3: flip the picture vertically.4: flip the picture horizontally.1: rotate the picture anti-clockwise.2: rotate the picture clockwise.
Playing a DivX disc
This DVD player supports the DivX movieplayback that you download from yourcomputer onto a CD-R/RW (see “System MenuOptions-DIVX(R) VOD registration code” formore information).
1 Load a DivX disc. Playback will start automatically. If not pressÉÅ.
2 If the DivX movie contains external subtitles, thesubtitle menu will appear on the TV screen foryour selection.
In this case, pressing SUBTITLE on the remotecontrol will turn on or off the subtitle.
If multilingual subtitles are embedded on theDivX disc, pressing SUBTITLE will change thesubtitle language during playback.
Note:– Subtitle files with the following filenameextensions (.srt, .smi, .sub, .ssa, .ass) are supportedbut do not appear on the file navigation menu.– The subtitle filename have to be the same asthe filename of the movie.
pg 020-039_MCD710_98_Eng 2007.12.27, 16:2825
26
En
glish
System Menu Options
Basic operations
1 Press SYSTEM MENU to enter the SetupMenu.
2 Press 1 2 to select a page to be set.
3 Press 3 4 to highlight an option.
4 Enter its submenu by pressing 2 or OK.
5 Move the cursor by pressing 3 4 to highlightthe selected item. In cases of value setting, press 1 2 to adjustvalues.
6 Press OK to confirm.
To return to the upper-level menu
Press 1 or OK (in cases of value adjustment).
To exit from the menu
Press SYSTEM MENU again. The settings will be stored in the player’smemory even if the player is switched off.
Note:– Some of the features in the System MenuOptions are described in “Getting Started”.
GENERAL SETUP PAGE
The options included in General Setup page are:“TV DISPLAY”, “OSD LANGUAGE”, “SCREENSAVER”and “DIVX (R) VOD”.
DIVX (R) VOD
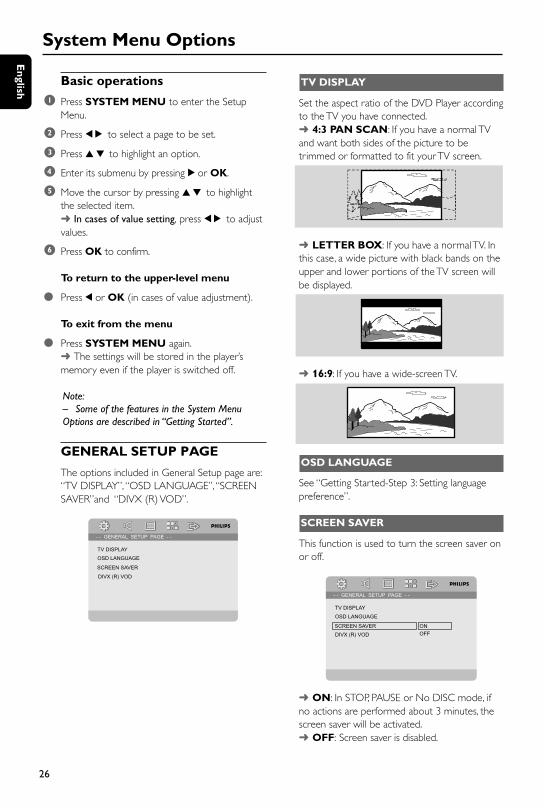
TV DISPLAY
Set the aspect ratio of the DVD Player accordingto the TV you have connected. 4:3 PAN SCAN: If you have a normal TVand want both sides of the picture to betrimmed or formatted to fit your TV screen.
LETTER BOX: If you have a normal TV. Inthis case, a wide picture with black bands on theupper and lower portions of the TV screen willbe displayed.
16:9: If you have a wide-screen TV.
OSD LANGUAGE
See “Getting Started-Step 3: Setting languagepreference”.
SCREEN SAVER
This function is used to turn the screen saver onor off.
DIVX (R) VOD
ON: In STOP, PAUSE or No DISC mode, ifno actions are performed about 3 minutes, thescreen saver will be activated. OFF: Screen saver is disabled.
pg 020-039_MCD710_98_Eng 2007.12.27, 16:2826
En
glis
h
27
System Menu Options
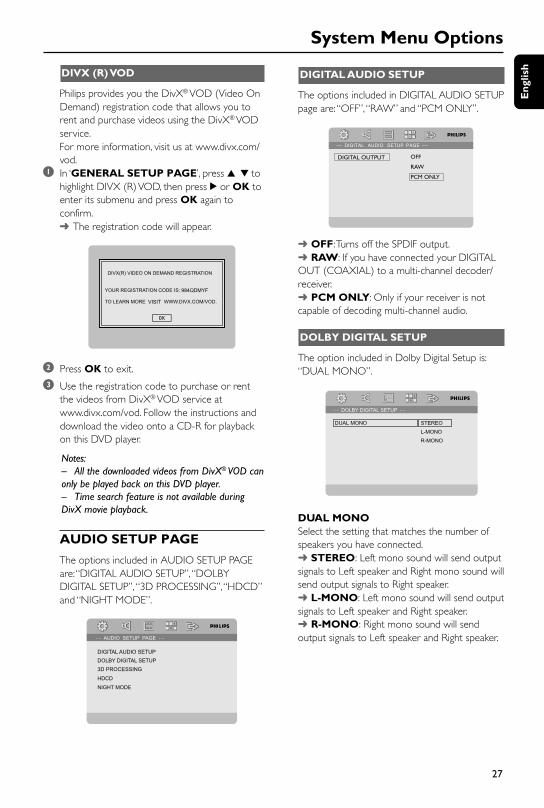
DIVX (R) VOD
Philips provides you the DivX® VOD (Video OnDemand) registration code that allows you torent and purchase videos using the DivX® VODservice.For more information, visit us at www.divx.com/vod.
1 In ‘GENERAL SETUP PAGE’, press 3 4 tohighlight DIVX (R) VOD, then press 2 or OK toenter its submenu and press OK again toconfirm. The registration code will appear.
VISIT
984QDMYF
2 Press OK to exit.
3 Use the registration code to purchase or rentthe videos from DivX® VOD service atwww.divx.com/vod. Follow the instructions anddownload the video onto a CD-R for playbackon this DVD player.
Notes:– All the downloaded videos from DivX® VOD canonly be played back on this DVD player.– Time search feature is not available duringDivX movie playback.
AUDIO SETUP PAGE
The options included in AUDIO SETUP PAGEare: “DIGITAL AUDIO SETUP”, “DOLBYDIGITAL SETUP”, “3D PROCESSING”, “HDCD”and “NIGHT MODE”.
DIGITAL AUDIO SETUP
3D PROCESSING
DIGITAL AUDIO SETUP
The options included in DIGITAL AUDIO SETUPpage are: “OFF”, “RAW” and “PCM ONLY”.
OFF
RAW
PCM ONLY
DIGITAL OUTPUT
OFF: Turns off the SPDIF output. RAW: If you have connected your DIGITALOUT (COAXIAL) to a multi-channel decoder/receiver. PCM ONLY: Only if your receiver is notcapable of decoding multi-channel audio.
DOLBY DIGITAL SETUP
The option included in Dolby Digital Setup is:“DUAL MONO”.
DUAL MONOSelect the setting that matches the number ofspeakers you have connected. STEREO: Left mono sound will send outputsignals to Left speaker and Right mono sound willsend output signals to Right speaker. L-MONO: Left mono sound will send outputsignals to Left speaker and Right speaker. R-MONO: Right mono sound will sendoutput signals to Left speaker and Right speaker.
pg 020-039_MCD710_98_Eng 2007.12.27, 16:2827
28
En
glish
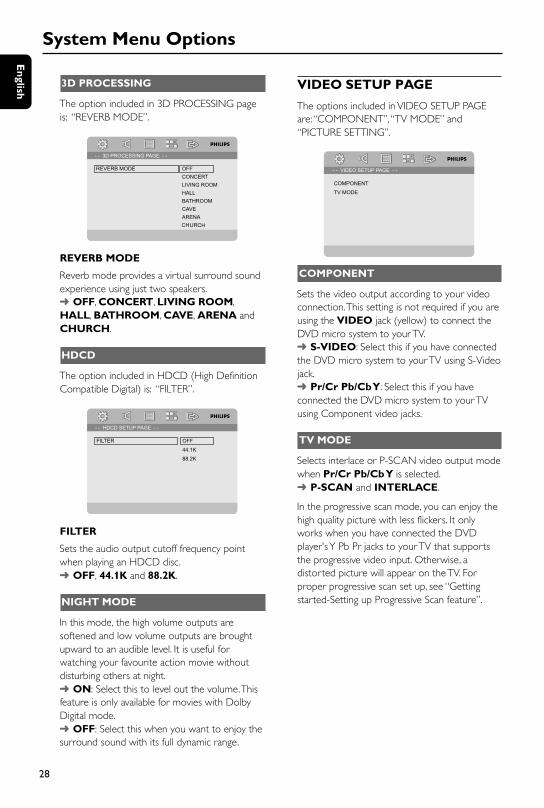
3D PROCESSING
The option included in 3D PROCESSING pageis: “REVERB MODE”.
U
REVERB MODE
Reverb mode provides a virtual surround soundexperience using just two speakers. OFF, CONCERT, LIVING ROOM,HALL, BATHROOM, CAVE, ARENA andCHURCH.
HDCD
The option included in HDCD (High DefinitionCompatible Digital) is: “FILTER”.
FILTER
Sets the audio output cutoff frequency pointwhen playing an HDCD disc. OFF, 44.1K and 88.2K.
NIGHT MODE
In this mode, the high volume outputs aresoftened and low volume outputs are broughtupward to an audible level. It is useful forwatching your favourite action movie withoutdisturbing others at night. ON: Select this to level out the volume. Thisfeature is only available for movies with DolbyDigital mode. OFF: Select this when you want to enjoy thesurround sound with its full dynamic range.
System Menu Options
VIDEO SETUP PAGE
The options included in VIDEO SETUP PAGEare: “COMPONENT”, “TV MODE” and“PICTURE SETTING”.
COMPONENT
Sets the video output according to your videoconnection. This setting is not required if you areusing the VIDEO jack (yellow) to connect theDVD micro system to your TV. S-VIDEO: Select this if you have connectedthe DVD micro system to your TV using S-Videojack. Pr/Cr Pb/Cb Y: Select this if you haveconnected the DVD micro system to your TVusing Component video jacks.
TV MODE
Selects interlace or P-SCAN video output modewhen Pr/Cr Pb/Cb Y is selected. P-SCAN and INTERLACE.
In the progressive scan mode, you can enjoy thehigh quality picture with less flickers. It onlyworks when you have connected the DVDplayer's Y Pb Pr jacks to your TV that supportsthe progressive video input. Otherwise, adistorted picture will appear on the TV. Forproper progressive scan set up, see “Gettingstarted-Setting up Progressive Scan feature”.
pg 020-039_MCD710_98_Eng 2007.12.27, 16:2828
En
glis
h
29
System Menu Options
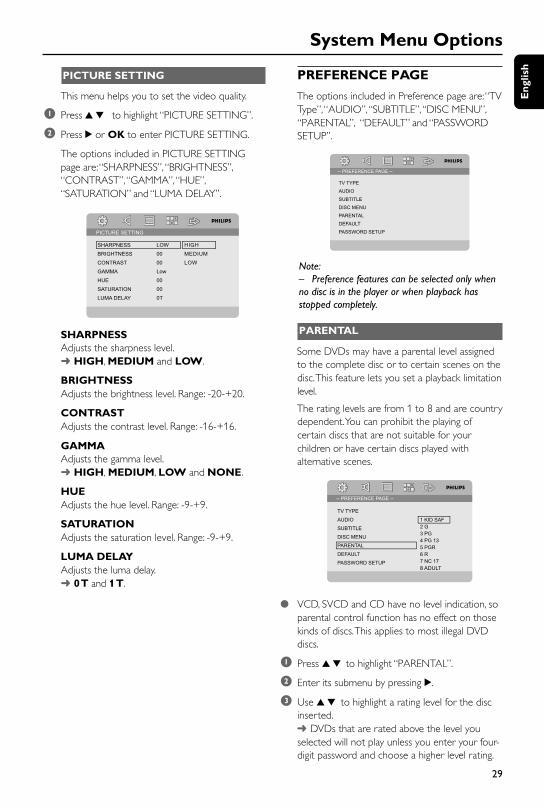
PICTURE SETTING
This menu helps you to set the video quality.
1 Press 3 4 to highlight “PICTURE SETTING”.
2 Press 2 or OK to enter PICTURE SETTING.
The options included in PICTURE SETTINGpage are: “SHARPNESS”, “BRIGHTNESS”,“CONTRAST”, “GAMMA”, “HUE”,“SATURATION” and “LUMA DELAY”.
PICTURE SETTING
SHARPNESSAdjusts the sharpness level. HIGH, MEDIUM and LOW.
BRIGHTNESSAdjusts the brightness level. Range: -20-+20.
CONTRASTAdjusts the contrast level. Range: -16-+16.
GAMMAAdjusts the gamma level. HIGH, MEDIUM, LOW and NONE.
HUEAdjusts the hue level. Range: -9-+9.
SATURATIONAdjusts the saturation level. Range: -9-+9.
LUMA DELAYAdjusts the luma delay. 0 T and 1 T.
PREFERENCE PAGE
The options included in Preference page are: “TVType”, “AUDIO”, “SUBTITLE”, “DISC MENU”,“PARENTAL”, “DEFAULT” and “PASSWORDSETUP”.
Note:– Preference features can be selected only whenno disc is in the player or when playback hasstopped completely.
PARENTAL
Some DVDs may have a parental level assignedto the complete disc or to certain scenes on thedisc. This feature lets you set a playback limitationlevel.
The rating levels are from 1 to 8 and are countrydependent. You can prohibit the playing ofcertain discs that are not suitable for yourchildren or have certain discs played withalternative scenes.
8 ADULT
VCD, SVCD and CD have no level indication, soparental control function has no effect on thosekinds of discs. This applies to most illegal DVDdiscs.
1 Press 3 4 to highlight “PARENTAL”.
2 Enter its submenu by pressing 2.
3 Use 3 4 to highlight a rating level for the discinserted. DVDs that are rated above the level youselected will not play unless you enter your four-digit password and choose a higher level rating.
pg 020-039_MCD710_98_Eng 2007.12.27, 16:2829

30
En
glish
System Menu Options
Note:– Some DVDs are not encoded with a ratingthough the movie rating may be printed on theDisc cover. The rating level feature does not workfor such Discs.
Rating explanations
1 KID SAF– Kids material; recommended especially forchildren and viewers of all ages.
2 G– General Audience; recommended asacceptable for viewers of all ages.
3 PG– Parental Guidance suggested.
4 PG 13– Material is unsuitable for children under age13.
5-6 PGR, R– Parental Guidance - Restricted;recommended that parents restrict childrenunder 17 from viewing or allow to view onlywhen supervised by a parent or adult guardian.
7 NC-17– No children under age 17; not recommendedviewing for children under age 17.
8 Adult– Mature materials; should be viewed only byadults due to graphic sexual material, violence orlanguage.
DEFAULT
Setting the “DEFAULT” function will reset alloptions and your personal settings to the factorydefaults and all your personal settings will beerased.
Caution!– When this function is activated, allsettings will be reset to factory defaults.
PASSWORD SETUP
The options included in Password Setup pageare: “PASSWORD MODE” and “PASSWORD”.
PASSWORD MODE
This feature is used to enable/disable passwordby selecting “ON”/”OFF”.
PASSWORD
Enter your four digit password when a hint isdisplayed on the screen. The default password is1234.
1 Press 3 4 to highlight “PASSWORD”.
2 Enter its submenu by pressing 2.
3 Press OK to open the page for inputting a newpassword.
4 Enter the existing 4-digit code.
5 Enter the new 4-digit code.
6 Enter the new 4-digit code a second time toconfirm. The new 4-digit code will take effect.
7 Press OK to exit.
Notes:– If the password has been changed, the parentaland disc lock code will also be changed.– The default password (1234) is always activeeven the password has been changed.
pg 020-039_MCD710_98_Eng 2007.12.27, 16:2830
En
glis
h
31
Radio Reception
Tuning to radio stations
1 Press STANDBY-ONB to switch on the lastselected source.
2 Press SOURCE (TUNER on the remote) toselect TUNER (FM) mode.
3 Press and hold ¡1/2™ on the system (or 2/3on the remote control) until the frequencyindication starts to change, then release. The system automatically tunes to the nextstrong radio station.
To tune to a weak station, press ¡1/2™ on thesystem (or 2/3 on the remote control) brieflyand repeatedly until an optimal reception isfound.
4 Repeat Step 3 if necessary until you find thedesired radio station.
Presetting radio stations
You can preset up to 20 stations regardless ofthe reception.
Automatic programming
Press PROGRAM on the remote control formore than two seconds to activateprogramming. All available stations are programmed.
Manual programming1 Tune to your desired radio station (refer to
“Tuning to radio stations”).
2 Press PROGRAM on the remote. ”PROG” icon flashes.
Other Functions
3 Press PRESET+/- (or ¡ / ™ on the remotecontrol) to select the desired preset number. If “PROG” icon goes off before you select thedesired preset number, press PROGRAM onthe remote.
4 Press PROGRAM on the remote again tostore the radio station.
Repeat steps 1-4 to store other radio stations.
Listening to preset radio stations
In tuner mode, press PRESET+/- (or ¡ / ™ onthe remote control) to select the desired presetnumber. The preset number, radio frequency, andwaveband are displayed.
Setting the clock
1 In Standby mode, press and hold CLOCK onthe remote control until the time flashes on thedisplay. ”CLOCK SET” is displayed briefly. Then, thehour digits flash on the display screen.
2 Turn VOLUME -/+ clockwise or anticlockwiseor press VOL +/- on the remote to set thehours.
3 Press CLOCK to confirm. The minute digits flash on the display screen.
4 Turn VOLUME -/+ clockwise or anticlockwiseor press VOL +/- on the remote to set theminutes.
5 Press CLOCK again to confirm the clocksetting.
Notes:– This system only supports 24-hour mode.– The clock setting will be erased when thesystem is disconnected from the power supply.– The system will exit clock setting mode if nobutton is pressed within 30 seconds.
pg 020-039_MCD710_98_Eng 2007.12.27, 16:2831
32
En
glish
Other Functions
Setting sleep/wake-up timer
Sleep timer setting
In power-on mode, the sleep setting enablesthe system to switch to standby modeautomatically at a preset time.
1 In power-on mode, press SLEEP/TIMER onthe remote repeatedly to select a preset time. The selections are as follows (time inminutes):00 10 20 30 40 50 60 70 80 90 00
2 When you reach the desired length of time, stoppressing SLEEP/TIMER. ”SLEEP” appears.
To deactivate the sleep timer
Press SLEEP/TIMER repeatedly until “00” isdisplayed, or press STANDBY-ONB.
In standby mode, the timer setting enables thesystem to switch on automatically at a set time.
Wake-up timer setting
IMPORTANT!– Before setting the timer, ensure thatthe clock is set correctly.
1 Press and hold SLEEP/TIMER until the timeflashes on the display. ”TIME SET” scrolls. Then, the hour digitsflash on the display screen.
2 Turn VOLUME -/+ clockwise or anticlockwiseor press VOL +/- on the remote to set thehours.
3 Press SLEEP/TIMER to confirm. The minute digits flash on the display screen.
4 Turn VOLUME -/+ clockwise or anticlockwiseor press VOL +/- on the remote to set theminutes.
5 Press SLEEP/TIMER to confirm the timesetting. ”OFF” flashes on the display screen.
6 Turn VOLUME -/+ clockwise or anticlockwiseor press VOL +/- on the remote to select“ON”. icon appears on the display screen.
To deactivate the timer
Select “OFF” at Step 6.
pg 020-039_MCD710_98_Eng 2007.12.27, 16:2832
En
glis
h
33
External Sources
Using a non-USB device1 Connect the system's AUX-IN (L/R) jacks to
the AUDIO OUT jacks on another audio/visual device (such as a VCR, Laser Disc player orcassette desk) using the audio cables (white/
red).
2 Press AUX to select external equipment. "AUX" is displayed.
Note:– All the sound control features (DSC or DBB, forexample) are available for selection.– Refer to the operating instructions for theconnected equipment for details.
Using a USB mass storagedevice
By connecting a USB mass storage device to theHi-Fi system, you can enjoy the device's storedmusic through the powerful speakers of Hi-Fisystem.
Playing a USB mass storage deviceCompatible USB mass storage devicesWith the Hi-Fi system, you can use:– USB flash memory (USB 2.0 or USB1.1)– USB flash players (USB 2.0 or USB1.1)– memory cards (requires an additional card
reader to work with this Hi-Fi system)
Notes:– In some USB flash players (or memory devices),the stored contents are recorded using copyrightprotection technology. Such protected contents willbe unplayable on any other devices (such as thisHi-Fi system).– Compatibility of the USB connection on thisproduct:a) This product supports most USB Mass storagedevices (MSD) that are compliant to the USBMSD standards.
i) Most common Mass storage class devices areflash drives, memory sticks, jump drives andetc.ii) If you see a "Disc Drive" show up on yourcomputer after you plugged the mass storagedevice into your computer, most likely it is MSDcompliant and it will work with this product.
b) If your Mass storage device required a battery/power source. Please make sure you have a freshbattery in it or charge the USB device first andthen plug it into the product again.
– Supported Music type:a) This device only supports unprotected musicwith the following file extension:.mp3.wmab) Music bought from on-line music stores are notsupported because they are secured by DigitalRights Management protection (DRM).c) File name extensions that end with thefollowing are not supported:.wav; .m4a; .m4p; mp4; .aac and etc.
– No Direct connection can be made fromComputer USB port to the product even you haveeither or both mp3 or wma files in your computer.
Supported formats:– USB or memory file format FAT12, FAT16,
FAT32 (sector size: 512 bytes)– MP3 bit rate (data rate): 32-320 Kbps and
variable bit rate– WMA v9 or earlier– Directory nesting up to a maximum of 8
levels– Number of albums/ folders: maximum 99– Number of tracks/titles: maximum 999– ID3 tag v2.0 or later– File name in Unicode UTF8 (maximum length:
128 bytes)
The system will not play or support thefollowing:
– Empty albums: an empty album is an albumthat does not contain MP3/WMA files, andwill not be shown in the display.
– Non-supported file formats are skipped. Thismeans that e.g.: Word documents .doc orMP3 files with extension .dlf are ignored andwill not be played.
– AAC, WAV, PCM audio files– DRM protected WMA files– WMA files in Lossless format
pg 020-039_MCD710_98_Eng 2007.12.27, 16:2833
34
En
glish
External Sources
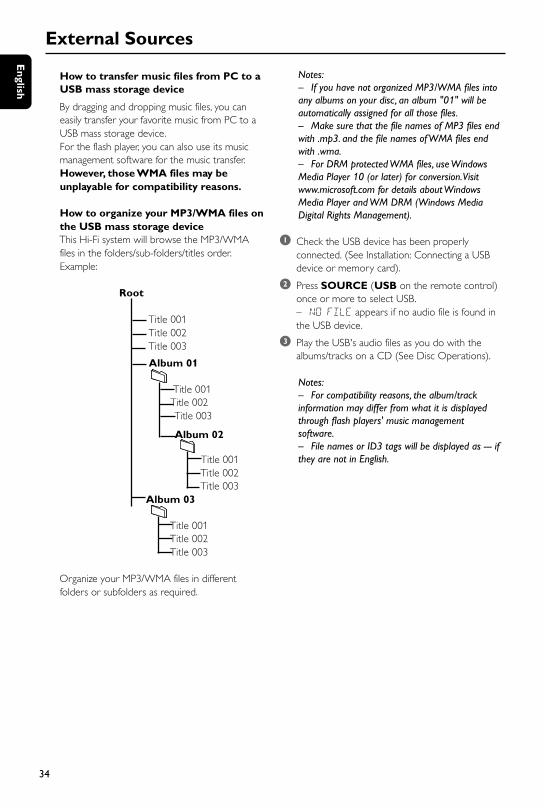
How to transfer music files from PC to aUSB mass storage device
By dragging and dropping music files, you caneasily transfer your favorite music from PC to aUSB mass storage device.For the flash player, you can also use its musicmanagement software for the music transfer.However, those WMA files may beunplayable for compatibility reasons.
How to organize your MP3/WMA files onthe USB mass storage deviceThis Hi-Fi system will browse the MP3/WMAfiles in the folders/sub-folders/titles order.Example:
Root
Title 001 Title 002 Title 003
Album 01
Title 001 Title 002
Title 003
Album 02
Title 001 Title 002 Title 003 Album 03
Title 001 Title 002 Title 003
Organize your MP3/WMA files in differentfolders or subfolders as required.
Notes:– If you have not organized MP3/WMA files intoany albums on your disc, an album "01" will beautomatically assigned for all those files.– Make sure that the file names of MP3 files endwith .mp3. and the file names of WMA files endwith .wma.– For DRM protected WMA files, use WindowsMedia Player 10 (or later) for conversion. Visitwww.microsoft.com for details about WindowsMedia Player and WM DRM (Windows MediaDigital Rights Management).
1 Check the USB device has been properlyconnected. (See Installation: Connecting a USBdevice or memory card).
2 Press SOURCE (USB on the remote control)once or more to select USB.– NO FILE appears if no audio file is found inthe USB device.
3 Play the USB's audio files as you do with thealbums/tracks on a CD (See Disc Operations).
Notes:– For compatibility reasons, the album/trackinformation may differ from what it is displayedthrough flash players' music managementsoftware.– File names or ID3 tags will be displayed as --- ifthey are not in English.
pg 020-039_MCD710_98_Eng 2007.12.27, 16:2834
En
glis
h
35
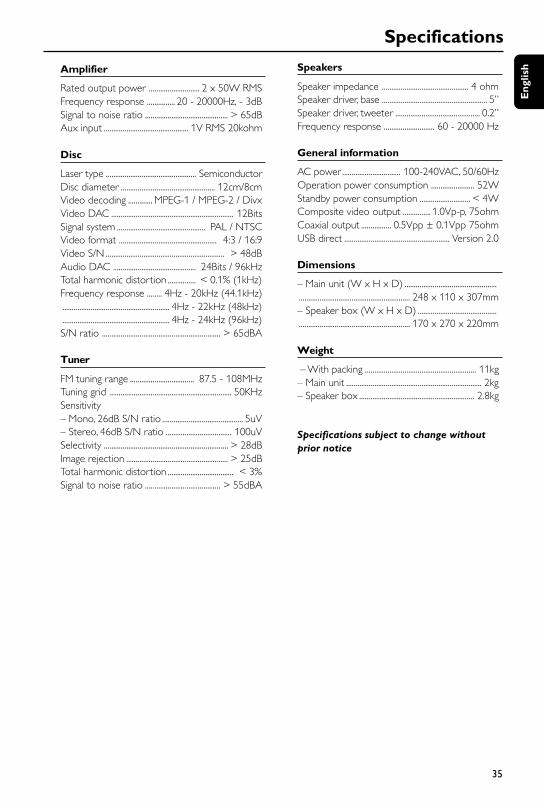
Amplifier
Rated output power ........................... 2 x 50W RMSFrequency response ............... 20 - 20000Hz, - 3dBSignal to noise ratio ............................................ > 65dBAux input ............................................. 1V RMS 20kohm
Disc
Laser type ................................................ SemiconductorDisc diameter .................................................. 12cm/8cmVideo decoding ............. MPEG-1 / MPEG-2 / DivxVideo DAC ................................................................. 12BitsSignal system ............................................... PAL / NTSCVideo format .................................................... 4:3 / 16:9Video S/N ............................................................... > 48dBAudio DAC ............................................ 24Bits / 96kHzTotal harmonic distortion ............... < 0.1% (1kHz)Frequency response ........ 4Hz - 20kHz (44.1kHz)......................................................... 4Hz - 22kHz (48kHz)......................................................... 4Hz - 24kHz (96kHz)S/N ratio ............................................................... > 65dBA
Tuner
FM tuning range .................................. 87.5 - 108MHzTuning grid ................................................................. 50KHzSensitivity– Mono, 26dB S/N ratio ........................................... 5uV– Stereo, 46dB S/N ratio ................................... 100uVSelectivity .................................................................. > 28dBImage rejection ...................................................... > 25dBTotal harmonic distortion ................................... < 3%Signal to noise ratio ........................................ > 55dBA
Specifications
Speakers
Speaker impedance .............................................. 4 ohmSpeaker driver, base ........................................................ 5”Speaker driver, tweeter ............................................. 0.2”Frequency response ........................... 60 - 20000 Hz
General information
AC power ............................... 100-240VAC, 50/60HzOperation power consumption ....................... 52WStandby power consumption ........................... < 4WComposite video output ............... 1.0Vp-p, 75ohmCoaxial output ................ 0.5Vpp ± 0.1Vpp 75ohmUSB direct ........................................................ Version 2.0
Dimensions
– Main unit (W x H x D) ............................................................................................................ 248 x 110 x 307mm– Speaker box (W x H x D) ..................................................................................................... 170 x 270 x 220mm
Weight
– With packing ........................................................... 11kg– Main unit ........................................................................ 2kg– Speaker box ............................................................. 2.8kg
Specifications subject to change withoutprior notice
pg 020-039_MCD710_98_Eng 2007.12.27, 16:2835
36
En
glish
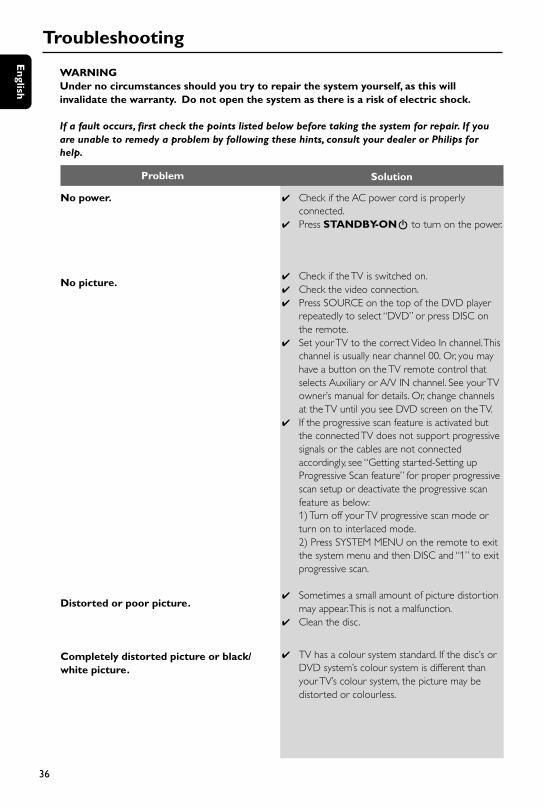
WARNINGUnder no circumstances should you try to repair the system yourself, as this willinvalidate the warranty. Do not open the system as there is a risk of electric shock.
If a fault occurs, first check the points listed below before taking the system for repair. If youare unable to remedy a problem by following these hints, consult your dealer or Philips forhelp.
Troubleshooting
Problem Solution
No power.
No picture.
Distorted or poor picture.
Completely distorted picture or black/white picture.
Check if the AC power cord is properlyconnected.
Press STANDBY-ONB to turn on the power.
Check if the TV is switched on. Check the video connection. Press SOURCE on the top of the DVD player
repeatedly to select “DVD” or press DISC onthe remote.
Set your TV to the correct Video In channel. Thischannel is usually near channel 00. Or, you mayhave a button on the TV remote control thatselects Auxiliary or A/V IN channel. See your TVowner’s manual for details. Or, change channelsat the TV until you see DVD screen on the TV.
If the progressive scan feature is activated butthe connected TV does not support progressivesignals or the cables are not connectedaccordingly, see “Getting started-Setting upProgressive Scan feature” for proper progressivescan setup or deactivate the progressive scanfeature as below:1) Turn off your TV progressive scan mode orturn on to interlaced mode.2) Press SYSTEM MENU on the remote to exitthe system menu and then DISC and “1” to exitprogressive scan.
Sometimes a small amount of picture distortionmay appear. This is not a malfunction.
Clean the disc.
TV has a colour system standard. If the disc’s orDVD system’s colour system is different thanyour TV’s colour system, the picture may bedistorted or colourless.
pg 020-039_MCD710_98_Eng 2007.12.27, 16:2836
En
glis
h
37
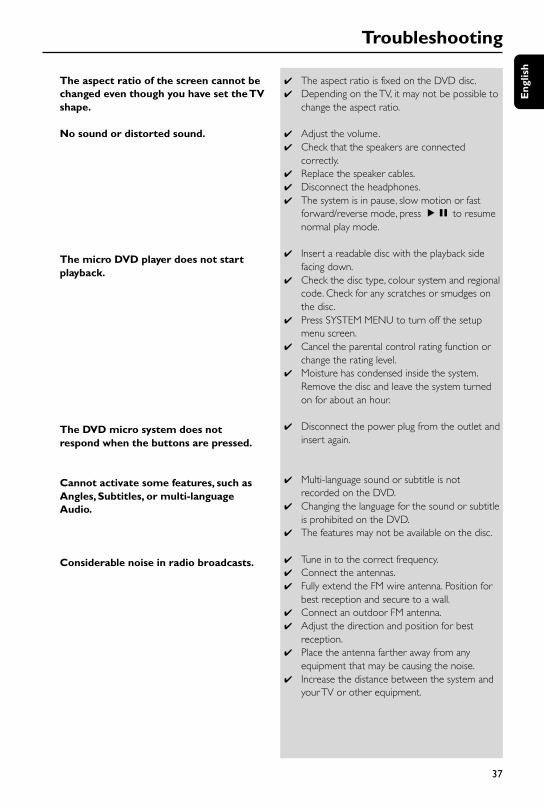
The aspect ratio of the screen cannot bechanged even though you have set the TVshape.
No sound or distorted sound.
The micro DVD player does not startplayback.
The DVD micro system does notrespond when the buttons are pressed.
Cannot activate some features, such asAngles, Subtitles, or multi-languageAudio.
Considerable noise in radio broadcasts.
The aspect ratio is fixed on the DVD disc. Depending on the TV, it may not be possible to
change the aspect ratio.
Adjust the volume. Check that the speakers are connected
correctly. Replace the speaker cables. Disconnect the headphones. The system is in pause, slow motion or fast
forward/reverse mode, press ÉÅ to resumenormal play mode.
Insert a readable disc with the playback sidefacing down.
Check the disc type, colour system and regionalcode. Check for any scratches or smudges onthe disc.
Press SYSTEM MENU to turn off the setupmenu screen.
Cancel the parental control rating function orchange the rating level.
Moisture has condensed inside the system.Remove the disc and leave the system turnedon for about an hour.
Disconnect the power plug from the outlet andinsert again.
Multi-language sound or subtitle is notrecorded on the DVD.
Changing the language for the sound or subtitleis prohibited on the DVD.
The features may not be available on the disc.
Tune in to the correct frequency. Connect the antennas. Fully extend the FM wire antenna. Position for
best reception and secure to a wall. Connect an outdoor FM antenna. Adjust the direction and position for best
reception. Place the antenna farther away from any
equipment that may be causing the noise. Increase the distance between the system and
your TV or other equipment.
Troubleshooting
pg 020-039_MCD710_98_Eng 2007.12.27, 16:2837
38
En
glish
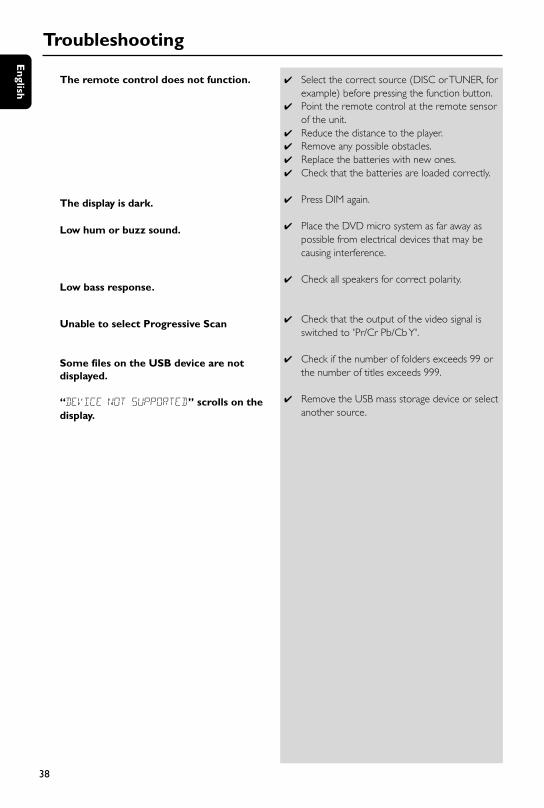
The remote control does not function.
The display is dark.
Low hum or buzz sound.
Low bass response.
Unable to select Progressive Scan
Some files on the USB device are notdisplayed.
“DEVICE NOT SUPPORTED” scrolls on thedisplay.
Select the correct source (DISC or TUNER, forexample) before pressing the function button.
Point the remote control at the remote sensorof the unit.
Reduce the distance to the player. Remove any possible obstacles. Replace the batteries with new ones. Check that the batteries are loaded correctly.
Press DIM again.
Place the DVD micro system as far away aspossible from electrical devices that may becausing interference.
Check all speakers for correct polarity.
Check that the output of the video signal isswitched to 'Pr/Cr Pb/Cb Y'.
Check if the number of folders exceeds 99 orthe number of titles exceeds 999.
Remove the USB mass storage device or selectanother source.
Troubleshooting
pg 020-039_MCD710_98_Eng 2007.12.27, 16:2838
En
glis
h
39
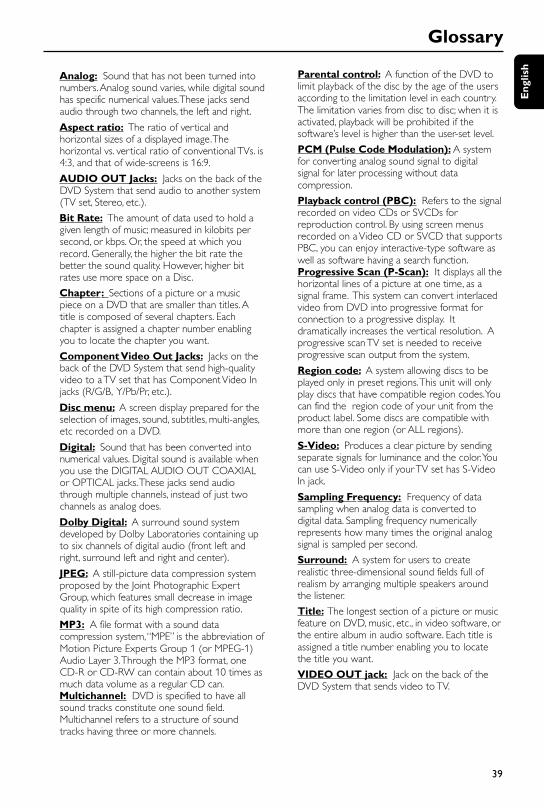
Glossary
Analog: Sound that has not been turned intonumbers. Analog sound varies, while digital soundhas specific numerical values. These jacks sendaudio through two channels, the left and right.
Aspect ratio: The ratio of vertical andhorizontal sizes of a displayed image. Thehorizontal vs. vertical ratio of conventional TVs. is4:3, and that of wide-screens is 16:9.
AUDIO OUT Jacks: Jacks on the back of theDVD System that send audio to another system(TV set, Stereo, etc.).
Bit Rate: The amount of data used to hold agiven length of music; measured in kilobits persecond, or kbps. Or, the speed at which yourecord. Generally, the higher the bit rate thebetter the sound quality. However, higher bitrates use more space on a Disc.
Chapter: Sections of a picture or a musicpiece on a DVD that are smaller than titles. Atitle is composed of several chapters. Eachchapter is assigned a chapter number enablingyou to locate the chapter you want.
Component Video Out Jacks: Jacks on theback of the DVD System that send high-qualityvideo to a TV set that has Component Video Injacks (R/G/B, Y/Pb/Pr, etc.).
Disc menu: A screen display prepared for theselection of images, sound, subtitles, multi-angles,etc recorded on a DVD.
Digital: Sound that has been converted intonumerical values. Digital sound is available whenyou use the DIGITAL AUDIO OUT COAXIALor OPTICAL jacks. These jacks send audiothrough multiple channels, instead of just twochannels as analog does.
Dolby Digital: A surround sound systemdeveloped by Dolby Laboratories containing upto six channels of digital audio (front left andright, surround left and right and center).
JPEG: A still-picture data compression systemproposed by the Joint Photographic ExpertGroup, which features small decrease in imagequality in spite of its high compression ratio.
MP3: A file format with a sound datacompression system, “MPE” is the abbreviation ofMotion Picture Experts Group 1 (or MPEG-1)Audio Layer 3. Through the MP3 format, oneCD-R or CD-RW can contain about 10 times asmuch data volume as a regular CD can.Multichannel: DVD is specified to have allsound tracks constitute one sound field.Multichannel refers to a structure of soundtracks having three or more channels.
Parental control: A function of the DVD tolimit playback of the disc by the age of the usersaccording to the limitation level in each country.The limitation varies from disc to disc; when it isactivated, playback will be prohibited if thesoftware’s level is higher than the user-set level.
PCM (Pulse Code Modulation): A systemfor converting analog sound signal to digitalsignal for later processing without datacompression.
Playback control (PBC): Refers to the signalrecorded on video CDs or SVCDs forreproduction control. By using screen menusrecorded on a Video CD or SVCD that supportsPBC, you can enjoy interactive-type software aswell as software having a search function.Progressive Scan (P-Scan): It displays all thehorizontal lines of a picture at one time, as asignal frame. This system can convert interlacedvideo from DVD into progressive format forconnection to a progressive display. Itdramatically increases the vertical resolution. Aprogressive scan TV set is needed to receiveprogressive scan output from the system.
Region code: A system allowing discs to beplayed only in preset regions. This unit will onlyplay discs that have compatible region codes. Youcan find the region code of your unit from theproduct label. Some discs are compatible withmore than one region (or ALL regions).
S-Video: Produces a clear picture by sendingseparate signals for luminance and the color. Youcan use S-Video only if your TV set has S-VideoIn jack.
Sampling Frequency: Frequency of datasampling when analog data is converted todigital data. Sampling frequency numericallyrepresents how many times the original analogsignal is sampled per second.
Surround: A system for users to createrealistic three-dimensional sound fields full ofrealism by arranging multiple speakers aroundthe listener.
Title: The longest section of a picture or musicfeature on DVD, music, etc., in video software, orthe entire album in audio software. Each title isassigned a title number enabling you to locatethe title you want.
VIDEO OUT jack: Jack on the back of theDVD System that sends video to TV.
pg 020-039_MCD710_98_Eng 2007.12.27, 16:2839

Meet Philips at the Internet http://www.philips.com
MCD 710
CLASS 1
LASER PRODUCT
English中文
Printed in China PDCC-ZC-0751
Pageback.indd 1Pageback.indd 1 2007-12-20 4:35:54 PM2007-12-20 4:35:54 PM