dr380-hd / dr380g-hd / dr400g-hd / dr400g-hd ii
TRANSCRIPT

www.blackvue.com
User's Manual Ver 1.00
DR380-HD / DR380G-HD / DR400G-HD / DR400G-HD II

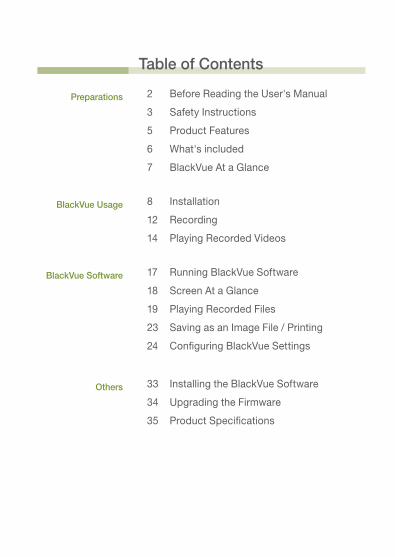
Table of Contents
Preparations 2 Before Reading the User's Manual
3 Safety Instructions
5 Product Features
6 What's included
7 BlackVue At a Glance
BlackVue Usage 8 Installation
12 Recording
14 Playing Recorded Videos
BlackVue Software 17 Running BlackVue Software
18 Screen At a Glance
19 Playing Recorded Files
23 Saving as an Image File / Printing
24 Configuring BlackVue Settings
Others 33 Installing the BlackVue Software
34 Upgrading the Firmware
35 Product Specifications
2
Preparations Before Reading the User's Manual
Thank you for purchasing Pittasoft's BlackVue. This product is a video event data recorder (VEDR) for vehicles.
X PleasereadtheUser'sManualcarefullybeforeusingtheBlackVue.
X Pittasoftisplanningtosupplementitsproductandaddnewfeaturesviafirmwareonaconstantbasis.Allinformationandspecificationsinthismanualaresubjecttochangewithoutapriornotice.
X ScreensandpicturesoftheUser'sManualmaybedifferentfromtheactualobject.
Descriptions of Symbols Used in the Manual
Symbol Name Description
CautionCaseswherethedevicefailstoworkproperlyoritssettingsaredisabled.
Tip Additionalnotesthatarehelpfulinworkingthedevice
Warranty and DisclaimerX Weshalltakenoresponsibilityforaccidentaldamage,injuriesandotherlossescausedbyimproperuseoftheproduct.
X Thisproductisavideoeventdatarecorderforvehiclesbutdoesnotguaranteethatallaccidentswillberecorded.Thisdevicemayfailtorecordaminoraccidentcausedbytoolightanimpacttotriggertheimpactsensor.
X Thisproductcreatesarecordofvideotohelpdeterminewhathappenedbefore,duringandafterthecrashorevent.PittasoftCo.shallnottakeanyresponsibilityfordamages(property,businessand/orindirectdamages).
3
Preparations Safety Instructions
This manual is about what should be done to protect the user's safety and prevent property damage. Please make sure to read it thoroughly before using the product.
Do not disassemble, repair and/or alter the product.Thismaycauseafire,anelectricshockand/ormalfunction.Contacttheservicecenterifyouneedtohavetheproductfixed.Usermaynotbeentitledtofreeserviceifandwhenproductmalfunctioniscausedbyuser'sfault.
Do not spray water on each parts of the product when cleaning it. Make sure not to wet the product. Thismaycauseafire,anelectricshockand/ormalfunction.
Do not spray a cleansing agent on the surface of the product. Thismaycausediscolorationand/orcracksonthesurfaceandresultinmalfunction.
Do not give the product a shock, and make sure foreign matter does not enter the product. Thismayresultinmalfunction.
Do not operate the product while driving.Thismaycauseatrafficaccidentbecauseitdistractsyoufromkeepingyoureyesontheroad.Useafterstopping/parkingyourcarinasafeplace.
Do not install the product in a location where it may interrupt a safe driving or block your view while driving. Thismaycauseatrafficaccident.
Excessively dark tinting on the windshield may make recorded images look blurry or distorted.
The optimum temperature for picture quality ranges from 0 to 50℃. The picture quality may vary according to seasons, especially in midsummer or winter season.
This product is fitted with a camera. Drastic changes in brightness (on entry/exit of tunnels), strong backlight in the daytime, and no light source at midnight may result in defective recorded images.
If power supply to the device is interrupted by a crash or accident, it may cause video not to be recorded.
4
Cautions for GPS Usage GPS models Only
X PoorGPSreceptionwillnotaffectvideorecording.Itwillonlyleadtoafailuretorecordavehicle'scoordinatesandspeed.
X Pleasemaintaintheoptimumtemperature,whichranges0to50ºCfromforproperworkingofGPS.GPSreceptionmaygetunstableoritsconnectiontimemaybedelayedinthemidsummerorwintertime.
X Whenyouusetheproductforthefirsttimeoryouhavenotuseditforanextendedperiodoftime(over3days),itmaytakesometimeforGPStoidentifythecurrentlocation.(atleast1to5minutes)
X InstalltheproductavoidingthefollowinginstanceswhereGPSreceptionisinterrupted,andchecktheGPSreception.
y AninstancewhereanobjectinputontopofGPS
y Aninstancewherethewindshieldistintedwithmetallicsubstances
y AninstancewheredevicesproducingRFradiationinterruptingGPSsignalsareinstalledinacar(certainmodelsofremotecaralarmsandMP3/CDplayers)
y AninstancewhereanotherdeviceusingGPSisused
y Aninstancewhereitisdarkandovercast
y AninstancewhereGPSisusedunderanoverpass;inatunnel,underpass,undergroundparkinglot,andanareaconcentratedwithlargebuildings;andnearapowerstation,barracks,andbroadcastrelaystation
Cautions for BlackVue InstallationX Installingoroperatingthedevicewhiledrivingmaycauseanaccident.Pleaseinstalloroperatethedeviceafterstopping/parkingyourcarinasafeplace.
X Ifthecigarettelighterreceptacleemitsfumesorafunnysmell,stopusingtheproductimmediatelyandcontactusorourdealerships.
X Dustandbuilt-updirtonthecigarettelighterreceptaclemaycauseheatorafire.Cleanitonaregularbasis.
X Checkfrequentlyiftheproductisinstalledproperly.Duetovibration,theBlackVuecomesoff,resultinginaninjuryordamage.
X Wedonottakeanyresponsibilityformalfunction,aninjuryordamagetotheproductcausedbyinappropriateuse.
Preparations Safety Instructions
5
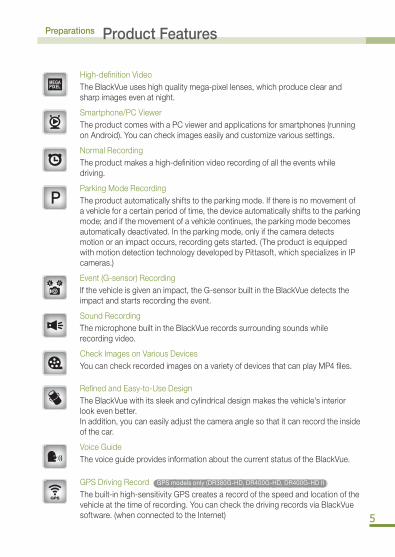
Preparations Product Features
High-definitionVideoTheBlackVueuseshighqualitymega-pixellenses,whichproduceclearandsharpimagesevenatnight.
Smartphone/PCViewerTheproductcomeswithaPCviewerandapplicationsforsmartphones(runningonAndroid).Youcancheckimageseasilyandcustomizevarioussettings.
NormalRecordingTheproductmakesahigh-definitionvideorecordingofalltheeventswhiledriving.
ParkingModeRecordingTheproductautomaticallyshiftstotheparkingmode.Ifthereisnomovementofavehicleforacertainperiodoftime,thedeviceautomaticallyshiftstotheparkingmode;andifthemovementofavehiclecontinues,theparkingmodebecomesautomaticallydeactivated.Intheparkingmode,onlyifthecameradetectsmotionoranimpactoccurs,recordinggetsstarted.(TheproductisequippedwithmotiondetectiontechnologydevelopedbyPittasoft,whichspecializesinIPcameras.)
Event(G-sensor)RecordingIfthevehicleisgivenanimpact,theG-sensorbuiltintheBlackVuedetectstheimpactandstartsrecordingtheevent.
SoundRecordingThemicrophonebuiltintheBlackVuerecordssurroundingsoundswhilerecordingvideo.
CheckImagesonVariousDevicesYoucancheckrecordedimagesonavarietyofdevicesthatcanplayMP4files.
RefinedandEasy-to-UseDesignTheBlackVuewithitssleekandcylindricaldesignmakesthevehicle'sinteriorlookevenbetter.Inaddition,youcaneasilyadjustthecameraanglesothatitcanrecordtheinsideofthecar.
VoiceGuideThevoiceguideprovidesinformationaboutthecurrentstatusoftheBlackVue.
GPSDrivingRecord GPS models only (DR380G-HD, DR400G-HD, DR400G-HD II )
Thebuilt-inhigh-sensitivityGPScreatesarecordofthespeedandlocationofthevehicleatthetimeofrecording.YoucancheckthedrivingrecordsviaBlackVuesoftware.(whenconnectedtotheInternet)
6
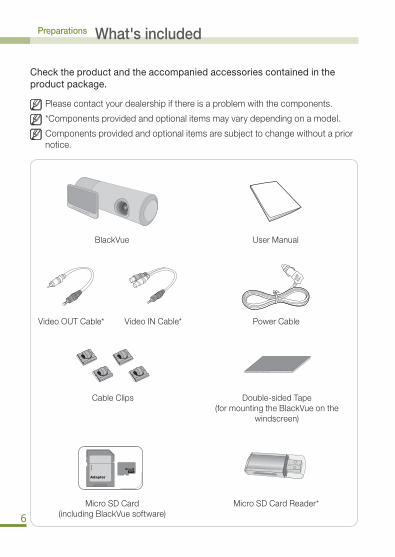
Preparations What's included
Check the product and the accompanied accessories contained in the product package.
Pleasecontactyourdealershipifthereisaproblemwiththecomponents.
*Componentsprovidedandoptionalitemsmayvarydependingonamodel.
Componentsprovidedandoptionalitemsaresubjecttochangewithoutapriornotice.
BlackVue UserManual
VideoOUTCable* VideoINCable* PowerCable
CableClips Double-sidedTape(formountingtheBlackVueonthe
windscreen)
MicroSDCard(includingBlackVuesoftware)
MicroSDCardReader*
7
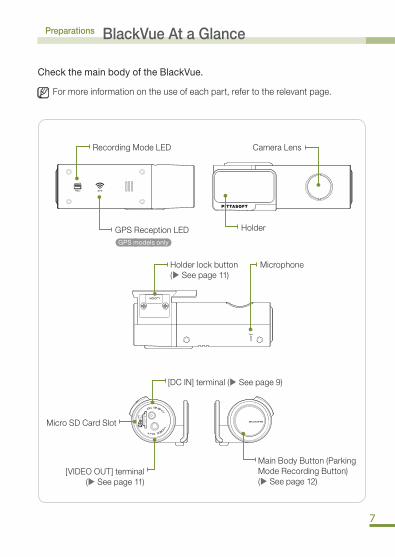
Preparations BlackVue At a Glance
Check the main body of the BlackVue.
Formoreinformationontheuseofeachpart,refertotherelevantpage.
RecordingModeLED
Microphone
MainBodyButton(ParkingModeRecordingButton)(XSeepage12)
[DCIN]terminal(XSeepage9)
MicroSDCardSlot
[VIDEOOUT]terminal(XSeepage11)
HolderGPSReceptionLED GPS models only
Holderlockbutton(XSeepage11)
CameraLens
8
BlackVue Usage Installation
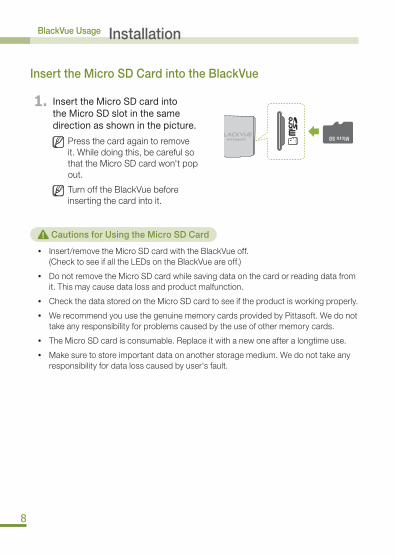
Insert the Micro SD Card into the BlackVue
1. Insert the Micro SD card into the Micro SD slot in the same direction as shown in the picture.
Pressthecardagaintoremoveit.Whiledoingthis,becarefulsothattheMicroSDcardwon'tpopout.
TurnofftheBlackVuebeforeinsertingthecardintoit.
Cautions for Using the Micro SD Card
y Insert/removetheMicroSDcardwiththeBlackVueoff.(ChecktoseeifalltheLEDsontheBlackVueareoff.)
y DonotremovetheMicroSDcardwhilesavingdataonthecardorreadingdatafromit.Thismaycausedatalossandproductmalfunction.
y CheckthedatastoredontheMicroSDcardtoseeiftheproductisworkingproperly.
y WerecommendyouusethegenuinememorycardsprovidedbyPittasoft.Wedonottakeanyresponsibilityforproblemscausedbytheuseofothermemorycards.
y TheMicroSDcardisconsumable.Replaceitwithanewoneafteralongtimeuse.
y Makesuretostoreimportantdataonanotherstoragemedium.Wedonottakeanyresponsibilityfordatalosscausedbyuser'sfault.
9
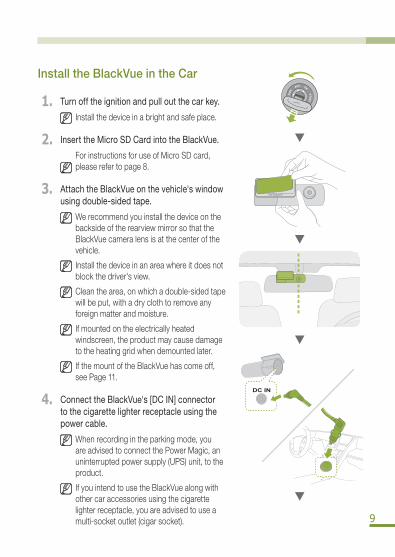
Install the BlackVue in the Car
1. Turn off the ignition and pull out the car key.
Installthedeviceinabrightandsafeplace.
2. Insert the Micro SD Card into the BlackVue.
ForinstructionsforuseofMicroSDcard,pleaserefertopage8.
3. Attach the BlackVue on the vehicle's window using double-sided tape.
WerecommendyouinstallthedeviceonthebacksideoftherearviewmirrorsothattheBlackVuecameralensisatthecenterofthevehicle.
Installthedeviceinanareawhereitdoesnotblockthedriver'sview.
Cleanthearea,onwhichadouble-sidedtapewillbeput,withadryclothtoremoveanyforeignmatterandmoisture.
Ifmountedontheelectricallyheatedwindscreen,theproductmaycausedamagetotheheatinggridwhendemountedlater.
IfthemountoftheBlackVuehascomeoff,seePage11.
4. Connect the BlackVue's [DC IN] connector to the cigarette lighter receptacle using the power cable.
Whenrecordingintheparkingmode,youareadvisedtoconnectthePowerMagic,anuninterruptedpowersupply(UPS)unit,totheproduct.
IfyouintendtousetheBlackVuealongwithothercaraccessoriesusingthecigarettelighterreceptacle,youareadvisedtouseamulti-socketoutlet(cigarsocket).
10
BlackVue Usage Installation
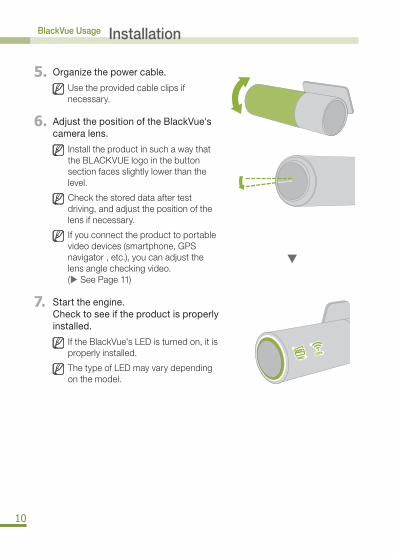
5.Organize the power cable.
Usetheprovidedcableclipsifnecessary.
6.Adjust the position of the BlackVue's camera lens.
InstalltheproductinsuchawaythattheBLACKVUElogointhebuttonsectionfacesslightlylowerthanthelevel.
Checkthestoreddataaftertestdriving,andadjustthepositionofthelensifnecessary.
Ifyouconnecttheproducttoportablevideodevices(smartphone,GPSnavigator,etc.),youcanadjustthelensanglecheckingvideo.(XSeePage11)
7. Start the engine. Check to see if the product is properly installed.
IftheBlackVue'sLEDisturnedon,itisproperlyinstalled.
ThetypeofLEDmayvarydependingonthemodel.
11
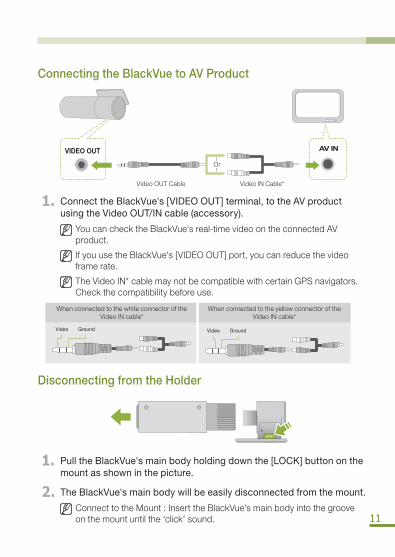
Connecting the BlackVue to AV Product
VideoOUTCable VideoINCable*
Or
1.Connect the BlackVue's [VIDEO OUT] terminal, to the AV product using the Video OUT/IN cable (accessory).
YoucanchecktheBlackVue'sreal-timevideoontheconnectedAVproduct.
IfyouusetheBlackVue's[VIDEOOUT]port,youcanreducethevideoframerate.
TheVideoIN*cablemaynotbecompatiblewithcertainGPSnavigators.Checkthecompatibilitybeforeuse.
WhenconnectedtothewhiteconnectoroftheVideoINcable*
WhenconnectedtotheyellowconnectoroftheVideoINcable*
GroundVideo GroundVideo
Disconnecting from the Holder
1.Pull the BlackVue's main body holding down the [LOCK] button on the mount as shown in the picture.
2.The BlackVue's main body will be easily disconnected from the mount.
ConnecttotheMount :InserttheBlackVue'smainbodyintothegrooveonthemountuntilthe‘click’sound.
12
BlackVue Usage Recording
Normal Recording
Start the ignition.
Doing this will turn on the BlackVue and start the normal recording. Recording will go on as long as the BlackVue is on.
ConnectedtothePowerMagic(UPSunit),theBlackVuewillremainon.
Ifyouset[SetNormalRecording]intheconfigurationto[NormalRecordingOff],normalrecordingbecomesdeactivated.(XSeePage27)
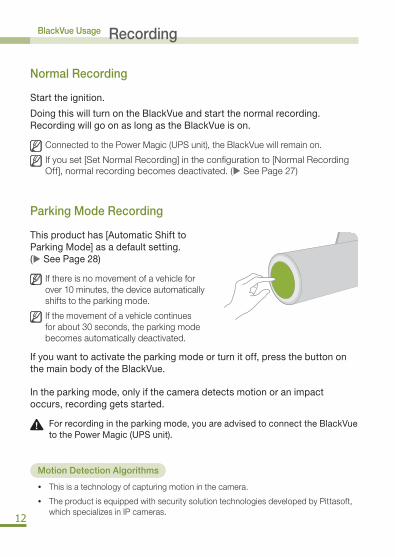
Parking Mode Recording
This product has [Automatic Shift to Parking Mode] as a default setting. (X See Page 28)
Ifthereisnomovementofavehicleforover10minutes,thedeviceautomaticallyshiftstotheparkingmode.
Ifthemovementofavehiclecontinuesforabout30seconds,theparkingmodebecomesautomaticallydeactivated.
If you want to activate the parking mode or turn it off, press the button on the main body of the BlackVue.
In the parking mode, only if the camera detects motion or an impact occurs, recording gets started.
For recording in the parking mode, you are advised to connect the BlackVue to the Power Magic (UPS unit).
Motion Detection Algorithms
y Thisisatechnologyofcapturingmotioninthecamera.
y TheproductisequippedwithsecuritysolutiontechnologiesdevelopedbyPittasoft,whichspecializesinIPcameras.
13
Event Recording
If the BlackVue detects an impact above the threshold, the device automatically records video before/after the event.
YoucanadjustthesensitivityoftheBlackVuedetectinganimpactin[SetSensitivity].(XSeePage29)Youcansetdifferentsensitivitiesbetweennormalrecordingmodeandparkingmode.
G-sensor (3-axis Acceleration Sensor)
y TheBlackVuerecordseventvideowithitsG-sensordetectinganimpact.
y TheG-sensor,a3-axisaccelerationsensor,iscomposedofX-axis(fronttorear),Y-axis(righttoleft),andZ-axis(toptobottom).
y YoucanchecktheG-sensorinformationofthefilesrecordedintheBlackVueSoftware,aviewerfortheBlackVue.
y YoucannotuseG-sensorvaluesmeasuredbytheBlackVueasevidencetodeterminethecontextofanaccident.
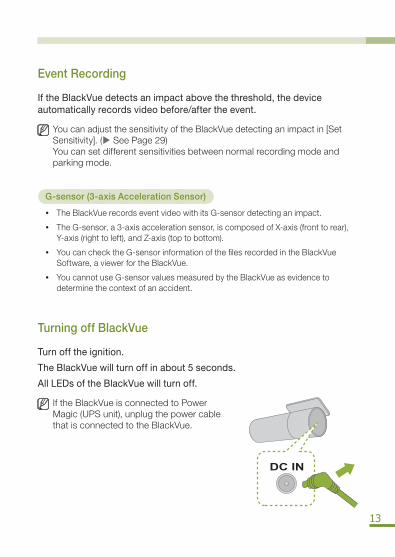
Turning off BlackVue
Turn off the ignition.
The BlackVue will turn off in about 5 seconds.
All LEDs of the BlackVue will turn off.
IftheBlackVueisconnectedtoPowerMagic(UPSunit),unplugthepowercablethatisconnectedtotheBlackVue.
14
BlackVue Usage Playing Recorded Videos
Recorded files of the BlackVue are saved in MP4 format. You can easily check the recorded video on media players (PC, smartphone, and GPS navigator) without converting the files.
RecordedfilesoftheBlackVuearesavedinthe‘Record’folderoftheMicroSDcard.
Playing videos on your smart phone
Download BlackVue Application
y WeprovideanapplicationfortheBlackVue.Usingthisapplication,youcaneasilyplayandmanagevideoclipsrecordedbytheBlackVue.
y AccessGooglePlaySearchforBlackVueSelectApplicationDownload
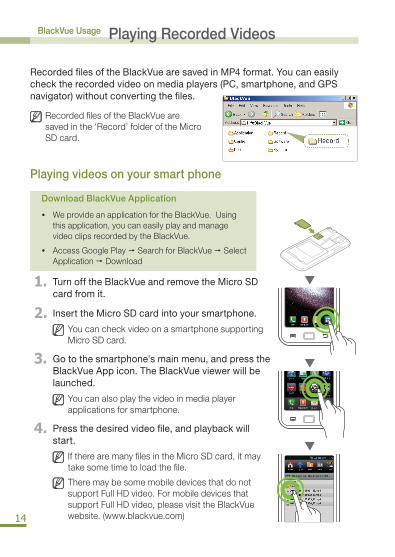
1.Turn off the BlackVue and remove the Micro SD card from it.
2. Insert the Micro SD card into your smartphone.
YoucancheckvideoonasmartphonesupportingMicroSDcard.
3.Go to the smartphone's main menu, and press the BlackVue App icon. The BlackVue viewer will be launched.
Youcanalsoplaythevideoinmediaplayerapplicationsforsmartphone.
4.Press the desired video file, and playback will start.
IftherearemanyfilesintheMicroSDcard,itmaytakesometimetoloadthefile.
TheremaybesomemobiledevicesthatdonotsupportFullHDvideo.FormobiledevicesthatsupportFullHDvideo,pleasevisittheBlackVuewebsite.(www.blackvue.com)
15
Playing videos on GPS Navigator
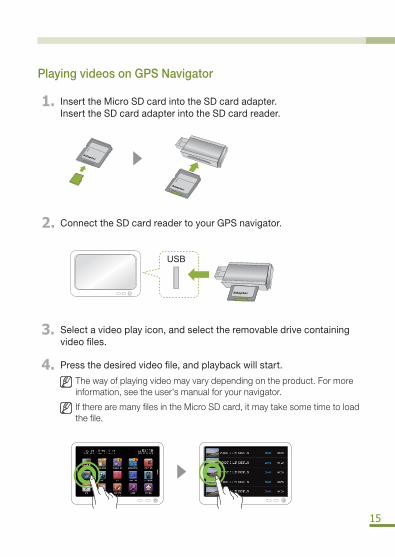
1. Insert the Micro SD card into the SD card adapter. Insert the SD card adapter into the SD card reader.
2.Connect the SD card reader to your GPS navigator.
3.Select a video play icon, and select the removable drive containing video files.
4.Press the desired video file, and playback will start.
Thewayofplayingvideomayvarydependingontheproduct.Formoreinformation,seetheuser'smanualforyournavigator.
IftherearemanyfilesintheMicroSDcard,itmaytakesometimetoloadthefile.
16
BlackVue Usage Playing Recorded Videos
Check Video on PC
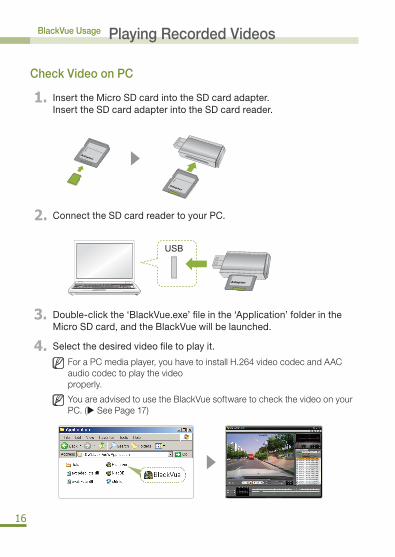
1. Insert the Micro SD card into the SD card adapter. Insert the SD card adapter into the SD card reader.
2.Connect the SD card reader to your PC.
3.Double-click the ‘BlackVue.exe’ file in the ‘Application’ folder in the Micro SD card, and the BlackVue will be launched.
4.Select the desired video file to play it.
ForaPCmediaplayer,youhavetoinstallH.264videocodecandAACaudiocodectoplaythevideoproperly.
YouareadvisedtousetheBlackVuesoftwaretocheckthevideoonyourPC.(XSeePage17)
17
BlackVue Software Running BlackVue Software
Use the BlackVue player to play files recorded by the BlackVue on your PC.
The BlackVue software allows you to easily play and manage video recorded by the BlackVue.
YoucanusetheBlackVueplayerwithoutinstallation.
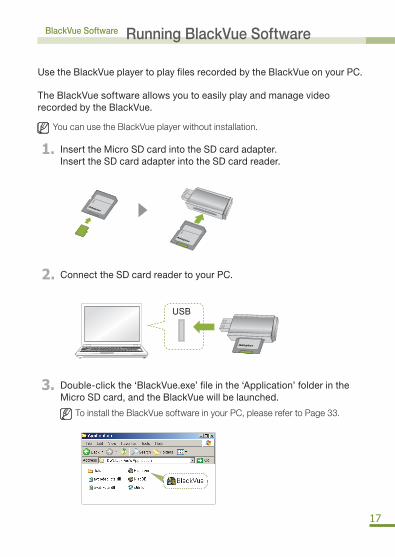
1. Insert the Micro SD card into the SD card adapter. Insert the SD card adapter into the SD card reader.
2.Connect the SD card reader to your PC.
3.Double-click the ‘BlackVue.exe’ file in the ‘Application’ folder in the Micro SD card, and the BlackVue will be launched.
ToinstalltheBlackVuesoftwareinyourPC,pleaserefertoPage33.
18
BlackVue Software Screen At a Glance
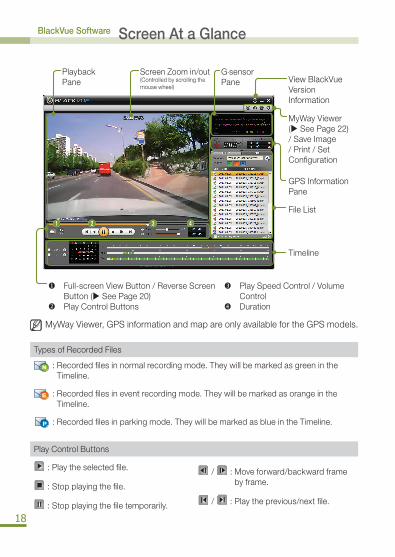
MyWayViewer,GPSinformationandmapareonlyavailablefortheGPSmodels.
TypesofRecordedFiles
:Recordedfilesinnormalrecordingmode.TheywillbemarkedasgreenintheTimeline.
:Recordedfilesineventrecordingmode.TheywillbemarkedasorangeintheTimeline.
:Recordedfilesinparkingmode.TheywillbemarkedasblueintheTimeline.
PlayControlButtons
:Playtheselectedfile.
:Stopplayingthefile.
:Stopplayingthefiletemporarily.
/ :Moveforward/backwardframebyframe.
/ :Playtheprevious/nextfile.
PlaybackPane
G-sensorPane
GPSInformationPane
ScreenZoomin/out(Controlledbyscrollingthemousewheel)
MyWayViewer(XSeePage22)/SaveImage/Print/SetConfiguration
FileList
ViewBlackVueVersionInformation
Timeline
Full-screenViewButton/ReverseScreenButton(XSeePage20)
PlayControlButtons
PlaySpeedControl/VolumeControl
Duration
19
BlackVue Software Playing Recorded Files
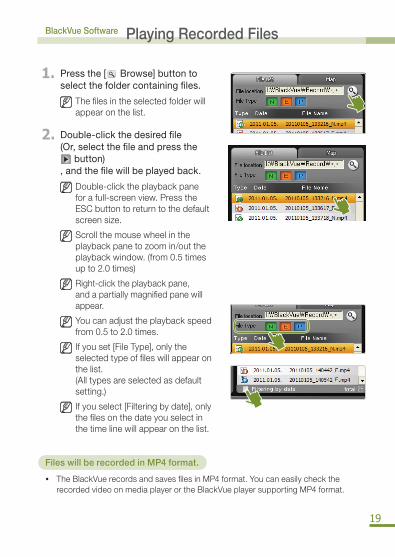
1. Press the [ Browse] button to select the folder containing files.
Thefilesintheselectedfolderwillappearonthelist.
2.Double-click the desired file (Or, select the file and press the
button), and the file will be played back.
Double-clicktheplaybackpaneforafull-screenview.PresstheESCbuttontoreturntothedefaultscreensize.
Scrollthemousewheelintheplaybackpanetozoomin/outtheplaybackwindow.(from0.5timesupto2.0times)
Right-clicktheplaybackpane,andapartiallymagnifiedpanewillappear.
Youcanadjusttheplaybackspeedfrom0.5to2.0times.
Ifyouset[FileType],onlytheselectedtypeoffileswillappearonthelist.(Alltypesareselectedasdefaultsetting.)
Ifyouselect[Filteringbydate],onlythefilesonthedateyouselectinthetimelinewillappearonthelist.
Files will be recorded in MP4 format.
y TheBlackVuerecordsandsavesfilesinMP4format.YoucaneasilychecktherecordedvideoonmediaplayerortheBlackVueplayersupportingMP4format.
20
BlackVue Software Playing Recorded Files
Display Settings
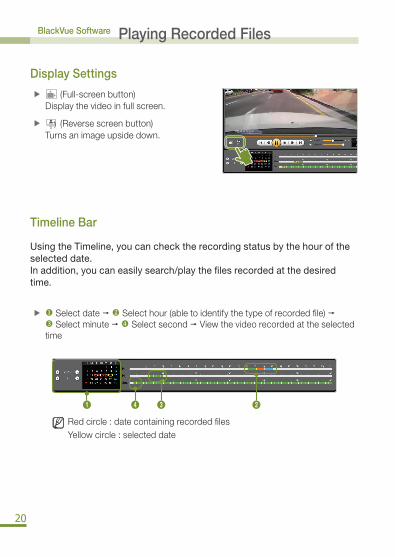
X (Full-screenbutton)Displaythevideoinfullscreen.
X (Reversescreenbutton)Turnsanimageupsidedown.
Timeline Bar
Using the Timeline, you can check the recording status by the hour of the selected date. In addition, you can easily search/play the files recorded at the desired time.
X SelectdateSelecthour(abletoidentifythetypeofrecordedfile)SelectminuteSelectsecondViewthevideorecordedattheselectedtime
Redcircle :datecontainingrecordedfilesYellowcircle :selecteddate
21
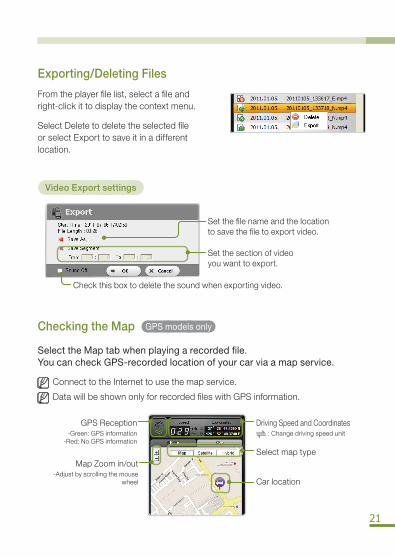
Exporting/Deleting Files
Fromtheplayerfilelist,selectafileandright-clickittodisplaythecontextmenu.
SelectDeletetodeletetheselectedfileorselectExporttosaveitinadifferentlocation.
Video Export settings
Setthefilenameandthelocationtosavethefiletoexportvideo.
Checkthisboxtodeletethesoundwhenexportingvideo.
Setthesectionofvideoyouwanttoexport.
Checking the Map GPS models only
Select the Map tab when playing a recorded file. You can check GPS-recorded location of your car via a map service.
ConnecttotheInternettousethemapservice.
DatawillbeshownonlyforrecordedfileswithGPSinformation.
GPSReception-Green:GPSinformation
-Red:NoGPSinformation
MapZoomin/out-Adjustbyscrollingthemouse
wheel
Selectmaptype
DrivingSpeedandCoordinates:Changedrivingspeedunit
Carlocation
22
BlackVue Software Playing Recorded Files
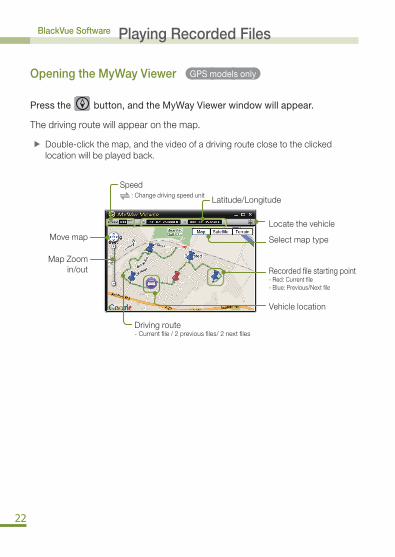
Opening the MyWay Viewer GPS models only
Press the button, and the MyWay Viewer window will appear.
Thedrivingroutewillappearonthemap.
X Double-clickthemap,andthevideoofadrivingrouteclosetotheclickedlocationwillbeplayedback.
MapZoomin/out
Movemap
Speed:Changedrivingspeedunit
Drivingroute-Currentfile/2previousfiles/2nextfiles
Selectmaptype
Latitude/Longitude
Locatethevehicle
Recordedfilestartingpoint-Red:Currentfile-Blue:Previous/Nextfile
Vehiclelocation
23
BlackVue Software Saving as an Image File / Printing
Saving the Desired Screen as an Image File
1.Press the button during playback to stop the screen.Select the desired screen.
Tosearchforthedesiredscreen,selecttheSecondunitintheTimeline,orpressthe / buttontonavigate.
2. Press the button. Check the file saving path, and press the Save button. Save the selected screen as an image (jpeg, bmp) file.
Printing the Selected Screen
1.Press the button during playback to stop the screen.Select the desired screen.
Tosearchforthedesiredscreen,selecttheSecondunitintheTimeline,orpressthe / buttontonavigate.
2.Press the button, and the selected screen will be printed out.
24
BlackVue Software Configuring BlackVue Settings
1. Insert the Micro SD card into your PC. (X See Page 16)
2.Press the button, and the Configuration window will appear.
YoucannotsetconfigurationiftheSDcardwiththeBlackVueFirmwareinstalledisnotconnectedtothePC.
3.Customize your BlackVue experience.
4.Press the [Save & Close] button.
YoucannotsetconfigurationforBlackVueifthesettingsarenotsavedintheMicroSDcard.
Pressthe[InitializeSettings]button,andthesettingswillbeinitialized.
5. Remove the Micro SD card with the settings saved from the PC, and insert the card into the BlackVue. The settings will be automatically saved into the BlackVue.
25
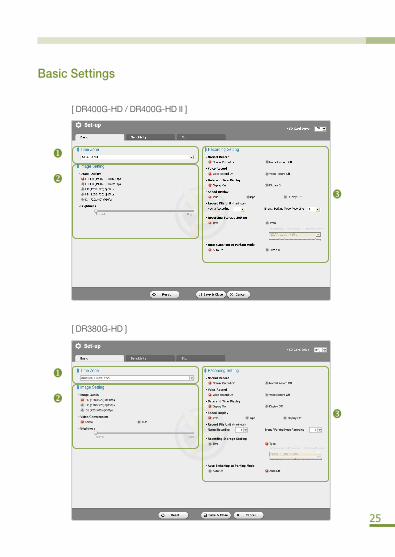
Basic Settings
[DR400G-HD/DR400G-HDII]
[DR380G-HD]
26
BlackVue Software Configuring BlackVue Settings
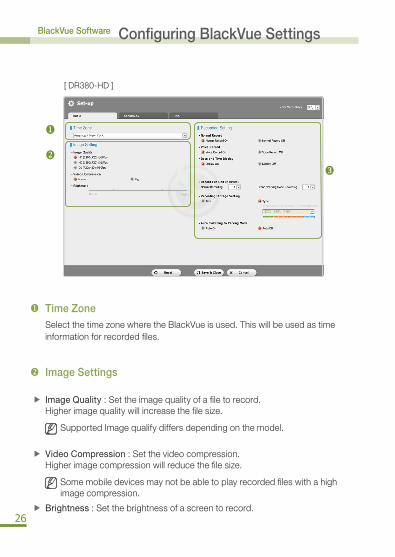
[DR380-HD]
Time ZoneSelectthetimezonewheretheBlackVueisused.Thiswillbeusedastimeinformationforrecordedfiles.
Image Settings
X Image Quality :Settheimagequalityofafiletorecord.Higherimagequalitywillincreasethefilesize.
SupportedImagequalifydiffersdependingonthemodel.
X Video Compression :Setthevideocompression.Higherimagecompressionwillreducethefilesize.
Somemobiledevicesmaynotbeabletoplayrecordedfileswithahighimagecompression.
X Brightness :Setthebrightnessofascreentorecord.
27
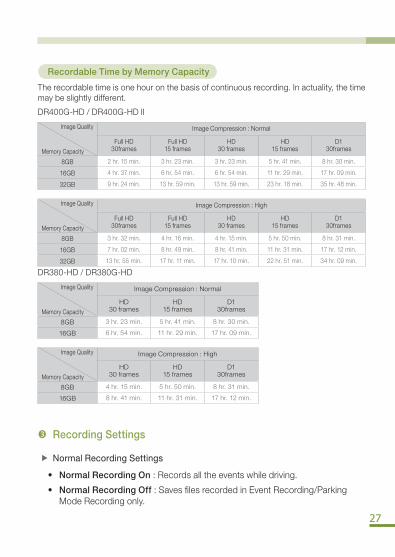
Recordable Time by Memory Capacity
Therecordabletimeisonehouronthebasisofcontinuousrecording.Inactuality,thetimemaybeslightlydifferent.
DR400G-HD/DR400G-HDII
ImageQuality
MemoryCapacity
ImageCompression:Normal
FullHD30frames
FullHD15frames
HD30frames
HD15frames
D130frames
8GB 2hr.15min. 3hr.23min. 3hr.23min. 5hr.41min. 8hr.30min.
16GB 4hr.37min. 6hr.54min. 6hr.54min. 11hr.29min. 17hr.09min.
32GB 9hr.24min. 13hr.59min. 13hr.59min. 23hr.18min. 35hr.48min.
ImageQuality
MemoryCapacity
ImageCompression:High
FullHD30frames
FullHD15frames
HD30frames
HD15frames
D130frames
8GB 3hr.32min. 4hr.16min. 4hr.15min. 5hr.50min. 8hr.31min.
16GB 7hr.02min. 8hr.49min. 8hr.41min. 11hr.31min. 17hr.12min.
32GB 13hr.55min. 17hr.11min. 17hr.10min. 22hr.51min. 34hr.09min.
DR380-HD/DR380G-HD
ImageQuality
MemoryCapacity
ImageCompression:Normal
HD30frames
HD15frames
D130frames
8GB 3hr.23min. 5hr.41min. 8hr.30min.
16GB 6hr.54min. 11hr.29min. 17hr.09min.
ImageQuality
MemoryCapacity
ImageCompression:High
HD30frames
HD15frames
D130frames
8GB 4hr.15min. 5hr.50min. 8hr.31min.
16GB 8hr.41min. 11hr.31min. 17hr.12min.
Recording Settings
X Normal Recording Settings
• Normal Recording On :Recordsalltheeventswhiledriving.
• Normal Recording Off :SavesfilesrecordedinEventRecording/ParkingModeRecordingonly.

28
BlackVue Software Configuring BlackVue Settings
X Voice Recording Settings:Whethertousethevoicerecordingfunctionornot.
X Date and Time Display :Displaysdateandtimeinthebottomleftcornerofthescreenwhilerecording.
X Speed Display GPS models only :Displaysthespeedofavehicleinthebottomleftcornerofthescreen.Selectthedesiredspeedunittodisplay.
Ifyouselect[DisplayOff],thespeedofavehiclewillnotbedisplayedintherecordedfiles.
X Record File Unit :Youcansetthefilesavingunitwhenrecording.
X Recoding Storage Setting :Theolderrecordedfileswillbedeletedsothatnewvideocanberecordedinalimitedstoragespace.
• Time :Ifthereisnotenoughstoragespaceavailable,theolderrecordedfileswillbeautomaticallydeleted.
• Type :Setmemoryusageproportionforeachrecordingtypewhensavingrecordedfiles.Recordedfilesforwhichthesetstoragespaceisfullwillbeautomaticallydeletedinsequence.BecarefulsincethefilesrecordedintheEventRecodingmodemaybedeletedaswell.
If storage space for files recorded in the Event Recording is full:
y FilesrecordedintheEventRecordingmodewillbeautomaticallydeletedinsequenceaswell.Becarefulnottodeleteimportantfiles.Backuptheimportantfilesinanotherstoragemedium.
X Auto Switching to Parking Mode :ThedevicewillshifttotheParkingmodeautomaticallyifthereisnochangeinG-sensorforover10minutes.IfG-sensorisdetectedforover30seconds,thedevicewillshifttotheNormalRecordingmode.
TheautomaticshifttotheParkingmodemaybeaffectedbythedegreetowhicheachvehiclevibrates.
29
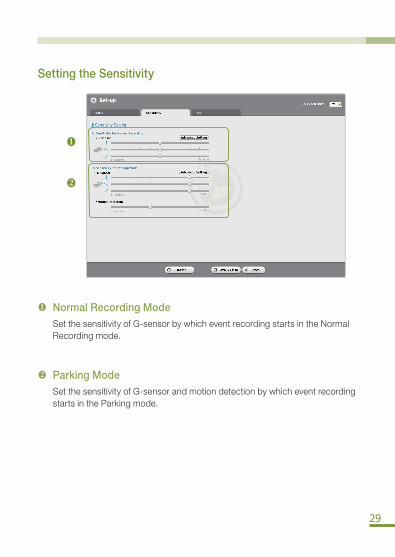
Setting the Sensitivity
Normal Recording ModeSetthesensitivityofG-sensorbywhicheventrecordingstartsintheNormalRecordingmode.
Parking ModeSetthesensitivityofG-sensorandmotiondetectionbywhicheventrecordingstartsintheParkingmode.
30
BlackVue Software Configuring BlackVue Settings
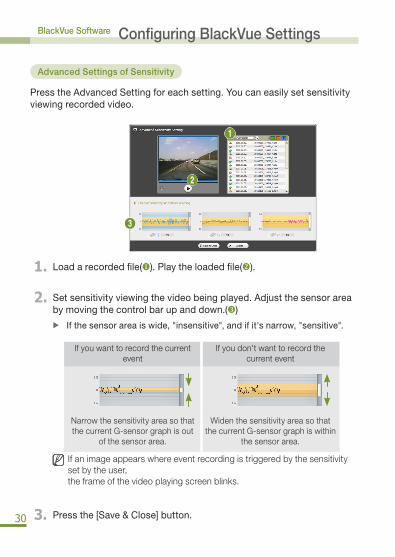
Advanced Settings of Sensitivity
Press the Advanced Setting for each setting. You can easily set sensitivity viewing recorded video.
1.Load a recorded file(). Play the loaded file().
2.Set sensitivity viewing the video being played. Adjust the sensor area by moving the control bar up and down.()
X If the sensor area is wide, "insensitive", and if it's narrow, "sensitive".
Ifyouwanttorecordthecurrentevent
Ifyoudon'twanttorecordthecurrentevent
NarrowthesensitivityareasothatthecurrentG-sensorgraphisout
ofthesensorarea.
WidenthesensitivityareasothatthecurrentG-sensorgraphiswithin
thesensorarea.
Ifanimageappearswhereeventrecordingistriggeredbythesensitivitysetbytheuser,theframeofthevideoplayingscreenblinks.
3.Press the [Save & Close] button.
31
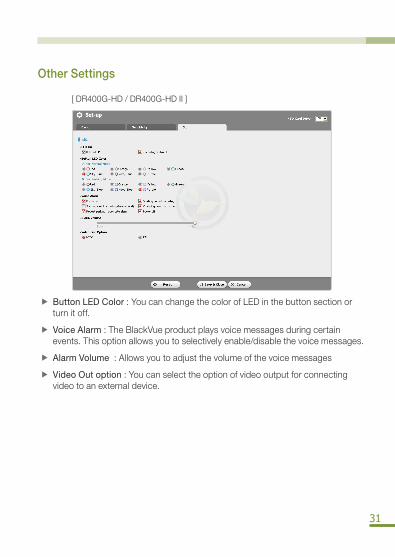
Other Settings
[DR400G-HD/DR400G-HDII]
X Button LED Color :YoucanchangethecolorofLEDinthebuttonsectionorturnitoff.
X Voice Alarm :TheBlackVueproductplaysvoicemessagesduringcertainevents.Thisoptionallowsyoutoselectivelyenable/disablethevoicemessages.
X Alarm Volume :Allowsyoutoadjustthevolumeofthevoicemessages
X Video Out option :Youcanselecttheoptionofvideooutputforconnectingvideotoanexternaldevice.
32
BlackVue Software Configuring BlackVue Settings
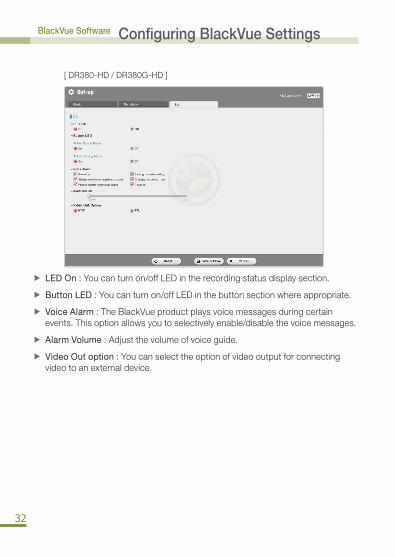
[DR380-HD/DR380G-HD]
X LED On :Youcanturnon/offLEDintherecordingstatusdisplaysection.
X Button LED :Youcanturnon/offLEDinthebuttonsectionwhereappropriate.
X Voice Alarm :TheBlackVueproductplaysvoicemessagesduringcertainevents.Thisoptionallowsyoutoselectivelyenable/disablethevoicemessages.
X Alarm Volume :Adjustthevolumeofvoiceguide.
X Video Out option :Youcanselecttheoptionofvideooutputforconnectingvideotoanexternaldevice.
33
Others Installing the BlackVue Software
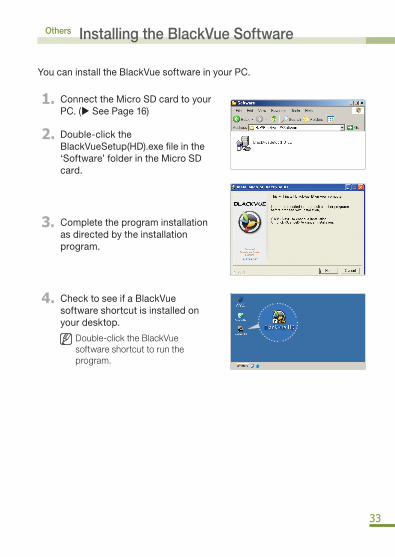
You can install the BlackVue software in your PC.
1.Connect the Micro SD card to your PC. (X See Page 16)
2.Double-click the BlackVueSetup(HD).exe file in the ‘Software’ folder in the Micro SD card.
3.Complete the program installation as directed by the installation program.
4. Check to see if a BlackVue software shortcut is installed on your desktop.
Double-clicktheBlackVuesoftwareshortcuttoruntheprogram.
34
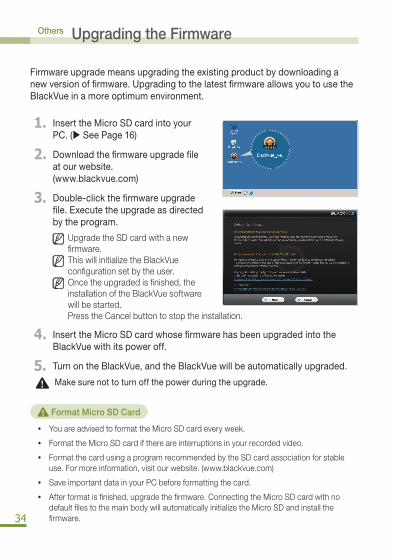
Others Upgrading the Firmware
Firmware upgrade means upgrading the existing product by downloading a new version of firmware. Upgrading to the latest firmware allows you to use the BlackVue in a more optimum environment.
1. Insert the Micro SD card into your PC. (X See Page 16)
2. Download the firmware upgrade file at our website. (www.blackvue.com)
3. Double-click the firmware upgrade file. Execute the upgrade as directed by the program.
UpgradetheSDcardwithanewfirmware.ThiswillinitializetheBlackVueconfigurationsetbytheuser.Oncetheupgradedisfinished,theinstallationoftheBlackVuesoftwarewillbestarted.PresstheCancelbuttontostoptheinstallation.
4. Insert the Micro SD card whose firmware has been upgraded into the BlackVue with its power off.
5. Turn on the BlackVue, and the BlackVue will be automatically upgraded.
Make sure not to turn off the power during the upgrade.
Format Micro SD Card
y YouareadvisedtoformattheMicroSDcardeveryweek.
y FormattheMicroSDcardifthereareinterruptionsinyourrecordedvideo.
y FormatthecardusingaprogramrecommendedbytheSDcardassociationforstableuse.Formoreinformation,visitourwebsite.(www.blackvue.com)
y SaveimportantdatainyourPCbeforeformattingthecard.
y Afterformatisfinished,upgradethefirmware.ConnectingtheMicroSDcardwithnodefaultfilestothemainbodywillautomaticallyinitializetheMicroSDandinstallthefirmware.
35
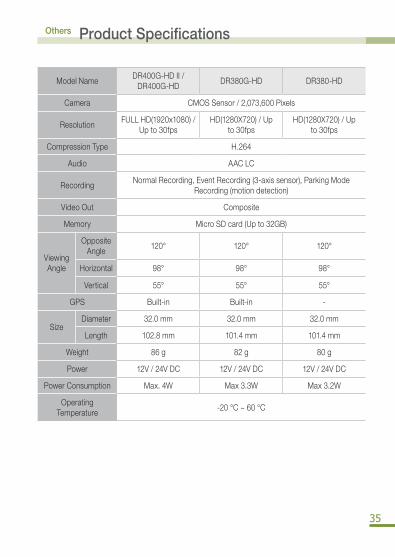
Others Product Specifications
ModelNameDR400G-HDII/
DR400G-HDDR380G-HD DR380-HD
Camera CMOSSensor/2,073,600Pixels
ResolutionFULLHD(1920x1080)/
Upto30fpsHD(1280X720)/Up
to30fpsHD(1280X720)/Up
to30fps
CompressionType H.264
Audio AACLC
RecordingNormalRecording,EventRecording(3-axissensor),ParkingMode
Recording(motiondetection)
VideoOut Composite
Memory MicroSDcard(Upto32GB)
ViewingAngle
OppositeAngle
120° 120° 120°
Horizontal 98° 98° 98°
Vertical 55° 55° 55°
GPS Built-in Built-in -
SizeDiameter 32.0mm 32.0mm 32.0mm
Length 102.8mm 101.4mm 101.4mm
Weight 86g 82g 80g
Power 12V/24VDC 12V/24VDC 12V/24VDC
PowerConsumption Max.4W Max3.3W Max3.2W
OperatingTemperature
-20°C~60°C
36
Others Product Specifications
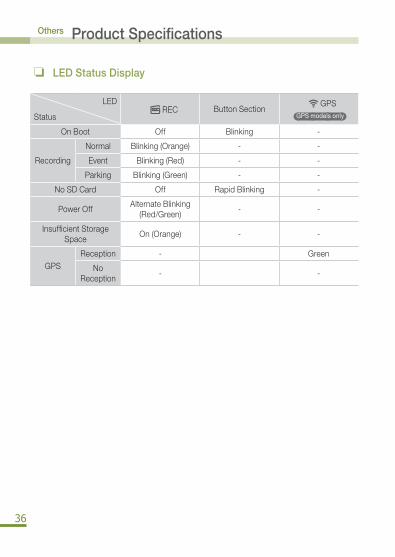
❏ LED Status Display
LED
Status REC ButtonSection
GPS GPS models only
OnBoot Off Blinking -
Recording
Normal Blinking(Orange) - -
Event Blinking(Red) - -
Parking Blinking(Green) - -
NoSDCard Off RapidBlinking -
PowerOffAlternateBlinking
(Red/Green)- -
InsufficientStorageSpace
On(Orange) - -
GPSReception - Green
NoReception
- -
Warranty Certificate
y The warranty period of this product is one year from the purchasing date. (6 months for accessories such as battery/Micro SD card)
y WeprovideswarrantyforourproductsinaccordancewiththeConsumerComplaintsSettlementStandards(NotificationoftheFairTradeCommission).After-salesservicewillbeofferedbyPittasoftorourdesignatedcontractors.
y Iftheproductisusedforbusinesspurposes,itswarrantyperiodshallbereducedbyhalf.
ProductName(ModelName)
SerialNo.
PurchasingDate PurchasingPlace
CustomerInformation
Address/PhoneNo.
TypeofConsumerComplaints
WarrantyAction
WithinWarrantyPeriod
AfterWarrantyPeriod
Caseswheremalfunctionoccursintermsofperformance/functionundernormalconditionsofuse:
Whenamajorrepairisneededwithin10daysofpurchase
Exchange/Refund N/A
Whenmajorrepairisneededwithin10daysofexchange
Refund N/A
Whenmalfunctionoccursthreetimesormoreforthesamedefect
FreeRepair PaidRepair
Whenmalfunctionoccursfourtimesormoreforthesamedefect
Exchange/Refund PaidRepair
Ifanemployeelosesaproductaconsumerhasleftforrepair
Exchange/RefundRefundbyadding10%toflat-ratedepreciation
amount
Ifarepairisimpossibleduetolackofreplacementpartsunderwarranty
Exchange/Refund N/A
Ifarepairisimpossibledespitereplacementpartsinstock
Exchange/Refund N/A
Caseswheremalfunctionisattributabletoconsumer'sdefault:
-Wheremalfunctionordamagetotheproductoccursduetocarelesshandling(fall,shock,damage,abuse,etc.)ormisuse
-Wheremalfunctionoccursduetotheuseofitemsthathavenotbeendesignatedbyus-Wheremalfunctionoccursaftertheconsumerorthirdpartytriesto
repairoraltertheproduct-Malfunctionordamagetotheproductattributabletoconsumer'sintentionordefault
Othercases
-Wheremalfunctionoccursduetonaturaldisasters-Wherethelifeofaconsumablepartcomestoanend
PaidRepair PaidRepair
y Thiswarrantycertificateisvalidonlyinacountrywhereyoupurchasetheproduct.
Pittasoft Headquarters in Korea
Address #371-17, 7th fl., BYC Hi City Center A, Gasan-dong, Geumcheon-gu, Seoul, Korea
Home Page www.blackvue.com E-mail [email protected]
Service Center 1599-2772 Fax 02-6947-4697