document resume ed 052 997 se 012 155 elementary
TRANSCRIPT
DOCUMENT RESUME
ED 052 997 SE 012 155
TITLE Elementary Science Curriculum, Grade 3.INSTITUTION Stoneham Public Schools, Mass.PUB DATE [70]NOTE 98p.
EDRS PRICEDESCRIPTORS
ABSTRACT
EDRS Price MF-$0.65 HC-$3.29*Curriculum Guides, *Elementary School Science,General Science, Grade 3, *Instruction, *LaboratoryProcedures, Science Activities, ScientificEnterprise, *Teaching Guides
This is one of a set of curriculum guides for theStoneham Elementary School Science Program (see SE 012 153 - SE 012158). Each guide contains a chart illustrating the scope and sequenceof the physical, life, and earth sciences introduced at each gradelevel. For each of the topics introduced at this grade level, anoverview of the topic, a list of concepts to be developed, motivatingideas, suggested activities to develop each concept, a reading list,a list of supplies needed, and examples of student work sheets areprovided. In most activities, the teacher is expected to involve allstudents in experimenting and applying scientific thinking. Thetopics covered in the grade three guide are: magnets, the water cycleand clouds, composition and structure of the earth, the earth inspace, simple machines (inclined planes, levers, pulleys), andecological communities. (AL)

...rentemmw000rTvecr 4.9103177?1,117SIEVIVPITMMILISZI tvrn- ,..mymemlorrn-c- troPamttaraM,75122MinniZ4'1':gg.MV::
U.S. DEPARTMENT OF HEALTH,EDUCATION & WELFAREOFFICE OF EDUCATION
THIS DOCUMENT HAS BEEN REPRO-DUCED EXACTLY AS RECEIVED FROMTHE PERSON OR ORGANIZATION ORIG-INATING IT. POINTS OF VIEW OR OPIN-IONS STATED DO NOT NECESSARILYREPRESENT OFFICIAL OFFICE. OF EDU-CATION POSITION OR POLICY.
STONEHAM PUBLIC.SCHOOLS
STONEHAM, MASSACHUSETTS
ILEMENTARY SCIENCE CURRICULUM GUIDE.
GRADE 3
Superintendent of Schools Michael Scarpitto, Ph.D..
Assistant Superintendent Daniel W. Hogan, Jr.
Administrative Assistant Thomas L. Wilton
Supervisor of Elementary Education Ruth E. Mayo
r
-
Introduction to Grade 3 rriculum
These units were written as guides for teaching Science in third grade.
The activities suggested are giveh to assist the teacher in illustrating
the given concepts. In ma intandes several adtivities are suggested
for one concept. It is not expected that the teacher use all these ac-
tivities, but only those which will best suit her class. In other cases
the activities suggested follow a particular sequence which would encom
pass several days illustrating several related subconcepts along the way.
It is not expected that the third grade teacher stick rigidly to her cur.,
riculum guide. If deviating to include another concept, however, the
teacher is advised to consult other Stoneham Science Curriculum Guides
to be certain that the concept is not introduced at another grade level.
The teacher is encouraged to have reference materials in the classroom
at all times for each unit.
Whenever possible, the teacher is expected to involve all the children
in experimenting and encouraging application of the scientific method
and thinking. This would involve the following skills:
1. to formulate hypothesis
2. to reason quantitatively
3. to evaluate critically
4. to draw conclusions
5. to select procedures
6. to define problems
7. to create charts and keep records
8. to use equipment effectively
it is intended that 'the teacher will adequately adapt this guide to her
own class needs
T.
err
AVPV,VMPAPIm..P
TABLE OF CONTENTS
Page
Philosophy 1
Scope and Sequence Chart 2
Units
I - Magnets 6
II - The Clouds Above and Water Below 18
III - Our Planet: Earth . . 29
IV - Astronomy 44
V - Machines 61
VI - Communities of Life 80
STATEMENT OF PHILOSOPHY
.We have all experienced the Cohfueion of sorting out events
that cote at us, seemingly, hat)hazardly. We try to petceive the link, the
relationship that will make everything cear, that will help us decide.
In fact, from the time we are born the main activity of our lives is trying
to sense some order in out constantly changing, world. Science is a tool
that ban uses to seek order. Modern science has evolved not only as a body
of fact, but also as a logical approach to problem solving. In the elemen-
tary school this aspect of science should not be overlooked. The study of
acience should encourage growth in the ability to solve problems, as well
as introduce a background of knowledge.
To achieve this goal the emphasis must shift away from the teach-
ing of "facts" to the development of such abilities as: observation, col-
lection of information, classification, formation of hypotheses, data in-
terpretation, generalization, and prediction. Thus the process of learning
becomes just as important as the information obtained.
This approach to teaching science transforms the classroom into a
laboratory and the children into scientists working within it. The teacher
provides enough orientation so that the children develop goals of their own,
and guides them through concrete experiences that nurture both technique and
knowledge of facts. There are many outcomes of a lesson: skills, facts,
aroused curiosity, ideas, and discovery of new relationships. The pupils
gain confidence in their own ability to learn, 'a proceas which will be valu-
able long after the facts are forgotten.
1
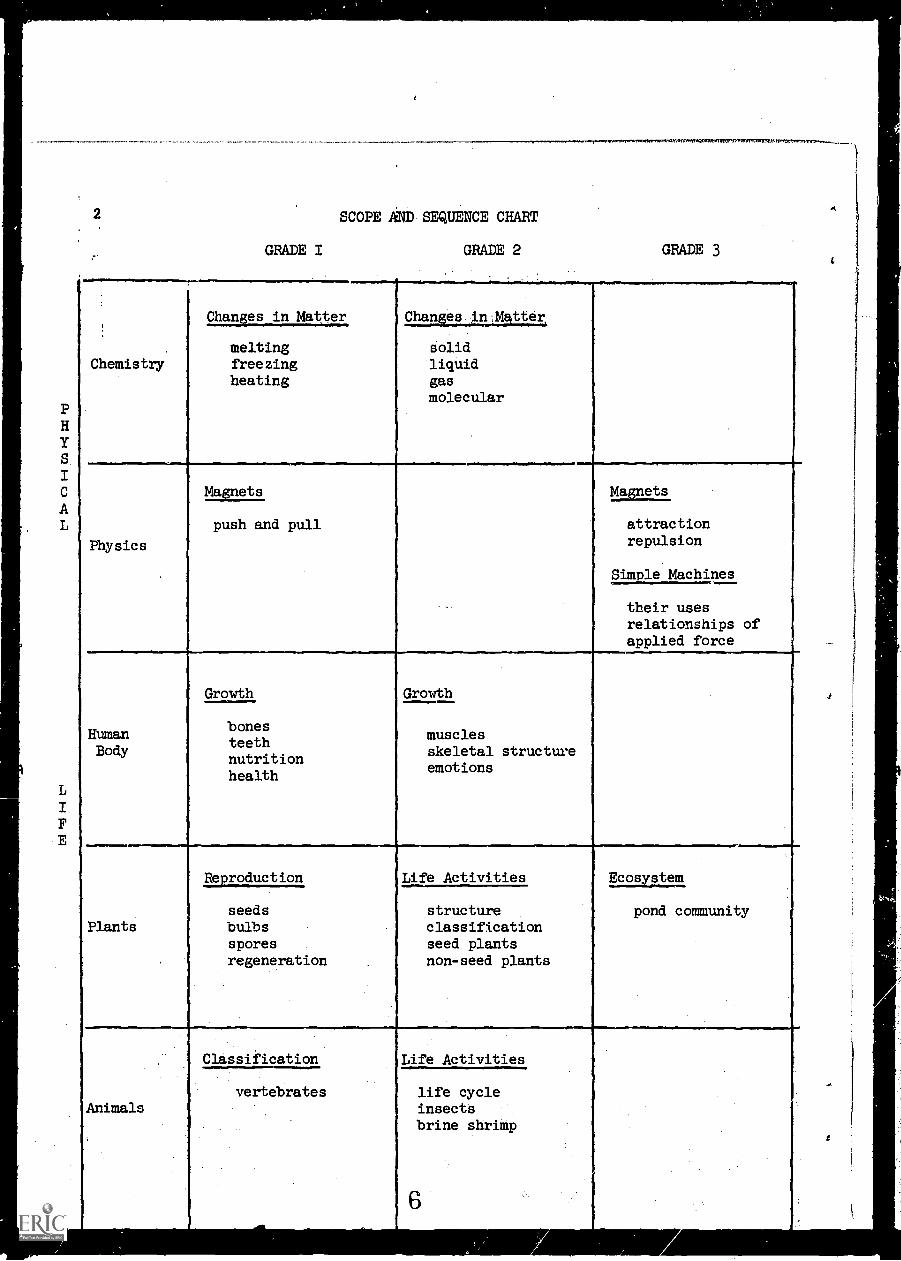
GRADE I
SCOPE AND SEQUENCE CHART
GRADE 2
......r....romnewevera.rInemIcennrs,1.0CfananstMIVIMMOTIMIttrirtkir
GRADE 3
..."......P..........w.aear
Chemistry
Changes in Matter aisigiudet-4.
meltingfreezingheating
solidliquidgas
molecular
Physics
....
Magnets Magnets
push and pull attractionrepulsion
Simple Machines
their usesrelationships ofapplied force
HumanBody
Growth Growth
bonesteethnutritionhealth
musclesskeletal structureemotions
Plants
Reroduction Life Activities Ecosystem
seedsbulbssporesregeneration
structureclassificationseed plantsnon-seed plants
pond community
Animals
Classification Life Activities
vertebrates life cycleinsectsbrine shrimp
g
C.
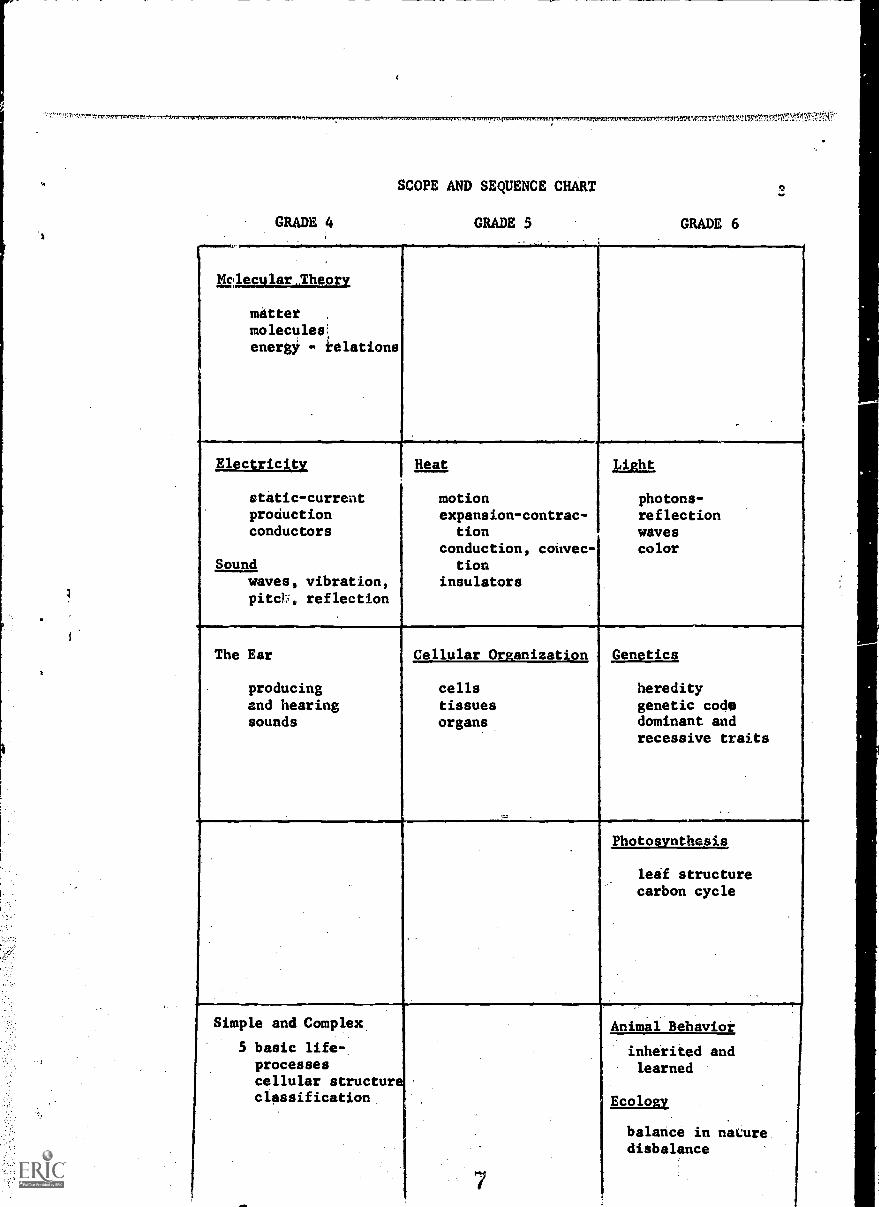
GRADE 4
=100ttritIrE,
SCOPE AND SEQUENCE CHART
GRADE 5
tamsnr,,mr,,,tnna Anal?: ,
GRADE 6
1-4rslecular.Theory
mattetmolecules,energy - ielations
Electricity Heat Light
static-currentproductionconductors
Sound
motionexpansion-contrac-
tionconduction, convec-tion
insulators
photons-reflectionwavescolor
waves, vibration,pitch., reflection
The Ear
producingand hearingsounds
Cellular Organization Genetics
cellstissuesorgans
hereditygenetic codedominant andrecessive traits
Photosynthesis
leaf structurecarbon cycle
Simple and Complex
5 basic life-processescellular structurclassification.
7
Animal Behavior
inherited andlearned
Ecology
balance in nature.disbalance

4
GRADE 1
SCOPE AND SEQUENCE CHART
GRADE 2 GRADE 3
Astronomy
E
A
R
T
H
....--m
Earth - Sun"- Moon
.
Solar System
rotationday and night
orbitsrevolutiotsseasonal change
Geology. .
Fossils Earth Composition
dinosaursfuelsevolution
soilrock formationclassification
[Meteorology
Changes in Weather
.,-,-2.-4
21121Laal-
cloud formationprecipitationweather prediction
clouds
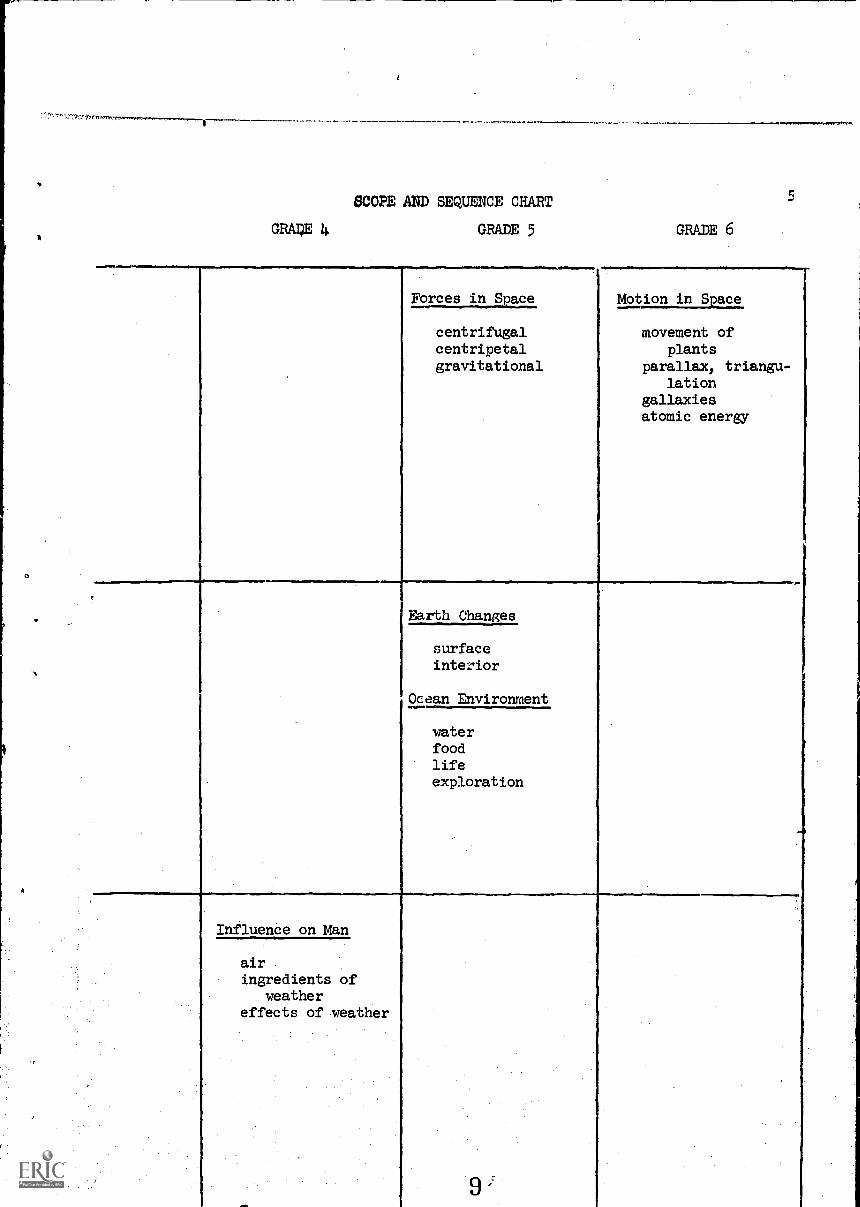
SCOPE AND SEQUENCE CHART
GRAPE 4 GRADE 5 GRADE 6
Forces in Space Motion in Space
centrifugalcentripetalgravitational
movement ofplants
parallax, triangu-lation
gallaxiesatomic energy
Earth Changes
surfaceinterior
Ocean Environment
waterfoodlifeexploration
Influence on Man
airingredients of
weathereffects of weather
_
6
MAGNETIC FORCE
Objective:
1. To familiarize students with magnetic properties do that they mayinfer how magnets help us do work.
2. To underdtand how magnetic force indicates direction.
3. Promote scientific thinking.
Concepts to be Developed
1. Magnets may vary in shapes and sizes.
2. Magnets attract things made with iron and steel.
3. A magnetic field is the region around a magnet in which a magneticeffect is produced. The field is most powerful at the magnetsends or poles.
4. The force of magnetism can attract through many materials.
5. A magnet can be made only out of those materials that are them-selves attracted to a magnet.
6. All magnets have two ends called poles.
7. A suspended magnet will align itself in a north-south direction dueto the earth's magnetic poles.
8. Dropping, heating or storing a magnet improperly will weaken itsforce.
Motivation
1. Ask children to bring magnetic toys to class which they have athome. Let each child who brings one demonstrate how it works.Allow them to t111 why the toys function as they do. *Skillfulquestions by the teacher will help reveal what the children alreadyknow about magnets from previous experience. Try to find the mag-net in each toy.
2. Arrange a display of various types of magnets including anatural magnet, lodestone. Have available things that will beattracted and things that will not. Observe questions asked andgeneral knowledge evident and adapt unit accordingly.
1 0
3. Show film Michael Discovers the Magnet
Activities for: Magnets Have Force
- 1. MAGNETS MAY VARY IN SHAPES AND SIZES
4.10 OM
A. Make a collection of magnets. Several bar magnets, a horse-shoe magnet, a U-magnet and a lodestone are desirable. Have
the children examine the different kinds of magnets.*Select a child to find out more about lodestones in refer-ence books.
2. MAGNETS ATTRACT THINGS MADE OF IRON AND,STEEL
A. Materials: several magnets, 3-inch string, numerous attract-able objects (have several non-attractable metals).
Procedure: Pose this problem or facsimile: A boy droppedhis penny into a grating and wanted to get it back. Howcould he get it? (Could a magnet on a string help him?)Take a vote and then try it. After failure to attract,make hypothesis on whether the following will be attracted:
Name Made of We Think. We Found Out
1. nails iron2. comb rubber3. pins steel4. hair curler alumin.5. penny bronze6. scissors steel7. coat hanger iron
(etc.)
Conclusions: Guide the children to observe that the objectstested successfully were made of iron or steel. A magnet couldnot retrieve a penny but one of sufficient strength could re-trieve an object made of iron or steel.
B. Materials: nail file (or small coarse rock), magnet, severalidentical appearing straight pins of steel and brass.. (Testwith magnet to determine which are steel).
Procedure: Ask someone to put some straight pins in a box.Have them use a magnet to make the task "easier." When failureis experienced with the brass pins, let the children firstdefine the problem, then raise hypothesis as to why failureoccurred. Attracted and unattracted pins may be rubbedagainst a nail file or rough stone, As the thin coating is:
7
8
worn Away, steel pins will appear dull gray and brass pions
411 appear yellowish. Let the'test continue until a;pattern develops. All attracted pins will be one color, allUnattracted pins another. This will help verify the hypothesis.
Conclusions: Bring out that some pins were made of steel and.some'of brass -.a metal that is not attracted by magnetism.
C.-'ineeurage,thildren to bring in other materials and magnets thatti*Ve*t by tested. This is an open-end activity. Follow a .
hypothesis-test procedure.
3: MAGNIVIC.ITE IS THE REGION AROUND A.MAGNET IN WHICH A MAGNETICittotigtEFFECT.1S' __ED, THE FIELD IS MOST POWERFUL AT THE MAGNETS END,
A. Materials: container of iron filings (salt shaker) or a hand-ful of tiny nails; a sheet of stiff white paper; several paperclips; a powerful magnet.
:Procedure: (Motivation) - How close must a magnet be to attractiron or steel things? Allow ,several children to try differentdistances with a magnet and paper clips. Have them determine4lich part of the-magnet appears most powerful. If several mag-nets of differing strengths are available, let the, children showthat some will attract over a greater distance than others. "Howis it possible for these magnets to pick up things without touch-ing them?" Lay a magnet on a table and place the white paperover it. Explain that the container holds small bits of ironcalled "filing/6u Sprinkle some' filings on the paper above themagnet. Tap the paper gently to assist in distribution offilings. Have the children observe the orderly arrangement offilings around the magnet. Tell them that this is the magnet'sfield of force.
Conclusions: Concentration of lines of force seem greatestatthe poles. Bring out that this is probably:why-the ends ofthe magnet seemed more. powerful than. its'other parts.
B. Make permanent records of.lines of forC4 withdifferentalag-nets. Sprinkle iron filings on blueprint papei,laid over amagnet. Place carefully ina sunny area Wittiout.disturbing thepattern. EXpOse:S or110 minutes. Brush or shake_filings offand run cold water over blueprint. A permanent record of linesof force will be recorded.
4. THE FORCE OF. MAGNETISM CAN ATTRACT THROUGH MANTIIATERIALS.
A.. Materials:' flat, thin pieces of glass, steel (can tops),:plastic, aluminum or aluminum foil, wood, etc.; magnet; string;Paper clip; ruler; books:
12
:4
9
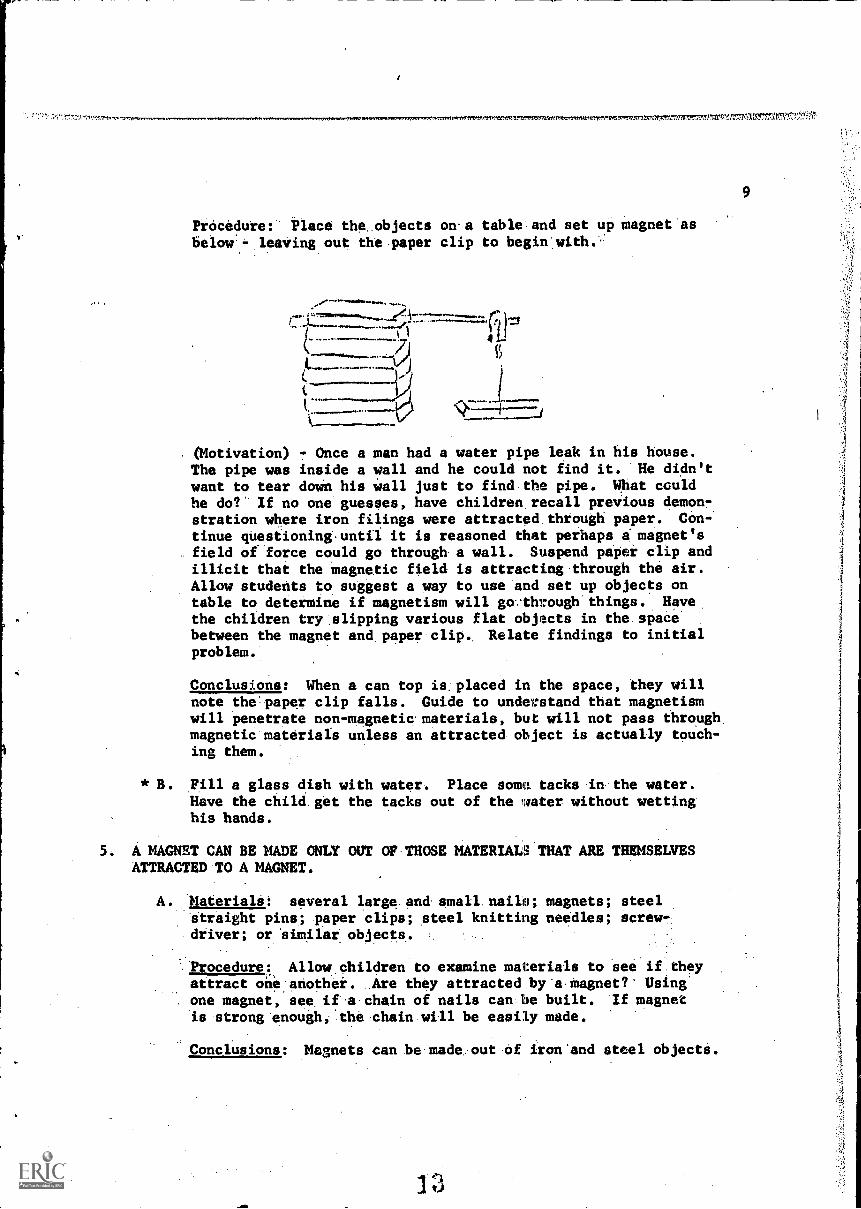
Procedure: Place the objects on a table and set up magnet asbelow-leaving out the paper clip to begin with..
t ..0/Mmr....Nsayel
) Si
)
i22.±11EEEE/
. (Motivation) - Once a man had a water pipe leak in his house.The pipe was inside a wall and he could not find it. He didn'twant to tear doWn his wall just to find the pipe. What couldhe do?' If no one guesses, have children recall previous demon-stration where iron filings were attracted through paper. Con-.
tinue questioninguntil it is reasoned that perhaps a magnet'sfield of force could go through a wall. Suspend paper clip andillicit that the magnetic field is attracting through the air.Allow students to suggest a way to use and set up objects ontable to determine if magnetism will go:through things. Havethe children try .slipping various flat objects in the spacebetween the magnet and paper clip.. Relate findings to initialproblem.
Conclusions: When a can top is. placed in the space, they willnote the-paper clip falls. Guide to understand that magnetismwill penetrate non-magnetic. materials, but will not pass throughmagnetic materials unless an attracted object is actually touch-ing them.
* B. Fill a glass dish with water. Place some tacks in-the water.Have the child get the tacks out of the water without wettinghis hands.
5. A MAGNET CAN BE MADE ONLY OUT OF THOSE MATERIALS THAT ARE THEMSELVESATTRACTED TO A MAGNET.
A. Materials: several large and small nails; magnets; steelStraight pins; paper clips; steel knitting needles; screw-driver; or 'similar objects.
.Procedure: Allow, children to examine materials to see if theyattract oneanothei. Are they attracted by 'a magnet?* Using'one magnet, see if a chain of nails can be built. If magnetis strong enough,.the chain will be easily made.
Conclusions: Magnets can be made out of iron 'and steel objects.
U
..4101.10111
B. Materials: Magnet, large nail or. steel knitting needle.
Procedure: Show that the nail is not a magnet by touching itto a paper clip. With either pole of a magnet, stroke the nailits entire length in one direction only. Call this to thechildren's attention. Lift the magnet at the end of each strokefor 20 or 30 strokes. Demonstrate that the object is now a mag-net.
Conclusions: &magnet can magnetize a magnetic object.
C. Will a nail's magnetism get more powerful the more it isstroked? (Test after each 10 strokes with a magnet.)
D. Which can be magnetized more easily - a soft iron nail or aknitting needle made of hard steel? (Each object is first testedfor magnetism, stroked once before each test, tested again withpaper clips, and so on.)
E. Which will keep its strength longer - the magnetized, soft ironnail, or the magnetized needle made of hard steel? (Same pro-cedure as above is followed, except that objects are initiallystroked more times and tested after a five minute or longer in-terval.)
F. Will a magnet you make be more powerful if stroked in one direc-tion or back and forth in two directions? (Use two identicalnails. Test to see if magnetized. Stroke both 30 times - onein both directions and one 15 times each way. Test with paperclips.)
6. ALL MAGNETS HAVE 2 ENDS, CALLED POLES. THE POLES ARE LABELED N (NORTH)AND S (SOUTH). IF 2 UNLIKE POLES ARE BROUGHT TOGETHER, THEY ATTRACTONE ANOTHER. TWO LIKE POLES WILL REPEL ONE ANOTHER.
A. Materials: 2 magnets, which have marked poles; string
Procedure: Suspend one magnet on a string an that it will befree to move. Bring one pole of the second magnet within thefield of force of the suspended one. Allow children to observethe attraction of opposite poles and the repelling of 2 likepoles.
Conclusion: Opposite poles attract each other. Like poles re-pel one another. Opposite fields of force attract and likefields of, force ..repel,..
Materials: shallow pan, water, cork, stiff paper, magnetizedneedle.
Procedure: Make a boat of cork, stiff paper and magnetizedneedle. Allow the children to experiment with their magnets inmoving the boat. (When boat is pulled the magnet attracts it.When boat is pushed, the magnet repels it.
Conclusion: The fields of force are attracting and repelling.
7. A SUSPENDED MAGNET WILL ALIGN ITSELF IN A NORTH .6 SOUTH DIRECTION DUETO THE EARTH'S MAGNETIC POLES. COMPASS NEEDLES ARE FREELY SWINGINGMAGNETS.
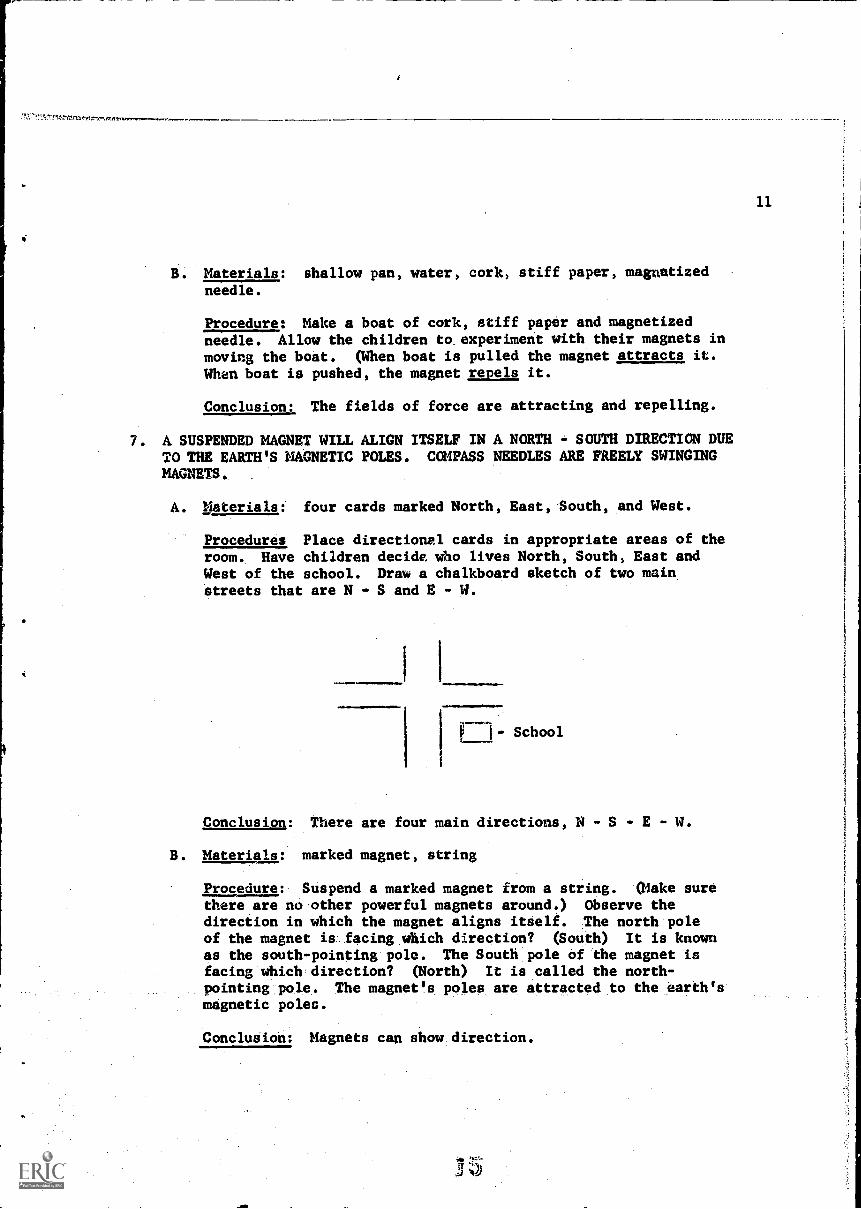
A. Materials: four cards marked North, East, South, and West.
Procedures Place directional cards in appropriate areas of theroom. Have children decide, who lives North, South, East andWest of the school. Draw a chalkboard sketch of two mainstreets that are N S and E - W.
School
Conclusion: There are four main directions, N - S - E - W.
B. Materials: marked magnet, string
Procedure: Suspend a marked magnet from a string. (Make surethere are no other powerful magnets around.) Observe thedirection in which the magnet aligns itself. The north poleof the magnet is facing which direction? (South) It is knownas the south-pointing pole. The South, pole of the magnet isfacing which direction? (North) It is called the north-pointing pole. The magnet's poles are attracted to the earth'smagnetic poles.
Conclusion: Magnets can show direction.
VCIA011.717, TJ eleitostammowlIMNWIIMIt
C. Materials: Several cdmpasbek;
.
Procedure: Allot,/ Children to observe that the north-pointingpoles of the compass needles point toward the same direction -north.
Conclusion: Compasses show direction.
D. Which pole of the compasses magnet needle points North? Whichpoints South? Why?
E. Why might you want to know which direction is north?
F. How can knowing which direction is north help yod find otherdirections?
8. DROPPING, HEATING, OR STORING A MAGNET IMPROPERLY WILL WEAKEN ITSFORCE.
A. Materials: candle; two identical steel knitting needles; mag-nets; pliers; paper clips.
Procedure: Make sure knitting needles are magnetized to thesamedegree. Drop only one magnet 20 - 30 times. This shouldproduce a noticeable difference in its attractive force. Helpchildren to record pre-test and post-test results in this way.
Dropped Magnet Other Magnet
Before 5 clips 5 clipsAfter 3 clips 5 clips
Conclusion:. Dropping a magnet will reduce magnetism.
B. Procedure: Re-magnetize needles. Develop a similar procedurewith heat as the critical factor. Pliers or tongs could holdmagnet while being heated in candle flame. A minute is usuallylong enough for significant results. Use paper clips for pre-test and post-test comparisons. Test control magnet to affirmconclusions.
C. Why can magnets easily be de-magnetized.
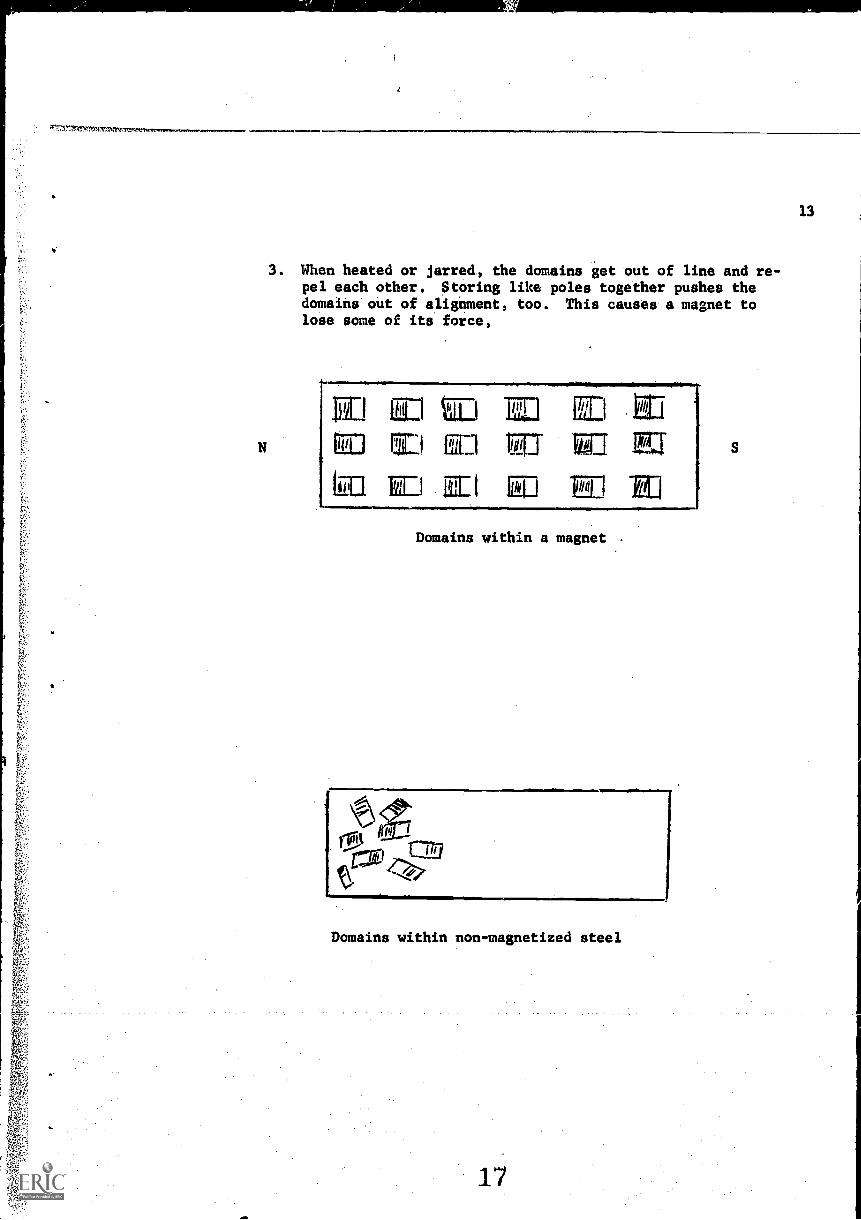
1. Magnets have inside them tiny, invisible particlescalled domains. Domains donYt really resmble thediagram but it is easier for pupils to understand thetheory.
2. When domains are lined up, they act like tiny magnetswhich are pointed in one direction. Stroking a needleor nail with a magnet is one way to arrange them in aline.
Yr
MIRMEINOMME
N
3. When heated or jarred, the domains get out of line and re-pel each other. Storing like poles together pushes thedomains out of alignment, too. This causes a magnet tolose some of its force,
Fri ziED lteL1
WI El Er) E
EE
Domains within a magnet
S
13
Domains within non-magnetized steel
17
14
Culminating Activity
Allow children to bring in Magnetic objects they are familiarwith and explain how they operate.
Worksheet Ideas.
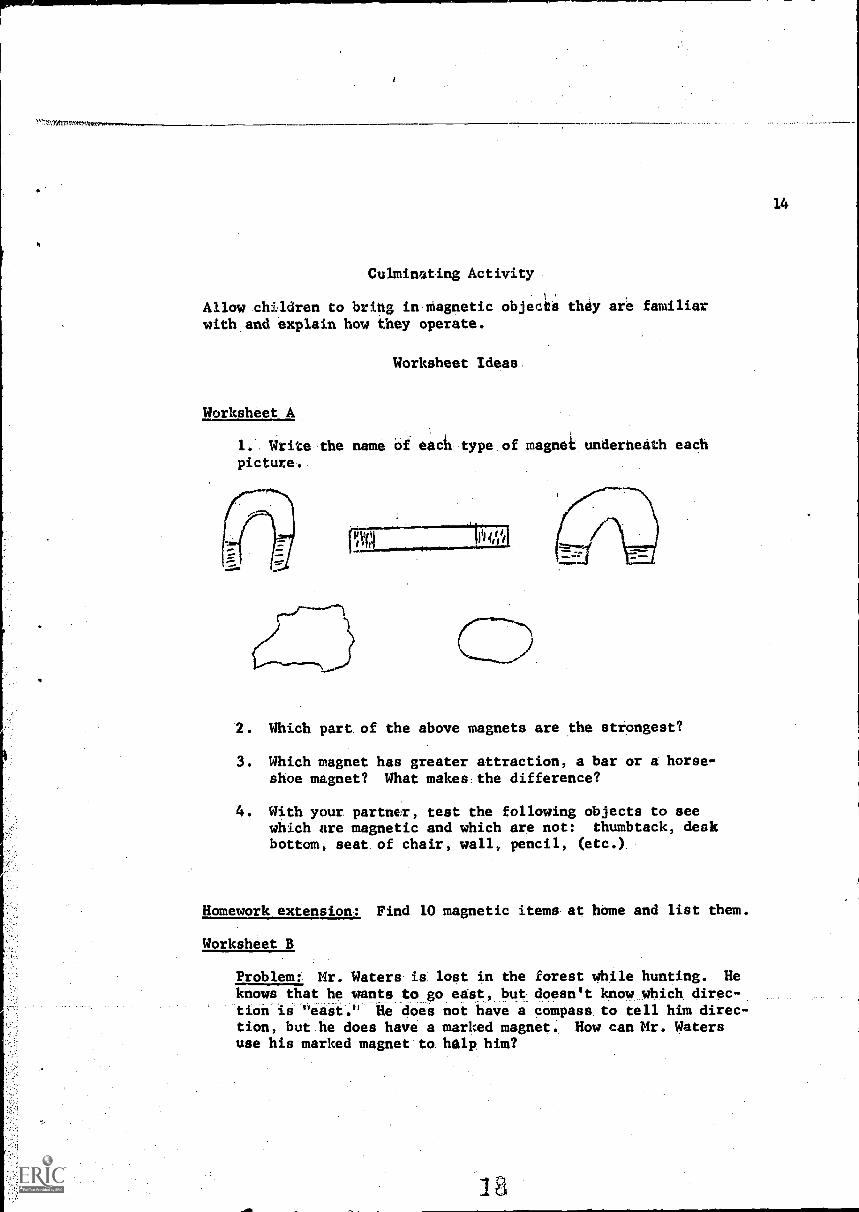
Worksheet Et
1.. Write-the'name of eactiHtype of magnet underneath eachpicture,,
00
2. Which part. of the above magnets are the strongest?
3. Which magnet has greater attraction, a bar or a horse-shoe magnet? What makes the difference?
4. With your partner, test the following objects to seewhich are magnetic and which are not: thumbtack, deskbottom, seat of chair, wall, pencil, (etc.),
Homework extension: Find 10 magnetic items at home and list them.
Worksheet B
Problem. Mr. Waters is lost in the forest while hunting. He
knows that he wants to go east, but doesn't know which direc-tiOnis 'east." He does not have a compass to tell him direc-tion, but.he does have a marked magnet.. How can Mr. Watersuse his marked magnet to. halp him?
18
wommommmmmMMMMM V
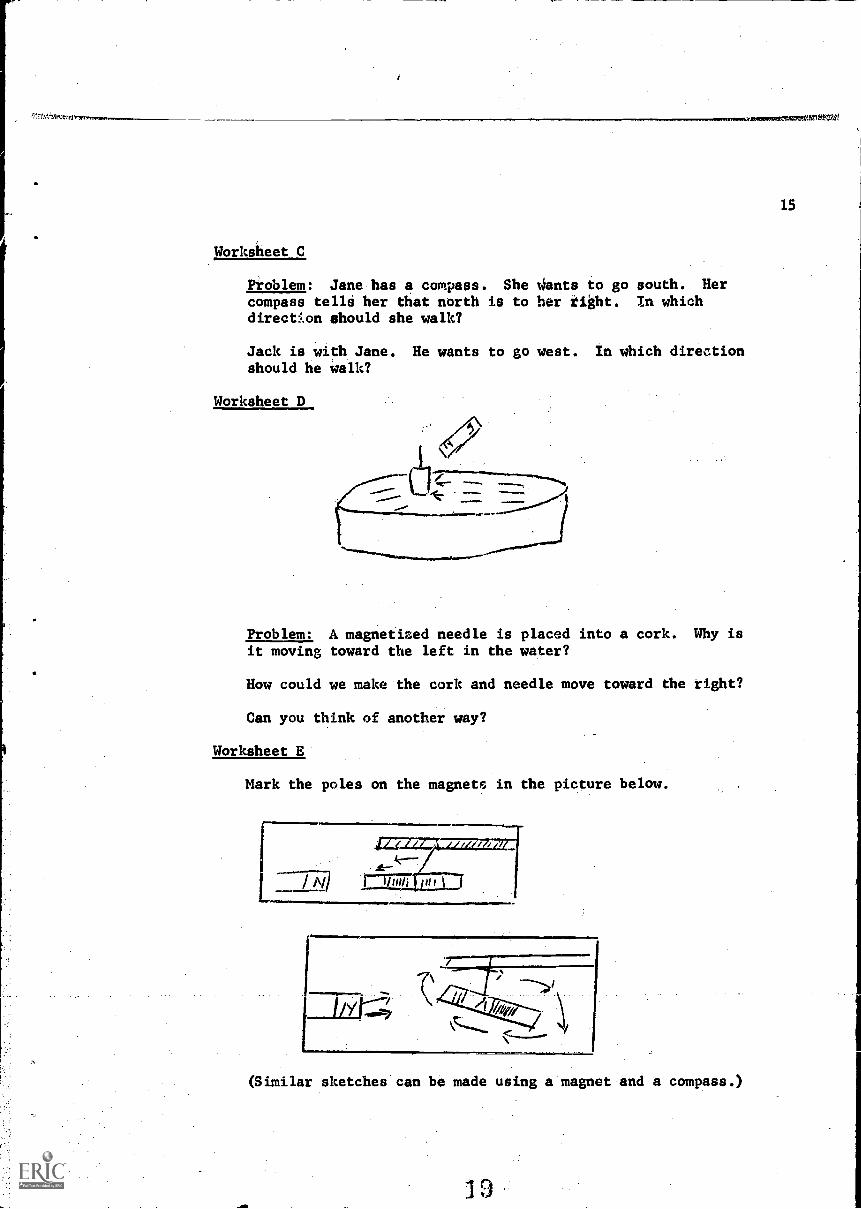
Worksheet C
Problem: Jane has a compass. She N4ants to go south. Hercompass tells her that north is to her tight. In whichdirection should she walk?
Jack is with Jane. He wants to go west. In which directionshould he walk?
Worksheet D
Problem: A magnetized needle is placed into a cork. Why isit moving toward the left in the water?
How could we make the cork and needle move toward the right?
Can you think of another way?
Worksheet E
Mark the poles on the magnets in the picture below.
(Similar sketches can be made using a magnet and a compass.)
11
15
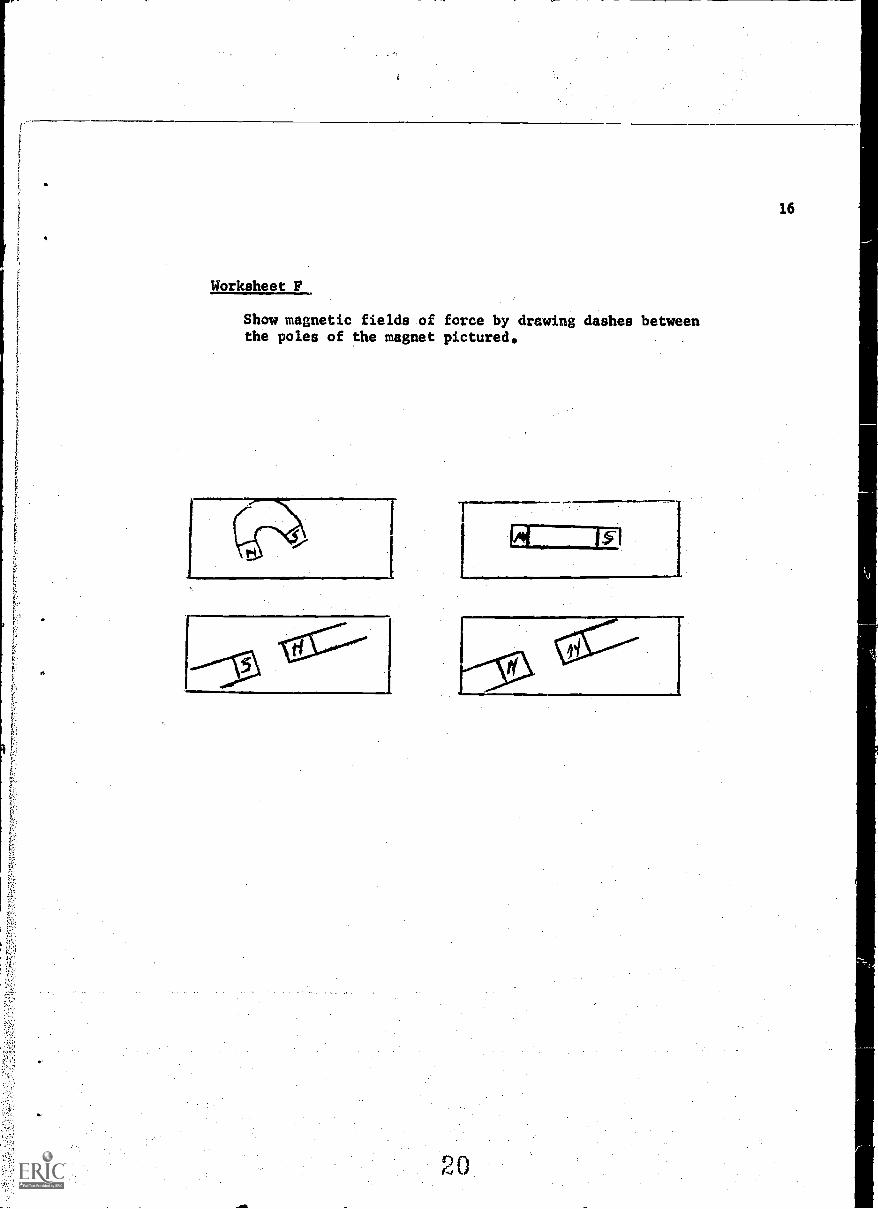
Worksheet F
Show magnetic fields of force by drawing dashes betweenthe poles of the magnet pictured.
20
16
17
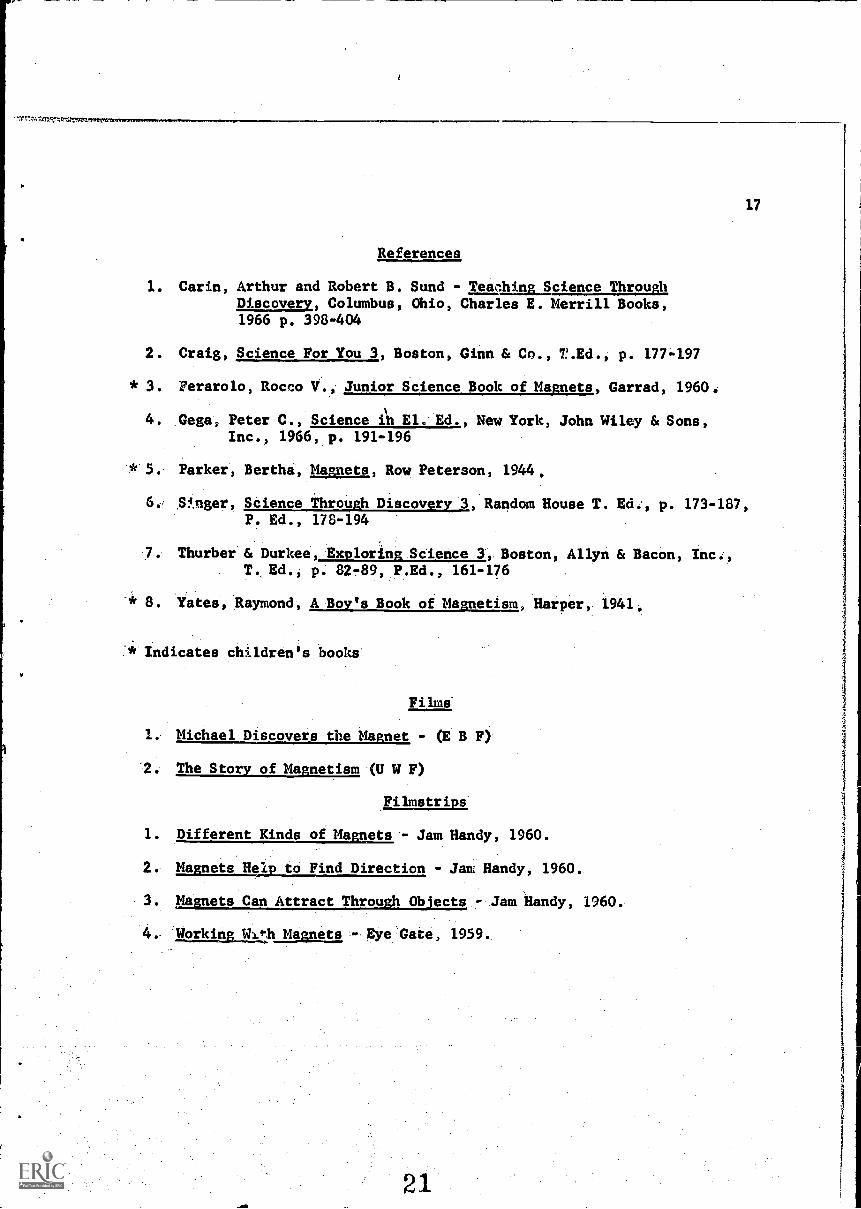
References
1. Carin, Arthur and Robert B. Sund - TeachingLScience ThroughDiscovery, Columbus, Ohio, Charles E. Merrill Books,1966 p. 398-404
2. Craig, Science For You 3, Boston, Ginn & Co., T.Ed. p. 177 -197
* 3. Ferarolo, Rocco V. Junior Science Book of Magnets, Garrad, 1960.
4. Gega, Peter C., Science & El. Ed. , New York, John Wiley & Sons,Inc., 1966, p. 191-196
* 5. Parker, Bertha, Magnets, Row Peterson, 1944,
S:Inger, Science Through Discovery 3, Random House T. Ed:, p. 173-187,P. Ed., 178-194
7. Thurber & Durkee, Exploring Science I,. Boston, Allyn & Bacon,. T, Ed., p. 82 -89, P.Ed., 161-176
. Yates, Raymond, A Box's Book of Magnetism, Harper, 1941.
'* Indicates children ',s books
Films
1. Mich_ ael Discovers the Magnet - (E B F)
2. The Story of Magnetism (U W F)
Filmstrips
1. Different Kinds of Magnets- Jam Handy, 1960.
2. Magnets Help to Find Direction - Jam Handy, 1960..
3. Magnets Can Attract Through Objects - Jam Handy, 1960.
4. 11014mgEkth Magnets - Eye Gate, 1959.
21a
18
Clouds Above and Water Below
Obiectives
1. To become aware of the water cycle and comprehend its per-petuality.
2. To differentiate between cloud formations and understand theirmeanings concerning weather prediction.
36 To promote scientific thinking.
Concepts
1. Water is continually with us, but in differing states.
2. Water evaporates into the air;'evaporation is effected bywind, temperature and the amount of water surface exposedto the air.
3. Precipitation occurs when the evaporated water vapor condenseson cool dust particles and the tiny droplets merge; the heavydrops fall to the earth. Precipitation takes several forms.
Motivation:
Question: Have you ever wondered why it rains and snows? In
this unit we are going to find out.
Bulletin Board
Display pictures of various forms of precipitation andbelow them the word "WHY?"
WATER IS CONTINUALLY WITH US, BUT IN DIFFERING STATES. (FORMS)
Water can appear in liquid form.,
A. Establish that water is visible in its liquid state by pouringwater from one container to another. Establish also that water istransparent by placing an object at the bottom of a bucket ofwater.
B. Review and discuss uses of water in its liquid state.
Water can appear in vapor form.
C. Demonstrate water vapor (tiny droplets of water) by boiling waterand observing steam. A vaporizer may also be used. What isanother name for water vapor? (steam) Where have they seen watervapor before? Radiator, out of cooking foods, fog, clouds.
Establish how water vapor may be used.
22
3",r
19
Water canappear the form of a gas.
D. This can be shown through the principle of evaporation. Ask whathappens to the puddles after a rain storm. (they disappear.)
Bring out that this is evaporation. What happens to the earlymorning dew?
The Water Cycle
When precipitation ensues watet soaks into tlie gtound. When the groundis soaked it begins, to flow downhill through soli and rocks until itreaches bedrock. It may flow along bedrock until it reaches an openplace. Some water keeps flowing until it reaches the sea. Water whichdoesn't flow down evaporates.
The water of the earth is always changing. The liquid water evaporatesto form water vapor. Water vapor condenses to form liquid water again.The changes of the water on the earth from liquid, to water vapor andback to liquid again is called the water cycle.
23
)
0 0
P
't1
I
60
14
)
0-
: ;
0Ci 0
--...--__
Simplified illustration of the water cycle
O
WATER EVAPORATES INTO THE AIR; EVAPORATION IS.EPPECTED BY WIND, TEM-PERATURE AND THE AMOUNT OF WATER SURFACE EXPOSED TO T1E AIR.
A. An instance where evaporation takes place may be shown with thesethree sketches of an aquarium. Tell the class that a few weekstime had elapsed between each sketch.
A
21
C
Ask pertinent questions. Where is the water going in sketchesB and C?
B. Materials: two glasses, (cover for one), water, sunny warm place
Procedure: Put three inches of water in each of two glasses in asunny, warm place. Cover one glass. Measure the water in eachglass every day. Keep a record of the findings.
Conclusiont Water evaporates into the air. The covered glassprevented noticeable evaporation.
Cite instances in which evaporation could be helpful. Could it betroublesome?
C. Materials: electric fan, pan of water, two identical handker-chiefs, string, hot plate or sunlight
Procedure: The two identical handkerchiefs may be soaked in waterand wrung out with equal force. One should be placed on a lineover a hot plate, or in the sun. The second handkerchief could beiaced on the same line but should be away from the hot plate or inthe shade. Which handkerchief dried first?
The same basic procedure will do for testing the effect of wind.Substitute the effect of a fan (wind) on drying the two identicalhandkerchiefs.
How might humidity effect evaporation? (Humidity - amount ofwater In the air.) -What are foggy days like?
22
When there is much water in thwair,'how will clothes drying beeffected? *Ask mothers.
Conclusion: Heat, wind and humidity are three factors effectingevaporation. Heat and wind speeds evaporation. A low humidityAids evaporation.
D. Materials: a cake or pie tin:, two drinking glasses, water
Procedure: Put equal amounts of Water into a glass and a cakeor pie tin.. (Allow students to determine controls.Y Havechi1dren,examine resulte the next day. Emphasize any disagree-,ment. as to which bowl contains the least water. Guide them tosee that a preCite comparison can be made by carefully pouringthe remaining water into two identical glasses.
,.
Concluoion: A larger surface area increeies,evaporation.:* WhY does an opened, spread-out bathing suit dry.fadter than 040crumPled,intaaballl,* dci.people sweep out Water'puddles over a larger area?
Subconcept - Air contains moisture which condenses when it cools.
A. Materials: spoon, sugar, ink, 2 identical tin cans, ice cubes,container of water at room temperature.
Procedure: Encourage children to recall what happens to apitcher filled with cold water or lemonade on a hot day. Havethem recall that sometimes the containers holding these liquidsfeel wet. This usually happens when the container is cool. Doesit have to be cool?
You can test with two cans of water, one with and one withoutice cubes. Shortly, a beaded film of water should appear allover the cooler can.
Where does the water come from? Is it from inside or outsidethe can? Test for a leaking can.
1. add sugar to ice water.2. add ink to ice water.
Conclusion: Water appears to be coming from the air surroundingthe cooled container. Bring out that this event is condensation,the opposite of evaporation.
B. Cite instances in which condensation was noticed by children, suchas the following:
1. During shower or bath, water condenses on cooler mirror andwalls.
2. Condensation on windows (warm air on cold windows.)
3. Water in the air condenses on cold water pipei in a basement:
26
1MmIVITRIMR.IrTIT
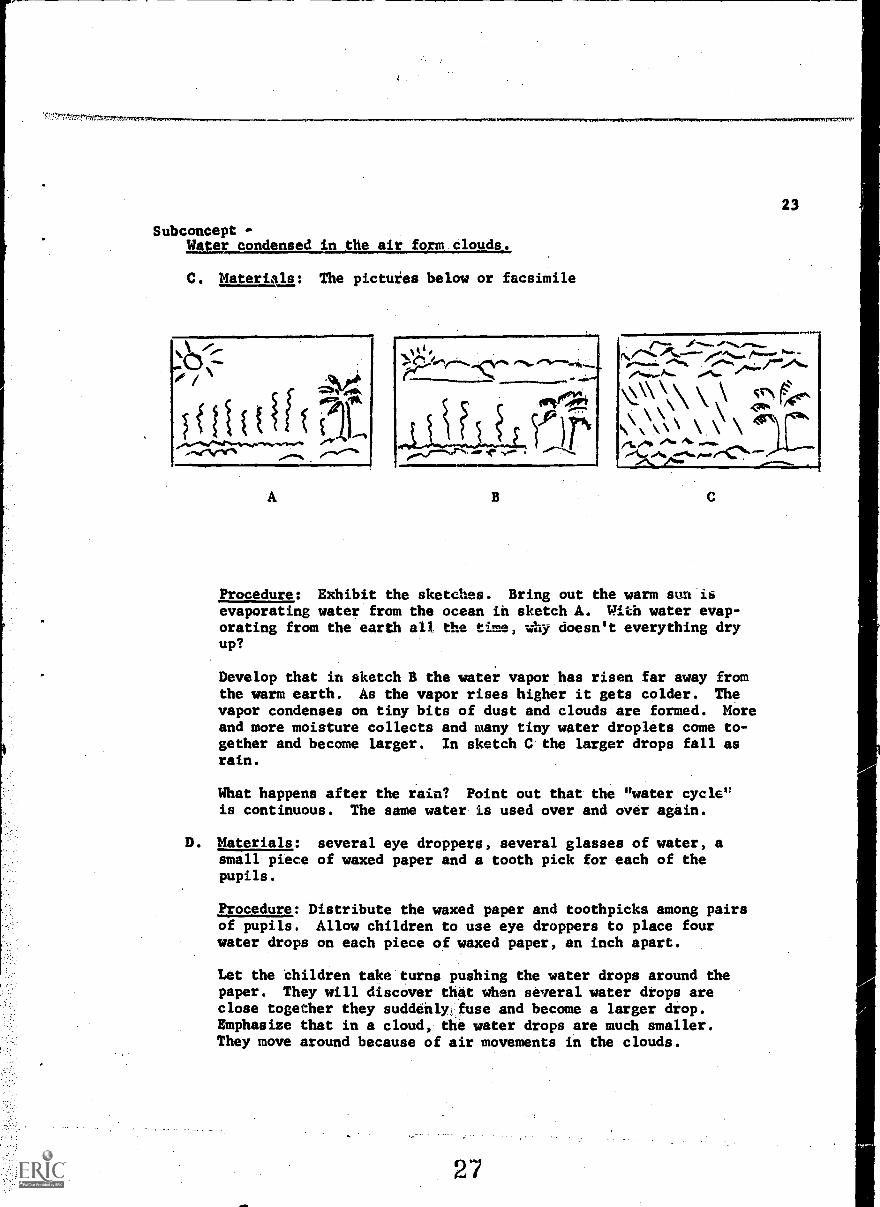
Subconcept -Water condensed in the " .1°r111.61°u".
C. Materials: The pictuies below or facsimile
/,/r
{1101i(cflf:
A B
444:0.\\
C
Procedure: Exhibit the sketches. Bring out the warm sun isevaporating water from the ocean in sketch A. With water evap-orating from the earth all the time, why doesn't everything dryup?
Develop that in sketch B the water vapor has risen far away fromthe warm earth. As the vapor rises higher it gets colder. Thevapor condenses on tiny bits of dust and clouds are formed. Moreand more moisture collects and many tiny water droplets come to-gether and become larger. In sketch C the larger drops fall asrain.
What happens after the rain? Point out that the "water cycle"is continuous. The same water is used over and over again.
D. Materials: several eye droppers, several glasses of water, asmall piece of waxed paper and a tooth pick for each of thepupils.
Procedure: Distribute the waxed paper and toothpicks among pairsof pupils. Allow children to use eye droppers to place fourwater drops on each piece of waxed paper, an inch apart.
Let the children take turns pushing the water drops around thepaper. They will discover that when several water drops areclose together they suddehlyjuse and become a larger drop.Emphasize that in a cloud, the water drops are much smaller.They move around because of air movements in the clouds.
PRECIPITATION OCCURS WHEN THE EVAPORATED. WATER VAPOR CONDENSES ON COOLDUST 'PARTICLES AND THE TINY DROPLETS MERGE;. THE HEAVY.DROFS FALL TOTHE EARTH. ..PRECIPITATION TAKES SEVERAL FORMS.
A. Materials: teakettle containing about an inch of water, hotplate, tray or can of ice cubes; sketches a, b, and c usedpreviously
Procedure: From sketchei, draw out that three .thiligs were
needed for rain to occur: water, a source of heat to evapo-rate the water, and dust particles on which the cooling watercould condense,
Ask how the aboire materials could be used to "make rain.
Draw out:
1. tea ketile could be used for Water.2. hot plate will help water to evaporate.3. cold tray will help evaporated water condense.
Set teakettle on hot plate. When it begins emitting visibleWater vapor, place the cold trap in the "cloud." Water vaporwill condense into large water drops and fall as "rain."
Review this analogy to assist understanding of actual process.
B. Discuss the various forms of precipitation, and the prepara-tion which must be made and precautions that must be taken foreach type.
A. rain2. snow3. hail4. sleet
*Picttires might facilitate discussion.*Children might role play their experiences with precip-itation.
C. Rain can be made by placing a cool lid on a warm, moistterrarium.
CLOUDS TAKE VARIOUS FORMS. WE CAN OFTEN DETERMINE THE TYPE OF PRECIP-ITATION WHICH WILL ENSUE,
A. Have pictures on display of these cloud types: fog, cumulus,thunderheads, nimbus, cirrus and stratus.
Allow children to recall weather conditions which usuallyaccompany each type of cloud.
28
24
Anwprownrywninwer,wwwwwwerxmegar .44MIRILT
25
cumulus -
thunderhead -
T.11....inklia
cirrus
stratusfog
B. Make, a chart showtnmeaning."
means "heap" - good weatherthunderstormsmeans "rainstorm" - rains (usually
clode to the grounds)means "cUrl" - made of ice - faiicweathermeans "layer" - rain is coming'a cloud touching the ground
a picture:of.eich type of'cloud and iti
C. Children should be introduced to how other types of precipitationare formed.
snow - Formed when parts of a cloud become very cold.sleet - Formed as raindrops fall through very cold
air and freeze. Sleet is frozen rain.hail - Pieces of ice are blown into the clouds where
water forms on each piece. The piece of icemay then fall through cold air and turn toice. (This process may happen many timesbefore the ball of ice falls to earth.)
* If hail can be obtained, allow children to split the hailstones tosee the "growth rings."
29
Cu lininajing Activity
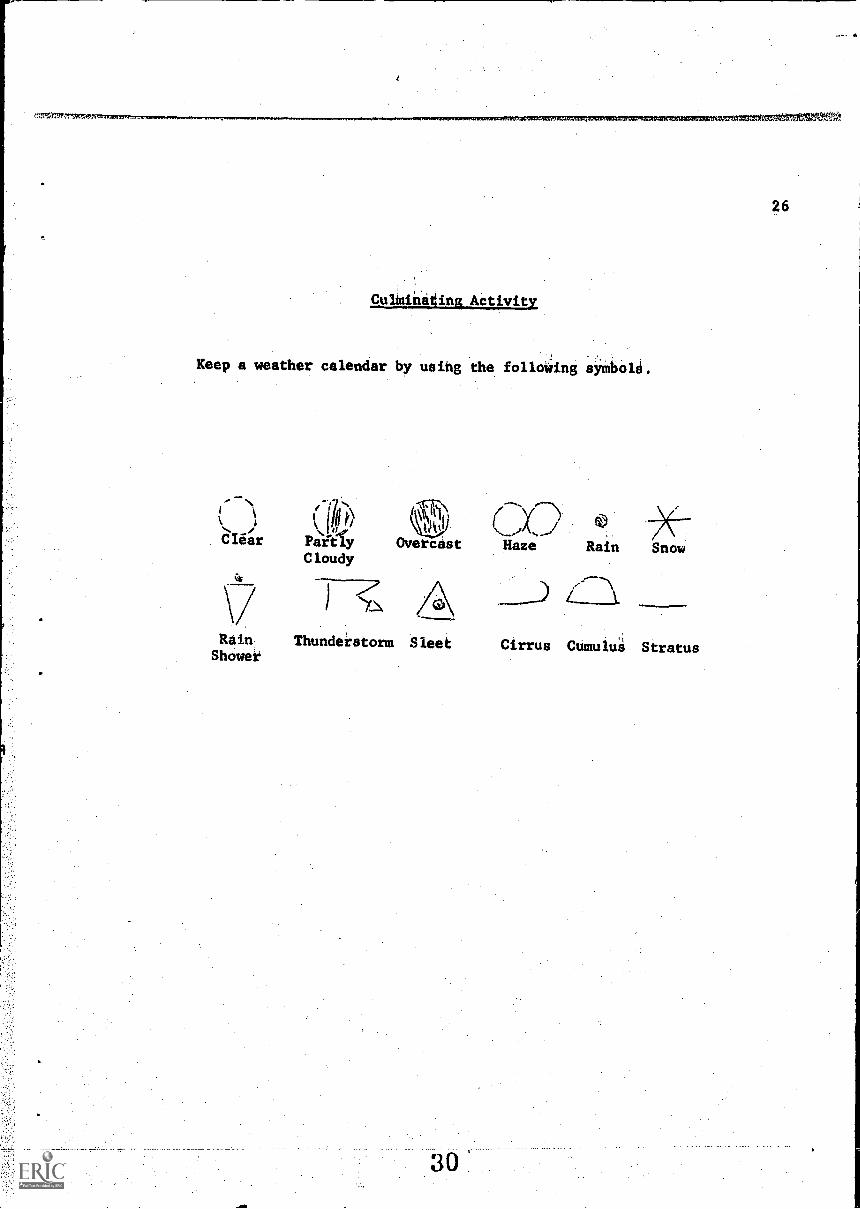
Keep a weather calendar by using the following symbols.
N
CIear
"Ms( IMP)
PartlyCloudy
RainShower
Overcast Haze Rain Snow
Thunderstorm Sleet Cirrus CUmulu'a Stratus
26
MC*
meettlinWVOttsttlAr./7.1.
27
BIBLIOGRAPHY
* Adler, Irving and Ruth," Rivers,. New York, John Day Co. Inc., 1962,
* Antoine., Tee, Wonders of the Wea era Dodd, 1962.,
* Blough, Glen O. Not Only For Ducks: The Story of Ws, New York, McGrawHill Book Po., 1954
* Donsall, George, How and Why Book of Weather, Grbsset, 1960
Xantzlair, George Iii, Your Guide to the WeeAer, Barnes and Noble, 1964.
ConwaYs.H. McKinley, Jr. eds Weather Handbook Conway, 1963.
* Feravolo, Rocco V.,Junior Science Book of. Weather Experiments, Garrad,1963.
Forrester, Frank, 1001 Questions Answered About the Weather, Dodd, 1957.
Gega, Peter C.,
Jacobson, Lauby
* Larrick, Nancy,
Science in Elementary Education, John Wiley and Sons,Inc., 1966.
- Konicek, Learnimin Science, 3, American Book Co.,1965.
Rain, Hail, Sleet and Snow, Garrad, 1961.
MacCracken, Helen Dolmon, and others, Science Through Discovery -3,Syracuse, L.W.Singer Co.(Random House,Inc.) 1957.
* McGrath, Thomas, About Clouds, Chicago, Melmont Pub., Inc., 1)59.
* Podendorf, Ilia, The True Book of Weather Experiments, Children's Press,1961.
Sutton, 0.G. Understanding Weather, Pelican, 1960.
* Tresselt, Alvin R.,1111Eamsomh, New York, Lothrop, Lee and Shepard Co.,Inc., 1946.
* Washburn, Stanley, Jr., Nimbo, the Little White Cloud, New York, Holt,Rinehard, and Winston, Inc. 1954.
* indicates children's books
31
Fame
Our. Weather g B F
How Weather Helps Us - COronet
Filmstrips
Weather 3 - 1 - B3
Weather Maps and Weather Forecasting 3 - 2 - A2
All Kinds of Weather 3 - 2 - A3
Water in Weather 3 - 3 - B6
Thunderstorms 3 - 3 - B7
Water and Its /mportance 3 - 3 - Dl
The World of Clouds 3 - 4 - C6
32
CUR PLANET: EARTH
Obiectives
To become familiar with the earth's basic composition.
To become familiar filth materials In the earth's crust andbecome aware of their qualities.
To realize that there are differences in soil quality andcomposition.
To promote scientific thinking.
Concepts
1. The earth is like a sphere, but flattened at the poles.
2. The earth is, composed of three sections: the crust, themantle, and the core.
3. The crust of the earth is composed of various materials.
4. Water, air, chemicals, and living things Call Galatia veatheringwhich changes rock.
5. Some minerals in rocks can be dissolved in water.
6. Undissolved minerals can'be separated from water by fil-tering and/or evaporation.
7. Rocks rubbing against each other cause wearing away of rocks.
8. Sand, clay, gravel and,r6oks carried by. water sink .to thebottomWhen.the movement of the water is slowed.
9. 'Topsoil is compOsed of mineral, vegetable and animal matter.
10. .,EarthwOrms help to keep soil moist.
THE EARTH IS LIKE A SPHERE, BUT FLATTENED AT.THE POLES.
A. Create a scale model of the earth or, if not possible, displaya globe.
The earthflattenedcenter:offrom polemiles.
is not a perfect sphere. It is slightlyat the poles. The distance through thethe earth is about 25 miles more thanto pole. The thickness is about 8,000
Allow children to determine the, width of the earthby measuring with a string around the equator. Harkthe distance on the string with 'a crayon,
3.3

Mtn, PTO, T. .Mm .v.nirftrrntivarfITIr.^.1,,T,IrMTWA ;Mr ..'174 :,,n."!,?!5.
30
Consult scale (25,000 miles.) Compare this distancewith other trips made.
THE EARTH IS COMPOSED OF THREE SECTIONS: THE CRUST, MANTLE AND CORE.
A. Discuss the three layers of the earth.
1. outermost zone - crust - composed of solid rocks20 - 30 miles deep.
2. second zone - mantle - composed of solid rocks1800 - 2000 miles.
3. inner zone - core - (two sections: (a) 1360 milesthick (b) 800 miles thick-thought to be liquid rock.)
B. Some pupils might make a model of the earth. Have them mounta 12-inch circular board on a base. Let them use plasticclay of different colors to repredent the different materialsof the earth. Have them place concentric rings of the differ-ent "materials" on the board. They can label the rings withflags of paper triangles attached to toothpicks.
C. Decide on a scale to draw concentric circles of the threelayers of the earth.
D. Show an opaque projection of diagram below. Scientists wantto drill through the earth's crust into the mantle - somethingnever done before. Samples of mantle rock will provide neededinformation about how the earth was formed. Challenge pupilsto select a place to drill. Impress upon students the enor-mous difficulty of drilling through a floating platform.
Lighter rock(Continent)
Ocean
AeV e,./4

1,04, ,017.0/W
1HE CRUST 00 THE EARTH IS COMPOSED OF VARIOUS MATERIALS.
A. The crust of the earth is bedrock, which is covered in mostplaces by loose materials stich.ad rocks, sand, clay, andsoil. Many different materials maka up the earth's cruet.The folloifinii are merely samples:
1. Shale 5. Granite2. Pumice 6. Gypsum3. Halite 1. Mica4. Quartz 8. Sandstone
Rocks have varying characteristics
B. Students may work in pairs examining the above rocks. Youmight set up a worksheet as the following:
Shale: ColorSmooth or roughDull or WililyDescribe grains, if any
Other description
Rocks vary in hardness
C. Materials: six rock samples - not including shale andpumice, a nail
Test each of the six samples for hardnessby scratching with a nail.
Things which can be scratched
Things which cannot be scratched
Which group is harder?
Procedure:
Record:
A harder material can scratch a softermaterial. List samples in their orderof hardness.
Softest
Hardest
1. (gypsum)2. (mica)3. (halite)4. (sandstone)5. (granite)6. (milky quartz)
32
WATER, AIR CHEMICALS AND LIVING THINGS CAN CAUSE WEATHERING WHICHCHANGES ROCK.
A. Discuss eliidences of weathering which they have seen.
Ex. 1. A plant's roots may split a rock.
2. The freezing and thawing of water in a rock will:split a rock.
, .
Color changes dile to continuous exposure toweather elements.
B. Materials: lava which has several large holes, water,rapid-sprouting small seeds (radish, clover)plastic bag
Procedure: Soak a piece of lava for several hours. Push
rapid-sprouting small seeds into the holes.Place the lava in a plastic bag or small cov-ered container. Add teaspoon of water. Tiebag or cover container. The seeds will usuallysprout and in some cases the roots will pene-trate the rock. It is unlikely that the seed-lings can be maintained for long, since the rocksamples do not contain soil.
C. Materials: lava, shale, water, plastic bag, freezer
Procedure: Students who have a freezer available can takesamples of lava and shale home. The rock shouldbe soaked thoroughly and placed in a plastic bagto keep it from drying out. A number of succeswsive freezings and thawings will be needed.(Possibility of the shale splitting along thelayer lines and the lava crumbling.)
SOME MINERALS IN ROCKS CAN BE DISSOLVED IN WATER.
A. Materials: labels, pencils, test cups, storage racks, washcontainer, dropper, stir stick
Procedure: Students may be grouped into sixes. Each personwill test one sample for its solubility by placingwater in a cup with the sample and stirring.Samples should be left overnight.A chart can be devised by each group with theresults.
36
Conclusion: HaliteGypsumOthers
0*11..11
soluableslightly soluablenot soluable in water
to?", ran.tr,1177.1.1.
UNDISSOLVED MINERALS CAN BE SEPARATED FREW:WATER BY FILTERING AND/OREVAPORATION.
A. MaZerials filter paper, plastic test cups, water
procedure: Each student folds his filter paper in half andthen, in half again. Form a cone by opening onethickness of the folded papere while the otherthree remain together. Clip the thiee thicknessesof the cone to the empty test cup, being carefulto keep the open end of the cone level. The stu-dent then pours the contents of the solutions frompreceding activity into the filter paper cone. Ob-
serve what happens to sample. What remains in thefilter of each sample?One student from each group folds another filterpaper and clips it to a clean cup. He pours waterfrom a wash container into filter paper until testcup is about full. What happens as the water ispoured into filter paper? Record results.
B. Materials:
Procedure:
dropper, previous filtrates, white paper, blackplastic sheet, water
Each group prepares a sheet of white paper and ablack plastic sheet as shown.
Halite Quartz Gypsum.
pandstone Granite Mica'
33
Black plastic.1 sheet
White paper
37
Oravrl..1".104,117.1r10
34
ilace in classroom wliete paper can remain over-niiht undisturbed. Each student carefully re-moifea the filter paper and solids it containsfrom his test cup. Place filter paper in a worktray to dry. When dry, the samples are storedin the group's plastic bag. Each student putsthree drops of the filtrate from his sample onthe group's bleat plastic sheet. Dropper must betbgrbughly rinsed before,each use. Tap watershodld be pla6ed in the middle of plastic sheet.
C. Materials: filtrates previously made
Procedure: One test cup of each filtrate can be left un-covered and water allowed to evaporate(several days). Good size crystals will formfrom halite and gypsum filtrates.
D. Examine dry spots on black plastic sheet with magnifyinglens. Observations to be made:
1. When water evaporated, tiny crystals ofhalite remained which resembled the orig-inal in shape and color.
2. The spot where gypsum filtrate was placedshows more residue than any other spot ex-cept by the halite filtrate.
3. The other four spots look similar. (Anydeposit left when tap water evaporates isa mineral that was present in the waterwhen it was drawn from the tap.)
* Discuss the importance of filtering andevaporating tap water as a control.
ROCKS RUBBING AGAINST EACH OTHER CAUSE WEARING AWAY OF THE ROCKS.
The rate at which rocks are worn away depends in part on thekind of rock. Hard rocks are worn away more slowly than softerrocks.
A. Discuss instances where' students, have observed running watercarrying solid materials.
1, streams or rivers
2. mountain streams

B. Maeriala:
Frodidutei
Stream or river water sample, filter paper,cup, black plastic sheet.
Filter water sample and.. examine material onfitter paper: EvaitoratCaome of the filtrateas drops on a black sheet of plastic. Someof filtrate can be left to evaporate in atest cup.
Conclusion: Solids are present in the water sample.
C. Materials: two rocks of the same type for every two stu-dents, black plastic sheet for every two stu-dents.
Procedure: The students take turns rubbing two samplesof the same material together for two minutesover a black plastic sheet. They gather allthe crumbled or powdered material into onepile and place the pile in one corner of apiece of paper. They write the name of thematerial next to the pile. Allow the studentsto compare the powdered material from otherrocks as done by the rest of the class. Re-cord results.
Conclusion:
Background:
Some rocks wear away quicker than other rocks.Quartz showed the least effect.
Natural bridges are created by the erosiveaction of a stream. (Ex. Rainbow Bridge -Southeast Utah - 280 ft. in length, rises 309ft.) The bridge is formed of sandstone whichis harder than rock, which originally sur-rounded it. At one time, Bridge Creek formeda gooseneck around the harder sandstone. Asthe creek eroded, the surrounding rock, itfinally reached a level of softer rock belowthe hard sandstone. The softer rock woreaway and the creek then followed a straightcourse under the sandstone arch. Floodscarrying rocks and boulders downstream chippedaway the sandstone, making a thinner and moregraceful bridge. The exposed sandstone wasalso affected by weathering which caused furtherrefining of the shape.
39
35
twammovurvisgaMPAOSIOgna
36
.
D. Allow each student to examine the abraded area of each samplewith a magnifying lens. Record observations.
Gypsum Shiny surface became dulland scratched.
Granite
-........
No change.
Mica Pieces flecked off.
Sandstone Became more rounded
MilkyQuartz,
No change..
Halite Shiny surface became dulland scratched.
40
......mm......ermnnnvwriop...rmrx,ITI.Z1frti.I'Vrlkt7'er'r'
37
E. Materials: rock rubbings, magnifying lenses, lava samples
Procedure: Examine grains with magnifying lenses. Guidingquestions may be:
1. Which samples do you think might become clay?Why? (Pumice, because pieces that rub offare soft, powdery and fine like clay.)
2. Which samples do you think might become sand?Why? (Sandstone, milky quartz and granitebecause pieces that rub off are hard, rough,and coarse like sand.)
3. Which samples do you think probably wouldnot become clay or sand? Why? (Halite andgypsum because these are soluble in waterand probably would dissolve, except in a desert.)
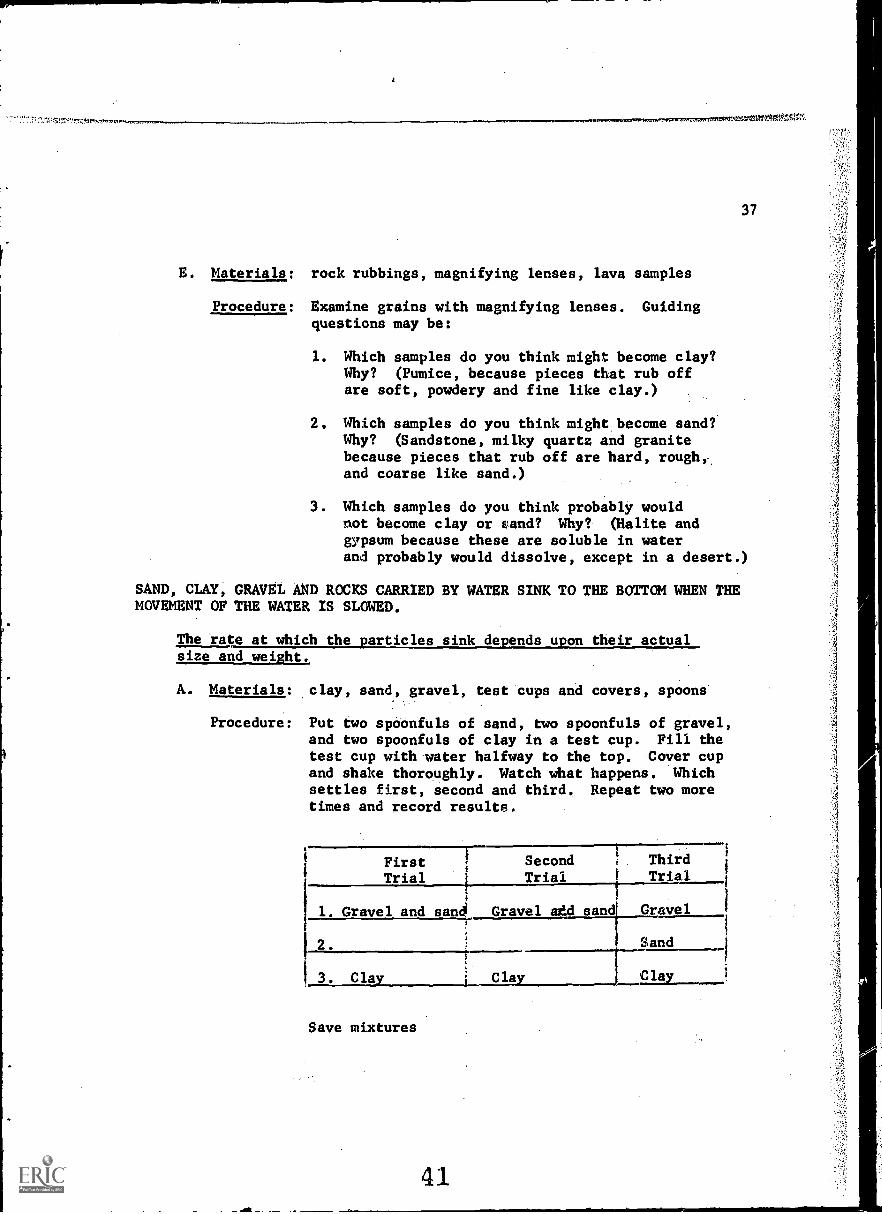
SAND, CLAY, GRAVEL AND ROCKS CARRIED BY WATER SINK TO THE BOTTOM WHEN THEMOVEMENT OF THE WATER IS SLOWED.
The rate at which the particles sink depends upon their actualsize and weight.
A. Materials: clay, sand, gravel, test cups and covers, spoons
Procedure: Put two spoonfuls of sand, two spoonfuls of gravel,and two spoonfuls of clay in a test cup. Fill thetest cup with water halfway to the top. Cover cupand shake thoroughly. Watch what happens. Whichsettles first, second and third. Repeat two moretimes and record results..
First Second Third
Trial1
i Trial Trial
i
1. Gravel and sant Gravel add sand Gravel
I 2.
3. Clay
Sand
Save mixtures
41
Clay Clay
B. Materials:
Procedure:
mixtures from last activity,Llarge container oftai) water and one of salt water
EachP
Each student sha es,the contents of his test cupthoroughly and p urs it into one of mixing con-tainers (tap water or salt water). Each studentobServes What happens when he pours the contentsoi his cup into one of the mixing containers andwhat happens wheh his partner pours his into thedthei. Record both observations.
Conclusions: Mixture in water: (Gravel and sand settleto the bottom very quickly. Clay clouds thewater uniformly.)
Mixture in salt water: (Gravel and sand settleto the bottom very quickly. Clay clouds thewater but the particles seem to come togetherand the cloudiness is not even.
Allow mixtures to stand for k hour.
Observe mixtures. Salt water looks clearerthan the tap water. More clay has settled outof the salt water, than out of the tap water.
The presence of dissolved materials (salt) inthe water may affect the rate and the endproduct of sedimentation.
C. Materials: six test cups, six filters, labels, black plasticsheets, droppers, mixing containers from lastactivity.
Procedure: Label three test cups "Tap Water" and three testcups "Salt Water." Prepare six filter papers andclip one to each of the test cups. Place two cupswith different labels on each of three work trays.Pour off most of the liquid from the top of eachof the mixing containers. Stir the remaining con-tents of the mixing containers thoroughly and pourabout a test cupful into each of the filters.When liquid has filtered through, remove the fil-ter papers. Spread filter papers on two trays,one marked "Salt Water Sediment" and the othermarked "Tap Water Sediment."
Allow sediments to dry.
sy.v.tv.MAT,6,si!t,'
38
In the meantime, allow students to place threedrops of filtrate from each mixture onto ablack plastic sheet and label. Each studentshould examine the dried materials on eachfilter paper. Record observations. Comparespots on black plastic sheet (magnifyinglens).
Conclusion: The residue from the salt water seemed firmerand somewhat more cemented together..
D. Examine shale. Note texture of grains and its composition.Shale was probably formed from a sediMent of clay.
TOPSOIL IS COMPOSED OF MINERAL, VEGETABLE AND ANIMAL MATTER; CONSER-VATION BENEFITS EVERYONE.
Topsoil is composed of a thin layer of mineral,animal and vegetable matter; soil differencesresult from differences in these materials.
A. Materials: soil, newspaper, old spoons or sticks.
Procedure: Allow three to four pupils to work togetherin examining soil on newspaper. Allow themto pick apart the soil. Have students sep-arate matter found into the three categories:animal, vegetable and mineral. Items foundmight be listed.Develop term humus (decaying vegetable andanimal matter).
* B. Discuss:. Are we likely to find much humus in the desert?
* C. Discuss: What, if anything, do earthworms do to the soil?(They burrow into the soil and make holes. Thisloosens the soil and more air circulates.. Thehumus they eat passes through their bodies andhelps to fertilize the soil. They become partof the humus when they die.)
43
-..wmwmwmammtotelt!tk
D. Materials: two jars with screw caps, one half filled withrich topsoil, the other with poor subsoil, con-tainer of water
Procedure: Inquire as to why we don't see plants growingin subsoil while we do in the topsoil. Easeof planting seeds in topsoil is (the mostlikely response.
Have children examine the two types of soil.Draw out that the subsoil appears to lackmuch humus
You can test this by pouring water to withinseveral inches to the top of both jars. Shakejars to separate humus from rock particles.Leave until material settles; may take severalhours. (Because humus is lighter than rockparticles, it will separate and rise to thetop.)
Conclusion: Topsoil has much more humus than subsoil. Thesoil increases in coarseness toward the jarbottom.'
Help children identify the materials in the soilfrom the bottom of the jar up: pebbles, sand,silt, clay, humus.
E. Establish that topsoils differ in composition with amountsof sand, silt, clay and humus varying.
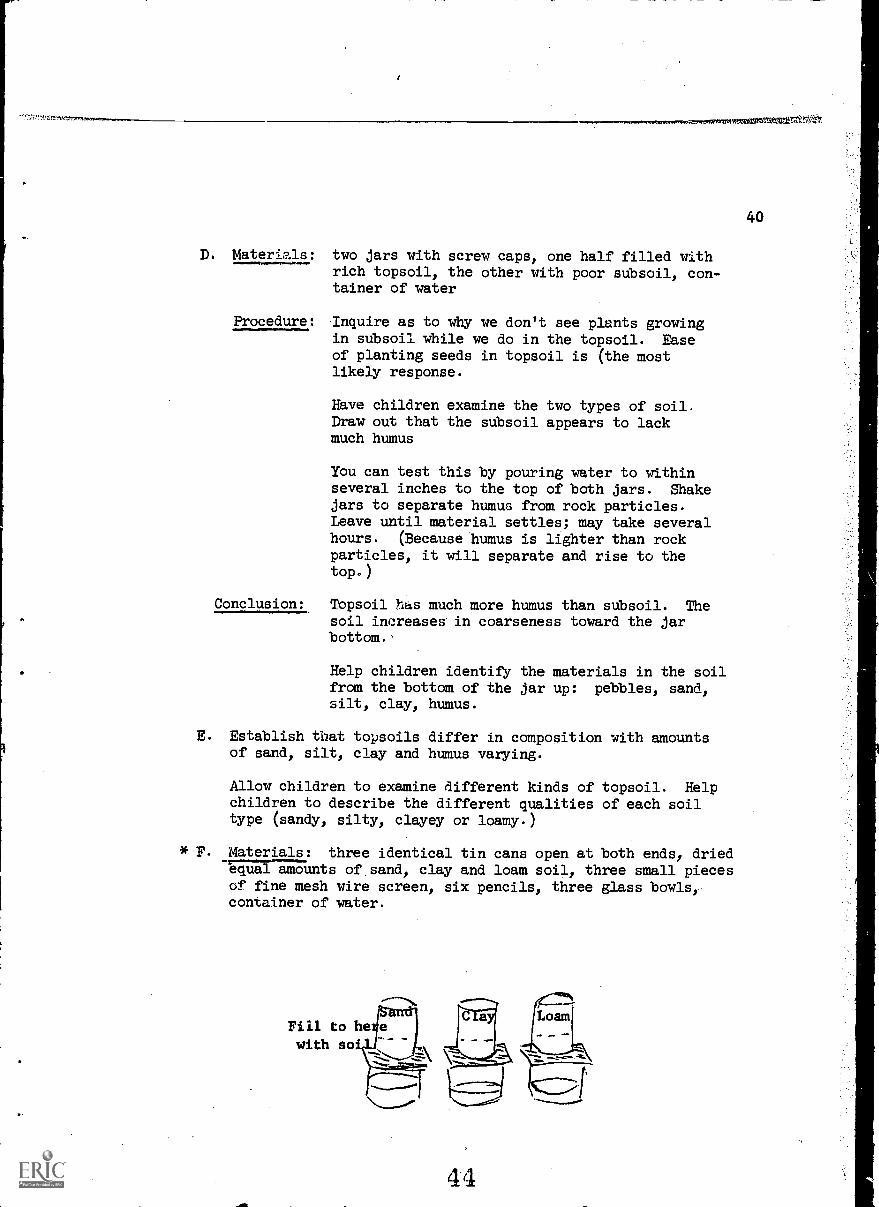
*P.
Allow children to examine different kinds of topsoil. Helpchildren to describe the different qualities of each soiltype (sandy, silty, clayey or loamy.)
Materials: three identical tin cans open at both ends, driedequal m ts of sand, clay and loam soil, three small piecesof fine mesh wire screen, six pencils, three glass bowls,container of water.
Fill to hewith so'
40
Carefully pour an equal amount of water intoeach can. The water will run fastest throughthe sandy soil, then the loam and slowestthrough the clay.
Pose the problem of the woman who planted threehealthy identical plants - one in each presentsoil type. She gave each the same amount offertilizer and water daily. After a short while,the plants in the clay and sand soil died. Why?What do you think the roots look like?
Couclusion: The .fine clay particles help to hold soil to-gether, but clay alone retains too much moisture.Large sand particles are good for drainage, buttoo much drainage results in too scant a watersupply for most plants. A mixture of these mate-rials usually works best.
EARTHWORMS HELP TO KEEP SOIL MOIST.
Earthworms help to aerate the soil. They help to conservewater in the soil. Earthworms are active in the dark andavoid the light.Earthworms dig their way through the soil and thereby mixrich, decaying organic material throughout it.
A. Materials: three coffee cans, rich loamy soil, earthworms,sawdust, corn meal
Procedure: Fill each coffee can 2/3 full of loamy soil.To two of the cans add some earthworms. Toeach can add about an inch of sawdust and2 inch of corn meal.
How do earthworms react to t?le light?
Place one of the cans with worms near a window.Have a lamp near it which can be turned on atnight. Place the other two cans in the darkAdd small amount of water each day.Observe each day and make notes. (The soilin the can kept in the dark appears to havebeen turned over more by the worms.)
Much of the water would be trapped in theloosely dug tunnels of soil the worm makes;therefore, the water will not evaporate asquickly.
41
*IVINIVR
What id Soil? - Encyclopedia Britiihica Films
Your Friend, The Soil " rr I I
Treasures of The Earth t. Churchill. Films
FIIESTRIPS
About Our Earth 3
3
- 1 - Af
- 2 ClThe Earth - A Great Storehouse
Soil Resources 3 - 3 - A2
Soil and Its Uses 3 - 3 - D3
Water and Soil 3 - 5 - A2
4G
.,,,....rm.mmrplyret4m7rm*MMMMMIZPV7tMn
42
43
BIBLIOGRAPHY AND REFERENCES
* Adler, Irving and Ruth. The Earth's Crust. New York: John Day Co., Inc.,1963.
American Geological Institute. Geology and Earth Science Source Book. NewYork: Holt, Rinehart and Winston, Inc., 1962.
* Clemons, Elizabeth. Rocks and The World Around You. New York: Coward Mc-Cann, Inc., 1960.
Fenton, Carol Lane and Mildred A. Riches From The Earth. New York: ffohnDay Co., Inc., 1953.
Gallant, Roy A. Exploring Under The Earth. New York: Garden City Books,1960.
Gega, Peter C. Science in Elementary Education. New York: John Wiley &Sons, Inc., 1966.
* Irving, Robert. Rocks and Minerals and the Stories They Tell. New York:Alfred A. Knopf, Inc., 1956.
Jacobson-Lauby-Konicek. Any one of this series published byAmerican Book Co., 1965.
* Jenson, David E. My Hobby is Collecting Rocks. Chicago: Children's Press,Inc., 1958.
* Layton, Aviva. The Singing Stones. New York: Abelard-Schuman, Ltd. 1963.
* Page, Low Williams. Rocks and Minerals. Chicago: Follett Publishing Co.,1962.
* Pearl, Richard M. Wonderq of Rocks and Mindrals. New York: Dodd, Mead andCo., 1961.
Pough, Frederic H. A Field Guide to Rocks and Minerals, Boston: Houghton-Mifflin Co., 1955.
Reinfeld, Fred. Treasures of the Earth. New York: Sterling Publishing Co.,Inc., 1954.
Schneider, Herman and Nina. Science Far and Near - 3. Boston: D.C. Heathand Co., 1968.
Seaman, David. The Story of Rocks and Minerals. Irvington-on-Kudson:Harvey House, Inc., 1961.
Syrocki, B. John.'What Is a Rock? Chicago: Benefic Press, 1959.
Tannenbaum, Harold E. and Others. Geologic Processes. New York: McGraw -Hill Book Co., 19b/.
Wyckoff, Jerome. The Story of Geololax. New York: Golden Press, Inc., 1960:
* Books recommended for children.
lyn-rf-awr-r...K.r.PTglrflrgiVg4,Pt!IM
44
THE ,EARTH IN SPACE
Objectives
1. To comprehend the earthIS relationship to other planets, themoon and the sun.
2. To comprehend the reasons behind some of our natural phenomena,i.e., night and day, seasonal change,' the moon's changing appear-ance.
3. Promote Scientific thinking.
Concepts
1. The solar system consists of the sun and all the objects thatmove around it.
2. Stars usually appear in the same position relative to eachother.
3. Planets vary in size and orbit.
4. The earth is in constant rotation as it orbits the sun.
5. All planets receive heat from the sun.
6. The earth's motion in space causes time and :seasonal changes.
7. The relative motions of the sun, earth and moon bring aboutmoon phases and eclipses.
8. Man has revised many instruments to help him study the starsand the pl,,:nets.
Motivating ideas
1. Bring in pictures of the earth as taken from the proximity cfthe moon. Discuss. Why does the earth appear smaller than themoon when we know it is larger'?
2. Create an introductory bulletin board showing the earth's rela-tion to the rest of the solar system.
3. Show introductory filmstrip to the Solar System. Discuss be-forehand. Where is the earth?
48
t7n777-1r21,:r...,...'*...*.+wnwInv,nrwww,mom.a.MCCM,PO74TIT,NRYNT,70W17141,VaMenft Trommr.rnmamtre.,===1.9.VZIre:;7t:::TE&
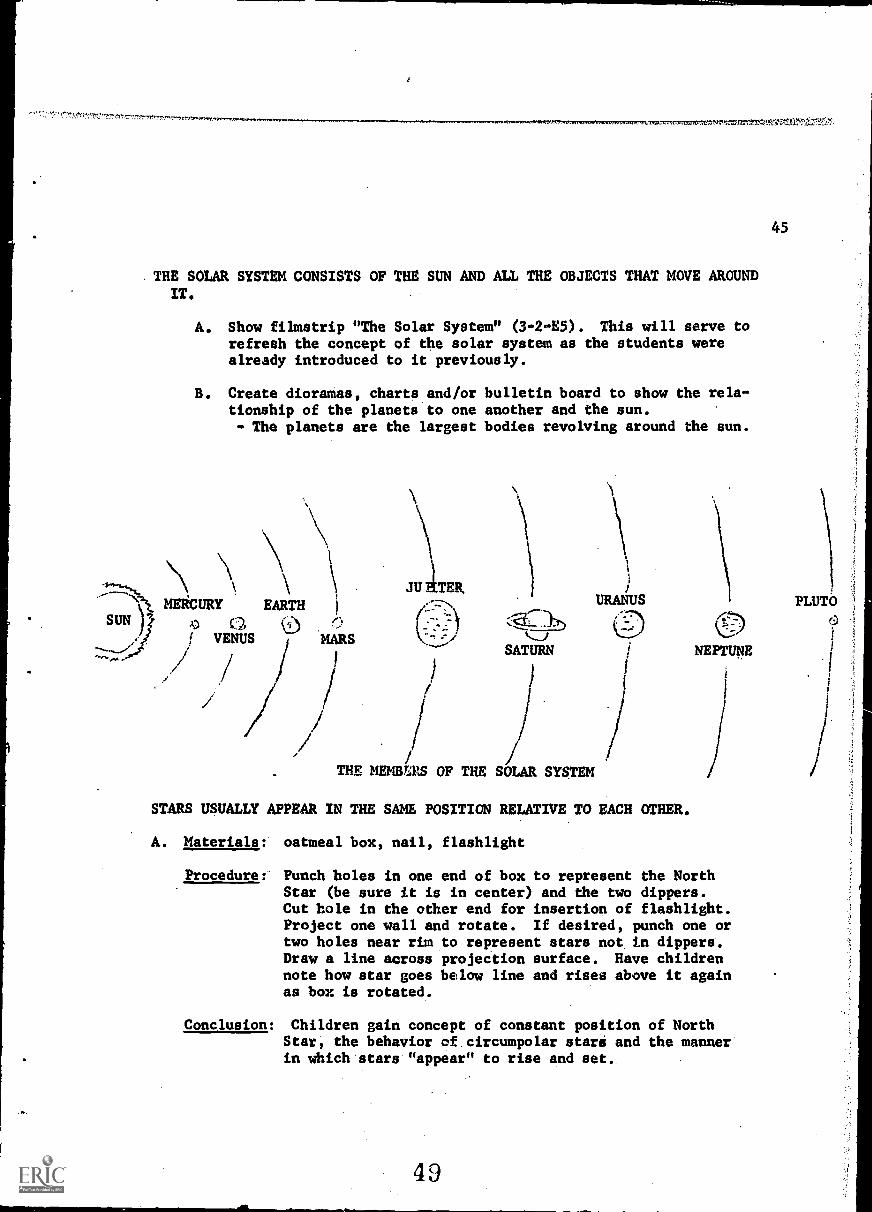
.THE SOLAR SYSTEM CONSISTS OF THE SUN AND ALL THE OBJECTS THAT MOVE AROUNDIT.
A. Show filmstrip "The Solar System" (3-2-E5). This will serve torefresh the concept of the solar system as the students werealready introduced to it previously.
B. Create dioramas, charts and/or bulletin board to show the rela-tionship of the planets to one another and the sun.- The planets are the largest bodies revolving around the sun.
MERCURY EARTHSUN
C2, %.0
i VENUS,
---......"
/
JU 4TER,
1
i
i
URANUS
ci
MARS (-;.;Cg1:1)
,...-1 CD
1i
SATURN$
li
/ / /THE MEMBLRS OF THE SOLAR SYSTEM
STARS USUALLY APPEAR IN THE SAME POSITION RELATIVE TO EACH OTHER.
A. Materials: oatmeal box, nail, flashlight
NEPTUNE
Procedure: Punch holes in one end of box to represent the NorthStar (be sure it is in center) and the two dippers.Cut hole in the other end for insertion of flashlight.Project one wall and rotate. If desired, punch one ortwo holes near rim to represent stars not in dippers.Draw a line across projection surface. Have childrennote how star goes below line and rises above it againas box is rotated.
Conclusion: Children gain concept of constant position of NorthStar, the behavior of.circumpolar stare and the manner'in which'stars'"appear" to rise and set..
49
45
PLUTO
.1
1'
B. Materials: umbrella, gummed stars or paint, table
Procedure: Place North Star at center of umbrella; several cir-cumpolar constellations around it and some stars nearouter rim of umbrella. Place so that a portion ofthe umbrella is below table edge (horizon). Rotate.
Conclusion: Same as A.
C. Develop how the term "planet" was derived. Explain that thousandsof years ago, no one knew about planets. People thought all suchobjects were stars. But these so called "stars" were a puzzle.They never seemed to stay in one place as the other stars did.Sometimes they would appear dim and far away; at other times near .
and bright. They seemed to "wander" through the sky.
Using a solar system model, determine under sihich conditions someplanets would look nearer and farther away from the earth. (If theplanets moved at different speeds some might get ahead or fall be-hind others. If they all moved at the same speed, each insideplanet would move ahead of its outside partner.) Demonstrate.
PLANETS VARY IN SIZE AND ORBIT.
A. Materials: balloons, string, bile base
Procedure: Make a solar system mobile using balloons. Labelplanets and the sun. Place in appropriate relationto one another. Show how the planets orbit the sunby orbiting one planet at a time. If possible, haveall planets orbiUng at once by assigning one childper planet.
Conclusion: Planets vary in size and orbit. They move simul-taneously in a coordinated fashion.
B. Materials: large outdoor area; chalk, 20 ft. string
Procedure: Take the class to a suitable location out on the play-ground. It will save time if someone previously hasdrawn with chalk and 20 ft. string nine circles of pro-portionate sizes to represeut planetary orbits. Prc,,er
scale may be ignored for now and developed later. Or-bits 1 ft. to 2 feet apart should be satisfactory. Letthe 9 planet children line up in a row.
First, test to see what happens to their distance fromthe planet earth child if they move counterclockwise atdifferent speeds in orbit. After a few seconds, havepupils stop and notice the planets' changing dis-tances from the earth. Now get them moving in orbit atthe same speed. Each outer planet will fall behind itsimmediate inner planet.
47
C. In class discussion, speculate about the difference between a starand a planc,t, verify decisions by checking references.
* D. Making an Oatmeal Box Planetarium
Materials: oatmeal box, two diagrams to pose on box, sharp in-strument to punch holes, paste, light bulb, extensioncord.
Procedure: Cut out hemisphere diagrams and paste to an oatmealbox. Line up diagrams by guidelines of Big Dipper.Punch holes where stars and planets appear. Punchhole in box lid and insert electrical extension cord.Put bulb in socket and close lid. Plug in other endof cord to outlet. Lay planetarium on table withhemisphere up.
Darken room. The light bulb, through holes, will casta simulated constellation on the ceiling.
THE EARTH IS IN CONSTANT ROTATION AS IT ORBITS THE SUN..
ALL PLANETS RECEIVE HEAT FROM THE SUN.
A. Materials: lamp with unshielded light bulb
Procedure: Point out that Mercury, the planet closest to the sun,may have a surface temperature of about 770° F.Pluto, the outermost planet, has a temperature esti-mated at 400° F. Why the difference? Develop discus-sion.
Turn on lamp. Have several children position theirhands at various distances from it. Does it feel warmerwhen one's hand is close to the lamp? Colder when fur-ther away?
Conclusion: The closer one is to the heat source, the warmer one is.
51
..1,7^..t-,,Trirernx,r...
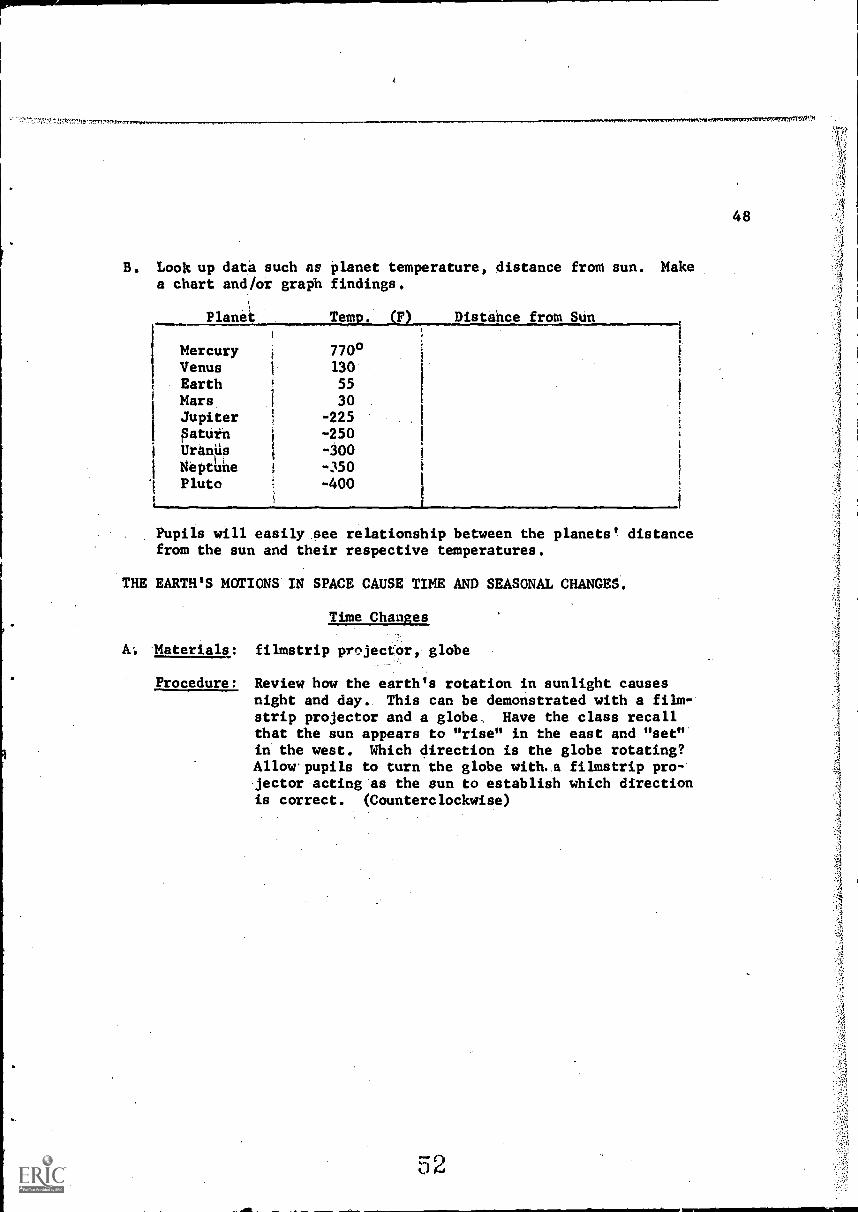
B. Look up data such as planet temperature, distance from sun. Makea chart and/or graph findings.
Planet Tem.. F Distahce froth Sun
Mercury 770°Venus 130
Earth 55Mars, 30Jupiter -225pawth -250Uranus -300Neptilhe -350Pluto -400
Pupils will easily.see relationship between the planets' distancefrom the sun and their respective temperatures.
THE EARTH'S MOTIONS IN SPACE CAUSE TIME AND SEASONAL CHANGES.
Time Changes
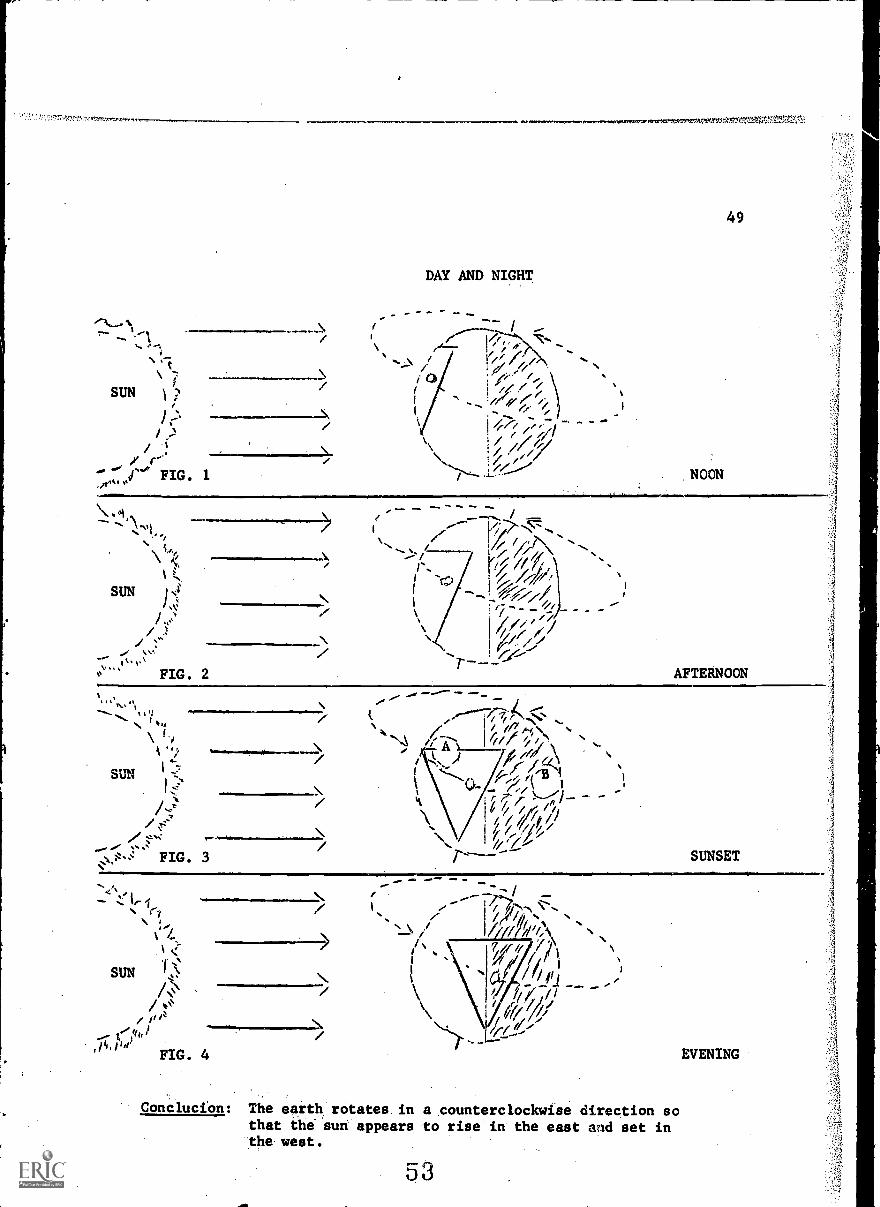
A. Materials: filmstrip projector, globe
Procedure: Review how the earth's rotation in sunlight causesnight and day.. This can be demonstrated with a filmstrip projector and a globe.. Have the class recallthat the sun appears to "rise" in the east and "set"in the west. Which direction is the globe rotating?Allow.pupils to turn the globe with. .a filmstrip projector acting as the sun to establish which directionis correct. (Counterclockwise)
TrIPIIVIr2romv.nrmoirtmtrAvir411,2T'1,1
48
1.
it
vt
t S I7 .- i
1. 0 -". \ 1/4...b ;4'. ...-..... - i /
1 ....\ 1 44. \ / 1/1 / / / ....
1 (')I I/ ,/, ./
i / i /i / ./ /SUN 1 ?I
. - I //re /?I
//' ,/ i 477 /.. .
i,
)!
i
,///4i \ \\\ i / /1/
d"''FIG . 1
.,
DAY AND NIGHT
onfflutrostrt,Prertcom.v.r.termrt...rtyfrl'Iin,"VrTV't'V,'
_ - - _\ .1, e /. '\,,,. / It //--- 1'// 7/ /.-.-..z.-,7\".%. . ... / / /././i " ,\ 11-,',
-.......\/ --- /
1-,. i --cc)11 //11/li
/( -.....; /: /2y/1,...SUN
sv\
\/ .: \
I //' // :" \ . I /4 1:/7- ---:-/
... .,.- /FIG. 2
SUN
/1../
Ito 1
FIG. 4
49
NOON
AFTERNOON
Conclucion: The earth rotates in a counterclockwise direction sothat the sun appears to rise in the east and set inthe west.
EVENING
50
C. Materials: map of Continental U.S. with time zones shown, opaqueprojector
Procedure: Exhibit a sketch or opaque projection of a ContinentalU.S. map. How isthe.timei problem solved in a countryas large.as!ours? Draw-out that the Continental UnitedStates is divided int&4 standard time zOnes.Thepeople ih each zone agree, to set their ,watches andClocks,to the .same time, whether the sun la directlyoverheid or noti fn. this 'Way; a viatch needs only to bechanged three:timed as one kliea di. drives from onecohat to the Other
Latin terms ante meridien and post meridien may be in-troduced at this point. '(Ante meridieniX.M. beforenoon, post meridien P.M. after noon).
Seasonal Changes
D. Materials: projector or unshaded lamp, globe, string at least 2 ft.
Procedure: Develop that, in addition to rotation, the earth alsorevolves about the sun. Take the classroom globe, andwhile rotating it slowly, move around a pupil who actsas the sun. Emphasize that the earth's tilted axiscontinues to point in one direction - toward the northstar - throughout the revolution. The entire revolutiontakes about 365 days, or one year
Pose a problem. On Dec. 22nd, New York City has about9 hours of daylight and 15 hours of darkness. On June21st it has the reverse. Why? Discuss briefly.
Darken the room. Turn on a slide projector or unshadedlamp. Place the globe in winter position shown. Fix asmall lump of clay at the position of New York City, sothat it may be easily observed. Slowly rotate the globeat a fairly uniform rate Of speed. Is the location ofNew York City longer in darkness or night ?. (Measurewith string.)
Do reverse by putting globe in June 21st position.
4
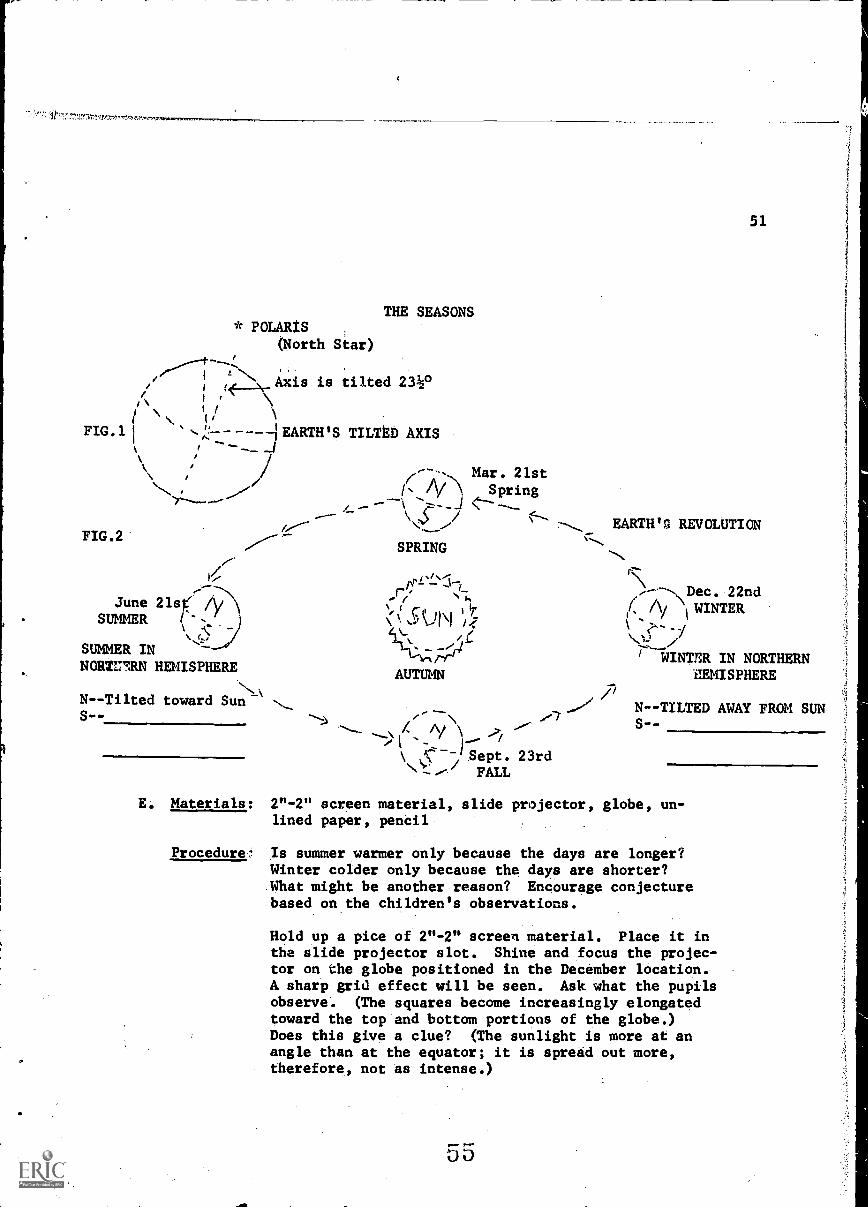
THE SEASONS* POLARIS
(North Star)
Axis is tilted 23e
\ I /
FIG.1 1 ' EARTH'S TILTED AXIS
FIG.2
li
June 21st( /ySUMMER
SUMMER INNORE7RN HEMISPHERE
N-- Tilted toward SunS --
E. Materials:
Procedure
SPRING
Mar. 21stSpring
\ -,1 Sept. 23rdL./' FALL
51
EARTH'S REVOLUTION
Dec. 22ndWINTER
1
\su
7 WINTER IN NORTHERNMMISPHERE
.N--TILTED AWAY FROM SUNS --
2"-2" screen material, slide projector, globe, un-lined paper, penal
Is summer warmer only because the days are longer?Winter colder only because the days are shorter?What might be another reason? Encourage conjecturebased on the children's observations.
Hold up a pice of 2"-2" screen material. Place it inthe slide projector slot. Shine and focus the projec-tor on the globe positioned in the December location.A sharp grid effect will be seen. Ask what the pupilsobserve. (The squares become increasingly elongatedtoward the top and bottom portions of the globe.)Does this give a clue? (The sunlight is more at anangle than at the equator; it is spread out more,therefore, not as intense.)
52
Have someone place paper over the projected rectangle at New YorkCity and trace it with a pencil. Will it be the same size at theJune position? (Try it.) The June's rectangle should be appreci-ably less elongated.
Conclusion:
* F. Is vertical
Materials:
Procedure:
In summer, sunlight is more nearly overhead and so ismore intense.
sunlight warmer than slanted sunlight?
2 identical thermometers and 2 small pieces of card-board
Lay one thermometer on one cardboard in a sunny place.Next to this, prop up the other cardboard and thermometeragainst a book so that sunlight hits it vertically.. Thecardboard pieces will insure similar background. A fewminutes in strong sunshine should be enough for a signif-icant difference to appear in thermometer readings.
Conclusion:" Vertical sunlight is warmer than slanted sunlight.
THE RELATIVE 10..WIONS OF THE SUN, EARTH AND MOON BRING ABOUT MOONPHASES AND ECLIPSES.
Moon .hases appear when the moon revolves around the earth.
A. Materials:
Procedure:"
Chart or blackboard sketch of moon phases, slide pro-jector, white volleyball
Establish that the moon is the earth's closest neighborin space. What makes the moon shine? Bring out thedifference between a body that reflects light and one,that generates light.
Does the moon 'always look the same? Have some chil-dren draw sketches on the chalkboard of moon shapes.they have observed, Why does the moon seem to changeits appearance?
Reveal a sketch of the moon phases.- Bring out thatthe moon is shown in 8 different positions as itrevolves around the earth. The entire revolutiontakes a little less than one month.
Darken the room and turn on slide projector. Have achild stand with a white volleyball at arm's lengtha little above his, head. The child should be about10 feet from the projected light.
56
53
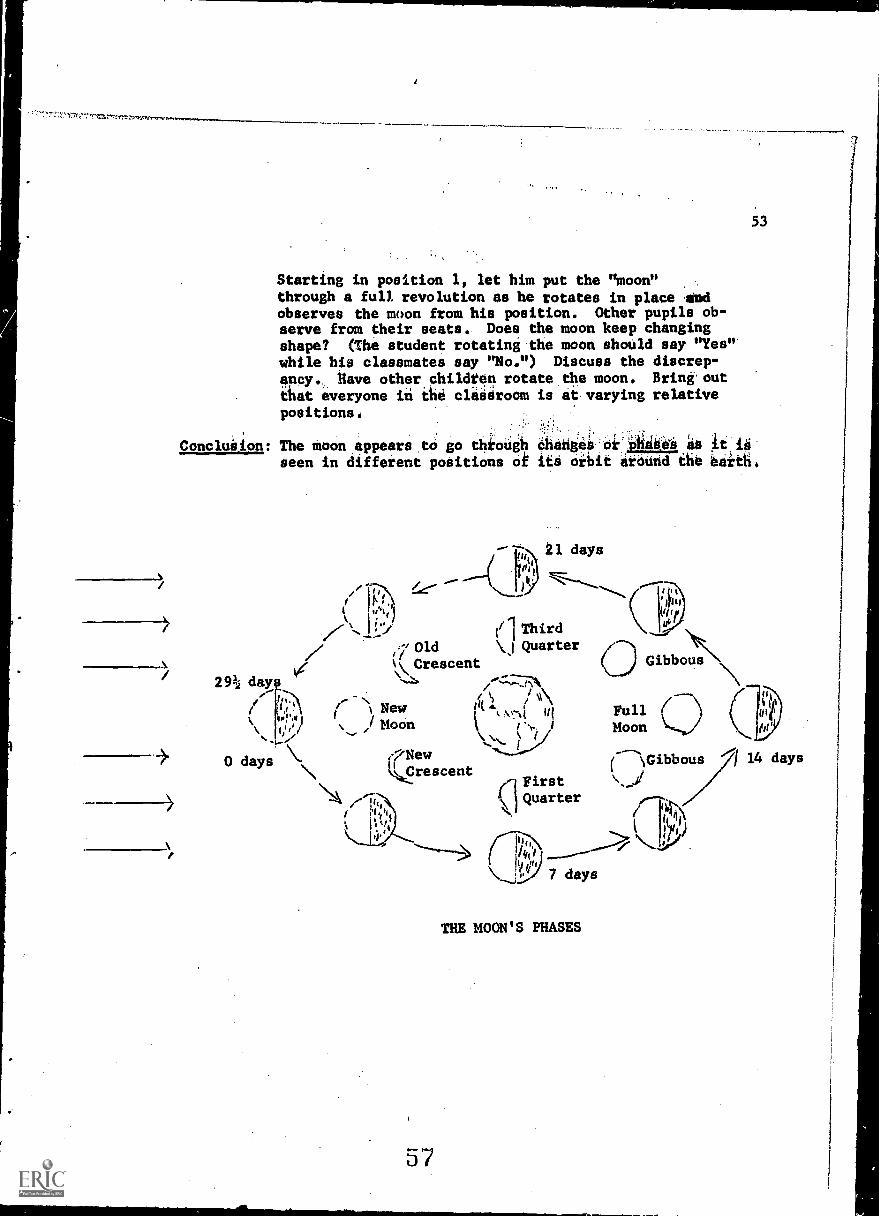
Starting in position 1, let him put the "moon"through a full revolution as he rotates in place andobserves the moon from his position. Other pupils ob-serve from their seats. Does the moon keep changingshape? (The student rotating the moon should say "Yes"while his classmates say "No.") Discuss the discrep-ancy. Have other children rotate.the moon. Bring. out
that everyone in the claidroom is at varying relativepositions.
Concludion: The moon appears to go thiough Changes of Aides* ,t isseen in different positions of its orbit around the haith.
I
%,./ :. 1.4:i
V(k:1 =scent// if
....
29k dam ......
,
I t1 t.,,\
\ 0,1t)
( 1 New. .11.1 boni, .....
..
0 days \
uhr!
7New,9.rescent
El days.
1/1 Third\j Quarter
if(/C:7-17)
k
IFirstQuarter
PY"\ ;
l4.,
7 days
Gibbous\\\\
Moon
CMGibbous/7 14 days
THE MOON'S PHASES
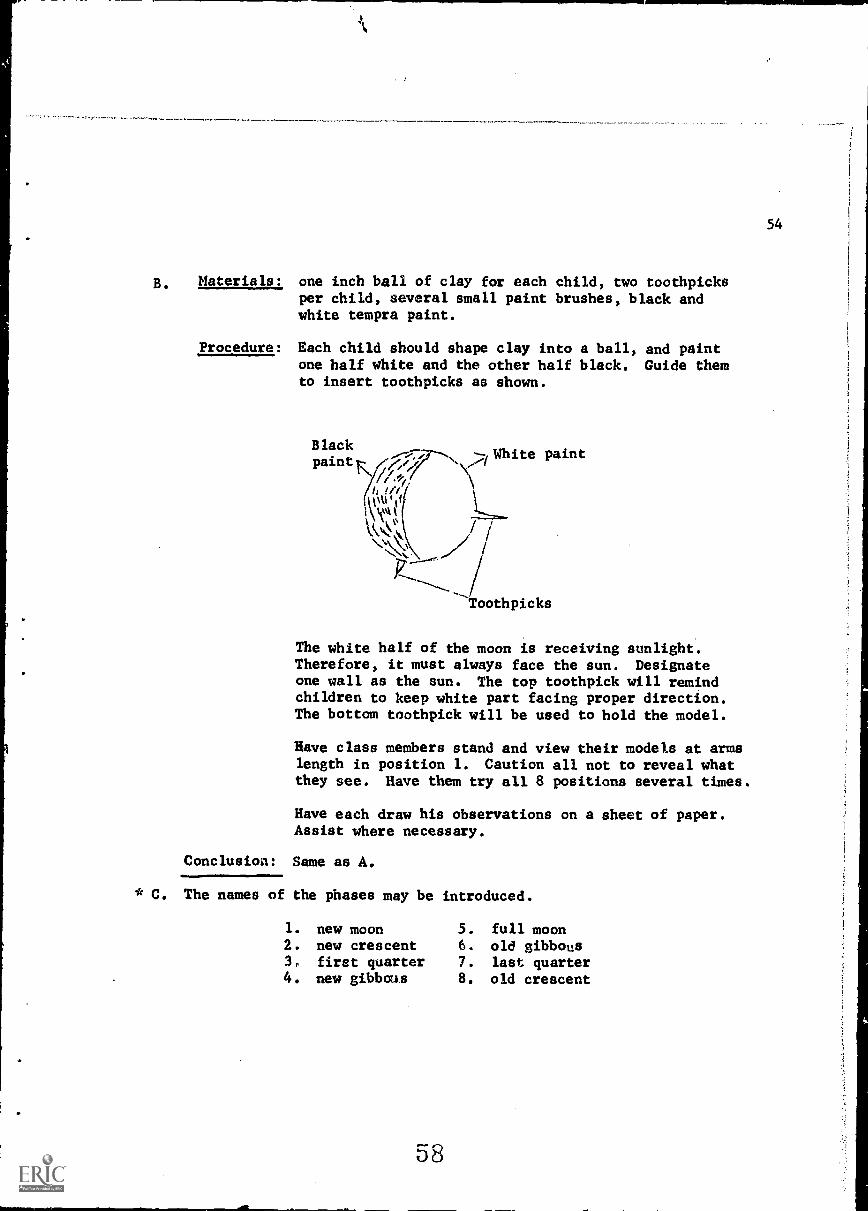
B. Materials: one inch ball of clay for each child, two toothpicksper child, several small paint brushes, black andwhite tempra paint.
Procedure: Each child should shape clay into a ball, and paintone half white and the other half black. Guide themto insert toothpicks as shown.
Blackpaint r
`//f.,fr,,
wu,
.\
---,White paint
/ /
--Toothpicks
The white half of the moon is receiving sunlight.Therefore, it must always face the sun. Designateone wall as the sun. The top toothpick will remindchildren to keep white part facing proper direction.The bottom toothpick will be used to hold the model.
Have class members stand and view their models at armslength in position 1. Caution all not to reveal whatthey see. Have them try all 8 positions several times.
Have each draw his observations on a sheet of paper.Assist where necessary.
Conclusion: Same as A.
* C. The names of the phases may be introduced.
1. new moon2. new crescent3, first quarter4. new gibbous
5. full moon6. old gibbous7. last quarter8. old crescent
54
55
* Encourage pupils to sketch and label the moon's appearanceeach night at a designated time for 30 days.
* If the moon revolves, why is only one half visible to the earthwhile the other side remains unseen from the earth?
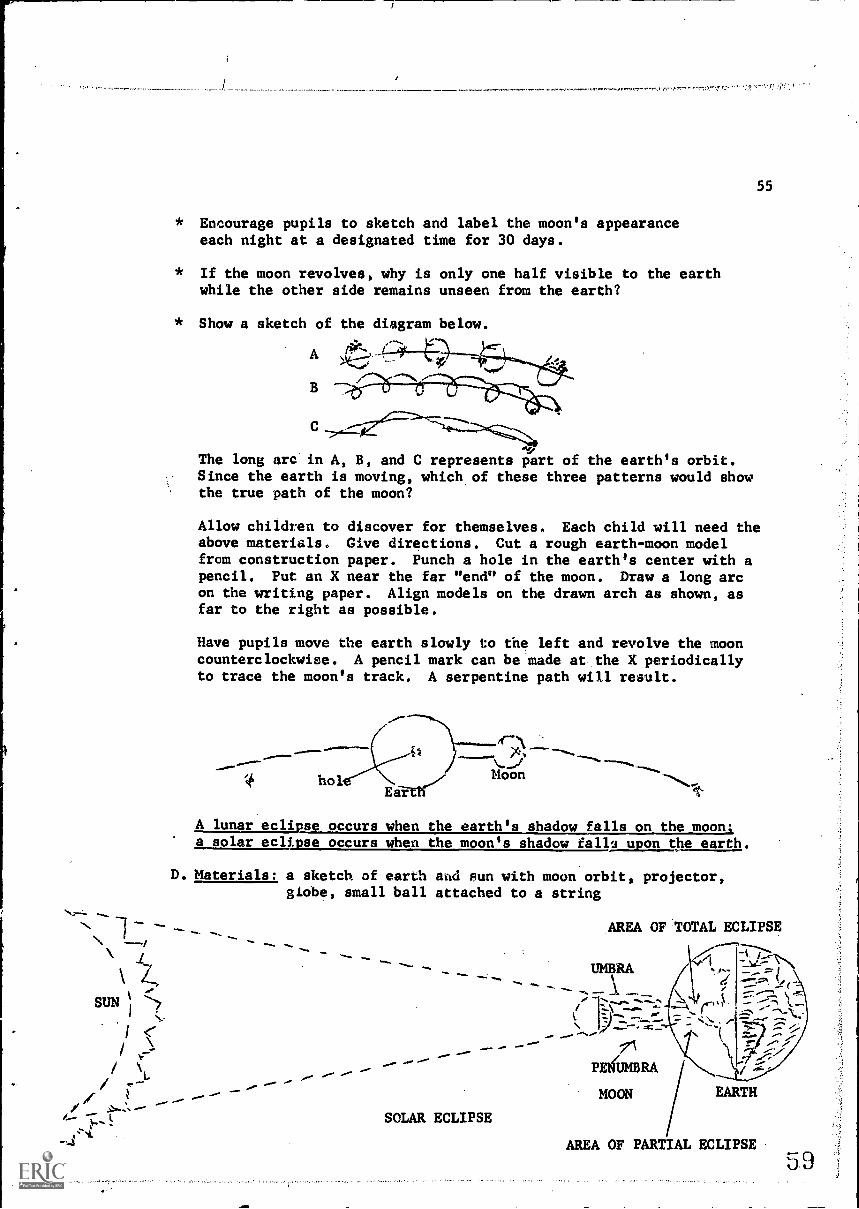
* Show a sketch of the diagram below.
A f*L
B
C
The long arc in A, B, and C represents part of the earth's orbit.Since the earth is moving, which of these three patterns would showthe true path of the moon?
Allow children to discover for themselves. Each child will need theabove materials. Give directions. Cut a rough earth-moon modelfrom construction paper. Punch a hole in the earth's center with apencil. Put an X near the far "end" of the moon. Draw a long arcon the writing paper. Align models on the drawn arch as shown, asfar to the right as possible.
Have pupils move the earth slowly to the left and revolve the mooncounterclockwise. A pencil mark can be made at the X periodicallyto trace the moon's track. A serpentine path will result.
.....1
hol
,Ar-N
\go .wdlMoon
Eaerg-7
A lunar eclipse occurs when the earth's shadow falls on the moonsa solar eclipse occurs when the moon's shadow falls upon the earth.
D. Materials: a sketch of earth and sun with moon orbit, projector,globe, small ball attached to a string
SUN ,
\L/ --//
4-- SOLAR ECLIPSE
AREA OF TOTAL ECLIPSE
UMBRA
, ...1 .......
..,-...,,... -.-....
/ z...\ -....
i - '''----7z.
- ------
PEIUMBRA
MOON EARTH
AREA OF PARTIAL ECLIPSE
.
.
LUNAR ECLIPSE
56
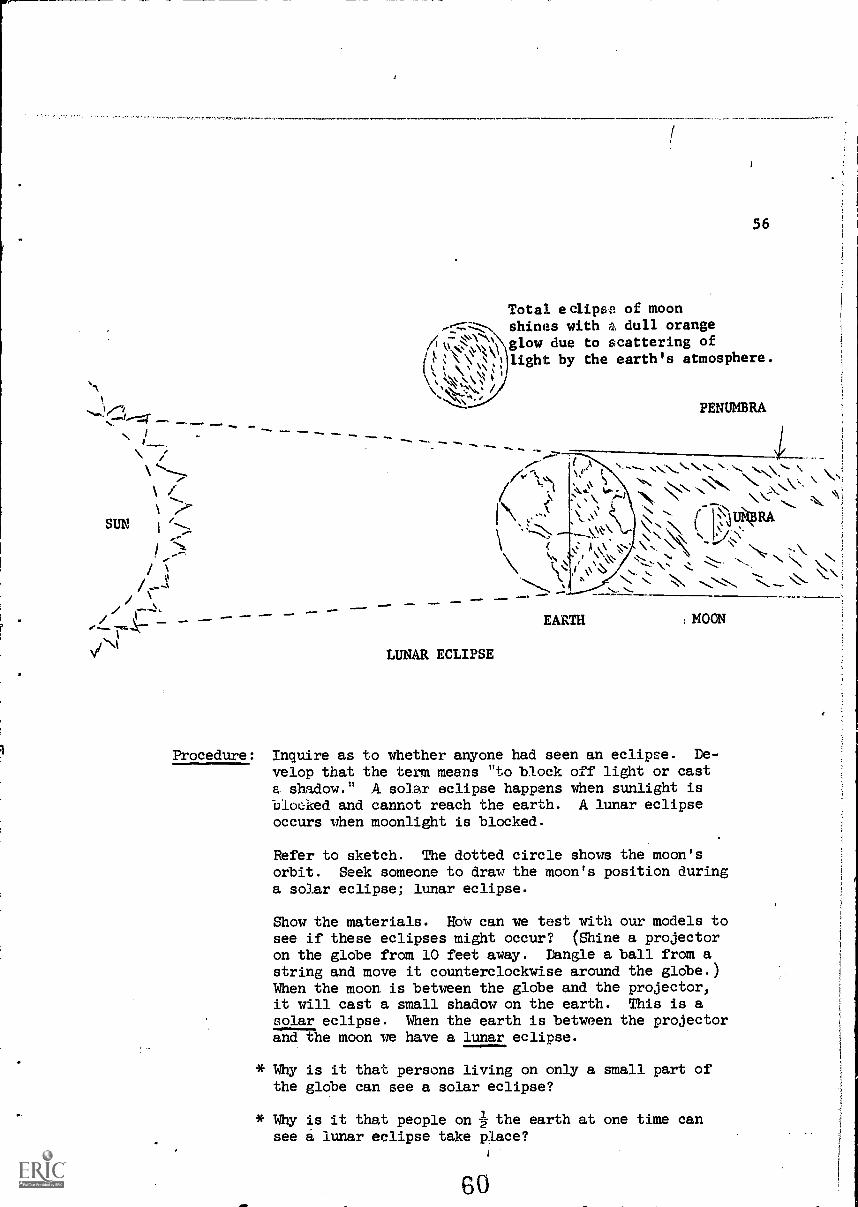
Total eclipse of moonshines with a, dull orangeglow due to scattering oflight by the earth's atmosphere.
PENUMBRA
%. rA
(1--- ..:...\-.- \- \\ \N\ \. \
\.0
sA. s 0. , N.'S 'N ,\N.4. N \ (.. ..\ \N
S...
I \ s F . s N .... , \
0.1j,1311A
s A ,,,..\ ! ...:... ..\. \":4\ Viy- --. '' \ N \ N '-... ..,.
.....!. \., sz. -.... ..\.\ i
..._ -.- - ..,>.. . . . . . . _ -.......
EARTH ;MOON
Procedure: Inquire as to whether anyone had seen an eclipse. De-
velop that the term means "to block off light or casta. shadow." A solar eclipse happens when sunlight isblocked and cannot reach the earth. A lunar eclipseoccurs when moonlight is blocked.
Refer to sketch. The dotted circle shows the moon'sorbit. Seek someone to draw the moon's position duringa solar eclipse; lunar eclipse.
Show the materials. How can we test with our models tosee if these eclipses might occur? (Shine a projectoron the globe from 10 feet away. Dangle a ball from astring and move it counterclockwise around the globe.)When the moon is between the globe and the projector,it will cast a small shadow on the earth. This is asolar eclipse. When the earth is between the projectorand the moon we have a lunar eclipse.
* Why is it that persons living on only a small part ofthe globe can see a solar eclipse?
* Why is it that people on z the earth at one time cansee a lunar eclipse take place?
60
Conclusion: Our chances of seeing a lunar eclipse are greater thanseeing a solar eclipse. There are several solar andlunar eclipses a year.
E. Why don't we have solar and lunar eclipses monthly?
Materials: moon models already made
Procedure: Encourage hypothesis to above question. What phase isthe moon in during a solar eclipse? (New moon) Lunareclipse? (Full moon)
If necessary have children recall why the moon-phasedemonstrator hellthe "moon' slightly higher than hishead. some pupils will suggest a moon orbit eitherabove 0, below the earth's plane of orbit. Both sug-gestions permit moon-phases but no eclipses.
F. How to view a solar eclipse.
Caution pupils never to look at the sun during a solar eclipse. We
may view it indirectly by punching a hole in the center of a piece ofcardboard. Then, with back to the sun, focus the sun's rays ontoanother cardboard. During a solar eclipse, it will be possible towatch the sun's bright disc on the cardboard being obscured by thepassing moon.
MAN HAS DEVISED MANY INSTRUMENTS TO HELP HIM STUDY THE STARS AND THE PLANETS
A. Spectroscope
B. Materials:
Procedure:
Conclusion:
C. Materials:
Procedure:
Conclusion:
- Interested pupils may look up references on the spec-troscope and how it operates.
camera with setting for time exposure, tripod
Set camera on tripod outside at night and focus on abright star. Take a time exposure at 15 minute inter-vals. Look at prints.
A camera can be used in the study of stars.
magnifying mirror (concave)
Pull all shades except one, which is left partly open;Face mirror into this light, but point it toward adja-cent wall. Maneuver until outdoor view appears onwall.
Pupils will have a concept of how the reflectingtelescope works. Point out that we could use amagnifying glass to enlarge the reflected image.
57

58
D. Refracting telesdope
Radio telescopes can be discussed and/or demonstrated.
F. Materials: 2 lenses - each thicker in the middle than at the sides,window, table, waxed paper, clay
Procedure: Stand the thinner lens in a piece of clay at the end ofthe table. Turn lens so that it faces the window.Move a piece of waxed paper back and forth behind thelens until you find the point where there is a sharpimage. Have someone hold the waxed paper there. Howdoes image appear? (upside down)
Stand the thicker lens in clay at the other end oftable. Put your eye close to the thick lens. Movethe lens back and forth until you can see a clearimage on the waxed paper. Take away waxed paper. Youhave a telescope.
59
Pupil and Teacher References
* Balet, Jan. Amos and the Moon. New York: Henry Z. Welch, Inc., 1962.
Barr, George. More Research Ideas for Young Scientists. New York:Mc-Graw Hill Book Co., Inc.
Bendick,,Jeanne. The First Book of Space Travel. New York: FranklinWatts, Inc., 1963.
* Binder, Otto. Planets: Exploring Other Worlds. New York: Golden Press,Inc., 1959.
Blanc, Sam, Abraham Fischler and Olcott Gardner. Modern Science:Earth _Space and Environment. Holt, Rinehartand Winston, Inc., 1967.
* Bradley, Duane. Time for You: How Man Measures Time. The J.B.Lippin-cott Co., 1960.
Brandwein, Paul F., and others. Concepts in Science 3. New York,Harcourt, Brace and World, Inc.
Branley, Franklyn, M. Experiments in Sky Watching. New York: ThomasY. Crowell Co., 1959.
* Coles/ Robert R., and Frances Frost. Star of Wonder. New York: McGraw-Hill Book Co., Inc., 1953.
* Crosby, Phoebe. Junior Science Book of Stars. New York: Grosset andDunlap, Inc., 1963.
Elementary Science Study. Daytime Astronomy. Newton, Mass.: Elemen-tary Science study of Education DevelopmentCenter, Inc.
* Engelbrektson, Sune. The Sun is a Star. New York: Holt, Rinehart andWinston, Inc., 1963.
Flamarium, Gabrielle, Andre Danyon. The Flamarion Book of Asttormax.Simon Schuster, Inc., 1964.
* Freeman, Mae and Ira. The Sun, the Moon, and the Stars. New York:Random House Inc., 1959.
Gega, Peter C. Science in Elementary Education. New York: John Wileyand Sons, Inc., 1966.
60
* Hyde, Margaret O. Off into Space. New York. McGraw Hill Book Co., Inc.,1959.
Lauber, Patricia. All About the Planets. New York: Random House, Inc.,1960.
MacCracken, Helen D., and others. Science Through Discovery 3. SingerScience Series: New York: Random House, Inc.
* Polygreen, John and Kathleen. The Earth In Space. New York: RandomHouse, Inc., 1963.
Schneider, Herman and Nina. Science Far and Near 3. Boston: D.C.Heathand Company, 1968.
Wolfe, C. Wroe, et al. Earth and Space Science. Boston: D. C. Heathand Company, 1966.
* Children's reading material
Duplicating and Transparency Aids
The Solar System and Space Travel - Grades 5-9. Milliken Publishing Co.,St. Louis, Missouri
FILMS
Why Explore Space? ChurchillThe Seasons of the Earth-Coronet FilmsWhat Causes the Seasons?-McGraw Hill
Text Film Division
FILMSTRIPS
The Moon--Our Nearest Neighbor in Space 3 - 2 - C7Stars and Planets 3 - 2 - C8The Solar System 3 - 2 - E5The Stars 3 - 2 - E6Man Studies the Sky 3 - 4 - AlThe Earth in Space 3 - 4 - B1
MACtitNES AND FORCE
Objectives
To develop the understanding of how the six simple machines helpmen to do work. To create the realization that without some typeof force, these machines could not operate.
Allowance for application of knowledge learned to new situations
Promote scientific thinking.
Concepts
1. People do work when they move things.
2. A machine is any tool or device that helps us do work.
3. Machines make work easier.
4. There are many different kinds of machines.
5. An inclined plane is a simple machine. The force needed. touse an inclined plane changes as its tilt is changed.
6. The screw is a simple machine. The force needed to use ascrew changes as its pitch is changed.
7. A wedge is a simple machine. The force needed to use awedge changes as its sharpness is changed.
8. A lever is a simple machine. The force needed to use a leverchanges as the length of the force arm is changed.
9. A wheel and axle is a simple machine. The force needed touse a wheel alad axle changes as the size of the wheel ischanged.
10. Gears are a modification of the wheel and axle.
11. A pulley is a simple machine. The force needed to use apulley changes as the number of ropes supporting a load ischanged.
6i
Motivation
62
1. Arrange a bulletin board a few days ahead of actual introductionto unit. This bulletin board might ask questions such as these:
a. What machine helps you open a bottle of soda?b. What machirehelps you open a can of peas?c. What machine helps you dig a hole?d. What machine helps you to travel?e. Etc.
2. Arrange a bulletin board showing people at work using variousmachines - simple as well as complex. .Allow class to labelmachines shown with their actual names. Later on in the unityou can label with names of the six simple machines (ex. bottleopener - lever.)
3. Have the children bring in toys that move. Experiment with toysthat have springs. Experiment with toys that have wheels. Ex-periment with toys that move (or parts that move) when they arestruck, pushed or squeezed, turned, pulled, blown or thrown.
--How are these toys moved?--How are the parts of some toys moved?,(We did something to the toy.)
4.. Set up a display of books which may spark interest.
5. Show introductory film or filmstrip.
66
63
ACTIVITIES FOR MACHINES AND FORCE
PHASE
PEOPLE DO WORK WHEN THEY MOVE THINGS1.'
1 ,
A. Discuss things which childreh have hAd to move and hot theyaccomplish the task. (Parents?)
----What could have made the task easier? (if no machine wasused)
----What made your task easier? (if machine was used)
B. Do you know anyone who makes a living by moving things? Whatmachines do they use to assist? (Children can be grouped todiscuss the various possibilities and list them. Listscan becompared after a set interval.)
A MACHINE IS ANY TOOL OR DEVICE THAT HELPS US DO WORK 1
A. Bring in an assortment of tools. Have the children identifyeach one. How do these tools help us? (They do work.)Discuss what each tool does.How is a hammer like a washing machine? (It helps us do work.)Why can we call a tool a machine? (It helps us do work.)
B. Make a list of different machines the children suggest and havethe children describe the work each machine does. Compare thecomplicated machines with the simple machines. (Complicatedmachines have many parts; simple machines have few parts.)
C. Make a table display or bulletin board exhibit of tools anddevices that the children bring in from their homes.
D. Discuss how machines make a task easier. Ex. What does yourmother do if she does not have a washing machine? Is it harderto work the machine or use your hands to wash clothes?
67
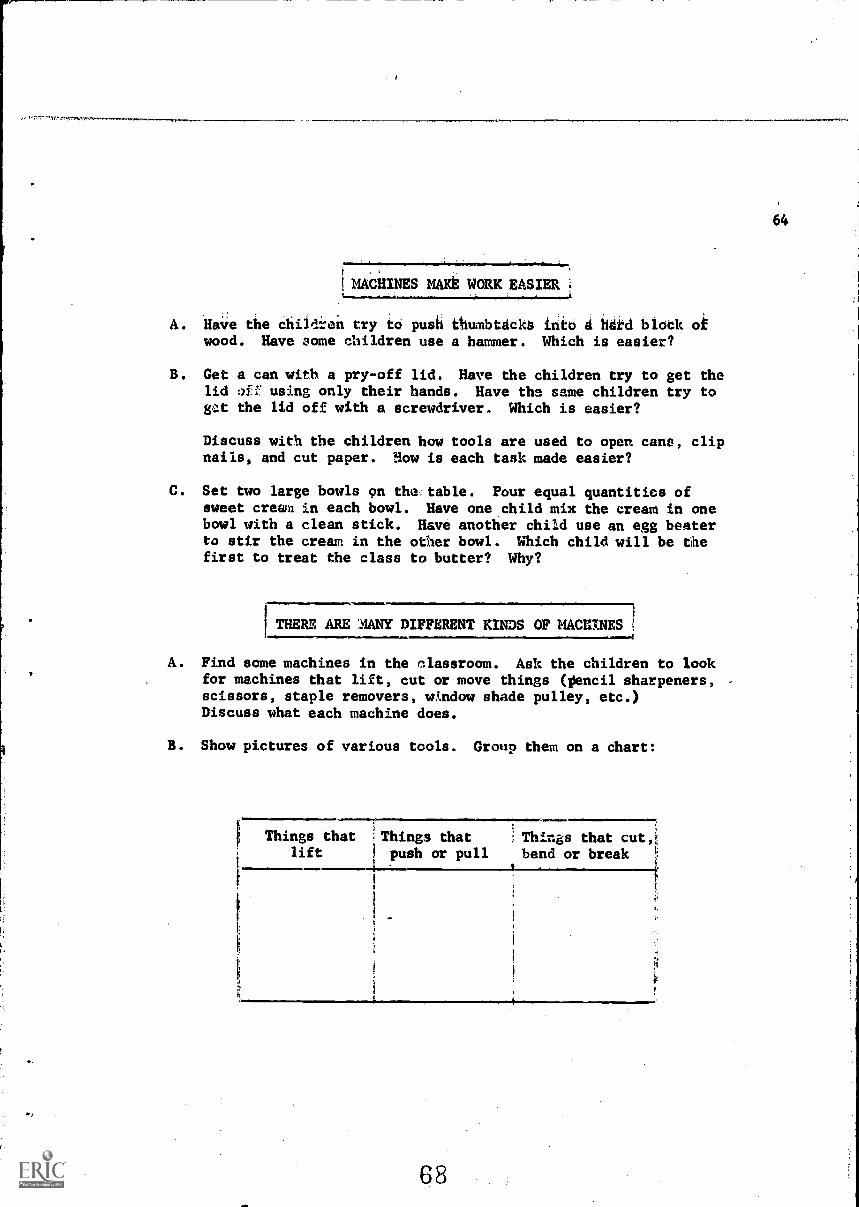
64
IMACHINES MAKE WORK EASIER
A. Have the child=en try to push thumbtdckS into d hdrd blotk ofwood. Have some children use a hammer. Which is easier?
B. Get a can with a pry-off lid. Have the children try to get thelid 9ff using only their hands. Have the same children try togzt the lid off with a screwdriver. Which is easier?
Discuss with the children how tools are used to open cane, clipnails, and cut paper. How is each tank made easier?
C. Set two large bowls 9n the: table. Pour equal quantities ofsweet creen in each bowl. Have one child mix the cream in onebowl with a clean stick. Have another child use an egg beaterto stir the cream in the other bowl. Which child will be thefirst to treat the class to butter? Why?
THERE ARE '241ANY DIFFERENT KINDS OF MACHINES4A. Find some machines in the classroom. Ask the children to look
for machines that lift, cut or move things (pencil sharpeners,scissors, staple removers, w.tndow shade pulley, etc.)Discuss what each machine does.
B. Show pictures of various tools. Group them on a chart:
i;
Things that Things that iThings that cut,lift ! push or pull bend or break I;
68
65
PHASE II SIMPLE MACHINES AND HOW THEY WORK
AN INCLINED PLANE IS A SIMPLE, MACHINE. THE FORCE NEEDED TO USEAN INCLINED PLANE CHANGES AS ITS TILT IS CHANGED.
A. Materials: Cardboard box weighted with books; smooth sturdyboard about four feet long; nine inch piece of string; lowtable; several pictures of inclined planes (stairways, agangway for ships, an airplane ramp, a trucker's loading ramp.)In the absence of pictures, make sketches.
Procedure:
1. Question about pictures (How do people leave the house?How do they get on a ship? Airplane?) What is thesimilarity between all pictures? Bring out that in eachpicture there is a slanting way going up or down--rampsor inclined planes. Explain "plane"--inclined plane.
2. Take a string and stretch it from the upper end of thefirst inciined plane straight to the ground. Hold thestring between thumb and forefinger of each hand to markthe distance. Place it over the inclined plane itself.Guide children to note that the distance is greater.Invite children to follow the same procedure with theother pictures.
3. Ask the children why an inclined plane was used in theabove case if it makes the walking distance longer.Why not use a ladder instead of stairs or gangplank?(It is easier to walk or push a load up an inclinedplane than to walk or pick something straight up.)
4. Experiment with the board, box of books and low table.At first, have two children try to lift the box of booksonto the table. Then the board can be placed againstthe table. Take care to hold the board so that fric-tion between box and board does not cause board toslide upward. Bring out from the two pupils and classthat it was somewhat easier using the inclined plane.Encourage other children to experiment to affirmfindings. Measure distance from table top to floorand then along ramp.
Conclusion: While it was easier to use an inclined plane,more distance had to be covered.
B. Allow children to stack some books on their desks And create aninclined plane from top book to desk top. Measure direct dis-tance down and then the distance along inclined plane. What isthe difference between distances?
69
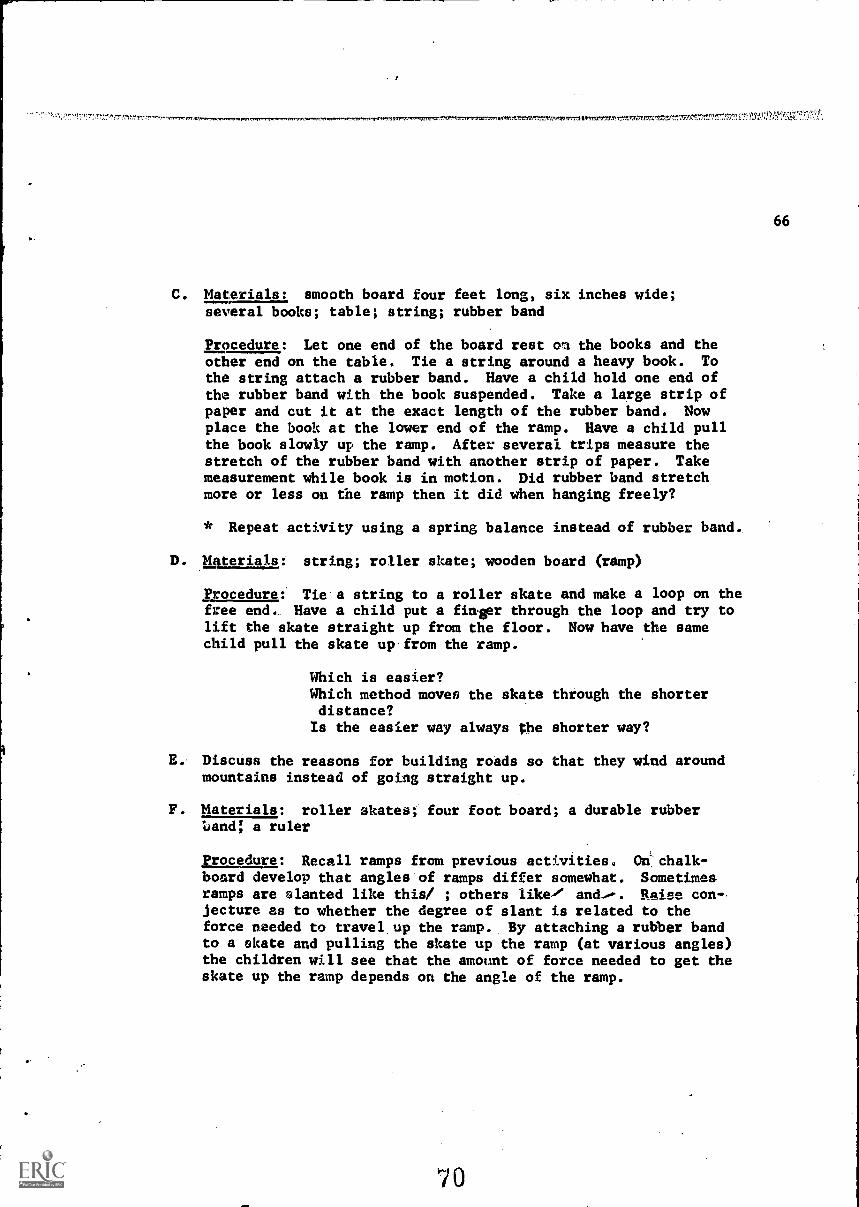
29111,7,141.17,7CRTIMTIrItIrMtM.
66
C. Materials: smooth board four feet long, six inches wide;several books; table; string; rubber band
Procedure: Let one end of the board rest on the books and theother end on the table. Tie a string around a heavy book. Tothe string attach a rubber band. Have a child hold one end ofthe rubber band with the book suspended. Take a large strip ofpaper and cut it at the exact length of the rubber band. Nowplace the book at the lower end of the ramp. Have a child pullthe book slowly up the ramp. After several trips measure thestretch of the rubber band with another strip of paper. Takemeasurement while book is in motion. Did rubber band stretchmore or less on the ramp then it did when hanging freely?
* Repeat activity using a spring balance instead of rubber band.,
D. Materials: string; roller skate; wooden board (ramp)
Procedure: Tie a string to a roller skate and make a loop on thefree end... Have a child put a finger through the loop and try tolift the skate straight up from the floor. Now have the samechild pull the skate up from the ramp.
Which is easier?Which method moves the skate through the shorterdistance?Is the easier way always the shorter way?
E. Discuss the reasons for building roads so that they wind aroundmountains instead of going straight up.
F. Materials: roller skates; four foot board; a durable rubberLand: a ruler
Procedure: Recall ramps from previous activities. On chalk-board develop that angles of ramps differ somewhat. Sometimesramps are slanted like this/ ; others like/ and...-. Raise con-jecture as to whether the degree of slant is related to theforce needed to travel up the ramp. By attaching a rubber bandto a skate and pulling the skate up the ramp (at various angles)the children will see that the amount of force needed to get theskate up the ramp depends on the angle of the ramp.
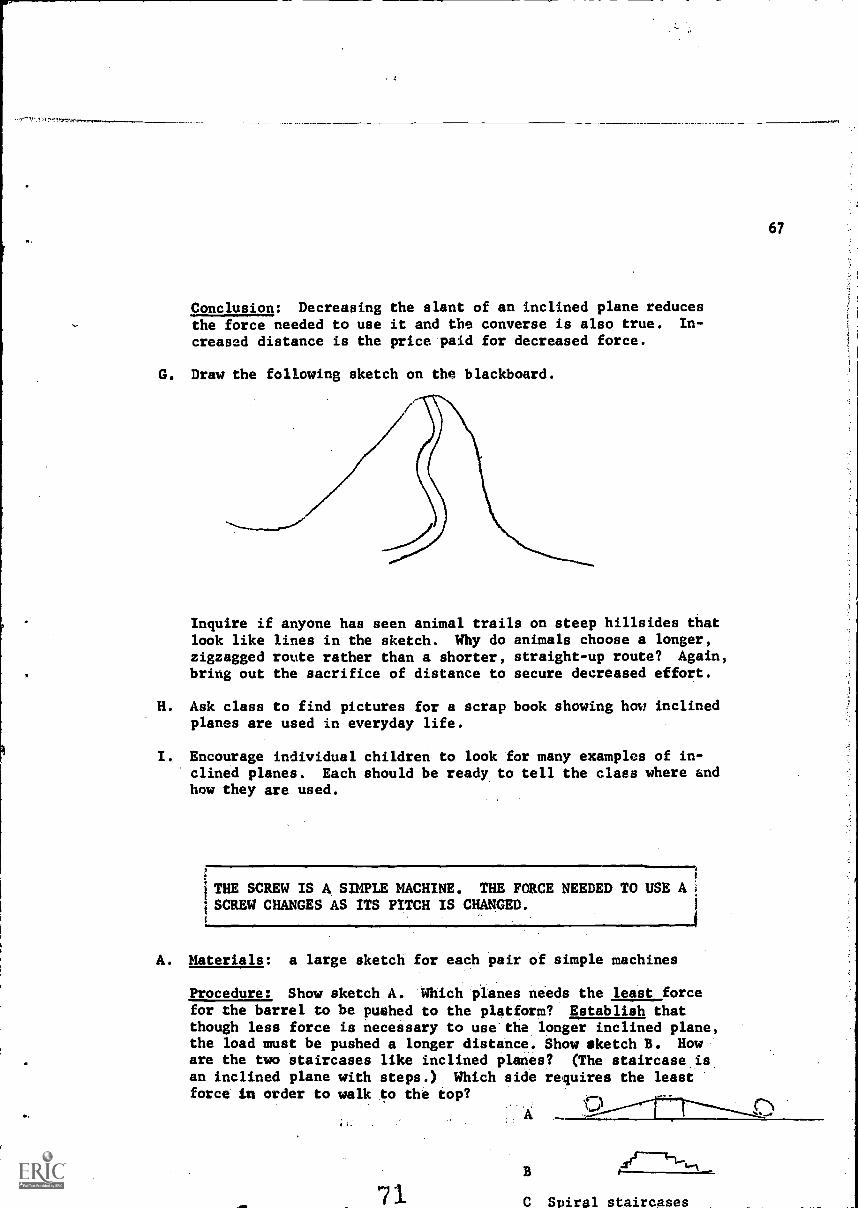
Conclusion: Decreasing the slant of an inclined plane reducesthe force needed to use it and the converse is also true. In-
creased distance is the price paid for decreased force.
G. Draw the following sketch on the blackboard.
Inquire if anyone has seen animal trails on steep hillsides thatlook like lines in the sketch. Why do animals choose a longer,zigzagged route rather than a shorter, straight-up route? Again,bring out the sacrifice of distance to secure decreased effort.
H. Ask class to find pictures for a scrap book showing how inclinedplanes are used in everyday life.
I. Encourage individual children to look for many examples of in-clined planes. Each should be ready to tell the class where andhow they are used.
,
1
iTHE SCREW IS A SIMPLE MACHINE. THE FORCE NEEDED TO USE A;SCREW CHANGES AS ITS PITCH IS CHANGED. i
A. Materials: a large sketch for each pair of simple machines
Procedure: Show sketch A. Which planes needs the least forcefor the barrel to be pushed to the platform? Establish thatthough less force is necessary to use the longer inclined plane,the load must be pushed a longer distance. Show sketch B. Howare the two staircases like inclined planes? (The staircase isan inclined plane with steps.) Which side requires the leastforce in order to walk to the top?
71B
C Spiral staircases
67
68
Again, establish that additional Watance is traveled to gain de-creased force. Show sketch C. Point out that the two light-houses are pictured with inside stairways visible; these also,are examples of inclined planes. Emphasize that these inclinedplanes wind around in a spiral and are called spiral staircases.Draw out similar illustrations the children may have seen. En-courage them to indicate which staircase would require the leastforce. They should easily recognize again that distance istraded for force.
B. Materials: two large wood screws of equal size but differentpitches, screwdriver, hammer, two small blocks of soft wood.
Screw down one end and nail the other end with a nail about thesame length .as the screw.
Procedure: Establish purpose of the screw. Cite places whereused. Hold up the fastened blocks. Have children observe thatone end is nailed and the other is screwed down. Which endwill be-most easily pried apart? Allow'a student to try to pryusing a screwdriver. The class should conclude that a screwholds more firmly than a nail.
C. Materials: two large wood screws of equal length but varying pitchand one soft wooden block per participating child, screwdrivers,sketches of screws.
Procedure: Show screw sketch illustrating different pitches.Bring out visible differences in threads of the screws; one hasmore spirals or turns. One has a steeper pitch or greater dis-tance between threads. The steeper pitch is the steeper slant.Compare threads to the spiral staircases in the lighthouses.Let the children hypothesize as to which screw in the sketchwould be easier to screw into a 'piece of wood and which would takemore turns with a screwdriver (lower pitch screw.)Permit as many children as possible to try screwing in both screws.Compare results. Which screw took the most turns?
Conclusion: The screw with lower pitch was easier but longer toturn. A sacrifice of time for ease of effort.
D. Materials: two identical pencils, two tacks, two inclined planescut from white paper, both four inches high, one six inches long,the other nine inches long. (Draw a heavy colored line on theouter edge of the long side on each cut-out.)
Procedure: Place the smaller inclined plane over the larger.Which inclined plane would take longer to use, but less force?Have "pretend" screws made by wrapping inclined planes around twopencils.. Secure paper with tape at each end.
Conclusion:; A screw is an inclined plane wound in a spiral.
72
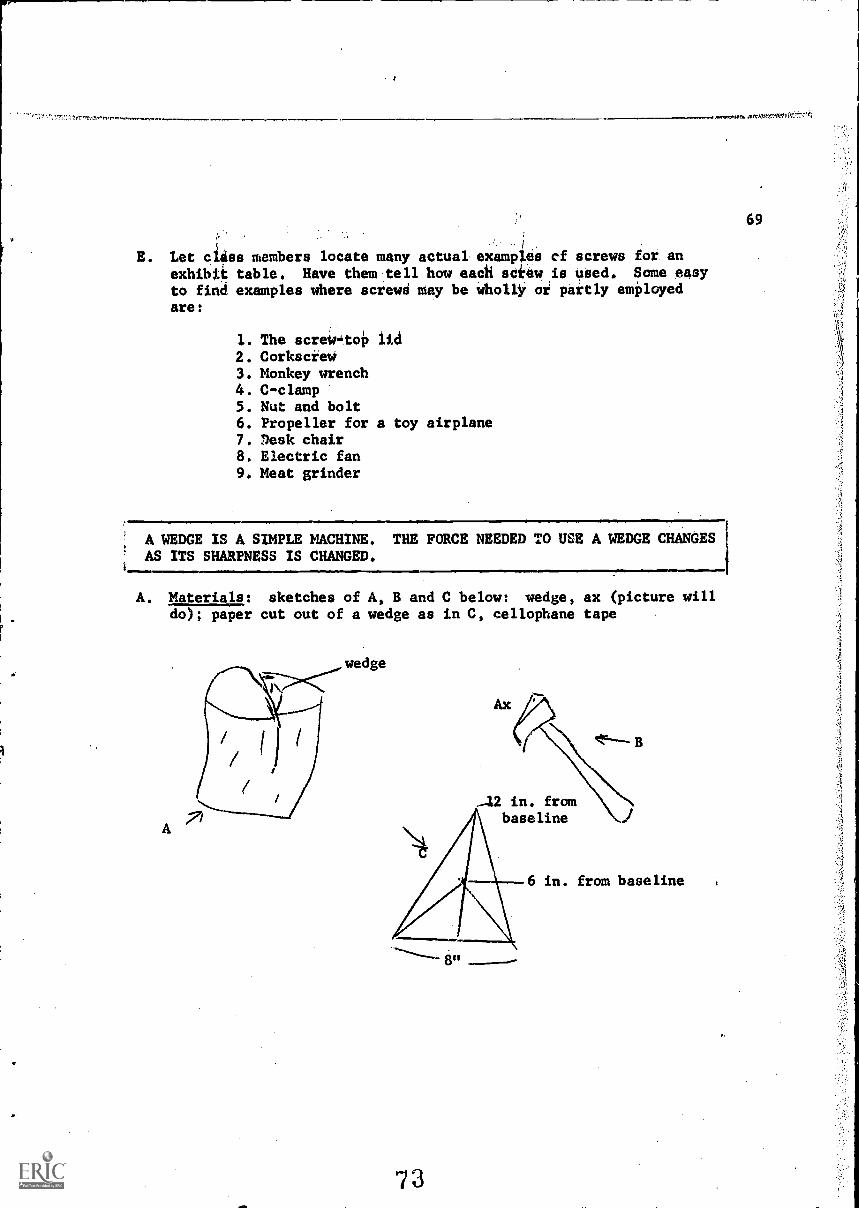
E. Let class members locate many actual examples cf screws for anexhibit table. Have them tell how (ma screw is used. Some easyto find examples where octave may be whollY or partly employedare:
1. The screie4toP lid2. Corksciew3. Monkey wrench4. C-clamp5. Nut and bolt6. Propeller for a toy airplane7. Desk chair8. Electric fan9. Meat grinder
A WEDGE IS A SIMPLE MACHINE. THE FORCE NEEDED TO USE A WEDGE CHANGES i
AS ITS SHARPNESS IS CHANGED.
A. Materials: sketches of A, B and C below: wedge, ax (picture willdo); paper cut out of a wedge as in C, cellophane tape
42 in. frombaseline
"73
6 in. from baseline
69
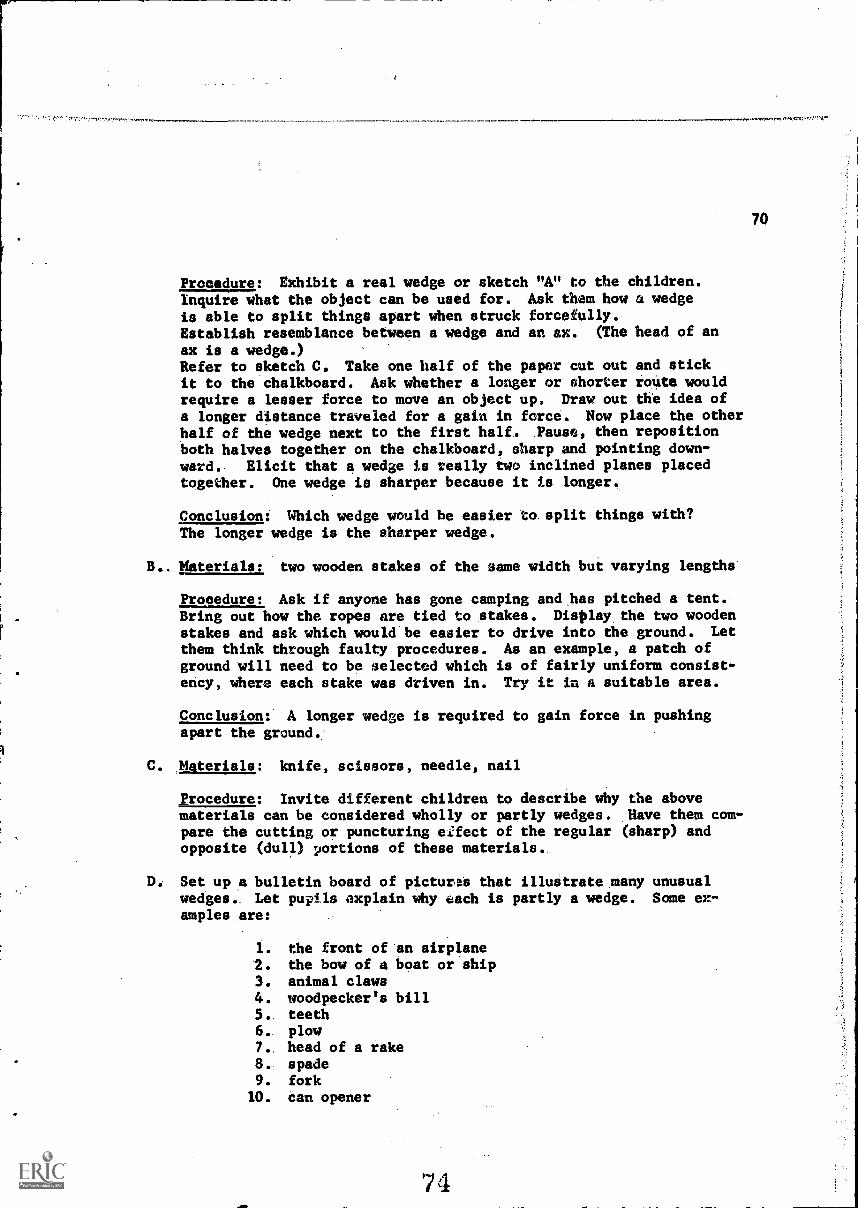
1,01014 0,
Procedure: Exhibit a real wedge or sketch "A" to the children.Inquire what the object can be used for. Ask them how a wedgeis able to split things apart when struck forcefully.Establish resemblance between a wedge and an ax. (The head of an
ax is a wedge.)Refer to sketch C. Take one half of the paper cut out and stickit to the chalkboard. Ask whether a longer or shorter route wouldrequire a lesser force to move an object up. Draw out the idea ofa longer distance traveled for a gain in force. Now place the otherhalf of the wedge next to the first half. Pause, then repositionboth halves together on the chalkboard, sharp and pointing down-ward. Elicit that a wedge is really two inclined planes placedtogether. One wedge is sharper because it is longer.
Conclusion: Which wedge would be easier to split things with?The longer wedge is the sharper wedge.
B.. Materials: two wooden stakes of the same width but varying lengths
Procedure: Ask if anyone has gone camping and has pitched a tent..Bring out how the ropes are tied to stakes. Display the two woodenstakes and ask which would be easier to drive into the ground. Let
them think through faulty procedures. As an example, a patch ofground will need to be selected which is of fairly uniform consist-ency, where each stake was driven in. Try it in a suitable area.
Conclusion: A longer wedge is required to gain force in pushingapart the ground.
C. Materials: knife, scissors, needle, nail
Procedure: Invite different children to describe why the abovematerials can be considered wholly or partly wedges. Have them com-pare the cutting or puncturing effect of the regular (sharp) andopposite (dull) portions of these materials..
D. Set up a bulletin board of picturas that illustrate many unusualwedges. Let pupils explain why each is partly a wedge. Some ex-amples are:
1. the front of an airplane2. the bow of a boat or ship3. animal claws4. woodpecker's bill5. teeth6.. plow7.. head of a rake8.. spade9. fork10. can opener
74_Mb
70
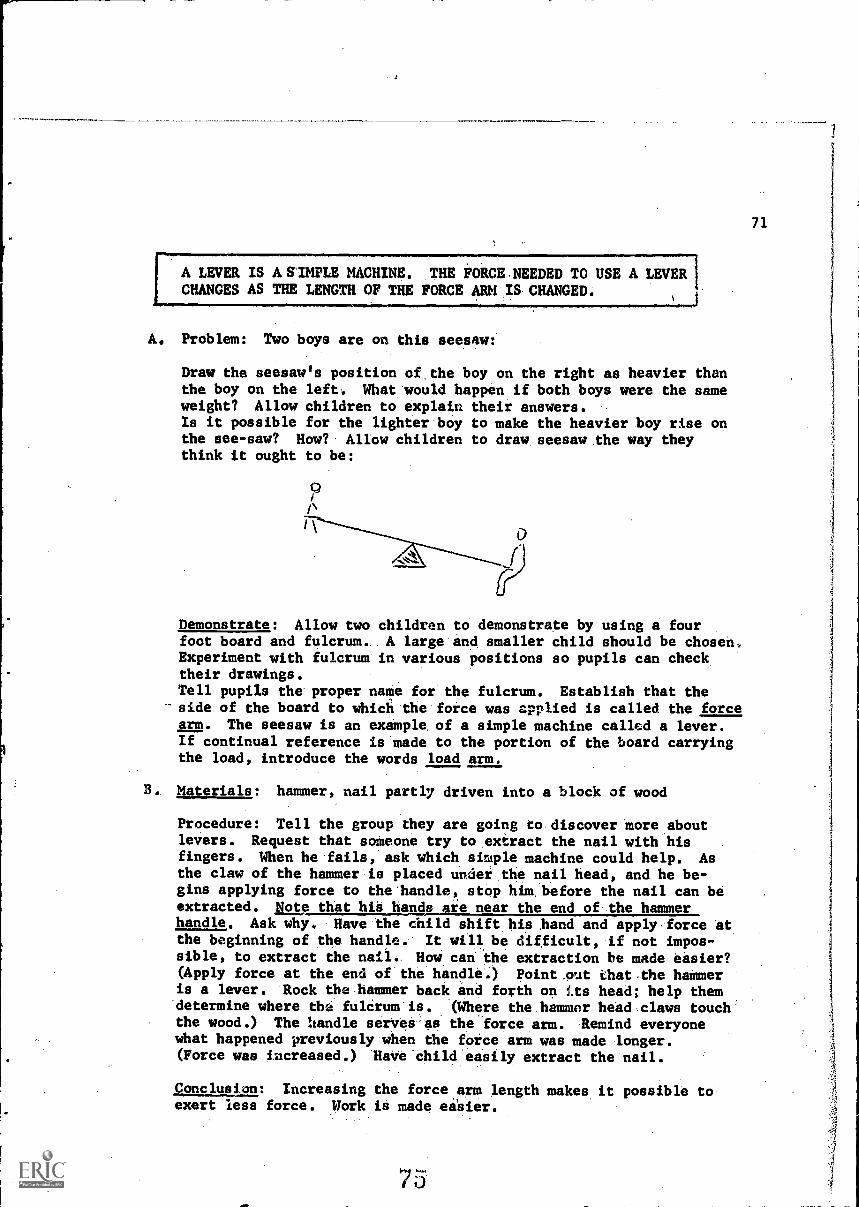
71
A LEVER IS Al SIMPLE MACHINE. THE FORCE NEEDED TO USE A LEVERCHANGES AS THE LENGTH OF THE FORCE ARM IS CHANGED.
A. Problem: Two boys are on this seesaw:
Draw the seesaw's position of,the boy on the, right as heavier thanthe boy on the left. What would happen if both boys were the sameweight? Allow children to explain their answers.Is it possible for the lighter boy to make the heavier boy rise onthe see-saw? How? Allow children to draw seesaw the way theythink it ought to be:
Demonstrate: Allow two children to demonstrate by using a fourfoot board and fulcrum. A large and smaller child should be chosen.Experiment with fulcrum in various positions so pupils can checktheir drawings.Tell pupils the proper name for the fulcrum. Establish that theside of the board to which the force was applied is called the forcearm. The seesaw is an example of a simple machine called a lever.If continual reference is made to the portion of the board carryingthe load, introduce the words load arm.
B. Materials: hammer, nail partly driven into a block of wood
Procedure: Tell the group they are going to discover more aboutlevers. Request that someone try to extract the nail with hisfingers. When he fails, ask which simple machine could help. Asthe claw of the hammer is placed under the nail head, and he be-gins applying force to the'handle, stop him before the nail can beextracted. Note that his hands are near the end of the hammerhandle. Ask why. Have the child shift his hand and apply force 'atthe beginning of the handle. It will be difficult, if not impos-sible, to extract the nail. How can 'the extraction be made easier?(Apply force at the end of the handle;) Point out chat .the hammeris a lever. Rock the hammer back and forth on 1.ts head; help themdetermine where the fulcrum is. (Where the hammer head claws touchthe wood.) The handle serves'as the force arm. Remind everyonewhat happened previously when the force arm was made longer.(Force was increased.) Have child easily extract the nail.
Conclusion: Increasing the force arm length makes it possible toexert less force. Work is made easier.
75

72
C. Materials: can opener, ahuili*Justable end wrench, clean tincan with one end intact, thiCk rubber band, ruler
Procedure: Adk.the .thildieb.tO demonstrate that increasing forcearm length permitti work to tie :dcitio with less force. Provideassistance and clues as needed, Stddenta should be able to designa demonstration that includeii
1. piercing thetin can. Witte a can opener.2. piercing can top with adjui0gAe end wrench attached
to handle (wench used to ienkthen bandle-idice atm)
A rubber. band may be affixed to the endoi the haridle.in. both tailedto allow amounts of applied force. A ruler may metieUte approximatestretch (force) required to pietce the can.
Conclusion: Increasing the force arm length permits less force tobe exerted in doing work.
D. Materials: thin rubber bands, thumb tacks, ruler, classroom orcloset door, sketch of drawing below
I -
-4Procedure:PEWEE Retch. Ask for identification of same. What simplemachine is like a door? (lever) Find fulcrum (hinges). Findthe door knob in sketch and note location. Trace the path of thehand when actually opening the door (largest arc). Show that ifthe door knob were in position A, the arc distance for opening andclosing the door would be lessened; even less at point B. Ask whythe door knob, then, is usually placed at the outside of a door.Someone might answer that it makes locking more convenient. Pressfor amount of force required in the opening and closing activity.Children might experiment by thumbtacking a rubber band to a doorin three different positions. A ruler may assist in recording thedegree of stretch (force) needed to move the door.
Conclusion: Increasing force arm length permits less force to besxerted in doing work. A greater distance is traveled to reduceeffort.
76
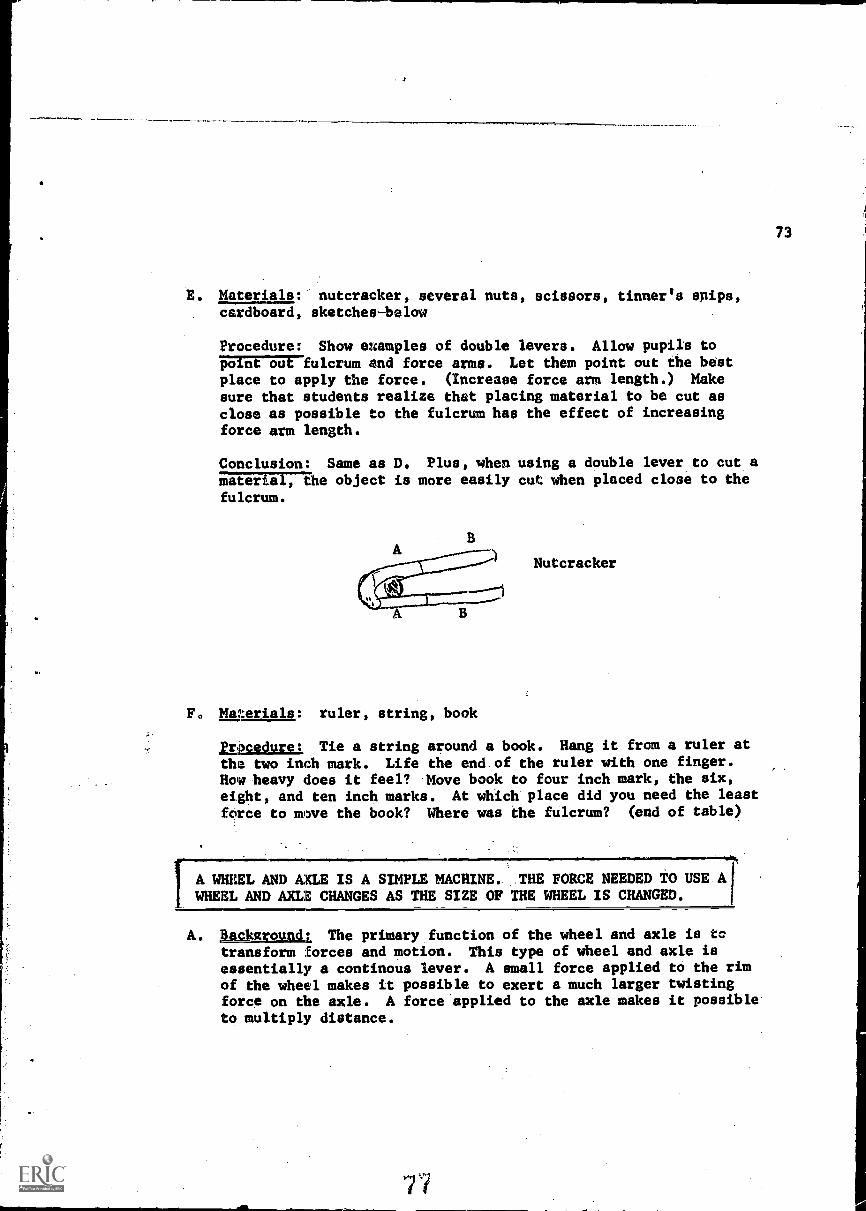
73
Materials: nutcracker, several nuts, scissors, tinner's snips,cardboard, sketches-below
Procedure: Show examples of double levers. Allow pupils toFOTEEIBTEfulcrum and force arms. Let them point out the bestplace to apply the force. (Increase force arm length.) Makesure that students realize that placing material to be cut asclose as possible to the fulcrum has the effect of increasingforce arm length.
Conclusion: Same as D. Plus, when using a double lever to cut aIMENTThe object is more easily cut when placed close to thefulcrum.
B
F. Materials: ruler, string, book
Nutcracker
Procedure: Tie a string around a book. Hang it from a ruler at
the two inch mark. Life the end. of the ruler with one finger.How heavy does it feel? Move book to four inch mark, the six,eight, and ten inch marks. At which' place did you need the least
f0rce to move the book? Where was the fulcrum? (end of table)
. A WHEEL AND AXLE IS A SIMPLE MACHINE.. THE FORCE NEEDED TO USE AWHEEL AND AXLE CHANGES AS THE SIZE OF THE WHEEL IS CHANGED.
.11i...
A. Background: The primary function of the wheel and axle is totransform forces and motion. This type of wheel and axle isessentially a continous lever. A small force applied to the rimof the wheel makes it possible to exert a much larger twistingforce on the axle. A force applied to the axle makes it possibleto multiply distance.
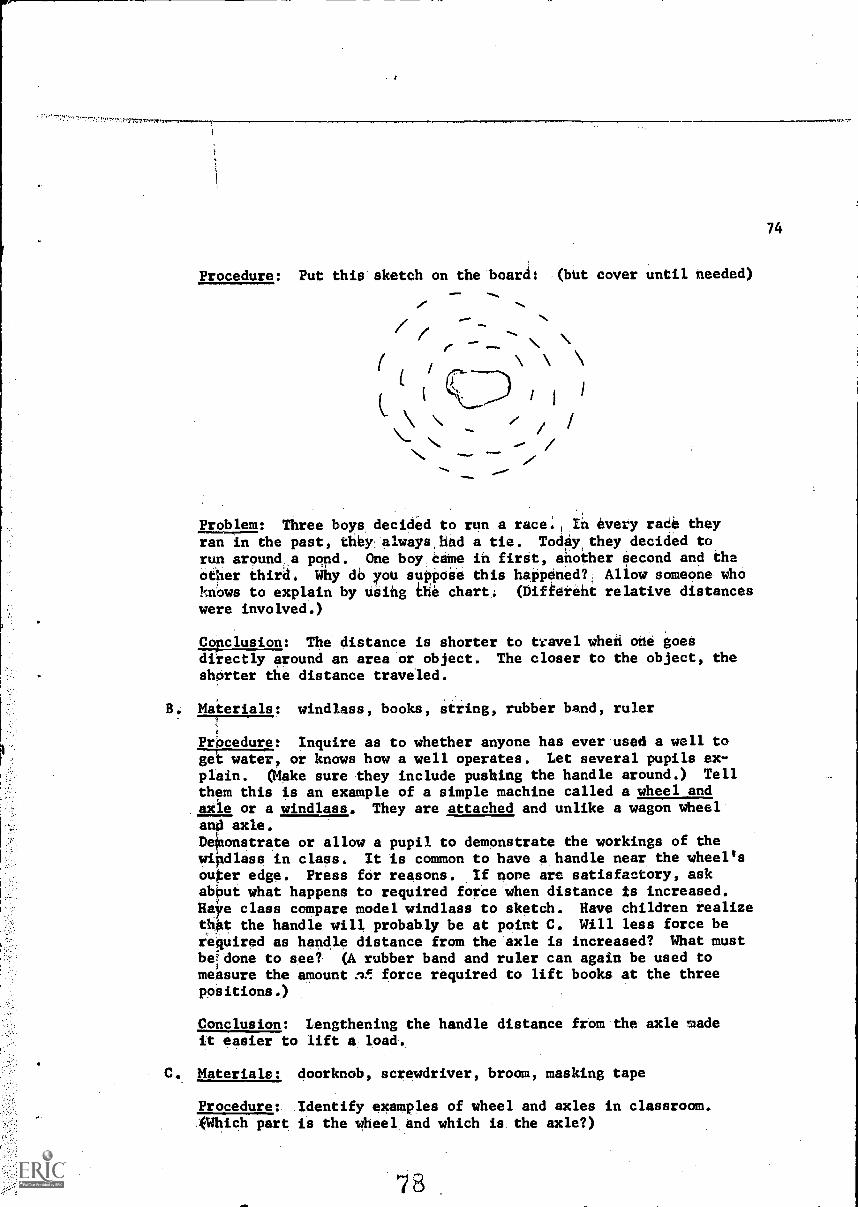
74
Procedure: Put this sketch on the board: (bUt cover until needed)-- -,
,
..
\ I
..... \ \r--\ \
I II
/ I
N,...- /
N, -- --''
Problem: Three boys decided to run a race:, In every rade theyran in the past, they. always.had a tie. Today they decided torun around,A pond. One boy Cattle in first, another second and theother third. Why di) you supPose this haiipaned?, Allow someone whohnows to explain by using the chart: (Different relative distanceswere involved.)
Conclusion: The distance is shorter to travel when one goesdirectly around an area or object. The closer to the object, theshorter the distance traveled.
B. Materials: windlass, books, string, rubber band, ruler
Procedure: Inquire as to whether anyone has ever used a well toget water, or knows how a well operates. Let several pupils ex-plain. (Make sure they include pushing the handle around.) Tellthem this is an example of a simple machine called a wheel andaxle or a windlass. They are attached and unlike a wagon wheeland axle.DeMonstrate or allow a pupil to demonstrate the workings of thewindlass in class. It is common to have a handle near the wheel'souter edge. Press for reasons. If none are satisfactory, askabOut what happens to required force when distance is increased.Haye class compare model windlass to sketch. Have children realizethat the handle will probably be at point C. Will less force berequired as handle distance from the axle is increased? What mustbe!done to see? (A rubber band and ruler can again be used tomeasure the amount force required to lift books at the threepositions.)
Conclusion: Lengthening the handle distance from the axle madeit easier to lift a load.
C. Materials: doorknob, screwdriver, broom, masking tape
Procedure: Identify examples of wheel and axles in classroom.(Which part is the wheel and which is the axle?)
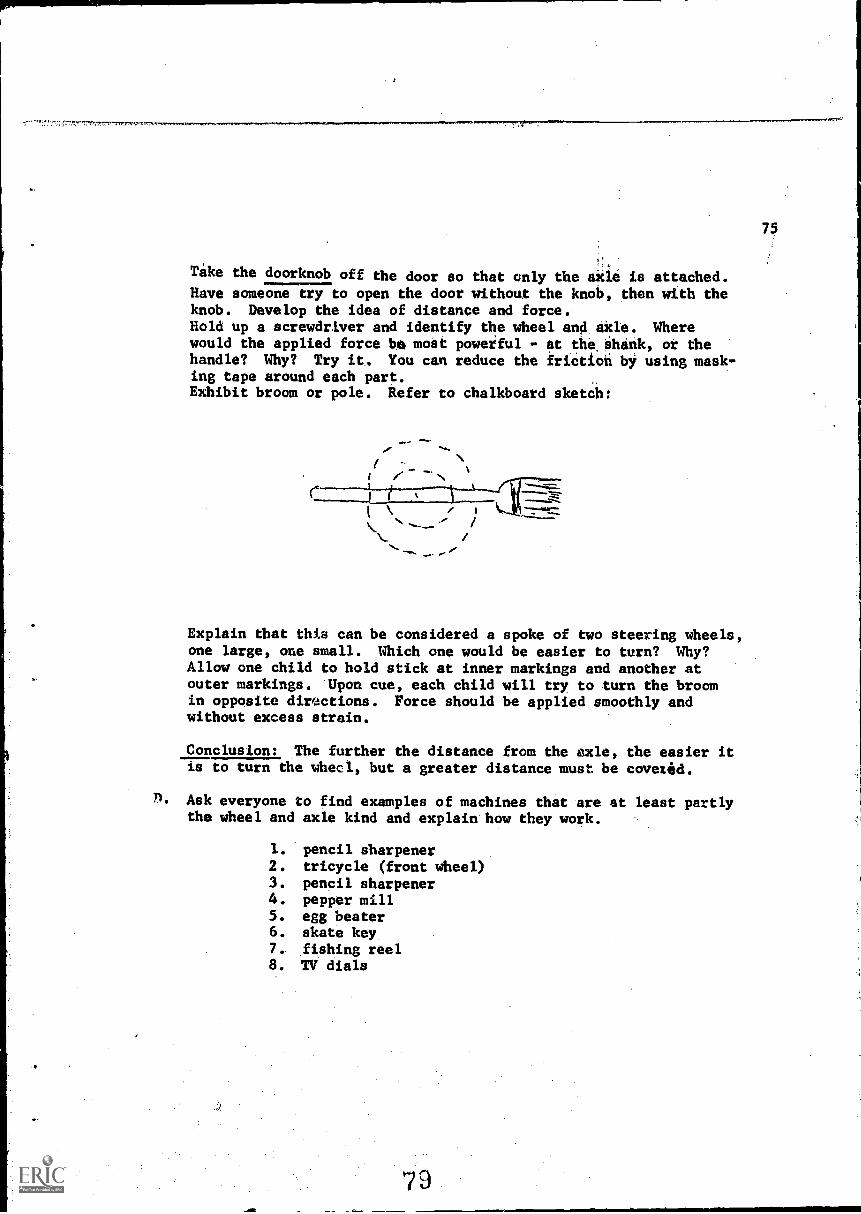
271,1,..,,,nrtsftromatoemneren,
4
Take the doorknob off the door so that only the axle is attached.Have someone try to open the door without the knob, then with theknob. Develop the idea of distance and force.Hold up a screwdriver and identify the wheel and axle. Wherewould the applied force be) most powerful - at the shank, or thehandle? Why? Try it. You can reduce the friction by using mask-ing tape around each part.Exhibit broom or pole. Refer to chalkboard sketch:
Explain that this can be considered a spoke of two steering wheels,one large, one small. Which one would be easier to turn? Why?Allow one child to hold stick at inner markings and another atouter markings. Upon cue, each child will try to turn the broomin opposite directions. Force should be applied smoothly andwithout excess strain.
Conclusion: The further the distance from the axle, the easier itis to turn the wheel, but a greater distance must be coveted.
n. Ask everyone to find examples of machines that are at least partlythe wheel and axle kind and explain how they work.
1. pencil sharpener2. tricycle (front wheel)3. pencil sharpener4. pepper mill5. egg beater6. skate key7.. fishing reel8. TV dials
79

.a,
GEARS ARE A' MODIFICATION OF THE WHEEL AND AXLE
A. Materials: egg beater
Procedure:, Hive children notice the bit wheel of a beater. Seehow they fit into the teeth, on the little wheels. The wheelswith teeth areitearqe Notice how a handle turns the big gear.What is the ptirOokie Of turning the large gear? (smaller geaks)When the emalier gears tUrn; what else turns/ (beater blades)Make a mark on one of the blades of the egg beater. Turn thehandle slowly for one revoidtion, Count how many turns theblade makes, (five to one ratio)
Conclusion: When i big gdar turns a smaller gear the work isspeeded op.
B. Materials: two bicycles
Procedure: Allow children to observe how the gears of a bicyclework. When a bicycle is peddled, you are turning a large gearwhich in turn moves a smaller gear which is turning the rearbicycle wheel. The rear bicycle wheel moves the bicycle. (Pointout the parts by referring to an actual bicycle or diagram.)Compare taking two steps on foot with two steps on a bicycle.Use another bicycle with larger or smaller wheels than the first.
Conclucion: With. a bicycle you gain speed and distance. Thelarger the wheel, the further and faster you go.
A PULLEY IS A SIMPLE MACHINE. THE FORCE NEEDED TO USE .A PULLEYCHANGES AS THE NUMBER OF ROPES SUPPORTING A LOAD IS CHANGED
A. Display,pulley. Show-that it has a movable wheel and a stationaryaxle,.
B. ,MateriAls: twine or light Pope, bucket or book; spring balance or'rubber band
Cite and discuss some pUlleys children may be familiar with.
Procedure:. AUsing a hookor nailHon_thevali in . the olassroom,-letchildren devise away in which a toy buCket can be raised orlOwered (using twine or lightrope),
76
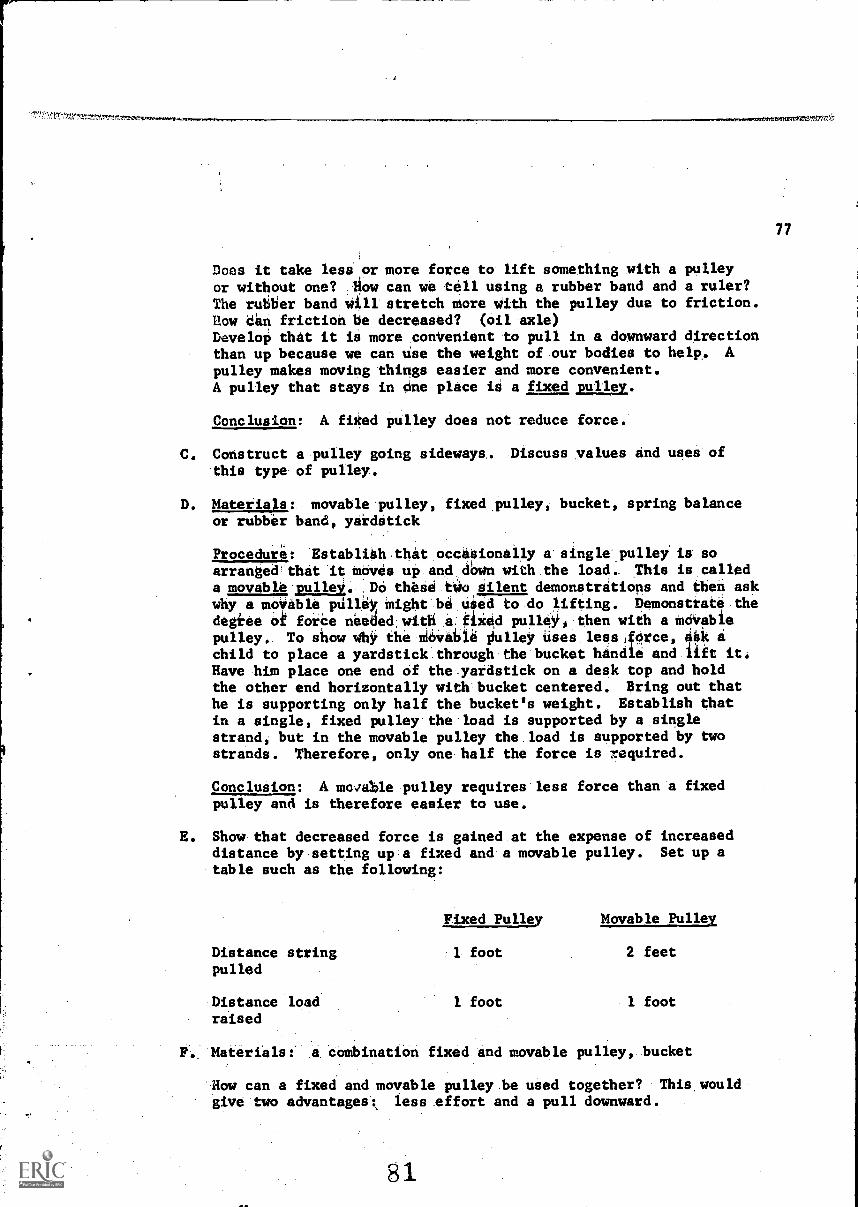
own
Does it take lesi or more force to. lift something with a pulleyor without one? :How can we tell using a rubber band and a ruler?The rubber band,Will stretch More With the pulley due to friction.How din friction be decreased? (oil axle)Develop that it ie more donVertient to pull in a downward directionthan up because we can use the weight of our bodies to help,. Apulley makes moving things easier and more convenient.A pulley that stays in One place is a fixed pulley.
Conclusion: A fisted pulley does not reduce force.
C. Construct a pulley going sideways. Discuss values and uses of
this type of pulley.
D. Materials movable pulley, fixed_pulley bucket, spring balanceor rubber band, yardstick
Procedure: 'Establish that occasionally a'singlepullei is soarrangedthat'it moves up and dOwn with.the This is calleda movable.pulleY. ,
DO theee.tWo.silent demonstrations and then askwhy a movable piney MightiNii died to do .lifting. Demonstrate.thedegiee elk forde needed: with .a: fixed pulley, then with a movablepulley,. To show Why the MOVAhle *1110 Uses.leesifOrce, ;keitchild to place a yardstick through the bucket hindle and lift it.Have him place one end of the yardstick on a deak top and holdthe other end horizontally with bucket centered. Bring out thathe is supporting only half the bucket's weight. Establish thatin a single, fixed pulley.the load is supported by a singlestrand, but in the movable pulley the load is supported by twostrands. Therefore, only one half the force is required.
Conclusion: A movable pulley requires less force than a fixedpulley' and is therefore easier to use.
E. Show that decreased force is gained at the expense of increaseddistance by setting up a fixed and a movable pulley. Set up a
table such as the following:
Distance stringpulled
Distance loadraised
Fixed Pulley Movable Pulley
1 foot 2 feet
1 foot 1 foot
Materials: a combination fixed and movable pulley, bucket
'How can a fixed and movable pulley .be used together? This, would
give 'two advantages.:, less effort and a pull downward.
81
77
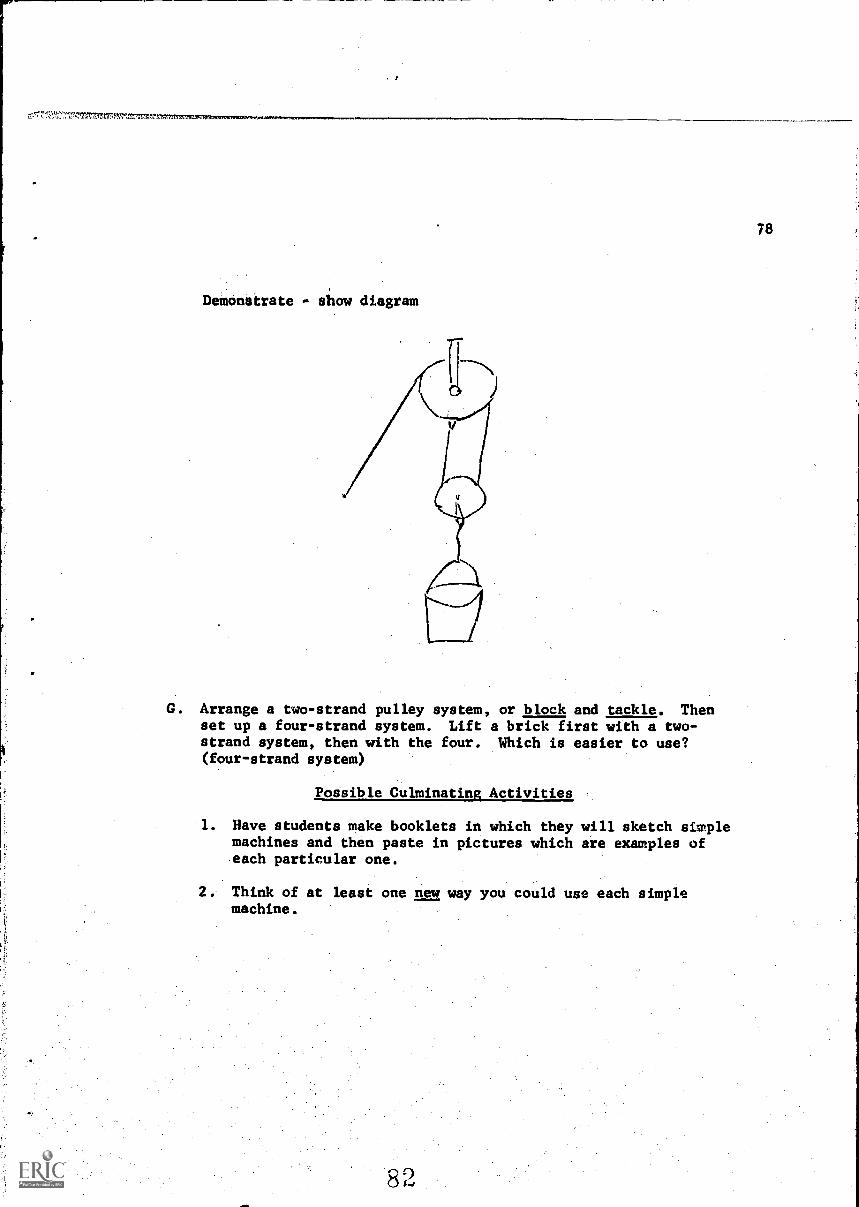
,11111.0.710Frter,
DeiOnitraie - show diagkam
G. Arrange a two-strand pulley system, or block and tackle. Thenset up a four-strand system. Lift a brick first with a two-strand system, then with the four. Which is easier to use?(four-strand system)
Possible Culminating Activities
1. Have students make booklets in which they will sketch simplemachines and then paste in pictures which are examples ofeach particular one.
2. Think of at least one new way you could use each simplemachine.

t,101:1.V.rt,P7,11'..7r....T.Virmxr..rmasemeterxt
Reference -- 111j1A.osrah,
Blough, Glen. O., Doing Work. New York: Harper & RowPublishers, 1959.
Gega, Peter C.,
Navarra, John G.
Science in Elementary Education, New York:John Wiley and Sons, Inc., 1966.
and Joseph Zafferoni, Science Today For TheElementary School Teacher, New York; Harper& Row, 1960.
Parker, Bertha Morrib, New York: Harper & Row, 1954.
Parker, Bertha Morris, sgeriences,EnSciencaE3itarSchool
New York: Harper & 1(4W1 1958.
Pine, Tillie S. and Joseph Levine, Simple Machines and How WeUse Them, New York: McGraw Hill Book Co.,1965.
Sharp, Elizabeth N., Simple Machine and How They Work. New York:Random House, 1959.
FILMS
1. How Wheels Help Us.2. How Machines and Tools Help Us. Coronet Films3. MachineiDo Work. McGraw-Hill Book Company4. Moving Things On Land. McGraw Hill Book Company5. Simple Machines: Pulleys, Coronet Films
FILMSTRIPS3-3-D7
1. Machines For Daily Use.2. Finding Out About Simple Machines. 'Society for Visual
Education.3. Machines and Tools Help Us Work. Society for Visual
Education4. Pulleys. Jam Handy Organization5. Simple Machines. McGraw Hill Book Company
83
,rr..7.1.,t,".t*.V.!tivxmnrztp , re,*
Commi4nities of Life
uc,rovamovraMOMMMWI,
Objectives,
1. To comprehend the continuity of life within a given environment.
2. To understand that there is a balance between plants and animalsin a given environment before said environment is disturbed byman.
3. To become aware that animals adapt to new environments orperish. Some animals, however, can alter a given environment.
4. To become aware that there are many types of plant and animalcommunities.
5. To promote scientific thinking.
Concepts,
1. A pond is a community of living things both in and around thewater.
2. Animals affect their community.
3. Life is affected by its surroundings.
4. Animals and plants depend upon one another for survival.
Motivation
A review of work previously covered by means of categorizing.
A. Materials: about 15 groups of pictures of plants and animals ofvarious phyla; pencils; paper
Procedure: For this activity the children might work in pairsfor maximum participation while conferring. A large varietyof pictures of "living things" should be given to each pairof pupils. The pictures might first be separated into kingdomsand then further subdivided. (Sub-categories may be pre-determined by the entire class or left to the individual pairsto decide.) After sub-categories are determined and picturesare arranged in piles, one child ought to write a listing chartfor his pictures while his partner dictates. (They might alter-nate jobs.) The chart's should vary.
Allow several charts to be read aloud and pictures shown. Allowfor class discussion, disagreement, etc. Large categories maybe written on the chalkboard in chart form.
A class listing process may ensue if desired.
81
80
B. A bulletin board may be created showing pictures. of variousforms of life. Pictures might be made by children and .placedin Stich a way that a true-to-life living situation is repre-sented. (Encourage,pictures:of plants as well as animals.)Allow ii'lroup of children tb arrange pictures on bulletinboard.
A POND IS A COMMUNITY OF LIVING THINGS BOTH IN AND AROUND THE WATER.
The purpose of color in animals or plants usually is to conceal,disguise or advertise.
Every living organism possessei some body parts which are adaptedfor the life it leads.
Each species is adapted, or is in the process of becoming adapted tolive where it is.
A pond is a small body of water containing many different forms oflife, which, if undisturbed, are in balance.
Some forms of life are very small and can be seen only with a micro-scope.
The children should be made aware of the above. The following waysmay be used as methods.
A. Ask: What is a pond?Is a pond non-moving water?Does a pond contain life?Is there life around a pond?
Discuss pond life, vegetation (plants), sources of water, and abovequestions.
Pond life may include:
Animals Plants
frogs mosseshydra algaewater skippers cattailsaquatic snails water liliescrayfish pond scum Opirogyra)toads reedsspiders grassesfliesgrasshoppersturtlessnakessalamanderssnails
81
I'f^.......IMMMROmOnOgwaMtTMII.N'Il..VIS.'raM.Mr.
Some exatples of ponds are trapped raih Water, dammed streams, sinkholes, storage water, and trapped draihage water.
B. Field Trip
Materiaia; dip nets (can be made out of old stockings and coathangers); Piro with lids; containers for insects; thermometers
procedure: Take a planned field trip to a pond; provide fortransportation, supervision, rules of conduct, safety rules,permission and equipment. Have students take temperaturereadings at different depths and record the data. Look forall of the different forms of life. Gather a few specimensof the following:
water samplesalgaemossesinsectsanimalslife from covered rocks
Record unusual examples of coloration.
C. Ask: What is the source of water thatWhat kinds of animals and insectWhat kinds of plants were. found?Could there be life in the waterHow can we examine the life?
was in the pond?life were found?
that we cannot see?
Materials: microscope; dropper; slide; cover glass
Procedure: Put a drop of water collected from the pond on aslide and cover it with a cover glass. Place under a micro.scope.
Questions which may be asked are:
What can be seen under the microscope?Can there be life we can't see?What would happen if the pond dried up?Is there any form of life on the rocks? (examine)How does water temperature' vary?Is it important to pond life?Why are algae and other plant life important?
Explanation: Temperature is important to life. If the pondis deep, there will be different types of life living at dif-ferent depths. Algae and other plant life serve as food forfish and some water insects.
ZITtP,ttellZ
82
lte'74,V:d?
83
D. How was life colored so as not to be easily seen?
Materials: microscopes or magnifying glasses; wood, rock, pondwater, tap water
Procedure: Set up microscopes or use magnifying glasses to ob-serve the material of the wood, lichens on the rock, and thepond water more closely. Observe tap water as well.
Why should you not drink pond water?Why is it safe to drink tap water?
Explanation: City water has been purified by killing organismsin water. ReView the purpose of each organism in the pond,pointing out how organisms are dependent on each other. Forexample, the fish eat the plants, but they also make ferti-lizer that plants need in order to grow.
*E. If you were to puesome soil, a few snails and some water plantsinto a jar, would you have a small pond? Explain.
ANIMALS AFFECT THEIR COMMUNITY
Animals are dependent on one another and plants for food.
The smaller the animals, the more likely it is that there will be alarger number of them present in a community.
Larger animals may consume many small animals in order to satisfytheir hunger.
The fittest survive.
When the supply cannot meet the demand, a change of some kind mustoccur in the community.
Water plants are important to an aquatic community.
"Pyramid of number" means that there are always more small animalsin an environment which serve as food for the larger animals, who in
..turn_are food_for_even.larger_animals.
The above points may be illustrated through the following series ofactivities.
A. Set up an aquarium. Obtain from a swampy region, a lake, or astagnant pool some rather scummy water. Be sure to get some ofthe green plants (algae) which live in the water and place thesein aquarium. Also attempt to collect some snails, daphnia, andother organisms found in stagnant water. Include some rocks anda small fish. (You now have a microcosm, a small world.)
87
B
<Inatttteetiti:
84
What is this? What does it show?How is it different from a regular aquarium?How many different kinds Of life do you see?What is happening in it?What dhange do you think Will take place in the jar?Is this a microcosm? (yes)
-What pgri do the animals play?-What function do the plants have?
What changes would you expect to take place in a day, a week, or amonth?
Explanation: During the beginning observations the students will notobserve much of a change. Perhaps the initial observations could befollowed by discussing these questions.
Why hasn't there been much change?Is the life in the aquarium balanced now?Do you think there will have to be an imbalance before we detectany change?What does the fish eat?Does the plant take care of anything else other than itself?Where does the plant get its food?
C. After some time the fish will die.
Discuss:
Why did fish die?-Was he sick ?,
-Was he getting anough food?-What did he eat? (how much at once?)-Lack of oxygen?
What will happen now to the fish if we leave him there? (Leaveexpired fish in the jar.)
D. After a few days:
How .do we account for the rise in population of the smaller animals ?.
What evidence do we have that one animal is dependent upon anotherfor food?
Explanation: After some time there will be a definite change,owing to the fact that the organism eating the dead fish multiplyrapidly, but when the fish has been eaten they begin to die.
Ask: How did the food supply effect the population?
88
85
E. Keep the aquarium for several more days. Note any changesin plants.
-Why are plants changing?-How did the plants contribute to the microcosm?
Explanation: To make food oxygen for the animals. What effectdid thedeith of the,animals have on ,the microcosm?
LIFE IS EFFECTED DY igS SURROUNDINGS
Points to. establish:
Certain environmental factors determine community types.
Scme of the types of communities are on land and some in water.
Land communities can be subdivided into forests, bogs, swamps,deserts and others.
A community is a collection of living organisms which have mutualrelationships among themselves and their environments.
All living things have certain requirements that must be met bytheir surroundings.
Habitat is a place where an animal or plant naturally lives orgrows.
The main purpose of this unit is to show that different environmentsare needed to sustain different types of life.
The following are suggestions for various environments which cervixset up in the classroom.
The children should be made aware of the interdependence of life ineach situation. Control situations may be arranged to show what alack of plants will do to animals and vice versa.
Procedures for Setting Up Plant and Animal Environments - UnheatedAauarium
Set aside in separate containers enough water to fill the aquarium.This water should be allowed to stand uncovered for twenty-fourhours to reach room temperature and also to aid in the removal ofchlorine. It is advisable to purchase the animal life a day ortwo after the aquarium has been set up. This gives the plant lifeample time to take root.
*.morpmpWWW
86
1.. Obtain and use a rectangular water-tight glass container oraquarium.
2: Waih container with soap and water and rinse container thor-oughly with clean; clear water.
3. Wash, sand or gravel thoroughly and Spread evenly over bottomof the aquarium.
4. Wish plants carefully under running water.
5. Tie small weights or stones on plants to help anchor them inthe sand.
6. Arrange the plants Attractively and firmly in ihe scald:
7. Placit a sheet of, paper (newspa0er or construction paper) overplaats and sand to prevent plants from being uprooted byfilling the aquarium with the "aged" water.
8. Cover aquarium and allow it to stand for a period of severaldays.
9. Place fish and other animals in aquarium.
10. Place glass cover over top of aquarium to keep clean (not tobe airtight.)
11. Keep fish in healthy condition by placing them about once amonth in a salt water solution. (1 teaspoon common salt and1 teaspoon Epsom salt to 1 gallon of water for 24 hours.)
12. Feed only recommended foods.
Note: Electric aerator and filter are helpful in keepingthe water clean for animal life and reducingnecessity for plants.
90
,
yeMperatUre Controlled Aquarium (Tropical Environment).
rill.Olein,containers. with tap. water.and,a1101 them to remain un-
covered for a period of 24 hours. This process should;allow thewater to reach room temperature (7,5 °F.) and also. aide in the re-moval of chlorine gad. It,is.advisable.to,p4rcha:WallanimdlIilife a day,or two after tile aquarium has been prOlierly Otepared,This will Afford ample time for the Plants to take rOdti
Obtain and use a rectangular water-tight glass container oraquarium.
2.. Wash container with soap and water and rinse thoroughly withclean, clear water.
3. Wash sand or gravel thoroughly and spread evenly over bottomof the aquarium..
4. Wash plants carefully under running water.
5. Tie small weights or stones on plants to help anchor them inthe sand.
6. Arrange the plants attractively and firmly in the sand.
7. Place a sheet of paper (newspaper or construction paper) overplants and sand to prevent plants from being uprooted whilefilling the aquarium with the aged water.
8. Plug into a nearby electric outlet a combination aquarium-heater-thermostat. Hang it over the side near one corner ofthe aquarium, being careful not to submerge the top. In thecorner, place an aquarium thermometer. Allow a week or tendays to adjust the thermostat until the water temperaturestabilizes between 72co and 80°F.
9. Place guppies, angel fish, or other tropical fish into theprepared aquarium. Add several snails or a Bronze Catfishto act as scavengers.
10. Place glass cover over top of aquarium to keep clean (not tobe air-tight.)
11. Keep fish in healthy condition by placing them about once amonth in a salt-water solution (1 teaspoon common salt and1 teaspoon Epsom salt to ,1 gallon of water for 24 hours.)
12. Feed only fish food or diet recommended by authorities.
Note: Electric aerator and filter are helpful in keepingthe water clean for animal life and reducing thenecessity for plants.
91
87
o.r.771,WMnntM7==.17gmm..,-
ANIMALS AND PLANTS DEPEND ON ONE ANOTHER
Several environments may be simulated.
A. Aquarium
....*.....alemes11111111011.,,MIMISTrre,ek
Materials; 6 galloa container4j gallons of water10 lbs. of sand or gravel1 feeding ring1 sand trough10 plants (Sagittaria, Elodea, Myriophyllum,
Vallisneria, Cabomba)1 or 2 tadpoles2 small fish (goldfish or sunfish)6 to 12 snails1 piece of glass for cover (not to be air-
tight)1 package of goldfish food1 siphon for removal of waste from the bottomof aquarium
1 thermometer1 electric filter system (optional)1 electric heater (optional)
B. Woodland Terrarium
Materials and procedure
1. terrarium with 5 gallon capacity2. layer of pebbles on the bottom of the container.3. layer of sand on top of pebbles4. layer of rich soil on top of sand5. Arrange plants attractively in the soil and water
thoroughly. Plants which can be used are: moss,lichens, liverworts, partridge berry or wintergreen,small ferns, creeping Charlie or grass.
6. Place animals in container. Animals which may beused are: snake, frog, newt or turtle.
7. Place a screen over container.8. Water is needed to maintain a moist soil condition.
C. Desert Terrarium
Materials and procedure
1. Acquire a 5 gallon terrarium2. Place dry fine sand in the container.3. Arrange plants attractively and firmly the sand
(various types of cacti.)
92,
88

,1.fT7M17ritr't1111111,1"rtftnetTrmar:rtlirr .
89
4. Place a small dish of fresh water on the sand for theanimals(collared lizards and chameleons).
5. Place animals in the container.6. Place screen cover over container. .
7. Watei 141.-1Weekly far we t, or SoUCh ZAposure, less fre-
quently for east of noktil8. Change Sand when odors are noticed.
D. Semiaquatic Terrarium
Materials and Procedure
1. Acquire terrarium.2. Place pebbles on the bottom of container, Build up one
end with sand or gravel to height of several inches abovewater line.
3. Place soil on top of the gravel for swamp plants.4. Arrange plants attractively and firmly in the soil.
Plants which may be used include: moss, partridge cherry,small ferns, arrowhead, lichens, liverworts, creepingCharlie or common grasses.
5. Carefully pour the water into the shallow end of con-tainer and maintain this level.
6. Place animals in environment. Animals which may be usedinclude: turtles, salamander or newt, frog or crayfish,toad.
7. Place glass cover over container (not air-tight).
uestions eared toward acedure.
uarium care and understandin 0 r0-
Why are snails needed in an aquarium?
(They eat the small green algae, scummy plants thatcollect on the side of the tank.)
Why clean tank?Why must gills of fish be kept clean?How do fish breathe?Why allow water to stand for several days before placing fishin aquarium?
Why were plants added to aquarium?Why is it necessary to add fish food?Why would the fish naturally eat?What do plants make that the fish can use and vice versa?
(brief mention)
Explanation: Plants make oxygen and food and fish producecarbon/dioxide and waste products. The aquarium is probablynot balanced, so that food must be added to it from time totime for the fish.
93
. Vrrain .7,r27t "Jr CITM2IMTV.VC, ram
90
Comparison of Aquarium and Terrarium
How does the life found in the aquarium differ from that found indesert and bog terrarium?
What kind of conditions do the fish, the turtle and the frog orlizard have to have in order to survive in their particularhabitats?
What kinds of conditions do bog plants need in order to growwell?
What kind of food does the fish, the lizards or the turtles eat?
What do you think would happen to the turtle if you left him inthe desert habitat; to the lizard if you put him in a bog habi-tat?
94
Culminating Activity
Depth study bf individual, animals.
Divide alas& into heterogeneous groups of 5, Each committeewill study one animal of their agt choosing which had beenobserved during unit:
The committee chairman should be given a question sheet afterteacher finds out ahilnal selected. Questions which mi:ght beabked:
1. How does your animal develop to adulthood?
(simply increases in size; undergoes change within acocoon where it developes wings; progression visiblechange - frog; etc.)
2. How does your animal get its food?
3. What does your animal look like?
4. How does your animal care for its young?
5. What are the enemies of this animal and how doesthe animal protect itself?
6. etc.
Questions may be assigned to individuals who are responsiblefor writing the answer on the answer sheet and initialing it.
Reports will be presented to the class after each group issatisfied with its individual results. Pictures shouldsupplement reports.
The committees should be ready to report after 3 committeemeetings of about 30 working minutes each.
It is essential that ample reading matter be present in theclassroom at the time of the committee meetings.
95
91
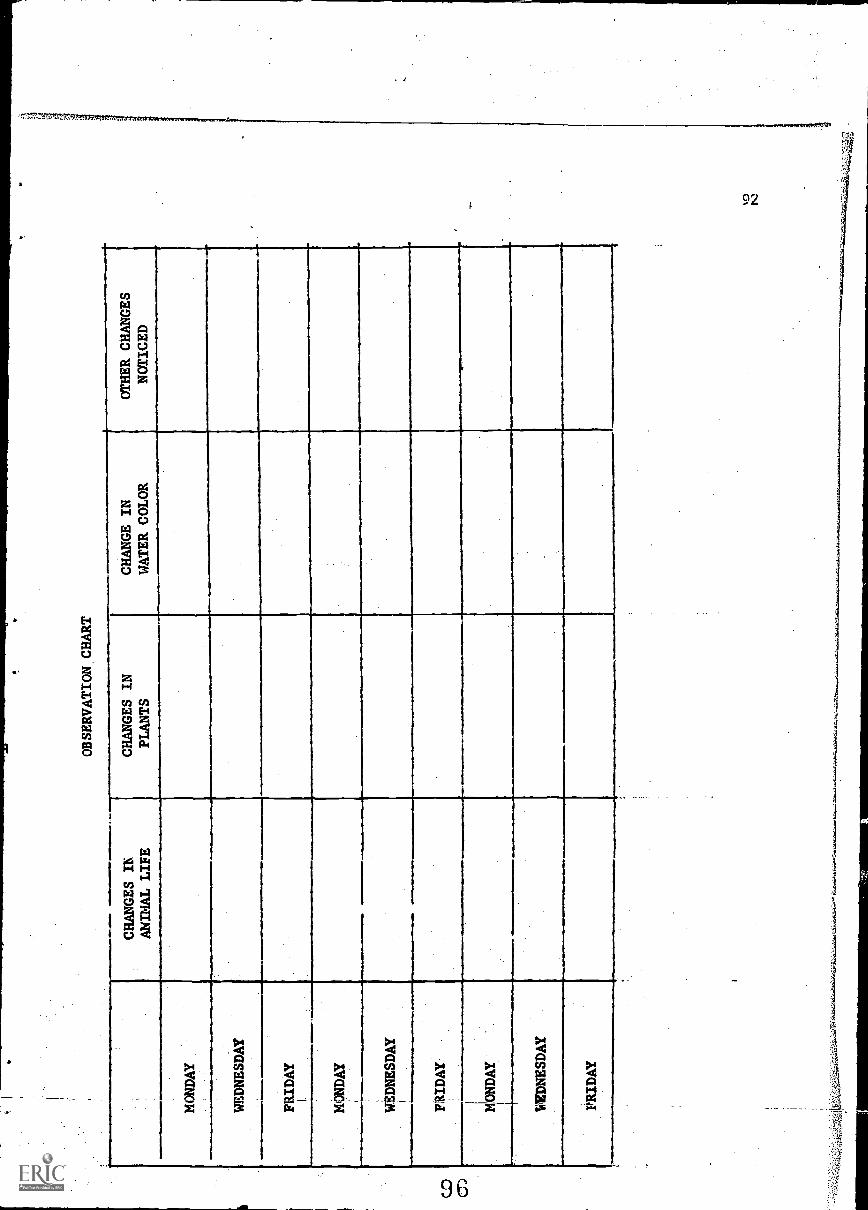
CJ
Cr)
OBSERVATION CHART
CHANGES IE
ANIMAL LIFE
CHANGES IN
PLANTS
CHANGE IN
WATER COLOR
OTHER CHANGES
NOTICED
MONDAY
WEDNESDAY
FRID
AY
I
MO
ND
AY
WE
DN
ESD
AY
1
FRIDAY
MONDAY
tiED
NE
SDA
Y
FRID
AY
i
ti
References
* Broekel, Ray, IbLarataoalsafarapjsALEtplits, Chicago, Children'sPress, Inc., 1956.
*Buck, Margaret Waring, In Ponds and Streams.
Cirin, Arthur and Robert B.Sund, Teachingicience .Thrdugh Discovery:.Columbus, Charles Merrill Books, It'd. 1964.
* Carter, Katherine J., Rumiellaitas, Austin, Steck Co., 1963.
* Fenton, Carroll Lane, and Evelyn Carswell, Wild Folks At The Pond,New York, John Day Co., Inc., 1947.
* Harris, Louise D. and Norman D. The Little Read Newt, Boston, Little,Brown and Co., 1958.
Hausman, Leon A, &Winner's Guide To Fresh Water Life, New York,G. T. Putnam's Sons, 1950.
* Hogner, Dorothy Childs, Odd Pets, New York, Thomas J. Crowell Co.1951.
* Hogner, Dorothy Childs, Snails, New York, Thomas J. Crowell Co.,1958.
Kane, Henry B. The Tale Of A Pond, New York, Alfred A. Knopf, Inc.1960.
* Kay, Dorothea, A Child's Book Of Fishes, Chicago, Maxton PublishingCorp., 1953
* Lavine,
* Lavine,
*McClung,
* Meeks, E
*Miller, P
Sigmund A., Wonders Of Animal Disguises, New York, Dodd,Mead and Co., 1962.
Sigmund A., Wonders of the Aquarium, New York, Dodd, Meadand Co., 1956
Robert M., Bufo, The Story Of A Toad, New York, WilliamMorrow and Co., Inc., 1954
sther Macbain, Jeff and Mr. James' Pond, New York, Lothrop,Lee and Shepard Co., Inc., 1962
atricia I.(' and Iran L. Seligman, Big Frogs, Little Frogs.New York, Holt, Rinehart and Winston,Inc., 1963.
93
Navarra, John Gabriel and Joseph Zafforoni, Tolayls Basic ScienceNew York, Harper & Row Publishers, 1967.
* Parker, Bertha Morris, The Golden Treasury of Natural History, NewYork, Simon and Schuster, Inc., 1952.
* Fels, Gertrude, The Care of Water Pets, New York, Thomas Y. CrowellCo, 1955.
Schneider, Herman and Nina, Science Far and Near 3, Boston, D,C.Heathand Co., 1968.
* Schoenknect, Charles A., Frogs and Toads, Chicago, Follett PublishingCo., 1960.
Waller, Robert (coordinator), Science, Ill:. Elk Grove TownshipDistrict 59.
* Zim, Herbert S., Frogs and Toads, New York, William Morrow and Co.,Inc., 1950.
Films
Pond Life Encyclopedia Britannica Films
Aquarium Wonderland Pat Dowling Pictures
Life in An Aquarium McGraw-Hill Book Co., Inc.
We Explore The Woodland Stoneham
Filmstrips
Looking For Animals
How Amphibians Get Their Food
How Fish Get Their Food
* Animals of The Pond
* Living Things Need OtherLiving Things
98
3- 1 - D1
3 - 1 - E2
3- 1 -E3
3- 1 - B3
3 -2 - C5
94