corel photo-paint 2018 user guide - digiars
TRANSCRIPT

User Guide

Copyright © 2018 Corel Corporation. All rights reserved.
Corel® PHOTO-PAINT® 2018 User Guide
Product specifications, pricing, packaging, technical support and information (“specifications”) refer to the retail English version only. The specifications for all other versions (including other language versions) may vary.
Information is provided by Corel on an “as is” basis, without any other warranties or conditions, express or implied, including, but not limited to, warranties of merchantable quality, satisfactory quality, merchantability or fitness for a particular purpose, or those arising by law, statute, usage of trade, course of dealing or otherwise. The entire risk as to the results of the information provided or its use is assumed by you. Corel shall have no liability to you or any other person or entity for any indirect, incidental, special, or consequential damages whatsoever, including, but not limited to, loss of revenue or profit, lost or damaged data or other commercial or economic loss, even if Corel has been advised of the possibility of such damages, or they are foreseeable. Corel is also not liable for any claims made by any third party. Corel’s maximum aggregate liability to you shall not exceed the costs paid by you to purchase the materials. Some states/countries do not allow exclusions or limitations of liability for consequential or incidental damages, so the above limitations may not apply to you.
Corel, the Corel logo, the Corel balloon logo, CorelDRAW, the CorelDRAW balloon logo, Corel DESIGNER, Corel Font Manager, CAPTURE, CONNECT, LiveSketch, PaintShop, PaintShop Pro, PHOTO-PAINT, Painter, PowerClip, VideoStudio and WordPerfect are trademarks or registered trademarks of Corel Corporation and/or its subsidiaries in Canada, the U.S. and/or other countries. Other product, font and company names and logos may be trademarks or registered trademarks of their respective companies.
Patents: www.corel.com/patent
218018
Contents | 1
Contents
Getting started.................................................................................................................................................................................... 15
Installing CorelDRAW Graphics Suite.................................................................................................................................................... 17
System requirements.......................................................................................................................................................................17
Preparing for installation................................................................................................................................................................ 18
Installing CorelDRAW Graphics Suite applications...........................................................................................................................18
Installation options......................................................................................................................................................................... 18
Modifying and repairing installations..............................................................................................................................................20
Uninstalling CorelDRAW Graphics Suite.......................................................................................................................................... 21
Frequently Asked Questions............................................................................................................................................................21
Corel accounts and services..................................................................................................................................................................23
Authenticating CorelDRAW Graphics Suite...................................................................................................................................... 23
Checking account settings.............................................................................................................................................................. 24
Updating Corel products................................................................................................................................................................ 24
Changing user credentials...............................................................................................................................................................24
Corel Support Services.................................................................................................................................................................... 25
About Corel....................................................................................................................................................................................25
What’s new in CorelDRAW Graphics Suite?..........................................................................................................................................27
Creative.......................................................................................................................................................................................... 27
Productive.......................................................................................................................................................................................31
Innovative....................................................................................................................................................................................... 35
Finding out what was new in previous versions............................................................................................................................. 38
Learning resources................................................................................................................................................................................39
Getting help................................................................................................................................................................................... 39
Using the Help and tooltips........................................................................................................................................................... 40
Using Hints.....................................................................................................................................................................................41
Welcome screen............................................................................................................................................................................. 42
Quick Start Guide........................................................................................................................................................................... 42
Insights from the Experts................................................................................................................................................................42
Video learning resources.................................................................................................................................................................43
2 | Corel PHOTO-PAINT 2018 User Guide
Community website for developers.................................................................................................................................................43
Network deployment guide............................................................................................................................................................ 43
Web-based resources......................................................................................................................................................................43
Starting and setting up........................................................................................................................................................................ 45
Starting and quitting Corel PHOTO-PAINT...................................................................................................................................... 45
Changing the language.................................................................................................................................................................. 45
Changing startup settings...............................................................................................................................................................46
Corel PHOTO-PAINT workspace tour..................................................................................................................................................... 47
Corel PHOTO-PAINT terms.............................................................................................................................................................. 47
Corel PHOTO-PAINT application window........................................................................................................................................ 48
Choosing a workspace....................................................................................................................................................................50
Toolbars.......................................................................................................................................................................................... 51
Toolbox...........................................................................................................................................................................................53
Property bar....................................................................................................................................................................................62
Dockers...........................................................................................................................................................................................63
Color palette...................................................................................................................................................................................65
Status bar.......................................................................................................................................................................................65
Setting options..................................................................................................................................................................................... 67
Changing workspace options..........................................................................................................................................................67
Disabling warning messages...........................................................................................................................................................68
Bringing images into Corel PHOTO-PAINT.............................................................................................................................................69
Opening images............................................................................................................................................................................. 69
Importing files................................................................................................................................................................................ 71
Scanning images............................................................................................................................................................................ 73
Creating images..............................................................................................................................................................................74
Working with multiple images........................................................................................................................................................76
Working with vector graphics.........................................................................................................................................................76
Displaying images and image information............................................................................................................................................79
Viewing images.............................................................................................................................................................................. 79
Zooming.........................................................................................................................................................................................81
Viewing image information............................................................................................................................................................ 82
Contents | 3
Refreshing the image window........................................................................................................................................................83
Detecting and embedding Digimarc watermarks............................................................................................................................ 83
Using the guidelines, grid, and rulers...................................................................................................................................................85
Setting up guidelines......................................................................................................................................................................85
Setting up the grid.........................................................................................................................................................................88
Setting up the rulers...................................................................................................................................................................... 90
Undoing, redoing, repeating, and fading actions................................................................................................................................. 93
Undoing and redoing actions.........................................................................................................................................................93
Reverting to an earlier image state.................................................................................................................................................94
Repeating and fading actions.........................................................................................................................................................95
Saving and closing............................................................................................................................................................................... 97
Saving images................................................................................................................................................................................ 97
Exporting images to other file formats........................................................................................................................................... 99
Working with locked files............................................................................................................................................................. 100
Closing images............................................................................................................................................................................. 100
Finding and managing creative tools and content..............................................................................................................................103
Acquiring applications, plug-ins, and content...............................................................................................................................103
Finding content with the CONNECT docker.................................................................................................................................. 104
Accessing content.........................................................................................................................................................................107
Browsing and searching for content.............................................................................................................................................109
Viewing content........................................................................................................................................................................... 112
Using content...............................................................................................................................................................................112
Installing fonts..............................................................................................................................................................................114
Managing content........................................................................................................................................................................115
Syncing trays with OneDrive.........................................................................................................................................................116
Changing content locations..........................................................................................................................................................118
Content types............................................................................................................................................................................... 118
Touch-enabled devices and wheel devices.......................................................................................................................................... 121
Using touch..................................................................................................................................................................................121
Using wheel devices..................................................................................................................................................................... 123
4 | Corel PHOTO-PAINT 2018 User Guide
Editing images................................................................................................................................................................................... 125
Changing image dimensions, resolution, and paper size.................................................................................................................... 127
Changing image dimensions.........................................................................................................................................................127
Changing image resolution...........................................................................................................................................................128
Changing paper size.....................................................................................................................................................................129
Cropping, stitching, scaling, and changing orientation.......................................................................................................................131
Cropping images.......................................................................................................................................................................... 131
Stitching images together.............................................................................................................................................................133
Scaling images by using Smart Carver.......................................................................................................................................... 134
Straightening images....................................................................................................................................................................137
Straightening images and objects interactively by using the Straighten tool..................................................................................139
Correcting perspective distortions................................................................................................................................................. 141
Rotating and flipping images....................................................................................................................................................... 144
Retouching......................................................................................................................................................................................... 147
Improving scanned images........................................................................................................................................................... 147
Removing red-eye......................................................................................................................................................................... 148
Removing dust and scratch marks................................................................................................................................................149
Cloning image areas.....................................................................................................................................................................152
Sharpening images....................................................................................................................................................................... 154
Removing artifacts and noise from JPEG images...........................................................................................................................156
Erasing image areas......................................................................................................................................................................156
Smearing, smudging, and blending colors....................................................................................................................................158
Adjusting color and tone....................................................................................................................................................................161
Using the Image Adjustment Lab................................................................................................................................................. 161
Using individual color-adjustment effects and tools...................................................................................................................... 166
Exploring adjustment filters.......................................................................................................................................................... 170
Working with color channels........................................................................................................................................................174
Working with lenses........................................................................................................................................................................... 177
Creating lenses............................................................................................................................................................................. 177
Editing lenses............................................................................................................................................................................... 181
Combining lenses with the image background............................................................................................................................. 183
Contents | 5
Reshaping image areas.......................................................................................................................................................................185
Smearing image areas.................................................................................................................................................................. 185
Adding twirl effects......................................................................................................................................................................186
Reshaping image areas by pulling or pushing away pixels............................................................................................................ 187
Color, fills, and transparencies...........................................................................................................................................................189
Working with color............................................................................................................................................................................ 191
Understanding color models.........................................................................................................................................................191
Understanding color depth...........................................................................................................................................................193
Choosing colors............................................................................................................................................................................194
Using the Image palette............................................................................................................................................................... 200
Creating and editing custom color palettes.................................................................................................................................. 202
Organizing and displaying color palettes...................................................................................................................................... 205
Displaying or hiding color palettes in the Palette libraries............................................................................................................. 207
Setting the properties of color palettes........................................................................................................................................ 208
Using spot color channels............................................................................................................................................................ 209
Changing color modes....................................................................................................................................................................... 213
Changing the color mode of images............................................................................................................................................ 213
Converting images to the black-and-white color mode.................................................................................................................215
Converting images to the paletted color mode.............................................................................................................................215
Converting images to the duotone color mode............................................................................................................................ 218
Using color management................................................................................................................................................................... 221
Understanding color management............................................................................................................................................... 221
Getting started with color management in Corel PHOTO-PAINT....................................................................................................225
Installing, loading, and embedding color profiles......................................................................................................................... 226
Assigning color profiles................................................................................................................................................................ 228
Converting colors to other color profiles...................................................................................................................................... 228
Choosing color-conversion settings............................................................................................................................................... 229
Soft proofing................................................................................................................................................................................229
Working with color management presets..................................................................................................................................... 232
Working with color management policies.....................................................................................................................................233
6 | Corel PHOTO-PAINT 2018 User Guide
Managing colors when opening documents.................................................................................................................................234
Managing colors when importing and pasting files......................................................................................................................235
Managing colors for print............................................................................................................................................................ 235
Using a safe CMYK workflow....................................................................................................................................................... 236
Managing colors for online viewing............................................................................................................................................. 236
Applying fills.......................................................................................................................................................................................237
Applying uniform fills................................................................................................................................................................... 237
Applying fountain fills.................................................................................................................................................................. 238
Applying bitmap pattern fills........................................................................................................................................................ 242
Applying texture fills.....................................................................................................................................................................246
Working with transparency.................................................................................................................................................................249
Applying uniform transparency.....................................................................................................................................................249
Applying fountain transparency.................................................................................................................................................... 250
Applying bitmap pattern transparency..........................................................................................................................................253
Applying texture transparency...................................................................................................................................................... 255
Applying transparency by using brushstrokes............................................................................................................................... 257
Making selected colors in objects transparent.............................................................................................................................. 257
Blending objects........................................................................................................................................................................... 257
Finding, managing, and saving fills and transparencies...................................................................................................................... 259
Finding and viewing fills and transparencies.................................................................................................................................259
Managing fills and transparencies................................................................................................................................................ 262
Saving fills and transparencies......................................................................................................................................................264
Masks and paths............................................................................................................................................................................... 267
Working with masks...........................................................................................................................................................................269
Distinguishing protected and editable areas................................................................................................................................. 269
Defining editable areas.................................................................................................................................................................271
Defining editable areas by using color information.......................................................................................................................275
Expanding and contracting editable areas.................................................................................................................................... 278
Inverting and removing masks......................................................................................................................................................280
Moving and aligning editable areas..............................................................................................................................................281
Transforming editable areas..........................................................................................................................................................283
Contents | 7
Adjusting the edges of editable areas.......................................................................................................................................... 285
Adjusting the transparency of masks............................................................................................................................................288
Cutting out images.......................................................................................................................................................................288
Using paths to define image areas.....................................................................................................................................................293
Creating paths..............................................................................................................................................................................293
Managing paths........................................................................................................................................................................... 295
Shaping paths.............................................................................................................................................................................. 297
Adding and deleting path nodes..................................................................................................................................................299
Joining and breaking paths.......................................................................................................................................................... 300
Changing node types................................................................................................................................................................... 300
Applying brushstrokes to paths.................................................................................................................................................... 302
Working with clipping paths........................................................................................................................................................ 303
Managing multiple masks with alpha channels.................................................................................................................................. 305
Creating and editing alpha channels............................................................................................................................................ 305
Saving masks and alpha channels................................................................................................................................................ 306
Loading masks and alpha channels.............................................................................................................................................. 307
Managing alpha channels.............................................................................................................................................................308
Painting and special effects...............................................................................................................................................................311
Drawing and painting........................................................................................................................................................................ 313
Drawing shapes and lines.............................................................................................................................................................313
Applying brushstrokes.................................................................................................................................................................. 317
Spraying images........................................................................................................................................................................... 320
Painting symmetrical patterns and orbits...................................................................................................................................... 323
Repeating brushstrokes.................................................................................................................................................................324
Creating custom brushes.............................................................................................................................................................. 325
Using pressure-sensitive pens and devices.................................................................................................................................... 327
Understanding merge modes....................................................................................................................................................... 331
Applying special effects...................................................................................................................................................................... 335
Working with special effects.........................................................................................................................................................335
Applying preset styles...................................................................................................................................................................337
8 | Corel PHOTO-PAINT 2018 User Guide
Applying color and tone effects................................................................................................................................................... 337
Applying Bevel effects...................................................................................................................................................................338
Applying the Bokeh Blur effect.....................................................................................................................................................338
Applying Lens Flare effects........................................................................................................................................................... 340
Applying Lighting effects..............................................................................................................................................................340
Adding photo frames................................................................................................................................................................... 341
Managing plug-ins....................................................................................................................................................................... 342
Special effects categories....................................................................................................................................................................345
3-D special effects........................................................................................................................................................................ 345
Art strokes special effects............................................................................................................................................................. 350
Blur special effects........................................................................................................................................................................356
Camera special effects.................................................................................................................................................................. 361
Color transform special effects..................................................................................................................................................... 365
Contour special effects................................................................................................................................................................. 366
Creative special effects..................................................................................................................................................................368
Custom special effects.................................................................................................................................................................. 372
Distort special effects....................................................................................................................................................................373
Noise special effects..................................................................................................................................................................... 378
Sharpen special effects................................................................................................................................................................. 382
Texture special effects................................................................................................................................................................... 384
Objects...............................................................................................................................................................................................391
Working with objects......................................................................................................................................................................... 393
Creating objects............................................................................................................................................................................394
Changing object properties...........................................................................................................................................................395
Selecting objects...........................................................................................................................................................................396
Moving, copying, and deleting objects.........................................................................................................................................398
Displaying and arranging objects..................................................................................................................................................399
Aligning and distributing objects..................................................................................................................................................401
Using alignment guides................................................................................................................................................................402
Locking objects.............................................................................................................................................................................405
Grouping and combining objects................................................................................................................................................. 405
Contents | 9
Choosing a merge mode for grouped objects.............................................................................................................................. 407
Working with clipping groups...................................................................................................................................................... 408
Modifying objects...............................................................................................................................................................................411
Transforming objects.................................................................................................................................................................... 411
Cropping objects.......................................................................................................................................................................... 415
Changing the edges of objects.....................................................................................................................................................416
Adding drop shadows to objects..................................................................................................................................................418
Using clip masks...........................................................................................................................................................................421
Protecting the area around an object...........................................................................................................................................423
Linking and embedding objects..........................................................................................................................................................425
Inserting linked or embedded objects into another application.....................................................................................................425
Editing linked or embedded objects............................................................................................................................................. 426
Text.....................................................................................................................................................................................................427
Creating and formatting text..............................................................................................................................................................429
Adding and selecting text.............................................................................................................................................................429
Adding color to text.....................................................................................................................................................................431
Formatting text.............................................................................................................................................................................432
Working with OpenType features..................................................................................................................................................434
Inserting special characters, symbols, and glyphs..........................................................................................................................438
Kerning, shifting, and rotating text...............................................................................................................................................441
Aligning text.................................................................................................................................................................................442
Adjusting line, character, and word spacing................................................................................................................................. 443
Anti-aliasing text...........................................................................................................................................................................443
Fitting text to a path....................................................................................................................................................................444
Working with legacy text..............................................................................................................................................................445
Managing fonts..................................................................................................................................................................................447
Viewing fonts............................................................................................................................................................................... 447
Filtering fonts............................................................................................................................................................................... 449
Searching for fonts.......................................................................................................................................................................450
Acquiring more fonts................................................................................................................................................................... 451
10 | Corel PHOTO-PAINT 2018 User Guide
Identifying fonts........................................................................................................................................................................... 452
Choosing fonts with Font Playground...........................................................................................................................................453
Using Corel Font Manager............................................................................................................................................................455
Working with text in different languages........................................................................................................................................... 457
Modifying encoding settings to display text correctly................................................................................................................... 457
Working with Asian and Middle Eastern text................................................................................................................................458
OpenType support for Asian text.................................................................................................................................................. 459
Web images and movies................................................................................................................................................................... 461
Creating and editing movies...............................................................................................................................................................463
Opening and playing movies........................................................................................................................................................ 463
Creating movies............................................................................................................................................................................464
Modifying frame sequence and frame display time...................................................................................................................... 467
Saving movies...............................................................................................................................................................................469
Creating images for the web..............................................................................................................................................................471
Exporting images for the web...................................................................................................................................................... 471
Exporting and uploading bitmaps to WordPress...........................................................................................................................477
Saving and applying web presets................................................................................................................................................. 478
Creating palette-based images with transparent colors and backgrounds..................................................................................... 478
Slicing images...............................................................................................................................................................................479
Creating and editing rollovers.......................................................................................................................................................482
E-mailing images.......................................................................................................................................................................... 486
Printing.............................................................................................................................................................................................. 487
Printing basics.................................................................................................................................................................................... 489
Printing your work........................................................................................................................................................................489
Laying out print jobs.................................................................................................................................................................... 490
Previewing print jobs.................................................................................................................................................................... 491
Applying print styles..................................................................................................................................................................... 492
Fine-tuning print jobs................................................................................................................................................................... 493
Printing colors accurately..............................................................................................................................................................494
Printing to a PostScript printer..................................................................................................................................................... 496
Contents | 11
Viewing preflight summaries........................................................................................................................................................ 497
Preparing files for print service providers............................................................................................................................................ 499
Preparing a print job for a print service provider.......................................................................................................................... 499
Working with imposition layouts.................................................................................................................................................. 500
Printing printers’ marks................................................................................................................................................................ 502
Printing color separations............................................................................................................................................................. 504
Working with color trapping and overprinting............................................................................................................................. 505
Printing composites...................................................................................................................................................................... 506
Printing to film............................................................................................................................................................................. 507
Preparing images for canvas printing........................................................................................................................................... 507
Working with a print service provider...........................................................................................................................................508
File formats........................................................................................................................................................................................509
Exporting to PDF................................................................................................................................................................................ 511
Exporting documents as PDF files.................................................................................................................................................511
Including hyperlinks, bookmarks, and thumbnails in PDF files.......................................................................................................513
Reducing the size of PDF files...................................................................................................................................................... 514
Specifying an encoding format for PDF files................................................................................................................................. 515
Specifying color management options for exporting PDF files.......................................................................................................515
Setting security options for PDF files............................................................................................................................................ 516
Optimizing PDF files..................................................................................................................................................................... 517
Viewing preflight summaries for PDF files.................................................................................................................................... 518
Preparing PDF files for a print provider.........................................................................................................................................518
Working with office productivity applications..................................................................................................................................... 521
Exporting files to office productivity applications..........................................................................................................................521
Adding objects to documents...................................................................................................................................................... 521
Working with RAW camera files.........................................................................................................................................................523
Using RAW camera files............................................................................................................................................................... 523
Bringing RAW camera files into Corel PHOTO-PAINT.....................................................................................................................524
Adjusting the color and tone of RAW camera files.......................................................................................................................527
Sharpening and reducing noise in RAW camera files....................................................................................................................529
12 | Corel PHOTO-PAINT 2018 User Guide
Previewing RAW camera files and obtaining image information................................................................................................... 530
Supported file formats........................................................................................................................................................................533
Adobe Illustrator (AI)....................................................................................................................................................................534
Windows Bitmap (BMP)................................................................................................................................................................534
OS/2 Bitmap (BMP).......................................................................................................................................................................535
Computer Graphics Metafile (CGM)..............................................................................................................................................535
CorelDRAW (CDR).........................................................................................................................................................................536
Corel Presentation Exchange (CMX)..............................................................................................................................................536
Corel PHOTO-PAINT (CPT)............................................................................................................................................................. 537
Cursor Resource (CUR)..................................................................................................................................................................537
AutoCAD Drawing Database (DWG) and AutoCAD Drawing Interchange Format (DXF).................................................................537
Encapsulated PostScript (EPS)....................................................................................................................................................... 538
PostScript (PS or PRN)...................................................................................................................................................................540
GIF................................................................................................................................................................................................541
JPEG (JPG).................................................................................................................................................................................... 542
JPEG 2000 (JP2)........................................................................................................................................................................... 543
Kodak Photo CD Image (PCD).......................................................................................................................................................544
PICT (PCT).....................................................................................................................................................................................545
PaintBrush (PCX)........................................................................................................................................................................... 546
Adobe Portable Document Format (PDF)...................................................................................................................................... 547
HPGL Plotter File (PLT).................................................................................................................................................................. 547
Portable Network Graphics (PNG)................................................................................................................................................. 548
Adobe Photoshop (PSD)............................................................................................................................................................... 549
Corel Painter (RIF)......................................................................................................................................................................... 550
TARGA (TGA)................................................................................................................................................................................551
TIFF...............................................................................................................................................................................................552
Corel Paint Shop Pro (PSP)............................................................................................................................................................552
WordPerfect Graphic (WPG)..........................................................................................................................................................553
RAW camera file formats..............................................................................................................................................................553
Wavelet Compressed Bitmap (WI).................................................................................................................................................553
Windows Metafile Format (WMF).................................................................................................................................................553
Contents | 13
Additional file formats..................................................................................................................................................................554
Recommended formats for importing graphics.............................................................................................................................554
Recommended formats for exporting graphics............................................................................................................................. 555
Customizing and automating............................................................................................................................................................ 557
Customizing Corel PHOTO-PAINT........................................................................................................................................................559
Changing and restoring defaults.................................................................................................................................................. 559
Creating workspaces.....................................................................................................................................................................560
Importing and exporting workspaces............................................................................................................................................560
Customizing workspace appearance............................................................................................................................................. 561
Customizing keyboard shortcuts................................................................................................................................................... 563
Customizing menus...................................................................................................................................................................... 564
Customizing toolbars....................................................................................................................................................................566
Customizing the toolbox.............................................................................................................................................................. 569
Customizing the property bar.......................................................................................................................................................569
Customizing the status bar...........................................................................................................................................................570
Customizing filters........................................................................................................................................................................572
Customizing file associations........................................................................................................................................................ 572
Using macros and scripts to automate tasks...................................................................................................................................... 575
Working with macros................................................................................................................................................................... 575
Working with scripts.................................................................................................................................................................... 580
Reference........................................................................................................................................................................................... 585
Corel PHOTO-PAINT for Adobe Photoshop users.................................................................................................................................587
Comparing terminology................................................................................................................................................................587
Comparing tools...........................................................................................................................................................................588
Glossary.............................................................................................................................................................................................. 591

14 | Corel PHOTO-PAINT 2018 User Guide
Getting started | 15
Getting started
Installing CorelDRAW Graphics Suite..................................................................................................................................................... 17
Corel accounts and services................................................................................................................................................................... 23
What’s new in CorelDRAW Graphics Suite?...........................................................................................................................................27
Learning resources................................................................................................................................................................................. 39
Starting and setting up......................................................................................................................................................................... 45
Corel PHOTO-PAINT workspace tour...................................................................................................................................................... 47
Setting options...................................................................................................................................................................................... 67
Bringing images into Corel PHOTO-PAINT..............................................................................................................................................69
Displaying images and image information.............................................................................................................................................79
Using the guidelines, grid, and rulers....................................................................................................................................................85
Undoing, redoing, repeating, and fading actions.................................................................................................................................. 93
Saving and closing.................................................................................................................................................................................97
Finding and managing creative tools and content...............................................................................................................................103
Touch-enabled devices and wheel devices............................................................................................................................................121

16 | Corel PHOTO-PAINT 2018 User Guide
Installing CorelDRAW Graphics Suite | 17
Installing CorelDRAW Graphics Suite
This section contains the following topics:• “System requirements” (page 17)• “Preparing for installation” (page 18)• “Installing CorelDRAW Graphics Suite applications” (page 18)• “Installation options” (page 18)• “Modifying and repairing installations” (page 20)• “Uninstalling CorelDRAW Graphics Suite” (page 21)• “Frequently Asked Questions” (page 21)
System requirements
The following list includes the minimum system requirements. Note that for optimum performance, you need more RAM and hard diskspace than indicated in the list.• Windows 7 SP1, Windows 8.1 or Windows 10, in 32-bit or 64-bit, with the latest updates and service pack• Intel Core i3/5/7 or AMD Athlon 64• 2 GB RAM• 1 GB hard disk space
Electronic software downloads require more space to allow for the download, the uncompressed setup files, and the actual installation,which includes copies of the source files as well.
• Mouse, tablet, or multi-touch screen• Display resolution
• 1280 x 720 screen resolution at 100% (96 dpi)
• 1920 x 1080 at 150%
• 2560 x 1440 at 200%• DVD drive (required for installing the box version of the software)• Microsoft .NET Framework 4.6• Microsoft Internet Explorer 11 or later
• Internet connection is required to sign in to authenticate CorelDRAW Graphics Suite, receive performance and stability updates, accessonline content, and use some features, such as QR Codes or the Content Exchange.
18 | Corel PHOTO-PAINT 2018 User Guide
If the Microsoft .NET Framework is not available on your computer, it will be installed during product installation.
Preparing for installation• Make sure that your system’s date and time are set correctly.• Make sure that your system has the latest updates installed.• Close all applications, including all virus detection programs and applications that are open in the system tray or on the Windows
taskbar. Not doing so may increase the installation time and interfere with the installation.• Log in as a user with administrative privileges.• Make sure that you have enough free disk space available on the drive where you want to install the application.• Delete the contents of the system’s TEMP folders to avoid file and memory conflicts. To navigate to the Temp folders, type %temp% in
the Search box on the Windows 7 SP1 or Windows 10 Start menu, or the Windows 8.1 desktop.• Install CorelDRAW® Graphics Suite in its own directory to avoid conflicts with previous versions.
Installing CorelDRAW Graphics Suite applications
The installation wizard makes it easy to install CorelDRAW Graphics Suite applications and components. You can choose a typical installationto quickly install the suite, or you can customize the installation by choosing different options.
To install CorelDRAW Graphics Suite applications
1 Close all applications, including all virus detection programs.
For smooth installation, we recommend that you restart Windows. This action will ensure that no restart is required by the latest systemupdates, and there are no memory issues.
2 Do one of the following:
• Insert the DVD in the DVD drive.
If the installation wizard does not start automatically, browse to the root of the DVD, locate setup.exe on the DVD, and double-click thefile. Be sure to navigate to the folder that corresponds to the version of your operating system: x64 for 64-Bit or x86 for 32-Bit.
• Download the product from the link provided on your order confirmation.
3 In the installation wizard, review the End User License Agreement and the Terms of Service by clicking the corresponding links.
4 Enable the I agree to the End User License Agreement and the Terms of Service check box, and click Accept.
5 Type your name in the Full name text box.
6 Type your serial number in the Serial number text box.
The serial number is not case-sensitive, and the dashes are optional.
7 Click Next.
8 Follow the instructions for installing the software.
Installation options
You can choose between the following types of installations:• Typical installation — automatically installs the main programs and utilities of the suite to a default location in the Program Files folder.
If later you need a component that is not installed, you can modify your installation.• Custom installation — lets you choose additional features, exclude components that you don’t need, and specify where to install the
suite.
• Deployment — available only for multiseat purchases. This option lets you create a server image for installing the software to individualworkstations. For more information, see the CorelDRAW Graphics Suite 2018 Deployment Guide.
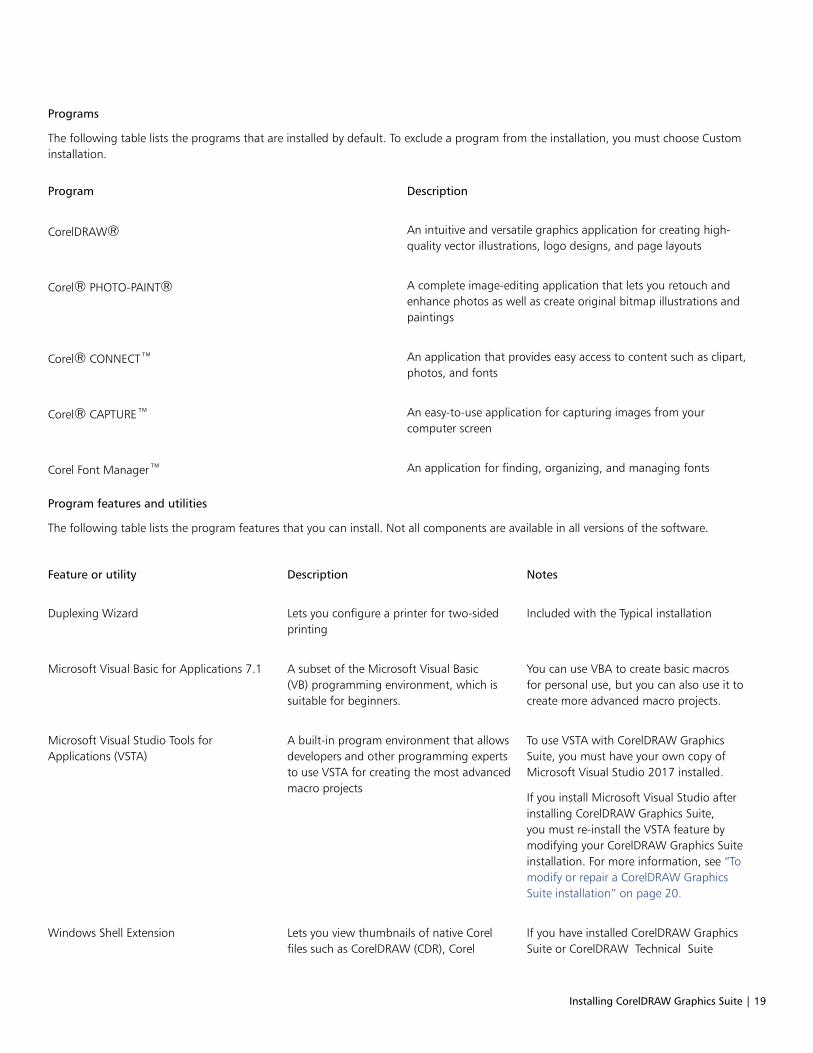
Installing CorelDRAW Graphics Suite | 19
Programs
The following table lists the programs that are installed by default. To exclude a program from the installation, you must choose Custominstallation.
Program Description
CorelDRAW® An intuitive and versatile graphics application for creating high-quality vector illustrations, logo designs, and page layouts
Corel® PHOTO-PAINT® A complete image-editing application that lets you retouch andenhance photos as well as create original bitmap illustrations andpaintings
Corel® CONNECT™ An application that provides easy access to content such as clipart,photos, and fonts
Corel® CAPTURE™ An easy-to-use application for capturing images from yourcomputer screen
Corel Font Manager™ An application for finding, organizing, and managing fonts
Program features and utilities
The following table lists the program features that you can install. Not all components are available in all versions of the software.
Feature or utility Description Notes
Duplexing Wizard Lets you configure a printer for two-sidedprinting
Included with the Typical installation
Microsoft Visual Basic for Applications 7.1 A subset of the Microsoft Visual Basic(VB) programming environment, which issuitable for beginners.
You can use VBA to create basic macrosfor personal use, but you can also use it tocreate more advanced macro projects.
Microsoft Visual Studio Tools forApplications (VSTA)
A built-in program environment that allowsdevelopers and other programming expertsto use VSTA for creating the most advancedmacro projects
To use VSTA with CorelDRAW GraphicsSuite, you must have your own copy ofMicrosoft Visual Studio 2017 installed.
If you install Microsoft Visual Studio afterinstalling CorelDRAW Graphics Suite,you must re-install the VSTA feature bymodifying your CorelDRAW Graphics Suiteinstallation. For more information, see “Tomodify or repair a CorelDRAW GraphicsSuite installation” on page 20.
Windows Shell Extension Lets you view thumbnails of native Corelfiles such as CorelDRAW (CDR), Corel
If you have installed CorelDRAW GraphicsSuite or CorelDRAW Technical Suite
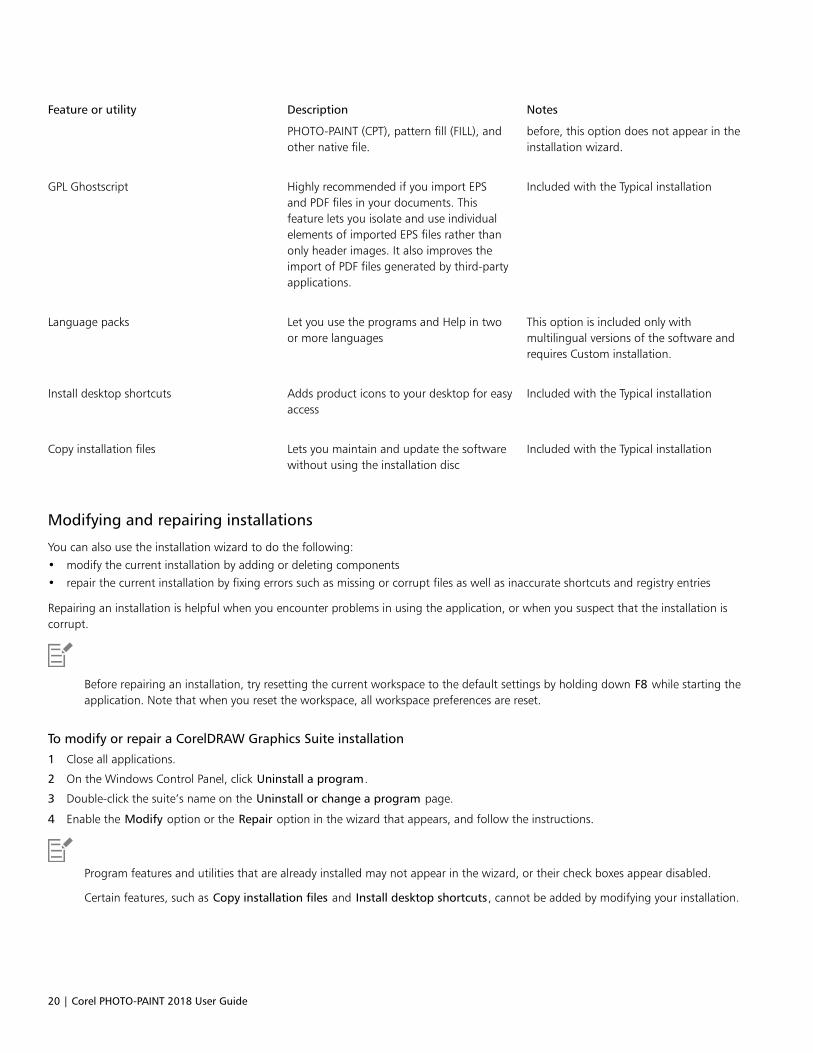
20 | Corel PHOTO-PAINT 2018 User Guide
Feature or utility Description Notes
PHOTO-PAINT (CPT), pattern fill (FILL), andother native file.
before, this option does not appear in theinstallation wizard.
GPL Ghostscript Highly recommended if you import EPSand PDF files in your documents. Thisfeature lets you isolate and use individualelements of imported EPS files rather thanonly header images. It also improves theimport of PDF files generated by third-partyapplications.
Included with the Typical installation
Language packs Let you use the programs and Help in twoor more languages
This option is included only withmultilingual versions of the software andrequires Custom installation.
Install desktop shortcuts Adds product icons to your desktop for easyaccess
Included with the Typical installation
Copy installation files Lets you maintain and update the softwarewithout using the installation disc
Included with the Typical installation
Modifying and repairing installations
You can also use the installation wizard to do the following:• modify the current installation by adding or deleting components• repair the current installation by fixing errors such as missing or corrupt files as well as inaccurate shortcuts and registry entries
Repairing an installation is helpful when you encounter problems in using the application, or when you suspect that the installation iscorrupt.
Before repairing an installation, try resetting the current workspace to the default settings by holding down F8 while starting theapplication. Note that when you reset the workspace, all workspace preferences are reset.
To modify or repair a CorelDRAW Graphics Suite installation
1 Close all applications.
2 On the Windows Control Panel, click Uninstall a program.
3 Double-click the suite’s name on the Uninstall or change a program page.
4 Enable the Modify option or the Repair option in the wizard that appears, and follow the instructions.
Program features and utilities that are already installed may not appear in the wizard, or their check boxes appear disabled.
Certain features, such as Copy installation files and Install desktop shortcuts, cannot be added by modifying your installation.
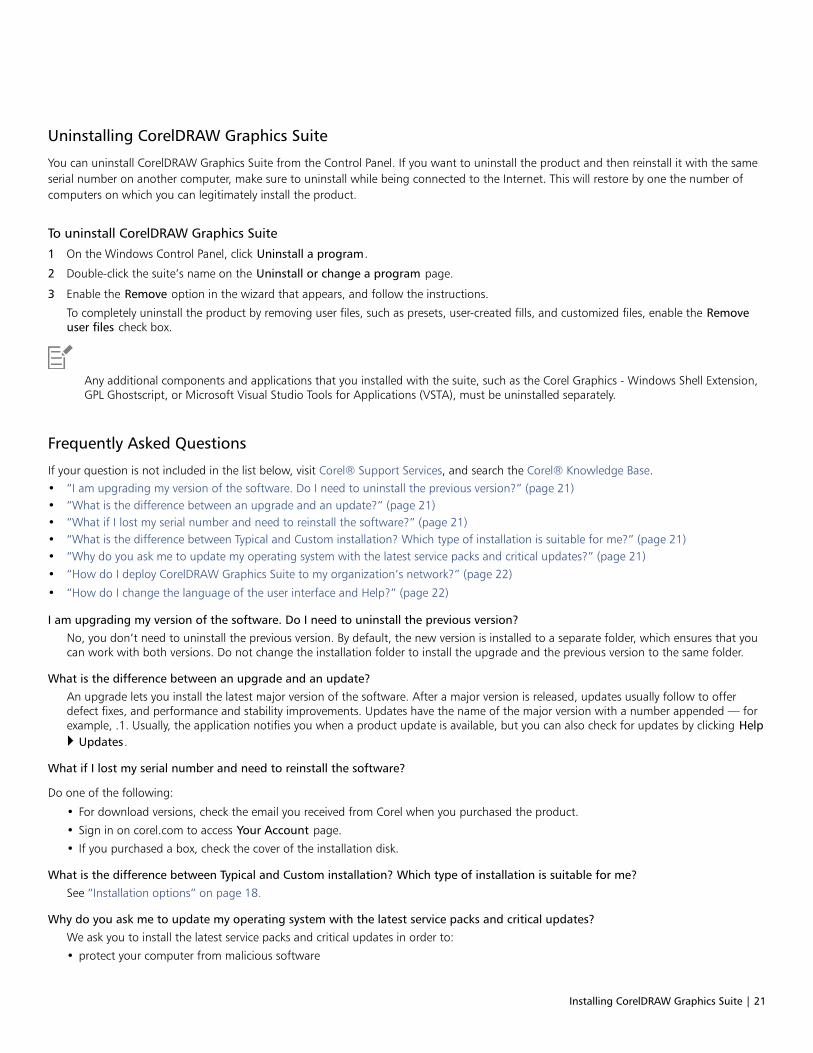
Installing CorelDRAW Graphics Suite | 21
Uninstalling CorelDRAW Graphics Suite
You can uninstall CorelDRAW Graphics Suite from the Control Panel. If you want to uninstall the product and then reinstall it with the sameserial number on another computer, make sure to uninstall while being connected to the Internet. This will restore by one the number ofcomputers on which you can legitimately install the product.
To uninstall CorelDRAW Graphics Suite
1 On the Windows Control Panel, click Uninstall a program.
2 Double-click the suite’s name on the Uninstall or change a program page.
3 Enable the Remove option in the wizard that appears, and follow the instructions.
To completely uninstall the product by removing user files, such as presets, user-created fills, and customized files, enable the Removeuser files check box.
Any additional components and applications that you installed with the suite, such as the Corel Graphics - Windows Shell Extension,GPL Ghostscript, or Microsoft Visual Studio Tools for Applications (VSTA), must be uninstalled separately.
Frequently Asked Questions
If your question is not included in the list below, visit Corel® Support Services, and search the Corel® Knowledge Base.• “I am upgrading my version of the software. Do I need to uninstall the previous version?” (page 21)• “What is the difference between an upgrade and an update?” (page 21)• “What if I lost my serial number and need to reinstall the software?” (page 21)• “What is the difference between Typical and Custom installation? Which type of installation is suitable for me?” (page 21)• “Why do you ask me to update my operating system with the latest service packs and critical updates?” (page 21)• “How do I deploy CorelDRAW Graphics Suite to my organization’s network?” (page 22)
• “How do I change the language of the user interface and Help?” (page 22)
I am upgrading my version of the software. Do I need to uninstall the previous version?No, you don’t need to uninstall the previous version. By default, the new version is installed to a separate folder, which ensures that youcan work with both versions. Do not change the installation folder to install the upgrade and the previous version to the same folder.
What is the difference between an upgrade and an update?An upgrade lets you install the latest major version of the software. After a major version is released, updates usually follow to offerdefect fixes, and performance and stability improvements. Updates have the name of the major version with a number appended — forexample, .1. Usually, the application notifies you when a product update is available, but you can also check for updates by clicking Help Updates.
What if I lost my serial number and need to reinstall the software?
Do one of the following:
• For download versions, check the email you received from Corel when you purchased the product.
• Sign in on corel.com to access Your Account page.
• If you purchased a box, check the cover of the installation disk.
What is the difference between Typical and Custom installation? Which type of installation is suitable for me?See “Installation options” on page 18.
Why do you ask me to update my operating system with the latest service packs and critical updates?We ask you to install the latest service packs and critical updates in order to:
• protect your computer from malicious software

22 | Corel PHOTO-PAINT 2018 User Guide
• resolve Windows issues and defects
• ensure smooth operation of the operating system and your Corel software
• help meet the minimum system requirements
• help speed up the installation process, sometimes bypassing prerequisites such as .NET Framework 4.6 and Microsoft Visual C++2015
• reduce the likelihood of needing to restart your operating system
• ensure that system drivers are up-to-date and optimized for the suite.
How do I deploy CorelDRAW Graphics Suite to my organization’s network?If you purchased multiple licenses of CorelDRAW Graphics Suite, you have the option of deploying the applications to your organization’snetwork.
The CorelDRAW Graphics Suite 2018 Deployment Guide provides more information about network installations. To purchase a volumelicense of the software, please contact Corel® Support Services.
How do I change the language of the user interface and Help?You can change the language of the user interface and Help only if you have purchased and installed a multilingual version of the suite.For more information, see “To change the language of the user interface and Help” on page 45.

Corel accounts and services | 23
Corel accounts and services
This section contains the following topics:• “Authenticating CorelDRAW Graphics Suite” (page 23)• “Checking account settings” (page 24)• “Updating Corel products” (page 24)• “Changing user credentials” (page 24)• “Corel Support Services” (page 25)• “About Corel” (page 25)
Authenticating CorelDRAW Graphics Suite
Authentication lets you access online features and content that are included with your software. You can authenticateCorelDRAW Graphics Suite after the suite installation, before starting an application, or while using an application.
To authenticate CorelDRAW Graphics Suite, you must sign in with your Corel.com account. This action associates your product with youraccount. If you don’t have a Corel.com account or you want to associate your product with a new account, you need to create an accountbefore signing in.
After you install and authenticate CorelDRAW Graphics Suite, the product appears in Your Account page on corel.com. If you wantto associate the product with a different account, you must change your user credentials. For more information, see “Changing usercredentials” on page 24.
To authenticate CorelDRAW Graphics Suite
1 Click the Sign-in button in the upper-right corner of the application window.
2 In the dialog box that appears, do one of the following:
• Sign in by entering the email address and the password associated with your Corel.com account.
24 | Corel PHOTO-PAINT 2018 User Guide
• Follow the instructions to create an account, and sign in.
You can now access online features and content provided you have Internet connection.
Checking account settings
You can check your account settings by accessing Your Account page from within the application. On Your Account page, you can find outmore about the products associated with your account, and you can access support and set your communication preferences.
In those rare cases when your account settings may not reflect your latest transaction, you can refresh your account from within theapplication.
To check your corel.com account
• In CorelDRAW or Corel PHOTO-PAINT, click Help Account Settings.
To refresh your corel.com account
• In CorelDRAW or Corel PHOTO-PAINT, click Help Refresh Your Account.
Updating Corel products
Product updates, formerly known as service packs, include performance and stability improvements that enhance your product experience.By default, you are automatically notified when product updates and news become available. You can customize the update and messagesettings. For example, you can choose how often to receive updates and offers as tray notifications: daily, weekly, monthly, or not at all.
To view information about product updates, click Help Updates.
To customize update and message settings, click Help Message Settings.
Changing user credentials
As a user and owner of CorelDRAW Graphics Suite, you must know your user credentials:• your product serial number — lets you install and reinstall your product. The serial number is the unique identifier of your product
license.• the email address associated with your Corel.com account. For each Corel.com account, a unique email address and password are
required. When you authenticate your product to access online features and content, you sign in with a specific Corel.com account,associating the product with that account and its email address.
This topic describes two typical cases in which you need to change your account settings and then update your user credentials in theinstalled product to match the new account settings. Updating your user credentials ensures that you don’t need to uninstall and reinstallthe product.
You want to merge two product subscriptions that you purchased with the same Corel.com account at a different time so that thesubscriptions have the same renewal date.
In this case, each subscription is associated with a different serial number. You must first go to Your Account page, and then associate bothsubscriptions with one of the serial numbers. Second, you must edit the user credentials in the product that now has an obsolete serialnumber.

Corel accounts and services | 25
Step 1: Go to Your Account page by signing in on corel.com, and then click Merge in the Product Status area. On the Subscriptions page,select the subscriptions that you want to merge. Proceed to the Confirm selection page, and choose the serial number that you want tokeep.
Step 2: Start the version of CorelDRAW or Corel PHOTO-PAINT that now has an obsolete serial number. Click Tools Options, and in theGlobal list of categories, click User Credentials. Next, click Edit Credentials, and in the dialog box, type the serial number that you chose instep 1.
You have two Corel.com accounts associated with different email addresses, and you want to merge the two accounts.
First, you must call Corel Support Services to merge the accounts for you, and then you must update your email address through theproduct.
Step 1: Contact Corel Support Services with a request to merge the two accounts for you. You will be asked to provide an active emailaddress for your merged account. If you have subscriptions or Upgrade Programs in each account, they are associated with different serialnumbers so you need to choose one of the serial numbers.
Step 2: Start the version of CorelDRAW or Corel PHOTO-PAINT that is now associated with an obsolete account and email address. Click
Tools Options, and in the Global list of categories, click User Credentials. Click Edit Credentials, and in the dialog box that appears, typethe email address that you chose for your merged account. Type your password. If necessary, type the serial number that you chose in step 1.
Corel Support Services
Corel Support Services can provide you with prompt and accurate information about product features, specifications, pricing, availability,services, and technical support. For the most current information on support services available for your Corel product, please visitwww.corel.com/support.
About Corel
Over the years, Corel has brought a spirit of innovation to the development of a range of award-winning products that includes graphics,painting, photo, video and office software. We’ve also earned a reputation for delivering high-quality products that are easy to learn anduse, and help people achieve new levels of productivity. But more than that, we’ve built a relationship with our community of users—tens ofmillions strong—who have amazed and delighted us with everything they create using our software.
Corel’s product line includes CorelDRAW Graphics Suite, CorelDRAW Technical Suite, Corel® Painter®, Corel® PaintShop® Pro, Corel®VideoStudio®, WinDVD, Corel® WordPerfect® Office, and WinZip. For more information about Corel, please visit www.corel.com.

26 | Corel PHOTO-PAINT 2018 User Guide

What’s new in CorelDRAW Graphics Suite? | 27
What’s new in CorelDRAW Graphics Suite?
The new and enhanced features of CorelDRAW Graphics Suite 2018 are described in the following topics:• “Creative” (page 27)• “Productive” (page 31)• “Innovative” (page 35)
For information about features and tools that were introduced or improved in earlier versions of CorelDRAW Graphics Suite, see “Finding outwhat was new in previous versions” on page 38.
Creative
Boost your creativity with the new Symmetry drawing mode, unique effects, new line options, and more.
Symmetry
Symmetry is a critical part of the graphics workflow because it creates balance, harmony, and order. Symmetry is everywhere in nature, sochances are a design element will rely on it. To that end, CorelDRAW 2018 introduces the Symmetry drawing mode, which boosts yourproductivity by automating what is usually a very time-consuming process. It lets you create a range of symmetrical designs, from simpleobjects to complex kaleidoscopic effects, in real time.

28 | Corel PHOTO-PAINT 2018 User Guide
There are two ways to use Symmetry mode. You can work in Symmetry mode from the outset and start drawing symmetrically immediately.Or, you can apply symmetry to an existing object or group of objects, both vector and bitmap.
Symmetry mode can be used with a range of tools, giving you unprecedented creative freedom. Whether you want symmetry in curves,shapes, objects, text, you’re free to experiment and play like never before. What’s more, you’re not limited to simple design tools. The abilityto use transparency, fills and more in a symmetrical design opens up a world of possibilities.
Controlling the symmetry appearance is a breeze. You can add symmetry lines, adjust the reflection angle, and move symmetry linesindependently of the objects in the group. And when you edit the original image or add new nodes or objects, you’ll see the changesrepeated and reflected in each copy.
Block shadow
CorelDRAW is a longtime favorite with vinyl cutters, screen printers and sign makers, so their feedback has been critical to the developmentof every version of the program. Working with users in those industries, CorelDRAW 2018 introduces the Block Shadow tool, which lets youadd solid vector shadows to objects and text. This intuitive feature accelerates reprographic workflows by greatly reducing the number oflines and nodes in shadows, slashing the time it takes to get a file ready for output and vastly improving the final result.
Powerful property bar settings let you specify the exact depth and direction of the shadow, or you can manipulate those propertiesinteractively within the drawing to get the look that you have in mind. Block shadow color is independent of the object from which it isbeing extruded, so there’s no restrictions on your creativity. There’s also an overprint option to ensure that block shadow colors remain intactbeneath text or objects that have a block shadow applied to them.
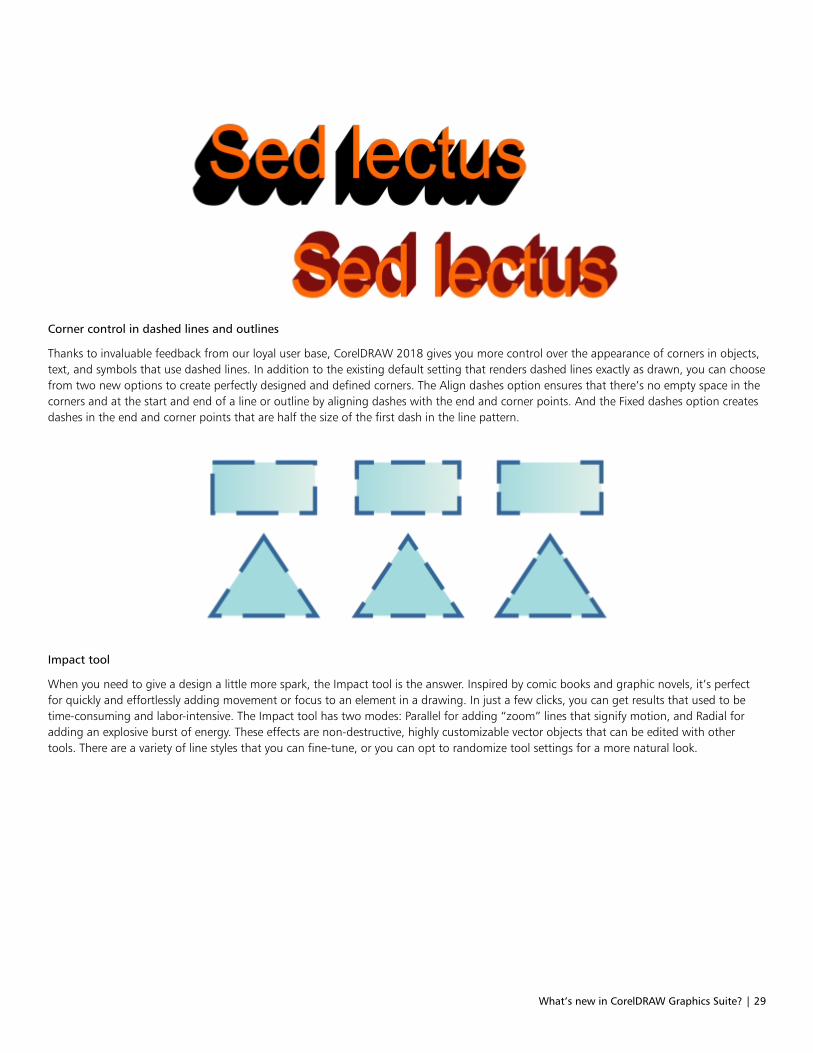
What’s new in CorelDRAW Graphics Suite? | 29
Corner control in dashed lines and outlines
Thanks to invaluable feedback from our loyal user base, CorelDRAW 2018 gives you more control over the appearance of corners in objects,text, and symbols that use dashed lines. In addition to the existing default setting that renders dashed lines exactly as drawn, you can choosefrom two new options to create perfectly designed and defined corners. The Align dashes option ensures that there’s no empty space in thecorners and at the start and end of a line or outline by aligning dashes with the end and corner points. And the Fixed dashes option createsdashes in the end and corner points that are half the size of the first dash in the line pattern.
Impact tool
When you need to give a design a little more spark, the Impact tool is the answer. Inspired by comic books and graphic novels, it’s perfectfor quickly and effortlessly adding movement or focus to an element in a drawing. In just a few clicks, you can get results that used to betime-consuming and labor-intensive. The Impact tool has two modes: Parallel for adding “zoom” lines that signify motion, and Radial foradding an explosive burst of energy. These effects are non-destructive, highly customizable vector objects that can be edited with othertools. There are a variety of line styles that you can fine-tune, or you can opt to randomize tool settings for a more natural look.
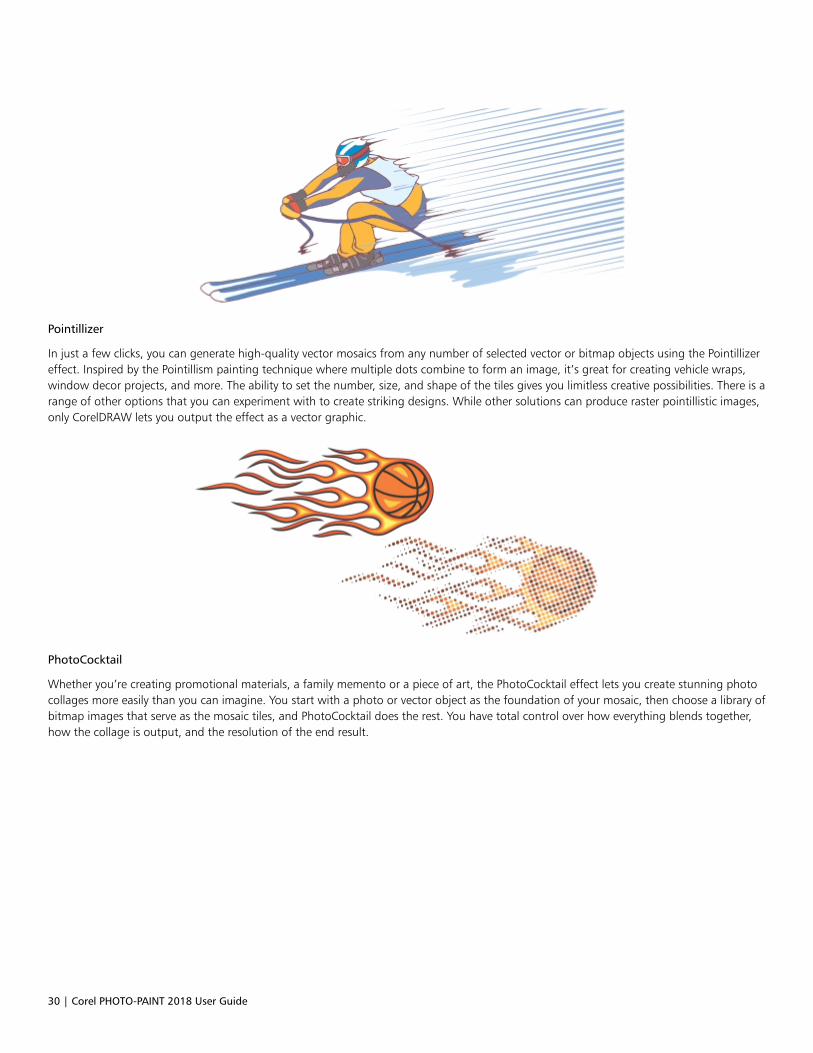
30 | Corel PHOTO-PAINT 2018 User Guide
Pointillizer
In just a few clicks, you can generate high-quality vector mosaics from any number of selected vector or bitmap objects using the Pointillizereffect. Inspired by the Pointillism painting technique where multiple dots combine to form an image, it’s great for creating vehicle wraps,window decor projects, and more. The ability to set the number, size, and shape of the tiles gives you limitless creative possibilities. There is arange of other options that you can experiment with to create striking designs. While other solutions can produce raster pointillistic images,only CorelDRAW lets you output the effect as a vector graphic.
PhotoCocktail
Whether you’re creating promotional materials, a family memento or a piece of art, the PhotoCocktail effect lets you create stunning photocollages more easily than you can imagine. You start with a photo or vector object as the foundation of your mosaic, then choose a library ofbitmap images that serve as the mosaic tiles, and PhotoCocktail does the rest. You have total control over how everything blends together,how the collage is output, and the resolution of the end result.
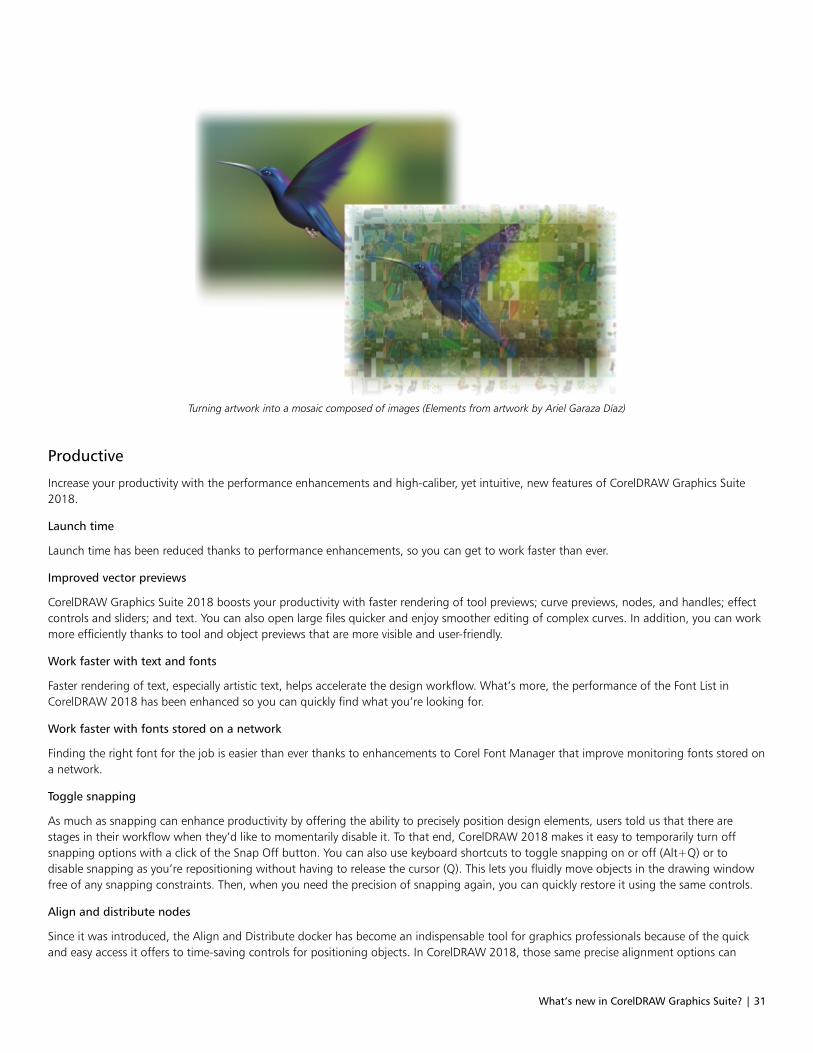
What’s new in CorelDRAW Graphics Suite? | 31
Turning artwork into a mosaic composed of images (Elements from artwork by Ariel Garaza Díaz)
Productive
Increase your productivity with the performance enhancements and high-caliber, yet intuitive, new features of CorelDRAW Graphics Suite2018.
Launch time
Launch time has been reduced thanks to performance enhancements, so you can get to work faster than ever.
Improved vector previews
CorelDRAW Graphics Suite 2018 boosts your productivity with faster rendering of tool previews; curve previews, nodes, and handles; effectcontrols and sliders; and text. You can also open large files quicker and enjoy smoother editing of complex curves. In addition, you can workmore efficiently thanks to tool and object previews that are more visible and user-friendly.
Work faster with text and fonts
Faster rendering of text, especially artistic text, helps accelerate the design workflow. What’s more, the performance of the Font List inCorelDRAW 2018 has been enhanced so you can quickly find what you’re looking for.
Work faster with fonts stored on a network
Finding the right font for the job is easier than ever thanks to enhancements to Corel Font Manager that improve monitoring fonts stored ona network.
Toggle snapping
As much as snapping can enhance productivity by offering the ability to precisely position design elements, users told us that there arestages in their workflow when they’d like to momentarily disable it. To that end, CorelDRAW 2018 makes it easy to temporarily turn offsnapping options with a click of the Snap Off button. You can also use keyboard shortcuts to toggle snapping on or off (Alt+Q) or todisable snapping as you’re repositioning without having to release the cursor (Q). This lets you fluidly move objects in the drawing windowfree of any snapping constraints. Then, when you need the precision of snapping again, you can quickly restore it using the same controls.
Align and distribute nodes
Since it was introduced, the Align and Distribute docker has become an indispensable tool for graphics professionals because of the quickand easy access it offers to time-saving controls for positioning objects. In CorelDRAW 2018, those same precise alignment options can
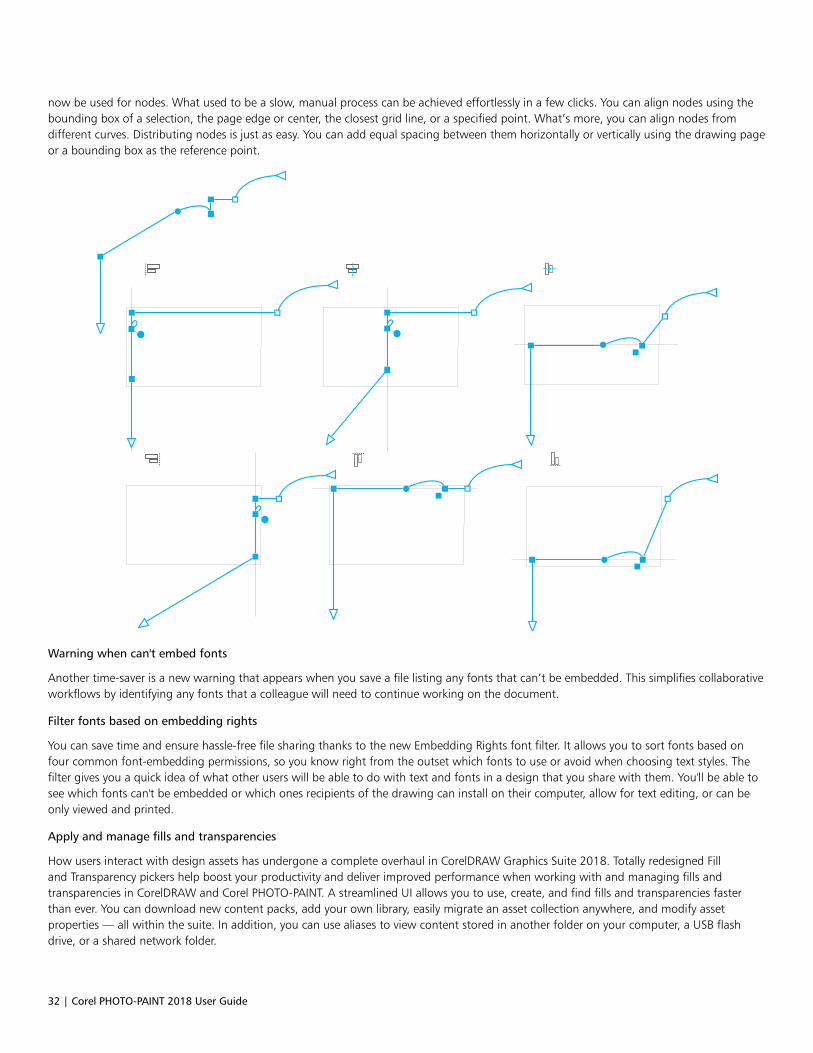
32 | Corel PHOTO-PAINT 2018 User Guide
now be used for nodes. What used to be a slow, manual process can be achieved effortlessly in a few clicks. You can align nodes using thebounding box of a selection, the page edge or center, the closest grid line, or a specified point. What’s more, you can align nodes fromdifferent curves. Distributing nodes is just as easy. You can add equal spacing between them horizontally or vertically using the drawing pageor a bounding box as the reference point.
Warning when can't embed fonts
Another time-saver is a new warning that appears when you save a file listing any fonts that can’t be embedded. This simplifies collaborativeworkflows by identifying any fonts that a colleague will need to continue working on the document.
Filter fonts based on embedding rights
You can save time and ensure hassle-free file sharing thanks to the new Embedding Rights font filter. It allows you to sort fonts based onfour common font-embedding permissions, so you know right from the outset which fonts to use or avoid when choosing text styles. Thefilter gives you a quick idea of what other users will be able to do with text and fonts in a design that you share with them. You'll be able tosee which fonts can't be embedded or which ones recipients of the drawing can install on their computer, allow for text editing, or can beonly viewed and printed.
Apply and manage fills and transparencies
How users interact with design assets has undergone a complete overhaul in CorelDRAW Graphics Suite 2018. Totally redesigned Filland Transparency pickers help boost your productivity and deliver improved performance when working with and managing fills andtransparencies in CorelDRAW and Corel PHOTO-PAINT. A streamlined UI allows you to use, create, and find fills and transparencies fasterthan ever. You can download new content packs, add your own library, easily migrate an asset collection anywhere, and modify assetproperties — all within the suite. In addition, you can use aliases to view content stored in another folder on your computer, a USB flashdrive, or a shared network folder.
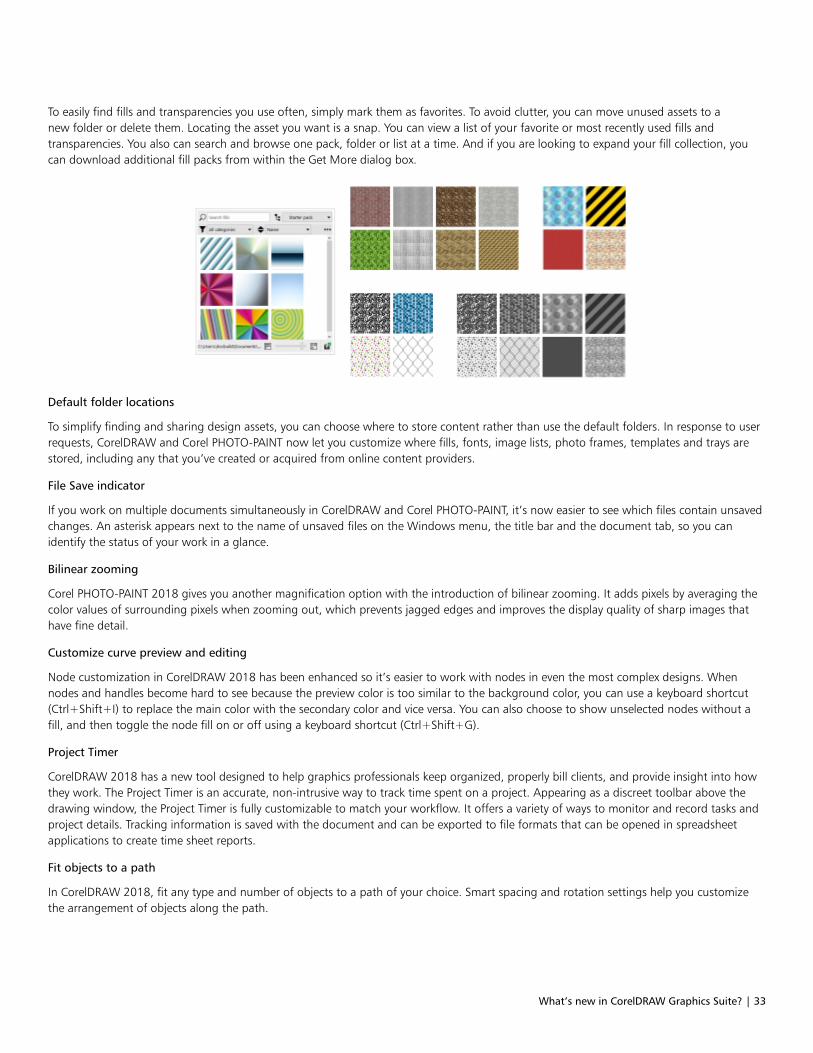
What’s new in CorelDRAW Graphics Suite? | 33
To easily find fills and transparencies you use often, simply mark them as favorites. To avoid clutter, you can move unused assets to anew folder or delete them. Locating the asset you want is a snap. You can view a list of your favorite or most recently used fills andtransparencies. You also can search and browse one pack, folder or list at a time. And if you are looking to expand your fill collection, youcan download additional fill packs from within the Get More dialog box.
Default folder locations
To simplify finding and sharing design assets, you can choose where to store content rather than use the default folders. In response to userrequests, CorelDRAW and Corel PHOTO-PAINT now let you customize where fills, fonts, image lists, photo frames, templates and trays arestored, including any that you’ve created or acquired from online content providers.
File Save indicator
If you work on multiple documents simultaneously in CorelDRAW and Corel PHOTO-PAINT, it’s now easier to see which files contain unsavedchanges. An asterisk appears next to the name of unsaved files on the Windows menu, the title bar and the document tab, so you canidentify the status of your work in a glance.
Bilinear zooming
Corel PHOTO-PAINT 2018 gives you another magnification option with the introduction of bilinear zooming. It adds pixels by averaging thecolor values of surrounding pixels when zooming out, which prevents jagged edges and improves the display quality of sharp images thathave fine detail.
Customize curve preview and editing
Node customization in CorelDRAW 2018 has been enhanced so it’s easier to work with nodes in even the most complex designs. Whennodes and handles become hard to see because the preview color is too similar to the background color, you can use a keyboard shortcut(Ctrl+Shift+I) to replace the main color with the secondary color and vice versa. You can also choose to show unselected nodes without afill, and then toggle the node fill on or off using a keyboard shortcut (Ctrl+Shift+G).
Project Timer
CorelDRAW 2018 has a new tool designed to help graphics professionals keep organized, properly bill clients, and provide insight into howthey work. The Project Timer is an accurate, non-intrusive way to track time spent on a project. Appearing as a discreet toolbar above thedrawing window, the Project Timer is fully customizable to match your workflow. It offers a variety of ways to monitor and record tasks andproject details. Tracking information is saved with the document and can be exported to file formats that can be opened in spreadsheetapplications to create time sheet reports.
Fit objects to a path
In CorelDRAW 2018, fit any type and number of objects to a path of your choice. Smart spacing and rotation settings help you customizethe arrangement of objects along the path.
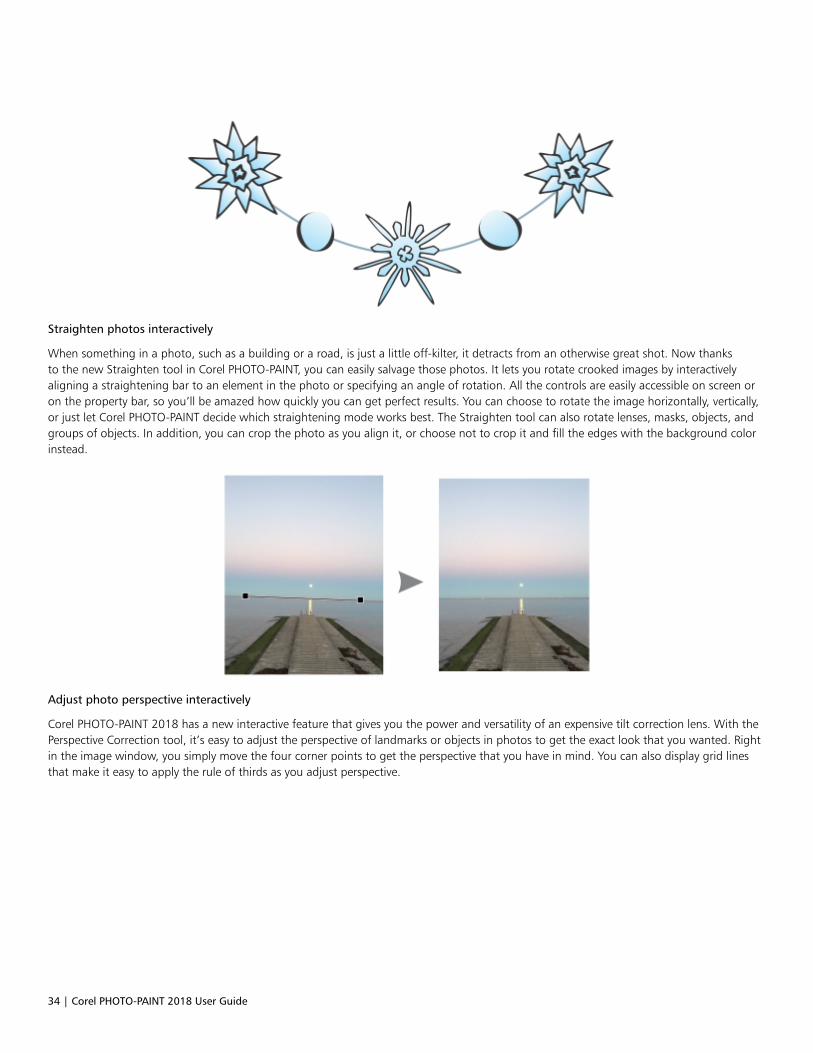
34 | Corel PHOTO-PAINT 2018 User Guide
Straighten photos interactively
When something in a photo, such as a building or a road, is just a little off-kilter, it detracts from an otherwise great shot. Now thanksto the new Straighten tool in Corel PHOTO-PAINT, you can easily salvage those photos. It lets you rotate crooked images by interactivelyaligning a straightening bar to an element in the photo or specifying an angle of rotation. All the controls are easily accessible on screen oron the property bar, so you’ll be amazed how quickly you can get perfect results. You can choose to rotate the image horizontally, vertically,or just let Corel PHOTO-PAINT decide which straightening mode works best. The Straighten tool can also rotate lenses, masks, objects, andgroups of objects. In addition, you can crop the photo as you align it, or choose not to crop it and fill the edges with the background colorinstead.
Adjust photo perspective interactively
Corel PHOTO-PAINT 2018 has a new interactive feature that gives you the power and versatility of an expensive tilt correction lens. With thePerspective Correction tool, it’s easy to adjust the perspective of landmarks or objects in photos to get the exact look that you wanted. Rightin the image window, you simply move the four corner points to get the perspective that you have in mind. You can also display grid linesthat make it easy to apply the rule of thirds as you adjust perspective.

What’s new in CorelDRAW Graphics Suite? | 35
Improved previews, cursors, and handles in Corel PHOTO-PAINT
CorelDRAW Graphics Suite 2018 simplifies painting, applying effects, and editing images with improved previews that are easier to see andmanipulate. The vectors tools in Corel PHOTO-PAINT such as the Path tool and Line tool, have also been updated with a clearer appearanceand more defines nodes and handles. Enhanced previews help you edit more efficiently by ensuring brush nibs and effect handles stand outagainst background colors in your design. And it’s easier than ever to work with the interactive fills, transparencies, drop shadows and morethanks to enhanced interactive sliders that are more visible.
AfterShot 3 HDR
You can download Corel AfterShot 3 HDR at no extra cost from within CorelDRAW and Corel PHOTO-PAINT, and quickly learn professional-grade photo editing. It lets you make easy corrections and enhancements to your RAW or JPEG photos, and apply adjustments to thousandsof photos in a click with batch-processing tools. Plus, you can create high dynamic range (HDR) images with the HDR module, included inAfterShot 3 HDR.
And if you want more powerful photo management and photo-editing features, you can upgrade to the latest version of AfterShot Prothrough Get More.
Welcome Screen
The redesigned Welcome Screen can help kickstart your workflow when you launch CorelDRAW or Corel PHOTO-PAINT. It lets you quicklystart a new document from scratch in both applications, from a template in CorelDRAW, or from the contents of the clipboard in CorelPHOTO-PAINT. You can also browse to open a file or use a revamped list of recent documents that displays thumbnails and file properties.All workspace options are at your fingertips, so you can get to work right away in the UI layout that best suits your needs. The enhancedWelcome Screen also provides one-click access to information about new features, online learning resources, a gallery of original artworkcreated with CorelDRAW Graphics Suite, as well as design assets, fonts, apps, and plug-ins.
Innovative
Make the most of innovative features and enhancements to create stunning projects and designs.
Add Perspective effect
CorelDRAW 2018 gives you the ability to use the Add Perspective effect on bitmaps with the same ease that you’ve always had whenapplying it to vector objects. It’s never been easier to create the illusion of distance and depth by applying perspective to bitmaps, vectorobjects, or both simultaneously. You can work with speed and precision because you apply it interactively right in the drawing window. TheAdd Perspective effect is a great tool for graphics professionals who want to showcase their artwork in real world scenarios. It allows theirclients to really see what a design will look like on a billboard, brochure, packaging, exhibition booth panel, and more. And if you want toexperiment and play, no problem. The effect is applied non-destructively, so you can edit it or remove it and revert to the original image atany point.
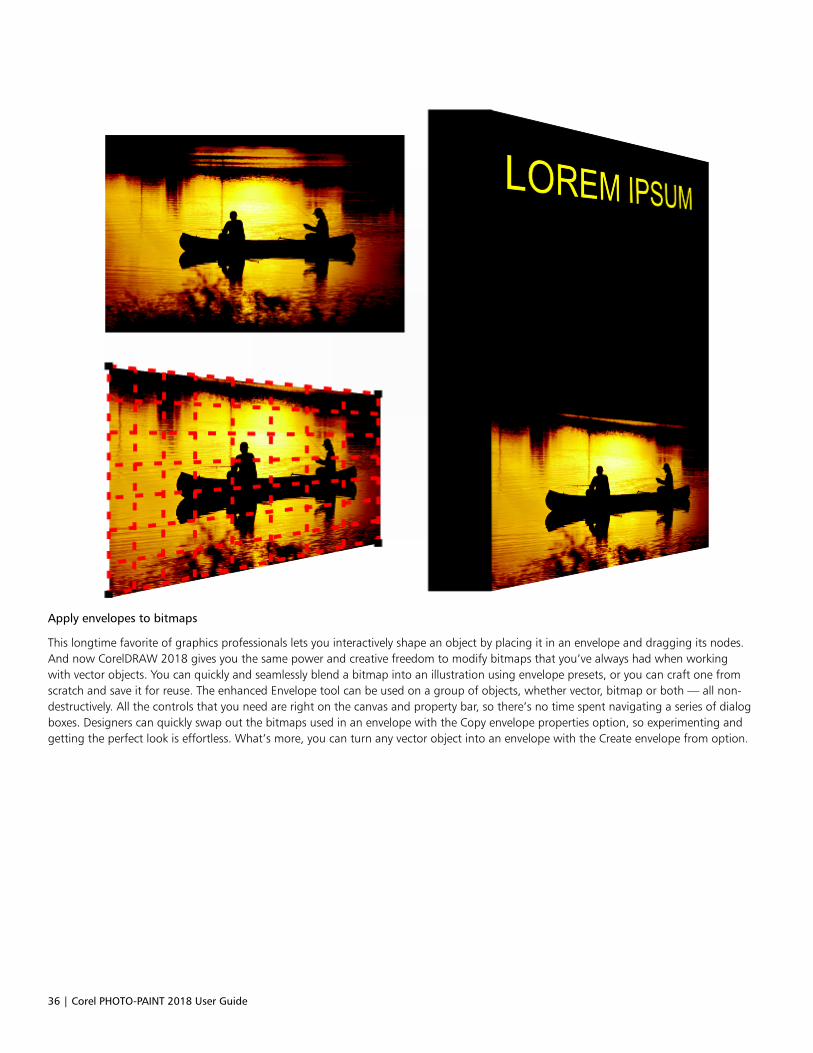
36 | Corel PHOTO-PAINT 2018 User Guide
Apply envelopes to bitmaps
This longtime favorite of graphics professionals lets you interactively shape an object by placing it in an envelope and dragging its nodes.And now CorelDRAW 2018 gives you the same power and creative freedom to modify bitmaps that you’ve always had when workingwith vector objects. You can quickly and seamlessly blend a bitmap into an illustration using envelope presets, or you can craft one fromscratch and save it for reuse. The enhanced Envelope tool can be used on a group of objects, whether vector, bitmap or both — all non-destructively. All the controls that you need are right on the canvas and property bar, so there’s no time spent navigating a series of dialogboxes. Designers can quickly swap out the bitmaps used in an envelope with the Copy envelope properties option, so experimenting andgetting the perfect look is effortless. What’s more, you can turn any vector object into an envelope with the Create envelope from option.
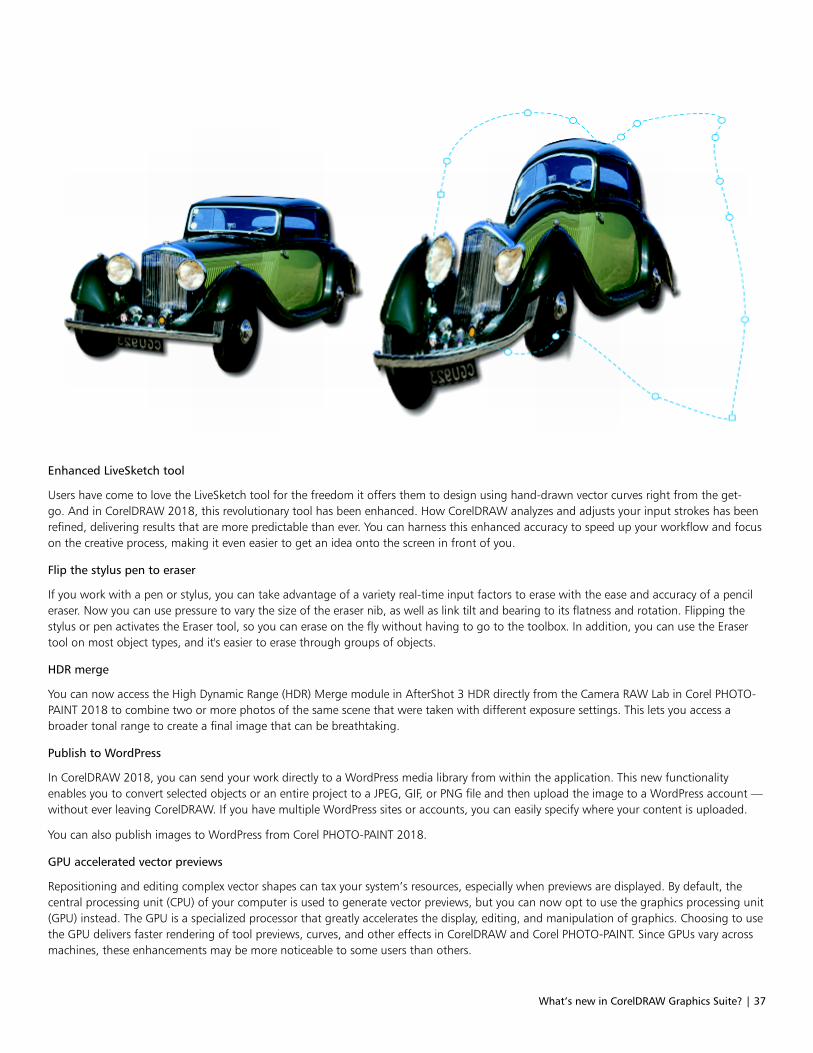
What’s new in CorelDRAW Graphics Suite? | 37
Enhanced LiveSketch tool
Users have come to love the LiveSketch tool for the freedom it offers them to design using hand-drawn vector curves right from the get-go. And in CorelDRAW 2018, this revolutionary tool has been enhanced. How CorelDRAW analyzes and adjusts your input strokes has beenrefined, delivering results that are more predictable than ever. You can harness this enhanced accuracy to speed up your workflow and focuson the creative process, making it even easier to get an idea onto the screen in front of you.
Flip the stylus pen to eraser
If you work with a pen or stylus, you can take advantage of a variety real-time input factors to erase with the ease and accuracy of a pencileraser. Now you can use pressure to vary the size of the eraser nib, as well as link tilt and bearing to its flatness and rotation. Flipping thestylus or pen activates the Eraser tool, so you can erase on the fly without having to go to the toolbox. In addition, you can use the Erasertool on most object types, and it's easier to erase through groups of objects.
HDR merge
You can now access the High Dynamic Range (HDR) Merge module in AfterShot 3 HDR directly from the Camera RAW Lab in Corel PHOTO-PAINT 2018 to combine two or more photos of the same scene that were taken with different exposure settings. This lets you access abroader tonal range to create a final image that can be breathtaking.
Publish to WordPress
In CorelDRAW 2018, you can send your work directly to a WordPress media library from within the application. This new functionalityenables you to convert selected objects or an entire project to a JPEG, GIF, or PNG file and then upload the image to a WordPress account —without ever leaving CorelDRAW. If you have multiple WordPress sites or accounts, you can easily specify where your content is uploaded.
You can also publish images to WordPress from Corel PHOTO-PAINT 2018.
GPU accelerated vector previews
Repositioning and editing complex vector shapes can tax your system’s resources, especially when previews are displayed. By default, thecentral processing unit (CPU) of your computer is used to generate vector previews, but you can now opt to use the graphics processing unit(GPU) instead. The GPU is a specialized processor that greatly accelerates the display, editing, and manipulation of graphics. Choosing to usethe GPU delivers faster rendering of tool previews, curves, and other effects in CorelDRAW and Corel PHOTO-PAINT. Since GPUs vary acrossmachines, these enhancements may be more noticeable to some users than others.
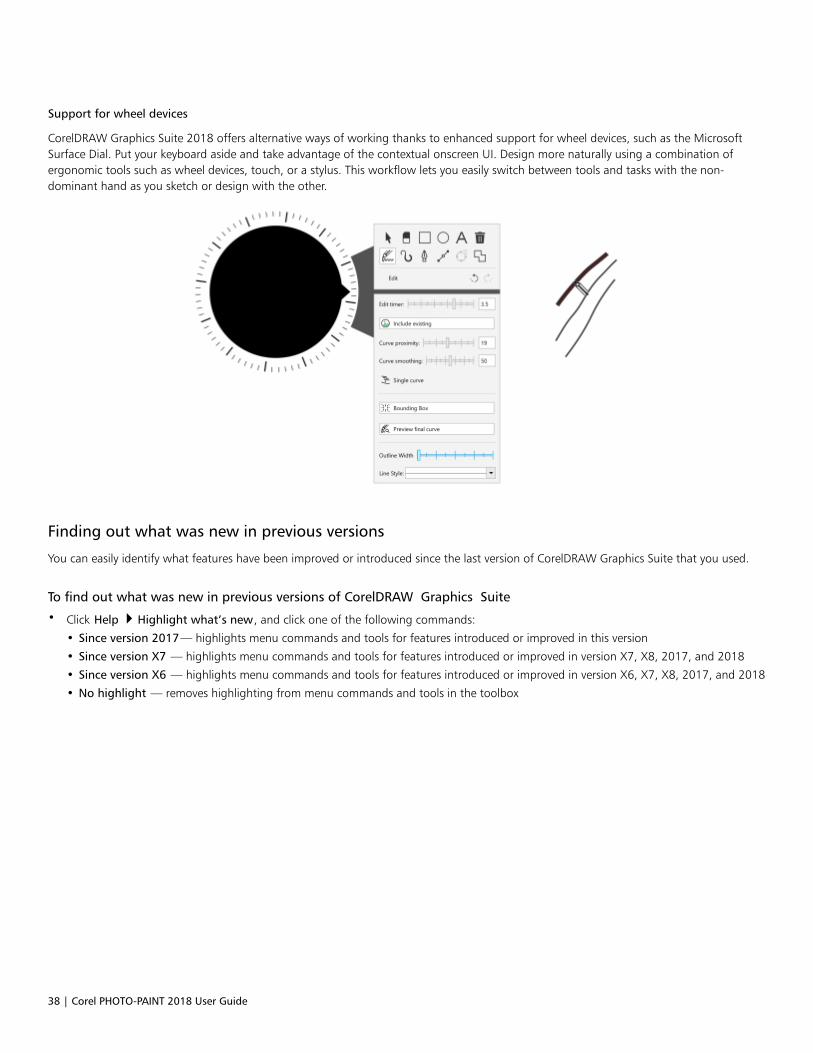
38 | Corel PHOTO-PAINT 2018 User Guide
Support for wheel devices
CorelDRAW Graphics Suite 2018 offers alternative ways of working thanks to enhanced support for wheel devices, such as the MicrosoftSurface Dial. Put your keyboard aside and take advantage of the contextual onscreen UI. Design more naturally using a combination ofergonomic tools such as wheel devices, touch, or a stylus. This workflow lets you easily switch between tools and tasks with the non-dominant hand as you sketch or design with the other.
Finding out what was new in previous versions
You can easily identify what features have been improved or introduced since the last version of CorelDRAW Graphics Suite that you used.
To find out what was new in previous versions of CorelDRAW Graphics Suite
• Click Help Highlight what’s new, and click one of the following commands:
• Since version 2017— highlights menu commands and tools for features introduced or improved in this version
• Since version X7 — highlights menu commands and tools for features introduced or improved in version X7, X8, 2017, and 2018
• Since version X6 — highlights menu commands and tools for features introduced or improved in version X6, X7, X8, 2017, and 2018
• No highlight — removes highlighting from menu commands and tools in the toolbox
Learning resources | 39
Learning resources
You can learn to use the product in various ways: by reading the Quick Start Guide; by accessing the Help, Hints, and tooltips, by viewingvideo tutorials, and by exploring the resources on the Corel website (www.corel.com). On the website, you can access tips and additionaltutorials. You can also check the Readme file (readme.html), which is installed with the software.
This section contains the following topics:• “Getting help” (page 39)• “Using the Help and tooltips” (page 40)• “Using Hints” (page 41)• “Welcome screen” (page 42)• “Quick Start Guide” (page 42)• “Insights from the Experts” (page 42)• “Video learning resources” (page 43)• “Community website for developers” (page 43)• “Network deployment guide” (page 43)• “Web-based resources” (page 43)
Getting help
Various learning resources are available. The following table can help you decide what learning resources to consult when you needassistance. You can access more information about some resources by clicking the corresponding links.
To See
Start learning the applications “Video learning resources” on page 43
“Quick Start Guide” on page 42
Learn about new and enhanced features “Video learning resources” on page 43
Obtain additional information about product tools and features “Using the Help and tooltips” on page 40
“Web-based resources” on page 43
40 | Corel PHOTO-PAINT 2018 User Guide
To See
“Using Hints” on page 41
Advance your knowledge of the suite by learning from graphicsdesign experts
“Insights from the Experts” on page 42
“Web-based resources” on page 43
Learn to automate tasks by using macros Community website for developers
Find information about deploying the suite on a network “Network deployment guide” on page 43
Find specific information about the latest version of the suite Readme file, which is installed with the software. To find it, go thefolder where the product is installed, open the Languages folder,and open the language folder you want.
Using the Help and tooltips
The Help provides comprehensive information about product features from within the application. If you are connected to the Internet, theapplication displays the web-based Help, which contains the latest updates. If no Internet connection is available, the application displaysthe local Help, which was copied to your computer during product installation.
You can browse through the entire list of topics or search for specific words. You can also access the Corel Knowledge Base on the Corelwebsite and other online resources from the Help window.
Tooltips provide helpful information about application controls when you position the pointer over icons, buttons, and other user interfaceelements.
Documentation conventions
The following table describes important conventions used in the documentation.
Convention Description Examples
Menu Menu command A menu item and menu command that youneed to click in sequence
Click File Open.
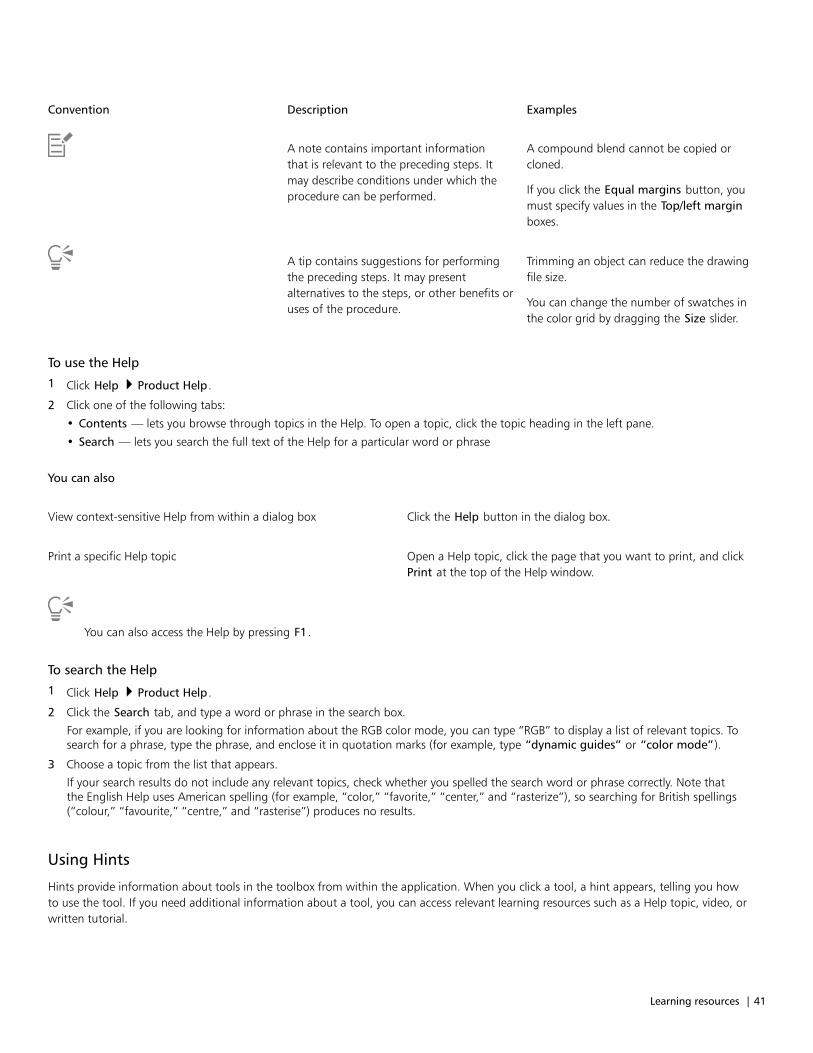
Learning resources | 41
Convention Description Examples
A note contains important informationthat is relevant to the preceding steps. Itmay describe conditions under which theprocedure can be performed.
A compound blend cannot be copied orcloned.
If you click the Equal margins button, youmust specify values in the Top/left marginboxes.
A tip contains suggestions for performingthe preceding steps. It may presentalternatives to the steps, or other benefits oruses of the procedure.
Trimming an object can reduce the drawingfile size.
You can change the number of swatches inthe color grid by dragging the Size slider.
To use the Help
1 Click Help Product Help.
2 Click one of the following tabs:
• Contents — lets you browse through topics in the Help. To open a topic, click the topic heading in the left pane.
• Search — lets you search the full text of the Help for a particular word or phrase
You can also
View context-sensitive Help from within a dialog box Click the Help button in the dialog box.
Print a specific Help topic Open a Help topic, click the page that you want to print, and clickPrint at the top of the Help window.
You can also access the Help by pressing F1.
To search the Help
1 Click Help Product Help.
2 Click the Search tab, and type a word or phrase in the search box.
For example, if you are looking for information about the RGB color mode, you can type “RGB” to display a list of relevant topics. Tosearch for a phrase, type the phrase, and enclose it in quotation marks (for example, type “dynamic guides” or “color mode”).
3 Choose a topic from the list that appears.
If your search results do not include any relevant topics, check whether you spelled the search word or phrase correctly. Note thatthe English Help uses American spelling (for example, “color,” “favorite,” “center,” and “rasterize”), so searching for British spellings(“colour,” “favourite,” “centre,” and “rasterise”) produces no results.
Using Hints
Hints provide information about tools in the toolbox from within the application. When you click a tool, a hint appears, telling you howto use the tool. If you need additional information about a tool, you can access relevant learning resources such as a Help topic, video, orwritten tutorial.
42 | Corel PHOTO-PAINT 2018 User Guide
Hints are displayed in the Hints docker on the right side of the application window, but you can hide them when you no longer need them.For information about working with dockers, see “Dockers” on page 63.
To use Hints
To Do the following
Display or hide Hints Click Help Hints.
When the Hints command is enabled, the Hints docker appearsand provides information about the active tool in the toolbox.
Display information about a tool Click the tool, or perform an action with a tool that is alreadyactive.
Get additional information about the active tool In the Learn more section, click a link to a relevant Help topic,video, or a written tutorial.
Navigate to previously viewed topics Click the Back and Forward buttons at the bottom of the Hintsdocker.
Welcome screen
The Welcome Screen appears when you start the application. With the Welcome Screen, you can quickly start or open a document, choose aworkspace that suits your needs, access online learning videos and other learning resources, and get inspired by a gallery of original artworkcreated with Corel PHOTO-PAINT.
To access the Welcome screen
• Click Help Welcome screen.
You can also access the Welcome screen by clicking the Welcome screen button on the tab bar. If you want to hide the Welcomescreen button from the tab bar, click Tools Options, click General in the Workspace list of categories, and disable the ShowWelcome Screen button on tab bar check box.
Quick Start Guide
The Quick Start Guide, available in PDF format, can help you get started quickly with the suite by introducing you to useful tools andfeatures.
You can also access the Quick Start Guide by clicking Help Quick Start Guide.
Insights from the Experts
The Insights from the Experts is a series of tutorials by graphic design professionals who use CorelDRAW Graphics Suite in their everydaywork. You can access these online tutorials as individual PDF files directly from the Corel website.
Learning resources | 43
Video learning resources
You can access video learning resources from the Welcome screen as well as from the Help menu.
The video tutorials show you how to complete basic tasks such as drawing, shaping, and coloring objects in CorelDRAW, or masking andcropping in Corel PHOTO-PAINT and help you get the most out of features such as symmetry, font management, fills and transparencies,alignment tools, QR codes, bitmap and vector effects, and more. Some videos don't have sound but include captions that provide usefultips and help you understand the features that are shown. Whether you are a new or long-time user, you will find useful demos and tips toboost your productivity and expand your experience.
To access a video
• Click Help Video tutorials.
Community website for developers
Whether you are automating tasks by using macros, creating custom tools, or developing commercial solutions that integrate withCorelDRAW Graphics Suite; the developer community website can help you with its wealth of useful resources: a programming guide,detailed Object Model reference documentation with code samples, and in-depth programming articles.
You can use either Microsoft Visual Basic for Applications (VBA) or Microsoft Visual Studio Tools for Applications (VSTA) to create macros andcustomized solutions for CorelDRAW and Corel PHOTO-PAINT.
Network deployment guide
The CorelDRAW Graphics Suite 2018 Deployment Guide is a step-by-step resource for deploying CorelDRAW Graphics Suite 2018 to anetwork. This guide is provided to customers who purchase a volume (“multi-seat”) license of CorelDRAW Graphics Suite 2018 for theirorganization. To purchase a volume license of the software and obtain its deployment guide, please contact Corel Support Services.
Web-based resources
The following web-based resources can help you get the most out of CorelDRAW Graphics Suite:• Corel Knowledge Base — articles written by the Corel Technical Support Services Team in response to questions by users• Community.CorelDRAW.com — an online environment to share your experience with the product, ask questions, and receive help and
suggestions from other users• Tutorials on the Corel website — in-depth tutorials in which CorelDRAW Graphics Suite experts share their knowledge and techniques
An active Internet connection is required to access web-based resources.

44 | Corel PHOTO-PAINT 2018 User Guide
Starting and setting up | 45
Starting and setting up
This section contains the following topics:• “Starting and quitting Corel PHOTO-PAINT” (page 45)• “Changing the language” (page 45)• “Changing startup settings” (page 46)
Starting and quitting Corel PHOTO-PAINT
You can start Corel PHOTO-PAINT from the Windows taskbar and end a Corel PHOTO-PAINT session from the application window.
To start and quit Corel PHOTO-PAINT
To Do the following
Start Corel PHOTO-PAINT Do one of the following:
• (Windows 7 and Windows 10) From the Windows
taskbar, click Start Programs CorelDRAW Graphics
Suite 2018 Corel PHOTO-PAINT.
• (Windows 8) Click the Corel PHOTO-PAINT 2018 tile onyour desktop.
Quit Corel PHOTO-PAINT Click File Exit.
Changing the language
If an application has been installed in more than one language, you can change the language of the user interface and Help at any time.
To change the language of the user interface and Help
1 Click Tools Options.
2 In the list of categories, click Global.
46 | Corel PHOTO-PAINT 2018 User Guide
3 Choose a language from the Select the language for the user interface list box.
If you want to change the language of the user interface and Help when you start the application, enable the Ask me the next time thesoftware starts check box.
4 Restart the application.
If there is only one language available in the Select the language for the user interface list box, you must first install the additionallanguages that you want. For more information, see “To modify or repair a CorelDRAW Graphics Suite installation” on page 20.
Changing startup settings
You can specify the startup settings for Corel PHOTO-PAINT, which control how the application appears when it’s opened. For example, youcan start the application with the Welcome screen open or a new blank document.
To change startup settings
1 Click Tools Options.
2 In the Workspace list of categories, click General.
3 In the Getting Started area, choose an option from the On start-up list box.
If you want to hide the Create a new image dialog box when starting images, disable the Show new image dialog box check box.

Corel PHOTO-PAINT workspace tour | 47
Corel PHOTO-PAINT workspace tour
Becoming familiar with the terminology and workspace of Corel PHOTO-PAINT will help you follow the concepts and procedures found inthe user guide and in the Help.
This section contains the following topics:• “Corel PHOTO-PAINT terms” (page 47)• “Corel PHOTO-PAINT application window” (page 48)• “Choosing a workspace” (page 50)• “Toolbars” (page 51)• “Toolbox” (page 53)• “Property bar” (page 62)• “Dockers” (page 63)• “Color palette” (page 65)• “Status bar” (page 65)
Corel PHOTO-PAINT terms
Before you get started in Corel PHOTO-PAINT, you should understand the following terms.
Term Description
Channel An 8-bit grayscale image that stores color or mask information foran image
Editable area An editable area of a mask allows paint and effects to be applied toa selected area of an image
Image A file you open or create in Corel PHOTO-PAINT
Lens An object layer that protects part or all of an image when youperform color and tonal corrections
48 | Corel PHOTO-PAINT 2018 User Guide
Term Description
Mask A mask can be applied to an image during image editing to defineprotected areas and editable areas
Object An independent bitmap that is layered above the backgroundimage
Path A series of line and curve segments connected by adjustableendpoints called nodes
Thumbnails A miniature, low-resolution version of an image
For more terms and definitions, see the “Glossary” on page 591.
Corel PHOTO-PAINT application window
The Corel PHOTO-PAINT application window contains elements that help you access the tools and commands you need to view and editimages. Application commands are accessible through the menu bar, toolbox, property bar, toolbars, or dockers.
The application window appears below.
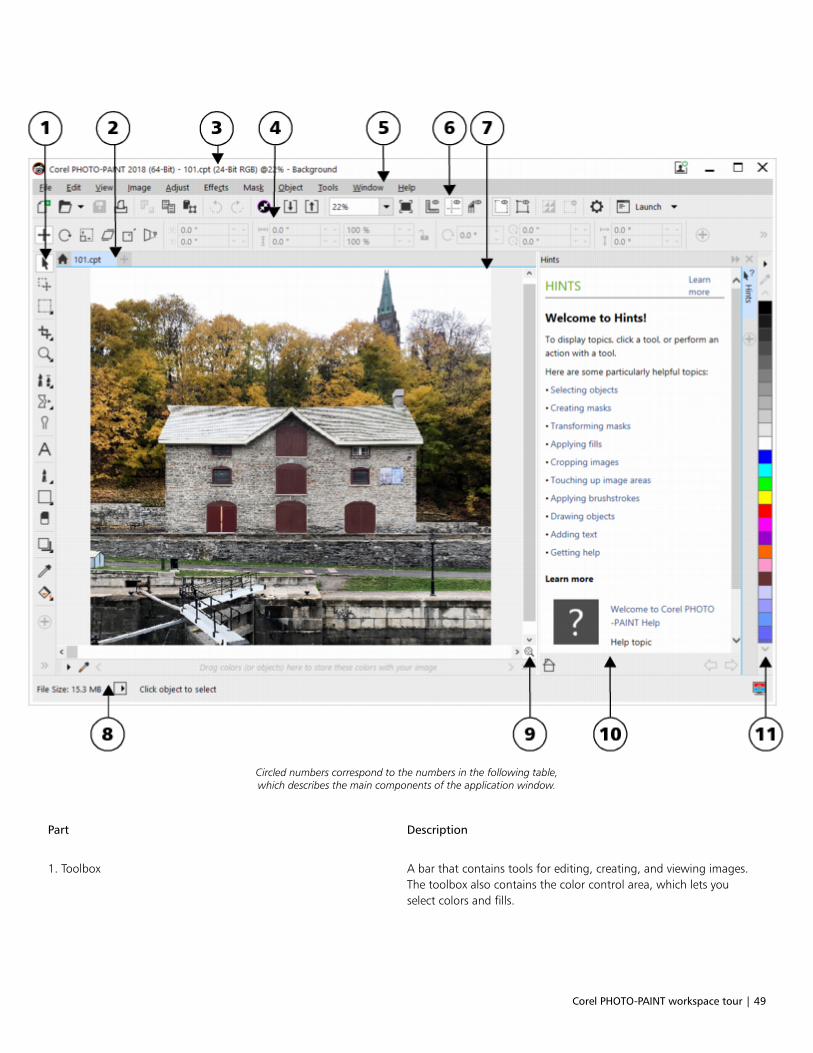
Corel PHOTO-PAINT workspace tour | 49
Circled numbers correspond to the numbers in the following table,which describes the main components of the application window.
Part Description
1. Toolbox A bar that contains tools for editing, creating, and viewing images.The toolbox also contains the color control area, which lets youselect colors and fills.
50 | Corel PHOTO-PAINT 2018 User Guide
Part Description
2 Document tab A tab displays for each open document to allow you to quicklymove between documents
3. Title bar The area on the image window displaying the title of the image
4. Property bar A detachable bar containing commands that change according tothe active tool
5. Menu bar The area containing drop-down menus with commands groupedby category
6. Toolbar (standard) A bar that contains shortcuts to some menus and other basiccommands, such as opening, saving, and printing
7. Image window The area in which the image appears. Although more than oneimage window can be open at the same time, you can applycommands to the active image window only.
8. Status bar An area that displays image information, system information, andtips
9. Navigator A button that lets you view a thumbnail of the entire image so thatyou can focus the image window on a specific area. The Navigatoris available only when the total image cannot be viewed in theimage window.
10. Docker A window that provides access to additional commands and imageinformation. Some dockers provide a visual display area. The Hintsand Object manager dockers are displayed by default.
11. Color palette A dockable bar that contains color swatches
You can customize many of the elements in the application window to suit your workflow. For information about customizing Corel PHOTO-PAINT, see “Customizing CorelDRAW” on page 559.
Choosing a workspace
Corel PHOTO-PAINT includes a collection of workspaces that are designed to help you increase your productivity. A workspace is aconfiguration of settings that specifies how the various command bars, commands, and buttons are arranged when you open theapplication. Their purpose is to make more accessible the tools that you use most often. You can choose a workspace from the WelcomeScreen, or you can switch to a different workspace from within the application.
The following table describes the available workspaces.
Corel PHOTO-PAINT workspace tour | 51
Workspace Description
Lite This workspace makes Corel PHOTO-PAINT’s most commonly usedtools and features more accessible. If you are new to Corel PHOTO-PAINT, the Lite workspace is ideal for getting started.
X6 Inspired This workspace is almost identical to the default Corel PHOTO-PAINT X6 workspace. It is best suited for experienced Corel PHOTO-PAINT users who are looking for a seamless transition to a modernyet familiar environment in Corel PHOTO-PAINT 2018. Manyelements of the workspace have been optimized for a morestreamlined workflow.
Default This workspace has been redesigned to provide a more intuitiveplacement of tools and controls. If you have experience using CorelPHOTO-PAINT, or another photo-editing application, the defaultworkspace is a good choice.
Help topics are based on the Default workspace.
Touch Optimized for touch-enabled devices, the Touch workspace is idealfor field work and sketching. Complete your tasks by using touch,dial, or a stylus, without needing a mouse or keyboard.
Adobe Photoshop Simulates the Adobe Photoshop workspace by positioning the CorelPHOTO-PAINT features where you would find the equivalent featurein Adobe Photoshop. This workspace is useful if you recentlyswitched from Adobe Photoshop to Corel PHOTO-PAINT and youare not familiar with the Corel PHOTO-PAINT workspace.
If you have a unique workflow, you can create a custom workspace that is optimized for your specific needs. For more information, see“Creating workspaces” on page 560.
To choose a workspace
• Click Window Workspace, and choose one of the available workspaces.
You can also choose a workspace from the Welcome Screen or by clicking Tools Option, clicking Workspace in the list ofcategories, and then enabling the check box beside a workspace in the Workspace list.
Toolbars
Toolbars consist of buttons that are shortcuts to menu commands. The standard toolbar consists of commonly used commands. The tablebelow outlines the buttons on the standard toolbar.
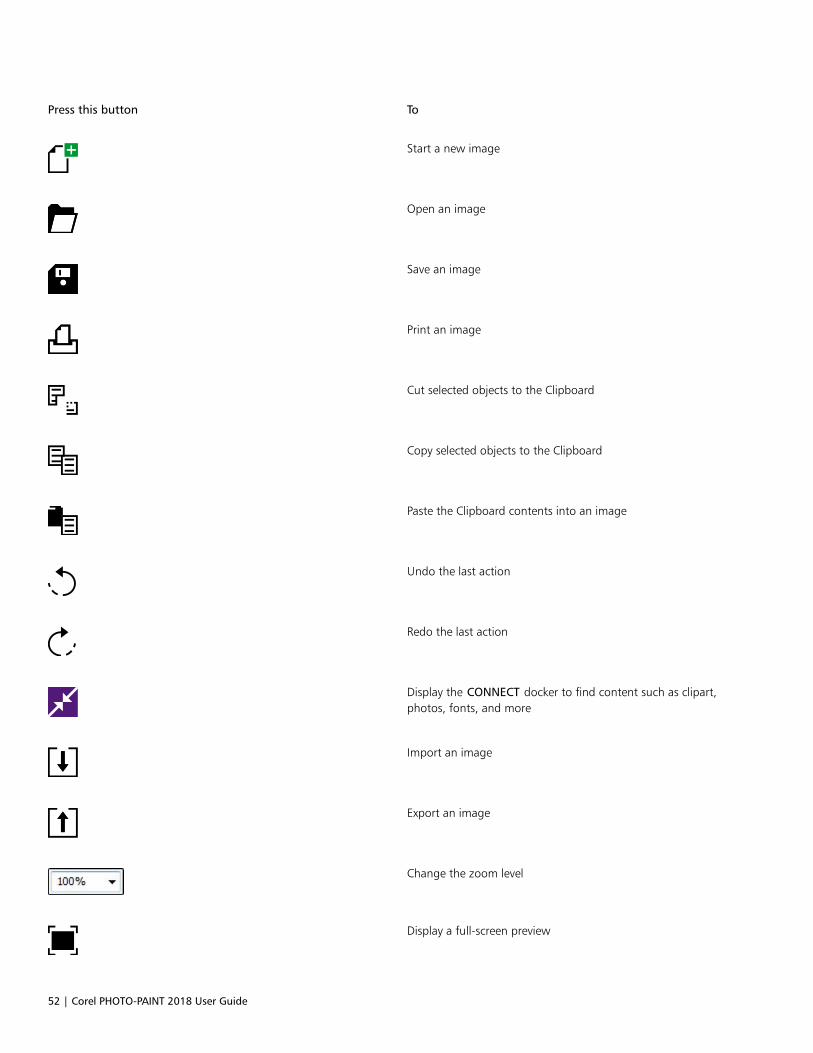
52 | Corel PHOTO-PAINT 2018 User Guide
Press this button To
Start a new image
Open an image
Save an image
Print an image
Cut selected objects to the Clipboard
Copy selected objects to the Clipboard
Paste the Clipboard contents into an image
Undo the last action
Redo the last action
Display the CONNECT docker to find content such as clipart,photos, fonts, and more
Import an image
Export an image
Change the zoom level
Display a full-screen preview
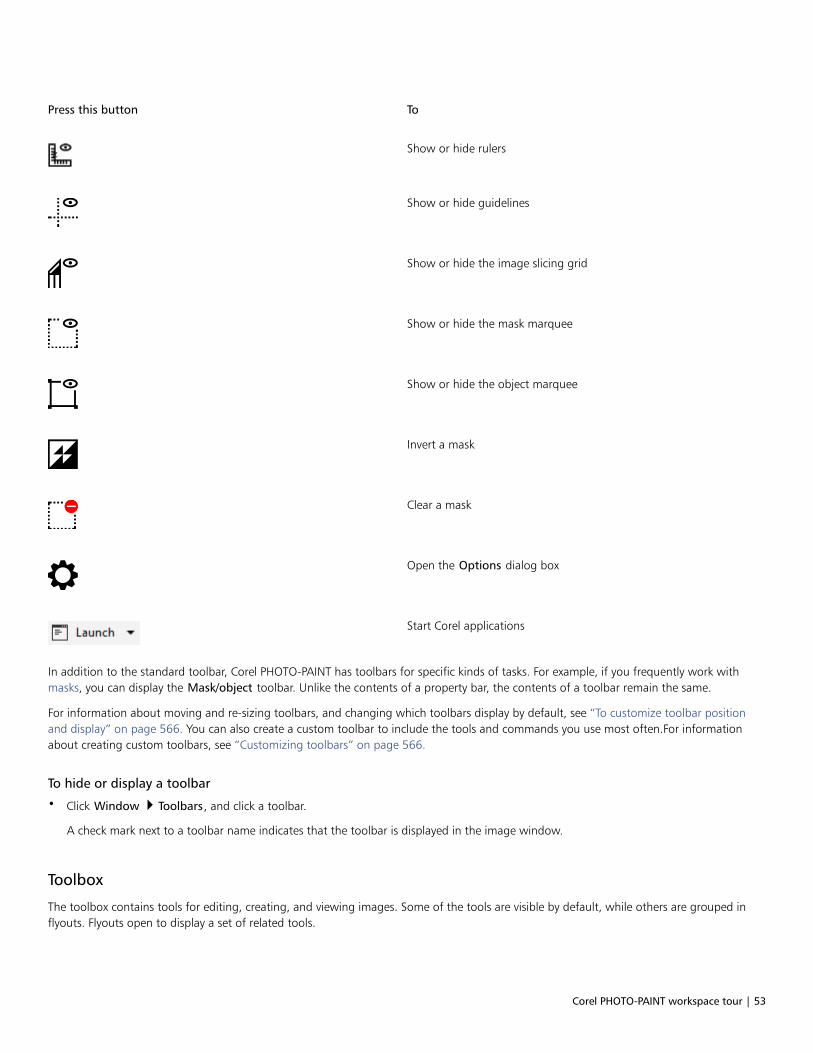
Corel PHOTO-PAINT workspace tour | 53
Press this button To
Show or hide rulers
Show or hide guidelines
Show or hide the image slicing grid
Show or hide the mask marquee
Show or hide the object marquee
Invert a mask
Clear a mask
Open the Options dialog box
Start Corel applications
In addition to the standard toolbar, Corel PHOTO-PAINT has toolbars for specific kinds of tasks. For example, if you frequently work withmasks, you can display the Mask/object toolbar. Unlike the contents of a property bar, the contents of a toolbar remain the same.
For information about moving and re-sizing toolbars, and changing which toolbars display by default, see “To customize toolbar positionand display” on page 566. You can also create a custom toolbar to include the tools and commands you use most often.For informationabout creating custom toolbars, see “Customizing toolbars” on page 566.
To hide or display a toolbar
• Click Window Toolbars, and click a toolbar.
A check mark next to a toolbar name indicates that the toolbar is displayed in the image window.
Toolbox
The toolbox contains tools for editing, creating, and viewing images. Some of the tools are visible by default, while others are grouped inflyouts. Flyouts open to display a set of related tools.
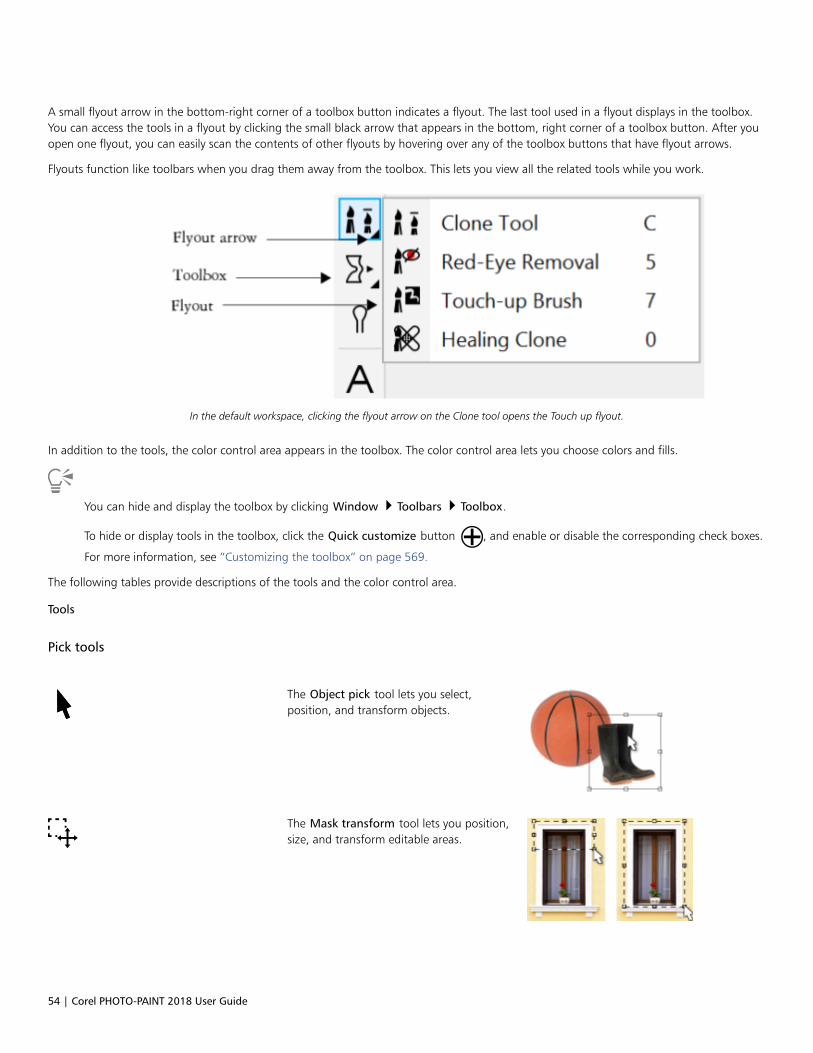
54 | Corel PHOTO-PAINT 2018 User Guide
A small flyout arrow in the bottom-right corner of a toolbox button indicates a flyout. The last tool used in a flyout displays in the toolbox.You can access the tools in a flyout by clicking the small black arrow that appears in the bottom, right corner of a toolbox button. After youopen one flyout, you can easily scan the contents of other flyouts by hovering over any of the toolbox buttons that have flyout arrows.
Flyouts function like toolbars when you drag them away from the toolbox. This lets you view all the related tools while you work.
In the default workspace, clicking the flyout arrow on the Clone tool opens the Touch up flyout.
In addition to the tools, the color control area appears in the toolbox. The color control area lets you choose colors and fills.
You can hide and display the toolbox by clicking Window Toolbars Toolbox.
To hide or display tools in the toolbox, click the Quick customize button , and enable or disable the corresponding check boxes.
For more information, see “Customizing the toolbox” on page 569.
The following tables provide descriptions of the tools and the color control area.
Tools
Pick tools
The Object pick tool lets you select,position, and transform objects.
The Mask transform tool lets you position,size, and transform editable areas.

Corel PHOTO-PAINT workspace tour | 55
Mask tools
The Rectangle mask tool lets you definerectangle editable areas.
The Ellipse mask tool lets you defineelliptical editable areas.
The Magic wand mask tool lets youdefine irregularly shaped editable areasthat include the first-clicked pixel and alladjacent pixels of similar color.
The Lasso mask tool lets you defineeditable areas that are irregular in shapeand surrounded by pixels of similar colors.
The Magnetic mask tool lets you snap themask marquee to the edges of areas thatcontrast in color with their surroundings.
The Freehand mask tool lets you defineirregularly shaped or polygonal editableareas.
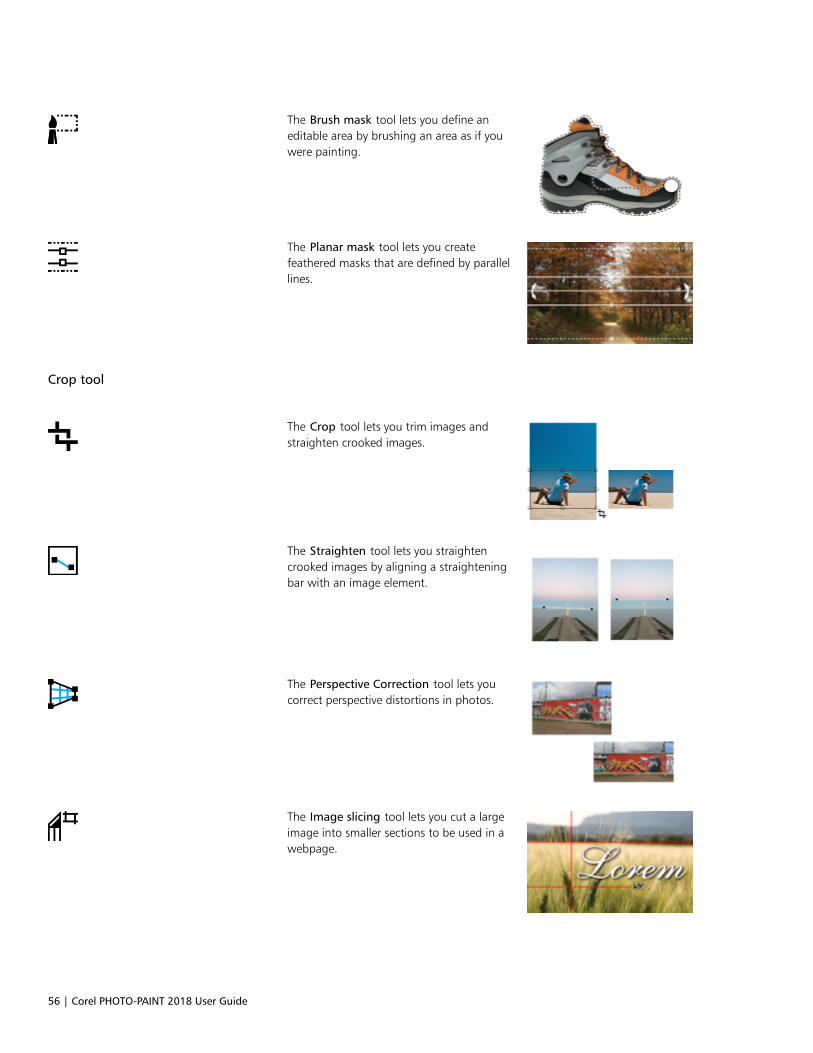
56 | Corel PHOTO-PAINT 2018 User Guide
The Brush mask tool lets you define aneditable area by brushing an area as if youwere painting.
The Planar mask tool lets you createfeathered masks that are defined by parallellines.
Crop tool
The Crop tool lets you trim images andstraighten crooked images.
The Straighten tool lets you straightencrooked images by aligning a straighteningbar with an image element.
The Perspective Correction tool lets youcorrect perspective distortions in photos.
The Image slicing tool lets you cut a largeimage into smaller sections to be used in awebpage.
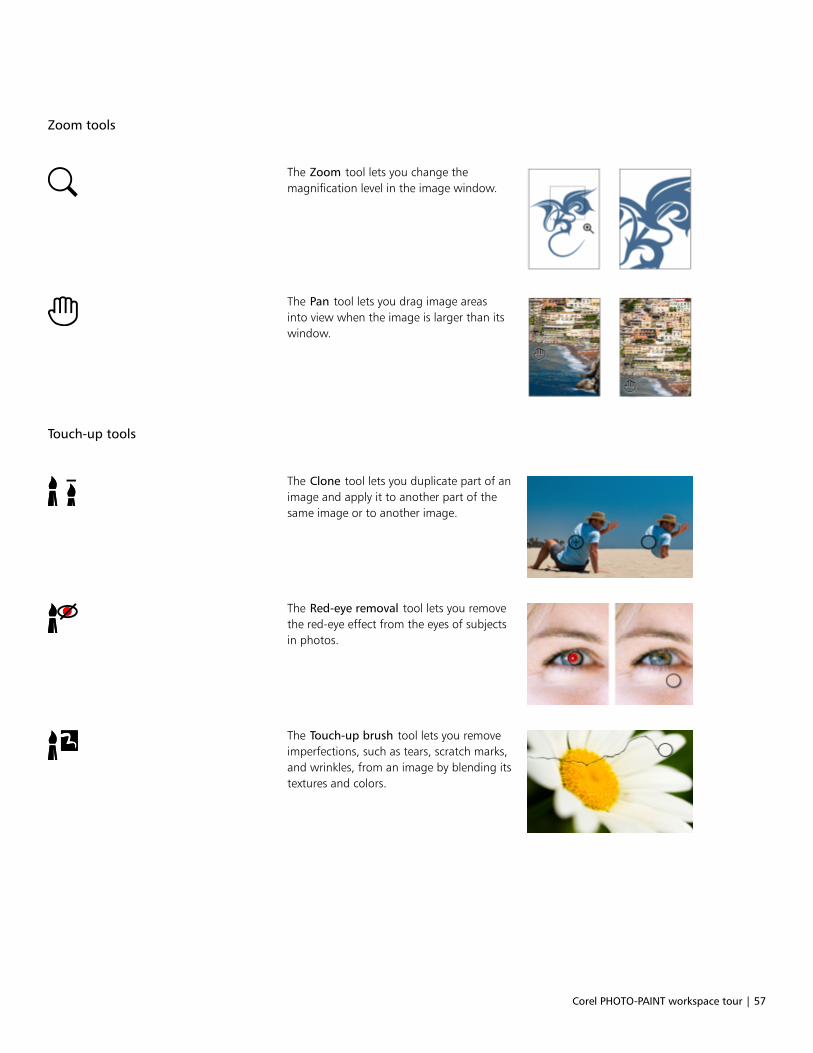
Corel PHOTO-PAINT workspace tour | 57
Zoom tools
The Zoom tool lets you change themagnification level in the image window.
The Pan tool lets you drag image areasinto view when the image is larger than itswindow.
Touch-up tools
The Clone tool lets you duplicate part of animage and apply it to another part of thesame image or to another image.
The Red-eye removal tool lets you removethe red-eye effect from the eyes of subjectsin photos.
The Touch-up brush tool lets you removeimperfections, such as tears, scratch marks,and wrinkles, from an image by blending itstextures and colors.
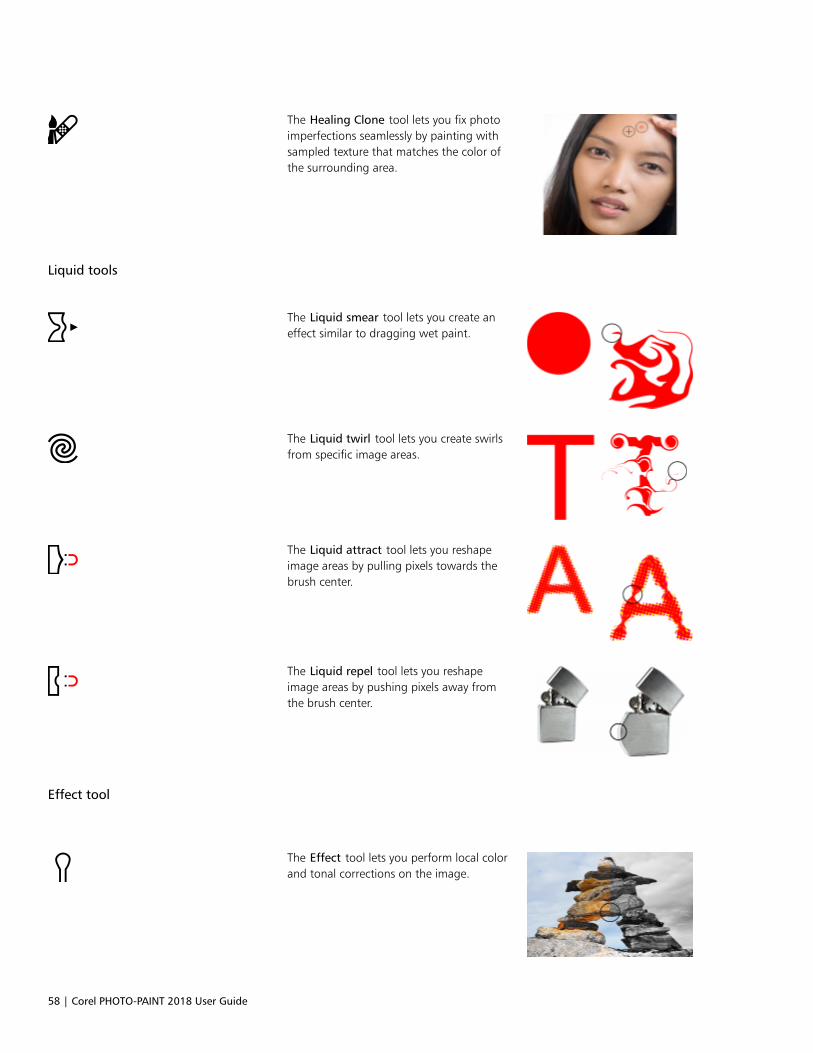
58 | Corel PHOTO-PAINT 2018 User Guide
The Healing Clone tool lets you fix photoimperfections seamlessly by painting withsampled texture that matches the color ofthe surrounding area.
Liquid tools
The Liquid smear tool lets you create aneffect similar to dragging wet paint.
The Liquid twirl tool lets you create swirlsfrom specific image areas.
The Liquid attract tool lets you reshapeimage areas by pulling pixels towards thebrush center.
The Liquid repel tool lets you reshapeimage areas by pushing pixels away fromthe brush center.
Effect tool
The Effect tool lets you perform local colorand tonal corrections on the image.
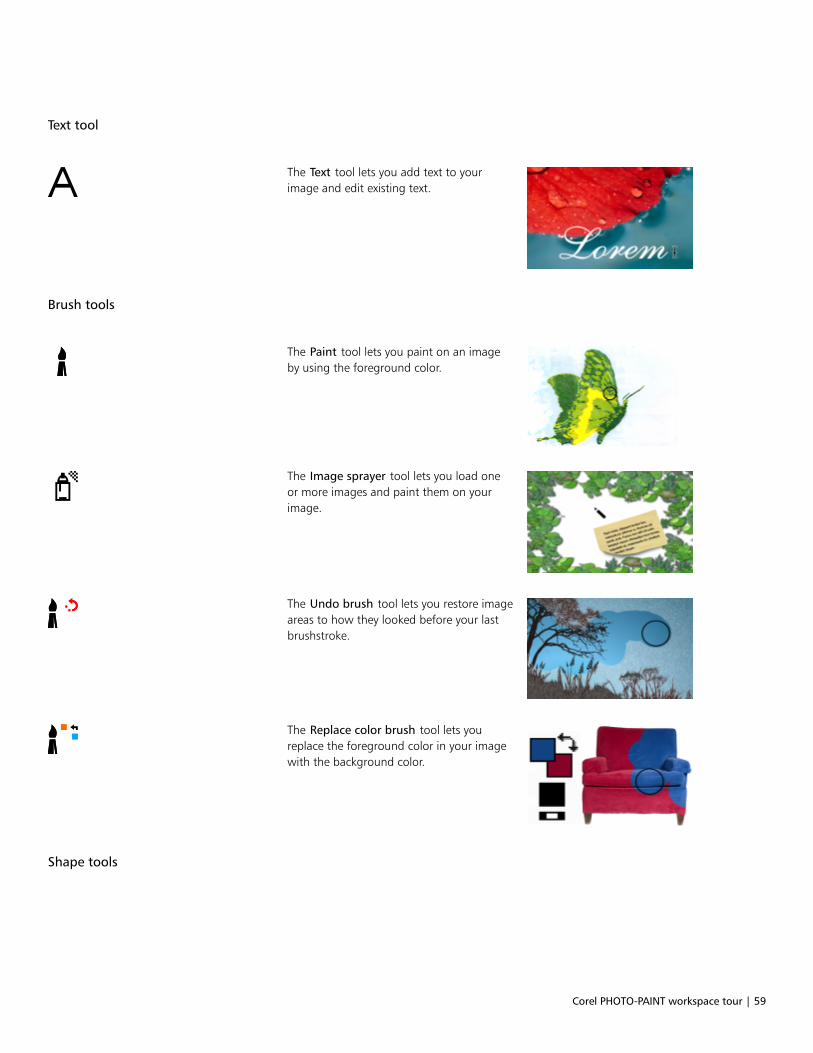
Corel PHOTO-PAINT workspace tour | 59
Text tool
The Text tool lets you add text to yourimage and edit existing text.
Brush tools
The Paint tool lets you paint on an imageby using the foreground color.
The Image sprayer tool lets you load oneor more images and paint them on yourimage.
The Undo brush tool lets you restore imageareas to how they looked before your lastbrushstroke.
The Replace color brush tool lets youreplace the foreground color in your imagewith the background color.
Shape tools
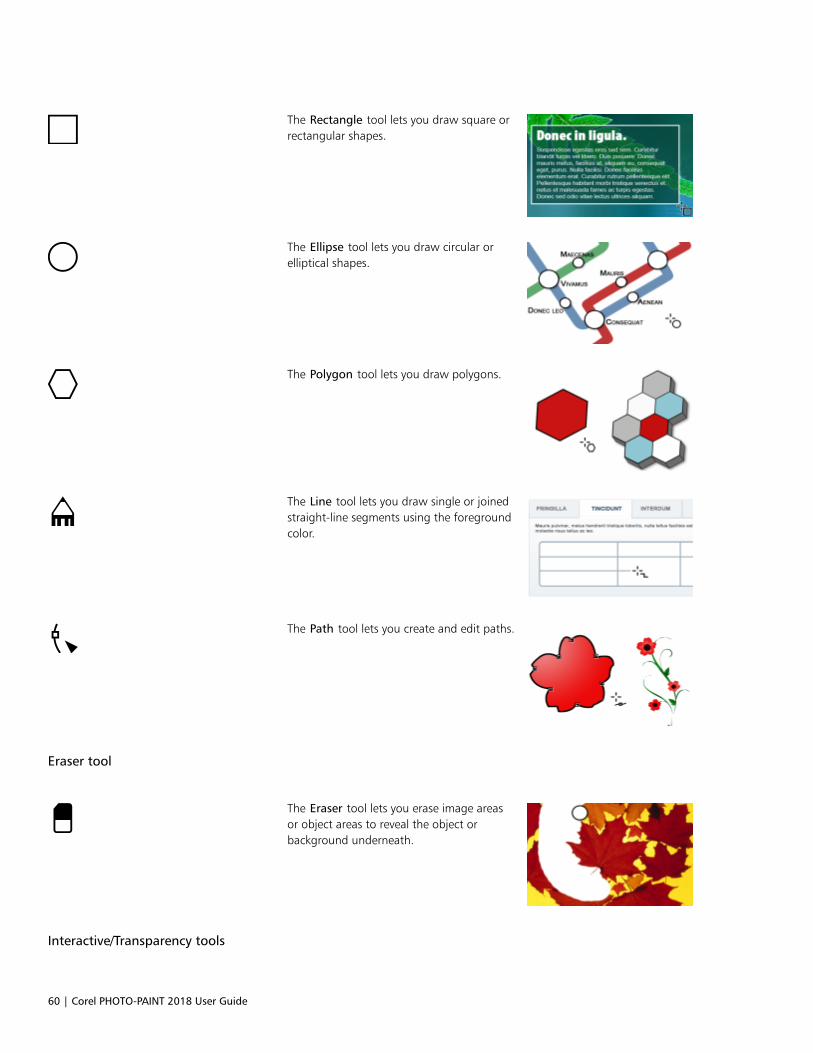
60 | Corel PHOTO-PAINT 2018 User Guide
The Rectangle tool lets you draw square orrectangular shapes.
The Ellipse tool lets you draw circular orelliptical shapes.
The Polygon tool lets you draw polygons.
The Line tool lets you draw single or joinedstraight-line segments using the foregroundcolor.
The Path tool lets you create and edit paths.
Eraser tool
The Eraser tool lets you erase image areasor object areas to reveal the object orbackground underneath.
Interactive/Transparency tools
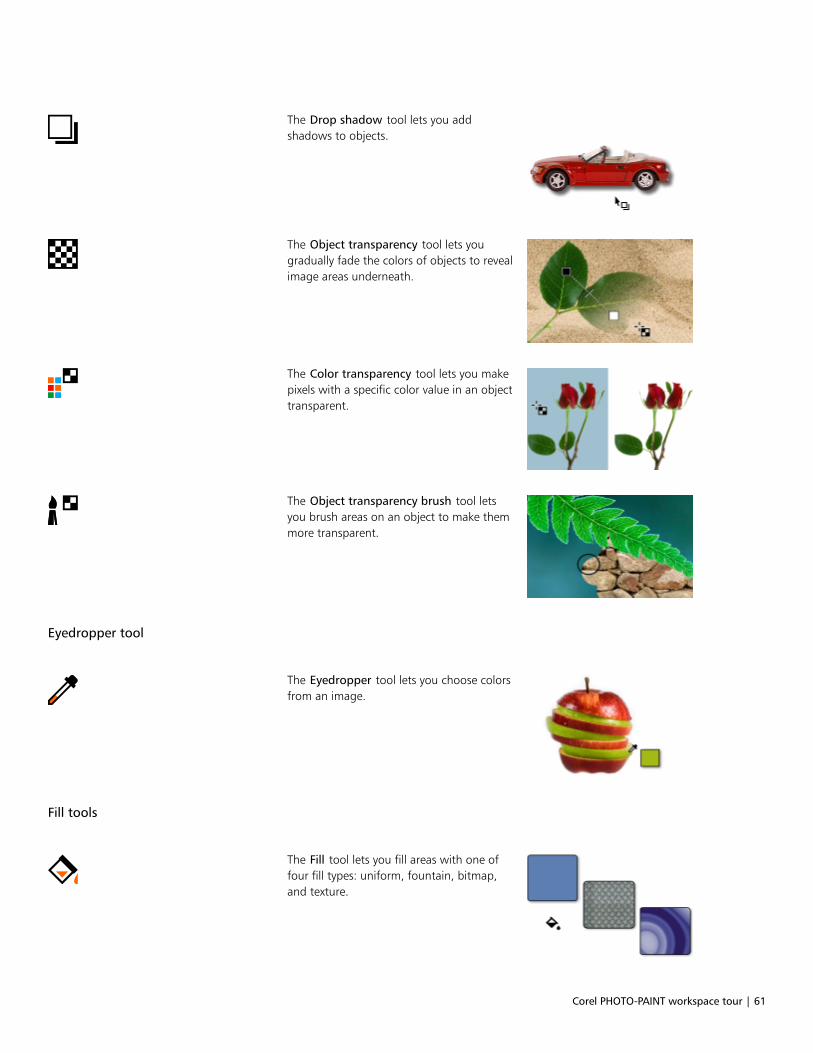
Corel PHOTO-PAINT workspace tour | 61
The Drop shadow tool lets you addshadows to objects.
The Object transparency tool lets yougradually fade the colors of objects to revealimage areas underneath.
The Color transparency tool lets you makepixels with a specific color value in an objecttransparent.
The Object transparency brush tool letsyou brush areas on an object to make themmore transparent.
Eyedropper tool
The Eyedropper tool lets you choose colorsfrom an image.
Fill tools
The Fill tool lets you fill areas with one offour fill types: uniform, fountain, bitmap,and texture.
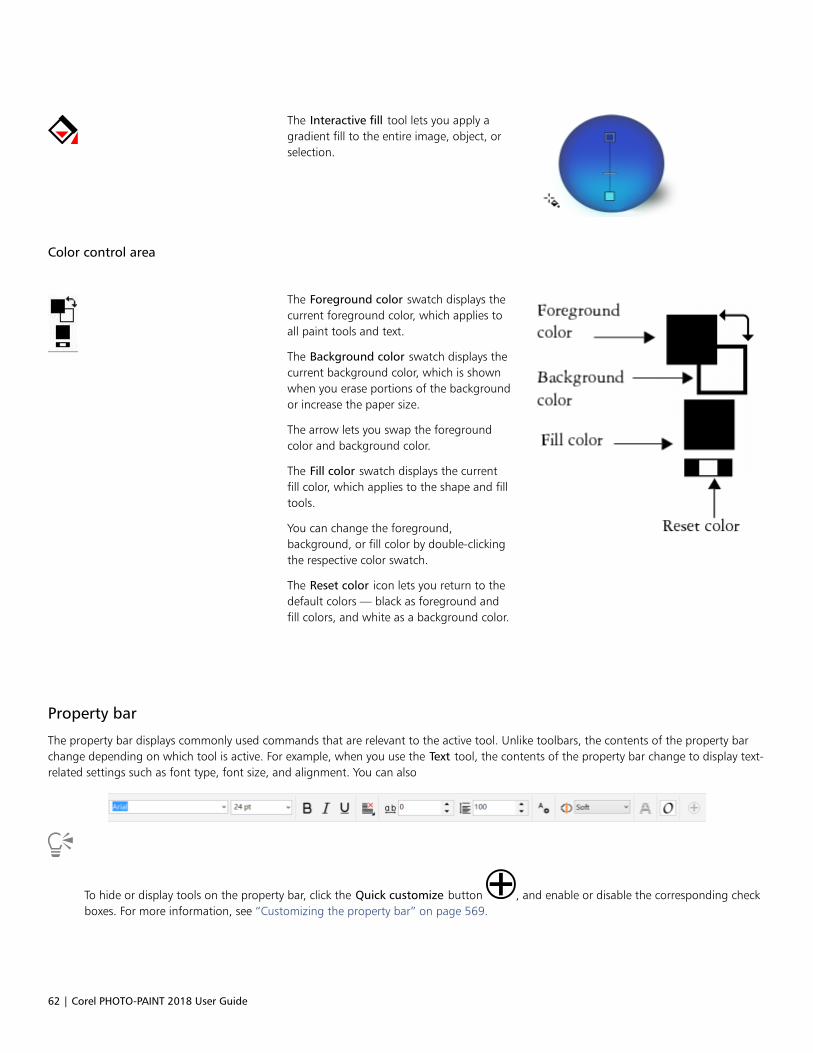
62 | Corel PHOTO-PAINT 2018 User Guide
The Interactive fill tool lets you apply agradient fill to the entire image, object, orselection.
Color control area
The Foreground color swatch displays thecurrent foreground color, which applies toall paint tools and text.
The Background color swatch displays thecurrent background color, which is shownwhen you erase portions of the backgroundor increase the paper size.
The arrow lets you swap the foregroundcolor and background color.
The Fill color swatch displays the currentfill color, which applies to the shape and filltools.
You can change the foreground,background, or fill color by double-clickingthe respective color swatch.
The Reset color icon lets you return to thedefault colors — black as foreground andfill colors, and white as a background color.
Property bar
The property bar displays commonly used commands that are relevant to the active tool. Unlike toolbars, the contents of the property barchange depending on which tool is active. For example, when you use the Text tool, the contents of the property bar change to display text-related settings such as font type, font size, and alignment. You can also
To hide or display tools on the property bar, click the Quick customize button , and enable or disable the corresponding checkboxes. For more information, see “Customizing the property bar” on page 569.

Corel PHOTO-PAINT workspace tour | 63
Dockers
Dockers display the same types of controls as a dialog box, such as command buttons, options, and list boxes. Unlike most dialog boxes, youcan keep dockers open while working on a document, so you can readily access the commands to experiment with different effects. Dockershave features similar to palettes in other graphics programs.
Dockers can be either docked or floating. A docked docker is attached to the edge of the application window, a toolbar, or a palette. Afloating docker is not attached to a workspace element. If you open several dockers, they usually appear nested, with only one docker fullydisplayed. You can quickly display a docker hidden from view by clicking the docker’s tab.
You can move dockers, and you can collapse dockers to save screen space.
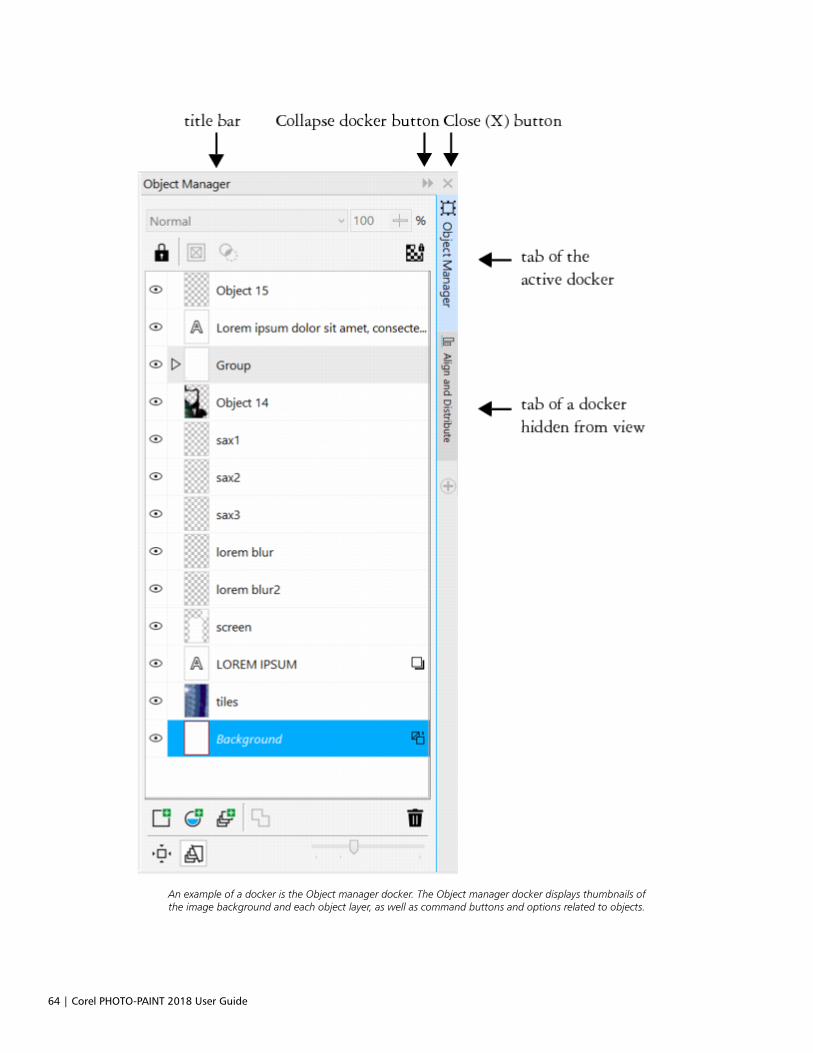
64 | Corel PHOTO-PAINT 2018 User Guide
An example of a docker is the Object manager docker. The Object manager docker displays thumbnails ofthe image background and each object layer, as well as command buttons and options related to objects.
Corel PHOTO-PAINT workspace tour | 65
To open or close a docker
• Click Window Dockers, and click a docker.
To open or close dockers, you can also click the Quick customize button on the right side of a docker, and enable or disable the
corresponding check boxes.
You can also close a docker by clicking the X button on its title bar. Clicking the X button on the title bar closes all nested dockers in agroup. To close only a specific docker, click the X button on the docker’s tab.
To move dockers
To move Do the following
A docker Drag the docker’s tab to a newlocation.
Multiple nested dockers Drag the title bar of the active dockerto a new location.
To dock a floating docker
• Drag the docker’s title bar or tab to an edge of the drawing window and position the pointer along the edge. When a grey preview ofthe docker’s position appears, release the mouse button.
To collapse a docker
• Click the Collapse docker button on the docker’s title bar.
To expand a collapsed docker, click its tab.
Color palette
A color palette is a collection of color swatches. You can choose foreground, background, and fill colors by using the default color palette,which contains RGB colors. For more information about choosing colors, see “Choosing colors” on page 194.
Status bar
The status bar displays information about the image, system memory, and the active tool. It also displays information about the documentcolor and the color proofing status. You can change the type of information that is displayed to help you with your current task. Forexample, if you are working with images that have different dimensions, you can display the dimension of the current image.
You can also customize the status bar by adding command buttons. For information about customizing the status bar, see “Customizing thestatus bar” on page 570.

66 | Corel PHOTO-PAINT 2018 User Guide
To change the type of information displayed on the status bar
• Click the arrow on the status bar, and click one of the following:
• File size
• Current tool
• Document dimensions
• Document color information
• Memory
Setting options | 67
Setting options
You can change a variety of settings in Corel PHOTO-PAINT according to your preferences.
This section contains the following topics:• “Changing workspace options” (page 67)• “Disabling warning messages” (page 68)
Changing workspace options
In Corel PHOTO-PAINT, you can change the default workspace settings according to your preferences.
There are two types of workspace options — general and display. General options let you specify settings, such as unit of measure, cursortype, dialog box position.
You can also set the nudge and super nudge values. The nudge value defines the distance (in pixels) that you can move an object, editablearea or guideline using arrow keys. The super nudge value is a multiple of the value.
Display options let you specify settings such as the color of paths, the mask tint color, the color of guidelines, transparency grid patterns, aswell as the threshold settings for the mask and object marquees.
To set general options
1 Click Tools Options.
2 In the Workspace list of categories, click General.
3 Specify the settings you want.
To set display options
1 Click Tools Options.
2 In the Workspace list of categories, click Display.
3 Specify the settings you want.

68 | Corel PHOTO-PAINT 2018 User Guide
Disabling warning messages
You may encounter warning messages while working in Corel PHOTO-PAINT. Warning messages explain the consequences of an action youare about to perform, and inform you of permanent changes that might result from that action. Although the warnings are helpful, you candisable them so you don’t have to view them after you become familiar with the software. Avoid disabling warning messages until you arecomfortable with the application and familiar with the results of the commands you use.
To disable warning messages
1 Click Tools Options.
2 In the Workspace list of categories, click Warnings.
3 Disable one or more of the check boxes.
Bringing images into Corel PHOTO-PAINT | 69
Bringing images into Corel PHOTO-PAINT
You can bring images into Corel PHOTO-PAINT in a variety of ways.
This section contains the following topics:• “Opening images” (page 69)• “Importing files” (page 71)• “Scanning images” (page 73)• “Creating images” (page 74)• “Working with multiple images” (page 76)• “Working with vector graphics” (page 76)
For information about bringing RAW camera files into Corel PHOTO-PAINT, see “Bringing RAW camera files into Corel PHOTO-PAINT” onpage 524.
Opening images
You can open most bitmaps in Corel PHOTO-PAINT. Each image you open appears in its own image window.
When you open documents in Corel PHOTO-PAINT, by default they are displayed in tabbed view. You can customize the application so thatdocuments are opened in floating windows.
You can also import images. Importing allows you to add a new image to the active image window. For more information, see “Importingfiles” on page 71.
You can use the clipart and photos that are included on the Corel DVD. You can search for images by different criteria, such as filename,title, subject, author, keyword, comment, and other properties attached to the file. For more information about searching for files, see theWindows Help. You can also browse and search for content by using the Get More docker. For more information, see ““Finding contentwith the CONNECT docker” on page 2.” on page 104.
Opening earlier versions of multilingual files
You can open or import an image from version 11 or earlier of Corel PHOTO-PAINT that contains text in a language different from thelanguage of your operating system. To do this, you can use code page settings to ensure that object names and notes saved with the imageare displayed correctly in the Object manager docker. To ensure that text is correctly displayed in the image window, you need to useencoding settings. For more information, see “Modifying encoding settings to display text correctly” on page 457.
70 | Corel PHOTO-PAINT 2018 User Guide
To open an image
1 Click File Open.
2 Locate the folder where the file is stored.
3 Click a filename.
If necessary, you can search for an image by using the search box. You can search by filename, title, subject, author, keyword, orcomment.
4 Click Open.
You can also
Detect a watermark Enable the Check for watermark check box.
This option is not available for all file formats.
Remove unwanted areas from an image as you open it In the Open list box, click Crop and load.
Decrease the dimensions of an image as you open it In the Open list box, click Resample and load.
Search for an image Type a word or phrase in the search box.
The search box looks for files only in the current folder andsubfolders. To search for an image in another location, you mustfirst navigate to the folder where the image is stored.
Access a previous version of a file Right-click a file, and click Restore previous versions.
You can access a previous version of a file only if System Protectionis turned on.
For detailed information about accessing previous versions of files,see the Windows Help.
Display object names and notes correctly in an image that wascreated in an earlier version of Corel PHOTO-PAINT
Choose the corresponding option from the Select code page listbox.
This option is not available for all file formats.
You can also open an image by clicking the Open button on the standard toolbar. If the standard toolbar is not displayed, click
Window Toolbars Standard.
To open documents in floating windows
1 Click Tools Options.
2 In the Workspace list of categories, click General.
3 Enable the Open documents in floating windows check box.
Bringing images into Corel PHOTO-PAINT | 71
To insert a file into an active image
• Drag the image or sound file to the image window.
You can also open a file in a new image window by dragging the file to the application window.
Importing files
Corel PHOTO-PAINT provides filters that convert files from one format to another when you import them. You can import a file and place itin the active application window as an object. The imported file becomes part of the active image. You can also bring in a file by opening itin a new application window.
You can use the import filter’s default settings or choose the settings you want when you import the file. You can also save a file’sembedded International Color Consortium (ICC) profile to a local color folder.
While importing a bitmap, you can resample it to change the number of pixels, eliminate unusable detail, and reduce the file size. You canalso crop a bitmap to select only the exact area and size of the image you want to import.
You can import the clipart and photos that are included on the Corel DVD. You can search for images by different criteria, such as filename,title, subject, author, keyword, comment, and other properties attached to the file. For more information about searching for files, see theWindows Help. You can also browse and search for content by using the Get More docker. For more information, see ““Finding contentwith the CONNECT docker” on page 2.” on page 104.
You can also export Corel PHOTO-PAINT images to a variety of file formats. The file format that you choose depends on how you want to usethe image in the future. For more information about exporting files, see “Exporting images to other file formats” on page 99.
For information about specific file formats, see “Supported file formats” on page 533.
To import a file into an active image
1 Click File Import.
2 Locate the folder where the file is stored.
3 Choose a file format from the list box next to the File name box.
If you are not sure about the format of the file you want to import, choose All file formats.
4 Click a filename.
If the file contains text in a language different from the language of your operating system, choose the corresponding option from theCode page list box to ensure that notes and object names are displayed correctly. This option is not available for all file formats.
5 Click Import.
6 Click the image window.
You can also
Save the embedded International Color Consortium (ICC) profile Enable the Extract embedded ICC profile check box to save theICC profile to the color folder in which the application is installed.
Check for watermark or copyright information Enable the Check for watermark check box.
Use the filter’s default settings without opening its dialog box Enable the Do not show filter dialog check box.
72 | Corel PHOTO-PAINT 2018 User Guide
You can also
Select the page to import when importing multi-page TIFFdocuments
In the Import TIFF dialog box, enable an option in the Select thepage(s) to import area.
In Corel PHOTO-PAINT, you can open only one page of a multi-pageTIFF at a time.
Search for an image Type a word or phrase in the search box.
The search box looks for files only in the current folder andsubfolders. To search for an image in another location, you mustfirst navigate to the folder where the image is stored.
The Import an Image from Disk dialog box displays the size of the file you want to import and any annotations associated with thefile.
You can also import a file by opening it in a new application window. For more information about opening a file in a new applicationwindow, see “To open an image” on page 70.
To resample an image while importing
1 Click File Import.
2 Choose the folder where the file is stored.
If necessary, you can search for an image by using the search box. You can search for such things as filename, title, subject, author,keyword, or comment, bitmap names, object names, and so on.
3 Choose a file format from the list box that is beside the File name box.
If you are not sure about what file format the file is, choose All file formats.
4 Click the filename.
5 Click Import, and click Resample and load.
6 In the Resample image dialog box, type values in any of the following boxes:
• Width — specifies the width of the graphic in a chosen unit of measurement or as a percentage of its original width
• Height — specifies the height of the graphic in a chosen unit of measurement or as a percentage of its original height
7 In the Resolution section, type values in any of the following boxes:
• Horizontal — lets you specify the horizontal resolution of the graphic in pixels or dots per inch (dpi)
• Vertical — lets you specify the vertical resolution of the graphic in pixels or dots per inch (dpi)
8 Click the image window.
You can also
Maintain the width-to-height ratio of the image Enable the Maintain aspect ratio check box.
Change the units of measurement Choose a unit type from the Units list box.
Bringing images into Corel PHOTO-PAINT | 73
You can also
Maintain equal horizontal and vertical resolution valuesautomatically
Enable the Identical values check box.
If a dialog box for the import format opens, specify the options you want. For detailed information about file formats, see“Supported file formats” on page 533.
You cannot increase the resolution of a file when importing.
You can also import a file by opening it in a new application window. For more information about opening a file in a new applicationwindow, see “To open an image” on page 70.
To crop an image while importing
1 Click File Import.
2 Choose the folder where the file is stored.
If necessary, you can search for an image by using the search box. You can search for such things as filename, title, subject, author,keyword, or comment, bitmap names, object names, and so on.
3 Choose a file format from the list box that is beside the File name box.
If you are not sure about what file format the file is, choose All file formats.
4 Click the filename.
5 Click Import, and click Crop and load.
6 Type values in any of the following boxes:
• Top — specifies the area to remove from the top of the graphic
• Left — specifies the area to remove from the left edge of the graphic
• Width — specifies the width of the graphic you want to keep
• Height — specifies the height of the graphic you want to keep
7 Click the image window.
When you import 16-color bitmaps, they are automatically converted to 256-color.
You can also resize an image by dragging the selection box in the preview window.
You can change the units of measurement by choosing a unit type from the Units list box, in the Crop image dialog box.
Scanning images
You can scan images in Corel PHOTO-PAINT. Corel PHOTO-PAINT supports scanners that use Microsoft Windows Image Acquisition (WIA),which provides a standard interface for scanning images.
If your scanner does not support WIA, but has a compatible TWAIN driver, you may be able to use this driver for scanning. TWAIN issupported by both the 32-bit and 64-bit versions of Corel PHOTO-PAINT. However, note that there are very few 64-bit TWAIN driversavailable.
The software interfaces and options vary. For information about using your scanner’s software, see the manufacturer’s documentation.
74 | Corel PHOTO-PAINT 2018 User Guide
For more detailed information about bringing in RAW camera files, see “Bringing RAW camera files into Corel PHOTO-PAINT” on page524.
To scan an image
1 Click File Acquire image, and click one of the following commands:
• Select WIA source — for a scanner that uses a WIA driver
• Select TWAIN source— for a scanner that uses a TWAIN driver
A command appears disabled if a compatible WIA or TWAIN scanner driver is not installed.
2 Choose a scanner from the dialog box that appears.
3 Click Select.
4 Click File Acquire image Acquire.
5 Preview the image, and select the area that you want to scan.
WIA, in combination with some scanners, supports scanning of multiple areas to separate files.
6 Click Scan.
On your scanner’s interface, this button may have a different name, such as OK or Send.
Creating images
You can produce original artwork by creating an image from scratch, or by duplicating an existing image. When creating an image fromscratch, Corel PHOTO-PAINT lets you specify various image and color management settings. You can choose from a list of preset settings,which are based on how you intend to use the image. For example, you can choose the Web option if you are creating an image for theInternet or the Photos option if you are creating a photo. However, if the preset settings are not suitable for the image that you want tocreate, you can also choose custom settings and store them for future use.
In addition, you can create an image by using data copied to the Clipboard from another image window or another application.
When you create an image from scratch, you can specify the size of the image, its background color, and the color mode you want to use.You can also choose the image resolution, or the number of pixels per unit of measure.
To create an image from scratch
1 Do one of the following:
• On the Welcome Page, click New document.
• In the application window, click File New.
2 Type a filename in the Name text box.
3 From the Preset destination list box, choose an output destination for the image:
• Web — applies settings for creating images that are destined for the Internet
• Photos — applies settings for creating images that are photos
• Default CMYK — applies settings for creating images that are destined for commercial printing
You can also
Change the unit of measurement for the image Choose a unit of measurement from the Units list box.
Change the image size Choose a image size for the image from the Size list box or typevalues in the Width and Height boxes.
Change the image orientation Click one of the following image orientation buttons:
Bringing images into Corel PHOTO-PAINT | 75
You can also
•Portrait•Landscape
Change the background color of the image Open the Background color picker, and click on a color.
Change the color mode for the image Choose a color mode from the Color mode list box.
Set the resolution for the image Choose a resolution from the Resolution list box.
Choose a rendering intent that corresponds to the final output ofthe image
Choose a rendering intent from the Rendering intent list box.
For more information about rendering intents, see “What is arendering intent?” on page 223.
Choose a color profile that corresponds with the selected colormode
Choose a color profile from the corresponding color profile list box.
Create multiple frames for a movie within your file Type a value in the Number of frames box.
Reset the default settings of the Create a new image dialog box From the Preset destination list box, choose PHOTO-PAINTdefault.
If you do not want to show the Create a new image dialog box and prefer to use the default settings to create new images, enablethe Do not show this dialog again check box.
You can restore the Create a new image dialog box when starting images by clicking Tools Options, then choosing Workspace General from the list of categories, and enabling the Show new image dialog check box.
To create a custom preset
1 In the application window, click File New.
2 From the Create a new image dialog box, choose the settings that you want to store as a preset destination.
3 Click the Add destination button.
4 In the Add destination dialog box, type a name for the new destination preset in the text box.
Higher image resolution results in a larger file size.
You can delete a destination preset by choosing the preset name from the Preset destination list box, and then clicking the Removedestination button.
You can specify a custom page size by choosing Custom from the Size list box and typing values in the Width and Height boxes.
You can also create an image by clicking the New button on the standard toolbar. If the standard toolbar is not displayed, click
Window Toolbars Standard.
76 | Corel PHOTO-PAINT 2018 User Guide
To create an image from a duplicate
1 Click Image Duplicate.
2 Type a filename in the As box.
If you want to combine the objects and background in the new image, enable the Merge objects with background check box.
To create an image by using the Clipboard contents
• Click File New from Clipboard.
Working with multiple images
Multiple images can be opened in a single image window, making it easy to handle many images simultaneously. You can access each openimage from its tab at the top of the image window, and you can start new images.
Open images appear docked, but you can undock any image you want and drag it inside or outside the application window.
You can also arrange images in overlapping (cascading) windows, side by side, or stacked vertically.
To handle multiple images
To Do the following
Switch to another open image At the top of the image window, click the tab that has the filenameyou want.
Start another image Click the New button to the right of the last document tab.
Undock an image Drag the image tab to a new position inside or outside theapplication window.
To arrange multiple images
• Click Window, and click one of the following commands:
• Cascade — arranges image windows so that they overlap and the title bars are visible
• Tile Horizontally — arranges images side by side
• Tile Vertically — stacks images vertically
Working with vector graphics
In Corel PHOTO-PAINT, you work with bitmaps, also called raster images. Bitmaps are composed of tiny squares called pixels; each pixel ismapped to a location in an image, and has numerical color values. The location and color value data is stored as bits — hence the namebitmaps.
Vector graphics are made up of lines, curves, objects, and fills that are all calculated mathematically. Although you cannot work with vectorgraphics in Corel PHOTO-PAINT, you can convert vector graphics to bitmaps as you open or import them. This conversion process is calledrasterization. You can also copy vector graphics from CorelDRAW and paste them into Corel PHOTO-PAINT.
Vector graphics usually have a smaller file size than bitmaps, so expect file size to increase when you convert vector graphics to bitmaps.

Bringing images into Corel PHOTO-PAINT | 77
The top illustration is a vector graphic consisting of lines, objects, and fills. The bottom version is a bitmap made up of pixels.
To open a vector graphic
1 Click File Open.
2 Choose the folder where the file is stored.
3 From the Files of type list box, choose the vector file format of the file you want to import.
4 Click the filename.
5 Click Open.
6 In the Convert to bitmap dialog box, specify the settings you want.
You can copy a vector graphic in CorelDRAW and paste it into Corel PHOTO-PAINT by clicking File New from clipboard.
To import a vector graphic
1 Click File Import.
You can also click the Import button on the toolbar.
2 Choose the folder where the file is stored.
3 From the Files of type list box, choose the vector file format of the file you want to import.
4 Click the filename.
5 Click Open.
6 Click in the image window.
7 In the Convert to bitmap dialog box, specify the settings you want.
You can copy a vector graphic in CorelDRAW and paste it into Corel PHOTO-PAINT by clicking File New from clipboard.

78 | Corel PHOTO-PAINT 2018 User Guide
Displaying images and image information | 79
Displaying images and image information
You can change the appearance of windows and the magnification level of an image. Changing the magnification level allows you to viewspecific image areas and makes image editing easier. You can also obtain relevant image information, such as color model information, asyou edit an image.
Corel PHOTO-PAINT includes the ImageBridge plugin from Digimarc, which allows you to embed and detect digital watermarks in images.These watermarks contain copyright and authorship information, but they do not interfere significantly with the visual quality of images.
This section contains the following topics:• “Viewing images” (page 79)• “Zooming” (page 81)• “Viewing image information” (page 82)• “Refreshing the image window” (page 83)• “Detecting and embedding Digimarc watermarks” (page 83)
Viewing images
Images can be viewed in a number of different ways. You can hide windows, the toolbox and the toolbars, leaving only the menu barand the image windows visible. You can view a large representation of an image in a full-screen preview. The image is editable when thewindows are hidden, but you cannot change the image while using the full-screen preview. You can also maximize or restore the work area.
You can view image areas that fall outside the image window. For example, when you are working at a high magnification level or with largeimages, you can pan or jump to a different image area without having to adjust the magnification level. You can use the Quick Pan mode toswitch from any active tool to the Pan tool.
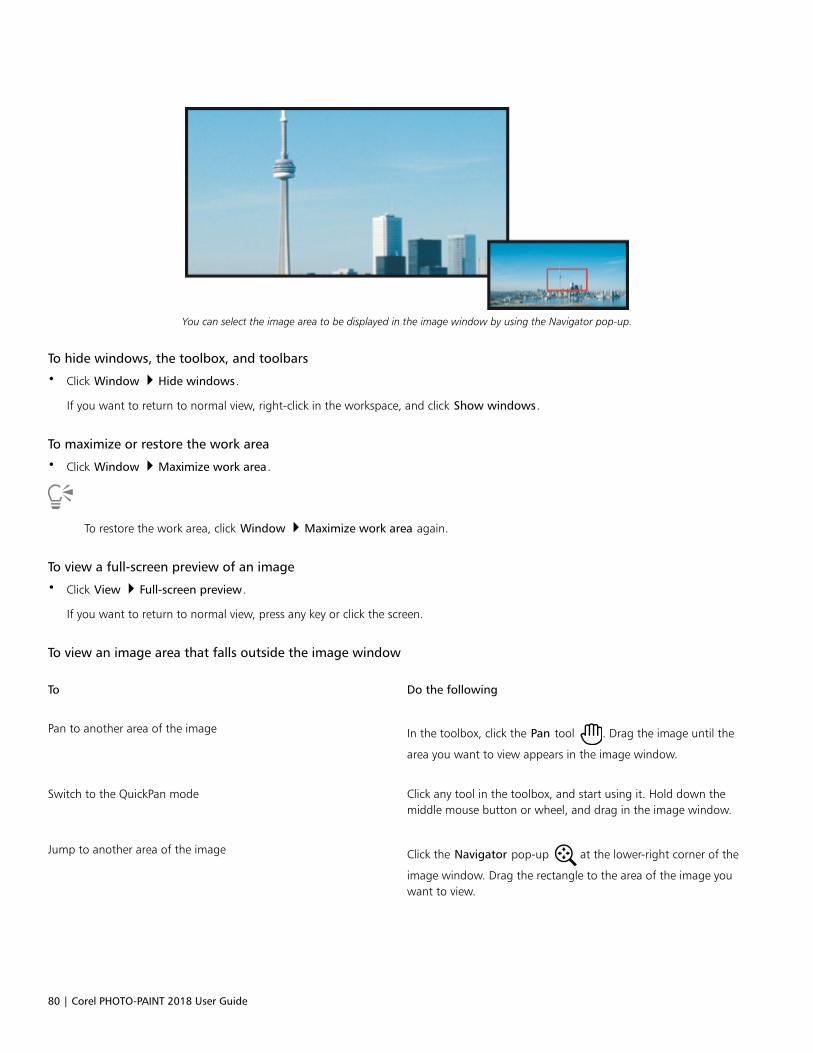
80 | Corel PHOTO-PAINT 2018 User Guide
You can select the image area to be displayed in the image window by using the Navigator pop-up.
To hide windows, the toolbox, and toolbars
• Click Window Hide windows.
If you want to return to normal view, right-click in the workspace, and click Show windows.
To maximize or restore the work area
• Click Window Maximize work area.
To restore the work area, click Window Maximize work area again.
To view a full-screen preview of an image
• Click View Full-screen preview.
If you want to return to normal view, press any key or click the screen.
To view an image area that falls outside the image window
To Do the following
Pan to another area of the image In the toolbox, click the Pan tool . Drag the image until the
area you want to view appears in the image window.
Switch to the QuickPan mode Click any tool in the toolbox, and start using it. Hold down themiddle mouse button or wheel, and drag in the image window.
Jump to another area of the image Click the Navigator pop-up at the lower-right corner of the
image window. Drag the rectangle to the area of the image youwant to view.
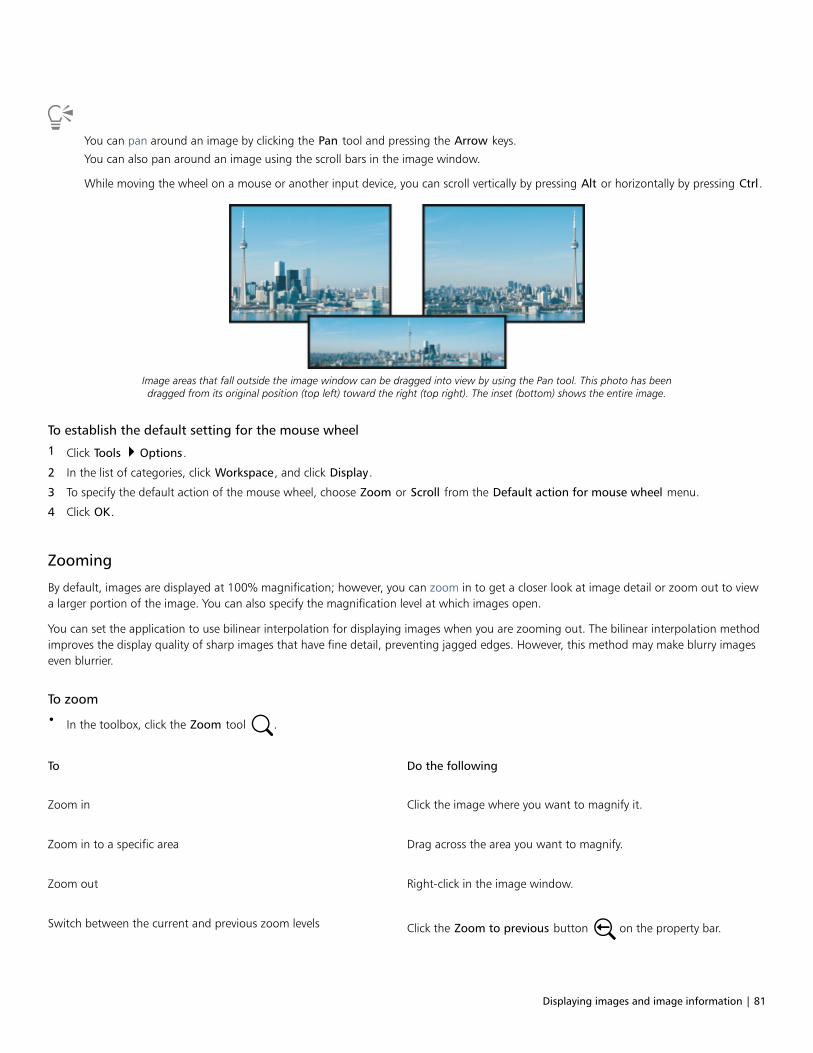
Displaying images and image information | 81
You can pan around an image by clicking the Pan tool and pressing the Arrow keys.
You can also pan around an image using the scroll bars in the image window.
While moving the wheel on a mouse or another input device, you can scroll vertically by pressing Alt or horizontally by pressing Ctrl.
Image areas that fall outside the image window can be dragged into view by using the Pan tool. This photo has beendragged from its original position (top left) toward the right (top right). The inset (bottom) shows the entire image.
To establish the default setting for the mouse wheel
1 Click Tools Options.
2 In the list of categories, click Workspace, and click Display.
3 To specify the default action of the mouse wheel, choose Zoom or Scroll from the Default action for mouse wheel menu.
4 Click OK.
Zooming
By default, images are displayed at 100% magnification; however, you can zoom in to get a closer look at image detail or zoom out to viewa larger portion of the image. You can also specify the magnification level at which images open.
You can set the application to use bilinear interpolation for displaying images when you are zooming out. The bilinear interpolation methodimproves the display quality of sharp images that have fine detail, preventing jagged edges. However, this method may make blurry imageseven blurrier.
To zoom
• In the toolbox, click the Zoom tool .
To Do the following
Zoom in Click the image where you want to magnify it.
Zoom in to a specific area Drag across the area you want to magnify.
Zoom out Right-click in the image window.
Switch between the current and previous zoom levels Click the Zoom to previous button on the property bar.
82 | Corel PHOTO-PAINT 2018 User Guide
To Do the following
Zoom in or out by a preset level Choose a magnification level from the Zoom list box on theproperty bar.
You can also zoom in to or out from the image by using a mouse wheel.
To set the magnification level at which images are opened
1 Click Tools Options.
2 In the Workspace list of categories, click General.
Choose a magnification level from the Opening zoom list box.
The magnification level that you choose is used the next time you open an image.
To use bilinear interpolation for displaying images
1 Click Tools Options.
2 In the Workspace list of categories, click General.
3 In the Resampling area, enable the Use bilinear interpolation when zoomed out check box.
Viewing image information
You can view image properties, such as name, file format, and file size. If an image is loaded from a digital camera, you can also view EXIFinformation about the image, such as the date and time the photo was taken, the exposure, and flash settings.
You can view information about image areas, such as pointer coordinates, as you work. You can view the changes in the x-coordinate (X)or the y-coordinate (Y) as you move the pointer in the image window. You can also make note of the angle (A) and distance (D) that thepointer moves in the image window as you draw a shape or define an editable area. In addition, you can obtain statistics related to the x-and y-coordinates of the center position (C) and the radius (R) when you create or select a circular editable area or shape.
You can also view color information for an image area that corresponds to the pointer position. By default, the RGB, Hex, and CMYK valuesare displayed. You can choose to display color information in two color models at once. For example, you can view both the grayscale andRGB values of a particular image area. For information about color modes and color models, see “Changing color modes” on page 213and “Working with color” on page 191.
To view image information
• Click File Document properties.
To view information about image areas
• Click Window Dockers Image info.
Displaying images and image information | 83
You can also
Choose a new color model Click the top flyout arrow , choose a color level, and click a
color model.
Change the units of measurement used to display imageinformation
Click the bottom flyout arrow, and click a unit of measurement.
By default, the Image info palette lists the RGB, Hex, and CMYK values from top to bottom.
You can also view color mode information by clicking the Eyedropper tool and pointing to an image area.
Refreshing the image window
You can refresh the image window at any time. For example, you may find this option useful when displaying large images.
To refresh the image window
• Click Window Refresh window.
You can also refresh the image window by pressing Ctrl + W.
Detecting and embedding Digimarc watermarks
A Digimarc watermark embeds copyright details, contact information, and image attributes in an image. A watermark makes subtle changesto the brightness of pixels in an image. These changes cannot be readily seen; however following image processing, you might noticechanges in the brightness of some pixels. Digimarc watermarks aren’t affected by normal editing, printing, and scanning.
The detecting and embedding of Digimarc watermarks is not supported by the 64-bit version of CorelDRAW Graphics Suite.
Detecting watermarks
When you open an image in Corel PHOTO-PAINT, you can check for a watermark. If a watermark is present, a copyright symbol displays onthe title bar. You can find information about the watermarked image by reading the embedded message and by linking to the contact profilein the Digimarc database.
Embedding watermarks
In Corel PHOTO-PAINT, you can also embed Digimarc watermarks in images. First, you must obtain a unique Creator ID by subscribing toDigimarc’s online service. The Creator ID includes contact details, such as name, phone number, address, e-mail and web addresses.
Once you have a Creator ID, you can embed a watermark in an image. You can specify the copyright year, image attributes, and thedurability of a watermark. You can also specify the target output method for an image, such as print or web.
Digimarc watermarks do not prevent unauthorized image use or copyright infringement. But the watermarks do communicate copyrightclaims. They also provide contact information for those who want to use or license an image.
For more information about Digimarc, see www.digimarc.com.
84 | Corel PHOTO-PAINT 2018 User Guide
To detect a watermark
1 Click Effects Digimarc Read watermark.
2 Click Web lookup to view the webpage with contact details, or call the Digimarc fax-back service at the listed fax number.
This feature is not supported by the 64-bit version of CorelDRAW Graphics Suite.
You can also detect a watermark by enabling the Check for watermark option when you open or import an image.
To get a Creator ID
1 Click Effects Digimarc Embed watermark.
2 Click Personalize.
3 In the Personalize creator ID dialog box, click Register, and follow the instructions on the Digimarc website.
4 In the Personalize creator ID dialog box, type your Creator ID in the Creator ID box.
To embed a watermark
1 Click Effects Digimarc Embed watermark.
2 In the Copyright year(s) box, type a year or years.
You cannot type a year before 1922 or after the current year. Separate the years with commas.
3 In the Image attributes area, enable the check boxes for the applicable attributes.
4 Choose an option from the Target output list box.
Monitor and Web require a DPI setting of less than 200, while Print requires a dpi setting of 300 or higher.
5 Type a value in the Watermark durability box.
Higher values increase the persistence of the watermark.
If you want to confirm the information available to viewers when they detect the watermark, enable the Verify check box.
This feature is not supported by the 64-bit version of CorelDRAW Graphics Suite.
Combine all objects with the background before adding a watermark. For more information about combining objects with thebackground, see “Grouping and combining objects” on page 405.

Using the guidelines, grid, and rulers | 85
Using the guidelines, grid, and rulers
The guidelines, grid, and rulers let you position and size images, objects, and editable areas.
This section contains the following topics:• “Setting up guidelines” (page 85)• “Setting up the grid” (page 88)• “Setting up the rulers” (page 90)
Setting up guidelines
Guidelines are vertical or horizontal lines that you can add anywhere in the image window to help you measure, align, and position imagecomponents. The guidelines use the same units of measure as the rulers. When you save an image in the Corel PHOTO-PAINT application,the guidelines are saved too.
You can display or hide the guidelines. You can also add, remove, move, and lock guidelines in the image window. You can add angledguidelines and rotate existing guidelines.
You can have objects and editable areas snap to guidelines, so that when you move an object or editable area to a guideline, the object oreditable area automatically aligns to that guideline. You can set the sensitivity of this feature so that the object or editable area snaps whenyou move within a specific number of pixels of a guideline.
You can change the color and line style of the guidelines to make them stand out against the image background. By default, when youselect a guideline, it turns red. When you deselect a guideline, it turns blue.
To display or hide the guidelines
• Click View Show guidelines.
A check mark beside the menu command indicates that the guidelines are displayed.
You can also display or hide the guidelines by clicking Window Dockers Guidelines and clicking the Show guidelines button
.
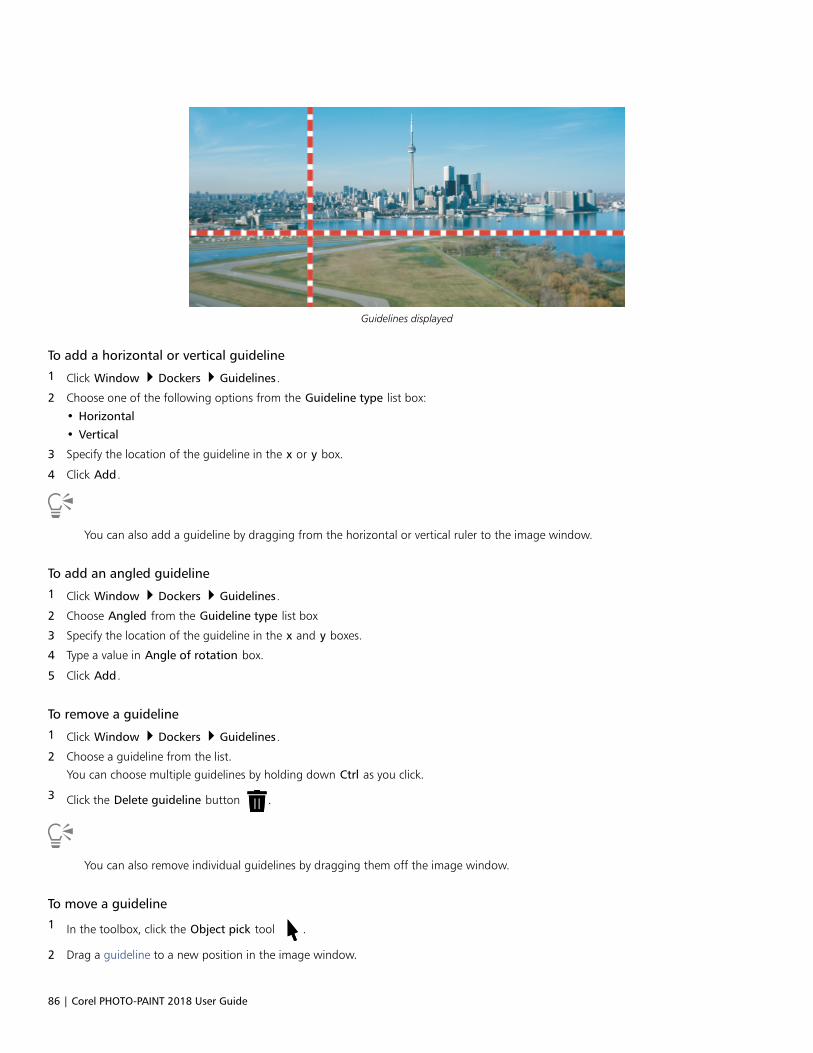
86 | Corel PHOTO-PAINT 2018 User Guide
Guidelines displayed
To add a horizontal or vertical guideline
1 Click Window Dockers Guidelines.
2 Choose one of the following options from the Guideline type list box:
• Horizontal
• Vertical
3 Specify the location of the guideline in the x or y box.
4 Click Add.
You can also add a guideline by dragging from the horizontal or vertical ruler to the image window.
To add an angled guideline
1 Click Window Dockers Guidelines.
2 Choose Angled from the Guideline type list box
3 Specify the location of the guideline in the x and y boxes.
4 Type a value in Angle of rotation box.
5 Click Add.
To remove a guideline
1 Click Window Dockers Guidelines.
2 Choose a guideline from the list.
You can choose multiple guidelines by holding down Ctrl as you click.
3 Click the Delete guideline button .
You can also remove individual guidelines by dragging them off the image window.
To move a guideline
1 In the toolbox, click the Object pick tool .
2 Drag a guideline to a new position in the image window.
Using the guidelines, grid, and rulers | 87
You can also move a guideline by nudging it.
To move a guideline by specifying x and y coordinates, click Window Dockers Guidelines. Select the guideline, type values in thex and y boxes, and click Modify.
To rotate a guideline
1 In the toolbox, click the Pick tool .
2 Perform a task from the following table.
To Do the following
Rotate a guideline Click the guideline twice, and then rotate the guideline whenrotation handles appear.
You can also rotate a guideline by choosing Angled from theGuideline type list box, typing a value in the Angle of rotationbox, and clicking Modify.
Rotate multiple guidelines Hold down Shift, select the guidelines, click a selected guidelineagain, and rotate the guidelines when the rotation handles appear.
The center of rotation is determined by the last guideline youselected.
Rotate a guideline by a specific value Click the guideline twice to display the rotation handles, and type avalue in the Angle of rotation box on the property bar.
You can also rotate multiple guidelines by a specific value.
Rotate a guideline in 15º increments Click the guideline twice to display the rotation handles, hold downCtrl, and rotate the guideline.
You can also rotate multiple guidelines in 15º increments.
Change the pivot point Drag the guideline’s center of rotation to a new location or type avalue in the Center of rotation box on the property bar.
To lock or unlock the guidelines
• Click View Lock guidelines.
A check mark displays beside the menu command to indicate the guideline is locked.
You can also lock a guideline by clicking Window Dockers Guidelines and clicking the Lock guideline button .
88 | Corel PHOTO-PAINT 2018 User Guide
To have objects and editable areas snap to the guidelines
• Click View Snap to Guidelines.
You can also set objects and editable areas to snap to a guideline by clicking Window Dockers Guidelines and clicking the Snap
to guideline button .
To set the snap sensitivity of the guidelines
1 Click Tools Options.
2 In the Workspace list of categories, click Display.
3 Type a value in the Guideline snap tolerance (pixels) box.
To set the line style and color of a guideline
1 Click Window Dockers Guidelines.
2 Open the Guideline color picker, and choose a color.
3 Open the Guideline style picker, and choose a line style.
Changing the line style or color affects all existing guidelines and any subsequent guidelines that you add.
Setting up the grid
The grid is a series of non-printing intersecting lines that are superimposed on an image to help you align and position objects accurately.You can display or hide the grid at any time.
You can have objects and editable areas align automatically with the gridlines. You can customize the look of the grid by changing the griddisplay and grid spacing. The grid display allows you to change the grid lines to dots or change the grid color. The spacing allows you toset the distance between the grid lines. The spacing options are based on the unit of measure for the ruler. For example, if the ruler unit ofmeasure is set to inches, the spacing options are based on inches.
If the ruler unit of measure is set to pixels, you have additional options for customizing the look of the grid. For the pixel grid, you canspecify the color and opacity of the grid.
For more precise pixel editing at maximum zoom level, you can display a grid around each pixel.
To display or hide the grid
• Click View Show grid.
A check mark beside the menu command indicates that the grid is displayed.
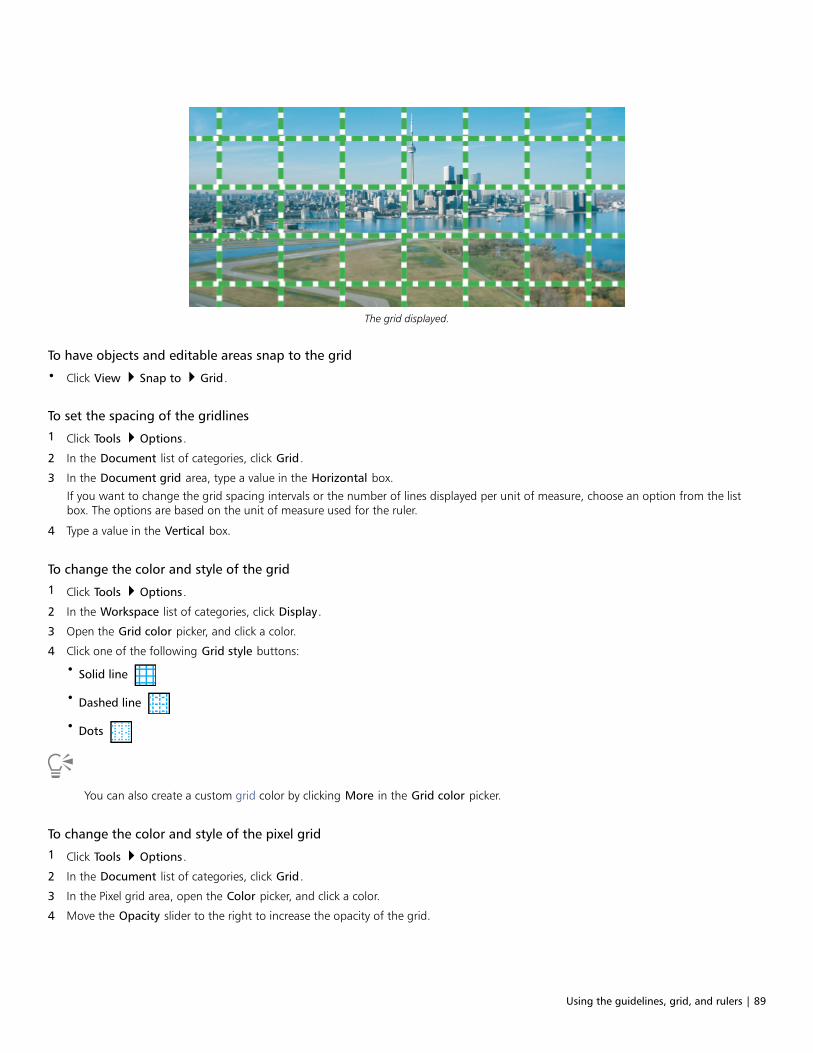
Using the guidelines, grid, and rulers | 89
The grid displayed.
To have objects and editable areas snap to the grid
• Click View Snap to Grid.
To set the spacing of the gridlines
1 Click Tools Options.
2 In the Document list of categories, click Grid.
3 In the Document grid area, type a value in the Horizontal box.
If you want to change the grid spacing intervals or the number of lines displayed per unit of measure, choose an option from the listbox. The options are based on the unit of measure used for the ruler.
4 Type a value in the Vertical box.
To change the color and style of the grid
1 Click Tools Options.
2 In the Workspace list of categories, click Display.
3 Open the Grid color picker, and click a color.
4 Click one of the following Grid style buttons:
• Solid line
• Dashed line
• Dots
You can also create a custom grid color by clicking More in the Grid color picker.
To change the color and style of the pixel grid
1 Click Tools Options.
2 In the Document list of categories, click Grid.
3 In the Pixel grid area, open the Color picker, and click a color.
4 Move the Opacity slider to the right to increase the opacity of the grid.
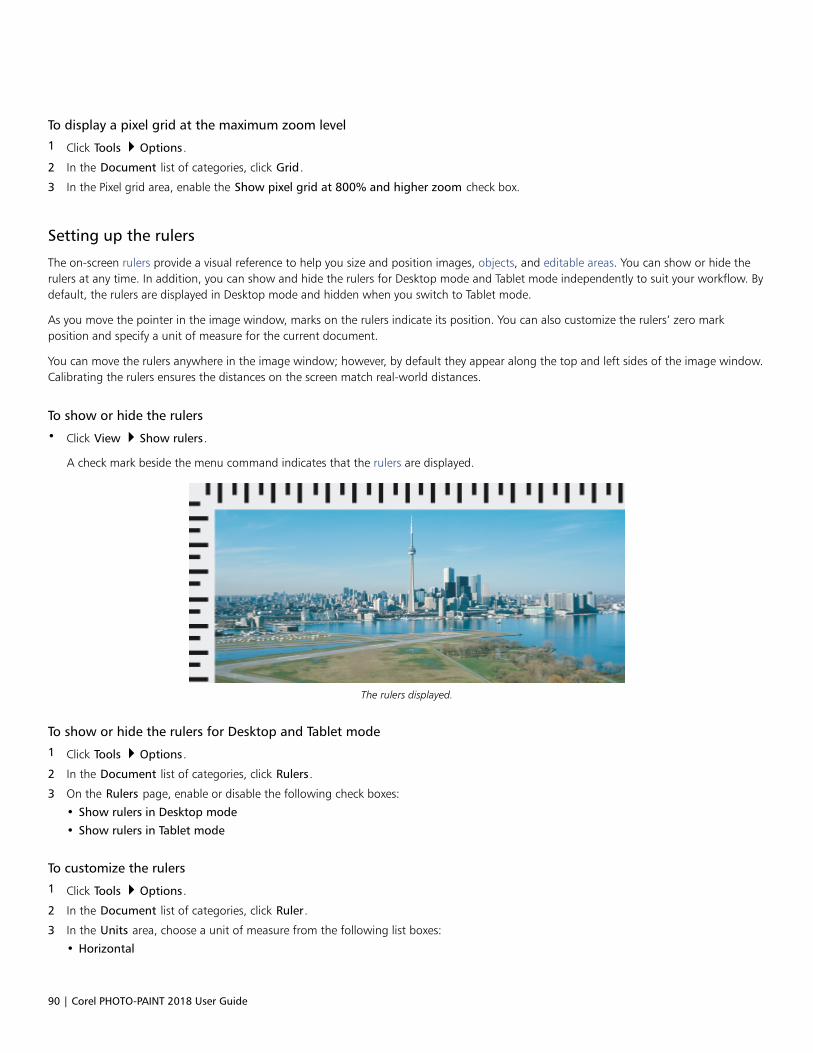
90 | Corel PHOTO-PAINT 2018 User Guide
To display a pixel grid at the maximum zoom level
1 Click Tools Options.
2 In the Document list of categories, click Grid.
3 In the Pixel grid area, enable the Show pixel grid at 800% and higher zoom check box.
Setting up the rulers
The on-screen rulers provide a visual reference to help you size and position images, objects, and editable areas. You can show or hide therulers at any time. In addition, you can show and hide the rulers for Desktop mode and Tablet mode independently to suit your workflow. Bydefault, the rulers are displayed in Desktop mode and hidden when you switch to Tablet mode.
As you move the pointer in the image window, marks on the rulers indicate its position. You can also customize the rulers’ zero markposition and specify a unit of measure for the current document.
You can move the rulers anywhere in the image window; however, by default they appear along the top and left sides of the image window.Calibrating the rulers ensures the distances on the screen match real-world distances.
To show or hide the rulers
• Click View Show rulers.
A check mark beside the menu command indicates that the rulers are displayed.
The rulers displayed.
To show or hide the rulers for Desktop and Tablet mode
1 Click Tools Options.
2 In the Document list of categories, click Rulers.
3 On the Rulers page, enable or disable the following check boxes:
• Show rulers in Desktop mode
• Show rulers in Tablet mode
To customize the rulers
1 Click Tools Options.
2 In the Document list of categories, click Ruler.
3 In the Units area, choose a unit of measure from the following list boxes:
• Horizontal
Using the guidelines, grid, and rulers | 91
• VerticalIf you want to use the same unit of measure for both the horizontal and vertical rulers, enable the Same units for horizontal andvertical rulers check box.
4 In the Origin area, type values in the following boxes:
• Horizontal
• VerticalThe origin value indicates the distance, in the units of measure you specify, between the zero mark of the ruler and the point of origin ofthe ruler. For example, an origin value of 4 for the horizontal ruler moves the zero mark of that ruler four units away from the origin —the point where the ruler begins.
5 Type a value in the Tick divisions box.
If you want to display fractions on the rulers, enable the Show fractions check box.
To move a ruler
• Hold down Shift, and drag a ruler to a new position.
You can also
Return the rulers to their original positions Hold down Shift, and double-click a ruler.
Move both rulers at the same time Hold down Shift, and drag the intersection point of the two rulers.
To calibrate the rulers
1 Click Tools Options.
2 In the Document list of categories, click Ruler.
3 Click Calibrate rulers.
4 Hold a clear plastic ruler next to the horizontal and vertical rulers displayed on your screen.
5 Type values in the following boxes so that one inch on each ruler corresponds exactly to one inch on the plastic ruler:
• Horizontal
• Vertical

92 | Corel PHOTO-PAINT 2018 User Guide
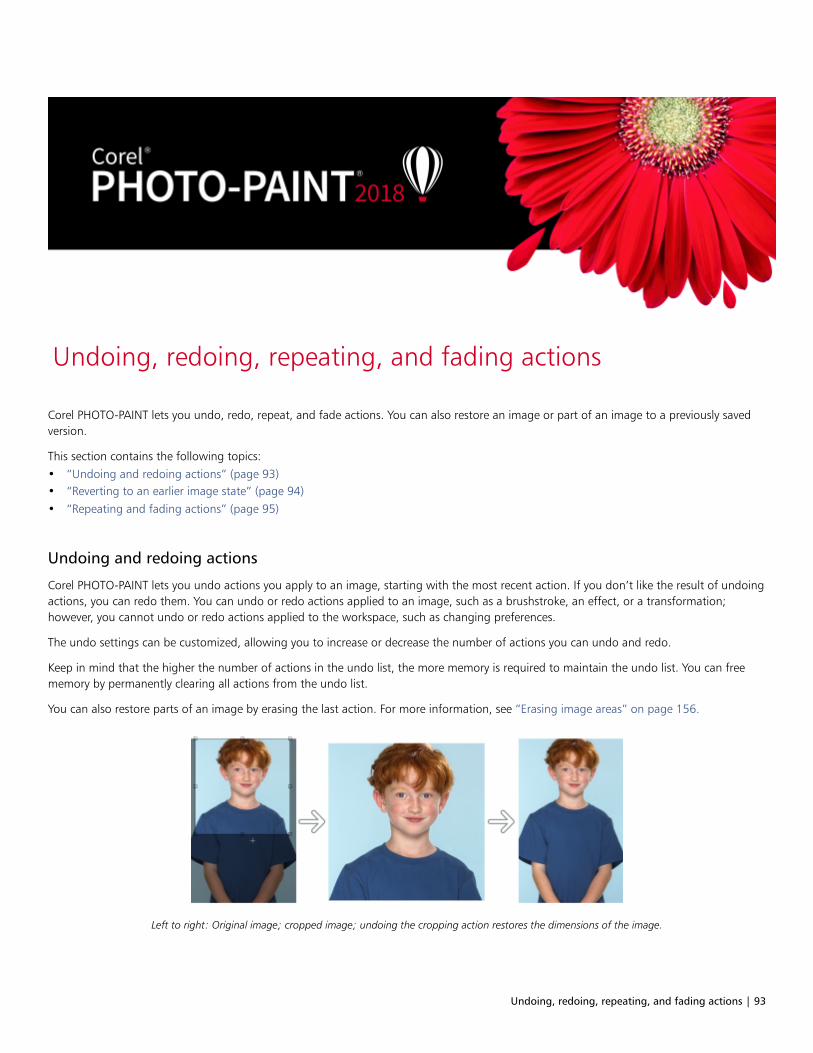
Undoing, redoing, repeating, and fading actions | 93
Undoing, redoing, repeating, and fading actions
Corel PHOTO-PAINT lets you undo, redo, repeat, and fade actions. You can also restore an image or part of an image to a previously savedversion.
This section contains the following topics:• “Undoing and redoing actions” (page 93)• “Reverting to an earlier image state” (page 94)• “Repeating and fading actions” (page 95)
Undoing and redoing actions
Corel PHOTO-PAINT lets you undo actions you apply to an image, starting with the most recent action. If you don’t like the result of undoingactions, you can redo them. You can undo or redo actions applied to an image, such as a brushstroke, an effect, or a transformation;however, you cannot undo or redo actions applied to the workspace, such as changing preferences.
The undo settings can be customized, allowing you to increase or decrease the number of actions you can undo and redo.
Keep in mind that the higher the number of actions in the undo list, the more memory is required to maintain the undo list. You can freememory by permanently clearing all actions from the undo list.
You can also restore parts of an image by erasing the last action. For more information, see “Erasing image areas” on page 156.
Left to right: Original image; cropped image; undoing the cropping action restores the dimensions of the image.
94 | Corel PHOTO-PAINT 2018 User Guide
To undo or redo actions
To Do the following
Undo the last action Click Edit Undo [last action].
Redo the last action Click Edit Redo [last action].
Undo or redo a series of actions In the Undo manager docker, choose an action from the list. Allactions listed below the action you choose will be undone. If the
Undo manager docker is not open, click Edit Undo manager or
Window Dockers Undo manager.
Remove all actions in the Undo manager docker to free memory Click Edit Purge Undo list.
When you undo a series of actions, the action you choose and all actions listed below it are undone.
When you redo a series of actions, the action you choose and all actions listed between it and the last undone action are redone.
To customize undo settings
1 Click Tools Options.
2 In the Workspace list of categories, click General.
3 In the Memory area, type a value in the Undo levels box.
You can specify up to 99 undo levels; however, the number of undo levels affects the size of the swap disk. Reduce the number ofundo levels if you find that your computer is not operating at the speed you want.
Reverting to an earlier image state
As you create or edit an image, you can revert to its last-saved version to remove all the changes you made since you saved the image. If youwant to remove only some changes, you can restore specific image areas to the way they look in the last-saved version of the image.
You can also create a checkpoint to save the current image temporarily, so that later you can return the image to that state if necessary.
You can also create a workspace that lets you save automatically using a checkpoint. For more information, see “To specify auto-savesettings” on page 98.
To revert to the last saved version of an image
• Click File Revert to saved.
You can also revert to the last saved image by clicking the Revert to last saved button in the Undo manager docker.
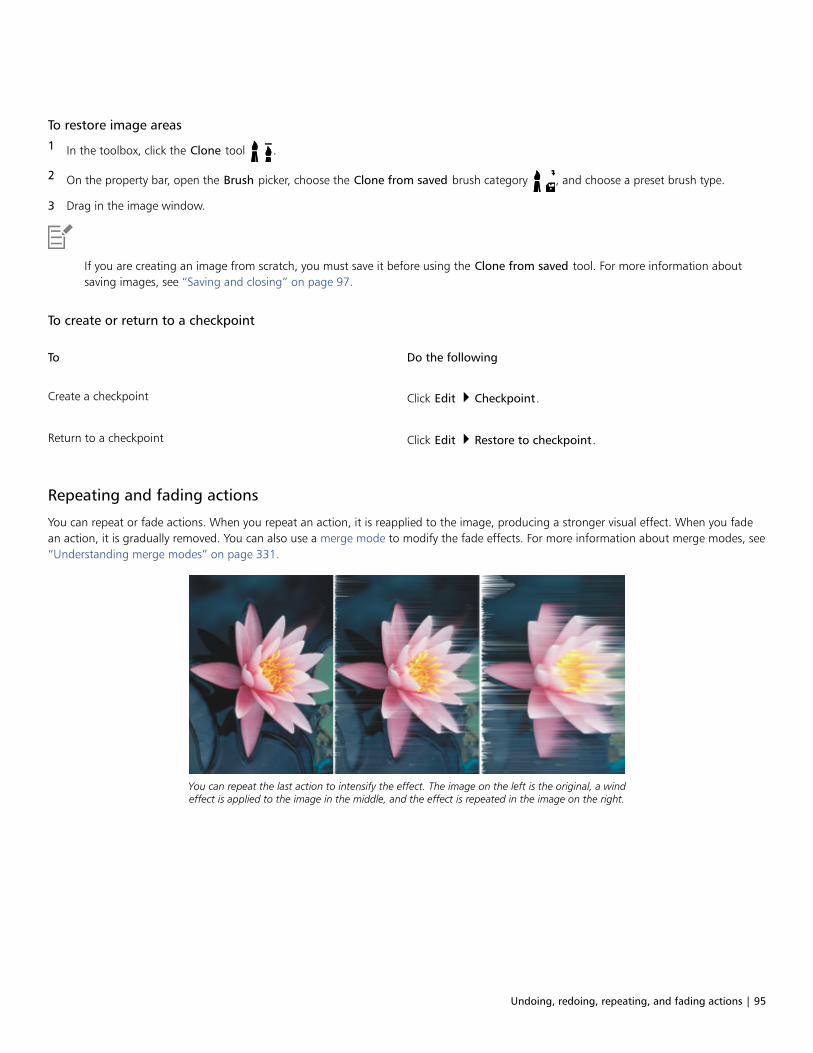
Undoing, redoing, repeating, and fading actions | 95
To restore image areas
1 In the toolbox, click the Clone tool .
2 On the property bar, open the Brush picker, choose the Clone from saved brush category , and choose a preset brush type.
3 Drag in the image window.
If you are creating an image from scratch, you must save it before using the Clone from saved tool. For more information aboutsaving images, see “Saving and closing” on page 97.
To create or return to a checkpoint
To Do the following
Create a checkpoint Click Edit Checkpoint.
Return to a checkpoint Click Edit Restore to checkpoint.
Repeating and fading actions
You can repeat or fade actions. When you repeat an action, it is reapplied to the image, producing a stronger visual effect. When you fadean action, it is gradually removed. You can also use a merge mode to modify the fade effects. For more information about merge modes, see“Understanding merge modes” on page 331.
You can repeat the last action to intensify the effect. The image on the left is the original, a windeffect is applied to the image in the middle, and the effect is repeated in the image on the right.
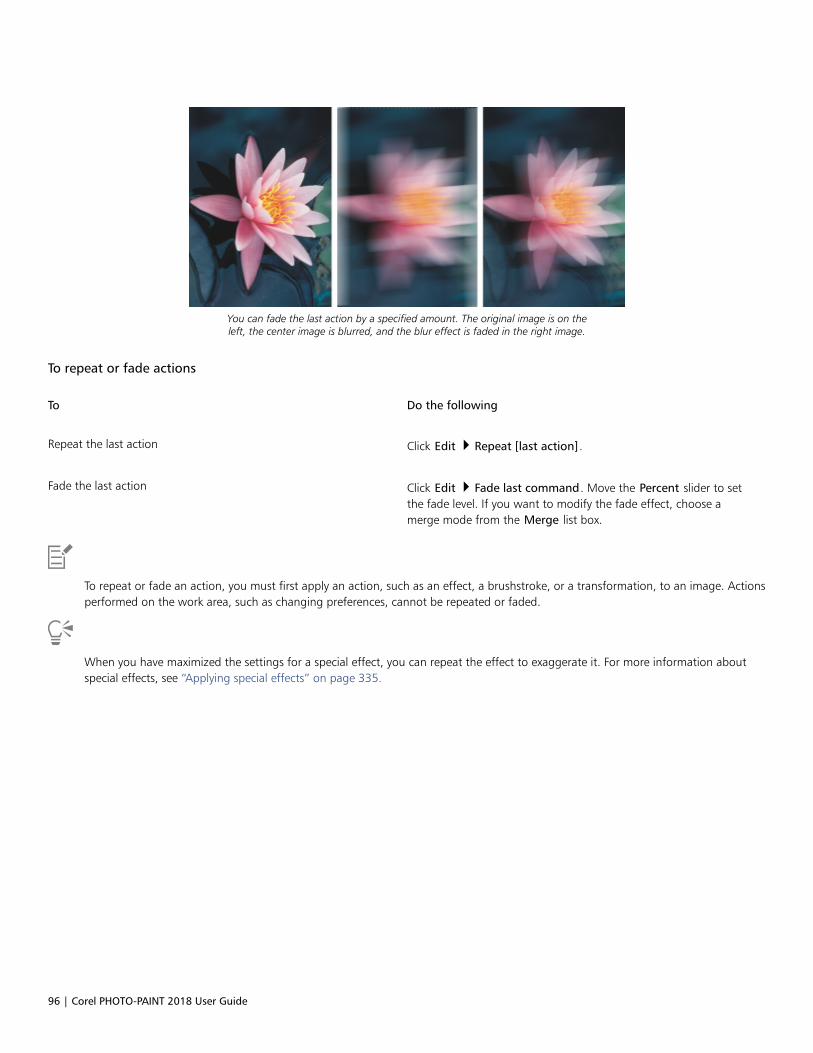
96 | Corel PHOTO-PAINT 2018 User Guide
You can fade the last action by a specified amount. The original image is on theleft, the center image is blurred, and the blur effect is faded in the right image.
To repeat or fade actions
To Do the following
Repeat the last action Click Edit Repeat [last action].
Fade the last action Click Edit Fade last command. Move the Percent slider to setthe fade level. If you want to modify the fade effect, choose amerge mode from the Merge list box.
To repeat or fade an action, you must first apply an action, such as an effect, a brushstroke, or a transformation, to an image. Actionsperformed on the work area, such as changing preferences, cannot be repeated or faded.
When you have maximized the settings for a special effect, you can repeat the effect to exaggerate it. For more information aboutspecial effects, see “Applying special effects” on page 335.

Saving and closing | 97
Saving and closing
In Corel PHOTO-PAINT, you can save your work as you create an image and before you close it. You can also save images to many differentfile formats.
This section contains the following topics:• “Saving images” (page 97)• “Exporting images to other file formats” (page 99)• “Working with locked files” (page 100)• “Closing images” (page 100)
Saving images
You can save an image to preserve it. You can also save images automatically at regular intervals and save backup copies of the file.
The application makes it easy to tell if an image has unsaved changes by adding an asterisk after its filename. The asterisk is added indifferent locations where the filename appears such as the Windows menu, the title bar, and the document tab.
The asterisk after the filename on the document tab shows that the file LoremIpsum_1.cpthas unsaved changes. The file LoremIpsum_2.cpt has no unsaved changes.
Saving images
When you save an image, you can specify a file format, a file name, and a folder where you want to save the file. Images are automaticallysaved using the currently selected file format, name, and location. The default format is the native Corel PHOTO-PAINT (CPT) file format.Saving to the Corel PHOTO-PAINT (CPT) file format retains all image properties — objects, the most recently created mask, alpha channels,grids, guidelines, and color information — so you can edit them later.
You can attach information (metadata) such as comments and notes to images so that you can find them and organize them more easily.
You can also export an image to another file format. For more information, see “Exporting images to other file formats” on page 99.
98 | Corel PHOTO-PAINT 2018 User Guide
Auto-saving and backing up images
You can specify auto-save settings to save an image automatically at regular intervals as you work. You can choose to save an imagetemporarily at a particular stage in its development, or you can overwrite the last version of the image.
Specifying backup settings lets you create a copy of an image each time you save. A backup copy is stored in the folder you choose.
You can also create a checkpoint to save a snapshot of the current image temporarily, so that you can return the image to that state ifnecessary. For more information about checkpoints, see “To create or return to a checkpoint” on page 95.
To save an image
1 Click File Save as.
2 Choose the folder where you want to save the file.
3 Choose a file format from the Save as type list box.
4 Type a file name in the File name list box.
The file extension for the file format you choose is appended to the file name automatically, but can be removed.
5 Enable any of the following active check boxes:
• Selected only — saves only the editable areas defined in your image, when there are no active and selected objects. If there are noeditable areas, this option saves only the active and selected objects.
• Do not show filter dialog — suppresses dialog boxes that provide advanced exporting options
6 Click Save.
You can also
Compress a file Choose a compression type from the Compression type list box.
The Compression type list box is available only when you aresaving an image to a file format that can be compressed.
Specify information about a file Type any comments you want in the Comments box.
If you don’t see this option, drag the lower-right corner to increasethe size of the dialog box and display options hidden from view.
When you save an image containing objects to a file format that does not support objects, you can continue working on the originalfile (which still contains the objects) in the image window. The image and its objects can still be saved to the Corel PHOTO-PAINT(CPT) format.
You can also save an image by clicking the Save button on the standard toolbar.
You can view notes in the Notes box in the Open dialog box when you open an image, or in the Import dialog box when you importan image. Some file formats do not let you save annotations with an image.
To specify auto-save settings
1 Click Tools Options.
2 In the Workspace list of categories, click Save.
Saving and closing | 99
3 Enable the Auto-save every check box, and type a value in the box beside it.
The value you type specifies the number of minutes between auto-saves.
4 Enable one of the following options:
• Save to checkpoint — saves a temporarily copy of the image in its current state without overwriting the version that has been savedto disk
• Save to file — overwrites the last version of the file that you saved to disk
If you want a message displayed at every auto-save, enable the Warn me before saving check box.
When you save the image or quit Corel PHOTO-PAINT, the checkpoint version of the image is lost.
To specify backup settings
1 Click Tools Options.
2 In the Workspace list of categories, click Save.
3 Enable the Make backup on save check box.
If you want to change the folder where backup copies are saved, enable the Back-up to check box, and click Browse to specify a folder.
To edit document properties
1 Click File Document properties.
2 In the Document properties dialog box, enter words or phrases for any of the following: Title, Subject, Keywords, Notes, or Author.
To specify a rating, choose a rating from the Rating list box.
3 Click OK.
Exporting images to other file formats
You can export Corel PHOTO-PAINT images to a variety of file formats. When you export an image, the original image is left open in theimage window in the existing file format.
The file format you choose depends on how you want to use the image in the future. If you export an image to a file format other thanCorel PHOTO-PAINT (CPT), you may lose some image properties; each file format has its own idiosyncrasies and appropriate use. Forexample, if you want to work on an image in another image-editing application, you can export it to the Adobe Photoshop (PSD) file format.You retain many image properties, such as objects and masks, so you can continue to edit the image. If you want to share an image, theTagged Image File Format (TIFF) or the Windows bitmap (BMP) file format are suitable because they are standard formats; images in theseformats can be opened in most image viewers and most image-editing and desktop-publishing applications.
You can also export a file so that it is optimized for office productivity applications, such as Microsoft Office or Corel WordPerfect Office.
You can also export images to web-compatible formats, such as the JPEG or GIF file formats. For more information, see “Exporting imagesfor the web” on page 471.
For more information about supported file formats, see “Supported file formats” on page 533.
To export an image to another file format
1 Click File Export.
2 Choose the folder where you want to save the file.
3 Choose a file format from the Save as type list box.
4 Type a file name in the File name list box.
The file extension for the file format you choose is appended to the file name automatically, but it can be removed.
100 | Corel PHOTO-PAINT 2018 User Guide
5 Enable any of the following active check boxes:
• Selected only — saves only the editable areas defined in the image, when there are no active and selected objects. If there are noeditable areas, this option saves only the active and selected objects.
• Do not show filter dialog — suppresses dialog boxes that provide advanced exporting options
6 Click Save.
You can also
Compress a file Choose a compression type from the Compression type list box.
The Compression type list box is available only when you aresaving an image to a file format that can be compressed.
Specify information about a file Type any comments you want in the Comments box.
If a dialog box for the export format opens, specify the options you want. For detailed information about file formats, see “Supportedfile formats” on page 533.
To export an image to Microsoft Office or Corel WordPerfect Office
1 Click File Export for Office.
2 From the Export to list box, choose one of the following:
• Microsoft Office
• WordPerfect Office
3 Click OK.
4 Locate the folder in which you want to save the file.
5 Type a file name in the File name list box.
6 Click Save.
Layers in an image are flattened when the image is exported to Microsoft Office or Corel WordPerfect Office.
Working with locked files
In a corporate environment, you may open a locked file that is already being edited by another user. You can save changes that you make toa locked file in one of the following ways:• If the other user has modified the file or still has the file open, you must save the file with a new name by clicking File Save As.• If the other user has closed the file without modifying it, you can save the changes by clicking File Save.
Closing images
You can close one open image or many open images at any time. If you close images without saving them, your work is lost.
To close an image

Saving and closing | 101
To Do the following
Close one open image Click File Close or Window Close Window.
Close all open images Click File Close all or Window Close all.
If you are unable to close a file, you may have a task, such as printing or saving, in progress or it has failed. Please refer to the statusbar to view the status of a task.

102 | Corel PHOTO-PAINT 2018 User Guide

Finding and managing creative tools and content | 103
Finding and managing creative tools and content
With the Get More dialog box in Corel PHOTO-PAINT, you can expand your collection of creative tools by purchasing apps, plug-ins, andcontent packs as well as downloading free tools and content.
The CONNECT docker lets you search and manage content. You can access, search and browse the Content Exchange, an online collection ofclipart, photos, fonts, frames, fills, and image lists. In addition, you can find content located on your computer, local network, or the websiteof an online content provider. When you find the content that you need, you can import it into your document, open it in its associatedapplication, or collect it in a tray for future reference.
Corel PHOTO-PAINT is fully integrated with the search capabilities that are offered by Windows. By default, the application searches alllocations that Windows Search is configured to index. For information about modifying indexing options in Windows Search, see theWindows Help.
This section contains the following topics:• “Acquiring applications, plug-ins, and content” (page 103)• “Finding content with the CONNECT docker” (page 104)• “Accessing content” (page 107)• “Browsing and searching for content” (page 109)• “Viewing content” (page 112)• “Using content” (page 112)• “Installing fonts” (page 114)• “Managing content” (page 115)• “Syncing trays with OneDrive” (page 116)• “Changing content locations” (page 118)
Acquiring applications, plug-ins, and content
The Get More dialog box lets you download apps and plug-ins as well as creative tools and content such as fill packs and font packs fromwithin Corel PHOTO-PAINT. The available selection is updated with new offerings as they become available. Some items are free while otheritems are available for purchase.
Both applications and plug-ins require installation.
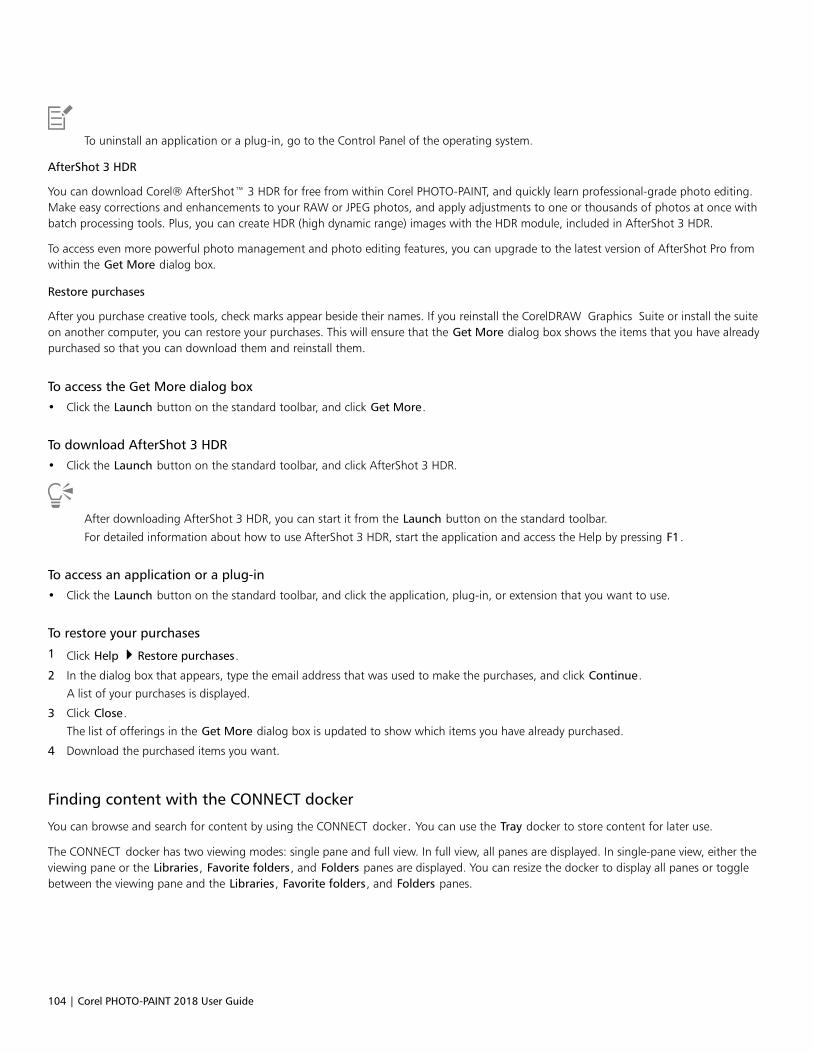
104 | Corel PHOTO-PAINT 2018 User Guide
To uninstall an application or a plug-in, go to the Control Panel of the operating system.
AfterShot 3 HDR
You can download Corel® AfterShot™ 3 HDR for free from within Corel PHOTO-PAINT, and quickly learn professional-grade photo editing.Make easy corrections and enhancements to your RAW or JPEG photos, and apply adjustments to one or thousands of photos at once withbatch processing tools. Plus, you can create HDR (high dynamic range) images with the HDR module, included in AfterShot 3 HDR.
To access even more powerful photo management and photo editing features, you can upgrade to the latest version of AfterShot Pro fromwithin the Get More dialog box.
Restore purchases
After you purchase creative tools, check marks appear beside their names. If you reinstall the CorelDRAW Graphics Suite or install the suiteon another computer, you can restore your purchases. This will ensure that the Get More dialog box shows the items that you have alreadypurchased so that you can download them and reinstall them.
To access the Get More dialog box
• Click the Launch button on the standard toolbar, and click Get More.
To download AfterShot 3 HDR
• Click the Launch button on the standard toolbar, and click AfterShot 3 HDR.
After downloading AfterShot 3 HDR, you can start it from the Launch button on the standard toolbar.
For detailed information about how to use AfterShot 3 HDR, start the application and access the Help by pressing F1.
To access an application or a plug-in
• Click the Launch button on the standard toolbar, and click the application, plug-in, or extension that you want to use.
To restore your purchases
1 Click Help Restore purchases.
2 In the dialog box that appears, type the email address that was used to make the purchases, and click Continue.
A list of your purchases is displayed.
3 Click Close.
The list of offerings in the Get More dialog box is updated to show which items you have already purchased.
4 Download the purchased items you want.
Finding content with the CONNECT docker
You can browse and search for content by using the CONNECT docker. You can use the Tray docker to store content for later use.
The CONNECT docker has two viewing modes: single pane and full view. In full view, all panes are displayed. In single-pane view, either theviewing pane or the Libraries, Favorite folders, and Folders panes are displayed. You can resize the docker to display all panes or togglebetween the viewing pane and the Libraries, Favorite folders, and Folders panes.
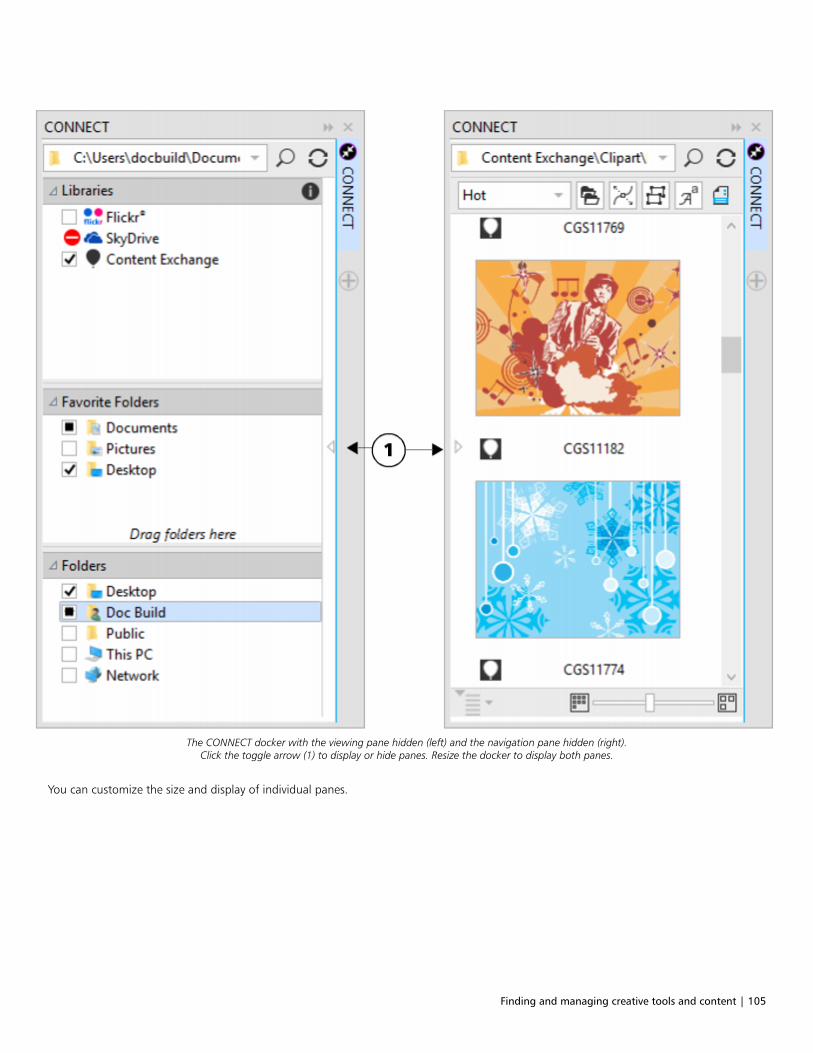
Finding and managing creative tools and content | 105
The CONNECT docker with the viewing pane hidden (left) and the navigation pane hidden (right).Click the toggle arrow (1) to display or hide panes. Resize the docker to display both panes.
You can customize the size and display of individual panes.
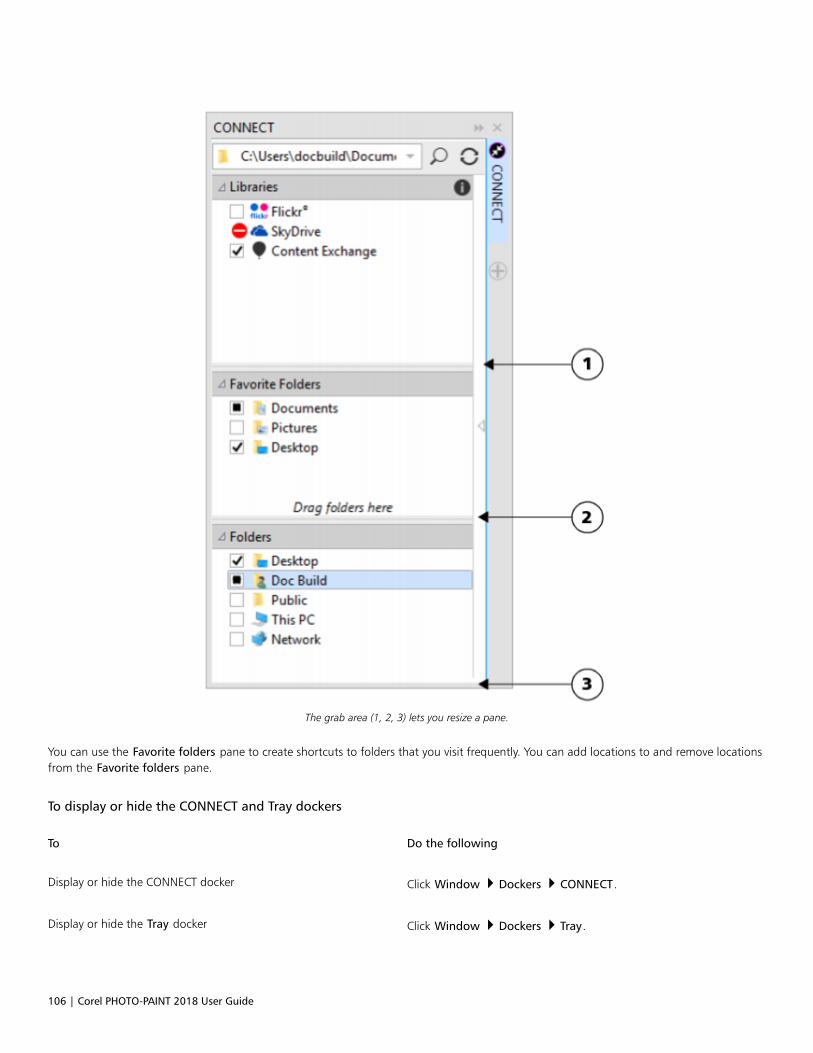
106 | Corel PHOTO-PAINT 2018 User Guide
The grab area (1, 2, 3) lets you resize a pane.
You can use the Favorite folders pane to create shortcuts to folders that you visit frequently. You can add locations to and remove locationsfrom the Favorite folders pane.
To display or hide the CONNECT and Tray dockers
To Do the following
Display or hide the CONNECT docker Click Window Dockers CONNECT.
Display or hide the Tray docker Click Window Dockers Tray.
Finding and managing creative tools and content | 107
You can also access the CONNECT docker from the standard toolbar and the File Search Content menu command.
To resize a pane
• Point to the pane’s grab area, and when the cursor changes to a two-directional arrow, drag the edge of the pane.
To display or hide a pane
• Click the arrow to toggle between displaying and hiding the pane.
To add a location to the Favorite Folders pane
• Drag a folder from the Libraries, Folders, or viewing pane to the Favorite folders pane.
You can also add locations to the Favorite folders pane by right-clicking a folder in the Libraries or Folders pane, and clicking Addto Favorites.
To remove a location from the Favorite Folders pane
• Right-click a location in the Favorite folders pane, and click Remove from Favorites.
Accessing content
You can access content available on the Content Exchange or on the websites of online content providers. You can also access content fromprevious versions of the software that is stored on a CD, DVD, or in a folder.
Using the Content Exchange
The Content Exchange provides a collection of clipart, photos, fonts, frames, vector and bitmap patterns, and image lists that you canaccess. You can browse the available content, or you can search by keywords, mark your favorites, vote for content that you like, or copycontent from the Content Exchange to your personal folder.
You must sign in to your corel.com account to use content from the Content Exchange.
Using content from online content providers
You can find content on the websites of online content providers such as Flickr ®. The images that you find online are often subject to usagerestrictions and may be watermarked or low-resolution. For information about using such images, see “Using content” on page 112.
Note that online content is unavailable in workplaces with restricted Internet access.
Using content stored on a CD or DVD
To access clipart and other content included on a CD or DVD from a previous version of the software, you must insert the CD or DVD, orbrowse to the folder to which you have copied the content.
To use the Content Exchange
1 Click File Search Content to open the CONNECT docker.
2 In the Libraries pane, click Content Exchange.
The available folders appear in the viewing pane.
3 Double-click a folder to access its content.
Thumbnail versions of the files appear in the viewing pane.

108 | Corel PHOTO-PAINT 2018 User Guide
4 Point to a thumbnail to view more information about a file.
5 Click a thumbnail.
A pop-up window appears.
6 In the pop-up window, perform an action from the following table.
To Do the following
Search content by keyword Click one of the keywords associated with a file to perform a searchbased on that keyword.
Search results include all types of content in the Content Exchangethat is tagged with this keyword. To narrow down search results tospecific types of content (such as bitmaps, vectors, or fonts), clickthe corresponding button on the Filter toolbar.
Copy fills, pattern, image lists, and photo frames from the ContentExchange to your personal folder
Click the More options button , and click the Copy to
personal button .
The content is copied in the respective folder in the My Documents\Corel\Corel Content folder.
Mark as a favorite Click the Favorite button .
To remove content from your favorites, click the Unfavorite button
.
Vote to rank content higher or lower Click the Vote up or the Vote down button .
Report inappropriate content Click the More options button , and click the Flag button .
Prevent a file from appearing in future searches Click the More options button , and click the Hide button
.
You must sign in to your corel.com account to use content from the Content Exchange.
To access a content library stored on a CD or DVD
1 Click File Search Content to open the CONNECT docker.
2 Insert the content CD or DVD.
The content library appears in the Libraries pane.
To access a CD or DVD content library that was copied to your computer
1 Click File Search Content to open the CONNECT docker.
Finding and managing creative tools and content | 109
2 In the Libraries pane, click the Configure content libraries button .
A warning sign next to a content library shows that it needs to be configured.
3 Click a content library, click Locate, and browse to the folder where the library is stored.
The content library appears in the Libraries pane.
Browsing and searching for content
With the CONNECT docker, you can browse for content, or you can search for content by using keywords.
You can browse and search for content in one or multiple locations on your computer or local network as well as online. You can alsonavigate to previously viewed content.
Searching for content
You can search by the name, category (for example, clipart, photo images, or fonts), or reference information (for example, tags or notes)associated with a file. When you type a term in the Search and address box and initiate a search, all matching files are displayed asthumbnail images in the viewing pane. For example, if you type flower, the application automatically filters out all files that do not matchand displays only the files that have the word flower in the filename, category, or tags assigned to the file. You can also type phrasesand multiple words, and you can fine-tune your search by using Boolean operators such as AND, NOT, and OR. For example, you canfind content that contains both flower and sun images by typing flowers AND sun. For information about adding tags and referenceinformation, see “To edit document properties” on page 99.
To increase the search speed for local content and improve results, you can adjust the Windows Search options by adding more locations tothe index.
You can also find all images on a webpage by typing the web address. For example, typing www.corel.com displays all the images thatappear on the Corel website.
Refining your search
By default, your search results include all relevant content such as vector graphics, bitmaps, and fonts. You can narrow down the searchresults by excluding content. For example, if you are searching for graphics, you can display only vector graphics or only bitmaps. If you wantto choose a font for your project, you can display only fonts.
You can widen the scope of a search, and you can cancel a search at any time.
To browse for content
1 Click File Search Content to open the CONNECT docker.
2 Click a location in one of the following panes:
• Libraries — lets you browse online and local content
• Favorite folders — lets you browse your favorite locations
• Folders — lets you browse the folder structure available on your computer
You can browse the contents of only one folder at a time.
To specify the location where you want to browse for content, type or paste a path in the Search and address box, and press Enter.The Search and address bar keeps track only of the locations that you enter manually. To delete all locations, click the drop-downarrow, and click Clear list.
110 | Corel PHOTO-PAINT 2018 User Guide
To search for content
1 Click File Search Content to open the CONNECT docker.
2 Click a location in any of the following panes:
• Libraries — lets you search for online and local content as well as content on a CD or DVD
• Favorite folders — lets you search for content in your favorite locations
• Folders — lets you search for content in the folder structure available on your computer
3 Type a word or multiple words in the Search and address box, and press Enter.
Files that match the search terms appear in the viewing pane.
If you want to search for a phrase, enclose the phrase with quotation marks.
You can also
Search for content in multiple locations Enable the check boxes for the libraries and folders that you want
to search, and click the Refresh button .
Show or hide search results for a location In the viewing pane, click the Show/Hide arrow to the right of thelocation.
Specify how many online search results to display In the Libraries pane, click the Configure content libraries button
.Click an online content provider, and choose a number from
the Search results list box. This number determines the initialnumber of search results that are displayed in the viewing pane, aswell as the additional results that are displayed each time you clickMore from.
Fine-tune a search by using Boolean operators Type one of the following Boolean operators between the searchterms:
AND — lets you find content that contains all search terms in theSearch and address box. Instead of AND, you can also use the plussign (+).
NOT — lets you exclude content that contains the search term afterNOT. Instead of NOT, you can also use the minus sign (-).
OR — lets you find content that contains at least one of the searchterms
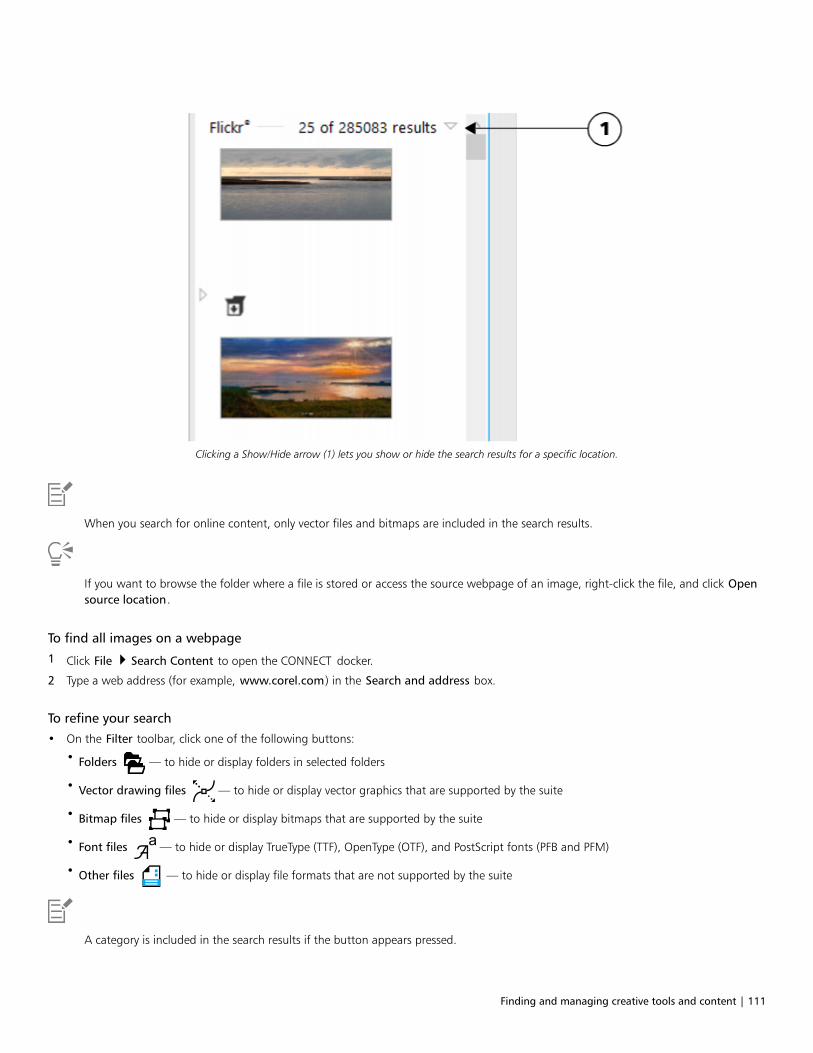
Finding and managing creative tools and content | 111
Clicking a Show/Hide arrow (1) lets you show or hide the search results for a specific location.
When you search for online content, only vector files and bitmaps are included in the search results.
If you want to browse the folder where a file is stored or access the source webpage of an image, right-click the file, and click Opensource location.
To find all images on a webpage
1 Click File Search Content to open the CONNECT docker.
2 Type a web address (for example, www.corel.com) in the Search and address box.
To refine your search
• On the Filter toolbar, click one of the following buttons:
• Folders — to hide or display folders in selected folders
• Vector drawing files — to hide or display vector graphics that are supported by the suite
• Bitmap files — to hide or display bitmaps that are supported by the suite
• Font files — to hide or display TrueType (TTF), OpenType (OTF), and PostScript fonts (PFB and PFM)
• Other files — to hide or display file formats that are not supported by the suite
A category is included in the search results if the button appears pressed.
112 | Corel PHOTO-PAINT 2018 User Guide
To stop a search
• Click the Cancel search button .
Viewing content
Clipart, photos, and fonts appear in the viewing pane as thumbnail images. You can select individual, multiple, or all thumbnails.
By positioning your pointer over a thumbnail, you can display a larger preview. You can also display file information such as filename, filesize, image resolution, and color mode for content that was not provided by an online content provider. You can also preview the fonts thatyou find. Thumbnail zooming makes recognizing a particular file easier and faster.
To select a thumbnail
1 Search or browse for content in the CONNECT docker.
2 Click a thumbnail.
You can also
Select multiple thumbnails Do one of the following:•Drag around the thumbnails that you want to select.•Hold down Ctrl, and in the viewing pane click the thumbnails
that you want to select.•Click a thumbnail, and holding down Shift, click the last
thumbnail in the range that you want to select.
Select all thumbnails Press Ctrl + A.
To view file information
• Hover over a thumbnail.
To preview a font
• Double-click a font thumbnail.
You can also preview a font by right-clicking a font thumbnail and clicking Open.
To adjust the size of thumbnails
• Drag the Zoom slider to the left to decrease the size of the thumbnails, or to the right to increase the size of the thumbnails.
Using content
If you want to view or edit a file before you incorporate it into your project, you can open it in CorelDRAW, Corel PHOTO-PAINT, or itsassociated application.
You can insert and place content in your document. Images that are obtained from online sources, such as Flickr, may be subject tocopyright and usage restrictions. Such images, also referred to as “comp images,” are often low-resolution or watermarked. To use comp
Finding and managing creative tools and content | 113
images, you must first check with the owner if you have rights to use them and purchase them if necessary. Then, you can replace the compimages in your document with the purchased images. You can view a list of all comp images in a document.
To open a file
1 Click File Search Content to open the CONNECT docker.
2 Search or browse for content.
3 Select a thumbnail, and perform an action from the following table.
To Do the following
Open a file by using the CONNECT docker Do one of the following:•In full view, click the Open button .
•In single pane view, click the File commands button , and
click Open.
Open a file by using the Tray docker Click the Open button .
You can also open a file by right-clicking it and choosing the option that you want.
You can also open multiple selected files.
To insert a file into an active document
To Do the following
Insert a file into an active document by using the CONNECT docker Do one of the following:•Drag a file from the viewing pane of the CONNECT docker to the
active document.•In single-pane view, select a file in the viewing pane, click the
File commands button , click Import, and click in your
document.•In full view, select a file in the viewing pane, click the Import
button , and click in your document.
Insert a file into an active document by using the Tray docker Select the file and click the Import button in the Tray docker.
You can also insert a file into an active document by dragging the file from the viewing pane or the Tray docker to the activedocument.
You can also insert a file into an active document by right-clicking the file in the viewing pane and choosing an import command.
You can also insert multiple selected files.
114 | Corel PHOTO-PAINT 2018 User Guide
To check, purchase, and replace a comp image
1 In your document, click a comp image, and click the Open comp source button on the toolbar that appears below the comp image.
2 On the website of the online content provider, check the copyright and usage restrictions for the image, and purchase it if necessary.
3 In your document, select the comp image, and click the Replace comp button on the toolbar that appears below the comp image.
4 Navigate to the purchased image, and click Import.
Transformations, such as scaling, rotating, and resizing, that were applied to the comp image are preserved in the final image.However, special effects and image adjustments are not preserved.
You can also access the Open comp source and Replace comp commands by right-clicking a comp image.
To view a list of all comp images in a document
• Open a document, and do one of the following:
• Click File Print, click the Preflight ( Issues) tab, and click Some images may be subject to copyright and usage restrictions.
• Click File Document properties.
You can also view a list of all comp images in the preflight summaries when you export a document as a PDF file.
Installing fonts
You can install the fonts that you find, and you can install font families.
For information about finding fonts, see “To browse for content” on page 109 and “To search for content” on page 110.
To install fonts
1 Click File Search Content to open the CONNECT docker.
2 Find the font that you want to install.
3 Do one of the following:
• In the viewing pane, right-click the font thumbnail, and click Install.
A check mark appears in the lower-right corner of the font thumbnail to show that the font is installed.
• To install a font family, right-click the font thumbnail, and click Install font family.
To install a font from the Content Exchange collection, you must sign in with your Corel.com account to authenticate your product.
To uninstall a font, right-click the font thumbnail, and click Uninstall.
You can also use Corel Font Manager to install or download online fonts. Installed fonts become available to all applications on yourcomputer. Downloaded fonts can be used only in CorelDRAW Graphics Suite.
Finding and managing creative tools and content | 115
Managing content
You can organize your content by using trays or by adding content files to specific folders on your computer.
A tray is useful for gathering content from various folders. While the files are referenced in the tray, they actually remain in their originallocation. You can add and remove content from the tray. The tray is shared between CorelDRAW, Corel PHOTO-PAINT, and Corel CONNECT.You can also open files from the tray to preview them more easily.
You can rename trays to give them meaningful names. When working with multiple trays, you can close some trays temporarily to avoidclutter. You can easily reopen a tray when you need it. In addition, you can load a tray file that is not listed among the available trays. Youcan delete a tray at any time.
To add content to a tray
1 Click File Search Content to open the CONNECT docker.
2 Search or browse for content.
3 Select one or more thumbnails in the viewing pane, and drag them to the tray.
If you want to open a file from the tray, double-click its thumbnail.
You can also drag content from a folder on your computer to the tray.
To add content to a folder
• Select one or more thumbnails in the viewing area, and drag them to a folder in the Favorite folders or Folders pane, or any otherfolder on your computer.
You can drag content from the tray to a folder.
To remove content from a tray
• Select one or more thumbnails in the tray, and click the Remove from tray button .
To create a tray
• Click the Add new tray button in the lower-right corner of the tray pane.
By default, trays are saved to the My Documents\Corel\Corel Content\Trays folder.
You can email trays that contain only online content.
To work with trays
To Do the following
Select a tray Click the tray tab.
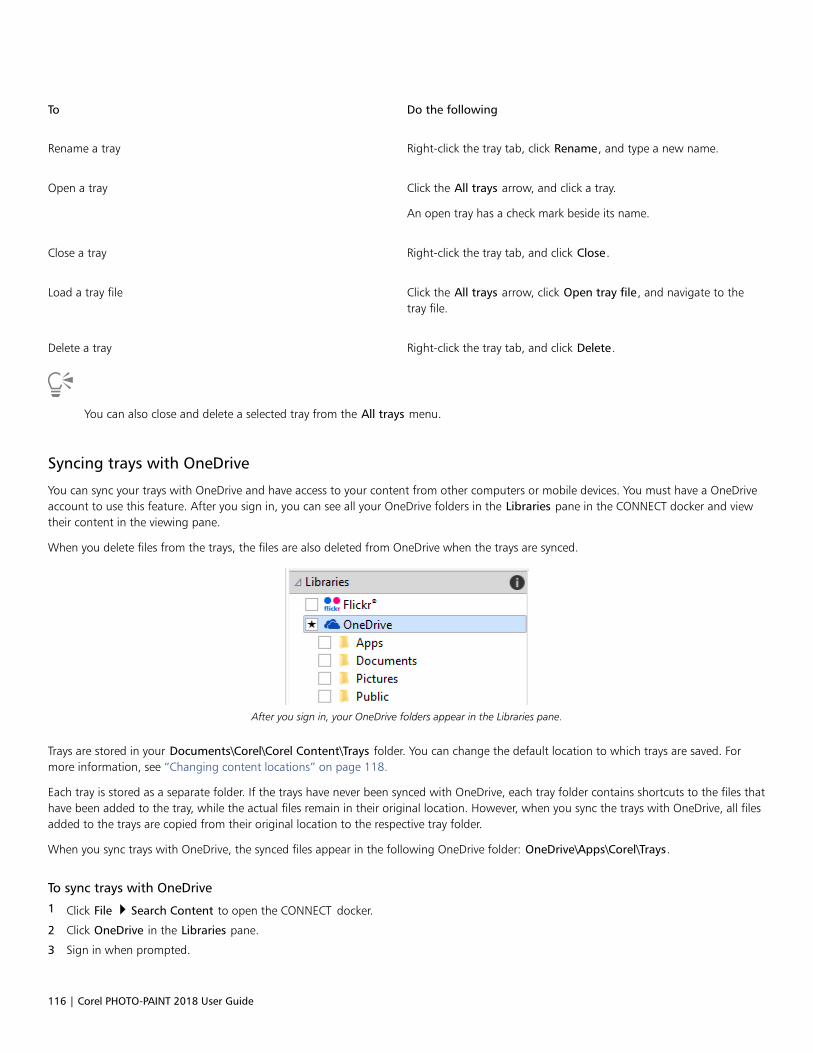
116 | Corel PHOTO-PAINT 2018 User Guide
To Do the following
Rename a tray Right-click the tray tab, click Rename, and type a new name.
Open a tray Click the All trays arrow, and click a tray.
An open tray has a check mark beside its name.
Close a tray Right-click the tray tab, and click Close.
Load a tray file Click the All trays arrow, click Open tray file, and navigate to thetray file.
Delete a tray Right-click the tray tab, and click Delete.
You can also close and delete a selected tray from the All trays menu.
Syncing trays with OneDrive
You can sync your trays with OneDrive and have access to your content from other computers or mobile devices. You must have a OneDriveaccount to use this feature. After you sign in, you can see all your OneDrive folders in the Libraries pane in the CONNECT docker and viewtheir content in the viewing pane.
When you delete files from the trays, the files are also deleted from OneDrive when the trays are synced.
After you sign in, your OneDrive folders appear in the Libraries pane.
Trays are stored in your Documents\Corel\Corel Content\Trays folder. You can change the default location to which trays are saved. Formore information, see “Changing content locations” on page 118.
Each tray is stored as a separate folder. If the trays have never been synced with OneDrive, each tray folder contains shortcuts to the files thathave been added to the tray, while the actual files remain in their original location. However, when you sync the trays with OneDrive, all filesadded to the trays are copied from their original location to the respective tray folder.
When you sync trays with OneDrive, the synced files appear in the following OneDrive folder: OneDrive\Apps\Corel\Trays.
To sync trays with OneDrive
1 Click File Search Content to open the CONNECT docker.
2 Click OneDrive in the Libraries pane.
3 Sign in when prompted.
Finding and managing creative tools and content | 117
The first time you sign in, you are asked to grant Corel Cloud Service access to your account. You can always change this setting bylogging into OneDrive online and specifying which applications have access to your account.
4 When asked whether you want to enable Tray Sync, click Yes.
5 Make sure that the Enable Tray Sync with OneDrive on this computer check box is enabled, and choose an option from the Syncfrequency list box.
Your OneDrive folders and content appear in the viewing pane.
You can also
Upload files to OneDrive Drag the files from the viewing pane or from the desktop to aOneDrive folder.
You can also drag files to a tray. If the trays are synced, the files inthe tray are automatically uploaded to OneDrive.
Import files from OneDrive into your document Select the file in the viewing pane, and click the Import button
, or drag the file to an open CorelDRAW or Corel PHOTO-PAINT
document.
Remove files from a synced OneDrive folder Select the file in the tray, and click the Remove from tray button
.
When the tray is synced, the file is removed from the syncedlocation in OneDrive.
If you delete a file from a synced OneDrive folder, the file from thelocal tray folder is moved to the Recycle Bin when the trays aresynced.
Access OneDrive online In the viewing pane, right-click a OneDrive file or folder, andchoose Open source location from the context menu.
OneDrive opens in a browser, where you can manage yourOneDrive files and folders.
View the properties of a file in a OneDrive folder Right-click the file, and then click Properties.
View the properties of a OneDrive folder Right-click an empty space in the viewing pane, and then clickProperties.
Sign out of OneDrive In the Libraries pane, click the Configure content libraries button
, and click Sign out in the OneDrive area.
If trays are syncing and there is a conflict between two files with the same name, both files are kept, and a number is appended tothe name of the second file.
If you do not enable Tray Sync, you can still see your OneDrive folders in Corel CONNECT and upload or download files.
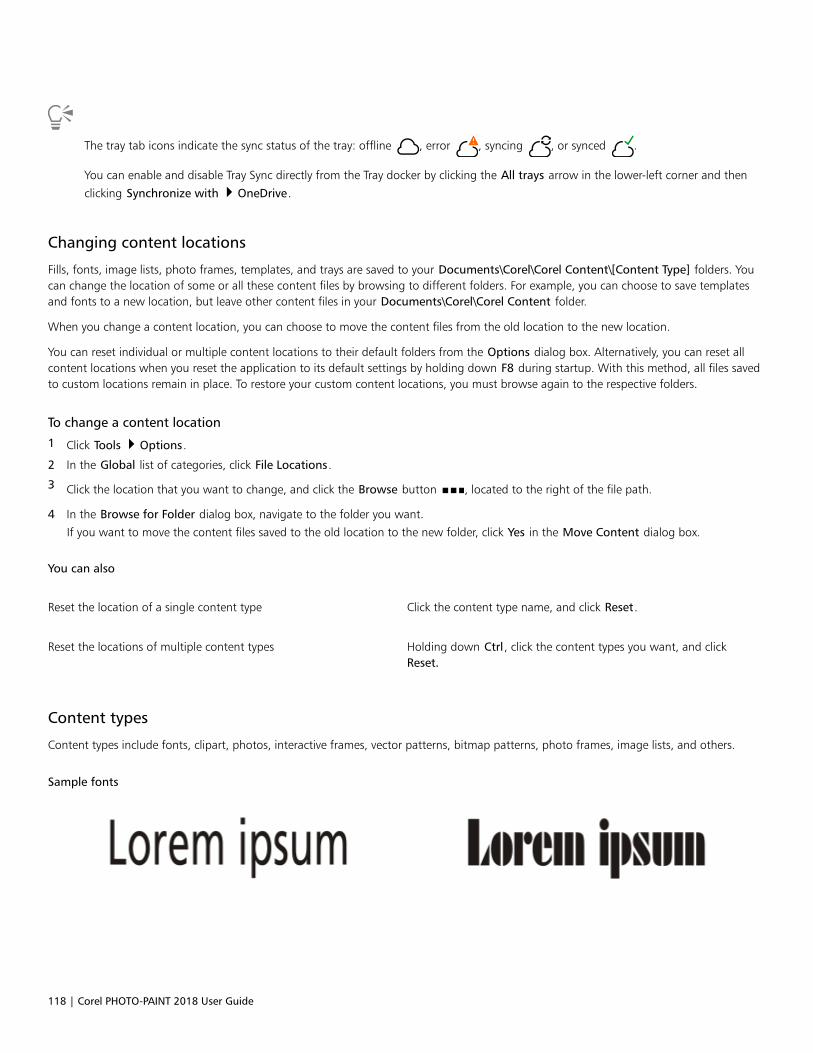
118 | Corel PHOTO-PAINT 2018 User Guide
The tray tab icons indicate the sync status of the tray: offline , error , syncing , or synced .
You can enable and disable Tray Sync directly from the Tray docker by clicking the All trays arrow in the lower-left corner and then
clicking Synchronize with OneDrive.
Changing content locations
Fills, fonts, image lists, photo frames, templates, and trays are saved to your Documents\Corel\Corel Content\[Content Type] folders. Youcan change the location of some or all these content files by browsing to different folders. For example, you can choose to save templatesand fonts to a new location, but leave other content files in your Documents\Corel\Corel Content folder.
When you change a content location, you can choose to move the content files from the old location to the new location.
You can reset individual or multiple content locations to their default folders from the Options dialog box. Alternatively, you can reset allcontent locations when you reset the application to its default settings by holding down F8 during startup. With this method, all files savedto custom locations remain in place. To restore your custom content locations, you must browse again to the respective folders.
To change a content location
1 Click Tools Options.
2 In the Global list of categories, click File Locations.
3 Click the location that you want to change, and click the Browse button , located to the right of the file path.
4 In the Browse for Folder dialog box, navigate to the folder you want.
If you want to move the content files saved to the old location to the new folder, click Yes in the Move Content dialog box.
You can also
Reset the location of a single content type Click the content type name, and click Reset.
Reset the locations of multiple content types Holding down Ctrl, click the content types you want, and clickReset.
Content types
Content types include fonts, clipart, photos, interactive frames, vector patterns, bitmap patterns, photo frames, image lists, and others.
Sample fonts
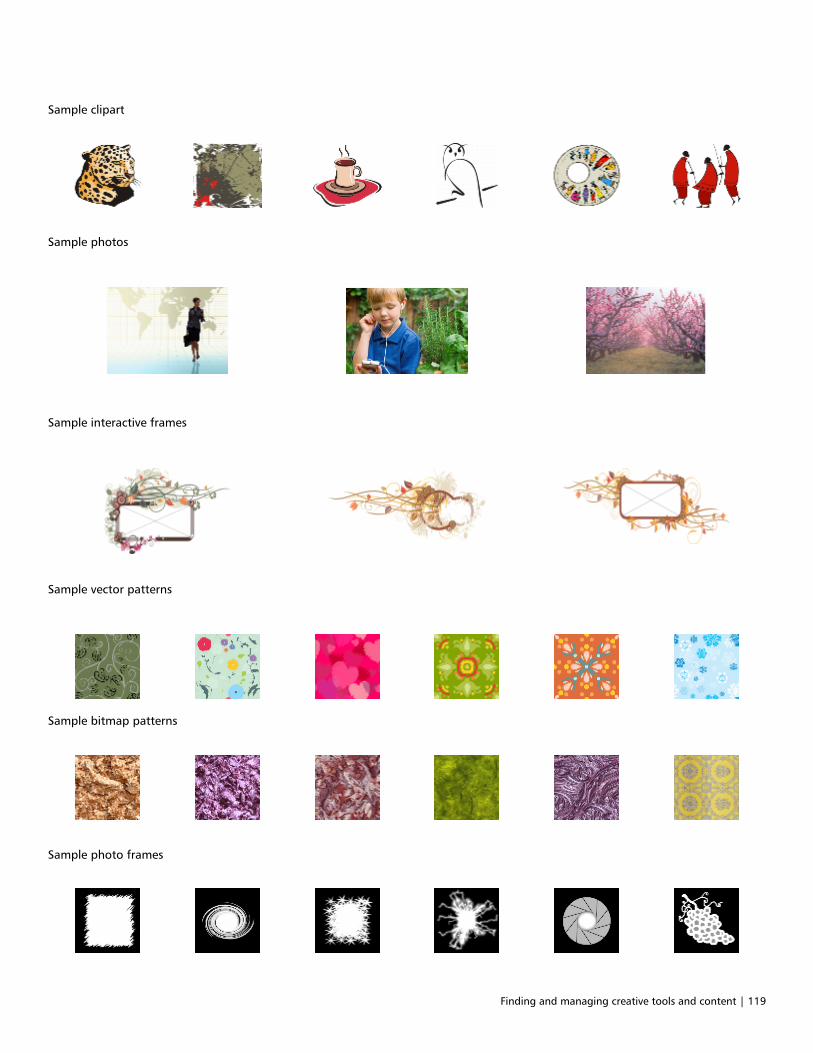
Finding and managing creative tools and content | 119
Sample clipart
Sample photos
Sample interactive frames
Sample vector patterns
Sample bitmap patterns
Sample photo frames

120 | Corel PHOTO-PAINT 2018 User Guide
Sample image lists

Touch-enabled devices and wheel devices | 121
Touch-enabled devices and wheel devices
This section includes the following topics:• “Using touch” (page 121)• “Using wheel devices” (page 123)
For information about using a pen and stylus with Corel PHOTO-PAINT, see “Using pressure-sensitive pens and devices” on page 327.
Using touch
Corel PHOTO-PAINT provides touch gesture support, a Touch workspace, and automatic workspace switching to help you make the most ofyour touch-enabled device.
Gestures
You can use common gestures on your touchscreen device to scroll, zoom, and pan in a document as well as access tools grouped in flyouts.The following table describes how to complete common tasks using touch gestures.
To Do the following
Scroll in a document Tap the screen with two fingers and drag in the direction you wantto scroll.
Zoom in and out Using two fingers, pinch outwards to zoom in and pinch inwardsto zoom out.
Choose a tool located in a flyout In the toolbox, tap a flyout button, and tap the tool you want.
Touch workspace
Optimized for touch-enabled devices, the Touch workspace is ideal for field work and sketching. It allows you to complete your tasks byusing touch, dial, and a stylus, without needing a mouse or keyboard.
The Touch workspace has streamlined user interface (UI) that shows you only the tools and commands that you are most likely to use whenusing a tablet. In comparison to the other available workspaces, the Touch workspace features the following changes:• Buttons and other UI elements are bigger to be touch-friendly.
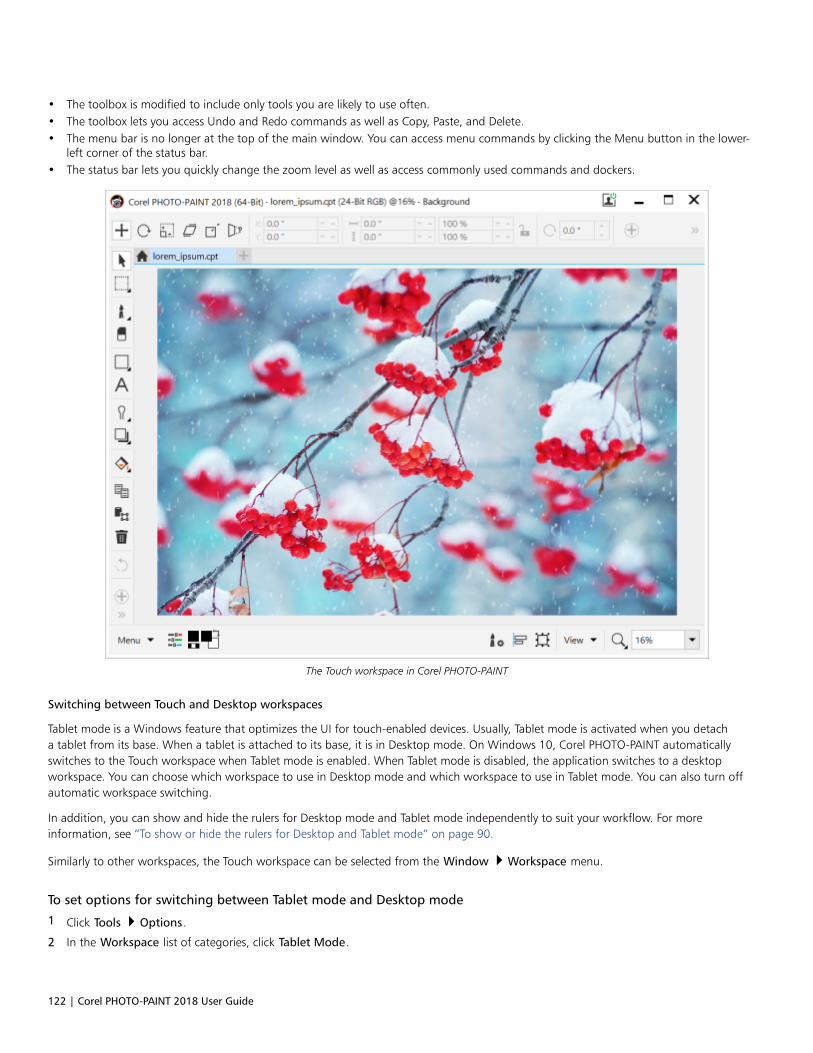
122 | Corel PHOTO-PAINT 2018 User Guide
• The toolbox is modified to include only tools you are likely to use often.• The toolbox lets you access Undo and Redo commands as well as Copy, Paste, and Delete.• The menu bar is no longer at the top of the main window. You can access menu commands by clicking the Menu button in the lower-
left corner of the status bar.• The status bar lets you quickly change the zoom level as well as access commonly used commands and dockers.
The Touch workspace in Corel PHOTO-PAINT
Switching between Touch and Desktop workspaces
Tablet mode is a Windows feature that optimizes the UI for touch-enabled devices. Usually, Tablet mode is activated when you detacha tablet from its base. When a tablet is attached to its base, it is in Desktop mode. On Windows 10, Corel PHOTO-PAINT automaticallyswitches to the Touch workspace when Tablet mode is enabled. When Tablet mode is disabled, the application switches to a desktopworkspace. You can choose which workspace to use in Desktop mode and which workspace to use in Tablet mode. You can also turn offautomatic workspace switching.
In addition, you can show and hide the rulers for Desktop mode and Tablet mode independently to suit your workflow. For moreinformation, see “To show or hide the rulers for Desktop and Tablet mode” on page 90.
Similarly to other workspaces, the Touch workspace can be selected from the Window Workspace menu.
To set options for switching between Tablet mode and Desktop mode
1 Click Tools Options.
2 In the Workspace list of categories, click Tablet Mode.

Touch-enabled devices and wheel devices | 123
3 Perform a task from the following table.
To Do the following
Turn on or off automatic workspace switching when changingbetween Desktop and Tablet mode
Enable or disable the Auto-switch between Tablet and Desktopworkspaces check box.
Automatic workspace switching is not available for Windows 8 orWindows 7. To switch to the Touch workspace, you must choose it
manually (Window Workspace).
Set the workspace for Tablet mode Choose a workspace from the Tablet mode list box.
Set the workspace for Desktop mode Choose a workspace from the Desktop mode list box.
To choose the Touch workspace
• Click Window Workspace Touch Touch.
Using wheel devices
With CorelDRAW Graphics Suite, you can take advantage of Microsoft Surface Dial and other wheel devices so that you can focus on yourcreative tasks. Especially useful in combination with a stylus, a wheel device helps you draw and create naturally and ergonomically. You caneasily transition between tasks by using your nondominant hand while you are sketching or designing with your stylus.
Your wheel device can be used in two modes: off-screen (placed on your desk) and on-screen (placed directly on the screen). In CorelPHOTO-PAINT, there is no difference between the on-screen and the off-screen mode of the wheel device. Whether you place the wheeldevice on the screen or on your desk, the on-screen UI lets you access the following commands: Undo, Zoom, and Object Order.
For information about setting up your wheel device, see the manufacturer’s instructions.
Off-screen mode
When the wheel device is off the screen, its on-screen interface lets you zoom in and out as well as undo and redo actions. In addition, youcan change the object order by moving selected objects to the front or back of other objects.
To use a wheel device in off-screen mode
1 Press down the wheel device to show the on-screen menu, and then release.
2 Rotate the wheel device to select one of the following commands on the on-screen menu, and click.
• Zoom — lets you zoom in and out
• Undo — lets you undo and redo actions
• Object Order — lets you move the selected object up or down in the stacking order
3 Rotate the wheel device clockwise or counterclockwise to complete your task.

124 | Corel PHOTO-PAINT 2018 User Guide
Editing images | 125
Editing images
Changing image dimensions, resolution, and paper size......................................................................................................................127
Cropping, stitching, scaling, and changing orientation........................................................................................................................ 131
Retouching.......................................................................................................................................................................................... 147
Adjusting color and tone.....................................................................................................................................................................161
Working with lenses............................................................................................................................................................................ 177
Reshaping image areas........................................................................................................................................................................ 185

126 | Corel PHOTO-PAINT 2018 User Guide
Changing image dimensions, resolution, and paper size | 127
Changing image dimensions, resolution, andpaper size
You can change the dimensions and resolution of an image. You can also change the size of the paper border that surrounds an image.
This section contains the following topics:• “Changing image dimensions” (page 127)• “Changing image resolution” (page 128)• “Changing paper size” (page 129)
You can also change the size of an image by removing unwanted areas, or by joining multiple images. For more information, see “Cropping,stitching, scaling, and changing orientation” on page 131.
Changing image dimensions
You can change the physical dimensions of images by increasing or decreasing their height and width. When you increase imagedimensions, the application inserts new pixels between existing pixels, and their colors are based on the colors of adjacent pixels. If youincrease image dimensions significantly, images may appear stretched and pixelated.
The size of the image on your screen depends on the pixel height and width of the image, on the zoom level, and on your monitor settings.As a result, an image may display as a different size on your screen than when it is printed.
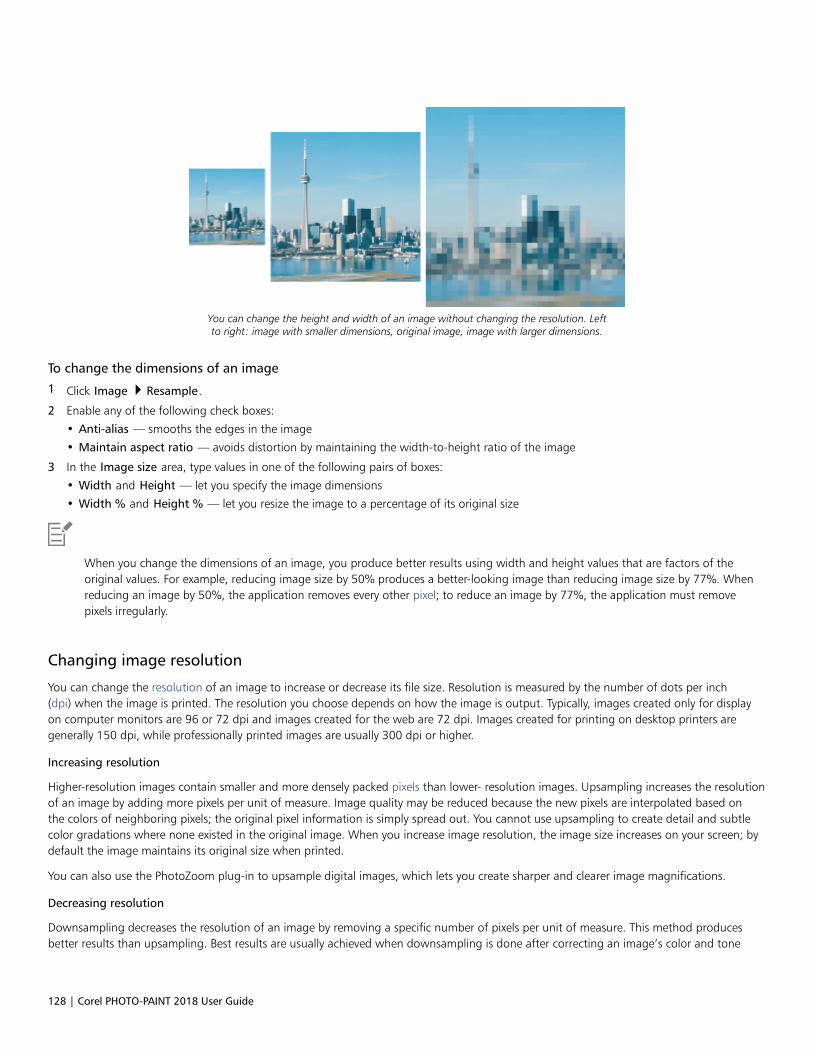
128 | Corel PHOTO-PAINT 2018 User Guide
You can change the height and width of an image without changing the resolution. Leftto right: image with smaller dimensions, original image, image with larger dimensions.
To change the dimensions of an image
1 Click Image Resample.
2 Enable any of the following check boxes:
• Anti-alias — smooths the edges in the image
• Maintain aspect ratio — avoids distortion by maintaining the width-to-height ratio of the image
3 In the Image size area, type values in one of the following pairs of boxes:
• Width and Height — let you specify the image dimensions
• Width % and Height % — let you resize the image to a percentage of its original size
When you change the dimensions of an image, you produce better results using width and height values that are factors of theoriginal values. For example, reducing image size by 50% produces a better-looking image than reducing image size by 77%. Whenreducing an image by 50%, the application removes every other pixel; to reduce an image by 77%, the application must removepixels irregularly.
Changing image resolution
You can change the resolution of an image to increase or decrease its file size. Resolution is measured by the number of dots per inch(dpi) when the image is printed. The resolution you choose depends on how the image is output. Typically, images created only for displayon computer monitors are 96 or 72 dpi and images created for the web are 72 dpi. Images created for printing on desktop printers aregenerally 150 dpi, while professionally printed images are usually 300 dpi or higher.
Increasing resolution
Higher-resolution images contain smaller and more densely packed pixels than lower- resolution images. Upsampling increases the resolutionof an image by adding more pixels per unit of measure. Image quality may be reduced because the new pixels are interpolated based onthe colors of neighboring pixels; the original pixel information is simply spread out. You cannot use upsampling to create detail and subtlecolor gradations where none existed in the original image. When you increase image resolution, the image size increases on your screen; bydefault the image maintains its original size when printed.
You can also use the PhotoZoom plug-in to upsample digital images, which lets you create sharper and clearer image magnifications.
Decreasing resolution
Downsampling decreases the resolution of an image by removing a specific number of pixels per unit of measure. This method producesbetter results than upsampling. Best results are usually achieved when downsampling is done after correcting an image’s color and tone
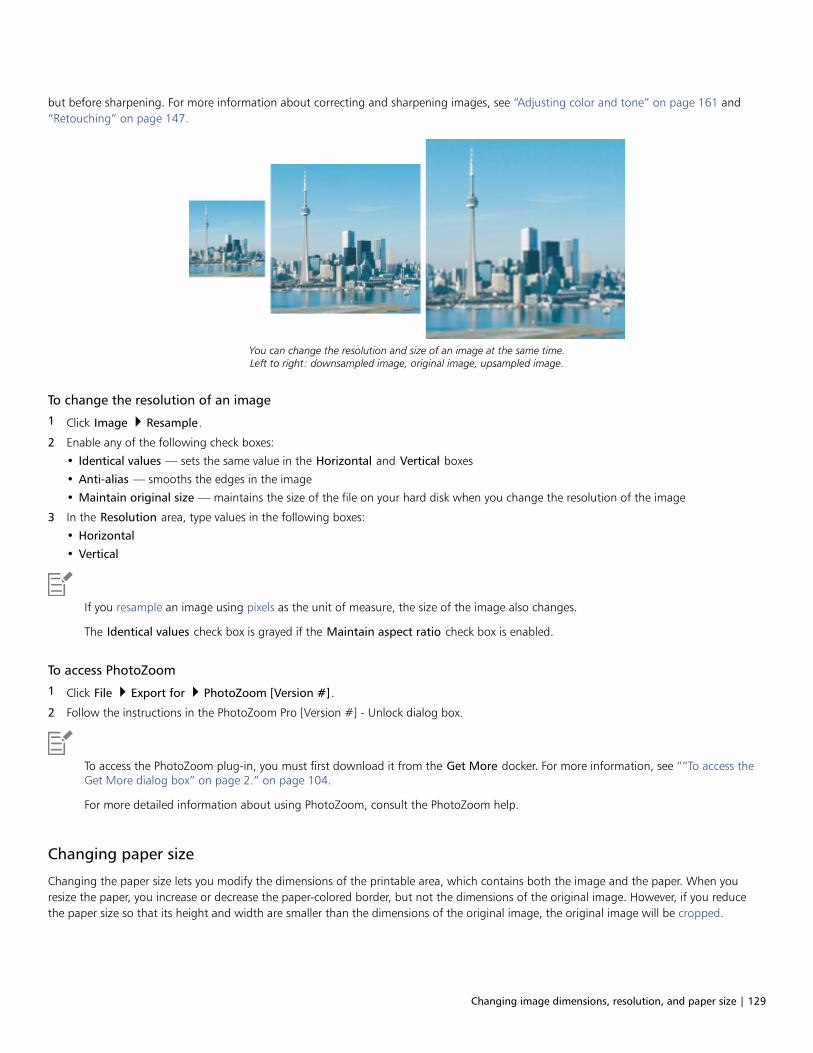
Changing image dimensions, resolution, and paper size | 129
but before sharpening. For more information about correcting and sharpening images, see “Adjusting color and tone” on page 161 and“Retouching” on page 147.
You can change the resolution and size of an image at the same time.Left to right: downsampled image, original image, upsampled image.
To change the resolution of an image
1 Click Image Resample.
2 Enable any of the following check boxes:
• Identical values — sets the same value in the Horizontal and Vertical boxes
• Anti-alias — smooths the edges in the image
• Maintain original size — maintains the size of the file on your hard disk when you change the resolution of the image
3 In the Resolution area, type values in the following boxes:
• Horizontal
• Vertical
If you resample an image using pixels as the unit of measure, the size of the image also changes.
The Identical values check box is grayed if the Maintain aspect ratio check box is enabled.
To access PhotoZoom
1 Click File Export for PhotoZoom [Version #].
2 Follow the instructions in the PhotoZoom Pro [Version #] - Unlock dialog box.
To access the PhotoZoom plug-in, you must first download it from the Get More docker. For more information, see ““To access theGet More dialog box” on page 2.” on page 104.
For more detailed information about using PhotoZoom, consult the PhotoZoom help.
Changing paper size
Changing the paper size lets you modify the dimensions of the printable area, which contains both the image and the paper. When youresize the paper, you increase or decrease the paper-colored border, but not the dimensions of the original image. However, if you reducethe paper size so that its height and width are smaller than the dimensions of the original image, the original image will be cropped.
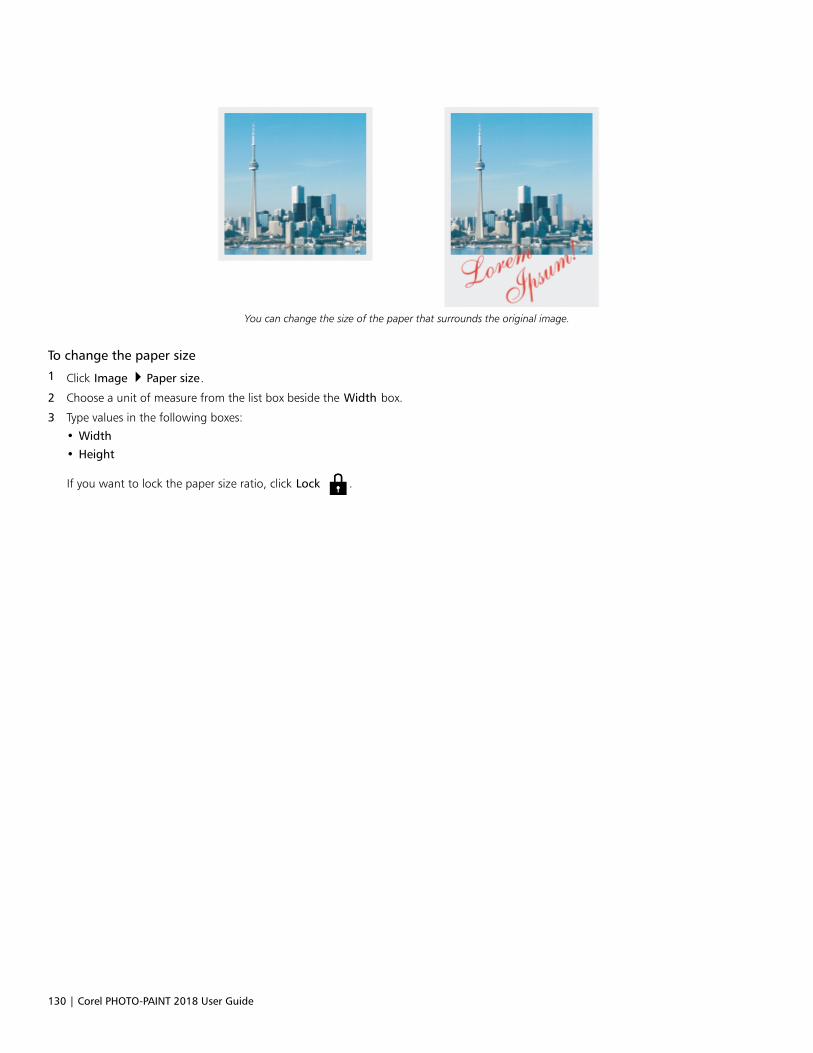
130 | Corel PHOTO-PAINT 2018 User Guide
You can change the size of the paper that surrounds the original image.
To change the paper size
1 Click Image Paper size.
2 Choose a unit of measure from the list box beside the Width box.
3 Type values in the following boxes:
• Width
• Height
If you want to lock the paper size ratio, click Lock .
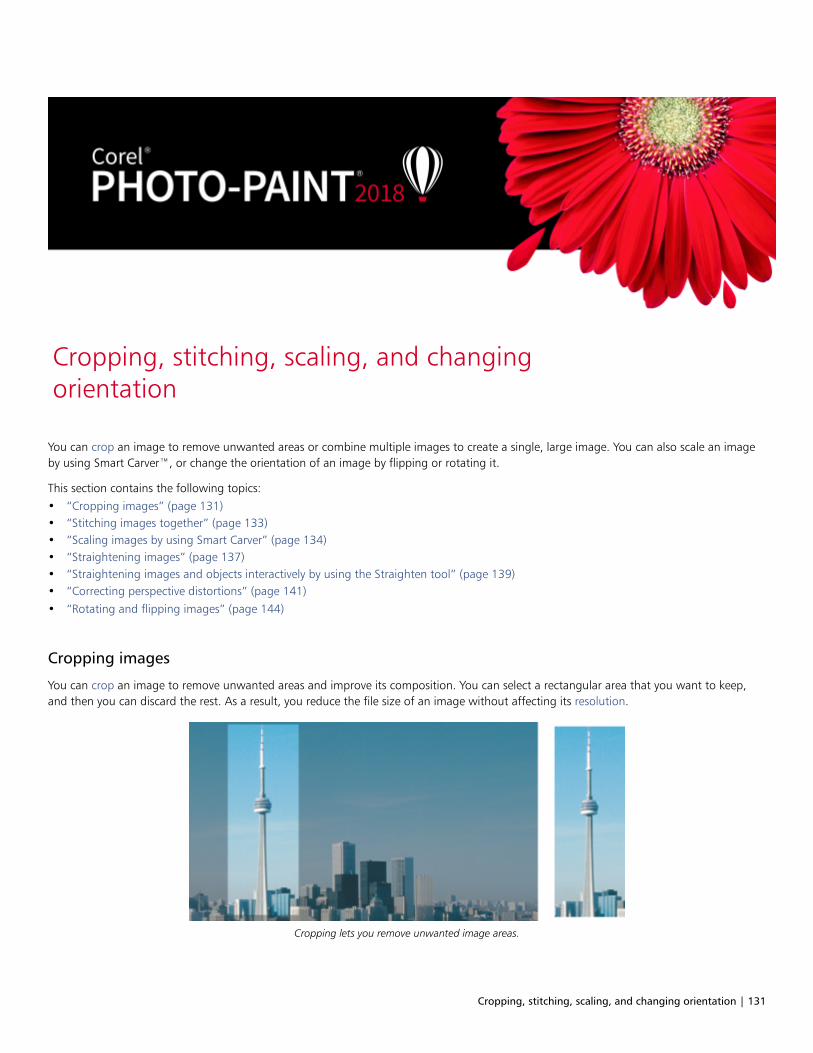
Cropping, stitching, scaling, and changing orientation | 131
Cropping, stitching, scaling, and changingorientation
You can crop an image to remove unwanted areas or combine multiple images to create a single, large image. You can also scale an imageby using Smart Carver™, or change the orientation of an image by flipping or rotating it.
This section contains the following topics:• “Cropping images” (page 131)• “Stitching images together” (page 133)• “Scaling images by using Smart Carver” (page 134)• “Straightening images” (page 137)• “Straightening images and objects interactively by using the Straighten tool” (page 139)• “Correcting perspective distortions” (page 141)• “Rotating and flipping images” (page 144)
Cropping images
You can crop an image to remove unwanted areas and improve its composition. You can select a rectangular area that you want to keep,and then you can discard the rest. As a result, you reduce the file size of an image without affecting its resolution.
Cropping lets you remove unwanted image areas.
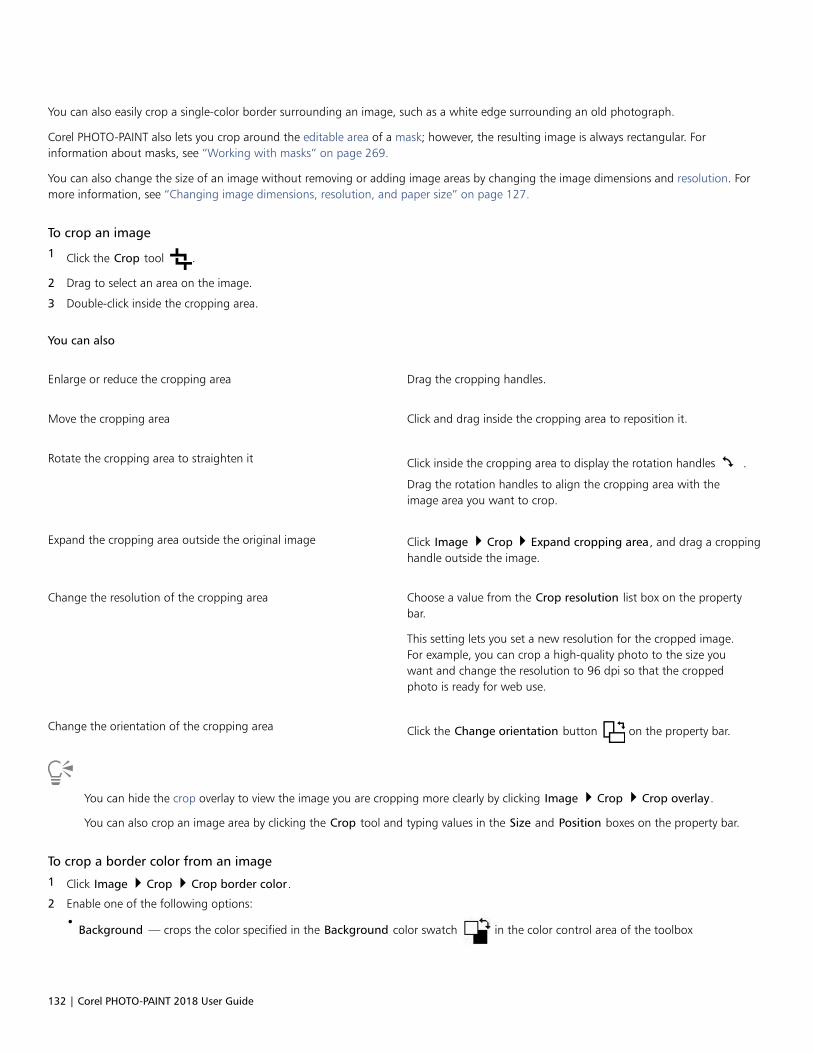
132 | Corel PHOTO-PAINT 2018 User Guide
You can also easily crop a single-color border surrounding an image, such as a white edge surrounding an old photograph.
Corel PHOTO-PAINT also lets you crop around the editable area of a mask; however, the resulting image is always rectangular. Forinformation about masks, see “Working with masks” on page 269.
You can also change the size of an image without removing or adding image areas by changing the image dimensions and resolution. Formore information, see “Changing image dimensions, resolution, and paper size” on page 127.
To crop an image
1 Click the Crop tool .
2 Drag to select an area on the image.
3 Double-click inside the cropping area.
You can also
Enlarge or reduce the cropping area Drag the cropping handles.
Move the cropping area Click and drag inside the cropping area to reposition it.
Rotate the cropping area to straighten it Click inside the cropping area to display the rotation handles .
Drag the rotation handles to align the cropping area with theimage area you want to crop.
Expand the cropping area outside the original image Click Image Crop Expand cropping area, and drag a croppinghandle outside the image.
Change the resolution of the cropping area Choose a value from the Crop resolution list box on the propertybar.
This setting lets you set a new resolution for the cropped image.For example, you can crop a high-quality photo to the size youwant and change the resolution to 96 dpi so that the croppedphoto is ready for web use.
Change the orientation of the cropping area Click the Change orientation button on the property bar.
You can hide the crop overlay to view the image you are cropping more clearly by clicking Image Crop Crop overlay.
You can also crop an image area by clicking the Crop tool and typing values in the Size and Position boxes on the property bar.
To crop a border color from an image
1 Click Image Crop Crop border color.
2 Enable one of the following options:
•Background — crops the color specified in the Background color swatch in the color control area of the toolbox
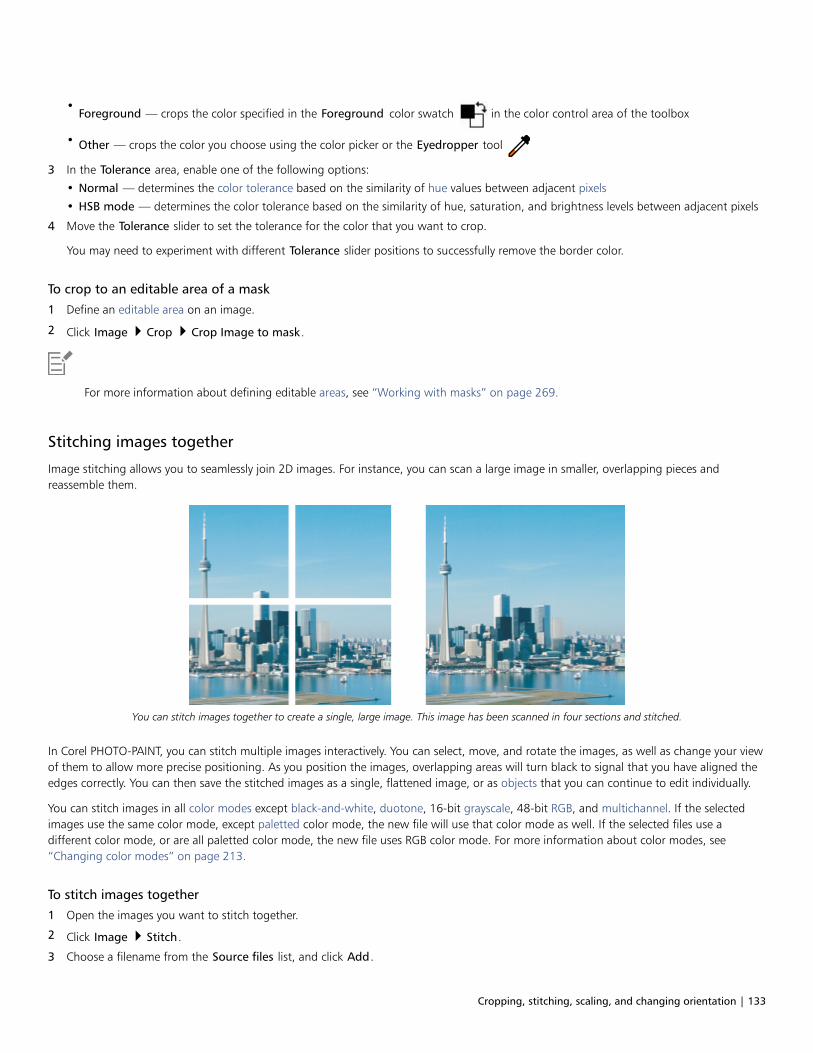
Cropping, stitching, scaling, and changing orientation | 133
•Foreground — crops the color specified in the Foreground color swatch in the color control area of the toolbox
• Other — crops the color you choose using the color picker or the Eyedropper tool
3 In the Tolerance area, enable one of the following options:
• Normal — determines the color tolerance based on the similarity of hue values between adjacent pixels
• HSB mode — determines the color tolerance based on the similarity of hue, saturation, and brightness levels between adjacent pixels
4 Move the Tolerance slider to set the tolerance for the color that you want to crop.
You may need to experiment with different Tolerance slider positions to successfully remove the border color.
To crop to an editable area of a mask
1 Define an editable area on an image.
2 Click Image Crop Crop Image to mask.
For more information about defining editable areas, see “Working with masks” on page 269.
Stitching images together
Image stitching allows you to seamlessly join 2D images. For instance, you can scan a large image in smaller, overlapping pieces andreassemble them.
You can stitch images together to create a single, large image. This image has been scanned in four sections and stitched.
In Corel PHOTO-PAINT, you can stitch multiple images interactively. You can select, move, and rotate the images, as well as change your viewof them to allow more precise positioning. As you position the images, overlapping areas will turn black to signal that you have aligned theedges correctly. You can then save the stitched images as a single, flattened image, or as objects that you can continue to edit individually.
You can stitch images in all color modes except black-and-white, duotone, 16-bit grayscale, 48-bit RGB, and multichannel. If the selectedimages use the same color mode, except paletted color mode, the new file will use that color mode as well. If the selected files use adifferent color mode, or are all paletted color mode, the new file uses RGB color mode. For more information about color modes, see“Changing color modes” on page 213.
To stitch images together
1 Open the images you want to stitch together.
2 Click Image Stitch.
3 Choose a filename from the Source files list, and click Add.
134 | Corel PHOTO-PAINT 2018 User Guide
If you want to select all open images, click Add all.
4 To change the position of an image in the Selected files list, click a filename, and click one of the following buttons:
• Up button
• Down button
5 Click OK.
6 In the Image stitch dialog box, click the Selection tool .
7 In the image stitch window, drag an image to align it with another image.
Repeat to align all images.
8 Type a value in the Blend image list box to define the number of overlapping pixels used to blend images together.
9 Enable one of the following options:
• Combine to background — creates a single, flattened image
• Create objects from images — creates a stitched image in which each source image becomes a separate object. You can later adjustthe brightness and contrast of each object so they match.
You can also
View image alignment Click the Difference tool . Overlapping image areas are
highlighted; correctly aligned image edges display as black.
Rotate one or more selected images Click the Rotate tool , and drag an image. If you want to
rotate an image by a precise angle, type a value in the Rotateimage box.
Zoom in to inspect an area where images join Click the Zoom in tool , and click where you want a close-up
view.
Zoom out Click the Zoom out tool , and click the image.
View areas outside the image stitch window Click the Pan tool , and drag an image.
Stitched images that are flattened have a smaller file size than stitched images containing separate objects.
Use the Arrow keys with the Selection tool, the Rotate tool, and the Pan tool to move, rotate and view images precisely in the imagestitch window.
Scaling images by using Smart Carver
Smart Carver lets you make an image narrower, wider, shorter, or longer without distorting the content. By automatically detecting andremoving image areas that have little structural detail, or by inserting background pixels, this feature lets you change the aspect ratio
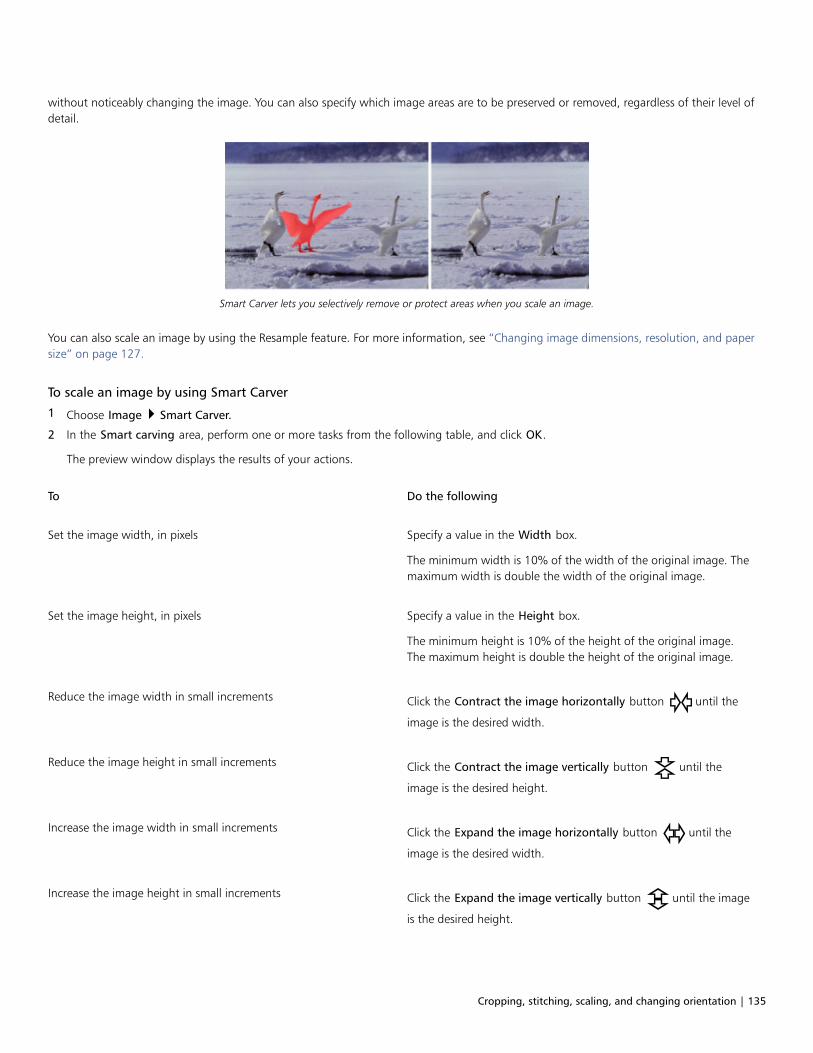
Cropping, stitching, scaling, and changing orientation | 135
without noticeably changing the image. You can also specify which image areas are to be preserved or removed, regardless of their level ofdetail.
Smart Carver lets you selectively remove or protect areas when you scale an image.
You can also scale an image by using the Resample feature. For more information, see “Changing image dimensions, resolution, and papersize” on page 127.
To scale an image by using Smart Carver
1 Choose Image Smart Carver.
2 In the Smart carving area, perform one or more tasks from the following table, and click OK.
The preview window displays the results of your actions.
To Do the following
Set the image width, in pixels Specify a value in the Width box.
The minimum width is 10% of the width of the original image. Themaximum width is double the width of the original image.
Set the image height, in pixels Specify a value in the Height box.
The minimum height is 10% of the height of the original image.The maximum height is double the height of the original image.
Reduce the image width in small increments Click the Contract the image horizontally button until the
image is the desired width.
Reduce the image height in small increments Click the Contract the image vertically button until the
image is the desired height.
Increase the image width in small increments Click the Expand the image horizontally button until the
image is the desired width.
Increase the image height in small increments Click the Expand the image vertically button until the image
is the desired height.
136 | Corel PHOTO-PAINT 2018 User Guide
You can also save the current settings in the Smart carver dialog box by clicking the Save preset button , and specifying a name
in the Setting name box.
To remove an area as you scale an image
1 Choose Image Smart carver.
2 In the Object removal area, click the Remove button , and specify the brush size in the Nib size box.
3 In the preview window, paint over the image areas that you want to remove.
A red overlay appears over the selected areas.
4 Click the Auto-contract horizontally or the Auto-contract vertically button to scale the image and simultaneously remove
the area covered by the red overlay.
5 Click the Background fusion button to smooth over the region where the area was cut out and the remaining parts merged.
You can also
Protect an image area Click the Preserve button , and paint over the image area that
you want to protect. A green overlay appears over the selectedarea.
Adjust the area to be protected or removed by deleting parts of theselection overlay
Click the Eraser button , and drag over those parts of the
selection overlay that you want to delete.
Hide the selection overlay in the preview window Enable the Hide mask check box.
Discard changes to the image and start all over Click Reset.
Undo the last brush stroke or eraser stroke Click the Undo button .
Reverse the last Undo operation Click the Redo button .
Zoom in or out Click the Zoom in or Zoom out buttons, and click in the
preview window.
View an area that falls outside the preview window Click the Pan button , and drag in the preview window.
Display an image at its actual size Click the Zoom to 100% button .
Fit an image in the preview window Click the Zoom to fit button .
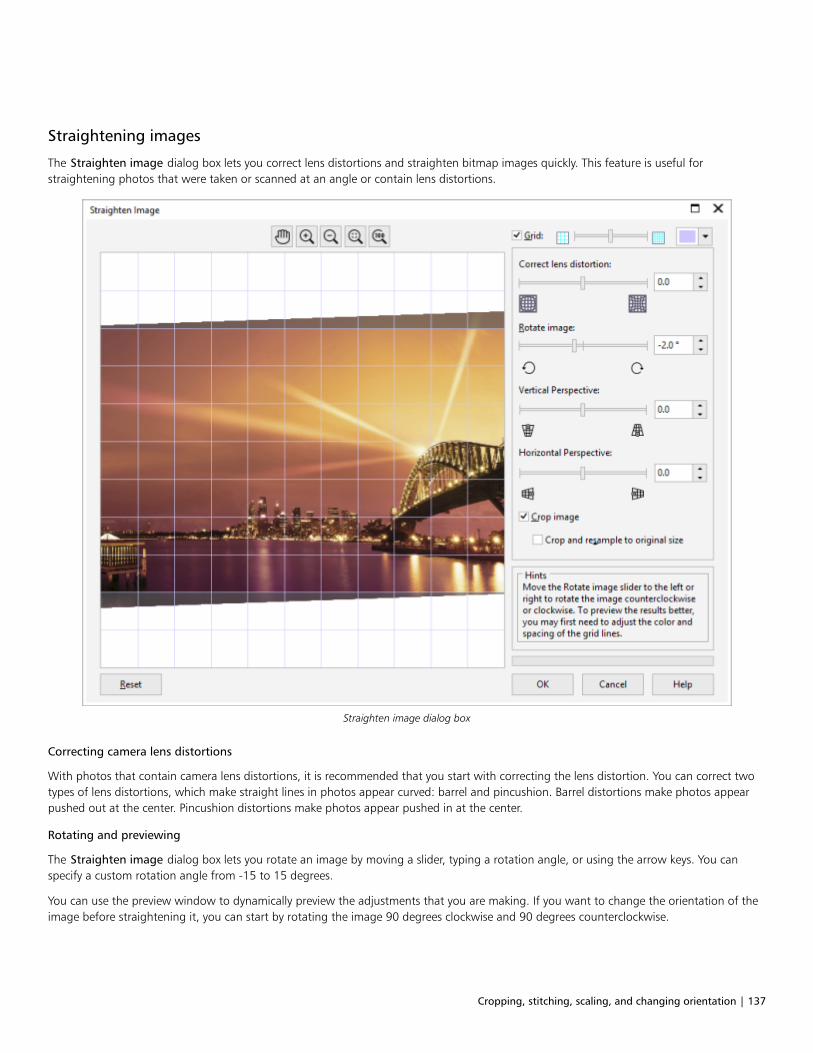
Cropping, stitching, scaling, and changing orientation | 137
Straightening images
The Straighten image dialog box lets you correct lens distortions and straighten bitmap images quickly. This feature is useful forstraightening photos that were taken or scanned at an angle or contain lens distortions.
Straighten image dialog box
Correcting camera lens distortions
With photos that contain camera lens distortions, it is recommended that you start with correcting the lens distortion. You can correct twotypes of lens distortions, which make straight lines in photos appear curved: barrel and pincushion. Barrel distortions make photos appearpushed out at the center. Pincushion distortions make photos appear pushed in at the center.
Rotating and previewing
The Straighten image dialog box lets you rotate an image by moving a slider, typing a rotation angle, or using the arrow keys. You canspecify a custom rotation angle from -15 to 15 degrees.
You can use the preview window to dynamically preview the adjustments that you are making. If you want to change the orientation of theimage before straightening it, you can start by rotating the image 90 degrees clockwise and 90 degrees counterclockwise.
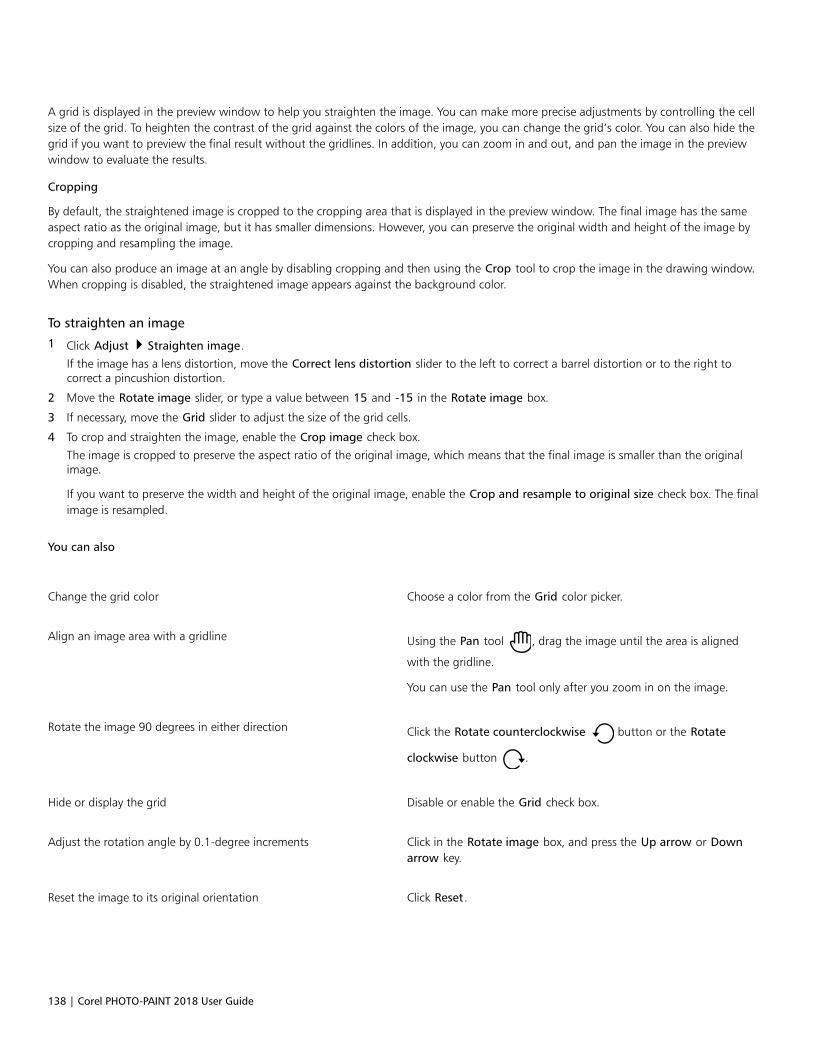
138 | Corel PHOTO-PAINT 2018 User Guide
A grid is displayed in the preview window to help you straighten the image. You can make more precise adjustments by controlling the cellsize of the grid. To heighten the contrast of the grid against the colors of the image, you can change the grid’s color. You can also hide thegrid if you want to preview the final result without the gridlines. In addition, you can zoom in and out, and pan the image in the previewwindow to evaluate the results.
Cropping
By default, the straightened image is cropped to the cropping area that is displayed in the preview window. The final image has the sameaspect ratio as the original image, but it has smaller dimensions. However, you can preserve the original width and height of the image bycropping and resampling the image.
You can also produce an image at an angle by disabling cropping and then using the Crop tool to crop the image in the drawing window.When cropping is disabled, the straightened image appears against the background color.
To straighten an image
1 Click Adjust Straighten image.
If the image has a lens distortion, move the Correct lens distortion slider to the left to correct a barrel distortion or to the right tocorrect a pincushion distortion.
2 Move the Rotate image slider, or type a value between 15 and -15 in the Rotate image box.
3 If necessary, move the Grid slider to adjust the size of the grid cells.
4 To crop and straighten the image, enable the Crop image check box.
The image is cropped to preserve the aspect ratio of the original image, which means that the final image is smaller than the originalimage.
If you want to preserve the width and height of the original image, enable the Crop and resample to original size check box. The finalimage is resampled.
You can also
Change the grid color Choose a color from the Grid color picker.
Align an image area with a gridline Using the Pan tool , drag the image until the area is aligned
with the gridline.
You can use the Pan tool only after you zoom in on the image.
Rotate the image 90 degrees in either direction Click the Rotate counterclockwise button or the Rotate
clockwise button .
Hide or display the grid Disable or enable the Grid check box.
Adjust the rotation angle by 0.1-degree increments Click in the Rotate image box, and press the Up arrow or Downarrow key.
Reset the image to its original orientation Click Reset.
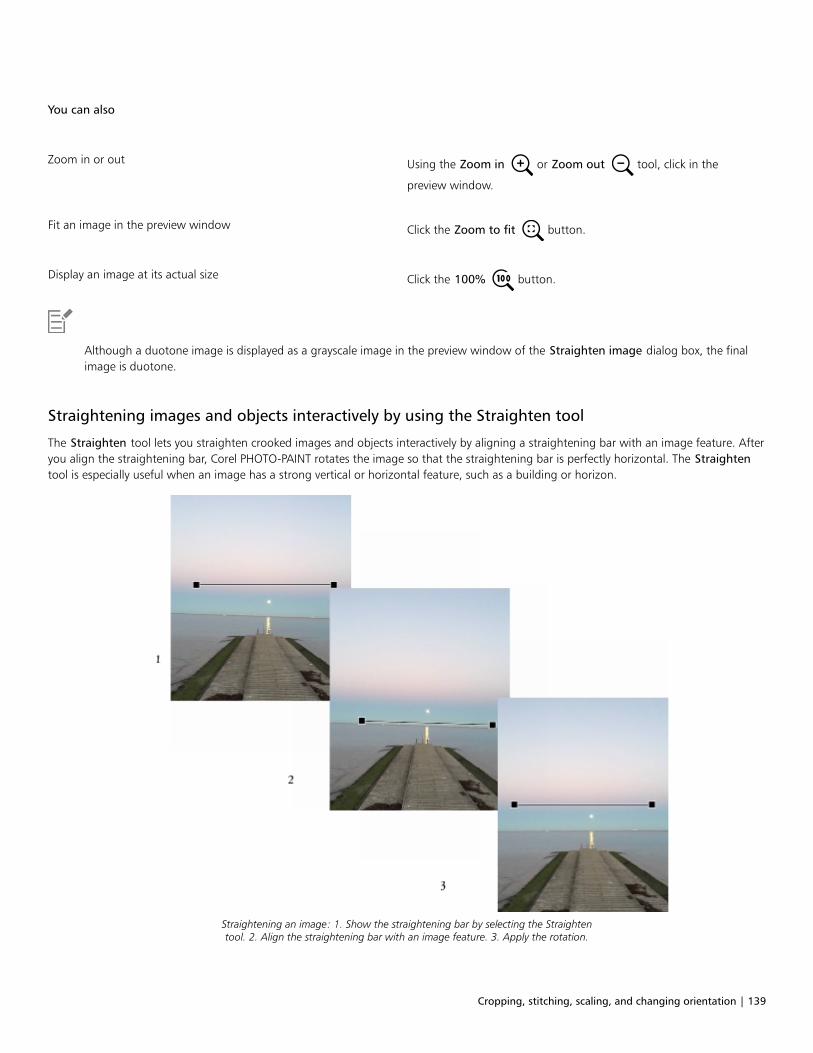
Cropping, stitching, scaling, and changing orientation | 139
You can also
Zoom in or out Using the Zoom in or Zoom out tool, click in the
preview window.
Fit an image in the preview window Click the Zoom to fit button.
Display an image at its actual size Click the 100% button.
Although a duotone image is displayed as a grayscale image in the preview window of the Straighten image dialog box, the finalimage is duotone.
Straightening images and objects interactively by using the Straighten tool
The Straighten tool lets you straighten crooked images and objects interactively by aligning a straightening bar with an image feature. Afteryou align the straightening bar, Corel PHOTO-PAINT rotates the image so that the straightening bar is perfectly horizontal. The Straightentool is especially useful when an image has a strong vertical or horizontal feature, such as a building or horizon.
Straightening an image: 1. Show the straightening bar by selecting the Straightentool. 2. Align the straightening bar with an image feature. 3. Apply the rotation.
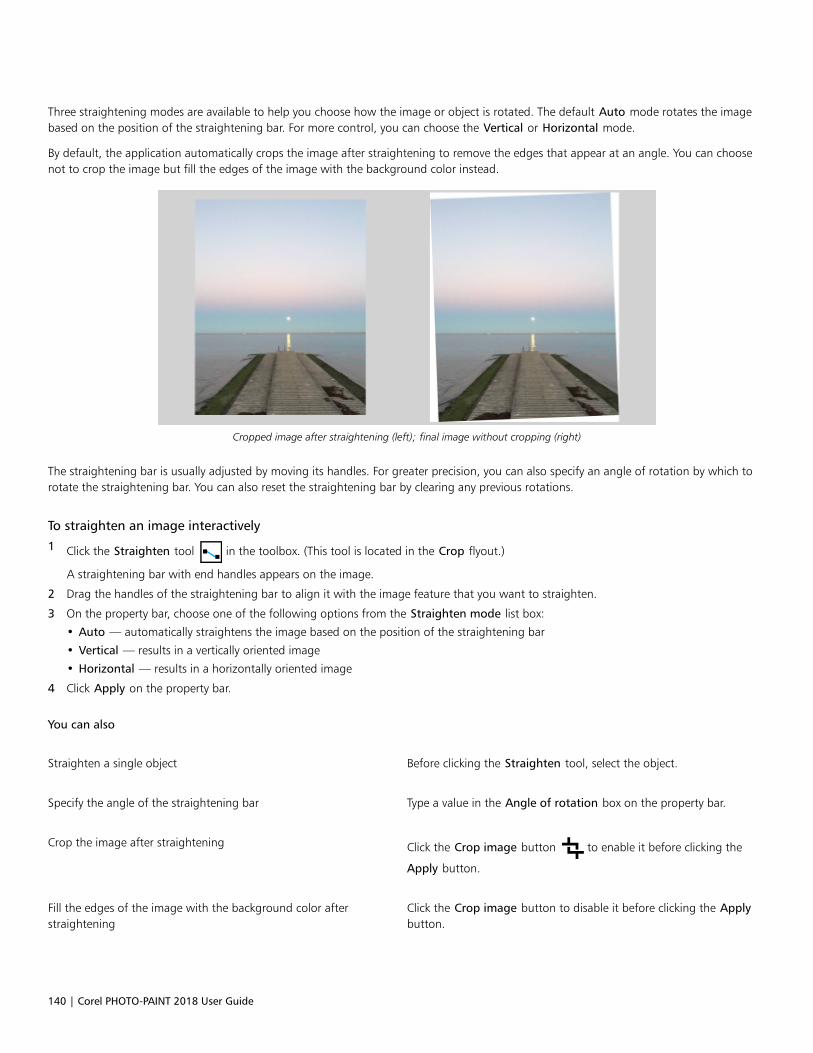
140 | Corel PHOTO-PAINT 2018 User Guide
Three straightening modes are available to help you choose how the image or object is rotated. The default Auto mode rotates the imagebased on the position of the straightening bar. For more control, you can choose the Vertical or Horizontal mode.
By default, the application automatically crops the image after straightening to remove the edges that appear at an angle. You can choosenot to crop the image but fill the edges of the image with the background color instead.
Cropped image after straightening (left); final image without cropping (right)
The straightening bar is usually adjusted by moving its handles. For greater precision, you can also specify an angle of rotation by which torotate the straightening bar. You can also reset the straightening bar by clearing any previous rotations.
To straighten an image interactively
1 Click the Straighten tool in the toolbox. (This tool is located in the Crop flyout.)
A straightening bar with end handles appears on the image.
2 Drag the handles of the straightening bar to align it with the image feature that you want to straighten.
3 On the property bar, choose one of the following options from the Straighten mode list box:
• Auto — automatically straightens the image based on the position of the straightening bar
• Vertical — results in a vertically oriented image
• Horizontal — results in a horizontally oriented image
4 Click Apply on the property bar.
You can also
Straighten a single object Before clicking the Straighten tool, select the object.
Specify the angle of the straightening bar Type a value in the Angle of rotation box on the property bar.
Crop the image after straightening Click the Crop image button to enable it before clicking the
Apply button.
Fill the edges of the image with the background color afterstraightening
Click the Crop image button to disable it before clicking the Applybutton.
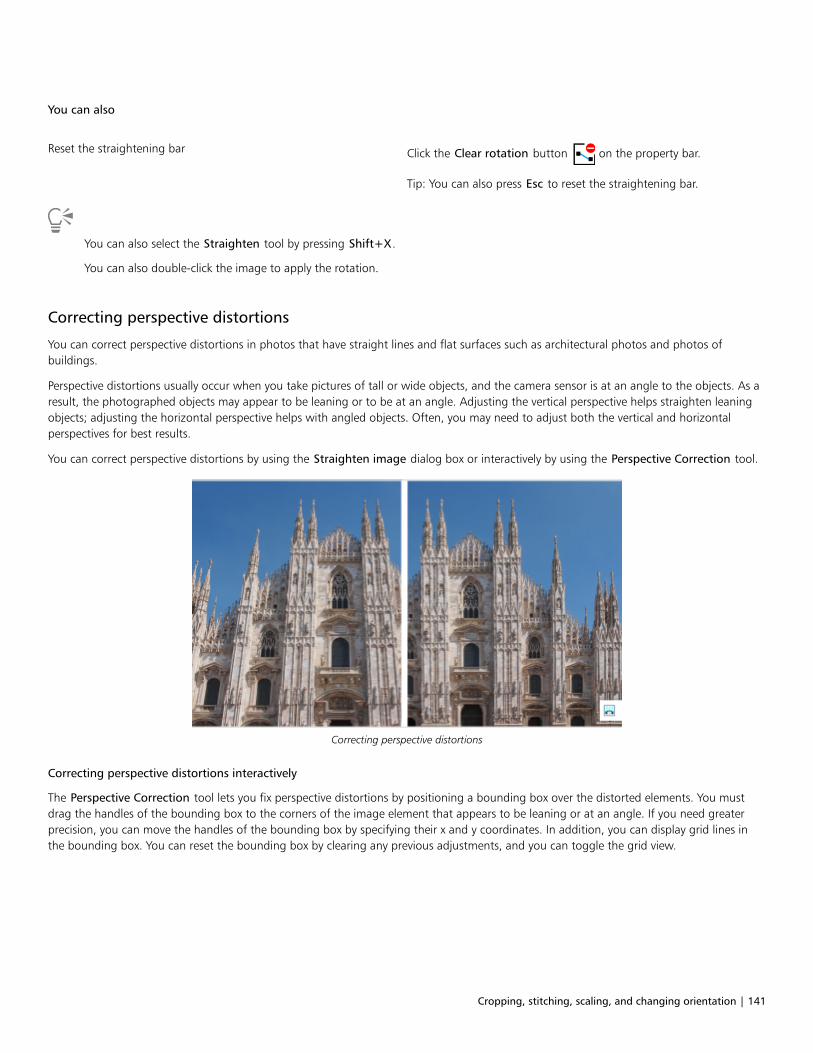
Cropping, stitching, scaling, and changing orientation | 141
You can also
Reset the straightening bar Click the Clear rotation button on the property bar.
Tip: You can also press Esc to reset the straightening bar.
You can also select the Straighten tool by pressing Shift+X.
You can also double-click the image to apply the rotation.
Correcting perspective distortions
You can correct perspective distortions in photos that have straight lines and flat surfaces such as architectural photos and photos ofbuildings.
Perspective distortions usually occur when you take pictures of tall or wide objects, and the camera sensor is at an angle to the objects. As aresult, the photographed objects may appear to be leaning or to be at an angle. Adjusting the vertical perspective helps straighten leaningobjects; adjusting the horizontal perspective helps with angled objects. Often, you may need to adjust both the vertical and horizontalperspectives for best results.
You can correct perspective distortions by using the Straighten image dialog box or interactively by using the Perspective Correction tool.
Correcting perspective distortions
Correcting perspective distortions interactively
The Perspective Correction tool lets you fix perspective distortions by positioning a bounding box over the distorted elements. You mustdrag the handles of the bounding box to the corners of the image element that appears to be leaning or at an angle. If you need greaterprecision, you can move the handles of the bounding box by specifying their x and y coordinates. In addition, you can display grid lines inthe bounding box. You can reset the bounding box by clearing any previous adjustments, and you can toggle the grid view.
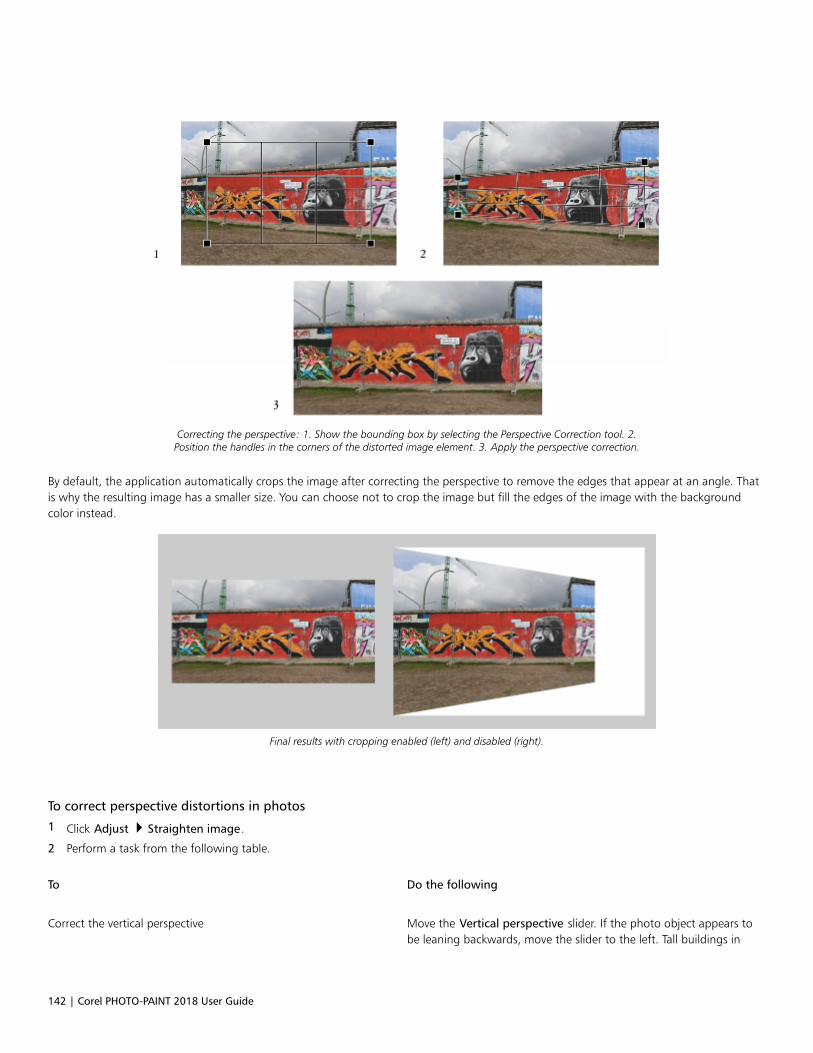
142 | Corel PHOTO-PAINT 2018 User Guide
Correcting the perspective: 1. Show the bounding box by selecting the Perspective Correction tool. 2.Position the handles in the corners of the distorted image element. 3. Apply the perspective correction.
By default, the application automatically crops the image after correcting the perspective to remove the edges that appear at an angle. Thatis why the resulting image has a smaller size. You can choose not to crop the image but fill the edges of the image with the backgroundcolor instead.
Final results with cropping enabled (left) and disabled (right).
To correct perspective distortions in photos
1 Click Adjust Straighten image.
2 Perform a task from the following table.
To Do the following
Correct the vertical perspective Move the Vertical perspective slider. If the photo object appears tobe leaning backwards, move the slider to the left. Tall buildings in
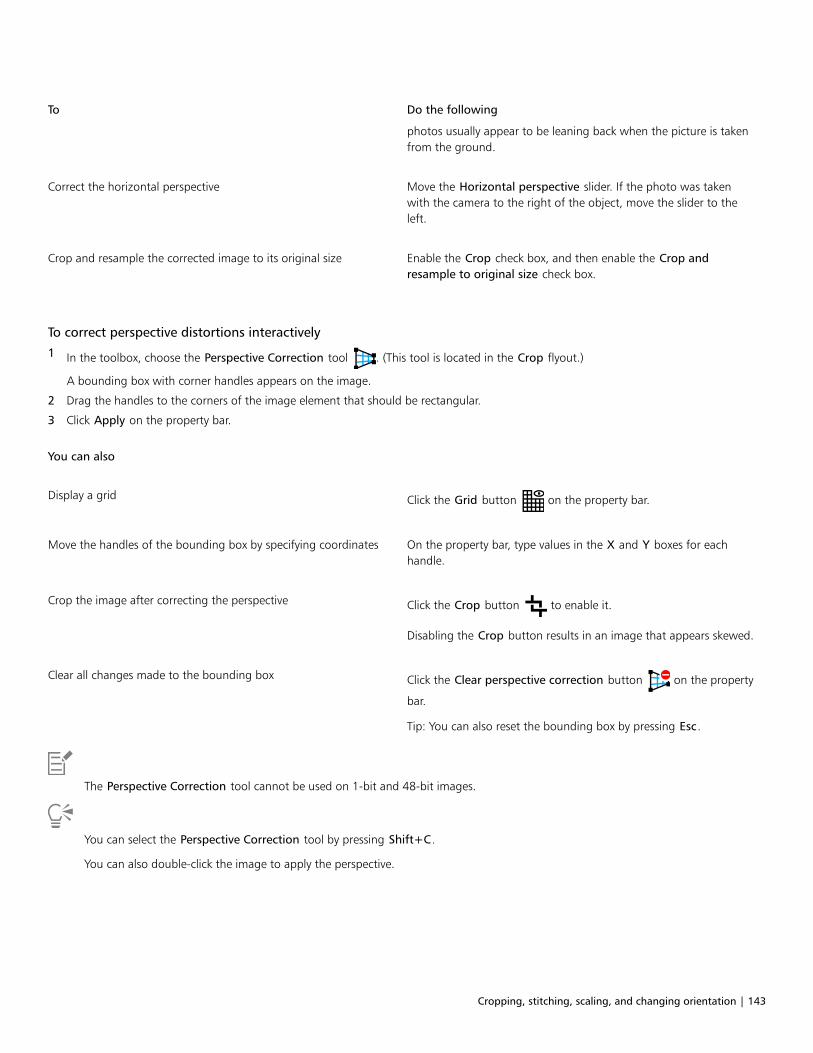
Cropping, stitching, scaling, and changing orientation | 143
To Do the following
photos usually appear to be leaning back when the picture is takenfrom the ground.
Correct the horizontal perspective Move the Horizontal perspective slider. If the photo was takenwith the camera to the right of the object, move the slider to theleft.
Crop and resample the corrected image to its original size Enable the Crop check box, and then enable the Crop andresample to original size check box.
To correct perspective distortions interactively
1 In the toolbox, choose the Perspective Correction tool . (This tool is located in the Crop flyout.)
A bounding box with corner handles appears on the image.
2 Drag the handles to the corners of the image element that should be rectangular.
3 Click Apply on the property bar.
You can also
Display a grid Click the Grid button on the property bar.
Move the handles of the bounding box by specifying coordinates On the property bar, type values in the X and Y boxes for eachhandle.
Crop the image after correcting the perspective Click the Crop button to enable it.
Disabling the Crop button results in an image that appears skewed.
Clear all changes made to the bounding box Click the Clear perspective correction button on the property
bar.
Tip: You can also reset the bounding box by pressing Esc.
The Perspective Correction tool cannot be used on 1-bit and 48-bit images.
You can select the Perspective Correction tool by pressing Shift+C.
You can also double-click the image to apply the perspective.
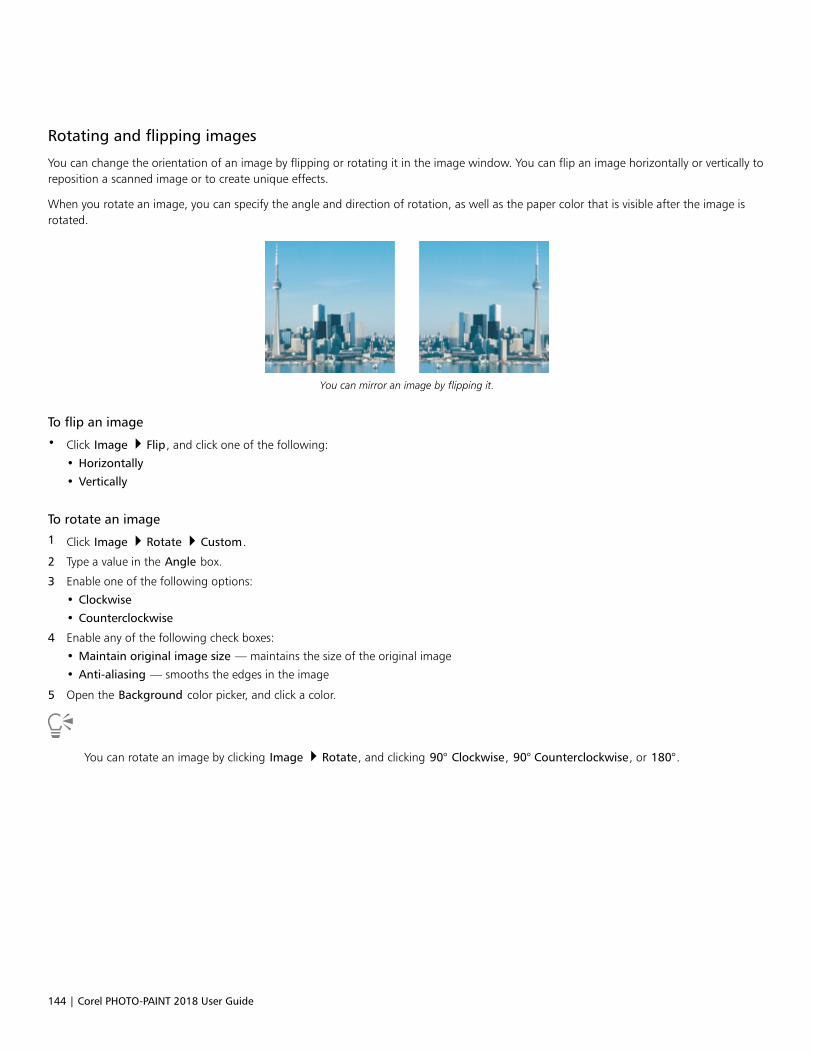
144 | Corel PHOTO-PAINT 2018 User Guide
Rotating and flipping images
You can change the orientation of an image by flipping or rotating it in the image window. You can flip an image horizontally or vertically toreposition a scanned image or to create unique effects.
When you rotate an image, you can specify the angle and direction of rotation, as well as the paper color that is visible after the image isrotated.
You can mirror an image by flipping it.
To flip an image
• Click Image Flip, and click one of the following:
• Horizontally
• Vertically
To rotate an image
1 Click Image Rotate Custom.
2 Type a value in the Angle box.
3 Enable one of the following options:
• Clockwise
• Counterclockwise
4 Enable any of the following check boxes:
• Maintain original image size — maintains the size of the original image
• Anti-aliasing — smooths the edges in the image
5 Open the Background color picker, and click a color.
You can rotate an image by clicking Image Rotate, and clicking 90° Clockwise, 90° Counterclockwise, or 180°.
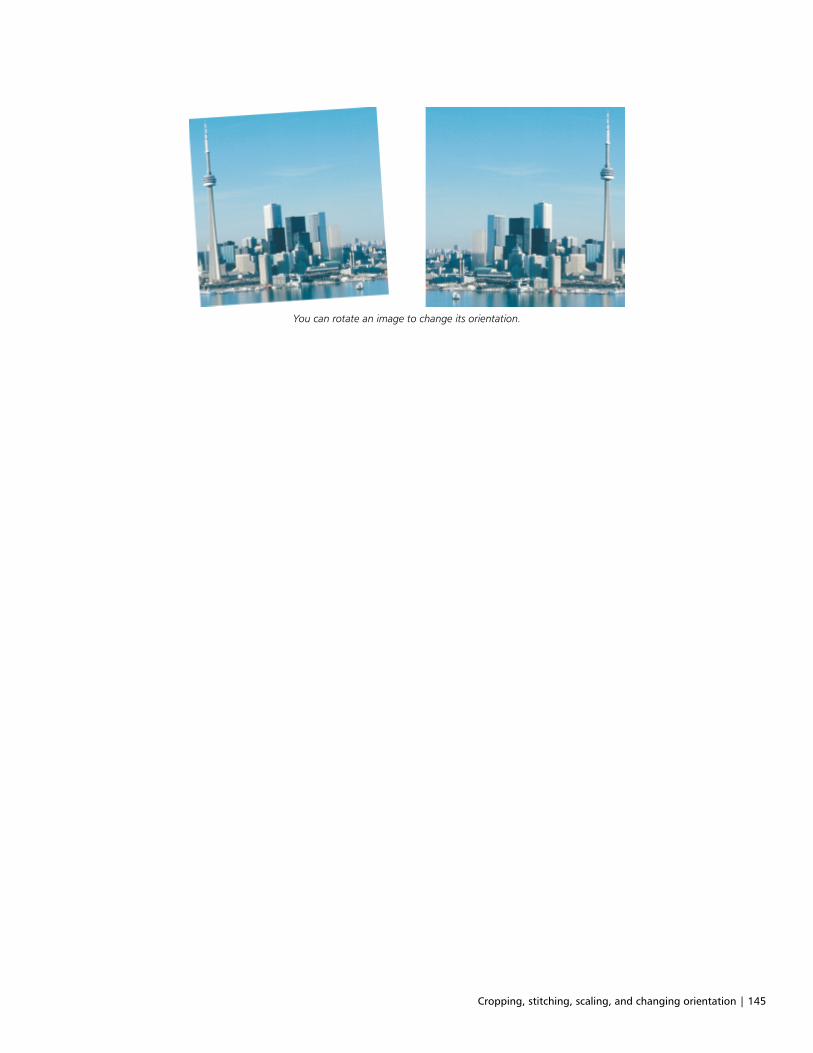
Cropping, stitching, scaling, and changing orientation | 145
You can rotate an image to change its orientation.

146 | Corel PHOTO-PAINT 2018 User Guide
Retouching | 147
Retouching
Corel PHOTO-PAINT lets you retouch images to improve their quality or modify their contents.
This section contains the following topics:• “Improving scanned images” (page 147)• “Removing red-eye” (page 148)• “Removing dust and scratch marks” (page 149)• “Cloning image areas” (page 152)• “Sharpening images” (page 154)• “Removing artifacts and noise from JPEG images” (page 156)• “Erasing image areas” (page 156)• “Smearing, smudging, and blending colors” (page 158)
Improving scanned images
You can remove lines from scanned or interlaced video images. These lines can be filled with copies of adjacent lines of pixels, or with colorsderived from surrounding pixels. You can also remove moiré or noise. Moiré is the wave pattern produced when halftone screens of twodifferent frequencies are superimposed on the same image. Noise is the speckled effect produced by scanning or video-capturing.
You can remove lines from a scanned image using the Deinterlace filter.
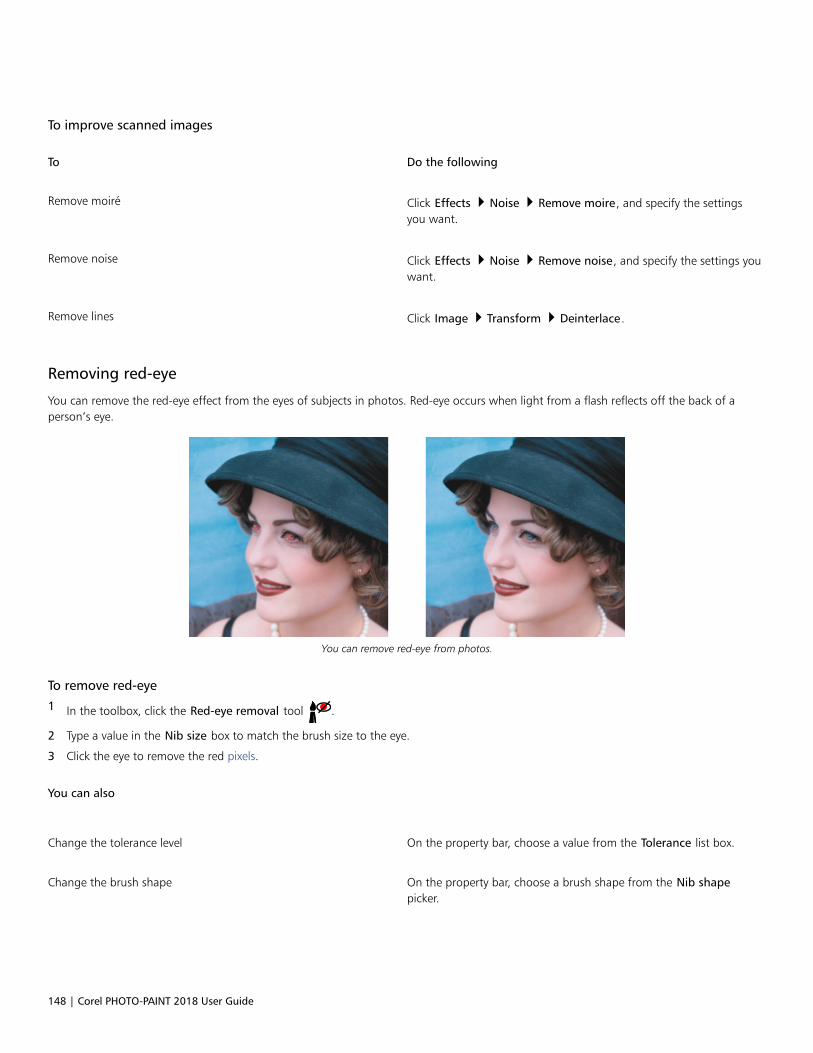
148 | Corel PHOTO-PAINT 2018 User Guide
To improve scanned images
To Do the following
Remove moiré Click Effects Noise Remove moire, and specify the settingsyou want.
Remove noise Click Effects Noise Remove noise, and specify the settings youwant.
Remove lines Click Image Transform Deinterlace.
Removing red-eye
You can remove the red-eye effect from the eyes of subjects in photos. Red-eye occurs when light from a flash reflects off the back of aperson’s eye.
You can remove red-eye from photos.
To remove red-eye
1 In the toolbox, click the Red-eye removal tool .
2 Type a value in the Nib size box to match the brush size to the eye.
3 Click the eye to remove the red pixels.
You can also
Change the tolerance level On the property bar, choose a value from the Tolerance list box.
Change the brush shape On the property bar, choose a brush shape from the Nib shapepicker.
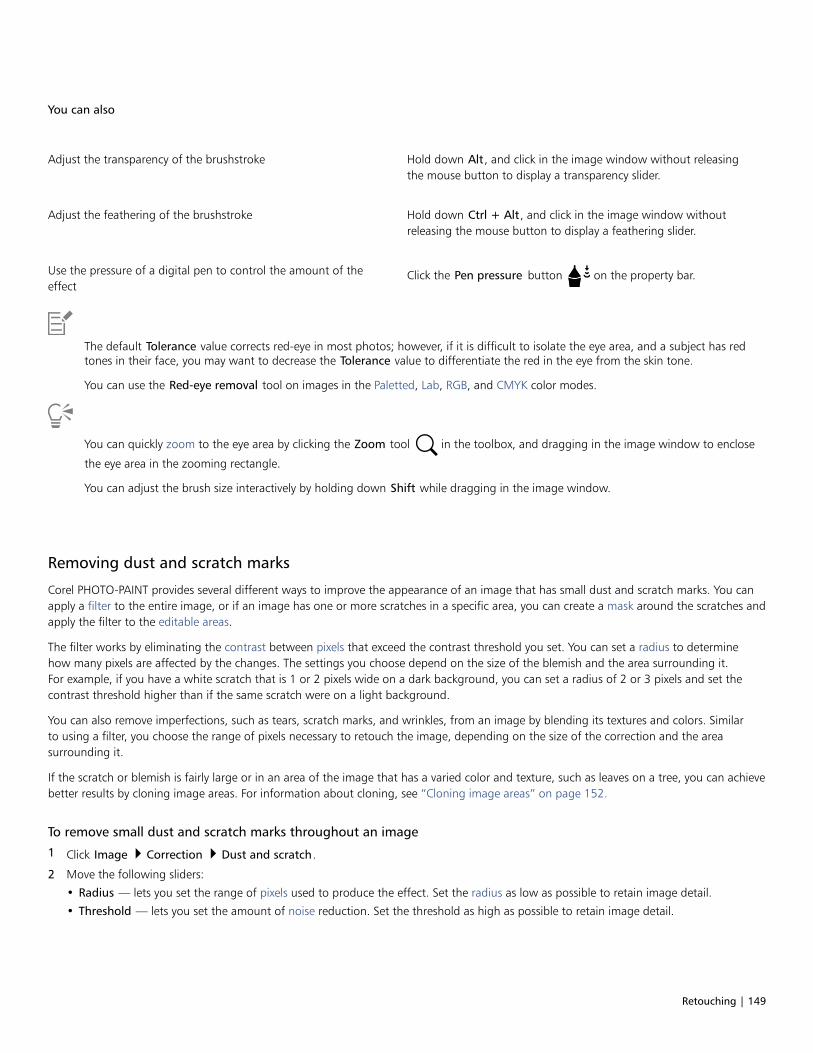
Retouching | 149
You can also
Adjust the transparency of the brushstroke Hold down Alt, and click in the image window without releasingthe mouse button to display a transparency slider.
Adjust the feathering of the brushstroke Hold down Ctrl + Alt, and click in the image window withoutreleasing the mouse button to display a feathering slider.
Use the pressure of a digital pen to control the amount of theeffect
Click the Pen pressure button on the property bar.
The default Tolerance value corrects red-eye in most photos; however, if it is difficult to isolate the eye area, and a subject has redtones in their face, you may want to decrease the Tolerance value to differentiate the red in the eye from the skin tone.
You can use the Red-eye removal tool on images in the Paletted, Lab, RGB, and CMYK color modes.
You can quickly zoom to the eye area by clicking the Zoom tool in the toolbox, and dragging in the image window to enclose
the eye area in the zooming rectangle.
You can adjust the brush size interactively by holding down Shift while dragging in the image window.
Removing dust and scratch marks
Corel PHOTO-PAINT provides several different ways to improve the appearance of an image that has small dust and scratch marks. You canapply a filter to the entire image, or if an image has one or more scratches in a specific area, you can create a mask around the scratches andapply the filter to the editable areas.
The filter works by eliminating the contrast between pixels that exceed the contrast threshold you set. You can set a radius to determinehow many pixels are affected by the changes. The settings you choose depend on the size of the blemish and the area surrounding it.For example, if you have a white scratch that is 1 or 2 pixels wide on a dark background, you can set a radius of 2 or 3 pixels and set thecontrast threshold higher than if the same scratch were on a light background.
You can also remove imperfections, such as tears, scratch marks, and wrinkles, from an image by blending its textures and colors. Similarto using a filter, you choose the range of pixels necessary to retouch the image, depending on the size of the correction and the areasurrounding it.
If the scratch or blemish is fairly large or in an area of the image that has a varied color and texture, such as leaves on a tree, you can achievebetter results by cloning image areas. For information about cloning, see “Cloning image areas” on page 152.
To remove small dust and scratch marks throughout an image
1 Click Image Correction Dust and scratch.
2 Move the following sliders:
• Radius — lets you set the range of pixels used to produce the effect. Set the radius as low as possible to retain image detail.
• Threshold — lets you set the amount of noise reduction. Set the threshold as high as possible to retain image detail.
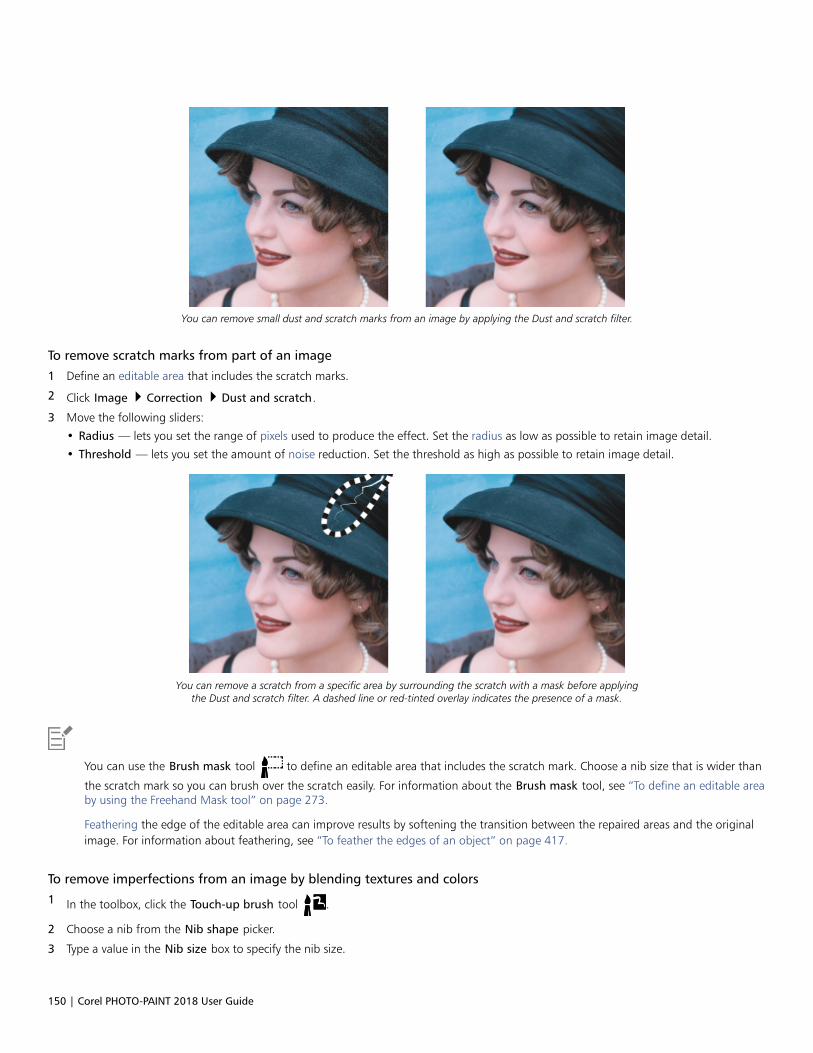
150 | Corel PHOTO-PAINT 2018 User Guide
You can remove small dust and scratch marks from an image by applying the Dust and scratch filter.
To remove scratch marks from part of an image
1 Define an editable area that includes the scratch marks.
2 Click Image Correction Dust and scratch.
3 Move the following sliders:
• Radius — lets you set the range of pixels used to produce the effect. Set the radius as low as possible to retain image detail.
• Threshold — lets you set the amount of noise reduction. Set the threshold as high as possible to retain image detail.
You can remove a scratch from a specific area by surrounding the scratch with a mask before applyingthe Dust and scratch filter. A dashed line or red-tinted overlay indicates the presence of a mask.
You can use the Brush mask tool to define an editable area that includes the scratch mark. Choose a nib size that is wider than
the scratch mark so you can brush over the scratch easily. For information about the Brush mask tool, see “To define an editable areaby using the Freehand Mask tool” on page 273.
Feathering the edge of the editable area can improve results by softening the transition between the repaired areas and the originalimage. For information about feathering, see “To feather the edges of an object” on page 417.
To remove imperfections from an image by blending textures and colors
1 In the toolbox, click the Touch-up brush tool .
2 Choose a nib from the Nib shape picker.
3 Type a value in the Nib size box to specify the nib size.
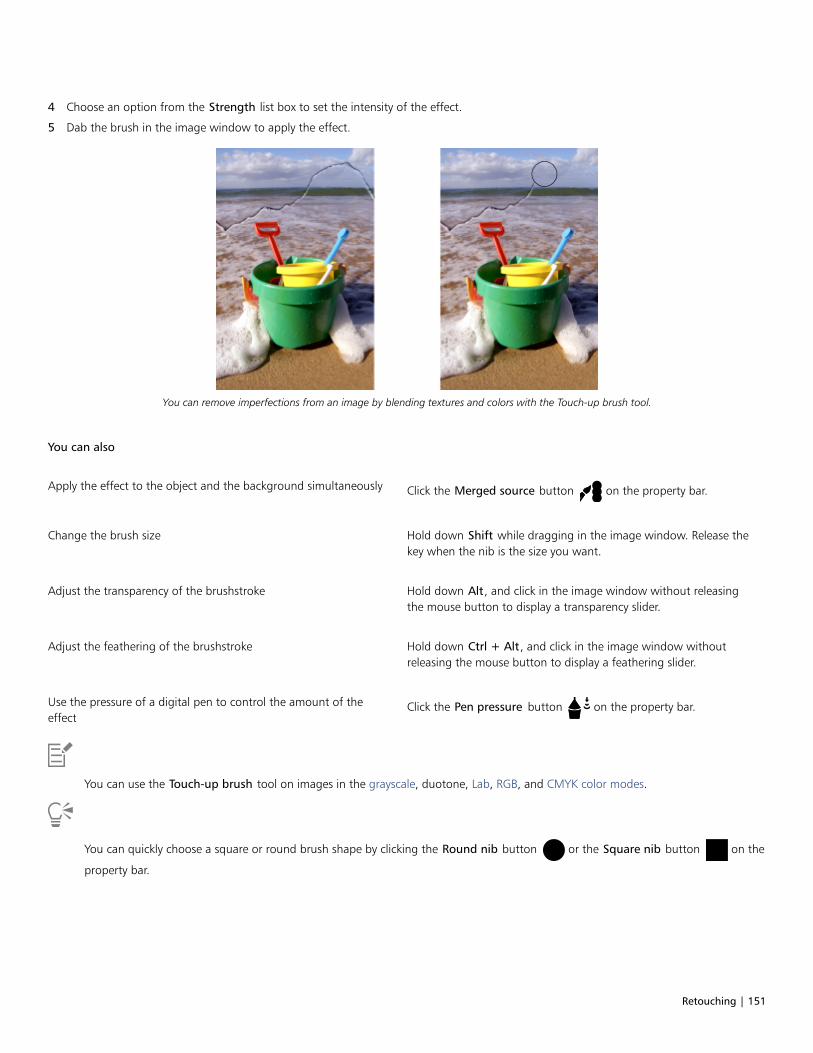
Retouching | 151
4 Choose an option from the Strength list box to set the intensity of the effect.
5 Dab the brush in the image window to apply the effect.
You can remove imperfections from an image by blending textures and colors with the Touch-up brush tool.
You can also
Apply the effect to the object and the background simultaneously Click the Merged source button on the property bar.
Change the brush size Hold down Shift while dragging in the image window. Release thekey when the nib is the size you want.
Adjust the transparency of the brushstroke Hold down Alt, and click in the image window without releasingthe mouse button to display a transparency slider.
Adjust the feathering of the brushstroke Hold down Ctrl + Alt, and click in the image window withoutreleasing the mouse button to display a feathering slider.
Use the pressure of a digital pen to control the amount of theeffect
Click the Pen pressure button on the property bar.
You can use the Touch-up brush tool on images in the grayscale, duotone, Lab, RGB, and CMYK color modes.
You can quickly choose a square or round brush shape by clicking the Round nib button or the Square nib button on the
property bar.
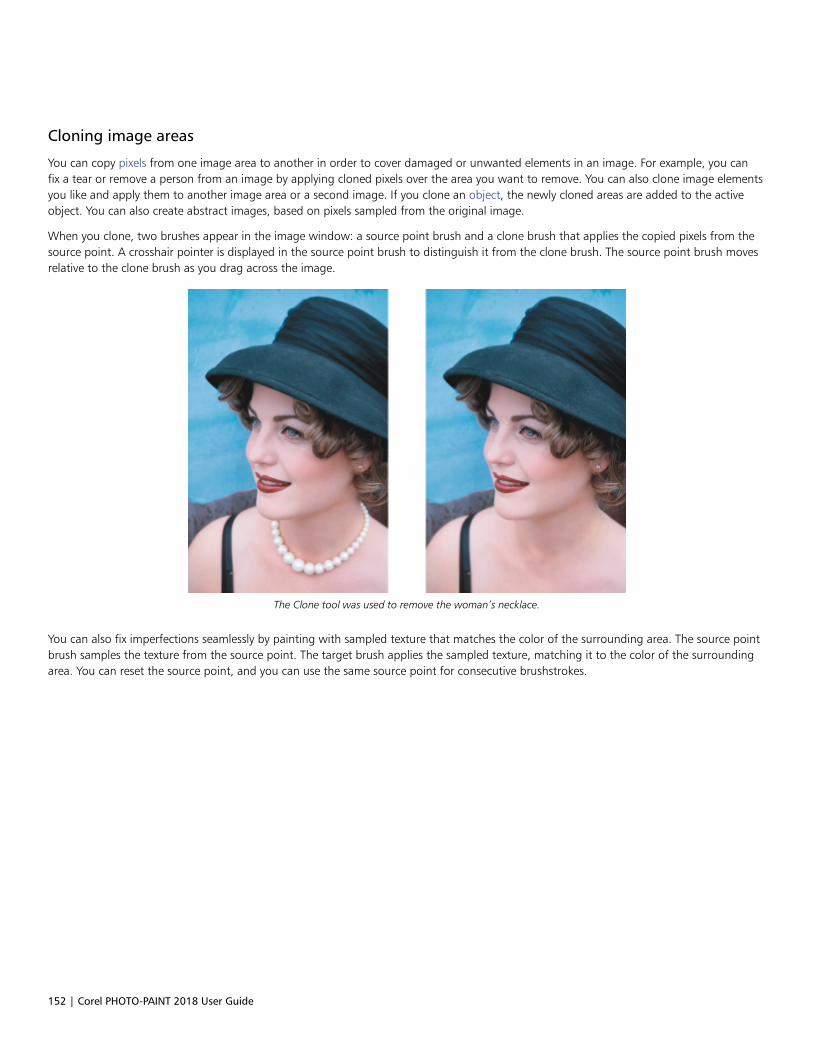
152 | Corel PHOTO-PAINT 2018 User Guide
Cloning image areas
You can copy pixels from one image area to another in order to cover damaged or unwanted elements in an image. For example, you canfix a tear or remove a person from an image by applying cloned pixels over the area you want to remove. You can also clone image elementsyou like and apply them to another image area or a second image. If you clone an object, the newly cloned areas are added to the activeobject. You can also create abstract images, based on pixels sampled from the original image.
When you clone, two brushes appear in the image window: a source point brush and a clone brush that applies the copied pixels from thesource point. A crosshair pointer is displayed in the source point brush to distinguish it from the clone brush. The source point brush movesrelative to the clone brush as you drag across the image.
The Clone tool was used to remove the woman’s necklace.
You can also fix imperfections seamlessly by painting with sampled texture that matches the color of the surrounding area. The source pointbrush samples the texture from the source point. The target brush applies the sampled texture, matching it to the color of the surroundingarea. You can reset the source point, and you can use the same source point for consecutive brushstrokes.
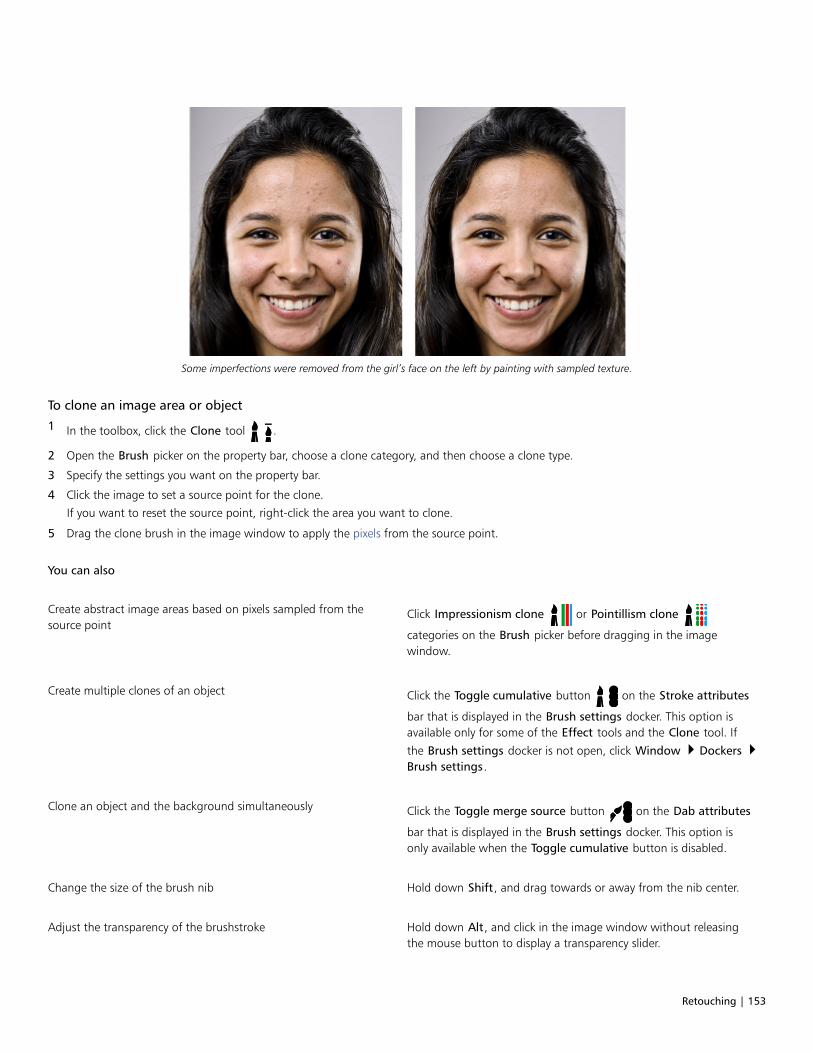
Retouching | 153
Some imperfections were removed from the girl’s face on the left by painting with sampled texture.
To clone an image area or object
1 In the toolbox, click the Clone tool .
2 Open the Brush picker on the property bar, choose a clone category, and then choose a clone type.
3 Specify the settings you want on the property bar.
4 Click the image to set a source point for the clone.
If you want to reset the source point, right-click the area you want to clone.
5 Drag the clone brush in the image window to apply the pixels from the source point.
You can also
Create abstract image areas based on pixels sampled from thesource point
Click Impressionism clone or Pointillism clone
categories on the Brush picker before dragging in the imagewindow.
Create multiple clones of an object Click the Toggle cumulative button on the Stroke attributes
bar that is displayed in the Brush settings docker. This option isavailable only for some of the Effect tools and the Clone tool. If
the Brush settings docker is not open, click Window Dockers Brush settings.
Clone an object and the background simultaneously Click the Toggle merge source button on the Dab attributes
bar that is displayed in the Brush settings docker. This option isonly available when the Toggle cumulative button is disabled.
Change the size of the brush nib Hold down Shift, and drag towards or away from the nib center.
Adjust the transparency of the brushstroke Hold down Alt, and click in the image window without releasingthe mouse button to display a transparency slider.
154 | Corel PHOTO-PAINT 2018 User Guide
You can also
Adjust the feathering of the brushstroke Hold down Ctrl + Alt, and click in the image window withoutreleasing the mouse button to display a transparency slider.
Use the same source point as the last brushstroke Hold down Shift + Alt, and drag in the image window.
Constrain the brushstroke to a straight line Hold down Ctrl, and drag in the image window. To change thedirection (from vertical to horizontal or vice versa), hold downShift.
Clone in a straight line between two clicked points Right-click to set the source point and start cloning. Hold downCtrl + Alt + Shift, and click in the image window to clone in astraight line.
To retouch image areas using sampled texture
1 In the toolbox, click the Healing Clone tool .
2 Specify the settings you want on the property bar.
3 Click the image to set a source point, sampling the texture that you want.
If you want to reset the source point, right-click the area that you want to sample.
4 Drag across the area that you want to cover.
You can also
Use the same source point as the last brushstroke Hold down Shift + Alt, and drag in the image window.
Change the size of the brush nib Hold down Shift, and drag towards or away from the nib center.
Modify brush attributes Click Window Dockers Brush Settings, click the roll-downarrow on the available bars in the Brush Settings docker, andspecify values for the attributes you want.
Improve tool performance On the property bar, click the Preview button to disable it.
The effect of disabling the preview is obvious only with big brushnibs.
Sharpening images
You can sharpen images to increase contrast, enhance image edges, or reduce shading. To sharpen an image, or an editable area of animage, you can use filters or brushstrokes. Filters can also be applied using a lens. For more information about lenses, see “Working withlenses” on page 177. Sharpening is usually done after adjusting the color and tone of an image and after resampling or resizing.

Retouching | 155
You can reveal more image detail by sharpening an image.
To sharpen an image by applying a filter
1 Click Image Correction Tune sharpen.
2 Move the Percentage slider to set the amount of sharpening that is applied each time you click a thumbnail button.
3 Click any of the following thumbnail buttons:
• Unsharp mask — lets you accentuate edge detail and focus blurred areas in the image without removing low-frequency areas.
• Adaptive unsharp — lets you accentuate edge detail by analyzing the values of neighboring pixels. This filter preserves most imagedetail, but its effect is most apparent in high-resolution images.
• Sharpen — lets you accentuate the edges of the image by focusing blurred areas and increasing the contrast between neighboringpixels. Move the Background slider to set the threshold for the effect. Lower values increase the number of pixels changed by thesharpening effect.
• Directional sharpen — lets you enhance the edges of an image without creating a grainy effect.
You can also
Remove shading Click Effects Sharpen High pass. The High pass filter removesimage detail and shading to give an image a glowing quality byemphasizing its highlights and luminous areas. However, it can alsoaffect the color and tone of the image.
The Unsharp mask filter provides best results for most photographs.
Most sharpen filters support all color modes except 48-bit RGB, 16-bit grayscale, paletted, and black-and-white. The Sharpen filtersupports all color modes except paletted and black-and-white.
You can access each of the sharpen filters individually by clicking Effects Sharpen, and clicking a filter.
You can use this procedure to sharpen an editable area of an image.
To sharpen selected areas by applying brushstrokes
1 In the toolbox, click the Effect tool .
2 On the property bar, open the Brush picker, click Sharpen, and then choose a brush.
3 Choose a nib from the Nib shape picker.
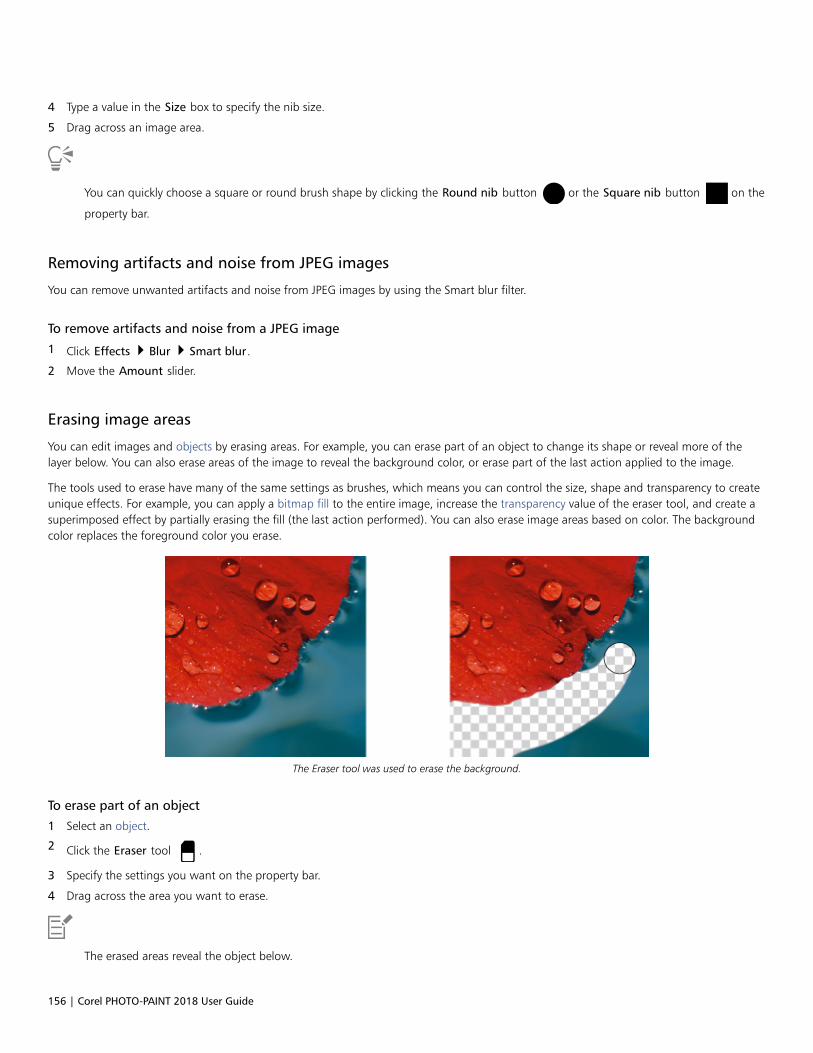
156 | Corel PHOTO-PAINT 2018 User Guide
4 Type a value in the Size box to specify the nib size.
5 Drag across an image area.
You can quickly choose a square or round brush shape by clicking the Round nib button or the Square nib button on the
property bar.
Removing artifacts and noise from JPEG images
You can remove unwanted artifacts and noise from JPEG images by using the Smart blur filter.
To remove artifacts and noise from a JPEG image
1 Click Effects Blur Smart blur.
2 Move the Amount slider.
Erasing image areas
You can edit images and objects by erasing areas. For example, you can erase part of an object to change its shape or reveal more of thelayer below. You can also erase areas of the image to reveal the background color, or erase part of the last action applied to the image.
The tools used to erase have many of the same settings as brushes, which means you can control the size, shape and transparency to createunique effects. For example, you can apply a bitmap fill to the entire image, increase the transparency value of the eraser tool, and create asuperimposed effect by partially erasing the fill (the last action performed). You can also erase image areas based on color. The backgroundcolor replaces the foreground color you erase.
The Eraser tool was used to erase the background.
To erase part of an object
1 Select an object.
2 Click the Eraser tool .
3 Specify the settings you want on the property bar.
4 Drag across the area you want to erase.
The erased areas reveal the object below.
Retouching | 157
To maintain the shape of an object, enable the Lock object transparency button on the Object manager docker. If the Object
manager docker is not open, click Window Dockers Object manager.
To adjust the transparency interactively, hold down Alt, and click in the image window without releasing the mouse button to displaya transparency slider.
To adjust the feathering interactively, hold down Ctrl + Alt, and click in the image window without releasing the mouse button todisplay a feathering slider.
To erase image areas and reveal the background color
1 Click the Eraser tool .
2 Specify the settings you want on the property bar.
3 Drag across the image area you want to erase.
To adjust the transparency interactively, hold down Alt, and click in the image window without releasing the mouse button to displaya transparency slider.
To adjust the feathering interactively, hold down Ctrl + Alt, and click in the image window without releasing the mouse button todisplay a feathering slider.
To erase the last action applied to an image
1 In the toolbox, click the Undo brush tool .
2 Specify the settings you want on the property bar.
3 Drag across the area you want to erase.
If you want to erase the last action completely, click the Undo button on the standard toolbar. For more information about
undoing, see “Undoing, redoing, repeating, and fading actions” on page 93.
You can also erase the last action applied to an object, but you must use the Eraser tool to erase the object itself.
To adjust the transparency interactively, hold down Alt, and click in the image window without releasing the mouse button to displaya transparency slider.
To adjust the feathering interactively, hold down Ctrl + Alt, and click in the image window without releasing the mouse button todisplay a feathering slider.
To replace a foreground color with the background color
1 In the toolbox, click the Replace color brush tool .
2 On the property bar, choose a nib shape from the Nib shape picker.
3 Type a value in the Tolerance box to specify the color tolerance based on color similarity.
4 In the color control area of the toolbox, double-click the Foreground color swatch, and choose a color.
5 Drag in the image window.
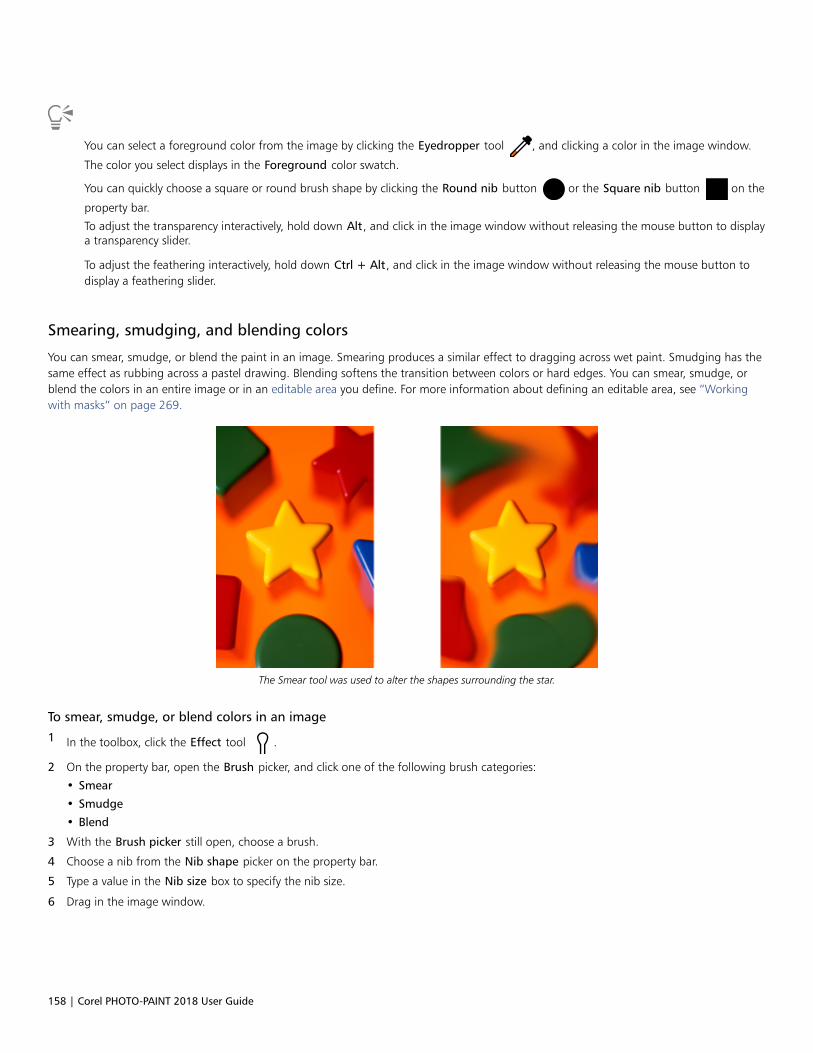
158 | Corel PHOTO-PAINT 2018 User Guide
You can select a foreground color from the image by clicking the Eyedropper tool , and clicking a color in the image window.
The color you select displays in the Foreground color swatch.
You can quickly choose a square or round brush shape by clicking the Round nib button or the Square nib button on the
property bar.
To adjust the transparency interactively, hold down Alt, and click in the image window without releasing the mouse button to displaya transparency slider.
To adjust the feathering interactively, hold down Ctrl + Alt, and click in the image window without releasing the mouse button todisplay a feathering slider.
Smearing, smudging, and blending colors
You can smear, smudge, or blend the paint in an image. Smearing produces a similar effect to dragging across wet paint. Smudging has thesame effect as rubbing across a pastel drawing. Blending softens the transition between colors or hard edges. You can smear, smudge, orblend the colors in an entire image or in an editable area you define. For more information about defining an editable area, see “Workingwith masks” on page 269.
The Smear tool was used to alter the shapes surrounding the star.
To smear, smudge, or blend colors in an image
1 In the toolbox, click the Effect tool .
2 On the property bar, open the Brush picker, and click one of the following brush categories:
• Smear
• Smudge
• Blend
3 With the Brush picker still open, choose a brush.
4 Choose a nib from the Nib shape picker on the property bar.
5 Type a value in the Nib size box to specify the nib size.
6 Drag in the image window.
Retouching | 159
You can also
Increase the effect of the brush across an area without clicking overthe area multiple times
Click the Cumulative button on the Stroke attributes bar
that displays in the Brush settings docker. This option is availableonly for some of the Effect tools and the Clone tool. If the Brush
settings docker is not open, click Window Dockers Brushsettings.
Apply the effect to an object and the background simultaneously Click the Merge source button on the Dab attributes bar
that displays in the Brush settings docker. This option is onlyavailable when the Cumulative button is disabled.
Adjust the transparency of the brushstroke Hold down Alt, and click in the image window without releasingthe mouse button to display a transparency slider.
Adjust the feathering of the brushstroke Hold down Ctrl + Alt, and click in the image window withoutreleasing the mouse button to display a feathering slider.
You can quickly choose a square or round brush shape by clicking the Round nib button or the Square nib button on the
property bar.

160 | Corel PHOTO-PAINT 2018 User Guide

Adjusting color and tone | 161
Adjusting color and tone
To improve the quality of an image, you can improve the image’s color and tone. You can correct color casts, balance excessive darkness orlightness, or alter specific colors.
This section contains the following topics:• “Using the Image Adjustment Lab” (page 161)• “Using individual color-adjustment effects and tools” (page 166)• “Exploring adjustment filters” (page 170)• “Working with color channels” (page 174)
Using the Image Adjustment Lab
The Image Adjustment Lab lets you correct the color and tone of most photos quickly and easily.
The Image Adjustment Lab consists of automatic and manual controls, which are organized in a logical order for image correction. Bystarting in the upper-right corner and working your way down, you can select the controls you need to correct the problems specific to yourimage. It is best to crop or retouch any areas of the image before beginning the color and tone corrections. For information about croppingand retouching images, see “Cropping images” on page 131 and “Retouching” on page 147.
While you work in the Image Adjustment Lab, you can take advantage of the following features:• Create snapshot — You can capture the corrected version of an image in a “snapshot” at any time. Thumbnails of the snapshots appear
in a window below the image. Snapshots make it easy to compare different corrected versions of the image so you can choose the bestone.
• Undo, Redo, and Reset to original — Image correction can be a trial and error process, so the ability to undo and redo corrections isimportant. The Reset to original command lets you clear all corrections so that you can start again.
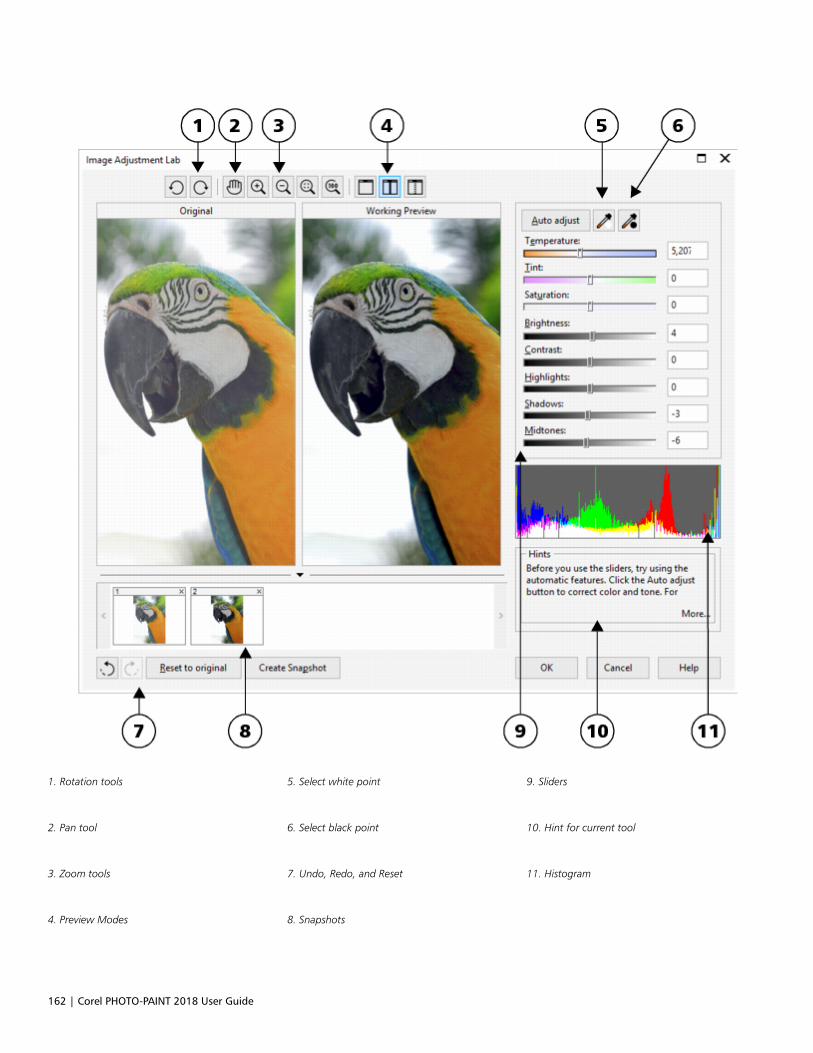
162 | Corel PHOTO-PAINT 2018 User Guide
1. Rotation tools 5. Select white point 9. Sliders
2. Pan tool 6. Select black point 10. Hint for current tool
3. Zoom tools 7. Undo, Redo, and Reset 11. Histogram
4. Preview Modes 8. Snapshots
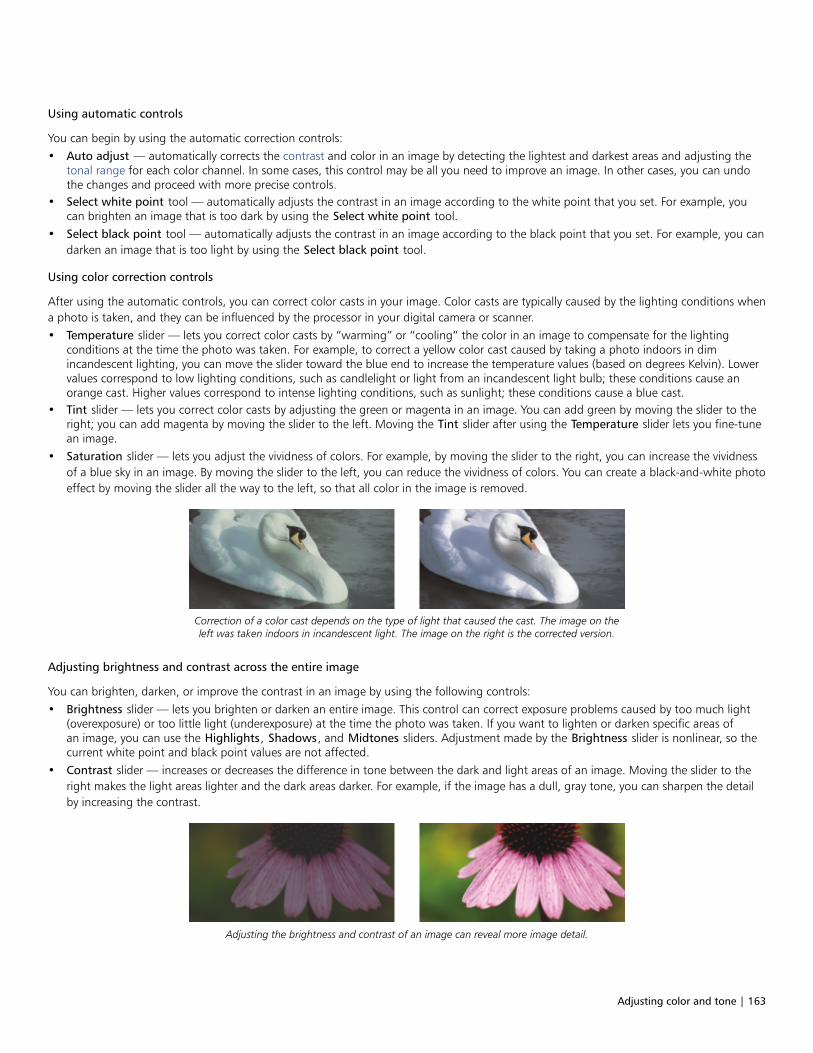
Adjusting color and tone | 163
Using automatic controls
You can begin by using the automatic correction controls:• Auto adjust — automatically corrects the contrast and color in an image by detecting the lightest and darkest areas and adjusting the
tonal range for each color channel. In some cases, this control may be all you need to improve an image. In other cases, you can undothe changes and proceed with more precise controls.
• Select white point tool — automatically adjusts the contrast in an image according to the white point that you set. For example, youcan brighten an image that is too dark by using the Select white point tool.
• Select black point tool — automatically adjusts the contrast in an image according to the black point that you set. For example, you candarken an image that is too light by using the Select black point tool.
Using color correction controls
After using the automatic controls, you can correct color casts in your image. Color casts are typically caused by the lighting conditions whena photo is taken, and they can be influenced by the processor in your digital camera or scanner.• Temperature slider — lets you correct color casts by “warming” or “cooling” the color in an image to compensate for the lighting
conditions at the time the photo was taken. For example, to correct a yellow color cast caused by taking a photo indoors in dimincandescent lighting, you can move the slider toward the blue end to increase the temperature values (based on degrees Kelvin). Lowervalues correspond to low lighting conditions, such as candlelight or light from an incandescent light bulb; these conditions cause anorange cast. Higher values correspond to intense lighting conditions, such as sunlight; these conditions cause a blue cast.
• Tint slider — lets you correct color casts by adjusting the green or magenta in an image. You can add green by moving the slider to theright; you can add magenta by moving the slider to the left. Moving the Tint slider after using the Temperature slider lets you fine-tunean image.
• Saturation slider — lets you adjust the vividness of colors. For example, by moving the slider to the right, you can increase the vividnessof a blue sky in an image. By moving the slider to the left, you can reduce the vividness of colors. You can create a black-and-white photoeffect by moving the slider all the way to the left, so that all color in the image is removed.
Correction of a color cast depends on the type of light that caused the cast. The image on theleft was taken indoors in incandescent light. The image on the right is the corrected version.
Adjusting brightness and contrast across the entire image
You can brighten, darken, or improve the contrast in an image by using the following controls:• Brightness slider — lets you brighten or darken an entire image. This control can correct exposure problems caused by too much light
(overexposure) or too little light (underexposure) at the time the photo was taken. If you want to lighten or darken specific areas ofan image, you can use the Highlights, Shadows, and Midtones sliders. Adjustment made by the Brightness slider is nonlinear, so thecurrent white point and black point values are not affected.
• Contrast slider — increases or decreases the difference in tone between the dark and light areas of an image. Moving the slider to theright makes the light areas lighter and the dark areas darker. For example, if the image has a dull, gray tone, you can sharpen the detailby increasing the contrast.
Adjusting the brightness and contrast of an image can reveal more image detail.
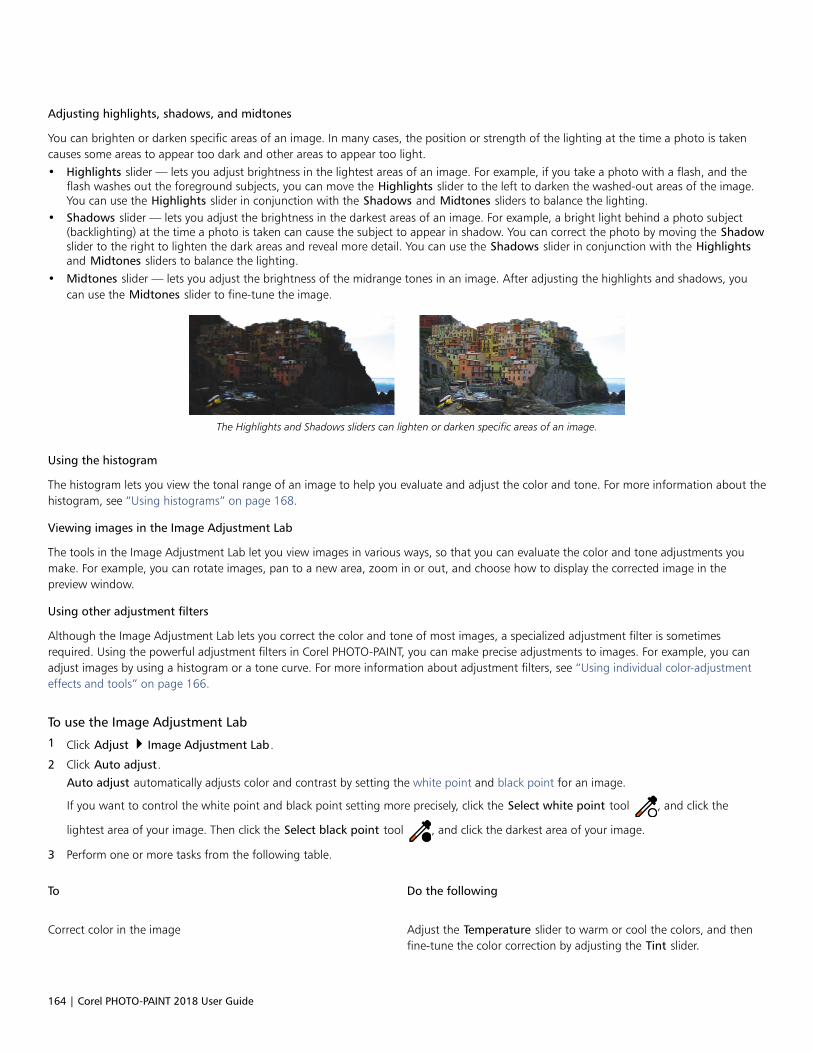
164 | Corel PHOTO-PAINT 2018 User Guide
Adjusting highlights, shadows, and midtones
You can brighten or darken specific areas of an image. In many cases, the position or strength of the lighting at the time a photo is takencauses some areas to appear too dark and other areas to appear too light.• Highlights slider — lets you adjust brightness in the lightest areas of an image. For example, if you take a photo with a flash, and the
flash washes out the foreground subjects, you can move the Highlights slider to the left to darken the washed-out areas of the image.You can use the Highlights slider in conjunction with the Shadows and Midtones sliders to balance the lighting.
• Shadows slider — lets you adjust the brightness in the darkest areas of an image. For example, a bright light behind a photo subject(backlighting) at the time a photo is taken can cause the subject to appear in shadow. You can correct the photo by moving the Shadowslider to the right to lighten the dark areas and reveal more detail. You can use the Shadows slider in conjunction with the Highlightsand Midtones sliders to balance the lighting.
• Midtones slider — lets you adjust the brightness of the midrange tones in an image. After adjusting the highlights and shadows, youcan use the Midtones slider to fine-tune the image.
The Highlights and Shadows sliders can lighten or darken specific areas of an image.
Using the histogram
The histogram lets you view the tonal range of an image to help you evaluate and adjust the color and tone. For more information about thehistogram, see “Using histograms” on page 168.
Viewing images in the Image Adjustment Lab
The tools in the Image Adjustment Lab let you view images in various ways, so that you can evaluate the color and tone adjustments youmake. For example, you can rotate images, pan to a new area, zoom in or out, and choose how to display the corrected image in thepreview window.
Using other adjustment filters
Although the Image Adjustment Lab lets you correct the color and tone of most images, a specialized adjustment filter is sometimesrequired. Using the powerful adjustment filters in Corel PHOTO-PAINT, you can make precise adjustments to images. For example, you canadjust images by using a histogram or a tone curve. For more information about adjustment filters, see “Using individual color-adjustmenteffects and tools” on page 166.
To use the Image Adjustment Lab
1 Click Adjust Image Adjustment Lab.
2 Click Auto adjust.
Auto adjust automatically adjusts color and contrast by setting the white point and black point for an image.
If you want to control the white point and black point setting more precisely, click the Select white point tool , and click the
lightest area of your image. Then click the Select black point tool , and click the darkest area of your image.
3 Perform one or more tasks from the following table.
To Do the following
Correct color in the image Adjust the Temperature slider to warm or cool the colors, and thenfine-tune the color correction by adjusting the Tint slider.
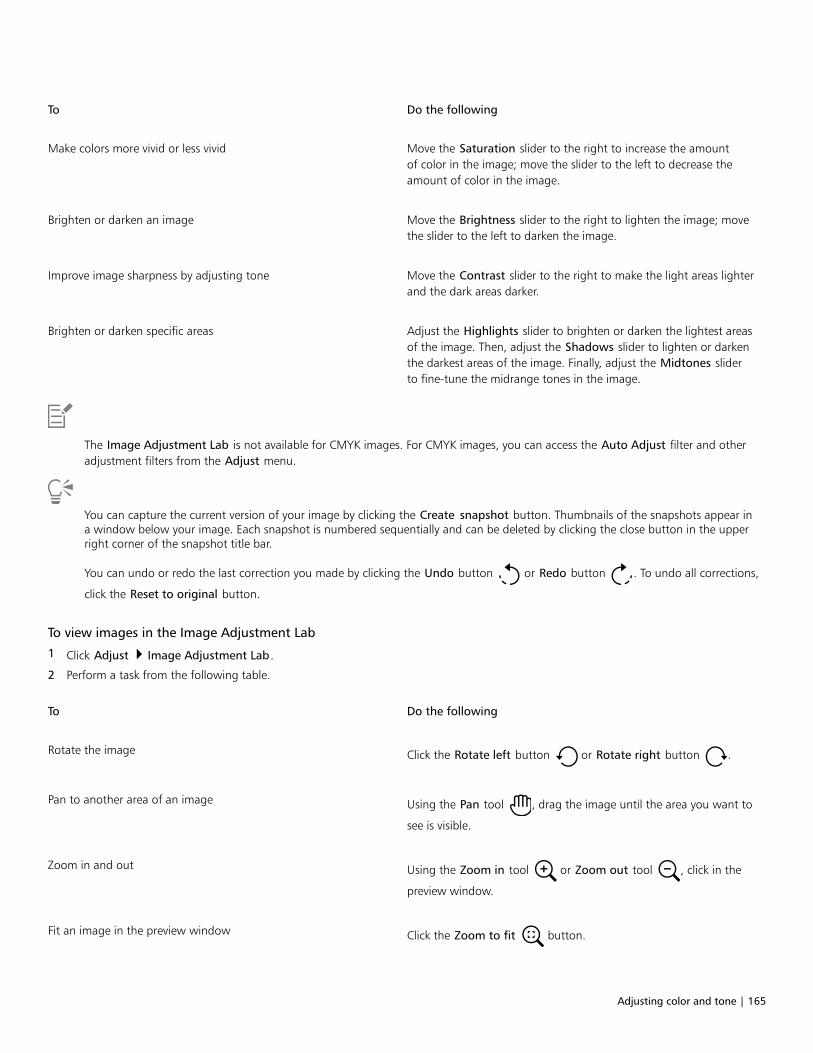
Adjusting color and tone | 165
To Do the following
Make colors more vivid or less vivid Move the Saturation slider to the right to increase the amountof color in the image; move the slider to the left to decrease theamount of color in the image.
Brighten or darken an image Move the Brightness slider to the right to lighten the image; movethe slider to the left to darken the image.
Improve image sharpness by adjusting tone Move the Contrast slider to the right to make the light areas lighterand the dark areas darker.
Brighten or darken specific areas Adjust the Highlights slider to brighten or darken the lightest areasof the image. Then, adjust the Shadows slider to lighten or darkenthe darkest areas of the image. Finally, adjust the Midtones sliderto fine-tune the midrange tones in the image.
The Image Adjustment Lab is not available for CMYK images. For CMYK images, you can access the Auto Adjust filter and otheradjustment filters from the Adjust menu.
You can capture the current version of your image by clicking the Create snapshot button. Thumbnails of the snapshots appear ina window below your image. Each snapshot is numbered sequentially and can be deleted by clicking the close button in the upperright corner of the snapshot title bar.
You can undo or redo the last correction you made by clicking the Undo button or Redo button . To undo all corrections,
click the Reset to original button.
To view images in the Image Adjustment Lab
1 Click Adjust Image Adjustment Lab.
2 Perform a task from the following table.
To Do the following
Rotate the image Click the Rotate left button or Rotate right button .
Pan to another area of an image Using the Pan tool , drag the image until the area you want to
see is visible.
Zoom in and out Using the Zoom in tool or Zoom out tool , click in the
preview window.
Fit an image in the preview window Click the Zoom to fit button.
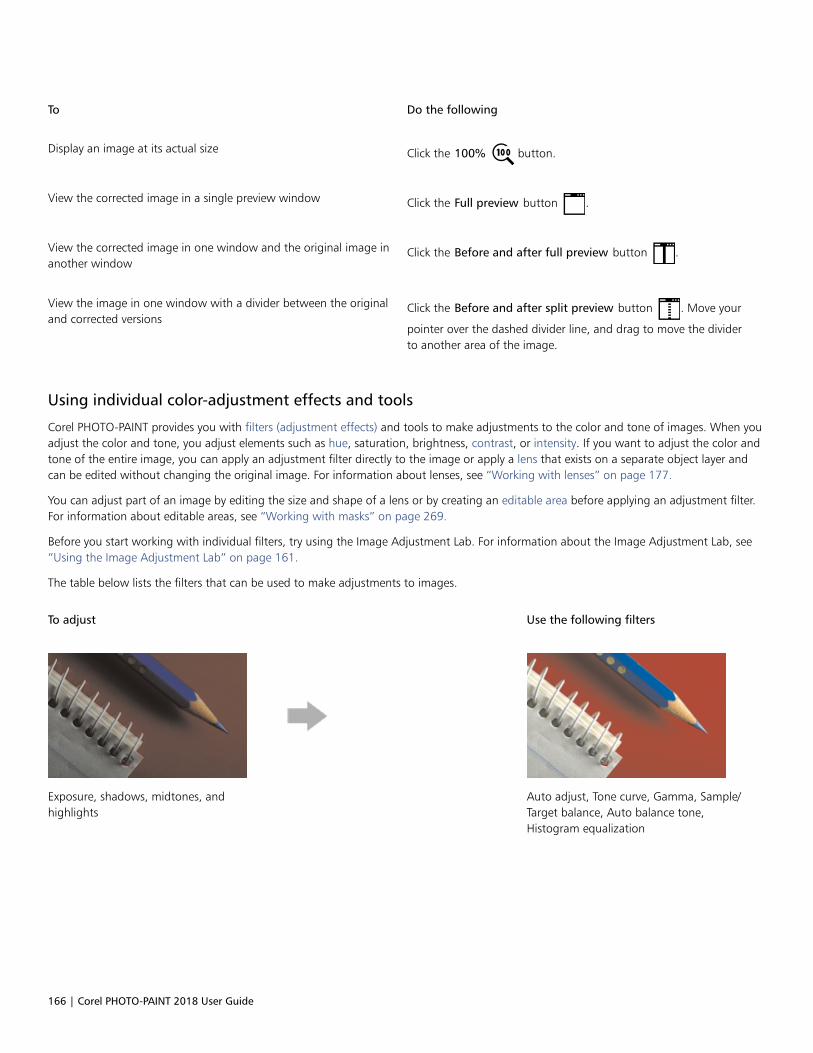
166 | Corel PHOTO-PAINT 2018 User Guide
To Do the following
Display an image at its actual size Click the 100% button.
View the corrected image in a single preview window Click the Full preview button .
View the corrected image in one window and the original image inanother window
Click the Before and after full preview button .
View the image in one window with a divider between the originaland corrected versions
Click the Before and after split preview button . Move your
pointer over the dashed divider line, and drag to move the dividerto another area of the image.
Using individual color-adjustment effects and tools
Corel PHOTO-PAINT provides you with filters (adjustment effects) and tools to make adjustments to the color and tone of images. When youadjust the color and tone, you adjust elements such as hue, saturation, brightness, contrast, or intensity. If you want to adjust the color andtone of the entire image, you can apply an adjustment filter directly to the image or apply a lens that exists on a separate object layer andcan be edited without changing the original image. For information about lenses, see “Working with lenses” on page 177.
You can adjust part of an image by editing the size and shape of a lens or by creating an editable area before applying an adjustment filter.For information about editable areas, see “Working with masks” on page 269.
Before you start working with individual filters, try using the Image Adjustment Lab. For information about the Image Adjustment Lab, see“Using the Image Adjustment Lab” on page 161.
The table below lists the filters that can be used to make adjustments to images.
To adjust Use the following filters
Exposure, shadows, midtones, andhighlights
Auto adjust, Tone curve, Gamma, Sample/Target balance, Auto balance tone,Histogram equalization
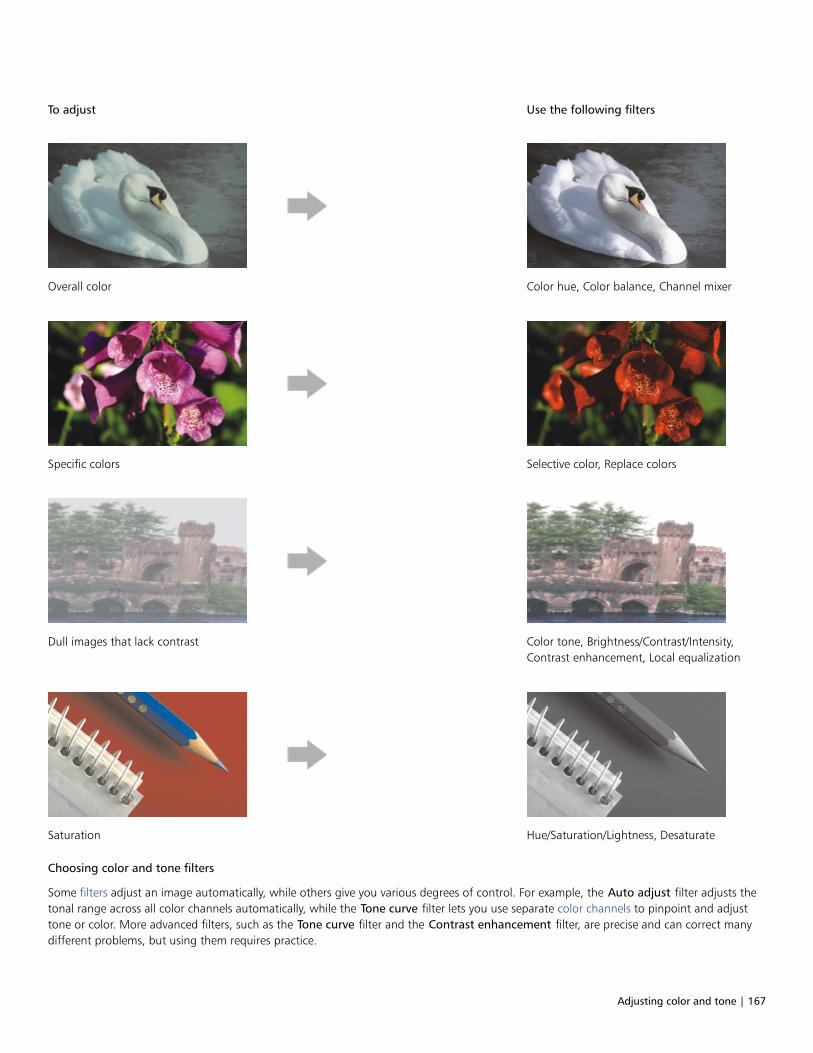
Adjusting color and tone | 167
To adjust Use the following filters
Overall color Color hue, Color balance, Channel mixer
Specific colors Selective color, Replace colors
Dull images that lack contrast Color tone, Brightness/Contrast/Intensity,Contrast enhancement, Local equalization
Saturation Hue/Saturation/Lightness, Desaturate
Choosing color and tone filters
Some filters adjust an image automatically, while others give you various degrees of control. For example, the Auto adjust filter adjusts thetonal range across all color channels automatically, while the Tone curve filter lets you use separate color channels to pinpoint and adjusttone or color. More advanced filters, such as the Tone curve filter and the Contrast enhancement filter, are precise and can correct manydifferent problems, but using them requires practice.
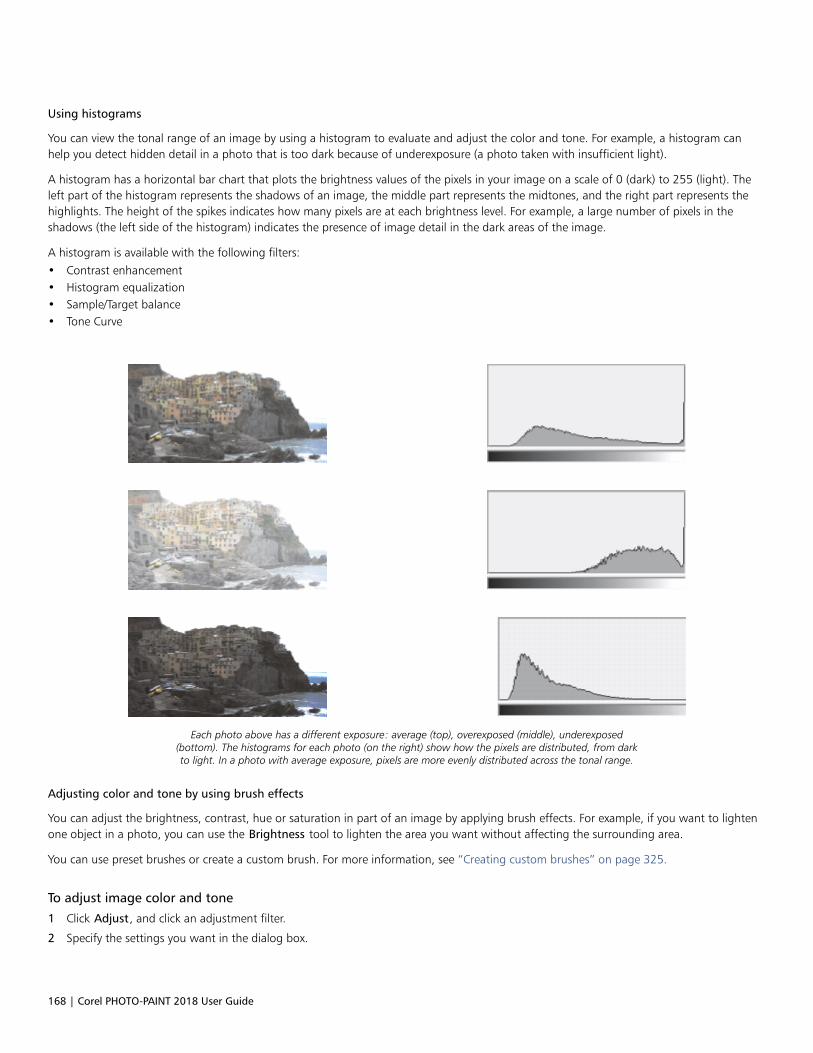
168 | Corel PHOTO-PAINT 2018 User Guide
Using histograms
You can view the tonal range of an image by using a histogram to evaluate and adjust the color and tone. For example, a histogram canhelp you detect hidden detail in a photo that is too dark because of underexposure (a photo taken with insufficient light).
A histogram has a horizontal bar chart that plots the brightness values of the pixels in your image on a scale of 0 (dark) to 255 (light). Theleft part of the histogram represents the shadows of an image, the middle part represents the midtones, and the right part represents thehighlights. The height of the spikes indicates how many pixels are at each brightness level. For example, a large number of pixels in theshadows (the left side of the histogram) indicates the presence of image detail in the dark areas of the image.
A histogram is available with the following filters:• Contrast enhancement• Histogram equalization• Sample/Target balance• Tone Curve
Each photo above has a different exposure: average (top), overexposed (middle), underexposed(bottom). The histograms for each photo (on the right) show how the pixels are distributed, from darkto light. In a photo with average exposure, pixels are more evenly distributed across the tonal range.
Adjusting color and tone by using brush effects
You can adjust the brightness, contrast, hue or saturation in part of an image by applying brush effects. For example, if you want to lightenone object in a photo, you can use the Brightness tool to lighten the area you want without affecting the surrounding area.
You can use preset brushes or create a custom brush. For more information, see “Creating custom brushes” on page 325.
To adjust image color and tone
1 Click Adjust, and click an adjustment filter.
2 Specify the settings you want in the dialog box.
Adjusting color and tone | 169
For descriptions of adjustment filters, see “Exploring adjustment filters” on page 170.
You can compare the original image with the adjusted image by clicking the Dual window preview button in filter dialog
boxes.
You can adjust the color and tone in an editable area by defining an editable area before you click an adjustment filter.
To adjust image tone interactively by using a histogram
1 Click Adjust Contrast enhancement.
2 Move the Input value clipping arrows to adjust shadows and highlights.
The arrow on the left lets you darken shadow areas. Drag the arrow until it points to the area where the histogram starts to spike.
The arrow on the right lets you lighten highlight areas. Drag the arrow until it points to the area where the histogram stops spiking.
3 Move the Gamma slider to adjust the midtones.
4 Move the Output range compression arrows to fine-tune the contrast.
To lighten dark areas, move the left arrow to the right.
To darken light areas, move the right arrow to the left.
You can also
Adjust image color Before adjusting the tone, choose a color channel from theChannel list box.
Automatically redistribute pixels across the tonal range Enable the Auto-adjust check box.
Set input and output values by sampling pixels in the image Enable the Set input values or Set output values option from theEyedropper sampling area. Click the Shadow eyedropper button
to sample shadow areas, or click the Highlight eyedropper
button to sample highlight areas.
The histogram displays adjusted values as a black outline and original values as gray shading.
You can compare the original image with the adjusted image by clicking the Dual window preview button in filter dialog
boxes.
To adjust image color and tone by using brush effects
1 Select an object or the background image.
2 In the toolbox, click the Effect tool .
3 On the property bar, open the Brush picker, and click one of the following brush categories:
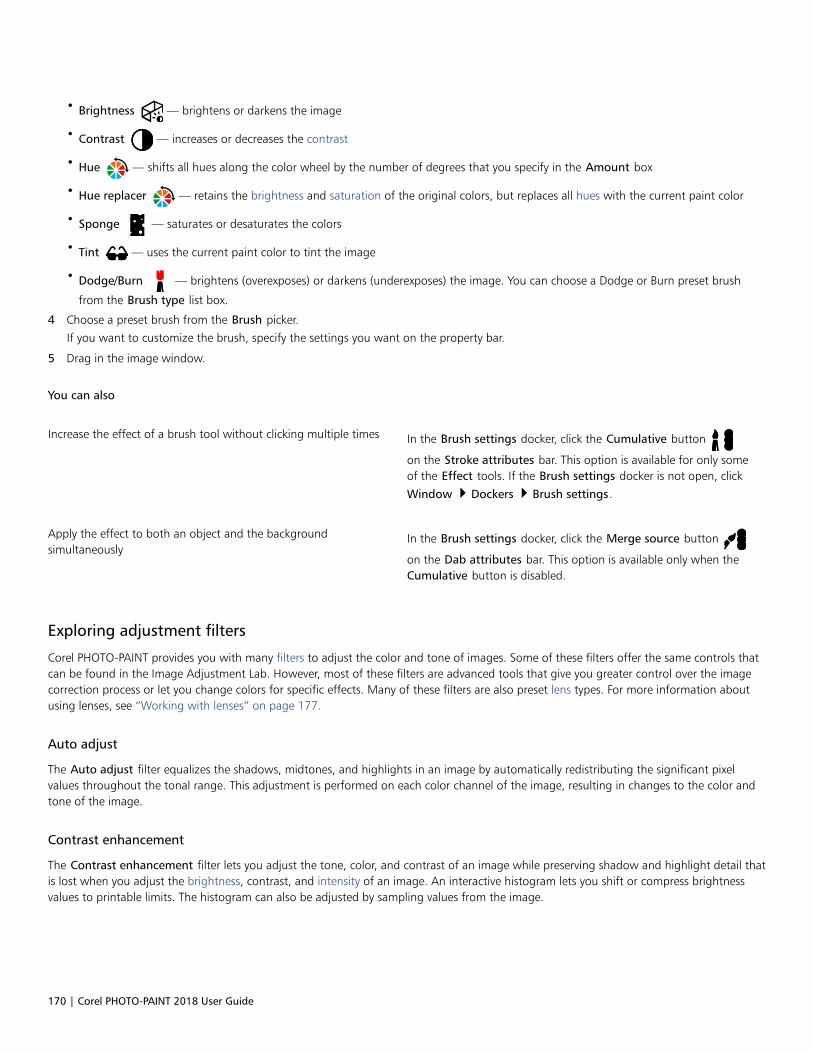
170 | Corel PHOTO-PAINT 2018 User Guide
• Brightness — brightens or darkens the image
• Contrast — increases or decreases the contrast
• Hue — shifts all hues along the color wheel by the number of degrees that you specify in the Amount box
• Hue replacer — retains the brightness and saturation of the original colors, but replaces all hues with the current paint color
• Sponge — saturates or desaturates the colors
• Tint — uses the current paint color to tint the image
• Dodge/Burn — brightens (overexposes) or darkens (underexposes) the image. You can choose a Dodge or Burn preset brush
from the Brush type list box.
4 Choose a preset brush from the Brush picker.
If you want to customize the brush, specify the settings you want on the property bar.
5 Drag in the image window.
You can also
Increase the effect of a brush tool without clicking multiple times In the Brush settings docker, click the Cumulative button
on the Stroke attributes bar. This option is available for only someof the Effect tools. If the Brush settings docker is not open, click
Window Dockers Brush settings.
Apply the effect to both an object and the backgroundsimultaneously
In the Brush settings docker, click the Merge source button
on the Dab attributes bar. This option is available only when theCumulative button is disabled.
Exploring adjustment filters
Corel PHOTO-PAINT provides you with many filters to adjust the color and tone of images. Some of these filters offer the same controls thatcan be found in the Image Adjustment Lab. However, most of these filters are advanced tools that give you greater control over the imagecorrection process or let you change colors for specific effects. Many of these filters are also preset lens types. For more information aboutusing lenses, see “Working with lenses” on page 177.
Auto adjust
The Auto adjust filter equalizes the shadows, midtones, and highlights in an image by automatically redistributing the significant pixelvalues throughout the tonal range. This adjustment is performed on each color channel of the image, resulting in changes to the color andtone of the image.
Contrast enhancement
The Contrast enhancement filter lets you adjust the tone, color, and contrast of an image while preserving shadow and highlight detail thatis lost when you adjust the brightness, contrast, and intensity of an image. An interactive histogram lets you shift or compress brightnessvalues to printable limits. The histogram can also be adjusted by sampling values from the image.
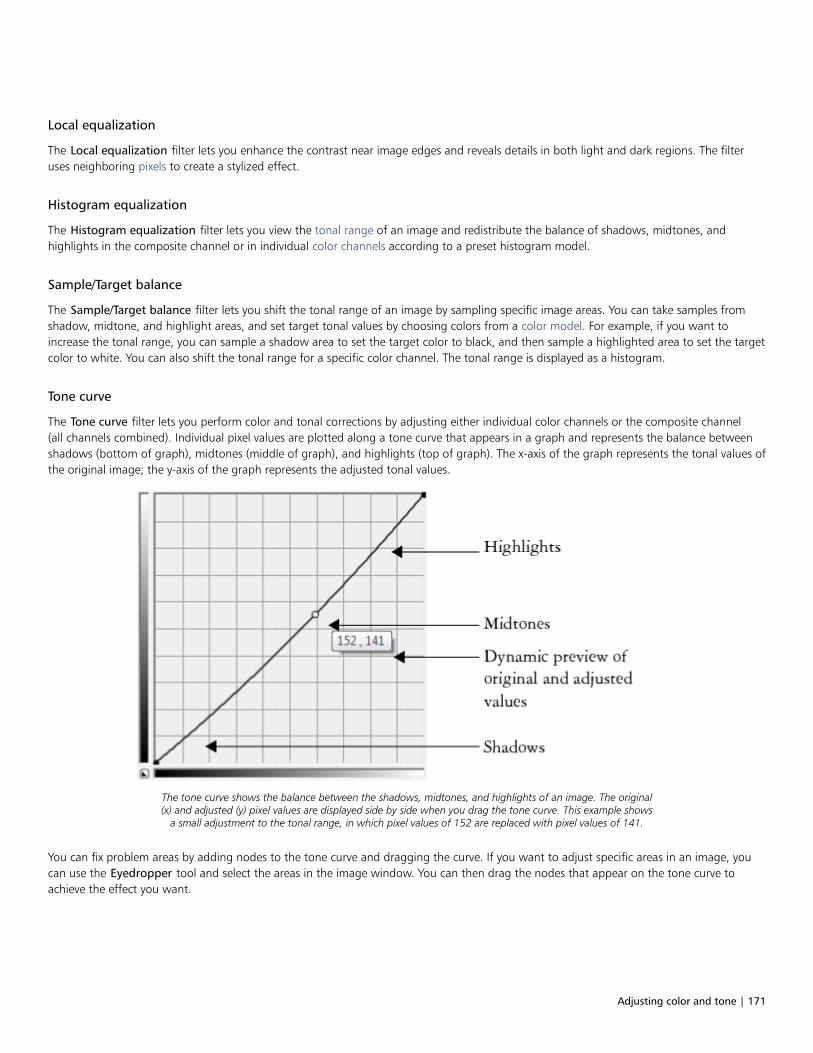
Adjusting color and tone | 171
Local equalization
The Local equalization filter lets you enhance the contrast near image edges and reveals details in both light and dark regions. The filteruses neighboring pixels to create a stylized effect.
Histogram equalization
The Histogram equalization filter lets you view the tonal range of an image and redistribute the balance of shadows, midtones, andhighlights in the composite channel or in individual color channels according to a preset histogram model.
Sample/Target balance
The Sample/Target balance filter lets you shift the tonal range of an image by sampling specific image areas. You can take samples fromshadow, midtone, and highlight areas, and set target tonal values by choosing colors from a color model. For example, if you want toincrease the tonal range, you can sample a shadow area to set the target color to black, and then sample a highlighted area to set the targetcolor to white. You can also shift the tonal range for a specific color channel. The tonal range is displayed as a histogram.
Tone curve
The Tone curve filter lets you perform color and tonal corrections by adjusting either individual color channels or the composite channel(all channels combined). Individual pixel values are plotted along a tone curve that appears in a graph and represents the balance betweenshadows (bottom of graph), midtones (middle of graph), and highlights (top of graph). The x-axis of the graph represents the tonal values ofthe original image; the y-axis of the graph represents the adjusted tonal values.
The tone curve shows the balance between the shadows, midtones, and highlights of an image. The original(x) and adjusted (y) pixel values are displayed side by side when you drag the tone curve. This example shows
a small adjustment to the tonal range, in which pixel values of 152 are replaced with pixel values of 141.
You can fix problem areas by adding nodes to the tone curve and dragging the curve. If you want to adjust specific areas in an image, youcan use the Eyedropper tool and select the areas in the image window. You can then drag the nodes that appear on the tone curve toachieve the effect you want.
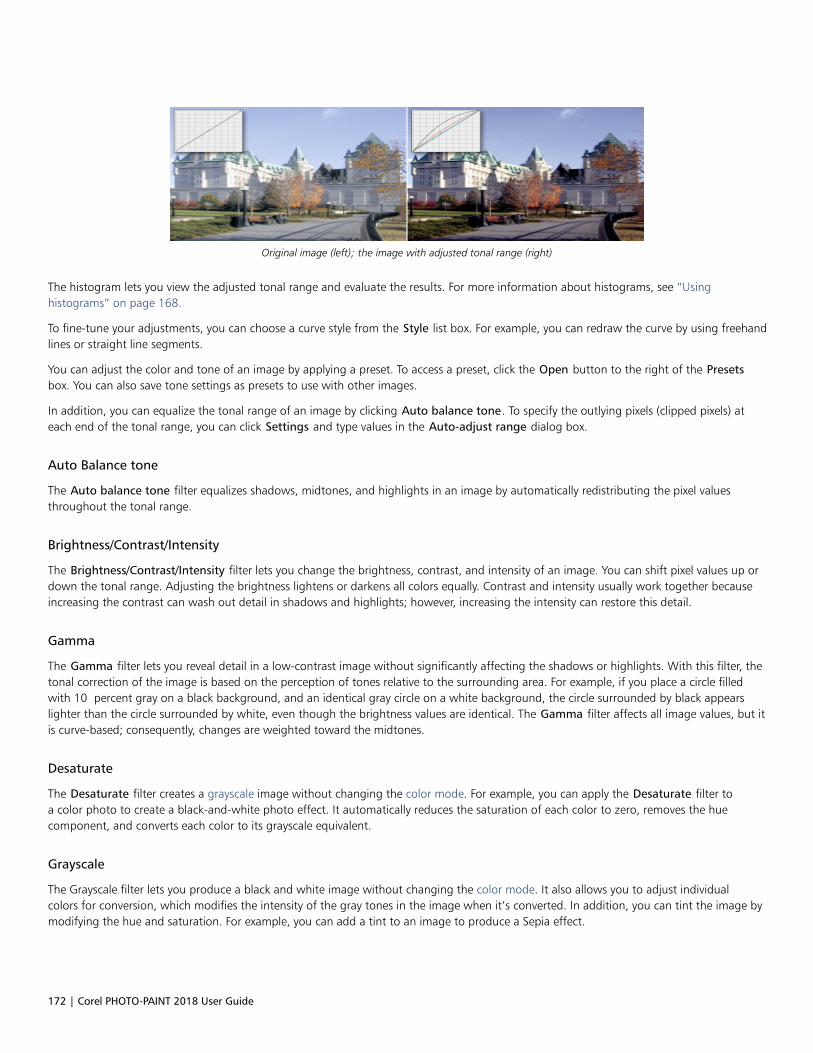
172 | Corel PHOTO-PAINT 2018 User Guide
Original image (left); the image with adjusted tonal range (right)
The histogram lets you view the adjusted tonal range and evaluate the results. For more information about histograms, see “Usinghistograms” on page 168.
To fine-tune your adjustments, you can choose a curve style from the Style list box. For example, you can redraw the curve by using freehandlines or straight line segments.
You can adjust the color and tone of an image by applying a preset. To access a preset, click the Open button to the right of the Presetsbox. You can also save tone settings as presets to use with other images.
In addition, you can equalize the tonal range of an image by clicking Auto balance tone. To specify the outlying pixels (clipped pixels) ateach end of the tonal range, you can click Settings and type values in the Auto-adjust range dialog box.
Auto Balance tone
The Auto balance tone filter equalizes shadows, midtones, and highlights in an image by automatically redistributing the pixel valuesthroughout the tonal range.
Brightness/Contrast/Intensity
The Brightness/Contrast/Intensity filter lets you change the brightness, contrast, and intensity of an image. You can shift pixel values up ordown the tonal range. Adjusting the brightness lightens or darkens all colors equally. Contrast and intensity usually work together becauseincreasing the contrast can wash out detail in shadows and highlights; however, increasing the intensity can restore this detail.
Gamma
The Gamma filter lets you reveal detail in a low-contrast image without significantly affecting the shadows or highlights. With this filter, thetonal correction of the image is based on the perception of tones relative to the surrounding area. For example, if you place a circle filledwith 10 percent gray on a black background, and an identical gray circle on a white background, the circle surrounded by black appearslighter than the circle surrounded by white, even though the brightness values are identical. The Gamma filter affects all image values, but itis curve-based; consequently, changes are weighted toward the midtones.
Desaturate
The Desaturate filter creates a grayscale image without changing the color mode. For example, you can apply the Desaturate filter toa color photo to create a black-and-white photo effect. It automatically reduces the saturation of each color to zero, removes the huecomponent, and converts each color to its grayscale equivalent.
Grayscale
The Grayscale filter lets you produce a black and white image without changing the color mode. It also allows you to adjust individualcolors for conversion, which modifies the intensity of the gray tones in the image when it’s converted. In addition, you can tint the image bymodifying the hue and saturation. For example, you can add a tint to an image to produce a Sepia effect.
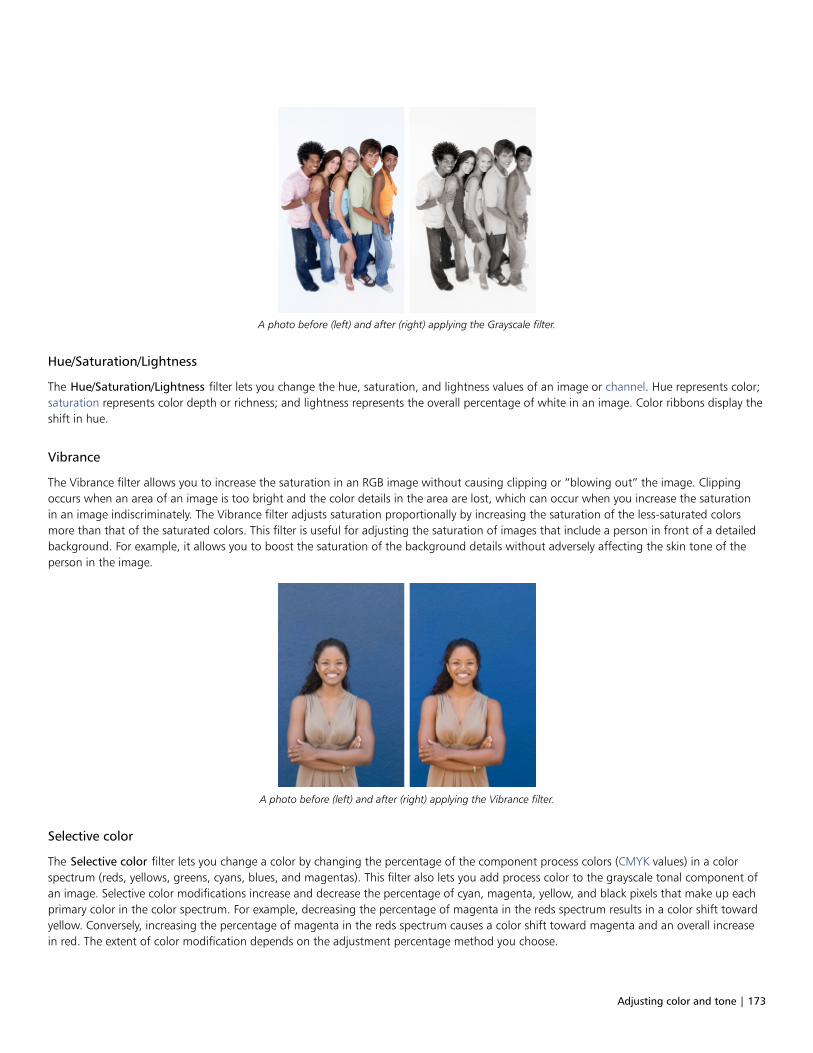
Adjusting color and tone | 173
A photo before (left) and after (right) applying the Grayscale filter.
Hue/Saturation/Lightness
The Hue/Saturation/Lightness filter lets you change the hue, saturation, and lightness values of an image or channel. Hue represents color;saturation represents color depth or richness; and lightness represents the overall percentage of white in an image. Color ribbons display theshift in hue.
Vibrance
The Vibrance filter allows you to increase the saturation in an RGB image without causing clipping or “blowing out” the image. Clippingoccurs when an area of an image is too bright and the color details in the area are lost, which can occur when you increase the saturationin an image indiscriminately. The Vibrance filter adjusts saturation proportionally by increasing the saturation of the less-saturated colorsmore than that of the saturated colors. This filter is useful for adjusting the saturation of images that include a person in front of a detailedbackground. For example, it allows you to boost the saturation of the background details without adversely affecting the skin tone of theperson in the image.
A photo before (left) and after (right) applying the Vibrance filter.
Selective color
The Selective color filter lets you change a color by changing the percentage of the component process colors (CMYK values) in a colorspectrum (reds, yellows, greens, cyans, blues, and magentas). This filter also lets you add process color to the grayscale tonal component ofan image. Selective color modifications increase and decrease the percentage of cyan, magenta, yellow, and black pixels that make up eachprimary color in the color spectrum. For example, decreasing the percentage of magenta in the reds spectrum results in a color shift towardyellow. Conversely, increasing the percentage of magenta in the reds spectrum causes a color shift toward magenta and an overall increasein red. The extent of color modification depends on the adjustment percentage method you choose.

174 | Corel PHOTO-PAINT 2018 User Guide
Channel mixer
You can mix color channels to balance the colors of an image. For example, if an image has too much red, you can adjust the red channel inan RGB image to improve image quality. For more information about mixing channels, see “Working with color channels” on page 174.
Replace colors
The Replace colors filter lets you replace one image color with another color. A color mask is created to define the color to be replaced.Depending on the range you set, you can replace one color or shift an entire image from one color range to another. You can set the hue,saturation, and lightness for the new color.
Color balance
The Color balance filter lets you adjust the color balance of an image by shifting the colors between complementary pairs of the primaryRGB color values and secondary CMY color values. This method is useful for correcting color casts. For example, if you want to tone downthe red in a photo, you can shift the color values from red to cyan. You can also change the hue values to change the colors used in animage.
Color hue
The Color hue filter lets you change the hue of an image by clicking sample thumbnails. For example, you can remove a yellow cast from animage by clicking a thumbnail that adds blue. The intensity of the effect increases by a specified amount each time you click the thumbnail.The thumbnails also let you preview the color hue adjustment.
Color tone
The Color tone filter lets you change the brightness, saturation, and contrast of colors by clicking sample thumbnails. The intensity of theeffect increases by a specified amount each time you click the thumbnail. The thumbnails also let you preview the color tone adjustment.
Working with color channels
You can adjust color and tone by making changes directly to the color channels of an image. The number of color channels in an imagedepends on the number of components in the color mode associated with the image. For example, black-and-white, grayscale, duotone,and paletted images have only one color channel; RGB and Lab images have three channels; and CMYK images have four color channels. Formore information about these color models, see “Understanding color models” on page 191. Additional channels can be used to preserveany spot colors in an image. For information about spot color channels, see ““Using spot color channels” on page 21.” on page 209.
Displaying, mixing, and editing color channels
Although color channels represent the colored components of an image, they are displayed by default as grayscale images in the imagewindow. However, you can display these channels in their respective colors so that the red channel is tinted red, the blue channel is tintedblue, and so on.
You can mix color channels to balance the colors of an image. For example, if an image has too much red, you can adjust the red channel inan RGB image to improve image quality.
You can edit color channels the same way that you edit other grayscale images. For example, you can select areas, apply paints and fills, addspecial effects or filters, and cut and paste objects in the image channel.
Splitting and combining images by using color channels
You can split an image into a series of 8-bit grayscale image files — one for each color channel of the color mode. Splitting an image intoseparate channel files lets you edit one channel without affecting the others, save channel information before you convert the image toanother mode, or associate channels from one mode with another mode for editing purposes. For example, if you have an oversaturatedRGB image, you can reduce the saturation by splitting the image into the HSB mode and reducing the saturation of the (S) channel. When
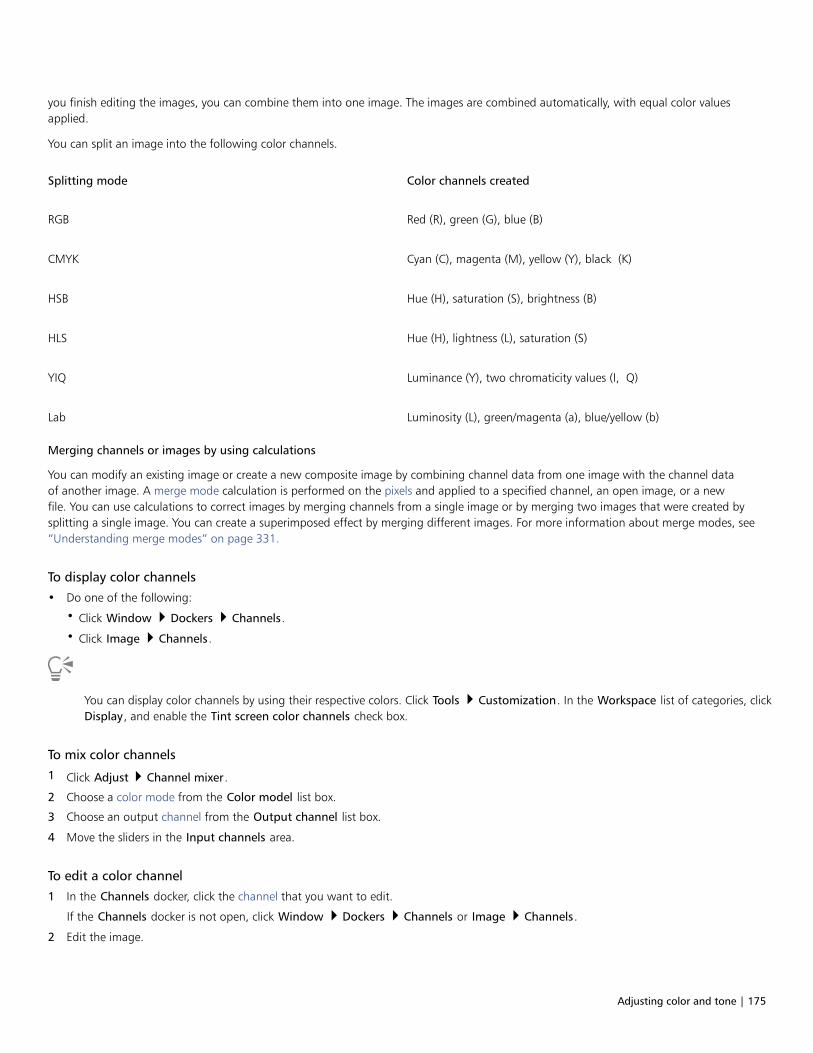
Adjusting color and tone | 175
you finish editing the images, you can combine them into one image. The images are combined automatically, with equal color valuesapplied.
You can split an image into the following color channels.
Splitting mode Color channels created
RGB Red (R), green (G), blue (B)
CMYK Cyan (C), magenta (M), yellow (Y), black (K)
HSB Hue (H), saturation (S), brightness (B)
HLS Hue (H), lightness (L), saturation (S)
YIQ Luminance (Y), two chromaticity values (I, Q)
Lab Luminosity (L), green/magenta (a), blue/yellow (b)
Merging channels or images by using calculations
You can modify an existing image or create a new composite image by combining channel data from one image with the channel dataof another image. A merge mode calculation is performed on the pixels and applied to a specified channel, an open image, or a newfile. You can use calculations to correct images by merging channels from a single image or by merging two images that were created bysplitting a single image. You can create a superimposed effect by merging different images. For more information about merge modes, see“Understanding merge modes” on page 331.
To display color channels
• Do one of the following:
• Click Window Dockers Channels.
• Click Image Channels.
You can display color channels by using their respective colors. Click Tools Customization. In the Workspace list of categories, clickDisplay, and enable the Tint screen color channels check box.
To mix color channels
1 Click Adjust Channel mixer.
2 Choose a color mode from the Color model list box.
3 Choose an output channel from the Output channel list box.
4 Move the sliders in the Input channels area.
To edit a color channel
1 In the Channels docker, click the channel that you want to edit.
If the Channels docker is not open, click Window Dockers Channels or Image Channels.
2 Edit the image.
176 | Corel PHOTO-PAINT 2018 User Guide
You can click the composite channel at the top of the Channels docker to view the edited image.
To split an image by using color channels
• Click Image Split channels to, and click a color mode.
Images in the CMYK and Lab color modes must be split into their original component channels.
To combine images by using color channels
1 Click Image Combine channels.
2 In the Mode area, choose a color mode option.
3 In the Channel area, choose a channel option and click a filename from the Images list to associate the channel with a file.
4 Repeat step 3 until all the channels in the Channel area have been associated with an image from the Images list.
To merge color channels or images by using calculations
1 Click Image Calculations.
2 In the Source 1 area, choose a filename from the Image list box.
3 Choose a channel type from the Channel list box.
4 In the Source 2 area, choose a filename from the Image list box.
5 Choose a channel type from the Channel list box.
6 In the Destination area, choose a filename from the Image list box, and a channel type from the Channel list box.
7 In the Method area, choose a merge mode from the list box.
8 Type a value in the Opacity box.
The merge mode determines how colors mix. For more information about merge modes, see “Understanding merge modes” on page331.
The Calculations command is grayed if the image contains objects. All objects in the image must be merged with the imagebackground before you can perform image calculations.

Working with lenses | 177
Working with lenses
Lenses let you view special effects, corrections, or adjustments, on a separate object layer before you apply the changes to the image. Insome programs, lenses are also known as adjustment layers.
This section contains the following topics:• “Creating lenses” (page 177)• “Editing lenses” (page 181)• “Combining lenses with the image background” (page 183)
Creating lenses
Lenses let you view adjustments and special effects that you want to apply to an image. When you create a lens, the changes you make arenot applied to the image pixels; instead, they are displayed on the screen through the lens. The lens is created as a separate object on a layerabove the image background so you can edit the lens and the background image separately. When you achieve the results you want, youcan combine the lens with the image background. When you export or print an image, the effects of the lens are applied to the exported orprinted image.
You can create a lens to cover the entire image, or you can create a lens from the editable area of a mask. You can create as many lenses asyou want for an image and assign a unique name to each. You can also use multiple lenses to apply successive changes to a specific area inthe image.
Corel PHOTO-PAINT lets you create the following lenses:
Lens type Description
Add Noise Lets you create a granular effect that adds texture to a flat or overlyblended image. You can specify the type and amount of noise thatis added to the image.
Grayscale Lets you create a black-and-white image from a color photo byadjusting the tonal range of the color channels
Brightness-Contrast-Intensity Lets you change the brightness, contrast, and intensity of an imageby shifting pixel values up or down the tonal range
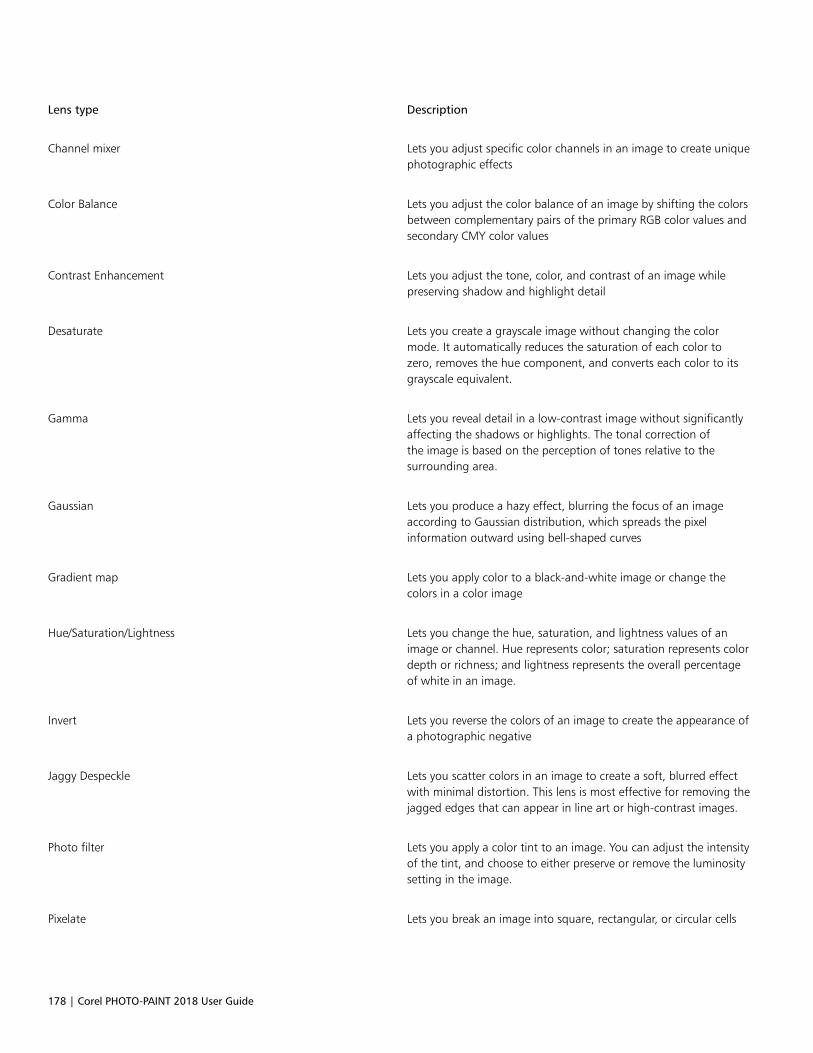
178 | Corel PHOTO-PAINT 2018 User Guide
Lens type Description
Channel mixer Lets you adjust specific color channels in an image to create uniquephotographic effects
Color Balance Lets you adjust the color balance of an image by shifting the colorsbetween complementary pairs of the primary RGB color values andsecondary CMY color values
Contrast Enhancement Lets you adjust the tone, color, and contrast of an image whilepreserving shadow and highlight detail
Desaturate Lets you create a grayscale image without changing the colormode. It automatically reduces the saturation of each color tozero, removes the hue component, and converts each color to itsgrayscale equivalent.
Gamma Lets you reveal detail in a low-contrast image without significantlyaffecting the shadows or highlights. The tonal correction ofthe image is based on the perception of tones relative to thesurrounding area.
Gaussian Lets you produce a hazy effect, blurring the focus of an imageaccording to Gaussian distribution, which spreads the pixelinformation outward using bell-shaped curves
Gradient map Lets you apply color to a black-and-white image or change thecolors in a color image
Hue/Saturation/Lightness Lets you change the hue, saturation, and lightness values of animage or channel. Hue represents color; saturation represents colordepth or richness; and lightness represents the overall percentageof white in an image.
Invert Lets you reverse the colors of an image to create the appearance ofa photographic negative
Jaggy Despeckle Lets you scatter colors in an image to create a soft, blurred effectwith minimal distortion. This lens is most effective for removing thejagged edges that can appear in line art or high-contrast images.
Photo filter Lets you apply a color tint to an image. You can adjust the intensityof the tint, and choose to either preserve or remove the luminositysetting in the image.
Pixelate Lets you break an image into square, rectangular, or circular cells
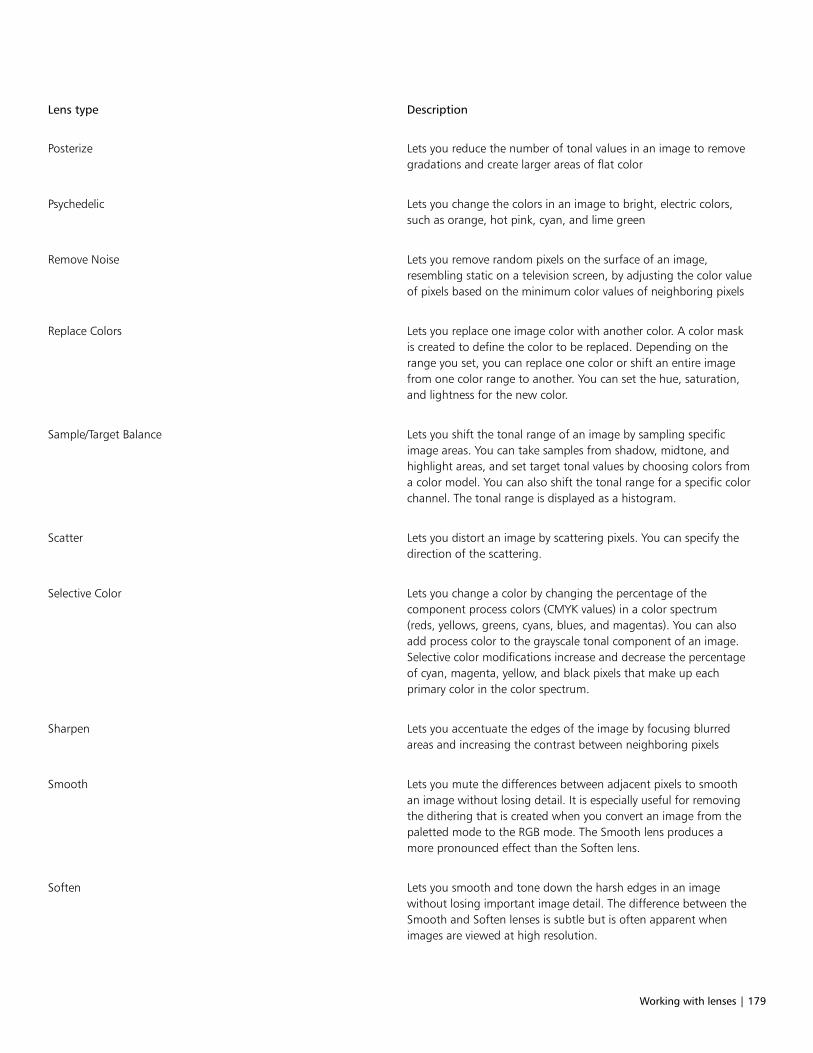
Working with lenses | 179
Lens type Description
Posterize Lets you reduce the number of tonal values in an image to removegradations and create larger areas of flat color
Psychedelic Lets you change the colors in an image to bright, electric colors,such as orange, hot pink, cyan, and lime green
Remove Noise Lets you remove random pixels on the surface of an image,resembling static on a television screen, by adjusting the color valueof pixels based on the minimum color values of neighboring pixels
Replace Colors Lets you replace one image color with another color. A color maskis created to define the color to be replaced. Depending on therange you set, you can replace one color or shift an entire imagefrom one color range to another. You can set the hue, saturation,and lightness for the new color.
Sample/Target Balance Lets you shift the tonal range of an image by sampling specificimage areas. You can take samples from shadow, midtone, andhighlight areas, and set target tonal values by choosing colors froma color model. You can also shift the tonal range for a specific colorchannel. The tonal range is displayed as a histogram.
Scatter Lets you distort an image by scattering pixels. You can specify thedirection of the scattering.
Selective Color Lets you change a color by changing the percentage of thecomponent process colors (CMYK values) in a color spectrum(reds, yellows, greens, cyans, blues, and magentas). You can alsoadd process color to the grayscale tonal component of an image.Selective color modifications increase and decrease the percentageof cyan, magenta, yellow, and black pixels that make up eachprimary color in the color spectrum.
Sharpen Lets you accentuate the edges of the image by focusing blurredareas and increasing the contrast between neighboring pixels
Smooth Lets you mute the differences between adjacent pixels to smoothan image without losing detail. It is especially useful for removingthe dithering that is created when you convert an image from thepaletted mode to the RGB mode. The Smooth lens produces amore pronounced effect than the Soften lens.
Soften Lets you smooth and tone down the harsh edges in an imagewithout losing important image detail. The difference between theSmooth and Soften lenses is subtle but is often apparent whenimages are viewed at high resolution.

180 | Corel PHOTO-PAINT 2018 User Guide
Lens type Description
Solarize Lets you transform colors in an image by reversing image tones
Threshold Lets you specify a brightness value as a threshold. Pixels with abrightness value higher or lower than the threshold will display inwhite or black, depending on the threshold option you specify.
Tone Curve Lets you perform color and tonal corrections by adjusting individualcolor channels or the composite channel (all channels combined).For more information, see “Tone curve” on page 171.
Unsharp Mask Lets you sharpen your photos by increasing the contrast of adjacentpixels. It preserves both high-frequency details, such as edges,and low-frequency details, such as large structures, gradients, andbackground colors.
For more information about sharpening images, see “Sharpeningimages” on page 154.
Vibrance Lets you increase the saturation in an RGB image proportionallyby increasing the saturation of the less-saturated colors more thanthat of the saturated colors. For more information, see “Vibrance”on page 173.
When you create a lens, you must choose a lens type based on the change that you want to apply. However, the types of lenses aredetermined by the image’s color mode. For example, you cannot use a color lens on a grayscale image because there are no colors tomodify. If you want to correct or adjust image color and tone, choose a lens type that corresponds to the adjustment and transform filters.For more information about using filters, see “Adjusting color and tone” on page 161. If you want to apply a special effect to improve imagequality or dramatically transform an image, choose a special effects filter. For more information about special effects, see “Applying specialeffects” on page 335.
The picture of the man is an image object cut out from a darker image. A lens was applied tobrighten the image object without permanently changing the image object or background.
To create a lens
1 Click Object Create New lens.
2 Choose a lens from the Lens type list.
Working with lenses | 181
3 Type a name in the Lens name box.
4 Click OK.
If a dialog box displays, specify the lens properties.
You can also create a lens by clicking the New lens button in the Object manager docker. If the Object manager docker is not
open, click Window Dockers Object manager.
To create a lens from an editable area
1 Define an editable area.
2 Click Object Create New lens.
3 Enable the Create lens from mask check box.
4 Choose a lens from the Lens type list.
5 Type a name in the Lens name box.
6 Click OK.
7 In the dialog box, specify the lens properties.
You can also create a lens from an editable area by clicking the New lens button in the Object manager docker after defining
an editable area. If the Object manager docker is not open, click Window Dockers Object manager.
Editing lenses
After you create a lens, you can edit it. For example, you can add areas to it and remove areas from it. You can change the lens properties orchange the transparency of a lens to fine-tune the changes you want to apply to the image.
Lenses can be selected and transformed in the same way that you select and transform objects. For information about selecting andtransforming objects, see “Working with objects” on page 393 and “Modifying objects” on page 411. You can also change the shape ofa lens using a special effects filter. For more information about special effects, see “Applying special effects” on page 335.
To add an area to a lens
1 Click the Object pick tool .
2 Select a lens.
3 Click one of the following:
• Paint tool
• Rectangle tool
• Ellipse tool
• Polygon tool
• Line tool
4 On the property bar, specify the tool’s attributes.

182 | Corel PHOTO-PAINT 2018 User Guide
Ensure the New object button on the property bar is disabled.
5 Drag across the areas that you want to add to the lens.
When adding areas to a lens, the grayscale value of the foreground color or fill color affects the lens opacity. White adds areas to thelens, while black makes lens areas transparent. For more information, see “Working with transparency” on page 249.
The Rectangle tool, Ellipse tool, Polygon tool, and Line tool create new objects by default.
To remove an area from a lens
1 Click the Object pick tool .
2 Select a lens.
3 Click the Eraser tool .
4 On the property bar, specify the Eraser tool’s attributes.
5 Drag across the areas that you want to remove from the lens.
To change the properties of a lens
1 Click the Object pick tool .
2 Select a lens.
3 Click Object Edit lens.
4 Edit the lens properties.
You cannot change the properties of a Desaturate lens or an Invert lens.
To change the transparency of a lens
1 Click the Object pick tool .
2 Select a lens.
3 In the Object manager docker, type a value in the Opacity box.
If the Object manager docker is not open, click Window Dockers Object manager.
The Opacity box is not available for 1-bit black-and-white images.
To change the shape of a lens by using a special effects filter
1 Click the Object pick tool .
2 Select a lens.
3 Click Effects, and click a special effect.
4 Specify the settings of the special effects filter.
Working with lenses | 183
Only some special effects change the shape of lenses. For example, many special effects from the 3D and Distort special effectcategories work well.
Combining lenses with the image background
To apply a lens adjustment and special effects to the pixels of an image, you combine the lens with the image background. Combining a lenswith the image background reduces the file size of the image and lets you save the image to a non-native file format. If you save an imageas a Corel PHOTO-PAINT file, lenses are saved with the image and do not have to be combined. Once a lens is combined with the imagebackground, the lens cannot be selected or modified.
When you combine a lens with the image background, you can choose a merge mode to enhance the results. For information about mergemodes, see “Understanding merge modes” on page 331.
To combine a lens with the image background
1 Click the Object pick tool .
2 Select a lens.
3 In the Object manager docker, choose a merge mode from the Merge mode list box.
If the Object manager docker is not open, click Window Dockers Object manager.
4 Click Object Combine, and click one of the following:
• Combine objects with background — combines the selected lens with the image background
• Combine all objects with background — combines the selected lens and all other objects with the image background

184 | Corel PHOTO-PAINT 2018 User Guide
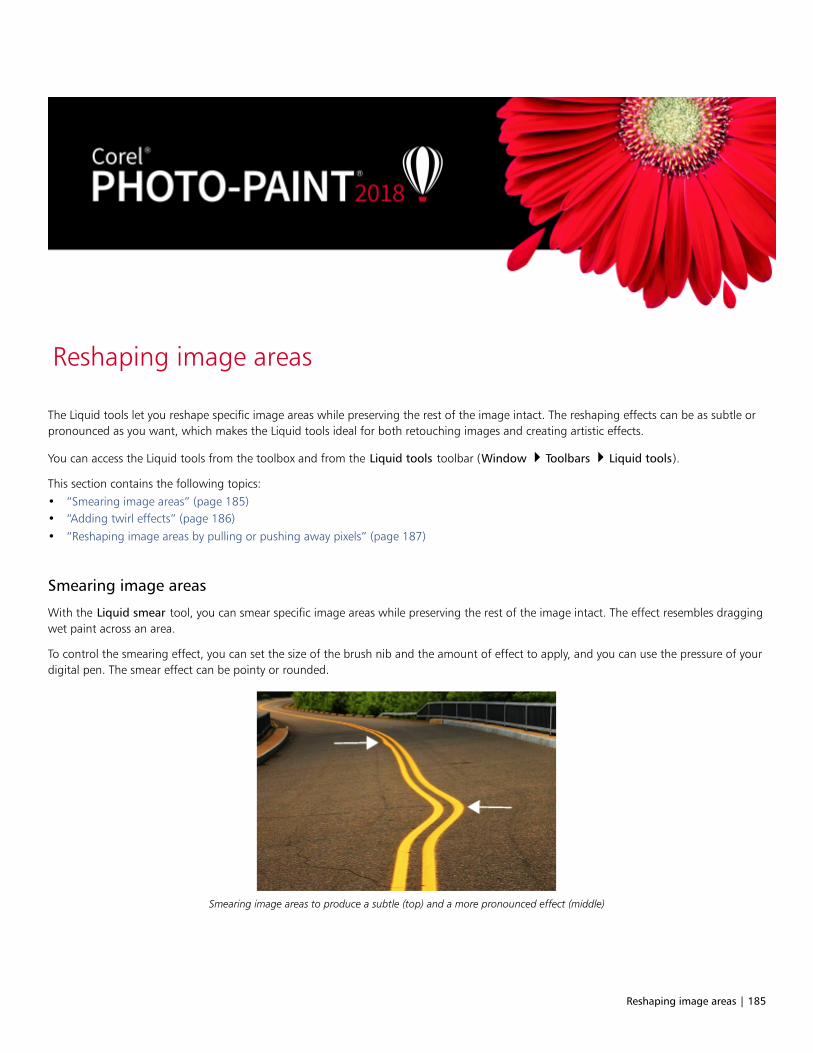
Reshaping image areas | 185
Reshaping image areas
The Liquid tools let you reshape specific image areas while preserving the rest of the image intact. The reshaping effects can be as subtle orpronounced as you want, which makes the Liquid tools ideal for both retouching images and creating artistic effects.
You can access the Liquid tools from the toolbox and from the Liquid tools toolbar (Window Toolbars Liquid tools).
This section contains the following topics:• “Smearing image areas” (page 185)• “Adding twirl effects” (page 186)• “Reshaping image areas by pulling or pushing away pixels” (page 187)
Smearing image areas
With the Liquid smear tool, you can smear specific image areas while preserving the rest of the image intact. The effect resembles draggingwet paint across an area.
To control the smearing effect, you can set the size of the brush nib and the amount of effect to apply, and you can use the pressure of yourdigital pen. The smear effect can be pointy or rounded.
Smearing image areas to produce a subtle (top) and a more pronounced effect (middle)
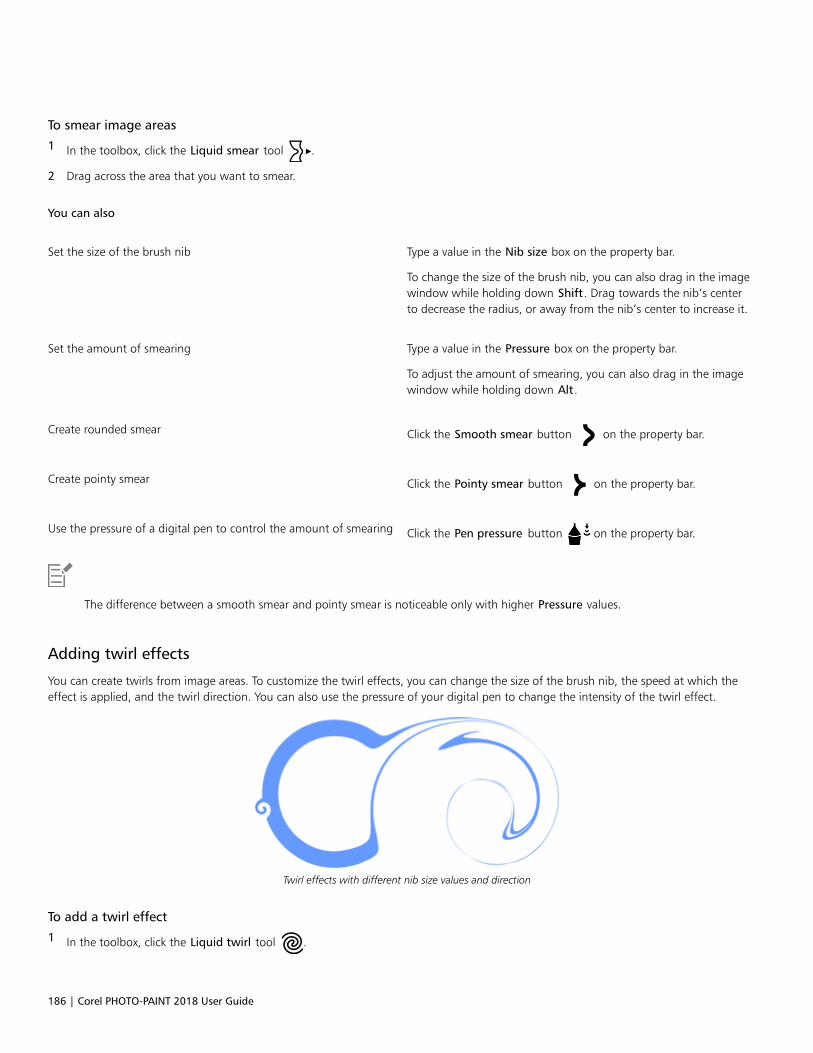
186 | Corel PHOTO-PAINT 2018 User Guide
To smear image areas
1 In the toolbox, click the Liquid smear tool .
2 Drag across the area that you want to smear.
You can also
Set the size of the brush nib Type a value in the Nib size box on the property bar.
To change the size of the brush nib, you can also drag in the imagewindow while holding down Shift. Drag towards the nib’s centerto decrease the radius, or away from the nib’s center to increase it.
Set the amount of smearing Type a value in the Pressure box on the property bar.
To adjust the amount of smearing, you can also drag in the imagewindow while holding down Alt.
Create rounded smear Click the Smooth smear button on the property bar.
Create pointy smear Click the Pointy smear button on the property bar.
Use the pressure of a digital pen to control the amount of smearing Click the Pen pressure button on the property bar.
The difference between a smooth smear and pointy smear is noticeable only with higher Pressure values.
Adding twirl effects
You can create twirls from image areas. To customize the twirl effects, you can change the size of the brush nib, the speed at which theeffect is applied, and the twirl direction. You can also use the pressure of your digital pen to change the intensity of the twirl effect.
Twirl effects with different nib size values and direction
To add a twirl effect
1 In the toolbox, click the Liquid twirl tool .
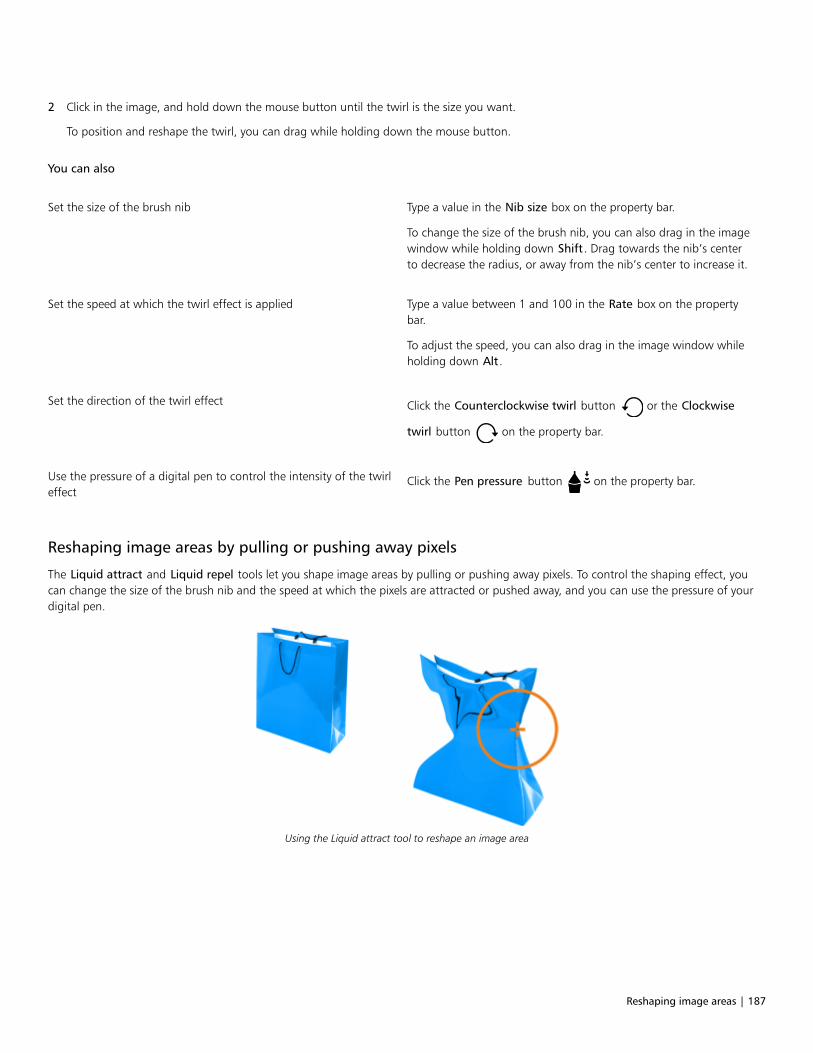
Reshaping image areas | 187
2 Click in the image, and hold down the mouse button until the twirl is the size you want.
To position and reshape the twirl, you can drag while holding down the mouse button.
You can also
Set the size of the brush nib Type a value in the Nib size box on the property bar.
To change the size of the brush nib, you can also drag in the imagewindow while holding down Shift. Drag towards the nib’s centerto decrease the radius, or away from the nib’s center to increase it.
Set the speed at which the twirl effect is applied Type a value between 1 and 100 in the Rate box on the propertybar.
To adjust the speed, you can also drag in the image window whileholding down Alt.
Set the direction of the twirl effect Click the Counterclockwise twirl button or the Clockwise
twirl button on the property bar.
Use the pressure of a digital pen to control the intensity of the twirleffect
Click the Pen pressure button on the property bar.
Reshaping image areas by pulling or pushing away pixels
The Liquid attract and Liquid repel tools let you shape image areas by pulling or pushing away pixels. To control the shaping effect, youcan change the size of the brush nib and the speed at which the pixels are attracted or pushed away, and you can use the pressure of yourdigital pen.
Using the Liquid attract tool to reshape an image area
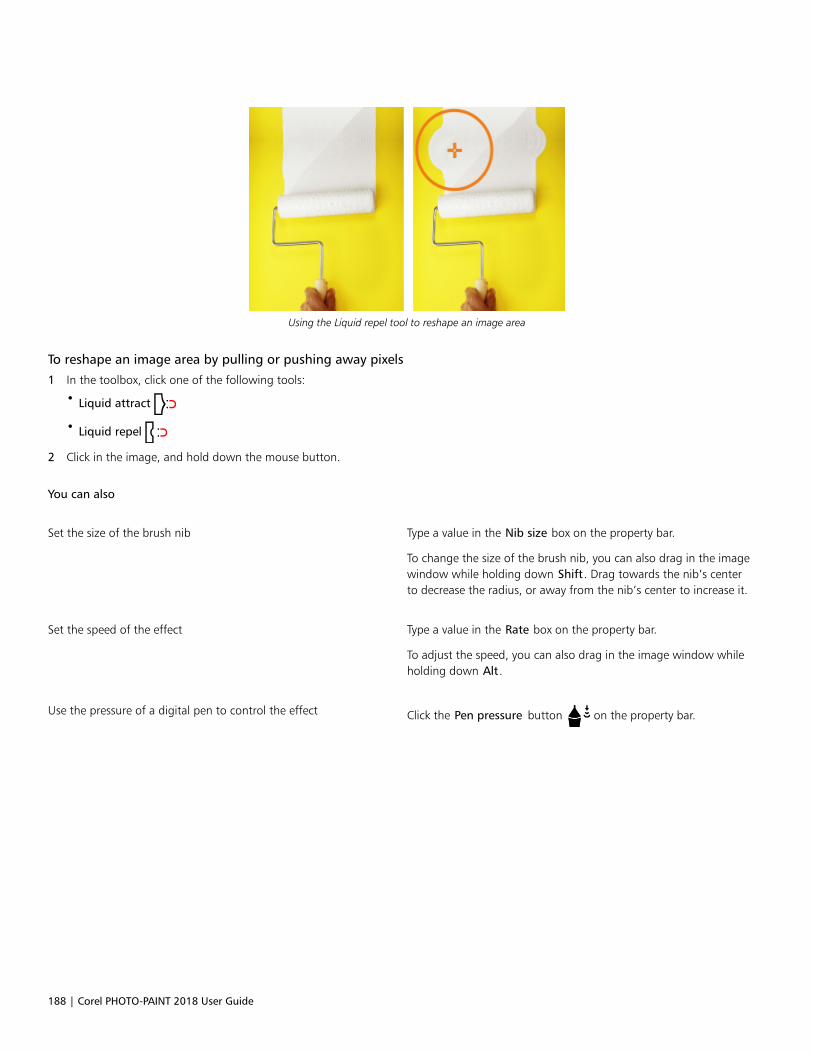
188 | Corel PHOTO-PAINT 2018 User Guide
Using the Liquid repel tool to reshape an image area
To reshape an image area by pulling or pushing away pixels
1 In the toolbox, click one of the following tools:
• Liquid attract
• Liquid repel
2 Click in the image, and hold down the mouse button.
You can also
Set the size of the brush nib Type a value in the Nib size box on the property bar.
To change the size of the brush nib, you can also drag in the imagewindow while holding down Shift. Drag towards the nib’s centerto decrease the radius, or away from the nib’s center to increase it.
Set the speed of the effect Type a value in the Rate box on the property bar.
To adjust the speed, you can also drag in the image window whileholding down Alt.
Use the pressure of a digital pen to control the effect Click the Pen pressure button on the property bar.

Color, fills, and transparencies | 189
Color, fills, and transparencies
Working with color..............................................................................................................................................................................191
Changing color modes........................................................................................................................................................................ 213
Using color management.................................................................................................................................................................... 221
Applying fills........................................................................................................................................................................................237
Working with transparency..................................................................................................................................................................249
Finding, managing, and saving fills and transparencies....................................................................................................................... 259

190 | Corel PHOTO-PAINT 2018 User Guide
Working with color | 191
Working with color
Corel PHOTO-PAINT lets you choose and create colors by using a wide variety of industry-standard color palettes, color mixers, and colormodels. You can store frequently used colors for future use by using the Image palette or creating and editing custom color palettes.
You can customize how a color palette appears on your screen by changing the size of swatches, the number of rows, and other properties.
This section contains the following topics:• “Understanding color models” (page 191)• “Understanding color depth” (page 193)• “Choosing colors” (page 194)• “Using the Image palette” (page 200)• “Creating and editing custom color palettes” (page 202)• “Setting the properties of color palettes” (page 208)• “Using spot color channels” (page 209)
Understanding color models
Color models provide a precise method for defining colors, each model defining colors through the use of specific color components. Thereis a range of color models to choose from when creating graphics.
CMYK color model
The CMYK color model, which is used in printing, uses the components cyan (C), magenta (M), yellow (Y), and black (K) to define color.Values for these components range from 0 to 100 and represent percentages.
In subtractive color models, such as CMYK, color (that is, ink) is added to a surface, such as white paper. The color then “subtracts”brightness from the surface. When the value of each color component (C,M,Y) is 100, the resulting color is black. When the value of eachcomponent is 0, no color is added to the surface, so the surface itself is revealed — in this case, the white paper. Black (K) is included in thecolor model for printing purposes because black ink is more neutral and darker than blending equal amounts of cyan, magenta, and yellow.Black ink produces sharper results, especially for printed text. In addition, black ink is usually less expensive than using colored ink.
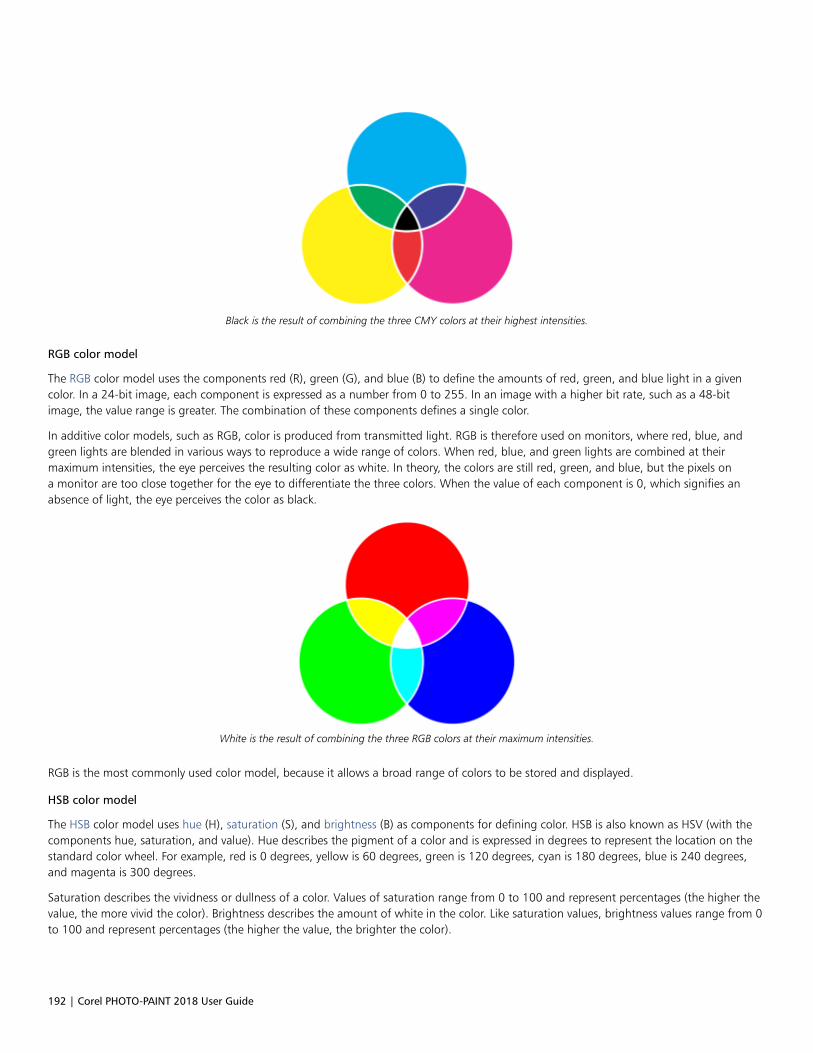
192 | Corel PHOTO-PAINT 2018 User Guide
Black is the result of combining the three CMY colors at their highest intensities.
RGB color model
The RGB color model uses the components red (R), green (G), and blue (B) to define the amounts of red, green, and blue light in a givencolor. In a 24-bit image, each component is expressed as a number from 0 to 255. In an image with a higher bit rate, such as a 48-bitimage, the value range is greater. The combination of these components defines a single color.
In additive color models, such as RGB, color is produced from transmitted light. RGB is therefore used on monitors, where red, blue, andgreen lights are blended in various ways to reproduce a wide range of colors. When red, blue, and green lights are combined at theirmaximum intensities, the eye perceives the resulting color as white. In theory, the colors are still red, green, and blue, but the pixels ona monitor are too close together for the eye to differentiate the three colors. When the value of each component is 0, which signifies anabsence of light, the eye perceives the color as black.
White is the result of combining the three RGB colors at their maximum intensities.
RGB is the most commonly used color model, because it allows a broad range of colors to be stored and displayed.
HSB color model
The HSB color model uses hue (H), saturation (S), and brightness (B) as components for defining color. HSB is also known as HSV (with thecomponents hue, saturation, and value). Hue describes the pigment of a color and is expressed in degrees to represent the location on thestandard color wheel. For example, red is 0 degrees, yellow is 60 degrees, green is 120 degrees, cyan is 180 degrees, blue is 240 degrees,and magenta is 300 degrees.
Saturation describes the vividness or dullness of a color. Values of saturation range from 0 to 100 and represent percentages (the higher thevalue, the more vivid the color). Brightness describes the amount of white in the color. Like saturation values, brightness values range from 0to 100 and represent percentages (the higher the value, the brighter the color).
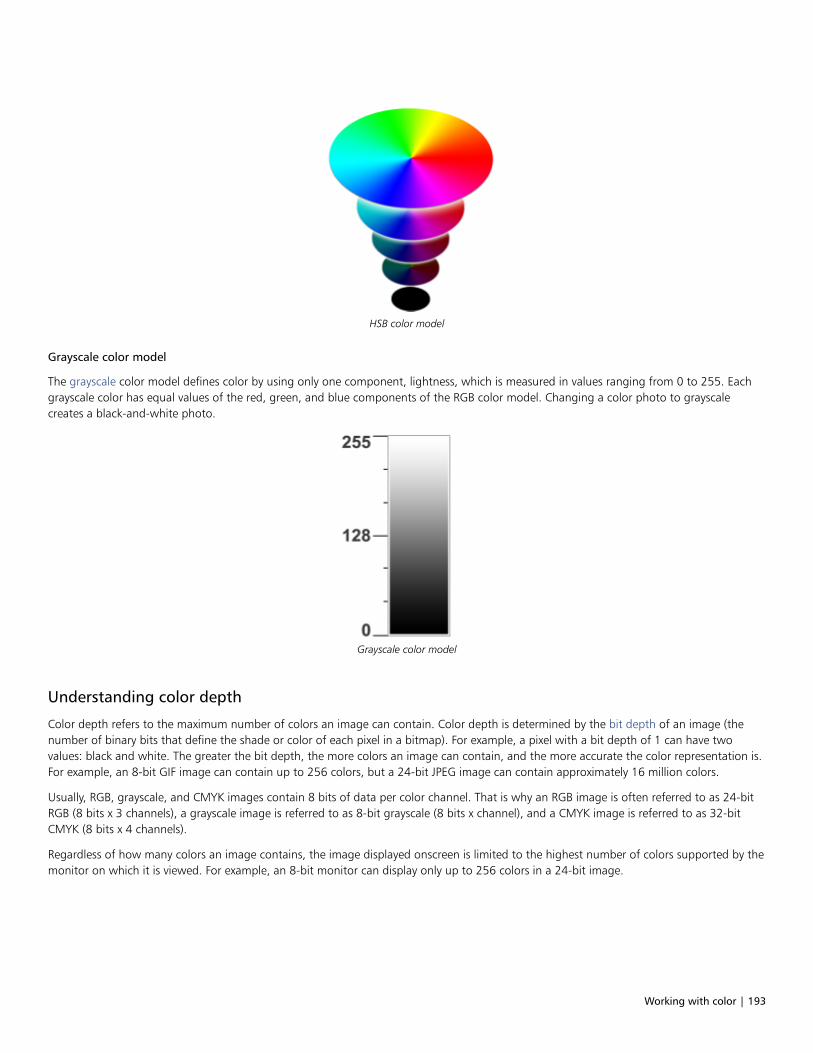
Working with color | 193
HSB color model
Grayscale color model
The grayscale color model defines color by using only one component, lightness, which is measured in values ranging from 0 to 255. Eachgrayscale color has equal values of the red, green, and blue components of the RGB color model. Changing a color photo to grayscalecreates a black-and-white photo.
Grayscale color model
Understanding color depth
Color depth refers to the maximum number of colors an image can contain. Color depth is determined by the bit depth of an image (thenumber of binary bits that define the shade or color of each pixel in a bitmap). For example, a pixel with a bit depth of 1 can have twovalues: black and white. The greater the bit depth, the more colors an image can contain, and the more accurate the color representation is.For example, an 8-bit GIF image can contain up to 256 colors, but a 24-bit JPEG image can contain approximately 16 million colors.
Usually, RGB, grayscale, and CMYK images contain 8 bits of data per color channel. That is why an RGB image is often referred to as 24-bitRGB (8 bits x 3 channels), a grayscale image is referred to as 8-bit grayscale (8 bits x channel), and a CMYK image is referred to as 32-bitCMYK (8 bits x 4 channels).
Regardless of how many colors an image contains, the image displayed onscreen is limited to the highest number of colors supported by themonitor on which it is viewed. For example, an 8-bit monitor can display only up to 256 colors in a 24-bit image.
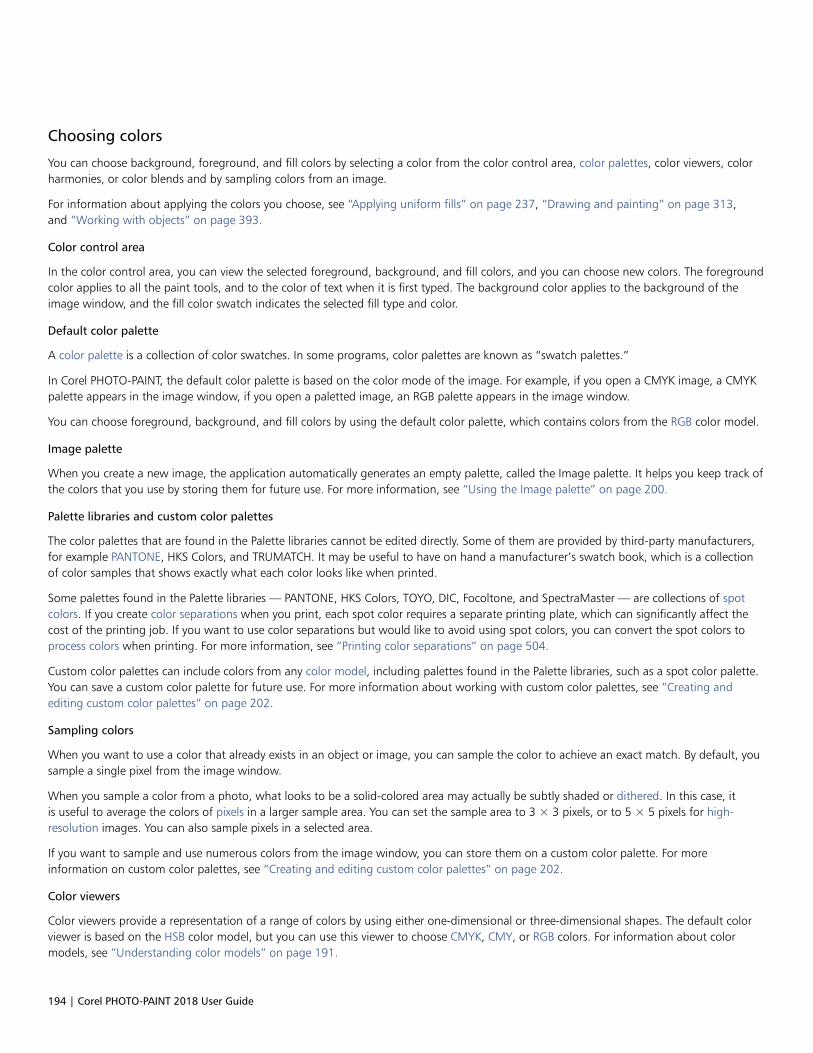
194 | Corel PHOTO-PAINT 2018 User Guide
Choosing colors
You can choose background, foreground, and fill colors by selecting a color from the color control area, color palettes, color viewers, colorharmonies, or color blends and by sampling colors from an image.
For information about applying the colors you choose, see “Applying uniform fills” on page 237, “Drawing and painting” on page 313,and “Working with objects” on page 393.
Color control area
In the color control area, you can view the selected foreground, background, and fill colors, and you can choose new colors. The foregroundcolor applies to all the paint tools, and to the color of text when it is first typed. The background color applies to the background of theimage window, and the fill color swatch indicates the selected fill type and color.
Default color palette
A color palette is a collection of color swatches. In some programs, color palettes are known as “swatch palettes.”
In Corel PHOTO-PAINT, the default color palette is based on the color mode of the image. For example, if you open a CMYK image, a CMYKpalette appears in the image window, if you open a paletted image, an RGB palette appears in the image window.
You can choose foreground, background, and fill colors by using the default color palette, which contains colors from the RGB color model.
Image palette
When you create a new image, the application automatically generates an empty palette, called the Image palette. It helps you keep track ofthe colors that you use by storing them for future use. For more information, see “Using the Image palette” on page 200.
Palette libraries and custom color palettes
The color palettes that are found in the Palette libraries cannot be edited directly. Some of them are provided by third-party manufacturers,for example PANTONE, HKS Colors, and TRUMATCH. It may be useful to have on hand a manufacturer’s swatch book, which is a collectionof color samples that shows exactly what each color looks like when printed.
Some palettes found in the Palette libraries — PANTONE, HKS Colors, TOYO, DIC, Focoltone, and SpectraMaster — are collections of spotcolors. If you create color separations when you print, each spot color requires a separate printing plate, which can significantly affect thecost of the printing job. If you want to use color separations but would like to avoid using spot colors, you can convert the spot colors toprocess colors when printing. For more information, see “Printing color separations” on page 504.
Custom color palettes can include colors from any color model, including palettes found in the Palette libraries, such as a spot color palette.You can save a custom color palette for future use. For more information about working with custom color palettes, see “Creating andediting custom color palettes” on page 202.
Sampling colors
When you want to use a color that already exists in an object or image, you can sample the color to achieve an exact match. By default, yousample a single pixel from the image window.
When you sample a color from a photo, what looks to be a solid-colored area may actually be subtly shaded or dithered. In this case, itis useful to average the colors of pixels in a larger sample area. You can set the sample area to 3 × 3 pixels, or to 5 × 5 pixels for high-resolution images. You can also sample pixels in a selected area.
If you want to sample and use numerous colors from the image window, you can store them on a custom color palette. For moreinformation on custom color palettes, see “Creating and editing custom color palettes” on page 202.
Color viewers
Color viewers provide a representation of a range of colors by using either one-dimensional or three-dimensional shapes. The default colorviewer is based on the HSB color model, but you can use this viewer to choose CMYK, CMY, or RGB colors. For information about colormodels, see “Understanding color models” on page 191.

Working with color | 195
An example of a color viewer
Color blends
When you choose a color by using color blends, you combine base colors to produce the color you want. The color blender displays a grid ofcolors that it creates from the four base colors you choose.
An example of color blends
Choosing web colors
You can use web colors when you design documents that will be published to the web. With Corel PHOTO-PAINT, you can define web colorsby using RGB hexadecimal values (for example, #aa003f).
To choose a color by using the color control area
1 In the color control area of the toolbox, double-click one of the following:
•Foreground color swatch
•Background color swatch
2 Move the color slider to set the range of colors displayed in the color selection area.
3 Click in the color selection area to choose a color.
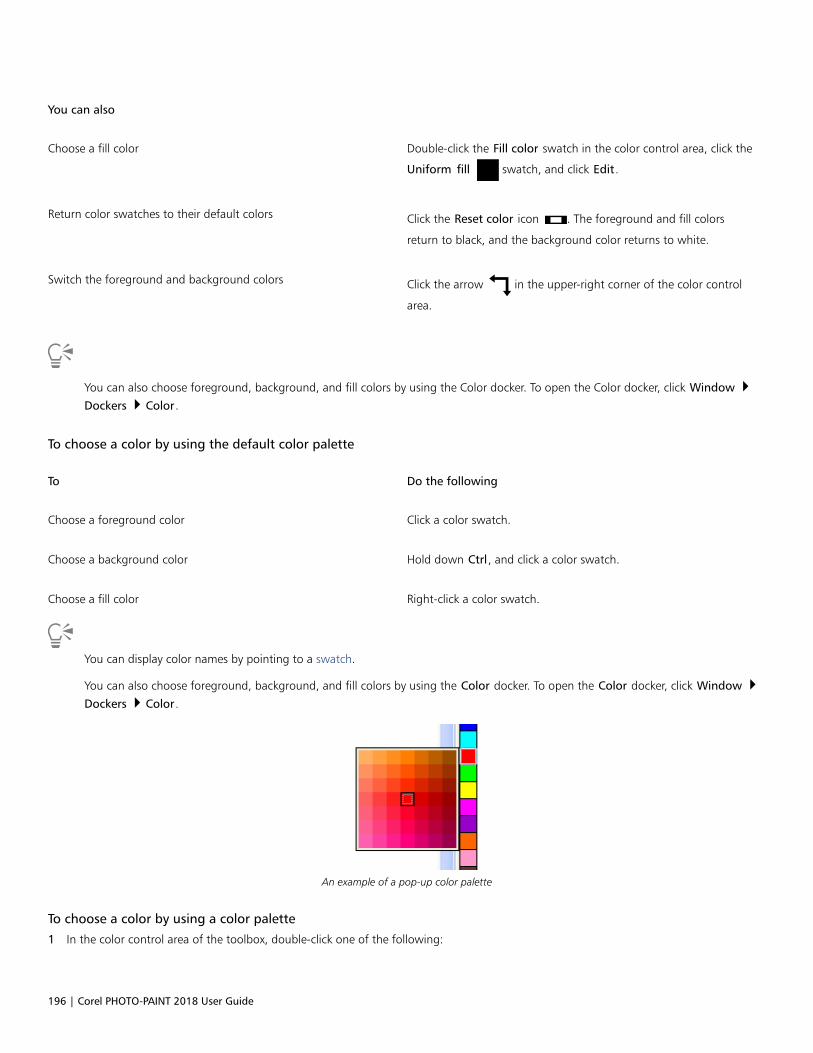
196 | Corel PHOTO-PAINT 2018 User Guide
You can also
Choose a fill color Double-click the Fill color swatch in the color control area, click the
Uniform fill swatch, and click Edit.
Return color swatches to their default colors Click the Reset color icon . The foreground and fill colors
return to black, and the background color returns to white.
Switch the foreground and background colors Click the arrow in the upper-right corner of the color control
area.
You can also choose foreground, background, and fill colors by using the Color docker. To open the Color docker, click Window Dockers Color.
To choose a color by using the default color palette
To Do the following
Choose a foreground color Click a color swatch.
Choose a background color Hold down Ctrl, and click a color swatch.
Choose a fill color Right-click a color swatch.
You can display color names by pointing to a swatch.
You can also choose foreground, background, and fill colors by using the Color docker. To open the Color docker, click Window Dockers Color.
An example of a pop-up color palette
To choose a color by using a color palette
1 In the color control area of the toolbox, double-click one of the following:
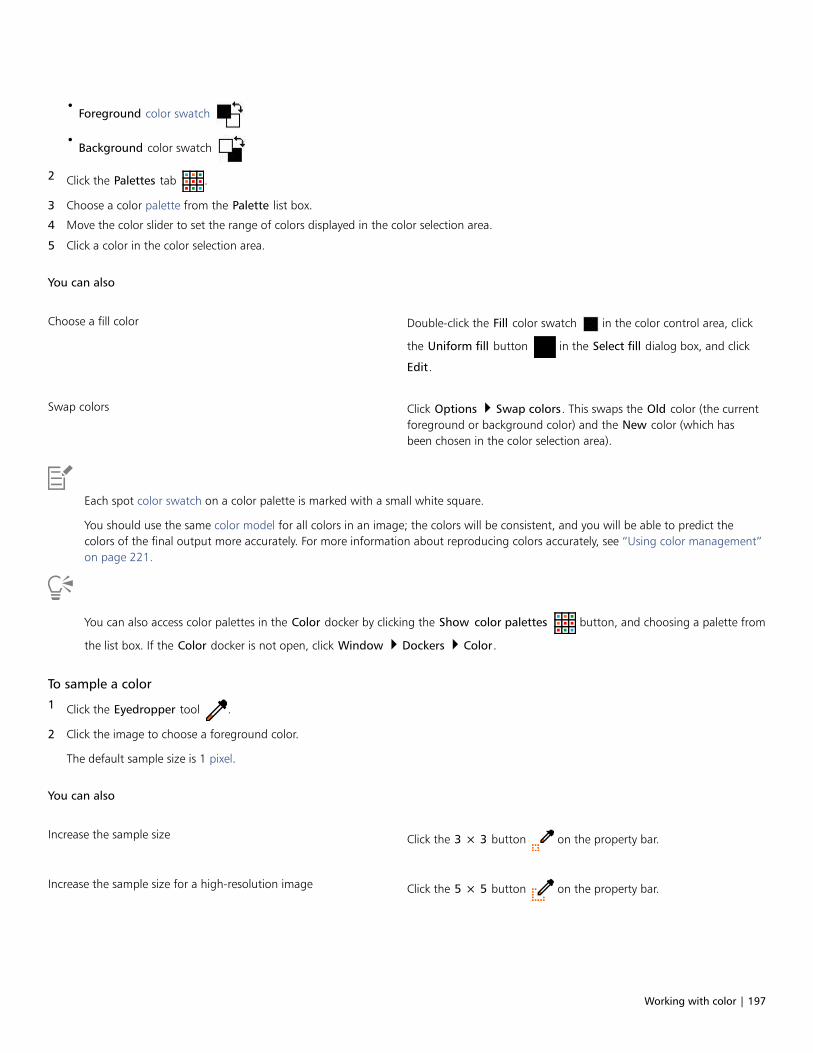
Working with color | 197
•Foreground color swatch
•Background color swatch
2 Click the Palettes tab .
3 Choose a color palette from the Palette list box.
4 Move the color slider to set the range of colors displayed in the color selection area.
5 Click a color in the color selection area.
You can also
Choose a fill color Double-click the Fill color swatch in the color control area, click
the Uniform fill button in the Select fill dialog box, and click
Edit.
Swap colors Click Options Swap colors. This swaps the Old color (the currentforeground or background color) and the New color (which hasbeen chosen in the color selection area).
Each spot color swatch on a color palette is marked with a small white square.
You should use the same color model for all colors in an image; the colors will be consistent, and you will be able to predict thecolors of the final output more accurately. For more information about reproducing colors accurately, see “Using color management”on page 221.
You can also access color palettes in the Color docker by clicking the Show color palettes button, and choosing a palette from
the list box. If the Color docker is not open, click Window Dockers Color.
To sample a color
1 Click the Eyedropper tool .
2 Click the image to choose a foreground color.
The default sample size is 1 pixel.
You can also
Increase the sample size Click the 3 × 3 button on the property bar.
Increase the sample size for a high-resolution image Click the 5 × 5 button on the property bar.
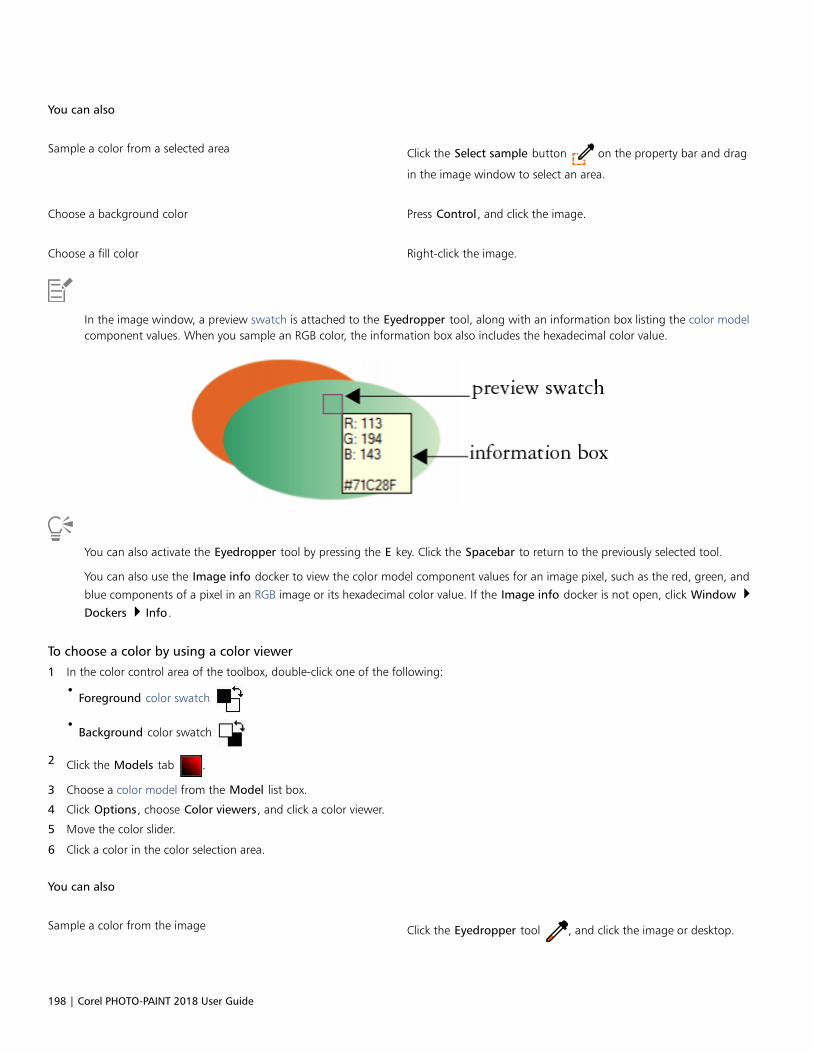
198 | Corel PHOTO-PAINT 2018 User Guide
You can also
Sample a color from a selected area Click the Select sample button on the property bar and drag
in the image window to select an area.
Choose a background color Press Control, and click the image.
Choose a fill color Right-click the image.
In the image window, a preview swatch is attached to the Eyedropper tool, along with an information box listing the color modelcomponent values. When you sample an RGB color, the information box also includes the hexadecimal color value.
You can also activate the Eyedropper tool by pressing the E key. Click the Spacebar to return to the previously selected tool.
You can also use the Image info docker to view the color model component values for an image pixel, such as the red, green, and
blue components of a pixel in an RGB image or its hexadecimal color value. If the Image info docker is not open, click Window Dockers Info.
To choose a color by using a color viewer
1 In the color control area of the toolbox, double-click one of the following:
•Foreground color swatch
•Background color swatch
2 Click the Models tab .
3 Choose a color model from the Model list box.
4 Click Options, choose Color viewers, and click a color viewer.
5 Move the color slider.
6 Click a color in the color selection area.
You can also
Sample a color from the image Click the Eyedropper tool , and click the image or desktop.
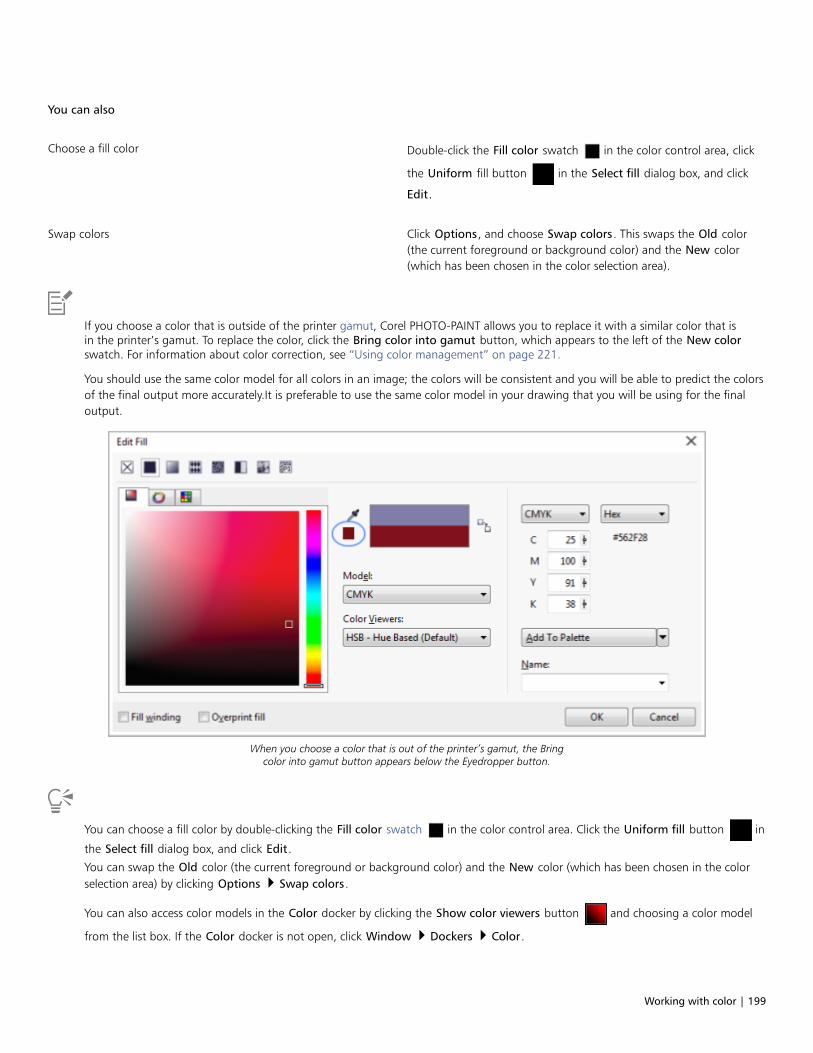
Working with color | 199
You can also
Choose a fill color Double-click the Fill color swatch in the color control area, click
the Uniform fill button in the Select fill dialog box, and click
Edit.
Swap colors Click Options, and choose Swap colors. This swaps the Old color(the current foreground or background color) and the New color(which has been chosen in the color selection area).
If you choose a color that is outside of the printer gamut, Corel PHOTO-PAINT allows you to replace it with a similar color that isin the printer’s gamut. To replace the color, click the Bring color into gamut button, which appears to the left of the New colorswatch. For information about color correction, see “Using color management” on page 221.
You should use the same color model for all colors in an image; the colors will be consistent and you will be able to predict the colorsof the final output more accurately.It is preferable to use the same color model in your drawing that you will be using for the finaloutput.
When you choose a color that is out of the printer’s gamut, the Bringcolor into gamut button appears below the Eyedropper button.
You can choose a fill color by double-clicking the Fill color swatch in the color control area. Click the Uniform fill button in
the Select fill dialog box, and click Edit.
You can swap the Old color (the current foreground or background color) and the New color (which has been chosen in the colorselection area) by clicking Options Swap colors.
You can also access color models in the Color docker by clicking the Show color viewers button and choosing a color model
from the list box. If the Color docker is not open, click Window Dockers Color.
200 | Corel PHOTO-PAINT 2018 User Guide
To choose a color by using color blends
1 In the color control area of the toolbox, double-click one of the following:
•Foreground color swatch
•Background color swatch
2 Click the Mixers tab.
3 Click Options, choose Mixers, and then click Color blend.
4 Open each color picker, and click a color.
5 Click a color in the color selection area.
You can also
Sample a color from the image Click the Eyedropper tool , and click the image or desktop.
Only colors that are on the default color palette can be blended. To blend other colors, you must change the default color palette.
To choose a web color
1 Click Window Dockers Color.
2 In the Color docker, click the Fill, Background, or Foreground color swatch and choose Default RGB palette from the list.
3 Type or paste a value in the Hex value box.
Whether you use a three-digit (#fff) or six-digit format (#ffffff), the final value is presented in the six-digit format.
You can specify hexadecimal color values only when working with RGB colors.
If you type an invalid hexadecimal value, the color does not change.
You can view hexadecimal color values on the status bar.
You can also choose web colors from the Foreground color, Background color, or Uniform fill dialog boxes. These dialog boxes alsolet you view and copy the hexadecimal equivalents of non-RGB colors.
Using the Image palette
When you start a new image, an empty color palette, named the Image palette, appears docked in the lower-left corner of the imagewindow. Every time you use a color in your image, it’s automatically added to the Image palette. However, if you prefer to control whichcolors are added to the Image palette, you can disable the automatic updates and add colors manually.
You can add colors from a color palette, an external image, a color picker, or a color-related dialog box, such as the Uniform fill color dialogboxes. In addition, you can add colors from an imported image or object.
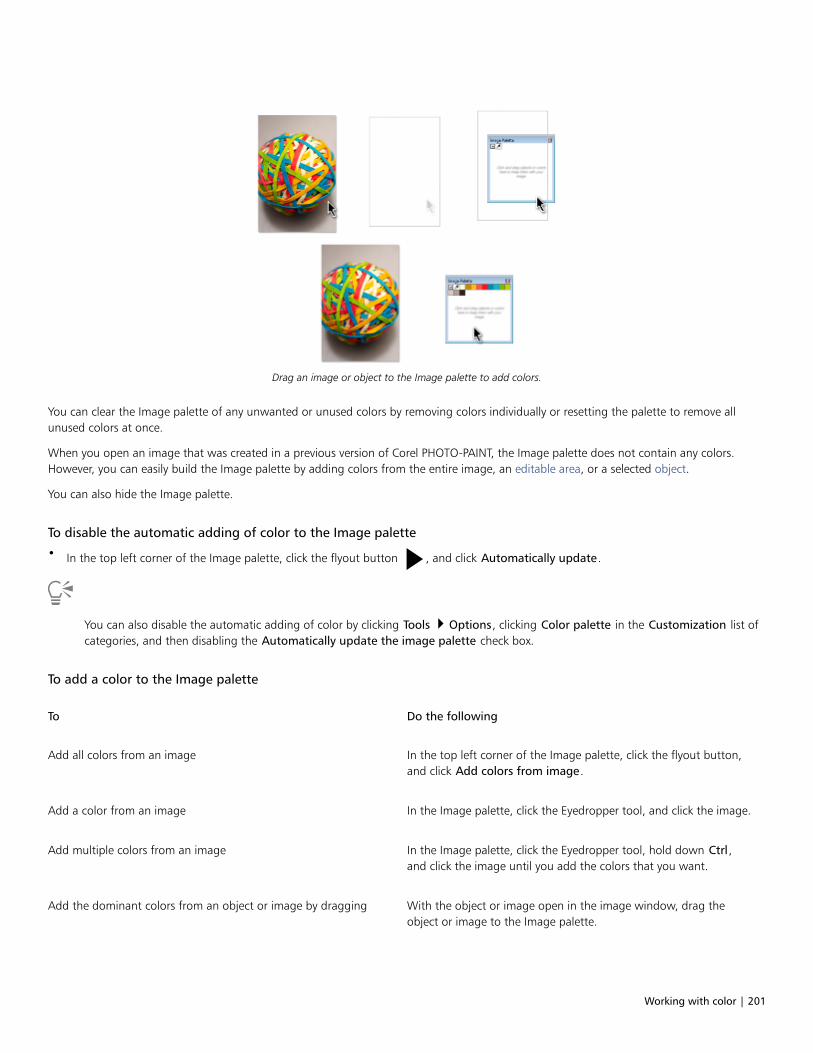
Working with color | 201
Drag an image or object to the Image palette to add colors.
You can clear the Image palette of any unwanted or unused colors by removing colors individually or resetting the palette to remove allunused colors at once.
When you open an image that was created in a previous version of Corel PHOTO-PAINT, the Image palette does not contain any colors.However, you can easily build the Image palette by adding colors from the entire image, an editable area, or a selected object.
You can also hide the Image palette.
To disable the automatic adding of color to the Image palette
• In the top left corner of the Image palette, click the flyout button , and click Automatically update.
You can also disable the automatic adding of color by clicking Tools Options, clicking Color palette in the Customization list ofcategories, and then disabling the Automatically update the image palette check box.
To add a color to the Image palette
To Do the following
Add all colors from an image In the top left corner of the Image palette, click the flyout button,and click Add colors from image.
Add a color from an image In the Image palette, click the Eyedropper tool, and click the image.
Add multiple colors from an image In the Image palette, click the Eyedropper tool, hold down Ctrl,and click the image until you add the colors that you want.
Add the dominant colors from an object or image by dragging With the object or image open in the image window, drag theobject or image to the Image palette.
202 | Corel PHOTO-PAINT 2018 User Guide
To Do the following
Add colors from an editable area Define an editable area. In the top left corner of the Image palette,click the flyout button, and click Add colors from visible.
Add colors from one or multiple objects Select one or more objects. In the top left corner of the Imagepalette, click the flyout button, and click Add colors from objects.
Add a color from a color-related dialog box In the dialog box, click a color swatch, then click Add to palette Image palette.
When dragging an image to the Image palette, only the five most dominant colors are added. Colors from PostScript fills are notsupported.
You can deselect the Eyedropper tool by pressing Esc.
You can move a color swatch by dragging a color swatch to a new position.
To remove a color from the Image palette
1 Click a color swatch on the Image palette.
2 In the top left corner of the Image palette, click the flyout button , and click Delete color.
To reset the Image palette
• In the top left corner of the Image palette, click the flyout button , and click Palette Reset palette.
To show or hide the Image palette
• Click Windows Color palette Image palette.
Creating and editing custom color palettes
Custom color palettes are collections of colors or color styles that you save. They can include colors or color styles from any color model,including spot colors, or any color palette found in the Palette libraries. You can create a custom palette to store all colors or color styles thatyou need in a current, or future, project.
It’s easy to share color palettes with others. The custom palettes are accessible from the My palettes folder in the Color Palette Manager.
You can create a custom color palette by choosing individual colors, or by using colors in an object, an editable area, or an entire image. Youcan also add custom spot colors to any custom palette. You can also edit, rename, and delete custom color palettes.
Custom color palettes are saved as XML files and are stored in the My Documents\My Palettes folder.
To create a custom color palette from scratch
1 Click Window Color palettes Palette editor.
2 Click the New palette button.
3 Type a filename in the File name box.

Working with color | 203
4 Click Save.
5 In the Palette editor dialog box, click Add color.
6 In the Select color dialog box, choose a color, and click Add to palette.
You can also
Treat the color as a spot color In the Selected color area of the Palette editor dialog box, chooseSpot from the Treat as list.
Treat the color as a process color In the Selected color area of the Palette editor dialog box, chooseProcess from the Treat as list.
Rename a color In the Palette editor dialog box, click a color in the color selectionarea, and type a name in the Name box.
To add a color to a custom color palette
1 Open a custom color palette.
2 Perform a task from the following table.
To Do the following
Add a color from another color palette Drag a color from an open color palette to the custom palette.
Add a color from an image On the custom palette, click the Eyedropper button , and click
the color that you want to add.
Add multiple colors from an image On the custom palette, click the Eyedropper button , hold
down Ctrl, and click the image until you add the colors that youwant.
Add multiple colors from an image or object Drag an image or object from the drawing window to the custompalette.
Add a color from a color-related dialog box In the dialog box, click a color swatch, click the arrow next to Addto palette, choose the name of your custom palette from the list,and then click Add to palette.
Add all colors from an image In the top left corner of the custom palette, click the flyout button
, and click Add colors from image.
Add colors from one or multiple Select one or more objects. In the top left corner of the Image
palette, click the flyout button , and click Add colors from
objects.
204 | Corel PHOTO-PAINT 2018 User Guide
To Do the following
Add colors from an editable area Define an editable area. In the top left corner of the custom
palette, click the flyout button , and click Add colors from
visible.
Move a color swatch Drag a color swatch to a new position on the palette.
When dragging an image to the Image palette, only the five most dominant colors are added. Colors from PostScript fills are notsupported.
To create a color palette from an editable area
1 Define an editable area.
2 Click Window Color palettes Create palette from visible.
3 Click Save palette as .
4 Type a filename.
5 Click Save.
For information about defining editable areas, see “Defining editable areas” on page 271.
To create a color palette from an image
1 Click Window Color palettes Create palette from document.
2 Type a filename.
3 Click Save.
To edit a custom color palette
1 Click Window Color palettes Palette editor.
2 Choose a palette from the list box.
3 Perform a task from the following table.
To Do the following
Add a color Click Add color. In the Select color dialog box, click the Modelstab, click a color in the color selection area, and click Add topalette.
Treat a color as a spot color In the Selected color area of the Palette editor dialog box, chooseSpot from the Treat as list.
Treat a color as a process color In the Selected color area of the Palette editor dialog box, chooseProcess from the Treat as list.
Working with color | 205
To Do the following
Change a color In the color selection area, click a color, and click Edit color. In theSelect color dialog box, click the Models tab, and click a new colorin the color selection area.
Delete a color In the color selection area, click a color, and click Delete color.
Sort colors Click Sort colors, and choose a color sorting method.
Move a color Drag a color swatch to a new position.
Rename a color Click a color in the color selection area, and type a name in theName box.
You can delete multiple colors by holding down Shift or Ctrl, clicking the colors that you want to delete, and clicking Delete color.
To rename a custom color palette
1 Click Window Color palettes Color palette manager.
2 From the My Palettes folder, right-click a custom palette, and click Rename.
3 Type a new name, and press Enter.
To delete a custom color palette
1 Click Window Color palettes Color palette manager.
2 From the My Palettes folder, right-click a custom palette, and click Delete.
Organizing and displaying color palettes
The Color Palette Manager is a docker that lets you quickly access the available color palettes, including the Image palette, and the ColorStyles palette, and create custom color palettes. The color palettes in the Color Palette Manager are divided into two main folders: Mypalettes and Palette libraries.
You can use the My palettes folder to store all the custom color palettes that you create. You can add folders to store and organize yourcolor palettes for different projects. You can also copy a color palette or move it to a different folder. You can open and control the display ofall color palettes.
The Palette libraries folder of the Color Palette Manager contains collections of preset color palettes from which you can choose colors.You cannot edit any of the color palettes that are found in the Palette libraries. However, you can create a custom color palette by copying acolor palette from the Palette libraries folder. For more information, see “Displaying or hiding color palettes in the Palette libraries” on page207.
To open the Color Palette Manager
• Click Window Color palettes Color palette manager.
206 | Corel PHOTO-PAINT 2018 User Guide
To display or hide a custom color palette
1 Open the Color Palette Manager.
2 In the My palettes folder, click the Show or hide icon beside the custom palette name.
If you want to set a custom color palette as the default palette, click the custom palette flyout button , and click Set as default.
To open a custom color palette
1 Open the Color Palette Manager.
2 Click the Opens a palette button .
3 Choose the drive and folder where the custom color palette is stored.
If you want to open a color palette (.cpl file) that was created in a previous version of Corel PHOTO-PAINT, select Legacy custom palette(*.cpl) from the Files of type list box.
4 Click the custom palette.
5 Click Open.
When you open a legacy custom palette (.cpl) file, it is automatically converted to the XML format (.xml). The XML version is storedin the x:\Documents and Settings\your name\My Documents folder, and also appears in the My palettes folder in the Color PaletteManager.
If the custom color palette (.xml) was saved to the My palettes folder, you can open it by clicking Window Color palettes andchoosing the custom palette from the list.
To create a folder for storing custom color palettes
1 Open the Color Palette Manager.
2 Click the Create a new folder button .
3 Type a new name, and press Enter.
If you want to move a custom color palette, drag it to the new folder.
To cut or copy a custom color palette
1 Open the Color Palette Manager.
2 In the My palettes folder, right-click a custom palette, and click one of the following:
• Cut
• Copy
If you want to paste the custom palette to a different folder, right-click the folder, and click Paste.
To copy a palette from the Palette libraries for editing
1 Open the Color Palette Manager.
2 Drag a palette from the Palette libraries folder to the My palettes folder.
An editable copy of the color palette appears in the My palettes folder.
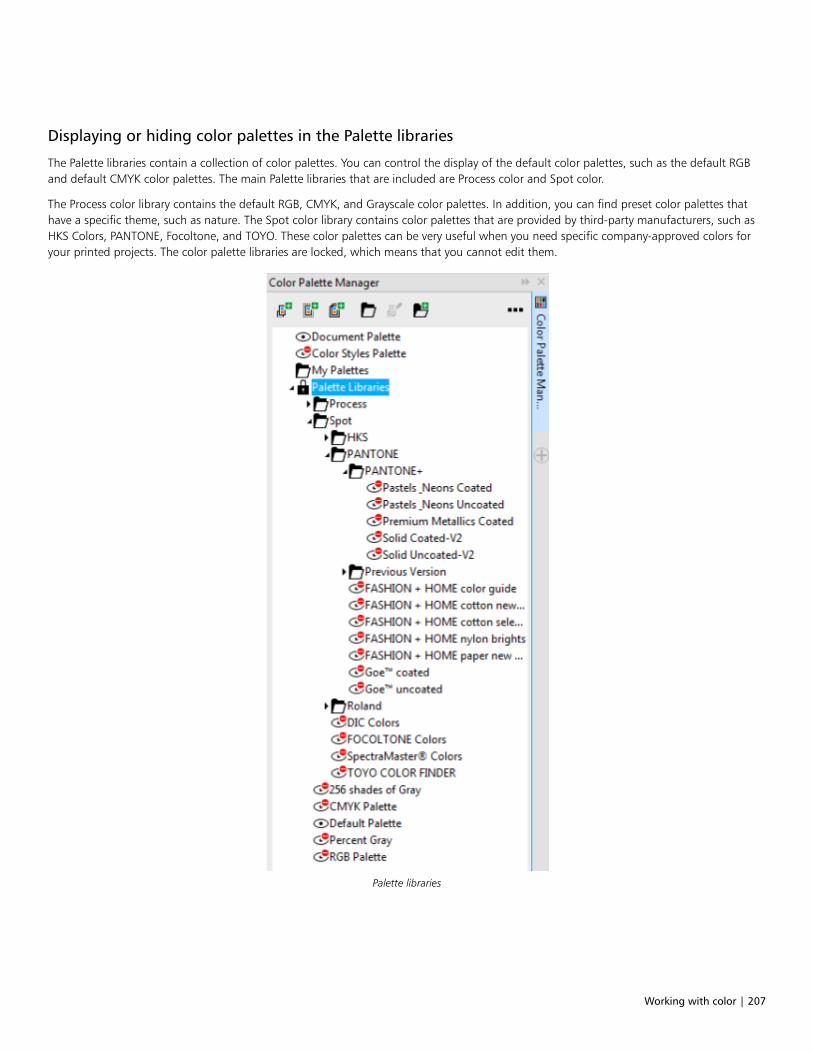
Working with color | 207
Displaying or hiding color palettes in the Palette libraries
The Palette libraries contain a collection of color palettes. You can control the display of the default color palettes, such as the default RGBand default CMYK color palettes. The main Palette libraries that are included are Process color and Spot color.
The Process color library contains the default RGB, CMYK, and Grayscale color palettes. In addition, you can find preset color palettes thathave a specific theme, such as nature. The Spot color library contains color palettes that are provided by third-party manufacturers, such asHKS Colors, PANTONE, Focoltone, and TOYO. These color palettes can be very useful when you need specific company-approved colors foryour printed projects. The color palette libraries are locked, which means that you cannot edit them.
Palette libraries
208 | Corel PHOTO-PAINT 2018 User Guide
To display a color palette in the Palette libraries
1 Open the Color Palette Manager.
2 In the Palette libraries folder, click the Show or hide icon beside the color palette name.
To display spot or process color palettes
1 Open the Color Palette Manager.
2 In the Palette libraries folder, double-click one of the following folders:
• Spot
• Process
3 Click the Show or hide icon beside the color palette name.
Setting the properties of color palettes
You can customize color palettes.
Color palettes can be either docked or floating. Docking a color palette attaches it to the edge of the application window. Undocking a colorpalette pulls it away from the edge of the application window, so it floats and can be easily moved around.
With color swatches, you can set the right mouse button either to display a context menu or set the fill color. You can also adjust the colorswatch border and size.
To dock or undock a color palette
To Do the following
Dock a color palette Click the top of the color palette border, and drag the color paletteto any edge of the application window until a thin black toolbaroutline appears.
Undock a color palette Click the dotted border of the color palette, and drag the colorpalette away from the edge of the application window.
Change the number of rows on a docked color palette On the palette, click the flyout button , click Rows, and choose
an option from the list.
You can also change the number of rows on a docked color palette by clicking Tools Customization, clicking Color palette in theCustomization list of categories, and typing a value in the Maximum palette rows when docked box. You can set a maximum ofseven rows on a color palette.
To set the action of the right mouse button for color swatches
1 Click Tools Customization.
2 In the Customization list of categories, click Color palette.
3 Enable one of the following check boxes:
Working with color | 209
• Context menu
• Set fill color
To customize color swatches
1 Click Tools Customization.
2 In the Customization list of categories, click Color palette.
3 Enable or disable any of the following check boxes:
• Wide borders
• Large swatches
You can also display color names in the color swatches by clicking the flyout button on a color palette and clicking Show color
names.
Using spot color channels
Spot color channels let you view, edit, and preserve spot color information in files. Whether you are importing a file that uses spot colors oryou add spot colors in Corel PHOTO-PAINT, spot color channels ensure that your color information is maintained when you output the file.The spot color is stored in an 8-bit grayscale channel that preserves information such as which spot color to use, where to apply the ink, andat what density.
You can create a new spot color channel, assign a color and name to the channel, and then add content. For example, you can paint, drawshapes, apply effects, or paste content onto the channel. When you paste an object or selection to a spot color channel, it is added as aneditable area. You can modify the editable area before you commit it to the spot color channel. For more information about modifyingeditable areas, see “Working with masks” on page 269.
When you preview your image, you can choose whether spot colors mix with underlying colors (overprint) or cover underlying colors. Thiscan be used to simulate opaque or transparent inks.
You can also select, edit, and change the properties of existing spot color channels. For example, if you open or import an image thatcontains spot color channels, you can edit channel content, rename a channel, or change the spot color of a channel. When you viewimages, you can choose to hide or display the contents of spot color channels or change the order of the channels. You can copy spot colorchannels between images and you can delete spot color channels when you no longer need them.
Whether you are creating a new channel or editing an existing one, you can add or erase channel content by changing the color for the toolyou are using. For example, painting with black applies a solid color, painting with white erases the color, and painting with gray applies atint of the color.
You can save your work to the CPT file format if you will be doing further editing. You can also save to the PSD file format or export to theDCS, PDF, or EPS file format if you are ready to print.
To create a spot color channel
1 In the Channels docker, click the flyout arrow , and choose New spot color channel.
If the Channels docker is not open, click Window Dockers Channels.
2 In the New spot color channel dialog box, choose a color from the color picker.
3 Type a name for the channel in the Name box if you do not want to use the spot color name for the channel.
4 From the Ink properties box, choose one of the following options:
• Solid — Colors underneath do not affect the ink color unless the ink density is less than 100 percent.
• Transparent — Colors underneath show through. This option lets you preview overprinting.
210 | Corel PHOTO-PAINT 2018 User Guide
5 Enable one of the following options:
• Empty channel — creates an empty channel (no ink applied)
• Fill with color — creates a channel filled with the ink color
6 Click OK.
The new spot color channel appears in the Channel docker under the current channels. The new spot color channel is displayed andother channels are hidden.
You can also create a new channel by clicking the New spot color channel button in the Channels docker.
The Pantone Solid Coated palette is the default color palette, but you can access other palettes from the color picker by clickingOther, and choosing a palette from the Palette list box in the Select color dialog box.
To select a spot color channel
• In the Channels docker, click a spot color channel in the Channels list.
A red outline appears around the thumbnail for a channel when the channel is selected.
If the Channels docker is not open, click Window Dockers Channels.
To change the properties of a spot color channel
1 In the Channels docker window, choose a spot color channel from the Channels list.
2 Click the flyout button in the upper-right corner of the docker, and click Channel properties.
3 In the Spot color channel properties dialog box, perform a task from the following table.
To
Change the spot color Choose a color from the color picker.
Rename the channel Type a name in the Name box.
Change the ink properties From the Ink properties box, choose one of the following options:•Solid — Colors underneath do not affect the ink color unless the
ink density is less than 100 percent.•Transparent — Colors underneath show through. This option lets
you preview overprinting.
You can also double-click a spot color channel in the Channels docker to access the Spot color channel properties dialog box.
To paste content to a spot color channel
1 Copy an object or selection to the Clipboard.
If you want to copy the object to another image, open the image in which you want to paste the content.
2 In the Channels docker, select a spot color channel.
3 Click Edit Paste Paste as new selection.
The content appears as an editable area surrounded by a mask (indicated by a colored overlay or a marquee). If you want to edit thearea, do so now.
Working with color | 211
If you want to specify a uniform ink density for the area, right-click black (for a solid spot color) or right-click a shade of gray (for a tint),
click the Fill tool , and click the editable area.
4 Click Mask Remove.
The pasted content is now committed to the spot color channel.
Image dimensions and image resolution affect how spot color channel information is pasted between images. For best results, copyand paste spot color channels between images that are similar in image dimensions and are the same image resolution.
To display or hide a spot color channel• In the Channels docker, click the eye icon beside a spot color channel.
The eye appears closed when channel content is hidden; the eye appears open when channel content is visible.
If the Channels docker is not open, click Window Dockers Channels.
To change the order of spot color channels
• In the Channels docker, click a spot color channel in the Channels list, and drag it to a new position.
To copy a spot color channel
1 In the Channels docker, select the spot color channel that you want to copy.
2 Click Edit Copy.
3 Open the image to which you want to paste the spot color channel.
4 Click Edit Paste Paste as new object.
The spot color channel appears at the bottom of the Channels list in the Channels docker.
Image dimensions and image resolution affect how spot color channel information is pasted between images. For best results, copyand paste spot color channels between images that are similar in image dimensions and are the same image resolution.
To delete a spot color channel
1 In the Channels docker window, click a spot color channel in the Channels list.
2 Click the Delete current channel button .

212 | Corel PHOTO-PAINT 2018 User Guide
Changing color modes | 213
Changing color modes
Changing an image to another color mode, such as RGB, CMYK, or grayscale, changes the image’s color structure and size and can affecthow the image is displayed and printed.
This section contains the following topics:• “Changing the color mode of images” (page 213)• “Converting images to the black-and-white color mode” (page 215)• “Converting images to the paletted color mode” (page 215)• “Converting images to the duotone color mode” (page 218)
Changing the color mode of images
In Corel PHOTO-PAINT, the colors of images are defined by color modes. Computer monitors display images in the RGB color mode; imagesin Corel PHOTO-PAINT are created in the RGB color mode by default. You can convert images to different color modes, depending on theirintended use. For example, it is recommended that images sent for high-end printing be in the CMYK color mode. For the World Wide Web,photos should be in the RGB color mode and GIF images should be in the paletted color mode.
Color modes are described by their component colors and bit depth. For example, the RGB (24-bit) color mode is composed of red, green,and blue channels and has a bit depth of 24 bits. Similarly, the CMYK (32-bit) color mode is composed of cyan, magenta, yellow, and blackchannels and has a bit depth of 32 bits. Each channel has a bit depth of 8 bits.
Although on the screen you may not be able to see the difference between an image in the CMYK color mode and an image in the RGBcolor mode, the images are quite different. Colors from the RGB color space can cover a greater range of the visual spectrum (they havea larger gamut) than those from the CMYK color space. For the same image dimensions, a CMYK image has a larger file size than an RGBimage, but it contains the channels necessary to print standard inks.
Each time you convert an image, you may lose color information. For this reason, you should finish editing and then save an image beforeyou convert it to a new color mode.
Color modes are based on standard color models used to describe, classify, and reproduce color digitally. For more information about theCMYK, RGB, HSB, and grayscale color models, see “Understanding color models” on page 191.
Corel PHOTO-PAINT supports the following color modes:
• Black-and-white (1-bit) • Grayscale (8-bit)
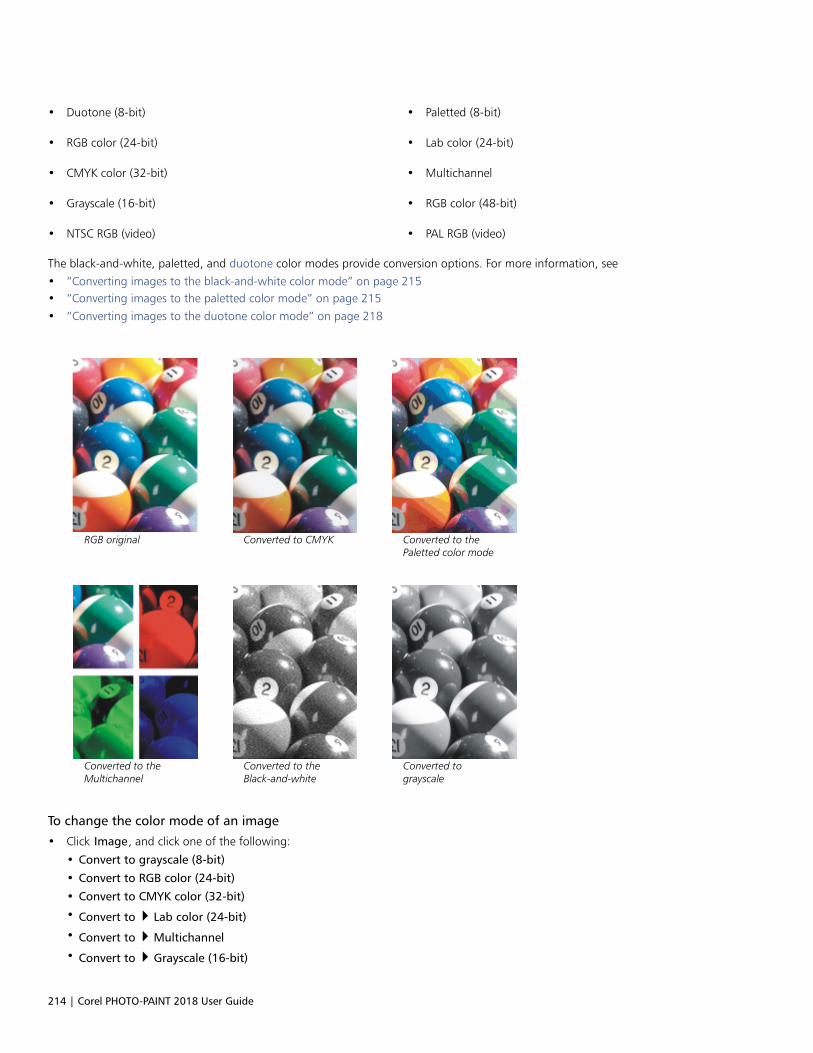
214 | Corel PHOTO-PAINT 2018 User Guide
• Duotone (8-bit) • Paletted (8-bit)
• RGB color (24-bit) • Lab color (24-bit)
• CMYK color (32-bit) • Multichannel
• Grayscale (16-bit) • RGB color (48-bit)
• NTSC RGB (video) • PAL RGB (video)
The black-and-white, paletted, and duotone color modes provide conversion options. For more information, see• “Converting images to the black-and-white color mode” on page 215• “Converting images to the paletted color mode” on page 215• “Converting images to the duotone color mode” on page 218
RGB original Converted to CMYK Converted to thePaletted color mode
Converted to theMultichannel
Converted to theBlack-and-white
Converted tograyscale
To change the color mode of an image
• Click Image, and click one of the following:
• Convert to grayscale (8-bit)
• Convert to RGB color (24-bit)
• Convert to CMYK color (32-bit)
• Convert to Lab color (24-bit)
• Convert to Multichannel
• Convert to Grayscale (16-bit)
Changing color modes | 215
• Convert to RGB color (48-bit)
• Convert to NTSC RGB
• Convert to PAL RGB
The current mode of the image determines the modes to which the image can be converted. Modes which are not available aregrayed.
The Black-and-white (1-bit), Paletted (8-bit), and Duotone (8-bit) color modes provide conversion options. For more information,see
• “Converting images to the black-and-white color mode” on page 215
• “Converting images to the paletted color mode” on page 215
• “Converting images to the duotone color mode” on page 218
Converting images to the black-and-white color mode
You can convert images to the 1-bit black-and-white color mode to reduce file size, or to create artistic looks. The black-and-white colormode (also known in some programs as bitmap mode) is not the same as the grayscale color mode. In black-and-white images, each pixelmust be either black or white; grayscale images can include black, white, and 254 shades of gray and are suitable for creating a black-and-white photo effect. For information about changing photos to grayscale, see “To change the color mode of an image” on page 214.
When you convert images to the black-and-white color mode, you can adjust settings — such as threshold, screen type, and intensity — andchoose from seven black-and-white conversion types:• Halftone — creates different shades of gray by varying the pattern of black and white pixels in an image. You can choose the screen
type, angle for the halftone, lines per unit, and the unit of measure.• Line art — produces a high-contrast black-and-white image. Colors with a grayscale value lower than the threshold value that you set
change to black, while colors with a grayscale value higher than the threshold value change to white.• Ordered — organizes the gray levels into repeating geometric patterns of black and white pixels. Solid colors are emphasized and image
edges are hard. This option is best suited for uniform colors, such as those used in charts and graphs.• Jarvis — applies the Jarvis algorithm to individual pixels. This form of error diffusion is suitable for photographic images.• Stucki — applies the Stucki algorithm to individual pixels. This form of error diffusion is suitable for photographic images.• Floyd-Steinberg — applies the Floyd-Steinberg algorithm to individual pixels. This form of error diffusion is suitable for photographic
images.• Cardinality-Distribution — creates a textured look by applying a calculation and distributing the result to each pixel.
To convert an image to the black-and-white color mode
1 Click Image Convert to black-and-white (1-bit).
2 Choose a conversion option from the Conversion list box.
3 Specify the conversion settings you want.
If you want to view other parts of the image, drag the hand in the Preview window.
Converting images to the paletted color mode
The paletted color mode, also called indexed color mode, is frequently used for GIF images on the web. When you convert a complex imageto the paletted color mode, a fixed color value is assigned to each pixel. These values are stored in a compact color table, or palette. As aresult, the paletted image contains less data than the original, and it has a smaller file size. Paletted color mode is an 8-bit mode that storesand displays images by using up to 256 colors.
216 | Corel PHOTO-PAINT 2018 User Guide
Choosing, editing, and saving a color palette
When you change an image to the paletted color mode, you use a predefined or a custom color palette and then edit the palette byreplacing individual colors. If you choose the Optimized color palette, you can also edit the palette by specifying a range sensitivity color. Thecolor palette you use to convert the image is called the processed color palette, and it can be saved for use with other images.
For more information about creating custom color palettes, see “Working with color” on page 191.
Dithering
Paletted images can only contain up to 256 different colors. If the original image contains many colors, you can use dithering to create theillusion of seeing more than 256 colors. Dithering creates additional colors and shades from an existing palette by interspersing pixels ofdifferent colors. The relationship of one colored pixel to another creates an optical mix, so you perceive additional colors.
Dithering can be done by distributing colors either regularly or randomly. Ordered dithering approximates color blends by using regular dotpatterns; as a result, solid colors are emphasized and edges appear harder. Error diffusion scatters pixels randomly, making edges and colorssofter. Jarvis, Stucki and Floyd-Steinberg are methods of error diffusion.
If your image contains only a few colors and simple shapes, you do not need to use dithering.
Setting the color range for a custom color palette
When you change an image to the paletted color mode using the Optimized palette, you can choose a seed color, or base color, and a rangesensitivity for the seed color. The seed color, and similar colors that fall within the range settings, are included in the processed color palette.You can also specify how much emphasis to place on the range sensitivity. Because the palette has a maximum of 256 colors, emphasizing aseed color reduces the number of colors that fall outside the range sensitivity.
Saving conversion options
After you choose a color palette and set the dithering and range sensitivity for the changing of an image to the paletted color mode, youcan save the selected options as a conversion preset that you can use with other images. You can add and remove as many conversionpresets as you want. You can also remove the presets you have added.
Converting multiple images to the paletted color mode
You can change multiple images to the paletted color mode simultaneously. Before you perform a batch conversion, you must open theimages in Corel PHOTO-PAINT. All images that you include in the batch are changed using the color palette and conversion options youspecify.
To convert an image to the paletted color mode
1 Click Image Convert to paletted (8-bit).
2 Click the Options tab.
3 Choose one of the following color palette types from the Palette list box:
• Uniform — provides a range of 256 colors with equal parts of red, green, and blue
• Standard VGA — provides the Standard VGA 16-color palette
• Adaptive — provides colors original to the image, and preserves the individual colors (the entire color spectrum) in the image
• Optimized — creates a color palette based on the highest percentage of colors in the image. You can also select a range sensitivitycolor for the color palette.
• Black Body — contains colors that are based on temperature. For example, black may represent cold temperatures, while red, orange,yellow, and white may represent hot temperatures.
• Grayscale — provides 256 shades of gray, ranging from black (0) to white (255)
• System — provides a palette of web-safe and grayscale colors
• Websafe — provides a palette of 216 colors that are common to web browsers
4 Choose a dithering option from the Dithering list box.
5 Move the Dither intensity slider to adjust the amount of dithering.
Changing color modes | 217
You can also
Save the conversion options as a preset Click Add preset , and type a name in the Save preset box.
Edit the processed color palette Click the Processed palette tab, and click Edit. In the Color tabledialog box, edit the color palette.
Save the processed color palette Click the Processed palette tab, and click Save. Choose the folderwhere you want to save the processed color palette, and type afilename.
The Ordered dithering option is applied more quickly than are the error diffusion options Jarvis, Stucki, and Floyd-Steinberg;however, it is less accurate.
You can choose a custom color palette by clicking the Options tab, clicking Open, locating the color palette file you want, anddouble-clicking the filename.
You can load preset conversion options by choosing a preset from the Presets list box on the Options tab.
To set the color range for a custom color palette
1 Click Image Convert to paletted (8-bit).
2 Click the Options tab.
3 Choose Optimized from the Palette list box.
4 Enable the Color range sensitivity to check box.
5 Click the Eyedropper tool , and click a color in the image.
6 Click the Range sensitivity tab, and specify the settings you want.
7 Move the range sensitivity sliders.
If you want to view the color palette, click the Processed palette tab.
To convert multiple files to the paletted color mode
1 Click Image Convert to paletted (8-bit).
2 Click the Batch tab.
3 From the left column, choose each file you want to change.
4 Click Add.
You can preview an image by choosing it from the Preview image list box and clicking Preview.
218 | Corel PHOTO-PAINT 2018 User Guide
Converting images to the duotone color mode
Duotone color mode is used for specialized color printing. A duotone image is a grayscale image that has been enhanced with the additionof one to four colored inks. The following list describes the duotone types:• monotone — a grayscale image colored with a single ink• duotone — a grayscale image colored with two inks. In most cases, the first ink is black and the other ink is colored.• tritone — a grayscale image colored with three inks. In most cases, the first ink is black and the second and third inks are colored.• quadtone — a grayscale image colored with four inks. In most cases, the first ink is black and the second, third, and fourth inks are
colored.
Adjusting tone curves
When you convert an image to the duotone color mode, a tone curve grid that represents the dynamic ink curves that are used throughoutthe conversion is displayed. The horizontal plane (x-axis) displays the 256 possible shades of gray in a grayscale image (0 is black; 255 iswhite). The vertical plane (y-axis) indicates the intensity of an ink (from 0 to 100 percent) that is applied to the corresponding grayscalevalues.
Saving and loading inks for duotone conversion
After you choose a duotone type and adjust the tone curves for the inks used to change images to the duotone color mode, you can savethe ink settings and load them for use with other images.
Specifying how overprint colors display
When you change an image to the duotone color mode, you can specify which colors will overprint when you print an image. Overprintcolors are the colors that have too much ink when two or more colors overlap. When you display the image, each color is applied on thescreen in sequence, creating a layered effect.
You can view all instances in which the ink colors you choose overlap. Associated with each instance is the color that is produced by theoverlap. You can also choose new overprint colors to see how they overlap.
To convert an image to the duotone color mode
1 Click Image Convert to Duotone (8-bit).
2 Click the Curves tab.
3 Click a duotone type from the Type list box.
4 Double-click an ink color in the Type window.
5 In the Select color dialog box, click a color, and click OK.
If you want to adjust the color's tone curve, click the ink tone curve on the grid to create a node, and drag the node to adjust theamount of color at that point on the grid.
You can also
Display all the ink tone curves on the grid Enable the Show all check box.
Save the ink settings Click Save. Choose the folder where you want to save the file withthe new settings, and type a filename.
Specify how overprint colors display Click the Overprint tab, and enable the Use overprint check box.Double-click the color you want to edit, and choose a new color.

Changing color modes | 219
You can load ink settings by clicking the Curves tab, clicking Load, locating the file where the ink settings are stored, and double-clicking the filename.
To specify how overprint colors display
1 Click Image Convert to Duotone (8-bit).
2 Click the Overprint tab.
3 Enable the Use overprint check box.
4 Double-click the color that you want to edit.
5 In the Select color dialog box, choose a color model from the Model list box, click a color, and click OK.
If you want to preview the new overprint color, click Preview.

220 | Corel PHOTO-PAINT 2018 User Guide
Using color management | 221
Using color management
Color management helps ensure colors appear consistent when you work with files from various sources and output these files on differentdevices.
This section contains the following topics:• “Understanding color management” (page 221)• “Getting started with color management in Corel PHOTO-PAINT” (page 225)• “Installing, loading, and embedding color profiles” (page 226)• “Assigning color profiles” (page 228)• “Converting colors to other color profiles” (page 228)• “Choosing color-conversion settings” (page 229)• “Soft proofing” (page 229)• “Working with color management presets” (page 232)• “Working with color management policies” (page 233)• “Managing colors when opening documents” (page 234)• “Managing colors when importing and pasting files” (page 235)• “Managing colors for print” (page 235)• “Using a safe CMYK workflow” (page 236)• “Managing colors for online viewing” (page 236)
Understanding color management
This section provides answers to the following commonly asked questions about color management:• “Why don’t colors match?” (page 222)• “What is color management?” (page 222)• “Why do I need color management?” (page 222)• “How do I get started with color management?” (page 223)• “Is my monitor displaying the correct colors?” (page 223)• “Should I assign a color profile or convert colors to a color profile?” (page 223)• “What is a rendering intent?” (page 223)
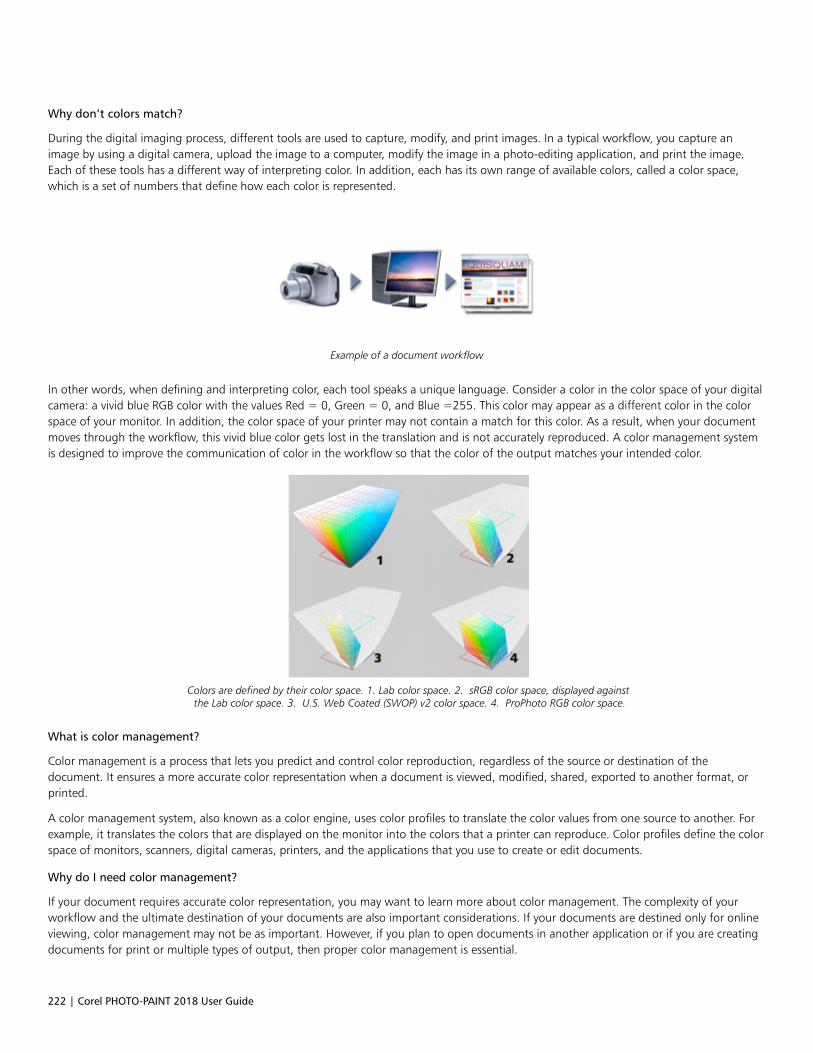
222 | Corel PHOTO-PAINT 2018 User Guide
Why don’t colors match?
During the digital imaging process, different tools are used to capture, modify, and print images. In a typical workflow, you capture animage by using a digital camera, upload the image to a computer, modify the image in a photo-editing application, and print the image.Each of these tools has a different way of interpreting color. In addition, each has its own range of available colors, called a color space,which is a set of numbers that define how each color is represented.
Example of a document workflow
In other words, when defining and interpreting color, each tool speaks a unique language. Consider a color in the color space of your digitalcamera: a vivid blue RGB color with the values Red = 0, Green = 0, and Blue =255. This color may appear as a different color in the colorspace of your monitor. In addition, the color space of your printer may not contain a match for this color. As a result, when your documentmoves through the workflow, this vivid blue color gets lost in the translation and is not accurately reproduced. A color management systemis designed to improve the communication of color in the workflow so that the color of the output matches your intended color.
Colors are defined by their color space. 1. Lab color space. 2. sRGB color space, displayed againstthe Lab color space. 3. U.S. Web Coated (SWOP) v2 color space. 4. ProPhoto RGB color space.
What is color management?
Color management is a process that lets you predict and control color reproduction, regardless of the source or destination of thedocument. It ensures a more accurate color representation when a document is viewed, modified, shared, exported to another format, orprinted.
A color management system, also known as a color engine, uses color profiles to translate the color values from one source to another. Forexample, it translates the colors that are displayed on the monitor into the colors that a printer can reproduce. Color profiles define the colorspace of monitors, scanners, digital cameras, printers, and the applications that you use to create or edit documents.
Why do I need color management?
If your document requires accurate color representation, you may want to learn more about color management. The complexity of yourworkflow and the ultimate destination of your documents are also important considerations. If your documents are destined only for onlineviewing, color management may not be as important. However, if you plan to open documents in another application or if you are creatingdocuments for print or multiple types of output, then proper color management is essential.
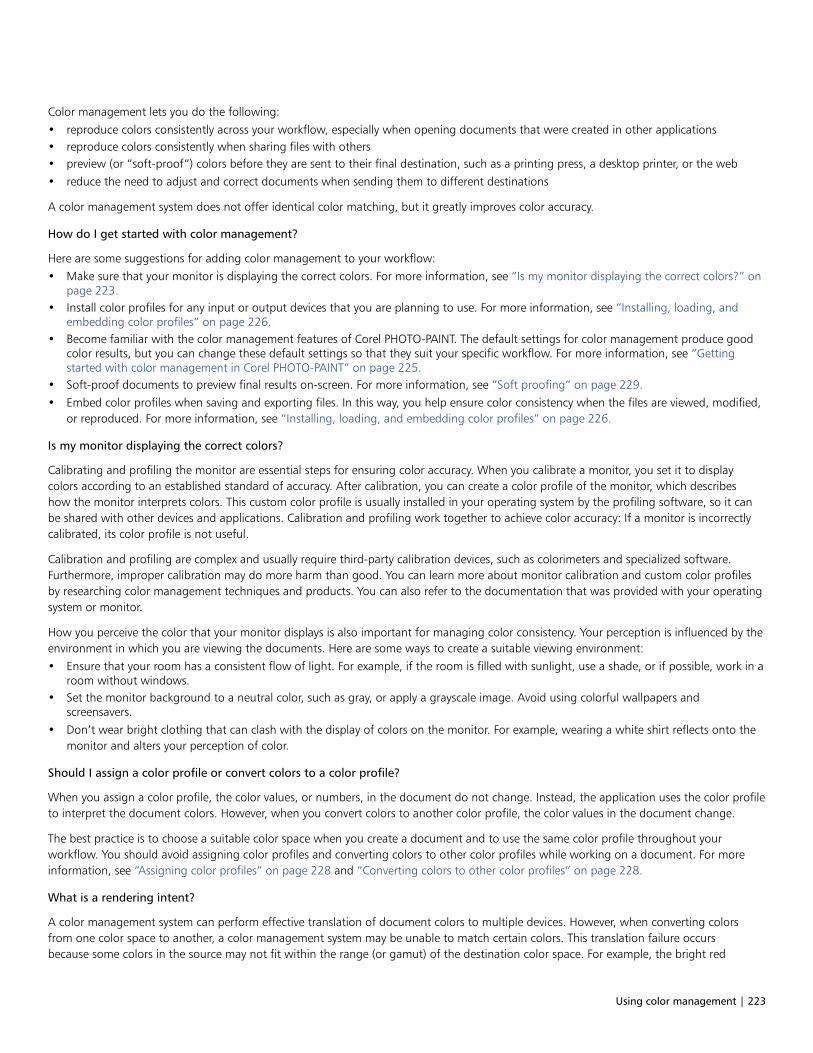
Using color management | 223
Color management lets you do the following:• reproduce colors consistently across your workflow, especially when opening documents that were created in other applications• reproduce colors consistently when sharing files with others• preview (or “soft-proof”) colors before they are sent to their final destination, such as a printing press, a desktop printer, or the web• reduce the need to adjust and correct documents when sending them to different destinations
A color management system does not offer identical color matching, but it greatly improves color accuracy.
How do I get started with color management?
Here are some suggestions for adding color management to your workflow:• Make sure that your monitor is displaying the correct colors. For more information, see “Is my monitor displaying the correct colors?” on
page 223.• Install color profiles for any input or output devices that you are planning to use. For more information, see “Installing, loading, and
embedding color profiles” on page 226.• Become familiar with the color management features of Corel PHOTO-PAINT. The default settings for color management produce good
color results, but you can change these default settings so that they suit your specific workflow. For more information, see “Gettingstarted with color management in Corel PHOTO-PAINT” on page 225.
• Soft-proof documents to preview final results on-screen. For more information, see “Soft proofing” on page 229.• Embed color profiles when saving and exporting files. In this way, you help ensure color consistency when the files are viewed, modified,
or reproduced. For more information, see “Installing, loading, and embedding color profiles” on page 226.
Is my monitor displaying the correct colors?
Calibrating and profiling the monitor are essential steps for ensuring color accuracy. When you calibrate a monitor, you set it to displaycolors according to an established standard of accuracy. After calibration, you can create a color profile of the monitor, which describeshow the monitor interprets colors. This custom color profile is usually installed in your operating system by the profiling software, so it canbe shared with other devices and applications. Calibration and profiling work together to achieve color accuracy: If a monitor is incorrectlycalibrated, its color profile is not useful.
Calibration and profiling are complex and usually require third-party calibration devices, such as colorimeters and specialized software.Furthermore, improper calibration may do more harm than good. You can learn more about monitor calibration and custom color profilesby researching color management techniques and products. You can also refer to the documentation that was provided with your operatingsystem or monitor.
How you perceive the color that your monitor displays is also important for managing color consistency. Your perception is influenced by theenvironment in which you are viewing the documents. Here are some ways to create a suitable viewing environment:• Ensure that your room has a consistent flow of light. For example, if the room is filled with sunlight, use a shade, or if possible, work in a
room without windows.• Set the monitor background to a neutral color, such as gray, or apply a grayscale image. Avoid using colorful wallpapers and
screensavers.• Don’t wear bright clothing that can clash with the display of colors on the monitor. For example, wearing a white shirt reflects onto the
monitor and alters your perception of color.
Should I assign a color profile or convert colors to a color profile?
When you assign a color profile, the color values, or numbers, in the document do not change. Instead, the application uses the color profileto interpret the document colors. However, when you convert colors to another color profile, the color values in the document change.
The best practice is to choose a suitable color space when you create a document and to use the same color profile throughout yourworkflow. You should avoid assigning color profiles and converting colors to other color profiles while working on a document. For moreinformation, see “Assigning color profiles” on page 228 and “Converting colors to other color profiles” on page 228.
What is a rendering intent?
A color management system can perform effective translation of document colors to multiple devices. However, when converting colorsfrom one color space to another, a color management system may be unable to match certain colors. This translation failure occursbecause some colors in the source may not fit within the range (or gamut) of the destination color space. For example, the bright red
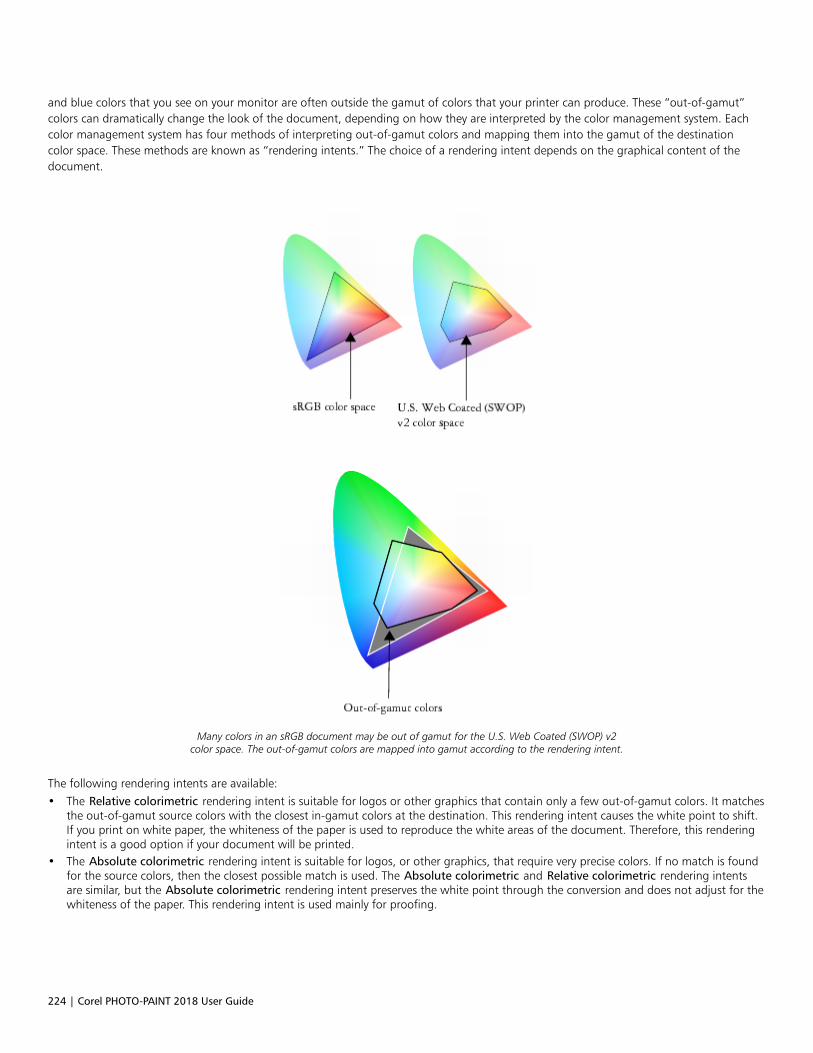
224 | Corel PHOTO-PAINT 2018 User Guide
and blue colors that you see on your monitor are often outside the gamut of colors that your printer can produce. These “out-of-gamut”colors can dramatically change the look of the document, depending on how they are interpreted by the color management system. Eachcolor management system has four methods of interpreting out-of-gamut colors and mapping them into the gamut of the destinationcolor space. These methods are known as “rendering intents.” The choice of a rendering intent depends on the graphical content of thedocument.
Many colors in an sRGB document may be out of gamut for the U.S. Web Coated (SWOP) v2color space. The out-of-gamut colors are mapped into gamut according to the rendering intent.
The following rendering intents are available:• The Relative colorimetric rendering intent is suitable for logos or other graphics that contain only a few out-of-gamut colors. It matches
the out-of-gamut source colors with the closest in-gamut colors at the destination. This rendering intent causes the white point to shift.If you print on white paper, the whiteness of the paper is used to reproduce the white areas of the document. Therefore, this renderingintent is a good option if your document will be printed.
• The Absolute colorimetric rendering intent is suitable for logos, or other graphics, that require very precise colors. If no match is foundfor the source colors, then the closest possible match is used. The Absolute colorimetric and Relative colorimetric rendering intentsare similar, but the Absolute colorimetric rendering intent preserves the white point through the conversion and does not adjust for thewhiteness of the paper. This rendering intent is used mainly for proofing.
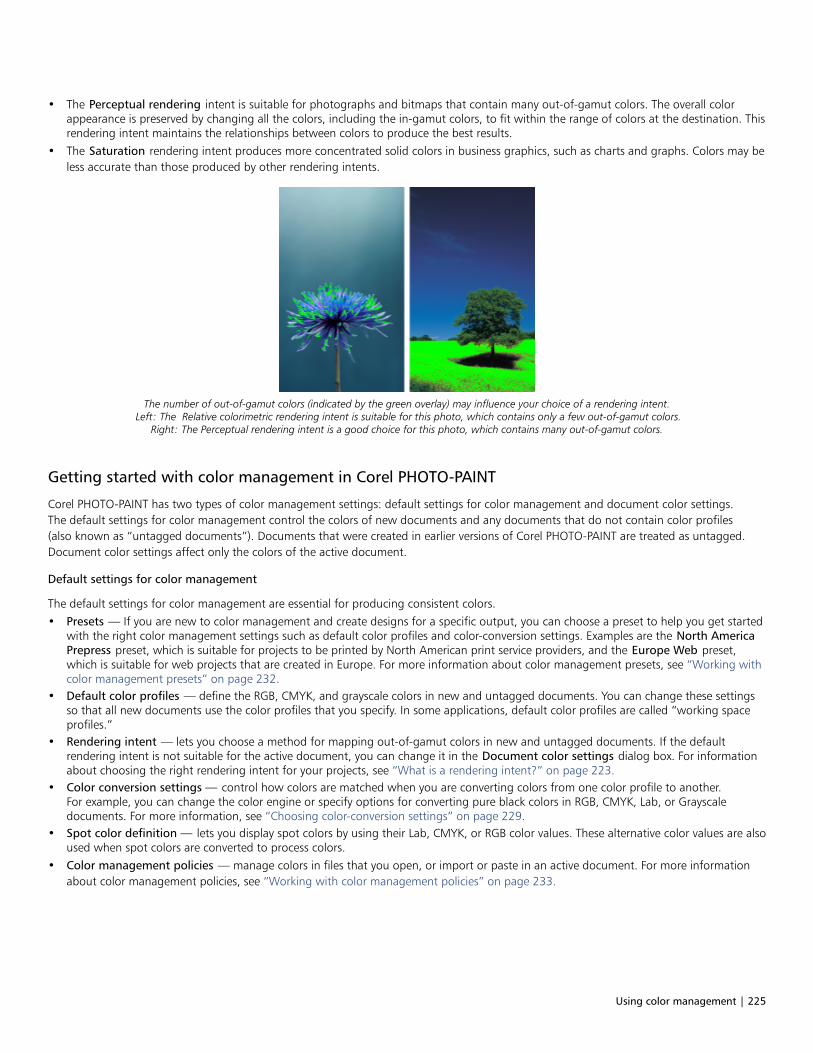
Using color management | 225
• The Perceptual rendering intent is suitable for photographs and bitmaps that contain many out-of-gamut colors. The overall colorappearance is preserved by changing all the colors, including the in-gamut colors, to fit within the range of colors at the destination. Thisrendering intent maintains the relationships between colors to produce the best results.
• The Saturation rendering intent produces more concentrated solid colors in business graphics, such as charts and graphs. Colors may beless accurate than those produced by other rendering intents.
The number of out-of-gamut colors (indicated by the green overlay) may influence your choice of a rendering intent.Left: The Relative colorimetric rendering intent is suitable for this photo, which contains only a few out-of-gamut colors.
Right: The Perceptual rendering intent is a good choice for this photo, which contains many out-of-gamut colors.
Getting started with color management in Corel PHOTO-PAINT
Corel PHOTO-PAINT has two types of color management settings: default settings for color management and document color settings.The default settings for color management control the colors of new documents and any documents that do not contain color profiles(also known as “untagged documents”). Documents that were created in earlier versions of Corel PHOTO-PAINT are treated as untagged.Document color settings affect only the colors of the active document.
Default settings for color management
The default settings for color management are essential for producing consistent colors.• Presets — If you are new to color management and create designs for a specific output, you can choose a preset to help you get started
with the right color management settings such as default color profiles and color-conversion settings. Examples are the North AmericaPrepress preset, which is suitable for projects to be printed by North American print service providers, and the Europe Web preset,which is suitable for web projects that are created in Europe. For more information about color management presets, see “Working withcolor management presets” on page 232.
• Default color profiles — define the RGB, CMYK, and grayscale colors in new and untagged documents. You can change these settingsso that all new documents use the color profiles that you specify. In some applications, default color profiles are called “working spaceprofiles.”
• Rendering intent — lets you choose a method for mapping out-of-gamut colors in new and untagged documents. If the defaultrendering intent is not suitable for the active document, you can change it in the Document color settings dialog box. For informationabout choosing the right rendering intent for your projects, see “What is a rendering intent?” on page 223.
• Color conversion settings — control how colors are matched when you are converting colors from one color profile to another.For example, you can change the color engine or specify options for converting pure black colors in RGB, CMYK, Lab, or Grayscaledocuments. For more information, see “Choosing color-conversion settings” on page 229.
• Spot color definition — lets you display spot colors by using their Lab, CMYK, or RGB color values. These alternative color values are alsoused when spot colors are converted to process colors.
• Color management policies — manage colors in files that you open, or import or paste in an active document. For more informationabout color management policies, see “Working with color management policies” on page 233.

226 | Corel PHOTO-PAINT 2018 User Guide
Document color settings
You can view and edit the current color settings of the active document. You can see what color profile is assigned to the document as wellas what are the default color profiles of the application. The color profile that is assigned to an active document determines the documentcolor space.
You can also assign another color profile to the active document or convert its colors to a specific color profile. For information aboutassigning color profiles, see “Assigning color profiles” on page 228. For information about converting document colors to other colorprofiles, see “Converting colors to other color profiles” on page 228.
Getting help
You can find information about each control available in the Default color settings and Document color settings dialog boxes by pointingto the control and viewing the description in the Description area.
To access default settings for color management
• Click Tools Color management Default settings.
To change the default color profiles
1 Click Tools Color management Default settings.
2 In the Default color settings area, choose a color profile from the following list boxes:
• RGB — describes RGB colors in new and untagged documents
• CMYK — describes CMYK colors in new and untagged documents
• Grayscale — describes grayscale colors in new and untagged documents
You can choose another rendering intent from the Rendering intent list box.
To access document color settings
• Click Tools Color management Document settings.
The Document color settings dialog box is not available for LAB, NTSC, PAL, or multi-channel images. Such images use the colormanagement options specified in the Default color management settings dialog box.
You can also view the document color settings in the Document properties dialog box by clicking File Document properties.
Installing, loading, and embedding color profiles
To ensure color accuracy, a color management system needs ICC-compliant profiles for monitors, input devices, external monitors, outputdevices, and documents.• Monitor color profiles — define the color space that is used by your monitor to display document colors. Corel PHOTO-PAINT uses the
primary monitor profile that is assigned by the operating system. The monitor profile is very important for color accuracy. For moreinformation, see “Is my monitor displaying the correct colors?” on page 223.
• Input device color profiles — used by input devices such as scanners and digital cameras. These color profiles define which colors can becaptured by specific input devices.
• Display color profiles — include monitor profiles that are not associated with your monitor in the operating system. These color profilesare especially useful for soft-proofing documents for monitors that are not connected to your computer.
Using color management | 227
• Output device color profiles — define the color space of output devices such as desktop printers and printing presses. The colormanagement system uses these profiles to map accurately document colors to the colors of the output device.
• Document color profiles — define the RGB, CMYK, and grayscale colors of a document. Documents that contain color profiles are knownas “tagged.”
Finding color profiles
Many color profiles are installed with your application or can be generated with profiling software. Manufacturers of monitors, scanners,digital cameras, and printers also provide color profiles. In addition, you can access color profiles from websites such as:• http://www.color.org/findprofile.xalter — This website of the International Color Consortium (ICC) can help you find commonly used
standard color profiles.• http://www.eci.org/doku.php?id=en:downloads — This website of the European Color Initiative (ECI) provides standard ISO profiles as
well as profiles that are specific to Europe• http://www.tftcentral.co.uk/articles/icc_profiles.htm — This website provides ICC profiles for many different types of LCD (Liquid Crystal
Display) monitors to help you display consistent colors. However, if color accuracy is essential for your workflow, you should calibrateand profile your monitor instead of relying on readily available monitor profiles. For more information, see “Is my monitor displaying thecorrect colors?” on page 223.
Installing and loading color profiles
If you don’t have the necessary color profile, you can install it, or you can load it within the application. Installing a color profile adds it tothe Color folder of the operating system; loading a color profile adds it to the Color folder of the application. CorelDRAW Graphics Suite canaccess color profiles from both Color folders.
Embedding color profiles
When you save or export a document to a file format that supports color profiles, the color profiles are embedded in the file by default.Embedding a color profile attaches the color profile to the document to ensure that the same colors you used are shared with anyone whoviews or prints the document.
To install a color profile
• In Windows Explorer, right-click a color profile, and click Install profile.
To load a color profile
1 Click Tools Color management Default settings.
2 In the Default color setting area, choose Load color profiles from the RGB, CMYK, or Grayscale list boxes.
3 In the Open dialog box, navigate to the color profile.
After you load a color profile, you can also access it from the Color proof settings docker, Print dialog box, and Document colorsetting dialog box.
Note that you can load a color profile of any color mode from any list box: RGB, CMYK, or Grayscale. However, after you load theprofile, you can access it only from the list box of the respective color mode. For example, you can load an RGB color profile from theCMYK list box, but you can access the profile only from the RGB list box.
You can also load a color profile from the Document color settings dialog box.
To embed a color profile
1 Click File, and then click one of the following commands:
• Save as
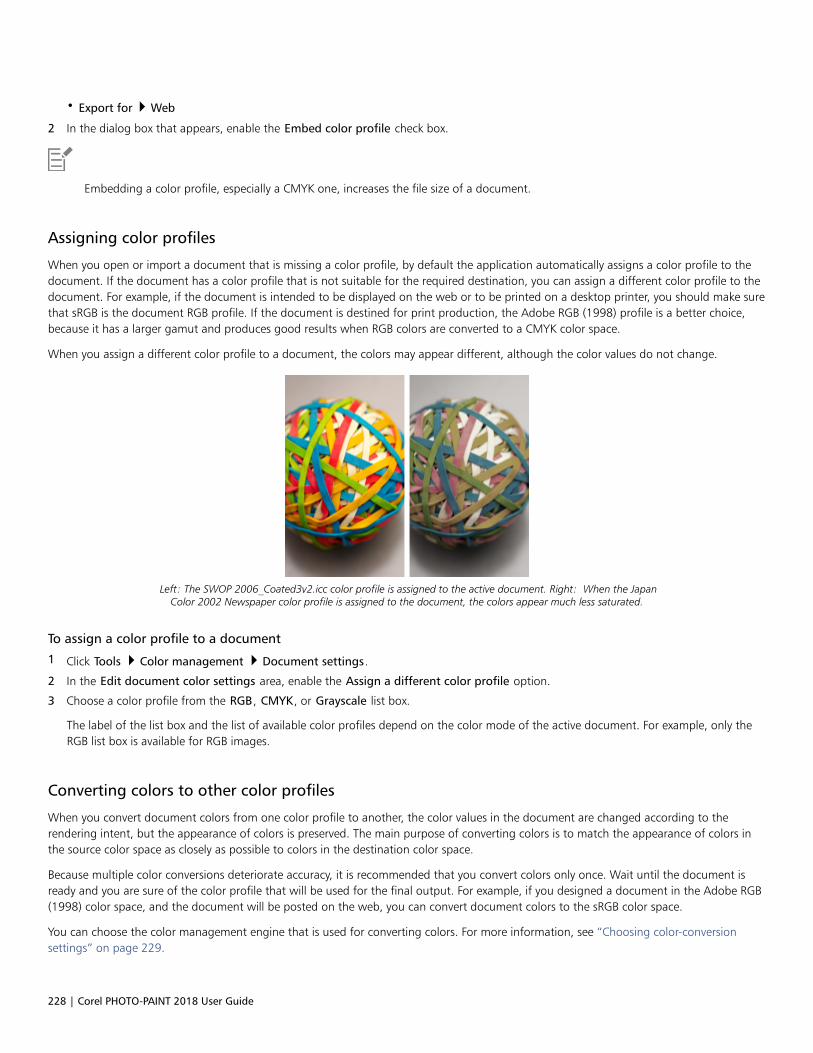
228 | Corel PHOTO-PAINT 2018 User Guide
• Export for Web
2 In the dialog box that appears, enable the Embed color profile check box.
Embedding a color profile, especially a CMYK one, increases the file size of a document.
Assigning color profiles
When you open or import a document that is missing a color profile, by default the application automatically assigns a color profile to thedocument. If the document has a color profile that is not suitable for the required destination, you can assign a different color profile to thedocument. For example, if the document is intended to be displayed on the web or to be printed on a desktop printer, you should make surethat sRGB is the document RGB profile. If the document is destined for print production, the Adobe RGB (1998) profile is a better choice,because it has a larger gamut and produces good results when RGB colors are converted to a CMYK color space.
When you assign a different color profile to a document, the colors may appear different, although the color values do not change.
Left: The SWOP 2006_Coated3v2.icc color profile is assigned to the active document. Right: When the JapanColor 2002 Newspaper color profile is assigned to the document, the colors appear much less saturated.
To assign a color profile to a document
1 Click Tools Color management Document settings.
2 In the Edit document color settings area, enable the Assign a different color profile option.
3 Choose a color profile from the RGB, CMYK, or Grayscale list box.
The label of the list box and the list of available color profiles depend on the color mode of the active document. For example, only theRGB list box is available for RGB images.
Converting colors to other color profiles
When you convert document colors from one color profile to another, the color values in the document are changed according to therendering intent, but the appearance of colors is preserved. The main purpose of converting colors is to match the appearance of colors inthe source color space as closely as possible to colors in the destination color space.
Because multiple color conversions deteriorate accuracy, it is recommended that you convert colors only once. Wait until the document isready and you are sure of the color profile that will be used for the final output. For example, if you designed a document in the Adobe RGB(1998) color space, and the document will be posted on the web, you can convert document colors to the sRGB color space.
You can choose the color management engine that is used for converting colors. For more information, see “Choosing color-conversionsettings” on page 229.
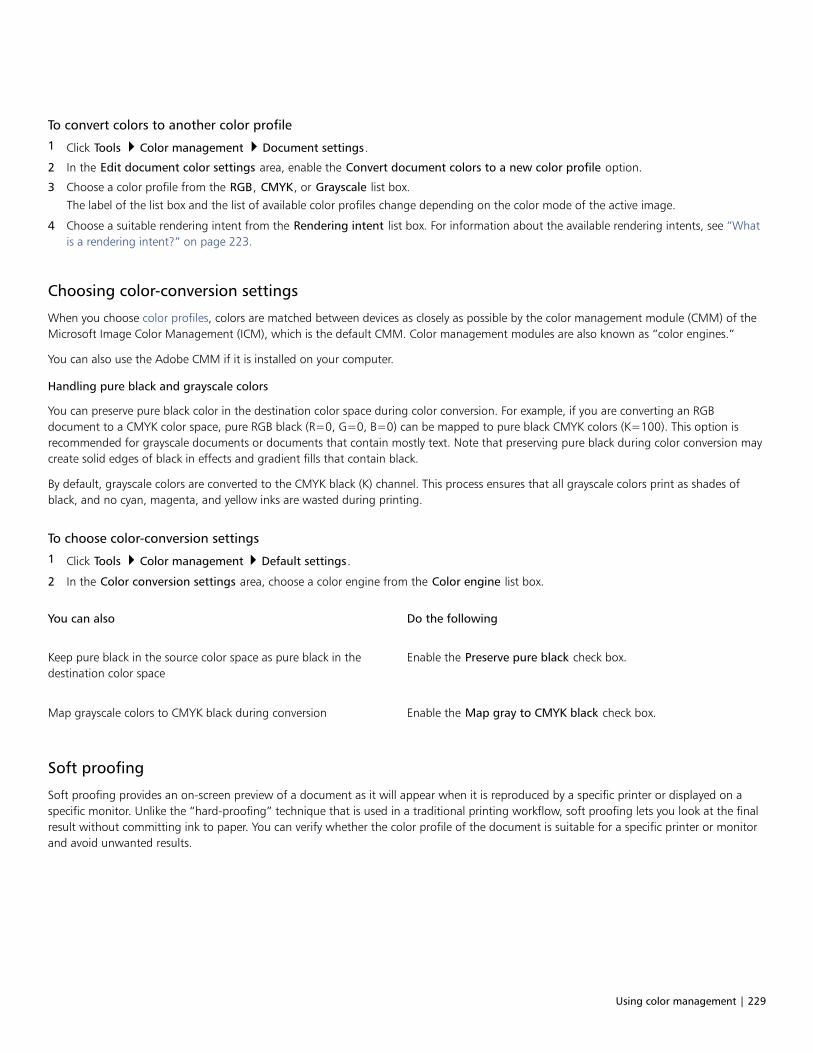
Using color management | 229
To convert colors to another color profile
1 Click Tools Color management Document settings.
2 In the Edit document color settings area, enable the Convert document colors to a new color profile option.
3 Choose a color profile from the RGB, CMYK, or Grayscale list box.
The label of the list box and the list of available color profiles change depending on the color mode of the active image.
4 Choose a suitable rendering intent from the Rendering intent list box. For information about the available rendering intents, see “Whatis a rendering intent?” on page 223.
Choosing color-conversion settings
When you choose color profiles, colors are matched between devices as closely as possible by the color management module (CMM) of theMicrosoft Image Color Management (ICM), which is the default CMM. Color management modules are also known as “color engines.”
You can also use the Adobe CMM if it is installed on your computer.
Handling pure black and grayscale colors
You can preserve pure black color in the destination color space during color conversion. For example, if you are converting an RGBdocument to a CMYK color space, pure RGB black (R=0, G=0, B=0) can be mapped to pure black CMYK colors (K=100). This option isrecommended for grayscale documents or documents that contain mostly text. Note that preserving pure black during color conversion maycreate solid edges of black in effects and gradient fills that contain black.
By default, grayscale colors are converted to the CMYK black (K) channel. This process ensures that all grayscale colors print as shades ofblack, and no cyan, magenta, and yellow inks are wasted during printing.
To choose color-conversion settings
1 Click Tools Color management Default settings.
2 In the Color conversion settings area, choose a color engine from the Color engine list box.
You can also Do the following
Keep pure black in the source color space as pure black in thedestination color space
Enable the Preserve pure black check box.
Map grayscale colors to CMYK black during conversion Enable the Map gray to CMYK black check box.
Soft proofing
Soft proofing provides an on-screen preview of a document as it will appear when it is reproduced by a specific printer or displayed on aspecific monitor. Unlike the “hard-proofing” technique that is used in a traditional printing workflow, soft proofing lets you look at the finalresult without committing ink to paper. You can verify whether the color profile of the document is suitable for a specific printer or monitorand avoid unwanted results.
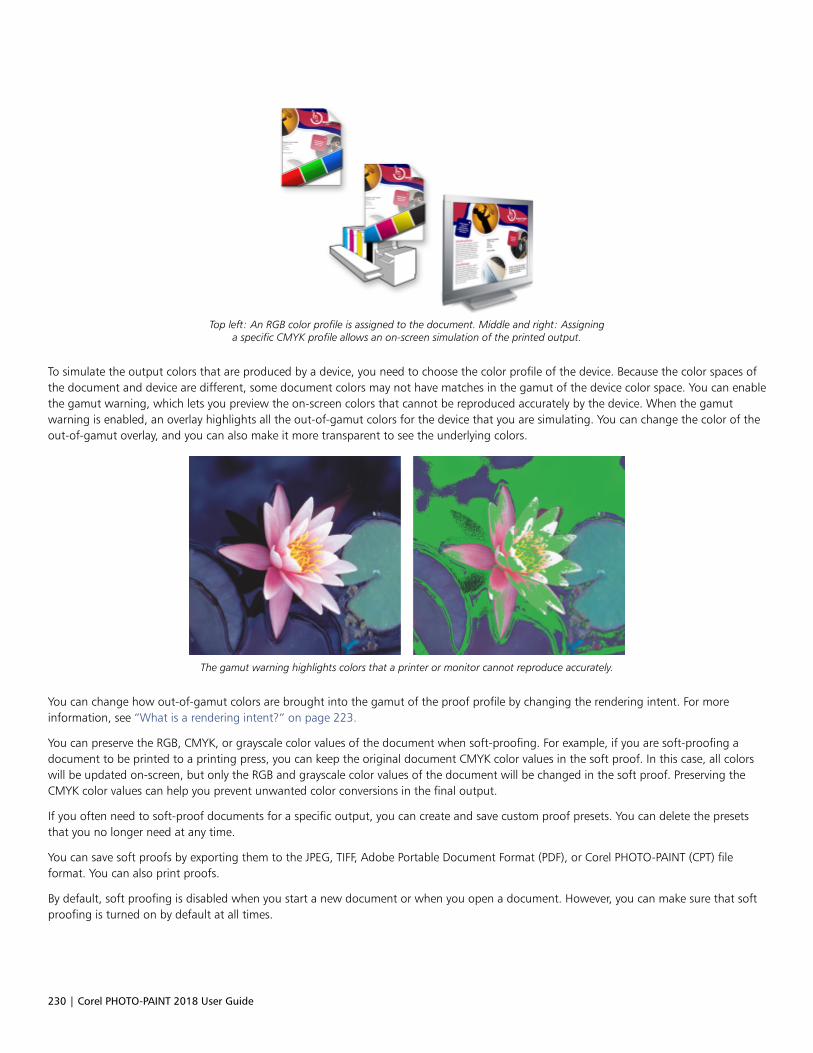
230 | Corel PHOTO-PAINT 2018 User Guide
Top left: An RGB color profile is assigned to the document. Middle and right: Assigninga specific CMYK profile allows an on-screen simulation of the printed output.
To simulate the output colors that are produced by a device, you need to choose the color profile of the device. Because the color spaces ofthe document and device are different, some document colors may not have matches in the gamut of the device color space. You can enablethe gamut warning, which lets you preview the on-screen colors that cannot be reproduced accurately by the device. When the gamutwarning is enabled, an overlay highlights all the out-of-gamut colors for the device that you are simulating. You can change the color of theout-of-gamut overlay, and you can also make it more transparent to see the underlying colors.
The gamut warning highlights colors that a printer or monitor cannot reproduce accurately.
You can change how out-of-gamut colors are brought into the gamut of the proof profile by changing the rendering intent. For moreinformation, see “What is a rendering intent?” on page 223.
You can preserve the RGB, CMYK, or grayscale color values of the document when soft-proofing. For example, if you are soft-proofing adocument to be printed to a printing press, you can keep the original document CMYK color values in the soft proof. In this case, all colorswill be updated on-screen, but only the RGB and grayscale color values of the document will be changed in the soft proof. Preserving theCMYK color values can help you prevent unwanted color conversions in the final output.
If you often need to soft-proof documents for a specific output, you can create and save custom proof presets. You can delete the presetsthat you no longer need at any time.
You can save soft proofs by exporting them to the JPEG, TIFF, Adobe Portable Document Format (PDF), or Corel PHOTO-PAINT (CPT) fileformat. You can also print proofs.
By default, soft proofing is disabled when you start a new document or when you open a document. However, you can make sure that softproofing is turned on by default at all times.
Using color management | 231
To turn soft proofing on or off
• Click View Proof colors.
When you turn soft proofing on, colors in the document window, color palettes, and preview windows of dialog boxes appeardifferent.
Simulating printer output may cause on-screen colors to appear dull because all colors are brought into a CMYK color space, whichhas a smaller gamut than an RGB color space.
You can also enable or disable soft proofing by clicking the Proof colors button on the status bar.
To specify soft-proof settings
1 Click Window Dockers Color proof settings.
2 Perform any of the following tasks.
To Do the following
Simulate the output of a specific device From the Simulate environment list box, choose the color profileof the device.
Keep specific color values unchanged Enable the Preserve numbers check box.
Depending on the color profile in the Simulate environment box,the check box lets you preserve CMYK, RGB, or grayscale colorvalues.
Change the rendering intent Choose a rendering intent from the Rendering intent list box.
Enable the gamut warning In the Gamut warning area, enable the Out-of-gamut colorscheck box.
Change the color of the out-of-gamut overlay In the Gamut warning area, choose a color from the color picker.
Change the transparency of the out-of-gamut overlay In the Gamut warning area, type a value in the Transparency box.
The value should be between 1 and 100.
Save a custom proof preset Choose the settings that you want, click the Save button , and
then type a name in the Save preset as box.
Out-of-gamut settings are not included in the proof preset.
Choose a proof preset From the Proof preset list box, choose a preset.
232 | Corel PHOTO-PAINT 2018 User Guide
To Do the following
Delete a proof preset Click the Delete button .
The accuracy of the simulation depends on factors such as the quality of your monitor, the color profile of the monitor and theoutput device, and the ambient lighting in your work area.
To export a soft proof
1 Click Window Dockers Color proof settings.
2 In the Color proof settings docker, click the Export soft proof button.
3 Type a filename in the File name box.
4 From the Save as type list box, choose one of the following options:
• JPG - JPEG Bitmaps
• PDF - Adobe Portable Document Format
• TIF - TIFF Bitmap
• CPT - Corel PHOTO-PAINT image
5 Choose any settings in the dialog box that appears.
To print a proof
1 Click Window Dockers Color proof settings.
2 In the Color proof settings docker, click the Print proof button.
To turn soft proofing on by default
1 Click Tools Options.
2 In the Workspace list of categories, click Display.
3 Enable the Proof colors by default check box.
Working with color management presets
The application provides color management presets, which are default color settings that are applied to new and untagged documents. Youcan choose a color management preset that is suitable for the geographic region where a document is created or for the location of its finaloutput.
You can also create your own presets, which allows you to retain your selections in the Default color management settings dialog box andreuse them in other documents. If you no longer need a preset, you can delete it.
To choose a color management preset for new documents
1 Click Tools Color management Default settings.
2 Choose one of the following color management presets from the Presets list box:
• North America General Purpose — suitable for designs that will be used in multiple types of output in North America
• Europe General Purpose — suitable for designs that will be used in multiple types of output in Europe
• Europe Prepress — suitable for designs that will be printed by print service providers in Europe
• Europe Web — suitable for web designs that are created in Europe
Using color management | 233
• Japan General Purpose — suitable for designs that will be used in multiple types of output in Japan
• Japan Prepress — suitable for designs that will be printed by print service providers in Japan
• Japan Web — suitable for web designs that are created in Japan
• Minimal Color Management — preserves the original RGB, CMYK, and Grayscale color values when opening, importing, or pastingdocuments
• North America Prepress — suitable for designs that will be printed by print service providers in North America
• North America Web — suitable for web designs that are created in North America
• Simulate Color Management Off — produces the color-conversion results of the Color Management Off preset that is available inearlier versions of Corel PHOTO-PAINT
• Simulate CorelDRAW Graphics Suite X4 — displays colors as they appear in CorelDRAW Graphics Suite X4
To add a color management preset
1 Click Tools Color management Default settings.
2 Change any default color settings.
3 Click the Save button next to the Presets list box.
4 In the Save color management style dialog box, type a name in the Save style as box.
To delete a color management preset
1 Click Tools Color management Default settings.
2 Choose a preset from the Presets list box.
3 Click the Delete button .
Working with color management policies
Color management policies determine how colors are managed in documents that you open and work with in an application. In CorelPHOTO-PAINT, you can set one color-management policy for opening documents and another for importing and pasting files and objects inthe active document.
The color management policy for opening documents determines what RGB, CMYK, or Grayscale color profile is used in each file you wantto open. By default, the application uses the color profile embedded in the file. You can also choose to assign the default color profile to thefile or convert colors in the file to the default color profile.
By default, the color management policy for importing and pasting files converts the colors of the file to the document color profile. Youcan also choose to assign the document color profile to the file, or convert the colors of the active document to the color profile that isembedded in the file.
The files that you are opening or importing may be missing color profiles, or may contain color profiles that do not match the default colorprofiles. By default, the application does not warn you about missing or mismatched color profiles but makes color management choicesthat produce good results. However, you can activate warning messages if you want to have full control over the colors in your documents.
To set a color management policy for opening documents
1 Click Tools Color management Default settings.
2 In the Open section of the Color management policies area, choose one of the following options from the RGB list box:
• Use embedded color profile — preserves the RGB color profile that is embedded in the file. This option is recommended, because itpreserves the original RGB color appearance and RGB color values of the document.
• Assign default color profile — uses the default RGB color profile to define document colors. RGB color values are preserved, but theappearance of RGB colors may change.

234 | Corel PHOTO-PAINT 2018 User Guide
• Convert to default color profile — converts colors to the default RGB color profile. The appearance of RGB colors in documents ispreserved, but the color values may change.
3 From the CMYK list box in the Open area, choose an option for managing CMYK colors in documents. The options are the same as theoptions that are available for RGB colors.
4 From the Grayscale list box in the Open area, choose an option for managing the grayscale colors in documents. The options are thesame as the options that are available for RGB colors.
To set a color management policy for importing and pasting files
1 Click Tools Color management Default settings.
2 In the Import and paste section of the Color management policies area, choose one of the following options from the RGB list box:
• Convert to document color profile — converts the RGB colors of the imported or pasted file to the RGB color profile of the activedocument. This option is used when the imported file contains a color profile that does not match the color profile of the document.
• Assign document color profile — assigns the RGB color profile of the document to the imported or pasted file. The RGB color valuesof the file are preserved but the color appearance may change.
• Use embedded color profile — uses the RGB color profile that is embedded in the file, preserving the RGB color values andappearance of the imported or pasted file. This option converts document colors to the color profile that is embedded in the importedor pasted file.
3 From the CMYK list box in the Import and paste area, choose an option for managing CMYK colors in imported and pasted files. Theoptions are the same as the options that are available for RGB colors.
4 From the Grayscale list box in the Import and paste area, choose an option for managing the grayscale colors in imported and pastedfiles. The options are the same as the options that are available for RGB colors.
To activate warning messages for missing and mismatched color profiles
1 Click Tools Color management Default settings.
2 In the Color management policies area, enable any of the following check boxes in the Open and Import and paste areas:
• Warn on color profile mismatch
• Warn on missing color profile
Managing colors when opening documents
The default color management policy for opening documents preserves colors in all tagged documents that you open and assigns thedefault color profiles to untagged documents.
If a document that you open is missing a color profile or contains a color profile that does not match the default color profile of theapplication, Corel PHOTO-PAINT makes color management choices based on the default policy for color management. If you are comfortablewith color management, you can view warnings about missing and mismatched color profiles and choose different color managementoptions. For more information about how to activate warnings, see “To activate warning messages for missing and mismatched colorprofiles” on page 234.
Opening documents with missing color profiles
The following options are available when you are opening a document with a missing color profile and have activated warnings for missingcolor profiles.• Assign color profile — lets you assign a color profile to the document. This option preserves color values, but may change the
appearance of colors. For example, if the RGB color profile is missing from the document, the default RGB color profile of the applicationis assigned by default. The RGB color values are preserved but the RGB colors may not appear as originally designed. You can also chooseto assign a color profile that is different from the default color profile of the application. This option is recommended only if you knowthe original color space of the document and have the associated color profile installed.
• Convert to default color profile — Used in conjunction with the Assign color profile control, this option converts colors from theassigned color profile to the default color profile. Colors will appear as they would in the assigned color space, but the color values maychange.
Using color management | 235
Opening documents with mismatched color profiles
When a document contains a color profile that does not match the default color profile, you can choose one of the following options:• Use embedded color profile — This option ensures that the color values are preserved and colors are displayed as originally intended.• Ignore embedded color profile, and use default color profile — Assigning the default color profile will preserve the color values but
may change the appearance of colors.• Convert from embedded color profile to default color profile — This option converts colors from the embedded color profile to the
default color profile. The appearance of colors will be preserved, but the color values may change. This option is recommended if youhave already set color management options suitable for your workflow. For example, you may be creating graphics for the web, and youmay have chosen sRGB as the application default color space. Enabling this option ensures that the document uses the sRGB color space,and document colors are consistent and suitable for the web.
Managing colors when importing and pasting files
The default color policy for importing and pasting files converts the colors of imported and pasted files to the color profile of the activedocument. If the color profile of the imported or pasted file matches the color profile of the active document, no color conversion isperformed. For more information about color management policies, see “Working with color management policies” on page 233.
However, you can choose to view warnings about missing and mismatched profiles and set other color management options. For moreinformation about how to view warnings, see “To activate warning messages for missing and mismatched color profiles” on page 234.
When a vector graphic, such as a CorelDRAW (CDR) file is imported or pasted in the active document, the file is first converted to a bitmapin the color mode of the active document. For example, if the document is in the RGB color mode, the file is converted into a bitmap in theRGB color mode.
Importing and pasting files with missing color profiles
If color profiles are missing from a file, you can choose to assign color profiles to the file, and then convert its colors to the document colorprofile. The color values of the file will change. In the following example, a vector graphic is missing color profiles, so Corel PHOTO-PAINTassigns the default color profiles to the file and then converts the colors of the file to the document color profile, which is sRGB. However,you can assign CMYK and RGB color profiles that are different from the default color profiles of the application.
Importing and pasting files with mismatched color profiles
If a file contains color profiles that do not match the document color profile, the following options are available:• Ignore embedded color profile, and assign the document color profile — Color values are preserved, but the appearance of colors
may change.• Convert from embedded color profile to the document color profile (default option) — The color of the imported file are converted
from the embedded color space to the document color space. The appearance of colors is preserved, but the color values may change.• Convert document colors to embedded color profile — Document colors are converted to the color profile embedded in the imported
file. The appearance and color values of the imported or pasted file are preserved.
Importing and pasting files with missing and mismatched color profiles
Some files can be missing color profiles and contain mismatched color profiles at the same time. In such cases, you are presented withdialog boxes that include options for missing and mismatched color profiles.
Managing colors for print
By default, Corel PHOTO-PAINT does not perform color conversions when a document is sent to the printer. The printer receives the colorvalues and interprets the colors. However, if there is a color profile associated with the printer in the operating system, Corel PHOTO-PAINTdetects the color profile and uses it to convert document colors to the color space of the printer.
If you have a PostScript printer, you can let Corel PHOTO-PAINT or the PostScript printer perform any necessary color conversion. WhenCorel PHOTO-PAINT manages the color conversion, document colors are converted from the assigned color space to the color space of the

236 | Corel PHOTO-PAINT 2018 User Guide
PostScript printer. Note that you must disable color management in the printer driver. Otherwise, both application and printer manage colorsduring printing, and document colors are corrected twice, which causes unwanted color shifts.
When the PostScript printer converts document colors, the color management feature must be enabled in the printer driver. Only PostScriptprinters and RIP engines that support printer color conversions can be used in this advanced method. Although it increases the file size, thismethod has the advantage of ensuring consistent colors when you send the same print job to different print service providers.
For more information about reproducing colors for print, see “Printing colors accurately” on page 494.
You can also manage colors in PDF files that you create for commercial printing. For more information, see “Specifying color managementoptions for exporting PDF files” on page 515.
Using a safe CMYK workflow
Often, you may use specific CMYK color values in your projects. To ensure reliable color reproduction, you may obtain these CMYK colorvalues from a color swatch book. By preserving these CMYK color values throughout the printing process, you can help prevent unwantedcolor conversions and ensure that colors are reproduced as they appeared in the original design. A workflow that preserves the CMYK colorvalues is known as a “safe” CMYK workflow.
Corel PHOTO-PAINT supports a safe CMYK workflow. By default, CMYK color values are preserved in any document that you open, import, orpaste. Also, CMYK color values are preserved by default when you print documents.
In some cases, you may want to bypass the safe CMYK workflow and preserve the appearance of CMYK colors when you open, import, orpaste documents. This option is useful when you want to see the original colors of a design on-screen, or view a copy that is printed to adesktop printer. To preserve the appearance of CMYK colors, you can set color management policies that convert CMYK colors in documentsthat you open, import, or paste. In addition, when printing to a PostScript printer, you can convert CMYK colors to the printer color profileby disabling the Preserve CMYK numbers check box on the Color page of the Print dialog box.
Managing colors for online viewing
Managing colors for online viewing can be even more complex than managing colors for print. Documents and images on the web aredisplayed on a great variety of monitors, which are often uncalibrated. In addition, most web browsers do not support color managementand ignore the color profiles that are embedded in files.
When you design documents for exclusive web use, it is recommended that you use the sRGB color profile as your document RGB colorprofile and choose RGB colors. If a document contains a different color profile, you should convert document colors to sRGB before savingthe document for use on the web.
When you create a PDF file for online viewing, you can embed color profiles in the file to reproduce colors consistently in Adobe Reader andAdobe Acrobat. For more information, see “To specify color management options for exporting PDF files” on page 515.
When you start a new document that is destined for online viewing, you can choose a preset that can help you achieve good color results.In addition, Corel PHOTO-PAINT offers color management presets for web documents. For information about how to choose a colormanagement preset, see “To choose a color management preset for new documents” on page 232.

Applying fills | 237
Applying fills
In Corel PHOTO-PAINT, you can fill objects, editable areas, and images with colors, patterns, and textures. You can choose from a widevariety of fills and create your own fills.
This section contains the following topics:• “Applying uniform fills” (page 237)• “Applying fountain fills” (page 238)• “Applying bitmap pattern fills” (page 242)• “Applying texture fills” (page 246)
You can apply transparency patterns to filled areas. For more information, see “Working with transparency” on page 249.
Applying uniform fills
Uniform fills are the simplest fill type. They are solid colors that you can apply to images. Uniform fills can be applied to the background orto selected objects.
To apply a uniform fill
1 In the toolbox, click the Fill tool .
If you want to fill an object, you must select it by using the Object pick tool before applying the fill.
2 Click the Uniform fill button on the property bar.
3 Choose a color from the Fill color picker on the property bar.
4 Click where you want to apply the fill in the image.
You can also
Specify a value for the opacity of the fill Type a value in the Fill transparency box on the property bar.Higher values increase the transparency.
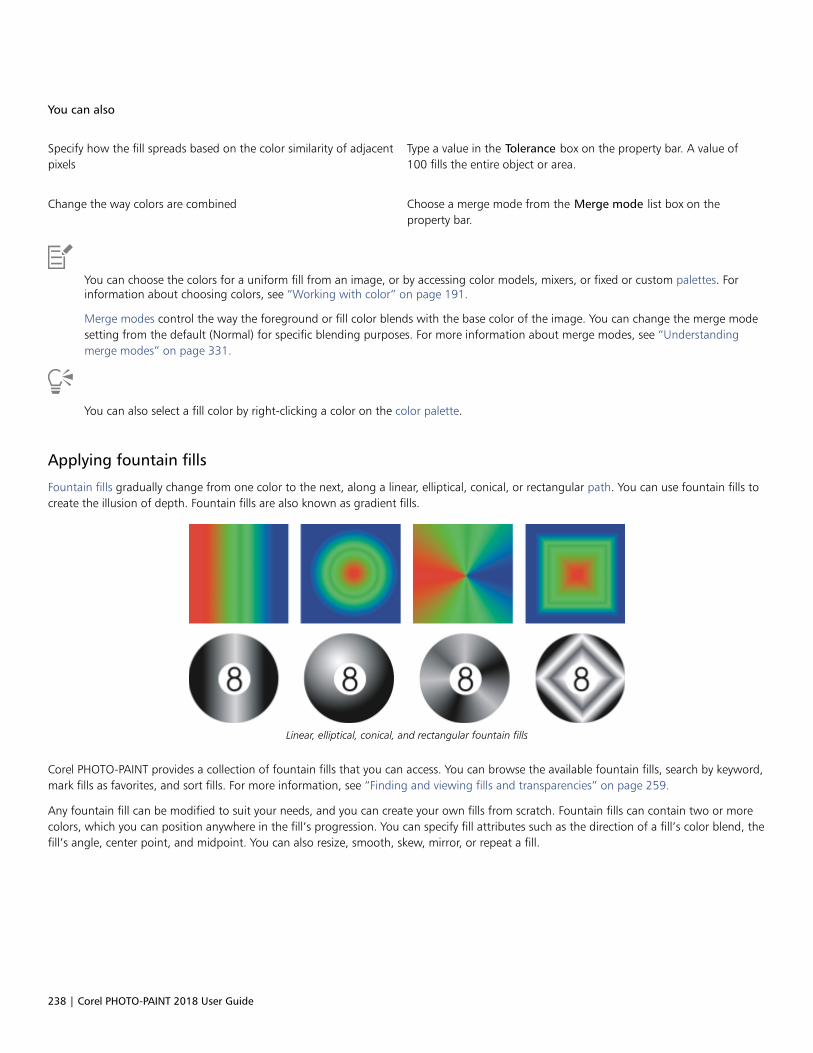
238 | Corel PHOTO-PAINT 2018 User Guide
You can also
Specify how the fill spreads based on the color similarity of adjacentpixels
Type a value in the Tolerance box on the property bar. A value of100 fills the entire object or area.
Change the way colors are combined Choose a merge mode from the Merge mode list box on theproperty bar.
You can choose the colors for a uniform fill from an image, or by accessing color models, mixers, or fixed or custom palettes. Forinformation about choosing colors, see “Working with color” on page 191.
Merge modes control the way the foreground or fill color blends with the base color of the image. You can change the merge modesetting from the default (Normal) for specific blending purposes. For more information about merge modes, see “Understandingmerge modes” on page 331.
You can also select a fill color by right-clicking a color on the color palette.
Applying fountain fills
Fountain fills gradually change from one color to the next, along a linear, elliptical, conical, or rectangular path. You can use fountain fills tocreate the illusion of depth. Fountain fills are also known as gradient fills.
Linear, elliptical, conical, and rectangular fountain fills
Corel PHOTO-PAINT provides a collection of fountain fills that you can access. You can browse the available fountain fills, search by keyword,mark fills as favorites, and sort fills. For more information, see “Finding and viewing fills and transparencies” on page 259.
Any fountain fill can be modified to suit your needs, and you can create your own fills from scratch. Fountain fills can contain two or morecolors, which you can position anywhere in the fill’s progression. You can specify fill attributes such as the direction of a fill’s color blend, thefill’s angle, center point, and midpoint. You can also resize, smooth, skew, mirror, or repeat a fill.
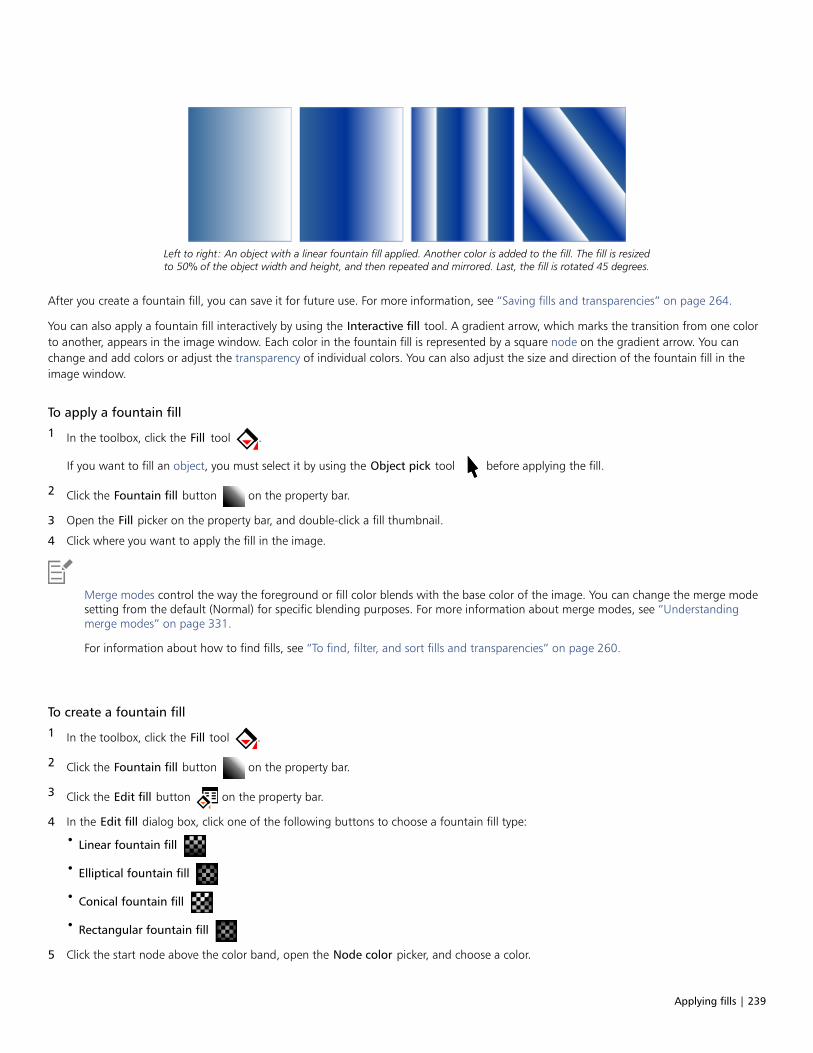
Applying fills | 239
Left to right: An object with a linear fountain fill applied. Another color is added to the fill. The fill is resizedto 50% of the object width and height, and then repeated and mirrored. Last, the fill is rotated 45 degrees.
After you create a fountain fill, you can save it for future use. For more information, see “Saving fills and transparencies” on page 264.
You can also apply a fountain fill interactively by using the Interactive fill tool. A gradient arrow, which marks the transition from one colorto another, appears in the image window. Each color in the fountain fill is represented by a square node on the gradient arrow. You canchange and add colors or adjust the transparency of individual colors. You can also adjust the size and direction of the fountain fill in theimage window.
To apply a fountain fill
1 In the toolbox, click the Fill tool .
If you want to fill an object, you must select it by using the Object pick tool before applying the fill.
2 Click the Fountain fill button on the property bar.
3 Open the Fill picker on the property bar, and double-click a fill thumbnail.
4 Click where you want to apply the fill in the image.
Merge modes control the way the foreground or fill color blends with the base color of the image. You can change the merge modesetting from the default (Normal) for specific blending purposes. For more information about merge modes, see “Understandingmerge modes” on page 331.
For information about how to find fills, see “To find, filter, and sort fills and transparencies” on page 260.
To create a fountain fill
1 In the toolbox, click the Fill tool .
2 Click the Fountain fill button on the property bar.
3 Click the Edit fill button on the property bar.
4 In the Edit fill dialog box, click one of the following buttons to choose a fountain fill type:
• Linear fountain fill
• Elliptical fountain fill
• Conical fountain fill
• Rectangular fountain fill
5 Click the start node above the color band, open the Node color picker, and choose a color.
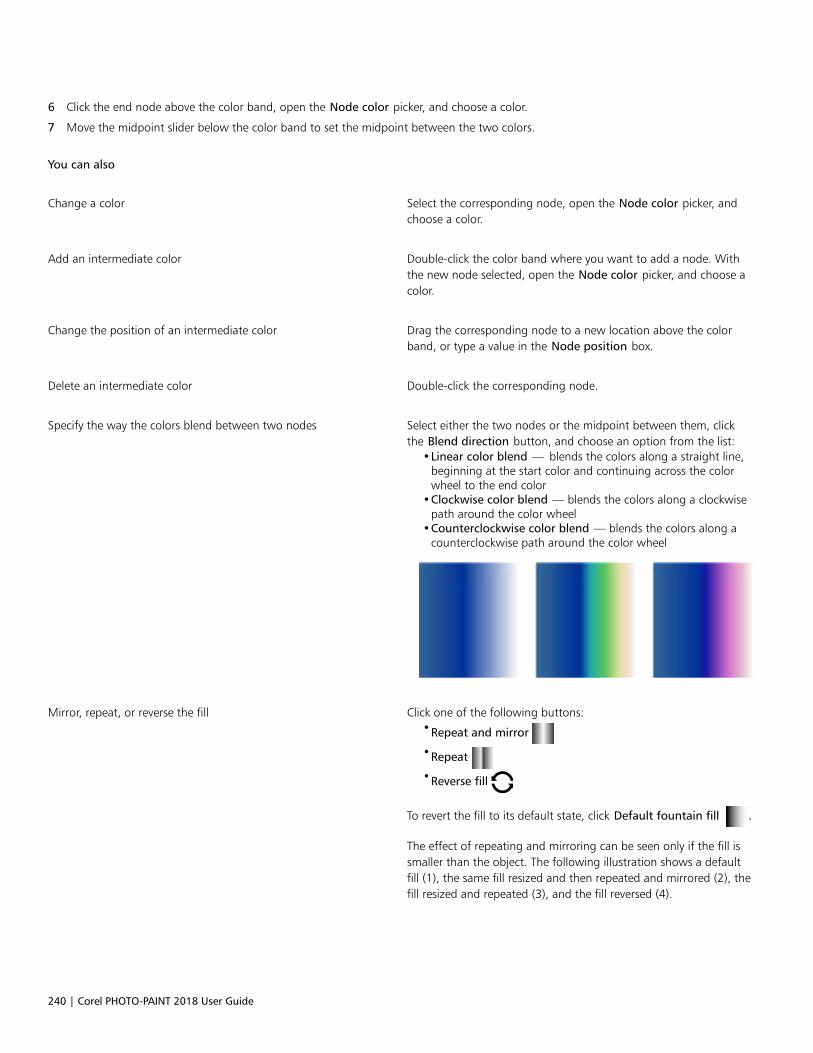
240 | Corel PHOTO-PAINT 2018 User Guide
6 Click the end node above the color band, open the Node color picker, and choose a color.
7 Move the midpoint slider below the color band to set the midpoint between the two colors.
You can also
Change a color Select the corresponding node, open the Node color picker, andchoose a color.
Add an intermediate color Double-click the color band where you want to add a node. Withthe new node selected, open the Node color picker, and choose acolor.
Change the position of an intermediate color Drag the corresponding node to a new location above the colorband, or type a value in the Node position box.
Delete an intermediate color Double-click the corresponding node.
Specify the way the colors blend between two nodes Select either the two nodes or the midpoint between them, clickthe Blend direction button, and choose an option from the list:
•Linear color blend — blends the colors along a straight line,beginning at the start color and continuing across the colorwheel to the end color
•Clockwise color blend — blends the colors along a clockwisepath around the color wheel
•Counterclockwise color blend — blends the colors along acounterclockwise path around the color wheel
Mirror, repeat, or reverse the fill Click one of the following buttons:•Repeat and mirror
•Repeat
•Reverse fill
To revert the fill to its default state, click Default fountain fill .
The effect of repeating and mirroring can be seen only if the fill issmaller than the object. The following illustration shows a defaultfill (1), the same fill resized and then repeated and mirrored (2), thefill resized and repeated (3), and the fill reversed (4).
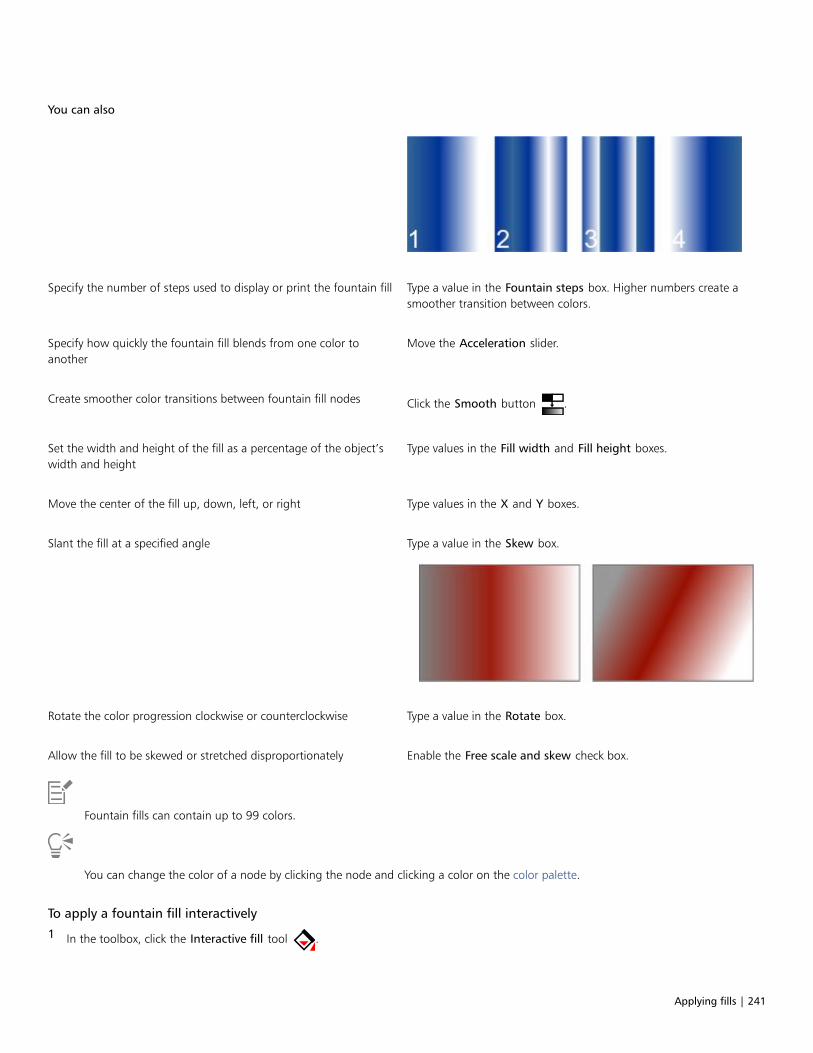
Applying fills | 241
You can also
Specify the number of steps used to display or print the fountain fill Type a value in the Fountain steps box. Higher numbers create asmoother transition between colors.
Specify how quickly the fountain fill blends from one color toanother
Move the Acceleration slider.
Create smoother color transitions between fountain fill nodes Click the Smooth button .
Set the width and height of the fill as a percentage of the object’swidth and height
Type values in the Fill width and Fill height boxes.
Move the center of the fill up, down, left, or right Type values in the X and Y boxes.
Slant the fill at a specified angle Type a value in the Skew box.
Rotate the color progression clockwise or counterclockwise Type a value in the Rotate box.
Allow the fill to be skewed or stretched disproportionately Enable the Free scale and skew check box.
Fountain fills can contain up to 99 colors.
You can change the color of a node by clicking the node and clicking a color on the color palette.
To apply a fountain fill interactively
1 In the toolbox, click the Interactive fill tool .
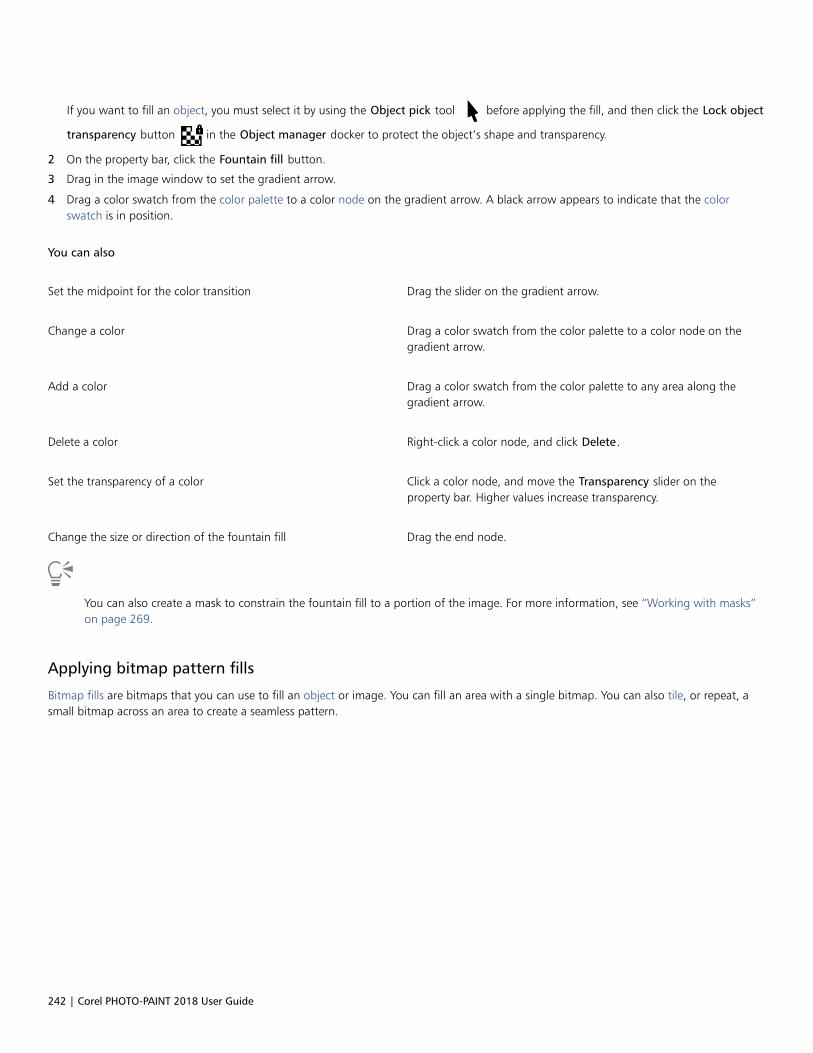
242 | Corel PHOTO-PAINT 2018 User Guide
If you want to fill an object, you must select it by using the Object pick tool before applying the fill, and then click the Lock object
transparency button in the Object manager docker to protect the object’s shape and transparency.
2 On the property bar, click the Fountain fill button.
3 Drag in the image window to set the gradient arrow.
4 Drag a color swatch from the color palette to a color node on the gradient arrow. A black arrow appears to indicate that the colorswatch is in position.
You can also
Set the midpoint for the color transition Drag the slider on the gradient arrow.
Change a color Drag a color swatch from the color palette to a color node on thegradient arrow.
Add a color Drag a color swatch from the color palette to any area along thegradient arrow.
Delete a color Right-click a color node, and click Delete.
Set the transparency of a color Click a color node, and move the Transparency slider on theproperty bar. Higher values increase transparency.
Change the size or direction of the fountain fill Drag the end node.
You can also create a mask to constrain the fountain fill to a portion of the image. For more information, see “Working with masks”on page 269.
Applying bitmap pattern fills
Bitmap fills are bitmaps that you can use to fill an object or image. You can fill an area with a single bitmap. You can also tile, or repeat, asmall bitmap across an area to create a seamless pattern.
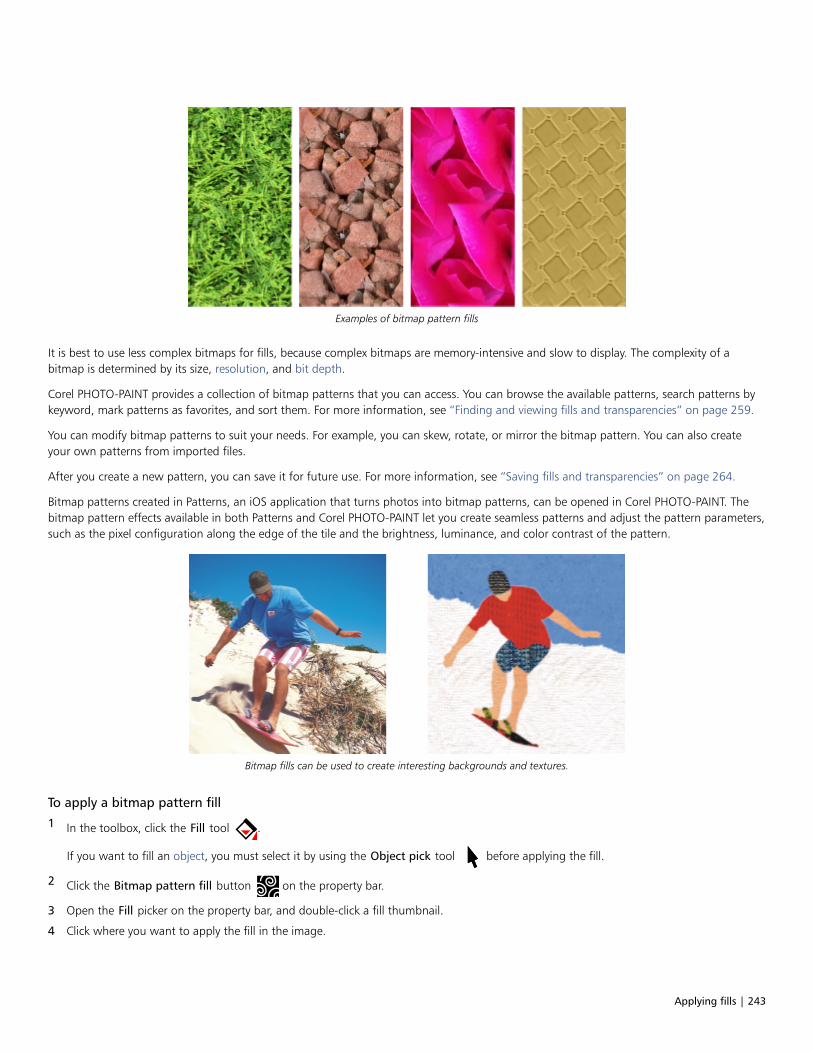
Applying fills | 243
Examples of bitmap pattern fills
It is best to use less complex bitmaps for fills, because complex bitmaps are memory-intensive and slow to display. The complexity of abitmap is determined by its size, resolution, and bit depth.
Corel PHOTO-PAINT provides a collection of bitmap patterns that you can access. You can browse the available patterns, search patterns bykeyword, mark patterns as favorites, and sort them. For more information, see “Finding and viewing fills and transparencies” on page 259.
You can modify bitmap patterns to suit your needs. For example, you can skew, rotate, or mirror the bitmap pattern. You can also createyour own patterns from imported files.
After you create a new pattern, you can save it for future use. For more information, see “Saving fills and transparencies” on page 264.
Bitmap patterns created in Patterns, an iOS application that turns photos into bitmap patterns, can be opened in Corel PHOTO-PAINT. Thebitmap pattern effects available in both Patterns and Corel PHOTO-PAINT let you create seamless patterns and adjust the pattern parameters,such as the pixel configuration along the edge of the tile and the brightness, luminance, and color contrast of the pattern.
Bitmap fills can be used to create interesting backgrounds and textures.
To apply a bitmap pattern fill
1 In the toolbox, click the Fill tool .
If you want to fill an object, you must select it by using the Object pick tool before applying the fill.
2 Click the Bitmap pattern fill button on the property bar.
3 Open the Fill picker on the property bar, and double-click a fill thumbnail.
4 Click where you want to apply the fill in the image.
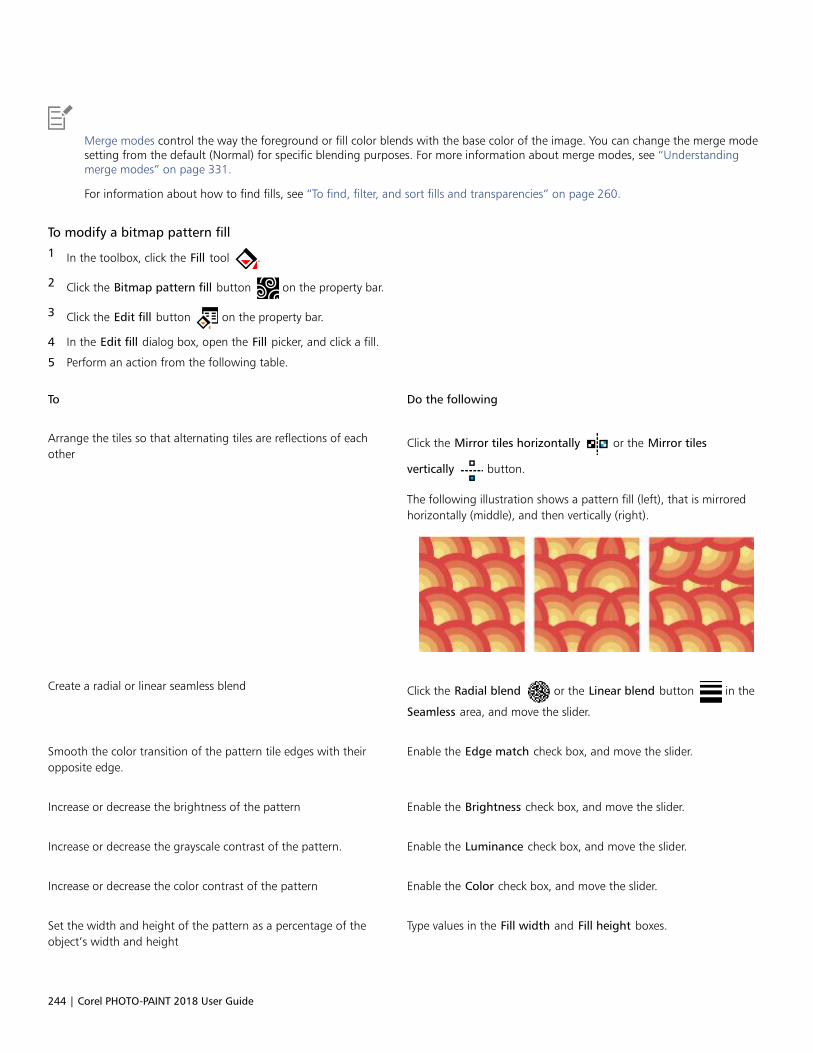
244 | Corel PHOTO-PAINT 2018 User Guide
Merge modes control the way the foreground or fill color blends with the base color of the image. You can change the merge modesetting from the default (Normal) for specific blending purposes. For more information about merge modes, see “Understandingmerge modes” on page 331.
For information about how to find fills, see “To find, filter, and sort fills and transparencies” on page 260.
To modify a bitmap pattern fill
1 In the toolbox, click the Fill tool .
2 Click the Bitmap pattern fill button on the property bar.
3 Click the Edit fill button on the property bar.
4 In the Edit fill dialog box, open the Fill picker, and click a fill.
5 Perform an action from the following table.
To Do the following
Arrange the tiles so that alternating tiles are reflections of eachother
Click the Mirror tiles horizontally or the Mirror tiles
vertically button.
The following illustration shows a pattern fill (left), that is mirroredhorizontally (middle), and then vertically (right).
Create a radial or linear seamless blend Click the Radial blend or the Linear blend button in the
Seamless area, and move the slider.
Smooth the color transition of the pattern tile edges with theiropposite edge.
Enable the Edge match check box, and move the slider.
Increase or decrease the brightness of the pattern Enable the Brightness check box, and move the slider.
Increase or decrease the grayscale contrast of the pattern. Enable the Luminance check box, and move the slider.
Increase or decrease the color contrast of the pattern Enable the Color check box, and move the slider.
Set the width and height of the pattern as a percentage of theobject’s width and height
Type values in the Fill width and Fill height boxes.
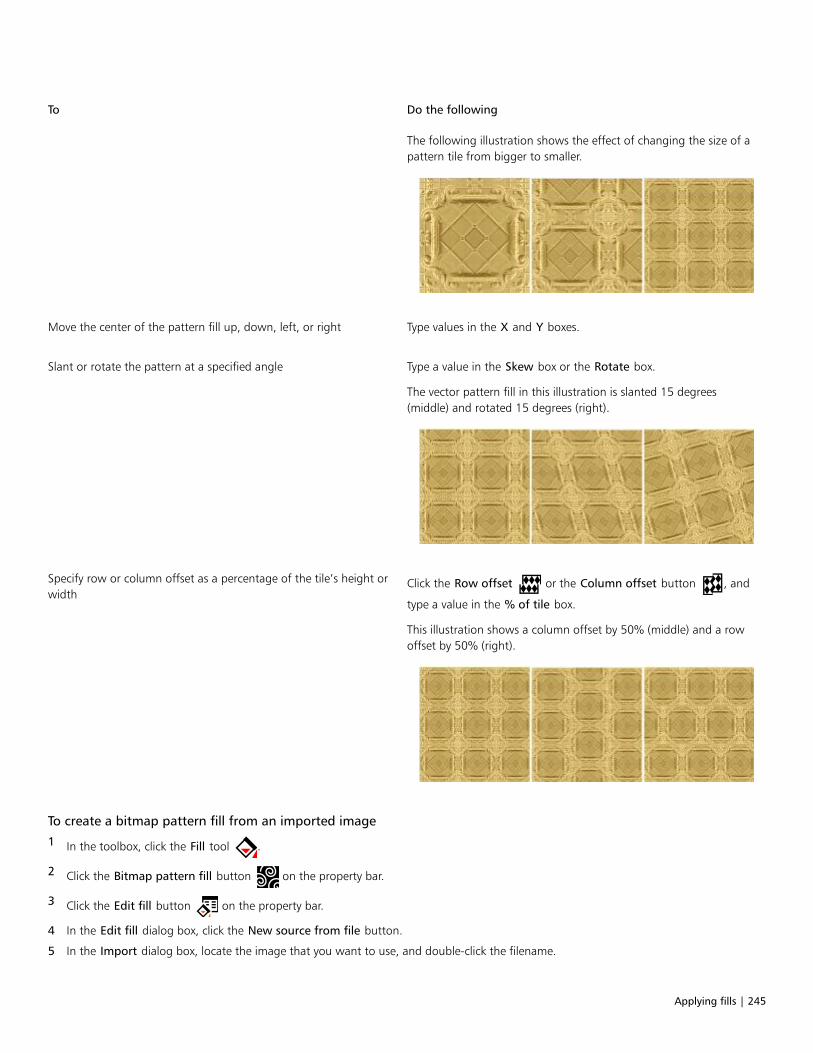
Applying fills | 245
To Do the following
The following illustration shows the effect of changing the size of apattern tile from bigger to smaller.
Move the center of the pattern fill up, down, left, or right Type values in the X and Y boxes.
Slant or rotate the pattern at a specified angle Type a value in the Skew box or the Rotate box.
The vector pattern fill in this illustration is slanted 15 degrees(middle) and rotated 15 degrees (right).
Specify row or column offset as a percentage of the tile’s height orwidth
Click the Row offset or the Column offset button , and
type a value in the % of tile box.
This illustration shows a column offset by 50% (middle) and a rowoffset by 50% (right).
To create a bitmap pattern fill from an imported image
1 In the toolbox, click the Fill tool .
2 Click the Bitmap pattern fill button on the property bar.
3 Click the Edit fill button on the property bar.
4 In the Edit fill dialog box, click the New source from file button.
5 In the Import dialog box, locate the image that you want to use, and double-click the filename.
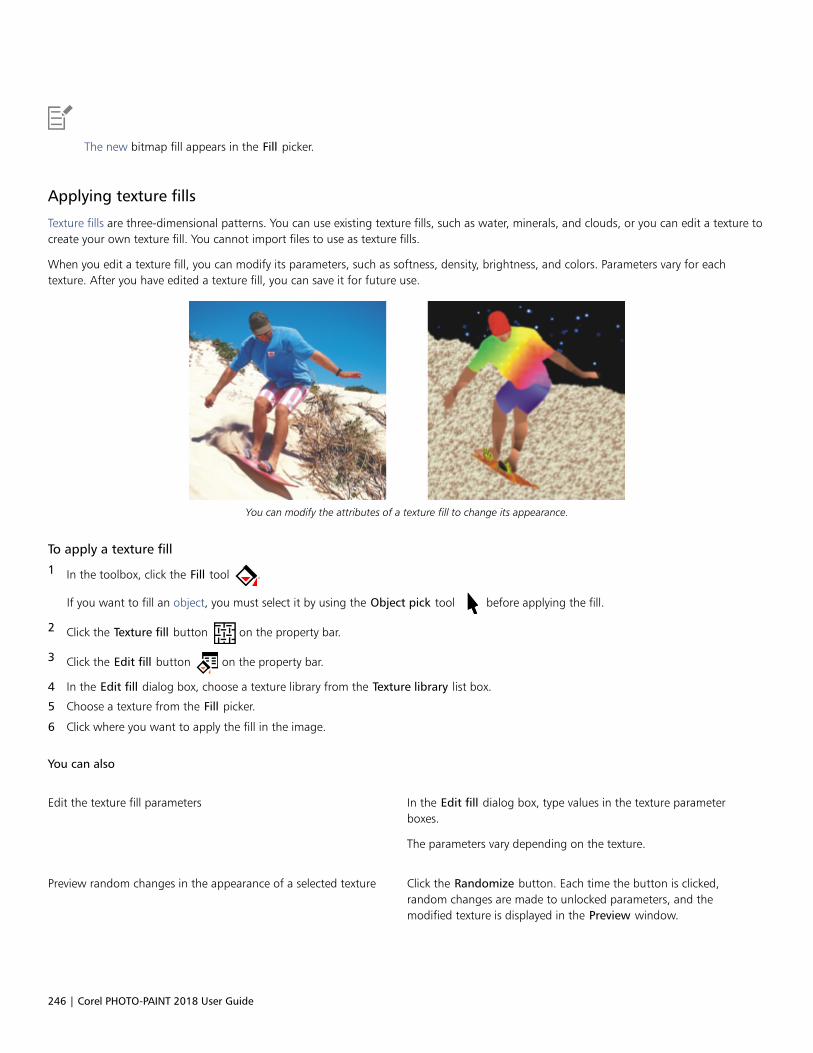
246 | Corel PHOTO-PAINT 2018 User Guide
The new bitmap fill appears in the Fill picker.
Applying texture fills
Texture fills are three-dimensional patterns. You can use existing texture fills, such as water, minerals, and clouds, or you can edit a texture tocreate your own texture fill. You cannot import files to use as texture fills.
When you edit a texture fill, you can modify its parameters, such as softness, density, brightness, and colors. Parameters vary for eachtexture. After you have edited a texture fill, you can save it for future use.
You can modify the attributes of a texture fill to change its appearance.
To apply a texture fill
1 In the toolbox, click the Fill tool .
If you want to fill an object, you must select it by using the Object pick tool before applying the fill.
2 Click the Texture fill button on the property bar.
3 Click the Edit fill button on the property bar.
4 In the Edit fill dialog box, choose a texture library from the Texture library list box.
5 Choose a texture from the Fill picker.
6 Click where you want to apply the fill in the image.
You can also
Edit the texture fill parameters In the Edit fill dialog box, type values in the texture parameterboxes.
The parameters vary depending on the texture.
Preview random changes in the appearance of a selected texture Click the Randomize button. Each time the button is clicked,random changes are made to unlocked parameters, and themodified texture is displayed in the Preview window.
Applying fills | 247
You can also
Arrange the tiles so that alternating tiles are reflections of eachother
Click Transformations, and click the Mirror tiles horizontally orthe Mirror tiles vertically button.
Change the size of the fill Click Transformations, and type values in the Fill width and Fillheight boxes.
Move the center of the fill up, down, left, or right Click Transformations, and type values in the X and Y boxes.
Rotate the fill at a specified angle Click Transformations, and type a value in the Rotate box.
Slant the fill at a specified angle Click Transformations, and type a value in the Skew box.
Specify a row or column offset as a percentage of the tile’s widthor height
Click Transformations, and click the Row offset or the Columnoffset button. Type a value in the % of tile box.
Specify the bitmap resolution of the texture fill Click Options, and type a value in the Bitmap resolution box.
Save the texture fill Click the Save texture button , and type a name in the Texture
name box in the Save texture as dialog box. Choose a library fromthe Library name list box.
Specify a value for the opacity of the fill Type a value in the Fill transparency box on the property bar.Higher values increase the transparency.
Specify how the fill spreads based on the color similarity of adjacentpixels
Type a value in the Tolerance box on the property bar. A value of100 fills the entire object or area.
Change the way colors are combined Choose a merge mode from the Merge mode list box on theproperty bar.

248 | Corel PHOTO-PAINT 2018 User Guide
Working with transparency | 249
Working with transparency
You can change the transparency of an object to reveal image elements that lie beneath it. When you change the transparency of an object,you change the grayscale value of its individual pixels.
Most changes to the transparency of an object are permanent. If you want to apply transparency changes separately, so the object is notaffected, you can use a clip mask. For more information, see “Using clip masks” on page 421.
This section contains the following topics:• “Applying uniform transparency” (page 249)• “Applying fountain transparency” (page 250)• “Applying bitmap pattern transparency” (page 253)• “Applying texture transparency” (page 255)• “Applying transparency by using brushstrokes” (page 257)• “Making selected colors in objects transparent” (page 257)• “Blending objects” (page 257)
Applying uniform transparency
Uniform transparency alters the transparency values of all pixels in the object or editable area by an equal amount. You can apply a uniformtransparency to an object or to an editable area.
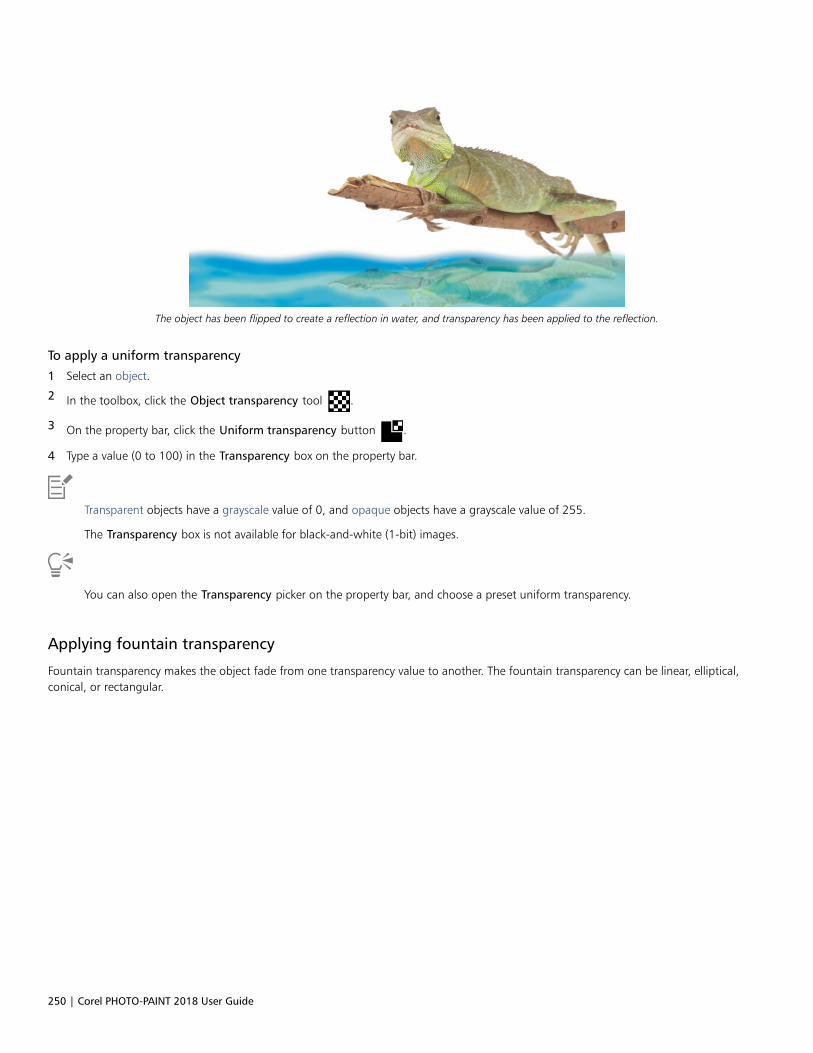
250 | Corel PHOTO-PAINT 2018 User Guide
The object has been flipped to create a reflection in water, and transparency has been applied to the reflection.
To apply a uniform transparency
1 Select an object.
2 In the toolbox, click the Object transparency tool .
3 On the property bar, click the Uniform transparency button .
4 Type a value (0 to 100) in the Transparency box on the property bar.
Transparent objects have a grayscale value of 0, and opaque objects have a grayscale value of 255.
The Transparency box is not available for black-and-white (1-bit) images.
You can also open the Transparency picker on the property bar, and choose a preset uniform transparency.
Applying fountain transparency
Fountain transparency makes the object fade from one transparency value to another. The fountain transparency can be linear, elliptical,conical, or rectangular.
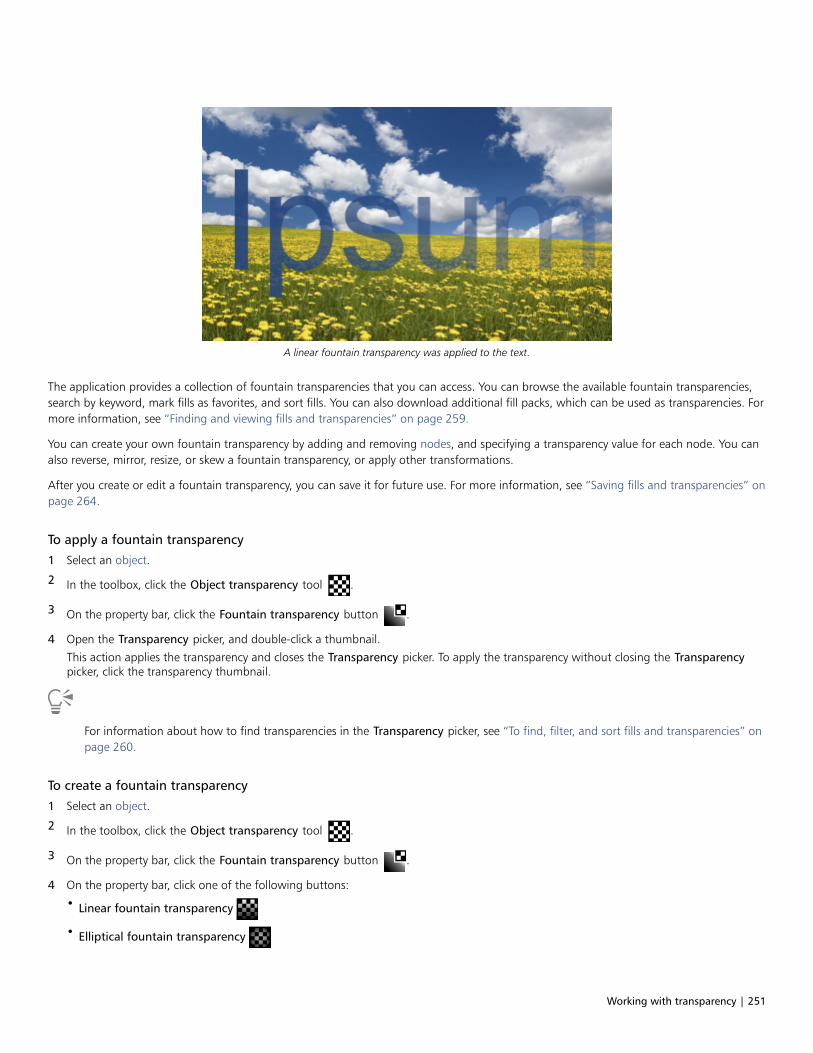
Working with transparency | 251
A linear fountain transparency was applied to the text.
The application provides a collection of fountain transparencies that you can access. You can browse the available fountain transparencies,search by keyword, mark fills as favorites, and sort fills. You can also download additional fill packs, which can be used as transparencies. Formore information, see “Finding and viewing fills and transparencies” on page 259.
You can create your own fountain transparency by adding and removing nodes, and specifying a transparency value for each node. You canalso reverse, mirror, resize, or skew a fountain transparency, or apply other transformations.
After you create or edit a fountain transparency, you can save it for future use. For more information, see “Saving fills and transparencies” onpage 264.
To apply a fountain transparency
1 Select an object.
2 In the toolbox, click the Object transparency tool .
3 On the property bar, click the Fountain transparency button .
4 Open the Transparency picker, and double-click a thumbnail.
This action applies the transparency and closes the Transparency picker. To apply the transparency without closing the Transparencypicker, click the transparency thumbnail.
For information about how to find transparencies in the Transparency picker, see “To find, filter, and sort fills and transparencies” onpage 260.
To create a fountain transparency
1 Select an object.
2 In the toolbox, click the Object transparency tool .
3 On the property bar, click the Fountain transparency button .
4 On the property bar, click one of the following buttons:
• Linear fountain transparency
• Elliptical fountain transparency
252 | Corel PHOTO-PAINT 2018 User Guide
• Conical fountain transparency
• Rectangular fountain transparency
5 On the property bar, click the Edit transparency button .
6 In the Edit transparency dialog box, perform an action from the following table.
To Do the following
Change the start transparency Click the start node above the grayscale band, and type a value inthe Node transparency box.
Change the end transparency Click the end node above the grayscale band, and type a value inthe Node transparency box.
Set the midpoint between the start and the end transparency Move the midpoint slider below the grayscale band to set themidpoint of the transparency.
Add an intermediate transparency Double-click the grayscale band where you want to add anode. With the new node selected, type a value in the Nodetransparency box.
Change the position of an intermediate transparency Drag the corresponding node to a new location above thegrayscale band, or type a value in the Node position box.
Delete an intermediate transparency Double-click the corresponding node.
Mirror, repeat, or reverse the transparency pattern Click one of the following buttons:•Repeat and mirror
•Repeat
•Reverse transparency
Revert to the default transparency Click the Default transparency button .
Specify the number of steps used to display or print the fountaintransparency
Click the Set to default button to unlock the fountain steps,
and type a value in the Fountain steps box.
Specify how quickly the fountain transparency blends from onetransparency to another
Move the Acceleration slider.
Create smoother transitions between fountain transparency nodes Click the Smooth button .
Set the width and height of the transparency as a percentage ofthe object’s width and height
Type values in the Transparency width and Transparency heightboxes.
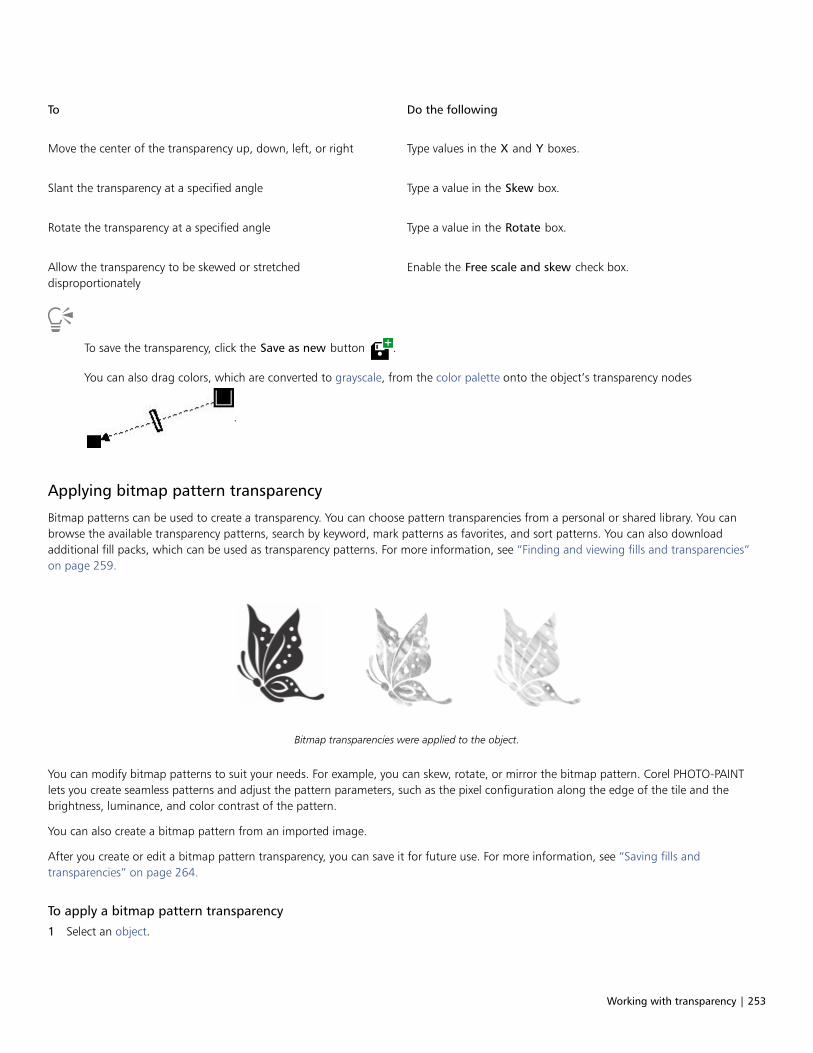
Working with transparency | 253
To Do the following
Move the center of the transparency up, down, left, or right Type values in the X and Y boxes.
Slant the transparency at a specified angle Type a value in the Skew box.
Rotate the transparency at a specified angle Type a value in the Rotate box.
Allow the transparency to be skewed or stretcheddisproportionately
Enable the Free scale and skew check box.
To save the transparency, click the Save as new button .
You can also drag colors, which are converted to grayscale, from the color palette onto the object’s transparency nodes
.
Applying bitmap pattern transparency
Bitmap patterns can be used to create a transparency. You can choose pattern transparencies from a personal or shared library. You canbrowse the available transparency patterns, search by keyword, mark patterns as favorites, and sort patterns. You can also downloadadditional fill packs, which can be used as transparency patterns. For more information, see “Finding and viewing fills and transparencies”on page 259.
Bitmap transparencies were applied to the object.
You can modify bitmap patterns to suit your needs. For example, you can skew, rotate, or mirror the bitmap pattern. Corel PHOTO-PAINTlets you create seamless patterns and adjust the pattern parameters, such as the pixel configuration along the edge of the tile and thebrightness, luminance, and color contrast of the pattern.
You can also create a bitmap pattern from an imported image.
After you create or edit a bitmap pattern transparency, you can save it for future use. For more information, see “Saving fills andtransparencies” on page 264.
To apply a bitmap pattern transparency
1 Select an object.
254 | Corel PHOTO-PAINT 2018 User Guide
2 In the toolbox, click the Object transparency tool .
3 On the property bar, click the Bitmap pattern transparency button .
4 Open the Transparency picker, and double-click a thumbnail.
This action applies the transparency and closes the Transparency picker. To apply the transparency without closing the Transparencypicker, click the transparency thumbnail.
For information about how to find transparencies in the Transparency picker, see “To find, filter, and sort fills and transparencies” onpage 260.
To modify or create a bitmap pattern transparency
1 Select an object.
2 In the toolbox, click the Object transparency tool .
3 On the property bar, click the Bitmap pattern transparency button .
4 On the property bar, click the Edit transparency button .
5 In the Edit transparency dialog box, choose a transparency pattern from the Transparency picker.
6 Perform a task from the following table.
To Do the following
Change the foreground transparency of the pattern Move the Foreground transparency slider.
Change the background transparency of the pattern Move the Background transparency slider.
Arrange the tiles so that alternating tiles are reflections of eachother
Click the Mirror horizontally or the Mirror vertically
button.
Create a radial or linear seamless blend In the Seamless area, click the Radial blend button , or click
the Linear blend button and move the slider.
Smooth the color transition of the pattern tile edges with theiropposite edge.
Enable the Edge match check box, and move the slider.
Increase or decrease the brightness of the pattern Enable the Brightness check box, and move the slider.
Increase or decrease the grayscale contrast of the pattern. Enable the Luminance check box, and move the slider.
Increase or decrease the color contrast of the pattern Enable the Color check box, and move the slider.
Change the size of the pattern Type a value in the Transparency width or the Transparencyheight box.

Working with transparency | 255
To Do the following
Move the center of the pattern fill up, down, left, or right Type values in the X and Y boxes.
Slant the pattern at a specified angle Type a value in the Skew box.
Rotate the pattern at a specified angle Type a value in the Rotate box.
Specify row or column offset as a percentage of the tile’s height orwidth.
Click the Row offset or the Column offset button , and
type a value in the % of tile box.
To save the transparency, click the Save as new button .
You can also skew or rotate the pattern by dragging the skewing or rotation handles on the object.
You can also use the controls on the property bar.
To create a bitmap pattern from an imported image
1 Select an object.
2 In the toolbox, click the Object transparency tool .
3 On the property bar, click the Bitmap pattern transparency button .
4 On the property bar, click the Edit transparency button .
5 In the Edit transparency dialog box, click the New source from file button .
6 In the Import dialog box, locate the image that you want to use, and double-click the filename.
Applying texture transparency
You can use textures to create transparency effects. You can use existing textures, such as water, minerals, and clouds, or you can edit atexture to create your own texture transparency.
A texture transparency is applied to the object filled with light green.
256 | Corel PHOTO-PAINT 2018 User Guide
When you edit a texture, you can modify its parameters, such as softness, density, brightness, and colors. Parameters vary for each texture.You can also apply other transformations, such as mirror, resize, or offset the texture tiles. After you have edited a texture, you can save it forfuture use.
To apply a texture transparency
1 Select an object.
2 In the toolbox, click the Object transparency tool .
3 On the property bar, click the Texture transparency button .
4 On the property bar, click the Edit transparency button .
5 In the Edit transparency dialog box, choose a texture library from the Texture library list box.
6 Choose a texture from the Fill picker.
7 Perform an action from the following table.
To Do the following
Change the foreground transparency of the texture Move the Foreground transparency slider.
Change the background transparency of the texture Move the Background transparency slider.
Edit the texture parameters Type values in the texture parameter boxes.
The parameters vary depending on the texture.
Preview random changes in the appearance of a selected texture Click Randomize. Each time the button is clicked, random changesare made to unlocked parameters, and the modified texture isdisplayed in the Preview window.
Arrange the tiles so that alternating tiles are reflections of eachother
Click Transformations, and click the Mirror tiles horizontally
or the Mirror tiles vertically button .
Change the size of texture tiles Click Transformations, and type values in the Transparency widthand Transparency height boxes.
Move the center of the texture up, down, left, or right Click Transformations, and type values in the X and Y boxes.
Rotate the texture at a specified angle Click Transformations, and type a value in the Rotate box.
Slant the texture at a specified angle Click Transformations, and type a value in the Skew box.
Specify a row or column offset as a percentage of the tile’s widthor height
Click Transformations, and click the Row offset or the
Column offset button . Type a value in the % of tile box.
Working with transparency | 257
To Do the following
Specify the bitmap resolution of the texture Click Options, and type a value in the Bitmap resolution box.
Save the texture Click the Save texture button , and type a name in the Texture
name box in the Save texture as dialog box. Choose a library fromthe Library name list box.
Applying transparency by using brushstrokes
You can change the transparency of part of an object by using brushstrokes. You can change the nib shape, the nib size, and the opacity ofthe brushstroke.
To apply transparency by using brushstrokes
1 Select an object.
2 In the toolbox, click the Object transparency brush tool .
3 On the property bar, open the Nib shape picker, and click a shape.
4 Type a value in the Nib size box.
5 Type a value in the Opacity box to set the transparency level for the brushstroke.
6 Drag across the object.
You can quickly choose a square or round brush shape by clicking the Round nib button or the Square nib button on the
property bar.
Making selected colors in objects transparent
You can make all pixels of a certain color or color range transparent in the active object. Removing one or all of the color selection nodesmakes the pixels of a certain color opaque again.
To make selected colors in an object transparent
1 Select an object.
2 In the toolbox, click the Color transparency tool .
3 Type a value in the Tolerance box on the property bar to specify the range of colors that will become transparent.
If you want to blend the surrounding colors with the transparent pixels, type a value in the Smoothing box. Higher values create asmoother transition.
4 Click a color in the image window.
Blending objects
You can create interesting effects by blending objects with other objects that are below them in the stacking order, or by blending objectswith the background. As you experiment with settings, the transparency effect previews in the image window.

258 | Corel PHOTO-PAINT 2018 User Guide
To blend an object
1 Right-click an object, and click Object properties from the context menu.
2 In the Object properties dialog box, click the General tab.
3 Choose the channel you want to blend from the Blend list box.
4 On the Active object graph and the Composite underlying graph, drag any of the following nodes:
• Increasing maximum (upper-left node) — specifies the upper maximum grayscale value of the pixels in the object
• Increasing minimum (lower-left node) — specifies the upper minimum grayscale value of the pixels in the object
• Decreasing maximum (upper-right node) — specifies the lower maximum grayscale value of the pixels in the object
• Decreasing minimum (lower-right node) — specifies the lower minimum grayscale value of the pixels in the object
You can also
Choose a blending method Click a merge mode in the Merge list box.
Adjust the opacity Drag the Opacity slider.
The boxes to the right of the Blend list box display the grayscale and transparency values of the selected object’s pixels.
You can specify the grayscale values of pixels on a scale of 0 (black) to 255 (white), and the opacity of pixels on a scale of 0(transparent) to 100 (opaque). Pixels in the active object that fall outside the specified range are hidden, so the pixels of theunderlying object are visible.

Finding, managing, and saving fills and transparencies | 259
Finding, managing, and saving fills andtransparencies
When working with bitmap patterns or fountain fills and transparencies, you can access your local library and shared network folders tobrowse, search, and save fills and transparency patterns.
This section contains the following topics:
• “Finding and viewing fills and transparencies” (page 259)
• “Managing fills and transparencies” (page 262)
• “Saving fills and transparencies” (page 264)
Finding and viewing fills and transparencies
Corel PHOTO-PAINT lets you use, browse, and search bitmap patterns and fountain fills that are available locally on your computer, onportable media devices, and in network folders. Any of these fills can also be used as transparency patterns. For more information, see“Working with transparency” on page 249.
To get you started, Corel provides local fills that are listed under User content in the Fill and Transparency pickers. These fills are stored inyour Documents\Corel\Corel Content\Fills folder. If you are looking to expand your fill collection, you can download additional fill packsfrom within the Get More dialog box.
To access fills and patterns that are saved to local folders outside your Documents\Corel\Corel Content\Fills folder, you can create links tothese folders in the Fill and Transparency pickers. Such links are known as aliases. In addition, aliases can be used to access fills saved toshared network locations as well as secondary storage devices such as USB flash drives, and portable hard drives.
You can also view the list of your favorite or most recently used fills and transparencies.
You can search and browse one pack, folder or list at a time. You can also browse and search your entire User content library by enablingthe Browse recursively option.
When you copy a folder that contains many fills to your computer, it may take some time for Windows to index the folder. To view, browse,and search fills in such a folder right away, you may need to reindex the folder.
To find fills and transparencies more easily, you can filter them based on categories such Abstract, Animals, Floral, Nature, and more. Youcan also sort local fills and transparencies by name and the date they were created or modified.
For more information about fills, see “Applying fills” on page 237.
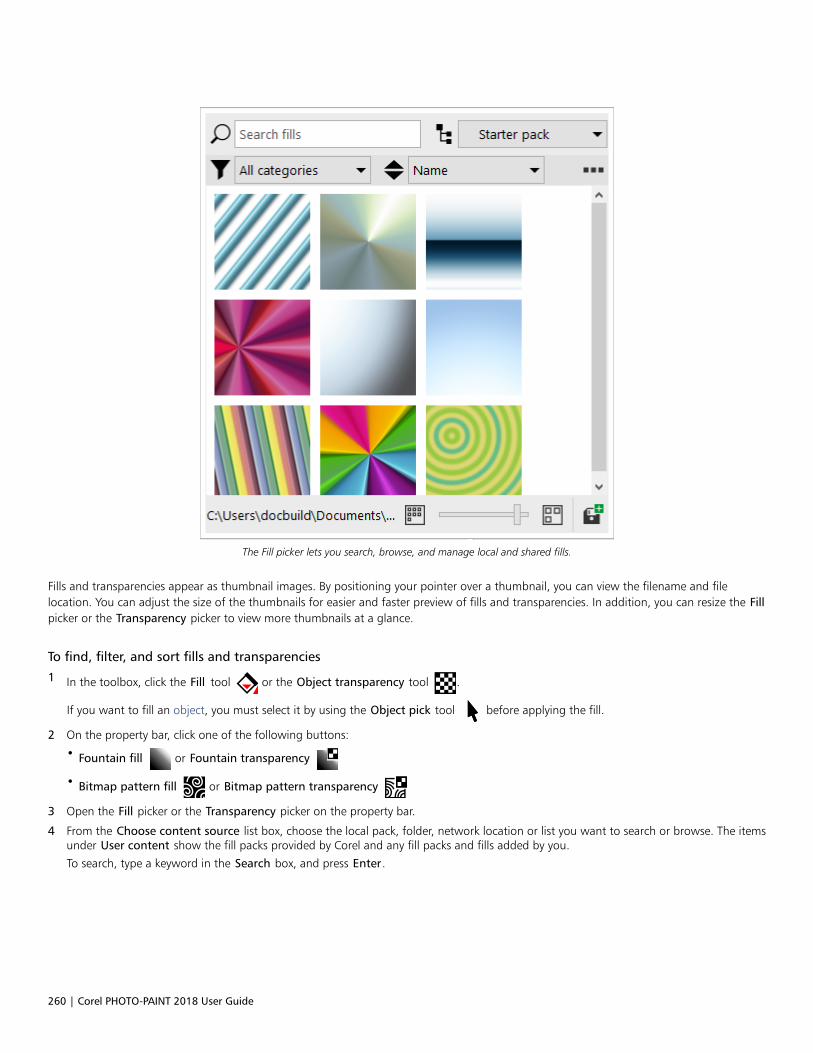
260 | Corel PHOTO-PAINT 2018 User Guide
The Fill picker lets you search, browse, and manage local and shared fills.
Fills and transparencies appear as thumbnail images. By positioning your pointer over a thumbnail, you can view the filename and filelocation. You can adjust the size of the thumbnails for easier and faster preview of fills and transparencies. In addition, you can resize the Fillpicker or the Transparency picker to view more thumbnails at a glance.
To find, filter, and sort fills and transparencies
1 In the toolbox, click the Fill tool or the Object transparency tool .
If you want to fill an object, you must select it by using the Object pick tool before applying the fill.
2 On the property bar, click one of the following buttons:
• Fountain fill or Fountain transparency
• Bitmap pattern fill or Bitmap pattern transparency
3 Open the Fill picker or the Transparency picker on the property bar.
4 From the Choose content source list box, choose the local pack, folder, network location or list you want to search or browse. The itemsunder User content show the fill packs provided by Corel and any fill packs and fills added by you.
To search, type a keyword in the Search box, and press Enter.
Finding, managing, and saving fills and transparencies | 261
You can also
Browse or search all items in your User content library From the Choose content source list box, choose User content.
Click the Edit button , and click Browse recursively.
Reindex a folder From the Choose content source list box, choose User content or
an alias. Click the Edit button , and click Reindex folder.
View the last 25 most recently used fills and patterns From the Choose content source list box, choose Recent.
View your favorite fills and transparencies From the Choose content source list box, choose Favorites. Forinformation about how to mark a fill as favorite, see “To managefills and transparencies” on page 263.
Filter fills and transparencies From the Choose content source list box, choose a pack underUser content or an alias. Choose a category from the Filter list box.
Sort fills and transparencies From the Choose content source list box, choose a pack underUser content or an alias. Open the Sort by list box next to theFilter list box, and choose one of the following options:
•Name sorts fills and transparencies by the fill name, inalphabetical order.
•Date created sorts fills and transparencies by the date they werecreated, starting with the last created fill.
•Last modified sorts fills and transparencies by the date they weremodified, starting with the last modified fill.
Fills and transparencies in your Favorites list are automaticallysorted by the date you marked them as favorites, starting with thelast fill and transparency added to Favorites.
Fills and transparencies in your Recent list are automatically sortedby the date you used them, starting with the last used fill ortransparency.
This procedure applies only to bitmap patterns and fountain fills and transparencies.
To download and add a new fill and transparency pack
1 Open the Fill picker or the Transparency picker on the property bar.
2 Open the Choose content source list box, and click Add new.
3 Click Get More.
4 In the Get More dialog box, click the fill pack you want.
5 Do one of the following:
• Click Buy, and follow the onscreen instructions to purchase the item.
• Click Download if the item is included in your product or subscription.
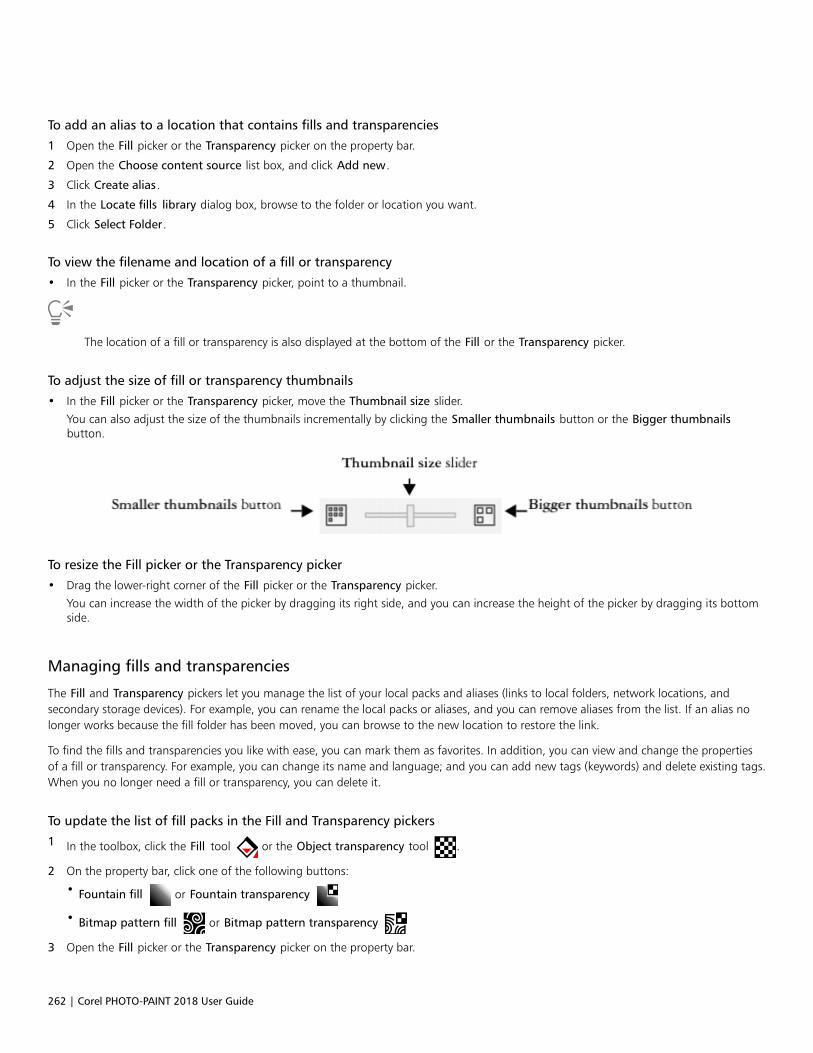
262 | Corel PHOTO-PAINT 2018 User Guide
To add an alias to a location that contains fills and transparencies
1 Open the Fill picker or the Transparency picker on the property bar.
2 Open the Choose content source list box, and click Add new.
3 Click Create alias.
4 In the Locate fills library dialog box, browse to the folder or location you want.
5 Click Select Folder.
To view the filename and location of a fill or transparency
• In the Fill picker or the Transparency picker, point to a thumbnail.
The location of a fill or transparency is also displayed at the bottom of the Fill or the Transparency picker.
To adjust the size of fill or transparency thumbnails
• In the Fill picker or the Transparency picker, move the Thumbnail size slider.
You can also adjust the size of the thumbnails incrementally by clicking the Smaller thumbnails button or the Bigger thumbnailsbutton.
To resize the Fill picker or the Transparency picker
• Drag the lower-right corner of the Fill picker or the Transparency picker.
You can increase the width of the picker by dragging its right side, and you can increase the height of the picker by dragging its bottomside.
Managing fills and transparencies
The Fill and Transparency pickers let you manage the list of your local packs and aliases (links to local folders, network locations, andsecondary storage devices). For example, you can rename the local packs or aliases, and you can remove aliases from the list. If an alias nolonger works because the fill folder has been moved, you can browse to the new location to restore the link.
To find the fills and transparencies you like with ease, you can mark them as favorites. In addition, you can view and change the propertiesof a fill or transparency. For example, you can change its name and language; and you can add new tags (keywords) and delete existing tags.When you no longer need a fill or transparency, you can delete it.
To update the list of fill packs in the Fill and Transparency pickers
1 In the toolbox, click the Fill tool or the Object transparency tool .
2 On the property bar, click one of the following buttons:
• Fountain fill or Fountain transparency
• Bitmap pattern fill or Bitmap pattern transparency
3 Open the Fill picker or the Transparency picker on the property bar.
Finding, managing, and saving fills and transparencies | 263
4 Choose a fill pack from the Choose content source list box under User content.
5 Click the Edit button , and perform a task from the following table.
To Do the following
Rename a fill pack Click Rename, and in the Rename Pack or Alias dialog box, type aname in the Name box.
Open the fill pack in Windows Explorer Click Open folder location.
Delete a fill pack Click Open folder location. Select the folder that contains the packin Windows Explorer, right-click it, and click Delete.
This action deletes the fill pack and removes it from the list in theFill and Transparency pickers.
To update the list of aliases in the Fill and Transparency pickers
1 In the toolbox, click the Fill tool or the Object transparency tool .
2 On the property bar, click one of the following buttons:
• Fountain fill or Fountain transparency
• Bitmap pattern fill or Bitmap pattern transparency
3 Open the Fill picker or the Transparency picker on the property bar.
4 Choose an alias from Choose content source list box.
5 Click the Edit button , and perform a task from the following table.
To Do the following
Browse to a folder that has been moved or renamed Click Browse, and navigate to the folder that contains the fills.
Rename the alias Click Rename, and in the Rename Pack or Alias dialog box, type aname in the Name box.
Remove the alias from the list Click Remove.
Open the folder in Windows Explorer Click Open folder location.
To manage fills and transparencies
1 In the toolbox, click the Fill tool or the Object transparency tool .
2 On the property bar, click one of the following buttons:
• Fountain fill or Fountain transparency
264 | Corel PHOTO-PAINT 2018 User Guide
• Bitmap pattern fill or Bitmap pattern transparency
3 Open the Fill picker or the Transparency picker on the property bar.
4 Perform an action from the following table.
To Do the following
Mark a fill or pattern as a favorite Right-click a thumbnail, and click Favorite.
Change the name of a fill or pattern in your local library, or the tagsassociated with it
Right-click a thumbnail, and click Properties. In the Propertiesdialog box, do any of the following:
•Choose a language from the Language list box.•Type a new name in the Name box.•Choose a category from the Category list box to categorize the
fill or pattern.•Add to or delete tags from the Tags box.
Delete a fill or pattern from your local library Right-click a thumbnail, and click Delete.
This procedure applies only to bitmap patterns and fountain fills and transparencies.
Saving fills and transparencies
After you create or modify a fill or transparency pattern, you can save it and add metadata such as name and tags (keywords) in thelanguage of your choice. Fills and patterns are saved in a special file format with a .fill extension, which preserves information about thetransformations applied to the fill or pattern.
To save a custom fill or transparency
1 In the toolbox, click the Fill tool or the Object transparency tool .
2 On the property bar, click one of the following buttons:
• Fountain fill
• Fountain transparency
• Bitmap pattern fill
• Bitmap pattern transparency
3 Click the Edit fill button or the Edit transparency button on the property bar.
4 In the Edit fill dialog box, click the Save as new button .
This button is available for fountain and bitmap pattern fills and transparencies, but not for texture fills and transparencies.
5 In the Create Custom [Fill Type] dialog box, choose a language from the list box, type a name for the fill or pattern, and type any tags(keywords) that you want to associate with it.
Fills and patterns in your personal library are saved by default in your Documents\Corel\Corel Content\Fills folder. You can changethe default location to which fills and patterns are saved. For more information, see “Content types” on page 118.

Finding, managing, and saving fills and transparencies | 265
You can also save a fill or transparency by clicking the Save custom fill button in the Fill or Transparency picker. The fill or
transparency is saved to the location selected in the Choose content source list box in the Fill or Transparency picker. If you haveselected Recent from the Choose content source list box, the fill or transparency is saved to your Documents\Corel\Corel Content\Fills folder.

266 | Corel PHOTO-PAINT 2018 User Guide
Masks and paths | 267
Masks and paths
Working with masks............................................................................................................................................................................269
Using paths to define image areas...................................................................................................................................................... 293
Managing multiple masks with alpha channels................................................................................................................................... 305

268 | Corel PHOTO-PAINT 2018 User Guide

Working with masks | 269
Working with masks
In Corel PHOTO-PAINT, you can use masks to isolate areas in an image for editing while protecting the remaining areas from change. Withtheir combination of editable and protected areas, masks let you modify images with precision. In some programs, editable areas are alsoknown as selections.
This section contains the following topics:• “Distinguishing protected and editable areas” (page 269)• “Defining editable areas” (page 271)• “Defining editable areas by using color information” (page 275)• “Expanding and contracting editable areas” (page 278)• “Inverting and removing masks” (page 280)• “Moving and aligning editable areas” (page 281)• “Transforming editable areas” (page 283)• “Adjusting the edges of editable areas” (page 285)• “Adjusting the transparency of masks” (page 288)• “Cutting out images” (page 288)
For information about clip masks, see “Using clip masks” on page 421.
Distinguishing protected and editable areas
You can use masks for advanced image editing. A masks functions like a stencil placed over an image. In protected areas, paint and effectsare not applied to the underlying image, whereas in editable areas, paint and effects are applied to the image. When you define an editablearea for an image, you also define a corresponding mask, or protected area, for the same image.
Mask overlay
You can display a mask overlay that appears only over protected areas to make it easy to differentiate between protected and editable areas.The mask overlay is a red-tinted, transparent sheet. If you adjust the transparency of a mask in certain areas, the degree of red displayed bythe mask overlay in those areas varies accordingly.
You can hide the mask overlay. You can also change the color of the mask overlay so that it can be seen clearly against the colors of theimage in the editable areas.
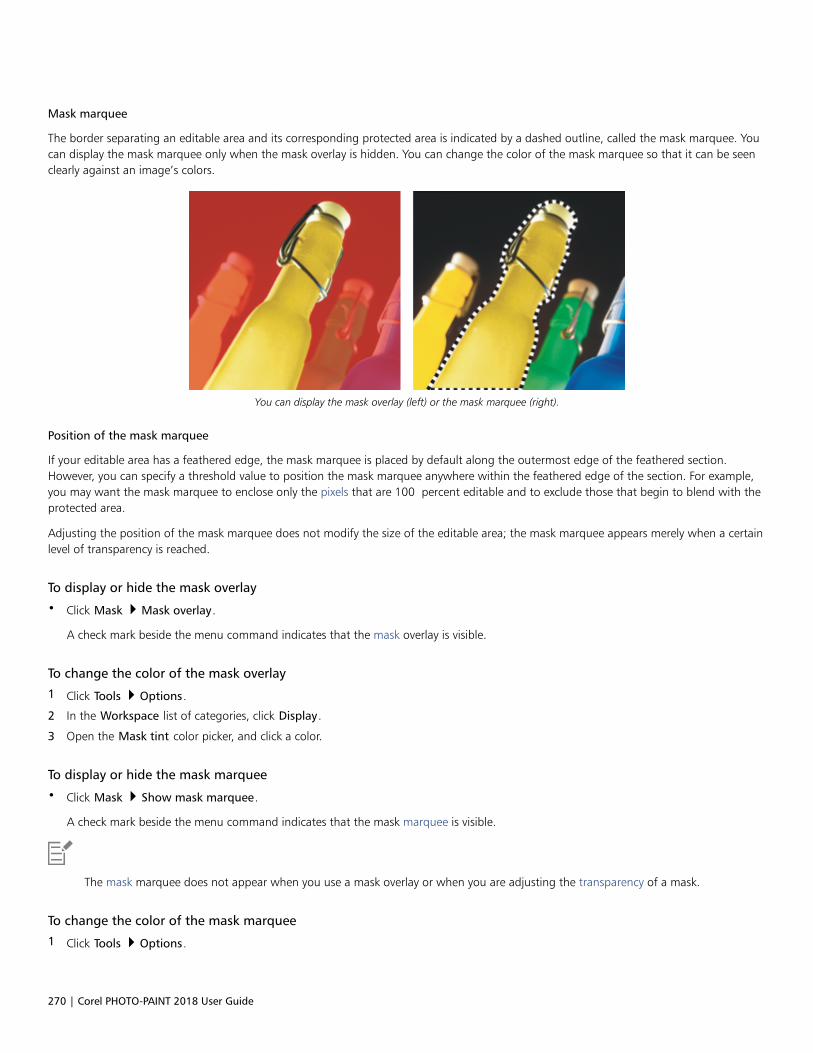
270 | Corel PHOTO-PAINT 2018 User Guide
Mask marquee
The border separating an editable area and its corresponding protected area is indicated by a dashed outline, called the mask marquee. Youcan display the mask marquee only when the mask overlay is hidden. You can change the color of the mask marquee so that it can be seenclearly against an image’s colors.
You can display the mask overlay (left) or the mask marquee (right).
Position of the mask marquee
If your editable area has a feathered edge, the mask marquee is placed by default along the outermost edge of the feathered section.However, you can specify a threshold value to position the mask marquee anywhere within the feathered edge of the section. For example,you may want the mask marquee to enclose only the pixels that are 100 percent editable and to exclude those that begin to blend with theprotected area.
Adjusting the position of the mask marquee does not modify the size of the editable area; the mask marquee appears merely when a certainlevel of transparency is reached.
To display or hide the mask overlay
• Click Mask Mask overlay.
A check mark beside the menu command indicates that the mask overlay is visible.
To change the color of the mask overlay
1 Click Tools Options.
2 In the Workspace list of categories, click Display.
3 Open the Mask tint color picker, and click a color.
To display or hide the mask marquee
• Click Mask Show mask marquee.
A check mark beside the menu command indicates that the mask marquee is visible.
The mask marquee does not appear when you use a mask overlay or when you are adjusting the transparency of a mask.
To change the color of the mask marquee
1 Click Tools Options.
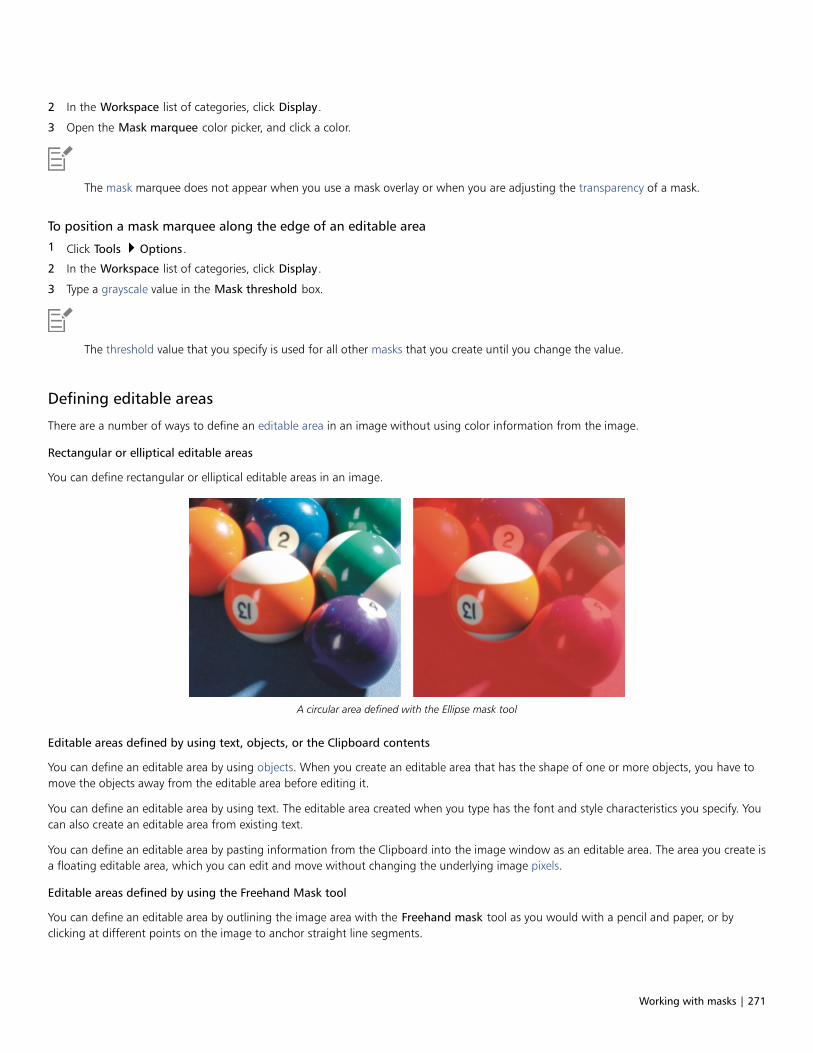
Working with masks | 271
2 In the Workspace list of categories, click Display.
3 Open the Mask marquee color picker, and click a color.
The mask marquee does not appear when you use a mask overlay or when you are adjusting the transparency of a mask.
To position a mask marquee along the edge of an editable area
1 Click Tools Options.
2 In the Workspace list of categories, click Display.
3 Type a grayscale value in the Mask threshold box.
The threshold value that you specify is used for all other masks that you create until you change the value.
Defining editable areas
There are a number of ways to define an editable area in an image without using color information from the image.
Rectangular or elliptical editable areas
You can define rectangular or elliptical editable areas in an image.
A circular area defined with the Ellipse mask tool
Editable areas defined by using text, objects, or the Clipboard contents
You can define an editable area by using objects. When you create an editable area that has the shape of one or more objects, you have tomove the objects away from the editable area before editing it.
You can define an editable area by using text. The editable area created when you type has the font and style characteristics you specify. Youcan also create an editable area from existing text.
You can define an editable area by pasting information from the Clipboard into the image window as an editable area. The area you create isa floating editable area, which you can edit and move without changing the underlying image pixels.
Editable areas defined by using the Freehand Mask tool
You can define an editable area by outlining the image area with the Freehand mask tool as you would with a pencil and paper, or byclicking at different points on the image to anchor straight line segments.
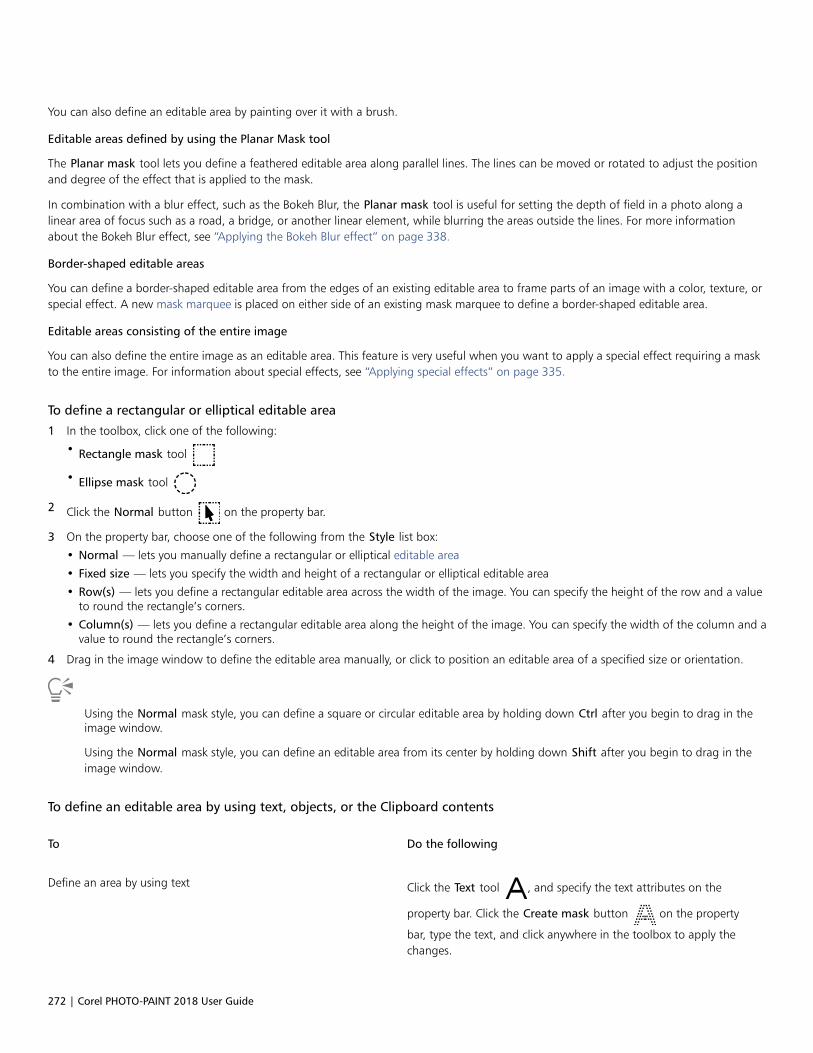
272 | Corel PHOTO-PAINT 2018 User Guide
You can also define an editable area by painting over it with a brush.
Editable areas defined by using the Planar Mask tool
The Planar mask tool lets you define a feathered editable area along parallel lines. The lines can be moved or rotated to adjust the positionand degree of the effect that is applied to the mask.
In combination with a blur effect, such as the Bokeh Blur, the Planar mask tool is useful for setting the depth of field in a photo along alinear area of focus such as a road, a bridge, or another linear element, while blurring the areas outside the lines. For more informationabout the Bokeh Blur effect, see “Applying the Bokeh Blur effect” on page 338.
Border-shaped editable areas
You can define a border-shaped editable area from the edges of an existing editable area to frame parts of an image with a color, texture, orspecial effect. A new mask marquee is placed on either side of an existing mask marquee to define a border-shaped editable area.
Editable areas consisting of the entire image
You can also define the entire image as an editable area. This feature is very useful when you want to apply a special effect requiring a maskto the entire image. For information about special effects, see “Applying special effects” on page 335.
To define a rectangular or elliptical editable area
1 In the toolbox, click one of the following:
• Rectangle mask tool
• Ellipse mask tool
2 Click the Normal button on the property bar.
3 On the property bar, choose one of the following from the Style list box:
• Normal — lets you manually define a rectangular or elliptical editable area
• Fixed size — lets you specify the width and height of a rectangular or elliptical editable area
• Row(s) — lets you define a rectangular editable area across the width of the image. You can specify the height of the row and a valueto round the rectangle’s corners.
• Column(s) — lets you define a rectangular editable area along the height of the image. You can specify the width of the column and avalue to round the rectangle’s corners.
4 Drag in the image window to define the editable area manually, or click to position an editable area of a specified size or orientation.
Using the Normal mask style, you can define a square or circular editable area by holding down Ctrl after you begin to drag in theimage window.
Using the Normal mask style, you can define an editable area from its center by holding down Shift after you begin to drag in theimage window.
To define an editable area by using text, objects, or the Clipboard contents
To Do the following
Define an area by using text Click the Text tool , and specify the text attributes on the
property bar. Click the Create mask button on the property
bar, type the text, and click anywhere in the toolbox to apply thechanges.
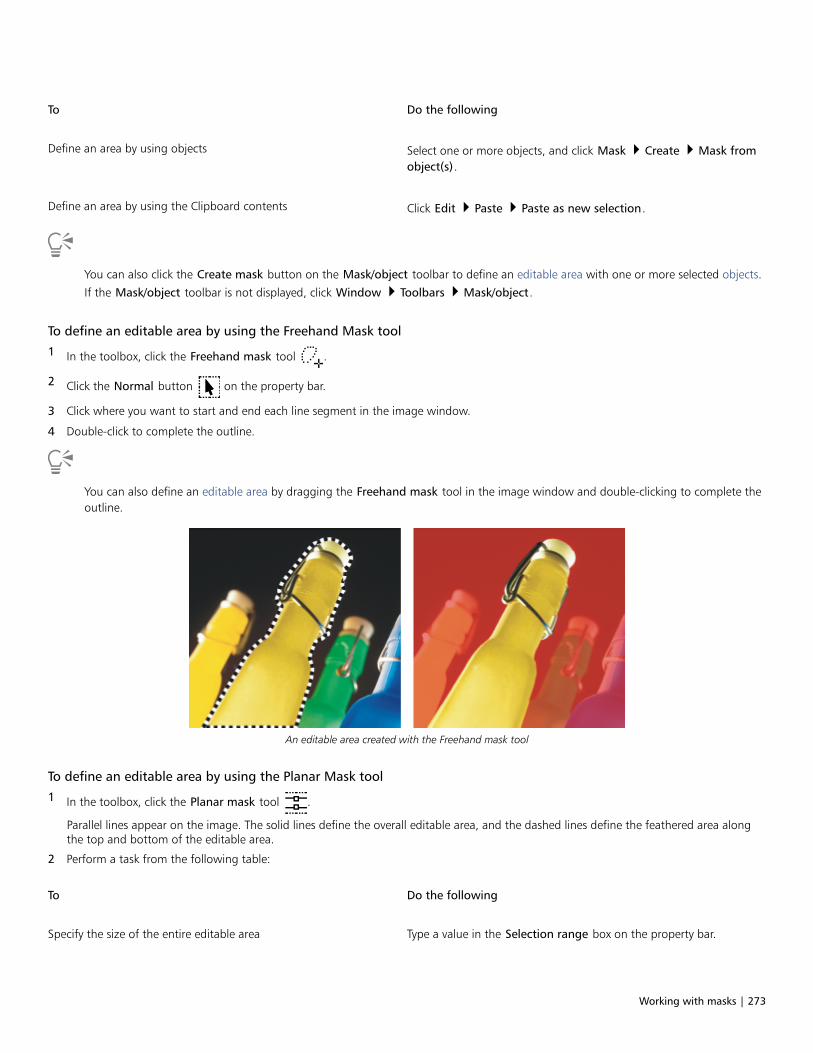
Working with masks | 273
To Do the following
Define an area by using objects Select one or more objects, and click Mask Create Mask fromobject(s).
Define an area by using the Clipboard contents Click Edit Paste Paste as new selection.
You can also click the Create mask button on the Mask/object toolbar to define an editable area with one or more selected objects.
If the Mask/object toolbar is not displayed, click Window Toolbars Mask/object.
To define an editable area by using the Freehand Mask tool
1 In the toolbox, click the Freehand mask tool .
2 Click the Normal button on the property bar.
3 Click where you want to start and end each line segment in the image window.
4 Double-click to complete the outline.
You can also define an editable area by dragging the Freehand mask tool in the image window and double-clicking to complete theoutline.
An editable area created with the Freehand mask tool
To define an editable area by using the Planar Mask tool
1 In the toolbox, click the Planar mask tool .
Parallel lines appear on the image. The solid lines define the overall editable area, and the dashed lines define the feathered area alongthe top and bottom of the editable area.
2 Perform a task from the following table:
To Do the following
Specify the size of the entire editable area Type a value in the Selection range box on the property bar.
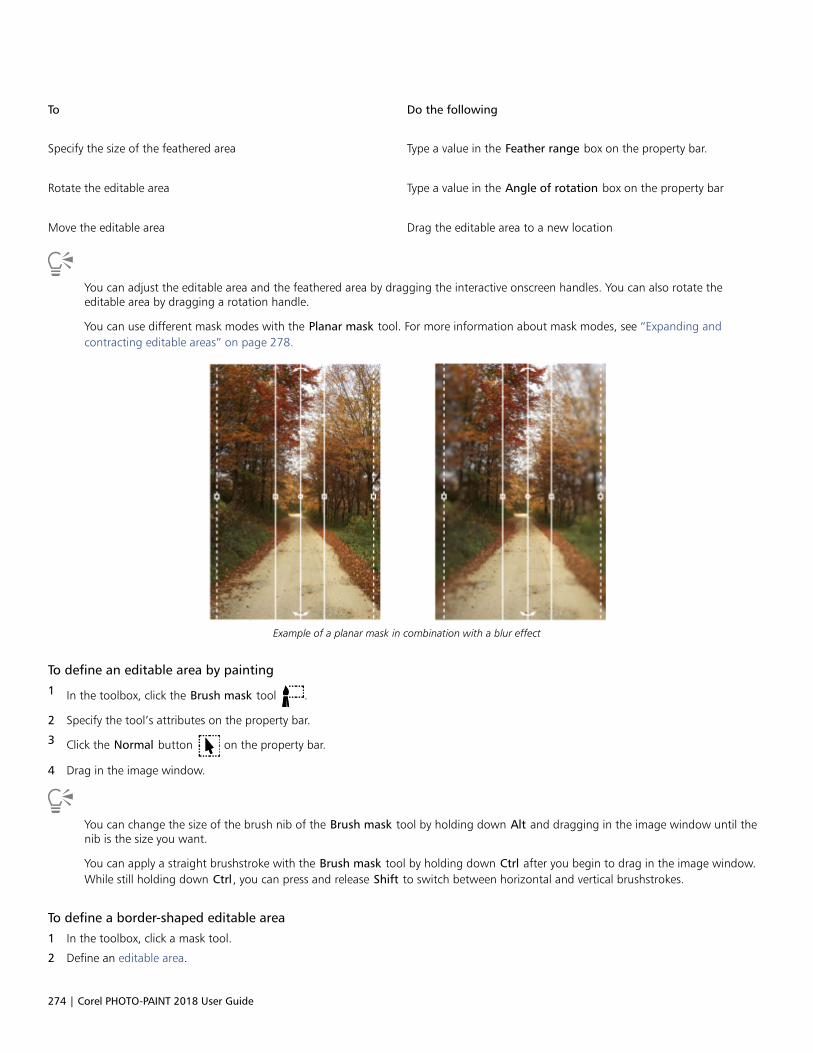
274 | Corel PHOTO-PAINT 2018 User Guide
To Do the following
Specify the size of the feathered area Type a value in the Feather range box on the property bar.
Rotate the editable area Type a value in the Angle of rotation box on the property bar
Move the editable area Drag the editable area to a new location
You can adjust the editable area and the feathered area by dragging the interactive onscreen handles. You can also rotate theeditable area by dragging a rotation handle.
You can use different mask modes with the Planar mask tool. For more information about mask modes, see “Expanding andcontracting editable areas” on page 278.
Example of a planar mask in combination with a blur effect
To define an editable area by painting
1 In the toolbox, click the Brush mask tool .
2 Specify the tool’s attributes on the property bar.
3 Click the Normal button on the property bar.
4 Drag in the image window.
You can change the size of the brush nib of the Brush mask tool by holding down Alt and dragging in the image window until thenib is the size you want.
You can apply a straight brushstroke with the Brush mask tool by holding down Ctrl after you begin to drag in the image window.While still holding down Ctrl, you can press and release Shift to switch between horizontal and vertical brushstrokes.
To define a border-shaped editable area
1 In the toolbox, click a mask tool.
2 Define an editable area.
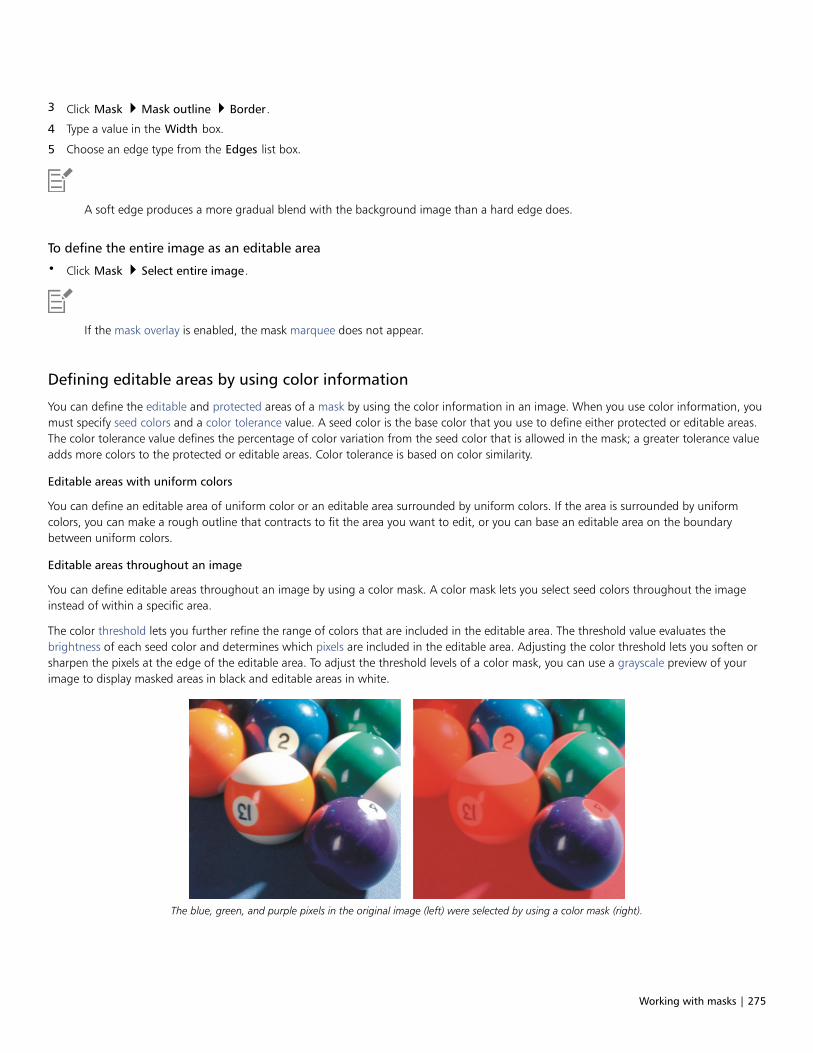
Working with masks | 275
3 Click Mask Mask outline Border.
4 Type a value in the Width box.
5 Choose an edge type from the Edges list box.
A soft edge produces a more gradual blend with the background image than a hard edge does.
To define the entire image as an editable area
• Click Mask Select entire image.
If the mask overlay is enabled, the mask marquee does not appear.
Defining editable areas by using color information
You can define the editable and protected areas of a mask by using the color information in an image. When you use color information, youmust specify seed colors and a color tolerance value. A seed color is the base color that you use to define either protected or editable areas.The color tolerance value defines the percentage of color variation from the seed color that is allowed in the mask; a greater tolerance valueadds more colors to the protected or editable areas. Color tolerance is based on color similarity.
Editable areas with uniform colors
You can define an editable area of uniform color or an editable area surrounded by uniform colors. If the area is surrounded by uniformcolors, you can make a rough outline that contracts to fit the area you want to edit, or you can base an editable area on the boundarybetween uniform colors.
Editable areas throughout an image
You can define editable areas throughout an image by using a color mask. A color mask lets you select seed colors throughout the imageinstead of within a specific area.
The color threshold lets you further refine the range of colors that are included in the editable area. The threshold value evaluates thebrightness of each seed color and determines which pixels are included in the editable area. Adjusting the color threshold lets you soften orsharpen the pixels at the edge of the editable area. To adjust the threshold levels of a color mask, you can use a grayscale preview of yourimage to display masked areas in black and editable areas in white.
The blue, green, and purple pixels in the original image (left) were selected by using a color mask (right).
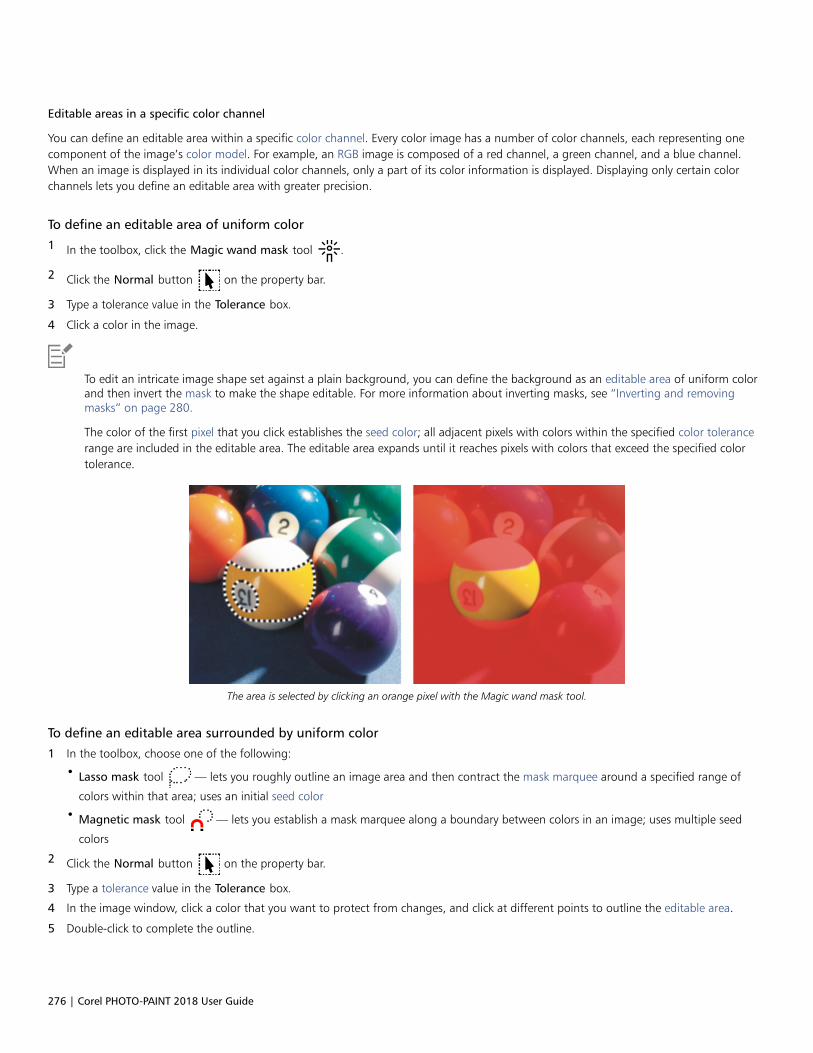
276 | Corel PHOTO-PAINT 2018 User Guide
Editable areas in a specific color channel
You can define an editable area within a specific color channel. Every color image has a number of color channels, each representing onecomponent of the image’s color model. For example, an RGB image is composed of a red channel, a green channel, and a blue channel.When an image is displayed in its individual color channels, only a part of its color information is displayed. Displaying only certain colorchannels lets you define an editable area with greater precision.
To define an editable area of uniform color
1 In the toolbox, click the Magic wand mask tool .
2 Click the Normal button on the property bar.
3 Type a tolerance value in the Tolerance box.
4 Click a color in the image.
To edit an intricate image shape set against a plain background, you can define the background as an editable area of uniform colorand then invert the mask to make the shape editable. For more information about inverting masks, see “Inverting and removingmasks” on page 280.
The color of the first pixel that you click establishes the seed color; all adjacent pixels with colors within the specified color tolerancerange are included in the editable area. The editable area expands until it reaches pixels with colors that exceed the specified colortolerance.
The area is selected by clicking an orange pixel with the Magic wand mask tool.
To define an editable area surrounded by uniform color
1 In the toolbox, choose one of the following:
• Lasso mask tool — lets you roughly outline an image area and then contract the mask marquee around a specified range of
colors within that area; uses an initial seed color
• Magnetic mask tool — lets you establish a mask marquee along a boundary between colors in an image; uses multiple seed
colors
2 Click the Normal button on the property bar.
3 Type a tolerance value in the Tolerance box.
4 In the image window, click a color that you want to protect from changes, and click at different points to outline the editable area.
5 Double-click to complete the outline.
Working with masks | 277
You can choose whether only the color of the first pixel or the color of every pixel you click establishes a seed color. The colortolerance range indicates the range of colors protected from changes. When the first pixel that you click establishes the seed color,the protected area expands until the specified color tolerance is reached. When you use the Lasso mask tool, the completed outlineof the editable area contracts from your original outline to fit the irregular shape produced by excluding all the pixels from theoriginal outline that fall within the specified color tolerance range. When you use the Magnetic mask tool, every pixel that you clickestablishes a seed color, so that each time you click, the protected area expands until the specified color tolerance is reached. Thecolor tolerance is measured in relation to the current seed color and within a specific area around the pointer.
You can also drag in the image window to outline in a freehand mode. When you use the Magnetic mask tool, click frequently to setmultiple seed colors and to establish multiple anchor points.
To define editable areas throughout an image
1 Click Mask Color mask.
2 Click the Normal mode button .
3 Choose Sampled colors from the top pop-up menu.
4 Click the Eyedropper tool , and click each seed color in the image window.
5 Click the Preview button .
6 From the list box beside the Preview button, choose one of the following options:
• Overlay — Protected areas are covered by a red-tinted transparent sheet.
• Grayscale — Protected areas appear in black, and editable areas appear in white.
• Black matte — Protected areas are covered by a black-tinted transparent sheet.
• White matte — Protected areas are covered by a white-tinted transparent sheet.
• Marquee — A dotted line appears around the editable area.
7 Click More, and enable one of the following options:
• Normal — determines the color tolerance based on color similarity between pixels
• HSB mode — determines the color tolerance based on similarity between hue, saturation, and brightness levels of pixels
8 In the box beside each seed color, specify the percentage of color variation permitted between pixels of that color and the remainingpixels.
9 In the Threshold area, move the Threshold slider and enable one of the following options:
• To black — All pixels with a brightness value above the threshold value are added to the protected area.
• To white — All pixels with a brightness value above the threshold value are added to the editable area.
If colors from a previous session appear in the Color mask dialog box, click Reset before you create a new color mask.
The Marquee display style is unavailable when the Show mask marquee command on the Mask menu is disabled.
You can set a default color tolerance for a color mask by clicking the flyout button and clicking Set tolerance default.
You can also specify predetermined seed colors by choosing a color preset, such as Greens, from the list box beside the Eyedroppertool.

278 | Corel PHOTO-PAINT 2018 User Guide
To define editable areas in specific color channels
1 In the Channels docker, click the Eye icon beside a color channel.
If the Channels docker is not open, click Window Dockers Channels.
2 In the toolbox, click one of the following:
• Lasso mask tool
• Magic wand mask tool
3 Define an area in the image.
Expanding and contracting editable areas
You can add parts to and remove parts from an editable area.
By default, each editable area that you define replaces the last one defined. However, you can use the following mask modes if you want toretain the current editable area but modify its shape:
Mode Description
Additive Lets you add areas to an editable area. Areas you add to theeditable area are removed from the protected areas.
Subtractive Lets you subtract areas from an editable area. Areas you subtractfrom the editable area are added to the protected area.
Overlap Lets you add areas to an already existing editable area, as long asthe new areas don’t overlap with the old ones. Any overlappingregions are excluded from the editable area and added to theprotected area. In addition to expanding or reducing an existingeditable area, this mask mode lets you define an editable area thathas no active mask.
A mask mode remains active until you change modes. The following examples illustrate the use of the different mask modes.
The Ellipse mask tool is used in the Normal mode. The entire ball is defined as an editable area in the resulting mask.
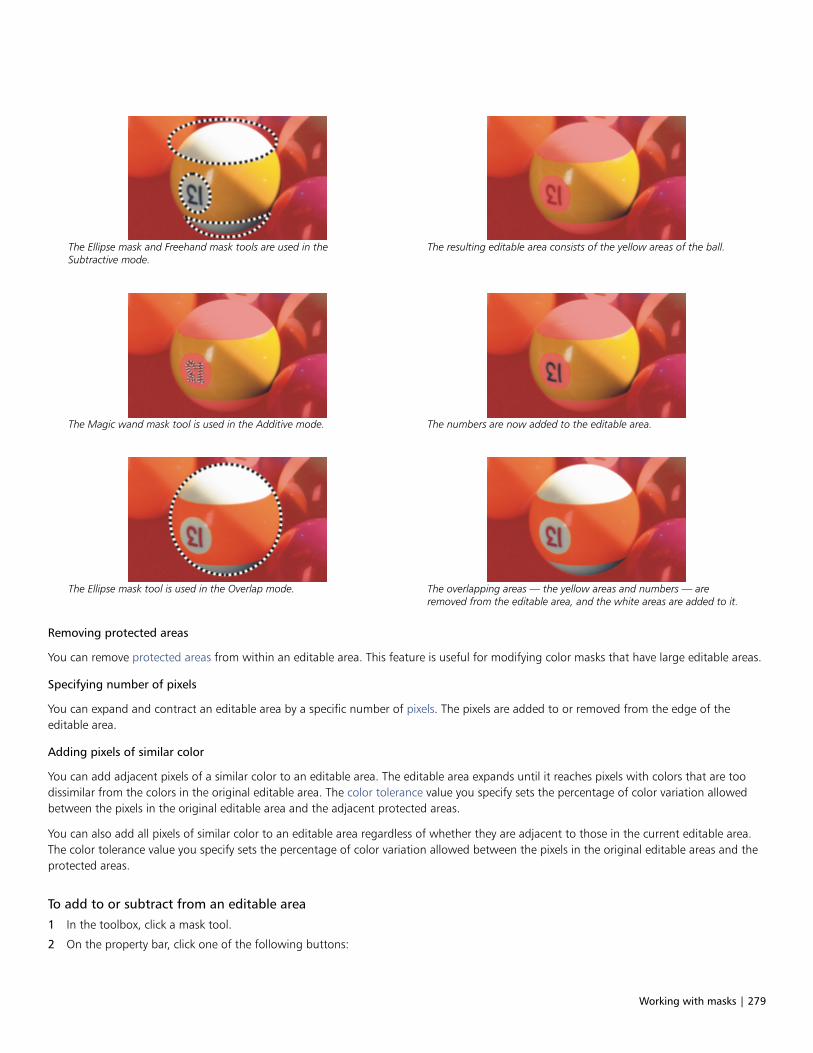
Working with masks | 279
The Ellipse mask and Freehand mask tools are used in theSubtractive mode.
The resulting editable area consists of the yellow areas of the ball.
The Magic wand mask tool is used in the Additive mode. The numbers are now added to the editable area.
The Ellipse mask tool is used in the Overlap mode. The overlapping areas — the yellow areas and numbers — areremoved from the editable area, and the white areas are added to it.
Removing protected areas
You can remove protected areas from within an editable area. This feature is useful for modifying color masks that have large editable areas.
Specifying number of pixels
You can expand and contract an editable area by a specific number of pixels. The pixels are added to or removed from the edge of theeditable area.
Adding pixels of similar color
You can add adjacent pixels of a similar color to an editable area. The editable area expands until it reaches pixels with colors that are toodissimilar from the colors in the original editable area. The color tolerance value you specify sets the percentage of color variation allowedbetween the pixels in the original editable area and the adjacent protected areas.
You can also add all pixels of similar color to an editable area regardless of whether they are adjacent to those in the current editable area.The color tolerance value you specify sets the percentage of color variation allowed between the pixels in the original editable areas and theprotected areas.
To add to or subtract from an editable area
1 In the toolbox, click a mask tool.
2 On the property bar, click one of the following buttons:
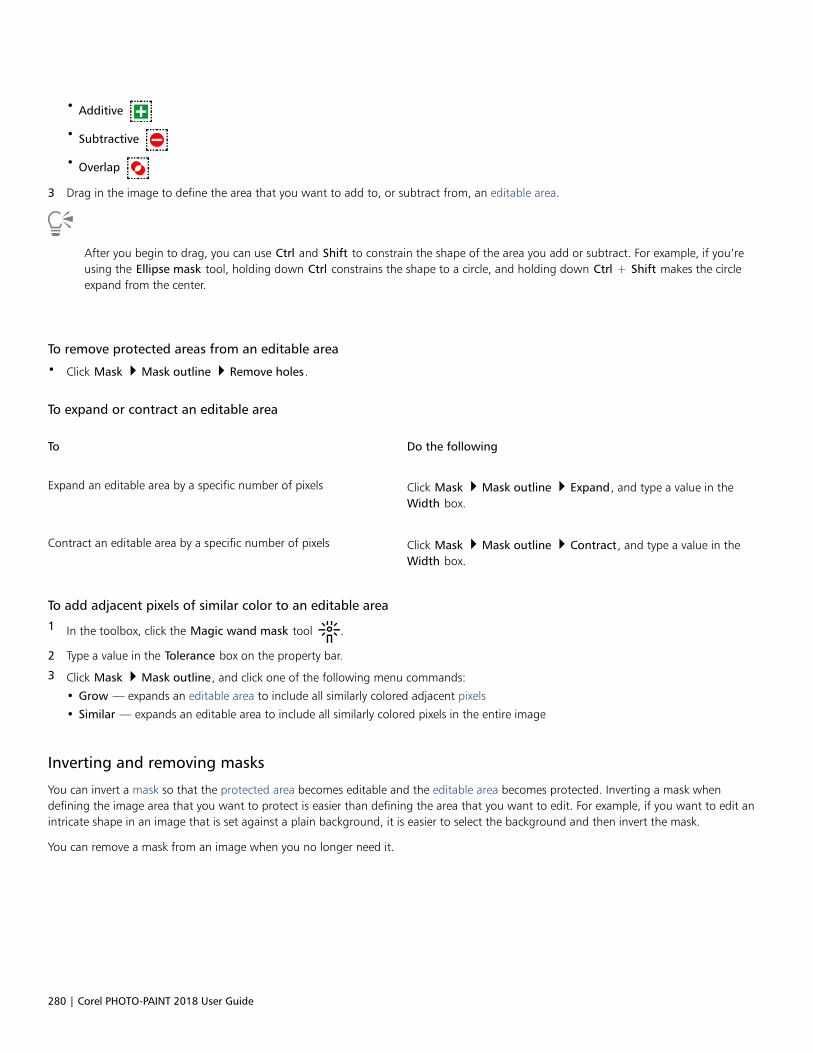
280 | Corel PHOTO-PAINT 2018 User Guide
• Additive
• Subtractive
• Overlap
3 Drag in the image to define the area that you want to add to, or subtract from, an editable area.
After you begin to drag, you can use Ctrl and Shift to constrain the shape of the area you add or subtract. For example, if you’reusing the Ellipse mask tool, holding down Ctrl constrains the shape to a circle, and holding down Ctrl + Shift makes the circleexpand from the center.
To remove protected areas from an editable area
• Click Mask Mask outline Remove holes.
To expand or contract an editable area
To Do the following
Expand an editable area by a specific number of pixels Click Mask Mask outline Expand, and type a value in theWidth box.
Contract an editable area by a specific number of pixels Click Mask Mask outline Contract, and type a value in theWidth box.
To add adjacent pixels of similar color to an editable area
1 In the toolbox, click the Magic wand mask tool .
2 Type a value in the Tolerance box on the property bar.
3 Click Mask Mask outline, and click one of the following menu commands:
• Grow — expands an editable area to include all similarly colored adjacent pixels
• Similar — expands an editable area to include all similarly colored pixels in the entire image
Inverting and removing masks
You can invert a mask so that the protected area becomes editable and the editable area becomes protected. Inverting a mask whendefining the image area that you want to protect is easier than defining the area that you want to edit. For example, if you want to edit anintricate shape in an image that is set against a plain background, it is easier to select the background and then invert the mask.
You can remove a mask from an image when you no longer need it.
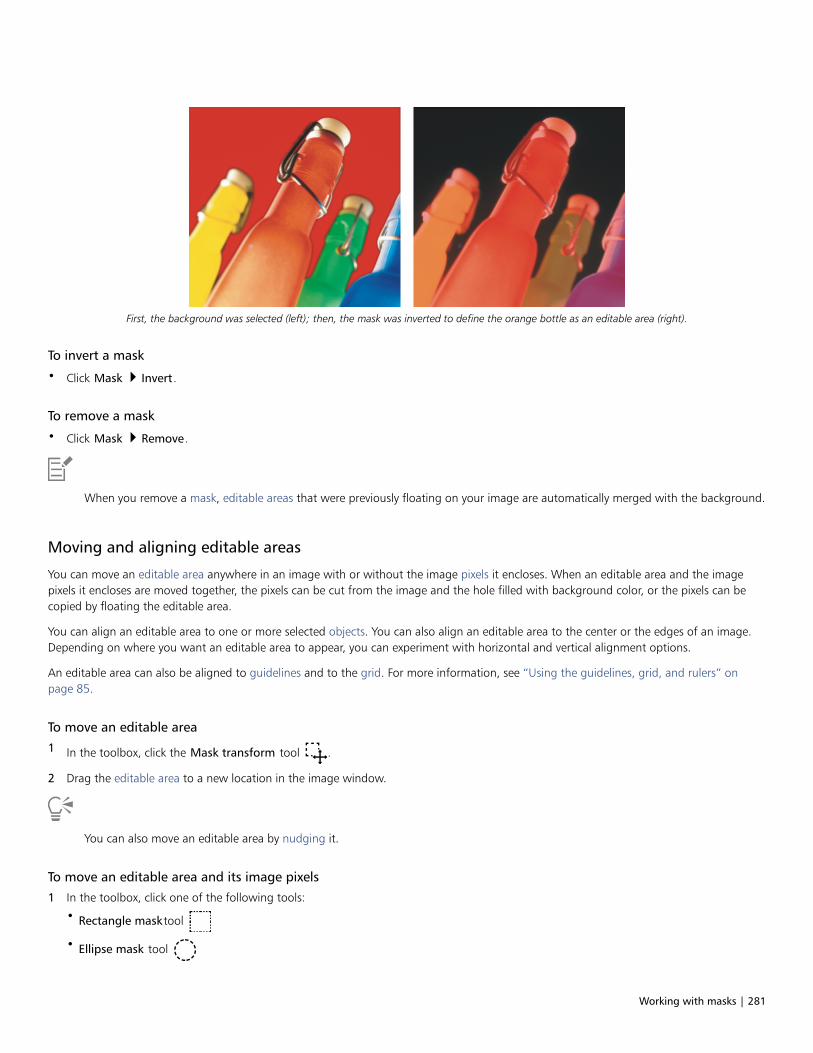
Working with masks | 281
First, the background was selected (left); then, the mask was inverted to define the orange bottle as an editable area (right).
To invert a mask
• Click Mask Invert.
To remove a mask
• Click Mask Remove.
When you remove a mask, editable areas that were previously floating on your image are automatically merged with the background.
Moving and aligning editable areas
You can move an editable area anywhere in an image with or without the image pixels it encloses. When an editable area and the imagepixels it encloses are moved together, the pixels can be cut from the image and the hole filled with background color, or the pixels can becopied by floating the editable area.
You can align an editable area to one or more selected objects. You can also align an editable area to the center or the edges of an image.Depending on where you want an editable area to appear, you can experiment with horizontal and vertical alignment options.
An editable area can also be aligned to guidelines and to the grid. For more information, see “Using the guidelines, grid, and rulers” onpage 85.
To move an editable area
1 In the toolbox, click the Mask transform tool .
2 Drag the editable area to a new location in the image window.
You can also move an editable area by nudging it.
To move an editable area and its image pixels
1 In the toolbox, click one of the following tools:
• Rectangle masktool
• Ellipse mask tool
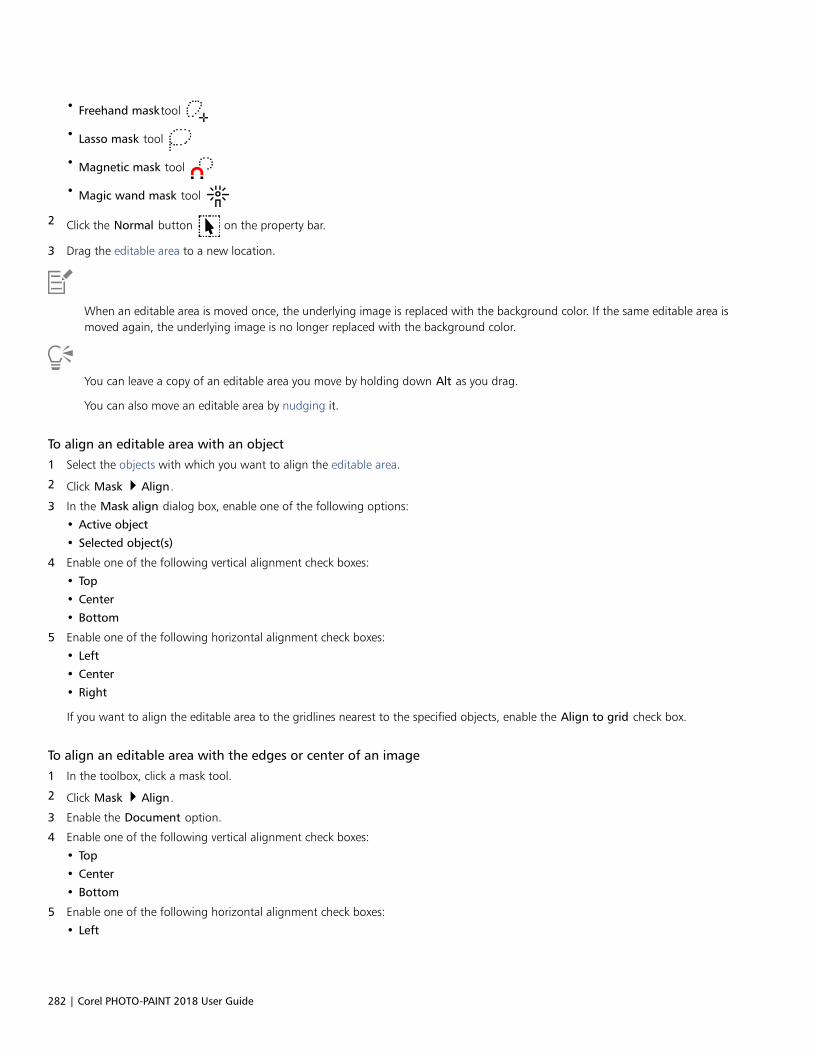
282 | Corel PHOTO-PAINT 2018 User Guide
• Freehand masktool
• Lasso mask tool
• Magnetic mask tool
• Magic wand mask tool
2 Click the Normal button on the property bar.
3 Drag the editable area to a new location.
When an editable area is moved once, the underlying image is replaced with the background color. If the same editable area ismoved again, the underlying image is no longer replaced with the background color.
You can leave a copy of an editable area you move by holding down Alt as you drag.
You can also move an editable area by nudging it.
To align an editable area with an object
1 Select the objects with which you want to align the editable area.
2 Click Mask Align.
3 In the Mask align dialog box, enable one of the following options:
• Active object
• Selected object(s)
4 Enable one of the following vertical alignment check boxes:
• Top
• Center
• Bottom
5 Enable one of the following horizontal alignment check boxes:
• Left
• Center
• Right
If you want to align the editable area to the gridlines nearest to the specified objects, enable the Align to grid check box.
To align an editable area with the edges or center of an image
1 In the toolbox, click a mask tool.
2 Click Mask Align.
3 Enable the Document option.
4 Enable one of the following vertical alignment check boxes:
• Top
• Center
• Bottom
5 Enable one of the following horizontal alignment check boxes:
• Left
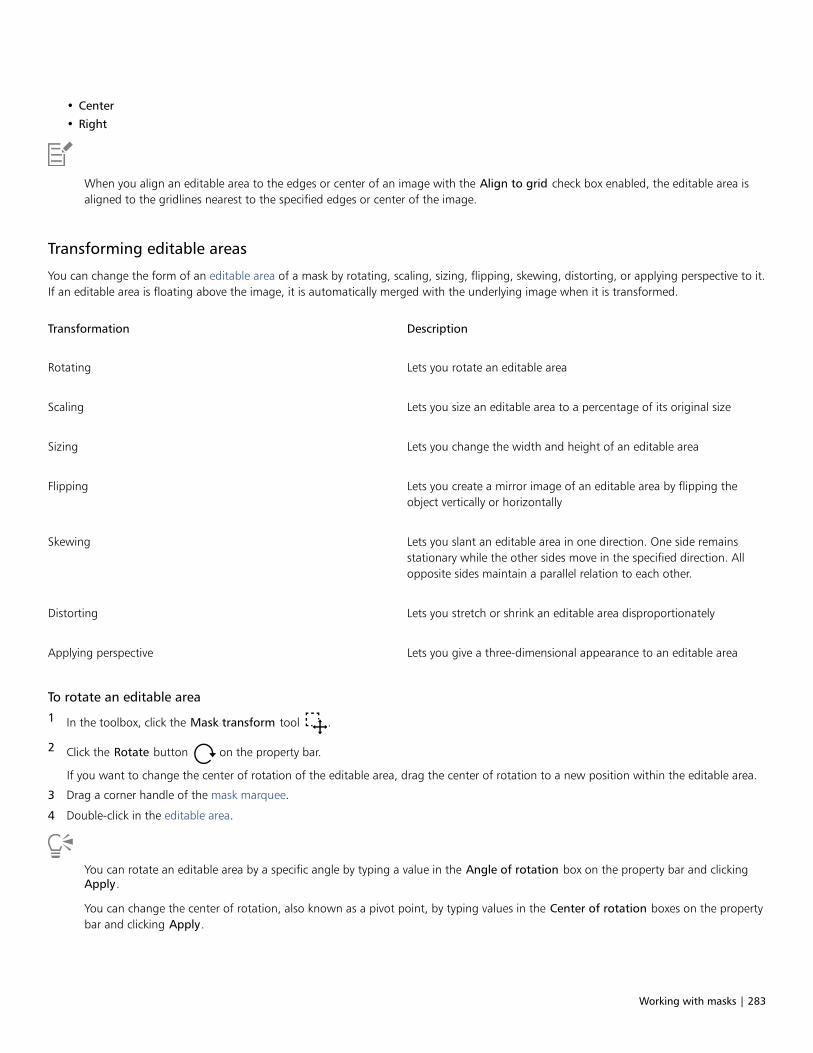
Working with masks | 283
• Center
• Right
When you align an editable area to the edges or center of an image with the Align to grid check box enabled, the editable area isaligned to the gridlines nearest to the specified edges or center of the image.
Transforming editable areas
You can change the form of an editable area of a mask by rotating, scaling, sizing, flipping, skewing, distorting, or applying perspective to it.If an editable area is floating above the image, it is automatically merged with the underlying image when it is transformed.
Transformation Description
Rotating Lets you rotate an editable area
Scaling Lets you size an editable area to a percentage of its original size
Sizing Lets you change the width and height of an editable area
Flipping Lets you create a mirror image of an editable area by flipping theobject vertically or horizontally
Skewing Lets you slant an editable area in one direction. One side remainsstationary while the other sides move in the specified direction. Allopposite sides maintain a parallel relation to each other.
Distorting Lets you stretch or shrink an editable area disproportionately
Applying perspective Lets you give a three-dimensional appearance to an editable area
To rotate an editable area
1 In the toolbox, click the Mask transform tool .
2 Click the Rotate button on the property bar.
If you want to change the center of rotation of the editable area, drag the center of rotation to a new position within the editable area.
3 Drag a corner handle of the mask marquee.
4 Double-click in the editable area.
You can rotate an editable area by a specific angle by typing a value in the Angle of rotation box on the property bar and clickingApply.
You can change the center of rotation, also known as a pivot point, by typing values in the Center of rotation boxes on the propertybar and clicking Apply.
284 | Corel PHOTO-PAINT 2018 User Guide
To scale an editable area
1 In the toolbox, click the Mask transform tool .
2 Click the Scale button on the property bar.
3 Drag a corner handle of the mask marquee.
4 Double-click in the editable area.
You can also
Scale an editable area with precision On the property bar, type percentage values in the Scale boxes andclick Apply.
Scale an editable area while preserving the ratio of width andheight
Click the Maintain ratio button on the property bar.
Scale an editable area from the center Hold down Shift as you drag a corner handle.
To size an editable area
1 In the toolbox, click the Mask transform tool .
2 Click the Position and size button on the property bar.
3 Drag a middle handle of the mask marquee.
If you want to size the editable area proportionally, drag a corner handle of the mask marquee.
4 Double-click in the editable area.
You can also
Size an editable area with precision On the property bar, type values in the Size boxes and click Apply.
Size an editable area from the center Hold down Shift as you drag a center transformation handle. Thechange in size occurs in two opposite directions.
Size an editable area in 100 percent increments Hold down Ctrl as you drag a transformation handle.
To flip an editable area
1 In the toolbox, click the Mask transform tool .
2 Click the Scale button on the property bar.
3 Drag a center handle of the mask marquee across the editable area and past the opposite center handle.
4 Double-click in the editable area.
You can flip an editable area symmetrically by holding down Ctrl and dragging a middle handle across the editable area and past theopposite middle handle.
Working with masks | 285
To skew an editable area
1 In the toolbox, click the Mask transform tool .
2 Click the Skew button on the property bar.
3 Drag a middle handle of the mask marquee.
4 Double-click in the editable area.
You can also skew an editable area by typing values in the Skew angle boxes on the property bar and clicking Apply.
Before applying the transformation, you can return an editable area to its original size by pressing Esc.
To distort an editable area
1 In the toolbox, click the Mask transform tool .
2 Click the Distort button on the property bar.
3 Drag a transformation handle of the mask marquee.
4 Double-click in the editable area.
You can also set the Mask transform tool to the Distort mode by clicking in the editable area until the handles you can use to distortthe editable area appear.
Before applying the transformation, you can return the editable area to its original size by pressing Esc.
To apply perspective to an editable area
1 In the toolbox, click the Mask transform tool .
2 Click the Perspective button on the property bar.
3 Drag a transformation handle of the mask marquee.
4 Double-click in the editable area.
You can also set the Mask transform tool to the Perspective mode by clicking in the editable area until the transformation handlesappear.
Before applying the transformation, you can return an editable area to its original size by pressing Esc.
Adjusting the edges of editable areas
You can customize the transition between a protected area and an editable area by adjusting the edges of these areas.
Preventing jagged edges
You can use anti-aliasing to avoid the appearance of jagged edges of editable areas that have curved and diagonal lines. Anti-aliasing makessome of the pixels located on the inside edge of an editable area semitransparent, creating a smoother outline.

286 | Corel PHOTO-PAINT 2018 User Guide
Feathering
Feathering gradually increases the transparency of the pixels along the edge of an editable area to soften the edge between the protectedand editable areas. You can specify the width of the feathered area as well as the feathering direction, which determines where thefeathering is located relative to the mask marquee. From the mask marquee, the feathering direction can go into the protected areas, intothe editable areas, or into both areas for an equal distance.
Left to right: Before and after feathering the edges of an editable area
Applying a sharp edge
You can remove the feathering from the edges of an editable area and create a new, sharper edge by setting a threshold value. Pixels in thefeathered editable area have a grayscale value ranging from 0 (black and fully protected) to 255 (white and fully editable). The thresholdvalue you specify determines where along the feathered edge you want the new, unfeathered edge to be created. For example, if you set athreshold value of 110, all pixels within the editable area that have a grayscale value of less than 110 are protected, and all pixels within thearea that have a grayscale value of more than 110 are editable.
Smoothing
You can smooth the edges of an editable area to remove sharp angles. Smoothing averages the grayscale values of a specified number ofpixels at the edge of an editable area. For example, if you specify 10 as the radius value, 10 pixels to the left and 10 pixels to the right of theedge are checked. If the editable pixels outnumber the protected pixels, the editable area is expanded; if the protected pixels outnumber theeditable pixels, the protected area is expanded.
Smoothing is useful when you work with complex color masks. For example, when you smooth the edges of an editable area, protectedareas that are isolated within the editable areas are often removed.
Applying color or a paint effect
You can apply color or a paint effect along the edges of an editable area to emphasize or blend the boundary between the editable andprotected areas. You can also reapply color or a paint effect along the edges of an editable area. Repeating a brushstroke lets you enhancethe effect.
To prevent jagged edges in an editable area
1 In the toolbox, click a mask tool.
2 Click the Anti-aliasing button on the property bar.
Anti-aliasing is enabled by default when you use the Ellipse, Freehand, Lasso, and Magic wand tools to define an editable area.
Anti-aliasing is not available for the Rectangle mask tool.
Working with masks | 287
To feather the edges of an editable area
1 Click Mask Mask outline Feather.
2 Type a value in the Width box.
3 From the Direction list box, choose one of the following:
• Inside — feathers in from the edge of the editable area and appears to blend the protected area into the editable area
• Outside — feathers out from the edge of the editable area and blends the editable area so that it appears to overlap the protectedarea
• Middle — places an equal number of feathered pixels on the inside and outside of the edge of the editable area
• Average — samples all the pixels in the area you specified in the Width box and assigns an average color value to each
4 Choose an edge type from the Edges list box.
If you want to preview the results, click Preview .
You can also feather the edges of an editable area by clicking the Feather mask button on the property bar.
To apply a sharp edge to a feathered editable area
1 Click Mask Mask outline Threshold.
2 Type a value in the Level box.
To smooth the edges of an editable area
1 Click Mask Mask outline Smooth.
2 Type a value in the Radius box.
To apply color or an effect along the edges of an editable area
1 Click one of the following:
• Paint tool
• Effect tool
• Image Sprayer tool
• Eraser tool
• Replace color brush tool
2 Set the tool’s attributes on the property bar.
3 Click Mask Create Brushstroke from mask.
4 Choose one of the following positions:
• Middle of mask border — centers the stroke on the edge of the editable area
• Inside of mask — places the stroke inside the edge of the editable area
• Outside of mask — places the stroke outside the edge of the editable area.
288 | Corel PHOTO-PAINT 2018 User Guide
You can reapply color or an effect along the edges of an editable area by clicking Edit Repeat brushstroke, and clicking the Repeat
stroke on mask button in the Repeat stroke dialog box.
Adjusting the transparency of masks
You can adjust the transparency of a mask to control the extent to which pixels in the image are protected from changes. When youadjust the transparency of a mask, you use a grayscale representation of the mask. Any color that you apply to the image appears in itscorresponding shade of gray; therefore, the darker the shade that is applied to the mask, the less the color and effects can change theimage. For example, if you use a brush to apply a color with a grayscale value of 127 (the midpoint of the 256 shades of gray) to an imagearea, this area receives only 50 percent of any effect that is later applied to it.
Because you are editing a grayscale representation of the mask, you can use a color, object, effect, or another mask to modify thetransparency of the mask. You can also change the transparency of the mask by pasting images from the Clipboard; the grayscale values ofthe pasted images are applied to the mask.
To adjust the transparency of a mask
1 Click Mask Paint on mask.
2 Apply a color, mask, object, or effect to the areas in which you want to change the transparency of the mask.
3 Click Mask Paint on mask.
The darker the shade of gray applied, the less editable the underlying pixels become.
Cutting out images
The Cutout Lab lets you cut out image areas from the surrounding background. This feature allows you to isolate image areas and preserveedge detail, such as hair or blurred edges.
To cut out an image area, you draw a highlight over its edges and then apply a fill to define the inside of the area. To evaluate the results,you can preview the cutout with the background removed or against a background of gray, white, or black. You can also preview the cutoutwith the original image showing underneath and with the highlight and fill displayed. If necessary, you can touch up the cutout by addingor removing detail along its edges.
If you make a mistake, you can erase and redo sections of the highlighted and filled area, undo or redo an action, or revert to the originalimage.
By default, the cutout is placed as an object in the image window and the original image is removed. You can also choose to keep both thecutout and the original image, or create a clip mask from the cutout.

Working with masks | 289
Cutout Lab workflow: (1) Highlight the edges of the image area; (2) Add a fill to the inside. (3) Preview the cutout and touchit up if needed. (4) Bring the cutout into the image window. (5 — optional) Place the cutout against a background image.
You can set options for some of the tools in the Cutout Lab. For example, you can customize the thickness of the highlight by changing thenib size of the Highlighter tool. If an image area has hard edges, you can use a thinner line to define its edges more precisely. Conversely, ifan image area has blurred or wispy edges that are hard to define, you can use a thicker line. Also, you can change the highlight and the fillcolor to make them more visible.
You can also zoom in to get a closer look at image detail or zoom out to view a larger area of the image. You can pan to view image areasthat fall outside the preview window.
To cut out an image area
1 Click Image Cutout Lab.
2 Click the Highlighter tool .
3 In the preview window, draw a line along the edges of the image area that you want to cut out.
The line should slightly overlap the surrounding background.
4 Click the Inside fill tool , and click inside the area you want to cut out.
5 Click Preview.
If you want to touch up the cutout, click the Add detail or Remove detail tool, and drag over an edge.
6 From the Cutout results area, choose any of the following options:
• Cutout — creates an object from the cutout and discards the original image
• Cutout and original image — creates an object from the cutout and preserves the original image
• Cutout as clip mask — creates a clip mask from the cutout and attaches the clip mask to the original image. A clip mask is a maskthat is attached to an object and lets you change the transparency of an object without permanently affecting it. If you created acutout from a background image, the background is converted to an object.
290 | Corel PHOTO-PAINT 2018 User Guide
You can also
Erase the highlight and fill Click the Eraser tool , and drag over the highlight and fill that
you want to delete. The Eraser tool is available before you clickPreview.
Undo or redo an action Click the Undo or Redo button.
Revert to the original image Click Reset.
Set preview options In the Preview settings area, enable any of the following checkboxes:
•Show highlight — displays the highlight around the cutout•Show fill — displays the fill inside the cutout•Show original image — displays the original image underneath
the cutout
From the Background list box, choose any of the followingoptions:
•None — displays the cutout against a black-and-white checkeredpattern. If the Show original image check box is enabled, theremoved areas appear under a semitransparent black-and-whitecheckered pattern.
•Grayscale — displays the cutout against a gray background. Ifthe Show original image check box is enabled, the removedareas are tinted gray.
•Black matte — displays the cutout against a black background.If the Show original image check box is enabled, the removedareas are tinted black.
•White matte — displays the cutout against a white background.If the Show original image check box is enabled, the removedareas are tinted white.
The Cutout Lab supports RGB, CMYK, grayscale, paletted, and Lab images. When brought into the Cutout Lab, grayscale, paletted,and Lab images are automatically converted to RGB or CMYK images, which may result in a slight color shift. The original imagecolors are restored after you apply or cancel the Cutout Lab command.
You can switch from the Highlighter to the Eraser tool, and from the Eraser to the Highlighter tool by right-clicking and dragging inthe preview window.
You can switch from the Add detail to the Remove detail tool, and from the Remove detail to the Add detail tool by right-clickingand dragging in the preview window.
To set tool options in the Cutout Lab
1 Click Image Cutout Lab.
2 Perform a task from the following table.
Working with masks | 291
To Do the following
Set the nib size of the Highlighter, Eraser, Add detail, andRemove detail tools
Choose a nib size from the Nib size list box.
Change the highlight color Choose a highlight color from the Highlight color picker.
Change the fill color Choose a fill color from the Fill color picker.
You can change the nib size of the Highlighter, Eraser, Add detail, and Remove detail tools interactively by holding down Shiftwhile dragging a tool.
To view an image in the Cutout Lab
1 Click Image Cutout Lab.
2 Perform a task from the following table.
To Do the following
Zoom in and out Using the Zoom in or Zoom out tool , click in the
preview window.
Display an image at its actual size Click the 100% button.
Fit an image in the preview window Click the Zoom to fit button.
Pan to another area of an image Using the Pan tool , drag the image until the area you want to
see is visible.

292 | Corel PHOTO-PAINT 2018 User Guide

Using paths to define image areas | 293
Using paths to define image areas
Paths let you create precise, curved lines or outlined shapes in an image. You can use paths to edit a mask, apply text or brushstrokes, orexport irregularly shaped images contained within the path.
This section contains the following topics:• “Creating paths” (page 293)• “Managing paths” (page 295)• “Shaping paths” (page 297)• “Adding and deleting path nodes” (page 299)• “Joining and breaking paths” (page 300)• “Changing node types” (page 300)• “Applying brushstrokes to paths” (page 302)• “Working with clipping paths” (page 303)
Creating paths
Paths are line and curve segments connected by square endpoints called nodes. You can create paths from scratch, from a mask, or byduplicating an existing path. You can create more than one path on an image, but only one path is displayed on the image at a time.
Drawing paths
You can create Bézier paths and freehand paths. When you draw a path from scratch, the first path is Path 1, and subsequent paths areincrementally numbered.
You can create a Bézier path by placing nodes on an image. Straight or curved line segments join the nodes. Control points indicate thedirection of the curve segment and its angle relative to the node. After you draw the path, you can edit the shape more precisely. For moreinformation about shaping the path, see “Shaping paths” on page 297.
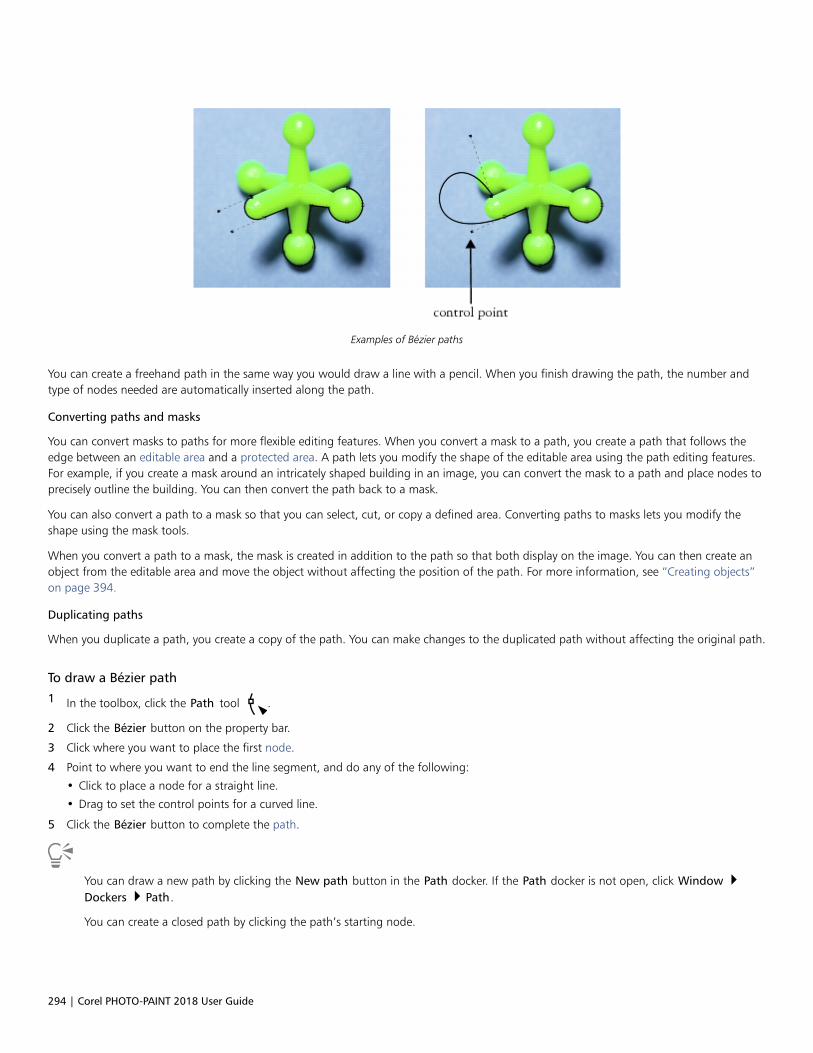
294 | Corel PHOTO-PAINT 2018 User Guide
Examples of Bézier paths
You can create a freehand path in the same way you would draw a line with a pencil. When you finish drawing the path, the number andtype of nodes needed are automatically inserted along the path.
Converting paths and masks
You can convert masks to paths for more flexible editing features. When you convert a mask to a path, you create a path that follows theedge between an editable area and a protected area. A path lets you modify the shape of the editable area using the path editing features.For example, if you create a mask around an intricately shaped building in an image, you can convert the mask to a path and place nodes toprecisely outline the building. You can then convert the path back to a mask.
You can also convert a path to a mask so that you can select, cut, or copy a defined area. Converting paths to masks lets you modify theshape using the mask tools.
When you convert a path to a mask, the mask is created in addition to the path so that both display on the image. You can then create anobject from the editable area and move the object without affecting the position of the path. For more information, see “Creating objects”on page 394.
Duplicating paths
When you duplicate a path, you create a copy of the path. You can make changes to the duplicated path without affecting the original path.
To draw a Bézier path
1 In the toolbox, click the Path tool .
2 Click the Bézier button on the property bar.
3 Click where you want to place the first node.
4 Point to where you want to end the line segment, and do any of the following:
• Click to place a node for a straight line.
• Drag to set the control points for a curved line.
5 Click the Bézier button to complete the path.
You can draw a new path by clicking the New path button in the Path docker. If the Path docker is not open, click Window Dockers Path.
You can create a closed path by clicking the path’s starting node.
Using paths to define image areas | 295
To draw a freehand path
1 In the toolbox, click the Path tool .
2 Click the Freehand button on the property bar.
3 Drag in the image window to draw the path.
You can draw a new path by clicking the New path button in the Path docker. If the Path docker is not open, click Window Dockers Path.
To convert a mask to a path
1 Define an editable area.
2 Click Mask Create Path from mask.
3 Move the Smoothing slider.
Lower values tend to create more nodes for more precise editing, while higher values tend to create fewer nodes for a smoother path.
To convert a path to a mask
• Click Mask Create Mask from path.
When you convert an open path to a mask, the start and end nodes are connected automatically.
If you have more than one path, select the one you want to convert by clicking the path thumbnail in the Path docker. If the Path
docker is not open, click Window Dockers Path.
To duplicate a path
1 Click a path in the Path docker.
If the Path docker is not open, click Window Dockers Path.
2 Click the flyout button in the Path docker, and click Duplicate.
The duplicate path is listed in the Path docker with the word “Copy.”
Managing paths
Saving, exporting and deleting paths
You can save one or more paths with an image when you save the image to the Corel PHOTO-PAINT (CPT) file format. You can also exportpaths for use in other applications, such as CorelDRAW (CDR) or Adobe Illustrator (AI). If you want to use a path in other Corel PHOTO-PAINT images, you must export the path to the Corel Presentation Exchange (CMX) file format. You can delete a path at any time.
296 | Corel PHOTO-PAINT 2018 User Guide
Importing paths and vector graphics
You can import a path into a Corel PHOTO-PAINT image. You can open more than one path and switch between them in the image window.Corel PHOTO-PAINT also lets you import vector graphics from other drawing applications. When vector graphics are converted to paths, eachpoint on the vector is converted to a node. To import text from CorelDRAW, you must first convert the text to curves.
Viewing a path
By default, a path displays in black. You can hide a path when you are working on an image, or you can change the default color of the pathto make it more visible.
To save a path with an image
1 Click File Save as.
2 Choose the folder where you want to save the file.
3 Type a name for the image in the File name box.
4 Choose Corel PHOTO-PAINT image from the Save as type list box.
You must export a path if you want to use it in other Corel PHOTO-PAINT images or other applications. For information aboutexporting paths, see “To export a path” on page 296.
To export a path
1 Click a path in the Path docker.
If the Path docker is not open, click Window Dockers Path.
2 Click the flyout button in the Path docker, and click Export path.
3 Choose the folder where you want to save the path.
4 Type a filename in the File name box.
5 Choose a file type from the Save as type list box.
To delete a path
1 Click a path in the Path docker.
If the Path docker is not open, click Window Dockers Path.
2 Click the Delete current path button in the Path docker.
To import a path or vector graphic
1 Click the flyout button in the Path docker, and click Import path.
If the Path docker is not open, click Window Dockers Path.
2 Choose the folder where the path or vector graphic is stored.
3 Double-click the filename.
Large, complex vector images are not suitable for importing as paths, because they contain too many nodes.
Using paths to define image areas | 297
To hide a path
• Click the Show/hide path button in the Path docker.
If the Path docker is not open, click Window Dockers Path.
To change the default path color
1 Click Tools Options.
2 In the Workspace list of categories, click Display.
3 Open the Path color picker, and click a color.
Shaping paths
You can change the shape of a path by selecting and moving its nodes, segments, or control points.
Selecting nodes
You must select a node before you can move it to another location, delete it, or drag its associated control points. Selecting several nodeslets you perform the same operation simultaneously on one or more path segments.
Moving path segments
You can move path segments by dragging nodes. When you drag a single node, the segments attached to it move with the node andremain connected. When you drag two or more adjacent nodes, the path segments between the nodes retain their form and move with thenodes.
Rotating and skewing path segments
Rotating paths lets you turn them around a pivot point, called the center of rotation, whereas skewing paths lets you slant them to one sidewhile the opposite side remains stationary.
Sizing path segments
You can change the length or width of the path segments that you select, and you can scale selected path segments. When you scale pathsegments, they can either keep their proportion or become distorted as you size the path.
Reshaping a curve segment by using control points
When you select a single node on a curve segment, two control points extend from it in opposite directions. You can change the shape ofa curve by repositioning the control points. You may need to change the node type to achieve the shape you want. For more informationabout node types, see “Changing node types” on page 300.
To select a path node
1 In the toolbox, click the Path tool .
2 Click the Shape button on the property bar.
3 Click a node.
You can also
Select multiple nodes Hold down Shift, and click the nodes you want to select.
Select all nodes Hold down Ctrl + Shift, and click a node.
298 | Corel PHOTO-PAINT 2018 User Guide
You can also select multiple nodes by clicking the Shape button and marquee selecting a group of nodes.
You can deselect a node by holding down Shift and clicking a node.
To move a path segment
1 In the toolbox, click the Path tool .
2 Click the Shape button on the property bar.
3 Select the nodes on a path segment.
4 Drag the nodes to a new location.
You can move path segments in precise increments by pressing an Arrow key to move the selected nodes the nudge distance, or byholding down Shift and pressing an Arrow key to move the selected nodes the super nudge distance.
To rotate a path segment
1 In the toolbox, click the Path tool .
2 Click the Shape button on the property bar.
3 Select the nodes on a path segment.
4 Click Object Edit Path Rotate and skew nodes.
5 Drag a rotation handle.
You can also drag the center of rotation to a new location.
To skew a path segment
1 In the toolbox, click the Path tool .
2 Click the Shape button on the property bar.
3 Select the nodes on a path segment.
4 Click Object Edit path Rotate and skew nodes.
5 Drag a skewing handle.
To size a path segment
1 In the toolbox, click the Path tool .
2 Click the Shape button on the property bar.
3 Select the nodes on a path segment.
4 Click Object Edit path Stretch and scale nodes.
5 On the highlighting box, drag any of the following handles:
• side selection handles — stretch the selected path segments
• corner selection handles — scale the selected path segments
Using paths to define image areas | 299
You can also size path segments by clicking the Elastic mode button on the property bar.
To shape a curve using the control points
1 In the toolbox, click the Path tool .
2 Click the Shape button on the property bar.
3 Select a curve node.
4 Drag the control points.
Adding and deleting path nodes
Increasing or decreasing the number of nodes on a path lets you change the shape of the line and curve segments with greater control.
Adding and deleting nodes
You can add nodes to a path if the existing segments, nodes, and control points do not let you shape a path the way you want. You can addone node at a time or several at once. When you add a node, you can choose where it displays on the line segment.
When you delete nodes, the shape of the path can change, depending on the position of the nodes that are removed.
Smoothing paths
Paths you create from masks or draw freehand style can contain more nodes than required to maintain their shape. These extra nodes cangive paths a rough appearance. You can smooth the path by removing the extra nodes from the entire path or from a section of the path.
To add a node to a path
1 In the toolbox, click the Path tool .
2 Click the Shape button on the property bar.
3 Click where you want to add a node on the path.
4 On the property bar, click the Add node button .
You can add a node at the midpoint of a path segment by selecting a node and clicking the Add node button on the property bar.The node is added between the selected node and the node that precedes it in the path.
You can also add a node by double-clicking where you want to add the node to a path segment.
To delete a node from a path
1 In the toolbox, click the Path tool .
2 Click the Shape button on the property bar.
3 Select a node.
4 On the property bar, click the Delete node button .
You can also delete a node by double-clicking it.
300 | Corel PHOTO-PAINT 2018 User Guide
To smooth a path
1 In the toolbox, click the Path tool .
2 Click the Shape button on the property bar.
3 Select an area of a path.
4 On the property bar, type a value in the Smoothing box.
You can enter values from 1 to 100. Lower values remove some nodes that are not necessary to maintain the shape of the path. Highervalues remove more nodes, while still preserving the path shape.
Joining and breaking paths
You can join or break path segments to create open or closed paths on an image. Because nodes act as connective joints for a path, you canjoin or break segments only at a node. If a node does not exist at the point where you want to break segments, you must add a node at thatpoint.
You can join two nodes in a path if they are at the end of open segments. For example, if you want to close an open path, you can join thestart and end nodes. You can also join subpaths.
If you want to open a closed path or create subpaths, you can break the connection between two nodes. When you break a path, newnodes are added to the ends of the disconnected segments, creating two subpaths.
To join path nodes
1 In the toolbox, click the Path tool .
2 Click the Shape button on the property bar.
3 Select two nodes positioned at the open end of path segments or subpaths.
4 On the property bar, click the Join nodes button .
When you join two nodes that are far apart, they join in the middle of their original positions.
To break a path
1 In the toolbox, click the Path tool .
2 Click the Shape button on the property bar.
3 Select a node.
4 On the property bar, click the Break node button .
5 Drag the node away from the path.
Changing node types
When you change a node type, you change the way segments attached to the node behave. While a new node type may not immediatelyaffect a path’s shape, it will change the shape when you move the control points to modify the path.
By changing the node type, you can change a line segment to a curve segment or change a curve segment to a line segment. When youchange a line segment to a curve segment, you must select the nodes at either end of the segment to view the curve’s control points.
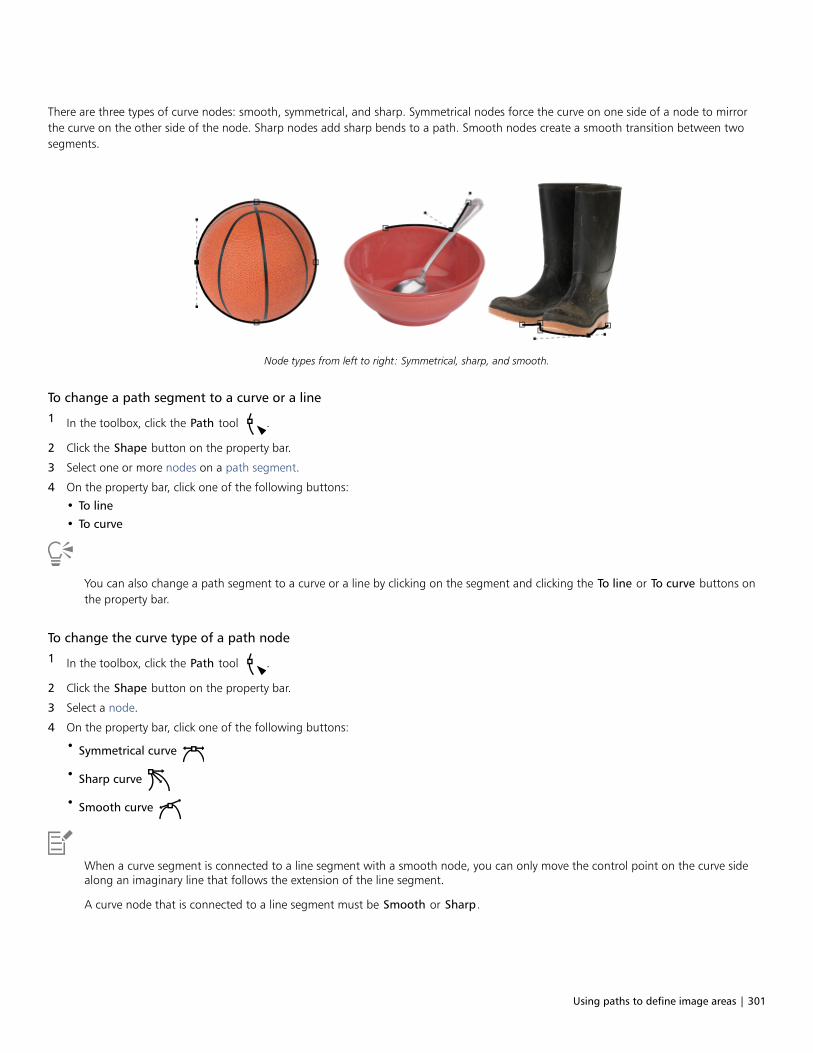
Using paths to define image areas | 301
There are three types of curve nodes: smooth, symmetrical, and sharp. Symmetrical nodes force the curve on one side of a node to mirrorthe curve on the other side of the node. Sharp nodes add sharp bends to a path. Smooth nodes create a smooth transition between twosegments.
Node types from left to right: Symmetrical, sharp, and smooth.
To change a path segment to a curve or a line
1 In the toolbox, click the Path tool .
2 Click the Shape button on the property bar.
3 Select one or more nodes on a path segment.
4 On the property bar, click one of the following buttons:
• To line
• To curve
You can also change a path segment to a curve or a line by clicking on the segment and clicking the To line or To curve buttons onthe property bar.
To change the curve type of a path node
1 In the toolbox, click the Path tool .
2 Click the Shape button on the property bar.
3 Select a node.
4 On the property bar, click one of the following buttons:
• Symmetrical curve
• Sharp curve
• Smooth curve
When a curve segment is connected to a line segment with a smooth node, you can only move the control point on the curve sidealong an imaginary line that follows the extension of the line segment.
A curve node that is connected to a line segment must be Smooth or Sharp.
302 | Corel PHOTO-PAINT 2018 User Guide
Applying brushstrokes to paths
You can paint along a path to apply precise brushstrokes to an image. For information about applying brushstrokes, see “Drawing andpainting” on page 313.
You can also repeat a saved brushstroke along a path. You can edit the saved brushstroke to create new effects by adjusting the size,number, angle, and color of the brushstroke.
To apply a brushstroke along a path
1 In the toolbox, click the Path tool .
2 Select a path.
3 Click one of the following:
• Paint tool
• Effect tool
• Clone tool
• Image sprayer tool
• Eraser tool
• Replace color brush tool
4 On the property bar, set any attributes for the tool.
5 Click Object Edit path Brushstroke from path.
If you want to reapply the brushstroke, click Edit Repeat brushstroke.
You can reverse the direction of a stroke by clicking Object Edit path Reverse brushstroke from path.
You can paint along a specific part of a path by selecting the area with a mask tool. For information on masking, see “Working withmasks” on page 269.
To repeat a saved brushstroke along a path
1 Click one of the following:
• Paint tool
• Effect tool
• Clone tool
• Image sprayer tool
• Eraser tool
• Replace color brush tool
2 On the property bar, set the attributes for the tool.
3 Click Edit Repeat brushstroke.
4 In the Repeat stroke dialog box, choose a stroke from the Stroke list box.
Using paths to define image areas | 303
5 Modify any attributes.
6 Click the Repeat stroke along path button .
You can load a path for the brushstroke by clicking the flyout button above the Stroke list box, and clicking Load path as stroke.Choose the folder where the path file is stored and double-click the filename before modifying the attributes in the Repeat strokedialog box.
Working with clipping paths
Clipping paths let you create non-rectangular images by outlining the area selected by a path, and making the rest of the image transparentwhen the image is viewed in another application. For example, if you have a Corel PHOTO-PAINT image of a vase on a table, you can createa clipping path around the vase and export the vase image area to another application. If you do not use a clipping path, the entire image isencased in a square or rectangular frame, losing the shape of the vase area.
To send a clipping path to another application, you must export the contents of the path as an encapsulated PostScript (EPS) file.
To create a clipping path
1 Create a path around an image area.
2 Click the flyout button in the Path docker, and click Set as clipping path.
If the Path docker is not open, click Window Dockers Path.
A clipping path icon displays beside the path filename in the Path docker.
To save a clipping path as an EPS file
1 Click File Save as.
2 Choose the folder where you want to save the clipping path.
3 Type a filename in the File name box.
4 Choose Encapsulated PostScript from the Save as type list box.
5 Click Save.
The EPS Export dialog box opens.
6 In the Clipping area, enable the Clip to check box.
7 Enable the Clipping path option.
8 Type a value in the Flatness box.
9 Enable the Crop image to clipping region check box.
You can save an entire image with a path by disabling the Crop image to clipping region check box. However, only the selectioninside the clipping path is printed on a PostScript printer.

304 | Corel PHOTO-PAINT 2018 User Guide
Managing multiple masks with alpha channels | 305
Managing multiple masks with alpha channels
You can use alpha channels to work with multiple masks in a single image. Since only one mask can be applied to an image at a time,storing masks in alpha channels lets you edit an image with one mask and then load another mask to edit the image further.
This section contains the following topics:• “Creating and editing alpha channels” (page 305)• “Saving masks and alpha channels” (page 306)• “Loading masks and alpha channels” (page 307)• “Managing alpha channels” (page 308)
Creating and editing alpha channels
When you create a mask in the Corel PHOTO-PAINT application, it appears in a new channel as the current mask. Each new mask you createreplaces the current mask. However, you can create alpha channels to store multiple masks in an image. You can create an alpha channelfrom the current mask to copy the current mask’s editable and protected areas, or you can create a blank alpha channel. A blank alphachannel is uniformly opaque and, therefore, contains no editable areas.
You can edit the mask stored in an alpha channel by adding the current mask to an alpha channel. This adds the editable areas of thecurrent mask to that alpha channel, thereby expanding the editable area in the alpha channel.
You can also edit the mask stored in an alpha channel in many of the same ways you edit a mask in the Paint on mask mode. Forinformation about editing a mask in the Paint on mask mode, see “Adjusting the transparency of masks” on page 288.
An alpha channel (1); an alpha channel displayed with the current mask (2); the mask is added to the alpha channel (3)
306 | Corel PHOTO-PAINT 2018 User Guide
To create an alpha channel from the current mask
• Click Mask Save Save as channel.
You can use this procedure to save the current mask to an alpha channel in the image.
To create a blank alpha channel
1 Click the New alpha channel button in the Channels docker.
If the Channels docker is not open, click Window Dockers Channels or Image Channels.
2 In the Channel properties dialog box, type a name for the channel in the Name box.
3 Click a color for the mask overlay.
4 Type a value in the Opacity box to set the opacity of the overlay color.
If you want to invert the mask overlay, enable the Invert overlay check box.
5 Enable one of the following options:
• Fill black — lets you create an alpha channel that contains no editable areas
• Fill white — lets you create an alpha channel that contains no protected areas
To add the current mask to an alpha channel
1 In the Channels docker, click an alpha channel.
If the Channels docker is not open, click Window Dockers Channels or Image Channels.
2 Click the Save to current channel button .
Saving masks and alpha channels
Since only one mask can be active in an image, each new mask you create replaces the current mask. However, before you create a mask,you can save the current mask to an alpha channel in the image so that it can be reused. When you save an image to a file format thatsupports mask information, such as Corel PHOTO-PAINT (CPT) or TIFF, the current mask and all alpha channels are saved with the image.
You can also save the current mask or an alpha channel to disk as a separate file. Saving a mask or an alpha channel lets you use masks inother images. This is especially useful if you want to save an image to a file format that doesn’t support mask information but you want tokeep copies of the masks used to edit that image. A color mask can also be saved to disk as a separate file. For more information about colormasks, see “Defining editable areas by using color information” on page 275.
To save the current mask to an alpha channel in an image
1 Click Mask Save Save as channel.
2 Type the name of the new or existing alpha channel in the As box.
To save a mask to disk
1 Click Mask Save Save mask to disk.
2 Choose the folder where you want to save the mask.
3 Type a filename in the File name box.
4 Choose a file type from the Save as type list box.
5 Click Save.
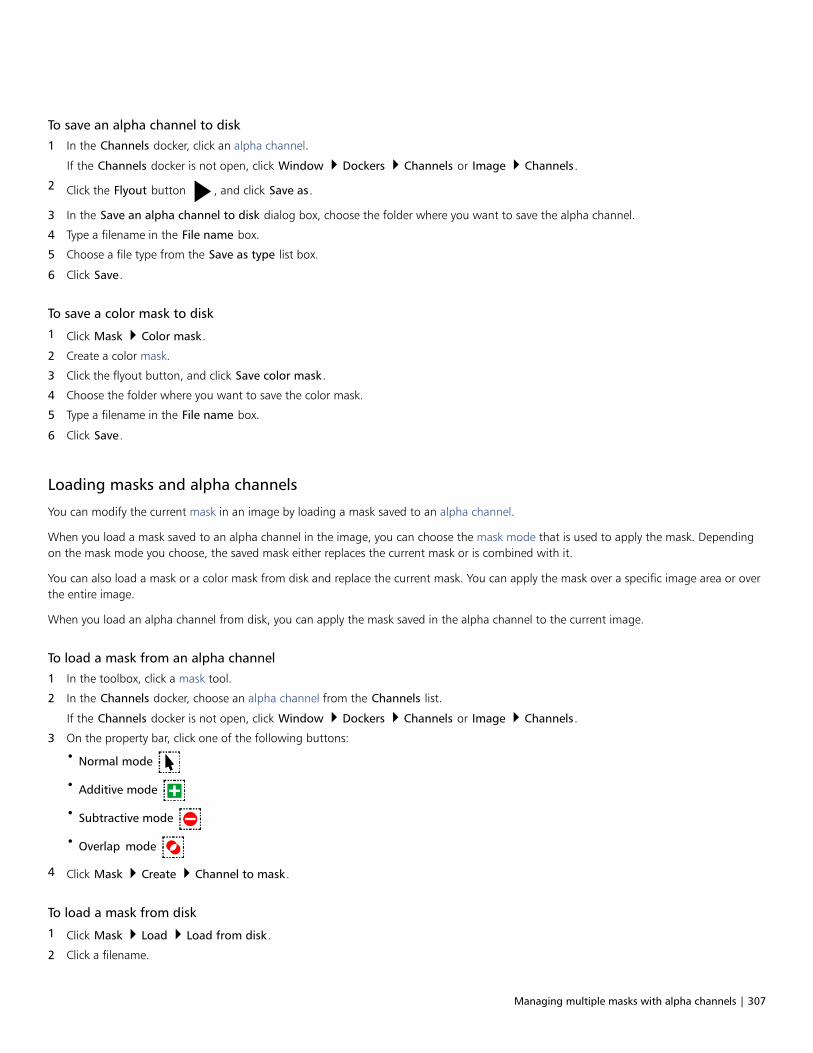
Managing multiple masks with alpha channels | 307
To save an alpha channel to disk
1 In the Channels docker, click an alpha channel.
If the Channels docker is not open, click Window Dockers Channels or Image Channels.
2 Click the Flyout button , and click Save as.
3 In the Save an alpha channel to disk dialog box, choose the folder where you want to save the alpha channel.
4 Type a filename in the File name box.
5 Choose a file type from the Save as type list box.
6 Click Save.
To save a color mask to disk
1 Click Mask Color mask.
2 Create a color mask.
3 Click the flyout button, and click Save color mask.
4 Choose the folder where you want to save the color mask.
5 Type a filename in the File name box.
6 Click Save.
Loading masks and alpha channels
You can modify the current mask in an image by loading a mask saved to an alpha channel.
When you load a mask saved to an alpha channel in the image, you can choose the mask mode that is used to apply the mask. Dependingon the mask mode you choose, the saved mask either replaces the current mask or is combined with it.
You can also load a mask or a color mask from disk and replace the current mask. You can apply the mask over a specific image area or overthe entire image.
When you load an alpha channel from disk, you can apply the mask saved in the alpha channel to the current image.
To load a mask from an alpha channel
1 In the toolbox, click a mask tool.
2 In the Channels docker, choose an alpha channel from the Channels list.
If the Channels docker is not open, click Window Dockers Channels or Image Channels.
3 On the property bar, click one of the following buttons:
• Normal mode
• Additive mode
• Subtractive mode
• Overlap mode
4 Click Mask Create Channel to mask.
To load a mask from disk
1 Click Mask Load Load from disk.
2 Click a filename.
308 | Corel PHOTO-PAINT 2018 User Guide
You can view a thumbnail of the mask.
3 Click Open.
4 Drag in the image window to define the area to which you want to apply the mask.
You can apply the mask to the entire image by clicking in the image window. If the dimensions of the image in which the mask wascreated are different from the dimensions of the active image, the mask stretches or compresses to fit the active image.
To load a color mask from disk
1 Click Mask Color mask.
2 Click the flyout button, and click Open color mask.
3 In the Open dialog box, choose the folder where the color mask is stored.
4 Double-click the filename.
If you load a color mask before you save the current color mask, the current color mask is lost.
To load an alpha channel from disk
1 In the Channels docker, click the flyout button, and click Open.
If the Channels docker is not open, click Window Dockers Channels or Image Channels.
2 In the Load an alpha channel from disk dialog box, choose the folder where the alpha channel is stored.
3 Double-click the filename.
If you load a mask that was created in an image with different dimensions than those of the active image, the mask stretches orcompresses to fit the entire active image; however, the mask’s aspect ratio may change.
Managing alpha channels
You can specify which alpha channels display and how they display. For example, you can display an alpha channel alone in the imagewindow, or in combination with other alpha or color channels. If you display one alpha channel, it is represented as a grayscale image. Ifyou display an alpha channel with one or more color channels, the protected areas in the alpha channel are covered by a tinted mask overlaywith varying degrees of opacity. You can see the mask overlay only when you display the alpha channel with a color channel.
You can also delete alpha channels you no longer need to reduce the file size of the image. You can modify an alpha channel's properties.For example, you can change the name, the color and opacity of the mask overlay, and whether the mask overlay covers the protected areasor the editable areas of the mask.
To display an alpha channel• In the Channels docker, click the Eye icon beside an alpha channel.
If the Channels docker is not open, click Window Dockers Channels or Image Channels.
If you want to change the order of an alpha channel in the list, drag it to a new position.

Managing multiple masks with alpha channels | 309
To delete an alpha channel
1 In the Channels docker, choose an alpha channel from the Channels list.
If the Channels docker is not open, click Window Dockers Channels or Image Channels.
2 Click the Delete current channel button .
To change the properties of an alpha channel
1 In the Channels docker, choose an alpha channel from the Channels list.
If the Channels docker is not open, click Window Dockers Channels or Image Channels.
2 Click the flyout button, and click Channel properties.
3 In the Channel properties dialog box, change the properties you want.

310 | Corel PHOTO-PAINT 2018 User Guide

Painting and special effects | 311
Painting and special effects
Drawing and painting..........................................................................................................................................................................313
Applying special effects....................................................................................................................................................................... 335
Special effects categories..................................................................................................................................................................... 345

312 | Corel PHOTO-PAINT 2018 User Guide
Drawing and painting | 313
Drawing and painting
Corel PHOTO-PAINT lets you create images or modify existing ones by using a variety of shape and paint tools.
This section contains the following topics:• “Drawing shapes and lines” (page 313)• “Applying brushstrokes” (page 317)• “Spraying images” (page 320)• “Painting symmetrical patterns and orbits” (page 323)• “Repeating brushstrokes” (page 324)• “Creating custom brushes” (page 325)• “Using pressure-sensitive pens and devices” (page 327)• “Understanding merge modes” (page 331)
Drawing shapes and lines
You can add shapes, such as squares, rectangles, circles, ellipses, and polygons, to images. You can also add rectangles and squares thathave rounded, scalloped, or chamfered corners. By default, shapes are added to images as new objects. Shapes can be outlined, filled, orrendered as separate, editable objects. For more information about objects, see “Creating objects” on page 394.
You can also add lines to images. When you add lines, you can specify the width and transparency, as well as the way line segments jointogether. The current foreground color determines the color of a line.
To draw a rectangle or square
1 In the toolbox, click the Rectangle tool .
2 On the property bar, click one of the following buttons:
• Uniform fill
• Fountain fill
• Bitmap fill
• Texture fill
3 Choose a fill from the Fill picker.
314 | Corel PHOTO-PAINT 2018 User Guide
If you want to edit the fill, click the Edit fill button on the property bar.
4 Drag in the image window until the rectangle is the size you want.
If you want to draw a square, hold down Ctrl as you drag.
You can also
Disable the fill Click the No fill button on the property bar.
Apply an outline Type a value in the Outline box on the property bar to specify theoutline width in pixels.
Change the color of an outline Click the Outline color button on the property bar.
Change the transparency Type a value in the Transparency box in the property bar.
The current fill is displayed in the color control area of the toolbox. For information about fills, see “Applying fills” on page 237.
You can use this procedure to create an object by clicking the New object button on the property bar after you click the
Rectangle tool.
To draw a rectangle or square with round, scalloped, or chamfered corners
1 In the toolbox, click the Rectangle tool .
2 On the property bar, click one of the following options:
• Round corner — produces a curved corner
• Scalloped corner — replaces a corner with an edge that has a curved notch
• Chamfered corner — replaces a corner with a flat edge
3 On the property bar, type a value in the Corner size box.
4 Drag in the image window until the rectangle is the size you want.
If you want to draw a square, hold down Ctrl as you drag.
To draw an ellipse or circle
1 In the toolbox, click the Ellipse tool .
2 On the property bar, click one of the following buttons:
• Uniform fill
• Fountain fill
• Bitmap fill
Drawing and painting | 315
• Texture fill
3 Choose a fill from the Fill picker.
If you want to edit the fill, click the Edit fill button on the property bar.
4 Drag in the image window until the rectangle or ellipse is the size you want.
If you want to draw a circle, hold down Ctrl as you drag.
You can also
Disable the fill Click the No fill button on the property bar.
Apply an outline Type a value in the Outline box on the property bar to specify theoutline width in pixels.
Change the color of an outline Click the Outline color button on the property bar.
Change the transparency Type a value in the Transparency box in the property bar.
The current fill is displayed in the color control area of the toolbox. For information about fills, see “Applying fills” on page 237.
You can draw a circle with the Ellipse tool by holding down Ctrl as you drag.
You can use this procedure to create an object by clicking the New object button on the property bar after you click the
Rectangle or Ellipse tool.
To draw a polygon
1 In the toolbox, click the Polygon tool .
2 On the property bar, click one of the following buttons:
• Uniform fill
• Fountain fill
• Bitmap fill
• Texture fill
3 Choose a fill from the Fill picker.
If you want to edit the fill, click the Edit fill button on the property bar.
4 Click where you want to set the anchor points of the polygon, and double-click to set the last anchor point.

316 | Corel PHOTO-PAINT 2018 User Guide
You can also
Disable the fill Click the No fill button on the property bar.
Apply an outline to the polygon Type a value in the Outline box on the property bar to specify theoutline width in pixels.
Change the color of an outline Click the Outline color button on the property bar.
Change the way outline segments join Choose a join type from the Shape joints list box on the propertybar.
Change the transparency Type a value in the Transparency box on the property bar.
You can create 45-degree angles by holding down Ctrl while dragging the Polygon tool .
You can use this procedure to create an object by clicking the New object button on the property bar after you click the
Polygon tool.
To draw a line
1 In the toolbox, click the Line tool .
2 Type a value in the Outline box on the property bar.
3 Click the Line color button on the property bar, and choose a color.
4 On the property bar, click one of the following buttons:
• Mitered corners — creates pointed corners where line segments are joined
• Rounded corners — creates lines with rounded corners
• Beveled corners — creates lines with flattened corners
• Butted corners — creates lines with sharp, notched corners
5 Drag in the image window to draw a single line segment.
You can also
Draw a line with multiple segments In the image window, click where you want to start and end eachsegment, and double-click to end the line.
Change the transparency Type a value in the Transparency box on the property bar.
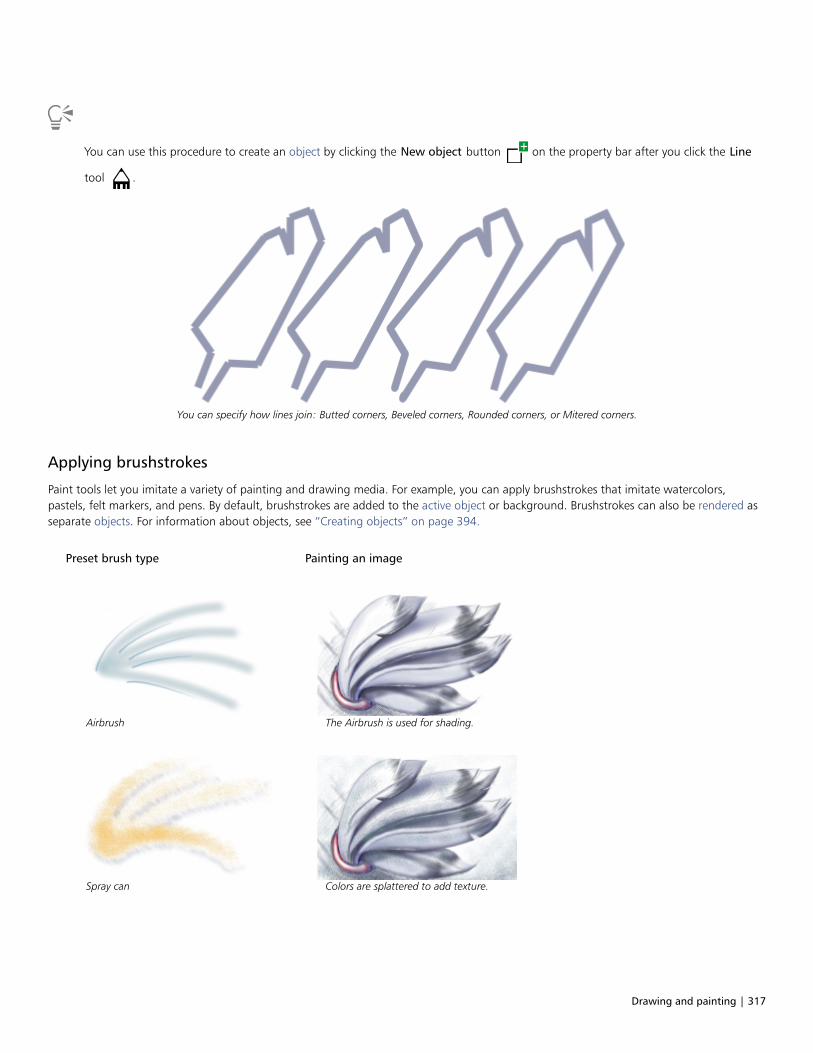
Drawing and painting | 317
You can use this procedure to create an object by clicking the New object button on the property bar after you click the Line
tool .
You can specify how lines join: Butted corners, Beveled corners, Rounded corners, or Mitered corners.
Applying brushstrokes
Paint tools let you imitate a variety of painting and drawing media. For example, you can apply brushstrokes that imitate watercolors,pastels, felt markers, and pens. By default, brushstrokes are added to the active object or background. Brushstrokes can also be rendered asseparate objects. For information about objects, see “Creating objects” on page 394.
Preset brush type Painting an image
Airbrush The Airbrush is used for shading.
Spray can Colors are splattered to add texture.
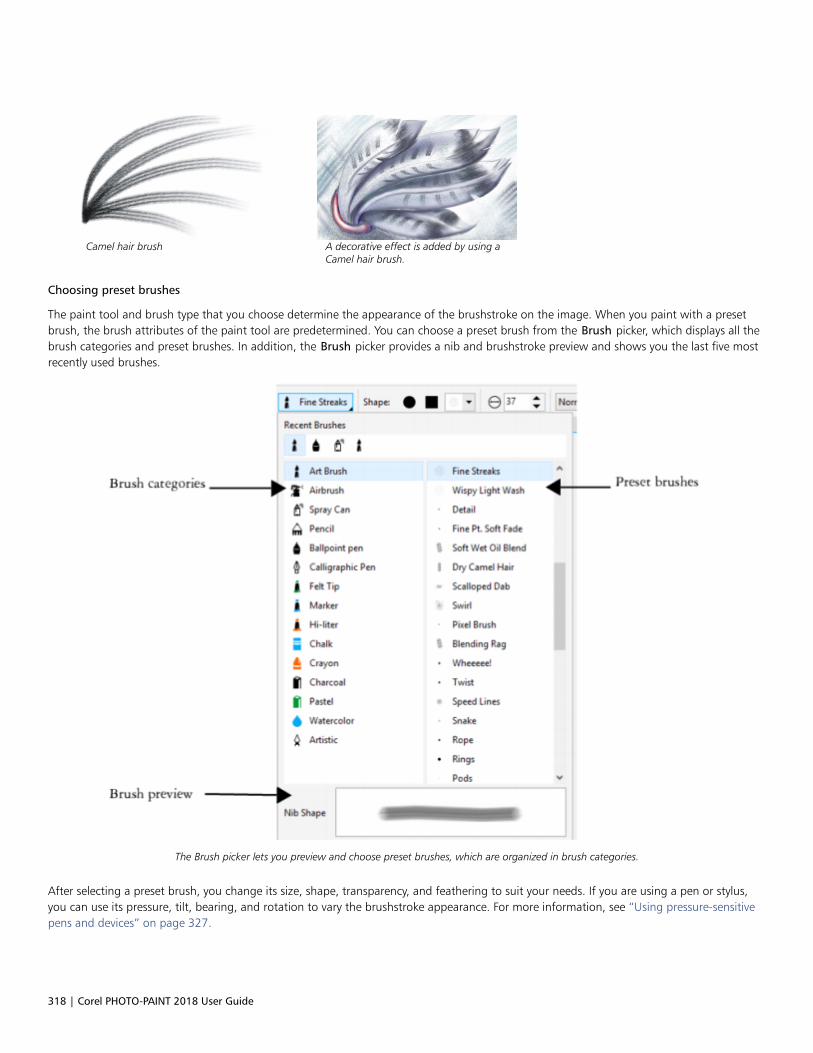
318 | Corel PHOTO-PAINT 2018 User Guide
Camel hair brush A decorative effect is added by using aCamel hair brush.
Choosing preset brushes
The paint tool and brush type that you choose determine the appearance of the brushstroke on the image. When you paint with a presetbrush, the brush attributes of the paint tool are predetermined. You can choose a preset brush from the Brush picker, which displays all thebrush categories and preset brushes. In addition, the Brush picker provides a nib and brushstroke preview and shows you the last five mostrecently used brushes.
The Brush picker lets you preview and choose preset brushes, which are organized in brush categories.
After selecting a preset brush, you change its size, shape, transparency, and feathering to suit your needs. If you are using a pen or stylus,you can use its pressure, tilt, bearing, and rotation to vary the brushstroke appearance. For more information, see “Using pressure-sensitivepens and devices” on page 327.
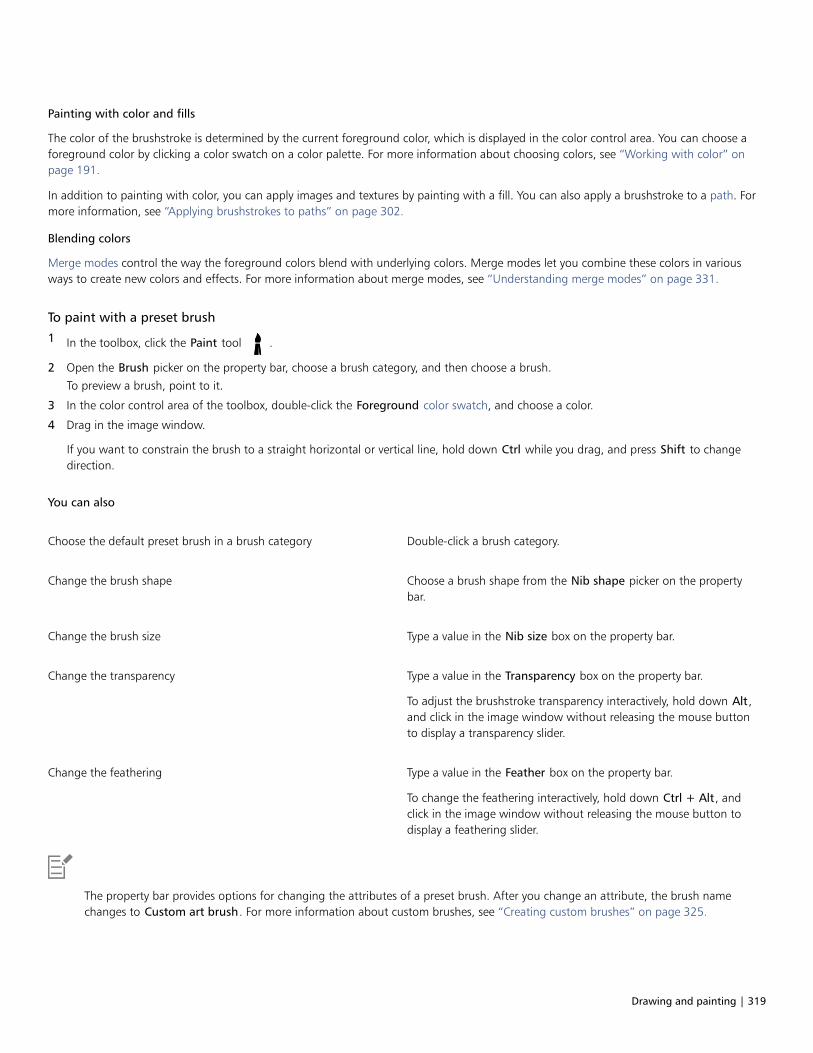
Drawing and painting | 319
Painting with color and fills
The color of the brushstroke is determined by the current foreground color, which is displayed in the color control area. You can choose aforeground color by clicking a color swatch on a color palette. For more information about choosing colors, see “Working with color” onpage 191.
In addition to painting with color, you can apply images and textures by painting with a fill. You can also apply a brushstroke to a path. Formore information, see “Applying brushstrokes to paths” on page 302.
Blending colors
Merge modes control the way the foreground colors blend with underlying colors. Merge modes let you combine these colors in variousways to create new colors and effects. For more information about merge modes, see “Understanding merge modes” on page 331.
To paint with a preset brush
1 In the toolbox, click the Paint tool .
2 Open the Brush picker on the property bar, choose a brush category, and then choose a brush.
To preview a brush, point to it.
3 In the color control area of the toolbox, double-click the Foreground color swatch, and choose a color.
4 Drag in the image window.
If you want to constrain the brush to a straight horizontal or vertical line, hold down Ctrl while you drag, and press Shift to changedirection.
You can also
Choose the default preset brush in a brush category Double-click a brush category.
Change the brush shape Choose a brush shape from the Nib shape picker on the propertybar.
Change the brush size Type a value in the Nib size box on the property bar.
Change the transparency Type a value in the Transparency box on the property bar.
To adjust the brushstroke transparency interactively, hold down Alt,and click in the image window without releasing the mouse buttonto display a transparency slider.
Change the feathering Type a value in the Feather box on the property bar.
To change the feathering interactively, hold down Ctrl + Alt, andclick in the image window without releasing the mouse button todisplay a feathering slider.
The property bar provides options for changing the attributes of a preset brush. After you change an attribute, the brush namechanges to Custom art brush. For more information about custom brushes, see “Creating custom brushes” on page 325.
320 | Corel PHOTO-PAINT 2018 User Guide
You can use this procedure to create an object by clicking Object Create New object before you drag in the image window.
You can also choose a preset brush by clicking a brushstroke sample in the Artistic media docker. If the Artistic media docker is notopen, click Window Dockers Artistic media.
You can quickly choose a square or round brush shape by clicking the Round nib button or the Square nib button on the
property bar.
To paint with a color sample from an image
1 Click the Eyedropper tool .
2 Click a color in the image window.
3 In the toolbox, click the Paint tool .
4 Open the Brush picker on the property bar, choose the Clone from fill brush category, and then choose a brush.
5 Drag in the image window.
To paint with a fill
1 In the toolbox, click the Fill tool .
2 On the property bar, choose a fill type.
3 In the toolbox, click the Clone tool .
4 Open the Brush picker on the property bar, choose a brush category, and then choose a brush.
5 Drag in the image window.
You can paint with any type of fill. For information about fills, see “Applying fills” on page 237.
To change the merge mode
1 In the toolbox, click a paint tool.
2 Choose a merge mode from the Merge mode list box on the property bar.
For more information on merge modes, see “Understanding merge modes” on page 331.
Spraying images
You can paint with small-scale, full-color bitmaps, instead of a brush. For example, you can enhance landscapes by spraying clouds acrossthe sky or foliage across the ground.
Corel PHOTO-PAINT includes a variety of images, which are used to create spraylists. You can load a preset spraylist, edit a preset, or create aspraylist by saving images in an image list. You can edit the source images at any time.
Corel Content provides an online collection of image lists that you can access and search. When you find an image list that you like, you candownload it and use it.
For more information about accessing image lists, see “Accessing content” on page 107.
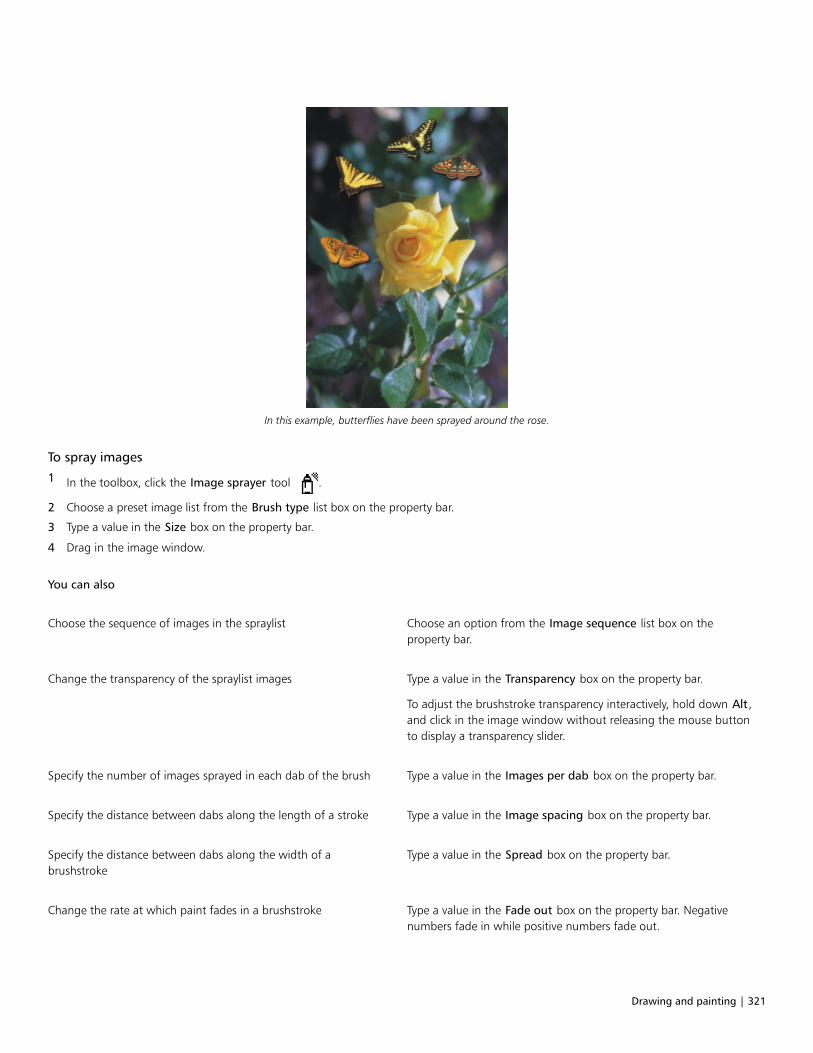
Drawing and painting | 321
In this example, butterflies have been sprayed around the rose.
To spray images
1 In the toolbox, click the Image sprayer tool .
2 Choose a preset image list from the Brush type list box on the property bar.
3 Type a value in the Size box on the property bar.
4 Drag in the image window.
You can also
Choose the sequence of images in the spraylist Choose an option from the Image sequence list box on theproperty bar.
Change the transparency of the spraylist images Type a value in the Transparency box on the property bar.
To adjust the brushstroke transparency interactively, hold down Alt,and click in the image window without releasing the mouse buttonto display a transparency slider.
Specify the number of images sprayed in each dab of the brush Type a value in the Images per dab box on the property bar.
Specify the distance between dabs along the length of a stroke Type a value in the Image spacing box on the property bar.
Specify the distance between dabs along the width of abrushstroke
Type a value in the Spread box on the property bar.
Change the rate at which paint fades in a brushstroke Type a value in the Fade out box on the property bar. Negativenumbers fade in while positive numbers fade out.
322 | Corel PHOTO-PAINT 2018 User Guide
The minimum and maximum numeric values for a box on the property bar can be displayed by right-clicking in the box to open theSettings dialog box.
To load an image list
1 In the toolbox, click the Image sprayer tool .
2 Click the Browse button on the property bar.
3 Choose the folder where the image list is stored.
4 Click a filename.
If you want to view a thumbnail of the image list, enable the Preview check box.
5 Click Import.
To create a spraylist
1 In the toolbox, click the Image sprayer tool .
2 Choose a preset image list from the Brush type list box on the property bar.
3 Click the Create spraylist button on the property bar.
4 In the Create spraylist dialog box, specify the contents of the spraylist.
To create an image list from an object
1 Using the Object pick tool, select the objects you want to use as source images.
2 In the toolbox, click the Image sprayer tool .
3 On the property bar, click the Save as image list button, and click Save objects as image list.
4 Choose the folder where you want to save the image list.
5 Type a filename in the Filename box.
To create an image list from an image
1 In the toolbox, click the Image sprayer tool .
2 On the property bar, click the Save as image list button, and click Save document as image list.
3 Type values in any of the following boxes:
• Images per row — lets you specify the number of horizontal tiles in the image list
• Images per column — lets you specify the number of vertical tiles in the image list
• Number of images — lets you specify the number of images to include in the list
4 Click OK.
5 Choose the folder where you want to save the image list.
6 Type a filename in the Filename box.
To edit a source image
1 In the toolbox, click the Image sprayer tool .
Drawing and painting | 323
2 In the Brush settings docker, click the flyout button , and click Edit current image list.
If the Brush settings docker is not open, click Window Dockers Brush settings.
3 Edit the source image.
If you want to overwrite the last version of the image list, click File Save as, and click Save in the Save an image to disk dialog box.
After you edit an image list, you must reload it in the Image sprayer tool to activate the changes.
To access and use an online image list
1 In the toolbox, click the Image sprayer tool .
2 Click the More image lists button on the property bar.
The Corel Content - image lists dialog box appears, displaying thumbnails of available image lists.
3 Click a thumbnail, and click Download.
4 Spray with the image list.
You can also
Search for an image list Type a search term in the Search box, and press Enter.
Display thumbnails of available image lists Click the Home button .
Watermarked image lists cannot be downloaded. Content appears watermarked if you have not signed in or do not have the requiredmembership. To sign in, click the Sign in button in the upper-right corner of the dialog box.
Painting symmetrical patterns and orbits
Corel PHOTO-PAINT gives you tools to create symmetrical and orbital patterns.
Painting symmetrical patterns
You can paint symmetrical patterns on an image by using the radial or mirror brush symmetry mode. When you paint in radial mode,satellite brush nibs, called satellite points, create brushstrokes around a center point. When you paint in mirror mode, an identicalbrushstroke is created on the horizontal plane, the vertical plane, or both.
Painting with orbits
You can create spiral effects by painting an image with orbits. Orbits are circular paths that rotate around a center point. Orbits let you paintspirals, pods, and rings. For example, you can draw a single spiral and adjust the size and closeness of the coils. You can also vary the size ofthe coils to create rounded segments called pods, or increase the number of orbits to create rings.
To paint symmetrical patterns
1 In the toolbox, click the Paint tool .
2 Open the Brush picker on the property bar, choose a brush category, and then choose a brush.
3 Click Window Toolbars Symmetry bar.
324 | Corel PHOTO-PAINT 2018 User Guide
4 On the Symmetry bar, click one of the following buttons:
• Radial symmetry — lets you add satellite points at intervals along the radius of a brush nib. Type a value in the Radial points
box to specify the number of satellite points.
• Mirror symmetry — lets you create an identical stroke on the horizontal or vertical plane of an image. Click the Horizontal
mirror button , the Vertical mirror button , or both.
5 Click the Set symmetry center button , and click the image to position the center point for the symmetry.
6 Drag in the image window.
Click the No symmetry button on the Symmetry bar to disable the brush symmetry mode.
To paint with orbits
1 In the toolbox, click the Paint tool .
2 Open the Brush picker on the property bar, choose a brush category, and then choose a brush.
3 Click the Orbits button on the property bar.
4 Click the Orbits bar in the Brush settings docker.
If the Brush settings docker is not open, click Window Dockers Brush settings.
5 Type a value in any of the following boxes:
• Number of orbits — lets you specify the number of orbits that are distributed around the center of a brushstroke. Use a value from 1to 128. Use lower values for spirals and higher values for rings.
• Radius — lets you specify the distance between the center of a brushstroke and the orbits. Use a value from 1 to 999. A smaller nibrequires higher values.
• Rotation speed — lets you specify the speed at which the orbits rotate around a brushstroke. Use a value from 0 to 100. Highervalues result in closer coils.
• Grow speed — lets you specify the speed at which the orbits move toward the center of a brushstroke. Use a value from 0 to 100.Higher values increase the frequency of the size variation.
• Grow amount — lets you specify the distance that the orbits move when rotating toward the center of a brushstroke. Use a valuefrom 0 to 100. Higher values increase the size variation and create pods.
6 Drag in the image window.
You can hide or display the point around which the orbits rotate clicking the Include center button on the Orbits bar in the
Brush settings docker.
Repeating brushstrokes
You can save a brushstroke and then reapply it to the same image or other images. You can also repeat a brushstroke along the border of apath or mask. For information about applying a brushstroke to a path, see “Applying brushstrokes to paths” on page 302.
You can edit a saved brushstroke to create new effects by adjusting attributes such as the size, number, angle, and color of the brushstroke.
To save a brushstroke
1 In the toolbox, click the Paint tool .
Drawing and painting | 325
2 Open the Brush picker on the property bar, choose a brush category, and then choose a brush.
3 Click Edit Repeat brushstroke.
4 In the Repeat stroke dialog box, click the Stroke flyout arrow, and click Add last tool stroke.
5 Choose the folder where you want to save the brushstroke.
6 Type a filename in the Filename box.
To apply a saved brushstroke
1 In the toolbox, click the Paint tool .
2 Open the Brush picker on the property bar, choose a brush category, and then choose a brush.
3 Click Edit Repeat brushstroke.
If there are two menu items called Repeat brushstroke, click the second one.
4 Choose a brushstroke from the Stroke list box.
5 Click in the image window to apply the brushstroke.
If you want to apply more than one brushstroke, continue clicking.
To edit a saved brushstroke
1 In the toolbox, click the Paint tool .
2 Open the Brush picker on the property bar, choose a brush category, and then choose a brush.
3 Click Edit Repeat brushstroke.
If there are two menu items called Repeat brushstroke, click the second one.
4 In the Repeat stroke dialog box, choose a saved brushstroke from the Stroke list box.
5 In the Repeat stroke dialog box, modify any attributes.
6 Click in the image window to apply the brushstroke.
Creating custom brushes
You can create a custom brush by modifying brush attributes. Once you have created a custom brush, you can save it and use it again.
Nib properties
The shape of a brush is determined by the brush nib. The preset nib shapes can be modified or a nib can be created from an editable areaand saved. The nib attributes you can adjust are• Transparency — lets you specify the transparency level for the nib• Rotation/Direction — lets you specify the angle at which the nib is rotated. You can use a value between 0 and 360. When you enable
pen bearing, this value determines the start angle of rotation. As you rotate the pen or stylus, values are added to the start angle ofrotation to determine the overall rotation of the brush nib.
• Flatness— lets you specify the amount by which the nib is flattened. The default value of 0 does not flatten the brush nib. When youenable pen tilt, the flatness value determines the starting flatness of the nib. As you tilt the pen, the nib flatness varies.
• Elongation — lets you elongate the brush nib. You can use a value between 1 and 999 for the elongation distance. The default valueof 0 has elongation turned off. The direction in which the brush nib is elongated is determined by the value in the Rotation/Directionbox as well as the bearing and rotation of your stylus. For example, a value of 0 in the Rotation/Direction box elongates the brush nibstraight up vertically. You can use only elongation or only flatness but not both at the same time.
• Soft Edge — lets you specify the transparency and width of the edges of the nib
Stroke attributes
The stroke attributes you can modify are
326 | Corel PHOTO-PAINT 2018 User Guide
• Smoothing — lets you specify a value for the smoothing of the stroke when the mouse moves fast. A higher value results in a roundercurve.
• Fade out — lets you specify the intensity of the fade-out effect for the brushstroke. A higher value results in a shorter brushstroke, i.e.,the brushstroke runs out of paint faster. A negative value results in a fade-in effect.
Dab attributes
The dab attributes you can adjust are• Number of dabs — lets you specify the number of dabs in a brushstroke• Spacing — lets you specify the amount of space between dabs along the length of the brushstroke. A value of 1 produces a solid line. A
higher value separates the dabs in the brushstroke.• Spread — lets you specify the distance between dabs along the width of the brushstroke. A higher value results in a thicker brushstroke.• Hue — lets you specify the hue variation in the brushstroke• Saturation — lets you specify the saturation variation in the brushstroke• Lightness — lets you specify the lightness variation in the brushstroke
Brush texture
Loading a preset brush texture gives you additional design options. The texture attributes you can adjust are• Brush Texture — lets you specify how much of the texture is applied to the brushstroke• Edge texture — lets you specify how much of the texture is applied to the edges of the brushstroke. The Edge Texture box is available
only if the nib has a soft edge.• Bleed — lets you specify the extent to which brushstrokes become diluted throughout the stroke. If a Sustain Color value is specified,
traces of the paint remain throughout the brushstroke.• Sustain color — lets you specify the extent to which traces of the paint color appear in a brushstroke with a specified bleed value
Color variation
The color attributes you can modify are• Hue range — lets you specify the amount of hue variation in the brushstroke• Hue speed — lets you specify how fast the hue value changes• Saturation range — lets you specify the amount of saturation variation in the brushstroke• Saturation speed — lets you specify how fast the saturation value changes• Lightness range — lets you specify the amount of lightness variation in the brushstroke• Lightness speed — lets you specify how fast the lightness value changes
To create a custom brush
1 In the toolbox, click the Paint tool .
2 Open the Brush picker on the property bar, choose a brush category, and then choose a brush.
3 Choose a preset brush in the Brush type list box on the property bar.
4 In the Brush settings docker, move the Size slider.
If the Brush settings docker is not open, click Window Dockers Brush settings.
5 In the Brush settings docker, click the roll-down arrow on any of the following bars, and specify values for any attributes:
• Nib properties
• Stroke attributes
• Dab attributes
• Brush texture
• Color variation
Drawing and painting | 327
You can also
Add a custom nib to the Nib shape picker Click the Nib options button on the Nib properties bar, and
click Add current nib.
Save a custom brush Click the flyout arrow on the Brush settings docker, and click
Save brush. In the Save brush dialog box, type a filename.
To create a brush nib from an editable area
1 Define an editable area.
2 In the toolbox, click the Paint tool .
3 Open the Brush picker on the property bar, choose a brush category, and then choose a brush.
4 In the Brush settings docker, click the Nib options button on the Nib properties bar.
If the Brush settings docker is not open, click Window Dockers Brush settings.
5 Click Create from contents of mask.
6 Type a value in the Nib size box.
To load a preset brush texture
1 In the toolbox, click the Paint tool .
2 Open the Brush picker on the property bar, choose a brush category, and then choose a brush.
3 In the Brush settings docker, click the Load texture button on the Brush texture bar.
If the Brush settings docker is not open, click Window Dockers Brush settings.
4 Choose a texture, or click More to locate the texture file you want.
5 Double-click the filename.
6 In the Brush settings docker, click the roll-down arrow on the Brush texture bar, and type a value from 0 to 100 in any of the followingboxes:
• Brush texture — lets you adjust the amount of texture applied to a brushstroke
• Edge texture — lets you adjust the amount of texture applied to the edge of a brushstroke
Using pressure-sensitive pens and devices
The following tools in Corel PHOTO-PAINT let you use the pressure, tilt, bearing, and rotation of your pressure-sensitive pen or stylus: effects,touch-up, and paint tools as well as the Eraser tool. Note that you can use pen tilt and pen bearing only if your pen or stylus supports thesefeatures.
In addition, the liquid tools in Corel PHOTO-PAINT support pen pressure.
Pressure and pen settings
The pressure applied with the pen on a pen tablet determines the size, opacity, and other attributes of the brushstroke.
When you use a pressure-sensitive stylus or pen tablet, the amount of pressure that you apply controls your strokes. Each person uses adifferent strength or pressure level in a stroke, and you can set the application to match your stroke strength by specifying pen settings.Proper pen settings are particularly useful if you have a light touch. If a light stroke leaves no trace, adjusting pen settings can increase
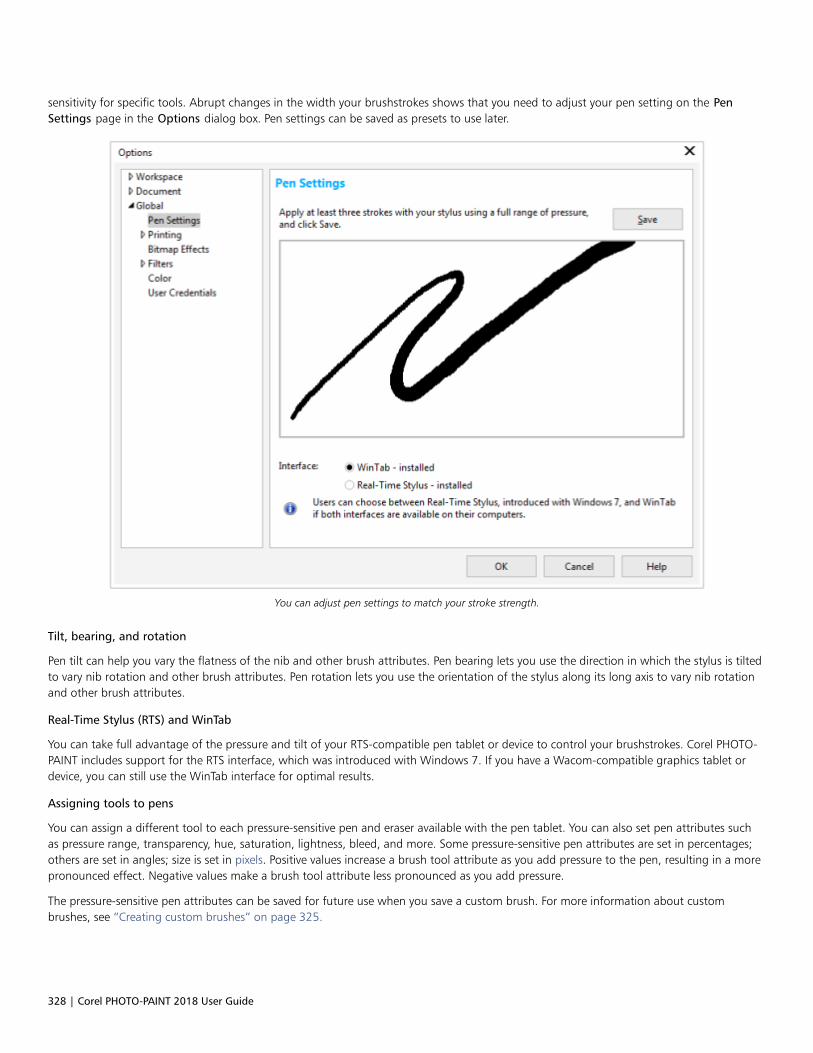
328 | Corel PHOTO-PAINT 2018 User Guide
sensitivity for specific tools. Abrupt changes in the width your brushstrokes shows that you need to adjust your pen setting on the PenSettings page in the Options dialog box. Pen settings can be saved as presets to use later.
You can adjust pen settings to match your stroke strength.
Tilt, bearing, and rotation
Pen tilt can help you vary the flatness of the nib and other brush attributes. Pen bearing lets you use the direction in which the stylus is tiltedto vary nib rotation and other brush attributes. Pen rotation lets you use the orientation of the stylus along its long axis to vary nib rotationand other brush attributes.
Real-Time Stylus (RTS) and WinTab
You can take full advantage of the pressure and tilt of your RTS-compatible pen tablet or device to control your brushstrokes. Corel PHOTO-PAINT includes support for the RTS interface, which was introduced with Windows 7. If you have a Wacom-compatible graphics tablet ordevice, you can still use the WinTab interface for optimal results.
Assigning tools to pens
You can assign a different tool to each pressure-sensitive pen and eraser available with the pen tablet. You can also set pen attributes suchas pressure range, transparency, hue, saturation, lightness, bleed, and more. Some pressure-sensitive pen attributes are set in percentages;others are set in angles; size is set in pixels. Positive values increase a brush tool attribute as you add pressure to the pen, resulting in a morepronounced effect. Negative values make a brush tool attribute less pronounced as you add pressure.
The pressure-sensitive pen attributes can be saved for future use when you save a custom brush. For more information about custombrushes, see “Creating custom brushes” on page 325.
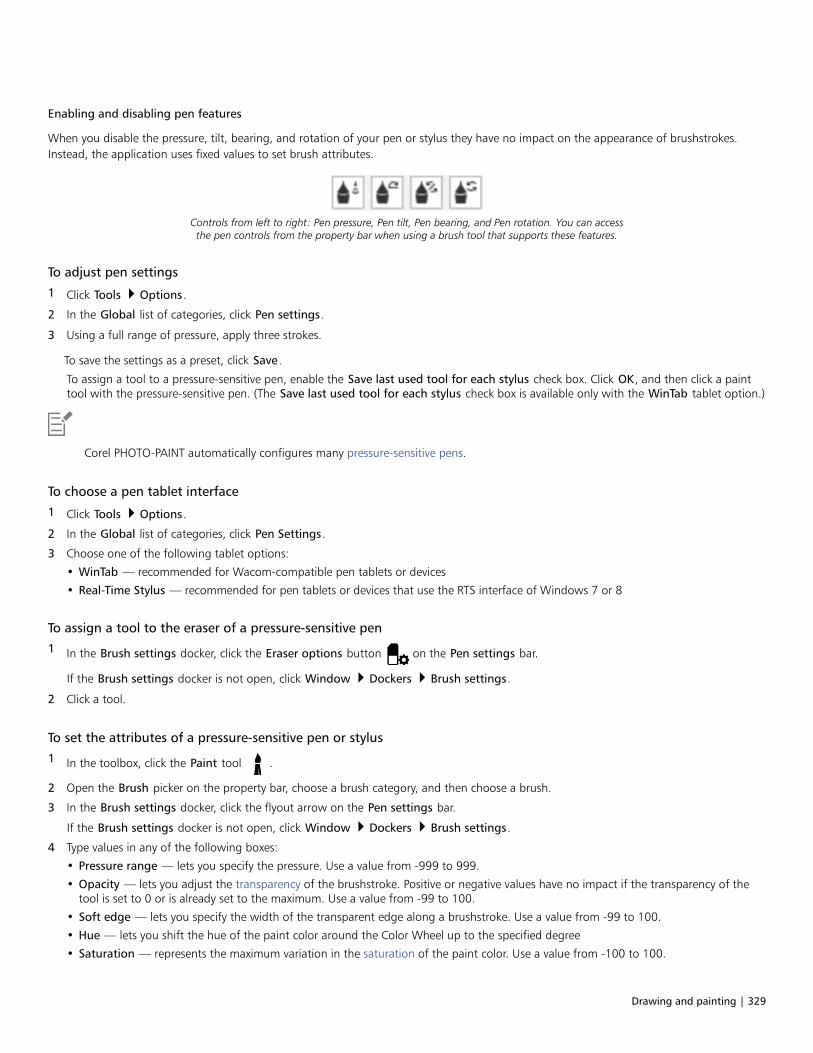
Drawing and painting | 329
Enabling and disabling pen features
When you disable the pressure, tilt, bearing, and rotation of your pen or stylus they have no impact on the appearance of brushstrokes.Instead, the application uses fixed values to set brush attributes.
Controls from left to right: Pen pressure, Pen tilt, Pen bearing, and Pen rotation. You can accessthe pen controls from the property bar when using a brush tool that supports these features.
To adjust pen settings
1 Click Tools Options.
2 In the Global list of categories, click Pen settings.
3 Using a full range of pressure, apply three strokes.
To save the settings as a preset, click Save.
To assign a tool to a pressure-sensitive pen, enable the Save last used tool for each stylus check box. Click OK, and then click a painttool with the pressure-sensitive pen. (The Save last used tool for each stylus check box is available only with the WinTab tablet option.)
Corel PHOTO-PAINT automatically configures many pressure-sensitive pens.
To choose a pen tablet interface
1 Click Tools Options.
2 In the Global list of categories, click Pen Settings.
3 Choose one of the following tablet options:
• WinTab — recommended for Wacom-compatible pen tablets or devices
• Real-Time Stylus — recommended for pen tablets or devices that use the RTS interface of Windows 7 or 8
To assign a tool to the eraser of a pressure-sensitive pen
1 In the Brush settings docker, click the Eraser options button on the Pen settings bar.
If the Brush settings docker is not open, click Window Dockers Brush settings.
2 Click a tool.
To set the attributes of a pressure-sensitive pen or stylus
1 In the toolbox, click the Paint tool .
2 Open the Brush picker on the property bar, choose a brush category, and then choose a brush.
3 In the Brush settings docker, click the flyout arrow on the Pen settings bar.
If the Brush settings docker is not open, click Window Dockers Brush settings.
4 Type values in any of the following boxes:
• Pressure range — lets you specify the pressure. Use a value from -999 to 999.
• Opacity — lets you adjust the transparency of the brushstroke. Positive or negative values have no impact if the transparency of thetool is set to 0 or is already set to the maximum. Use a value from -99 to 100.
• Soft edge — lets you specify the width of the transparent edge along a brushstroke. Use a value from -99 to 100.
• Hue — lets you shift the hue of the paint color around the Color Wheel up to the specified degree
• Saturation — represents the maximum variation in the saturation of the paint color. Use a value from -100 to 100.
330 | Corel PHOTO-PAINT 2018 User Guide
• Lightness — represents the maximum variation of lightness of the paint color. Use a value from -100 to 100.
• Texture — lets you specify the amount of texture visible for the current paint tool. Use a value from -100 to 100.
• Bleed — lets you specify how quickly a brushstroke runs out of paint. Use a value from -100 to 100.
• Sustain color — works in conjunction with the bleed value to adjust the traces of paint that remain throughout the brushstroke. Use avalue from -100 to 100.
5 Drag the pen, varying the amount of pressure you apply to the tablet, to test the attributes.
If your stylus or pen supports tilt, bearing, and rotation, these features can also help you vary brush attributes.
To enable or disable pen pressure
1 In the toolbox, click a brush tool.
2 Click the Pen pressure button on the property bar.
When enabled, pen pressure varies the size of the brush nib. The maximum size is set in the Nib size box on the property bar.
To enable or disable pen tilt
1 In the toolbox, click a brush tool.
2 Click the Pen tilt button on the property bar.
When enabled, pen tilt varies the flatness of the brush nib. You can specify a starting flatness value in the Nib properties section ofthe Brush settings docker. For more information, see “Nib properties” on page 325.
To enable or disable pen bearing
1 In the toolbox, click a brush tool.
2 Click the Pen bearing button on the property bar.
When enabled, pen bearing varies the rotation of the brush nib. You can specify a starting angle of rotation in the Nib propertiessection of the Brush settings docker. For more information, see “Nib properties” on page 325.
To enable or disable pen rotation
1 In the toolbox, click a brush tool.
2 Click the Pen rotation button on the property bar.
When enabled, pen rotation varies the rotation of the brush nib. You can specify the starting angle of rotation in the Nib propertiessection of the Brush settings docker. For more information, see “Nib properties” on page 325.

Drawing and painting | 331
Understanding merge modes
On computers, colors have numeric values, and merge modes let you perform mathematical calculations with these color values. Mergemodes combine a source and a base color in an image to produce a new color or effect, called a result color. In some programs, mergemodes are also known as blending modes.
For paint tools, merge modes alter the way brushstrokes combine with an image. For objects, merge modes alter the way the colors of anobject combine with the background behind the object or with underlying objects.
Merge mode
Normal replaces the base color with the source color. This is thedefault merge mode.
Add adds the values of the source and base colors.
Subtract adds the values of the source and base colors andsubtracts 255 from the result. Because this merge mode treats thecolor channels as subtractive, the result color is never lighter thanthe base color. For example, painting blue on white yields blue, andpainting blue on black yields black.
Difference subtracts the source color value from the base colorvalue and applies the absolute value of the result. If the value of thecurrent source color is 0, the base color does not change.
Multiply multiplies the values of the source and base colors anddivides the result by 255. Unless you paint on white, the final resultis always darker than the original base color. Multiplying black withany color produces black. Multiplying white with any color leavesthe color unchanged.
Divide divides the base color value by the source color value, andensures that the result is less than or equal to 255.
If lighter replaces the base color with the source color when thesource color is lighter than the base color.
If darker applies the source color to the base color when the sourcecolor is darker than the base color.
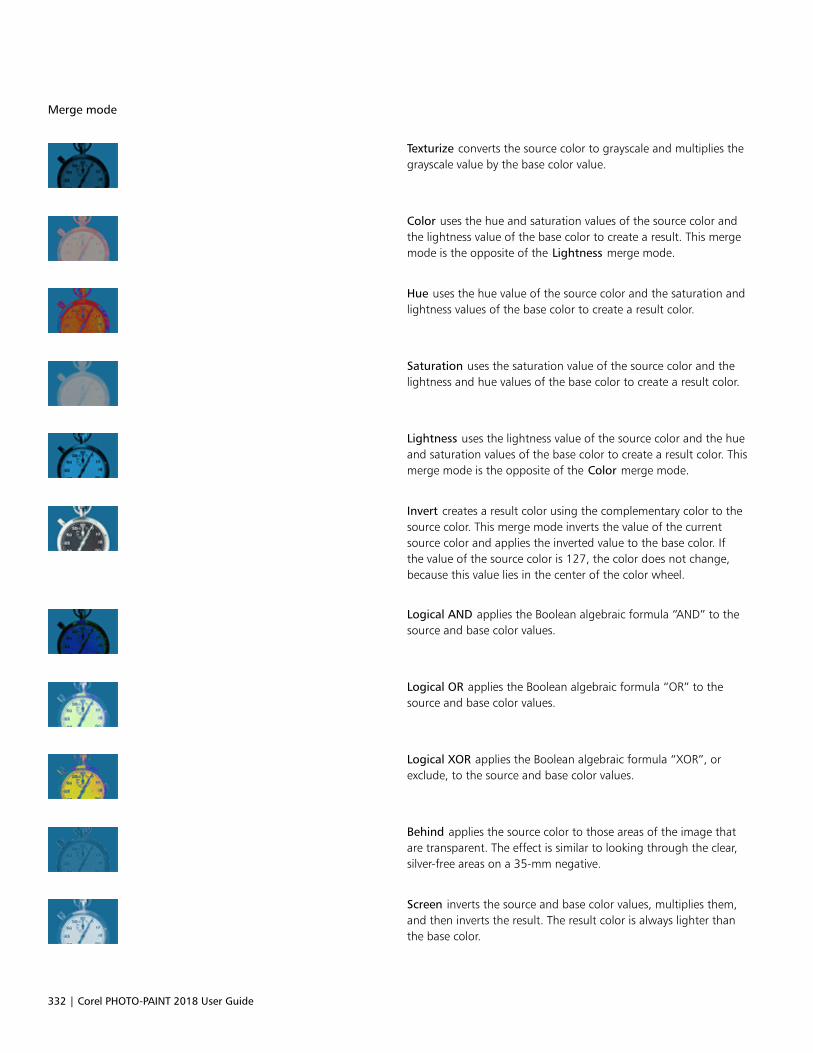
332 | Corel PHOTO-PAINT 2018 User Guide
Merge mode
Texturize converts the source color to grayscale and multiplies thegrayscale value by the base color value.
Color uses the hue and saturation values of the source color andthe lightness value of the base color to create a result. This mergemode is the opposite of the Lightness merge mode.
Hue uses the hue value of the source color and the saturation andlightness values of the base color to create a result color.
Saturation uses the saturation value of the source color and thelightness and hue values of the base color to create a result color.
Lightness uses the lightness value of the source color and the hueand saturation values of the base color to create a result color. Thismerge mode is the opposite of the Color merge mode.
Invert creates a result color using the complementary color to thesource color. This merge mode inverts the value of the currentsource color and applies the inverted value to the base color. Ifthe value of the source color is 127, the color does not change,because this value lies in the center of the color wheel.
Logical AND applies the Boolean algebraic formula “AND” to thesource and base color values.
Logical OR applies the Boolean algebraic formula “OR” to thesource and base color values.
Logical XOR applies the Boolean algebraic formula “XOR”, orexclude, to the source and base color values.
Behind applies the source color to those areas of the image thatare transparent. The effect is similar to looking through the clear,silver-free areas on a 35-mm negative.
Screen inverts the source and base color values, multiplies them,and then inverts the result. The result color is always lighter thanthe base color.
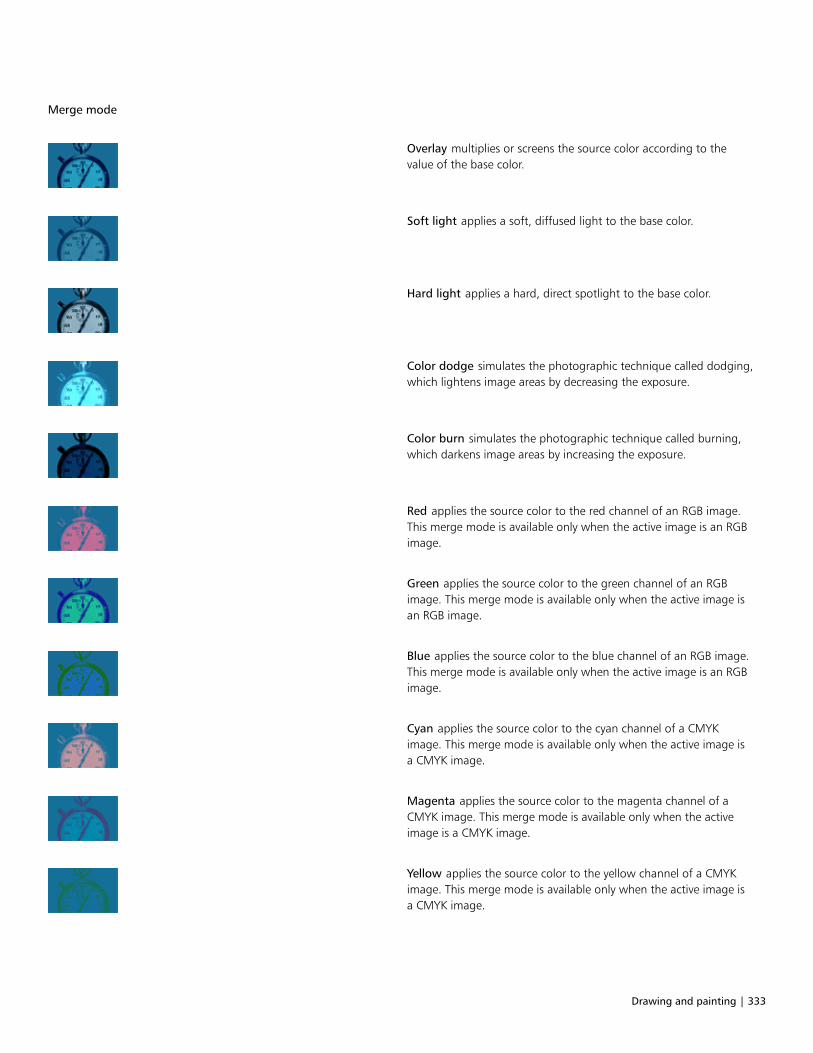
Drawing and painting | 333
Merge mode
Overlay multiplies or screens the source color according to thevalue of the base color.
Soft light applies a soft, diffused light to the base color.
Hard light applies a hard, direct spotlight to the base color.
Color dodge simulates the photographic technique called dodging,which lightens image areas by decreasing the exposure.
Color burn simulates the photographic technique called burning,which darkens image areas by increasing the exposure.
Red applies the source color to the red channel of an RGB image.This merge mode is available only when the active image is an RGBimage.
Green applies the source color to the green channel of an RGBimage. This merge mode is available only when the active image isan RGB image.
Blue applies the source color to the blue channel of an RGB image.This merge mode is available only when the active image is an RGBimage.
Cyan applies the source color to the cyan channel of a CMYKimage. This merge mode is available only when the active image isa CMYK image.
Magenta applies the source color to the magenta channel of aCMYK image. This merge mode is available only when the activeimage is a CMYK image.
Yellow applies the source color to the yellow channel of a CMYKimage. This merge mode is available only when the active image isa CMYK image.

334 | Corel PHOTO-PAINT 2018 User Guide
Merge mode
Black applies the source color to the black channel of a CMYKimage. This merge mode is available only when the active image isa CMYK image.
In addition, the Pass through merge mode is available for grouped objects. The Pass through merge mode allows the merge modes ofindividual objects within a group to affect how their colors blend with underlying objects. For more information, see “Choosing a mergemode for grouped objects” on page 407.

Applying special effects | 335
Applying special effects
Corel PHOTO-PAINT provides special-effects filters that let you apply a wide range of transformations to images. For example, you cantransform images to simulate drawings, paintings, etchings, or abstract art.
This section contains the following topics:• “Working with special effects” (page 335)• “Applying preset styles” (page 337)• “Applying color and tone effects” (page 337)• “Applying Bevel effects” (page 338)• “Applying the Bokeh Blur effect” (page 338)• “Applying Lens Flare effects” (page 340)• “Applying Lighting effects” (page 340)• “Adding photo frames” (page 341)• “Managing plug-ins” (page 342)
Working with special effects
Corel PHOTO-PAINT special effects let you change the appearance of an image. You can apply a special effect to the entire image, or you canuse a mask or a lens to transform only part of an image.
Applying special effects
The following are all the categories of special effects available, each of which includes several different effects. For more information, see“Special effects categories” on page 345.
• 3-D effects • Color transform • Distort
• Art strokes • Contour • Noise
• Blur • Creative • Texture
• Camera • Custom
When you apply a special effect, you can adjust its settings to control how the effect transforms an image. For example, when you use avignette effect to frame an image, you can increase the offset value and decrease the fade value to decrease the size and opacity of the
336 | Corel PHOTO-PAINT 2018 User Guide
frame. With a watercolor effect, you can decrease the size of the brush to show more image detail or increase the size of the brush for anabstract effect.
Applying special effects to part of an image
You can apply special effects to part of an image by defining an editable area. For information about editable areas, see “Working withmasks” on page 269.
You can also use a lens to apply a special effect to part of an image. The following special effects are also preset lens types:
• Jaggy despeckle • Scatter • Invert
• Smooth • Pixelate • Posterize
• Soften • Add noise • Threshold
• Psychedelic • Remove noise • Solarize
• Sharpen
When you use a lens, changes are not applied to the image; instead, they are seen on the screen through the lens. For information aboutlenses, see “Working with lenses” on page 177.
Repeating and fading special effects
You can repeat a special effect to intensify its result. You can also fade an effect to diminish its intensity, and you can define how the effect ismerged with the image. For information about repeating and fading a special effect that you’ve applied, see “Undoing, redoing, repeating,and fading actions” on page 93. For information about merge modes, see “Understanding merge modes” on page 331.
To apply a special effect
1 Click Effects, choose a special effect category, and click an effect.
2 Adjust the settings of the special effect filter.
If the image contains one or more objects, the special effect is applied only to the background or the selected object.
When you preview the special effect in the image window, you can press and hold F2 to hide the special effect dialog box.
Some special effects can affect the shape of the object they are applied to. You can retain an outline of the object’s original shape by
enabling the Lock object transparency button on the Object manager docker. The areas that remain between the outline of
the original shape and the new shape of the object are filled with black. If the Object manager docker is not open, click Window Dockers Object manager.
To apply a special effect to an editable area
1 Define an editable area.
2 Click Effects, choose a special effect category, and click an effect.
3 Adjust the settings in the dialog box.
To repeat a special effect
• Click Effects Repeat, and click one of the following:
Applying special effects | 337
• Repeat [last effect] — applies the last applied effect
• [Last effect] to all visible — applies the last applied effect to all visible elements in an image
• [Last effect] to all selected — applies the last applied effect to all selected objects in an image
Applying preset styles
Some special effects include preset styles. You can apply different preset styles and modify their settings to get the effect you want. Whenyou are satisfied with an effect, you can save the customized settings as a preset style to apply it to other images. When you no longer needa preset style, you can delete it.
The following special effects include preset styles:
• The Boss • Glass • Mesh warp
• Lens flare • Frame • Whirlpool
• Lighting effects • Bump map • Bevel effects
• Spot filter
To apply a preset style
1 Click Effects, choose a special effect category, and click an effect that includes preset styles.
2 Choose a preset style from the Style or Presets list box.
To create a custom preset style
1 Click Effects, choose a special effect category, and click an effect that includes preset styles.
If you want to base the custom preset style on an existing preset style, choose a preset style from the Style or Presets list box.
2 Adjust the settings of the special effect.
3 Click the Add preset button .
4 Type a name in the dialog box.
To delete a custom preset style
1 Click Effects, choose a special effect category, and click an effect that includes preset styles.
2 Choose a preset style from the Style or Presets list box.
3 Click the Delete preset button .
You cannot delete the default or the last-used preset style.
Applying color and tone effects
You can transform the color and tone of an image to produce a special effect. For example, you can create an image that looks like aphotographic negative or flatten the appearance of an image.
338 | Corel PHOTO-PAINT 2018 User Guide
To apply color and tone effects
• Click Image Transform, and click one of the following effects:
• Invert — lets you reverse the colors of an image. Inverting an image creates the appearance of a photographic negative.
• Posterize — lets you reduce the number of tonal values in an image to remove gradations and create larger areas of flat color
• Threshold — lets you specify a brightness value as a threshold. Pixels with a brightness value higher or lower than the thresholdappear as white or black, depending on the threshold option you specify.
If a dialog box appears, adjust the effect settings.
The Deinterlace effect is a transformation effect that lets you remove lines from images. For information about the Deinterlaceeffect, see “Improving scanned images” on page 147.
Applying Bevel effects
Bevel effects let you create the appearance of a raised surface by applying a sloped edge along an editable area. For example, you can usebevel effects to add depth to text or create 3D buttons for the web. You can change the angle, direction and color of the lighting, as well asapply a texture along the beveled edge. You can use a preset style or customize a preset style and save it in the preset list.
To apply a bevel
1 Select an editable area.
2 Click Effects 3D Effects Bevel effect.
3 Click the Bevel tab, and adjust the following sliders:
• Width — lets you specify the width of the bevel in pixels
• Height — lets you specify the depth of the bevel. The height and width settings determine the angle of the bevel.
• Smoothness — lets you specify the roundness of the beveled edge. Higher values produce rounder edges.
4 Click the Lighting tab, and specify the settings you want.
You can also
Change the color of the light Open the Color picker, and click a color.
Apply a texture to the beveled edge Open the Texture picker, and click a texture.
Apply lighting and texture settings to the area inside the bevel Disable the Preserve interior check box.
Applying the Bokeh Blur effect
The Bokeh Blur effect lets you control the amount of blur applied to the outside of an editable area and adjust the transition between thearea in focus and the blurred area. You can also choose between circular and hexagonal aperture shapes. The aperture shape can affect lightpatterns that appear in the out-of-focus areas. This effect is most noticeable in small pinpoints of light on a dark background. For example, itcan be used to simulate the way a camera lens handles lights that are out of focus.
This effect can also be used effectively in combination with the Planar mask tool. For more information, see “Editable areas defined by usingthe Planar Mask tool” on page 272.
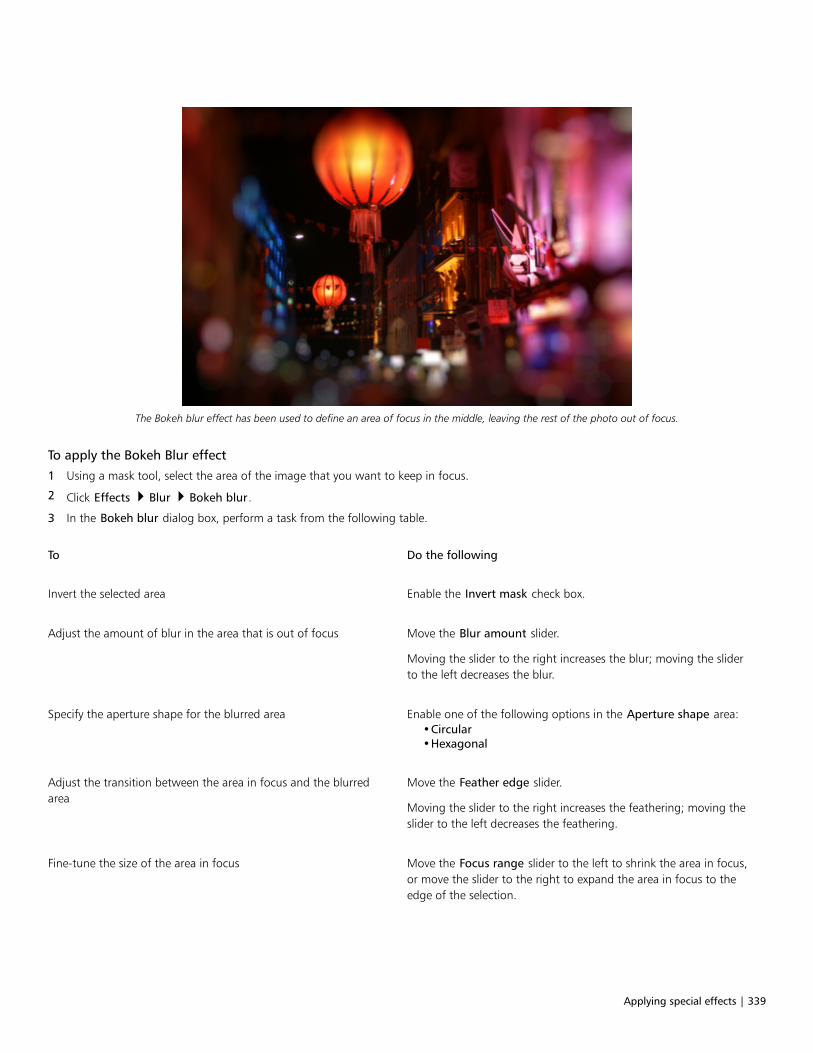
Applying special effects | 339
The Bokeh blur effect has been used to define an area of focus in the middle, leaving the rest of the photo out of focus.
To apply the Bokeh Blur effect
1 Using a mask tool, select the area of the image that you want to keep in focus.
2 Click Effects Blur Bokeh blur.
3 In the Bokeh blur dialog box, perform a task from the following table.
To Do the following
Invert the selected area Enable the Invert mask check box.
Adjust the amount of blur in the area that is out of focus Move the Blur amount slider.
Moving the slider to the right increases the blur; moving the sliderto the left decreases the blur.
Specify the aperture shape for the blurred area Enable one of the following options in the Aperture shape area:•Circular•Hexagonal
Adjust the transition between the area in focus and the blurredarea
Move the Feather edge slider.
Moving the slider to the right increases the feathering; moving theslider to the left decreases the feathering.
Fine-tune the size of the area in focus Move the Focus range slider to the left to shrink the area in focus,or move the slider to the right to expand the area in focus to theedge of the selection.
340 | Corel PHOTO-PAINT 2018 User Guide
Make your selection slightly larger than the area you want to keep in focus, and then fine-tune the edge of the selection by using theFocus range slider.
Applying Lens Flare effects
You can add rings of light to an RGB image to simulate the flare that appears on a photograph when the camera is aimed towards a direct,bright light. For example, you can create the appearance of sunlight reflecting off a surface or create a space scene with nebulas andgalaxies. You can control many elements of a lens flare effect:• flare — the brightest part of the reflected light• halo — a ring of light that appears around the flare• reflection tail — a series of smaller circles moving away from the flare• rays — lines of light that radiate from the flare• anamorphic light — a streak of light that passes through the flare
You can set the position, size, brightness, and color of these elements, and add noise to create a more natural looking effect.
To apply a lens flare
1 Select an image, editable area, or object.
2 Click Effects Camera Lens flare.
3 Click the Flares tab, and set the properties you want.
If you want to modify the halo or reflection tail, choose Halo or Reflection tail from the list box, and modify the settings you want.
4 Click the Rays tab, and set the properties you want.
If you want to modify the anamorphic light, choose Anamorphic light from the list box, and modify the settings you want.
Applying Lighting effects
You can add light sources to an RGB or grayscale image to create the illusion of spotlights, floodlights, or sunlight. You can specify the typeand number of light sources, the intensity of the light, and the color of the light. You can also create embossed reliefs by applying a presetor modifying color channel information. You can use a preset light and texture style, or you can customize a preset style and save it in thepreset list.
To apply a lighting effect
1 Click Effects Camera Lighting effects.
2 Click the Light source tab.
3 Enable the Spotlight option in the Type area.
4In the preview window, drag the Light source selector to set the position and direction for the light.
5 Type a value in the Angle box to set the angle of the light relative to the image.
6 Move any of the following sliders:
• Brightness — lets you set the intensity of the light source
• Cone size — lets you set the width of the light beam. Higher values produce a wider, more diffused light beam.
• Edge — lets you set the diffusion of the light along the edge of the beam
• Opacity — lets you set the density of the light
7 Click the Atmosphere tab, and move the Brightness slider to adjust the brightness of the entire image.
Applying special effects | 341
You can also
Change the color of the light Click the Color picker, and choose a color swatch.
Add a light with the same properties as the last light applied Click the Add light button .
Delete the last light appliedClick the Delete light button .
Hide/Reveal the Light source selector Click the Hide/Reveal Light source button .
Add three-dimensional texture using a preset Click the Presets tab, choose a preset that adds texture to theimage, and click the Image texture tab to set the properties youwant.
Add three-dimensional texture using color channels Click the Image texture tab, choose a color channel from theChannels list box, and modify the settings you want.
Adding photo frames
You can frame photos and other images by adding preset photo frames. Corel Content includes an online collection of photo frames thatyou can access and search. When you find a photo frame you like, you can download it and apply it to an image. For more information, see“Accessing content” on page 107.
You can overlay two or more frames on an image. In addition, you can customize preset frames by changing their color, opacity, edges, andalignment. Customized photo frames can be saved as presets for future use. For more information, see “To create a custom preset style” onpage 337.
To add a photo frame
1 Click Effects Creative Frames.
2 In the Frames dialog box, open the frame picker, and choose a frame.
The filename of the photo frame and its location appear in the View and select frame box next to the frame picker.
You can also
Access online photo frames In the Frame dialog box, open the frame picker, and click More.
The Corel Content - photo frames dialog box appears, displayingthumbnails of available photo frames.
Download an online photo frame Click a thumbnail, and then click Download.
Downloaded photo frames can be accessed from the frame picker.
To apply the photo frame, click OK in the Frame dialog box.
342 | Corel PHOTO-PAINT 2018 User Guide
You can also
Search for an online photo frame Type a search term in the Search box, and press Enter.
Display thumbnails of available photo frames Click the Home button .
Customize a photo frame In the Frames dialog box, click the Modify tab, and choose thesettings you want.
Overlay frames Click an empty row in the View and select frame box, and choosea frame from the frame picker.
Show or hide a frame Click the Eye icon.
Remove a frame from the View and select frame box Click a frame, and click the Delete button.
Watermarked photo frames cannot be downloaded. Content appears watermarked if you have not signed in or do not have therequired membership. To sign in, click the Sign in button in the upper-right corner of the dialog box.
Managing plug-ins
Plug-ins provide additional features and effects for image editing in Corel PHOTO-PAINT. Special-effect plug-in filters process imageinformation and alter an image according to preset specifications.
At startup, Corel PHOTO-PAINT automatically detects and loads plug-ins placed in the plug-ins folder. You can add more plug-ins to theplug-ins folder or you can add plug-ins installed in other locations. Note that third-party plug-ins must be installed in a folder for which youhave read and write access. You can disable plug-ins you are not using.
To install a plug-in from another location
1 Click Tools Options.
2 In the Workspace list of categories, click Plug-ins.
3 Click Add.
4 Choose the folder where the plug-in is stored.
5 Restart the application.
The plug-in appears in the Effects menu.
To disable a plug-in
1 Click Tools Options.
2 In the Workspace list of categories, click Plug-ins.
3 Disable the check box next to the plug-in you want to disable.

Applying special effects | 343
If your plug-ins are installed in the CorelDRAW Graphics Suite 2018\Plug-ins folder, you must add individual plug-ins to the list on thePlug-ins page, and disable the first check box in the list (the CorelDRAW Graphics Suite 2018\Plug-ins folder) before you can disableindividual plug-ins. To add individual plug-ins to the list, see “To install a plug-in from another location” on page 342.
You can also disable a plug-in and remove it from the plug-in list by clicking a plug-in to highlight it and clicking the Remove button.

344 | Corel PHOTO-PAINT 2018 User Guide
Special effects categories | 345
Special effects categories
In this chapter, you will find descriptions of the special effects that are available in the application as well as sample images that illustrateeach effect. The special effects are organized into the following categories:• “3-D special effects” (page 345)• “Art strokes special effects” (page 350)• “Blur special effects” (page 356)• “Camera special effects” (page 361)• “Color transform special effects” (page 365)• “Contour special effects” (page 366)• “Creative special effects” (page 368)• “Custom special effects” (page 372)• “Distort special effects” (page 373)• “Noise special effects” (page 378)• “Sharpen special effects” (page 382)• “Texture special effects” (page 384)
For information about the Sharpen special effects, see “Sharpening images” on page 154. For information about the Remove moiré andRemove noise effects, see “Improving scanned images” on page 147.
For information about applying special effects, see “To apply a special effect” on page 336.
3-D special effects
You can apply three-dimensional special effects to an image to create the illusion of depth.
3-D rotate
The 3-D rotate effect (Effects 3D Effects 3D Rotate) lets you rotate an image by adjusting an interactive, three-dimensional model.Click and drag the interactive, three-dimensional model in the 3D Rotate dialog box to rotate and position the image. Hold down Ctrl andclick a different plane on the three-dimensional model to assign the face of the image to that plane. Enable the Best fit check box to ensurethat the image stays within the boundaries of the image window.
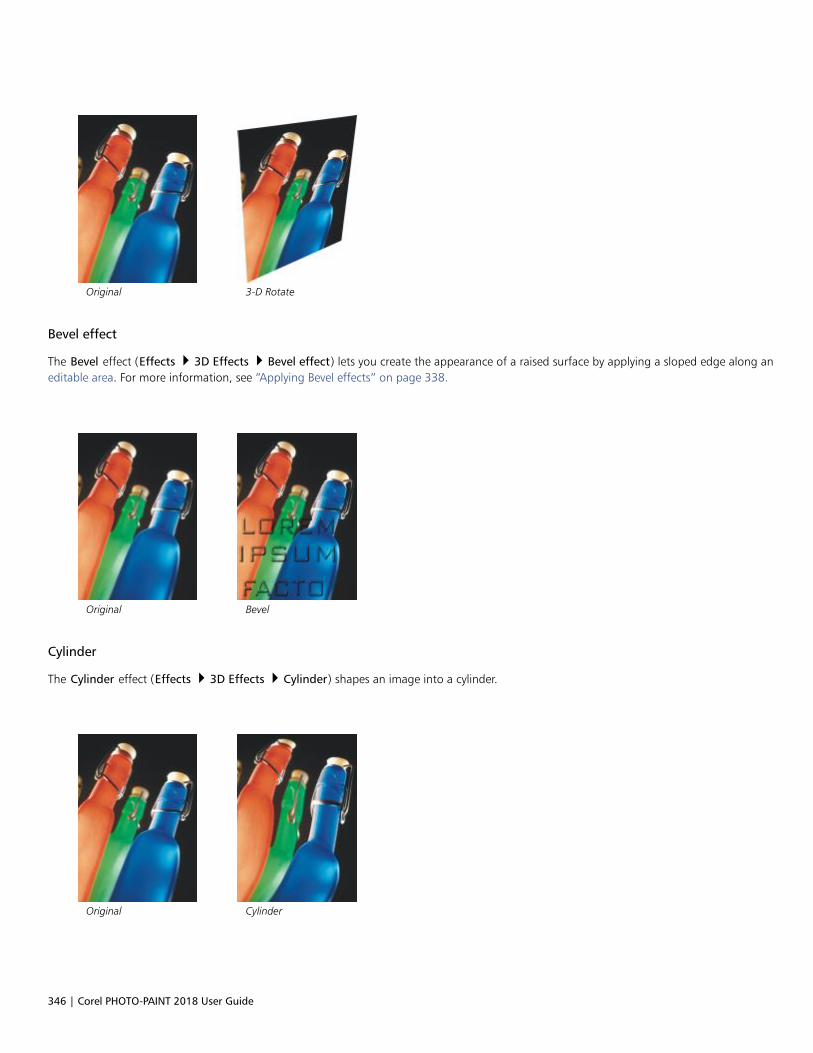
346 | Corel PHOTO-PAINT 2018 User Guide
Original 3-D Rotate
Bevel effect
The Bevel effect (Effects 3D Effects Bevel effect) lets you create the appearance of a raised surface by applying a sloped edge along aneditable area. For more information, see “Applying Bevel effects” on page 338.
Original Bevel
Cylinder
The Cylinder effect (Effects 3D Effects Cylinder) shapes an image into a cylinder.
Original Cylinder
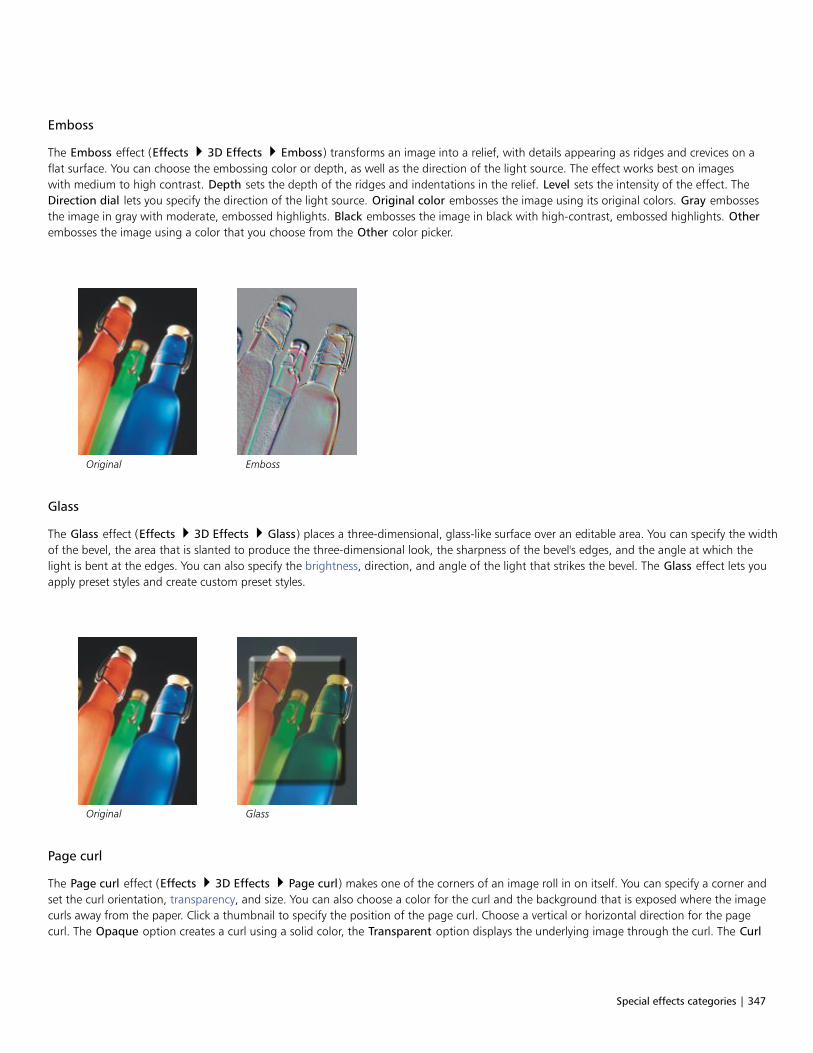
Special effects categories | 347
Emboss
The Emboss effect (Effects 3D Effects Emboss) transforms an image into a relief, with details appearing as ridges and crevices on aflat surface. You can choose the embossing color or depth, as well as the direction of the light source. The effect works best on imageswith medium to high contrast. Depth sets the depth of the ridges and indentations in the relief. Level sets the intensity of the effect. TheDirection dial lets you specify the direction of the light source. Original color embosses the image using its original colors. Gray embossesthe image in gray with moderate, embossed highlights. Black embosses the image in black with high-contrast, embossed highlights. Otherembosses the image using a color that you choose from the Other color picker.
Original Emboss
Glass
The Glass effect (Effects 3D Effects Glass) places a three-dimensional, glass-like surface over an editable area. You can specify the widthof the bevel, the area that is slanted to produce the three-dimensional look, the sharpness of the bevel's edges, and the angle at which thelight is bent at the edges. You can also specify the brightness, direction, and angle of the light that strikes the bevel. The Glass effect lets youapply preset styles and create custom preset styles.
Original Glass
Page curl
The Page curl effect (Effects 3D Effects Page curl) makes one of the corners of an image roll in on itself. You can specify a corner andset the curl orientation, transparency, and size. You can also choose a color for the curl and the background that is exposed where the imagecurls away from the paper. Click a thumbnail to specify the position of the page curl. Choose a vertical or horizontal direction for the pagecurl. The Opaque option creates a curl using a solid color, the Transparent option displays the underlying image through the curl. The Curl
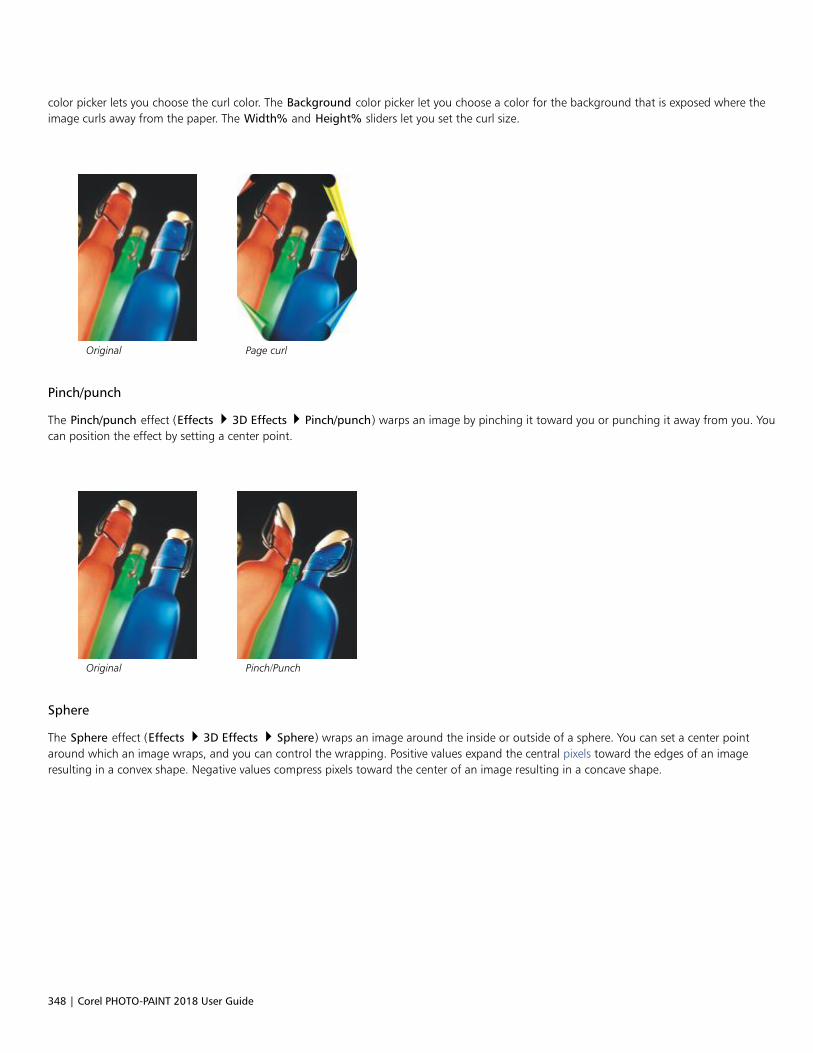
348 | Corel PHOTO-PAINT 2018 User Guide
color picker lets you choose the curl color. The Background color picker let you choose a color for the background that is exposed where theimage curls away from the paper. The Width% and Height% sliders let you set the curl size.
Original Page curl
Pinch/punch
The Pinch/punch effect (Effects 3D Effects Pinch/punch) warps an image by pinching it toward you or punching it away from you. Youcan position the effect by setting a center point.
Original Pinch/Punch
Sphere
The Sphere effect (Effects 3D Effects Sphere) wraps an image around the inside or outside of a sphere. You can set a center pointaround which an image wraps, and you can control the wrapping. Positive values expand the central pixels toward the edges of an imageresulting in a convex shape. Negative values compress pixels toward the center of an image resulting in a concave shape.
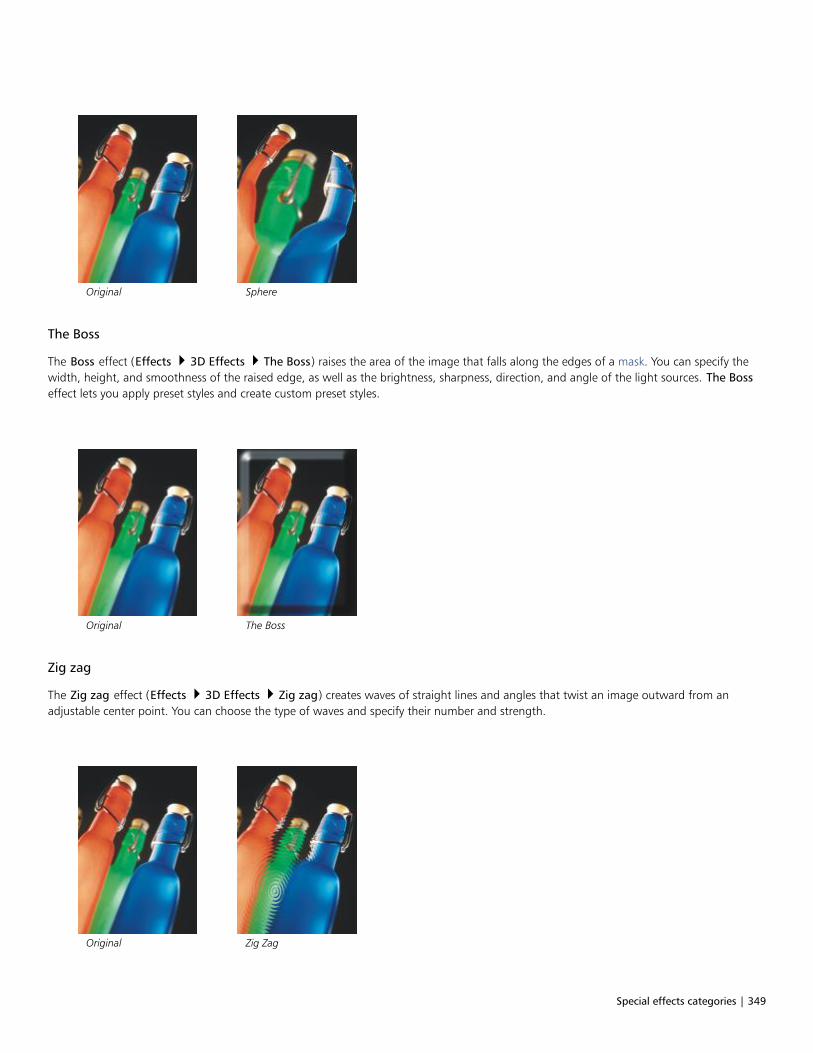
Special effects categories | 349
Original Sphere
The Boss
The Boss effect (Effects 3D Effects The Boss) raises the area of the image that falls along the edges of a mask. You can specify thewidth, height, and smoothness of the raised edge, as well as the brightness, sharpness, direction, and angle of the light sources. The Bosseffect lets you apply preset styles and create custom preset styles.
Original The Boss
Zig zag
The Zig zag effect (Effects 3D Effects Zig zag) creates waves of straight lines and angles that twist an image outward from anadjustable center point. You can choose the type of waves and specify their number and strength.
Original Zig Zag
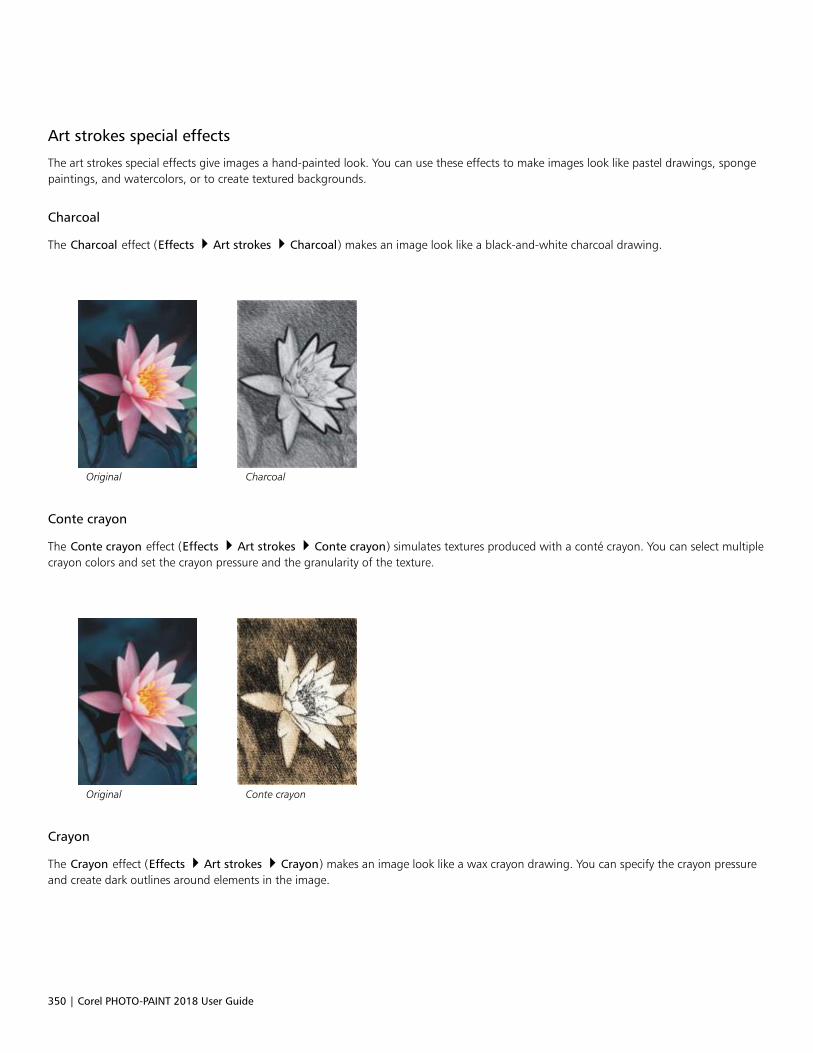
350 | Corel PHOTO-PAINT 2018 User Guide
Art strokes special effects
The art strokes special effects give images a hand-painted look. You can use these effects to make images look like pastel drawings, spongepaintings, and watercolors, or to create textured backgrounds.
Charcoal
The Charcoal effect (Effects Art strokes Charcoal) makes an image look like a black-and-white charcoal drawing.
Original Charcoal
Conte crayon
The Conte crayon effect (Effects Art strokes Conte crayon) simulates textures produced with a conté crayon. You can select multiplecrayon colors and set the crayon pressure and the granularity of the texture.
Original Conte crayon
Crayon
The Crayon effect (Effects Art strokes Crayon) makes an image look like a wax crayon drawing. You can specify the crayon pressureand create dark outlines around elements in the image.
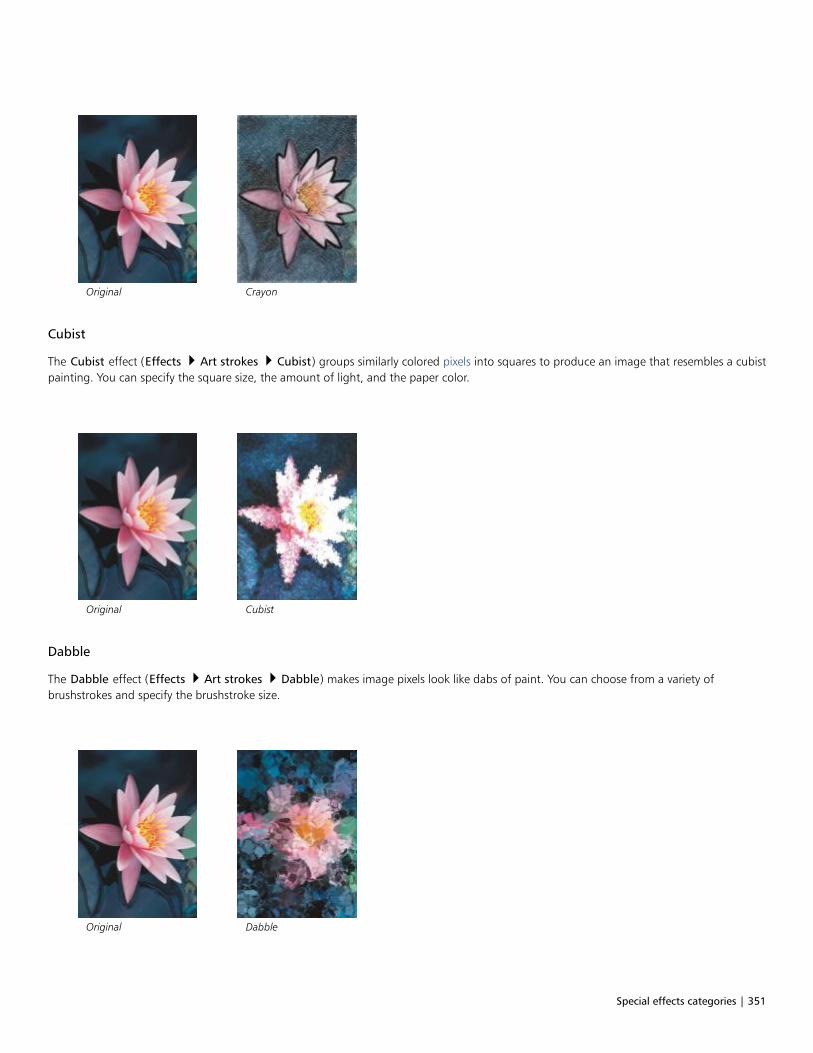
Special effects categories | 351
Original Crayon
Cubist
The Cubist effect (Effects Art strokes Cubist) groups similarly colored pixels into squares to produce an image that resembles a cubistpainting. You can specify the square size, the amount of light, and the paper color.
Original Cubist
Dabble
The Dabble effect (Effects Art strokes Dabble) makes image pixels look like dabs of paint. You can choose from a variety ofbrushstrokes and specify the brushstroke size.
Original Dabble
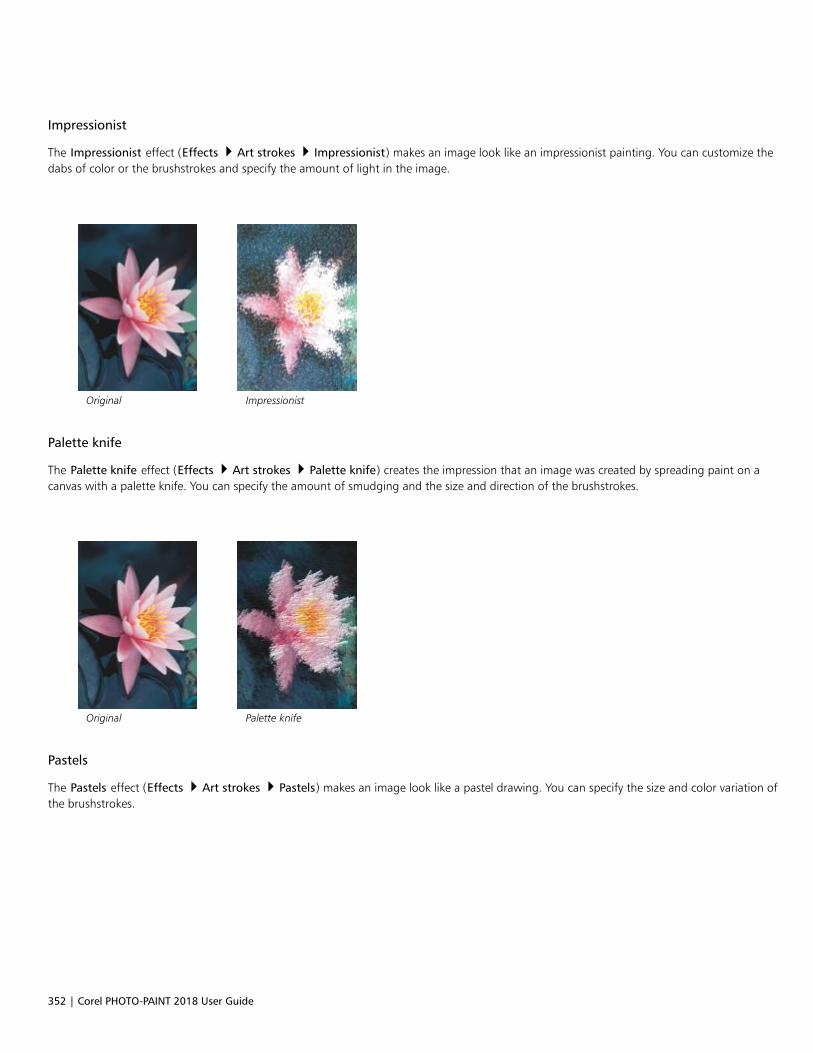
352 | Corel PHOTO-PAINT 2018 User Guide
Impressionist
The Impressionist effect (Effects Art strokes Impressionist) makes an image look like an impressionist painting. You can customize thedabs of color or the brushstrokes and specify the amount of light in the image.
Original Impressionist
Palette knife
The Palette knife effect (Effects Art strokes Palette knife) creates the impression that an image was created by spreading paint on acanvas with a palette knife. You can specify the amount of smudging and the size and direction of the brushstrokes.
Original Palette knife
Pastels
The Pastels effect (Effects Art strokes Pastels) makes an image look like a pastel drawing. You can specify the size and color variation ofthe brushstrokes.
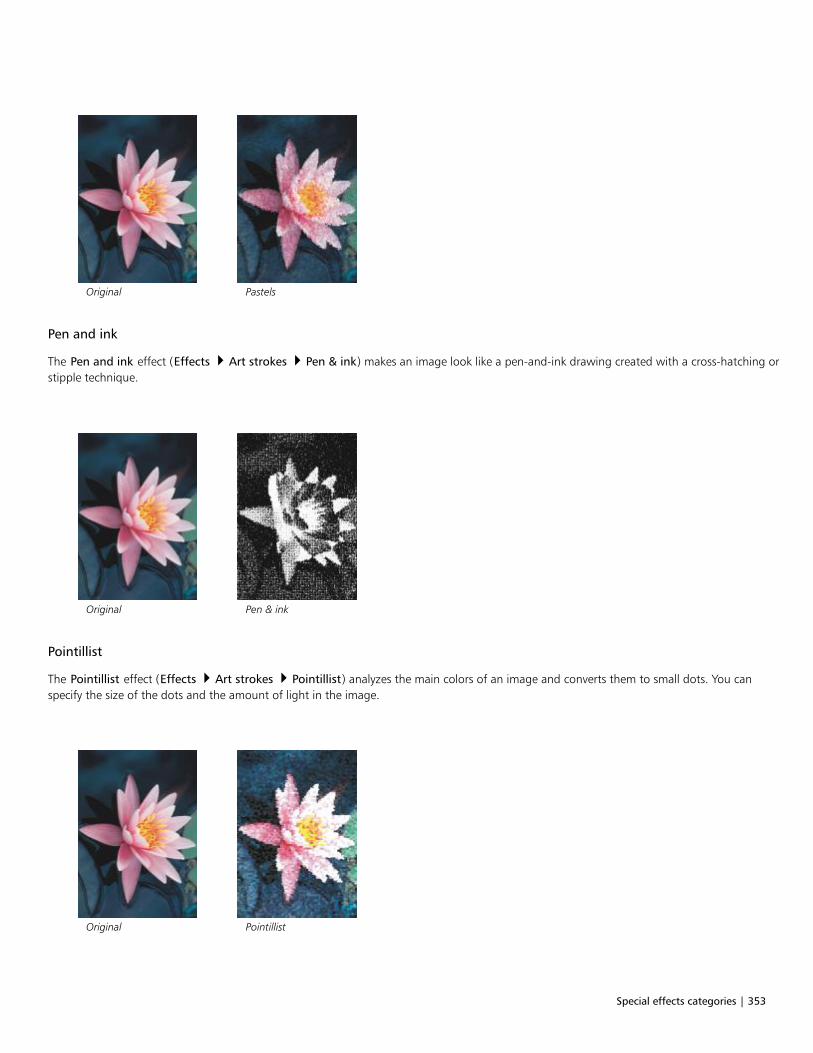
Special effects categories | 353
Original Pastels
Pen and ink
The Pen and ink effect (Effects Art strokes Pen & ink) makes an image look like a pen-and-ink drawing created with a cross-hatching orstipple technique.
Original Pen & ink
Pointillist
The Pointillist effect (Effects Art strokes Pointillist) analyzes the main colors of an image and converts them to small dots. You canspecify the size of the dots and the amount of light in the image.
Original Pointillist
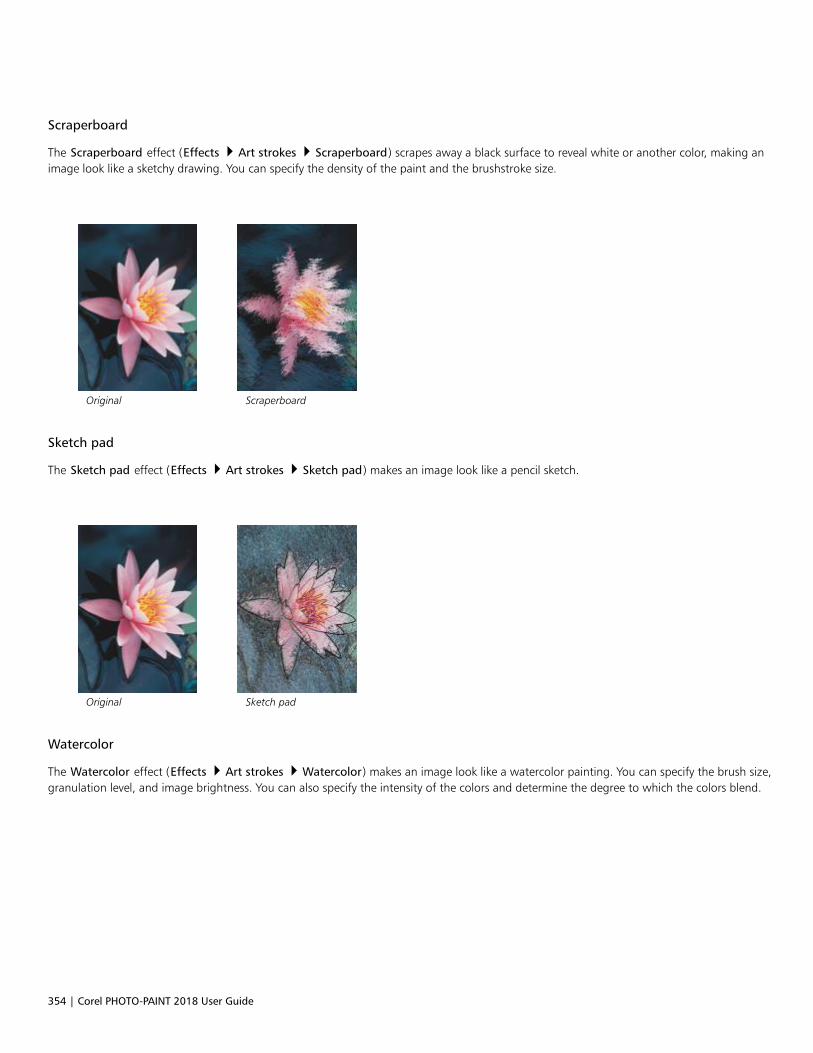
354 | Corel PHOTO-PAINT 2018 User Guide
Scraperboard
The Scraperboard effect (Effects Art strokes Scraperboard) scrapes away a black surface to reveal white or another color, making animage look like a sketchy drawing. You can specify the density of the paint and the brushstroke size.
Original Scraperboard
Sketch pad
The Sketch pad effect (Effects Art strokes Sketch pad) makes an image look like a pencil sketch.
Original Sketch pad
Watercolor
The Watercolor effect (Effects Art strokes Watercolor) makes an image look like a watercolor painting. You can specify the brush size,granulation level, and image brightness. You can also specify the intensity of the colors and determine the degree to which the colors blend.
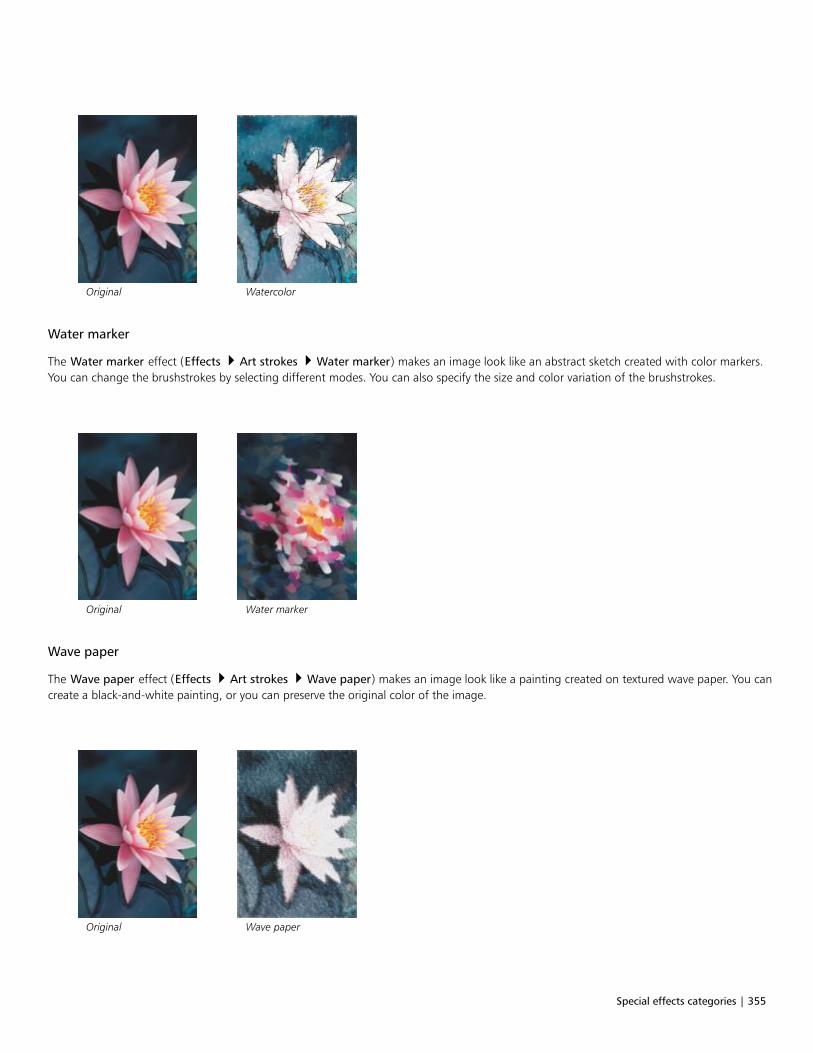
Special effects categories | 355
Original Watercolor
Water marker
The Water marker effect (Effects Art strokes Water marker) makes an image look like an abstract sketch created with color markers.You can change the brushstrokes by selecting different modes. You can also specify the size and color variation of the brushstrokes.
Original Water marker
Wave paper
The Wave paper effect (Effects Art strokes Wave paper) makes an image look like a painting created on textured wave paper. You cancreate a black-and-white painting, or you can preserve the original color of the image.
Original Wave paper
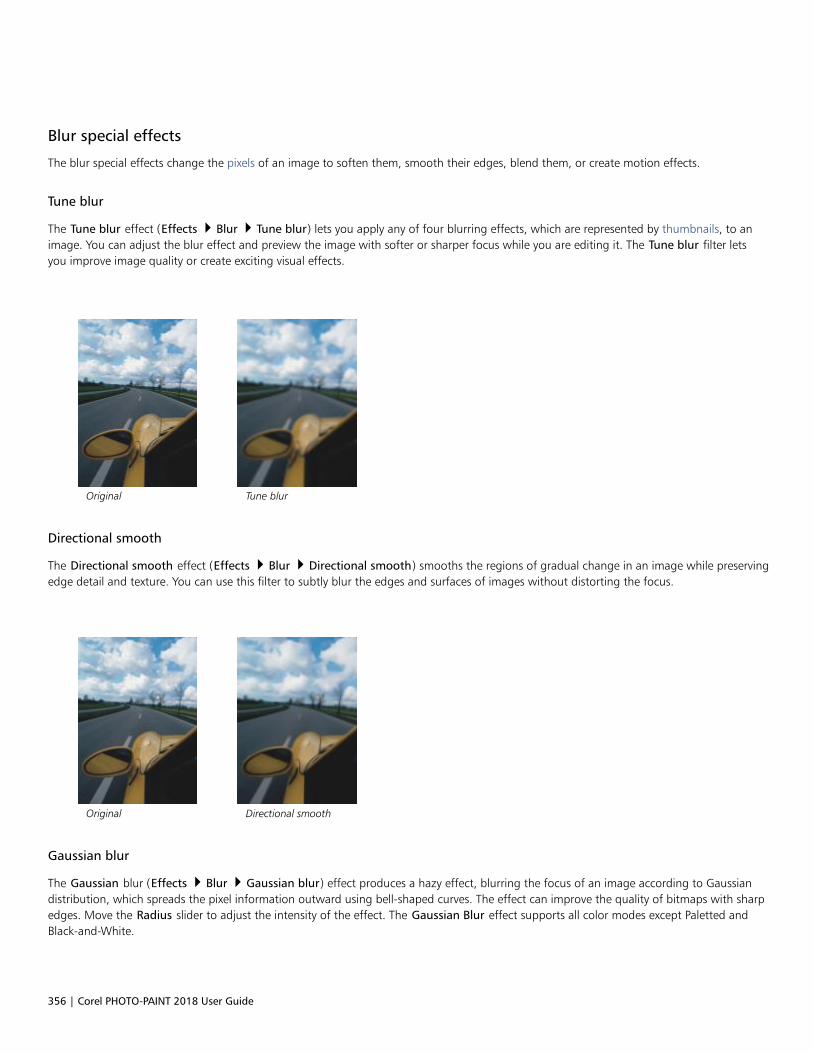
356 | Corel PHOTO-PAINT 2018 User Guide
Blur special effects
The blur special effects change the pixels of an image to soften them, smooth their edges, blend them, or create motion effects.
Tune blur
The Tune blur effect (Effects Blur Tune blur) lets you apply any of four blurring effects, which are represented by thumbnails, to animage. You can adjust the blur effect and preview the image with softer or sharper focus while you are editing it. The Tune blur filter letsyou improve image quality or create exciting visual effects.
Original Tune blur
Directional smooth
The Directional smooth effect (Effects Blur Directional smooth) smooths the regions of gradual change in an image while preservingedge detail and texture. You can use this filter to subtly blur the edges and surfaces of images without distorting the focus.
Original Directional smooth
Gaussian blur
The Gaussian blur (Effects Blur Gaussian blur) effect produces a hazy effect, blurring the focus of an image according to Gaussiandistribution, which spreads the pixel information outward using bell-shaped curves. The effect can improve the quality of bitmaps with sharpedges. Move the Radius slider to adjust the intensity of the effect. The Gaussian Blur effect supports all color modes except Paletted andBlack-and-White.
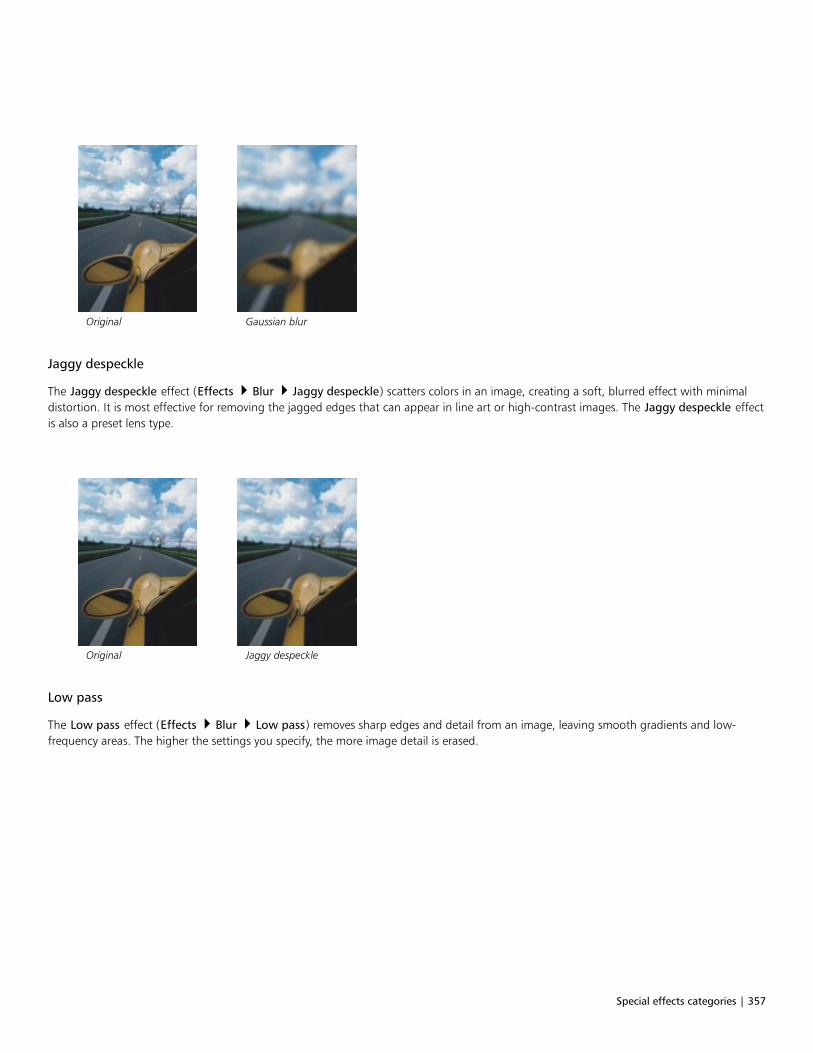
Special effects categories | 357
Original Gaussian blur
Jaggy despeckle
The Jaggy despeckle effect (Effects Blur Jaggy despeckle) scatters colors in an image, creating a soft, blurred effect with minimaldistortion. It is most effective for removing the jagged edges that can appear in line art or high-contrast images. The Jaggy despeckle effectis also a preset lens type.
Original Jaggy despeckle
Low pass
The Low pass effect (Effects Blur Low pass) removes sharp edges and detail from an image, leaving smooth gradients and low-frequency areas. The higher the settings you specify, the more image detail is erased.
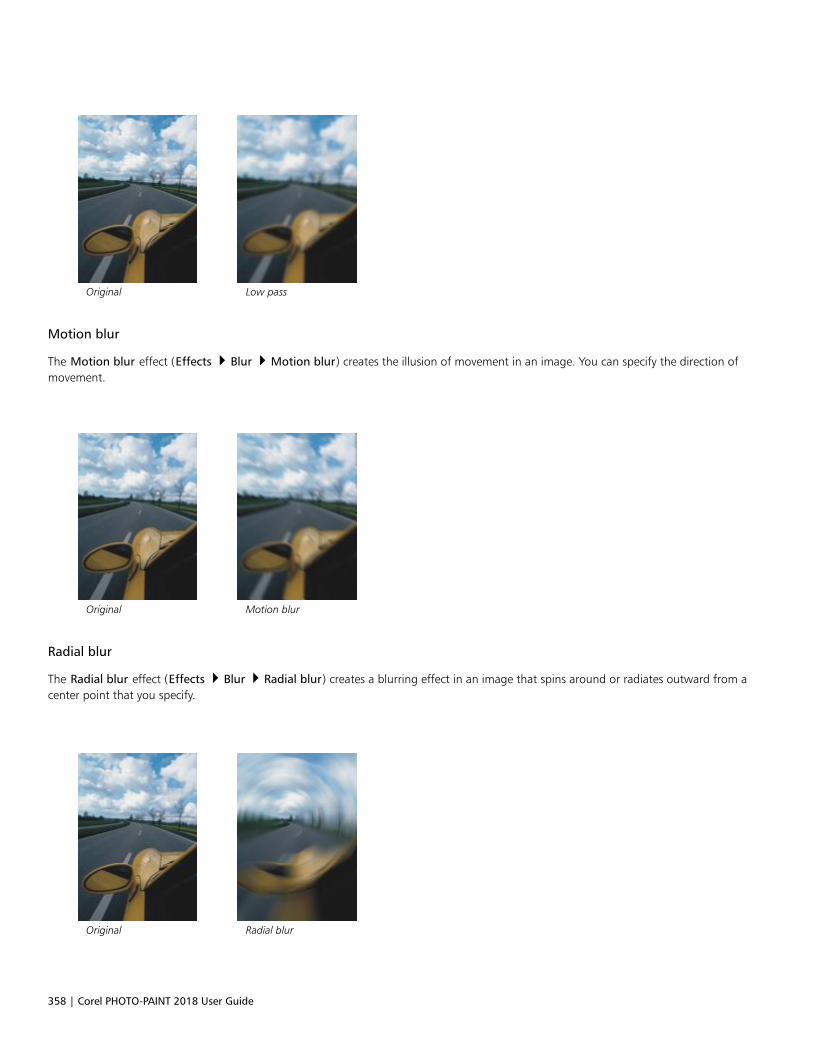
358 | Corel PHOTO-PAINT 2018 User Guide
Original Low pass
Motion blur
The Motion blur effect (Effects Blur Motion blur) creates the illusion of movement in an image. You can specify the direction ofmovement.
Original Motion blur
Radial blur
The Radial blur effect (Effects Blur Radial blur) creates a blurring effect in an image that spins around or radiates outward from acenter point that you specify.
Original Radial blur
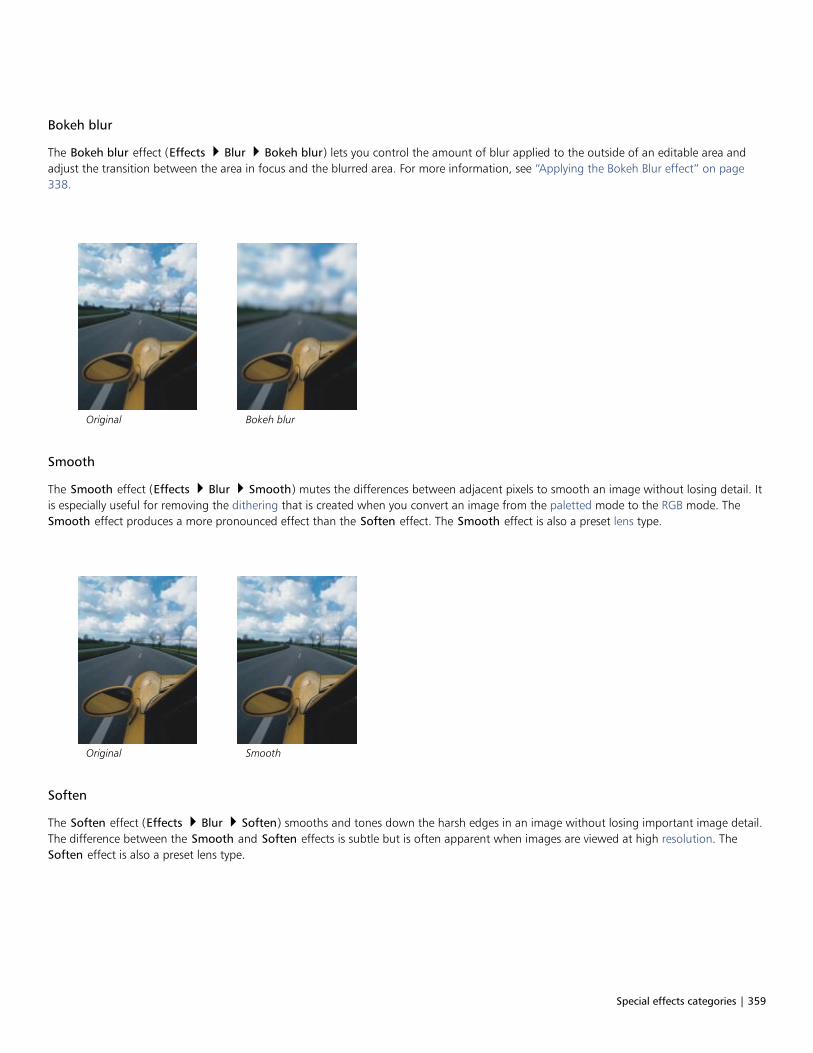
Special effects categories | 359
Bokeh blur
The Bokeh blur effect (Effects Blur Bokeh blur) lets you control the amount of blur applied to the outside of an editable area andadjust the transition between the area in focus and the blurred area. For more information, see “Applying the Bokeh Blur effect” on page338.
Original Bokeh blur
Smooth
The Smooth effect (Effects Blur Smooth) mutes the differences between adjacent pixels to smooth an image without losing detail. Itis especially useful for removing the dithering that is created when you convert an image from the paletted mode to the RGB mode. TheSmooth effect produces a more pronounced effect than the Soften effect. The Smooth effect is also a preset lens type.
Original Smooth
Soften
The Soften effect (Effects Blur Soften) smooths and tones down the harsh edges in an image without losing important image detail.The difference between the Smooth and Soften effects is subtle but is often apparent when images are viewed at high resolution. TheSoften effect is also a preset lens type.
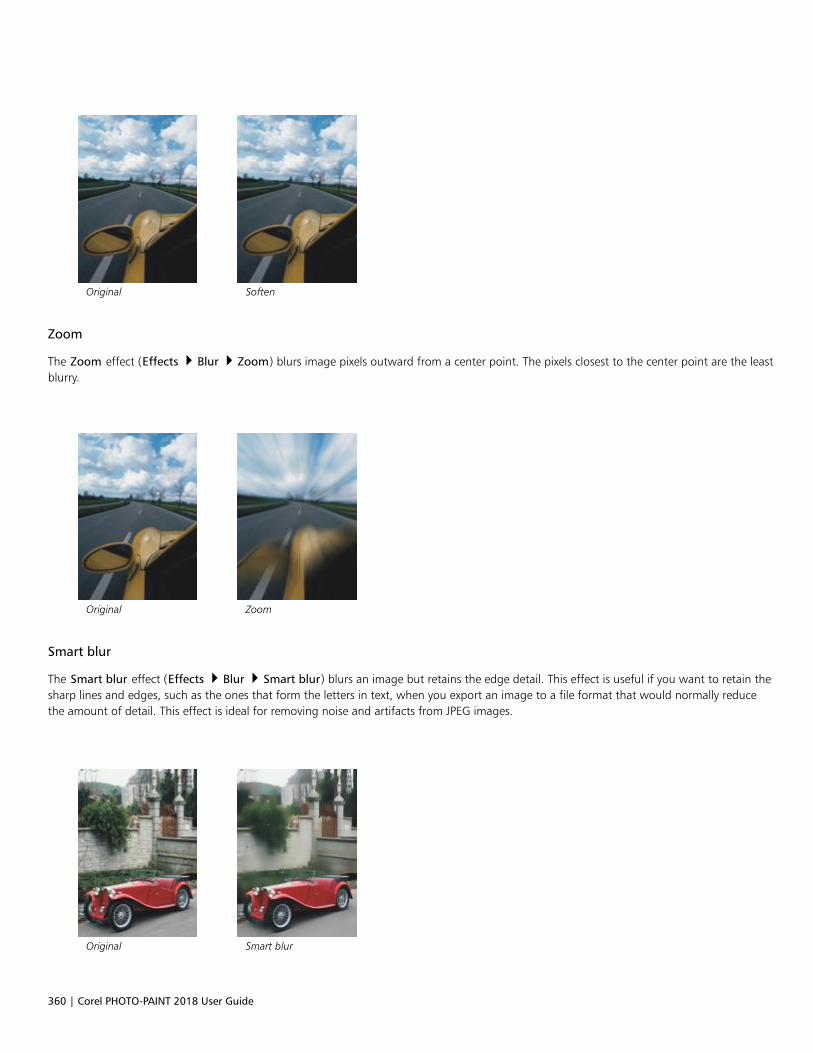
360 | Corel PHOTO-PAINT 2018 User Guide
Original Soften
Zoom
The Zoom effect (Effects Blur Zoom) blurs image pixels outward from a center point. The pixels closest to the center point are the leastblurry.
Original Zoom
Smart blur
The Smart blur effect (Effects Blur Smart blur) blurs an image but retains the edge detail. This effect is useful if you want to retain thesharp lines and edges, such as the ones that form the letters in text, when you export an image to a file format that would normally reducethe amount of detail. This effect is ideal for removing noise and artifacts from JPEG images.
Original Smart blur
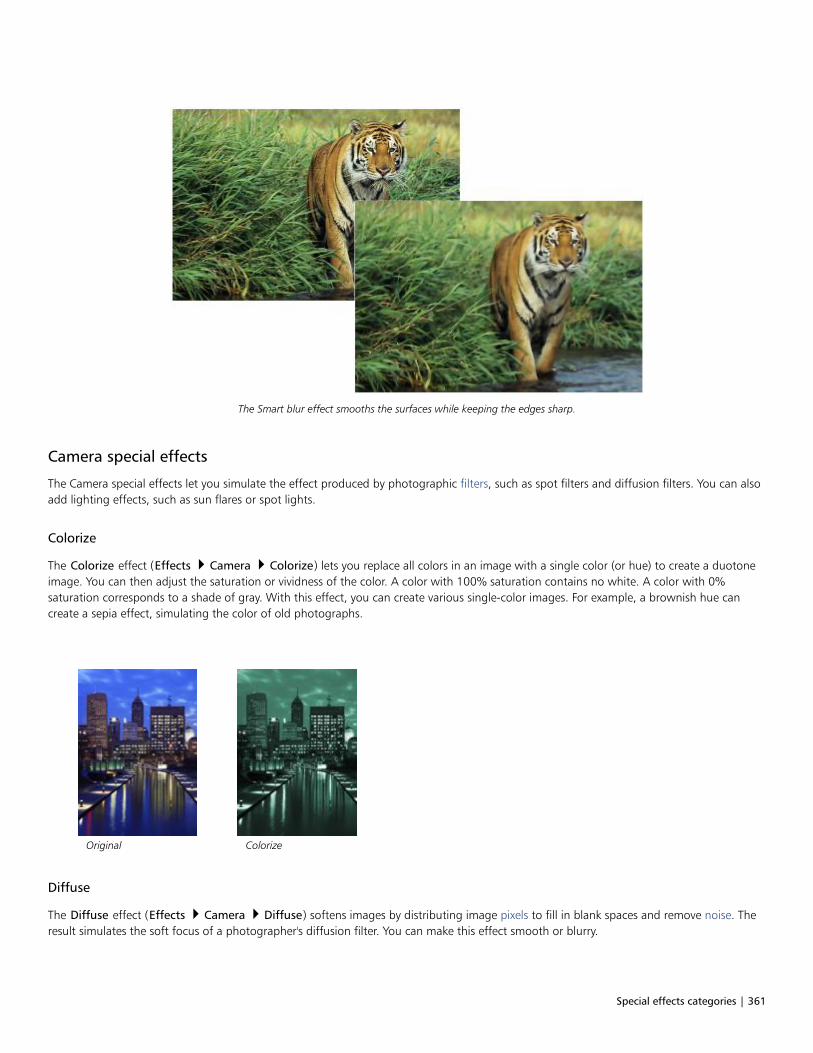
Special effects categories | 361
The Smart blur effect smooths the surfaces while keeping the edges sharp.
Camera special effects
The Camera special effects let you simulate the effect produced by photographic filters, such as spot filters and diffusion filters. You can alsoadd lighting effects, such as sun flares or spot lights.
Colorize
The Colorize effect (Effects Camera Colorize) lets you replace all colors in an image with a single color (or hue) to create a duotoneimage. You can then adjust the saturation or vividness of the color. A color with 100% saturation contains no white. A color with 0%saturation corresponds to a shade of gray. With this effect, you can create various single-color images. For example, a brownish hue cancreate a sepia effect, simulating the color of old photographs.
Original Colorize
Diffuse
The Diffuse effect (Effects Camera Diffuse) softens images by distributing image pixels to fill in blank spaces and remove noise. Theresult simulates the soft focus of a photographer's diffusion filter. You can make this effect smooth or blurry.
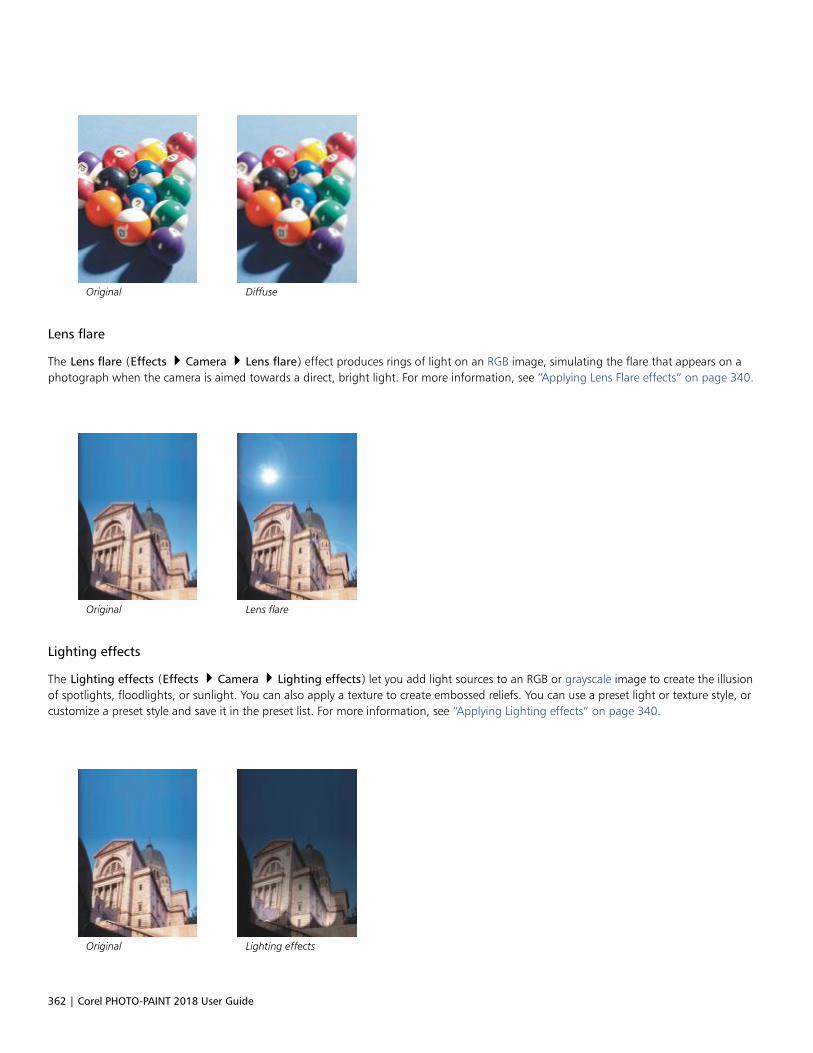
362 | Corel PHOTO-PAINT 2018 User Guide
Original Diffuse
Lens flare
The Lens flare (Effects Camera Lens flare) effect produces rings of light on an RGB image, simulating the flare that appears on aphotograph when the camera is aimed towards a direct, bright light. For more information, see “Applying Lens Flare effects” on page 340.
Original Lens flare
Lighting effects
The Lighting effects (Effects Camera Lighting effects) let you add light sources to an RGB or grayscale image to create the illusionof spotlights, floodlights, or sunlight. You can also apply a texture to create embossed reliefs. You can use a preset light or texture style, orcustomize a preset style and save it in the preset list. For more information, see “Applying Lighting effects” on page 340.
Original Lighting effects
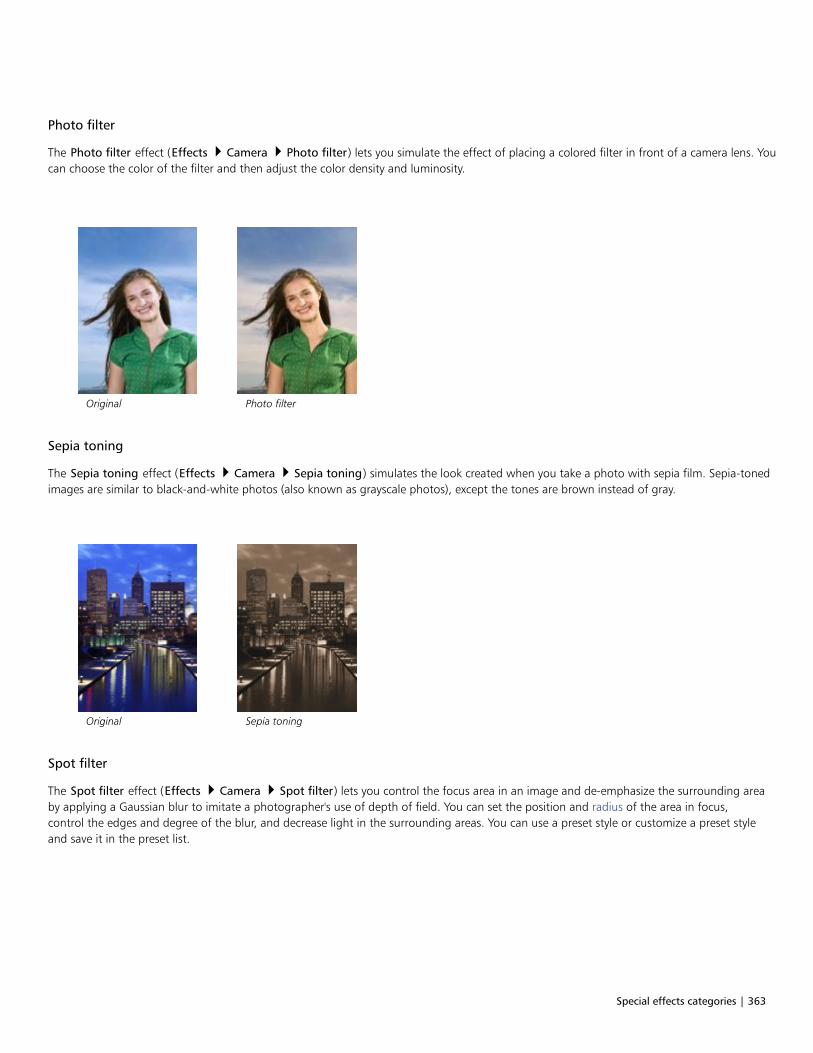
Special effects categories | 363
Photo filter
The Photo filter effect (Effects Camera Photo filter) lets you simulate the effect of placing a colored filter in front of a camera lens. Youcan choose the color of the filter and then adjust the color density and luminosity.
Original Photo filter
Sepia toning
The Sepia toning effect (Effects Camera Sepia toning) simulates the look created when you take a photo with sepia film. Sepia-tonedimages are similar to black-and-white photos (also known as grayscale photos), except the tones are brown instead of gray.
Original Sepia toning
Spot filter
The Spot filter effect (Effects Camera Spot filter) lets you control the focus area in an image and de-emphasize the surrounding areaby applying a Gaussian blur to imitate a photographer's use of depth of field. You can set the position and radius of the area in focus,control the edges and degree of the blur, and decrease light in the surrounding areas. You can use a preset style or customize a preset styleand save it in the preset list.
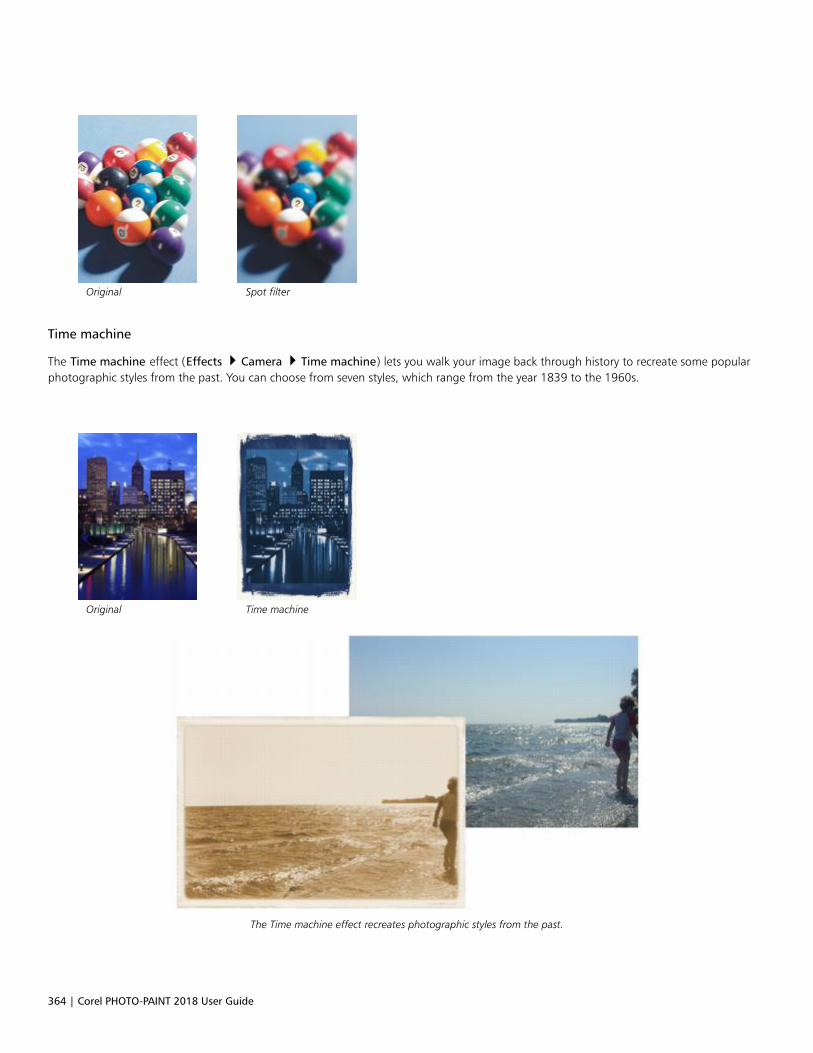
364 | Corel PHOTO-PAINT 2018 User Guide
Original Spot filter
Time machine
The Time machine effect (Effects Camera Time machine) lets you walk your image back through history to recreate some popularphotographic styles from the past. You can choose from seven styles, which range from the year 1839 to the 1960s.
Original Time machine
The Time machine effect recreates photographic styles from the past.
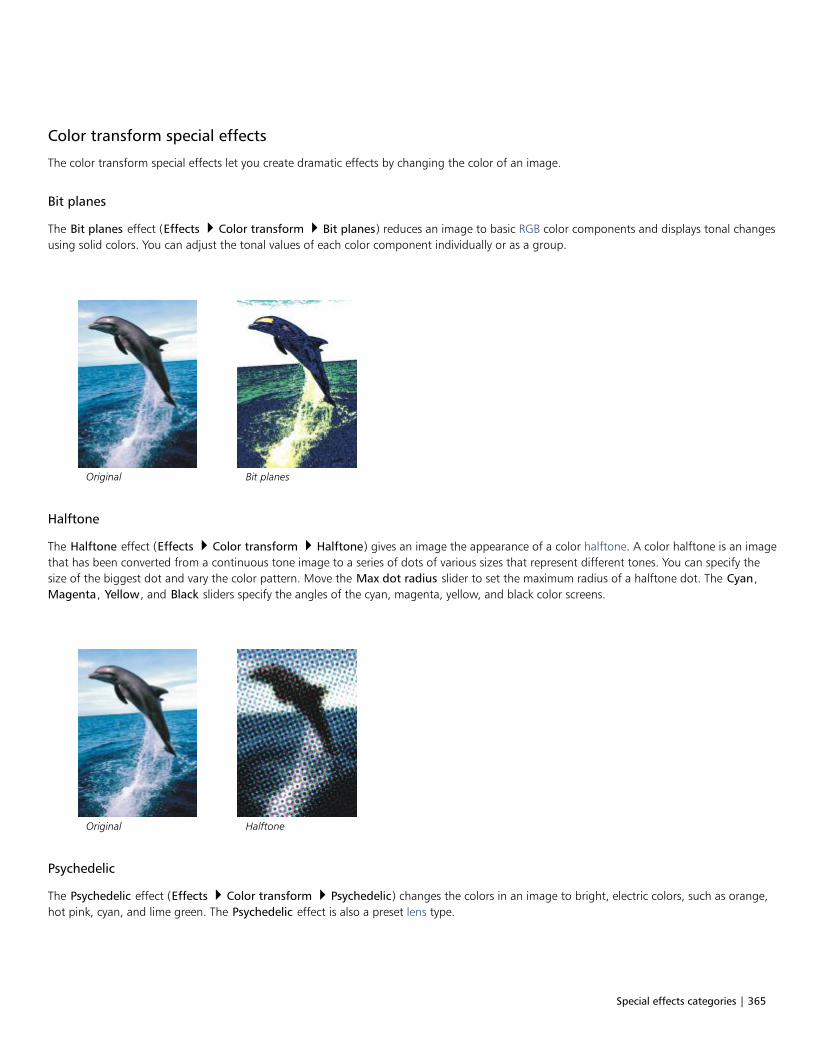
Special effects categories | 365
Color transform special effects
The color transform special effects let you create dramatic effects by changing the color of an image.
Bit planes
The Bit planes effect (Effects Color transform Bit planes) reduces an image to basic RGB color components and displays tonal changesusing solid colors. You can adjust the tonal values of each color component individually or as a group.
Original Bit planes
Halftone
The Halftone effect (Effects Color transform Halftone) gives an image the appearance of a color halftone. A color halftone is an imagethat has been converted from a continuous tone image to a series of dots of various sizes that represent different tones. You can specify thesize of the biggest dot and vary the color pattern. Move the Max dot radius slider to set the maximum radius of a halftone dot. The Cyan,Magenta, Yellow, and Black sliders specify the angles of the cyan, magenta, yellow, and black color screens.
Original Halftone
Psychedelic
The Psychedelic effect (Effects Color transform Psychedelic) changes the colors in an image to bright, electric colors, such as orange,hot pink, cyan, and lime green. The Psychedelic effect is also a preset lens type.
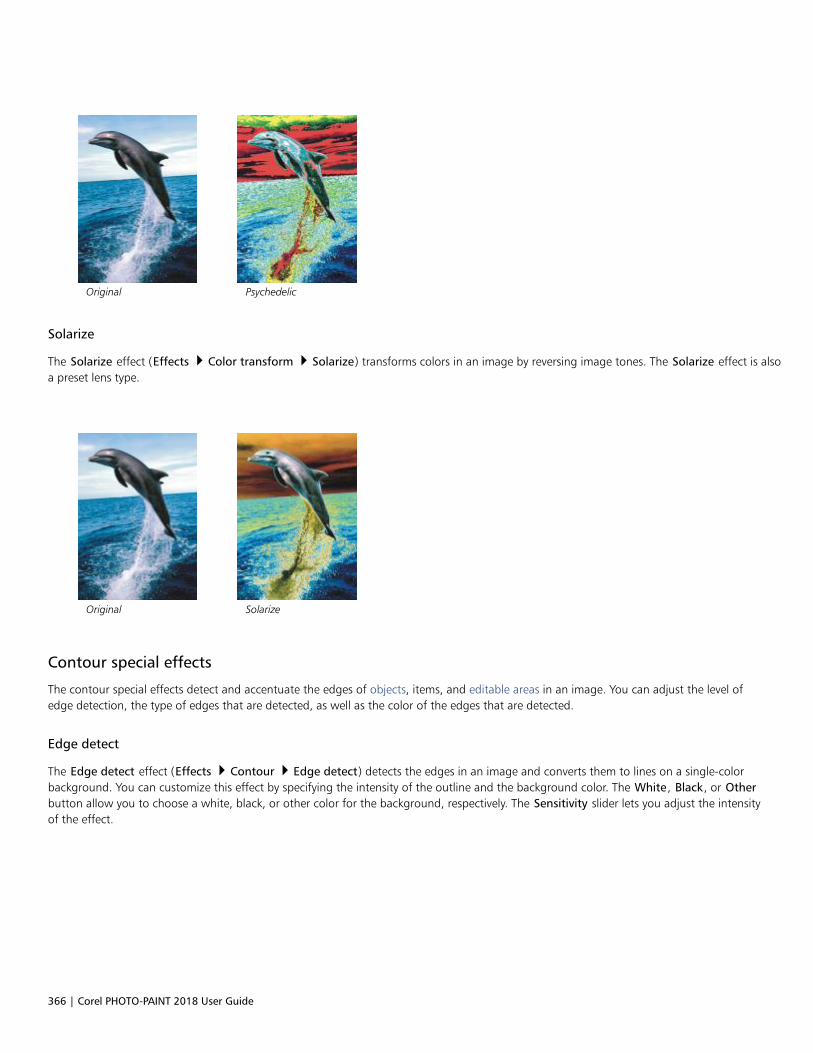
366 | Corel PHOTO-PAINT 2018 User Guide
Original Psychedelic
Solarize
The Solarize effect (Effects Color transform Solarize) transforms colors in an image by reversing image tones. The Solarize effect is alsoa preset lens type.
Original Solarize
Contour special effects
The contour special effects detect and accentuate the edges of objects, items, and editable areas in an image. You can adjust the level ofedge detection, the type of edges that are detected, as well as the color of the edges that are detected.
Edge detect
The Edge detect effect (Effects Contour Edge detect) detects the edges in an image and converts them to lines on a single-colorbackground. You can customize this effect by specifying the intensity of the outline and the background color. The White, Black, or Otherbutton allow you to choose a white, black, or other color for the background, respectively. The Sensitivity slider lets you adjust the intensityof the effect.
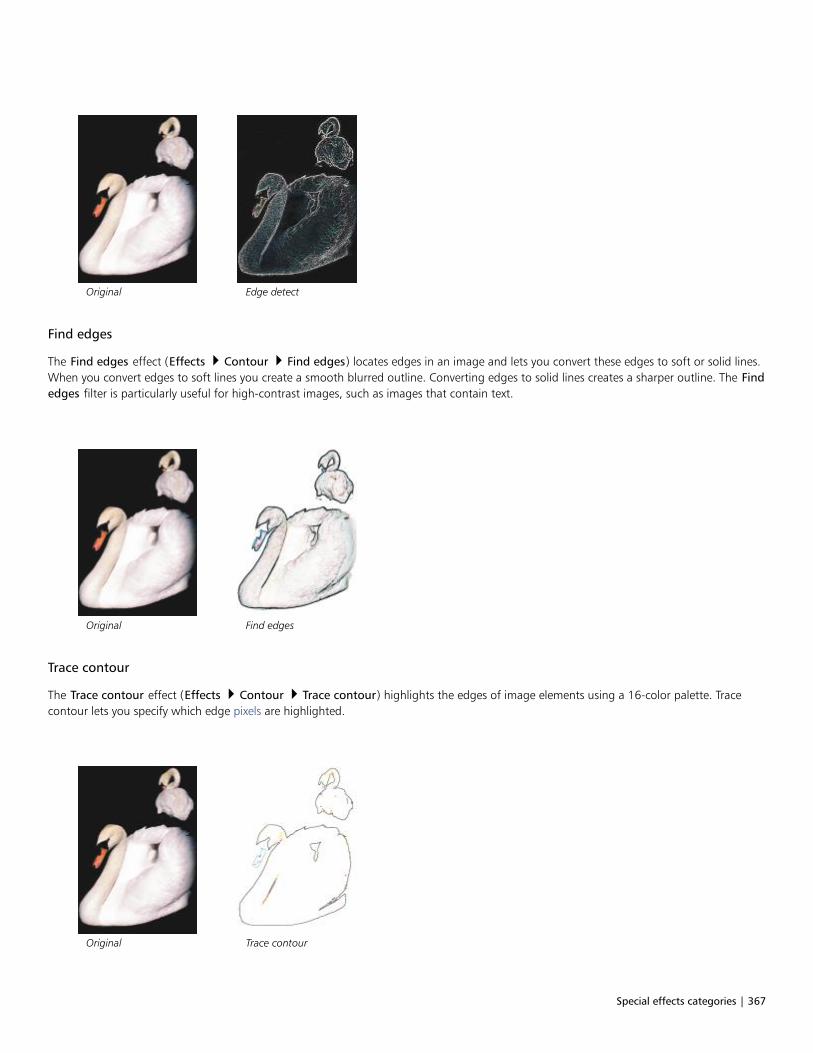
Special effects categories | 367
Original Edge detect
Find edges
The Find edges effect (Effects Contour Find edges) locates edges in an image and lets you convert these edges to soft or solid lines.When you convert edges to soft lines you create a smooth blurred outline. Converting edges to solid lines creates a sharper outline. The Findedges filter is particularly useful for high-contrast images, such as images that contain text.
Original Find edges
Trace contour
The Trace contour effect (Effects Contour Trace contour) highlights the edges of image elements using a 16-color palette. Tracecontour lets you specify which edge pixels are highlighted.
Original Trace contour

368 | Corel PHOTO-PAINT 2018 User Guide
Creative special effects
The creative special effects use a variety of shapes and textures to transform an image into abstract art. They use crystals, fabric, glass,frames, or whirlpools as the foundation for creating something new.
Crystalize
The Crystalize effect (Effects Creative Crystalize) makes an image look as though it was created with crystals. You can control the effectby specifying the dimensions of the crystals. Lower values produce smaller crystals, causing less distortion. Higher values produce largercrystals and create a more abstract effect.
Original Crystalize
Fabric
The Fabric effect (Effects Creative Fabric) makes an image look as though it was created with textiles, such as needlepoint, rughooking, quilts, strings, ribbons, and tissue collage. You can specify the size and angle of the textile, as well as the brightness.
Original Fabric
Frame
The Frame effect (Effects Creative Frame) lets you frame an image with a preset frame, another image, or an area defined by a mask.You can change the color, opacity, orientation, and alignment of a frame, and you can save customized settings as preset styles. You canalso update, load, and delete preset frame settings. To customize a frame, click the Modify tab. Opacity sets the opacity of the frame. Blur/Feather blurs or feathers the edge of the frame with the contents. Horizontal and Vertical set the horizontal and vertical frame size. The
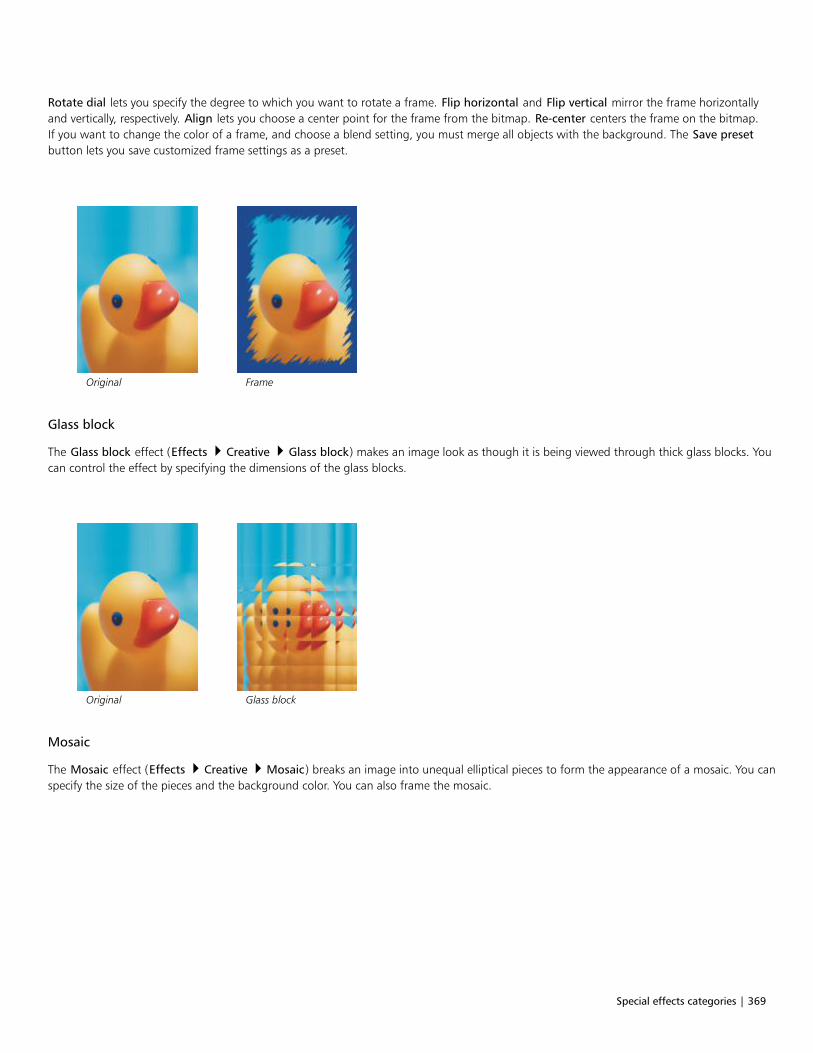
Special effects categories | 369
Rotate dial lets you specify the degree to which you want to rotate a frame. Flip horizontal and Flip vertical mirror the frame horizontallyand vertically, respectively. Align lets you choose a center point for the frame from the bitmap. Re-center centers the frame on the bitmap.If you want to change the color of a frame, and choose a blend setting, you must merge all objects with the background. The Save presetbutton lets you save customized frame settings as a preset.
Original Frame
Glass block
The Glass block effect (Effects Creative Glass block) makes an image look as though it is being viewed through thick glass blocks. Youcan control the effect by specifying the dimensions of the glass blocks.
Original Glass block
Mosaic
The Mosaic effect (Effects Creative Mosaic) breaks an image into unequal elliptical pieces to form the appearance of a mosaic. You canspecify the size of the pieces and the background color. You can also frame the mosaic.
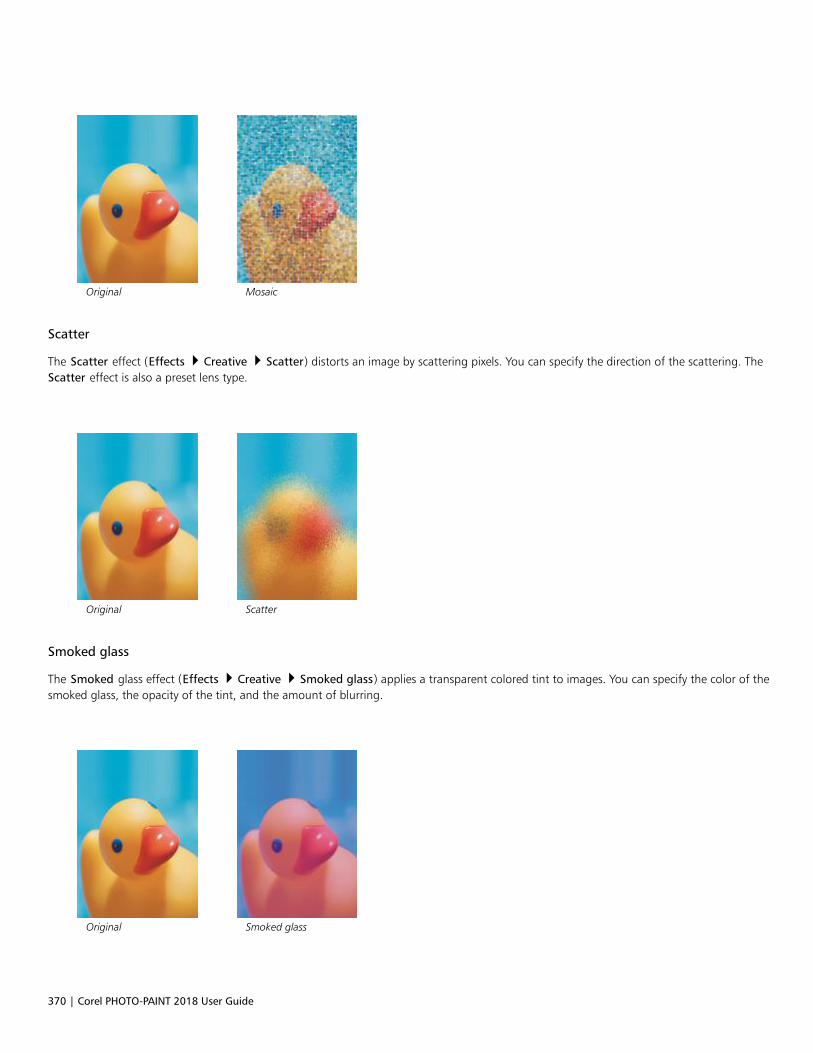
370 | Corel PHOTO-PAINT 2018 User Guide
Original Mosaic
Scatter
The Scatter effect (Effects Creative Scatter) distorts an image by scattering pixels. You can specify the direction of the scattering. TheScatter effect is also a preset lens type.
Original Scatter
Smoked glass
The Smoked glass effect (Effects Creative Smoked glass) applies a transparent colored tint to images. You can specify the color of thesmoked glass, the opacity of the tint, and the amount of blurring.
Original Smoked glass
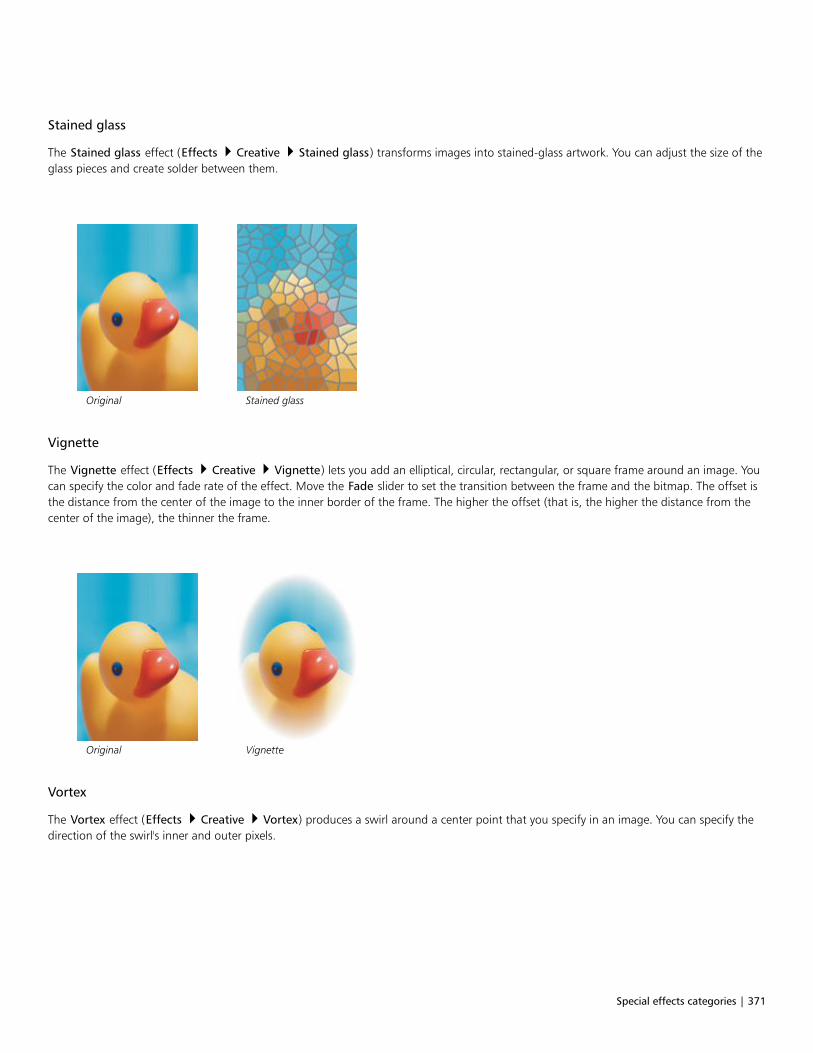
Special effects categories | 371
Stained glass
The Stained glass effect (Effects Creative Stained glass) transforms images into stained-glass artwork. You can adjust the size of theglass pieces and create solder between them.
Original Stained glass
Vignette
The Vignette effect (Effects Creative Vignette) lets you add an elliptical, circular, rectangular, or square frame around an image. Youcan specify the color and fade rate of the effect. Move the Fade slider to set the transition between the frame and the bitmap. The offset isthe distance from the center of the image to the inner border of the frame. The higher the offset (that is, the higher the distance from thecenter of the image), the thinner the frame.
Original Vignette
Vortex
The Vortex effect (Effects Creative Vortex) produces a swirl around a center point that you specify in an image. You can specify thedirection of the swirl's inner and outer pixels.
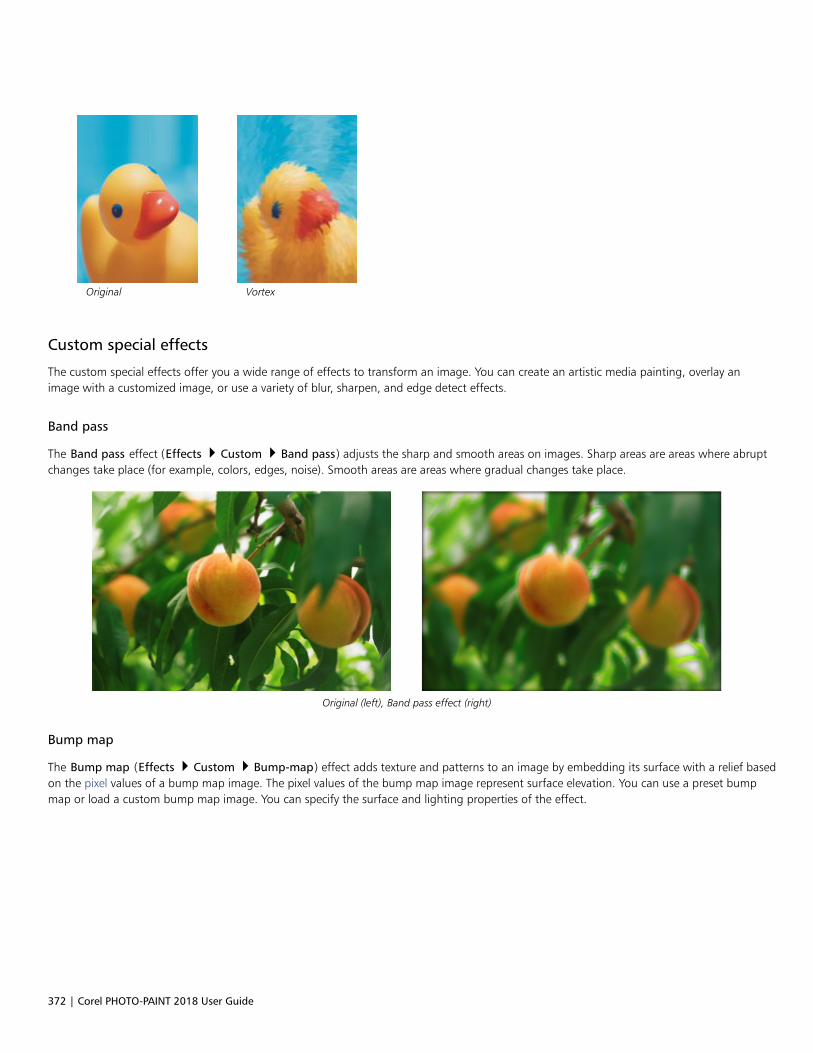
372 | Corel PHOTO-PAINT 2018 User Guide
Original Vortex
Custom special effects
The custom special effects offer you a wide range of effects to transform an image. You can create an artistic media painting, overlay animage with a customized image, or use a variety of blur, sharpen, and edge detect effects.
Band pass
The Band pass effect (Effects Custom Band pass) adjusts the sharp and smooth areas on images. Sharp areas are areas where abruptchanges take place (for example, colors, edges, noise). Smooth areas are areas where gradual changes take place.
Original (left), Band pass effect (right)
Bump map
The Bump map (Effects Custom Bump-map) effect adds texture and patterns to an image by embedding its surface with a relief basedon the pixel values of a bump map image. The pixel values of the bump map image represent surface elevation. You can use a preset bumpmap or load a custom bump map image. You can specify the surface and lighting properties of the effect.
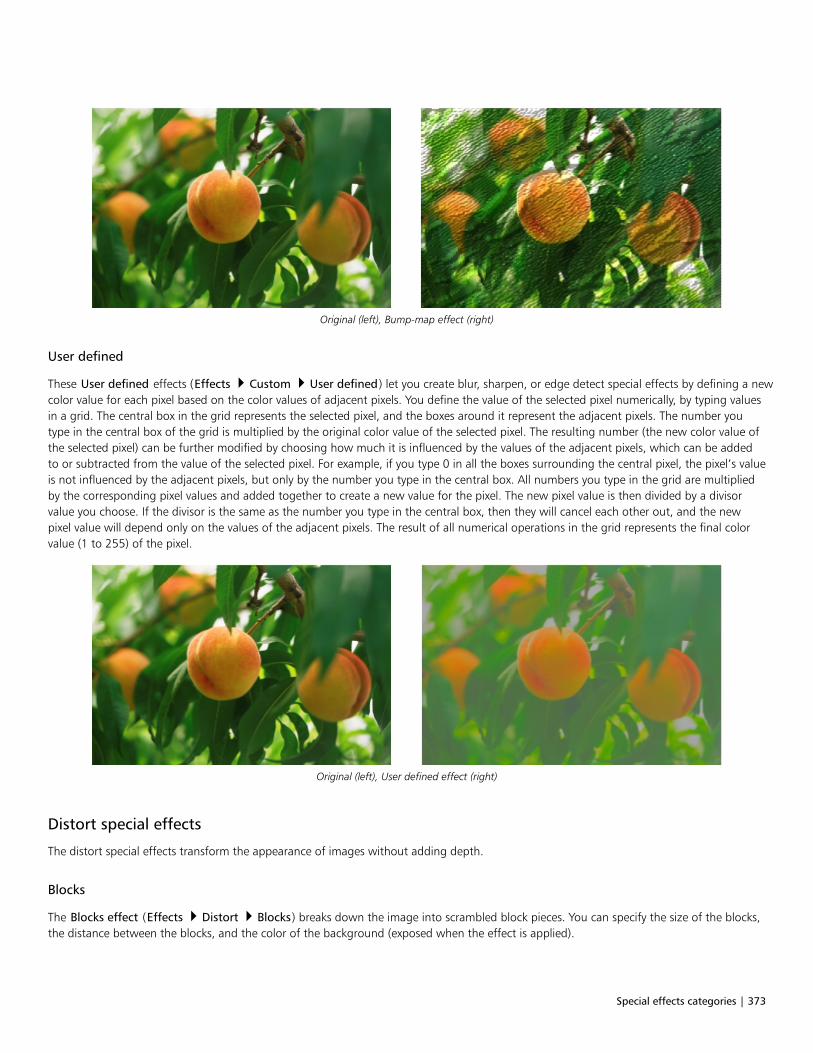
Special effects categories | 373
Original (left), Bump-map effect (right)
User defined
These User defined effects (Effects Custom User defined) let you create blur, sharpen, or edge detect special effects by defining a newcolor value for each pixel based on the color values of adjacent pixels. You define the value of the selected pixel numerically, by typing valuesin a grid. The central box in the grid represents the selected pixel, and the boxes around it represent the adjacent pixels. The number youtype in the central box of the grid is multiplied by the original color value of the selected pixel. The resulting number (the new color value ofthe selected pixel) can be further modified by choosing how much it is influenced by the values of the adjacent pixels, which can be addedto or subtracted from the value of the selected pixel. For example, if you type 0 in all the boxes surrounding the central pixel, the pixel’s valueis not influenced by the adjacent pixels, but only by the number you type in the central box. All numbers you type in the grid are multipliedby the corresponding pixel values and added together to create a new value for the pixel. The new pixel value is then divided by a divisorvalue you choose. If the divisor is the same as the number you type in the central box, then they will cancel each other out, and the newpixel value will depend only on the values of the adjacent pixels. The result of all numerical operations in the grid represents the final colorvalue (1 to 255) of the pixel.
Original (left), User defined effect (right)
Distort special effects
The distort special effects transform the appearance of images without adding depth.
Blocks
The Blocks effect (Effects Distort Blocks) breaks down the image into scrambled block pieces. You can specify the size of the blocks,the distance between the blocks, and the color of the background (exposed when the effect is applied).
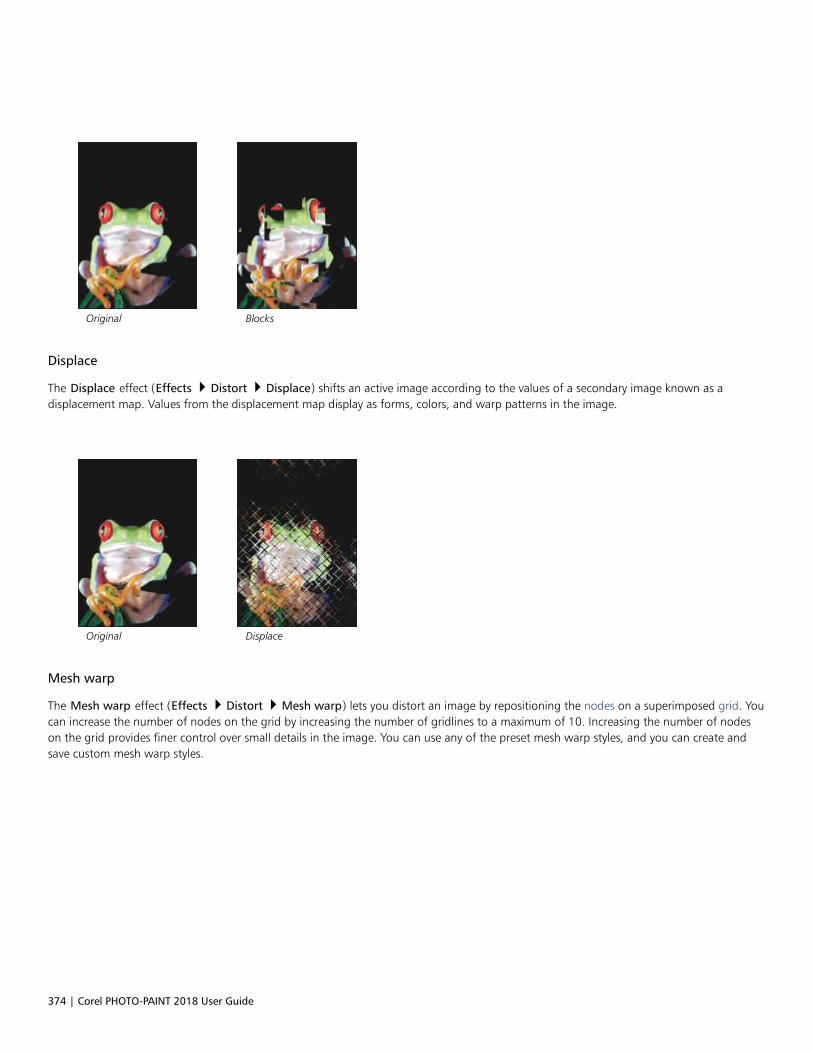
374 | Corel PHOTO-PAINT 2018 User Guide
Original Blocks
Displace
The Displace effect (Effects Distort Displace) shifts an active image according to the values of a secondary image known as adisplacement map. Values from the displacement map display as forms, colors, and warp patterns in the image.
Original Displace
Mesh warp
The Mesh warp effect (Effects Distort Mesh warp) lets you distort an image by repositioning the nodes on a superimposed grid. Youcan increase the number of nodes on the grid by increasing the number of gridlines to a maximum of 10. Increasing the number of nodeson the grid provides finer control over small details in the image. You can use any of the preset mesh warp styles, and you can create andsave custom mesh warp styles.
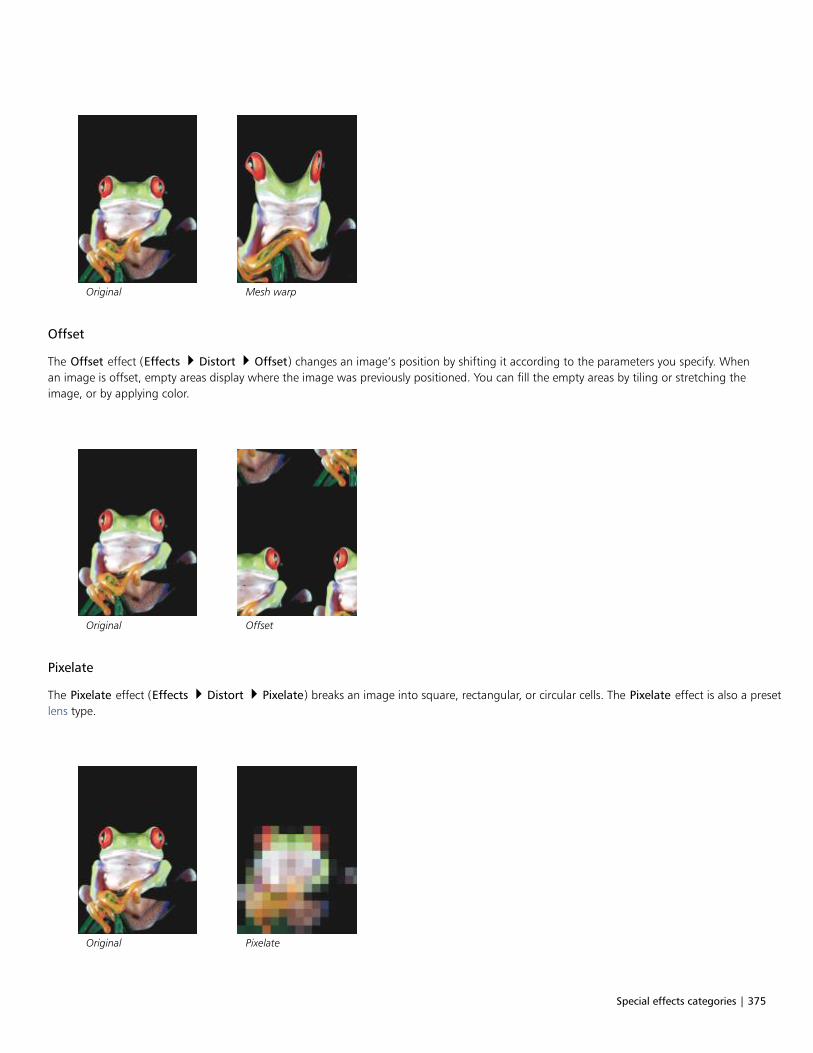
Special effects categories | 375
Original Mesh warp
Offset
The Offset effect (Effects Distort Offset) changes an image’s position by shifting it according to the parameters you specify. Whenan image is offset, empty areas display where the image was previously positioned. You can fill the empty areas by tiling or stretching theimage, or by applying color.
Original Offset
Pixelate
The Pixelate effect (Effects Distort Pixelate) breaks an image into square, rectangular, or circular cells. The Pixelate effect is also a presetlens type.
Original Pixelate
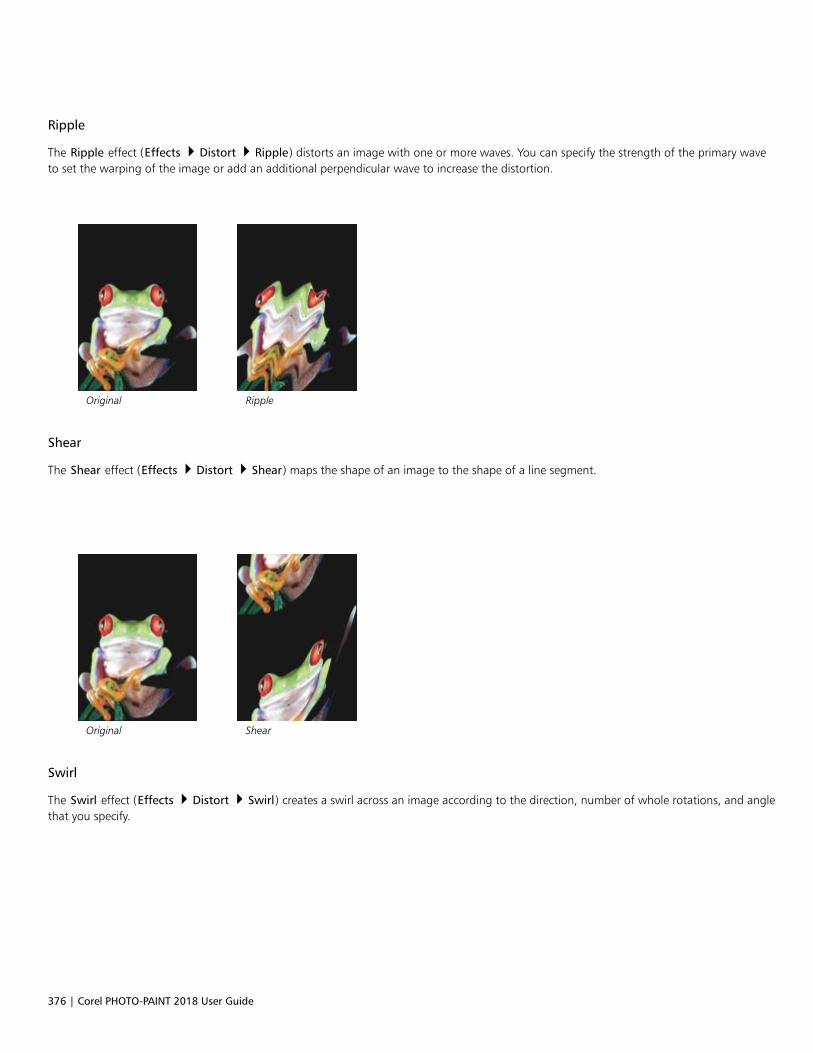
376 | Corel PHOTO-PAINT 2018 User Guide
Ripple
The Ripple effect (Effects Distort Ripple) distorts an image with one or more waves. You can specify the strength of the primary waveto set the warping of the image or add an additional perpendicular wave to increase the distortion.
Original Ripple
Shear
The Shear effect (Effects Distort Shear) maps the shape of an image to the shape of a line segment.
Original Shear
Swirl
The Swirl effect (Effects Distort Swirl) creates a swirl across an image according to the direction, number of whole rotations, and anglethat you specify.
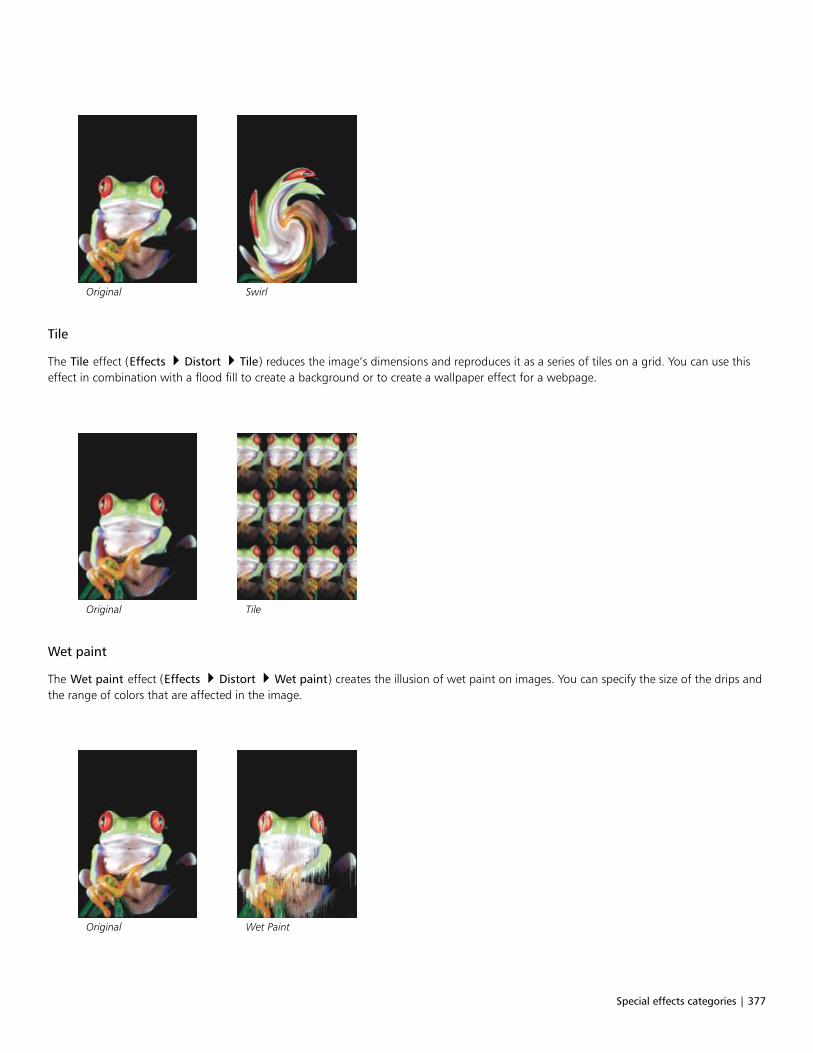
Special effects categories | 377
Original Swirl
Tile
The Tile effect (Effects Distort Tile) reduces the image’s dimensions and reproduces it as a series of tiles on a grid. You can use thiseffect in combination with a flood fill to create a background or to create a wallpaper effect for a webpage.
Original Tile
Wet paint
The Wet paint effect (Effects Distort Wet paint) creates the illusion of wet paint on images. You can specify the size of the drips andthe range of colors that are affected in the image.
Original Wet Paint
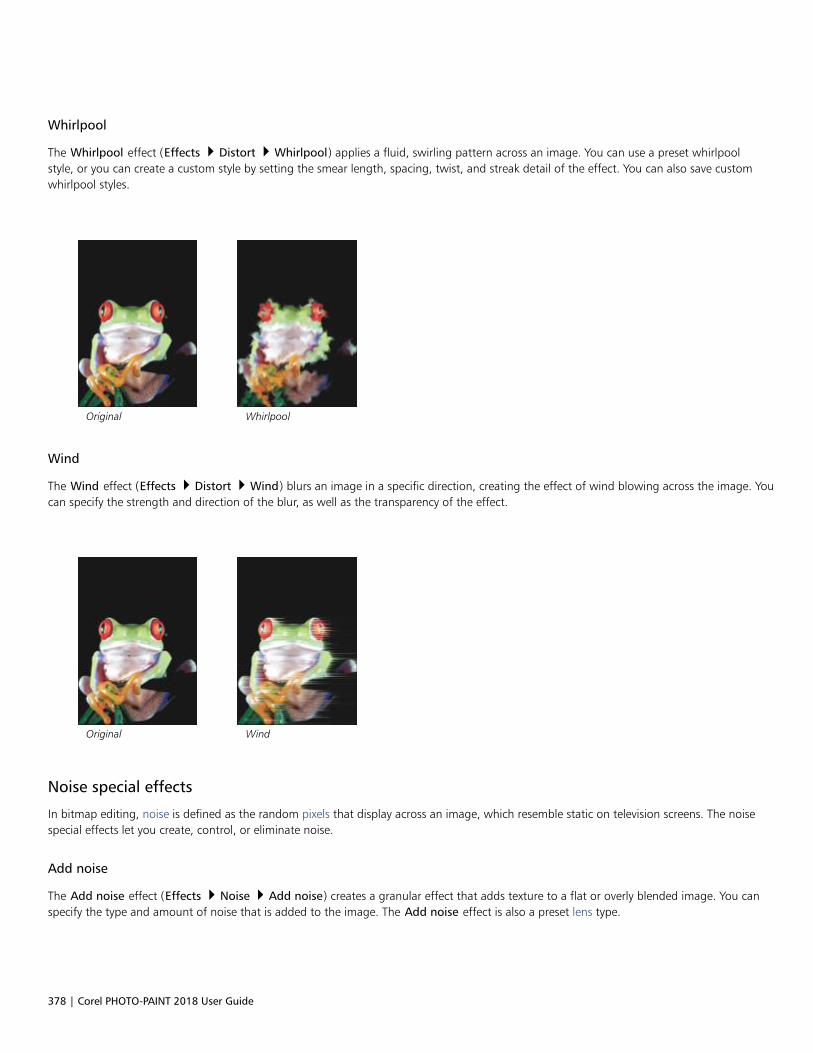
378 | Corel PHOTO-PAINT 2018 User Guide
Whirlpool
The Whirlpool effect (Effects Distort Whirlpool) applies a fluid, swirling pattern across an image. You can use a preset whirlpoolstyle, or you can create a custom style by setting the smear length, spacing, twist, and streak detail of the effect. You can also save customwhirlpool styles.
Original Whirlpool
Wind
The Wind effect (Effects Distort Wind) blurs an image in a specific direction, creating the effect of wind blowing across the image. Youcan specify the strength and direction of the blur, as well as the transparency of the effect.
Original Wind
Noise special effects
In bitmap editing, noise is defined as the random pixels that display across an image, which resemble static on television screens. The noisespecial effects let you create, control, or eliminate noise.
Add noise
The Add noise effect (Effects Noise Add noise) creates a granular effect that adds texture to a flat or overly blended image. You canspecify the type and amount of noise that is added to the image. The Add noise effect is also a preset lens type.

Special effects categories | 379
Original Add noise
3-D stereo noise
The 3-D stereo noise effect (Effects Noise 3-D stereo noise) creates a dithered noise pattern giving an image the appearance of three-dimensional depth when viewed a certain way. This effect is particularly suited to high-contrast line art and grayscale images. This effect maybe very difficult to perceive.
Original 3-D stereo noise
Maximum
The Maximum effect (Effects Noise Maximum) removes noise by adjusting the color value of a pixel based on the maximum colorvalues of its neighboring pixels. This effect also produces a mild blurring effect when applied more than once.
Original Maximum
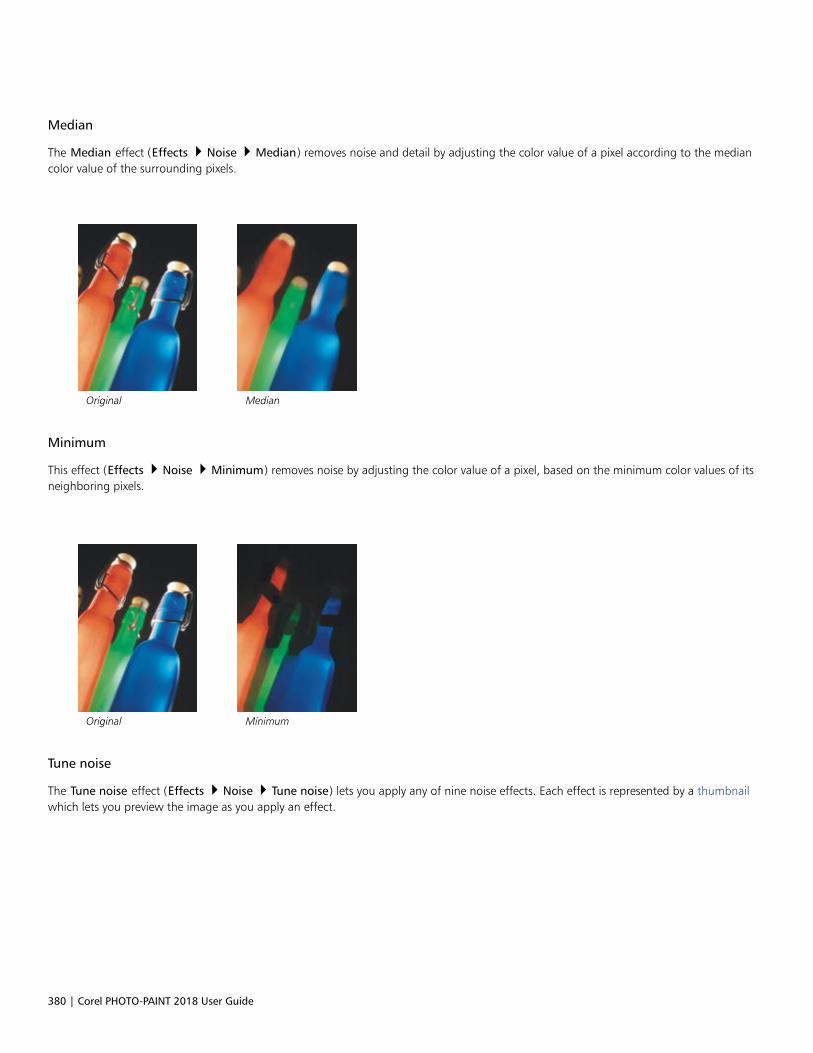
380 | Corel PHOTO-PAINT 2018 User Guide
Median
The Median effect (Effects Noise Median) removes noise and detail by adjusting the color value of a pixel according to the mediancolor value of the surrounding pixels.
Original Median
Minimum
This effect (Effects Noise Minimum) removes noise by adjusting the color value of a pixel, based on the minimum color values of itsneighboring pixels.
Original Minimum
Tune noise
The Tune noise effect (Effects Noise Tune noise) lets you apply any of nine noise effects. Each effect is represented by a thumbnailwhich lets you preview the image as you apply an effect.
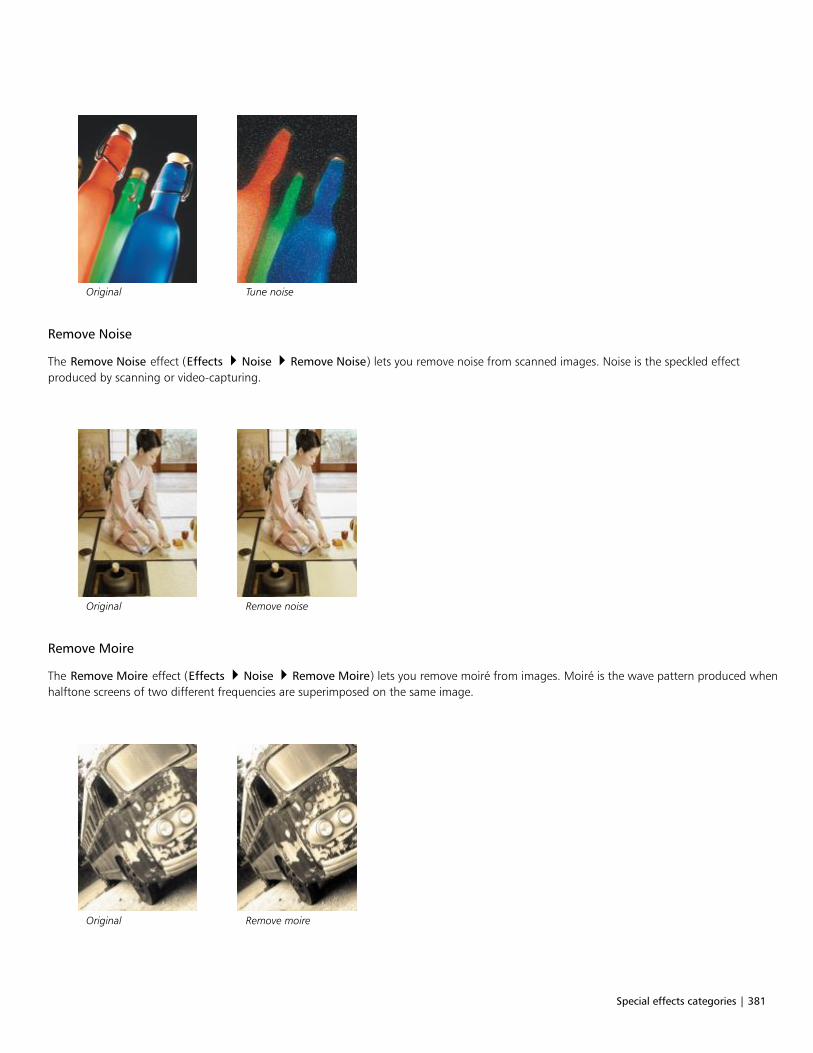
Special effects categories | 381
Original Tune noise
Remove Noise
The Remove Noise effect (Effects Noise Remove Noise) lets you remove noise from scanned images. Noise is the speckled effectproduced by scanning or video-capturing.
Original Remove noise
Remove Moire
The Remove Moire effect (Effects Noise Remove Moire) lets you remove moiré from images. Moiré is the wave pattern produced whenhalftone screens of two different frequencies are superimposed on the same image.
Original Remove moire
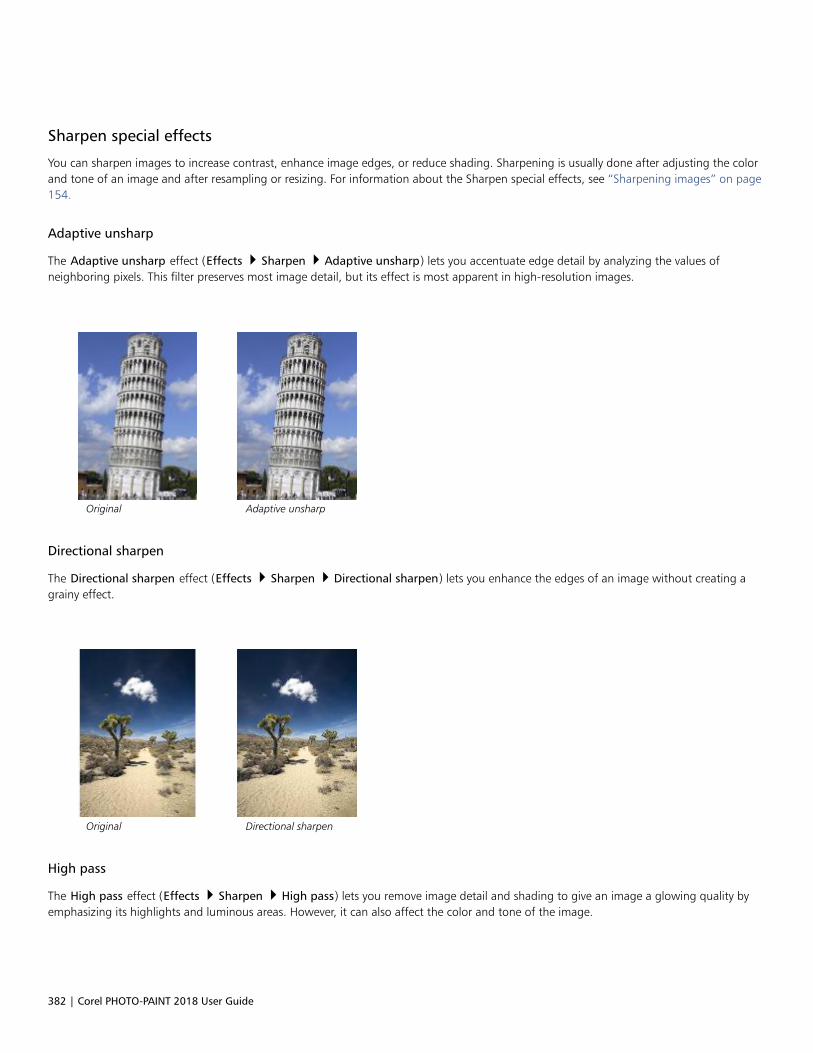
382 | Corel PHOTO-PAINT 2018 User Guide
Sharpen special effects
You can sharpen images to increase contrast, enhance image edges, or reduce shading. Sharpening is usually done after adjusting the colorand tone of an image and after resampling or resizing. For information about the Sharpen special effects, see “Sharpening images” on page154.
Adaptive unsharp
The Adaptive unsharp effect (Effects Sharpen Adaptive unsharp) lets you accentuate edge detail by analyzing the values ofneighboring pixels. This filter preserves most image detail, but its effect is most apparent in high-resolution images.
Original Adaptive unsharp
Directional sharpen
The Directional sharpen effect (Effects Sharpen Directional sharpen) lets you enhance the edges of an image without creating agrainy effect.
Original Directional sharpen
High pass
The High pass effect (Effects Sharpen High pass) lets you remove image detail and shading to give an image a glowing quality byemphasizing its highlights and luminous areas. However, it can also affect the color and tone of the image.
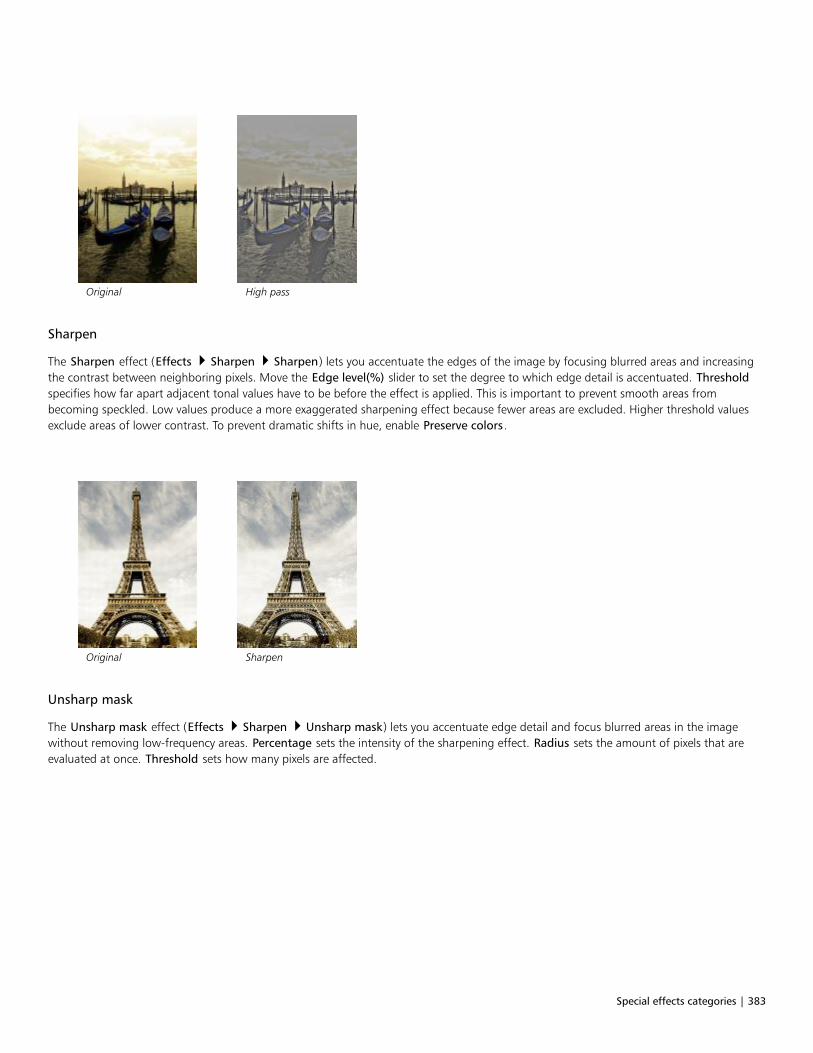
Special effects categories | 383
Original High pass
Sharpen
The Sharpen effect (Effects Sharpen Sharpen) lets you accentuate the edges of the image by focusing blurred areas and increasingthe contrast between neighboring pixels. Move the Edge level(%) slider to set the degree to which edge detail is accentuated. Thresholdspecifies how far apart adjacent tonal values have to be before the effect is applied. This is important to prevent smooth areas frombecoming speckled. Low values produce a more exaggerated sharpening effect because fewer areas are excluded. Higher threshold valuesexclude areas of lower contrast. To prevent dramatic shifts in hue, enable Preserve colors.
Original Sharpen
Unsharp mask
The Unsharp mask effect (Effects Sharpen Unsharp mask) lets you accentuate edge detail and focus blurred areas in the imagewithout removing low-frequency areas. Percentage sets the intensity of the sharpening effect. Radius sets the amount of pixels that areevaluated at once. Threshold sets how many pixels are affected.
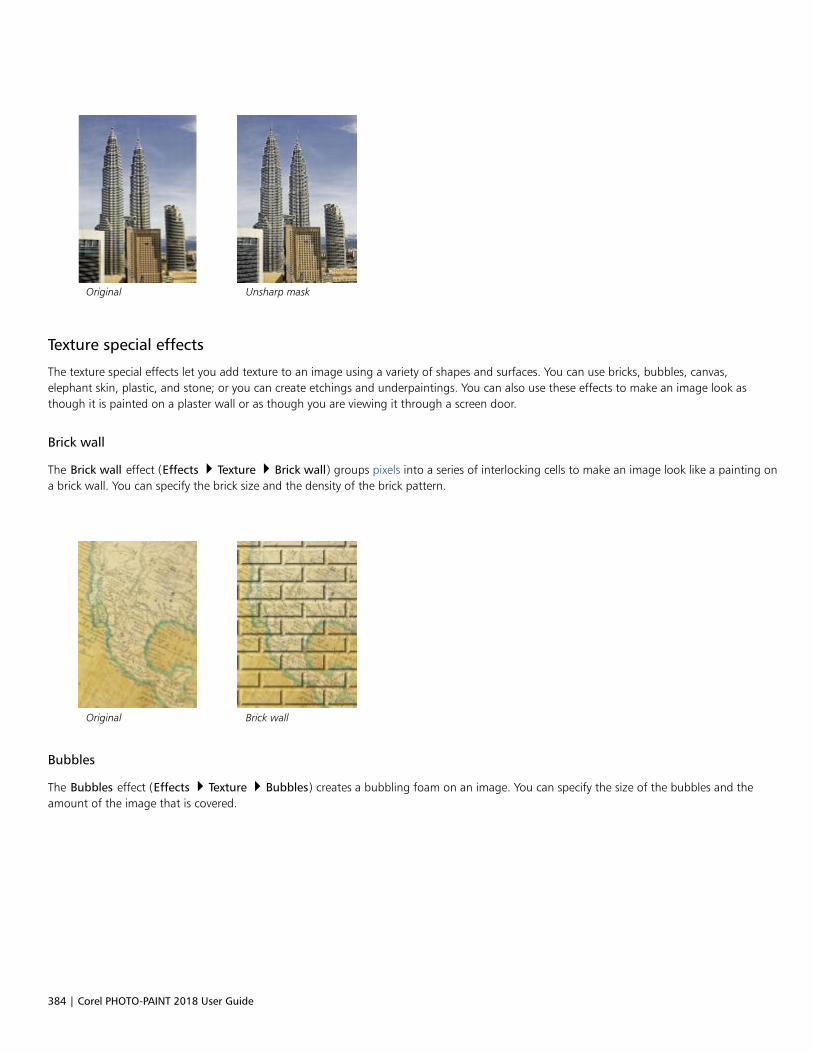
384 | Corel PHOTO-PAINT 2018 User Guide
Original Unsharp mask
Texture special effects
The texture special effects let you add texture to an image using a variety of shapes and surfaces. You can use bricks, bubbles, canvas,elephant skin, plastic, and stone; or you can create etchings and underpaintings. You can also use these effects to make an image look asthough it is painted on a plaster wall or as though you are viewing it through a screen door.
Brick wall
The Brick wall effect (Effects Texture Brick wall) groups pixels into a series of interlocking cells to make an image look like a painting ona brick wall. You can specify the brick size and the density of the brick pattern.
Original Brick wall
Bubbles
The Bubbles effect (Effects Texture Bubbles) creates a bubbling foam on an image. You can specify the size of the bubbles and theamount of the image that is covered.
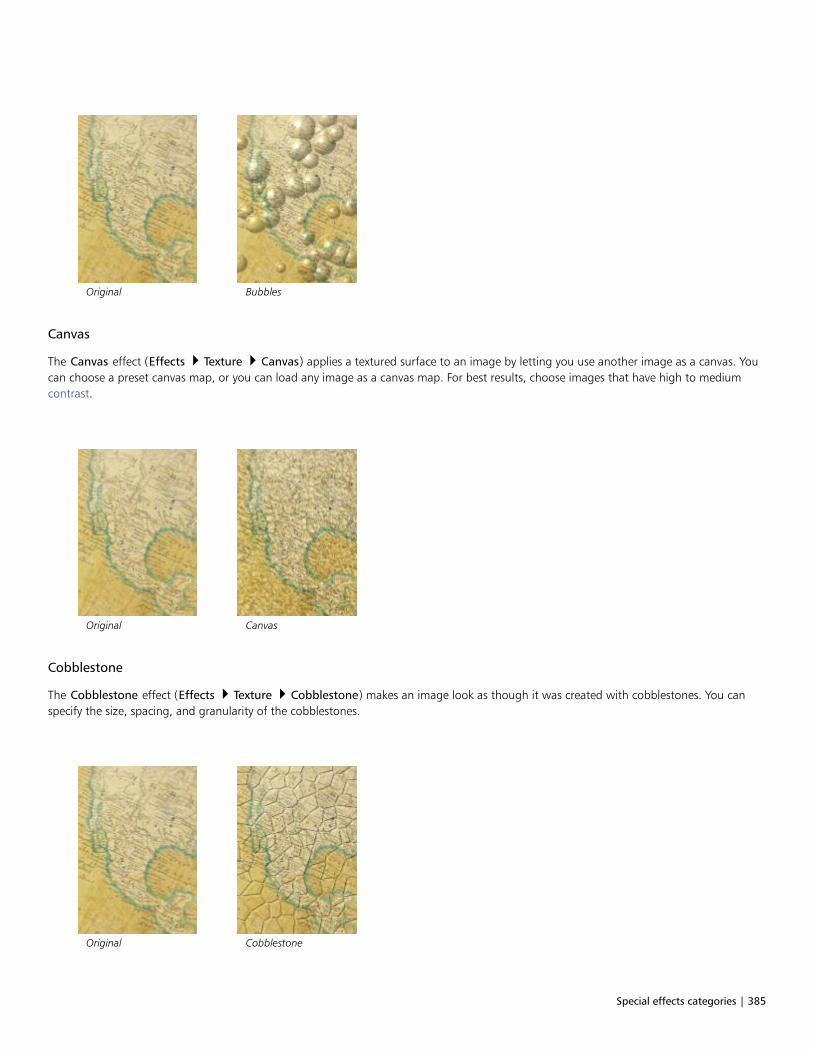
Special effects categories | 385
Original Bubbles
Canvas
The Canvas effect (Effects Texture Canvas) applies a textured surface to an image by letting you use another image as a canvas. Youcan choose a preset canvas map, or you can load any image as a canvas map. For best results, choose images that have high to mediumcontrast.
Original Canvas
Cobblestone
The Cobblestone effect (Effects Texture Cobblestone) makes an image look as though it was created with cobblestones. You canspecify the size, spacing, and granularity of the cobblestones.
Original Cobblestone
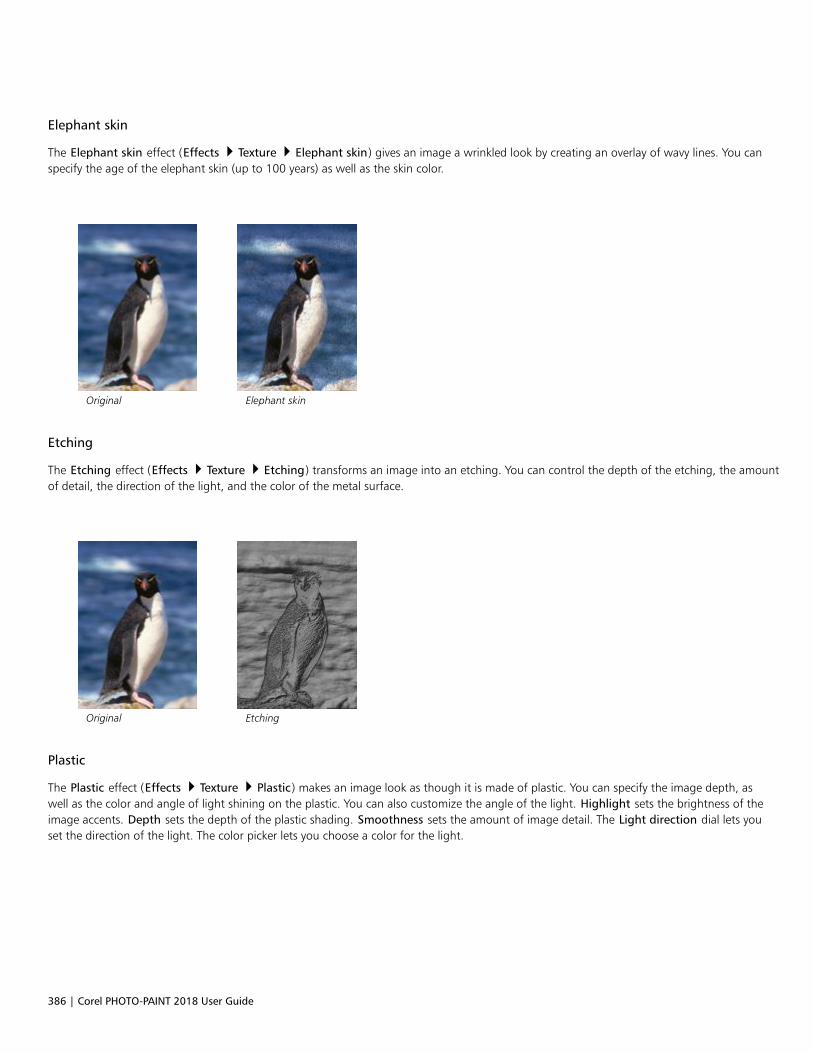
386 | Corel PHOTO-PAINT 2018 User Guide
Elephant skin
The Elephant skin effect (Effects Texture Elephant skin) gives an image a wrinkled look by creating an overlay of wavy lines. You canspecify the age of the elephant skin (up to 100 years) as well as the skin color.
Original Elephant skin
Etching
The Etching effect (Effects Texture Etching) transforms an image into an etching. You can control the depth of the etching, the amountof detail, the direction of the light, and the color of the metal surface.
Original Etching
Plastic
The Plastic effect (Effects Texture Plastic) makes an image look as though it is made of plastic. You can specify the image depth, aswell as the color and angle of light shining on the plastic. You can also customize the angle of the light. Highlight sets the brightness of theimage accents. Depth sets the depth of the plastic shading. Smoothness sets the amount of image detail. The Light direction dial lets youset the direction of the light. The color picker lets you choose a color for the light.
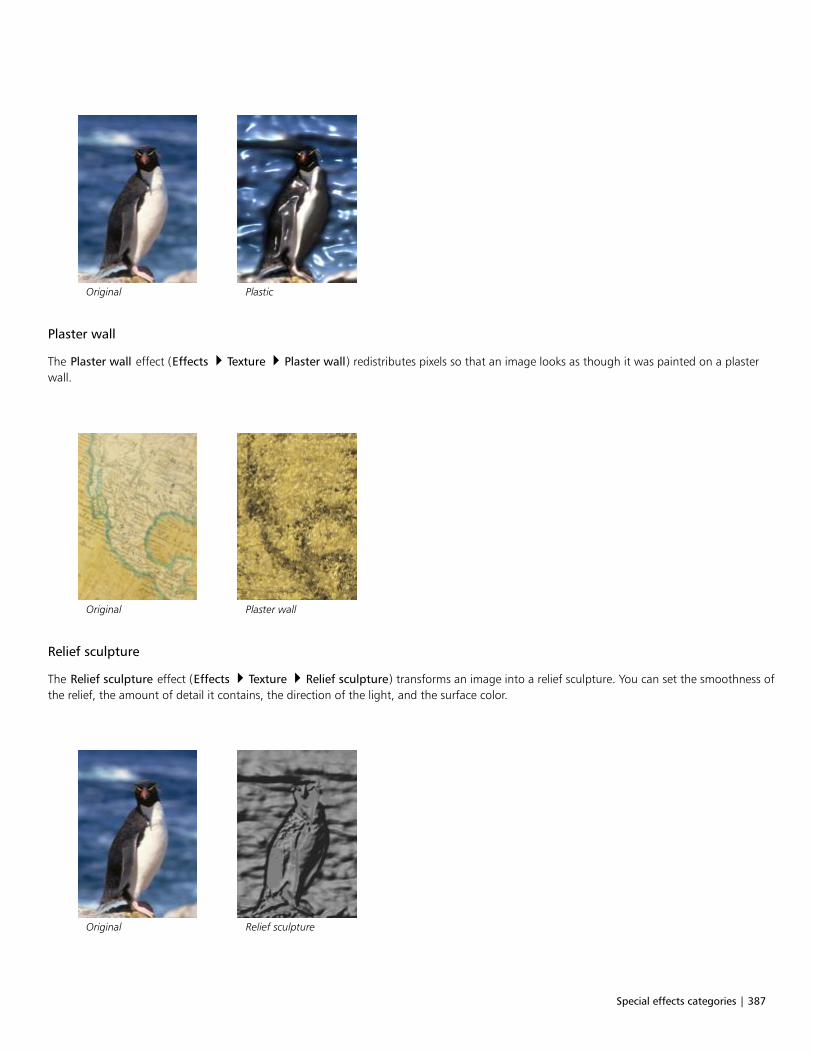
Special effects categories | 387
Original Plastic
Plaster wall
The Plaster wall effect (Effects Texture Plaster wall) redistributes pixels so that an image looks as though it was painted on a plasterwall.
Original Plaster wall
Relief sculpture
The Relief sculpture effect (Effects Texture Relief sculpture) transforms an image into a relief sculpture. You can set the smoothness ofthe relief, the amount of detail it contains, the direction of the light, and the surface color.
Original Relief sculpture
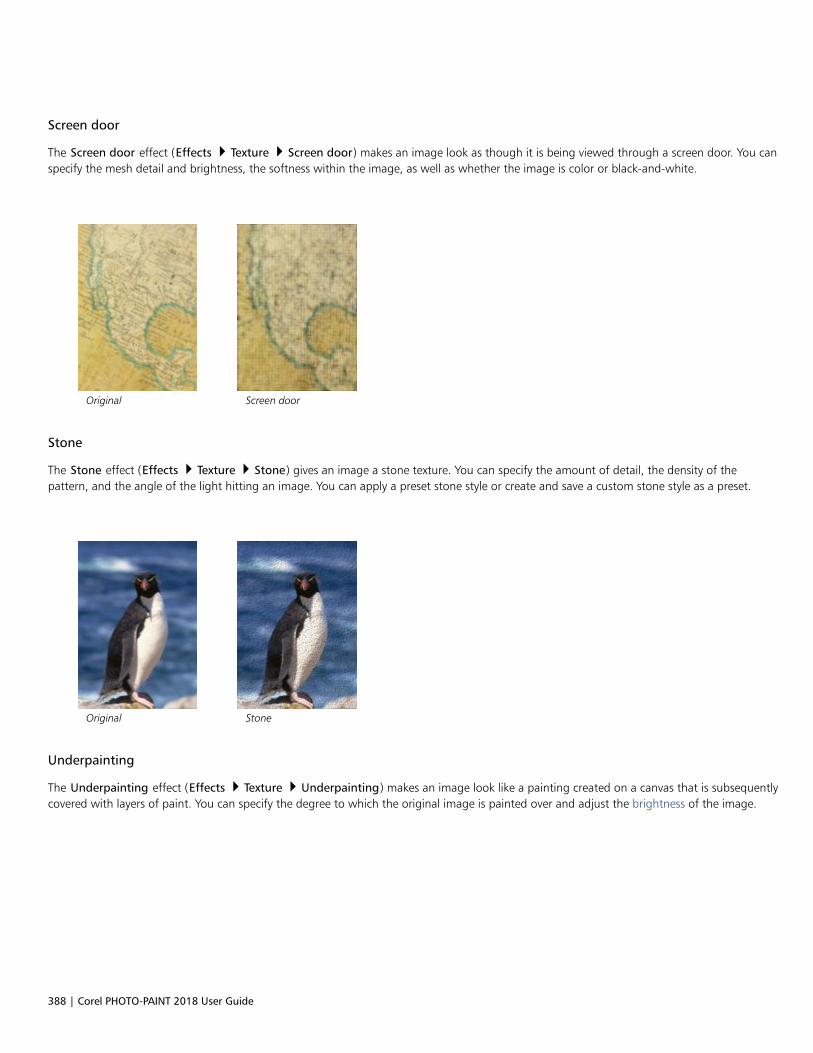
388 | Corel PHOTO-PAINT 2018 User Guide
Screen door
The Screen door effect (Effects Texture Screen door) makes an image look as though it is being viewed through a screen door. You canspecify the mesh detail and brightness, the softness within the image, as well as whether the image is color or black-and-white.
Original Screen door
Stone
The Stone effect (Effects Texture Stone) gives an image a stone texture. You can specify the amount of detail, the density of thepattern, and the angle of the light hitting an image. You can apply a preset stone style or create and save a custom stone style as a preset.
Original Stone
Underpainting
The Underpainting effect (Effects Texture Underpainting) makes an image look like a painting created on a canvas that is subsequentlycovered with layers of paint. You can specify the degree to which the original image is painted over and adjust the brightness of the image.
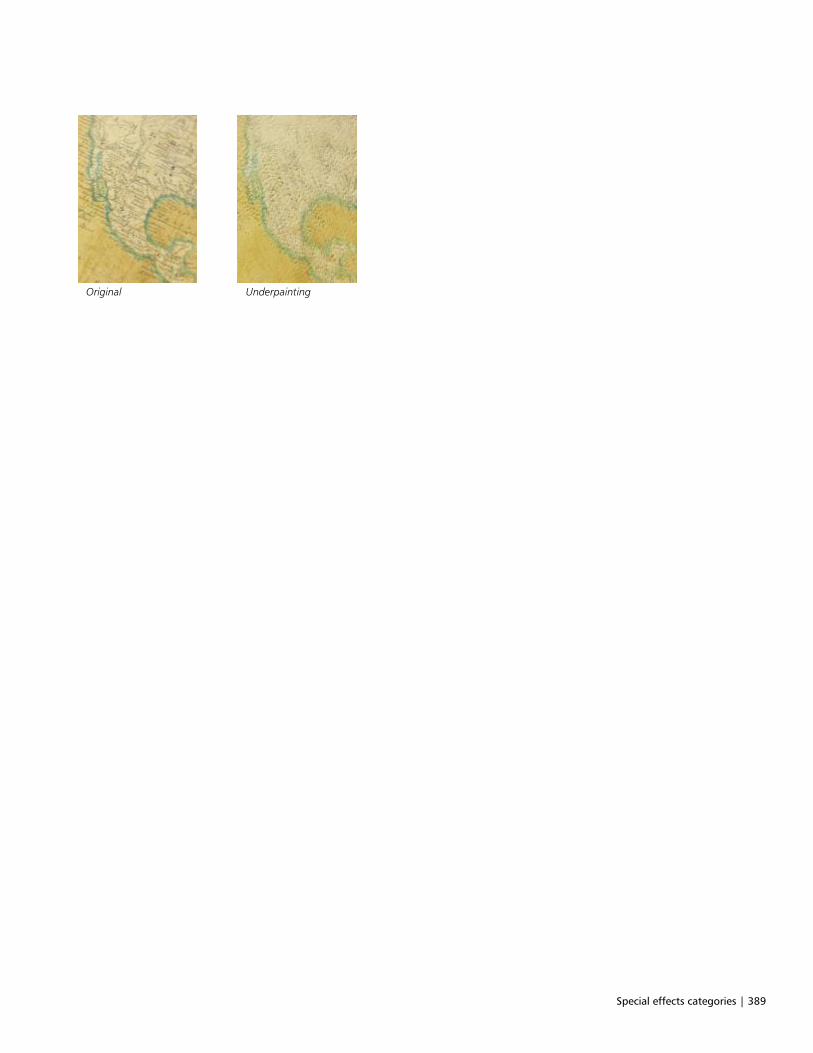
Special effects categories | 389
Original Underpainting

390 | Corel PHOTO-PAINT 2018 User Guide

Objects | 391
Objects
Working with objects.......................................................................................................................................................................... 393
Modifying objects................................................................................................................................................................................ 411
Linking and embedding objects...........................................................................................................................................................425

392 | Corel PHOTO-PAINT 2018 User Guide
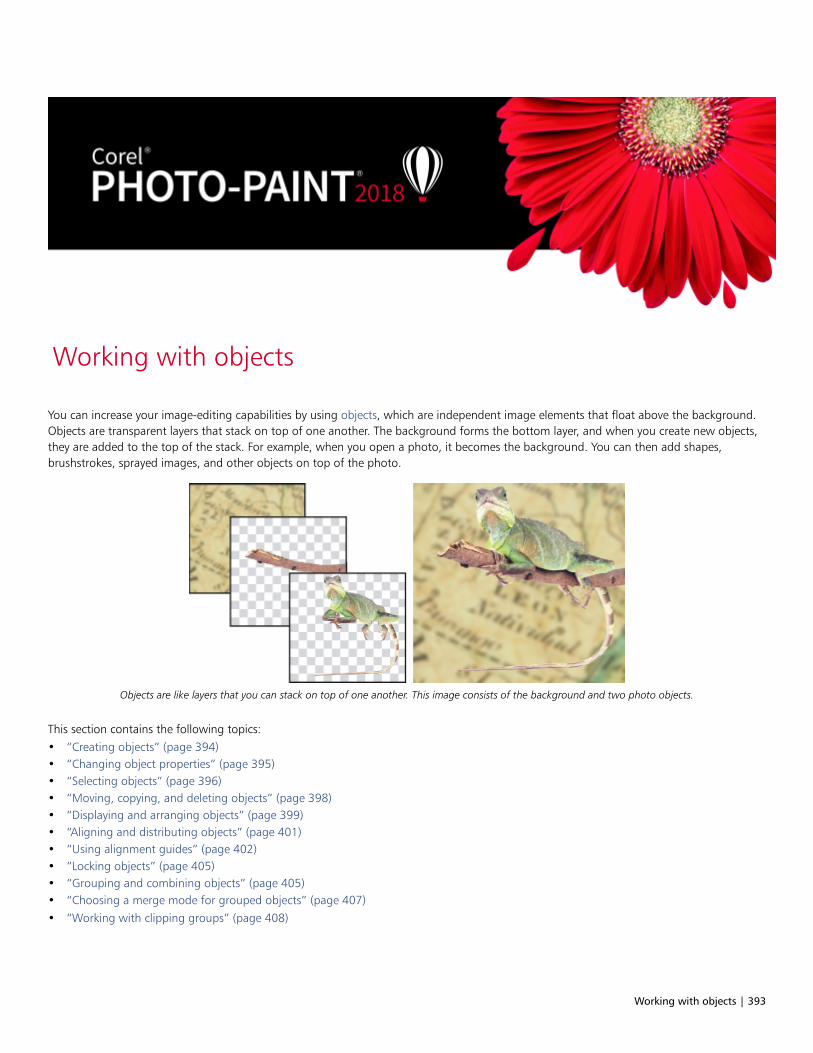
Working with objects | 393
Working with objects
You can increase your image-editing capabilities by using objects, which are independent image elements that float above the background.Objects are transparent layers that stack on top of one another. The background forms the bottom layer, and when you create new objects,they are added to the top of the stack. For example, when you open a photo, it becomes the background. You can then add shapes,brushstrokes, sprayed images, and other objects on top of the photo.
Objects are like layers that you can stack on top of one another. This image consists of the background and two photo objects.
This section contains the following topics:• “Creating objects” (page 394)• “Changing object properties” (page 395)• “Selecting objects” (page 396)• “Moving, copying, and deleting objects” (page 398)• “Displaying and arranging objects” (page 399)• “Aligning and distributing objects” (page 401)• “Using alignment guides” (page 402)• “Locking objects” (page 405)• “Grouping and combining objects” (page 405)• “Choosing a merge mode for grouped objects” (page 407)• “Working with clipping groups” (page 408)
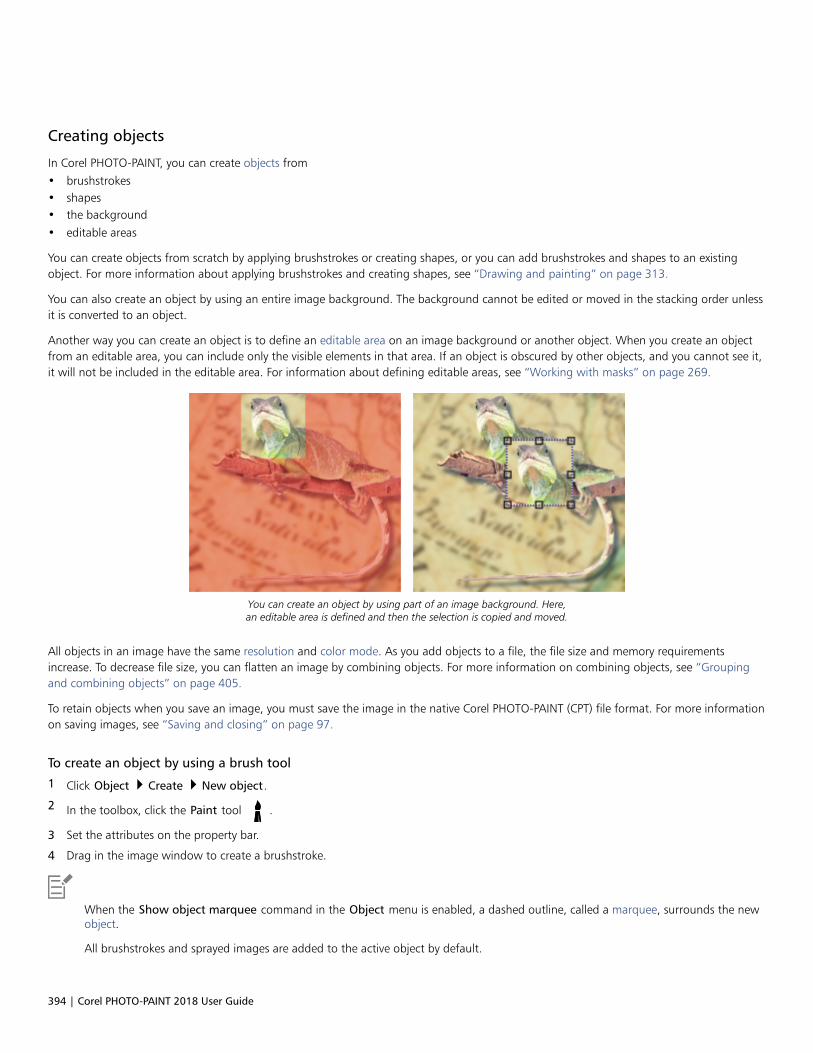
394 | Corel PHOTO-PAINT 2018 User Guide
Creating objects
In Corel PHOTO-PAINT, you can create objects from• brushstrokes• shapes• the background• editable areas
You can create objects from scratch by applying brushstrokes or creating shapes, or you can add brushstrokes and shapes to an existingobject. For more information about applying brushstrokes and creating shapes, see “Drawing and painting” on page 313.
You can also create an object by using an entire image background. The background cannot be edited or moved in the stacking order unlessit is converted to an object.
Another way you can create an object is to define an editable area on an image background or another object. When you create an objectfrom an editable area, you can include only the visible elements in that area. If an object is obscured by other objects, and you cannot see it,it will not be included in the editable area. For information about defining editable areas, see “Working with masks” on page 269.
You can create an object by using part of an image background. Here,an editable area is defined and then the selection is copied and moved.
All objects in an image have the same resolution and color mode. As you add objects to a file, the file size and memory requirementsincrease. To decrease file size, you can flatten an image by combining objects. For more information on combining objects, see “Groupingand combining objects” on page 405.
To retain objects when you save an image, you must save the image in the native Corel PHOTO-PAINT (CPT) file format. For more informationon saving images, see “Saving and closing” on page 97.
To create an object by using a brush tool
1 Click Object Create New object.
2 In the toolbox, click the Paint tool .
3 Set the attributes on the property bar.
4 Drag in the image window to create a brushstroke.
When the Show object marquee command in the Object menu is enabled, a dashed outline, called a marquee, surrounds the newobject.
All brushstrokes and sprayed images are added to the active object by default.
Working with objects | 395
You can also create an object by clicking the New object button in the Object manager docker. If the Object manager docker
is not open, click Window Dockers Object manager.
To create an object by using a shape tool
1 In the toolbox, click a shape tool.
2 Set the attributes on the property bar.
3 Drag in the image window to create a shape.
When the Show object marquee command in the Object menu is enabled, a dashed outline, called a marquee, surrounds the newobject.
To add a shape to the active object without creating a new object, disable the New object button on the property bar.
To create an object by using the entire image background
• Click Object Create From background.
To create an object by using an editable area
1 In the Object manager docker, click the thumbnail of the background, or of an object.
If the Object manager docker is not open, click Window Dockers Object manager.
2 Define an editable area.
3 Click Object Create Copy from mask.
To remove the editable area of an image as you create an object, click Object Create Cut from mask.
To create an object by using all visible elements in an editable area
1 Define an editable area.
2 Click Edit Copy visible.
3 Click Edit Paste Paste as new object.
Changing object properties
You can rename an object and change its properties. When you create an object, it is given a default name, such as Object 2. If you have notspecified settings, the default settings are applied to the object. In some programs, object properties are also known as layer options.
You can change the opacity of an object, choose a merge mode, and modify the way an object blends with underlying objects or with thebackground image. For more information about merge modes, see “Understanding merge modes” on page 331.
To change the properties of an object
1 In the toolbox, click the Object pick tool .
2 Select an object in the image window.
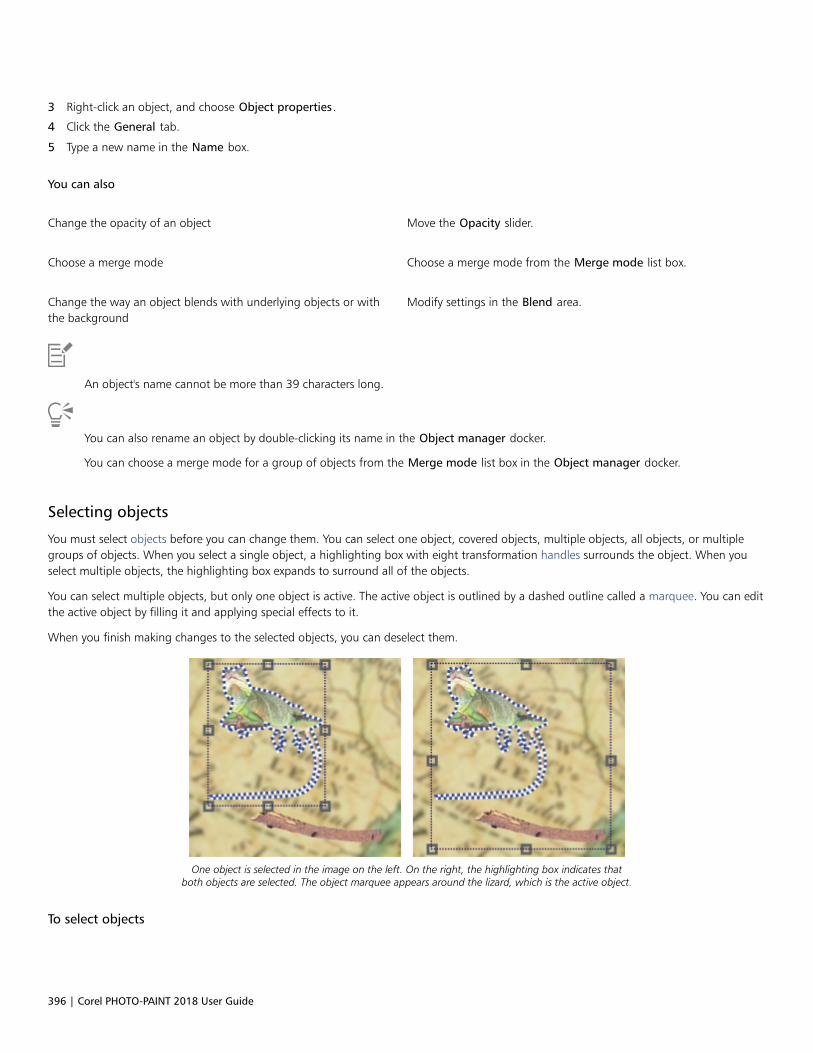
396 | Corel PHOTO-PAINT 2018 User Guide
3 Right-click an object, and choose Object properties.
4 Click the General tab.
5 Type a new name in the Name box.
You can also
Change the opacity of an object Move the Opacity slider.
Choose a merge mode Choose a merge mode from the Merge mode list box.
Change the way an object blends with underlying objects or withthe background
Modify settings in the Blend area.
An object's name cannot be more than 39 characters long.
You can also rename an object by double-clicking its name in the Object manager docker.
You can choose a merge mode for a group of objects from the Merge mode list box in the Object manager docker.
Selecting objects
You must select objects before you can change them. You can select one object, covered objects, multiple objects, all objects, or multiplegroups of objects. When you select a single object, a highlighting box with eight transformation handles surrounds the object. When youselect multiple objects, the highlighting box expands to surround all of the objects.
You can select multiple objects, but only one object is active. The active object is outlined by a dashed outline called a marquee. You can editthe active object by filling it and applying special effects to it.
When you finish making changes to the selected objects, you can deselect them.
One object is selected in the image on the left. On the right, the highlighting box indicates thatboth objects are selected. The object marquee appears around the lizard, which is the active object.
To select objects
Working with objects | 397
To select Do the following
An object In the toolbox, click the Object pick tool , and click an object.
All objects in an image Click Objects Select all objects.
An object covered by another object In the toolbox, click the Object pick tool . Hold down Alt, and
click until the highlighting box of a covered object is displayed. Thisshortcut key allows you to cycle through layered objects.
Multiple objects In the toolbox, click the Object pick tool . Click one object,
hold down Shift, and click the other objects.
Multiple groups of objects In the toolbox, click the Object pick tool . Click an object in
one group, hold down Shift, and click an object from each groupthat you want to select.
When the Show object marquee command in the Object menu is enabled, a dashed outline, called a marquee, surrounds the activeobject.
If the background is selected before you click Objects Select all objects, it is added to the selection — all objects and the
background are now selected. If an object is selected before you click Objects Select all objects, the background is not included inthe selection.
You can select an object by clicking a thumbnail in the Object manager docker. If the Object manager docker is not open, clickWindow Dockers Object manager.
You can also select objects in the Object manager docker stacking order using the following shortcut keys: press Shift + N to selectthe object above the current object; Shift + P to select the object below the current object; Shift + T to select the top object in thestacking order; and Shift + B to select the background object or the bottom object in the stacking order.
To deselect objects
To deselect Do the following
An object In the toolbox, click the Object pick tool . Click anywhere
outside the object’s highlighting box.
Multiple objects Click the Object pick tool , hold down Shift, and click each
object in the image window that you want to deselect.
All objects Click the Object pick tool , and click the background.
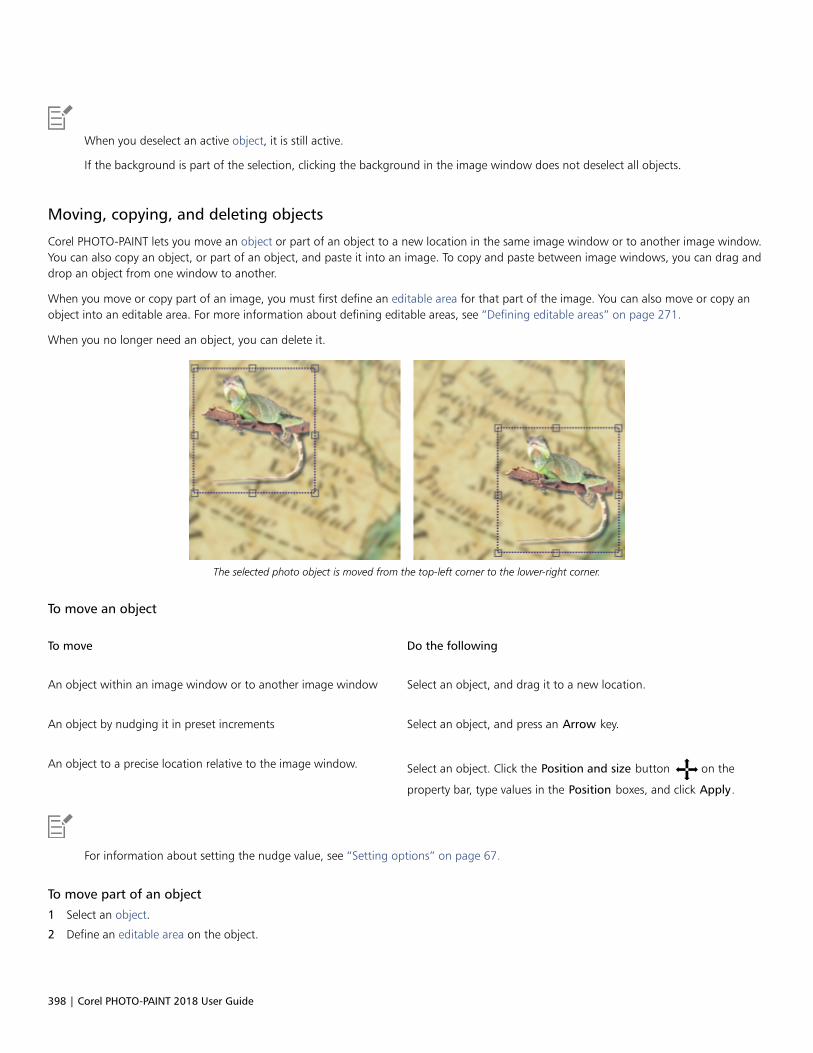
398 | Corel PHOTO-PAINT 2018 User Guide
When you deselect an active object, it is still active.
If the background is part of the selection, clicking the background in the image window does not deselect all objects.
Moving, copying, and deleting objects
Corel PHOTO-PAINT lets you move an object or part of an object to a new location in the same image window or to another image window.You can also copy an object, or part of an object, and paste it into an image. To copy and paste between image windows, you can drag anddrop an object from one window to another.
When you move or copy part of an image, you must first define an editable area for that part of the image. You can also move or copy anobject into an editable area. For more information about defining editable areas, see “Defining editable areas” on page 271.
When you no longer need an object, you can delete it.
The selected photo object is moved from the top-left corner to the lower-right corner.
To move an object
To move Do the following
An object within an image window or to another image window Select an object, and drag it to a new location.
An object by nudging it in preset increments Select an object, and press an Arrow key.
An object to a precise location relative to the image window. Select an object. Click the Position and size button on the
property bar, type values in the Position boxes, and click Apply.
For information about setting the nudge value, see “Setting options” on page 67.
To move part of an object
1 Select an object.
2 Define an editable area on the object.

Working with objects | 399
3 Click Edit Cut.
4 Click Edit Paste Paste as new object.
To copy an object
1 Select an object.
2 Click Edit Copy.
3 Click Edit Paste Paste as new object.
If you paste the object into the same window, the copy is placed on top of the original object.
You can also copy and paste an object using Ctrl + C to copy and Ctrl + V to paste.
To copy a selected object within the same image window, click Object Duplicate.
To copy or move an object into an editable area
1 Select an object.
2 Click Edit, and click one of the following:
• Copy
• Cut
3 Define an editable area.
4 Click Edit Paste Into selection.
To delete an object
1 Select an object.
2 Click Object Delete.
You can also delete a selected object by clicking the Delete button in the Object manager docker. If the Object manager
docker is not open, click Window Dockers Object manager.
Displaying and arranging objects
You can hide an object from view and change the stacking order of objects.
Displaying and hiding objects
By default, all objects are displayed in the image window. However, you can hide an object to make it temporarily invisible.
Changing the order of objects
When you create multiple objects in an image, they are stacked on top of one another in the order in which they were created. The mostrecently created object is at the top of the stack, and the image background is at the bottom. You can move an object in the image windowto cover an object that is lower in the stacking order; however, an object always displays behind objects that are higher in the stacking order.Changing the stacking order of objects brings hidden objects into view or places the topmost objects behind other objects.
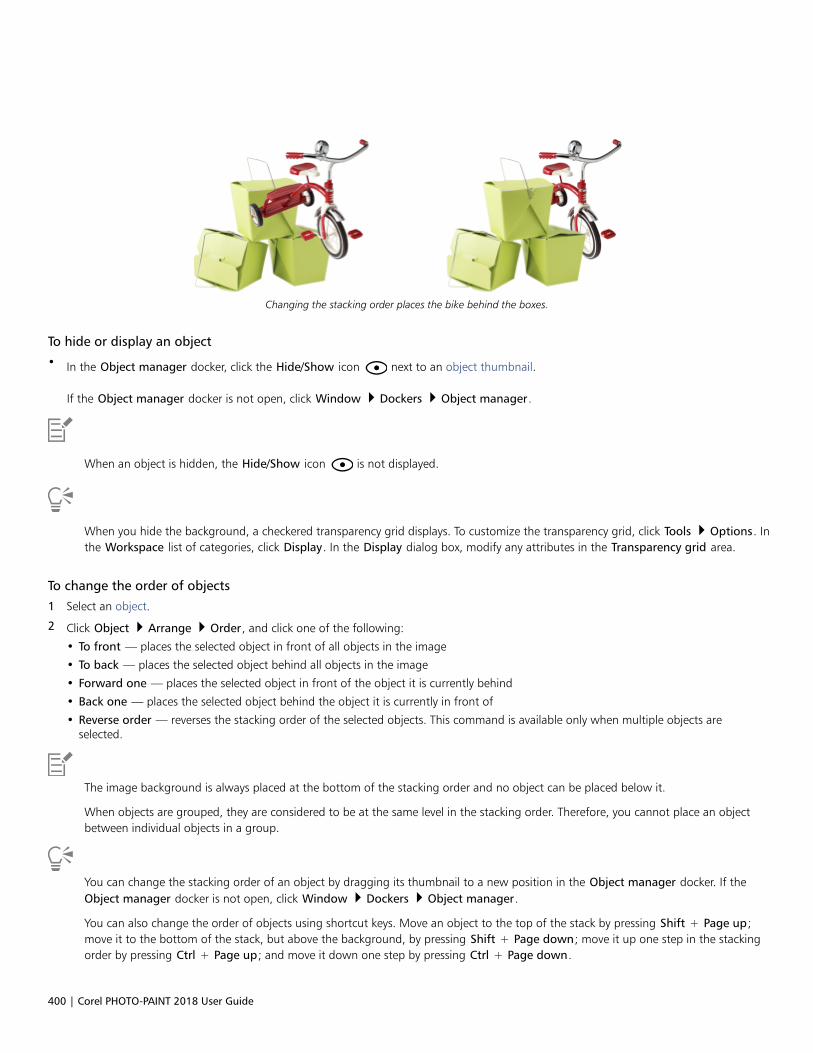
400 | Corel PHOTO-PAINT 2018 User Guide
Changing the stacking order places the bike behind the boxes.
To hide or display an object
• In the Object manager docker, click the Hide/Show icon next to an object thumbnail.
If the Object manager docker is not open, click Window Dockers Object manager.
When an object is hidden, the Hide/Show icon is not displayed.
When you hide the background, a checkered transparency grid displays. To customize the transparency grid, click Tools Options. Inthe Workspace list of categories, click Display. In the Display dialog box, modify any attributes in the Transparency grid area.
To change the order of objects
1 Select an object.
2 Click Object Arrange Order, and click one of the following:
• To front — places the selected object in front of all objects in the image
• To back — places the selected object behind all objects in the image
• Forward one — places the selected object in front of the object it is currently behind
• Back one — places the selected object behind the object it is currently in front of
• Reverse order — reverses the stacking order of the selected objects. This command is available only when multiple objects areselected.
The image background is always placed at the bottom of the stacking order and no object can be placed below it.
When objects are grouped, they are considered to be at the same level in the stacking order. Therefore, you cannot place an objectbetween individual objects in a group.
You can change the stacking order of an object by dragging its thumbnail to a new position in the Object manager docker. If theObject manager docker is not open, click Window Dockers Object manager.
You can also change the order of objects using shortcut keys. Move an object to the top of the stack by pressing Shift + Page up;move it to the bottom of the stack, but above the background, by pressing Shift + Page down; move it up one step in the stackingorder by pressing Ctrl + Page up; and move it down one step by pressing Ctrl + Page down.
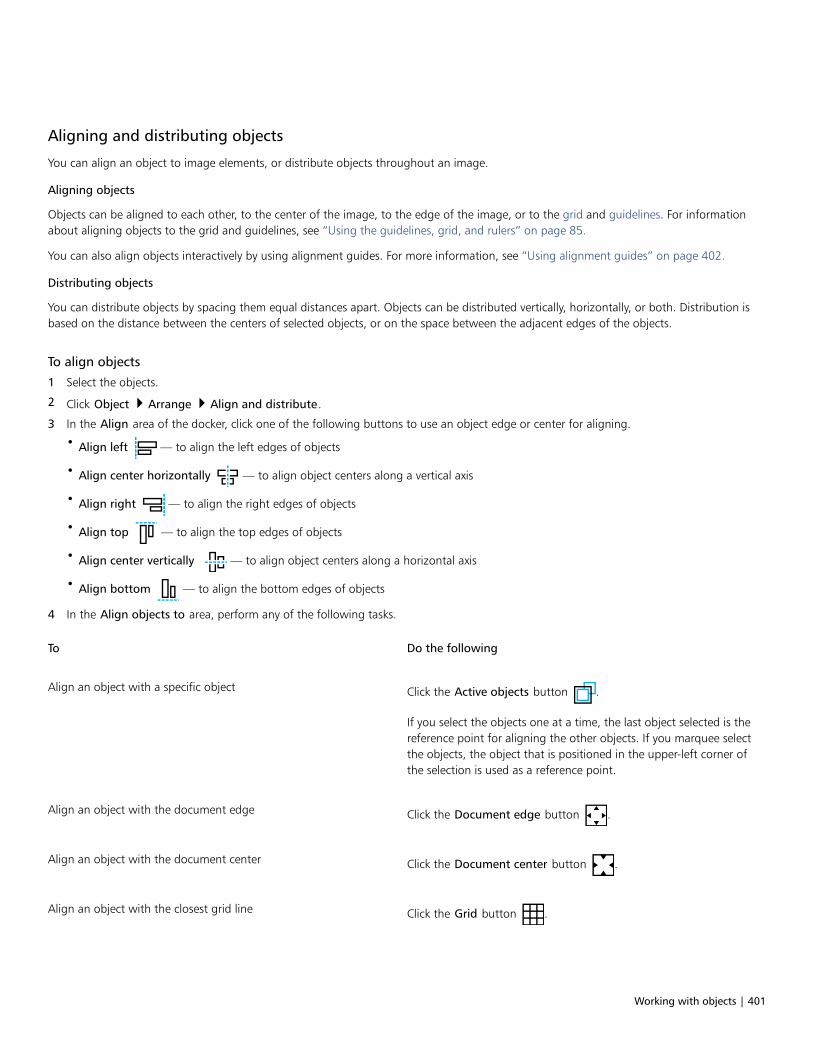
Working with objects | 401
Aligning and distributing objects
You can align an object to image elements, or distribute objects throughout an image.
Aligning objects
Objects can be aligned to each other, to the center of the image, to the edge of the image, or to the grid and guidelines. For informationabout aligning objects to the grid and guidelines, see “Using the guidelines, grid, and rulers” on page 85.
You can also align objects interactively by using alignment guides. For more information, see “Using alignment guides” on page 402.
Distributing objects
You can distribute objects by spacing them equal distances apart. Objects can be distributed vertically, horizontally, or both. Distribution isbased on the distance between the centers of selected objects, or on the space between the adjacent edges of the objects.
To align objects
1 Select the objects.
2 Click Object Arrange Align and distribute.
3 In the Align area of the docker, click one of the following buttons to use an object edge or center for aligning.
• Align left — to align the left edges of objects
• Align center horizontally — to align object centers along a vertical axis
• Align right — to align the right edges of objects
• Align top — to align the top edges of objects
• Align center vertically — to align object centers along a horizontal axis
• Align bottom — to align the bottom edges of objects
4 In the Align objects to area, perform any of the following tasks.
To Do the following
Align an object with a specific object Click the Active objects button .
If you select the objects one at a time, the last object selected is thereference point for aligning the other objects. If you marquee selectthe objects, the object that is positioned in the upper-left corner ofthe selection is used as a reference point.
Align an object with the document edge Click the Document edge button .
Align an object with the document center Click the Document center button .
Align an object with the closest grid line Click the Grid button .
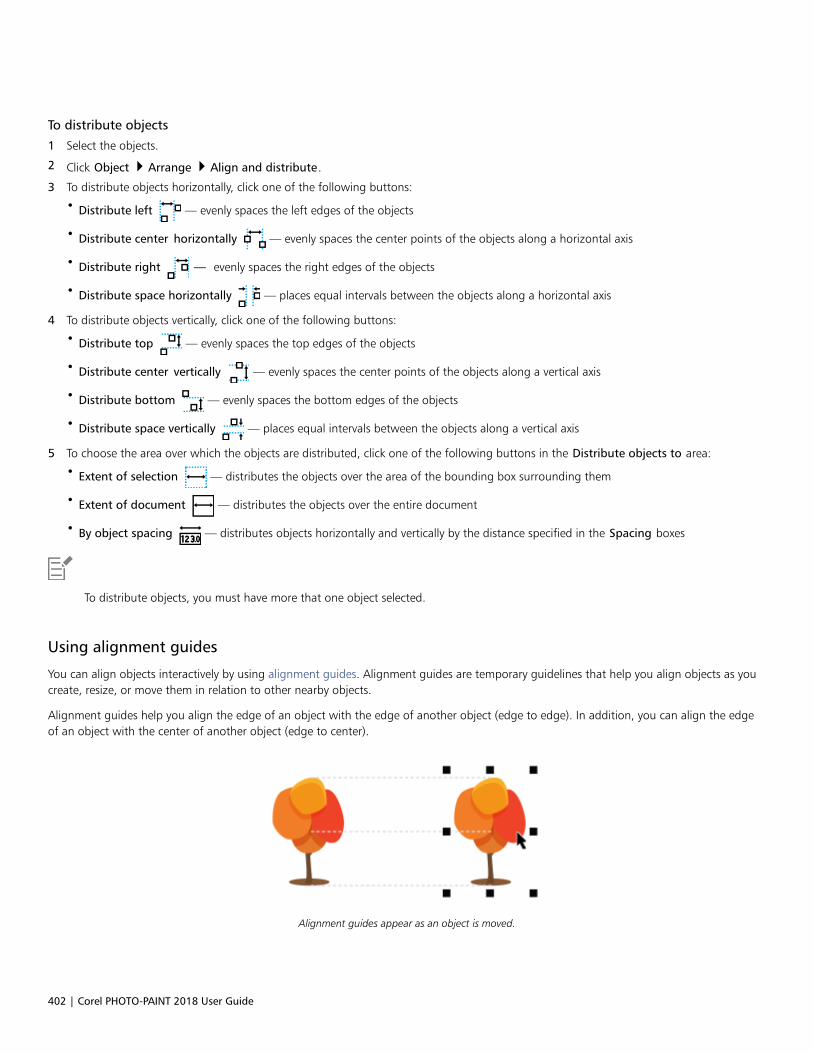
402 | Corel PHOTO-PAINT 2018 User Guide
To distribute objects
1 Select the objects.
2 Click Object Arrange Align and distribute.
3 To distribute objects horizontally, click one of the following buttons:
• Distribute left — evenly spaces the left edges of the objects
• Distribute center horizontally — evenly spaces the center points of the objects along a horizontal axis
• Distribute right — evenly spaces the right edges of the objects
• Distribute space horizontally — places equal intervals between the objects along a horizontal axis
4 To distribute objects vertically, click one of the following buttons:
• Distribute top — evenly spaces the top edges of the objects
• Distribute center vertically — evenly spaces the center points of the objects along a vertical axis
• Distribute bottom — evenly spaces the bottom edges of the objects
• Distribute space vertically — places equal intervals between the objects along a vertical axis
5 To choose the area over which the objects are distributed, click one of the following buttons in the Distribute objects to area:
• Extent of selection — distributes the objects over the area of the bounding box surrounding them
• Extent of document — distributes the objects over the entire document
• By object spacing — distributes objects horizontally and vertically by the distance specified in the Spacing boxes
To distribute objects, you must have more that one object selected.
Using alignment guides
You can align objects interactively by using alignment guides. Alignment guides are temporary guidelines that help you align objects as youcreate, resize, or move them in relation to other nearby objects.
Alignment guides help you align the edge of an object with the edge of another object (edge to edge). In addition, you can align the edgeof an object with the center of another object (edge to center).
Alignment guides appear as an object is moved.
Working with objects | 403
If you want to align an object at a set distance from the edge of another object, you can set margins for the alignment guides. After youspecify the margins, you can choose how the edge guides appear: they can follow either the margins, or both the margins and the edges ofthe object. In addition, you can use margin alignment guides that give you the ability to inset and offset an object relative to another object.
Alignment guides are turned off by default. You can easily enable or disable alignment guides, or modify their default settings. You canchoose whether alignment guides appear for individual objects in a group, or for the bounding box of the group as a whole.
To enable or disable alignment guides
• Click View Alignment guides.
A check mark beside the Alignment guides command indicates that alignment guides are enabled.
You can also enable alignment guides by pressing Shift + Alt + A.
To modify alignment guide settings
1 Click Window Dockers Alignment guides.
2 Perform any of the following tasks.
To Do the following
Enable or disable alignment guides Enable or disable the Enable alignment guides check box.
Change the color of alignment guides Open the Line color picker, and choose a color.
Change the line style of alignment guides Open the Line style picker, and choose a line style.
Set guides to align the edge of an object with the edge of anotherobject
Click the Object edges button .
Set guides to align the edge of an object with the center of anotherobject
Click the Object centers button .
Set guides to align to individual objects in a group Click the Individual objects in a group button .
To add margin alignment guides
1 Click Window Dockers Alignment guides.
2 Perform any of the following tasks.
To Do the following
Add margin alignment guides Enable the Margins check box.

404 | Corel PHOTO-PAINT 2018 User Guide
To Do the following
Change the line color of margins Open the Margin line color picker, and choose a color.
Change the line style of margins Open the Margin line style picker, and choose a line style.
Set horizontal margins Type a value in the Horizontal margin box, click the Horizontalmargin button, and choose one of the following options:
•Offset horizontally — creates a margin of the specified
distance around an object•Inset horizontally — creates a margin of the specified
distance within an object•Offset and inset horizontally — creates margins of the
specified distance around and within an object
Set vertical margins Type a value in the Vertical margin box, click the Vertical marginbutton, and choose one of the following options:
•Offset vertically — creates a margin of the specified
distance around an object•Inset vertically — creates a margin of the specified distance
within an object•Offset and inset vertically — creates a margin of the
specified distance around and within an object
Lock the ratio between vertical and horizontal margins Click the Lock ratio button
View only margin alignment guides Disable the Object edges button and the Object centers
button .
Disable horizontal margins Click the Horizontal margin button, and choose No horizontal
margin .
Disable vertical margins Click the Vertical margin button, and choose No vertical margin
.
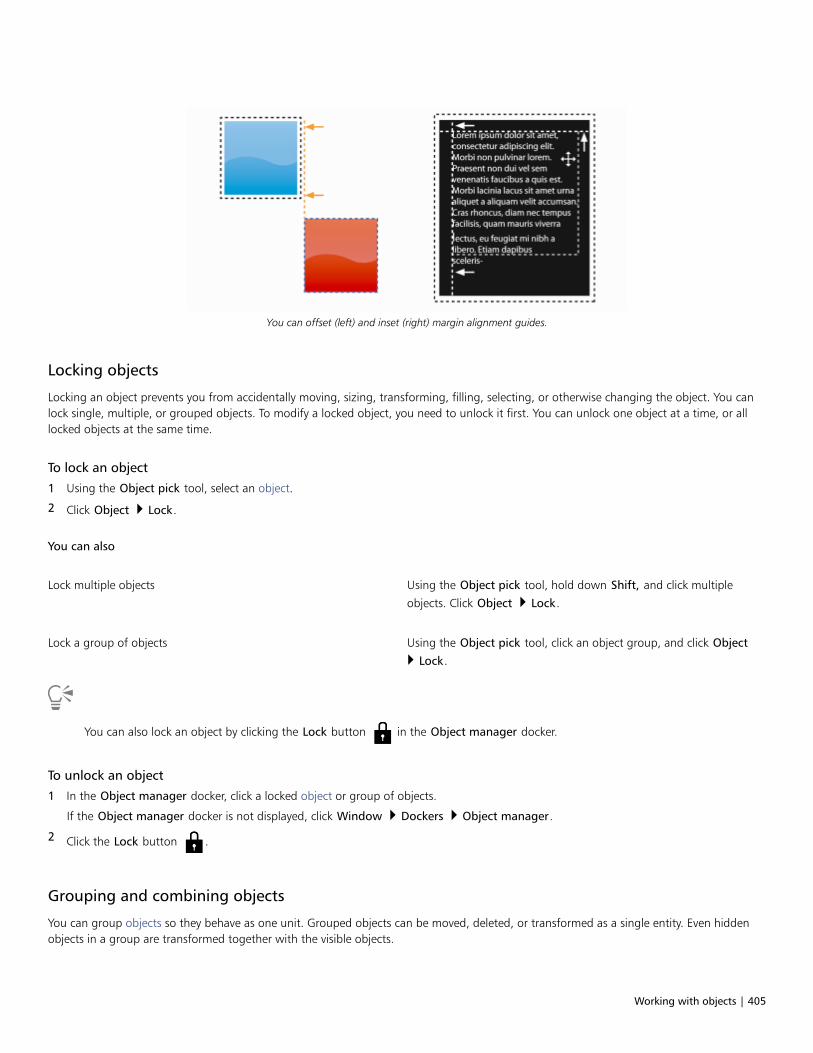
Working with objects | 405
You can offset (left) and inset (right) margin alignment guides.
Locking objects
Locking an object prevents you from accidentally moving, sizing, transforming, filling, selecting, or otherwise changing the object. You canlock single, multiple, or grouped objects. To modify a locked object, you need to unlock it first. You can unlock one object at a time, or alllocked objects at the same time.
To lock an object
1 Using the Object pick tool, select an object.
2 Click Object Lock.
You can also
Lock multiple objects Using the Object pick tool, hold down Shift, and click multiple
objects. Click Object Lock.
Lock a group of objects Using the Object pick tool, click an object group, and click Object
Lock.
You can also lock an object by clicking the Lock button in the Object manager docker.
To unlock an object
1 In the Object manager docker, click a locked object or group of objects.
If the Object manager docker is not displayed, click Window Dockers Object manager.
2 Click the Lock button .
Grouping and combining objects
You can group objects so they behave as one unit. Grouped objects can be moved, deleted, or transformed as a single entity. Even hiddenobjects in a group are transformed together with the visible objects.
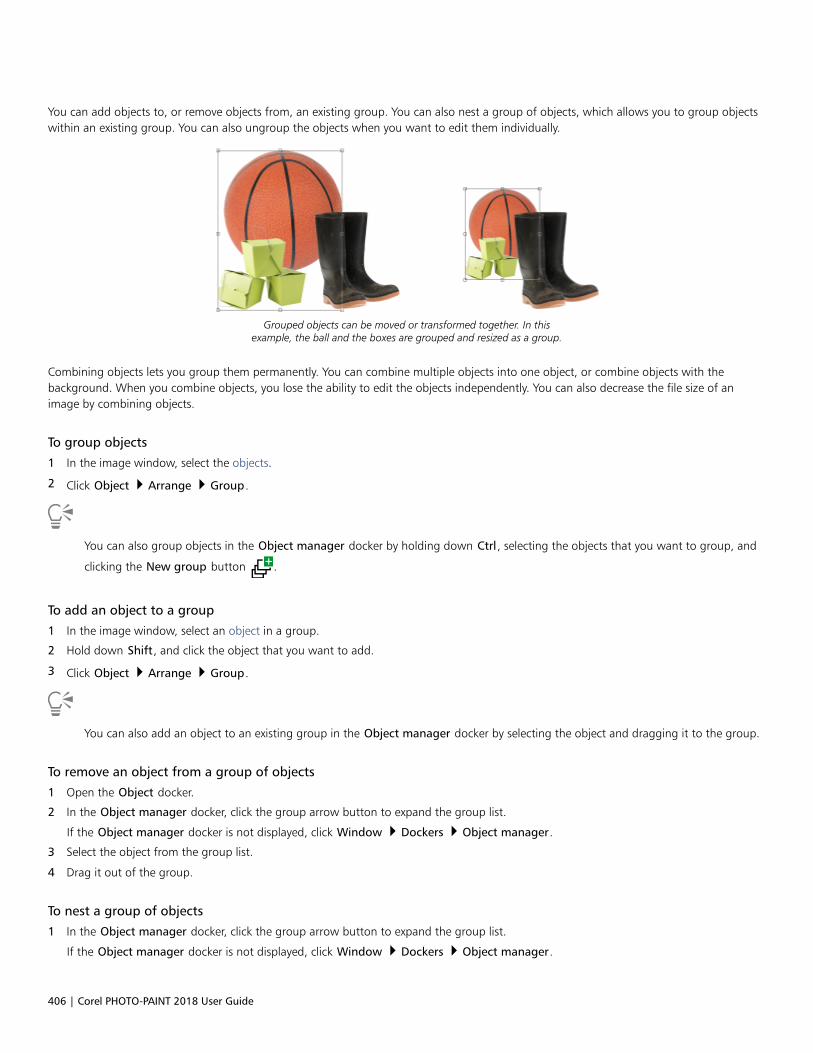
406 | Corel PHOTO-PAINT 2018 User Guide
You can add objects to, or remove objects from, an existing group. You can also nest a group of objects, which allows you to group objectswithin an existing group. You can also ungroup the objects when you want to edit them individually.
Grouped objects can be moved or transformed together. In thisexample, the ball and the boxes are grouped and resized as a group.
Combining objects lets you group them permanently. You can combine multiple objects into one object, or combine objects with thebackground. When you combine objects, you lose the ability to edit the objects independently. You can also decrease the file size of animage by combining objects.
To group objects
1 In the image window, select the objects.
2 Click Object Arrange Group.
You can also group objects in the Object manager docker by holding down Ctrl, selecting the objects that you want to group, and
clicking the New group button .
To add an object to a group
1 In the image window, select an object in a group.
2 Hold down Shift, and click the object that you want to add.
3 Click Object Arrange Group.
You can also add an object to an existing group in the Object manager docker by selecting the object and dragging it to the group.
To remove an object from a group of objects
1 Open the Object docker.
2 In the Object manager docker, click the group arrow button to expand the group list.
If the Object manager docker is not displayed, click Window Dockers Object manager.
3 Select the object from the group list.
4 Drag it out of the group.
To nest a group of objects
1 In the Object manager docker, click the group arrow button to expand the group list.
If the Object manager docker is not displayed, click Window Dockers Object manager.
Working with objects | 407
2 Hold down Ctrl and select the objects in the group that you want to nest.
3 Click the New group button .
To ungroup objects
1 In the image window, click a group of objects.
2 Click Object Arrange Ungroup.
To combine objects
To combine Do the following
Multiple objects into one object Select the objects, and click Object Combine Combine objectstogether.
One or more objects with the background Select an object or objects, and click Object Combine Combine objects with background.
All objects with the background Click Object Combine Combine all objects with background.
When objects are combined with the background, they become part of the background layer and can no longer be edited asindividual objects.
You can also combine objects in the Object manager docker by holding down Ctrl, selecting the objects that you want to combine,
and clicking the Combine selected objects button .
You can specify a merge mode and transparency level before you combine objects by modifying the settings in the Merge mode list
box and Opacity box in the Object manager docker. If the Object manager docker is not open, click Window Dockers Objectmanager.
Choosing a merge mode for grouped objects
When you group objects, the Pass Through merge mode is automatically assigned to the new group. With the Pass Through mode, thegroup has no merge properties of its own. Instead, the merge modes within the group affect the appearance of object colors within thegroup as well as any underlying objects. If an adjustment lens or another effect is applied to the group, it affects the colors of underlyingobjects or background.
You can change the merge mode for the group to create various blending effects. For more information about merge modes, see“Understanding merge modes” on page 331.
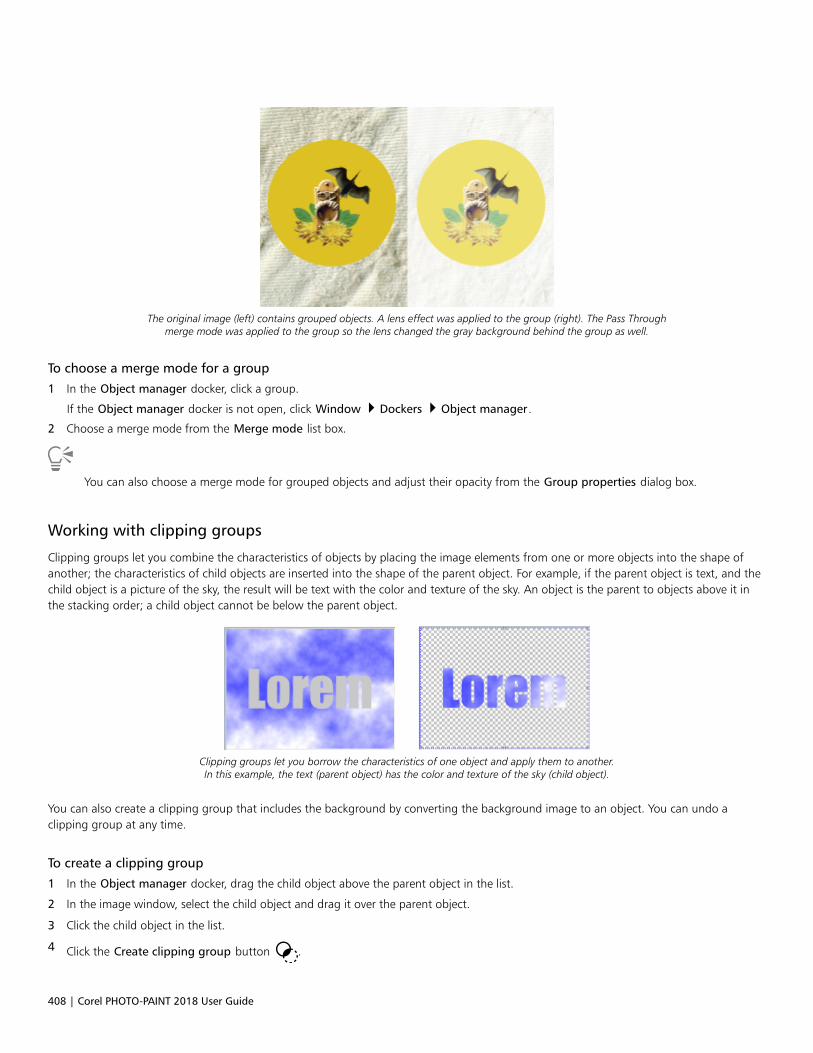
408 | Corel PHOTO-PAINT 2018 User Guide
The original image (left) contains grouped objects. A lens effect was applied to the group (right). The Pass Throughmerge mode was applied to the group so the lens changed the gray background behind the group as well.
To choose a merge mode for a group
1 In the Object manager docker, click a group.
If the Object manager docker is not open, click Window Dockers Object manager.
2 Choose a merge mode from the Merge mode list box.
You can also choose a merge mode for grouped objects and adjust their opacity from the Group properties dialog box.
Working with clipping groups
Clipping groups let you combine the characteristics of objects by placing the image elements from one or more objects into the shape ofanother; the characteristics of child objects are inserted into the shape of the parent object. For example, if the parent object is text, and thechild object is a picture of the sky, the result will be text with the color and texture of the sky. An object is the parent to objects above it inthe stacking order; a child object cannot be below the parent object.
Clipping groups let you borrow the characteristics of one object and apply them to another.In this example, the text (parent object) has the color and texture of the sky (child object).
You can also create a clipping group that includes the background by converting the background image to an object. You can undo aclipping group at any time.
To create a clipping group
1 In the Object manager docker, drag the child object above the parent object in the list.
2 In the image window, select the child object and drag it over the parent object.
3 Click the child object in the list.
4 Click the Create clipping group button .
Working with objects | 409
Only areas of the child object that fall within the boundaries of the parent object are visible. Only the object marquee of the childobject is visible in areas that fall outside the boundaries of the parent object.
To create a clipping group that includes the background image
1 In the Object manager docker, click the background.
2 Click Object Create From background.
The background appears as an object in the Object manager docker.
3 In the Object manager docker, drag the background object, which becomes the child object, above the parent object in the list.
4 Click the background object in the Object manager docker list.
5 Click the Create clipping group button .
To undo a clipping group
1 In the Object manager docker, click the child object that is contained in the clipping group.
If the object belongs to a clipping group, a clipping group symbol displays to the left of the object name.
2 Click the Create clipping group button to undo the clipping group.

410 | Corel PHOTO-PAINT 2018 User Guide
Modifying objects | 411
Modifying objects
Objects are independent image elements that can be layered on top of one another. You can transform objects, change their edges, or adddrop shadows. Objects can be changed without affecting the other objects, or the background, in an image.
This section contains the following topics:• “Transforming objects” (page 411)• “Cropping objects” (page 415)• “Changing the edges of objects” (page 416)• “Adding drop shadows to objects” (page 418)• “Using clip masks” (page 421)• “Protecting the area around an object” (page 423)
Transforming objects
You can change the appearance of objects by using the following transformations.
Transformation Description
Sizing Lets you change the width and height of an object
Scaling Lets you size an object to a percentage of its original size
Rotating Lets you turn an object around its center of rotation
Flipping Lets you create a horizontal or vertical mirror image of an object
Skewing Lets you slant an object to one side
Distorting Lets you stretch an object disproportionately
Applying perspective Lets you give an object the appearance of depth
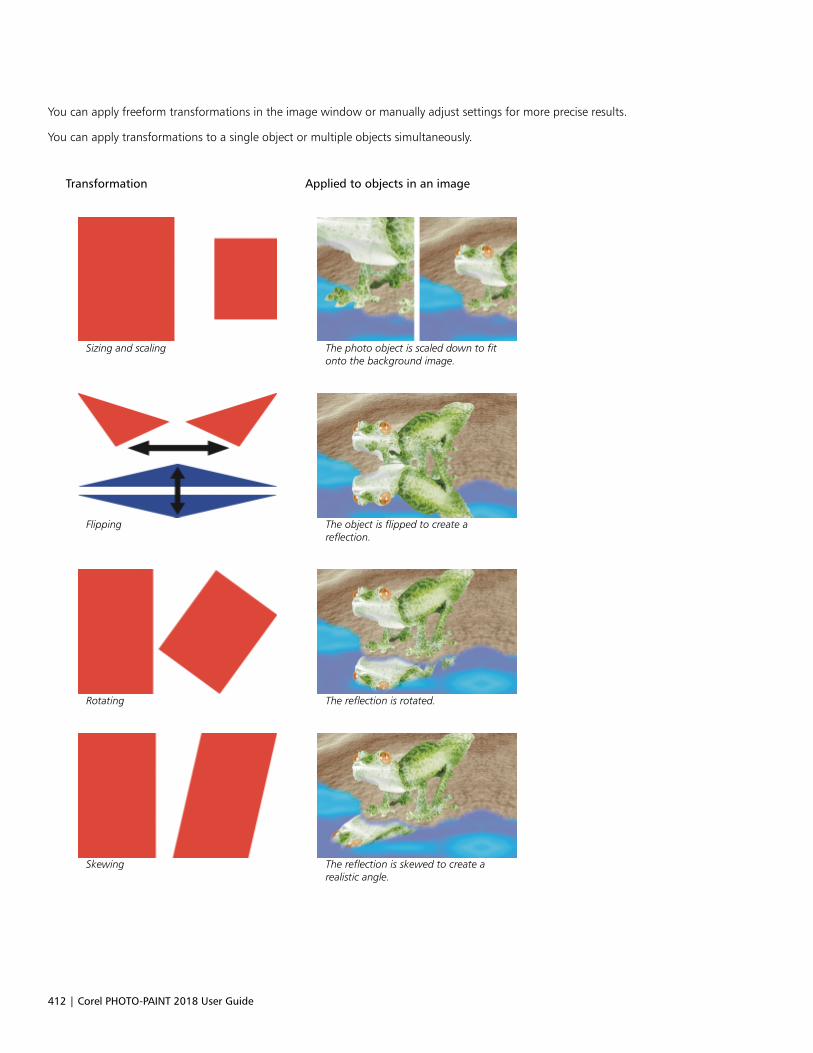
412 | Corel PHOTO-PAINT 2018 User Guide
You can apply freeform transformations in the image window or manually adjust settings for more precise results.
You can apply transformations to a single object or multiple objects simultaneously.
Transformation Applied to objects in an image
Sizing and scaling The photo object is scaled down to fitonto the background image.
Flipping The object is flipped to create areflection.
Rotating The reflection is rotated.
Skewing The reflection is skewed to create arealistic angle.
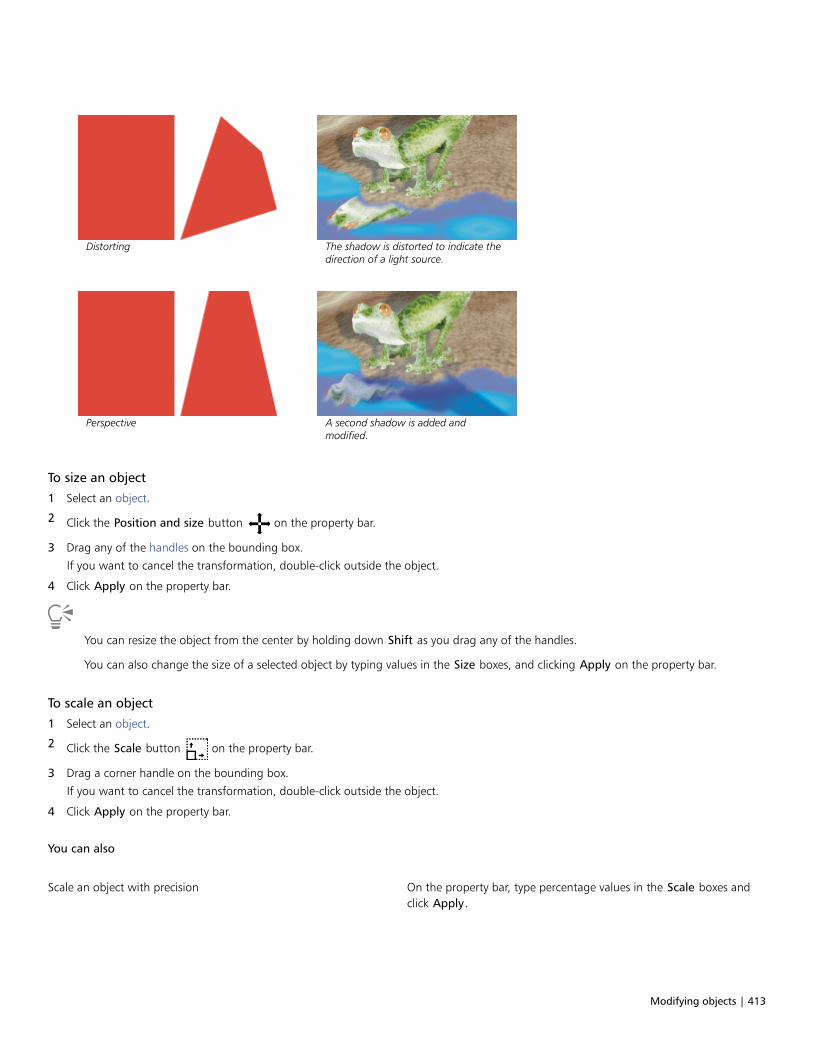
Modifying objects | 413
Distorting The shadow is distorted to indicate thedirection of a light source.
Perspective A second shadow is added andmodified.
To size an object
1 Select an object.
2 Click the Position and size button on the property bar.
3 Drag any of the handles on the bounding box.
If you want to cancel the transformation, double-click outside the object.
4 Click Apply on the property bar.
You can resize the object from the center by holding down Shift as you drag any of the handles.
You can also change the size of a selected object by typing values in the Size boxes, and clicking Apply on the property bar.
To scale an object
1 Select an object.
2 Click the Scale button on the property bar.
3 Drag a corner handle on the bounding box.
If you want to cancel the transformation, double-click outside the object.
4 Click Apply on the property bar.
You can also
Scale an object with precision On the property bar, type percentage values in the Scale boxes andclick Apply.
414 | Corel PHOTO-PAINT 2018 User Guide
You can also
Scale an object while preserving the ratio of width and height Click the Maintain ratio button on the property bar.
Scale an object from the center Hold down Shift as you drag a corner handle.
When you scale, skew, or rotate an object, its edges can appear jagged. For this reason, these transformation modes enable anti-aliasing by default.
To rotate an object
1 Select an object.
2 Click the Rotate button on the property bar.
3 Drag a rotation handle on the bounding box.
If you want to cancel the transformation, double-click outside the object.
4 Click Apply on the property bar.
You can also
Rotate an object by a specific angle Type a value in the Angle of rotation box on the property bar, andthen click Apply.
Constrain the rotation to 15-degree increments Hold down Ctrl as you drag a corner handle.
Change the pivot point Drag the object’s center of rotation to a new location or type avalue in the Center of rotation box on the property bar.
When you scale, skew, or rotate an object, its edges can appear jagged. For this reason, these transformation modes enable anti-aliasing by default.
You can also switch to rotate mode by clicking an object twice. As you cycle through the transformation modes, the handlessurrounding an object will change to indicate the active mode.
To flip an object
1 Select an object.
2 Hold down Ctrl, and drag a middle handle on the highlighting box across the object, past the middle handle on the opposite side.
If you want to cancel the transformation, double-click outside the object.
3 Click Apply on the property bar.
Modifying objects | 415
You can flip a selected object disproportionately by not holding down Ctrl while dragging a middle handle of the highlighting boxacross the middle handle on the opposite side.
To skew an object
1 Select an object.
2 Click the Skew button on the property bar.
3 Drag a skewing handle on the bounding box.
If you want to cancel the transformation, double-click outside the object.
4 Click Apply on the property bar.
When you scale, skew, or rotate an object, its edges can appear jagged. For this reason, these transformation modes enable anti-aliasing by default.
You can also skew an object by typing values in the Skew angle boxes on the property bar and clicking Apply.
To distort an object
1 Select an object.
2 Click the Distort button on the property bar.
3 Drag a distortion handle on the bounding box.
If you want to cancel the transformation, double-click outside the object.
You can also switch to distort mode by clicking an object two times. As you cycle through the transformation modes, the handlessurrounding an object will change to indicate the active mode.
To apply perspective to an object
1 Select an object.
2 Click the Perspective button on the property bar.
3 Drag a perspective handle on the bounding box.
If you want to cancel the transformation, double-click outside the object.
You can also switch to perspective mode by clicking an object three times. As you cycle through the transformation modes, thehandles surrounding an object will change to indicate the active mode.
Cropping objects
You can crop an object to remove unwanted areas or to change its shape. You can use a mask tool to select the editable area of the objectthat you want to keep, and then you can discard the rest. For more information, see “Defining editable areas” on page 271.
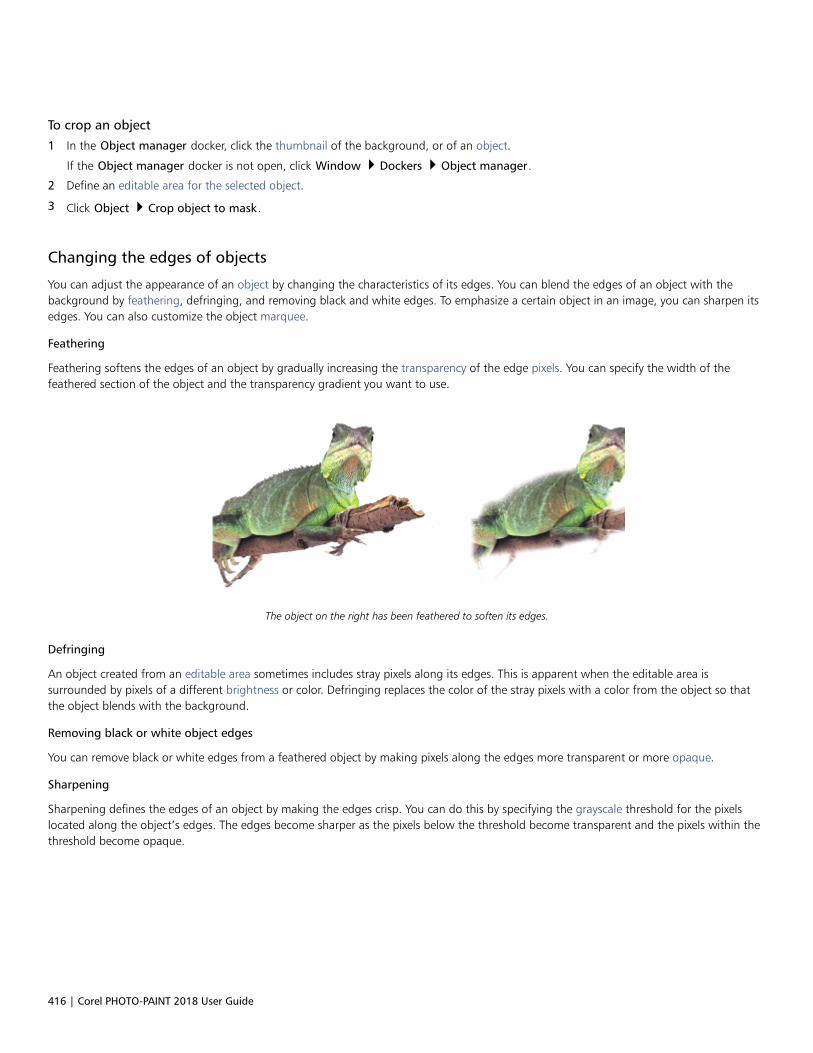
416 | Corel PHOTO-PAINT 2018 User Guide
To crop an object
1 In the Object manager docker, click the thumbnail of the background, or of an object.
If the Object manager docker is not open, click Window Dockers Object manager.
2 Define an editable area for the selected object.
3 Click Object Crop object to mask.
Changing the edges of objects
You can adjust the appearance of an object by changing the characteristics of its edges. You can blend the edges of an object with thebackground by feathering, defringing, and removing black and white edges. To emphasize a certain object in an image, you can sharpen itsedges. You can also customize the object marquee.
Feathering
Feathering softens the edges of an object by gradually increasing the transparency of the edge pixels. You can specify the width of thefeathered section of the object and the transparency gradient you want to use.
The object on the right has been feathered to soften its edges.
Defringing
An object created from an editable area sometimes includes stray pixels along its edges. This is apparent when the editable area issurrounded by pixels of a different brightness or color. Defringing replaces the color of the stray pixels with a color from the object so thatthe object blends with the background.
Removing black or white object edges
You can remove black or white edges from a feathered object by making pixels along the edges more transparent or more opaque.
Sharpening
Sharpening defines the edges of an object by making the edges crisp. You can do this by specifying the grayscale threshold for the pixelslocated along the object’s edges. The edges become sharper as the pixels below the threshold become transparent and the pixels within thethreshold become opaque.
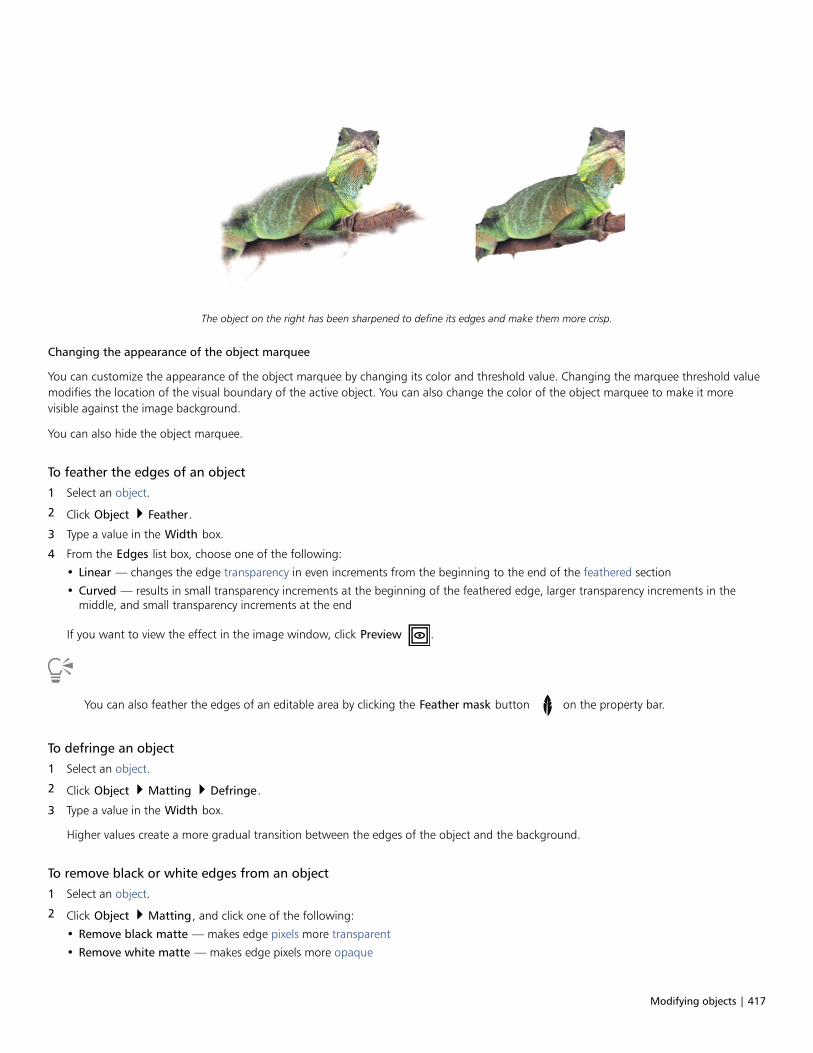
Modifying objects | 417
The object on the right has been sharpened to define its edges and make them more crisp.
Changing the appearance of the object marquee
You can customize the appearance of the object marquee by changing its color and threshold value. Changing the marquee threshold valuemodifies the location of the visual boundary of the active object. You can also change the color of the object marquee to make it morevisible against the image background.
You can also hide the object marquee.
To feather the edges of an object
1 Select an object.
2 Click Object Feather.
3 Type a value in the Width box.
4 From the Edges list box, choose one of the following:
• Linear — changes the edge transparency in even increments from the beginning to the end of the feathered section
• Curved — results in small transparency increments at the beginning of the feathered edge, larger transparency increments in themiddle, and small transparency increments at the end
If you want to view the effect in the image window, click Preview .
You can also feather the edges of an editable area by clicking the Feather mask button on the property bar.
To defringe an object
1 Select an object.
2 Click Object Matting Defringe.
3 Type a value in the Width box.
Higher values create a more gradual transition between the edges of the object and the background.
To remove black or white edges from an object
1 Select an object.
2 Click Object Matting, and click one of the following:
• Remove black matte — makes edge pixels more transparent
• Remove white matte — makes edge pixels more opaque
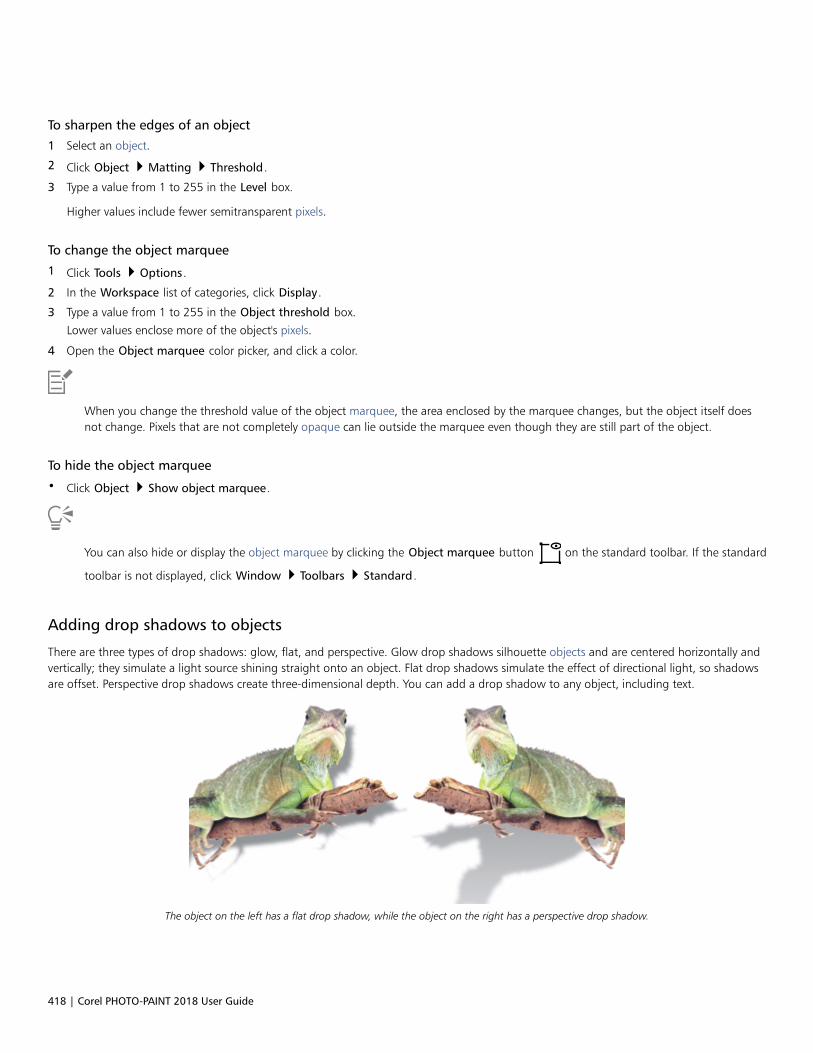
418 | Corel PHOTO-PAINT 2018 User Guide
To sharpen the edges of an object
1 Select an object.
2 Click Object Matting Threshold.
3 Type a value from 1 to 255 in the Level box.
Higher values include fewer semitransparent pixels.
To change the object marquee
1 Click Tools Options.
2 In the Workspace list of categories, click Display.
3 Type a value from 1 to 255 in the Object threshold box.
Lower values enclose more of the object's pixels.
4 Open the Object marquee color picker, and click a color.
When you change the threshold value of the object marquee, the area enclosed by the marquee changes, but the object itself doesnot change. Pixels that are not completely opaque can lie outside the marquee even though they are still part of the object.
To hide the object marquee
• Click Object Show object marquee.
You can also hide or display the object marquee by clicking the Object marquee button on the standard toolbar. If the standard
toolbar is not displayed, click Window Toolbars Standard.
Adding drop shadows to objects
There are three types of drop shadows: glow, flat, and perspective. Glow drop shadows silhouette objects and are centered horizontally andvertically; they simulate a light source shining straight onto an object. Flat drop shadows simulate the effect of directional light, so shadowsare offset. Perspective drop shadows create three-dimensional depth. You can add a drop shadow to any object, including text.
The object on the left has a flat drop shadow, while the object on the right has a perspective drop shadow.
Modifying objects | 419
You can create and adjust drop shadows in the image window. You can also change the color, position, direction, and transparency of adrop shadow directly in the image window.
You can also apply preset drop shadows. When you apply a preset, you can modify it to create a custom drop shadow. For example, you canchange its direction and distance from an object, its color, and its opacity. By default, the edges of drop shadows feature squared feathering.You can choose another feathering type, such as a Gaussian blur which creates a realistic-looking drop shadow. You can also copy a customdrop shadow or save it as a preset.
When you change the shape or transparency of an object that has a drop shadow, the drop shadow automatically also changes.
You can remove a drop shadow at any time.
To add a flat or perspective drop shadow
1 In the toolbox, click the Drop shadow tool .
2 Select an object.
If you want to create a flat drop shadow, drag from the center of the object.
If you want to create a perspective drop shadow, drag from the edge of an object.
You can also
Change the color of the drop shadow Drag a color swatch from the color palette to the end node on thedrop shadow arrow.
Move the drop shadow Drag the end node on the drop shadow arrow.
Flip a flat drop shadow from the center of the object or aperspective drop shadow to the edge of the object.
Drag the start node on the drop shadow arrow.
Change the direction of or offset the drop shadow Drag the drop shadow arrow head.
Adjust the drop shadow’s opacity Drag the triangular Transparency handle on the drop shadowarrow.
Adjust the edge feathering Drag the triangular Feather handle on the drop shadow arrow. Bydefault, squared feathering is used, but you can choose another
type from the Feather edge picker on the property bar. For
example, the Gaussian blur creates a realistic drop shadow.
To add a glow drop shadow
1 In the toolbox, click the Drop shadow tool .
2 Select an object.
3 On the property bar, choose one of the following presets from the Preset list box:
• Large glow
• Medium glow
• Small glow
420 | Corel PHOTO-PAINT 2018 User Guide
You can also
Change the color of the drop shadow Drag a color swatch from the color palette to the end node on thedrop shadow arrow.
Adjust the drop shadow’s opacity Drag the triangular Transparency handle on the drop shadowarrow.
Adjust the edge feathering Drag the triangular Feather handle on the drop shadow arrow. Bydefault, squared feathering is used, but you can choose another
type from the Feather edge picker on the property bar. For
example, the Gaussian blur creates a realistic drop shadow.
To add a preset or custom drop shadow
1 In the toolbox, click the Drop shadow tool .
2 Select an object.
3 Choose a preset from the Preset list box on the property bar.
If you modify the preset by changing any of the values on property bar, the preset name changes to Custom in the Preset list box.
4 Open the Shadow color picker on the property bar, and click a color.
5 On the property bar, type values in any of the following boxes:
• Shadow direction — lets you specify the angle of the shadow in relation to the object
• Shadow offset — lets you specify the distance of the shadow from the object’s point of origin
• Shadow fade — lets you specify the percentage by which a perspective drop shadow fades as it moves away from the object
• Shadow stretch — lets you specify the length of a perspective shadow
• Shadow transparency — lets you specify the transparency of the shadow
• Shadow feathering — lets you specify the number of pixels on the edge of the shadow that are feathered to create a soft edge. By
default, squared feathering is used, but you can choose another type from the Feather edge picker on the property bar. For
example, if you want to create a realistic drop shadow, choose the Gaussian blur. You can also specify a direction for the feathered
pixels from the Feathering direction picker .
You can also
Save a custom drop shadow as a preset Click the Add preset button on the property bar, and type a
name for the drop shadow in the Save preset as box.
Specify the offset and the feather width of the offset as apercentage of the size of the drop shadow
In the Save as preset dialog box, enable the Shadow relativecheck box.
After you choose a preset, you can modify many drop shadow attributes by adjusting the nodes and triangle handles on the dropshadow arrow.
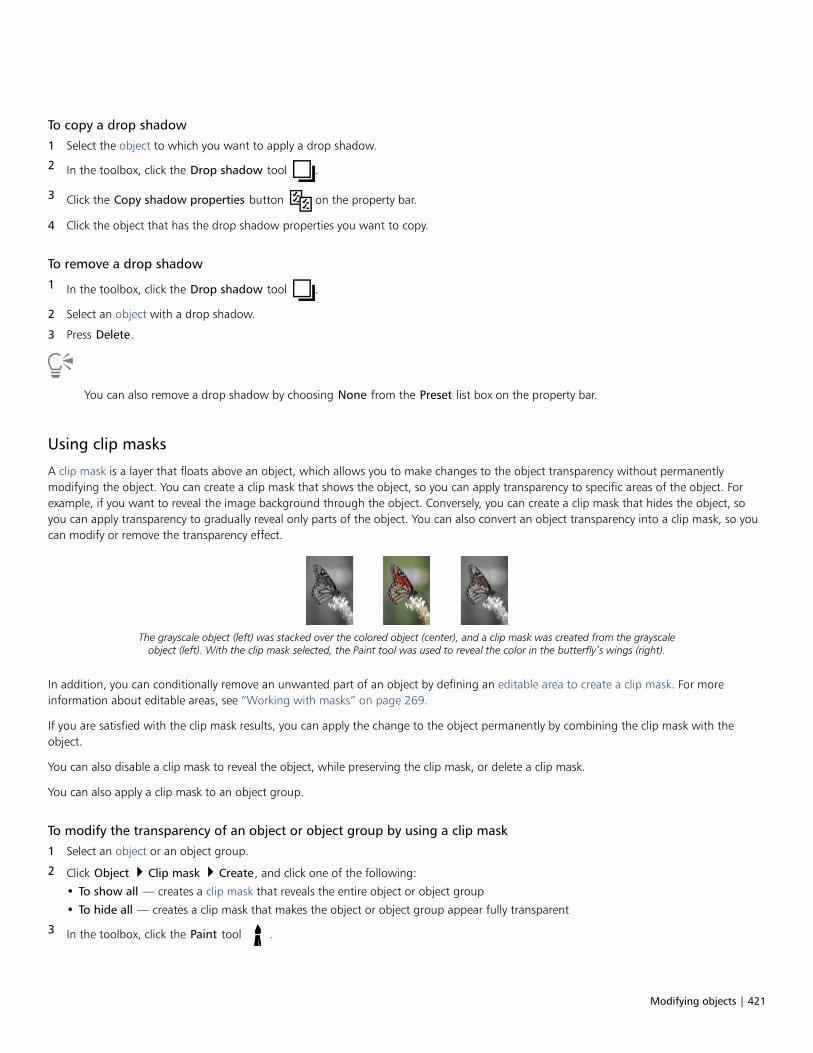
Modifying objects | 421
To copy a drop shadow
1 Select the object to which you want to apply a drop shadow.
2 In the toolbox, click the Drop shadow tool .
3 Click the Copy shadow properties button on the property bar.
4 Click the object that has the drop shadow properties you want to copy.
To remove a drop shadow
1 In the toolbox, click the Drop shadow tool .
2 Select an object with a drop shadow.
3 Press Delete.
You can also remove a drop shadow by choosing None from the Preset list box on the property bar.
Using clip masks
A clip mask is a layer that floats above an object, which allows you to make changes to the object transparency without permanentlymodifying the object. You can create a clip mask that shows the object, so you can apply transparency to specific areas of the object. Forexample, if you want to reveal the image background through the object. Conversely, you can create a clip mask that hides the object, soyou can apply transparency to gradually reveal only parts of the object. You can also convert an object transparency into a clip mask, so youcan modify or remove the transparency effect.
The grayscale object (left) was stacked over the colored object (center), and a clip mask was created from the grayscaleobject (left). With the clip mask selected, the Paint tool was used to reveal the color in the butterfly’s wings (right).
In addition, you can conditionally remove an unwanted part of an object by defining an editable area to create a clip mask. For moreinformation about editable areas, see “Working with masks” on page 269.
If you are satisfied with the clip mask results, you can apply the change to the object permanently by combining the clip mask with theobject.
You can also disable a clip mask to reveal the object, while preserving the clip mask, or delete a clip mask.
You can also apply a clip mask to an object group.
To modify the transparency of an object or object group by using a clip mask
1 Select an object or an object group.
2 Click Object Clip mask Create, and click one of the following:
• To show all — creates a clip mask that reveals the entire object or object group
• To hide all — creates a clip mask that makes the object or object group appear fully transparent
3 In the toolbox, click the Paint tool .
422 | Corel PHOTO-PAINT 2018 User Guide
4 Click a color from the color palette.
Choose a lighter color, such as light gray, to apply less transparency. Choose a darker color, such as black, to apply more transparency.
5 Drag in the image window.
You can change only the active clip mask. The active clip mask has a red border around its thumbnail in the Object manager docker.
You can also create a clip mask that reveals the entire object or object group from the Object manager docker by clicking the Create
clip mask button .
When you apply a clip mask to an object group, you can modify the view of individual objects in the clipped mask area by selectingthem in the Object manager docker and moving them around.
To create a clip mask from an object transparency
1 Select an object or object group that has a transparency.
2 Click Object Clip mask Create From object transparency.
To remove editable areas by using a clip mask
1 Select an object or object group.
2 In the toolbox, choose a Mask tool.
3 In the image window, define an editable area.
4 Click Object Clip mask Create, and click one of the following:
• From mask — hides the area surrounding the editable area
• From inverted mask — hides the editable area while revealing only the area that surrounds it
You can also create a clip mask that reveals the entire object or object group from the Object manager docker by clicking the Create
clip mask button .
To combine a clip mask with an object or object group
1 Select an object or object group that has a clip mask.
2 Click Object Clip mask Combine.
To disable a clip mask
1 Select an object or object group that has a clip mask.
2 Click Object Clip mask Disable.
To delete a clip mask
1 Select an object or object group that has a clip mask.
2 Click Object Clip mask Remove.
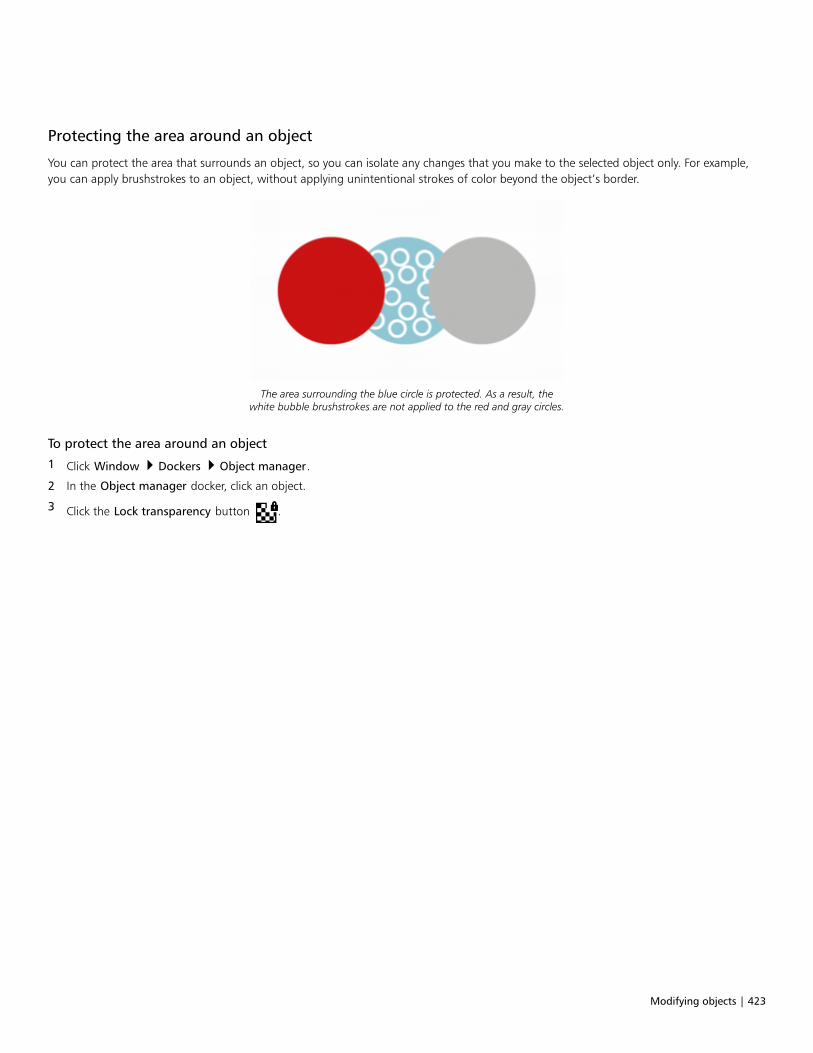
Modifying objects | 423
Protecting the area around an object
You can protect the area that surrounds an object, so you can isolate any changes that you make to the selected object only. For example,you can apply brushstrokes to an object, without applying unintentional strokes of color beyond the object’s border.
The area surrounding the blue circle is protected. As a result, thewhite bubble brushstrokes are not applied to the red and gray circles.
To protect the area around an object
1 Click Window Dockers Object manager.
2 In the Object manager docker, click an object.
3 Click the Lock transparency button .

424 | Corel PHOTO-PAINT 2018 User Guide

Linking and embedding objects | 425
Linking and embedding objects
Object linking and embedding (OLE) is a method of exchanging information between applications. Using OLE, you can take selectedobjects or entire files from one application, called the source application, and place them into another application, called the destinationapplication.
You can freely move objects and files between applications as long as all the applications involved support OLE. Linking results in a larger filesize but is useful when you want to use an object or file in multiple files. To change every instance of the object or the file, you only need tochange the object in the source application. Linking is also useful when the destination application does not directly support files created inthe source application. Embedding is useful when you want to include all objects in one file. Embedded objects are not linked to the sourcefile, and result in a smaller file size in the destination application.
This section contains the following topics:• “Inserting linked or embedded objects into another application” (page 425)• “Editing linked or embedded objects” (page 426)
Inserting linked or embedded objects into another application
Corel PHOTO-PAINT lets you create OLE objects that you can insert into other applications. You can link an object by copying it from CorelPHOTO-PAINT and pasting into another application. You can also embed an object from Corel PHOTO-PAINT into another application as anOLE object.
To insert a linked object
1 In Corel PHOTO-PAINT, select an object.
Make sure that the file is saved first.
2 Click Edit Copy.
3 Click Edit Paste special in the destination application.
4 Enable the Paste link option.
To insert an embedded object
1 In Corel PHOTO-PAINT, select an object.
2 Drag the selected object to the destination application window.

426 | Corel PHOTO-PAINT 2018 User Guide
When you insert an embedded object by dragging, the application windows of both Corel PHOTO-PAINT and the destinationapplication must be visible.
Dragging an object from one application to another deletes the object from the source application and places it in the destinationapplication. If you want to leave a copy of the object in Corel PHOTO-PAINT, hold down Ctrl + Shift while you’re dragging.
Editing linked or embedded objects
You can edit a linked or embedded object created in Corel PHOTO-PAINT and inserted into another application as an OLE object. You canedit a linked object by editing its source file in Corel PHOTO-PAINT. Any changes you make to the source file are automatically applied to thelinked object.
To edit a linked or embedded object
1 Double-click the linked or embedded object to start Corel PHOTO-PAINT.
2 Edit the object.
3 Save the changes.
4 Close Corel PHOTO-PAINT.
5 Return to the active application window to review the edits.
You can also edit a linked or embedded object by starting Corel PHOTO-PAINT and opening the file directly.

Text | 427
Text
Creating and formatting text............................................................................................................................................................... 429
Managing fonts................................................................................................................................................................................... 447
Working with text in different languages............................................................................................................................................ 457

428 | Corel PHOTO-PAINT 2018 User Guide
Creating and formatting text | 429
Creating and formatting text
In Corel PHOTO-PAINT, you can add text to images and create interesting text effects. You can also move, edit, and format text. Fitting text toa path lets you place text along an uneven line. You can even capture a font from any source and identify it, so that you can reuse it in yourown artwork. If you are using an Asian operating system, you can take advantage of the Asian text formatting capabilities available withCorel PHOTO-PAINT. For information, see “Working with Asian and Middle Eastern text” on page 458.
This section contains the following topics:• “Adding and selecting text” (page 429)• “Adding color to text” (page 431)• “Formatting text” (page 432)• “Working with OpenType features” (page 434)• “Inserting special characters, symbols, and glyphs” (page 438)• “Kerning, shifting, and rotating text” (page 441)• “Aligning text” (page 442)• “Adjusting line, character, and word spacing” (page 443)• “Anti-aliasing text” (page 443)• “Fitting text to a path” (page 444)• “Working with legacy text” (page 445)
Adding and selecting text
You can add text to enhance images. You can specify the text font, size, and alignment, as well as the character spacing and line spacing.
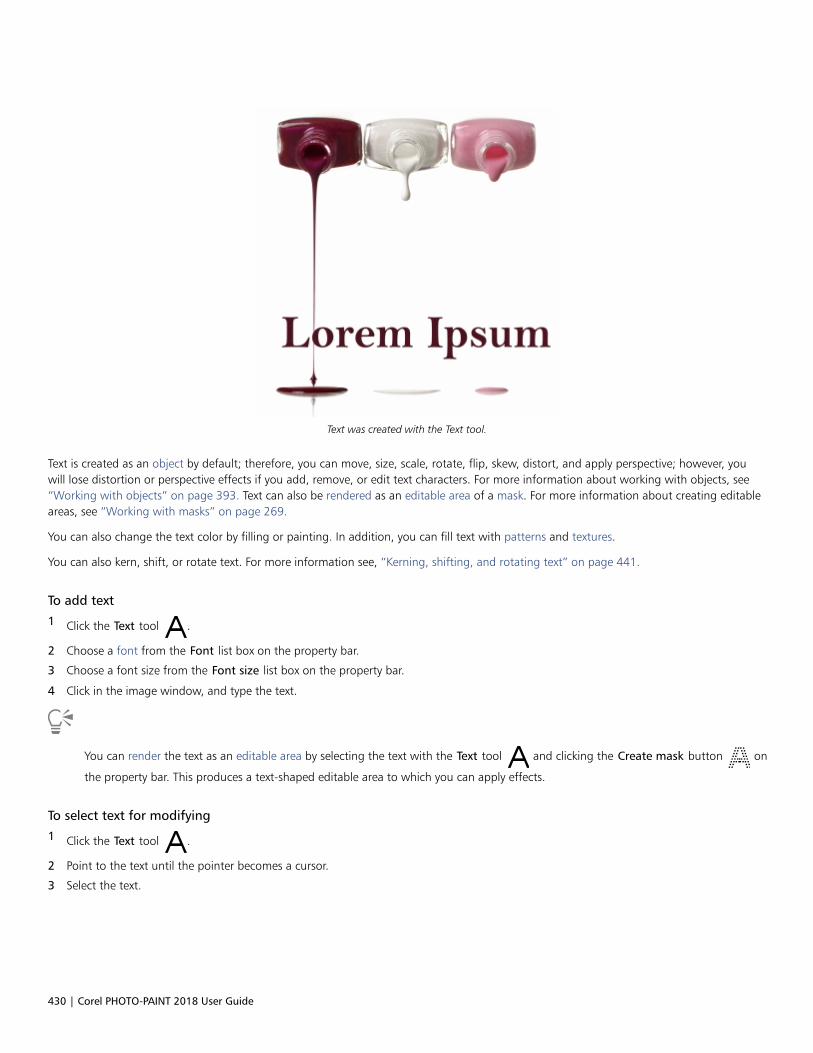
430 | Corel PHOTO-PAINT 2018 User Guide
Text was created with the Text tool.
Text is created as an object by default; therefore, you can move, size, scale, rotate, flip, skew, distort, and apply perspective; however, youwill lose distortion or perspective effects if you add, remove, or edit text characters. For more information about working with objects, see“Working with objects” on page 393. Text can also be rendered as an editable area of a mask. For more information about creating editableareas, see “Working with masks” on page 269.
You can also change the text color by filling or painting. In addition, you can fill text with patterns and textures.
You can also kern, shift, or rotate text. For more information see, “Kerning, shifting, and rotating text” on page 441.
To add text
1 Click the Text tool .
2 Choose a font from the Font list box on the property bar.
3 Choose a font size from the Font size list box on the property bar.
4 Click in the image window, and type the text.
You can render the text as an editable area by selecting the text with the Text tool and clicking the Create mask button on
the property bar. This produces a text-shaped editable area to which you can apply effects.
To select text for modifying
1 Click the Text tool .
2 Point to the text until the pointer becomes a cursor.
3 Select the text.
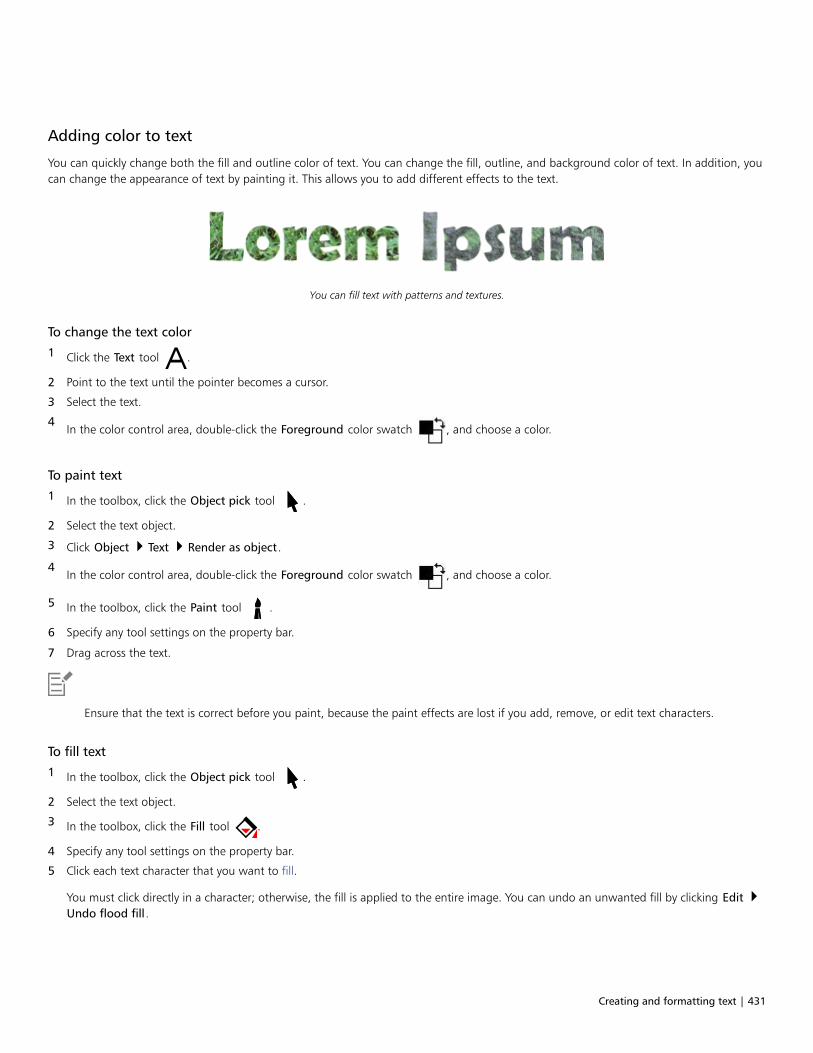
Creating and formatting text | 431
Adding color to text
You can quickly change both the fill and outline color of text. You can change the fill, outline, and background color of text. In addition, youcan change the appearance of text by painting it. This allows you to add different effects to the text.
You can fill text with patterns and textures.
To change the text color
1 Click the Text tool .
2 Point to the text until the pointer becomes a cursor.
3 Select the text.
4In the color control area, double-click the Foreground color swatch , and choose a color.
To paint text
1 In the toolbox, click the Object pick tool .
2 Select the text object.
3 Click Object Text Render as object.
4In the color control area, double-click the Foreground color swatch , and choose a color.
5 In the toolbox, click the Paint tool .
6 Specify any tool settings on the property bar.
7 Drag across the text.
Ensure that the text is correct before you paint, because the paint effects are lost if you add, remove, or edit text characters.
To fill text
1 In the toolbox, click the Object pick tool .
2 Select the text object.
3 In the toolbox, click the Fill tool .
4 Specify any tool settings on the property bar.
5 Click each text character that you want to fill.
You must click directly in a character; otherwise, the fill is applied to the entire image. You can undo an unwanted fill by clicking Edit Undo flood fill.
432 | Corel PHOTO-PAINT 2018 User Guide
Ensure that the text is correct before you paint, because the paint effects are lost if you add, remove, or edit text characters.
You can quickly zoom into a text character by clicking the Zoom tool in the toolbox and dragging in the image to enclose the
text character.
You can render the text as an editable area by selecting the text object with the Text tool and clicking the Create mask button
on the property bar. This produces a text-shaped editable area to which you can apply fills.
Formatting text
Corel PHOTO-PAINT lets you format text to enhance its appearance. You can change the font attributes, such as style and size, and you canunderline, strikethrough, and overline text. You can also change the position and appearance of characters by displaying them as subscriptor superscript, which is useful in drawings with scientific notations. In addition, you can also change the text case.
If you select an OpenType font that supports subscript, superscript, or case, you can apply the OpenType feature. However, if you select afont, including an OpenType font, that does not support these features, you can apply a synthesized version of the character, which CorelPHOTO-PAINT produces by altering the characteristics of the default font character. For more information, see “Working with OpenTypefeatures” on page 434.
You can also add underlines, strikethrough lines, and overlines to selected characters.
To change font attributes
1 Using the Text tool , select the text.
2 Click Object Text Text properties.
3 In the Text properties docker, perform a task from the following table.
To Do the following
Choose the typeface Choose a typeface from the Font list box.
Set the font size Type a value in the Font size box.
Change the font style Choose an option from the Font style list box.
You can also choose a typeface from the Font list box on the property bar.
You can also change the font style of selected text by clicking the Bold button or the Italicize button on the property bar.
To underline, strikethrough, and overline text
1 Using the Text tool , select the text.
2 Click Object Text Text properties.
Creating and formatting text | 433
3 In the Text properties docker, click the advanced arrow to display additional options.
4 Perform an action from the following table.
To Do the following
Underline the text Click the Underline button and choose an option from the list.
Add a line through the text Click the Character strikethrough button and choose an optionfrom the list.
Add a line above the text Click the Character overline button and choose an option from thelist.
You can add a single underline to selected text by clicking the Underline button on the property bar.
To add superscript or subscript text
1 Using the Text tool , select the text.
2 Click Object Text Text properties.
3 In the Text properties docker, choose one of the following from the Position list box:
• None — turns off all the features in the list
• Superscript (auto) — applies the OpenType feature if the font supports it, or applies a synthesized version if the font does not supportsuperscript
• Subscript (auto) — applies the OpenType feature if the font supports it, or applies a synthesized version if the font does not supportsubscript
• Superscript (synthesized) — applies a synthesized version of the superscript feature, which looks the same as in previous versions ofCorel PHOTO-PAINT
• Subscript (synthesized) — applies a synthesized version of the subscript feature, which looks the same as in previous versions of CorelPHOTO-PAINT
Some OpenType fonts may appear to support features that are unsupported. For example, Superscript and Subscript options mayappear available, but are not. If you apply one of these OpenType fonts, Corel PHOTO-PAINT cannot provide a synthesized version ofSuperscript and Subscript.
To change the text case
1 Using the Text tool , select the text.
2 Click Object Text Text properties.
3 In the Text properties docker, choose one of the following from the Caps list box:
• None — turns off all of the features in the list
• All caps — substitutes lowercase characters with upper case equivalents
• Titling caps — applies the OpenType version of the feature if the font supports it
• Small caps (auto) — applies the OpenType version of the feature if the font supports it
• All small caps — substitutes characters with a scaled-down version of the upper case characters
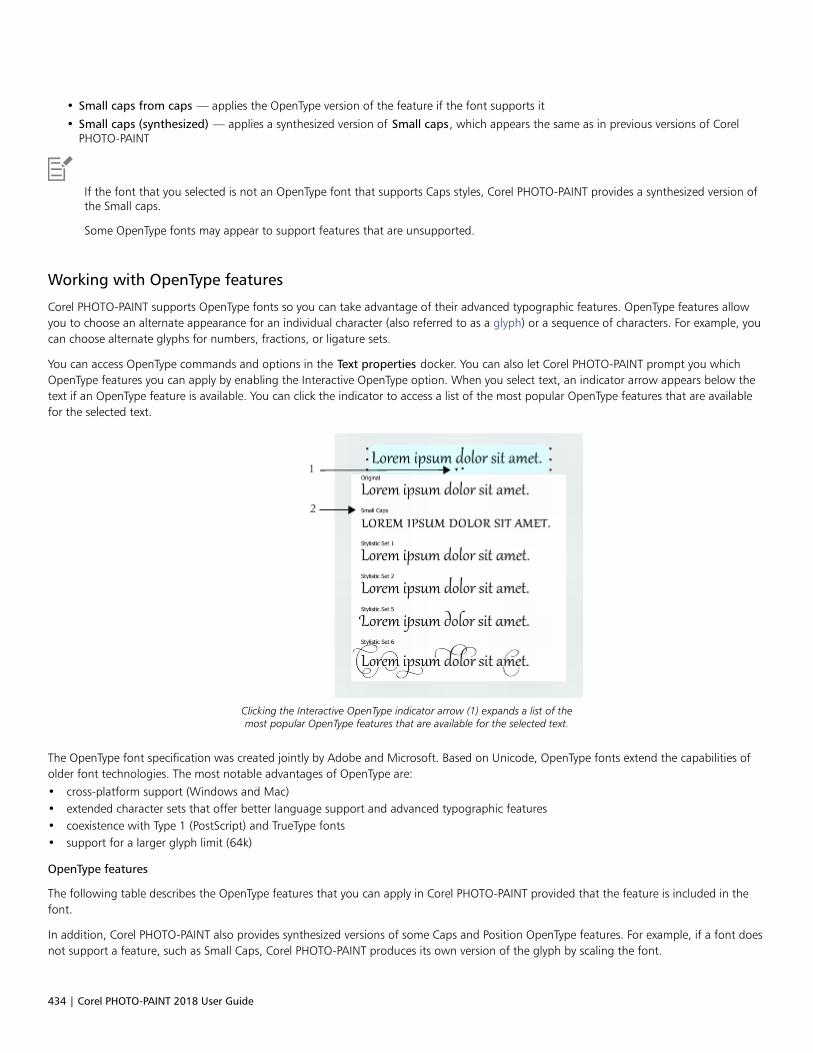
434 | Corel PHOTO-PAINT 2018 User Guide
• Small caps from caps — applies the OpenType version of the feature if the font supports it
• Small caps (synthesized) — applies a synthesized version of Small caps, which appears the same as in previous versions of CorelPHOTO-PAINT
If the font that you selected is not an OpenType font that supports Caps styles, Corel PHOTO-PAINT provides a synthesized version ofthe Small caps.
Some OpenType fonts may appear to support features that are unsupported.
Working with OpenType features
Corel PHOTO-PAINT supports OpenType fonts so you can take advantage of their advanced typographic features. OpenType features allowyou to choose an alternate appearance for an individual character (also referred to as a glyph) or a sequence of characters. For example, youcan choose alternate glyphs for numbers, fractions, or ligature sets.
You can access OpenType commands and options in the Text properties docker. You can also let Corel PHOTO-PAINT prompt you whichOpenType features you can apply by enabling the Interactive OpenType option. When you select text, an indicator arrow appears below thetext if an OpenType feature is available. You can click the indicator to access a list of the most popular OpenType features that are availablefor the selected text.
Clicking the Interactive OpenType indicator arrow (1) expands a list of themost popular OpenType features that are available for the selected text.
The OpenType font specification was created jointly by Adobe and Microsoft. Based on Unicode, OpenType fonts extend the capabilities ofolder font technologies. The most notable advantages of OpenType are:• cross-platform support (Windows and Mac)• extended character sets that offer better language support and advanced typographic features• coexistence with Type 1 (PostScript) and TrueType fonts• support for a larger glyph limit (64k)
OpenType features
The following table describes the OpenType features that you can apply in Corel PHOTO-PAINT provided that the feature is included in thefont.
In addition, Corel PHOTO-PAINT also provides synthesized versions of some Caps and Position OpenType features. For example, if a font doesnot support a feature, such as Small Caps, Corel PHOTO-PAINT produces its own version of the glyph by scaling the font.
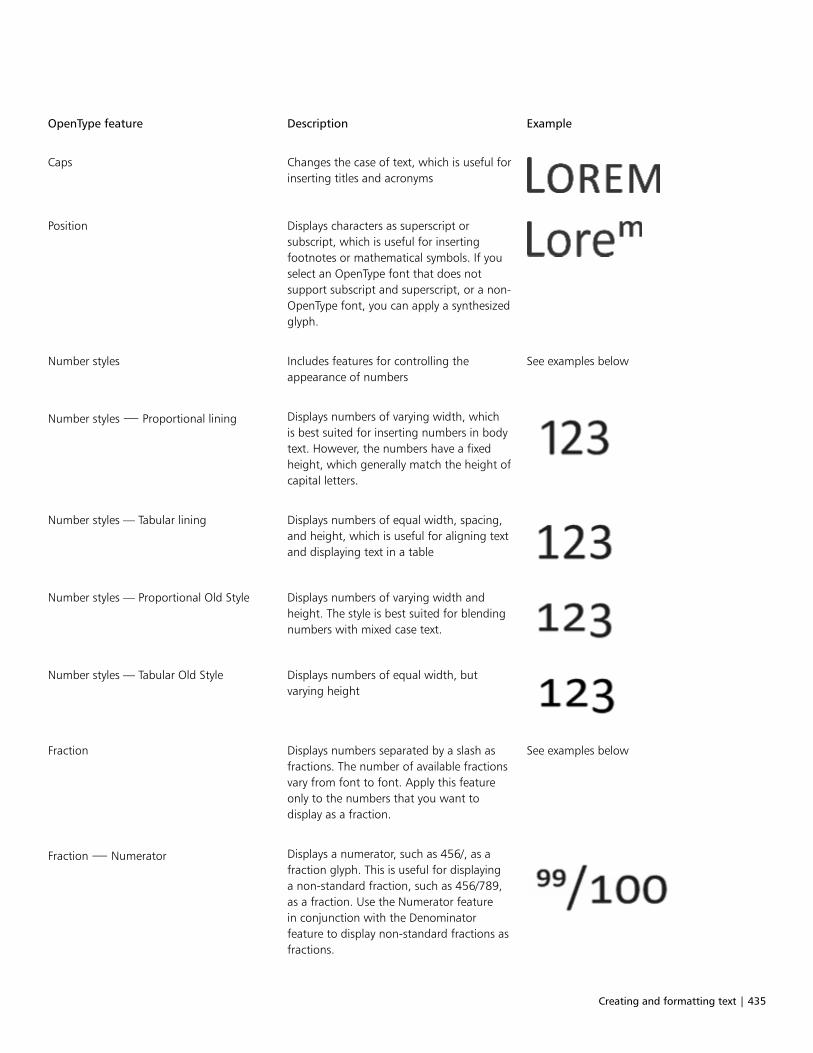
Creating and formatting text | 435
OpenType feature Description Example
Caps Changes the case of text, which is useful forinserting titles and acronyms
Position Displays characters as superscript orsubscript, which is useful for insertingfootnotes or mathematical symbols. If youselect an OpenType font that does notsupport subscript and superscript, or a non-OpenType font, you can apply a synthesizedglyph.
Number styles Includes features for controlling theappearance of numbers
See examples below
Number styles — Proportional lining Displays numbers of varying width, whichis best suited for inserting numbers in bodytext. However, the numbers have a fixedheight, which generally match the height ofcapital letters.
Number styles — Tabular lining Displays numbers of equal width, spacing,and height, which is useful for aligning textand displaying text in a table
Number styles — Proportional Old Style Displays numbers of varying width andheight. The style is best suited for blendingnumbers with mixed case text.
Number styles — Tabular Old Style Displays numbers of equal width, butvarying height
Fraction Displays numbers separated by a slash asfractions. The number of available fractionsvary from font to font. Apply this featureonly to the numbers that you want todisplay as a fraction.
See examples below
Fraction — Numerator Displays a numerator, such as 456/, as afraction glyph. This is useful for displayinga non-standard fraction, such as 456/789,as a fraction. Use the Numerator featurein conjunction with the Denominatorfeature to display non-standard fractions asfractions.
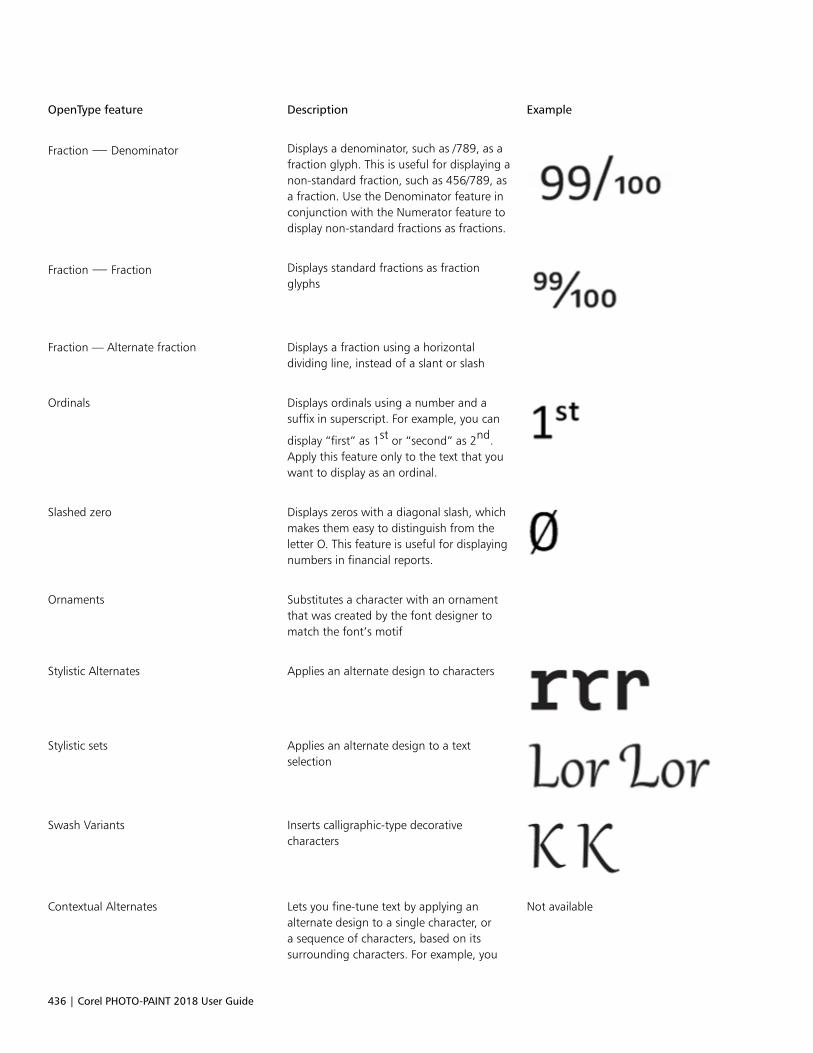
436 | Corel PHOTO-PAINT 2018 User Guide
OpenType feature Description Example
Fraction — Denominator Displays a denominator, such as /789, as afraction glyph. This is useful for displaying anon-standard fraction, such as 456/789, asa fraction. Use the Denominator feature inconjunction with the Numerator feature todisplay non-standard fractions as fractions.
Fraction — Fraction Displays standard fractions as fractionglyphs
Fraction — Alternate fraction Displays a fraction using a horizontaldividing line, instead of a slant or slash
Ordinals Displays ordinals using a number and asuffix in superscript. For example, you can
display “first” as 1st or “second” as 2nd.Apply this feature only to the text that youwant to display as an ordinal.
Slashed zero Displays zeros with a diagonal slash, whichmakes them easy to distinguish from theletter O. This feature is useful for displayingnumbers in financial reports.
Ornaments Substitutes a character with an ornamentthat was created by the font designer tomatch the font’s motif
Stylistic Alternates Applies an alternate design to characters
Stylistic sets Applies an alternate design to a textselection
Swash Variants Inserts calligraphic-type decorativecharacters
Contextual Alternates Lets you fine-tune text by applying analternate design to a single character, ora sequence of characters, based on itssurrounding characters. For example, you
Not available
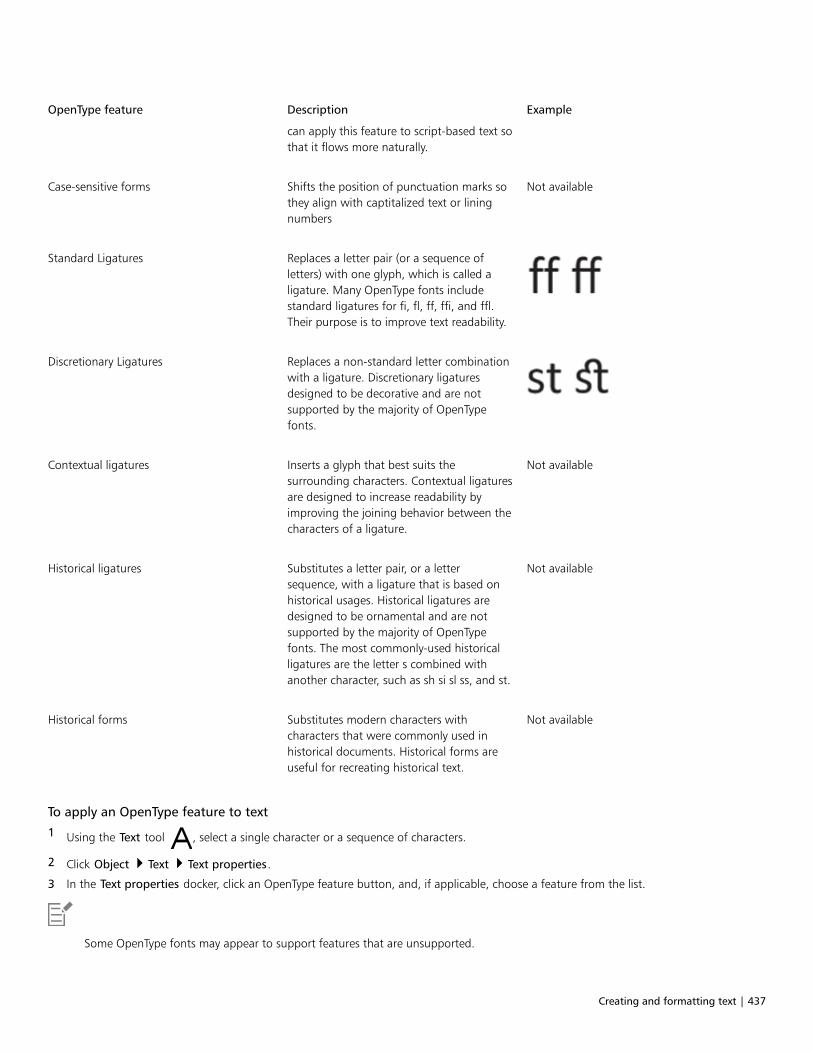
Creating and formatting text | 437
OpenType feature Description Example
can apply this feature to script-based text sothat it flows more naturally.
Case-sensitive forms Shifts the position of punctuation marks sothey align with captitalized text or liningnumbers
Not available
Standard Ligatures Replaces a letter pair (or a sequence ofletters) with one glyph, which is called aligature. Many OpenType fonts includestandard ligatures for fi, fl, ff, ffi, and ffl.Their purpose is to improve text readability.
Discretionary Ligatures Replaces a non-standard letter combinationwith a ligature. Discretionary ligaturesdesigned to be decorative and are notsupported by the majority of OpenTypefonts.
Contextual ligatures Inserts a glyph that best suits thesurrounding characters. Contextual ligaturesare designed to increase readability byimproving the joining behavior between thecharacters of a ligature.
Not available
Historical ligatures Substitutes a letter pair, or a lettersequence, with a ligature that is based onhistorical usages. Historical ligatures aredesigned to be ornamental and are notsupported by the majority of OpenTypefonts. The most commonly-used historicalligatures are the letter s combined withanother character, such as sh si sl ss, and st.
Not available
Historical forms Substitutes modern characters withcharacters that were commonly used inhistorical documents. Historical forms areuseful for recreating historical text.
Not available
To apply an OpenType feature to text
1 Using the Text tool , select a single character or a sequence of characters.
2 Click Object Text Text properties.
3 In the Text properties docker, click an OpenType feature button, and, if applicable, choose a feature from the list.
Some OpenType fonts may appear to support features that are unsupported.
438 | Corel PHOTO-PAINT 2018 User Guide
To enable the onscreen OpenType feature indicator
• Click the Text tool in the toolbox, and click the Interactive OpenType button on the property bar.
If an OpenType feature is available for the selected text, an arrow displays below the text.
You can also
View a list of the most popular OpenType features onscreen Click the arrow below the text.
Apply an OpenType feature to a text selection Hover over an option in the OpenType feature list and click anoption.
Inserting special characters, symbols, and glyphs
Using the Insert character docker, you can find and insert special characters, symbols, and glyphs (variations of individual characters orcharacter combinations) of OpenType fonts.
Filtering
All characters, symbols, and glyphs included in a font are displayed by default, but you can filter character subsets to display only thecharacters you want. For example, you can display only currency symbols or numbers, or you can display only Cyrillic characters and symbols.
Characters included in a font are organized in the following categories:• Common — includes arrows, currency, mathematical symbols, numbers, punctuation marks, and separators as well as CJK symbols and
punctuation marks (used in Asian scripts)• Scripts — includes the scripts that the selected font supports, such as Latin, Greek, Cyrillic, Hiragana and Katakana, Han, Arabic, or
Hebrew scripts• OpenType — includes the OpenType features provided by the selected font such as standard ligatures, discretionary ligatures, fraction,
alternate annotation forms, and more. For more information about OpenType features, see “Working with OpenType features” on page434.
OpenType fonts
The Insert character docker is ideal for viewing and applying the OpenType features provided by OpenType fonts. The default view shows alist of characters in which the glyphs for individual characters appear grouped. Alternatively, you can display a longer list that shows availableglyphs at a glance.
Viewing character position
Each selected character appears against a set of blue lines that let you preview its position in relation to the text baseline.
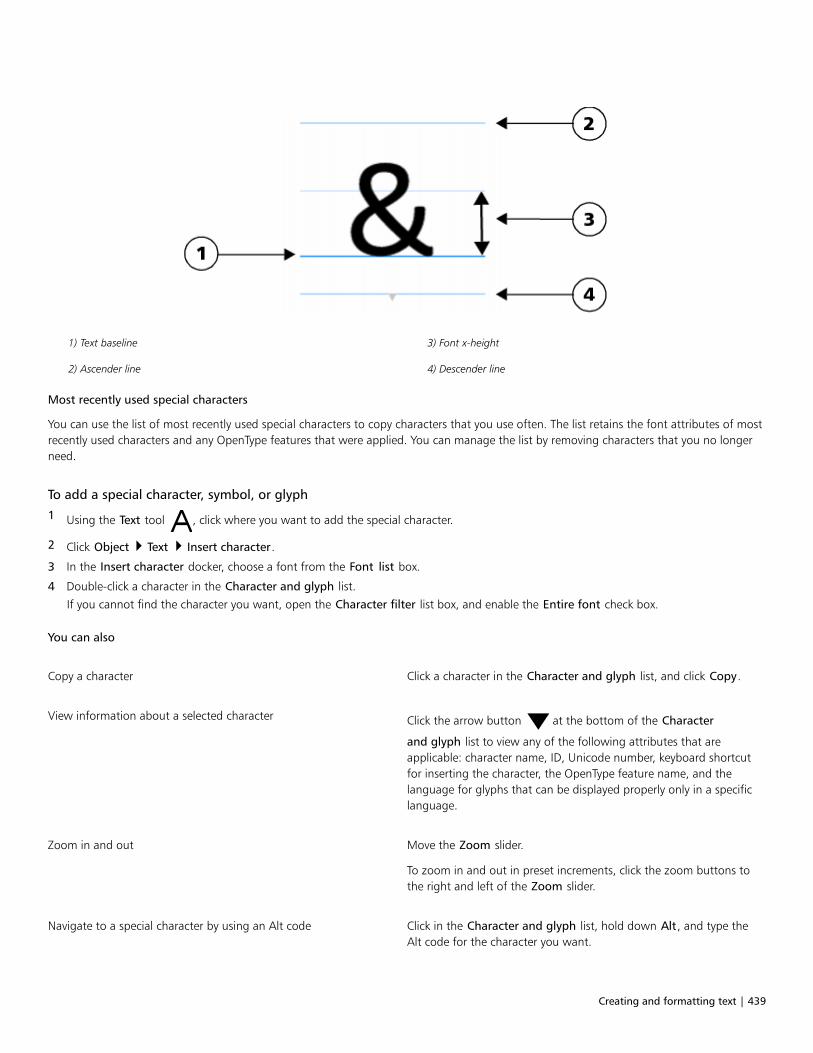
Creating and formatting text | 439
1) Text baseline 3) Font x-height
2) Ascender line 4) Descender line
Most recently used special characters
You can use the list of most recently used special characters to copy characters that you use often. The list retains the font attributes of mostrecently used characters and any OpenType features that were applied. You can manage the list by removing characters that you no longerneed.
To add a special character, symbol, or glyph
1 Using the Text tool , click where you want to add the special character.
2 Click Object Text Insert character.
3 In the Insert character docker, choose a font from the Font list box.
4 Double-click a character in the Character and glyph list.
If you cannot find the character you want, open the Character filter list box, and enable the Entire font check box.
You can also
Copy a character Click a character in the Character and glyph list, and click Copy.
View information about a selected character Click the arrow button at the bottom of the Character
and glyph list to view any of the following attributes that areapplicable: character name, ID, Unicode number, keyboard shortcutfor inserting the character, the OpenType feature name, and thelanguage for glyphs that can be displayed properly only in a specificlanguage.
Zoom in and out Move the Zoom slider.
To zoom in and out in preset increments, click the zoom buttons tothe right and left of the Zoom slider.
Navigate to a special character by using an Alt code Click in the Character and glyph list, hold down Alt, and type theAlt code for the character you want.
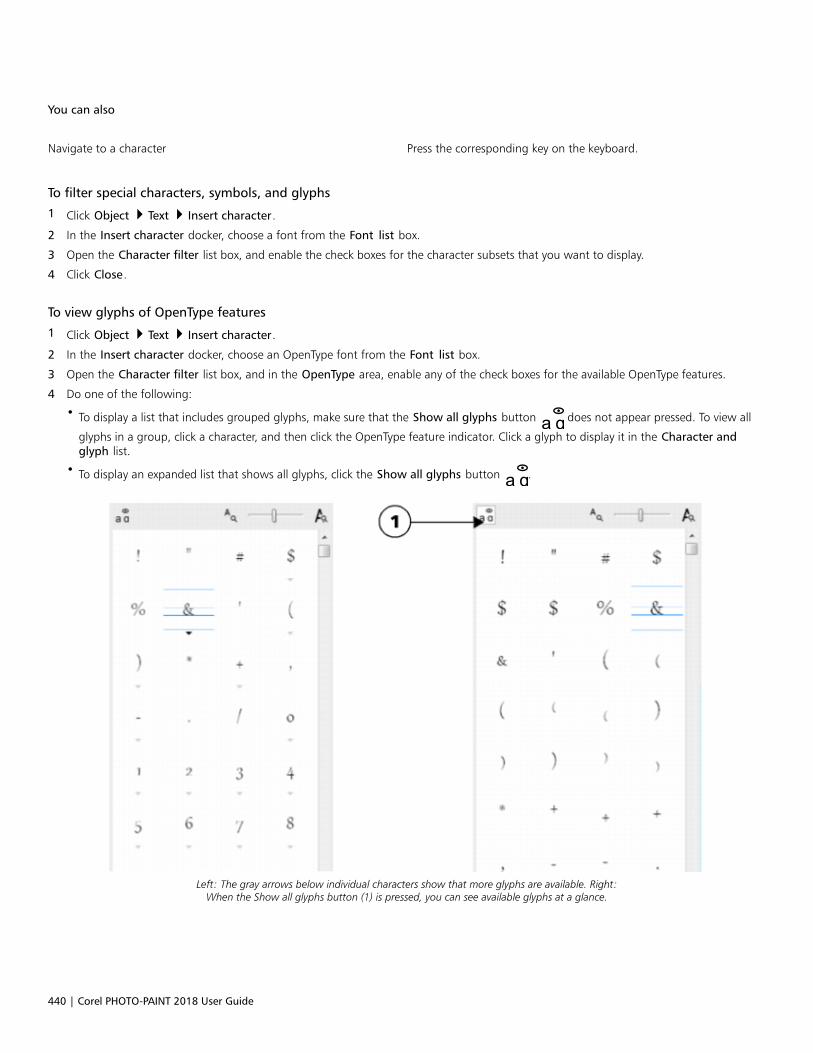
440 | Corel PHOTO-PAINT 2018 User Guide
You can also
Navigate to a character Press the corresponding key on the keyboard.
To filter special characters, symbols, and glyphs
1 Click Object Text Insert character.
2 In the Insert character docker, choose a font from the Font list box.
3 Open the Character filter list box, and enable the check boxes for the character subsets that you want to display.
4 Click Close.
To view glyphs of OpenType features
1 Click Object Text Insert character.
2 In the Insert character docker, choose an OpenType font from the Font list box.
3 Open the Character filter list box, and in the OpenType area, enable any of the check boxes for the available OpenType features.
4 Do one of the following:
• To display a list that includes grouped glyphs, make sure that the Show all glyphs button does not appear pressed. To view all
glyphs in a group, click a character, and then click the OpenType feature indicator. Click a glyph to display it in the Character andglyph list.
• To display an expanded list that shows all glyphs, click the Show all glyphs button .
Left: The gray arrows below individual characters show that more glyphs are available. Right:When the Show all glyphs button (1) is pressed, you can see available glyphs at a glance.
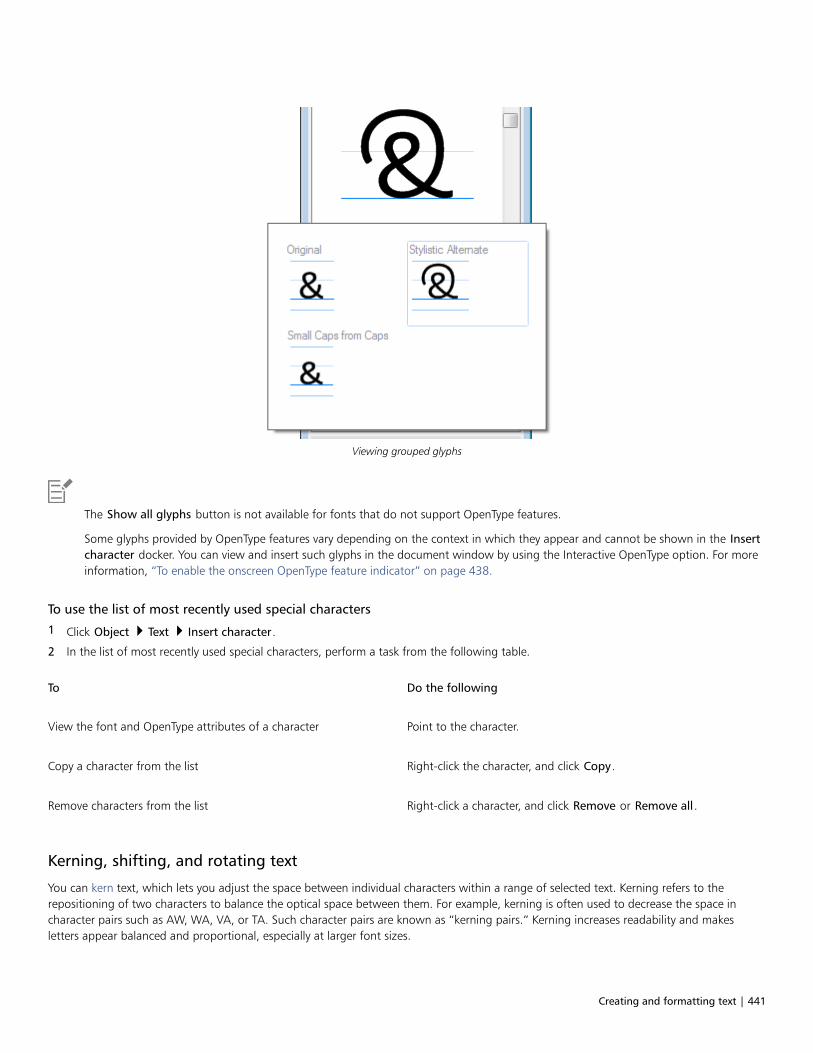
Creating and formatting text | 441
Viewing grouped glyphs
The Show all glyphs button is not available for fonts that do not support OpenType features.
Some glyphs provided by OpenType features vary depending on the context in which they appear and cannot be shown in the Insertcharacter docker. You can view and insert such glyphs in the document window by using the Interactive OpenType option. For moreinformation, “To enable the onscreen OpenType feature indicator” on page 438.
To use the list of most recently used special characters
1 Click Object Text Insert character.
2 In the list of most recently used special characters, perform a task from the following table.
To Do the following
View the font and OpenType attributes of a character Point to the character.
Copy a character from the list Right-click the character, and click Copy.
Remove characters from the list Right-click a character, and click Remove or Remove all.
Kerning, shifting, and rotating text
You can kern text, which lets you adjust the space between individual characters within a range of selected text. Kerning refers to therepositioning of two characters to balance the optical space between them. For example, kerning is often used to decrease the space incharacter pairs such as AW, WA, VA, or TA. Such character pairs are known as “kerning pairs.” Kerning increases readability and makesletters appear balanced and proportional, especially at larger font sizes.
442 | Corel PHOTO-PAINT 2018 User Guide
You can modify the appearance of text by shifting the characters vertically or horizontally, which changes the position of the selectedcharacters relative to the surrounding characters. You can also rotate characters by specifying an angle of rotation.
To kern text
1 Using the Text tool , select the text.
2 Click Object Text Text properties.
3 In the Text properties docker, type a value in the Range kerning box.
To shift characters
1 Using the Text tool , select the text.
2 Click Object Text Text properties.
3 In the Text properties docker, perform a task from the following table.
To Do the following
Shift characters horizontally Type a value in the Horizontal character offset box.
Shift characters vertically Type a value in the Vertical character offset box.
Positive horizontal values move the characters to the right; negative horizontal values move them to the left. Positive vertical valuesmove the characters up; negative vertical values move the characters down.
To rotate text
1 Using the Text tool , select the text.
2 Click Object Text Text properties.
3 In the Text properties docker, type a value in the Character angle box.
Aligning text
You can align a text object horizontally, which aligns the text in relation to its bounding box. If characters have not been shifted horizontally,applying no alignment produces the same result as applying left alignment.
To modify text alignment
1 Using the Text tool , select the text.
2 Click the Text alignment button on the property bar, and choose one of the following options:
• None — applies the default alignment setting
• Left — aligns text with the left side of the text frame or the bounding box of artistic text
• Center — centers text within the text frame
• Right — aligns text with the right side of the text frame and the bounding box of artistic text
• Full justify — aligns text, with the exception of the last line, with the left and right sides of the text frame
• Force justify — aligns text, including the last line, with the left and right sides of the text frame
Creating and formatting text | 443
You can also align text by clicking an alignment button in the Text properties docker.
Adjusting line, character, and word spacing
You can change the spacing between lines of text, which is also known as “leading” or “interline spacing.” When changing the line spacingfor artistic text, it applies only to the lines of text that are separated by a hard return.
You can change the spacing between characters (also known as “letter spacing”) in a block of text. For example, fully justifying a block oftext may insert too much space between characters, which creates a visual imbalance. To improve readability, you can decrease the characterspacing. You can also adjust the spacing between words.
To adjust line spacing
1 Using the Text tool , select the text.
2 Click Object Text Text properties.
3 In the Text properties docker, choose one of the following unit of measurement options from the Vertical spacing units list box:
• % of Char. height — lets you use a percentage value that is relative to the character height
• Points — lets you use points
• % of Pt.size — lets you use a percentage value that is relative to the character point size
4 Type a value in the Line spacing box.
To adjust character spacing
1 Using the Text tool , select the text.
2 Click Object Text Text properties.
3 In the Text properties docker, type a value in the Character spacing box.
To adjust word spacing
1 Using the Text tool , select the text.
2 Click Object Text Text properties.
3 In the Text properties docker, type a value in the Word spacing box.
Anti-aliasing text
You can use anti-aliasing to smooth the appearance of text. Anti-aliasing can improve the legibility of on-screen text, especially text that usesa small font size. When adding text to an image, anti-aliasing is applied by default. You can, however, remove text anti-aliasing.
To apply anti-aliasing to text
1 Select the text by using the Text tool .
2 Choose one of the following options from the Text antialiasing list box on the property bar:
• Soft — produces text that is softer in appearance, but remains true to the font shape
• Hard — produces text that is very clear and sharp
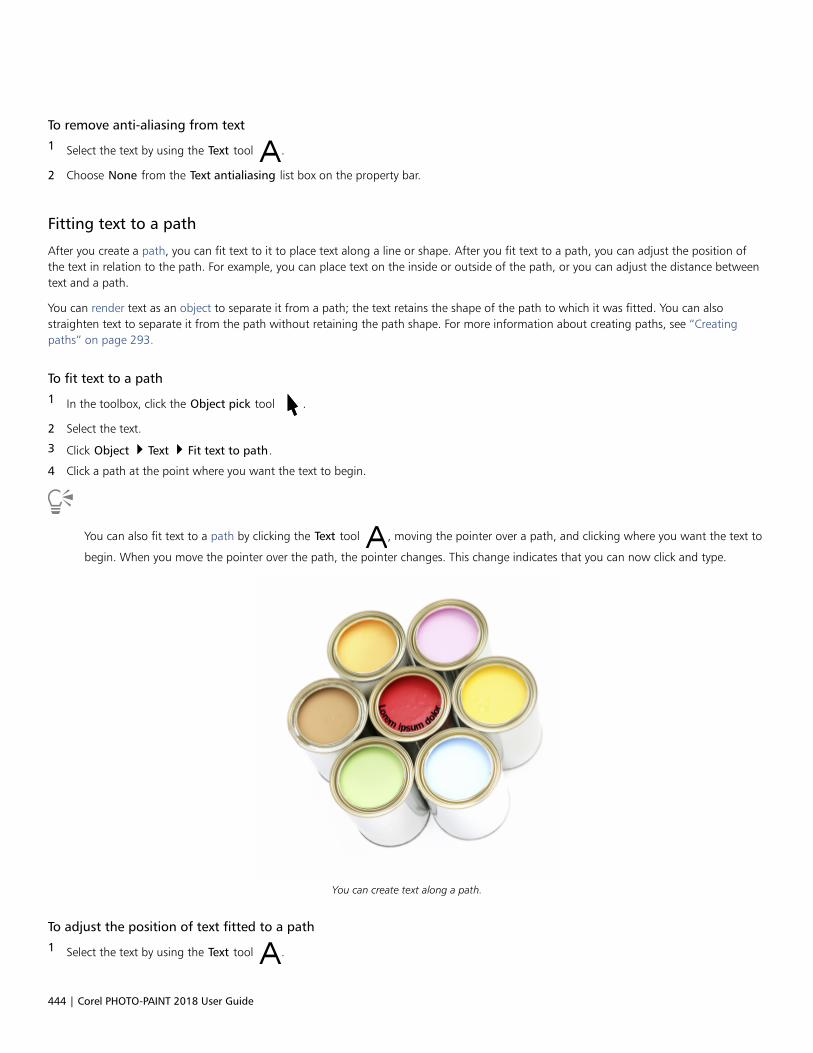
444 | Corel PHOTO-PAINT 2018 User Guide
To remove anti-aliasing from text
1 Select the text by using the Text tool .
2 Choose None from the Text antialiasing list box on the property bar.
Fitting text to a path
After you create a path, you can fit text to it to place text along a line or shape. After you fit text to a path, you can adjust the position ofthe text in relation to the path. For example, you can place text on the inside or outside of the path, or you can adjust the distance betweentext and a path.
You can render text as an object to separate it from a path; the text retains the shape of the path to which it was fitted. You can alsostraighten text to separate it from the path without retaining the path shape. For more information about creating paths, see “Creatingpaths” on page 293.
To fit text to a path
1 In the toolbox, click the Object pick tool .
2 Select the text.
3 Click Object Text Fit text to path.
4 Click a path at the point where you want the text to begin.
You can also fit text to a path by clicking the Text tool , moving the pointer over a path, and clicking where you want the text to
begin. When you move the pointer over the path, the pointer changes. This change indicates that you can now click and type.
You can create text along a path.
To adjust the position of text fitted to a path
1 Select the text by using the Text tool .
Creating and formatting text | 445
2 On the property bar, choose a setting from any of the following list boxes:
• Text orientation — sets the orientation of text
• Vertical placement — sets the vertical position of text
• Text placement — sets the placement of text
• Distance from path — sets the distance between the text and the path
• Offset — sets the horizontal position of text
If you want to move text to the opposite side of the path, click the Place on other side button on the property bar.
You can also adjust text by selecting the text with the Object pick tool , choosing a mode from the property bar, and dragging
the selection handles in the image window.
To render text as an object
1 In the toolbox, click the Object pick tool .
2 Select the text.
3 Click Object Text Render as object.
You can render the text as an editable area by selecting the text object with the Text tool , and clicking the Create mask button
on the property bar. This produces a text-shaped editable area that you can modify.
To straighten text
1 In the toolbox, click the Object pick tool .
2 Select the text.
3 Click Object Text Straighten text.
Working with legacy text
If you open a document with text that was created in a previous version of Corel PHOTO-PAINT, such as Corel PHOTO-PAINT X5, you need toupdate the legacy text before you can apply OpenType text features. For more information, see “Working with OpenType features” on page434.
To update legacy text
1 Open the document with legacy text.
An Update toolbar appears at the top of the image window.
2 Click Update.
To undo the update, click Undo on the Update toolbar. However, once you make changes to the updated text, this option is no longeravailable.
You can also update legacy text by clicking the Update button in the Text properties docker.

446 | Corel PHOTO-PAINT 2018 User Guide

Managing fonts | 447
Managing fonts
Corel PHOTO-PAINT allows you to manage and preview fonts.
This section contains the following topics:• “Viewing fonts” (page 447)• “Filtering fonts” (page 449)• “Searching for fonts” (page 450)• “Acquiring more fonts” (page 451)• “Identifying fonts” (page 452)• “Choosing fonts with Font Playground” (page 453)• “Using Corel Font Manager” (page 455)
Viewing fonts
You can customize the font list, from within the Font list box, to make it easier to find fonts. For example, you can change the size of thefont names displayed in the Font list box. You can display fonts grouped by family or as a flat list. If you have non-Latin fonts installed, youcan show their names in Latin or in their native language. In addition, you can show recently used fonts at the top of the font list, or hidethem, and you can specify the number of recently used fonts to display.
By default, font names use the corresponding fonts, but you can display all font names by using the same font.
Corel PHOTO-PAINT lets you preview fonts in the Preview area at the bottom of the Font list box or in the drawing window. You can alsopreview a font in all available styles, such as bold and italic.
You can resize the Font list area by adjusting its height and width or by hiding the preview area.
To customize the font list
1 Click the Text tool in the toolbox, and open the Font list box on the property bar.
2 To change the size of the font names, move the Zoom slider.
3 Click the Font Options button , and perform a task from the following table.
448 | Corel PHOTO-PAINT 2018 User Guide
To Do the following
Display the font list grouped by family or as a flat list Click Group by family to enable or disable the command.
Show the names of non-Latin fonts in Latin or in the nativelanguage
Click Show Latin names to enable or disable the command.
This option is useful when you work with Cyrillic, Arabic, and Asianfonts.
Display font names by using the same font Click Use font to display the font name to disable the command.
Display or hide recently used fonts Click Show recently used fonts to enable or disable the command.
Specify the number of recently used fonts to display Click Font List Options, and on the Fonts page of the Optionsdialog box, type a value in the Number of recently used fontsdisplayed box.
The maximum number of recently used fonts that you can display is20.
To preview a font
1 Click the Text tool in the toolbox.
If you want to preview a font in the document window, select the text you want.
2 On the property bar, click the Font list box.
The font name appears in the given font.
To preview the selected text with a specific font applied, point to the font name in the Font list box.
The names of symbol fonts are displayed in the default user interface font, with examples of the symbol font appearing to the rightof the symbol font name and in the Preview area.
If a font has other styles, such as bold or italic, you can preview them by pointing to the flyout arrow next to the font name.
To resize the Font list area
1 Click the Text tool in the toolbox, and open the Font list box on the property bar.
2 Do any of the following:
• To hide the preview area, click the Hide preview button .
• To adjust the width of the Font list area, point to the vertical grab area (right edge) and drag when the double-sided arrow appears.
• To adjust the height, point to the horizontal grab area (above the Zoom slider), and drag when the double-sided arrow appears.
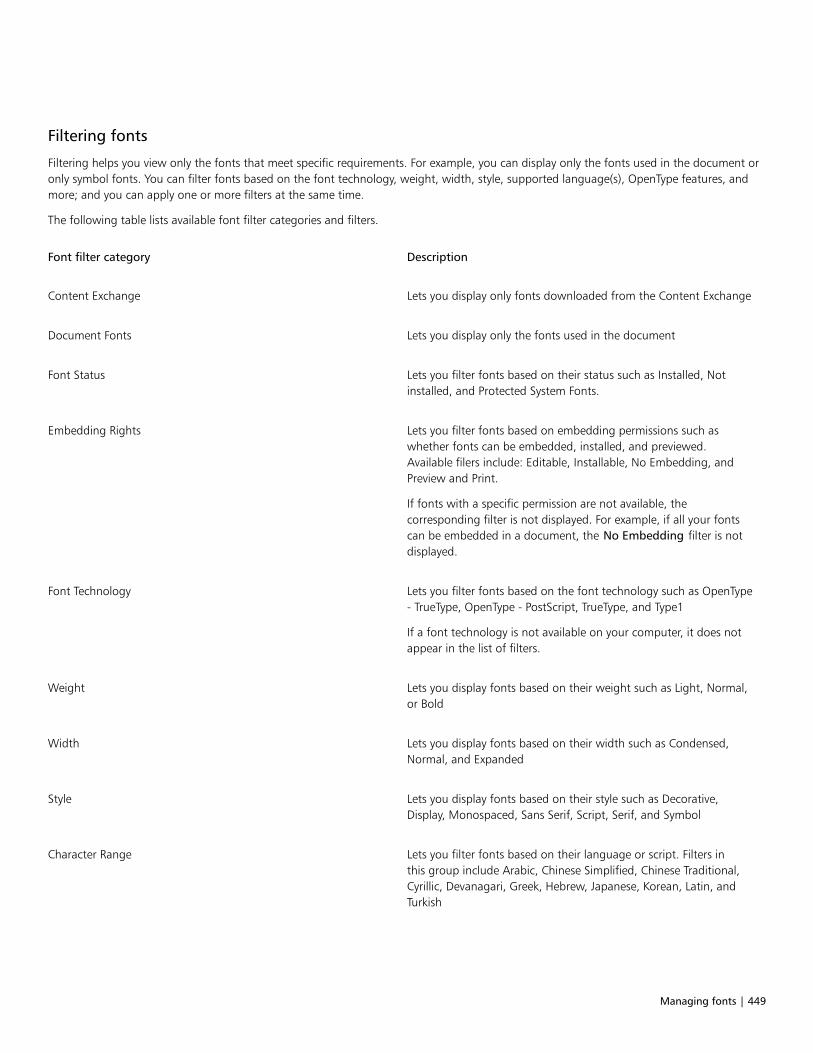
Managing fonts | 449
Filtering fonts
Filtering helps you view only the fonts that meet specific requirements. For example, you can display only the fonts used in the document oronly symbol fonts. You can filter fonts based on the font technology, weight, width, style, supported language(s), OpenType features, andmore; and you can apply one or more filters at the same time.
The following table lists available font filter categories and filters.
Font filter category Description
Content Exchange Lets you display only fonts downloaded from the Content Exchange
Document Fonts Lets you display only the fonts used in the document
Font Status Lets you filter fonts based on their status such as Installed, Notinstalled, and Protected System Fonts.
Embedding Rights Lets you filter fonts based on embedding permissions such aswhether fonts can be embedded, installed, and previewed.Available filers include: Editable, Installable, No Embedding, andPreview and Print.
If fonts with a specific permission are not available, thecorresponding filter is not displayed. For example, if all your fontscan be embedded in a document, the No Embedding filter is notdisplayed.
Font Technology Lets you filter fonts based on the font technology such as OpenType- TrueType, OpenType - PostScript, TrueType, and Type1
If a font technology is not available on your computer, it does notappear in the list of filters.
Weight Lets you display fonts based on their weight such as Light, Normal,or Bold
Width Lets you display fonts based on their width such as Condensed,Normal, and Expanded
Style Lets you display fonts based on their style such as Decorative,Display, Monospaced, Sans Serif, Script, Serif, and Symbol
Character Range Lets you filter fonts based on their language or script. Filters inthis group include Arabic, Chinese Simplified, Chinese Traditional,Cyrillic, Devanagari, Greek, Hebrew, Japanese, Korean, Latin, andTurkish
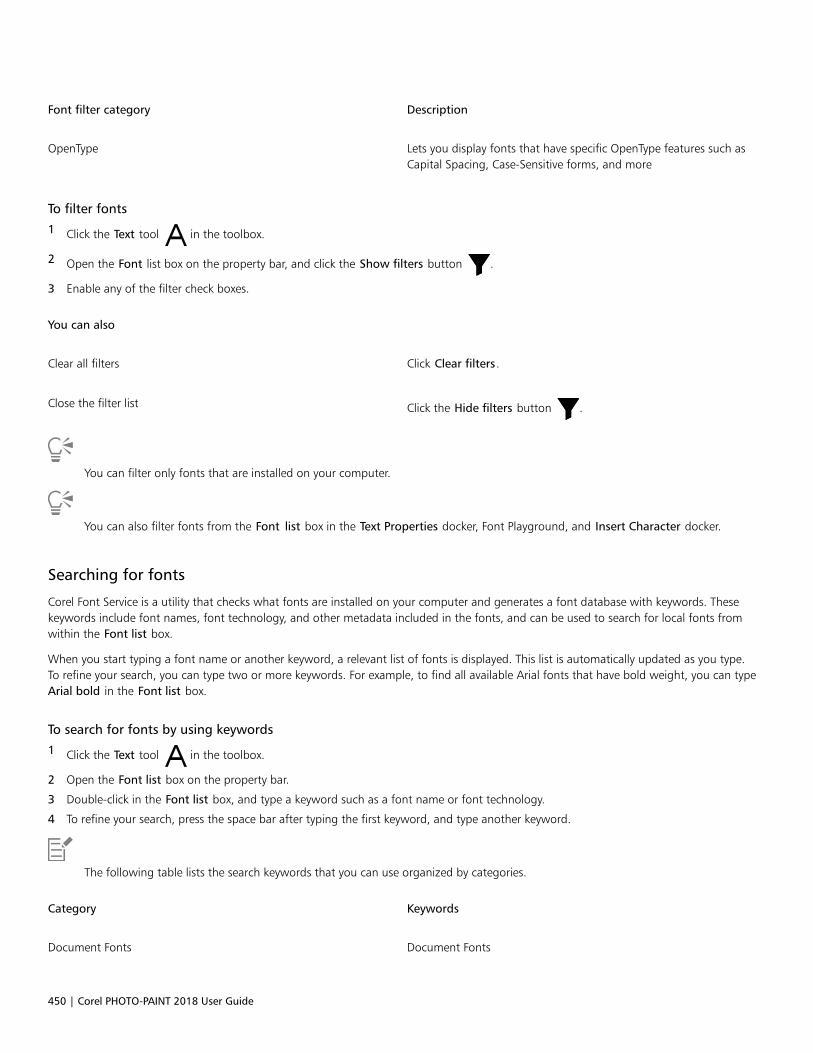
450 | Corel PHOTO-PAINT 2018 User Guide
Font filter category Description
OpenType Lets you display fonts that have specific OpenType features such asCapital Spacing, Case-Sensitive forms, and more
To filter fonts
1 Click the Text tool in the toolbox.
2 Open the Font list box on the property bar, and click the Show filters button .
3 Enable any of the filter check boxes.
You can also
Clear all filters Click Clear filters.
Close the filter list Click the Hide filters button .
You can filter only fonts that are installed on your computer.
You can also filter fonts from the Font list box in the Text Properties docker, Font Playground, and Insert Character docker.
Searching for fonts
Corel Font Service is a utility that checks what fonts are installed on your computer and generates a font database with keywords. Thesekeywords include font names, font technology, and other metadata included in the fonts, and can be used to search for local fonts fromwithin the Font list box.
When you start typing a font name or another keyword, a relevant list of fonts is displayed. This list is automatically updated as you type.To refine your search, you can type two or more keywords. For example, to find all available Arial fonts that have bold weight, you can typeArial bold in the Font list box.
To search for fonts by using keywords
1 Click the Text tool in the toolbox.
2 Open the Font list box on the property bar.
3 Double-click in the Font list box, and type a keyword such as a font name or font technology.
4 To refine your search, press the space bar after typing the first keyword, and type another keyword.
The following table lists the search keywords that you can use organized by categories.
Category Keywords
Document Fonts Document Fonts

Managing fonts | 451
Category Keywords
Font Technology OpenType - TrueType, OpenType - PostScript, TrueType, Type1
Weight Thin, Extra Light, Light, Regular, Medium, Semi Bold, Bold, ExtraBold, Black
Width Ultra Condensed, Extra Condensed, Condensed, Semi Condensed,Normal, Semi Expanded, Expanded, Extra Expanded, UltraExpanded
Style Decorative, Display, Monospaced, Sans Serif, Script, Serif, Symbol
Character Range Arabic, Armenian, Chinese Simplified, Chinese Traditional, Coptic,Cyrillic, Devanagari, Dhivehi, Georgian, Greek, Gujarati, Hebrew,Hiragana, Japanese, Kannada, Katakana, Korean, Latin, Russian,Syria, Tamil, Telugu, Thai, Turkish, Vietnamese
Manufacturer Ale/Paul, Bitstream, Cultivated/Mind, DynaComware, Font Fabric,Fontlab, Fontographer, ITC, Linotype, Mark Simonson, Monotype,Typodermic, RW++
Embedding rights Editable, Installable, No Embedding, Preview& Print, Restricted
OpenType All Small Capitals, Alternate Annotation Forms, AlternateHalf Widths, Alternate Vertical Half Metrics, Alternate VerticalMetrics, Alternative Fractions, Capital Spacing, Case SensitiveForms Centered CJK Punctuation, Character Variants ContextualAlternates, Contextual Ligatures, Denominators DiscretionaryLigatures, Expert Forms, Fractions, Half Widths, Historical Forms,Historical Ligatures, Hojo Kanji Forms, Horizontal Kana Alternates,JIS2004 Forms,JIS78 Forms, JIS83 Forms, JIS90 Forms, Kerning,Lining Figures, Localized Forms, NLC Kanji, Numerators, Ordinals,Ornaments, Proportional Kana, Proportional Lining, ProportionalOldstyle, Proportional Widths, Quarter Widths, Scientific Inferiors,Simplified Forms, Slashed ZeroSmall Capitals, Small Capitals fromCapitals, Standard Ligatures, Stylistic Alternates, Stylistic Sets,Subscript, Superscript, Swash Variants, Tabular, Tabular Oldstyle,Third Widths, Titling, Traditional Forms, Traditional Name Forms,Vertical Alternates and Rotation
Acquiring more fonts
You can download additional fonts from within the Font list box in Corel PHOTO-PAINT and Corel Font Manager. These fonts are usuallygrouped in font packs. Some font packs are free while others are available for purchase. You can access information about the font packsand the fonts they include as well as view font samples.
You can change the default location to which fonts are saved. For more information, see “Content types” on page 118.
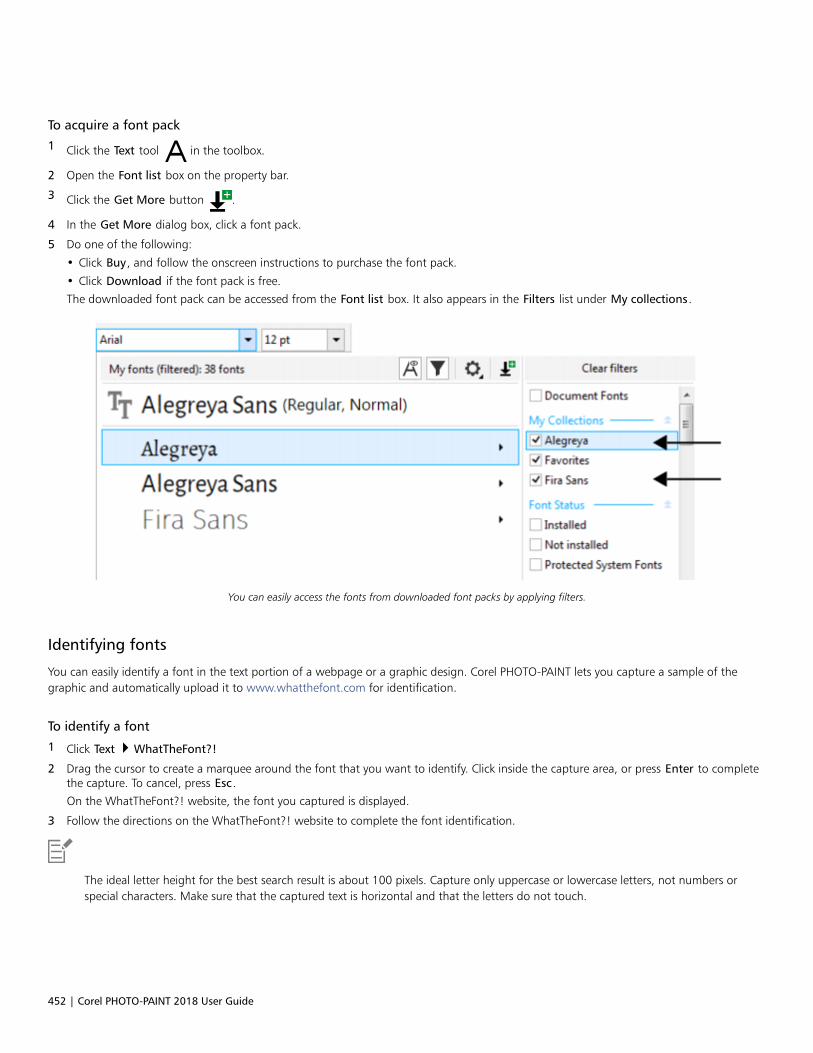
452 | Corel PHOTO-PAINT 2018 User Guide
To acquire a font pack
1 Click the Text tool in the toolbox.
2 Open the Font list box on the property bar.
3 Click the Get More button .
4 In the Get More dialog box, click a font pack.
5 Do one of the following:
• Click Buy, and follow the onscreen instructions to purchase the font pack.
• Click Download if the font pack is free.
The downloaded font pack can be accessed from the Font list box. It also appears in the Filters list under My collections.
You can easily access the fonts from downloaded font packs by applying filters.
Identifying fonts
You can easily identify a font in the text portion of a webpage or a graphic design. Corel PHOTO-PAINT lets you capture a sample of thegraphic and automatically upload it to www.whatthefont.com for identification.
To identify a font
1 Click Text WhatTheFont?!
2 Drag the cursor to create a marquee around the font that you want to identify. Click inside the capture area, or press Enter to completethe capture. To cancel, press Esc.
On the WhatTheFont?! website, the font you captured is displayed.
3 Follow the directions on the WhatTheFont?! website to complete the font identification.
The ideal letter height for the best search result is about 100 pixels. Capture only uppercase or lowercase letters, not numbers orspecial characters. Make sure that the captured text is horizontal and that the letters do not touch.
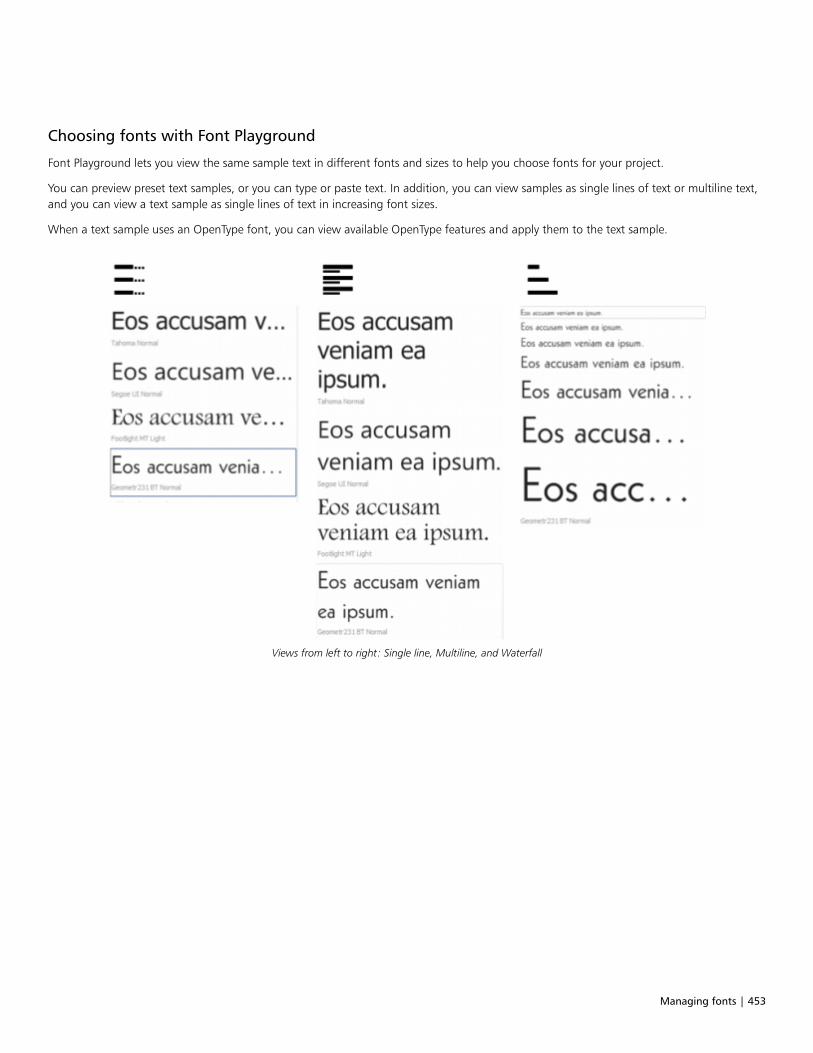
Managing fonts | 453
Choosing fonts with Font Playground
Font Playground lets you view the same sample text in different fonts and sizes to help you choose fonts for your project.
You can preview preset text samples, or you can type or paste text. In addition, you can view samples as single lines of text or multiline text,and you can view a text sample as single lines of text in increasing font sizes.
When a text sample uses an OpenType font, you can view available OpenType features and apply them to the text sample.
Views from left to right: Single line, Multiline, and Waterfall
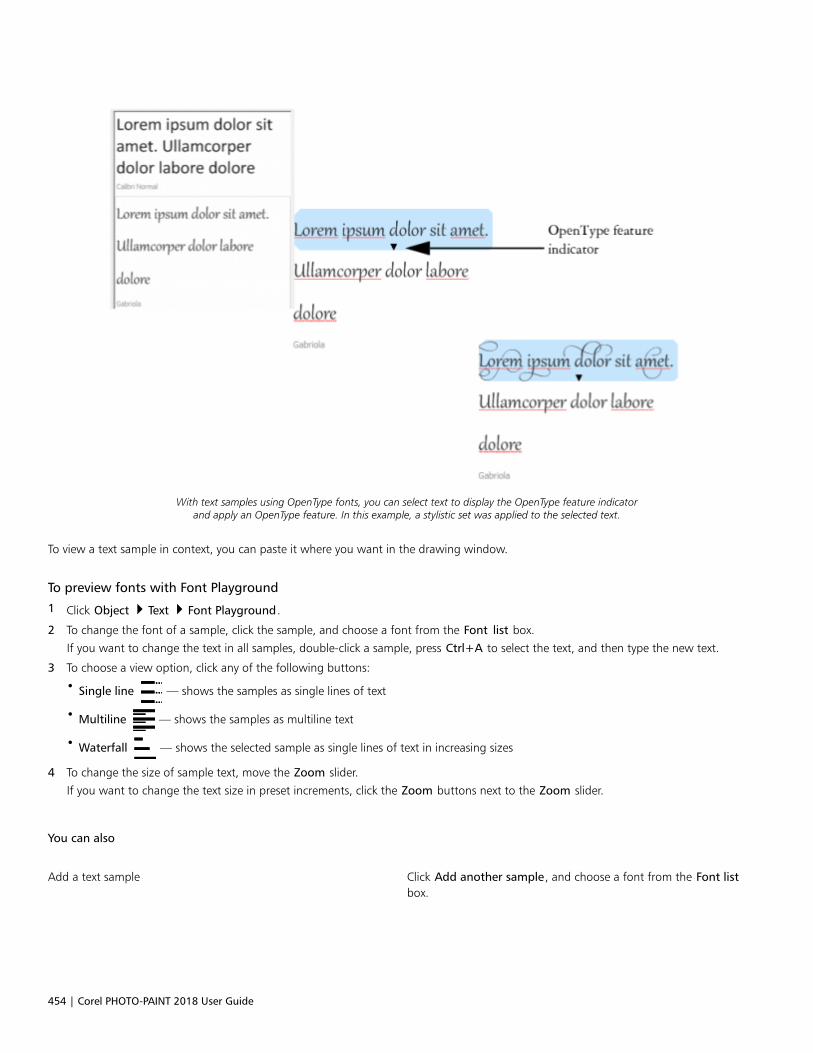
454 | Corel PHOTO-PAINT 2018 User Guide
With text samples using OpenType fonts, you can select text to display the OpenType feature indicatorand apply an OpenType feature. In this example, a stylistic set was applied to the selected text.
To view a text sample in context, you can paste it where you want in the drawing window.
To preview fonts with Font Playground
1 Click Object Text Font Playground.
2 To change the font of a sample, click the sample, and choose a font from the Font list box.
If you want to change the text in all samples, double-click a sample, press Ctrl+A to select the text, and then type the new text.
3 To choose a view option, click any of the following buttons:
• Single line — shows the samples as single lines of text
• Multiline — shows the samples as multiline text
• Waterfall — shows the selected sample as single lines of text in increasing sizes
4 To change the size of sample text, move the Zoom slider.
If you want to change the text size in preset increments, click the Zoom buttons next to the Zoom slider.
You can also
Add a text sample Click Add another sample, and choose a font from the Font listbox.
Managing fonts | 455
You can also
Paste a text sample in a document Click a text sample, and click Copy. Using the Text tool , right-
click where you want to place the text sample, and click Paste.
You can also drag a text sample to the document window.
Delete a text sample Click a text sample, and click the Close button in the upper-rightcorner of the sample.
Paste text in a text sample Click a text sample, and then press Ctrl+V.
Change the order of text samples Drag a text sample to a new position in the list.
Using Corel Font Manager
Corel Font Manager is a standalone font management application included with CorelDRAW Graphics Suite. Corel Font Manager lets youeasily handle, organize, and explore your typeface and font collections by giving you tools to control every aspect of your typographyworkflow. You can find and preview local and online fonts, install and uninstall fonts, and delete fonts that you no longer need. For moreinformation, see the Help in Corel Font Manager.
To start Corel Font Manager
• Click the Application launcher button on the standard toolbar, and then click Corel Font Manager.
To access the Corel Font Manager Help
• In Corel Font Manager, click the Help button on the title bar.

456 | Corel PHOTO-PAINT 2018 User Guide

Working with text in different languages | 457
Working with text in different languages
In Corel PHOTO-PAINT, you can work with text in different languages. For example, if you are using an Asian operating system, you can takeadvantage of additional text formatting capabilities available with Corel PHOTO-PAINT.
This section contains the following topics:• “Modifying encoding settings to display text correctly” (page 457)• “Working with Asian and Middle Eastern text” (page 458)• “OpenType support for Asian text” (page 459)
Modifying encoding settings to display text correctly
In Corel PHOTO-PAINT, all text that is added to a document is encoded using Unicode, which determines the character set of the text. Whenyou open or import an image that contains text, Corel PHOTO-PAINT converts the encoding system that was used in the file to Unicode. Forexample, if you import an older document that includes 8-bit ANSI text that uses a specific code page (e.g. (949 ANSI/OEM - Korean), CorelPHOTO-PAINT converts code page 949 to Unicode. However, if the code page is not specified when opening the image, Corel PHOTO-PAINTuses a default code page to convert the text, which may cause some text to display incorrectly. You can display the text correctly by selectingthe affected text and reconverting it to Unicode by using the appropriate code page.
Encoding settings do not affect the display of text outside the drawing window, such as keywords, filenames, and text entries in the Objectmanager and Object data manager dockers. For these types of text, you must use code page settings in the Open or Import dialog boxes toset the proper characters. For information about using code page settings, see “Opening images” on page 69.
To display text correctly in any language
1 Select the text.
2 Click Object Text Encode.
3 In the Text encoding dialog box, choose the Other encoding option.
4 From the Other encoding list box, choose an encoding setting that makes the text readable.
The preview window displays the text according to the current encoding setting.
458 | Corel PHOTO-PAINT 2018 User Guide
Working with Asian and Middle Eastern text
You can type Asian or Middle Eastern text if you are using an operating system that has the appropriate language support, or if you havean Input Method Editor (IME). You can change the font properties of Asian and Middle Eastern text. To limit the changes only to Asian andMiddle Eastern text, you can choose the appropriate script type. For example, to change the font size of Japanese text in a document thathas both English and Japanese text, choose the Asian script type, and then make the changes you want. This applies the new font size toonly the Japanese text, the English text size is unaffected.
In addition, you can mix Asian text with Latin text in one text object and set the spacing in between the two words. For example, you canspecify the spacing in between Japanese text and English text that display in a text object. You can also change text orientation if you areusing an Asian operating system or an operating system with Asian support enabled.
To change the font properties and language of text
1 Using the Text tool , select the text.
2 Click Object Text Text properties.
3 In the Text properties docker, specify the font attributes.
4 Choose one of the following options from the Language group and script list box:
• All languages
• Latin
• Asian
• Middle Eastern
To specify spacing between Latin and Asian text
1 Using the Text tool , select the text that combines both the Latin and Asian text.
2 In the Text properties docker, type values in the Language spacing box.
The language spacing value is based on the percentage of a standard word space. For example, two spaces are represented by typinga value of 200.
To change the orientation of Asian text
1 Using the Text tool , select the text.
2 Click one of the following buttons on the property bar:
• Vertical text orientation — changes the orientation of selected text to vertical
• Horizontal text orientation — changes the orientation of selected text to horizontal
A text object can have only one orientation. Changing the orientation of text as you type changes the orientation for the entire textobject.
The default orientation for Asian text is horizontal.

Working with text in different languages | 459
OpenType support for Asian text
You can apply advanced OpenType typography features to Asian text. OpenType features can be accessed from the Text properties docker
(Object Text Text properties). The following table lists the OpenType features that you can use with Asian text provided the features areincluded in the font.
OpenType feature Description
Asian widths Changes the width by spacing or replacing the glyphs
The Centered CJK punctuation feature centers punctuation markshorizontally and vertically.
Asian forms Replaces the selected characters with a different glyph form. Formscannot be combined.
Asian vertical metrics The Alternate vertical metrics feature centers shorter charactersvertically relative to full-height characters. This feature also appliesto full-width Latin glyphs.
The Alternate vertical half metrics feature centers charactersvertically relative to half-height characters.
Horizontal Kana alternates Substitutes the standard kana glyph with a horizontal kana glyph
Vertical Kana alternates Substitutes the standard kana glyph with a vertical kana glyph
Vertical alternates and rotation Substitutes characters with forms suitable for vertical text, oftenrotating them at 90 degrees
Alternate annotation forms Applies an annotation form to the selected characters. ThisOpenType feature applies to both Latin and Asian text.
For more information about working with OpenType features, see the following topics:• “Working with OpenType features” on page 434• “To apply an OpenType feature to text” on page 437

460 | Corel PHOTO-PAINT 2018 User Guide

Web images and movies | 461
Web images and movies
Creating and editing movies................................................................................................................................................................463
Creating images for the web...............................................................................................................................................................471

462 | Corel PHOTO-PAINT 2018 User Guide
Creating and editing movies | 463
Creating and editing movies
With Corel PHOTO-PAINT, you can make movies. Movies contain a series of images, called frames. As you change the position of objects insuccessive frames, the objects appear to move.
This section contains the following topics:• “Opening and playing movies” (page 463)• “Creating movies” (page 464)• “Modifying frame sequence and frame display time” (page 467)• “Saving movies” (page 469)
Opening and playing movies
You can open all or part of a movie. Partial movies open and play more quickly, because your computer has less data to process at one time.
The movie controls let you play a movie, rewind to the beginning, fast forward to the end, or stop at any frame. You can also step forwardor backward through a movie one frame at a time, or jump to a specific frame.
To open a movie
1 Click File Open.
2 Choose the folder where the movie is stored.
3 Click the filename.
4 From the list box next to the Cancel button, choose one of the following:
• Partial load
• Open
• Resample and load
• Crop and load
If you choose Partial load, in the Partial load movie dialog box type values in the From and To boxes to specify the range of frames youwant to open.
To use movie playback controls
1 Click Window Toolbars Movie.
2 Perform an action from the following table.
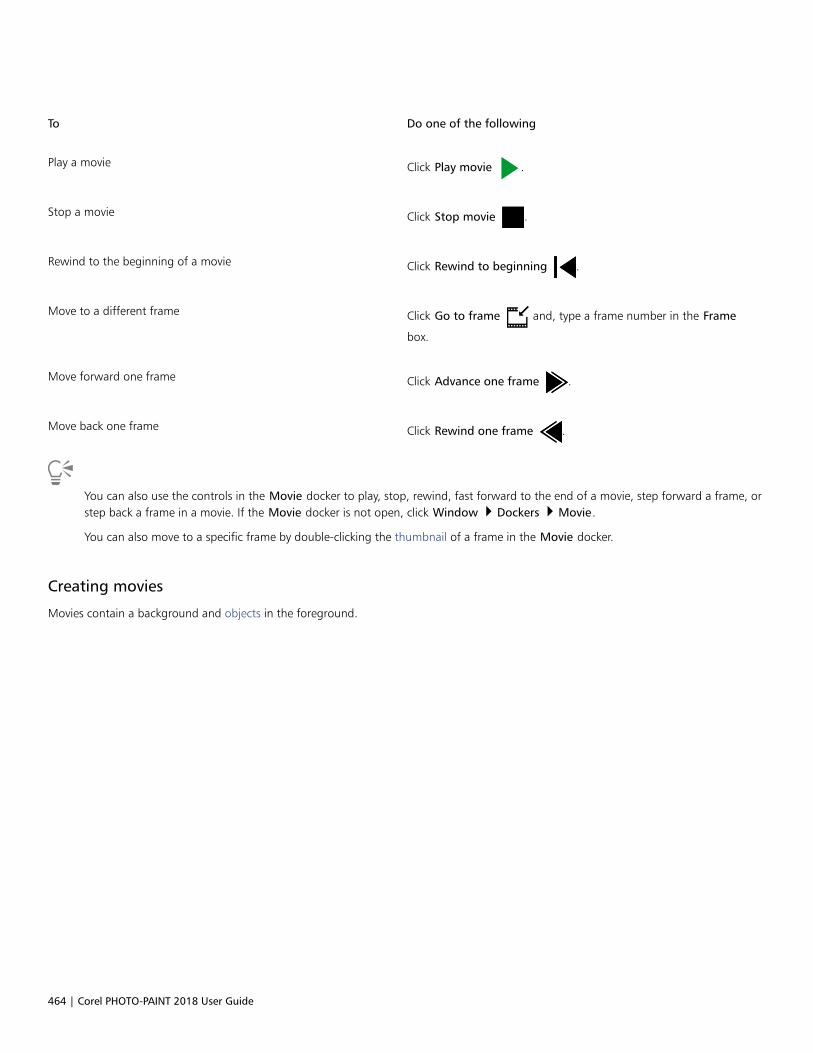
464 | Corel PHOTO-PAINT 2018 User Guide
To Do one of the following
Play a movie Click Play movie .
Stop a movie Click Stop movie .
Rewind to the beginning of a movie Click Rewind to beginning .
Move to a different frame Click Go to frame and, type a frame number in the Frame
box.
Move forward one frame Click Advance one frame .
Move back one frame Click Rewind one frame .
You can also use the controls in the Movie docker to play, stop, rewind, fast forward to the end of a movie, step forward a frame, orstep back a frame in a movie. If the Movie docker is not open, click Window Dockers Movie.
You can also move to a specific frame by double-clicking the thumbnail of a frame in the Movie docker.
Creating movies
Movies contain a background and objects in the foreground.
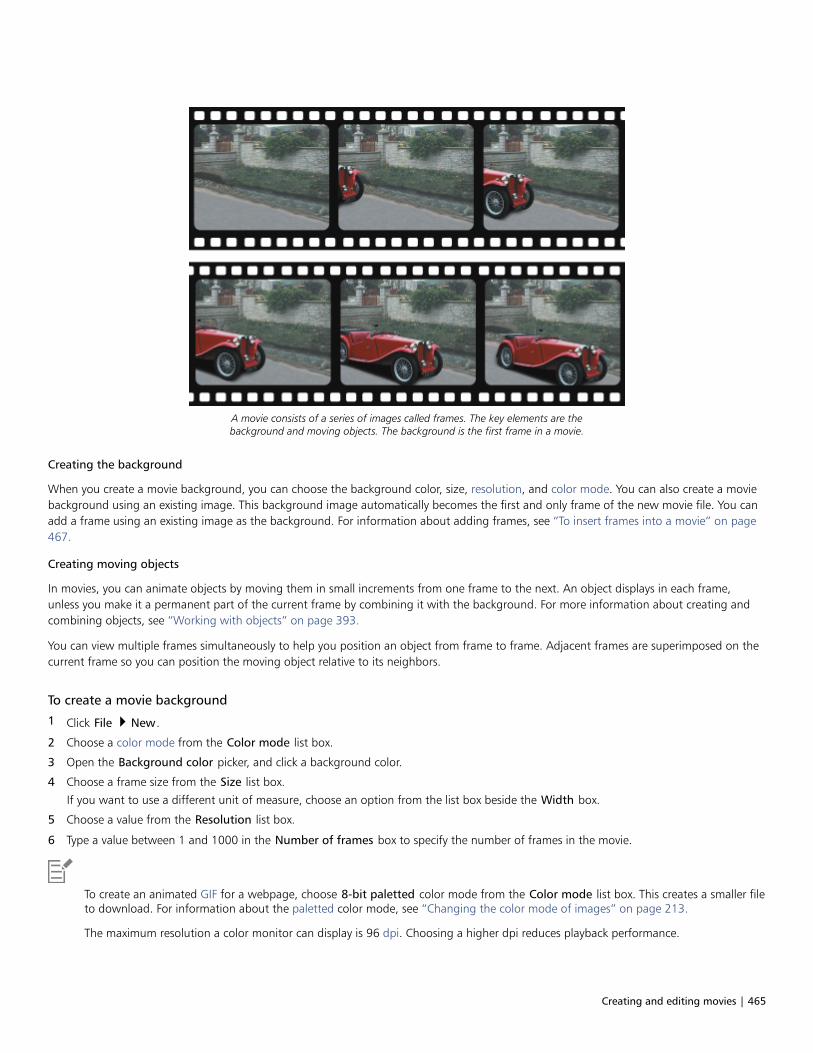
Creating and editing movies | 465
A movie consists of a series of images called frames. The key elements are thebackground and moving objects. The background is the first frame in a movie.
Creating the background
When you create a movie background, you can choose the background color, size, resolution, and color mode. You can also create a moviebackground using an existing image. This background image automatically becomes the first and only frame of the new movie file. You canadd a frame using an existing image as the background. For information about adding frames, see “To insert frames into a movie” on page467.
Creating moving objects
In movies, you can animate objects by moving them in small increments from one frame to the next. An object displays in each frame,unless you make it a permanent part of the current frame by combining it with the background. For more information about creating andcombining objects, see “Working with objects” on page 393.
You can view multiple frames simultaneously to help you position an object from frame to frame. Adjacent frames are superimposed on thecurrent frame so you can position the moving object relative to its neighbors.
To create a movie background
1 Click File New.
2 Choose a color mode from the Color mode list box.
3 Open the Background color picker, and click a background color.
4 Choose a frame size from the Size list box.
If you want to use a different unit of measure, choose an option from the list box beside the Width box.
5 Choose a value from the Resolution list box.
6 Type a value between 1 and 1000 in the Number of frames box to specify the number of frames in the movie.
To create an animated GIF for a webpage, choose 8-bit paletted color mode from the Color mode list box. This creates a smaller fileto download. For information about the paletted color mode, see “Changing the color mode of images” on page 213.
The maximum resolution a color monitor can display is 96 dpi. Choosing a higher dpi reduces playback performance.
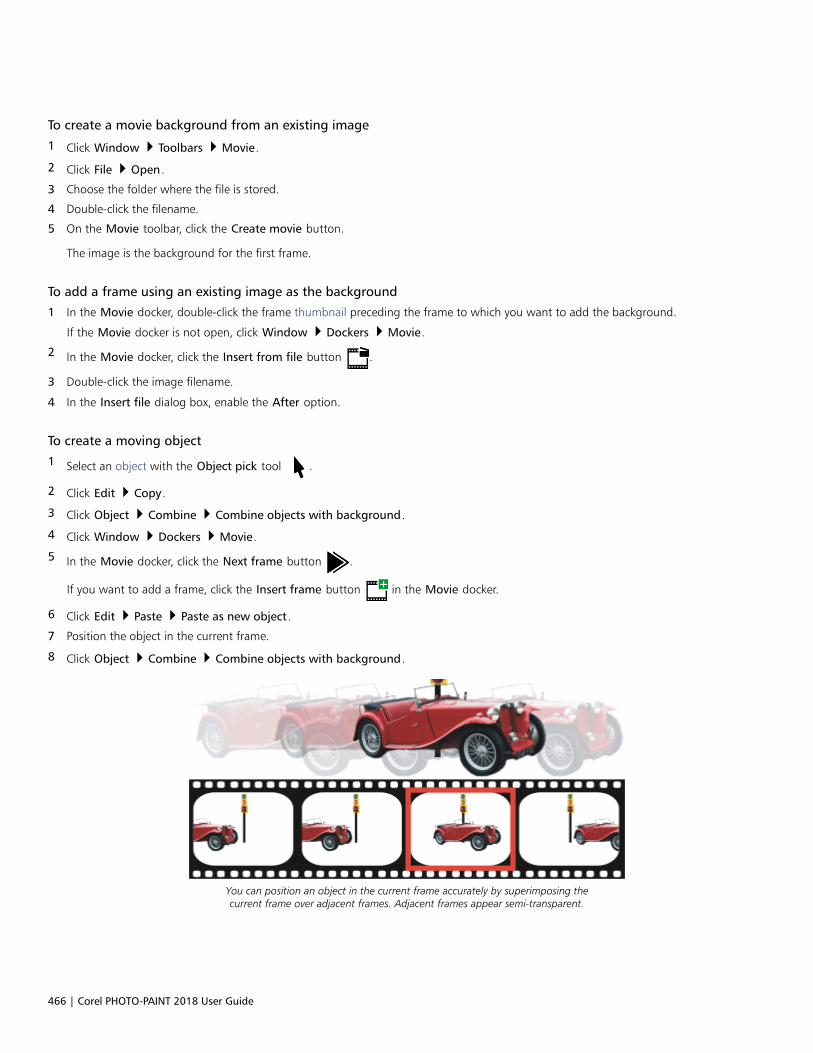
466 | Corel PHOTO-PAINT 2018 User Guide
To create a movie background from an existing image
1 Click Window Toolbars Movie.
2 Click File Open.
3 Choose the folder where the file is stored.
4 Double-click the filename.
5 On the Movie toolbar, click the Create movie button.
The image is the background for the first frame.
To add a frame using an existing image as the background
1 In the Movie docker, double-click the frame thumbnail preceding the frame to which you want to add the background.
If the Movie docker is not open, click Window Dockers Movie.
2 In the Movie docker, click the Insert from file button .
3 Double-click the image filename.
4 In the Insert file dialog box, enable the After option.
To create a moving object
1 Select an object with the Object pick tool .
2 Click Edit Copy.
3 Click Object Combine Combine objects with background.
4 Click Window Dockers Movie.
5 In the Movie docker, click the Next frame button .
If you want to add a frame, click the Insert frame button in the Movie docker.
6 Click Edit Paste Paste as new object.
7 Position the object in the current frame.
8 Click Object Combine Combine objects with background.
You can position an object in the current frame accurately by superimposing thecurrent frame over adjacent frames. Adjacent frames appear semi-transparent.
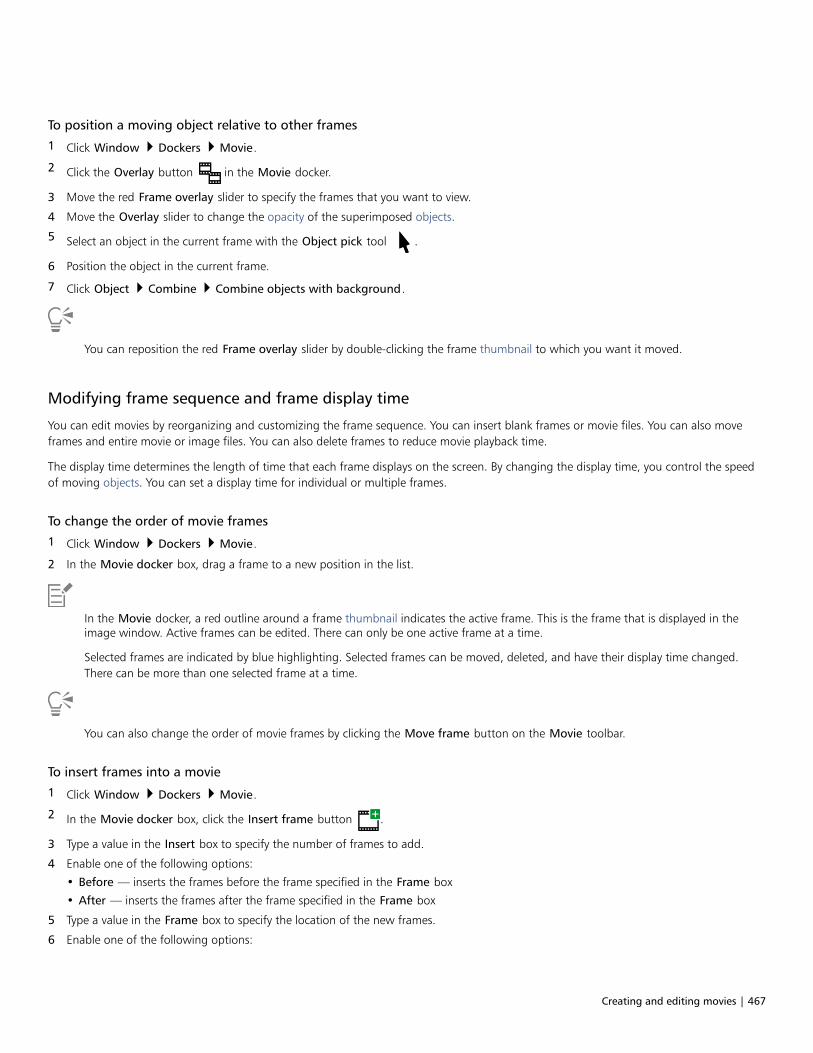
Creating and editing movies | 467
To position a moving object relative to other frames
1 Click Window Dockers Movie.
2 Click the Overlay button in the Movie docker.
3 Move the red Frame overlay slider to specify the frames that you want to view.
4 Move the Overlay slider to change the opacity of the superimposed objects.
5 Select an object in the current frame with the Object pick tool .
6 Position the object in the current frame.
7 Click Object Combine Combine objects with background.
You can reposition the red Frame overlay slider by double-clicking the frame thumbnail to which you want it moved.
Modifying frame sequence and frame display time
You can edit movies by reorganizing and customizing the frame sequence. You can insert blank frames or movie files. You can also moveframes and entire movie or image files. You can also delete frames to reduce movie playback time.
The display time determines the length of time that each frame displays on the screen. By changing the display time, you control the speedof moving objects. You can set a display time for individual or multiple frames.
To change the order of movie frames
1 Click Window Dockers Movie.
2 In the Movie docker box, drag a frame to a new position in the list.
In the Movie docker, a red outline around a frame thumbnail indicates the active frame. This is the frame that is displayed in theimage window. Active frames can be edited. There can only be one active frame at a time.
Selected frames are indicated by blue highlighting. Selected frames can be moved, deleted, and have their display time changed.There can be more than one selected frame at a time.
You can also change the order of movie frames by clicking the Move frame button on the Movie toolbar.
To insert frames into a movie
1 Click Window Dockers Movie.
2 In the Movie docker box, click the Insert frame button .
3 Type a value in the Insert box to specify the number of frames to add.
4 Enable one of the following options:
• Before — inserts the frames before the frame specified in the Frame box
• After — inserts the frames after the frame specified in the Frame box
5 Type a value in the Frame box to specify the location of the new frames.
6 Enable one of the following options:

468 | Corel PHOTO-PAINT 2018 User Guide
• Copy current frame — adds frames using a copy of the current frame
• Use background color — adds blank frames using the current background color
If you are inserting frames into a partially loaded movie, use the Movie docker to determine where to locate the new frames. TheMovie docker displays the actual frame numbers from the full movie. The movie status bar, located at the bottom of the imagewindow, displays only the total number of frames in the partially loaded movie, not the frame numbers.
In the Movie docker, a red outline around a frame thumbnail indicates the active frame. This is the frame that is displayed in theimage window. Active frames can be edited. There can only be one active frame at a time.
Selected frames are indicated by blue highlighting. Selected frames can be moved, deleted, and have their display time changed.There can be more than one selected frame at a time.
You can insert up to 100 frames into a movie at a time.
You can also insert frames into a movie by clicking the Insert frame button on the Movie toolbar.
To insert files into a movie
1 In the Movie docker, click the Insert from file button .
If the Movie docker is not open, click Window Dockers Movie.
2 Choose the folder where the file is stored.
3 Click the filename.
4 Click Open.
5 Enable one of the following options:
• Before — inserts the files before the frame specified in the Frame box
• After — inserts the files after the frame specified in the Frame box
6 Type a value in the Frame box to specify the location of the file in the movie.
If the current movie and the inserted file are different sizes, the inserted file conforms to the image dimensions of the current movie.
In the Movie docker, a red outline around a frame thumbnail indicates the active frame. This is the frame that is displayed in theimage window. Active frames can be edited. There can only be one active frame at a time.
Selected frames are indicated by blue highlighting. Selected frames can be moved, deleted, and have their display time changed.There can be more than one selected frame at a time.
You can also insert files into a movie by clicking Window Toolbars Movie and clicking the Insert from file button .
To delete frames from a movie
1 In the Movie docker, click the frame thumbnail of the frame you want to delete.
If the Movie docker is not open, click Window Dockers Movie.
2 In the Movie docker, click the Delete frames button .
Creating and editing movies | 469
In the Movie docker, a red outline around a frame thumbnail indicates the active frame. This is the frame that is displayed in theimage window. Active frames can be edited. There can only be one active frame at a time.
Selected frames are indicated by blue highlighting. Selected frames can be moved, deleted, and have their display time changed.There can be more than one selected frame at a time.
You can also delete frames by navigating to the frame you want to delete and clicking the Delete frames button on the Movie
toolbar. If the Movie toolbar is not open, click Window Toolbars Movie.
To change the display time of a frame
1 Click Window Dockers Movie.
2 Click a frame thumbnail in the Movie docker.
3 Type a value in the Frame delay box beside the thumbnail.
If you want to test the effect of the frame display time change on the movie, click the Play button .
In the Movie docker, a red outline around a frame thumbnail indicates the active frame. This is the frame that is displayed in theimage window. Active frames can be edited. There can only be one active frame at a time.
Selected frames are indicated by blue highlighting. Selected frames can be moved, deleted, and have their display time changed.There can be more than one selected frame at a time.
You can change the display time of multiple frames simultaneously by holding down Ctrl, choosing the frames, and typing a value inthe Frame delay box.
Saving movies
You can save a movie before or after you add the background and objects; however, when you save a movie as a an animated GIF or to theAVI format, objects are automatically combined with the background in every frame and are no longer editable.
If you want use a movie on a webpage, save it to the animated GIF file format. When you save a movie to this format, you must convert it toan 8-bit palette, consisting of 256 colors. For information on converting a 24-bit image to 8-bit Paletted color mode, see “Converting imagesto the black-and-white color mode” on page 215.
When you save a movie to animated GIF format, you can make a color transparent, which lets you see the background of a webpagethrough the movie. You can also specify the number of times your movie replays.
To save a movie
1 Click File Save as.
2 Choose the folder where you want to save the file.
3 From the Save as type list box, choose a file format.
4 Type a filename in the File name box, and click Save.
470 | Corel PHOTO-PAINT 2018 User Guide
To save a movie as an animated GIF
1 Click File Save as.
2 Choose the folder where you want to save the file.
3 Type a filename in the File name box.
4 Choose GIF - GIF animation from the Save as type list box, and click Save.
5 In the Convert to paletted dialog box, modify the settings you want, and then click OK.
6 In the GIF 89 animation options dialog box, click the Frame settings tab.
7 Enable one of the following options in the Palette area:
• Use global — uses the same color palette for all frames
• Use local — uses a different color palette for each frame
8 Type a value in the Frame delay box to specify the length of time between frames.
9 Click one of the following buttons:
• Apply changed only — applies only the frame settings that have changed
• Apply all — applies all frame settings
You can also
Choose a color to appear transparent in the movie Enable the Image color option, and click Select color. In the Selectcolor dialog box, choose a color and click OK.
Refresh the image after each frame is loaded Enable the Interlace rows check box.
Specify the number of pixels a frame is offset Type values in the X and Y boxes to offset the current frame fromthe top left corner of the page. Type values in the dX and dY boxesto offset each successive frame from the preceding frame.
Specify how the previous frame disappears Choose an option from the How to dispose list box. To make atransparent background, choose Replace with background.
Play the animation repeatedly Click the File settings tab, enable the Loop frame check box, andenable an option in the Frame repetition area.
Specify the page size Enable the Automatic check box or type values in the Width andHeight boxes to set the background size manually.
Save only the pixels that differ from the first frame Enable the Save difference between frames only check box.
Changes are applied only to selected frames. Select all frames in the left window to apply changes to all frames.
When you save a movie as an animated GIF, objects are automatically combined with the background of each frame. This means thatyou can no longer edit the objects separately from the image.

Creating images for the web | 471
Creating images for the web
Corel PHOTO-PAINT gives you the tools you need to create images for the web.
This section contains the following topics:• “Exporting images for the web” (page 471)• “Exporting and uploading bitmaps to WordPress” (page 477)• “Saving and applying web presets” (page 478)• “Creating palette-based images with transparent colors and backgrounds” (page 478)• “Slicing images” (page 479)• “Creating and editing rollovers” (page 482)• “E-mailing images” (page 486)
Exporting images for the web
Corel PHOTO-PAINT lets you export the following web-compatible file formats: GIF, PNG, and JPEG.
While specifying exporting options, you can preview an image with up to four different configurations of settings. You can compare fileformats, preset settings, download speeds, compression, file size, image quality, and color range. You can also examine previews by zoomingand panning within the preview windows.
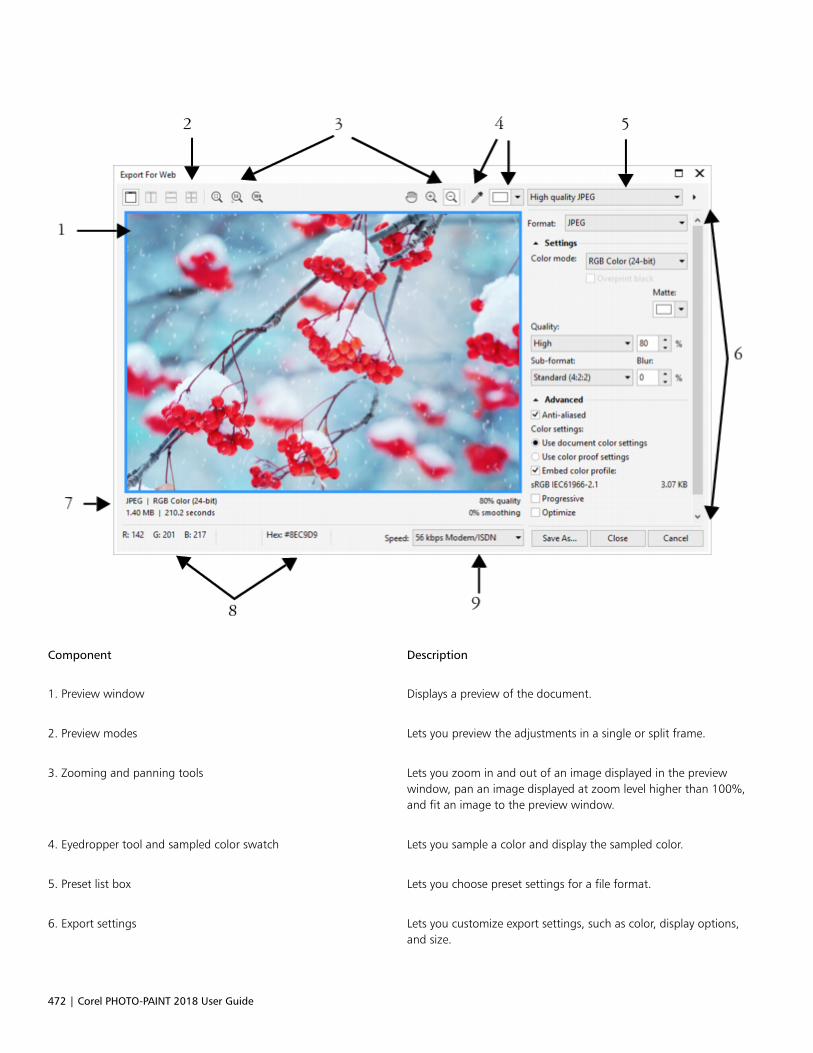
472 | Corel PHOTO-PAINT 2018 User Guide
Component Description
1. Preview window Displays a preview of the document.
2. Preview modes Lets you preview the adjustments in a single or split frame.
3. Zooming and panning tools Lets you zoom in and out of an image displayed in the previewwindow, pan an image displayed at zoom level higher than 100%,and fit an image to the preview window.
4. Eyedropper tool and sampled color swatch Lets you sample a color and display the sampled color.
5. Preset list box Lets you choose preset settings for a file format.
6. Export settings Lets you customize export settings, such as color, display options,and size.
Creating images for the web | 473
Component Description
7. Format information Lets you view file-format information, which is available for eachpreview frame.
8. Color information Displays the color values for a selected color.
9. Speed list box Lets you choose an Internet speed for saving the file.
You can export web-compatible files using preset settings. This allows you to optimize the file, without the need to modify individualsettings. You can also customize the settings to produce a specific result. For example, you can adjust its color, display quality, and file size.
Choosing a web-compatible file format
This table is a quick reference for choosing a web-compatible file format.
File format Ideal for
GIF Line drawings, text, images with few colors, or images with sharpedges, such as scanned black-and-white images or a logos.
GIF offers several advanced graphic options, including transparentbackgrounds, interlaced images, and animation. It also lets youcreate custom palettes for the image.
PNG Various image types, including photos and line drawings.
The PNG file format (unlike the GIF and JPEG formats) supports thealpha channel. This allows you to save transparent images withsuperior results.
JPEG Photos and scanned images.
JPEG files use file compression to store an approximation of animage, which results in some loss of image data, but does notcompromise the quality of most photographs. You can choose theimage quality when you save an image — the higher the imagequality, the larger the file size.
Exporting palette-based images
Palette-based images, such as paletted GIF and 8-bit PNG, allow individual pixels to retain their exact color value. This lets you control thedisplay of colors in the file when exporting. Palette-based images also allow you to introduce transparency to a file by choosing a color in theimage and making it transparent. For information, see “Creating palette-based images with transparent colors and backgrounds” on page478.
To adjust the image-export preview
1 Click File Export for Web.
2 Perform one or more tasks from the following table.
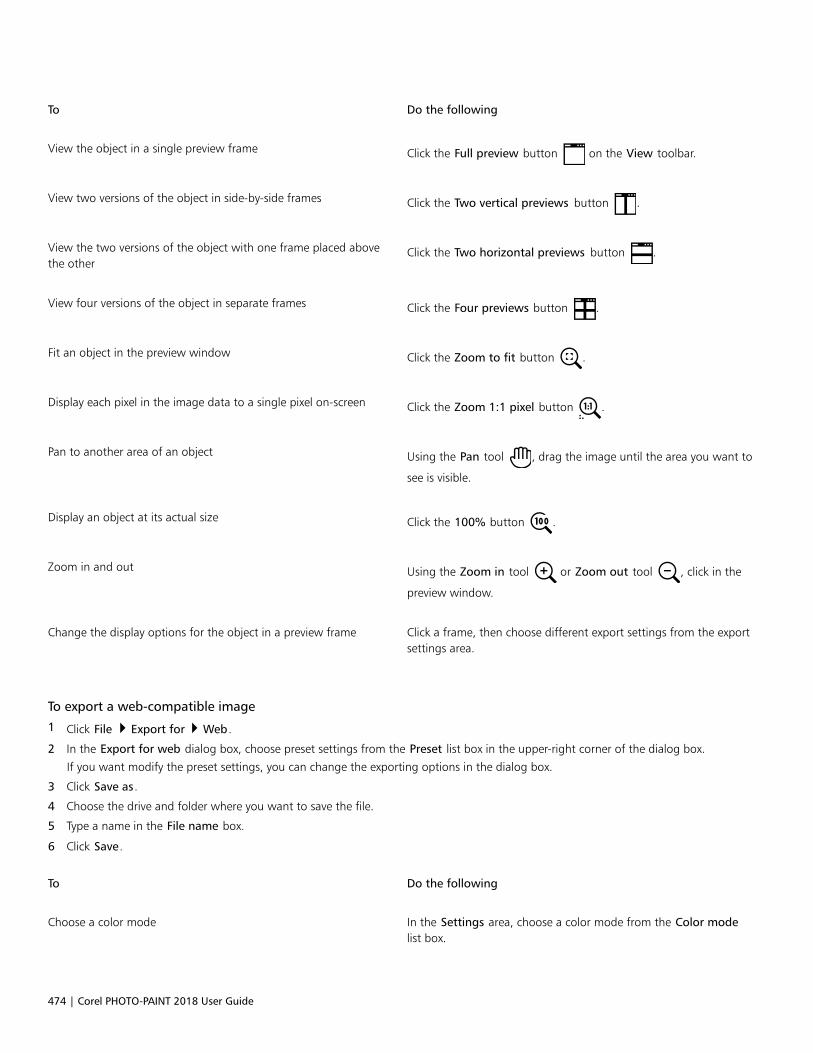
474 | Corel PHOTO-PAINT 2018 User Guide
To Do the following
View the object in a single preview frame Click the Full preview button on the View toolbar.
View two versions of the object in side-by-side frames Click the Two vertical previews button .
View the two versions of the object with one frame placed abovethe other
Click the Two horizontal previews button .
View four versions of the object in separate frames Click the Four previews button .
Fit an object in the preview window Click the Zoom to fit button .
Display each pixel in the image data to a single pixel on-screen Click the Zoom 1:1 pixel button .
Pan to another area of an object Using the Pan tool , drag the image until the area you want to
see is visible.
Display an object at its actual size Click the 100% button .
Zoom in and out Using the Zoom in tool or Zoom out tool , click in the
preview window.
Change the display options for the object in a preview frame Click a frame, then choose different export settings from the exportsettings area.
To export a web-compatible image
1 Click File Export for Web.
2 In the Export for web dialog box, choose preset settings from the Preset list box in the upper-right corner of the dialog box.
If you want modify the preset settings, you can change the exporting options in the dialog box.
3 Click Save as.
4 Choose the drive and folder where you want to save the file.
5 Type a name in the File name box.
6 Click Save.
To Do the following
Choose a color mode In the Settings area, choose a color mode from the Color modelist box.
Creating images for the web | 475
To Do the following
This option is unavailable for the GIF file format.
Embed the color profile In the Advanced area, enable the Embed color profile check box.
You can also export to a web-compatible format by clicking File Export, and choosing a file format from the Save as type list box.
You can choose an Internet connection speed from the Speed list box at the bottom of the dialog box.
To resize an image when exporting a web-compatible image
• From the Export to web dialog box, perform one or more tasks from the following table.
To Do the following
Choose a unit of measurement for the object In the Transformation area, choose a unit of measurement fromthe Units list box.
Specify the object dimensions In the Transformation area, type values in the Width and Heightboxes.
Resize the object to a percentage of its original size In the Transformation area, type values in the Width % andHeight % boxes.
Avoid distortion by maintaining the width-to-height ratio of theimage
In the Transformation area, enable the Maintain aspect ratiocheck box.
Specify the object resolution In the Transformation area, type a value in the Resolution box.
Maintain the size of the file on your hard disk when you change theresolution of the object
In the Transformation area, enable the Maintain size check box.
To customize options for exporting a JPEG bitmap
1 From the Export to web dialog box, choose JPEG from the Format list box.
2 Perform one or more tasks from the following table.
To Do the following
Control image quality In the Settings area, choose a quality option from the Quality listbox, or type a percentage value.
Choose an encoding setting In the Settings area, choose an option from the Sub-format listbox.
Blur the transition between adjacent pixels of different colors In the Settings area, type a value in the Blur box.
476 | Corel PHOTO-PAINT 2018 User Guide
To Do the following
Load the JPEG image gradually in certain web browsers to displayportions of the image before it finishes loading
In the Advanced area, enable the Progressive check box.
Use the optimal encoding method to produce the smallest JPEG filesize
In the Advanced area, enable the Optimize check box.
You can also
Apply the document-color settings In the Advanced area, enable the Use document color settingsoption.
Apply the color-proof settings to the document In the Advanced area, enable the Use color proof settings option.
Enable the overprinting of black when exporting to CMYK In the Settings area, enable the Overprint black check box.
Apply a matte color to the object’s background to help blend theedges of anti-aliased objects
In the Settings area, open the Matte color picker, and click a color.
To specify display-quality options for exporting web-compatible images
• From the Export to web dialog box, perform one or more tasks from the following table.
To Do the following
Apply a matte color to the object’s background to help blend theedges of anti-aliased objects
In the Settings area, open the Matte color picker, and click a color.
Smooths the edges of the object In the Advanced area, enable the Anti-aliased check box.
Load the file gradually in certain web browsers to display onlyportions of the image before it finishes loading
In the Advanced area, enable the Interlaced check box.
To specify color settings for exporting palette-based web-compatible images
• From the Export to web dialog box, perform one or more tasks from the following table.
To Do the following
Choose a color mode In the Settings area, choose a color mode from the Color modelist box.
This option is unavailable for the GIF file format.
Choose a color palette In the Settings area, choose a palette from the Color palette listbox.

Creating images for the web | 477
To Do the following
Specify a dithering setting and amount In the Settings area, choose a dithering option from the Ditheringlist box, and type a value in the box.
Embed the color profile In the Advanced area, enable the Embed color profile check box.
You can also
Load a color palette In the Settings area, click the arrow next to Color palette list box,and click Load palette.
Sample a color and add it to a color palette Click the Eyedropper on the toolbar, and then click in the imageto choose a color. In the Settings area, click the Add the sampled
color to palette button .
Add or modify colors Double-click a color swatch on the color palette.
Choose the number of colors that you want to display In the Settings area, choose a value from the Number of colors listbox.
Delete a color from the color palette In the Settings area, click a color on the color palette, and thenclick the Delete the selected color button.
You can also add transparency to a palette-based document by choosing a color in the image and making it transparent. Forinformation, see “Creating palette-based images with transparent colors and backgrounds” on page 478.
Exporting and uploading bitmaps to WordPress
With Corel PHOTO-PAINT, you can export your projects to bitmap images suitable for WordPress and then upload them to your WordPressaccount without leaving the application.
After choosing the file format and options you want, you can upload the image to your WordPress account. If you have multiple WordPresssites, you can choose to which site to upload the bitmap. The exported bitmap is added to the media library of the selected site.
When you upload bitmaps to WordPress for the first time, you must authenticate your WordPress account and log in. If you have more thanone WordPress account, you can switch accounts at any time.
To export and upload a bitmap to WordPress
1 Click File Export For WordPress.
2 In the Export for WordPress dialog box, choose the file format you want from the Format list box, and adjust any export settings youwant.
The Export for WordPress dialog box lets you access the same export options that are available in the Export for Web dialog box. Fordetailed information about export options, see “Exporting images for the web” on page 471.
3 Click Upload.
4 In the Upload to WordPress dialog box, perform one or more tasks from the following table.

478 | Corel PHOTO-PAINT 2018 User Guide
To Do the following...
Authenticate your WordPress account and log in Click Authenticate your WordPress account.
Choose a WordPress site Choose a site from the Site box.
Upload the bitmap Click Upload.
Log in to another WordPress account Click Log out or switch accounts.
The exported bitmap is saved to a temporary file, which is deleted after you upload the image to WordPress.
Saving and applying web presets
Web presets allow you to save custom settings for exporting web-compatible file formats.
To save a preset for exporting web-compatible images
1 From the Export to web dialog box, choose a file format from the Format list box.
2 Choose the settings that you want to store as a preset.
3 Click the arrow next to the Preset list box, and click Save preset.
4 Type the name of the preset in the File name box.
5 Click Save.
You can delete a saved preset by choosing a preset from the Preset list box, clicking the arrow next to the Preset list box, and clickingDelete preset.
To apply a preset for exporting web-compatible images
1 From the Export to web dialog box, click the arrow next to the Preset list box, and click Load preset.
2 Click the name of the file.
3 Click Open.
Creating palette-based images with transparent colors and backgrounds
Corel PHOTO-PAINT lets you export palette-based images, such as paletted GIF or 8-bit PNG, with transparent colors and backgrounds. Theseimages, such as buttons and logos, are commonly used on webpages with colored or patterned backgrounds.
If you place an image with an opaque background onto a webpage, the image background color appears as a rectangle on the page. Bymaking an image background transparent, the image background blends in with the page. Transparent image backgrounds also let youchange the color or pattern of a webpage background without having to change the backgrounds of the images to match.
The background color must be a single, solid color that is not used elsewhere in the image. You can also make an editable area or aprotected area transparent. For information about defining these areas, see “Working with masks” on page 269.
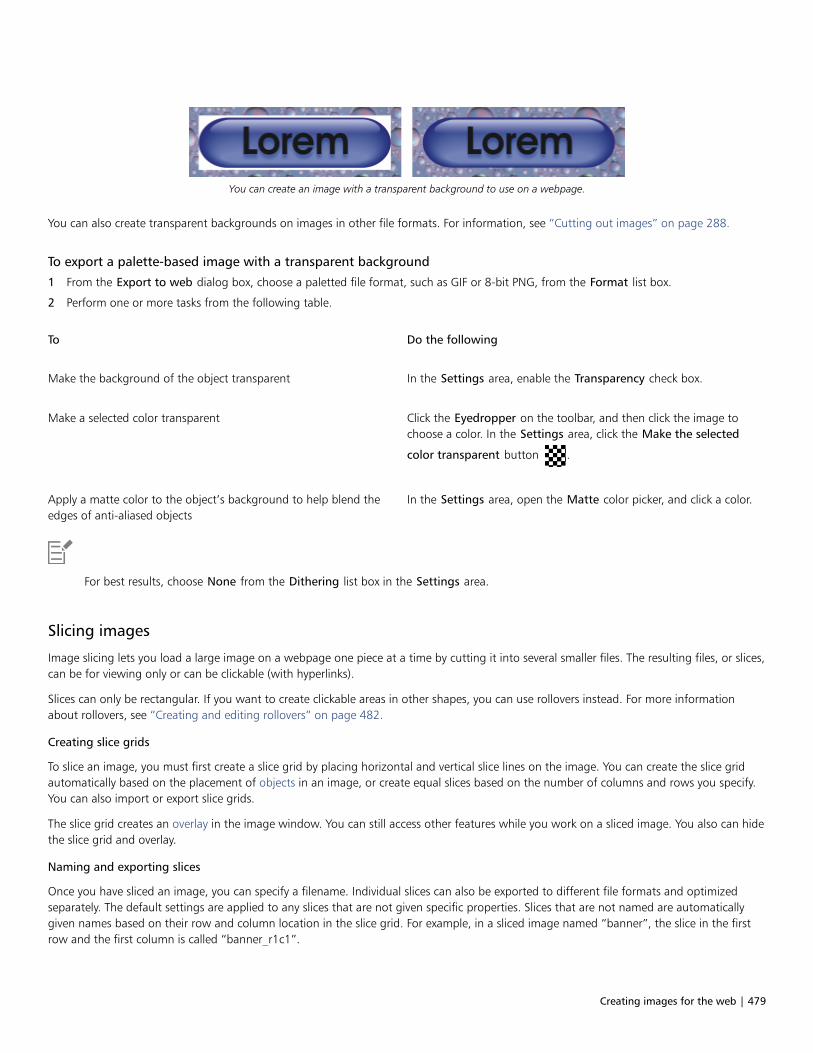
Creating images for the web | 479
You can create an image with a transparent background to use on a webpage.
You can also create transparent backgrounds on images in other file formats. For information, see “Cutting out images” on page 288.
To export a palette-based image with a transparent background
1 From the Export to web dialog box, choose a paletted file format, such as GIF or 8-bit PNG, from the Format list box.
2 Perform one or more tasks from the following table.
To Do the following
Make the background of the object transparent In the Settings area, enable the Transparency check box.
Make a selected color transparent Click the Eyedropper on the toolbar, and then click the image tochoose a color. In the Settings area, click the Make the selected
color transparent button .
Apply a matte color to the object’s background to help blend theedges of anti-aliased objects
In the Settings area, open the Matte color picker, and click a color.
For best results, choose None from the Dithering list box in the Settings area.
Slicing images
Image slicing lets you load a large image on a webpage one piece at a time by cutting it into several smaller files. The resulting files, or slices,can be for viewing only or can be clickable (with hyperlinks).
Slices can only be rectangular. If you want to create clickable areas in other shapes, you can use rollovers instead. For more informationabout rollovers, see “Creating and editing rollovers” on page 482.
Creating slice grids
To slice an image, you must first create a slice grid by placing horizontal and vertical slice lines on the image. You can create the slice gridautomatically based on the placement of objects in an image, or create equal slices based on the number of columns and rows you specify.You can also import or export slice grids.
The slice grid creates an overlay in the image window. You can still access other features while you work on a sliced image. You also can hidethe slice grid and overlay.
Naming and exporting slices
Once you have sliced an image, you can specify a filename. Individual slices can also be exported to different file formats and optimizedseparately. The default settings are applied to any slices that are not given specific properties. Slices that are not named are automaticallygiven names based on their row and column location in the slice grid. For example, in a sliced image named “banner”, the slice in the firstrow and the first column is called “banner_r1c1”.
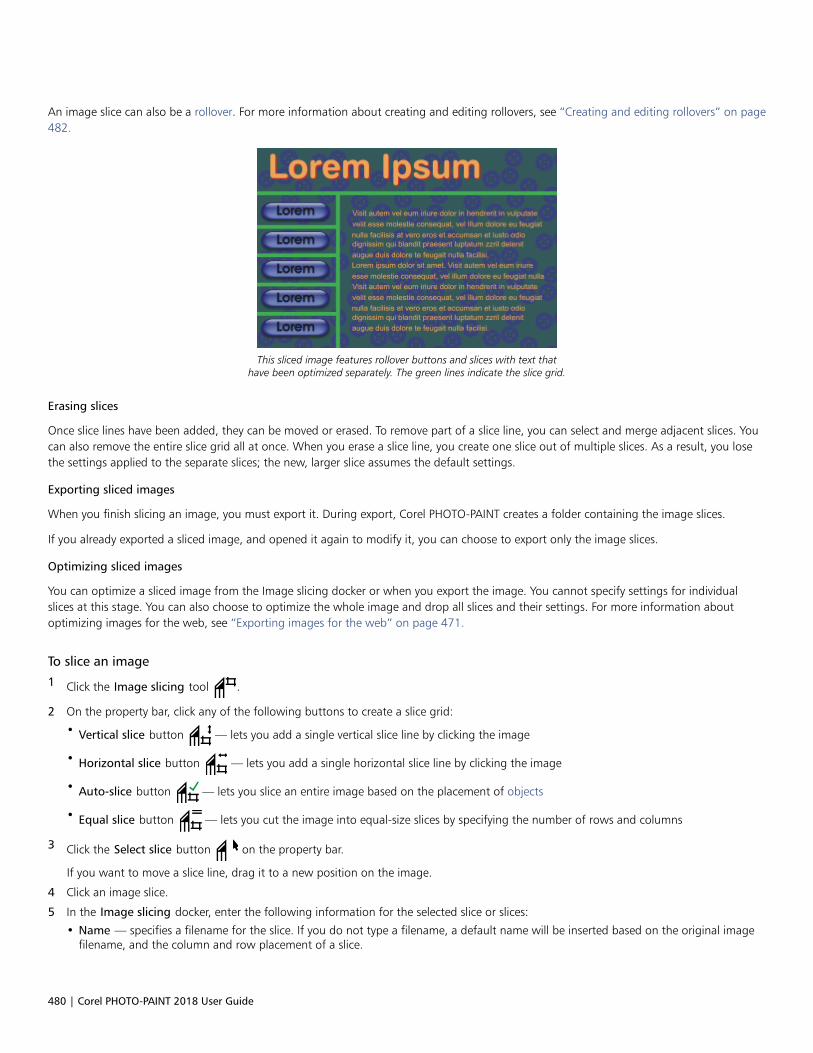
480 | Corel PHOTO-PAINT 2018 User Guide
An image slice can also be a rollover. For more information about creating and editing rollovers, see “Creating and editing rollovers” on page482.
This sliced image features rollover buttons and slices with text thathave been optimized separately. The green lines indicate the slice grid.
Erasing slices
Once slice lines have been added, they can be moved or erased. To remove part of a slice line, you can select and merge adjacent slices. Youcan also remove the entire slice grid all at once. When you erase a slice line, you create one slice out of multiple slices. As a result, you losethe settings applied to the separate slices; the new, larger slice assumes the default settings.
Exporting sliced images
When you finish slicing an image, you must export it. During export, Corel PHOTO-PAINT creates a folder containing the image slices.
If you already exported a sliced image, and opened it again to modify it, you can choose to export only the image slices.
Optimizing sliced images
You can optimize a sliced image from the Image slicing docker or when you export the image. You cannot specify settings for individualslices at this stage. You can also choose to optimize the whole image and drop all slices and their settings. For more information aboutoptimizing images for the web, see “Exporting images for the web” on page 471.
To slice an image
1 Click the Image slicing tool .
2 On the property bar, click any of the following buttons to create a slice grid:
• Vertical slice button — lets you add a single vertical slice line by clicking the image
• Horizontal slice button — lets you add a single horizontal slice line by clicking the image
• Auto-slice button — lets you slice an entire image based on the placement of objects
• Equal slice button — lets you cut the image into equal-size slices by specifying the number of rows and columns
3 Click the Select slice button on the property bar.
If you want to move a slice line, drag it to a new position on the image.
4 Click an image slice.
5 In the Image slicing docker, enter the following information for the selected slice or slices:
• Name — specifies a filename for the slice. If you do not type a filename, a default name will be inserted based on the original imagefilename, and the column and row placement of a slice.
Creating images for the web | 481
• URL — lets you insert a hyperlink
6 In the Format area, choose a file format for the slice from the list box.
If you do not choose a file format, the image slice is automatically saved to the default file format.
For information about how to export the sliced image, see “To export a sliced image” on page 481.
You can also
Optimize a slice Select a slice, and in the Image slicing docker, click Advanced, andadjust the file format settings.
Import a slice grid Click the flyout arrow , and click Import slice grid.
Export a slice grid to use on another image Click the flyout arrow , and click Export slice grid.
Save the file format settings you specify as a preset Click the flyout arrow , and click Save preset.
If you want to select multiple slices, hold down Shift, and click the slices.
To switch between the Horizontal slice and Vertical slice buttons, press Shift.
To display or hide the slice overlay and grid
• Click View Slice grid.
You cannot choose to display or hide the slice grid when the Image slicing tool is selected. When the slice tool is selected, the
slice grid is always displayed.
To erase an image slice line
1 Click the Image slicing tool .
2 Click the Erase line button on the property bar.
3 Click a line to erase it.
If you want to erase all slices, click the Erase line button on the property bar.
When a slice line is erased, the new combined slice reverts to the default settings. Any settings that were applied to the individualslices are lost.
To export a sliced image
1 Click File Export for Web.
2 From the Export for web dialog box, choose preset settings from the Preset list box in the upper-right corner of the dialog box.
482 | Corel PHOTO-PAINT 2018 User Guide
3 In the HTML and slices area, choose the Image and HTML option from the Export list box.
4 Enable the Include slices check box.
5 Click Save as.
6 Choose the drive and folder where you want to store the files.
7 Type a filename in the File name box.
8 Click Save.
You can also
Replace existing image slices In the HTML and slices area, enable the Overwrite existing filesoption.
Preview the sliced image in a browser Enable the Display in browser check box to start the defaultbrowser and to preview the file with the current settings.
If the Slices option is not enabled, the slices and all settings assigned in the Image slicing docker will not be applied to the exportedimage. If you choose not to apply the slices and settings, you can choose a file format to apply to the whole image from the Save astype list box.
If you have not used a web-compatible filename, it is automatically corrected during export. If you have inadvertently duplicated afilename, this is also automatically corrected.
If you want to export only the image slices, enable the Image only option.
Creating and editing rollovers
A rollover is an interactive image that changes in appearance when you click or point to it. For example, you can make a button changecolor when it is clicked, or display text when you point to it. Rollovers are frequently used on webpages as navigation buttons.
Creating rollovers
Rollovers are made by using objects, such as shapes, brushstrokes and text. You can use a single object or a group of objects, such as anellipse with text on it. Rollovers consist of the following states:• Normal — displays the default state• Over — is triggered when you point to it• Down — is triggered when you click it
Each state consists of an object or multiple objects.
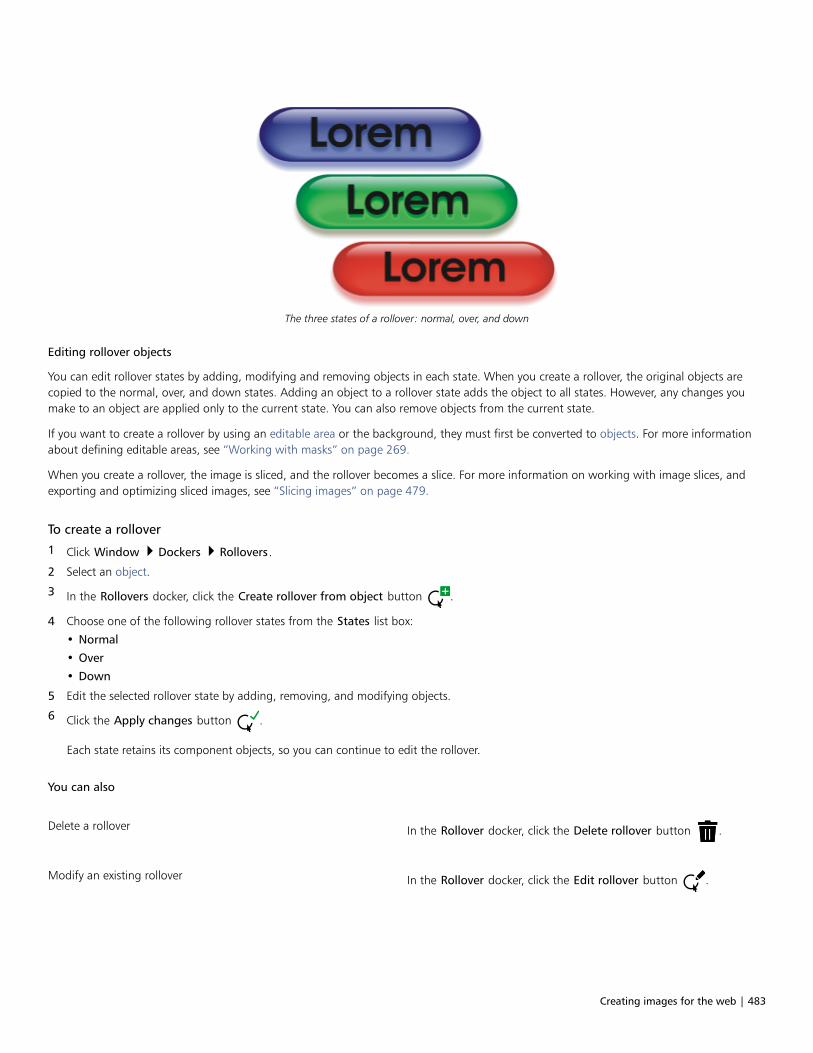
Creating images for the web | 483
The three states of a rollover: normal, over, and down
Editing rollover objects
You can edit rollover states by adding, modifying and removing objects in each state. When you create a rollover, the original objects arecopied to the normal, over, and down states. Adding an object to a rollover state adds the object to all states. However, any changes youmake to an object are applied only to the current state. You can also remove objects from the current state.
If you want to create a rollover by using an editable area or the background, they must first be converted to objects. For more informationabout defining editable areas, see “Working with masks” on page 269.
When you create a rollover, the image is sliced, and the rollover becomes a slice. For more information on working with image slices, andexporting and optimizing sliced images, see “Slicing images” on page 479.
To create a rollover
1 Click Window Dockers Rollovers.
2 Select an object.
3 In the Rollovers docker, click the Create rollover from object button .
4 Choose one of the following rollover states from the States list box:
• Normal
• Over
• Down
5 Edit the selected rollover state by adding, removing, and modifying objects.
6 Click the Apply changes button .
Each state retains its component objects, so you can continue to edit the rollover.
You can also
Delete a rollover In the Rollover docker, click the Delete rollover button .
Modify an existing rollover In the Rollover docker, click the Edit rollover button .
484 | Corel PHOTO-PAINT 2018 User Guide
In the Object manager docker, rollover objects are highlighted, grouped, and appear with a Rollover object icon beside the
name. The Text rollover object icon indicates that the rollover object is text.
Overlapping rollovers cannot be exported. You must move the rollover so it no longer overlaps with another rollover object.
You can select a single object to start, and then add other objects to it to change the appearance of the rollover.
To edit a rollover
1 In the Object manager docker, select a rollover.
Rollover objects appear with a Rollover object icon beside the name.
2 Click Window Toolbars Internet.
3 On the Internet toolbar, click the Edit rollover button.
4 In the Rollover docker, choose one of the following rollover states from the States list box:
• Normal
• Over
• Down
5 Edit the rollover state by adding, removing, and modifying objects.
6 On the Internet toolbar, click the Finish rollover button.
You can also
Return a state to the current Normal state, so you can start overagain
In the Rollovers docker, click Reset.
Return all states in a rollover to simple objects On the Internet toolbar, click the Extract rollover objects button.
When you extract a rollover to simple objects, the component objects are named automatically.
It is not possible to edit two rollovers at the same time.
You can edit a rollover by double-clicking it in the image window.
You can also edit a rollover by clicking the Edit rollover button in the Rollover docker.
To add an object to a rollover
1 In the Rollover docker, choose one of the following rollover states from the States list box:
• Normal
• Over
• Down
2 In the toolbox, click a shape tool.
Creating images for the web | 485
3 Drag in the image window to create a shape.
The object is added to all rollover states.
You can also
Add brushstrokes In the toolbox, click the Paint tool , and drag in the image
window to create a brushstroke.
Add text Click the Text tool , click in the image window, and type the
text.
For more information about adding shapes and brushstrokes, see “Working with objects” on page 393. For more information aboutadding text, see “Creating and formatting text” on page 429.
You can also create objects from the image background and editable areas. For information, see “Working with objects” on page393.
All brushstrokes are added to the active object by default. You can also create an object by clicking the New object button in
the Object manager docker. If the Object manager docker is not open, click Window Dockers Object manager.
To modify an object in the current rollover state
1 In the Rollover docker, choose one of the following rollover states from the States list box:
• Normal
• Over
• Down
2 In the Object manager docker, select the object you want to modify.
If the Object manager docker is not open, click Window Dockers Object manager.
3 Modify the object.
The changes apply only to the object in the current state.
For more information about changing objects, see “Working with objects” on page 393 and “Modifying objects” on page 411.
You can also paint text or change the color, fill, and formatting. For more information about modifying text, see “Creating andformatting text” on page 429.
A rollover can display different text in each of the normal, over and down states. To edit text in a rollover, click the Text tool ,
point to the text until the pointer becomes a cursor, and select the text. Type new text to replace the current text.
To remove an object from the current rollover state
1 In the Rollover docker, choose one of the following rollover states from the States list box:
• Normal

486 | Corel PHOTO-PAINT 2018 User Guide
• Over
• Down
2 In the Object manager docker, select the object you want to remove.
3 Double-click the Eraser tool .
The object is removed only from the current state.
If you delete an object using the Delete key, the object is deleted from all rollover states.
E-mailing images
After you create or open an image in Corel PHOTO-PAINT, you can e-mail it as an attachment using your e-mail program. If the image wasnot saved, however, you will be prompted to save the image before e-mailing it. In addition, you must have an e-mail application installed. Ifyou don’t, the Internet connection or the e-mail setup wizard launches.
To e-mail an image
• Click File Send.
Printing | 487
Printing
Printing basics......................................................................................................................................................................................489
Preparing files for print service providers............................................................................................................................................. 499

488 | Corel PHOTO-PAINT 2018 User Guide
Printing basics | 489
Printing basics
Corel PHOTO-PAINT provides extensive options for printing your work.
This section includes the following topics:
• “Printing your work” (page 489)
• “Laying out print jobs” (page 490)
• “Previewing print jobs” (page 491)
• “Applying print styles” (page 492)
• “Fine-tuning print jobs” (page 493)
• “Printing colors accurately” (page 494)
• “Printing to a PostScript printer” (page 496)
• “Viewing preflight summaries” (page 497)
Printing your work
With Corel PHOTO-PAINT, you can print one or more copies of the same image. You can specify whether to print the current image orspecific images. Before printing an image, you can specify printer properties, including paper size and device options.
To set printer properties
1 Click File Print.
2 Click the General tab.
3 In the Destination area, choose a printer from the Printer list box.
4 Click Preferences.
5 Set any properties in the dialog box.
To print your work
1 Click File Print.
2 Click the General tab.
3 In the Destination area, choose a printer from the Printer list box.
4 In the Destination area, choose a page size and orientation option from the Page list box.

490 | Corel PHOTO-PAINT 2018 User Guide
5 In the Copies area, type a value in the Number of copies box.
If you want the copies collated, enable the Collate check box.
6 In the Print range area, enable one of the following options:
• Current document — prints the active drawing
• Current page — prints the active page
• Pages — prints the pages that you specify
• Documents — prints the documents that you specify
• Selection — prints the objects that you have selected
If you enable the Pages option, you can choose to print a range of pages, only even pages, only odd pages, or both even and odd pages.
You can also
Automatically match the printer orientation to the documentorientation
In the Destination area, choose Match orientation from the Pagelist box.
Apply the printer’s default page size In the Destination area, choose Use printer default from the Pagelist box.
You must select objects before printing a selection.
Laying out print jobs
You can lay out a print job by specifying the size, position, and scale. Tiling a print job prints portions of each page on separate sheets ofpaper that you can assemble into one sheet. You would, for example, tile a print job that is larger than your printer paper.
To specify the size and position of a print job
1 Click File Print.
2 Click the Layout tab.
3 In the Image position and size area, enable one of the following options:
• As in document — maintains the image size as it is in the document
• Fit to page — sizes and positions the print job to fit to a printed page
• Reposition images to — lets you reposition the print job by choosing a position from the list box
Enabling the Reposition images to option lets you specify size, position, and scale in the corresponding boxes.
You can also choose an imposition layout, such as 2 x 2 (4-up) or 2 x 3 (6-up), from the Imposition layout list box. For moreinformation, see “Working with imposition layouts” on page 500.
To tile a print job
1 Click File Print.
2 Click the Layout tab.
3 In the Image position and size area, enable the Print tiled pages check box.
Printing basics | 491
4 Type values in the following boxes:
• Tile overlap — lets you specify the amount by which to overlap tiles
• % of page width — lets you specify the percentage of the page width the tiles will occupy
You can include tiling alignment marks by enabling the Tiling marks check box.
Previewing print jobs
You can preview your work to show how the position and size of the print job will appear on paper. For a detailed view, you can zoom in onan area. You can view how the individual color separations will appear when printed.
Before printing your work, you can view a summary of issues for a print job to find potential printing problems. For example, you can checkthe current print job for print errors, possible print problems, and suggestions for resolving issues.
To preview a print job
• Click File Print preview.
To close the print preview, click File Close print preview.
You can quickly preview a print job in the Print dialog box by clicking File Print and clicking the Mini preview button .
To magnify the preview page
1 Click File Print preview.
2 Click View Zoom.
3 Enable the Percent option, and type a value in the box.
You can also magnify the preview page by choosing a preset zoom level.
You can also zoom in on a portion of the print preview by clicking the Zoom tool in the toolbox and marquee selecting an area.
To preview color separations
1 Click File Print preview.
2 On the property bar, click the Enable color separations button .
You can preview the composite by clicking View Preview separations Composite.
You can view individual color separations by clicking the tabs at the bottom of the application window.
To view a summary of issues for a print job
1 Click File Print.
2 Click the Preflight tab.
492 | Corel PHOTO-PAINT 2018 User Guide
If there are no print job issues, the tab name displays as No issues. If there are issues, the tab name displays the number of issues thatwere found.
If you want to exclude certain issues from the preflight check, click Settings, double-click Printing, and disable any check boxes thatcorrespond to issues you want overlooked.
You can save settings by clicking the Add preflight settings button and typing a name in the Save preflight style box.
Applying print styles
A print style is a set of saved printing options. Each print style is a separate file. This lets you move a print style from one computer toanother, back up a print style, and keep document-specific styles in the same directory as the document file.
You can select an existing print style, create a new print style, or edit a print style and save the changes. You can also delete print styles.
To choose a print style
1 Click File Print.
2 Click the General tab.
3 Choose one of the following from the Print style list box:
• Corel PHOTO-PAINT defaults
• Browse
To create a print style
1 Click File Print.
2 Click the General tab.
3 Set any printing options.
4 Click Save as.
5 Choose the folder where you want to save the print style.
6 Type a name for the style in the File name box.
You can also save a print style by clicking File Print preview, and clicking the Save print style as button.
To edit a print style
1 Click File Print.
2 Choose a print style from the Print style list box.
3 Modify any of the printing options.
4 Click Save as.
5 Choose the folder where the print style is stored.
6 Click the filename.
7 Click Save.
Printing basics | 493
You should save the modified settings as a print style or apply the changes before canceling; otherwise, you’ll lose all the modifiedsettings.
To delete a print style
1 Click File Print preview.
2 Select a print style.
3 Click the Delete print style button .
Fine-tuning print jobs
You can decrease printing time by specifying driver compatibility for non-PostScript printing devices. For more information, see “Printingcolors accurately” on page 494.
If a printing device has difficulty processing large bitmaps, you can divide a bitmap into smaller, more manageable chunks by setting anoutput threshold. If any lines appear when the printing device prints the chunks, you can set an overlap value to produce a seamless image.
To reduce file size, you can downsample images. Because images are made up of pixels, when you downsample an image, the number ofpixels per line decreases, which decreases the file size.
To specify driver compatibility settings
1 Click Tools Options.
2 In the list of categories, double-click Global, double-click Printing, and click Driver compatibility.
3 Choose a non-PostScript printing device from the Printer list box.
4 Enable any of the check boxes that correspond to the settings that you want to specify.
To choose a threshold and chunk overlap
1 Click Tools Options.
2 In the list of categories, double-click Global, and click Printing.
3 From the Special settings list, choose one of the following:
• Bitmap output threshold (K)
• Bitmap chunk overlap pixels
4 Choose a value from the Setting list box.
To downsample images
1 Click File Print.
2 Click the Prepress tab.
3 In the Bitmap downsampling area, enable any of the following check boxes and type a value in the corresponding box:
• Color and grayscale
• Monochrome
494 | Corel PHOTO-PAINT 2018 User Guide
Printing colors accurately
Corel PHOTO-PAINT allows you to manage colors when printing to ensure accurate color reproduction. You can print the document with thedocument colors settings applied or you can choose alternate color settings only for printing. You can also print a document using the colorproofing settings that you previously specified in the Color proof settings docker.
In addition, you can choose a rendering intent to effectively interpret the out-of-gamut colors when printing. The rendering intent that youchoose depends on the graphic content of the document.
For information about selecting printing device color profiles, see “Using color management” on page 221.
Notes for GDI printers
GDI printers support only two color spaces: RGB and Grayscale. If your document contains colors from multiple color spaces, for exampleRGB, CMYK, and spot colors, you must convert all the colors to RGB or Grayscale before printing.
You can determine if a printer is a GDI printer by clicking File Print and choosing a printer from the Printer list box. If thePostScript tab does not appear at the top of the dialog box, the selected printer is a GDI printer.
The following table describes different ways of managing color when printing to a GDI printer.
How to In the Print dialog box
Print the document and preserve the RGB or Grayscale colors Click the Color tab, and choose the appropriate color mode fromthe Output colors as list box.
Print the document with original colors Click the Color tab, and choose the document color profile fromthe Document profile area of the Correct colors using colorprofile list box.
Print the document and convert the document colors to the printercolors
Choose the printer color profile from the Correct colors usingcolor profile list box.
Notes for PostScript printers
Most PostScript printers support the use of multiple color spaces in a document. For example, a document can contain colors from multiplecolors spaces, such as RGB, CMYK, and Grayscale.
The following table describes different ways of managing color when printing to a PostScript printer.
How to In the Print dialog box
Print the document with the original colors Click the Color tab, and choose Native from the Output colors aslist box.
Print a document that contains multiple color modes using onecolor mode
Click the Color tab, and choose a color mode from the Outputcolors as list box.
If the printer supports only one color mode, you can control thecolor conversion within Corel PHOTO-PAINT.
Printing basics | 495
How to In the Print dialog box
Print a document that contains only one color mode Click the Color tab, and choose the color profile from the Outputcolor as list box and from the Correct colors using color profilelist box.
To specify color settings for printing
1 Click File Print.
2 Click the Color tab.
3 Enable the Use document color settings option.
If you selected a PostScript printer, you can choose one of the following options from the Color conversion performed by list box:
• Corel PHOTO-PAINT — lets the application perform the color conversion
• (selected printer) — lets the selected printer perform the color conversion (This option is only available for PostScript printers.)
4 Choose a color model from the Output colors as list box.
This allows you to merge all document colors into a specific color model when printing.
You can also
Convert spot colors to process colors Enable the Convert spot colors to check box.
If you selected Native from the Output colors as list box, you needto select a color mode from the list box.
Choose a color profile for correcting colors when printing to aspecific printer
Choose a color profile from the Correct colors using color profileslist box.
This option is available only for certain color models.
Retain the color values associated with the selected color model Enable the Preserve (color model) numbers check box.
To print using color proofing settings
1 Click File Print.
2 Click the Color tab.
3 Enable the Use color proof settings option to apply the color settings that are defined in the Color proof settings docker.
If you want to correct the proof colors, you can choose a color profile from the Correct colors using color profile list box.
4 Click Print.
To specify a rendering intent for printing
1 Click File Print.
2 Click the Color tab.
3 From the Rendering intent list box, choose one of the following options:
• Relative colorimetric — for producing proofs on printers, without preserving the white point
• Absolute colorimetric — for preserving the white point and proofing
• Perceptual — for a variety of images, especially bitmaps and photographs
• Saturation — for vector graphics and for preserving highly saturated colors (lines, text, and solid-colored objects, such as charts)
496 | Corel PHOTO-PAINT 2018 User Guide
Printing to a PostScript printer
PostScript is a page-description language that sends printing instructions to a PostScript device. All the elements in a print job (forexample, curves and text) are represented by lines of PostScript code that the printing device uses to produce the document. For improvedcompatibility, you can choose a device-independent PostScript option. You can also select a PostScript Printer Description (PPD) file. APostScript Printer Description file describes the capabilities and features of your PostScript printer and is available from your printer’smanufacturer.
A print job that contains too many fonts may not print properly, and a print job that contains too many spot colors increases file size. Youcan set the PostScript options to warn you when a print job contains more than a set number of fonts or spot colors. You can specify themaximum number of bitmap fonts that a print job can contain.
To select a PostScript Printer Description (PPD) file
1 Click File Print.
2 Click the General tab.
3 In the Destination area, choose a PostScript printer from the Printer list box.
4 Enable the Use PPD check box.
5 Choose the folder where the file is stored.
6 Double-click the filename.
To print to a PostScript device
1 Click File Print.
2 Click the General tab.
3 In the Destination area, choose a PostScript printer from the Printer list box.
4 Click the PostScript tab.
5 From the list box in the Compatibility area, choose the PostScript level that corresponds to the printer.
If you want to compress bitmaps when printing, choose an option from the Compression type list box in the Bitmaps area. If youchoose JPEG compression, you can move the JPEG quality slider to adjust the compression.
Bitmap compression settings can be saved in PostScript Interpreted (PS or PRN) files when you print to a file using a PostScript driver.For information about printing to a file, see “To print to a file” on page 499.
To test fountain fills for banding
1 Click File Print.
2 Click the Preflight tab.
If there are no print job issues, the tab name displays as No issues.
3 Click Settings.
4 Double-click Printing.
5 Enable the Banded fountain fills check box.
Testing fountain fills for banding applies only to linear fountain fills.
Printing basics | 497
To set color separations and font warning options
1 Click Tools Options.
2 In the list of categories, double-click Global, and click Printing.
3 Choose Spot color separations warning from the Special settings list.
4 Choose one of the following from the Setting list box:
• If any spot colors are used
• If more than 1 spot color used
• If more than 2 spot colors used
• If more than 3 spot colors used
5 Choose Many fonts (preflight) from the Special settings list, and choose a number from the Setting list box that appears.
To choose the maximum number of bitmap fonts
1 Click Tools Options.
2 In the list of categories, double-click Global, and click Printing.
3 Choose Bitmap font limit (PS) from the Special settings list.
4 Choose a value from the Settings list box.
If you want to set a maximum bitmap font size, choose a font size from the Bitmap font size threshold (PS) list box.
Viewing preflight summaries
Preflight checks the status of your file before you decide to output it and provides a summary of issues and potential problems, andsuggestions for resolving them. You can specify which issues Preflight checks for. You can also save Preflight settings. For more informationabout specific Preflight settings, see any of the following:• To check for issues related to printing a file, see “To view a summary of issues for a print job” on page 491.• To check for issues related to publishing a PDF file, see “To view the preflight summary for a PDF file” on page 518.

498 | Corel PHOTO-PAINT 2018 User Guide
Preparing files for print service providers | 499
Preparing files for print service providers
With Corel PHOTO-PAINT, you can prepare a print job for sending to a print service provider.
This section contains the following topics:• “Preparing a print job for a print service provider” (page 499)• “Working with imposition layouts” (page 500)• “Printing printers’ marks” (page 502)• “Printing color separations” (page 504)• “Working with color trapping and overprinting” (page 505)• “Printing composites” (page 506)• “Printing to film” (page 507)• “Preparing images for canvas printing” (page 507)• “Working with a print service provider” (page 508)
Preparing a print job for a print service provider
You can print an image to a file, which lets the print service provider send the file directly to an output device. If you are unsure about whichsettings to choose, consult the print service provider.
For more information about commercial printing, see “Working with a print service provider” on page 508.
To print to a file
1 Click File Print.
2 Click the General tab.
3 In the Destination area, enable the Print to file check box.
4 Click the flyout arrow, and click one of the following commands:
• For Mac — saves the drawing to be readable on a Macintosh computer
• Single file — prints all pages in a document to a single file
• Pages to separate files — prints each page to a separate file
• Plates to separate files — prints each plate to a separate file
5 Click Print.
6 Choose one of the following from the Save as type list box:
500 | Corel PHOTO-PAINT 2018 User Guide
• Print file — saves the file as a PRN file
• PostScript file — saves the file as a PS file
7 Choose the folder where you want to save the file.
8 Type a filename in the File name box.
9 Click Save.
If you prefer not to prepare PostScript files, print service providers equipped with the application in which you created your work cantake the original files (for example, CorelDRAW files) and apply the required prepress settings.
Working with imposition layouts
Working with imposition layouts lets you print more than one page of a document on each sheet of paper. You can choose a presetimposition layout to create documents such as magazines and books to print on a commercial printing press; produce documents thatinvolve cutting or folding, such as mailing labels, business cards, pamphlets, or greeting cards; or print multiple thumbnails of a documenton one page. You can also edit a preset imposition layout to create your own layout.
You can select a binding method by choosing from three preset binding methods, or you can customize a binding method. When youchoose a preset binding method, all but the first signature are automatically arranged.
You can arrange pages on a signature manually or automatically. When you arrange the pages automatically, you can choose the angle ofthe image. If you have more than one page across or down, you can specify the size of gutters between pages; for example, you can choosethe automatic gutter spacing option, which sizes gutters so that the document’s pages fill the entire available space in the layout.
When printing on a desktop printer, you can adjust the margins to accommodate the non-printable area of a page. If the margin is smallerthan the non-printable area, the edges of some pages or some printers’ marks may be clipped by your printer.
To choose a preset imposition layout
1 Click File Print.
2 Click the Layout tab.
3 Choose an imposition layout from the Imposition layout list box.
The layout you choose does not affect the original document, only the way it is printed.
To edit an imposition layout
1 Click File Print.
2 Click the Layout tab.
3 Choose an imposition layout from the Imposition layout list box.
4 Click Edit.
5 Edit any imposition layout settings.
6 Click File Save imposition layout.
7 Type a name for the imposition layout in the Save as box.
When editing an imposition layout, you should save it with a new name; otherwise the settings for a preset imposition layout will beoverwritten.
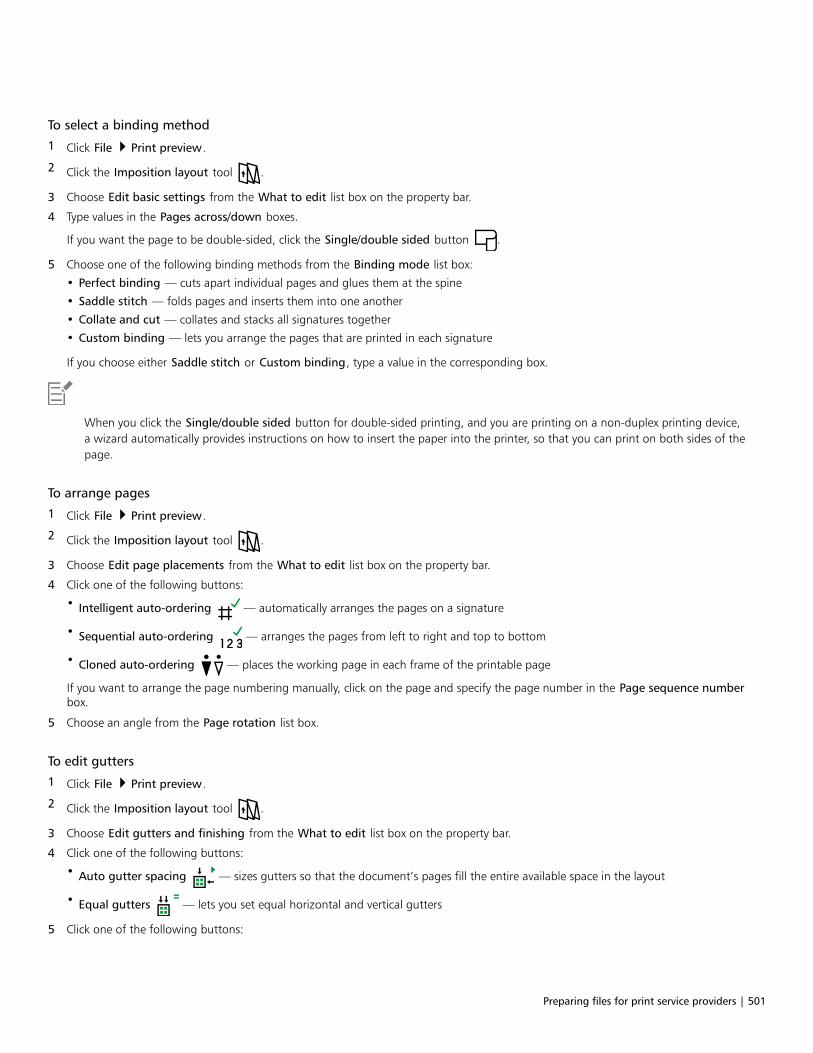
Preparing files for print service providers | 501
To select a binding method
1 Click File Print preview.
2 Click the Imposition layout tool .
3 Choose Edit basic settings from the What to edit list box on the property bar.
4 Type values in the Pages across/down boxes.
If you want the page to be double-sided, click the Single/double sided button .
5 Choose one of the following binding methods from the Binding mode list box:
• Perfect binding — cuts apart individual pages and glues them at the spine
• Saddle stitch — folds pages and inserts them into one another
• Collate and cut — collates and stacks all signatures together
• Custom binding — lets you arrange the pages that are printed in each signature
If you choose either Saddle stitch or Custom binding, type a value in the corresponding box.
When you click the Single/double sided button for double-sided printing, and you are printing on a non-duplex printing device,a wizard automatically provides instructions on how to insert the paper into the printer, so that you can print on both sides of thepage.
To arrange pages
1 Click File Print preview.
2 Click the Imposition layout tool .
3 Choose Edit page placements from the What to edit list box on the property bar.
4 Click one of the following buttons:
• Intelligent auto-ordering — automatically arranges the pages on a signature
• Sequential auto-ordering — arranges the pages from left to right and top to bottom
• Cloned auto-ordering — places the working page in each frame of the printable page
If you want to arrange the page numbering manually, click on the page and specify the page number in the Page sequence numberbox.
5 Choose an angle from the Page rotation list box.
To edit gutters
1 Click File Print preview.
2 Click the Imposition layout tool .
3 Choose Edit gutters and finishing from the What to edit list box on the property bar.
4 Click one of the following buttons:
• Auto gutter spacing — sizes gutters so that the document’s pages fill the entire available space in the layout
• Equal gutters — lets you set equal horizontal and vertical gutters
5 Click one of the following buttons:
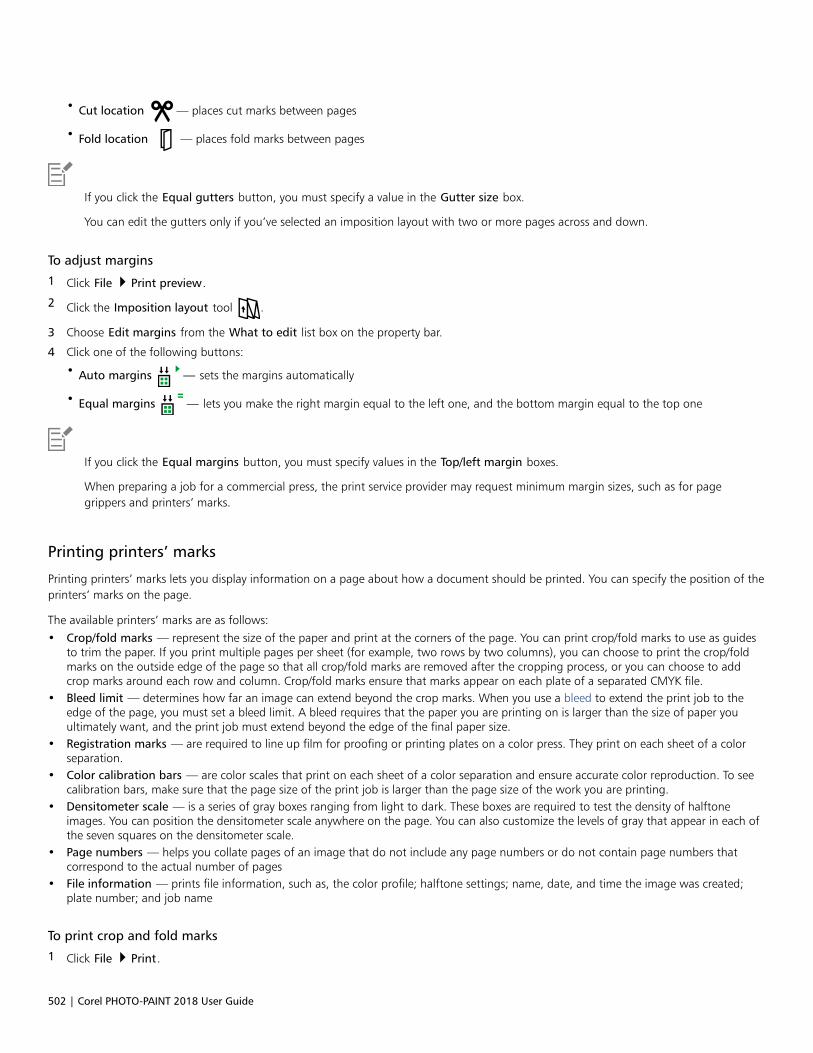
502 | Corel PHOTO-PAINT 2018 User Guide
• Cut location — places cut marks between pages
• Fold location — places fold marks between pages
If you click the Equal gutters button, you must specify a value in the Gutter size box.
You can edit the gutters only if you’ve selected an imposition layout with two or more pages across and down.
To adjust margins
1 Click File Print preview.
2 Click the Imposition layout tool .
3 Choose Edit margins from the What to edit list box on the property bar.
4 Click one of the following buttons:
• Auto margins — sets the margins automatically
• Equal margins — lets you make the right margin equal to the left one, and the bottom margin equal to the top one
If you click the Equal margins button, you must specify values in the Top/left margin boxes.
When preparing a job for a commercial press, the print service provider may request minimum margin sizes, such as for pagegrippers and printers’ marks.
Printing printers’ marks
Printing printers’ marks lets you display information on a page about how a document should be printed. You can specify the position of theprinters’ marks on the page.
The available printers’ marks are as follows:• Crop/fold marks — represent the size of the paper and print at the corners of the page. You can print crop/fold marks to use as guides
to trim the paper. If you print multiple pages per sheet (for example, two rows by two columns), you can choose to print the crop/foldmarks on the outside edge of the page so that all crop/fold marks are removed after the cropping process, or you can choose to addcrop marks around each row and column. Crop/fold marks ensure that marks appear on each plate of a separated CMYK file.
• Bleed limit — determines how far an image can extend beyond the crop marks. When you use a bleed to extend the print job to theedge of the page, you must set a bleed limit. A bleed requires that the paper you are printing on is larger than the size of paper youultimately want, and the print job must extend beyond the edge of the final paper size.
• Registration marks — are required to line up film for proofing or printing plates on a color press. They print on each sheet of a colorseparation.
• Color calibration bars — are color scales that print on each sheet of a color separation and ensure accurate color reproduction. To seecalibration bars, make sure that the page size of the print job is larger than the page size of the work you are printing.
• Densitometer scale — is a series of gray boxes ranging from light to dark. These boxes are required to test the density of halftoneimages. You can position the densitometer scale anywhere on the page. You can also customize the levels of gray that appear in each ofthe seven squares on the densitometer scale.
• Page numbers — helps you collate pages of an image that do not include any page numbers or do not contain page numbers thatcorrespond to the actual number of pages
• File information — prints file information, such as, the color profile; halftone settings; name, date, and time the image was created;plate number; and job name
To print crop and fold marks
1 Click File Print.
Preparing files for print service providers | 503
2 Click the Prepress tab.
3 In the Crop/fold marks area, enable the Crop/fold marks check box.
If you want to print all crop/fold marks, disable the Exterior only check box.
To print crop and fold marks, ensure that the paper on which you print is 0.5 inches larger on all sides than the page size of theimage that you are printing.
To set crop and fold marks, see “To edit gutters” on page 501.
To print composite crop and fold marks
1 Click Tools Options.
2 In the list of categories, double-click Global, and click Printing.
3 Choose Composite crop marks (PS) from the Option list.
4 Choose Output on all plates from the Setting list box.
To set a bleed limit
1 Click File Print.
2 Click the Layout tab.
3 Enable the Bleed limit check box.
4 Type a value in the Bleed limit box.
Usually, a bleed limit of 0.125 to 0.25 inches is sufficient. Any object extending beyond that uses memory needlessly and may causeproblems when you print multiple pages with bleeds on a single sheet of paper.
To print registration marks
1 Click File Print.
2 Click the Prepress tab.
3 In the Registration marks area, enable the Print registration marks check box.
4 Choose a registration mark style from the Style picker.
To print registration marks, ensure that the paper on which you print is 0.5 inches larger on all sides than the page size of the imagethat you are printing.
To print color calibration bars and densitometer scales
1 Click File Print.
2 Click the Prepress tab.
3 In the Calibration bars area, enable any of the following check boxes:
• Color calibration bar
504 | Corel PHOTO-PAINT 2018 User Guide
• Densitometer scales
If you want to customize the levels of gray in one of the densitometer scale squares, choose a number from the Densities list (lowervalues represent lighter squares), and type a new density for that square.
To print page numbers
1 Click File Print.
2 Click the Prepress tab.
3 In the File information area, enable the Print page numbers check box.
If you want to position the page number inside the page, enable the Position within page check box.
To print file information
1 Click File Print.
2 Click the Prepress tab.
3 In the File information area, enable the Print file information check box.
4 Type a job name in the Print file information box.
If you want to position the file information inside the page, enable the Position within page check box.
To position printers’ marks
1 Click File Print preview.
2 Click the Marks placement tool .
3 Click the Auto-position marks rectangle button on the property bar.
4 Type values in the Marks alignment rectangle boxes.
You can also change the position of the printer’s marks by clicking a printers’ mark icon in the print preview window and draggingthe bounding box.
Printing color separations
When you send color work to a print service provider or printing shop, either you or the print service provider must create color separations.Color separations are necessary because a typical printing press applies only one color of ink at a time to a sheet of paper. You can specifythe color separations to print, including the order in which they print.
Printing presses produce color using either process color or spot color, or both. You can convert the spot colors to process colors at printingtime. For more information on spot and process colors, see “Choosing colors” on page 194.
When setting halftone screens to print color separations, we recommend that you use the default settings; otherwise, screens can beimproperly set and result in undesirable moiré patterns and poor color reproduction. However, if you are using an imagesetter, the screentechnology should be set to match the type of imagesetter the print service provider uses. Before customizing a halftone screen, consult theprint service provider to determine the correct setting.
To print color separations
1 Click File Print.
2 Click the Color tab.
Preparing files for print service providers | 505
3 Enable the Print separations option.
If you want to print specific color separations, click the Separations tab, and enable the corresponding check box in the list of colorseparations.
You can change the order in which color separations print, by enabling the Use advanced settings check box in the Options area. Inthe separations list at the bottom of the dialog box, click in the Order column next to the color separation that you want to change.Chose a new order value from the list box.
If you want to print separations using a color profile that is different from the document color profile, you can click the Color tab andchoose a color profile from the Correct colors using color profile list box.
To convert spot colors to process colors
1 Click File Print.
2 Click the Color tab.
3 Enable the Print separations option.
4 Enable the Convert spot colors to check box.
Changing the spot colors to process colors does not affect the original Corel PHOTO-PAINT file; it affects the way colors are sent tothe printer.
To customize a halftone screen
1 Click File Print.
2 Click the Color tab.
3 Enable the Print separations option.
4 Click the Separations tab.
5 In the Options area, enable the Use advanced settings check box.
6 Click Advanced.
7 Change any of the following settings:
• Screening technology
• Resolution
• Basic screen
• Halftone type
You can set the screen frequency, screen angle, and overprint options for spot colors as well as process colors. For example, if youhave a fountain fill made up of two spot colors, you can set one to print at 45 degrees and the other at 90 degrees.
Working with color trapping and overprinting
When colors are trapped, they are intentionally overlapped so that misalignments of print separations are not noticeable. In manualtrapping, one color must overprint the other. Overprinting is achieved by printing one color over another. Overprint trapping works bestwhen the top color is much darker than the underlying color; otherwise, an undesirable third color may result (for example, cyan over yellowresults in a green object).
506 | Corel PHOTO-PAINT 2018 User Guide
When you are ready to print, you can preserve overprint settings by choosing to overprint specific color separations, specify in which orderthey will print, and specify whether you want to overprint graphics, text, or both.
To overprint selected color separations
1 Click File Print.
2 Click the Color tab.
3 Enable the Print separations option.
4 Click the Separations tab.
5 In the Options area, enable the Use advanced settings check box.
6 Click Advanced.
7 In the Advanced separations settings dialog box, choose a color separation from the Screening technology list box.
8 In the Overprint column, click one or both of the following icons:
• Overprint graphics
• Overprint text
The icons appear darker when the separation is set to overprint.
You can change the order in which color separations print by selecting a color separation and choosing an order from the Order listbox.
Printing composites
You can print a composite of an image by combining all colors, text, and objects on a single sheet for proofing. In a composite, continuoustone is simulated by halftone dots printed in lines. Choosing a higher number of lines per inch (lpi) reduces the size of the halftone dots andthe space between them, creating a more finely rendered result.
To print a composite
1 Click File Print.
2 Click the Color tab.
3 Enable the Print composite option.
4 Enable one of the following options:
• Use color proof settings — applies the color-proof settings to the document
• Use document color settings — applies the document-color settings
If you selected a PostScript printer, you can choose one of the following options from the Color conversion performed by list box:
• Corel PHOTO-PAINT — lets the application perform the color conversion
• (selected printer) — lets the selected printer perform the color conversion (This option is only available for PostScript printers.)
5 Choose a color model from the Output colors as list box.
This allows you to merge all document colors into a specific color model when printing.
6 Choose a color profile for correcting colors when printing to a specific printer from the Correct colors using color profiles list box.
7 Choose a rendering intent that corresponds to the final output of the image from the Rendering intent list box.
For more information about rendering intents, see “What is a rendering intent?” on page 223.
8 Click the Composite tab.
Preparing files for print service providers | 507
9 Choose a line-screen ruling from the Screen frequency list box.
10 Click Apply.
Printing to film
You can set up a print job to produce negative images. An imagesetter produces images on film that may need to be produced as negativesdepending on which printing device you are using. Consult your print service provider to determine whether you can produce images onfilm.
You can specify to print with the emulsion down. Printing with the emulsion down produces a backward image on desktop printers.
To print a negative
1 Click File Print.
2 Click the Prepress tab.
3 In the Paper/film settings area, enable the Invert check box.
Do not choose negative film if you are printing to a desktop printer.
To specify film with the emulsion down
1 Click File Print.
2 Click the Prepress tab.
3 In the Paper/film settings area, enable the Mirror check box.
Preparing images for canvas printing
The Prep and Stretch docker lets you prepare your photos and images for canvas printing in three steps. By resizing, fine-tuning, andstretching the image, you can achieve the perfect composition for your wall art.
First, you specify the print size by resizing the image proportionally. For best results, specify the smaller dimension first. For example, if youwant your final print to be 8 by 10 inches and landscape orientation, set 8 for height. Leave the width value as is.
Second, you fine-tune the print size by trimming the image. You can specify the exact height or width, and then adjust the size in the imagewindow. When printing to canvas and mounting on a profile, the trimmed image will constitute the face of the wall art.
Third, you specify a stretch amount so that the image can be printed on canvas and mounted on a profile without losing important imagedetail. Stretching copies pixels from the image borders and adds them around the image. You can stretch an image by stretching ormirroring its edges. The stretched areas appear wrapped around the profile in the final output.
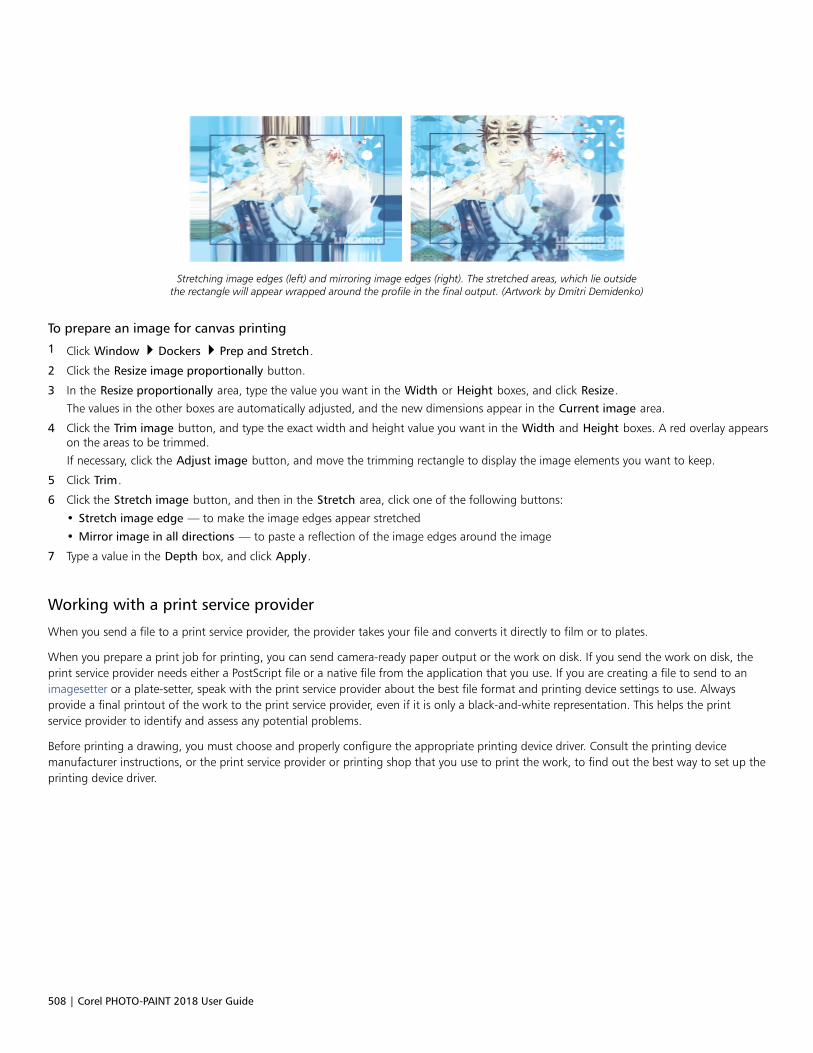
508 | Corel PHOTO-PAINT 2018 User Guide
Stretching image edges (left) and mirroring image edges (right). The stretched areas, which lie outsidethe rectangle will appear wrapped around the profile in the final output. (Artwork by Dmitri Demidenko)
To prepare an image for canvas printing
1 Click Window Dockers Prep and Stretch.
2 Click the Resize image proportionally button.
3 In the Resize proportionally area, type the value you want in the Width or Height boxes, and click Resize.
The values in the other boxes are automatically adjusted, and the new dimensions appear in the Current image area.
4 Click the Trim image button, and type the exact width and height value you want in the Width and Height boxes. A red overlay appearson the areas to be trimmed.
If necessary, click the Adjust image button, and move the trimming rectangle to display the image elements you want to keep.
5 Click Trim.
6 Click the Stretch image button, and then in the Stretch area, click one of the following buttons:
• Stretch image edge — to make the image edges appear stretched
• Mirror image in all directions — to paste a reflection of the image edges around the image
7 Type a value in the Depth box, and click Apply.
Working with a print service provider
When you send a file to a print service provider, the provider takes your file and converts it directly to film or to plates.
When you prepare a print job for printing, you can send camera-ready paper output or the work on disk. If you send the work on disk, theprint service provider needs either a PostScript file or a native file from the application that you use. If you are creating a file to send to animagesetter or a plate-setter, speak with the print service provider about the best file format and printing device settings to use. Alwaysprovide a final printout of the work to the print service provider, even if it is only a black-and-white representation. This helps the printservice provider to identify and assess any potential problems.
Before printing a drawing, you must choose and properly configure the appropriate printing device driver. Consult the printing devicemanufacturer instructions, or the print service provider or printing shop that you use to print the work, to find out the best way to set up theprinting device driver.
File formats | 509
File formats
Exporting to PDF................................................................................................................................................................................. 511
Working with office productivity applications...................................................................................................................................... 521
Working with RAW camera files.......................................................................................................................................................... 523
Supported file formats.........................................................................................................................................................................533

510 | Corel PHOTO-PAINT 2018 User Guide
Exporting to PDF | 511
Exporting to PDF
PDF is a file format designed to preserve fonts, images, graphics, and formatting of an original application file. You can also save multipleimages to a single PDF file to create a compact photo album to send to others.
This section contains the following topics:• “Exporting documents as PDF files” (page 511)• “Including hyperlinks, bookmarks, and thumbnails in PDF files” (page 513)• “Reducing the size of PDF files” (page 514)• “Specifying an encoding format for PDF files” (page 515)• “Specifying color management options for exporting PDF files” (page 515)• “Setting security options for PDF files” (page 516)• “Optimizing PDF files” (page 517)• “Viewing preflight summaries for PDF files” (page 518)• “Preparing PDF files for a print provider” (page 518)
Exporting documents as PDF files
You can export a document as a PDF file. A PDF file can be viewed, shared, and printed on any platform provided that users have AdobeAcrobat, Adobe Reader, or a PDF-compatible reader installed on their computers. A PDF file can also be uploaded to an intranet or the web.
When you export a document as a PDF file, you can choose from several PDF presets, which apply specific settings. For example, with theWeb preset, you can create a PDF that is suitable for online viewing.
You can also create a new PDF preset or edit any existing preset. PDF file security settings are not saved with a PDF preset. For informationabout PDF file security options, see “Setting security options for PDF files” on page 516.
To export a document as a PDF file
1 Click File Publish to PDF.
2 Locate the folder in which you want to save the file.
3 Type a filename in the File name box.
4 Choose one of the following options from the PDF preset list box:
• Archiving (CMYK) — creates a PDF/A-1b file, which is suitable for archiving purposes. In comparison to traditional PDF files, PDF/A-1bfiles are better suited for long-term preservation of documents because they are more self-contained and more device-independent.PDF/A-1b files include device-independent color and their own description as XMP metadata. This PDF style preserves any spot or
512 | Corel PHOTO-PAINT 2018 User Guide
Lab colors included in the original document, but it converts all other colors, such as grayscale or RGB, to the CMYK color mode. Inaddition, this style embeds a color profile to specify how CMYK colors should be interpreted on the rendering device.
• Archiving (RGB) — similarly to the previous style, creates a PDF/A-1b file, preserving any spot and Lab colors. All other colors areconverted to the RGB color mode.
• Current proof settings — applies the proofing color profile to the PDF
• Document distribution — creates a PDF file that can be printed on a laser or desktop printer and is suitable for general documentdelivery. This style enables JPEG bitmap image compression and can include bookmarks and hyperlinks.
• Editing — enables LZW compression, and includes hyperlinks, bookmarks, and thumbnails. This style displays the PDF file with all ofthe images at full resolution, and with hyperlinks, so that you can edit the file at a later date.
• PDF/X-1a — enables ZIP bitmap image compression, converts all objects to the destination CMYK color space
• PDF/X-3 — This style is a superset of PDF/X-1a. It allows both CMYK and non-CMYK data (such as Lab or Grayscale) in the PDF file.
• Prepress — enables ZIP bitmap image compression and preserves spot color options best designed for high-end quality printing.Before preparing a PDF file for printing, it’s always best to consult your print provider to find out which settings are recommended.
• Web — creates a PDF file intended for online viewing, such as a PDF file to be distributed by email or published on the web. This styleenables the file to be displayed more quickly and lets you use JPEG bitmap image compression and hyperlinks.
5 Click Settings.
The PDF settings dialog box appears.
6 In the Export range area, enable one of the following options:
• Current document — exports the current document
• Documents — exports the documents that you specify
• Selection — exports the objects that you have selected
• Current frame — exports the selected frame
• Frames — exports only the frames that you specify
7 Click OK.
8 Click Save.
To export multiple documents as a single PDF file
1 Click File Publish to PDF.
2 Locate the folder in which you want to save the file.
3 Type a filename in the File name box.
4 Click Settings.
The PDF settings dialog box appears.
5 On the General tab, enable the Documents option from the Export range area.
6 Enable the check box for each document you want to save.
7 Click OK.
8 Click Save.
To create a PDF preset
1 Click File Publish to PDF.
2 Locate the folder in which you want to save the file.
3 Type a filename in the File name box.
4 Click Settings.
5 In the PDF settings dialog box, specify any settings.
6 Click the General tab.
7 Click the Add PDF preset button next to the PDF preset list box.
Exporting to PDF | 513
8 Type a name for the style in the Save PDF preset as list box.
9 Click OK.
10 Click Save.
If you want to delete a PDF style, select the style and click the Delete PDF preset button next to the PDF preset list box.
To edit a PDF preset
1 Click File Publish to PDF.
2 Locate the folder in which you want to save the file.
3 Type a filename in the File name box.
4 Click Settings.
5 In the PDF settings dialog box, specify any settings.
6 Click the General tab.
7 Click the Add PDF preset button next to the PDF list box.
8 Choose the style you want to edit from the Save PDF preset as list box.
9 Click OK.
10 Click Save.
If you save changes you make to preset settings, the original settings will be overwritten. To avoid this, save any changes to presetsettings with a new name.
Including hyperlinks, bookmarks, and thumbnails in PDF files
You can include hyperlinks, bookmarks, and thumbnails in a PDF file. Hyperlinks are useful for adding jumps to webpages or to InternetURLs. Bookmarks allow you to link to specific areas in a PDF file. You can specify whether bookmarks or thumbnails are displayed when thePDF file is first opened in Adobe Acrobat or Acrobat Reader.
To include hyperlinks, bookmarks, and thumbnails in a PDF file
1 Click File Publish to PDF.
2 Locate the folder in which you want to save the file.
3 Type a filename in the File name box.
4 Click Settings.
The PDF settings dialog box appears.
5 Click the Document tab.
6 In the Bookmarks area, enable any of the following check boxes:
• Include hyperlinks
• Generate bookmarks
• Generate thumbnailsIf you want to display bookmarks or thumbnails on startup, enable the Bookmarks or Thumbnails button in the On start, display area.
7 Click OK.
8 Click Save.
514 | Corel PHOTO-PAINT 2018 User Guide
Reducing the size of PDF files
You can compress bitmap images to reduce the size of a PDF file. Options for bitmap image compression include JPEG, LZW, and ZIP.Bitmap images that use JPEG compression have a quality scale ranging from 2 (high quality, less compression) to 255 (lower quality, morecompression). The higher the image quality, the larger the file size.
Downsampling color, grayscale, or monochrome bitmap images also reduces file size.
To set the bitmap compression in a PDF file
1 Click File Publish to PDF.
2 Locate the folder in which you want to save the file.
3 Type a filename in the File name box.
4 Click Settings.
The PDF settings dialog box appears.
5 Click the Objects tab.
6 Choose one of the following from the Compression type list box:
• None
• LZW
• JPEG
• ZIP
• JP2
7 Click OK.
8 Click Save.
The JP2 (JPEG 2000) option is available only for Adobe Acrobat 6.0, Adobe Acrobat 8.0, and Adobe Acrobat 9.0
If you choose JPEG compression, you can specify the compression quality by moving the JPEG quality slider.
To downsample bitmap images in a PDF file
1 Click File Publish to PDF.
2 Locate the folder in which you want to save the file.
3 Type a filename in the File name box.
4 Click Settings.
The PDF settings dialog box appears.
5 Click the Objects tab.
6 Enable any of the following check boxes, and type a value in the corresponding box:
• Color
• Grayscale
• Monochrome
7 Click OK.
8 Click Save.
Exporting to PDF | 515
Downsampling color, grayscale, or monochrome bitmap images is effective only when the resolution of the bitmap image is higherthan the resolution specified in the Bitmap downsampling area.
Specifying an encoding format for PDF files
ASCII and binary are encoding formats for documents. When you publish a file to PDF, you can choose to export ASCII or binary files. TheASCII format creates files that are fully portable to all platforms. The binary format creates smaller files, but they are less portable, becausesome platforms cannot handle the file format.
To specify an encoding format for a PDF file
1 Click File Publish to PDF.
2 Locate the folder in which you want to save the file.
3 Type a filename in the File name box.
4 Click Settings.
The PDF settings dialog box appears.
5 Click the Document tab.
6 Enable one of the following options:
• ASCII 85
• Binary
7 Click OK.
8 Click Save.
Specifying color management options for exporting PDF files
You can specify color management options for exporting files to PDF. You can choose a color profile or leave the objects in their original colorspace. You can also embed the color profile with the PDF.
If you have spot colors in your file, you can either preserve the spot colors or convert them to process colors so that the file produces fourplates for CMYK output.
If you want to export to PDF for the purpose of soft-proofing the document, you can apply the document’s color proofing settings. Inaddition, you can choose additional soft-proofing options, such as preserving document overprints and overprinting black.
To specify color management options for exporting PDF files
1 Click File Publish to PDF.
2 Locate the folder in which you want to save the file.
3 Type a filename in the File name box.
4 Click Settings.
The PDF settings dialog box appears.
5 Click the Color tab.
6 In the Color management area, enable the Use document color settings option.
7 Choose a color profile option from the Output colors as list box:
• RGB
• CMYK
• Grayscale
516 | Corel PHOTO-PAINT 2018 User Guide
• Native
8 Click OK.
9 Click Save.
You can also
Apply proofing color profile to the PDF In the Color management area, enable the Use color proofsettings option.
Convert all spot colors applied in the document to the chosen colorprofile
Enable the Convert spot colors to check box.
Embed the color profile in the PDF Enable the Embed color profile check box.
Setting security options for PDF files
You can set security options to protect PDF files that you create. Security options let you control whether, and to what extent, a PDF file canbe accessed, edited, and reproduced when viewed in Adobe Reader.
The level of security that is available is also determined by which version of Adobe Reader you use to create the PDF file. The encryption levelsprovided by Adobe Reader have increased over time. For example, if you save to Adobe Reader version 6, or lower, it has standard encoding,version 8 has 128-bit encoding, and version 9 has 256-bit encoding. For more information about choosing a version, see “Optimizing PDFfiles” on page 517.
The security options are controlled by two passwords: the Permission password and the Open password.
The Permission password is the master password that lets you control whether a file can be printed, edited, or copied. For example, as theowner of the file, you can protect the integrity of the file’s content by choosing permission settings that prevent editing.
You can also set an Open password that lets you control who can access the file. For example, if your file contains sensitive information,and you want to limit the users who can view it, you can set an Open password. It is not recommended that you set an Open passwordwithout setting a Permission password, because users would then have unrestricted access to the PDF file — including the ability to set anew password.
The security options are applied when you save the PDF file. These settings can be viewed when a PDF file is opened in Adobe Acrobat.
To set PDF file permissions
1 Click File Publish to PDF.
2 Locate the folder in which you want to save the file.
3 Type a filename in the File name box.
4 Click Settings.
The PDF settings dialog box appears.
5 Click the Security tab.
6 Enable the Permission password check box.
7 Type a password in the Password box.
8 Retype the password in the Confirm Permission password box.
9 In the Printing permissions box, choose one of the following options:
• None — lets users view the PDF on-screen but prevents them from printing the PDF file
• Low resolution — lets users print a low resolution version of the PDF file. This option is available for PDF files compatible with AdobeAcrobat 5 or higher.

Exporting to PDF | 517
• High resolution — lets users print a high resolution version of the PDF file
10 In the Editing permissions box, choose one of the following options:
• None — prevents users from editing the PDF file
• Insert, delete, and rotate pages — lets users insert, delete, and rotate pages when editing the PDF file. This option is available forPDF files compatible with Adobe Acrobat 5 or higher.
• Any except extracting pages — lets users edit the PDF file but prevents them from removing pages from the file
If you want to allow copying of content from the PDF file to other documents, enable the Enable copying of text, images, and othercontents check box.
11 Click OK.
12 Click Save.
The Permission password is the master password for the document. It can be used by the file owner to set permissions, or to openthe file if an Open password is set.
Some PDF compatibility options, such as PDF/X-3 and PDF/A-1b, do not let you set PDF file permissions. If you choose such acompatibility option, all controls on the Security page appear disabled. To change the compatibility, see “To select a compatibilityoption” on page 517.
To set a user password for a PDF file
1 Click File Publish to PDF.
2 Locate the folder in which you want to save the file.
3 Type a filename in the File name box.
4 Click Settings.
The PDF settings dialog box appears.
5 Click the Security tab.
6 Enable the Open password check box.
7 Type a password in the Password box.
8 Retype the password in the Confirm Open password box.
9 Click OK.
10 Click Save.
If you set an Open password, it is recommended that you also set a Permission password.
Optimizing PDF files
You can optimize PDF files for different versions of Adobe Acrobat or Acrobat Reader by choosing a compatibility option that matchesthe type of viewer used by the recipients of the PDF file. In Corel PHOTO-PAINT, you can select one of the following compatibility options:Acrobat 4.0, Acrobat 5.0, Acrobat 6.0, Acrobat 8.0, Acrobat 9.0, PDF/X-1a, PDF/X-3, or PDF/A-1b. The available controls differ, dependingon which compatibility option you choose. If you are publishing a PDF file for a wide distribution, it is better to choose an earliercompatibility option such as Acrobat 8.0 or 9.0 to ensure that the file can be viewed in earlier versions of Acrobat. However, if security isa concern, you may want to choose a later version because the encryption levels are higher. For more information, see “Setting securityoptions for PDF files” on page 516.
To select a compatibility option
1 Click File Publish to PDF.
518 | Corel PHOTO-PAINT 2018 User Guide
2 Locate the folder in which you want to save the file.
3 Type a filename in the File name box.
4 Click Settings.
The PDF settings dialog box appears.
5 Click the General tab.
6 From the Compatibility list box, choose a compatibility option.
Viewing preflight summaries for PDF files
Before saving a document as a PDF file, you can preflight your document to find potential problems. Preflighting checks and displays asummary of errors, possible problems, and suggestions for resolving issues. By default, many PDF issues are checked during a preflight, butyou can disable the issues that you do not want to check.
To view the preflight summary for a PDF file
1 Click File Publish to PDF.
2 Locate the folder in which you want to save the file.
3 Type a filename in the File name box.
4 Click Settings.
The PDF settings dialog box appears.
5 Click the Preflight tab.
You can limit the issues to check during the preflight by clicking the No issues tab, clicking Settings, and, in the Preflight settings dialogbox, disabling the check boxes next to the items that you want the preflight to overlook.
You can save settings by clicking the No issues tab, clicking Settings, and, in the Preflight settings dialog box, clicking the Add
preflight settings button and typing a name in the Save preflight style as box.
Preparing PDF files for a print provider
Printers’ marks provide information to the print provider about how the work should be printed. You can specify which printers’ marks toinclude on the page. The available printers’ marks are as follows:• Crop marks — represent the size of the paper and appear at the corners of the page. You can add crop marks to use as guides in
trimming the paper. If your output has multiple pages per sheet (for example, two rows by two columns), you can add the crop markson the outside edge of the page so that all crop marks are removed after the cropping process, or you can choose to add crop marksaround each row and column. A bleed determines how far an image can extend beyond the crop marks. When you use a bleed toextend the print job to the edge of the page, you must set a bleed limit.A bleed requires that the paper you are printing on is larger thanthe size of paper you ultimately want, and the image area must extend beyond the edge of the final paper size.
• Registration marks — are required to line up the film for proofing the printing plates on a color press. Registration marks print on eachsheet of a color separation.
• Densitometer scale — is a series of gray boxes ranging from light to dark. These boxes are required to test the density of halftoneimages. You can position the densitometer scale anywhere on the page. You can also customize the levels of gray that appear in each ofthe seven squares on the densitometer scale.
• File information — can be printed, including the color profile; halftone settings; name, date, and time the image was created; platenumber; and job name.
To include printers’ marks in a PDF file
1 Click File Publish to PDF.

Exporting to PDF | 519
2 Locate the folder in which you want to save the file.
3 Type a filename in the File name box.
4 Click Settings.
The PDF settings dialog box appears.
5 Click the Preflight tab.
6 Enable any of the following check boxes:
• Crop marks
• File information
• Registration marks
• Densitometer scales
If you want to include a bleed, enable the Bleed limit check box, and type a bleed amount in the corresponding box.
Usually, a bleed amount of 0.125 to 0.25 inch is sufficient. Any object extending beyond this amount uses space needlessly and maycause problems when you print multiple pages with bleeds on a single sheet of paper.

520 | Corel PHOTO-PAINT 2018 User Guide

Working with office productivity applications | 521
Working with office productivity applications
Corel PHOTO-PAINT is highly compatible with office productivity applications such as Microsoft Word and WordPerfect. For example, youcan import and export files between applications, and you can copy, move, or insert objects from Corel PHOTO-PAINT into office productivitydocuments.
This section contains the following topics:• “Exporting files to office productivity applications” (page 521)• “Adding objects to documents” (page 521)
Exporting files to office productivity applications
You can export a file so that it is optimized for use with office productivity applications such as Microsoft Word or WordPerfect. For moreinformation about exporting files from Corel PHOTO-PAINT, see “To export an image to Microsoft Office or Corel WordPerfect Office” onpage 100.
Adding objects to documents
Corel PHOTO-PAINT lets you copy an object and paste it into an image. You can also copy an object and place it into an office productivitydocument, such as one created using Microsoft Word or WordPerfect. For more information about copying objects, see “Moving, copying,and deleting objects” on page 398.
You can insert an object into an office productivity document. For information about inserting objects into office productivity documents,see “Inserting linked or embedded objects into another application” on page 425, or see the office productivity application’s Help.

522 | Corel PHOTO-PAINT 2018 User Guide
Working with RAW camera files | 523
Working with RAW camera files
You can import and process RAW camera files in Corel PHOTO-PAINT
This section contains the following topics:• “Using RAW camera files” (page 523)• “Bringing RAW camera files into Corel PHOTO-PAINT” (page 524)• “Adjusting the color and tone of RAW camera files” (page 527)• “Sharpening and reducing noise in RAW camera files” (page 529)• “Previewing RAW camera files and obtaining image information” (page 530)
You can also download AfterShot 3 HDR to edit and process RAW camera files. For more information, see ““AfterShot 3 HDR” on page 1.”on page 104.
Using RAW camera files
RAW camera files contain picture data that is captured by the image censor of a digital camera. These files are called RAW because, unlikeJPEG and TIFF files, they contain minimal in-camera processing and need to be edited and prepared for printing in an image-editingapplication.
With RAW camera files, you can control the processing of image data, rather than having the camera make automatic color adjustments andconversions. You can adjust the white balance, tonal range, contrast, color saturation, and sharpness of a RAW image without any loss ofimage quality. In addition, you can reprocess RAW images at any time to achieve the results you want. In this sense, RAW camera files canbe compared to an exposed but undeveloped film.
To take advantage of RAW camera files, you need to set your camera to save files to its own RAW file format. Corel PHOTO-PAINT lets youopen and import RAW camera files from supported camera models. Supported camera models include:• Canon EOS-1D X, Canon EOS 650D, Canon 5D Mark III, Canon G1-X, Canon ID-X, Canon EOS 6D, Canon A3300, Canon EOS C500,
Canon EOS SX50• Casio EX-ZR100• Fuji X-Pro1, Fuji X-S1, Fuji XS50, Fuji X20, Fuji X100S, Fuji SL1000, Fuji X-E1, and Fuji XF1• Olympus XZ-10• Pentax K-5 II (s)• Samsung EX2F, Samsung NX300, Samsung NX1000, Samsung NX20• Sigma SD1, Sigma SD15, Sigma DP cameras• Sony RX100

524 | Corel PHOTO-PAINT 2018 User Guide
In addition, the Adobe’s lossy Digital Negative (DNG) file format and the Imacon Flexframe 3f format are now supported.
For more information about supported cameras, visit the Corel Knowledge Base.
Bringing RAW camera files into Corel PHOTO-PAINT
When you open single or multiple RAW camera files in Corel PHOTO-PAINT, they are first displayed in the Camera RAW Lab. You can use thecontrols in the Camera RAW Lab to adjust the color and tone of the RAW camera images. If you are satisfied with the adjustments of a file,you can apply the same adjustments to the remaining files.
After processing RAW camera files, you can edit them further by using the tools and effects available in Corel PHOTO-PAINT. Then, you cansave the RAW camera files as TIFF or JPEG files, or you can save them to any other file format supported by Corel PHOTO-PAINT.
Note that RAW camera files cannot be saved to a RAW camera file format in Corel PHOTO-PAINT. Any changes made to the RAW camerafiles in the Camera RAW Lab are lost unless you save the files to a supported file format.
Processing RAW camera files
The Camera RAW Lab includes controls that are organized in a logical order for color correction and other adjustments of RAW cameraimages. It is recommended that you start from the top of the Color page and work your way down. Once you finish correcting the color andtone of your image, you can sharpen it and remove noise by using the controls on the Detail page. For information about the settings onthe Color page, see “Adjusting the color and tone of RAW camera files” on page 527. For information about the settings on the Detailpage, see “Sharpening and reducing noise in RAW camera files” on page 529.

Working with RAW camera files | 525
Camera RAW Lab: circled numbers correspond to the numbers in thefollowing table, which describes the main components of the lab.
526 | Corel PHOTO-PAINT 2018 User Guide
Component Description
1. Rotation tools Let you rotate the image 90 degrees clockwise andcounterclockwise
2. Zooming and panning tools Let you zoom in and out of an image displayed in the previewwindow, pan an image displayed at a zoom level higher than100%, and fit an image to the preview window
3. Preview modes and Preview window Let you preview the adjustments made to a RAW camera image ina single or split window. To compare the original and the adjustedimage, you can display them side by side.
4. Color page Contains controls that let you adjust the color and tone of RAWcamera images to remove color casts and reveal hidden detail
5. Detail page Contains controls that let you remove noise from RAW cameraimages
6. Properties page Contains controls that let you view information about a RAWcamera image, such as size, color mode, and camera settings
7. Undo and Redo buttons Let you undo and redo the last action you performed
8. Reset to original button Lets you clear all corrections so that you can start with the originalRAW camera image
9. Create snapshot Lets you capture the corrected version of an image in a “snapshot”at any time. Thumbnails of the snapshots appear in a windowbelow the image.
10. Hints area Displays information about the active control
11. Histogram Lets you preview the tonal range of the image.
To bring a RAW camera file into Corel PHOTO-PAINT
1 Do one of the following:
• Click File Open.
• Click File Import.
2 Select a RAW camera file or multiple RAW camera files, and click Open or Import.
3 In the Camera RAW Lab, adjust the color and tone of the RAW camera image. If necessary, you can also sharpen the image and reducethe amount of noise.
If you selected multiple RAW camera files and want to apply the same adjustments to all of them, enable the Apply to all remainingfiles check box.
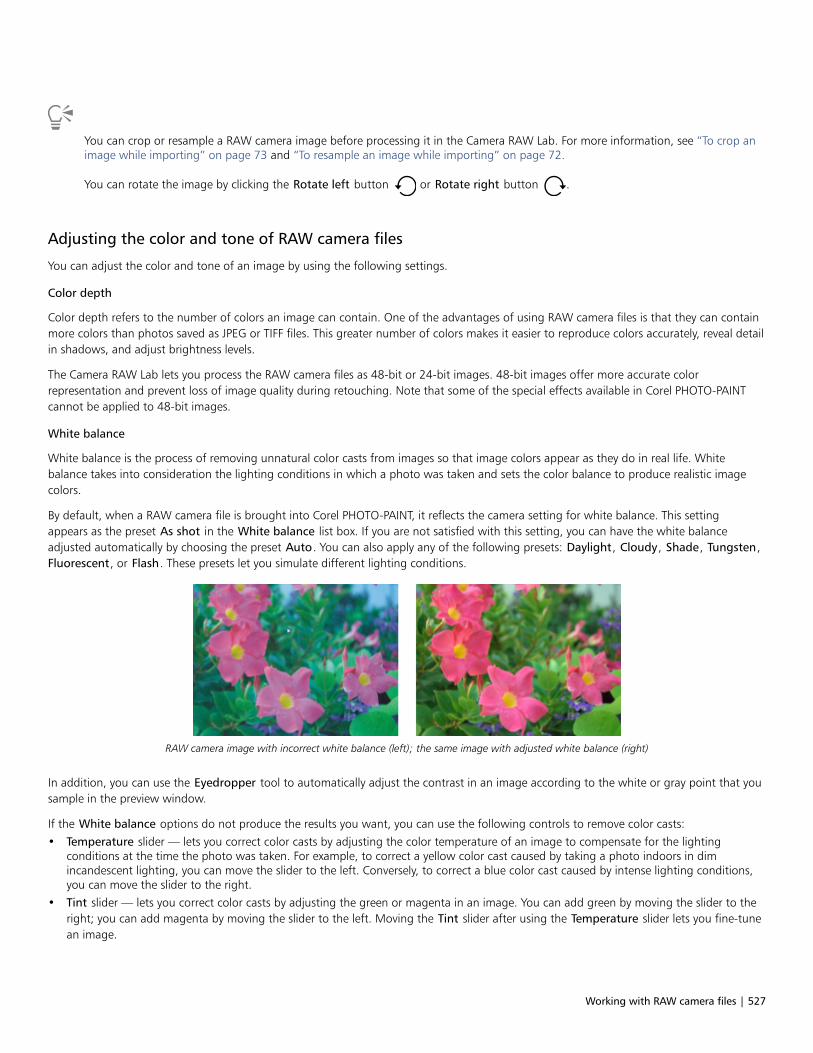
Working with RAW camera files | 527
You can crop or resample a RAW camera image before processing it in the Camera RAW Lab. For more information, see “To crop animage while importing” on page 73 and “To resample an image while importing” on page 72.
You can rotate the image by clicking the Rotate left button or Rotate right button .
Adjusting the color and tone of RAW camera files
You can adjust the color and tone of an image by using the following settings.
Color depth
Color depth refers to the number of colors an image can contain. One of the advantages of using RAW camera files is that they can containmore colors than photos saved as JPEG or TIFF files. This greater number of colors makes it easier to reproduce colors accurately, reveal detailin shadows, and adjust brightness levels.
The Camera RAW Lab lets you process the RAW camera files as 48-bit or 24-bit images. 48-bit images offer more accurate colorrepresentation and prevent loss of image quality during retouching. Note that some of the special effects available in Corel PHOTO-PAINTcannot be applied to 48-bit images.
White balance
White balance is the process of removing unnatural color casts from images so that image colors appear as they do in real life. Whitebalance takes into consideration the lighting conditions in which a photo was taken and sets the color balance to produce realistic imagecolors.
By default, when a RAW camera file is brought into Corel PHOTO-PAINT, it reflects the camera setting for white balance. This settingappears as the preset As shot in the White balance list box. If you are not satisfied with this setting, you can have the white balanceadjusted automatically by choosing the preset Auto. You can also apply any of the following presets: Daylight, Cloudy, Shade, Tungsten,Fluorescent, or Flash. These presets let you simulate different lighting conditions.
RAW camera image with incorrect white balance (left); the same image with adjusted white balance (right)
In addition, you can use the Eyedropper tool to automatically adjust the contrast in an image according to the white or gray point that yousample in the preview window.
If the White balance options do not produce the results you want, you can use the following controls to remove color casts:• Temperature slider — lets you correct color casts by adjusting the color temperature of an image to compensate for the lighting
conditions at the time the photo was taken. For example, to correct a yellow color cast caused by taking a photo indoors in dimincandescent lighting, you can move the slider to the left. Conversely, to correct a blue color cast caused by intense lighting conditions,you can move the slider to the right.
• Tint slider — lets you correct color casts by adjusting the green or magenta in an image. You can add green by moving the slider to theright; you can add magenta by moving the slider to the left. Moving the Tint slider after using the Temperature slider lets you fine-tunean image.
528 | Corel PHOTO-PAINT 2018 User Guide
Tonal adjustments
You can use the following controls to adjust the tone of RAW camera files.• Saturation slider — lets you adjust the vividness of colors. For example, by moving the slider to the right, you can increase the vividness
of a blue sky in an image. By moving the slider to the left, you can reduce the vividness of colors.• Exposure slider — lets you compensate for the lighting conditions at the time the photo was taken. Exposure is the amount of light
allowed to fall on the image sensor of a digital camera. High exposure values result in areas that are completely white (no detail); lowvalues result in increased shadows. Exposure values (EV) range from -3.0 to + 3.0.
• Brightness slider — lets you brighten or darken an entire image. If you want to darken only the darkest areas of an image, you must usethe Shadow slider.
• Shadow slider — lets you adjust the brightness in the darkest areas of an image without affecting the lighter areas. For example, abright light behind a photo subject (backlighting) at the time a photo is taken can cause the subject to appear in shadow. You cancorrect the photo by moving the Shadow slider to the right to lighten dark areas and reveal more detail.
Using the histogram
While you are making adjustments, you can view the tonal range of the image on the histogram to check for any clipping of shadow orhighlight areas. Clipping is the shifting of image pixels to white (highlight clipping) or black (shadow clipping). Clipped highlight areasappear completely white and contain no detail; clipped shadow areas appear completely black and contain no detail.
The button on the left side of the histogram displays a warning if the image contains shadow clipping. The button on the right side of thehistogram displays a warning if the image contains highlight clipping. You can also choose to apply shading to the clipped areas in thepreview window.
To adjust the color and tone of a RAW camera file
1 Do one of the following:
• Click File Open.
• Click File Import.
2 Select a RAW camera file or multiple RAW camera files, and click Open or Import.
3 From the Color depth list box, choose one of the following options:
• 48-bit (16 bits/channel)
• 24-bit (8 bits/channel)
4 To remove a color cast, select the Auto option from the White balance list box.
If you are not satisfied with the results, you can set the white point more precisely by using the Eyedropper tool to sample a white
or gray color in your image.
5 Perform one or more tasks from the following table.
To Do the following
Simulate different lighting conditions Select an option from the White balance list box.
Correct color in the image Adjust the Temperature slider, and then fine-tune the colorcorrection by adjusting the Tint slider.
Make colors more vivid or less vivid Move the Saturation slider to the right to increase the amount ofcolor in the image or to the left to decrease the amount of color inthe image.
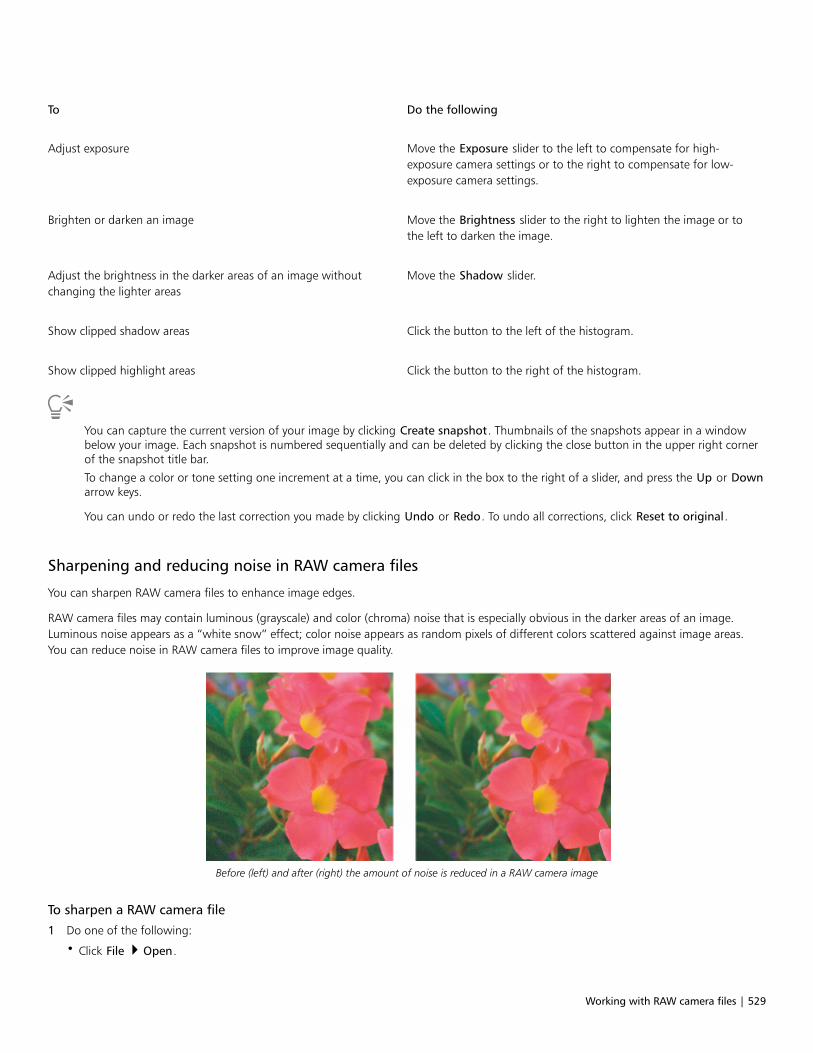
Working with RAW camera files | 529
To Do the following
Adjust exposure Move the Exposure slider to the left to compensate for high-exposure camera settings or to the right to compensate for low-exposure camera settings.
Brighten or darken an image Move the Brightness slider to the right to lighten the image or tothe left to darken the image.
Adjust the brightness in the darker areas of an image withoutchanging the lighter areas
Move the Shadow slider.
Show clipped shadow areas Click the button to the left of the histogram.
Show clipped highlight areas Click the button to the right of the histogram.
You can capture the current version of your image by clicking Create snapshot. Thumbnails of the snapshots appear in a windowbelow your image. Each snapshot is numbered sequentially and can be deleted by clicking the close button in the upper right cornerof the snapshot title bar.
To change a color or tone setting one increment at a time, you can click in the box to the right of a slider, and press the Up or Downarrow keys.
You can undo or redo the last correction you made by clicking Undo or Redo. To undo all corrections, click Reset to original.
Sharpening and reducing noise in RAW camera files
You can sharpen RAW camera files to enhance image edges.
RAW camera files may contain luminous (grayscale) and color (chroma) noise that is especially obvious in the darker areas of an image.Luminous noise appears as a “white snow” effect; color noise appears as random pixels of different colors scattered against image areas.You can reduce noise in RAW camera files to improve image quality.
Before (left) and after (right) the amount of noise is reduced in a RAW camera image
To sharpen a RAW camera file
1 Do one of the following:
• Click File Open.
530 | Corel PHOTO-PAINT 2018 User Guide
• Click File Import.
2 Select a RAW camera file or multiple RAW camera files, and click Open or Import.
3 In the Camera RAW Lab, click the Detail tab.
4 Move the Sharpness slider to enhance the edges in an image.
To reduce noise in a RAW camera file
1 Do one of the following:
• Click File Open.
• Click File Import.
2 Select a RAW camera file or multiple RAW camera files, and click Open or Import.
3 Click the Detail tab.
4 Move any of the following sliders to the right:
• Luminance noise — to reduce the amount of luminance noise
• Color noise — to reduce the amount of color noise. Note that higher settings may decrease the color accuracy of an image.
Adjusting both the Luminance noise and Color noise settings produces better results.
Previewing RAW camera files and obtaining image information
By previewing RAW camera files in various ways, you can evaluate the color and tone adjustments you make. For example, you can rotateimages, pan to a new area, zoom in or out, and choose how to display the processed image in the preview window.
You can obtain information about the color mode, size, and resolution of a RAW camera file. In addition, you can obtain information aboutthe camera and camera settings used when the photo was taken.
To preview a RAW camera file
1 Do one of the following:
• Click File Open.
• Click File Import.
2 Select a RAW camera file or multiple RAW camera files, and click Open or Import.
3 In the Camera RAW Lab, perform a task from the following table.
To Do the following
Pan to another area of an image Using the Pan tool , drag the image until the area that you
want to see is visible.
Zoom in and out Using the Zoom in tool or Zoom out tool , click in the
preview window.
You can also zoom in and out by dragging the Zoom slider.
Fit an image in the preview window Click the Zoom to fit button.
Working with RAW camera files | 531
To Do the following
Display an image at its actual size Click the 100% button.
View the corrected image in a single preview window Click the Full preview button .
View the corrected image in one window and the original image inanother window
Click the Before and after full preview button .
View the image in one window with a divider between the originaland corrected versions
Click the Before and after split preview button . Move your
pointer over the dashed divider line, and drag to move the dividerto another area of the image.
To obtain information about a RAW camera file
1 Do one of the following:
• Click File Open.
• Click File Import.
2 Select a RAW camera file, and click Open or Import.
3 In the Camera RAW Lab, click the Properties tab, and view any of the properties that are available for the selected RAW camera file, suchas color space, camera manufacturer and model, focal length, exposure time, and ISO speed ratings.

532 | Corel PHOTO-PAINT 2018 User Guide
Supported file formats | 533
Supported file formats
A file format defines how an application stores information in a file. If you want to use a file created in a different application than the oneyou are currently using, you must import that file. Conversely, if you create a file in one application and want to use it in another application,you must export the file to a different file format.
When you name a file, an application automatically appends a filename extension, usually three characters in length (for example, .cdr,.bmp, .tif, and .eps). This filename extension helps you and the computer differentiate between files of different formats.
The following list includes all file formats used in this application. Note that not all file format filters are installed by default. If youcannot export or import a file from the list, you need to update your installation of CorelDRAW Graphics Suite. For more information, see“Modifying and repairing installations” on page 20.• “Adobe Illustrator (AI)” (page 534)• “Windows Bitmap (BMP)” (page 534)• “OS/2 Bitmap (BMP)” (page 535)• “Computer Graphics Metafile (CGM)” (page 535)• “CorelDRAW (CDR)” (page 536)• “Corel Presentation Exchange (CMX)” (page 536)• “Corel PHOTO-PAINT (CPT)” (page 537)• “Cursor Resource (CUR)” (page 537)• “AutoCAD Drawing Database (DWG) and AutoCAD Drawing Interchange Format (DXF)” (page 537)• “Encapsulated PostScript (EPS)” (page 538)• “PostScript (PS or PRN)” (page 540)• “GIF” (page 541)• “JPEG (JPG)” (page 542)• “JPEG 2000 (JP2)” (page 543)• “Kodak Photo CD Image (PCD)” (page 544)• “PICT (PCT)” (page 545)• “PaintBrush (PCX)” (page 546)• “HPGL Plotter File (PLT)” (page 547)• “Portable Network Graphics (PNG)” (page 548)• “Adobe Photoshop (PSD)” (page 549)• “Corel Painter (RIF)” (page 550)• “TARGA (TGA)” (page 551)• “TIFF” (page 552)• “Corel Paint Shop Pro (PSP)” (page 552)

534 | Corel PHOTO-PAINT 2018 User Guide
• “WordPerfect Graphic (WPG)” (page 553)• “RAW camera file formats” (page 553)• “Wavelet Compressed Bitmap (WI)” (page 553)• “Windows Metafile Format (WMF)” (page 553)• “Additional file formats” (page 554)• “Recommended formats for importing graphics” (page 554)• “Recommended formats for exporting graphics” (page 555)
Adobe Illustrator (AI)
The Adobe Illustrator (AI) file format was developed by Adobe Systems, Incorporated for the Macintosh and Windows platforms. It isprimarily vector-based, although later versions support bitmap information.
To import an Adobe Illustrator file
1 Click File Import.
2 Locate the folder in which the file is stored.
3 Click the filename.
4 Click Import.
5 Click in the image window where you want to import the file.
6 In the Convert to bitmap dialog box, adjust the width, height, resolution, color mode, or any of the other settings.
Adobe Illustrator (AI) technical notes
Importing an AI file• You can import AI file formats up to and including Adobe Illustrator CS4.• Because multiple-pages are not supported in Corel PHOTO-PAINT, all Artboard objects are placed on one page.
Windows Bitmap (BMP)
The Windows bitmap (BMP) file format was developed as a standard for representing graphic images as bitmaps on the Windows operatingsystem.
To import a bitmap file
1 Click File Import.
2 Locate the folder in which the file is stored.
3 Choose BMP - Windows bitmap (*.bmp; *.dib; *.rle) from the list box next to the File name box.
4 Click the filename.
5 Click Import.
To save to a bitmap file
1 Click File Save as.
2 Locate the folder in which you want to save the file.
3 Choose BMP - Windows bitmap from the Save as type list box.
4 Type a filename in the File name list box.
5 Click Save.
Supported file formats | 535
Windows Bitmap (BMP) technical notes
Importing a BMP file• You can import Windows Bitmap files conforming to the Windows and OS/2 BMP specifications.• Windows Bitmap files may be black-and-white, 16 colors, grayscale, paletted, or RGB color (24-bit), and print accordingly, depending on
your printer.• Run-length encoding (RLE) compression may be used on all bitmaps, except RGB color (24-bit), and black-and-white bitmaps.• The resolution ranges from 72 to 300 dpi, or higher if you choose custom settings.• The maximum image size is 64,535 × 64,535 pixels.
Exporting a BMP file• Because raster images such as bitmaps are mapped pixel by pixel to the page, the resolution does not increase. Instead, your bitmap
appears jagged, with an apparent loss of resolution.
OS/2 Bitmap (BMP)
This type of bitmap file is designed for the OS/2 operating system. The OS/2 Bitmap file format supports a maximum image size of 64,535 ×64,535 pixels. OS/2 uses Run-length encoding (RLE) compression.
OS/2 Bitmap (BMP) technical notes• Corel programs support Standard Version 1.3 and Enhanced Version 2.0, or later versions of the OS/2 Bitmap file format.• Corel programs support the following color depths when importing and exporting BMP files: 1-bit black and white, 256 shade (8-bit)
grayscale, 16-color (4-bit) and 256-color (8-bit) paletted, and 24-bit RGB.
Computer Graphics Metafile (CGM)
Computer Graphics Metafile (CGM) is an open, platform-independent metafile format used for storing and exchanging two-dimensionalgraphics. It supports RGB color. CGM files can contain both vector graphics and bitmaps, but they usually contain one graphic type or theother — rarely both.
To import a CGM file
1 Click File Import.
2 Locate the folder in which the file is stored.
3 Choose CGM - Computer Graphics Metafile (*.cgm) from the list box next to the File name box.
4 Click the filename.
5 Click Import.
The Convert to bitmap dialog box appears.
Computer Graphics Metafile (CGM) technical notes• You can import files formatted in CGM versions 1, 3, and 4.• The CGM filter accepts only markers supported by the CGM file format standard. Private-use markers are ignored.• If the CGM file contains a font that is not on your computer, the PANOSE font-matching dialog box lets you replace the font with an
available one.
536 | Corel PHOTO-PAINT 2018 User Guide
CorelDRAW (CDR)
CorelDRAW (CDR) files are primarily vector graphic drawings. Vectors define a picture as a list of graphic primitives (rectangles, lines, text,arcs, and ellipses). Vectors are mapped point by point to the page, so if you reduce or increase the size of a vector graphic, the originalimage will not be distorted.
Vector graphics are created and edited in graphics design applications, such as CorelDRAW, but you can also edit vector graphics in image-editing applications such as Corel PHOTO-PAINT. You can use vector images of various formats in desktop publishing programs.
To import a CorelDRAW file
1 Click File Import.
2 Locate the folder in which the file is stored.
3 Click the filename.
4 Click the image window.
5 In the Convert to bitmap dialog box, adjust the width, height, resolution, color mode, or any of the other settings.
CorelDRAW (CDR) technical notes• Imported CorelDRAW files are rasterized.• Linked symbols are converted to internal symbols.
Corel Presentation Exchange (CMX)
Corel Presentation Exchange (CMX) is a metafile format that supports bitmap and vector information and the full range of PANTONE, RGB,and CMYK colors. Files saved in CMX format can be opened and edited in other Corel applications.
To import a Corel Presentation Exchange file
1 Click File Import.
2 Locate the folder in which the file is stored.
3 Choose one of the following from the list box next to the File name box:
• CMX - Corel Presentation Exchange — for files created in Corel Presentations X6 or later
• CMX - Corel Presentation Exchange legacy — for files created in Corel Presentations X5 or earlier
4 Click the filename.
5 Click Import.
6 Click the image window.
7 In the Convert to bitmap dialog box, adjust the width, height, resolution, color mode, or any of the other settings.
• one of the followingCMX - Corel Presentation Exchange — for versions 16.0 or later
• CMX - Corel Presentation Exchange legacy — for versions 15.0 or earlier
Corel Presentation Exchange (CMX) technical notes• The following versions are supported: 5, 6, 7, 8, 9, 10, 11, 12, X3, X4, X5, and X6.• Corel Presentation Exchange (CMX) files are imported as bitmaps in Corel PHOTO-PAINT.

Supported file formats | 537
Corel PHOTO-PAINT (CPT)
Files saved to the Corel PHOTO-PAINT (CPT) file format are bitmaps that represent shapes as pixels arranged to form an image. When yousave a graphic to the Corel PHOTO-PAINT format, masks, floating objects, and lenses are saved with the image.
To export a Corel PHOTO-PAINT file
1 Click File Export.
2 Locate the folder in which you want to save the file.
3 Choose CPT - Corel PHOTO-PAINT image from the Save as type list box.
4 Type a filename in the File name list box.
5 Click Export.
Corel PHOTO-PAINT (CPT) technical notes• This filter is available in CorelDRAW, Corel PHOTO-PAINT, and Corel DESIGNER.• Corel PHOTO-PAINT files may be black-and-white, grayscale, paletted, CMYK color (32-bit), RGB color (24-bit), or Lab.
Cursor Resource (CUR)
The Windows 3.x/NT Cursor Resource (.cur files) file format is used to create cursors for Windows 3.1, Windows NT, and Windows 95interfaces. It supports cursor graphic elements that are used in Windows pointers. You can select a color for Transparent and Inverse masks.
The Windows 3.x/NT Cursor Resource file format supports a maximum image size of 32 × 32 pixels.
Cursor Resource (CUR) technical notes• Corel programs support the following color depths when importing .cur files: 1-bit black-and-white, 16-color (4-bit) paletted, and 256-
color (8-bit) paletted.
AutoCAD Drawing Database (DWG) and AutoCAD Drawing Interchange Format (DXF)
AutoCAD Drawing Database (DWG) files are vector files used as a native format for AutoCAD drawings.
The Drawing Interchange Format (DXF) is a tagged data representation of the information contained in an AutoCAD drawing file. TheDrawing Interchange format is a native file format of AutoCAD. It has become a standard for exchanging CAD drawings and is supported bymany CAD applications. The Drawing Interchange format is vector-based and supports up to 256 colors.
To import an AutoCAD Drawing Database file (DWG) or AutoCAD Drawing Interchange Format (DXF)
1 Click File Import.
2 Locate the folder in which the file is stored.
3 Choose DWG - AutoCAD (*.dwg) or DXF - AutoCAD (*.dxf) from the list box next to the File name box.
4 Click the filename.
5 Click Import.
6 Click the image window.
7 In the Convert to bitmap dialog box, adjust the width, height, resolution, color mode, or any of the other settings.
538 | Corel PHOTO-PAINT 2018 User Guide
If your computer is missing a font that is included in a file you are importing, a PANOSE font matching dialog box appears and letsyou substitute the font with a similar font.
AutoCAD Data Interchange Format (DXF) technical notes• The program supports AutoCAD files from version R2.5 to 2018.
Importing an AutoCAD DXF file• Model space pages are imported as master pages.• Solid and trace entities are filled.• A point is imported as an ellipse of minimum size.• Files exported as “Entities only” may not appear as expected in the Corel program because of a lack of header information.• Justification of text entries may not be preserved, especially if fonts are replaced in the imported files. For best results, avoid justification
of text.• If the DXF file contains a font that is not on the user’s computer, the PANOSE font matching dialog box lets the user replace the font
with an available one.
AutoCAD Drawing Database (DWG) technical notes• Corel PHOTO-PAINT can import AutoCAD files from version R2.5 to 2013.• If the DWG file contains a font that is not on your computer, the PANOSE font matching dialog box lets you replace the font with an
available one.
Encapsulated PostScript (EPS)
EPS files can contain text, vector graphics, and bitmaps and are intended to be included (encapsulated) in other documents. Unlike otherPostScript files, which can contain multiple pages, an EPS file is always a single page.
EPS files usually contain a preview image (header) that lets you view the file content without the help of a PostScript interpreter. An EPS filewithout a preview image is displayed as a gray box in Corel applications.
During the CorelDRAW Graphics Suite installation, you have the option of installing Ghostscript, which is an application that interprets thePostScript file format. Ghostscript allows you to import PostScript Level 3 files. If you did not install Ghostscript when you first installed theproduct, you can do so now.
To import an encapsulated PostScript file
1 Click File Import.
The File Import command lets you place the file as an object in the active image. If you want to open an EPS file as an image, click File Open.
2 Locate the folder in which the file is stored.
3 Choose PS, EPS, PRN - PostScript (*.ps; *.eps; *.prn) from the list box next to the File name box.
4 Click the filename.
5 Click Import.
6 Click OK.
7 Click the image window.
8 In the Convert to bitmap dialog box, adjust the width, height, resolution, color mode, or any of the other settings.
To save to an encapsulated PostScript file
1 Click File Export.
Supported file formats | 539
2 Locate the folder in which you want to save the file.
3 Choose EPS - Encapsulated PostScript from the Save as type list box.
4 Type a filename in the File name list box.
5 Click Export.
6 In the EPS export dialog box, adjust any of the settings.
To set general exporting options
• In the EPS export dialog box, perform one or more tasks from the following table:
To Do the following
Specify the color mode for exporting to eps In the Color management area, choose an option from theOutput colors as list box:
•Native•RGB•CMYK•Grayscale
If you choose the Native option, all objects preserve the color modein which they were created, for example RGB, CMYK, Grayscale, orspot.
Convert spot colors In the Color management area, enable the Convert spot colors tocheck box, and select an option from the list box.
Choose a file format for previewing the PostScript image In the Preview image area, choose one of the following options:•None•TIFF•WMF
If you choose the TIFF format, choose a color mode and resolution.
Choose a compatibility option From the Compatibility list box, choose a PostScript level that issupported by the printer or the application with which you will beprinting or displaying the file.
If you choose the 8-bit TIFF format for previewing images, you can make the background of the bitmap transparent by enabling theTransparent background check box in the Preview image area.
To specify clipping options
1 In the Clipping area of the EPS export dialog box, enable the Clip to check box.
2 Enable any of the following options:
• Mask — lets you save the contents of the mask area to an EPS file
• Clipping path — lets you save the contents of either the active path or one of the paths listed in the MRU list box
540 | Corel PHOTO-PAINT 2018 User Guide
3 In the Flatness box, type a value to set the accuracy with which curved path segments are rendered on an output device, such as aprinter.
If you want to permanently remove the sections of the image that are outside the mask or path, enable the Discard image data outsideclipping region check box.
To install Ghostscript
1 Close any open programs.
2 On the Windows taskbar, click Start Control panel.
3 Click Uninstall a program.
4 Double-click CorelDRAW Graphics Suite 2018 from the Uninstall or change a program page.
5 Enable the Modify option.
6 On the Features page, enable the GPL Ghostscript check box.
7 Follow the instructions in the installation wizard.
Encapsulated PostScript (EPS) technical notes
Importing an EPS file• In Corel PHOTO-PAINT, EPS files are imported as bitmaps.• Duotone information is preserved only in EPS files created in Corel PHOTO-PAINT. When you import a duotone EPS file created in
CorelDRAW, the file is converted to grayscale.
Exporting an EPS file• On a PostScript printer, graphics exported to the encapsulated PostScript (EPS) format print from other programs exactly as they do from
a Corel graphics programs.• You can save a header to the Tagged Image file format (TIFF) or Windows Metafile format (WMF) in black and white, 4-bit grayscale or
color, or 8-bit grayscale or color. You can set the header resolution between 1 and 300 dots per inch (dpi); the default header resolutionis 72 dpi. If the program importing the EPS file has a limitation on the image header size, you might receive an error message statingthat the file is too large. To reduce file size, in the EPS export dialog box, choose Black and White from the Mode box, and lowerthe header resolution before exporting the file. The setting determines only the resolution of the header and has no impact on theprint quality of a drawing. Color headers are useful for viewing EPS files. If the program in which you are going to use the file does notsupport color headers, try exporting with a mono header instead. You can also export without a header.
• Along with the graphic, exported EPS files contain a filename, program name, and date.
PostScript (PS or PRN)
PostScript (PS) files use PostScript language to describe the layout of text, vector graphics, or bitmaps for printing and display purposes. Theycan contain multiple pages.
PostScript files usually have a .ps filename extension, but you can also import PostScript files with a .prn extension. Files with a .prn filenameextension, commonly known as Printer (PRN) files, contain instructions about how a file should be printed. These files let you reprint adocument even if the application in which the document was created is not installed on your computer.
During the CorelDRAW Graphics Suite installation, you have the option of installing Ghostscript, which is an application that interprets thePostScript file format. Ghostscript assists the file importing process. If you did not install Ghostscript during the installation, see “To installGhostscript” on page 540.
You can also import encapsulated PostScript (EPS) files. For more information, see “Encapsulated PostScript (EPS)” on page 538.
To import a PostScript (PS or PRN) file
1 Click File Import.
Supported file formats | 541
The File Import command lets you place the file as an object in the active image. If you want to open a PostScript file as an image,click File Open.
2 Locate the folder in which the file is stored.
3 Choose PS, EPS, PRN - PostScript (*.ps; *.eps; *.prn) from the list box next to the File name box.
4 Click the filename, and click Import.
5 Click OK.
6 Click the image window.
7 In the Convert to bitmap dialog box, adjust the width, height, resolution, color mode, or any of the other settings.
PostScript (PS or PRN) technical notes• PostScript files containing mesh fills with spot colors or DeviceN images cannot be imported. Installing Ghostscript resolves this issue.• PostScript files are imported as bitmaps.• Text in imported PostScript files is not editable.• Only Printer (PRN) files, PS files, and EPS files in PostScript format are supported.
GIF
GIF is a bitmap-based format designed for use on the web. It is highly compressed to minimize file transfer time and supports images withup to 256 colors. The GIF file format supports a maximum image size of 30,000 × 30,000 pixels and uses LZW compression.
The GIF format provides the ability to store multiple bitmaps in a file. When the multiple images are displayed in rapid succession, the file iscalled an animated GIF file. For more information, see “Saving movies” on page 469.
GIF images with transparent backgrounds are commonly used on the web. For more information, see “Creating palette-based images withtransparent colors and backgrounds” on page 478.
For Internet use, you can also save images to the JPEG and PNG formats. If you want to publish an image to the Web and are not sure whichformat to use, see “Choosing a web-compatible file format” on page 473.
To import a GIF file
1 Click File Import.
The File Import command lets you place the file as an object in the active image. If you want to open a GIF file as an image, click File Open.
2 Locate the folder in which the file is stored.
3 Choose GIF - CompuServe Bitmap (*.gif) from the list box next to the File name box.
4 Click the filename.
5 Click Import.
6 Click the image window.
You can also
Resample a graphic while importing For more information, see “To resample an image while importing”on page 72.
Crop a graphic while importing For more information, see “To crop an image while importing” onpage 73.
542 | Corel PHOTO-PAINT 2018 User Guide
To open an animated GIF file
1 Click File Open.
2 Locate the folder in which the file is stored.
3 Choose GIF - GIF animation (*.gif) from the list box next to the File name box.
4 Click the filename.
5 Choose Full image from the list box below the list window.
6 Click Open.
For more information about opening and playing movies, see “Opening and playing movies” on page 463.
You can also open part of a movie by choosing Partial load, and, in the Partial load movie dialog box, typing values in the From andTo boxes to specify the range of frames.
GIF technical notes• Corel programs import versions 87A and 89A of the GIF file format, but export only to version 89A. Version 87A supports basic features
and interlacing. The newer version, 89A, includes all features found in 87A plus the ability to use transparent colors and to includecomments and other data from the image file.
• Corel programs support the following color depths when importing animated GIF files: black and white (1-bit), 16 colors, grayscale (8-bit), and 256 color paletted (8-bit).
JPEG (JPG)
JPEG is a standard format developed by the Joint Photographic Experts Group. Through the use of superior compression techniques, thisformat allows the transfer of files among a wide variety of platforms. JPEG supports 8-bit grayscale, 24-bit RGB, and 32-bit CMYK colormodes.
The JPEG format is commonly used on the web. For more information, see “Choosing a web-compatible file format” on page 473.
To import a JPEG file
1 Click File Import.
The File Import command lets you place the file as an object in the active image. If you want to open a JPEG file as an image, click File Open.
2 Locate the folder in which the file is stored.
3 Choose JPG - JPEG Bitmaps (*.jpg; *.jtf; *.jff; *.jpeg) from the list box next to the File name box.
4 Click the filename.
5 Click Import.
6 Click the image window.
You can also
Resample a graphic while importing For more information, see “To resample an image while importing”on page 72.
Supported file formats | 543
You can also
Crop a graphic while importing For more information, see “To crop an image while importing” onpage 73.
You can drag on the image window to resize the image.
JPEG technical notes• JPEG files can contain EXIF data. This data may affect how the JPEG files open.
JPEG 2000 (JP2)
The JPEG 2000 (JP2) file format is a JPEG image with advanced compression and file data capabilities. JPEG 2000 standard files can storemore descriptive file data (or metadata), such as dimensions, tone scale, color space, and intellectual property rights, than JPEG 2000codestream files. Codestream files are optimized for network transmission since they resist bit errors that can cause data loss on low-bandwidth channels.
Not all web browsers support JPEG 2000 formats. You may require a plug-in to view these files.
You can mask an area of a JP2 image to define a region of interest (ROI). If you apply a lower compression setting to the ROI, you canimprove the image quality of the area.
When you export the image to a JP2 file, you can choose to view download progression by resolution, quality, and position.
To import a JPEG 2000 file
1 Click File Import.
The File Import command lets you place the file as an object in the active image. If you want to open the file as an image, click File Open.
2 Locate the folder in which the file is stored.
3 Choose JP2 - JPEG 2000 Bitmaps (*.jp2; *.j2k) from the list box next to the File name box.
4 Click the filename.
5 Click Import.
6 Click the image window.
To export a JPEG 2000 bitmap
1 Click File Export.
2 Choose JP2 - JPEG 2000 bitmaps from the Save as type list box.
3 Type a name in the File name box.
4 Click Export.
5 Choose a JPEG 2000 preset from the Preset list list box in the upper-right corner of the dialog box.
If you want modify the preset settings, you can change the exporting options in the dialog box.
6 Click OK.
544 | Corel PHOTO-PAINT 2018 User Guide
You can also
Choose a color mode In the Settings area, choose a color mode from the Color modelist box.
Embed the color profile In the Advanced area, enable the Embed color profile check box.
Control image quality In the Settings area, choose a quality option from the Quality listbox or type a value.
Set the JPEG 2000 download from low to high resolution so thatthe size of the entire image increases
In the Advanced area, choose Resolution\Quality from theProgression list box.
Set the JPEG 2000 download from the upper-left corner of theimage to the lower-right corner
In the Advanced area, choose Resolution\Position from theProgression list box.
Set the JPEG 2000 download from the upper-left corner of theimage to the lower-right corner
In the Advanced area, choose Position from the Progression listbox.
Set the JPEG 2000 download progressively by color channel In the Advanced area, choose Channels from the Progression listbox.
Allow JPEG 2000 codestream In the Advanced area, enable the Codestream check box.
JPEG 2000 (JP2) technical notes• Corel PHOTO-PAINT can import either JP2 or JPC files but save only to the JP2 format.
Kodak Photo CD Image (PCD)
Kodak Photo CD image file is a raster format developed by Eastman Kodak for scanning photographic images onto compact discs. PCDimages are derived from 35-mm film negatives or slides that have been converted to digital format and stored on a CD. Photo CD allowshigh-quality digital storage and manipulation of photographic images. The PCD format is typically used by photofinishers and servicebureaus who provide the service of placing photographs on CDs.
This file format is not supported by the 64-bit version of the application.
To import a Kodak Photo CD image file
1 Click File Import.
2 Choose the folder in which the file is stored.
3 Choose PCD - Kodak Photo-CD image (*.pcd) from the list box next to the File name box.
4 Click the filename.
5 Click Import.
6 In the PCD import dialog box, move any of the following sliders:
• Brightness — lets you set the amount of light
• Contrast — lets you specify the contrast between the pixels in the image
• Saturation — lets you specify the purity of a color
Supported file formats | 545
• Red — lets you specify the amount of red in the image
• Green — lets you specify the amount of green in the image
• Blue — lets you specify the amount of blue in the image
7 From the Resolutions list box, choose an image size.
8 From the Image type list box, choose a color mode.
9 Position the import placement start cursor in the image window, and click.
You can also
Resample a graphic while importing For more information, see “To resample an image while importing”on page 72.
Crop a graphic while importing For more information, see “To crop an image while importing” onpage 73.
You can remove the adjustments made by the photofinisher at the time the original image was scanned and placed on the Photo CDdisk by enabling the Subtract scene balance check box.
You can identify out-of-gamut areas of the image by enabling the Show colors out of gamut check box, which renders the out-of-gamut pixels in pure red or pure blue.
Kodak Photo CD Image (PCD) technical notes• Kodak Photo CD (PCD) images may be subject to copyright. The Corel program does not display a warning message about this.• Other Kodak-compatible programs may install the Kodak pcdlib.dll file in the Windows folder instead of the Windows\System folder.
This difference in the folder location produces an error message.• When you import Photo CD files, a dialog box appears and prompts you to choose the desired file resolution and color. The resolution is
limited to 72 dpi and the maximum image size is 3072 × 2048 pixels.• You can import the following color modes: RGB (24-bit), paletted (8-bit), and grayscale (8-bit).
PICT (PCT)
The Macintosh PICT file format was developed for the macOS platform by Apple Computer Inc. It is a native file format of QuickDraw andcan contain both vectors and bitmaps. The Macintosh PICT file format is widely used in Macintosh applications.
To import a PICT file
1 Click File Import.
The File Import command lets you place the file as an object in the active image. If you want to open a PICT file as an image, click File Open.
2 Locate the folder in which the file is stored.
3 Choose PCT - Macintosh PICT (*.pct; *.pict) from the list box next to the File name box.
4 Click the filename.
5 Click Import.
6 Click the image window.
7 In the Convert to bitmap dialog box, adjust the width, height, resolution, color mode, or any of the other settings.
546 | Corel PHOTO-PAINT 2018 User Guide
PICT (PCT) technical notes• Corel graphics programs can import vector drawings and bitmaps contained in PICT (PCT) files.• Objects that contain a fill and an outline open as a group of two objects. One object is the outline, and the other is the fill.• PICT fills are often bitmap patterns, and the Corel program tries to maintain these fills as bitmap patterns.• Pattern outlines are converted to a solid color.• Text in PICT files opens as editable text. If a typeface in the imported file is not available on your computer, it is converted to the font that
it most closely resembles.• Text alignment may not be preserved in the original file. This is due to the differences in font size, and intercharacter and interword
spacing between the two formats. Any misalignment is easily corrected using the text formatting settings in the program.
PaintBrush (PCX)
The PaintBrush (PCX) file format is a bitmap format originally developed by the ZSoft Corporation for the PC Paintbrush program.
To import a PaintBrush file
1 Click File Import.
The File Import command lets you place the file as an object in the active image. If you want to open a PCX file as an image, click File Open.
2 Locate the folder in which the file is stored.
3 Choose PCX - PaintBrush (*.pcx) from the list box next to the File name box.
4 Click the filename.
5 Click Import.
6 Click the image window.
To export a PaintBrush file
1 Click File Export.
2 Locate the folder in which you want to save the file.
3 Choose PCX - PaintBrush from the Save as type list box.
4 Type a filename in the File name list box.
5 Click Export.
PaintBrush (PCX) technical notes
Exporting a PCX file• Bitmaps may be black-and-white, 16 colors, grayscale (8-bit), paletted (8-bit), or RGB color (24-bit).• Run-length encoding (RLE) compression is supported, and the maximum image size is 64,535 × 64,535 pixels.• These files may contain one, two, or four color planes.• This file format is supported in CorelDRAW and Corel PHOTO-PAINT.
Importing a PCX file• PCX files can be imported if they conform to the following PCX specifications: 2.5, 2.8, and 3.0.• Bitmaps may be black-and-white, 16 colors, grayscale (8-bit), paletted (8-bit), or RGB color (24-bit).• RLE compression is supported and the maximum image size is 64,535 × 64,535 pixels.• These files may contain one, two, or four color planes. Files containing three color planes or more than four color planes cannot be
imported.
Supported file formats | 547
Adobe Portable Document Format (PDF)
The Adobe Portable Document Format (PDF) is a file format designed to preserve fonts, images, graphics, and formatting of an original file.Using Adobe Reader and Adobe Acrobat, a PDF file can be viewed, shared, and printed by macOS, Windows, and UNIX users.
You can save a file in the PDF format. For more information, see “Exporting to PDF” on page 511.
Adobe Portable Document Format (PDF) technical notes
Publishing a PDF file• Embedded 3D models are exported as embedded interactive 3D objects. If a document contains a 3D model, click Settings in the
Publish to PDF dialog box, and choose Acrobat 9.0 or higher from the Compatibility list box to ensure that the 3D model is interactivein PDF readers.
• Color channels created in Corel PHOTO-PAINT are preserved.• Transparency applied to text and graphics is preserved.• Character attributes of text, including OpenType features, are preserved.• DeviceN color spaces may be converted to RGB or CMYK processed colors in the imported file, depending on the file content.• Layers are preserved in files created with Adobe Acrobat 6 and later.• Xform objects, headers and footers are converted to symbols.• Symbols are preserved when PDF files created with version 1.3 or later undergo round-tripping.
HPGL Plotter File (PLT)
The HPGL Plotter File (PLT) format, developed by Hewlett-Packard, is vector-based. It is used in programs such as AutoCAD for printingdrawings on plotters. Other Corel applications can interpret a SUBSET of the HPGL and HPGL/2 command set. This format uses a scalingfactor of 1,016 plotter units to 1 inch.
To import an HPGL Plotter file
1 Click File Import.
The File Import command lets you place the file as an object in the active image. If you want to open a PLT file as an image, click File Open.
2 Locate the folder in which the file is stored.
3 Choose PLT - HPGL Plotter File (*.plt; *.hgl) from the list box next to the File name box.
4 Click the filename.
5 Click Import.
6 In the HPGL options dialog box, adjust any of the settings.
HPGL Plotter (PLT) technical notes
Importing a PLT file• Corel programs support versions 1 and 2 of PLT file formats although some features of version 2 are not supported.• You can import images larger than the Corel program’s maximum page size by enabling the Scale option in the HPGL options dialog
box, which lets you resize the imported image.• The curve resolution factor can be set to a value between 0.0001 and 1.0 inch. The value can be very precise; up to eight decimal places
are accepted. A setting of 0.0001 results in the highest resolution, but it also greatly increases file size. A curve resolution of 0.004 inchis recommended.
548 | Corel PHOTO-PAINT 2018 User Guide
• The PLT file format does not contain color information. Instead, the various objects in a PLT file have certain pen numbers associatedwith them. When imported into a Corel program, each pen number is assigned a specific color. You can specify the color assigned to aparticular pen, so that you can match the original colors of the graphic.
• The Pen selection list contains 256 pens, although not all of the pens may be assigned. You can change the color assignments bychoosing the pen and then choosing a new color for that pen from the Pen color list box. Choosing Custom colors brings up a colordefinition dialog box that allows you to define a custom color according to RGB values.
• You can change the pen width assignments by choosing the pen and then choosing a new width for that pen from the Pen width listbox.
• You can set a defined pen to the Unused option. You can also reset the current Pen Library pen settings to the previously saved settings.• Corel programs support numerous dotted, dashed, and solid line types of the PLT file format. The pattern number of a line in a PLT file is
translated to a line type pattern.• If the PLT file contains a font that is not on the user’s computer, the PANOSE font matching dialog box lets the user replace the font
with an available one.
Portable Network Graphics (PNG)
The Portable Network Graphics (PNG) file format is an excellent file format for lossless, portable, and well-compressed storage of bitmaps.It takes up a minimum amount of disk space and can be easily read and exchanged between computers. The Portable Network Graphicsformat provides a replacement for the GIF format and can also replace many common uses of the TIFF format.
The Portable Network Graphics format is designed to work well in online viewing, such as on the web, and it’s fully streamable with aprogressive display option. Some web browsers do not support all formatting and features. You can export images to the Portable NetworkGraphics file format if you want to use transparent backgrounds, image interlacing, image maps, or animation in your webpages.
Exporting graphics to the Portable Network Graphics format converts them to bitmaps that can be used in desktop publishing programsand Microsoft Office applications. You can also edit Portable Network Graphics in image-editing programs such as Corel PHOTO-PAINT andAdobe Photoshop.
You can also save images to the GIF and JPEG formats to use on the Internet. If you want to publish an image to the web but are not surewhich format to use, see “Choosing a web-compatible file format” on page 473.
To import a Portable Network Graphics file
1 Click File Import.
The File Import command lets you place the file as an object in the active image. If you want to open a PNG file as an image, click File Open.
2 Locate the folder in which the file is stored.
3 Choose PNG - Portable Network Graphics (*.png) from the list box next to the File name box.
4 Click the filename.
5 Click Import.
6 Click the image window.
You can also
Resample a graphic while importing For more information, see “To resample an image while importing”on page 72.
Crop a graphic while importing For more information, see “To crop an image while importing” onpage 73.
Supported file formats | 549
You can drag in the image window to resize the image.
Portable Network Graphics (PNG) technical notes• You can import Portable Networks Graphics (PNG) files from 1-bit black and white to 24-bit color; 48-bit color is not supported.• Masks and indexed-color, grayscale, and true color images are supported. Masks, however, are not saved in 1-bit black-and-white or 8-
bit paletted files.• LZ77 compression is supported, and the maximum image size is 30,000 × 30,000 pixels. Sample depths range from 1 to 16 bits.• The PNG file format also checks full-file integrity and detects common transmission errors. The PNG file format can store gamma and
chromatic data for improved color matching on different platforms.
Adobe Photoshop (PSD)
The Adobe Photoshop (PSD) file format is the native bitmap file format for Adobe Photoshop.
To import an Adobe Photoshop file
1 Click File Import.
The File Import command lets you place the file as an object in the active image. If you want to open a PSD file as an image, click File Open.
2 Locate the folder in which the file is stored.
3 Choose PSD - Adobe Photoshop (*.psd; *.pdd) from the list box next to the File name box.
4 Click the filename.
5 Click Import.
6 Click the image window.
You can also
Resample a graphic while importing For more information, see “To resample an image while importing”on page 72.
Crop a graphic while importing For more information, see “To crop an image while importing” onpage 73.
To export an Adobe Photoshop file
1 Click File Export.
2 Locate the folder in which you want to save the file.
3 Choose PSD - Adobe Photoshop from the Save as type list box.
4 Type a filename in the File name list box.
5 Click Export.
You can preserve Corel PHOTO-PAINT objects as layers in the PSD file format.
550 | Corel PHOTO-PAINT 2018 User Guide
If you are exporting a 16-bit grayscale or 48-bit RGB file for use in Adobe Photoshop versions CS and earlier, choose Uncompressedfrom the Compression type list box. Adobe Photoshop versions CS and earlier do not support compressed 16-bit grayscale and 48-bit RGB files.
Adobe Photoshop (PSD) technical notes
Importing a PSD file• Text is imported as a text object, so it remains editable.• Monotone, grayscale, duotone, 48-bit RGB, and up to 32-bit CMYK images are supported.• Some layer effects cannot be imported. (Gradient map adjustment layer is imported without Noise, Opacity stops, and Dither.)• Imported layers using the Darken Color and Lighten Color blend modes map to the If Darker and If Lighter merge modes, respectively. For
more information about working with merge modes in Corel PHOTO-PAINT, see “Understanding merge modes” on page 331.• Smart Filter effects are imported as a base object stacked with separate filter effects.• The Vibrance adjustment layer maps to the Vibrance lens.• The Black-and-white adjustment layer maps to the Grayscale lens.• The Channel Mixer adjustment layer maps to the Channel Mixer lens.• The Gradient Map adjustment layer maps to the Gradient Map lens; however, opacity stops, dithering, and noise adjustments are not
supported.• The Photo Filter adjustment layer maps to the Photo Filter lens.• Spot color channels are preserved. Alpha channels with spot color channels applied to them are not supported.• A layer mask that has density applied to it imports as a clip mask with the transparency adjusted. However, you can’t change the density
settings in Corel PHOTO-PAINT.• A layer mask that has feathering applied to it imports as a clip mask with the feathering applied. However, you can’t change the
feathering settings in Corel PHOTO-PAINT
Exporting a PSD file• Text is exported as a text object, so it remains editable.• This format supports 1-bit black and white, duotone, 16-bit grayscale, 48-bit RGB, and up to 32-bit CMYK color images.• Objects are supported.• 32-bit floating point color channels are mapped to 16-bit channels, which cannot be exported as 32-bit High Dynamic Range (HDR)
images.• Smart Filter effects are not retained when imported and are not replaced when exported.• Spot color channel information is preserved in the exported file.
Corel Painter (RIF)
Imported Corel Painter (RIF) files retain information such as floating objects, which makes the files much larger than GIF or JPEG files. CorelPainter files can be imported for resizing and adjusting floaters.
To import a Corel Painter file
1 Click File Import.
The File Import command lets you place the file as an object in the active image. If you want to open a RIFF file as an image, click File Open.
2 Locate the folder in which the file is stored.
3 Choose RIFF - Painter (*.rif) from the list box next to the File name box.
4 Click the filename.
Supported file formats | 551
5 Click Import.
6 Click the image window.
You can also
Resample a graphic while importing For more information, see “To resample an image while importing”on page 72.
Crop a graphic while importing For more information, see “To crop an image while importing” onpage 73.
Corel Painter (RIF) technical notes• The embedded color profile is preserved, but can be changed after importing the file.• If the Corel Painter image contains a transparent background, which is called a canvas in Corel Painter, it is preserved.• Vector shapes are not preserved in the imported file.• Text and annotations are not preserved.• Bitmap layers are imported as objects.• Layer masks are retained as clip masks.• Liquid Ink, Watercolor, Digital Watercolor, and plug-in layers are imported as RGB objects.• Mosaics and tessellations are imported as RGB objects.• Image slicing is not retained.
TARGA (TGA)
The TARGA (TGA) graphics format is used for saving bitmaps. It supports various compression systems and can represent bitmaps rangingfrom black-and-white to RGB color. You can open, import, or export TGA files in Corel PHOTO-PAINT.
For more information about opening or importing files, see “Opening images” on page 69 or “Importing files” on page 71.
To export a TARGA file
1 Click File Export.
The File Import command lets you place the file as an object in the active image. If you want to open a TGA file as an image, click File Open.
2 Locate the folder in which you want to save the file.
3 Choose TGA - Targa bitmap from the Save as type list box.
4 Type a filename in the File name list box.
To compress an image while exporting it, choose a compression type from the Compression type list box.
5 Click Export.
6 In the TGA export dialog box, enable one of the following options:
• Normal
• Enhanced
Black-and-white images cannot be saved as TARGA files.
552 | Corel PHOTO-PAINT 2018 User Guide
TARGA (TGA) technical notes• The following features are supported: uncompressed color-mapped images, uncompressed RGB images, run-length encoding (RLE)
compressed color-mapped images, RLE-compressed RGB images (types 1, 2, 9, and 10 as defined by the AT&T Electronic Photographyand Imaging Center), and masks.
• The type of file produced depends on the number of colors exported. For example, 24-bit color TARGA (TGA) files are exported as RLE-compressed RGB bitmaps.
• You can import TGA files from 8-bit grayscale to 24-bit RGB.• Masks are not saved in 1-bit black-and-white or 8-bit paletted files.• RLE compression is supported, and the maximum image size is 64,535 × 64,535 pixels.
TIFF
The Tagged Image File format (TIFF) is a raster format designed as a standard. Almost every graphics application can read and write TIFF files.TIFF supports various color modes and bit depths.
You can open or import TIFF files in Corel PHOTO-PAINT. For more information about opening or importing files, see “Opening images” onpage 69 or “Importing files” on page 71.
To export a TIFF file
1 Click File Export.
2 Locate the folder in which you want to save the file.
3 Choose TIF - TIFF bitmap from the Save as type list box.
4 Type a filename in the File name list box.
5 Click Export.
TIFF technical notes• When importing a TIFF that contains multiple pages, you can choose the individual pages that you want to import.• Masks are not exported in 1-bit black-and-white, 16-bit grayscale, or 48-bit RGB files.• Black-and-white, color, and grayscale TIFF files up to and including the 6.0 specification can be imported and exported.• TIFF files compressed using JPEG, ZIP, CCITT, Packbits 32773, or LZW compression can also be imported. However, you may notice
additional loading time with these files because the program decodes the file compression.
Corel Paint Shop Pro (PSP)
The .PspImage file format is the native format for Corel Paint Shop Pro. You can import .PspImage files versions 9 and 10 that are in the RGBcolor mode (24- or 48-bit).
This file format is not supported by the 64-bit version of CorelDRAW Graphics Suite.
To import a PSP file
1 Click File Import.
The File Import command lets you place the file as an object in the active image. If you want to open a PSP file as an image, click File Open.
2 Locate the folder in which the file is stored.
3 Choose PSP - Corel Paint Shop Pro (*.pspimage) from the list box next to the File name box.
4 Click the filename.
Supported file formats | 553
5 Click Import.
6 Click the image window.
Corel Paint Shop Pro (PSP) technical notes• You can import only Corel Paint Shop Pro files with a .PspImage filename extension.• Text and layers are merged with the background in the imported file.
WordPerfect Graphic (WPG)
The Corel WordPerfect Graphic file format (WPG) is primarily a vector graphic format, but it can store both bitmap and vector data. The WPGfiles may contain up to 256 colors, chosen from a palette of more than 1 million colors.
To import a WordPerfect Graphic file
1 Click File Import.
The File Import command lets you place the file as an object in the active image. If you want to open a WPG file as an image, click File Open.
2 Locate the folder in which the file is stored.
3 Choose WPG - Corel WordPerfect Graphic (*.wpg) from the list box next to the File name box.
4 Click the filename.
5 Click Import.
6 Click the image window.
WordPerfect Graphic (WPG) technical notes• Graphics Text Type 2 is not supported.
RAW camera file formats
A RAW camera file is a data file captured by the image censor of a high-end digital camera. RAW camera files contain minimal in-cameraprocessing, such as sharpening or digital zoom, and they give you full control over the sharpness, contrast, and saturation of images.Various RAW camera file formats exist, so the files can have different filename extensions, such as .nef, .crw, .dcr, .orf, or .mrw.
You can import RAW camera files directly into Corel PHOTO-PAINT. For more information, see “Working with RAW camera files” on page523.
Wavelet Compressed Bitmap (WI)
This file format is not supported by the 64-bit version of the suite.
Importing a WI file• Corel programs support the following color depths when you import Wavelet Compressed Bitmap (.wi) files: 256-shade (8-bit) grayscale,
and 24-bit RGB.
Windows Metafile Format (WMF)
Developed by Microsoft Corporation, this file format stores both vector and bitmap information. It was developed as the internal file formatfor Microsoft Windows 3. It supports 24-bit RGB color and is supported by most Windows applications.
554 | Corel PHOTO-PAINT 2018 User Guide
Windows Metafile Format (WMF) technical notes
Importing a WMF file• The following features are not supported: PANOSE font matching and rotated and skewed bitmaps.
Additional file formats
Corel PHOTO-PAINT also supports the following file formats:• Audio Video Interleaved (AVI) — Audio video interleaved format is a Microsoft multi-media format where audio and video elements are
stored in alternating segments.• CALS Compressed Bitmap (CAL) — CALS Raster (CAL) is a bitmap format used mainly for document storage by high-end CAD programs.
It supports a monochrome (1-bit) color depth and is used as a data graphics exchange format for computer-aided design andmanufacturing, technical graphics, and image-processing applications.
• Corel ArtShow 5 (CPX) — The CPX file format is a native file format of Corel ArtShow 5. It can contain both vectors and bitmaps.• CorelDRAW Compressed (CDX) — The CDX file format is a compressed CorelDRAW file.• Encapsulated PostScript (Desktop Color Separation) — The DCS file format, developed by QuarkXPress, is an extension of the standard
encapsulated PostScript (EPS) file format. Typically, the DCS file format consists of five files. Four of the five files contain informationabout high-resolution color. This information is expressed in CMYK (cyan, magenta, yellow and black) format. The fifth file, consideredthe master file, contains a PICT preview of the DCS file. The DCS format supports spot color channels.
• EXE — The EXE format is a Windows 3.x/NT bitmap resource and can store an ICO file as a Windows 3.x/NT icon resource.• FPX — The FlashPix file format stores images at different resolutions in a single file. This file format is not supported by the 64-bit version
of the suite.• Frame Vector Metafile (FMV) — The FMV file format is used for a Frame Vector Metafile.• GEM Paint (IMG) — GEM Paint (IMG) is a bitmap format that is the native bitmap file format of the GEM environment. IMG files support
1- and 4-bit paletted color and are compressed by using an RLE method. IMG was a common format in the early days of desktoppublishing.
• GEM File (GEM) — The GEM file format is used for a GEM file.• GIMP (XCF) — XCF is the native GIMP format. It supports layers and other GIMP-specific information.• ICO — The ICO format is a Windows 3.x/NT icon resource.• Lotus PIC (PIC) — The PIC file format is used for a Lotus PIC file.• MacPaint Bitmap (MAC) — MacPaint (MAC) is a bitmap format that uses the filename extensions MAC, PCT, PNT, and PIX. It is the format
used by the MacPaint program that was included with the Macintosh 128. It supports only two colors and a palette of patterns. It isused mainly by Macintosh graphics applications to store black-and-white graphics and clipart. The maximum size for MAC images is 720× 576 pixels.
• MET Metafile (MET) — The MET file format is for a MET Metafile.• Micrografx Picture Publisher 4 & 5 (PP4, PP5) — The PP4 file format is a native file format of Micrographx Picture Publisher 4. The PP5 file
format is a native file format of Micrographx Picture Publisher 5. This file format is not supported by the 64-bit version of the suite.• Picture Publisher File (PPF) — The PPF file format is native to Micrografx Picture Publisher 6, 7, 8, 9, and 10. This file format is not
supported by the 64-bit version of the suite.• NAP Metafile (NAP) — The NAP file format is used for a NAP Metafile.• Fill File (FILL) — This file format is used for saving custom fills in Corel PHOTO-PAINT.• PostScript Interpreted (PS or PRN) — PRN PostScript (PS or PRN) is a metafile format for PostScript printers. This format is written in ANSI
text. The PostScript Interpreted import filter can import PS, PRN, and EPS PostScript files.• SCITEX CT Bitmap (SCT) — The SCT file format is used for importing 32-bit color and grayscale SCITEX images. SCITEX bitmaps are
created from high-end scanners. The bitmaps are then processed for output by film recorders or high-end page layout programs.• XPixMap Image (XPM) — The XPM file format is used with an XPixMap Image file.
Recommended formats for importing graphics
The table below shows what file formats to use when you are importing graphics from graphics applications, or other sources.

Supported file formats | 555
Application/Source Recommended import format
Adobe Photoshop PSD
Paint Shop Pro PSP
Corel Painter RIF
Picture Publisher PPF
Digital cameras RAW camera files
Recommended formats for exporting graphics
The following table lists the recommended file formats for exporting to other graphics applications, or for the web.
Application/Output Recommended format
Adobe Photoshop PSD, TIF
The web JPG, GIF, PNG

556 | Corel PHOTO-PAINT 2018 User Guide

Customizing and automating | 557
Customizing and automating
Customizing Corel PHOTO-PAINT......................................................................................................................................................... 559
Using macros and scripts to automate tasks....................................................................................................................................... 575

558 | Corel PHOTO-PAINT 2018 User Guide

Customizing Corel PHOTO-PAINT | 559
Customizing Corel PHOTO-PAINT
You can customize your application by arranging command bars and commands to suit your needs and changing the color of windowborders. Command bars include menus, toolbars, the property bar, and the status bar. You can also customize filters and file associations.
Help topics are based on the application’s default settings. When you customize command bars, commands, and buttons, the Help topicsassociated with them do not reflect your changes.
This section contains the following topics:• “Creating workspaces” (page 560)• “Importing and exporting workspaces” (page 560)• “Customizing workspace appearance” (page 561)• “Customizing keyboard shortcuts” (page 563)• “Customizing menus” (page 564)• “Customizing toolbars” (page 566)• “Customizing the toolbox” (page 569)• “Customizing the property bar” (page 569)• “Customizing the status bar” (page 570)• “Customizing filters” (page 572)
• “Customizing file associations” (page 572)
Changing and restoring defaults
You can change many of the default workspace options in the Options dialog box (Tools Options). For example, you can change the colortheme or scaling level, or you can change the default unit of measurement.
You can restore the default settings by resetting the current workspace.
To reset the current workspace
1 Exit the application.
2 Restart the application while holding down F8.
560 | Corel PHOTO-PAINT 2018 User Guide
Creating workspaces
You can create workspaces to make more accessible the tools that you use most often. For example, you can open dockers or add tools totoolbars. You can also delete the custom workspaces that you create.
You can change the default location to which workspaces are saved. For more information, see “Content types” on page 118.
Before creating a workspace, you can try the workspaces that are included with the application. These workspaces are optimized for anumber of common workflows. For more information, see “Choosing a workspace” on page 50.
To create a workspace
1 Click Tools Options.
2 In the list of categories, click Workspace.
3 Click New.
4 Type the name of the workspace in the Name of new workspace box.
5 From the Base new workspace on list box, choose an existing workspace on which to base the new workspace.
If you want to include a description of the workspace, type a description in the Description of new workspace box.
To delete a workspace
1 Click Tools Options.
2 In the list of categories, click Workspace.
3 Choose a workspace from the Workspace list.
4 Click Delete.
You cannot delete the Default workspace.
Importing and exporting workspaces
You can import custom workspaces created on other computers or in other versions of the application (back to version X6). When importinga workspace, you can select which workspace elements to import. For example, you can import docker settings and position, but you candiscard application settings such as startup options. You can also import the selected workspace elements into the current workspace or intoa new workspace. You can base the new workspace on one of the available workspaces, and you can give it a name and description.
You can also export the workspaces that you create to share them with others.
To import a workspace
1 Click Window Workspace Import.
2 In the Open dialog box, locate the workspace file you want to import, and click Open.
3 In the Import Workspace dialog box, select the workspace elements that you want to import. By default, all workspace elements areselected.
4 Enable one of the following options:
• Current workspace — to replace the workspace elements of the current workspace with the imported workspace elements. Forexample, if you choose to import all toolbars, the toolbars of the current workspace are replaced with the imported ones.
• New workspace — creates a workspace that includes the imported workspace elements
Customizing Corel PHOTO-PAINT | 561
You can also
Specify the name of the new workspace Type a name in the Name box.
Base the new workspace on an existing workspace Choose a workspace from the Base on list box.
The imported workspace elements will be merged with the baseworkspace.
Add a workspace description Type a description in the Description box.
Any new features that were not available when the workspace was created are added to the imported workspace. The new featuresmay not be in the same location as they appear in the default workspace.
Custom icons may not be scaled properly in imported workspaces created in versions X6 and X7.
To export a workspace
1 Click Window Workspace Export.
2 Enable the check boxes beside the workspace items you want to export.
3 Click Save.
4 Choose the folder where you want to save the file.
5 Type a filename in the File name box.
6 Click Save.
7 Click Close.
The workspace items available for export are dockers, toolbars (including the property bar and toolbox), menus, and shortcut keys.
A workspace is exported as a .cdws file.
Customizing workspace appearance
You can customize the size of user interface items, choose a theme, and change the color of window borders and the desktop.
Scaling
You can change the size of user interface (UI) items by changing the scaling level. The scaling level is relative to the scaling level of theoperating system. The default setting is 100%, which means that UI items in the application appear the same size as similar UI items in theoperating system. Scaling by 200% makes the application UI items appear twice as large as the UI items of the operating system.
Theme
To make the workspace lighter or darker, you can choose one of the following themes: Light, Medium, or Dark.
Window border color
You can customize the application window and dialog boxes by changing the color of their borders.
Desktop color
You can change the color of the desktop, the area surrounding the image, to suit your documents. For example, if the document containsdark colors, you can change the desktop color from white to gray for lower contrast.
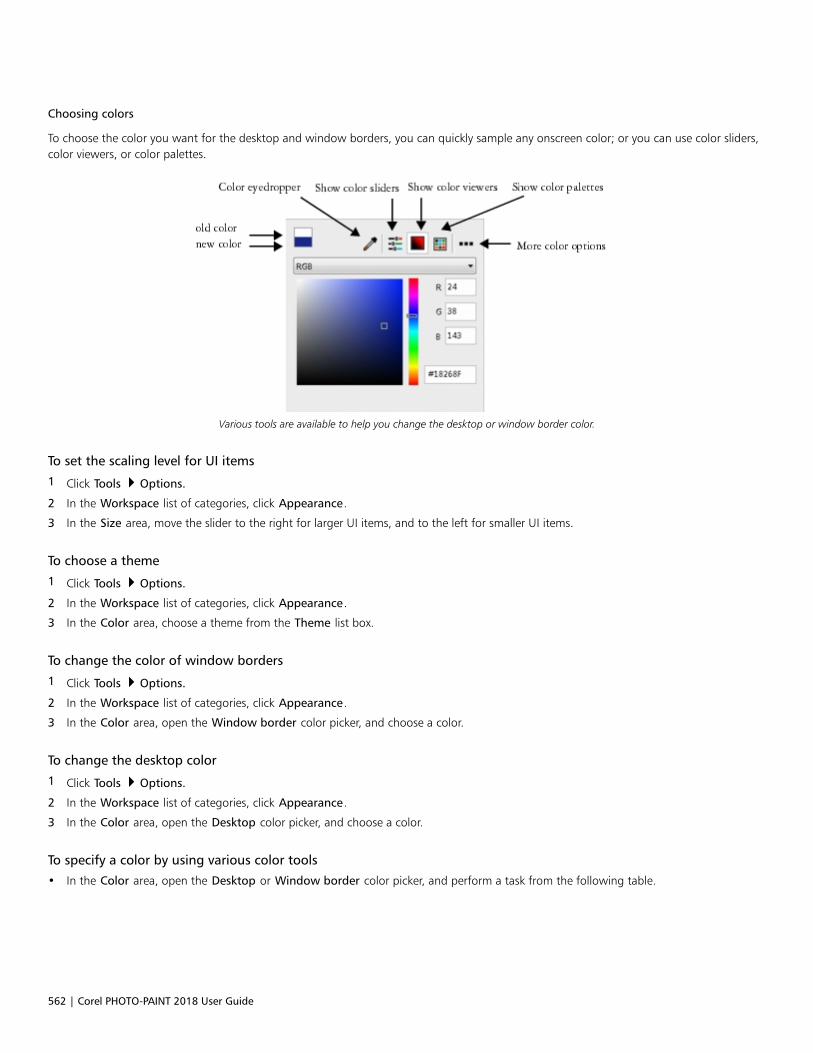
562 | Corel PHOTO-PAINT 2018 User Guide
Choosing colors
To choose the color you want for the desktop and window borders, you can quickly sample any onscreen color; or you can use color sliders,color viewers, or color palettes.
Various tools are available to help you change the desktop or window border color.
To set the scaling level for UI items
1 Click Tools Options.
2 In the Workspace list of categories, click Appearance.
3 In the Size area, move the slider to the right for larger UI items, and to the left for smaller UI items.
To choose a theme
1 Click Tools Options.
2 In the Workspace list of categories, click Appearance.
3 In the Color area, choose a theme from the Theme list box.
To change the color of window borders
1 Click Tools Options.
2 In the Workspace list of categories, click Appearance.
3 In the Color area, open the Window border color picker, and choose a color.
To change the desktop color
1 Click Tools Options.
2 In the Workspace list of categories, click Appearance.
3 In the Color area, open the Desktop color picker, and choose a color.
To specify a color by using various color tools
• In the Color area, open the Desktop or Window border color picker, and perform a task from the following table.
Customizing Corel PHOTO-PAINT | 563
To Do the following
Sample a color Click the Color eyedropper tool , and click an onscreen color.
Use color sliders Click the Show color sliders button , choose a color mode
from the list box, and move the sliders.
Use a color viewer Click the Show color viewers button , choose a color mode
from the list box, and click a color on the color viewer.
Choose a color from a color palette Click the Show color palettes button , choose a color palette
from the Palette Libraries, and click a color. To adjust the tint, movethe Tint slider.
Access additional color options Click the More color options button , and choose an option.
The options are dependent on the selected method such assampling or using a color viewer, color sliders or a color palette.
Customizing keyboard shortcuts
Although your application has preset keyboard shortcuts, you can change them, or add your own shortcuts, to suit your working style.Youcan assign keyboard shortcuts to the commands you use the most, and you can delete any keyboard shortcuts that you don’t use.
You can print a list of keyboard shortcuts. You can also export a list of keyboard shortcuts to the CSV file format — a comma delimitedformat that is easily opened by word processors and spreadsheet applications.
When you change keyboard shortcuts, the changes are saved in a file called an accelerator table. Your application comes with the followingaccelerator tables which can be customized to suit your work habits:• Main table — contains all non-text-related shortcut keys• Print preview — contains shortcut keys for print preview options• Text editing table — contains all text-related shortcut keys
To assign a keyboard shortcut to a command
1 Click Tools Customization.
2 In the Customization list of categories, click Commands.
3 Click the Shortcut keys tab.
4 Choose a shortcut key table from the Shortcut key table list box.
5 Choose a command category from the top list box.
6 Click a command in the Commands list.
The shortcut keys currently assigned to the selected command are displayed in the Current shortcut keys box.
7 Click the New shortcut key box, and press a key combination.
If the key combination is already assigned to another command, that command is listed in the Currently assigned to box.
8 Click Assign.
564 | Corel PHOTO-PAINT 2018 User Guide
If the same keyboard shortcut is already assigned to another command, the second assignment overwrites the first. By enablingthe Navigate to conflict on assign check box, you can automatically navigate to the command whose shortcut you reassigned,prompting you to assign a new shortcut.
You can view all of the existing keyboard shortcuts by clicking View all.
To delete a keyboard shortcut
1 Click Tools Customization.
2 In the Customization list of categories, click Commands.
3 Click the Shortcut keys tab.
4 Choose a shortcut key table from the Shortcut key table list box.
5 Choose a command category from the top list box.
6 Click a command in the Commands list.
7 Click a shortcut key in the Current shortcut keys box.
8 Click Delete.
To print keyboard shortcuts
1 Click Tools Customization.
2 In the Customization list of categories, click Commands.
3 Click the Shortcut keys tab.
4 Click View all.
5 Click Print.
To export a list of keyboard shortcuts
1 Click Tools Customization.
2 In the Customization list of categories, click Commands.
3 Click the Shortcut keys tab.
4 Click View all.
5 Click Export to CSV.
6 Choose the folder where you want to save the file.
7 Type a filename in the File name box.
8 Click Save.
Customizing menus
Corel customization features let you modify the menu bar and the menus it contains. You can change the order of menus and menucommands; add, remove, and rename menus and menu commands. You can search for a menu command if you do not remember themenu in which it belongs. You can also reset menus to the default setting.
The customization options apply to the menu bar menus as well as to shortcut menus that you access by right-clicking.
Help topics are based on the application’s default settings. When you customize menus and menu commands, the Help topics associatedwith them do not reflect your changes.
Customizing Corel PHOTO-PAINT | 565
To change the order of menus and menu commands
1 Click Tools Customization.
2 In the Customization list of categories, click Commands.
3 In the application window, drag a menu on the menu bar to the left or right.
If you want to change the order of menu commands, click a menu on the menu bar, click a menu command, and drag it up or down.
If you want to change the order of context menu commands, right-click in the application window to display the context menu, anddrag a menu command to a new position.
To rename a menu or menu command
1 Click Tools Customization.
2 In the Customization list of categories, click Commands.
3 Choose a command category from the top list box.
4 Click a menu or command in the list.
5 Click the Appearance tab.
6 Type a name in the Caption box.
An ampersand (&) before a letter in the Caption box indicates a shortcut, also known as an accelerator key. Menus are displayed bypressing Alt + the letter. Commands are invoked by pressing the letter that is underlined when the menu is displayed.
You can reset the name to the default by clicking Restore defaults.
To add or remove an item on the menu bar
1 Click Tools Customization.
2 In the Customization list of categories, click Commands.
If you want to remove an item, drag it off the menu bar.
3 Choose a command category from the top list box.
4 Drag an item to the menu bar.
To add or remove a command on a menu
1 Click Tools Customization.
2 In the Customization list of categories, click Commands.
If you want to remove a command from a menu, click the menu name, and when the menu displays, drag the command off the menu.
3 Choose a command category from the top list box.
4 Drag a command to a menu in the application window.
To find a menu command quickly
1 Click Tools Customization.
2 In the Customization list of categories, click Commands.
3 Click the Search button .
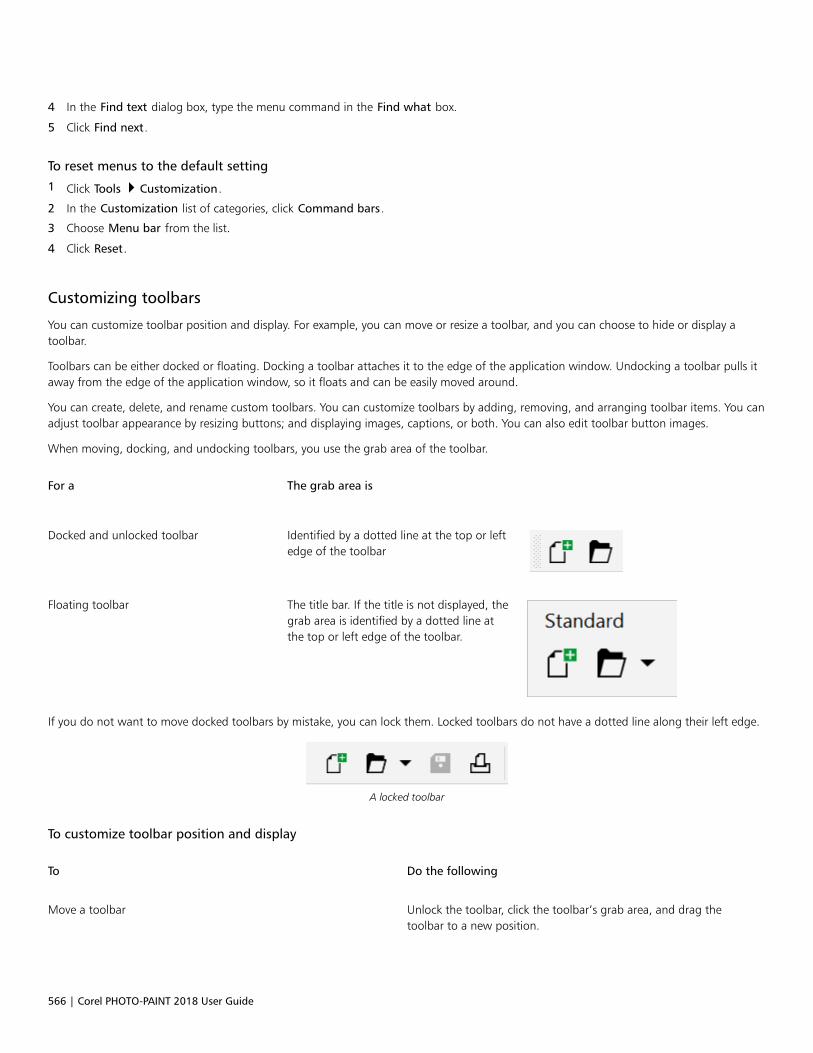
566 | Corel PHOTO-PAINT 2018 User Guide
4 In the Find text dialog box, type the menu command in the Find what box.
5 Click Find next.
To reset menus to the default setting
1 Click Tools Customization.
2 In the Customization list of categories, click Command bars.
3 Choose Menu bar from the list.
4 Click Reset.
Customizing toolbars
You can customize toolbar position and display. For example, you can move or resize a toolbar, and you can choose to hide or display atoolbar.
Toolbars can be either docked or floating. Docking a toolbar attaches it to the edge of the application window. Undocking a toolbar pulls itaway from the edge of the application window, so it floats and can be easily moved around.
You can create, delete, and rename custom toolbars. You can customize toolbars by adding, removing, and arranging toolbar items. You canadjust toolbar appearance by resizing buttons; and displaying images, captions, or both. You can also edit toolbar button images.
When moving, docking, and undocking toolbars, you use the grab area of the toolbar.
For a The grab area is
Docked and unlocked toolbar Identified by a dotted line at the top or leftedge of the toolbar
Floating toolbar The title bar. If the title is not displayed, thegrab area is identified by a dotted line atthe top or left edge of the toolbar.
If you do not want to move docked toolbars by mistake, you can lock them. Locked toolbars do not have a dotted line along their left edge.
A locked toolbar
To customize toolbar position and display
To Do the following
Move a toolbar Unlock the toolbar, click the toolbar’s grab area, and drag thetoolbar to a new position.
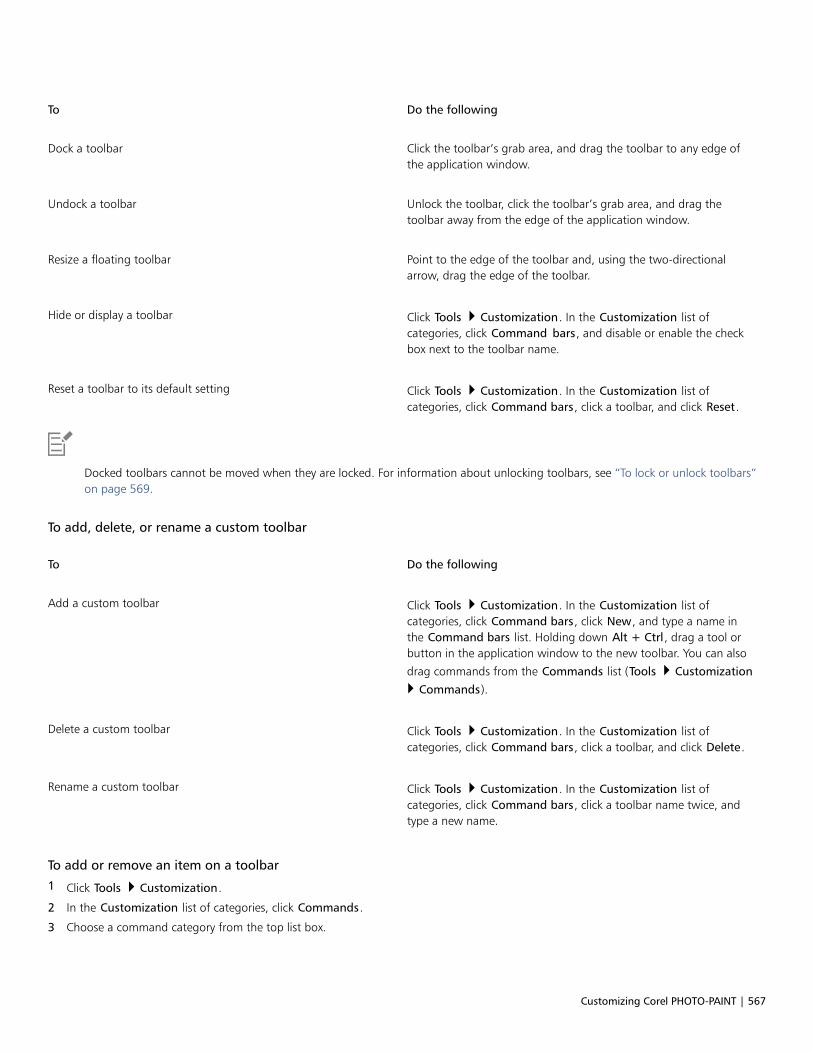
Customizing Corel PHOTO-PAINT | 567
To Do the following
Dock a toolbar Click the toolbar’s grab area, and drag the toolbar to any edge ofthe application window.
Undock a toolbar Unlock the toolbar, click the toolbar’s grab area, and drag thetoolbar away from the edge of the application window.
Resize a floating toolbar Point to the edge of the toolbar and, using the two-directionalarrow, drag the edge of the toolbar.
Hide or display a toolbar Click Tools Customization. In the Customization list ofcategories, click Command bars, and disable or enable the checkbox next to the toolbar name.
Reset a toolbar to its default setting Click Tools Customization. In the Customization list ofcategories, click Command bars, click a toolbar, and click Reset.
Docked toolbars cannot be moved when they are locked. For information about unlocking toolbars, see “To lock or unlock toolbars”on page 569.
To add, delete, or rename a custom toolbar
To Do the following
Add a custom toolbar Click Tools Customization. In the Customization list ofcategories, click Command bars, click New, and type a name inthe Command bars list. Holding down Alt + Ctrl, drag a tool orbutton in the application window to the new toolbar. You can also
drag commands from the Commands list (Tools Customization
Commands).
Delete a custom toolbar Click Tools Customization. In the Customization list ofcategories, click Command bars, click a toolbar, and click Delete.
Rename a custom toolbar Click Tools Customization. In the Customization list ofcategories, click Command bars, click a toolbar name twice, andtype a new name.
To add or remove an item on a toolbar
1 Click Tools Customization.
2 In the Customization list of categories, click Commands.
3 Choose a command category from the top list box.

568 | Corel PHOTO-PAINT 2018 User Guide
4 Drag a toolbar item from the list to a toolbar in the application window.
If you want to remove an item from a toolbar, drag the toolbar item off the toolbar.
To arrange toolbar items
1 Click Tools Customization.
2 In the Customization list of categories, click Commands.
3 On the toolbar in the application window, drag the toolbar item to a new position.
If you want to move a toolbar item to another toolbar, drag the toolbar item icon from one toolbar to the other.
You can copy a toolbar item to another toolbar by holding down Ctrl while dragging a toolbar item. If the Options dialog box is notopen, you must hold down Alt+Ctrl.
To modify toolbar appearance
1 Click Tools Customization.
2 In the Customization list of categories, click Command bars.
3 Click a toolbar name in the list.
If you want to choose multiple toolbars, hold down Ctrl, and click the other toolbar names.
4 Choose a size from the Button list box.
5 From the Default button appearance list box, choose one of the following:
• Caption only
• Caption to right of image
• Default
• Image only
If you want to hide the title when the toolbar is floating, disable the Show title when toolbar is floating check box.
You can reset a built-in toolbar to its default settings by clicking Reset.
To edit a toolbar button image
1 Click Tools Customization.
2 In the Customization list of categories, click Commands.
3 Choose a command category from the top list box.
4 Click a toolbar command.
5 Click the Appearance tab.
6 Edit the button image using the options in the Imagearea.
When you choose either Small or Medium in the Size list box, you edit the small or medium versions of a particular button image.You cannot edit the large version of a button image. For information about how to display all buttons as small, medium, or large, see“To modify toolbar appearance” on page 568.
Customizing Corel PHOTO-PAINT | 569
You can reset toolbar button images to the default settings by clicking Restore defaults.
To lock or unlock toolbars
• Click Windows Toolbars Lock toolbars.
The Lock toolbars command is enabled when a check mark appears beside it. When you launch the application for the first time, thetoolbars are locked by default.
Floating toolbars cannot be locked.
You can also lock or unlock toolbars by right-clicking a toolbar and clicking Lock toolbars.
Customizing the toolbox
You can add or remove tools from the toolbox. If you modify the toolbox, you can reset the default settings at any time.
To customize the toolbox
1 On the toolbox, click the Quick customize button .
2 Enable or disable any of the check boxes.
You can also
Reset the toolbox Click the Reset toolbar button.
Customize the toolbox Click the Customize button.
Customizing the property bar
You have control over the placement and content of the property bar. You can move the property bar anywhere on screen. Placing it insidethe application window creates a floating property bar. Placing it on any of the four sides of the application window docks it, making it partof the window border.
When moving, docking, or undocking the property bar, you use the grab area of the property bar, which is the same as the grab area of atoolbar. For more information about the grab area, see “Customizing toolbars” on page 566.
You can also customize the property bar by adding or removing tools. This lets you customize what appears on the property bar when youchoose various tools. For example, when the Text tool is active, you can have the property bar display additional commands for text-relatedtasks such as increasing or decreasing font size, or changing case. You can also reset the property bar to its default settings.
To position the property bar
570 | Corel PHOTO-PAINT 2018 User Guide
To Do the following
Move the property bar Unlock the property bar, click the property bar’s grab area, anddrag the property bar to a new position.
Undock the property bar Click the property bar’s grab area, and drag the property bar awayfrom the edge of the application window.
Dock the property bar Click the property bar’s grab area, and drag the property bar to anyedge of the application window.
To add or remove a toolbar item on the property bar
1 On the property bar, click the Quick customize button .
2 Enable or disable the check boxes next to the items that you want to add or remove.
You can also
Reset the toolbox Click the Reset toolbar button.
Customize the toolbox Click the Customize button.
The new item is displayed on the property bar for the active tool or task. When the property bar content changes, the item is notdisplayed. The new item is displayed again when the related tool or task is activated.
You can also customize the property bar by clicking Tools Customization. In the Customization list of categories, clickCommands, choose a command category from the top list box, and then drag a toolbar item from the list to the property bar. If youwant to remove an item from the property bar, drag the toolbar item icon off the property bar.
To rearrange toolbar items on the property bar
1 Click Tools Customization.
2 In the Customization list of categories, click Commands.
3 Drag the toolbar item icon to a new position on the property bar.
Customizing the status bar
The status bar displays information about file size, the current tool, document dimensions, and memory.In addition, it displays documentcolor information, such as the document color profile and color proofing status. You can customize the status bar by changing theinformation that is displayed and by resizing it. You can also customize the status bar by adding, removing, and resizing toolbar items. Inaddition, you can restore the status bar to its default settings. You can also place the status bar at the top of the application window to seethe displayed information more easily.
Customizing Corel PHOTO-PAINT | 571
To change the information the status bar displays
• On the status bar, click the flyout button next to the displayed information and choose one of the following options:
• File size
• Current tool
• Document dimensions
• Document color information
• Memory
To resize the status bar
1 Click Tools Customization.
2 In the Customization list of categories, click Command bars.
3 Click Status bar, and enable the check box.
4 Type 1 or 2 in the Number of lines when docked box.
To add or remove a toolbar item on the status bar
1 Click Tools Customization.
2 In the Customization list of categories, click Commands.
3 Choose a command category from the top list box.
4 Drag a toolbar item from the list to the status bar.
If you want to remove a toolbar item from the status bar, drag the item off the status bar.
To resize toolbar items on the status bar
1 Click Tools Customization.
2 In the Customization list of categories, click Command bars.
3 Click Status bar, and enable the check box.
4 Choose one of the following options from the Button list box:
• Small
• Medium
• Large
Only toolbar items you have added to the status bar are affected by resizing. The size of the default icons remains unchanged.
To change the position of the status bar• Right-click the status bar, click Customize Status bar Position, and click Top or Bottom.
To restore the status bar default settings
• Right-click the status bar, and click Customize Status bar Reset to default.
572 | Corel PHOTO-PAINT 2018 User Guide
Customizing filters
Filters are used to convert files from one format to another. They are organized into four types: raster, vector, animation, and text. You cancustomize filter settings by adding or removing filters so that only the filters you need are loaded. You can also change the order of the listof filters and reset filters to the default setting.
To add a filter
1 Click Tools Options.
2 In the list of categories, double-click Global, and double-click Filters.
3 Double-click a type of filter in the Available file types list.
4 Click a filter.
5 Click Add.
To remove a filter
1 Click Tools Options.
2 In the list of categories, double-click Global, and click Filters.
3 Click a filter in the List of active filters.
4 Click Remove.
To change the order of the list of filters
1 Click Tools Options.
2 In the list of categories, double-click Global, and click Filters.
3 Click a filter in the List of active filters.
4 Click one of the following:
• Move up — moves the filter up the list
• Move down — moves the filter down the list
You can reset the List of active filters to the default setting by clicking Reset.
Customizing file associations
You can associate a number of different file types with Corel applications. When you double-click a file you have associated with anapplication, the application starts and the file opens. When you no longer need a file type association, you can break it.
To associate a file type with Corel PHOTO-PAINT
1 Click Tools Options.
2 In the list of categories, double-click Global, and click Filters.
3 Click Associate.
4 In the Associated file extensions with Corel PHOTO-PAINT list, enable the check box of the file type you want to associate.
Associating a file type with an application adds the application to the list of recommended programs for opening this file type.To open a file of an associated file type in Corel PHOTO-PAINT while browsing in Windows, you also need to make Corel PHOTO-

Customizing Corel PHOTO-PAINT | 573
PAINT the default program. To do this, click the Start button on the Windows taskbar, and then click Default programs. Next, clickAssociate a file type or protocol with a program. For detailed instructions about how to change the default program for a file type,see the Windows Help.
You can reset file associations by clicking Reset.
To break a Corel PHOTO-PAINT file type association
1 Click Tools Options.
2 In the list of categories, double-click Global, and click Filters.
3 Click Associate.
4 In the Associated file extensions with Corel PHOTO-PAINT list, disable the check box of the file type you want to associate.

574 | Corel PHOTO-PAINT 2018 User Guide

Using macros and scripts to automate tasks | 575
Using macros and scripts to automate tasks
You can use macros and scripts to speed up repetitive tasks, combine multiple or complex actions, or make an option more easily accessible.You create macros by using the built-in features for Visual Basic for Applications (VBA) or Visual Studio Tools for Applications (VSTA), andyou create scripts by using the Corel SCRIPT programming language.
Using a macro (or script) is similar to using the speed-dialing feature on a phone. On many phones, you can set a frequently dialed numberto a speed-dial button; then, the next time you need to dial that number, you can save time by pressing its speed-dial button. Similarly, amacro lets you set the actions that you want to repeat; then, the next time that you need to repeat those actions, you can save time byplaying that macro.
You can use either a macro or a script to automate a task in Corel PHOTO-PAINT. A macro is the better choice if you want to write the codethat is required to carry out the task (by using VBA or VSTA), while a script is the better choice if you want to record the steps that arerequired to carry out the task (by using Corel SCRIPT).
This section contains the following topic:
• “Working with macros” (page 575)
• “Working with scripts” (page 580)
Working with macros
You can save time by using a macro to automate a series of repetitive tasks. A macro lets you specify a sequence of actions so that you canquickly repeat those actions later.
You don’t need any programming experience to use macros — in fact, the basic tools for working with macros are available within themain application window. However, if you want to have more control over your macros, you can use the following built-in programmingenvironments:
• Microsoft Visual Studio Tools for Applications (VSTA) — the successor to VBA, and an excellent choice for developers and otherprogramming experts. VSTA provides the tools and features that you need to create the most advanced macro projects.
• Microsoft Visual Basic for Applications (VBA) — a subset of the Microsoft Visual Basic (VB) programming environment, and an excellentchoice for beginners. You can use VBA to create basic macros for personal use, but you can also use it to create more advanced macroprojects.
For detailed information on the differences between VBA and VSTA, please see the programming guide on the Developer area on theCorelDRAW community website.
576 | Corel PHOTO-PAINT 2018 User Guide
Getting started with macros
The macro features for VBA and VSTA are installed with the software by default, but you can manually install these features if necessary. Youcan specify options for the VBA feature.
To use VSTA macro features with Corel PHOTO-PAINT, you must have Microsoft Visual Studio 2017 installed. To use the VSTA Editor,you must first install Microsoft Visual Studio 2017, Community, Professional, Premium, Ultimate or Enterprise Edition; and thenreinstall Microsoft Visual Studio Tools for Applications 2017 from microsoft.com.
If you install Microsoft Visual Studio after installing CorelDRAW Graphics Suite, you must re-install the VSTA macro features bymodifying your installation. For more information, see “To manually install the macro features” on page 577.
The macro features provide several tools for working with macros in the main application window:• Macros toolbar — provides easy access to common macro functions• Macro Manager docker — provides easy access to all available macro projects for VBA, and to basic functions for working with those
projects• Macro Editor (formerly the Visual Basic Editor) — provides advanced functions for creating VBA-based macro projects• VSTA Editor — provides advanced functions for creating VSTA-based macro projects. The VSTA Editor is accessible only if you have
Microsoft Visual Studio 2017 installed.
Creating macros
Macros are stored in modules (also called “code modules”), which are stored in macro projects. The Macro Manager docker lets you viewand manage all of the macro projects, modules, and macros that are available to you.
You can use the Macro Manager docker to create macro projects in the form of Global Macro Storage (GMS) files or Corel VSTA Projects(CGSaddon). Using such files is an excellent way to bundle the components of your macro project for sharing with others. You can use theMacro Manager docker to open (or “load”) the macro projects that you create, as well as the macro projects that install with the softwareor that are otherwise made available to you. You can also use the Macro Manager docker to rename macro projects, as well as to copy andclose (or “unload”) GMS-based and VSTA macro projects.
Some macro projects are locked and cannot be modified.
When you create a document, a macro project for that document is automatically added to the Macro Manager docker. Althoughyou can store macros within the macro project for a document — for example, to create an all-in-one template — it is recommendedthat you instead use GMS files to store your macro projects.
Each macro project contains at least one module. You can use the Macro Manager docker to add a module to a VBA-based macro project,or to open existing modules for editing. You can also use the Macro Manager docker to rename or delete VBA modules.
The editing feature is disabled for some modules.
Finally, you can use the Macro Manager docker to create macros within the available modules. You don’t need any programming experienceto create macros; however, if you have programming experience and want to edit VBA macros, you can do so by using the Macro Editor. Youcan also use the Macro Manager docker to rename and delete VBA macros.
Playing macros
You can perform the actions that are associated with a macro by playing that macro.
Using macros and scripts to automate tasks | 577
Learning more about macros
The Developer area on the CorelDRAW community website can help you with its wealth of useful resources: a programming guide, detailedObject Model reference documentation with code samples, object model diagrams, and in-depth programming articles and tutorials.
The Object Model reference documentation, also referred to as API documentation, includes help on every feature and function that canbe automated in the applications. (Collectively, these features and functions are called an “object model.”) You can easily access relevantdocumentation from within the Macro Editor.
The Object Model diagrams provide a hierarchical representation of the features and functions that can be automated in CorelDRAW, CorelPHOTO-PAINT, and Corel DESIGNER.
For more detailed information about VBA and its programming environment, please consult the Microsoft Visual Basic Help from theHelp menu in the Macro Editor.
For more detailed information about VSTA and its programming environment, please consult the Help menu in the VSTA Editor.
To manually install the macro features
1 On the Windows Control Panel, click Uninstall a program.
2 Double-click CorelDRAW Graphics Suite on the Uninstall or change a program page.
3 Enable the Modify option in the wizard that appears, and follow the instructions.
4 On the Features page of the installation wizard, enable the following check boxes in the Utilities list box:
• Visual Basic for Applications
• Visual Studio Tools for Applications
The macro features for VBA and VSTA are installed with the software by default.
To specify VBA options
1 Click Tools Options.
2 In the Workspace list of categories, click VBA.
3 In the Security area, specify how to control the risk of running malicious macros by clicking Security options.
If you want to bypass this security feature, enable the Trust all installed GMS modules check box, and then proceed to step 6.
4 On the Security level page of the Security dialog box, enable one of the following options:
• Very high — allows only macros installed in trusted locations to run. All other signed and unsigned macros are disabled.
• High — allows only signed macros from trusted sources to run. Unsigned macros are automatically disabled.
• Medium — lets you choose which macros run, even if they are potentially harmful
• Low (not recommended) — allows all potentially unsafe macros to run. Enable this setting if you have virus-scanning softwareinstalled, or if you check the safety of all documents that you open.
5 On the Trusted publishers page of the Security dialog box, review which macro publishers are trusted. Click View to display details onthe selected macro publisher, or click Remove to delete the selected macro publisher from the list.
If desired, you can enable or disable the Trust access to Visual Basic project check box for the selected macro publisher.
6 Disable the Delay load VBA check box if you want to load the VBA feature at start-up.
To access the macro tools
To Do the following
578 | Corel PHOTO-PAINT 2018 User Guide
Display the Macros toolbar Click Window Toolbars Macros.
A check mark next to the command indicates that the toolbar isdisplayed.
Display the Macro Manager docker Do one of the following:•Click Tools Macros Macro Manager.•Click the Macro Manager button on the Macros toolbar.
Display the Macro Editor Do one of the following:•Click Tools Macros Macro Editor.•Click the Macro Editor button on the Macros toolbar.
•Right-click Visual Basic for Applications in the Macro Managerdocker, and then click Show IDE.
Display the VSTA Editor Click Tools Macros VSTA Editor. (VSTA must be installed onyour computer.)
To create a macro project
• In the Macro Manager docker, do one of the following:
• Click Visual Studio Tools for Applications in the list, click New, and then click New macro project.
• Click Visual Basic for Applications in the list, click New, and then click New macro project.
You can also
Open (or “load”) a macro project Do one of the following:•Click Visual Studio Tools for Applications in the list, click Load,
and then choose the project.•Click Visual Basic for Applications in the list, click Load, and
then choose the project.
Rename a macro project Right-click the project in the list, and then click Rename.
Copy a GMS-based macro project Right-click the project in the list, click Copy to, and then choose thetarget location for the copied project.
NOTE: You cannot copy a document-based macro project. Suchprojects are stored within a document and cannot be managedseparately from that document.
Display or hide all modules in the list Click the Simple mode button .
Add a module to a VBA macro project Do one of the following:•Click the project in the list, click New, and then click New
module.•Right-click the project in the list, and then click New module.
Using macros and scripts to automate tasks | 579
You can also
Edit a module in a VBA macro project Do one of the following:•Click the module in the list, and then click the Edit button .
•Right-click the module in the list, and then click Edit.
Rename a module in a macro project Right-click the module in the list, and then click Rename.
Delete a module from a macro project Do one of the following:•Click the module in the list, and then click the Delete button
.
•Right-click the module in the list, and then click Delete.
Close (or “unload”) a GMS-based macro project Right-click the macro project in the list, and then click Unloadmacro project.
NOTE: You can close a document-based macro project only byclosing the document in which it is stored.
Some macro projects are locked and cannot be modified.
To create a macro
• In the Macro Manager docker, do one of the following:
• Click the container you want, click New, and then click New macro.
• Right-click the desired container module, and then click New macro.
You can also
Edit a macro Do one of the following:•Click the macro in the list, and then click the Edit button .
•Right-click the macro in the list, and then click Edit.
Delete a macro Do one of the following:•Click the macro in the list, and then click the Delete button .
•Right-click the macro in the list, and then click Delete.
Some macro projects are locked and cannot be modified.
To play a macro
• Do any of the following:
• Click Tools Macros Run macro, or click the Run macro button on the Macros toolbar. From the Macros in list box, choose
the project in which the macro is stored. From the Macro name list, choose the macro. Click Run.
• In the Macro Manager docker, double-click the macro in the list.
580 | Corel PHOTO-PAINT 2018 User Guide
• In the Macro Manager docker, click the macro in the list, and then click the Run button .
• In the Macro Manager docker, right-click the macro in the list, and then click Run.
To access Object Model reference documentation from within the Macro Editor
1 While in Microsoft Visual Basic for Applications, press F2 to display the Object Browser.
The Object Browser displays all the features and functions that can be automated in the Macro Editor.
2 Choose PHOTOPAINT from the Library list box.
The Object Browser is updated to display only the features and functions of Corel PHOTO-PAINT that can be automated in the MacroEditor. Collectively, these features and functions are called an “object model.”
3 Click an item in the Object Browser, and press F1.
You can also display information for any item in the Code window of the Macro Editor by clicking that item and pressing F1.
Working with scripts
Scripts are short programs that use the Corel SCRIPT programming language to automate simple tasks. For example, if you have a series ofimages that are underexposed, you can record the corrective adjustments as you apply them to the first photograph. You can then play therecording on all the remaining photographs to correct them simultaneously.
You can use the Recorder docker to create recordings, which you can save as scripts for future use. You can also use the Recorder docker toopen, edit, and play recordings and scripts.
Creating recordings and scripts
You can record a sequence of most keyboard, toolbar, toolbox, menu, and mouse operations. As you record, the operations are translatedinto command statements that appear chronologically in a command list. Each command statement is one word that is based on the nameof a menu plus the name of a command found in that menu.
Some operations are converted to parameters that are embedded within a command. Parameters are recorded, but they are not displayed inthe command list. For example, if you choose a paint color and apply a brushstroke to the image, the color selection is not displayed in therecorder’s command list; instead, it is recorded as a parameter of the paint tool command.
The following operations and commands cannot be recorded in Corel PHOTO-PAINT:• toolbar, keyboard, and menu customization• grid, ruler, and guideline customization• Window and Help menu commands• image calculations and image stitching• viewing operations, such as zooming
To make a recording accessible in a future Corel PHOTO-PAINT session, you must save it as a script. The scripts that you create can be loadedand played at any time.
You can also save a list of Undo actions as a script. For example, if you did not record the actions for an effect that you want to reproduce,you can save those operations as a script by using the Undo list. A script created from an Undo list includes all the operations you performon an image; therefore, you may need to edit the script to isolate the commands you want.
Editing recordings and scripts
You can edit a recording or script by inserting new commands, recording over existing commands, and deleting the commands that you nolonger want to include.
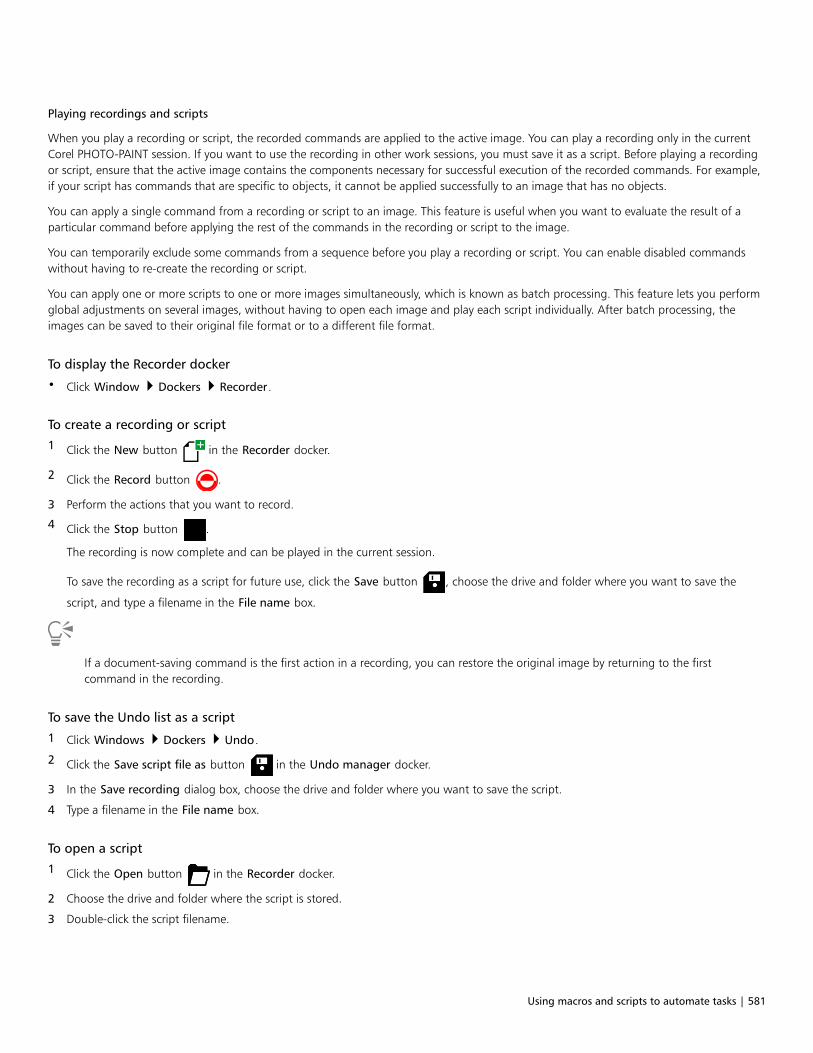
Using macros and scripts to automate tasks | 581
Playing recordings and scripts
When you play a recording or script, the recorded commands are applied to the active image. You can play a recording only in the currentCorel PHOTO-PAINT session. If you want to use the recording in other work sessions, you must save it as a script. Before playing a recordingor script, ensure that the active image contains the components necessary for successful execution of the recorded commands. For example,if your script has commands that are specific to objects, it cannot be applied successfully to an image that has no objects.
You can apply a single command from a recording or script to an image. This feature is useful when you want to evaluate the result of aparticular command before applying the rest of the commands in the recording or script to the image.
You can temporarily exclude some commands from a sequence before you play a recording or script. You can enable disabled commandswithout having to re-create the recording or script.
You can apply one or more scripts to one or more images simultaneously, which is known as batch processing. This feature lets you performglobal adjustments on several images, without having to open each image and play each script individually. After batch processing, theimages can be saved to their original file format or to a different file format.
To display the Recorder docker
• Click Window Dockers Recorder.
To create a recording or script
1 Click the New button in the Recorder docker.
2 Click the Record button .
3 Perform the actions that you want to record.
4 Click the Stop button .
The recording is now complete and can be played in the current session.
To save the recording as a script for future use, click the Save button , choose the drive and folder where you want to save the
script, and type a filename in the File name box.
If a document-saving command is the first action in a recording, you can restore the original image by returning to the firstcommand in the recording.
To save the Undo list as a script
1 Click Windows Dockers Undo.
2 Click the Save script file as button in the Undo manager docker.
3 In the Save recording dialog box, choose the drive and folder where you want to save the script.
4 Type a filename in the File name box.
To open a script
1 Click the Open button in the Recorder docker.
2 Choose the drive and folder where the script is stored.
3 Double-click the script filename.
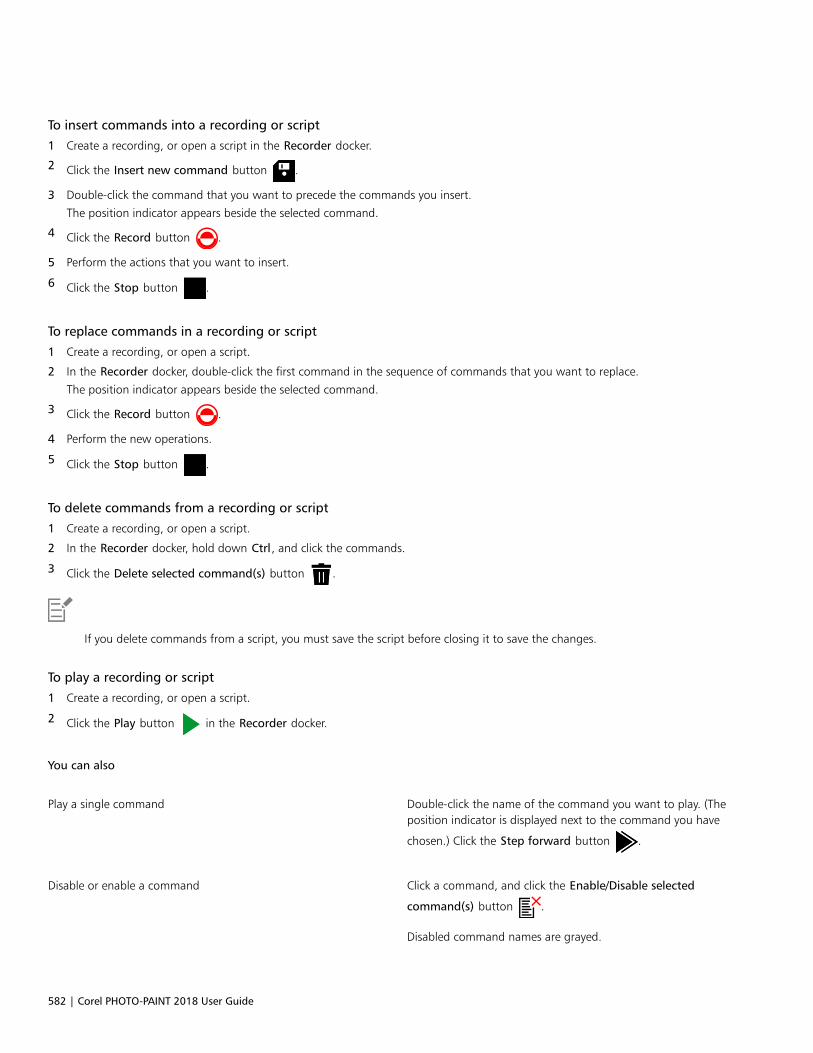
582 | Corel PHOTO-PAINT 2018 User Guide
To insert commands into a recording or script
1 Create a recording, or open a script in the Recorder docker.
2 Click the Insert new command button .
3 Double-click the command that you want to precede the commands you insert.
The position indicator appears beside the selected command.
4 Click the Record button .
5 Perform the actions that you want to insert.
6 Click the Stop button .
To replace commands in a recording or script
1 Create a recording, or open a script.
2 In the Recorder docker, double-click the first command in the sequence of commands that you want to replace.
The position indicator appears beside the selected command.
3 Click the Record button .
4 Perform the new operations.
5 Click the Stop button .
To delete commands from a recording or script
1 Create a recording, or open a script.
2 In the Recorder docker, hold down Ctrl, and click the commands.
3 Click the Delete selected command(s) button .
If you delete commands from a script, you must save the script before closing it to save the changes.
To play a recording or script
1 Create a recording, or open a script.
2 Click the Play button in the Recorder docker.
You can also
Play a single command Double-click the name of the command you want to play. (Theposition indicator is displayed next to the command you have
chosen.) Click the Step forward button .
Disable or enable a command Click a command, and click the Enable/Disable selected
command(s) button .
Disabled command names are grayed.
Using macros and scripts to automate tasks | 583
You can also
Go to the first command Click the Rewind button .
Go to the last command Click the Fast forward button .
To play scripts on multiple images
1 Click File Batch process.
2 Click Add file.
3 In the Load images for batch playback dialog box, choose the drive and folder where the images are stored.
4 Holding down Ctrl, click the images that you want to edit, and click Open.
5 In the Batch process dialog box, click Add script.
6 In the Load script dialog box, choose the drive and folder where the scripts are stored.
7 Holding down Ctrl, click the scripts that you want to play, and click Open.
8 Choose an option from the On completion list box.
To save the files to a specific folder, click Browse, and navigate to the folder you want.
9 Click Play.
Choosing Don’t save from the On completion list box lets you assess the results before overwriting the original image.

584 | Corel PHOTO-PAINT 2018 User Guide

Reference | 585
Reference
Corel PHOTO-PAINT for Adobe Photoshop users..................................................................................................................................587
Glossary............................................................................................................................................................................................... 591

586 | Corel PHOTO-PAINT 2018 User Guide

Corel PHOTO-PAINT for Adobe Photoshop users | 587
Corel PHOTO-PAINT for Adobe Photoshop users
Adobe Photoshop and Corel PHOTO-PAINT have many similarities, which makes it easy to move from one application to the other. Althoughthey share most basic drawing and design capabilities, Adobe Photoshop and Corel PHOTO-PAINT are distinguished by some differences inboth terminology and tools. Understanding these differences lets you make a quick transition to Corel PHOTO-PAINT.
In this section you’ll learn about• “Comparing terminology” (page 587)• “Comparing tools” (page 588)
Comparing terminology
The terms and concepts in Adobe Photoshop and Corel PHOTO-PAINT differ for some features. Adobe Photoshop terms are listed below withtheir Corel PHOTO-PAINT equivalents.
Adobe Photoshop term Corel PHOTO-PAINT term
Actions Scripts/macros
Adjustment layers Lenses
Animations Movies
Bitmap mode Black-and-white color mode
Blending modes Merge modes
Canvas Paper size
Extract filter Cutout Lab
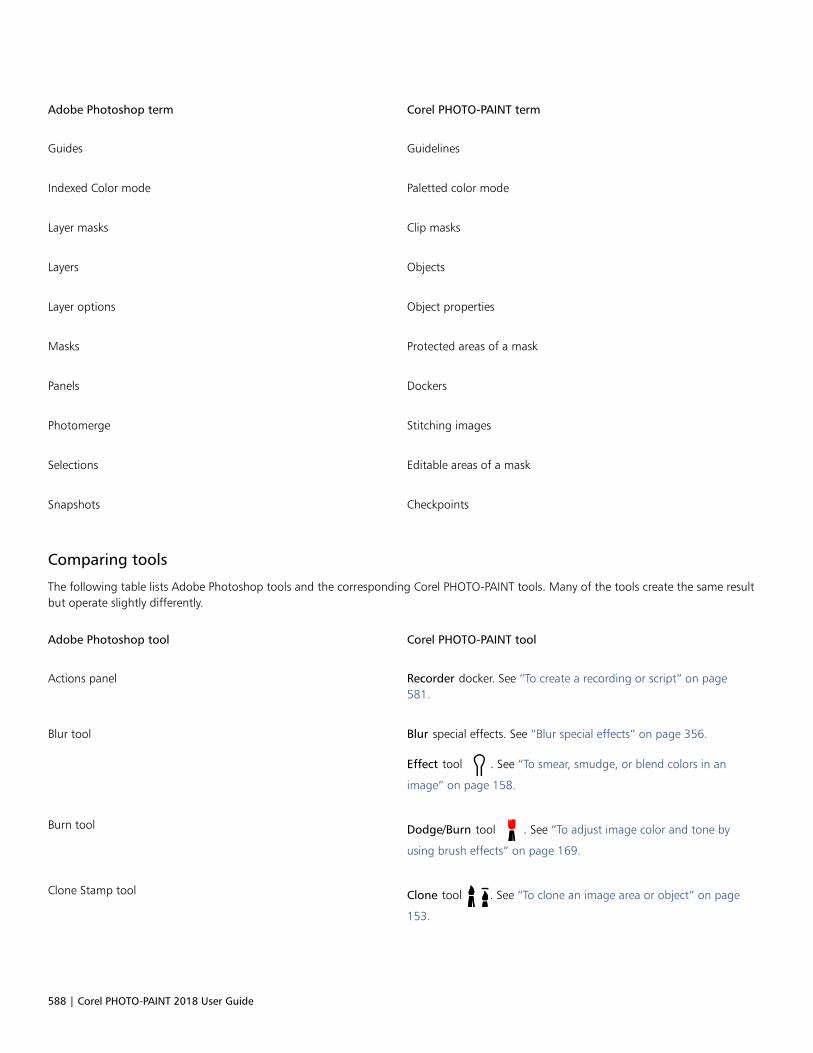
588 | Corel PHOTO-PAINT 2018 User Guide
Adobe Photoshop term Corel PHOTO-PAINT term
Guides Guidelines
Indexed Color mode Paletted color mode
Layer masks Clip masks
Layers Objects
Layer options Object properties
Masks Protected areas of a mask
Panels Dockers
Photomerge Stitching images
Selections Editable areas of a mask
Snapshots Checkpoints
Comparing tools
The following table lists Adobe Photoshop tools and the corresponding Corel PHOTO-PAINT tools. Many of the tools create the same resultbut operate slightly differently.
Adobe Photoshop tool Corel PHOTO-PAINT tool
Actions panel Recorder docker. See “To create a recording or script” on page581.
Blur tool Blur special effects. See “Blur special effects” on page 356.
Effect tool . See “To smear, smudge, or blend colors in an
image” on page 158.
Burn tool Dodge/Burn tool . See “To adjust image color and tone by
using brush effects” on page 169.
Clone Stamp tool Clone tool . See “To clone an image area or object” on page
153.
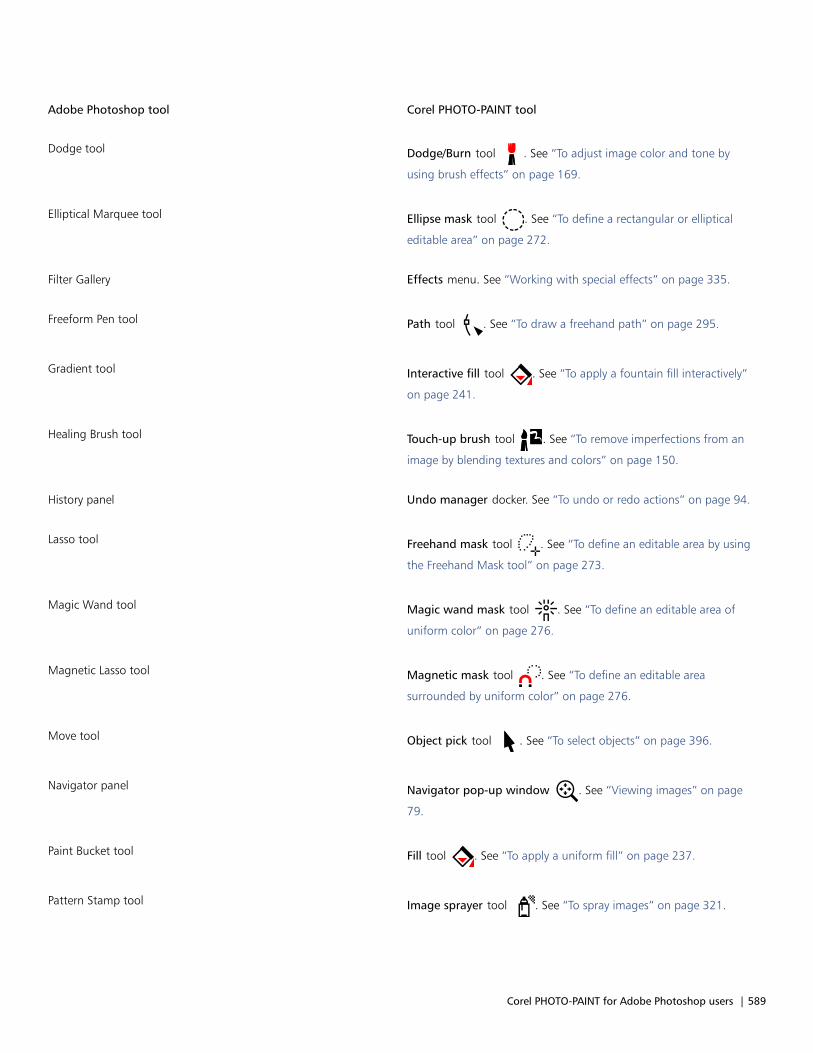
Corel PHOTO-PAINT for Adobe Photoshop users | 589
Adobe Photoshop tool Corel PHOTO-PAINT tool
Dodge tool Dodge/Burn tool . See “To adjust image color and tone by
using brush effects” on page 169.
Elliptical Marquee tool Ellipse mask tool . See “To define a rectangular or elliptical
editable area” on page 272.
Filter Gallery Effects menu. See “Working with special effects” on page 335.
Freeform Pen tool Path tool . See “To draw a freehand path” on page 295.
Gradient tool Interactive fill tool . See “To apply a fountain fill interactively”
on page 241.
Healing Brush tool Touch-up brush tool . See “To remove imperfections from an
image by blending textures and colors” on page 150.
History panel Undo manager docker. See “To undo or redo actions” on page 94.
Lasso tool Freehand mask tool . See “To define an editable area by using
the Freehand Mask tool” on page 273.
Magic Wand tool Magic wand mask tool . See “To define an editable area of
uniform color” on page 276.
Magnetic Lasso tool Magnetic mask tool . See “To define an editable area
surrounded by uniform color” on page 276.
Move tool Object pick tool . See “To select objects” on page 396.
Navigator panel Navigator pop-up window . See “Viewing images” on page
79.
Paint Bucket tool Fill tool . See “To apply a uniform fill” on page 237.
Pattern Stamp tool Image sprayer tool . See “To spray images” on page 321.
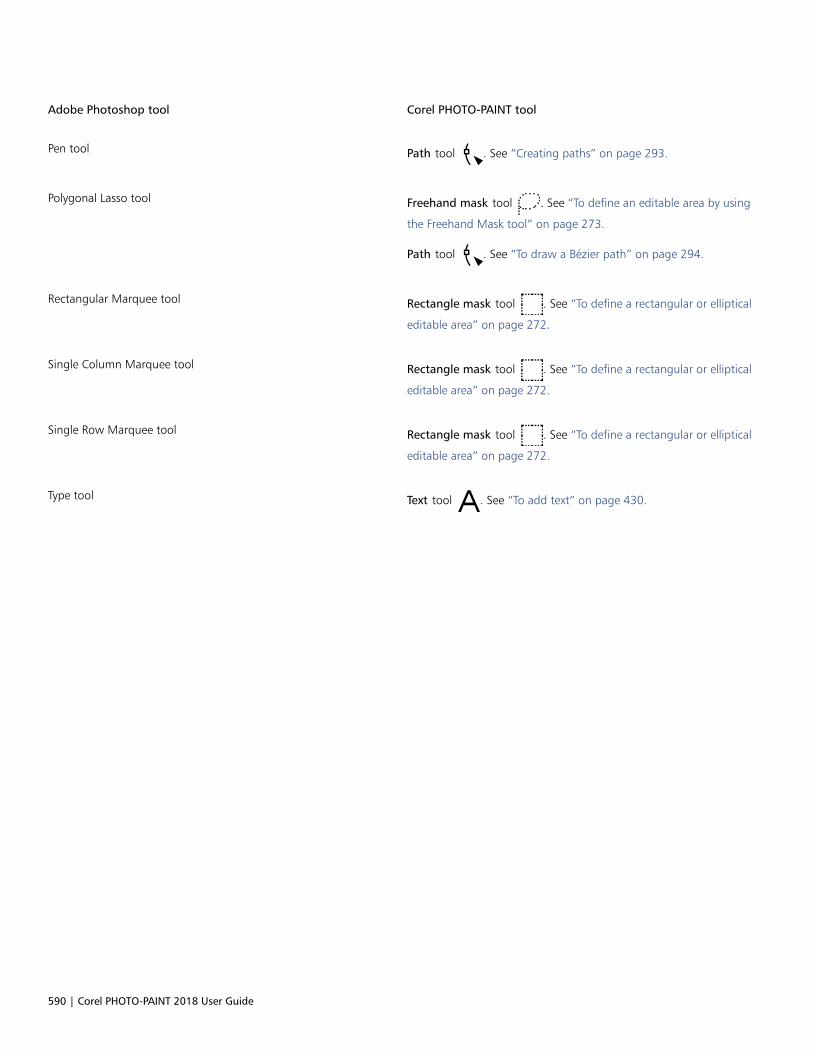
590 | Corel PHOTO-PAINT 2018 User Guide
Adobe Photoshop tool Corel PHOTO-PAINT tool
Pen tool Path tool . See “Creating paths” on page 293.
Polygonal Lasso tool Freehand mask tool . See “To define an editable area by using
the Freehand Mask tool” on page 273.
Path tool . See “To draw a Bézier path” on page 294.
Rectangular Marquee tool Rectangle mask tool . See “To define a rectangular or elliptical
editable area” on page 272.
Single Column Marquee tool Rectangle mask tool . See “To define a rectangular or elliptical
editable area” on page 272.
Single Row Marquee tool Rectangle mask tool . See “To define a rectangular or elliptical
editable area” on page 272.
Type tool Text tool . See “To add text” on page 430.
Glossary | 591
Glossary
A B C D E F G H I J K L M N O P R S T U V W Z
A
accelerator table
A file that contains a list of shortcut keys. Different tables are active depending on the task that you are performing.
active object (Corel PHOTO-PAINT)
An object that has a red border around its thumbnail in the Object manager docker.
alpha channel
A temporary storage area for masks. When you save a mask to an alpha channel, you can access and reuse it in the image as many times asyou want. You can save an alpha channel to a file or load a previously saved channel in the active image.
ambient lighting
The lighting in a room, including natural and artificial light sources.
animation file
A file that supports moving images; for example, animated GIF and QuickTime (MOV).
anti-aliasing
A method of smoothing curved and diagonal edges in images. Intermediate pixels along edges are filled to smooth the transition betweenthe edges and the surrounding area.
aspect ratio
The ratio of the width of an image to its height (expressed mathematically as x:y). For example, the aspect ratio of an image that is 640 x480 pixels is 4:3.
B
bit depth
The number of binary bits that define the shade or color of each pixel in a bitmap. For example, a pixel in a black-and-white image has adepth of 1 bit, because it can only be black or white. The number of color values that a given bit depth can produce is equal to 2 to the
power of the bit depth. For example, a bit depth of 1 can produce two color values (2 1=2), and a bit depth of 2 can produce 4 color values
(2 2 = 4).
Bit depth ranges between 1 and 64 bits per pixel (bpp) and determines the color depth of an image.
592 | Corel PHOTO-PAINT 2018 User Guide
bitmap
An image composed of grids of pixels or dots.
See also vector graphic.
bitmap fill
A fill created from any bitmap.
black point
A brightness value that is considered black in a bitmap image. In Corel PHOTO-PAINT, you can set the black point to improve the contrast ofan image. For example, in a histogram of an image, with a brightness scale of 0 (dark) to 255 (light), if you set the black point at 5, all pixelswith a value greater than 5 are converted to black.
black-and-white color mode
A 1-bit color mode that stores images as two solid colors — black and white — with no gradations. This color mode is useful for line art andsimple graphics. To create a black-and-white photo effect, you can use the grayscale color mode.
See also grayscale.
bleed
The part of the printed image that extends beyond the edge of the page. The bleed ensures that the final image goes right to the edge ofthe paper after binding and trimming.
bounding box
The invisible box indicated by the eight selection handles surrounding a selected object.
brightness
The amount of light that is transmitted or reflected from a given pixel. In the HSB color mode, brightness is a measure of how much white acolor contains. For example, a brightness value of 0 produces black (or shadow in photos), and a brightness value of 255 produces white (orhighlight in photos).
C
CERN
CERN (Conseil Europeén pour la Recherche Nucléaire) is the scientific laboratory in which the World Wide Web was developed. CERN is alsoone of the World Wide Web server systems. Contact your server administrator to find out which system your server uses.
channel
An 8-bit grayscale image that stores color or mask information for another image. There are two types of channels: color and mask. Imageshave one color channel for each component of the color model on which they are based. In addition, some images use spot color channels.Each channel contains the color information for that component. Mask (alpha) channels store masks that you create for your images, andthey can be saved with images in formats that support mask information, such as Corel PHOTO-PAINT (CPT) format.
child object
An object whose image elements are inserted into the shape of another object, called a parent object. The child object and parent object arecalled a clipping group. The child object must be on a layer above the parent object.
choke
In commercial printing, a form of trapping created by extending the background object into the foreground object.
client/server image map
A rarely used image map type that includes code for both client-side and server-side image maps. This type of image map automaticallydefaults to the user’s web browser for image map processing. If the browser does not support image maps, the server uses the external mapfile to process information. Currently, most web browsers support image maps, so client-side image maps are more common.
client-side image map
This common image map type does not depend on the server to process the map information.
Glossary | 593
clipart
Ready-made images that can be imported into Corel applications and edited if required.
Clipboard
An area that is used to temporarily store cut or copied information. The information is stored until new information is cut or copied to theClipboard, replacing the old.
clip mask
A mask that lets you edit an object’s transparency levels without affecting the pixels in the object. You can change the transparency levelsdirectly on the object and then add the clip mask, or add the clip mask before making the changes.
clipping range
The percentage of the range of values that is not displayed in the upper part of the histogram’s vertical axis.
color cast
A color tint that often occurs in photos as a result of lighting conditions or other factors. For example, taking a photo indoors in dimincandescent light can result in a yellow color cast, and taking a photo outdoors in bright sunlight can result in a blue color cast.
color depth
The maximum number of colors an image can contain. Color depth is determined by the bit depth of an image and the displaying monitor.For example, an 8-bit image can contain up to 256 colors, while a 24-bit image can contain roughly up to 16 million colors. A GIF image isan example of an 8-bit image; a JPEG image is an example of a 24-bit image.
CMY
A color mode made up of cyan (C), magenta (M), and yellow (Y). This mode is used in the three-color printing process.
CMYK
A color mode made up of cyan (C), magenta (M), yellow (Y), and black (K). CMYK printing produces true blacks and a wide tonal range. Inthe CMYK color mode, color values are expressed as percentages; therefore, a value of 100 for an ink means that the ink is applied at fullsaturation.
code page
A code page is a table in the DOS or Windows operating system that defines which ASCII or ANSI character set is used for displaying text.Different character sets are used for different languages.
color channel
An 8-bit grayscale version of an image. Each channel represents one level of color in the image; for example, RGB has three color channels,while CMYK has four. When all the channels are printed together, they produce the entire range of colors in the image.
See also RGB and CMYK.
color gamut
The range of colors that can be reproduced or perceived by any device. For example, a monitor displays a different color gamut than aprinter, making it necessary to manage colors from original images to final output.
color mode
A system that defines the number and kind of colors that make up an image. Black-and-white, grayscale, RGB, CMYK, and paletted areexamples of color modes.
color model
A simple color chart that defines the range of colors displayed in a color mode. RGB (red, green, blue), CMY (cyan, magenta, yellow), CMYK(cyan, magenta, yellow, black), HSB (hue, saturation, brightness), HLS (hue, lightness, saturation), and CIE L*a*b (Lab) are examples of colormodels.
color palette
A collection of solid colors from which you can choose colors for fills and outlines.
594 | Corel PHOTO-PAINT 2018 User Guide
color profile
A description of the color-handling capabilities and characteristics of a device.
color separation
In commercial printing, the process of splitting colors in a composite image to produce a number of separate grayscale images, one for eachprimary color in the original image. In the case of a CMYK image, four separations (one for cyan, magenta, yellow, and black) must be made.
color space
In electronic color management, a virtual representation of a device or the color gamut of a color model. The boundaries and contours of adevice’s color space are mapped by color management software.
See also color gamut.
color swatch
A solid-colored patch in a color palette.
color tolerance
The value that determines the color range or sensitivity of the Lasso mask tool, Magic wand mask tool, and Fill tool. Tolerance is also used inthe Color mask dialog box to determine which pixels are protected when you create a color mask. A pixel is included in the specified colorrange if its grayscale value falls within the defined tolerance.
color trapping
A printing term used to describe a method of overlapping colors to compensate for misaligned color separations (misregistration). Thismethod avoids white slivers that appear between adjoining colors on a white page.
See also spread, choke, and overprinting.
contrast
The difference in tone between the dark and light areas of an image. Higher contrast values indicate greater differences and fewergradations between dark and light.
control points (Corel PHOTO-PAINT)
The points that extend from a node along a curve that is being edited with the Shape tool. Control points determine the angle at which thecurve passes through the node.
crop
To cut unwanted areas of an image without affecting the resolution of the part that remains.
cubist
An abstract style of art that stresses several aspects of the same object simultaneously, generally in the form of squares or cubes.
D
DeviceN
A type of color space and device color model. This color space is multi-component, allowing color to be defined by other than the standardset of three (RGB) and four (CMYK) color components.
distortion handles
The outward-facing, double-headed arrows located at each corner of the highlighting box.
dithering
A process used to simulate a greater number of colors when only a limited number of colors are available.
dpi (dots per inch)
A measure of a printer’s resolution in dots per inch. Typical desktop laser printers print at 600 dpi. Imagesetters print at 1270 or 2540 dpi.Printers with higher dpi capabilities produce smoother and cleaner output. The term dpi is also used to measure scanning resolution and toindicate bitmap resolution.
Glossary | 595
drawing page
The portion of a drawing window enclosed by a rectangle with a shadow effect.
duotone
An image in the duotone color mode is an 8-bit grayscale image that has been enhanced with one to four additional colors.
E
editable area
An editable area (selection) allows paint and effects to be applied to the underlying pixels.
See also protected area and mask.
encoding
Determines the character set of text, letting you correctly display text in the appropriate language.
Exchangeable Image File (EXIF)
A file format that embeds digital camera information, such as the time and date a photo is taken, shutter speed, and focus, into JPEGimages.
exposure
A photographic term referring to the amount of light used to create an image. If not enough light is permitted to interact with the sensor (ina digital camera) or film (in a traditional camera), the image appears too dark (underexposed). If too much light is permitted to interact withthe sensor or film, the image appears too light (overexposed).
F
feathering
The level of sharpness along the edges of a drop shadow.
fill
A color, bitmap, fountain, or pattern applied to an area of an image.
filter
An application that translates digital information from one form to another.
flattened image
An image in which objects are combined with the background and can no longer be edited as individual objects.
floating editable area
An editable area that hovers or floats above an image and can be moved and modified without affecting the underlying pixels.
floating object
A bitmap with no background. Floating objects are also referred to as photo objects or cutout images.
font
A set of characters with a single style (such as italic), weight (such as bold), and size (such as 10 point) for a typeface such as Times NewRoman.
fountain fill
A smooth progression of two or more colors applied to an area of an image that follow a linear, radial, conical, or square path. Two-colorfountain fills have a direct progression from one color to another, while custom fills may have a progression of many colors.
fountain step
The shades of color that make up the appearance of a fountain fill. The more steps in a fill, the smoother the transition from the beginningcolor to the end color.
596 | Corel PHOTO-PAINT 2018 User Guide
fractal
An irregular shape generated by a repeating pattern. Fractals can be used to mathematically generate an irregular and complex image byfollowing a pattern, without having to define all of the individual components in the image.
G
Gaussian
A type of pixel distribution that spreads the pixel information outward using bell-shaped curves rather than straight lines.
GIF
A graphic file format designed to use a minimum of disk space and be easily exchanged between computers. This format is commonly usedto publish images of 256 or fewer colors to the Internet.
glyph (typographic)
A typographic glyph corresponds to a single character of a typeface.
grab area
The area of a command bar that can be dragged. Dragging the grab area moves the bar, while dragging any other area of the bar has noeffect. The location of the grab area depends on the operating system you are using, the orientation of the bar, and whether the bar isdocked or undocked. Command bars with grab areas include toolbars, the toolbox, and the property bar.
gradient node
A square point that represents each color on the gradient arrow of a gradient fill, which is used to change the fill’s start and end points,colors, and transparency values.
grayscale
A color mode that displays images by using 256 shades of gray. Each color is defined as a value between 0 and 255, where 0 is darkest(black) and 255 is lightest (white). Grayscale images, especially photos, are commonly referred to as “black and white.”
grayscale image
An image that uses the grayscale color mode, which can display up to 256 shades of gray, ranging from white to black. Grayscale images,especially photos, are commonly referred to as “black and white.”
grid
A series of evenly spaced horizontal and vertical lines that are used to help draw and arrange objects.
group
A set of objects that behave as one unit. Operations you perform on a group apply equally to each of its objects.
guideline
A horizontal, vertical, or slanted line that can be placed anywhere in the drawing window to aid in object placement.
H
halftone
An image that has been converted from a continuous tone image to a series of dots of various sizes to represent different tones.
handles
A set of eight black squares that appear at the corners and sides of an object when the object is selected. By dragging individual handles,you can scale, resize, or mirror the object. If you click a selected object, the shape of the handles changes to arrows so that you can rotateand skew the object.
highlight, shadow, and midtone
Terms used to describe the brightness of pixels in a bitmap image. Brightness values range from 0 (dark) to 255 (light). Pixels in the firstthird of the range are considered shadows, pixels in the middle third of the range are considered midtones, and pixels in the last third ofthe range are considered highlights. You can lighten or darken specific areas in images by adjusting the highlights, shadows, or midtones. Ahistogram is an excellent tool for viewing and evaluating the highlights, shadows, and midtones of images.
Glossary | 597
highlighting box
A rectangle with eight handles that encloses a selection in an image.
histogram
A histogram consists of a horizontal bar chart that plots the brightness values of the pixels in your bitmap image on a scale from 0 (dark) to255 (light). The left part of the histogram represents the shadows of an image, the middle part represents the midtones, and the right partrepresents the highlights. The height of the spikes indicates the number of pixels at each brightness level. For example, a large number ofpixels in the shadows (the left side of the histogram) indicates the presence of image detail in the dark areas of the image.
hotspot
The area of an object that you can click to jump to the address specified by a URL.
HSB (hue, saturation, brightness)
A color model that defines three components: hue, saturation, and brightness. Hue determines color (yellow, orange, red, and so on);brightness determines perceived intensity (lighter or darker color); and saturation determines color depth (from dull to intense).
HTML
The World Wide Web authoring standard comprised of markup tags that define the structure and components of a document. The tags areused to tag text and integrate resources (such as images, sound, video, and animation) when you create a webpage.
hue
The property of a color that allows it to be classified by its name. For example, blue, green, and red are all hues.
hyperlink
An electronic link that provides access directly from one place in a document to another place in that document or to another document.
I
image map
A graphic in an HTML document that contains clickable areas that link to locations on the World Wide Web, to other HTML documents, orto graphics.
imagesetter
A high-resolution device that creates film or film-based paper output used in the production of plates for printing presses.
intensity
Intensity is a measure of the brightness of the light pixels in a bitmap compared with the darker midtones and dark pixels. An increase inintensity increases the vividness of whites while maintaining true darks.
interlaced video image
Interlaced video images take two passes to fill a screen, painting every other line in each pass. This can produce a flicker.
interlacing
In GIF images, a method that lets you display a web-based image on the screen at a low, blocky resolution. As the image data loads, theimage quality improves.
J
JavaScript
A scripting language used on the web to add interactive functions to HTML pages.
JPEG
A format for photographic images that offers compression with some loss of image quality. Because of their compression (up to 20 to 1)and small file size, JPEG images are widely used in Internet publishing.
JPEG 2000
An improved version of the JPEG file format that features better compression and allows you to attach image information and assign adifferent compression rate to an image area.
598 | Corel PHOTO-PAINT 2018 User Guide
K
kerning
The space between characters, and the adjustment of that space. Often, kerning is used to place two characters closer together than usual,for example WA, AW, TA, or VA. Kerning increases readability and makes letters appear balanced and proportional, especially at larger fontsizes.
knockout
A printing term that refers to an area where underlying colors have been removed so that only the top color prints. For example, if you printa small circle on a large circle, the area under the small circle is not printed. This ensures that the color used for the small circle remains trueinstead of overlapping and mixing with the color used for the large circle.
L
Lab
A color model that contains a luminance (or lightness) component (L) and two chromatic components: “a” (green to red) and “b” (blue toyellow).
layer
A transparent plane on which you can place objects in a drawing.
leading
The spacing between lines of text. Leading is important for both readability and appearance.
lens
An object that protects part or all of an image when you perform color and tonal corrections. You can view the effect of a correctionthrough a lens without affecting the underlying pixels. If you move a lens, the correction is applied to the pixels at the new location.
linking
The process of placing an object created in one application into a document created in a different application. A linked object remainsconnected with its source file. If you want to change a linked object in a file, you have to modify the source file.
lossless
A kind of file compression that maintains the quality of an image that has been compressed and decompressed.
lossy
A kind of file compression that results in noticeable degradation of image quality.
low-frequency areas
Smooth areas in an image where gradual changes take place. That is, areas where there are no edges or noise.
LZW
A lossless file compression technique that results in smaller file size and faster processing time. LZW compression is commonly used on GIFand TIFF files.
M
marquee
A dashed outline that surrounds an editable area or an object in an image. By default, object marquees are blue and mask marquees areblack.
marquee select
To select objects or nodes by dragging the Pick tool or Shape tool diagonally and enclosing objects in a marquee box with a dotted outline.
mask
A mask is applied to an image during image editing to define protected areas and editable areas.
Glossary | 599
mask modes
Mask tool operation modes that you must choose before you create or fine-tune a mask and its editable area. There are four mask modes:Normal, Additive, Subtractive, and XOR. The Normal mode (default) lets you select an area in an image. The Additive mode lets you expandthe editable regions by selecting multiple areas in an image. The Subtractive mode lets you reduce the editable regions by removing areasfrom a selection. The XOR mode lets you select multiple areas in an image. If areas overlap, the overlapping regions are excluded from theeditable area and added to the protected area.
merge mode
An editing state that determines how the selected paint, object, or fill color combines with other colors in the image.
micro nudge
To move an object in small increments.
See also nudge and super nudge.
moiré pattern
The visual effect of radiating curves created by superimposing two regular patterns. For example, a moiré pattern can result fromoverlapping two halftone screens of different angles, dot spacing, and dot size. Moiré patterns are the undesirable result of rescreening animage with a different halftone screen or with the same halftone screen on an angle different from the original.
mosaic
The decorative artwork made by arranging small pieces of variously colored material to form pictures or patterns.
multichannel
A color mode that displays images by using multiple color channels, each comprising 256 shades of gray. When you convert an RGB colorimage to the multichannel color mode, the individual color channels (red [R], green [G], and blue [B]) are converted to grayscale informationthat reflects the color values of the pixels in each channel.
multitasking
An option that can improve the overall performance of an application by optimizing how the CPU executes tasks.
N
NCSA (National Center for Supercomputing Applications)
NCSA is a server system. If you are creating an image map to be displayed on the web, you need to know the system your server uses,because different codes are used in the map files. Contact your server administrator to find out which system your server uses.
nodes
The square points at each end of a line or curve segment. You can change the shape of a line or curve by dragging one or more of its nodes.
noise
In bitmap editing, random pixels on the surface of a bitmap, resembling static on a television screen.
NTSC (National Television Standards Committee)
A video color filter that is commonly used to define the gamut of colors supported by television monitors in North America.
nudge
To move an object in increments.
See also micro nudge and super nudge.
O
object (Corel PHOTO-PAINT)
An independent bitmap that is layered above the background image. Changes applied to objects do not affect the underlying image.
opacity
The quality of an object that makes it difficult to see through. If an object is 100 percent opaque, you cannot see through it. Opacity levelsunder 100 percent increase the transparency of objects.
600 | Corel PHOTO-PAINT 2018 User Guide
See also transparency.
overlay
A red-tinted, transparent sheet that you can superimpose on the protected areas in an image. The mask overlay makes it easy to distinguishbetween the editable and the masked (protected) regions in an image. When the overlay is applied, the masked areas are displayed invarying degrees of red (according to their transparency). The deeper the saturation of the red tint, the greater the degree of protection.
See also editable area and protected area.
overprinting
Overprinting is achieved by printing one color over another. Depending on the colors you choose, the overprinted colors mix to create a newcolor, or the top color covers the bottom color. Overprinting a dark color on a light color is often used to avoid registration problems thatoccur when color separations are not precisely aligned.
See also color trapping, choke, and spread.
P
PAL
A video color filter that is commonly used to define the gamut of colors supported by television monitors in Europe and Asia.
paletted color mode
An 8-bit color mode that displays images of up to 256 colors. You can convert a complex image to the paletted color mode to reduce filesize and to achieve more precise control of the colors used throughout the conversion process.
pan (Corel PHOTO-PAINT)
To move the image around in the image window, usually when the image is larger than its window. Panning changes the image view in thesame way that scrolling moves the image up, down, to the left, or to the right in the image window. When working at high magnificationlevels where not all of the image is displayed, you can quickly pan to see parts of the image that were previously hidden.
PANOSE font matching
A feature that lets you choose a substitute font if you open a file that contains a font not installed on your computer. You can make asubstitution for the current working session only, or you can make a permanent substitution, so that the new font is automatically displayedwhen you save and reopen the file.
PANTONE process colors
The colors that are available through the PANTONE Process Color System, which is based on the CMYK color model.
parent object
An object whose shape is combined with the image elements of another object, called a child object. The child object and parent object arecalled a clipping group. The parent object must be on an object layer below the child object.
path
A series of line or curve segments connected by square endpoints called nodes.
pattern fill
A fill consisting of a series of repeating vector objects or images.
perspective handles
The hollow circles in the corners of the highlighting box.
pixel
A colored dot that is the smallest part of a bitmap.
See also resolution.
pixelation
A type of image distortion in which individual pixels are discernible to the naked eye, or groups of pixels appear as blocks of colors.Pixelation is caused by incorrect resolution or incorrect image dimensions, or it can be created intentionally for a special effect.
Glossary | 601
PNG (Portable Network Graphics)
A graphic file format designed for use in online viewing. This format can import 24-bit color graphics.
pressure-sensitive pen
A stylus that you can use to access commands and draw your images. To use with Corel PHOTO-PAINT, you must install the pressure-sensitivepen, along with a pressure-sensitive tablet and its corresponding drivers.
process color
In commercial printing, colors that are produced from a blend of cyan, magenta, yellow, and black. This is different from a spot color, whichis a solid ink color printed individually (one printing plate is required for each spot color).
progressive
In JPEG images, a method of having the image appear on screen in its entirety, at a low, blocky resolution. As the image data loads, theimage quality progressively improves.
protected area
An area that prevents paint and effects from being applied to the underlying pixels.
See also mask and editable area.
R
radius
As applied to orbits, sets the distance between the center of the brushstroke and the nibs that travel around the center of the brushstrokewhen you paint with orbits. Increasing this value increases the size of the brushstroke.
As applied to the Dust & Scratch filter, sets the number of pixels surrounding the damaged area that are used to apply the filter.
range sensitivity
A paletted color mode option that lets you specify a focus color for the paletted conversion. You can adjust the color and specify itsimportance to guide converting.
rasterized image
An image that has been rendered into pixels. When you convert vector graphic files to bitmap files, you create rasterized images.
render
To capture a two-dimensional image from a three-dimensional model.
resample
To change the resolution and dimensions of a bitmap. Upsampling increases the size of the image; downsampling decreases the size ofthe image. Resampling with fixed resolution lets you maintain the resolution of the image by adding or subtracting pixels while varying theimage size. Resampling with variable resolution keeps the number of pixels unchanged while changing the image size, resulting in lower orhigher resolution than that of the original image.
resolution
The amount of detail that an image file contains, or that an input, output, or display device is capable of producing. Resolution is measuredin dpi (dots per inch) or ppi (pixels per inch). Low resolutions can result in a grainy appearance; high resolutions can produce higher qualityimages but result in larger file sizes.
RGB
A color mode in which the three colors of light (red, green, and blue) are combined in varying intensities to produce all other colors. A valuebetween 0 and 255 is assigned to each channel of red, green, and blue. Monitors, scanners, and the human eye use RGB to produce ordetect color.
rollover
An interactive object or group of objects that changes its appearance when you click or point to it.
602 | Corel PHOTO-PAINT 2018 User Guide
round-tripping
The conversion of a document saved in one file format, such as Portable Document Format (PDF), to another format, such asCorel DESIGNER (DES) and then back again.
rotation handles
The curved, double arrows in the corners of the highlighting box.
ruler
A horizontal or vertical bar marked off in units and used to determine the size and position of objects. By default, the rulers appear on theleft side and along the top of the application window, but they can be hidden or moved.
S
saturation
The purity or vividness of a color, expressed as the absence of white. A color that has 100 percent saturation contains no white. A color with0 percent saturation is a shade of gray.
scanner
A device that converts images on paper, transparency, or film to digital form. Scanners produce bitmaps or rasterized images.
seed color
The color of the first pixel that you click when you define an editable area by using the Lasso and Magic wand mask tools. This color is usedby the tolerance value to set the sensitivity of the color detection in color masks.
segment
The line or curve between nodes in a curve object.
segment (path)
The section of a path located between two consecutive nodes. A path is a series of segments.
selection
An area of an image, also called editable area, that is not protected by a mask and that is, therefore, available for editing. The selection canbe modified by painting and editing tools, special effects, and image commands.
selection box
An invisible rectangle with eight visible handles that appears around any object you select using the Pick tool.
server-side image map
A rarely used image map type that relies on a server to process image map information. It requires a separate map (*.map) file for the webserver. Currently, most web browsers can process image maps, so client-side image maps are more common.
shape cursor
Uses the shape and size of the nib of the current tool as a cursor.
skewing handles
The straight, double-headed arrows located in the center of each side of the highlighting box.
spot color
In commercial printing, a solid ink color that prints individually, one plate per spot color.
spread
In commercial printing, a type of trap that is created by extending the foreground object into the background object.
stacking order
The sequence in which objects are created in the image window. This order determines the relationship between objects and, therefore, theappearance of your image. The first object you create appears on the bottom; the last object appears on the top.
Glossary | 603
stylus
A pen device, used in conjunction with a pen tablet, that allows you to draw paint strokes. A pressure-sensitive stylus allows you to vary yourstrokes with subtle changes in pressure.
subpath (Corel PHOTO-PAINT)
A segment which is not joined to the main path.
subtractive color model
A color model, such as CMYK, that creates color by subtracting wavelengths of light reflected from an object. For example, a colored inkappears blue if it absorbs all colors except blue.
super nudge
To move an object in large increments by pressing Shift and an Arrow key. The super nudge value is multiplied by the nudge value to obtainthe distance by which the object is moved.
See also nudge and micro nudge.
swap disk
Hard drive space used by applications to artificially increase the amount of memory available in your computer.
swatch
One of a series of solid-colored patches used as a sample when selecting color. A printed booklet of swatches is called a swatchbook. Swatchalso refers to the colors contained in the color palette.
symbol
A reusable object or group of objects. A symbol is defined once and can be referenced many times in an image.
T
target
The frame or web browser window in which a new webpage appears.
temperature
A way of describing light in terms of degrees Kelvin — lower values correspond to dim lighting conditions that cause an orange cast, such ascandlelight or the light from an incandescent light bulb. Higher values correspond to intense lighting conditions that cause a blue cast, suchas sunlight.
texture fill
A fractally generated fill that, by default, fills an object or image area with one image instead of with a series of repeating images.
threshold
A level of tolerance for tonal variation in a bitmap.
threshold (path)
A control available when you create a path from a mask. Threshold values range from 1 to 10 and determine the size of the angle requiredbetween two sections of a mask for a node to be created there. A low value produces more cusps, and therefore more nodes on theresulting path.
thumbnail
A miniature, low-resolution version of an image or illustration.
tightness (path)
A control available when you create a path from a mask marquee. Tightness values range from 1 to 10 and determine how close the path’sshape will be to that of the marquee. The higher the value, the more the new path resembles the marquee; it will have more nodes than apath with a lower tightness value.
tiling
The technique of repeating a small image across a large surface. Tiling is often used to create a patterned background for webpages.
604 | Corel PHOTO-PAINT 2018 User Guide
tint
In photo editing, a tint often refers to a semitransparent color applied over an image. Also called a color cast.
In printing, a tint refers to a lighter shade of a color created with halftone screening — for example, a spot color.
See also halftone.
tonal range
The distribution of pixels in a bitmap image from dark (a value of zero, indicating no brightness) to light (a value of 255, indicating fullbrightness). Pixels in the first third of the range are considered shadows, pixels in the middle third of the range are considered midtones,and pixels in the last third of the range are considered highlights. Ideally, the pixels in an image should be distributed across the entire tonalrange. A histogram is an excellent tool for viewing and evaluating the tonal range of images.
tone
The variations in a color or the range of grays between black and white.
transparency
The quality of an object that makes it easy to see through. Setting lower levels of transparency causes higher levels of opacity and lessvisibility of the underlying items or image.
See also opacity.
true color
A term that refers to digital RGB color that is composed of 24 bits, or 16.7 million colors.
TWAIN
By using the TWAIN driver supplied by the manufacturer of the imaging hardware, Corel graphics applications can acquire images directlyfrom a digital camera or scanner.
U
uniform fill
A type of fill used to apply one solid color to your image.
See also fill.
Unicode
A character encoding standard that defines character sets for all written languages in the world by using a 16-bit code set and more than65, 000 characters. Unicode lets you handle text effectively regardless of the language of the text, your operating system, or the applicationyou are using.
URL (Uniform Resource Locator)
A unique address that defines where a webpage is located on the Internet.
V
vector graphic
An image generated from mathematical descriptions that determine the position, length, and direction in which lines are drawn. Vectorgraphics are created as collections of lines rather than as patterns of individual dots or pixels.
See also bitmap.
W
watermark
A small amount of random noise added to the luminance component of the image pixels which carries information about the image. Thisinformation survives normal editing, printing, and scanning.
white point
The measurement of white on a color monitor that influences how highlights and contrast appear.

Glossary | 605
In image correction, the white point determines the brightness value that is considered white in a bitmap image. In Corel PHOTO-PAINT, youcan set the white point to improve the contrast of an image. For example, in a histogram of an image, with a brightness scale of 0 (dark) to255 (light), if you set the white point at 250, all pixels with a value greater than 250 are converted to white.
Windows Image Acquisition (WIA)
A standard interface and driver, created by Microsoft, for loading images from peripheral devices, such as scanners and digital cameras.
Z
zoom
To reduce or magnify the view of a drawing. You can zoom in to see details or zoom out for a broader view.
ZIP
A lossless file compression technique that results in smaller file size and faster processing time.