construction manual - nordstrom supplier compliance
TRANSCRIPT

Nordstrom Product Group
CONSTRUCTION MANUAL• Womens Division• Nordstrom Signature
MAY 2019
In reviewing the Construction manual table of content, please reference below diagram to locate the accurate page. Our naming format is as below:
“ 1 – W – pockets – A ” 1st portion is the number of the top main category. (1 for Tops, 2 for Bottoms, 3 for 2pc/Dresses, 4 for General) 2nd portion is the letter for the fabric type. (W for woven, K for Knits, S for Sweaters, G for General) 3rd portion is the descriptive file name 4th portion is the end letter for variations
“1-W-Sleeve Setting-A” for example: this is a construction method for a Top, made with woven fabric, on how to set sleeves, construction variance A As always, please contact your technical designer should you have any questions.
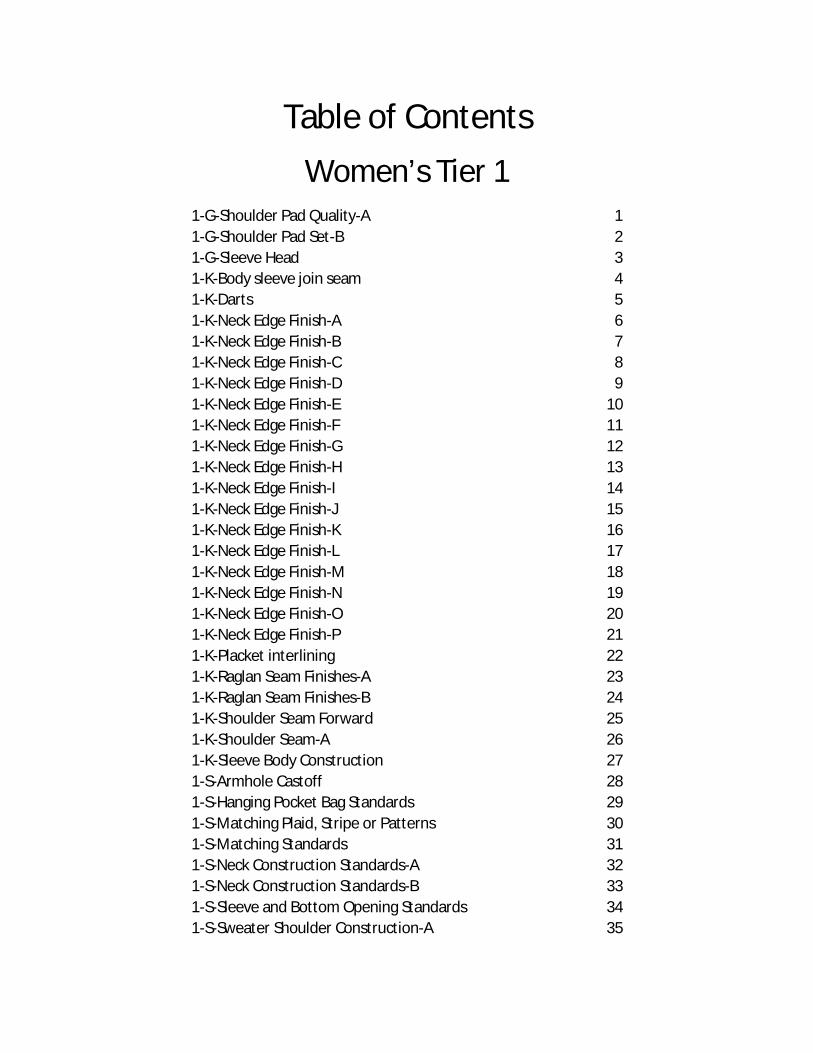
Table of Contents Women’s Tier 1
1-G-Shoulder Pad Quality-A 1 1-G-Shoulder Pad Set-B 2 1-G-Sleeve Head 3 1-K-Body sleeve join seam 4 1-K-Darts 5 1-K-Neck Edge Finish-A 6 1-K-Neck Edge Finish-B 7 1-K-Neck Edge Finish-C 8 1-K-Neck Edge Finish-D 9 1-K-Neck Edge Finish-E 10 1-K-Neck Edge Finish-F 11 1-K-Neck Edge Finish-G 12 1-K-Neck Edge Finish-H 13 1-K-Neck Edge Finish-I 14 1-K-Neck Edge Finish-J 15 1-K-Neck Edge Finish-K 16 1-K-Neck Edge Finish-L 17 1-K-Neck Edge Finish-M 18 1-K-Neck Edge Finish-N 19 1-K-Neck Edge Finish-O 20 1-K-Neck Edge Finish-P 21 1-K-Placket interlining 22 1-K-Raglan Seam Finishes-A 23 1-K-Raglan Seam Finishes-B 24 1-K-Shoulder Seam Forward 25 1-K-Shoulder Seam-A 26 1-K-Sleeve Body Construction 27 1-S-Armhole Castoff 28 1-S-Hanging Pocket Bag Standards 29 1-S-Matching Plaid, Stripe or Patterns 30 1-S-Matching Standards 31 1-S-Neck Construction Standards-A 32 1-S-Neck Construction Standards-B 33 1-S-Sleeve and Bottom Opening Standards 34 1-S-Sweater Shoulder Construction-A 35
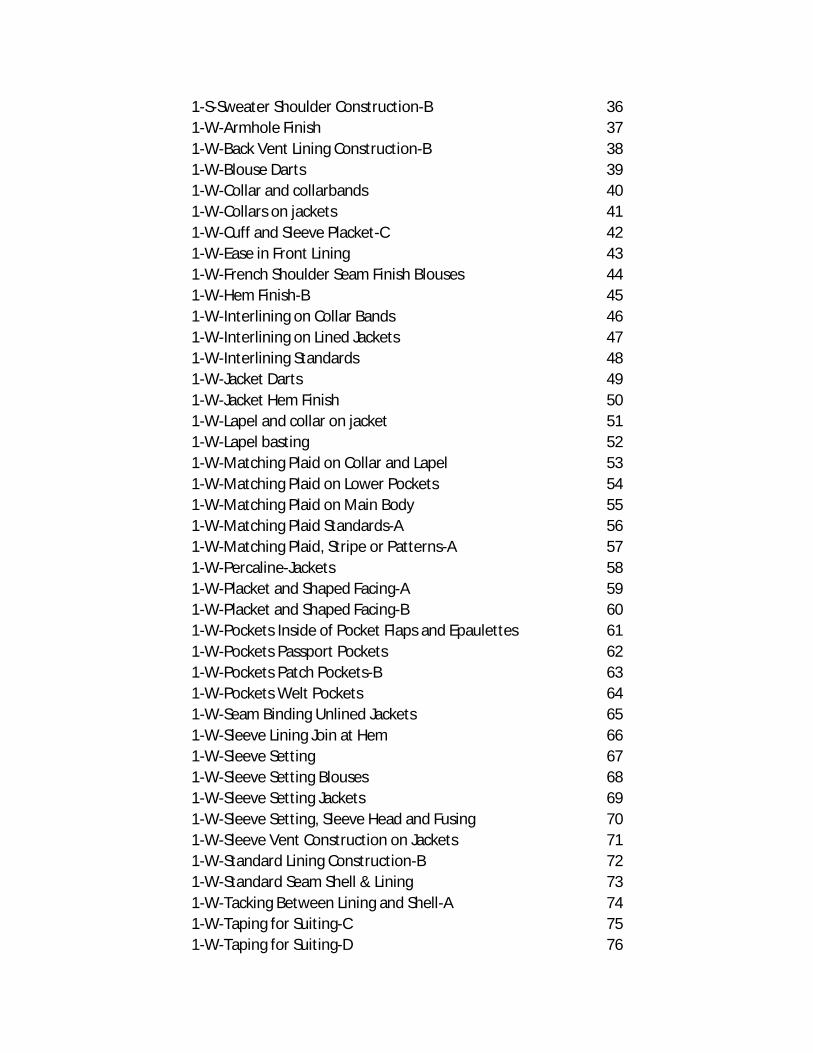
1-S-Sweater Shoulder Construction-B 36 1-W-Armhole Finish 37 1-W-Back Vent Lining Construction-B 38 1-W-Blouse Darts 39 1-W-Collar and collarbands 40 1-W-Collars on jackets 41 1-W-Cuff and Sleeve Placket-C 42 1-W-Ease in Front Lining 43 1-W-French Shoulder Seam Finish Blouses 44 1-W-Hem Finish-B 45 1-W-Interlining on Collar Bands 46 1-W-Interlining on Lined Jackets 47 1-W-Interlining Standards 48 1-W-Jacket Darts 49 1-W-Jacket Hem Finish 50 1-W-Lapel and collar on jacket 51 1-W-Lapel basting 52 1-W-Matching Plaid on Collar and Lapel 53 1-W-Matching Plaid on Lower Pockets 54 1-W-Matching Plaid on Main Body 55 1-W-Matching Plaid Standards-A 56 1-W-Matching Plaid, Stripe or Patterns-A 57 1-W-Percaline-Jackets 58 1-W-Placket and Shaped Facing-A 59 1-W-Placket and Shaped Facing-B 60 1-W-Pockets Inside of Pocket Flaps and Epaulettes 61 1-W-Pockets Passport Pockets 62 1-W-Pockets Patch Pockets-B 63 1-W-Pockets Welt Pockets 64 1-W-Seam Binding Unlined Jackets 65 1-W-Sleeve Lining Join at Hem 66 1-W-Sleeve Setting 67 1-W-Sleeve Setting Blouses 68 1-W-Sleeve Setting Jackets 69 1-W-Sleeve Setting, Sleeve Head and Fusing 70 1-W-Sleeve Vent Construction on Jackets 71 1-W-Standard Lining Construction-B 72 1-W-Standard Seam Shell & Lining 73 1-W-Tacking Between Lining and Shell-A 74 1-W-Taping for Suiting-C 75 1-W-Taping for Suiting-D 76
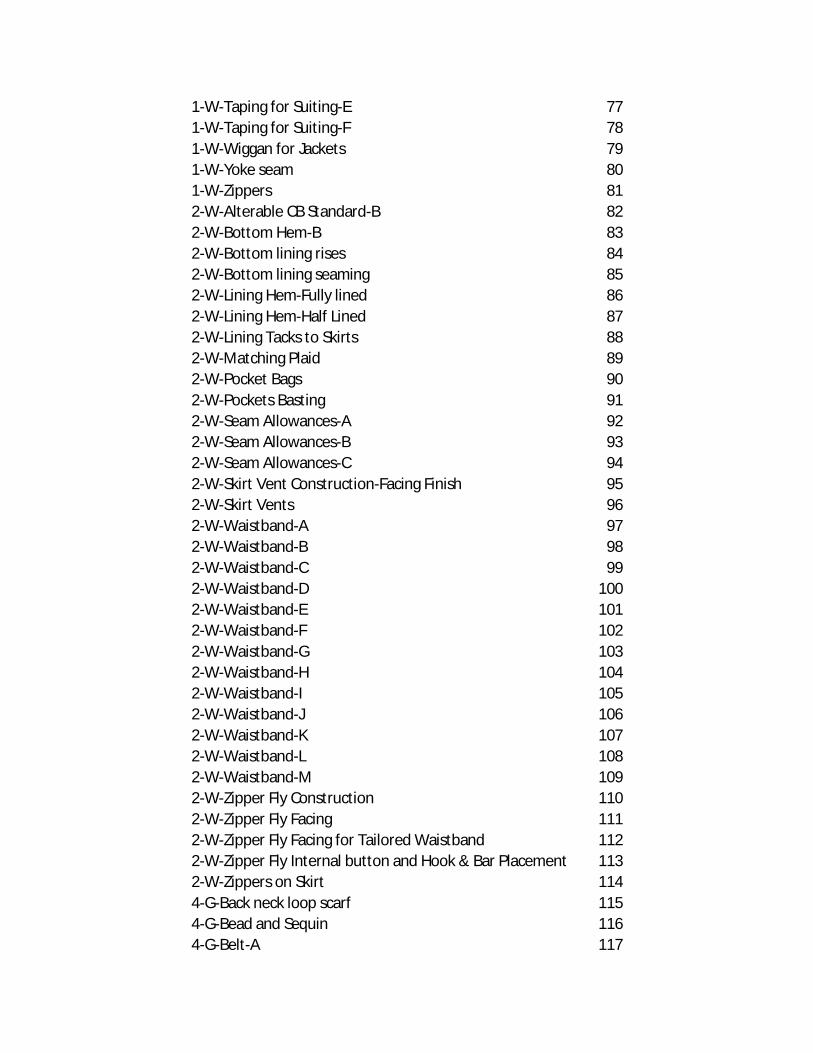
1-W-Taping for Suiting-E 77 1-W-Taping for Suiting-F 78 1-W-Wiggan for Jackets 79 1-W-Yoke seam 80 1-W-Zippers 81 2-W-Alterable CB Standard-B 82 2-W-Bottom Hem-B 83 2-W-Bottom lining rises 84 2-W-Bottom lining seaming 85 2-W-Lining Hem-Fully lined 86 2-W-Lining Hem-Half Lined 87 2-W-Lining Tacks to Skirts 88 2-W-Matching Plaid 89 2-W-Pocket Bags 90 2-W-Pockets Basting 91 2-W-Seam Allowances-A 92 2-W-Seam Allowances-B 93 2-W-Seam Allowances-C 94 2-W-Skirt Vent Construction-Facing Finish 95 2-W-Skirt Vents 96 2-W-Waistband-A 97 2-W-Waistband-B 98 2-W-Waistband-C 99 2-W-Waistband-D 100 2-W-Waistband-E 101 2-W-Waistband-F 102 2-W-Waistband-G 103 2-W-Waistband-H 104 2-W-Waistband-I 105 2-W-Waistband-J 106 2-W-Waistband-K 107 2-W-Waistband-L 108 2-W-Waistband-M 109 2-W-Zipper Fly Construction 110 2-W-Zipper Fly Facing 111 2-W-Zipper Fly Facing for Tailored Waistband 112 2-W-Zipper Fly Internal button and Hook & Bar Placement 113 2-W-Zippers on Skirt 114 4-G-Back neck loop scarf 115 4-G-Bead and Sequin 116 4-G-Belt-A 117
4-G-Belt-B 118 4-G-Beltloops-A 119 4-G-Beltloops-C 120 4-G-Button Position for jacket 121 4-G-Button Setting Method-A 122 4-G-Button Setting Method-B 123 4-G-Buttonholes and Button Position-A 124 4-G-Buttonholes and Button Position-B 125 4-G-Buttonholes Types and Size 126 4-G-Fabric handling 127 4-G-Grainline Direction Blouses-A 128 4-G-Grainline Direction Bottoms 129 4-G-Grainline Direction Jackets 130 4-G-Grainline sweater 131 4-G-Hanger loop coats 132 4-G-Hanger loops 133 4-G-Hardware Attachment 134 4-G-Hems 135 4-G-Pressing-A 136 4-G-Pressing-C 137 4-G-Pressing-D 138 4-G-Pressing-E 139 4-G-Stitch Per Inch-A 140 4-G-Stitch Terminology 141 4-G-Thread Loop-A 142 4-K-Hems-A 143 4-K-Hems-D 144 4-S-Buttonholes and Button Position-A 145 4-S-Buttonholes and Button Position-B 146 4-W-Interlining-A 147 4-W-Interlining-B 148 4-W-Threads General Seams 149
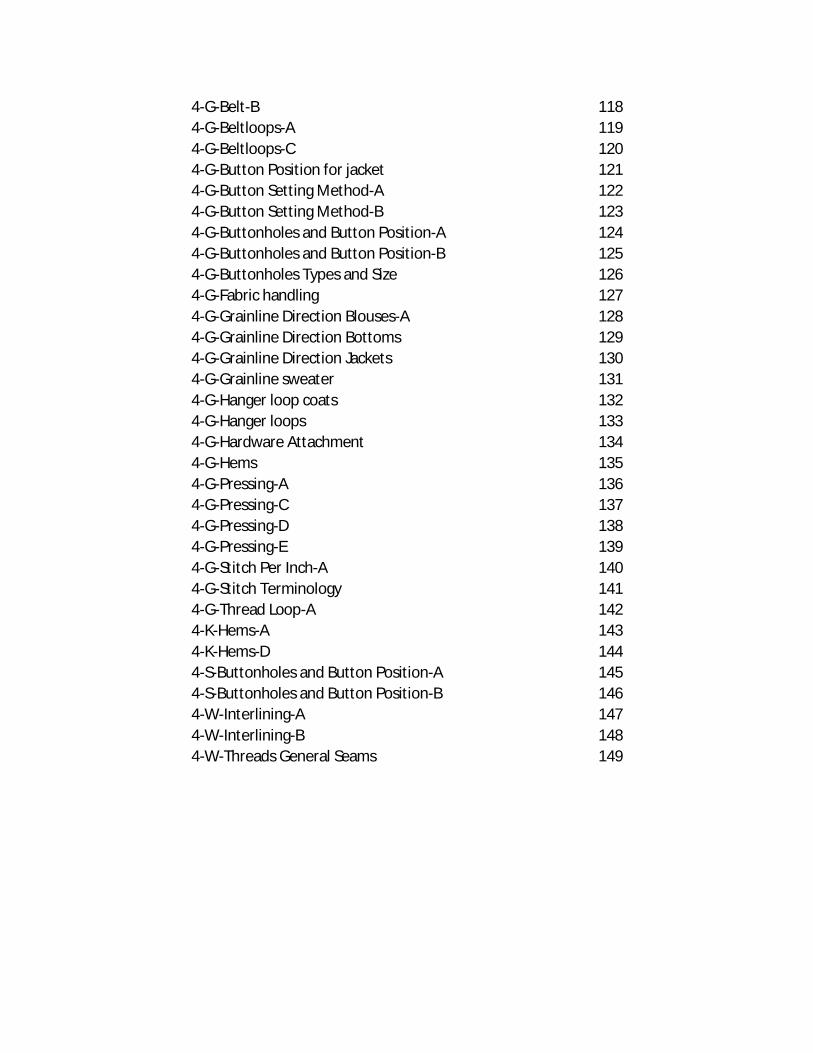
SET SHOULDER PAD
Shoulder Pad Quality
Use approved quality for shoulder pads.For unlined jackets, shoulder pads should be covered.
This end of the shoulder padextends beyond the shoulder seam,and into the sleeve cap
Shoulder pad forlined garments
Shoulder pad forunlined garments
001
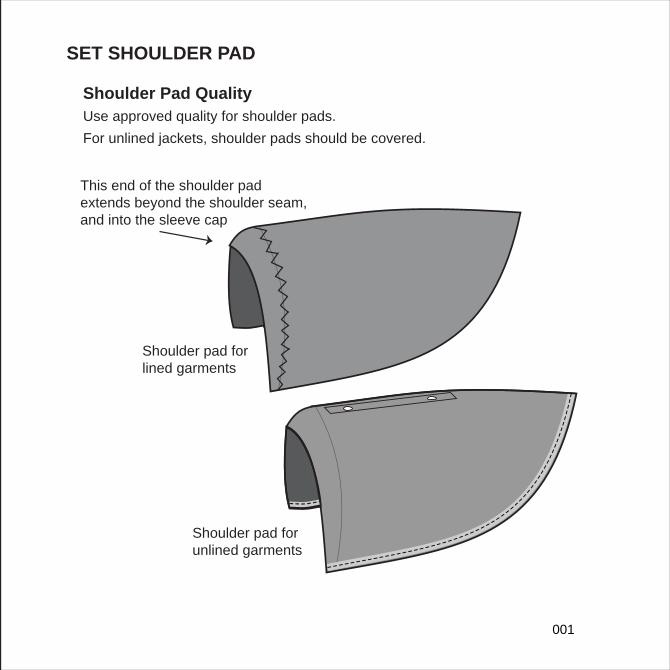
SET SHOULDER PAD
Shoulder Pad Setting in Sleeve
Place the pad so that 1/2“ of pad extends past the armhole stitch line.In unlined jackets, shoulder pads should also be attached with bra stay andhand tacked at armhole and shoulder seam.
Shoulder pad for lined garments
SET SHOULDER PADShoulder Pad Setting in Sleeve
Place the pad so that 1/2“ of pad extends past the armhole stitch line.
In unlined jackets, shoulder pads should also be attached with bra stay and hand tacked at armhole and shoulder seam.
Tacked 1/2” from shoulder pad edge
Baste stitched along armhole
Tack 1 1/2” from shoulder pad’sBottom edges
002
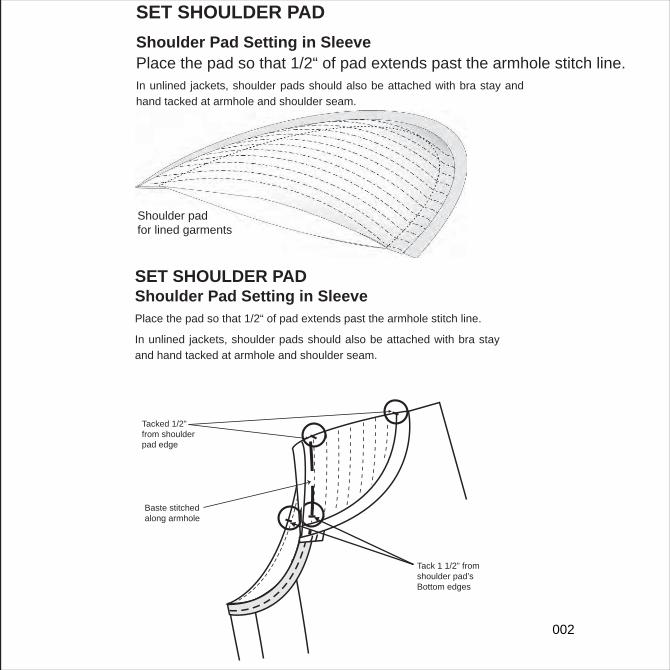
SLEEVE HEAD (LINED JACKETS)
One -piece Sleeve Head
In lined jackets, the sleeve heads should be 11” long. The sleeve heads should be set as notched, with more of the sleeve head towards the back.Add a layer of lining in between the shell and the sleeve heads. This layer needs to be 1/2“ wider and longer than the sleeve head.On unlined jackets, use a folded bias, 1 1/2” wide clean finished self fabric forsleeve head. Set in the same manner as in lined jackets.
Front Back
003
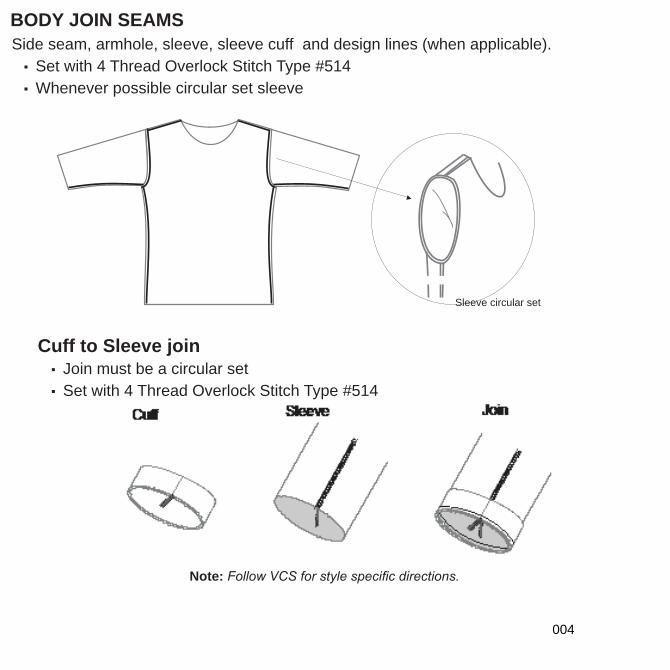
BODY JOIN SEAMS
Side seam, armhole, sleeve, sleeve cuff and design lines (when applicable).▪ Set with 4 Thread Overlock Stitch Type #514▪ Whenever possible circular set sleeve
Sleeve circular set
Cuff to Sleeve join
▪ Join must be a circular set▪ Set with 4 Thread Overlock Stitch Type #514
Note:
004
Front Back
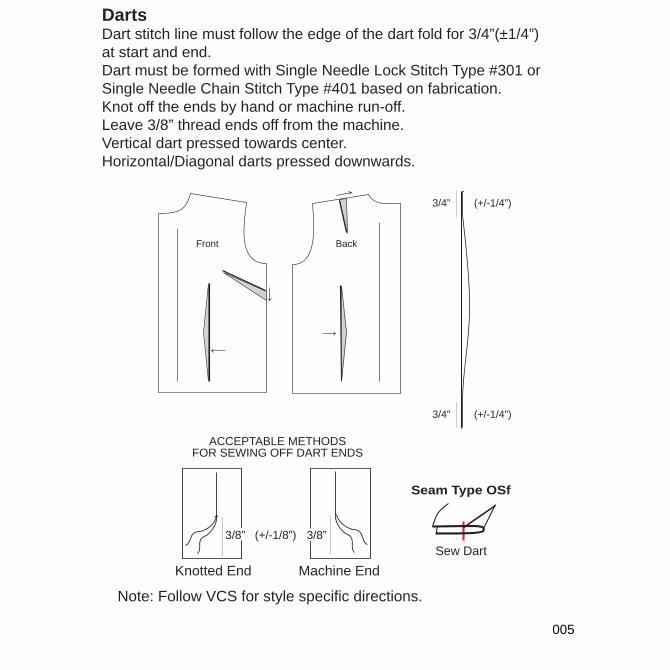
DartsDart stitch line must follow the edge of the dart fold for 3/4”(±1/4”) at start and end.Dart must be formed with Single Needle Lock Stitch Type #301 or Single Needle Chain Stitch Type #401 based on fabrication. Knot off the ends by hand or machine run-off.Leave 3/8” thread ends off from the machine.Vertical dart pressed towards center.Horizontal/Diagonal darts pressed downwards.
3/4”
3/4” (+/-1/4”)
(+/-1/4”)
ACCEPTABLE METHODSFOR SEWING OFF DART ENDS
Knotted End Machine End
(+/-1/8”)3/8” 3/8”
Seam Type OSf
Sew Dart
Note: Follow VCS for style specific directions.
005
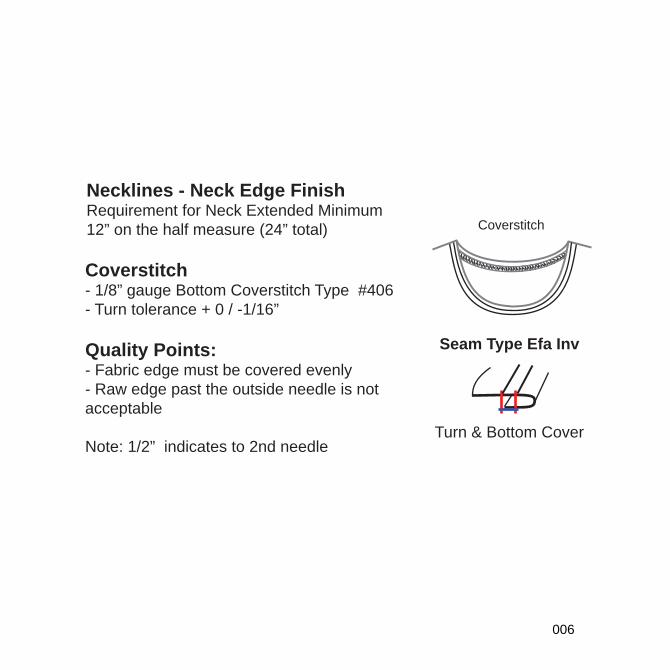
Coverstitch
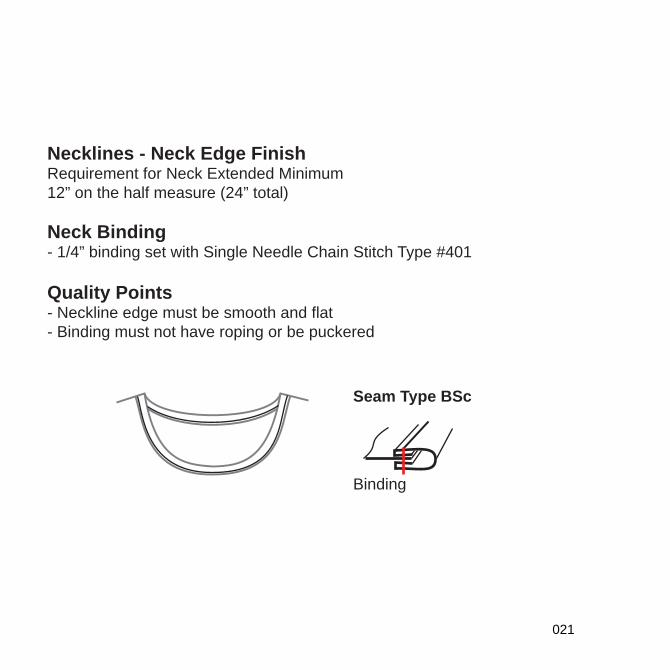
Necklines - Neck Edge FinishRequirement for Neck Extended Minimum12” on the half measure (24” total)
Coverstitch- 1/8” gauge Bottom Coverstitch Type #406 - Turn tolerance + 0 / -1/16”
Quality Points:- Fabric edge must be covered evenly- Raw edge past the outside needle is not acceptable
Note: 1/2” indicates to 2nd needle
Seam Type Efa Inv
Turn & Bottom Cover
006
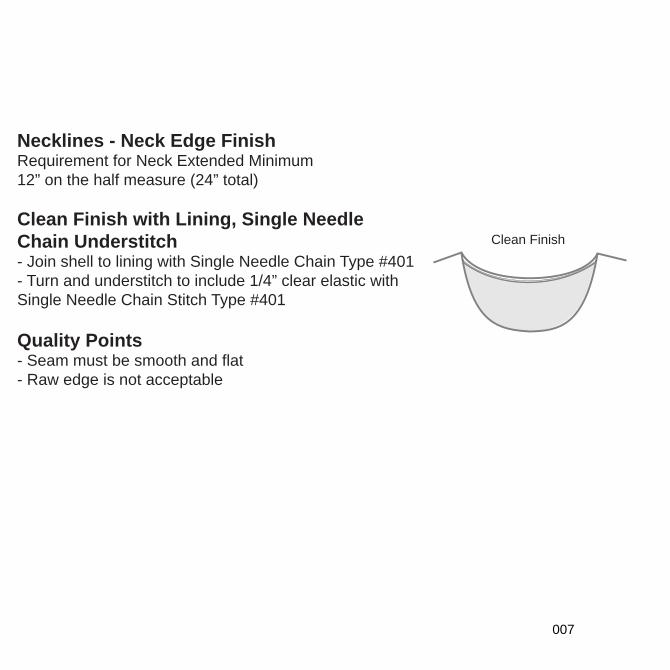
Necklines - Neck Edge FinishRequirement for Neck Extended Minimum12” on the half measure (24” total)
Clean Finish with Lining, Single Needle
Chain Understitch- Join shell to lining with Single Needle Chain Type #401- Turn and understitch to include 1/4” clear elastic withSingle Needle Chain Stitch Type #401
Quality Points- Seam must be smooth and flat- Raw edge is not acceptable
Clean Finish
007
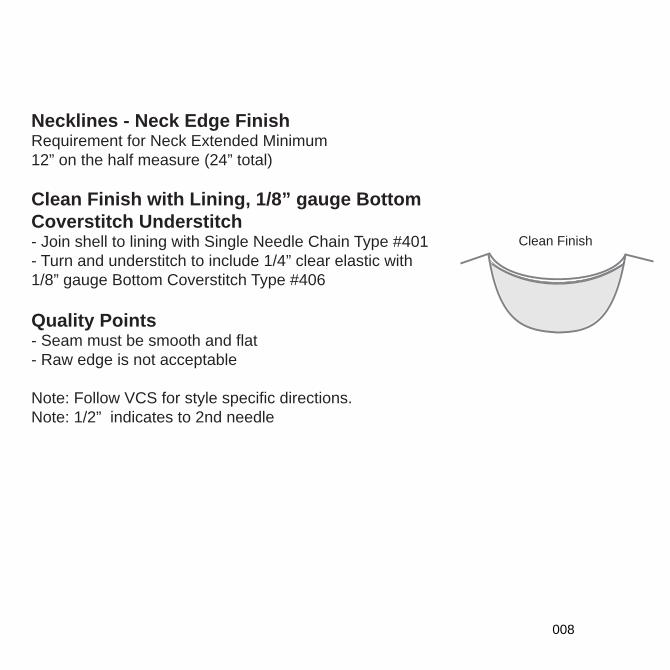
Necklines - Neck Edge FinishRequirement for Neck Extended Minimum12” on the half measure (24” total)
Clean Finish with Lining, 1/8” gauge Bottom
Coverstitch Understitch- Join shell to lining with Single Needle Chain Type #401- Turn and understitch to include 1/4” clear elastic with 1/8” gauge Bottom Coverstitch Type #406
Quality Points- Seam must be smooth and flat - Raw edge is not acceptable
Note: Follow VCS for style specific directions.Note: 1/2” indicates to 2nd needle
Clean Finish
008
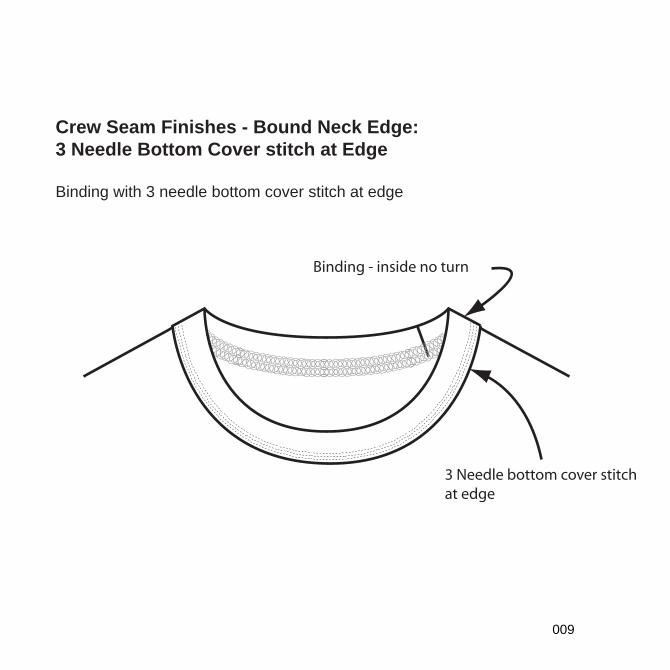
3 Needle bottom cover stitchat edge
Binding - inside no turn
Crew Seam Finishes - Bound Neck Edge:
3 Needle Bottom Cover stitch at Edge
Binding with 3 needle bottom cover stitch at edge
009
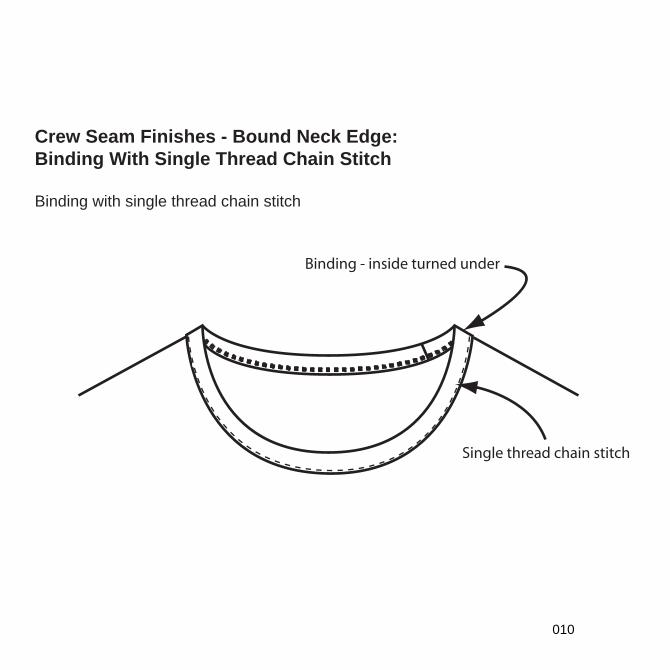
Single thread chain stitch
Binding - inside turned under
Crew Seam Finishes - Bound Neck Edge:
Binding With Single Thread Chain Stitch
Binding with single thread chain stitch
010
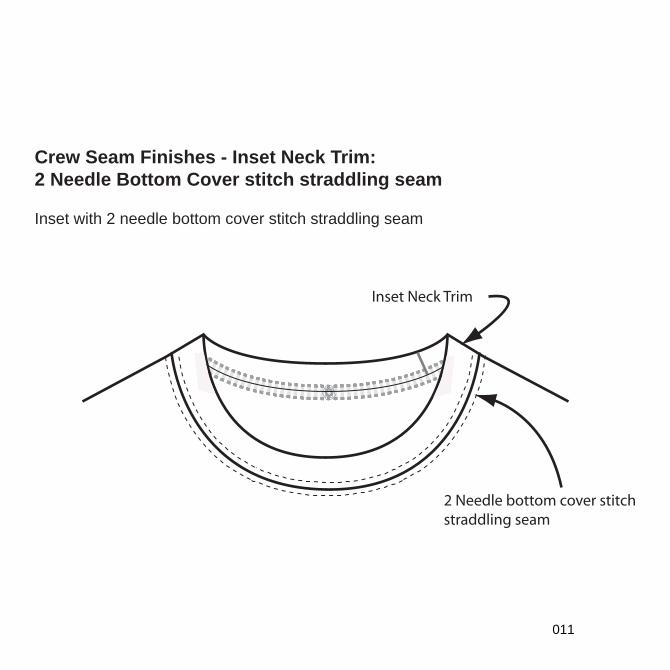
2 Needle bottom cover stitchstraddling seam
Inset Neck Trim
Crew Seam Finishes - Inset Neck Trim:
2 Needle Bottom Cover stitch straddling seam
Inset with 2 needle bottom cover stitch straddling seam
011
Inset Neck Trim
3 Needle 5 Thread cover stitchstraddling seam
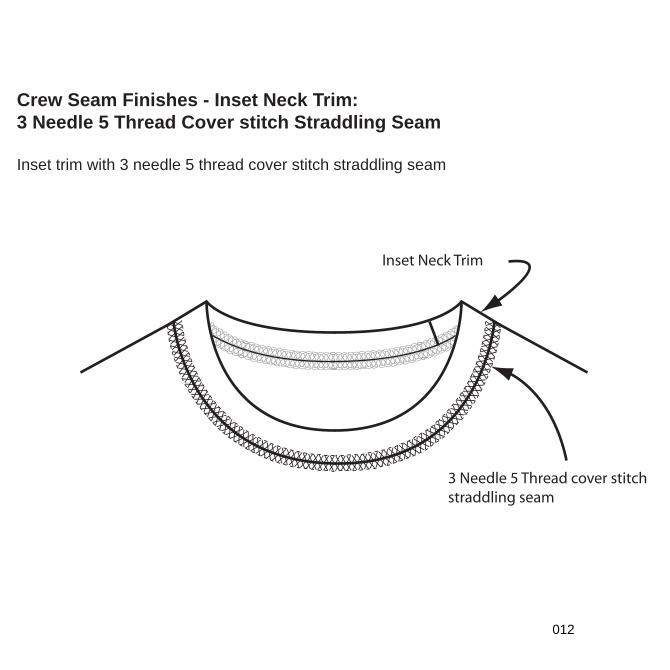
Crew Seam Finishes - Inset Neck Trim:
3 Needle 5 Thread Cover stitch Straddling Seam
Inset trim with 3 needle 5 thread cover stitch straddling seam
012

Inset Neck Trim
2 needle 4 threadcover stitch straddlingseam
Crew Seam Finishes - Inset Neck Trim:
2 Needle 4-Thread Cover stitch Straddling Seam
Inset trim with 2 needle 4 thread cover stitch straddling seam
013
Inset Neck Trim
Single thread chain stitch
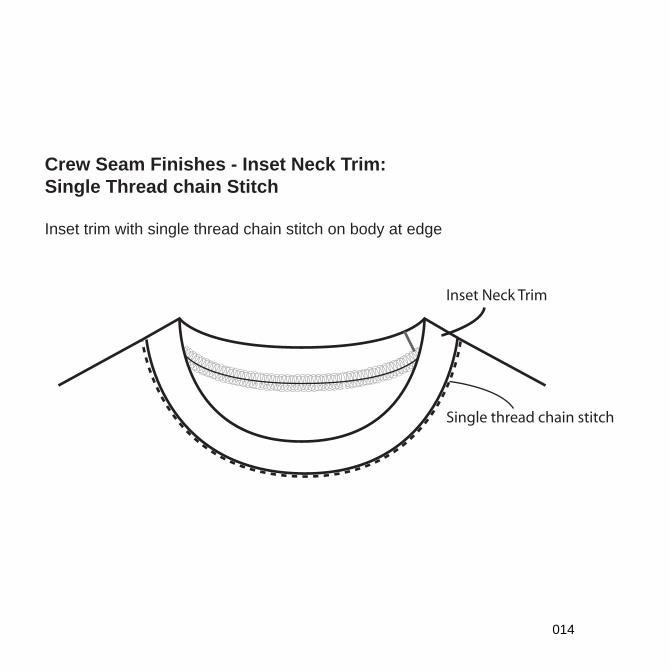
Crew Seam Finishes - Inset Neck Trim:
Single Thread chain Stitch
Inset trim with single thread chain stitch on body at edge
014
Inset Neck Trim
Single thread chain stitch
Trim covers back neck join seam
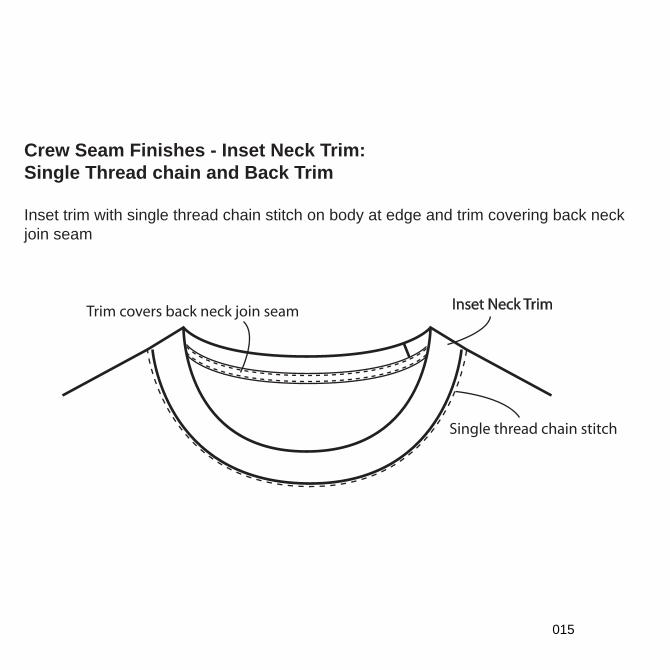
Crew Seam Finishes - Inset Neck Trim:
Single Thread chain and Back Trim
Inset trim with single thread chain stitch on body at edge and trim covering back neck join seam
015
2 Needle Bottom cover stitchstraddling seam
Mitered V Neck
Inset Neck Trim
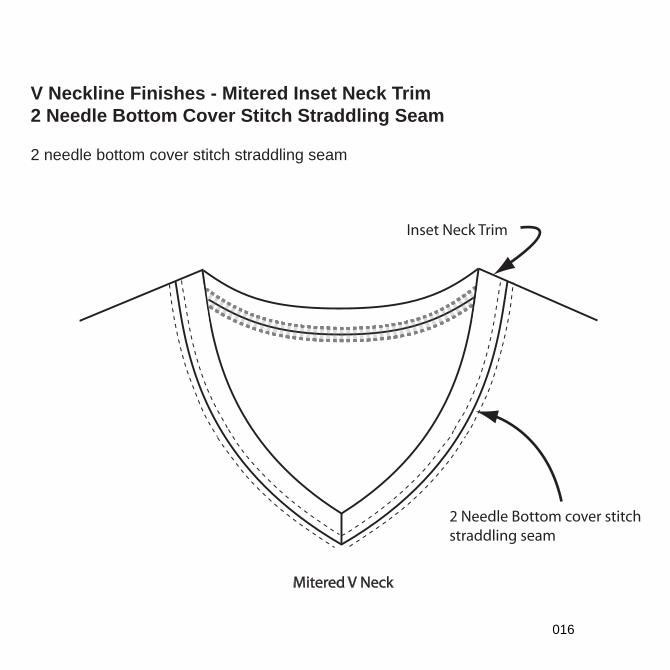
V Neckline Finishes - Mitered Inset Neck Trim
2 Needle Bottom Cover Stitch Straddling Seam
2 needle bottom cover stitch straddling seam
016
Inset Neck Trim
Mitered V Neck
3 Needle 5 Thread cover stitchstraddling seam
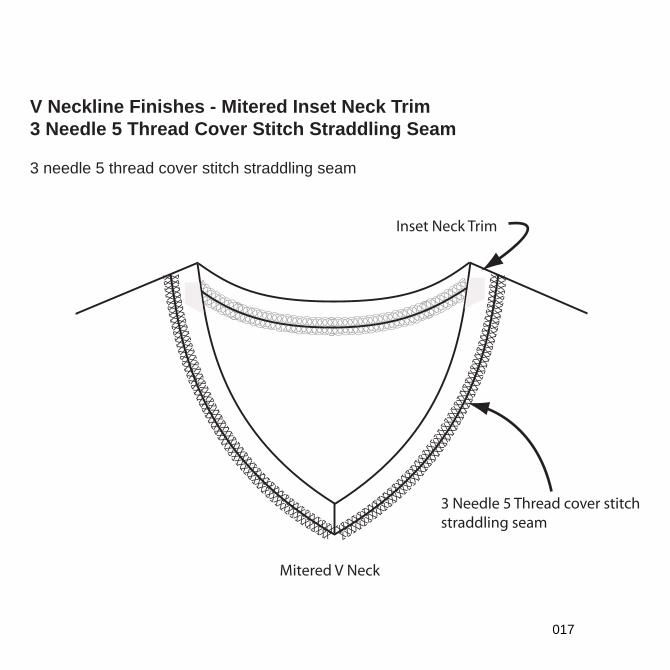
V Neckline Finishes - Mitered Inset Neck Trim
3 Needle 5 Thread Cover Stitch Straddling Seam
3 needle 5 thread cover stitch straddling seam
017
Inset Neck Trim
2 Needle 4 Thread cover stitchinside needle on join seam
Lapped V Neck
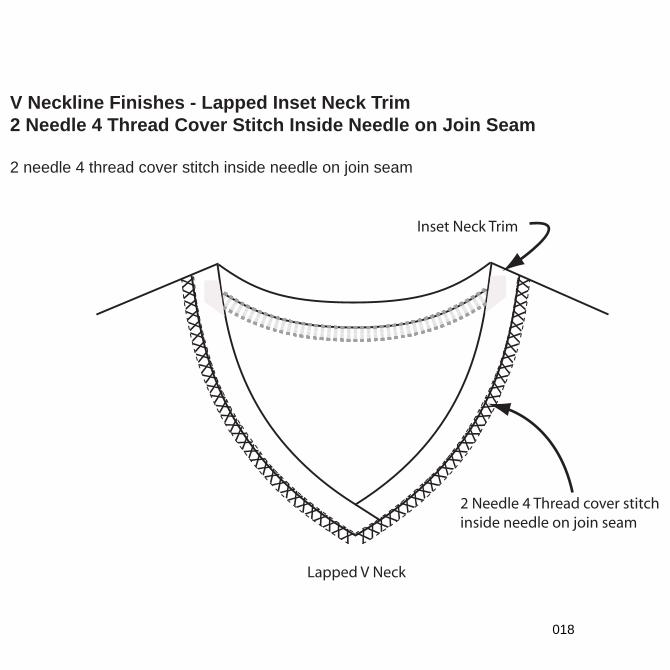
V Neckline Finishes - Lapped Inset Neck Trim
2 Needle 4 Thread Cover Stitch Inside Needle on Join Seam
2 needle 4 thread cover stitch inside needle on join seam
018
Inset Neck Trim
Lapped V Neck
Lock stitch at edge
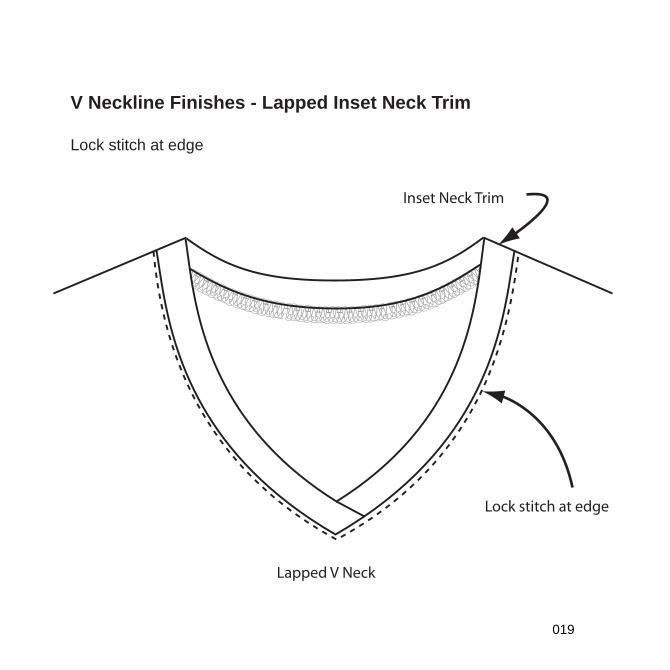
V Neckline Finishes - Lapped Inset Neck Trim
Lock stitch at edge
019
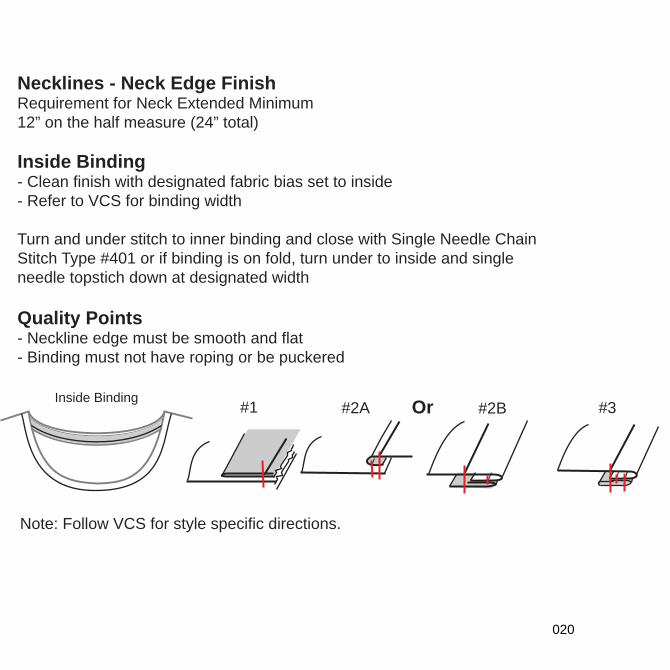
Necklines - Neck Edge FinishRequirement for Neck Extended Minimum12” on the half measure (24” total)
Inside Binding- Clean finish with designated fabric bias set to inside- Refer to VCS for binding width
Turn and under stitch to inner binding and close with Single Needle Chain Stitch Type #401 or if binding is on fold, turn under to inside and single needle topstich down at designated width
Quality Points- Neckline edge must be smooth and flat- Binding must not have roping or be puckered
Inside Binding#2B#1 #3#2A Or
Note: Follow VCS for style specific directions.
020
Necklines - Neck Edge FinishRequirement for Neck Extended Minimum12” on the half measure (24” total)
Neck Binding- 1/4” binding set with Single Needle Chain Stitch Type #401
Quality Points- Neckline edge must be smooth and flat- Binding must not have roping or be puckered
Seam Type BSc
Binding
021
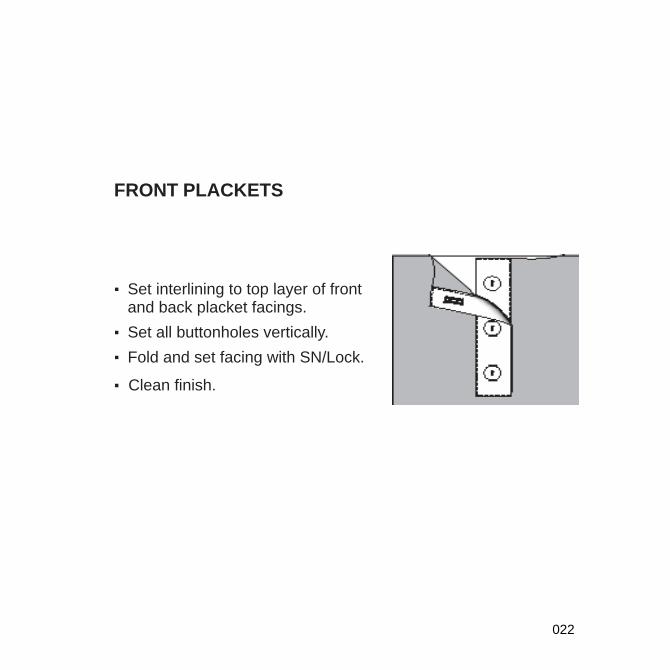
FRONT PLACKETS
▪ Set interlining to top layer of front and back placket facings.
▪ Set all buttonholes vertically.▪ Fold and set facing with SN/Lock.
Clean finish.▪
022

3-Thread overlock Seam Allowance
Self fabric binding w/single needle lock stitch
Binding - inside turned under -clean finished at join seam
Bound Neck Edge With Over Lock Seams Binding with single needle lock stitch at edge and over locked seam
023
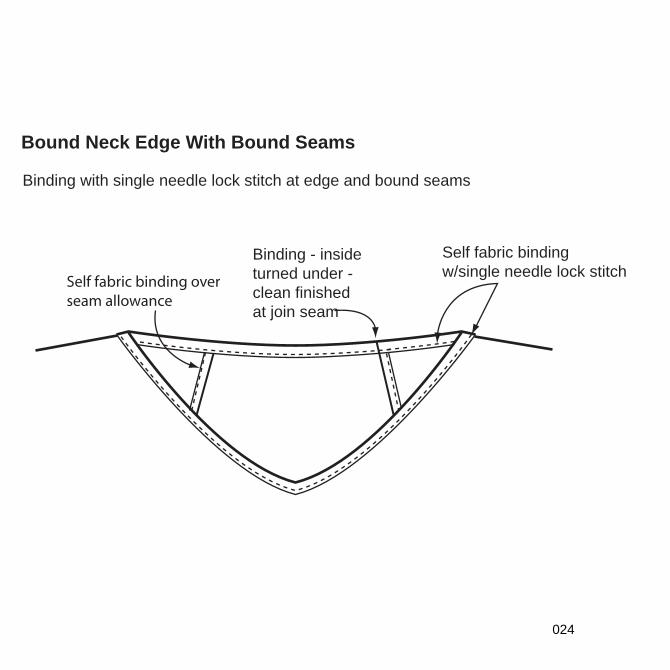
Self fabric binding w/single needle lock stitch
Self fabric binding over seam allowance
Binding - insideturned under -clean finished at join seam
Bound Neck Edge With Bound Seams Binding with single needle lock stitch at edge and bound seams
024
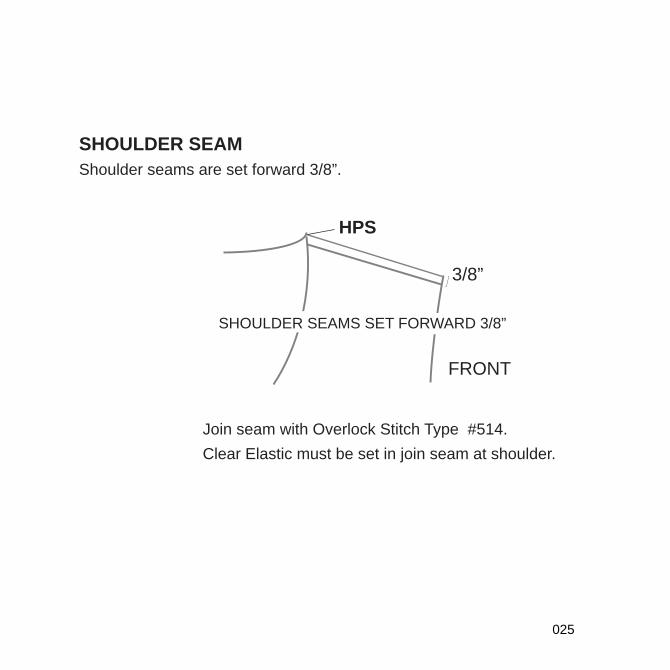
SHOULDER SEAM
Shoulder seams are set forward 3/8”.
FRONT
HPS
3/8”
SHOULDER SEAMS SET FORWARD 3/8”
Join seam with Overlock Stitch Type #514.Clear Elastic must be set in join seam at shoulder.
025
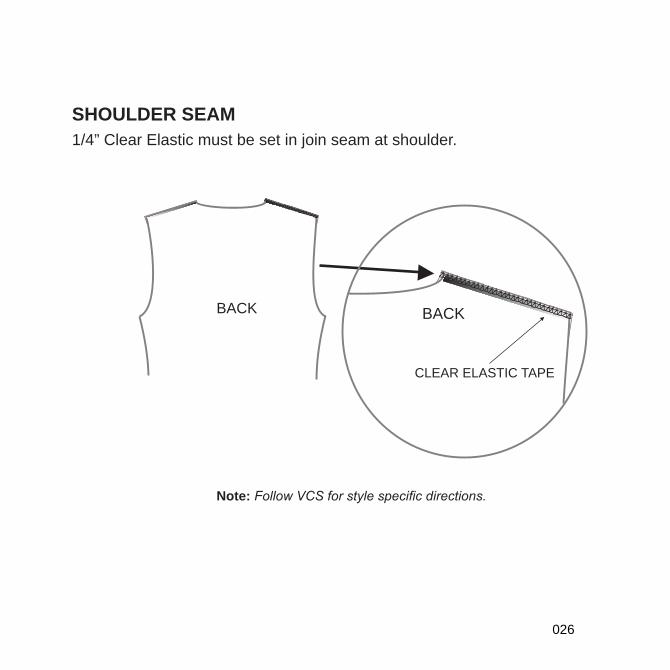
SHOULDER SEAM
1/4” Clear Elastic must be set in join seam at shoulder.
BACK BACK
CLEAR ELASTIC TAPE
Note:
026
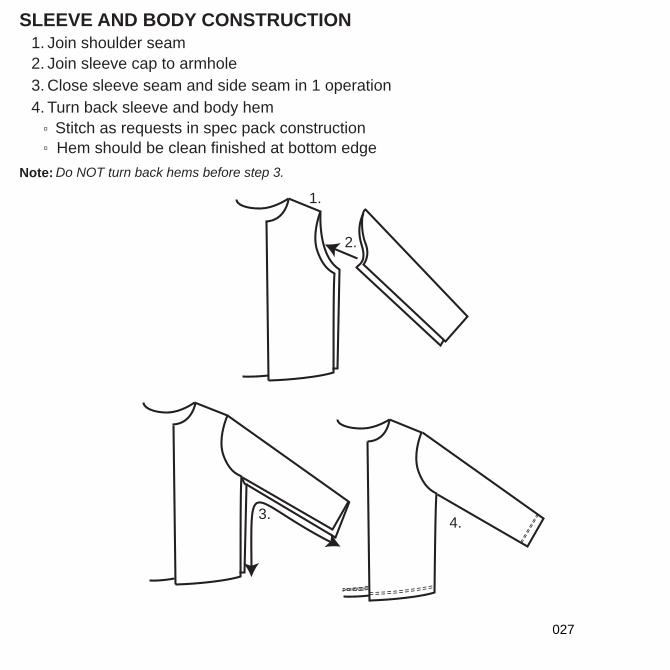
SLEEVE AND BODY CONSTRUCTION
1. Join shoulder seam2. Join sleeve cap to armhole3. Close sleeve seam and side seam in 1 operation4. Turn back sleeve and body hem
Stitch as requests in spec pack construction
Note: Do NOT turn back hems before step 3.
2.
1.
3. 4.
Hem should be clean finished at bottom edge
027
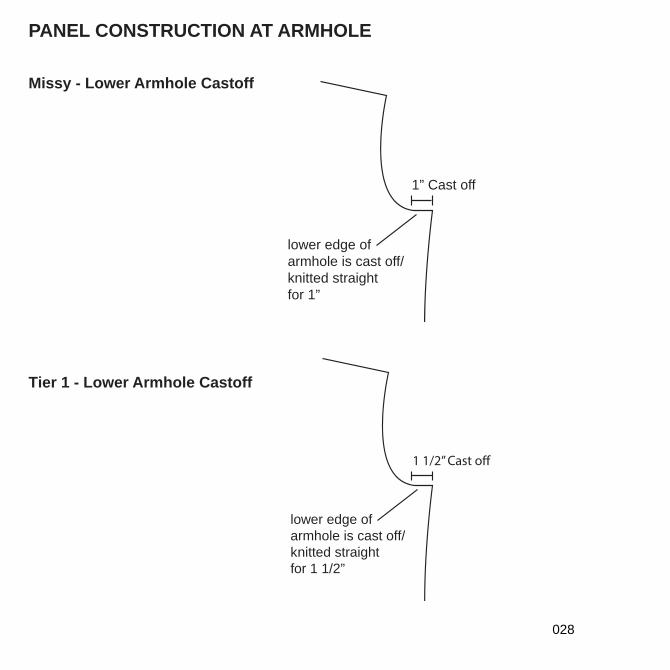
PANEL CONSTRUCTION AT ARMHOLE
Missy - Lower Armhole Castoff
1” Cast off
Missy-lower armhole castoff
lower edge ofarmhole is cast off/knitted straight for 1”
Tier 1 - Lower Armhole Castoff
1 1/2” Cast o�
Encore-lower armhole castoff
lower edge ofarmhole is cast off/knitted straight for 1 1/2”
028
HANGING POCKET BAG STANDARDS
Quality Point
▪ Pocket opening can be made with various stitches and will be specified in VCS
▪ Make with jersey stitch continuous piece.▪ Close the both sides of pocket bag by linking.
029
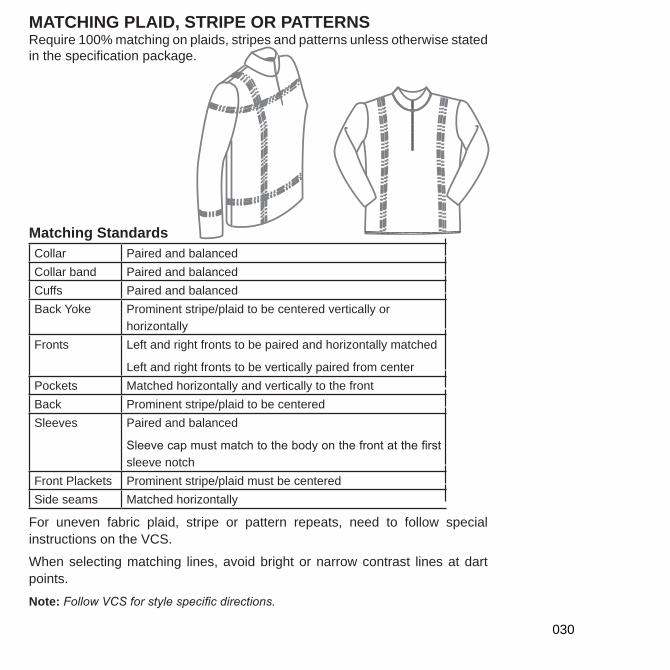
MATCHING PLAID, STRIPE OR PATTERNSRequire 100% matching on plaids, stripes and patterns unless otherwise statedin the specification package.
Matching Standards
Collar Paired and balancedCollar band Paired and balancedCuffs Paired and balancedBack Yoke Prominent stripe/plaid to be centered vertically or
horizontallyFronts Left and right fronts to be paired and horizontally matched
Left and right fronts to be vertically paired from centerPockets Matched horizontally and vertically to the frontBack Prominent stripe/plaid to be centeredSleeves Paired and balanced
sleeve notchFront Plackets Prominent stripe/plaid must be centeredSide seams Matched horizontally
For uneven fabric plaid, stripe or pattern repeats, need to follow special instructions on the VCS.
When selecting matching lines, avoid bright or narrow contrast lines at dart points.
Note:
030

MATCHING STANDARDS
CablesPlace cables balanced between left and right side of garment, unless otherwise specifiedin style specification package. Note: Follow specification package for style specific directions.
Plaids, Stripes, and PatternsRequire 100% matching on plaids, stripes, and patterns unless otherwise stated in the specification package.
TerminologyFully Balanced = A center line with pattern repeat in same order left to right AND top to bottom.Unbalanced Plaid = No center line, but pattern repeats in same order left to right OR top to bottom.Prominent Stripe = High contrast of color and/or size of pattern.Balanced = Prominent Stripe is placed at center of garment (center front or center back)Paired = Vertical and horizontal stripes fall in the same place on the left and right sides of the body(Horizontal and vertical match is mirrored from left part to right part).Match = Horizontal and/or vertical alignment of plaid/pattern at seam.Chevron = Pattern alignment forms a V or inverted V at seam and pattern must be mirrored.Engineered = Pattern is placed at the same location horizontally and /or vertically in each garment.One way match = horizontalTwo way match = horizontal and vertical
Matching Tolerances
0” for presentation areas: center front
031
NECK CONSTRUCTION STANDARDS
V Neck
▪▪
Double layer neck trim ▪ Also, it needs to be knotted at beginning
and the end of each linking. These knots will later be secured by linking the neck trim to body.▪
Single layer neck trim▪
Crew Neck
▪ See VCS for construction details
032
NECK CONSTRUCTION STANDARDS
Half Zip Mock
▪ CF Zipper’s left and right side panels must be balanced at neck seam and neck opening.▪ Set 5/8” wide full needle rib tape inside of garment. ▪ If buttons are used, set all buttonholes direction per spec pack callout.
Full Zip Front
▪ Set zipper pull at wearer’s right hand side. ▪ CF Zipper’s left and right side front panels must be balanced at neck and bottom opening.▪ Set 1” wide 5/8” wide full needle rib tape facing. ▪ If buttons are used, set all buttonholes direction per spec pack callout.
Button Front
▪ CF Placket can be made with continuous tape with full needle, rib single layer, or jersey double layer.
▪ Set buttons at wearer’s right hand side and buttonholes at wearer’s left hand side. ▪ Utilize thread shank for the buttons to prevent curves at edge of CF placket after button. ▪ If buttons are used, buttons will mainly be set in the vertical direction. Exceptions will
be defined in VCS.▪ Set neckband button and buttonhole so that when buttoned all buttons align
033
SLEEVE AND BOTTOM OPENING STANDARDS
Variations
▪ 1x1, 2x2, 2x3, or 3x3 Single start rib or double layer layer rib.▪ Jersey tubular or Full needle.▪ Links and links.
Quality Point
▪ Linked seams must be secured to prevent unravel.
034
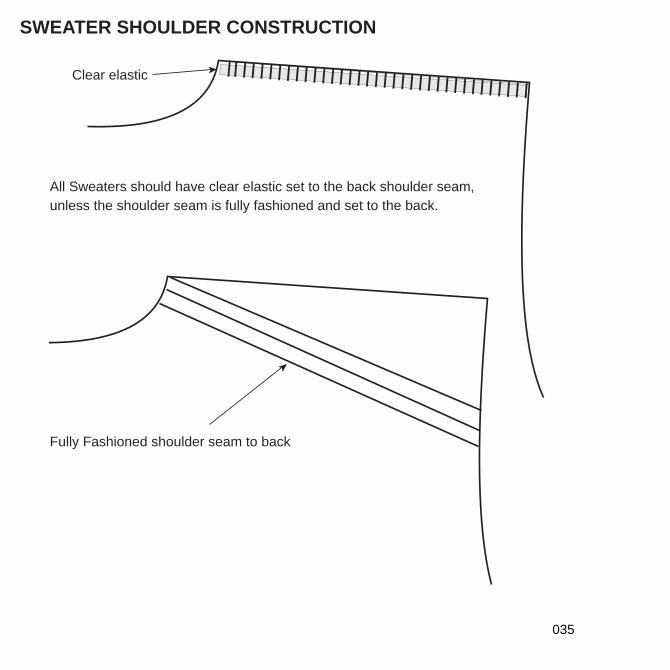
SWEATER SHOULDER CONSTRUCTION
lllllllllllllllllllllllllllllllllll
All Sweaters should have clear elastic set to the back shoulder seam, unless the shoulder seam is fully fashioned and set to the back.
Fully Fashioned shoulder seam to back
Clear elastic
035
SWEATER SHOULDER CONSTRUCTION
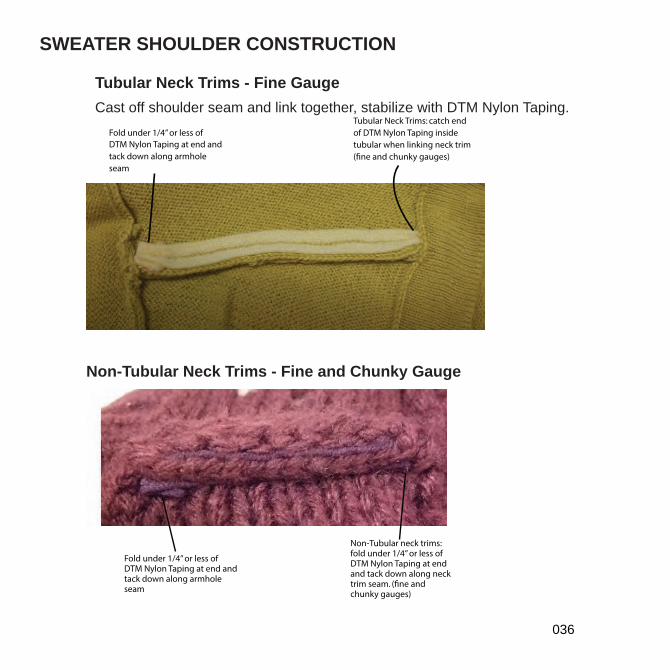
Tubular Neck Trims - Fine Gauge
Cast off shoulder seam and link together, stabilize with DTM Nylon Taping. Tubular Neck Trims: catch endof DTM Nylon Taping insidetubular when linking neck trim(�ne and chunky gauges)
Fold under 1/4” or less ofDTM Nylon Taping at end andtack down along armholeseam
Non-Tubular Neck Trims - Fine and Chunky Gauge
Fold under 1/4” or less ofDTM Nylon Taping at end andtack down along armholeseam
Non-Tubular neck trims:fold under 1/4” or less ofDTM Nylon Taping at endand tack down along necktrim seam. (�ne andchunky gauges)
036
▪▪
▪
▪
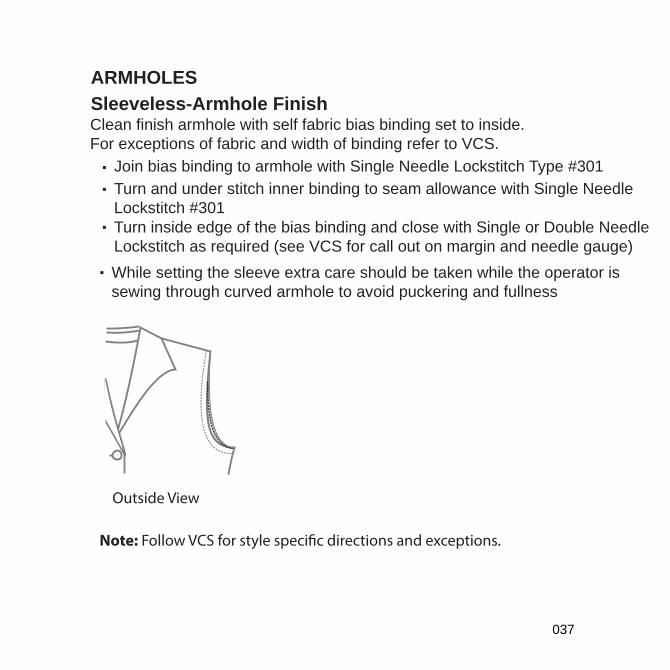
Clean finish armhole with self fabric bias binding set to inside. For exceptions of fabric and width of binding refer to VCS.
Join bias binding to armhole with Single Needle Lockstitch Type #301 Turn and under stitch inner binding to seam allowance with Single Needle Lockstitch #301Turn inside edge of the bias binding and close with Single or Double Needle Lockstitch as required (see VCS for call out on margin and needle gauge)While setting the sleeve extra care should be taken while the operator is sewing through curved armhole to avoid puckering and fullness
Outside View
Note: Follow VCS for style speci�c directions and exceptions.
ARMHOLES
Sleeveless-Armhole Finish
037
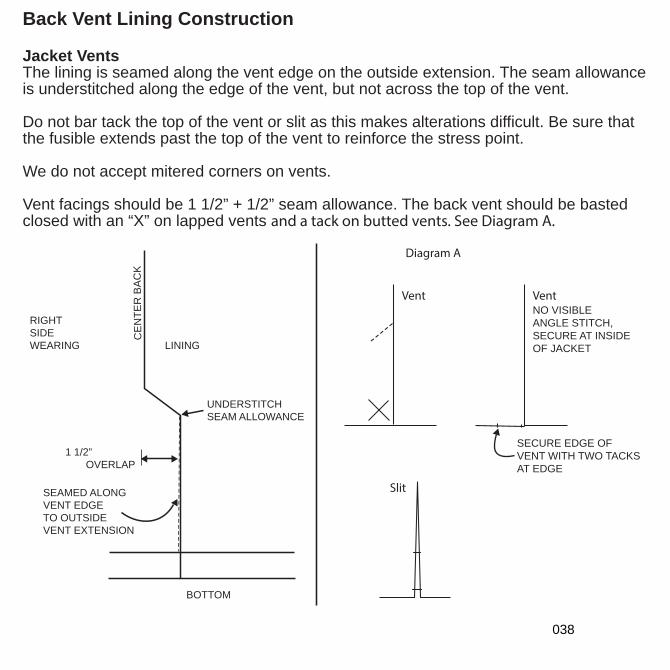
Back Vent Lining Construction
Jacket VentsThe lining is seamed along the vent edge on the outside extension. The seam allowanceis understitched along the edge of the vent, but not across the top of the vent.
Do not bar tack the top of the vent or slit as this makes alterations difficult. Be sure thatthe fusible extends past the top of the vent to reinforce the stress point.
We do not accept mitered corners on vents.
Vent facings should be 1 1/2” + 1/2” seam allowance. The back vent should be basted closed with an “X” on lapped vents and a tack on butted vents. See Diagram A.
RIGHT SIDE WEARING
K
CA
B R
ETN
EC
SEAMED ALONGVENT EDGETO OUTSIDEVENT EXTENSION
BOTTOM
1 1/2”OVERLAP
UNDERSTITCHSEAM ALLOWANCE
LINING
Diagram A
Vent
Slit
Vent NO VISIBLEANGLE STITCH, SECURE AT INSIDEOF JACKET
SECURE EDGE OF VENT WITH TWO TACKS AT EDGE
038
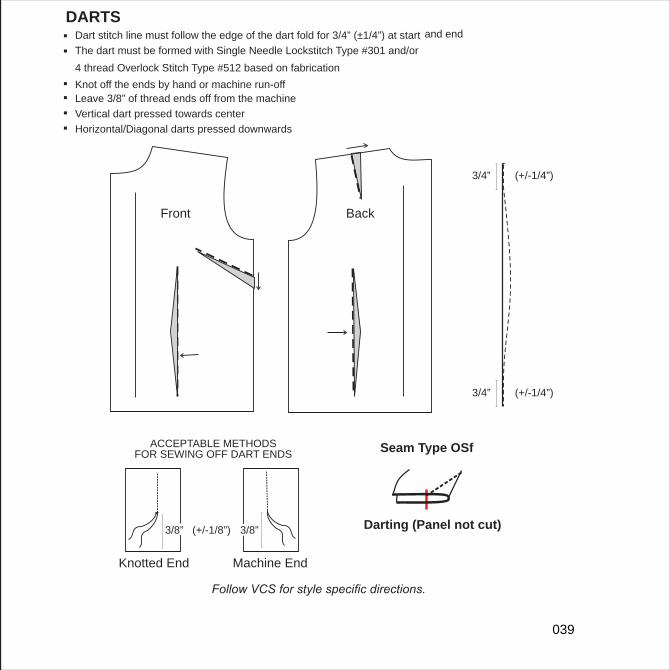
DARTS▪ Dart stitch line must follow the edge of the dart fold for 3/4” (±1/4”) at start and end
▪ The dart must be formed with Single Needle Lockstitch Type #301 and/or 4 thread Overlock Stitch Type #512 based on fabrication
▪ Knot off the ends by hand or machine run-off▪ Leave 3/8” of thread ends off from the machine ▪ Vertical dart pressed towards center▪ Horizontal/Diagonal darts pressed downwards
Front Back
ACCEPTABLE METHODSFOR SEWING OFF DART ENDS
Knotted End Machine End
(+/-1/8”)3/8” 3/8”
3/4”
3/4” (+/-1/4”)
(+/-1/4”)
Seam Type OSf
Darting (Panel not cut)
039
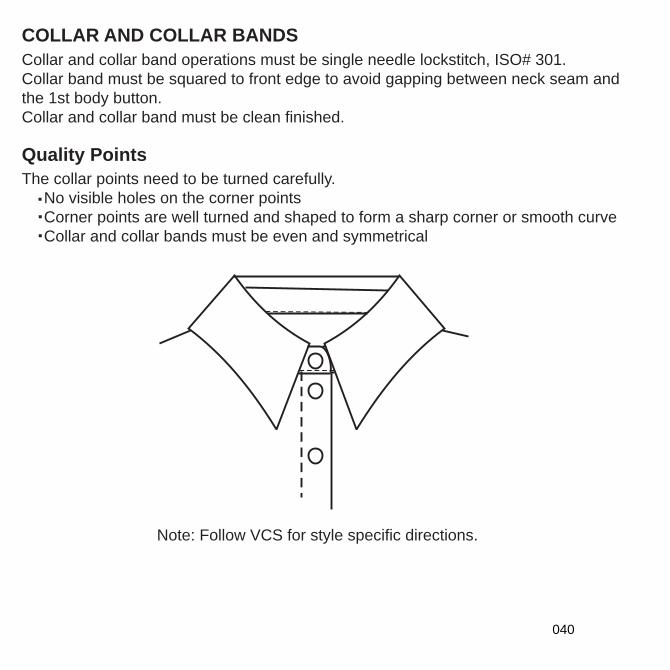
COLLAR AND COLLAR BANDS
Quality Points
▪▪▪
Note: Follow VCS for style specific directions.
Collar and collar band operations must be single needle lockstitch, ISO# 301.Collar band must be squared to front edge to avoid gapping between neck seam and the 1st body button. Collar and collar band must be clean finished.
The collar points need to be turned carefully. No visible holes on the corner points Corner points are well turned and shaped to form a sharp corner or smooth curve Collar and collar bands must be even and symmetrical
040
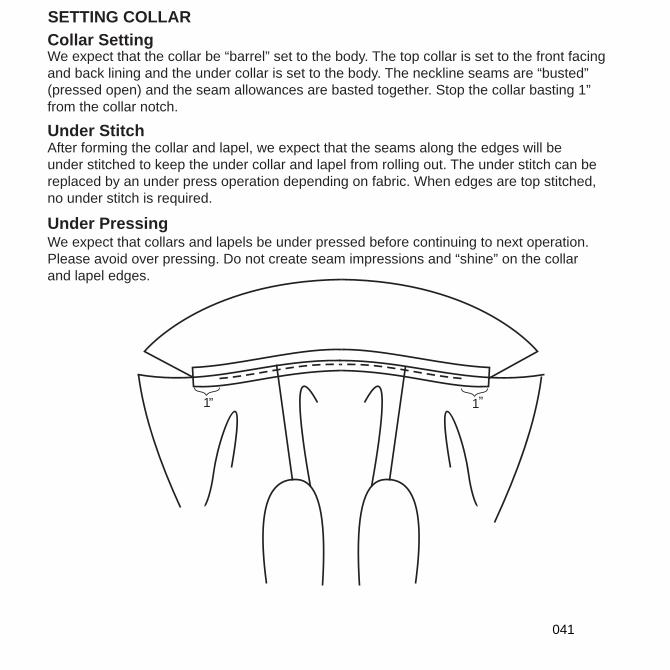
SETTING COLLAR
Collar Setting
Under Stitch
Under Pressing
1” 1”
We expect that the collar be “barrel” set to the body. The top collar is set to the front facing and back lining and the under collar is set to the body. The neckline seams are “busted” (pressed open) and the seam allowances are basted together. Stop the collar basting 1” from the collar notch.
After forming the collar and lapel, we expect that the seams along the edges will be under stitched to keep the under collar and lapel from rolling out. The under stitch can be replaced by an under press operation depending on fabric. When edges are top stitched, no under stitch is required.
We expect that collars and lapels be under pressed before continuing to next operation. Please avoid over pressing. Do not create seam impressions and “shine” on the collar and lapel edges.
041
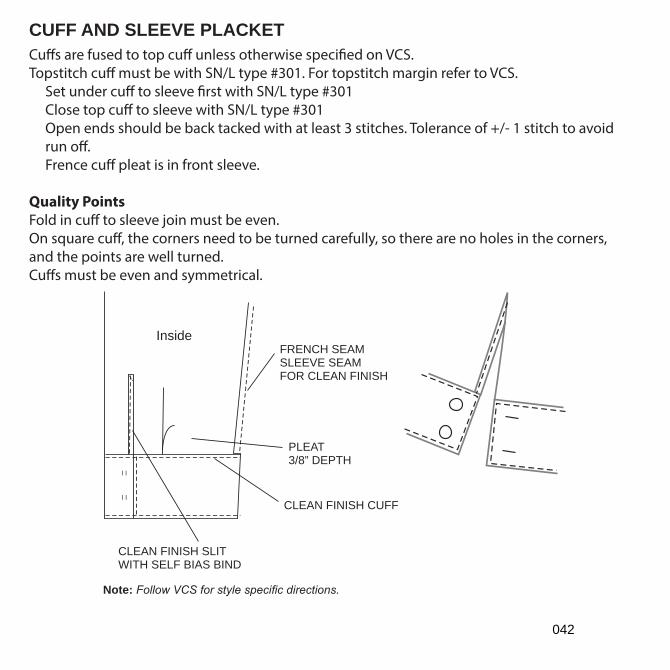
CUFF AND SLEEVE PLACKET
I I
I I
CLEAN FINISH SLIT WITH SELF BIAS BIND
FRENCH SEAMSLEEVE SEAMFOR CLEAN FINISH
PLEAT3/8” DEPTH
Inside
CLEAN FINISH CUFF
Note:
Cu�s are fused to top cu� unless otherwise speci�ed on VCS.Topstitch cu� must be with SN/L type #301. For topstitch margin refer to VCS. Set under cu� to sleeve �rst with SN/L type #301 Close top cu� to sleeve with SN/L type #301 Open ends should be back tacked with at least 3 stitches. Tolerance of +/- 1 stitch to avoid run o�. Frence cu� pleat is in front sleeve.
Quality PointsFold in cu� to sleeve join must be even.On square cu�, the corners need to be turned carefully, so there are no holes in the corners, and the points are well turned.Cu�s must be even and symmetrical.
042
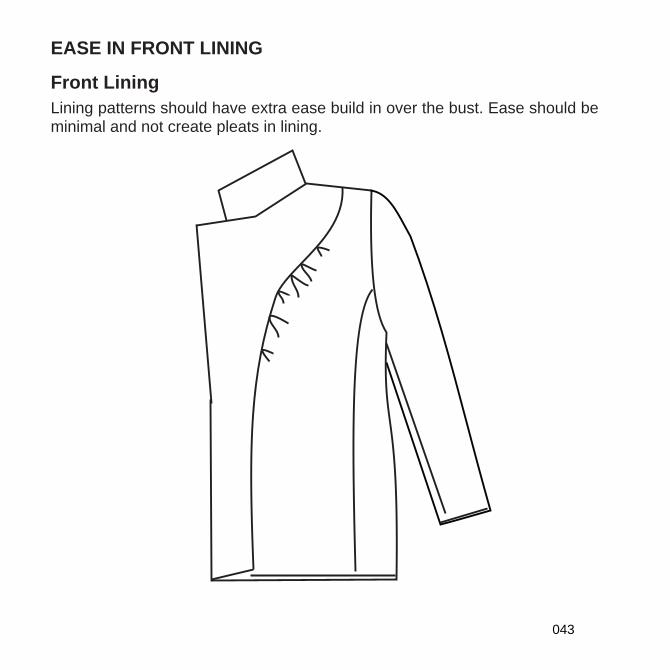
EASE IN FRONT LINING
Front Lining
Lining patterns should have extra ease build in over the bust. Ease should be minimal and not create pleats in lining.
043
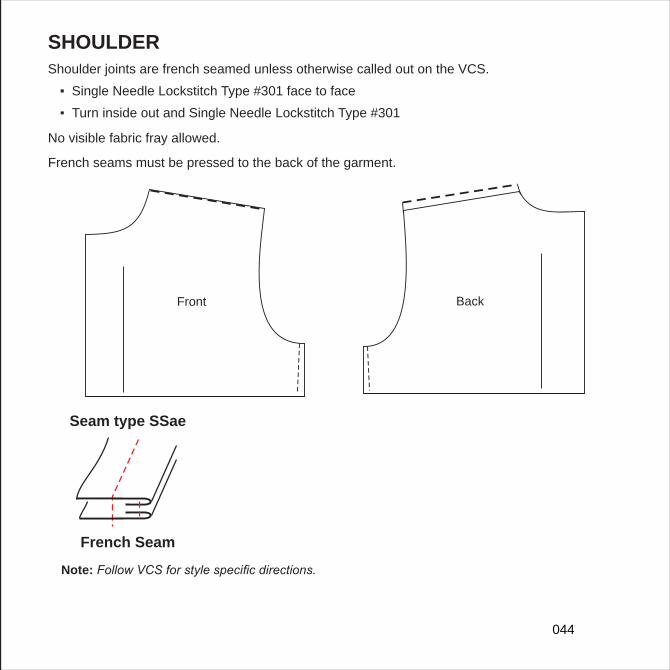
SHOULDER
Shoulder joints are french seamed unless otherwise called out on the VCS.▪ Single Needle Lockstitch Type #301 face to face▪ Turn inside out and Single Needle Lockstitch Type #301
No visible fabric fray allowed.
French seams must be pressed to the back of the garment.
Front Back
French Seam
Seam type SSae
Note:
044
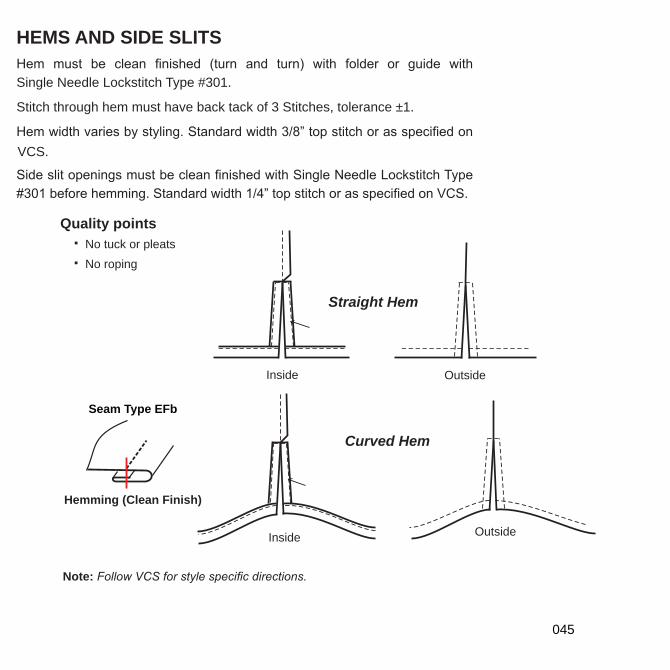
HEMS AND SIDE SLITS
Single Needle Lockstitch Type #301.
Stitch through hem must have back tack of 3 Stitches, tolerance ±1.
VCS.
Quality points
▪ No tuck or pleats▪ No roping
Straight Hem
OutsideInside
Curved Hem
Inside Outside
Seam Type EFb
Hemming (Clean Finish)
Note:
045
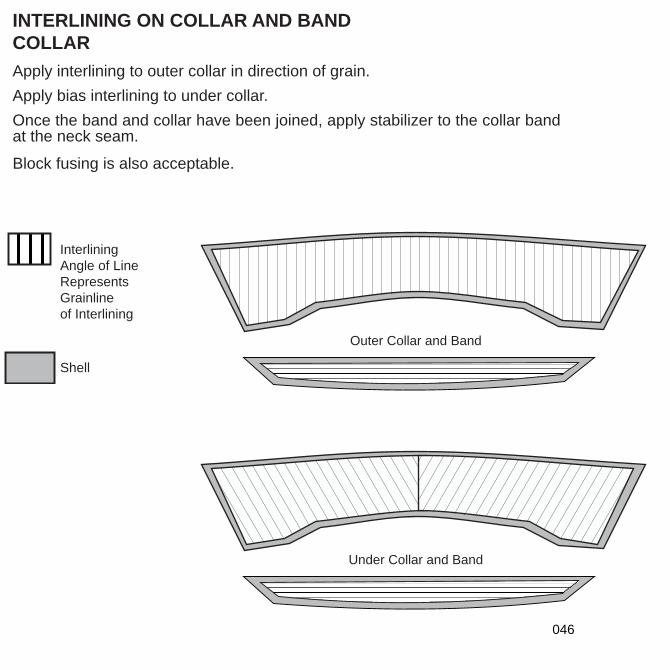
INTERLINING ON COLLAR AND BAND
COLLAR
Apply interlining to outer collar in direction of grain.Apply bias interlining to under collar.Once the band and collar have been joined, apply stabilizer to the collar band at the neck seam.
Block fusing is also acceptable.
Outer Collar and Band
Under Collar and Band
InterliningAngle of LineRepresentsGrainlineof Interlining
Shell
046
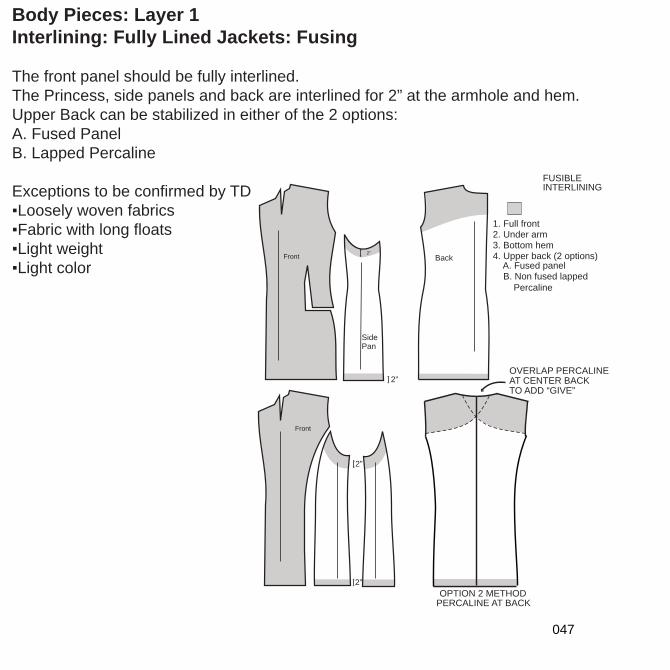
Body Pieces: Layer 1
Interlining: Fully Lined Jackets: Fusing
The front panel should be fully interlined.The Princess, side panels and back are interlined for 2” at the armhole and hem. Upper Back can be stabilized in either of the 2 options:A. Fused PanelB. Lapped Percaline
Exceptions to be confirmed by TD▪Loosely woven fabrics▪Fabric with long floats▪Light weight▪Light color
Front Back
2”
SidePan
2”
Front
2”
2”
OVERLAP PERCALINEAT CENTER BACKTO ADD “GIVE”
OPTION 2 METHODPERCALINE AT BACK
1. Full front2. Under arm3. Bottom hem4. Upper back (2 options)
A. Fused panelB. Non fused lapped
Percaline
FUSIBLEINTERLINING
047
INTERLINING STANDARDSPlease follow Bill of Materials needed for interlining Quality.
Woven Fusible
The following testing must be completed for interlining. Results must be included when sending garment for approval.▪Bond strength▪Show through▪Hand feel▪Dimensional stability▪Appearance after wash using assigned care instructionIf you find an interlining that performs better than designated interlining, please make recommendation and submit mock up to Technical Designer.All above tests should be conducted on bulk before production starts.When applying or testing the interlining follow supplier specifications and guidelines for the best results.▪Verify heat setting on fusing machine at least twice a day.
Woven Non - Fusible
The following testing must be completed for interlining. Results must be included when sending garment for approval.▪Hand feel▪Dimensional stability▪Appearance after wash using assigned care instructionIf you find an interlining that performs better than designated interlining, please make recommendation and submit mock up to Technical Designer.All above tests should be conducted on bulk before production starts.When applying or testing the interlining follow supplier specifications and guidelines for the best results.
048

Dart Construction
The dart stitch should follow the edge of the dart fold for 1” from the end. See Diagram 1a. Diagram 1b is NOT acceptable.
On thicker fabrics, stitch a piece of self fabric into the dart seam to help balance the thickness. See Diagram 2.
Knot off the ends by hand or leave 3/4” of thread chained off from machine. See Diagram 4.
Do not clip the dart open to the very tip. This weakens the seam and can create a hole. See Diagram 3.
DIAGRAMS:1a. 1b.
DIAGRAM:2
DIAGRAM:3
1” 1”
1”1”
KNOTTED END CHAINED END
DIAGRAM: 4ACCEPTABLE METHODS FOR
SEWING OFF DART ENDS
049
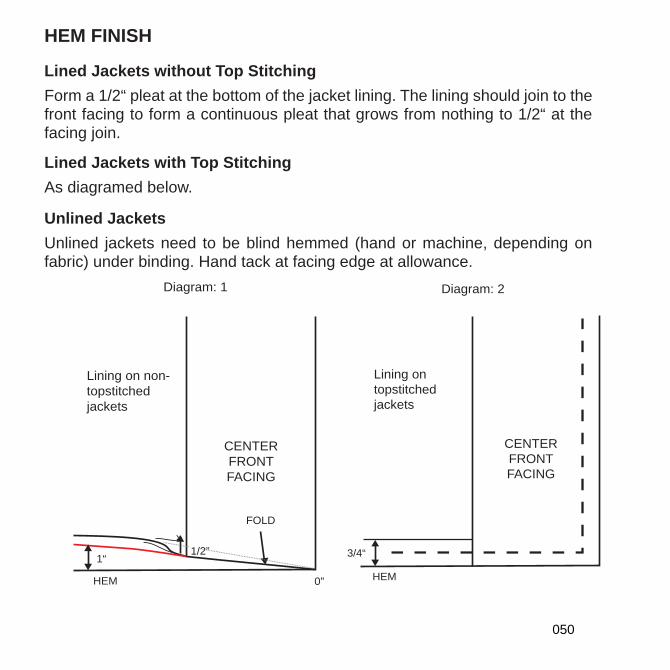
HEM FINISH
Lined Jackets without Top Stitching
Form a 1/2“ pleat at the bottom of the jacket lining. The lining should join to thefront facing to form a continuous pleat that grows from nothing to 1/2“ at thefacing join.
Lined Jackets with Top Stitching
As diagramed below.
Unlined Jackets
Unlined jackets need to be blind hemmed (hand or machine, depending on fabric) under binding. Hand tack at facing edge at allowance.
FOLD
CENTERFRONTFACING
1“
0”
1/2”
HEM
Lining on non-topstitchedjackets
Diagram: 1
HEM
3/4“
Lining ontopstitchedjackets
Diagram: 2
CENTERFRONTFACING
050
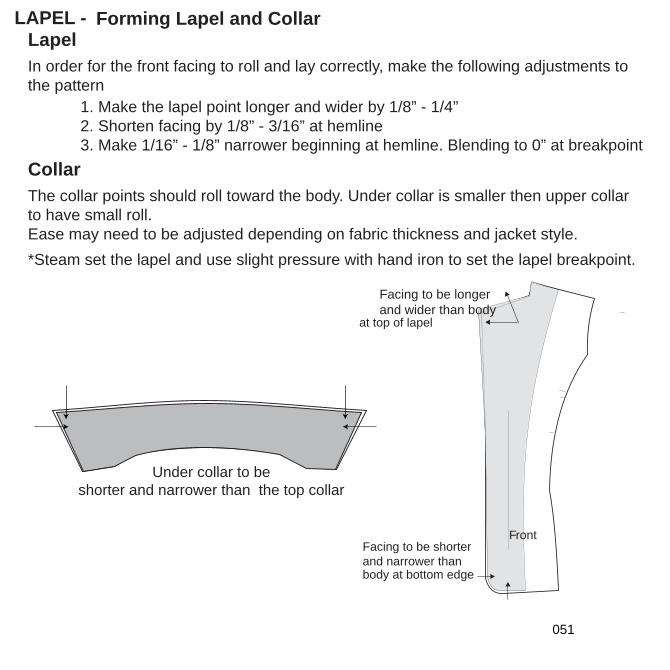
Under collar to beshorter and narrower than the top collar
Front
Facing to be longer and wider than body
at top of lapel
Facing to be shorter and narrower than body at bottom edge
LAPEL - Forming Lapel and Collar Lapel
In order for the front facing to roll and lay correctly, make the following adjustments to the pattern
1. Make the lapel point longer and wider by 1/8” - 1/4”2. Shorten facing by 1/8” - 3/16” at hemline3. Make 1/16” - 1/8” narrower beginning at hemline. Blending to 0” at breakpoint
Collar
The collar points should roll toward the body. Under collar is smaller then upper collar to have small roll. Ease may need to be adjusted depending on fabric thickness and jacket style. *Steam set the lapel and use slight pressure with hand iron to set the lapel breakpoint.
051
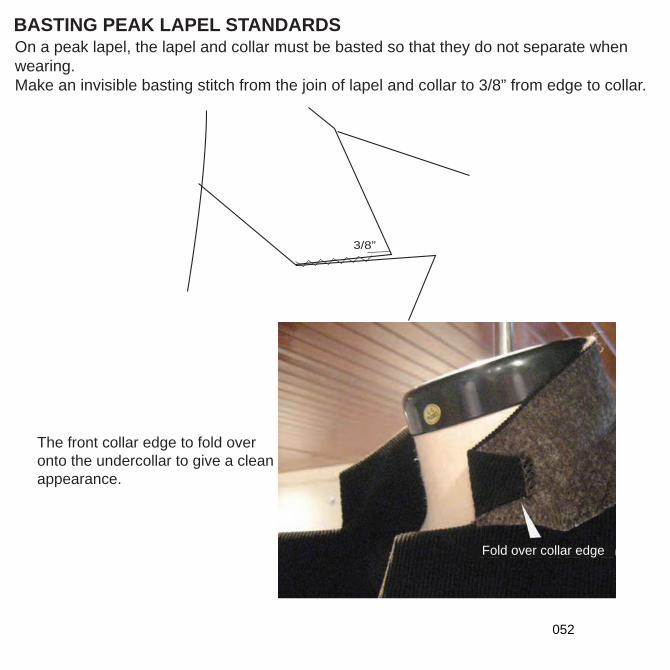
BASTING PEAK LAPEL STANDARDS
3/8”
On a peak lapel, the lapel and collar must be basted so that they do not separate when wearing.Make an invisible basting stitch from the join of lapel and collar to 3/8” from edge to collar.
Fold over collar edge
The front collar edge to fold over onto the undercollar to give a clean appearance.
052
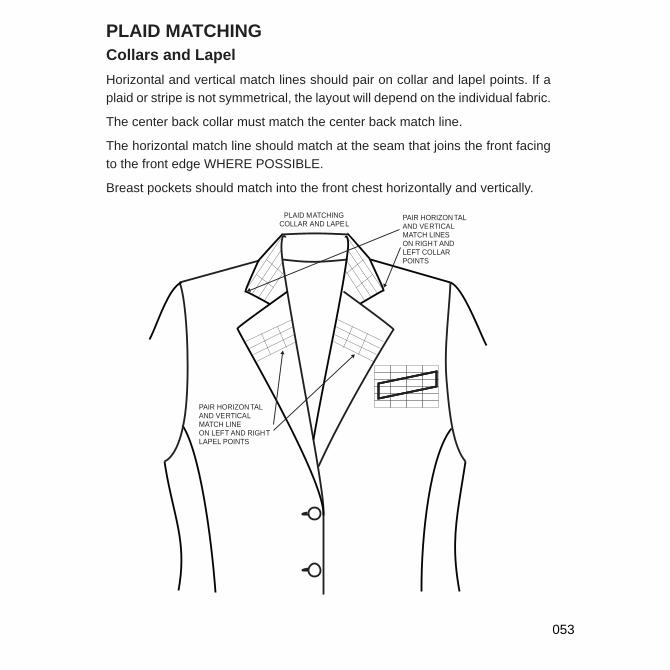
PLAID MATCHING
Collars and Lapel
Horizontal and vertical match lines should pair on collar and lapel points. If a plaid or stripe is not symmetrical, the layout will depend on the individual fabric.
The center back collar must match the center back match line.
The horizontal match line should match at the seam that joins the front facing to the front edge WHERE POSSIBLE.
Breast pockets should match into the front chest horizontally and vertically.
PLAID MATCHINGCOLLAR AND LAPEL
PAIR HORIZONTAL AND VERTICALMATCH LINE ON LEFT AND RIGHTLAPEL POINTS
PAIR HORIZONTAL AND VERTICALMATCH LINES ON RIGHT AND LEFT COLLAR POINTS
053
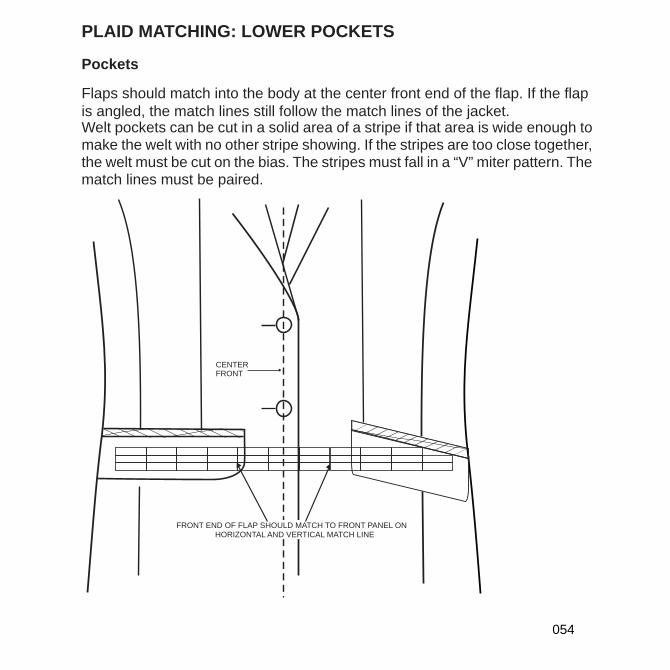
PLAID MATCHING: LOWER POCKETS
Pockets
Flaps should match into the body at the center front end of the flap. If the flapis angled, the match lines still follow the match lines of the jacket.Welt pockets can be cut in a solid area of a stripe if that area is wide enough to make the welt with no other stripe showing. If the stripes are too close together, the welt must be cut on the bias. The stripes must fall in a “V” miter pattern. The match lines must be paired.
CENTERFRONT
FRONT END OF FLAP SHOULD MATCH TO FRONT PANEL ONHORIZONTAL AND VERTICAL MATCH LINE
054
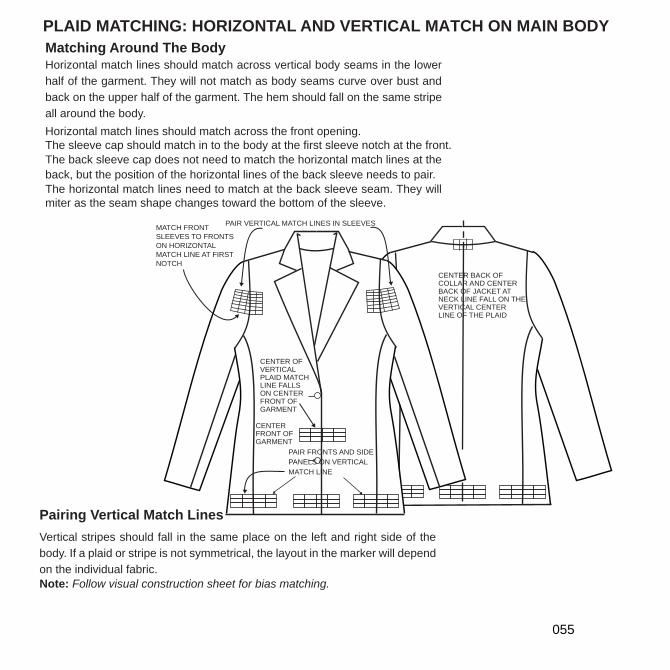
PLAID MATCHING: HORIZONTAL AND VERTICAL MATCH ON MAIN BODY
Matching Around The Body
Horizontal match lines should match across vertical body seams in the lower half of the garment. They will not match as body seams curve over bust and back on the upper half of the garment. The hem should fall on the same stripe all around the body.Horizontal match lines should match across the front opening.The sleeve cap should match in to the body at the first sleeve notch at the front.The back sleeve cap does not need to match the horizontal match lines at the back, but the position of the horizontal lines of the back sleeve needs to pair.The horizontal match lines need to match at the back sleeve seam. They will miter as the seam shape changes toward the bottom of the sleeve.
CENTER BACK OF COLLAR AND CENTERBACK OF JACKET AT NECK LINE FALL ON THE VERTICAL CENTERLINE OF THE PLAID
CENTER OFVERTICALPLAID MATCHLINE FALLS ON CENTERFRONT OF GARMENT
CENTERFRONT OFGARMENT
PAIR FRONTS AND SIDE PANELS ON VERTICAL MATCH LINE
PAIR VERTICAL MATCH LINES IN SLEEVESMATCH FRONT SLEEVES TO FRONTS ON HORIZONTAL MATCH LINE AT FIRST NOTCH
Pairing Vertical Match Lines
Vertical stripes should fall in the same place on the left and right side of the body. If a plaid or stripe is not symmetrical, the layout in the marker will depend on the individual fabric.Note: Follow visual construction sheet for bias matching.
055
PLAID MATCHING
We expect a 100% plaid match on plaids and stripes unless otherwise stated in the Spec Pack.
Selecting Match Lines
We rely on the supplier to choose match lines based on fabric consumption.
that are made for good yield as well as good design. The consumption needs to be reviewed and any change in yardage needs to be discussed before a
Please note the following when choosing match lines:
When selecting match lines for marker making with plaids and stripes please avoid bright or narrow contrast lines along the front, bottom hem, or collar edge. Having a strong stripe on folded or sewn edges creates quality problems.
Select a neutral, subtle match line for the center back as the shaping of the center back distorts the plaid lines and can be very unattractive when contrast stripes swing into and out of the center back seam.
The same match line chosen for the center back jacket should carry on to the center back skirt or pant.
056
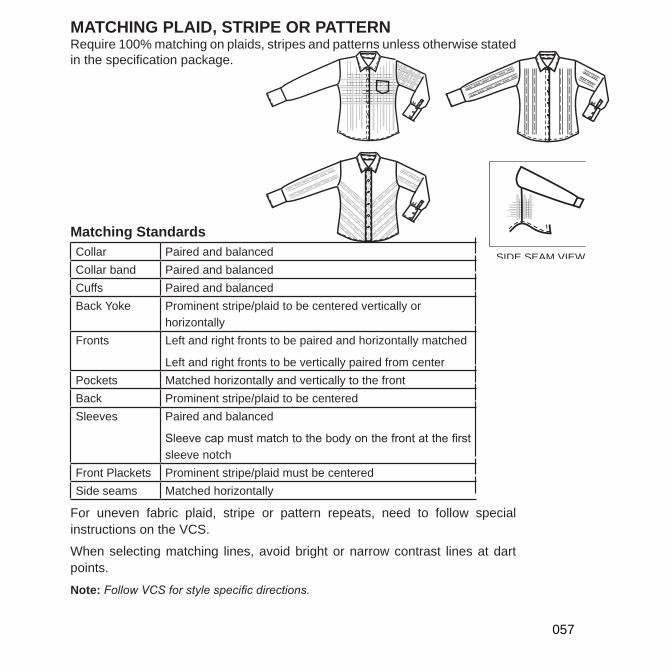
MATCHING PLAID, STRIPE OR PATTERNRequire 100% matching on plaids, stripes and patterns unless otherwise statedin the specification package.
Matching Standards
Collar Paired and balancedCollar band Paired and balancedCuffs Paired and balancedBack Yoke Prominent stripe/plaid to be centered vertically or
horizontallyFronts Left and right fronts to be paired and horizontally matched
Left and right fronts to be vertically paired from centerPockets Matched horizontally and vertically to the frontBack Prominent stripe/plaid to be centeredSleeves Paired and balanced
sleeve notchFront Plackets Prominent stripe/plaid must be centeredSide seams Matched horizontally
For uneven fabric plaid, stripe or pattern repeats, need to follow special instructions on the VCS.
When selecting matching lines, avoid bright or narrow contrast lines at dart points.
Note:
SIDE SEAM VIEW
057
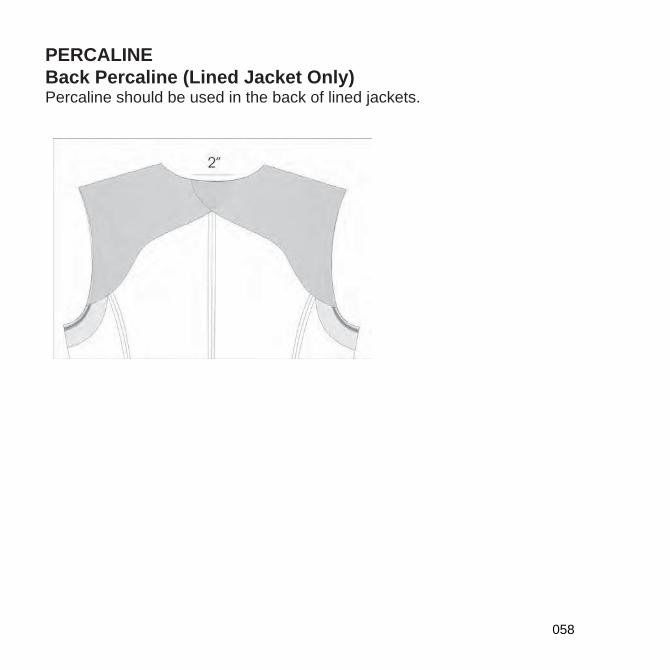
PERCALINE
Back Percaline (Lined Jacket Only)Percaline should be used in the back of lined jackets.
058
▪▪
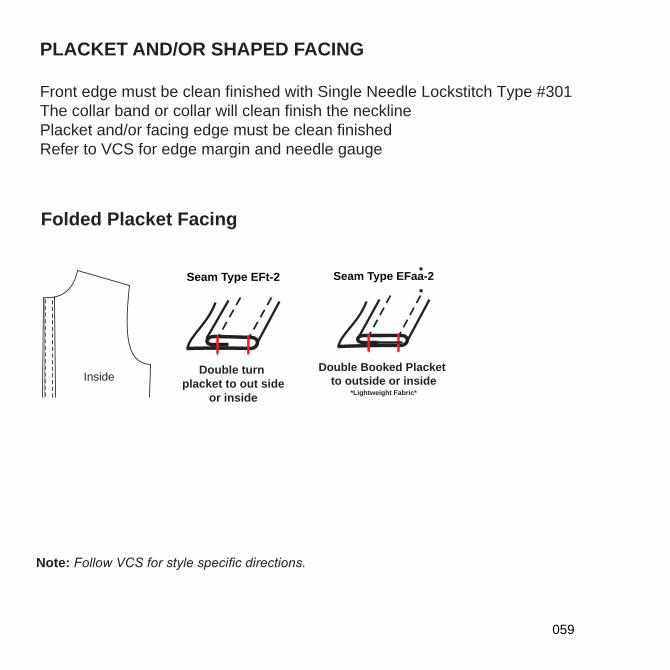
Folded Placket Facing
Inside
Seam Type EFt-2
Double turn
placket to out side
or inside
Seam Type EFaa-2
Double Booked Placket
to outside or inside*Lightweight Fabric*
Note:
PLACKET AND/OR SHAPED FACING
Front edge must be clean finished with Single Needle Lockstitch Type #301The collar band or collar will clean finish the necklinePlacket and/or facing edge must be clean finishedRefer to VCS for edge margin and needle gauge
059
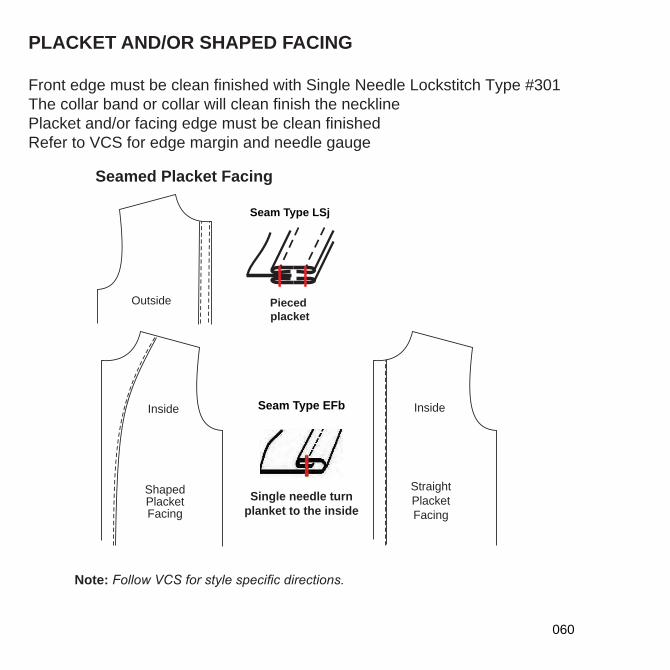
ShapedPlacketFacing
Inside Inside
StraightPlacketFacing
Seam Type EFb
Single needle turn
planket to the inside
Seamed Placket Facing
Outside Pieced
placket
Seam Type LSj
Note:
PLACKET AND/OR SHAPED FACING
Front edge must be clean finished with Single Needle Lockstitch Type #301The collar band or collar will clean finish the necklinePlacket and/or facing edge must be clean finishedRefer to VCS for edge margin and needle gauge
060
1/4” 1/4”
1/4”
1/8”
STEPPED TRIMMING IS IDEAL
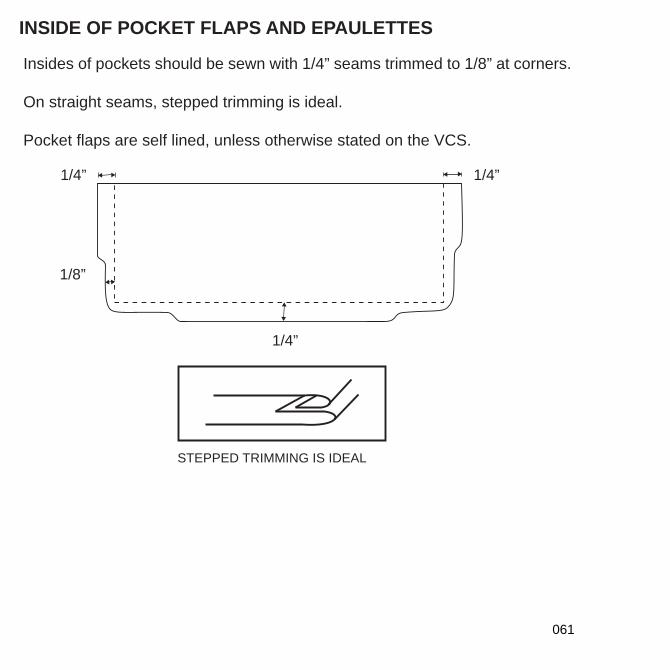
INSIDE OF POCKET FLAPS AND EPAULETTES
Insides of pockets should be sewn with 1/4” seams trimmed to 1/8” at corners.
On straight seams, stepped trimming is ideal.
Pocket flaps are self lined, unless otherwise stated on the VCS.
061
CF
5"6 1/2”
13 1/4”
FACING
HPS
LINING
DOUBLE WELT POCKET
INSIDE FRONT LEFT WEARING - LINING
3/8”
Self Fabric
Lining
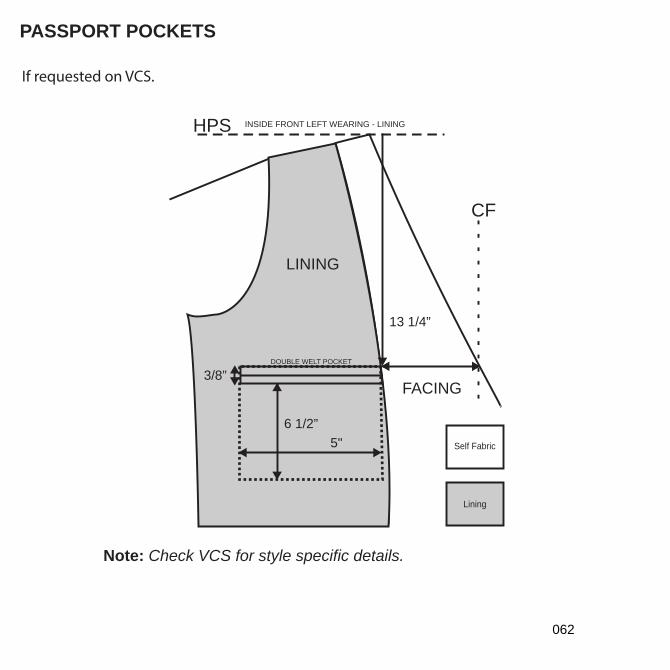
PASSPORT POCKETS
Note: Check VCS for style specific details.
If requested on VCS.
062
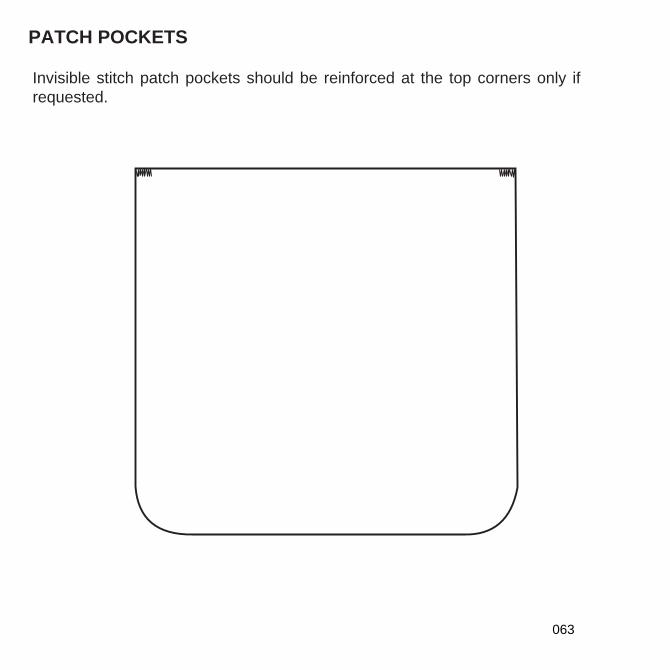
PATCH POCKETS
Invisible stitch patch pockets should be reinforced at the top corners only if requested.
063
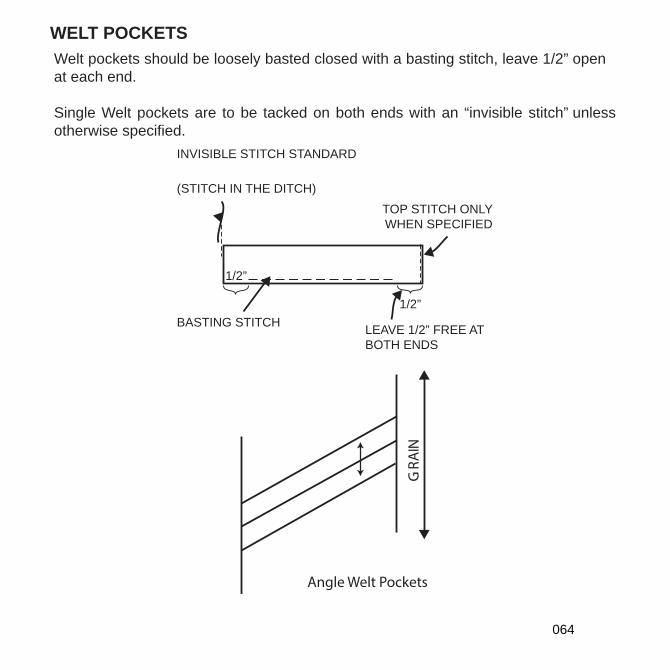
INVISIBLE STITCH STANDARD
(STITCH IN THE DITCH)
1/2”
1/2”
LEAVE 1/2” FREE ATBOTH ENDS
BASTING STITCH
TOP STITCH ONLYWHEN SPECIFIED
Angle Welt Pockets
NIARG
WELT POCKETS
Welt pockets should be loosely basted closed with a basting stitch, leave 1/2” open at each end.
Single Welt pockets are to be tacked on both ends with an “invisible stitch” unless otherwise specified.
064
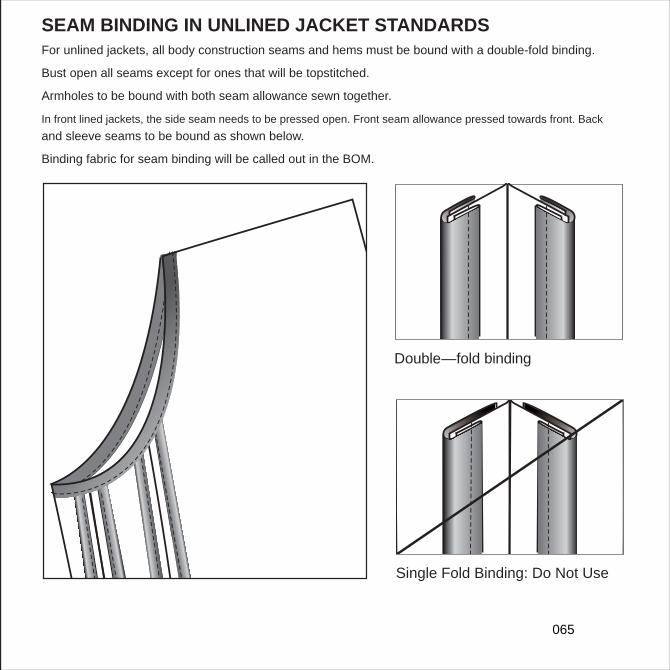
SEAM BINDING IN UNLINED JACKET STANDARDS
For unlined jackets, all body construction seams and hems must be bound with a double-fold binding.
Bust open all seams except for ones that will be topstitched.
Armholes to be bound with both seam allowance sewn together.
In front lined jackets, the side seam needs to be pressed open. Front seam allowance pressed towards front. Back and sleeve seams to be bound as shown below.
Binding fabric for seam binding will be called out in the BOM.
Double—fold binding
Single Fold Binding: Do Not Use
065

SLEEVE LINING JOIN AT HEM
Sleeve Linings
Form a 1/2” pleat at the bottom of the sleeve lining.
Unlined Jackets
Unlined sleeves need to be blind hemmed (hand or machine depending on fabric) under the binding. Then hand tack at seam allowance.
SEAM JOIN,SHELL TOLINING
PLEAT DEPTH
FROM FOLDOF LINING TO HEM LINEOF SHELL
TotalHem1 1/2”
1/2”
1/2”
1/2”
INSIDE SLEEVE HEM DETAIL
INSIDEVIEW
SHELL
INSIDEVIEW
SHELL
LINING LINING
BACK SLEEVE
066
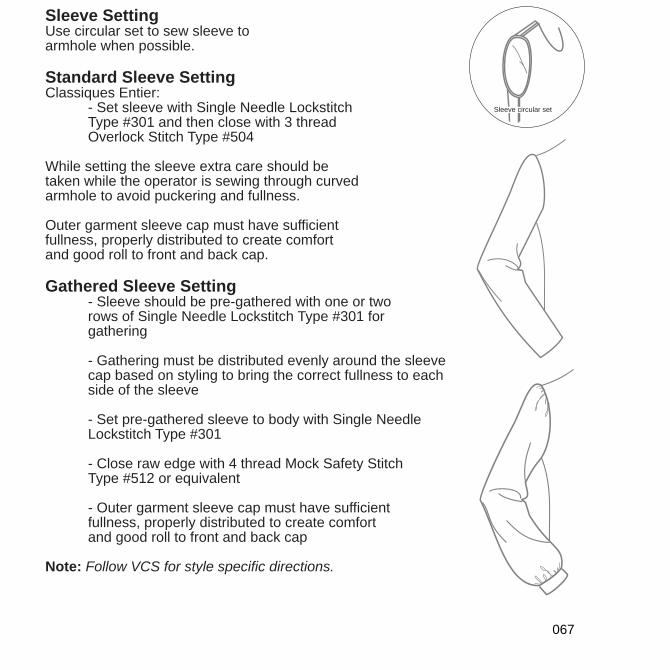
Sleeve SettingUse circular set to sew sleeve to armhole when possible.
Standard Sleeve SettingClassiques Entier:
- Set sleeve with Single Needle LockstitchType #301 and then close with 3 threadOverlock Stitch Type #504
While setting the sleeve extra care should be taken while the operator is sewing through curved armhole to avoid puckering and fullness.
Outer garment sleeve cap must have sufficient fullness, properly distributed to create comfort and good roll to front and back cap.
Gathered Sleeve Setting- Sleeve should be pre-gathered with one or tworows of Single Needle Lockstitch Type #301 forgathering
- Gathering must be distributed evenly around the sleevecap based on styling to bring the correct fullness to eachside of the sleeve
- Set pre-gathered sleeve to body with Single NeedleLockstitch Type #301
- Close raw edge with 4 thread Mock Safety StitchType #512 or equivalent
- Outer garment sleeve cap must have sufficientfullness, properly distributed to create comfortand good roll to front and back cap
Note: Follow VCS for style specific directions.
Sleeve circular set
067
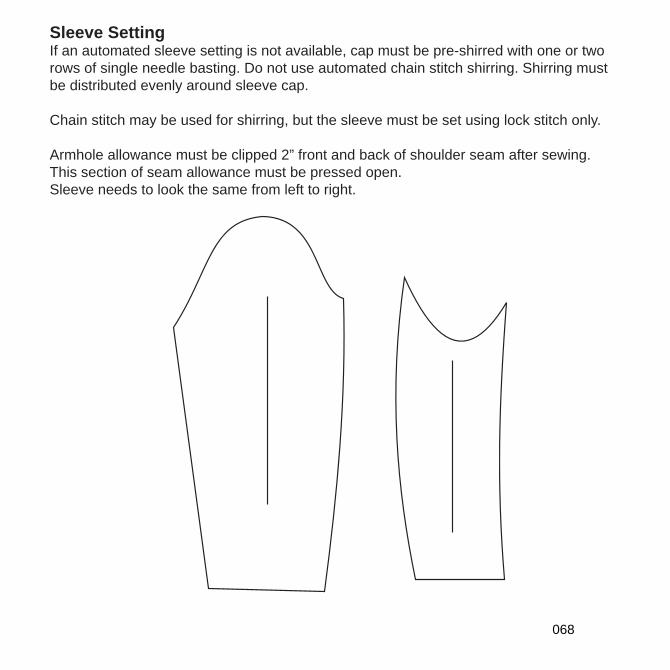
Sleeve SettingIf an automated sleeve setting is not available, cap must be pre-shirred with one or two rows of single needle basting. Do not use automated chain stitch shirring. Shirring must be distributed evenly around sleeve cap.
Chain stitch may be used for shirring, but the sleeve must be set using lock stitch only.
Armhole allowance must be clipped 2” front and back of shoulder seam after sewing. This section of seam allowance must be pressed open.Sleeve needs to look the same from left to right.
068
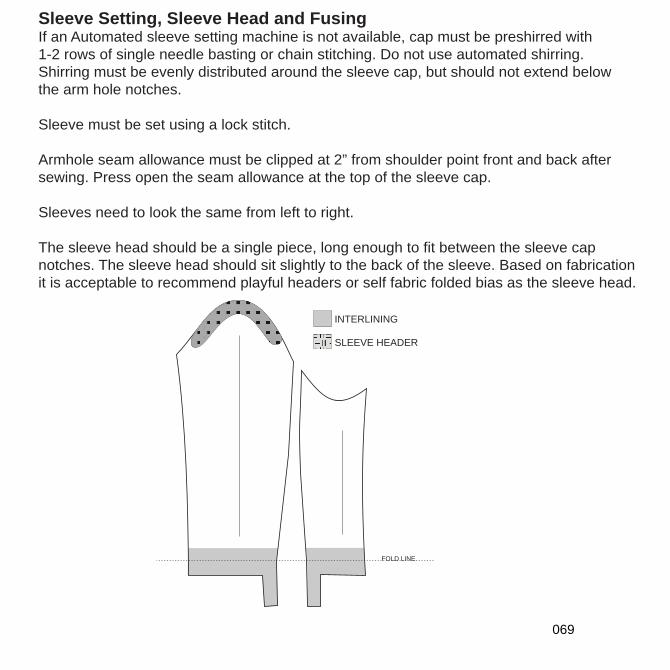
Sleeve Setting, Sleeve Head and FusingIf an Automated sleeve setting machine is not available, cap must be preshirred with 1-2 rows of single needle basting or chain stitching. Do not use automated shirring.Shirring must be evenly distributed around the sleeve cap, but should not extend belowthe arm hole notches.
Sleeve must be set using a lock stitch.
Armhole seam allowance must be clipped at 2” from shoulder point front and back after sewing. Press open the seam allowance at the top of the sleeve cap.
Sleeves need to look the same from left to right.
The sleeve head should be a single piece, long enough to fit between the sleeve cap notches. The sleeve head should sit slightly to the back of the sleeve. Based on fabrication it is acceptable to recommend playful headers or self fabric folded bias as the sleeve head.
FOLD LINE
INTERLINING
SLEEVE HEADER
069

Sleeve SettingUse circular set to sew sleeve to armhole when possible.
Standard Sleeve SettingWhile setting the sleeve extra care should be taken while the operator is sewing through curved armhole to avoid puckering.
Outer garment sleeve cap must have sufficient fullness, properly distributed to create comfort and good roll to front and back cap.
Gathered Sleeve Setting- Sleeve should be pre-gathered with one or two rows of
Single Needle Lockstitch Type #301 for gathering.
- Gathering must be distributed evenly around the sleeve cap based onstyling to bring the correct fullness to each side of the sleeve.
- Set pre-gathered sleeve to body with Single Needle Lockstitch Type #301.
- Close raw edge with 4 thread Mock Safety Stitch Type #512 or equivalent.
- Outer garment sleeve cap must have sufficient fullness, properlydistributed to create comfort and good roll to front and back cap.
070
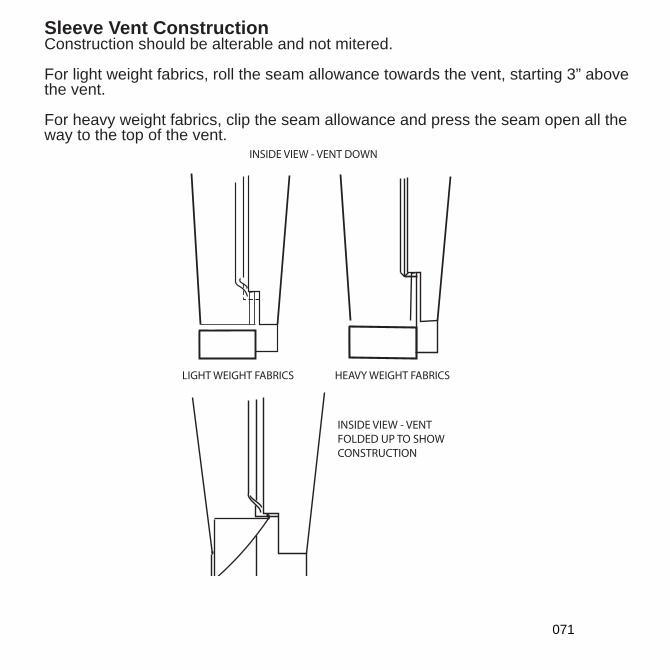
Sleeve Vent ConstructionConstruction should be alterable and not mitered.
For light weight fabrics, roll the seam allowance towards the vent, starting 3” above the vent.
For heavy weight fabrics, clip the seam allowance and press the seam open all theway to the top of the vent.
INSIDE VIEW - VENT DOWN
HEAVY WEIGHT FABRICSLIGHT WEIGHT FABRICS
INSIDE VIEW - VENTFOLDED UP TO SHOWCONSTRUCTION
071
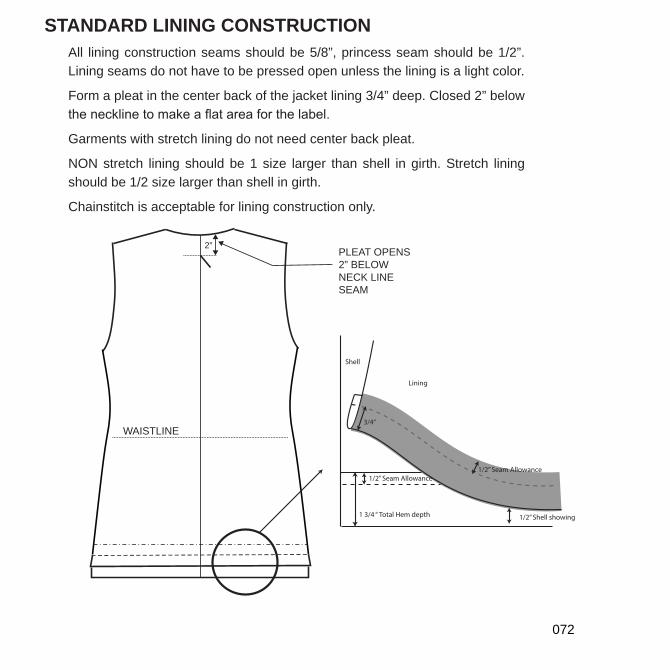
STANDARD LINING CONSTRUCTION
.”2/1 eb dluohs maes ssecnirp ,”8/5 eb dluohs smaes noitcurtsnoc gninil llALining seams do not have to be pressed open unless the lining is a light color.
Form a pleat in the center back of the jacket lining 3/4” deep. Closed 2” below
Garments with stretch lining do not need center back pleat.
NON stretch lining should be 1 size larger than shell in girth. Stretch lining should be 1/2 size larger than shell in girth.
Chainstitch is acceptable for lining construction only.
2”PLEAT OPENS2” BELOWNECK LINESEAM
WAISTLINE
Lining
Shell
1/2” Seam Allowance1/2” Seam Allowance
3/4”
1 3/4 “ Total Hem depth 1/2” Shell showing
072
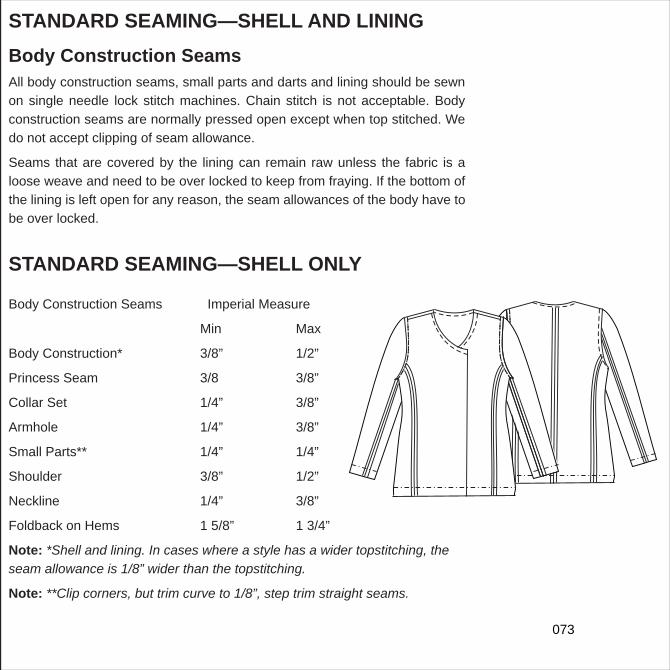
STANDARD SEAMING—SHELL AND LINING
Body Construction Seams
All body construction seams, small parts and darts and lining should be sewn on single needle lock stitch machines. Chain stitch is not acceptable. Body construction seams are normally pressed open except when top stitched. We do not accept clipping of seam allowance.
Seams that are covered by the lining can remain raw unless the fabric is a loose weave and need to be over locked to keep from fraying. If the bottom of the lining is left open for any reason, the seam allowances of the body have to be over locked.
STANDARD SEAMING—SHELL ONLY
Body Construction Seams Imperial Measure
Min Max
Body Construction* 3/8” 1/2”
Princess Seam 3/8 3/8”
Collar Set 1/4” 3/8”
Armhole 1/4” 3/8”
Small Parts** 1/4” 1/4”
Shoulder 3/8” 1/2”
Neckline 1/4” 3/8”
Foldback on Hems 1 5/8” 1 3/4”
Note: *Shell and lining. In cases where a style has a wider topstitching, the seam allowance is 1/8” wider than the topstitching.
Note: **Clip corners, but trim curve to 1/8”, step trim straight seams.
073
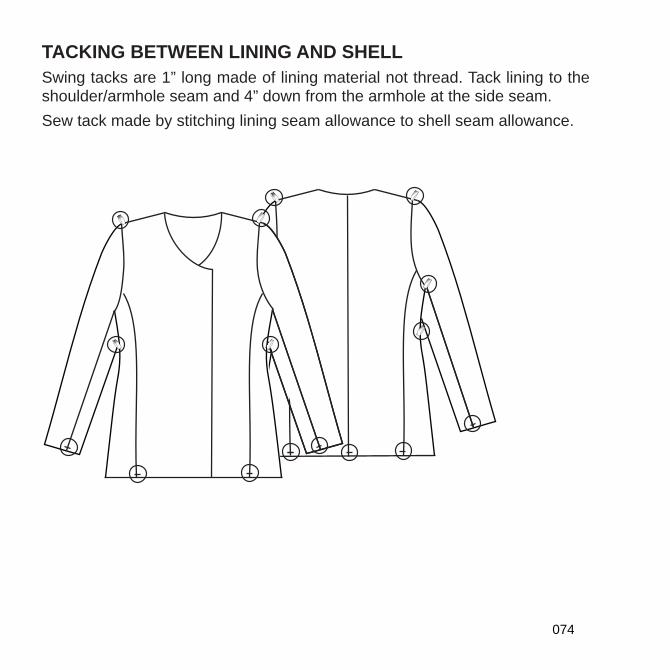
TACKING BETWEEN LINING AND SHELL
Swing tacks are 1” long made of lining material not thread. Tack lining to the shoulder/armhole seam and 4” down from the armhole at the side seam. Sew tack made by stitching lining seam allowance to shell seam allowance.
074
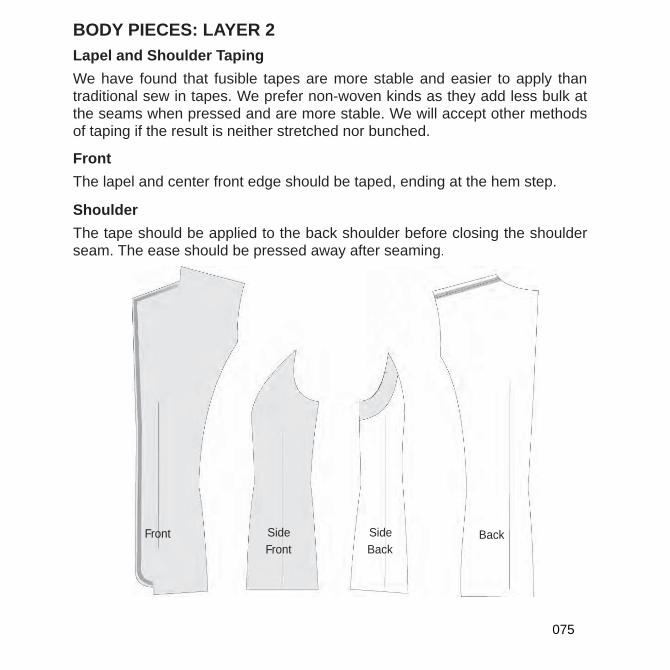
BODY PIECES: LAYER 2
Lapel and Shoulder Taping
We have found that fusible tapes are more stable and easier to apply than traditional sew in tapes. We prefer non-woven kinds as they add less bulk at the seams when pressed and are more stable. We will accept other methodsof taping if the result is neither stretched nor bunched.
Front
The lapel and center front edge should be taped, ending at the hem step.
Shoulder
The tape should be applied to the back shoulder before closing the shoulderseam. The ease should be pressed away after seaming.
Front SideFront
SideBack
Back
075
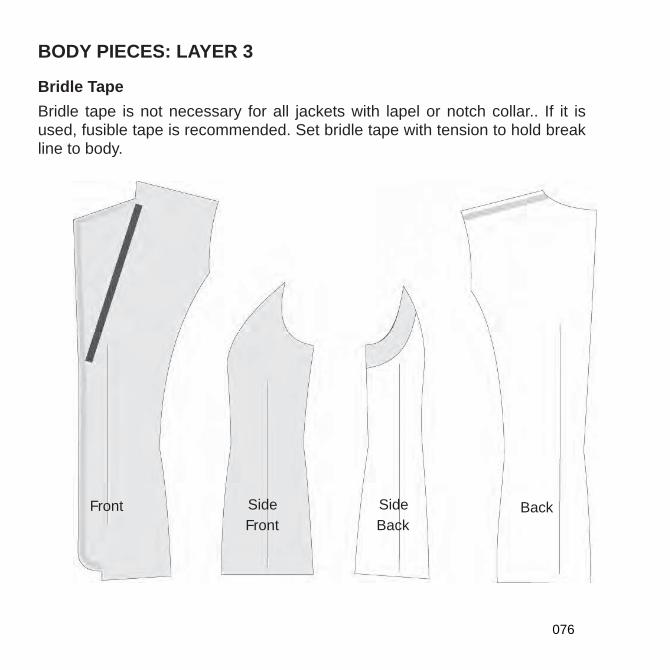
BODY PIECES: LAYER 3
Bridle Tape
Bridle tape is not necessary for all jackets with lapel or notch collar.. If it is used, fusible tape is recommended. Set bridle tape with tension to hold break line to body.
Front SideFront
SideBack
Back
076
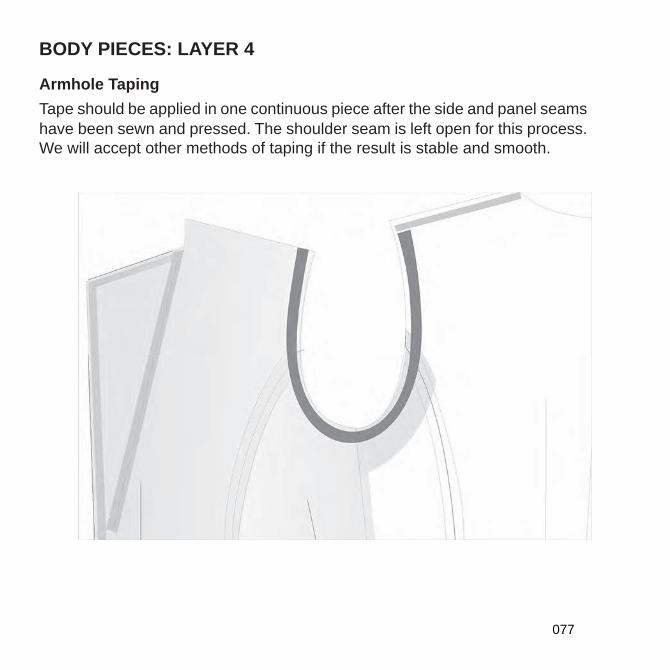
BODY PIECES: LAYER 4
Armhole Taping
Tape should be applied in one continuous piece after the side and panel seams have been sewn and pressed. The shoulder seam is left open for this process.We will accept other methods of taping if the result is stable and smooth.
077

BODY PIECES: LAYER 5
Addition of Chest Piece
Chest piece is to be applied after armhole taping is completed and before shoulder seam is sewn.Chest piece should be invisibly stitched at roll line. The machine for this function is STROBLE 174 or STROBLE 227D.
078
Wig
gan
Sto
ps a
t Edg
e of
Fac
ing
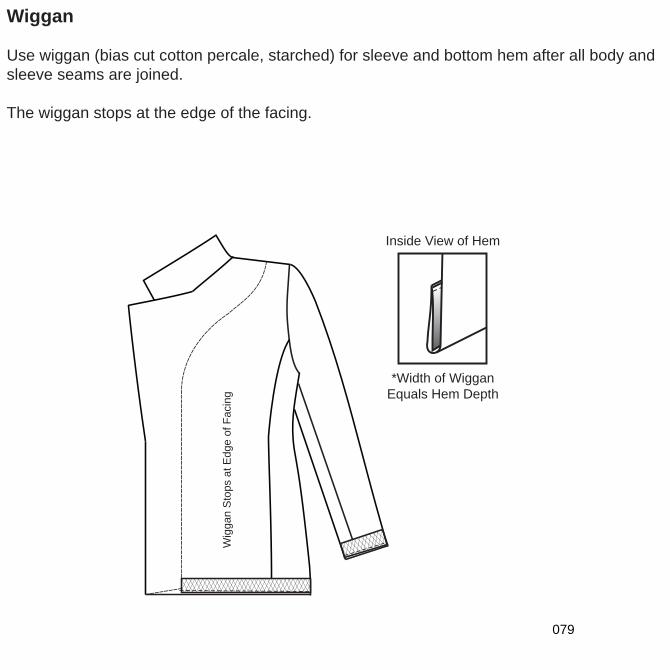
Inside View of Hem
*Width of WigganEquals Hem Depth
Wiggan
Use wiggan (bias cut cotton percale, starched) for sleeve and bottom hem after all body and sleeve seams are joined.
The wiggan stops at the edge of the facing.
079
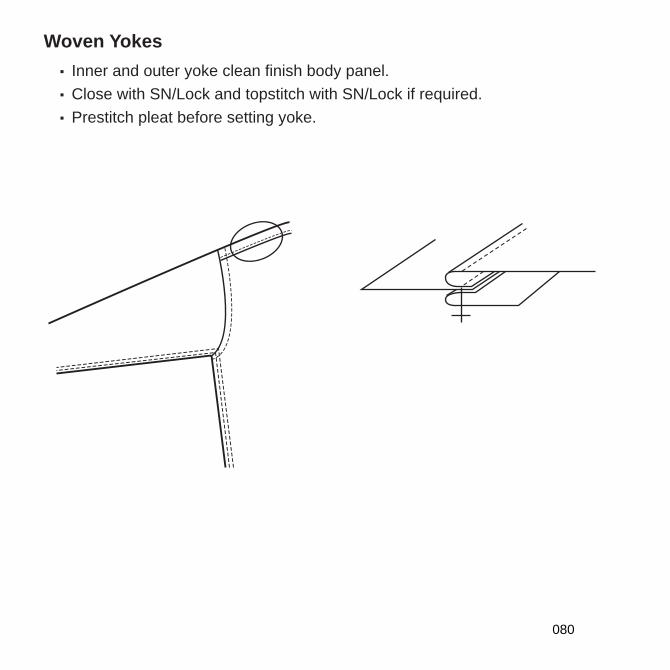
Woven Yokes
▪
▪ Close with SN/Lock and topstitch with SN/Lock if required.▪ Prestitch pleat before setting yoke.
Inner and outer yoke clean finish body panel.
080
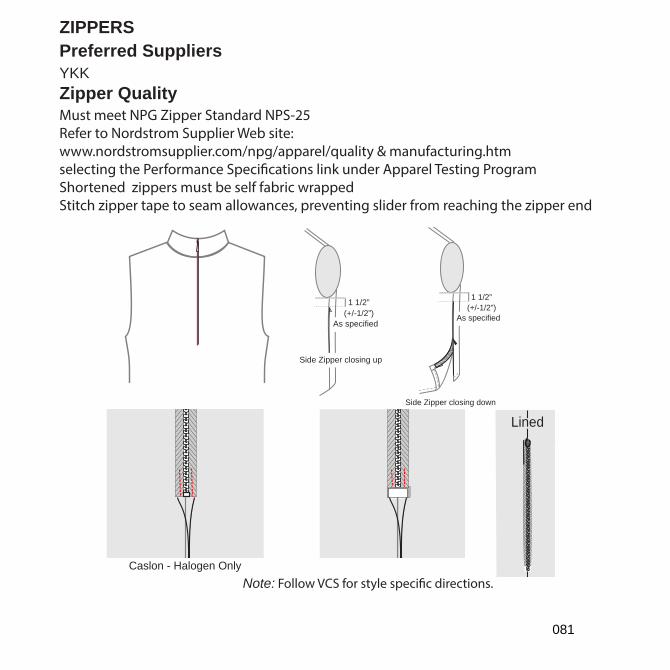
ZIPPERS
Preferred Suppliers
YKKZipper Quality
Must meet NPG Zipper Standard NPS-25Refer to Nordstrom Supplier Web site: www.nordstromsupplier.com/npg/apparel/quality & manufacturing.htm selecting the Performance Speci�cations link under Apparel Testing ProgramShortened zippers must be self fabric wrappedStitch zipper tape to seam allowances, preventing slider from reaching the zipper end
UU
Invisible zipper without extension
1/4”
Side Zipper closing up
1 1/2”(+/-1/2”)
As specified
Side Zipper closing down
1 1/2”(+/-1/2”)
As specified
YKK
1/4“
YKK
1/4“
Caslon - Halogen Only
YKK
1/4“Lined
Note: Follow VCS for style speci�c directions.
081

Alterable Center BackFor alterable waistband the seam allowance is 1” at CB seam. Stitch CB seam after waistband is set. This must be a continuous seam from top of waistband seam. Press center back seam open before stitching down waistband.
INSIDE WAISTBAND
Binding
CB
Sea
m
Cen
ter B
ack
Sea
m
Inside Waistband
OutsideWaistband
1”
3/8”
Bias Binding
Outer Shell WaistbandRollover 1/16”Toward Inside
Fold back seam allowance to avoid raw edges showing on finished waistband
Taped back riseFor unlined pants only
082
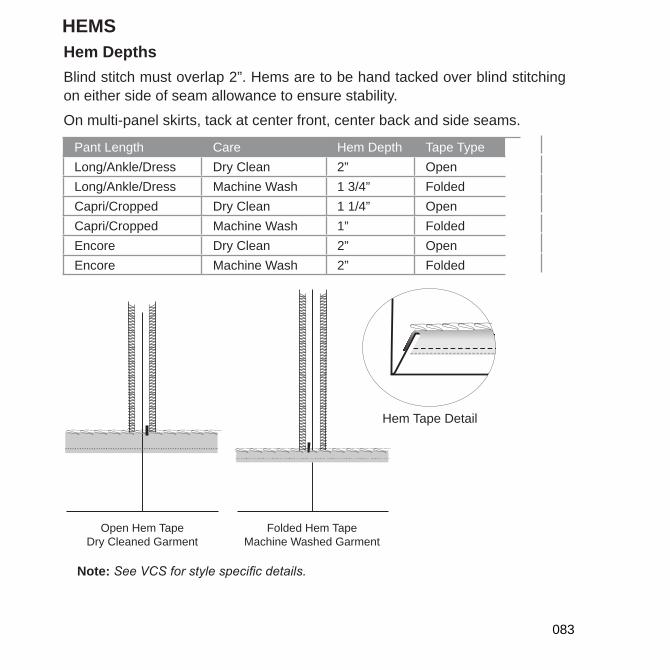
HEMS
Hem Depths
Blind stitch must overlap 2”. Hems are to be hand tacked over blind stitchingon either side of seam allowance to ensure stability.
On multi-panel skirts, tack at center front, center back and side seams.
Pant Length Care Hem Depth Tape TypeLong/Ankle/Dress Dry Clean 2” OpenLong/Ankle/Dress Machine Wash 1 3/4” FoldedCapri/Cropped Dry Clean 1 1/4” OpenCapri/Cropped Machine Wash 1” FoldedEncore Dry Clean 2” OpenEncore Machine Wash 2” Folded
Open Hem TapeDry Cleaned Garment
Folded Hem TapeMachine Washed Garment
Hem Tape Detail
Note:
083
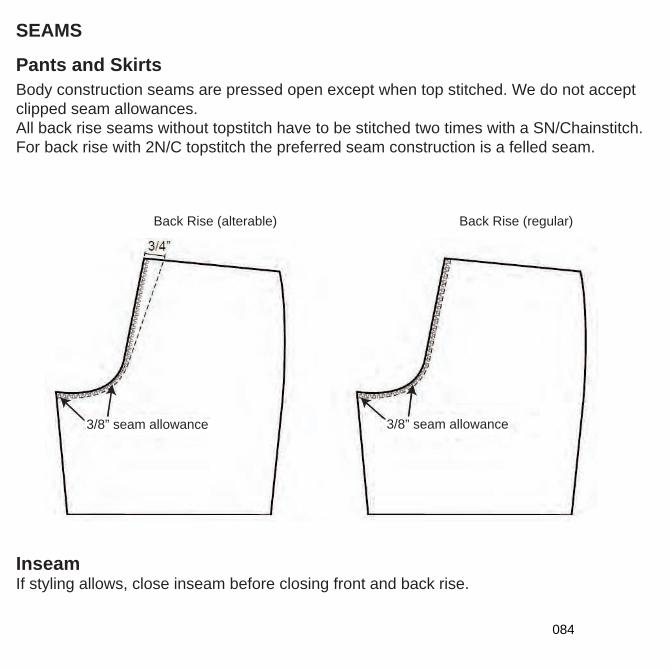
SEAMS
Pants and Skirts
Body construction seams are pressed open except when top stitched. We do not accept clipped seam allowances. All back rise seams without topstitch have to be stitched two times with a SN/Chainstitch. For back rise with 2N/C topstitch the preferred seam construction is a felled seam.
InseamIf styling allows, close inseam before closing front and back rise.
Back Rise (alterable) Back Rise (regular)
3/8” seam allowance 3/8” seam allowance
084

LININGSeams
Fully Lined Garments: Lining length is 1” shorter then shellFor Half Lined Pants:
Lining inseam is 17”The lining must be:▪ 1 size larger than shell for non-stretch fabric▪ 1/2 size larger than shell for stretch fabric
Over Vents:▪ Minimum of 1/4” of ease must be built into the seam above knee
Darts:▪ Darts do not need to be sewn into the lining, but must be formed as pleats
zzzz
zzzz
zzzz
zzzz
zzzz
zzzz
zzzz
zzzz
zzzz
zzzz
zzzz
zzzz
zzzz
zzzz
zzzz
zzzz
zzzz
zzPRESS SEAM
TOWARDS BACK
FRONT BACK
PLEATS
zzzzzz
zzzzzz
zzzzzz
zzz
5/8”
MA
EST
UO
3 thread overlockand chainstitch
085
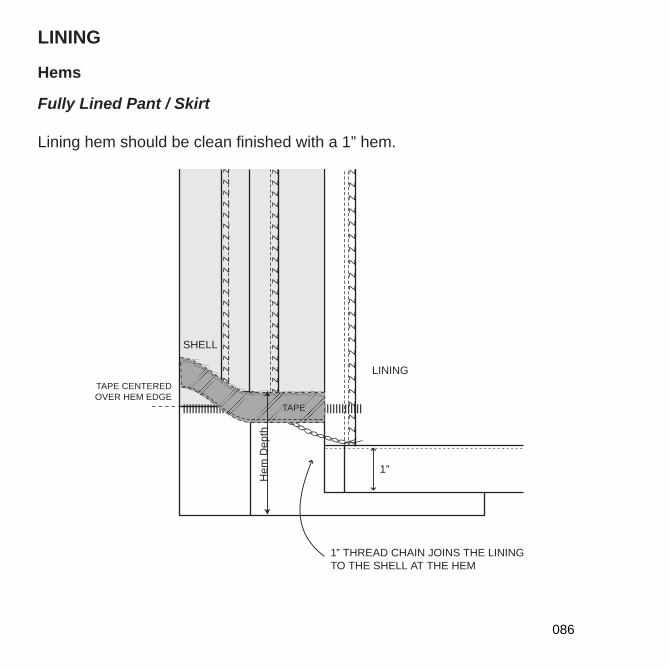
LINING
Hems
Fully Lined Pant / Skirt
Lining hem should be clean finished with a 1” hem.
SHELL
LINING
1” THREAD CHAIN JOINS THE LININGTO THE SHELL AT THE HEM
ZZ
Z
ZZZ
1”
TAPE CENTEREDOVER HEM EDGE
lllllllllllllllllllllllllllllllllllllllllllllllllllllllllllll
Z Z
TAPE
Hem
Dep
th
086
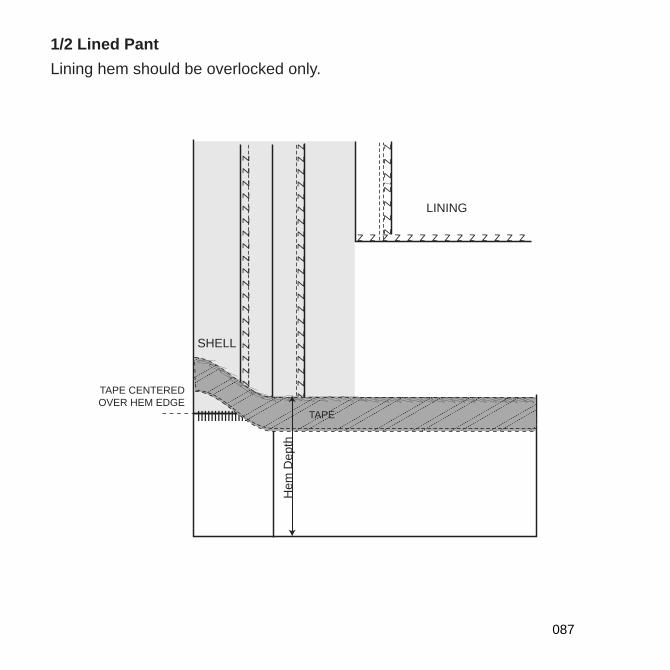
1/2 Lined Pant
Lining hem should be overlocked only.
SHELL
LINING
Z Z
ZZ
TAPE CENTEREDOVER HEM EDGE
lllllllllllllllllllllllllllllllllllllllllllllllllllllllllllll
Z Z
TAPE
Hem
Dep
th
087
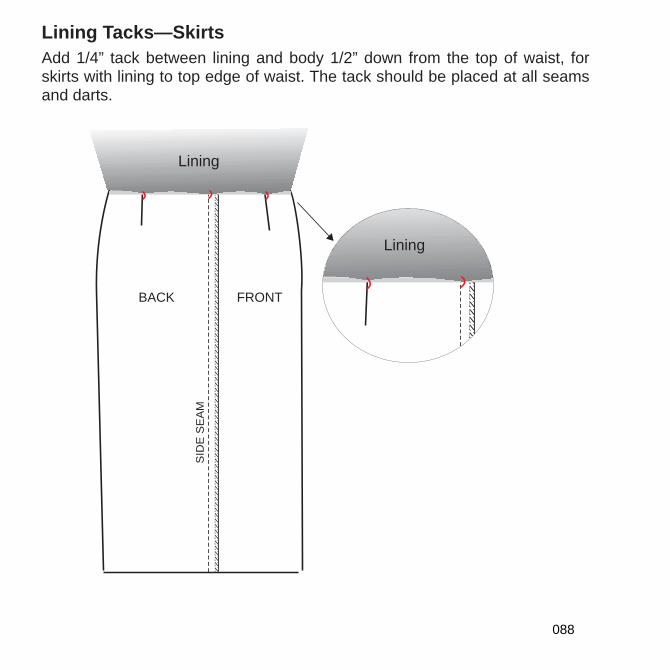
Lining Tacks—Skirts
Add 1/4” tack between lining and body 1/2” down from the top of waist, for skirts with lining to top edge of waist. The tack should be placed at all seams and darts.
zzzz
zzzz
zzzz
zzzz
zzzz
zzzz
zzzz
zzzz
zzzz
zzzz
zzzz
zzzz
zzzz
zzzz
zzzz
zzzz
zzzz
zz
FRONTBACK
MA
ES
EDI
S
Lining
zzzz
zzzz
zzzz
zzzz
zzzz
zzzz
zzzz
zzzz
zzzz
zzzz
zzzzz
zzzz
zzzz
zzzz
zzzz
zzzz
zzzz
z
BACK
Lining
088
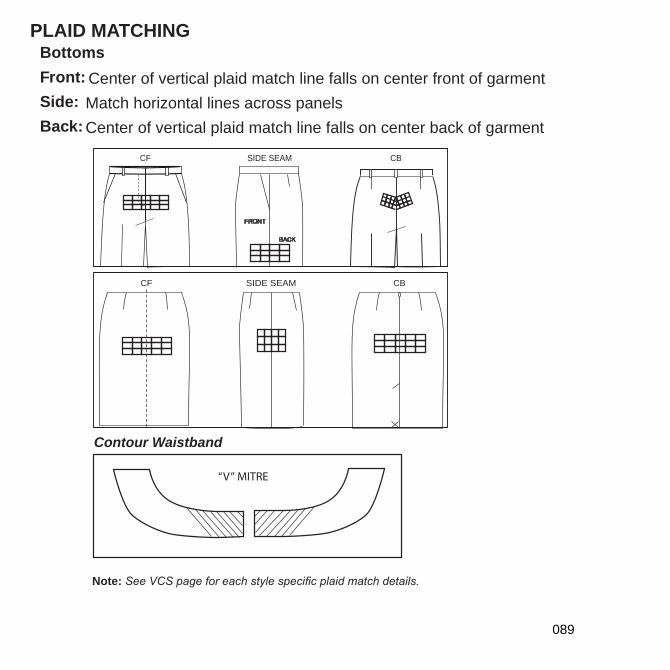
PLAID MATCHINGBottoms
Front: Center of vertical plaid match line falls on center front of garmentSide: Match horizontal lines across panelsBack: Center of vertical plaid match line falls on center back of garment
CB
FRONT
BACK
SIDE SEAMCF
CF CBSIDE SEAM
Contour Waistband
“V” MITRE
Note:
089
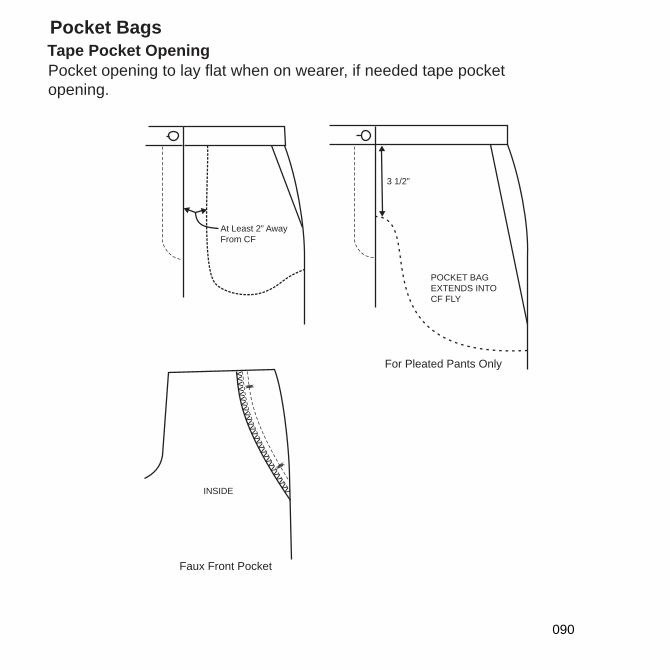
Pocket Bags
Tape Pocket Opening
POCKET BAG EXTENDS INTOCF FLY
3 1/2”
At Least 2” AwayFrom CF
For Pleated Pants Only
Faux Front Pocket
INSIDE
vvvvvvvvvvvvvvvvvvvvvvvvvv
xxxxx
xxxxx
Pocket opening to lay flat when on wearer, if needed tape pocket opening.
090
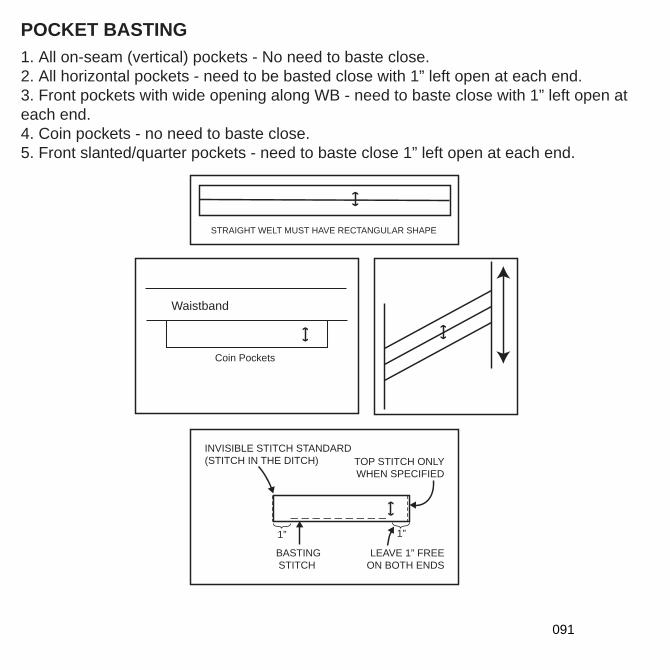
POCKET BASTING
Waistband
Coin Pockets
STRAIGHT WELT MUST HAVE RECTANGULAR SHAPE
INVISIBLE STITCH STANDARD(STITCH IN THE DITCH)
1” 1”
BASTINGSTITCH
LEAVE 1” FREEON BOTH ENDS
TOP STITCH ONLYWHEN SPECIFIED
1. All on-seam (vertical) pockets - No need to baste close.2. All horizontal pockets - need to be basted close with 1” left open at each end.3. Front pockets with wide opening along WB - need to baste close with 1” left open at each end.4. Coin pockets - no need to baste close.5. Front slanted/quarter pockets - need to baste close 1” left open at each end.
091
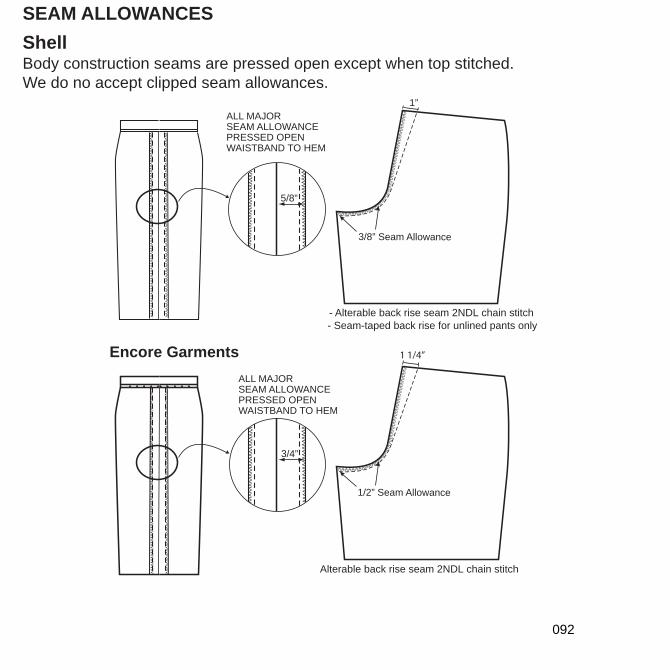
SEAM ALLOWANCES
Shell
vvv vvvvvvvvvvvvvvvvvvvvvvvvvvvvvvvvvvvvvvvvvvvvvvv vvv vvvvvvvvvvv vvvvvvvvv v
vvvvvvvvvvvvvvvvvvvvvv vvvvv vvvvvvvvvvvvvvvvvvvvvvvvvvvvvvv vv vvvvvvvvvvvvvv
5/8”
vv vv vv vvvvvvv vv vv vvv vvvv
vvvvvvvvvvvvvvvvvvvvvvv
ALL MAJORSEAM ALLOWANCEPRESSED OPENWAISTBAND TO HEM
vvvvvvvvvvvvvvvvvvvvvvvvvvvvvvvvvvvvvvvvvv
1”
3/8” Seam Allowance
- Alterable back rise seam 2NDL chain stitch - Seam-taped back rise for unlined pants only
Encore Garments
vvvvvvvvvvvvv vvvvvvvvvvvvvvvvvvvvvvvvvvvvvvvvvvvvvvvv
vvvvvvvvvvvvvvvvvvvvvvvvvvvv vvvvvvvv vvv vvvvvvvvvvvv vv
3/4”
vv vv vv vvvvvvv vv vv vvv vvvv
vvvvvvvvvvvvvvvvvvvvvvv
ALL MAJORSEAM ALLOWANCEPRESSED OPENWAISTBAND TO HEM
vvvvvvvvvvvvvvvvvvvvvvvvvvvvvvvvvvvvvvvvvv
1 1/4”
1/2” Seam Allowance
Alterable back rise seam 2NDL chain stitch
vvvvvvvvvvvvvvvvv vvvv
vvvvvvvvvvvvvvvvv vvv v
Body construction seams are pressed open except when top stitched. We do no accept clipped seam allowances.
092

SEAMS
Pants and Skirts
Body construction seams are pressed open except when top stitched.We do not accept clipped seam allowances.
vvvvvvvvvvvvvvvvvvvvvvvvvvvvvvvvvvvvvvvvvvvvvvvvvv vv vvvvvvvvvvvvvvvvvvvvvv
vvvvvvvvvvvvvvvvvvvvvvvvvvvvvvvvvvvvvvvvvvvvvvvvvvvvvvvvvvvvvvvvvvvvvv vvvv
1/2”
vvvvvvvvvvvvvvvvvvvvvvvv
vvvvvvvvvvvvvvvvvvvvvvv
ALL MAJORSEAM ALLOWANCEPRESSED OPENWAISTBAND TO HEM
vvvvvvvvvvvvvvvvvvvvvvvvvvvvvvvvvvvvvvvvvv
3/4”
3/8” Seam Allowance
Alterable back rise seam 2NDL chain stitch
093
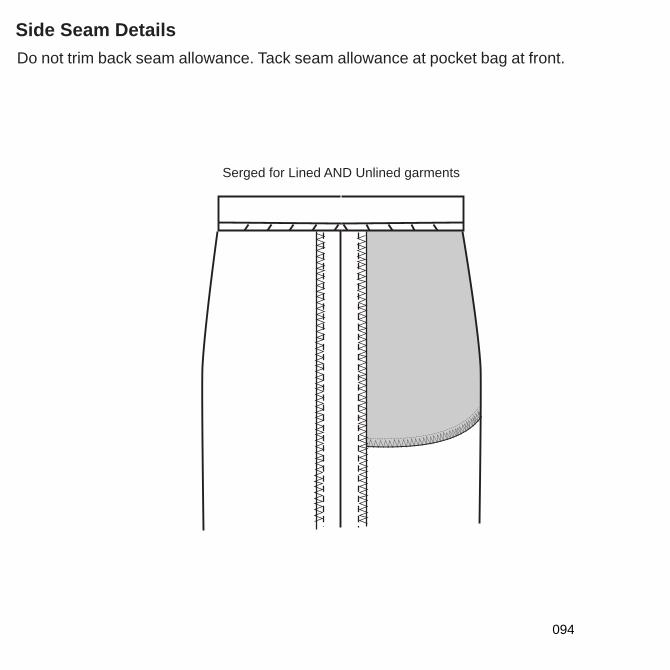
Side Seam Details
Do not trim back seam allowance. Tack seam allowance at pocket bag at front.
Serged for Lined AND Unlined garments
094
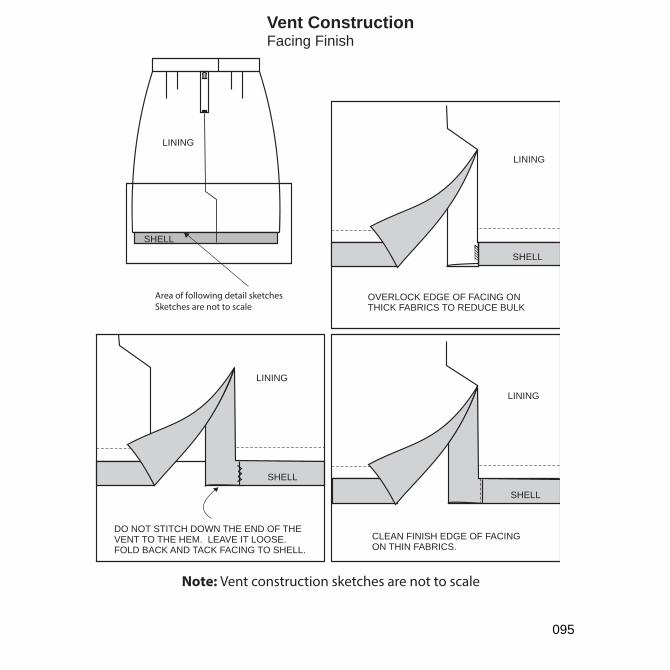
Vent ConstructionFacing Finish
Note: Vent construction sketches are not to scale
DO NOT STITCH DOWN THE END OF THEVENT TO THE HEM. LEAVE IT LOOSE. FOLD BACK AND TACK FACING TO SHELL.
SHELL
SHELL
LINING
LINING
Area of following detail sketchesSketches are not to scale
LINING
SHELL
LINING
SHELL
OVERLOCK EDGE OF FACING ONTHICK FABRICS TO REDUCE BULK
CLEAN FINISH EDGE OF FACINGON THIN FABRICS.
zzz
095
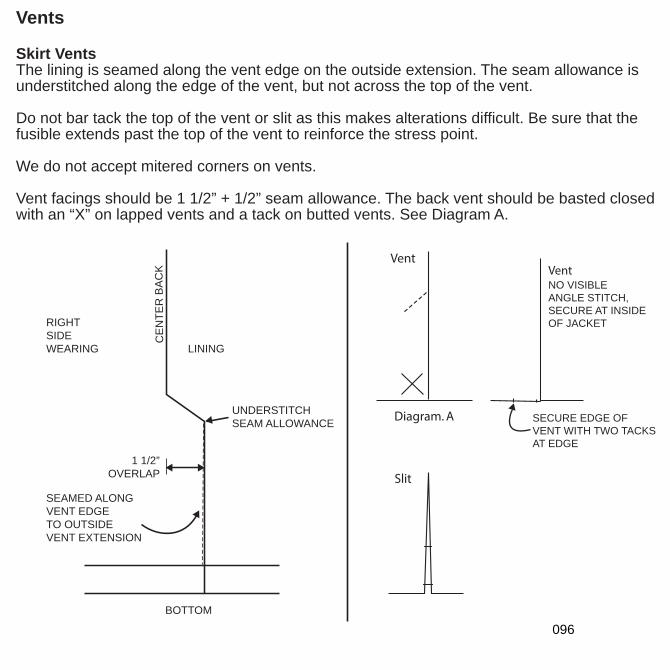
Vents
Skirt VentsThe lining is seamed along the vent edge on the outside extension. The seam allowance is understitched along the edge of the vent, but not across the top of the vent.
Do not bar tack the top of the vent or slit as this makes alterations difficult. Be sure that the fusible extends past the top of the vent to reinforce the stress point.
We do not accept mitered corners on vents.
Vent facings should be 1 1/2” + 1/2” seam allowance. The back vent should be basted closed with an “X” on lapped vents and a tack on butted vents. See Diagram A.
RIGHT SIDE WEARING
K
CA
B R
ETN
EC
SEAMED ALONGVENT EDGETO OUTSIDEVENT EXTENSION
BOTTOM
1 1/2”OVERLAP
UNDERSTITCHSEAM ALLOWANCE
LINING
Diagram. A
Slit
VentVent NO VISIBLEANGLE STITCH, SECURE AT INSIDEOF JACKET
SECURE EDGE OF VENT WITH TWO TACKS AT EDGE
096
WaistbandsAll waist bands should be set with single needle lock stitch machinery. We do not accept waistbands set in one operation on folder equipment. Denim jeans with straight waistband may be set with a folder machine. Waistbands can be cut and fused in blocks, then trimmed and notched.
097
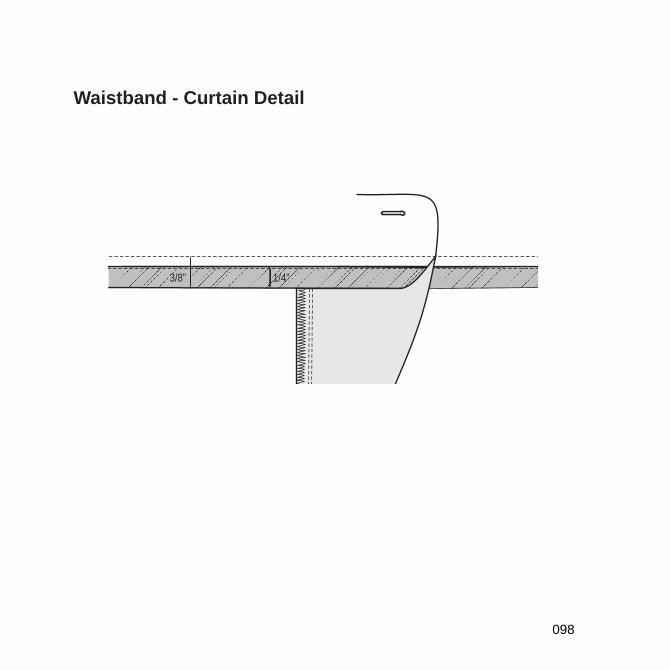
Waistband - Curtain Detail
1/4”3/8”
XXXXXXXXXXXXXXXXXXXXXXXXXXXXXXXXXX XXXXXXX X
X
X
X
X
X
XXXXXX
X X
X
X X X X
098
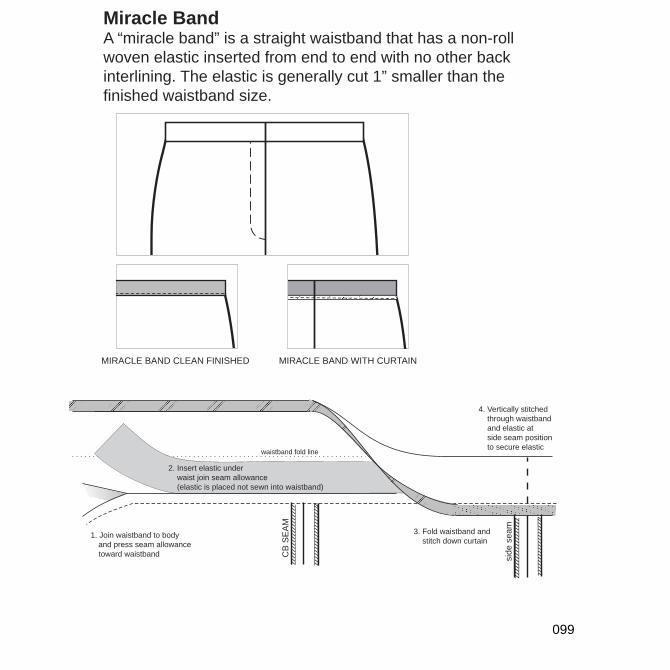
Miracle BandA “miracle band” is a straight waistband that has a non-roll woven elastic inserted from end to end with no other back interlining. The elastic is generally cut 1” smaller than the finished waistband size.
MIRACLE BAND CLEAN FINISHED MIRACLE BAND WITH CURTAINzzzzz zzz zzzz zzz zzzz zz
zzzz
zzz
zzzz
zzzz
zzz
z zzzz zzz zzzz zzz zzzz zzzz
zzzz
zzzz
zzzz
zzz
1. Join waistband to bodyand press seam allowance toward waistband
2. Insert elastic under waist join seam allowance(elastic is placed not sewn into waistband)
3. Fold waistband and stitch down curtain
4. Vertically stitchedthrough waistband and elastic at side seam positionto secure elastic
side
sea
m
waistband fold line
CB
SE
AM
099
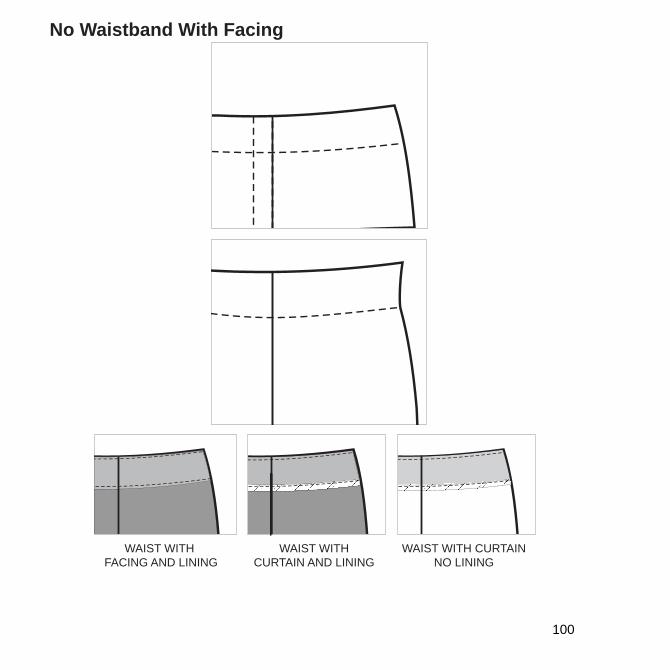
No Waistband With Facing
WAIST WITH FACING AND LINING
WAIST WITHCURTAIN AND LINING
WAIST WITH CURTAINNO LINING
100
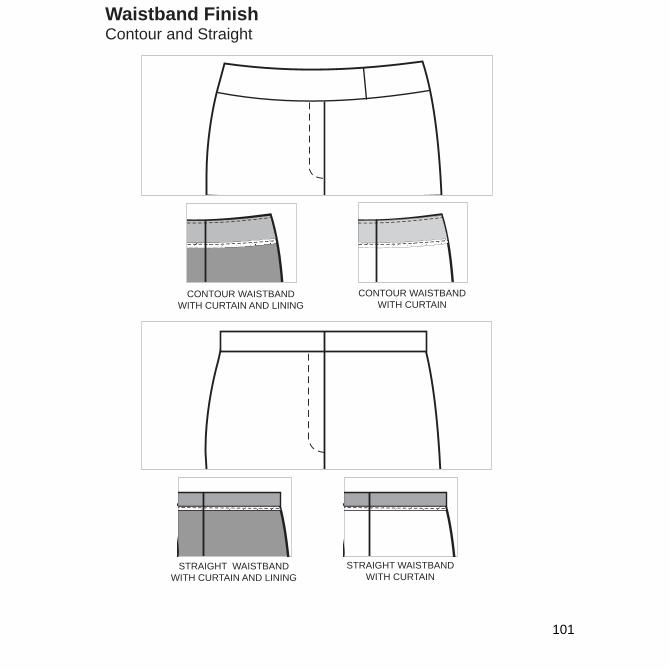
Waistband FinishContour and Straight
CONTOUR WAISTBANDWITH CURTAIN AND LINING
CONTOUR WAISTBANDWITH CURTAIN
STRAIGHT WAISTBANDWITH CURTAIN AND LINING
STRAIGHT WAISTBANDWITH CURTAIN
101
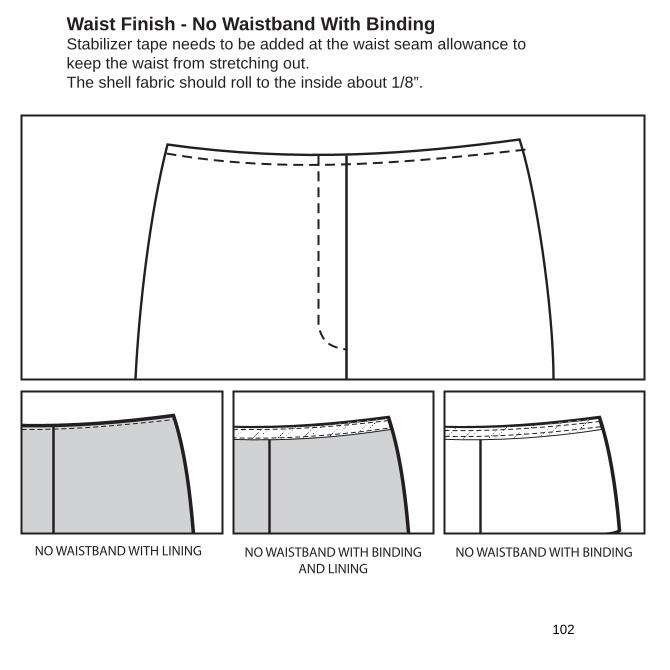
Waist Finish - No Waistband With BindingStabilizer tape needs to be added at the waist seam allowance to keep the waist from stretching out. The shell fabric should roll to the inside about 1/8”.
NO WAISTBAND WITH LINING NO WAISTBAND WITH BINDING AND LINING
NO WAISTBAND WITH BINDING
102
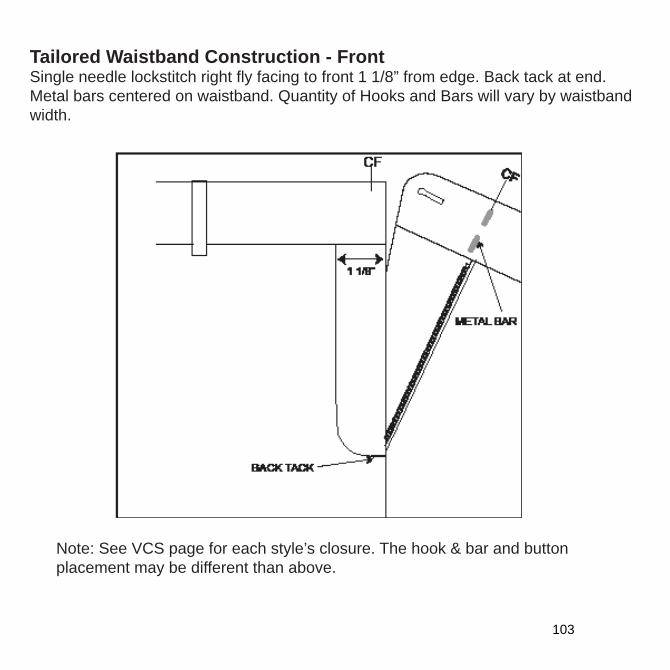
Tailored Waistband Construction - FrontSingle needle lockstitch right fly facing to front 1 1/8” from edge. Back tack at end. Metal bars centered on waistband. Quantity of Hooks and Bars will vary by waistband width.
Note: See VCS page for each style’s closure. The hook & bar and button placement may be different than above.
103
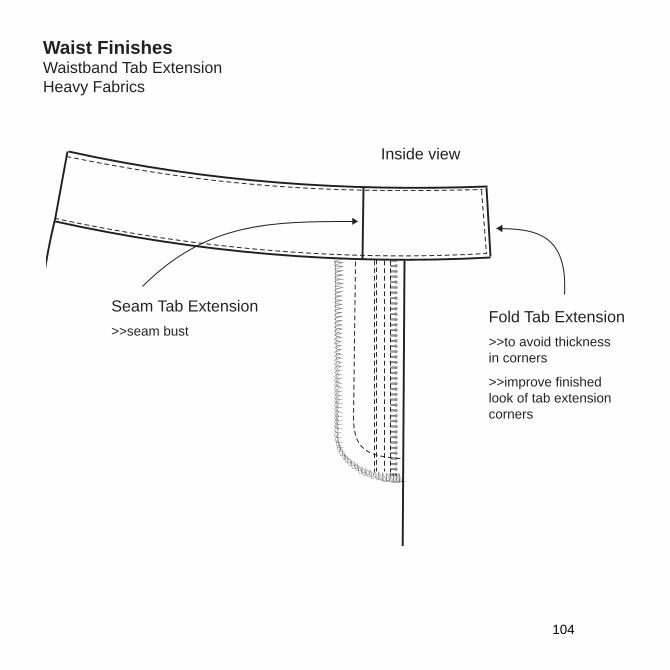
Waist FinishesWaistband Tab ExtensionHeavy Fabrics
Seam Tab Extension>>seam bust
Inside view
Fold Tab Extension>>to avoid thickness in corners
>>improve finished look of tab extension corners
104
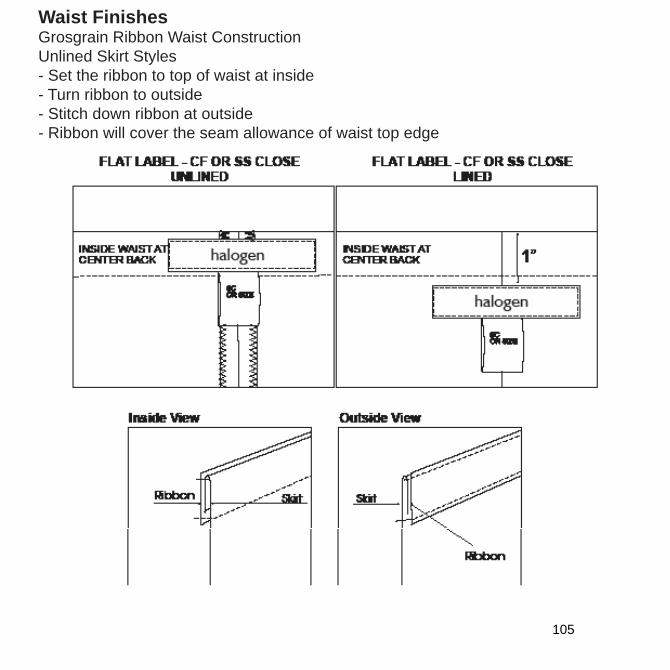
Waist FinishesGrosgrain Ribbon Waist ConstructionUnlined Skirt Styles- Set the ribbon to top of waist at inside- Turn ribbon to outside- Stitch down ribbon at outside- Ribbon will cover the seam allowance of waist top edge
105
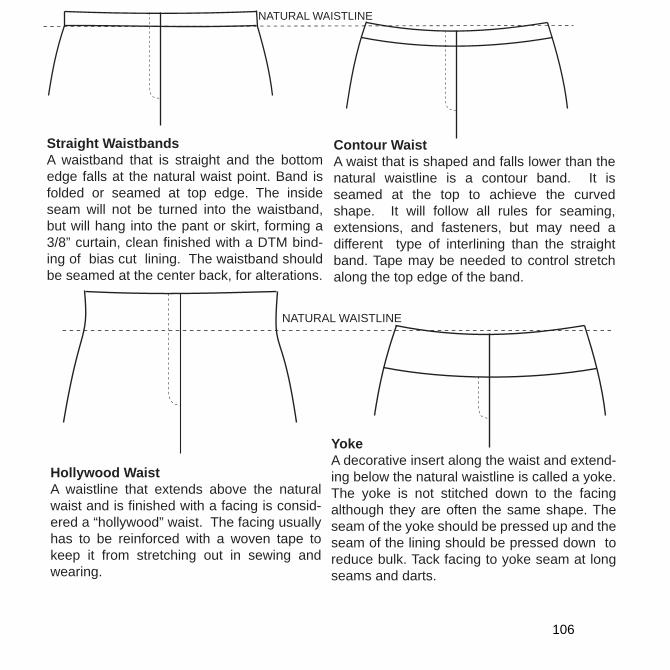
NATURAL WAISTLINE
Straight Waistbands
A waistband that is straight and the bottom edge falls at the natural waist point. Band is folded or seamed at top edge. The inside seam will not be turned into the waistband, but will hang into the pant or skirt, forming a 3/8” curtain, clean finished with a DTM bind-ing of bias cut lining. The waistband should be seamed at the center back, for alterations.
Contour Waist
A waist that is shaped and falls lower than the natural waistline is a contour band. It is seamed at the top to achieve the curved shape. It will follow all rules for seaming, extensions, and fasteners, but may need a different type of interlining than the straight band. Tape may be needed to control stretch along the top edge of the band.
NATURAL WAISTLINE
Hollywood Waist
A waistline that extends above the natural waist and is finished with a facing is consid-ered a “hollywood” waist. The facing usually has to be reinforced with a woven tape to keep it from stretching out in sewing and wearing.
Yoke
A decorative insert along the waist and extend-ing below the natural waistline is called a yoke. The yoke is not stitched down to the facing although they are often the same shape. The seam of the yoke should be pressed up and the seam of the lining should be pressed down to reduce bulk. Tack facing to yoke seam at long seams and darts.
106
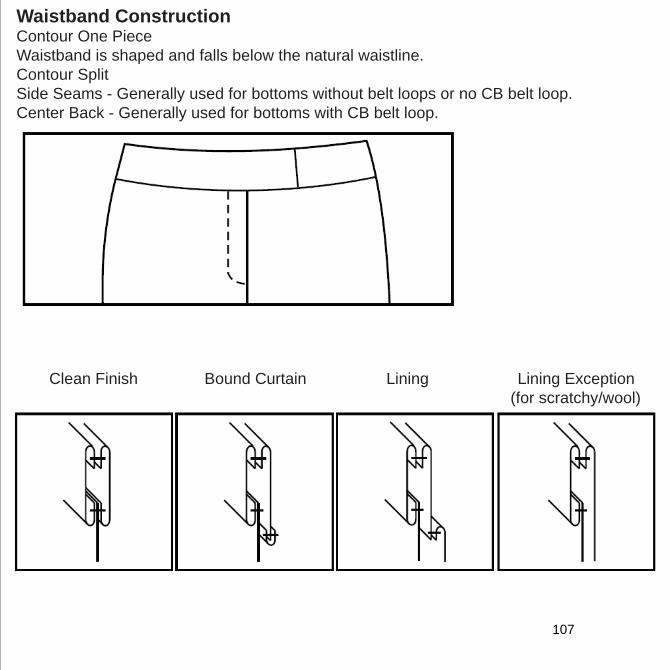
Waistband ConstructionContour One PieceWaistband is shaped and falls below the natural waistline.Contour SplitSide Seams - Generally used for bottoms without belt loops or no CB belt loop.Center Back - Generally used for bottoms with CB belt loop.
Clean Finish Bound Curtain Lining Lining Exception (for scratchy/wool)
107
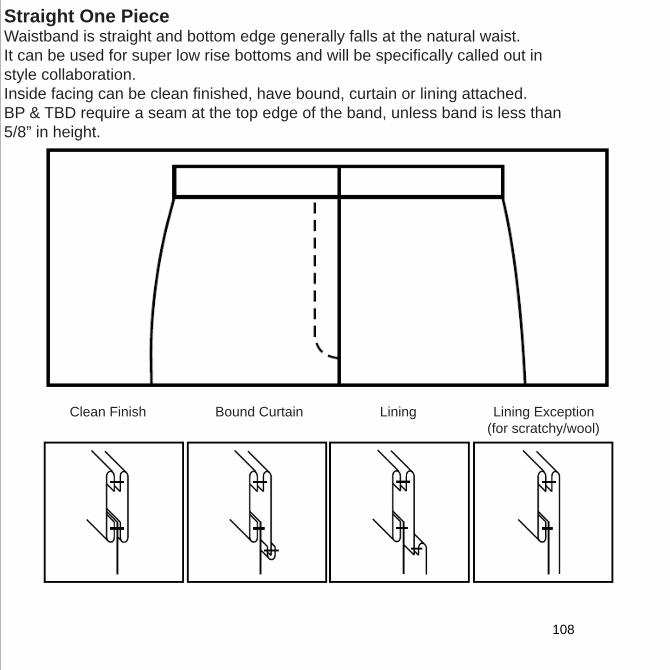
Straight One PieceWaistband is straight and bottom edge generally falls at the natural waist.It can be used for super low rise bottoms and will be specifically called out instyle collaboration.Inside facing can be clean finished, have bound, curtain or lining attached.BP & TBD require a seam at the top edge of the band, unless band is less than5/8” in height.
Clean Finish Bound Curtain Lining Lining Exception (for scratchy/wool)
108
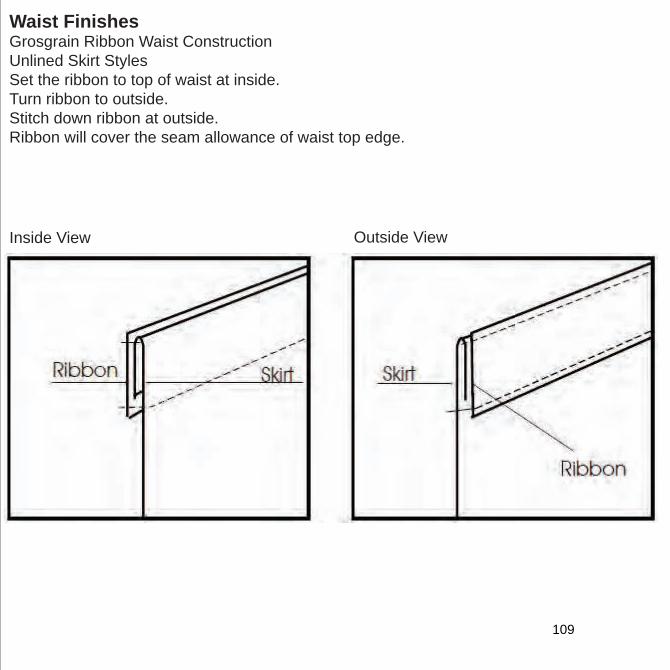
Waist FinishesGrosgrain Ribbon Waist ConstructionUnlined Skirt StylesSet the ribbon to top of waist at inside.Turn ribbon to outside.Stitch down ribbon at outside.Ribbon will cover the seam allowance of waist top edge.
Inside View Outside View
109
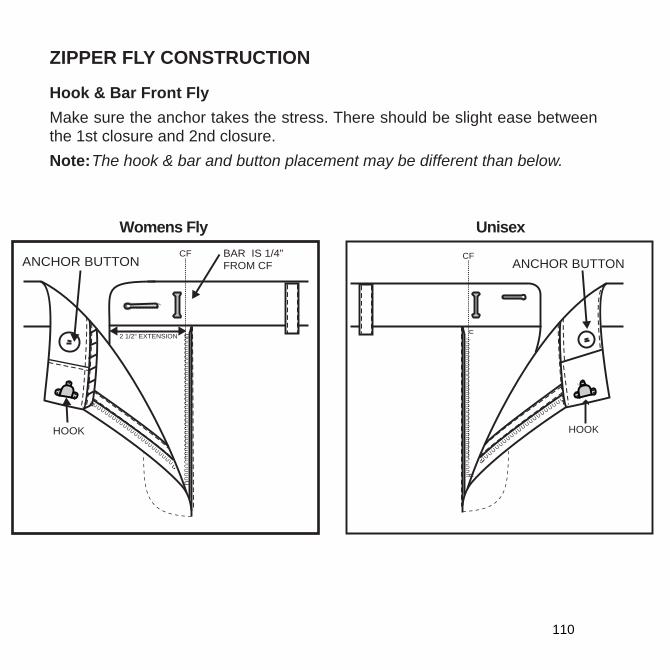
ZIPPER FLY CONSTRUCTION
Hook & Bar Front Fly
Make sure the anchor takes the stress. There should be slight ease between the 1st closure and 2nd closure.Note: The hook & bar and button placement may be different than below.
XXXXXXXXXXXXXXXXXXXXXXXXXXXXXXXXXXXXXXXX XX
X
X
X
XX XX XXXX
X X X
XXX
X
CF
uu
u
u
2 1/2“ EXTENSION
BAR IS 1/4”FROM CF
U
HOOK
ANCHOR BUTTON
UnisexWomens Fly
XXXXXXXXXXXXXXXXXXXXXXXXXXXXXXXXXX XXXXXXX X
XX
XXXXXXXXX
X X
X
XXX
X
CF
u
u
u
U
ANCHOR BUTTON
HOOK
110
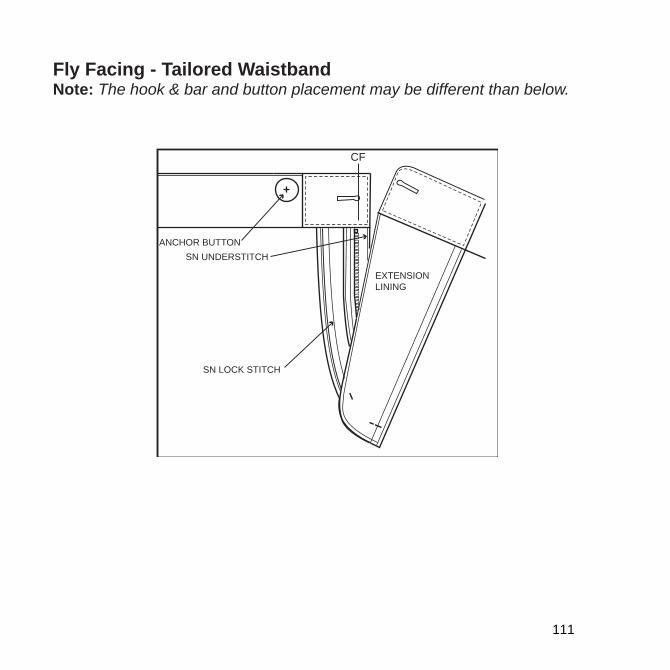
Fly Facing - Tailored WaistbandNote: The hook & bar and button placement may be different than below.
EXTENSIONLINING
ANCHOR BUTTON
SN LOCK STITCH
SN UNDERSTITCH
CF
n
n
111
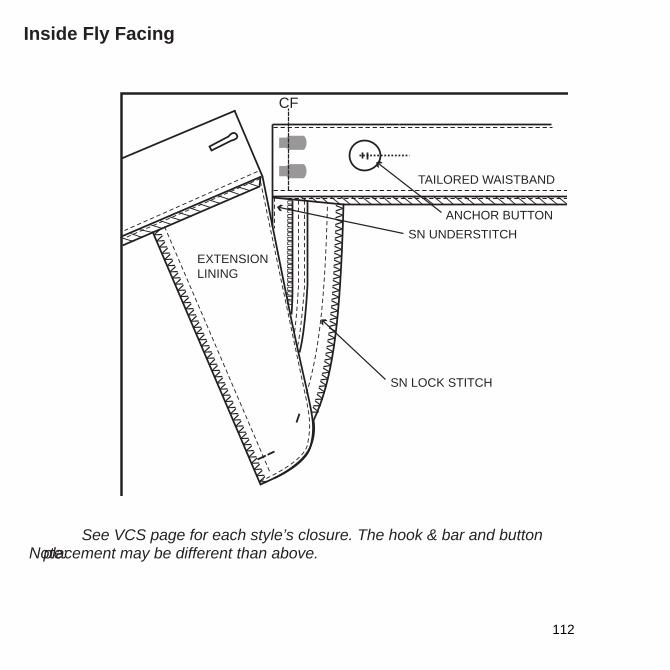
Inside Fly Facing
EXTENSIONLINING
ANCHOR BUTTON
TAILORED WAISTBAND
SN LOCK STITCH
SN UNDERSTITCH
CF
nn
Note:See VCS page for each style’s closure. The hook & bar and button
placement may be different than above.
112
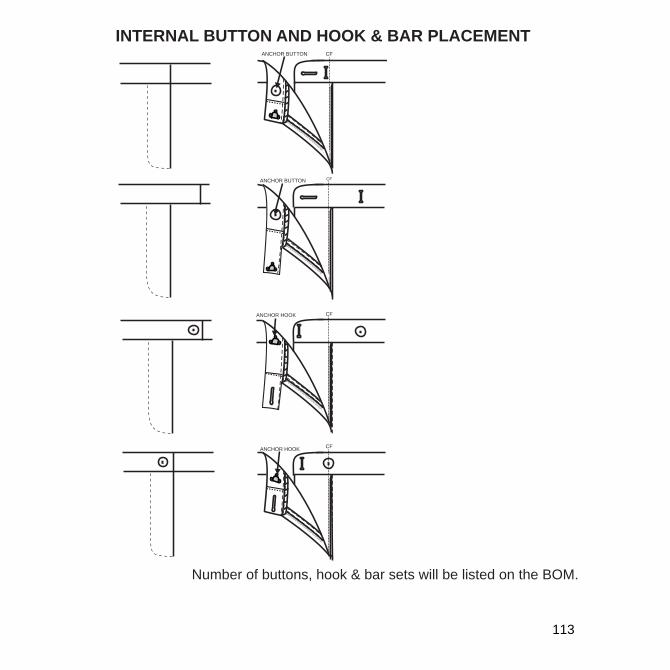
INTERNAL BUTTON AND HOOK & BAR PLACEMENT
Number of buttons, hook & bar sets will be listed on the BOM.XXXXXXXXXXXXXXXXXX
XXXXXXXXXXXXXXXXXXXXXX XX
X
X
X
XX XX XXXX
X X X
XXX
X
CF
uu
u
u
U
CF
XXXXXXXXXXXXXXXXXXXXXXXXXXXXXXXXXXXXXXXX XX
X
X
X
XX XX XXXX
X X X
XXX
X
uu
u
u
ANCHOR BUTTON
XXXXXXXXXXXXXXXXXXXXXXXXXXXXXXXX XX
XXXXX X
X
X XX XX X
XX
XXXX
X X X XXXX
CF
uu
u
u
ANCHOR HOOK
XXXXXXXXXXXXXXXXXXXXXXXXXXXXXXXX XX
XXXXX X
X
X XX XX X
XX
XXXX
X X X XXXX
CF
uu
u
u
ANCHOR HOOK
ANCHOR BUTTON
113
XXXXXXXXXXXXXXXXXXXXXXXXXXXXXXXXXXXXXXXX XX
X
X
X
X
X XX XXXX
X X X
XXX
X
uu
U
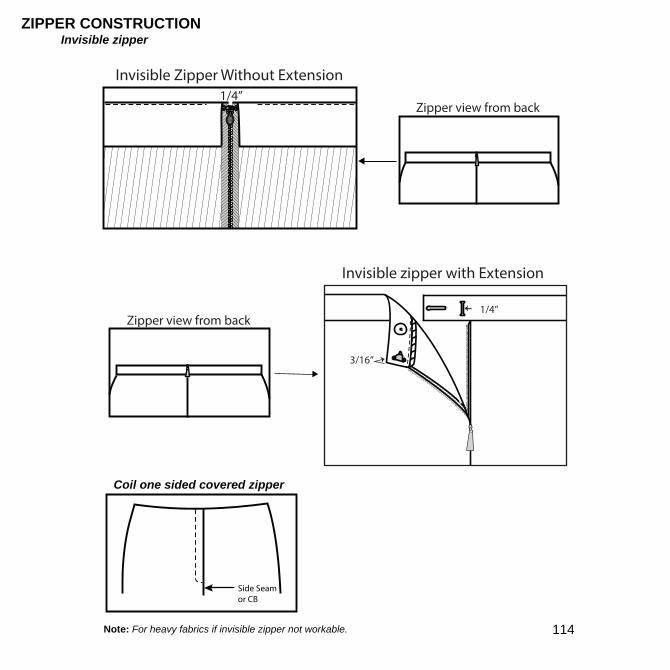
ZIPPER CONSTRUCTIONInvisible zipper
YKK
UU
Coil one sided covered zipper
Side Seam or CB
Note: For heavy fabrics if invisible zipper not workable.
UU
3/16”
1/4”
Invisible zipper with Extension
Invisible Zipper Without Extension
Zipper view from back
Zipper view from back
1/4”
114

Belt width varies + 1/8” OR 2” wide (Scarf)
1/2”
BACK NECK BELT LOOP FOR BELTED OF SCARF STYLES
Loop width must be 1/8” Length must be enough to make 1/2” deep loop and 1/8” wider than the belt or a total of 2” wide for a scarf. All styles with belt or scarf must have a self fabric loop at the back neck. Belts & scarves will be shipped looped at back neck and secured with a small safety pin.
Note: Follow VCS for style specific directions.
115
Bead and Sequin Sewing Specifications- Tie off on every sixth bead or sequin.
116
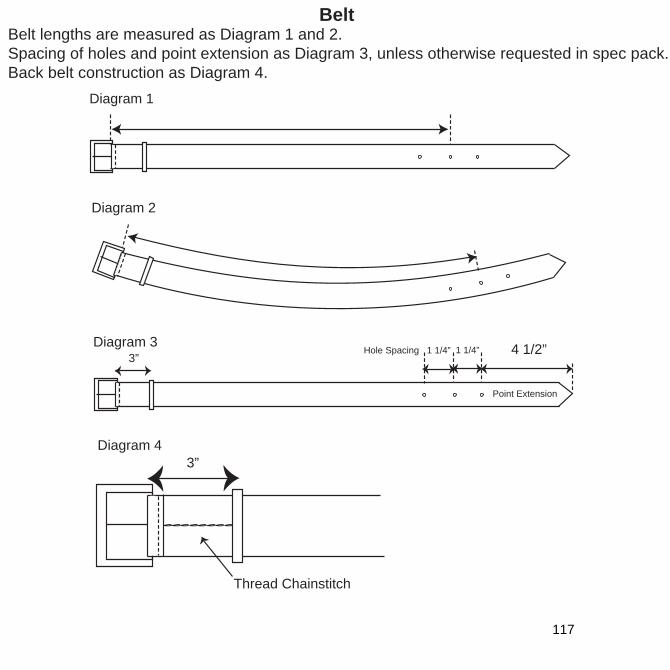
4 1/2”1 1/4”Hole Spacing
Point Extension
1 1/4”3”
Diagram 3
BeltBelt lengths are measured as Diagram 1 and 2.Spacing of holes and point extension as Diagram 3, unless otherwise requested in spec pack.Back belt construction as Diagram 4.
Diagram 1
Diagram 2
3”Diagram 4
Thread Chainstitch
117

Sourced Belt
* Should follow the same standard as outlined in Diagram 3 and 4.* Loop, hole spacing and point extension my vary from standard based on supplier capability.* In some cases a 5-hole belt will be acceptable. * Sourced belts have to be approved by Design.
Hole Spacing
Point Extension
may vary by supplier
may vary by supplier
Diagram 3
Diagram 4
Thread Chainstitch or leather/faux leather loop
118
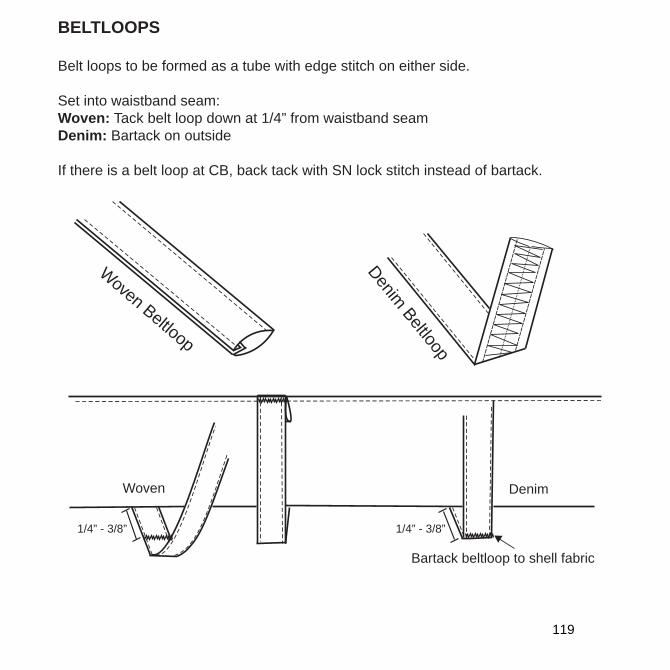
BELTLOOPS
Belt loops to be formed as a tube with edge stitch on either side.
Set into waistband seam:Woven: Tack belt loop down at 1/4” from waistband seamDenim: Bartack on outside
If there is a belt loop at CB, back tack with SN lock stitch instead of bartack.
1/4” - 3/8”1/4” - 3/8”
Woven Beltloop
Denim Beltloop
Woven Denim
Bartack beltloop to shell fabric
119
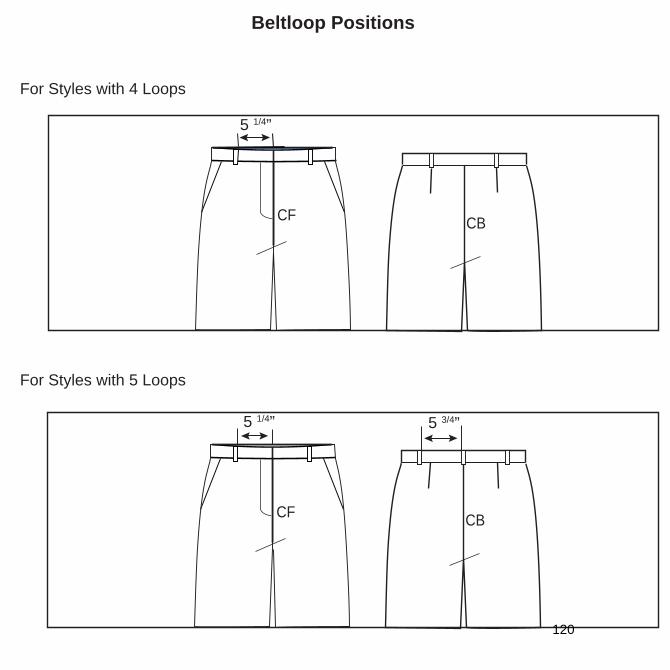
Beltloop Positions
For Styles with 4 Loops
For Styles with 5 Loops
CBCF
5 1/4”
CBCF
5 3/4”5 1/4”
120
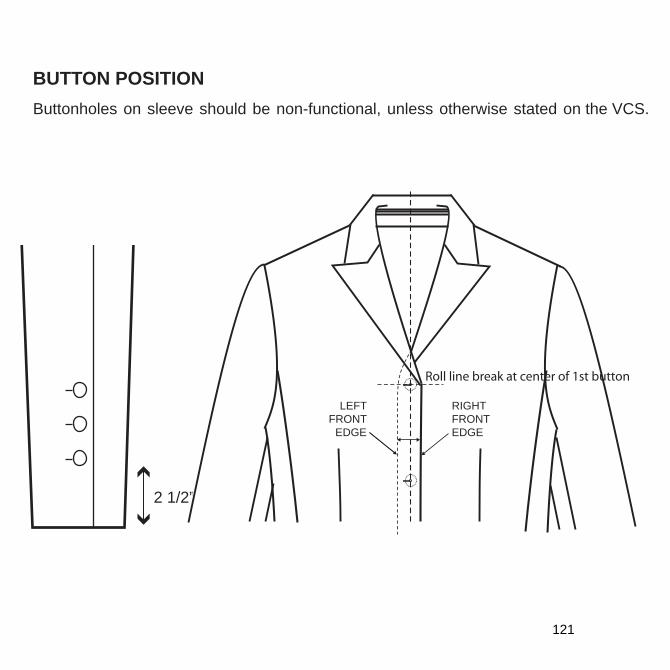
BUTTON POSITION
Buttonholes on sleeve should be non-functional, unless otherwise stated on the VCS.
RIGHTFRONTEDGE
LEFTFRONT
EDGE
Roll line break at center of 1st button
2 1/2”
121
▪
▪▪
▪▪
▪
▪
▪
▪
▪▪
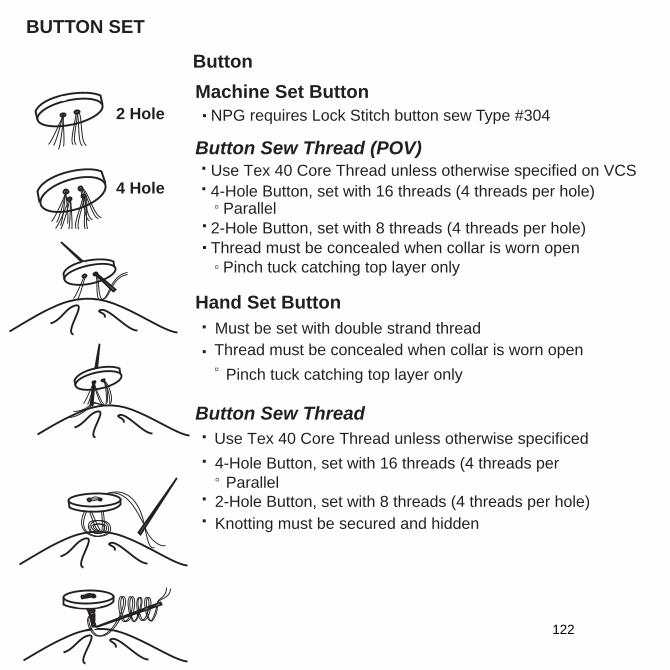
BUTTON SET
Button
Machine Set Button
NPG requires Lock Stitch button sew Type #304
Button Sew Thread (POV)Use Tex 40 Core Thread unless otherwise specified on VCS4-Hole Button, set with 16 threads (4 threads per hole)
Parallel2-Hole Button, set with 8 threads (4 threads per hole)Thread must be concealed when collar is worn open
Pinch tuck catching top layer only
Hand Set Button
Must be set with double strand thread Thread must be concealed when collar is worn open
Pinch tuck catching top layer only
Button Sew ThreadUse Tex 40 Core Thread unless otherwise specificed 4-Hole Button, set with 16 threads (4 threads per
Parallel2-Hole Button, set with 8 threads (4 threads per hole)Knotting must be secured and hidden
2 Hole
4 Hole
122
BUTTONS AND BUTTONHOLE STANDARDS
Button Setting Method
We prefer buttons to be set with lock stitch machines and finely finished on underside. If only chain stitch machines are available, please be sure the cycle is correct so that the last stroke locks the chain on the inside of the garment.We do not set buttons with an “X” stitch. We make two horizontal stitches on a lock-stitch machine.
Shanks (Wrapping)
The length of the thread shank should be determined by the thickness of the fabric. The button should hold the garment closed without distort-ing the buttonhole.Buttons with shanks should not be wrapped.
Thread
Match the thread color to the button unless otherwise stated in the spec pack. Use Perma Cored or equivalent Tex 40 button sewing thread for buttons. Do not use thread designed for single needle or over lock machines.Note: For inside buttons and hook & bar, fuse fabric to add strength ifneeded.
123
▪
▪▪
▪
▪
▪
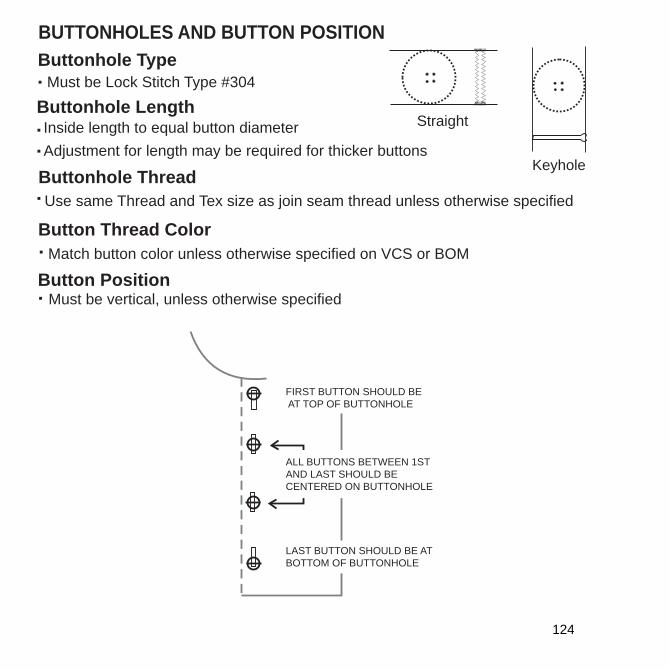
FIRST BUTTON SHOULD BE AT TOP OF BUTTONHOLE
ALL BUTTONS BETWEEN 1STAND LAST SHOULD BECENTERED ON BUTTONHOLE
LAST BUTTON SHOULD BE ATBOTTOM OF BUTTONHOLE
Straight
Keyhole
BUTTONHOLES AND BUTTON POSITION
Buttonhole Type
Must be Lock Stitch Type #304
Buttonhole LengthInside length to equal button diameter Adjustment for length may be required for thicker buttons
Buttonhole Thread
Use same Thread and Tex size as join seam thread unless otherwise specified
Button Thread Color
Match button color unless otherwise specified on VCS or BOM
Button PositionMust be vertical, unless otherwise specified
124

BUTTONHOLES AND BUTTON POSITION (cont’d)
▪▪▪
Quality Points (Women’s only)
Buttons set on wearers left Buttons set on center line unless otherwise specified on VCSMark button position after making button holes
125
vvvvvvvvvvvvvvvvv vvv
vvvvvvvvvvvvvvvvvvvvvvvv
VV
VVV
V
vvvvvvvvvvvvvvvvvvvvvvvvvvvvvvvvvv
VV
VVV
V VV
VVV
V1/16” apart
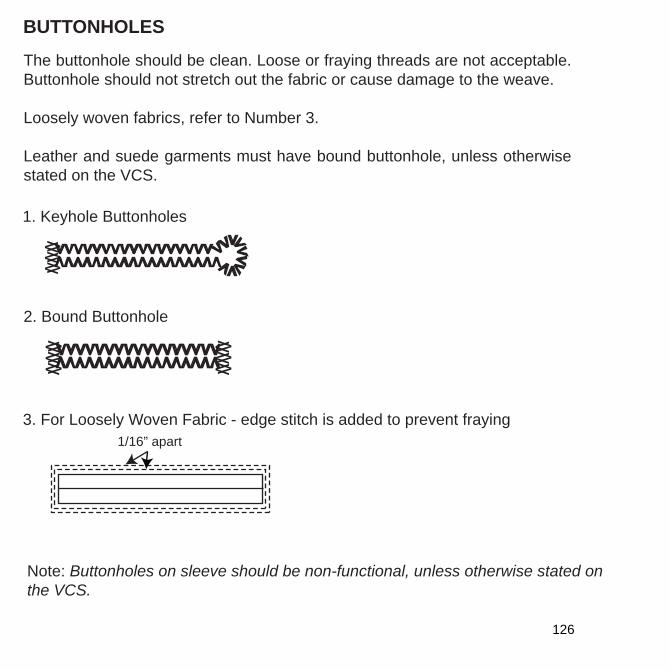
BUTTONHOLES
The buttonhole should be clean. Loose or fraying threads are not acceptable. Buttonhole should not stretch out the fabric or cause damage to the weave.
Loosely woven fabrics, refer to Number 3.
Leather and suede garments must have bound buttonhole, unless otherwise stated on the VCS.
1. Keyhole Buttonholes
2. Bound Buttonhole
3. For Loosely Woven Fabric - edge stitch is added to prevent fraying
Note: Buttonholes on sleeve should be non-functional, unless otherwise stated on the VCS.
126
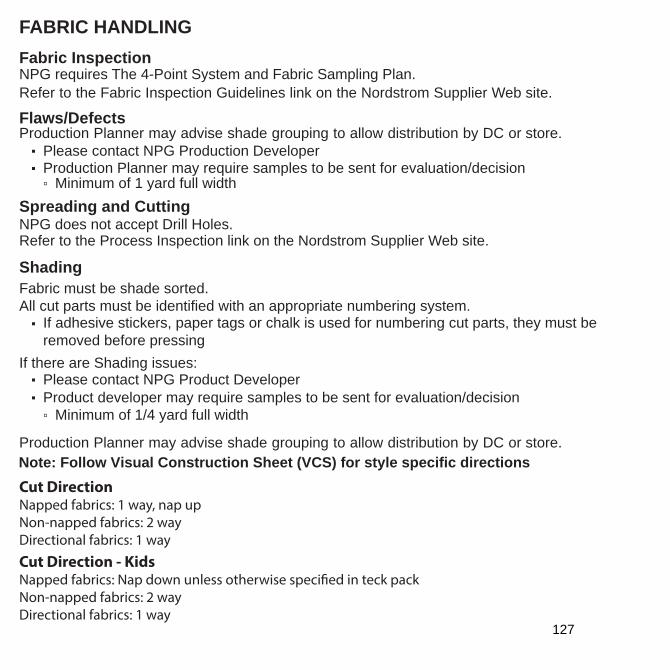
FABRIC HANDLING
Fabric InspectionNPG requires The 4-Point System and Fabric Sampling Plan.Refer to the Fabric Inspection Guidelines link on the Nordstrom Supplier Web site.
Flaws/DefectsProduction Planner may advise shade grouping to allow distribution by DC or store.▪ Please contact NPG Production Developer ▪ Production Planner may require samples to be sent for evaluation/decision
Minimum of 1 yard full widthSpreading and CuttingNPG does not accept Drill Holes.Refer to the Process Inspection link on the Nordstrom Supplier Web site.
Shading
Fabric must be shade sorted.All cut parts must be identified with an appropriate numbering system.▪ If adhesive stickers, paper tags or chalk is used for numbering cut parts, they must be
removed before pressing If there are Shading issues:▪ Please contact NPG Product Developer ▪ Product developer may require samples to be sent for evaluation/decision
Minimum of 1/4 yard full width
Production Planner may advise shade grouping to allow distribution by DC or store.Note: Follow Visual Construction Sheet (VCS) for style specific directions
Cut DirectionNapped fabrics: 1 way, nap upNon-napped fabrics: 2 way Directional fabrics: 1 way
Cut Direction - KidsNapped fabrics: Nap down unless otherwise speci�ed in teck packNon-napped fabrics: 2 way Directional fabrics: 1 way
127
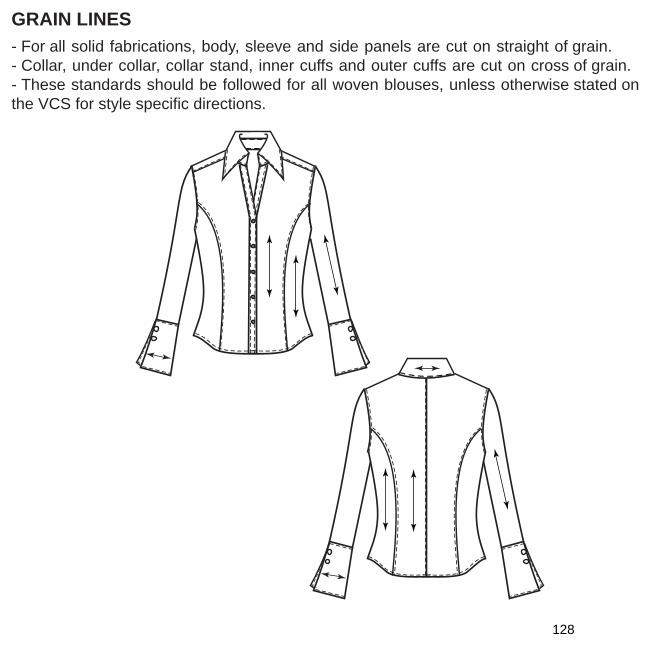
GRAIN LINES
- For all solid fabrications, body, sleeve and side panels are cut on straight of grain.- Collar, under collar, collar stand, inner cuffs and outer cuffs are cut on cross of grain.- These standards should be followed for all woven blouses, unless otherwise stated on the VCS for style specific directions.
128
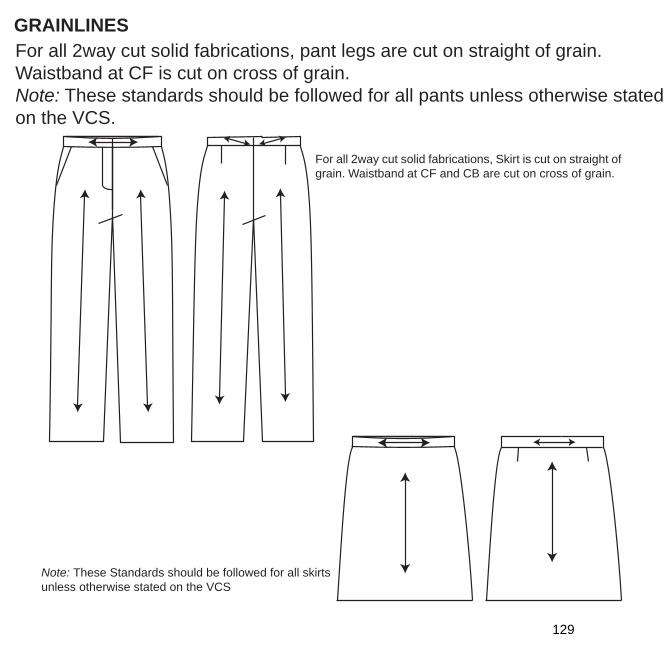
GRAINLINES
For all 2way cut solid fabrications, pant legs are cut on straight of grain. Waistband at CF is cut on cross of grain. Note: These standards should be followed for all pants unless otherwise stated on the VCS.
For all 2way cut solid fabrications, Skirt is cut on straight of grain. Waistband at CF and CB are cut on cross of grain.
Note: These Standards should be followed for all skirts unless otherwise stated on the VCS
129
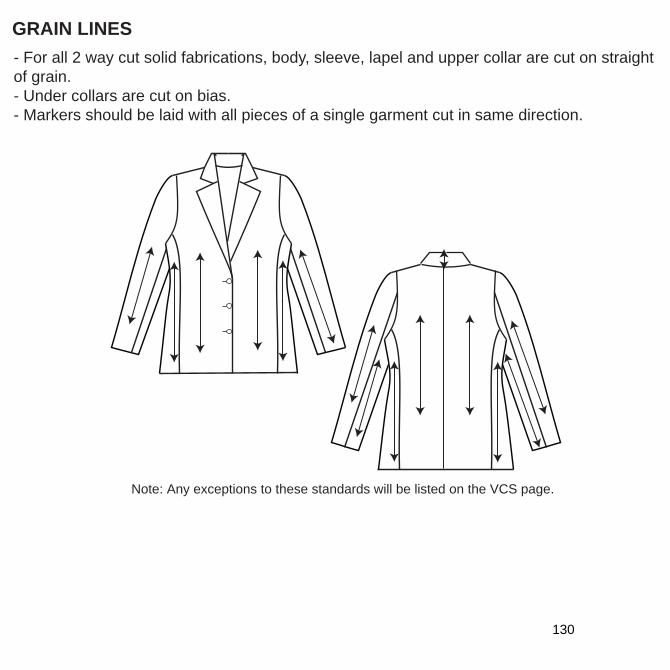
GRAIN LINES
Note: Any exceptions to these standards will be listed on the VCS page.
- For all 2 way cut solid fabrications, body, sleeve, lapel and upper collar are cut on straight of grain. - Under collars are cut on bias.- Markers should be laid with all pieces of a single garment cut in same direction.
130
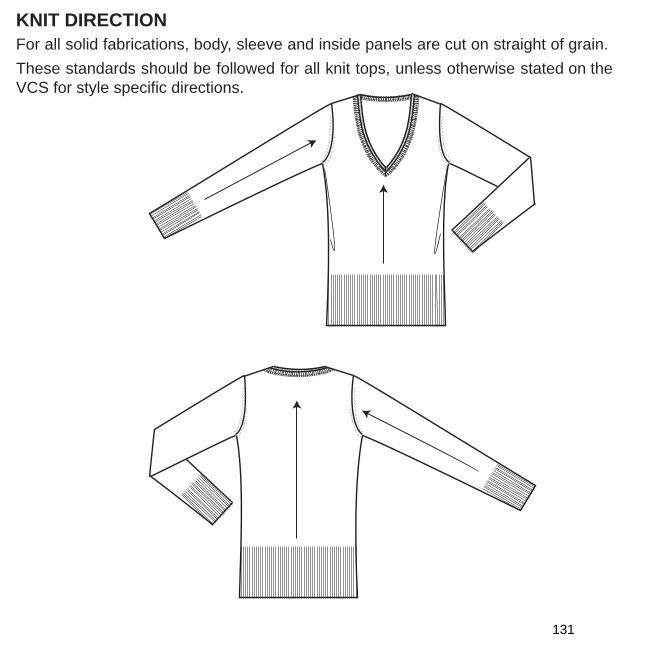
KNIT DIRECTION
For all solid fabrications, body, sleeve and inside panels are cut on straight of grain.These standards should be followed for all knit tops, unless otherwise stated on the VCS for style specific directions.
131
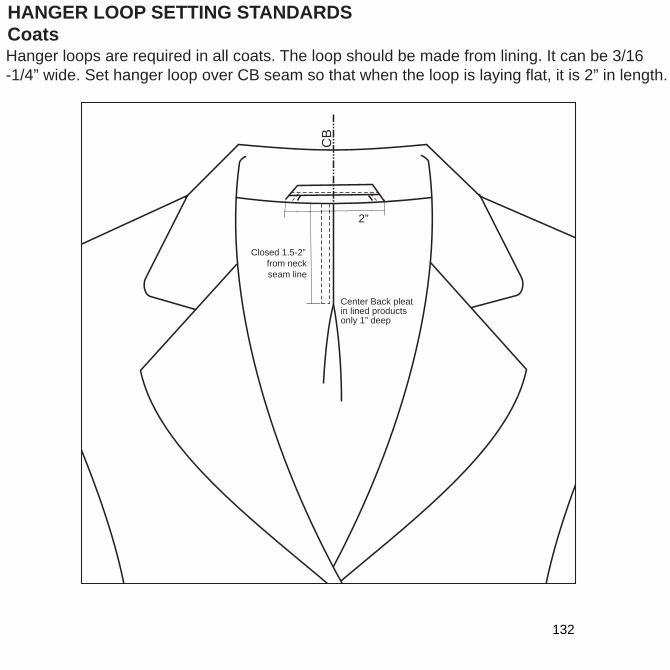
HANGER LOOP SETTING STANDARDS
Coats
2”
Closed 1.5-2”from neckseam line
Center Back pleat in lined products only 1” deep
CB
Hanger loops are required in all coats. The loop should be made from lining. It can be 3/16 -1/4” wide. Set hanger loop over CB seam so that when the loop is laying flat, it is 2” in length.
132
HANGER LOOPS
Hanger loop requirements are:1. Hanger loops should be clear elastic or satin as specified in BOM. No twill tape permitted.
2. Use hanger loops to maintain good hanger appeal. Garment on hanger should appear as close to the flat sketch as possible. The garment silhouette should be clearly visible when the garment is hung. Examples: halters, strapless styles, off the shoulder styles.
3. TD to advise suggested placement and measurement for hanger loops.
4. Use hanger loops for garments that may fall off the hanger.
133
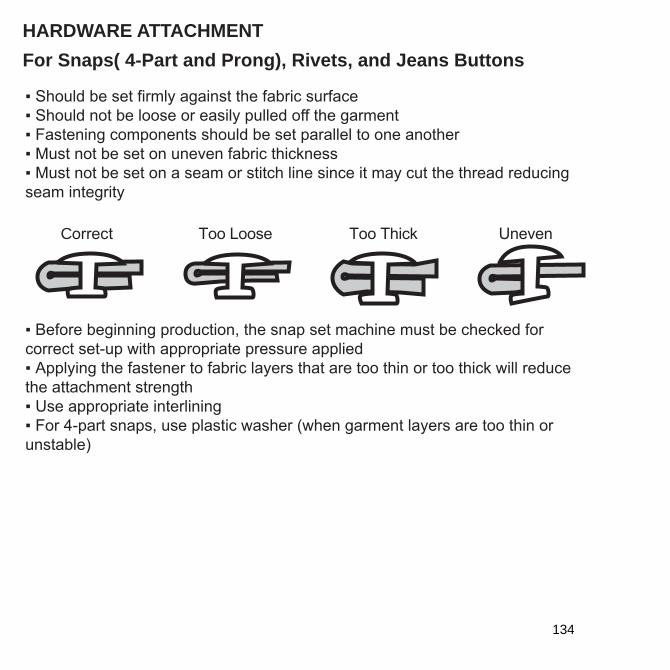
HARDWARE ATTACHMENT
For Snaps( 4-Part and Prong), Rivets, and Jeans Buttons
▪▪▪▪▪
▪
▪
▪▪
C
134

HEMSRaw edge▪
2N Bottom Cover▪ Finish with 2N cover bottom▪ Cover edge of hem completely▪ Do not set wavy or with exposed hem▪ Roping or tunneling is not acceptable.
Clean Finish with Topstitch▪
Lock for woven products and SN/Chain for knit products.
▪ Boy’s Dress Shirts have 3/16” margin.
Blind Hem▪ 3 Thread Overlock edge, turn under
and hem with blind hemmer. Caution that hem stitching does not show to outside of garment.
Overlock with Topstitch▪ 3 thread overlock bottom edge, turn,
135
PRESSING
▪ Interlining must be applied as per Supplier specification ▫ Must test heat setting at least twice a day at fusing operation andpresses
▪ Pockets must be pre-creased before setting▪ Inline pressing completed as required per operation▪ Finished product pressing must meet following quality points:
▫ All seams must be smooth, without rippling▫ Pressure setting on presses must be checked twice a day▫ Sleeve must not be creased on top sleeve line▫ Seam impressions or lay in creases not acceptable▫ Fabric or seam shine not acceptable▫ Over pressing not acceptable▫ Double edge press/crease not acceptable
Note: Follow VCS for style specific directions.
136
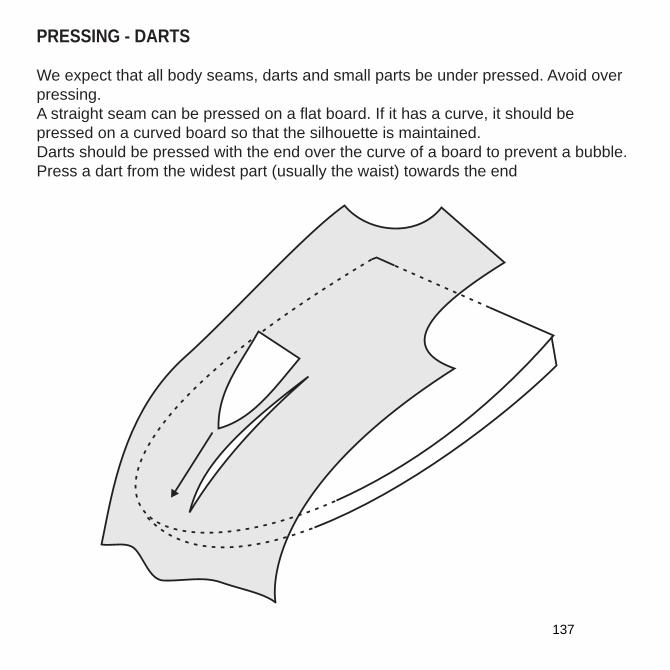
PRESSING - DARTS
We expect that all body seams, darts and small parts be under pressed. Avoid over pressing.A straight seam can be pressed on a flat board. If it has a curve, it should be pressed on a curved board so that the silhouette is maintained. Darts should be pressed with the end over the curve of a board to prevent a bubble. Press a dart from the widest part (usually the waist) towards the end
137
PRESSING
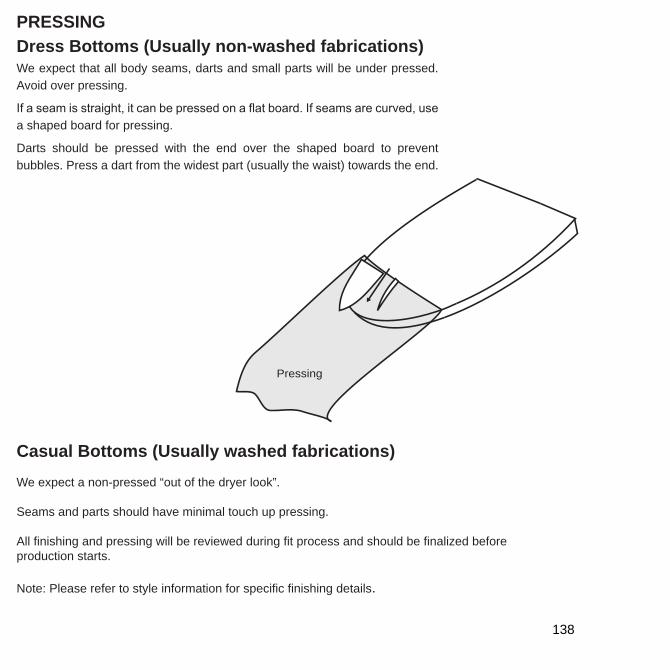
Dress Bottoms (Usually non-washed fabrications)
We expect that all body seams, darts and small parts will be under pressed. Avoid over pressing.
a shaped board for pressing.
Darts should be pressed with the end over the shaped board to prevent bubbles. Press a dart from the widest part (usually the waist) towards the end.
Pressing
Casual Bottoms (Usually washed fabrications)
We expect a non-pressed “out of the dryer look”.
Seams and parts should have minimal touch up pressing.
All finishing and pressing will be reviewed during fit process and should be finalized beforeproduction starts.
Note: Please refer to style information for specific finishing details.
138
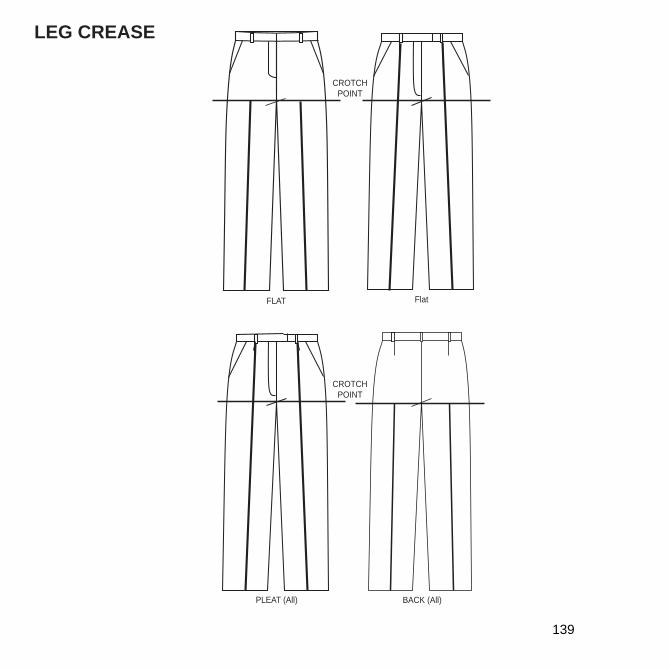
LEG CREASE
FLAT Flat
CROTCHPOINT
CROTCHPOINT
PLEAT (All) BACK (All)
139
Stitch Per Inch (SPI)SPI for Join seams: 11 1SPI for Understitching: 9 1SPI for Leather: 8 1SPI for Denim Join seams: 9 1SPI for Denim Topstitching: 7 1Note: See VCS page for style specific details regarding novelty and decorative topstitching.
++
+++
140

We follow the Stitch Terminology as recongized by International Organization for Standardization.
Please reference below:
https://www.iso.org/standard/10932.html
http://www.amefird.com/technical-tools/thread-education/glossary/stitch-terminology-glossary/
141
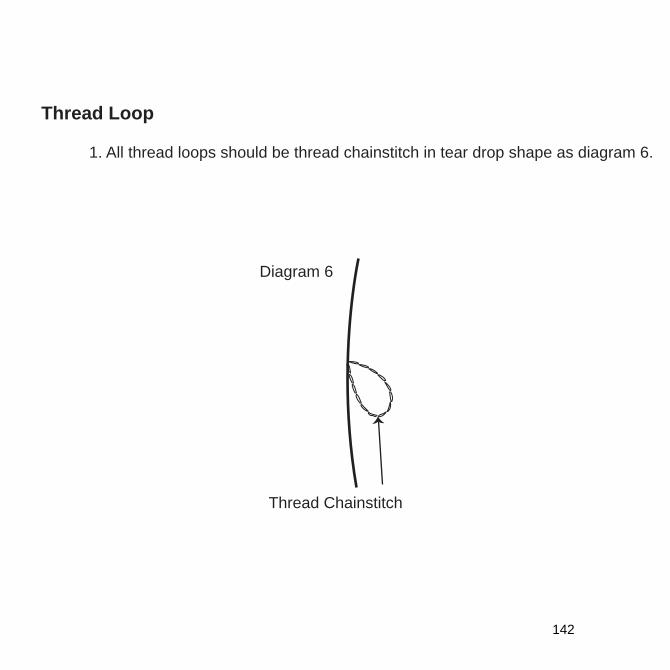
Thread Loop
1. All thread loops should be thread chainstitch in tear drop shape as diagram 6.
Diagram 6
Thread Chainstitch
142
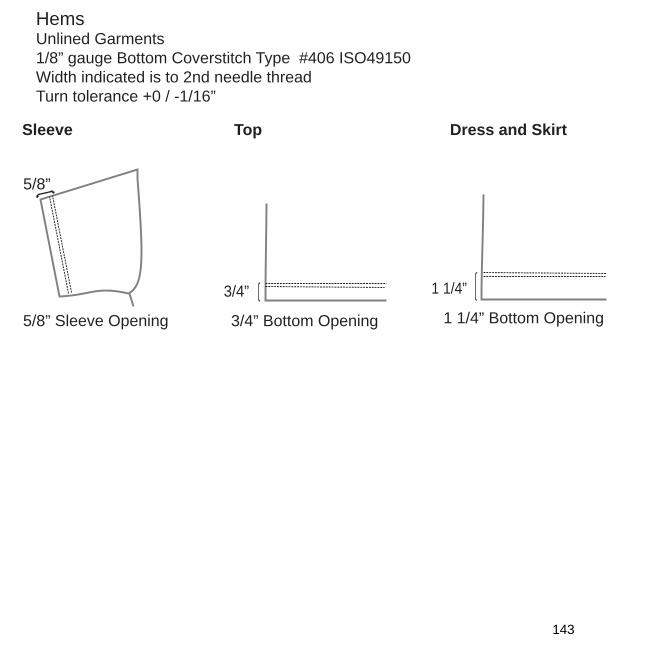
HemsUnlined Garments1/8” gauge Bottom Coverstitch Type #406 ISO49150Width indicated is to 2nd needle threadTurn tolerance +0 / -1/16”
5/8”
3/4” 1 1/4”
5/8” Sleeve Opening 1 1/4” Bottom Opening3/4” Bottom Opening
Sleeve Top Dress and Skirt
143
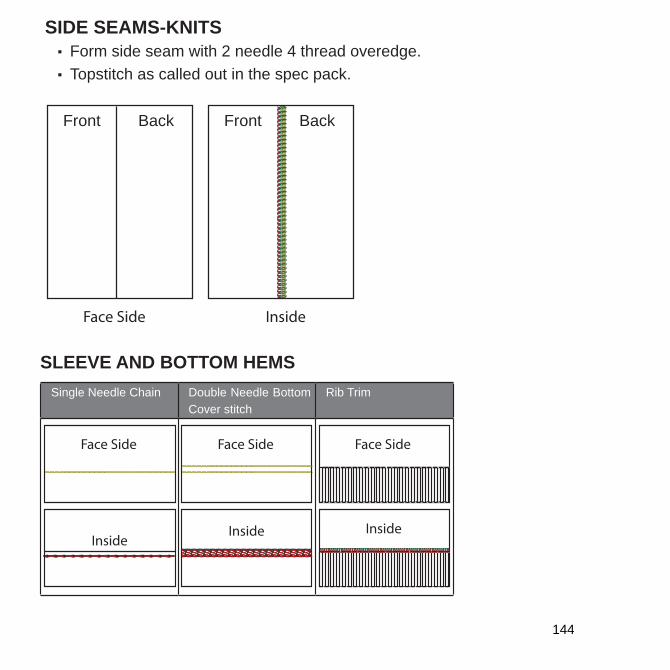
SIDE SEAMS-KNITS
▪ Form side seam with 2 needle 4 thread overedge.▪ Topstitch as called out in the spec pack.
BackFront
Face Side
BackFront
Inside
SLEEVE AND BOTTOM HEMS
Single Needle Chain Double Needle Bottom Cover stitch
Rib Trim
Face Side
Inside
Face Side
Inside
Face Side
Inside
144
▪
▪▪
▪
▪
Straight
Keyhole
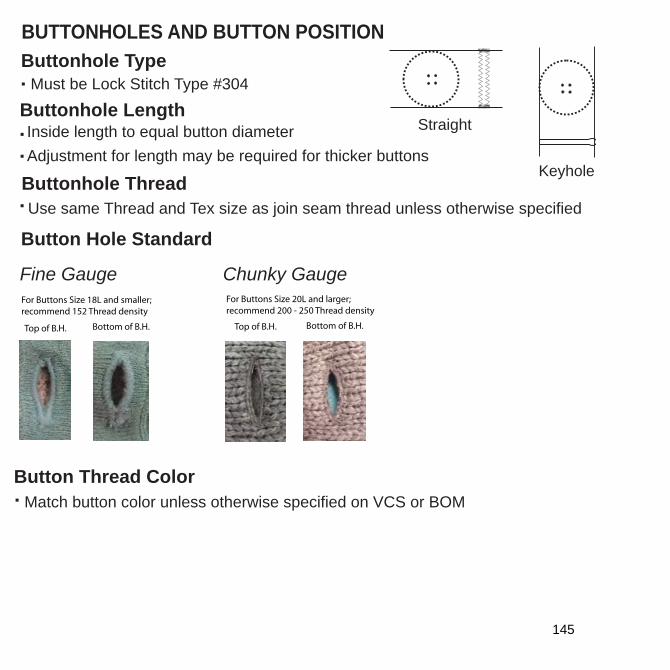
BUTTONHOLES AND BUTTON POSITION
Buttonhole Type
Must be Lock Stitch Type #304
Buttonhole LengthInside length to equal button diameter Adjustment for length may be required for thicker buttons
Buttonhole Thread
Use same Thread and Tex size as join seam thread unless otherwise specified
Button Thread Color
Match button color unless otherwise specified on VCS or BOM
For Buttons Size 18L and smaller;recommend 152 Thread density
Top of B.H. Bottom of B.H.
For Buttons Size 20L and larger; recommend 200 - 250 Thread density
Top of B.H. Bottom of B.H.
ChunkyGauge
For Buttons Size 18L and smaller;recommend 152 Thread density
Top of B.H. Bottom of B.H.
For Buttons Size 20L and larger; recommend 200 - 250 Thread density
Top of B.H. Bottom of B.H.
ChunkyGauge
Button Hole Standard
Fine Gauge Chunky Gauge
145
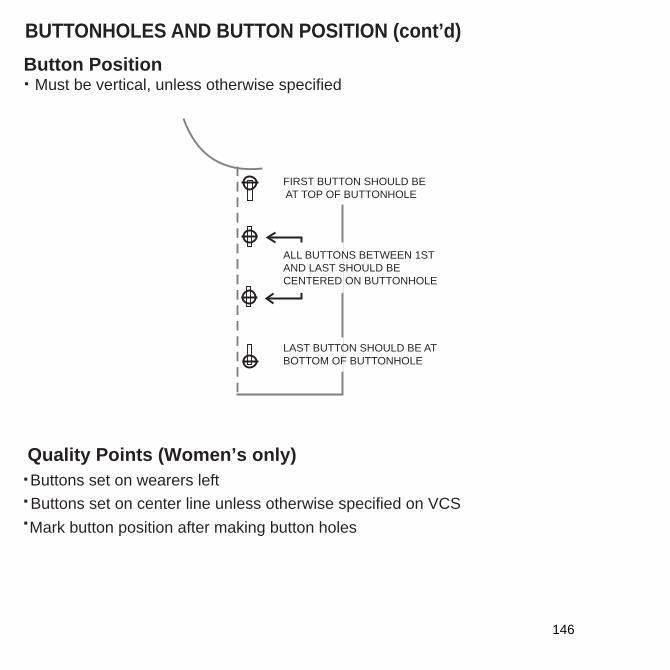
BUTTONHOLES AND BUTTON POSITION (cont’d)
▪▪▪
Quality Points (Women’s only)
Buttons set on wearers left Buttons set on center line unless otherwise specified on VCSMark button position after making button holes
▪
FIRST BUTTON SHOULD BE AT TOP OF BUTTONHOLE
ALL BUTTONS BETWEEN 1STAND LAST SHOULD BECENTERED ON BUTTONHOLE
LAST BUTTON SHOULD BE ATBOTTOM OF BUTTONHOLE
Button PositionMust be vertical, unless otherwise specified
146
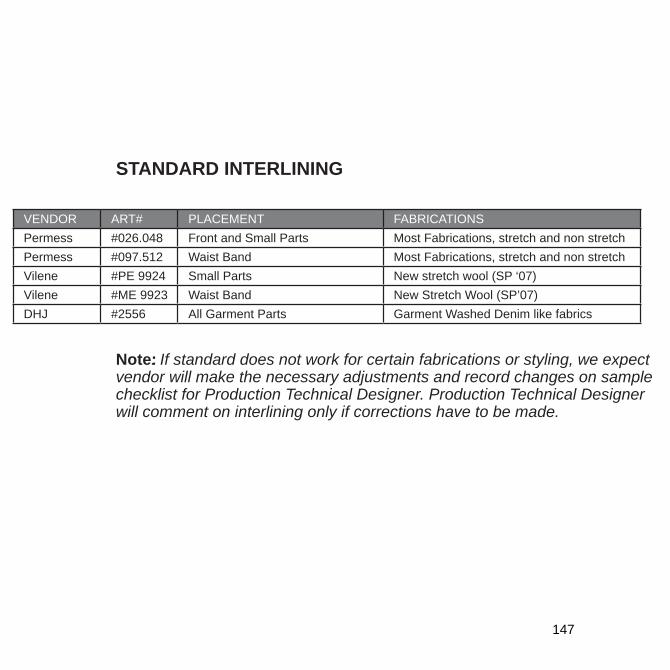
STANDARD INTERLINING
VENDOR ART# PLACEMENT FABRICATIONSPermess #026.048 Front and Small Parts Most Fabrications, stretch and non stretchPermess #097.512 Waist Band Most Fabrications, stretch and non stretchVilene #PE 9924 Small Parts New stretch wool (SP ‘07)Vilene #ME 9923 Waist Band New Stretch Wool (SP’07)DHJ #2556 All Garment Parts Garment Washed Denim like fabrics
Note:: If standard does not work for certain fabrications or styling, we expect vendor will make the necessary adjustments and record changes on sample checklist for Production Technical Designer. Production Technical Designer will comment on interlining only if corrections have to be made.
147
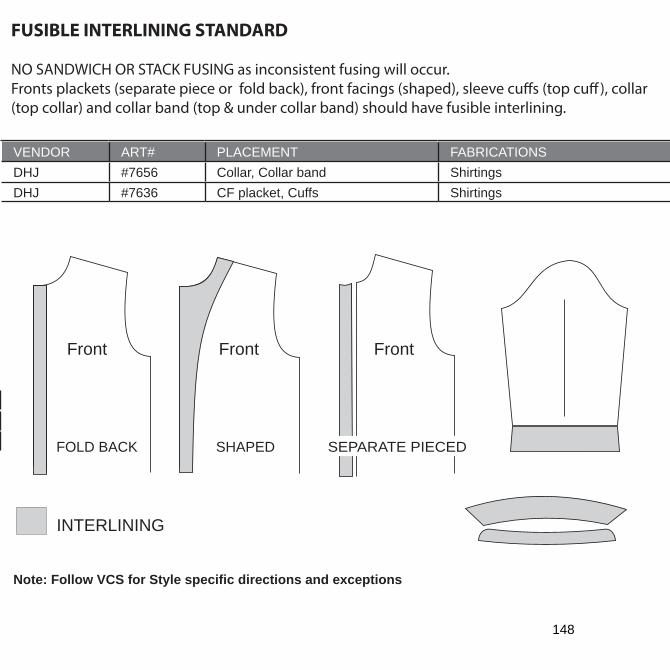
FUSIBLE INTERLINING STANDARD
NO SANDWICH OR STACK FUSING as inconsistent fusing will occur.Fronts plackets (separate piece or fold back), front facings (shaped), sleeve cu�s (top cu�), collar (top collar) and collar band (top & under collar band) should have fusible interlining.
VENDOR ART# PLACEMENT FABRICATIONSDHJ #7656 Collar, Collar band ShirtingsDHJ #7636 CF placket, Cuffs Shirtings
INTERLINING
FOLD BACK SHAPED
Front Front Front
SEPARATE PIECED
Note: Follow VCS for Style specific directions and exceptions
148
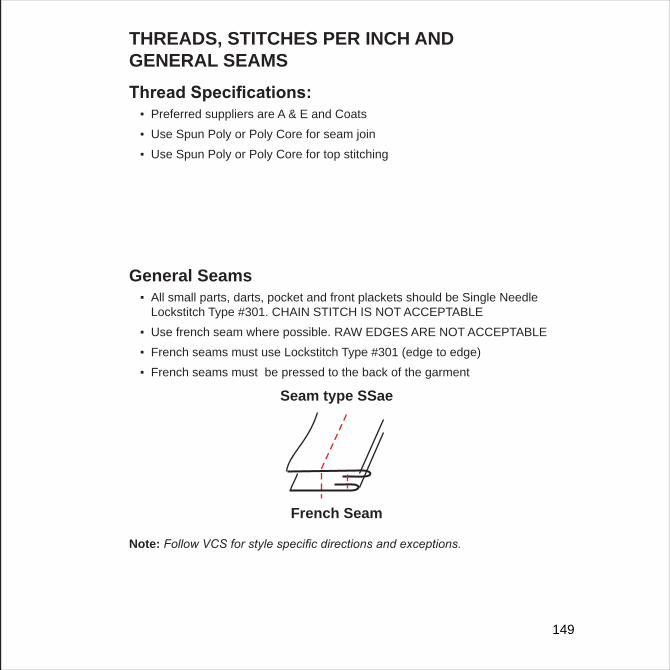
THREADS, STITCHES PER INCH AND
GENERAL SEAMS
▪ Preferred suppliers are A & E and Coats▪ Use Spun Poly or Poly Core for seam join ▪ Use Spun Poly or Poly Core for top stitching
General Seams
▪ All small parts, darts, pocket and front plackets should be Single Needle Lockstitch Type #301. CHAIN STITCH IS NOT ACCEPTABLE
▪ Use french seam where possible. RAW EDGES ARE NOT ACCEPTABLE▪ French seams must use Lockstitch Type #301 (edge to edge) ▪ French seams must be pressed to the back of the garment
French Seam
Seam type SSae
Note:
149