connected backup 9.0.3 administering the data center
TRANSCRIPT
Connected BackupSoftware Version 9.0.3
Administering the Data Center
Document Release Date: October 2020Software Release Date: October 2020
Legal notices
Copyright notice
© Copyright 2017-2020 Micro Focus or one of its affiliates.
The only warranties for products and services of Micro Focus and its affiliates and licensors (“Micro Focus”)are set forth in the express warranty statements accompanying such products and services. Nothing hereinshould be construed as constituting an additional warranty. Micro Focus shall not be liable for technical oreditorial errors or omissions contained herein. The information contained herein is subject to change withoutnotice.
Documentation updatesThe title page of this document contains the following identifying information:l Software Version number, which indicates the software version.l Document Release Date, which changes each time the document is updated.l Software Release Date, which indicates the release date of this version of the software.
You can check for more recent versions of a document through the MySupport portal. Many areas of theportal, including the one for documentation, require you to sign in with a Software Passport. If you need aPassport, you can create one when prompted to sign in.
Additionally, if you subscribe to the appropriate product support service, you will receive new or updatededitions of documentation. Contact your Micro Focus sales representative for details.
SupportVisit the MySupport portal to access contact information and details about the products, services, andsupport that Micro Focus offers.
This portal also provides customer self-solve capabilities. It gives you a fast and efficient way to accessinteractive technical support tools needed to manage your business. As a valued support customer, you canbenefit by using the MySupport portal to:
l Search for knowledge documents of interestl Access product documentationl View software vulnerability alertsl Enter into discussions with other software customersl Download software patchesl Manage software licenses, downloads, and support contractsl Submit and track service requestsl Contact customer supportl View information about all services that Support offers
Many areas of the portal require you to sign in with a Software Passport. If you need a Passport, you cancreate one when prompted to sign in. To learn about the different access levels the portal uses, see theAccess Levels descriptions.
Administering the Data Center
Connected Backup (9.0.3) Page 2 of 113
Contents
Chapter 1: Data Center services 9Services overview 9
BackupServer overview 9
IndexServer overview 11
ReplicationServer overview 11
PoolServer overview 12
Compactor overview 13
DCAlerter overview 13
Chapter 2: Compactor 14Compactor Service and Data Center configurations 14
Compactor configurations 14Compactor in mirrored Data Centers 14Administration of Compactor 14
Compactor tasks 15Select accounts 15Synchronize archives 15Mark files as expired 15Repackage archives 16Delete archives and database entries 16Notify the Agent about changes 16
File Expiration overview 17Expiration rules and default settings 17Rule exceptions 18
Chapter 3: Integrate the Data Center with enterprise directory 19Enterprise directory overview 19
Enterprise directory uses 19Existing enterprise directory servers 20Validate Support Center technicians 20Enterprise directory management 20
Enterprise directory integration process 21Prepare for enterprise directory integration 21Configure your firewall 22Enable Support Center access 22Define Enterprise Directory Setup Properties 23
Administering the Data Center
Connected Backup (9.0.3) Page 3 of 113
Map data fields 24Default values for data fields 24Map the data fields 25
Verify successful enterprise directory integration 26
Chapter 4: Integrate the Data Center with single sign-on 27Single sign-on Service provider overview 27
SSO integration process 27Prepare for SSO integration 28Install the SSO service provider software 28Configure the contract 29Configure SSODirectory Service 29Configure OAuth clients 29
Add redirection URIs for CB_WebOAuth client 30Add redirection URIs for CB_AppOAuth client 30
Configure DCMC to support SSO 30Configure a community for single sign-on support 31
Verify successful SSO integration 32
Change the SSO shared secret 32
Chapter 5: Maintain the Data Center configuration 33Convert a stand-alone Data Center to amirror 33
Before you begin 34Reinstall the Data Center software on Server A 34Install the Data Center software on Server B 35Attach the SQL databases to Server B 37Copy archives 38Prepare Server B for connections 39
Convert a mirrored Data Center to a stand-alone 39Before you begin 40
Convert your mirrored Data Center 41Configure your stand-alone Data Center 42Verifications 42
Add server pairs to amirrored environment 43Before you begin 43
Add a new primary directory Data Center server 44Add a new secondary directory Data Center server 44
Prepare servers for a non-mirrored cluster Data Center 45Before you begin 45
Create a Registry Master server for a non-mirrored cluster Data Center 46Add a Directory server to the non-mirrored cluster 46
Create RegistrationMaster servers for amirrored cluster 47
Administering the Data Center
Connected Backup (9.0.3) Page 4 of 113
Before you begin 47Install the new RegistrationMaster servers 47Prepare themirrored cluster 48Point one side of the cluster to a RegistrationMaster server 49Final steps 52
Configure the secondary server as the primary server 52
Swap primary and secondary Data Center assignments 53
Assign Data Center servers and communities based on geography 54Before you begin 54
Replace a Data Center server with new hardware 55
Chapter 6: Data Center management tools 57Management tools overview 57
Install DataBundler 58DataBundler requirements 58Prepare to install DataBundler 59Install DataBundler 59Requirements for using DataBundler 60
Install the Data Center toolkit 60Data Center toolkit requirements 60Install the toolkit 61Run the Data Center toolkit 61
Chapter 7: Manage the Data Center with DCMC 62DCMC overview 62
DCMC Access Requirements 63Start DCMC 64
DCMC user interface 64Console tree 65Details pane 66Menus and toolbars 66
Menus 66Toolbars 67
Chapter 8: The CancelHoldAccounts utility 68CancelHoldAccounts overview 68
CancelHoldAccounts access requirements 68Assumptions 68
Command syntax 69CancelHoldAccounts CommandUsage Notes 71
Run the CancelHoldAccounts utility 71
Administering the Data Center
Connected Backup (9.0.3) Page 5 of 113
CancelHoldAccounts command syntax examples 72Use shorthand parameters 72Hold accounts 72CancelHoldAccounts with a file of UserIDs 73Incorrect parameters 73
Error messages 73CancelHoldAccounts error messages 73Web services API error codes 74
Chapter 9: Data Center logging 75Event logs 75
Event messages hierarchy 76Maintain the event logs 76
Maintain the application event log 76Maintain the DCMaint log 77
Data Center protocol session log 77Enable the Data Center protocol session log 78Data Center protocol logmaintenance 78
Chapter 10: Performance monitoring for Data Center services 80Overview 80
Evaluate current Data Center capacity 80CPU 81RAM 81SQL database disk partitions 82
BackupServer counters 82
Reinstall and remove counters 83Install counters 84Remove counters 84
Troubleshoot 84Installation of the counters fails 85Counters work incorrectly 85
Chapter 11: Daily maintenance 86Tasks to complete at the start of every day 86
Verify the daily automatic procedure results 86Verify personal backups 87Check backup disk status and unknown disk space 88
Tasks to complete at the start and end of every day 88Verify that the services on the Data Center server are running 88Examine theWindows event log 90
Administering the Data Center
Connected Backup (9.0.3) Page 6 of 113
Verify that Support Center andMyRoam Are running 90Check Copy on Reference and Replication 90
Check replication 91
Chapter 12: Weekly maintenance 92Verify the results of the weekly automatic procedure 92
Review the weekly maintenance scripts 92Review the application event log 93
Weekly backup tasks 94
Check for available disk space 94Check the Customers folder 94Check the SQL database 94Check the SQL database backup 95
Perform weekly general tasks 95Check system time synchronization 95Check for updates 95
Chapter 13: Monthly maintenance 96Perform databasemaintenance 96
Considerations for stand-alone Data Centers 96Considerations for Mirrored Data Centers 97Considerations for clustered Data Centers 97Perform monthly databasemaintenance 97
Step 1: Prepare themirrored server 97Step 2: Stop the server 98Step 3: Runmaintenance SQL scripts 98Step 4: Restart the server 99
Perform account maintenance 99Unowned accounts 99Unsupported Agent versions 100Duplicate accounts 100Inactive accounts 100Heavy hitters 101Invalid accounts 101
Verify current firmware 101
Check software licensing 102Deploy Agents to additional accounts 102Add new NICs on the Data Center 102Determining HostIDs for additional NICs 103Change the features offered to end-users 103
Maintain the event logs 103
Verify records 104
Administering the Data Center
Connected Backup (9.0.3) Page 7 of 113
Chapter 14: Maintenance checklists 105Daily maintenance checklist 105
Weekly maintenance checklist 106
Monthly maintenance checklist 106
Chapter 15: Managing the SSL/TLS protocols 108Deprecation of TLS 1.0 108
Secure communication for web services 108
Secure communication between Agent and Data Center 109Disable TLS 1.0 109
Index 110
Send documentation feedback 113
Administering the Data Center
Connected Backup (9.0.3) Page 8 of 113
Chapter 1: Data Center services
This chapter provides an overview of the services that the Data Center uses to run Data Centerservers.
l Services overview, below
l BackupServer overview, below
l IndexServer overview, on page 11
l ReplicationServer overview, on page 11
l PoolServer overview, on page 12
l Compactor overview, on page 13
l DCAlerter overview, on page 13
Services overview
To perform the necessary tasks to run the Data Center server, the Data Center uses the followingservices:
l BackupServer overview, below —Facilitates data backups and retrievals
l IndexServer overview, on page 11— Indexes file and archive information to databases
l ReplicationServer overview, on page 11—Replicates between servers in amirrored pairconfiguration
l PoolServer overview, on page 12—Maintains the shared pool that the SendOnce technology uses
l Compactor overview, on page 13—Removes old data from the Data Center
l DCAlerter overview, on page 13—Alerts technicians about Data Center events
NOTE:When you administer the Data Center services, do not pause the services. Use only Stop andStart whenmanaging Data Center services. If you pause a service, you cannot view its statusin the Data Center Management Console (DCMC).
BackupServer overview
The BackupServer service processes requests from the Agent for data backup and retrieval.BackupServer gathers backed-up data into an archive. The Data Center saves the archive as a file witha .arc extension and stores it in the Customer folder. Each file contains file backup data transmittedfrom a client during a single backup session.
Connected Backup (9.0.3) Page 9 of 113
CAUTION:Do not delete .arc files from the Customers directory. Doing so deletes end users’ data andrenders it unrecoverable.
If the data from a single backup session is large, BackupServer saves information tomore than onearchive. Each represents a portion of the backup session. Usingmultiple archives helps to optimizedata recovery performance.
When BackupServer receives a request from the Agent to retrieve a file, BackupServer must find thefirst backup of the file (the base) and all the changes (the deltas) necessary to recreate the specificversion of the file requested.
For example, you request to retrieve the third backed-up version of a file:
l BackupServer must retrieve the base (version 1)
l The delta that represents the differences between version 1 and version 2
l The delta that represents the differences between version 2 and version 3
Because you backed up the base and the deltas in different backup sessions, they are in differentarchives. Typically, BackupServer uses multiple archives to retrieve a file.
In addition to processing requests for data backup and retrieval, BackupServer manages the list ofauthorized user accounts and registers new accounts. There is one user account for each client.
BackupServer starts automatically withWindows Server. The Data Center Management Console(DCMC) includes aBackupServer node. This node lets you view the following information:
l Service status
l Sessions
l Properties
To view and edit status information
1. Select Start > All Programs > Data Center > Data Center Management Console.
2. In the left pane, expand the Data Center server name that runs the service.
3. Right-click BackupServer, and then select Properties.
NOTE:If you want to enable the IPv6 connectivity between the PC Agent and Data Center, the serverconnections in the BackupServer properties must be configured with DNS names.
CAUTION:Make sure to contact Connected Backup support team before you change the default values forthe following Backup server session limits:
l Maximum Active Sessions
l Maximum Active Backup Sessions
Administering the Data CenterChapter 1: Data Center services
Connected Backup (9.0.3) Page 10 of 113
l Maximum Active First Backup Sessions
l Maximum Active Download Sessions
IndexServer overview
As Agents back up archives to the Data Center server, information about each file in the archivemustbe stored in the Directory database. After an archive is fully written to the Data Center, the IndexServerwrites the information to the Directory database, allowing for faster lookups of file data during retrieves.When the indexing process is finished, the archive is queued for replication to themirrored server (if youuse amirrored configuration).
If the Data Center is mirrored or part of a non-mirrored cluster, the IndexServer writes information to thedatabase for all archives that have been replicated from themirrored server.
IndexServer starts automatically withWindows Server. The Data Center Management Console(DCMC) includes an IndexServer node that lets you access the following information:
l Service status
l Properties
To view and edit status information
1. Select Start > All Programs > Data Center > Data Center Management Console.
2. In the left pane, expand the Data Center server name that runs the service.
3. Right-click IndexServer, and then select Properties.
ReplicationServer overview
The ReplicationServer service replicates the following content between the servers in amirrored pair:
l Archives
l Database table rows
l Agent configurations
IMPORTANT:The ReplicationServer service runs only onMirrored Data Center configurations, either amirrored pair or as part of a mirrored cluster.
After the Agent backs up an archive to the Data Center server and indexes the database, the archivegoes into a queue to be replicated to themirror. The ReplicationServer services replicates the archiveto themirror as a whole rather than in portions as the Agent backs it up.
Most, but not all, of the database tables in the schema replicate between the servers in amirrored pair.When a row in a replicated database table is inserted, deleted, or modified, the database is placed in aqueue for replication between themirrored servers. SQL replication handles the replication process.
Administering the Data CenterChapter 1: Data Center services
Connected Backup (9.0.3) Page 11 of 113
ReplicationServer starts automatically withWindows Server. Archives, database entries, and Agentconfiguration files are replicated continuously when ReplicationServer runs. If you have to pause orstop replication, you can pause or stop the service in the Data Center Management Console (DCMC).
The DCMC includes aReplicationServer node that lets you view the following information:
l Service status
l Properties
To view and edit status information
1. Select Start > All Programs > Data Center > Data Center Management Console.
2. In the left pane, expand the Data Center server name that runs the service.
3. Right-click ReplicationServer, and then select Properties.
PoolServer overview
PoolServer maintains the shared file pool that implements SendOnce technology. SendOncetechnology recognizes duplicate files frommultiple Agents and stores an identical file for eachduplicated file on the Data Center server.
1. BackupServer stores the original contributor’s file
2. SendOnce recognizes that a duplicate file is being sent for backup by another Agent
3. PoolServer stores an identical file as the original contributor’s file
Using PoolServer reduces the storage space needed on the Data Center, as additional duplicate filesbacked up to the Data Center reference the PoolServer-saved copy, instead of a copy of each duplicatefile being stored. Backing up references to files that were already saved by the PoolServer also reducesthe amount of time Agents are connected to the Data Center during backups.
PoolServer also implements the Copy OnReference scheduled process. Copy OnReference cleansthe shared file pool of uncommon files. When two Agents back up an identical file (for example, anapplication file, operating system file, or common organization file), the SendOnce technology placesthe file in a queue for Copy OnReference. Copy OnReferencemakes a copy of the file and places it ina special account known as the Pool Account. The Pool Account always uses 999999999 as itsaccount number. Any Agent that backs up the same file references the copy instead of sending anotherfull copy of the file to the server. Also, if any Agent needs to retrieve the file after backing it up, theAgent retrieves the copy from the Pool Account.
Every 14 days by default, the PoolServer removes references to files that no other account has backedup within 14 days. These files are removed to keep the Directory database from growing too large andto keep the performance of the SendOnce operation efficient. You can use DCMC to change thenumber of days that uncommon files remain in the pool.
NOTE:While you can change this value, you should use the default value of 14 days for the SendOncepool, unless you are directed to change the value by Support.
PoolServer starts automatically withWindows Server.
Administering the Data CenterChapter 1: Data Center services
Connected Backup (9.0.3) Page 12 of 113
The Data Center Management Console (DCMC) includes aPoolServer node that lets you access thefollowing information:
l Service status
l Properties
To view and edit status information
1. Select Start > All Programs > Data Center > Data Center Management Console.
2. In the left pane, expand the Data Center server name that runs the service.
3. Right-click PoolServer, and then select Properties.
Compactor overview
The Compactor service cleans old data off of the Data Center. Compactor verifies synchronizationbetweenmirrored servers, applies expiration rules to backed up data, and deletes expired data. Thegoal of Compactor is to speed up the Retrieve process and reduce the amount of data stored long termon the Data Center.
For more information about the Compactor process, see Compactor, on page 14.
DCAlerter overview
DCAlerter monitors the Data Center event logs for the event IDs that you specify. When the DataCenter logs an event ID that you have specified for notification, DCAlerter sends an e-mail message tothe designated individuals.
You can specify your SMTP mail host and an administrator e-mail address for DCAlerter during DataCenter Setup. If you do not enter the SMTP mail host information during Data Center Setup, theDCAlerter feature is not active. Data Center Setup installs a default set of events for notifications. Youcanmodify the installed settings using DCMC.
To view status information in the details pane, select DCAlerter from the console tree for the server theservice runs on.
To view and edit DCAlerter settings
1. Select Start > All Programs > Data Center > Data Center Management Console.
2. In the left pane, expand the Data Center server name that runs the service.
3. Right-click DCAlerter, and then select Properties.
NOTE:The DCAlerter service can generate a large amount of email for those individuals configured asrecipients. Be sure to carefully configure the event groups to only send those event messagesthat are necessary tomonitor the Data Center.
Administering the Data CenterChapter 1: Data Center services
Connected Backup (9.0.3) Page 13 of 113
Chapter 2: Compactor
This chapter describes the Compactor service.
l Compactor Service and Data Center configurations, below
l Compactor tasks, on the next page
l File Expiration overview, on page 17
Compactor Service and Data Center configurations
Compactor is a Data Center service that runs continuously based on Data Center activity. Compactorhas the following capabilities:
l Reduce the overall storage requirement for the Data Center.
l Improve the performance of Agent file retrieval.
l Free disk space by removing expired data.
l Reduce the size of the databases.
l Improve data integrity.
Compactor configurations
Compactor runs on all Data Center configurations, but runs differently onmirrored configurations than itdoes on stand-alone or non-mirrored cluster configurations.
Compactor in mirrored Data Centers
In mirrored Data Centers, the Compactor service runs on both servers. However, only one of theservers in the pair controls the workload of the compaction process. This server is called the primaryserver. If you run a clustered Data Center, there is one primary server for every mirrored pair in thecluster. For example, a clustered Data Center with threemirrored pairs has three primary servers. Youcan check the status of the primary server(s) in the Compactor view of DCMC.
Administration of Compactor
You can use DCMC to administer Compactor in the following ways:
l Start, stop, or pause the Compactor service.
l Specify startup parameters.
Connected Backup (9.0.3) Page 14 of 113
l Monitor Compactor progress for the current session.
l Monitor disk space.
l Monitor Compactor progress for the past 90 days.
For more information on these topics, refer to DCMC Help.
Compactor tasks
The Compactor service removes redundant data from the Data Center. It also removes data that isolder than set expiration parameters. To remove data, Compactor performs the following tasks:
1. Selects accounts
2. Synchronizes archives (mirrored Data Center configurations only, either amirrored pair or as partof a mirrored cluster)
3. Marks files as expired according to rules set during Data Center installation
4. Repackages archives
5. Deletes expired archives and database entries
6. Informs the Agent of changes
Select accounts
For each session, Compactor determines which accounts to work on. Compactor first locks theaccount from all other processes.
Compactor runs continuously, but you can start the Compactor servicemanually if you specify anaccount. You can also run Compactor service on canceled accounts. For more information about howto use switches to start Compactor, refer to the DCMC Help.
Synchronize archives
Compactor then verifies synchronicity between the archives in the account and the databaseinformation on the local server, and then between the two servers of amirrored pair.
If inconsistencies exist (corrupt or missing files), Compactor tries to correct them. If inconsistenciesstill exist, Compactor marks the files that it cannot retrieve for deletion, and then requests that the DataCenter notify the Agent to resend those files.
Mark files as expired
l To expire files, Compactor uses rules that technicians create during Data Center installation. Theserules specify the following parameters:
l How long to keep data for cancelled accounts
Administering the Data CenterChapter 2: Compactor
Connected Backup (9.0.3) Page 15 of 113
l How long to keep files deleted from the Agent computer
l How long to keep files excluded from the Agent backup
l How many versions of a file to keep and how long to keep them
Formore information about expiration rules, see File Expiration overview, on the next page.
Compactor runs through every version of every file for the selected account. If an expiration rule appliesto a file, Compactor marks the file as expired. Expiration settings are immediately applied to your DataCenter, but these settings require Compactor to process the account to be fulfilled. Compaction cyclesfluctuate with each added variable. These variables might be one or all of the following considerations:
l Number of accounts
l Size of the back up set
l Number of file revisions per account
l Expiration settings
Compactor does not copy archives for accounts that are canceled and ready for compaction. Canceledaccounts are processed first.
Repackage archives
After Compactor marks files as expired, it determines which files to delete and which archives torepackage for efficiency.
If a failure to retrieve the archive from storage or disk occurs, Compactor attempts to retrieve thearchive from the server’s mirror. When Compactor works with files in an archive, it either copies orrebases the file. Rebasing takes the original base of a file (the first backed-up version) and combines itwith its deltas (subsequent changes to backed-up files) to create a new base. Compaction deletes theexpired base and deltas. When a file has not expired, but it is in an archive with other files thatCompactor must rebase or delete, Compactor copies the files to new archives. After the repackagingprocess, Compactor performs additional data integrity checks on the new archives.
Delete archives and database entries
After Compactor repackages all archives, it deletes the old archives from disk. During this process,Compactor also deletes the appropriate database rows for these files and archives. When this step iscomplete, the account is unlocked, allowing access to all processes.
Notify the Agent about changes
After Compactor repackages or deletes archives, BackupServer notifies the Agent of the change. Thenext time the Agent connects to the Data Center server, the Data Center updates the file list with thenew information from the compaction process. After Compactor deletes files, the Agent cannot restorethe files. Therefore, the Agent must update the list of files available for retrieval. The Agent alsoresends any files or revisions that aremissing from the Data Center that remain on the local computer.
Administering the Data CenterChapter 2: Compactor
Connected Backup (9.0.3) Page 16 of 113
After Compactor migrates all new archives, the process begins again. Compactor checks for availabledisk cache and selects the next account for compaction.
File Expiration overview
To reuse disk and archive storage space, the Data Center use the expiration process to delete old data.
When technicians set up the Data Center, they specify parameters that define when data is “old” andready for deletion. The file expiration rules have default settings created by Data Center Setup. You canaccept the defaults if you do not know the parameters that you need.
On a disk-only configuration, the file expiration rules keep your Data Center from running out of diskstorage. Monitor a disk-only configuration closely in the weeks after startup, and decrease the fileexpiration rules if disk space fills too quickly. On disk-only configuration, if space is tightly limited, youneedmore aggressive file expiration rules. Use DCMC to change file the expiration rules.
Expiration rules and default settings
Expiration rules have the following default settings:
l Canceled. Theminimum number of days after an account is canceled until its backed-up data isdeleted. The default number of days until deletion is 60.
l Deleted. Theminimum number of days that the Data Center retains a file after it has been deletedfrom the Agent. If a file is backed up and later deleted, you can usually retrieve the file with theAgent. However, if the Data Center expires and compacts the file, you cannot retrieve it. The defaultvalue is 90 days for disk-only configuration.
l Excluded. The number of days that the Data Center retains a file after the end-user excludes it fromthe backup list on the Agent. If you back up a file and then later exclude it from the Agent backup list,the next time Compactor runs on the account the file is expired and deleted. For disk-onlyconfiguration, the default value is 10 days.
l RecentVersions and OldVersions. Used together to specify the number of versions of a retainedfile. For example, if RecentVersions = 9 (versions) andOldVersions = 30 (days), then old versions ofa file are deleted if they aremore than 30 days old or there are 9more recent versions. Themostrecent backed-up version of a file is not expired using these parameters. The default value forRecentVersions is 10 versions for disk-only configurations. The default value for OldVersions is 45days for disk-only configurations.
CAUTION:Micro Focus Connected Backup is a backup and restore application, and is not designed as anarchiving application. Do not modify the values of these settings tomore than double the defaultvalues for the following reasons:
l Storage needs may be greatly increased.
l Data Center performancemay be decreased.
l Permanent data loss is possible, due to reduced data integrity checks.
Administering the Data CenterChapter 2: Compactor
Connected Backup (9.0.3) Page 17 of 113
Rule exceptions
Data can remain on the Data Center longer than the expiration rules imply. For example, on January 1,a user deletes a file from his or her computer. The file has been backed up to the Data Center. The userthen performs a subsequent backup.
Compactor typically processes disk-only accounts every 30 days. To use the January 1 example fromthe previous paragraph, the next time Compactor can process the user’s account is on February 2nd. Ifyou delete a file, the expiration rule for deleted files is typically 45 days. As Compactor processes thisaccount, Compactor marks the deleted file for deletion from the Data Center. However, the file canremain on the Data Center for more than 90 days after the user deletes it from the his or her computer.This occurs because the expiration rule values and the number of days between Compactor runs for anaccount areminimum values. Data can remain on the Data Center longer than these values indicate.
Administering the Data CenterChapter 2: Compactor
Connected Backup (9.0.3) Page 18 of 113
Chapter 3: Integrate the Data Center withenterprise directory
This chapter describes how to integrate your Data Center with an enterprise directory.
l Enterprise directory overview, below
l Enterprise directory integration process, on page 21
l Map data fields, on page 24
l Verify successful enterprise directory integration, on page 26
Enterprise directory overview
In Connected Backup, an enterprise directory is the application you use tomanage your directoryservices requirements. Enterprise directory uses Lightweight Directory Access Protocol Version 3(LDAPv3), a software protocol that enables you to store personal information for every individual in yourorganization. This directory of information enables other applications, including Connected Backup, toread information from it for authentication and other purposes.
You can integrate some or all of your Agents with your enterprise directory by mapping a community inSupport Center. If youmap a community to enterprise directory, all of its subcommunities useenterprise directory as well. It is important to map a community to enterprise directory before you allowAgents to register to the community.
NOTE:You administer your enterprise directory and the information it contains separately fromConnected Backup. Connected Backup uses information from the enterprise directory, andcannot be used as an enterprise directory.
Administer your enterprise directory based on the application vendor’s instructions.
For more information on enterprise directory requirements to work with your Data Center, refer toConnected Backup Interoperability Matrix guide.
Enterprise directory uses
You can use Enterprise directory to validate Support Center technicians and optionally, to maintain thepersonal data of end users. When you integrate Connected Backup with your enterprise directory, yougain the following benefits:
l Support Center technicians can use their enterprise directory passwords for authentication.
l Support Center technicians cannot gain access to Support Center after reassignment or termination.
Connected Backup (9.0.3) Page 19 of 113
l Agent accounts can authenticate with the current enterprise directory user account and password.This means that Agent users can use their enterprise directory credentials to register Agents andretrieve data.
l You can perform Account Lifecycle Management, because your accounts are based on your existingenterprise directory accounts.
l The contact information for accounts can be automatically populated and updated. This is useful foraccount management, reporting, and troubleshooting.
Existing enterprise directory servers
If you have an existing enterprise directory server, use Support Center to map the directory to the DataCenter database. For more information about how tomap your Data Center to the enterprise directoryData Center, refer to Support Center Help.
Validate Support Center technicians
Use Support Center to map the Data Center or communities to an enterprise directory. When youassociate a community with an enterprise directory, Support Center technicians in that communitymust use their LDAP user ID and password to log on to Support Center.
Enterprise directory management
For enterprise directory-enabled communities, the Data Center synchronizes user information betweenthe enterprise directory server and the Data Center databases. The LDAPSyncher application usesWindows Scheduled Tasks to perform this synchronization process and run daily.
If the enterprise directory server is unavailable, you will see the following behaviors:
l New Agents cannot register.
l Existing Agents cannot retrieve files.
l Technicians cannot log in to Support Center.
If your organization uses Lotus Domino, contact Connected Support for more information andassistance. Support for Lotus Domino requires modifications to the databases in the Data Centerintegration process.
NOTE:Connected Backup supports only LDAPv3. Do not attempt to use enterprise directoryapplications based on different LDAP variants.
Administering the Data CenterChapter 3: Integrate the Data Center with enterprise directory
Connected Backup (9.0.3) Page 20 of 113
Enterprise directory integration process
CAUTION:Read this entire procedure before you integrate and be sure you understand all the requirementsand steps.
Complete each set of steps in one phase before you begin the next phase.
Integration includes the following phases:
1. Prepare your IT infrastructure for integration, and gather the information that you need to completethe procedures in this document.
NOTE:Do not integrate the enterprise directory at the root level of Support Center.
2. Configure your firewall to let the Data Center and Support Center gain access to your enterprisedirectory.
3. Enable Support Center access.
4. Define the Enterprise Directory Setup Properties in Support Center. This requires you tomapSupport Center data fields to corresponding enterprise directory data fields.
The following sections explain these phases in detail.
Prepare for enterprise directory integration
The preparation phase requires you to collect information to configure access to your enterprisedirectory and verify that your infrastructuremeets requirements to support integration.
NOTE:An LDAP browser helps you identify and locate your enterprise directory accounts and servers.As you prepare process, you can use the LDAP browser to gather information and identify theserver(s) that you want to permit Support Center to access. Check if your enterprise directorysoftware includes a browser. If it does not, you can obtain a free LDAP browser from theInternet.
To prepare for integration with enterprise directory
1. Install the Data Center, or upgrade your Data Center to the current version.
For more information about how to install your Data Center for the first time, refer to Installing theData Center guide.
For more information about how to upgrade your Data Center, refer toUpgrading the Data Centerguide.
2. Confirm that your enterprise directory supports LDAPv3, which includes Microsoft WindowsActive Directory server.
Administering the Data CenterChapter 3: Integrate the Data Center with enterprise directory
Connected Backup (9.0.3) Page 21 of 113
3. Verify that enterprise directory accounts exist for users to whom you deploy Agents. The usersinclude people use Support Center to manage Connected Backup user accounts, and commonlyreferred to as Support Center technicians.
If you plan to use enterprise directory to authenticate Agent registration, this step is critical. Usersthat do not have enterprise directory accounts cannot authenticate. Therefore, the Agent fails toregister.
4. Locate the enterprise directory source server that has access to user accounts to which you planto deploy Connected Backup Agents. Note the URL for the source server, as you will need it laterto grant Support Center access to your enterprise directory.
For best results, place this server as high as possible in the enterprise directory architecture.
5. Install Secure Socket Layer (SSL) certificates on each enterprise directory server that the DataCenter servers and the Support Center server will read.
SSL prevents unauthorized interception of user credentials.
For LDAP Enterprise Directory secured via SSL, ensure that the certificates are installed on theSupport Center server and any of the following servers that it needs to contact for LDAPauthentication and synchronization, including:
l Enterprise Directory server(s).
l Data Center server(s).
l Account Management Website server(s).
6. Create a new enterprise directory account that has read-only permission on the enterprisedirectory server that you identified in step 4. Remember the user account and password, as youneed to enter it in Support Center.
This account requires read access to all enterprise directory accounts and to your enterprisedirectory schema. Support Center uses this user account to read information from your enterprisedirectory during the initial integration, and for every communication from Support Center.
CAUTION:Use a password with aminimum of eight characters, and a combination of letters and numbers.Keep inmind that if you change this enterprise directory account password, youmust alsochange it in Support Center.
Configure your firewall
If you protected your Data Center with a firewall, youmust configure the firewall to permit the DataCenter, Support Center and Registry Master servers access to your enterprise directory servers.
For more information about how to configure your firewall, refer to Installing the Data Center guide.
Enable Support Center access
To enable Support Center access, youmust provide Support Center the information required tomake aconnection to your enterprise directory, andmapping the Support Center data fields to your
Administering the Data CenterChapter 3: Integrate the Data Center with enterprise directory
Connected Backup (9.0.3) Page 22 of 113
corresponding enterprise directory data fields.
Data field labels vary from one enterprise directory to another. To determine which fields tomap to theSupport Center data fields, contact the person who administers your enterprise directory fields.
Define Enterprise Directory Setup Properties
To gain access to your enterprise directory server or servers, Support Center uses the enterprisedirectory account you created. For more information, see Prepare for enterprise directory integration, onpage 21. Support Center connects through your corporate firewall to the enterprise directory and readsaccount information.
You can enable the Data Center to connect to your enterprise directory to authenticate users whoattempt to register Agent accounts and retrieve backed up data. The Data Center also authenticatesthe technicians who attempt to log on to Support Center to administer your Connected Backupaccounts and subcommunities.
To enter the setup properties
1. Log on to Support Center.
2. Locate the subcommunity that you want to integrate with your enterprise directory.
Your root and subcommunities appear in the navigation tree on the left. Youmight need to expandyour root community node to locate the subcommunity that you want to integrate.
3. To display theEnterprise Directory Setup page, on theCommunity Status page, clickEnterprise Directory.
4. Type the URL of the source server in theEnterprise Directory Server URL field.
The following example shows a valid URL for an Active Directory server.
LDAP://my.edserver.com/dc=edserver,dc=com
NOTE:Connected Backup does not support security groups on an Active Directory server.
The Data Center can connect to a security group, but it cannot authenticate or validate users.
5. To ensure that inbound Support Center connections are secure, select Use SSL.
6. In theConnection Login DN box, enter the read-only enterprise directory user account ID thatyou created for Support Center to enable it to connect to your enterprise directory.
The following example shows an Active Directory account.
7. In theConnection Password box, enter the account password.
The Data Center encrypts and stores the password. Only technicians that have theChange theEnterprise Directory user permission have access to the password. For more information, referto Support Center Help.
Administering the Data CenterChapter 3: Integrate the Data Center with enterprise directory
Connected Backup (9.0.3) Page 23 of 113
8. Select Verify existence of users through Enterprise Directory to have Support Center useyour enterprise directory to authenticate all users who attempt to register a Connected Backupaccount.
NOTE:Connected Backup verifies against only accounts deleted from the enterprise directory. Itdoes not verify against disabled accounts. Connected Backup treats disabled accountsthe same as active accounts. If you create an account for a disabled enterprise directoryaccount, you can use Support Center to change the account status toOn Hold orCancelled.
9. To indicate how you want Data Center to respond to users who fail to authenticate, select one ofthe following options:
l Change the Account Status to On Hold— if you want to place these accounts on holdtemporarily until you can verify independently whether they should be allowed to register.
l Change the Account Status to Cancel— if you want to deny the account registrationpermanently.
10. Continue to the next section, Map data fields, below, to complete the integration.
NOTE:After creating a new sub-community under the Enterprise Directory enabled community, ensurethat youmanually run the LDAPSyncher utility just once. To do this:
On both the primary and secondary current RegistrationMaster servers, click Start > ControlPanel > Administrative Tools > Tasks Scheduler > Task Scheduler Library>LDAPSyncher task>, and then click Run.
Map data fields
Support Center also can read user information, such as First Name, Last Name, department or otherinformation from your enterprise directory. To do so, provide Support Center with the name of thecorresponding data field in your enterprise directory. For example, youmust map the Support CenterLast Name field to theSN (surname) field. By mapping the data fields, you can control whichinformation the Support Center obtains and reads.
Default values for data fields
The following table lists default values for data fields in Mozilla Directory, Novell eDirectory andMicrosoft Active Directory. These suggested values might not represent the values in your enterprisedirectory implementation. For assistance with mapping data fields, consult your enterprise directoryadministrator.
In the table, an asterisk (*) next to a field indicates a required field, and youmust enter the name of yourcorresponding enterprise directory data field.
Administering the Data CenterChapter 3: Integrate the Data Center with enterprise directory
Connected Backup (9.0.3) Page 24 of 113

Map this SupportCenter field:
To this MozillaDirectory field:
To this NovelleDirectory field:
To this Microsoft ActiveDirectory field:
User Class * Inetorgperson InetOrgPerson User
LoginID * Cn CN userPrincipalName
UniqueID * Uid Uid objectGUID
First Name GivenName Given Name givenName
Middle Initial Initials Initials initials
Last Name Sn Sn Sn
Address1 Postaladdress Postal Address StreetAddress
Address2 Street Street Street
City City L City
State st ST st
Zip Postalcode PostalCode Postalcode
Country Country Country c
Telephone TelephoneNumber TelephoneNumber TelephoneNumber
Email * Mail Mail mail
Company Company Company company
Department departmentNumber departmentNumber Department
Map the data fields
To map the data fields
1. In theEnterprise Directory Setup page, enter the name of the corresponding enterprise directorydata field in each field.
NOTE:If you do not know which field names tomap to the Support Center fields, consult yourenterprise directory administrator.
2. Check the spelling, capitalization, and spacing of each field name that you enter.
3. After youmap the fields, click Save.
Administering the Data CenterChapter 3: Integrate the Data Center with enterprise directory
Connected Backup (9.0.3) Page 25 of 113
Verify successful enterprise directory integration
After you complete the integration procedures, verify that the integration completed successfully andworks as expected.
To verify that the enterprise directory integration was successful
1. Create a new technician account in Support Center and verify that you can use that account to logon to Support Center.
For instructions on how to create technician accounts, refer toAdministering Agents guide for youroperating system.
2. Create a new test Agent configuration in the Support Center community that you integrated withyour enterprise directory.
For more information about how to create an Agent configuration, refer toAdministering Agentsguide for your operating system.
3. Deploy and install that Agent to a user account in the enterprise directory. Verify that you can usethe user account in the enterprise directory as credentials to install and register the new Agent.
For instructions on how to deploy an Agent, refer to Installing Agents guide for your operatingsystem.
4. After you install a test Agent, confirm that the account information appears in the Agent. If theaccount information fields in the Agent are empty, confirm that the fields are populated in theenterprise directory user account.
5. Change a value for a user in a field mapped to the test Agent, and then run LDAPSyncher from theScheduled Tasks Windows Control Panel. Confirm that the correct values are displayed for theaccount in Support Center.
Administering the Data CenterChapter 3: Integrate the Data Center with enterprise directory
Connected Backup (9.0.3) Page 26 of 113
Chapter 4: Integrate the Data Center withsingle sign-on
This chapter describes how to integrate your Data Center with a single sign-on (SSO) service provider.
l Single sign-on Service provider overview, below
l SSO integration process, below
l Verify successful SSO integration, on page 32
l Change the SSO shared secret, on page 32
Single sign-on Service provider overview
Single-sign on (SSO) support lets technicians and users access password-protected ConnectedBackup functions with their network account credentials, which are defined in a third-party identityprovider (IdP). You can configure an existing community to support SSO-enabled accounts under thefollowing conditions:
l You use Connected Backup in a subscription environment.
l You host a Connected Backup environment that is configured to use a single sign-on (SSO) serviceprovider.
For more information on SSOService Provider (SP) and Identity Provider (IdP) requirements to supportyour Data Center, refer toConnected Backup Requirements Matrix guide.
SSO integration process
CAUTION:Read this entire procedure before you integrate and be sure you understand all the requirementsand steps.
Complete each set of steps in one phase before you begin the next phase.
Integration includes the following phases:
1. Prepare your IT infrastructure for integration, and gather the information that you need to completethe procedures in this document.
2. Install the SSO service provider software according to its system requirements on the ServiceProvider (SP) server and the Identity Provider (IdP) server.
3. Configure the contract between the SP and IdP servers. For more information, see Configure thecontract, on page 29.
Connected Backup (9.0.3) Page 27 of 113
4. Configure the SSODirectory Service on the SP. For more information, see Configure SSODirectory Service, on the next page.
5. Configured the OAuth clients required by Connected applications. For more information, seeConfigure OAuth clients, on the next page.
6. In Connected Backup Data Center Management Console (DCMC), configure the connections tothe SSO service provider and the shared secret. For more information, see Configure DCMC tosupport SSO, on page 30.
7. In Support Center, enable communities for SSO and create SSO technicians. For moreinformation, see Configure a community for single sign-on support , on page 31.
The following sections explain these phases in detail.
Prepare for SSO integration
The preparation phase requires you to collect information to configure access to your SSOSP and IdPand verify that your infrastructuremeets requirements to support integration.
To prepare for integration with SSO
l Install the Data Center, or upgrade your Data Center to the current version.
For more information about how to install your Data Center for the first time, refer to Installing theData Center guide.
For more information about how to upgrade your Data Center, refer toUpgrading the Data Centerguide.
Install the SSO service provider software
Install the SSOService Provider and Identity Provider software according to its requirements. For moreinformation, refer to your SSOService Provider (SP) and Identity Provider (IdP) productdocumentation.
Configure the SP and IdP Connections
Configure the SP and IdP connections according to your security and protocol needs.
If for example, your security policy requires you to use a specific protocol for the SAML bindings, usethe SP and IdP Connection interface to set the appropriate SAML bindings for sending and receivingSAMLmessages.
For example:
l Artifact
l POST
l Redirect
l SOAP
Administering the Data CenterChapter 4: Integrate the Data Center with single sign-on
Connected Backup (9.0.3) Page 28 of 113
Formore information on the SP and IdP connections, refer to your SSO and IdP productdocumentation.
For more information on SSOService Provider (SP) and Identity Provider (IdP) requirements to supportyour Data Center, refer toConnected Backup Requirements Matrix guide.
Configure the contract
Configure the contract between the Service Provider (SP) and the Identity Provider (IdP).
The contract needs tomeet the following characteristics:
l Protocol: SAML 2.0
l Attribute Contract: SAML_SUBJECT.
SAML_SUBJECTmust contain the unique identifier, such as a user ID or e-mail address thatuniquely identifies a user within the customer domain
For more information, refer to your SSOService Provider (SP) and Identity Provider (IdP) productdocumentation.
Configure SSO Directory Service
To support SSO in your Data Center, youmust configure the application authentication by activatingthe SSODirectory Service on the SP.
To activate the SSO Directory Service
1. On the SP server, activate the SSODirectory Service.
2. Enter the name of the specified Id and its Shared Secret.
3. Re-enter the Shared Secret.
4. Take note of the Shared Secret, as you will use it in later steps.
Configure OAuth clients
On the SSOSP Server, configure the listed OAuth clients for use by Connected applications.
l CB_Web. Provides implicit grants. No token refresh.
l CB_App. Provides authorization code grants. No token refresh.
l CB_Validation. Configure for ‘Access Token Validation’. This client is used by the applications tovalidate OAuth tokens.
A client shared secret is required for this configuration.
NOTE:TheOAuth clients above are required by the Data Center.
Administering the Data CenterChapter 4: Integrate the Data Center with single sign-on
Connected Backup (9.0.3) Page 29 of 113
TheCB_Validation client shared secret is used to configure SSO in the Data Center andduring installation of theManagement API.
Add redirection URIs for CB_Web OAuth client
To support redirection URIs for Support Center and the Account Management Website, youmust addthe redirection URIs in theCB_Web OAuth client settings.
1. On the SSOSP Server, select theCB_Web client from the list of OAuth clients.
2. Add the redirect URI for your Account Management Website.
For example: https://<hostname>/ssws/faces/fed_auth_validation.jsp
where
<hostname> is the name of the server that hosts Account Management Website.
3. Add the redirect URIs for your Support Center.
l https://<hostname>/supportcenter/fauth.htm
l https://<hostname>/supportcenter/login.asp
where
<hostname> is the name of the server that hosts Support Center.
For more information on configuring OAuth client settings, refer to your SSOSP productdocumentation.
Add redirection URIs for CB_App OAuth client
To support redirection URIs for Connected application, youmust add the redirection URIs in theCB_App OAuth client settings.
1. On the SSOSP Server, select theCB_App client from the list of OAuth clients.
2. Add the redirect URI http://localhost:16389.
For more information on configuring OAuth client settings, refer to your SSOSP productdocumentation.
Configure DCMC to support SSO
To support SSO in your Data Center, youmust configure access in the Data Center ManagementConsole (DCMC).
1. Start the DCMC.
a. Click Start > All Programs > Data Center.
b. Click Data Center Management Console.
Administering the Data CenterChapter 4: Integrate the Data Center with single sign-on
Connected Backup (9.0.3) Page 30 of 113
The DCMC opens
2. In the SSOAuthentication Configuration section, do the following:
a. In theSSO Service Provider Base URL box, type the URL to the SSO service provider thatsupports your Connected Backup environment.
For example: https://sso.myDomain.com:9031
b. In theSSO Service Provider Secret box, type the same client secret that you used whenyou configured the CB_Validation client on your SSO service provider to support ConnectedBackup.
The Data Center sends this token with its requests to the SSO service provider so that it canauthenticate the requests.
NOTE:The client secret to configure SSO in this stepmust match theCB_ValidationOAuth clientconfigured in the previous steps.
For more information, refer to the DCMC Help.
Configure a community for single sign-on support
Support Center lets you configure communities for single sign-on support. In an SSO-enabledcommunity, the technicians and users you createmap to network accounts defined in the SSOIdP.
To support SSO communities in your Data Center, youmust configure SSO communities in SupportCenter. Each community requires two SSO provider IDs—one for technicians and the other for users.You can use the same ID for both. If themappings do not exist, Support Center will not save yourchanges.
TheData Center does not store passwords for SSO-enabled technicians or users. ConnectedBackup applications delegate the authentication of SSO-enabled accounts to the IdPassigned to the community in which the account resides. The application calls on the IdP todisplay its browser-based single sign-on page to capture and validate the technician or useraccount credentials.
To support SSO-enabled accounts with command-line tools that require a password, such as theRetrieve command, youmust use non-SSO technicians. These tools do not support SSO-enabledtechnicians or users due to the browser-based interaction required by the IdP to capture and validatecredentials. Conversely, to retrieve files or recover an account through the Agent on behalf of a userwith SSO credentials requires an SSO-enabled technician with access to the user account.
If you plan to use command-line tools to support SSO-enabled users, the following describes one wayto structure your community hierarchy to ensure that you have technicians that can support these usersthough command-line utilities or the Agent:
1. Create a non-SSO enabled community that serves as the parent of your community hierarchy. Ifyou host your ownConnected Backup environment, you can use the Data Center root communityas the parent.
Administering the Data CenterChapter 4: Integrate the Data Center with single sign-on
Connected Backup (9.0.3) Page 31 of 113
2. Create non-SSO technicians in the parent community. With proper permissions, these technicianscan use command-line tools for SSO-enabled users in subcommunities.
3. Create one or more SSO-enabled subcommunities.
4. In each subcommunity, create SSO-enabled technicians and users. SSO-enabled technicians arerequired to retrieve files or recover an account through the Agent on behalf of SSO-enabled users.
For more information on configuring a community for SSO support, refer to Support Center help.
Verify successful SSO integration
After you complete the integration procedures, verify that the integration completed successfully andworks as expected.
To verify that the SSO integration was successful
1. Create a new SSO technician account in Support Center and verify that you can use that accountto log on to Support Center using the SSO login page.
For instructions on how to create technician accounts, refer toAdministering Agents guide for youroperating system.
2. Create a new test Agent configuration in the Support Center community that you integrated withSSO.
For more information about how to create an Agent configuration, refer toAdministering Agentsguide for your operating system.
3. Verify that the SSO agent user can perform a successful retrieve.
4. Verify that the SSO user is able to register successfully on the Account Management Website byauthenticating with the IdP.
Change the SSO shared secret
If you need to change the SSO shared secret at any time after the initial configuration, youmust changeit in the following locations.
1. On the SSOSP, configure the SSODirectory Service to use the new shared secret.
2. On the SSOSP, configure the OAuthCB_Validation to use the new shared secret.
3. In the Data Center Management Console (DCMC), use the new shared secret in theSSO ServiceProvider Secret box.
4. Reset IIS on the Support Center server.
5. Log in to Support Center to verify the changes.
Administering the Data CenterChapter 4: Integrate the Data Center with single sign-on
Connected Backup (9.0.3) Page 32 of 113
Chapter 5: Maintain the Data Centerconfiguration
This chapter describes how to update or troubleshoot your Data Center configuration.
l Convert a stand-alone Data Center to amirror, below
l Convert a mirrored Data Center to a stand-alone, on page 39
l Add server pairs to amirrored environment, on page 43
l Prepare servers for a non-mirrored cluster Data Center, on page 45
l Create RegistrationMaster servers for amirrored cluster, on page 47
l Configure the secondary server as the primary server, on page 52
l Swap primary and secondary Data Center assignments, on page 53
l Assign Data Center servers and communities based on geography, on page 54
l Replace a Data Center server with new hardware , on page 55
Convert a stand-alone Data Center to a mirror
This section describes how add a server to a stand-alone Data Center to create themirrored DataCenter configuration.
Use the following terms and concepts when adding amirrored server to your stand-alone Data Center.
Server A Represents the original stand-alone Data Center server
Server B Represents the server that you add to your new mirrored Data Centerconfiguration
CAUTION:This procedures in this section include steps that use SQLManagement Studio tomanuallychange the SQL databases. Manual changes to SQL databases can cause damage if youperform them incorrectly. Do not change the SQL database except as described in thisprocedure.
To change a stand-alone Data Center into amirrored Data Center, use the following procedure:
Connected Backup (9.0.3) Page 33 of 113
Before you begin
l Read the entire procedure.
l Only use this procedure with stand-alone Data Center configurations.
Adding servers to your Data Center configuration requires new licenses for all Data Centers in theconfiguration. You can use the License Request Form available through theMySupport portal torequest for a license.
l The Data Center conversion requires that the Data Center is unavailable to users for backups andretrieves during the conversion process. Schedule an appropriate Data Center conversion time andeducate your users regarding backup and retrieve availability.
l Verify that all required software is installed and configured on Server B. Ensure that Server B meetsthe hardware and software requirements inConnected Backup Requirements Matrix.
l Determine the Data Center service account and password information for the Data Center. Thisinformation is used during the Data Center install and reinstall processes andmust be the same forall Data Center servers.
l Add Server B to the domain that contains Server A. All Data Centers must reside in the samedomain.
l Download the Data Center installation file from theMySupport portal . Youmust install the exactversion of the Data Center software on Server B as the version that is installed on Server A.
l Ensure you are logged in to the new servers using an account with local administrator permissions.
l OnServer A, use Notepad to edit \DataCenter\DRProcs\AddingMirrorInsertInfo.sql. Modifythe file to include the following information from Server B:
o server name
o DNS name
o replication IP address
o backup IP address
l OnServer A, run the following SQL scripts in the \DataCenter\DRProcs folder:
o AddingMirrorInsertInfo.sql
o delete_tables.sql
Reinstall the Data Center software on Server A
To reinstall the Connected Backup Data Center software on Server A
1. Ensure you have a secure copy of the Connected registry keys for Server A. For more informationon how to back up needed files and information for a Data Center, including the Connected registrykey, refer to the Required Disaster Recovery items section of Connected Backup DisasterRecovery guide.
Administering the Data CenterChapter 5: Maintain the Data Center configuration
Connected Backup (9.0.3) Page 34 of 113
2. On Server A, using the Data Center Management Console (DCMC), stop the Data Centerservices on Server A.
3. If Support Center and the Account Management Website are installed on a server other thanServer A, stop these services. Open theServices Control Panel on theWeb services server andstop the IIS Admin and Apache Tomcat (only visible if the Account Management Website isinstalled) services.
4. On Server A, reinstall the Connected Backup Data Center software as thePrimary server in anew cluster.
5. After installation completes, ensure that all Data Center services are started except Compactor. IfCompactor is started, stop the service using the DCMC.
6. On Server A, open the SQL Server Management Studio.
7. To determine the Primary and Secondary server ID values, run the following script:
DECLARE @ServerID tinyintSELECT @ServerID = max(ServerID) FROM Registry.dbo.ServerUPDATE Registry.dbo.ServerSET SecondaryServerID = @ServerIDWHERE ServerType = 1AND IsRegistrationMaster = 1 AND IsPrimary = 1SELECT ServerID ‘Primary Server ID’, SecondaryServerID ‘Secondary Server ID’FROM Registry.dbo.ServerWHERE ServerType = 1AND IsRegistrationMaster = 1 AND IsPrimary = 1
8. Record the Primary server and Secondary server ID values. You need these values later in theprocedure.
9. Close the SQL Server Management Studio.
10. On Server A, using the DCMC, check the event log for errors.
Install the Data Center software on Server B
To install the Connected Backup Data Center software on Server B
1. Copy the Connected\ Keys registry key .REG file from Server A to Server B, and then on Server B,double-click the .reg file. The .reg file recreates the Connected registry key on Server B.
HKEY_LOCAL_MACHINE\SOFTWARE\Wow6432Node\Connected\Keys
2. If theMEK and PMEK keys and values are not visible to you, right-click...\Connected\Keys andthen select Permissions. Change the permissions for the logged-on user to Read. To close thewindow, click OK.
3. Copy the following scripts from server A (available in DataCenter\scripts) to server B:
l Replication_Registry_SP.sql
l Replication_Directory_SP.sql
Administering the Data CenterChapter 5: Maintain the Data Center configuration
Connected Backup (9.0.3) Page 35 of 113
Youmust run the above scripts on server B in the following scenarios:
o When the Data Center installation directory on server B is same as that on server A.
o When the Data Center installation directory is different on server B, ensure that you replacethe installation directory in both the scripts before running them on server B.
4. On Server B, install the Connected Backup Data Center software. At the prompt, specify thefollowing information:
l It is amirrored configuration.
l You are installing the second server.
l Server A is the primary.
5. Complete the Connected Backup Data Center installation. The Data Center servicesautomatically start.
6. On Server B, using the DCMC, stop all Data Center services on Server B.
7. On Server B, open the SQL Server Management Studio.
8. Complete one of the following steps:
l If your Data Center servers are configured with a single archive storage volume, run thefollowing script on Server B to determine theVolumeID number:
SELECT ID FROM Directory.dbo.VolumesWHERE ServerID = <server_id>
where
<server_id> is the server ID for Server B. This number was obtained by step 7 in Reinstall theData Center software on Server A, on page 34.
After you obtain the <server_id> using the previous script, run the following SQL script:
UPDATE Directory.dbo.ArchiveSetSET VolumeID = x
where
x is the VolumeID number from the previous script.
l If your Data Center servers are configured with multiple archive storage volumes, use SQLServer Management Studio on Server B to run the following SQL script:
UPDATE Directory.dbo.ArchiveSetSET VolumeID = -1
9. Close the SQL Server Management Studio.
10. Copy the \DataCenter\Configuration$ folder from Server A to the same folder location onServer B.
Administering the Data CenterChapter 5: Maintain the Data Center configuration
Connected Backup (9.0.3) Page 36 of 113
Attach the SQL databases to Server B
To copy the SQL databases from Server A to Server B
1. On Server A, using the DCMC, stop all Data Center services on Server A.
2. On Server A and Server B, using the Services Control Panel, stop the SQL Server and the SQLServer Agent services.
3. Copy the following files from Server A to Server B:
l Directory.ldf
l Directory.mdf
l Registry.ldf
l Registry.mdf
These files are in a designated SQL database volume and folder, as selected in Data CenterSetup.
4. On Server A and Server B, using the Services Control Panel, restart the SQL Server and the SQLServer Agent services.
5. On Server B, open the SQL Server Management Studio.
6. In the Object Explorer, expand the server name, and then right-click Databases.
7. Click Attach.
8. Click Add, and then navigate to the location of Registry database files from step 3. Select theRegistry.mdf file, and then click OK.
Repeat the process for the Directory database.
9. Click OK to close the Attach Databases dialog box.
10. To configure the Registry database
a. Right-click Registry, and then select Tasks > Backup. The Backup Database windowopens.
b. From the left pane, select Options.
c. Under the Reliability section, select theVerify backup when finished check box, and thenclick OK.
d. From the left pane, click General, and then set theBackup Type to Full.
e. Click OK.
f. The Destination section indicates the location where you initially installed the SQL Serversoftware. To accept the default location, click OK.
Optionally, to change the destination, click Delete, and then click Add to create a newlocation. Browse to aSelected Path, and enter a File Name in the corresponding fields.
11. Repeat step 10 for the Directory database.
Administering the Data CenterChapter 5: Maintain the Data Center configuration
Connected Backup (9.0.3) Page 37 of 113
12. On Server B, execute the SQL script \<installation softwarefolder>\DRProcs\SQLMirror_recover_cleanup.sql
where
\<installation software folder> is the software installation folder.
13. On Server A, open the SQL Server Management Studio.
14. To verify that you successfully restored the databases on Server B, run the following script onServer A and Server B:
SELECT COUNT(*) FROM Registry.dbo.CustomerSELECT COUNT(*) FROM Registry.dbo.CommunitySELECT COUNT(*) FROM Directory.dbo.ArchiveSetSELECT COUNT(*) FROM Directory.dbo.Symlink
Matching results on both servers indicate that you successfully restored the databases. If theresults do not match, contact Support.
15. On Server A and Server B, close the SQL Server Management Studio.
16. On Server A, using DCMC, ensure that all the Data Center services are started exceptCompactor.
Copy archives
To copy the archives from Server A to Server B
1. On Server B, open the DCMC.
2. Expand Server B, right-click BackupServer, and then click Properties.
3. In theBackupServer tab, clear theAllow Backups andAllow Restores check boxes, and thenclick OK.
4. Start BackupServer on Server B.
5. Close the DCMC.
6. On Server B, start DataCopier. The DataCopier application is in the Data Center installationfolder.
7. In the DataCopier - Select Action window, select Add or rebuild a mirror server, and then clickNext.
8. Click Add Server.
9. Type the name of the new mirror server in the Add Server dialog box, and then click OK.
10. Click Next.
The DataCopier - Summary window opens.
11. Click Next.
Administering the Data CenterChapter 5: Maintain the Data Center configuration
Connected Backup (9.0.3) Page 38 of 113
DataCopier copies the archives from Server A to Server B. TheCopyingwindow provides thestatus of the operation.
12. When the operation completes, click Show Log to verify that all archives were copied.
NOTE:If you experience problems when you copy the archives, do not continue to the next step.Contact Support.
13. Close the DataCopier application.
Prepare Server B for connections
To turn on backups and restores on Server B
1. On Server B, open the DCMC.
2. Expand Server B, right-click BackupServer, and then click Properties.
3. In theBackupServer tab, select theAllow Backups andAllow Restores check boxes, and thenclick OK.
4. Use DCMC to verify that all Data Center services start for both servers. Start any services thatare currently stopped.
5. Close the DCMC.
6. On the server hosting the Support Center and Account Management Website, restart the IISAdmin and Apache Tomcat services.
The Data Center is now amirrored Data Center configuration.
Convert a mirrored Data Center to a stand-alone
This section explains how to convert a mirrored Data Center to a stand-alone configuration. Whenimplementing the procedure, the user communities are preserved, while it decommissions Server B.
Do not use this procedure on a clustered Data Center.
CAUTION:The results of this procedure are irreversible. Before you perform this procedure, contactSupport.
This section uses the following terms and concepts as you convert your Data Center.
Server A The server to remain in operation. For best practice, select the primary DataCenter (the first server installed) as the server that you want to designate asthe stand-alone server.
Server B The server to be decommissioned.
Administering the Data CenterChapter 5: Maintain the Data Center configuration
Connected Backup (9.0.3) Page 39 of 113
If youmust keep the secondary server of themirrored pair as the remaining Data Center server,complete the Configure the secondary server as the primary server, on page 52before you perform thisprocedure.
Before you begin
l Read the entire procedure.
l Verify that themirrored Data Center is fully operational and replicates properly.
l Obtain administrative logon access to the Data Center server.
l Youmust use the same version of the Data Center software installed on the servers before youconvert to a stand-alone configuration.
l Notify users that the Data Center will be unavailable during the procedure.
l Record the Server ID and Data Center software version for Server A. To get this information, openDCMC and then select the BackupServer node.
l To perform a full database backup on Server A. To do so, open the DataCenter\DRProcs folder, andthen run the following scripts:
o database_backup.sql
o weeklymaint.sql
Do not overwrite the full database backup performed before you convert your Data Center.
NOTE:To use the databases, Server A must have the Support Center service installed, or point toan independent Support Center server.
l Save the Connected registry Keys key. To save theKeys key, complete the following steps:
1. Open theWindows Registry Editor
2. Select HKEY_LOCAL_MACHINE\SOFTWARE\Connected\Keys. Ensure that you can see theMEKand PMEK values in the right pane. If you cannot, right-click theKeys key and then selectPermissions. Verify that your Keys key permissions are set to Full Control. Then, re-examinetheKeys key.
NOTE:If you cannot see theMEK and PMEK values for theHKEY_LOCAL_MACHINE\SOFTWARE\Connected\Keys key, you cannot complete this procedure.For assistance with completing this task, contact Support.
3. Right-click theKeys key and then select Export.
4. Save the exported file to any folder on the old server.
5. Copy this file to the replacement server and restore it.
6. Stop all Data Center services on the old server, and then stop the Replication service on themirror.
Administering the Data CenterChapter 5: Maintain the Data Center configuration
Connected Backup (9.0.3) Page 40 of 113
Convert your mirrored Data Center
NOTE:This procedure requires that you use SQL Server Management Studio to change the SQLdatabases. Copy and paste the script content. Do not perform any SQL database changes otherthan those in this procedure.
To convert a mirrored Data Center to a stand-alone configuration
1. On Server A, use Data Center Management Console (DCMC) to verify that ReplicationServerstarts.
2. On Server B, use DCMC to verify that ReplicationServer starts.
3. Use DCMC to perform the following tasks on both Server A and Server B:
a. Pause BackupServer.
b. Stop Compactor.
c. Verify that no backups are in progress.
If a backup is in progress, wait until the backup completes and then stop BackupServer onboth servers.
4. Use DCMC to verify that the replication from Server B to Server A completes with no archive setson Server B queued for replication, and no database table entries need to be replicated.
Wait for replication to complete. Depending on the number of backups in progress at the time youpaused BackupServer, this might take several minutes.
5. Use DCMC to stop all Data Center services on both servers.
6. Open SQL Server Management Studio and then open the DataCenter\DRProcs folder and run thefollowing scripts on Server B:
l Uninstall_SQLMirror_Directory.sql
l Uninstall_SQLMirror_Distribution.sql
If an error occurs in any SQL script, contact Corporate Support before you proceed with thenext step.
7. Open SQL Server Management Studio and run the following scripts on Server A:
l Uninstall_SQLMirror_Directory.sql
l Uninstall_SQLMirror_Distribution.sql
l FixupStandaloneServer.sql
8. Open SQL Server Management Studio and run the following scripts on Server B:
l Uninstall_SQLMirror_Directory.sql
l Uninstall_SQLMirror_Distribution.sql
Administering the Data CenterChapter 5: Maintain the Data Center configuration
Connected Backup (9.0.3) Page 41 of 113
NOTE:When you run the Uninstall_SQLMirror_Directory.sql or the Uninstall_SQLMirror_Distribution.sql scripts, youmight encounter somewarnings. Thesecan safely be ignored. However, if an error occurs in any SQL script, contact CorporateSupport before you proceed with the rest of the procedure.
9. Remove Server B from the network to ensure that Agents cannot back up to that server. If youreconnect Server B to your network, it must have a new IP address and a new DNS name. Thisensures that Server B does not attempt to reconnect for its previous use.
Configure your stand-alone Data Center
To configure you stand-alone Data Center
1. On Server A, run Data Center Setup to configure the server as a stand-alone Data Center. To doso, select Reinstall the Data Center software.To reinstall the Data Center software, youmustmeet the following conditions:
l Use the same version of the Data Center software currently installed.
l Use the original Server ID used for this server.
l Install the Data Center software in the same order as you initially installed it. For example, ifyou configured your Data Center to use secondary tape sets during the initial installation, youmust indicate the same during this installation. Select stand-alone instead of mirrored.
2. After Data Center Setup completes, restart all Data Center servers including theWeb server andDataBundler server.
3. Open SQL Server Management Studio and then open the DataCenter\DRProcs folder and run theDropSQLMirrorTables.sql script on Server A.
This step removes all tables that contain information replicated from the oldmirrored server. Runthis script when you are confident that the procedure has been a success.
4. Perform a backup of the SQL databases by running weeklymaint.sql. You can find this task inWindows Scheduler. Do not overwrite the full database backup you performed before you beganthis procedure.
Verifications
To verify that you can perform the following Connected Backup services on the new server:
1. Use an Agent to verify backup and retrieve files to the new stand-alone Data Center.
2. Log on Support Center and verify its usability.
3. Log on to the Account Management Website, and then verify that you can retrieve a file.
Administering the Data CenterChapter 5: Maintain the Data Center configuration
Connected Backup (9.0.3) Page 42 of 113
4. Create a DVD using the DataBundler application, if used.
5. Use DCMC to verify that all Data Center services started.
Add server pairs to a mirrored environment
This section describes how to add an additional pair of mirrored server to amirrored data centerenvironment, either amirrored pair or amirrored cluster. Adding a second server pair to an existingmirrored Data Center configuration converts the Data Center to a clustered configuration.
In a cluster, the original mirrored Data Center servers are the RegistrationMaster servers. All othermirrored servers in the cluster are referred to as directory servers.
Use the following terms and concepts when adding servers to your Data Center.
Server A Represents the new primary-side directory server
Server B Represents the new secondary-side directory server
Before you begin
l Read the entire procedure.
l Use this procedure only with mirrored or clustered Data Center configurations.
l Adding servers to your Data Center configuration requires new licenses for all Data Centers in theconfiguration. You can use the License Request Form available through theMySupport portal torequest for a license.
l Verify that all required software is installed and configured on the new server pair. Ensure that thenew server pair meets the hardware and software requirements inConnected Backup RequirementsMatrix.
l Determine the Data Center service account and password information for the Data Center. Thisinformation is used during the Data Center install and reinstall processes andmust be the same forall Data Center servers.
l Add the new servers to the domain that contains the existing Data Center. All Data Centers mustreside in the same domain.
l Download the Data Center installation file from theMySupport portal. Youmust install the exactversion of the Data Center software on the new server pair as the version that is installed on theexisting Data Center.
l Log in to the new servers using an account with local administrator permissions.
Administering the Data CenterChapter 5: Maintain the Data Center configuration
Connected Backup (9.0.3) Page 43 of 113
Add a new primary directory Data Center server
To add a new primary directory Data Center server
1. On one of themirrored servers or one of the RegistrationMaster servers if a cluster already exists,open the SQL Server Management Studio.
2. To determine the name of the primary RegistrationMaster server, run the following script.
SELECT ServerName FROM Registry.dbo.ServerWHERE IsRegistrationMaster = 1 AND IsPrimary = 1
Record the server name for the server. You need this value later in this procedure.
3. Close the SQL Server Management Studio.
4. On Server A, install the Connected Backup Data Center software as the primary server in anexisting cluster.
5. To select the primary RegistrationMaster server for the existing Data Center click the [...] button.Select the primary Data Center server that matches the result of the query in step 2. If you typethe Data Center information rather than navigate to it, type the computer name, and not the DNSname or IP address, of the server.
6. In the Data Center Setup - Server Group window, use the number provided or type a uniquenumber to control where new accounts and communities are created on the Data Center.
l If you use the default value of zero (0), Connected Backup creates new accounts on any of theData Center servers in the cluster.
l If you use a different, unique value, the accounts for communities created after the Data Centerinstall are stored on the newly added directory servers. Pre-existing communities do notregister new accounts or back up to the new servers.
7. Complete the Connected Backup Data Center installation. The Data Center servicesautomatically start.
8. On Server A, using the Data Center Management Console (DCMC), check the event log forerrors.
Add a new secondary directory Data Center server
To install the Data Center software on the second cluster of servers
1. On Server B, install the Connected Backup Data Center software as a secondary server.
2. To select the primary Data Center server, click the [...] button and select Server A. If you enter theData Center information rather than navigate to it, type the computer name, and not the DNSname or IP address, of the server.
3. Complete the Connected Backup Data Center installation. The Data Center services
Administering the Data CenterChapter 5: Maintain the Data Center configuration
Connected Backup (9.0.3) Page 44 of 113
automatically start.
4. On Server B, using the DCMC, check the event log for errors.
The Data Center now has an additional pair of directory servers for use.
Prepare servers for a non-mirrored cluster DataCenter
This section describes how to create a Registry Master Server for a Non-Mirrored Cluster Data Centerand add a subsequent Directory Server in the cluster. In this configuration, the Data Center Servers areinstalled individually instead of in pairs.
Use the following terms and concepts when adding servers to your Non-Mirrored Cluster Data Center
Server A Represents the Registry Master Server
Server B Represents the Directory Server that you add to your existing Non-Mirrored Cluster Data Center
Before you begin
l Read the entire procedure.
l Use this procedure only with Non-Mirrored Cluster Data Center configurations.
l Adding servers to your Non-Mirrored Cluster Data Center configuration requires new license for theData Center in the configuration. You can use the License Request Form available through theMySupport portal to request for a license.
l Verify that all required software is installed and configured on the new server. Ensure that the newserver meets the hardware and software requirements inConnected Backup Requirements Matrix.
l Determine the Data Center service account and password information for the Data Center. Thisinformation is used during the Data Center install and reinstall processes.
l Ensure that the first server to be installedmust be a Stand-alone server (Registry Master Server) fora non-mirrored cluster, and this server must be a single instance in the Non-Mirrored Clusteredconfiguration.
l For the subsequent Directory Server installations, ensure the following:
o Web services (AMWS, Support Center) should not be installed on the same servers as the DataCenter services (for performance reasons).
o Ensure that you select Primary server in an existing cluster option, and then select Non-Mirrored Directory Server checkbox in theServer Configuration Window.
o The Number of Users value in the Database Size dialogmust be same as the number of userswho will be directly assigned to a Directory Server.
o Ensure that you use the sameWindows service account for all the subsequent installations.
Administering the Data CenterChapter 5: Maintain the Data Center configuration
Connected Backup (9.0.3) Page 45 of 113
o Ensure that you note the Server ID. The default value is 1 as each subsequent server installationmust have its own unique Server ID.
l Download the Data Center installation file from theMySupport portal. Youmust install the exactversion of the Data Center software on the new Directory Server as the version that is installed onthe existing Non-Mirrored Cluster Data Center.
l Log in to the new servers using an account with local administrator permissions.
Create a Registry Master server for a non-mirroredcluster Data Center
To create a Registry Master Server:
1. On Server A, youmust install the Connected Backup Data Center as a Stand-alone server.
2. In theData Center Setup - Server ID dialog box, create a unique server ID numbers for theserver.
The ID numbermust be different from any other server ID numbers used in the cluster. Validnumbers for this field are between 1 and 98. Record the server ID you chose for the server. Youneed the value later in the procedure.
3. In theData Center Setup - Database Sizewindow, specify the estimated number of users youexpect to backup data to your Data Center.
4. When prompted, the Customer Volume can be set up in any available location on the server.
5. Complete the Connected Backup Data Center installation.
Add a Directory server to the non-mirrored cluster
To add a Directory server to the non-mirrored cluster:
1. On Server B, youmust install the Data Center software as aPrimary server in an existingcluster.
2. To select the Registry Master Server, click the [...] button and select Server A. If you enter theData Center information rather than navigate to it, type the computer name, and not the DNSname or IP address, of the server.
3. Select theNon-Mirrored Directory Server checkbox.
4. Youmust ensure that this server is the first directory server added to the cluster or, all existingdirectory servers in the cluster are non-mirrored.
5. Complete the Connected Backup Data Center installation. The Data Center servicesautomatically start.
6. On Server B, using the Data Center Management Console (DCMC), check the event log for
Administering the Data CenterChapter 5: Maintain the Data Center configuration
Connected Backup (9.0.3) Page 46 of 113
errors.
7. Repeat steps 1 through 4 to optionally add directory servers to the Non-Mirrored Cluster.
Create Registration Master servers for a mirroredcluster
This section describes how to set up dedicated RegistrationMaster servers for your mirrored clusteredData Center. In the course of these procedures, you are required tomove the Registry database fromthe two servers where the database currently reside on, to the two new servers designated for theRegistrationMasters.
Before you begin
l Read the entire procedure.
l Only use this procedure with clustered Data Center configurations.
l Adding servers to your Data Center configuration requires new licenses for all Data Centers in theconfiguration.You can use the License Request Form available through theMySupport portal torequest for a license.
l Verify that all required software is installed and configured on the new server pair. Ensure that thenew server pair meets the hardware and software requirements inConnected Backup RequirementsMatrix.
l Determine the Data Center service account and password information for the Data Center. Thisinformation is used during the Data Center install and reinstall processes andmust be the same forall Data Center servers.
l Add the new servers to the domain that contains the existing Data Center. All Data Centers mustreside in the same domain.
l Download the Data Center installation file from theMySupport portal. Youmust install the exactversion of the Data Center software on the new server pair as the version that is installed on theexisting Data Center.
l Log in to the new servers using an account with local administrator permissions.
NOTE:During the time that this procedure is completed, a service outage is required for the DataCenter.
Install the new Registration Master servers
Install the Data Center software on the new mirrored servers that you designate as the RegistrationMaster servers.
Administering the Data CenterChapter 5: Maintain the Data Center configuration
Connected Backup (9.0.3) Page 47 of 113
To install the Registration Master servers
1. On the one of the new RegistrationMaster servers, install the Connected Backup Data Center asthe primary server in a new cluster.
NOTE:Set up the new RegistrationMaster servers on a new cluster, not on an existing cluster.
2. In theData Center Setup - Server ID dialog box, create a unique server ID numbers for theserver.
The ID numbermust be different from any other server ID numbers used in the cluster. Validnumbers for this field are between 1 and 98. Record the server ID you chose for the server. Youneed the value later in the procedure.
3. In the Data Center Setup - Database Size window, type the number 10.
4. When prompted, the Customer Volume can be set up in any available location on the server.
5. Complete the Connected Backup Data Center installation.
6. Using the Data Center Management Console (DCMC), stop all Data Center services on the newRegistrationMaster server.
7. Repeats steps 1 through 6, but in step 1, install the Connected Backup Data Center as asecondary server on the remaining new RegistrationMaster server.
Prepare the mirrored cluster
To prepare the mirrored cluster
1. Using the Data Center Management Console (DCMC), stop ReplicationServer and Compactor onall servers in the cluster.
2. On the Support Center server, useWindows Registry Editor to view theRegistryConnect value.The key is in the following registry location:
HKEY_LOCAL_MACHINE\SOFTWARE\Wow6432Node\Connected\SupportCenter
The SERVER= valuemust equal the Secondary RegistrationMaster server name. If it does notequal the Secondary RegistrationMaster server name, change the value.
CAUTION:Failure to change the SERVER value to the secondary RegistrationMaster server resultsin a Support Center service outage.
3. If you change theWindows registry, use Control Panel Services to stop the IIS Admin service,and then start theWorld Wide Web Publishing service on the Support Center servers.
4. If you use DataBundler, stop all DataBundler applications.
5. To determine the primary side of the Data Center cluster, open the SQL Server Management
Administering the Data CenterChapter 5: Maintain the Data Center configuration
Connected Backup (9.0.3) Page 48 of 113
Studio on one of the Data Centers servers that contains a Registry database, and run the followingscript.
SELECT ServerName FROM Registry.dbo.ServerWHERE IsRegistrationMaster = 1 AND IsPrimary = 1
6. On the each of the Data Center servers that contain a Registry database (the current RegistrationMaster servers), open the SQL Server Management Studio and run the following script.
UPDATE Registry.dbo.ServerSET IsRegistrationMaster = 0WHERE IsRegistrationMaster = 1
Point one side of the cluster to a Registration Masterserver
When you change the server configuration for your entire Data Center, perform the procedure first onthe primary side of the Data Center, and then on the secondary side of the Data Center. This ensuresthat one side of your Data Center can accept backups when the other side is receivingmaintenance.
1. Pick one side of the cluster to configure the new RegistrationMaster for use. The remaininginstructions in this section refer to the side of the cluster that you choose in this step.
2. Make sure you have a secure copy of the Connected registry keys for the current RegistrationMaster server. For more information on how to back up needed files and information for a DataCenter, including the Connected registry key, refer to the Required Disaster Recovery itemssection of Connected Backup Disaster Recovery guide.
3. Using the DCMC, stop all Data Center services for all servers on the chosen side of the cluster.
4. On the Data Center server that contains the Registry database (current RegistrationMasterserver), open the SQL Server Management Studio.
5. To link the new RegistrationMaster server to this Data Center, run the following script.
EXEC Master..sp_addlinkedserver '<new_server>', N'SQL Server'
where
<new_server> is the server name for the new RegistrationMaster server for the chosen side ofthe cluster.
6. To insert the Server and ServerInterface table information for the new RegistrationMaster serverinto the Registry database, run the following scripts:
l INSERT INTO <old_server>.Registry.dbo.Server(ServerID, ServerName, TotalCust, ServerGroup, SecondaryServerID,IsRegistrationMaster, IsPrimary, ServerType)SELECT ServerID, ServerName, TotalCust, ServerGroup, SecondaryServerID,IsRegistrationMaster, IsPrimary, ServerTypeFROM <new_server>.Registry.dbo.Server
where
Administering the Data CenterChapter 5: Maintain the Data Center configuration
Connected Backup (9.0.3) Page 49 of 113
<old_server> is the server name of the original RegistrationMaster server.
<new_server> is the server name of the new RegistrationMaster server.
l INSERT INTO <old_server>.Registry.dbo.ServerInterface(ServerID, DNSName, IPAddress, Port, Services, CDate)SELECT ServerID, DNSName, IPAddress, Port, Services, CDateFROM <new_server>.Registry.dbo.ServerInterface
where
<old_server> is the server name of the original RegistrationMaster server.
<new_server> is the server name of the new RegistrationMaster server.
7. To verify the integrity of the Registry database later in this procedure, run the following script:
SELECT COUNT(*) FROM Registry.dbo.Customer
You need this value later in the procedure.
8. Navigate to the current RegistrationMaster server, and then expand theDatabases folder.
9. Right-click Registry, and then click Tasks > Detach. The Detach window opens.
10. Select Drop Connections
11. Click OK.
12. Close the SQL Server Management Studio.
13. On the current RegistrationMaster server, using the Services Control Panel, stop the SQL Serverand the SQL Server Agent services.
14. On the new RegistrationMaster server, using the Services Control Panel, stop the SQL Serverand the SQL Server Agent services.
15. Copy the following files from the current RegistrationMaster server to the new RegistrationMaster server:
l Registry.ldf
l Registry.mdf
These files are in a designated SQL database volume and folder, as selected in Data CenterSetup. If prompted, confirm that you want to overwrite the original files in the folder.
16. On the new RegistrationMaster server, using the Services Control Panel, restart the SQL Serverand the SQL Server Agent services.
17. On the new RegistrationMaster server, open the SQL Server Management Studio.
18. To configure the new RegistrationMaster server to exclusively handle account registration dutiesand not to store Connected Backup account data, run the following script.
UPDATE Registry.dbo.ServerSET ServerGroup = 99WHERE ServerID = X
where
Administering the Data CenterChapter 5: Maintain the Data Center configuration
Connected Backup (9.0.3) Page 50 of 113
X is the ServerID for the new RegistrationMaster server.
19. On each Data Center server in the chosen cluster, using the Registry Editor, change theMastervalue to the new RegistrationMaster server name. The key is in the following registry location:
HKEY_LOCAL_MACHINE\SOFTWARE\Wow6432Node\Connected\BackupServer
20. Copy the Connected registry key .reg file from the current RegistrationMaster server to the newRegistrationMaster server.
21. On the new RegistrationMaster server, double-click the .reg file. The .reg file recreates theMaster Encryption Key (MEK) and Pool Master Encryption Key (PMEK) registry keys on the newRegistrationMaster server.
22. On the current RegistrationMaster server, using Registry Editor, delete theKeys key. The key isin the following registry location:
HKEY_LOCAL_MACHINE\SOFTWARE\Wow6432Node\Connected
23. On each Data Center server in the chosen cluster, using the Services Control Panel, restart theSQL Server and SQL Server Agent services.
24. On each Data Center server in the chosen cluster, using SQL Server Management Studio, run thefollowing script:
EXEC Master..sp_setnetname 'RegistryMaster', '<new_server>'
where
<new_server> is the server name of the new RegistrationMaster server.
NOTE:When you run this script, youmight receive the following warning:
Warning: A linked server that refers to the originating server is not asupported scenario. If you wish to use a four-part name to reference alocal table, please use the actual server name rather then an alias.
You can safely ignore this warning.
25. Copy the following files from the Data Center installation folder of the current RegistrationMasterserver to the Data Center installation folder of the new RegistrationMaster server:
l privatekey.pem
l certificate.pem
26. Copy the \DataCenter\Configuration$ folder from the current RegistrationMaster server to thesame folder location on the new RegistrationMaster server.
27. Use DCMC to restart the Data Center services on each Data Center server in the chosen cluster,excepting the ReplicationServer and Compactor services.
28. After you successfully restart the Data Center services, run the following script on the newRegistrationMaster server:
SELECT COUNT(*) FROM Registry.dbo.Customer
Administering the Data CenterChapter 5: Maintain the Data Center configuration
Connected Backup (9.0.3) Page 51 of 113
Compare these results with those found in step 8. The values must be equal.
29. On the Support Center server, using Registry Editor, navigate toRegistryConnect, and changethe value of SERVER to the server name of the new RegistrationMaster server. The key is in thefollowing registry location:
HKEY_LOCAL_MACHINE\SOFTWARE\Wow6432Node\Connected\SupportCenter
NOTE:This step is required only for the primary side of the cluster, and is skipped for thesecondary side.
30. On the Support Center server, using the Services Control Panel, stop the IIS Admin service, andthen start theWorld Wide Web Publishing service.
31. Log on to Support Center to verify that Support Center can connect to the Registry database. Ifyou cannot connect to Support Center, contact Support.
32. Using the DCMC, check the event log for errors.
After you complete each task on the Primary Data Center side, repeat each task in the order theyare presented for the Secondary Data Center side.
NOTE:When you perform maintenance on one side of the cluster, be sure that yourSupport Center points to the opposite side.
Final steps
1. Use DCMC to start all Data Center services on all Data Centers in the cluster.
2. On both the primary and secondary current RegistrationMaster servers, click Start > AllPrograms > Accessories > System Tools > Scheduled Tasks, and then delete theLDAPsyncher task.
3. Close the Scheduled Tasks window.
A new RegistrationMaster server pair has been incorporated for use into the clustered Data Center.
Configure the secondary server as the primaryserver
Use the following procedure tomake the secondary server the primary server on the Data Center. Forexample, you install the Data Center on Server A first, whichmakes it the primary Data Center server.You then install the software on Server B, whichmakes it the secondary Data Center server.
To make Server B the primary Data Center server
1. Save and export the following theCompactorWindows registry key from the primary server. Thekey is in the following registry location:
Administering the Data CenterChapter 5: Maintain the Data Center configuration
Connected Backup (9.0.3) Page 52 of 113
HKEY_LOCAL_MACHINE\SOFTWARE\Wow6432Node\Connected\Compactor
2. Import the saved Compactor registry key from step 1 on the secondary server.
3. Delete theCompactor registry key on the primary server.
4. Stop all Data Center services on both servers by using DCMC.
5. Use SQL Server Management Studio to run the following command:
SELECT * FROM Registry.dbo.Server
The command displays the ServerID values for themirrored servers, which you need to use instep 6.
6. Use SQL Server Management Studio to run the following commands.
UPDATE Registry.dbo.ServerSET IsPrimary = 1 WHERE ServerID = X
UPDATE Registry.dbo.ServerSET IsPrimary = 0 WHERE ServerID = Y
where
l X with the ServerID of the new primary server.
l Y with the ServerID of the old primary server.
7. Use DCMC to stop and restart ReplicationServer on both servers.
NOTE:If you run a clustered Data Center, use DCMC to stop and restart ReplicationServer onboth RegistrationMaster servers.
8. Move the LDAP Syncher scheduled task to the new primary server.
If you run a clustered Data Center and the servers that you aremodifying are the RegistrationMasters, move the LDAPSyncher scheduled task to the new primary server.
Swap primary and secondary Data Centerassignments
If one of amirrored pair of Data Centers is not running, in most cases users for whom it is the primaryData Center will automatically connect to themirror that is still up. For example, if Data Center A is notrunning, and a user has Data Center A for his primary Data Center, he will connect automatically toData Center B as long as A is down. In practice, this “bounce” feature sometimes fails.
Occasionally, it is necessary to ask the Agent to swap temporarily the precedence of Data Centers,that is, to try to connect to its secondary Data Center first.
NOTE:Only use this procedure with mirrored or clustered Data Center configurations.
Administering the Data CenterChapter 5: Maintain the Data Center configuration
Connected Backup (9.0.3) Page 53 of 113
To change the primary server for a particular account
1. Open aWeb browser and log in to Support Center.
2. Search for the account that requires a primary server change, and then click on the accountnumber.
3. On the Account Summary page for the account, click Primary Server.
4. Select the server that will be the new primary server for the account, and then click Save.
5. Close theWeb browser.
Assign Data Center servers and communities basedon geography
You can have aMirrored Data Center configurations, either amirrored pair or as part of a mirroredcluster where the servers are geographically distant. In this case, you can configure the servers so thatthe Agent registers, and then consequently, attempts to connect to the local Data Center server first.
For example, you have one Data Center server in California and themirrored server in New York. Youcan set up the Data Center so that all end users in New York use the New York server as their primaryData Center server. In addition, end users in California use the California server as their primary server.An end-user's primary Data Center server is the server that the Agent attempts to connect to first. If theprimary Data Center server is not available, the Agent attempts to connect to themirrored server.Because it is amirror, all datamust eventually go to both servers.
Before you begin
Ensure that you have local administrator logon privileges to access the Data Center servers.
To assign Data Center servers and communities based on geography
1. OpenMicrosoft SQL Server Management Studio and then run the following query:
USE Registry
SELECT * FROM Server
The results of the preceding query show an entry for each server. You assign a ServerID numberfor each server with a Server Group number. The number for both servers is 0, which is the defaultconfiguration for mirrored servers.
2. To assign each Data Center server to its own Server Group, run the following query:
UPDATE Server
SET ServerGroup = ServerID
WHERE ServerType = 1
Administering the Data CenterChapter 5: Maintain the Data Center configuration
Connected Backup (9.0.3) Page 54 of 113
3. To verify the update ran properly, run the following query:
USE Registry
SELECT * FROM Server
4. Use Support Center to create new communities. After you create the community, be sure toassign the community to the appropriate Data Center server. If communities exist, update eachone to point to one Data Center server or the other. To perform this task, complete the followingsteps:
a. Use SQL Server Management Studio to run the following script. Record the CommunityID foreach community:
USE Registry
SELECT * FROM Community
The results from the preceding script display a list of each community that you assigned to aServerGroup number. The ServerGroup number for each community is 0.
b. To update each community to the new ServerGroup number, run the following script:
USE Registry
UPDATE Community
SET ServerGroup = X
WHERE CommunityId = Y
Where
–X is the ServerGroup number that corresponds to the appropriate Data Center server.
–Y is the CommunityID number that corresponds to the appropriate community.
c. To update each active account to use the appropriate server, run the following script for eachcommunity on the Data Center:
USE Registry
UPDATE Customer
SET AssignedServerId = X
WHERE OfferId = Y
Where
–X is the ServerID number that corresponds to the appropriate Data Center server. To viewthe ServerID numbers for each server, run the Select * from Server query.
–Y is the CommunityID number that corresponds to the appropriate community.
Replace a Data Center server with new hardware
To replace a Data Center of any configuration type with new hardware, refer to the appropriate chapterof theData Center Disaster Recovery guide because both planned and unplanned server replacements
Administering the Data CenterChapter 5: Maintain the Data Center configuration
Connected Backup (9.0.3) Page 55 of 113
use the same process.
l To replace hardware in a stand-alone Data Center, refer to the “Recovering a Standalone DataCenter” chapter.
l To replace hardware in mirrored Data Centers, refer to the “Recovery of aMirrored Data Center”chapter. In this chapter, use the “Recover One Data Center Server of aMirrored Pair” topic for eachserver in themirror that you want to move to new hardware.
l For clustered Data Centers, refer to the “Recovering a Clustered Data Center” chapter. In thischapter, use the “Recover a Clustered Data Center Server” topic for each server in the cluster thatyou want to move to new hardware.
Administering the Data CenterChapter 5: Maintain the Data Center configuration
Connected Backup (9.0.3) Page 56 of 113
Chapter 6: Data Center management tools
This chapter describes the tools that you can install on Data Centers and use tomanage Data Centers.It also explains how to install the tools.
l Management tools overview, below
l Install DataBundler, on the next page
l Install the Data Center toolkit, on page 60
Management tools overview
The Connected Backup software includes the followingmanagement tools:
Tool Description of service
Data CenterManagement Console(DCMC)
Enables you to perform a variety of tasks necessary tomonitor and controlData Center operations. The DCMC is a snap-in for theMicrosoftManagement Console (MMC). For more information, seeManage the DataCenter with DCMC, on page 62.
This tool is included in the Data Center Toolkit.
CancelHoldAccounts Enables you to cancel or place an account on hold when you are usingSingle Sign On (SSO) in your Data Center. CancelHoldAccounts uses SSOCommunityIDs and FedAuth User IDs to identify accounts of interest. Formore information, see The CancelHoldAccounts utility, on page 68.
This tool is included in the Data Center Toolkit.
DC Message Logger Enables the Data Center Management Console to read remote event logs.
This tool is included in the Data Center Toolkit.
Host ID Determines the host ID (ethernet host address) of a server. This utility runson the Data Center; you cannot use it from a remote location.
Disk Status Displays disk space allocation for files used by the Data Center.
This tool is included in the Data Center Toolkit.
DC Status Provides detailed statistics about each Data Center server’s uptime andcurrent status.
dsping Helps to diagnose connectivity problems. It is similar to the standard pingcommand, but uses the Data Center protocol rather than the ICMP protocolused by regular ping.
This tool is included in the Data Center Toolkit.
Connected Backup (9.0.3) Page 57 of 113
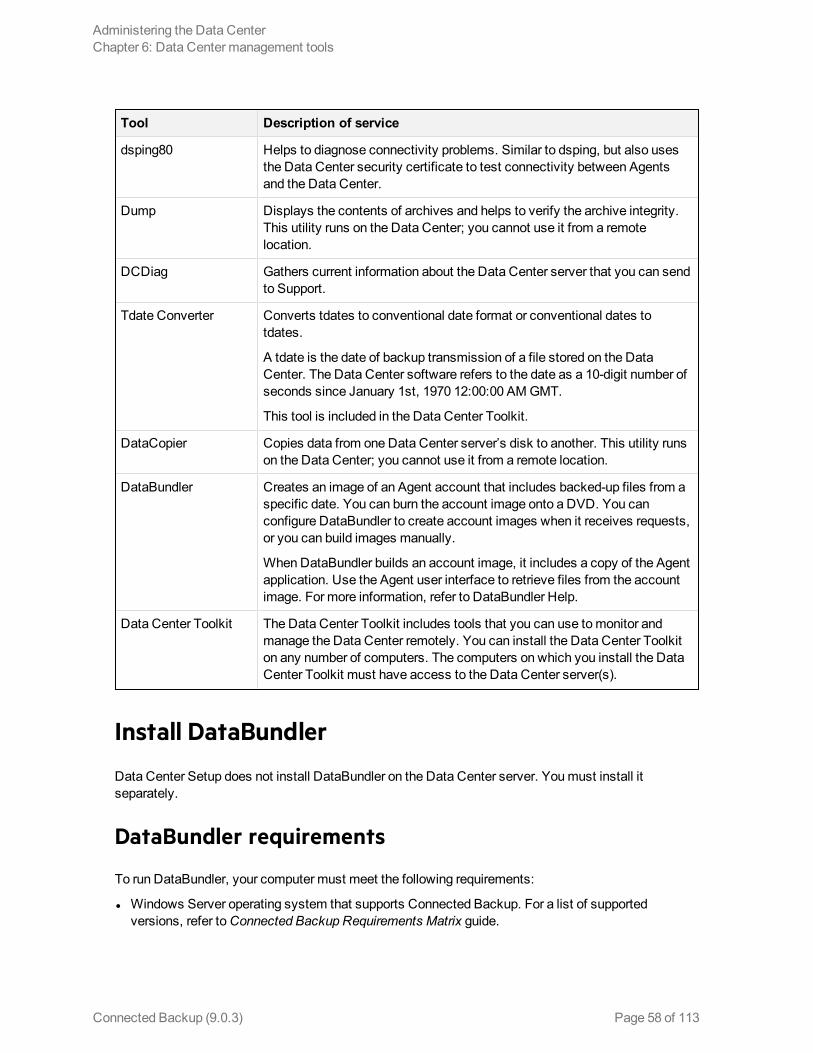
Tool Description of service
dsping80 Helps to diagnose connectivity problems. Similar to dsping, but also usesthe Data Center security certificate to test connectivity between Agentsand the Data Center.
Dump Displays the contents of archives and helps to verify the archive integrity.This utility runs on the Data Center; you cannot use it from a remotelocation.
DCDiag Gathers current information about the Data Center server that you can sendto Support.
Tdate Converter Converts tdates to conventional date format or conventional dates totdates.
A tdate is the date of backup transmission of a file stored on the DataCenter. The Data Center software refers to the date as a 10-digit number ofseconds since January 1st, 1970 12:00:00 AMGMT.
This tool is included in the Data Center Toolkit.
DataCopier Copies data from one Data Center server’s disk to another. This utility runson the Data Center; you cannot use it from a remote location.
DataBundler Creates an image of an Agent account that includes backed-up files from aspecific date. You can burn the account image onto a DVD. You canconfigure DataBundler to create account images when it receives requests,or you can build images manually.
When DataBundler builds an account image, it includes a copy of the Agentapplication. Use the Agent user interface to retrieve files from the accountimage. For more information, refer to DataBundler Help.
Data Center Toolkit The Data Center Toolkit includes tools that you can use tomonitor andmanage the Data Center remotely. You can install the Data Center Toolkiton any number of computers. The computers on which you install the DataCenter Toolkit must have access to the Data Center server(s).
Install DataBundler
Data Center Setup does not install DataBundler on the Data Center server. Youmust install itseparately.
DataBundler requirements
To run DataBundler, your computer must meet the following requirements:
l Windows Server operating system that supports Connected Backup. For a list of supportedversions, refer toConnected Backup Requirements Matrix guide.
Administering the Data CenterChapter 6: Data Center management tools
Connected Backup (9.0.3) Page 58 of 113
l Hard disk space on one volume that is at least twice the size of the largest account (minimum of 6GB).
l Full connectivity to the Data Center server(s).
l The DataBundler client must be in the same domain as the Data Center server(s) andmust havehigh-speed LAN access to the server(s).
l SQLServer Client Networking Utility that supports Connected Backup. For a list of supportedversions, refer toConnected Backup Requirements Matrix guide.
l DVD -burning hardware and software. While you burn a DVD, do not use the DataBundler client forany other purpose. Dedicate the client solely to the creation of DVDs. If you expect to burn a largenumber of DVDs, install DataBundler onmore than one computer. Each computer that hasDataBundler can burn only one DVD at a time.
NOTE:Because of performance issues, do not install DataBundler on the same computer as a DataCenter.
Prepare to install DataBundler
Before you install DataBundler, create the user account CNTD_DataBundler on the computer whereyou plan to install the DataBundler application and add it to the Administrator Users group. WithAdministrator User privileges, you can successfully burn DVDs.
NOTE:If you upgrade your Data Center from an earlier version, you can continue to use the CNTD_CDMaker user account on the computer where you installed the DataBundler application.
Install DataBundler
To install DataBundler
1. Do one of the following:
l If you want to use DataBundler to create images for 6.x Agents, install version 6.x of theCDMaker software first.
Do not remove the CD Maker software.
l If you do not want to use DataBundler to create images for 6.x Agents, continue to the nextstep.
2. Log on to the computer as an administrator.
3. Close applications that are open.
If you switch user IDs on the same computer, the first user’s open applications do not closeautomatically.
Administering the Data CenterChapter 6: Data Center management tools
Connected Backup (9.0.3) Page 59 of 113
4. Copy the DataBundler folder from where you installed the Data Center software to a convenientlocation on the local computer.
5. In the DataBundler folder, double-click setup.exe.
6. Follow the instructions in the setup program to install DataBundler.
7. When DataBundler prompts you for the location of where to install the program, specify thelocation of the large disk volume on which you want Data Bundler to create the account images.
The setup program creates a share for the folder, so that all members of the domain can haveaccess to it.
Requirements for using DataBundler
Before you use DataBundler application, complete the following tasks:
l Be sure that DataBundler has write access to its installation directory.
l When you start the DataBundler application, use the user account that you specified for theapplication when you installed the Data Center (CNTD_DataBundler or CNTD_CDMaker)
l Be sure that the DataBundler user account belongs to the Administrators User group.
NOTE:CNTD_CDMaker is only used on a 7.x or earlier Data Center.
l When you specify the location for themedia images, use a UNC (Universal Naming Convention)path to a directory to which DataBundler has access. If you specify a path on the local computer,youmust provide write permissions for that directory. If you specify a path on a remote computer,use a shared directory and provide the write privileges. For more information about how to useDataBundler, refer to DataBundler Help.
Install the Data Center toolkit
The Data Center Toolkit lets you use some of the utilities that are included in the Data Center Setup tomaintain the Data Center remotely from a computer other than the Data Center server. For example,you can use the Data Center Toolkit to monitor the BackupServer status remotely.
Data Center toolkit requirements
The Data Center Toolkit has the following requirements:
l Youmust install the Data Center Toolkit on a computer that does not host the Data Center software,but is in the same domain as the Data Center server(s).
l Youmust install the Data Center Toolkit only on computers withWindows operating systems thatuse the English locale.
l The computer on which you install the Data Center Toolkit must have access to the Data Center
Administering the Data CenterChapter 6: Data Center management tools
Connected Backup (9.0.3) Page 60 of 113
server(s).
l The computer on which you install the Data Center Toolkit must be in the same domain as the DataCenter server(s).
Install the toolkit
You can install the Data Center Toolkit on any number of computers.
NOTE:Youmust install the Data Center Toolkit on a computer that does not host the Data Centersoftware.
To install the Data Center toolkit
1. Navigate to the folder where you downloaded and extracted the contents of the Data Centersoftware installation package
2. In the Toolkit folder, double-click setup.exe,and then follow the installation prompts.
Run the Data Center toolkit
The Data Center Toolkit contains the following tools:
l Data Center Management Console (DCMC)
l DC Message Logger
l Disk Status
l Tdate Converter
l dsping
l CancelHoldAccounts
To run a Data Center toolkit
l Click Start > All Programs > Data Center Toolkit.
Administering the Data CenterChapter 6: Data Center management tools
Connected Backup (9.0.3) Page 61 of 113
Chapter 7: Manage the Data Center withDCMC
This chapter explains the Data Center Management Console (DCMC). It also describes how to use theDCMC tomonitor and control Data Center operations, andmanage Connected Backup services.
l DCMC overview, below
l DCMC user interface, on page 64
DCMC overview
The Data Center Management Console (DCMC) is a snap-in for theMicrosoft Management Console(MMC). Together with theMMC, the DCMC provides a user interface that you can use tomonitor andcontrol Data Center operations andmanage the following services:
l BackupServer
l PoolServer
l ReplicationServer
l IndexServer
l Compactor
For more information, refer to the DCMC Help.
NOTE:Towork with the DCMC, youmust be familiar with theMicrosoft Management Console (MMC).
The following table describes the tasks that you can perform with the DCMC.
Task Description
Start, pause,and stop theData Centerservices.
Starts, pauses, and stops Data Center services. Also shows icons in the DCMCconsole tree and information in the details pane to indicate whether Data Centerservices are running or stopped. For more information about the DCMC interface,see DCMC user interface, on page 64.
View andmodifyproperties foreach DataCenter service.
Shows the default properties and properties that you selected during Data Centersetup. Also lets you can change these properties. Contact Corporate Support forguidance before youmake changes.
Monitor multiple Shows the status of mirrored or clustered servers simultaneously.
Connected Backup (9.0.3) Page 62 of 113
Task Description
Data Centerserverssimultaneously.
View event logsand run theWindows EventViewer.
Shows the event logs for Data Center operations so you can diagnose DataCenter problems. You also can run theWindows Event Viewer for a Data Center.
DCMC Access Requirements
To use DCMC, log on to the Data Center server or a remote computer that has the Data Center Toolkit.To use DCMC, youmust have access to the following components:
l Local administrator privileges for the following computers:
o Local computer
o Data Center servers
o TheConnectedWindows registry key. The key is in the following registry location:
HKEY_LOCAL_MACHINE\SOFTWARE\Wow6432Node\Connected
l Service Control Manager
The Service Control Manager lets you start, stop, and query services.
l The disk volumes that are attached to each computer
By default, Data Center Setup sets these device shares to allow access only to administrators whohave privileges in the domain. You can change this setting to allow access to other administrators.
l Event Log on each computer
l SQLServer on the selected server
Youmust be able to perform the following tasks on SQL tables:
o Read queries
o Inserts
o Updates
o Deletes
o Stored procedure calls
The Data Center Setup procedure grants access to the Domain Administrators group, but youcan extend these permissions to other administrators not part of the group.
l Domain access
The DCMC computer must be in the same domain as the Data Center server.
Administering the Data CenterChapter 7: Manage the Data Center with DCMC
Connected Backup (9.0.3) Page 63 of 113
Start DCMC
You can run the DCMC on aData Center server. Alternatively, if your remote computer hosts the DataCenter Toolkit, you can run the DCMC remotely.
To start the DCMC, from a Data Center server
1. Click Start > All Programs > Data Center.
2. Click Data Center Management Console.
To start the DCMC from a remote computer that hosts the Data Center Toolkit
1. Click Start > All Programs > Data Center Toolkit.
2. Click Data Center Management Console.
If your Data Center does not appear in the DCMC console tree, add it. For more information, refer to theDCMC Help.
DCMC user interface
The DCMC supports and enhances the standardMMC functions and interface elements. Together withtheMMC, the DCMC provides a user interface that lets youmanage the Data Center components.
The DCMC interface includes the following elements:
Console tree (left pane) Displays DCMC icons tomake visualizing DCMCcomponents easy
Details pane (right pane) Provides information based on your selection in theconsole tree
Menus and toolbars (including shortcutmenus)
Displays DCMC commands
The following figure shows the DCMC interface:
Administering the Data CenterChapter 7: Manage the Data Center with DCMC
Connected Backup (9.0.3) Page 64 of 113
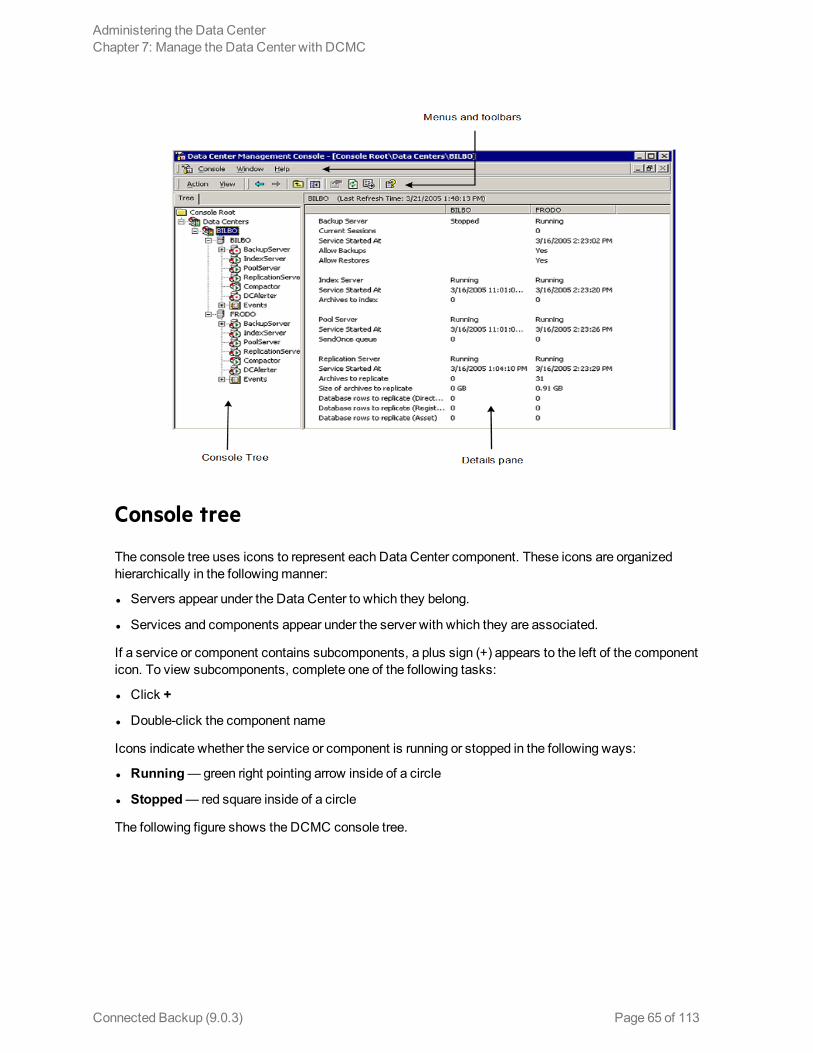
Console tree
The console tree uses icons to represent each Data Center component. These icons are organizedhierarchically in the followingmanner:
l Servers appear under the Data Center to which they belong.
l Services and components appear under the server with which they are associated.
If a service or component contains subcomponents, a plus sign (+) appears to the left of the componenticon. To view subcomponents, complete one of the following tasks:
l Click +
l Double-click the component name
Icons indicate whether the service or component is running or stopped in the following ways:
l Running—green right pointing arrow inside of a circle
l Stopped— red square inside of a circle
The following figure shows the DCMC console tree.
Administering the Data CenterChapter 7: Manage the Data Center with DCMC
Connected Backup (9.0.3) Page 65 of 113
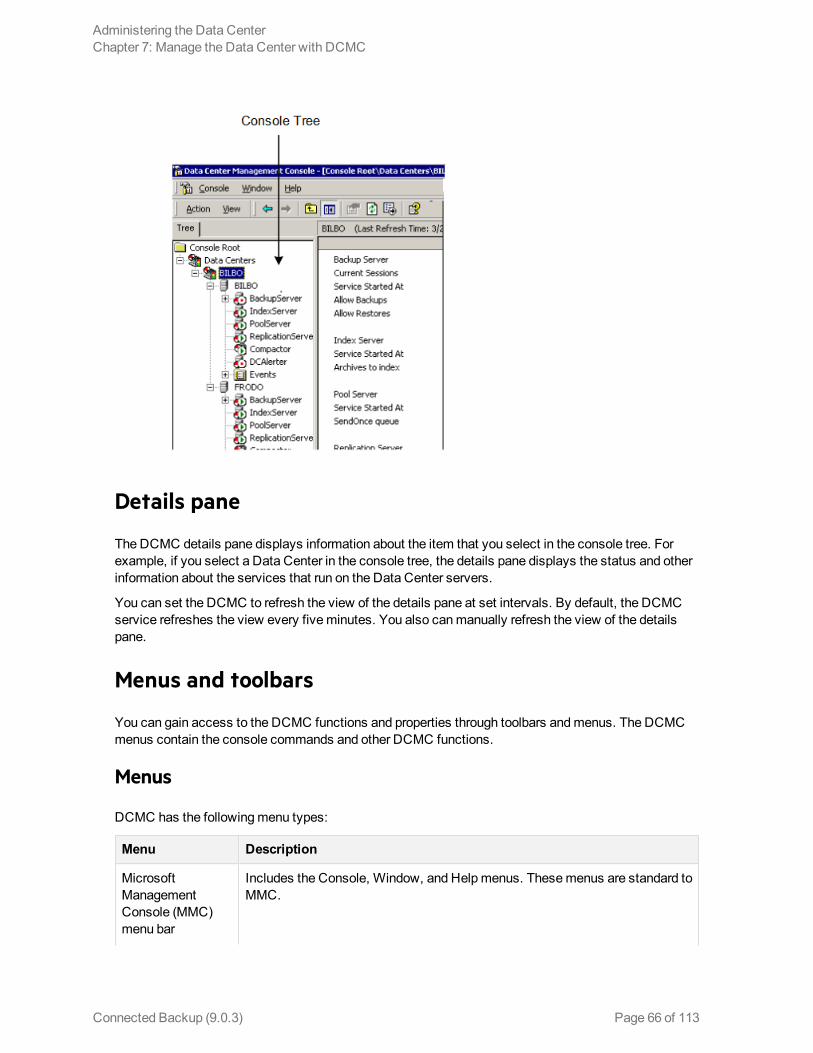
Details pane
The DCMC details pane displays information about the item that you select in the console tree. Forexample, if you select a Data Center in the console tree, the details pane displays the status and otherinformation about the services that run on the Data Center servers.
You can set the DCMC to refresh the view of the details pane at set intervals. By default, the DCMCservice refreshes the view every fiveminutes. You also canmanually refresh the view of the detailspane.
Menus and toolbars
You can gain access to the DCMC functions and properties through toolbars andmenus. The DCMCmenus contain the console commands and other DCMC functions.
Menus
DCMC has the followingmenu types:
Menu Description
MicrosoftManagementConsole (MMC)menu bar
Includes the Console, Window, and Helpmenus. Thesemenus are standard toMMC.
Administering the Data CenterChapter 7: Manage the Data Center with DCMC
Connected Backup (9.0.3) Page 66 of 113
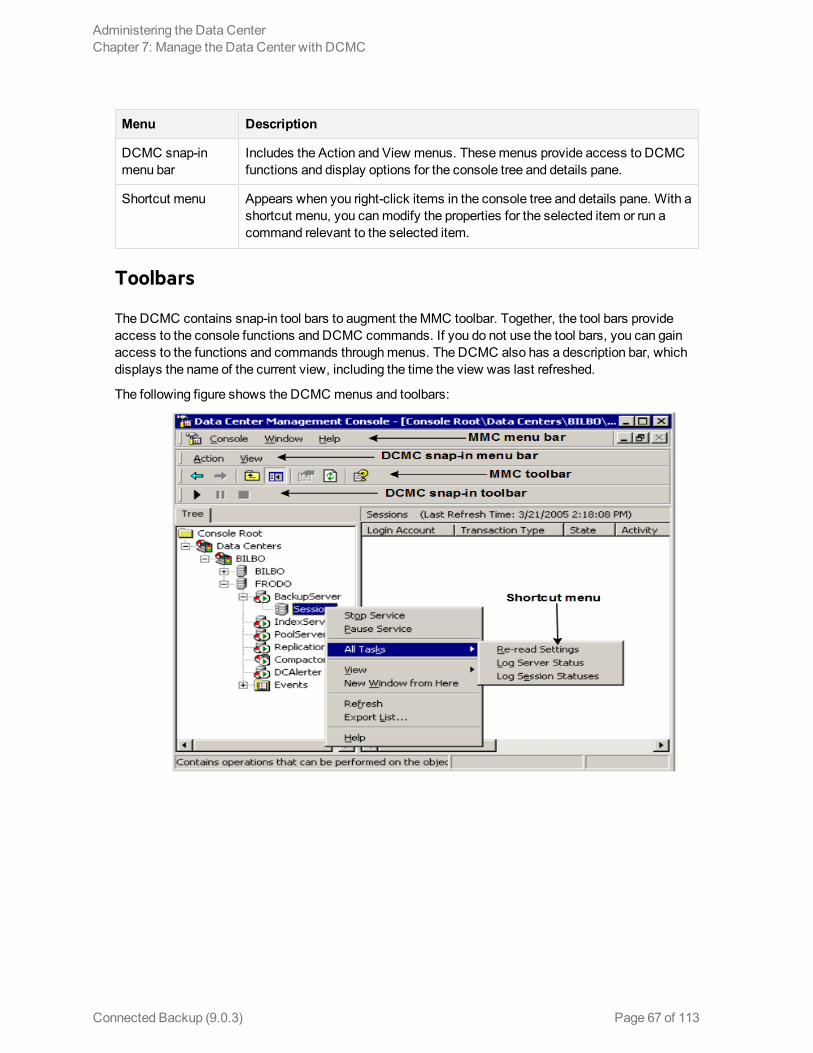
Menu Description
DCMC snap-inmenu bar
Includes the Action and View menus. Thesemenus provide access to DCMCfunctions and display options for the console tree and details pane.
Shortcut menu Appears when you right-click items in the console tree and details pane. With ashortcut menu, you canmodify the properties for the selected item or run acommand relevant to the selected item.
Toolbars
The DCMC contains snap-in tool bars to augment theMMC toolbar. Together, the tool bars provideaccess to the console functions and DCMC commands. If you do not use the tool bars, you can gainaccess to the functions and commands throughmenus. The DCMC also has a description bar, whichdisplays the name of the current view, including the time the view was last refreshed.
The following figure shows the DCMC menus and toolbars:
Administering the Data CenterChapter 7: Manage the Data Center with DCMC
Connected Backup (9.0.3) Page 67 of 113
Chapter 8: The CancelHoldAccountsutility
This chapter explains the CancelHoldAccounts utility for use with Single Sign On (SSO) communitiesin your Data Center.
l CancelHoldAccounts overview, below
l Command syntax, on the next page
l Run the CancelHoldAccounts utility, on page 71
l Error messages, on page 73
CancelHoldAccounts overview
The CancelHoldAccounts utility allows Single Sign On (SSO) community technicians to log in andoperated within their communities and also allows root technicians to operate across all SSOcommunities to cancel or hold accounts.
The CancelHoldAccounts command line utility is included as part of the Data Center installation andseparately available in the Data Center Toolkit.
CancelHoldAccounts access requirements
To run the CancelHoldAccounts tools from the DataCenter, log in to a DataCenter host as anadministrator and navigate to the DataCenter installation directory.
To run the CancelHoldAccounts tool from any other host, install the Data Center Toolkit as anadministrator, and navigate to the directory where it is installed. For more information on installing theData Center Toolkit, see Install the Data Center toolkit, on page 60.
l Microsoft .NET Framework Version 3.5 or higher
The CancelHoldAccounts computer must haveMicrosoft .Net Framework 3.5 or higher installed.
To use CancelHoldAccounts, youmust have access to the following components:
l Your Connected Data Center must be licensed forWeb Services API.
Assumptions
The CancelHoldAccounts uses SSO community IDs and user IDs to identify accounts to operateupon.
Connected Backup (9.0.3) Page 68 of 113
Command syntax
The CancelHoldAccounts utility uses the following syntax.
CancelHoldAccounts.exe
-endpoint=<URL|host>
-techid=<id>
-password=<password>
-techcommunity=<community-name>
-cancel | -hold
-communityid=<community>
-userid=<user> | @<userfile>
Parameter Short
Default value Description
-endpoint=<URL|host>
-e localhost URL of theWeb Services API endpoint.
If -endpoint is specified, it must appear before any user IDs.
The full path is
https://<supportcentermachine>/AdminAPI/AdminAPI.dll?Handler=Default
where <supportcentermachine> is themachine where theWeb Services API and Support Center is installed.
For example:
-endpoint=https://sc.example.com/AdminAPI/AdminAPI.dll?Handler=Default
where
https://sc.example.com is the Support Center server.
The URL of theWeb Services API endpoint must usehttps://.
<id> -tid
none (Required) A valid Technician ID.
-password=<pwd>
-pw none (Required) The password associated with the selectedTechnician ID.
-techcommunity=
-tc “”
The default -1
Technician login community
Administering the Data CenterChapter 8: The CancelHoldAccounts utility
Connected Backup (9.0.3) Page 69 of 113
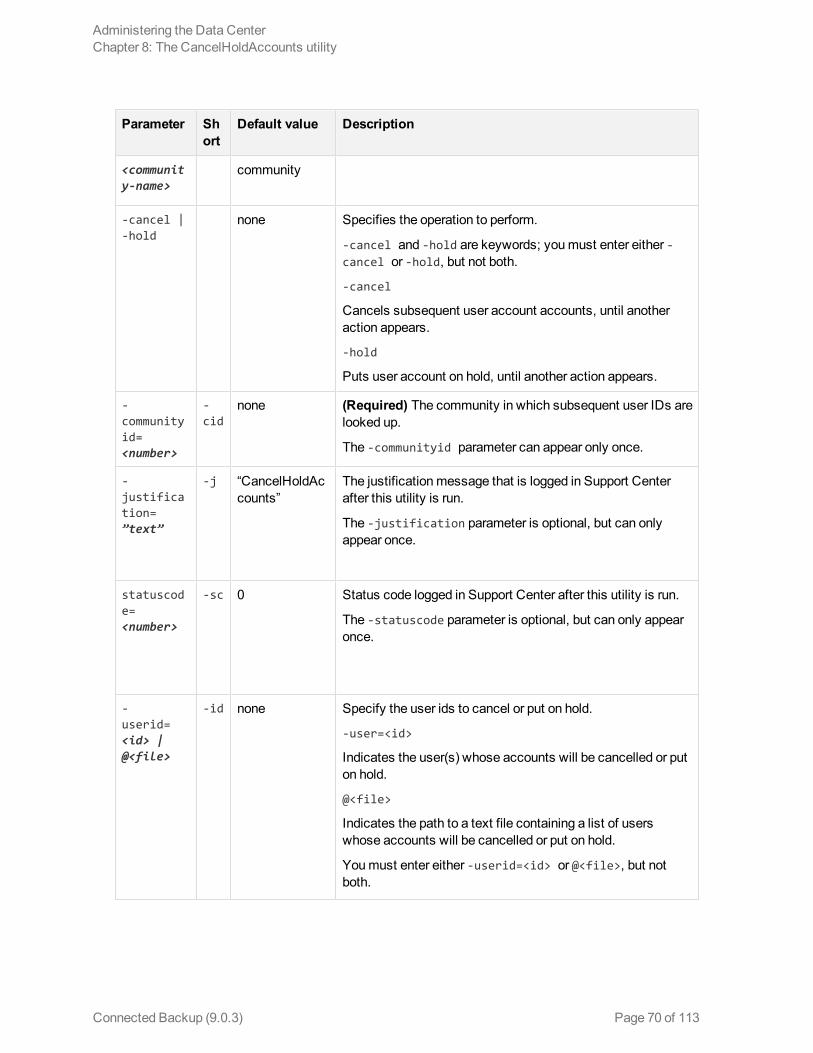
Parameter Short
Default value Description
<community-name>
community
-cancel |-hold
none Specifies the operation to perform.
-cancel and -hold are keywords; youmust enter either -cancel or -hold, but not both.
-cancel
Cancels subsequent user account accounts, until anotheraction appears.
-hold
Puts user account on hold, until another action appears.
-communityid=<number>
-cid
none (Required) The community in which subsequent user IDs arelooked up.
The -communityid parameter can appear only once.
-justification=”text”
-j “CancelHoldAccounts”
The justificationmessage that is logged in Support Centerafter this utility is run.
The -justification parameter is optional, but can onlyappear once.
statuscode=<number>
-sc 0 Status code logged in Support Center after this utility is run.
The -statuscode parameter is optional, but can only appearonce.
-userid=<id> |@<file>
-id none Specify the user ids to cancel or put on hold.
-user=<id>
Indicates the user(s) whose accounts will be cancelled or puton hold.
@<file>
Indicates the path to a text file containing a list of userswhose accounts will be cancelled or put on hold.
Youmust enter either -userid=<id> or @<file>, but notboth.
Administering the Data CenterChapter 8: The CancelHoldAccounts utility
Connected Backup (9.0.3) Page 70 of 113
CancelHoldAccounts Command Usage Notes
Consider the following factors when preparing to run the CancelHoldAccounts utility:
l Most parameters in the CancelHoldAccounts utility have shorthand equivalents. See the tableabove for the parameters, and the examples below.
l For the -endpoint parameter for theWeb Services API URL, https:// is required.
l For the -endpoint parameter, the path after themachine name defaults to/AdminAPI/AdminAPI.dll?Handler=Default and the protocol defaults to https://.
The shortest form of the -endpoint parameter you can use is -endpoint=<supportcentermachine>.
For example:
-endpoint=https://sc.example.com/
l The parameter -techcommunityid is the technician’s login community.
l If no -techcommunity parameter is present, then this is root technician.
l The -communityid parameter is required andmust appear only once.
l Either -cancel or -hold is required.
l The text file for use with the @<file> parameter must contain one user ID per line.
l User ID parameters must be “quoted” if they contain special characters to the command line parser.User IDs inside a @<file> text file do not need to be quoted.
Run the CancelHoldAccounts utility
Run the CancelHoldAccounts utility to cancel or put SSOuser accounts on hold.
To run the CancelHoldAccounts utility
1. Log in as an administrator to the computer where you installed the Data Center Toolkit.
2. Navigate to the folder where you installed the Data Center Toolkit.
3. At a command prompt, enter the commandwith the parameters in order.
For example:
CancelHoldAccounts -endpoint=<URL> -techid=<id> -password=<password> -techcommunity=<community-name> -cancel | -hold -communityid=<community> -userid=<user> | @<userfile>
4. Press ENTER.
The utility runs.
When the utility succeeds, the command line returns a success message.
Administering the Data CenterChapter 8: The CancelHoldAccounts utility
Connected Backup (9.0.3) Page 71 of 113
CancelHoldAccounts command syntax examples
The CancelHoldAccounts utility can be run with several combinations of parameters to perform thenecessary operations. Below are examples of common scenarios.
Cancel Accounts
The following CancelHoldAccounts command example performs the following actions:
l Attaches to theWeb Services API running on localhost, because the -endpoint parameter was notspecified.
l Logs in as technician Admin with its password into the root community.
l Cancels all accounts in community 3 associated with the users JamesZ and SonaliM.
CancelHoldAccounts -techid=Admin -password=myPassword -cancel -communityid=3 -userid=JamesZ -userid=SonaliM
The command example results in the following output:
User JamesZ account 101000892 set to status Cancelled
User SonaliM account 101001288 set to status Cancelled
User SonaliM account 101001369 set to status Cancelled
Use shorthand parameters
The following example uses the shorthand versions of each parameter and is equivalent to the previousexample.
CancelHoldAccounts -tid=Admin -pw=myPassword -cancel -cid=3 -id=JamesZ -id=SonaliM
The command example results in the following output:
User JamesZ account 101000892 set to status Cancelled
User SonaliM account 101001288 set to status Cancelled
User SonaliM account 101001369 set to status Cancelled
Hold accounts
The following CancelHoldAccounts command example performs the following actions:
l Attaches to theWeb Services API running on localhost, because the -endpoint parameter was notspecified.
l Logs in as technician Admin with its password into the root community.
l Puts on hold all accounts in community 3 associated with the users JamesZ and SonaliM.
CancelHoldAccounts -techid=Admin -password=myPassword -hold -communityid=3 -userid=JamesZ
The command example results in the following output:
Administering the Data CenterChapter 8: The CancelHoldAccounts utility
Connected Backup (9.0.3) Page 72 of 113

User JamesZ account 101000892 set to status On Hold
User SonaliM account 101001288 set to status On Hold
CancelHoldAccounts with a file of UserIDs
The following example uses a file containing a list of user IDs to cancel instead of individual user IDs.
CancelHoldAccounts -tid=Admin -pw=myPassword -cancel [email protected]
where the users.txt file contains
JamesZ
SonaliM
NOTE:The text file for use with the @<file> parameter must contain one user ID per line.
User ID parameters must be “quoted” if they contain special characters to the command lineparser. User IDs inside a @<file> text file do not need to be quoted.
Incorrect parameters
If the CancelHoldAccounts utility encounters failures, it logs errors messages to the standard output.
The following CancelHoldAccounts command example contains an incorrect parameter for the -password parameter.
CancelHoldAccounts -techid=Admin -password=myWrongPassword -cancel -communityid=3 -userid=JamesZ
The command example results in the following error output:
SOAP exception logging in technician: Unable to authenticate technician. Eitherthe Technician ID or password is incorrect, or there is more than one technicianwith submitted credentials.
Error messages
CancelHoldAccounts utility error messages are written to the standard error stream.
CancelHoldAccounts error messages
The following error messages are generated by the CancelHoldAccounts utility.
Error Description Corrective Action
0 All accounts were handled
Administering the Data CenterChapter 8: The CancelHoldAccounts utility
Connected Backup (9.0.3) Page 73 of 113
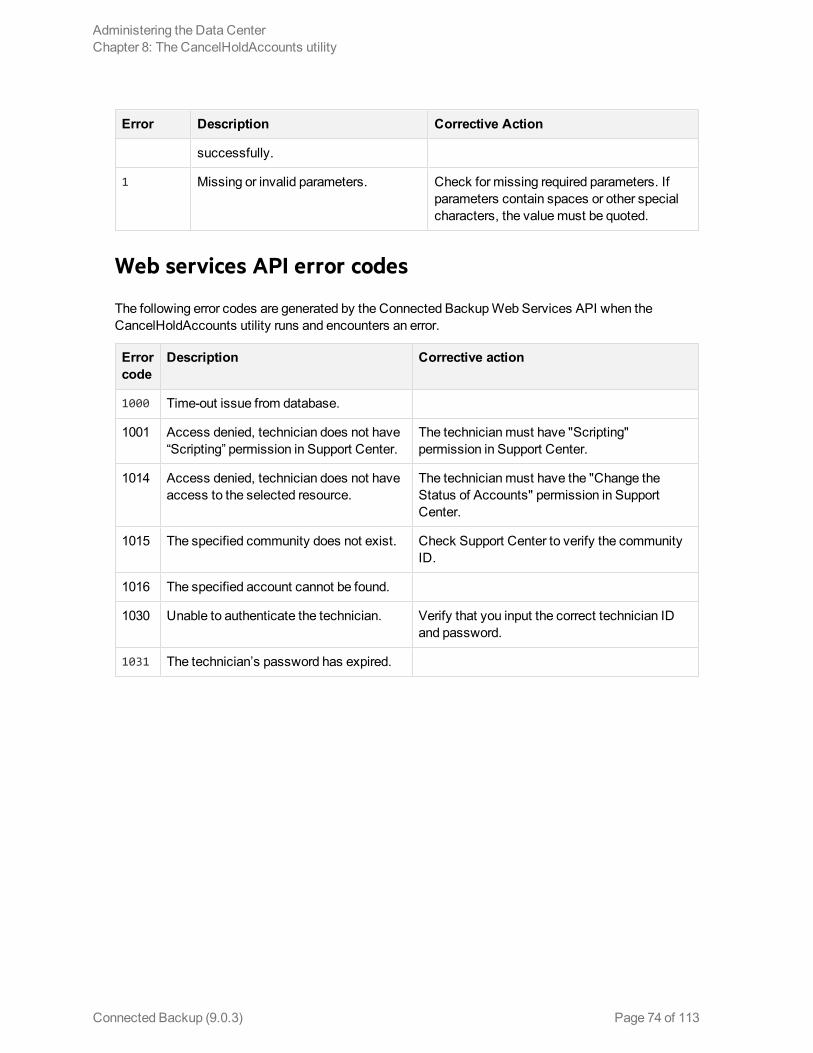
Error Description Corrective Action
successfully.
1 Missing or invalid parameters. Check for missing required parameters. Ifparameters contain spaces or other specialcharacters, the valuemust be quoted.
Web services API error codes
The following error codes are generated by the Connected BackupWeb Services API when theCancelHoldAccounts utility runs and encounters an error.
Errorcode
Description Corrective action
1000 Time-out issue from database.
1001 Access denied, technician does not have“Scripting” permission in Support Center.
The technicianmust have "Scripting"permission in Support Center.
1014 Access denied, technician does not haveaccess to the selected resource.
The technicianmust have the "Change theStatus of Accounts" permission in SupportCenter.
1015 The specified community does not exist. Check Support Center to verify the communityID.
1016 The specified account cannot be found.
1030 Unable to authenticate the technician. Verify that you input the correct technician IDand password.
1031 The technician’s password has expired.
Administering the Data CenterChapter 8: The CancelHoldAccounts utility
Connected Backup (9.0.3) Page 74 of 113
Chapter 9: Data Center logging
This chapter explains how the Data Center logs information.
l Event logs, below
l Event messages hierarchy, on the next page
l Data Center protocol session log, on page 77
Event logs
The Data Center provides a standard way for multiple Data Center components to report events. It alsoprovides a way to categorize events according to levels of priority.
The following table describes the Event logs:
Log Description
DCMaintevent log
Contains entries about events that pertain to the Data Center application, and arespecifically designated to the DCMaint event log. You can use this event log tomonitorthe Data Center services. You can view the DCMaint from DCMC or theWindowsEvent Viewer on the Data Center server. Because themessages in the DCMaint logare detailed, this log is useful for troubleshooting.
Added by the Data Center Setup application.
NOTE:The user account provisioning (add, change, and delete) is now logged intoDCMaint. The following changes done by technician are included:
l For communities:
o Changes associated with community, for example, adding/ moving/renaming a community, updating/removing bandwidth throttling ,updating/removing branding , registration status changes, digital licensingchanges etc.
l For accounts:
o Changes associated with accounts, for example, updating accountconfiguration, account status, password, contact information etc.
Applicationevent log
Contains event entries that notify the user of an occurrence detected by the operatingsystem or the applications that run on the Data Center server. An event includes thefollowing information:
Type of event
Date and time that the event occurred
Connected Backup (9.0.3) Page 75 of 113

Log Description
The computer on which the event occurred
Event ID
Event category
The source of the event
You can use the Application event log to troubleshoot andmonitor the performance andbehavior of the Data Center server and the Data Center application.
StandardWindows log file.
DataCentercomponenttrace logfile
Trace log files provide a deeper level of detail that helps Support diagnose problems.Support uses trace logs to assist users with problems.
Trace logs do not comewith a standard Data Center configuration. To enable this levelof log files, contact Support.
Event messages hierarchy
The Data Center generates event messages in the following order:
l The Application event log contains only event messages specifically designated for the Applicationevent log.
l The DCMaint event log contains event messages specifically designated for the DCMaint event logand repeats the event messages that are designated for the Application event log.
l If trace flags are turned on for a Data Center component, the trace log file for the componentcontains the followingmessages:
o Event messages specifically designated for the trace log
o Event messages designated for the DCMaint event log for that component
o Event messages designated for the Application event log for that component
Maintain the event logs
This section explains how tomaintain the following types of event logs:
l Application event logs
l DCMaint logs
Maintain the application event log
If the addition of an event causes the Application event log to exceed its limit (for example, 50MB), andif the properties of the Application event log are set to not overwrite events, the Data Center backs upthe Application event log file. The Data Center then clears the event log, and adds an informational
Administering the Data CenterChapter 9: Data Center logging
Connected Backup (9.0.3) Page 76 of 113
message to the log. Themessage indicates that the event log was backed up and cleared because ofspace limitations.
The string value LogFileDir under theBackupDataCenter key in theWindows registry specifies thelocation to which the Agent backs up the Application event log file. The key is in the following registrylocation:
HKEY_LOCAL_MACHINE\SOFTWARE\Wow6432Node\Connected\BackupDataCenter
The Data Center names the file according to the following format:
NTApp TimeStamp.evt
For example, NTApp 2003-10-01 092345.evt.
NOTE:To backup and clear the Application log, the Data Center must send themessage that causesthe log to exceed its limit.
For example, if a different server component, such as SQL Server, fills the log, the Data Centerdoes not save the log. Youmust save and clear the logmanually.
Maintain the DCMaint log
If the DCMaint log becomes full, and if the properties of the DCMaint event log are set to not overwriteevents, the Data Center backs up the log file and clears the log. The system generates an informationalmessage in the DCMaint event log. Themessage indicates that the DCMaint event log was backed upand cleared because of space limitations. You can save the log because only the Data Center softwarewrites to the DCMaint event log.
The Data Center performs other maintenance of the DCMaint log upon initialization such as acomparison of the event log size and age to theWindows registry values MaxSize and LogFileTime.The Data Center also backs up and clears the log if either value exceeds the defined limits.
The string value LogFileDir under the BackupDataCenter key on theWindows registry specifies thelocation to which the Agent backs up the DCMaint event log file. The key is in the following registrylocation:
HKEY_LOCAL_MACHINE\SOFTWARE\Wow6432Node\Connected\BackupDataCenter
The Data Center names the file according to the following format:
DCMaint TimeStamp.evt
For example, DCMaint 2003-10-01 092345.evt.
Data Center protocol session log
The Data Center Protocol Session log (DataCenter.log) records messages that the Data Center sendsand receives during backups. Corporate Support and Data Center technicians can use this log and theAgent Protocol Session log to troubleshoot problems that might occur when the Data Center and theAgent communicate during backups. For example, if a problem occurs during backup, the Data Centertechnician can view both the Agent Protocol Session log and the Data Center Protocol Session log to
Administering the Data CenterChapter 9: Data Center logging
Connected Backup (9.0.3) Page 77 of 113
determine if the Data Center received all messages sent by the Agent, and the reverse. You can viewthe Data Center Protocol Session log in a standard text editor such as Notepad.
The Data Center technician can use the Backup Server Properties table on the Data CenterManagement Console (DCMC) to turn on the Data Center Protocol Session log for specific accountson a backup server, and to specify the following information:
l Location of the log file
l Level of logging
l Maximum log file size
l Number of log files to keep.
Enable the Data Center protocol session log
The Data Center session log can be configured by the DCMC technician for the following options:
l Info. Standard level of logging, captures more information, not for troubleshooting, more formaintenance.
l Debug. Detailed level of logging, captures only error messages, troubleshooting.
Data Center protocol log maintenance
The Data Center records session information in one log file unless you specify a different number of logfiles to keep.
For example, if you specify three log files with amaximum of 8MB, the Data Center logs informationaccording to the following rules:
l The Data Center stores session information in the DataCenter.log files until the size of the filereaches 8MB.
l The Data Center renames the log file to DataCenter.log.1, and then creates a newDataCenter.log file and records themost recent events to the new file.
l When the new Data.Center.log files reaches 8MB, the Data Center renames DataCenter.log.1to Data Center.log.2, and then renames the DataCenter.log to DataCenter.log.1. It thencreates a new DataCenter.log file and records themost recent events to this file. The files are inthe location that you specify with the newest log listed first:
o DataCenter.log
o DataCenter.log.1
o DataCenter.log.2
When all three logs are full, the following actions occur:
l The Data Center deletes DataCenter.log.2.
l Then, the Data Center renames DataCenter.log.1 to DataCenter.log.2.
Administering the Data CenterChapter 9: Data Center logging
Connected Backup (9.0.3) Page 78 of 113

l Then, the Data Center renames DataCenter.log to DataCenter.log.1 and then creates a newDataCenter.log file.
If a problem occurs during backup, the technician can view both Protocol Session logs to determinewhether the Data Center received all messages that the Agent sent.
The DCMC technician specifies the directory for the Data Center Protocol Session log. By default, theData Center Protocol log is on the Backup Server Properties tab on the DCMC. The string valueLogFileDir under the AccountLogging key in theWindows registry specifies the location to whichthe Agent backs up the protocol session log file. The key is in the following registry location:
HKEY_LOCAL_MACHINE\SOFTWARE\Wow6432Node\Connected\AccountLogging
NOTE:Protocol Session logging is optional. By default, the Protocol Session log is disabled for everyaccount.
Administering the Data CenterChapter 9: Data Center logging
Connected Backup (9.0.3) Page 79 of 113
Chapter 10: Performance monitoring forData Center services
This chapter describes performancemonitoring for Data Center services.
l Overview, below
l Evaluate current Data Center capacity, below
l BackupServer counters, on page 82
l Reinstall and remove counters, on page 83
l Troubleshoot, on page 84
Overview
Performancemonitoring for Data Center services measures the real-time performance of theConnected Backup Data Center.
Counters that work with Microsoft Windows PerformanceMonitor enable performancemonitoring.Counters exist or the following Data Center services:
l BackupServer
l Compactor
l ReplicationServer
l IndexServer
l PoolServer
NOTE:This chapter describes only the BackupServer counters. For information about other counters,contact Support.
Evaluate current Data Center capacity
You shouldmonitor your Data Center capacity during the initial phases of deployment, as well as on aregularly recurring basis.
As you deploy the Agent to more computers, youmight need to change your original hardware andsoftware configuration. For example, more backup data from an increase in accounts might require youto addmore storage space on your server(s).
Check Data Center capacity more frequently for aggressive deployments than for a slow deployments.
Connected Backup (9.0.3) Page 80 of 113
To determine when to check capacity, use time intervals based onmilestones in your deployment. Forexample, check capacity when you reach 50%, 60%, 75%, and 90% of your installed projectedcapacity.
Perform system checks monthly to assess the following hardware and software requirements:
l CPU
l RAM
l SQL database disk partitions
CPU
For best performance, refer to theConnected Backup Requirements Matrix guide to determine theappropriate processor for your Data Center servers. If the server overuses the CPU, add additionalprocessors or upgrade the existing processors to improve performance. For more information aboutData Center sizing requirements, refer to Installing the Data Center guide.
Although CPU usage as a potential bottleneck to Data Center performance is easy to detect, it isdifficult to address without a complete hardware upgrade. Certain processes (particularly compaction),however, can use a large amount of CPU resources. During these peak periods, measure CPU use.
To evaluate your server's CPU, use the SystemMonitor feature of theWindows PerformanceMonitorto determine averages during peak activity for the followingmetrics:
l Average CPU utilization: Processor\ % Processor Time > 80% indicates heavy CPU use.
Generally, a healthy CPU has peaks and valleys of use, with many of the peaks at 100%. Therefore,average processor activity during peak times indicates a better reflection of true performance thanthe peaks themselves. The average CPU use should be less than 85%.
l System processor queue length: System\ Processor Queue Length > 2 per CPU indicates thatCPUs are overwhelmed and are queuing up requests.
Generally, there should be nomore than the number of processors x 2 as an average queue.
RAM
For best performance, refer to theConnected Backup Requirements Matrix guide to determine theappropriate amount of RAM for your Data Center servers. To determine whether RAM limits systemperformance, use the SystemMonitor feature of yourWindows Performance utility to determineaverages during peak activity for the followingmetrics:
l Number of times Windows goes to disk: Memory\Pages/sec > 0 indicates that Windows goes todisk frequently, using disk I/O and CPU resources.
If you keep this value close to zero, you reduce performance problems incurred if youmove to disk.To resolve this issue, addmore RAM to your system.
l Number of times per second that Windows has read from the paging file: Memory\Page Reads/sec> 5 indicates that youmight need to addmore RAM to resolve a bottleneck in your system.
Administering the Data CenterChapter 10: Performancemonitoring for Data Center services
Connected Backup (9.0.3) Page 81 of 113
SQL database disk partitions
Check the database disk partition weekly. Also, include this check in your regular assessments toevaluate factors that affect Data Center capacity. For more information, see Check for available diskspace, on page 94.
BackupServer counters
The following table describes the BackupServer counters:
Counter name Counter object name Description
Backup Server TotalSessions
BACKUPSERVER_TOTALSESSIONS
Total number of sessions running
Backup ServerSessions SinceStartup
BACKUPSERVER_SSESSIONSSINCESTARTUP
Total number of sessions that have runsince startup of the BackupServerservice
Backup Server 8.xSessions
BACKUPSERVER_8X_SESSIONS
Number of sessions running for 8.xAgents
Backup Server 7.xSessions
BACKUPSERVER_7X_SESSIONS
Number of sessions running for 7.xAgents
Backup ServerRetrieve Sessions
BACKUPSERVER_RETRIEVES
Number of retrieval sessions running forall Agents
Backup Server 8.xRetrieve Sessions
BACKUPSERVER_8X_RETRIEVES
Number of retrieval sessions running for8.x Agents
Backup Server 7.xRetrieve Sessions
BACKUPSERVER_7X_RETRIEVES
Number of retrieval sessions running for7.x Agents
Backup Server FirstBackup Sessions
BACKUPSERVER_FIRSTBACKUPS
Number of first backup sessions runningfor all Agents
Backup Server 8.xFirst BackupSessions
BACKUPSERVER_8X_FIRSTBACKUPS
Number of first backup sessions currentlyrunning for 8.x Agents
Backup Server 7.xFirst BackupSessions
BACKUPSERVER_7X_FIRSTBACKUPS
Number of first backup sessions runningfor 7.x Agents
Backup ServerBackup Sessions
BACKUPSERVER_TOTALBACKUPS
Number of backup sessions running forall Agents
Backup Server 8.xBackup Sessions
BACKUPSERVER_8X_TOTALBACKUPS
Number of backup sessions running for8.x Agents
Administering the Data CenterChapter 10: Performancemonitoring for Data Center services
Connected Backup (9.0.3) Page 82 of 113
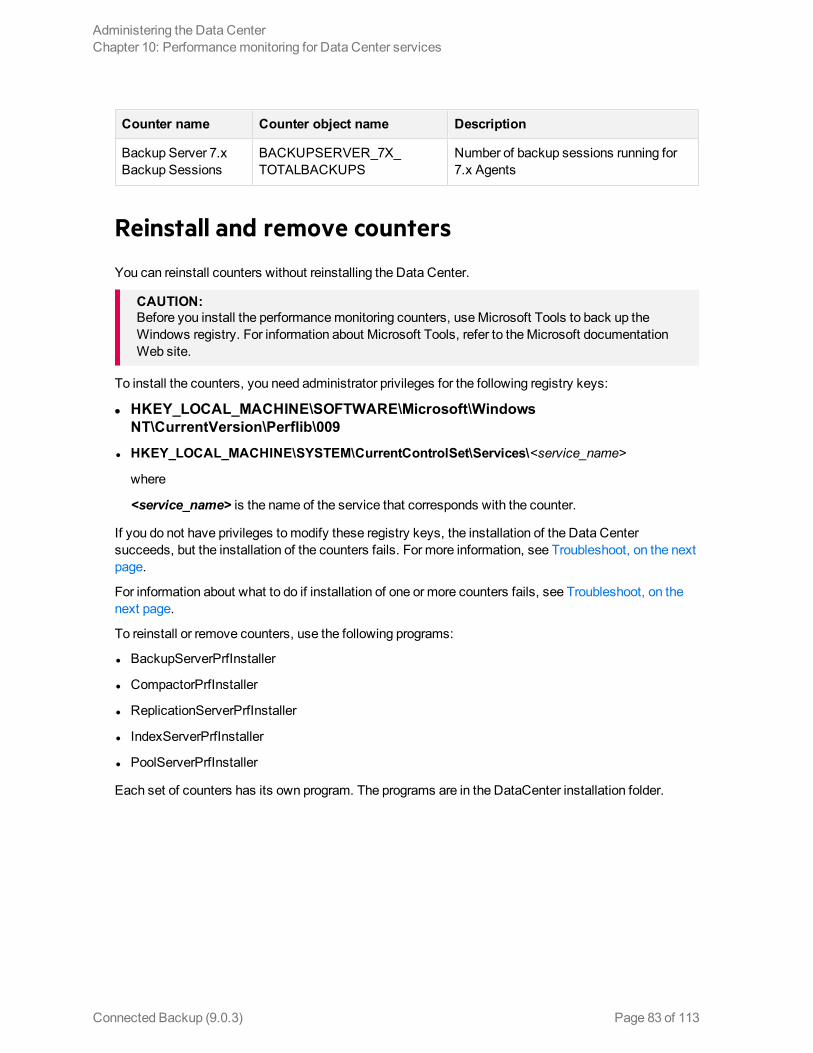
Counter name Counter object name Description
Backup Server 7.xBackup Sessions
BACKUPSERVER_7X_TOTALBACKUPS
Number of backup sessions running for7.x Agents
Reinstall and remove counters
You can reinstall counters without reinstalling the Data Center.
CAUTION:Before you install the performancemonitoring counters, useMicrosoft Tools to back up theWindows registry. For information about Microsoft Tools, refer to theMicrosoft documentationWeb site.
To install the counters, you need administrator privileges for the following registry keys:
l HKEY_LOCAL_MACHINE\SOFTWARE\Microsoft\WindowsNT\CurrentVersion\Perflib\009
l HKEY_LOCAL_MACHINE\SYSTEM\CurrentControlSet\Services\<service_name>
where
<service_name> is the name of the service that corresponds with the counter.
If you do not have privileges tomodify these registry keys, the installation of the Data Centersucceeds, but the installation of the counters fails. For more information, see Troubleshoot, on the nextpage.
For information about what to do if installation of one or more counters fails, see Troubleshoot, on thenext page.
To reinstall or remove counters, use the following programs:
l BackupServerPrfInstaller
l CompactorPrfInstaller
l ReplicationServerPrfInstaller
l IndexServerPrfInstaller
l PoolServerPrfInstaller
Each set of counters has its own program. The programs are in the DataCenter installation folder.
Administering the Data CenterChapter 10: Performancemonitoring for Data Center services
Connected Backup (9.0.3) Page 83 of 113
Install counters
To install counters
1. On the Data Center computer, open a command line, and then enter the following command:
counter_program install
where
counter_program is the installation program for the counters that you want to install.
Example:
BackupServerPrfInstaller install
2. Restart the corresponding Data Center service.
For example, if you installed the BackupServer counters, restart the BackupServer service
3. Enable the counter.
For more information, see Reinstall and remove counters, on the previous page.
Remove counters
To remove counters
1. On the Data Center computer, open a command line, and then enter the following command:
counter_program uninstall
where
counter_program is the installation program for the counters that you want to install.
Example:
backupServerPrfInstaller uninstall
2. Restart the corresponding Data Center service.
For example, if you installed the BackupServer counters, restart the BackupServer service.
Troubleshoot
This section explains how to resolve the following problems:
l Installation of the counters fails
l The counters work incorrectly
Administering the Data CenterChapter 10: Performancemonitoring for Data Center services
Connected Backup (9.0.3) Page 84 of 113
Installation of the counters fails
To install the counters, you need administrator privileges for the following registry keys:
l HKEY_LOCAL_MACHINE\SOFTWARE\Microsoft\WindowsNT\CurrentVersion\Perflib\009
l HKEY_LOCAL_MACHINE\SYSTEM\CurrentControlSet\Services\<service_name>
where
<service_name> is the name of the service that corresponds with the counter.
If you do not have privileges tomodify these registry keys, the installation of the Data Centersucceeds, but the installation of the counters fails. If the installation of one or more counters fails, theData Center installation program logs errors to the Data Center Setup log. This log is in\Datacenter\Setup. The following error is an example:
[2009-08-24 10:11:37 Info (10665)] Running program'f:\datacenter\PoolServerPrfInstaller.exe' with arguments '-install'
Error: ERROR in CPrfData::InstallPrfData.OpenSubKey failed to open HKEY_LOCAL_MACHINE\SOFTWARE\Microsoft\Windows NT\CurrentVersion\Perflib. Failed with errorcode: 5
If you receive this error, reinstall the counters, but do not install the Data Center. For information, seeReinstall and remove counters, on page 83.
Counters work incorrectly
If counters do not work correctly, they log errors that describe the problem to the DCMaint log. If a setof counters does not work correctly, remove it, and then reinstall it. For instructions, see Reinstall andremove counters, on page 83.
Administering the Data CenterChapter 10: Performancemonitoring for Data Center services
Connected Backup (9.0.3) Page 85 of 113
Chapter 11: Daily maintenance
This chapter describes themaintenance tasks that youmust perform each day to ensure that the DataCenter runs optimally. Because there are tasks to perform throughout the day, this chapter categorizestasks by those to perform at the start of the day, and those to perform at the end of the day.
For a checklist that you can use to keep track of daily maintenance tasks, seeMaintenance checklists,on page 105.
l Tasks to complete at the start of every day, below
l Tasks to complete at the start and end of every day, on page 88
Tasks to complete at the start of every day
At the start of every day, complete the following tasks:
l Verify the Daily Automatic Procedure results.
l Verify personal backups.
l Verify the disk status and whether there is unknown disk space.
Verify the daily automatic procedure results
The Data Center contains a daily maintenance script, dailymaint.sql, that runs at 12:00 p.m. everyday except Sunday. This script executes the following tasks:
l Backs up the SQL transaction logs for the Directory database and Registry database. Thesebackups happen only for stand-alone Data Centers.
l Calculates statistics on database size, account data totals, and archive storage device totals. Anarchive storage device is a component that stores data (for example, a SAN device).
NOTE:If you run amirrored Data Center configurations, either amirrored pair or as part of a mirroredcluster, the Data Center replicates the SQL databases between the servers. Therefore, theDaily Automatic Procedure does not back up the SQLDatabase. In amirrored environment, if adata loss occurs, you can restore a database from its mirror.
The dailymaint.sql script writes the results of the tasks it performs to two log files in the Data Centerfolder:
dailymaint.out Contains the results for only the previous day.
sqldump.log Contains an ongoing history of the Daily Automatic Procedure results.
Connected Backup (9.0.3) Page 86 of 113
To review the results of the daily automatic procedure
1. In the \DataCenter folder, open dailymaint.out or sqldump.log.
2. Review the output file for errors that might have occurred while themaintenance script wasrunning.
If the script runs successfully, the output file indicates the following information:
l The Directory database and Registry database transaction logs have been backed up at thetime that you specified. These backups happen only for stand-alone Data Centers.
3. To view the Application event log, open the Data Center Management Console (DCMC),expanding theEvents node, and click Application.
4. Verify that no errors occurred during the daily SQL transaction logs backup.
5. If problems appear in the log files or in the Application event log, contact Support.
NOTE:If you run a large stand-alone Data Center, you can schedule the dailymaint.sql script to runmore than one time per day. If you run the script more than once a day, you reduce the risk ofdata loss and decrease the time required to recover a failed system.
Verify personal backups
Verify that user’s personal backups complete successfully. To perform this task, you can use theAgent on any computer that backs up to your Data Center.
To verify personal backups on Mac Agents
1. Open the Agent.
2. Click the History tab and select themost recent session logs.
3. To display the log for the selected sessions, click View Details.
4. Verify that each session started and completed successfully.
5. Look for errors and indications of problems with the connection.
Although these types of problems might occur occasionally, they might not indicate a persistentproblem.
To verify personal backups on PC Agents
1. Open the Agent.
2. Click the date link next to Last Backup on theBack Up Panel.
3. Verify that each session started and completed successfully.
4. Look for errors and indications of problems with the connection.
Administering the Data CenterChapter 11: Daily maintenance
Connected Backup (9.0.3) Page 87 of 113
Although these types of problems might occur occasionally, they might not indicate a persistentproblem.
Check backup disk status and unknown disk space
Use the Disk Status tool to check the status of the backup disk.
To check disk status
1. Open the Disk Status tool and enter your Data Center name in the Server box.
2. Click Update.
The Disk Status tool displays information about the status of the disk.
3. Verify that all indicators are between normal parameters (in the appropriate colored indicator).
4. Check the unknown disk space.
The Disk Status tool displays unknown disk space in red. Files not related to the Data Center usethe unknown disk space.
5. To generate a text file that lists files on the customer data volume that are unrelated to the DataCenter, click Display.
The text file contains columns that list the file name and the file size in bytes.
6. Move or delete these files to allow more space for the Data Center files.
Tasks to complete at the start and end of every day
Perform the following general tasks at every start and end of every day:
l Verify that services are running.
l Examine theWindows event log.
l Verify that Support Center andMyRoam are running.
l Check Copy on Reference and replication.
Verify that the services on the Data Center server arerunning
To verify that the services are running
1. Open DCMC and expand your Data Center node in the Console tree.
2. Do one of the following:
Administering the Data CenterChapter 11: Daily maintenance
Connected Backup (9.0.3) Page 88 of 113
l If you do not see your Data Center in the Console tree
a. Right-click Data Centers, and then click Add a Data Center.
b. In theData Centerswindow, select the appropriate configuration for your Data Center, andthen type the Data Center or server name (whichever required, based on your configurationselection).
l If you see your Data Center in the Console tree, continue to the next step.
3. To view the status of the services, in the Console tree, click the name of the Data Center server.
The Console tree displays the following services:
l BackupServer
l DCAlerter
l ReplicationServer
l IndexServer
l PoolServer
l Compactor
4. To restart a service that has stopped
a. In the left pane, expand the Data Center server name that runs the service.
b. Right-click the service.
A dialog box opens.
c. Click Start Service.
If your request to start the service fails, the Data Center sends amessage to the Application event log.
To verify the status of the Compactor service
1. Expand theEvents node.
2. To view event messages, click DCMaint.
3. Look for messages with Compactor under theSource column.
4. Do one of the following:
l If the Data Center writes warning or error messages to the log file, examine the Compactor log in theLog Files folder and the compaction date appended to the file name.
l If the Data Center does not write warning or error messages to the log, for details on logging andtrace logs, seeManage the Data Center with DCMC, on page 62.
Administering the Data CenterChapter 11: Daily maintenance
Connected Backup (9.0.3) Page 89 of 113
Examine the Windows event log
To examine the Windows event log for warning messages or error messages
1. Open the DCMC.
2. In the left pane, expand the Data Center server name.
3. Expand theEvents node, and click Application.
4. Look for warnings and errors in the log window and review them to determine what actions youmust take. For more information about how to respond to error messages, contact Support.
Verify that Support Center and MyRoam Are running
To verify that Support Center and MyRoam are running
NOTE:The steps to verify MyRoam apply only if your enterprise uses MyRoam for PC Agents.
1. To verify that the IIS Admin Service and theWWW Publishing Service run, open the ServicesControl Panel and verify that the status is Started.
2. To verify that Support Center is running, log on to Support Center from a remote computer andperform a quick lookup of an account.
The default URL for Support Center has the following syntax:
http|https://<servername>/supportcenter
where servername is the name of theWeb server that hosts Support Center
3. To verify that MyRoam is running, log on to the Account Management Website from a remotecomputer and retrieve one or more files.
Check Copy on Reference and Replication
Copy on Reference is the process that makes copies of files that multiple users have backed up withSendOnce. Replication is the process that, in amirrored environment, copies files from aData Centerserver to it’s mirror. To check Copy on Reference and replication, youmust check values in DCMCagainst previously noted values. Therefore, keep a record of values so that you have a data history towhich you can refer.
DCMC obtains the values from SQL tables in your database, which under normal circumstances, aretypically empty. Because these tables are empty or nearly empty, the values in DCMC should berelatively small.
Administering the Data CenterChapter 11: Daily maintenance
Connected Backup (9.0.3) Page 90 of 113
Check Copy on Reference
To check Copy on Reference
1. Open the DCMC.
2. In the left pane, expand the Data Center server name.
3. Click PoolServer.
4. Review and note the values for SendOnceQueue and SendOnce Status.
5. If the SendOnceQueue does not display zero, press F5 to refresh the window.
If Copy on Reference is working, the value decreases after a few minutes. The SendOnceQueueis processed every 20minutes by the PoolServer service.
Check replication
Youmust check replication on eachmirrored pair of servers in the Data Center, and on both of theservers that compose amirrored pair.
To check replication
1. Open DCMC.
2. In the left pane, expand the Data Center server name that runs the service.
3. Click theReplicationServer node.
4. Review and notice the values for Database rows to replicate and Archives to replicate.
5. If the values do not equal zero, press F5 to refresh the window.
6. If replication is working, the values decrease after a few minutes.
Administering the Data CenterChapter 11: Daily maintenance
Connected Backup (9.0.3) Page 91 of 113
Chapter 12: Weekly maintenance
This chapter describes themaintenance tasks that youmust perform each week to ensure that theData Center runs optimally.
For a checklist that you can use to keep track of weekly maintenance tasks, seeWeekly maintenancechecklist, on page 106.
l Verify the results of the weekly automatic procedure, below
l Weekly backup tasks, on page 94
l Check for available disk space, on page 94
l Perform weekly general tasks, on page 95
Verify the results of the weekly automaticprocedure
To verify the results of theWeekly Automatic Procedure
l Review the results of the weekly maintenance scripts.
l Review the Application event log.
The following sections explain how to perform these tasks.
Review the weekly maintenance scripts
The Data Center has a weekly maintenance script that runs at 12:00 p.m. every Sunday. This scriptcarries out the following tasks:
l Performs a full backup of the SQL databases on a stand-alone Data Center.
l Collects Data Center statistics.
l Clears the transaction log on a stand-alone Data Center so that the log does not grow continuously.
NOTE:If you run amirrored or clustered Data Center, the SQL databases replicate the data betweenthe servers. Therefore, theWeekly Automatic Procedure does not back up the databases.
The weeklymaintdisk.sql script performs the database backup to disk.
NOTE:A weekly, full database backup to a disk can use as much disk space as the actual database. Ifyou perform a backup to a disk, use another utility to copy the backup files to a different
Connected Backup (9.0.3) Page 92 of 113
medium. Do not let a new full backup overwrite a previous full backup in case the new backupfails.
Do not back up your SQL databases to the same disk partition as the original SQL databases. Ifyou experience problems with the disk partition, youmight lose the databases and the backups.
The Data Center software records the results of the weekly maintenance script to theweeklymaint.out file and sqldump.log file in the Data Center folder. The files have the followingdifferences:
l The weeklymaint.out file contains only the results for the previous week.
l The sqldump.log file contains the results for ongoing history.
These files reside in the default \DataCenter folder.
Review the weeklymaint.out and sqldump.log files to verify the following information:
l Whether the database backup succeeded without errors
l Whether theMaster, Model, MSDB, Directory and Registry databases have been backed up at thetime specified, if you run a stand-alone Data Center
l If you run a stand-alone Data Center, whether the Directory and Registry database transaction logswere backed up at the time specified
l Whether the start and end times written at the start and end of the output file are consistent with theactual start and end times of the backups
Review the application event log
If an output file reports problems with the database backup, review the Application event log formessages that pertain to the backup.
To view the Application event log
1. Open the DCMC.
2. In the left pane, expand the Data Center server name.
3. Expand theEvents node, and click Application.
The Application windows displays a list of events.
NOTE:If you run a large stand-alone Data Center, you can schedule the weeklymaint.sql script to runmore often. If you increase the frequency, you can reduce the risk of data loss and decrease thetime required to recover a failed system.
Administering the Data CenterChapter 12: Weekly maintenance
Connected Backup (9.0.3) Page 93 of 113
Weekly backup tasks
Weekly maintenance includes backing up files and folders required for a successful disaster recoveryfor your Data Center.
For more information about the files and information to back up for your Data Center, refer to RequiredDisaster Recovery Items inData Center Disaster Recovery guide.
Check for available disk space
Each week, check the available disk space on the following volumes to ensure that the disk hassufficient capacity:
l Customers folder
l SQL database
l SQL database backup
Check the Customers folder
The Customers folder contains the end-user data. If you run a disk-only configuration, you canmonitorthe available disk space on the Customers volumes withWindows Explorer, or the Disk Status tool.For information about the Disk Status tool, see Check backup disk status and unknown disk space, onpage 88.
Check the SQL database
The SQL database grows throughout the life of the Data Center.
To track the size of the SQL database
1. OpenMicrosoft SQL Server Management Studio.
2. In theObject Explorer pane, expand your Data Center server.
A list of folders is displayed under your Data Center server.
3. Expand theDatabases folder, then right click Directory, and then click Properties.
TheDatabase Propertieswindow opens. Locate the Data Center Size information.
4. Under theSelect a Page pane, select Files.
5. To view the path of your .mdf and .ldf files, scroll to the Path column. Make note of this path.
6. OpenWindows Explorer, and then selectMy Computer.
7. Follow the path that you noted in step five.
8. Record the size of your .mdf files and .ldf files for weekly tracking purposes.
Administering the Data CenterChapter 12: Weekly maintenance
Connected Backup (9.0.3) Page 94 of 113

9. Calculate how much the used disk space grew since the previous week to determine how muchdisk space the databases needs for the next threemonths.
CAUTION:Do not back up your SQL databases to the same disk partition as the original SQL databases. Ifyou experience problems with the disk partition for any reason, youmight lose the databasesand the backups.
Check the SQL database backup
If you run a stand-alone Data Center, monitor the SQL database backup volume for available diskspace weekly. Also, move the SQL backups from the disk to other media. Doing so lets you havemultiple backups to restore from should a disaster occur.
Perform weekly general tasks
Perform the following general tasks weekly:
l Check system time synchronization.
l Check for updates.
Check system time synchronization
If you run amirrored Data Center configurations, either amirrored pair or as part of a mirrored cluster,the two servers that comprise amirrored pair should run within 30 seconds of each other. Check thetime on each server and correct discrepancies.
To check the system time
1. Open theMicrosoft SQL Server Management Studio.
2. Open a connection to eachmirrored server in the samewindow.
3. For each server, run select getdate().
NOTE:Perform this time check after you add hardware to your server(s) and after changes in standardor daylight savings time.
Check for updates
You can upgrade the Data Center, the Agent, or both. A service release includes all updates releasedsince the last major release or service release.To check for recent software updates, visit theMySupport portal.
Administering the Data CenterChapter 12: Weekly maintenance
Connected Backup (9.0.3) Page 95 of 113
Chapter 13: Monthly maintenance
This chapter describes maintenance tasks that youmust perform eachmonth to ensure that the DataCenter runs optimally.
For a checklist that you can use to keep track of monthly maintenance tasks, seeMonthlymaintenance checklist, on page 106.
l Perform databasemaintenance, below
l Perform account maintenance, on page 99
l Verify current firmware, on page 101
l Check software licensing, on page 102
l Maintain the event logs, on page 103
Perform database maintenance
The Data Center contains amonthly maintenance script (dbmaint.sql) that runs the DBCC utility(dbcc checkdb query). The DBCC utility comes with SQL Server. The DBCC utility checks each DataCenter database for the following conditions:
l Logical and physical consistency in the database
l Correctly linked indexes and data pages in tables
l Data and index pages that are consistent with corresponding extent structures
l Correctly ordered indexes, consistent pointers, reasonable data information on each page, andreasonable page offsets
When you run themonthly maintenance script, youmust perform tasks that are specific to yourData Center configuration. For this reason, the Data Center Setup program does not add themonthlyscript to theWindows Scheduler as it does for the daily and weekly scripts, which run on a schedule.Youmust run themonthly maintenance script manually.
Themonthly maintenance script file (dbmaint.sql), is in the Data Center folder. To run the script, useSQL Server Management Studio.
NOTE:Before you run the script, read the remainder of this section for important guidelines andinstructions particular to your Data Center environment.
Considerations for stand-alone Data Centers
To perform maintenance on a stand-alone Data Center, youmust stop the BackupServer service.Users cannot backup or retrieve files duringmaintenance.
Connected Backup (9.0.3) Page 96 of 113

The procedures contain references toServer 1 andServer 2. When you follow the procedures, Server 1represents your Data Center server. Ignore references in the procedures toServer 2.
Considerations for Mirrored Data Centers
To prevent a service outage, continue to run one server in themirrored pair while you performmaintenance on the other server. When you finishmaintenance on the first server, repeat themaintenance tasks for themirror server.
The procedures contain references toServer 1 andServer 2. When you follow the procedures, considerServer 1 andServer 2 as the names of your Data Center servers according to the followingconventions:
l Server 1 represents the server that you shut down for maintenance.
l Server 2 represents the server that you continue to run.
Considerations for clustered Data Centers
For the purpose of databasemaintenance, consider eachmirrored server pair in a clusteredData Center as a separate Data Center. In other words, perform maintenance on one Data Center inthe cluster (onemirrored pair), then perform maintenance again for the next Data Center in the cluster(the next mirrored pair). To save time, perform maintenance on all Data Centers in the clustersequentially. For example, perform maintenance tasks in sequential order on one side of the cluster(such as the primary side), and then on themirrored side.
Perform monthly database maintenance
Databasemaintenance comprises the following tasks:
1. Prepare themirrored server (for mirrored and clustered Data Centers).
2. Stop all Connected Backup services.
3. Runmaintenance SQL scripts.
4. Restart all Connected Backup services.
The following sections explain how to perform these tasks.
NOTE:Perform the tasks in the order in which they appear.
This process can take hours on larger Data Centers.
Step 1: Prepare the mirrored server
This procedure applies only to Data Centers that usemirrored or clustered environments.
Administering the Data CenterChapter 13: Monthly maintenance
Connected Backup (9.0.3) Page 97 of 113
To prepare the mirrored server
1. Open DCMC.
2. From the console tree, select Server 2.
3. Verify that services forServer 2 are running.
For more information about how to verify that services are running, seeVerify that the services onthe Data Center server are running, on page 88.
Step 2: Stop the server
To stop the server for maintenance
1. Open the Data Center Management Console (DCMC).
2. In the left pane, expandServer 1.
3. Right-click BackupServer, and then select Properties.
4. In the Session Restrictions section, deselect the Allow Backups and Allow Restores checkboxes.
5. Click OK.
6. After the number of current sessions goes to zero or stays at a consistently low number, stop allData Center services.
7. Close the DCMC.
Step 3: Run maintenance SQL scripts
To run maintenance SQL scripts
1. Verify that the Compactor service is stopped. If it is still running, stop the process or wait until theprocess finishes.
2. OpenMicrosoft SQL Server Management Studio and connect toServer 1.
3. Open the SQL script weeklymaintdisk.sql.
4. The script file is in the Data Center folder, default location \DataCenter.
5. To run the SQL script, click Execute.
6. The system backs up the SQL databases. For more information, seeVerify the results of theweekly automatic procedure, on page 92.
7. After the SQL script finishes, run the SQL script dbmaint.sql.
The script is in the Data Center folder, default location \DataCenter. The SQL script can takeminutes or hours to complete, depending on the size of your databases.
Administering the Data CenterChapter 13: Monthly maintenance
Connected Backup (9.0.3) Page 98 of 113

Step 4: Restart the server
To restart the server
NOTE:Do not restart the server until after the SQL dbmaint.sql script finishes.
1. To restart the services forServer 1
a. Open DCMC.
b. ExpandServer 1 in the console tree.
c. Right-click each service, and select StartService.
2. To verify that Agents can connect toServer 1
a. Right-click BackupServer, select All Tasks, and click Log Session Statuses.
b. Expand theEvents node, and click Application.
3. To verify that backups or retrievals are in progress
a. Use the Disk Status tool to check the available free space on the database volume. If the freespace on the volume is 10GB or less, contact Support. Do not continue until you completethis step successfully.
b. Repeat all steps forServer 2.
Perform account maintenance
Abandoned accounts can clutter the Data Center and use space in the databases and archive storage.They also use up seats in the Data Center license.
Tominimize clutter on the Data Center, look for the following types of accounts:
l Unowned accounts
l Unsupported Agent versions
l Duplicate accounts
l Inactive accounts
l Heavy hitters
l Invalid accounts
Unowned accounts
An account is unowned when the Data Center cannot determine ownership. You can create anunknown account if you fail to enter a name, e-mail address, telephone number, or other informationduring the Agent Setup and registration process.
Administering the Data CenterChapter 13: Monthly maintenance
Connected Backup (9.0.3) Page 99 of 113
If you can locatemissing account information, enter the information on Support Center. Otherwise,cancel the account.
In time, Compactor removes unowned accounts from the Data Center.
Unsupported Agent versions
An unsupported Agent version is an account that runs a version of the Agent software that yourorganization no longer supports. Your organizationmight discontinue support for an Agent version forseveral reasons:
l To reduce support costs and Help Desk calls
l Because Connected Backup no longer supports the Agent version
l Because the version has known issues
When you identify accounts that use unsupported versions of the Agent, upgrade the version for thoseaccounts. To do so, use the upgrademethod that your organization employs.
Duplicate accounts
A duplicate account is an unused account because two accounts exist on the same Agent computer.Users might accidentally create a new account during the account recovery process instead ofrecovering an existing account. Users alsomight create duplicate accounts if they are unaware of theaccount recovery process, or if an error occurred during the recovery process that forces the user tocreate a new account.
You cannot use an automatedmethod to identify duplicate accounts.
To identify duplicate accounts
1. Findmultiple accounts registered for the same e-mail address or name.
To find accounts with the same e-mail address on the Data Center, run the Last Backup report inSupport Center, and then sort the results by computer name to identify the duplicate accounts.
2. Determine whether the accounts that you identified in step 1 have the same computer name.
3. Verify that the last backup activity for one account ends, and that a new account registers shortlythereafter.
4. Verify that the new account you determined in step 3 has current backup activity and that the otheraccount does not.
Inactive accounts
An inactive account is one that has had no recorded activity over an extended period of time. Anaccount can become inactive for the following reasons:
Administering the Data CenterChapter 13: Monthly maintenance
Connected Backup (9.0.3) Page 100 of 113
l Attrition
l Duplicate account
l Inactive backup schedule
l Agent removed from the computer
For best results, select an account inactivity threshold time frame. For example, if an account has notperformed a backup in the past 90 days, the account is inactive. The policy created should be publishedfor end users and Help Desk representatives and should also accommodate end users on extendedabsence.
Heavy hitters
The following Support Center reports examine the amount of data that each account backs up to theData Center:
l Heavy Hitters
l Heavy Hitters Cumulative
The reports appear in the Support Center under theReports node. For information about how to run andview the reports, refer to Support Center Help.
Regularly backups of large amounts of data indicate that an account backs up unnecessary data. Largebackups put stress on the Data Center server, and the SQL databases.
Each organizationmust determine what constitutes heavy use and how tomanage heavy hitters. Takesteps to reduce or eliminate the load that heavy hitters put on the Data Center. Use the results from theheavy hitters reports to decide whether to exclude data from backups or to contact account ownersabout inordinately large backups.
Invalid accounts
An invalid account is an unstable account. Unstable accounts can occur from a failed registrations. Thefailure can be from a network error or another failure that did not let the system register. Invalidaccounts are rare.
Verify current firmware
Occasionally, hardwaremanufacturers release firmware fixes and updates for issues. Check with themanufacturer of each hardware component in your Data Center for firmware updates that apply to yourequipment.
Administering the Data CenterChapter 13: Monthly maintenance
Connected Backup (9.0.3) Page 101 of 113
Check software licensing
You initially purchased a set number of licenses for the Data Center. You can update the Data Centerlicense for the following reasons:
l Youwant to deploy the Agent to additional computers.
l Youwant to deploy a new Agent type.
l The network interface card (NIC) on the Data Center changed.
l You installed an additional NIC.
l The license now controls access to some features.
Every server in amirrored Data Center configurations, either amirrored pair or as part of a mirroredcluster must have the same license. Therefore, every server must be licensed for the same featuresand the same number of end-user accounts.
Deploy Agents to additional accounts
If you plan to deploy the Agent to more computers, consider when you want to addmore licenses.
To check for the number of available licenses
1. Open the DCMC.
2. Expand the Data Center in the Console tree and expand the primary Data Center server.
3. Expand theEvents node, and then click Application.
4. Find themessage that has a License Manager source. Event ID 9507 displays the number ofseats and features that you or your has company purchased.
5. In Support Center, create a report that displays the number of active accounts.
For more information about how to request a new license, seeMaintain the event logs, on the nextpage.
Add new NICs on the Data Center
You create each license for a Data Center server based on the HostID of the network interface card(NIC). You need a new license if the Host ID on the server changes (you install a new NIC).
To determine the new HostID associated with the new card
1. Open a command prompt window.
2. Change the directory to the Data Center folder. By default, this folder is \DataCenter.
3. Type hostid and press Enter.
The following example shows a system output:
Administering the Data CenterChapter 13: Monthly maintenance
Connected Backup (9.0.3) Page 102 of 113
The HostID for the current machine is:
0050dad5a9e6
NOTE: Provide NetBios over TCP/IP on the Data Center servers. The HostID.exe programrequires this configuration to verify the Data Center server's MAC address correctly against theData Center license.
For more information about how to request your new license, see toMaintain the event logs, below.
Determining HostIDs for additional NICs
Each license applies to a specific Data Center server. The association between the license and theserver is based on the HostID of the server’s network interface card (NIC). You can install a maximumof four NICs on your Data Center server. If your Data Center server uses multiple NICs, the license filemust be aware of each NIC.
To determine the HostID of a NIC
1. Open a command prompt window.
2. Change the directory to the Data Center folder. By default this directory is \DataCenter.
3. Type hostid and press Enter.
The following is an example of the system output:
The HostID for the current machine is:
0050dad5a9e6
0026fal7b9r5
0123kel8a6w2
0475der9n3y5
4. Record the Host IDs in the table in Installing the Data Center.
For more information about how to request a new license, seeMaintain the event logs, below.
Change the features offered to end-users
If your organization adds or removes features, request a new license to activate or deactivate features.You can use the License Request Form available through theMySupport portal to request for a license.
For more information about how to obtain a new license, refer to Installing the Data Center guide.
Maintain the event logs
Windows event logs record software, hardware, and system information. They provide valuablediagnostic information in case of system failure. Track your event logs to help diagnose problems in
Administering the Data CenterChapter 13: Monthly maintenance
Connected Backup (9.0.3) Page 103 of 113
case of system failure.
The Data Center saves and clears the Application log only if the Data Center is the application that fillsthe log. If a different application, such as SQL Server, fills the log, the Data Center does not save andclear it. Therefore, save and clear the Application logmanually. The Data Center never saves andclears the System and Security logs.
Store at least threemonths of event logs. Over time, these logs might become full. Save and clear thecurrent Application and System logs. When the Data Center detects a full DCMaint, the Data Centersaves the log to the Log Files folder and clears the log.
For best performance, useConnected Backup Requirements Matrix to determine the appropriate logsize for your Data Center servers.
You use theMicrosoft Windows Event Viewer to access the event logs on the Data Center. You canalso use the Event Viewer for the following actions:
l Saving event logs.
l Clearing event logs.
l Preventing the contents of the event logs from being overwritten.
l Increasing the size of the event logs.
For more information about the Event Viewer, refer to Microsoft Windows Event Viewer Help.
Verify records
To ensure that Data Center records remain current
l Examine the daily and weekly scheduledmaintenance records to ensure that you performed andrecorded themaintenance.
l Compile the system use records, such as the number of end-user accounts, backups, andretrievals, and publish them.
l Examine the service availability records, and compile and publish service availability statistics on arolling twelve-month basis.
l Examine hardwaremaintenance records, system software upgrade records, and records ofprocedure that you performed on the Data Center procedures to verify that you or your staff keepsthese records up-to-date.
l Examine the training records of Data Center operators to ensure that you properly train your staff.
l Verify that your vendor support contracts are current.
l When the Data Center server certificate expires after two years, replace the certificate with one thathas an expiration date of five years into the future. To do so, run the Certificate Renewer utility. Formore information, contact Support.
Administering the Data CenterChapter 13: Monthly maintenance
Connected Backup (9.0.3) Page 104 of 113
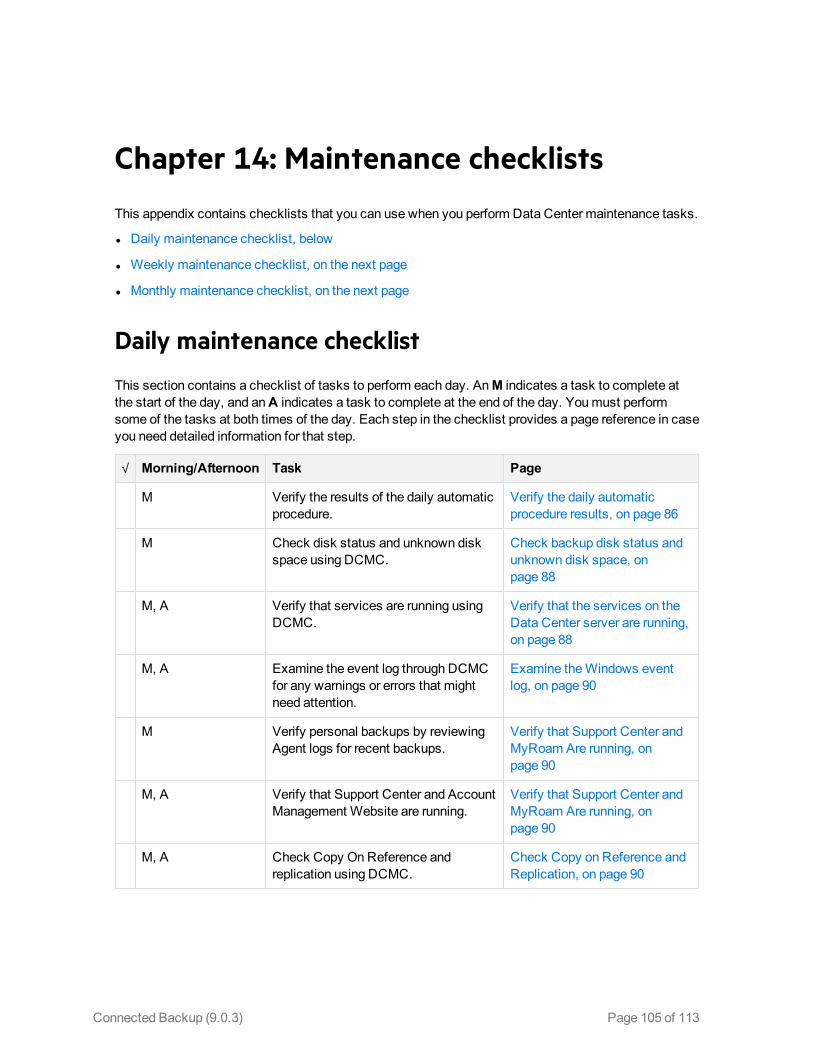
Chapter 14: Maintenance checklists
This appendix contains checklists that you can use when you perform Data Center maintenance tasks.
l Daily maintenance checklist, below
l Weekly maintenance checklist, on the next page
l Monthly maintenance checklist, on the next page
Daily maintenance checklist
This section contains a checklist of tasks to perform each day. AnM indicates a task to complete atthe start of the day, and anA indicates a task to complete at the end of the day. Youmust performsome of the tasks at both times of the day. Each step in the checklist provides a page reference in caseyou need detailed information for that step.
√ Morning/Afternoon Task Page
M Verify the results of the daily automaticprocedure.
Verify the daily automaticprocedure results, on page 86
M Check disk status and unknown diskspace using DCMC.
Check backup disk status andunknown disk space, onpage 88
M, A Verify that services are running usingDCMC.
Verify that the services on theData Center server are running,on page 88
M, A Examine the event log through DCMCfor any warnings or errors that mightneed attention.
Examine theWindows eventlog, on page 90
M Verify personal backups by reviewingAgent logs for recent backups.
Verify that Support Center andMyRoam Are running, onpage 90
M, A Verify that Support Center and AccountManagement Website are running.
Verify that Support Center andMyRoam Are running, onpage 90
M, A Check Copy On Reference andreplication using DCMC.
Check Copy on Reference andReplication, on page 90
Connected Backup (9.0.3) Page 105 of 113
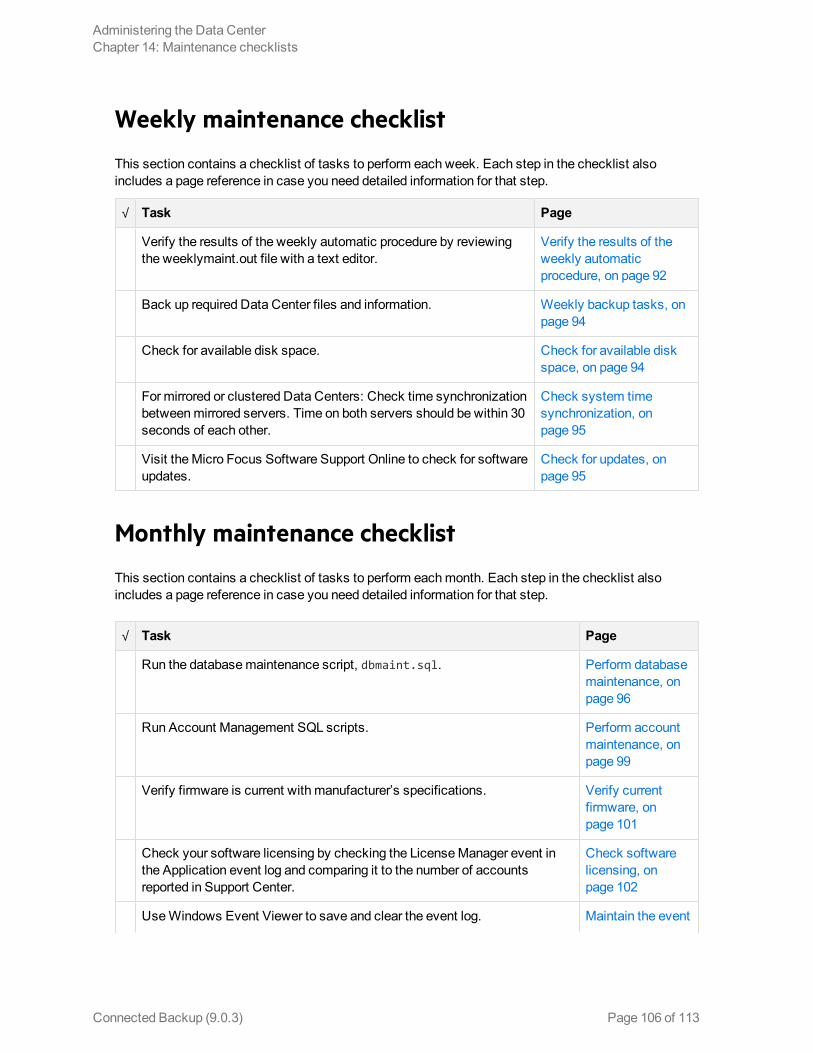
Weekly maintenance checklist
This section contains a checklist of tasks to perform each week. Each step in the checklist alsoincludes a page reference in case you need detailed information for that step.
√ Task Page
Verify the results of the weekly automatic procedure by reviewingthe weeklymaint.out file with a text editor.
Verify the results of theweekly automaticprocedure, on page 92
Back up required Data Center files and information. Weekly backup tasks, onpage 94
Check for available disk space. Check for available diskspace, on page 94
For mirrored or clustered Data Centers: Check time synchronizationbetweenmirrored servers. Time on both servers should be within 30seconds of each other.
Check system timesynchronization, onpage 95
Visit theMicro Focus Software Support Online to check for softwareupdates.
Check for updates, onpage 95
Monthly maintenance checklist
This section contains a checklist of tasks to perform eachmonth. Each step in the checklist alsoincludes a page reference in case you need detailed information for that step.
√ Task Page
Run the databasemaintenance script, dbmaint.sql. Perform databasemaintenance, onpage 96
Run Account Management SQL scripts. Perform accountmaintenance, onpage 99
Verify firmware is current with manufacturer’s specifications. Verify currentfirmware, onpage 101
Check your software licensing by checking the LicenseManager event inthe Application event log and comparing it to the number of accountsreported in Support Center.
Check softwarelicensing, onpage 102
UseWindows Event Viewer to save and clear the event log. Maintain the event
Administering the Data CenterChapter 14: Maintenance checklists
Connected Backup (9.0.3) Page 106 of 113

√ Task Page
logs, on page 103
Verify that record keeping is up-to-date. Verify records , onpage 104
Administering the Data CenterChapter 14: Maintenance checklists
Connected Backup (9.0.3) Page 107 of 113
Chapter 15: Managing the SSL/TLSprotocols
This chapter provides information on how to enable and disable secure communications protocols (SSLand TLS).
l Deprecation of TLS 1.0
l Secure communication for web services
l Secure communication between Agent and Data Center
Deprecation of TLS 1.0
TLS 1.0 is no longer considered to be a secure version of the TLS protocol, somany corporatecompliance standards require it to be disabled and amore secure version, such as TLS 1.1 or later, beused.
DEPRECATED:TLS 1.0 has been deprecated and its official “end of life” is June 30, 2018
Secure communication for web services
Secure web communication protocols provide a way to authenticate clients and servers on the web andto protect the confidentiality of communication between clients and servers.
Support Center, Account Management Website (AMWS), andMyRoam web sites use HTTPcommunication with the Data Center for secure communication.
Microsoft Secure Channel (Schannel) is a security package that facilitates the use of SSL and/or TLSencryption. Schannel usesWindows Registry settings to enable and disable SSL/TLScommunication over HTTP. You can optionally enable and disable the following protocols:
l PCT 1.0
l SSL 2.0
l SSL 3.0
l TLS 1.0
l TLS 1.1
l TLS 1.2
To ensure secure communication for Connected Backup web applications, perform the following:
• Disable PCT 1.0, SSL 2.0, and SSL 3.0 .
Connected Backup (9.0.3) Page 108 of 113
• Enable TLS 1.1 and TLS 1.2.
• (Recommended) Disable TLS 1.0.
Secure communication between Agent and DataCenter
The secure communication between Connected Agents and the Data Center are handled using TCP.The Schannel security provider keys, described above, do not have any effect on TCP.
As of Connected Backup 8.6.3.10 and 8.8.7, the two components negotiate the highest level ofcommunication supported by both the Agent and the Data Center. The Data Center supports TCPcommunication using the following protocols:
• TLS 1.0
• TLS 1.1
• TLS 1.2
The Backup Server (and other Data Center components) disable communication using SSL 2.0 andSSL 3.0.
Disable TLS 1.0
You can disable the use of TLS 1.0 for communication between the Agent and Data Center through aWindows registry key. To disable TLS 1.0, theEnableTLSv10 key must be added to theWindowsRegistry and set to zero. Otherwise, TLS 1.0 is not disabled. The Data Center installation processdoes not add this key so the Data Center administrator must add it manually.
NOTE:To disable TLS 1.0 for amirrored pair or clustered environment, the administrator must add thiskey to each Data Center in the environment.
To disable TLS 1.0 communication, do the following:
1. OpenWindows Registry Editor.
2. Navigate to HKEY_LOCAL_MACHINE\SOFTWARE\Wow6432Node\Connected\BackupServer registrykey.
3. Create a new DWORD value with the nameEnableTLSv10 and set the value data to 0 .
4. Close the Registry Editor.
5. Restart the Data Center services using DCMC.
IMPORTANT:Connected Agents prior to versions 8.6.3.10 and 8.8.7 are hard coded to use TLS 1.0. If youhave any such Agents deployed in your environment, disabling TLS 1.0 will prevent thoseAgents from communicating with the Data Center. As a result, those Agents will no longerbackup or restore data.
Administering the Data CenterChapter 15: Managing the SSL/TLS protocols
Connected Backup (9.0.3) Page 109 of 113
Administering the Data CenterIndex: access, Data Center Management Console (DCMC) – evaluating
Index
A
access, Data Center Management Console(DCMC) 64
accountsduplicate 100heavy hitters 101inactive 100invalid 101management 99reducing unnecessary 99unowned 99unsupported Agent versions 100with excessive backup amounts 101
adding new licenseadding seats to Data Center 102additional host ID 103additional NIC 103changing Agent features 103
Agentlicensing, features 103
archivesand Compactor 16deleting, and compaction 16repackaging, about 16replication, about 11
B
back updatabases 92
backups, managing excessive 101BackupServer 9
overview 9
C
capacitychecking disk space 94
checkingData Center license 102disk space status 94hardware firmware 101
clustered Data Centermonthly tasks 96
Compactorarchives, deleting 16archives, repackaging 16
database entries, deleting 16file expiration 17system analysis and repair 15
Copy OnReference 12CPU utilization, evaluating 81Customer volume, checking disk space 94
D
Data Center Management Console (DCMC)accessing 64interface 65, 71menus and toolbars 66, 71
Data Center Toolkitabout 60installing 61requirements 60
databasebackup to disk 92clearing transaction logs 92compaction and deleting entries from 16Master, Model, MSDB, backing up 93monthly maintenance 96replication of 11
DataBundlerbefore installing 59installing 58system requirements 58usage requirements 60
DBCC utility 96dbmaint.sql 96DCAlerter
about 13default data expiration settings 17deleting archives, and compaction 16Directory database, backing up 92disk
space, check available 94disk-only configuration
expiration rules, aboutexpiration, about 17
duplicate accounts, managing 100
E
Enabling the Data Center Protocol Sessionlog 78
enterprise directorymanaging 20
evaluatingCPU utilization 81RAM utilization 81
Connected Backup (9.0.3) Page 110 of 113
Administering the Data CenterIndex: event log – record keeping, verifying
event logDCAlerter service 13
excessive backups, managing accounts 101expiration
about 17default settings 17marking files for 15of files, and Compactor 17
F
features, licensing for Agent 103files
marking as expired, about 15replication, about 11
firmware, checking 101formulas
average CPU utilization 81RAM utilization 81system processor queue length 81
H
hardwarefirmware, checking 101
heavy hitter accounts, managing 101host ID, new license 102
I
inactive accounts, managing 100IndexServer 11invalid accounts, managing 101
L
licenseadding Agent features 103adding users 102additional host ID 103additional NIC 103checking Data Center 102host ID change 102new NIC 102removing Agent features 103updating Data Center 102
logsDCAlerter service 13Trace 76
M
maintenancedaily tasks 86monthly tasks 96
weekly tasks 92managing
accounts excessive backup amounts 101accounts on the Data Center 99accounts unsupported Agent versions 100duplicate accounts 100heavy hitter accounts 101inactive accounts 100invalid accounts 101unowned accounts 99
Master database, backing up 93measuring
CPU utilization 81RAM utilization 81
mirrored Data Centerdatabase backup 92monthly tasks 96synchronizing system time 95
Model database, backing up 93monthly maintenance
tasks 96MSDB database, backing up 93
N
NIClicense for additional 103license for new 102
O
overviewBackupServer 9DCAlerter 13IndexServer 11ReplicationServer 11
P
Pool account, about 12
Q
querying forduplicate accounts 100heavy hitter accounts 101inactive accounts 100invalid accounts 101unowned accounts 99unsupported Agent versions 100
R
RAM utilization, evaluating 81record keeping, verifying 104
Connected Backup (9.0.3) Page 111 of 113

Administering the Data CenterIndex: Registry database, backing up – verifying
Registry database, backing up 92removing Agent features, licensing 103replication
about 11database 11
ReplicationServer 11results
weekly maintenance 92results, weekly maintenance 92results,weekly maintenance 92
S
SendOnceCopy OnReference process, about 12
services, Data CenterBackupServer 9DCAlerter 13IndexServer 11ReplicationServer 11
settings, file expiration defaults 17SQL database
backup volume, checking for disk space 94volume, checking for disk space 94
stand-alone Data Centerdatabase backup 92monthly tasks 96
synchronicity of account data, andCompactor 15
synchronization, system time 95SystemMonitor
evaluating CPU utilization 81evaluating RAM utilization 81
system time, synchronization 95
T
technicians, validating 20, 27time, synchronizing system 95tools
Data Center Toolkit 57DataBundler 57
trace logging, about 76transaction logs, clearing 92
U
unowned accounts, managing 99unsupported Agent versions, finding accounts
with 100updating, Data Center license 102
V
validate Support Center technicians 20, 27verifying
disk space 94record keeping 104weekly maintenance results 92
Connected Backup (9.0.3) Page 112 of 113
Send documentation feedback
If you have comments about this document, you can contact the documentation team by email. If anemail client is configured on this system, click the link above and an email window opens with thefollowing information in the subject line:
Feedback on Administering the Data Center (Micro Focus Connected Backup 9.0.3)
Add your feedback to the email and click Send.
If no email client is available, copy the information above to a new message in a webmail client, andsend your feedback to [email protected].
We appreciate your feedback!
Connected Backup (9.0.3) Page 113 of 113