code of practice - everest solid wall panels
TRANSCRIPT

Code of Practice Everest Solid Wall Panels
2009
©Everest Industries Limited | 2009

C O P | E v e r e s t S o l i d W a l l P a n e l | P a g e | 2
CONTENTS
About Everest Industries Limited
Chapter 1
Introduction to Everest Solid Wall Panel – The Concept
Main Attributes of Everest Solid Wall Panel
Dimensions and Profile, Technical Specifications
Applications
Details of material required / Jointing Compound / Sodium Silicate Compound
Chapter 2
General Guidelines
Chapter 3
Product Selector
Chapter 4
Installation Details
Full Height Partitions
Full Height Partitions with Doors
Half Height Partitions
Jumbo Height Partitions
Jumbo Length Partitions
Prefab Construction Details
Chapter 5
Storage and Handling
Loading and Unloading

C O P | E v e r e s t S o l i d W a l l P a n e l | P a g e | 3
Everest Industries Limited
Everest Industries Limited (EIL), as an established and reputed name in India since 1934 for the
manufacturing and marketing of Fiber Cement products. EIL's current product portfolio covers both
roofing as well as plain boards and composite panels, which finds its applications in different
segments like industrial, commercial as well as residential for wall and ceiling lining, dry wall
partitioning and prefab shelters or portable cabins. EIL is a fast growing company and its turnover
has reached US $ 75 million registering CAGR of 15% over the last three years.
Company has the backing of vast experience and expertise, both organizational and technical. The
Ultra Modern Research and Development facility is manned with experienced, skilled and dedicated
personnel engaged in product, plant and technology development.
The R&D activities are directed towards modernization automation and technological innovation,
development and commercialization of value added products and towards exploring new avenues
for import substitution and utilize waste materials.
Everest – Key Facts
• 5 major production facilities
• 1100 employees
• Over 3000 retail points
• Fast growing export market in Europe, Africa, Australia & Asia
Everest – Presence in India

C O P | E v e r e s t S o l i d W a l l P a n e l | P a g e | 4
Everest Solid Wall Panel
India is now becoming a global real estate hub. With a growth rate of around 15 % in the building
construction sector, India poses itself as a happening playground for the world players in the field of
construction business. With more and more MNCs, BPOs, KPOs coming in, Indian construction
industry is moving fast towards a period where speed of construction and strength of the structure
will be the key areas of gaining competitive advantage and thus more profitability.
Seeing the great opportunity present in the construction market, we would like to build up an
association between the two companies, for our joint working.
The Dry Wall Systems Drywall is a concept that originated in the west, and moved to countries with advancement in
construction technology. As the rate of construction increased in countries like India and the cost of
material as well as labour increased, the need was to find an alternative that would help to cut down
project costs and could give speedy construction. The drywall construction was an answer to this.
Since the drywall is constructed with modules which are pre-cured and are easy to install, it reduces
the overall project cost by reducing the number of man hours out in the construction process.
Another advantage of the drywall systems is that the changes required at any time in the
construction could be done with ease. At times the whole structure could be moved (if required)
ESWP-Key Features • Tongue and Groove jointing system allow faster construction.
• Factory cured panels eliminates need for site Curing
• Light weight panels allow easy handling and erection.
• Easy workability-no special tools required.
• Re-locatable-complete structure can be dismantled and re-erected
Strong and Durable
• Superior strength to weight ratio and it can withstand dead and live loads.
• Excellent water , termite and fire resistant properties to withstand adverse conditions
• Most suitable for seismic and cyclone prone zones.
Quality
• Made to the exact specifications and sizes to improve erection speed and quality
• 100% ASBESTOS FREE Everest Solid Wall Panels makes it Eco-friendly.
Other Advantages
• Excellent surface finish- takes all decorative treatments.
• Excellent thermal and sound insulation properties.
• Slim Wall Panels provide extra usable floor area.
• Dry wall construction – Factory made Panels keep work site neat and clean.

C O P | E v e r e s t S o l i d W a l l P a n e l | P a g e | 5
ESWP-Main Attributes
Everest Industries Limited, pioneer of fibre cement products in India, proudly introduces of Everest
Solid Wall Panels – a new age product that will revolutionize the construction industry.
Everest Solid Wall Panels are sandwich panels made of lightweight FRACC (fiber-reinforced aerated
cement core) and Everest
Wall Boards (asbestos-free
fiber cement boards).
Factory-cured sandwiched
Everest Solid Wall Panels
are light in weight fire
resistant and sound
insulating. Everest’s high
quality asbestos-free
Everest Wall Boards used
as skin gives Everest Solid
Wall Panels a smooth
finish and makes them
dimensionally stable and
resistant to moisture /
humidity. Everest Solid
Wall Panel’s smooth surface can accept a host of finishes, making these modules ideal for
aesthetically pleasing interiors and exteriors.
Everest Solid Wall Panels come with the universally accepted tongue-and-groove joint system to
facilitate easy assembly. Now, Everest Solid Wall Panel can easily replace brick and mortar; and
other partition materials and systems for clean, hassle-free constructions.
Everest Solid Wall Panels are ideal for a host of applications such as internal walls, prefab housing
and mezzanine flooring. It is a time saving, safe and cost effective alternative for conventional
masonry.
Dimensions and Sizes Everest Solid Wall Panels are available in the following Sizes:
Thickness (mm) Width (mm) Length (mm) Tolerance (L, W, T)
75
600
2400 ±1 mm
2700 ± 1 mm
3000 ±1 mm
50
2400 ±1 mm
2700 ±1 mm
3000 ±1 mm
The panels are light weight and durable. Easy to cut the panels could be easily fixed in the required
floor plans. Everest Solid Wall Panels are stronger as compared to other partition systems. The
product is also termite proof and moisture resistant hence long lasting. Everest Solid Wall Panels are
90% lighter than brick and mortar structures thus putting fewer loads on the foundation of the
building. Due to its lightweight, tongue-and-groove jointing Everest Solid Wall Panels are perfect for
earthquake-prone areas.

C O P | E v e r e s t S o l i d W a l l P a n e l | P a g e | 6
The panels are available in two profiles
1. Square edge profile:
2. Beveled profile

C O P | E v e r e s t S o l i d W a l l P a n e l | P a g e | 7
PHYSICAL PROPERTIES :
S.NO. PROPERTIES UNIT 50mm 75 mm
1 Weight Kgs/sq.m 42.8 58.2
2 Density Kg/cubic m 857 892
3 Modulus of Rupture Mpa 3.8 3.8
4 Tensile strength N/sq.mm 0.35 0.35
( perpendicular to surface )
5 Axial compressive strength Kg/sq.cm 46.1 75
6 Thermal conductivity K.cal/h.m deg C 0.12 0.13
7 Sound transmission class db 38 40
8 Screw withdrawal strength KN 51 0.37
9 Fire Rating Min 108 138
Using brick and mortar for construction is a time consuming affair. In today’s world, time is money.
Consider Everest Solid Wall Panel for interior and exterior applications to save time, space, money;
and for a clean construction site. A product from the house of Everest, it guarantees you superior
attributes as well as the best in quality and durability.
Applications INTERNAL WALLS EXTERNAL WALLS PREFAB HOUSING
• Partition walls in
commercial housing
• Partition walls in
residential buildings
• Partitions in
temporary structures
• Cladding walls in
warehouses, factories, etc.
• Walls in residential and
commercial buildings
• Schools, colleges
• Barracks
• Hospitals, rural health care centers
• Farm Houses, hotels, resorts
• Residential Buildings
• Project-site offices and accommodations
• Rehabilitation Centers
• Roof top extensions
• Guard houses, security cabins
• Telecom shelters and many more

C O P | E v e r e s t S o l i d W a l l P a n e l | P a g e | 8
Material required • Circular Saw
• Hand Saw ( For minor works in emergency )
• Hand Planner ( For minor works in emergency )
• Electric drill machine
• Electric Hammer Drill Machine.
• Electric Planner.
• Iron Hammers- 1Kg, 2Kg.,5Kg.
• 2” Wooden Screws
• 3” Wooden Screws
• Self tapping screws, Caps
• Screw Drivers-12” , 15” , 18”
• Sealant application gun
• Sand paper
• Measurement tape-3mtr,5mtr,10mtr
• Plumb
• Paint Brushes/rollers
• Putty application patti/plate
• Cotton /Nylon Line Thread (Dori) and color.
• Spirit Level/ Water level
• Soft Wood timber pieces ( 75mm x 50mm x
600mm length )
• Safety goggles
• Nose Masks
• Waste disposal bin/container.
• Scaffolding as per requirement.
• Hacksaw frame and blades/GI sheet cutter
Everest Fixing Compound The Everest Fixing Compound is mixed with sodium silicate to join the tongue and groove of the two
adjacent solid wall panels. The mixture joins the two panels in a homogeneous manner and gives it
strength and a longer life. The mixture consists of three parts (by weight) of Sodium Silicate of
Commercial Grade and one part (by weight) of Everest Fixing Compound. The mixture binds with the
tongue and groove section of the respective panels in contact and provides suitable strength.
Everest Jointing Compound It is specially formulated jointing compound in powder form, used for jointing & finishing of cement
fiber board as per normal recommended practice. It has been formulated as per International
standard to have more user friendly features. It is used for jointing & finishing of joints of cement
fiber board to obtain flush & seamless finish.
This is an air drying material having improved properties in terms of flexibility & anti cracking. This is
specially developed to be used for medium suction building boards & also to suit tropical climatic as
well as site working conditions. It attains early strength & allows early decoration.
This comprises of natural minerals (calcium carbonate, gypsum etc) & additives (polymer, water
retention agent etc) to have properties like easy workability, sand ability & good adhesion with
board surface, right workable open time of 100 minutes. It also passes tape adhesion test.
This is in very fine powder form & is mixed to clean water to have right consistency paste. After
mixing with water, paste is to be left for 10 minutes & to again mix thoroughly. The paste so made is
now ready for application. The paste is applied into the joints of boards for embedding joint tape &
finishing the surface of the joints, as per recommended practice. The wet mix (paste) should be used
be used within 90 minutes.
This is packed in 25 kg paper bags & is recommended to store in dry condition inside the building.
The shelf life is six months. Paper bags should be handled with care, not using hooks. Also these are
to be protected from humidity & water.
Safety information
This does not contain any hazardous or toxic material. All raw materials used are refined & in fine
powder form. It does not make burning sensation with skin. However it is required to use hand
gloves as well as recommended tools for jointing & finishing.

C O P | E v e r e s t S o l i d W a l l P a n e l | P a g e | 9
In case it comes in contact with eyes, immediately to wash with quantity of clean running water & to
make sure to perfectly wash back of eye lid as well followed with medical assistance earliest
possible.
In case someone has accidentally inhaled or swallowed it, have him/her rest in clean air & to seek
medical assistance immediately.
Everest Solid Wall PanelSolid Abutment

C O P | E v e r e s t S o l i d W a l l P a n e l | P a g e | 1 0
General Guidelines
Installation Procedures
Step 1: Check the level of the ground with water level
tube. Mark the layout of the partitions plan on the
floor.
Step 2: Cut the floor channels to the required lengths
and fix the GI bottom U-profile channel on the floor by
using expandable screws and caps. Wherever required
please provide leveling strips/ packing strips under the
bottom track. Fix the U-profile GI Channel as vertical at
one end of the partition in plumb. Mark the ceiling with
plumb to the floor channel and fix the Top track to the
slab with screws and cap.
Note: Preferred screw is No. 8 size and length 35mm/50mm. Height of the Everest Solid Wall Panel
should be approx. 18mm less than the gap between the floor and ceiling.
Step 3: Clean the floor channels, tongue and groove portion of the Module for firm fixing.
Step 4: Insert the Module by lifting and tilting it into ceiling channel first, and then position the same
by pushing from smaller size edge of the floor channel .Position the module and push towards wall.
Step 5: Check the right angle of the panel (using Set Square) and adjust by inserting wooden packing
in between floor channel and Module to ensure right angle.
Step 6: Apply sodium silicate and Everest Fixing Compound paste on entire length of tongue and
groove for proper joining and Slide Everest Solid Wall Panels one after the other in to the floor and

C O P | E v e r e s t S o l i d W a l l P a n e l | P a g e | 1 1
ceiling channels and fixed together by same method. Ensure that sodium silicate and Everest Fixing
Compound is applied in every joint of Everest Solid Wall Panel.
Door and Window fixing Details Different Types of Door Frames like steel, aluminium,
and timber can be fixed to the Everest Solid Wall
Panels.
Typical floor plan showing different cases of door
positioning is drawn for quick reference.
CASE 1: Door Frame 300mm away from Column / Wall
• Fix the floor channel leaving the gap for the door
as per the size of the door and fix the ceiling
channel to the entire length of the partition.
• Cut the standard 600mm wide panel to make it a
300mm wide panel. Cut the panel to L shape on
the top, for resting the lintel panel. The width of the L remains constant i.e. 150mm whereas the
height of the L varies depending upon the door height.
• Fix the door frame in position.
• Cut the 600m wide panel, which is to be fixed to other side
of the door frame, to L shape in opposite side to the first
panel. Now the partition is ready to take the lintel panel.
• Length of the Lintel panel should be 300m plus the door
opening for providing the minimum bearing of 150mm on
either side of the opening. Width of the Lintel panel is to
be decided by the space available above the door opening.
• Fix the
remaining panels and complete the partition,
as per the procedure described for full height
partitions. Now the Door can be fixed.
• The partition wall is ready and is to be finished as
per the finishing procedures.
CASE 2: When the door is to be fixed from the
starting of the partition i.e. Brick Wall / Column
• Start Construction the partition where there is
no opening.
• Complete the partition up to the door. Last panel
is to be cut for resting the panel. The width is to be reduced by 150mm and the height is to be
decided as per the height of the door opening.
• Mark the height of the door opening on the column. Ensure that it is in level with the cut panel
and Fix a M.S. Bracket, of Size 75 x 75 x 6mm and 50mm wide, to the column with anchor
fastener.
• Position the door frame and fix it to the panel on one side and to the column on the other.
• Position the lintel panel on vertical panel and MS bracket and fix the lintel panel.

C O P | E v e r e s t S o l i d W a l l P a n e l | P a g e | 1 2
• Fix the door shutter and finish the partition as per requirement.
CASE 3: When two doors are fixed at one place
• First construct the first wall perpendicular to the wall on which the doors are to be placed. The
length of the wall should be less by the thickness of the panel, than the length required so that
the overall size is maintained after
fixing the front wall.
• A 300mm panel is required for fixing
the two door frames. The height of
this panel should be same as the two
door opening. Fix this panel to the
wall A as shown in the drawing.
• Start constructing the wall on which
the doors are to be made, as shown,
up to the last but one panel. At the door opening, cut L in the last vertical panel of size 150mm
width and depth as per door opening to rest the lintel panel
• Position the door frame and fasten it to both the adjacent panel.
• Fix the second frame to the 300mm wide panel, on the wall C side. Cut “L” in the first panel of
wall C, of 150mm wide and height depending upon the door opening.
• Fix the lintel panel as per the procedure described.
• Continue to build the other walls to complete the partition.
• Fix the door shutter of required size and do the finishing as per the procedure.
Glass Window Fixing
• Partition wall to be constructed as per the procedure described.
• Glass can be provided in Everest Solid Wall Panel partitions to the required height using frames
and beading in the timber, MDF or aluminum. A view for the same is shown.
• At least one panel is required on either side of the glass to support the lintel panel.
• Horizontal panels are fixed above glass openings with minimum bearing of 150mm to transmit
loads on vertical panels.
• Maximum length of the glass panel can be 2700mm (after which a vertical panel has to be used),
• Various treatments can be given to the lintel panel as per the design keeping that minimum
width of the lintel panel has to be 30mm
• Lintel panel is fixed as per the described procedure. Clean the surface at the grout filled portion
for lintel panels and treat the joint as per details of finishing.

C O P | E v e r e s t S o l i d W a l l P a n e l | P a g e | 1 3
Product Selector
The selection of the Everest Solid Wall Panel for the specific application would depend on the load
that the system needs to carry and the size of the installation. The places which are high traffic areas
must be installed with 75 mm panels. The low traffic areas may be installed with 50 mm panels.
Applications Edge Recommended Thickness
(mm)
Partitions 50 75
Full Height Square / Beveled � �
Full Height with Glass Square / Beveled � �
Half Height Square / Beveled � �
Jumbo Height Square / Beveled � �
Industrial Cladding Square / Beveled � �
* Recess Edge panels are recommended where flush joints/Joint-less finish are required.
The thickness of the Everest Solid Wall Panels is decided on the basis of design parameters. Recess
Edge panels are recommended for all seamless / flush joint / Joint-less applications. Panels with
tongue and groove on 600mm portion for Jumbo height partition can be offered on specific
requirement.
Length of the panel to be used is selected based upon the height of the partition required. The
Panels are available in lengths of 2400mm, 2700mm and 3000mm.
In certain cases, depending upon the length of the partitions the width of the panel is to be cut to
size. However panels of width less than 150mm should not be used in partitions.
In case the length of the partition is in multiples of 600mm, the tongue portion of one panel (last
panel) is to be removed and the width is to be reduced, from tongue side, as per size requirement.
If the length of the partition is in multiples of 600mm + X, where x > 150mm <600mm, the width of
one panel (last panel) is to be reduced, from tongue side, as per the size requirement.
Further, if the length of the partition is in multiples of 600mm + x where x < 150mm, the width is to
be reduced from two panels, preferably the first and the last panels of the partition, as per the size
requirement. The reduction in width for the first Module should be done from groove side and for
last panel from tongue side.
Remarks
• The thickness of the Everest Solid Wall Panel is decided on the basis of design parameters.
• For joint-less finish we recommended the bevelled edge Everest Solid Wall Panels.
Accessories
Floor & Ceiling Channels
The size of the channels, to be used depends upon the thickness of the selected panels. Everest
recommends 1.25mm thick G.I. Channels. The thickness of the channels is 1.20 mm and the sides are
of height 25 mm and 14 mm leaving a height gap of 11 mm

C O P | E v e r e s t S o l i d W a l l P a n e l | P a g e | 1 4
Installation Details
Full Height Partition After selecting the panels and accessories as detailed in previous segments, the construction for the
partitions can be carried out in the following way: -
• Mark the floor plan as per approved drawing.
• Cut the floor channels (F.C.) to the required lengths.
• Place the smaller size edge of the F.C. towards the
working side – for the ease of lifting and positioning
of the panels.
• Fasten the F.C. to the floor, with self expansion
screws of size N8 x 35/50mm at every 600mm
center to center on base of the channel. First screw
shall be at 50mm away from the starting point.
• Mark the ceiling plumb to F.C. and fix Ceiling
channels to the ceiling, with self expansion screws.
• Height of the Everest Solid Wall Panels used should be approx. 18mm less than the gap between
the floor and ceiling. Required size of the panel is to be cut from the standard 2.4m, 2.7m or 3m
long panels. The height needs to be checked and maintained for each individual panel before
inserting.
• Clean the floor channels, tongue and groove portion of the panels for firm fixing.
• Lift and keep the first panel vertical to the floor with the groove side towards the wall end.
• Insert the panel by lifting and tilting into ceiling channel first, and then position the same by
pushing from smaller size edge of the floor channel with the help of two heavy duty wide steel
wedges without damaging the corners.
• Position the panel and push towards the wall.
• Check the right angle of the panel (using Set-Square) and adjust by inserting wooden wedge in
between floor channel and panel to ensure right angle.
• Similarly, the second panel is also inserted in such a way that the groove of the second panel and
the tongue of the first panel are in perfect mesh.
• The tongue and groove joint is filled with the sodium silicate compound, spread evenly over the
tongue-groove intersection.
• The second panel is then pushed to fix into the first panel leaving a uniform gap between the
two panel surfaces.
• The surface is then treated as per the finish required. The joint-less finish may be obtained on
beveled panels using the mesh tape and the Everest Jointing compound.
C O P | E v e r e s t S o l i d W a l l P a n e l | P a g e | 1 5
Half Height Partition Everest Solid Wall Panels are ideal for half height partitions as these are single monolith in nature
and therefore offer sturdiness.
Procedure
• Fix the floor channel with self expansion screws at every 600mm center to centre.
• The first panel starting from the brick wall shall be fixed as shown in the figure
• Fill the groove portion of panel with Everest Jointing compound and push towards the wall. The
gap may be filled with a suitable flexible silicone sealant making a proper wall abutment.
• Alternatively, floor channel can be used vertically for supporting the panel to avoid any lateral
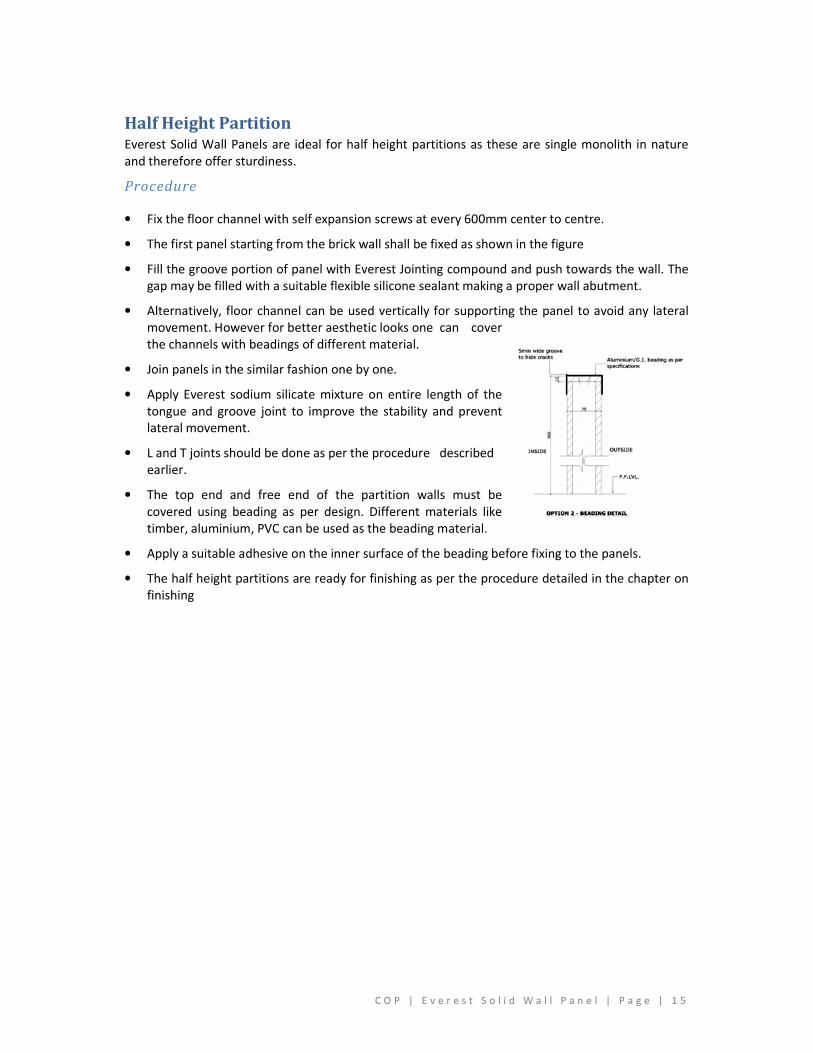
movement. However for better aesthetic looks one can cover
the channels with beadings of different material.
• Join panels in the similar fashion one by one.
• Apply Everest sodium silicate mixture on entire length of the
tongue and groove joint to improve the stability and prevent
lateral movement.
• L and T joints should be done as per the procedure described
earlier.
• The top end and free end of the partition walls must be
covered using beading as per design. Different materials like
timber, aluminium, PVC can be used as the beading material.
• Apply a suitable adhesive on the inner surface of the beading before fixing to the panels.
• The half height partitions are ready for finishing as per the procedure detailed in the chapter on
finishing

C O P | E v e r e s t S o l i d W a l l P a n e l | P a g e | 1 6
Jumbo Height Partitions Partition without steel frame work (up to 4.5 and 4.8mtr height)
• Suitable for non load bearing walls up to 4.5mtrs height.
• Frame work/ Steel work is not required for these type of partitions up to 4.5 meters
• In such cases panels are staggered for attaining stability and rigidity.
• Minimum stagger of 1500mm is recommended between horizontal joints of two adjacent
panels. Length of the panels is to be decided accordingly
• Top support such as G.I channel is necessary for such kind of construction.
Procedure
• Fix the floor and ceiling channel as per the drawing and follow the procedure described for
construction of partition panel in chapter 3.2. Full height partitions.
• Horizontal jointing can be done as under:
• First fix the 3M panel and apply the Everest jointing compound in the groove portion.
• Place the hexagonal beading or G.I. channel as shown in the drawing on the top groove of the
bottom panel before placing the upper panel having groove.
• Place the 1.5M panel above the 3M panel and push the same into ceiling channel.
• Next, the smaller size panel should come in the lower side and bigger panel in the upper side
and proceed in the similar fashion.
• Special panel with tongue on one side and groove on other side can be used.
Following procedure is to be adopted for fastening the panels for rigidity.
• Rout the facing sheet of the panel of size 15 x 35 x 250mm on top and bottom panels.
• Place the 12mm dia. G.I. coated rod in the rout after dipping the same in sodium silicate.
• Fill the rout with Everest Jointing compound.
• Fill the timber / G.I. (25 x 50 x 1000 mm long) bracing with 6mm dia. nut and bolts across for a
day to ensure proper fixing as shown in the figure.
• Remove the bracing after one day. The wall is ready for finishing.
• Fill the holes with jointing compound, used to do the finishing. The joining of the tongue and
groove, filling of the joints and finishing is to be done as per the procedure described in later
chapters.
Note: If the width of the partition is more than 4.8m, it is recommended to use steel column or cross
wall at every 4.8mtrs.

C O P | E v e r e s t S o l i d W a l l P a n e l | P a g e | 1 7
Jumbo Height Partitions: (Without steel frame)
Procedure
• Partition without steel frame work (up to 4.5 and 4.8mtr height)
• Suitable for non load bearing walls up to 4.5mtrs height.
• Frame work/ Steel work is not required for these type of partitions up to 4.5 mtrs.
• In such cases panels are staggered for attaining stability and rigidity.
• Minimum stagger of 1500mm is recommended between horizontal joints of two adjacent
panels. Length of the panels is to be decided accordingly
• Top support such as G.I channel is necessary for such kind of construction.
• Fix the floor and ceiling channel as per the drawing and follow the procedure described for
construction of partition panel in chapter 3.2. Full height partitions.
Horizontal jointing can be done as under:
• First fix the 3M panel and apply the Everest jointing compound in the groove portion.
• Place the hexagonal beading or G.I. channel as shown in the drawing on the top groove of the
bottom panel before placing the upper panel having groove.
• Place the 1.5M panel above the 3M panel and push the same into ceiling channel.
• Next, the smaller size panel should come in the lower side and bigger panel in the upper side
and proceed in the similar fashion.
• Special panel with tongue on one side and groove on other side can be used.
Following procedure is to be adopted for fastening the panels for rigidity.
• Rout the facing sheet of the panel of size 15 x 35 x 250mm on top and bottom panels.
• Place the 12mm dia G.I. coated rod in the rout after dipping the same in sodium silicate.
• Fill the rout with Everest Jointing compound.
• Fill the timber / G.I. (25 x 50 x 1000 mm long) bracing with 6mm dia nut and bolts across for a
day to ensure proper fixing as shown in the figure.
• Remove the bracing after one day. The wall is ready for finishing.
• Fill the holes with jointing compound, used to do the finishing. The joining of the tongue and
groove, filling of the joints and finishing is to be done as per the procedure described in later
chapters.
Note: If the width of the partition is more than 4.8m, it is recommended to use steel column or cross
wall at every 4.8mtrs.

C O P | E v e r e s t S o l i d W a l l P a n e l | P a g e | 1 8
Jumbo Height Partitions in horizontal execution.
• Supporting structure (T section) is to be fabricated by welding MS angles back to back.
• The size of the angles are designed based on different parameters like height of the wall,
external and internal use, wind velocity etc, as per the structural requirements.
• The maximum distance between the supporting structures should be 3000mm.
• The supporting structure should be welded to steel plate grouted in the ground. The other end
is to be grouted in RCC or anchored into steel structure as per the requirement.
• Floor channels are to be fixed at the bottom, between supporting structures, to guide the
panels.
• Everest Solid Wall panels are positioned betweens the two sections horizontally with the tongue
and groove on upper side of the panel and groove to the floor channel and fasten with M6 nuts
and bolts.
• Apply Everest jointing compound on the tongue and groove portion
• Fix the panel to the required height as per the procedure described above
• Apply Everest jointing compound on the tongue and groove joint.
• After securing the entire panel in position, seal the Everest Solid wall junctions at the steel
column vertically with Hat section to cover the bolts.
• Openings of different sizes can be provided in these partition walls to provide windows using
frames. The partition is ready for the finishing.
A TYPICAL JUMBO HEIGHT PARTITION IN HORIZONTAL EXECUTION

C O P | E v e r e s t S o l i d W a l l P a n e l | P a g e | 1 9
Pre-fabricated Structures Everest Solid Wall Panels are specific for pre-fabricated structure. Prefabricated structures are
specified in two field, Load bearing and Non load bearing structures. Everest Solid Wall Panels are
specified for the structures, load bearing as well as non load bearing structure.
Procedure
• Mark the layout of the prefab structure plan on the floor.
• Fixed ‘U’ profile GI Channel on the floor as per the lay out.
• Insert Everest Solid Wall Panel in Floor channel and check its plumb,if it is not in plumb firstly
fixed it in plumb by tilting and other methods.
• After checking the plumb of first module insert other Everest Solid Wall Panel one after the
other in to the ‘U’ profile GI Channel.

C O P | E v e r e s t S o l i d W a l l P a n e l | P a g e | 2 0
• Initially firm up the corner portion by inserting the corner angle.
• If the length or width is more than 3000mm than used coloumn at every 3000mm.
• Coloumn should be RHS/SHS,MS Section or Brick mesonary.
• Where ever door or windows is required insert the door/windows frame and put the cut piece of
Everest Solid Wall Panel on the top of the frame and continue the process as per plan.
• Slide and fix the ‘U’ profile GI channel on the top of the Everest Solid Wall Panels.
• Take up the erection of back and front wall simultaneously.

C O P | E v e r e s t S o l i d W a l l P a n e l | P a g e | 2 1
• Put the truss on the column and firmly fixed with nut and bolts of 8mm dia.
• If the span is less than 3.6 mtr we can directly fixed the truss on Everest Solid Wall Panels.
• After fixing the trusses,fixed purlins and all as per design.
• After all the trusses and purlins are erected , start laying roof sheets.
• Once the roof sheets are laid down start fixing the ridge covers.
• If in scope do false ceiling as per specification.
• We can’t concelled the electrical and plumbing in 50mm Everest Solid Wall Panel.

C O P | E v e r e s t S o l i d W a l l P a n e l | P a g e | 2 2
Storage and Handling
• Place the support frame 2000mm away from each other. Position the husk bags on the base of
the support frame.
• Lift and carry the Modules vertically.
• Position the first Module with proper alignment and let it rest on the back support. Always keep
the tongue side of the Module on the top side.

C O P | E v e r e s t S o l i d W a l l P a n e l | P a g e | 2 3
• Position three metal spacers, for every panel, one at the centre of the module and other two on
either side i.e. 900mm away from centre.
• Always keep the tongue side of the module on the top side.
• Position the modules one after another. Ensure that spacers are used after every module.
• After the stack is built, always cover the modules with plastic/tarpaulin sheets when kept in the
open.
Loading and Unloading
• Position the husk bags in the truck body in three rows. Timber supports are tied on both sides of
the truck to support second stack of modules.
• Start loading the bottom stack from both the sides of the truck body and pack the gap at the
centre with husk bags.
• Put husk bags above the first stack of modules and load the second stack.
• Put husk bags above the second stack and load the third stack of modules flat up to 8 modules in
a row. Provide husk bags in between the horizontal stacks.

C O P | E v e r e s t S o l i d W a l l P a n e l | P a g e | 2 4
• Tie the modules with jute rope/coir to the truck body. Cover the modules with tarpaulin before
dispatch.

C O P | E v e r e s t S o l i d W a l l P a n e l | P a g e | 2 5
Everest Industries Limited
G E N E S I S , G - 1 , A - 3 2 ,
M O H A N C O - O P E R A T I V E N D U S T R I A L E S T A T E
M A T H U R A R O A D , N E W D E L H I P I N – 1 1 0 0 4 4 ( I N D I A )
B O A R D N U M B E R S : + 9 1 - 1 1 - 4 1 7 3 1 9 5 1 / 5 2 / 5 3
F A C S I M I L E : + 9 1 - 1 1 - 4 6 5 6 6 3 7 0
© 2008 | Everest Industries Limited