classroom performance system (cps) clickers
TRANSCRIPT
CPS Clicker Quick Guide Page 1
Classroom Performance System (CPS) Clickers - Training and Support
1. The CPS Training Video Series and Quick Step Guides (PC) –Click link to view two to three
minute videos for every feature. Each Quick Step Guide is usually one or two pages and are available
to download.
The CPS Video Series and Quick Step Guides (MAC) – Click link to view tutorials.
2. Technical Support Toll-free Hotline: 1-888-333-4988, 5am to 6pm, Monday-Friday (CST).
When prompted press 1, press 2, then press 1.
3. eInstruction Community – Join the eI Community™ to connect with other educators, find free high-
quality resources (including CPS lessons), and learn about the latest best practices and technologies in
classroom instruction. www.eicommunity.com . There is also an icon within the CPS software to
access the eI community.
Don’t Forget the Three Tabs in CPS – Prepare, Engage and Report
In Prepare, you can create your classes and lessons, import and view our pre-made lessons,
import ExamView content, create an answer key for your paper tests (fastgrade feature) or set up
a team activity like our Challenge Board (Jeopardy Style Game).
In Engage, get ready to hand out the clickers! You can engage a lesson, challenge board,
examview test bank lesson or use the verbal mode with “on the fly” questions or online quiz
content– always remember to detect your receiver first!
Reports – Once you close out of your assessment, you can view different reports showing how
each student and the class did on every question (and even for NYS standards if you linked them
with your questions). You can choose to print the report or export it to another file format.
Important Notes – Messages you may see:
A message may pop up each time you open CPS warning you that you are saving to a
network drive, you can say yes/ok. This is just making sure you know it is being saved to
a network and make sure it is backed up. Every week or two, back up your CPS folder
on a flash drive or cd so if you ever lose your computer data, your cps database will not
be lost.
Update CPS software - if it asks if you want to update say no, you probably won‟t have
permission to do that anyway. Your network admin can do the updates when they are
ready.
You do not have to be online to use the clickers – say ok if it tells you that you are not
online.
Don‟t create a NEW database at school… you should already have one!
I included directions below for setting up the media cart and for the most popular features in
CPS. Please view the online video tutorials and quick start guides for additional features.
To access the videos without links, go to www.einstruction.com, click Training in the Quick
Links Box on the right side. Click on Resource and Videos.
Click on CPS 6 K-12 to see the modules.
CPS Clicker Quick Guide Page 2
Setting up your CPS Clicker lesson
1. First save a premade database folder for your grade or subject to your My
Documents Folder.
2. Double click on CPS icon on the computer
3. Choose open an existing database (DO NOT click on Create a New Database)
4. Browse to your my documents folder
5. Double click on the cps folder you saved, then double click on the database icon
or click open.
6. Say Yes to the message about opening your database on a network drive.
7. The CPS software should open with your database lessons.
8. The next time you click on the CPS icon on your computer, it should automatically open up the
software with your database lessons. If it doesn‟t, then repeat steps 4-6.
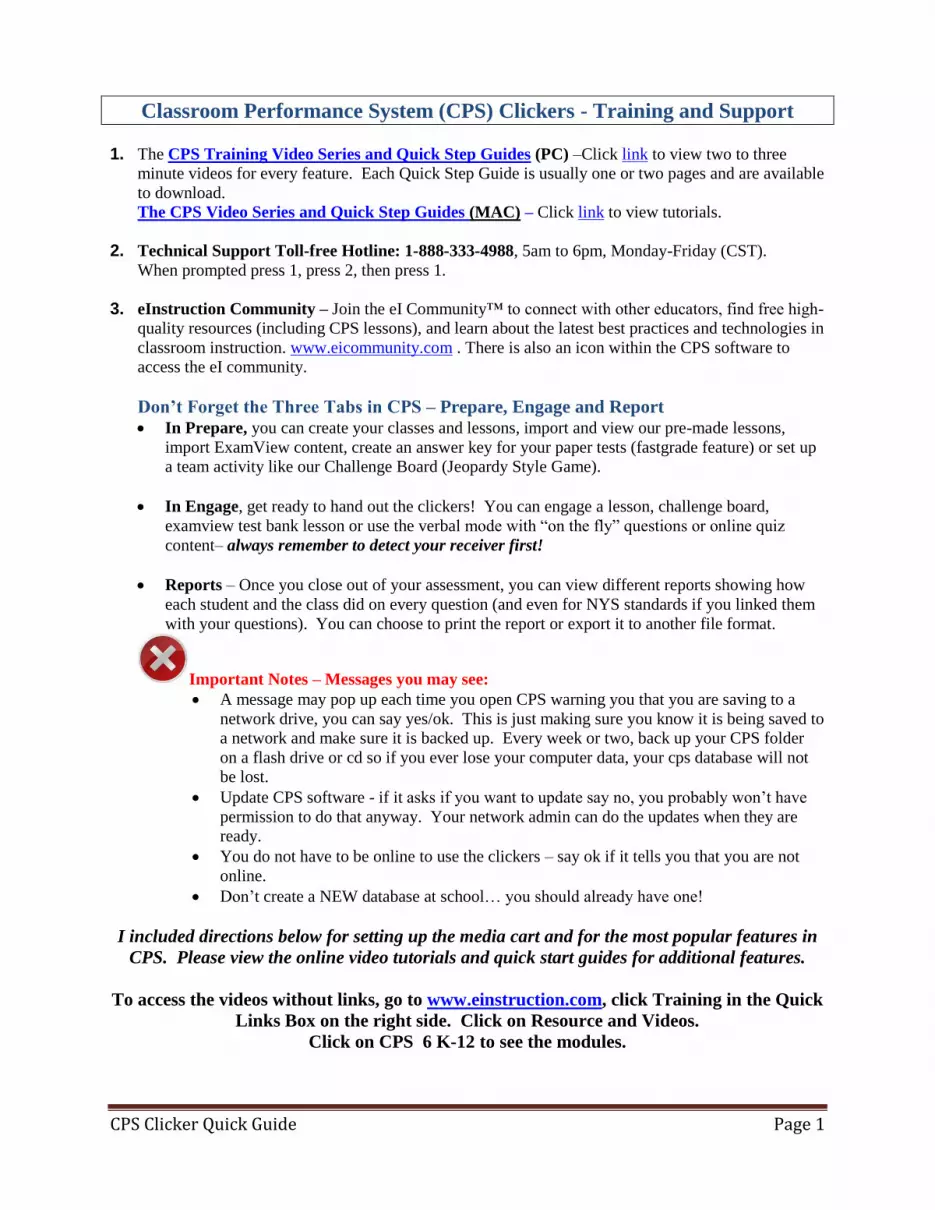
Detect Your Receiver - Always “detect” the receiver before you engage a lesson with your students.
This is so you know the computer recognizes that the receiver is plugged in so you can receive response
from the clickers.
1. You will be clicking on the eInstruction icon in your system tray at the bottom right hand
corner of the comptuer screen.
2. If you don‟t see the eInstruction icon in the bottom right corner of your computer screen, click on
the arrow button and will show the hidden icons.
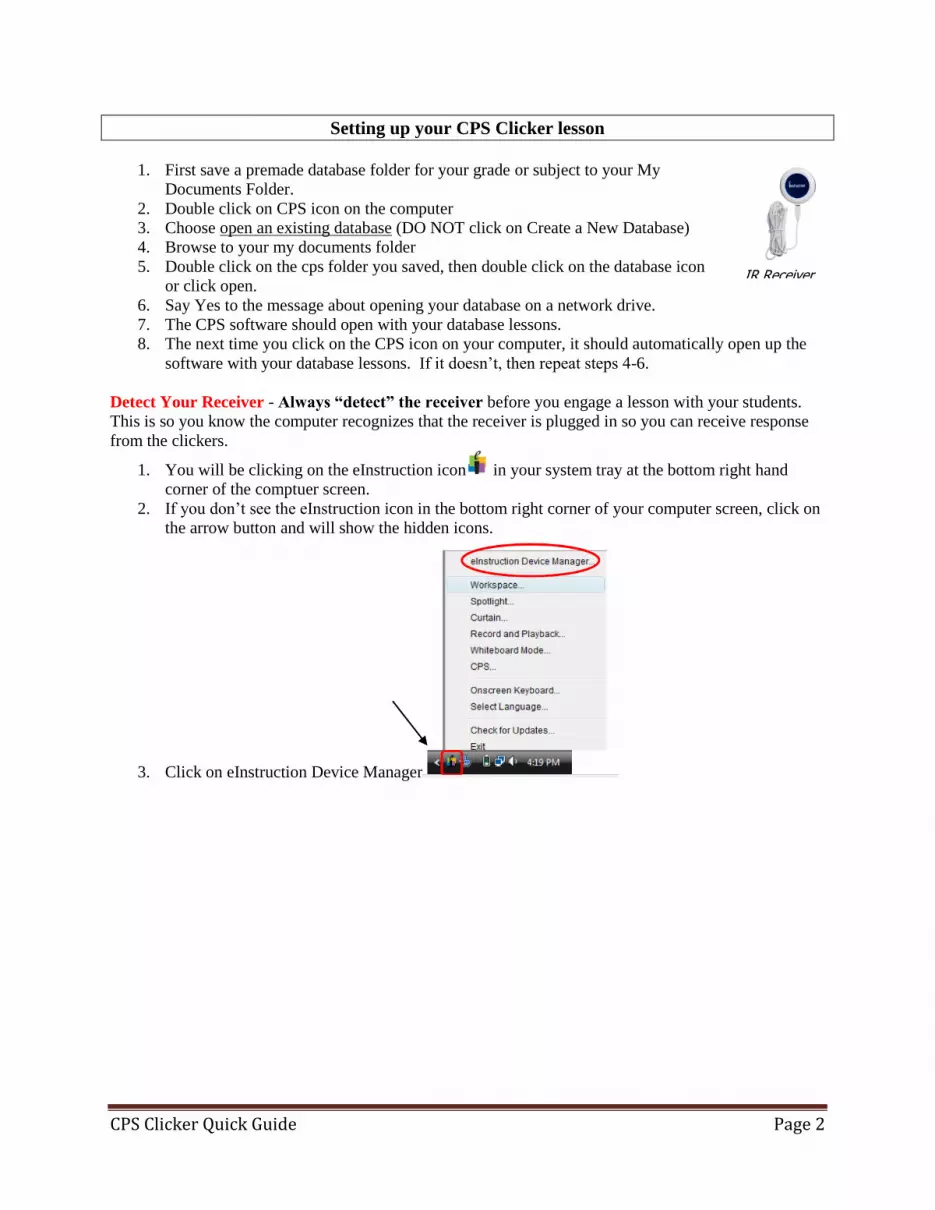
3. Click on eInstruction Device Manager
IR Receiver
CPS Clicker Quick Guide Page 3
4. If an icon that shows a CPS IR Receiver graphic or CPS RF Receiver graphic with a check mark
next to it is in the box then the receiver has been detected. You may also see an icon for a Mobi
wireless tablet, that is a different receiver.
5. If there is no icon for IR receiver or RF receiver or if there is one and it has ax X, delete the icon
and go to options, then click on Discover Devices and the icon should appear.
Engage Your Lesson (lesson complete and ready to hand out the clickers)
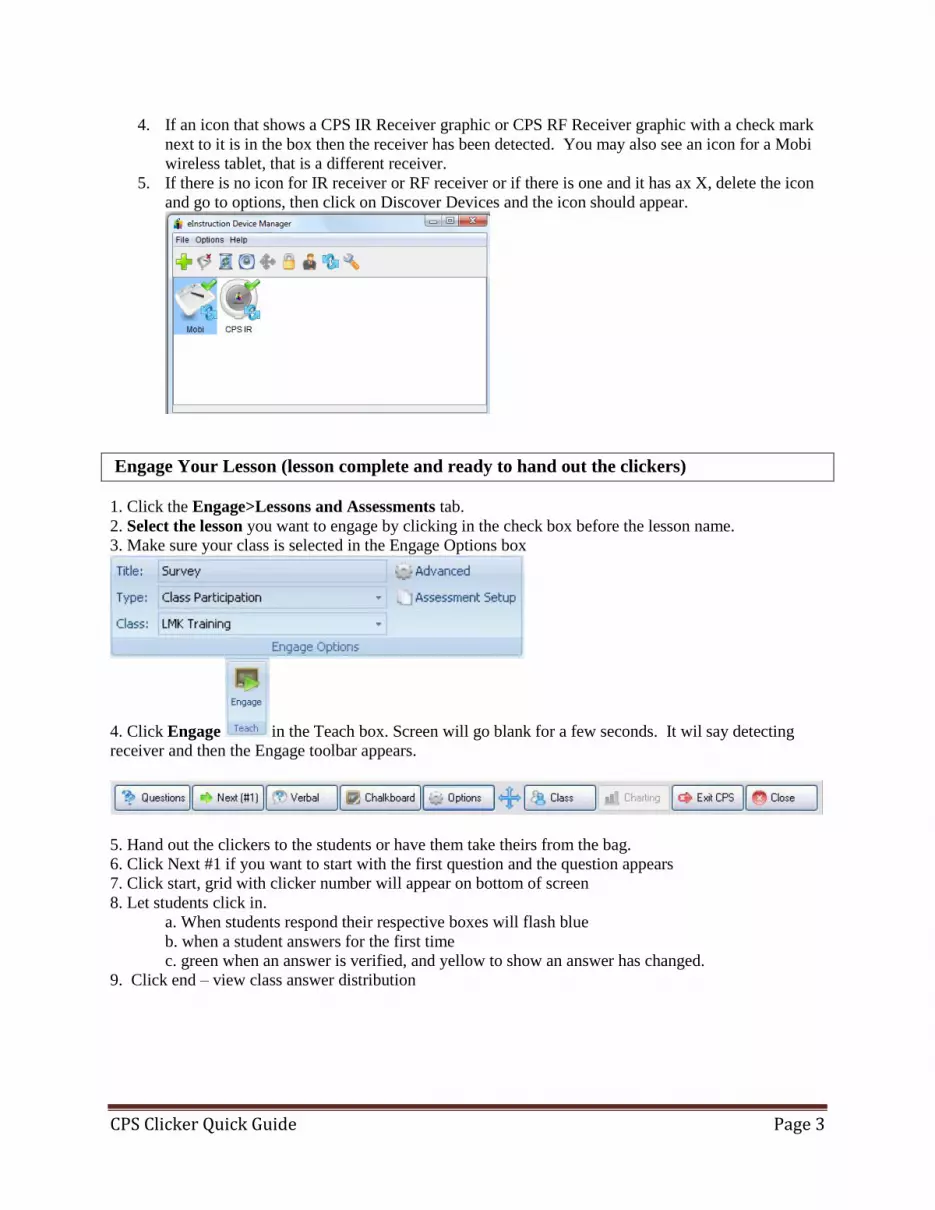
1. Click the Engage>Lessons and Assessments tab.
2. Select the lesson you want to engage by clicking in the check box before the lesson name.
3. Make sure your class is selected in the Engage Options box
4. Click Engage in the Teach box. Screen will go blank for a few seconds. It wil say detecting
receiver and then the Engage toolbar appears.
5. Hand out the clickers to the students or have them take theirs from the bag.
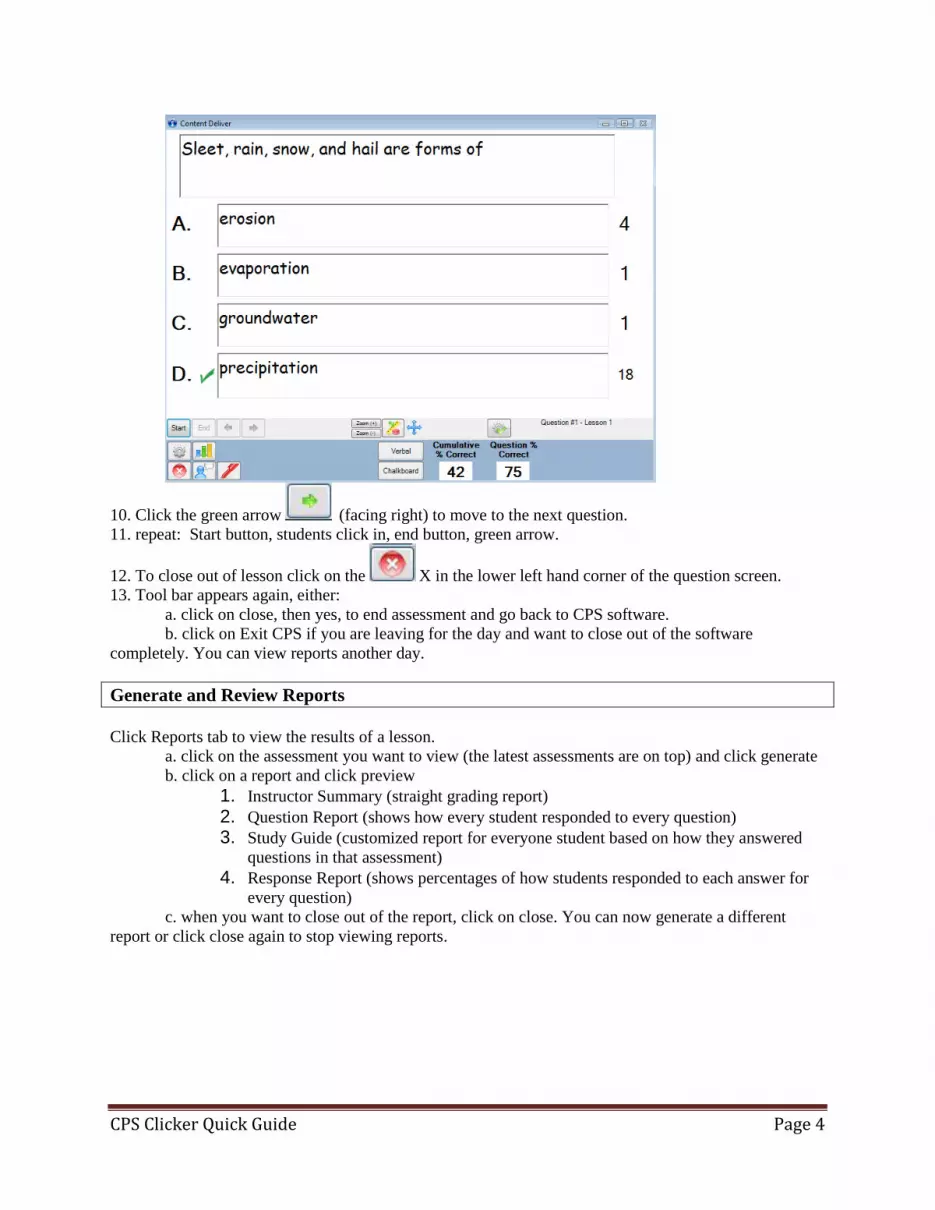
6. Click Next #1 if you want to start with the first question and the question appears
7. Click start, grid with clicker number will appear on bottom of screen
8. Let students click in.
a. When students respond their respective boxes will flash blue
b. when a student answers for the first time
c. green when an answer is verified, and yellow to show an answer has changed.
9. Click end – view class answer distribution
CPS Clicker Quick Guide Page 4
10. Click the green arrow (facing right) to move to the next question.
11. repeat: Start button, students click in, end button, green arrow.
12. To close out of lesson click on the X in the lower left hand corner of the question screen.
13. Tool bar appears again, either:
a. click on close, then yes, to end assessment and go back to CPS software.
b. click on Exit CPS if you are leaving for the day and want to close out of the software
completely. You can view reports another day.
Generate and Review Reports
Click Reports tab to view the results of a lesson.
a. click on the assessment you want to view (the latest assessments are on top) and click generate
b. click on a report and click preview
1. Instructor Summary (straight grading report)
2. Question Report (shows how every student responded to every question)
3. Study Guide (customized report for everyone student based on how they answered
questions in that assessment)
4. Response Report (shows percentages of how students responded to each answer for
every question)
c. when you want to close out of the report, click on close. You can now generate a different
report or click close again to stop viewing reports.
CPS Clicker Quick Guide Page 5
CPS Clicker POPULAR FEATURES:
(to watch video or view quick start guide for PC click on link below) http://www.einstruction.com/support_downloads/training/CPS6/K12.html#
1. Create and Edit Class Rosters
a. Module 1 – Create a class roster
b. Module 1 – Adding students and editing class roster
c. Importing Class Rosters (instructions below)
2. Creating a Fast Grade Lesson (using existing paper test or homework assignments)
a. Module 2 - Create a Fastgrade Lesson and
b. Module 2 - Engage Student Paced Mode (if you have infrared (IR) clickers, you
need a projector, Radio Frequency (RF) clickers use the lcd screen on clicker)
3. Creating Folders, Lessons and Questions
a. Module 3 – Create Folders and Lessons
b. Module 3 – Create Questions in CPS
c. Module 3 – Add Graphics to a Question
4. Creating a CPS Challenge Board Team Activity (Jeopardy-style game)
a. Module 6 – Create a Challenge Board
b. Module 6 – Engage a Challenge Board
5. Engaging your students with a lesson and handing out the clickers
a. Verbal Lesson without preparing any questions ahead of time
i. Module 2 – Engage Verbal Questions
b. Engage a lesson with questions already prepared
i. Module 3 – Deliver Questions in Standard Mode
6. Generate and View Reports
a. Module 7- Generate, Print and Export Reports
For the following features, see directions below:
Importing a class roster from a student management system
Engaging the Verbal Mode using the clickers with online quiz content like Brainpop,
Castle Learning (School Island), Regentsprep.org, Master Guru, etc.
Creating a lesson using Lesson Builder (pulling questions from different lessons to
make a new one)
Sharing a lesson with another teacher
Working on lessons from home (download our software for free on your home
computer)
Using the Mobi to be mobile in the classroom and assess students with the clickers!
CPS Clicker Quick Guide Page 6
Importing Class Rosters from Student Management Systems
If you have a class or classes in a different software application other than CPS (like a gradebook program
of some kind), you can save that data as a specific file type (*.csv file type), make a few simple format
changes, and then import that data into CPS. To prepare your roster so you can import a non-CPS class
roster into CPS, follow these directions.
1. Open the class in the non-CPS software (i.e. Infinite Campus). Format the data to include the
following two required column headers:
First (do not write FIRST NAME)
Last (do not write LAST NAME)
Student Id (if you want to bring in the student id numbers, this heading is not required.
NOTE: The CPS software doesn't care if these headers are capitalized, or if they appear in a different
order. In fact, you can have a column header in between the last and the first columns, but at least one of
these columns must exist for CPS to import the class.
4. Fill in the student„s first and last name under the corresponding required header (First and Last)
5. Save that class data as a .csv file (Comma Separated Values file type). Most spreadsheet or database
programs do this with the Save As command. You will need to save each roster separately and name it so
you will know which class it is (ie. Per 1, Per 2, advanced math, etc.)
Import the .CSV Class Roster into your CPS Database:
1. Within CPS, click on the Classes tab
2. Click on the Import icon
3. Select „Comma Separated Values‟ as the import source
4. Click the Next button
5. Click the Browse button
6. Select your .csv file
7. Click the Open button
8. Select the class (A checkmark will appear next to the class you select.)
9. Click the Next button
10.Click the Done button once CPS imports your .csv file
Engaging the Verbal Mode – use CPS with online quiz content like
Brainpop, Castle Learning (School Island), Regents Prep.org, Master Guru, etc.
CPS in verbal mode with online content like Castle Learning, Brainpop, etc. You can show a
Brainpop video to the class and pull up the quiz and then the students click in to each answer.
This mode allows you to get assessments as a class, question by question. You can re-teach after
each question if necessary as well. You will get immediate feedback and record responses.
1. Open up your online quiz content. If you are using BrainPop, bring up the video you want to
use. Minimize the window.
2. Open CPS from your desktop icon
3. Detect your receiver
4. Click the Engage>Lessons and Assessments tab.
5. Click Engage in the Verbal box (left side). The CPS Verbal Question Setup window appears.
CPS Clicker Quick Guide Page 7
6. Type the name of your Lesson in the title (this way you will know which lesson it is when
you view the reports later)
7. Class Options – Select a class from the drop down menu (you may only have one class)
8. Click OK. The Verbal CPS Engage toolbar appears.
9. First Click the Options Button (you only have to do this the first time you use with online
content, these setting will become default). In the Teacher Managed Tab, under Verbal
Questions, make sure there is no check in the box next to Show Large Screen. This way
you can see the online content questions and the CPS toolbar. Once you change this setting
the first time it will be the default and you won‟t have to do it again unless you want to
change it back.
10. Now maximize the Brain Pop Screen/Castle Learning/online content screen. If in brainpop,
show the video.
11. The CPS toolbar can be moved under the content or above it by clicking and holding the blue
arrow icon and moving the toolbar.
12. Click on Review Quiz (brainpop) or have the first question opened in castle learning or your
online content. Use the drop down button at bottom right of internet screen to increase the
size of the quiz to the maximum where question and answers can still be seen on the screen at
the same time. This is important b/c when you use the camera to take a snapshot of the
question for the reports, the bigger the words are the better the picture.
13. Use the Verbal button on the toolbar to match the answer options for the question that you
are using from your online content.
14. If it is a multiple choice question with 3 answer options, then click on the Verbal button and
choose Multiple Choice A-C from the drop down menu.
15. The students can now click in their responses using their clickers to the online question. For
example, they can click in A, B, or C.
16. Click the camera icon to take a snapshot of the question for the reports.
17. Click end when everyone has responded to the question
18. The charting box will open up showing graphically how everyone responded.
19. Next to Correct Answer, choose the correct answer from the drop down menu (the correct
answer graphic will turn to green) then click close. Put in an answer in the online content to
move to the next question.
20. CPS saves performance data. You can see the % correct for the question and cumulative for
the lesson.
21. Advance to the next question in your online quiz.
22. Repeat steps
23. Click on the Red ball with X to end the session. Click Close and then Yes. Performance
data is available from the Report>Reports tab.
Creating a Lesson using Lesson Builder
(pulling questions from different lessons to make a new lesson)
When you use the Lessons Builder function, you can build one lesson of questions from several
pre-existing lessons. For example, if a Language Arts database has 32 lessons in it, each lesson
representing a chapter from a text, you can create a mid-term exam from the first six lessons
(chapters) without re-typing all the questions. You can also create a lesson from multiple
databases.

CPS Clicker Quick Guide Page 8
To create a lesson from the Lesson Builder, follow these directions:
1. Open the Prepare>Lessons and Assessments tab.
2. Select a lesson from the lesson side (left or top window) of the screen.
The top pane is the target lesson, the lesson to which you are adding questions.
The bottom left pane lists the lessons available in the open database. You can also
build from the standards in this open database.
The bottom right pane is a list of questions available in the source lesson or standard
selected in the bottom left pane.
The Dragged Questions section allows you to choose whether the questions you select
for the target lesson are copied from the lesson source or linked to the lesson source.
If you link the questions, then if a change is made to that question in another lesson,
the changes will be made to this question as well.
The Link Selected Questions button allows you to select questions from the bottom
right pane and copy the questions to the top pane.
The Link Random Questions button allows CPS to select random questions from the
open database and copy them to the top pane.
NOTE: Check whether the database open in the bottom left pane is the source from which
you want to take questions. You should only have one database, but if you have more and
this is not the correct database, use the File menu to find and open the database from which
you want to select questions. Also, make certain the target lesson named at the top of the
Builder window is the destination into which you want to build questions. If not, use the File
menu to select a different lesson name from the open database.
3. Select a lesson from the database open in the bottom left pane. Alternately, you can
choose to build from Standards questions if you have linked questions with Standards;
simply click the Standards tab in the bottom left window. Questions for the selected
lesson or standard display in the bottom right pane.
4. Select questions, from the bottom right pane, to copy or link into the target lesson.
5. Press the Ctrl key and your mouse simultaneously to select specific questions to include
in the target lesson. While pressing your mouse button, drag those selected questions into
the top pane.
6. Or Use the Link or Copy option buttons, in the Dragged Questions area, to choose how
you want the questions moved.
7. Click the Link Random Questions button to choose the number of specific question types
you want to include in the target lesson. Click the OK button to complete this random
selection.
8. Close the Lesson Builder to return to the Prepare>Lessons and Assessments tab. Your
lesson will appear in the left (or top in horizontal view) window.
9. If you would like to delete or edit a question, click on the question in the right pane and
click a button in the Home box.

CPS Clicker Quick Guide Page 9
Sharing a lesson with another teacher
Divide up the work so everyone doesn’t have to create the same lesson!
CPS allows you to share the lessons you create with other teachers… why re-create the wheel!
For example, if you are a 4th
grade teacher and there are 4 other teachers in your grade, you many
want to ask each teacher to create one CPS lesson that you can all share. You can divide it by
subjects like math, english, social studies, science or topics within a certain subject. This way
you are just creating one CPS lesson but will be able to use five CPS lessons to engage your
students.
To export a lesson to share with another teacher:
1. Open up CPS
2. Go to Prepare>Lessons and Assessments
3. Click once on the lesson you want to export (left hand side)
4. Click on Export to Mac in the Lessons box (this will make it a .cxm file and can be used
on PC)
5. Type in a file name (can be named the same as the lesson)
6. Use the drop down menu next to the Save In box to pick a location to save your exported
lesson to. If you are going to email the lesson to another teacher, save it to a location on
your computer so you can attach it to the email later. You can also save it to a flash
drive.
7. Click on the Save button
8. A box may pop that says “Would you like to include any associated standards with the
lessons you are exporting. Say yes if you have associated standards with your lessons.
Say no if you have not.
9. Your exported lesson has been converted to a .cxm file and is now saved to the location
that you chose.
10. You can email this lesson by attaching it to the email or giving the flash drive that you
saved the lesson on to another teacher.
11. Now to safely remove the flash drive, double-click on the icon at the bottom right of your
screen that says “Unplug or eject hardware” when you put your mouse over it. The
“Unplug or Eject Hardware” wizard should open. Click “Stop”, “OK”, and “OK” again.
Note: To avoid damage to the flash disk or data corruption, it is strongly advised you do not
skip this step. DO NOT REMOVE the flash disk until the database or file has completely
been copied to the flash disk.
To import a CPS lesson (.cxm file) that another teacher has shared with you.
1. Open up CPS
2. Go to Prepare>Lessons and Assessments
3. If the lesson is on a flash drive, insert it into your computer‟s USB port. If the lesson was
sent by email as an attachment. Save the attachment (lesson) to your computer
4. In CPS, Click on the Import button in the Lessons box
5. Click on the Browse button
6. Click on the drop down arrow next to Files of Type and choose CXM files. This way
CPS will search for those specific files with an extension of CXM.
CPS Clicker Quick Guide Page 10
7. Use the Look In box to locate where you saved your lesson that you want to import. If it
is located on a flash drive, go to My Computer and click on the drive for your removable
flash drive.
8. Click once on the lesson and click on Open.
9. CPS will say Importing, click OK when the box pops up that says CXM file has imported
successfully.
10. Your imported lesson will show up at the bottom of all of your lessons. You can drag
and drop it into any folder.
11. Click once on the imported lesson to view the questions on the right hand side. Double
click on the question to view it and use the arrow keys to move throughout the lesson.
Working on Lessons at Home
You can create and edit CPS lessons from home. You will first need to download the software
from the www.einstruction.com website. It is a free download. Go to quick links box on right,
click on downloads, and scroll down to Classroom Performance System. Click on download
and follow wizard.
At home, you will create a brand new database that will not come with preloaded lessons. This
database will just be used at home to create lessons.
To create a new CPS database, follow these directions:
1. Open CPS from the desktop icon. The CPS Open or Create New CPS Database window
appears.
2. Choose Create a new CPS File.
3. Click OK. The New CPS File dialog box opens.
4. In the File Name text box, type the database name that you are creating. For example first
initial last name – jsmith. While in this CPS New File Box, click on the drop down arrow
next to “Save in” and browse for your “My Documents folder”.
5. Make certain that you save this database in a CPS folder. To do this, while in the New
CPS File Box, click on the “create new folder” icon (picture of folder with red circle).
This will create a new folder. Now where it says New Folder type CPS. If you can‟t
type right over “new folder” then right click on the new folder, click rename and type
CPS.
6. Click Save and wait while CPS processes your request. The Engage>Lesson and
Assessments tab opens with your database name in the left panel. The database you
created automatically opens each time you start CPS.
7. Now create a lesson and add questions.
8. To export the lesson from your home CPS database and import to your school CPS
database, see Sharing a Lesson with Another Teacher above.
CPS Clicker Quick Guide Page 11
Using the Mobi Hand-Held Wireless Tablet to be Mobile in the Classroom!
1. The Mobi charges when you plug the USB cord into the Mobi and the other end into your
computer.
2. When ready to use the Mobi, unplug the usb cord.
3. Put the receiver (USB stick) that is locked in the back of the Mobi into the USB hub that
is plugged into the laptop.
4. Take the pen out of the Mobi pen holder and move it around on the Mobi to see if it is
controlling the mouse on your computer. If it‟s not:
a. press the blue button on the Grey USB stick when it is plugged into the computer
and it will flash and then press the blue button on the back of the Mobi and the
light should go solid on the USB stick. It should now be joined.
b. check to see if the Mobi icon shows up in the device manager by detecting the
receiver (see beginning of document).
5. Use the Mobi to control your computer mouse by looking at the computer screen and
pressing directly on the Mobi.
6. When used with the clickers, you can see how each of your students are answering each
question on the Mobi screen instead of waiting to review the report.
a. Use the pen to click on the clicker icon on the Mobi to view the different reports.
Use the blue buttons to scroll up and down your roster.
7. Plug the Mobi back in to the USB cord when you are not using it so it charges from the
computer. Make sure the pen is pushed all of the way in to its holder so it charges as
well.
Questions?
Patti Novy
eInstruction
631-974-2607