cisco cloudcenter suite 5.3 documentation
TRANSCRIPT

CloudCenter Suite 5.3 DocumentationFirst Published: December 10, 2021
Last Modified: December 23, 2021
Americas HeadquartersCisco Systems, Inc.170 West Tasman Drive San Jose, CA 95134-1706 USAhttp://www.cisco.comTel: 408 526-4000
800 553-NETS (6387) Fax: 408 527-0883

© 2021 Cisco Systems, Inc. All rights reserved.

1. Install 5.3 Home . . . . . . . . . . . . . . . . . . . . . . . . . . . . . . . . . . . . . . . . . . . . . . . . . . . . . . . . . . . . . . . . . . . . . . . . . . . . . . . . . . . . . . . . . . . . . . . 21.1 Suite Installer 5.3 Home . . . . . . . . . . . . . . . . . . . . . . . . . . . . . . . . . . . . . . . . . . . . . . . . . . . . . . . . . . . . . . . . . . . . . . . . . . . . . . . . . . . . 3
1.1.1 Suite Admin 5.3.0 Release Notes . . . . . . . . . . . . . . . . . . . . . . . . . . . . . . . . . . . . . . . . . . . . . . . . . . . . . . . . . . . . . . . . . . . . . . . . 41.1.1.1 Suite Admin 5.3.1 Release Notes . . . . . . . . . . . . . . . . . . . . . . . . . . . . . . . . . . . . . . . . . . . . . . . . . . . . . . . . . . . . . . . . . . 14
1.1.2 Suite Architecture . . . . . . . . . . . . . . . . . . . . . . . . . . . . . . . . . . . . . . . . . . . . . . . . . . . . . . . . . . . . . . . . . . . . . . . . . . . . . . . . . . . 231.1.3 Self-Hosted Installation . . . . . . . . . . . . . . . . . . . . . . . . . . . . . . . . . . . . . . . . . . . . . . . . . . . . . . . . . . . . . . . . . . . . . . . . . . . . . . . 25
1.1.3.1 Installer Overview . . . . . . . . . . . . . . . . . . . . . . . . . . . . . . . . . . . . . . . . . . . . . . . . . . . . . . . . . . . . . . . . . . . . . . . . . . . . . . 261.1.3.2 Installer Virtual Appliances . . . . . . . . . . . . . . . . . . . . . . . . . . . . . . . . . . . . . . . . . . . . . . . . . . . . . . . . . . . . . . . . . . . . . . . 27
1.1.3.2.1 Virtual Appliance Overview . . . . . . . . . . . . . . . . . . . . . . . . . . . . . . . . . . . . . . . . . . . . . . . . . . . . . . . . . . . . . . . . . 281.1.3.2.2 OpenStack Appliance Setup . . . . . . . . . . . . . . . . . . . . . . . . . . . . . . . . . . . . . . . . . . . . . . . . . . . . . . . . . . . . . . . . 301.1.3.2.3 VMware vSphere Appliance Setup . . . . . . . . . . . . . . . . . . . . . . . . . . . . . . . . . . . . . . . . . . . . . . . . . . . . . . . . . . . . 33
1.1.3.3 Prepare Infrastructure . . . . . . . . . . . . . . . . . . . . . . . . . . . . . . . . . . . . . . . . . . . . . . . . . . . . . . . . . . . . . . . . . . . . . . . . . . . 431.1.3.4 New Cluster Installation . . . . . . . . . . . . . . . . . . . . . . . . . . . . . . . . . . . . . . . . . . . . . . . . . . . . . . . . . . . . . . . . . . . . . . . . . 46
1.1.3.4.1 VMware vSphere Installation . . . . . . . . . . . . . . . . . . . . . . . . . . . . . . . . . . . . . . . . . . . . . . . . . . . . . . . . . . . . . . . . 471.1.3.4.2 OpenStack Installation . . . . . . . . . . . . . . . . . . . . . . . . . . . . . . . . . . . . . . . . . . . . . . . . . . . . . . . . . . . . . . . . . . . . . 71
1.1.3.5 Existing Cluster Installation . . . . . . . . . . . . . . . . . . . . . . . . . . . . . . . . . . . . . . . . . . . . . . . . . . . . . . . . . . . . . . . . . . . . . . . 761.1.3.6 Upgrade Kubernetes Cluster . . . . . . . . . . . . . . . . . . . . . . . . . . . . . . . . . . . . . . . . . . . . . . . . . . . . . . . . . . . . . . . . . . . . . 80
1.1.3.6.1 Upgrade Approach . . . . . . . . . . . . . . . . . . . . . . . . . . . . . . . . . . . . . . . . . . . . . . . . . . . . . . . . . . . . . . . . . . . . . . . . 811.1.3.6.2 OpenStack Upgrade . . . . . . . . . . . . . . . . . . . . . . . . . . . . . . . . . . . . . . . . . . . . . . . . . . . . . . . . . . . . . . . . . . . . . . . 911.1.3.6.3 VMware vSphere Upgrade . . . . . . . . . . . . . . . . . . . . . . . . . . . . . . . . . . . . . . . . . . . . . . . . . . . . . . . . . . . . . . . . . . 97
1.1.3.7 Air Gap Installation . . . . . . . . . . . . . . . . . . . . . . . . . . . . . . . . . . . . . . . . . . . . . . . . . . . . . . . . . . . . . . . . . . . . . . . . . . . . 1021.1.3.8 Upgrade Offline Repository . . . . . . . . . . . . . . . . . . . . . . . . . . . . . . . . . . . . . . . . . . . . . . . . . . . . . . . . . . . . . . . . . . . . . 1101.1.3.9 Backup and Restore . . . . . . . . . . . . . . . . . . . . . . . . . . . . . . . . . . . . . . . . . . . . . . . . . . . . . . . . . . . . . . . . . . . . . . . . . . . 114
1.1.3.9.1 Public Cloud . . . . . . . . . . . . . . . . . . . . . . . . . . . . . . . . . . . . . . . . . . . . . . . . . . . . . . . . . . . . . . . . . . . . . . . . . . . . 1151.1.3.9.2 Private Cloud . . . . . . . . . . . . . . . . . . . . . . . . . . . . . . . . . . . . . . . . . . . . . . . . . . . . . . . . . . . . . . . . . . . . . . . . . . . 154
1.1.3.10 Troubleshooting . . . . . . . . . . . . . . . . . . . . . . . . . . . . . . . . . . . . . . . . . . . . . . . . . . . . . . . . . . . . . . . . . . . . . . . . . . . . . 1721.1.4 Suite Admin Workflow . . . . . . . . . . . . . . . . . . . . . . . . . . . . . . . . . . . . . . . . . . . . . . . . . . . . . . . . . . . . . . . . . . . . . . . . . . . . . . . 1771.1.5 Initial Administrator Setup . . . . . . . . . . . . . . . . . . . . . . . . . . . . . . . . . . . . . . . . . . . . . . . . . . . . . . . . . . . . . . . . . . . . . . . . . . . . 1791.1.6 Kubernetes Cluster Management . . . . . . . . . . . . . . . . . . . . . . . . . . . . . . . . . . . . . . . . . . . . . . . . . . . . . . . . . . . . . . . . . . . . . . 181
1.1.6.1 Cluster Status . . . . . . . . . . . . . . . . . . . . . . . . . . . . . . . . . . . . . . . . . . . . . . . . . . . . . . . . . . . . . . . . . . . . . . . . . . . . . . . . 1821.1.6.2 Manage Clusters . . . . . . . . . . . . . . . . . . . . . . . . . . . . . . . . . . . . . . . . . . . . . . . . . . . . . . . . . . . . . . . . . . . . . . . . . . . . . . 184
1.1.7 Configure Smart Licenses . . . . . . . . . . . . . . . . . . . . . . . . . . . . . . . . . . . . . . . . . . . . . . . . . . . . . . . . . . . . . . . . . . . . . . . . . . . . 1861.1.8 Module Lifecycle Management . . . . . . . . . . . . . . . . . . . . . . . . . . . . . . . . . . . . . . . . . . . . . . . . . . . . . . . . . . . . . . . . . . . . . . . . 196
1.1.8.1 Install Module . . . . . . . . . . . . . . . . . . . . . . . . . . . . . . . . . . . . . . . . . . . . . . . . . . . . . . . . . . . . . . . . . . . . . . . . . . . . . . . . 1971.1.8.2 Update Module . . . . . . . . . . . . . . . . . . . . . . . . . . . . . . . . . . . . . . . . . . . . . . . . . . . . . . . . . . . . . . . . . . . . . . . . . . . . . . . 2021.1.8.3 Monitor Modules . . . . . . . . . . . . . . . . . . . . . . . . . . . . . . . . . . . . . . . . . . . . . . . . . . . . . . . . . . . . . . . . . . . . . . . . . . . . . . 207

Suite Installer 5.3 HomeSelf-Hosted 5.3 Documentation
System Announcements
Cisco released the following Suite Admin releases:
Suite Admin 5.3.0released onDec 10, 2021
Installation Process
Search Suite Installer 5.3 Documentation
The selected root page could not be found.
Recent Updates
Private Cloudupdated Nov 08, 2021view changePrivate Cloudupdated Jul 15, 2021view changeSuite Installer 5.2 Homeupdated Apr 16, 2021view change
Back to: HomeCloudCenter Suite

1. 2.
a. b. c.
3.
1. 2.
Suite Admin 5.3.0 Release NotesSuite Admin 5.3.0 Release Notes
Release DateHelm Chart Upgrade from 5.2.3 to 5.2.4ArchitecturePublic CloudsAdministrationModule ManagementSmart Software LicensingSuite Admin DashboardUser Tenant ManagementCluster ManagementSecurity ManagementSuite UIDeprecatedAPI
New API CallsUpdated API Calls
DocumentationKnown IssuesResolved Issues
Release Date
First Published: December 10, 2021
Updating ModulesCloudCenter Suite5.3.0 is only supported as an upgrade from Suite Admin 5.2.4. Please ensure that you follow the procedural steps below to correctly update your CloudCenter installation.
You must upgrade the Suite Admin module to version 5.3.0 before you upgrade any other CloudCenter Suite module.After the Suite Admin upgrade has completed, upgrade the other CloudCenter modules to a supported configuration.
Workload Manager required version - 5.5.1Cost Optimizer required version - 5.5.1Action Orchestrator required version - 5.2.4
After all CloudCenter modules have been upgraded, follow the directions below to upgrade your Kubernetes cluster.
Note
Before updating any module, verify that you have twice the required CPU/Memory in your cluster. A module-update scenario requires additional resources for the old pod to continue running until the new pod initializes and takes over. Thisadditional resource requirement is temporary and only required while a module update is in progress. After the module is updated, the additional resources are no longer needed.
Update only one module at at time. If you simultaneously update more than one module, your update process may fail due to limited resource availability. See for additional context.Prepare Infrastructure
Backup and RestoreThere are two ways to upgrade the kubernetes cluster. Ensure you take backup of the kubernetes cluster before upgrading the cluster.
Upgrade the existing kubernetes cluster orSpin up a new kubernetes cluster with the Suite 5.3.0 installer. On this new cluster the backup.restore
Please follow the instructions documented here to before upgrading the cluster.backup
Kubernetes Cluster Upgrade

1. 2.
3.
Customers running CCS v5.2.4 can now upgrade their Kubernetes cluster using v5.3.0 installer. However they need to follow a few required steps to start upgrading the Kubernetes version to 1.18.12.
IMP: Follow documented steps to take a before proceeding with the kubernetes upgrade.backup of the clusterUpgrade Suite Admin version to v5.3.0 using the UI. This is a required step to continue the upgrade, if Suite Admin is not upgraded users will see this error message on the installer: "Cluster is NOT running Common-Framework Suite Admin v5.3.x. Please upgrade the Suite Admin chart to v5.3.x before upgrading kubernetes."
(Only on vSphere)This release addresses the security issue of encrypting ETCD secrets in Kubernetes. To do this users need to run the documented workaround script to enable ETCD Encryption of secrets in the kubernetes clusters. New cluster installed using v5.3.0 installer has ETCD encryption enabled by default. The contents of the script is shown .etcdEncrypt_master_1.sh here
Important: File name of the script in the first master must beetcdEncrypt_master_1.sh
#!/bin/bash
# if encryption is not enabled, enable it.# Because etcd disk is shared between old and new master node,# we have to turn on encryption on the old master, and encrypt# all secrets first. After this, when new master node# is booted, its own etcd will have encrypted data and kube api# process will then use encryption key to decrypt secrets stored# in etcd.function check_if_running_sudo {if [ "$EUID" -ne 0 ] then echo "This script needs to run as sudo. Please retry with:"echo "sudo bash $0" exitfi}
function check_if_vsphere_cloud { if kubectl get cm k8s-mgmt.cloudaccount --kubeconfig=/home/$(users)/.kube/config -n cisco ; then echo "continue with the upgrade..."else echo "Workaround is not required for this cloud. Please continue with the upgrade from installer UI." exitfi kubectl get cm k8s-mgmt.cloudaccount --kubeconfig=/home/$(users)/.kube/config -n cisco -o jsonpath="{.data.data}" | base64 -d > k8s-mgmt.cloudaccount.json sleep 60 CLOUD_TYPE=$(cat k8s-mgmt.cloudaccount.json | jq -r '.cloudType') if [[ $CLOUD_TYPE == *"vsphere"* ]]; then echo "Vshere cloud, continue with the workaround."else echo "$CLOUD_TYPE cloud, workaround is not required for this cloud. Please continue with the upgrade from installer UI" exitfi}
function check_for_encryption_file { #Function to check if this file is executed only Once, if first time, create a lock FILE=/etc/kubernetes/pki/etcd/encryption.confif [ -f "$FILE" ]; then echo -e "-----------------------------------------------------------------------------------------" echo "$FILE already exists. Looks like workaround is already performed on this master node. Please do not run the script multiple times on same master. Continue with other master nodes." echo -e "-----------------------------------------------------------------------------------------" exitfi }
function backup_resources { mkdir -p backup && cd backup || exit echo -e "Backing up all the certificates to backup folder $PWD /backup" kubectl get -o yaml --all-namespaces issuer,clusterissuer,certificates,secrets --kubeconfig=/home/$(users)/.kube/config > cert-manager-backup.yaml kubectl get cm k8s-mgmt.cloudaccount --kubeconfig=/home/$(users)/.kube/config -n cisco -o jsonpath="{.

3.
data.data}" | base64 -d > k8s-mgmt.cloudaccount.json echo -e "Backing up all the secrets to resources_backup.yaml" kubectl get -o yaml --all-namespaces secrets --kubeconfig=/home/$(users)/.kube/config > resources_backup.yaml for n in $(kubectl get -n cisco -o=name pvc,certificate,configmap,serviceaccount,secret,ingress,service,deployment,statefulset,hpa,job,cronjob) do
mkdir -p $(dirname "$n")kubectl get -n cisco --kubeconfig=/home/$(users)/.kube/config -o=yaml --export "$n" > "$n".yaml 2>
/dev/null done cd .. echo -e "-----------------------------------------------------------------------------------------"}
ETCD_ENCRYPTION_SECRET=$(head -c 32 /dev/urandom | base64)
function generate_encryption_conf_file { #!/bin/bash
OUTPUT_FILE=/etc/kubernetes/pki/etcd/encryption.conf
echo -e "\nCreating ETCD_ENCRYPTION_SECRET and ETCD_ENCRYPTION_KEY"
ETCD_ENCRYPTION_SECRET=$(head -c 32 /dev/urandom | base64)ETCD_ENCRYPTION_KEY=$(echo ccp-key-$(echo "$ETCD_ENCRYPTION_SECRET" | base64 -d | sha256sum | cut -c1-10))
echo "Writing content to file $OUTPUT_FILE"
cat <<EOF > $OUTPUT_FILEapiVersion: apiserver.config.k8s.io/v1kind: EncryptionConfigurationresources:- resources:- secretsproviders:- aescbc:
keys:- name: $ETCD_ENCRYPTION_KEYsecret: $ETCD_ENCRYPTION_SECRET
- identity: {}EOF}
check_if_running_sudocheck_if_vsphere_cloudcheck_for_encryption_filebackup_resourcesecho -e "\nCreating etcd Encryption configuration file for all the master nodes"generate_encryption_conf_fileecho -e "\nSaved etcd Encryption configuration file at $OUTPUT_FILE"cp $OUTPUT_FILE encryption.confecho -e "\nSaved etcd Encryption configuration file's copy at encrption.conf\n\n"
#----------------------------------------------#----------------------------------------------
function check_if_running_sudo {if [ "$EUID" -ne 0 ] then echo "This script needs to run as sudo. Please retry with:"echo "sudo bash $0" exitfi}function sleep_function { echo "Sleeping for $1 minutes..." while true;do echo -n .;sleep 1;done & sleep "$1" # or do something else here

3.
kill $!; trap 'kill $!' SIGTERM echo "Done" echo -e "\n\n-----------------------------------------------------------------------------------------"}function check_if_vsphere_cloud { if kubectl get cm k8s-mgmt.cloudaccount --kubeconfig=/home/$(users)/.kube/config -n cisco ; then echo "continue with the upgrade..."else echo "Workaround is not required for this cloud. Please continue with the upgrade from installer UI." exitfi kubectl get cm k8s-mgmt.cloudaccount --kubeconfig=/home/$(users)/.kube/config -n cisco -o jsonpath="{.data.data}" | base64 -d > k8s-mgmt.cloudaccount.json sleep 60 CLOUD_TYPE=$(cat k8s-mgmt.cloudaccount.json | jq -r '.cloudType') if [[ $CLOUD_TYPE == *"vsphere"* ]]; then echo "Vshere cloud, continue with the workaround."else echo "$CLOUD_TYPE cloud, workaround is not required for this cloud. Please continue with the upgrade from installer UI" exitfi}
function check_for_encryption_file { #Function to check if this file is executed only Once, if first time, create a lock FILE=/etc/kubernetes/pki/etcd/encryption.confif [ -f "$FILE" ]; then echo -e "-----------------------------------------------------------------------------------------" echo "$FILE already exists. Looks like workaround is already performed on this master node. Please do not run the script multiple times on same master. Continue with other master nodes." echo -e "-----------------------------------------------------------------------------------------" exitfi }check_if_running_sudocheck_if_vsphere_cloud
OUTPUT_FILE=/etc/kubernetes/pki/etcd/encryption.conf
function copy_encryption_conf_file { #!/bin/bash
OUTPUT_FILE=/etc/kubernetes/pki/etcd/encryption.conf echo "Copying script to $OUTPUT_FILE" cat <<EOF > $OUTPUT_FILE $(sed -n -e '/^ETCD_ENCRYPTION_FILE_START$/,/^ETCD_ENCRYPTION_FILE_END$/ { /^ETCD_ENCRYPTION_FILE_START$/d; /^ETCD_ENCRYPTION_FILE_END$/d; p; }' "${0}")EOFcp $OUTPUT_FILE encryption.confecho -e "\nSaved etcd Encryption configuration file's copy at encrption.conf\n\n"}
# File content which updates kube-apiserver.yaml and waits for kubeserver to startfunction check_kube_api { API_PID=$(ps -ef | awk '/kube-ap[i]server/{print $2}') echo -e "-----------------------------------------------------------------------------------------" echo "check_kube_api to verify that kube-apiserver is restarted: $API_PID ..." while [ $API_PID = $1 ]; do
echo "wait for kube api server to exist.."sleep_function 2mAPI_PID=$(ps -ef | awk '/kube-ap[i]server/{print $2}')
done
while ! ps -ef | grep kube-ap[i]server; do echo "wait for kube api server to restart.." sleep_function 2m done

3.
echo -e "\n=========================================================================================" echo -e "Waiting. Please DO NOT INTERRUPT." sleep 300 echo -e "Successfully updated kubernetes manifests" echo -e "\n========================================================================================="
}
function update_kube_apiserver_manifest { API_PID=$(ps -ef | awk '/kube-ap[i]server/{print $2}')
echo -e "Adding ETCD encryption resources to kube-apiserver, it might take some time. Please DO NOT INTERRUPT."
API_CONF="/etc/kubernetes/manifests/kube-apiserver.yaml" ENC_CONF="/etc/kubernetes/pki/etcd/encryption.conf"
sudo python - <<EOFimport yamlname = 'k8s-encryption'
with open("$API_CONF", "r") as f: data = yaml.safe_load(f) data['spec']['volumes'].append({'hostPath': {'path': "$ENC_CONF", 'type': ''}, 'name': name}) data['spec']['containers'][0]['command'].append("--encryption-provider-config=$ENC_CONF") data['spec']['containers'][0]['volumeMounts'].append({'mountPath': "$ENC_CONF", 'name': name})
with open("$API_CONF", "w") as f:f.write(yaml.dump(data, default_flow_style=False, indent=2))
EOF
sleep_function 2m}
function patch_kubeconfig_secret {
KUBECONFIG_SECRET_NAME=$(kubectl get secret -n ccp --kubeconfig=/home/$(users)/.kube/config | grep kubeconfig | awk '/-/{print $1}') echo "\nCreating patch file for kubeconfig secret $KUBECONFIG_SECRET_NAME" echo "{\"data\":{\"etcdEncryptionKey\": \"${ETCD_ENCRYPTION_SECRET}\"}}" > patch_kubeconfig_secret.json kubectl -n ccp patch secret "$KUBECONFIG_SECRET_NAME" --kubeconfig=/home/$(users)/.kube/config --patch "$(cat patch_kubeconfig_secret.json)" echo -e "\nSuccessfully patched kubeconfig secret, sleeping for 2 mins, please DO NOT INTERRUPT.\n\n" sleep_function 2m kubectl get secrets --all-namespaces -o json --kubeconfig=/home/$(users)/.kube/config | kubectl replace -f - --kubeconfig=/home/$(users)/.kube/config echo -e "\n\nUpdating the secret, please DO NOT INTERRUPT." sleep_function 5m
echo -e "\n\n===========================================================================================" echo -e "===========================================================================================" echo -e "\nWorkaround completed." echo -e "\nRestart all 3 Master nodes one by one." echo -e "\nGive significant time for all services to become RUNNING before proceeding with next master node.(Recommended ~5 mins)" echo -e "\n\n===========================================================================================" echo -e "===========================================================================================\n"}
#----------------------------------------------#----------------------------------------------
API_PID=$(ps -ef | awk '/kube-ap[i]server/{print $2}')echo -e "\n\nPrinting encrption file, please copy it to other masters and execute\n"

3.
4. 5.
echo ": '" > etcdEncrypt_master_2.shecho ": '" > etcdEncrypt_master_3.shecho "ETCD_ENCRYPTION_FILE_START" >> etcdEncrypt_master_2.shecho "ETCD_ENCRYPTION_FILE_START" >> etcdEncrypt_master_3.shcat $OUTPUT_FILE >> etcdEncrypt_master_2.shcat $OUTPUT_FILE >> etcdEncrypt_master_3.shecho "ETCD_ENCRYPTION_FILE_END" >> etcdEncrypt_master_2.shecho "ETCD_ENCRYPTION_FILE_END" >> etcdEncrypt_master_3.shecho " '" >> etcdEncrypt_master_2.shecho " '" >> etcdEncrypt_master_3.sh
sed -n '107,245p' etcdEncrypt_master_1.sh >> etcdEncrypt_master_2.shsed -n '107,245p' etcdEncrypt_master_1.sh >> etcdEncrypt_master_3.shecho "check_for_encryption_file" >> etcdEncrypt_master_2.shecho "check_for_encryption_file" >> etcdEncrypt_master_3.shecho "copy_encryption_conf_file" >> etcdEncrypt_master_2.shecho "copy_encryption_conf_file" >> etcdEncrypt_master_3.shecho "update_kube_apiserver_manifest" >> etcdEncrypt_master_2.shecho "update_kube_apiserver_manifest" >> etcdEncrypt_master_3.shecho -e "export -f check_kube_api \ntimeout 300s bash -c check_kube_api "\$API_PID"" >> etcdEncrypt_master_2.shecho -e "export -f check_kube_api \ntimeout 300s bash -c check_kube_api "\$API_PID"" >> etcdEncrypt_master_3.shecho -e "ETCD_ENCRYPTION_SECRET=""$ETCD_ENCRYPTION_SECRET">>etcdEncrypt_master_3.shecho "patch_kubeconfig_secret" >> etcdEncrypt_master_3.sh
update_kube_apiserver_manifestexport -f check_kube_apitimeout 300s bash -c check_kube_api "$API_PID"
echo -e "\nWorkaround completed on Master-1, please continue with Master-2 and Master-3"echo -e "\n\n==========================================================================================="echo -e "\nCopy etcdEncrypt_master_2.sh to second master and run sudo bash etcdEncrypt_master_2.sh"echo -e "\nCopy etcdEncrypt_master_3.sh to third master and run sudo bash etcdEncrypt_master_3.sh"echo -e "===========================================================================================\n\n"
The script is mandatory, not optional for the upgrade to work.IMPORTANT: DO NOT run the workaround script TWICEon any of the masters, this can bring the cluster since script interacts with kube-apiserver of the cluster.Use v5.3.0 installer to upgrade the kubernetes cluster & cert-managerAfter upgrading the cluster, users can use the "Take me to Suiteadmin" link to go back to the Suite Admin UI. Please note that this address might change for DHCP based clusters.
In the upgraded cluster, if you upgrade Workload-manager, Cost-optimizer, or Action Orchestrator and see this error on suite admin UI:"failed to wait for command /bin/helm, err: exit status 1, msg: Error: [unable to recognize\\\"\\\": no matches for kind\\\"Certificate\\\"in version\\\"certmanager.
",please follow workaround k8s.io/v1alpha1\\\", unable to recognize\\\"\\\": no matches for kind\\\"Issuer\\\"in version\\\"certmanager.k8s.io/v1alpha1\\\"]steps mentioned in .Update Module

Kubernetes Cluster InstallationCCS Installer drops support for Public clouds (AWS, GKE & Azure) for new cluster installation, however, the "existing cluster" mode of installation is still supported. Users can bring a GKE/Azure based Kubernetes cluster and install suite admin using v5.3.0 installer. (CPSGCORE-4305- to see Authenticate
)issue details
CCS v5.3.0 does not have installer images for public clouds. Only OVA and QCOV2 appliances are published.
CCS Installerupgrades Supported Kubernetes version and cert-manager
CCS v5.2.3 (Previous release) suppoted Kubernetes v1.16.3 and Cert-manger v0.10.1CCS v5.3.0 Upgraded Kubernetes to v1.18.12 and Cert-manger to v1.0.2
CCS Installerchanges how DHCP based clusters are installed:
CCS v5.2.3 required users to only provide only a master VIP to create a cluster, but

1.
CCS v5.3.0 now requires users to provide all the network information like static IP case to create a cluster & its resources. DHCP_Pool_Start_IP, DHCP_Pool_End_IP, Subnet mask, Gateway IP & DNS Addresses.
Helm Chart Upgrade from 5.2.3 to 5.2.4
If you are upgrading from SA 5.2.3 or older to 5.2.4, perform the following procedure after upgrade:
Run an SQL command in the suite-postgresqldatabase.
2.Log in to common-framework-suite-postgresql-0
Renew your license to continue
Your evaluation license has expired. Contact your administrator to renew your Reporting for Confluence license.
3.Run the following bash command.
PGDATABASE=suite-samlpsql-c"UPDATEpublic.saml_infra_configSETcert_source='cert_manager' WHERE id=1;"
4.Optionally regenerate the SSO certificate.
kubectldelete secret suite-saml-sso-tls-n cisco
5. Restart the suite-samlpod.
kubectldelete pod suite-saml-pod -n cisco
6. If yourcustomeruses SSO, reconfigure SSO.
Architecture
No updates
Public Clouds
The following public clouds with existing kubernetes clusters are supported:
Azure AKS:
Supported Version: 1.20.9Google GKE:
Supported Version: 1.20.11See for additional detailsExisting Cluster InstallationKubernetes version upgrade on existing clusters from older version 1.13,1.16.x is not supported for public clouds.
Administration
No updates

Module Management
No updates
Smart Software Licensing
No updates
Suite Admin Dashboard
No updates
User Tenant Management
No updates
Cluster Management
No updates
Security Management
No updates
Suite UI
No updates.
Deprecated
CCS Installer drops support for Public clouds(AWS, GKE & Azure) for new cluster installation
API
New API Calls
Updated API Calls
No updates.
Documentation
The following documentation changes were implemented in CloudCenter Suite5.3.0:
Support for Two Cloud TypesSupport for New Kubernetes Version 1.18.xRestrictions on ContainersNew IP Allocation ModeHelm Chart Configuration after k8s UpgradeUpdate BackupSSO ConfigurationVMware Folder Name ChangeCluster Upgrade
Known Issues
CloudCenter Suite5.3.0 has the following known issues:
When the Suite Admin chart is upgraded from version 5.2.4 to 5.3.0 in a few elasticsearch pods, note the following:The busybox image is not upgraded from version 1.29.3 to 1.33.1.The elasticsearch image is not upgraded from elasticsearch version 6.8.12 to elasticsearch version 6.8.13-cisco2.Two elasticsearch client pods are running after performing a Suite Admin upgrade.
Resolved Issues

CloudCenter Suite 5.3.0 has the following resolved issues:
CSCvs03618:Update base installer images to address multiple Vulnerabilities in ntp//sntp/liboptsCSCvs03618:Apache Camel XML External Entity Injection Vulnerability. An Apache Camel XML External Entity Injection vulnerability appeared in versions of Suite Admin prior to version 5.3.0.CSCvu73902: After starting to upgrade from Suite Admin version 5.1 to 5.2, the upgrade begins, but halts after completing only 2 percent of the task because of Helm Chart version mismatch.CSCvx68373: After configuring CloudCenter Suite, the Suite Admin module with email settings using TLS shows the emails are not sent from Suite Admin when using password reset. option.CSCwa44980: A custom role name in Action Orchestrator displays with the "null" string incorrectly appended to the name.CSCwa43511: Action Orchestrator user interface. After clicking on the Uninstall Action Orchestrator button, the interface incorrectly opened in a new tab displaying a prompt to uninstall.CSCwa44925: Using the IPAM/DHCP allocation method, CloudCenter Suite cannot create a NodePort cluster.NO CDETS: Add support for upgrading DHCP vSphere clusters fromCloudCenter Suite 5.2.4 kubernetes version 1.16 toCloudCenter Suite 5.3.0kubernetes 1.18.12CSCwa44974: Google has removed Helm Chart version 2.16.3 when upgrading from version 2.16.3 to 2.16.12.NO CDETSThe walkme object is still present in Suite Admin, although it should be removed.CSCvt19754: A violation of an information disclosure agreement could allow an authenticated Elasticsearch user to improperly view details.CSCwa44971: When the reloader image used by Quicksilver was updated, an imagepullbackoff session occurred when the cluster tried to pull the new reloader image.CSCvs03620: Google Guava Eager Allocation Remote Denial of Service VulnerabilityCSCwa44964: Unexpected stop actions occurred after performing the k8s-mgmt Anchore scans.CSCwa44972: A CloudCenter Suite cluster runs out of space on a disk with Action Orchestrator version 5.2.4 installed.CSCwa44958: Details of a previously created user incorrectly display in the creation form of another user in Suite Admin.CSCwa44959: When Suite Admin logs into the Suite Admin dashboard and enables the log archive to configure a storage location on AWS, the validator indicates only two fields are missing when several other fields are not displaying.CSCwa44981: When enabling a filter in the filter pane, the Suite Admin improperly indicates the filter has invalid criteria.CSCwa44960: libgcrypt vulnerabilities.CSCwa44961: After logging in to the Suite Admin dashboard and enabling the log archive, you are unexpectedly unable to disable the archive. Also, the archive does not establish a valid connection to AWS.CSCwa44973: After setting the forge_personalInfoAcknowledged setting to false and clicking the Acknowledge button, an error is unexpectedly generated.CSCwa44969: When attempting to access public storage in a Suite Admin private cluster, the storage bucket configuration fails indicating the server could not find the resource.CSCwa44962: Address OpenSSL CVEs for Alpine and Ciscoj.CSCwa44970: When a Suite Admin installation failed for an existing cluster on Azure, the Start Over button does not redirect you to the installer Welcome page.CSCwa44977: The Download KubeConfig file option is incorrectly unlisted in the Suite Admin user interface.CSCwa44963: After clicking the Startover button to delete virtual machines on OpenStack, the installer user interface incorrectly goes to the main installer page instead of going directly to the cluster deletion page.CSCwa4336/4343/4266/4258/4260/4277/4280/4286/4289/4290: Minerva requires sw updates: suite-k8s-mgmt-5.2.4-RC1.0,api-6.1.1,busybox-1.29.3,kubectl-1.13.2,ccp-6.1.1,suite-gateway-5.2.4-RC1.6,suite-jwt-keys-5.2.4-RC1.6,suite-license-RC1.6,suite-res-mgmt-5.2.4-RC1.6,ui-5.2.4-RC1.0

1. 2.
a. b. c.
3.
1. 2.
Suite Admin 5.3.1 Release NotesSuite Admin 5.3.1 Release Notes
Release DateHelm Chart Upgrade from 5.2.3 to 5.2.4ArchitecturePublic CloudsAdministrationModule ManagementSmart Software LicensingSuite Admin DashboardUser Tenant ManagementCluster ManagementSecurity ManagementSuite UIDeprecatedAPI
New API CallsUpdated API Calls
DocumentationKnown IssuesResolved Issues
Release Date
First Published: December 23, 2021
Updating ModulesCloudCenter Suite5.3.1 is only supported as an upgrade from Suite Admin 5.2.4. Please ensure that you follow the procedural steps below to correctly update your CloudCenter installation.
You must upgrade the Suite Admin module to version 5.3.1 before you upgrade any other CloudCenter Suite module. After the Suite Admin upgrade has completed, upgrade the other CloudCenter modules to a supported configuration.
Workload Manager required version - 5.5.1Cost Optimizer required version - 5.5.1Action Orchestrator required version - 5.2.4
After all CloudCenter modules have been upgraded, follow the directions below to upgrade your Kubernetes cluster.
Backup and RestoreThere are two ways to upgrade the kubernetes cluster. Ensure you take backup of the kubernetes cluster before upgrading the cluster.
Upgrade the existing kubernetes cluster orSpin up a new kubernetes cluster with the Suite 5.3.1 installer. On this new cluster the backup.restore
Please follow the instructions documented here to before upgrading the cluster.backup
Kubernetes Cluster UpgradeCustomers running CCS v5.2.4 can now upgrade their Kubernetes cluster using v5.3.1 installer. However they need to follow a few required steps to start upgrading the Kubernetes version to 1.18.12.
Note: As Suite Installer 5.3.0 versions are deprecatedavoid upgrade to 5.3.1 from 5.2.4
Before updating any module, verify that you have twice the required CPU/Memory in your cluster. A module-update scenario requires additional resources for the old pod to continue running until the new pod initializes and takes over. This additional resource requirement is temporary and only required while a module update is in progress. After the module is updated, the additional resources are no longer needed.
Update only one module at at time. If you simultaneously update more than one module, your update process may fail due to limited resource availability. SeePrepare Infrastructure for additional context.

1. 2.
3.
IMP: Follow documented steps to take a before proceeding with the kubernetes upgrade.backup of the clusterUpgrade Suite Admin version to v5.3.1 using the UI. This is a required step to continue the upgrade, if Suite Admin is not upgraded users will see this error message on the installer: "Cluster is NOT running Common-Framework Suite Admin v5.3.x. Please upgrade the Suite Admin chart to v5.3.x before upgrading kubernetes."
(Only on vSphere) This release addresses the security issue of encrypting ETCD secrets in Kubernetes. To do this users need to run the documented workaround script to enable ETCD Encryption of secrets in the kubernetes clusters. New cluster installed using v5.3.1 installer has ETCD encryption enabled by default. The contents of the script is shown below and it needs to be run on the first etcdEncrypt_master_1.shkubernetes master node. Post that follow the instructions from the output of script execution. Keep the filenames as mentioned in this document.
#!/bin/bash
# if encryption is not enabled, enable it.# Because etcd disk is shared between old and new master node,# we have to turn on encryption on the old master, and encrypt# all secrets first. After this, when new master node# is booted, its own etcd will have encrypted data and kube api# process will then use encryption key to decrypt secrets stored# in etcd.function check_if_running_sudo {if [ "$EUID" -ne 0 ] then echo "This script needs to run as sudo. Please retry with:"echo "sudo bash $0" exitfi}
function check_if_vsphere_cloud { if kubectl get cm k8s-mgmt.cloudaccount --kubeconfig=/home/$(users)/.kube/config -n cisco ; then echo "continue with the upgrade..."else echo "Workaround is not required for this cloud. Please continue with the upgrade from installer UI." exitfi kubectl get cm k8s-mgmt.cloudaccount --kubeconfig=/home/$(users)/.kube/config -n cisco -o jsonpath="{.data.data}" | base64 -d > k8s-mgmt.cloudaccount.json sleep 60 CLOUD_TYPE=$(cat k8s-mgmt.cloudaccount.json | jq -r '.cloudType') if [[ $CLOUD_TYPE == *"vsphere"* ]]; then echo "Vshere cloud, continue with the workaround."else echo "$CLOUD_TYPE cloud, workaround is not required for this cloud. Please continue with the upgrade from installer UI" exitfi}
function check_for_encryption_file { #Function to check if this file is executed only Once, if first time, create a lock FILE=/etc/kubernetes/pki/etcd/encryption.confif [ -f "$FILE" ]; then echo -e "-----------------------------------------------------------------------------------------" echo "$FILE already exists. Looks like workaround is already performed on this master node. Please do not run the script multiple times on same master. Continue with other master nodes." echo -e "-----------------------------------------------------------------------------------------" exitfi}
function backup_resources { mkdir -p backup && cd backup || exit echo -e "Backing up all the certificates to backup folder $PWD /backup" kubectl get -o yaml --all-namespaces issuer,clusterissuer,certificates,secrets --kubeconfig=/home/$(users)/.kube/config > cert-manager-backup.yaml kubectl get cm k8s-mgmt.cloudaccount --kubeconfig=/home/$(users)/.kube/config -n cisco -o jsonpath="{.data.data}" | base64 -d > k8s-mgmt.cloudaccount.json echo -e "Backing up all the secrets to resources_backup.yaml" kubectl get -o yaml --all-namespaces secrets --kubeconfig=/home/$(users)/.kube/config > resources_backup.yaml for n in $(kubectl get -n cisco -o=name pvc,certificate,configmap,serviceaccount,secret,ingress,

3.
service,deployment,statefulset,hpa,job,cronjob) do
mkdir -p $(dirname "$n")kubectl get -n cisco --kubeconfig=/home/$(users)/.kube/config -o=yaml --export "$n" > "$n".yaml 2>
/dev/null done cd .. echo -e "-----------------------------------------------------------------------------------------"}
ETCD_ENCRYPTION_SECRET=$(head -c 32 /dev/urandom | base64)
function generate_encryption_conf_file { #!/bin/bash
OUTPUT_FILE=/etc/kubernetes/pki/etcd/encryption.conf
echo -e "\nCreating ETCD_ENCRYPTION_SECRET and ETCD_ENCRYPTION_KEY"
ETCD_ENCRYPTION_SECRET=$(head -c 32 /dev/urandom | base64)ETCD_ENCRYPTION_KEY=$(echo ccp-key-$(echo "$ETCD_ENCRYPTION_SECRET" | base64 -d | sha256sum | cut -c1-10))
echo "Writing content to file $OUTPUT_FILE"
cat <<EOF > $OUTPUT_FILEapiVersion: apiserver.config.k8s.io/v1kind: EncryptionConfigurationresources:- resources:- secretsproviders:- aescbc:
keys:- name: $ETCD_ENCRYPTION_KEYsecret: $ETCD_ENCRYPTION_SECRET
- identity: {}EOF}
check_if_running_sudocheck_if_vsphere_cloudcheck_for_encryption_filebackup_resourcesecho -e "\nCreating etcd Encryption configuration file for all the master nodes"generate_encryption_conf_fileecho -e "\nSaved etcd Encryption configuration file at $OUTPUT_FILE"cp $OUTPUT_FILE encryption.confecho -e "\nSaved etcd Encryption configuration file's copy at encrption.conf\n\n"
#----------------------------------------------#----------------------------------------------
function check_if_running_sudo {if [ "$EUID" -ne 0 ] then echo "This script needs to run as sudo. Please retry with:"echo "sudo bash $0" exitfi}function sleep_function { echo "Sleeping for $1 minutes..." while true;do echo -n .;sleep 1;done & sleep "$1" # or do something else here kill $!; trap 'kill $!' SIGTERM echo "Done" echo -e "\n\n-----------------------------------------------------------------------------------------"}function check_if_vsphere_cloud {

3.
if kubectl get cm k8s-mgmt.cloudaccount --kubeconfig=/home/$(users)/.kube/config -n cisco ; then echo "continue with the upgrade..."else echo "Workaround is not required for this cloud. Please continue with the upgrade from installer UI." exitfi kubectl get cm k8s-mgmt.cloudaccount --kubeconfig=/home/$(users)/.kube/config -n cisco -o jsonpath="{.data.data}" | base64 -d > k8s-mgmt.cloudaccount.json sleep 60 CLOUD_TYPE=$(cat k8s-mgmt.cloudaccount.json | jq -r '.cloudType') if [[ $CLOUD_TYPE == *"vsphere"* ]]; then echo "Vshere cloud, continue with the workaround."else echo "$CLOUD_TYPE cloud, workaround is not required for this cloud. Please continue with the upgrade from installer UI" exitfi}
function check_for_encryption_file { #Function to check if this file is executed only Once, if first time, create a lock FILE=/etc/kubernetes/pki/etcd/encryption.confif [ -f "$FILE" ]; then echo -e "-----------------------------------------------------------------------------------------" echo "$FILE already exists. Looks like workaround is already performed on this master node. Please do not run the script multiple times on same master. Continue with other master nodes." echo -e "-----------------------------------------------------------------------------------------" exitfi}check_if_running_sudocheck_if_vsphere_cloud
OUTPUT_FILE=/etc/kubernetes/pki/etcd/encryption.conf
function copy_encryption_conf_file { #!/bin/bash
OUTPUT_FILE=/etc/kubernetes/pki/etcd/encryption.conf echo "Copying script to $OUTPUT_FILE" cat <<EOF > $OUTPUT_FILE$(sed -n -e '/^ETCD_ENCRYPTION_FILE_START$/,/^ETCD_ENCRYPTION_FILE_END$/ { /^ETCD_ENCRYPTION_FILE_START$/d; /^ETCD_ENCRYPTION_FILE_END$/d; p; }' "${0}")EOFcp $OUTPUT_FILE encryption.confecho -e "\nSaved etcd Encryption configuration file's copy at encrption.conf\n\n"}
# File content which updates kube-apiserver.yaml and waits for kubeserver to startfunction check_kube_api { API_PID=$(ps -ef | awk '/kube-ap[i]server/{print $2}') echo -e "-----------------------------------------------------------------------------------------" echo "check_kube_api to verify that kube-apiserver is restarted: $API_PID ..." while [ $API_PID = $1 ]; do
echo "wait for kube api server to exist.."sleep_function 2mAPI_PID=$(ps -ef | awk '/kube-ap[i]server/{print $2}')
done
while ! ps -ef | grep kube-ap[i]server; do echo "wait for kube api server to restart.." sleep_function 2m done
echo -e "\n=========================================================================================" echo -e "Waiting. Please DO NOT INTERRUPT." sleep 300 echo -e "Successfully updated kubernetes manifests"

3.
echo -e "\n=========================================================================================" } function update_kube_apiserver_manifest { API_PID=$(ps -ef | awk '/kube-ap[i]server/{print $2}') echo -e "Adding ETCD encryption resources to kube-apiserver, it might take some time. Please DO NOT INTERRUPT." API_CONF="/etc/kubernetes/manifests/kube-apiserver.yaml" ENC_CONF="/etc/kubernetes/pki/etcd/encryption.conf" sudo python - <<EOFimport yamlname = 'k8s-encryption' with open("$API_CONF", "r") as f: data = yaml.safe_load(f) data['spec']['volumes'].append({'hostPath': {'path': "$ENC_CONF", 'type': ''}, 'name': name}) data['spec']['containers'][0]['command'].append("--encryption-provider-config=$ENC_CONF") data['spec']['containers'][0]['volumeMounts'].append({'mountPath': "$ENC_CONF", 'name': name}) with open("$API_CONF", "w") as f: f.write(yaml.dump(data, default_flow_style=False, indent=2))EOF sleep_function 2m} function patch_kubeconfig_secret { KUBECONFIG_SECRET_NAME=$(kubectl get secret -n ccp --kubeconfig=/home/$(users)/.kube/config | grep kubeconfig | awk '/-/{print $1}') echo "\nCreating patch file for kubeconfig secret $KUBECONFIG_SECRET_NAME" echo "{\"data\":{\"etcdEncryptionKey\": \"${ETCD_ENCRYPTION_SECRET}\"}}" > patch_kubeconfig_secret.json kubectl -n ccp patch secret "$KUBECONFIG_SECRET_NAME" --kubeconfig=/home/$(users)/.kube/config --patch "$(cat patch_kubeconfig_secret.json)" echo -e "\nSuccessfully patched kubeconfig secret, sleeping for 2 mins, please DO NOT INTERRUPT.\n\n" sleep_function 2m kubectl get secrets --all-namespaces -o json --kubeconfig=/home/$(users)/.kube/config | kubectl replace -f - --kubeconfig=/home/$(users)/.kube/config echo -e "\n\nUpdating the secret, please DO NOT INTERRUPT." sleep_function 5m echo -e "\n\n===========================================================================================" echo -e "===========================================================================================" echo -e "\nWorkaround completed." echo -e "\nRestart all 3 Master nodes one by one." echo -e "\nGive significant time for all services to become RUNNING before proceeding with next master node.(Recommended ~5 mins)" echo -e "\n\n===========================================================================================" echo -e "===========================================================================================\n"} #----------------------------------------------#---------------------------------------------- API_PID=$(ps -ef | awk '/kube-ap[i]server/{print $2}')echo -e "\n\nPrinting encrption file, please copy it to other masters and execute\n"echo ": '" > etcdEncrypt_master_2.shecho ": '" > etcdEncrypt_master_3.shecho "ETCD_ENCRYPTION_FILE_START" >> etcdEncrypt_master_2.shecho "ETCD_ENCRYPTION_FILE_START" >> etcdEncrypt_master_3.shcat $OUTPUT_FILE >> etcdEncrypt_master_2.sh

3.
4. 5.
cat $OUTPUT_FILE >> etcdEncrypt_master_3.shecho "ETCD_ENCRYPTION_FILE_END" >> etcdEncrypt_master_2.shecho "ETCD_ENCRYPTION_FILE_END" >> etcdEncrypt_master_3.shecho " '" >> etcdEncrypt_master_2.shecho " '" >> etcdEncrypt_master_3.sh
sed -n '107,245p' etcdEncrypt_master_1.sh >> etcdEncrypt_master_2.shsed -n '107,245p' etcdEncrypt_master_1.sh >> etcdEncrypt_master_3.shecho "check_for_encryption_file" >> etcdEncrypt_master_2.shecho "check_for_encryption_file" >> etcdEncrypt_master_3.shecho "copy_encryption_conf_file" >> etcdEncrypt_master_2.shecho "copy_encryption_conf_file" >> etcdEncrypt_master_3.shecho "update_kube_apiserver_manifest" >> etcdEncrypt_master_2.shecho "update_kube_apiserver_manifest" >> etcdEncrypt_master_3.shecho -e "export -f check_kube_api \ntimeout 300s bash -c check_kube_api "\$API_PID"" >> etcdEncrypt_master_2.shecho -e "export -f check_kube_api \ntimeout 300s bash -c check_kube_api "\$API_PID"" >> etcdEncrypt_master_3.shecho -e "ETCD_ENCRYPTION_SECRET=""$ETCD_ENCRYPTION_SECRET">>etcdEncrypt_master_3.shecho "patch_kubeconfig_secret" >> etcdEncrypt_master_3.sh
update_kube_apiserver_manifestexport -f check_kube_apitimeout 300s bash -c check_kube_api "$API_PID"
echo -e "\nWorkaround completed on Master-1, please continue with Master-2 and Master-3"echo -e "\n\n==========================================================================================="echo -e "\nCopy etcdEncrypt_master_2.sh to second master and run sudo bash etcdEncrypt_master_2.sh"echo -e "\nCopy etcdEncrypt_master_3.sh to third master and run sudo bash etcdEncrypt_master_3.sh"echo -e "===========================================================================================\n\n"
The script is mandatory, not optional for the upgrade to work. on any of the masters, this can bring the cluster since script interacts with kube-IMPORTANT: DO NOT run the workaround script TWICE
apiserver of the cluster.Use v5.3.1installer to upgrade the kubernetes cluster & cert-managerAfter upgrading the cluster, users can use the "Take me to Suiteadmin" link to go back to the Suite Admin UI. Please note that this address might change for DHCP based clusters.
In the upgraded cluster, if you upgrade Workload-manager, Cost-optimizer, or Action Orchestrator and see this error on suite admin UI:"failed to wait for command /bin/helm, err: exit status 1, msg: Error: [unable to recognize \\\"\\\": no matches for kind \\\"Certificate\\\" in version \\\"
", certmanager.k8s.io/v1alpha1\\\", unable to recognize \\\"\\\": no matches for kind \\\"Issuer\\\" in version \\\"certmanager.k8s.io/v1alpha1\\\"]please follow workaround steps mentioned in .Update Module

1.
Kubernetes Cluster InstallationCCS Installer drops support for Public clouds (AWS, GKE & Azure) for new cluster installation, however, the "existing cluster" mode of installation is still supported. Users can bring a GKE/Azure based Kubernetes cluster and install suite admin using v5.3.1 installer. (CPSGCORE-4305- to see Authenticate
)issue details
CCS v5.3.1 does not have installer images for public clouds. Only OVA and QCOV2 appliances are published.
CCS Installerupgrades Supported Kubernetes version and cert-manager
CCS v5.2.3 (Previous release) suppoted Kubernetes v1.16.3 and Cert-manger v0.10.1CCS v5.3.1 Upgrades Kubernetes to v1.18.12 and Cert-manger to v1.0.2
CCS Installerchanges how DHCP based clusters are installed:
CCS v5.2.3 required users to only provide only a master VIP to create a cluster, butCCS v5.3.1 now requires users to provide all the network information like static IP case to create a cluster & its resources. DHCP_Pool_Start_IP, DHCP_Pool_End_IP, Subnet mask, Gateway IP & DNS Addresses.
Helm Chart Upgrade from 5.2.3 to 5.2.4
If you are upgrading from SA 5.2.3 or older to 5.2.4, perform the following procedure after upgrade:
Run an SQL command in the suite-postgresqldatabase.
2.Log in to common-framework-suite-postgresql-0
Renew your license to continue

3.Run the following bash command.
PGDATABASE=suite-samlpsql-c"UPDATEpublic.saml_infra_configSETcert_source='cert_manager' WHERE id=1;"
4.Optionally regenerate the SSO certificate.
kubectldelete secret suite-saml-sso-tls-n cisco
5. Restart the suite-samlpod.
kubectldelete pod suite-saml-pod -n cisco
6. If yourcustomeruses SSO, reconfigure SSO.
Architecture
No updates
Public Clouds
The following public clouds with existing kubernetes clusters are supported:
Azure AKS:
Supported Version: 1.20.9Google GKE:
Supported Version: 1.20.11See for additional detailsExisting Cluster InstallationKubernetes version upgrade on existing clusters from older version 1.13,1.16.x is not supported for public clouds.
Administration
No updates
Module Management
No updates
Smart Software Licensing
No updates
Suite Admin Dashboard
No updates
User Tenant Management
No updates
Cluster Management
No updates
Security Management
Your evaluation license has expired. Contact your administrator to renew your Reporting for Confluence license.

No updates
Suite UI
No updates.
Deprecated
CCS Installer drops support for Public clouds(AWS, GKE & Azure) for new cluster installation
API
New API Calls
Updated API Calls
No updates.
Documentation
The following documentation changes were implemented in CloudCenter Suite5.3.1:
Support for Two Cloud TypesSupport for New Kubernetes Version 1.18.xRestrictions on ContainersNew IP Allocation ModeHelm Chart Configuration after k8s UpgradeUpdate BackupSSO ConfigurationVMware Folder Name ChangeCluster Upgrade
Known Issues
CloudCenter Suite 5.3.1 has the following known issues:
When the Suite Admin chart is upgraded from version 5.2.4 to 5.3.1in a few elasticsearch pods, note the following:The busybox image is not upgraded from version 1.29.3 to 1.33.1.The elasticsearch image is not upgraded from elasticsearch version 6.8.12 to elasticsearch version 6.8.13-cisco2.Two elasticsearch client pods are running after performing a Suite Admin upgrade.
Resolved Issues
CloudCenter Suite 5.3.1 has the following resolved issues:
CSCwa47349: Vulnerability in Apache Log4j Library

Suite ArchitectureSuite Architecture
OverviewThe Suite ArchitecturePort RequirementsThe Suite AdminThe Modules
Overview
The is takes a unique approach to install, configure, and maintain hybrid cloud environments %ccs Cisco's hybrid cloud deployment platform. This platformthat are often encountered by Information Technology (IT) departments to adopt business agility and improve time-to-market solutions within an enterprise. As a cloud-based organization, your enterprise can choose from multiple cloud providers depending on your location, policies, permissions, ( )multicloudsecurity requirements, and governance regulationsfor both traditional and modern IT requirements.
The provides a solution that is cloud agnostic, works with diverse workloads, provides supports cost-optimization, and %ccs cross-domain orchestration,integrates easily in an agile world.
The Suite Architecture
The is made up of the following components:%ccs
Suite Installer Installs the Suite Admin. SeeInstaller Overview for additional details.Suite Admin Installs and launches a suite of modules. See The Suite Admin section belowfor additional details.Modules The workload manager, the Cost Optimizer, and the Action Orchestrator. See The Modules section below for additional details.Core Runtime Platform and Kubernetes Infrastructure A Kubernetes-based platform that allows you to launch each module on a new or existing Kubernetes cluster.
The following image displays the Suite Admin architecture.
Port Requirements
The following image identifies the ports that must be open for the CloudCenter Suite to function as designed.

The Suite Admin
When you download and install the Suite Installer, the Suite Admin is already installed! You have the option to use the Suite Admin UI to perform the following tasks:
Install additional, available modules based on the list available in the Dashboard. Upgrade the Suite Admin or other installed modules when a new version becomes available.
The Modules
The Suite Admin facilitates the installation of the following modules:
workload manager:
This module allows IT organizations to provide management for clouds (public/private/container), applications, VMs/pods, governance policies withcentralized visibility and permission control for enterprise environments. See for additional details.Workload Manager
Action Orchestrator:
This module allows IT organizations to use cross-domain orchestration to automate a process that has multiple, complex steps with a specific order and implemented across different technical domains.See Action Orchestratorfor additional details.
Cost Optimizer:
This module allows IT organizations to use cost optimization in a pay-per-use environment to avoid consumption that does not add value.SeeCost Optimizerfor additional details.
Each module in the CloudCenter Suite is independent andallows access to additional gateways or endpoints so you can add on module-specific components on supported clouds.

Self-Hosted InstallationSelf-Hosted Installation
Installer OverviewInstaller Virtual AppliancesPrepare InfrastructureNew Cluster InstallationExisting Cluster InstallationUpgrade Kubernetes ClusterAir Gap InstallationUpgrade Offline RepositoryBackup and RestoreTroubleshooting

Installer OverviewInstaller Overview
OverviewSupported CloudsInstaller Appliance Download Location
Overview
The CloudCenter Suite provides a new way toinstall, configure, and maintain multiple modules that jointly make up the suite. The CloudCenter Suite has a common installer to install all modules included in the suite., upgrade, and integrate
You can install the CloudCenter Suite by using installer appliance images provided by Cisco. A he CloudCenter Suite s part of the installation process, tinstalls the Suite Admin. O ach user can access the CloudCenter Suite using valid credentials created by the Suite Administrator.nceauthenticated, e
Supported Clouds
Cisco supports the following private clouds for the CloudCenter Suite:
6.5VMware vSphereOpenStackQueens
Installer Appliance Download Location
Major releases include installer appliances for the following components and cloud providers.
You can download these files fromsoftware.cisco.com.
The section provides more details on these files.Virtual Appliance Overview
All supported clouds are visible and enabled for private cloud installers.
This includes both the functionality and the CloudCenter Suite UI.

Installer Virtual AppliancesInstaller Virtual Appliances
Virtual Appliance OverviewOpenStack Appliance SetupVMware vSphere Appliance Setup

1. 2. 3. 4.
a. b.
i. ii.
c.
d. e.
f.
g.
5.
Virtual Appliance OverviewVirtual ApplianceOverview
Virtual Appliance OverviewGeneral Virtual Appliance ApproachCloud-Specific Setup
Virtual Appliance Overview
The only way to install the CloudCenter Suite is to use the virtual appliance Installer method.Cisco builds these appliances on CentOS 7.x base images.
General Virtual Appliance Approach
To prepare infrastructure for the appliance approach, follow this process.
Review and ensure that you have met the requirements to before installing the CloudCenter Suite.Prepare InfrastructureReview the list of Suite Installersto verify the supported Virtual Appliances.SupportedNavigate to .software.cisco.comto download virtual appliances for each supported cloudFollow directions as specified in the table below to obtain and import each image.
Cloud Image Type Description
OpenStack
Downloaded Virtual Appliance (QCOW2)
Import the QCOW2 image file Refer to the for additional using the OpenStack client. OpenStack Documentationcontext.
VMwarevSphere
Downloaded Virtual Appliance (OVA)
Follow this procedure:
Download the OVA image.Import the OVA to your vSphere environment by using the vSphere client
When you import the OVA as a VM, ensure that it is powered on vSphere.offIf your environment requires a static IP, use a VMware Customization Spec to manually configure the static IP for the installer VM.
A default password is required to ensure access to the VM using the console (in case the SSH has issues).
Select the required Network for the interface to be connected.Convert the VM to a template.
Select the template created in the previous step and , to launch the installer VM. clone to Virtual MachineThis template will also be used as the value for the cloud setting, in the installer UI.vSphere Template NameAfter the VM is created from the template, power it on. To access the UI, go to the newly created VM IP using HTTPS protocol in a supported browser (see ).Browser Compatibility
Launch the installer instance using the image.
Cloud-Specific Setup
OpenStack Appliance Setup
:If you provide a default password or public-key, be aware of the following requirements
The login user is the cloud-user.If you configure a default password in the VM, you must also configure the or public key default instance ID and hostname fields as they are dependent and required fields.Use this password to access the VM via vSphere console.You cannot use this password to SSH into the launched VMs.
You convert the VM to template and then create a VM from this template, so that the musttemplate can be used when installing a VMware data center. If you do not provide the template name when installing a VMware data center, your installation will fail.
The per-cloud setup procedures are only listed below to serve as sample setup scenarios.

VMware vSphere Appliance Setup

1. 2.
a. b. c. d. e.
3. 4.
5.
OpenStack Appliance SetupOpenStack Appliance Setup
Tosetup infrastructure for OpenStack clouds, follow this process.
Download the CloudCenter Suite QCOW2 file to your local machine.Login into your OpenStack datacenter to perform this task.
Click .ImagesClick the button.Create ImageEnter a valid name.Click the button.File BrowseSelect the file stored in your local machine as displayed in the following screenshot.QCOW2
In the dropdown, sFormat electQCOW2.To share this image with other users, select in the field.Public Image Sharing Visibility
The exact VM size really depends on the instance type configuration in your environment! See > Prepare Infrastructure Resource Requirements for additional details.for CloudCenter Suite Modules

5.
6.
7.
Click and then click the button as displayed in the following screenshot.Next Create Image
Create the instance for each component using the imported images:
Follow the standard OpenStack procedure to create the instance from an image.Create the security group(s) with Port 80 and 443 (optionally 22 if you need SSH access) open for Ingress and Outbound communication.You may need to assign floating IP to your VM after you create the VM is created.
Select a new or existing key pair to log into each instance if multiple key pairs are available, you must to be used for the CloudCenter select oneinstance as displayed in the following screenshot.
The image import will take some time depending on the network speed. During this time, do not close the browser/application/tab.
If you do not select a key pair, you will not be able to log into the component VM!

You have nowsetup OpenStack cloud.the installer for an

1.
2.
3. 4.
a.
i.
ii.
VMware vSphere Appliance Setup
VMware vSphere Appliance Setup
Tosetup infrastructure using CloudCenter appliances for VMware vSphere clouds, follow this process.
Configure Network Time Protocol (NTP) on the VMware ESXi hosts this is important as the CloudCenter Suite installation can fail, if NTP is not configured or if it is wrongly configured.See for additional detailshttps://kb.vmware.com/s/article/57147?lang=en_US .
Download the OVA image file to your local machine. fromsoftware.cisco.com
Log into the VMware Datacenter console and click on the section.VMs and Templates Deployan OVA template (right-clickand selectDeploy OVA Template option).
If DHCP installed, follow these steps.is
Follow these steps ONLY if DHCP installed.is
Click the option, click to provide the location for the downloaded OVA file, ensure the file is selected, and Local file Browsethen click Nextas displayed in the following screenshot.
Note the value that you enter in this field for later use. You will need to enter the same values for the or fields NTP Servers NTP Poolsin the Placement Properties page (see > Advanced Installation Process > Step 6).VMware vSphere Installation
Identical NTP values are required to ensure that the NTP communication between the installer and CloudCenter Suite master/worker VMs are in sync so the certificates generated by the installer for CloudCenter Suite are also in sync.
The installer appliance has/requires a minimum resource requirement of 4 vCPUs and 75 GB storage (root disk).

4.
a.
ii.
iii.
iv.
v.
Provide a suitable name and select the target folder where you need to create the Template as displayed in the following .screenshot
Select a suitable host and cluster as displayed in the following screenshot.
Review the details as displayed in the following screenshot.
Select the storage location as displayed in the following screenshots.
Use as the storage format so it has the flexibility to optimize the storage location. The following Thin Provisionscreenshots displays views from two different datacenters to provide a point of context.

4.
a.
v.
vi.

4.
a.
vi.
vii.
1. 2. 3.
viii.
Select a destination network as displayed in the following screenshot.
Enter the information identified below in the Customize vApp Properties page displayed in the following screenshot.
The public SSH key.The default user's password to SSH from the vSphere console.The unique ID and hostname ensure that these credentials are unique to avoid duplication issues.
Do not customize your setup credentials at this point or any other point during the installation. You can do so after you complete the installation process.
Use lowercase characters when providing the installer hostname in theCustomize vApp Properties page.

4.
a.
viii.
ix.
b.
i. ii.
iii.
iv. v.
vi.
Customize the template as required for your environment and review the completed information as displayed in the following screenshot.
Click to start deploying the VM from the template inside the target folder.Finish
If DHCP installed, follow these steps is not
Follow these steps ONLY if DHCP installed use your static IP as theVMware customization specification is needed to attach is notthe IP to the installer VM.
The details attached in the Customization (term specific to vSphere), like the IP, DNS, Gateway, and so forth are Specificationassigned to the VM, when it is powered on.
IPs cannot be attached to the VM when it is Powered ON automatically and you must follow the instructions provided below to create an installation VM using the (specific to vSphere) which is used to create a template or custom Customization Specificationprofile with IP details, when attached to the VM.
Login to vSphere.From the Home icon, select .Policies and Profiles
Under Customization Specification Manager, click the icon to (first from left).Create a new specification
For the , select . Target VM OS LinuxSet the to any suitable name.Computer Name

4.
b.
vi.
vii.
viii. ix.
x.
Enter as the .cpsg.ciscolabs.com Domain name
To configure the network, select the button to for to ensure Static IP allocation so that Manually select custom settingsyou can manually enter the Static IP details.
Enter other details in subsequent screens to complete the wizard requirements.Wait for the installer VM to start when it does, the Static IP assigned by the custom specification will be assigned to the VM.
Select the option to use standard network. if you are using a DHCP setup.
Currently, an existing VMware issue does not save the check box setting. To workaround this issue, click the Editsettings on the VM, and check it again, and save your changes to assign the static IP.

4.
b.
x.
xi. xii.
xiii.
xiv.
Click the Button.Edit
Click and then click the .OK Enter DNS and Domain SettingsIn the DNS search path enter and click OK.cpsg.ciscolabs.com
Click and then .Next Finish

4.
b.
xiv.
xv.
xvi.
xvii.
Create a New Installer VM using this customization spec. Start creating the VM installer from the installer template, in the wizard section Select the option, make sure to check the box so that you can Clone Customize the Operating Systemselect the custom specification in the next screen.
Select the specification that you need and click .Next
Enter other details in subsequent screens, to complete the wizard. Wait for the installer VM to start, the Static IP assigned by the custom specification will be assigned to the VM.Wait for the installer VM to start when it does, the Static IP assigned by the custom specification will be assigned to the VM.
Currently, an existing VMware issue does not save the check box setting. To workaround this issue, click the Editsettings on the VM, and check it again, and save your changes to assign the static IP.

5.
6.
7.
8.
Wait for some time so the VM is cloned and created, then refresh the VM page to view the powered off VMThe OVA is imported as a VM (powered off) on vSphere.
Right-click to edit the VM Settings for the powered off VM. Click the tab. Under , select the checkbox to VM Options VMware Tools Synchronize as displayed in the following screenshot.guest time with host
Clone the VM to a template using the option (a sample of this template is displayed in the following screenshot).Convert to template...
Once the VM is converted to template, it should appear as identified by the orange arrow in the following screenshot.
When you import the OVA as a VM, ensure that it is poweredoffon vSphere.

8.
9.
10. 11.
12.
Right click this template name and select the New VM from This Template option as displayed in the following screenshot this template will also be used as the value for thevSphere Template Namecloud setting, when you provide the details to install the Suite Admin.
After the VM is created from the template, power it on.Editthe to ensure that the VM has unique values for , ,1eCustomize vApp properties A unique ID for this VM instance Hostname Default user's
,and for this VM instance.password SSH public keys
Use this IP address to access the CloudCenter Suite UI (displayed in the following screenshot), go to the newly created VM's IP using HTTPS protocol in a supported browser (seeBrowser Compatibility).
You have now setup the installer for a VMware cloud.
For the password and/or the public key to take effect when deploying the VMware OVA for the. CloudCenter Suite installer, you chmustange the to something else than ordefault-instance-id default-instance-id the hostname!

Prepare InfrastructurePrepare Infrastructure
General CompatibilityResource Requirements for CloudCenter Suite ModulesNumber of VMsIP Pool RequirementsNTP RequirementsThe Suite Installer DashboardWithout Internet Access
General Compatibility
SeeBrowser Compatibility and the Suite Admin Compatibility Matrix for
additional details.%ccs supports Kubernetes 1.16.3 for new installations.
The CloudCenter Suiterequires Tiller v2.16.3 to be installed. Refer to the for additional details.Helm documentation
Resource Requirements for CloudCenter SuiteModules
The following table lists the minimum resource requirements assuming that you install all available modules.
Module1,2
Public Cloud5 Private Cloud3
vCPU Memory (GB) Storage (GB) vCPU Memory (GB) Storage (GB)
Suite Admin 16 37 300 16 37 300
4Workload Manager aCost Optimizernd
15 68 2306 15 68 2306
7Action Orchestrator 20 30 750 20 30 750
Kubernetes Cluster (3 primary servers)
na na na 9 24 120
Total 51 135 1280 60 159 1400
Update only one module at a time. If you simultaneously update more than one module, your update process may fail due to limited resource 1
availability.
2 modnsure that your environment has free CPU/Memory a verify that you have un-allocated CPU/Memory in your cluster to eBefore updating any module, ule-update scenario requires additional resources for the old pod to continue running until the new pod initializes and takes over. This additional resource requirement is temporary and only required while a module update is in Progress. After the module is updated, the additional resources are no longer needed.
3 On private clouds (vSphere and OpenStack), each of the 3 primary server instances require 3 vCPU and 8 GB memory and 40 GB storage (root disk), hence the difference in the additional requirement of 9 vCPU, 24 GB memory, and 120 GB storage (root disk). See the Number of VMs section below for additional details. Similarly, each workerinstances require 3 vCPU and 8 GB memory and 40 GB storage (root disk) however, the number of workers changes dynamically at install time. Installer VMs require a minimum of 4 vCPUs .and 8 GB RAM
4Workload Manager numbers include considerations for4 s in the same instance. To support additional cloud regions, you must scale your Cloud Regioncluster by adding Kubernetes worker nodes. You will need for each additional region. For regions without Cloud Remote, you will 1 CPU and 3 GB memoryneed 1.5 GB memory and 0.5 CPU when using Workload Manager 5.2.
For existing installations:
For public clouds, Kubernetes support parallels the popular version supported by the major public cloud providers.For private clouds, the previous Kubernetes version (1.14) is also supported.
Installers are already incorporated in the CloudCenter Suite SaaS offer, see for additional details.SaaS Access

5 Public clouds do not support auto-scaling the number of nodes might differ if scaled on an auto-scaling enabled node group.
6 The storage is 230 GB just to enable migration. In reality, only 115 GB is being used for operation of services.StatefulSet
7 Effective . The Action Orchestrator also requires 3 worker nodes to proceed with the installation.Action Orchestrator 5.2.0
Number of VMs
A CloudCenter Suiteinstallation launches a highly available Kubernetes cluster which consists of primary server(s) and worker(s) instances.
For private clouds, a redundant cluster requires a minimum of 2 out of 3 primary server nodes to be running at any point, so the cluster can function as designed.
The CloudCenter Suiterequires that the underlying disks forKubernetes disk attachmentsbe redundant and available. Most public clouds already provide built-in redundancy for their block disks (AWS EBS, GCP Persistent Disks, and so forth). Be sure to verify thatthe Datastores/Datastore Clusters are also on redundant, non-local storage (NFS, NetApp) before you begin the installation process.
IP Pool Requirements
You must select IP address to ensure that each IP endpoints is available, accessible, and not used by any other resource.
When configuring or modifying you pool of IP addresses, be aware of the following requirements:
Verify if the IP pool can accommodate additional workloads.Select your instance type according to the following dependencies based on your instance type selection, the installer displays the error or success information in the UI.
The CloudCenter Suitesetup requires 3 primary servers.The CloudCenter Suite dynamically calculates the number of application VMs (workers).
Do not use172.18.0.1/16 for the installer instance as this IP address is used by the Docker/Kubernetes setup.NodePort: If you set the type field to NodePort, the Kubernetes control plane allocates a port from a range specified by service-node-port-range flag (default: 30000-32767). Refer to for additional details.https://kubernetes.io/docs/concepts/services-networking/service/
NTP Requirements
You must either set the time at the datacenter level or at the time of installation.Network Time Protocol (NTP)
If set at installation time, then verify that the network can access the NTP server.
The number of worker nodes (for both private and public cloud) vary based on the instance type selected during the installation process.
If you plan to scale up at a later date, be aware that the worker instance type selected at installation time will also be used for the scaled nodes.

The time for all worker and primary server nodes is synced with the controller node. The controller node is the instance used to launch the primary primaryCloudCenter Suite identified by the link that takes you to the Suite Admin UI (Take Me to Suite Admin). This link contains the IP address of the primarycontroller as displayed in the following screenshot.
The Suite Installer Dashboard
After launching the installer, navigate to the IP address of your VM in a supported browser. This presents the Suite Installer Dashboard.The Suite Installer Dashboardhas the following options:
New Cluster InstallationExisting Cluster InstallationUpgrade Kubernetes Cluster
Without Internet Access
The Cisco Repository is used to host Cisco-related files and packages for various purposes. You may need to install the CloudCenter Suite in an environment that does not have internet access. If so, you need to set up an Air Gap Installation.

1.
2.
New Cluster InstallationVMware vSphere InstallationOpenStack Installation
Install the CloudCenter Suite on a New Kubernetes ClusterOnce you access the Suite Installer Dashboard (see ), you can install a new cluster andPrepare Infrastructure launch nodes for the new Kubernetes cluster.
Navigating to the Cluster IP When "Take Me Home" Page Does not Work
After upgrading your Kubernetes version to 1.18.12, theTake Me to theSuite Admin button does not navigate to the cluster-ip.To navigate to the cluster-ip, perform the following workaround:
Run the following command to display the allocation mode:
echo $(kubectlget cmk8s-mgmt.cluster-n cisco -ojsonpath="{.data.data}") | base64 -d | grep"vsphere_ip_allocation_mode"
From the output, look for thestaticIPor DHCP allocation mode.
For thestaticIPcase:
Run the following command and note the value of the External-IP and port 443 mapping:
kubectlget svc -n cisco | grep common-framework-nginx-ingress-controller
Note the Suite Admin URL will be >. For example, a Suite Admin URL of would appear https://< >:<external_ip_address 443_port https://10.10.124.157:30037in the command this way:
kubectlget svc -n cisco | grep common-framework-nginx-ingress-controllercommon-framework-nginx-ingress-controller LoadBalancer10.99.116.114 10.10.124.157 80:32165/TCP,443:30037/TCP 17d
The service type for common-framework-nginx-ingress-controller isNodePort;Option 1 for the DHCP case:
Find theMasterIPand note the master IP address. TheMaster_VIPis stored in thek8s-mgmt.clusterconfigmapin the Cisco namespace. To obtain themaster IP address, run this command:
echo $(kubectlget cmk8s-mgmt.cluster-n cisco -ojsonpath="{.data.data}") | base64 -d | grep "master_vip"
The master IP address is the external IP address of the first master node. Option 2 for the DHCP case:
You can find the master IP address byloggininto thevsphere/openstackconsole and running the following command.
kubectlget svc -n cisco | grep common-framework-nginx-ingress-controller
Note the Suite Admin URL is >https://< >:<master_vip 443_port
For example, a Suite Admin URL of would appear this way:https://10.12.104.77:30750
kubectl get svc -n cisco | grep common-framework-nginx-ingress-controllercommon-framework-nginx-ingress-controllerNodePort 10.111.85.45 <none> 80:30719/TCP,443:30750/TCP 20h

1.
2.
VMware vSphere InstallationVMware vSphere Installation
Overview
These instructions outline theend-to-end steps for installing CloudCenter Suite in a vSphere environment. In order to ensure successful installation, please take special care to review and understand the required below in and of prerequisites PART1 PART 2 Prepare/Verify the Installation Environment and
.Infrastructure
Installation Process
Prerequisites: Prepare/Verify the Installation Environment and Infrastructure - PART 1Import the Suite Installer into vSpherePrerequisites: Prepare/Verify the Installation Environment and Infrastructure - PART 2Deploy CloudCenter Suite into vSphere
Prerequisites: Prepare/Verify the Installation Environment and Infrastructure - PART 1
In order to ensure a successful installation of CloudCenter Suite into a vSphere environment, the following steps can be used to verify and/or appropriately configure the environment and infrastructure.
Ensure the vSphere Datastore being used for installation meets the following requirements:
The Datastore should be directly under the vSphere Datacenter.
The Datastore should be reachable from the workers and primary servers in the CloudCenter Suite cluster.Verify that the network and IP assigned to workers and primary serversin the CloudCenter Suite cluster can reach this datastore.
The Datastore should have adequate permissions to be managed by the previously created user.Ideally, the Datastore utilized for the VM Installer and Tenant image should be the same to ensure the quickest possible installation.
The installation process requires a vSphere User with specific Permissions. For users who do not want to use the default administrator, use the following steps to create a new Role and User for the installation.
Step 1: In vSphere, login into vSphere as an administrator user. Navigate to and create a Role by Home > Administration > Rolesproviding the following privileges to this role -
Datastore.Allocate spaceDatastore.Browse datastoreDatastore.Low level file operationsDatastore.Remove fileFolder. Create folderGlobal.Manage Custom AttributesGlobal.Set custom attributeNetwork.Assign networkResource.Apply recommendationResource.ApplyvApp to resource poolResource.Apply virtual machine to resource poolStorage views. ViewTasks.Create taskTasks.Update taskVirtual machine (Check all the permissions under this Privilege).vApp.ImportvApp.Power offvApp.Power onvApp.SuspendvApp.vApp application configurationvApp.vApp instance configurationvApp.vAppmanagedBy configurationvApp.vApp resource configurationIn
Step 2: Navigate to Click on the + icon and create a new user. Remember the username and Home > Administration > User and Groups. password - these will be used in subsequent steps.
Step 3: Click on Click on the + icon to open . Click on to map the Global Permissions. Global Permission Root - Add Permission Add previously created user to the Role created in Step 1 - make sure to click Propagate to children.
The Datastore should be part of a Datastore Cluster.NOT

3. The Suite Installer requires a single IP address. For environments without support for DHCP, users will need to create a VM Customization Specification to assign a Static IP to the Suite Installer.
Step 1: In vSphere, login into vSphere as an administrator user. Navigate to Click on the + icon to create a Home > Policies and Profiles. new VM Customization Specification.
Step 2: In the V wizard, enter a name and then select for the Click to proceed.New M Customization Specification Linux Guest OS. Next
Step 3: For the step of the wizard,ensure is checked, and enter the if Computer name Use the virtual machine name Domain nameapplicable. Click to proceed.Next

3.
Step 4: For the step of the wizard, select the appropriate time zone and then click to proceed.Time zone Next
Step 5: For the step of the wizard, select and then click on the three dots toNetwork Manually select custom settings
Step 6: Once the wizard appears, select and then input the Static IPv4 IP address, including the Edit Network Use custom settings appropriate subnet and gateway - this is the IP address the user will use to access the Suite Installer post-installation. Click to proceed, OK and then click to move onto the next step of the wizard.Next

3.
4.
1.
2.
Step 7: For the step of the wizard, input the necessary information for DNS. Click to proceed.DNS settings Next
Step 8: Verify the configuration and then click to complete the creation of the VM Customization Specification.Finish
The CloudCenter Suite installation process recommends that the Suite Installer uses the same NTP server as the ESX cluster. The NTP server can be retrieved from the ESX host by navigating to . Remember the IP address of the Configure > System > Time ConfigurationNTP server - it will be used in subsequent steps.
This completes PART 1 of the Prepare/Verify the Installation Environment and Infrastructure.
Import the Suite Installer into vSphere
Download the Installer OVA from .software.cisco.com

2.
3.
4.
Login into vSphere as an administrator or with an user with the appropriate permissions as outlined above in of PART 1 Prepare/Verify the . Click on and then select the vSphere Datacenter where the Installer needs to be Installation Environment and Infrastructure VM and Templates,
uploaded. Right-click and select Deploy OVF Template...
In the wizard, select and open the previously downloaded OVA from your computer's file browser. Click to Deploy OVF Template Local File Nextproceed.For the step of the wizard, select a folder directly underneath the Datacenter - see below screenshot for an example. Click Select name and folder
to proceed.Next

4.
5.
You select an installation folder, however do select a sub-folder. This requirement is the same for uploading the Suite MUST NOTInstaller, as well as selecting an installation directory during the installation of CloudCenter Suite. This behavior applies to CloudCenter Suite 5.2.1 and earlier versions.
Effective 5.2.2, CloudCenter Suite supports the following changes:
VMware environments can configure Clusters, DataStores, and/or Networks under a sub-folder. For example, sub-folder/Cluster , sub-folder/Datastore , sub-folder/NetworkYou can install a CloudCenter Suite cluster under any sub-folder

5.
6.
For the step of the wizard, select an ESX Host from the Cluster. Click , and wait for the validation checks to complete. ClickSelect resource Next Nagain to proceed to the step of the wizard.ext Select storage
For the step of the wizard, select an Datastore with necessary permissions as outlined above in Select storage of PART 1 Prepare/Verify the Click to proceed.. Installation Environment and Infrastructure Next
Reminder: The Suite Installer does support Datastore Clusters.NOT
Recommendation: Select Thin for the Virtual Disk Format.

6.
7.
8.
For the step of the wizard, from the drop-down select the appropriate network for the installer management interface - if Select networks necessary, this can be modified later. Click to proceed.Next
For the step of the wizard, use the following table to complete the form:Customize template
Field Description Condition
Unique ID This value must be unique within the vSphere networking domain. This field will be used to generate the hostname.
Required

8.
Password This value will be used to allow password-based authentication to the Installer VM via the vSphere Console. Recommended
SSH Public Key
This value will be used to allow key-based authentication with the Installer VM via SSH. The encryption formats supported are and ecdsa ed25519.
Recommended
Hostname This value must be unique within the vSphere networking domain. This field will be used to generate the hostname.
Required
For additional information - including instructions on how to generate a SSH key - please consider visiting .SSH Documentation

8.
9. 10.
Click and then to proceed. The OVA will start uploading - this will take approximately 5-10 minutes.Next FinishOnce the OVA is finished uploading, create a VM Template from the uploaded installer image. This template can be used in future installations. Right-click on the OVA and select Click to confirm. Once the wizard is complete, the convert will take Template > Convert to Template. Yesapproximately 5-10 minutes.

10.
11. Once the converting completes, right-click on the OVF template and selectNew VM from this Template...

11.
12.
The following steps are similar to . Remember that the following Steps 4-6 behavior applies to CloudCenter Suite 5.2.1 and earlier :versions
You select an installation folder, however do select a sub-folder.MUST NOTSelect the same Datacenter Cluster or Host as the Suite Installer.The Suite Installer does support Datastore Clusters.NOT
Effective 5.2.2, CloudCenter Suite supports the following changes:
VMware environments can configure Clusters, DataStores, and/or Networks under a sub-folder. For example, sub-folder/Cluster , sub-folder/Datastore , sub-folder/NetworkYou can install a CloudCenter Suite cluster under any sub-folder

12.
13.
For the step of the wizard, check Click to proceed.Select clone options Power on virtual machine after creation. Next
The Suite Installer requires a single IP address. For environments without support for DHCP, users will need to attach a VM Customization to assign a Static IP to the VM Installer. The creation of the VM Customization Specification was previously outlined above in Specification PA
of RT 1 Prepare/Verify the Installation Environment and Infrastructure.
Step 1: For the part of the wizard, select the previously created VM Customization Specification and click to Customize guest OS Nextproceed.
For environments using DHCP, select NOT Customize the operating system.

13.
14. Review the details of the wizard and then click to proceed with the creation of the Suite Installer VM. The creation of the VM will take Finish approximately 5-10 minutes.
Important: There is a known issue with some vCenter clients when usingVM Customization Specifications with Deploy From Templatewhere the Suite Installer VM does not receive an IP address. If you are unable to reach your Suite Installer homepage, please ensure the NIC is This can be checked by right-clicking on the VM and selecting Connected. Edit Settings.

14.
1.
This completes the import/upload of the Suite Installer into VMware.
Prerequisites: Prepare/Verify the Installation Environment and Infrastructure - PART 2
In order to ensure a successful installation of CloudCenter Suiteinto a vSphere environment, the following steps can be used to verify and/or appropriately configure the environment and infrastructure.
The installation process assumes internet connectivity to certain domains. When installing CloudCenter Suite into environments residing behind a proxy, please ensure the following domains are entirely accessible. Remember the proxy information - this will be used during the installation of CloudCenter Suite.
Proxy URL Description
https://devhub.cisco.com
http://devhub.cisco.com
https://devhub-docker.cisco.com
http://devhub-docker.cisco.com
Repository for Cisco CloudCenter Suite Docker Charts
https://gcr.io
http://gcr.io
Repository for Cisco CloudCenter Suite Helm Charts
Note: The Installer VM supports HTTP and HTTPS proxies, with or without username and password. The proxy must support TLS 1.2.
Warning: Several of the following links might perform redirects. Please ensure your proxy and firewall are configured to allow redirects of the following URLs.

1.
2.
3.
1.
https://storage.googleapis.com
http://storage.googleapis.com
Repository for Cisco CloudCenter Suite Tiller Image
Other The Suite Installer may require additional connections to the installation environment (for example, vCenter, Hyperflex Data Platform, AWS Console, and so forth) Please ensure your cloud target is reachable via the proxy!
A Note on Offline Clusters
While CloudCenter Suite 5.2offers a completely air gapped environment,your CCS cluster will require access to the URLs in the above tableif your internet access is via a proxy environment.However, as the offline solution is a completely air gapped environment and you do not need to adds URLs to your acceptable list of URLs when using the approach.Air Gap Installation
Users can use an existing Linux VM to test their proxy configurations. The following steps outline how to test a proxy on an Ubuntu VM.
Step 1: Configure the proxy on the VM:
export http_proxy=http://<proxy value> (HTTP Proxy)
export https_proxy=https://<proxy value> (HTTPS Proxy)
export http_proxy=http://<username>:<password>@<proxy value> (HTTP w/ Authentication)
export https_proxy=https://<username>:<password>@<proxy value> (HTTPS w/ Authentication)
Step 2: Use this command to login to the CloudCenter Suite docker registry. If this command fails, there might be an issue with the proxy configuration:
docker login -u "multicloudsuite.gen" -p "AKCp5aTvLmuvA2d1eRkiehsSAySuWZiyEv76bczZWzHe7bq5W96drHsmUzKus6v2ZsYXqMFje"devhub-docker.cisco.com
/multicloudsuite-release
Step 3: Use this command to download a docker image from the CloudCenter Suite registry. If this command fails, there might be an issue with the proxy configuration:
sudo docker pull gcr.io/kubernetes-helm/tiller:v2.12.3
In vSphere environments with more than one Datacenter, users are required to create a . This is true for both uploading the Resource PoolSuite Installer, as well as picking an installation environment.
In order to improve installation time, it is also recommended to upload the Tenant Image to the same Datastore and Datacenter as the installation target. The Tenant Image is cloned and used to deploy the Worker Nodes in the Kubernetes control-plane. The Tenant Image can be downloaded from . When then Tenant Image is not uploaded prior to installation, the Suite Installer will attempt to software.cisco.comupload clone and upload a copy of the image from the Installer OVA.
This completes PART 2 of the Prepare/Verify the Installation Environment and Infrastructure
Deploy CloudCenter Suite into vSphere
Once the Suite Installer VM finishes deploying and powering on, navigate to appropriate IP address to start the installation process of CloudCenter Suite. For DHCP-enabled deployments, the IP address can be found on the VMware console. Click on to proceed.New Cluster
Note: These steps may vary depending on the user's installation environment and proxy configuration.
The Resource Pool should be "nested" and part of another Resource Pool.NOT
The name of uploaded OVA have a prefix of MUST ."CCS"
Depending on the browser, users may need to dismiss a self-signed certificate error before proceeding.Note:

1.
2. Select and then complete the wizard with the required information (IP address and login credentials). Click verify the vSphere Connect connectivity. If the connectivity check successfully completes, click to continue.Next
Cisco CloudCenter Suite supports Air Gap Installations. However, in order to deploy CloudCenter Suite into environments without internet connectivity, users need to first setup an . Once the repository is setup, users can select for ProOffline Repository Yes Use Offline Repository. vide the login information and then click to proceed.Validate
Reminder: Use the account created above in of to Step 2 Prepare/Verify the Installation Environment and Infrastructure - PART 1 connect to vCenter.
Note: Depending on the deployment environment, the selections/inputs for the following steps may vary.

2.
3. On the next step of the installer, select/input the necessary for your environment. vSphere Placement Properties
vSphere Configuration
Field Input Condition Notes
Datacenter
Select the vSphere Datacenter for installation Required
Cluster Select the vSphere Cluster for installation Required
ResourcePool
Select the vSphere Resource Pool for allocation of resources
Optional
Datastore Select the vSphere Datastore for installation Required
Network Select the vSphere Network for installation and connectivity between the various nodes/services of the Kubernetes cluster
Required
CCS VM Tenant Image
Select the installation image used to create the Kubernetes cluster
Optional The Suite Installer includes a default Kubernetes cluster image (CCS-). This image will be automatically used whenever version-Base-Image
this field is left empty.
Cluster Folder
Select the installation directory Required
Reminder: This field is required for environments with more than one VMware Datacenter.
Recommendation: Select the same Datastore as the Suite Installer and Tenant Image.
Recommendation: For slow environments, upload the Tenant Image to same folder as the Suite Installer - ensure the name of the image is prefaced with " ".CCS-
This was previously outlined above in of Step 3 Prepare/Verify the Installation Environment and Infrastructure - PART 2.
The following screenshot is an example. Selections and values may differ between different installation environments.

3.
4. Scroll down to the next step of the installer and select/input the necessary values for .Kubernetes Cluster Configuration
Kubernetes Cluster Configuration
Field Input Condition Notes
Worker Instance Type
Select the Instance Type with the right amount of CPU / Memory
Required See > Prepare Infrastructure for Resource Requirements for CloudCenter Suite Modules.additional context
Kubernetes Worker Count
The number of nodes is automatically calculated based on the selection made for Worker Instance Type
Required See > Prepare Infrastructure for Resource Requirements for CloudCenter Suite Modules.additional context Users can opt to increase or decrease the number of nodes deployed during
installation.
Recommendation: 8CPU_32GBMem will deploy the number of nodes.least
The IP address requirements will change depending on the number of Worker Nodes selected during installation. For example:
If the instance type is , then 5 workers are created and the 8CPU_32GBMemtotal static IPs required for this environment are 7 IPs (4 worker VMs, and 3 primary servers).If the instance type is memory, then 5 workers are created 8CPU_24GBMemand the total static IPs required for this environment are 8 IPs (5 worker VMs, and 3 primary servers).If the instance type is , then 7 workers are created and the 8CPU_16GBMemtotal static IPs required for this environment are 9 IPs (6 worker VMs, and 3 primary servers).If the instance type is , then 9 workers are created, so the 4CPU_16GBMemstatic IPs required for this environment are 11 IPs (8 worker VMs, and 3 primary servers).

4.
Kubernetes Pod CIDR
Select the IP address block for internal networking between the pods running on each of the nodes
Required This address space is , and is not routable outside of the Kubernetes Cluster.INTERNAL
Cluster Prefix
Enter any unique value Required Used to identify which VMs / nodes are part of a Kubernetes cluster.
IP Allocation Mode
Select either or DHCP Static IP Required
DHCP: During the boot process, IP addresses will be allocated via .DHCP server
Master VIP - Common virtual IP address shared by the primary server nodes. Users can access the CloudCenter Suite login with this address.CCS v5.2.3 required users to only provide only a master VIP to create a cluster, butCCS v5.3.0 now requires users to provide all the network information like static IP case to create a cluster & its resources. DHCP_Pool_Start_IP, DHCP_Pool_End_IP, Subnet mask, Gateway IP & DNS Addresses.
Static: During the boot process, IP addresses will be allocated from a .user-defined pool
The first IP address in the pool.Static IP Pool Start IP -The last IP address in the pool. Static IP Pool End IP -
The subnet mask of the address pool.Subnet Mask - The available DNS servers in the environment.DNS Server List -
The subnet's "Default Gateway".Gateway List -
Warning: This address block should conflict with the subnet or IP addresses NOTused for the nodes.
Value must be lowercase, and must start and end with an alphanumeric character. Input field supports "-" (hyphens) but not "_" (underscores).
Note: Besides the assignment of IP addresses, the following selection also determines how Services are exposed outside of the cluster. When DHCP is selected, Kubernetes will use a load balancing service (MetalLB). However, when Static IP is selected, Kubernetes will use NodePorts.
The IP address for the Master VIP must be unique, and not available to DHCP.
Important: Please note the following requirements when allocating a block of IP addresses -
The block of IP addresses must cover the number of Nodes (Workers + and . However, we recommend primary servers) (4) additional services
users define larger pools (50% more) to allow for future scalabilty.e.g. If the instance type is 7 IP addresses are , 8CPU_32GBMemrequired for the nodes and 4 IP addresses are required for the additional services. Therefore total required is 11 IP minimum addresses.
The block of IP addresses for the user-defined pool must be unique. Verify network reachability before proceeding - the installation will fail without complete connectivity.
The following screenshot is an example. Selections and values may differ between different installation environments.

4.
5.
Scroll down to the next step of the installer and input the necessary values for . This configuration will be used to allow key- SSH Configurationbased authentication with the worker and primary server nodes via SSH.
SSH Configuration
Field Input Condition Notes
SSH Username
Enter valid username
Recommended
This is a user-assigned field to identify the user for SSH access into worker(s)/primary server(s).
SSH Public Key
Enter valid SSH key
Recommended
The encryption formats supported are and ecdsa ed25519.
Scroll down to the next step of the installer and input the necessary values for .(Optional) NTP Configuration
The username must be or .NOT root cloud-user
For additional information - including instructions on how to generate a SSH key - please consider visiting .SSH Documentation
The Suite Installer does not require the SSH key to have a comment. However, any comments MUSTbe in the following format: <username>@<hostname>

5.
6. Scroll down to the next step of the installer and select/input the necessary values for . This configuration will define (Optional) Proxy Configurationthe Docker proxy settings on each worker/primary server node. When attempting to reach the internet, the nodes will use these settings for interne
.t connectivity - this is particularly important during installation
Proxy Configuration
Field Input Conditional Notes
HTTP Proxy
Enter the IP address and port of the HTTP proxy server
N/A For proxies requiring Username / Password, select for Yes Proxy Requires User Click to ensure the configuration is correct.Authentication. Validate
HTTPS Proxy
Enter the IP address and port of the HTTPS HTTP proxy serveror
N/A For proxies requiring Username / Password, select for Yes Proxy Requires User Click to ensure the configuration is correct.Authentication. Validate
Bypass Proxy Settings
Enter the IP addresses or URLs of the domains you want to bypassthe proxy
N/A This configuration will define the Docker proxy settings on each worker/primary server node. The field should be used to define which IP addresses and domains Bypass Proxy Settingsshould use the proxy to reach the internet.NOT
Example: localhost,10.100.96.168,*. ,. ,10.1.0.0/16,127.0.0.1test.example.com example2.com
Note: The NTP values should match the ESXi NTP configuration as outlined above in of Step 4 Prepare/Verify the Installation -Environment and Infrastructure PART 1.
Reminder: Please review of for additional information Step 1 Prepare/Verify the Installation Environment and Infrastructure - PART 1on the proxy configuration, including a list of required domains.
In Suite Admin 5.2.x, updating proxy configurations must be manually completed on each node. This process is not "hitless" and will require a restart of the VM.
The HTTP proxy value is allowed in HTTPS proxy field. However, HTTP traffic will utilize secure channel (SSL) to connect to internet.

6.
7. Once completed, click to proceed. The installation will take approximately 30-60 minutes depending on the installation environment. Click Install on to continue the setup and installation.Take Me To Suite Admin
Folder Names in the VMware Environment
Recommendation: Do not forget to download the - this can be used to used to manage the Kubernetes nodes.kubeconfig file

When you deployCloudCenterSuite5 in a VMware environment, you can specify a top-level folder to place the K8snodes.Thename of that folder cannot be changed after the installation. If the folder name has been changed, installation of new modules will fail.If you rename the folder name theoriginalname, theinstallationwill succeed.

OpenStack InstallationOpenStack Installation
OpenStack NuancesModule DetailsInstallation Process
OpenStack Nuances
Verify the following OpenStack nuances:
OpenStack newton release with at least the followingservice versions:Cinder v2Keystone v3OpenStack Nova v2OpenStack Networking v2OpenStack Glance v2
Ensure to add Port 6443 to the default security group as the security group created for the cluster is not automatically assigned to the load balancer created for the cluster.The tenant and project requirements for OpenStack Cloud are identified in the following table.
Model Quota Description
For all cases 2 (primary server group, worker group) Server Groups
Number of workers + number of primary servers Server Group Members
3 (API load balancers) Load Balancers
6 (2 for each load balancer) Health Monitors
6 (2 for each load balancer) Pools
6(2 for each load balancer) Listeners
3 (1 for the cluster VMs, 2 for the Kubernetesload balancer services) Security Groups
18 Security Group Rules
See for additional detailsPrepare Infrastructure Volume GB
Number of workers + number of primary servers +3 for each load balancer
Ports
Number of workers + number of primary servers Instances
16 GB (recommended for each worker and each primary server) RAM
32 (recommended for each workers and each primary server) vCPUs
Tenant network Floating IPs = 3 1 for each load balancer
Networks = 1 For the tenant network
Subnet = 1 For the tenant network
Router = 1 For the tenant network to public network connection
Provider network
Number of workers + number of primary servers + 3 load balancers Free IPs in the provider network
Network Time Protocol (NTP) must be configured this is important as the CloudCenter Suite installation can fail, if NTP is not configured or if it is wrongly configured.
Module Details
If you setup CloudCenter Suite in offline mode, you must provide valid NTP server details before you save your configuration.

1. 2. 3. 4. 5.
6. 7.
Additionally, refer to your module documentation for module-specific dependencies as identified in the following table:
Module Documentation
Workload Manager Cloud Overview
Action Orchestrator Add Cloud Account
Cost Optimizer Cloud Overview
Installation Process
To installthe CloudCenter Suite on a new OpenStack cluster,perform the following procedure.
Verify that you have prepared your environment as listed in the section above.OpenStack Nuances Navigate to the Suite Installer Dashboard.Click .New ClusterClick the OpenStack card.To connect using OpenStack cloud credentials, enter the OpenStack Placement Property details identified in the following table.
OpenStackPlacement Properties
Description
OpenStack Authentication URL
The OpenStack authentication service URL.
OpenStack Region The OpenStack cloud region.
OpenStack Domain Name
The OpenStack account domain name.
OpenStack Project The OpenStack project name.
OpenStack Username The OpenStack account username.
OpenStack Password The OpenStack account password.
OpenStack CA Certificate
The CA certificate that is required to verify an OpenStack HTTPS URL. This field is mandatory using a HTTPS URL and is not required if using a HTTP URL.
Click .ConnectOnce the connection is validated, click .Next
To specify the placement properties, enter the following details.
OpenStack Placement Properties
Description
Control Plane Cluster Prefix
Select the OpenStack project to which the Kubernetes cluster is deployed.
OpenStack Details
OpenStack Flavor UUID
Select one of the existing flavors or VMs. Based on your selection, the recommended number of workers is calculated and displayed in the field.Kubernetes Worker Count
If you setup CloudCenter Suite in offline mode, you must provide valid NTP server details before you save your configuration.

7.
OpenStack Image UUID
Different images will be used for the installer and the cluster launched by the installer. The installer includes a default Kubernetes cluster image (called, CCS- -Base-Image) with a configurable option to override the use of this default versionimage. TheCCS-version-Base-Image image included in the installer is selected if you do not override the setting.
To override the CCS- -Base-Image image used by the Suite installer, be sure to add the applicable image in theversion OpenS console and selected the applicable image from the dropdown list in this field.tack QCOW2
If you use the installer to launch the cluster in an vSphere environment, be sure to override this field and select the OVAapplicable CCS- -Base-Image.QCOW2 version
OpenStack SSH Keypair Name
Only SSH keys of type or are supported.ssh-ed25519 ecdsa-sha2-nistp256
OpenStack Network Model
. See The functional networking model for OpenStack https://docs.openstack.org/security-guide/networking/architecture.htmlfor additional context.
Provider Network or Tenant Network
Provider Network Created by the OpenStack administrator on behalf of tenants and can be dedicated to a particular tenant, shared by a subset of tenants, or shared by all tenants. Refer tohttps://docs.openstack.org/liberty/networking-guide/intro-os-
for additional details.networking-overview.html
If you install the CloudCenter Suite using any image other than CCS-version-Base-Image, the installation will fail.
You must have at least one existing SSH-key in the selected OpenStack environment to begin the installation.

7.
8. 9.
10.
a. b. c. d.
Tenant Network Created by tenants for use by their instances and cannot be shared (based upon default policy settings). Refer to for additional details.https://docs.openstack.org/liberty/networking-guide/intro-os-networking-overview.html
Kubernetes Configuration
Kubernetes Worker Count
This field is auto-populated with the recommended number of worker VMs. While you can change the recommended number, be sure to verify that the worker count is adequate to accommodate the modules that you want to install. See Prepare
for additional details.Infrastructure
KubernetesPod CIDR
Floating IP pool from which IP addresses are assigned to pods.
Proxy Configuration
HTTP Proxy The hostname or IP address of the proxy host along with the port.
HTTPS Proxy
The hostname or IP address of the secure proxy host along with the port.
NTP Configuration
NTP Servers
A comma-separated list of IP addresses or FQDNs of your NTP server(s) to be used to sync VM clocks.
NTP Pools A comma-separated list of IP addresses or FQDNs of your NTP cluster(s) to be used to sync VM clocks.
Click .Install The installation progress is visible on screen. Once successful, you see the following message.
CloudCenter Suite installation successful!
You have the following options at this point:
Click to launch and set up the .Take Me To Suite Admin Suite AdminClick to start another installation and go back to the homepage (Installer Dashboard).Install Another ClusterDownload to connect to the launched cluster using the tool.Kubeconfig file kubectlAfter the installation is complete, use the following command to SSH into the workers/primary servers as ubuntu and use the private SSH key of the public key (provided when you configured the Placement Properties details above).
Verify that this IP does not conflict with the node/VM IP address.
Ensure that Port 22 is open on the primary server/worker node so you can provide communication security via Security Groups/Firewall rules for OpenStack environments.

10.
d.
11.
#Sample command to SSH into a worker/primary server
ssh -i <private key> ubuntu@<primary server/Worker IP>
Be sure to switch off the installer VM. You can reuse this VM for any other purpose, for example, as an Offline Repository or to upgrade the .Kubernetes cluster or to upgrade the tenant image on the nodes

Existing Cluster InstallationInstall the CloudCenter Suite on an Existing Kubernetes Cluster
OverviewRestrictionsPrerequisitesProcedure
Overview
Once you access the Suite Installer Dashboard (see ), you can choose to install the Suite Adminon an existing clusterPrepare Infrastructure .
Restrictions
Before proceeding with section, adhere to the following restrictions:
AWS: The CloudCenter Suite does not currently support a Suite Admin installation on an existing AWS cluster.Permission: Admin-level permissions for the cluster are mandatory for a user to install the Suite Adminin an existing cluster.
Prerequisites
Verify that the cluster adheres to the following requirements:
: The existing cluster must be of Version v1.18.x or and later.Kubernetes Version KubernetesKubernetes : InstallAdd Ons Cert-manager (required) using the following command:versionv1.0.2
kubectl apply -f https://github.com/jetstack/cert-manager/releases/download/v1.0.2/cert-manager.yaml
Also, see https://cert-manager.io/docs/Instance Type: The instance type for GKE is should be n1-standard-8 or higher. Verify that it is large enough to accommodate the installation of Suite Adminand other CloudCenter Suite modules.Basic Authentication: When creating the GKE cluster, go to and check the box to .Security Enable Basic Authentication
: The default storageClass must be configured.Storage Class: The kubeconfig user must have cluster-admin permission in the kubeconfig namespace. Kubeconfig
If the cluster does not support Load Balancer.GCP: You must remove auth provider and use the admin user password.
- Must be enabled.RBAC: Define the PriorityClass for suite-high/suite-medium/suite-low. Pod Priority
Refer to for details.https://kubernetes.io/docs/concepts/configuration/pod-priority-preemption/The commands to define PriorityClass are listed in the following code block.

# create pod priority class: suite-high/suite-medium/suite-low
##################################### begin create pod priority
cat <<EOF | kubectl apply -f -
apiVersion: scheduling.k8s.io/v1beta1
kind: PriorityClass
metadata:
name: suite-high
value: 1000000
globalDefault: false
description: "High priority"
---
apiVersion: scheduling.k8s.io/v1beta1
kind: PriorityClass
metadata:
name: suite-medium
value: 10000
globalDefault: false
description: "Medium priority"
---
apiVersion: scheduling.k8s.io/v1beta1
kind: PriorityClass
metadata:
name: suite-low
value: 100
globalDefault: false
description: "Low priority"
EOF
##################################### end create pod priority
GKE clusters with static version or regional location type are supported.Use the 'Container-Optimized OS with Docker (cos) (default)' as the container run time for the cluster.Azure AKS clusters in private networks with and without advanced network configurations:
For clusters with advanced network configurations with no private network follow the previously mentioned existing clusterinstallation scenario.For clusters in private network with or without advanced network configurations enabled as the Kubernetes API server endpoint is in a private network with no public IP address, but there are multiple ways a network connection between the AKS cluster and installer VM( and therefore successful installation) can be established you will need to use an installer VM that has access to the AKS cluster's Azure Virtual Network (VNet). Use one of the following options:
(Easiest) Start the installer VM in the same private network (vnet) where the Kubernetes cluster is so that installer can connect to the cluster.

1. 2.
3.
4.
a. b.
5.
6.
Use the Installer VM in a separate network and set upVirtual network peering.Use anExpress Route or VPNconnection. Refer to for https://docs.microsoft.com/en-us/azure/aks/private-clusters#options-for-connecting-to-the-private-clusteradditional details.
Procedure
To install perform the following procedure.the CloudCenter Suiteon an existing cluster,
Navigate to the Suite Installer Dashboard.Click to get started as displayed in the following screenshot.Existing Cluster
Verify that you have met the items identified in the section. The following screenshot displays these items as well.Prerequisites
Identify if you cluster supports accordingly, turn this toggleload balancer as the service type
f supported (YES Toggle ON i public clouds support load balancers)generally NO Toggle OFF if not supported(private clouds support load balancers)generally do not
Upload theKubeconfig file.
Click . The installation progress is visible on screen. Once successful, you see the following message .Install
CloudCenter Suite installation successful!

5.
6. a. b.
You have the following options at this point:ClickTake Me To Suite Adminto launch and set up theSuite Admin.Click to start another installation on the same cluster.Install Another Cluster
You have now installed the Suite Adminon an existing cluster.

Upgrade Kubernetes ClusterUpgrade Kubernetes ClusterAccess the Suite Installer Dashboard (see ) to install a new cluster andPrepare Infrastructure launch nodes for the new Kubernetes cluster
Upgrade ApproachOpenStack UpgradeVMware vSphere Upgrade

Upgrade ApproachUpgrade Approach
Upgrade ApproachOverviewRestrictionsPrerequisites
Kubernetes Cluster UpgradeProcessUpgrading from SA 5.2.3 to 5.2.4
Overview
This section provides details on restrictions, prerequisites, and the process to upgrade the Kubernetes cluster. During this upgrade, the software upgrades the cluster and migrates the pods to new worker instances.
Restrictions
Before proceeding with an upgrade, adhere to the following restrictions:
Usage: To upgrade the Kubernetes cluster to a new version, you can do so from CloudCenter Suite5.1.0 and later releases.
You cannot use the CloudCenter Suite 5.2 upgrader to upgrade a CloudCenter Suite 5.1 or 5.0 cluster. You can only use the CloudCenter Suite 5.2 upgrader effective CloudCenter Suite 5.2.1 to upgrade to a later release.As an upgrader is not available to upgrade from CloudCenter Suite 5.2 to CloudCenter Suite 5.2, you must use the Backup and Restoreprocedure to upgrade to a CloudCenter Suite 5.2 cluster.Even if you update the Suite Adminto Suite Admin 5.2, the underlying cluster will not have the capability to be upgraded as it is still using CloudCenter Suite 5.2.Public Clouds:
Take a backup and then restore on to a new existing cluster with supported kubernetes version for the cloud.Private Clouds:
By upgrading the cluster, you are performing a rolling upgrade on each base image in the cluster.A rolling upgrade may or may not include a change in the Kubernetes version it may merely apply an OS patch or address vulnerabilities depending on the image version that you use.The installer includes a default Kubernetes cluster image (called, ). The VM Template contains a list CCS-version-Base-Imageof tenant images with a CCS-version-Base-Image name format. If you want to upgrade to a version other than the default version provided by the installer, then upload that CCS-version-Base-Image under the root folder, so that it will display in this dropdown list. You can use this option to upgrade the cluster across private clouds.
Suite Admin-level Permissions: Suite Admin-level permissions are mandatory for a user to upgrade the cluster.New Clusters Only: You can upgrade a cluster that is created (from the ) using the option. Suite Installer New cluster
Prerequisites
Verify that the cluster adheres to the following requirements:
: Back up your environment before initiating the upgrade. See for additional details.Backup Environment Backup ApproachSchedule a suitable downtime during off-peak hours to minimize the impact to your users and or customers. Communicate Schedule Downtime:
the downtime as the CloudCenter Suitewill not be accessible during the upgrade.: Verify that the existing cluster is Version v1.16.3 and above.Verify Kubernetes Version Kubernetes
If you restart any worker node, be sure to wait for approximately 10 minutes before logging into the CloudCenter Suite this timeline is determined by the pods taking about 10 minutes to startup.
For private cloud, the CloudCenter Suite 5.2 Installer cannot perform a Kubernetes upgrade on a cluster that was installed using a previous release (for example, any 5.x release). Instead, you should use the backup and restore functionality and restore it on a freshly created CloudCenter Suite 5.2.0 cluster and then perform the Kubernetes version upgrade.
This is the same process that was followed for any other CloudCenter Suite 5.0 or 5.1 releases.
If you created your cluster by clicking the option (using theKubeConfig file), then you cannot upgrade this cluster Existing clusterusing the process provided in this section.

1. 2.
3.
4. 5.
6.
7.
Kubernetes Cluster UpgradeCustomers running CCS v5.2.4 can now upgrade their kubernetes cluster using v5.3.0 installer. However they need to follow a few required steps to start upgradin the kubernetes version to 1.18.12.
IMPORTANT: Follow documented steps to take a backup of the cluster before proceeding with the kubernetes upgrade.Upgrade Suite Admin version to v5.3.0 using the UI. This is a required step to continue the upgrade, if Suite Admin is not upgraded users will see this error message on the installer: "Cluster is NOT running Common-Framework Suite Admin v5.3.x. Please upgrade the Suite Admin chart to v5.3.x before upgrading kubernetes."
(Only on vSphere) This release addresses the security issue of encrypting ETCD secrets in Kubernetes. To do this users need to run the documented workaround script to enable ETCD Encryption of secrets in the kubernetes clusters. New cluster installed using v5.3.0 installer has ETCD encryption enabled by default. The contents of the script is shown below. etcdEncrypt_master_1.sh The script is mandatory, not optional for the upgrade to work.
on any of the masters, this can bring the cluster since the script interacts with kube-IMPORTANT: DO NOT run the workaround script TWICEapiserver of the cluster.Use v5.3.0 installer to upgrade the kubernetes cluster & cert-managerAfter upgrading the cluster, users can use the "Take me to Suiteadmin" link to go back to the Suite Admin UI. Please note that this address might change for DHCP based clusters.In the upgraded cluster, if you want to upgrade the Workload-manager, Cost-optimizer or Action Orchestrator chart and see this error on suite admin UI:"failed to wait for command /bin/helm, err: exit status 1, msg: Error: [unable to recognize \\\"\\\": no matches for kind \\\"Certificate\\\" in version \\\"c
"ertmanager.k8s.io/v1alpha1\\\", unable to recognize \\\"\\\": no matches for kind \\\"Issuer\\\" in version \\\"certmanager.k8s.io/v1alpha1\\\"]Please follow workaround steps mentioned inRequired Post-Kubernetes Upgrade Configuration Tasks
from step 3:etcdEncrypt_master_1.sh
Important: File name of the script in the first master must beetcdEncrypt_master_1.sh
#!/bin/bash
# if encryption is not enabled, enable it.# Because etcd disk is shared between old and new master node,# we have to turn on encryption on the old master, and encrypt# all secrets first. After this, when new master node# is booted, its own etcd will have encrypted data and kube api# process will then use encryption key to decrypt secrets stored# in etcd.function check_if_running_sudo {if [ "$EUID" -ne 0 ] then echo "This script needs to run as sudo. Please retry with:"echo "sudo bash $0" exitfi}
function check_if_vsphere_cloud { if kubectl get cm k8s-mgmt.cloudaccount --kubeconfig=/home/$(users)/.kube/config -n cisco ; then echo "continue with the upgrade..."else

echo "Workaround is not required for this cloud. Please continue with the upgrade from installer UI." exitfi kubectl get cm k8s-mgmt.cloudaccount --kubeconfig=/home/$(users)/.kube/config -n cisco -o jsonpath="{.data.data}" | base64 -d > k8s-mgmt.cloudaccount.json sleep 60 CLOUD_TYPE=$(cat k8s-mgmt.cloudaccount.json | jq -r '.cloudType') if [[ $CLOUD_TYPE == *"vsphere"* ]]; then echo "Vshere cloud, continue with the workaround."else echo "$CLOUD_TYPE cloud, workaround is not required for this cloud. Please continue with the upgrade from installer UI" exitfi}
function check_for_encryption_file { #Function to check if this file is executed only Once, if first time, create a lock FILE=/etc/kubernetes/pki/etcd/encryption.confif [ -f "$FILE" ]; then echo -e "-----------------------------------------------------------------------------------------" echo "$FILE already exists. Looks like workaround is already performed on this master node. Please do not run the script multiple times on same master. Continue with other master nodes." echo -e "-----------------------------------------------------------------------------------------" exitfi }
function backup_resources { mkdir -p backup && cd backup || exit echo -e "Backing up all the certificates to backup folder $PWD /backup" kubectl get -o yaml --all-namespaces issuer,clusterissuer,certificates,secrets --kubeconfig=/home/$(users)/.kube/config > cert-manager-backup.yaml kubectl get cm k8s-mgmt.cloudaccount --kubeconfig=/home/$(users)/.kube/config -n cisco -o jsonpath="{.data.data}" | base64 -d > k8s-mgmt.cloudaccount.json echo -e "Backing up all the secrets to resources_backup.yaml" kubectl get -o yaml --all-namespaces secrets --kubeconfig=/home/$(users)/.kube/config > resources_backup.yaml for n in $(kubectl get -n cisco -o=name pvc,certificate,configmap,serviceaccount,secret,ingress,service,deployment,statefulset,hpa,job,cronjob) do mkdir -p $(dirname "$n") kubectl get -n cisco --kubeconfig=/home/$(users)/.kube/config -o=yaml --export "$n" > "$n".yaml 2> /dev/null done cd .. echo -e "-----------------------------------------------------------------------------------------"}
ETCD_ENCRYPTION_SECRET=$(head -c 32 /dev/urandom | base64)
function generate_encryption_conf_file { #!/bin/bash
OUTPUT_FILE=/etc/kubernetes/pki/etcd/encryption.conf
echo -e "\nCreating ETCD_ENCRYPTION_SECRET and ETCD_ENCRYPTION_KEY"
ETCD_ENCRYPTION_SECRET=$(head -c 32 /dev/urandom | base64)ETCD_ENCRYPTION_KEY=$(echo ccp-key-$(echo "$ETCD_ENCRYPTION_SECRET" | base64 -d | sha256sum | cut -c1-10))
echo "Writing content to file $OUTPUT_FILE"
cat <<EOF > $OUTPUT_FILEapiVersion: apiserver.config.k8s.io/v1kind: EncryptionConfigurationresources: - resources: - secrets providers: - aescbc:

keys: - name: $ETCD_ENCRYPTION_KEY secret: $ETCD_ENCRYPTION_SECRET - identity: {}EOF}
check_if_running_sudocheck_if_vsphere_cloudcheck_for_encryption_filebackup_resourcesecho -e "\nCreating etcd Encryption configuration file for all the master nodes"generate_encryption_conf_fileecho -e "\nSaved etcd Encryption configuration file at $OUTPUT_FILE"cp $OUTPUT_FILE encryption.confecho -e "\nSaved etcd Encryption configuration file's copy at encrption.conf\n\n"
#----------------------------------------------#----------------------------------------------
function check_if_running_sudo {if [ "$EUID" -ne 0 ] then echo "This script needs to run as sudo. Please retry with:"echo "sudo bash $0" exitfi}function sleep_function { echo "Sleeping for $1 minutes..." while true;do echo -n .;sleep 1;done & sleep "$1" # or do something else here kill $!; trap 'kill $!' SIGTERM echo "Done" echo -e "\n\n-----------------------------------------------------------------------------------------"}function check_if_vsphere_cloud { if kubectl get cm k8s-mgmt.cloudaccount --kubeconfig=/home/$(users)/.kube/config -n cisco ; then echo "continue with the upgrade..."else echo "Workaround is not required for this cloud. Please continue with the upgrade from installer UI." exitfi kubectl get cm k8s-mgmt.cloudaccount --kubeconfig=/home/$(users)/.kube/config -n cisco -o jsonpath="{.data.data}" | base64 -d > k8s-mgmt.cloudaccount.json sleep 60 CLOUD_TYPE=$(cat k8s-mgmt.cloudaccount.json | jq -r '.cloudType') if [[ $CLOUD_TYPE == *"vsphere"* ]]; then echo "Vshere cloud, continue with the workaround."else echo "$CLOUD_TYPE cloud, workaround is not required for this cloud. Please continue with the upgrade from installer UI" exitfi}
function check_for_encryption_file { #Function to check if this file is executed only Once, if first time, create a lock FILE=/etc/kubernetes/pki/etcd/encryption.confif [ -f "$FILE" ]; then echo -e "-----------------------------------------------------------------------------------------" echo "$FILE already exists. Looks like workaround is already performed on this master node. Please do not run the script multiple times on same master. Continue with other master nodes." echo -e "-----------------------------------------------------------------------------------------" exitfi }check_if_running_sudocheck_if_vsphere_cloud

OUTPUT_FILE=/etc/kubernetes/pki/etcd/encryption.conf
function copy_encryption_conf_file { #!/bin/bash
OUTPUT_FILE=/etc/kubernetes/pki/etcd/encryption.conf echo "Copying script to $OUTPUT_FILE" cat <<EOF > $OUTPUT_FILE $(sed -n -e '/^ETCD_ENCRYPTION_FILE_START$/,/^ETCD_ENCRYPTION_FILE_END$/ { /^ETCD_ENCRYPTION_FILE_START$/d; /^ETCD_ENCRYPTION_FILE_END$/d; p; }' "${0}")EOFcp $OUTPUT_FILE encryption.confecho -e "\nSaved etcd Encryption configuration file's copy at encrption.conf\n\n"}
# File content which updates kube-apiserver.yaml and waits for kubeserver to startfunction check_kube_api { API_PID=$(ps -ef | awk '/kube-ap[i]server/{print $2}') echo -e "-----------------------------------------------------------------------------------------" echo "check_kube_api to verify that kube-apiserver is restarted: $API_PID ..." while [ $API_PID = $1 ]; do echo "wait for kube api server to exist.." sleep_function 2m API_PID=$(ps -ef | awk '/kube-ap[i]server/{print $2}') done
while ! ps -ef | grep kube-ap[i]server; do echo "wait for kube api server to restart.." sleep_function 2m done echo -e "\n=========================================================================================" echo -e "Waiting. Please DO NOT INTERRUPT." sleep 300 echo -e "Successfully updated kubernetes manifests" echo -e "\n=========================================================================================" }
function update_kube_apiserver_manifest { API_PID=$(ps -ef | awk '/kube-ap[i]server/{print $2}')
echo -e "Adding ETCD encryption resources to kube-apiserver, it might take some time. Please DO NOT INTERRUPT."
API_CONF="/etc/kubernetes/manifests/kube-apiserver.yaml" ENC_CONF="/etc/kubernetes/pki/etcd/encryption.conf"
sudo python - <<EOFimport yamlname = 'k8s-encryption'
with open("$API_CONF", "r") as f: data = yaml.safe_load(f) data['spec']['volumes'].append({'hostPath': {'path': "$ENC_CONF", 'type': ''}, 'name': name}) data['spec']['containers'][0]['command'].append("--encryption-provider-config=$ENC_CONF") data['spec']['containers'][0]['volumeMounts'].append({'mountPath': "$ENC_CONF", 'name': name}) with open("$API_CONF", "w") as f: f.write(yaml.dump(data, default_flow_style=False, indent=2))EOF
sleep_function 2m}
function patch_kubeconfig_secret { KUBECONFIG_SECRET_NAME=$(kubectl get secret -n ccp --kubeconfig=/home/$(users)/.kube/config | grep kubeconfig

| awk '/-/{print $1}') echo "\nCreating patch file for kubeconfig secret $KUBECONFIG_SECRET_NAME" echo "{\"data\":{\"etcdEncryptionKey\": \"${ETCD_ENCRYPTION_SECRET}\"}}" > patch_kubeconfig_secret.json kubectl -n ccp patch secret "$KUBECONFIG_SECRET_NAME" --kubeconfig=/home/$(users)/.kube/config --patch "$(cat patch_kubeconfig_secret.json)" echo -e "\nSuccessfully patched kubeconfig secret, sleeping for 2 mins, please DO NOT INTERRUPT.\n\n" sleep_function 2m kubectl get secrets --all-namespaces -o json --kubeconfig=/home/$(users)/.kube/config | kubectl replace -f - --kubeconfig=/home/$(users)/.kube/config echo -e "\n\nUpdating the secret, please DO NOT INTERRUPT." sleep_function 5m echo -e "\n\n===========================================================================================" echo -e "===========================================================================================" echo -e "\nWorkaround completed." echo -e "\nRestart all 3 Master nodes one by one." echo -e "\nGive significant time for all services to become RUNNING before proceeding with next master node.(Recommended ~5 mins)" echo -e "\n\n===========================================================================================" echo -e "===========================================================================================\n"}
#----------------------------------------------#----------------------------------------------
API_PID=$(ps -ef | awk '/kube-ap[i]server/{print $2}')echo -e "\n\nPrinting encrption file, please copy it to other masters and execute\n"echo ": '" > etcdEncrypt_master_2.shecho ": '" > etcdEncrypt_master_3.shecho "ETCD_ENCRYPTION_FILE_START" >> etcdEncrypt_master_2.shecho "ETCD_ENCRYPTION_FILE_START" >> etcdEncrypt_master_3.shcat $OUTPUT_FILE >> etcdEncrypt_master_2.shcat $OUTPUT_FILE >> etcdEncrypt_master_3.shecho "ETCD_ENCRYPTION_FILE_END" >> etcdEncrypt_master_2.shecho "ETCD_ENCRYPTION_FILE_END" >> etcdEncrypt_master_3.shecho " '" >> etcdEncrypt_master_2.shecho " '" >> etcdEncrypt_master_3.sh
sed -n '107,245p' etcdEncrypt_master_1.sh >> etcdEncrypt_master_2.shsed -n '107,245p' etcdEncrypt_master_1.sh >> etcdEncrypt_master_3.shecho "check_for_encryption_file" >> etcdEncrypt_master_2.shecho "check_for_encryption_file" >> etcdEncrypt_master_3.shecho "copy_encryption_conf_file" >> etcdEncrypt_master_2.shecho "copy_encryption_conf_file" >> etcdEncrypt_master_3.shecho "update_kube_apiserver_manifest" >> etcdEncrypt_master_2.shecho "update_kube_apiserver_manifest" >> etcdEncrypt_master_3.shecho -e "export -f check_kube_api \ntimeout 300s bash -c check_kube_api "\$API_PID"" >> etcdEncrypt_master_2.shecho -e "export -f check_kube_api \ntimeout 300s bash -c check_kube_api "\$API_PID"" >> etcdEncrypt_master_3.shecho -e "ETCD_ENCRYPTION_SECRET=""$ETCD_ENCRYPTION_SECRET">>etcdEncrypt_master_3.shecho "patch_kubeconfig_secret" >> etcdEncrypt_master_3.sh
update_kube_apiserver_manifestexport -f check_kube_apitimeout 300s bash -c check_kube_api "$API_PID"
echo -e "\nWorkaround completed on Master-1, please continue with Master-2 and Master-3"echo -e "\n\n==========================================================================================="echo -e "\nCopy etcdEncrypt_master_2.sh to second master and run sudo bash etcdEncrypt_master_2.sh"echo -e "\nCopy etcdEncrypt_master_3.sh to third master and run sudo bash etcdEncrypt_master_3.sh"echo -e "===========================================================================================\n\n"
Process

1.
2.
3.
This is the generic process to upgrade a Kubernetes cluster for a cloud that is supported by the CloudCenter Suite.
Navigate to the Suite Installer Dashboard (see ).Prepare Infrastructure
Click in the section to specify the credentials for your cluster as displayed in the following screenshot.Upgrade Upgrade Kubernetes Cluster
Enter the Suite AdminURL (or DNS), username, password, and Tenant ID for the admin account.
See the individual cloud upgrade pages for additional notes and nuances.

3.
4. 5.
Click to validate your credentials.ConnectAt this point, you have multiple scenarios:
You will be able to click and select the desired Kubernetes version from the dropdown list for this upgrade. Proceed to Step 8.NextIf an upgrade is not available for your cluster as displayed in the following screenshot, some possible reasons are:
An upgrade is not currently available as the cluster is already at the latest available version of Kubernetes.

5.
6.
7. 8.
9.
a. b.
10.
11.
a. b. c. d. e.
12.
1.
You may have provided the wrong cluster credentials (in this case, you will not see the status update when you try Connectedto connect). If so, enter the right credentials and try again.
Once Connected, you see the cloud type and other information on the left side off the screen as visible in the following screenshot (sample of a GKE environment):If an upgrade is available, select the for the upgrade.Desired K8s versionClick to A progress bar with Upgrade upgrade the Kubernetes cluster as well as the master and worker nodes once the upgrade is complete.relevant status messages is displayed.
At this point, you can:
Download the latest logs to track the upgrade process. Wait for cluster to finish upgrading.
The installation progress and success is visible on the screen.
You have the following options at this point depending on your cloud environment:
ClickTake Me To Suite Adminto launch and set up theSuite Admin.Click to start another installation on the same cluster.Install Another ClusterDownload the .Kubeconfig fileDownload the .SSH private keyRe-purpose the installer server.
Login to CloudCenter Suiteusing valid credentials and verify that your information is preserved and that the cluster was upgraded.
Upgrading from SA 5.2.3 to 5.2.4
If you are upgrading from 5.2.3 or older to 5.2.4, perform the following procedure:
Run an SQL command in the suite-postgresqldatabase.
2.Log in to common-framework-suite-postgresql-0
kubectlexec -it common-framework-suite-postgresql-0 -n cisco bash
3.Run the following bash command.
PGDATABASE=suite-samlpsql-c"UPDATEpublic.saml_infra_configSETcert_source='cert_manager' WHERE id=1;"
4.Optionally regenerate the SSO certificate.
An upgrade operation can take more than one hour depending on the number of nodes to be upgraded and cloud response time.
See the individual cloud upgrade pages for which of these options are available and for additional notes and nuances.

kubectldelete secret suite-saml-sso-tls-n cisco
5. Restart the suite-samlpod.
kubectldelete pod suite-saml-pod -n cisco
6. If you use SSO, reconfigure SSO.

OpenStack UpgradeOpenStackUpgrade
OverviewOpenStack NuancesModule DetailsUpgrade Process
Overview
See for details on permissions and prerequisites.Upgrade Approach
OpenStack Nuances
Verify the following OpenStack nuances:
OpenStack newton release with at least the followingservice versions:Cinder v2Keystone v3OpenStack Nova v2OpenStack Networking v2OpenStack Glance v2
Ensure to add Port 6443 to the default security group as the security group created for the cluster is not automatically assigned to the load balancer created for the cluster.The tenant and project requirements for OpenStack Cloud are identified in the following table.
Model Quota Description
For all cases 2 (primary server group, worker group) Server Groups
Number of workers + number of primary servers Server Group Members
3 (API load balancers) Load Balancers
6 (2 for each load balancer) Health Monitors
6 (2 for each load balancer) Pools
6(2 for each load balancer) Listeners
3 (1 for the cluster VMs, 2 for the Kubernetesload balancer services) Security Groups
18 Security Group Rules
See for additional detailsPrepare Infrastructure Volume GB
Number of workers + number of primary servers +3 for each load balancer
Ports
Number of workers + number of primary servers Instances
16 GB (recommended for each worker and each primary server) RAM
32 (recommended for each workers and each primary server) vCPUs
Tenant network Floating IPs = 3 1 for each load balancer
Networks = 1 For the tenant network
Subnet = 1 For the tenant network
Router = 1 For the tenant network to public network connection
Provider network
Number of workers + number of primary servers + 3 load balancers Free IPs in the provider network
Network Time Protocol (NTP) must be configured this is important as the CloudCenter Suite installation can fail, if NTP is not configured or if it is wrongly configured.

1. 2.
3.
Module Details
Additionally, refer to your module documentation for module-specific dependencies as identified in the following table:
Module Documentation
Workload Manager Cloud Overview
Action Orchestrator Add Cloud Account
Cost Optimizer Cloud Overview
Upgrade Process
To upgrade the perform the following procedure. cluster for an OpenStack Kubernetes environment,
Verify that you have prepared your environment as listed in the section above. OpenStack Nuances Navigate to the Suite Installer Dashboard.
Enter your Suite Admin credentials and clickConnect.
If you setup CloudCenter Suite in offline mode, you must provide valid NTP server details before you save your configuration.

3.
4.
5.
6.
OpenStack Details Description
Suite Admin Endpoint for the Cluster to be Upgraded
The DNS address or IP address of the vCenter server where you launch the Suite Admin.
Email Address (Username) of the Suite Admin The email address of Suite Admin(the ) who setup the Suite Initial AdministratorAdmin.
Password for the Suite Admin The password for the Suite Admin(the ) who setup the Suite Initial AdministratorAdmin.
Tenant ID for the Suite Admin The Tenant ID for the Suite Admin(the ) who setup the Suite Initial AdministratorAdmin.
Is This an Amazon EKS Cluster Toggle the switch (default = No). If it is, provide the Access Key and Secret Key details.
The CloudCenter Suitevalidates the OpenStack credentials to ensure that the cluster is available to this user.Once the connection is validated, click .Next
Click to continue with the changes.Confirm

6.
7.
When Connected, you enter the information in the Upgrade settings fieldssee the cloud type and other information on the left side off the screen

7.
8.
a. b.
9.
Click to A progress bar Upgrade upgrade the Kubernetes cluster as well as the primary server and worker nodes once the upgrade is complete.with relevant status messages is displayed as visible in the following screenshots.
At this point, you can:
Download the latest logs to track the upgrade process. Wait for cluster to finish upgrading.

9.
a. b. c.
10.
11.
Once successful, you see the success message.
You have the following options at this point:
Click to launch and set up the .Take Me To Suite Admin Suite AdminClick to start another installation and go back to the homepage (Installer Dashboard).Install Another ClusterDownload to connect to the launched cluster using the tool.Kubeconfig file kubectl
After the installation is complete, use the following command to SSH into the workers/primary servers ascloud-user and use the private SSH key or the public key (provided when you configured the Placement Properties details above).
#Sample command to SSH into a worker/primary server
ssh -I <private key> cloud-user@<primary server/worker IP>
Login to CloudCenter Suiteusing valid credentials and verify that your information is preserved and that the cluster was upgraded.
You have now upgraded the cluster on the OpenStack cloud. Verify your Suite Adminand tenant data.

1. 2.
3.
VMware vSphere UpgradeVMware vSphere Upgrade
OverviewUpgrade Process
Overview
See for details on permissions and prerequisites.Upgrade Approach
Upgrade Process
To installthe CloudCenter Suite on a new vSphere cluster,perform the following procedure.
Verify that you have prepared your environment as listed in the section above. VMware Nuances Navigate to the Suite Installer Dashboard.

3.
4.
5.
Enter your Suite Admin credentials and click .Connect
vSphere Details Description
Suite Admin Endpoint for the Cluster to be Upgraded
The DNS address or IP address of the vCenter server where you launch the Suite Admin.
Email Address (Username) of the Suite Admin The email address of Suite Admin (the ) who setup the Suite Initial AdministratorAdmin.
Password for the Suite Admin The password for the Suite Admin (the ) who setup the Suite Initial AdministratorAdmin.
Tenant ID for the Suite Admin The Tenant ID for the Suite Admin (the ) who setup the Suite Initial AdministratorAdmin.
Is This an Amazon EKS Cluster Toggle the switch (default is No). If it is, provide the Access Key and Secret Key details.
The CloudCenter Suitevalidates the vSphere credentials to ensure that the cluster is available to this user.Once the connection is validated, click .Next
Once Connected, you see the cloud type and other information on the left side off the screen

5. Enter the information in the Upgrade settings fields.
Upgrade Settings Field
Description
Current Kubernetes Version
The current version for your Kubernetes setup is pre-populated in this field.
New Kubernetes Version
If an upgrade is available, it is listed in this dropdown list. Select the for the upgrade.Desired K8s version

5.
6.
VM Template
Different images will be used for the installer and the cluster launched by the installer as visible in the following screenshot.
The installer includes a default Kubernetes cluster image (called, CCS- -Base-Image). version The VM Template contains a list of tenant images with a CCS-version-Base-Image format. If you want to upgrade to a version other than the default nameversion provided by the installer, then upload that CCS-version-Base-Image under the root folder, so that it will display in this dropdown list.
The image included in the installer is selected if you do not override the setting.CCS- -Base-Imageversion
To override the image used by the Suite installer, be sure to add the applicable image in the CCS- -Base-ImageversionvSphere console and selected the applicable from the dropdown list in this field.OVA
If you use the installer to launch the cluster in an OpenStack environment, be sure to override this field and select the OVAapplicable .QCOW2 CS- -Base-Imageversion
IP Allocation Mode
This switch allows you to select the mode. C .urrently, only DHCP is supported
DHCP: This strategy allows the IP to be allocated by the DHCP server to the instance on server boot up.
:Master VIP The IP address for the link Users can determine the IP address that should Take Me to Suite Adminhave the primary server role for the link.Take Me to Suite Admin
Static IP: This strategy allows the customer to provide the IP address. As this IP address may or may not be available to the server (based on the availability), you must perform adequate checks to ensure IP availability before using this strategy.
: The first IP address of the static IP range. If you need to scale up nodes after setting up the Static IP Pool Start IPSuite Admin, then you must ensure a wider range.Sta :tic IP Pool End IP The last IP address for the static IP range.
: The netmask corresponding the the specified IP range.Subnet Mask: The comma separated list of DNS server IP addresses.DNS Server List
: Gateway List The comma separated list of Gateway server IP addresses.
If you install the CloudCenter Suite using any image other than CCS-version-Base-Image, the installation will fail.
This should be a unique IP and should not be assigned to any other resource.

6.
7.
a. b.
8.
9.
a. b. c. d.
10.
Click to A progress bar Upgrade upgrade the Kubernetes cluster as well as the primary server and worker nodes once the upgrade is complete.with relevant status messages is displayed as visible in the following screenshot.
At this point, you can:
Download the latest logs to track the upgrade process. Wait for cluster to finish upgrading.
Once successful, you see the success message as visible in the following screenshot.
You have the following options at this point:
ClickTake Me To Suite Adminto launch and set up theSuite Admin.Click to start another installation and go back to the homepage (Installer Dashboard).Install or Upgrade Another ClusterDownload to connect to the launched cluster using the tool.KubeConfig file kubectlAfter the installation is complete, use the following command to SSH into the workers/primary servers as cloud-user and use the private SSH key or the public key (provided when you configured the Placement Properties details above).
#Sample command to SSH into a worker/primary server ssh -I <private key> cloud-user@<primary server/worker IP>
Be sure to switch off the installer VM. You can reuse this VM for any other purpose, for example, as an .Offline Repository
You have now upgraded the cluster on the VMware cloud. Verify your Suite Admin and tenant data.

1. 2. 3. 4. 5. 6.
1.
2.
Air Gap InstallationEnd-to-End Air Gap Installation in an Isolated Environment
OverviewLimitationsPrerequisites to Configure an Air Gap SetupWorkflowDownload the Offline Appliance and Import into vSphereConfigure the Offline RepositoryConfigure the Installer to use the Offline RepositoryPost Configuration Verification
For the CloudCenter Suite InstallerFor the Launched Kubernetes ClusterUsing Config Map
When Is the Offline Repository Used?Alternate Path of Airgap Certificates
Overview
The term refers to security measures implemented for computers, computer systems, or networks requiring airtight security without the risk of air gapcompromise. It ensures total isolation of the system from other less secure networks.
An Air Gap installation in the CloudCenter Suite context refers to the ability to support an installation of the CloudCenter Suite in environments that do not have an internet connection (equivalent of an isolated network). While efers to the feature refers to the delivery Air Gap Installation r , Offline Repositorymechanism for the Air Gap Installation feature.
Until 5.1, CloudCenter Suite had the concept of offline repository and installations using offline repository but that offline repository was accessed using proxy server settings that were accessed through the CloudCenter Suite cluster and is no longer available in CloudCenter Suite 5.2. To use the Air Gap solution, CloudCenter Suite 5.2.0.you must use the offline repository appliance to create a dedicated repository server which is introduced with
Effective CloudCenter Suite 5.2, the CloudCenter Suite installer exchanges certificates and host information with the offline repository as soon as the installer in launched, it connects to the offline repository VM (equivalent of an isolated network).
After the cluster is launched, you can use the same offline appliance at any point and install modules. When a newer CloudCenter Suite version becomes available, the corresponding new offline appliance will also be available you can use the new appliance and upgrade to the latest version of all CloudCenter Suite modules.
Limitations
Be aware of the following limitations for the air gap feature:
The offline repository appliance that is available in CloudCenter Suite 5.2 does not have a UI.This feature is only available for VMware environments.To upgrade from Action Orchestrator5.1.4 to Action Orchestrator 5.2 in offline mode, follow this procedure.
Verify that you have already installed and in the device that you will be backing up.ArangoDB NPMBackup up your Action Orchestrator 5.1.4 setup.UninstallAction Orchestrator 5.1.4 from this device.Upgrade Offline Repository over to a new repository which contains Action Orchestrator 5.2InstallAction Orchestrator 5.2.Restore the backed up data.
Prerequisites to Configure an Air Gap Setup
Verify these prerequisites before setting up anAir Gap installation environment:
You must get avalid Certificate Authority to sign the certificate and aprivate key pair for the DNS name.The offline repository must be accessible from the Kubernetes cluster through the domain name.
Workflow
The following process identifies the high-level process of the change between previous releases and the new CloudCenter Suite 5.2.0 solution:
To deploys an offline/Air Gap appliance containing all the Docker images and Helm charts hosted in a local registry backed by a web server, the CloudCenter Suite uses harbor see for additional details.https://goharbor.io/To configure the offline appliance and upload user defined certificates or generate self signed certificates:
You cannot re-purpose or reuse the installer server.

2.
a.
3.
1. 2.
a.
b.
c.
d.
3.
4.
5.
6. 7.
8.
User defined certs, if using FQDN, your DNS should be able to resolve within the network or else the IP address of the offline repository should be part of cert as an alt alias. Also you must provide the CA cert for generated certificates. Self signed certificates can use the IP or FQDN of the offline appliance. Along with the certificates, you must also change the admin password. The out-of-box password is Cisc
.o123To install the CloudCenter Suite using an offline appliance, you must turn the Air Gap setup option in the Installer page (Select , enter ON VMwareyour credentials of vSphere, for this option to display).
Download the Offline Appliance and Import into vSphere
Download the offline appliance (suite_offline OVA) from .software.cisco.comLogin into vSphere as an administrator or with an user with the following permissions.
The installation process requires a vSphere User with specific Permissions. For users who do not want to use the default administrator, use the following steps to create a new Role and User for the installation.In vSphere, login into vSphere as an administrator user. Navigate to and create a Role by providing Home > Administration > Rolesthe following privileges to this role:
Datastore.Allocate spaceDatastore.Browse datastoreDatastore.Low level file operationsDatastore.Remove fileFolder. Create folderGlobal.Manage Custom AttributesGlobal.Set custom attributeNetwork.Assign networkResource.Apply recommendationResource.ApplyvApp to resource poolResource.Apply virtual machine to resource poolStorage views. ViewTasks.Create taskTasks.Update taskVirtual machine (check all the permissions under this privilege)vApp.ImportvApp.Power offvApp.Power onvApp.SuspendvApp.vApp application configurationvApp.vApp instance configurationvApp.vAppmanagedBy configurationvApp.vApp resource configurationIn
Navigate to Click on the + icon and create a new user. Remember the username and Home > Administration > User and Groups. password - these will be used in subsequent steps.Click on Click on the + icon to open . Click on to map the previously Global Permissions. Global Permission Root - Add Permission Add created user to the Role created in Step 1 - make sure to click Propagate to children.
Click on and then select the vSphere Datacenter where the Installer needs to be uploaded. Right-click and select VM and Templates, Deploy OVF Template ...In the wizard, select and open the previously downloaded OVA from your computer's file browser. Click to Deploy OVF Template Local File Nextproceed.For the step of the wizard, select a folder directly underneath the Datacenter. Click to Select name and location Do NOT select a sub-folder. Nextproceed.For the step of the wizard, select an ESX Host from the Cluster. Click to proceed.Select resource NextFor the step of the wizard, select an Datastore with necessary permissions as outlined above in Select storage Prepare the vSphere Infrastructure
Click to proceed.(Prerequisites). Next
For the of the wizard, select the checkbox for each of the following options. Click to proceed.Select clone options Next
(Optional) Customize the operating system
Customize this virtual machine's hardware (Experimental)Power on virtual machine after creation
Select the Customization Spec created during This Customization Spec was created to Prepare the vSphere Infrastructure (Prerequisites). assign a Static IP to the CloudCenter Suite Installer. Click to proceed.Next
All listed permissions are required to proceed with this installation. Missing even one role will lead to unpredictable consequences.
Recommendation: Select for the Thin Virtual Disk Format.
Note: This selection is only required for environments with access to DHCP. The requirement and "workaround" is OUToutlined above in .Prepare the vSphere Infrastructure (Prerequisites)

9. 10.
11.
1.
a.
b.
2.
3.
4.
For the step of the wizard, select the appropriate network for . Click to proceed.Customize hardware Network adapter 1 NextFor the step of the wizard, use the following table to complete the form:Customize template
Field Description Condition
Unique ID This value must be unique within the vSphere networking domain. This field will be used to generate the hostname.
Required
SSH Private Key
This value will be used to allow key-based authentication with the Installer VM via SSH. Recommended
Hostname This value must be unique within the vSphere networking domain. This field will be used to generate the hostname.
Required
Click and then to proceed. The OVA will start uploading - this will take approximately 5-10 minutes.Next Finish
This completes the import of the CloudCenter Suite Installer into vSphere.
Configure the Offline Repository
To configure the offline repository, follow this procedure.
SSH into the offline repository using one of two methods.
Method 1: Using self-signed certificate.
sudo config-airgap-repo -i <ip address> -s
Method 2: Using customized certificates.
sudo config-airgap-repo -c /tmp/certs/airgap-setup.cisco.com.crt -k airgap-setup.cisco.com.key -r ca.crt -i <ip address> # for user provided certificates
Verify that Harbor and its associated services are up and running and that the health of the system is successful as displayed in the following screenshot. This may take up to 20 seconds.
sudo docker ps # Verify the services are up.
Enter the password for this user:
Cisco123
# Be sure to change this default password.
When creating a VM, you provided the public key, here you need to provide the private key of the public key that you used to install the VM.
Recommendation:Once the OVA is finished uploading, it is recommended to create a VM Template from the uploaded installer image. This template can be used in future installations. Right-click on the OVA and select Clone > Clone to Template.
The offline repository has the same user details as the CloudCenter Suite installer VM.

4.
5.
6.
7.
Change the admin password using the following command.
sudo change-repo-password <oldpassword> <newpassword> # First time users use 'Cisco123' as the bootstrap password.
Verify if the Harbor console is accessible via https://<IP address>:8443. Use as the username along with the newly updated password.admin
Click > and download the . Configuration System Settings Registry Root Certificate
Note down this password as you will need it in the later in this procedure! admin

7.
8.
1.
Once the CA certificate is downloaded, add it to your local keychain/truststore depending on the OS and verify that you can pull the Docker images from this appliance. You can view sample pull commands by navigating to any project > repository.
To test, pull the Helm charts, add the offline repository as the Helm repository using the CA file downloaded along with the credentials.
For example:
helm repo add --username admin --password <YourNewAdminPassword> --ca-file ~/Downloads/ca-helm.crt airgap https://10.11.84.50:8443/chartrepo
helm repo updateHang tight while we grab the latest from your chart repositories......Successfully got an update from the "airgap" chart repositoryUpdate Complete. Happy Helming!
helm search common-framework NAME CHART VERSION APP VERSION DESCRIPTION airgap/library/common-framework 5.2.0-16798 1.0 Common framework multicloud suite
Configure the Installer to use the Offline Repository
To configure the Installer to use the Air Gap environment, follow this procedure.
Use the password that you changed in Step 4 above.admin

1.
2.
3.
4.
After validating a vSphere cloud account to use the offline repo, you must validate youroffline repository credentials.
The following fields are required to validate youroffline repository credentials:
Offline Repository FQDN / IP Address (without port)Offline Repositorypassword
After validating the vSphere cloud account, toggle the provide the domain name, and password for switch to and Use Air Gap Environment Yesthe offline repository in the applicable fields. The installer fetches the certificate from the offline repository (as long as the required CA certificate exists in the /data/ca_download/ca.crt folder of theoffline repository).
To continue the installation, click and continue with installation as usual. If you prefer to change back to a non-Air Gap setup, toggle the Next Use click . switch to and Air Gap Environment No Next
Post Configuration Verification
This section identifies the verification process for each step in this process.
For the CloudCenter Suite Installer
To verify the CloudCenter Suite installation, follow this process.
You cannot change from an Air Gap to a non-Air Gap mode or vice-versa after moving away from this screen of the installation process. You must return to the first screen and restart this process if you choose to change at a later point.
These steps are only required for troubleshooting purposes if the installation fails at any point.

1. 2.
3.
1.
2.
3.
SSH into the installer using the private key.Check if the offline repo configurations and the certificates are stored in the file system by running the following commands.
installer verification steps
$ sudo -i$ cat /home/cloud-user/.installer/k8s-mgmt/store/k8s-mgmt.airgap-repo-config
You should see the CA certificated displayed as follows (similar):
{ "cacertificate":"-----BEGIN CERTIFICATE-----\nMIIFrzCCA5egAwIBAgIJAJ6s98GvsCpoMA0GCSqGSIb3DQEBDQUAMG4xCzAJBgNV\nBAYTA...HxE\nKETWDsFgVVC3A1ZDYLNQWyKGVM7i49jV7POkOVjWuRQNfEY/KZSXGvixqJJUtQzo\n9y3RvH8Oi3CzKSr2AyMlcWT/eMpB3qAMajJbxXyngZJevVr12NJOuMG8jAjv1O4e\n3eap8/MRptR9NpDvTVuVcOAfW151ysnQmaOH7+N3dVHPFQ+AEKcj0Ck781GXNI1N\nx6wymfE43cIPyvdHOxcpIOkQsMx0dx5RAgMBAAGjUDBOMB0GA1UdDgQWBBR54c3g\nDWHfulMZ2fvB2C/CXkQohTAfBgNVHSMEGDAWgBR54c3gDWHfulMZ2fvB2C/CXkQo\nhTAMBgNVHRMEBTADAQH/MA0GCSqGSIb3DQEBDQUAA4ICAQCaDMYnveDld41L8T4y\nlxJ8f7CiZDBGPmL/yI1Hjk1tsh9BvyvhvAFjhjXzQphSxz15hzajxnvIpeCK/usI\nq+caeL7lGFTet5xLfIU/fLq3/AxrvTeZCMz/tSYU1shNUs4EiJKEBNtSLCjU1349\nipz1O0fnCoByYORwFp7bQ3pHBTYZDUNI+VmuPL/D50ZqCB0vF0AC2uJhqAbSS9Xg\nI6bYfG9uYEMcHwTAfL8fcw7YoSiaOL8wHGDuPNHp7m726BtH9D3rV0cV69a475EF\ndkOvzJcMq/Zq0iOogGfe3K3Pof2Q74/6WW+j0OChKuD3NPVOtVZh/INRLItH7ZGB\n/2NXSVrZ6S9mmuohzyD0xFCAXiPXnwjMC9Lo0/4ah992eeKBXxlxw4+Ykid6Yjtg\nDQLang6J93ozKb4YJhlwmT8I+yad7RyHg8+4UTodlXxdqJXFZ2fSSGF9mbZ/ZD17\nZ3IuWXUIe+nvsczBzw8yJlg3buJZlxbI7fDKCSwwXEUUO/IO7eoZa60kwCtCaY09\nw5pnYuxJx8/hRPLhbq8SQmU3dM7VhCPMMjLoTYo32dh6gpLi7Q6HKJVjii2iU9mA\nio2rR1czsoG1qf3VGrgJ9nGfEk4RSag0Jp642JdUokWStPR1Glpl6ang5+EBTK9e\nEIWISD6XT8lps04b5m2DZ79kig==\n-----END CERTIFICATE-----\n", "domainName":"10.11.4.0", "password":"*****", "username":"admin"
For the Launched Kubernetes Cluster
To verify the Kubernetes cluster, follow this process.
Check if the certificate is present on all the master nodes using the following script.
k8s-cluster verification steps
awk -v cmd='openssl x509 -noout -subject' ' /BEGIN/{close(cmd)};{print | cmd}' < /etc/ssl/certs/ca-certificates.crt
Verify if the offline repository certificate/CN is present in the certificate list generated by the script.
Check if the offline repository configurations and certificates from the installer are migrated and stored in configmap.
$ kubectl get configmaps k8s-mgmt.offline-repo -n cisco -o yaml
Using Config Map
You can also verify the launched Kubernetes cluster usingconfigmap as displayed in the following code block
You can upgrade modules to a later version (when available) using the same offline repository certificates if you save the certificate details.
After installing CloudCenter Suite using the Offline Repository, be sure to take a backup of the certificates if the certificates were generated using SSL. This backup is for future reference so you can reuse the same certificates and configure the Offline Repository for a later version, when available.

1. 2. 3. 4.
kubectl describe cm k8s-mgmt.airgap-repo-config -n ciscoResult:Name: k8s-mgmt.airgap-repo-configNamespace: ciscoLabels: <none>Annotations: <none>
Data====data:----eyJjYWNlcnRpZmljYXRlIjoiTFMwdExTMUNSVWRKVGlCRFJWSlVTVVpKUTBGVVJTMHRMUzB0Q2sxSlNVWnlla05EUVRWbFowRjNTVUpCWjBsS1FWQnpUMUEwYUZwWE1USjFUVUV3UjBOVGNVZFRTV0l6UkZGRlFrUlJWVUZOUnpSNFEzcEJTa0puVGxZS1FrRlpWRUZzVmxSTlVYTjNRMUZaUkZaUlVVbEVRVXBFVVZSRlVrMUJPRWRCTVZWRlFuZDNTVlV5Um5WSlJYQjJZekpWZUVScVFVMUNaMDVXUWtGdlRRcENWVTV3WXpKT2RrMVJOSGRFUVZsRVZsRlJURVJCVmtSaFdFNXFZbnBGWmsxQ01FZEJNVlZGUVhkM1YxbFhiSGxhTWtaM1RGaE9iR1JJVm5kTWJVNXdDbU15VG5aTWJVNTJZbFJCWlVaM01IbE5SRUY2VFZSbmVFMTZUVEJOVkZaaFJuY3dlazFFUVhwTlZGbDRUWHBOTUUxVVZtRk5SelI0UTNwQlNrSm5UbFlLUWtGWlZFRnNWbFJOVVhOM1ExRlpSRlpSVVVsRVFVcEVVVlJGVWsxQk9FZEJNVlZGUW5kM1NWVXlSblZKUlhCMll...VTNWWFRTOVFlR2RHYjFGMFpEQk1RV3R4WWl0b09GTTBTekJIY1hsRlJXZzNWWGRWVUdSaFREWTFaQXBXV1RWcFFYQklkRWh2ZVRWbE16WlljRTVRWjFsQ1JHWk1kalpEZDJ4UFExSXpURTA1VW1ZeWFFWnNUWGhzY0U1b1lWWm5lRW93T0hSTE1rUjNNSFpTQ2t0d1QySmFhbTA0VjJwbkwxWjVNMlZLYUc5a2VWQlpNRGt3TlhaWU5FaHhSMUJIT0hwT1owcG5TRUZRZW0xYWMzQllNRFYyTTBWeE9UWndjbmRPZG1jS2VXNXZNVFJ4YTJseVZFY3lWRWxQV0Uxck5tTjJiVkZ5ZEdwTE1tcDJjRFZDTXpjMU5IRjVZbTlRVFdoYVRHMVlRMGhwYW5jMlZuQjVPVE15UTNwWVJBcEdSbEJoV1hOaVRtUkZNWGczZVhCTVpWVkllVWhWVDA1b2R6UXhTek5EY2twRGNWUkRiWHA1WkdrMlRVeGpSU3N2Vlc1c1pqZHNjUzl0V2pSRWF5dElDbkp1UWt3ck1EQlNRa2xITUVwM2EwWXJSelpMZG10eVIySm5QVDBLTFMwdExTMUZUa1FnUTBWU1ZFbEdTVU5CVkVVdExTMHRMUW89Iiwib2ZmbGluZV9yZXBvX2FkZHJlc3MiOiIxMC4xMS44Ni40OSIsIm9mZmxpbmVfcmVwb19wYXNzd29yZCI6IkNpc2NvMTIzIiwib2ZmbGluZV9yZXBvX3BvcnQiOiI4NDQzIiwib2ZmbGluZV9yZXBvX3VzZXJuYW1lIjoiYWRtaW4ifQ==Events: <none>
When Is the Offline Repository Used?
Once you complete the CloudCenter Suite installation and see the screen, the CloudCenter Suite pulls the information from Take Me to the Suite Adminthe offline repository. This transition works seamlessly as it does in situations where you have internet connectivity!
Alternate Path of Airgap Certificates
Before beginning the below steps to upgrade the offline repository, you need to copythe following files under the /tmp/certs folder to the new offline repository.
.crtairgap-setup.cisco.comairgap- .keysetup.cisco.comca.crt
If the /certs folder is deleted from the /tmpfolder, the above files can be found under the /data folder with the different names as below:
/tmp/certs/airgap- .key -> /data/certs/harbor.keysetup.cisco.com/tmp/certs/ crt -> /data/certs/harbor.crtairgap-setup.cisco.com//tmp/ca.crt -> /data/ca_download/ca.crt
To upgrade the offline repository, follow this procedure.
Note theIP address and take back up of certificates of your current Air Gap environment.Power off your current offline repository.Create a new offline repository using the information provided in the section.Air Gap InstallationSSH into the offline repository using customized certificates.

1. 2. 3. 4.
5.
Upgrade Offline RepositoryUpgrade Offline Repository for an Air Gap Setup
OverviewRestrictionsPrerequisitesUpgrade the Offline RepositoryVerify that the Offline Repository Is Correctly UpgradedAlternate Path of Airgap Certificates
Overview
This section provides details on restrictions, prerequisites, and the process to upgrade the offline repository in an Air Gap environment. During this upgrade, the software upgrades .create a new repository using theSAMEcertificates and IP address
Restrictions
Before proceeding with an upgrade, adhere to the following restrictions:
Usage: To upgrade theAir Gap environment to a new version, you can only use the CloudCenter Suite 5.3.0 upgrader to upgrade to a later release.Suite Admin-level Permissions: Suite Admin-level permissions are mandatory for a user to upgrade the cluster.
Prerequisites
Verify that the cluster adheres to the following requirements:
: Back up your environment before initiating the upgrade. See for additional details.Backup Environment Backup ApproachSchedule a suitable downtime during off-peak hours to minimize the impact to your users and or customers. Communicate Schedule Downtime:
the downtime as the CloudCenter Suite will not be accessible during the upgrade.:Action Orchestrator environments The back up process for Action Orchestratorenvironments is different than from other CloudCenter Suite
modules. See to ensure that this processes has already been addressed.Migrating Database to Install Action Orchestrator 5.2.0
Upgrade the Offline Repository
To upgrade the offline repository, follow this procedure.
Note theIP address and take back up of certificates of your current Air Gap environment.Power off your current offline repository.Create a new offline repository using the information provided in the section.Air Gap InstallationSSH into the offline repository. sing customized certificates.
sudo config-airgap-repo -c /tmp/certs/airgap-setup.cisco.com.crt -k airgap-setup.cisco.com.key -r ca.crt -i <ip address> # for user provided certificates
Verify that Harbor and its associated services are up and running and that the health of the system is successful as displayed in the following screenshot. This may take up to 20 seconds.
sudo docker ps # Verify the services are up.
The offline repository has the same user details as the CloudCenter Suite installer VM.
Be sure to use the SAME IP address and certificates for your current air gap environment t above.hat you noted down in Step 1

5.
6.
7.
8.
9.
Enter the password for this user:
Cisco123 # Be sure to change this default password.
Change the password using the following command.admin
sudo change-repo-password <oldpassword> <newpassword> # First time users use 'Cisco123' as the bootstrap password.
Verify if the Harbor console is accessible via https://<IP address>:8443. Use as the username along with the newly updated password.admin
Note down this password as you will need it in the later in this procedure!admin

9.
10.
11.
Click > and download the . Configuration System Settings Registry Root Certificate
Once the CA certificate is downloaded, add it to your local keychain/truststore depending on the OS and verify that you can pull the Docker images from this appliance. You can view sample pull commands by navigating to any project > repository.
To test, pull the Helm charts, add the offline repository as the Helm repository using the CA file downloaded along with the credentials.
For example:
Use the password that you changed in Step 7 above. admin

11.
1. 2. 3. 4.
helm repo add --username admin --password <YourNewAdminPassword> --ca-file ~/Downloads/ca-helm.crt airgap https://10.11.84.50:8443/chartrepo helm repo updateHang tight while we grab the latest from your chart repositories......Successfully got an update from the "airgap" chart repositoryUpdate Complete. Happy Helming! helm search common-framework NAME CHART VERSION APP VERSION DESCRIPTION airgap/library/common-framework 5.2.0-16798 1.0 Common framework multicloud suite
Verify that the Offline Repository Is Correctly Upgraded
Once you complete the upgrade and see the screen, the CloudCenter Suite pulls the information from the offline repository. Take Me to the Suite AdminThis transition works seamlessly as it does in situations where you have internet connectivity!
If is displayed in you log into the Suite Admin, then the iconRepo Proxy Connectivity AFTERgreen you have set up the Offline Repository as .listed in this section
If in , then is displayedthe iconRepo Proxy Connectivity red the repo configuration has an issue perhaps an incorrect IP address or/and incorrect certificates. In this case:
Recheck your offline repository certificates and verify if they are applied correctly. If nothing else works, repeat the procedure provided above.
Alternate Path of Airgap Certificates
Before beginning the below steps to upgrade the offline repository, you need to copythe following files under the /tmp/certs folder to the new offline repository.
.crtairgap-setup.cisco.comairgap- .keysetup.cisco.comca.crt
If the /certs folder is deleted from the /tmpfolder, the above files can be found under the /data folder with the different names as below:
/tmp/certs/airgap- .key -> /data/certs/harbor.keysetup.cisco.com/tmp/certs/ crt -> /data/certs/harbor.crtairgap-setup.cisco.com//tmp/ca.crt -> /data/ca_download/ca.crt
To upgrade the offline repository, follow this procedure.
Note theIP address and take back up of certificates of your current Air Gap environment.Power off your current offline repository.Create a new offline repository using the information provided in the section.Air Gap InstallationSSH into the offline repository using customized certificates.

Backup and RestoreBackup and Restore
Public CloudBackup ApproachRestore Approach
Restore without ProxyRestore with Proxy
Private Cloud

Public CloudPublic Cloud with Internet Access
Backup ApproachRestore Approach
Restore without ProxyRestore with Proxy

Backup ApproachBackup Approach
OverviewLimitationsWhat Data Is Backed Up?RequirementsProcessActions after Configuring the Backup
Overview
You may sometimes need to backup your CloudCenter Suite setup so you have the option to recover the data when required. When you have a cluster running, it can go into a bad state for a number of reasons (resource shortage, application unavailability, infrastructure changes,undependable state and so forth). In these cases, backing up the data allows you a to recover data when required.
If you are backing up data in the previous release clusters (for example, 5.2.3 clusters), update all module charts to the current version.
Limitations
Before proceeding with a backup, adhere to the following limitations:
Supported Clouds: You can backup data to one of the following locations:
Google Cloud Storage (use the procedure below)AWS S3 (use the procedure below)
Switching between Clouds and Cloud Accounts:
While editing the storage location in the CloudCenter Suite, if you switch to a new cloud type or cloud account within the same cloud type, be aware that backups in the previously configured storage location will no longer be accessible from the CloudCenter Suite.The backup files from the previously configured storage location will continue to be available via your cloud console.
Restoring to a Different Cluster:
This feature is only supported for clusters launched by the%ccs installer.You cannot backup from and restore to the same cluster you backup to one cluster and restore to a different cluster.can onlyThe backed up cluster and the target restore cluster should both be on the same cloud.The backup taken on private clouds after running the script skips backup of elasticsearch-master and pod_vol_restic_scan.pyelasticsearch-data pods. When this backup is restored on a different cluster you will not see logs in Kibana.
User Credentials:
The credentials are specific to your service account in the cloud and only the user with those credentials can configure and initiate the backup.If you change the credentials you will see a warning message to indicate that you cannot access previous backups.
What Data Is Backed Up?
The CloudCenter Suite uses the latest cloud/cloud account and bucket configurations to retrieve the list of existing backups, displayed in the table in the Admin > Backup page (under the Data Recovery section in the Suite Admin UI).
The backup action backs up the ENTIRE namespace.cisco
The backup/restore feature is only available onnew%ccs clusters installed using CloudCenter Suite installers and not on existing Kubernetes clusters.
For isolated, air gap, environments, that do not have internet access, or to back up to a local system, a manual backup procedure is available see for additional details.Private Cloud
The CloudCenter Suite does NOT provide a granular option to backup Kubernetes resources or application-
specific databases. Additionally, you CANNOT take volume snapshots.
If you update the existing configuration for any reason, users cannot manage the backups from the earlier cloud/cloud account and bucket configuration.

1. 2. 3.
1.2.3.
Backed Up:
Any data under the Cisco ( ) name space.ciscoThis includes users, groups, and roles for all modules.This also includes but is not restricted to the Kubernetes resources with associated application data, pod data, secrets, PersistentVolumeClaim (PVC) data, PersistentVolume (PV) data, and other relevant data associated with these sub-systems
Not Backed Up: Any data that is not under the Cisco ( ) name space.cisco
The backup taken on private clouds after running thepod_vol_restic_scan.pyscript skips backup of elasticsearch-master and elasticsearch-data pods.Action Orchestrator Nuances:
The backup and restore procedures do not back up Action Orchestrator-specific data like workflows, targets, and so forth.This type of Action Orchestrator-specific data is stored in arangoDB and requires arangodump and arangorestore to backup and restore the data.To backup the date (Without internet access or proxy), theArangodump should occur before you install the new Action Orchestrator version. See for additional details onPrivate Cloud >Action Orchestrator-Specific Post-Restore Procedure for additional details.Action Orchestrator Backup Requirements:
Backup the Action Orchestrator database using the arangodump tool. Uninstall %aofrom the CCS cluster.Backup Suite Admin, workload manager, and Cost Optimizer using Velero.Action Orchestrator Restore Requirements:
Restore Suite Admin, workload manager, and %cousing Velero Reinstall Action Orchestrator. Restore the Action Orchestrator databaseusing arangorestore tool
Requirements
Before proceeding with a backup, adhere to the following limitations:
General: When configuring a backup for the first time, verify that the storage bucket is empty before scheduling any backups.GCP:
Configure a Storage Bucket with the required permissions: The following screenshot displays a sample storage bucket in a GCP environment:
The cloud account used to configure the backup must have an empty storage.bucket.list.The bucket must have its ACL set to storage.objects(create,delete,get,list).
AWS:
The storage bucket in your AWS S3 environment must be empty with the applicable ACL permission.The IAM user permissionsdefine the user privilege on the S3 bucket as listed in the following screenshot:
In the following code block, the bucket name is defined as ! Be sure to change this velero-cisco this is just an examplevalue to reflect the name of your own bucket!

1. 2.
{ "Version":"2012-10-17", "Statement":[
{"Effect":"Allow","Action":[
"ec2:DescribeRegions","ec2:DescribeVolumes","ec2:DescribeSnapshots","ec2:CreateTags","ec2:CreateVolume","ec2:CreateSnapshot","ec2:DeleteSnapshot"
],"Resource":"*"
},{
"Effect":"Allow","Action":[
"s3:GetObject","s3:DeleteObject","s3:PutObject","s3:AbortMultipartUpload","s3:ListMultipartUploadParts"
],"Resource":[
"arn:aws:s3:::velero-cisco/*"]
},{
"Effect":"Allow","Action":[
"s3:ListBucket"],"Resource":[
"arn:aws:s3:::velero-cisco"]
},{
"Effect":"Allow","Action":"s3:ListAllMyBuckets","Resource":[
"arn:aws:s3:::*"]
} ]}
Process
To backup the CloudCenter Suite data, follow this procedure.
Navigate to the .Suite Admin DashboardClick > (under the Data Recovery section) to access the Backup page as displayed in the following screenshot.Admin Backup

2.
3.
4.
5.
a.
b.
Click the icon in the Backup page (as displayed in the following screenshot) to configure a new backup storage location.cog
Select the required cloud in the Configure a Backup Storage Location page as displayed in the following screenshot.
Depending on the selected cloud, the Add Credential section differs:
GCP:
Select the file containing the credentials is displayed in the following screenshot.
Select the Storage bucket as displayed in the following screenshot.

5.
b.
c.
a.
b.
c.
Click to save the backup configuration as displayed in the following screenshot.Done
AWS S3:
Select the file containing the credentials as displayed in the following screenshot.
Select the Storage bucket as displayed in the following screenshot.
Click to save the backup configuration as displayed in the following screenshot.Done

5.
c.
6.
7.
Once configured, click in the Backup page to initiate the data backup. Until you initiate the first backup, this page will be empty. Once you Backuphave initiated one or more backups, they are automatically listed in this page as visible in the following screenshot.
In the Backup Name popup, assign a unique name (by default, the current date is listed) for this backup task and click as displayed in the OKfollowing screenshot.
You have now backed up the CloudCenter Suite data to a cloud of choice.
Actions after Configuring the Backup

Once you have configure one or more backup settings in the Backup page, you may see the following actions in the Actions column.
Delete: You can delete the configured backup as visible in the following screenshot:
Cancel: You will only see the option when you are in the process of backing up a storage location. After you create the location, the only Canceloption you will see is .Delete
Back to: Public Cloud

Restore ApproachRestore Approach
Restore without ProxyRestore with Proxy
Back to:Public Cloud

1. 2.
3.
Restore without ProxyRestore without Proxy
OverviewLimitationsRequirements
1. Launch the Target Cluster2. Download the KubeConfig Files3. Download Velero4. Download JQ5. Pre-Restore Procedure6. Restore Procedure7. Post-Restore Procedure
workload manager-Specific Post-Restore Procedure Cloud Remote
Considerationsa. Understand the %wm Restore Contextb. Retrieve the Port Numbers from the NEW Restored Clusterc. Retrieve the IP Address of the NEW Restored Clusterd. Change the IP Address and Port Numbers for the NEW Restored Clustere. Perform the Pre-Migrate Activitiesf. Migrate Deployments from the OLD Cluster to the NEW Cluster
Overview
To restore data, the CloudCenter Suite requires that you launch a new cluster.
Limitations
If you configured the old cluster using a DNS, be sure to update the new IP address (from the restored cluster) that is mapped to the DNS entry. Once you update the DNS entry of your new cluster, these services will continue to work as designed.
Additionally, be aware that you may need to update the DNS for the and (both ADFS and SP).Base URL Configuration SSO Setup
Requirements
Before proceeding with a restore, adhere to the following limitations:
The Velero tool must be installed. Velero Version 1.5.3 - refer to /v1.5 for details.https://velero.io/docsLaunch a new cluster to restore the data.You will need to execute multiple scripts as part of these procedures. Make sure to use the 755 permission to execute each script mentioned in this section.
1.Launch the Target Cluster
To launch CloudCenter Suite on a new target cluster and access the Suite Admin UI for this cluster.
Navigate to the for the new cluster.Suite Admin DashboardConfigure the identical backup configuration that you configured in your old cluster. See > additional details. When you Backup Approach Processprovide the credentials, the new cluster automatically connects to the cloud storage location.
Wait for a few minutes (at least 5 Mins, maybe more) for the Velero service in the new cluster to be synced up with the cloud storage location. At this point return to your local command window (shell console or terminal window) to perform the remaining steps in this process.
The backup/restore feature is only available on CloudCenter Suite clusters installed using CloudCenter Suite installers and not on existing Kubernetes clusters.
Reconfiguration of Base URL and SSO are only applicable for backup & restore functions IF the source cluster is created using the CloudCenter Suite 5.0.x installer and the destination cluster is freshly created using the CloudCenter Suite 5.1.1 installer.
This step is REQUIRED to initiate the connection and fetch the backup(s).

3.
2. Download the KubeConfig Files
You must download theKubeConfig file from the Suite Admin Kubernetes cluster management page for your source and target clusters to your local machine via a local command window (shell console or terminal window):
From the source cluster, download theKubeConfig file and name it KUBECONFIG ._OLDFrom the target cluster, download theKubeConfig file and name it KUBECONFIG ._NEW
See for additional details on accessing theKubeConfig file as displayed in the following screenshot.Kubernetes Cluster Management
3. Download Velero
The restore process requires Velero and must be performed on a local command window (shell console or terminal window).
To download Velero, use one of the following options:
OSX option:
$ cd <VELERO_DIRECTORY>$ curl -L -O https://github.com/vmware-tanzu/velero/releases/download/v1.5.3/velero-v1.5.3-darwin-amd64.tar.gz$ tar -xvf velero-v1.5.3-darwin-amd64.tar.gz
CentOS Option:
$ mkdir -p /velero-test && cd /velero-test$ curl -LO https://github.com/vmware-tanzu/velero/releases/download/v1.5.3/velero-v1.5.3-linux-amd64.tar.gz$ tar -xvf velero-v1.5.3-linux-amd64.tar.gz && rm -rf velero-v1.5.3-linux-amd64.tar.gz $ cp /velero-test/velero /usr/local/bin/
After you download Velero, export theKubeConfig file of the target (restore) cluster using the downloaded file:
export KUBECONFIG=<KUBECONFIG_PATH>
4. Download JQ
If both your clusters are accessible from your local machine, the scripts used in the following steps can be executed as designed.
If either one of your clusters uses proxy access or if you cannot recover/download the KubeConfig file from your old cluster, follow the instructions provided in the section.Restore with Proxy

The restore process requires that you install JQ on your machine. Refer to for additional details.https://stedolan.github.io/jq/download
# To install jq on MacOS$ brew install jq # To install jq on Debian and Ubuntu$ sudo apt-get install jq # To install jq on CentOS$ sudo yum install epel-release -y$ sudo yum install jq -y$ sudo jq --version
5. Pre-Restore Procedure
The pre-restore script creates the storageclass, if it does not exist on destination cluster, and saves the nginx-ingress-controller YAML file as well as the config maps for the following Suite Admin services:
The suite-k8 serviceThe suite-prod service
To execute the pre-restore script, run the script with the provided parameters:pre-restore.sh
# Command to execute the bashscript$ ./pre-restore.sh 5101 </pathTo/oldCluster/kube_config> </pathTo/targetCluster/kube_config> #Note: For 5.2.0 or later release, continue to provide the 5101 value.#</pathTo/oldCluster/kube_config> is the path to the OLD KubeConfig file downloaded in Step 2.#</pathTo/targetCluster/kube_config> is the path to the NEW KubeConfig file downloaded in Step 2.{{}}
The following code block includes the script:pre-restore.sh
#!/bin/bashINSTALLER_VERSION_OLD=$1KUBECONFIG_OLD=$2KUBECONFIG_NEW=$3 declare INSTALLER_STORAGECLASSINSTALLER_STORAGECLASS["500"]="thin"INSTALLER_STORAGECLASS["501"]="thin"INSTALLER_STORAGECLASS["502"]="thin"INSTALLER_STORAGECLASS["51"]="standard"INSTALLER_STORAGECLASS["510"]="standard" if [[ ( ($KUBECONFIG_OLD == "" && $INSTALLER_VERSION_OLD == "") || $KUBECONFIG_NEW == "" ) ]]; then echo "Missing Paths for kubeconfigs" echo "Quitting" exit 0else export KUBECONFIG_SAVED=$KUBECONFIG export KUBECONFIG=$HOME/.kube/config mkdir $HOME/backup cp $HOME/.kube/config $HOME/backup/saved_config if [[ $KUBECONFIG_OLD != "" ]]; then
Make sure that the backup folder does not exist at ~/backup on the device in which you are execute these scripts. If a exists, delete it ~/backupusing the following command:
rm -rf ~/backup

# Fetching the storage class name for the old(backup) cluster and storing it in variable STORAGECLASS_NAME_OLD cp $KUBECONFIG_OLD $HOME/.kube/config STORAGECLASS_NAME_OLD=$(kubectl get storageclass -o json | jq '.items[0].metadata.name' | sed -e 's/^"//' -e 's/"$//') # Extracting the storage class name from the json file of old cluster echo "Creating storage class "${STORAGECLASS_NAME_OLD} "in the target cluster." else echo "Creating storage class "${INSTALLER_STORAGECLASS[$INSTALLER_VERSION_OLD]} "in the target cluster." STORAGECLASS_NAME_OLD=${INSTALLER_STORAGECLASS[$INSTALLER_VERSION_OLD]} fi # Creating a storage class with the name STORAGECLASS_NAME_OLD in the target(restore) cluster cp $KUBECONFIG_NEW $HOME/.kube/config kubectl get storageclass -o json | jq --arg inp1 $STORAGECLASS_NAME_OLD '.items[0].metadata.name=$inp1' > $HOME/backup/storageclass.json cat $HOME/backup/storageclass.json | kubectl create -f - #setting the old storage class as "not default" if [[ $STORAGECLASS_NAME_OLD != "standard" ]]; then kubectl annotate --overwrite storageclass $STORAGECLASS_NAME_OLD storageclass.beta.kubernetes.io/is-default-class='false' -n cisco fi #Scripts to backup ingress service spec, k8s, proxy settings, ssh keys and prod-mgmt configmaps on the target cluster mkdir -p $HOME/backup/configmap mkdir -p $HOME/backup/service mkdir -p $HOME/backup/sshkeys mkdir -p $HOME/backup/proxy kubectl get svc -n cisco common-framework-nginx-ingress-controller -o json > $HOME/backup/service/ingress.json for cm in $(kubectl get configmaps -n cisco -o custom-columns=:metadata.name --no-headers=true | grep "k8s-mgmt") do kubectl get configmap $cm -n cisco -o yaml > $HOME/backup/configmap/$cm done for cm in $(kubectl get configmaps -n cisco -o custom-columns=:metadata.name --no-headers=true | grep "prod-mgmt") do kubectl get configmap $cm -n cisco -o yaml > $HOME/backup/configmap/$cm done kubectl get configmap suite.key -n cisco -o yaml > $HOME/backup/sshkeys/suite.key kubectl get configmap suite.pub -n cisco -o yaml > $HOME/backup/sshkeys/suite.pub kubectl get configmap proxy.settings -n cisco -o yaml > $HOME/backup/proxy/proxy.settings kubectl set env deployment/common-framework-suite-prod-mgmt --list -n cisco | grep "CLOUD_TYPE" >> $HOME/backup/proxy/proxy_variables kubectl set env deployment/common-framework-suite-prod-mgmt --list -n cisco | grep "HTTP_PROXY" >> $HOME/backup/proxy/proxy_variables kubectl set env deployment/common-framework-suite-prod-mgmt --list -n cisco | grep "HTTPS_PROXY" >> $HOME/backup/proxy/proxy_variables kubectl set env deployment/common-framework-suite-prod-mgmt --list -n cisco | grep "NO_PROXY" >> $HOME/backup/proxy/proxy_variables cp $HOME/backup/saved_config $HOME/.kube/config export KUBECONFIG=$KUBECONFIG_SAVED fi echo 'Successful!'

1.
2.
3.
6. Restore Procedure
To restore the backed up data to the target cluster, run the following Velero commands from your local machine.
List available backups.
$ ./<VELERO_DIRECTORY>/velero backup get
Make sure the backed up namespace does not exist in the target clustercisco . Be sure to delete the name space, if it exists, before you ciscorestore.
$ kubectl delete ns cisco
Restore from one of the listed backups.
$ ./velero restore create --from-backup <BACKUPNAME>
You have now restored the CloudCenter Suite data to the new cluster.
7. Post-Restore Procedure
At this stage, you must restore the config maps for the following Suite Admin services:
The suite-k8 serviceThe suite-prod service
If the new cluster is accessible (from the local device) using theKubeConfig file, execute the following post-restore.sh script.
Verify if the backups are listed BEFORE proceeding to the next step.

With Internet Access - The post-restore.sh script
#!/bin/bash
KUBECONFIG_NEW=$1
if [[ ( $KUBECONFIG_NEW == "" ) ]]; then echo "Missing Paths for kubeconfig" echo "Quitting" exit 0else export KUBECONFIG_SAVED=$KUBECONFIG export KUBECONFIG=$HOME/.kube/config
cp $HOME/.kube/config $HOME/backup/saved_config cp $KUBECONFIG_NEW $HOME/.kube/config
kubectl delete svc -n cisco common-framework-nginx-ingress-controller cat $HOME/backup/service/ingress.json | kubectl create -f -
for cm in $(ls $HOME/backup/configmap)do
kubectl delete configmap $cm -n ciscodone
for cm in $(ls $HOME/backup/configmap)do
cat $HOME/backup/configmap/$cm | kubectl create -f -done
kubectl delete configmap suite.key -n cisco kubectl delete configmap suite.pub -n cisco kubectl delete configmap proxy.settings -n cisco cat $HOME/backup/sshkeys/suite.key | kubectl create -f - cat $HOME/backup/sshkeys/suite.pub | kubectl create -f - cat $HOME/backup/proxy/proxy.settings | kubectl create -f -
while IFS= read -r line; do kubectl set env deployment/common-framework-suite-prod-mgmt $line -n cisco; done < $HOME/backup/proxy/proxy_variables
cp $HOME/backup/saved_config $HOME/.kube/config export KUBECONFIG=$KUBECONFIG_SAVED
rm -r $HOME/backup/fi
echo 'Successful!'
workload manager-Specific Post-Restore Procedure
Cloud Remote Considerations
This migration procedure only applies to deployments.Running
Be sure to verify that you are only migrating deployment in the state.Running
The first few steps differ based on your use of private clouds or public clouds. Be sure to use the procedure applicable to your cloud environment.

1.
2.
3.
1.
2.
3.
1.
2.
3.
1.
2.
3.
Scenario Cloud Remote Configured
Settings Notes
1 No No additional settings Proceed with the steps provided below, other than the note that only applies to Scenario 3.
You must repeat this procedure for each region.
2 YesCloud endpoint accessible from CloudCenter Suite = NoCloudCenter Suite AMQP reachable from worker VMs = NoCloudCenter Suite AMQP accessible from cloud = No
You do not need to perform any additional configurations and can skip this section.
3Cloud endpoint accessible from CloudCenter Suite = NoCloudCenter Suite AMQP reachable from worker VMs = NoCloudCenter Suite AMQP accessible from cloud = Yes
Proceed with the steps provided below, INCLUDING the note that is specific to this scenario.
You must repeat this procedure for each region.
4Cloud endpoint accessible from CloudCenter Suite = YesCloudCenter Suite AMQP reachable from worker VMs = NoCloudCenter Suite AMQP accessible from cloud = No
You do not need to perform any additional configurations and can skip this section (similar to Scenario 2 above).
5Cloud endpoint accessible from CloudCenter Suite = YesCloudCenter Suite AMQP reachable from worker VMs = NoCloudCenter Suite AMQP accessible from cloud = Yes
Proceed with the steps provided below, INCLUDING the note that is specific to this scenario (similar to Scenario 3 above).
You must repeat this procedure for each region.
a. Understand the workload manager Restore Context
If you have installed the workload manager module, you must perform this procedure to update the DNS/IP address for the private cloud resources listed below and displayed in the following image:
The Worker AMQP IPThe Guacamole Public IP and PortThe Guacamole IP Address and Port for Application VMs
b. Retrieve the Port Numbers from the NEW Restored Cluster
The Kubernetes cluster contains the information that is required to update the workload manager UI. This section provides the commands required to retrieve this information.
To ensure that the source (old) cluster does not connect to Cloud Remote, click Edit in the Regions page and change the settings to for all settings.Connectivity Yes three
If you have multiple deployments that use both Scenario 1 and 3, you perform mustthese additional steps for deployments that use both Scenarios 1 and 3.
You must repeat this procedure for each region.
As public clouds use load balancers and static IP ports, these resource details may differ accordingly. Be sure to use the resources applicable to your cloud environment.

1.
a.
b.
c.
2.
To retrieve the port numbers from the new cluster for private clouds, follow this procedure.
The port numbers for each component will differ.
Run the following command on the new cluster (login to the KubeConfig of the new cluster) to locate the new port numbers for the Worke.r AMQP IP
kubectl get service -n cisco | grep rabbitmq-ext | awk '{print $5}'
# In the resulting response, locate the port corresponding to Port 443 and use that port number!
443:26642/TCP,15672:8902/TCP
Run the following command on the new cluster to retrieve the port number for the . Guacamole Public IP and Port
kubectl get service -n cisco | grep cloudcenter-guacamole | awk '{print $5}'
# In the resulting response, locate the port corresponding to Port 443 and use that port number for the Guacamole port!
8080:2376/TCP,7788:25226/TCP,7789:32941/TCP,443:708/TCP
Run the following command on the new cluster to retrieve the port number for the Guacamole IP Address and Port for Application .VMs
kubectl get service -n cisco | grep cloudcenter-guacamole | awk '{print $5}'
# In the resulting response, locate the port corresponding to Port 7789 and use that port number for the Guacamole port!
8080:2376/TCP,7788:25226/TCP,7789:32941/TCP,443:708/TCP
c. Retrieve the IP Address of the NEW Restored Cluster
Use the IP address of one of the primary servers of the NEW restored Kubernetes cluster for all the resources where the IP address needs to be replaced.
d. Change the IP Address and Port Numbers for the NEW Restored Cluster
The IP addresses and port numbers are not updated automatically in the workload manager UI and you must explicitly update them using this procedure.
To configure the IP address and port number in the new cluster, follow this procedure.
1. Access the workload manager module.
As public clouds use load balancers and static IP ports, these resource details may differ accordingly. Be sure to use the resources applicable to your cloud environment.
As public clouds use load balancers and static IP ports, these resource details may differ accordingly. Be sure to use the resources applicable to your cloud environment.
As public clouds use load balancers and static IP ports, these resource details may differ accordingly. Be sure to use the resources applicable to your cloud environment.

2.
3. 4.
5.
6.
Navigate to > > Clouds Configure Cloud Region Connectivity.
Click in the Region Connectivity settings.Edit ConnectivityIn the Configure Region popup, change the 3 fields mentioned above to ensure that the IP and port details are updated to the NEW restored VM.
Click to save your changes.OK
You have now updated the DNS/IP/Port for the restored WM for this particular cloud. If you have configured other clouds in this environment, be sure to repeat this procedure for each cloud. Once you complete this procedure for all configured clouds, you can resume new deployment activities using the workload manager.
Only for Scenario 3
DO NOT MAKE ANY OTHER CONFIGURATION CHANGES!
Saving your changes may not automatically update the information in the Region Connectivity settings. Be sure to refresh the page to see the saved information.

1.
2.
e. Perform the Pre-Migrate Activities
Before you migrate the deployment details you need to ensure that you can connect to both clusters and have the required files to perform the migration.
To perform the pre-migrate activities, follow this procedure.
Verify that the OLD cluster VMs can reach the NEW cluster. The remaining steps in this procedure are dependent on this connectivity in your environment.Save the contents of the following file using the same name and file extension to your local directory with a file type JSON format.actions.json
The actions.json file
{"repositories":[],"actions":{"resource":null,"size":2,"pageNumber":0,"totalElements":2,"totalPages":1,"actionJaxbs":[{"id":"57","resource":null,"name":"AgentReConfig_Linux","description":"","actionType":"EXECUTE_COMMAND","category":"ON_DEMAND","lastUpdatedTime":"2019-09-19 22:14:54.245","timeOut":1200,"enabled":true,"encrypted":false,"explicitShare":false,"showExplicitShareFeature":false,"deleted":false,"systemDefined":false,"bulkOperationSupported":true,"isAvailableToUser":true,"currentlyExecuting":false,"owner":1,"actionParameters":[{"paramName":"downloadFromBundle","paramValue":"true","customParam":false,"required":true,"useDefault":false,"preference":"VISIBLE_UNLOCKED"},{"paramName":"bundlePath","paramValue":"http://10.0.0.3/5.1-release/ccs-bundle-artifacts-5.1.0-20190819/agent.zip","customParam":false,"required":true,"useDefault":false,"preference":"VISIBLE_UNLOCKED"},{"paramName":"script","paramValue":"agent/agentReconfig.sh","customParam":false,"required":true,"useDefault":false,"preference":"VISIBLE_UNLOCKED"},{"paramName":"executeOnContainer","paramValue":"false","customParam":false,"required":true,"useDefault":false,"preference":"VISIBLE_UNLOCKED"},{"paramName":"rebootInstance","paramValue":"false","customParam":false,"required":true,"useDefault":false,"preference":"VISIBLE_UNLOCKED"},{"paramName":"refreshInstanceInfo","paramValue":"false","customParam":false,"required":true,"useDefault":false,"preference":"VISIBLE_UNLOCKED"}],"actionResourceMappings":[{"type":"VIRTUAL_MACHINE","actionResourceFilters":[{"cloudRegionResource":null,"serviceResource":null,"applicationProfileResource":null,"deploymentResource":null,"vmResource":{"type":"DEPLOYMENT_VM","appProfiles":["all"],"cloudRegions":["all"],"cloudAccounts":["all"],"services":["all"],"osTypes":[],"cloudFamilyNames":[],"nodeStates":[],"cloudResourceMappings":[]},"isEditable":true},{"cloudRegionResource":null,"serviceResource":null,"applicationProfileResource":null,"deploymentResource":null,"vmResource":{"type":"IMPORTED_VM","appProfiles":[],"cloudRegions":["all"],"cloudAccounts":["all"],"services":[],"osTypes":["all"],"cloudFamilyNames":[],"nodeStates":[],"cloudResourceMappings":[]},"isEditable":true}]}],"actionResourceMappingAncillaries":[],"actionCustomParamSpecs":[{"paramName":"brokerHost","displayName":"BrokerHost","helpText":"Ip Address or Hostname of Rabbit MQ cluster","type":"string","valueList":null,"defaultValue":"","confirmValue":"","pathSuffixValue":"","userVisible":true,"userEditable":true,"systemParam":false,"exampleValue":null,"dataUnit":null,"optional":false,"deploymentParam":false,"multiselectSupported":false,"useDefault":true,"valueConstraint":{"minValue":0,"maxValue":255,"maxLength":255,"regex":null,"allowSpaces":true,"sizeValue":0,"step":0,"calloutWorkflowName":null},"scope":null,"webserviceListParams":{"url":"","protocol":"","username":"","password":"","requestType":null,"contentType":null,"commandParams":null,"requestBody":null,"resultString":null},"secret":null,"tabularTypeData":null,"collectionList":[],"preference":"VISIBLE_UNLOCKED"},{"paramName":"brokerPort","displayName":"BrokerPort","helpText":"RabbitMQ Port number","type":"string","valueList":null,"defaultValue":"","confirmValue":"","pathSuffixValue":"","userVisible":true,"userEditable":true,"systemParam":false,"exampleValue":null,"dataUnit":null,"optional":false,"deploymentParam":false,"multiselectSupported":false,"useDefault":true,"valueConstraint":{"minValue":0,"maxValue":255,"maxLength":255,"regex":null,"allowSpaces":true,"sizeValue":0,"step":0,"calloutWorkflowName":null},"scope":null,"webserviceListParams":{"url":"","protocol":"","username":"","password":"","requestType":null,"contentType":null,"commandParams":null,"
1.
2. 3. 4.
Only required for Scenario 3 in the Workload Manager table above
With Cloud Remoteconfigured in your old cluster, you must also reconfigure Cloud Remote to communicate with the new cluster by following this procedure.
Click in the Region Connectivity section as displayed in the following screen shot.Download Configuration
Click .Copy Encryption KeyAccess the Cloud Remote UI.Apply the downloaded configuration on the Cloud Remote.

2.
3.4.
5. 6.
requestBody":null,"resultString":null},"secret":null,"tabularTypeData":null,"collectionList":[],"preference":"VISIBLE_UNLOCKED"}]},{"id":"58","resource":null,"name":"AgentReConfig_Win","description":"","actionType":"EXECUTE_COMMAND","category":"ON_DEMAND","lastUpdatedTime":"2019-09-19 22:15:02.311","timeOut":1200,"enabled":true,"encrypted":false,"explicitShare":false,"showExplicitShareFeature":false,"deleted":false,"systemDefined":false,"bulkOperationSupported":true,"isAvailableToUser":true,"currentlyExecuting":false,"owner":1,"actionParameters":[{"paramName":"downloadFromBundle","paramValue":"true","customParam":false,"required":true,"useDefault":false,"preference":"VISIBLE_UNLOCKED"},{"paramName":"bundlePath","paramValue":"http://10.0.0.3/5.1-release/ccs-bundle-artifacts-5.1.0-20190819/agent.zip","customParam":false,"required":true,"useDefault":false,"preference":"VISIBLE_UNLOCKED"},{"paramName":"script","paramValue":"agent\\agentReconfig.ps1","customParam":false,"required":true,"useDefault":false,"preference":"VISIBLE_UNLOCKED"},{"paramName":"executeOnContainer","paramValue":"false","customParam":false,"required":true,"useDefault":false,"preference":"VISIBLE_UNLOCKED"},{"paramName":"rebootInstance","paramValue":"false","customParam":false,"required":true,"useDefault":false,"preference":"VISIBLE_UNLOCKED"},{"paramName":"refreshInstanceInfo","paramValue":"false","customParam":false,"required":true,"useDefault":false,"preference":"VISIBLE_UNLOCKED"}],"actionResourceMappings":[{"type":"VIRTUAL_MACHINE","actionResourceFilters":[{"cloudRegionResource":null,"serviceResource":null,"applicationProfileResource":null,"deploymentResource":null,"vmResource":{"type":"DEPLOYMENT_VM","appProfiles":["all"],"cloudRegions":["all"],"cloudAccounts":["all"],"services":["all"],"osTypes":[],"cloudFamilyNames":[],"nodeStates":[],"cloudResourceMappings":[]},"isEditable":true},{"cloudRegionResource":null,"serviceResource":null,"applicationProfileResource":null,"deploymentResource":null,"vmResource":{"type":"IMPORTED_VM","appProfiles":[],"cloudRegions":["all"],"cloudAccounts":["all"],"services":[],"osTypes":["all"],"cloudFamilyNames":[],"nodeStates":[],"cloudResourceMappings":[]},"isEditable":true}]}],"actionResourceMappingAncillaries":[],"actionCustomParamSpecs":[{"paramName":"brokerHost","displayName":"BrokerHost","helpText":"Ip Address or Hostname of Rabbit MQ cluster","type":"string","valueList":null,"defaultValue":"","confirmValue":"","pathSuffixValue":"","userVisible":true,"userEditable":true,"systemParam":false,"exampleValue":null,"dataUnit":null,"optional":false,"deploymentParam":false,"multiselectSupported":false,"useDefault":true,"valueConstraint":{"minValue":0,"maxValue":255,"maxLength":255,"regex":null,"allowSpaces":true,"sizeValue":0,"step":0,"calloutWorkflowName":null},"scope":null,"webserviceListParams":{"url":"","protocol":"","username":"","password":"","requestType":null,"contentType":null,"commandParams":null,"requestBody":null,"resultString":null},"secret":null,"tabularTypeData":null,"collectionList":[],"preference":"VISIBLE_UNLOCKED"},{"paramName":"brokerPort","displayName":"BrokerPort","helpText":"RabbitMQ Port number","type":"string","valueList":null,"defaultValue":"","confirmValue":"","pathSuffixValue":"","userVisible":true,"userEditable":true,"systemParam":false,"exampleValue":null,"dataUnit":null,"optional":false,"deploymentParam":false,"multiselectSupported":false,"useDefault":true,"valueConstraint":{"minValue":0,"maxValue":255,"maxLength":255,"regex":null,"allowSpaces":true,"sizeValue":0,"step":0,"calloutWorkflowName":null},"scope":null,"webserviceListParams":{"url":"","protocol":"","username":"","password":"","requestType":null,"contentType":null,"commandParams":null,"requestBody":null,"resultString":null},"secret":null,"tabularTypeData":null,"collectionList":[],"preference":"VISIBLE_UNLOCKED"}]}]},"repositoriesMappingRequired":false,"actionTypesCounts":[{"key":"EXECUTE_COMMAND","value":"2"}]}
Access workload manager in your OLD cluster and navigate to the Actions Library page. Import the actions.json file that you saved in Step 2 above. You should see two files (AgentReconfig_Linux and AgentReconfig_Win) as
displayed in the following screenshot.
The files are disabled by default (OFF) enable both files by toggling each switch to .ONSave the following script to a file in your local directory and name it . This is the file to use for Linux environments.agentReconfig.sh
The agentReconfig.sh file
#!/bin/bash
#Write to system log as well as to terminallogWrite(){ msg=$1 echo "$(date) ${msg}" logger -t "OSMOSIX" "${msg}" return 0}
logWrite "Starting agent migrate..."
env_file="/usr/local/osmosix/etc/userenv"

6.
7.
if [ -f $env_file ];then logWrite "Source the userenv file..." . $env_filefi
if [ -z $brokerHost ];then logWrite "Broker Host / Rabbit Server Ip not passed as action parameter" exit 3;fi
if [ -z $brokerPort ];then logWrite "Broker Port / Rabbit Server Port not passed as action parameter" exit 4fi
replaceUserdataValue() { key=$1 value=$2
if [ -z $key ] || [ -z $value ]; then logWrite "Command line arguments missing to update user-data file, key: $key, value:$value" return fi
user_data_file="/usr/local/agentlite/etc/user-data" if [ -f $user_data_file ]; then json_content=`cat $user_data_file` old_value=`echo $json_content | awk -F $key '{print $2}' | awk -F \" '{print $3}'` sed -i 's@'"$old_value"'@'"$value"'@g' $user_data_file fi
}
export AGENT_HOME="/usr/local/agentlite"
logWrite "Updating the user data file"replaceUserdataValue "brokerClusterAddresses" "$brokerHost:$brokerPort"
logWrite "Updating config.json file"sed -i '/AmqpAddress/c\ "AmqpAddress": "'"${brokerHost}:${brokerPort}"'",' "$AGENT_HOME/config/config.json"
cd $AGENT_HOMEecho "sleep 10" > execute.shecho "/usr/local/agentlite/bin/agent-stop.sh" >> execute.shecho "/usr/local/agentlite/bin/agent-start.sh" >> execute.shchmod a+x execute.shnohup bash execute.sh > /dev/null 2>&1 &
exit 0
Save the following script to a file in your local directory and name it . This is the file to use for Windows environments.agentReconfig.ps1

7.
8.
The agentReconfig.ps1 file
param ( [string]$brokerHost = "$env:brokerHost", [string]$brokerPort = "$env:brokerPort")
$SERVICE_NAME = "AgentService"$SYSTEM_DRIVE = (Get-WmiObject Win32_OperatingSystem).SystemDrive. "$SYSTEM_DRIVE\temp\userenv.ps1"
if ($brokerHost -eq 0 -or $brokerHost -eq $null -or $brokerHost -eq "") { echo "Variable brokerHost not available in the env file" exit 1}
if ($brokerPort -eq 0 -or $brokerPort -eq $null -or $brokerPort -eq "") { echo "Variable brokerPort not available in the env file" exit 2}
$AGENTGO_PARENT_DIR = "$SYSTEM_DRIVE\opt"
echo "Check if AgentGo Parent directory exists. If not create it: '$AGENTGO_PARENT_DIR'"if (-not (Test-Path $AGENTGO_PARENT_DIR)) { echo "Create $AGENTGO_PARENT_DIR..." mkdir $AGENTGO_PARENT_DIR}else { echo "$AGENTGO_PARENT_DIR already exists."}
$AGENT_CONFIG="{0}\agentlite\config\config.json" -f $AGENTGO_PARENT_DIRif (Test-Path $AGENT_CONFIG) { echo "Changing the config.json file with the new broker host $env:brokerHost and port $env:brokerPort" $confJson = get-content $AGENT_CONFIG | out-string | convertfrom-json $confJson.AmqpAddress = "$($env:brokerHost):$($env:brokerPort)" $confJson | ConvertTo-Json | set-content $AGENT_CONFIG}
$USER_DATA_FILE = "{0}\agentlite\etc\user-data" -f $AGENTGO_PARENT_DIRif (Test-Path $USER_DATA_FILE) { echo "Changing user-data file with new broker host $env:brokerHost and port $env:brokerPort" $userDataJson = get-content $USER_DATA_FILE | out-string | convertfrom-json $userDataJson.brokerClusterAddresses = "$($env:brokerHost):$($env:brokerPort)" $userDataJson | ConvertTo-Json | set-content $USER_DATA_FILE}
$AGENT_SERVICE_NAME = "AgentService"echo "Stop-Service $AGENT_SERVICE_NAME" > $AGENTGO_PARENT_DIR\exec.ps1echo "sleep 10" >> $AGENTGO_PARENT_DIR\exec.ps1echo "Start-Service $AGENT_SERVICE_NAME" >> $AGENTGO_PARENT_DIR\exec.ps1
echo "Restarting agent"Start-Process -filepath "powershell" -argumentlist "-executionpolicy bypass -noninteractive -file `"$AGENTGO_PARENT_DIR\exec.ps1`""
echo "Agent set to restart after config changes"
Add these two files to a folder called (just an example) and compress the folder to create agent agent.zipwith the same structure displayed here.
agent
agentReconfig.ps1

8.
9.
1.2.
3.
4.
agentReconfig.sh
Move the folder to an HTTP repository in your local environment that is accessible from the OLD and NEW clusters.agent.zip
You have now ensured cluster connectivity and saved the required files for the migration procedure.
f. Migrate Deployments from the OLD Cluster to the NEW Cluster
To migrate the deployment details from the old cluster to the new cluster, follow this procedure.
Navigate to the workload manager Actions Libray page and edit the AgentReconfig_Linux action.This procedure continues to use the Linux file going foward. Scroll to the Actions Definition section and update the URL as displayed in the following screenshot.
Scroll to the section and change the default value of the to use the NEW cluster IP.Custom Fields Broker Host
This procedure uses the following URL as an example:
http://10.0.0.3/repo/agent.zip
The URL and Script from Bundle fields in the above screenshot are in accordance with the steps above.

4.
5. 6. 7.
8. 9.
10. 11.
Scroll down to the and change the default to use the NEW Worker AMQP IP port (for example, 26642 in Step 8 above).Broker Port
Click to save your default configuration changes in the OLD cluster.DoneNavigate to the page and locate the VM to migrate to the new cluster.Virual MachinesClick the dropdown and verify if your newly modified actions are visible under the Custom Actions section in the dropdown list as visible Actionsin the following screenshot.
Click one of the actions and verify that the configured defaults are displayed in the Broker host and Broker port fields as indicated earlier.Click to migrate this VM to the new cluser.SubmitVerify that the migration is complete by going to the Deployment page in your NEW cluster and the VM is listed as RUNNING (green line).Repeat Steps 6 through 10 for each VM that needs to be migrated to the NEW cluster.
You have now migrated the deployment details from the old cluster to the new cluster
Back to: Public Cloud

1. 2.
3.
Restore with ProxyRestore with Proxy
OverviewLimitationsRequirements
1. Launch the Target Cluster2. Download the KubeConfig Files3. Download Velero4. Download JQ5. Pre-Restore Procedure6. Restore Procedure7. Post-Restore Procedure
workload manager-Specific Post-Restore Procedure Cloud Remote
Considerationsa. Understand the %wm Restore Contextb. Retrieve the Port Numbers from the NEW Restored Clusterc. Retrieve the IP Address of the NEW Restored Clusterd. Change the IP Address and Port Numbers for the NEW Restored Clustere. Perform the Pre-Migrate Activitiesf. Migrate Deployments from the OLD Cluster to the NEW Cluster
Overview
To restore data, the CloudCenter Suite requires that you launch a new cluster.
Limitations
If you configured the old cluster using a DNS, be sure to update the new IP address (from the restored cluster) that is mapped to the DNS entry. Once you update the DNS entry of your new cluster, these services will continue to work as designed.
Additionally, be aware that you may need to update the DNS for the and (both ADFS and SP).Base URL Configuration SSO Setup
Requirements
Before proceeding with a restore, adhere to the following limitations:
The Velero tool must be installed. Velero Version 1.5.3 - refer to /v1.5 for details.https://velero.io/docsLaunch a new cluster to restore the data.You will need to execute multiple scripts as part of these procedures. Make sure to use the 755 permission to execute each script mentioned in this section.
1.Launch the Target Cluster
To launch CloudCenter Suite on a new target cluster and access the Suite Admin UI for this cluster.
Navigate to the for the new cluster.Suite Admin DashboardConfigure the identical backup configuration that you configured in your old cluster. See > additional details. When you Backup Approach Processprovide the credentials, the new cluster automatically connects to the cloud storage location.
Wait for a few minutes (at least 5 Mins, maybe more) for the Velero service in the new cluster to be synced up with the cloud storage location. At this point return to your local command window (shell console or terminal window) to perform the remaining steps in this process.
The backup/restore feature is only available on CloudCenter Suite clusters installed using CloudCenter Suite installers and not on existing Kubernetes clusters.
Reconfiguration of Base URL and SSO are only applicable for backup & restore functions IF the source cluster is created using the CloudCenter Suite 5.0.x installer and the destination cluster is freshly created using the CloudCenter Suite 5.1.1 installer.
This step is REQUIRED to initiate the connection and fetch the backup(s).

3.
2. Download the KubeConfig Files
You must download theKubeConfig file from the Suite Admin Kubernetes cluster management page for your source and target clusters to your local machine via a local command window (shell console or terminal window):
From the source cluster, download theKubeConfig file and name it KUBECONFIG ._OLDFrom the target cluster, download theKubeConfig file and name it KUBECONFIG ._NEW
See for additional details on accessing theKubeConfig file as displayed in the following screenshot.Kubernetes Cluster Management
3. Download Velero
The restore process requires Velero and must be performed on a local command window (shell console or terminal window).
To download Velero, use one of the following options:
OSX option:
$ cd <VELERO_DIRECTORY>$ curl -L -O https://github.com/vmware-tanzu/velero/releases/download/v1.5.3/velero-v1.5.3-darwin-amd64.tar.gz$ tar -xvf velero-v1.5.3-darwin-amd64.tar.gz
CentOS Option:
$ mkdir -p /velero-test && cd /velero-test$ curl -LO https://github.com/vmware-tanzu/velero/releases/download/v1.5.3/velero-v1.5.3-linux-amd64.tar.gz$ tar -xvf velero-v1.5.3-linux-amd64.tar.gz && rm -rf velero-v1.5.3-linux-amd64.tar.gz $ cp /velero-test/velero /usr/local/bin/
After you download Velero, export theKubeConfig file of the target (restore) cluster using the downloaded file:
export KUBECONFIG=<KUBECONFIG_PATH>
4. Download JQ
If both your clusters are accessible from your local machine, the scripts used in the following steps can be executed as designed.
If either one of your clusters uses proxy access or if you cannot recover/download the KubeConfig file from your old cluster, follow the instructions provided in the section.Restore with Proxy

1.
2.
3.
The restore process requires that you install JQ on your machine. Refer to for additional details.https://stedolan.github.io/jq/download
# To install jq on MacOS$ brew install jq
# To install jq on Debian and Ubuntu$ sudo apt-get install jq
# To install jq on CentOS$ sudo yum install epel-release -y$ sudo yum install jq -y$ sudo jq --version
5. Pre-Restore Procedure
If either one of your clusters uses proxy access or if you cannot recover/download the KubeConfig file from your old cluster, follow the instructions provided in this section.
SSH into one of the VMs in your old cluster and retrieve the storageclass names.
$ kubectl get storageclass -o json | grep '\"name\"' | cut -d ':' -f 2 | sed 's/"/\"/g' | sed 's/[\,]/ /g'
For example:
Example
$ kubectl get storageclass -o json | grep '\"name\"' | cut -d ':' -f 2 | sed 's/"/\"/g' | sed 's/[\,]/ /g' "thin"
SSH into one of the VMs in your new cluster and retrieve the storageclass names:
$ kubectl get storageclass -o json | grep '\"name\"' | cut -d ':' -f 2 | sed 's/"/\"/g' | sed 's/[\,]/ /g'
For example:
Example
$ kubectl get storageclass -o json | grep '\"name\"' | cut -d ':' -f 2 | sed 's/"/\"/g' | sed 's/[\,]/ /g' "standard"
Copy the contents of storageclass from the new cluster using the command below: (use the storageclass_name retrieve using the above step). You need to run the following command, copy the output, and save the output to a file called backupStorageclass.yaml.
$ kubectl get storageclass <storageclass_name> -o yaml
For example:
This step is required because of changes in the storageclass name between CloudCenter Suite 5.0.0 and 5.1.0.

3.
4. 5.
6.
7.
8.
cloud-user@ab21461-fcc43751-1381-4e98-8d45-934bb965edfe-mg-1-primary-0:~$ kubectl get storageclass standard -o yamlapiVersion: storage.k8s.io/v1kind: StorageClassmetadata: annotations: kubectl.kubernetes.io/last-applied-configuration: | {"apiVersion":"storage.k8s.io/v1beta1","kind":"StorageClass","metadata":{"annotations":{"storageclass.beta.kubernetes.io/is-default-class":"true"},"name":"standard"},"parameters":{"diskformat":"thin"},"provisioner":"kubernetes.io/vsphere-volume"} storageclass.beta.kubernetes.io/is-default-class: "true" creationTimestamp: "2019-07-31T23:26:57Z" name: standard resourceVersion: "605" selfLink: /apis/storage.k8s.io/v1/storageclasses/standard uid: b045d700-b3ea-11e9-9b1d-0050569f28fdparameters: diskformat: thinprovisioner: kubernetes.io/vsphere-volumereclaimPolicy: DeletevolumeBindingMode: Immediate
Create a new file backupStorageclass.yaml and paste the contents copied from the previous step.Replace the field in the backupStorageclass.yaml filewith the OLD storage_classname from the old cluster from Step 1.nameFor example:
Create a new storageclass in the new cluster using the command below
$ cat /path/backupStorageclass.yaml | kubectl create -f -
Create a backup of the Kubernetes config maps of the following services by executing the script provided in this step.
The suite-k8 serviceThe suite-prod service
Run the command to execute the backup_configmap.sh script
#Execute the script as sudo user$ sudo /path/to/script/backup_configmap.sh.sh
The backup_configmap.sh script

8.
1.
2.
3.
backup_configmap.sh
#!/bin/bash
#Scripts to backup ssh keys, proxy settings, k8s and prod-mgmt configmaps on the target clustermkdir -p $HOME/backup/configmapmkdir -p $HOME/backup/servicemkdir -p $HOME/backup/sshkeysmkdir -p $HOME/backup/proxy
kubectl get svc -n cisco common-framework-nginx-ingress-controller -o json > $HOME/backup/service/ingress.json
for cm in $(kubectl get configmaps -n cisco -o custom-columns=:metadata.name --no-headers=true | grep "k8s-mgmt") do
kubectl get configmap $cm -n cisco -o yaml > $HOME/backup/configmap/$cm done
for cm in $(kubectl get configmaps -n cisco -o custom-columns=:metadata.name --no-headers=true | grep "prod-mgmt") do
kubectl get configmap $cm -n cisco -o yaml > $HOME/backup/configmap/$cm done
kubectl get configmap suite.key -n cisco -o yaml > $HOME/backup/sshkeys/suite.keykubectl get configmap suite.pub -n cisco -o yaml > $HOME/backup/sshkeys/suite.pub
kubectl get configmap proxy.settings -n cisco -o yaml > $HOME/backup/proxy/proxy.settings
kubectl set env deployment/common-framework-suite-prod-mgmt --list -n cisco | grep "CLOUD_TYPE" >> $HOME/backup/proxy/proxy_variableskubectl set env deployment/common-framework-suite-prod-mgmt --list -n cisco | grep "HTTP_PROXY" >> $HOME/backup/proxy/proxy_variableskubectl set env deployment/common-framework-suite-prod-mgmt --list -n cisco | grep "HTTPS_PROXY" >> $HOME/backup/proxy/proxy_variableskubectl set env deployment/common-framework-suite-prod-mgmt --list -n cisco | grep "NO_PROXY" >> $HOME/backup/proxy/proxy_variables
echo 'Successful!'
6. Restore Procedure
List available backups.
$ ./<VELERO_DIRECTORY>/velero backup get
Make sure the backed up namespace does not exist in the target cluster (for example, if the namespace was backed up it shouldn't be here ciscoon the cluster).
$ kubectl delete ns cisco
Restore from one of the listed backups.
$ ./velero restore create --from-backup <BACKUPNAME>
You have now restored the CloudCenter Suite data to the new cluster.
Verify if the backups are listed BEFORE proceeding to the next step.

7. Post-Restore Procedure
At this stage, you must restore the config maps for the following Suite Admin services:
The suite-k8 serviceThe suite-prod service
If the new cluster is NOT accessible (from the local device) using kubeconfig, execute the following script from the remote device after the restore process is complete.
#Execute the script as sudo user$ sudo /path/to/script/post-restore.sh
Without Internet Access - The post-restore.sh script
#!/bin/bashkubectl delete svc -n cisco common-framework-nginx-ingress-controllercat $HOME/backup/service/ingress.json | kubectl create -f -
for cm in $(ls $HOME/backup/configmap) do
kubectl delete configmap $cm -n cisco done
for cm in $(ls $HOME/backup/configmap) do
cat $HOME/backup/configmap/$cm | kubectl create -f - done
kubectl delete configmap suite.key -n cisco kubectl delete configmap suite.pub -n ciscokubectl delete configmap proxy.settings -n cisco cat $HOME/backup/sshkeys/suite.key | kubectl create -f -cat $HOME/backup/sshkeys/suite.pub | kubectl create -f -cat $HOME/backup/proxy/proxy.settings | kubectl create -f -
while IFS= read -r line; do kubectl set env deployment/common-framework-suite-prod-mgmt $line -n cisco; done < $HOME/backup/proxy/proxy_variables
rm -r $HOME/backup/configmap
echo 'Successfull!
You have now restored the Suite Admin data to the new cluster. You can now follow the post-restore procedure specific to workload manager as provided in the next section.
workload manager-Specific Post-Restore Procedure
Cloud Remote Considerations
Scenario Cloud Remote Configured
Settings Notes
This migration procedure only applies to deployments.Running
Be sure to verify that you are only migrating deployment in the state.Running
The first few steps differ based on your use of private clouds or public clouds. Be sure to use the procedure applicable to your cloud environment.

1.
2.
3.
1.
2.
3.
1.
2.
3.
1.
2.
3.
1 No No additional settings Proceed with the steps provided below, other than the note that only applies to Scenario 3.
You must repeat this procedure for each region.
2 YesCloud endpoint accessible from CloudCenter Suite = NoCloudCenter Suite AMQP reachable from worker VMs = NoCloudCenter Suite AMQP accessible from cloud = No
You do not need to perform any additional configurations and can skip this section.
3Cloud endpoint accessible from CloudCenter Suite = NoCloudCenter Suite AMQP reachable from worker VMs = NoCloudCenter Suite AMQP accessible from cloud = Yes
Proceed with the steps provided below, INCLUDING the note that is specific to this scenario.
You must repeat this procedure for each region.
4Cloud endpoint accessible from CloudCenter Suite = YesCloudCenter Suite AMQP reachable from worker VMs = NoCloudCenter Suite AMQP accessible from cloud = No
You do not need to perform any additional configurations and can skip this section (similar to Scenario 2 above).
5Cloud endpoint accessible from CloudCenter Suite = YesCloudCenter Suite AMQP reachable from worker VMs = NoCloudCenter Suite AMQP accessible from cloud = Yes
Proceed with the steps provided below, INCLUDING the note that is specific to this scenario (similar to Scenario 3 above).
You must repeat this procedure for each region.
a. Understand the workload manager Restore Context
If you have installed the workload manager module, you must perform this procedure to update the DNS/IP address for the private cloud resources listed below and displayed in the following image:
The Worker AMQP IPThe Guacamole Public IP and PortThe Guacamole IP Address and Port for Application VMs
b. Retrieve the Port Numbers from the NEW Restored Cluster
The Kubernetes cluster contains the information that is required to update the workload manager UI. This section provides the commands required to retrieve this information.
To ensure that the source (old) cluster does not connect to Cloud Remote, click Edit in the Regions page and change the settings to for all settings.Connectivity Yes three
If you have multiple deployments that use both Scenario 1 and 3, you perform mustthese additional steps for deployments that use both Scenarios 1 and 3.
You must repeat this procedure for each region.
To ensure that the source (old) cluster does not connect to Cloud Remote, click Edit in the Regions page and change the settings to for all settings.Connectivity Yes three
If you have multiple deployments that use both Scenario 1 and 3, you perform mustthese additional steps for deployments that use both Scenarios 1 and 3.
You must repeat this procedure for each region.
As public clouds use load balancers and static IP ports, these resource details may differ accordingly. Be sure to use the resources applicable to your cloud environment.

1.
a.
b.
c.
2.
To retrieve the port numbers from the new cluster for private clouds, follow this procedure.
The port numbers for each component will differ.
Run the following command on the new cluster (login to the KubeConfig of the new cluster) to locate the new port numbers for the Worke.r AMQP IP
kubectl get service -n cisco | grep rabbitmq-ext | awk '{print $5}'
# In the resulting response, locate the port corresponding to Port 443 and use that port number!
443:26642/TCP,15672:8902/TCP
Run the following command on the new cluster to retrieve the port number for the . Guacamole Public IP and Port
kubectl get service -n cisco | grep cloudcenter-guacamole | awk '{print $5}'
# In the resulting response, locate the port corresponding to Port 443 and use that port number for the Guacamole port!
8080:2376/TCP,7788:25226/TCP,7789:32941/TCP,443:708/TCP
Run the following command on the new cluster to retrieve the port number for the Guacamole IP Address and Port for Application .VMs
kubectl get service -n cisco | grep cloudcenter-guacamole | awk '{print $5}'
# In the resulting response, locate the port corresponding to Port 7789 and use that port number for the Guacamole port!
8080:2376/TCP,7788:25226/TCP,7789:32941/TCP,443:708/TCP
c. Retrieve the IP Address of the NEW Restored Cluster
Use the IP address of one of the primary servers of the NEW restored Kubernetes cluster for all the resources where the IP address needs to be replaced.
d. Change the IP Address and Port Numbers for the NEW Restored Cluster
The IP addresses and port numbers are not updated automatically in the workload manager UI and you must explicitly update them using this procedure.
To configure the IP address and port number in the new cluster, follow this procedure.
1. Access the workload manager module.
As public clouds use load balancers and static IP ports, these resource details may differ accordingly. Be sure to use the resources applicable to your cloud environment.
As public clouds use load balancers and static IP ports, these resource details may differ accordingly. Be sure to use the resources applicable to your cloud environment.
As public clouds use load balancers and static IP ports, these resource details may differ accordingly. Be sure to use the resources applicable to your cloud environment.

2.
3. 4.
5.
6.
Navigate to > > Clouds Configure Cloud Region Connectivity.
Click in the Region Connectivity settings.Edit ConnectivityIn the Configure Region popup, change the 3 fields mentioned above to ensure that the IP and port details are updated to the NEW restored VM.
Click to save your changes.OK
You have now updated the DNS/IP/Port for the restored WM for this particular cloud. If you have configured other clouds in this environment, be sure to repeat this procedure for each cloud. Once you complete this procedure for all configured clouds, you can resume new deployment activities using the workload manager.
Only for Scenario 3
DO NOT MAKE ANY OTHER CONFIGURATION CHANGES!
Saving your changes may not automatically update the information in the Region Connectivity settings. Be sure to refresh the page to see the saved information.

1.
2.
e. Perform the Pre-Migrate Activities
Before you migrate the deployment details you need to ensure that you can connect to both clusters and have the required files to perform the migration.
To perform the pre-migrate activities, follow this procedure.
Verify that the OLD cluster VMs can reach the NEW cluster. The remaining steps in this procedure are dependent on this connectivity in your environment.Save the contents of the following file using the same name and file extension to your local directory with a file type JSON format.actions.json
The actions.json file
{"repositories":[],"actions":{"resource":null,"size":2,"pageNumber":0,"totalElements":2,"totalPages":1,"actionJaxbs":[{"id":"57","resource":null,"name":"AgentReConfig_Linux","description":"","actionType":"EXECUTE_COMMAND","category":"ON_DEMAND","lastUpdatedTime":"2019-09-19 22:14:54.245","timeOut":1200,"enabled":true,"encrypted":false,"explicitShare":false,"showExplicitShareFeature":false,"deleted":false,"systemDefined":false,"bulkOperationSupported":true,"isAvailableToUser":true,"currentlyExecuting":false,"owner":1,"actionParameters":[{"paramName":"downloadFromBundle","paramValue":"true","customParam":false,"required":true,"useDefault":false,"preference":"VISIBLE_UNLOCKED"},{"paramName":"bundlePath","paramValue":"http://10.0.0.3/5.1-release/ccs-bundle-artifacts-5.1.0-20190819/agent.zip","customParam":false,"required":true,"useDefault":false,"preference":"VISIBLE_UNLOCKED"},{"paramName":"script","paramValue":"agent/agentReconfig.sh","customParam":false,"required":true,"useDefault":false,"preference":"VISIBLE_UNLOCKED"},{"paramName":"executeOnContainer","paramValue":"false","customParam":false,"required":true,"useDefault":false,"preference":"VISIBLE_UNLOCKED"},{"paramName":"rebootInstance","paramValue":"false","customParam":false,"required":true,"useDefault":false,"preference":"VISIBLE_UNLOCKED"},{"paramName":"refreshInstanceInfo","paramValue":"false","customParam":false,"required":true,"useDefault":false,"preference":"VISIBLE_UNLOCKED"}],"actionResourceMappings":[{"type":"VIRTUAL_MACHINE","actionResourceFilters":[{"cloudRegionResource":null,"serviceResource":null,"applicationProfileResource":null,"deploymentResource":null,"vmResource":{"type":"DEPLOYMENT_VM","appProfiles":["all"],"cloudRegions":["all"],"cloudAccounts":["all"],"services":["all"],"osTypes":[],"cloudFamilyNames":[],"nodeStates":[],"cloudResourceMappings":[]},"isEditable":true},{"cloudRegionResource":null,"serviceResource":null,"applicationProfileResource":null,"deploymentResource":null,"vmResource":{"type":"IMPORTED_VM","appProfiles":[],"cloudRegions":["all"],"cloudAccounts":["all"],"services":[],"osTypes":["all"],"cloudFamilyNames":[],"nodeStates":[],"cloudResourceMappings":[]},"isEditable":true}]}],"actionResourceMappingAncillaries":[],"actionCustomParamSpecs":[{"paramName":"brokerHost","displayName":"BrokerHost","helpText":"Ip Address or Hostname of Rabbit MQ cluster","type":"string","valueList":null,"defaultValue":"","confirmValue":"","pathSuffixValue":"","userVisible":true,"userEditable":true,"systemParam":false,"exampleValue":null,"dataUnit":null,"optional":false,"deploymentParam":false,"multiselectSupported":false,"useDefault":true,"valueConstraint":{"minValue":0,"maxValue":255,"maxLength":255,"regex":null,"allowSpaces":true,"sizeValue":0,"step":0,"calloutWorkflowName":null},"scope":null,"webserviceListParams":{"url":"","protocol":"","username":"","password":"","requestType":null,"contentType":null,"commandParams":null,"requestBody":null,"resultString":null},"secret":null,"tabularTypeData":null,"collectionList":[],"preference":"VISIBLE_UNLOCKED"},{"paramName":"brokerPort","displayName":"BrokerPort","helpText":"RabbitMQ Port number","type":"string","valueList":null,"defaultValue":"","confirmValue":"","pathSuffixValue":"","userVisible":true,"userEditable":true,"systemParam":false,"exampleValue":null,"dataUnit":null,"optional":false,"deploymentParam":false,"multiselectSupported":false,"useDefault":true,"valueConstraint":{"minValue":0,"maxValue":255,"maxLength":255,"regex":null,"allowSpaces":true,"sizeValue":0,"step":0,"calloutWorkflowName":null},"scope":null,"webserviceListParams":{"url":"","protocol":"","username":"","password":"","requestType":null,"contentType":null,"commandParams":null,"
1.
2. 3. 4.
Only required for Scenario 3 in the Workload Manager table above
With Cloud Remoteconfigured in your old cluster, you must also reconfigure Cloud Remote to communicate with the new cluster by following this procedure.
Click in the Region Connectivity section as displayed in the following screen shot.Download Configuration
Click .Copy Encryption KeyAccess the Cloud Remote UI.Apply the downloaded configuration on the Cloud Remote.

2.
3.4.
5. 6.
requestBody":null,"resultString":null},"secret":null,"tabularTypeData":null,"collectionList":[],"preference":"VISIBLE_UNLOCKED"}]},{"id":"58","resource":null,"name":"AgentReConfig_Win","description":"","actionType":"EXECUTE_COMMAND","category":"ON_DEMAND","lastUpdatedTime":"2019-09-19 22:15:02.311","timeOut":1200,"enabled":true,"encrypted":false,"explicitShare":false,"showExplicitShareFeature":false,"deleted":false,"systemDefined":false,"bulkOperationSupported":true,"isAvailableToUser":true,"currentlyExecuting":false,"owner":1,"actionParameters":[{"paramName":"downloadFromBundle","paramValue":"true","customParam":false,"required":true,"useDefault":false,"preference":"VISIBLE_UNLOCKED"},{"paramName":"bundlePath","paramValue":"http://10.0.0.3/5.1-release/ccs-bundle-artifacts-5.1.0-20190819/agent.zip","customParam":false,"required":true,"useDefault":false,"preference":"VISIBLE_UNLOCKED"},{"paramName":"script","paramValue":"agent\\agentReconfig.ps1","customParam":false,"required":true,"useDefault":false,"preference":"VISIBLE_UNLOCKED"},{"paramName":"executeOnContainer","paramValue":"false","customParam":false,"required":true,"useDefault":false,"preference":"VISIBLE_UNLOCKED"},{"paramName":"rebootInstance","paramValue":"false","customParam":false,"required":true,"useDefault":false,"preference":"VISIBLE_UNLOCKED"},{"paramName":"refreshInstanceInfo","paramValue":"false","customParam":false,"required":true,"useDefault":false,"preference":"VISIBLE_UNLOCKED"}],"actionResourceMappings":[{"type":"VIRTUAL_MACHINE","actionResourceFilters":[{"cloudRegionResource":null,"serviceResource":null,"applicationProfileResource":null,"deploymentResource":null,"vmResource":{"type":"DEPLOYMENT_VM","appProfiles":["all"],"cloudRegions":["all"],"cloudAccounts":["all"],"services":["all"],"osTypes":[],"cloudFamilyNames":[],"nodeStates":[],"cloudResourceMappings":[]},"isEditable":true},{"cloudRegionResource":null,"serviceResource":null,"applicationProfileResource":null,"deploymentResource":null,"vmResource":{"type":"IMPORTED_VM","appProfiles":[],"cloudRegions":["all"],"cloudAccounts":["all"],"services":[],"osTypes":["all"],"cloudFamilyNames":[],"nodeStates":[],"cloudResourceMappings":[]},"isEditable":true}]}],"actionResourceMappingAncillaries":[],"actionCustomParamSpecs":[{"paramName":"brokerHost","displayName":"BrokerHost","helpText":"Ip Address or Hostname of Rabbit MQ cluster","type":"string","valueList":null,"defaultValue":"","confirmValue":"","pathSuffixValue":"","userVisible":true,"userEditable":true,"systemParam":false,"exampleValue":null,"dataUnit":null,"optional":false,"deploymentParam":false,"multiselectSupported":false,"useDefault":true,"valueConstraint":{"minValue":0,"maxValue":255,"maxLength":255,"regex":null,"allowSpaces":true,"sizeValue":0,"step":0,"calloutWorkflowName":null},"scope":null,"webserviceListParams":{"url":"","protocol":"","username":"","password":"","requestType":null,"contentType":null,"commandParams":null,"requestBody":null,"resultString":null},"secret":null,"tabularTypeData":null,"collectionList":[],"preference":"VISIBLE_UNLOCKED"},{"paramName":"brokerPort","displayName":"BrokerPort","helpText":"RabbitMQ Port number","type":"string","valueList":null,"defaultValue":"","confirmValue":"","pathSuffixValue":"","userVisible":true,"userEditable":true,"systemParam":false,"exampleValue":null,"dataUnit":null,"optional":false,"deploymentParam":false,"multiselectSupported":false,"useDefault":true,"valueConstraint":{"minValue":0,"maxValue":255,"maxLength":255,"regex":null,"allowSpaces":true,"sizeValue":0,"step":0,"calloutWorkflowName":null},"scope":null,"webserviceListParams":{"url":"","protocol":"","username":"","password":"","requestType":null,"contentType":null,"commandParams":null,"requestBody":null,"resultString":null},"secret":null,"tabularTypeData":null,"collectionList":[],"preference":"VISIBLE_UNLOCKED"}]}]},"repositoriesMappingRequired":false,"actionTypesCounts":[{"key":"EXECUTE_COMMAND","value":"2"}]}
Access workload manager in your OLD cluster and navigate to the Actions Library page. Import the actions.json file that you saved in Step 2 above. You should see two files (AgentReconfig_Linux and AgentReconfig_Win) as
displayed in the following screenshot.
The files are disabled by default (OFF) enable both files by toggling each switch to .ONSave the following script to a file in your local directory and name it . This is the file to use for Linux environments.agentReconfig.sh
The agentReconfig.sh file
#!/bin/bash
#Write to system log as well as to terminallogWrite(){ msg=$1 echo "$(date) ${msg}" logger -t "OSMOSIX" "${msg}" return 0}
logWrite "Starting agent migrate..."
env_file="/usr/local/osmosix/etc/userenv"

6.
7.
if [ -f $env_file ];then logWrite "Source the userenv file..." . $env_filefi
if [ -z $brokerHost ];then logWrite "Broker Host / Rabbit Server Ip not passed as action parameter" exit 3;fi
if [ -z $brokerPort ];then logWrite "Broker Port / Rabbit Server Port not passed as action parameter" exit 4fi
replaceUserdataValue() { key=$1 value=$2
if [ -z $key ] || [ -z $value ]; then logWrite "Command line arguments missing to update user-data file, key: $key, value:$value" return fi
user_data_file="/usr/local/agentlite/etc/user-data" if [ -f $user_data_file ]; then json_content=`cat $user_data_file` old_value=`echo $json_content | awk -F $key '{print $2}' | awk -F \" '{print $3}'` sed -i 's@'"$old_value"'@'"$value"'@g' $user_data_file fi
}
export AGENT_HOME="/usr/local/agentlite"
logWrite "Updating the user data file"replaceUserdataValue "brokerClusterAddresses" "$brokerHost:$brokerPort"
logWrite "Updating config.json file"sed -i '/AmqpAddress/c\ "AmqpAddress": "'"${brokerHost}:${brokerPort}"'",' "$AGENT_HOME/config/config.json"
cd $AGENT_HOMEecho "sleep 10" > execute.shecho "/usr/local/agentlite/bin/agent-stop.sh" >> execute.shecho "/usr/local/agentlite/bin/agent-start.sh" >> execute.shchmod a+x execute.shnohup bash execute.sh > /dev/null 2>&1 &
exit 0
Save the following script to a file in your local directory and name it . This is the file to use for Windows environments.agentReconfig.ps1

7.
8.
The agentReconfig.ps1 file
param ( [string]$brokerHost = "$env:brokerHost", [string]$brokerPort = "$env:brokerPort")
$SERVICE_NAME = "AgentService"$SYSTEM_DRIVE = (Get-WmiObject Win32_OperatingSystem).SystemDrive. "$SYSTEM_DRIVE\temp\userenv.ps1"
if ($brokerHost -eq 0 -or $brokerHost -eq $null -or $brokerHost -eq "") { echo "Variable brokerHost not available in the env file" exit 1}
if ($brokerPort -eq 0 -or $brokerPort -eq $null -or $brokerPort -eq "") { echo "Variable brokerPort not available in the env file" exit 2}
$AGENTGO_PARENT_DIR = "$SYSTEM_DRIVE\opt"
echo "Check if AgentGo Parent directory exists. If not create it: '$AGENTGO_PARENT_DIR'"if (-not (Test-Path $AGENTGO_PARENT_DIR)) { echo "Create $AGENTGO_PARENT_DIR..." mkdir $AGENTGO_PARENT_DIR}else { echo "$AGENTGO_PARENT_DIR already exists."}
$AGENT_CONFIG="{0}\agentlite\config\config.json" -f $AGENTGO_PARENT_DIRif (Test-Path $AGENT_CONFIG) { echo "Changing the config.json file with the new broker host $env:brokerHost and port $env:brokerPort" $confJson = get-content $AGENT_CONFIG | out-string | convertfrom-json $confJson.AmqpAddress = "$($env:brokerHost):$($env:brokerPort)" $confJson | ConvertTo-Json | set-content $AGENT_CONFIG}
$USER_DATA_FILE = "{0}\agentlite\etc\user-data" -f $AGENTGO_PARENT_DIRif (Test-Path $USER_DATA_FILE) { echo "Changing user-data file with new broker host $env:brokerHost and port $env:brokerPort" $userDataJson = get-content $USER_DATA_FILE | out-string | convertfrom-json $userDataJson.brokerClusterAddresses = "$($env:brokerHost):$($env:brokerPort)" $userDataJson | ConvertTo-Json | set-content $USER_DATA_FILE}
$AGENT_SERVICE_NAME = "AgentService"echo "Stop-Service $AGENT_SERVICE_NAME" > $AGENTGO_PARENT_DIR\exec.ps1echo "sleep 10" >> $AGENTGO_PARENT_DIR\exec.ps1echo "Start-Service $AGENT_SERVICE_NAME" >> $AGENTGO_PARENT_DIR\exec.ps1
echo "Restarting agent"Start-Process -filepath "powershell" -argumentlist "-executionpolicy bypass -noninteractive -file `"$AGENTGO_PARENT_DIR\exec.ps1`""
echo "Agent set to restart after config changes"
Add these two files to a folder called (just an example) and compress the folder to create agent agent.zipwith the same structure displayed here.
agent
agentReconfig.ps1

8.
9.
1.2.
3.
4.
agentReconfig.sh
Move the folder to an HTTP repository in your local environment that is accessible from the OLD and NEW clusters.agent.zip
You have now ensured cluster connectivity and saved the required files for the migration procedure.
f. Migrate Deployments from the OLD Cluster to the NEW Cluster
To migrate the deployment details from the old cluster to the new cluster, follow this procedure.
Navigate to the workload manager Actions Libray page and edit the AgentReconfig_Linux action.This procedure continues to use the Linux file going foward. Scroll to the Actions Definition section and update the URL as displayed in the following screenshot.
Scroll to the section and change the default value of the to use the NEW cluster IP.Custom Fields Broker Host
This procedure uses the following URL as an example:
http://10.0.0.3/repo/agent.zip
The URL and Script from Bundle fields in the above screenshot are in accordance with the steps above.

4.
5. 6. 7.
8. 9.
10. 11.
Scroll down to the and change the default to use the NEW Worker AMQP IP port (for example, 26642 in Step 8 above).Broker Port
Click to save your default configuration changes in the OLD cluster.DoneNavigate to the page and locate the VM to migrate to the new cluster.Virual MachinesClick the dropdown and verify if your newly modified actions are visible under the Custom Actions section in the dropdown list as visible Actionsin the following screenshot.
Click one of the actions and verify that the configured defaults are displayed in the Broker host and Broker port fields as indicated earlier.Click to migrate this VM to the new cluser.SubmitVerify that the migration is complete by going to the Deployment page in your NEW cluster and the VM is listed as RUNNING (green line).Repeat Steps 6 through 10 for each VM that needs to be migrated to the NEW cluster.
You have now migrated the deployment details from the old cluster to the new cluster
Back to: Public Cloud

1. 2.
Private CloudPrivate Cloud behind Firewalls
OverviewMinio Server SetupBackup and Restore ProcessAction Orchestrator-Specific Post-Restore Procedure%wm-Specific Post-Restore ProcedureCloud Remote Considerations
a. Understand the workload manager Restore Contextb. Retrieve the Port Numbers from the NEW Restored Clusterc. Retrieve the IP Address of the NEW Restored Clusterd. Change the IP Address and Port Numbers for the NEW Restored Clustere. Perform the Pre-Migrate Activitiesf. Migrate Deployments from the OLD Cluster to the NEW Cluster
Overview
You may sometimes need to work in an environment that is completely behind the firewall. This section addresses the backup and restore procedures for those environments.
See for restrictions and limitations.Backup Approach
Minio Server Setup
You need to set up a Minio server to configure a S3-compatible backup storage location.Refer to to setup the Minio server.https://min.io/download#/macos
Once the Minio server is setup, .use YOUR Minio server credentials to login to your Minio server
Minio server URLMinio server usernameMinio server password
To set up a Minio server, use one of the following options:
Run using Docker:
docker run -p 9000:9000 -v /mnt/data:/data minio/minio server /data
Run using Linux binary on any machine:
wget https://dl.min.io/server/minio/release/linux-amd64/miniochmod +x minioexport MINIO_ACCESS_KEY=minioexport MINIO_SECRET_KEY=minio123./minio server /mnt/data
Run using Windows binary:
minio.exe server F:\Data
Backup and Restore Process
To backup and restore the CloudCenter Suite data in an air gap environment, follow this procedure.
Create a bucket on the Minio server and provide a meaningful name.This example, uses for details.. See velero Backup ApproachBefore installing Velero, annotate all the pods in your cluster by using Velero-specific annotations that are provided in the script below.
The script provided as part of this process uses publicly available and tools to Velero1.5.3(see https://velero.io/docs/v1.5/for details) Miniocomplete the manual backup and restore process in isolated environments.

2.
kubectl -n YOUR_POD_NAMESPACE annotate pod/YOUR_POD_NAME backup.velero.io/backup-volumes=YOUR_VOLUME_NAME_1,YOUR_VOLUME_NAME_2,...
To make the process simpler, here is a utility that does it for you. Be sure to save the following script contents to a file called pod_vol_restic_sca to your local system.n.py
# This utility is used to annotate pods for Velero backupsimport randomimport loggingimport stringimport osimport timeimport datetimefrom argparse import ArgumentParserimport sysimport zipfileimport shutilimport subprocessimport refrom pprint import pprint as ppimport yaml__copyright__ = "Copyright Cisco Systems"__license__ = "Cisco Systems"
def script_run_time(seconds): min, sec = divmod(seconds, 60) hrs, min = divmod(min, 60) timedatastring = "%d:%02d:%02d" % (hrs, min, sec) return timedatastring
def random_char(y): return ''.join(random.choice(string.ascii_letters) for x in range(y))
def border_print(symbol, msg): line = " " + msg + " " totalLength = len(line) + 50 logger.info("") logger.info(symbol * totalLength) logger.info(line.center(totalLength, symbol)) logger.info(symbol * totalLength) logger.info("")
def setup_custom_logger(name, tcStartTime, fileBaseName, inputName=""): if inputName == "" or inputName == None: st = datetime.datetime.fromtimestamp( tcStartTime).strftime('%Y-%m-%d-%H-%M-%S') filename = fileBaseName + "-" + st + '.log' dirName = "po-scan" + st dirPath = os.path.abspath(os.path.join( os.path.dirname(__file__), '.', dirName)) logfilename = os.path.join(dirPath, filename) if not os.path.isdir(dirPath): os.makedirs(dirPath) else: logfilename = inputName
# print(logfilename) formatter = logging.Formatter( fmt='%(asctime)s %(levelname)-8s %(message)s', datefmt='%Y-%m-%d %H:%M:%S')
handler = logging.FileHandler(logfilename, mode='w') handler.setFormatter(formatter)

2.
screen_handler = logging.StreamHandler(stream=sys.stdout) screen_handler.setFormatter(formatter) logger = logging.getLogger(name) logger.setLevel(logging.DEBUG) logger.addHandler(handler) logger.addHandler(screen_handler) return logger, logfilename
def shell_cmd(cmd): logger.info("Shell cmd execution >>> '{}'".format(cmd)) p = subprocess.Popen( cmd, shell=True, stdout=subprocess.PIPE, universal_newlines=True) output = p.communicate()[0] p_status = p.wait() return output.split("\n")
def zipdir(path, ziph): # ziph is zipfile handle for root, dirs, files in os.walk(path): for file in files: # print(file) ziph.write(os.path.join(root, file))
def create_zip(): st = datetime.datetime.fromtimestamp( tcStartTime).strftime('%Y-%m-%d-%H-%M-%S') dirName = "ccs-log" + st zipFileName = dirName + ".zip" zipFilePath = os.path.abspath(os.path.join(os.path.dirname(__file__))) logger.info( "Generating zip file '{}' at '{}'".format(zipFileName, zipFilePath)) zipf = zipfile.ZipFile(zipFileName, 'w', zipfile.ZIP_DEFLATED) zipdir(dirName, zipf) zipf.close() shutil.rmtree(dirName)
if __name__ == "__main__": fileBaseName = os.path.basename(__file__).split(".")[0] tcStartTime = time.time() timeStamp = datetime.datetime.fromtimestamp( tcStartTime).strftime('%Y%m%d%H%M%S') parser = ArgumentParser() parser.add_argument( "-n", "--namespace", dest="namespace", help="Kubernetes Namespace", required=True) args = parser.parse_args() namespace = args.namespace.strip() logger, logFileName = setup_custom_logger( "Cloudcenter K8 Debug", tcStartTime, fileBaseName) cmd = "kubectl get pod -n " + namespace + \ " | grep -v NAME | awk '{print $1}'" pod_name_list = shell_cmd(cmd) pod_pvc_dict = {} pod_vol_dict = {}
for pod in pod_name_list: if pod != "": cmd = "kubectl get pod {} -n {} -o yaml > temp.yaml".format(pod, namespace) data = shell_cmd(cmd) temp_file = open("temp.yaml", "r") with open('temp.yaml', 'r') as temp_file: try: file_contents = (yaml.load(temp_file)) #print("Pod Name = {}".format(pod.strip()))

2.
3.
4.
5.
6.
7.
a.
for vol in file_contents['spec']['volumes']:# pp(vol)try:
pvc = vol['persistentVolumeClaim']pod_vol_dict[pod.strip()] = vol['name'].strip()#print("Vol Name = {}".format(vol['name']))
except:pass
except yaml.YAMLError as exc:logger.error("Error in reading YAML file.")logger.error(exc)
os.remove('temp.yaml')
# pp(pod_vol_dict) border_print("+", "Applying POD annotations") for pod in pod_vol_dict.keys():
if ('elasticsearch-data' in pod) or ('elasticsearch-master' in pod) :cmd = "kubectl -n {} annotate pod {} backup.velero.io/backup-volumes-".format(namespace,pod)data = shell_cmd(cmd)cmd = "kubectl -n {} annotate --overwrite pod {} backup.velero.io/backup-volumes-excludes=
{}".format(namespace,pod,pod_vol_dict[pod])data = shell_cmd(cmd)
else:cmd = "kubectl -n {} annotate --overwrite pod {} backup.velero.io/backup-volumes={}".format
(namespace,pod,pod_vol_dict[pod])data = shell_cmd(cmd)
From where you have saved the pod_vol_restic_scan.py script, run the following command be sure to run thisscript each time you need a backup!
#Needs Python3python pod_vol_restic_scan.py -n cisco
Install Velero Version 1.5.3 refer to for details.https://velero.io/docs/v1.5/
Create a credential file to store your credentials. This example, uses the following URL and credentials this is only an example!
Contents of the credentials-minio file
[default]aws_access_key_id = <your Minio username>aws_secret_access_key = <your Minio password>
On the CloudCenter Suite cluster, you must deploy Velero and configure it with the AWS compatible bucket location, in this example, Minio.
Install Velero manually on the CloudCenter Suite cluster before taking a backup of the CloudCenter Suite cluster (assuming kubeclt is using kubeconfig of source/backup CloudCenter Suite cluster).
This is the version used for the client-side CLI commands. You can download from here -https://github.com/vmware-tanzu/velero/releases/tag/v1.5.3
Velero and Minio Usage
This process uses Velero to backup the Kubernetes data to a Minio server.
Once you finish this task you can configure the AWS S3 storage provider using the Minio server credentials as specified below. Configuring Minio is similar to configuring an AWS S3 environment, the difference is that you must provide the region and endpoint details when adding the Minio server as AWS S3 storage. You can verify the data from Minio server GUI or command line. The following steps are an example to verify the data from the Minio command line.
Refer to for additional detailshttps://docs.min.io/docs/aws-cli-with-minio.html .

7.
a.
b.
8.
a. b.
9.
10. a.
i.
Isolated, air gap, environments, that do not have internet accessand back up to a local system: Velero images will be pulled from the offline repository.
velero install \ --provider aws \ --bucket velero \ --secret-file ./credentials-minio \ --plugins <offline_repo_url>:8443/velero/velero-plugin-for-aws:v1.1.0 \ --image <offline_repo_url>:8443/velero/velero:v1.5.3 \ --use-volume-snapshots=false \ --backup-location-config region=minio,s3ForcePathStyle="true",s3Url=http://<minio server url>:9000 \ --use-restic \ --wait
Have internet connectivity and want to back up to a local system: Velero images will be pulled from the online repo.
velero install \--provider aws \--bucket velero \--secret-file ./credentials-minio \--plugins velero/velero-plugin-for-aws:v1.1.0 \--use-volume-snapshots=false \--backup-location-config region=minio,s3ForcePathStyle="true",s3Url=http://<minio server
url>:9000 \--use-restic \--wait
Start a backup using the following command.
velero backup create <Minio backup name> --include-namespaces=cisco --wait
Take a backup on source CCS cluster:
Execute pod_vol_restic_scan.py to annotate all the pods in your cluster .be sure to run thisscript each time you need a backup!Start a backup using the following command:
velero backup create <Minio backup name> --include-namespaces=cisco --wait
Wait for the backup to complete and watch the logs. Once the backup is complete, the Minio output should look like the information displayed in the following screenshot.
Run the Restore Procedure to restore the backup to a different cluster or a fresh cluster. Install Velero manually on the CloudCenter Suite cluster before restoring the backup on the CloudCenter Suite cluster (assuming kubeclt is using kubeconfig of de stination/restore CloudCenter Suite cluster).
Isolated, air gap, environments, that do not have internet accessand back up to a local system: Velero images will be pulled from the offline repository.

a.
i.
ii.
b.
c.
d.
velero install \ --provider aws \ --bucket velero \ --secret-file ./credentials-minio \ --plugins <offline_repo_url>:8443/velero/velero-plugin-for-aws:v1.1.0 \ --image <offline_repo_url>:8443/velero/velero:v1.5.3 \ --use-volume-snapshots=false \ --backup-location-config region=minio,s3ForcePathStyle="true",s3Url=http://<minio server url>:9000 \ --use-restic \ --wait
Have internet connectivity and want to restore from the local system: Velero images will be pulled from the online repo.
velero install \--provider aws \--bucket velero \--secret-file ./credentials-minio \--plugins velero/velero-plugin-for-aws:v1.1.0 \--use-volume-snapshots=false \--backup-location-config region=minio,s3ForcePathStyle="true",s3Url=http://<minio
server url>:9000 \--use-restic \--wait
Once the Velero pods are up and running, create the configmap described below to configure the restic to use offline repo for fetching .restore-helper image
## ConfigmapapiVersion: v1kind: ConfigMapmetadata: name: restic-restore-action-config namespace: velero labels: velero.io/plugin-config: "" velero.io/restic: RestoreItemActiondata: image: <offline_repo_url>:8443/velero/velero-restic-restore-helper:v1.5.3
$ kubectl apply -f /path/to/configmap -n velero
Create a backup of the Kubernetes config maps of the following services by executing the script provided on CloudCenter Suite cluster where you are going to perform restore.
The suite-k8 serviceThe suite-prod service
Run the command to execute the backup_configmap.sh script
#Execute the script as sudo user$ sudo /path/to/script/backup_configmap.sh
The backup_configmap.sh script
This step (kubectl create config map) is not applicable if the CloudCenter Suite cluster is online.

d.
e.
f.
backup_configmap.sh
#!/bin/bash #Scripts to backup ssh keys, proxy settings, k8s and prod-mgmt configmaps on the target clustermkdir -p $HOME/backup/configmapmkdir -p $HOME/backup/servicemkdir -p $HOME/backup/sshkeysmkdir -p $HOME/backup/proxy kubectl get svc -n cisco common-framework-nginx-ingress-controller -o json > $HOME/backup/service/ingress.json for cm in $(kubectl get configmaps -n cisco -o custom-columns=:metadata.name --no-headers=true | grep "k8s-mgmt") do kubectl get configmap $cm -n cisco -o yaml > $HOME/backup/configmap/$cm done for cm in $(kubectl get configmaps -n cisco -o custom-columns=:metadata.name --no-headers=true | grep "prod-mgmt") do kubectl get configmap $cm -n cisco -o yaml > $HOME/backup/configmap/$cm done kubectl get configmap suite.key -n cisco -o yaml > $HOME/backup/sshkeys/suite.keykubectl get configmap suite.pub -n cisco -o yaml > $HOME/backup/sshkeys/suite.pub kubectl get configmap proxy.settings -n cisco -o yaml > $HOME/backup/proxy/proxy.settings kubectl set env deployment/common-framework-suite-prod-mgmt --list -n cisco | grep "CLOUD_TYPE" >> $HOME/backup/proxy/proxy_variableskubectl set env deployment/common-framework-suite-prod-mgmt --list -n cisco | grep "HTTP_PROXY" >> $HOME/backup/proxy/proxy_variableskubectl set env deployment/common-framework-suite-prod-mgmt --list -n cisco | grep "HTTPS_PROXY" >> $HOME/backup/proxy/proxy_variableskubectl set env deployment/common-framework-suite-prod-mgmt --list -n cisco | grep "NO_PROXY" >> $HOME/backup/proxy/proxy_variables echo 'Successful!'
Start the restore process :after ensuring that the cisco namespace does not exist
kubectl delete ns ciscovelero restore create --from-backup <Minio backup name>
The Minio output should look like the information displayed in the following screenshot you will see an additional restore folder as displayed in the following screenshot

f.
g. At this stage, you must restore the config maps for the following Suite Admin services:
The suite-k8 serviceThe suite-prod service
#Execute the script as sudo user$ sudo /path/to/script/post-restore.sh
Without Internet Access - The post-restore.sh script
#!/bin/bashkubectl delete svc -n cisco common-framework-nginx-ingress-controllercat $HOME/backup/service/ingress.json | kubectl create -f -
for cm in $(ls $HOME/backup/configmap) do
kubectl delete configmap $cm -n cisco done
for cm in $(ls $HOME/backup/configmap) do
cat $HOME/backup/configmap/$cm | kubectl create -f - done
kubectl delete configmap suite.key -n cisco kubectl delete configmap suite.pub -n ciscokubectl delete configmap proxy.settings -n cisco cat $HOME/backup/sshkeys/suite.key | kubectl create -f -cat $HOME/backup/sshkeys/suite.pub | kubectl create -f -cat $HOME/backup/proxy/proxy.settings | kubectl create -f -
while IFS= read -r line; do kubectl set env deployment/common-framework-suite-prod-mgmt $line -n cisco; done < $HOME/backup/proxy/proxy_variables
rm -r $HOME/backup/configmap
echo 'Successfull!'

g.
1.
2.
3.
4.
5.
6.
7.
8.
You have now restored the Suite Admin data to the new cluster. You can now follow the post-restore procedure specific to workload manager or/and the post-restore procedure specific to Action Orchestrator,as provided in the next section.
Action Orchestrator-Specific Post-Restore Procedure
This section identifies the ArangoDB Backup/Restore Process that is specific to the Action Orchestrator module. If this section is not relevant to your environment, you can skip this section.
Ensure the client machine has the ArangoDB client installed. Only the download/install is required. Choose the download appropriate for clientyour operating system: https://www.arangodb.com/download-major/After installation, ensure that the tools can be executed:
$ arangodump --version$ arangorestore --version
Obtain the root password from the secret.ArangoDB
$ kubectl get secrets -n cisco action-orchestrator-pers-arangodb-root-password -o jsonpath={.data.password} | base64 --decode
#Output:
75e39e601efc0d74d191b53c0a47bca25640acad861b88ff6ae940f172e2c15a
In a separate terminal window, start a port-forward process to access the arango service from your client.
$ kubectl port-forward -n cisco svc/action-orchestrator-pers-arangodb 8529#Output:
Forwarding from 127.0.0.1:8529 -> 8529Forwarding from [::1]:8529 -> 8529Handling connection for 8529
Setup environment variables for arangodump/arangorestore commands:
export ARANGO_ENDPOINT=http+ssl://localhost:8529export ARANGO_PWD=75e39e601efc0d74d191b53c0a47bca25640acad861b88ff6ae940f172e2c15a
Perform the backup:
$ arangodump --server.endpoint=$ARANGO_ENDPOINT --server.username=root \--server.password=$ARANGO_PWD --server.authentication=true \--all-databases true --threads 8 \--output-directory $(date "+%Y-%m-%d_%H%M%S")
Perform the restore.
Ensure the DUMP_FOLDER is replaced with the actual path of the dump.
$ arangorestore --server.endpoint=$ARANGO_ENDPOINT --server.username root \--server.password=$ARANGO_PWD --all-databases true --create-database true \--replication-factor 3 --threads 4 --overwrite true \--input-directory {DUMP_FOLDER}
7. Log in to arangodb console to verify the cluster is working properly.
If the restore is being performed on a separateenvironment from the backup, ensure that Step 4 has been done in the new clientsession, and that the variables are appropriate for the new cluster.

1.
2.
3.
1.
2.
3.
1.
2.
3.
1.
2.
3.
workload manager-Specific Post-Restore Procedure
Cloud Remote Considerations
Scenario Cloud Remote Configured
Settings Notes
1 No No additional settings Proceed with the steps provided below, other than the note that only applies to Scenario 3.
You must repeat this procedure for each region.
2 YesCloud endpoint accessible from CloudCenter Suite = NoCloudCenter Suite AMQP reachable from worker VMs = NoCloudCenter Suite AMQP accessible from cloud = No
You do not need to perform any additional configurations and can skip this section.
3Cloud endpoint accessible from CloudCenter Suite = NoCloudCenter Suite AMQP reachable from worker VMs = NoCloudCenter Suite AMQP accessible from cloud = Yes
Proceed with the steps provided below, INCLUDING the note that is specific to this scenario.
You must repeat this procedure for each region.
4Cloud endpoint accessible from CloudCenter Suite = YesCloudCenter Suite AMQP reachable from worker VMs = NoCloudCenter Suite AMQP accessible from cloud = No
You do not need to perform any additional configurations and can skip this section (similar to Scenario 2 above).
5Cloud endpoint accessible from CloudCenter Suite = YesCloudCenter Suite AMQP reachable from worker VMs = NoCloudCenter Suite AMQP accessible from cloud = Yes
Proceed with the steps provided below, INCLUDING the note that is specific to this scenario (similar to Scenario 3 above).
You must repeat this procedure for each region.
a. Understand the workload manager Restore Context
If you have installed the workload manager module, you must perform this procedure to update the DNS/IP address for the private cloud resources listed below and displayed in the following image:
The Worker AMQP IPThe Guacamole Public IP and Port
This migration procedure only applies to deployments.Running
Be sure to verify that you are only migrating deployment in the state.Running
The first few steps differ based on your use of private clouds or public clouds. Be sure to use the procedure applicable to your cloud environment.
To ensure that the source (old) cluster does not connect to Cloud Remote, click Edit in the Regions page and change the settings to for all settings.Connectivity Yes three
If you have multiple deployments that use both Scenario 1 and 3, you perform mustthese additional steps for deployments that use both Scenarios 1 and 3.
You must repeat this procedure for each region.

1.
a.
b.
c.
The Guacamole IP Address and Port for Application VMs
b. Retrieve the Port Numbers from the NEW Restored Cluster
The Kubernetes cluster contains the information that is required to update the workload manager UI. This section provides the commands required to retrieve this information.
To retrieve the port numbers from the new cluster for private clouds, follow this procedure.
The port numbers for each component will differ.
Run the following command on the new cluster (login to the KubeConfig of the new cluster) to locate the new port numbers for the Worke.r AMQP IP
kubectl get service -n cisco | grep rabbitmq-ext | awk '{print $5}'
# In the resulting response, locate the port corresponding to Port 443 and use that port number!
443:26642/TCP,15672:8902/TCP
Run the following command on the new cluster to retrieve the port number for the . Guacamole Public IP and Port
kubectl get service -n cisco | grep cloudcenter-guacamole | awk '{print $5}'
# In the resulting response, locate the port corresponding to Port 443 and use that port number for the Guacamole port!
8080:2376/TCP,7788:25226/TCP,7789:32941/TCP,443:708/TCP
Run the following command on the new cluster to retrieve the port number for the Guacamole IP Address and Port for Application .VMs
kubectl get service -n cisco | grep cloudcenter-guacamole | awk '{print $5}'
# In the resulting response, locate the port corresponding to Port 7789 and use that port number for the Guacamole port!
8080:2376/TCP,7788:25226/TCP,7789:32941/TCP,443:708/TCP
c. Retrieve the IP Address of the NEW Restored Cluster
Use the IP address of one of the primary servers of the NEW restored Kubernetes cluster for all the resources where the IP address needs to be replaced.
d. Change the IP Address and Port Numbers for the NEW Restored Cluster
As public clouds use load balancers and static IP ports, these resource details may differ accordingly. Be sure to use the resources applicable to your cloud environment.
As public clouds use load balancers and static IP ports, these resource details may differ accordingly. Be sure to use the resources applicable to your cloud environment.
As public clouds use load balancers and static IP ports, these resource details may differ accordingly. Be sure to use the resources applicable to your cloud environment.

1.2.
3. 4.
5.
6.
The IP addresses and port numbers are not updated automatically in the workload manager UI and you must explicitly update them using this procedure.
To configure the IP address and port number in the new cluster, follow this procedure.
Access the workload manager module. Navigate to Clouds > Configure Cloud > Region Connectivity.
Click in the Region Connectivity settings.Edit ConnectivityIn the Configure Region popup, change the 3 fields mentioned above to ensure that the IP and port details are updated to the NEW restored VM.
Click to save your changes.OK
As public clouds use load balancers and static IP ports, these resource details may differ accordingly. Be sure to use the resources applicable to your cloud environment.
DO NOT MAKE ANY OTHER CONFIGURATION CHANGES!
Saving your changes may not automatically update the information in the Region Connectivity settings. Be sure to refresh the page to see the saved information.

6.
1.
2.
You have now updated the DNS/IP/Port for the restored WM for this particular cloud. If you have configured other clouds in this environment, be sure to repeat this procedure for each cloud. Once you complete this procedure for all configured clouds, you can resume new deployment activities using the workload manager.
Only for Scenario 3
e. Perform the Pre-Migrate Activities
Before you migrate the deployment details you need to ensure that you can connect to both clusters and have the required files to perform the migration.
To perform the pre-migrate activities, follow this procedure.
Verify that the OLD cluster VMs can reach the NEW cluster. The remaining steps in this procedure are dependent on this connectivity in your environment.Save the contents of the following file using the same name and file extension to your local directory with a file type JSON format.actions.json
The actions.json file
{"repositories":[],"actions":{"resource":null,"size":2,"pageNumber":0,"totalElements":2,"totalPages":1,"actionJaxbs":[{"id":"57","resource":null,"name":"AgentReConfig_Linux","description":"","actionType":"EXECUTE_COMMAND","category":"ON_DEMAND","lastUpdatedTime":"2019-09-19 22:14:54.245","timeOut":1200,"enabled":true,"encrypted":false,"explicitShare":false,"showExplicitShareFeature":false,"deleted":false,"systemDefined":false,"bulkOperationSupported":true,"isAvailableToUser":true,"currentlyExecuting":false,"owner":1,"actionParameters":[{"paramName":"downloadFromBundle","paramValue":"true","customParam":false,"required":true,"useDefault":false,"preference":"VISIBLE_UNLOCKED"},{"paramName":"bundlePath","paramValue":"http://10.0.0.3/5.1-release/ccs-bundle-artifacts-5.1.0-20190819/agent.zip","customParam":false,"required":true,"useDefault":false,"preference":"VISIBLE_UNLOCKED"},{"paramName":"script","paramValue":"agent/agentReconfig.sh","customParam":false,"required":true,"useDefault":false,"preference":"VISIBLE_UNLOCKED"},{"paramName":"executeOnContainer","paramValue":"false","customParam":false,"required":true,"useDefault":false,"preference":"VISIBLE_UNLOCKED"},{"paramName":"rebootInstance","paramValue":"false","customParam":false,"required":true,"useDefault":false,"preference":"VISIBLE_UNLOCKED"},{"paramName":"refreshInstanceInfo","paramValue":"false","customParam":false,"required":true,"useDefault":false,"preference":"VISIBLE_UNLOCKED"}],"actionResourceMappings":[{"type":"VIRTUAL_MACHINE","actionResourceFilters":[{"cloudRegionResource":null,"serviceResource":null,"applicationProfileResource":null,"deploymentResource":null,"vmResource":{"type":"DEPLOYMENT_VM","appProfiles":["all"],"cloudRegions":["all"],"cloudAccounts":["all"],"services":["all"],"osTypes":[],"cloudFamilyNames":[],"nodeStates":[],"cloudResourceMappings":[]},"isEditable":true},{"cloudRegionResource":null,"serviceResource":null,"applicationProfileResource":null,"deploymentResource":null,"vmResource":{"type":"IMPORTED_VM","appProfiles":[],"cloudRegions":["all"],"cloudAccounts":["all"],"services":[],"osTypes":["all"],"cloudFamilyNames":[],"nodeStates":[],"cloudResourceMappings":[]},"isEditable":true}]}],"actionResourceMappingAncillaries":[],"actionCustomParamSpecs":[{"paramName":"brokerHost","displayName":"BrokerHost","helpText":"Ip Address or Hostname of Rabbit MQ cluster","type":"string","valueList":null,"defaultValue":"","confirmValue":"","pathSuffixValue":"","userVisible":true,"userEditable":true,"systemParam":false,"exampleValue":null,"dataUnit":null,"optional":false,"deploymentParam":false,"multiselectSupported":false,"useDefault":true,"valueConstraint":{"minValue":0,"maxValue":255,"maxLength":255,"regex":null,"allowSpaces":true,"sizeValue":0,"step":0,"calloutWorkflowName":null},"scope":null,"webserviceListParams":{"url":"","protocol":"","username":"","password":"","requestType":null,"contentType":null,"commandParams":null,"requestBody":null,"resultString":null},"secret":null,"tabularTypeData":null,"collectionList":[],"preference":"VISIBLE_UNLOCKED"},{"paramName":"brokerPort","displayName":"BrokerPort","helpText":"
1.
2. 3. 4.
Only required for Scenario 3 in the Workload Manager table above
With Cloud Remoteconfigured in your old cluster, you must also reconfigure Cloud Remote to communicate with the new cluster by following this procedure.
Click in the Region Connectivity section as displayed in the following screen shot.Download Configuration
Click .Copy Encryption KeyAccess the Cloud Remote UI.Apply the downloaded configuration on the Cloud Remote.

2.
3.4.
5. 6.
RabbitMQ Port number","type":"string","valueList":null,"defaultValue":"","confirmValue":"","pathSuffixValue":"","userVisible":true,"userEditable":true,"systemParam":false,"exampleValue":null,"dataUnit":null,"optional":false,"deploymentParam":false,"multiselectSupported":false,"useDefault":true,"valueConstraint":{"minValue":0,"maxValue":255,"maxLength":255,"regex":null,"allowSpaces":true,"sizeValue":0,"step":0,"calloutWorkflowName":null},"scope":null,"webserviceListParams":{"url":"","protocol":"","username":"","password":"","requestType":null,"contentType":null,"commandParams":null,"requestBody":null,"resultString":null},"secret":null,"tabularTypeData":null,"collectionList":[],"preference":"VISIBLE_UNLOCKED"}]},{"id":"58","resource":null,"name":"AgentReConfig_Win","description":"","actionType":"EXECUTE_COMMAND","category":"ON_DEMAND","lastUpdatedTime":"2019-09-19 22:15:02.311","timeOut":1200,"enabled":true,"encrypted":false,"explicitShare":false,"showExplicitShareFeature":false,"deleted":false,"systemDefined":false,"bulkOperationSupported":true,"isAvailableToUser":true,"currentlyExecuting":false,"owner":1,"actionParameters":[{"paramName":"downloadFromBundle","paramValue":"true","customParam":false,"required":true,"useDefault":false,"preference":"VISIBLE_UNLOCKED"},{"paramName":"bundlePath","paramValue":"http://10.0.0.3/5.1-release/ccs-bundle-artifacts-5.1.0-20190819/agent.zip","customParam":false,"required":true,"useDefault":false,"preference":"VISIBLE_UNLOCKED"},{"paramName":"script","paramValue":"agent\\agentReconfig.ps1","customParam":false,"required":true,"useDefault":false,"preference":"VISIBLE_UNLOCKED"},{"paramName":"executeOnContainer","paramValue":"false","customParam":false,"required":true,"useDefault":false,"preference":"VISIBLE_UNLOCKED"},{"paramName":"rebootInstance","paramValue":"false","customParam":false,"required":true,"useDefault":false,"preference":"VISIBLE_UNLOCKED"},{"paramName":"refreshInstanceInfo","paramValue":"false","customParam":false,"required":true,"useDefault":false,"preference":"VISIBLE_UNLOCKED"}],"actionResourceMappings":[{"type":"VIRTUAL_MACHINE","actionResourceFilters":[{"cloudRegionResource":null,"serviceResource":null,"applicationProfileResource":null,"deploymentResource":null,"vmResource":{"type":"DEPLOYMENT_VM","appProfiles":["all"],"cloudRegions":["all"],"cloudAccounts":["all"],"services":["all"],"osTypes":[],"cloudFamilyNames":[],"nodeStates":[],"cloudResourceMappings":[]},"isEditable":true},{"cloudRegionResource":null,"serviceResource":null,"applicationProfileResource":null,"deploymentResource":null,"vmResource":{"type":"IMPORTED_VM","appProfiles":[],"cloudRegions":["all"],"cloudAccounts":["all"],"services":[],"osTypes":["all"],"cloudFamilyNames":[],"nodeStates":[],"cloudResourceMappings":[]},"isEditable":true}]}],"actionResourceMappingAncillaries":[],"actionCustomParamSpecs":[{"paramName":"brokerHost","displayName":"BrokerHost","helpText":"Ip Address or Hostname of Rabbit MQ cluster","type":"string","valueList":null,"defaultValue":"","confirmValue":"","pathSuffixValue":"","userVisible":true,"userEditable":true,"systemParam":false,"exampleValue":null,"dataUnit":null,"optional":false,"deploymentParam":false,"multiselectSupported":false,"useDefault":true,"valueConstraint":{"minValue":0,"maxValue":255,"maxLength":255,"regex":null,"allowSpaces":true,"sizeValue":0,"step":0,"calloutWorkflowName":null},"scope":null,"webserviceListParams":{"url":"","protocol":"","username":"","password":"","requestType":null,"contentType":null,"commandParams":null,"requestBody":null,"resultString":null},"secret":null,"tabularTypeData":null,"collectionList":[],"preference":"VISIBLE_UNLOCKED"},{"paramName":"brokerPort","displayName":"BrokerPort","helpText":"RabbitMQ Port number","type":"string","valueList":null,"defaultValue":"","confirmValue":"","pathSuffixValue":"","userVisible":true,"userEditable":true,"systemParam":false,"exampleValue":null,"dataUnit":null,"optional":false,"deploymentParam":false,"multiselectSupported":false,"useDefault":true,"valueConstraint":{"minValue":0,"maxValue":255,"maxLength":255,"regex":null,"allowSpaces":true,"sizeValue":0,"step":0,"calloutWorkflowName":null},"scope":null,"webserviceListParams":{"url":"","protocol":"","username":"","password":"","requestType":null,"contentType":null,"commandParams":null,"requestBody":null,"resultString":null},"secret":null,"tabularTypeData":null,"collectionList":[],"preference":"VISIBLE_UNLOCKED"}]}]},"repositoriesMappingRequired":false,"actionTypesCounts":[{"key":"EXECUTE_COMMAND","value":"2"}]}
Access workload manager in your OLD cluster and navigate to the Actions Library page. Import the actions.json file that you saved in Step 2 above. You should see two files (AgentReconfig_Linux and AgentReconfig_Win) as
displayed in the following screenshot.
The files are disabled by default (OFF) enable both files by toggling each switch to .ONSave the following script to a file in your local directory and name it . This is the file to use for Linux environments.agentReconfig.sh
The agentReconfig.sh file
#!/bin/bash
#Write to system log as well as to terminallogWrite(){ msg=$1 echo "$(date) ${msg}" logger -t "OSMOSIX" "${msg}" return 0

6.
7.
}
logWrite "Starting agent migrate..."
env_file="/usr/local/osmosix/etc/userenv"if [ -f $env_file ];then logWrite "Source the userenv file..." . $env_filefi
if [ -z $brokerHost ];then logWrite "Broker Host / Rabbit Server Ip not passed as action parameter" exit 3;fi
if [ -z $brokerPort ];then logWrite "Broker Port / Rabbit Server Port not passed as action parameter" exit 4fi
replaceUserdataValue() { key=$1 value=$2
if [ -z $key ] || [ -z $value ]; then logWrite "Command line arguments missing to update user-data file, key: $key, value:$value" return fi
user_data_file="/usr/local/agentlite/etc/user-data" if [ -f $user_data_file ]; then json_content=`cat $user_data_file` old_value=`echo $json_content | awk -F $key '{print $2}' | awk -F \" '{print $3}'` sed -i 's@'"$old_value"'@'"$value"'@g' $user_data_file fi
}
export AGENT_HOME="/usr/local/agentlite"
logWrite "Updating the user data file"replaceUserdataValue "brokerClusterAddresses" "$brokerHost:$brokerPort"
logWrite "Updating config.json file"sed -i '/AmqpAddress/c\ "AmqpAddress": "'"${brokerHost}:${brokerPort}"'",' "$AGENT_HOME/config/config.json"
cd $AGENT_HOMEecho "sleep 10" > execute.shecho "/usr/local/agentlite/bin/agent-stop.sh" >> execute.shecho "/usr/local/agentlite/bin/agent-start.sh" >> execute.shchmod a+x execute.shnohup bash execute.sh > /dev/null 2>&1 &
exit 0
Save the following script to a file in your local directory and name it . This is the file to use for Windows environments.agentReconfig.ps1

7.
8.
The agentReconfig.ps1 file
param ( [string]$brokerHost = "$env:brokerHost", [string]$brokerPort = "$env:brokerPort")
$SERVICE_NAME = "AgentService"$SYSTEM_DRIVE = (Get-WmiObject Win32_OperatingSystem).SystemDrive. "$SYSTEM_DRIVE\temp\userenv.ps1"
if ($brokerHost -eq 0 -or $brokerHost -eq $null -or $brokerHost -eq "") { echo "Variable brokerHost not available in the env file" exit 1}
if ($brokerPort -eq 0 -or $brokerPort -eq $null -or $brokerPort -eq "") { echo "Variable brokerPort not available in the env file" exit 2}
$AGENTGO_PARENT_DIR = "$SYSTEM_DRIVE\opt"
echo "Check if AgentGo Parent directory exists. If not create it: '$AGENTGO_PARENT_DIR'"if (-not (Test-Path $AGENTGO_PARENT_DIR)) { echo "Create $AGENTGO_PARENT_DIR..." mkdir $AGENTGO_PARENT_DIR}else { echo "$AGENTGO_PARENT_DIR already exists."}
$AGENT_CONFIG="{0}\agentlite\config\config.json" -f $AGENTGO_PARENT_DIRif (Test-Path $AGENT_CONFIG) { echo "Changing the config.json file with the new broker host $env:brokerHost and port $env:brokerPort" $confJson = get-content $AGENT_CONFIG | out-string | convertfrom-json $confJson.AmqpAddress = "$($env:brokerHost):$($env:brokerPort)" $confJson | ConvertTo-Json | set-content $AGENT_CONFIG}
$USER_DATA_FILE = "{0}\agentlite\etc\user-data" -f $AGENTGO_PARENT_DIRif (Test-Path $USER_DATA_FILE) { echo "Changing user-data file with new broker host $env:brokerHost and port $env:brokerPort" $userDataJson = get-content $USER_DATA_FILE | out-string | convertfrom-json $userDataJson.brokerClusterAddresses = "$($env:brokerHost):$($env:brokerPort)" $userDataJson | ConvertTo-Json | set-content $USER_DATA_FILE}
$AGENT_SERVICE_NAME = "AgentService"echo "Stop-Service $AGENT_SERVICE_NAME" > $AGENTGO_PARENT_DIR\exec.ps1echo "sleep 10" >> $AGENTGO_PARENT_DIR\exec.ps1echo "Start-Service $AGENT_SERVICE_NAME" >> $AGENTGO_PARENT_DIR\exec.ps1
echo "Restarting agent"Start-Process -filepath "powershell" -argumentlist "-executionpolicy bypass -noninteractive -file `"$AGENTGO_PARENT_DIR\exec.ps1`""
echo "Agent set to restart after config changes"
Add these two files to a folder called (just an example) and compress the folder to create agent agent.zipwith the same structure displayed here.
agent
agentReconfig.ps1

8.
9.
1.2.
3.
4.
agentReconfig.sh
Move the folder to an HTTP repository in your local environment that is accessible from the OLD and NEW clusters.agent.zip
You have now ensured cluster connectivity and saved the required files for the migration procedure.
f. Migrate Deployments from the OLD Cluster to the NEW Cluster
To migrate the deployment details from the old cluster to the new cluster, follow this procedure.
Navigate to the workload manager Actions Libray page and edit the AgentReconfig_Linux action.This procedure continues to use the Linux file going foward. Scroll to the Actions Definition section and update the URL as displayed in the following screenshot.
Scroll to the section and change the default value of the to use the NEW cluster IP.Custom Fields Broker Host
This procedure uses the following URL as an example:
http://10.0.0.3/repo/agent.zip
The URL and Script from Bundle fields in the above screenshot are in accordance with the steps above.

4.
5. 6. 7.
8. 9.
10. 11.
Scroll down to the and change the default to use the NEW Worker AMQP IP port (for example, 26642 in Step 8 above).Broker Port
Click to save your default configuration changes in the OLD cluster.DoneNavigate to the page and locate the VM to migrate to the new cluster.Virual MachinesClick the dropdown and verify if your newly modified actions are visible under the Custom Actions section in the dropdown list as visible Actionsin the following screenshot.
Click one of the actions and verify that the configured defaults are displayed in the Broker host and Broker port fields as indicated earlier.Click to migrate this VM to the new cluser.SubmitVerify that the migration is complete by going to the Deployment page in your NEW cluster and the VM is listed as RUNNING (green line).Repeat Steps 6 through 10 for each VM that needs to be migrated to the NEW cluster.
You have now migrated the deployment details from the old cluster to the new cluster
You have now backed up and restored the CloudCenter Suite to an isolated environment using the
Minio server.

TroubleshootingTroubleshooting
OverviewFinding Kubernetes ResourcesError during the Suite Installation ProcessThe Kubernetes Cluster is installed successfully, but the progress bar for Suite Administration is stuck at Waiting for product to be readyAfter using Suite Admin for a while, users cannot login to Suite Admin if any of the cluster nodes are in a Not Ready stateDownload LogsVelero IssuesvSphere Environments
A Pod has unbound PersistentVolumeClaimsThe Progress bar for a Kubernetes Cluster is stuck at Launching cluster nodes on the cloud or Configuring the primary server clusterInstallation Failed: Failed to copy <script-name.sh> to remote host or any error related to SSH connection failureWhen one of the workers is down a worker node scale up operation is stuck
Overview
If you encounter issues during the installation process, be sure to review the tips provided in this page before calling the support team.
Finding Kubernetes Resources
For private clouds, the download link for the is available on the last page of the installer UI as displayed in the following screenshot.Kubeconfig file
While you may see this file for successful installations in the above screen, you will not be able to access this file if your installation was not successful. This file is required to issue any command listed in thehttps://kubernetes.io/docs/reference/kubectl/cheatsheet/section of the Kubernetes documentation.
By default, the command looks for thekubectl Kubeconfigfile in the $HOME/.kubefolder.
:Successful installation Copy the downloadedKubeconfigfileto your $HOME/.kube folder and then issue any of the kubectl commands listed in the cheatsheet link above.KubernetesStalled Installation:
Private clouds and most public clouds: SSH into one of the primary server nodes andcopy the Kubeconfig filefrom /etc/kubernetes/admin.conf to the/root/.kubefolder.GCP: Login to GCP, access the Kubernetes Engine, locate your cluster, click Connect toConnect to the cluster, and click the copy icon as displayed in the following screenshot. You should have already installed gcloud in order to view this icon.

1.
2. 3. 4.
Error during the Suite Installation Process
At any time, if you your installation stalls due to a lack of resources, perform this procedure to analyze the error logs.
To fetch the logs for this pod run :
Locate the actual name of the container by running the following command:
kubectl get pods -all-namespaces | grep common-framework-suite-prod-mgmt-xxxx
Click the link to download the installation logs for the failed service inDownload LogsDownload case of aninstallationfailure.View theLogs for the container: common-framework-suite-prod-mgmt ...Run the following command to view the error:
kubectl logs -f common-framework-suite-prod-mgmt-xxxx -n cisco
The Kubernetes Cluster is installed successfully, but the progress bar for Suite Administration is stuck at Waiting for product to be ready
This issue indicates that the CloudCenter Suite installation has some issue. SSH into one of the primary server nodes . To check the using the private keystatus of the pods, run for each pod. If the status does not display , run the following commands to debug kubectl get pods --all-namespaces Runningfurther:
kubectl describe pod <pod-name> -n cisco
or
kubectl logs -f <pod-name> -n cisco
To SSH into each cluster node, and check if the system clock is synchronized on all nodes. Even if the NTP SSH into the node using the private keyservers were initially synchronized verify if they are still active by using the following command.
ntpdate <ntp_server>
or
You may have provided the wrong proxy details at installation time test if the proxy is working on the installer VM and ensure that the repository is accessible.

or
Verify the offline CloudCenter Suite cluster to ensure that the installer is able to pull the image from the offline repository. Alternately, manually pull the images from the offline repo and verify if it works
After using Suite Adminfor a while, users cannot login to Suite Adminif any of the cluster nodes are in a stateNot Ready
This issue may be the result of any of the following situations:
Are all the cluster nodes up and running with a valid IP address?If the nodes are running, then SSH into one of the primary server nodes . using the private keyRun the following command on the primary server to verify if all the nodes are in the state.Ready
kubectl get nodes
Download Logs
Click the link to download the installation logs for the failed service inDownload Logs Download case of an failure. See > installation Monitor Modules Down for additional information.load Logs
Velero Issues
Refer to for Velero troubleshooting information.https://heptio.github.io/velero/v0.11.0/
vSphere Environments
The following issues are specific to vSphere environments.
A Pod has unbound PersistentVolumeClaims
The problem displayed in the following screenshot is usually caused when the cloud user does not have permissions to the configured storage. For example, a vSphere user may not have permissions to the selected datastore.

The Progress bar for a Kubernetes Cluster is stuck at orLaunching cluster nodes on the cloud Configuring the primary server cluster
The issue displayed in the following screenshot could be an issue with the cloud environment. Refer to your cloud documentation for possible issues.
Other examples:
If the target cloud is vSphere, check if the cloud account being used has permissions to launch a VM and if the VM is configured with a valid IPv4 address.If the cluster nodes are configured to use static IP, verify if the IP pool used is valid and if all the launched nodes have a unique IP from the pool.
Installation Failed: Failed to copy <script-name.sh> to remote host or any error related to SSH connection failure
If any of the nodes are state, then run the following command on the node:Not Ready
kubectl describe node <node-name>
This issue can occur when the installer node cannot SSH/SCP into launched cluster nodes. Verify if all the launched nodes have a valid IPv4 address and if the installer network can communicate with the Kubernetes cluster network (if they are on different networks).Also verify that the cluster nodes are able to connect to vSphere.
If none of the above methods work, retry the installation or contact your CloudCenter Suite admin.
When one of the workers is down a worker node scale up operation is stuck
When one of the workers is down, and you try to scale up the worker node, the node does not scaled up. The scale up operation remains stuck in scaling state.
Restart the operator POD of your environment by using the following command. The following example displays vSphere, and the corresponding operator will be the vSphere operator. Similarly, if you are working in an OpenStack environment, use the OpenStack operator as applicable.

kubectl delete pod kaas-ccp-vsphere-operator-<dynamic alphanumeric characters> -n ccp
#or
kubectl delete pod kaas-ccp-openstack-operator-<dynamic alphanumeric characters> -n ccp
By restarting this service on any worker node, you will start the shutdown VM and scale up the new node which was stuck during the scale operation.

Suite Admin WorkflowSuite Admin
The following table identifies the tasks to be performed on the Suite Admin once you install the CloudCenter Suite.
# Required? Goal Task Description
1 Yes Onboarding Create the suite administrator and root tenant. See Initial Administrator Setup
Navigate to the Suite Admin Dashboard. See Suite Admin Dashboard
2 No Language selection Select your language choices to view the CloudCenter Suite UI. See UI Language Availability
3 Yes Module installation Install module(s) of choice based on the list available in the Dashboard.
This is optional, however, you cannot configure resources other than users/tenants/groups/roles/admin menu settings if you don't install modules!
See Install Module
4 Yes User management Create users See Create and Manage Users
5 Yes Group Management Assign users to default groups.
When thesuiteadministratorinstalls any module, additional, default out-of-box groups become available. These groups vary based on the module.
See Create and Assign Groups
Optional Create a custom group
If the out-of-box groups don't meet your requirements, you can create custom groups.
See Custom Groups by Admin
Yes Assign roles to a group
For each custom group, you must assign at least one role.
See Understand Roles
6 Yes Admin Management Set up the base URL See Base URL Configuration
Yes Set up email communication See Email Settings
Optional Configure a dedicated alias hostname and use an external IdP to authenticate its users. See SSO Setup
Optional Set up the proxy server See Proxy Settings
7 Yes Product Registration Configure a license See Configure Smart Licenses
8 Optional Cluster Management Modify the size of the cluster See Manage Clusters
9 Optional TroubleshootingView log archivesDownload logs for troubleshooting purposes
See Log ArchiveSee Monitor Modules
10 Optional Tenant/Sub-tenant Management
Manage your own tenant or create additional sub-tenants See Manage Tenants
Add users as additional tenant administrators to a group See Create and Assign Groups
11 Optional Admin Management Backup CloudCenter Suite See Backup
Restore CloudCenter Suite See Restore
Setup Isolated (Air Gap) environment See Without Internet Access


1.
2.
3.
Initial Administrator SetupInitialAdministratorSetup
OverviewThe Suite AdministratorConfigure an Admin User and Tenant
Overview
Once the Suite Admin is installed you must perform the following tasks:
Note or bookmark the IP address for the Suite Admin console.Set up the credentials for the Suite administrator.Configure a Root tenant.
The Suite Administrator
As theadministratorfor the Suite Admin, you can perform the following tasks from the Suite Admin dashboard:
Install Module(s)Create and Manage Users, includingtenants and tenant administratorsCreate and Assign Groups, includinguser-group(s)associationConfigure Smart LicensesManage Clusters, if the cluster was created by the suiteadministrator
Configure an Admin User and Tenant
To configure the admin user and tenant, follow this procedure:
Navigate to the Suite Admin console and complete the form to enter details for the root user and tenant Admin User and Tenant Credentials as .displayed in the following screenshot
Besides the First and Last Name, Email Address, Password, Company Name, and Company Logo (defaults to the Cisco logo), you must enter a Tenant ID of your choice so you can log into the Suite Admin using this Tenant ID and password.Click to save your settings and launch the Suite Admin Dashboard as displayed in the following screenshot.Done

3.

Kubernetes Cluster ManagementKubernetes Cluster Management
Cluster StatusManage Clusters

Cluster StatusCluster Status
OverviewRequirementsThe Cloud Icon DetailsKubernetes Cluster ActionsModify Cluster SizeVirtual Machines
Overview
You can view the status of a Kubernetes cluster by clicking the cloud icon located in the header of the Suite Admin Dashboard. The Cluster status popup displays. Click View Details to viewdetailed information about each node in the cluster.
Requirements
For private clouds, the HA cluster requires a minimum of 2 out of 3 master nodes to be running at any point, for the cluster to function as designed.
The Cloud Icon Details
Click the cloud icon to view and verify the number of nodes in the Kubernetes cluster. The View Details page displays detailed information about each node in the cluster. This information is retrieved from the Kubernetes cluster after you install the CloudCenter Suiteccs. The following screenshot displays details within this page.
Kubernetes Cluster Actions
The cluster-level actions allow you to download the following files.
The SSH key file is used to connect to the cluster.The KubeConfig file is used to view cluster information.

Modify Cluster Size
Based on your environment requirements,you can modify the Kubernetes cluster size from the Suite Admin. SeeManage Clusters for additional details.
Virtual Machines
This tab displays the VMs that make up the Kubernetes cluster accessed from this instance of CloudCenter Suite.
The colored status indicators identify the state of each VM in your Kubernetes cluster as described in the following table.
Cluster Status Color Indication
Green The node is functioning.
Red The node is not functioning.
The color merely indicates the health of your Kubernetes cluster so you can make the required changes to your Kubernetes setup as required by your environment.

1. 2. 3.
4.
Manage ClustersManage Clusters
OverviewScale UpScale DownReconfigure Cloud Credentials
Overview
If a cluster was created by the as described in , then this can msuiteadministrator Initial Administrator Setup suiteadministrator anage those clusters. Managing a cluster includes the following tasks.
Scale this cluster.Monitor the cluster by viewing alerts.
The 's ability to view a cluster is indicated by the green circle on the . Clicking this icon provides additional information as suiteadministrator cloud icondisplayed in the following screenshot.
Scale Up
To increase the number of nodes in your cluster, perform this procedure.
Navigate to the > page.Suite Admin Dashboard TenantsClick the loud Iconto access the > page.c Cluster Status View DetailsIn the Kubernetes Cluster page, click the wheel icon to display the popup .Modify Cluster Size as displayed in the following screenshot
Increase the number as required in the field. You will see the status bar list a alert. Current number of worker nodes: Scaling operation successfulIt take a few minutes to increase the node count.
Initially, the node will be in the red state while it is still initializing. Once it has initialized, it will turn green.The Runtime displays the length of time that this node has been running:
h = Upto 24 hoursd = Any number of days
The Status can only be up (red) or down (green).The memory and CPU details are displayed as available in the Kubernetes cluster.When complete, you see a subsequent alert notifying you of the Cluster node being added.
You have nowincreased the number of nodes in your cluster.
Scale Down
Suite administrators can only manage clusters that they installed.
If you setup the CloudCenter Suite using static IPs, verify that the static IP range has free IPs available to support scale up operations. If IPs are not available in the static IP range (defined during installation) then the scale up process will not take place.

While you can scale up the number of nodes in the Kubernetes cluster from the Suite Admin, you scale down using this process.cannot
Reconfigure Cloud Credentials
The Cloud Accounts tab, provides a way to change your cloud credentials for thecloud where the CloudCenter Suite is installed.
You can change your cloud account password based on your cloud credentials for each supported cloud as listed in .New Cluster Installation
OpenStack
If you installed CloudCenter Suite 5.1.1 as a fresh installation, this feature is not available in OpenStack environments.
If you upgraded CloudCenter Suite from 5.0.x to 5.1.0 or 5.1.1, the Cloud Account section is preserved and you can update the password.
vSphere
If you have updated your password in the vSphere console, be sure to update it in the Cloud Accounts tab (in the Kubernetes Cluster page), before the vSphere lockout period takes effect.
If you do not update the password, be aware that the vSphere policy will prevent you from proceeding with you CloudCenter Suite configuration and CloudCenter Suite will continue with its polling attempts with vSphere.

Configure Smart LicensesConfigure Smart Licenses
OverviewCisco Smart Software Manager
Virtual AccountsSmart Call Home
Configuring Cisco Smart Software LicensingRequest a Smart AccountAdding Users to a Smart Account
License Usage and ComplianceWorkflow of Cisco Smart Software Licensing
Generating a Registration TokenConfiguring Transport SettingsRegistering a CloudCenter Suite LicenseRenewing AuthorizationRe-Registering a CloudCenter Suite LicenseDe-Registering a CloudCenter Suite License
Enable for ProductionTroubleshooting Licensing Issues
Invalid TokenDownload Logs
Overview
CloudCenter Suite integrates with the solution.Cisco Smart Software Licensing The CloudCenter Suite is available for a 90-day evaluation period after which, you must register with .Cisco Smart Software Manager
The number of licenses required depends on your deployment scenario.For example, the Workload Managerand Cost Optimizerdefine entitlements based on features used in thosemodules. These entitlements may apply to the use of a specific public/private cloud, the number of management units used when deploying applications (VMs and containers), the options purchased (essentials, advanced, premium), and so forth.
Cisco Smart Software Manager
Cisco Smart Software Manager (Cisco SSM)enables the management of software licenses and Smart Account from a single portal. This interface allows you to activate your product, manage entitlements, renew and upgrade software. You must have a functioning Smart Account to complete the registration process andwill need to exchange three key elements with the Cisco Smart Software Manager over HTTPS:
Trusted Unique Identifier This is the Product ID (SUDI/SUVI/ID).Organizational Identifier In a numerical format to associate product with a Smart / Virtual Account.Licenses consumed Allows the Cisco Smart Software Manager to understand the license type and level of consumption.
Virtual Accounts
A Smart Account provides a single location for all Smart enabled products and entitlements. It assists to speed procurement, deployment and maintenance of Cisco Software. When creating a Smart Account the submitter must have the authority to represent the requesting organization. After submitting the request goes through a brief approval.
A Virtual Account exists as a sub-account within the Smart Account. Virtual Accounts are a customer defined structure based on organizational layout, business function, geography or any defined hierarchy. They are created and maintained by the Smart Account administrator(s).
Smart Call Home
Smart Call Home is feature to communicate with the Cisco Smart Software Manager. By default, Smart Call Home is enabled when you configure Smart Software Licensing. Smart Call Home creates a Cisco TAC-1 profile and sends associated Smart Call Home messages after the enablement. For platforms with Smart Software Licensing enabled by default, call-home is also enabled by default with associated messages.
Configuring Cisco Smart Software Licensing
You need to configure Cisco Smart Software Licensing to easily procure, deploy, and manage licenses for your CloudCenter Suite.
Smart licenses are already incorporated in the CloudCenter Suite SaaS offer, see for additional details.SaaS Access

1.
2.
3.
Smart Licensing is a cloud-based approach to licensing. The solution simplifies the purchase, deployment and management of Cisco software assets. Entitlements are purchased through your Cisco account via Cisco Commerce Workspace (CCW) and immediately deposited into a for Virtual Accountusage. This process eliminates the need to install license files on every device using the product. Products that are smart enabled communicate directly to Cisco to report consumption. A single location is available to customers to manage Cisco software licenses the Cisco SSM. License ownership and consumption are readily available to help make better purchase decision based on consumption or business need.
Cisco SSM enables you to manage your Cisco Smart Software Licenses from one centralized website. With Cisco SSM, you can organize and view your licenses into . You can also use Cisco SSM to transfer licenses between virtual accounts as needed. You can access Cisco SSM Virtual Accountgroupsfrom the Cisco Software Central homepage at , under .software.cisco.com Smart Licensing
If you do not want to manage licenses using Cisco SSM, either for policy reasons or network availability reasons, you can choose to install Cisco SSM Satellite at your premises. registers and reports license consumption to the Cisco SSM Satellite as it does to Cisco SSM.Cisco SSM CloudCenter SuiteSatellite coordinates with the Cisco Smart Software Manager to manage software licenses on premises. Devices register locally to report license ownership and consumption.
Request a Smart Account
The creation of a new Smart Account is a one-time event and subsequent management of users is a capability provided through the tool. To request a Smart Account, visit and follow this process.software.cisco.com
After logging in, select in the Administration section as displayed in the following screenshot.Request a Smart Account
Select the type of Smart Account to create using one of two options as displayed in the following screenshot.
Individual Smart Account requiring agreement to represent your company. By creating this Smart Account you agree to authorize, create, and manage product and service entitlements, users, and roles on behalf of your organization.Create the account on someone elses behalf
Provide the required domain identifier and the preferred account name as displayed in the following screenshot.
Ensure that you use Cisco SSM Satellite version 5.0 or later. For more information on installing and configuring Cisco SSM Satellite, refer tohttp://www.cisco.com/go/smartsatellite.

3.
4.
1.
2.
3.
The account request requires approval for the Account Domain Identifier as displayed in the following screenshot. An email will be sent to the requester to complete the setup process.
Adding Users to a Smart Account
Smart Account user management is available in the Administration section of . To add a new user to a Smart Account, follow this software.cisco.comprocess.
After logging in, select in the Administration section as displayed in the following screenshot.Manage Smart Account
Select the tab as displayed in the following screenshot.Users

3.
4.
Select and provide the required email address, cisco.com ID, and role as displayed in the following screenshot. You can select the New Userrequired role to manage the entire Smart Account or specific Virtual Accounts.
Click to complete the process.Continue
License Usage and Compliance
Once you register with Cisco SSM, you will receive the .CloudCenter Suite CloudCenter Suite License
If you use specific resources, the CloudCenter Suite reports each usage to the Cisco SSM to tally the number of times that this resource was used and report it in the column.By verifying this usage count, Cisco SSM calculates the license usage and compliance.Count
Cisco SSM or Cisco SSM Satellite totals the license requirements for all yourCloudCenter Suiteinstances and compares the total license usage to the number of licenses purchased, on a daily basis.
After the data synchronization, yourCloudCenter Suiteinstance displays one of the indicators listed in thefollowing table.Registration Status
Registration Status
Description
Unregistered The Smart Software Licensing is running in Evaluation mode and you have not yet registered the CloudCenter Suite. This status is identified in the following screenshot when you click on the Licensing icon the orange, exclamation icon in the following screenshot.

Registered The product registration was completed and an ID certificate was received and will be used for future communication with the Cisco licensing authority. This status is identified in the following screenshot.
in theAfter the data synchronization, yourCloudCenter Suiteinstance displays one of the indicators as explainedLicensing Authorization Status following table.
License Authorization Status
Description
Evaluation Mode (countdown from 90 days)
You must register yourCloudCenter Suiteinstance with Cisco SSM or Cisco SSM Satellite before the 90-dayevaluationperiod expires. This state is displayed in the following screenshot.
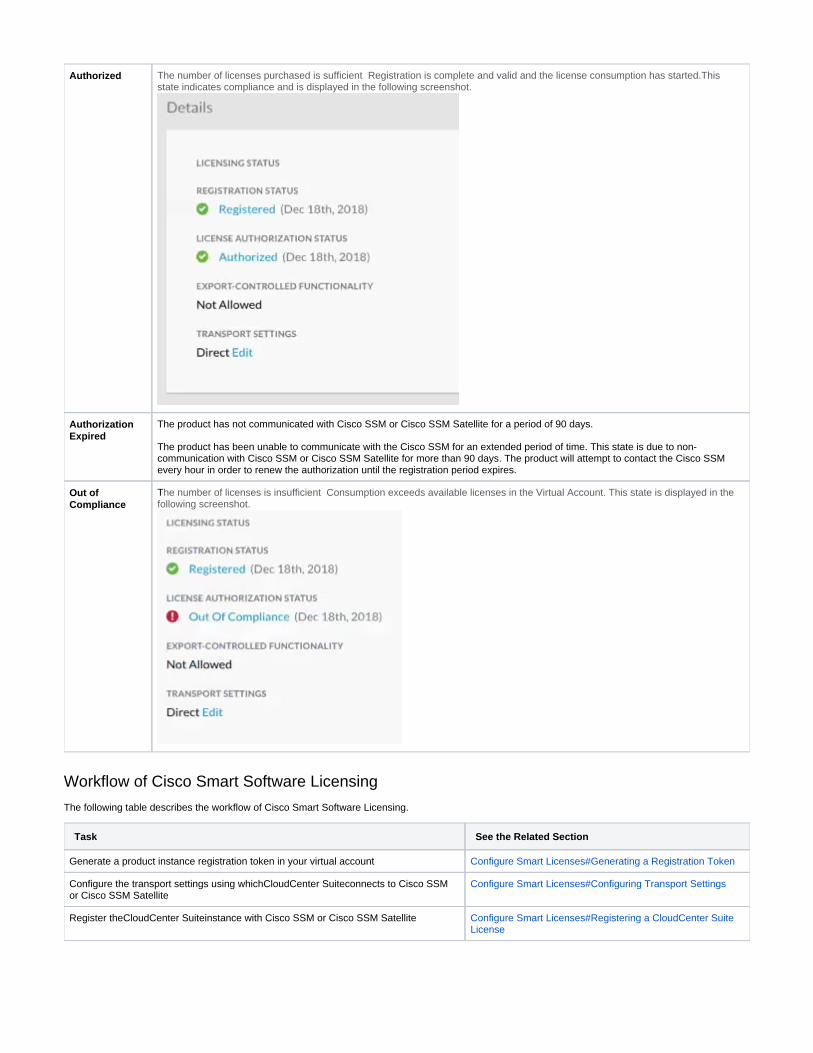
Authorized The number of licenses purchased is sufficient Registration is complete and valid and the license consumption has started.This state indicates compliance and is displayed in the following screenshot.
Authorization Expired
The product has not communicated with Cisco SSM or Cisco SSM Satellite for a period of 90 days.
The product has been unable to communicate with the Cisco SSM for an extended period of time. This state is due to non-communication with Cisco SSM or Cisco SSM Satellite for more than 90 days. The product will attempt to contact the Cisco SSM every hour in order to renew the authorization until the registration period expires.
Out of Compliance
The number of licenses is insufficient Consumption exceeds available licenses in the Virtual Account. This state is displayed in the following screenshot.
Workflow of Cisco Smart Software Licensing
The following table describes the workflow of Cisco Smart Software Licensing.
Task See the Related Section
Generate a product instance registration token in your virtual account Configure Smart Licenses#Generating a Registration Token
Configure the transport settings using which connects to Cisco SSM CloudCenter Suiteor Cisco SSM Satellite
Configure Smart Licenses#Configuring Transport Settings
Register the instance with Cisco SSM or Cisco SSM SatelliteCloudCenter Suite Configure Smart Licenses#Registering a CloudCenter Suite License

1. 2. 3.
4. 5. 6.
1. 2.
3.
4.
Manage licensesConfigure Smart Licenses#Renewing AuthorizationConfigure Smart Licenses#Re-Registering a CloudCenter Suite LicenseConfigure Smart Licenses#De-Registering a CloudCenter Suite License
Generating a Registration Token
You need to generate a registration token from Cisco SSM or Cisco SSM Satellite to register the instance.CloudCenter Suite
To generate a registration token, follow this procedure.
Log in to your Smart Account usingCisco SSMor Cisco SSM Satellite.Navigate to the Virtual account using which you want to register theCloudCenter Suiteinstance.If you want to enable higher levels of encryption for the products registered using the registration token, check the Allow export-controlledfunctionality on the products registered with this tokencheck box.
ClickNew Tokento generate a registration token.Copy and save the token so you can use it when you register yourCloudCenter Suiteinstance.For more information on registering yourCloudCenter Suiteinstance, seeConfigure Smart Licenses#Registering a CloudCenter Suite License.
Configuring Transport Settings
By default, directly communicates with the Cisco SSM. You can modify the mode of communication by configuring the transport settings.CloudCenter Suite
Toconfigure the transport settings, follow this procedure.
Navigate to the .Suite Admin DashboardClick in the left tree pane.If you are runningCloudCenter Suitein the Evaluation mode, a license notification is displayed on theSmart LicensingSoftware Licensingpane.If a license notification is displayed, click the link that is highlighted in the following screenshot. Edit Transport Settings
Alternatively, click the tab, and then click the link that appears underTransport Settings.Licensing Status View/Edit
Ensure that you have set up a Smart Account and a Virtual account on Cisco SSM or Cisco SSM Satellite.
This option is available only if your smart account is enabled for Export Control.
Ensure that you have obtained the registration token for theCloudCenter Suiteinstance.

4.
a. b.
a. b.
a. b.
5.
1. 2. 3. 4.
5.
In theTransport Settingsdialog box displayed in the following screenshot, perform one of these steps:
To configureCloudCenter Suiteto send the license usage information to Cisco SSM using the Internet (default):
Click the switch to communicate directly using the Cisco URL.DirectConfigure a DNS onCloudCenter Suiteto resolve .tools.cisco.com
To configureCloudCenter Suiteto send the license usage information to Cisco SSM using the Cisco SSM Satellite:
Click the button.Transport GatewayEnter the URL of the Cisco SSM Satellite.
To configureCloudCenter Suiteto send the license usage information to Cisco SSM using a proxy server. For example, an off-the-shelf proxy, such as Cisco Transport Gateway or Apache:
Toggle the switch.HTTP/HTTPS ProxyEnter the IP address and port number of the proxy server.
Click .Save
Registering a CloudCenter SuiteLicense
You need to register your instance with Cisco SSM or Cisco SSM Satellite before the 90-day evaluation period expires.CloudCenter Suite
To register the CloudCenter Suite license, follow this procedure.
Navigate to the .Suite Admin DashboardClick in the left tree pane.Licensing In the license notification, click .Register TheSmart Software Licensing Product Registrationdialog box appears.In theProduct Instance Registration Tokenfield, paste the registration token that you generated using the Cisco SSM or Cisco SSM Satellite.For more information on generating a registration token, seeConfigure Smart Licenses#Generating a Registration Token.Click to complete the registration process. TheRegister CloudCenter Suitesends a request to Cisco SSM or Cisco SSM Satellite to check the
If registering the token registration status and Cisco SSM or Cisco SSM Satellite reports back the status toCloudCenter Suite, on a daily basis.fails, you can re-register the instance using a new token. For more information on re-registering , seeCloudCenter Suite CloudCenter Suite Configure
.Smart Licenses#Re-Registering a CloudCenter Suite License
Renewing Authorization
By default, the authorization is automatically renewed every 30 days. However, allows a user to manually initiate the authorization renew CloudCenter Suitein case the automatic renewal process fails. The authorization expires if is not connected to Cisco SSM or Cisco SSM Satellite for 90 CloudCenter Suitedays and the licenses consumed by are reclaimed and put back to the license pool.CloudCenter Suite
To renew authorization, follow this procedure.
Ensure that you have configured the transport settings.
Ensure that theCloudCenter Suiteinstance is registered with Cisco SSM or Cisco SSM Satellite.

1. 2. 3.
4.
1. 2. 3.
4.
5.
1. 2. 3.
4.
Navigate to the .Suite Admin DashboardClick in the left tree pane.LicensingFrom theActionsdrop-down list, chooseRenew Authorization Now as displayed in the Actions dropdown in the following screenshot.
ClickOKin theRenew Authorizationdialog box to confirm authorization renewal. TheCloudCenter Suitesynchronizes with Cisco SSM or Cisco SSM Satellite to check the license authorization status and Cisco SSM or Cisco SSM Satellite reports back the status toCloudCenter Suite, on a daily basis.
Re-Registering a CloudCenter Suite License
You can re-register with Cisco SSM or Cisco SSM Satellite by de-registering it and registering it again, or by using a register force option.CloudCenter Suite
To , follow this procedure.re-registerCloudCenter Suitelicense
Navigate to the .Suite Admin DashboardClick in the left tree pane.LicensingFrom theActionsdrop-down list, choose .Reregister
In theProduct Instance Registration Tokenfield of theSmart Software Licensing Product Re-registrationdialog box, enter the registration token that you generated using Cisco SSM or Cisco SSM Satellite.For more information on generating a registration token, seeGenerating a Registration Token.ClickRegisterto complete the registration process. TheCloudCenter Suitesends a request to Cisco SSM or Cisco SSM Satellite to check the registration status and Cisco SSM or Cisco SSM Satellite reports back the status toCloudCenter Suite, on a daily basis.
De-Registering a CloudCenter Suite License
You can de-register the instance from Cisco SSM or Cisco SSM Satellite to release all the licenses from the current Virtual account and CloudCenter Suitethe licenses are available for use by other products in the virtual account. De-registering disconnects from Cisco SSM or Cisco SSM CloudCenter SuiteSatellite.
To , follow this procedure.de-registerCloudCenter Suitelicense
Navigate to the .Suite Admin DashboardClick in the left tree pane.LicensingFrom theActionsdrop-down list, choose .Deregister
ClickDeregisterin the confirmation dialog box. TheCloudCenter Suitesends a request to Cisco SSM or Cisco SSM Satellite to check the de-registration status and Cisco SSM or Cisco SSM Satellite reports back the status toCloudCenter Suite, on a daily basis.
Enable for Production
Toggle the switch to use the license in production mode displayed in the following screenshot. When you purchase one license for Enable for Productionthe CloudCenter Suite, you automatically receive a free non-production license as well.Both modes are independent of each other and you can switch from one mode to the other anynumber of times.
Ensure that you have obtained a new registration token from Cisco SSM or Cisco SSM Satellite
Ensure that the instance is registered with Cisco SSM or Cisco SSM Satellite.CloudCenter Suite

When the CloudCenter Suite is in non-production mode, the entitlement tags do not validate the license for usage, in which case, you can use it for development, testing, or staging purposes.
Troubleshooting Licensing Issues
This section identifies issues that you may encounter when dealing with licenses.
Invalid Token
When you see the message displayed in the following screenshot for your instance, verify if your token is still valid and if it needs to be renewed.
Download Logs
If you have any issues with Smart Licenses, download the logs files by using the UI(see > ) or the suite-logs/v2/api-docs Monitor Modules Download Logs(see )and contact the .Logs Service API Calls Smart License team

Module Lifecycle ManagementModule Lifecycle Management
Install ModuleUpdate ModuleMonitor Modules

1. 2.
3.
Install ModuleInstall Module
OverviewRequirementsProcessFree LicenseModule ActionsUninstall a ModuleModule States
Overview
The lists the available modules in the Display pane. If you are installing each module for the first time, you will see the button Suite Admin Dashboard Installenabled. Once installed, each module may be in various lifecycle phases as described in this section.
Requirements
Be sure to adhere to the following requirements:
If your current cluster does not have sufficient resources mentioned in the section, then to meet the minimum requirements Prepare Infrastructurethe installation process will be blocked and you will need to resolve these issues by scaling up to these requirements (see > Manage Clusters Scal
for details).e UpOnly asuite administratorcan install a module.By installing the module, thissuite administratorautomatically inherits the module admin role as well.Be sure to synchronize the server time for all instances running the CloudCenter Suite as this can potentially cause module install or upgrade to fail.
Process
You can install multiple modules simultaneously.
To install a module, follow this procedure.
Navigate to the .Suite Admin DashboardClick on the required module. This procedure uses the Cost Optimizeras an example. The following screenshot displays the available Installmodules.
After installing Action Orchestrator, be aware that you must wait for 2-3 minutes before accessing the application.

3.
4. 5.
In the popup, select the required version from the dropdown list.You're updating module name
The module starts its installation process and displays a progress bar indicator.Once Installed, you can perform the following actions:
Click a module to .Monitor ModulesOpen the module or uninstall the module (seethe section below).Navigate back and forth to other modules and the Suite Adminusing the navigation icon in the header as displayed in the following
. screenshot
You have now installed one of the modules in the CloudCenter Suite.
Free License
When you install any module, you see the countdown for the 90-day free license time remaining for the license in the top left portion of the module. SeeCon for details.figure Smart Licenses
Module Actions
Once installed, the can perform the following actions on a module:suite administrator
Update ModuleMonitor ModulesConfigure Smart LicensesManage Module-Specific Content
The Suite Adminmodule allows the additional actions displayed in the following screenshot:
Download SSH Key (used to connect to the cluster).Download KubeConfig file (used to view cluster information).See for additional context.Cluster Status
Once installed, you cannot revert to a previous version.

1.
2.
3.
Uninstall a Module
To uninstall a module, follow this procedure.
Click the module's dropdown and select U as displayed in the following screenshot.ninstall
Confirm your intention to uninstall as all your content will be deleted .as displayed in the following screenshot
Uninstallation takes a few minutes as the CloudCenter Suite cleans up all aspects of the installation.The module starts its uninstallation process.
Module States
The following table provides details on the various module states.
State and Screenshot Description
New Installation A new module is available for installation in the .Suite Admin Dashboard
After you uninstall any module, verify that all dependent resources have been deleted.
Before re-installing a module that was previously installed, verify that the volumes, secrets, and other dependent details have been cleaned up.

Installing (or updating) The module is being installed/updated and the installation process displays a progress bar indicator.
Licensed This screenshot identifies a module that is installed, registered, and licensed. See Configure for details.Smart Licenses
Update Available Once a new software version becomes available, the module displays the new version availability and provides a link to the documentation website. See for details.Update Module
The release notes link for the available release is directly linked to the release notes for each module.
The dropdown list also provides additional options for each module
Alerts When alerts are generated, they are displayed in the Suite AdminDashboard (dropdown list for this module) > >View Module Details Alertstab.
The number of alerts are also identified in the corresponding module tile that are displayed in the Dashboard (the screenshot identifies that 3 Warning alerts are available Suite Adminfor this module)
See for details.Monitor Modules
Validation Error The module installation resulted in an error. See for additional Troubleshoot Suite Admindetails.


1. 2.
Update ModuleUpdate Module
OverviewConsiderationsLimitationsProcessModule ActionsRequired Post-Kubernetes Upgrade Configuration Tasks
Overview
The can only upgrade the module to later versions of the software and will not be able to revert to an earlier version of the software.suite administrator
Considerations
Before updating a module, see the following module considerations:
Workload Manager Installation Overview > Module Update ConsiderationsCost Optimizer Overview > Module Update ConsiderationsAction Orchestrator > Migrating Database
Limitations
Only a can update a module.suite administrator
Once a new software version becomes available, the module displays the new version availability and provides a link to the documentation website.
Process
To update a module, follow this process.
Navigate to the .Suite Admin DashboardSelect the required version and click to upgrade this module. The following screenshot displays Cost Optimizeras an example. All available Donereleases are displayed in the dropdown list in descending order with the latest version at the start of the list.
nsure that your environment has free verify that you have un-allocated CPU/Memory in your cluster to eBefore updating any module, module-update scenario requires additional resources for the old pod to continue running until the new pod initializes CPU/Memory a
and takes over. This additional resource requirement is temporary and only required while a module update is in Progress. After the module is updated, the additional resources are no longer needed.You must update the Suite Admin module before you update any other CloudCenter Suite module.Update only one module at at time. If you simultaneously update more than one module, your update process may fail due to limited resource availability. See for additional context.Prepare InfrastructureYou may see one or more error messages during the update process. Be aware that these messages will not affect the update itself.

2.
3. 4.
1.
The module starts its upgrade process and displays a progress bar indicator.Once Installed, you can click the module to access the details of that module
or
Navigate to other modules using the module navigation icon in the header .as displayed in the following screenshot
You have now updated the modules in the CloudCenter Suite.
Module Actions
Once a module is upgraded, the can perform the following actions on a module:suite administrator
Monitor ModulesConfigure Smart LicensesManage Module-Specific Content
Required Post-Kubernetes Upgrade Configuration Tasks
TheCloudCenterSuite connects to a Cisco hosted Helm repository and a Docker registry to check for available modules and updates. These repositoriesare fully compliant with export control and requires authentication for each user connecting to the repository. AllCloudCenterSuite module are packagedas Helm Chart and Docker images. The Helm Chart refers to Docker images via the image's SHA256 hash. The Helm Chart itself is signed and verified bytheCloudCenterSuite upon installation or upgrade. This way the integrity of the Helm Chart and Docker images are guaranteed.
Due to changes in underlying Kubernetes versions, cert-manager & deprecated Kubernetes APIs, the Helm chart upgrades will not work directly. We need to migrate the references of deprecated APIs to new supported versions.
To ensure the chart works, perform the following steps:
Execute the below Helm commands with version helm-v2.16.3 from inside the common-framework-prod-mgmtpod which already has this version installed:

kubectl exec -it $(kubectl get pods -n cisco | grep prod-mgmt | cut -f1 -d' ') -n cisco /bin/sh
2. Run the following command:
mkdirp $(helm home)/plugins
3. Run the following command:
helm plugin install https://github.com/helm/helm-mapkubeapis --version=v0.1.0
4. Create a Map.yaml file with content shown below this procedure.
5. Run the following command to get all the helm releases
helm ls --tiller-namespace cisco
6. Repeat the above command for all helm releases.
helmmapkubeapis<replace with release name> namespace cisco v2 mapfileMap.yaml
7. Wait formapkubeapisto finish.
8.Update the CCS modules from SA UI.
For Airgap setups with no Internet, users can run the commands from a client with Internet access with helm-v2.16.3.
TheCloudCenterSuiteoffers granular control of access to eachCloudCenterSuite resource through role-based, module-level access control. Access toresources like services, clouds, application profiles, deployment environments, and otherCloudCenterSuiteresources can be managed based on rolesassociated with users or user groups. See for details.Understand Roles
Content required for step 4:
mappings: - deprecatedAPI: "apiVersion: extensions/v1beta1\nkind: Deployment" newAPI: "apiVersion: apps/v1\nkind: Deployment" deprecatedInVersion: "v1.9" removedInVersion: "v1.16" - deprecatedAPI: "apiVersion: apps/v1beta1\nkind: Deployment" newAPI: "apiVersion: apps/v1\nkind: Deployment" deprecatedInVersion: "v1.9" removedInVersion: "v1.16" - deprecatedAPI: "apiVersion: apps/v1beta2\nkind: Deployment" newAPI: "apiVersion: apps/v1\nkind: Deployment" deprecatedInVersion: "v1.9" removedInVersion: "v1.16" - deprecatedAPI: "apiVersion: apps/v1beta1\nkind: StatefulSet" newAPI: "apiVersion: apps/v1\nkind: StatefulSet" deprecatedInVersion: "v1.9" removedInVersion: "v1.16" - deprecatedAPI: "apiVersion: apps/v1beta2\nkind: StatefulSet" newAPI: "apiVersion: apps/v1\nkind: StatefulSet" deprecatedInVersion: "v1.9" removedInVersion: "v1.16" - deprecatedAPI: "apiVersion: extensions/v1beta1\nkind: DaemonSet" newAPI: "apiVersion: apps/v1\nkind: DaemonSet" deprecatedInVersion: "v1.9" removedInVersion: "v1.16" - deprecatedAPI: "apiVersion: apps/v1beta2\nkind: DaemonSet" newAPI: "apiVersion: apps/v1\nkind: DaemonSet" deprecatedInVersion: "v1.9" removedInVersion: "v1.16" - deprecatedAPI: "apiVersion: extensions/v1beta1\nkind: ReplicaSet"

newAPI: "apiVersion: apps/v1\nkind: ReplicaSet" deprecatedInVersion: "v1.9" removedInVersion: "v1.16" - deprecatedAPI: "apiVersion: apps/v1beta1\nkind: ReplicaSet" newAPI: "apiVersion: apps/v1\nkind: ReplicaSet" deprecatedInVersion: "v1.9" removedInVersion: "v1.16" - deprecatedAPI: "apiVersion: apps/v1beta2\nkind: ReplicaSet" newAPI: "apiVersion: apps/v1\nkind: ReplicaSet" deprecatedInVersion: "v1.9" removedInVersion: "v1.16" - deprecatedAPI: "apiVersion: extensions/v1beta1\nkind: NetworkPolicy" newAPI: "apiVersion: networking.k8s.io/v1\nkind: NetworkPolicy" deprecatedInVersion: "v1.8" removedInVersion: "v1.16" - deprecatedAPI: "apiVersion: extensions/v1beta1\nkind: PodSecurityPolicy" newAPI: "apiVersion: policy/v1beta1\nkind: PodSecurityPolicy" deprecatedInVersion: "v1.10" removedInVersion: "v1.16" - deprecatedAPI: "apiVersion: apiextensions.k8s.io/v1beta1\nkind: CustomResourceDefinition" newAPI: "apiVersion: apiextensions.k8s.io/v1\nkind: CustomResourceDefinition" deprecatedInVersion: "v1.16" removedInVersion: "v1.19" - deprecatedAPI: "apiVersion: extensions/v1beta1\nkind: Ingress" newAPI: "apiVersion: networking.k8s.io/v1beta1\nkind: Ingress" deprecatedInVersion: "v1.14" removedInVersion: "v1.22" - deprecatedAPI: "apiVersion: rbac.authorization.k8s.io/v1alpha1\nkind: ClusterRole" newAPI: "apiVersion: rbac.authorization.k8s.io/v1\nkind: ClusterRole" deprecatedInVersion: "v1.17" removedInVersion: "v1.22" - deprecatedAPI: "apiVersion: rbac.authorization.k8s.io/v1alpha1\nkind: ClusterRoleList" newAPI: "apiVersion: rbac.authorization.k8s.io/v1\nkind: ClusterRoleList" deprecatedInVersion: "v1.17" removedInVersion: "v1.22" - deprecatedAPI: "apiVersion: rbac.authorization.k8s.io/v1alpha1\nkind: ClusterRoleBinding" newAPI: "apiVersion: rbac.authorization.k8s.io/v1\nkind: ClusterRoleBinding" deprecatedInVersion: "v1.17" removedInVersion: "v1.22" - deprecatedAPI: "apiVersion: rbac.authorization.k8s.io/v1alpha1\nkind: ClusterRoleBindingList" newAPI: "apiVersion: rbac.authorization.k8s.io/v1\nkind: ClusterRoleBindingList" deprecatedInVersion: "v1.17" removedInVersion: "v1.22" - deprecatedAPI: "apiVersion: rbac.authorization.k8s.io/v1alpha1\nkind: Role" newAPI: "apiVersion: rbac.authorization.k8s.io/v1\nkind: Role" deprecatedInVersion: "v1.17" removedInVersion: "v1.22" - deprecatedAPI: "apiVersion: rbac.authorization.k8s.io/v1alpha1\nkind: RoleList" newAPI: "apiVersion: rbac.authorization.k8s.io/v1\nkind: RoleList" deprecatedInVersion: "v1.17" removedInVersion: "v1.22" - deprecatedAPI: "apiVersion: rbac.authorization.k8s.io/v1alpha1\nkind: RoleBinding" newAPI: "apiVersion: rbac.authorization.k8s.io/v1\nkind: RoleBinding" deprecatedInVersion: "v1.17" removedInVersion: "v1.22" - deprecatedAPI: "apiVersion: rbac.authorization.k8s.io/v1alpha1\nkind: RoleBindingList" newAPI: "apiVersion: rbac.authorization.k8s.io/v1\nkind: RoleBindingList" deprecatedInVersion: "v1.17" removedInVersion: "v1.22" - deprecatedAPI: "apiVersion: rbac.authorization.k8s.io/v1beta1\nkind: ClusterRole" newAPI: "apiVersion: rbac.authorization.k8s.io/v1\nkind: ClusterRole" deprecatedInVersion: "v1.17" removedInVersion: "v1.22" - deprecatedAPI: "apiVersion: rbac.authorization.k8s.io/v1beta1\nkind: ClusterRoleList" newAPI: "apiVersion: rbac.authorization.k8s.io/v1\nkind: ClusterRoleList" deprecatedInVersion: "v1.17" removedInVersion: "v1.22" - deprecatedAPI: "apiVersion: rbac.authorization.k8s.io/v1beta1\nkind: ClusterRoleBinding" newAPI: "apiVersion: rbac.authorization.k8s.io/v1\nkind: ClusterRoleBinding" deprecatedInVersion: "v1.17" removedInVersion: "v1.22"

- deprecatedAPI: "apiVersion: rbac.authorization.k8s.io/v1beta1\nkind: ClusterRoleBindingList" newAPI: "apiVersion: rbac.authorization.k8s.io/v1\nkind: ClusterRoleBindingList" deprecatedInVersion: "v1.17" removedInVersion: "v1.22" - deprecatedAPI: "apiVersion: rbac.authorization.k8s.io/v1beta1\nkind: Role" newAPI: "apiVersion: rbac.authorization.k8s.io/v1\nkind: Role" deprecatedInVersion: "v1.17" removedInVersion: "v1.22" - deprecatedAPI: "apiVersion: rbac.authorization.k8s.io/v1beta1\nkind: RoleList" newAPI: "apiVersion: rbac.authorization.k8s.io/v1\nkind: RoleList" deprecatedInVersion: "v1.17" removedInVersion: "v1.22" - deprecatedAPI: "apiVersion: rbac.authorization.k8s.io/v1beta1\nkind: RoleBinding" newAPI: "apiVersion: rbac.authorization.k8s.io/v1\nkind: RoleBinding" deprecatedInVersion: "v1.17" removedInVersion: "v1.22" - deprecatedAPI: "apiVersion: rbac.authorization.k8s.io/v1beta1\nkind: RoleBindingList" newAPI: "apiVersion: rbac.authorization.k8s.io/v1\nkind: RoleBindingList" deprecatedInVersion: "v1.17" removedInVersion: "v1.22" - deprecatedAPI: "apiVersion: certmanager.k8s.io/v1alpha1\nkind: Certificate" newAPI: "apiVersion: cert-manager.io/v1\nkind: Certificate" deprecatedInVersion: "v1.15" removedInVersion: "v1.16" - deprecatedAPI: "apiVersion: certmanager.k8s.io/v1alpha1\nkind: Issuer" newAPI: "apiVersion: cert-manager.io/v1\nkind: Issuer" deprecatedInVersion: "v1.15" removedInVersion: "v1.16"

Monitor ModulesMonitor Modules
OverviewAccessing a ModuleView Logs in KibanaDownload LogsThe Grafana Dashboard AlertDefault Alert CategoriesType of AlertsAlert TypesViewing Alerts in GrafanaSetup Grafana Email Alerts
Overview
Once Installed, you can click a module to access the page displayed in the following screenshot. If you click the Workload Manager, the DetailsModulefollowing screenshot displays the corresponding page to monitor this module.
The module name displays at the top of the page and you can perform the following actions on this page:

1.
Perform one of theactions listed in the next to the name as displayed in the following screenshot:Dropdown Module
Alternately, click the dropdown from the Module Alerts page as displayed in the following screenshot:
View the Tab See the section below.Alerts Understand Dashboard AlertsAccess the TabLicense Usage
Accessing aModule
There are numerous ways for you to access a module in the CloudCenter Suite. However, your determine if you can access the module!User Levels
View Logs in Kibana
is a web interface that can be used to search and view the logs for .Kibana any of the CloudCenter Suitemodules
CloudCenter Suite log file use the standard log format:
Where relevant, modules display the user and tenant information.You can search by or when users view logs in KibanauserId tenantId .The log files support JSON format.
To view the Kibana logs, follow this procedure.

1.
2. 3.
Click the module dropdown and select from the dropdown to display the Kibana dashboard visible in the following View Logs in Kibanascreenshot.
Click > to list and filter the available logs for this module.Discover OpenFilter the list to view the required logs as visible in the following screenshot.
Download Logs
An alternative to viewing logs in Kibana is to download the log files byclicking a module and selectingDownload Logsfrom the dropdown as displayed in .the following screenshot

The Grafana Dashboard Alert
Grafana is anopen source visualization tool that allows you tocreate and edit dashboards.
Modules can create their own services to write custom alerts or create alerts in Grafana for services that they wish to monitor.
When alerts are generated, they are displayed in the Suite Admin's details page > tab. When you acknowledge active alerts, they are move module Alertsto the Dismissed tab and stored there for 60 days before they are deleted.
Default Alert Categories
The tab lists two categories of alerts which are driven from Grafana.Alerts
Active Alerts: Each active alert lists the following details:
A color-coded alert categoryThe alert titleclick the alert link to open the chart in Grafana using authorized credentialsAn alert count only displayed when there is more than one alertA brief description of the alertThe alert sourceThe impacted componentA snapshot of the chart in Grafana notavailable for application alertsThe timestamp when this alert was issued hovering over this timestamp displays the exact timeThe option to multi-select multiple alertes the button becomes visible when you multi-select alertsDismiss
Dismissed Alerts
Type of Alerts
Alert types are described in the following table.
Alert Type Description
Infrastructure These alerts pertain to network, disk, CPU, and memory usage derived from module configured Grafana dashboards.
Application These alerts are derived from application endpoints that provide the current health of the system.
Alert Types
You can filter alerts based on the type. Alert types are described in the following table.
Alert Type Color Description
Critical Red Red bar on the side. VM launch failure rate is increasing on the configured cloud.
Warning Orange The connection to the AMQP server is not stable and has been dropped t times in the last 45 minutes.

1.
2. 3.
Info Blue Updates based on endpoint reports.
Viewing Alerts in Grafana
When you access the Grafana dashboard, you will see the following sections:
: CPU usage, memory usage, and crash loops. You can alsoSystem metrics configure additional alerts in this section, refer tohttp://docs.grafana.org/alerting/rules/.
: Cluster health, deployments, nodes, pods (number of pods and pods status), containers, and jobs. You cannot configure Visualization metricsadditional alerts in this section.
To view the Grafana alerts, follow this procedure.
Click the module dropdown and selectView Alerts in Grafanafrom the dropdown to display the Grafana dashboard visible in the following screenshot.
Click > to list and filter the available alerts for this module.Dashboard ManageFilter the list to view the required alerts as visible in the following screenshot.
Setup Grafana Email Alerts

1.
2.
3.
To setup email alerts in Grafana, follow this procedure.
Use the following command to edit the configmap for Grafana:
kubectl edit configmap common-framework-grafana
Add the following block to the Grafana configmap:
grafana.ini: | [smtp] enabled = true host = smtp.gmail.com user = <your email address>@gmail.com password = <your password>
Use the following command to reload Grafana:
run kubectl delete po <grafana pod name> to reload grafana
Perform this procedure time you upgrade the Suite Admin.each