chốt chặn dây dẫn kim chọc - dịch vụ công bộ y tế
TRANSCRIPT


2
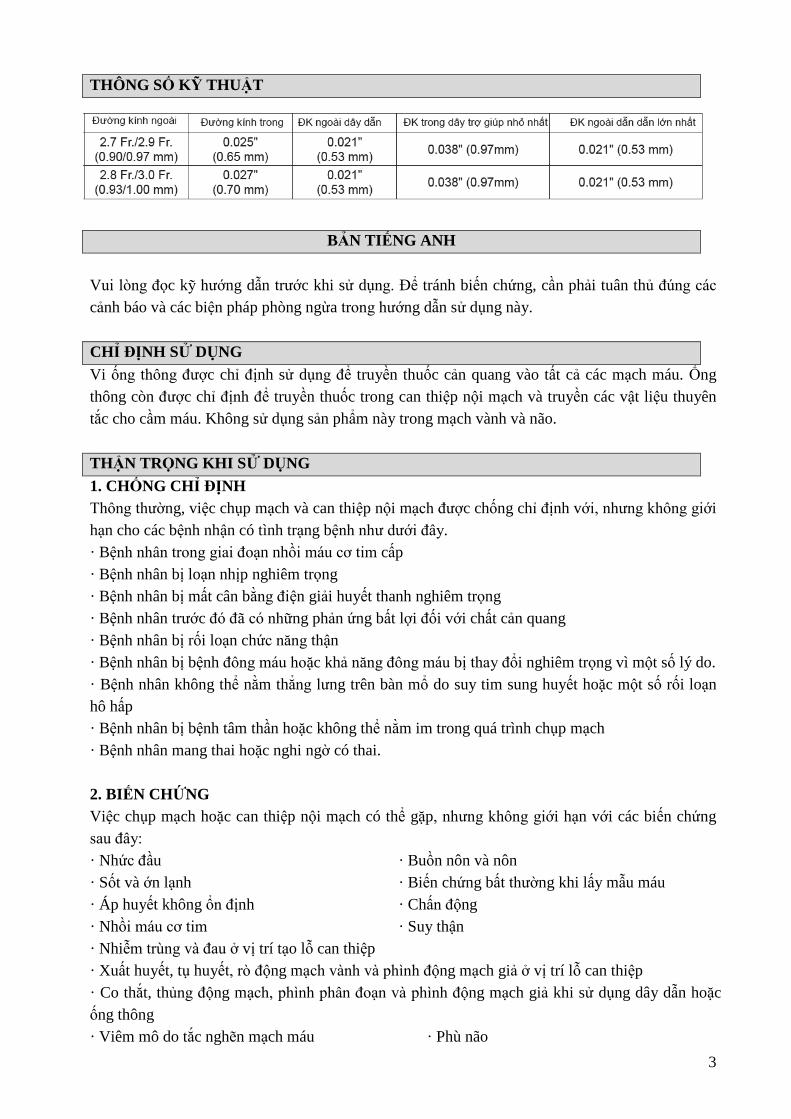
Số catalog Số lô Hạn sử dụng Tiệt trùng bằng khi Ethylene oxide
Không tái sử dụng Tham khảo HDSD Nội dung Nhà sản xuất
Không tiệt trùng
lại Tham khảo HDSD Nội
dung Nhà sản xuất
GIỚI THIỆU SẢN PHẨM Ống thông được lắp cùng một dây dẫn dùng để chụp mạch hoặc điều trị nội mạch. Ống thông có lớp phủ polymer ái nước trên bề mặt ở toàn bộ chiều dài của nó trừ phần đầu gần. Lớp phủ này được bôi trơn khi nó bị ướt. Hơn nữa, dây dẫn gồm lõi hợp kim siêu đàn hồi, bọc polyurethane, lớp phủ ái nước trên bề mặt của nó, và một điểm đánh dấu đầu xa của lõi vàng có thể giúp đầy ống thông đến mạch máu đích. Có hai loại dây dẫn có sẵn, loại tạo hình trước và loại có thể tạo hình. Có thể tạo hình đầu của dây dẫn có thể tạo hình. Khi bơm chất cản quang qua ống thông, có thể sử dụng bơm tiêm điện.
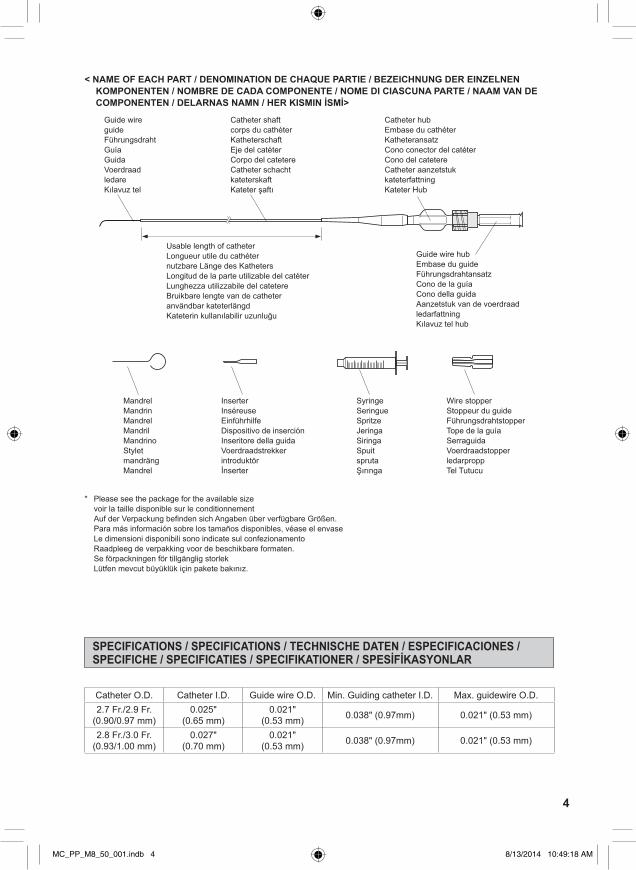
<TÊN CỦA TỪNG BỘ PHẬN>
Áp lực bơm tối đa
Chốt chặn dây dẫn Kim chọc
3
THÔNG SỐ KỸ THUẬT
BẢN TIẾNG ANH
Vui lòng đọc kỹ hướng dẫn trước khi sử dụng. Để tránh biến chứng, cần phải tuân thủ đúng các cảnh báo và các biện pháp phòng ngừa trong hướng dẫn sử dụng này. CHỈ ĐỊNH SỬ DỤNG Vi ống thông được chỉ định sử dụng để truyền thuốc cản quang vào tất cả các mạch máu. Ống thông còn được chỉ định để truyền thuốc trong can thiệp nội mạch và truyền các vật liệu thuyên tắc cho cầm máu. Không sử dụng sản phẩm này trong mạch vành và não. THẬN TRỌNG KHI SỬ DỤNG 1. CHỐNG CHỈ ĐỊNH Thông thường, việc chụp mạch và can thiệp nội mạch được chống chỉ định với, nhưng không giới hạn cho các bệnh nhận có tình trạng bệnh như dưới đây. · Bệnh nhân trong giai đoạn nhồi máu cơ tim cấp · Bệnh nhân bị loạn nhịp nghiêm trọng · Bệnh nhân bị mất cân bằng điện giải huyết thanh nghiêm trọng · Bệnh nhân trước đó đã có những phản ứng bất lợi đối với chất cản quang · Bệnh nhân bị rối loạn chức năng thận · Bệnh nhân bị bệnh đông máu hoặc khả năng đông máu bị thay đổi nghiêm trọng vì một số lý do. · Bệnh nhân không thể nằm thẳng lưng trên bàn mổ do suy tim sung huyết hoặc một số rối loạn hô hấp · Bệnh nhân bị bệnh tâm thần hoặc không thể nằm im trong quá trình chụp mạch · Bệnh nhân mang thai hoặc nghi ngờ có thai. 2. BIẾN CHỨNG Việc chụp mạch hoặc can thiệp nội mạch có thể gặp, nhưng không giới hạn với các biến chứng sau đây: · Nhức đầu · Buồn nôn và nôn · Sốt và ớn lạnh · Biến chứng bất thường khi lấy mẫu máu · Áp huyết không ổn định · Chấn động · Nhồi máu cơ tim · Suy thận · Nhiễm trùng và đau ở vị trí tạo lỗ can thiệp · Xuất huyết, tụ huyết, rò động mạch vành và phình động mạch giả ở vị trí lỗ can thiệp · Co thắt, thủng động mạch, phình phân đoạn và phình động mạch giả khi sử dụng dây dẫn hoặc ống thông · Viêm mô do tắc nghẽn mạch máu · Phù não

4
· Nhịp tim chậm · Nhồi máu não từ động mạch ngoại biên · Rối loạn hành vi · Tử vong 3. CẢNH BÁO • Xả rửa lòng ống thông trợ giúp và ống thông can thiệp siêu nhỏ (vi ống thông) liên tục bằng dung dịch nước muối heparin. Chất cản quang tồn dư hoặc cục máu đông còn lại trên bề mặt ống sẽ làm giảm độ trơn trượt, cản trở sự di chuyển của vi ống thông. Nếu sau khi xả rửa mà vẫn không đảm bảo được độ trơn bề mặt, cần phải dừng sử dụng vi ống thông, từ từ và cẩn thận rút vi ống thông ra cùng với ống thông trợ giúp can thiệp. Việc dùng lực quá mạnh khi kéo ống thông có thể làm vỡ/gãy/ bong tróc vi ống thông, khi đó cần phải gắp hết mảnh vỡ ra. • Không tạo áp lực lên ống thông hoặc đẩy dây dẫn đường qua ống thông khi ống bị kẹt hay xoắn vặn, nếu không thì có thể làm vỡ ống thông và làm tổn thương mạch máu. • Theo dõi các thao tác khi dùng bộ vi ống thông trong mạch máu bằng việc xác định vị trí của đầu ống thông/ dây dẫn đường dưới hình ảnh cản quang và thiết bị chụp mạch xóa nền có độ phân giải cao (DSA). Nếu có trở kháng trong mạch máu, không được phép đẩy hoặc rút vi ống thông cho đến khi xác định được nguyên nhân gây trở kháng bằng máy quan sát bằng hình ảnh cản quang và thiết bị chụp mạch xóa nền có độ phân giải cao (DSA). Việc tiếp tục thao tác vi ống thông và/hoặc dây dẫn đường khi có trở kháng có thể làm tổn thương mạch máu, làm hỏng ống thông hoặc dây dẫn. Nếu không thể xử lý tình huống này, cần phải rút toàn bộ hệ thống vi ống thông với ống thông trợ giúp can thiệp ra. • Không cố dùng lực để đẩy vi ống thông vào trong các mạch máu quá ngoằn ngoèo. Điều này có thể làm cho ống thông bị xoắn vặn hoặc làm tổn thương mạch máu. • Không đưa ống thông đi qua các thanh của khung giá đỡ. 4. CÁC BIỆN PHÁP PHÒNG NGỪA • Bộ vi ống thông nên được sử dụng bởi các bác sĩ thành thạo với quy trình chỉ định • Thao tác bộ vi ống thông nên được theo dõi dưới hình ảnh cản quang và thiết bị chụp mạch xóa nền có độ phân giải cao (DSA) • Sản phẩm này đã được tiệt trùng bằng khí ethylene oxide. Chỉ sử dụng một lần. Không tái sử dụng. Không tiệt trùng lại. Không tái chế. Việc tái chế có thể ảnh hưởng đến tính vô trùng, khả năng tương thích sinh học và chức năng của thiết bị. • Không sử dụng nếu bao bì hoặc sản phẩm đã bị hư hỏng hoặc bị bẩn. • Sử dụng ngay sau khi mở bao bì và thải bỏ theo các quy trình xử lý chất thải y tế tại địa phương. • Toàn bộ quá trình phẫu thuật can thiệp phải được tiến hành trong điều kiện vô trùng. • Bề mặt của bộ vi ống thông phải luôn được làm ướt bằng dùng dịch muối heparin để đảm bảo độ trơn trượt trên bề mặt. • Tham khảo hướng dẫn sử dụng về các loại thuốc và/hoặc thiết bị được sử dụng cùng với vi ống thông để đảm bảo sự tương thích và tránh làm hỏng ống thông.

5
HƯỚNG DẪN SỬ DỤNG 1.Cẩn thận lấy bộ vi ống thông bên trong dụng cụ giữ ra khỏi bao bì. 2. Dùng xi-lanh, bơm tràn dung dịch nước muối heparin vào dụng cụ giữ thông qua công hub của dụng cụ giữ để làm ướt hoàn toàn bề mặt của ống thông. (Hình 1). 3. Chầm chậm rút ống thông siêu nhỏ ra khỏi dụng cụ giữ. Nếu thấy có trở kháng, không cố gắng để rút ống thông ra, mà lần nữa bơm nước muối sinh lý có heparin vào dụng cụ giữ, rồi thử lại. THẬN TRỌNG
• Không sử dụng vi ống thông bị hỏng hoặc quan sát thấy có gì bất thường • Khi ướt, phần thân của ống thống rất trơn. Giữ ống thông ở phần hub của nó trong khi thao tác.
4. Chắc chắn bộ chuyển đổi có khóa không mở. Bơm dung dịch nước muối sinh lý có heparin vào cổng hub của dây dẫn bằng xi-lanh đầu khóa 2.5mL kèm theo (Hình 2). Để mồi ống thông đúng cách, chầm chậm bơm ít nhất 1mL dung dịch vào ống thông tới khi có hơn 10 giọt dịch chảy ra khỏi đầu ống thông. Để duy trì độ trơn trượt của bề mặt, ngâm ống thông có dây dẫn đi kèm vào chậu dung dịch muối sinh lý có heparin hoặc đặt nó vào dụng cụ giữ đã được bơm đầy dung dịch muối sinh lý có heparin. THẬN TRỌNG • Sử dụng ngay sau khi mở bao bì sản phẩm. Khi đã mở bao gói ống thông, thì
gói xi-lanh đi kèm không còn vô trùng nữa. • Mồi ống thông và dây dẫn đúng cách. Việc mồi không đúng cách có thể làm xoắn gập, tách ống thông và/ hoặc làm mất lớp ái nước trên dây dẫn.
5. Để định hình đầu dây dẫn loại có thể định hình lại, duy trì độ trơn trượt của bề mặt và cẩn thận cuộn nó quanh ngón tay hoặc bằng dụng cụ đưa dây dẫn vào (Hình 3). THẬN TRỌNG • Không định hình lại dây dẫn loại đã được định hình trước. Việc này có thể làm
hỏng dây dẫn. • Không định hình dây dẫn bằng phương pháp khác với phương pháp đã nêu ở trên. Không thao tác với dây dẫn khi nó đã bị khô, không làm nóng, định hình với kẹp hoặc móng tay. Không uốn quá mức trước và sau hay uốn phần dây dẫn đã được uốn rồi. Điều này có thể làm dây dẫn bị gãy/ tách. Lau bề mặt không được bôi trơn có thể làm bong lớp ái nước.
6. Khi định hình ống thông bằng hơi nước, luồn kim chọc định hình vào đầu xa của ống thông và nhẹ nhàng uốn nó thành hình đã định. Sau đó để đầu ống thông tiếp xúc với hơi nước trong khoảng 10 giây (Hình 4). Kiểm tra hình đã tạo ra sau khi rút kim chọc định hình.

6
THẬN TRỌNG • Không chà xát hoặc uốn cong đầu ống thông có bán kính quá nhỏ, kẹp chặt bằng kẹp hoặc nhíp, vì có thể làm hỏng lớp phủ bề mặt, phá hủy thân ống thông và/hoặc biến dạng ống thông. • Đặt đầu ống thông cách nguồn hơi nước dưới 2 cm có thể làm hỏng lớp phủ bề mặt hoặc đầu ống thông. • Tạo hình lại ống thông quá mức có thể làm hỏng lớp phủ bề mặt hoặc đầu ống thông. • Khi tạo hình bằng hơi nước, cần phải cẩn thận kẻo bị bỏng. • Không luồn kim chọc định hình vào cơ thể bệnh nhân • Không dùng tay kéo căng đầu ống thông hoặc uốn quá mức khi tạo hình mà không dùng kim chọc định hình. Việc này có thể làm phá hủy thân ống và/hoặc biến dạng ống thông.
7. Đưa ống thông trợ giúp can thiệp vào mạch máu. Gắn van cầm máu kiểu xoay (van Tuhoy-Borst) vào ống thông trợ giúp can thiệp và tiếp tục rửa ống thông bằng nước muối sinh lý có heparin. Luồn ống thông siêu nhỏ vào dây dẫn đi kèm qua van cầm máu trong ống thông trợ giúp can thiệp và đẩy tới đầu xa của ống thông trợ giúp can thiệp. Nếu khó luồn ống thông siêu nhỏ, nới lỏng dụng cụ chuyển đổi có khóa, từ từ kéo dây dẫn trở ra khoảng 20mm so với đầu ống thông để làm thẳng đầu ống thông, sau đó cẩn thận luồn ống thông trở lại, tránh làm xoắn gập ống thông (hình 5-2). Sau khi đầu ống thông đã ở trong cổng hub ống thông trợ giúp can thiệp, từ từ đẩy dây dẫn đường và siết lại dụng cụ chuyển đổi có khóa. CẢNH BÁO • Không thao tác và/hoặc rút vi ống thông qua đầu kim tiêm kim loại
hoặc que nong kim loại vì có thể làm mất nước ái nước, làm hỏng và/hoặc tách ống thông. • Nếu ống thông trợ giúp can thiệp khít với khóa ba chạc, không khóa khóa ba chạc có ống thông siêu nhỏ bên trong ống thông trợ giúp can thiệp. Ống thông siêu nhỏ này có thể bị vỡ. • Đảm bảo rằng ống thông trợ giúp can thiệp không trượt ra ngoài mạch máu. Nếu ống thông trợ giúp can thiệp phải rút ra khỏi mạch máu khi vi ống thông và/hoặc dây dẫn di chuyển thì có thể làm hỏng ống thông.
THẬN TRỌNG • Không vặn quá chặt van cầm máu kiểu xoay trên vi ống thông, hay thao tác vi ống thông qua van đã được vặn chặt vì có thể làm hỏng ống thông. • Nếu có lực cản, không cố đẩy vi ống thông vào ống thông can thiệp vì có thể làm hỏng ống thông. • Không vừa đẩy vi ống thông vừa rút dây dẫn ở bên trong nó vì có thể gây ra gập gãy ở đoạn gần và đoạn xa ống thống . Nếu đoạn xa của vi ống thông đã được luồn thông qua ống nối ngoài của ống trợ giúp can thiệp, cần phải rút dây dẫn từ từ và cẩn thận đẩy ống thông.

7
8. Cẩn thận đẩy ống thông siêu nhỏ qua ống thông trợ giúp can thiệp tới khi nó chạm tới vị trí mong muốn. Ở nhánh rẽ, quay cổng hub của dây dẫn sao cho đầu góc của dây dẫn chỉ theo hướng mong muốn (Hình 5-1). Nếu quan sát thấy việc chọn mạch phức tạp, từ từ kéo dây dẫn ra, cách đầu ống thông khoảng 20mm để làm thẳng đầu ống thông (Hình 5-2). CẢNH BÁO • Theo dõi đường đi của vi ống thông trong mạch máu bằng cách xác
định vị trí của đầu ống thống/ dây dẫn dưới hình ảnh cản quang có độ phân giải cao và hình ảnh chụp mạch DSA. Nếu có lực cản trong mạch máu, không được phép đẩy hoặc rút vi ống thông cho đến khi xác định được nguyên nhân. Thao tác vi ống thông và/hoặc dây dẫn khi có lực cản có thể làm tổn thương mạch máu, làm hỏng ống thông hoặc dây dẫn. Nếu tình trạng này không được giải quyết, rút toàn bộ hệ thống ống thông hoặc dây dẫn kèm ống thông trợ giúp can thiệp ra. • Khi đẩy vi ống thông vào mạch ngoại biên, kéo nhẹ nó trở lại dưới hình ảnh cản quang mỗi lần nó được đẩy vào, để đảm bảo rằng vi ống thông không bị đẩy quá xa đến mức không thể kéo nó lại. • Nếu thao tác vi ống thông trong mạch không có dây dẫn, có thể làm tổn thương mạch máu. Khi luồn lại dây dẫn vào ống thông, cần phải cẩn thận khi luồn dây dẫn mà vẫn đảm bảo thấy vị trí dây dẫn dưới hình ảnh cản quang và chụp mạch DSA. Mạch máu có thể bị tổn thương nếu dịch chuyển nhanh và bất hợp lý.
9. Khi đẩy vi ống thông đến vị trí mong muốn, có thể điều chỉnh và gắn đầu dây nhô ra từ đầu ống thông vào chốt chặn dây dẫn. Đặt phần trượt của chốt chặn vào dây dẫn ở khoảng giữa đầu hub ống thông và đầu hub dây dẫn. Tháo dây dẫn ra khỏi đầu hub và điều chỉnh chiều dài phần đầu nhô ra. Trượt chốt chặn vào trong cổng hub ống thông để cố định dây dẫn (Hình 6). THẬN TRỌNG • Không dịch chuyển dây dẫn khi đã cố định chốt chặn trên cổng hub ống
thông. Nếu dịch chuyển dây dẫn trong tình huống như vậy, lớp ái nước và lớp nhựa trên dây dẫn có thể bị bong tróc.
10. Khi đã chạm đến vị trí mong muốn, tháo dây dẫn khỏi vi ống thông. THẬN TRỌNG • Nếu thấy có trở kháng khi rút dây dẫn, không cố gắng rút ra. Việc này báo
hiệu việc bôi trơn dây dẫn chưa đủ. Bơm nước muối sinh lý có heparin vào ống thông lần nữa. Nếu có bất kỳ lực cản nào trong khi rút dây dẫn, không cố thực hiện. Việc rút dây dẫn không có trở kháng có thể làm vi ống thông bị gập. Cẩn thận rút dây dẫn ra cùng với ống thông. • Rửa sạch máu bám dính trên dây dẫn đã rút ra trong bể chứa dung dịch muối heparin. Nếu còn vết máu sót lại, cần phải lau sạch dây dẫn một lần bằng gạc thấm dung dịch muối heparin. Máu còn dính lại trên dây dẫn có thể ảnh hưởng đến độ trơn trượt của bề mặt và tạo ra lực cản khi luồn vào vi ống thông.

8
11. Trước khi đưa vật liệu hoặc các tác nhân gây tắc mạch khác vào, từ từ bơm một lượng nhỏ chất cản quang vào ống thông bằng xi-lanh và kiểm tra dưới hình ảnh cản quang và chụp mạch DSA để biết chất đó đã ra khỏi đầu vi ống thông chưa. Khi sử dụng các vật liệu thuyên tắc mạch và thuốc, sử dụng chúng theo đúng hướng dẫn để đảm bảo sự tương thích với ống thông. Trong trường hợp sử dụng nhiều loại vật liệu thuyên tắc mạch khác nhau, nên đổi vi ống thông trong mỗi lần bơm vật liệu. CẢNH BÁO • Nếu trở kháng tăng lên khi bơm vật liệu gây tắc mạch, cần thay vi ống
thông mới. Nếu không có thể làm vỡ ống thông, dẫn đến tổn thương mạch máu. • Nếu không thấy chất cản quang thoát ra, khả năng ống thông đã bị gập. Nếu ống thông không hết gập sau khi kéo ngược lại, thì phải thay ống thông mới. Không cố gắng làm ống thông hết gập bằng cách luồn dây dẫn hoặc bơm truyền có áp lực. Việc bắt đầu đưa các vật liệu hoặc tác nhân thuyên tắc mạch vào mà không làm ống thông hết gập hoặc làm bằng cách luồn dây dẫn hoặc bơm bơm dịch có thể làm ống thông bị gãy/ gập/tách, dẫn đến làm hỏng mạch máu. • Ma sát giữa thành vi ống thông và vật liệu thuyên tắc mạch có thể làm đẩy ống thông, dẫn đến tổn thương thành mạch. Để phòng tránh việc này, làm chùng ống thông bằng cách kéo ngược trở lại một cách nhẹ nhàng và giữ chặt.
THẬN TRỌNG • Nếu trở kháng tăng lên khi bơm truyền, thì có thể ống thông đã bị tắc do thuốc hoặc chất cản quang được bơm vào hoặc do cục máu đông. Dừng bơm ngay lập tức và thay vi ống thông mới. • Không sử dụng xi-lanh 2,5mL đi kèm để bơm thuốc cản quang, các vật liệu thuyên tắc mạch hoặc các thuốc khác. Sử dụng xi-lanh 2,5mL để bơm áp lực cao có thể làm hỏng xi-lanh hoặc làm bật xi-lanh ra khỏi cổng hub ống thông. • Khi đưa các vật liệu thuyên tắc mạch vào, không sử dụng dây dẫn đi kèm như một dụng cụ hỗ trợ. Điều này có thể làm các vật liệu thuyên tắc chạy vào bên trong lòng ống thông. • Khi dùng bơm tiêm điện, cần tuân theo các hướng dẫn bên dưới trong “Hướng dẫn sử dụng Bơm tiêm điện với Ống thông”. • Sử dụng dung môi hữu cơ có thể làm hỏng vi ống thông. • Khi sử dụng vật liệu thuyên tắc mạch, cần phải sử dụng vật liệu và các thiết bị dẫn có kích thước đường kính không quá 0,018" (0,46 mm). • Trong trường hợp sử dụng vật liệu thuyên tắc mạch và thiết bị hỗ trợ phù hợp với ống thông có đường kính trong là 0,016" (0,41 mm) hoặc nhỏ hơn, thiết bị hỗ trợ có thể di chuyển trên vật liệu gây tắc mạch bên trong lòng ống thông vì khoảng hở rộng giữa đường kính ngoài của thiết bị và đường kính trong của ống thông.

9
12. Khi luồn vi ống thông đi xa hơn vào các mạch máu khác, cần bơm đủ dung dịch muối heparin vào ống thông này. Nếu gặp lực cản khi luồn dây dẫn, ngừng đẩy dây dẫn và thay mới. Trong trường hợp khó luồn dây dẫn vào cổng hub của ống thông, thì cần phải luồn đầu dây dẫn bằng cách xoay dây dẫn hoặc xoay cổng hub ống thông sang trái và phải. CẢNH BÁO Khi luồn lại dây dẫn vào vi ống thông, cẩn thận đẩy dây dẫn nhưng vẫn
phải đảm bảo nhìn thấy vị trí đầu dây dẫn dưới hình ảnh cản quang và chụp mạch DSA. Nếu luồn nhanh và bất hợp lý, ống thông có thể bị gãy/vỡ/ tách và làm tổn thương mạch máu.
13. Khi hoàn thành thủ thuật, cẩn thận rút vi ống thông ra. CẢNH BÁO Nếu có lực cản, thì không dùng lực để rút vi ống thông. Rút vi ống thông
ra một cách từ từ và cẩn thận cùng với ống thông trợ giúp can thiệp. Dùng lực quá mạnh khi rút vi ống thông có thể làm vỡ/tách ống thông, khi đó cần phải gắp hết mảnh vỡ ra
Hướng dẫn Sử dụng Bơm tiêm điện với Ống thông Bơm tiêm điện có thể được sử dụng để truyền chất cản quang qua vi ống thông. Cần phải tuân thủ theo đúng các cảnh báo và lưu ý bên dưới. Tốc độ bơm phụ thuộc vào các yếu tố như độ nhớt của chất cản quang. Độ nhớt thay đổi theo loại và nhiệt độ của chất cản quang, model và thông số thiết lập bơm tiêm điện và cách nối bơm với vi ống thông. Tham khảo giá trị tốc độ bơm bên dưới. CẢNH BÁO • Không sử dụng Bơm tiêm điện để truyền các tác nhân khác không
phải chất cản quang vì có thể làm tắc vi ống thông. • Áp lực bơm không được cao hơn áp lực bơm truyền tối đa nêu bên dưới, áp lực bơm truyền tối đa nêu bên dưới tương ứng với đường kính ngoài của đầu vi ống thông. Nếu cao hơn, có thể làm vỡ ống thông.
Đường kính ngoài của ống thông Áp lực bơm truyền tối đa 2.7 Fr. 5171 kPa (750 psi) 2.8 Fr. 6205 kPa (900 psi)
• Dưới hình ảnh cản quang và máy chụp mạch DSA, bơm một lượng nhỏ chất cản quang bằng xi-lanh và chắc chắn chất cản quang chảy ra khỏi đầu ồng thông trước khi sử dụng bơm. • Nếu quan sát thấy đường kính ngoài của ống thông bị giãn nở trong quá trình bơm truyền, thì có thể đã vượt quá giới hạn áp lực tối đa. Trong trường hợp đó, dừng bơm ngay lập tức. • Khi muốn cố định vi ống thông vào một vị trí, hãy cố định nó bằng cổng hub sao cho thân ống thông không bị hỏng. Không dùng lực giữ chặt thân của vi ống thông, điều này có thể khiến nó bị gãy.
THẬN TRỌNG • Nếu vi ống thông bị gãy hoặc uốn gập, cần thay ống thông mới. • Gắn bơm tiêm điện vào ống thông bằng ống nối dài chống áp lực. • Khi luồn lại dây dẫn sau khi chụp mạch, xối rửa sạch lòng của vi ống thông bằng dung dịch muối heparin.

10
SỐ LIỆU THAM KHẢO 1. Sử dụng bơm tiêm 2. Điều kiện và thiết lập bơm tiêm
MARK V (MEDRAD) Nhiệt độ chất cản quang…………………………. 37oC Giới hạn/Định mức áp lực bơm………………………….4137 kPa (600 psi),5171 kPa (750 psi), 6205 kPa (900 psi) Tốc độ bơm…………………………. mL/giây Gia tăng tuyến tính theo giây……………………0,3 giây
3. Phương pháp và kết quả Giá trị thể tích bơm vào sẽ bằng ba lần giá trị tốc độ bơm đã thiết lập. Trong trường hợp thay đổi điều kiện, gồm cả thay đổi độ nhớt của chất cản quang thì sẽ không đáp ứng thể tích bơm vào.
Đường kính
ngoài vi ống
thông
Độ dài hữu dụng của vi ống
thông (cm)
Chất cản quang
Hàm lượng i-ốt (mg/mL)
Độ nhớt (cp)
Điều kiện đã thiết lập
Tốc độ bơm thực tế (mL/giây)
Tốc độ bơm
(mL/giây)
Khối lượng (mL)
4137 kPa (600 psi)
5171 kPa (750 psi)
6205 kPa (900 psi)
2,7/2,9Fr.(0,90/0,97m
m)
100 lopamidol 300 4,4 6,0 20 2,8 3,5 - 370 9,1 3,0 10 1,9 2,2 -
110 lopamidol 300 4,4 6,0 20 2,6 3,4 - 370 9,1 3,0 10 1,7 2,0 -
130 lopamidol 300 4,4 6,0 20 2,3 3,0 - 370 9,1 3,0 10 1,5 1,8 -
2,8/3,0Fr.
(0,93/1,00mm)
100 lopamidol 300 4,4 6,0 20 3,5 4,0 4,6 370 9,1 6,0 20 2,3 2,8 3,1
110 lopamidol 300 4,4 6,0 20 3,3 3,9 4,4 370 9,1 6,0 20 2,1 2,5 3,0
130 lopamidol 300 4,4 6,0 20 3,0 3,5 3,9 370 9,1 6,0 20 1,9 2,3 2,6
BIỆN PHÁP PHÒNG NGỪA KHI BẢO QUẢN Tránh tiếp xúc với nước, ánh sáng mặt trời, nhiệt độ và độ ẩm cao khi bảo quản.

11

1
Catalogue numberRéférence du catalogueBestellnummerNúmero de catálogoCodice prodottoCatalogus nummerArtikelnummerÜrün kodu
Do not reuseNe pas réutiliserNicht zur WiederverwendungNo reutilizarMonousoNiet opnieuw gebruikenIngen återanvändningTek kullanımlık
Sterilized using ethylene oxideStérilisé à l’oxyde d’éthylèneSterilisation mit EthylenoxidEsterilizado con óxido de etilenoSterilizzato con ossido di etileneGesteriliseerd met ethyleenoxideSteriliserad med etylenoxidEtilen Oksitle sterilize edilmiştir
Batch codeNuméro de lotChargenbezeichnungNúmero de loteNumero di lottoLotnummerBatchkodLot numarası
Use by dateA utiliser jusqueVerwendbar bisCaducidadUtilizzare entroGebruiken voorAnvändes föreSon kullanım tarihi
ContentsContenuStückUnidadesUnitàStuksStyckİçindekiler
ManufacturerFabricantHerstellerFabricanteFabbricanteFabrikantTillverkareÜretici firma
Consult instructions for useLire le mode d’emploiGebrauchsanweisung beachtenConsulte las instrucciones de usoConsultare le istruzioni per l’usoDe gebruiksaanwijzing raadplegenLäs bruksanvisningenKullanma talimatına başvurunuz.
Do not use if package is damagedNe pas utiliser si l’emballage est endommagéInhalt beschädigter Packung nicht verwendenNo usar si el paquete está dañadoNon utilizzare se la confezione risulta danneggiataNiet gebruiken wanneer de verpakking beschadigd isAnvänd inte om förpackningen är skadadPaket hasarlıysa kullanmayınız
Inner DiameterDiamètre interneInneren DiameterDiámetro internoDiametro InternoInwendige diameterInner diameterIç çap
Maximum injection pressurePression maximale d’injectionMaximale InjektionsdruckPresión máxima de inyecciónMassima pressione di iniezioneMaximale injectiedrukMaximalt injektionstryckEn yüksek enjeksiyon basıncı
Do not resterilizeNe pas restériliserNicht wieder sterilisierenNo reesterilizarNon risterilizzareNiet hersteriliserenFår ej omsteriliserasYeniden sterilize etmeyin
Radiopaque markerMarqueur radiopaqueRöntgendichter Markermarcador radioopacoMarker radioopacoRadio-opake merkerRadioopak markörRadyopak işaret
MC_PP_M8_50_001.indb 1 8/13/2014 10:49:17 AM

2
DESCRIPTION OF COMPONENTSThe catheter assembled with the guide wire is for angiographic or intravascular therapy. The catheter has a hydrophilic polymer coating on the surface over its entire length except its proximal end. The coating gives it lubricity when it is wet. Furthermore, the guide wire consists of super elastic alloy core, polyurethane jacket, hydrophilic coating on its surface, and a gold coil distal tip marker can help to advance the catheter to target vessels. There are two types of guide wire available, pre-shaped type and shapeable type. Shapeable type guide wire tip can be reshaped. When infusing a contrast media through the catheter, a power injector can be used.
DESCRIPTION DES COMPOSANTSCe cathéter associé à un guide est destiné à l’angiographie et à la thérapie intravasculaire. Le cathéter est pourvu d’un revêtement de surface en polymère hydrophile sur toute sa longueur, à l’exception de l’extrémité proximale. Le revêtement manifeste son pouvoir lubrifiant que lorsqu’il est humide. Le guide se compose d’une âme en alliage hautement élastique, d’une enveloppe en polyuréthane, d’un revêtement hydrophile en surface et d’un marqueur de l’extrémité distale en or qui aide à avancer le cathéter vers les vaisseaux cibles. Deux types de guide sont disponibles: un type préformable et un type préformé. Le guide de type préformable permet de profiler l’extrémité. Un injecteur automatique peut être utilisé lors de l’injection d’un produit de contraste.
BESCHREIBUNG DER KOMPONENTENDieses Kathetersysytem zur Durchführung von Angiographien und intravaskulären Therapien setzt sich zusammen aus einem Mikro-Katheter und einem koaxialen Führungsdraht. Die Oberfläche des Katheters weist über die gesamte Länge außer am proximalen Ende eine Beschichtung aus hydrophilem Polymer auf, die im nassen Zustand eine hohe Gleitfähigkeit des Katheters gewährleistet. Der Führungsdraht besteht aus einem hochelastischen Kern mit Polyurethan Ummantelung und hydrophiler Oberflächenbeschichtung. Ein Goldspiralenmarker am distalen Ende des Führungsdrahtes erleichtert die Platzierung im Zielgefäß. Der Führungsdraht ist in zwei verschiedenen Versionen verfügbar, als vorgeformte Version und als verformbare Version, bei der die Spitze geformt werden kann. Zur Infusion von Kontrastmitteln über den Katheter kann ein Power Injektor verwendet werden.
DESCRIPCIÓN DE LOS COMPONENTESEste catéter, con guía incorporada, es apto para angiografías y para la terapia intravascular. El catéter está cubierto con un polímero hidrófilo a lo largo de toda la superficie excepto en el extremo proximal. Esta capa le procura lubricidad cuando está húmeda. Además, el núcleo de la guía se compone de una aleación altamente elástica, una camisa de poliuretano y una capa hidrófila en la superficie. Y una punta con marcador de oro espiral en el extremo que sirve de ayuda para llegar hasta los vasos deseados. Hay dos tipos de guía disponibles, tipo preformada y tipo preformable. En el tipo de guía preformable, la punta puede ser moldeada. Cuando se hace una infusión de medios de contraste mediante el catéter, puede usarse un inyector automático.
DESCRIZIONE DEI COMPONENTIIl catetere è indicato per l’angiografia e per la terapia intravascolare, in associazione con una guida. Il catetere ha un rivestimento superficiale in polimero idrofilo per tutta la sua lunghezza ad eccezione della porzione prossimale. Tale rivestimento fornisce viscosità al catetere quando questo viene inumidito. La guida è costituita da un’anima in lega altamente elastica, di un primo rivestimento in poliuretano e di un rivestimento superficiale idrofilo. Il marker radiopaco è costituito da una spirale in oro posizionata sulla porzione distale della punta, che permette al catetere a sistema coassiale di raggiungere i vasi prescelti. Sono disponibili due tipi di guida: il tipo “preformato” e il tipo “preformabile”. A quest’ultimo tipo di guida è possibile modellare la punta. Per infondere il mezzo di contrasto attraverso il catetere, è possibile utilizzare un iniettore automatico.
BESCHRIJVING VAN DE COMPONENTENDe catheter gemonteerd met voerdraad is bestemd voor angiografie en intravasculaire therapie. De catheter is over zijn volledige lengte, het proximale einde uitgezonderd, bedekt met een hydrofiele polymere coating. De coating geeft de catheter een hoge gladheid zodra hij bevochtigd wordt. De voerdraad heeft een zeer elastische kern, een polyurethaan beschermmantel, bedekt met een hydrofiele coating en een gouden spiraalvormige distale tip marker die het voortbewegen van de catheter tot in de bedoelde bloedvaten vergemakkelijkt. Er zijn twee types voerdraden verkrijgbaar, het voorgevormde type en het vervormbare type. De tip van de vervormbare voerdraad kan opnieuw in vorm gebracht worden. Wanneer contrastvloeistof via de catheter wordt toegediend, kan een injectiesysteem onder druk gebruikt worden.
MC_PP_M8_50_001.indb 2 8/13/2014 10:49:17 AM

3
BESKRIVNING AV DELARDenna kateter med ledare är avsedd för angiografi och intravaskulär behandling. Katetern har en vattenuppsugande polymerbeläggning på hela ytan, med undantag av den proximala änden. Beläggningen gör att den är hal när den är fuktig. Dessutom har ledaren en ytterst elastisk legeringskärna, polyuretanfodral, vattenuppsugande ytbeläggning och en distal spetsmarkör i guldspiral som hjälper till att föra fram katetern till målkärlet. Det finns två typer av ledare tillgängliga; redan formade och formbara ledare. På formbara ledare kan man forma spetsen. En injektor kan användas vid infusion av kontrastmedel.
TANIMKılavuz telle kurulu kateter anjiyografi veya intravasküler tedavi içindir. Kateterin proksimal uç dışında tüm uzunluğu boyunca yüzeyinde bir hidrofilik polimer kaplama vardır. Kaplama ıslak olduğunda kayganlık sağlar. Kılavuz tel süper elastik alaşım kor, poliüretan ceket, yüzeyde hidrofilik kaplama ve altın sarmal distal uç işaretine sahiptir ve kateteri hedef damarlara ilerletmeye yardımcı olabilir. Önceden şekillendirilmiş tip ve şekillendirilebilir tip olarak iki tip kılavuz tel mevcuttur. Şekillendirilebilir tip kılavuz tel ucu tekrar şekillendirilebilir. Kateter içinden kontrast madde infüzyonu yaparken elektrikli bir enjektör kullanılabilir.
MC_PP_M8_50_001.indb 3 8/13/2014 10:49:17 AM
4
< NAME OF EACH PART / DENOMINATION DE CHAQUE PARTIE / BEZEICHNUNG DER EINZELNEN KOMPONENTEN / NOMBRE DE CADA COMPONENTE / NOME DI CIASCUNA PARTE / NAAM VAN DE COMPONENTEN / DELARNAS NAMN / HER KISMIN İSMİ>
* Please see the package for the available size voir la taille disponible sur le conditionnement Auf der Verpackung befinden sich Angaben über verfügbare Größen. Para más información sobre los tamaños disponibles, véase el envase Le dimensioni disponibili sono indicate sul confezionamento Raadpleeg de verpakking voor de beschikbare formaten. Se förpackningen för tillgänglig storlek Lütfen mevcut büyüklük için pakete bakınız.
Guide wireguideFührungsdrahtGuíaGuidaVoerdraadledareKılavuz tel
Catheter shaftcorps du cathéterKatheterschaftEje del catéter Corpo del catetereCatheter schachtkateterskaftKateter şaftı
Catheter hubEmbase du cathéterKatheteransatzCono conector del catéter Cono del catetereCatheter aanzetstukkateterfattningKateter Hub
Guide wire hubEmbase du guideFührungsdrahtansatzCono de la guíaCono della guidaAanzetstuk van de voerdraadledarfattningKılavuz tel hub
Usable length of catheterLongueur utile du cathéternutzbare Länge des KathetersLongitud de la parte utilizable del catéterLunghezza utilizzabile del catetereBruikbare lengte van de catheteranvändbar kateterlängdKateterin kullanılabilir uzunluğu
MandrelMandrinMandrelMandrilMandrinoStyletmandrängMandrel
InserterInséreuseEinführhilfeDispositivo de inserciónInseritore della guidaVoerdraadstrekkerintroduktörİnserter
SyringeSeringueSpritzeJeringaSiringaSpuitsprutaŞırınga
Wire stopperStoppeur du guideFührungsdrahtstopperTope de la guíaSerraguidaVoerdraadstopperledarproppTel Tutucu
SPECIFICATIONS / SPECIFICATIONS / TECHNISCHE DATEN / ESPECIFICACIONES / SPECIFICHE / SPECIFICATIES / SPECIFIKATIONER / SPESİFİKASYONLAR
Catheter O.D. Catheter I.D. Guide wire O.D. Min. Guiding catheter I.D. Max. guidewire O.D.2.7 Fr./2.9 Fr.
(0.90/0.97 mm)0.025"
(0.65 mm)0.021"
(0.53 mm) 0.038" (0.97mm) 0.021" (0.53 mm)
2.8 Fr./3.0 Fr.(0.93/1.00 mm)
0.027"(0.70 mm)
0.021"(0.53 mm) 0.038" (0.97mm) 0.021" (0.53 mm)
MC_PP_M8_50_001.indb 4 8/13/2014 10:49:18 AM

5
Cathéterdiamètre externe
Cathéterdiamètre interne
Diamètre externe du guide
Diamètre interne minimum du cathéter guide
Diamètre externe max. du guide
2.7 Fr./2.9 Fr.(0.90/0.97 mm)
0.025" (0.65 mm)
0.021" (0.53 mm) 0.038" (0.97 mm) 0.021" (0.53 mm)
2.8 Fr./3.0 Fr.(0.93/1.00 mm)
0.027"(0.70 mm)
0.021" (0.53 mm) 0.038" (0.97 mm) 0.021" (0.53 mm)
Katheter Außen-
durchmesser
Katheter Innen-
durchmesser
Führungsdraht Außen-
durchmesser
Mindestinnendurchmesser Führungskatheter
Max. Führungsdraht-Außendurchmesser
2.7 Fr./2.9 Fr.(0.90/0.97 mm)
0.025" (0.65 mm)
0.021"(0.53 mm) 0.038" (0.97mm) 0.021" (0.53 mm)
2.8 Fr./3.0 Fr.(0.93/1.00 mm)
0.027"(0.70 mm)
0.021"(0.53 mm) 0.038" (0.97mm) 0.021" (0.53 mm)
Diámetroexterior
del catéter
DiámetroInterior
del catéter
Diámetroexterior de la
guía
Diámetro interior mínimo del catéter guía
Diámetro externo máx. de la guía
2.7 Fr./2.9 Fr.(0.90/0.97 mm)
0.025"(0.65 mm)
0.021"(0.53 mm) 0.038" (0.97 mm) 0.021" (0.53 mm)
2.8 Fr./3.0 Fr.(0.93/1.00 mm)
0.027"(0.70 mm)
0.021"(0.53 mm) 0.038" (0.97 mm) 0.021" (0.53 mm)
Diametroesterno del
catetere
Diametrointerno delcatetere
Diametroesternoguida
Diametro interno minimo catetere guida
Diametro externo massimo della guida
2.7 Fr./2.9 Fr.(0.90/0.97 mm)
0.025" (0.65 mm)
0.021" (0.53 mm) 0.038" (0.97mm) 0.021" (0.53 mm)
2.8 Fr./3.0 Fr.(0.93/1.00 mm)
0.027"(0.70 mm)
0.021" (0.53 mm) 0.038" (0.97mm) 0.021" (0.53 mm)
Uitwendigediametercatheter
Inwendigediametercatheter
Uitwendigediameter
voerdraad
Minimum inwendige diameter guiding catheter
Max. uitwendige diameter voerdraad
2.7 Fr./2.9 Fr.(0.90/0.97 mm)
0.025" (0.65 mm)
0.021" (0.53 mm) 0.038" (0.97mm) 0.021" (0.53 mm)
2.8 Fr./3.0 Fr.(0.93/1.00 mm)
0.027"(0.70 mm)
0.021" (0.53 mm) 0.038" (0.97mm) 0.021" (0.53 mm)
Kateter Y.D. Kateter I.D. Ledare Y.D. Ledarkateter minsta innerdiameter
Maximal guide wire ytterdiameter
2.7 Fr./2.9 Fr.(0.90/0.97 mm)
0.025" (0.65 mm)
0.021" (0.53 mm) 0.038" (0.97mm) 0.021" (0.53 mm)
2.8 Fr./3.0 Fr.(0.93/1.00 mm)
0.027"(0.70 mm)
0.021" (0.53 mm) 0.038" (0.97mm) 0.021" (0.53 mm)
Kateter Dış Çapı Kateter İç Çapı Kılavuz tel Dış Çap
Min. Kılavuz kateter İç Çapı Maks. kılavuz tel Dış Çap
2.7 Fr./2.9 Fr.(0.90/0.97 mm)
0.025 inç (0.65 mm)
0.021 inç (0.53 mm) 0.038 inç (0.97mm) 0.021 inç (0.53 mm)
2.8 Fr./3.0 Fr.(0.93/1.00 mm)
0.027 inç(0.70 mm)
0.021 inç (0.53 mm) 0.038 inç (0.97mm) 0.021 inç (0.53 mm)
MC_PP_M8_50_001.indb 5 8/13/2014 10:49:18 AM

6
ENG
LISH
Please read all instructions prior to use. To avoid complications, observe all warnings and precautions throughout these instructions.
INDICATIONThis MICRO CATHETER SYSTEM is intended for the infusion of contrast media into all blood vessels. The catheter is also intended for drug infusion in intra-arterial therapy and for the infusion of embolic materials for haemostasis. Do not use this product in coronary and cerebral blood vessels.
CAUTIONS FOR USE1. CONTRAINDICATIONS
· Generally, angiography or intervascular therapy is contraindicated for, but not limited to, the patients listed below.
· Patients in the acute phase of myocardial infarction · Patients with serious arrhythmia · Patients with serious serum electrolyte imbalance · Patients who in prior procedures have developed an adverse reaction to the injection of contrast media · Patients with renal dysfunction · Patients with coagulopathy or those whose blood has suffered a serious change in coagulation capability for
some reasons · Patients who cannot lie on their back on the operating table because of congestive heart failure or some
respiratory disorder · Patients with mental disease or those who are not expected to lie quietly during angiography · Patients who are pregnant or are supposed to be pregnant
2. COMPLICATIONSAngiography or intravascular therapy may be accompanied by, but not limited to, the following: · Headache · Nausea and vomiting · Fever and chill · Abnormality in blood sampling tests · Blood pressure drifting · Shock · Myocardial infarction · Renal failure · Infection and pain at the puncture site · Haemorrhage, haematoma, arterio-venous fistula and false aneurysm at the puncture site · Spasm, artery perforation, dissecting aneurysm and false aneurysm with the use of a guide wire or catheter · Inflammation with embolic material · Cerebral oedema · Bradycardia · Cerebral infarction from peripheral artery occlusion · Behavior disorder · Death
3. WARNINGS • Flush the lumen of the guiding catheter and the micro catheter system continuously with heparinized
saline solution. Residual contrast media or blood clots on the micro catheter system surface reduce its lubricity, preventing smooth catheter movement. If flushing fails to restore surface lubricity, discontinue the use of the micro catheter system and remove it slowly and carefully together with the guiding catheter. Excessive force used in pulling the catheter may cause breakage/rupture/separation, which may necessitate retrieval of fragments.
• Do not pressurize the catheter or advance the guide wire through the catheter when the catheter is kinked or blocked. This may result in breakage of the catheter and damage to the vessels.
• Monitor the manipulation of the micro catheter system in the vessel by confirming the position of the catheter tip / guide wire under high resolution fluoroscopy and a digital subtraction angiography monitor (DSA). If any resistance is felt in the vessel, do not advance or withdraw the micro catheter system until the cause of resistance is determined under high resolution fluoroscopy and DSA. Manipulating the catheter and/or the guide wire against resistance may result in damaging the vessel, the catheter or the guide wire. If the situation is not solved, withdraw the entire system of the catheter or the guide wire with the guiding catheter.
• Do not advance the micro catheter system by forcing in extremely tortuous vessels. This may result in kink of the catheter or damage to the vessel.
• Do not pass the catheter through a stent strut.4. PRECAUTIONS
• The micro catheter system should be used by a physician who is familiar to the intended procedures.• Manipulation of the micro catheter system should be monitored under high resolution fluoroscopy and DSA.
ENGLISH
MC_PP_M8_50_001.indb 6 8/13/2014 10:49:18 AM

7
• This product has been sterilized by ethylene oxide gas. For single use only. Do not reuse. Do not resterilize. Do not reprocess. Reprocessing may compromise the sterility, biocompatibility and functional integrity of the device.
• Do not use if the unit packaging or the product have been damaged or soiled. • The product should be used immediately after opening the package and be disposed of safely and properly
after use.• The entire procedure should be carried out aseptically.• The surface of the micro catheter system must be completely wet with heparinized saline solution to maintain
a lubricious surface.• Before use, consult the instructions for use of the drugs and devices to be used along with this catheter to
determine compatibility and to prevent catheter damage.
DIRECTIONS FOR USE 1. Carefully remove the micro catheter system in its holder from the package. 2. Fill the holder with heparinized saline solution through the hub
of the holder using a syringe, to thoroughly wet the surface of the catheter (Fig. 1).
3. Remove the micro catheter system slowly from its holder. If resistance is felt, do not try to remove it against the resistance , but inject heparinized saline solution into its holder again, and try once more.
CAUTIONS • Do not use if the micro catheter system has been damaged or if any other abnormality is observed.
• When wet, the shaft of the micro catheter system is very lubricious. Hold the catheter by its hub during handling.
4. Make sure that the lock adapter is not loose. Inject heparinized saline solution into the guide wire hub using the attached 2.5 mL lure lock syringe (Fig. 2). In order to prime the catheter sufficiently, slowly inject at least 1 mL of the solution into the catheter until more than 10 drops of the solution appear out of its tip. To maintain surface lubricity, immerse the catheter and the guide wire assembly in a heparinized saline solution bath or put it into its holder filled with heparinized saline solution.
CAUTIONS • Use immediately after opening the package. Once the catheter pouch is opened, the enclosed syringe package is no longer sterile.
• Prime the catheter and guide wire sufficiently. Manipulation of an insufficiently primed catheter may cause wrinkling, separation of the catheter, and/or abrasion of the hydrophilic coating on the guide wire.
5. To shape the tip of the re-shapable type guide wire, maintain its surface lubricity and coil it carefully around your fingertip or the attached inserter (Fig. 3).
CAUTIONS • Do not shape the pre-shaped type guide wire. This may cause damage to the guide wire. • Do not shape the guide wire using method other than that described above. Do not handle
the wire when it is dry, do not heat, shape with forceps or fingernails. Do not bend tightly or back and forth nor bend the same part of the guide wire repeatedly. This may result in guide wire breakage/separation. Wiping without surface lubricity may result in abrasion of hydrophilic coating.
6. When shaping this catheter by steam, insert the enclosed shaping mandrel into the distal tip of the catheter and gently shape to the desired angle. Then expose the tip to the steam for approximately 10 seconds (Fig. 4). Check the resulting shape after removing of the shaping mandrel.
CAUTIONS • Do not rub or bend the catheter tip with too small radius, pinch by forceps or tweezers, which may result in the damage of the surface coating, collapse of the catheter shaft and/or deformation of catheter.
• Positioning the catheter tip closer than 2 cm from the steam source may result in the damage of the surface coating or the tip of the catheter.
• Excessively re-shaping the catheter may damage the surface coating or the tip of the catheter.
Fig. 3 InserterGuide wire
Fig. 4
Catheter
Mandrel
Fig. 1
Micro catheter system Syringe
HolderHolder hub
Fig. 2Lock adapter 2.5 mL Syringe
Guide wire hub
MC_PP_M8_50_001.indb 7 8/13/2014 10:49:18 AM

8
ENG
LISH
• When shaping with steam, take care not to burn yourself. • Do not insert the enclosed shaping mandrel into the patient’s body. • Do not stretch the catheter tip tightly or bend excessively when shaping it not with the
enclosed shaping mandrel but with your fingers. It may result in collapse of the catheter shaft and/or deformation of the catheter.
7. Insert the guiding catheter into the patient’s vessel. Attach a rotating haemostatic valve (Tuhoy-Borst type) to the guiding catheter and continuously irrigate the catheter with heparinized saline solution. Insert the micro catheter system with guide wire assembly through the valve into the guiding catheter and advance to the distal end of the guiding catheter. In case of difficulty of the micro catheter system insertion, loosen the lock adapter, slowly pull the guide wire back approximately 20mm from the catheter tip in order to straighten the catheter tip, and then carefully insert the catheter, avoiding catheter kinking (Fig. 5-2). After the catheter tip has successfully negotiated the guiding catheter hub, slowly advance the guide wire and re-tighten the lock adapter.
WARNINGS • Do not manipulate and/or withdraw the micro catheter system through a metal entry needle or a metal dilator. Manipulation and/or withdrawal through a metal entry needle or a metal dilator may result in abrasion of the hydrophilic coating, destruction and/or separation of the micro catheter system.
• If the guiding catheter is fitted with a stopcock, do not close the stopcock with the micro catheter system inside the guiding catheter. The micro catheter system may be broken.
• Make sure that the guiding catheter does not slip out of the vessel. If the guiding catheter should leave the vessel when the catheter and/or the guide wire is moved, this may result in the damage of the micro catheter system.
CAUTIONS • Do not tighten the rotating haemostatic valve excessively on the micro catheter system, and/or manipulate the micro catheter system through a tightened valve. Damage to the micro catheter system may occur.
• If resistance is felt, do not force the micro catheter system into the guiding catheter as this may result in the damage of the micro catheter system.
8. Carefully advance the micro catheter system through the guiding catheter until it reaches the desired site. At bifurcation, rotate the guide wire hub so that the angled tip of the guide wire points in the desired direction (Fig. 5-1). If complicated vessels selectivity is observed, slowly pull the guide wire back approximately 20 mm from the catheter’s tip to make its tip straight (Fig. 5-2).
WARNINGS • Monitor the manipulation of the micro catheter system in the vessel, by confirming the position of the catheter tip / guide wire under high-resolution fluoroscopy and DSA. If any resistance is felt in the vessel, do not advance or withdraw the catheter until the cause of resistance is determined. Manipulating the catheter and/or the guide wire against resistance may result in damaging the vessel, the catheter or the guide wire. If the situation is not solved, withdraw the entire system of the catheter or the guide wire with the guiding catheter.
• When advancing the micro catheter system into the peripheral vessel, draw it back slightly under fluoroscopy each time it has been advanced, to make sure that the micro catheter system has not been advanced so far that it can not be drawn back.
• If the micro catheter system is manipulated in the vessel without the guide wire, it may result in damaging the vessel. When re-inserting the guide wire into the catheter, carefully advance the guide wire while making sure the position of the guide wire under high resolution fluoroscopy and DSA. The quick and unreasonable movement may cause damage to the vessel.
9. When advancing the micro catheter system to the desired site, the wire protruding from the catheter tip can be adjusted and affixed with the attached wire stopper. Set the slit part of the wire stopper to the guide wire between the catheter hub and the guide wire hub. Remove the guide wire from the catheter hub and adjust the protruding tip length. Slide the wire stopper into the catheter hub to fix the guide wire (Fig. 6).
CAUTION Do not move the guide wire while the wire stopper is fixed on the catheter hub. If the guide wire is moved in such a situation, the hydrophilic coating and the coating resin on the guide wire may be abraded.
1
2
Catheter’s tip
Guide wire points
Guide wire points
20mm
Fig. 5
Fig. 6
Slit part of the wire stopper
Wire stopper
Catheter hubGuide wire
Guide wire hub
MC_PP_M8_50_001.indb 8 8/13/2014 10:49:18 AM

9
10. When the desired site is reached, remove the guide wire from the catheter.CAUTIONS • If any resistance is felt while removing the guide wire, do not remove the guide wire by
force. The resistance may indicate insufficient lubricity of the guide wire. Flush the catheter again with heparinized saline solution. If any resistance is felt while removing the guide wire, do not remove the guide wire by force. Drawing back the guide wire against resistance may cause the catheter kink. Carefully remove the guide wire together with the catheter.
• Rinse residual blood from the removed guide wire in a heparinized saline solution bath. If the residual stains do not come off, wipe the guide wire once with gauze moistened with heparinized saline solution. Blood remaining on the guide wire can affect its surface lubricity and could cause resistance when inserted into the catheter.
• To avoid damage to the surface coating, do not wipe the guide wire with gauze with disinfectant.
11. Before introducing an embolic material or other agent, slowly inject a small volume of contrast media into the catheter using a syringe and verify under high resolution fluoroscopy and DSA that the media come out of the catheter tip. When using embolic materials and drugs, use them following their instruction for use to check their compatibility with the catheter. When using many embolic materials, it is recommended to change the catheter each time.
WARNINGS • If any increase of resistance is felt during infusion, replace the catheter with a new one. Injection against increased resistance may cause the catheter to break, resulting in damage to the vessel.
• If no contrast media come out, it indicates possible kinking of the catheter. If drawing back the catheter fails to correct the kink, replace the catheter with a new one. Do not try to correct the kink by inserting a guide wire or by pressurized infusion. Starting the introduction of embolic material or the agent without correcting the kink or attempts to correct the kink by inserting guide wire or by infusion may cause the catheter to break/rupture/separate and this may result in damage to the vessel.
• Friction between the catheter wall and the embolic material may work to advance the catheter, resulting in perforation of the vessel wall. To prevent this, take up the slack of the catheter by drawing it back slightly and hold.
CAUTIONS • Increased resistance to infusion suggests that the catheter is blocked with the drug or contrast media being infused or with blood clots. Discontinue infusion immediately and replace the catheter with a new one.
• Do not use the attached 2.5 mL syringe to inject contrast medium, embolic materials or other medicines. Using the 2.5 mL syringe for high pressure injection of such agents may cause damage of the syringe or dislocation of the syringe from the catheter hub.
• When introducing an embolic material, do not use the attached guide wire as a supportive device. It may run onto the embolic material inside the lumen.
• When a power injector is to be used, follow the instructions given below under “Instruction For Using a Power Injector with the catheter”.
• Using organic solvents may cause damage to the catheter. • When introducing an embolic material, use material and loading devices not exceeding
0.018" (0.46 mm) in diameter. • In case of use of embolic material and supportive device suitable for catheter with 0.016"
(0.41 mm) or smaller I.D., the supportive device may run onto the embolic material inside the lumen because of clearance between their O.D. and the catheter I.D.
12. When inserting the catheter further more to the other vessel, sufficiently inject the heparinized saline solution into the catheter. If any resistance is felt during the insertion of the guide wire, discontinue to advance the guide wire and replace with a new one.
In case the guide wire is difficult to be inserted into the catheter hub, insert the guide wire tip by turning the guide wire or the catheter hub right and left.
WARNING When re-inserting the guide wire into the catheter, carefully advance the guide wire while making sure of the position of the guide wire tip under high resolution fluoroscopy and DSA. The quick and unreasonable movement may cause the catheter to break/rupture/separate and may result in damage to the vessel.
13. When the procedure is completed, remove the micro catheter system together carefully. WARNING If any resistance is felt, do not remove the micro catheter system by force. Withdraw
the catheter carefully together with the guiding catheter. Removing the catheter by force may result in the catheter breakage/separation, which may necessitate retrieval.
MC_PP_M8_50_001.indb 9 8/13/2014 10:49:18 AM

10
ENG
LISH
Instruction For Using a Power Injector with the catheterA power injector can be used to infuse a contrast media through the catheter. Observe the warnings and cautions given below. The flow rate depends upon such factors as the viscosity of the contrast media, which varies with the type and temperature of the media, the model and setting of the power injector and how the injector is connected to the catheter. The observed flow rate values indicated below are for reference only.
WARNINGS • Do not use a power injector to infuse agents other than contrast media, as the catheter may become blocked.
• Setting of injection pressure must not exceed below listed maximum injection pressure that correspond to outer diameter of each catheter tip. Exceeding of injection pressure beyond the maximum injection pressure may cause catheter rupture.
Catheter O.D. Maximum injection pressure2.7Fr. 5171 kPa (750psi)2.8Fr. 6205 kPa (900psi)
• Under high resolution fluoroscopy and DSA monitor, inject small amount of contrast media with syringe and confirm the flow of contrast media out of the catheter tip before using injector.
• If expansion of the catheter O.D. is observed during the injection, it may be an excess over the maximum pressure limit. In such case, stop injection immediately.
• When securing the catheter in position, secure it by the hub so that catheter shaft is not damaged. In securing, do not hold the catheter shaft with forceps, or this may result in catheter separation.
CAUTIONS • If the catheter has been kinked or bent sharply, replace it with a new one. • Connect the power injector to the catheter using a pressure-resistant extension tube.
• When re-inserting the guide wire after completion of angiography, flush out the catheter lumen with heparinized saline solution.
REFERENCE DATA1. Injector use MARK V (MEDRAD)2. Conditions and injector setting Contrast media temperature·························37 ºC Injection pressure monitor/limit ························· 4137 kPa (600 psi), 5171 kPa (750 psi), 6205 kPa (900 psi) Flow scale ····················································mL/sec Linear rise seconds ······································0.3 sec3. Methods and results The value of injection volume was selected to be three times the set flow rate value. The set injection volume is
not attained because of varying conditions, including the viscosity of the contrast media.
100 Iopamidol
300 4.4 6.0 20 2.8 3.5 – 370 9.1 3.0 10 1.9 2.2 – 2.7/2.9Fr. 110 Iopamidol
300 4.4 6.0 20 2.6 3.4 – (0.90/0.97mm) 370 9.1 3.0 10 1.7 2.0 –
130 Iopamidol 300 4.4 6.0 20 2.3 3.0 –
370 9.1 3.0 10 1.5 1.8 –
100 Iopamidol 300 4.4 6.0 20 3.5 4.0 4.6
370 9.1 6.0 20 2.3 2.8 3.1 2.8/3.0Fr. 110 Iopamidol
300 4.4 6.0 20 3.3 3.9 4.4 (0.93/1.00mm) 370 9.1 6.0 20 2.1 2.5 3.0
130 Iopamidol 300 4.4 6.0 20 3.0 3.5 3.9
370 9.1 6.0 20 1.9 2.3 2.6
Usable length of Catheter
(cm)Catheter
O.D.Contrastmedia
Iodinecontent(mg/mL)
Viscosity(cp) Flow Rate
(mL/sec) Volume
(mL)
Actual Flow Rate (mL/sec)
4137 kPa(600 psi)
5171 kPa(750 psi)
6205 kPa(900 psi)
Set Condition
PRECAUTION FOR STORAGEAvoid exposure to water, direct sunlight, extreme temperature or humidity during storage.
MC_PP_M8_50_001.indb 10 8/13/2014 10:49:19 AM