carbonite server backup agent 6.72 for hp-ux - user guide
TRANSCRIPT
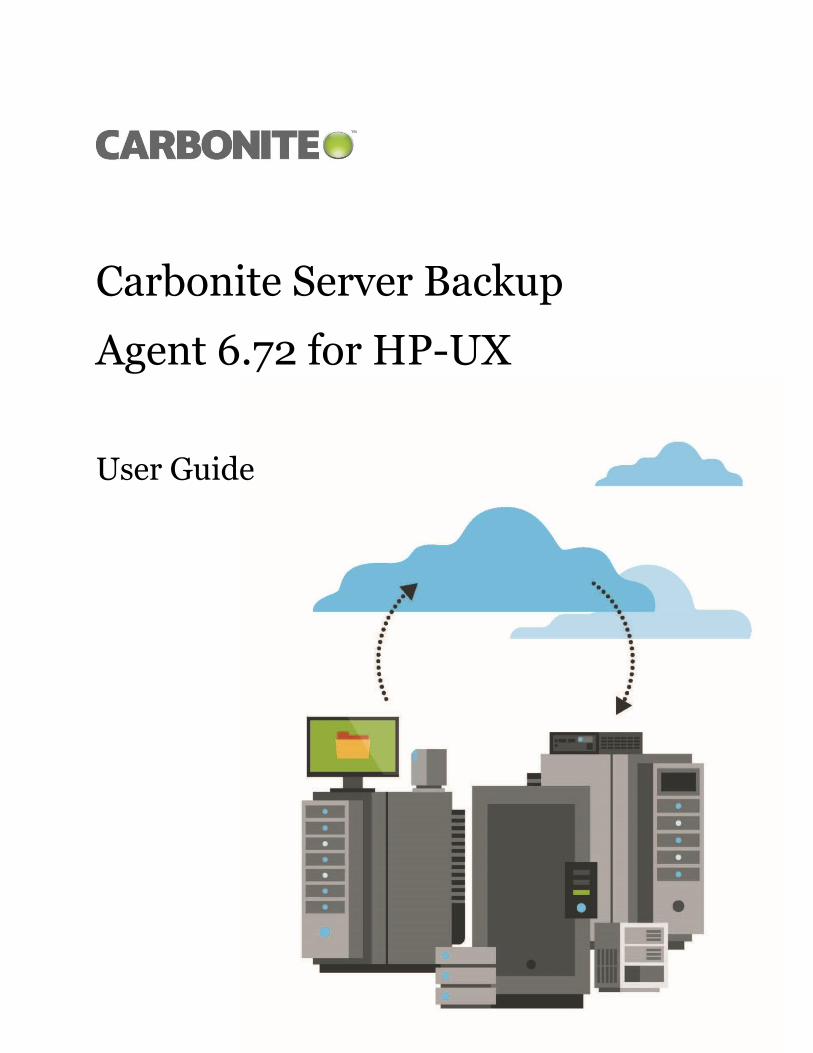
Carbonite Server Backup
Agent 6.72 for HP-UX
User Guide
© 2017 Carbonite, Inc. All rights reserved.
Carbonite makes no representations or warranties with respect to the contents hereof and specifically disclaims any implied warranties of merchantability or fitness for any particular purpose. Furthermore, Carbonite reserves the right to revise this publication and to make changes from time to time in the content hereof without obligation of Carbonite to notify any person of such revision of changes. All companies, names and data used in examples herein are fictitious unless otherwise noted.
No part of this document may be reproduced, transmitted, transcribed, stored in a retrieval System or translated into any language including computer language, in any form or by any means electronic, mechanic, magnetic, optical, chemical or otherwise without prior written permission of:
Carbonite, Inc. Two Avenue de Lafayette Boston, MA 02111 www.carbonite.com
Carbonite and the Carbonite logo are registered trademarks of Carbonite, Inc. Product names that include the Carbonite mark are trademarks of Carbonite, Inc. All other products or company names mentioned in this document are trademarks or registered trademarks of their respective owners.
Acknowledgements: Two encryption methods, DES and TripleDES, include cryptographic software written by Eric Young. The Windows versions of these algorithms also include software written by Tim Hudson. Bruce Schneier designed Blowfish encryption.
“Part of the software embedded in this product is gSOAP software. Portions created by gSOAP are Copyright 2001-2006 Robert A. van Engelen, Genivia Inc. All Rights Reserved. THE SOFTWARE IN THIS PRODUCT WAS IN PART PROVIDED BY GENIVIA INC AND ANY EXPRESS OR IMPLIED WARRANTIES, INCLUDING, BUT NOT LIMITED TO, THE IMPLIED WARRANTIES OF MERCHANTABILITY AND FITNESS FOR A PARTICULAR PURPOSE ARE DISCLAIMED. IN NO EVENT SHALL THE AUTHOR BE LIABLE FOR ANY DIRECT, INDIRECT, INCIDENTAL, SPECIAL, EXEMPLARY, OR CONSEQUENTIAL DAMAGES (INCLUDING, BUT NOT LIMITED TO, PROCUREMENT OF SUBSTITUTE GOODS OR SERVICES; LOSS OF USE, DATA, OR PROFITS; OR BUSINESS INTERRUPTION) HOWEVER CAUSED AND ON ANY THEORY OF LIABILITY, WHETHER IN CONTRACT, STRICT LIABILITY, OR TORT (INCLUDING NEGLIGENCE OR OTHERWISE) ARISING IN ANY WAY OUT OF THE USE OF THIS SOFTWARE, EVEN IF ADVISED OF THE POSSIBILITY OF SUCH DAMAGE.”
The Carbonite Server Backup Agent, Carbonite Server Backup CentralControl, and Carbonite Server Backup Director applications have the encryption option of AES (Advanced Encryption Standard). Advanced Encryption Standard algorithm (named Rijndael, pronounced “Rain Doll”) was developed by cryptographers Dr. Joan Daemen and Dr. Vincent Rijmen. This algorithm was chosen by the National Institute of Standards and Technology (NIST) of the U.S. Department of Commerce to be the new Federal Information Processing Standard (FIPS).
The Carbonite Server Backup Agents and Carbonite Server Backup Director applications also have the added security feature of an over the wire encryption method.
Document History
Version Date Description
1 October 2017 Carbonite Server Backup-branded Agent 6.72 guide.

Agent 6.72 for HP-UX User Guide
ii
Contents
1. Introduction ..................................................................................................................... 4
1.1 Features in this Release .................................................................................................. 4
1.2 Agent vs. CentralControl ................................................................................................. 4
1.3 Agent/Central Control Configuration Overview ............................................................. 5
2. Agent Configuration ......................................................................................................... 6
2.1 Introduction .................................................................................................................... 6
2.2 Create an Agent Profile ................................................................................................... 7
2.3 Save the Workspace........................................................................................................ 9
2.4 Configure the vault – Agent Configuration ................................................................... 10
2.5 Create a Job .................................................................................................................. 11
2.5.1 Adding a File or Directory to a new Backup Job ................................................... 12
2.5.2 Adding/Removing a File or Directory with an existing Backup Job ...................... 14
2.6 Schedule the Job ........................................................................................................... 15
3. Performing Backups ....................................................................................................... 17
3.1 Running an Ad-Hoc Backup ........................................................................................... 17
3.1.1 File Backup Options for Unix ................................................................................ 18
3.2 Check the Backup results .............................................................................................. 19
4. Performing Restores ....................................................................................................... 21
4.1 Restoring a Backup ....................................................................................................... 21
4.1.1 Symbolic Links ....................................................................................................... 23
4.1.2 NFS – Network File System ................................................................................... 23
4.2 Cross-Computer Restores ............................................................................................. 23
4.3 Disaster Recovery ......................................................................................................... 24
4.4 Restoring ACLs .............................................................................................................. 25
Agent 6.72 for HP-UX User Guide
iii
5. Installation ..................................................................................................................... 26
5.1 Installation – Install.sh Options .................................................................................... 26
5.1.1 Starting and Stopping the Agent .......................................................................... 27
5.1.2 Registration ........................................................................................................... 27
5.1.3 Language Selection ............................................................................................... 28
5.2 Agent for HP-UX Installation ......................................................................................... 29
5.2.1 System Requirements ........................................................................................... 29
5.2.2 Installation Procedures ......................................................................................... 30
5.2.2.1 Requirements ...................................................................................................... 31
5.2.2.2 Running the Installation Kit ................................................................................. 31
5.2.3 Uninstall Procedures ............................................................................................. 32
5.2.4 Upgrading ............................................................................................................. 32
5.2.4.1 Meeting System and Software Requirements .................................................... 33
5.2.4.2 Preparing the Computer ..................................................................................... 33
5.2.4.3 Upgrading Program Files and Configuration Files ............................................... 34
5.2.4.4 Upgrade Steps ..................................................................................................... 34
5.2.5 Kernel Configuration Parameters ......................................................................... 35
6. Unix System Recovery .................................................................................................... 36
6.1 Hardware Requirements ............................................................................................... 36
6.2 Software Requirements ................................................................................................ 36
6.3 Unix Restoration Steps .................................................................................................. 36
6.3.1 Install the minimal operating system ................................................................... 36
6.3.2 Install and configure the Agent ............................................................................ 37
6.3.3 Restore the backed up system ............................................................................. 37
6.3.4 Perform post-restore maintenance ...................................................................... 37
6.3.5 Verify the restore .................................................................................................. 38
6.3.6 Unix Recovery Problems ....................................................................................... 38
7 Carbonite Server Backup Support ................................................................................... 39
7.1 Contacting Carbonite .................................................................................................... 39
Agent 6.72 for HP-UX User Guide
4
1. Introduction
Carbonite Server Backup CentralControl, Director (Vault), and Agent comprise a data protection
software suite that securely backs up and restores data from servers across a network to a
remote data vault. The applications provide an automated lights-out method for protecting your
valuable computer data without the need for tape devices or other backup media.
This Agent for HP-UX User Guide explains how to install, configure and manage the Agent on
individual computers. This guide is intended for the administrator responsible for ensuring that
users’ servers (computers) are configured properly for backups. Those who use the servers do
not necessarily need to be aware that their systems are being backed up.
Different servers may require different files and directories backed up depending on what data
needs to be secured. Some may require more frequent backups or different schedules. This can
depend on your backup requirements, how frequently the data changes (its volatility), as well as
your bandwidth capabilities.
This guide shows the administrator how to configure the Agents, select the data to be backed
up, and schedule when the backups will be run.
1.1 Features in this Release
Added support for HP-UX 11i (11.31) on PA-RISC and on IA-64 in Binary Translation.
For Agent versions 6.72 and above, the “Preserve folder structure” checkbox has been
removed from the Restore Wizard. If your data to restore has been selected with the
recursive option, the directory structure will also be restored to the alternate location
(starting from the selection point of the included item). You can individually specify
whether your restore/directory selections are recursive or not.
1.2 Agent vs. CentralControl
Each computer that needs to be backed up must have the Agent software installed, running, and
connected to the network. The Agent runs on the computer as a background service, and starts
automatically when the system starts.
The setup of Agents, Jobs, scheduling, and monitoring is done from the CentralControl
application. The actual backup is done from the server with the Agent, to the system with the
vault. No user data goes through CentralControl. The vault has to be previously set up with a
valid account to receive your Agent’s commands and data.
Agent 6.72 for HP-UX User Guide
5
1.3 Agent/Central Control Configuration Overview
The Agent program runs as a service on the server (computer) that will be backed up. The way
to configure and control it is with the CentralControl program. One CentralControl program
controls many different Agents on many different servers on a network.
You need to provide names, passwords, and permissions to allow the Agent to connect with
CentralControl:
1. Each server (computer to be backed up) needs an Agent.
2. Need to connect (from CentralControl) to an Agent (when you create a new Agent).
3. Supply Name, IP address, and user/password.
4. Then, register the computer on the vault.
You must register a computer on a vault in order to log on to the vault and establish a
connection. The vault must be informed that this Agent is valid and is authorized to perform its
functions.
You need to “re-register” a computer if you restore from another computer, or perform a
disaster recovery (described in chapter 4 of this guide.).
When you create a backup Job, you register information about it. For example:
1. Which profile (i.e., which vault) applies?
2. What data does it need to back up?
3. What types of logs will it produce?
4. What type of encryption (if any) will it use?
5. When will it run?
Note: The first backup is a “seed” (complete backup). The next and subsequent ones are deltas
(i.e., changes only), but they are still considered to be full backups.
Depending on the configuration of your system:
- There might be more than one vault that you can use.
- One CentralControl usually controls all of the Agents on your network.
- You can also back up to your own local disk or tape.
Agent 6.72 for HP-UX User Guide
6
2. Agent Configuration
2.1 Introduction
For a newly installed application, you can use the following steps to quickly perform your first
backup. Regarding the CentralControl program, the “CentralControl Operations Guide”
describes all of the features, options, and further details.
An Agent configures, manages, runs, and monitors backup Jobs. You can manage and
control many Agents through one CentralControl application (GUI). An Agent can have
multiple Jobs.
A Job defines the parameters associated with backups, restores, and other processes.
Parameters can include: file selections and filters; compression; and encryption settings.
A Job can belong to only one Agent. Job names are unique on that Agent.
A Profile defines the vault configuration that your Agent will use. It matches a Job to an
account on a vault. The Job uses the profile to validate the backup to the vault, and to
know where to put the data. A profile can apply to more than one Job.
Steps for a QUICK START:
1. Create an Agent profile.
This is the local name (used by CentralControl) of the Agent program that will initiate the
backups. You need an Agent profile name for each computer that you back up.
2. Save the default workspace as a named workspace.
To save your configurations (for Agents, Jobs, and options), you need to assign a workspace
name. CentralControl will prompt you to save any changes. You can create more than one
workspace, but you can open only one workspace at a time.
3. Configure the vault.
To connect with your account on the vault, create a profile with the properties of this Agent.
Some users may have only one profile to service one account (i.e., all Jobs back up to a single
account). Others may have multiple profiles (and accounts) on one or more vaults.
4. Create a Job.
Each Agent on CentralControl has Jobs with names that are unique to that Agent. Other Agents
may have similar or different Job names, even if they perform similar functions. A named Job
can be one of many for different types of backups, in different ways, at different times. When
you create a Job, specify a profile that you have created. This allows you to access the vault (i.e.,
your account).
Agent 6.72 for HP-UX User Guide
7
5. Schedule the Job.
You can run your Job at predetermined times. You can also run it manually (“ad-hoc”) whenever
you want.
When you have completed these steps, you are ready to run a backup.
The remainder of this chapter describes the steps in more detail. Backups are described in the
next chapter.
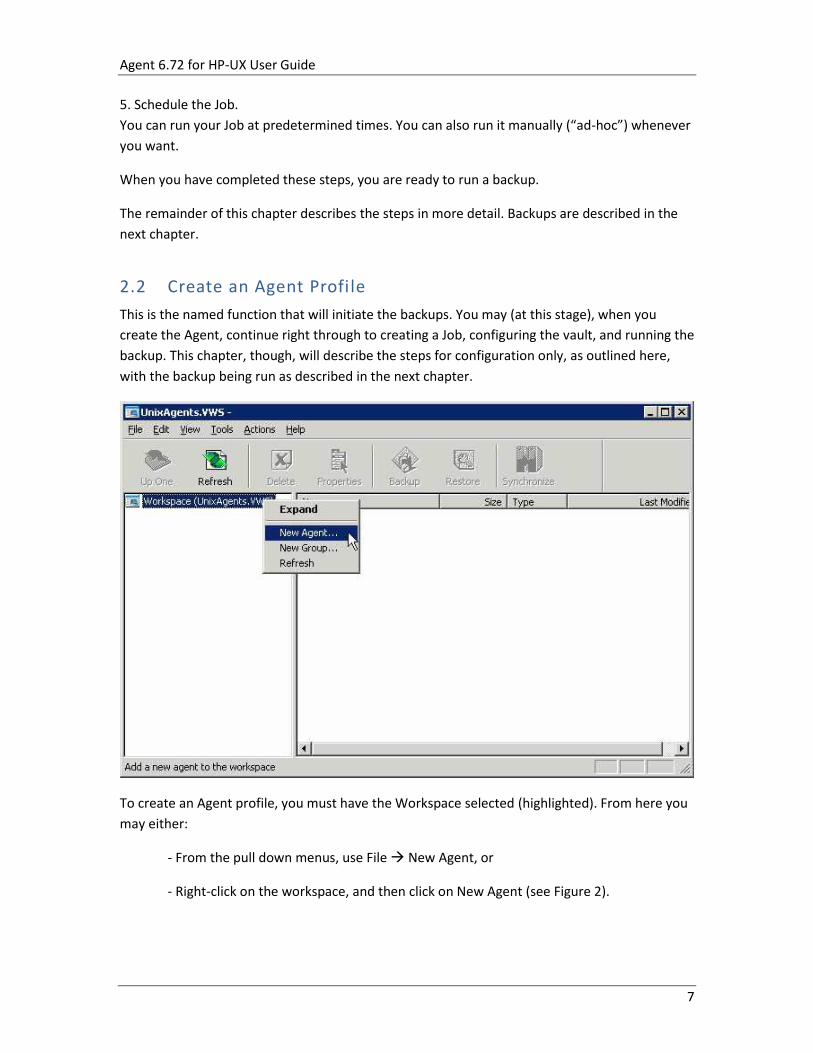
2.2 Create an Agent Profile
This is the named function that will initiate the backups. You may (at this stage), when you
create the Agent, continue right through to creating a Job, configuring the vault, and running the
backup. This chapter, though, will describe the steps for configuration only, as outlined here,
with the backup being run as described in the next chapter.
To create an Agent profile, you must have the Workspace selected (highlighted). From here you
may either:
- From the pull down menus, use File New Agent, or
- Right-click on the workspace, and then click on New Agent (see Figure 2).
Agent 6.72 for HP-UX User Guide
8
This brings up an Agent Properties screen.
- Description: a description meaningful to you.
- Network Address: either the IP or name of the server the Agent software is on.
- Port: the communications port number reserved for this service (the default is 808).
- User name: authentication to communicate with the Agent service.
- Password: password assigned to the user above.
- (Check to save the password): saves the password on this machine with
CentralControl.
- Domain: Windows domain (if applicable).
Click the Check Status button to ensure the communication is valid and you can talk to the
remote Agent. If not, check with your support or vault service provider. Click OK to exit the
Status window, and OK again to finish and exit the New Agent window.
Your new Agent’s name will show up in the left pane of the CentralControl GUI.
Note: In this screen and others, use the “What’s This” help (the ‘?’ in the upper right corner) for
further information about the fields, as well as the main Help menu (F1) for general help.
If the F1 Help screen is open (even minimized), the “What’s This” help will not be active. The F1
help must be closed for the “What’s This” help to function properly.
Agent 6.72 for HP-UX User Guide
9
2.3 Save the Workspace
Save the default workspace as a named workspace. To save all your configurations (Agents, Jobs
and options) you must save your workspace with a name of your choice. CentralControl will
prompt you to save any changes before you exit the application. You can save more than one
workspace, but only open one at a time.
Choose a meaningful name for your workspace. As well as saving the current workspace as a new
name, you may create new ones, open existing ones, save the current one, and see the recent ones.
Because a workspace contains important user names and passwords necessary for access to do
backups, it is advisable to optionally encrypt these workspaces so that unauthorized users cannot gain
access to them.
The “Workspace Password” option allows you to add or change a password, as well as choose from
encryption types with different cipher strengths.
If this is the first time that you are using a password here, there will not be an “Old Password”,
so leave that field blank. Select an encryption type, and create a password (case sensitive). If you
lose this password you will need to recreate the workspace.
If the F1 Help screen is open (even minimized), the “What’s This” help will not be active. Close
the F1 Help to allow the “What’s This” help to function properly.
Agent 6.72 for HP-UX User Guide
10
2.4 Configure the vault – Agent Configuration
Configure the vault with Agent Configuration (i.e., Agent Properties). These are the properties
that the Agent will use to connect to this vault. The settings are specific to the Agent, and affect
all Jobs run under that Agent.
You can start the Agent Configuration from either the Tools Agent Configuration pull-down
menus, or by right-clicking on a selected Agent in the left pane (see Figure 5). The Agent
Configuration screen has several tabs available. Some, such as Notification or Plug-In, you might
not use here, depending on your system and company/organization policies.
Vaults - Adds new vaults, and edits and/or deletes existing ones
- New: You want to select a new (existing) vault, and enter the following information,
supplied by the vault service provider.
- Registration: The first time is always New. (Re-Registration is used for changes to the
profile.)
- Profile Name: A meaningful name that points to your account on the vault.
- Network Address: vault machine address (IP or server name).
- Ports: Use a communication port.
- Reconnection: How to reconnect if there are communication problems.
Agent 6.72 for HP-UX User Guide
11
- Authentication: Account, user name, and password to access your vault account.
Retention: Decide on the number of days online, copies online and number of days archived for
your backups. This may affect the cost of your backups.
Notification: Do you want to be alerted by emails, to successful or failed backups?
Plug-Ins: Allows you to set and use optional Plug-In software. See the Plug-In manuals.
Note: Use the “What’s This” help (the ‘?’ in the upper-right corner) for further information
about the fields, as well as the main Help menu (F1) for general help.
2.5 Create a Job
This named Job can be one of many used to do different types of backups, in different ways, at
different times.
Select New Job to start the New Job Wizard (a program that asks you questions and prompts for
details regarding the new Job).
- Backup source type – choose a local drive or mapped network drives.
- Vault profile – choose an existing one created earlier, or “branch out” from this Wizard
and create a new one here.
Agent 6.72 for HP-UX User Guide
12
- Job name – choose a unique, meaningful Job name.
- File list backup source - Select Data files. You can include/exclude files and
subdirectories.
- Set the options – Quick File Scanning (on/off) and Backup time Options. (These are also
accessible in the Schedule Job Wizard.)
- Select an encryption type – choose one from the list, or none. You must supply a
password if you choose to encrypt your data on the vault. The data cannot be
recovered if you lose the password.
- Configure the logs – set log options and log copies. Choices here depend on your
backup activity, and your need for detailed logs and their length of retention. Changes
here only affect the logs that will be created, not those already created.
- Finish – Run immediately, schedule a backup, or just exit.
To do an “ad-hoc” backup, we could choose to run this Job immediately. For this chapter, we are
going to schedule the Job to run later. Choose either “Schedule a Backup” and go to the next
section, or “Exit” and start the schedule in the next section.
Note: On this screen and others, use the “What’s This” help (the ‘?’ in the upper right corner) for
further information about the fields, as well as the main Help menu (F1) for general help.
2.5.1 Adding a File or Directory to a new Backup Job
When you first create a Backup Job, you must include one or more files, or directories (folders). You
may modify this list of files and directories afterwards.
In the New Job Wizard (described in the previous section), the Source screen asks you to select files
and/or directories to include in the Backup.
If you are selecting Data Files, the Options button allows you to select Backup files opened for write
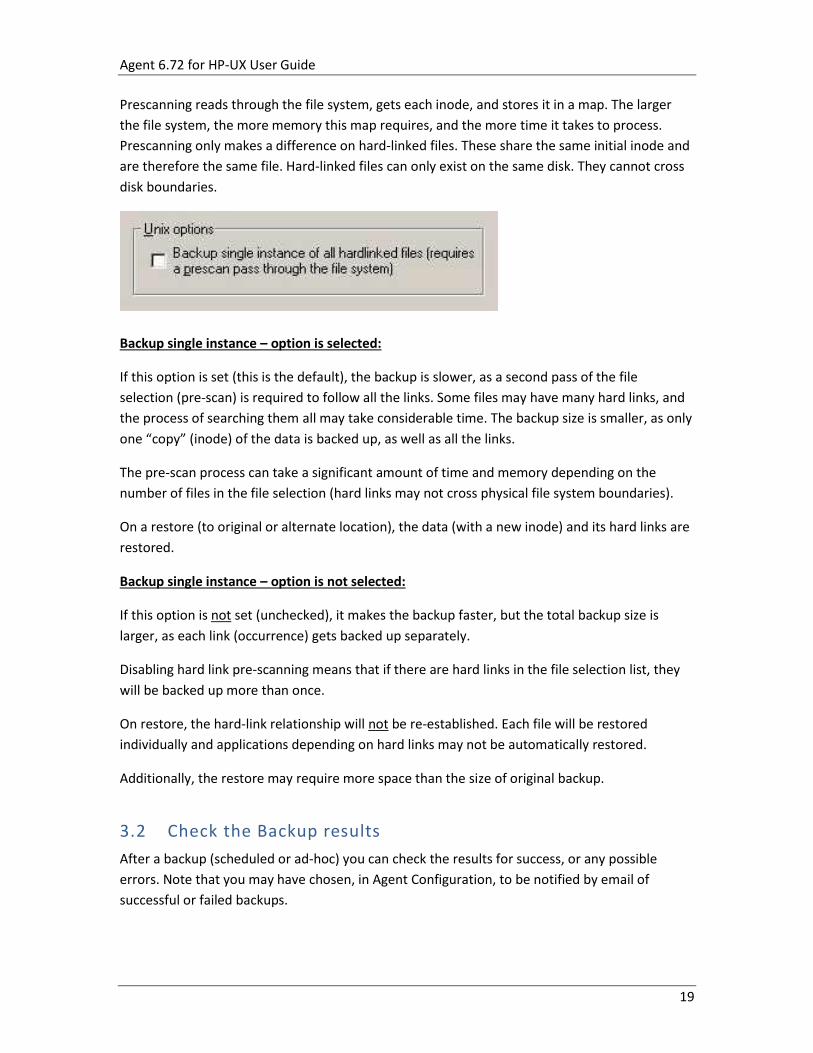
(that is, shared read, not opened exclusive), or back up a single instance of all selected hard linked
files. This requires a pre-scan pass through the file selection. (See Section 3.1.1 for more information
on these options.)
Click Add to start adding files/directories to the list to be backed up. This brings up the
Include/Exclude screen, which displays a hierarchy of the disks and directories that you may select
from for the backup.
Agent 6.72 for HP-UX User Guide
13
You can “open” the tree in the left pane by clicking on the + signs. The files in that directory are
displayed in the right pane, where you can select one or more files. Use the CTRL key and the mouse
to select multiple files in that directory. Click Include. The file/directory names are moved to the lower
part of the screen. The Remove Item button allows you to un-select names from this lower list, if you
change your mind, before you click the OK button.
If you have a directory with a large number of files, and you want to select most of them, it might be
easier to Include them all, and then Exclude (from the list) the ones you don’t want.
You may also select one directory (folder) at a time to be backed up. When you click Include, you will
get a message asking if you want to include all files, or just some of them which match your selection
criteria (filter).
“Recursive” means to include all files and directories below this directory. Otherwise you may choose
to select certain files, depending on their names and extensions. The asterisk (*) means all files with
any name or extension.
When you have finished selecting (and including) all the files and directories you want to be in this
Backup Job, click OK and you will be back at the Source screen, where you can click Next to continue
the next step of the New Job Wizard. See the information in the preceding section about creating a
Job.
Agent 6.72 for HP-UX User Guide
14
2.5.2 Adding/Removing a File or Directory with an existing Backup Job
When you first create a Backup Job, you must include one or more files, or directories (folders). See
the section about “Adding a File or Directory to your new Backup Job”. Later you may want to add or
remove files or directories from the Backup Job.
Select a Job in the CentralControl window, and select “Properties” for that Job, either from the icons,
or by right-clicking or by using F2.
Select the “Source” tab in the Properties window.
This displays the existing list of files and directories for this Backup Job. You may select
(highlight) one or more in the lower window, and click Remove. You will be prompted with a
message “Are you sure you wish to delete the scheduled entry (or entries)?”
The Add and Options buttons work as described in preceding sections.
Click OK when you finish.
Agent 6.72 for HP-UX User Guide
15
2.6 Schedule the Job
This Job can be run at predetermined times. All Jobs can also be run “manually” (ad-hoc) when
desired.
Start the scheduling from Tools Schedule Entries, or right-click on a selected Agent in the left
pane (see Figure 9). This brings up the Schedule List screen. For a new installation, this will be
empty. Click New to add a new schedule. This will start the Schedule Wizard, which will take you
through the steps to configure a schedule.
- Select a Command to schedule. You may choose: Backup, Synchronize, or Custom
command. For now choose “Backup”.
- Select a Job from the list. It shows the Target and Destination for each.
- Select a Backup type. (Note: This screen will not display for a vault backup.) Specify a
Backup type and Processing Options for local disk or tape.
- Select a Retention. Choose Daily, Weekly, or Monthly from the list. This determines
how long your backup will be kept online.
- Set the Options. Choose Quick File Scanning (on/off), and Backup Time Options. (These
are also accessible in the Create a Job Wizard.)
Agent 6.72 for HP-UX User Guide
16
- Select a Command Cycle. Choose Weekly, Monthly or a Custom Cycle for backups.
When you have selected one, and defined the days and times, the Wizard will finish.
The command you have just created will now show in the Schedule List. You may Edit,
Remove or Disable it. If you have more than one schedule in the list, you may move
them up or down in position (priority), so that any conflicts are resolved by taking the
parameters in the first (highest) one, and overriding any others. Click OK when done.
Note: On this screen and others, use the “What’s This” help (the ‘?’ in the upper right corner) for
further information about the fields, as well as the main Help menu (F1) for general help.
If the F1 Help screen is open (even minimized) the “What’s This” help will not be active. The F1
help must be closed for the “What’s This” help to function properly.
Agent 6.72 for HP-UX User Guide
17
3. Performing Backups
Once all the Agent Configuration information has been entered, and a schedule set up, as in the
previous chapter, the backups will take place automatically.
On occasion you may need to run a “one-time” backup for a special reason. You can either use
an existing Agent and Job (and modify it), or create one specifically for this backup.
Seeding and Re-Seeding:
When you run your first Backup, a full backup is created on the vault. This first backup contains
all the data selected for backup and is called a "seed". Subsequent backups are deltas (changes
in file), which are applied to the first full backup to create subsequent backups. This way a
current full backup is always available.
If the Agent detects changes, such as the encryption type or password changing, the next
backup will be a re-seed.
In this case of a re-seed, your backup will take longer to complete and a message about re-
seeding is created in the log file.
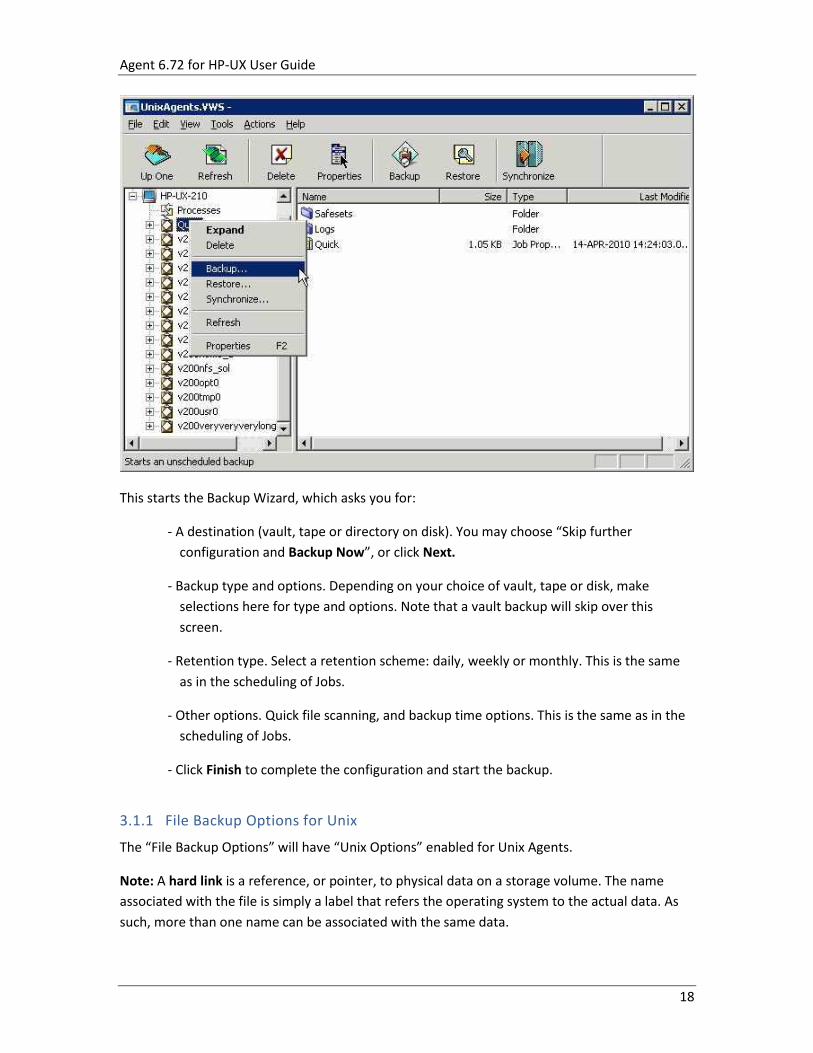
3.1 Running an Ad-Hoc Backup
To start an unscheduled (ad-hoc) backup Job, select (highlight) a Job, and then perform one of
these actions:
- Choose Actions Backup
- Click the backup icon (or use CTRL+B)
- Right-click a Job in the left pane
Agent 6.72 for HP-UX User Guide
18
This starts the Backup Wizard, which asks you for:
- A destination (vault, tape or directory on disk). You may choose “Skip further
configuration and Backup Now”, or click Next.
- Backup type and options. Depending on your choice of vault, tape or disk, make
selections here for type and options. Note that a vault backup will skip over this
screen.
- Retention type. Select a retention scheme: daily, weekly or monthly. This is the same
as in the scheduling of Jobs.
- Other options. Quick file scanning, and backup time options. This is the same as in the
scheduling of Jobs.
- Click Finish to complete the configuration and start the backup.
3.1.1 File Backup Options for Unix
The “File Backup Options” will have “Unix Options” enabled for Unix Agents.
Note: A hard link is a reference, or pointer, to physical data on a storage volume. The name
associated with the file is simply a label that refers the operating system to the actual data. As
such, more than one name can be associated with the same data.
Agent 6.72 for HP-UX User Guide
19
Prescanning reads through the file system, gets each inode, and stores it in a map. The larger
the file system, the more memory this map requires, and the more time it takes to process.
Prescanning only makes a difference on hard-linked files. These share the same initial inode and
are therefore the same file. Hard-linked files can only exist on the same disk. They cannot cross
disk boundaries.
Backup single instance – option is selected:
If this option is set (this is the default), the backup is slower, as a second pass of the file
selection (pre-scan) is required to follow all the links. Some files may have many hard links, and
the process of searching them all may take considerable time. The backup size is smaller, as only
one “copy” (inode) of the data is backed up, as well as all the links.
The pre-scan process can take a significant amount of time and memory depending on the
number of files in the file selection (hard links may not cross physical file system boundaries).
On a restore (to original or alternate location), the data (with a new inode) and its hard links are
restored.
Backup single instance – option is not selected:
If this option is not set (unchecked), it makes the backup faster, but the total backup size is
larger, as each link (occurrence) gets backed up separately.
Disabling hard link pre-scanning means that if there are hard links in the file selection list, they
will be backed up more than once.
On restore, the hard-link relationship will not be re-established. Each file will be restored
individually and applications depending on hard links may not be automatically restored.
Additionally, the restore may require more space than the size of original backup.
3.2 Check the Backup results
After a backup (scheduled or ad-hoc) you can check the results for success, or any possible
errors. Note that you may have chosen, in Agent Configuration, to be notified by email of
successful or failed backups.

Agent 6.72 for HP-UX User Guide
20
Processes are the “jobs” that the system has performed, such as backups, synchs, and restores.
If you select “Processes” in the left pane, you can see a list of processes. Double clicking on one
will show you the details. These processes will normally be deleted after approximately one
hour in this list. To ensure an accurate (current) picture of the processes, you must perform a
Synchronize operation.
Below each Job in the left pane are Safesets and Logs. Safesets are ”sets” of backup data
(sequentially numbered) on the vault. They remain until their retention date (configured by you)
expires. Double-click a backup (Safeset) to see its properties.
Log files are the system transcripts of what happened while the backup, synch or restore
function proceeded. Double-clicking on a log will display the contents, which you can also print.
Agent 6.72 for HP-UX User Guide
21
4. Performing Restores
There are several reasons for which you might want to do restores:
- To recover one or more data files or directories. You can restore them to their original
location, overwriting any that are there, or restore them to a different location on that
disk, so that you can then decide on which files you want to copy (restore).
- To recover data that was backed up from one computer, to be restored on another
(similar) computer system.
- To recover a complete system (i.e., perform a disaster recovery) when the original
system has been lost.
4.1 Restoring a Backup
Restoring a backup is the most common usage, allowing you to recover anything from a single
file to a complete directory structure.
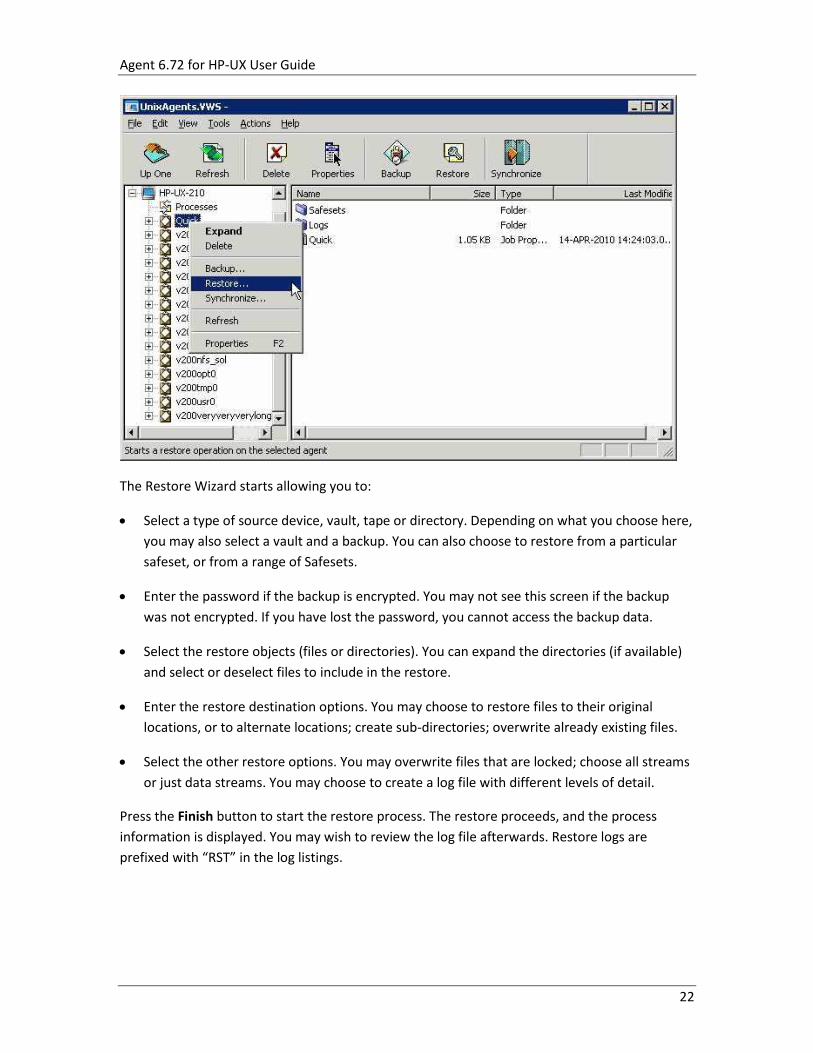
To start a restore Job, select (highlight) a Job, and then perform one of these actions:
- Choose Actions Restore
- Click the Restore icon (or use CTRL+R)
- Right-click a Job in the left pane
Agent 6.72 for HP-UX User Guide
22
The Restore Wizard starts allowing you to:
Select a type of source device, vault, tape or directory. Depending on what you choose here,
you may also select a vault and a backup. You can also choose to restore from a particular
safeset, or from a range of Safesets.
Enter the password if the backup is encrypted. You may not see this screen if the backup
was not encrypted. If you have lost the password, you cannot access the backup data.
Select the restore objects (files or directories). You can expand the directories (if available)
and select or deselect files to include in the restore.
Enter the restore destination options. You may choose to restore files to their original
locations, or to alternate locations; create sub-directories; overwrite already existing files.
Select the other restore options. You may overwrite files that are locked; choose all streams
or just data streams. You may choose to create a log file with different levels of detail.
Press the Finish button to start the restore process. The restore proceeds, and the process
information is displayed. You may wish to review the log file afterwards. Restore logs are
prefixed with “RST” in the log listings.
Agent 6.72 for HP-UX User Guide
23
4.1.1 Symbolic Links
A symbolic link (also called a symlink or soft link) consists of a special type of file that serves as a
reference to another file or directory. A symbolic link contains a path that identifies the target of
the symbolic link. The term “orphan” refers to a symbolic link whose target has moved or been
deleted.
During a backup, a symbolic link gets backed up with the timestamp of the link. Restoring a
symbolic link sets its modification date and time to the date and time of the restore (rather than
the date and time of the symbolic link when it was backed up).
4.1.2 NFS – Network File System
To back up Unix data (at a local or remote mount point) to a vault, you can use NFS on HP-UX.
In the CentralControl application, create a new Job using “New Job Wizard - Backup Source
Type”, and then select “Mapped Network Drive Only” from the drop-down list.
NFS servers must share their exports in order to make them available to client systems. If you
want to perform a mount-point backup or restore, the NFS server must be available, and it must
provide sufficient privileges to your client system. Also, the NFS must be mounted on your client
system at the time of the backup or restore.
Note: If you restore an NFS backup, and the NFS mount does not exist, the restore will proceed
as if it were a local restore. It will put the data on the local disk (with a similar path that is local)
without using a mount-point (NFS) path. It will not indicate a “failure”.
If the local disk does not have sufficient space, this may cause a problem.
If you do not realize that a restore is local, and overwrite is enabled, you will overwrite the local
data. You will think, however, that you are overwriting the mount-point data.
4.2 Cross-Computer Restores
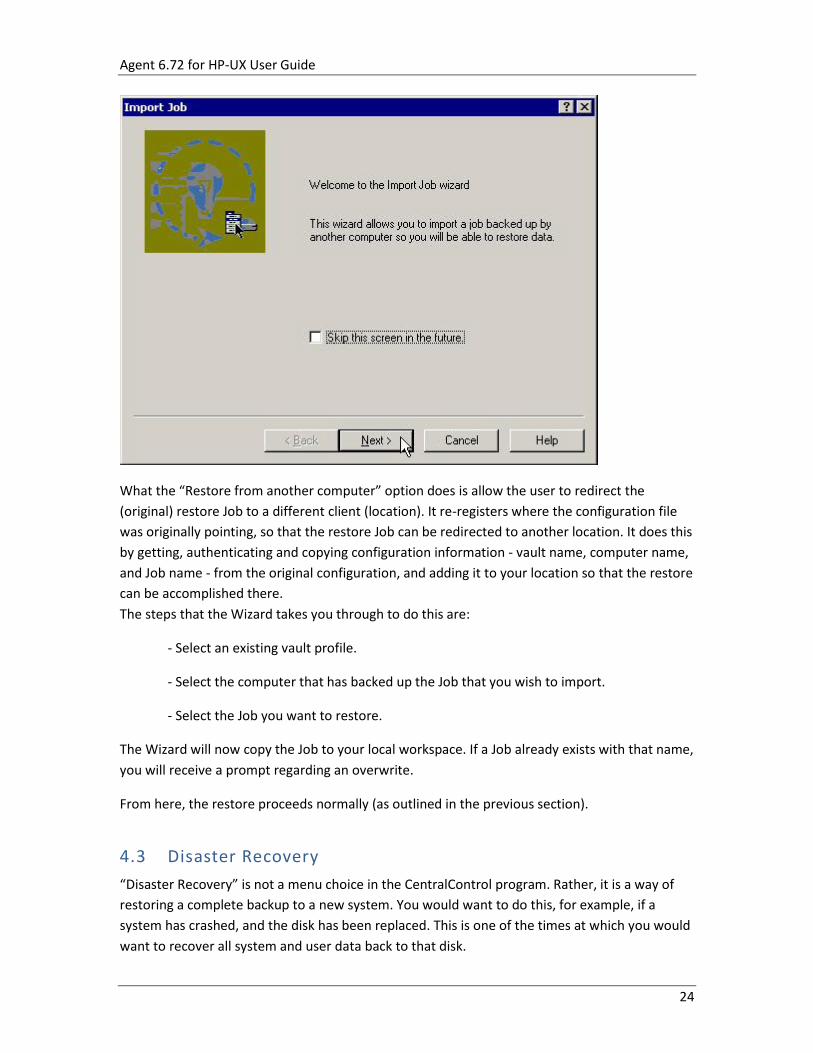
From the menus, select Options Restore from another computer. This starts the Job Import
Wizard.
Agent 6.72 for HP-UX User Guide
24
What the “Restore from another computer” option does is allow the user to redirect the
(original) restore Job to a different client (location). It re-registers where the configuration file
was originally pointing, so that the restore Job can be redirected to another location. It does this
by getting, authenticating and copying configuration information - vault name, computer name,
and Job name - from the original configuration, and adding it to your location so that the restore
can be accomplished there.
The steps that the Wizard takes you through to do this are:
- Select an existing vault profile.
- Select the computer that has backed up the Job that you wish to import.
- Select the Job you want to restore.
The Wizard will now copy the Job to your local workspace. If a Job already exists with that name,
you will receive a prompt regarding an overwrite.
From here, the restore proceeds normally (as outlined in the previous section).
4.3 Disaster Recovery
“Disaster Recovery” is not a menu choice in the CentralControl program. Rather, it is a way of
restoring a complete backup to a new system. You would want to do this, for example, if a
system has crashed, and the disk has been replaced. This is one of the times at which you would
want to recover all system and user data back to that disk.
Agent 6.72 for HP-UX User Guide
25
Reinstalling the O/S, applications, and data is possible, but you may not be able to recreate the
exact state of the system that you would get with a restore of a full-drive backup that included
data files, system state, and system files. A successful disaster recovery brings your new system
to the state of the original system after its last full-drive backup.
4.4 Restoring ACLs
You can back up and restore Access Control Lists (ACLs). The following behaviors can occur when
you restore ACLs on a Unix server.
ACLs control the access of users or groups to particular files. Similar to regular file permissions
(e.g., owner, group, world), ACLs are tracked by the ID of the user/group. ACLs provide access-
control granularity beyond regular file permissions, and unlike regular permissions, they are not
always enabled.
ACL implementations differ by variety of Unix, and by the type of file system. Not all ACL
implementations are "portable" (i.e., ACLs on one OS/file system may be incompatible with ACLs
on another OS/file system). In addition, you might need to enable ACL support on a partition
before you can configure it.
If you attempt to restore ACLs to an incompatible system (i.e., a file system that does not
support ACLs, or where you are using another variety of Unix), the ACLs will not be restored. An
error message will appear in the backup log.
If you restore to a compatible system (i.e., the original system, or a different system with the
same variety of Unix), ACLs will also be restored.
Since ACLs are associated with user and group IDs, you will observe the following on a
compatible system:
If the group, user names, and IDs on the restored system match those of the original
system, the ACLs will be associated with the same user name as on original system.
If the group, user names, and IDs on the restored system do not match those on the
original system, the ACLs will be associated with a different user or group name
compared to the original system.
If the group or user name ID does not exist on the restored system, the ACLs will be associated
with the user ID or group ID respectively. Therefore, browsing ACLs on these files will show
user/group IDs as opposed to user/group names.
Agent 6.72 for HP-UX User Guide
26
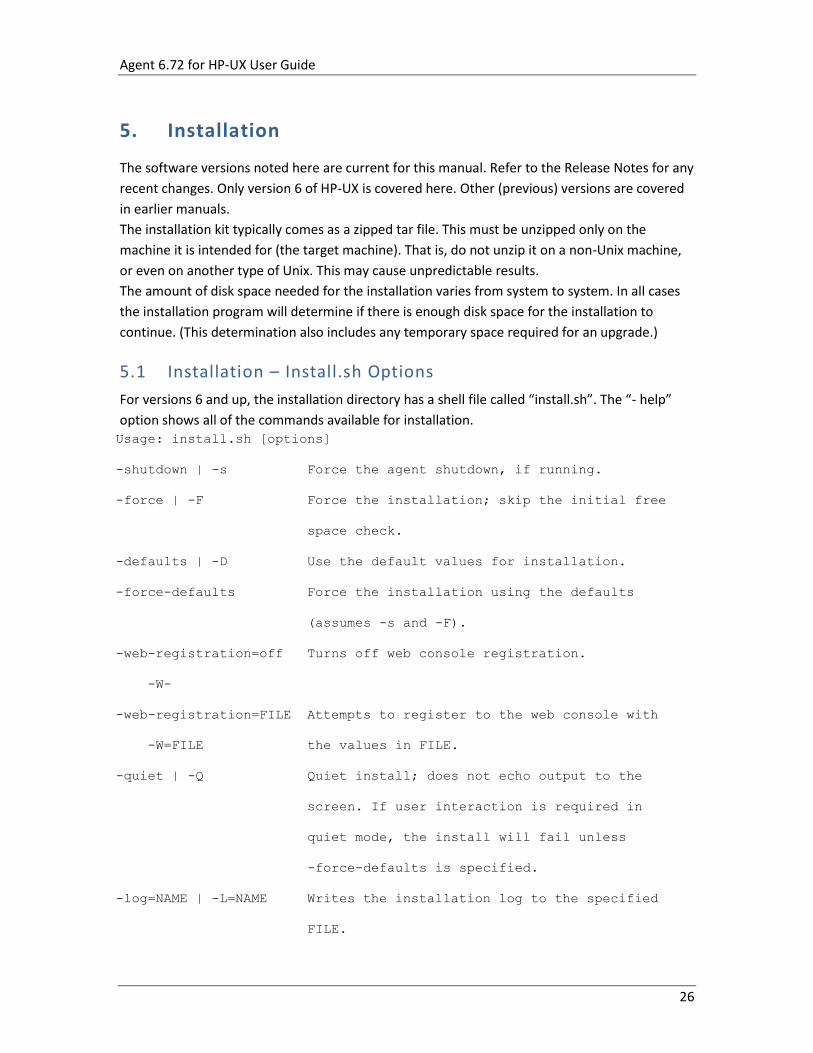
5. Installation
The software versions noted here are current for this manual. Refer to the Release Notes for any
recent changes. Only version 6 of HP-UX is covered here. Other (previous) versions are covered
in earlier manuals.
The installation kit typically comes as a zipped tar file. This must be unzipped only on the
machine it is intended for (the target machine). That is, do not unzip it on a non-Unix machine,
or even on another type of Unix. This may cause unpredictable results.
The amount of disk space needed for the installation varies from system to system. In all cases
the installation program will determine if there is enough disk space for the installation to
continue. (This determination also includes any temporary space required for an upgrade.)
5.1 Installation – Install.sh Options
For versions 6 and up, the installation directory has a shell file called “install.sh”. The “- help”
option shows all of the commands available for installation. Usage: install.sh [options]
-shutdown | -s Force the agent shutdown, if running.
-force | -F Force the installation; skip the initial free
space check.
-defaults | -D Use the default values for installation.
-force-defaults Force the installation using the defaults
(assumes -s and -F).
-web-registration=off Turns off web console registration.
-W-
-web-registration=FILE Attempts to register to the web console with
-W=FILE the values in FILE.
-quiet | -Q Quiet install; does not echo output to the
screen. If user interaction is required in
quiet mode, the install will fail unless
-force-defaults is specified.
-log=NAME | -L=NAME Writes the installation log to the specified
FILE.
Agent 6.72 for HP-UX User Guide
27
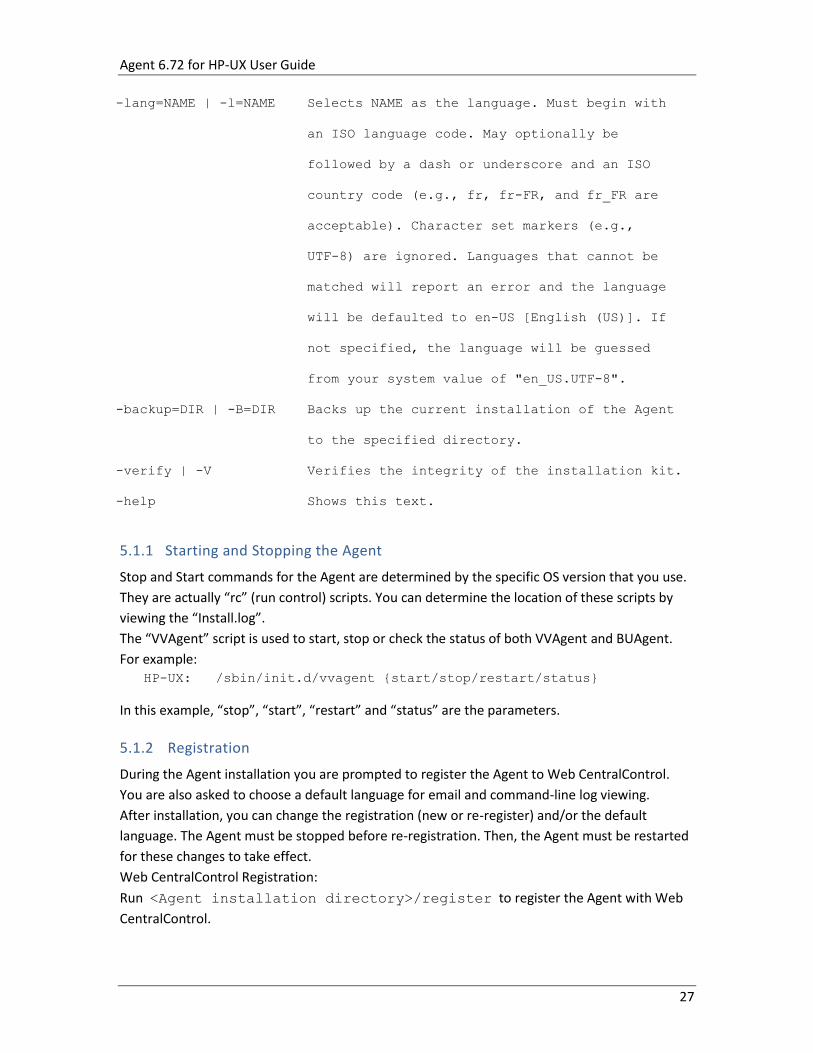
-lang=NAME | -l=NAME Selects NAME as the language. Must begin with
an ISO language code. May optionally be
followed by a dash or underscore and an ISO
country code (e.g., fr, fr-FR, and fr_FR are
acceptable). Character set markers (e.g.,
UTF-8) are ignored. Languages that cannot be
matched will report an error and the language
will be defaulted to en-US [English (US)]. If
not specified, the language will be guessed
from your system value of "en_US.UTF-8".
-backup=DIR | -B=DIR Backs up the current installation of the Agent
to the specified directory.
-verify | -V Verifies the integrity of the installation kit.
-help Shows this text.
5.1.1 Starting and Stopping the Agent
Stop and Start commands for the Agent are determined by the specific OS version that you use.
They are actually “rc” (run control) scripts. You can determine the location of these scripts by
viewing the “Install.log”.
The “VVAgent” script is used to start, stop or check the status of both VVAgent and BUAgent.
For example: HP-UX: /sbin/init.d/vvagent {start/stop/restart/status}
In this example, “stop”, “start”, “restart” and “status” are the parameters.
5.1.2 Registration
During the Agent installation you are prompted to register the Agent to Web CentralControl.
You are also asked to choose a default language for email and command-line log viewing.
After installation, you can change the registration (new or re-register) and/or the default
language. The Agent must be stopped before re-registration. Then, the Agent must be restarted
for these changes to take effect.
Web CentralControl Registration:
Run <Agent installation directory>/register to register the Agent with Web
CentralControl.
Agent 6.72 for HP-UX User Guide
28
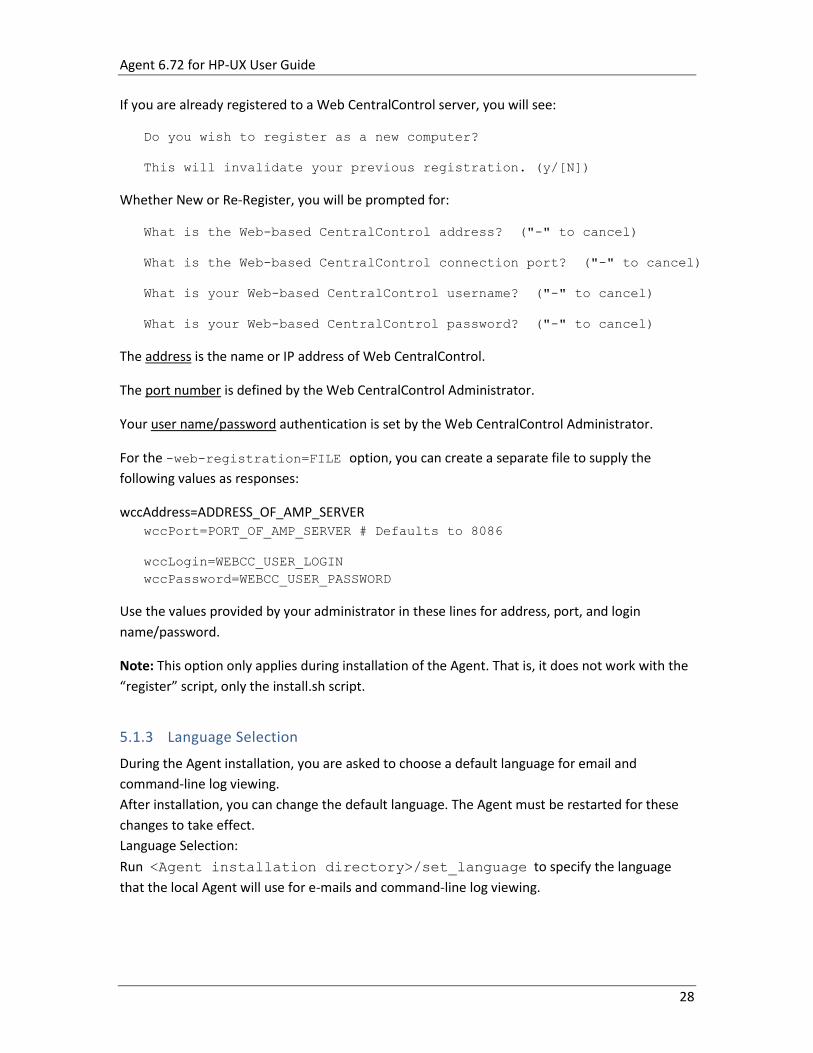
If you are already registered to a Web CentralControl server, you will see:
Do you wish to register as a new computer?
This will invalidate your previous registration. (y/[N])
Whether New or Re-Register, you will be prompted for:
What is the Web-based CentralControl address? ("-" to cancel)
What is the Web-based CentralControl connection port? ("-" to cancel)
What is your Web-based CentralControl username? ("-" to cancel)
What is your Web-based CentralControl password? ("-" to cancel)
The address is the name or IP address of Web CentralControl.
The port number is defined by the Web CentralControl Administrator.
Your user name/password authentication is set by the Web CentralControl Administrator.
For the -web-registration=FILE option, you can create a separate file to supply the
following values as responses:
wccAddress=ADDRESS_OF_AMP_SERVER wccPort=PORT_OF_AMP_SERVER # Defaults to 8086
wccLogin=WEBCC_USER_LOGIN
wccPassword=WEBCC_USER_PASSWORD
Use the values provided by your administrator in these lines for address, port, and login
name/password.
Note: This option only applies during installation of the Agent. That is, it does not work with the
“register” script, only the install.sh script.
5.1.3 Language Selection
During the Agent installation, you are asked to choose a default language for email and
command-line log viewing.
After installation, you can change the default language. The Agent must be restarted for these
changes to take effect.
Language Selection:
Run <Agent installation directory>/set_language to specify the language
that the local Agent will use for e-mails and command-line log viewing.
Agent 6.72 for HP-UX User Guide
29
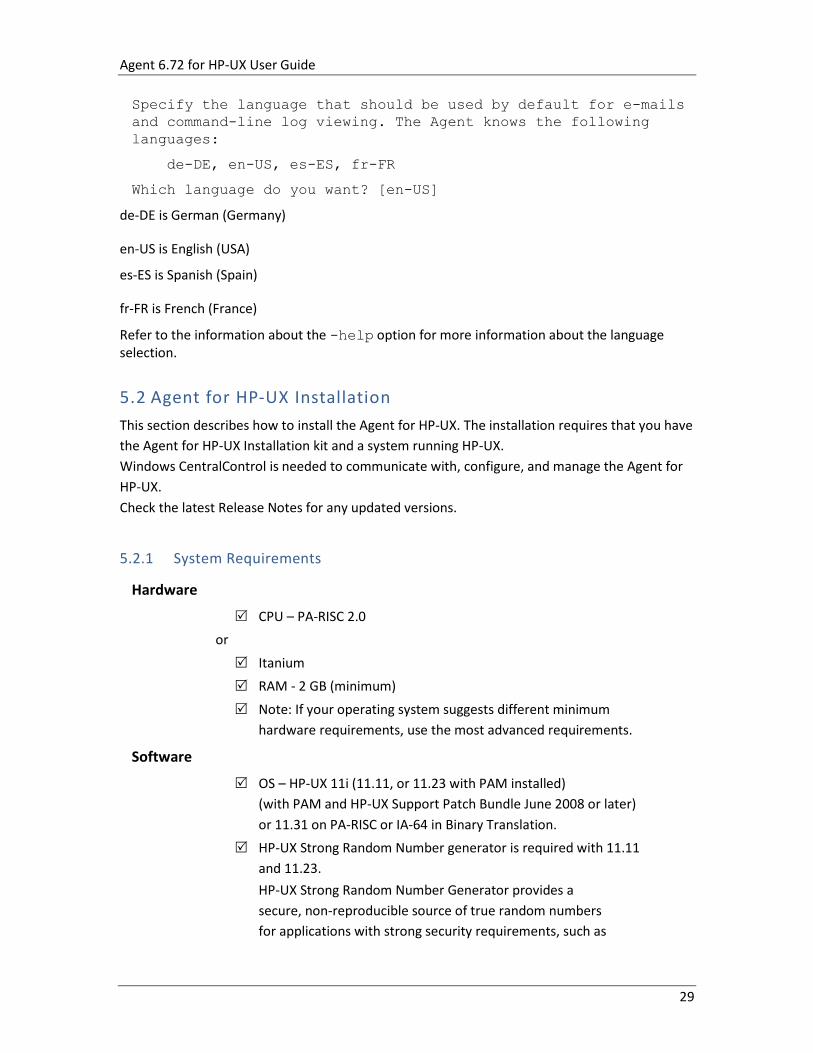
Specify the language that should be used by default for e-mails
and command-line log viewing. The Agent knows the following
languages:
de-DE, en-US, es-ES, fr-FR
Which language do you want? [en-US]
de-DE is German (Germany)
en-US is English (USA)
es-ES is Spanish (Spain)
fr-FR is French (France)
Refer to the information about the -help option for more information about the language selection.
5.2 Agent for HP-UX Installation
This section describes how to install the Agent for HP-UX. The installation requires that you have
the Agent for HP-UX Installation kit and a system running HP-UX.
Windows CentralControl is needed to communicate with, configure, and manage the Agent for
HP-UX.
Check the latest Release Notes for any updated versions.
5.2.1 System Requirements
Hardware
CPU – PA-RISC 2.0
or
Itanium
RAM - 2 GB (minimum)
Note: If your operating system suggests different minimum
hardware requirements, use the most advanced requirements.
Software
OS – HP-UX 11i (11.11, or 11.23 with PAM installed)
(with PAM and HP-UX Support Patch Bundle June 2008 or later)
or 11.31 on PA-RISC or IA-64 in Binary Translation.
HP-UX Strong Random Number generator is required with 11.11
and 11.23.
HP-UX Strong Random Number Generator provides a
secure, non-reproducible source of true random numbers
for applications with strong security requirements, such as
Agent 6.72 for HP-UX User Guide
30
for generating encryption keys. When configured to use
these special files, applications such as SSH will have a more
secure environment for performing cryptographic
computations.
Privilege Requirements
Installation
To extract the installation files for the Agent for HP-UX, no
special privileges are required. However, to run the
installation script, you must have root privileges.
Functional
To communicate with the Agent remotely, the user
specified must have full root privileges.
Note that you require enhanced privileges for the User ID that you use for Windows
CentralControl Agent authentication.
To log in to the account:
The User ID must be enabled.
The User ID must not be suspended or locked out due to invalid password attempts.
The password must not have expired.
The User ID should not have time of day limits for when you can log in.
The User ID must belong to the "root" group.
For additional security, rather than disabling the account, you can set the shell to be
/bin/false. This can usually be done with the following command:
usermod -s /bin/false buagent
If you are running an ftp server, for additional security, it may be necessary to review the ftp
server configuration to deny logins for this User ID. It is often sufficient to ensure /bin/false is
not listed as a valid shell in /etc/shells. Your server may vary.
Note: You can install the HP-UX Agent from “fresh” or upgrade it from version 5.x.
5.2.2 Installation Procedures
The Agent for HP-UX Installation kit is available in a file whose name is similar to
Agent-HP-UX-6.xx.xxxx.tar.gz (your service provider might have assigned a
Agent 6.72 for HP-UX User Guide
31
different name to this file). The kit contains all of the necessary components for installing the
Agent for HP-UX.
5.2.2.1 Requirements
Before beginning the installation, make certain that the following requirements and materials
are available:
The Agent for HP-UX Installation kit.
A target system running a supported version of HP-UX.
Root privileges on the target system to install the product.
Sufficient disk space for the new installation, and later Job activities. Note that if the
available disk space is insufficient for a complete installation, the installation directory
will roll back to its original state. You can override the space checking with
./install.sh –F (but this only applies to the initial check for actual installation
space, rather than extra temporary space for rolling back).
5.2.2.2 Running the Installation Kit
Depending on your service provider, you may have the option of downloading the file from the
Web, from diskette and/or from a CD.
To install the Agent for HP-UX:
1. Download the Agent-HP-UX-6.xx.xxxx.tar.gz package.
Note: You must do this locally (i.e., on the target machine).
2. Extract the files from the package. To do so, use this command (in which
“PACKAGENAME” could be “Agent-HP-UX-6.72”):
gunzip -c PACKAGENAME.tar.gz | tar xvf -
3. Run the installation script.
# ./install.sh
Note: The installation script will interactively prompt you for configuration information such as
web registration (address, port number and authentication), log file name, and language
selection for logs and command lines. See section 5.1.1 of this guide.
When the installation is complete, a completion message will appear, and the Agent daemon
will be running.
The Install.log is in the installation directory, if successful. For example:
<Agent installation directory>/Install.log
If the installation fails and rolls back, the installation log will be in the <Installation
Failure directory>.
If it fails and does not roll back, the installation log will be in the <Installation Kit
directory>.
Agent 6.72 for HP-UX User Guide
32
5.2.3 Uninstall Procedures
To uninstall the Agent for HP-UX:
1. Log onto the target system.
2. Go to the installation directory (by default /opt/BUAgent/).
3. Use the VVAgent script to stop the Agent (see section 5.1.1).
4. Run “uninstall.sh”. A message will appear, asking if you want to remove the
Agent.
Select Yes to completely remove the Agent, including all Job files and settings.
Select No to remove the VVAgent service entry, executables and scripts. This
choice leaves your directory, Job files and settings intact for future use.
If you choose to completely uninstall the VVAgent, a confirmation prompt will appear.
The log will be in /tmp/Agent-Uninstall-<timestamp>.log
5.2.4 Upgrading
This Agent version supports upgrades from Agent 5.x and above.
Upgrading an Agent includes the following tasks:
1. Meeting System and Software Requirements
2. Preparing the Computer
3. Upgrading Program Files and Configuration Files
4. Running the upgrade (installation) Job.
Note: During the upgrade, you will be prompted to stop the Agent before performing the
new installation.
When you run the Installation Kit, the Agent is upgraded to Version 6.72 and the following tasks
are automatically performed:
The new BuildVersion and VVCVersion are created in Global.vvc and Job vvc files:
BuildVersion = 6.7X.XXXX
VVCVersion = XXX
Server profiles in Global.vvc are updated with the computer registration information,
such as computer GUID (Global Unique ID), computer name and vault GUID. These must
match the information stored in the vault’s database.
Agent 6.72 for HP-UX User Guide
33
Job vvc files are updated with Job registration information. This includes computer GUID
(must be the same as in Global.vvc), Job GUID (must match the record of the vault’s
database) and vault GUID (must be the same as in Global.vvc).
All Delta files are upgraded to Version 6.7x format.
A backup of the old Global.vvc, Job vvc and Delta files is saved under a subdirectory of
Agent installation directory.
A log file will be created in Agent installation directory.
All executables and documents are replaced by new versions.
5.2.4.1 Meeting System and Software Requirements
To upgrade the Agent, your system must meet the minimum requirements mentioned in the
User Guide.
Note: Available free space of the volume that the Agent is installed on should be bigger than
the size of all Delta files + the size of the largest Delta file + a reasonable cushion (at
least 100 MB).
5.2.4.2 Preparing the Computer
To prepare your existing machine for upgrading the Agent, complete these tasks:
a. Back up the previous Agent Files
We strongly recommend that you make at least one backup of your previous Agent files,
including all files and subdirectories under the Agent installation directory. Do not attempt an
upgrade without a backup.
b. Clean up Server Profiles in Global.vvc
From CentralControl, open up the Agent Configuration of the Agent that you want to upgrade.
Go to the Vaults section, look for a server configuration that is no longer in use, and delete it.
Also, highlight every server configuration and click Edit to double-check that the information in
this server profile is valid. Then click OK to save your changes.
c. Clean up Jobs
After the Global.vvc has been cleaned up, check all backup Jobs to see if there is any Job backing
up to a vault that has been deleted from Agent Configuration. If so, delete that Job or assign it
to a different vault.
If you have Jobs that are backing up to Tape drive or Directory on Disk, they are local Jobs and
leave them unchanged. During the upgrade, they will be registered to the first vault indicated in
Agent Configuration.
Agent 6.72 for HP-UX User Guide
34
d. Synchronize all backup Jobs
After cleaning up the Jobs, check the backup logs of each Job to see if any errors show
“Validation failed: “. If so, you need to verify the validation information with your vault operator
to make sure it is valid. If the latest backup log shows no errors, do a Synchronize with the vault
and check the Synch log.
e. Verify eligible vault version
For every vault that you are backing up to, make sure it is running Director Version 5.53 or
higher. Otherwise, you need to upgrade the vault before you upgrade the Agent.
5.2.4.3 Upgrading Program Files and Configuration Files
We recommend starting the installation when the Directors in Agent Configuration are not busy
with other Jobs.
When the Installation Kit is launched, it detects the previously installed versions of the Agent
and starts to upgrade it.
IMPORTANT: When the upgrade process starts, wait until it finishes. Do not run more than one
upgrade at the same time.
5.2.4.4 Upgrade Steps
Note: To upgrade the Agent properly, you must select the same installation directory that was
used for the previous Agent. Otherwise, the Upgrade will proceed as if it were a new
installation.
1. Log onto the target system.
2. Go to the installation kit directory.
3. Use the VVAgent script to stop the Agent (see section 5.1.1).
4. Download the Agent-HP-UX-6.xx.xxxx.tar.gz package.
Note: You must do this locally (i.e., on the target machine).
5. Extract the files from the package. To do so, use this command (where
“PACKAGENAME” could be “Agent-HP-UX-6.72”):
gunzip -c PACKAGENAME.tar.gz | tar xvf –
6. Run the installation script.
# ./install.sh
Always check the log file after an upgrade. The log file will be used when troubleshooting in the
case of failure. If an upgrade fails, the Global.vvc, Job vvc and Delta files will roll back to their old
Agent 6.72 for HP-UX User Guide
35
versions. The Global, Job and Deltas will not work with new executables, but an upgrade failure
will roll back the executables, too.
You may try to run the upgrade program again. If it still fails, contact your service provider for
support. To completely roll back to the old version, you need to manually copy back the
previous backups.
Recommendation: Do at least one backup for each Job after upgrading successfully. This allows
the Agent to upload new configuration files to the vault.
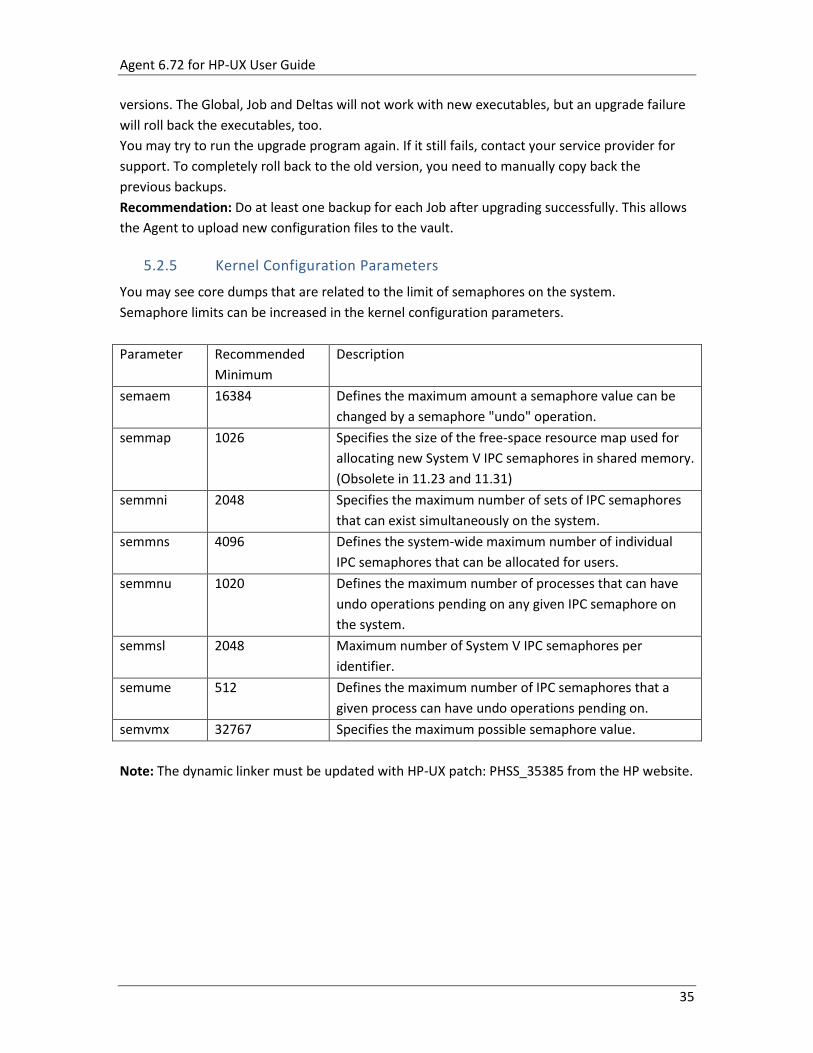
5.2.5 Kernel Configuration Parameters
You may see core dumps that are related to the limit of semaphores on the system.
Semaphore limits can be increased in the kernel configuration parameters.
Parameter Recommended
Minimum
Description
semaem 16384 Defines the maximum amount a semaphore value can be
changed by a semaphore "undo" operation.
semmap 1026 Specifies the size of the free-space resource map used for
allocating new System V IPC semaphores in shared memory.
(Obsolete in 11.23 and 11.31)
semmni 2048 Specifies the maximum number of sets of IPC semaphores
that can exist simultaneously on the system.
semmns 4096 Defines the system-wide maximum number of individual
IPC semaphores that can be allocated for users.
semmnu 1020 Defines the maximum number of processes that can have
undo operations pending on any given IPC semaphore on
the system.
semmsl 2048 Maximum number of System V IPC semaphores per
identifier.
semume 512 Defines the maximum number of IPC semaphores that a
given process can have undo operations pending on.
semvmx 32767 Specifies the maximum possible semaphore value.
Note: The dynamic linker must be updated with HP-UX patch: PHSS_35385 from the HP website.

Agent 6.72 for HP-UX User Guide
36
6. Unix System Recovery
The purpose of this chapter is to illustrate techniques for recovering a Unix file system. The
procedures provided describe the minimum resources and information required to rebuild the
Unix file system to its state at the last system backup. The recovery procedure can be performed
from a backup tape or directly from a vault.
The basic recovery procedure for a Unix system is:
1. Install the minimal operating system, including networking (and optionally, tape
services).
2. Install and configure the Agent.
3. Restore the backed up system state, programs, and data using the Agent.
4. Perform post-restore maintenance.
5. Verify the restore.
Prior to performing a recovery with a Unix system, ensure that your hardware configuration is at
least sufficient to hold the programs, data, and system state previously installed on the system.
6.1 Hardware Requirements
It is crucial for local storage on the system to be sufficient for a full restore of programs, system
state, and data. Otherwise, the restore will fail, and your system may be left in an indeterminate
state.
If any configuration files for your operating system depend on specific identifiers of installed
hardware (such as the MAC address of a network card), ensure that this information is noted, as
the values may be different than when the system was backed up using the Agent.
6.2 Software Requirements
Ensure that the appropriate installation media is available. The minimum system software
includes:
Unix installation media identical to that installed on the original system.
Any necessary OS patches to install the Agent, as described in the installation
instructions for the Agent on the OS.
Agent Installation media identical to that installed on the original system.
6.3 Unix Restoration Steps
This section describes the steps to perform a system restore.
6.3.1 Install the minimal operating system
Follow the instructions in your operating system manual and installation media to install a
minimal operating system.
Agent 6.72 for HP-UX User Guide
37
When prompted to partition your drive(s), ensure that the partitions are large enough
to restore to; they should be at least as large as the original partitions.
If restoring over the network, TCP/IP network services must be installed and configured
appropriately, and there must be a connection between the system and the backup
vault.
If restoring from a tape device, the driver and tape device files must exist.
If restoring from a directory on disk, there must be sufficient disk space to handle all the
restored data.
6.3.2 Install and configure the Agent
1. Install the Agent according to the instructions in this manual appropriate for your
operating system.
2. Configure the Agent according to the instructions in section 2 of this manual. It is
important to re-register to the vault where the data was backed up. (If restoring
from tape, it is still required to re-register to the same vault, because previously
defined Jobs will be restored.)
3. Synchronize the Job to ensure that local copies of Job catalogs are created.
6.3.3 Restore the backed up system
1. Start a restore according to the instructions in section 4 of this manual.
2. Select the files you wish to restore. The Unix Agent will restore most files to their
original locations and protect against many known restore problems (for file
systems mounted in their default locations), but some files may cause
unpredictable results if restored. These files vary by OS to OS and may generally
be restored to alternative locations without problems.
3. Ensure that the files are not being restored to a file system that is mounted read-
only.
Note: The Agent will prevent restoration of files to critical locations, but not all critical
locations are necessarily detected. Also, the locations can vary between varieties of
Unix.
When the restoration procedure is complete, the process of verifying the integrity of the restore
can commence.
6.3.4 Perform post-restore maintenance
If any modifications to the configuration of the restored system are required after restore, these
should be performed now. Known post-restore maintenance steps are noted below.
Agent 6.72 for HP-UX User Guide
38
6.3.5 Verify the restore
Once the restore procedure is complete, determine if the restoration is complete and correct.
The listing and testing of the Jobs should be performed as part of the systems recovery planning.
The specific Jobs to be performed for verification depend on the application environment and
the system's importance.
Once the system is restored, the integrity of the restoration must be verified. The test can be as
simple as placing a duplicate file in a different directory structure and testing for any differences
within the file. Then, confirm that the file can be opened using a known application and that you
are able to send e-mail to a known address. It can also be as complex as completing an SQL
query on a known database set.
Whatever the test, both the list and the test itself must be planned and executed during normal
system operation.
6.3.6 Unix Recovery Problems
Should any of the recovery Jobs fail, consider these questions:
Was the system restored using the same version of OS?
What possible differences were there in the hardware or software settings that could
have affected the restoration?
Were any errors reported in the error log file?
Were all the necessary drivers installed?
Were the applicable OS patches added?
Was there sufficient disk space to handle all of the restored data?
Agent 6.72 for HP-UX User Guide
39
7 Carbonite Server Backup Support
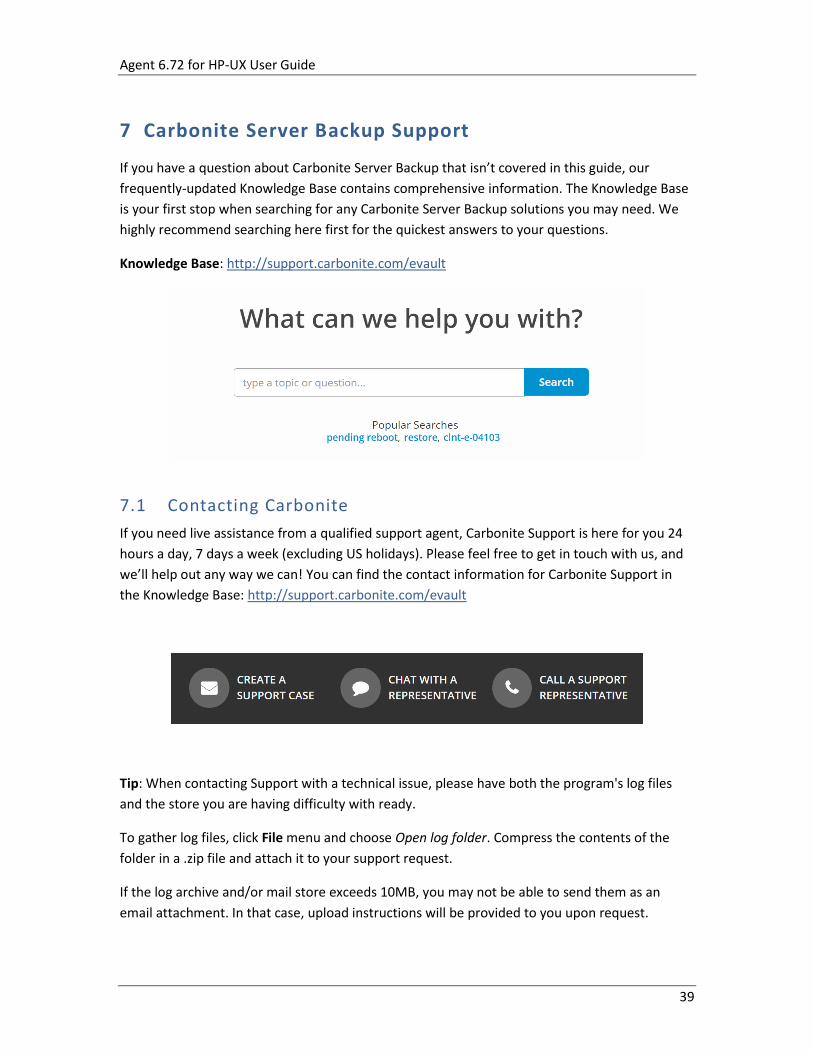
If you have a question about Carbonite Server Backup that isn’t covered in this guide, our
frequently-updated Knowledge Base contains comprehensive information. The Knowledge Base
is your first stop when searching for any Carbonite Server Backup solutions you may need. We
highly recommend searching here first for the quickest answers to your questions.
Knowledge Base: http://support.carbonite.com/evault
7.1 Contacting Carbonite
If you need live assistance from a qualified support agent, Carbonite Support is here for you 24
hours a day, 7 days a week (excluding US holidays). Please feel free to get in touch with us, and
we’ll help out any way we can! You can find the contact information for Carbonite Support in
the Knowledge Base: http://support.carbonite.com/evault
Tip: When contacting Support with a technical issue, please have both the program's log files
and the store you are having difficulty with ready.
To gather log files, click File menu and choose Open log folder. Compress the contents of the
folder in a .zip file and attach it to your support request.
If the log archive and/or mail store exceeds 10MB, you may not be able to send them as an
email attachment. In that case, upload instructions will be provided to you upon request.