beneficiary identification system web portal user - pmjay
TRANSCRIPT
NATIONAL INFORMATICS CENTER Page 1
Ministry of Health and Family Welfare
User Reference Guide
For
Beneficiary Identification System
Web Portal User
NATIONAL INFORMATICS CENTER Page 2
CONTENTS
INTRODUCTION 3
USER ROLES 4
LOGIN 5
SEARCH 6
SEARCH BY SECC NAME 7
❖ AADHAAR BASED VERIFICATION 9
❖ NON- AADHAAR VERIFICATION 12
SEARCH BY MOBILE 14
SEARCH BY RATION CARD 16
SEARCH BY RSBY URN 17
SEARCH BY HH ID 17
SEARCH BY AB NHPM ID 17
PENDING APPROVAL 19
APPROVED BENEFICIARY 20
ADD MEMBER 21
BY MOBILE 21
BY HH ID 24
BY NHPM ID 25
REJECTED LIST 26
NATIONAL INFORMATICS CENTER Page 3
1. INTRODUCTION Beneficiary Identification System (BIS) is a process, of applying the identification criteria
(as per AB-NHPM guidelines) on the SECC and RSBY database to approve/reject the
applications entitled for the benefits. AB-NHPM aims to target about 10.74 crore poor,
deprived rural families and identified occupational category of urban workers’ families as
per the latest Socio-Economic Caste Census (SECC) data. Additionally, all families enrolled
under RSBY that do not feature in the targeted groups as per SECC data will also be
included. There are following types of user in the process namely:
➢ National
➢ State- SHA
➢ State-Approver
➢ District
➢ Pradhan Mantri Arogya Mitra (PMAM)
➢ KIOSK Operators
National, State and District users will be able to view Dashboards and Reports for
monitoring.
NATIONAL INFORMATICS CENTER Page 4
2. USER ROLES Each user has been assigned a specific role in order to make the process hassle free and
easy. These roles have been briefly discussed below-
❖ NHA ADMIN- The National user is able to view the Dashboards and Reports at
National level (both State wise and District wise).
❖ STATE HEALTH AGENCY (SHA) - This user can view the Dashboard reports of the
Beneficiary Identification System, for a particular state.
❖ STATE APPROVER- A State Approver converts the Silver Records to Golden records.
This means that it approves or rejects the beneficiary list which has come for his
approval. In case an entry is rejected, it has to be with a valid reason.
❖ DISTRICT- The District user is able to view the Dashboards and Reports at the District
level.
❖ PRADHAN MANTRI AROGYA MITRA (PMAM) – This user is able to search and submit
the beneficiary identification details. He can also print the beneficiary card called the
AB NHPM card.
❖ KIOSK OPERATORS- KIOSK Operators can search and submit the beneficiary
identification details.
NATIONAL INFORMATICS CENTER Page 5
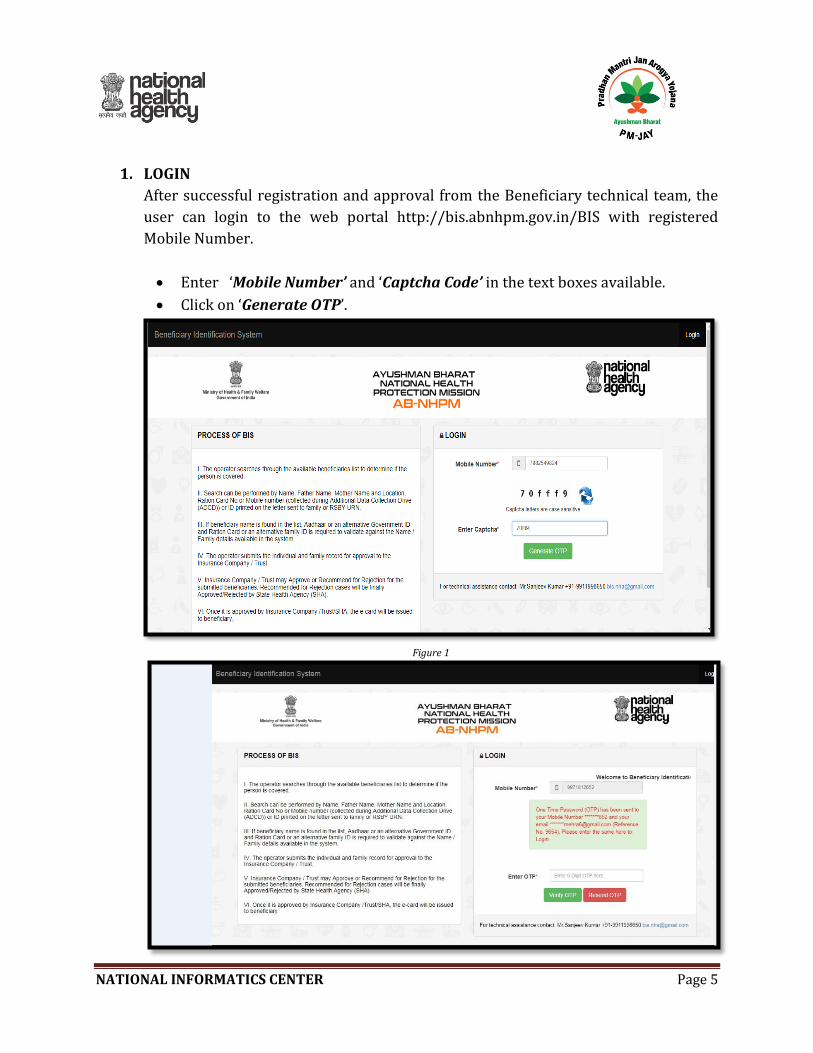
1. LOGIN
After successful registration and approval from the Beneficiary technical team, the
user can login to the web portal http://bis.abnhpm.gov.in/BIS with registered
Mobile Number.
• Enter ‘Mobile Number’ and ‘Captcha Code’ in the text boxes available.
• Click on ‘Generate OTP’.
Figure 1
NATIONAL INFORMATICS CENTER Page 6
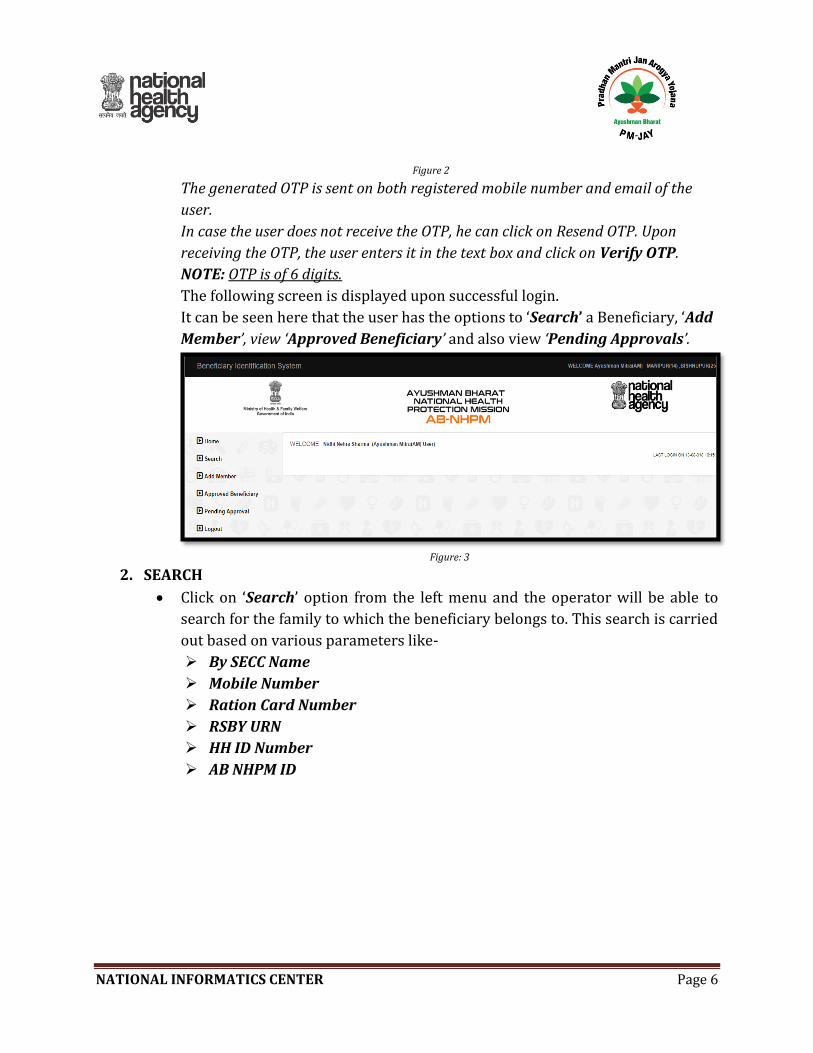
Figure 2
The generated OTP is sent on both registered mobile number and email of the
user.
In case the user does not receive the OTP, he can click on Resend OTP. Upon
receiving the OTP, the user enters it in the text box and click on Verify OTP.
NOTE: OTP is of 6 digits.
The following screen is displayed upon successful login.
It can be seen here that the user has the options to ‘Search’ a Beneficiary, ‘Add
Member’, view ‘Approved Beneficiary’ and also view ‘Pending Approvals’.
Figure: 3
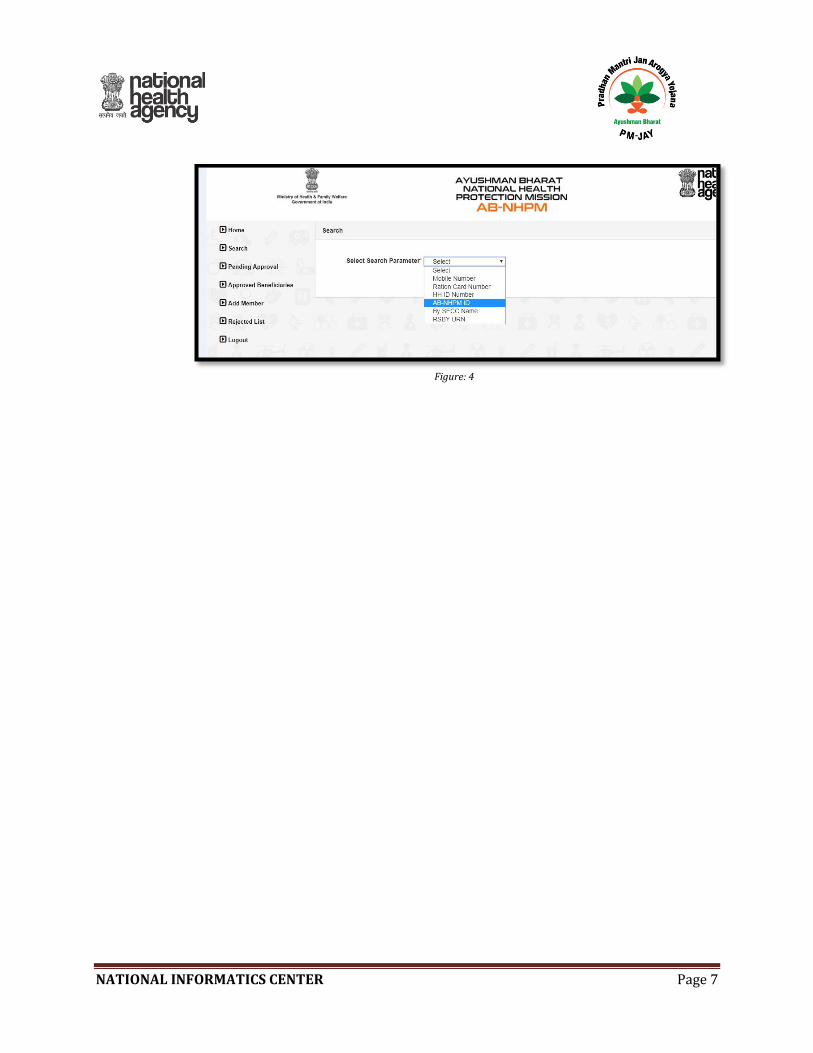
2. SEARCH
• Click on ‘Search’ option from the left menu and the operator will be able to
search for the family to which the beneficiary belongs to. This search is carried
out based on various parameters like-
➢ By SECC Name
➢ Mobile Number
➢ Ration Card Number
➢ RSBY URN
➢ HH ID Number
➢ AB NHPM ID
NATIONAL INFORMATICS CENTER Page 7
Figure: 4
NATIONAL INFORMATICS CENTER Page 8
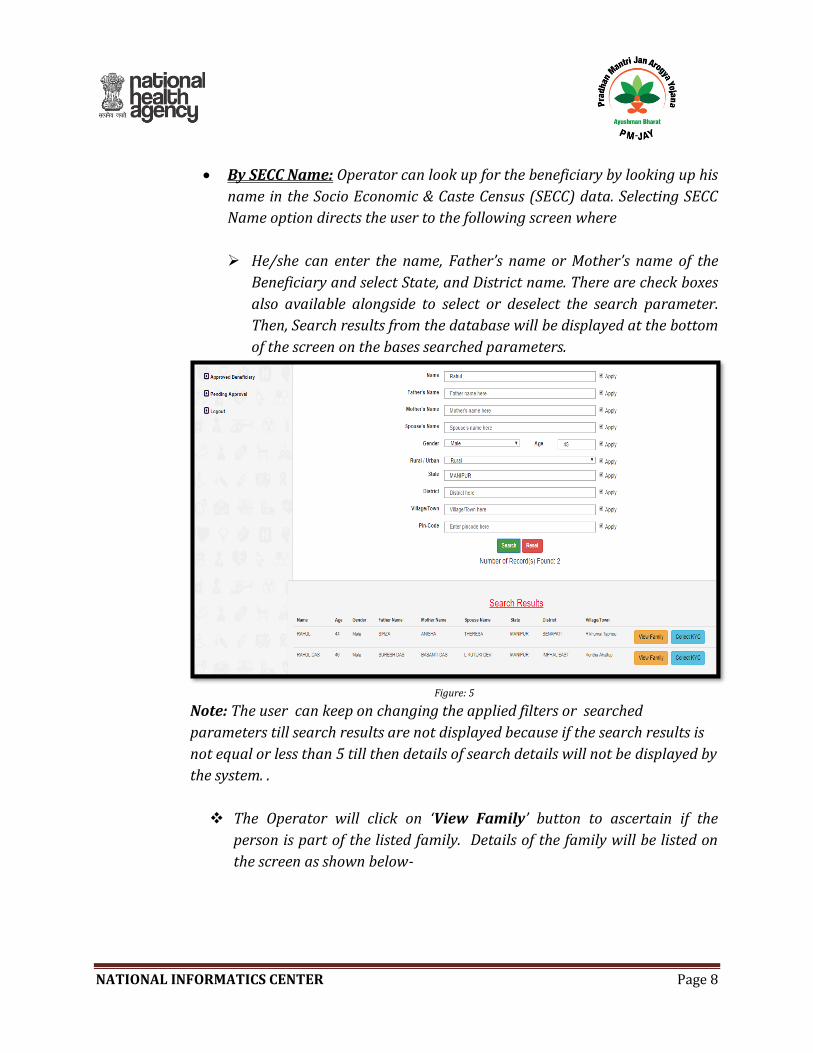
• By SECC Name: Operator can look up for the beneficiary by looking up his
name in the Socio Economic & Caste Census (SECC) data. Selecting SECC
Name option directs the user to the following screen where
➢ He/she can enter the name, Father’s name or Mother’s name of the
Beneficiary and select State, and District name. There are check boxes
also available alongside to select or deselect the search parameter.
Then, Search results from the database will be displayed at the bottom
of the screen on the bases searched parameters.
Figure: 5
Note: The user can keep on changing the applied filters or searched
parameters till search results are not displayed because if the search results is
not equal or less than 5 till then details of search details will not be displayed by
the system. .
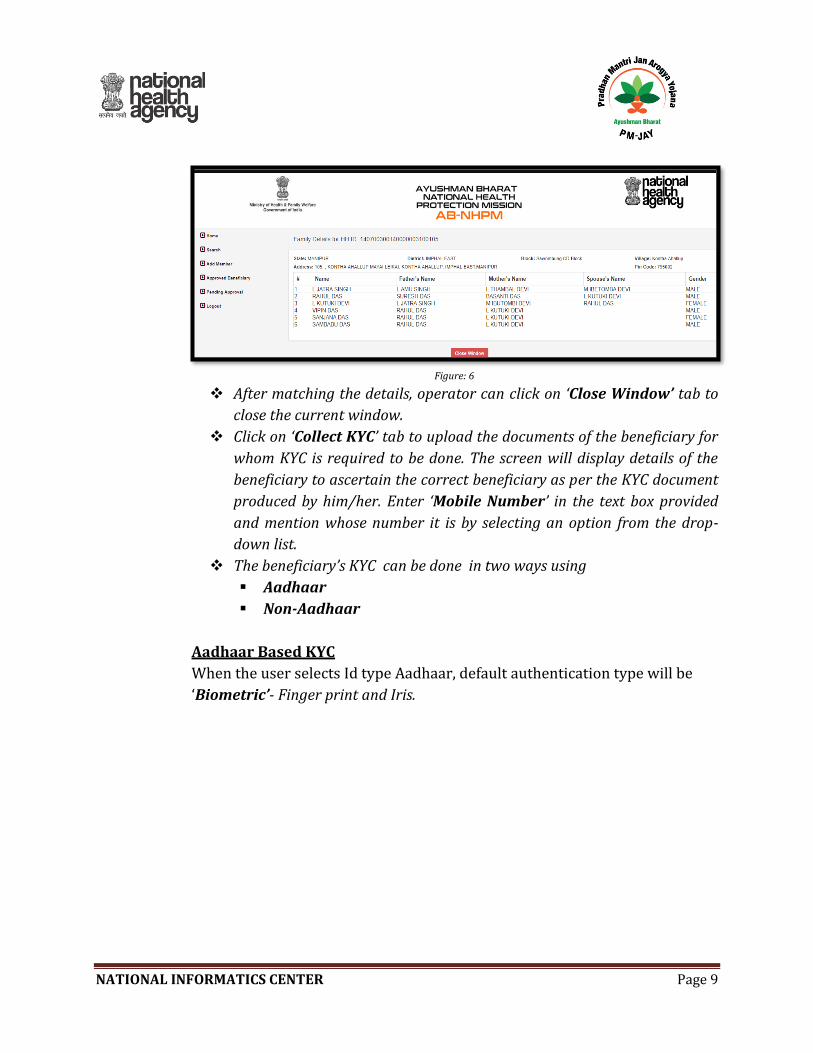
❖ The Operator will click on ‘View Family’ button to ascertain if the
person is part of the listed family. Details of the family will be listed on
the screen as shown below-
NATIONAL INFORMATICS CENTER Page 9
Figure: 6
❖ After matching the details, operator can click on ‘Close Window’ tab to
close the current window.
❖ Click on ‘Collect KYC’ tab to upload the documents of the beneficiary for
whom KYC is required to be done. The screen will display details of the
beneficiary to ascertain the correct beneficiary as per the KYC document
produced by him/her. Enter ‘Mobile Number’ in the text box provided
and mention whose number it is by selecting an option from the drop-
down list.
❖ The beneficiary’s KYC can be done in two ways using
▪ Aadhaar
▪ Non-Aadhaar
Aadhaar Based KYC
When the user selects Id type Aadhaar, default authentication type will be
‘Biometric’- Finger print and Iris.
NATIONAL INFORMATICS CENTER Page 10
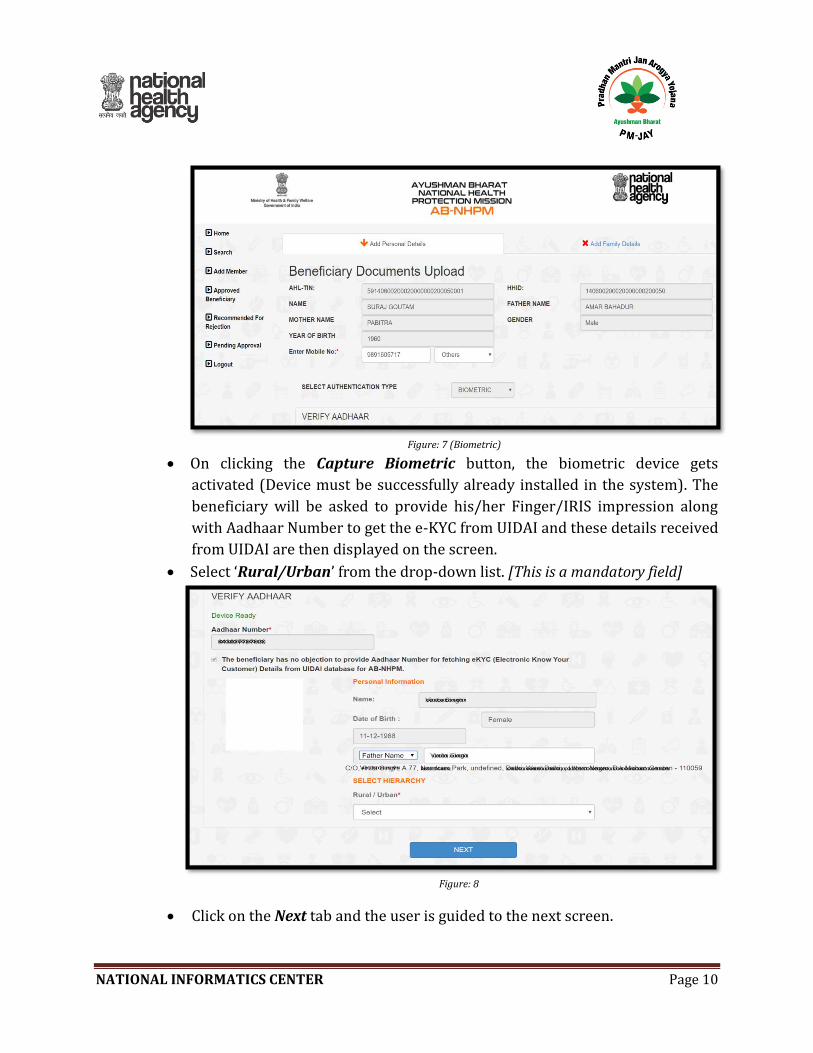
Figure: 7 (Biometric)
• On clicking the Capture Biometric button, the biometric device gets
activated (Device must be successfully already installed in the system). The
beneficiary will be asked to provide his/her Finger/IRIS impression along
with Aadhaar Number to get the e-KYC from UIDAI and these details received
from UIDAI are then displayed on the screen.
• Select ‘Rural/Urban’ from the drop-down list. [This is a mandatory field]
Figure: 8
• Click on the Next tab and the user is guided to the next screen.
NATIONAL INFORMATICS CENTER Page 11
•
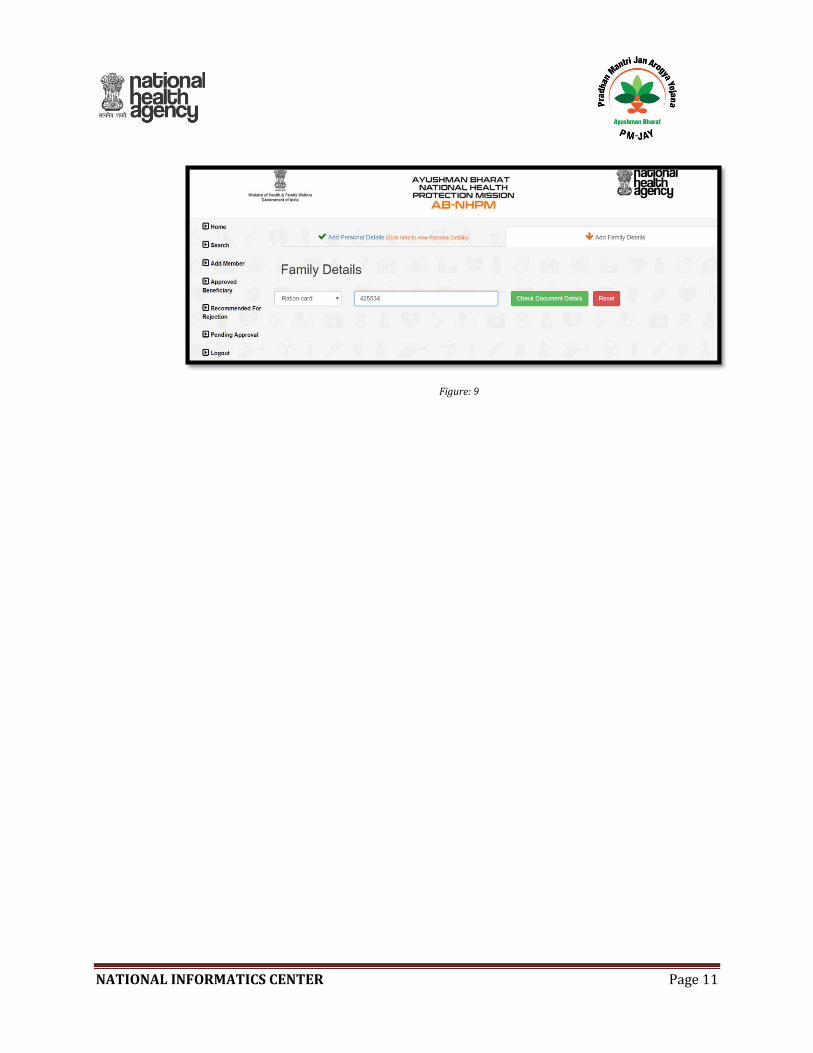
Figure: 9
NATIONAL INFORMATICS CENTER Page 12
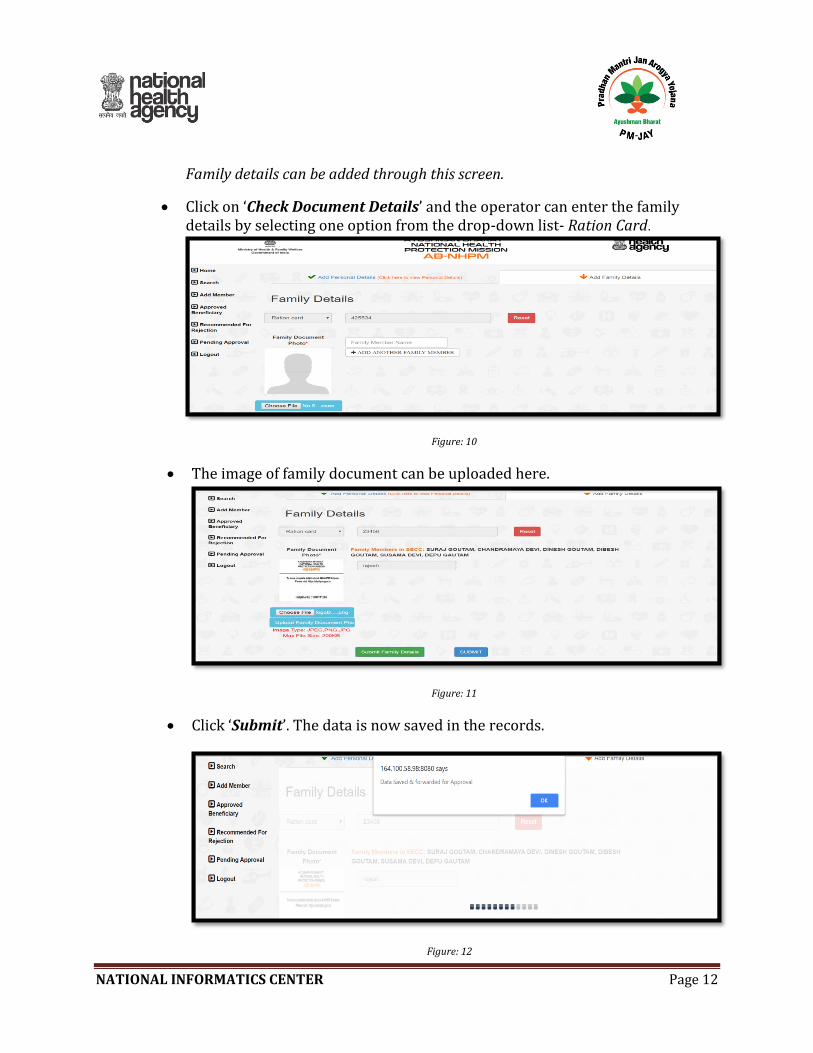
Family details can be added through this screen.
• Click on ‘Check Document Details’ and the operator can enter the family details by selecting one option from the drop-down list- Ration Card.
Figure: 10
• The image of family document can be uploaded here.
Figure: 11
• Click ‘Submit’. The data is now saved in the records.
Figure: 12
NATIONAL INFORMATICS CENTER Page 13
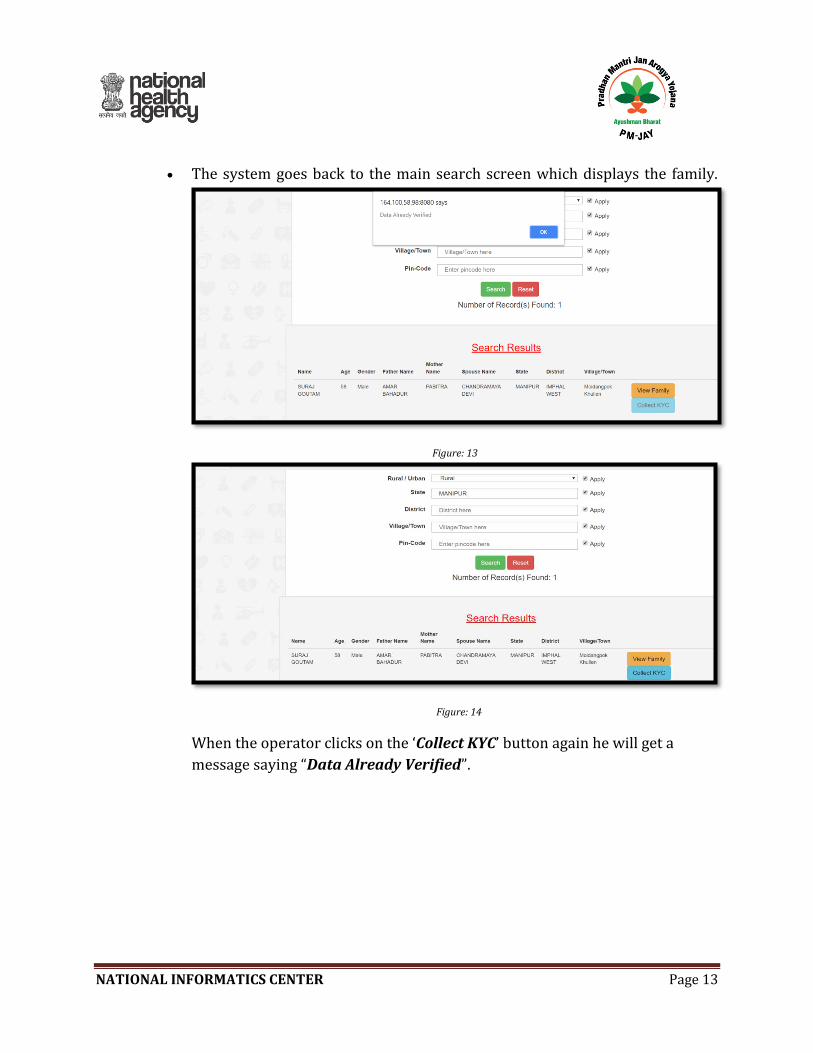
• The system goes back to the main search screen which displays the family.
Figure: 13
Figure: 14
When the operator clicks on the ‘Collect KYC’ button again he will get a
message saying “Data Already Verified”.
NATIONAL INFORMATICS CENTER Page 14
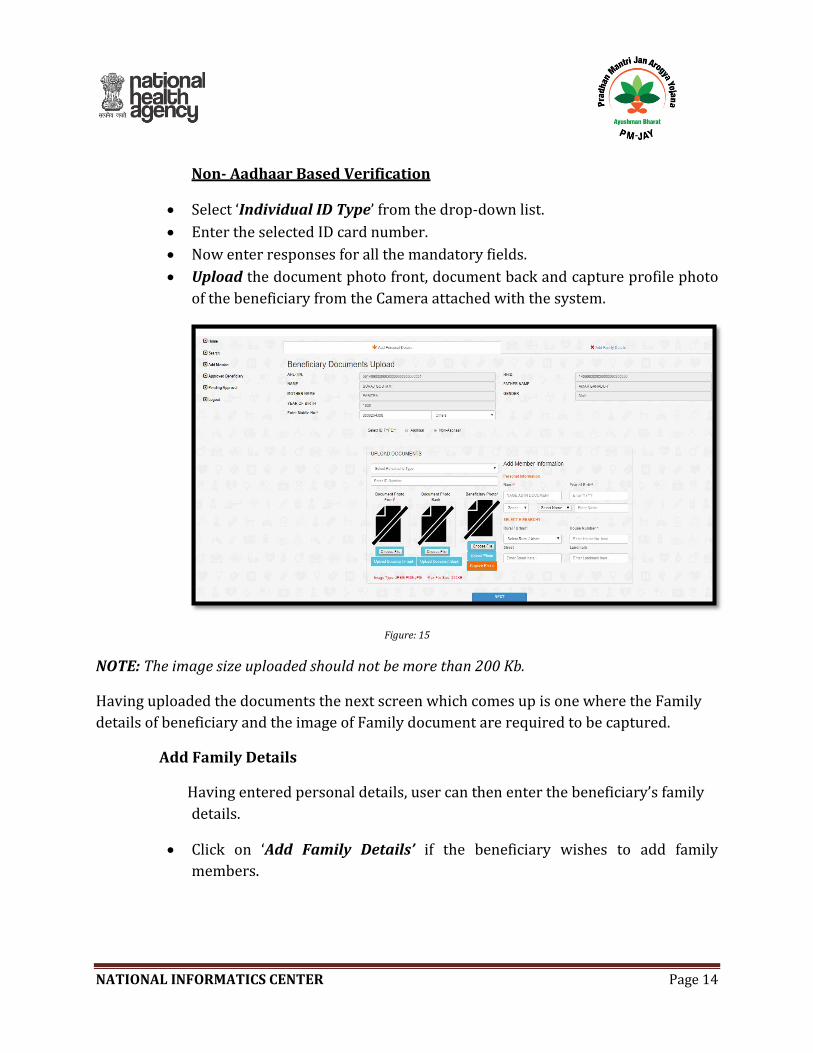
Non- Aadhaar Based Verification
• Select ‘Individual ID Type’ from the drop-down list.
• Enter the selected ID card number.
• Now enter responses for all the mandatory fields.
• Upload the document photo front, document back and capture profile photo
of the beneficiary from the Camera attached with the system.
Figure: 15
NOTE: The image size uploaded should not be more than 200 Kb.
Having uploaded the documents the next screen which comes up is one where the Family
details of beneficiary and the image of Family document are required to be captured.
Add Family Details
Having entered personal details, user can then enter the beneficiary’s family
details.
• Click on ‘Add Family Details’ if the beneficiary wishes to add family
members.
NATIONAL INFORMATICS CENTER Page 15
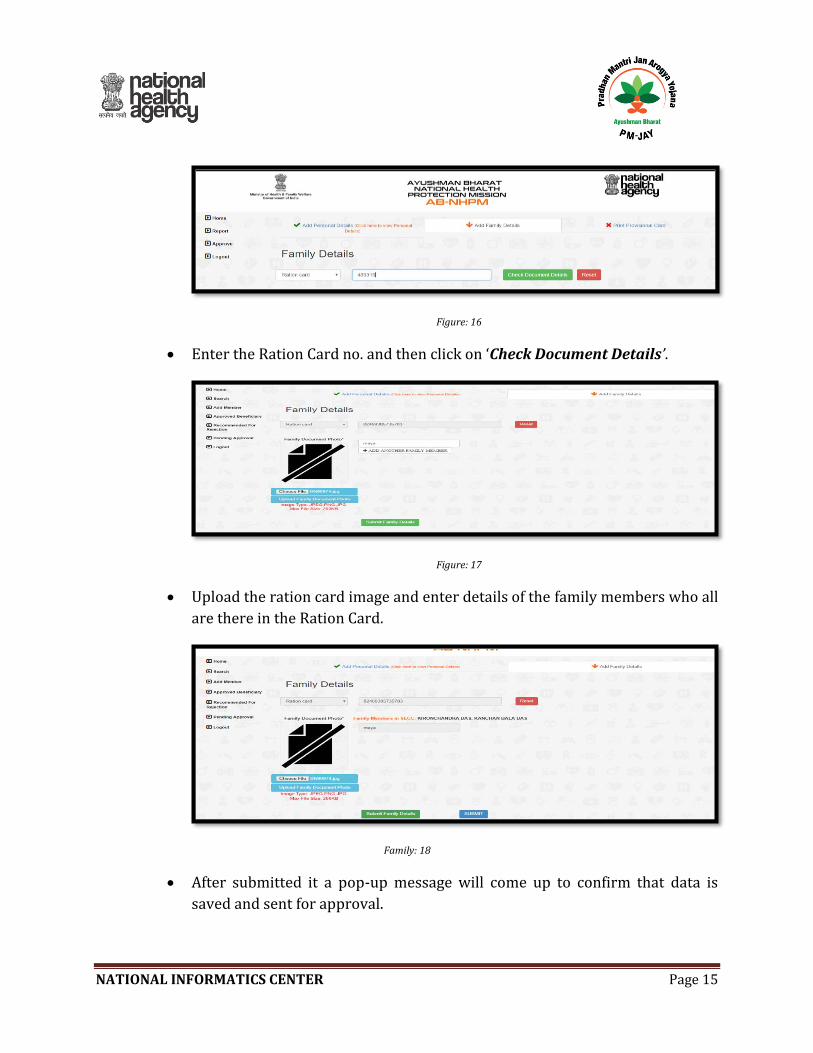
Figure: 16
• Enter the Ration Card no. and then click on ‘Check Document Details’.
Figure: 17
• Upload the ration card image and enter details of the family members who all
are there in the Ration Card.
Family: 18
• After submitted it a pop-up message will come up to confirm that data is
saved and sent for approval.

NATIONAL INFORMATICS CENTER Page 16
Figure: 19
➢ Mobile Number- A beneficiary can also be searched by entering his
mobile number. (Collected during ADCD drive).
▪ Select Mobile Number from the drop-down list.
▪ In the text box, enter the 10-digit mobile number (collect during
ADCD drive).
▪ Click on ‘Search’.
Figure: 20
➢ Family members details along with the document number and mobile
number is displayed here
NATIONAL INFORMATICS CENTER Page 17
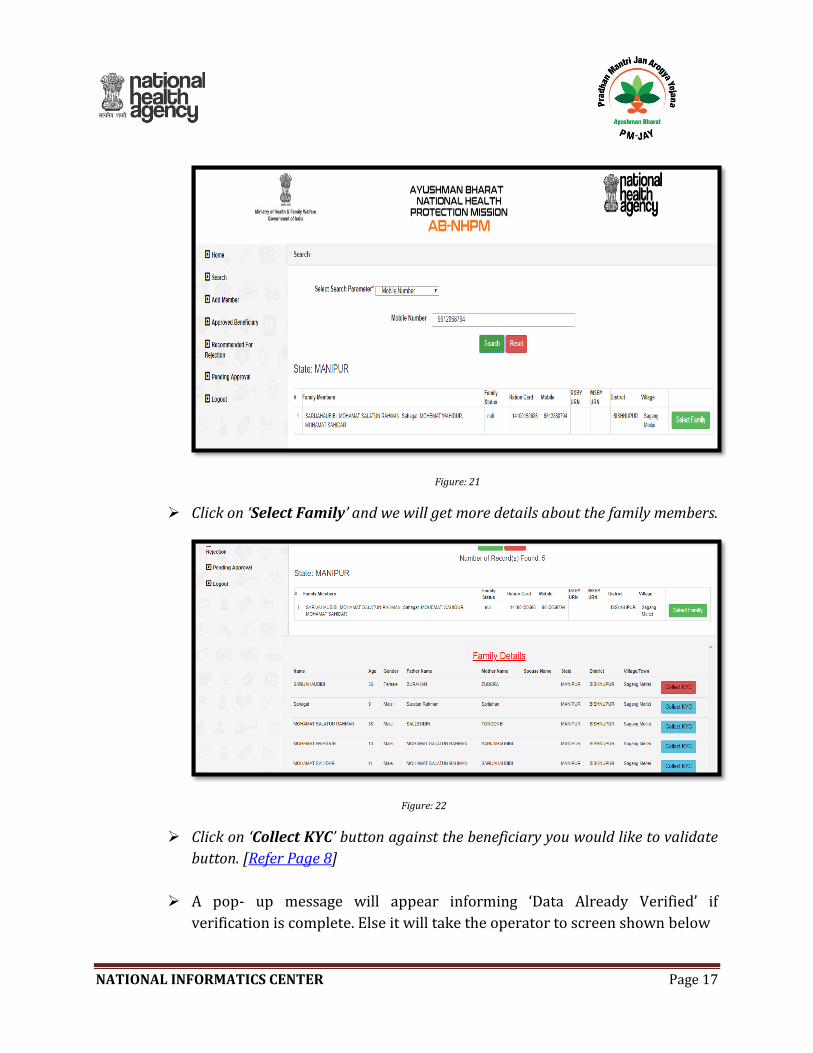
Figure: 21
➢ Click on ‘Select Family’ and we will get more details about the family members.
Figure: 22
➢ Click on ‘Collect KYC’ button against the beneficiary you would like to validate
button. [Refer Page 8]
➢ A pop- up message will appear informing ‘Data Already Verified’ if
verification is complete. Else it will take the operator to screen shown below
NATIONAL INFORMATICS CENTER Page 18
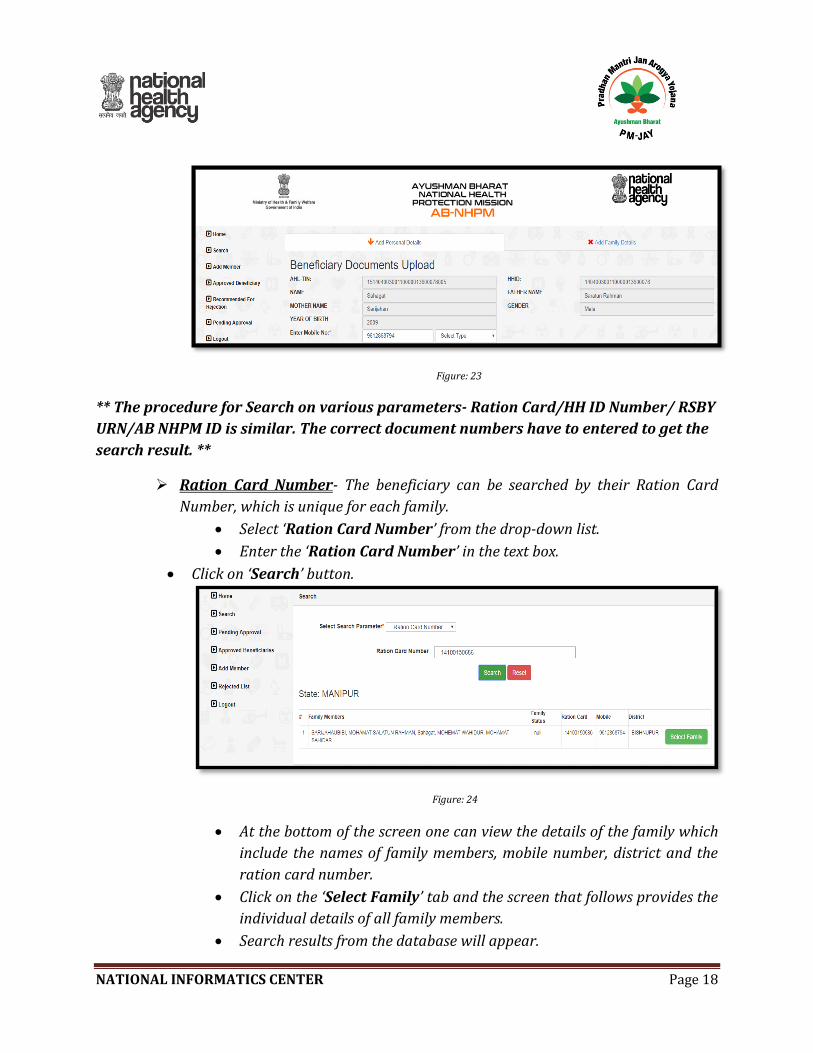
Figure: 23
** The procedure for Search on various parameters- Ration Card/HH ID Number/ RSBY
URN/AB NHPM ID is similar. The correct document numbers have to entered to get the
search result. **
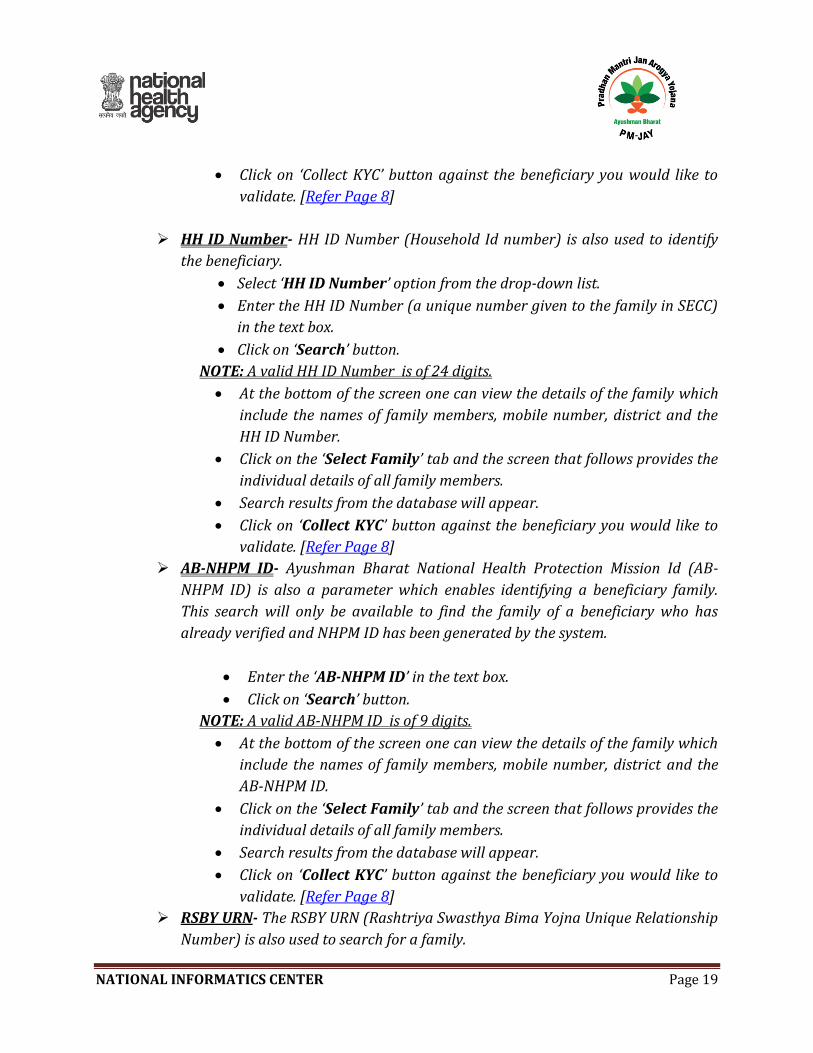
➢ Ration Card Number- The beneficiary can be searched by their Ration Card
Number, which is unique for each family.
• Select ‘Ration Card Number’ from the drop-down list.
• Enter the ‘Ration Card Number’ in the text box.
• Click on ‘Search’ button.
Figure: 24
• At the bottom of the screen one can view the details of the family which
include the names of family members, mobile number, district and the
ration card number.
• Click on the ‘Select Family’ tab and the screen that follows provides the
individual details of all family members.
• Search results from the database will appear.
NATIONAL INFORMATICS CENTER Page 19
• Click on ‘Collect KYC’ button against the beneficiary you would like to
validate. [Refer Page 8]
➢ HH ID Number- HH ID Number (Household Id number) is also used to identify
the beneficiary.
• Select ‘HH ID Number’ option from the drop-down list.
• Enter the HH ID Number (a unique number given to the family in SECC)
in the text box.
• Click on ‘Search’ button.
NOTE: A valid HH ID Number is of 24 digits.
• At the bottom of the screen one can view the details of the family which
include the names of family members, mobile number, district and the
HH ID Number.
• Click on the ‘Select Family’ tab and the screen that follows provides the
individual details of all family members.
• Search results from the database will appear.
• Click on ‘Collect KYC’ button against the beneficiary you would like to
validate. [Refer Page 8]
➢ AB-NHPM ID- Ayushman Bharat National Health Protection Mission Id (AB-
NHPM ID) is also a parameter which enables identifying a beneficiary family.
This search will only be available to find the family of a beneficiary who has
already verified and NHPM ID has been generated by the system.
• Enter the ‘AB-NHPM ID’ in the text box.
• Click on ‘Search’ button.
NOTE: A valid AB-NHPM ID is of 9 digits.
• At the bottom of the screen one can view the details of the family which
include the names of family members, mobile number, district and the
AB-NHPM ID.
• Click on the ‘Select Family’ tab and the screen that follows provides the
individual details of all family members.
• Search results from the database will appear.
• Click on ‘Collect KYC’ button against the beneficiary you would like to
validate. [Refer Page 8]
➢ RSBY URN- The RSBY URN (Rashtriya Swasthya Bima Yojna Unique Relationship
Number) is also used to search for a family.
NATIONAL INFORMATICS CENTER Page 20
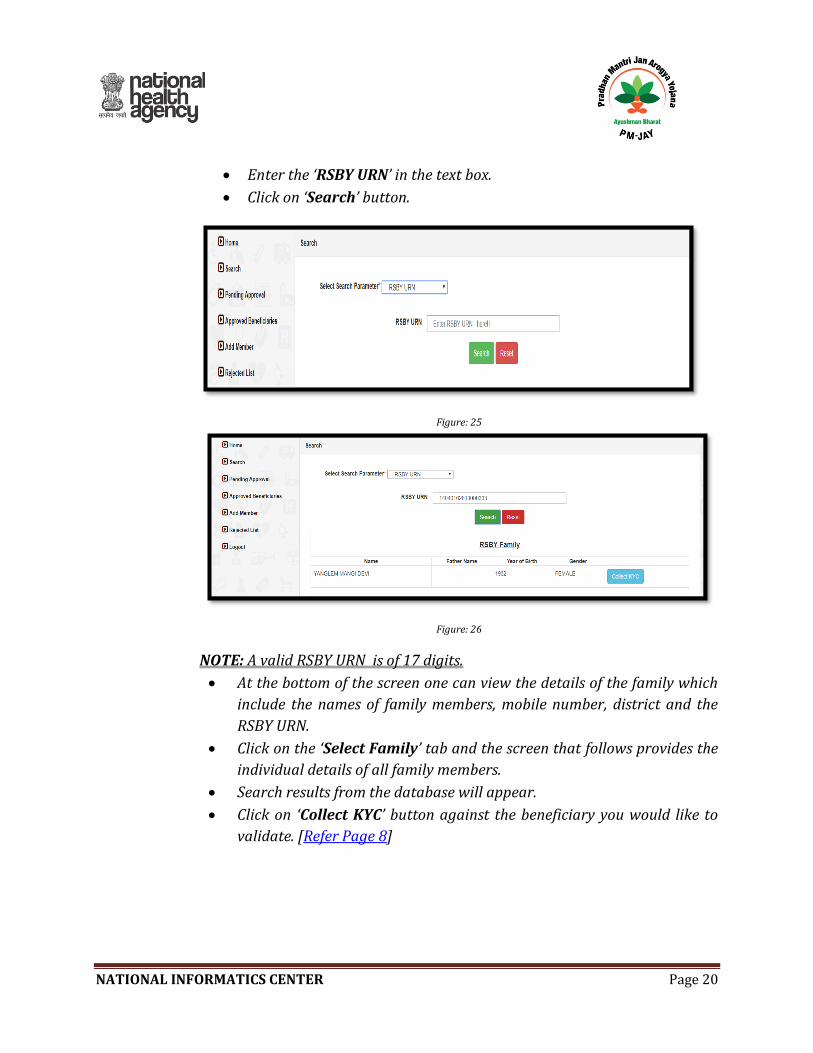
• Enter the ‘RSBY URN’ in the text box.
• Click on ‘Search’ button.
Figure: 25
Figure: 26
NOTE: A valid RSBY URN is of 17 digits.
• At the bottom of the screen one can view the details of the family which
include the names of family members, mobile number, district and the
RSBY URN.
• Click on the ‘Select Family’ tab and the screen that follows provides the
individual details of all family members.
• Search results from the database will appear.
• Click on ‘Collect KYC’ button against the beneficiary you would like to
validate. [Refer Page 8]
NATIONAL INFORMATICS CENTER Page 21
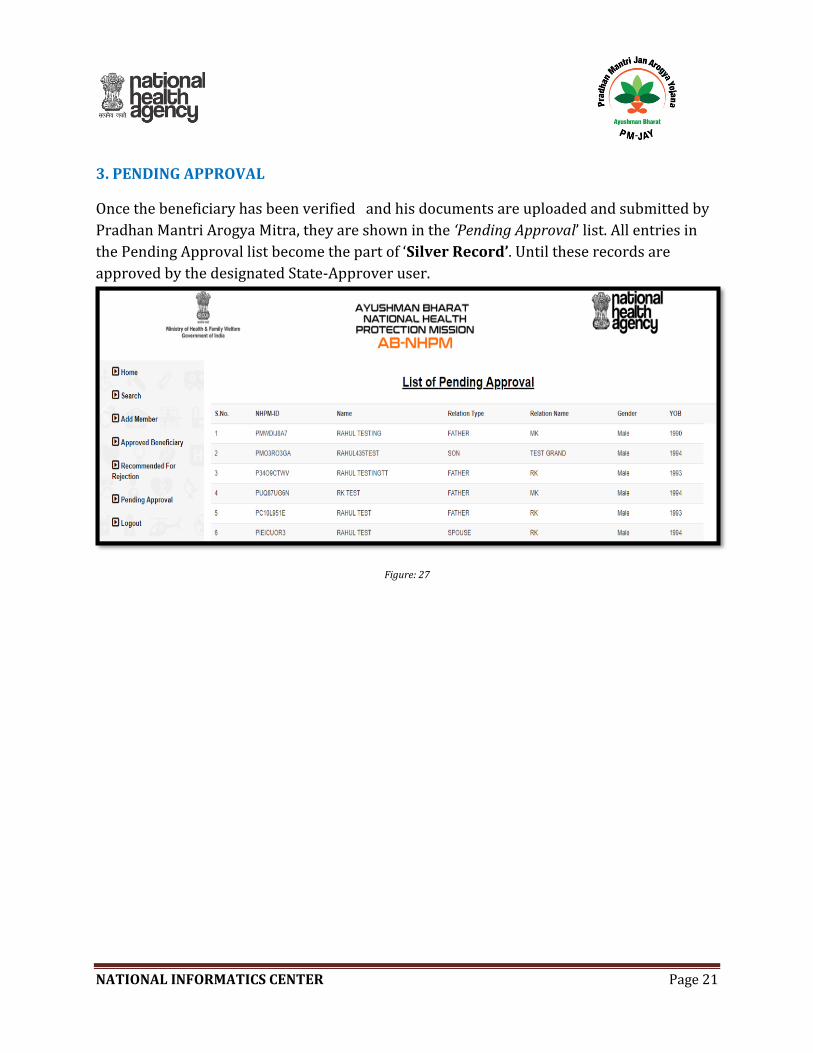
3. PENDING APPROVAL
Once the beneficiary has been verified and his documents are uploaded and submitted by
Pradhan Mantri Arogya Mitra, they are shown in the ‘Pending Approval’ list. All entries in
the Pending Approval list become the part of ‘Silver Record’. Until these records are
approved by the designated State-Approver user.
Figure: 27
NATIONAL INFORMATICS CENTER Page 22
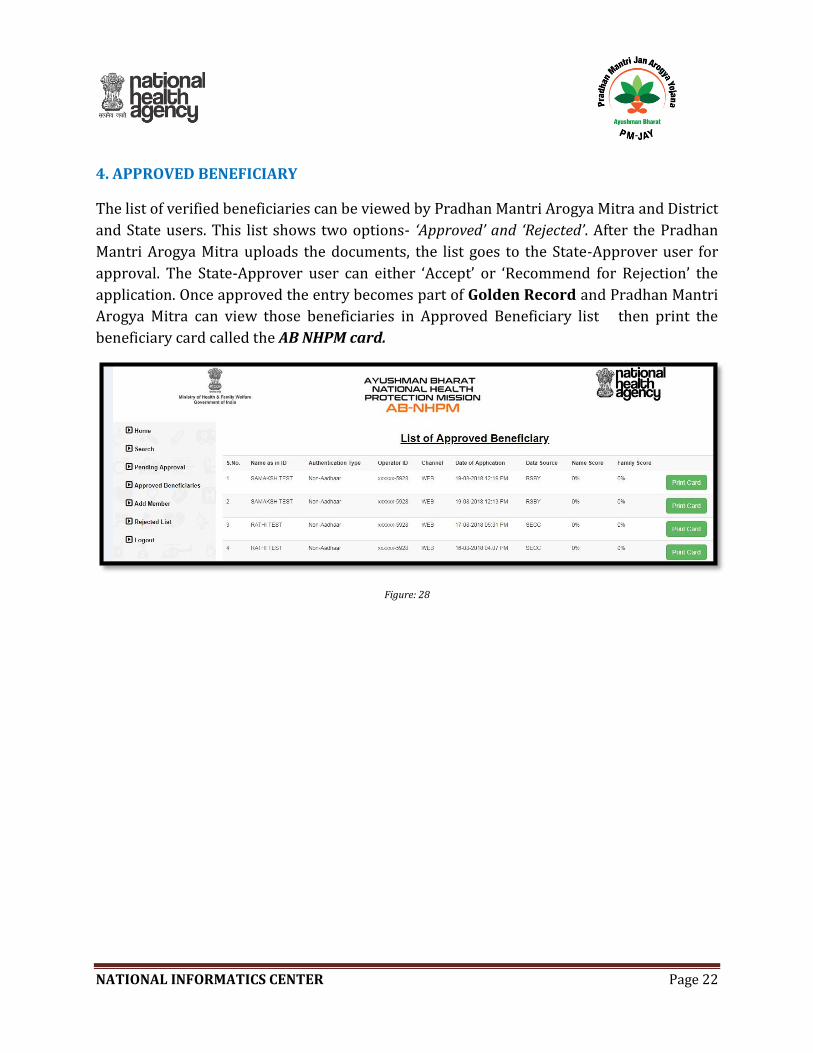
4. APPROVED BENEFICIARY
The list of verified beneficiaries can be viewed by Pradhan Mantri Arogya Mitra and District
and State users. This list shows two options- ‘Approved’ and ‘Rejected’. After the Pradhan
Mantri Arogya Mitra uploads the documents, the list goes to the State-Approver user for
approval. The State-Approver user can either ‘Accept’ or ‘Recommend for Rejection’ the
application. Once approved the entry becomes part of Golden Record and Pradhan Mantri
Arogya Mitra can view those beneficiaries in Approved Beneficiary list then print the
beneficiary card called the AB NHPM card.
Figure: 28
NATIONAL INFORMATICS CENTER Page 23
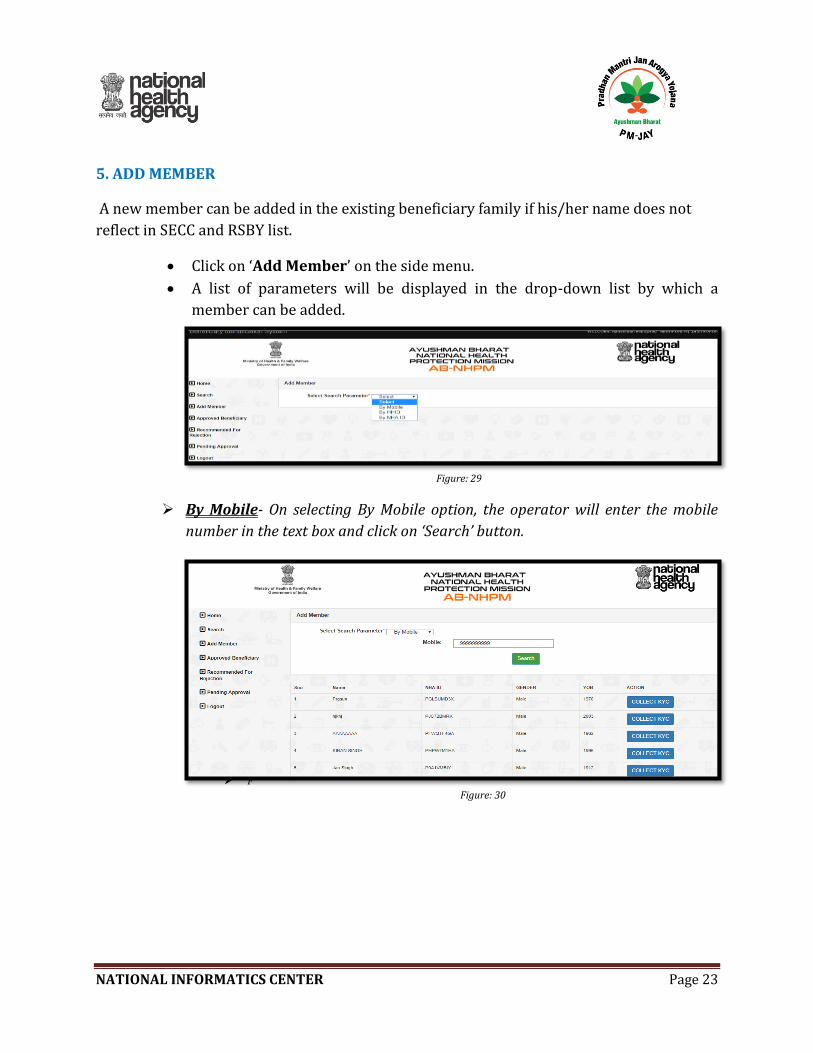
5. ADD MEMBER
A new member can be added in the existing beneficiary family if his/her name does not
reflect in SECC and RSBY list.
• Click on ‘Add Member’ on the side menu.
• A list of parameters will be displayed in the drop-down list by which a
member can be added.
Figure: 29
➢ By Mobile- On selecting By Mobile option, the operator will enter the mobile
number in the text box and click on ‘Search’ button.
F
i
g
u
r
e
:
3
.
2
➢ F
Figure: 30
NATIONAL INFORMATICS CENTER Page 24
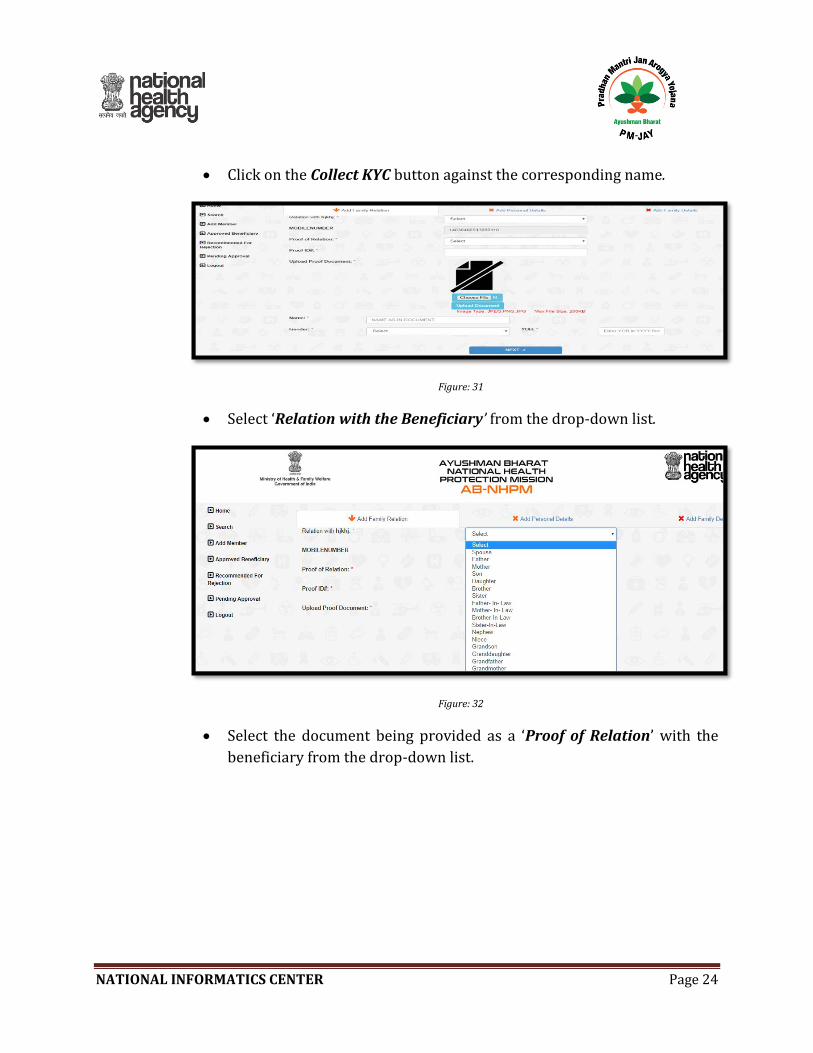
• Click on the Collect KYC button against the corresponding name.
Figure: 31
• Select ‘Relation with the Beneficiary’ from the drop-down list.
Figure: 32
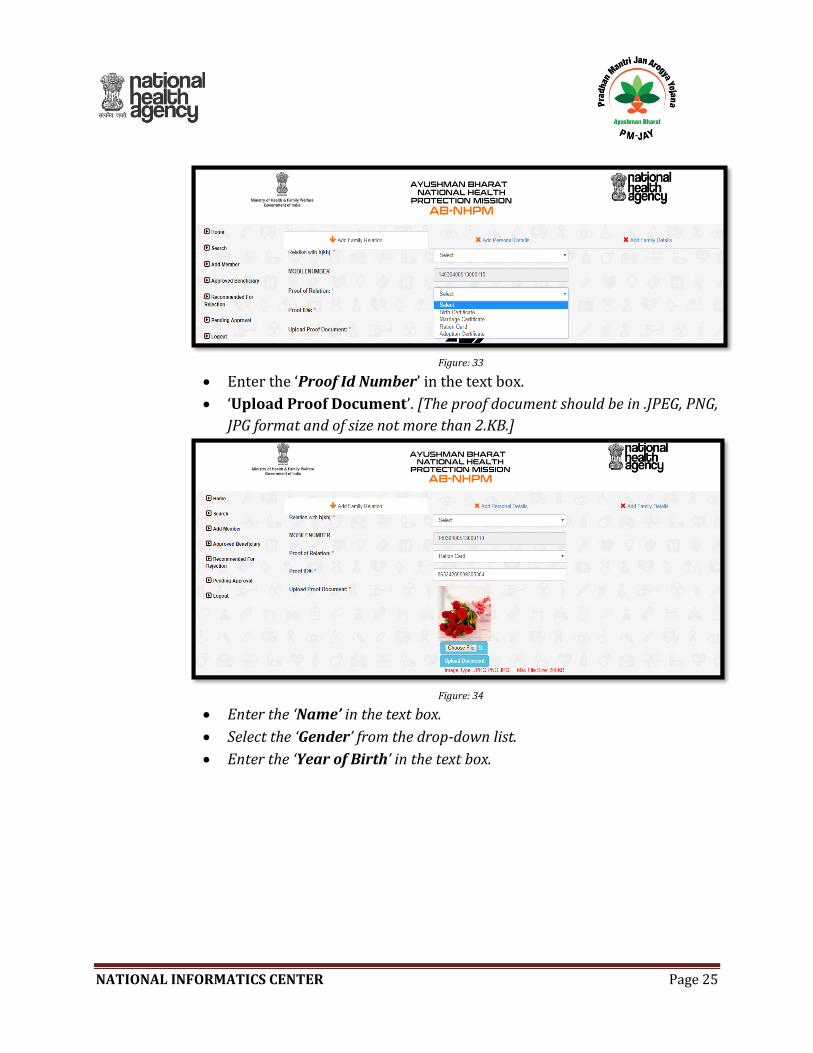
• Select the document being provided as a ‘Proof of Relation’ with the
beneficiary from the drop-down list.
NATIONAL INFORMATICS CENTER Page 25
Figure: 33
• Enter the ‘Proof Id Number’ in the text box.
• ‘Upload Proof Document’. [The proof document should be in .JPEG, PNG,
JPG format and of size not more than 2.KB.]
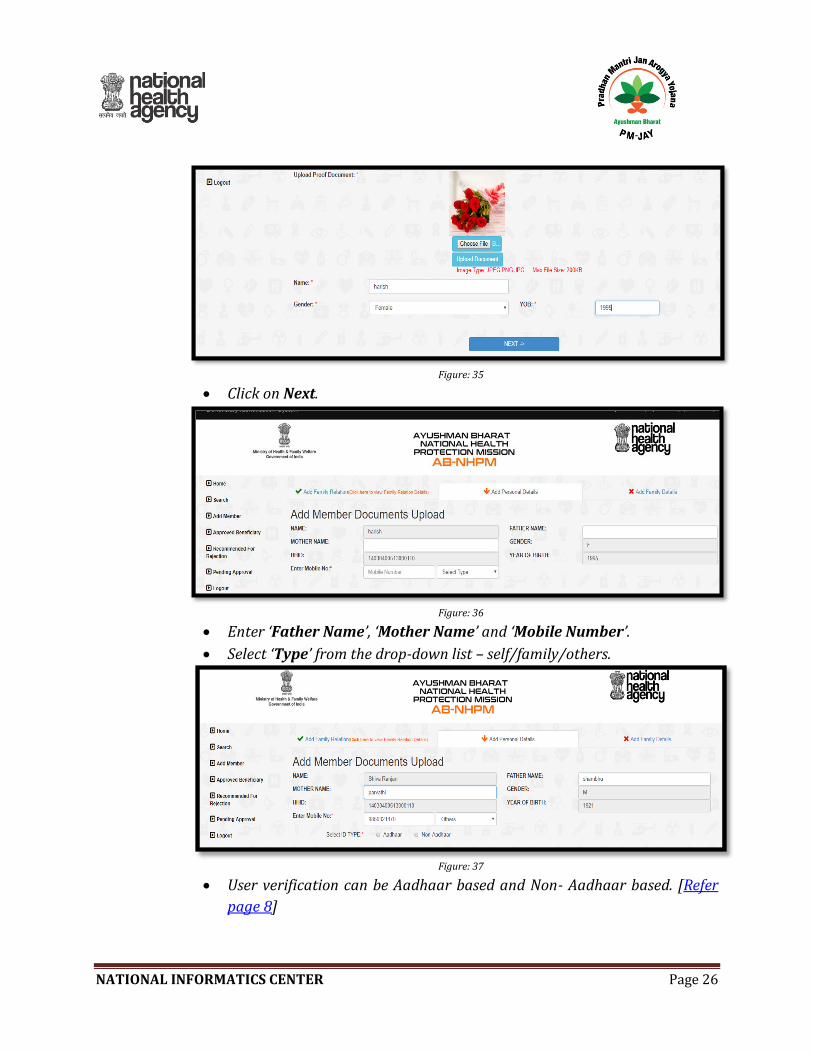
Figure: 34
• Enter the ‘Name’ in the text box.
• Select the ‘Gender’ from the drop-down list.
• Enter the ‘Year of Birth’ in the text box.
NATIONAL INFORMATICS CENTER Page 26
Figure: 35
• Click on Next.
Figure: 36
• Enter ‘Father Name’, ‘Mother Name’ and ‘Mobile Number’.
• Select ‘Type’ from the drop-down list – self/family/others.
Figure: 37
• User verification can be Aadhaar based and Non- Aadhaar based. [Refer
page 8]
NATIONAL INFORMATICS CENTER Page 27
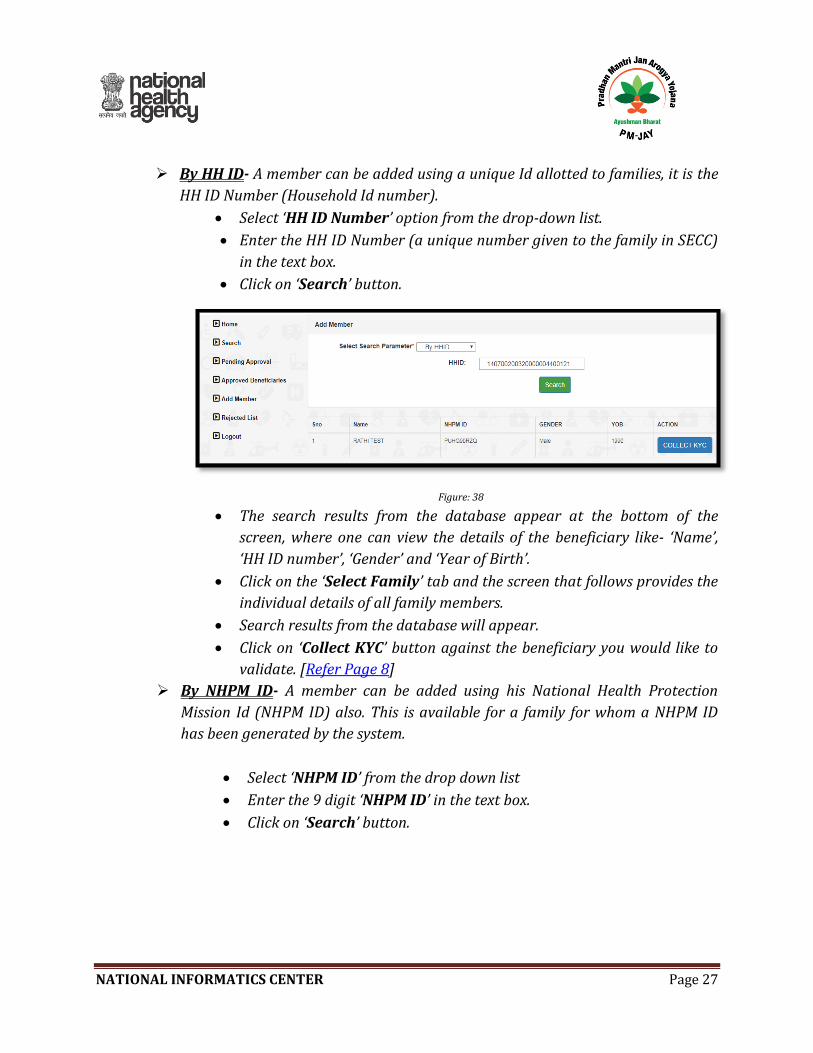
➢ By HH ID- A member can be added using a unique Id allotted to families, it is the
HH ID Number (Household Id number).
• Select ‘HH ID Number’ option from the drop-down list.
• Enter the HH ID Number (a unique number given to the family in SECC)
in the text box.
• Click on ‘Search’ button.
Figure: 38
• The search results from the database appear at the bottom of the
screen, where one can view the details of the beneficiary like- ‘Name’,
‘HH ID number’, ‘Gender’ and ‘Year of Birth’.
• Click on the ‘Select Family’ tab and the screen that follows provides the
individual details of all family members.
• Search results from the database will appear.
• Click on ‘Collect KYC’ button against the beneficiary you would like to
validate. [Refer Page 8]
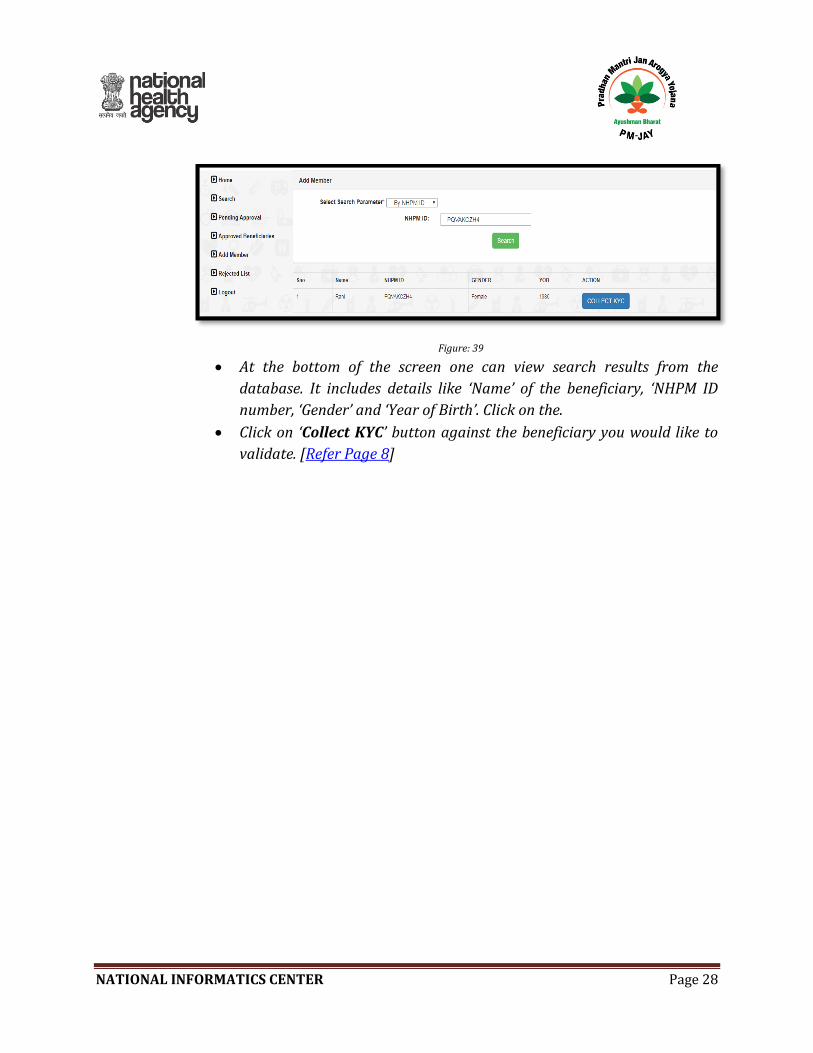
➢ By NHPM ID- A member can be added using his National Health Protection
Mission Id (NHPM ID) also. This is available for a family for whom a NHPM ID
has been generated by the system.
• Select ‘NHPM ID’ from the drop down list
• Enter the 9 digit ‘NHPM ID’ in the text box.
• Click on ‘Search’ button.
NATIONAL INFORMATICS CENTER Page 28
Figure: 39
• At the bottom of the screen one can view search results from the
database. It includes details like ‘Name’ of the beneficiary, ‘NHPM ID
number, ‘Gender’ and ‘Year of Birth’. Click on the.
• Click on ‘Collect KYC’ button against the beneficiary you would like to
validate. [Refer Page 8]
NATIONAL INFORMATICS CENTER Page 29
➢
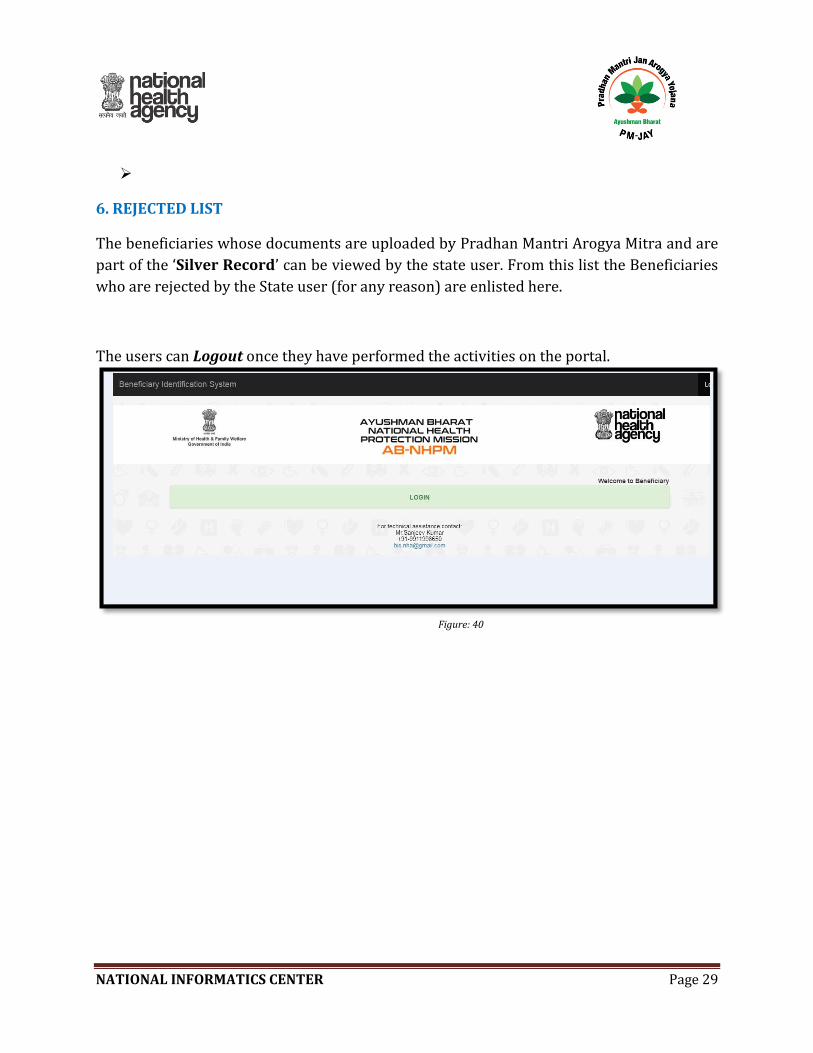
6. REJECTED LIST
The beneficiaries whose documents are uploaded by Pradhan Mantri Arogya Mitra and are
part of the ‘Silver Record’ can be viewed by the state user. From this list the Beneficiaries
who are rejected by the State user (for any reason) are enlisted here.
The users can Logout once they have performed the activities on the portal.
Figure: 40