beginning oracle application express 4.2
TRANSCRIPT

For your convenience Apress has placed some of the front matter material after the index. Please use the Bookmarks
and Contents at a Glance links to access them.
www.it-ebooks.info
v
Contents at a Glance
About the Authors �������������������������������������������������������������������������������������������������������������� xix
About the Technical Reviewer ������������������������������������������������������������������������������������������� xxi
Acknowledgments ����������������������������������������������������������������������������������������������������������� xxiii
Chapter 1: An Introduction to APEX 4�2 ■ �����������������������������������������������������������������������������1
Chapter 2: A Developer’s Overview ■ �����������������������������������������������������������������������������������7
Chapter 3: Identifying the Problem and Designing the Solution ■ ��������������������������������������29
Chapter 4: SQL Workshop ■ ������������������������������������������������������������������������������������������������37
Chapter 5: Applications and Navigation ■ ��������������������������������������������������������������������������55
Chapter 6: Forms and Reports—The Basics ■ ��������������������������������������������������������������������97
Chapter 7: Forms and Reports—Advanced ■ �������������������������������������������������������������������153
Chapter 8: Programmatic Elements ■ ������������������������������������������������������������������������������203
Chapter 9: Security ■ ��������������������������������������������������������������������������������������������������������235
Chapter 10: Application Bundling and Deployment ■ �������������������������������������������������������263
Chapter 11: Understanding Websheets ■ �������������������������������������������������������������������������283
Chapter 12: A Websheet Example ■ ����������������������������������������������������������������������������������311
Chapter 13: Extended Developer Tools ■ ��������������������������������������������������������������������������329
Chapter 14: Managing Workspaces ■ �������������������������������������������������������������������������������351
Chapter 15: Team Development ■ �������������������������������������������������������������������������������������369
Chapter 16: Dynamic Actions ■ ����������������������������������������������������������������������������������������397
Index ���������������������������������������������������������������������������������������������������������������������������������413
www.it-ebooks.info
1
Chapter 1
An Introduction to APEX 4.2
Welcome to the wonderful world of Oracle Application Express (APEX). You’re about to learn how to use a tool that will revolutionize the way you think about and approach writing web-based Oracle systems. It certainly has done so for the authors.
Prior to the advent of APEX, developing fully interactive web-based systems for data that resided within an Oracle database almost always meant learning a new and often complex language like Java, .NET, or PHP and then figuring out how to integrate your chosen language seamlessly with that data. Often this also meant trying to incorporate business rules that were already coded in the form of PL/SQL program units.
In such situations, it could take months or even years just to become proficient enough with your chosen language to begin to write a functional system. If you’re like many developers, you become frustrated with the fact that you’ve spent an inordinate amount of time to do what seems like a relatively easy task.
Fear not! The days of long-winded and complex web development platforms may be behind you.
What Is APEX?APEX is a 100% browser-based rapid application development (RAD) tool that helps you to create rich interactive Oracle-based web applications very quickly and with relatively little programming effort.
There are many RAD development tools and platforms on the market. If you’re dealing with data that resides in an Oracle database, a number of things make APEX distinctive and thus more attractive as a development platform. First and foremost is the fact that APEX is built on and uses as its core languages SQL and PL/SQL. This is a huge advantage for those of you who have already been working with the Oracle database because it means you can immediately draw on what you know. Even if you don’t have an Oracle background but are going to be working with an Oracle database, you need to learn about its particular flavor of SQL and will at some point likely find a need for the PL/SQL procedural language.
PL/SQL program units become even more beneficial when migrating from an Oracle-based system that already has a significant amount of business logic coded into stored PL/SQL program units. In this instance, you can almost immediately take advantage of that logic with very little effort or change to the existing code.
Another great advantage is that APEX is a declarative tool that provides a feature-rich core designed to make your job easier. Because APEX takes care of many of the underlying functions common to all web-based applications, you can focus on the logic specific to your application.
A large share of what you need to accomplish can be done using one of the many built-in wizards provided as part of the APEX Application Builder. The wizards walk you through the process of defining what you want your application to do and then store that information as metadata. Once a wizard is complete, you can edit and enhance the functionality or even replace it with your own custom SQL and PL/SQL routines. After you become proficient with APEX, you might even find yourself bypassing the wizards altogether and generating more complex definitions directly.
During the course of the book, you’ll likely discover you a few other tools at your disposal, but in truth, you could easily develop a very rich application using nothing but your web browser and what APEX provides for you.
www.it-ebooks.info
Chapter 1 ■ an IntroduCtIon to apeX 4.2
2
A Brief History of APEXAPEX has been around for quite some time—perhaps even longer than most people know. The first public release of APEX, or HTML DB as it was called then, came in 2004, but its history reaches back a long way.
Ancient HistoryAPEX has its roots in technology that has been around for quite a while. In fact, parts of the PL/SQL Web Toolkit, which is used under the covers by APEX to generate the HTML that is sent to the browser, date back to as early as 1994.
At that point in time, you could actually write web applications in PL/SQL by hand, and unfortunately we authors did. This required not only a thorough knowledge of PL/SQL and HTML but also the patience of a saint and the determination of a headstrong mule. The end result wasn’t very pretty, and it was definitely not secure by today’s terms, but it was functional, if somewhat limited.
Not long after, Oracle introduced PL/SQL Server Pages (PSPs). This involved first coding the static HTML and including special Oracle markup to indicate where dynamic data would go. Once you had the output looking as you wanted, you then ran it through a program called LOADPSP. This would translate the raw HTML and the special Oracle markup into a PL/SQL procedure that, again, used the PL/SQL Web Toolkit to emit the HTML including the dynamic data you requested. At the time, this was a huge leap forward. Doug Gault worked at a company where he built an entire framework around using PSP technology and deployed it at several clients.
Finally, in 1997, WebDB came on the scene. The true grandfather of what is now called APEX, WebDB was revolutionary in that it was a 100% web-based tool that allowed developers to design web applications. It was written entirely in PL/SQL even though Java seemed to be taking over the world. Developers could point WebDB at their database and generate code that would produce forms, reports, charts, and calendars. There was no session-state management, and there were no templates; once the code was generated, you couldn’t go back through the tool.
WebDB allowed a large number of companies that wanted to jump on the web-based bandwagon to do so without spending vast amounts of time and effort retraining their staff. As a tribute to its success, the authors know of a number of companies that still have WebDB systems running in production environments.
Unfortunately, WebDB’s days were numbered. Because it generated code (and if you didn’t like the code it generated, then too bad for you), it had already begun to fade from favor by the time it was absorbed into Oracle’s Portal product. However, creator Mike Hichwa didn’t forget the glimpse of greatness that WebDB had seen.
More Recent HistoryAround 1999, Oracle CEO Larry Ellison presented Mike Hichwa (VP of Software Development) with the task of creating an internal calendaring and scheduling system for Oracle Corp. The original remit was to use WebDB to generate the initial code and then hand-code all the changes from that point forward. Mike, however, saw this as an opportunity to completely rewrite WebDB into something that could be far more useful. Thus, with the help of Joel Kallman and Tom Kyte, Oracle Flows was born.
Based on the success of the internal calendaring and scheduling system, the team was allowed to move forward toward making Oracle Flows a product. In 2001, using what was then known as Flow Builder, Mike and his team begin implementing systems for various customers, including one situation where they managed to replace a Java development project that was going horribly wrong.
By 2003, the team had proven the tool’s power, and they were given permission to release it as a product. HTML DB 1.5 was released to the public as a no-cost option of Oracle 10gR1.
Since then, various releases have been introduced, each providing improved features and functionality. The following is a very brief list of the releases and some of the more notable features:
HTML DB 1.6 (2004) introduced themes, master-detail forms, page groups, page locking, and •some multilingual capabilities.
HTML DB 2.0 (2005) introduced SQL Workshop, a graphical query builder, a database object •browser, and session-state protection.
www.it-ebooks.info
Chapter 1 ■ an IntroduCtIon to apeX 4.2
3
APEX 2.2 (2006) introduced packaged applications, the APEX dictionary views, and the access •control wizard.
APEX 3.0 (2007) introduced PDF printing with BI Publisher, migration from Microsoft Access, •and page and region caching.
APEX 3.1 (2008) introduced interactive reports, the runtime-only installation capability, and •improved security.
APEX 3.2 (2009) introduced a migration helper for Oracle Forms–based systems and various •security enhancements.
APEX 4.0 (2010) was a huge leap forward, introducing dynamic actions and plug-ins: •declarative ways to introduce server-side logic and extend the core APEX environment, respectively. Also introduced was the new Team Development module.
APEX 4.1 (2011) included a new user-facing data-uploading feature, enhanced error-handling •capabilities, and much-improved support for tabular forms.
APEX 4 and the FutureAnd so we arrive at the release of APEX 4.2. In our opinion, the changes introduced with APEX 4.0 through APEX 4.2 have truly brought the development environment into the realm of “forces to be reckoned with.” The original focus of APEX 4.0 was to make development of rich interactive Web 2.0 applications easier by making the process as declarative as possible. With APEX 4.2, the development team has introduced so many new features—indeed, new ways to attack problems—that it will be hard not to choose APEX as the preferred development platform for Oracle-based applications.
APEX’s dynamic actions provide a way for you to define client-side behaviors, such as enabling or disabling fields or regions declaratively without JavaScript. With some JavaScript knowledge under your belt, you can create complex dynamic actions that do client-side calculations, AJAX, and more.
An improved charting engine based on the latest version of AnyChart not only provides declarative Flash-based charts, gauges, maps, and Gantt charts, but also allows you to create HTML5-based charts that run on any platform, including those that don’t support Adobe Flash. All chart types are interactive and drillable, and several charts can be combined into a dashboard style interface.
Another exciting feature is the plug-in architecture that provides an extensible framework allowing APEX community members to build and share their own custom items, regions, processes, and dynamic action types. Although the ramifications of this might not be immediately apparent, the possibilities of what can and will be developed using the plug-in architecture are virtually limitless—and that is very good news for all APEX developers.
As a user of the APEX development platform, you no longer have to wait for the APEX team to respond to specific feature requests. You can take the future of APEX into your own hands and code missing features, actions, and item types. In fact, the authors see a future where the APEX team uses the plug-in architecture to extend APEX in many different directions.
We almost can’t overstate the significance of plug-ins. Although APEX 4 is definitely a giant leap forward from the architecture of APEX 3, the plug-in architecture blows the doors wide open to change from the broad and growing community of APEX developers.
From version 4.0, APEX now comes with a Team Development feature that eases the management of the development process by tracking features, to-do lists, bugs, and milestones. A user-feedback mechanism is also included that allows users to provide inline feedback while using the system. The feature automatically captures the user’s session-state information so you can see exactly what was going on during their session. You can then take this information and create a bug or a to-do entry with the simple click of a button.
Websheets provide a fast and direct way for end users to gather and share information without IT intervention. Armed with only a web browser and access to the Websheets application, end users can define page content, data grids, and reports and decide who else in the enterprise has access to that data. Websheet page content supports
www.it-ebooks.info
Chapter 1 ■ an IntroduCtIon to apeX 4.2
4
standard wiki syntax, and pages can be organized hierarchically. Users can also add annotations to pages and content in the form of files, notes, and tags.
Probably the single most important new feature in APEX 4.2 is the ability to build applications specifically aimed at mobile devices. APEX incorporates jQuery Mobile to render content for the vast majority of mobile devices. A unique attribute of the way the APEX team implemented support for mobile devices is that each application can now include both desktop- and mobile-based user interfaces.
The APEX team has also created a new mobile-specific theme that includes support for mobile page transitions and gestures such as swipe, tap, and pinch. Another new theme incorporates responsive design, which automatically adjusts to the screen dimensions and allows the same user interface to work on desktop, tablet, and mobile devices.
As you can see, the APEX core functionality continues to grow with each release. But what you may not know is that you can help drive the future direction of APEX. By going to the following URL, you can not only request new features, but also view and vote on features that others have requested. You need an Oracle Technical Network account, but it’s free and easy to sign up for: https://apex.oracle.com/pls/apex/f?p=55447:1
To get a view of what the APEX team is committed to providing, you can read the most recent Statement of Direction (SoD). It may take a short time after a release for this to be updated, but it normally contains an overview of the main functional areas for the next planned release. You can find the SoD at the following URL: www.oracle.com/technetwork/developer-tools/apex/application-express/apex-sod-087560.html
What You Need to Get StartedThe goal of this book is to get you started using APEX, to launch you in a way that enables you to grow toward mastery of the product. To begin, you need three things: access to an APEX instance, access to a web browser, and a copy of SQL Developer.
Access to an APEX InstanceThis is definitely a hands-on book, so to work through the examples and exercises you need access to an instance of APEX 4.2. There are a number of different ways you can access APEX; depending on your level of comfort and expertise with Oracle, some may be better for you than others. Here is a description of the three most common scenarios:
By far the easiest is to sign up for an account on Oracle’s hosted version of APEX at •https://apex.oracle.com. It’s free for nonproduction applications and is a great place to get started, because you don’t have to worry about installing either the database or APEX.
If you already have an Oracle database installed locally, you can download and install APEX 4.2 •into that instance. Simply go to the Oracle APEX home page at http://otn.oracle.com/apex and download the latest version of the software.
If you don’t have an Oracle database already but would like to install one locally, you can •download a free developer’s license version of the database from Oracle Technology Network (OTN) at http://otn.oracle.com/database. Both Oracle 10g and 11g run APEX 4.2. Oracle 11g even allows you to install APEX (albeit an earlier version) as an option in the database install.
Although having a locally accessible instance of the Oracle database gives you more direct access to the data, it’s definitely not necessary to complete the exercises in this book. All code and instructions have been written so that they can be completed on Oracle’s hosted instance with no special access required.
www.it-ebooks.info
Chapter 1 ■ an IntroduCtIon to apeX 4.2
5
Note ■ oracle provides very good documentation on the installation process for both the database and apeX, so it isn’t covered in detail here. however, if you’re planning to install apeX on an environment in your organization, you should coordinate with the database administrator responsible for that instance to ensure that no mishaps occur.
Web BrowserThe APEX documentation states that to view or develop APEX applications, you must have a web browser that supports cookies, JavaScript, HTML 4.0, and CSS 1.0. However, although you can deploy to any browser that support these things, the list of supported browsers is fairly narrow. Currently, the following browsers are supported: Internet Explorer 7+, Firefox 14+, Apple’s Safari 5.0+, and Google Chrome 21+.
Without getting into a religious debate about which web browser is the best on the market, but the authors’ preference for development is either Firefox or Chrome due to the number of developer tools and add-ons that can help you with APEX development. Note that because of the difference in the way each browser interprets HTML and JavaScript, you must test your application in any and all web browsers that your target audience might use.
SQL DeveloperAs mentioned before, all the exercises and scripts in the book can be loaded and run directly within the APEX interface. However, if you have chosen to install or have access to a local instance of the Oracle database, a SQL IDE will definitely make your life easier.
SQL Developer is a free SQL and PL/SQL IDE provided by Oracle. You can download SQL Developer from the OTN’s home page at http://otn.oracle.com/sqldeveloper.
Using SQL Developer, you can browse database objects, edit row data, develop and test stored PL/SQL program units, code and test SQL statements, and interactively debug PL/SQL code. SQL Developer also has many direct integration points with APEX that make reporting in, monitoring, and maintaining APEX instances and applications easier. This book doesn’t cover those, but it’s definitely worth your time to look into this tool.
SummaryOracle Application Express has come a long way from its simple beginnings, and the APEX community is poised at the beginning of a new cycle of growth. APEX 4.2 provides so much possibility and promise that it’s hard not to be excited about what the future holds. With that spirit, you’re ready to begin your journey to discover how APEX can make development easier and more fun.
www.it-ebooks.info
7
Chapter 2
A Developer’s Overview
You’re probably anxious to get started, but there are a few concepts that you should understand before you jump into APEX development headfirst. This chapter introduces the fundamental development architecture of APEX and then walks you through the different areas of the developer interface.
You delve deeper into the details as you go through the book and put the architecture to work for you, but it will help tremendously to know how things are structured ahead of time. This chapter is designed to ease you in, but it isn’t a complete guided tour of every nook and cranny. Be patient; you’ll get there.
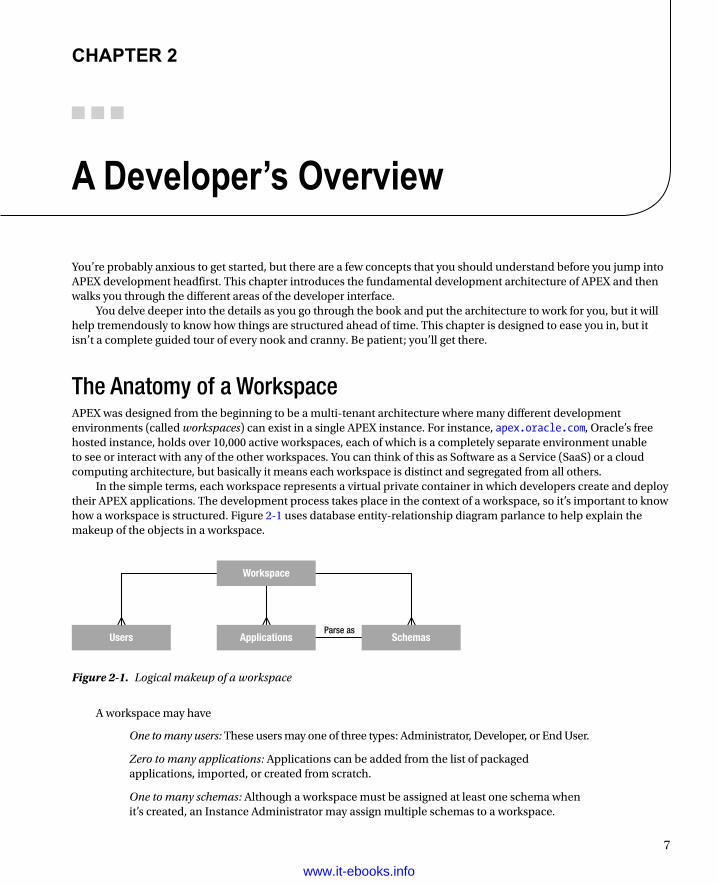
The Anatomy of a WorkspaceAPEX was designed from the beginning to be a multi-tenant architecture where many different development environments (called workspaces) can exist in a single APEX instance. For instance, apex.oracle.com, Oracle’s free hosted instance, holds over 10,000 active workspaces, each of which is a completely separate environment unable to see or interact with any of the other workspaces. You can think of this as Software as a Service (SaaS) or a cloud computing architecture, but basically it means each workspace is distinct and segregated from all others.
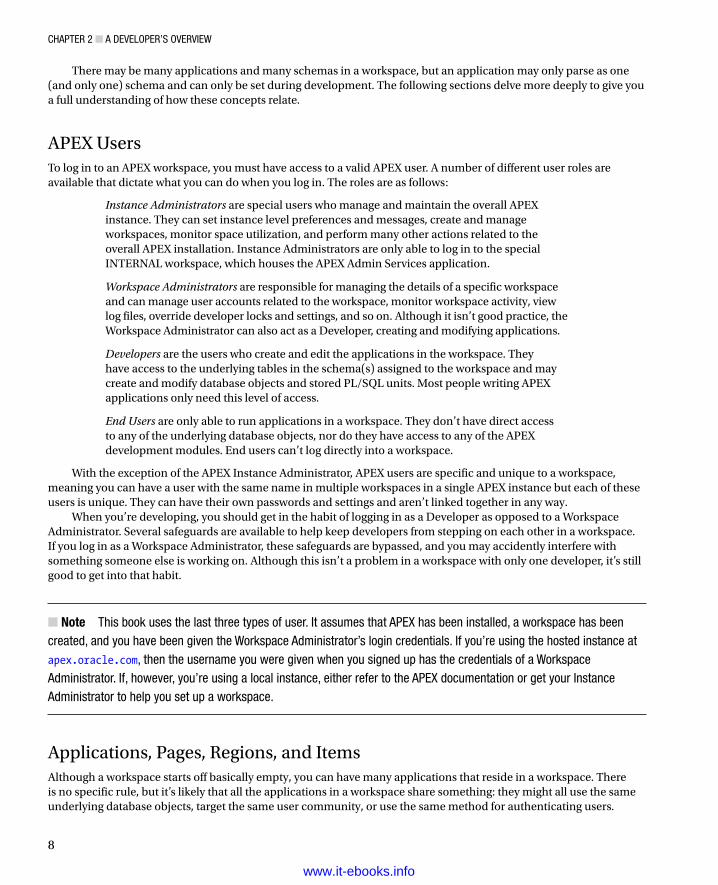
In the simple terms, each workspace represents a virtual private container in which developers create and deploy their APEX applications. The development process takes place in the context of a workspace, so it’s important to know how a workspace is structured. Figure 2-1 uses database entity-relationship diagram parlance to help explain the makeup of the objects in a workspace.
Workspace
ApplicationsParse as
SchemasUsers
Figure 2-1. Logical makeup of a workspace
A workspace may have
One to many users: These users may one of three types: Administrator, Developer, or End User.
Zero to many applications: Applications can be added from the list of packaged applications, imported, or created from scratch.
One to many schemas: Although a workspace must be assigned at least one schema when it’s created, an Instance Administrator may assign multiple schemas to a workspace.
www.it-ebooks.info
Chapter 2 ■ a Developer’s overview
8
There may be many applications and many schemas in a workspace, but an application may only parse as one (and only one) schema and can only be set during development. The following sections delve more deeply to give you a full understanding of how these concepts relate.
APEX UsersTo log in to an APEX workspace, you must have access to a valid APEX user. A number of different user roles are available that dictate what you can do when you log in. The roles are as follows:
Instance Administrators are special users who manage and maintain the overall APEX instance. They can set instance level preferences and messages, create and manage workspaces, monitor space utilization, and perform many other actions related to the overall APEX installation. Instance Administrators are only able to log in to the special INTERNAL workspace, which houses the APEX Admin Services application.
Workspace Administrators are responsible for managing the details of a specific workspace and can manage user accounts related to the workspace, monitor workspace activity, view log files, override developer locks and settings, and so on. Although it isn’t good practice, the Workspace Administrator can also act as a Developer, creating and modifying applications.
Developers are the users who create and edit the applications in the workspace. They have access to the underlying tables in the schema(s) assigned to the workspace and may create and modify database objects and stored PL/SQL units. Most people writing APEX applications only need this level of access.
End Users are only able to run applications in a workspace. They don’t have direct access to any of the underlying database objects, nor do they have access to any of the APEX development modules. End users can’t log directly into a workspace.
With the exception of the APEX Instance Administrator, APEX users are specific and unique to a workspace, meaning you can have a user with the same name in multiple workspaces in a single APEX instance but each of these users is unique. They can have their own passwords and settings and aren’t linked together in any way.
When you’re developing, you should get in the habit of logging in as a Developer as opposed to a Workspace Administrator. Several safeguards are available to help keep developers from stepping on each other in a workspace. If you log in as a Workspace Administrator, these safeguards are bypassed, and you may accidently interfere with something someone else is working on. Although this isn’t a problem in a workspace with only one developer, it’s still good to get into that habit.
Note ■ this book uses the last three types of user. it assumes that apeX has been installed, a workspace has been created, and you have been given the workspace administrator’s login credentials. if you’re using the hosted instance at apex.oracle.com, then the username you were given when you signed up has the credentials of a workspace administrator. if, however, you’re using a local instance, either refer to the apeX documentation or get your instance administrator to help you set up a workspace.
Applications, Pages, Regions, and ItemsAlthough a workspace starts off basically empty, you can have many applications that reside in a workspace. There is no specific rule, but it’s likely that all the applications in a workspace share something: they might all use the same underlying database objects, target the same user community, or use the same method for authenticating users.
www.it-ebooks.info
Chapter 2 ■ a Developer’s overview
9
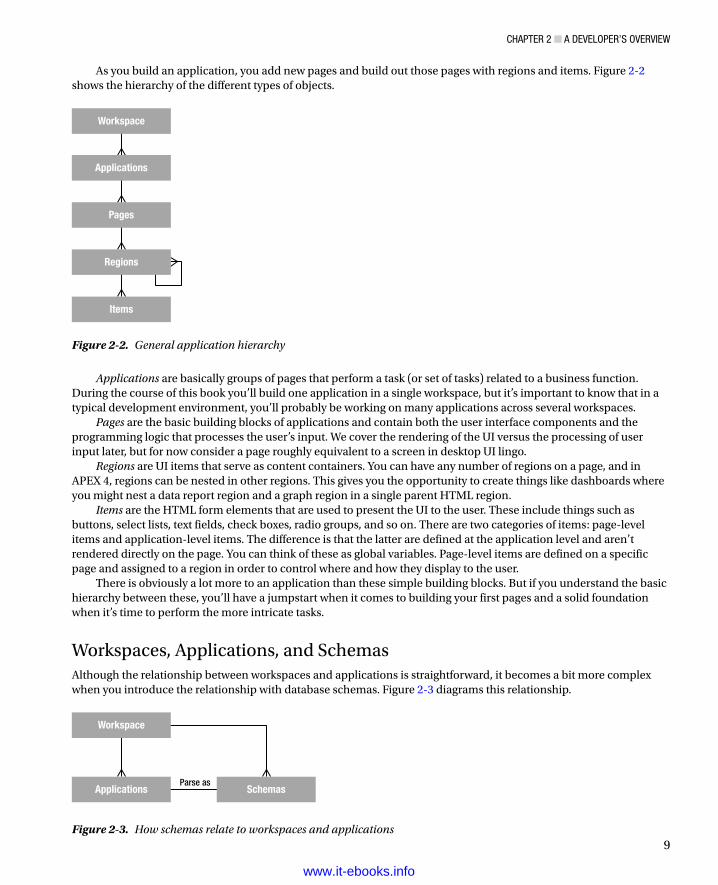
As you build an application, you add new pages and build out those pages with regions and items. Figure 2-2 shows the hierarchy of the different types of objects.
Applications are basically groups of pages that perform a task (or set of tasks) related to a business function. During the course of this book you’ll build one application in a single workspace, but it’s important to know that in a typical development environment, you’ll probably be working on many applications across several workspaces.
Pages are the basic building blocks of applications and contain both the user interface components and the programming logic that processes the user’s input. We cover the rendering of the UI versus the processing of user input later, but for now consider a page roughly equivalent to a screen in desktop UI lingo.
Regions are UI items that serve as content containers. You can have any number of regions on a page, and in APEX 4, regions can be nested in other regions. This gives you the opportunity to create things like dashboards where you might nest a data report region and a graph region in a single parent HTML region.
Items are the HTML form elements that are used to present the UI to the user. These include things such as buttons, select lists, text fields, check boxes, radio groups, and so on. There are two categories of items: page-level items and application-level items. The difference is that the latter are defined at the application level and aren’t rendered directly on the page. You can think of these as global variables. Page-level items are defined on a specific page and assigned to a region in order to control where and how they display to the user.
There is obviously a lot more to an application than these simple building blocks. But if you understand the basic hierarchy between these, you’ll have a jumpstart when it comes to building your first pages and a solid foundation when it’s time to perform the more intricate tasks.
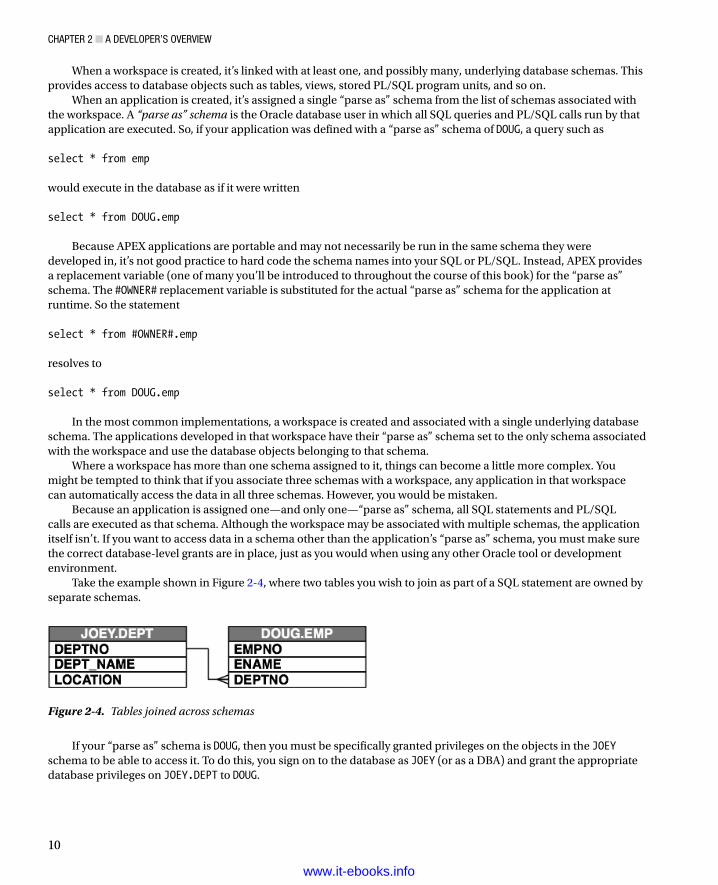
Workspaces, Applications, and SchemasAlthough the relationship between workspaces and applications is straightforward, it becomes a bit more complex when you introduce the relationship with database schemas. Figure 2-3 diagrams this relationship.
Workspace
Applications
Pages
Regions
Items
Figure 2-2. General application hierarchy
Workspace
Applications SchemasParse as
Figure 2-3. How schemas relate to workspaces and applications
www.it-ebooks.info
Chapter 2 ■ a Developer’s overview
10
When a workspace is created, it’s linked with at least one, and possibly many, underlying database schemas. This provides access to database objects such as tables, views, stored PL/SQL program units, and so on.
When an application is created, it’s assigned a single “parse as” schema from the list of schemas associated with the workspace. A “parse as” schema is the Oracle database user in which all SQL queries and PL/SQL calls run by that application are executed. So, if your application was defined with a “parse as” schema of DOUG, a query such as
select * from emp
would execute in the database as if it were written
select * from DOUG.emp
Because APEX applications are portable and may not necessarily be run in the same schema they were developed in, it’s not good practice to hard code the schema names into your SQL or PL/SQL. Instead, APEX provides a replacement variable (one of many you’ll be introduced to throughout the course of this book) for the “parse as” schema. The #OWNER# replacement variable is substituted for the actual “parse as” schema for the application at runtime. So the statement
select * from #OWNER#.emp
resolves to
select * from DOUG.emp
In the most common implementations, a workspace is created and associated with a single underlying database schema. The applications developed in that workspace have their “parse as” schema set to the only schema associated with the workspace and use the database objects belonging to that schema.
Where a workspace has more than one schema assigned to it, things can become a little more complex. You might be tempted to think that if you associate three schemas with a workspace, any application in that workspace can automatically access the data in all three schemas. However, you would be mistaken.
Because an application is assigned one—and only one—“parse as” schema, all SQL statements and PL/SQL calls are executed as that schema. Although the workspace may be associated with multiple schemas, the application itself isn’t. If you want to access data in a schema other than the application’s “parse as” schema, you must make sure the correct database-level grants are in place, just as you would when using any other Oracle tool or development environment.
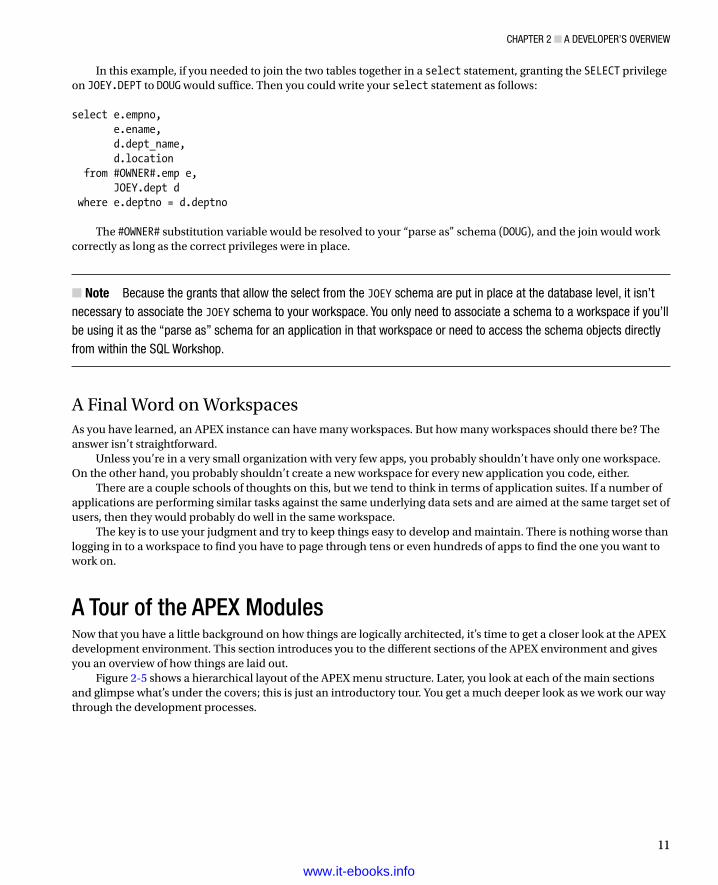
Take the example shown in Figure 2-4, where two tables you wish to join as part of a SQL statement are owned by separate schemas.
If your “parse as” schema is DOUG, then you must be specifically granted privileges on the objects in the JOEYschema to be able to access it. To do this, you sign on to the database as JOEY (or as a DBA) and grant the appropriate database privileges on JOEY.DEPT to DOUG.
Figure 2-4. Tables joined across schemas
www.it-ebooks.info
Chapter 2 ■ a Developer’s overview
11
In this example, if you needed to join the two tables together in a select statement, granting the SELECT privilege on JOEY.DEPT to DOUG would suffice. Then you could write your select statement as follows: select e.empno, e.ename, d.dept_name, d.location from #OWNER#.emp e, JOEY.dept d where e.deptno = d.deptno
The #OWNER# substitution variable would be resolved to your “parse as” schema (DOUG), and the join would work correctly as long as the correct privileges were in place.
Note ■ Because the grants that allow the select from the JOEY schema are put in place at the database level, it isn’t necessary to associate the JOEY schema to your workspace. You only need to associate a schema to a workspace if you’ll be using it as the “parse as” schema for an application in that workspace or need to access the schema objects directly from within the sQl workshop.
A Final Word on WorkspacesAs you have learned, an APEX instance can have many workspaces. But how many workspaces should there be? The answer isn’t straightforward.
Unless you’re in a very small organization with very few apps, you probably shouldn’t have only one workspace. On the other hand, you probably shouldn’t create a new workspace for every new application you code, either.
There are a couple schools of thoughts on this, but we tend to think in terms of application suites. If a number of applications are performing similar tasks against the same underlying data sets and are aimed at the same target set of users, then they would probably do well in the same workspace.
The key is to use your judgment and try to keep things easy to develop and maintain. There is nothing worse than logging in to a workspace to find you have to page through tens or even hundreds of apps to find the one you want to work on.
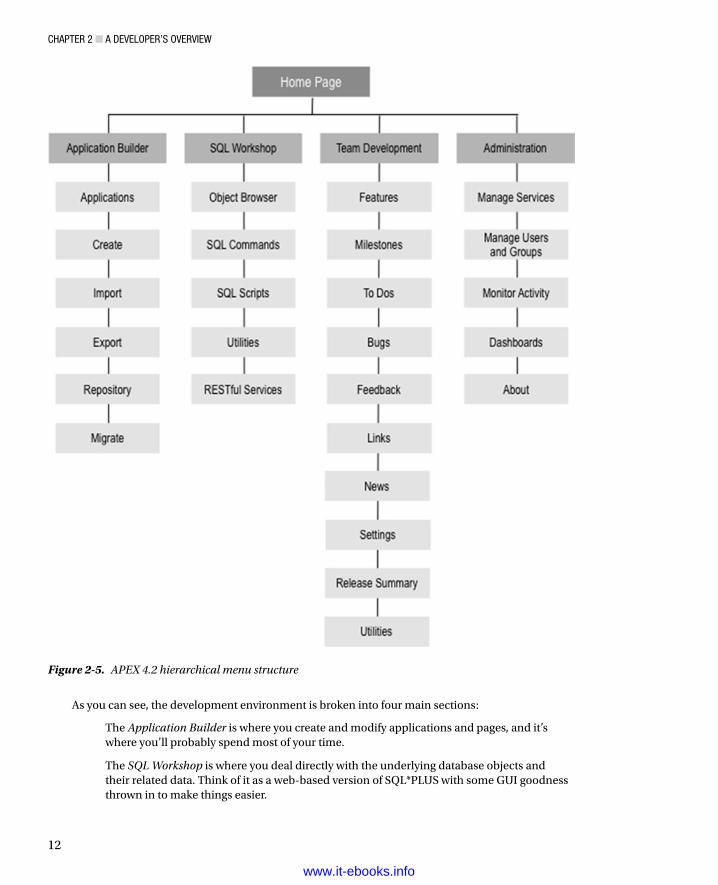
A Tour of the APEX ModulesNow that you have a little background on how things are logically architected, it’s time to get a closer look at the APEX development environment. This section introduces you to the different sections of the APEX environment and gives you an overview of how things are laid out.
Figure 2-5 shows a hierarchical layout of the APEX menu structure. Later, you look at each of the main sections and glimpse what’s under the covers; this is just an introductory tour. You get a much deeper look as we work our way through the development processes.
www.it-ebooks.info
Chapter 2 ■ a Developer’s overview
12
Figure 2-5. APEX 4.2 hierarchical menu structure
As you can see, the development environment is broken into four main sections:
The Application Builder is where you create and modify applications and pages, and it’s where you’ll probably spend most of your time.
The SQL Workshop is where you deal directly with the underlying database objects and their related data. Think of it as a web-based version of SQL*PLUS with some GUI goodness thrown in to make things easier.
www.it-ebooks.info
Chapter 2 ■ a Developer’s overview
13
Team Development is the section that lets you enter and track information related to the development of APEX applications.
Administration is where you can manage the details of your workspace, its defaults, users, groups, and so on. Be aware that a Workspace Administrator has more options available to them than a standard developer.
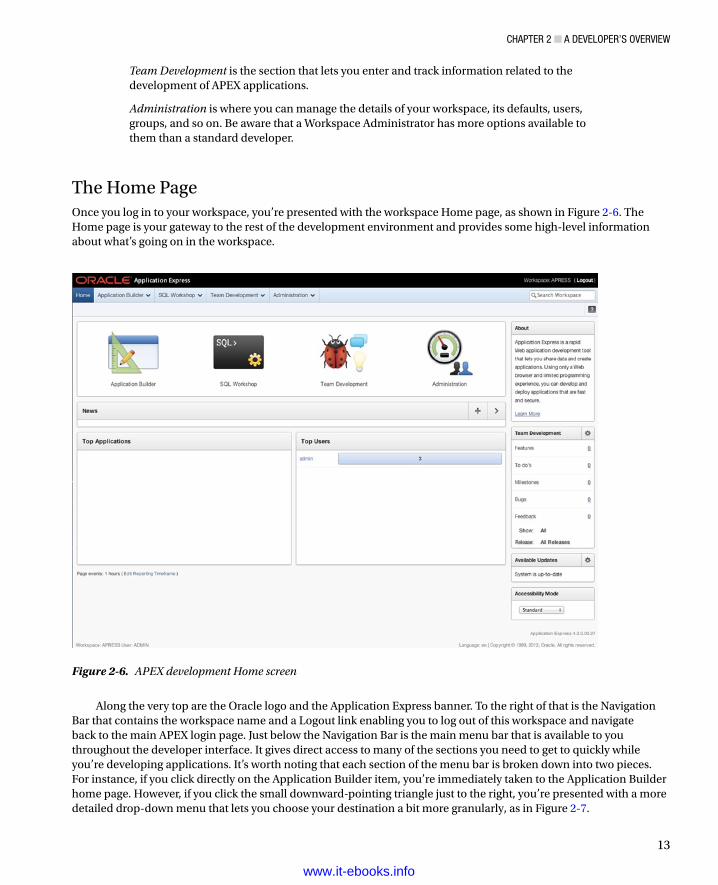
The Home PageOnce you log in to your workspace, you’re presented with the workspace Home page, as shown in Figure 2-6. The Home page is your gateway to the rest of the development environment and provides some high-level information about what’s going on in the workspace.
Along the very top are the Oracle logo and the Application Express banner. To the right of that is the Navigation Bar that contains the workspace name and a Logout link enabling you to log out of this workspace and navigate back to the main APEX login page. Just below the Navigation Bar is the main menu bar that is available to you throughout the developer interface. It gives direct access to many of the sections you need to get to quickly while you’re developing applications. It’s worth noting that each section of the menu bar is broken down into two pieces. For instance, if you click directly on the Application Builder item, you’re immediately taken to the Application Builder home page. However, if you click the small downward-pointing triangle just to the right, you’re presented with a more detailed drop-down menu that lets you choose your destination a bit more granularly, as in Figure 2-7.
Figure 2-6. APEX development Home screen
www.it-ebooks.info
Chapter 2 ■ a Developer’s overview
14
At the far right of the menu bar is a search box that allows you to perform context-sensitive searches. The context of the search depends on where you are in the Application Builder. For instance, if you’re on the workspace home page, your search is across the entire workspace. However, if you’re in the Application Builder or the Administration section, the search is limited contextually to those specific areas.
Beneath the main menu bar is the breadcrumb region. This not only gives you a visual clue of where you are in the hierarchy of the workspace, but each breadcrumb is also a quick link that takes you back to that specific spot in the hierarchy. You’ll create breadcrumbs in your own application that perform a very similar job. You don’t see breadcrumb entries when you’re on the Home page.
Last, to the far right of the breadcrumbs, is the Help link, which appears as a stylized question mark. This pops open a new window that displays the documentation web site containing searchable help for APEX. If, for some reason, you don’t have access to external web sites, you may want to download the PDF versions of the documentation to have on hand.
The rest of the page is dedicated to either giving you a quick link to the four main sections or providing you with information about what’s going on in the workspace. The News region, shown in Figure 2-8, allows the developers in a workspace to enter information they want others in the workspace to see. If more than one news item is active, this region scrolls through the news items, wrapping back around to the first item when it reaches the end of the list.
Figure 2-7. Using the drop-down menus on the menu bar
Figure 2-8. Home page News scroller
www.it-ebooks.info
Chapter 2 ■ a Developer’s overview
15
The two regions at the bottom of the Home page show an overview of the activity in the workspace. The regions, from left to right, show the Top Applications and the Top Users in the workspace. In a new workspace, there probably won’t be anything in these regions, but as you work your way through the book, you’ll see that start to change.
Notice that most of the main pages for each section of the development environment adhere to this dashboard-style home page interface, the notable exception being the Application Builder. Let’s look at that section first.
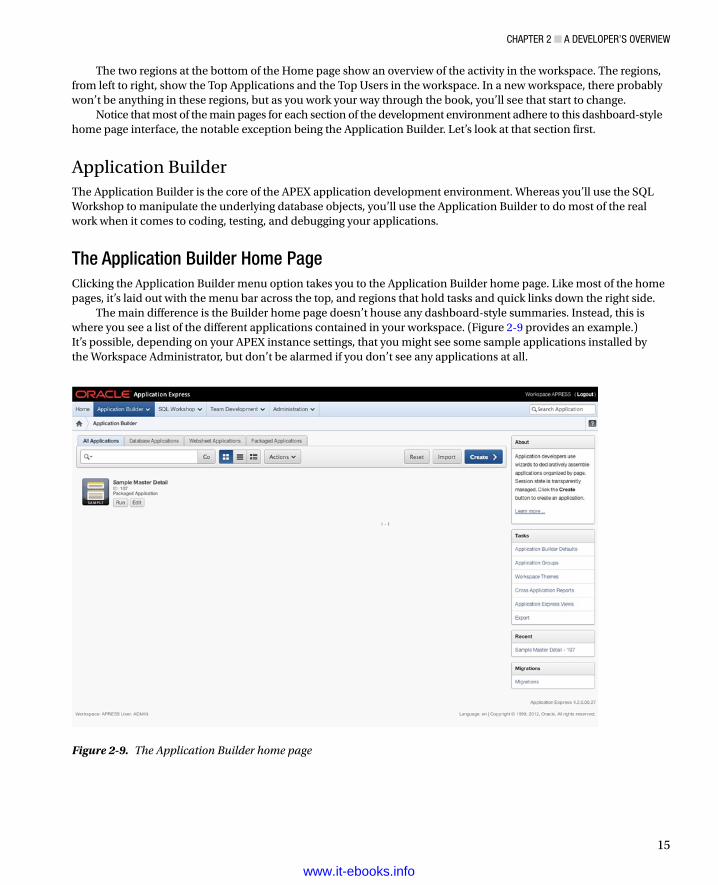
Application BuilderThe Application Builder is the core of the APEX application development environment. Whereas you’ll use the SQL Workshop to manipulate the underlying database objects, you’ll use the Application Builder to do most of the real work when it comes to coding, testing, and debugging your applications.
The Application Builder Home PageClicking the Application Builder menu option takes you to the Application Builder home page. Like most of the home pages, it’s laid out with the menu bar across the top, and regions that hold tasks and quick links down the right side.
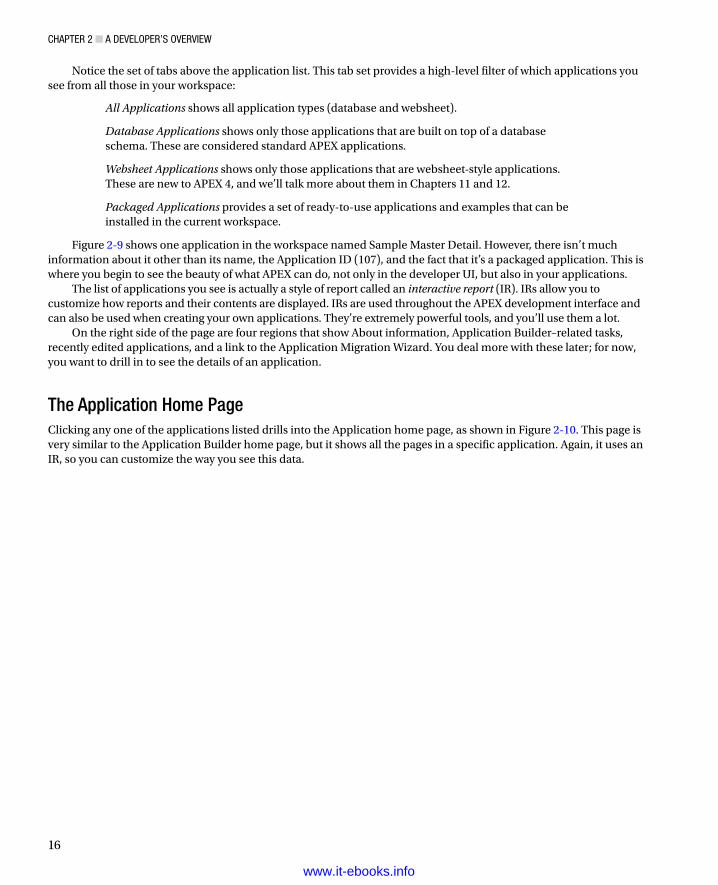
The main difference is the Builder home page doesn’t house any dashboard-style summaries. Instead, this is where you see a list of the different applications contained in your workspace. (Figure 2-9 provides an example.) It’s possible, depending on your APEX instance settings, that you might see some sample applications installed by the Workspace Administrator, but don’t be alarmed if you don’t see any applications at all.
Figure 2-9. The Application Builder home page
www.it-ebooks.info
Chapter 2 ■ a Developer’s overview
16
Notice the set of tabs above the application list. This tab set provides a high-level filter of which applications you see from all those in your workspace:
All Applications shows all application types (database and websheet).
Database Applications shows only those applications that are built on top of a database schema. These are considered standard APEX applications.
Websheet Applications shows only those applications that are websheet-style applications. These are new to APEX 4, and we’ll talk more about them in Chapters 11 and 12.
Packaged Applications provides a set of ready-to-use applications and examples that can be installed in the current workspace.
Figure 2-9 shows one application in the workspace named Sample Master Detail. However, there isn’t much information about it other than its name, the Application ID (107), and the fact that it’s a packaged application. This is where you begin to see the beauty of what APEX can do, not only in the developer UI, but also in your applications.
The list of applications you see is actually a style of report called an interactive report (IR). IRs allow you to customize how reports and their contents are displayed. IRs are used throughout the APEX development interface and can also be used when creating your own applications. They’re extremely powerful tools, and you’ll use them a lot.
On the right side of the page are four regions that show About information, Application Builder–related tasks, recently edited applications, and a link to the Application Migration Wizard. You deal more with these later; for now, you want to drill in to see the details of an application.
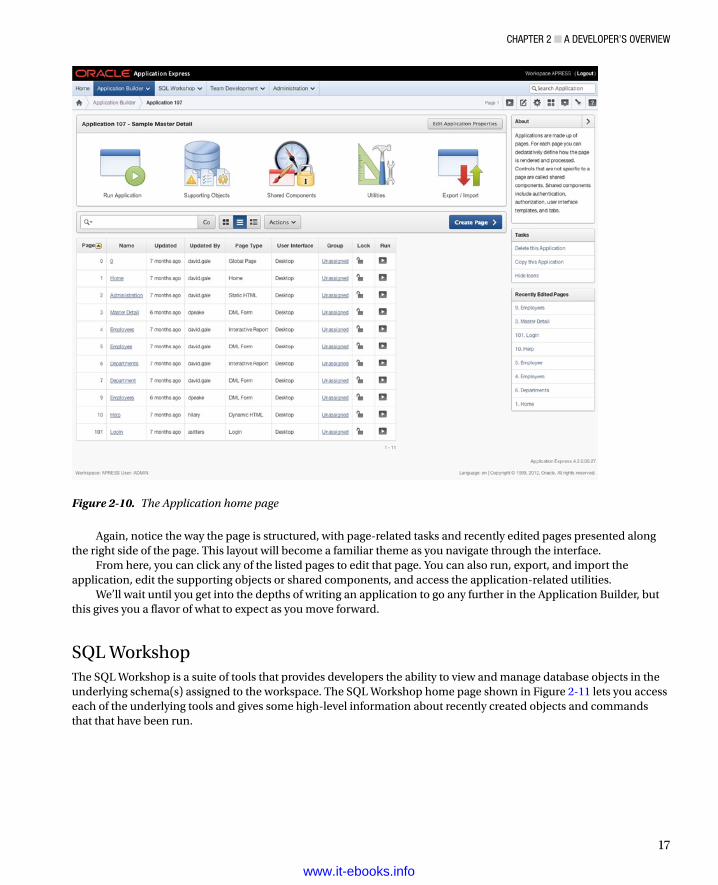
The Application Home PageClicking any one of the applications listed drills into the Application home page, as shown in Figure 2-10. This page is very similar to the Application Builder home page, but it shows all the pages in a specific application. Again, it uses an IR, so you can customize the way you see this data.
www.it-ebooks.info
Chapter 2 ■ a Developer’s overview
17
Again, notice the way the page is structured, with page-related tasks and recently edited pages presented along the right side of the page. This layout will become a familiar theme as you navigate through the interface.
From here, you can click any of the listed pages to edit that page. You can also run, export, and import the application, edit the supporting objects or shared components, and access the application-related utilities.
We’ll wait until you get into the depths of writing an application to go any further in the Application Builder, but this gives you a flavor of what to expect as you move forward.
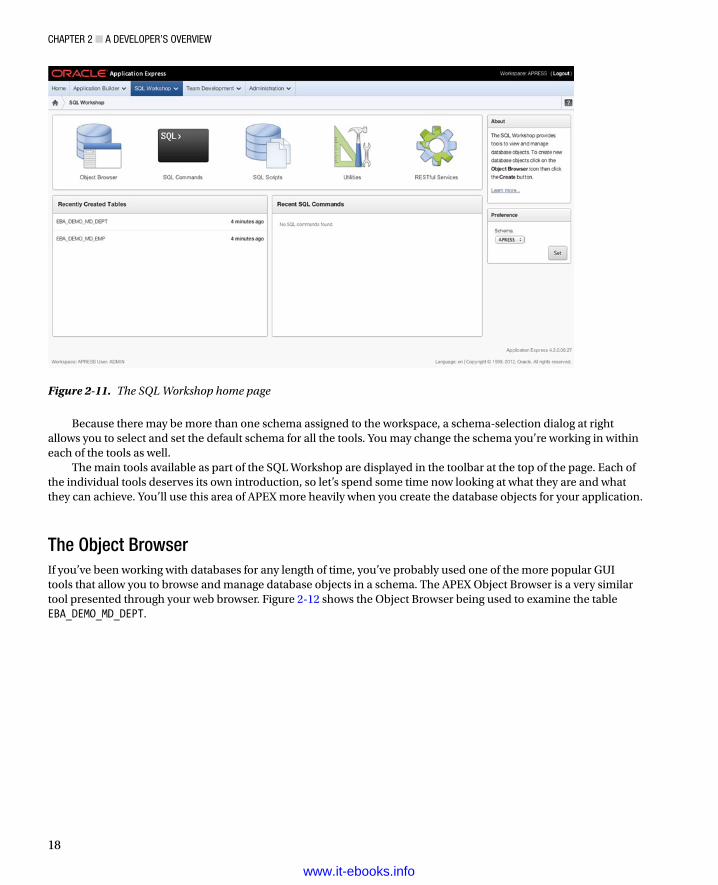
SQL WorkshopThe SQL Workshop is a suite of tools that provides developers the ability to view and manage database objects in the underlying schema(s) assigned to the workspace. The SQL Workshop home page shown in Figure 2-11 lets you access each of the underlying tools and gives some high-level information about recently created objects and commands that that have been run.
Figure 2-10. The Application home page
www.it-ebooks.info
Chapter 2 ■ a Developer’s overview
18
Because there may be more than one schema assigned to the workspace, a schema-selection dialog at right allows you to select and set the default schema for all the tools. You may change the schema you’re working in within each of the tools as well.
The main tools available as part of the SQL Workshop are displayed in the toolbar at the top of the page. Each of the individual tools deserves its own introduction, so let’s spend some time now looking at what they are and what they can achieve. You’ll use this area of APEX more heavily when you create the database objects for your application.
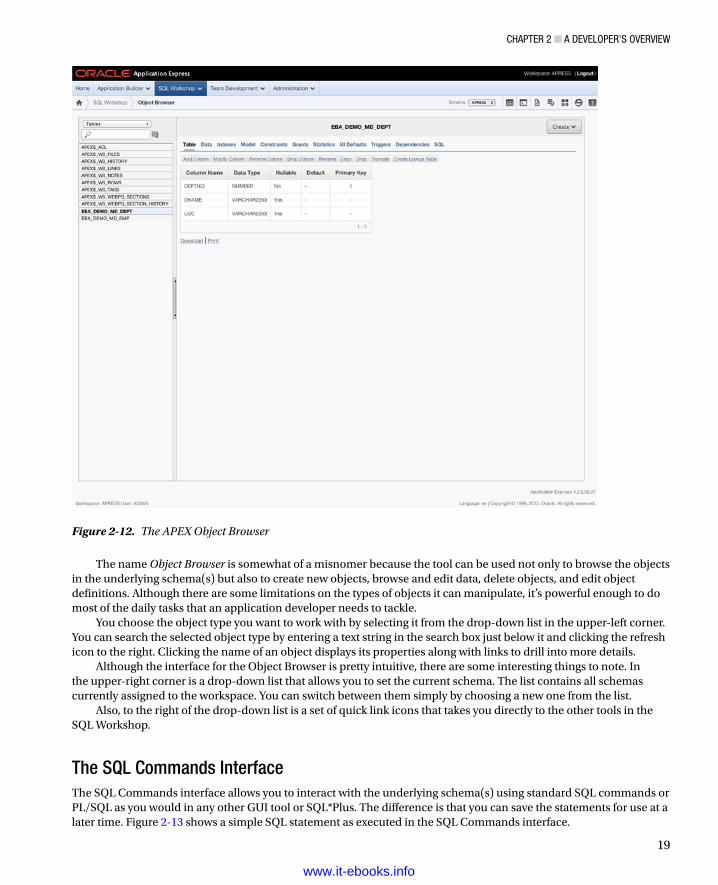
The Object BrowserIf you’ve been working with databases for any length of time, you’ve probably used one of the more popular GUI tools that allow you to browse and manage database objects in a schema. The APEX Object Browser is a very similar tool presented through your web browser. Figure 2-12 shows the Object Browser being used to examine the table EBA_DEMO_MD_DEPT.
Figure 2-11. The SQL Workshop home page
www.it-ebooks.info
Chapter 2 ■ a Developer’s overview
19
The name Object Browser is somewhat of a misnomer because the tool can be used not only to browse the objects in the underlying schema(s) but also to create new objects, browse and edit data, delete objects, and edit object definitions. Although there are some limitations on the types of objects it can manipulate, it’s powerful enough to do most of the daily tasks that an application developer needs to tackle.
You choose the object type you want to work with by selecting it from the drop-down list in the upper-left corner. You can search the selected object type by entering a text string in the search box just below it and clicking the refresh icon to the right. Clicking the name of an object displays its properties along with links to drill into more details.
Although the interface for the Object Browser is pretty intuitive, there are some interesting things to note. In the upper-right corner is a drop-down list that allows you to set the current schema. The list contains all schemas currently assigned to the workspace. You can switch between them simply by choosing a new one from the list.
Also, to the right of the drop-down list is a set of quick link icons that takes you directly to the other tools in the SQL Workshop.
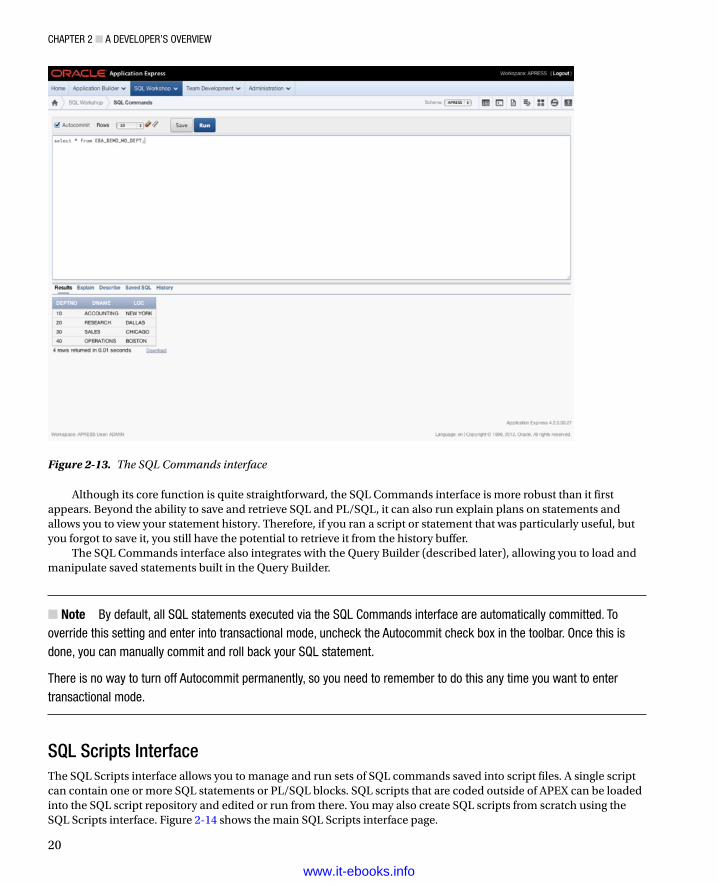
The SQL Commands InterfaceThe SQL Commands interface allows you to interact with the underlying schema(s) using standard SQL commands or PL/SQL as you would in any other GUI tool or SQL*Plus. The difference is that you can save the statements for use at a later time. Figure 2-13 shows a simple SQL statement as executed in the SQL Commands interface.
Figure 2-12. The APEX Object Browser
www.it-ebooks.info
Chapter 2 ■ a Developer’s overview
20
Although its core function is quite straightforward, the SQL Commands interface is more robust than it first appears. Beyond the ability to save and retrieve SQL and PL/SQL, it can also run explain plans on statements and allows you to view your statement history. Therefore, if you ran a script or statement that was particularly useful, but you forgot to save it, you still have the potential to retrieve it from the history buffer.
The SQL Commands interface also integrates with the Query Builder (described later), allowing you to load and manipulate saved statements built in the Query Builder.
Note■ By default, all sQl statements executed via the sQl Commands interface are automatically committed. to override this setting and enter into transactional mode, uncheck the autocommit check box in the toolbar. once this is done, you can manually commit and roll back your sQl statement.
there is no way to turn off autocommit permanently, so you need to remember to do this any time you want to enter transactional mode.
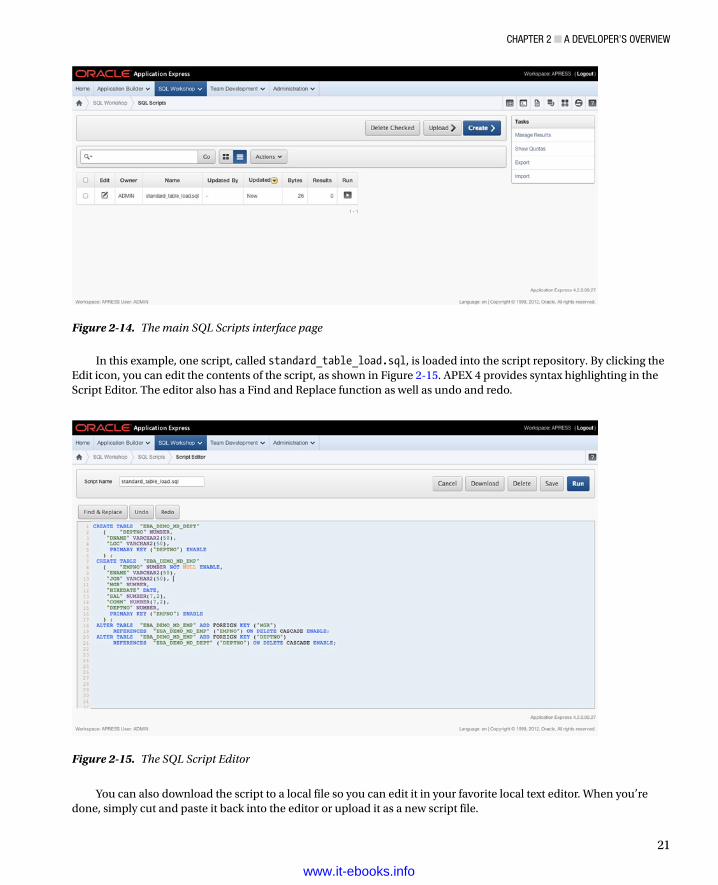
SQL Scripts InterfaceThe SQL Scripts interface allows you to manage and run sets of SQL commands saved into script files. A single script can contain one or more SQL statements or PL/SQL blocks. SQL scripts that are coded outside of APEX can be loaded into the SQL script repository and edited or run from there. You may also create SQL scripts from scratch using the SQL Scripts interface. Figure 2-14 shows the main SQL Scripts interface page.
Figure 2-13. The SQL Commands interface
www.it-ebooks.info
Chapter 2 ■ a Developer’s overview
21
In this example, one script, called standard_table_load.sql, is loaded into the script repository. By clicking the Edit icon, you can edit the contents of the script, as shown in Figure 2-15. APEX 4 provides syntax highlighting in the Script Editor. The editor also has a Find and Replace function as well as undo and redo.
Figure 2-14. The main SQL Scripts interface page
Figure 2-15. The SQL Script Editor
You can also download the script to a local file so you can edit it in your favorite local text editor. When you’re done, simply cut and paste it back into the editor or upload it as a new script file.
www.it-ebooks.info
Chapter 2 ■ a Developer’s overview
22
Note ■ when you upload a script file to the repository, the name of the script must be unique. You can’t overwrite an existing script file of the same name with a new version without first deleting the script from the script repository.
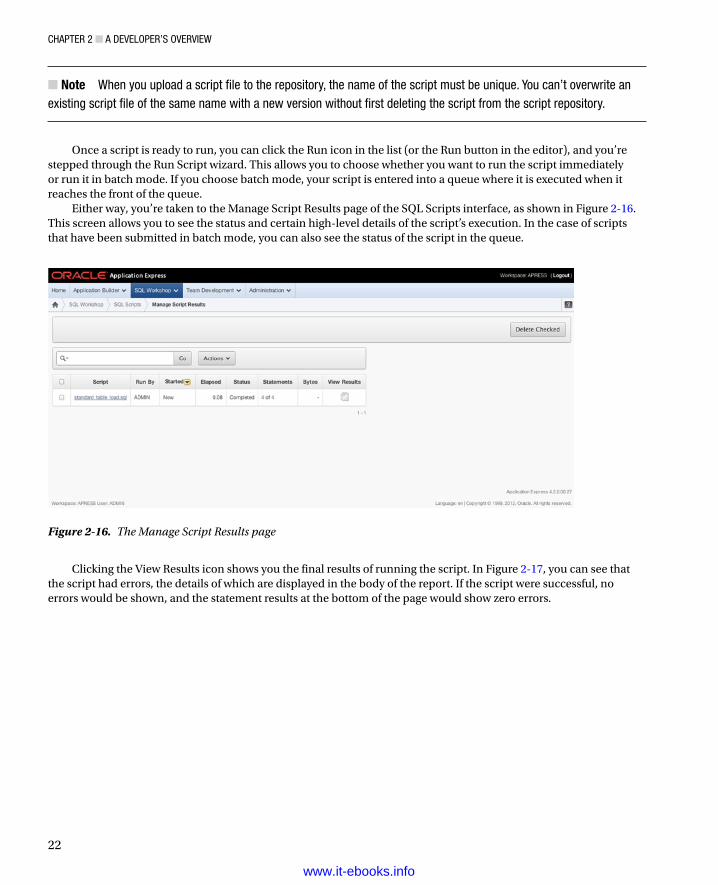
Once a script is ready to run, you can click the Run icon in the list (or the Run button in the editor), and you’re stepped through the Run Script wizard. This allows you to choose whether you want to run the script immediately or run it in batch mode. If you choose batch mode, your script is entered into a queue where it is executed when it reaches the front of the queue.
Either way, you’re taken to the Manage Script Results page of the SQL Scripts interface, as shown in Figure 2-16. This screen allows you to see the status and certain high-level details of the script’s execution. In the case of scripts that have been submitted in batch mode, you can also see the status of the script in the queue.
Figure 2-16. The Manage Script Results page
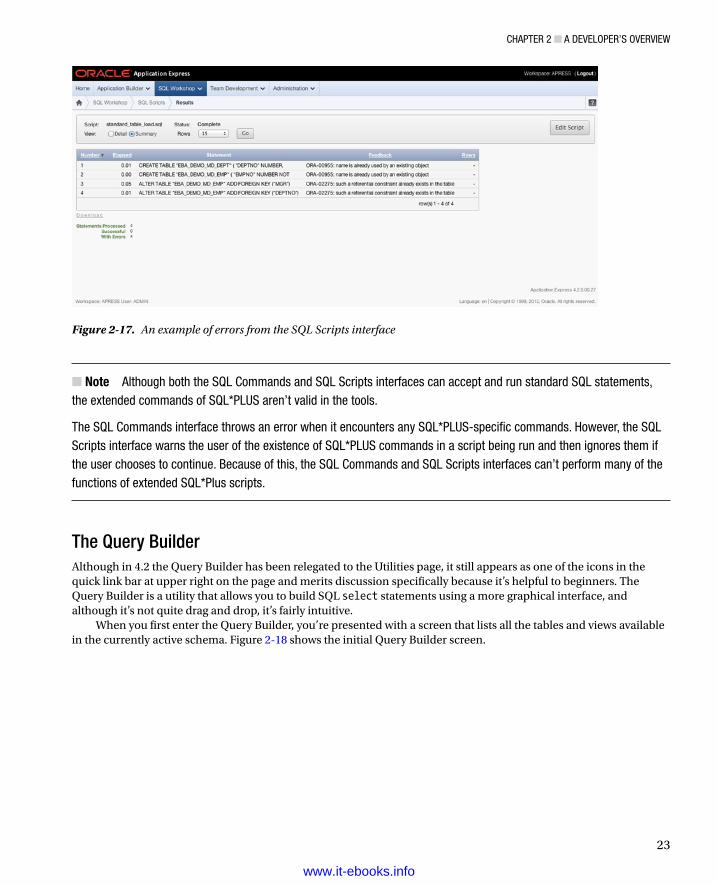
Clicking the View Results icon shows you the final results of running the script. In Figure 2-17, you can see that the script had errors, the details of which are displayed in the body of the report. If the script were successful, no errors would be shown, and the statement results at the bottom of the page would show zero errors.
www.it-ebooks.info
Chapter 2 ■ a Developer’s overview
23
Note ■ although both the sQl Commands and sQl scripts interfaces can accept and run standard sQl statements, the extended commands of sQl*plUs aren’t valid in the tools.
the sQl Commands interface throws an error when it encounters any sQl*plUs-specific commands. however, the sQl scripts interface warns the user of the existence of sQl*plUs commands in a script being run and then ignores them if the user chooses to continue. Because of this, the sQl Commands and sQl scripts interfaces can’t perform many of the functions of extended sQl*plus scripts.
The Query BuilderAlthough in 4.2 the Query Builder has been relegated to the Utilities page, it still appears as one of the icons in the quick link bar at upper right on the page and merits discussion specifically because it’s helpful to beginners. The Query Builder is a utility that allows you to build SQL select statements using a more graphical interface, and although it’s not quite drag and drop, it’s fairly intuitive.
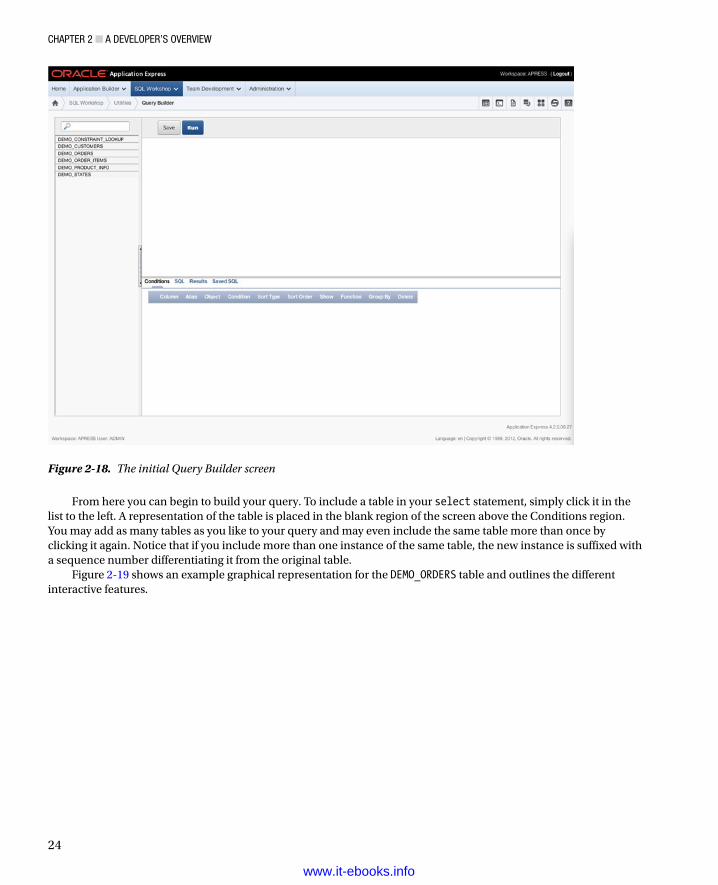
When you first enter the Query Builder, you’re presented with a screen that lists all the tables and views available in the currently active schema. Figure 2-18 shows the initial Query Builder screen.
Figure 2-17. An example of errors from the SQL Scripts interface
www.it-ebooks.info
Chapter 2 ■ a Developer’s overview
24
From here you can begin to build your query. To include a table in your select statement, simply click it in the list to the left. A representation of the table is placed in the blank region of the screen above the Conditions region. You may add as many tables as you like to your query and may even include the same table more than once by clicking it again. Notice that if you include more than one instance of the same table, the new instance is suffixed with a sequence number differentiating it from the original table.
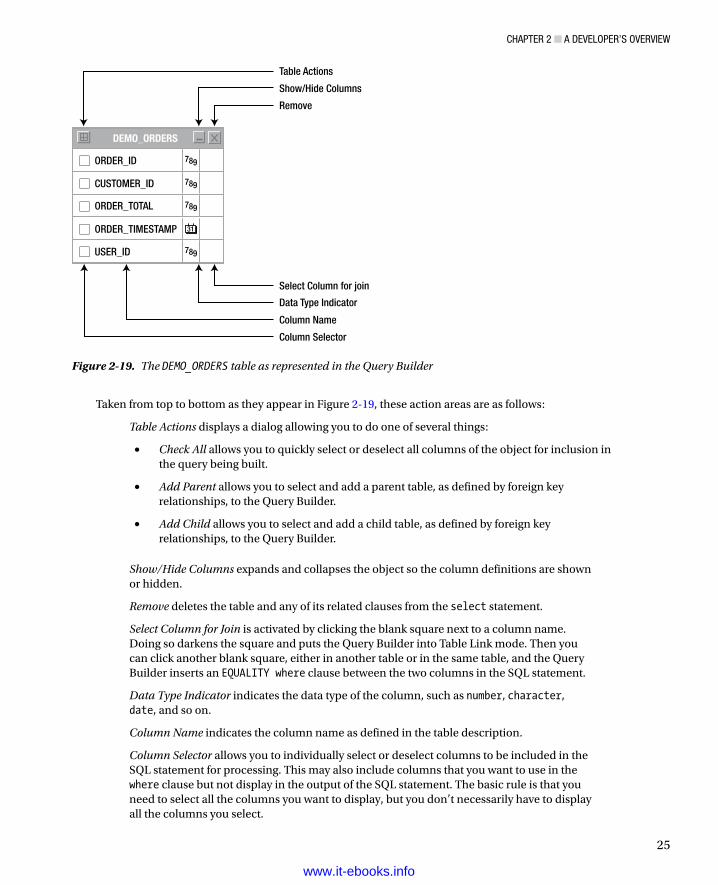
Figure 2-19 shows an example graphical representation for the DEMO_ORDERS table and outlines the different interactive features.
Figure 2-18. The initial Query Builder screen
www.it-ebooks.info
Chapter 2 ■ a Developer’s overview
25
Taken from top to bottom as they appear in Figure 2-19, these action areas are as follows:
Table Actions displays a dialog allowing you to do one of several things:
• Check All allows you to quickly select or deselect all columns of the object for inclusion in the query being built.
• Add Parent allows you to select and add a parent table, as defined by foreign key relationships, to the Query Builder.
• Add Child allows you to select and add a child table, as defined by foreign key relationships, to the Query Builder.
Show/Hide Columns expands and collapses the object so the column definitions are shown or hidden.
Remove deletes the table and any of its related clauses from the select statement.
Select Column for Join is activated by clicking the blank square next to a column name. Doing so darkens the square and puts the Query Builder into Table Link mode. Then you can click another blank square, either in another table or in the same table, and the Query Builder inserts an EQUALITY where clause between the two columns in the SQL statement.
Data Type Indicator indicates the data type of the column, such as number, character, date, and so on.
Column Name indicates the column name as defined in the table description.
Column Selector allows you to individually select or deselect columns to be included in the SQL statement for processing. This may also include columns that you want to use in the where clause but not display in the output of the SQL statement. The basic rule is that you need to select all the columns you want to display, but you don’t necessarily have to display all the columns you select.
Table Actions
Show/Hide Columns
Select Column for join
Data Type Indicator
Column Name
Column Selector
Remove
ORDER_ID 789
789
789
31
789
ORDER_TOTAL
ORDER_TIMESTAMP
USER_ID
CUSTOMER_ID
DEMO_ORDERS
Figure 2-19. The DEMO_ORDERS table as represented in the Query Builder
www.it-ebooks.info
Chapter 2 ■ a Developer’s overview
26
As you add and join tables and select columns to operate on, the region at the bottom of the screen begins to change. This region is subdivided into several tabs:
The Conditions tab shows one row for each column selected in the area above and allows you to further define its attributes. (More on this feature in just a moment.)
The SQL tab displays the SQL statement as the wizard builds it. Although it’s not directly editable, you can easily highlight the statement and cut it to the clipboard from here.
The Results tab shows the results of running the SQL statement and allows you to download the resulting data in CSV format.
The Saved SQL tab allows you to save, recall, and manage statements that have been built with the Query Builder. There are also filters that let you search and limit which saved queries display.
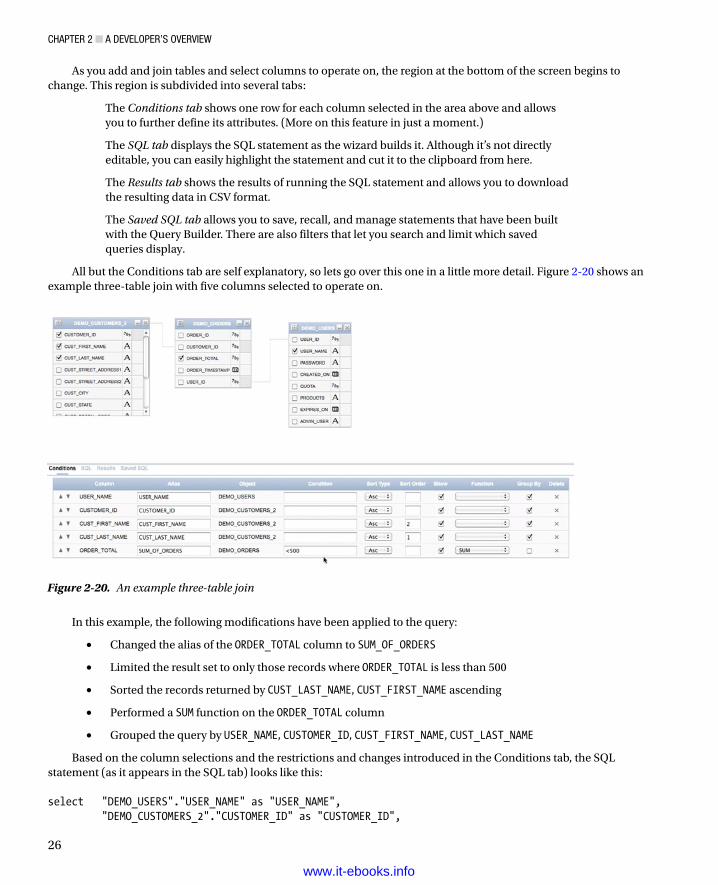
All but the Conditions tab are self explanatory, so lets go over this one in a little more detail. Figure 2-20 shows an example three-table join with five columns selected to operate on.
Figure 2-20. An example three-table join
In this example, the following modifications have been applied to the query:
Changed the alias of the • ORDER_TOTAL column to SUM_OF_ORDERS
Limited the result set to only those records where • ORDER_TOTAL is less than 500
Sorted the records returned by • CUST_LAST_NAME, CUST_FIRST_NAME ascending
Performed a • SUM function on the ORDER_TOTAL column
Grouped the query by • USER_NAME, CUSTOMER_ID, CUST_FIRST_NAME, CUST_LAST_NAME
Based on the column selections and the restrictions and changes introduced in the Conditions tab, the SQL statement (as it appears in the SQL tab) looks like this: select "DEMO_USERS"."USER_NAME" as "USER_NAME", "DEMO_CUSTOMERS_2"."CUSTOMER_ID" as "CUSTOMER_ID",
www.it-ebooks.info
Chapter 2 ■ a Developer’s overview
27
"DEMO_CUSTOMERS_2"."CUST_FIRST_NAME" as "CUST_FIRST_NAME", "DEMO_CUSTOMERS_2"."CUST_LAST_NAME" as "CUST_LAST_NAME", sum(DEMO_ORDERS.ORDER_TOTAL) as "SUM_OF_ORDERS" from "DEMO_CUSTOMERS" "DEMO_CUSTOMERS_2", "DEMO_USERS" "DEMO_USERS", "DEMO_ORDERS" "DEMO_ORDERS" where "DEMO_USERS"."USER_ID"="DEMO_ORDERS"."USER_ID" and "DEMO_CUSTOMERS_2"."CUSTOMER_ID"="DEMO_ORDERS"."CUSTOMER_ID" and "DEMO_ORDERS"."ORDER_TOTAL" <500group by DEMO_USERS.USER_NAME, DEMO_CUSTOMERS_2.CUSTOMER_ID, DEMO_CUSTOMERS_2.CUST_FIRST_NAME, DEMO_CUSTOMERS_2.CUST_LAST_NAME
Although the Query Builder is very useful and allows you to put together a basic query fairly quickly using a simple GUI, it does have its limitations, such as nested subqueries and complex unions. We use the Query Builder to get the skeleton of a query defined; we then take the query to the SQL Commands window or a SQL IDE and fine-tune it from there.
As a final note, it’s worth mentioning that the Query Builder is linked to from several places in APEX, so any time you’re prompted for a SQL statement (for example, as the basis for a report) you can open the Query Builder in a pop-up window and return the query to the calling form.
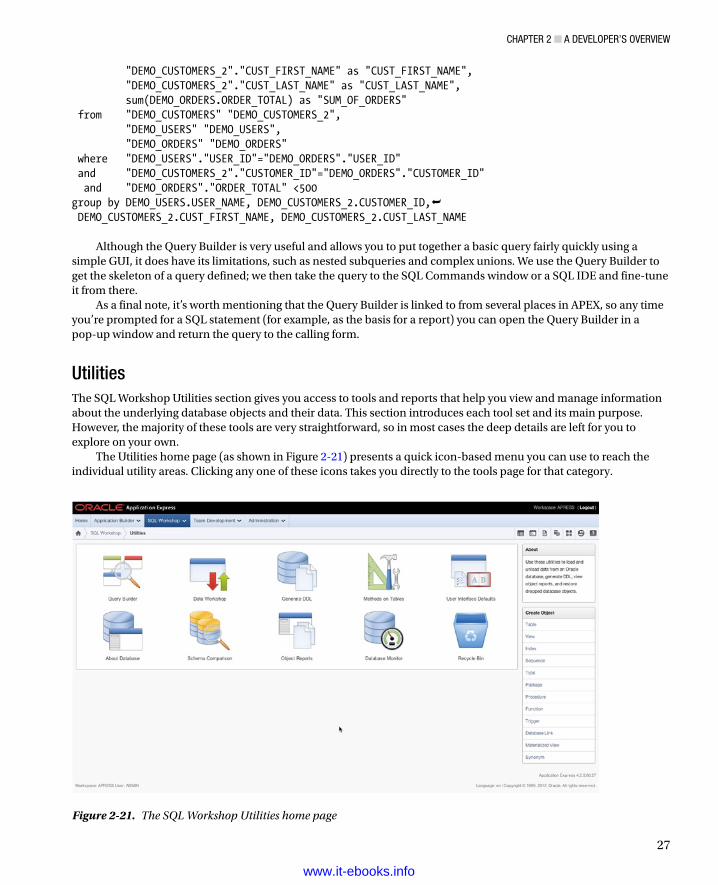
UtilitiesThe SQL Workshop Utilities section gives you access to tools and reports that help you view and manage information about the underlying database objects and their data. This section introduces each tool set and its main purpose. However, the majority of these tools are very straightforward, so in most cases the deep details are left for you to explore on your own.
The Utilities home page (as shown in Figure 2-21) presents a quick icon-based menu you can use to reach the individual utility areas. Clicking any one of these icons takes you directly to the tools page for that category.
Figure 2-21. The SQL Workshop Utilities home page
www.it-ebooks.info

Chapter 2 ■ a Developer’s overview
28
You’ve already seen the Query Builder, which gives users the ability to visually create queries.The Data Workshop provides tools that import and export data in many different formats including comma or tab
separated, XML, or spreadsheet data. These tools also help you manage files that you have loaded into either the text or spreadsheet repository.
The Generate DDL wizard allows you to choose a schema associated with the workspace and generates a script that can be used to re-create some or all of the objects with that schema based on your selection. The generated script doesn’t include any insert statements for the data that resides in the database objects, but it’s a good way to easily re-create the underlying objects an application might use.
The Methods on Tables wizard generates an Application Programming Interface (API) based on a specific table or set of tables. For each table selected (up to ten named tables), the generated package contains a procedure for each of the following actions: Insert, Update, Delete, and Select. The benefit of using table APIs instead of accessing the table directly is that any required validation logic can be included once, in the API, and accessed from various alternate interfaces including APEX.
User Interface Defaults allow you to define default display attributes to APEX regions and items. The utility lets you manage these UI defaults at two different levels: Table Dictionary and Attribute Dictionary. UI Defaults are discussed in more detail later.
About Database and Database Monitor are special utilities that require the user running them to have access to a database login that has been granted the DBA role. The Database Monitor utilities allow the privileged user to view Sessions, Systems Statistics, Top SQL, and Long Operations reports. The About Database report shows detailed information about the database instance and the APEX environment. Depending on the settings the Instance Administrator has chosen, these two utilities may not appear in the list, because they can be turned off.
The Schema Comparison utility allows you to compare the objects in two separate schemas and create a difference report. You may choose to compare only certain attributes or all attributes of the objects in the selected schemas. The limitation here is that both schemas must be assigned to the workspace in order for the comparison to take place.
The Object Reports are actually a set of utilities that let you get detailed information about the different types of objects that live in the “parse as” schema(s) assigned to the workspace. Although most of the reports have to do with tables, others deal with PL/SQL objects, invalid objects, grants and permissions, and so on. This is a good place to find details of the objects in your working schema.
When an object is dropped, Oracle doesn’t immediately remove the space associated with the table, but instead renames the table and places it and its associated storage in the Recycle Bin. The Recycle Bin utility allows you to view and potentially recover objects that have been dropped from the schemas associated with a workspace. You may also purge the Recycle Bin, allowing the space to be reclaimed by the Oracle database for use somewhere else.
Administration and Team DevelopmentThe last two functional areas of the UI, Administration and Team Development, are complex enough to truly deserve their own chapters. Therefore, we refer you to the chapters that cover these areas in depth. Chapter 10 covers deploying applications, Chapter 14 is about managing workspaces, and Chapter 15 goes over Team Development.
You dip into administrative tasks throughout this book, so if you want to have a full understanding of administration before you start, you should take a detour and read these chapters now to get a good foundation. However, if you’re prepared to learn on the fly, go to the next chapter, where you start the real programming.
SummaryThe architecture of APEX may seem a bit daunting at first, but once you actually start working with it, things will begin to fall into place and you’ll understand more and more about how everything fits together. If you take away only one thing from this chapter, let it be that a workspace is essentially your development sandbox. Everything you do happens in the context of a workspace. Everything else—from a development standpoint—is much like any other development environment. Are you building a new application? Then it needs to be created in a workspace. Do you need access to a schema to build that app? Then it needs to be assigned to your workspace. You get the picture. Now, on to the fun!
www.it-ebooks.info
29
Chapter 3
Identifying the Problem and Designing the Solution
Every computer system is (or at least should be) the result of solving some type of problem. Although “Hello World” apps are great, we firmly believe that the best way to learn any technology is to apply it to a real problem and see how things actually work.
We adhere to that principle throughout this book. This chapter discusses a very common problem in most organizations that can be solved technically. You also look at some of the detailed things you need to consider when designing web-based systems in general and APEX specifically.
Identifying System RequirementsAlmost every company, no matter the size, will at some point need to implement some sort of help desk. Whether it’s an internal one to track employee questions and problems or an external one to track client issues with commercial software or hardware, the basics of a help-desk system are fairly standard.
Most help-desk systems are driven by the notion of a trouble ticket or ticket. This term is a leftover from the days before computers: most problems were reported over the phone, and troubleshooters used a physical paper ticket to log a call. The information contained on that paper ticket included a description of the problem, the person having the problem, when the problem was logged, and so on. Then, throughout the process of troubleshooting and, hopefully, solving the problem, the engineers wrote down each step of the process and included any documentation of the problem they gathered along the way. Today, it would be very surprising to see a help-desk system that wasn’t computerized, even if it’s only a spreadsheet of issues with notes and statuses.
In this chapter, you attack the help-desk system with APEX. Before you dive in, you need to clearly understand the problems you’re trying to solve. If nothing else, you need to review the current system.
Never a Clean SlateAlmost no computer system written today starts from scratch. There is almost always something in place, even if it’s just some loose guidelines or ideas.
For this example, let’s say your company has a very basic system in place, but it’s no longer meeting the needs of your growing user community. Your goal is to create a new system that will make the logging of issues and their solutions much easier for everyone involved; however, to do that, you must understand the needs of the users and the functionality of the system that is in place now.
www.it-ebooks.info
Chapter 3 ■ IdentIfyIng the problem and desIgnIng the solutIon
30
A Broken SystemIn general, the users of help-desk systems can be categorized into two groups: people who log problems (end users) and people who help solve the problems (technicians). Depending on which user community you fall into, it’s likely you have different needs, but overall, the system should help the end users and the technicians communicate about the problem or issue.
The first step is to understand how your help desk is being managed today and why it’s not working. Speaking to both the technicians and the end users can provide a huge amount of information, but the challenge is that this information usually comes in the form of complaints about the current system.
Quizzing the end users reveals that their main complaint is that they never know the status of the problems they’ve logged. They can go days, sometimes weeks, without communication from the technicians, and in the eyes of the users, no communication means no one is working on their problems. Another user complaint is that the help-desk technicians often don’t know how to contact them to ask further questions or communicate progress.
On the other end of the issue, the technicians are overloaded. Ticket information is kept in an Excel spreadsheet. Originally, the help desk was only one person, but now there are several technicians working independently. While performing their daily duties, each needs to update the spreadsheet with information regarding the tickets assigned to them. The increasing number of people accessing a single spreadsheet causes problems, because only one person can open and update the spreadsheet at any given time. The technicians are also tired of constantly being called by users wanting an update on the status of their issues.
It’s obvious that the system is broken. Neither the users nor the technicians are happy about the situation. It’s your job to take the information you’ve gleaned from these conversations and design something that will address the needs of both user communities.
How Do You Fix Things?With the information you’ve gathered so far, you can now define some loose requirements and break them down by user type so you can have a much clearer understanding of what each community needs. Then, from those requirements, you can begin to think about the database design that you’ll need to create in support of them.
Defining the RequirementsYou can look at requirements from two perspectives. End users have one set of requirements and technicians another. Some requirements overlap between the two groups. Others are unique to one group or the other.
End users should be able to
Create a new ticket outlining their problem.•
See the status and progress of tickets.•
Technicians should be able to
Easily identify and view new tickets.•
Easily identify which tickets are directly assigned to them.•
Search existing tickets.•
Create new tickets on behalf of an end user.•
Assign tickets to other technicians.•
Add details (comments, information, and attachments) to tickets.•
Update the status of a ticket.•
www.it-ebooks.info
Chapter 3 ■ IdentIfyIng the problem and desIgnIng the solutIon
31
Although you could go a lot further, these requirements form the basis of a pretty complete help-desk system. You can always add functionality to it later when you have a better understanding of what else the users and the company might need.
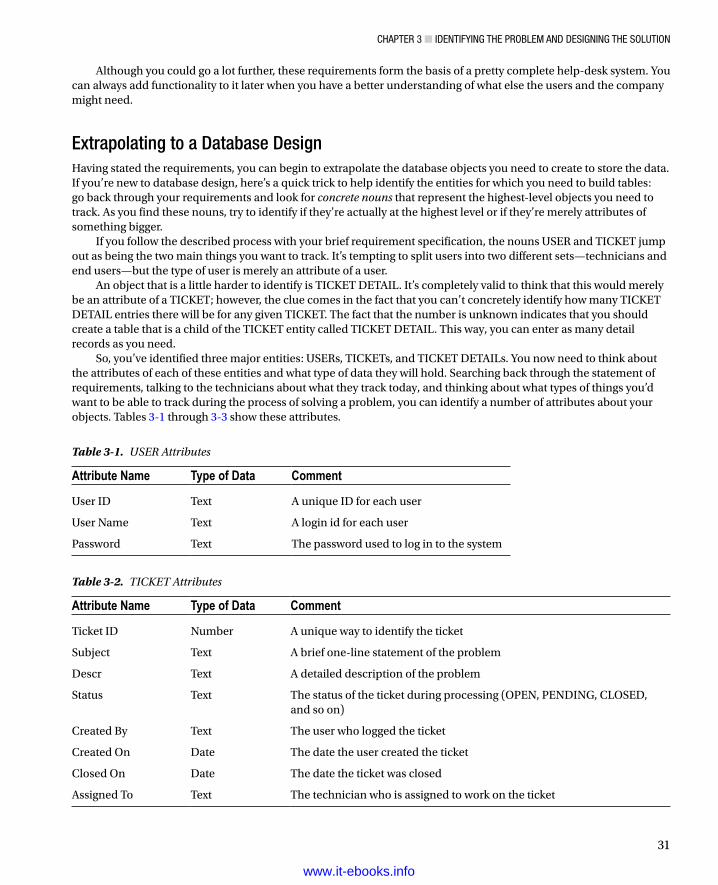
Extrapolating to a Database DesignHaving stated the requirements, you can begin to extrapolate the database objects you need to create to store the data. If you’re new to database design, here’s a quick trick to help identify the entities for which you need to build tables: go back through your requirements and look for concrete nouns that represent the highest-level objects you need to track. As you find these nouns, try to identify if they’re actually at the highest level or if they’re merely attributes of something bigger.
If you follow the described process with your brief requirement specification, the nouns USER and TICKET jump out as being the two main things you want to track. It’s tempting to split users into two different sets—technicians and end users—but the type of user is merely an attribute of a user.
An object that is a little harder to identify is TICKET DETAIL. It’s completely valid to think that this would merely be an attribute of a TICKET; however, the clue comes in the fact that you can’t concretely identify how many TICKET DETAIL entries there will be for any given TICKET. The fact that the number is unknown indicates that you should create a table that is a child of the TICKET entity called TICKET DETAIL. This way, you can enter as many detail records as you need.
So, you’ve identified three major entities: USERs, TICKETs, and TICKET DETAILs. You now need to think about the attributes of each of these entities and what type of data they will hold. Searching back through the statement of requirements, talking to the technicians about what they track today, and thinking about what types of things you’d want to be able to track during the process of solving a problem, you can identify a number of attributes about your objects. Tables 3-1 through 3-3 show these attributes.
Table 3-1. USER Attributes
Attribute Name Type of Data Comment
User ID Text A unique ID for each user
User Name Text A login id for each user
Password Text The password used to log in to the system
Table 3-2. TICKET Attributes
Attribute Name Type of Data Comment
Ticket ID Number A unique way to identify the ticket
Subject Text A brief one-line statement of the problem
Descr Text A detailed description of the problem
Status Text The status of the ticket during processing (OPEN, PENDING, CLOSED, and so on)
Created By Text The user who logged the ticket
Created On Date The date the user created the ticket
Closed On Date The date the ticket was closed
Assigned To Text The technician who is assigned to work on the ticket
www.it-ebooks.info
Chapter 3 ■ IdentIfyIng the problem and desIgnIng the solutIon
32
Although it’s good to try to be as detailed as possible as early as you can, you don’t have to be perfect here. You can always go back and alter or expand the data you wish to capture as you identify other potential attributes.
System Design with APEX in MindBecause APEX not only resides in but is built on the Oracle database, you would think that designing database objects for APEX would be the same as designing for any other system that uses Oracle as a data store—and in some aspects you would be right. However, there are definitely some things you need to understand when designing for an APEX system that will make your life much easier.
Most of what you do with APEX, at least initially, uses a series of wizards. If the database objects are designed with APEX in mind, the wizards will do far more work for you; therefore, you’ll need to do far less fine tuning manually. The following sections discuss the most important design considerations and how they affect what the wizards do for you.
Table Definition and User Interface DefaultsOne such area you see in more detail later is user-interface defaults (UI Defaults). It’s important to know that when you use UI Defaults, certain table attributes are translated into default settings used across APEX. Here are some of the more far-reaching things you can do at the table level to help make UI Defaults more useful:
Placing comments on a table column seeds that item’s UI Default help text with the text of the •comment.
Marking a column as • NOT NULL at the database level triggers a Required flag to be set in the UI Defaults.
• Date and Timestamp data types are set up to display as Date Pickers on input forms.
The order in which the columns appear in the table is the default order in which the UI •Defaults set them to display on a form or report.
Defining a column as a • BLOB sets the form-level UI Defaults to use APEX’s declarative blob functionality.
You set up and modify UI Defaults in a later chapter so you can see for yourself how design decisions affect the way UI Defaults are set up.
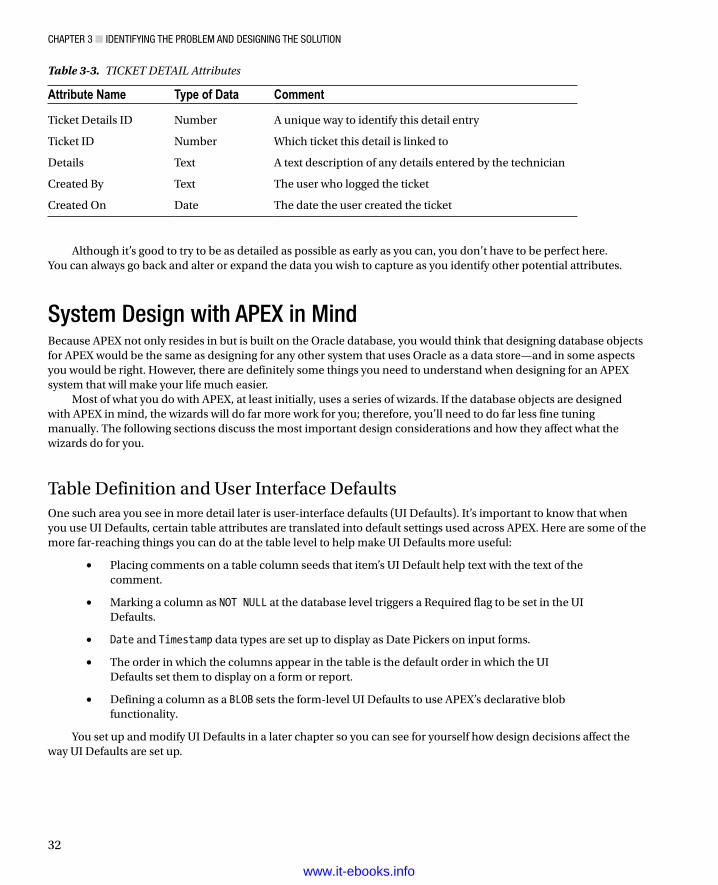
Table 3-3. TICKET DETAIL Attributes
Attribute Name Type of Data Comment
Ticket Details ID Number A unique way to identify this detail entry
Ticket ID Number Which ticket this detail is linked to
Details Text A text description of any details entered by the technician
Created By Text The user who logged the ticket
Created On Date The date the user created the ticket
www.it-ebooks.info
Chapter 3 ■ IdentIfyIng the problem and desIgnIng the solutIon
33
APEX and Primary KeysAPEX is set up to make the best use of sequence-based surrogate primary keys of no more than two columns. Although you can still use APEX on table structures that use multicolumn natural keys, it’s far easier and you get much more out of the box if you give APEX what it likes.
We have worked with many systems over the years that implemented multicolumn natural keys, and we’ve successfully implemented APEX systems on top of these types of data structures. However, we ended up hand coding the logic that APEX would have provided for free had the structures used one or two column surrogate keys.
In APEX 4, the ability to use ROWIDs in place of primary keys was introduced to help solve the problem of multicolumn primary keys. This feature provides a way to bypass the perceived limitation of APEX’s two-column primary key limit by using the ROWID as the primary key.
Although using ROWIDs in this manner is technically and syntactically correct, when building an APEX application from scratch, it’s still considered a best practice to use single-column surrogate primary keys based on a database sequence and assigned by database triggers.
If you take the example of the TICKET table, the ID for a ticket is an arbitrary piece of data used only to uniquely identify one ticket from another. Therefore, it easily fits into the realm of a surrogate primary key. Even if the spreadsheet that the help-desk technicians currently use has IDs assigned to the tickets, you can load those values and start your sequence counting at a point above the highest current TICKET ID. The same is true for TICKET DETAILS. Even in the USER table, where you have a unique single-column natural key (the User Name), it behooves you to implement a surrogate key to be able to take advantage of the built-in APEX code paths.
Business Logic vs. User Interface LogicBecause it’s written in PL/SQL, APEX takes full advantage of everything that PL/SQL has to offer. The APEX development team has made thorough use of stored PL/SQL program units for their business logic, and you can take a very important lesson from them.
Although it’s arguably a valid development method to prototype your business logic by first coding it as an anonymous PL/SQL block inside of APEX, it’s foolish to leave it there long term. By moving it out into stored program units, you gain in many different ways.
One very important gain is in the realm of performance. Anonymous PL/SQL blocks are stored in the APEX metadata as uncompiled PL/SQL code. Each time they’re required to run, they must first be extracted from the APEX metadata, parsed, compiled, and then run. This process carries quite an overhead if the PL/SQL in question is part of a page that gets thousands or even hundreds of thousands of hits a day. If you move that code into a stored program unit in the database, the retrieval, parse, and compile steps are all skipped, and the code is run directly.
Another benefit is reusability. If the same logic is used in more than one place, it can simply be called instead of duplicated in two anonymous blocks. Therefore, any change to the business logic need only happen in one place. Another reusability benefit might occur if multiple systems (some being non-APEX) need access to the same business logic. When stored in a PL/SQL program unit, it doesn’t matter whether the calling system is APEX, .NET, Java, or PHP. They can all use the same logic.
Finally, by moving business logic code into stored program units, you gain the ability to code, debug, and test these program units outside of the restrictions of APEX, using your favorite PL/SQL coding tool instead. However, not all code needs to be moved out into the database. User interface logic that manages and manipulates items on the page, such as computations, validations, and processes, is often best kept as part of the page. Such logic is often so page specific and so small in footprint that the gain from moving it out to the database isn’t worth the extra management overhead. As a general rule of thumb, logic that controls or manipulates the UI is best placed in APEX, and logic that implements business rules or controls the data is best placed in stored program units in the database.
www.it-ebooks.info
Chapter 3 ■ IdentIfyIng the problem and desIgnIng the solutIon
34
Placement of Database ObjectsThe Oracle database is very flexible, allowing data from multiple schemas to be granted to and queried by other schemas, even across database links. The APEX wizards have been coded to work best when the database objects reside in a “parse as” schema assigned directly to the workspace.
The APEX wizards make heavy use of database metadata for the objects in its “parse as” schemas. If you’re trying to create applications against synonyms from another schema or across a database link to another database, in many cases the wizards won’t be functional because the metadata for these objects is unavailable. Some features won’t work at all, such as the management of BLOB data across database links.
In general, reports are much easier to deal with when it comes to disparate data, because you can supply a working query and create a report. Forms, however, become much more difficult because the insert, update, and delete logic must be coded manually instead of relying on the APEX-supplied automated DML processes.
Although it’s not always possible, the best practice is to create the underlying database objects in the “parse as” schema for the application. This is how you will architect your help-desk system.
Translating Theory to PracticeNow that you have a reasonable understanding of the things you need to think about when designing the database objects for your system, you can translate your text-based tables into a real schema definition. Although it’s very easy to take the previously described objects and attributes straight to SQL Workshop and start entering their definition, it’s usually a good idea to go through the steps of creating an entity-relationship diagram (ERD). Often, the action of doing this can bring other design considerations to light.
There are dozens of ways to draw ERDs—from pen and paper to high-end database design tools. However, we tend to take the middle ground and use Oracle’s SQL Developer Data Modeler, a robust and free tool from Oracle.
Figure 3-1 shows the results of using the Data Modeler to create the ERD from the information in the initial definitions.
Figure 3-1. First draft of database design
The diagram shows each table having a surrogate primary key that uniquely identifies the records. As discussed in the previous section, this allows the APEX wizards to work more seamlessly and generate more complete objects.
There is a foreign key in place between TICKETS and USERS to identify the person to whom the ticket is currently assigned. In addition, a unique constraint is placed on the USER_NAME column of the USERS table to make sure someone doesn’t accidentally create two users with the same USER_NAME.
www.it-ebooks.info
Chapter 3 ■ IdentIfyIng the problem and desIgnIng the solutIon
35
Although this isn’t likely to be the final version of the data model, it’s probably complete enough for a start. Using your ERD tool, you could go ahead and generate the database object creation scripts and then upload and run them through APEX SQL Workshop’s SQL Scripts interface. However, because your data model is so small, in the next chapter you use the Object Browser tool to create the objects from scratch.
SummaryIdentifying the problems your APEX application is supposed to solve is only half the battle. Good database design—and designing specifically with APEX in mind—is the key to creating a successful APEX application. Taking the time to make sure you have a solid foundation means you can take full advantage of everything APEX gives you so that there is less work to do later.
www.it-ebooks.info
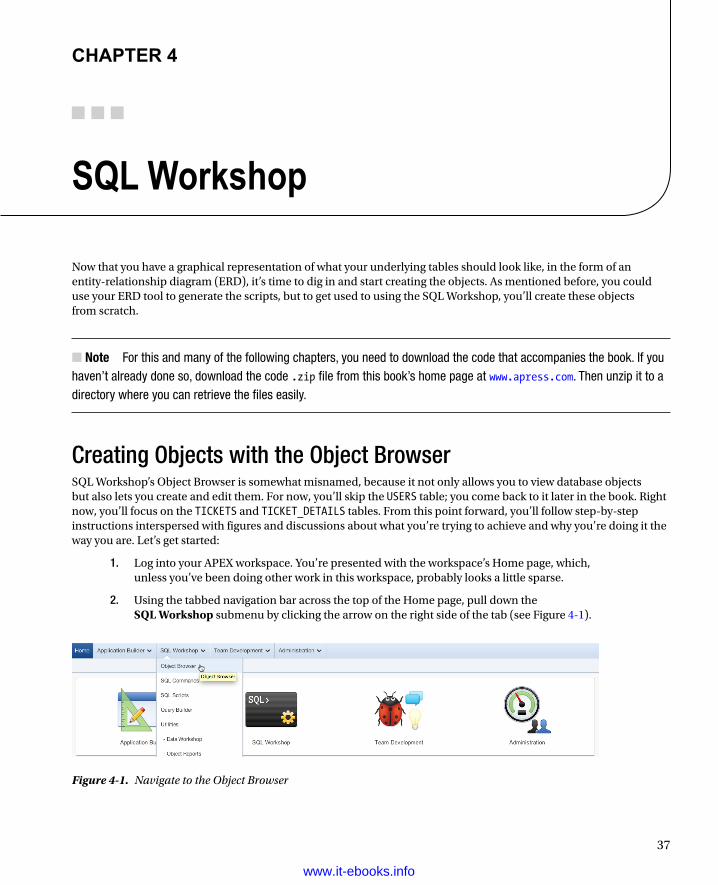
37
Chapter 4
SQL Workshop
Now that you have a graphical representation of what your underlying tables should look like, in the form of an entity-relationship diagram (ERD), it’s time to dig in and start creating the objects. As mentioned before, you could use your ERD tool to generate the scripts, but to get used to using the SQL Workshop, you’ll create these objects from scratch.
Note ■ For this and many of the following chapters, you need to download the code that accompanies the book. If you haven’t already done so, download the code .zip file from this book’s home page at www.apress.com. Then unzip it to a directory where you can retrieve the files easily.
Creating Objects with the Object BrowserSQL Workshop’s Object Browser is somewhat misnamed, because it not only allows you to view database objects but also lets you create and edit them. For now, you’ll skip the USERS table; you come back to it later in the book. Right now, you’ll focus on the TICKETS and TICKET_DETAILS tables. From this point forward, you’ll follow step-by-step instructions interspersed with figures and discussions about what you’re trying to achieve and why you’re doing it the way you are. Let’s get started:
1. Log into your APEX workspace. You’re presented with the workspace’s Home page, which, unless you’ve been doing other work in this workspace, probably looks a little sparse.
2. Using the tabbed navigation bar across the top of the Home page, pull down the SQL Workshop submenu by clicking the arrow on the right side of the tab (see Figure 4-1).
Figure 4-1. Navigate to the Object Browser
www.it-ebooks.info
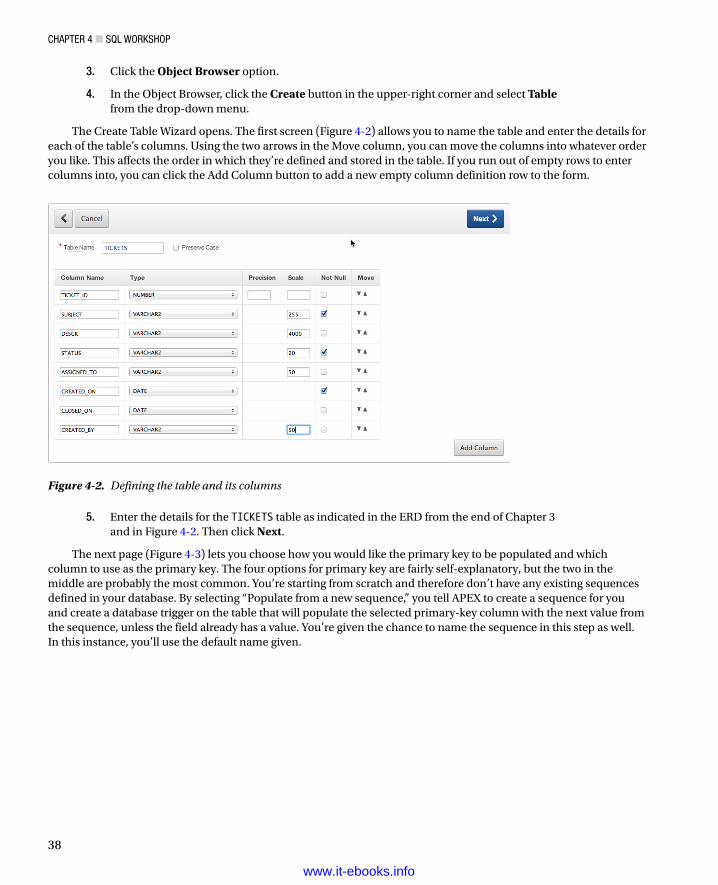
ChapTer 4 ■ SQL WorkShop
38
3. Click the Object Browser option.
4. In the Object Browser, click the Create button in the upper-right corner and select Table from the drop-down menu.
The Create Table Wizard opens. The first screen (Figure 4-2) allows you to name the table and enter the details for each of the table’s columns. Using the two arrows in the Move column, you can move the columns into whatever order you like. This affects the order in which they’re defined and stored in the table. If you run out of empty rows to enter columns into, you can click the Add Column button to add a new empty column definition row to the form.
Figure 4-2. Defining the table and its columns
5. Enter the details for the TICKETS table as indicated in the ERD from the end of Chapter 3 and in Figure 4-2. Then click Next.
The next page (Figure 4-3) lets you choose how you would like the primary key to be populated and which column to use as the primary key. The four options for primary key are fairly self-explanatory, but the two in the middle are probably the most common. You’re starting from scratch and therefore don’t have any existing sequences defined in your database. By selecting “Populate from a new sequence,” you tell APEX to create a sequence for you and create a database trigger on the table that will populate the selected primary-key column with the next value from the sequence, unless the field already has a value. You’re given the chance to name the sequence in this step as well. In this instance, you’ll use the default name given.
www.it-ebooks.info
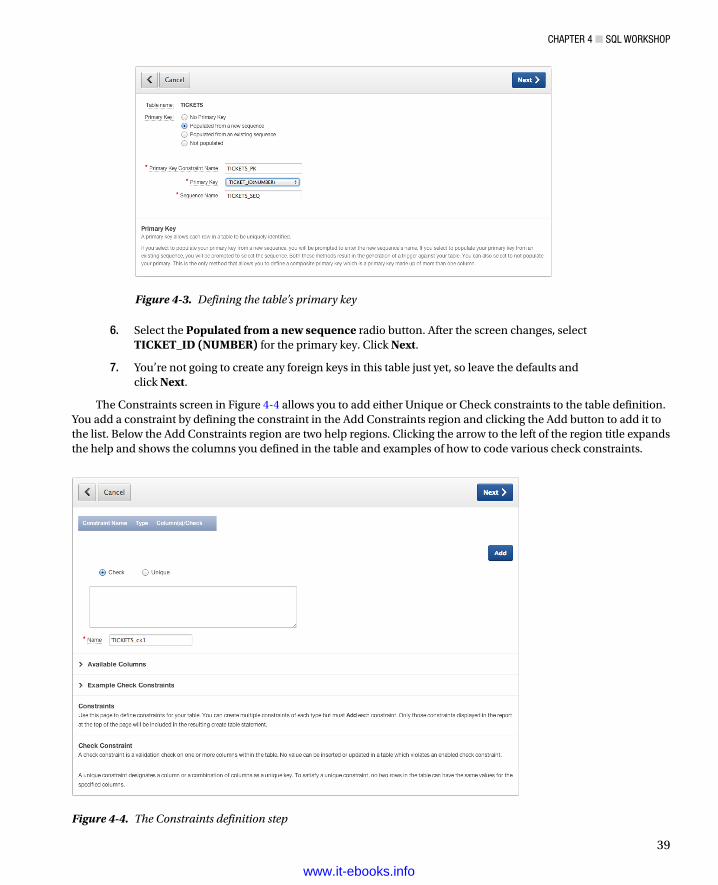
ChapTer 4 ■ SQL WorkShop
39
6. Select the Populated from a new sequence radio button. After the screen changes, select TICKET_ID (NUMBER) for the primary key. Click Next.
7. You’re not going to create any foreign keys in this table just yet, so leave the defaults and click Next.
The Constraints screen in Figure 4-4 allows you to add either Unique or Check constraints to the table definition. You add a constraint by defining the constraint in the Add Constraints region and clicking the Add button to add it to the list. Below the Add Constraints region are two help regions. Clicking the arrow to the left of the region title expands the help and shows the columns you defined in the table and examples of how to code various check constraints.
Figure 4-3. Defining the table’s primary key
Figure 4-4. The Constraints definition step
www.it-ebooks.info
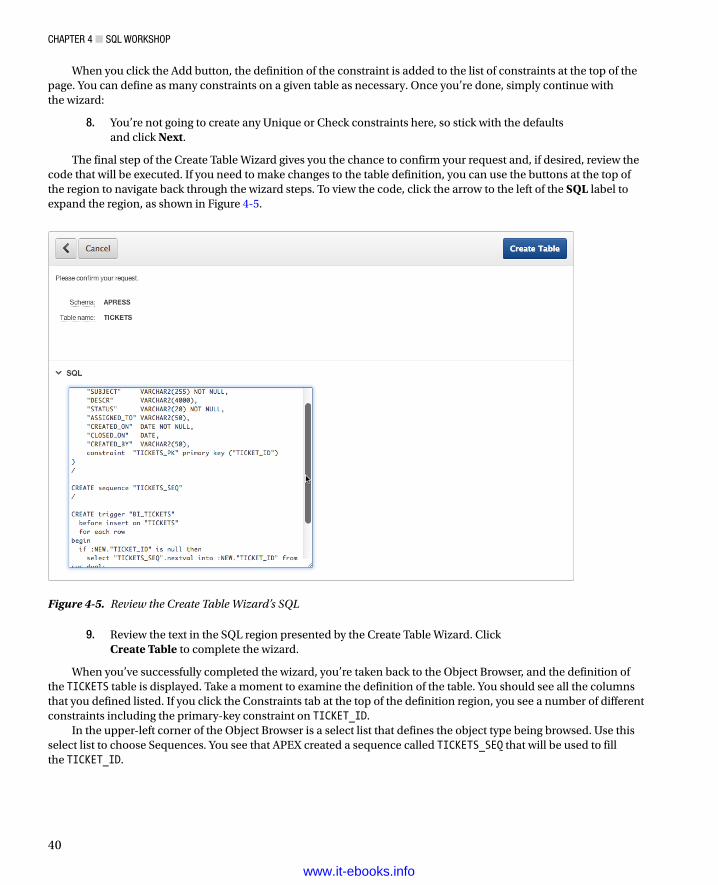
ChapTer 4 ■ SQL WorkShop
40
When you click the Add button, the definition of the constraint is added to the list of constraints at the top of the page. You can define as many constraints on a given table as necessary. Once you’re done, simply continue with the wizard:
8. You’re not going to create any Unique or Check constraints here, so stick with the defaults and click Next.
The final step of the Create Table Wizard gives you the chance to confirm your request and, if desired, review the code that will be executed. If you need to make changes to the table definition, you can use the buttons at the top of the region to navigate back through the wizard steps. To view the code, click the arrow to the left of the SQL label to expand the region, as shown in Figure 4-5.
Figure 4-5. Review the Create Table Wizard’s SQL
9. Review the text in the SQL region presented by the Create Table Wizard. Click Create Table to complete the wizard.
When you’ve successfully completed the wizard, you’re taken back to the Object Browser, and the definition of the TICKETS table is displayed. Take a moment to examine the definition of the table. You should see all the columns that you defined listed. If you click the Constraints tab at the top of the definition region, you see a number of different constraints including the primary-key constraint on TICKET_ID.
In the upper-left corner of the Object Browser is a select list that defines the object type being browsed. Use this select list to choose Sequences. You see that APEX created a sequence called TICKETS_SEQ that will be used to fill the TICKET_ID.
www.it-ebooks.info
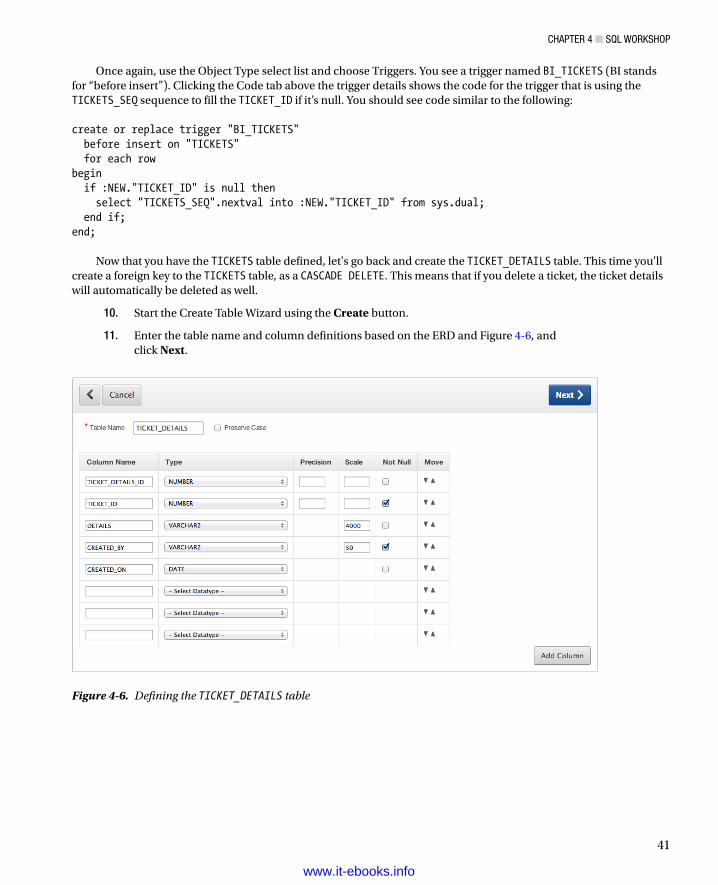
ChapTer 4 ■ SQL WorkShop
41
Once again, use the Object Type select list and choose Triggers. You see a trigger named BI_TICKETS (BI stands for “before insert”). Clicking the Code tab above the trigger details shows the code for the trigger that is using the TICKETS_SEQ sequence to fill the TICKET_ID if it’s null. You should see code similar to the following:
create or replace trigger "BI_TICKETS" before insert on "TICKETS" for each rowbegin if :NEW."TICKET_ID" is null then select "TICKETS_SEQ".nextval into :NEW."TICKET_ID" from sys.dual; end if;end;
Now that you have the TICKETS table defined, let's go back and create the TICKET_DETAILS table. This time you'll create a foreign key to the TICKETS table, as a CASCADE DELETE. This means that if you delete a ticket, the ticket details will automatically be deleted as well.
10. Start the Create Table Wizard using the Create button.
11. Enter the table name and column definitions based on the ERD and Figure 4-6, and click Next.
Figure 4-6. Defining the TICKET_DETAILS table
www.it-ebooks.info
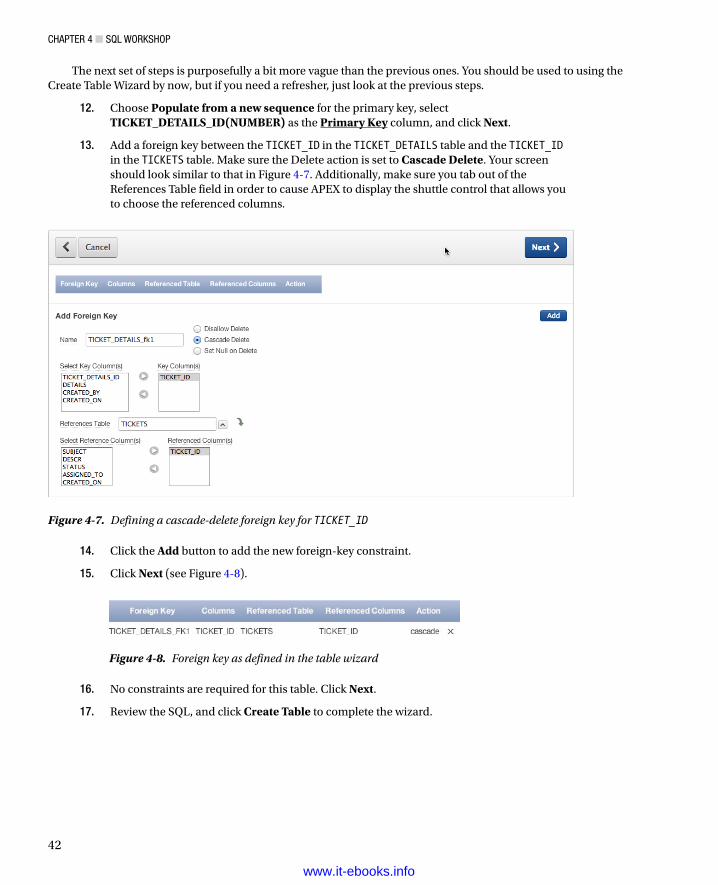
ChapTer 4 ■ SQL WorkShop
42
The next set of steps is purposefully a bit more vague than the previous ones. You should be used to using the Create Table Wizard by now, but if you need a refresher, just look at the previous steps.
12. Choose Populate from a new sequence for the primary key, select TICKET_DETAILS_ID(NUMBER) as the Primary Key column, and click Next.
13. Add a foreign key between the TICKET_ID in the TICKET_DETAILS table and the TICKET_ID in the TICKETS table. Make sure the Delete action is set to Cascade Delete. Your screen should look similar to that in Figure 4-7. Additionally, make sure you tab out of the References Table field in order to cause APEX to display the shuttle control that allows you to choose the referenced columns.
Figure 4-7. Defining a cascade-delete foreign key for TICKET_ID
14. Click the Add button to add the new foreign-key constraint.
15. Click Next (see Figure 4-8).
Figure 4-8. Foreign key as defined in the table wizard
16. No constraints are required for this table. Click Next.
17. Review the SQL, and click Create Table to complete the wizard.
www.it-ebooks.info
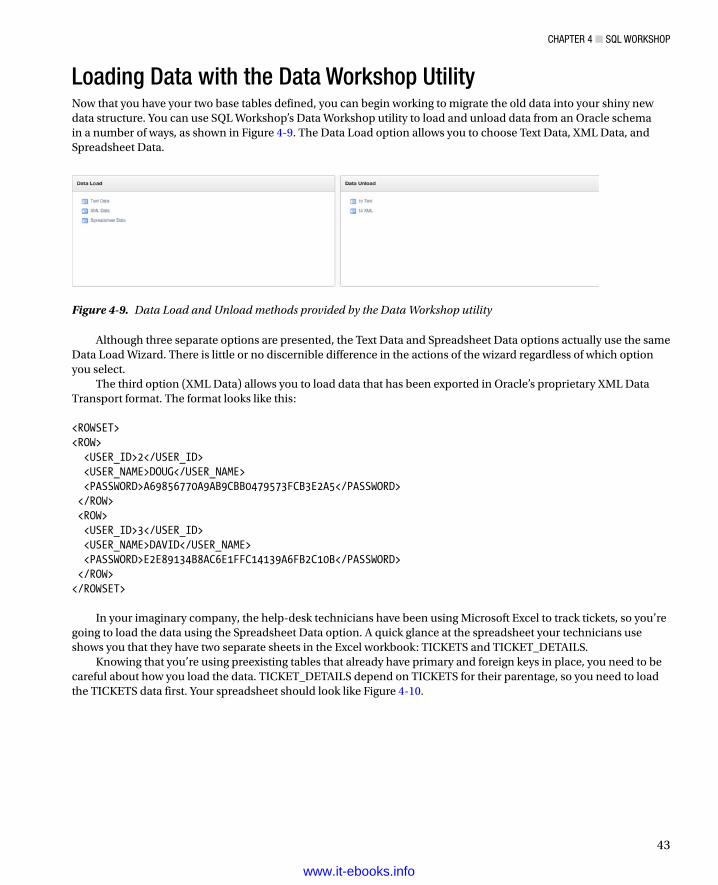
ChapTer 4 ■ SQL WorkShop
43
Loading Data with the Data Workshop UtilityNow that you have your two base tables defined, you can begin working to migrate the old data into your shiny new data structure. You can use SQL Workshop’s Data Workshop utility to load and unload data from an Oracle schema in a number of ways, as shown in Figure 4-9. The Data Load option allows you to choose Text Data, XML Data, and Spreadsheet Data.
Figure 4-9. Data Load and Unload methods provided by the Data Workshop utility
Although three separate options are presented, the Text Data and Spreadsheet Data options actually use the same Data Load Wizard. There is little or no discernible difference in the actions of the wizard regardless of which option you select.
The third option (XML Data) allows you to load data that has been exported in Oracle’s proprietary XML Data Transport format. The format looks like this: <ROWSET><ROW> <USER_ID>2</USER_ID> <USER_NAME>DOUG</USER_NAME> <PASSWORD>A69856770A9AB9CBB0479573FCB3E2A5</PASSWORD> </ROW> <ROW> <USER_ID>3</USER_ID> <USER_NAME>DAVID</USER_NAME> <PASSWORD>E2E89134B8AC6E1FFC14139A6FB2C10B</PASSWORD> </ROW></ROWSET>
In your imaginary company, the help-desk technicians have been using Microsoft Excel to track tickets, so you’re going to load the data using the Spreadsheet Data option. A quick glance at the spreadsheet your technicians use shows you that they have two separate sheets in the Excel workbook: TICKETS and TICKET_DETAILS.
Knowing that you’re using preexisting tables that already have primary and foreign keys in place, you need to be careful about how you load the data. TICKET_DETAILS depend on TICKETS for their parentage, so you need to load the TICKETS data first. Your spreadsheet should look like Figure 4-10.
www.it-ebooks.info
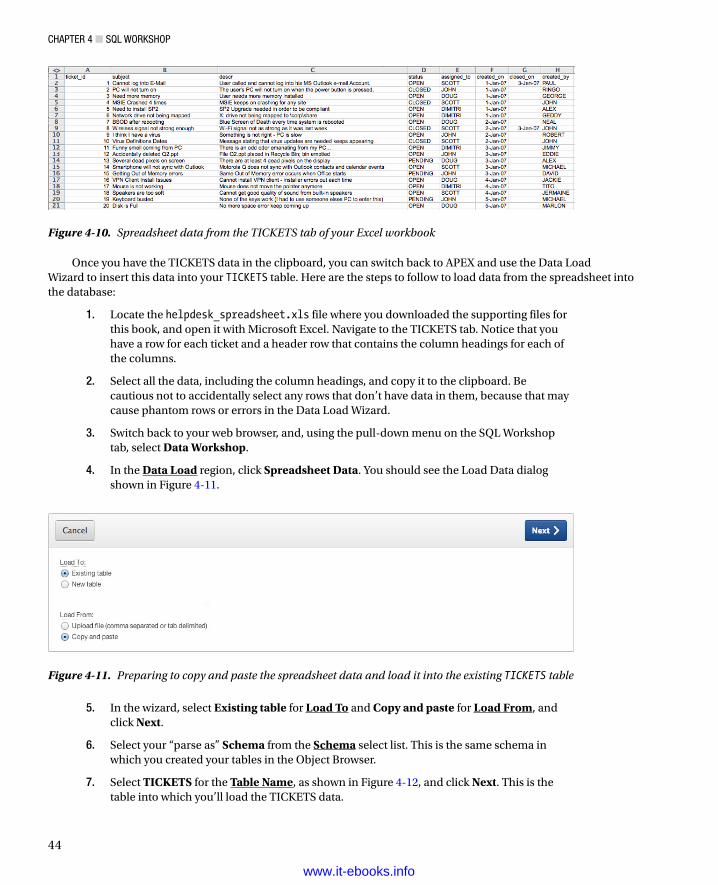
ChapTer 4 ■ SQL WorkShop
44
Once you have the TICKETS data in the clipboard, you can switch back to APEX and use the Data Load Wizard to insert this data into your TICKETS table. Here are the steps to follow to load data from the spreadsheet into the database:
1. Locate the helpdesk_spreadsheet.xls file where you downloaded the supporting files for this book, and open it with Microsoft Excel. Navigate to the TICKETS tab. Notice that you have a row for each ticket and a header row that contains the column headings for each of the columns.
2. Select all the data, including the column headings, and copy it to the clipboard. Be cautious not to accidentally select any rows that don’t have data in them, because that may cause phantom rows or errors in the Data Load Wizard.
3. Switch back to your web browser, and, using the pull-down menu on the SQL Workshop tab, select Data Workshop.
4. In the Data Load region, click Spreadsheet Data. You should see the Load Data dialog shown in Figure 4-11.
Figure 4-10. Spreadsheet data from the TICKETS tab of your Excel workbook
Figure 4-11. Preparing to copy and paste the spreadsheet data and load it into the existing TICKETS table
5. In the wizard, select Existing table for Load To and Copy and paste for Load From, and click Next.
6. Select your “parse as” Schema from the Schema select list. This is the same schema in which you created your tables in the Object Browser.
7. Select TICKETS for the Table Name, as shown in Figure 4-12, and click Next. This is the table into which you’ll load the TICKETS data.
www.it-ebooks.info
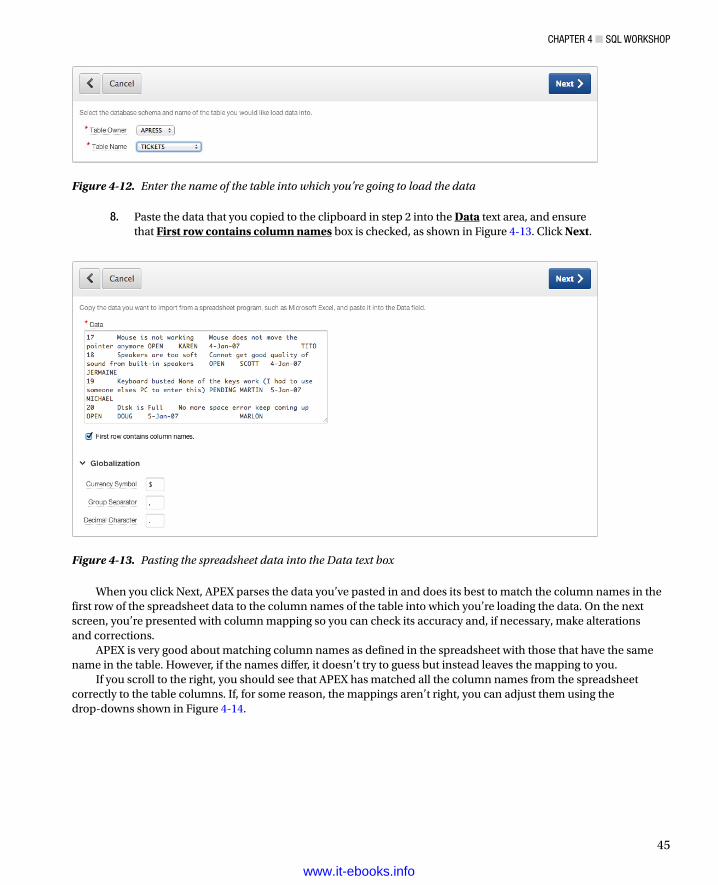
ChapTer 4 ■ SQL WorkShop
45
8. Paste the data that you copied to the clipboard in step 2 into the Data text area, and ensure that First row contains column names box is checked, as shown in Figure 4-13. Click Next.
Figure 4-12. Enter the name of the table into which you’re going to load the data
Figure 4-13. Pasting the spreadsheet data into the Data text box
When you click Next, APEX parses the data you’ve pasted in and does its best to match the column names in the first row of the spreadsheet data to the column names of the table into which you’re loading the data. On the next screen, you’re presented with column mapping so you can check its accuracy and, if necessary, make alterations and corrections.
APEX is very good about matching column names as defined in the spreadsheet with those that have the same name in the table. However, if the names differ, it doesn’t try to guess but instead leaves the mapping to you.
If you scroll to the right, you should see that APEX has matched all the column names from the spreadsheet correctly to the table columns. If, for some reason, the mappings aren’t right, you can adjust them using the drop-downs shown in Figure 4-14.
www.it-ebooks.info
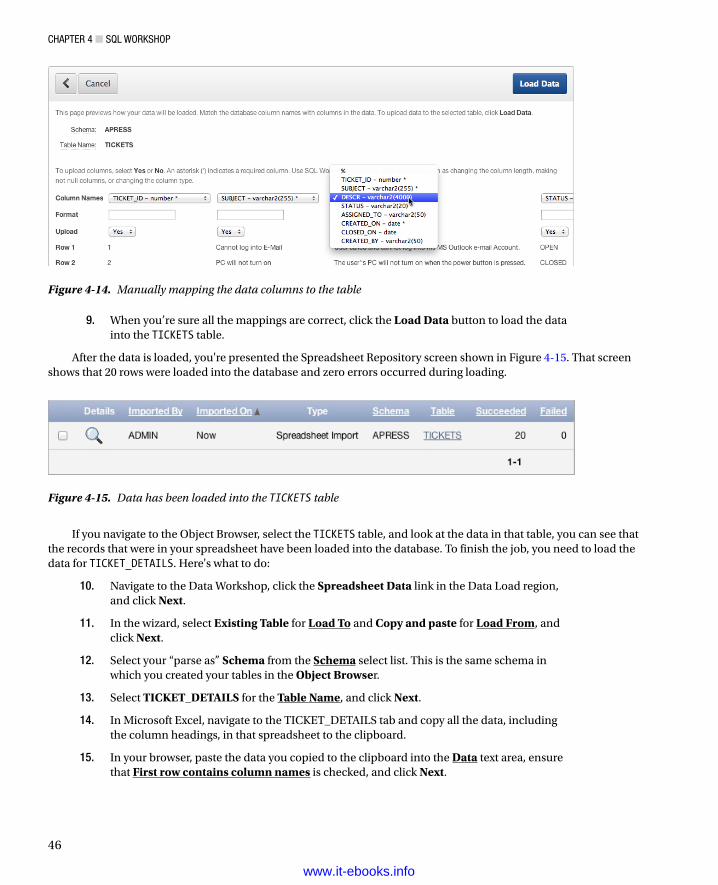
ChapTer 4 ■ SQL WorkShop
46
9. When you’re sure all the mappings are correct, click the Load Data button to load the data into the TICKETS table.
After the data is loaded, you're presented the Spreadsheet Repository screen shown in Figure 4-15. That screen shows that 20 rows were loaded into the database and zero errors occurred during loading.
Figure 4-14. Manually mapping the data columns to the table
Figure 4-15. Data has been loaded into the TICKETS table
If you navigate to the Object Browser, select the TICKETS table, and look at the data in that table, you can see that the records that were in your spreadsheet have been loaded into the database. To finish the job, you need to load the data for TICKET_DETAILS. Here's what to do:
10. Navigate to the Data Workshop, click the Spreadsheet Data link in the Data Load region, and click Next.
11. In the wizard, select Existing Table for Load To and Copy and paste for Load From, and click Next.
12. Select your “parse as” Schema from the Schema select list. This is the same schema in which you created your tables in the Object Browser.
13. Select TICKET_DETAILS for the Table Name, and click Next.
14. In Microsoft Excel, navigate to the TICKET_DETAILS tab and copy all the data, including the column headings, in that spreadsheet to the clipboard.
15. In your browser, paste the data you copied to the clipboard into the Data text area, ensure that First row contains column names is checked, and click Next.
www.it-ebooks.info
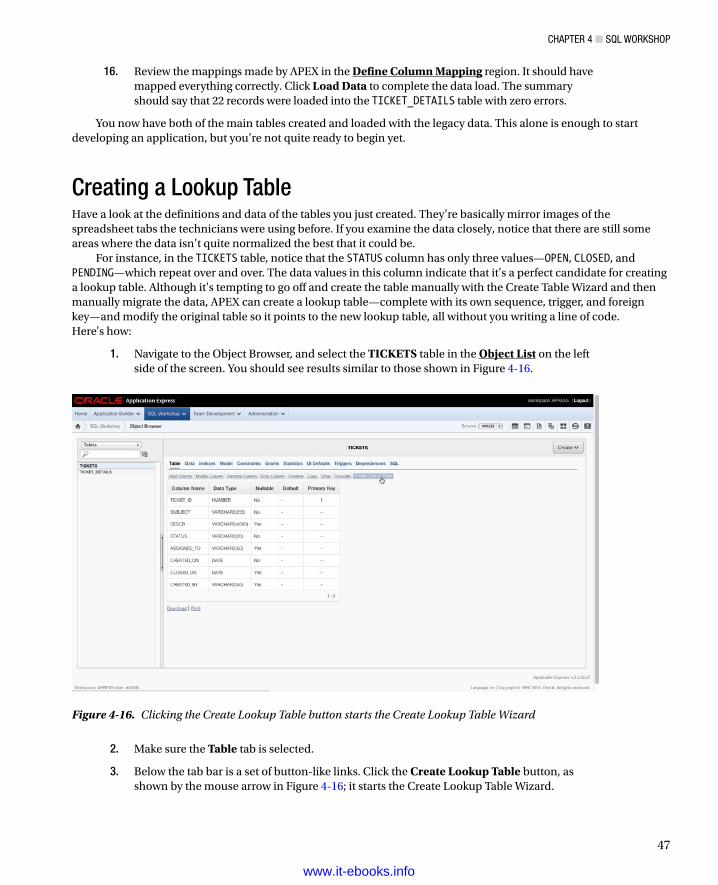
ChapTer 4 ■ SQL WorkShop
47
16. Review the mappings made by APEX in the Define Column Mapping region. It should have mapped everything correctly. Click Load Data to complete the data load. The summary should say that 22 records were loaded into the TICKET_DETAILS table with zero errors.
You now have both of the main tables created and loaded with the legacy data. This alone is enough to start developing an application, but you’re not quite ready to begin yet.
Creating a Lookup TableHave a look at the definitions and data of the tables you just created. They’re basically mirror images of the spreadsheet tabs the technicians were using before. If you examine the data closely, notice that there are still some areas where the data isn’t quite normalized the best that it could be.
For instance, in the TICKETS table, notice that the STATUS column has only three values—OPEN, CLOSED, and PENDING—which repeat over and over. The data values in this column indicate that it's a perfect candidate for creating a lookup table. Although it's tempting to go off and create the table manually with the Create Table Wizard and then manually migrate the data, APEX can create a lookup table—complete with its own sequence, trigger, and foreign key—and modify the original table so it points to the new lookup table, all without you writing a line of code. Here's how:
1. Navigate to the Object Browser, and select the TICKETS table in the Object List on the left side of the screen. You should see results similar to those shown in Figure 4-16.
Figure 4-16. Clicking the Create Lookup Table button starts the Create Lookup Table Wizard
2. Make sure the Table tab is selected.
3. Below the tab bar is a set of button-like links. Click the Create Lookup Table button, as shown by the mouse arrow in Figure 4-16; it starts the Create Lookup Table Wizard.
www.it-ebooks.info
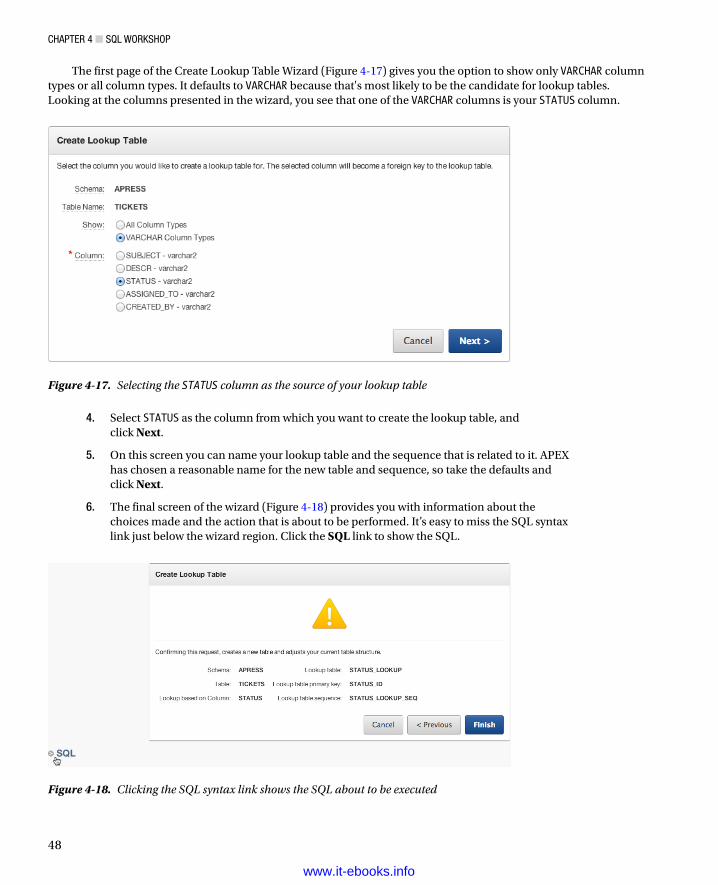
ChapTer 4 ■ SQL WorkShop
48
The first page of the Create Lookup Table Wizard (Figure 4-17) gives you the option to show only VARCHAR column types or all column types. It defaults to VARCHAR because that's most likely to be the candidate for lookup tables. Looking at the columns presented in the wizard, you see that one of the VARCHAR columns is your STATUS column.
Figure 4-17. Selecting the STATUS column as the source of your lookup table
4. Select STATUS as the column from which you want to create the lookup table, and click Next.
5. On this screen you can name your lookup table and the sequence that is related to it. APEX has chosen a reasonable name for the new table and sequence, so take the defaults and click Next.
6. The final screen of the wizard (Figure 4-18) provides you with information about the choices made and the action that is about to be performed. It’s easy to miss the SQL syntax link just below the wizard region. Click the SQL link to show the SQL.
Figure 4-18. Clicking the SQL syntax link shows the SQL about to be executed
www.it-ebooks.info
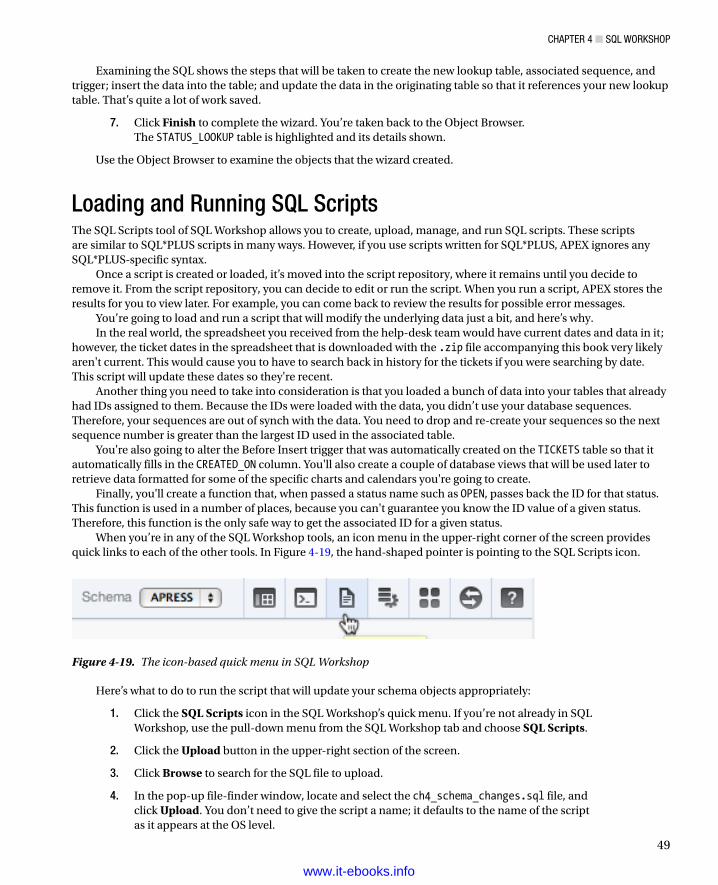
ChapTer 4 ■ SQL WorkShop
49
Examining the SQL shows the steps that will be taken to create the new lookup table, associated sequence, and trigger; insert the data into the table; and update the data in the originating table so that it references your new lookup table. That’s quite a lot of work saved.
7. Click Finish to complete the wizard. You’re taken back to the Object Browser. The STATUS_LOOKUP table is highlighted and its details shown.
Use the Object Browser to examine the objects that the wizard created.
Loading and Running SQL ScriptsThe SQL Scripts tool of SQL Workshop allows you to create, upload, manage, and run SQL scripts. These scripts are similar to SQL*PLUS scripts in many ways. However, if you use scripts written for SQL*PLUS, APEX ignores any SQL*PLUS-specific syntax.
Once a script is created or loaded, it’s moved into the script repository, where it remains until you decide to remove it. From the script repository, you can decide to edit or run the script. When you run a script, APEX stores the results for you to view later. For example, you can come back to review the results for possible error messages.
You’re going to load and run a script that will modify the underlying data just a bit, and here’s why.In the real world, the spreadsheet you received from the help-desk team would have current dates and data in it;
however, the ticket dates in the spreadsheet that is downloaded with the .zip file accompanying this book very likely aren't current. This would cause you to have to search back in history for the tickets if you were searching by date. This script will update these dates so they're recent.
Another thing you need to take into consideration is that you loaded a bunch of data into your tables that already had IDs assigned to them. Because the IDs were loaded with the data, you didn’t use your database sequences. Therefore, your sequences are out of synch with the data. You need to drop and re-create your sequences so the next sequence number is greater than the largest ID used in the associated table.
You're also going to alter the Before Insert trigger that was automatically created on the TICKETS table so that it automatically fills in the CREATED_ON column. You'll also create a couple of database views that will be used later to retrieve data formatted for some of the specific charts and calendars you're going to create.
Finally, you'll create a function that, when passed a status name such as OPEN, passes back the ID for that status. This function is used in a number of places, because you can't guarantee you know the ID value of a given status. Therefore, this function is the only safe way to get the associated ID for a given status.
When you’re in any of the SQL Workshop tools, an icon menu in the upper-right corner of the screen provides quick links to each of the other tools. In Figure 4-19, the hand-shaped pointer is pointing to the SQL Scripts icon.
Figure 4-19. The icon-based quick menu in SQL Workshop
Here’s what to do to run the script that will update your schema objects appropriately:
1. Click the SQL Scripts icon in the SQL Workshop’s quick menu. If you’re not already in SQL Workshop, use the pull-down menu from the SQL Workshop tab and choose SQL Scripts.
2. Click the Upload button in the upper-right section of the screen.
3. Click Browse to search for the SQL file to upload.
4. In the pop-up file-finder window, locate and select the ch4_schema_changes.sql file, and click Upload. You don’t need to give the script a name; it defaults to the name of the script as it appears at the OS level.
www.it-ebooks.info
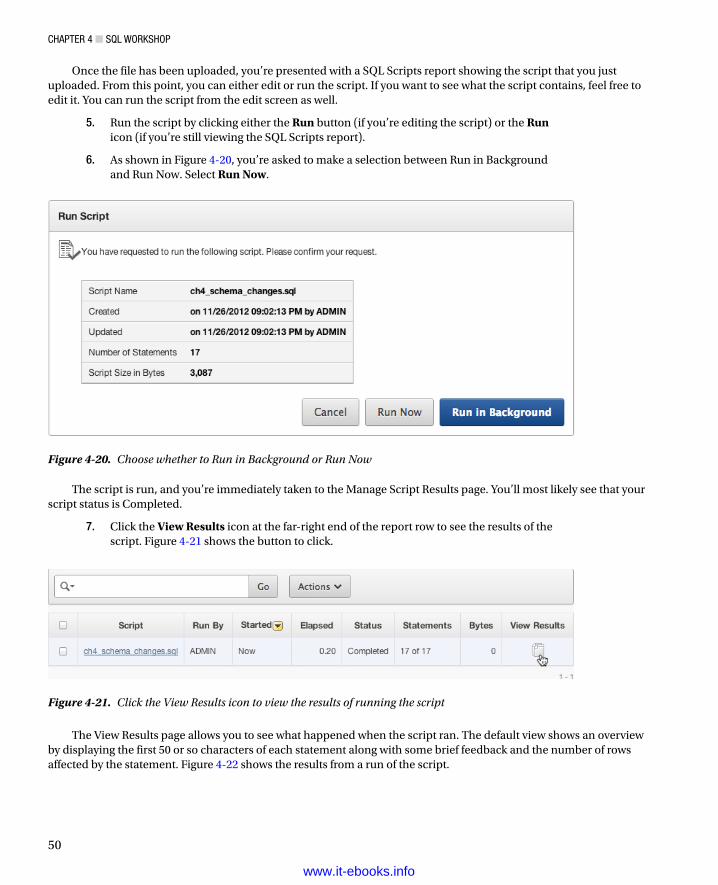
ChapTer 4 ■ SQL WorkShop
50
The View Results page allows you to see what happened when the script ran. The default view shows an overview by displaying the first 50 or so characters of each statement along with some brief feedback and the number of rows affected by the statement. Figure 4-22 shows the results from a run of the script.
Once the file has been uploaded, you’re presented with a SQL Scripts report showing the script that you just uploaded. From this point, you can either edit or run the script. If you want to see what the script contains, feel free to edit it. You can run the script from the edit screen as well.
5. Run the script by clicking either the Run button (if you’re editing the script) or the Run icon (if you’re still viewing the SQL Scripts report).
6. As shown in Figure 4-20, you’re asked to make a selection between Run in Background and Run Now. Select Run Now.
Figure 4-20. Choose whether to Run in Background or Run Now
The script is run, and you’re immediately taken to the Manage Script Results page. You’ll most likely see that your script status is Completed.
7. Click the View Results icon at the far-right end of the report row to see the results of the script. Figure 4-21 shows the button to click.
Figure 4-21. Click the View Results icon to view the results of running the script
www.it-ebooks.info
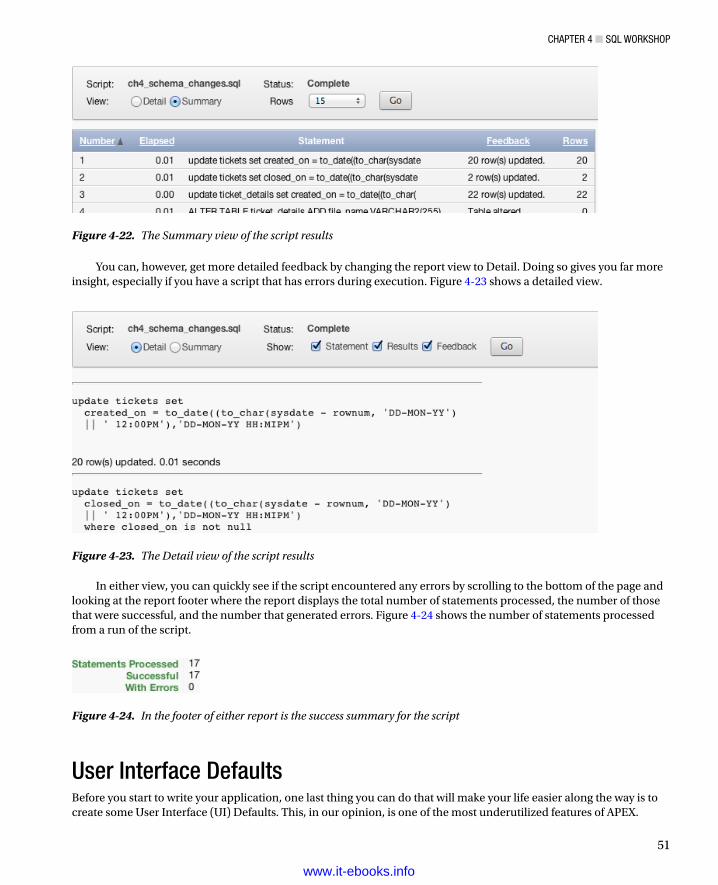
ChapTer 4 ■ SQL WorkShop
51
Figure 4-22. The Summary view of the script results
Figure 4-23. The Detail view of the script results
Figure 4-24. In the footer of either report is the success summary for the script
You can, however, get more detailed feedback by changing the report view to Detail. Doing so gives you far more insight, especially if you have a script that has errors during execution. Figure 4-23 shows a detailed view.
In either view, you can quickly see if the script encountered any errors by scrolling to the bottom of the page and looking at the report footer where the report displays the total number of statements processed, the number of those that were successful, and the number that generated errors. Figure 4-24 shows the number of statements processed from a run of the script.
User Interface DefaultsBefore you start to write your application, one last thing you can do that will make your life easier along the way is to create some User Interface (UI) Defaults. This, in our opinion, is one of the most underutilized features of APEX.
www.it-ebooks.info
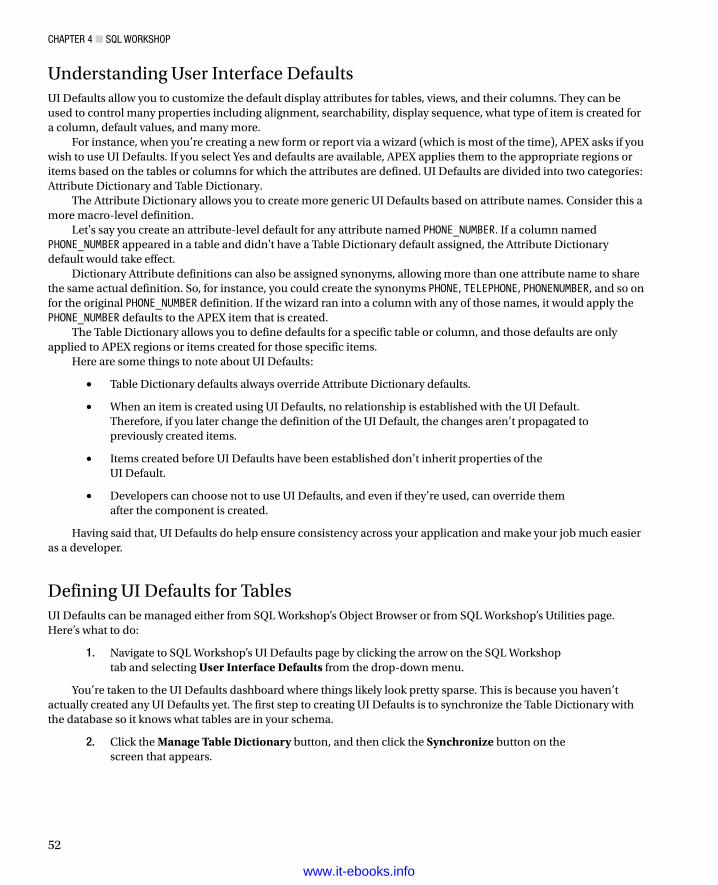
ChapTer 4 ■ SQL WorkShop
52
Understanding User Interface DefaultsUI Defaults allow you to customize the default display attributes for tables, views, and their columns. They can be used to control many properties including alignment, searchability, display sequence, what type of item is created for a column, default values, and many more.
For instance, when you’re creating a new form or report via a wizard (which is most of the time), APEX asks if you wish to use UI Defaults. If you select Yes and defaults are available, APEX applies them to the appropriate regions or items based on the tables or columns for which the attributes are defined. UI Defaults are divided into two categories: Attribute Dictionary and Table Dictionary.
The Attribute Dictionary allows you to create more generic UI Defaults based on attribute names. Consider this a more macro-level definition.
Let's say you create an attribute-level default for any attribute named PHONE_NUMBER. If a column named PHONE_NUMBER appeared in a table and didn't have a Table Dictionary default assigned, the Attribute Dictionary default would take effect.
Dictionary Attribute definitions can also be assigned synonyms, allowing more than one attribute name to share the same actual definition. So, for instance, you could create the synonyms PHONE, TELEPHONE, PHONENUMBER, and so on for the original PHONE_NUMBER definition. If the wizard ran into a column with any of those names, it would apply the PHONE_NUMBER defaults to the APEX item that is created.
The Table Dictionary allows you to define defaults for a specific table or column, and those defaults are only applied to APEX regions or items created for those specific items.
Here are some things to note about UI Defaults:
Table Dictionary defaults always override Attribute Dictionary defaults.•
When an item is created using UI Defaults, no relationship is established with the UI Default. •Therefore, if you later change the definition of the UI Default, the changes aren’t propagated to previously created items.
Items created before UI Defaults have been established don’t inherit properties of the •UI Default.
Developers can choose not to use UI Defaults, and even if they’re used, can override them •after the component is created.
Having said that, UI Defaults do help ensure consistency across your application and make your job much easier as a developer.
Defining UI Defaults for TablesUI Defaults can be managed either from SQL Workshop’s Object Browser or from SQL Workshop’s Utilities page. Here’s what to do:
1. Navigate to SQL Workshop’s UI Defaults page by clicking the arrow on the SQL Workshop tab and selecting User Interface Defaults from the drop-down menu.
You’re taken to the UI Defaults dashboard where things likely look pretty sparse. This is because you haven’t actually created any UI Defaults yet. The first step to creating UI Defaults is to synchronize the Table Dictionary with the database so it knows what tables are in your schema.
2. Click the Manage Table Dictionary button, and then click the Synchronize button on the screen that appears.
www.it-ebooks.info
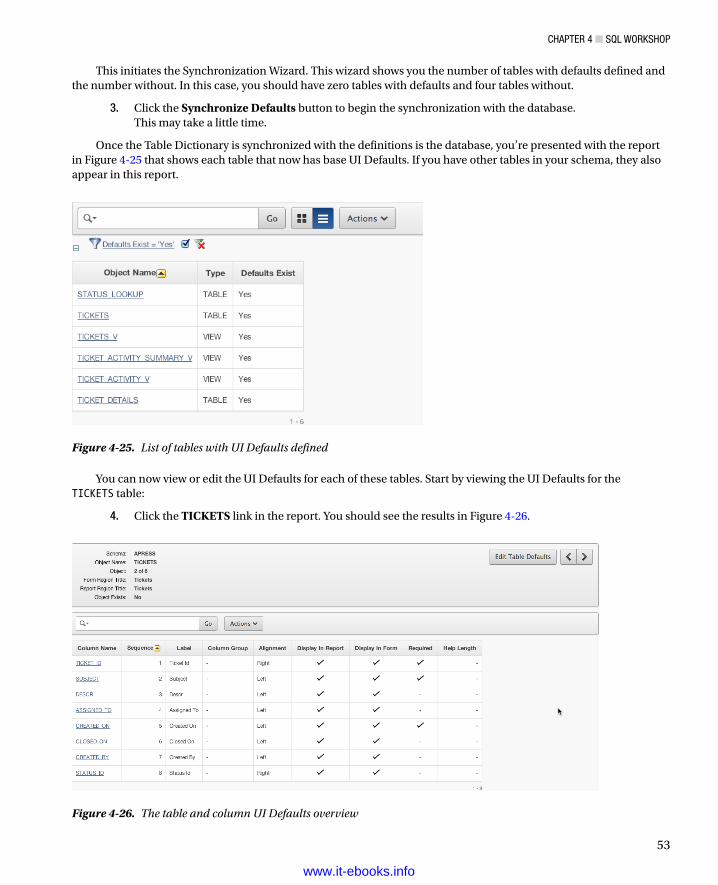
ChapTer 4 ■ SQL WorkShop
53
This initiates the Synchronization Wizard. This wizard shows you the number of tables with defaults defined and the number without. In this case, you should have zero tables with defaults and four tables without.
3. Click the Synchronize Defaults button to begin the synchronization with the database. This may take a little time.
Once the Table Dictionary is synchronized with the definitions is the database, you’re presented with the report in Figure 4-25 that shows each table that now has base UI Defaults. If you have other tables in your schema, they also appear in this report.
Figure 4-25. List of tables with UI Defaults defined
You can now view or edit the UI Defaults for each of these tables. Start by viewing the UI Defaults for the TICKETS table:
4. Click the TICKETS link in the report. You should see the results in Figure 4-26.
Figure 4-26. The table and column UI Defaults overview
www.it-ebooks.info
ChapTer 4 ■ SQL WorkShop
54
On the page in Figure 4-26 you can see an overview of the UI Defaults for the TICKETS table. In the upper portion of the report are the table-level definitions, including what the Form and Report regions based on this table will be called. In the lower portion is a list of the table's columns, the labels that will be used, how they will be aligned when used in a report, whether they will be displayed in a report or form, whether their REQUIRED attribute will be set in a form, and whether they have any help text.
Next, edit both the table-level and column-level attributes:
5. Click the Edit Table Defaults button in the upper portion of the report. This allows you to edit how Form and Report regions based on this table are named.
6. Enter Manage Tickets for the Form Region Title, leave the Report Region Title as it is, and click Apply Changes.
Clicking any of the column names takes you to a page that allows you to set UI Defaults for that specific column. As you peruse the column UI Defaults, notice that several things have been set for you, including the REQUIRED attribute. When APEX synchronized with the database, it saw that certain fields were marked as NOT NULL at the database level and translated those constraints into UI Defaults for you.
APEX also makes some decisions based on the column’s data type, such as how to align the column when it’s displayed in a report. Use the following information to alter the UI Defaults for the indicated columns by clicking the link in the column name:
Column: SUBJECT
Label: Subject
Help Text: A brief title for the issue.
Column: DESCR
Label: Description
Help Text: Describes the ticket in detail. Please be as complete as you can.
Resizable: YES
Width: 50
Height: 5
Column: STATUS_ID
Label: Status
If you wish, you can go ahead and set the UI Defaults for any of the other columns and/or tables. Just remember, what you do now will affect what the wizards create for you later, so if something doesn’t look exactly like what is shown in the book, check what you set for UI Defaults.
SummarySQL Workshop may not measure up to some of the more popular GUI tools, but it certainly has the power to do most things you need to do with relation to creating and managing tables and data. You’ve also seen that SQL Workshop has a few built-in but hidden gems like the Create Lookup Table Wizard. Finally, among the many useful utilities is the UI Defaults manager, making your job as a developer just a bit easier.
Sure, this chapter hasn’t covered SQL Workshop in its entirety, but you’ve definitely gained a fair amount of insight as to what it’s capable of. You use SQL Workshop for a number of other things throughout the book, but don’t wait. Go poke around in some of the dark nooks and crannies and see what you find!
www.it-ebooks.info
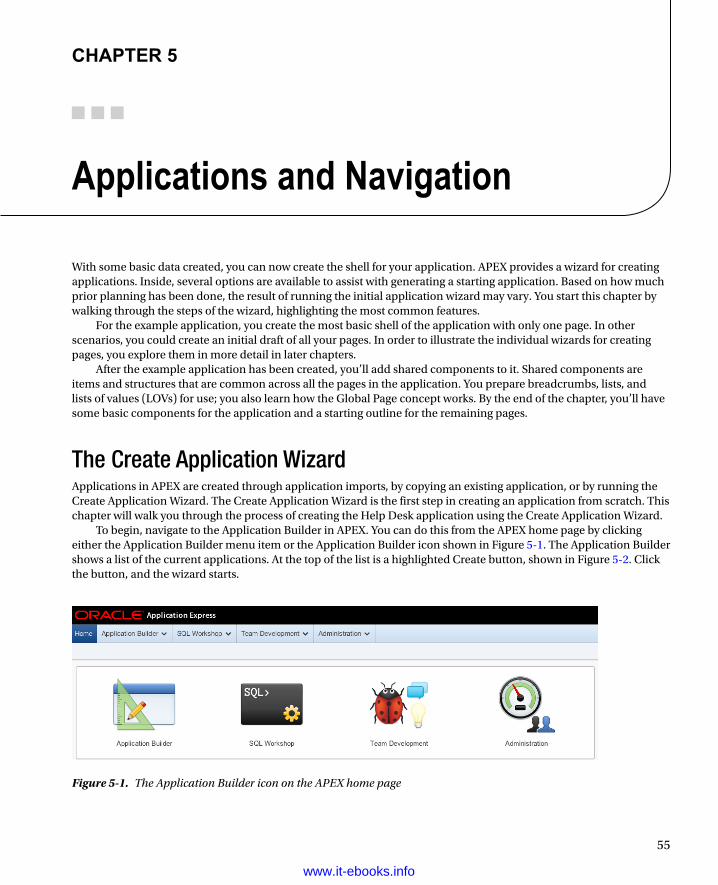
55
Chapter 5
Applications and Navigation
With some basic data created, you can now create the shell for your application. APEX provides a wizard for creating applications. Inside, several options are available to assist with generating a starting application. Based on how much prior planning has been done, the result of running the initial application wizard may vary. You start this chapter by walking through the steps of the wizard, highlighting the most common features.
For the example application, you create the most basic shell of the application with only one page. In other scenarios, you could create an initial draft of all your pages. In order to illustrate the individual wizards for creating pages, you explore them in more detail in later chapters.
After the example application has been created, you’ll add shared components to it. Shared components are items and structures that are common across all the pages in the application. You prepare breadcrumbs, lists, and lists of values (LOVs) for use; you also learn how the Global Page concept works. By the end of the chapter, you’ll have some basic components for the application and a starting outline for the remaining pages.
The Create Application WizardApplications in APEX are created through application imports, by copying an existing application, or by running the Create Application Wizard. The Create Application Wizard is the first step in creating an application from scratch. This chapter will walk you through the process of creating the Help Desk application using the Create Application Wizard.
To begin, navigate to the Application Builder in APEX. You can do this from the APEX home page by clicking either the Application Builder menu item or the Application Builder icon shown in Figure 5-1. The Application Builder shows a list of the current applications. At the top of the list is a highlighted Create button, shown in Figure 5-2. Click the button, and the wizard starts.
Figure 5-1. The Application Builder icon on the APEX home page
www.it-ebooks.info
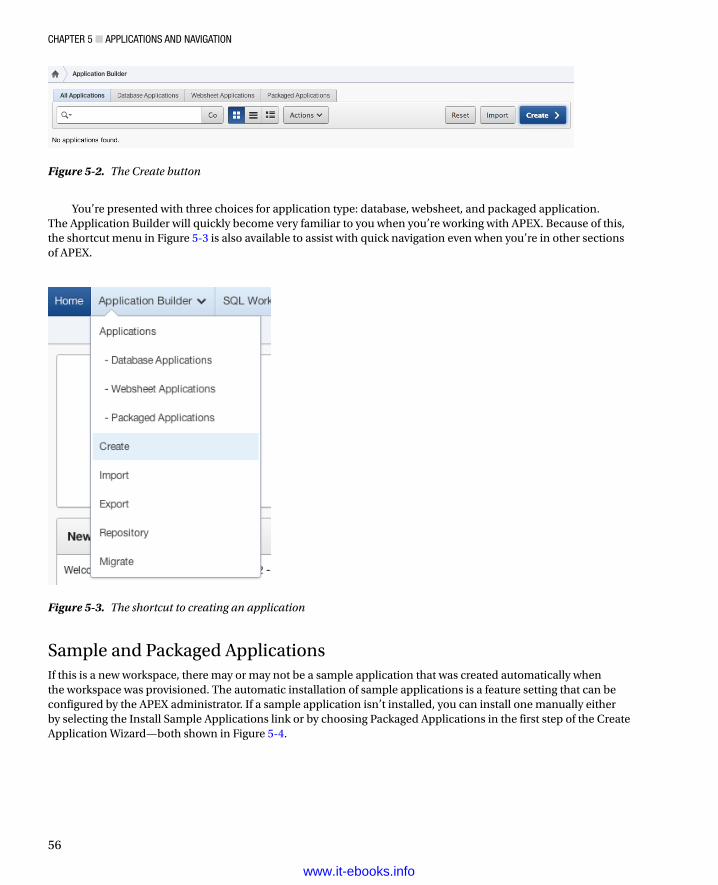
Chapter 5 ■ appliCations and navigation
56
You’re presented with three choices for application type: database, websheet, and packaged application. The Application Builder will quickly become very familiar to you when you’re working with APEX. Because of this, the shortcut menu in Figure 5-3 is also available to assist with quick navigation even when you’re in other sections of APEX.
Figure 5-2. The Create button
Figure 5-3. The shortcut to creating an application
Sample and Packaged ApplicationsIf this is a new workspace, there may or may not be a sample application that was created automatically when the workspace was provisioned. The automatic installation of sample applications is a feature setting that can be configured by the APEX administrator. If a sample application isn’t installed, you can install one manually either by selecting the Install Sample Applications link or by choosing Packaged Applications in the first step of the Create Application Wizard—both shown in Figure 5-4.
www.it-ebooks.info
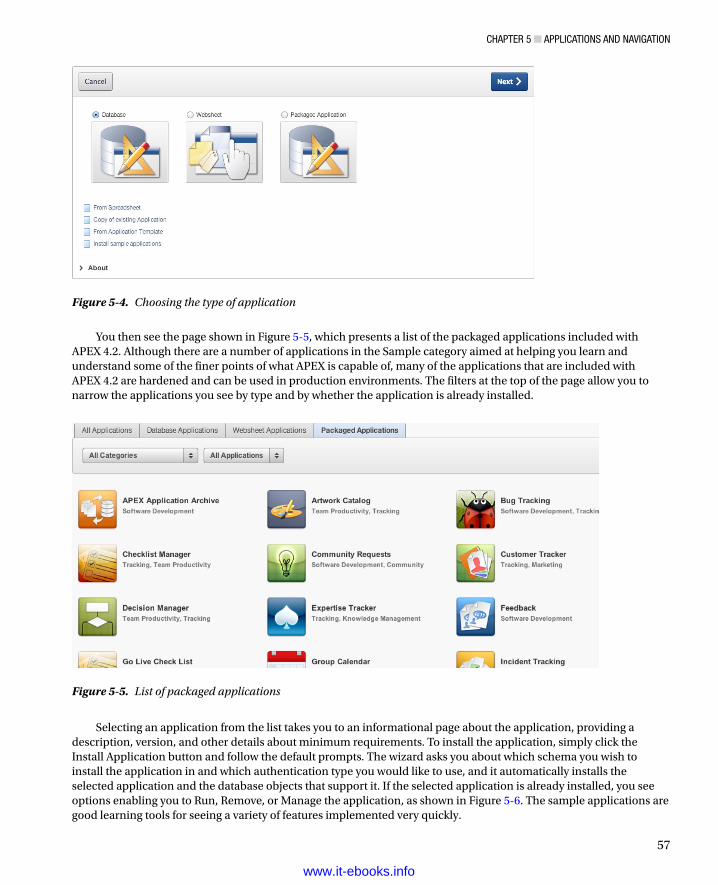
Chapter 5 ■ appliCations and navigation
57
You then see the page shown in Figure 5-5, which presents a list of the packaged applications included with APEX 4.2. Although there are a number of applications in the Sample category aimed at helping you learn and understand some of the finer points of what APEX is capable of, many of the applications that are included with APEX 4.2 are hardened and can be used in production environments. The filters at the top of the page allow you to narrow the applications you see by type and by whether the application is already installed.
Figure 5-4. Choosing the type of application
Figure 5-5. List of packaged applications
Selecting an application from the list takes you to an informational page about the application, providing a description, version, and other details about minimum requirements. To install the application, simply click the Install Application button and follow the default prompts. The wizard asks you about which schema you wish to install the application in and which authentication type you would like to use, and it automatically installs the selected application and the database objects that support it. If the selected application is already installed, you see options enabling you to Run, Remove, or Manage the application, as shown in Figure 5-6. The sample applications are good learning tools for seeing a variety of features implemented very quickly.
www.it-ebooks.info

Chapter 5 ■ appliCations and navigation
58
Packaged applications (apart from those that are considered Sample applications) are installed in a locked state by default so they can’t be edited. If you wish to look at the code, or you want to extend or alter the application, you can unlock the application by clicking the Manage button. From here you’re able to unlock, export, or change the authentication for the application, as shown in Figure 5-7.
Figure 5-6. Run, Remove, and Manage buttons for an installed packaged application
Figure 5-7. Managing a packaged application
The packaged applications that are provided with 4.2 are quite comprehensive, interesting, and worth taking a look at for various reasons. In fact, it may save you development time and effort if you’re able to use one of these in your environment with little or no alteration. The sample applications provide very succinct code samples, allowing you to get more information about specific features of APEX. Together, they provide an excellent resource for learning more about the APEX programming environment.
Websheet ApplicationsThis book covers websheet application features in chapters 12 and 13. The starting point for creating a websheet application is the same as for a database application. One of the primary differences is the creation of predefined database objects that support websheet applications. Another difference is that Application Builder segregates database applications and websheet applications by using tabs (shown in Figure 5-8) that quickly display the different types of applications separately.
www.it-ebooks.info
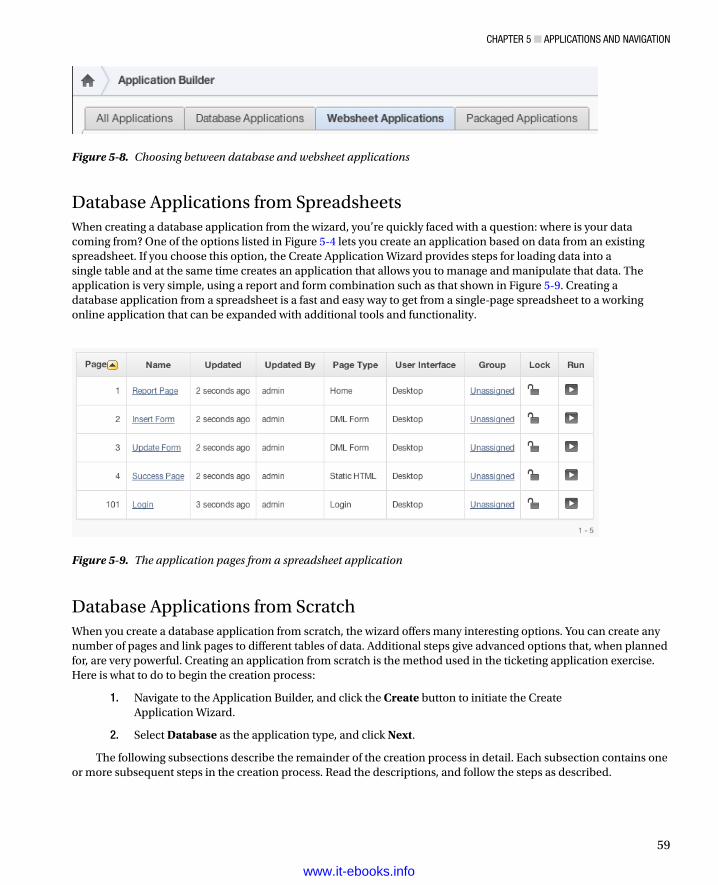
Chapter 5 ■ appliCations and navigation
59
Database Applications from SpreadsheetsWhen creating a database application from the wizard, you’re quickly faced with a question: where is your data coming from? One of the options listed in Figure 5-4 lets you create an application based on data from an existing spreadsheet. If you choose this option, the Create Application Wizard provides steps for loading data into a single table and at the same time creates an application that allows you to manage and manipulate that data. The application is very simple, using a report and form combination such as that shown in Figure 5-9. Creating a database application from a spreadsheet is a fast and easy way to get from a single-page spreadsheet to a working online application that can be expanded with additional tools and functionality.
Figure 5-8. Choosing between database and websheet applications
Figure 5-9. The application pages from a spreadsheet application
Database Applications from ScratchWhen you create a database application from scratch, the wizard offers many interesting options. You can create any number of pages and link pages to different tables of data. Additional steps give advanced options that, when planned for, are very powerful. Creating an application from scratch is the method used in the ticketing application exercise. Here is what to do to begin the creation process:
1. Navigate to the Application Builder, and click the Create button to initiate the Create Application Wizard.
2. Select Database as the application type, and click Next.
The following subsections describe the remainder of the creation process in detail. Each subsection contains one or more subsequent steps in the creation process. Read the descriptions, and follow the steps as described.
www.it-ebooks.info
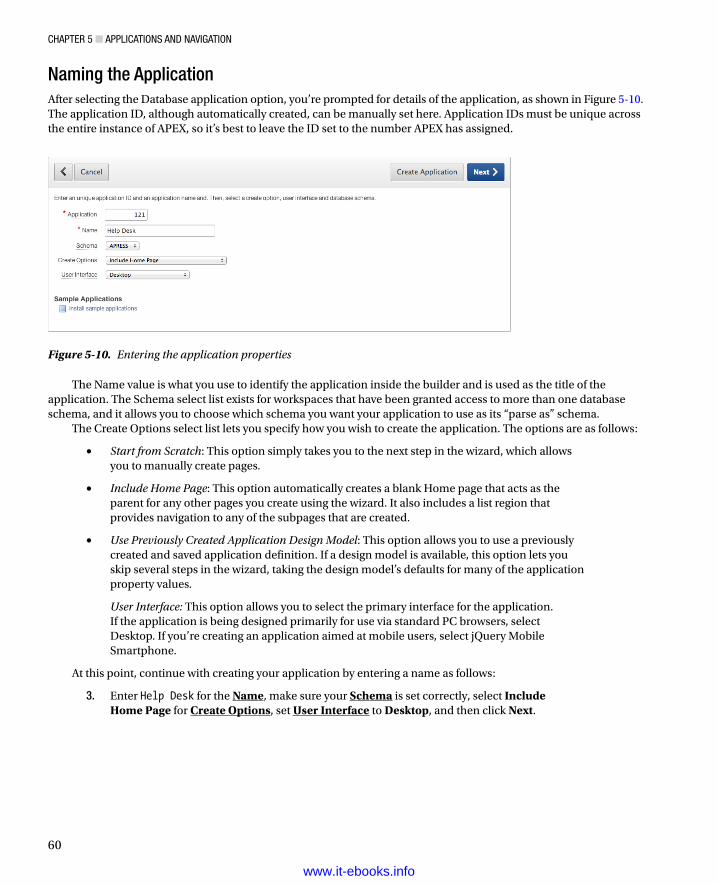
Chapter 5 ■ appliCations and navigation
60
Naming the ApplicationAfter selecting the Database application option, you’re prompted for details of the application, as shown in Figure 5-10. The application ID, although automatically created, can be manually set here. Application IDs must be unique across the entire instance of APEX, so it’s best to leave the ID set to the number APEX has assigned.
Figure 5-10. Entering the application properties
The Name value is what you use to identify the application inside the builder and is used as the title of the application. The Schema select list exists for workspaces that have been granted access to more than one database schema, and it allows you to choose which schema you want your application to use as its “parse as” schema.
The Create Options select list lets you specify how you wish to create the application. The options are as follows:
• Start from Scratch: This option simply takes you to the next step in the wizard, which allows you to manually create pages.
• Include Home Page: This option automatically creates a blank Home page that acts as the parent for any other pages you create using the wizard. It also includes a list region that provides navigation to any of the subpages that are created.
• Use Previously Created Application Design Model: This option allows you to use a previously created and saved application definition. If a design model is available, this option lets you skip several steps in the wizard, taking the design model’s defaults for many of the application property values.
User Interface: This option allows you to select the primary interface for the application. If the application is being designed primarily for use via standard PC browsers, select Desktop. If you’re creating an application aimed at mobile users, select jQuery Mobile Smartphone.
At this point, continue with creating your application by entering a name as follows:
3. Enter Help Desk for the Name, make sure your Schema is set correctly, select Include Home Page for Create Options, set User Interface to Desktop, and then click Next.
www.it-ebooks.info
Chapter 5 ■ appliCations and navigation
61
The Add Page form at the bottom of this page allows you to define pages of varying types. Each page type calls for different information to be provided. For instance, adding a report page prompts you to select either a table name or a query on which to base the report. Choosing a chart requires a chart type and a query for the initial data series.
For now, you’ll stick with the blank home page shown in Figure 5-12 and create the rest of the pages later as needed. Thus, the next step is simple:
4. An application home page has already been created. Accept the defaults on this page, and click Next.
Figure 5-11. Multiple pages defined in the Create Application Wizard
Laying Out PagesThe next step in the wizard is to decide which pages you need for your application. The wizard requires at least one page to be created, but Figure 5-11 shows that you have the option to create as many pages as you like.
www.it-ebooks.info
Chapter 5 ■ appliCations and navigation
62
Copying Shared ComponentsThe next screen asks whether you wish to copy shared components from another application. This comes in handy if you have a template application that houses components that are shared across applications in the same workspace. Copying shared components isn’t an advanced procedure, but it does lend itself to a controlled and mature development process. This feature step in the wizard is a convenience, because the same objects can be copied in other ways after the application has been created. You don’t need this step, because you’re creating an application from scratch. Skip the step as follows:
5. Select No for Copy Shared Components from Another Application, and click Next.
Application AttributesThe next step in the wizard allows you to set some of the application-level attributes such as the type of authentication to use, whether to use tabs, and globalization attributes including where to derive the primary language, date formats, and so on. Let’s look at each of these individually so you can gain a full understanding of the ramifications of each.
Selecting an Authentication Method
With every application, you need to make a choice about authentication, even if that choice is no authentication at all. This topic is discussed further in Chapter 9. By default, the APEX Create Application Wizard provides three options for authentication:
• Application Express: Users and passwords are local to the APEX workspace. These users are managed in the same way the developer accounts are managed inside the APEX workspace, and users only work inside the current workspace.
Figure 5-12. The Add Page section of the wizard as it appears for the example application
www.it-ebooks.info
Chapter 5 ■ appliCations and navigation
63
• No Authentication: This is like a public web site. Users aren’t prompted for any type of authentication. This is useful for informational applications where the question “Who are you?” isn’t important.
• Database Account: This option uses the Oracle Database schema usernames and passwords for credentials. Some organizations use this type of database-driven authentication to keep track of users. The application still executes as the chosen “parse as” schema, not as the individual user in the database.
For simplicity, the default is to use the Application Express authentication scheme. This is the one setting that provides login security; by default, the developer writing the application can log in without any additional work.
Note ■ Many organizations have an existing method of authenticating users. if an ldap server is currently available (such as oracle internet directory, Microsoft active directory for network domain authentication, or even an oracle e-Business suite), you may want to use this system for apeX authentication. the number of options and methods are beyond the scope of this book. simply know that with the oracle database technology and the technology of your application server, it’s possible to use many of the most common authentication infrastructures.
Selecting Tab Options
Tabs are a common navigational structure for web applications. They provide an intuitive interface for switching subjects or general areas in an application. Three options are available:
• No Tabs: This is a basic page style where no tabs are generated by the wizard and no tabs are displayed by the page template. This is often selected for small applications or applications where navigation is managed by a different method such as lists, buttons, or other template constructs.
• One Level Tabs: This is the most common style of tab layout; it’s useful for small to mid-sized applications where functionality needs to be separated yet easily accessible. This is also the easiest type of tab style to manage.
• Two Level Tabs: The construction of two-level tabs uses a parent tab construct and breaks the standard tabs into tab sets. It’s similar to having a controlling tab.
APEX supports up to two-level tabs in the display templates provided, and the wizard builds the shared components for the tab set as part of the wizard. If you know your application’s page outline and can lay it out during the creation of the application, the wizard will do most of the tab setup. Designing the page at creation time can be a big time saver if the application design calls for a significant number of tabs. In any case, you can create and modify the shared component after the initial run of the Create Application Wizard.
Globalization Options
The authentication step in the wizard also includes six additional settings, as shown in Figure 5-13. A few of the settings have to do with the ability to translate the application to other languages. Multilingual applications are beyond the scope of this book, but for completeness the general usage descriptions of these options are included.
www.it-ebooks.info
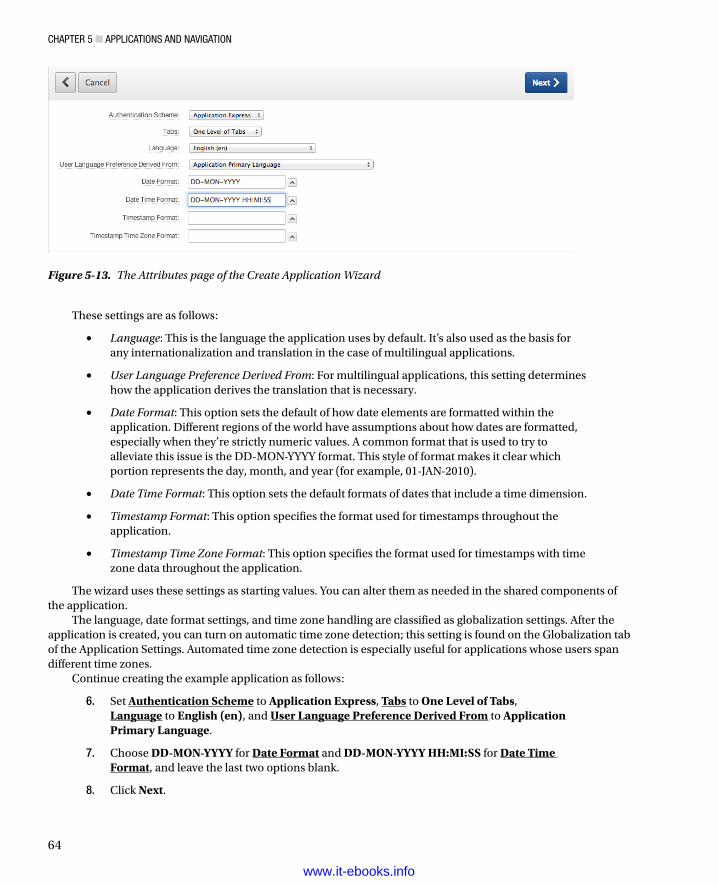
Chapter 5 ■ appliCations and navigation
64
These settings are as follows:
• Language: This is the language the application uses by default. It’s also used as the basis for any internationalization and translation in the case of multilingual applications.
• User Language Preference Derived From: For multilingual applications, this setting determines how the application derives the translation that is necessary.
• Date Format: This option sets the default of how date elements are formatted within the application. Different regions of the world have assumptions about how dates are formatted, especially when they’re strictly numeric values. A common format that is used to try to alleviate this issue is the DD-MON-YYYY format. This style of format makes it clear which portion represents the day, month, and year (for example, 01-JAN-2010).
• Date Time Format: This option sets the default formats of dates that include a time dimension.
• Timestamp Format: This option specifies the format used for timestamps throughout the application.
• Timestamp Time Zone Format: This option specifies the format used for timestamps with time zone data throughout the application.
The wizard uses these settings as starting values. You can alter them as needed in the shared components of the application.
The language, date format settings, and time zone handling are classified as globalization settings. After the application is created, you can turn on automatic time zone detection; this setting is found on the Globalization tab of the Application Settings. Automated time zone detection is especially useful for applications whose users span different time zones.
Continue creating the example application as follows:
6. Set Authentication Scheme to Application Express, Tabs to One Level of Tabs, Language to English (en), and User Language Preference Derived From to Application Primary Language.
7. Choose DD-MON-YYYY for Date Format and DD-MON-YYYY HH:MI:SS for Date Time Format, and leave the last two options blank.
8. Click Next.
Figure 5-13. The Attributes page of the Create Application Wizard
www.it-ebooks.info
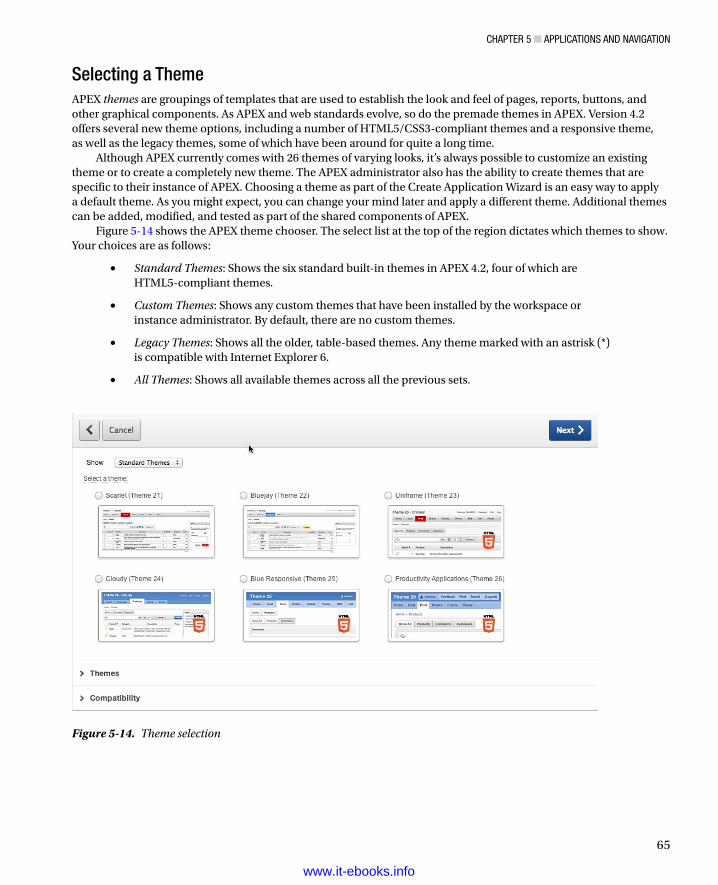
Chapter 5 ■ appliCations and navigation
65
Selecting a ThemeAPEX themes are groupings of templates that are used to establish the look and feel of pages, reports, buttons, and other graphical components. As APEX and web standards evolve, so do the premade themes in APEX. Version 4.2 offers several new theme options, including a number of HTML5/CSS3-compliant themes and a responsive theme, as well as the legacy themes, some of which have been around for quite a long time.
Although APEX currently comes with 26 themes of varying looks, it’s always possible to customize an existing theme or to create a completely new theme. The APEX administrator also has the ability to create themes that are specific to their instance of APEX. Choosing a theme as part of the Create Application Wizard is an easy way to apply a default theme. As you might expect, you can change your mind later and apply a different theme. Additional themes can be added, modified, and tested as part of the shared components of APEX.
Figure 5-14 shows the APEX theme chooser. The select list at the top of the region dictates which themes to show. Your choices are as follows:
• Standard Themes: Shows the six standard built-in themes in APEX 4.2, four of which are HTML5-compliant themes.
• Custom Themes: Shows any custom themes that have been installed by the workspace or instance administrator. By default, there are no custom themes.
• Legacy Themes: Shows all the older, table-based themes. Any theme marked with an astrisk (*) is compatible with Internet Explorer 6.
• All Themes: Shows all available themes across all the previous sets.
Figure 5-14. Theme selection
www.it-ebooks.info
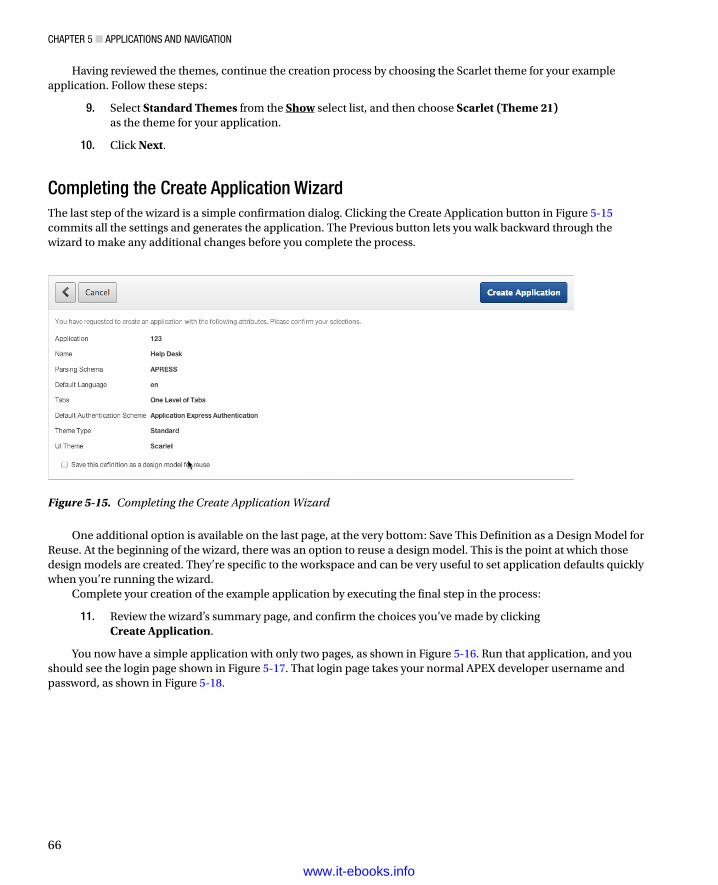
Chapter 5 ■ appliCations and navigation
66
Having reviewed the themes, continue the creation process by choosing the Scarlet theme for your example application. Follow these steps:
9. Select Standard Themes from the Show select list, and then choose Scarlet (Theme 21) as the theme for your application.
10. Click Next.
Completing the Create Application WizardThe last step of the wizard is a simple confirmation dialog. Clicking the Create Application button in Figure 5-15 commits all the settings and generates the application. The Previous button lets you walk backward through the wizard to make any additional changes before you complete the process.
Figure 5-15. Completing the Create Application Wizard
One additional option is available on the last page, at the very bottom: Save This Definition as a Design Model for Reuse. At the beginning of the wizard, there was an option to reuse a design model. This is the point at which those design models are created. They’re specific to the workspace and can be very useful to set application defaults quickly when you’re running the wizard.
Complete your creation of the example application by executing the final step in the process:
11. Review the wizard’s summary page, and confirm the choices you’ve made by clicking Create Application.
You now have a simple application with only two pages, as shown in Figure 5-16. Run that application, and you should see the login page shown in Figure 5-17. That login page takes your normal APEX developer username and password, as shown in Figure 5-18.
www.it-ebooks.info
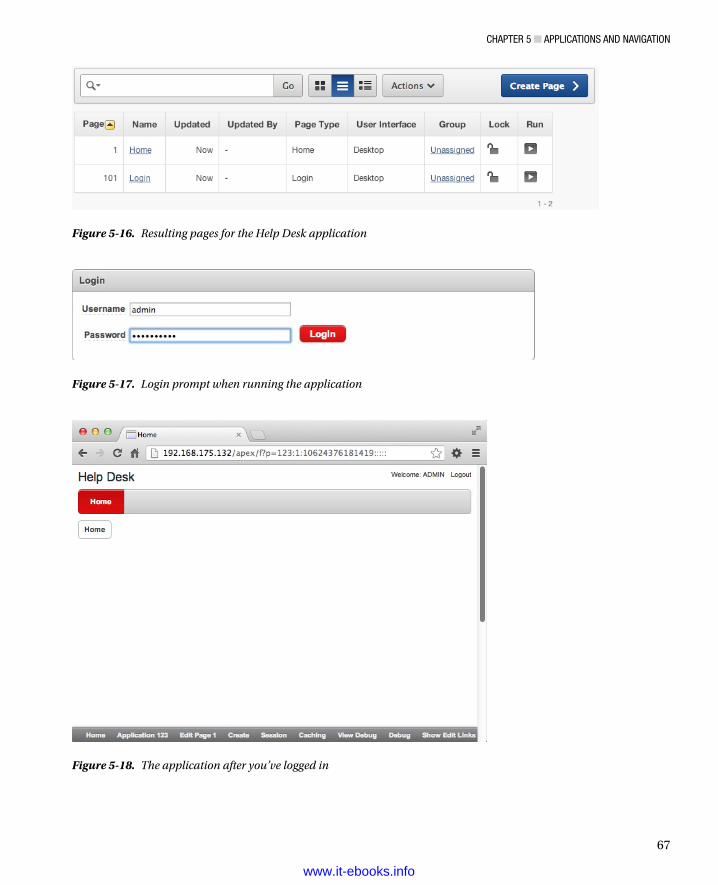
Chapter 5 ■ appliCations and navigation
67
Figure 5-16. Resulting pages for the Help Desk application
Figure 5-17. Login prompt when running the application
Figure 5-18. The application after you’ve logged in
www.it-ebooks.info
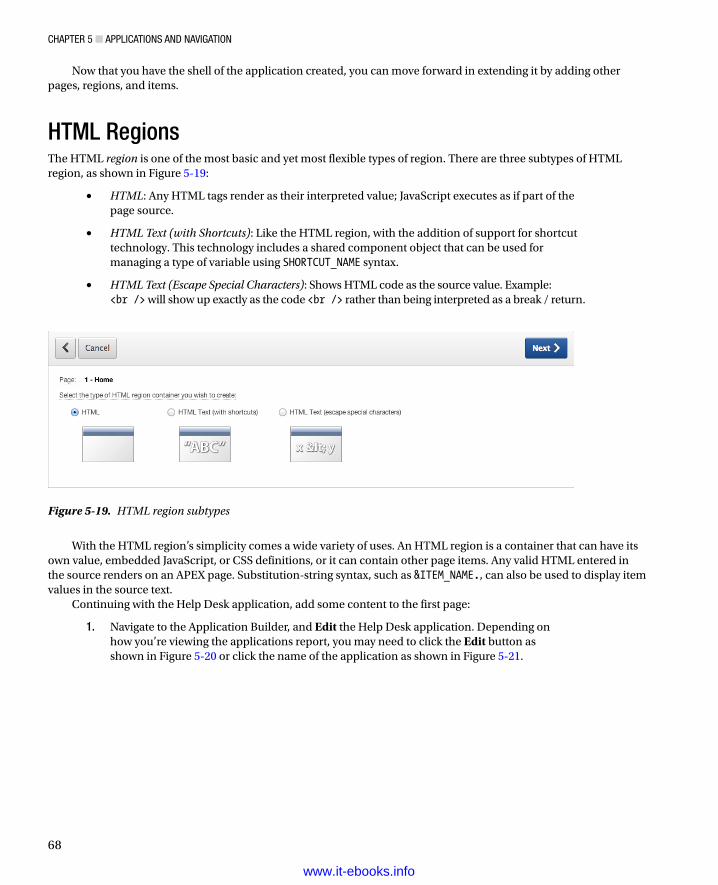
Chapter 5 ■ appliCations and navigation
68
Now that you have the shell of the application created, you can move forward in extending it by adding other pages, regions, and items.
HTML RegionsThe HTML region is one of the most basic and yet most flexible types of region. There are three subtypes of HTML region, as shown in Figure 5-19:
• HTML: Any HTML tags render as their interpreted value; JavaScript executes as if part of the page source.
• HTML Text (with Shortcuts): Like the HTML region, with the addition of support for shortcut technology. This technology includes a shared component object that can be used for managing a type of variable using SHORTCUT_NAME syntax.
• HTML Text (Escape Special Characters): Shows HTML code as the source value. Example: <br /> will show up exactly as the code <br /> rather than being interpreted as a break / return.
Figure 5-19. HTML region subtypes
With the HTML region’s simplicity comes a wide variety of uses. An HTML region is a container that can have its own value, embedded JavaScript, or CSS definitions, or it can contain other page items. Any valid HTML entered in the source renders on an APEX page. Substitution-string syntax, such as &ITEM_NAME., can also be used to display item values in the source text.
Continuing with the Help Desk application, add some content to the first page:
1. Navigate to the Application Builder, and Edit the Help Desk application. Depending on how you’re viewing the applications report, you may need to click the Edit button as shown in Figure 5-20 or click the name of the application as shown in Figure 5-21.
www.it-ebooks.info
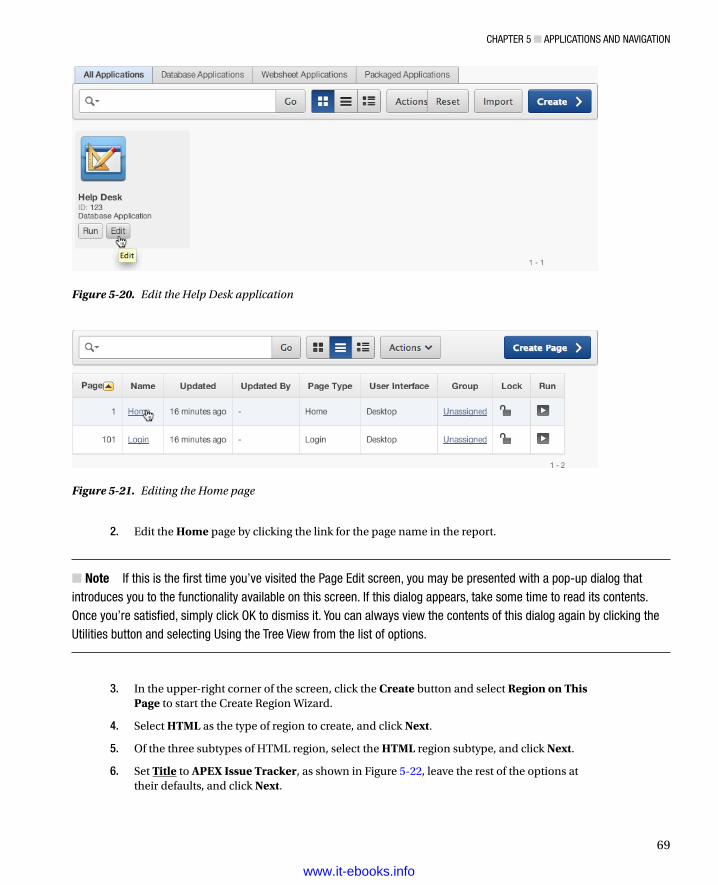
Chapter 5 ■ appliCations and navigation
69
2. Edit the Home page by clicking the link for the page name in the report.
Note ■ if this is the first time you’ve visited the page edit screen, you may be presented with a pop-up dialog that introduces you to the functionality available on this screen. if this dialog appears, take some time to read its contents. once you’re satisfied, simply click oK to dismiss it. You can always view the contents of this dialog again by clicking the Utilities button and selecting Using the tree view from the list of options.
3. In the upper-right corner of the screen, click the Create button and select Region on This Page to start the Create Region Wizard.
4. Select HTML as the type of region to create, and click Next.
5. Of the three subtypes of HTML region, select the HTML region subtype, and click Next.
6. Set Title to APEX Issue Tracker, as shown in Figure 5-22, leave the rest of the options at their defaults, and click Next.
Figure 5-20. Edit the Help Desk application
Figure 5-21. Editing the Home page
www.it-ebooks.info
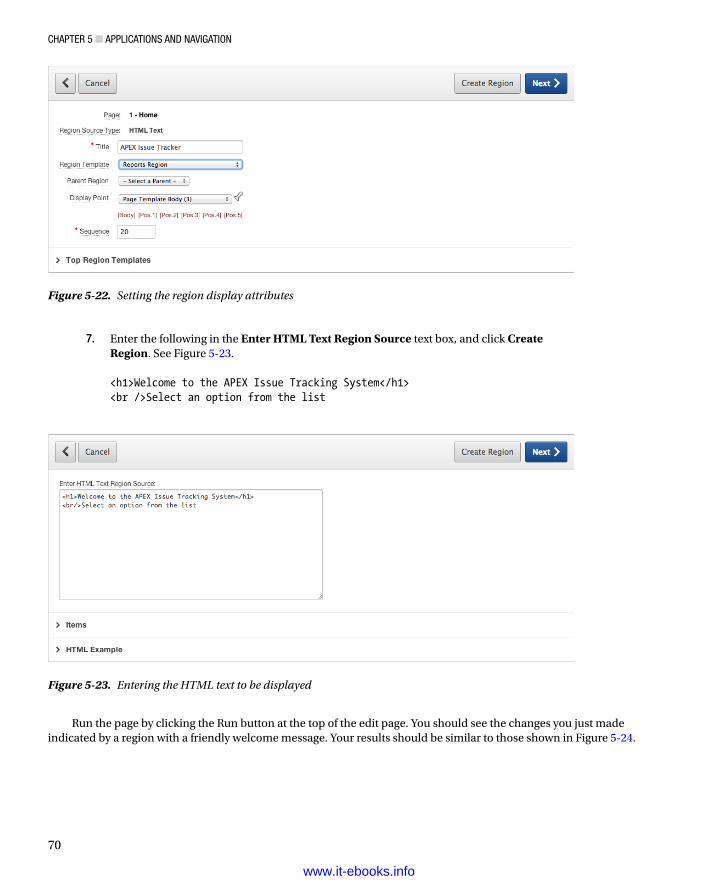
Chapter 5 ■ appliCations and navigation
70
7. Enter the following in the Enter HTML Text Region Source text box, and click Create Region. See Figure 5-23.
<h1>Welcome to the APEX Issue Tracking System</h1><br />Select an option from the list
Figure 5-22. Setting the region display attributes
Figure 5-23. Entering the HTML text to be displayed
Run the page by clicking the Run button at the top of the edit page. You should see the changes you just made indicated by a region with a friendly welcome message. Your results should be similar to those shown in Figure 5-24.
www.it-ebooks.info
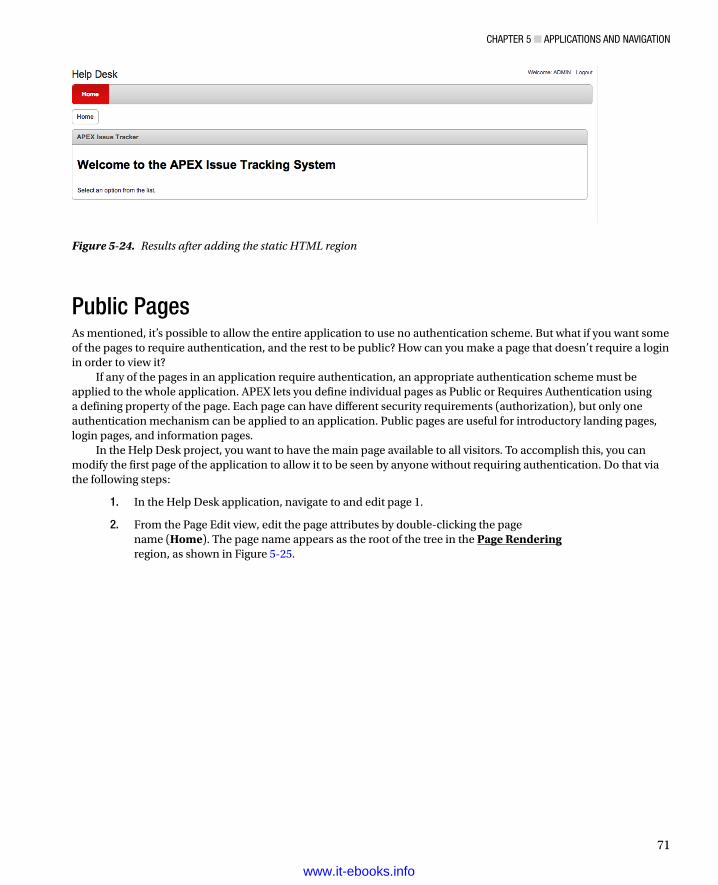
Chapter 5 ■ appliCations and navigation
71
Public PagesAs mentioned, it’s possible to allow the entire application to use no authentication scheme. But what if you want some of the pages to require authentication, and the rest to be public? How can you make a page that doesn’t require a login in order to view it?
If any of the pages in an application require authentication, an appropriate authentication scheme must be applied to the whole application. APEX lets you define individual pages as Public or Requires Authentication using a defining property of the page. Each page can have different security requirements (authorization), but only one authentication mechanism can be applied to an application. Public pages are useful for introductory landing pages, login pages, and information pages.
In the Help Desk project, you want to have the main page available to all visitors. To accomplish this, you can modify the first page of the application to allow it to be seen by anyone without requiring authentication. Do that via the following steps:
1. In the Help Desk application, navigate to and edit page 1.
2. From the Page Edit view, edit the page attributes by double-clicking the page name (Home). The page name appears as the root of the tree in the Page Renderingregion, as shown in Figure 5-25.
Figure 5-24. Results after adding the static HTML region
www.it-ebooks.info
Chapter 5 ■ appliCations and navigation
72
3. Scroll to the Security section, shown in Figure 5-26. In this section, change Authentication to Page Is Public.
Figure 5-26. Changing a page’s authentication setting
Figure 5-25. Editing the page attributes
4. Scroll to the top of the page, and click Apply Changes.
Now, when the page is run, the authentication screen doesn’t appear when page 1 is requested. You learn more about authentication and authorization in Chapter 9. For now, just know that the change you’ve made allows users to see the first page of the application without being logged in.
www.it-ebooks.info
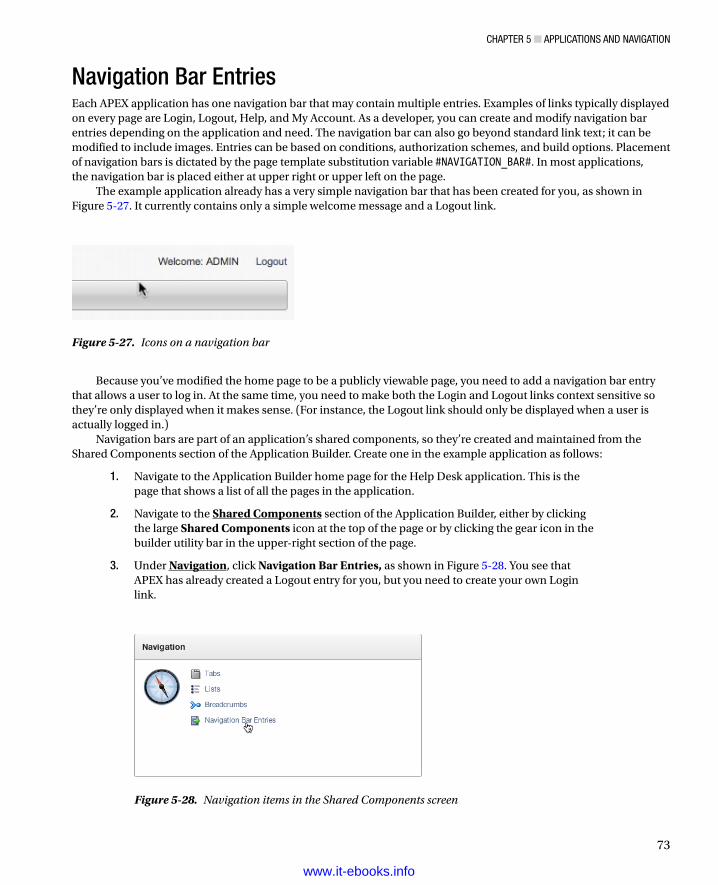
Chapter 5 ■ appliCations and navigation
73
Navigation Bar EntriesEach APEX application has one navigation bar that may contain multiple entries. Examples of links typically displayed on every page are Login, Logout, Help, and My Account. As a developer, you can create and modify navigation bar entries depending on the application and need. The navigation bar can also go beyond standard link text; it can be modified to include images. Entries can be based on conditions, authorization schemes, and build options. Placement of navigation bars is dictated by the page template substitution variable #NAVIGATION_BAR#. In most applications, the navigation bar is placed either at upper right or upper left on the page.
The example application already has a very simple navigation bar that has been created for you, as shown in Figure 5-27. It currently contains only a simple welcome message and a Logout link.
Figure 5-27. Icons on a navigation bar
Because you’ve modified the home page to be a publicly viewable page, you need to add a navigation bar entry that allows a user to log in. At the same time, you need to make both the Login and Logout links context sensitive so they’re only displayed when it makes sense. (For instance, the Logout link should only be displayed when a user is actually logged in.)
Navigation bars are part of an application’s shared components, so they’re created and maintained from the Shared Components section of the Application Builder. Create one in the example application as follows:
1. Navigate to the Application Builder home page for the Help Desk application. This is the page that shows a list of all the pages in the application.
2. Navigate to the Shared Components section of the Application Builder, either by clicking the large Shared Components icon at the top of the page or by clicking the gear icon in the builder utility bar in the upper-right section of the page.
3. Under Navigation, click Navigation Bar Entries, as shown in Figure 5-28. You see that APEX has already created a Logout entry for you, but you need to create your own Login link.
Figure 5-28. Navigation items in the Shared Components screen
www.it-ebooks.info
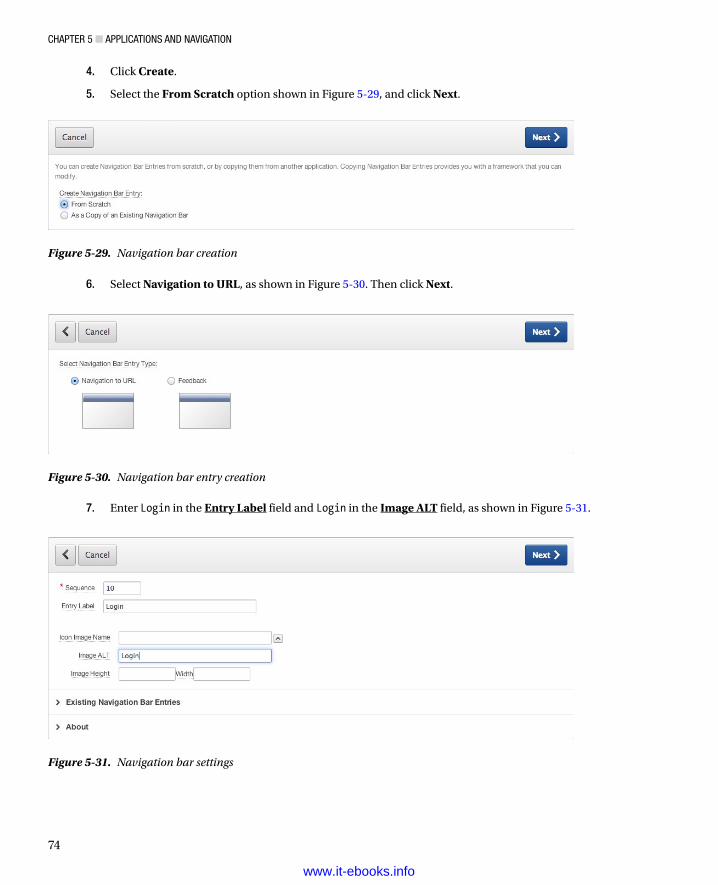
Chapter 5 ■ appliCations and navigation
74
4. Click Create.
5. Select the From Scratch option shown in Figure 5-29, and click Next.
Figure 5-29. Navigation bar creation
6. Select Navigation to URL, as shown in Figure 5-30. Then click Next.
Figure 5-30. Navigation bar entry creation
Figure 5-31. Navigation bar settings
7. Enter Login in the Entry Label field and Login in the Image ALT field, as shown in Figure 5-31.
www.it-ebooks.info
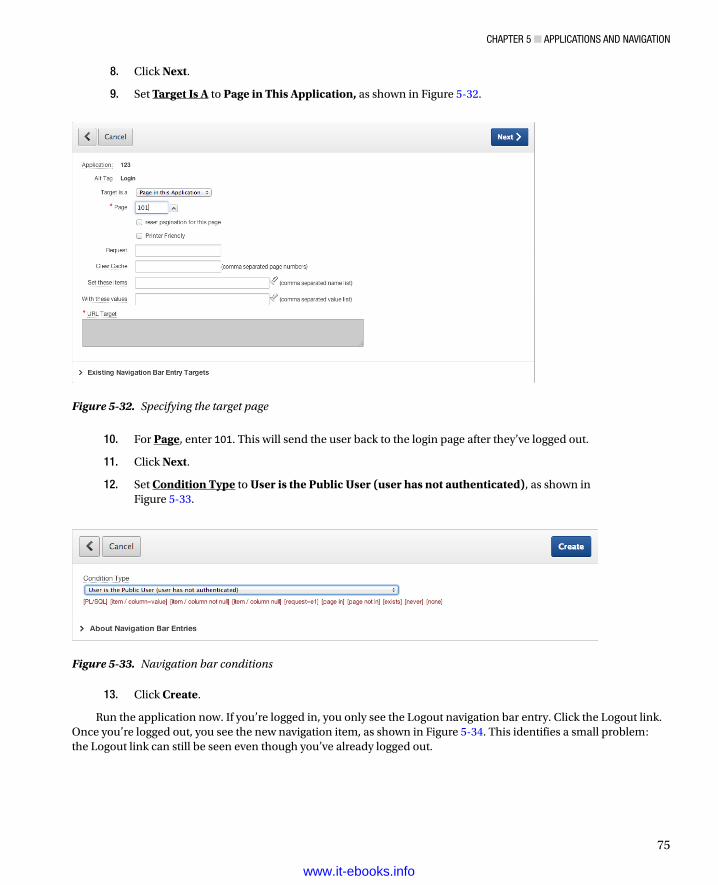
Chapter 5 ■ appliCations and navigation
75
8. Click Next.
9. Set Target Is A to Page in This Application, as shown in Figure 5-32.
Figure 5-32. Specifying the target page
10. For Page, enter 101. This will send the user back to the login page after they’ve logged out.
11. Click Next.
12. Set Condition Type to User is the Public User (user has not authenticated), as shown in Figure 5-33.
Figure 5-33. Navigation bar conditions
13. Click Create.
Run the application now. If you’re logged in, you only see the Logout navigation bar entry. Click the Logout link. Once you’re logged out, you see the new navigation item, as shown in Figure 5-34. This identifies a small problem: the Logout link can still be seen even though you’ve already logged out.
www.it-ebooks.info
Chapter 5 ■ appliCations and navigation
76
Clearly it’s a problem to show the Login and Logout choices at the same time. After all, only one of those two choices can apply. Let’s tackle that problem:
1. Navigate back to the Shared Components section for the Help Desk application.
2. Edit Navigation Bar Entries, and edit the Logout item.
3. In the Conditions section of the page, set Condition Type to User is Authenticated (not public), as shown in Figure 5-35.
Figure 5-34. Login and Logout buttons
Figure 5-35. Navigation bar condition type
4. Click Apply Changes.
Run the application again. You should see that the Login and Logout navigation items are mutually exclusive. When you created the new navigation item, you applied the condition to allow it to be seen only by the public user. The Logout navigation item was created as part of the Create Application Wizard; no condition was placed on the Logout item by default. You learn more about conditions in Chapter 8.
Global PagesA Global Page is a special type of page that acts as a “master page” for your application and can be added one per user interface type (that is, you may have one Global Page for the desktop UI and another for the mobile UI).
Items placed on a Global Page are rendered on every page in its related UI for that application unless conditionally told to do otherwise. This is particularly useful when you identify the need to display the same region on multiple pages or even on all pages in your application. Simply move a region to your Global Page, and it’s rendered with every page.
A good example of usage is a breadcrumb region or a region that contains custom JavaScript code that needs to be available to every page. Region contents from a Global Page are included on every page of that UI, even when a region doesn’t render visibly.
Although you can assign any page number to a Global Page, the default page number for a Global Page related to a desktop interface is zero (0). In fact, Global Pages take the place of what used to be called Page Zero in previous versions of APEX.
www.it-ebooks.info

Chapter 5 ■ appliCations and navigation
77
You may notice when looking at the definition of a Global Page in the APEX page editor (Figure 5-36) that there is no Page Processing section. Global Pages are only used during page rendering. Regions that are added to a Global Page are included even on the Login page. You need to consider the different page types in an application when adding content to a Global Page.
Figure 5-36. A Global Page for a desktop interface, as shown in the APEX page editor
Caution ■ although the apeX Builder lets you add calculations, validations, and processes to a global page, these items don’t execute.
Creating a Global Page is like creating any other page in an APEX application. However, once it’s created, it’s no longer available in the Creation Options list for that UI type. Let’s create a Global Page for the desktop interface:
1. From the application page list, click the Create Page button.
2. Select Global Page from the Page Type list. Figure 5-37 shows the Global Page option, which should be near the bottom of the list.
Figure 5-37. Choosing to create a Global Page
www.it-ebooks.info
Chapter 5 ■ appliCations and navigation
78
3. Leave Page Number set to 0 (zero), and click Finish.
You should now see your Global Page listed in the pages for the application. Currently there is no content on the Global Page. You use this Global Page to contain and display the breadcrumb region in the next section.
Breadcrumb RegionsBreadcrumbs are a popular navigation structure. They give the user a quick and intuitive representation of the current navigation path with optional functionality to navigate back using the structure. Oracle Application Express uses the structure in the builder shown in Figure 5-38.
Figure 5-38. Example of breadcrumbs in the Application Builder
Figure 5-39. The Breadcrumbs position in the page-rendering hierarchy
In APEX, breadcrumbs are a declarative structure with built-in behavior. They’re managed as shared components and have their own region type and template. When you ran the Create Application Wizard, the pages that the wizard created automatically included a region to contain the breadcrumbs. Figure 5-39 shows the Breadcrumbs region in Position 01 of the page.
www.it-ebooks.info
Chapter 5 ■ appliCations and navigation
79
When you’re creating new pages of an application, the Create Page wizard has an option to assist in creating new breadcrumb entries. When you use this option, child pages receive a copy of the breadcrumb region from the parent as well as an automatic entry in the Breadcrumb group. When a breadcrumb region doesn’t exist, nothing is copied, but the entry in the breadcrumb shared component is still created. An issue with this approach is that if you need to make any changes to the region’s display or other layout considerations, they have to be done on every page that contains a breadcrumb region. Adding the region to a Global Page to make it appear on all pages can be helpful, because it gives you one point of change instead of many.
Continuing the Help Desk application, the design is to have a breadcrumb region appear on all pages. It isn’t necessary to re-create the region manually. Because the Create Application Wizard created the region for you, you can use the Copy Region feature in APEX to duplicate the region to your Global Page. Do the following:
1. Navigate to the Page 1 edit screen.
2. Right-click the Breadcrumbs region in the tree to show the context menu, as shown in Figure 5-40.
Figure 5-40. Context menu for the Breadcrumbs region
3. Select the Copy option.
4. Change the page number for the new region to 0, as shown in Figure 5-41, and click Next.
www.it-ebooks.info
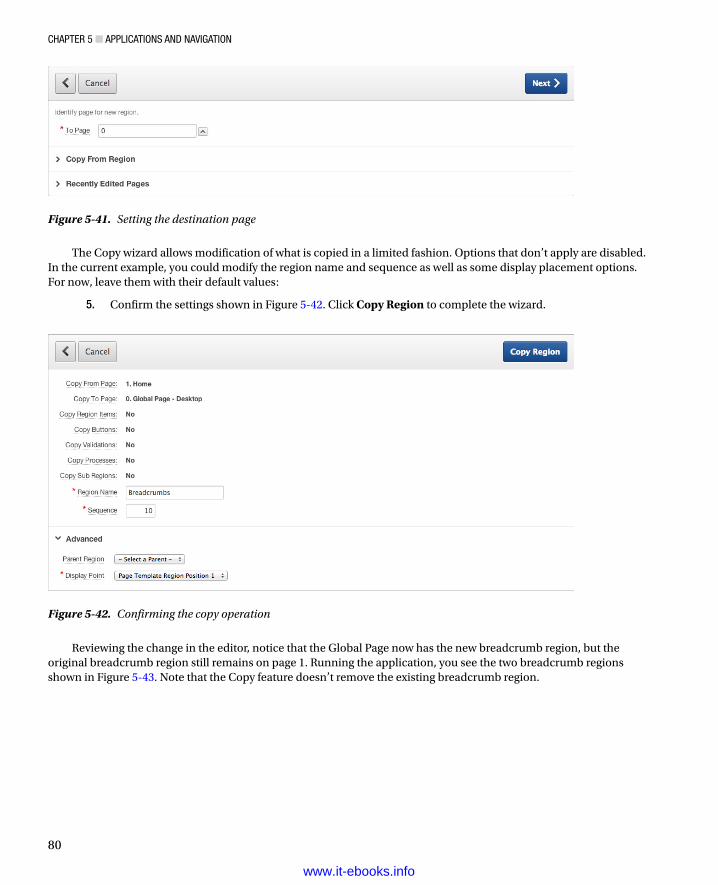
Chapter 5 ■ appliCations and navigation
80
The Copy wizard allows modification of what is copied in a limited fashion. Options that don’t apply are disabled. In the current example, you could modify the region name and sequence as well as some display placement options. For now, leave them with their default values:
5. Confirm the settings shown in Figure 5-42. Click Copy Region to complete the wizard.
Figure 5-41. Setting the destination page
Figure 5-42. Confirming the copy operation
Reviewing the change in the editor, notice that the Global Page now has the new breadcrumb region, but the original breadcrumb region still remains on page 1. Running the application, you see the two breadcrumb regions shown in Figure 5-43. Note that the Copy feature doesn’t remove the existing breadcrumb region.
www.it-ebooks.info
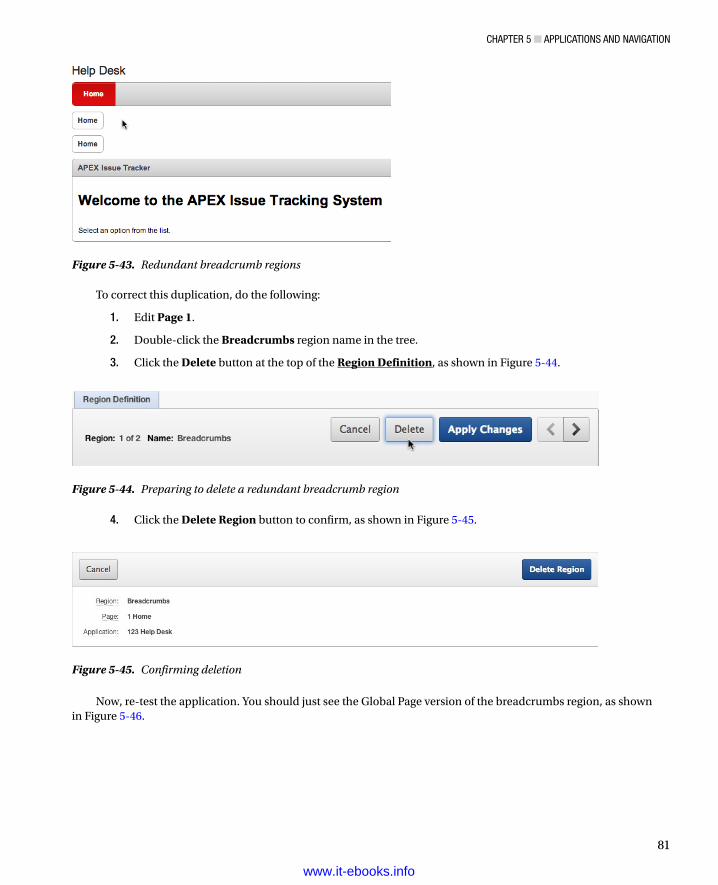
Chapter 5 ■ appliCations and navigation
81
To correct this duplication, do the following:
1. Edit Page 1.
2. Double-click the Breadcrumbs region name in the tree.
3. Click the Delete button at the top of the Region Definition, as shown in Figure 5-44.
Figure 5-43. Redundant breadcrumb regions
Figure 5-44. Preparing to delete a redundant breadcrumb region
4. Click the Delete Region button to confirm, as shown in Figure 5-45.
Figure 5-45. Confirming deletion
Now, re-test the application. You should just see the Global Page version of the breadcrumbs region, as shown in Figure 5-46.
www.it-ebooks.info
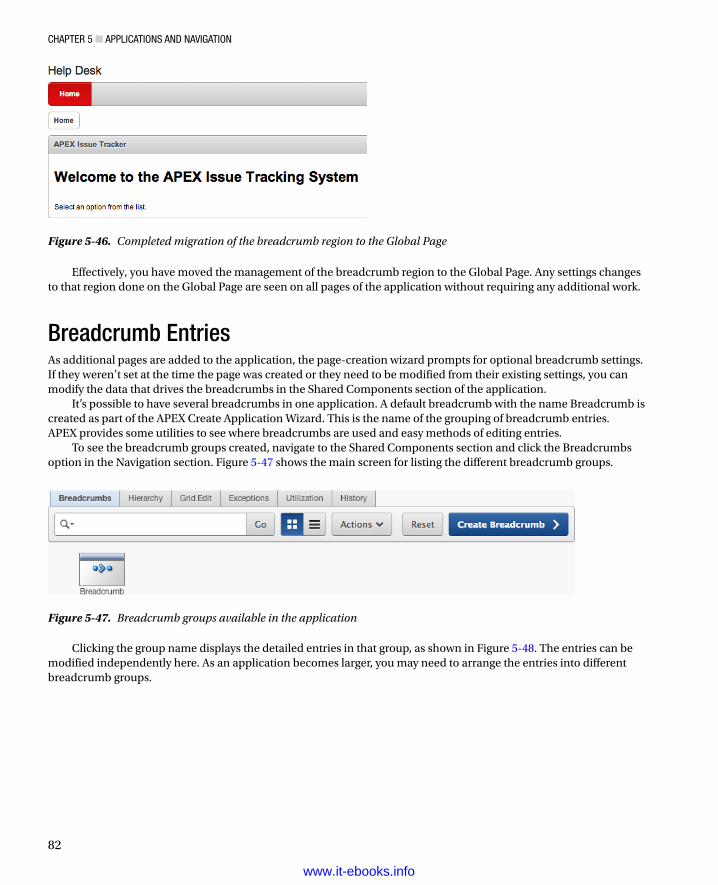
Chapter 5 ■ appliCations and navigation
82
Effectively, you have moved the management of the breadcrumb region to the Global Page. Any settings changes to that region done on the Global Page are seen on all pages of the application without requiring any additional work.
Breadcrumb EntriesAs additional pages are added to the application, the page-creation wizard prompts for optional breadcrumb settings. If they weren’t set at the time the page was created or they need to be modified from their existing settings, you can modify the data that drives the breadcrumbs in the Shared Components section of the application.
It’s possible to have several breadcrumbs in one application. A default breadcrumb with the name Breadcrumb is created as part of the APEX Create Application Wizard. This is the name of the grouping of breadcrumb entries. APEX provides some utilities to see where breadcrumbs are used and easy methods of editing entries.
To see the breadcrumb groups created, navigate to the Shared Components section and click the Breadcrumbs option in the Navigation section. Figure 5-47 shows the main screen for listing the different breadcrumb groups.
Figure 5-46. Completed migration of the breadcrumb region to the Global Page
Figure 5-47. Breadcrumb groups available in the application
Clicking the group name displays the detailed entries in that group, as shown in Figure 5-48. The entries can be modified independently here. As an application becomes larger, you may need to arrange the entries into different breadcrumb groups.
www.it-ebooks.info
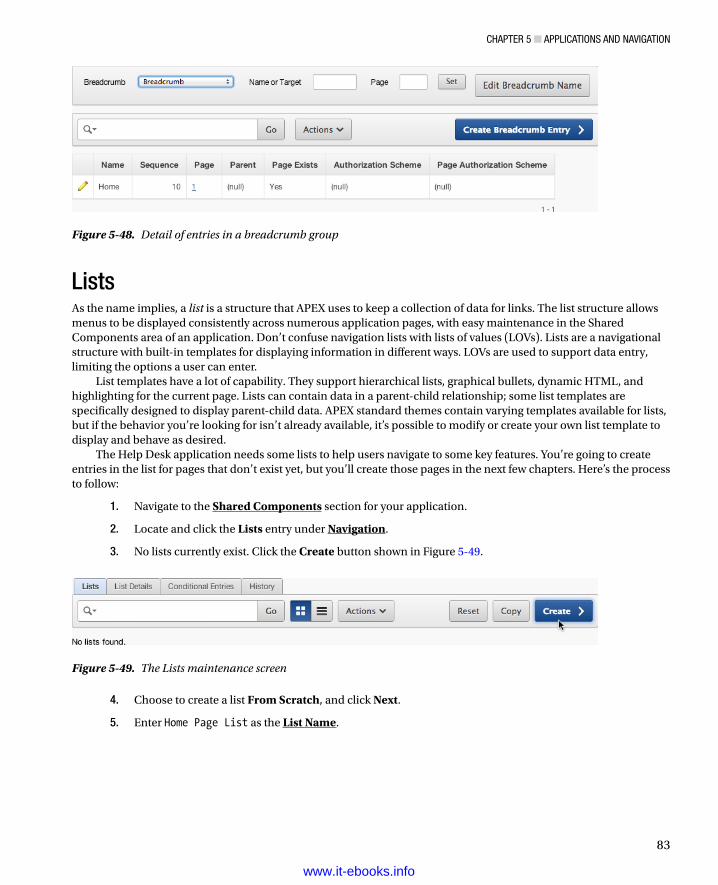
Chapter 5 ■ appliCations and navigation
83
ListsAs the name implies, a list is a structure that APEX uses to keep a collection of data for links. The list structure allows menus to be displayed consistently across numerous application pages, with easy maintenance in the Shared Components area of an application. Don’t confuse navigation lists with lists of values (LOVs). Lists are a navigational structure with built-in templates for displaying information in different ways. LOVs are used to support data entry, limiting the options a user can enter.
List templates have a lot of capability. They support hierarchical lists, graphical bullets, dynamic HTML, and highlighting for the current page. Lists can contain data in a parent-child relationship; some list templates are specifically designed to display parent-child data. APEX standard themes contain varying templates available for lists, but if the behavior you’re looking for isn’t already available, it’s possible to modify or create your own list template to display and behave as desired.
The Help Desk application needs some lists to help users navigate to some key features. You’re going to create entries in the list for pages that don’t exist yet, but you’ll create those pages in the next few chapters. Here’s the process to follow:
1. Navigate to the Shared Components section for your application.
2. Locate and click the Lists entry under Navigation.
3. No lists currently exist. Click the Create button shown in Figure 5-49.
Figure 5-48. Detail of entries in a breadcrumb group
Figure 5-49. The Lists maintenance screen
4. Choose to create a list From Scratch, and click Next.
5. Enter Home Page List as the List Name.
www.it-ebooks.info
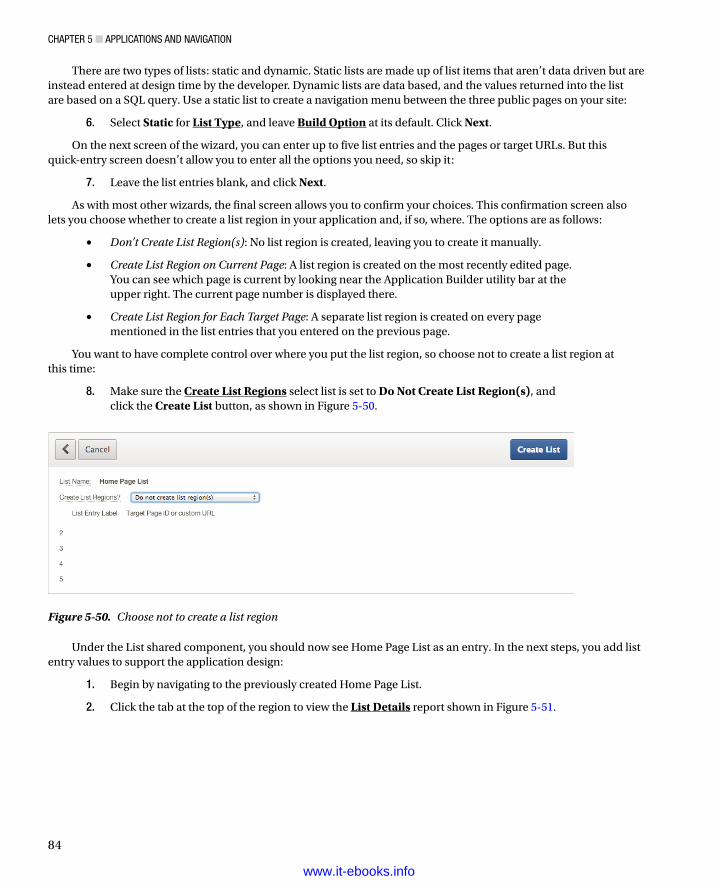
Chapter 5 ■ appliCations and navigation
84
There are two types of lists: static and dynamic. Static lists are made up of list items that aren’t data driven but are instead entered at design time by the developer. Dynamic lists are data based, and the values returned into the list are based on a SQL query. Use a static list to create a navigation menu between the three public pages on your site:
6. Select Static for List Type, and leave Build Option at its default. Click Next.
On the next screen of the wizard, you can enter up to five list entries and the pages or target URLs. But this quick-entry screen doesn’t allow you to enter all the options you need, so skip it:
7. Leave the list entries blank, and click Next.
As with most other wizards, the final screen allows you to confirm your choices. This confirmation screen also lets you choose whether to create a list region in your application and, if so, where. The options are as follows:
• Don’t Create List Region(s): No list region is created, leaving you to create it manually.
• Create List Region on Current Page: A list region is created on the most recently edited page. You can see which page is current by looking near the Application Builder utility bar at the upper right. The current page number is displayed there.
• Create List Region for Each Target Page: A separate list region is created on every page mentioned in the list entries that you entered on the previous page.
You want to have complete control over where you put the list region, so choose not to create a list region at this time:
8. Make sure the Create List Regions select list is set to Do Not Create List Region(s), and click the Create List button, as shown in Figure 5-50.
Figure 5-50. Choose not to create a list region
Under the List shared component, you should now see Home Page List as an entry. In the next steps, you add list entry values to support the application design:
1. Begin by navigating to the previously created Home Page List.
2. Click the tab at the top of the region to view the List Details report shown in Figure 5-51.
www.it-ebooks.info
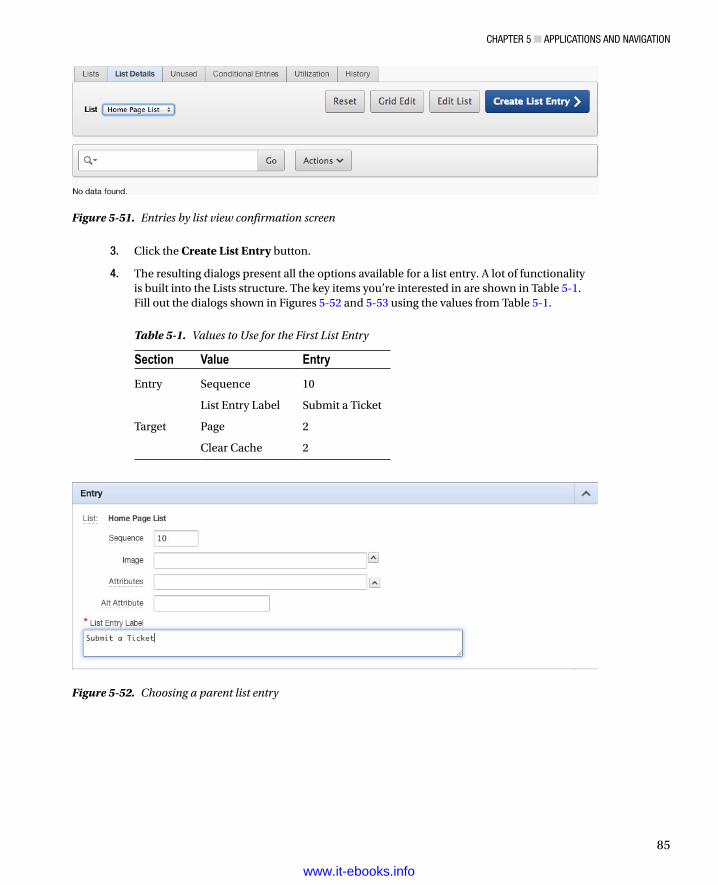
Chapter 5 ■ appliCations and navigation
85
3. Click the Create List Entry button.
4. The resulting dialogs present all the options available for a list entry. A lot of functionality is built into the Lists structure. The key items you’re interested in are shown in Table 5-1. Fill out the dialogs shown in Figures 5-52 and 5-53 using the values from Table 5-1.
Figure 5-51. Entries by list view confirmation screen
Figure 5-52. Choosing a parent list entry
Table 5-1. Values to Use for the First List Entry
Section Value Entry
Entry Sequence 10
List Entry Label Submit a Ticket
Target Page 2
Clear Cache 2
www.it-ebooks.info
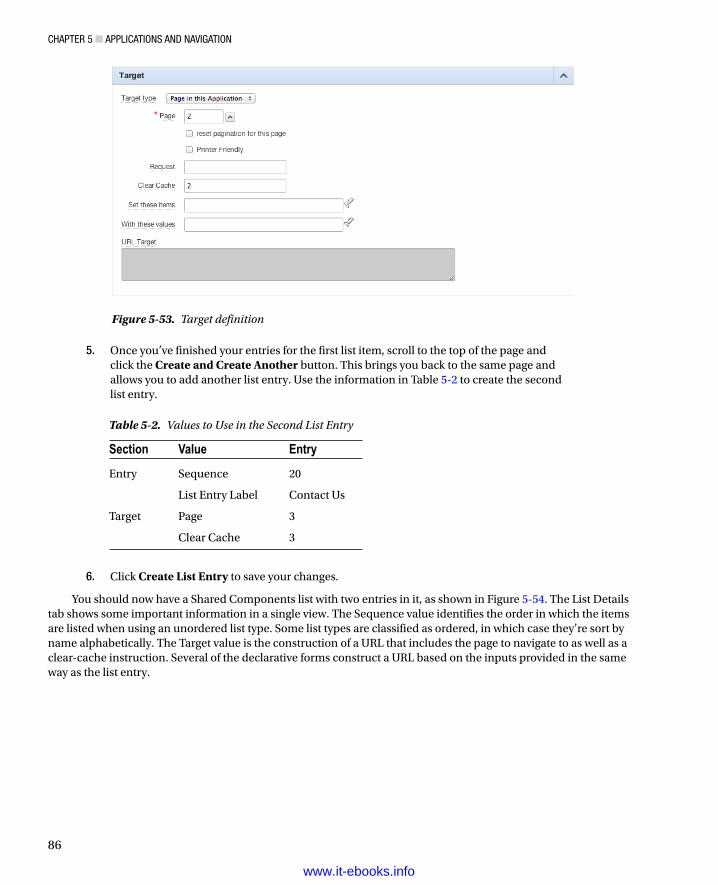
Chapter 5 ■ appliCations and navigation
86
5. Once you’ve finished your entries for the first list item, scroll to the top of the page and click the Create and Create Another button. This brings you back to the same page and allows you to add another list entry. Use the information in Table 5-2 to create the second list entry.
Table 5-2. Values to Use in the Second List Entry
Section Value Entry
Entry Sequence 20
List Entry Label Contact Us
Target Page 3
Clear Cache 3
Figure 5-53. Target definition
6. Click Create List Entry to save your changes.
You should now have a Shared Components list with two entries in it, as shown in Figure 5-54. The List Details tab shows some important information in a single view. The Sequence value identifies the order in which the items are listed when using an unordered list type. Some list types are classified as ordered, in which case they’re sort by name alphabetically. The Target value is the construction of a URL that includes the page to navigate to as well as a clear-cache instruction. Several of the declarative forms construct a URL based on the inputs provided in the same way as the list entry.
www.it-ebooks.info
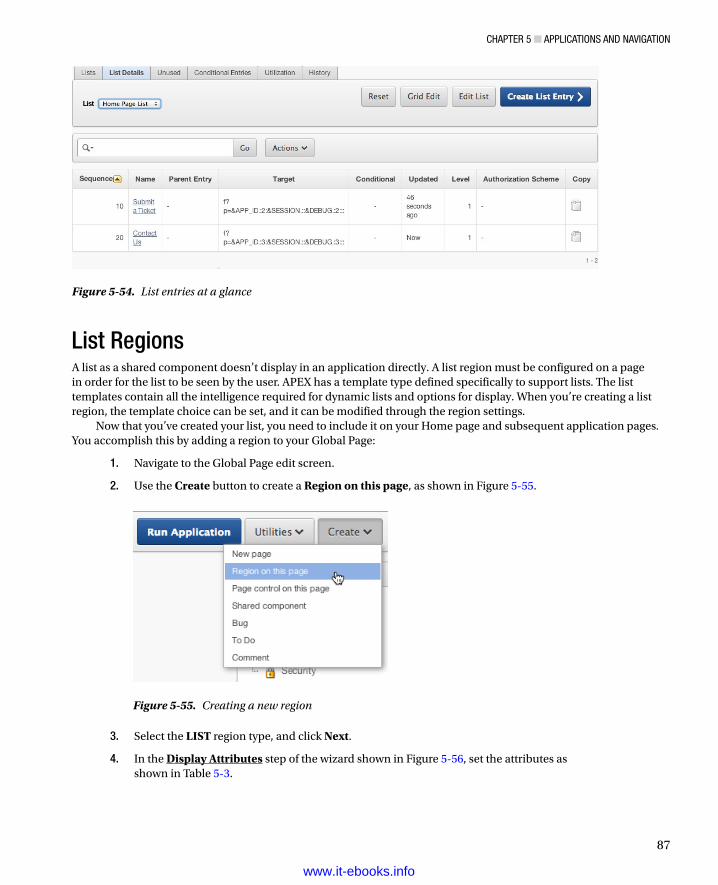
Chapter 5 ■ appliCations and navigation
87
List RegionsA list as a shared component doesn’t display in an application directly. A list region must be configured on a page in order for the list to be seen by the user. APEX has a template type defined specifically to support lists. The list templates contain all the intelligence required for dynamic lists and options for display. When you’re creating a list region, the template choice can be set, and it can be modified through the region settings.
Now that you’ve created your list, you need to include it on your Home page and subsequent application pages. You accomplish this by adding a region to your Global Page:
1. Navigate to the Global Page edit screen.
2. Use the Create button to create a Region on this page, as shown in Figure 5-55.
Figure 5-54. List entries at a glance
Figure 5-55. Creating a new region
3. Select the LIST region type, and click Next.
4. In the Display Attributes step of the wizard shown in Figure 5-56, set the attributes as shown in Table 5-3.
www.it-ebooks.info
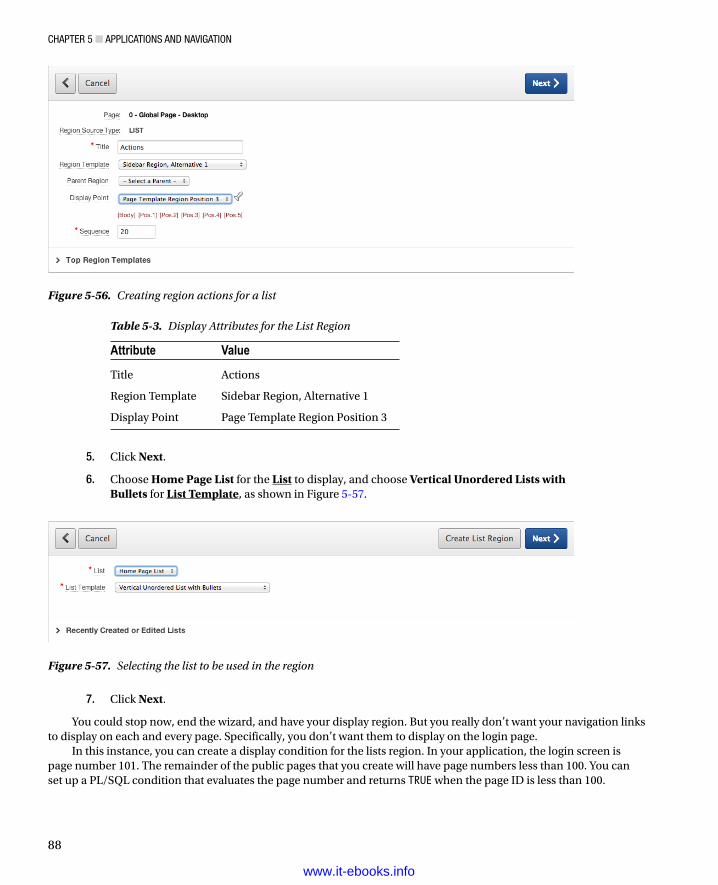
Chapter 5 ■ appliCations and navigation
88
5. Click Next.
6. Choose Home Page List for the List to display, and choose Vertical Unordered Lists with Bullets for List Template, as shown in Figure 5-57.
Table 5-3. Display Attributes for the List Region
Attribute Value
Title Actions
Region Template Sidebar Region, Alternative 1
Display Point Page Template Region Position 3
Figure 5-56. Creating region actions for a list
Figure 5-57. Selecting the list to be used in the region
7. Click Next.
You could stop now, end the wizard, and have your display region. But you really don’t want your navigation links to display on each and every page. Specifically, you don’t want them to display on the login page.
In this instance, you can create a display condition for the lists region. In your application, the login screen is page number 101. The remainder of the public pages that you create will have page numbers less than 100. You can set up a PL/SQL condition that evaluates the page number and returns TRUE when the page ID is less than 100.
www.it-ebooks.info

Chapter 5 ■ appliCations and navigation
89
The page number can be referenced using the substitution variable :APP_PAGE_ID. The condition enables the display of your list region only on the non-login pages:
8. Set Condition Type to PL/SQL Function Body Returning a Boolean.
9. Set Expression 1 to the following code: IF :APP_PAGE_ID <100 THEN RETURN TRUE;ELSE RETURN FALSE;END IF;
10. Validate your entries against Figure 5-58, and click Create Region.
Figure 5-58. Specifying a conditional display option for a list region
Running your application now should result in the action list you created appearing on the right side of the screen (Figure 5-59). Clicking either link causes the application to prompt for authentication. After you log in, clicking a link generates an application error. This is expected: you’ve asked the application to link to pages that don’t exist yet.
Figure 5-59. Application page with an action list
www.it-ebooks.info
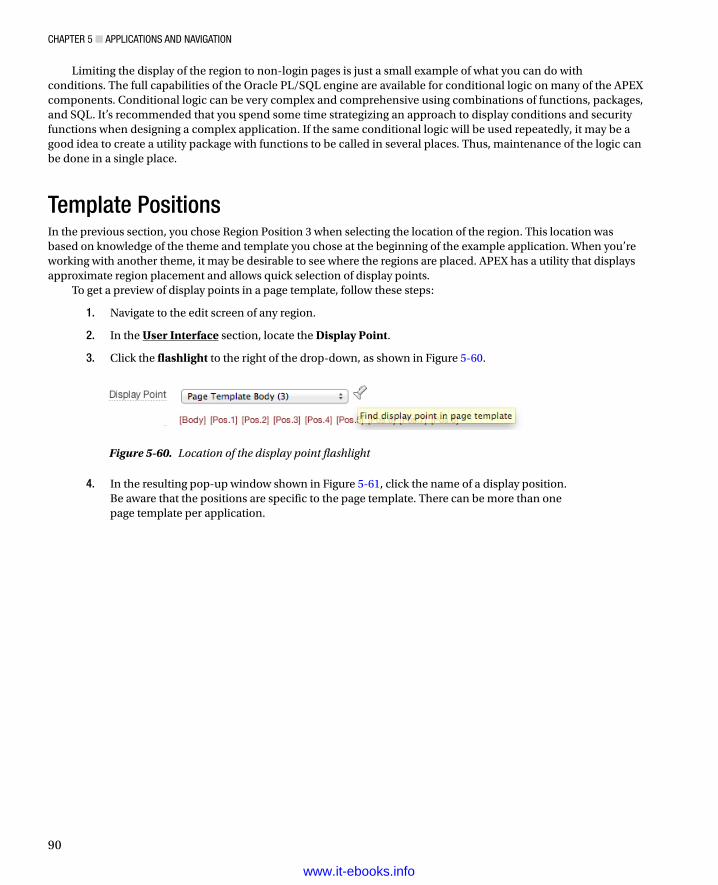
Chapter 5 ■ appliCations and navigation
90
Limiting the display of the region to non-login pages is just a small example of what you can do with conditions. The full capabilities of the Oracle PL/SQL engine are available for conditional logic on many of the APEX components. Conditional logic can be very complex and comprehensive using combinations of functions, packages, and SQL. It’s recommended that you spend some time strategizing an approach to display conditions and security functions when designing a complex application. If the same conditional logic will be used repeatedly, it may be a good idea to create a utility package with functions to be called in several places. Thus, maintenance of the logic can be done in a single place.
Template PositionsIn the previous section, you chose Region Position 3 when selecting the location of the region. This location was based on knowledge of the theme and template you chose at the beginning of the example application. When you’re working with another theme, it may be desirable to see where the regions are placed. APEX has a utility that displays approximate region placement and allows quick selection of display points.
To get a preview of display points in a page template, follow these steps:
1. Navigate to the edit screen of any region.
2. In the User Interface section, locate the Display Point.
3. Click the flashlight to the right of the drop-down, as shown in Figure 5-60.
Figure 5-60. Location of the display point flashlight
4. In the resulting pop-up window shown in Figure 5-61, click the name of a display position. Be aware that the positions are specific to the page template. There can be more than one page template per application.
www.it-ebooks.info
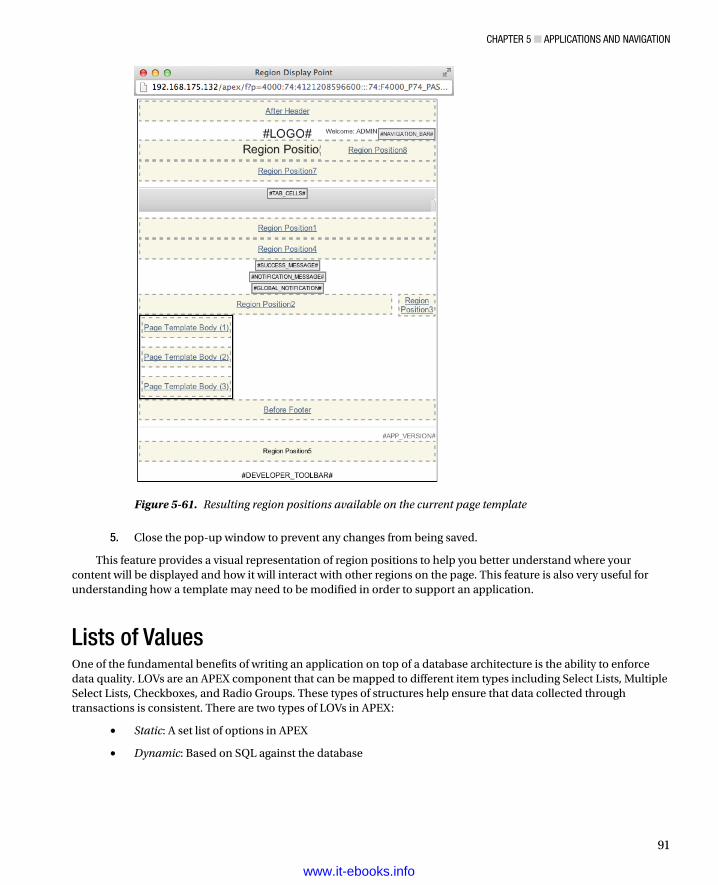
Chapter 5 ■ appliCations and navigation
91
5. Close the pop-up window to prevent any changes from being saved.
This feature provides a visual representation of region positions to help you better understand where your content will be displayed and how it will interact with other regions on the page. This feature is also very useful for understanding how a template may need to be modified in order to support an application.
Lists of ValuesOne of the fundamental benefits of writing an application on top of a database architecture is the ability to enforce data quality. LOVs are an APEX component that can be mapped to different item types including Select Lists, Multiple Select Lists, Checkboxes, and Radio Groups. These types of structures help ensure that data collected through transactions is consistent. There are two types of LOVs in APEX:
• Static: A set list of options in APEX
• Dynamic: Based on SQL against the database
Figure 5-61. Resulting region positions available on the current page template
www.it-ebooks.info
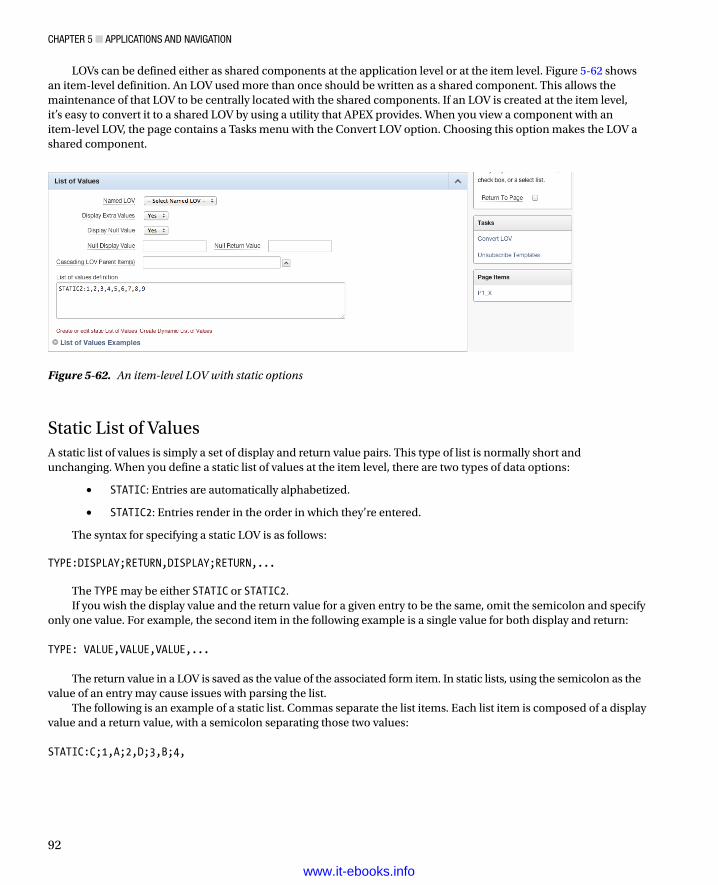
Chapter 5 ■ appliCations and navigation
92
LOVs can be defined either as shared components at the application level or at the item level. Figure 5-62 shows an item-level definition. An LOV used more than once should be written as a shared component. This allows the maintenance of that LOV to be centrally located with the shared components. If an LOV is created at the item level, it’s easy to convert it to a shared LOV by using a utility that APEX provides. When you view a component with an item-level LOV, the page contains a Tasks menu with the Convert LOV option. Choosing this option makes the LOV a shared component.
Figure 5-62. An item-level LOV with static options
Static List of ValuesA static list of values is simply a set of display and return value pairs. This type of list is normally short and unchanging. When you define a static list of values at the item level, there are two types of data options:
• STATIC: Entries are automatically alphabetized.
• STATIC2: Entries render in the order in which they’re entered.
The syntax for specifying a static LOV is as follows:
TYPE:DISPLAY;RETURN,DISPLAY;RETURN,...
The TYPE may be either STATIC or STATIC2.If you wish the display value and the return value for a given entry to be the same, omit the semicolon and specify
only one value. For example, the second item in the following example is a single value for both display and return: TYPE: VALUE,VALUE,VALUE,...
The return value in a LOV is saved as the value of the associated form item. In static lists, using the semicolon as the value of an entry may cause issues with parsing the list.
The following is an example of a static list. Commas separate the list items. Each list item is composed of a display value and a return value, with a semicolon separating those two values: STATIC:C;1,A;2,D;3,B;4,
www.it-ebooks.info
Chapter 5 ■ appliCations and navigation
93
When you display the values in this list, you see only the display values. Because the list is type STATIC, the values are displayed in alphabetical order: ABCD
Next is an example of a STATIC2 list. Notice that the entries are specified in the same order as before: STATIC2:C;1,A;2,D;3,B;4,
However, this time the values are displayed in their order of definition. They are not sorted alphabetically: CADB
Shared-component static LOVs have more options than item-level static LOVs. Due to their shared nature, conditions and build option can be configured. These can be edited after the list has been created. Because the lists are stored differently as shared components, it’s possible to use a semicolon in the item value.
Dynamic List of ValuesAs with static LOVs, dynamic LOVs have a display and return value pair requirement. The difference is that the values are obtained through a SQL query. The SQL query you write must return two columns. If the columns are the same, you need to use aliases to distinguish a display value and a return value. You must also use an alias if you’re using a concatenated string as a column. Dynamic LOVs can also use session variables or values currently being used in the application. This gives dynamic LOVs flexibility to dynamically change what is offered during runtime.
The example application needs two LOVs to support the selection of usernames. In preparation for building your form pages, create a LOV to support the names of the users and the technicians in your Help Desk system:
1. Navigate to the Shared Components section of the Help Desk application, then go to the User Interface section shown in Figure 5-63, and click the Lists of Values link.
Figure 5-63. User Interface options
www.it-ebooks.info
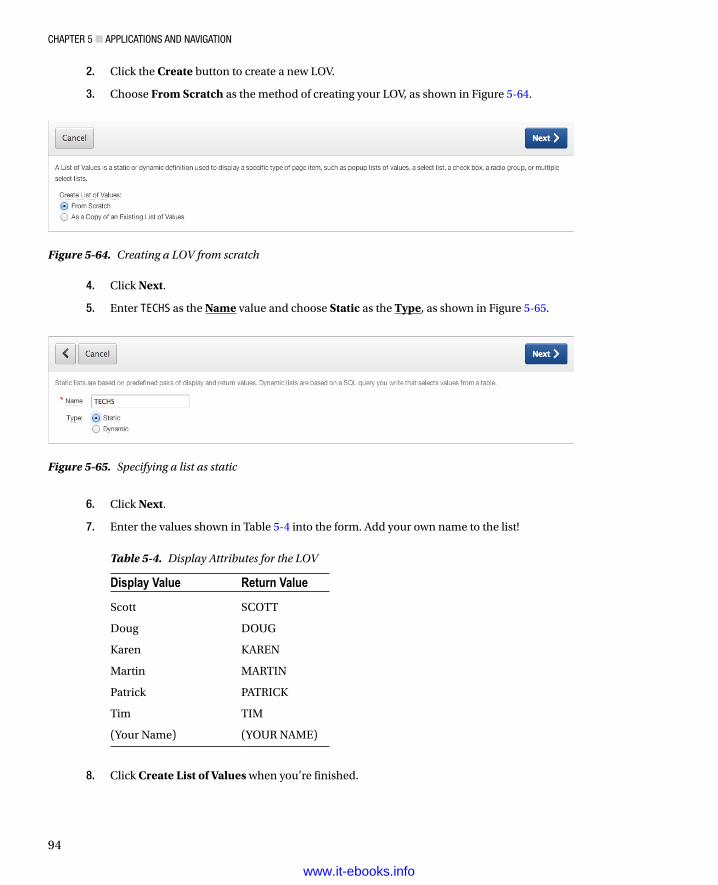
Chapter 5 ■ appliCations and navigation
94
2. Click the Create button to create a new LOV.
3. Choose From Scratch as the method of creating your LOV, as shown in Figure 5-64.
Figure 5-64. Creating a LOV from scratch
Figure 5-65. Specifying a list as static
4. Click Next.
5. Enter TECHS as the Name value and choose Static as the Type, as shown in Figure 5-65.
6. Click Next.
7. Enter the values shown in Table 5-4 into the form. Add your own name to the list!
Table 5-4. Display Attributes for the LOV
Display Value Return Value
Scott SCOTT
Doug DOUG
Karen KAREN
Martin MARTIN
Patrick PATRICK
Tim TIM
(Your Name) (YOUR NAME)
8. Click Create List of Values when you’re finished.
www.it-ebooks.info
Chapter 5 ■ appliCations and navigation
95
Now that you’ve created a static LOV, let’s include a second one that uses a SQL query to derive the list of values:
9. Repeat steps 1 through 4.
10. Create a second list named USERS, selecting the Dynamic option. Click Next.
11. Locate the book supplemental file ch5_lov.txt that includes the SQL query text. Enter the SQL query for the LOV source.
12. Click Create List of Values
You should now have two LOVs. Don’t worry if you made a mistake. All the settings can be modified—simply click the name of the LOV you want to modify.
SummaryIn this chapter, you created the basic shell of an application and several of the supporting objects that you use in the upcoming chapters. These items have been created as a result of planning that was done prior to starting the application. Depending on your situation, the amount of planning you do for your own application may vary. The shared components outlined here can be created at any time as needed during the development process. In the next section you start using some of the key structures outlined here.
www.it-ebooks.info
97
Chapter 6
Forms and Reports—The Basics
Now that you have the database objects and the base application in place, you can get to the real work of building pages in your application. Most applications contain a series of forms, reports, charts, and other elements designed to display, edit, and collect data.
This chapter focuses on basic forms and reports. These are the simplest, most standard types of forms and reports in APEX. They’re most often created by using the APEX wizards, which create all the elements of a form or report for you.
In the sections that follow, you learn how to use the APEX wizards to add pages to your Help Desk application. You create some basic forms and reports on the Tickets table; you also look at the elements created by the wizards for your working forms and reports.
APEX FormsForms are used to display, edit, and collect data, which is then sent back to the database for processing. Forms can interface with tables, views (via “instead of” triggers), procedures, and web services.
An APEX form is actually a collection of APEX objects acting together as a single, cohesive unit to perform insert, update, and delete operations on data elements. An APEX form generally consists of a region, one or more items, one or more buttons, and one or more processes that handle interactions with the database. The APEX form wizards create all the objects necessary for a fully operational form.
Note ■ Once a form is generated, the objects in it aren’t logically associated in any way except that they collectively make a complete working form. Although it’s possible to alter or delete individual elements, doing so may cause the form to not work properly if an error is introduced; thus doing so isn’t recommended.
The APEX form wizards listed in Figure 6-1 are the fastest, most effective, and most accurate way to create APEX forms. The wizards guide you through a series of steps, collect the information required for the form type, and then generate all the required items, processes, and buttons. Using the wizards frees you from the tedious and error-prone task of individually creating each component. After a wizard creates a form, you can, and likely will, make modifications and enhancements to the resulting components to tailor the form to your specific requirements.
www.it-ebooks.info
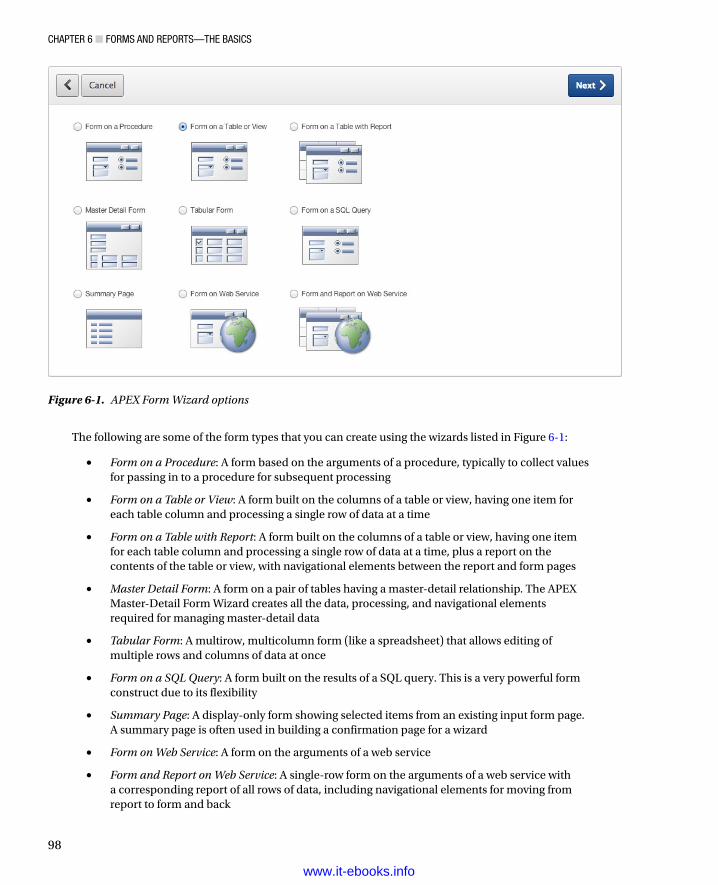
ChApter 6 ■ FOrms And repOrts—the BAsiCs
98
The following are some of the form types that you can create using the wizards listed in Figure 6-1:
• Form on a Procedure: A form based on the arguments of a procedure, typically to collect values for passing in to a procedure for subsequent processing
• Form on a Table or View: A form built on the columns of a table or view, having one item for each table column and processing a single row of data at a time
• Form on a Table with Report: A form built on the columns of a table or view, having one item for each table column and processing a single row of data at a time, plus a report on the contents of the table or view, with navigational elements between the report and form pages
• Master Detail Form: A form on a pair of tables having a master-detail relationship. The APEX Master-Detail Form Wizard creates all the data, processing, and navigational elements required for managing master-detail data
• Tabular Form: A multirow, multicolumn form (like a spreadsheet) that allows editing of multiple rows and columns of data at once
• Form on a SQL Query: A form built on the results of a SQL query. This is a very powerful form construct due to its flexibility
• Summary Page: A display-only form showing selected items from an existing input form page. A summary page is often used in building a confirmation page for a wizard
• Form on Web Service: A form on the arguments of a web service
• Form and Report on Web Service: A single-row form on the arguments of a web service with a corresponding report of all rows of data, including navigational elements for moving from report to form and back
Figure 6-1. APEX Form Wizard options
www.it-ebooks.info
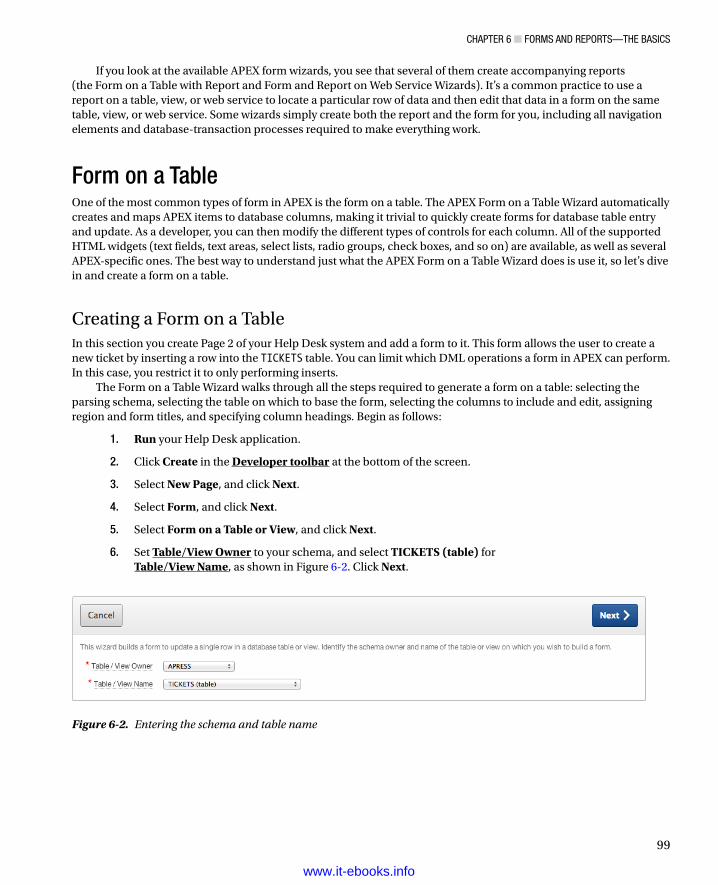
ChApter 6 ■ FOrms And repOrts—the BAsiCs
99
If you look at the available APEX form wizards, you see that several of them create accompanying reports (the Form on a Table with Report and Form and Report on Web Service Wizards). It’s a common practice to use a report on a table, view, or web service to locate a particular row of data and then edit that data in a form on the same table, view, or web service. Some wizards simply create both the report and the form for you, including all navigation elements and database-transaction processes required to make everything work.
Form on a TableOne of the most common types of form in APEX is the form on a table. The APEX Form on a Table Wizard automatically creates and maps APEX items to database columns, making it trivial to quickly create forms for database table entry and update. As a developer, you can then modify the different types of controls for each column. All of the supported HTML widgets (text fields, text areas, select lists, radio groups, check boxes, and so on) are available, as well as several APEX-specific ones. The best way to understand just what the APEX Form on a Table Wizard does is use it, so let’s dive in and create a form on a table.
Creating a Form on a TableIn this section you create Page 2 of your Help Desk system and add a form to it. This form allows the user to create a new ticket by inserting a row into the TICKETS table. You can limit which DML operations a form in APEX can perform. In this case, you restrict it to only performing inserts.
The Form on a Table Wizard walks through all the steps required to generate a form on a table: selecting the parsing schema, selecting the table on which to base the form, selecting the columns to include and edit, assigning region and form titles, and specifying column headings. Begin as follows:
1. Run your Help Desk application.
2. Click Create in the Developer toolbar at the bottom of the screen.
3. Select New Page, and click Next.
4. Select Form, and click Next.
5. Select Form on a Table or View, and click Next.
6. Set Table/View Owner to your schema, and select TICKETS (table) for Table/View Name, as shown in Figure 6-2. Click Next.
Figure 6-2. Entering the schema and table name
www.it-ebooks.info
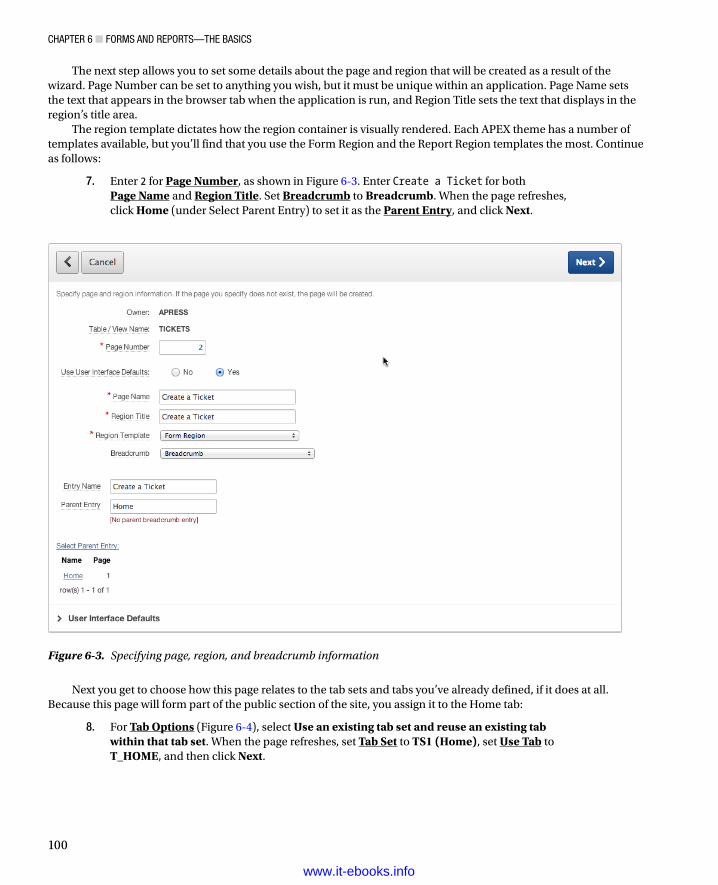
ChApter 6 ■ FOrms And repOrts—the BAsiCs
100
The next step allows you to set some details about the page and region that will be created as a result of the wizard. Page Number can be set to anything you wish, but it must be unique within an application. Page Name sets the text that appears in the browser tab when the application is run, and Region Title sets the text that displays in the region’s title area.
The region template dictates how the region container is visually rendered. Each APEX theme has a number of templates available, but you’ll find that you use the Form Region and the Report Region templates the most. Continue as follows:
7. Enter 2 for Page Number, as shown in Figure 6-3. Enter Create a Ticket for both Page Name and Region Title. Set Breadcrumb to Breadcrumb. When the page refreshes, click Home (under Select Parent Entry) to set it as the Parent Entry, and click Next.
Figure 6-3. Specifying page, region, and breadcrumb information
Next you get to choose how this page relates to the tab sets and tabs you’ve already defined, if it does at all. Because this page will form part of the public section of the site, you assign it to the Home tab:
8. For Tab Options (Figure 6-4), select Use an existing tab set and reuse an existing tab within that tab set. When the page refreshes, set Tab Set to TS1 (Home), set Use Tab to T_HOME, and then click Next.
www.it-ebooks.info
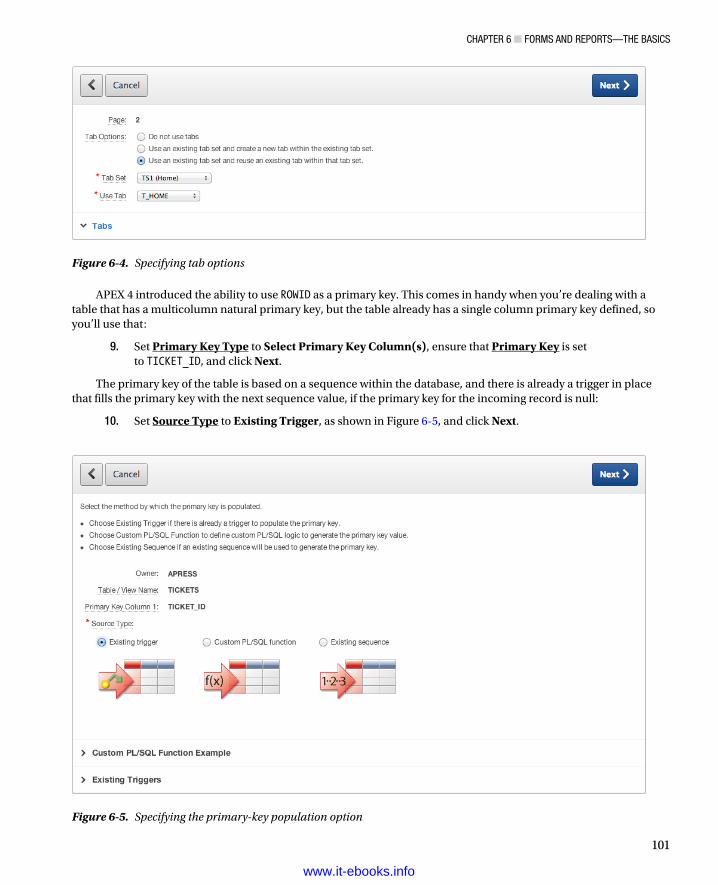
ChApter 6 ■ FOrms And repOrts—the BAsiCs
101
APEX 4 introduced the ability to use ROWID as a primary key. This comes in handy when you’re dealing with a table that has a multicolumn natural primary key, but the table already has a single column primary key defined, so you’ll use that:
9. Set Primary Key Type to Select Primary Key Column(s), ensure that Primary Key is set to TICKET_ID, and click Next.
The primary key of the table is based on a sequence within the database, and there is already a trigger in place that fills the primary key with the next sequence value, if the primary key for the incoming record is null:
10. Set Source Type to Existing Trigger, as shown in Figure 6-5, and click Next.
Figure 6-4. Specifying tab options
Figure 6-5. Specifying the primary-key population option
www.it-ebooks.info
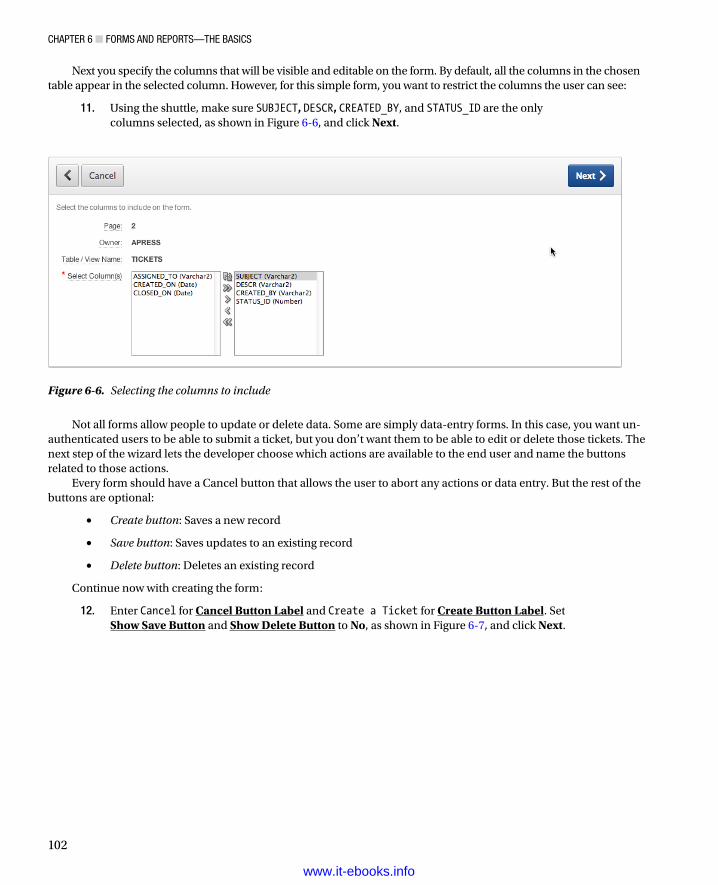
ChApter 6 ■ FOrms And repOrts—the BAsiCs
102
Next you specify the columns that will be visible and editable on the form. By default, all the columns in the chosen table appear in the selected column. However, for this simple form, you want to restrict the columns the user can see:
11. Using the shuttle, make sure SUBJECT, DESCR, CREATED_BY, and STATUS_ID are the only columns selected, as shown in Figure 6-6, and click Next.
Figure 6-6. Selecting the columns to include
Not all forms allow people to update or delete data. Some are simply data-entry forms. In this case, you want un-authenticated users to be able to submit a ticket, but you don’t want them to be able to edit or delete those tickets. The next step of the wizard lets the developer choose which actions are available to the end user and name the buttons related to those actions.
Every form should have a Cancel button that allows the user to abort any actions or data entry. But the rest of the buttons are optional:
• Create button: Saves a new record
• Save button: Saves updates to an existing record
• Delete button: Deletes an existing record
Continue now with creating the form:
12. Enter Cancel for Cancel Button Label and Create a Ticket for Create Button Label. Set Show Save Button and Show Delete Button to No, as shown in Figure 6-7, and click Next.
www.it-ebooks.info
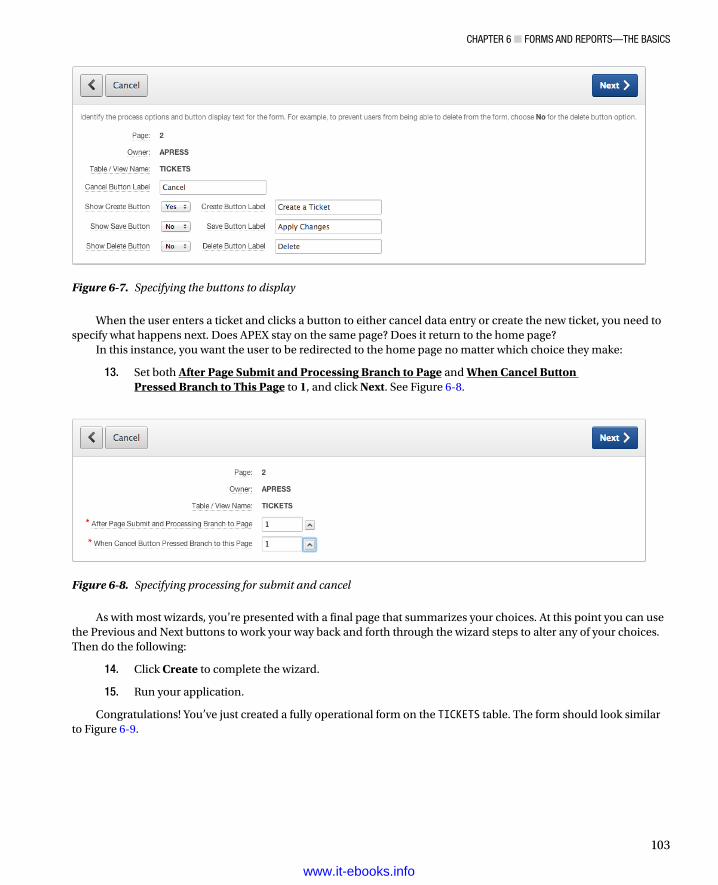
ChApter 6 ■ FOrms And repOrts—the BAsiCs
103
When the user enters a ticket and clicks a button to either cancel data entry or create the new ticket, you need to specify what happens next. Does APEX stay on the same page? Does it return to the home page?
In this instance, you want the user to be redirected to the home page no matter which choice they make:
13. Set both After Page Submit and Processing Branch to Page and When Cancel Button Pressed Branch to This Page to 1, and click Next. See Figure 6-8.
Figure 6-7. Specifying the buttons to display
Figure 6-8. Specifying processing for submit and cancel
As with most wizards, you’re presented with a final page that summarizes your choices. At this point you can use the Previous and Next buttons to work your way back and forth through the wizard steps to alter any of your choices. Then do the following:
14. Click Create to complete the wizard.
15. Run your application.
Congratulations! You’ve just created a fully operational form on the TICKETS table. The form should look similar to Figure 6-9.
www.it-ebooks.info
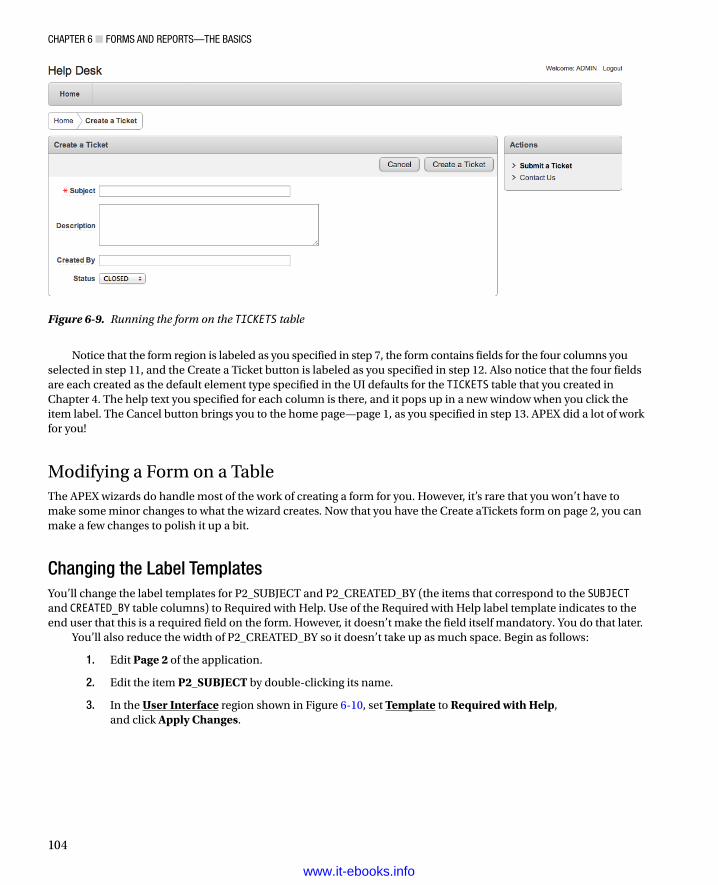
ChApter 6 ■ FOrms And repOrts—the BAsiCs
104
Notice that the form region is labeled as you specified in step 7, the form contains fields for the four columns you selected in step 11, and the Create a Ticket button is labeled as you specified in step 12. Also notice that the four fields are each created as the default element type specified in the UI defaults for the TICKETS table that you created in Chapter 4. The help text you specified for each column is there, and it pops up in a new window when you click the item label. The Cancel button brings you to the home page—page 1, as you specified in step 13. APEX did a lot of work for you!
Modifying a Form on a TableThe APEX wizards do handle most of the work of creating a form for you. However, it’s rare that you won’t have to make some minor changes to what the wizard creates. Now that you have the Create aTickets form on page 2, you can make a few changes to polish it up a bit.
Changing the Label TemplatesYou’ll change the label templates for P2_SUBJECT and P2_CREATED_BY (the items that correspond to the SUBJECT and CREATED_BY table columns) to Required with Help. Use of the Required with Help label template indicates to the end user that this is a required field on the form. However, it doesn’t make the field itself mandatory. You do that later.
You’ll also reduce the width of P2_CREATED_BY so it doesn’t take up as much space. Begin as follows:
1. Edit Page 2 of the application.
2. Edit the item P2_SUBJECT by double-clicking its name.
3. In the User Interface region shown in Figure 6-10, set Template to Required with Help, and click Apply Changes.
Figure 6-9. Running the form on the TICKETS table
www.it-ebooks.info
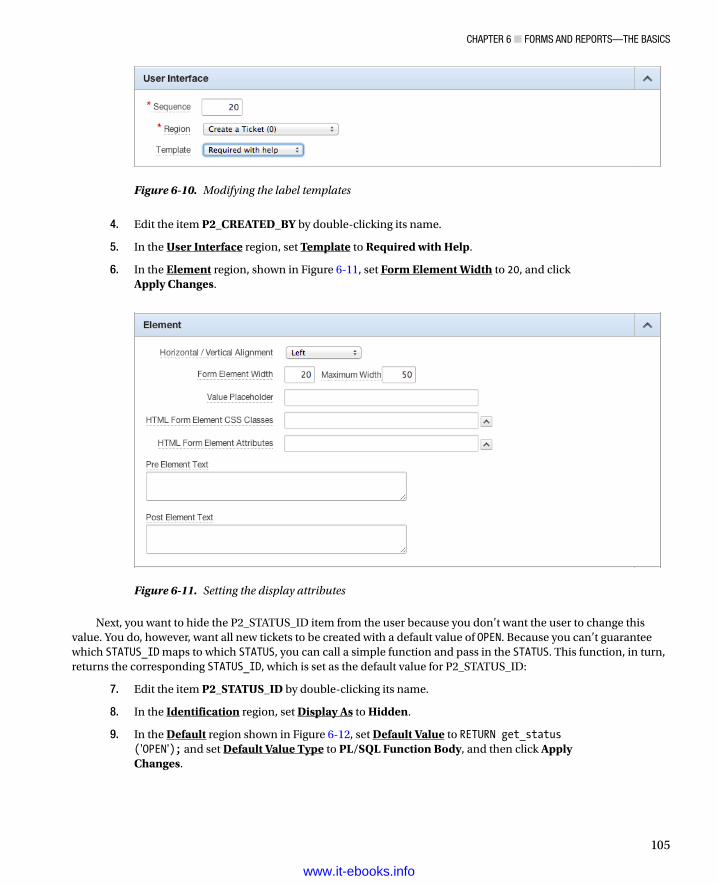
ChApter 6 ■ FOrms And repOrts—the BAsiCs
105
4. Edit the item P2_CREATED_BY by double-clicking its name.
5. In the User Interface region, set Template to Required with Help.
6. In the Element region, shown in Figure 6-11, set Form Element Width to 20, and click Apply Changes.
Figure 6-10. Modifying the label templates
Figure 6-11. Setting the display attributes
Next, you want to hide the P2_STATUS_ID item from the user because you don’t want the user to change this value. You do, however, want all new tickets to be created with a default value of OPEN. Because you can’t guarantee which STATUS_ID maps to which STATUS, you can call a simple function and pass in the STATUS. This function, in turn, returns the corresponding STATUS_ID, which is set as the default value for P2_STATUS_ID:
7. Edit the item P2_STATUS_ID by double-clicking its name.
8. In the Identification region, set Display As to Hidden.
9. In the Default region shown in Figure 6-12, set Default Value to RETURN get_status ('OPEN'); and set Default Value Type to PL/SQL Function Body, and then click Apply Changes.
www.it-ebooks.info
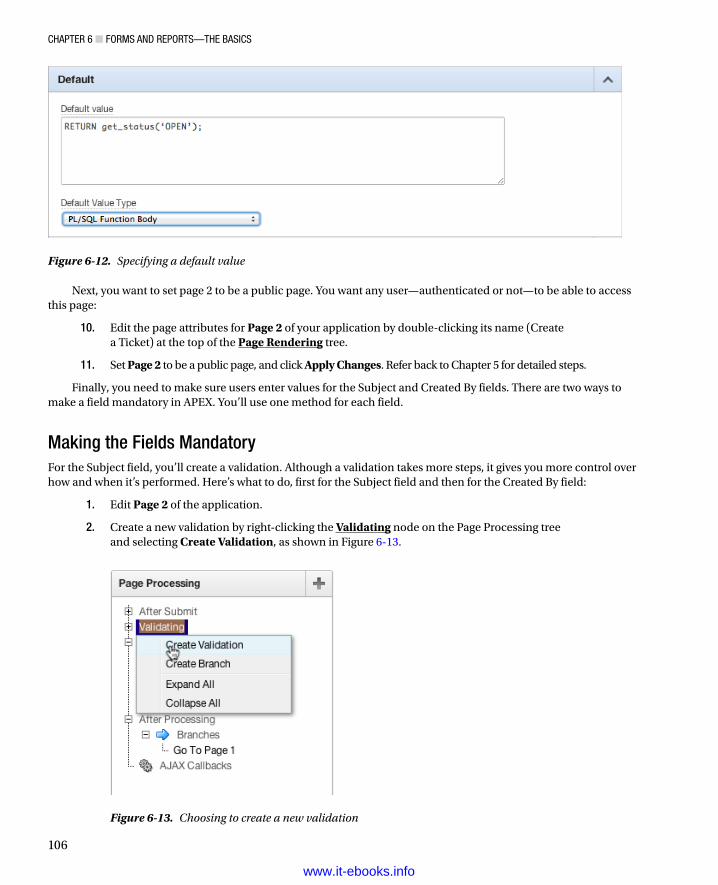
ChApter 6 ■ FOrms And repOrts—the BAsiCs
106
Next, you want to set page 2 to be a public page. You want any user—authenticated or not—to be able to access this page:
10. Edit the page attributes for Page 2 of your application by double-clicking its name (Create a Ticket) at the top of the Page Rendering tree.
11. Set Page 2 to be a public page, and click Apply Changes. Refer back to Chapter 5 for detailed steps.
Finally, you need to make sure users enter values for the Subject and Created By fields. There are two ways to make a field mandatory in APEX. You’ll use one method for each field.
Making the Fields MandatoryFor the Subject field, you’ll create a validation. Although a validation takes more steps, it gives you more control over how and when it’s performed. Here’s what to do, first for the Subject field and then for the Created By field:
1. Edit Page 2 of the application.
2. Create a new validation by right-clicking the Validating node on the Page Processing tree and selecting Create Validation, as shown in Figure 6-13.
Figure 6-12. Specifying a default value
Figure 6-13. Choosing to create a new validation
www.it-ebooks.info
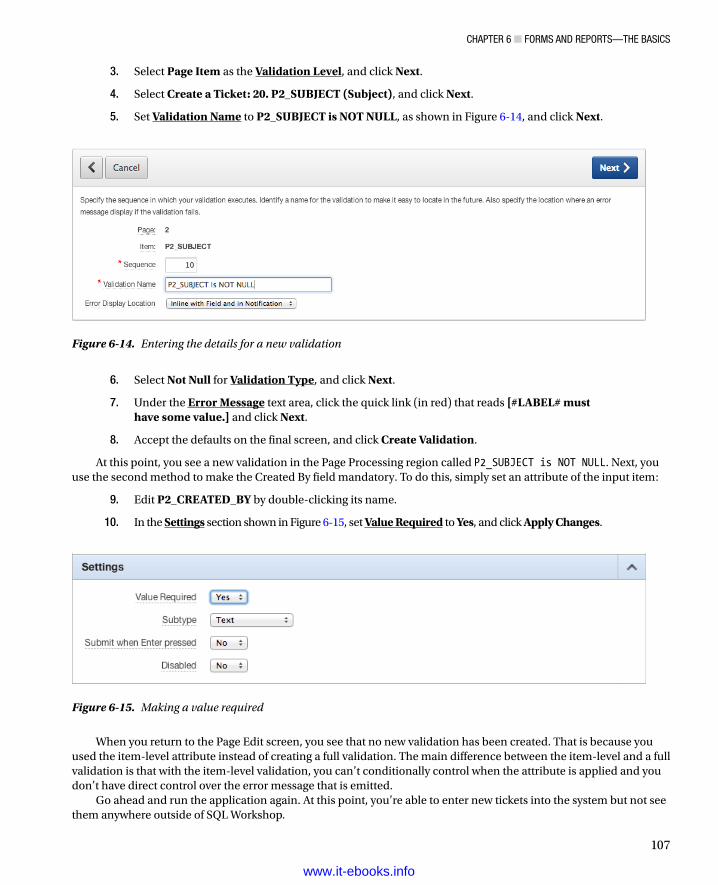
ChApter 6 ■ FOrms And repOrts—the BAsiCs
107
3. Select Page Item as the Validation Level, and click Next.
4. Select Create a Ticket: 20. P2_SUBJECT (Subject), and click Next.
5. Set Validation Name to P2_SUBJECT is NOT NULL, as shown in Figure 6-14, and click Next.
Figure 6-14. Entering the details for a new validation
Figure 6-15. Making a value required
6. Select Not Null for Validation Type, and click Next.
7. Under the Error Message text area, click the quick link (in red) that reads [#LABEL# must have some value.] and click Next.
8. Accept the defaults on the final screen, and click Create Validation.
At this point, you see a new validation in the Page Processing region called P2_SUBJECT is NOT NULL. Next, you use the second method to make the Created By field mandatory. To do this, simply set an attribute of the input item:
9. Edit P2_CREATED_BY by double-clicking its name.
10. In the Settings section shown in Figure 6-15, set Value Required to Yes, and click Apply Changes.
When you return to the Page Edit screen, you see that no new validation has been created. That is because you used the item-level attribute instead of creating a full validation. The main difference between the item-level and a full validation is that with the item-level validation, you can’t conditionally control when the attribute is applied and you don’t have direct control over the error message that is emitted.
Go ahead and run the application again. At this point, you’re able to enter new tickets into the system but not see them anywhere outside of SQL Workshop.
www.it-ebooks.info

ChApter 6 ■ FOrms And repOrts—the BAsiCs
108
Looking Behind the ScenesNow that you have a working form, let’s look at just what the APEX Form Wizard built in order to understand a bit more about how your form works. You can use the Form ➤ Display Form Details option of the Web Developer Toolbar add-in (available for both Chrome and Firefox) to display the form details. Figure 6-16 illustrates the Create a Ticket form with the form details exposed.
Figure 6-16. Form on the TICKETS table with form details exposed
Note ■ the Web developer toolbar add-in is a free web development tool, written by Chris pederick, that lets you inspect various aspects of a web page. to learn more about Web developer, visit http://chrispederick.com/.
The highlighted input tags display the input identifier and name for each field of the form. Both are unique for each form field. The input identifier is the column name prepended with the page number. The input name identifies the element names that APEX uses internally to process data in the form. Note that the columns you didn’t choose to display in the form, TICKET_ID and STATUS_ID, are still present in the page’s HTML.
A look behind the scenes tells you more. Click Edit Page 2 in the Developer toolbar to view the elements that make up the new form. You should see results similar to those in Figure 6-17.
www.it-ebooks.info

ChApter 6 ■ FOrms And repOrts—the BAsiCs
109
The Page Rendering region contains APEX objects required for page rendering. The Page Processing region contains objects required for page processing, such as validations, processes, and branches. The Shared Components region contains APEX objects that are shared across pages, such as tabs, lists of values, breadcrumbs, templates, and security schemes.
For your new Create a Ticket form, in the Page Rendering section, you see that the wizard has created one item for each of the columns from the TICKETS table that you selected via the wizard. There are also two buttons called Cancel and Create, and a Fetch Row from TICKETS process. This process is an Automated Row Fetch process, which does exactly what its name says: it fetches a row from the designated table into the current form. The attributes of the Automated Row Fetch process specify the table owner, the table name, the primary key column(s), success and failure messages, and a condition.
Notice that the TICKET_ID item is present on the page but isn’t rendered on the form. It’s visible in the Display Details view of the form as the first element on the page, with no visible element associated with it. TICKET_ID is a hidden item. APEX hidden items exist to hold a value, but although they’re rendered on the page, they aren’t visible to the user. In this case, the hidden TICKET_ID column holds the primary key value for the TICKETS row. As the primary key, TICKET_ID is used by the APEX processes to pull data from the database and to process inserts, updates, and deletes on a TICKETS row. Because you don’t want the end users to edit the primary key, APEX automatically hides it for you.
In the Page Processing column, you have a Process Row of Tickets process, a Reset Page process, and a Go To Page 1 branch. The Process Row of Tickets process does just that: it processes one row of the TICKETS table using the values from the items that correspond to the columns of the TICKETS table. This process fires when the user clicks the Create button. The reset page process clears the items on the page. It fires when the user clicks the Cancel button.
In the Shared Components region, you need to expand the Parent Tabs tree node to see that this page uses the Home tab in the TS1 tab set. Expanding the Breadcrumbs region shows the Breadcrumb object. Under Templates, you see that your form uses the default One Level Tabs - Right Sidebar (Optional/Table Based) page template, the Form Region template, two different Label templates, and the default Button template.
All APEX form wizards create items, buttons, and processes, but in different combinations to suit the specific needs of the form type. The other APEX form wizards perform essentially the same way, with slight differences in process types and navigation objects to accommodate the underlying data source: table or view, procedure, query, or web service. Next, let’s look at a form on a procedure.
Figure 6-17. Elements of a form as viewed from Application Builder
www.it-ebooks.info
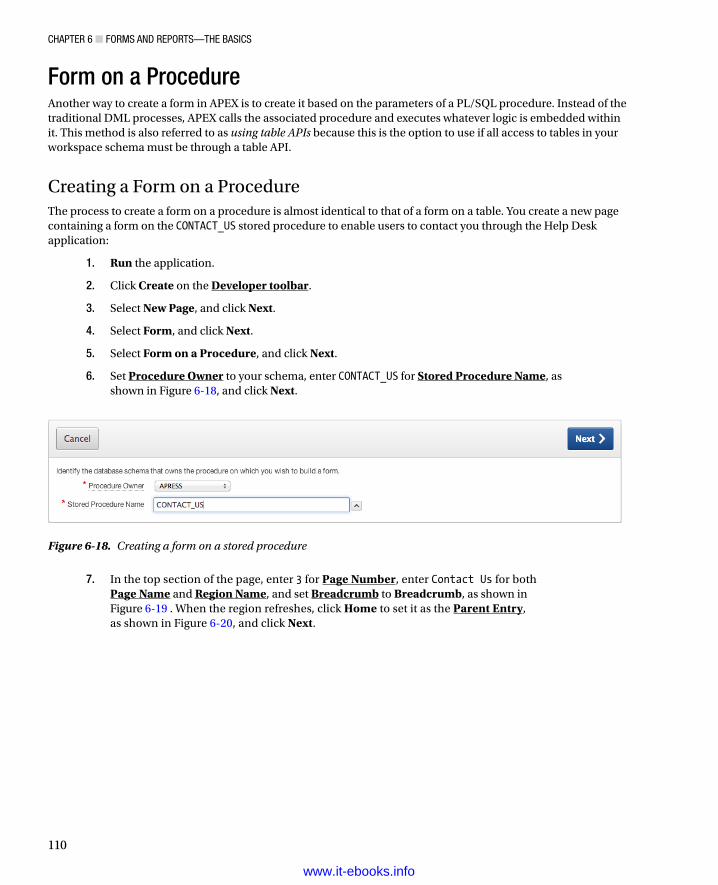
ChApter 6 ■ FOrms And repOrts—the BAsiCs
110
Form on a ProcedureAnother way to create a form in APEX is to create it based on the parameters of a PL/SQL procedure. Instead of the traditional DML processes, APEX calls the associated procedure and executes whatever logic is embedded within it. This method is also referred to as using table APIs because this is the option to use if all access to tables in your workspace schema must be through a table API.
Creating a Form on a ProcedureThe process to create a form on a procedure is almost identical to that of a form on a table. You create a new page containing a form on the CONTACT_US stored procedure to enable users to contact you through the Help Desk application:
1. Run the application.
2. Click Create on the Developer toolbar.
3. Select New Page, and click Next.
4. Select Form, and click Next.
5. Select Form on a Procedure, and click Next.
6. Set Procedure Owner to your schema, enter CONTACT_US for Stored Procedure Name, as shown in Figure 6-18, and click Next.
Figure 6-18. Creating a form on a stored procedure
7. In the top section of the page, enter 3 for Page Number, enter Contact Us for both Page Name and Region Name, and set Breadcrumb to Breadcrumb, as shown in Figure 6-19 . When the region refreshes, click Home to set it as the Parent Entry, as shown in Figure 6-20, and click Next.
www.it-ebooks.info
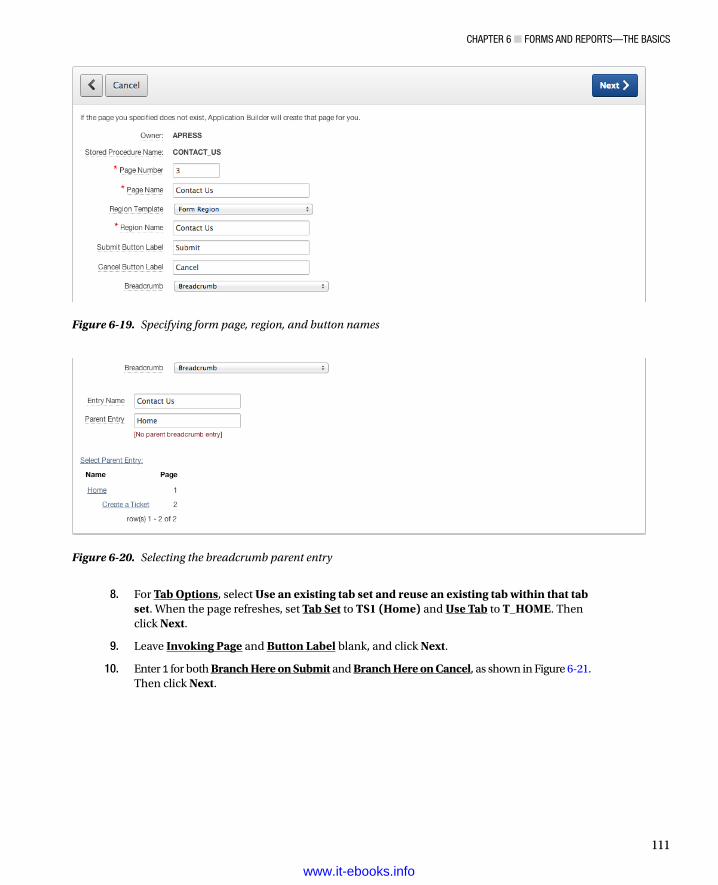
ChApter 6 ■ FOrms And repOrts—the BAsiCs
111
8. For Tab Options, select Use an existing tab set and reuse an existing tab within that tab set. When the page refreshes, set Tab Set to TS1 (Home) and Use Tab to T_HOME. Then click Next.
9. Leave Invoking Page and Button Label blank, and click Next.
10. Enter 1 for both Branch Here on Submit and Branch Here on Cancel, as shown in Figure 6-21. Then click Next.
Figure 6-19. Specifying form page, region, and button names
Figure 6-20. Selecting the breadcrumb parent entry
www.it-ebooks.info
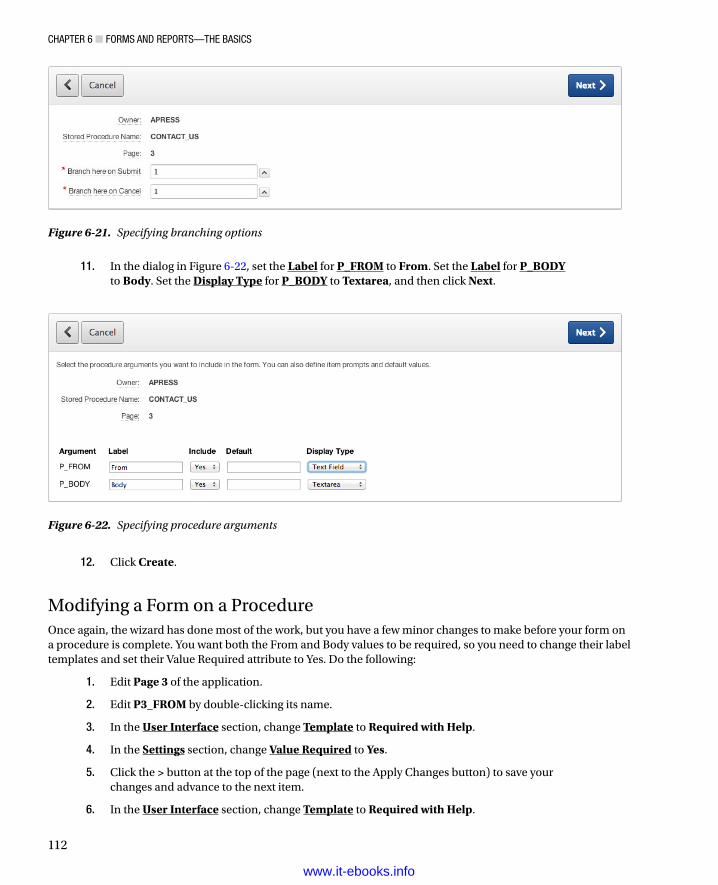
ChApter 6 ■ FOrms And repOrts—the BAsiCs
112
11. In the dialog in Figure 6-22, set the Label for P_FROM to From. Set the Label for P_BODYto Body. Set the Display Type for P_BODY to Textarea, and then click Next.
Figure 6-21. Specifying branching options
Figure 6-22. Specifying procedure arguments
12. Click Create.
Modifying a Form on a ProcedureOnce again, the wizard has done most of the work, but you have a few minor changes to make before your form on a procedure is complete. You want both the From and Body values to be required, so you need to change their label templates and set their Value Required attribute to Yes. Do the following:
1. Edit Page 3 of the application.
2. Edit P3_FROM by double-clicking its name.
3. In the User Interface section, change Template to Required with Help.
4. In the Settings section, change Value Required to Yes.
5. Click the > button at the top of the page (next to the Apply Changes button) to save your changes and advance to the next item.
6. In the User Interface section, change Template to Required with Help.
www.it-ebooks.info
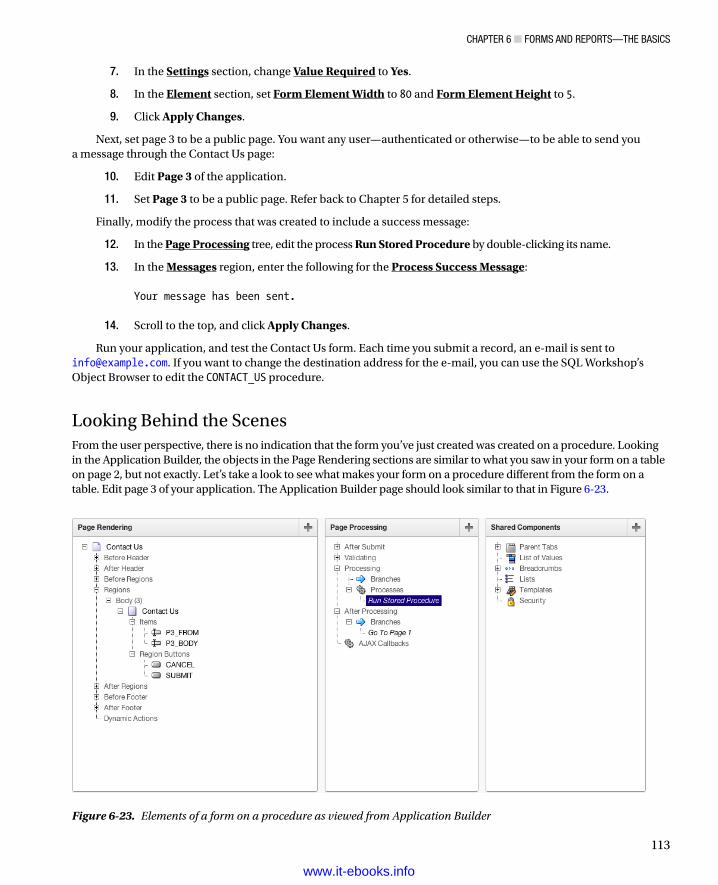
ChApter 6 ■ FOrms And repOrts—the BAsiCs
113
7. In the Settings section, change Value Required to Yes.
8. In the Element section, set Form Element Width to 80 and Form Element Height to 5.
9. Click Apply Changes.
Next, set page 3 to be a public page. You want any user—authenticated or otherwise—to be able to send you a message through the Contact Us page:
10. Edit Page 3 of the application.
11. Set Page 3 to be a public page. Refer back to Chapter 5 for detailed steps.
Finally, modify the process that was created to include a success message:
12. In the Page Processing tree, edit the process Run Stored Procedure by double-clicking its name.
13. In the Messages region, enter the following for the Process Success Message:
Your message has been sent.
14. Scroll to the top, and click Apply Changes.
Run your application, and test the Contact Us form. Each time you submit a record, an e-mail is sent to [email protected]. If you want to change the destination address for the e-mail, you can use the SQL Workshop’s Object Browser to edit the CONTACT_US procedure.
Looking Behind the ScenesFrom the user perspective, there is no indication that the form you’ve just created was created on a procedure. Looking in the Application Builder, the objects in the Page Rendering sections are similar to what you saw in your form on a table on page 2, but not exactly. Let’s take a look to see what makes your form on a procedure different from the form on a table. Edit page 3 of your application. The Application Builder page should look similar to that in Figure 6-23.
Figure 6-23. Elements of a form on a procedure as viewed from Application Builder
www.it-ebooks.info
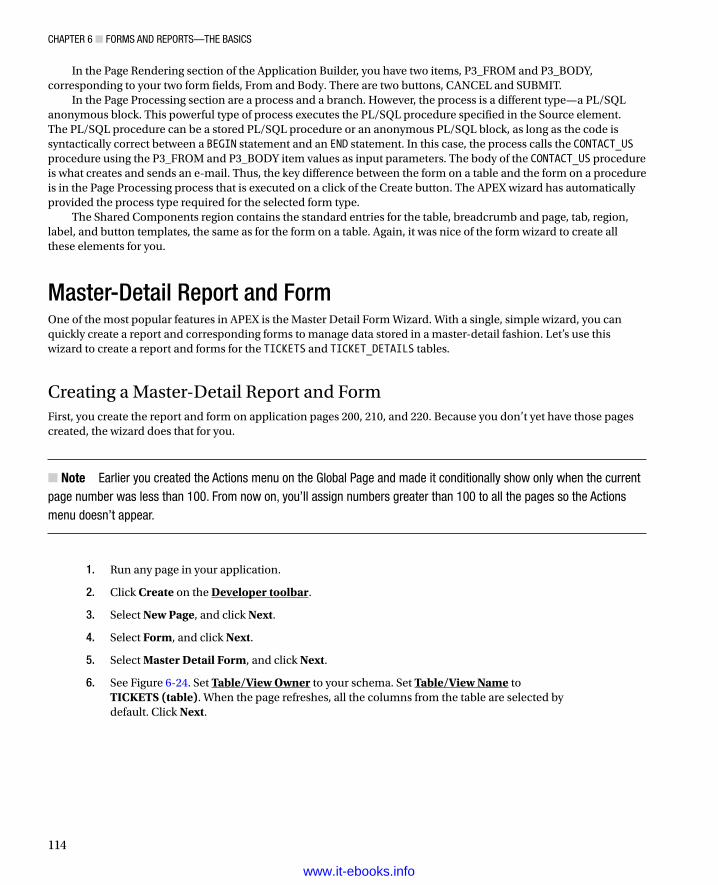
ChApter 6 ■ FOrms And repOrts—the BAsiCs
114
In the Page Rendering section of the Application Builder, you have two items, P3_FROM and P3_BODY, corresponding to your two form fields, From and Body. There are two buttons, CANCEL and SUBMIT.
In the Page Processing section are a process and a branch. However, the process is a different type—a PL/SQL anonymous block. This powerful type of process executes the PL/SQL procedure specified in the Source element. The PL/SQL procedure can be a stored PL/SQL procedure or an anonymous PL/SQL block, as long as the code is syntactically correct between a BEGIN statement and an END statement. In this case, the process calls the CONTACT_US procedure using the P3_FROM and P3_BODY item values as input parameters. The body of the CONTACT_US procedure is what creates and sends an e-mail. Thus, the key difference between the form on a table and the form on a procedure is in the Page Processing process that is executed on a click of the Create button. The APEX wizard has automatically provided the process type required for the selected form type.
The Shared Components region contains the standard entries for the table, breadcrumb and page, tab, region, label, and button templates, the same as for the form on a table. Again, it was nice of the form wizard to create all these elements for you.
Master-Detail Report and FormOne of the most popular features in APEX is the Master Detail Form Wizard. With a single, simple wizard, you can quickly create a report and corresponding forms to manage data stored in a master-detail fashion. Let’s use this wizard to create a report and forms for the TICKETS and TICKET_DETAILS tables.
Creating a Master-Detail Report and FormFirst, you create the report and form on application pages 200, 210, and 220. Because you don’t yet have those pages created, the wizard does that for you.
Note ■ earlier you created the Actions menu on the Global page and made it conditionally show only when the current page number was less than 100. From now on, you’ll assign numbers greater than 100 to all the pages so the Actions menu doesn’t appear.
1. Run any page in your application.
2. Click Create on the Developer toolbar.
3. Select New Page, and click Next.
4. Select Form, and click Next.
5. Select Master Detail Form, and click Next.
6. See Figure 6-24. Set Table/View Owner to your schema. Set Table/View Name to TICKETS (table). When the page refreshes, all the columns from the table are selected by default. Click Next.
www.it-ebooks.info
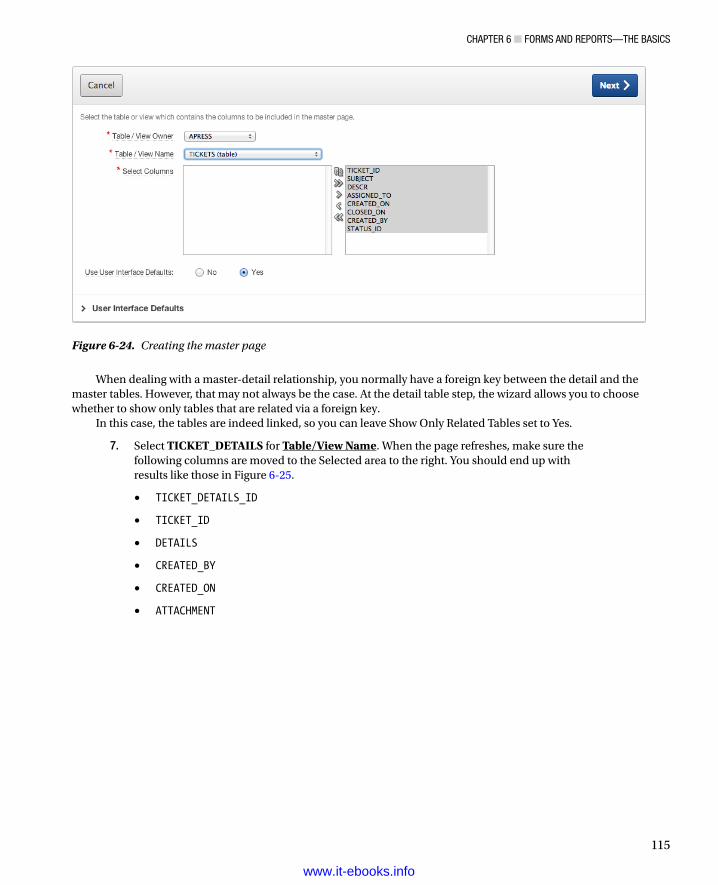
ChApter 6 ■ FOrms And repOrts—the BAsiCs
115
When dealing with a master-detail relationship, you normally have a foreign key between the detail and the master tables. However, that may not always be the case. At the detail table step, the wizard allows you to choose whether to show only tables that are related via a foreign key.
In this case, the tables are indeed linked, so you can leave Show Only Related Tables set to Yes.
7. Select TICKET_DETAILS for Table/View Name. When the page refreshes, make sure the following columns are moved to the Selected area to the right. You should end up with results like those in Figure 6-25.
• TICKET_DETAILS_ID
• TICKET_ID
• DETAILS
• CREATED_BY
• CREATED_ON
• ATTACHMENT
Figure 6-24. Creating the master page
www.it-ebooks.info
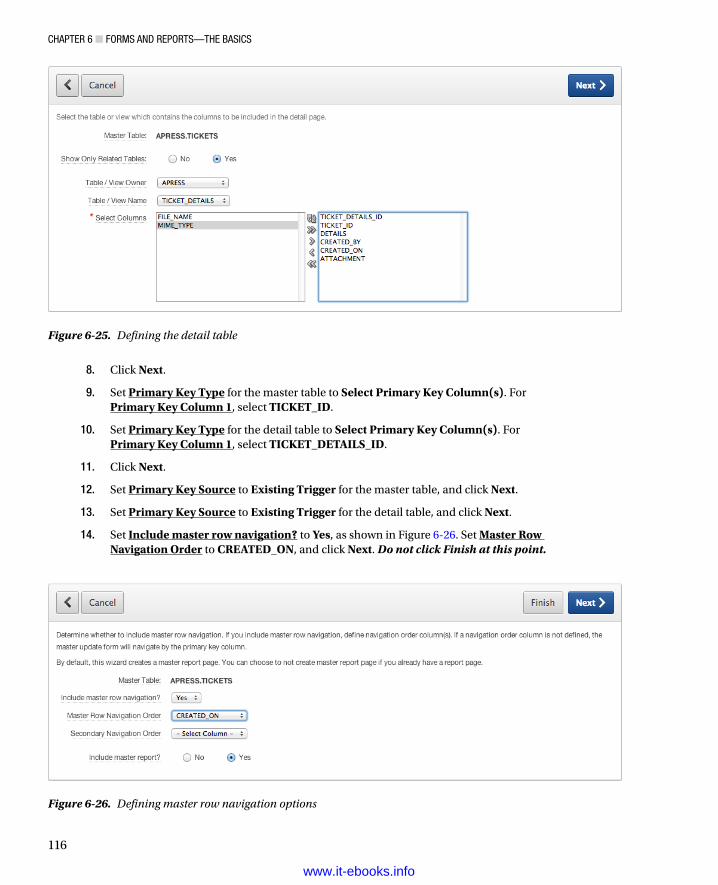
ChApter 6 ■ FOrms And repOrts—the BAsiCs
116
8. Click Next.
9. Set Primary Key Type for the master table to Select Primary Key Column(s). For Primary Key Column 1, select TICKET_ID.
10. Set Primary Key Type for the detail table to Select Primary Key Column(s). For Primary Key Column 1, select TICKET_DETAILS_ID.
11. Click Next.
12. Set Primary Key Source to Existing Trigger for the master table, and click Next.
13. Set Primary Key Source to Existing Trigger for the detail table, and click Next.
14. Set Include master row navigation? to Yes, as shown in Figure 6-26. Set Master Row Navigation Order to CREATED_ON, and click Next. Do not click Finish at this point.
Figure 6-25. Defining the detail table
Figure 6-26. Defining master row navigation options
www.it-ebooks.info
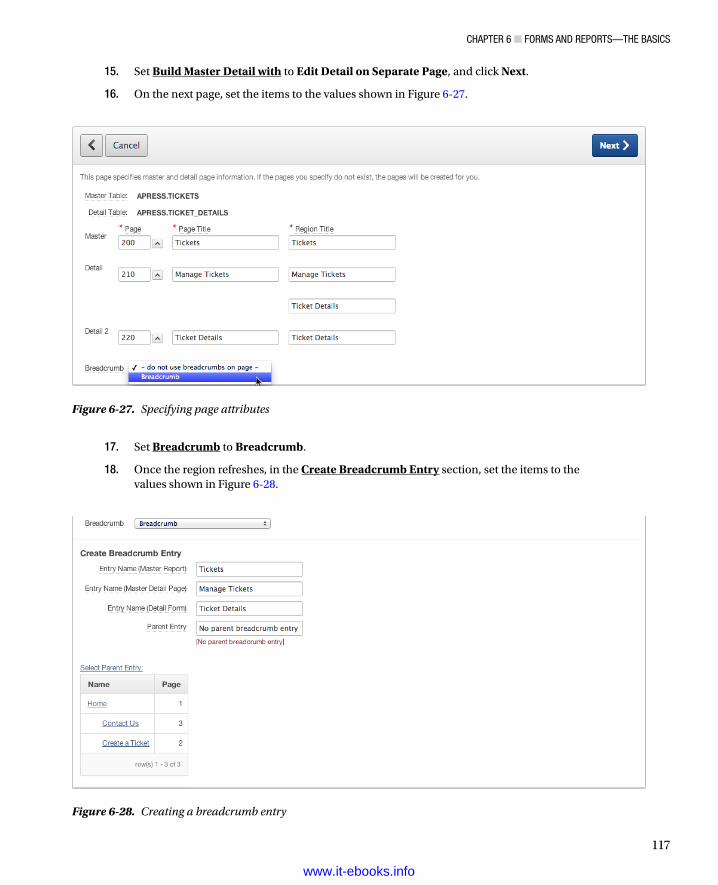
ChApter 6 ■ FOrms And repOrts—the BAsiCs
117
15. Set Build Master Detail with to Edit Detail on Separate Page, and click Next.
16. On the next page, set the items to the values shown in Figure 6-27.
Figure 6-27. Specifying page attributes
17. Set Breadcrumb to Breadcrumb.
18. Once the region refreshes, in the Create Breadcrumb Entry section, set the items to the values shown in Figure 6-28.
Figure 6-28. Creating a breadcrumb entry
www.it-ebooks.info
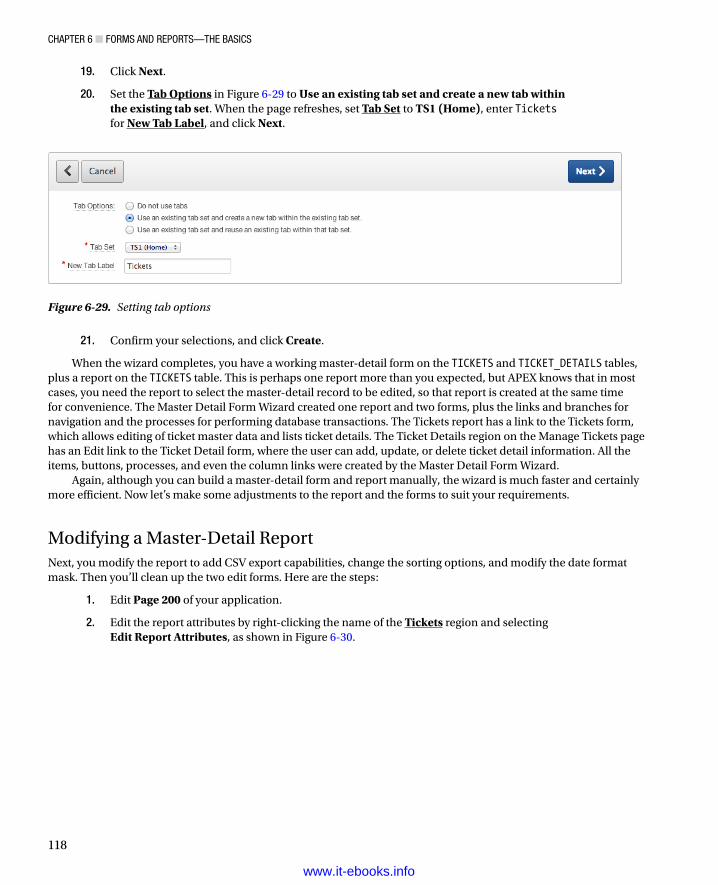
ChApter 6 ■ FOrms And repOrts—the BAsiCs
118
19. Click Next.
20. Set the Tab Options in Figure 6-29 to Use an existing tab set and create a new tab within the existing tab set. When the page refreshes, set Tab Set to TS1 (Home), enter Tickets for New Tab Label, and click Next.
Figure 6-29. Setting tab options
21. Confirm your selections, and click Create.
When the wizard completes, you have a working master-detail form on the TICKETS and TICKET_DETAILS tables, plus a report on the TICKETS table. This is perhaps one report more than you expected, but APEX knows that in most cases, you need the report to select the master-detail record to be edited, so that report is created at the same time for convenience. The Master Detail Form Wizard created one report and two forms, plus the links and branches for navigation and the processes for performing database transactions. The Tickets report has a link to the Tickets form, which allows editing of ticket master data and lists ticket details. The Ticket Details region on the Manage Tickets page has an Edit link to the Ticket Detail form, where the user can add, update, or delete ticket detail information. All the items, buttons, processes, and even the column links were created by the Master Detail Form Wizard.
Again, although you can build a master-detail form and report manually, the wizard is much faster and certainly more efficient. Now let’s make some adjustments to the report and the forms to suit your requirements.
Modifying a Master-Detail ReportNext, you modify the report to add CSV export capabilities, change the sorting options, and modify the date format mask. Then you’ll clean up the two edit forms. Here are the steps:
1. Edit Page 200 of your application.
2. Edit the report attributes by right-clicking the name of the Tickets region and selecting Edit Report Attributes, as shown in Figure 6-30.
www.it-ebooks.info
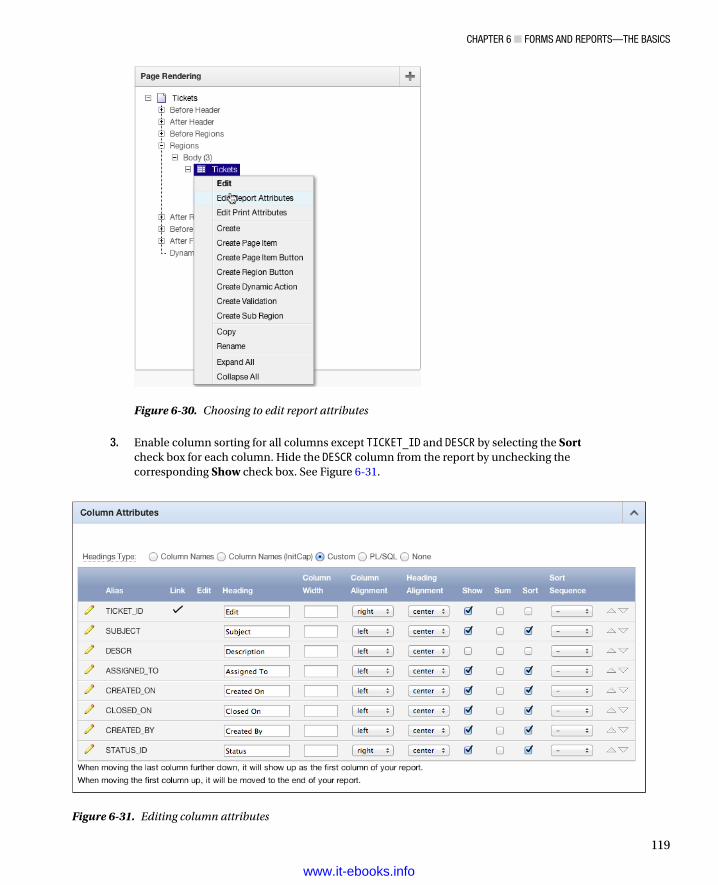
ChApter 6 ■ FOrms And repOrts—the BAsiCs
119
3. Enable column sorting for all columns except TICKET_ID and DESCR by selecting the Sort check box for each column. Hide the DESCR column from the report by unchecking the corresponding Show check box. See Figure 6-31.
Figure 6-30. Choosing to edit report attributes
Figure 6-31. Editing column attributes
www.it-ebooks.info
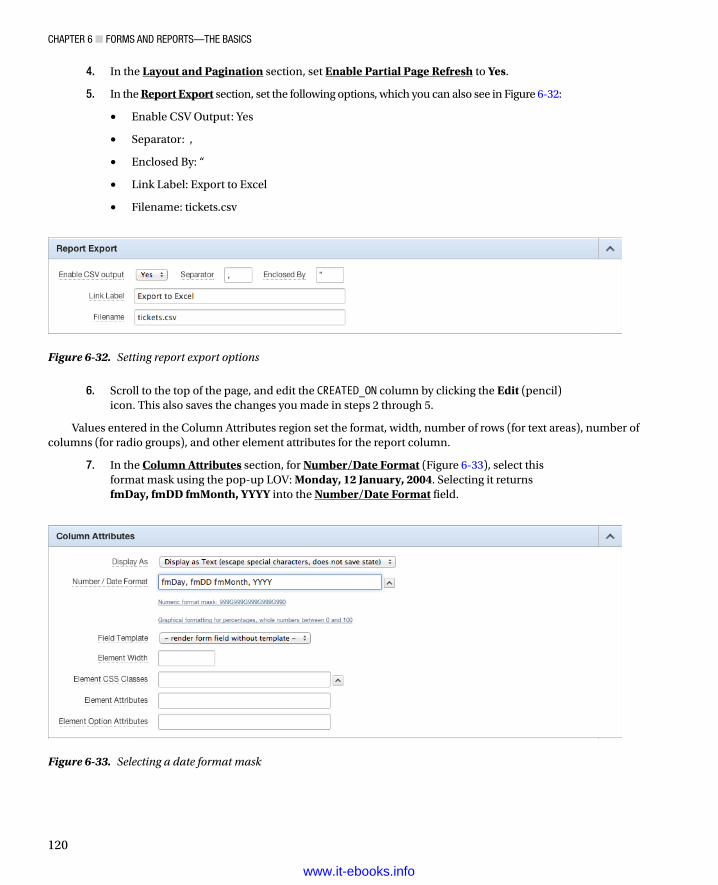
ChApter 6 ■ FOrms And repOrts—the BAsiCs
120
4. In the Layout and Pagination section, set Enable Partial Page Refresh to Yes.
5. In the Report Export section, set the following options, which you can also see in Figure 6-32:
Enable CSV Output: Yes•
Separator: ,•
Enclosed By: “•
Link Label: Export to Excel•
Filename: tickets.csv•
Figure 6-32. Setting report export options
Figure 6-33. Selecting a date format mask
6. Scroll to the top of the page, and edit the CREATED_ON column by clicking the Edit (pencil) icon. This also saves the changes you made in steps 2 through 5.
Values entered in the Column Attributes region set the format, width, number of rows (for text areas), number of columns (for radio groups), and other element attributes for the report column.
7. In the Column Attributes section, for Number/Date Format (Figure 6-33), select this format mask using the pop-up LOV: Monday, 12 January, 2004. Selecting it returns fmDay, fmDD fmMonth, YYYY into the Number/Date Format field.
www.it-ebooks.info
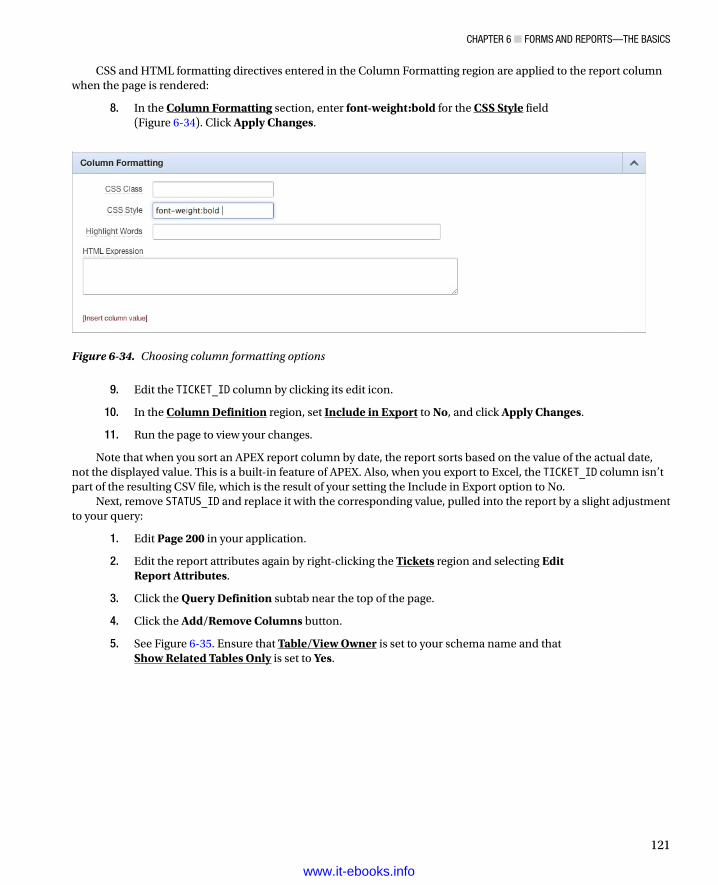
ChApter 6 ■ FOrms And repOrts—the BAsiCs
121
CSS and HTML formatting directives entered in the Column Formatting region are applied to the report column when the page is rendered:
8. In the Column Formatting section, enter font-weight:bold for the CSS Style field (Figure 6-34). Click Apply Changes.
Figure 6-34. Choosing column formatting options
9. Edit the TICKET_ID column by clicking its edit icon.
10. In the Column Definition region, set Include in Export to No, and click Apply Changes.
11. Run the page to view your changes.
Note that when you sort an APEX report column by date, the report sorts based on the value of the actual date, not the displayed value. This is a built-in feature of APEX. Also, when you export to Excel, the TICKET_ID column isn’t part of the resulting CSV file, which is the result of your setting the Include in Export option to No.
Next, remove STATUS_ID and replace it with the corresponding value, pulled into the report by a slight adjustment to your query:
1. Edit Page 200 in your application.
2. Edit the report attributes again by right-clicking the Tickets region and selecting Edit Report Attributes.
3. Click the Query Definition subtab near the top of the page.
4. Click the Add/Remove Columns button.
5. See Figure 6-35. Ensure that Table/View Owner is set to your schema name and that Show Related Tables Only is set to Yes.
www.it-ebooks.info
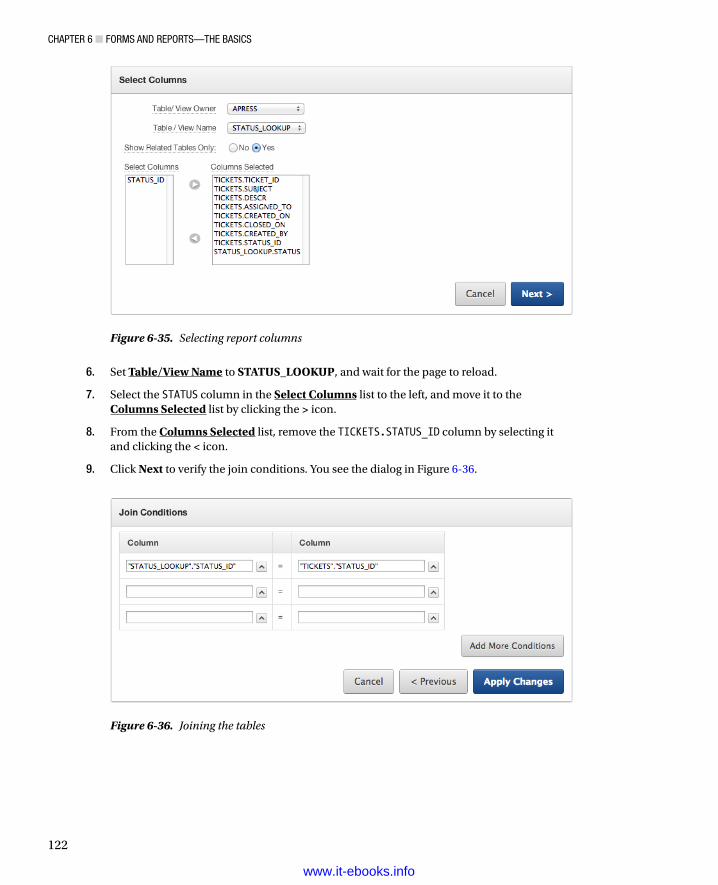
ChApter 6 ■ FOrms And repOrts—the BAsiCs
122
6. Set Table/View Name to STATUS_LOOKUP, and wait for the page to reload.
7. Select the STATUS column in the Select Columns list to the left, and move it to the Columns Selected list by clicking the > icon.
8. From the Columns Selected list, remove the TICKETS.STATUS_ID column by selecting it and clicking the < icon.
9. Click Next to verify the join conditions. You see the dialog in Figure 6-36.
Figure 6-35. Selecting report columns
Figure 6-36. Joining the tables
www.it-ebooks.info

ChApter 6 ■ FOrms And repOrts—the BAsiCs
123
10. Validate that the Join Conditions are correct, and click Apply Changes.
11. Edit the report attributes again by right-clicking the Tickets region and selecting Edit Report Attributes.
12. Enable sorting for the Status column by selecting the Sort check box, and click Apply Changes.
13. Click the + symbol to the left to the Report Columns for the Tickets region to expand that section of the tree. You can use your mouse to drag and drop columns within the column list to reorder them. Reorder the columns so that STATUS is the second column in the list. Drag-and-drop changes are automatically saved.
Run the application to see the changes to the Tickets report. You should see results like those in Figures 6-37 through 6-39. The Created On and Status values are now more readable, and you can sort by column by double-clicking the column heading.
Figure 6-37. The Tickets report
www.it-ebooks.info
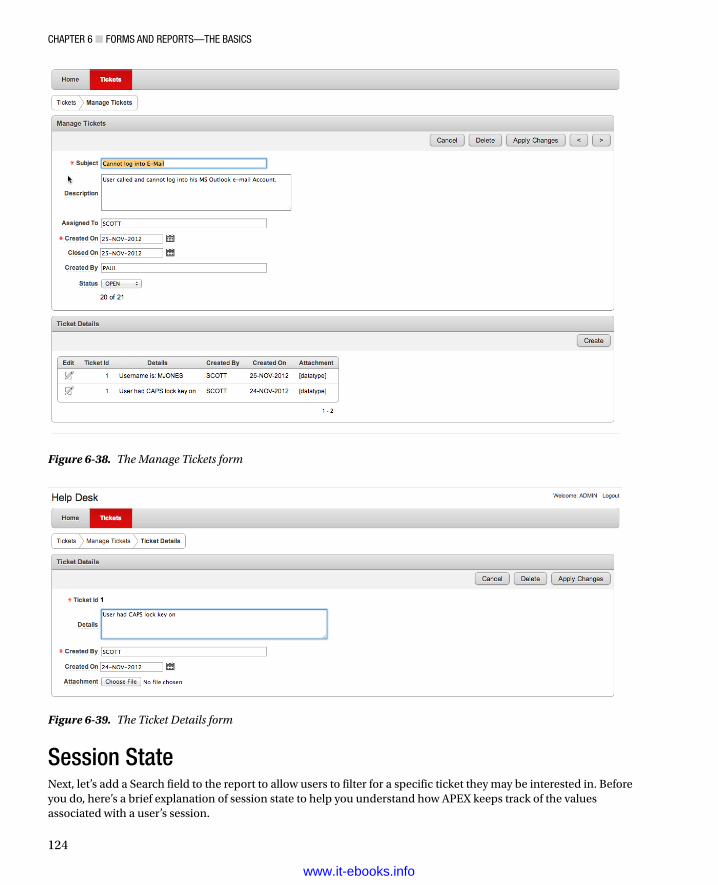
ChApter 6 ■ FOrms And repOrts—the BAsiCs
124
Session StateNext, let’s add a Search field to the report to allow users to filter for a specific ticket they may be interested in. Before you do, here’s a brief explanation of session state to help you understand how APEX keeps track of the values associated with a user’s session.
Figure 6-39. The Ticket Details form
Figure 6-38. The Manage Tickets form
www.it-ebooks.info
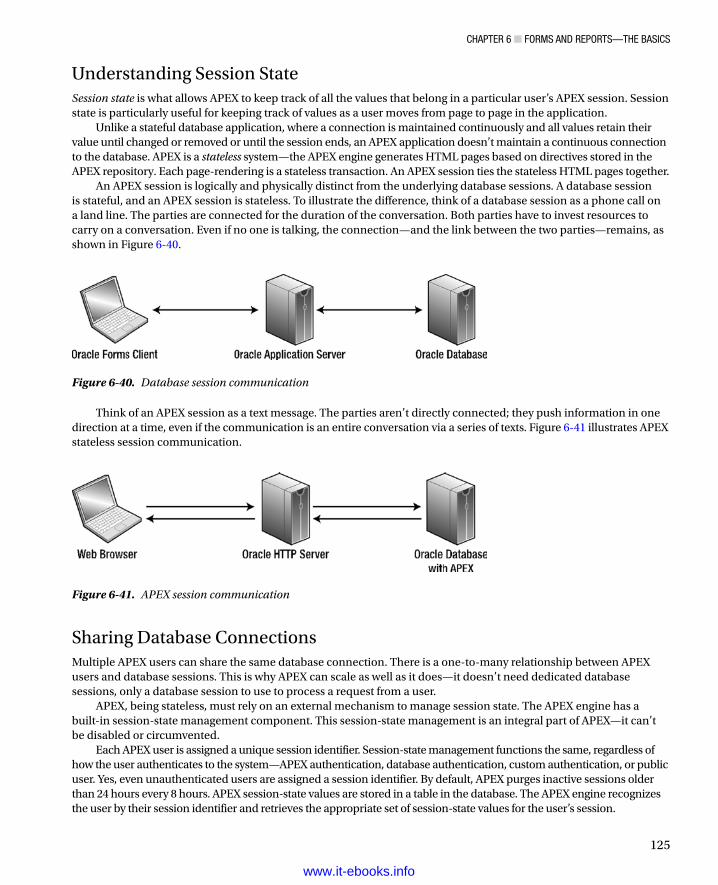
ChApter 6 ■ FOrms And repOrts—the BAsiCs
125
Understanding Session StateSession state is what allows APEX to keep track of all the values that belong in a particular user’s APEX session. Session state is particularly useful for keeping track of values as a user moves from page to page in the application.
Unlike a stateful database application, where a connection is maintained continuously and all values retain their value until changed or removed or until the session ends, an APEX application doesn’t maintain a continuous connection to the database. APEX is a stateless system—the APEX engine generates HTML pages based on directives stored in the APEX repository. Each page-rendering is a stateless transaction. An APEX session ties the stateless HTML pages together.
An APEX session is logically and physically distinct from the underlying database sessions. A database session is stateful, and an APEX session is stateless. To illustrate the difference, think of a database session as a phone call on a land line. The parties are connected for the duration of the conversation. Both parties have to invest resources to carry on a conversation. Even if no one is talking, the connection—and the link between the two parties—remains, as shown in Figure 6-40.
Figure 6-40. Database session communication
Think of an APEX session as a text message. The parties aren’t directly connected; they push information in one direction at a time, even if the communication is an entire conversation via a series of texts. Figure 6-41 illustrates APEX stateless session communication.
Figure 6-41. APEX session communication
Sharing Database ConnectionsMultiple APEX users can share the same database connection. There is a one-to-many relationship between APEX users and database sessions. This is why APEX can scale as well as it does—it doesn’t need dedicated database sessions, only a database session to use to process a request from a user.
APEX, being stateless, must rely on an external mechanism to manage session state. The APEX engine has a built-in session-state management component. This session-state management is an integral part of APEX—it can’t be disabled or circumvented.
Each APEX user is assigned a unique session identifier. Session-state management functions the same, regardless of how the user authenticates to the system—APEX authentication, database authentication, custom authentication, or public user. Yes, even unauthenticated users are assigned a session identifier. By default, APEX purges inactive sessions older than 24 hours every 8 hours. APEX session-state values are stored in a table in the database. The APEX engine recognizes the user by their session identifier and retrieves the appropriate set of session-state values for the user’s session.
www.it-ebooks.info
ChApter 6 ■ FOrms And repOrts—the BAsiCs
126
The values of all APEX items, both page items and application items, are tied to this unique session identifier. This identifier is referred to as the APP_SESSION_ID. You can see the session identifier in the URL of most pages in an APEX application. It’s highlighted in Figure 6-42.
Figure 6-42. APEX session identifier in an APEX URL
Setting and Retrieving Session StateSession state is set by user-input items, computations, processes, and PL/SQL code. In PL/SQL, when within an APEX process, you can set an item equal to a value, like so: :P1_ITEM_NAME := 'some value';
In PL/SQL, when in a stored procedure, you can use the apex_util.set_session_state procedure to set a value in session state: apex_util.set_session_state( 'P1_ITEM_NAME', 'some value');
The syntax to retrieve session state for an item varies according to where you’re referencing the item.In templates or regions, tabs, menus, or lists, use the following substitution-string syntax (and don’t forget the
trailing dot!): &P1_ITEM_NAME.
Use the following syntax in SQL statements: :P1_ITEM_NAME
From PL/SQL, use one of the following two options depending on what type of block or program unit you’re in: Anonymous PL/SQL block: :P1_ITEM_NAMEPL/SQL Unit Called from APEX: V('P1_ITEM_NAME')
Within conditions, use this syntax: P1_ITEM_NAME
Note ■ the V function just mentioned is an ApeX-provided function that retrieves the session-state value of an ApeX item. exercise caution when using this function, because using it in a stored program unit could introduce performance issues.
Viewing Session StateTo view session state, click the Session link on the Developer toolbar. You should see a page like that in Figure 6-43. Then use the Page, Find, and Views parameters to view session state for the application. The drop-down View menu shown in Figure 6-44 allows you to view Page Items, Application Items, Session State, Collections, and All of the above.
www.it-ebooks.info
ChApter 6 ■ FOrms And repOrts—the BAsiCs
127
Figure 6-43. Viewing session state
Figure 6-44. Choosing to view page items
www.it-ebooks.info
ChApter 6 ■ FOrms And repOrts—the BAsiCs
128
APEX ItemsThere are two types of APEX items: page items, which are displayed to the user on a page, and application items, which hold values in an application but aren’t displayed. When referencing item values in queries, you should use bind variables. You may also want to reference some of the built-in items that are available.
Page vs. Application ItemsAPEX page items are the UI controls that let users view and enter data—Text Field, Textarea, Select List, Checkbox, and so on. Page items are associated with a specific page and have UI properties associated with them; the item is displayed to the user (or not) according to the UI properties. Figure 6-45 shows the available APEX page item types. See the APEX documentation for more information on page item types and their attributes.
Figure 6-45. APEX page item types
Application items aren’t associated with a page and have no UI properties. They hold values in an application that are essential but not necessarily displayed. You can use an application item much like a global variable. For example, you may need to calculate sales tax based on the state the user lives in. You could read that sales tax percent from a table when the user logs in and keep the value in an application item for use throughout the user’s session.
www.it-ebooks.info
ChApter 6 ■ FOrms And repOrts—the BAsiCs
129
The Importance of Bind VariablesWhen referencing APEX item values, particularly in SQL queries in your APEX application, it’s important to think about SQL security basics, including SQL injection. Consider the example of an online form that allows a user to sign on with a username and password, which ultimately executes this query:
SELECT COUNT(*) FROM usersWHERE username = '&username' AND password = '&password'
If you enter this password I_dont_know OR 'x' = 'x
the resulting SQL is SELECT COUNT(*) FROM usersWHERE username = 'SCOTT' AND password = 'I_dont_know' OR 'x' = 'x'
This SQL statement erroneously returns 1, indicating True, rather than No data found. The user is allowed in! Not good. To prevent the injection of unintended SQL, use bind variables in the SQL query, like so: SELECT COUNT(*) FROM usersWHERE username = :USERNAME AND password = :PASSWORD
Now try entering the following as your password: I_dont_know OR 'x' = 'x
Unless this entire string is specifically your password, the database returns No data found. Your attempt to sneak past the login fails.
We recommend the use of bind variables whenever possible. They prevent SQL injection and improve SQL performance.
Built-In ItemsAPEX includes several built-in items for referencing key APEX application-wide session-state values. These are set automatically by APEX and available for reference by the developer throughout APEX. The most common of these are as follows:
• APP_ID: The application identifier of the currently running application
• APP_ALIAS: The application alias of the currently running application
• APP_USER: The currently signed-on user
• APP_SESSION: The session identifier of the currently signed-on user
• APP_PAGE_ID: The currently running page identifier
www.it-ebooks.info
ChApter 6 ■ FOrms And repOrts—the BAsiCs
130
APEX URL SyntaxEvery APEX page is a call to the APEX engine. Every APEX URL is really a call to a specific page, passing various parameters. Figure 6-46 shows the URL syntax.
f?p is the call to the f PL/SQL procedure passing the argument p. The argument is actually a concatenation of nine arguments combined into one, delimited by a colon. The nine elements of the p argument are the same for all APEX page requests. You may omit one or more of the arguments, but you must include the colon delimiters as placeholders.
The elements that form the p argument are as follows:
• APP_ID: The application number or alias
• APP_PAGE_ID: The page number or alias
• APP_SESSION: The APEX session identifier
• REQUEST: The HTML request
• DEBUG: A debug flag, set to YES or NO or omitted to use the current value of the debug flag
• Clear Cache: A list of pages for which to clear the cache
• Item names: A list of APEX item names, separated by commas
• Item values: A list of APEX item values, separated by commas, that correspond in order to the items specified in the list of item names
• Printer Friendly: A flag that determines whether the page is rendered in Printer Friendly mode
It’s easiest to understand the APEX URL syntax by looking at a few examples. Table 6-1 shows several examples and explains them.
Figure 6-46. APEX URL syntax
Table 6-1. APEX URL Examples
f?p=&APP_ID.:10:&APP_SESSION.:::10 Calls page 10 of the current application using the current session and clears the session cache for page 10
f?p=&APP_ID.:5:&APPSESSION.::NO::P2_ID:1234 Calls page 5 of the current application using the current session, not in Debug mode, setting the value of P2_ID to 1234
f?p=&APP_ID.:5:&APP_SESSION.::YES Calls page 5 of the current application using the current session in Debug mode
www.it-ebooks.info
ChApter 6 ■ FOrms And repOrts—the BAsiCs
131
As you can see, the APEX URL not only supplies directions to the server, but is also your key to what page is being requested, with what request, and with what values. So how does this URL syntax tie in to your work on the Help Desk application?
APEX applications store all values in an APEX session, which is securely bound to a specific user and user session. Values stored in this user session can easily be set or read by a developer. Any item—application or page—can be easily referenced from anywhere within your APEX application. Values can be referenced and passed to APEX as part of the p parameter to control which APEX page is rendered and what values are displayed on that page.
As the volume of data in your system grows, you need a quick way to sort through it and control what data is passed to what page. You can add a page item and then use the value of that item to filter the SQL statement for the report on page 200 of the application. In fact, an item in APEX can be referenced in a SQL or PL/SQL region, as in the predicate of a query, by using the bind variable syntax (:P1_ITEM_NAME) and as part of the APEX URL.
Getting back to the wizard-generated Tickets report, you can apply what you just learned about session state, APEX items, and the APEX URL to add a new item called P200_SEARCH that the user can use to filter the report. After you make these report modifications, you take a closer look at the components and attributes of an APEX report.
Searchable APEX ReportsReports with Edit links let users scan a list of rows and choose one to modify. Scanning works well for reports that are short. But when reports are long, especially more than a page or two, it’s time to add some search functionality to help a user quickly zero in on a record to edit.
Creating a Searchable APEX ReportYou’ve already modified the Tickets report generated by the Master Detail Form Wizard to add sorting, CSV export capability, and a readable status value. As generated, the report has an Edit link on the first column, which navigates to a Ticket—Ticket Details master-detail form. For the user to find the correct ticket to edit, you need a search function. In the next series of steps you add a Search item and a Go button to activate the search, and you modify the report query to filter on the Search value:
1. Edit Page 200 of the application.
2. Create a new item in the Tickets region by right-clicking the region name and selecting Create Page Item.
3. Select Text Field, and click Next.
4. Enter P200_SEARCH for the Item Name, as shown in Figure 6-47. Make sure Tickets (10) is selected as the Region, and click Next.
Figure 6-47. Creating a search field
www.it-ebooks.info
ChApter 6 ■ FOrms And repOrts—the BAsiCs
132
5. No changes are needed for the Item Attributes. Click Next.
6. Set the value of Submit When Enter pressed to Yes. Click Next.
7. Accept the defaults on the next page, and click Create Item.
Although you just set the item attributes so that the page is submitted when the Enter key is pressed, it’s still a good practice to provide a way to submit the page using the mouse. Next you create a new button that, when clicked, processes the item value, stores it in session state, and then reloads page 200:
8. Create a new Button item by right-clicking the Tickets region and selecting Create Page Item Button. Be careful not to select Create Region Button, because that would place the button at the top of the region as opposed to alongside your text box.
9. Enter P200_GO as the Button Name, as shown in Figure 6-48. Leave all the other values alone, and click Create Button.
Figure 6-48. Creating a Go button for the search function
Next, you’ll adjust the report query to apply the P200_SEARCH filter. First you need to convert the query from a structured report to a SQL report. A structured report is a result returned from the Query Builder. A SQL report is more flexible, because it allows you to enter any valid SQL, rather than rely on a limited set of declarative options. After you convert the report to a SQL query, you’ll add a line to the query predicate that uses the value stored in P200_SEARCH as a filter:
10. Edit the Tickets region definition by double-clicking its name.
11. In the Tasks region on the right side of the page, click Convert to SQL Query. Click OKwhen prompted.
12. Edit the Tickets region again by double-clicking its name.
You now see the Source Region, which contains the SQL Query:
13. Append the following line to the end of the query, and click Apply Changes:
AND UPPER(subject) LIKE '%'||UPPER(:P200_SEARCH)||'%'
14. Run your report. Remember to test both the button and pressing Enter while editing the Search field. Both should filter the report correctly.
www.it-ebooks.info
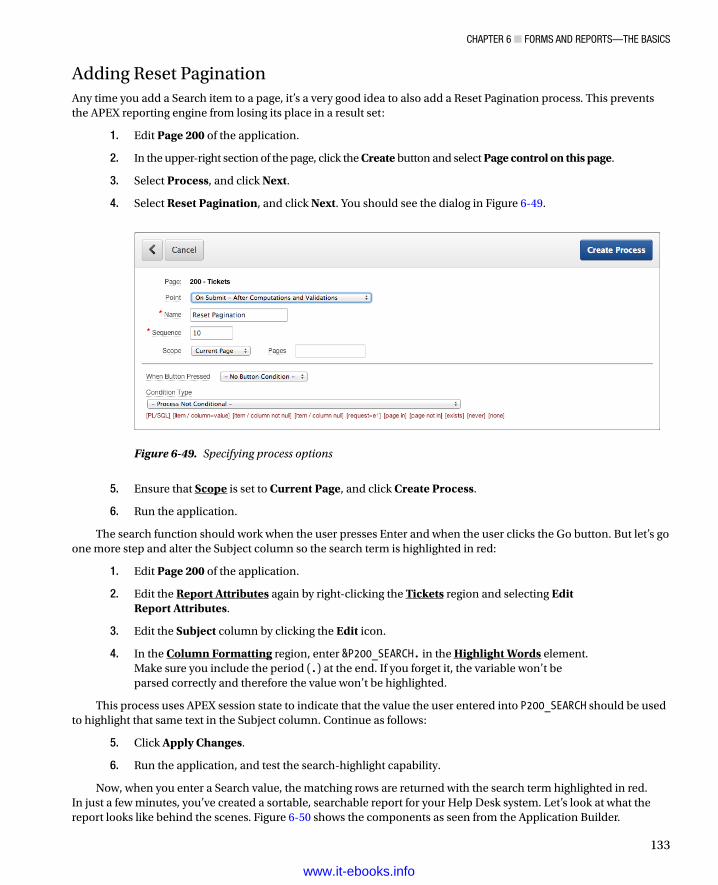
ChApter 6 ■ FOrms And repOrts—the BAsiCs
133
Adding Reset PaginationAny time you add a Search item to a page, it’s a very good idea to also add a Reset Pagination process. This prevents the APEX reporting engine from losing its place in a result set:
1. Edit Page 200 of the application.
2. In the upper-right section of the page, click the Create button and select Page control on this page.
3. Select Process, and click Next.
4. Select Reset Pagination, and click Next. You should see the dialog in Figure 6-49.
Figure 6-49. Specifying process options
5. Ensure that Scope is set to Current Page, and click Create Process.
6. Run the application.
The search function should work when the user presses Enter and when the user clicks the Go button. But let’s go one more step and alter the Subject column so the search term is highlighted in red:
1. Edit Page 200 of the application.
2. Edit the Report Attributes again by right-clicking the Tickets region and selecting Edit Report Attributes.
3. Edit the Subject column by clicking the Edit icon.
4. In the Column Formatting region, enter &P200_SEARCH. in the Highlight Words element. Make sure you include the period (.) at the end. If you forget it, the variable won’t be parsed correctly and therefore the value won’t be highlighted.
This process uses APEX session state to indicate that the value the user entered into P200_SEARCH should be used to highlight that same text in the Subject column. Continue as follows:
5. Click Apply Changes.
6. Run the application, and test the search-highlight capability.
Now, when you enter a Search value, the matching rows are returned with the search term highlighted in red. In just a few minutes, you’ve created a sortable, searchable report for your Help Desk system. Let’s look at what the report looks like behind the scenes. Figure 6-50 shows the components as seen from the Application Builder.
www.it-ebooks.info
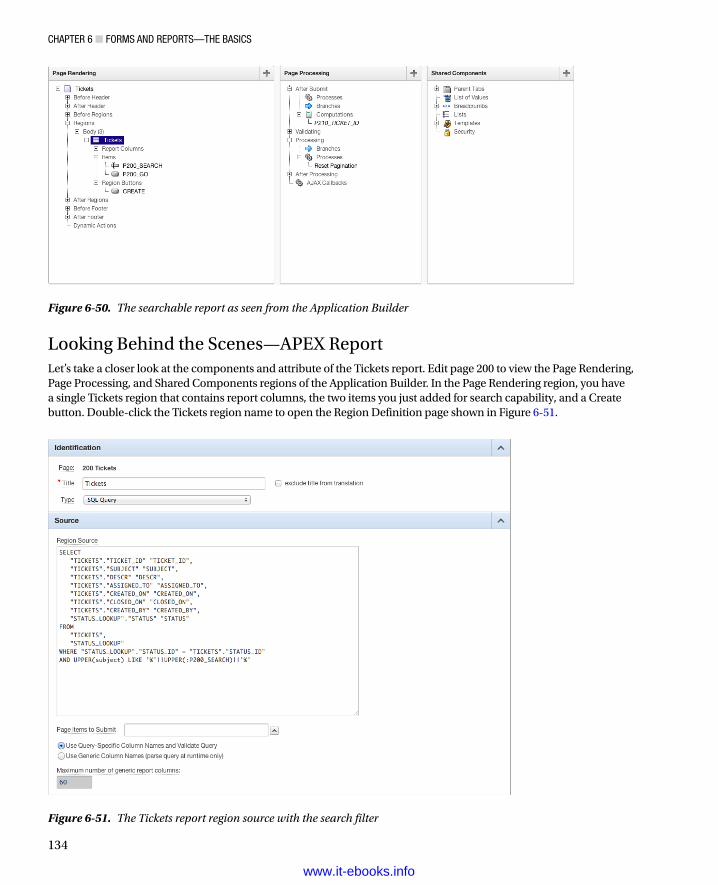
ChApter 6 ■ FOrms And repOrts—the BAsiCs
134
Looking Behind the Scenes—APEX ReportLet’s take a closer look at the components and attribute of the Tickets report. Edit page 200 to view the Page Rendering, Page Processing, and Shared Components regions of the Application Builder. In the Page Rendering region, you have a single Tickets region that contains report columns, the two items you just added for search capability, and a Create button. Double-click the Tickets region name to open the Region Definition page shown in Figure 6-51.
Figure 6-50. The searchable report as seen from the Application Builder
Figure 6-51. The Tickets report region source with the search filter
www.it-ebooks.info
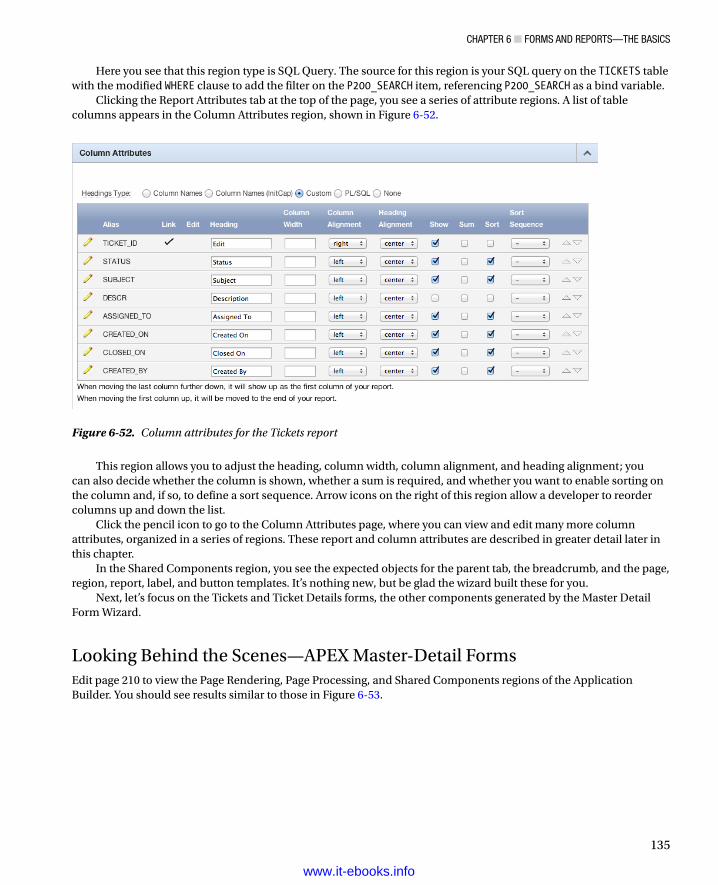
ChApter 6 ■ FOrms And repOrts—the BAsiCs
135
Here you see that this region type is SQL Query. The source for this region is your SQL query on the TICKETS table with the modified WHERE clause to add the filter on the P200_SEARCH item, referencing P200_SEARCH as a bind variable.
Clicking the Report Attributes tab at the top of the page, you see a series of attribute regions. A list of table columns appears in the Column Attributes region, shown in Figure 6-52.
Figure 6-52. Column attributes for the Tickets report
This region allows you to adjust the heading, column width, column alignment, and heading alignment; you can also decide whether the column is shown, whether a sum is required, and whether you want to enable sorting on the column and, if so, to define a sort sequence. Arrow icons on the right of this region allow a developer to reorder columns up and down the list.
Click the pencil icon to go to the Column Attributes page, where you can view and edit many more column attributes, organized in a series of regions. These report and column attributes are described in greater detail later in this chapter.
In the Shared Components region, you see the expected objects for the parent tab, the breadcrumb, and the page, region, report, label, and button templates. It’s nothing new, but be glad the wizard built these for you.
Next, let’s focus on the Tickets and Ticket Details forms, the other components generated by the Master Detail Form Wizard.
Looking Behind the Scenes—APEX Master-Detail FormsEdit page 210 to view the Page Rendering, Page Processing, and Shared Components regions of the Application Builder. You should see results similar to those in Figure 6-53.
www.it-ebooks.info
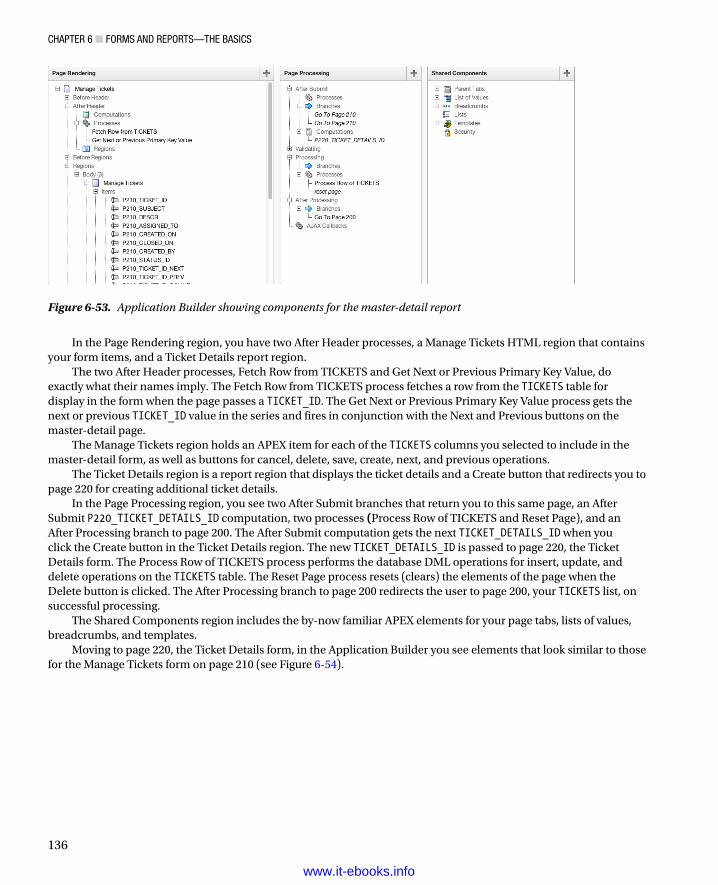
ChApter 6 ■ FOrms And repOrts—the BAsiCs
136
In the Page Rendering region, you have two After Header processes, a Manage Tickets HTML region that contains your form items, and a Ticket Details report region.
The two After Header processes, Fetch Row from TICKETS and Get Next or Previous Primary Key Value, do exactly what their names imply. The Fetch Row from TICKETS process fetches a row from the TICKETS table for display in the form when the page passes a TICKET_ID. The Get Next or Previous Primary Key Value process gets the next or previous TICKET_ID value in the series and fires in conjunction with the Next and Previous buttons on the master-detail page.
The Manage Tickets region holds an APEX item for each of the TICKETS columns you selected to include in the master-detail form, as well as buttons for cancel, delete, save, create, next, and previous operations.
The Ticket Details region is a report region that displays the ticket details and a Create button that redirects you to page 220 for creating additional ticket details.
In the Page Processing region, you see two After Submit branches that return you to this same page, an After Submit P220_TICKET_DETAILS_ID computation, two processes (Process Row of TICKETS and Reset Page), and an After Processing branch to page 200. The After Submit computation gets the next TICKET_DETAILS_ID when you click the Create button in the Ticket Details region. The new TICKET_DETAILS_ID is passed to page 220, the Ticket Details form. The Process Row of TICKETS process performs the database DML operations for insert, update, and delete operations on the TICKETS table. The Reset Page process resets (clears) the elements of the page when the Delete button is clicked. The After Processing branch to page 200 redirects the user to page 200, your TICKETS list, on successful processing.
The Shared Components region includes the by-now familiar APEX elements for your page tabs, lists of values, breadcrumbs, and templates.
Moving to page 220, the Ticket Details form, in the Application Builder you see elements that look similar to those for the Manage Tickets form on page 210 (see Figure 6-54).
Figure 6-53. Application Builder showing components for the master-detail report
www.it-ebooks.info
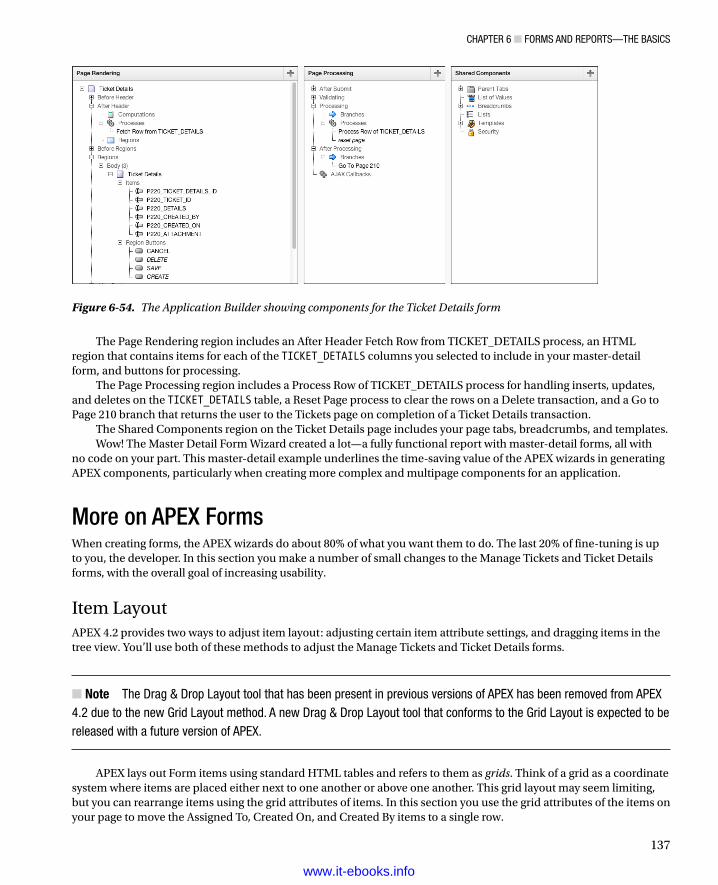
ChApter 6 ■ FOrms And repOrts—the BAsiCs
137
The Page Rendering region includes an After Header Fetch Row from TICKET_DETAILS process, an HTML region that contains items for each of the TICKET_DETAILS columns you selected to include in your master-detail form, and buttons for processing.
The Page Processing region includes a Process Row of TICKET_DETAILS process for handling inserts, updates, and deletes on the TICKET_DETAILS table, a Reset Page process to clear the rows on a Delete transaction, and a Go to Page 210 branch that returns the user to the Tickets page on completion of a Ticket Details transaction.
The Shared Components region on the Ticket Details page includes your page tabs, breadcrumbs, and templates.Wow! The Master Detail Form Wizard created a lot—a fully functional report with master-detail forms, all with
no code on your part. This master-detail example underlines the time-saving value of the APEX wizards in generating APEX components, particularly when creating more complex and multipage components for an application.
More on APEX FormsWhen creating forms, the APEX wizards do about 80% of what you want them to do. The last 20% of fine-tuning is up to you, the developer. In this section you make a number of small changes to the Manage Tickets and Ticket Details forms, with the overall goal of increasing usability.
Item LayoutAPEX 4.2 provides two ways to adjust item layout: adjusting certain item attribute settings, and dragging items in the tree view. You’ll use both of these methods to adjust the Manage Tickets and Ticket Details forms.
Note ■ the drag & drop Layout tool that has been present in previous versions of ApeX has been removed from ApeX 4.2 due to the new Grid Layout method. A new drag & drop Layout tool that conforms to the Grid Layout is expected to be released with a future version of ApeX.
APEX lays out Form items using standard HTML tables and refers to them as grids. Think of a grid as a coordinate system where items are placed either next to one another or above one another. This grid layout may seem limiting, but you can rearrange items using the grid attributes of items. In this section you use the grid attributes of the items on your page to move the Assigned To, Created On, and Created By items to a single row.
Figure 6-54. The Application Builder showing components for the Ticket Details form
www.it-ebooks.info
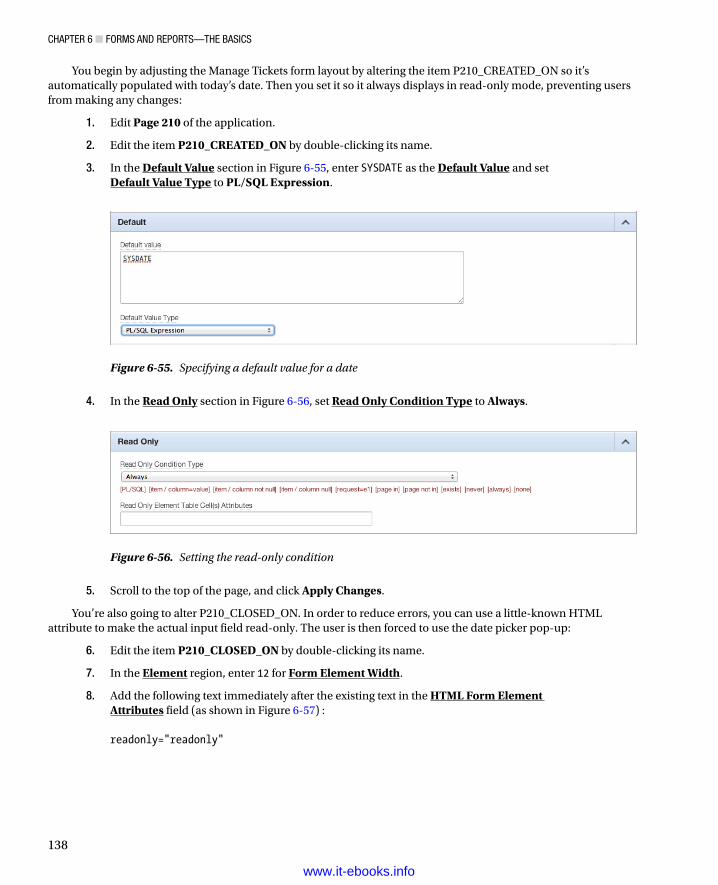
ChApter 6 ■ FOrms And repOrts—the BAsiCs
138
5. Scroll to the top of the page, and click Apply Changes.
You’re also going to alter P210_CLOSED_ON. In order to reduce errors, you can use a little-known HTML attribute to make the actual input field read-only. The user is then forced to use the date picker pop-up:
6. Edit the item P210_CLOSED_ON by double-clicking its name.
7. In the Element region, enter 12 for Form Element Width.
8. Add the following text immediately after the existing text in the HTML Form Element Attributes field (as shown in Figure 6-57) :
readonly="readonly"
You begin by adjusting the Manage Tickets form layout by altering the item P210_CREATED_ON so it’s automatically populated with today’s date. Then you set it so it always displays in read-only mode, preventing users from making any changes:
1. Edit Page 210 of the application.
2. Edit the item P210_CREATED_ON by double-clicking its name.
3. In the Default Value section in Figure 6-55, enter SYSDATE as the Default Value and set Default Value Type to PL/SQL Expression.
4. In the Read Only section in Figure 6-56, set Read Only Condition Type to Always.
Figure 6-55. Specifying a default value for a date
Figure 6-56. Setting the read-only condition
www.it-ebooks.info
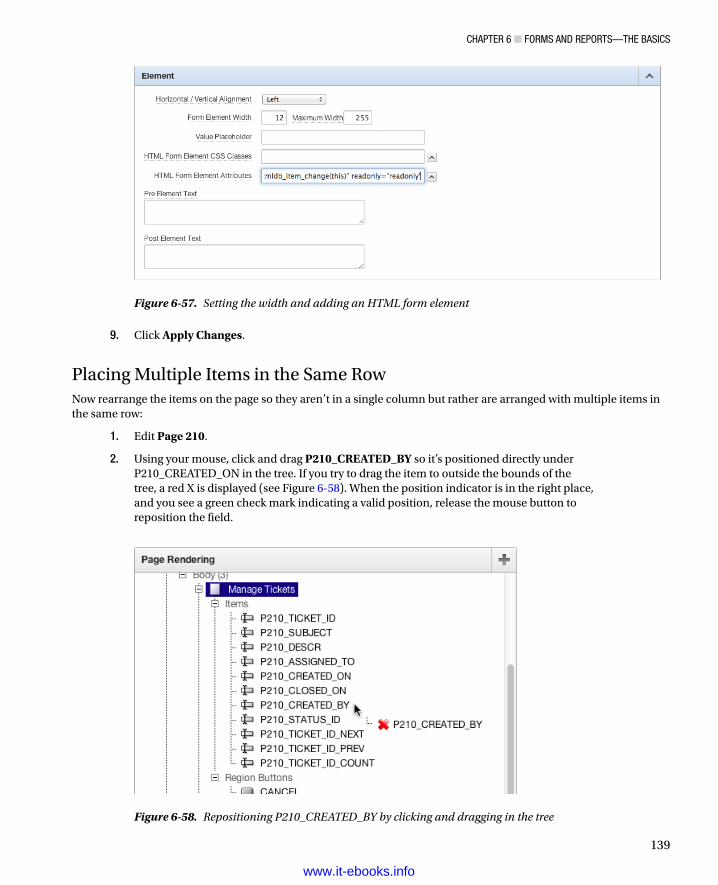
ChApter 6 ■ FOrms And repOrts—the BAsiCs
139
Figure 6-57. Setting the width and adding an HTML form element
Figure 6-58. Repositioning P210_CREATED_BY by clicking and dragging in the tree
9. Click Apply Changes.
Placing Multiple Items in the Same RowNow rearrange the items on the page so they aren’t in a single column but rather are arranged with multiple items in the same row:
1. Edit Page 210.
2. Using your mouse, click and drag P210_CREATED_BY so it’s positioned directly under P210_CREATED_ON in the tree. If you try to drag the item to outside the bounds of the tree, a red X is displayed (see Figure 6-58). When the position indicator is in the right place, and you see a green check mark indicating a valid position, release the mouse button to reposition the field.
www.it-ebooks.info
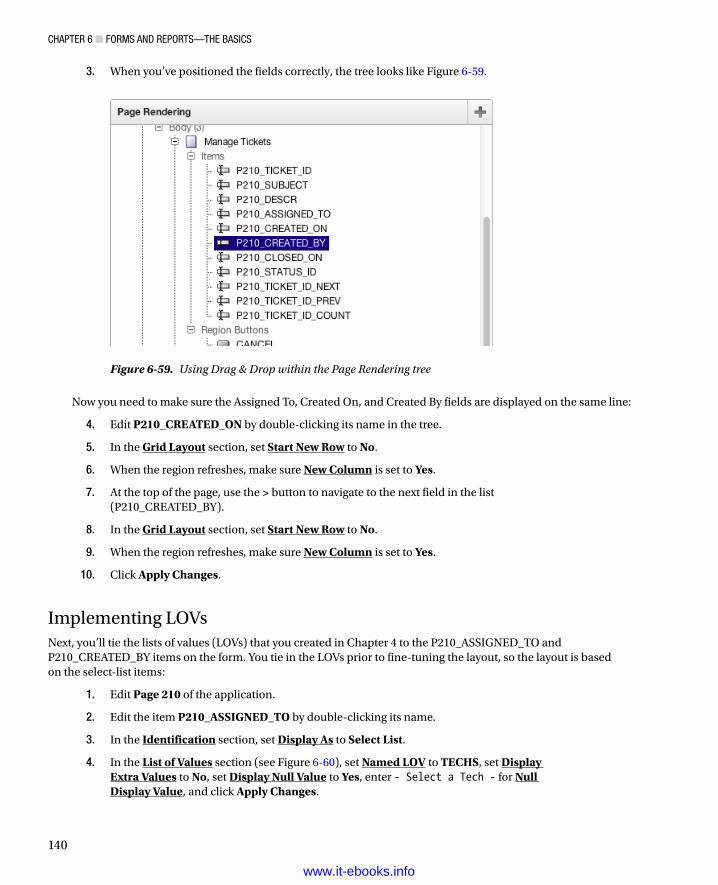
ChApter 6 ■ FOrms And repOrts—the BAsiCs
140
3. When you’ve positioned the fields correctly, the tree looks like Figure 6-59.
Figure 6-59. Using Drag & Drop within the Page Rendering tree
Now you need to make sure the Assigned To, Created On, and Created By fields are displayed on the same line:
4. Edit P210_CREATED_ON by double-clicking its name in the tree.
5. In the Grid Layout section, set Start New Row to No.
6. When the region refreshes, make sure New Column is set to Yes.
7. At the top of the page, use the > button to navigate to the next field in the list (P210_CREATED_BY).
8. In the Grid Layout section, set Start New Row to No.
9. When the region refreshes, make sure New Column is set to Yes.
10. Click Apply Changes.
Implementing LOVsNext, you’ll tie the lists of values (LOVs) that you created in Chapter 4 to the P210_ASSIGNED_TO and P210_CREATED_BY items on the form. You tie in the LOVs prior to fine-tuning the layout, so the layout is based on the select-list items:
1. Edit Page 210 of the application.
2. Edit the item P210_ASSIGNED_TO by double-clicking its name.
3. In the Identification section, set Display As to Select List.
4. In the List of Values section (see Figure 6-60), set Named LOV to TECHS, set Display Extra Values to No, set Display Null Value to Yes, enter - Select a Tech - for Null Display Value, and click Apply Changes.
www.it-ebooks.info
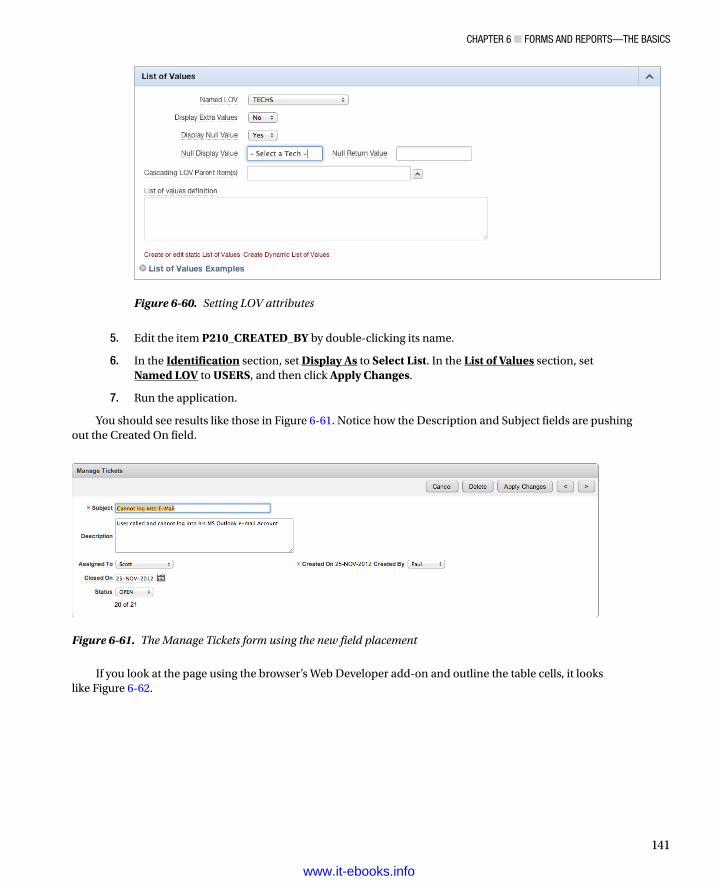
ChApter 6 ■ FOrms And repOrts—the BAsiCs
141
If you look at the page using the browser’s Web Developer add-on and outline the table cells, it looks like Figure 6-62.
5. Edit the item P210_CREATED_BY by double-clicking its name.
6. In the Identification section, set Display As to Select List. In the List of Values section, set Named LOV to USERS, and then click Apply Changes.
7. Run the application.
You should see results like those in Figure 6-61. Notice how the Description and Subject fields are pushing out the Created On field.
Figure 6-61. The Manage Tickets form using the new field placement
Figure 6-60. Setting LOV attributes
www.it-ebooks.info

ChApter 6 ■ FOrms And repOrts—the BAsiCs
142
Notice that there is a lot of whitespace between Assigned To and Created On. You can resolve this a couple of ways. If the Description text area is a static size (that is, not resizable by the user), you can alter the number of columns that the Subject and Description fields take up by altering their colspan value. This allows the Created On field to begin immediately after the Assigned To field:
8. Edit the item P210_SUBJECT by double-clicking its name.
9. In the Grid Layout region, as shown in Figure 6-63, set Column Span to 4, and click Apply Changes.
Figure 6-62. The Manage Tickets form with table cells outlined
Figure 6-63. Altering Column Span to reduce whitespace
10. Edit the item P210_DESCR by double-clicking its name.
11. In the Grid Layout region, set Column Span to 4, and click Apply Changes.
12. Once again, run the application, and notice the difference in how the items are laid out on the page now. You should see results like those in Figure 6-64.
www.it-ebooks.info
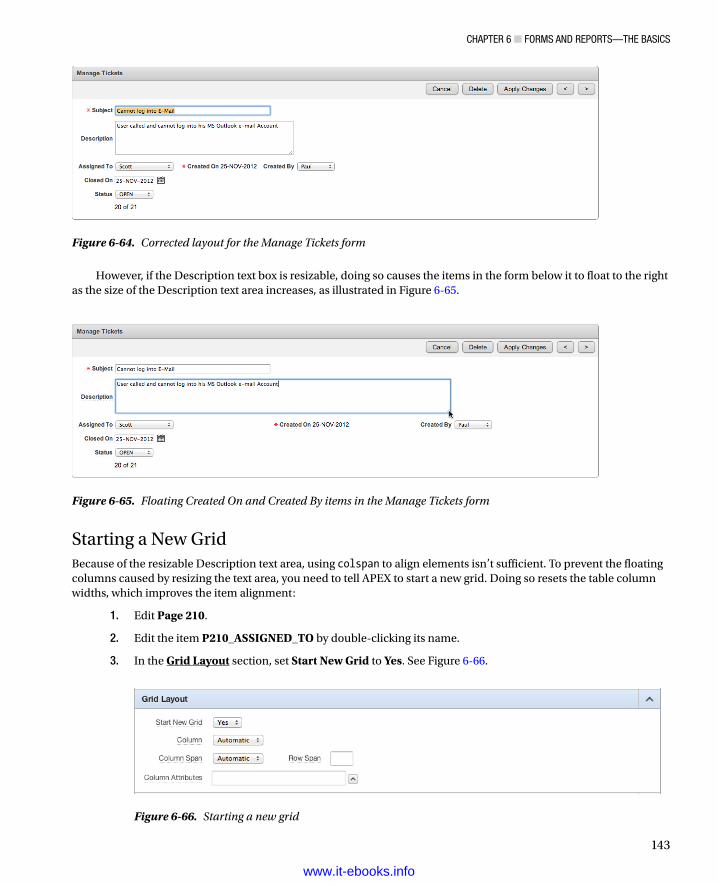
ChApter 6 ■ FOrms And repOrts—the BAsiCs
143
However, if the Description text box is resizable, doing so causes the items in the form below it to float to the right as the size of the Description text area increases, as illustrated in Figure 6-65.
Figure 6-64. Corrected layout for the Manage Tickets form
Figure 6-65. Floating Created On and Created By items in the Manage Tickets form
Figure 6-66. Starting a new grid
Starting a New GridBecause of the resizable Description text area, using colspan to align elements isn’t sufficient. To prevent the floating columns caused by resizing the text area, you need to tell APEX to start a new grid. Doing so resets the table column widths, which improves the item alignment:
1. Edit Page 210.
2. Edit the item P210_ASSIGNED_TO by double-clicking its name.
3. In the Grid Layout section, set Start New Grid to Yes. See Figure 6-66.
www.it-ebooks.info

ChApter 6 ■ FOrms And repOrts—the BAsiCs
144
4. Click Apply Changes.
5. Run the application and notice the difference in how the items are now aligned alongside each other, as shown in Figure 6-67.
Figure 6-67. Manage Tickets form with corrected item alignment
Regardless of how the user resizes the Description text area, the Created By and Created On fields remain aligned.
Master-Detail CleanupYou need to make a few more minor tweaks to the master-detail report and form. Let’s start by hiding the TICKET_ID column from the detail report and form. At the detail level, TICKET_ID is the foreign key and should not be an editable item:
1. Edit Page 210 of the application.
2. Edit the Ticket Details report attributes by right-clicking the region name and selecting Edit Report Attributes.
3. Hide the TICKET_ID column by unchecking the value in the Show column.
4. Enable sorting for the DETAILS, CREATED_ON, and CREATED_BY columns by selecting the corresponding check boxes in the Sort column. These changes are shown in Figure 6-68.
Figure 6-68. Hiding the ticket ID and specifying Sort columns
www.it-ebooks.info
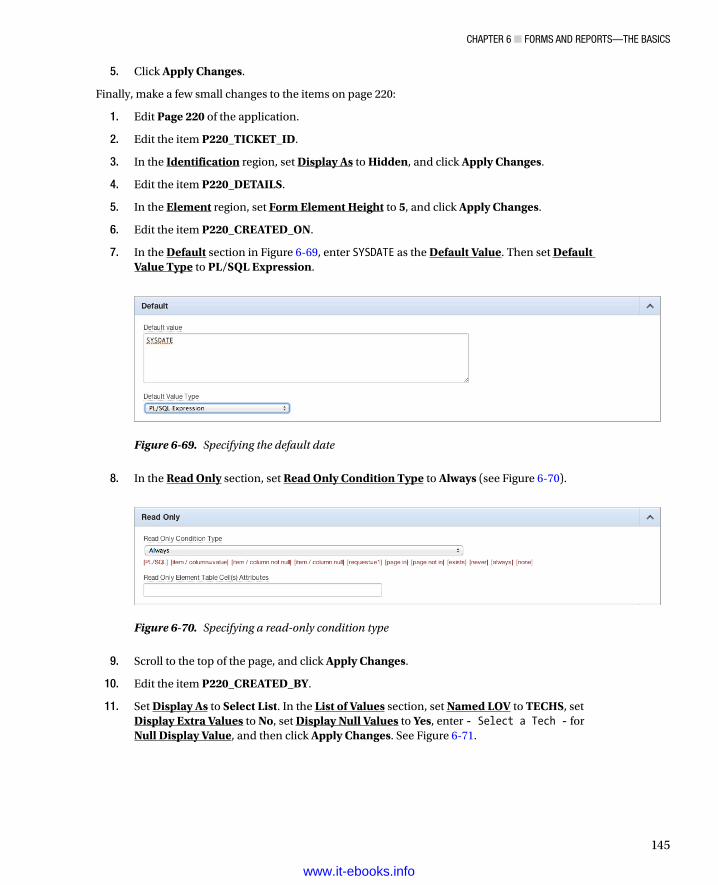
ChApter 6 ■ FOrms And repOrts—the BAsiCs
145
5. Click Apply Changes.
Finally, make a few small changes to the items on page 220:
1. Edit Page 220 of the application.
2. Edit the item P220_TICKET_ID.
3. In the Identification region, set Display As to Hidden, and click Apply Changes.
4. Edit the item P220_DETAILS.
5. In the Element region, set Form Element Height to 5, and click Apply Changes.
6. Edit the item P220_CREATED_ON.
7. In the Default section in Figure 6-69, enter SYSDATE as the Default Value. Then set Default Value Type to PL/SQL Expression.
Figure 6-69. Specifying the default date
8. In the Read Only section, set Read Only Condition Type to Always (see Figure 6-70).
9. Scroll to the top of the page, and click Apply Changes.
10. Edit the item P220_CREATED_BY.
11. Set Display As to Select List. In the List of Values section, set Named LOV to TECHS, set Display Extra Values to No, set Display Null Values to Yes, enter - Select a Tech - for Null Display Value, and then click Apply Changes. See Figure 6-71.
Figure 6-70. Specifying a read-only condition type
www.it-ebooks.info
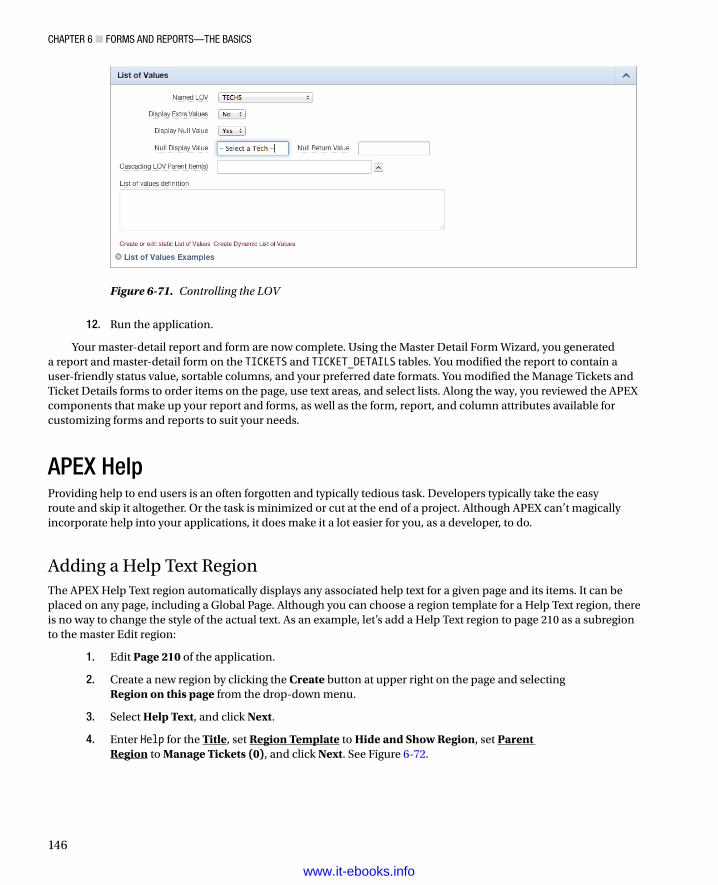
ChApter 6 ■ FOrms And repOrts—the BAsiCs
146
12. Run the application.
Your master-detail report and form are now complete. Using the Master Detail Form Wizard, you generated a report and master-detail form on the TICKETS and TICKET_DETAILS tables. You modified the report to contain a user-friendly status value, sortable columns, and your preferred date formats. You modified the Manage Tickets and Ticket Details forms to order items on the page, use text areas, and select lists. Along the way, you reviewed the APEX components that make up your report and forms, as well as the form, report, and column attributes available for customizing forms and reports to suit your needs.
APEX HelpProviding help to end users is an often forgotten and typically tedious task. Developers typically take the easy route and skip it altogether. Or the task is minimized or cut at the end of a project. Although APEX can’t magically incorporate help into your applications, it does make it a lot easier for you, as a developer, to do.
Adding a Help Text RegionThe APEX Help Text region automatically displays any associated help text for a given page and its items. It can be placed on any page, including a Global Page. Although you can choose a region template for a Help Text region, there is no way to change the style of the actual text. As an example, let’s add a Help Text region to page 210 as a subregion to the master Edit region:
1. Edit Page 210 of the application.
2. Create a new region by clicking the Create button at upper right on the page and selecting Region on this page from the drop-down menu.
3. Select Help Text, and click Next.
4. Enter Help for the Title, set Region Template to Hide and Show Region, set Parent Region to Manage Tickets (0), and click Next. See Figure 6-72.
Figure 6-71. Controlling the LOV
www.it-ebooks.info
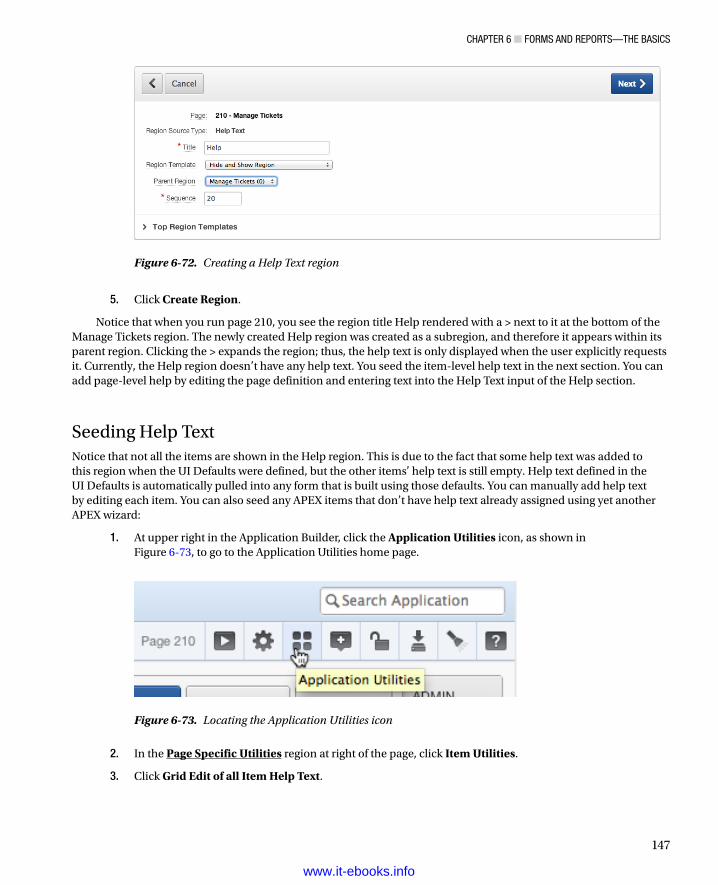
ChApter 6 ■ FOrms And repOrts—the BAsiCs
147
5. Click Create Region.
Notice that when you run page 210, you see the region title Help rendered with a > next to it at the bottom of the Manage Tickets region. The newly created Help region was created as a subregion, and therefore it appears within its parent region. Clicking the > expands the region; thus, the help text is only displayed when the user explicitly requests it. Currently, the Help region doesn’t have any help text. You seed the item-level help text in the next section. You can add page-level help by editing the page definition and entering text into the Help Text input of the Help section.
Seeding Help TextNotice that not all the items are shown in the Help region. This is due to the fact that some help text was added to this region when the UI Defaults were defined, but the other items’ help text is still empty. Help text defined in the UI Defaults is automatically pulled into any form that is built using those defaults. You can manually add help text by editing each item. You can also seed any APEX items that don’t have help text already assigned using yet another APEX wizard:
1. At upper right in the Application Builder, click the Application Utilities icon, as shown in Figure 6-73, to go to the Application Utilities home page.
Figure 6-72. Creating a Help Text region
Figure 6-73. Locating the Application Utilities icon
2. In the Page Specific Utilities region at right of the page, click Item Utilities.
3. Click Grid Edit of all Item Help Text.
www.it-ebooks.info
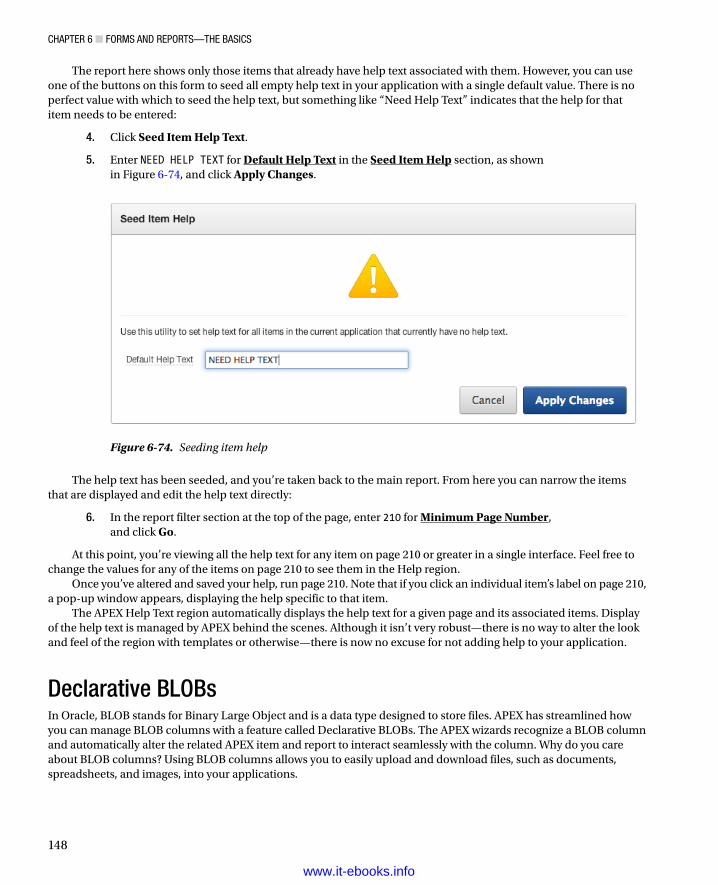
ChApter 6 ■ FOrms And repOrts—the BAsiCs
148
The report here shows only those items that already have help text associated with them. However, you can use one of the buttons on this form to seed all empty help text in your application with a single default value. There is no perfect value with which to seed the help text, but something like “Need Help Text” indicates that the help for that item needs to be entered:
4. Click Seed Item Help Text.
5. Enter NEED HELP TEXT for Default Help Text in the Seed Item Help section, as shown in Figure 6-74, and click Apply Changes.
Figure 6-74. Seeding item help
The help text has been seeded, and you’re taken back to the main report. From here you can narrow the items that are displayed and edit the help text directly:
6. In the report filter section at the top of the page, enter 210 for Minimum Page Number, and click Go.
At this point, you’re viewing all the help text for any item on page 210 or greater in a single interface. Feel free to change the values for any of the items on page 210 to see them in the Help region.
Once you’ve altered and saved your help, run page 210. Note that if you click an individual item’s label on page 210, a pop-up window appears, displaying the help specific to that item.
The APEX Help Text region automatically displays the help text for a given page and its associated items. Display of the help text is managed by APEX behind the scenes. Although it isn’t very robust—there is no way to alter the look and feel of the region with templates or otherwise—there is now no excuse for not adding help to your application.
Declarative BLOBsIn Oracle, BLOB stands for Binary Large Object and is a data type designed to store files. APEX has streamlined how you can manage BLOB columns with a feature called Declarative BLOBs. The APEX wizards recognize a BLOB column and automatically alter the related APEX item and report to interact seamlessly with the column. Why do you care about BLOB columns? Using BLOB columns allows you to easily upload and download files, such as documents, spreadsheets, and images, into your applications.
www.it-ebooks.info
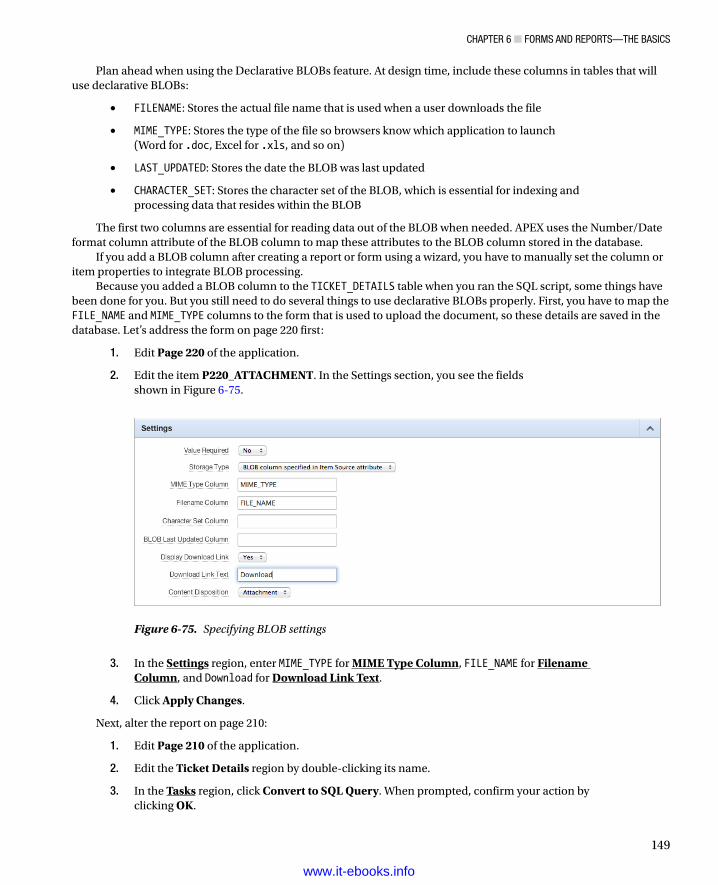
ChApter 6 ■ FOrms And repOrts—the BAsiCs
149
Plan ahead when using the Declarative BLOBs feature. At design time, include these columns in tables that will use declarative BLOBs:
• FILENAME: Stores the actual file name that is used when a user downloads the file
• MIME_TYPE: Stores the type of the file so browsers know which application to launch (Word for .doc, Excel for .xls, and so on)
• LAST_UPDATED: Stores the date the BLOB was last updated
• CHARACTER_SET: Stores the character set of the BLOB, which is essential for indexing and processing data that resides within the BLOB
The first two columns are essential for reading data out of the BLOB when needed. APEX uses the Number/Date format column attribute of the BLOB column to map these attributes to the BLOB column stored in the database.
If you add a BLOB column after creating a report or form using a wizard, you have to manually set the column or item properties to integrate BLOB processing.
Because you added a BLOB column to the TICKET_DETAILS table when you ran the SQL script, some things have been done for you. But you still need to do several things to use declarative BLOBs properly. First, you have to map the FILE_NAME and MIME_TYPE columns to the form that is used to upload the document, so these details are saved in the database. Let’s address the form on page 220 first:
1. Edit Page 220 of the application.
2. Edit the item P220_ATTACHMENT. In the Settings section, you see the fields shown in Figure 6-75.
Figure 6-75. Specifying BLOB settings
3. In the Settings region, enter MIME_TYPE for MIME Type Column, FILE_NAME for Filename Column, and Download for Download Link Text.
4. Click Apply Changes.
Next, alter the report on page 210:
1. Edit Page 210 of the application.
2. Edit the Ticket Details region by double-clicking its name.
3. In the Tasks region, click Convert to SQL Query. When prompted, confirm your action by clicking OK.
www.it-ebooks.info
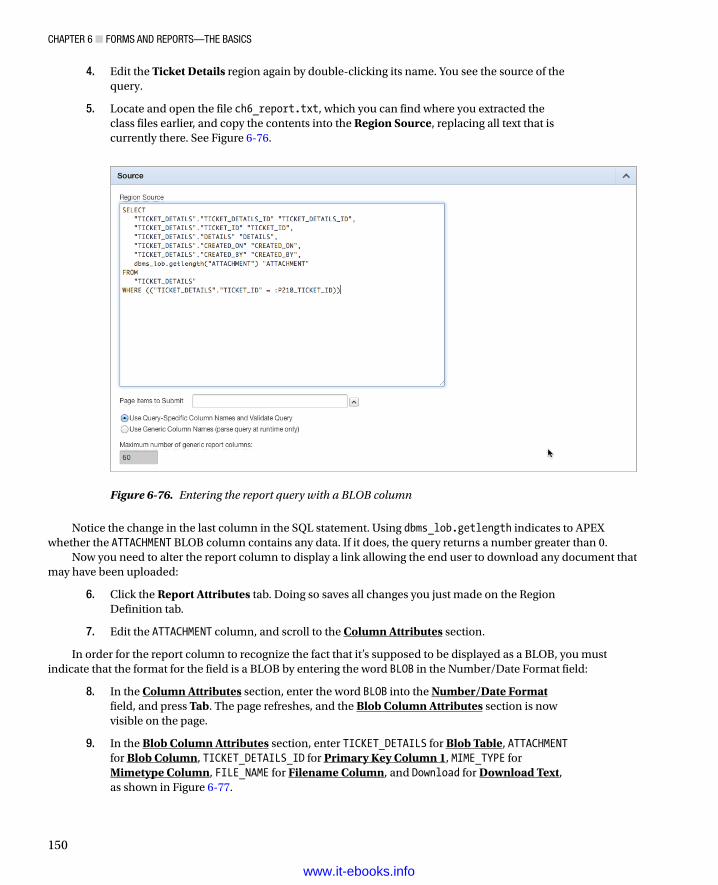
ChApter 6 ■ FOrms And repOrts—the BAsiCs
150
4. Edit the Ticket Details region again by double-clicking its name. You see the source of the query.
5. Locate and open the file ch6_report.txt, which you can find where you extracted the class files earlier, and copy the contents into the Region Source, replacing all text that is currently there. See Figure 6-76.
Figure 6-76. Entering the report query with a BLOB column
Notice the change in the last column in the SQL statement. Using dbms_lob.getlength indicates to APEX whether the ATTACHMENT BLOB column contains any data. If it does, the query returns a number greater than 0.
Now you need to alter the report column to display a link allowing the end user to download any document that may have been uploaded:
6. Click the Report Attributes tab. Doing so saves all changes you just made on the Region Definition tab.
7. Edit the ATTACHMENT column, and scroll to the Column Attributes section.
In order for the report column to recognize the fact that it’s supposed to be displayed as a BLOB, you must indicate that the format for the field is a BLOB by entering the word BLOB in the Number/Date Format field:
8. In the Column Attributes section, enter the word BLOB into the Number/Date Format field, and press Tab. The page refreshes, and the Blob Column Attributes section is now visible on the page.
9. In the Blob Column Attributes section, enter TICKET_DETAILS for Blob Table, ATTACHMENT for Blob Column, TICKET_DETAILS_ID for Primary Key Column 1, MIME_TYPE for Mimetype Column, FILE_NAME for Filename Column, and Download for Download Text, as shown in Figure 6-77.
www.it-ebooks.info
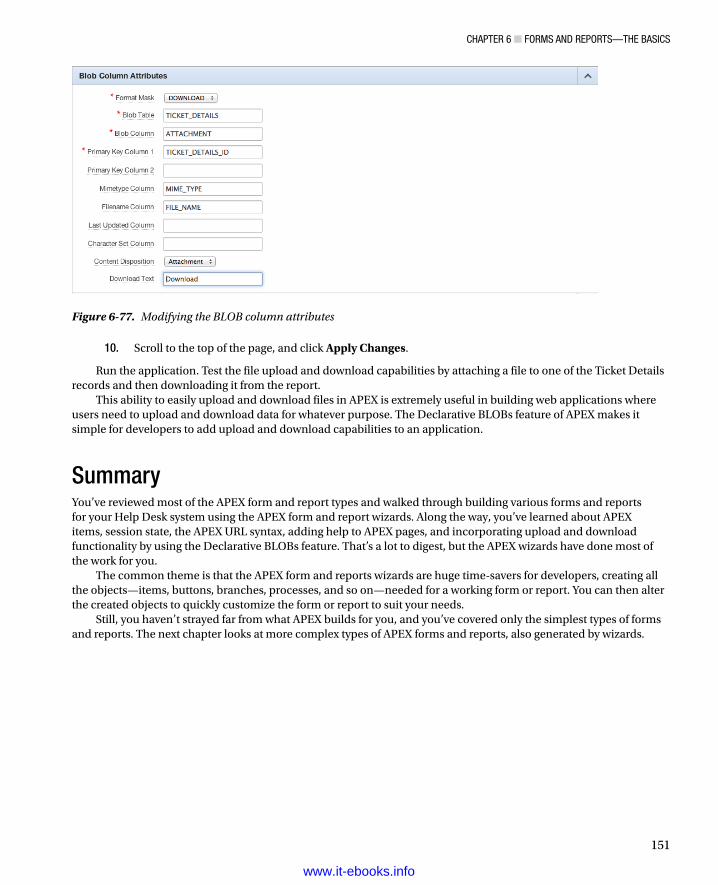
ChApter 6 ■ FOrms And repOrts—the BAsiCs
151
10. Scroll to the top of the page, and click Apply Changes.
Run the application. Test the file upload and download capabilities by attaching a file to one of the Ticket Details records and then downloading it from the report.
This ability to easily upload and download files in APEX is extremely useful in building web applications where users need to upload and download data for whatever purpose. The Declarative BLOBs feature of APEX makes it simple for developers to add upload and download capabilities to an application.
SummaryYou’ve reviewed most of the APEX form and report types and walked through building various forms and reports for your Help Desk system using the APEX form and report wizards. Along the way, you’ve learned about APEX items, session state, the APEX URL syntax, adding help to APEX pages, and incorporating upload and download functionality by using the Declarative BLOBs feature. That’s a lot to digest, but the APEX wizards have done most of the work for you.
The common theme is that the APEX form and reports wizards are huge time-savers for developers, creating all the objects—items, buttons, branches, processes, and so on—needed for a working form or report. You can then alter the created objects to quickly customize the form or report to suit your needs.
Still, you haven’t strayed far from what APEX builds for you, and you’ve covered only the simplest types of forms and reports. The next chapter looks at more complex types of APEX forms and reports, also generated by wizards.
Figure 6-77. Modifying the BLOB column attributes
www.it-ebooks.info
153
Chapter 7
Forms and Reports—Advanced
This chapter focuses on more complex types of forms and reports; it also introduces charts and maps. Although these are more complex types of forms and reports, they’re most often created by using the APEX form and report wizards.
In the sections that follow, you learn how to use the APEX form and report wizards to add pages to your Help Desk application to manage multiple tickets on a single page, allow some interactive analysis of ticket data, and visualize tickets by date and status. To do so, you create a tabular form, an interactive report, a calendar, and a pie chart, each demonstrating one of the more advanced types of APEX forms and reports.
Tabular FormsTabular forms allow users to edit both rows and columns of data at once, much like a spreadsheet. The developer can choose a different element type for each column—text box, text area, select list, check box, radio group, and so on. Users can make changes to multiple data elements and submit them as a single transaction. APEX tabular forms handle inserts, updates, and deletes—all with no code!
The APEX wizards create all of the required elements for a fully operational tabular form. Like all APEX forms, there is no logical relationship between items that make up a tabular form. Once the wizard creates the items, they’re indistinguishable from other APEX page items and can be modified independently of one another. However, we recommend exercising caution when making modifications to items generated by an APEX wizard; doing so can cause the tabular forms to become inoperable.
You can bypass the wizard and create your own tabular forms. As your application becomes more sophisticated, you may find it more efficient to create forms manually. However, this book focuses on the wizard approach.
Creating a Tabular FormIn this section you create a new page that contains a tabular form based on the TICKETS table. The form allows multiple tickets to be edited on the same page. You then alter the display properties of the tabular form columns. Proceed as follows:
1. Edit any page in your application.
2. Click the Create button at upper right on the page, and select New Page from the menu.
3. Select Form, and click Next.
4. Select Tabular Form, and click Next.
5. Select your schema for Table/View Owner, and then select TICKETS for Table/View Name.
6. Set Allowed Operations to Update, Insert and Delete.
www.it-ebooks.info
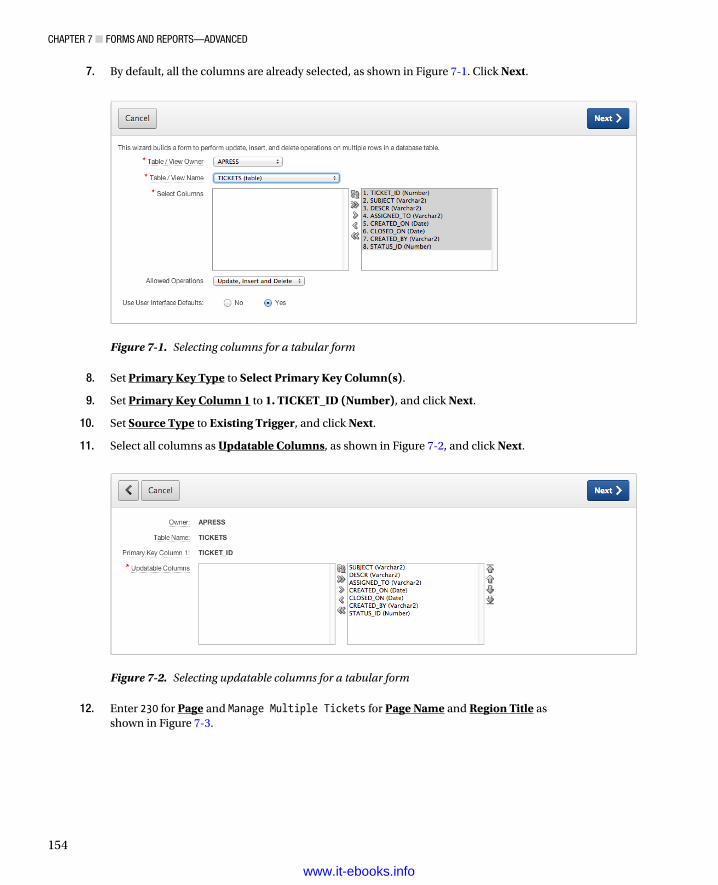
Chapter 7 ■ Forms and reports—advanCed
154
7. By default, all the columns are already selected, as shown in Figure 7-1. Click Next.
Figure 7-1. Selecting columns for a tabular form
Figure 7-2. Selecting updatable columns for a tabular form
8. Set Primary Key Type to Select Primary Key Column(s).
9. Set Primary Key Column 1 to 1. TICKET_ID (Number), and click Next.
10. Set Source Type to Existing Trigger, and click Next.
11. Select all columns as Updatable Columns, as shown in Figure 7-2, and click Next.
12. Enter 230 for Page and Manage Multiple Tickets for Page Name and Region Title as shown in Figure 7-3.
www.it-ebooks.info
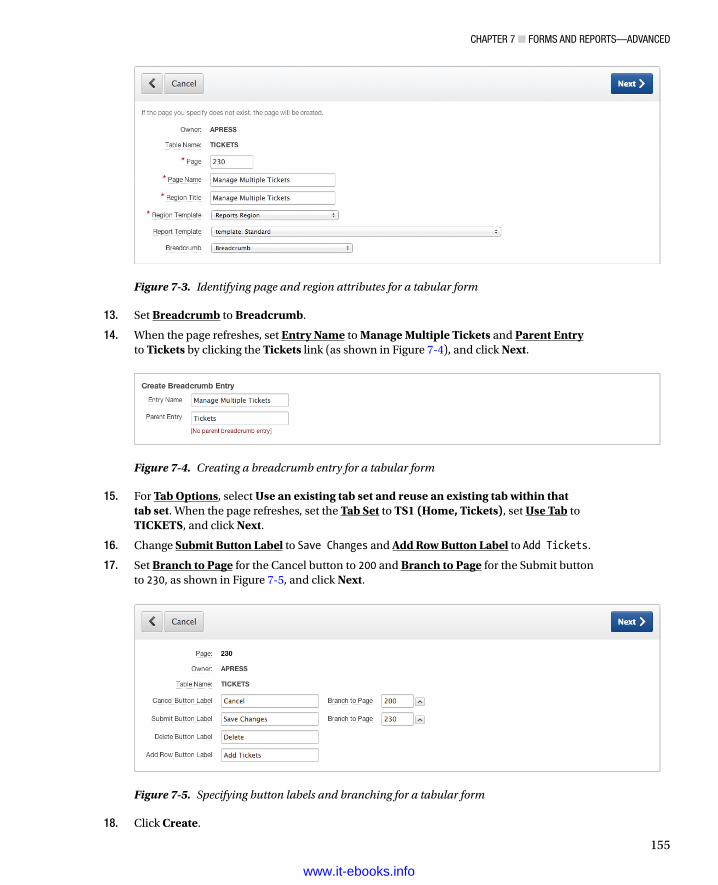
Chapter 7 ■ Forms and reports—advanCed
155
13. Set Breadcrumb to Breadcrumb.
14. When the page refreshes, set Entry Name to Manage Multiple Tickets and Parent Entry to Tickets by clicking the Tickets link (as shown in Figure 7-4), and click Next.
Figure 7-3. Identifying page and region attributes for a tabular form
Figure 7-4. Creating a breadcrumb entry for a tabular form
15. For Tab Options, select Use an existing tab set and reuse an existing tab within that tab set. When the page refreshes, set the Tab Set to TS1 (Home, Tickets), set Use Tab to TICKETS, and click Next.
16. Change Submit Button Label to Save Changes and Add Row Button Label to Add Tickets.
17. Set Branch to Page for the Cancel button to 200 and Branch to Page for the Submit button to 230, as shown in Figure 7-5, and click Next.
Figure 7-5. Specifying button labels and branching for a tabular form
18. Click Create.
www.it-ebooks.info
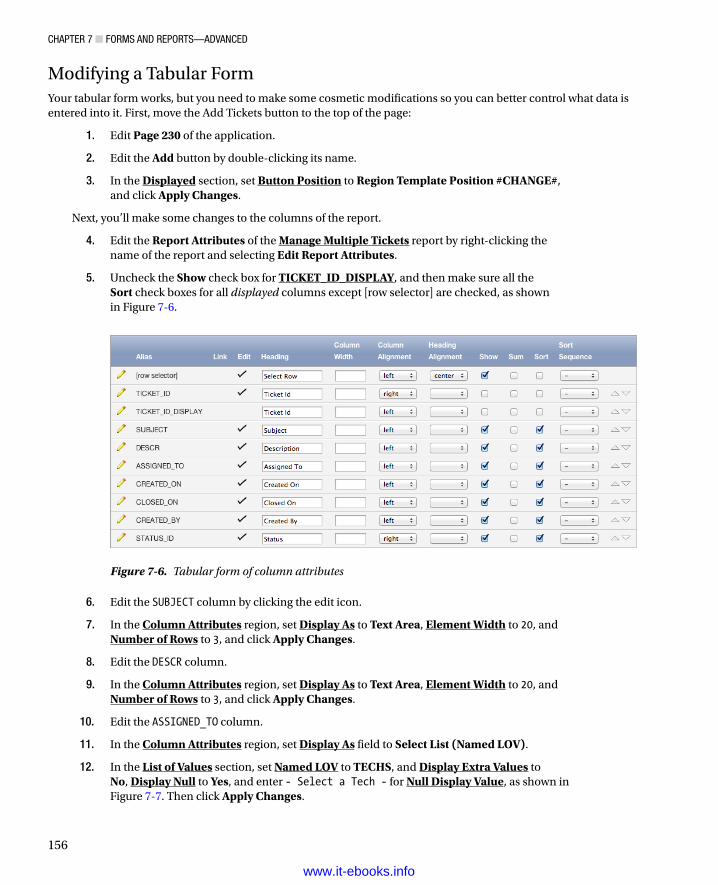
Chapter 7 ■ Forms and reports—advanCed
156
Modifying a Tabular FormYour tabular form works, but you need to make some cosmetic modifications so you can better control what data is entered into it. First, move the Add Tickets button to the top of the page:
1. Edit Page 230 of the application.
2. Edit the Add button by double-clicking its name.
3. In the Displayed section, set Button Position to Region Template Position #CHANGE#, and click Apply Changes.
Next, you’ll make some changes to the columns of the report.
4. Edit the Report Attributes of the Manage Multiple Tickets report by right-clicking the name of the report and selecting Edit Report Attributes.
5. Uncheck the Show check box for TICKET_ID_DISPLAY, and then make sure all the Sort check boxes for all displayed columns except [row selector] are checked, as shown in Figure 7-6.
Figure 7-6. Tabular form of column attributes
6. Edit the SUBJECT column by clicking the edit icon.
7. In the Column Attributes region, set Display As to Text Area, Element Width to 20, and Number of Rows to 3, and click Apply Changes.
8. Edit the DESCR column.
9. In the Column Attributes region, set Display As to Text Area, Element Width to 20, and Number of Rows to 3, and click Apply Changes.
10. Edit the ASSIGNED_TO column.
11. In the Column Attributes region, set Display As field to Select List (Named LOV).
12. In the List of Values section, set Named LOV to TECHS, and Display Extra Values to No, Display Null to Yes, and enter - Select a Tech - for Null Display Value, as shown in Figure 7-7. Then click Apply Changes.
www.it-ebooks.info

Chapter 7 ■ Forms and reports—advanCed
157
Figure 7-7. Specifying a LOV for the ASSIGNED_TO column
13. Edit the CREATED_BY column.
14. In the Column Attributes region, set the Display As field to Select List (Named LOV).
15. In the List of Values section, set Named LOV to USERS, Display Extra Values to No, and Display Null to Yes, and enter - Select a User - for Null Display Value, as shown in Figure 7-8. Then click Apply Changes.
Figure 7-8. Specifying LOV attributes for the CREATED_BY column
16. Edit the STATUS_ID column.
17. In the Tabular Form Attributes region, set Default Type to PL/SQL Expression or Function and enter get_status ('OPEN') for Default, and click Apply Changes.
Next, you need to create a button on page 200 that links to your new tabular form:
1. Edit Page 200 of the application.
2. Create a new button by right-clicking the Region Buttons node and selecting Create.
3. Enter MANAGE_MULTIPLE_TICKETS for Button Name and Manage Multiple Tickets for Label, and select Template Based Button for Button Style and Button for Button Template, as shown in Figure 7-9. Click Next.
www.it-ebooks.info
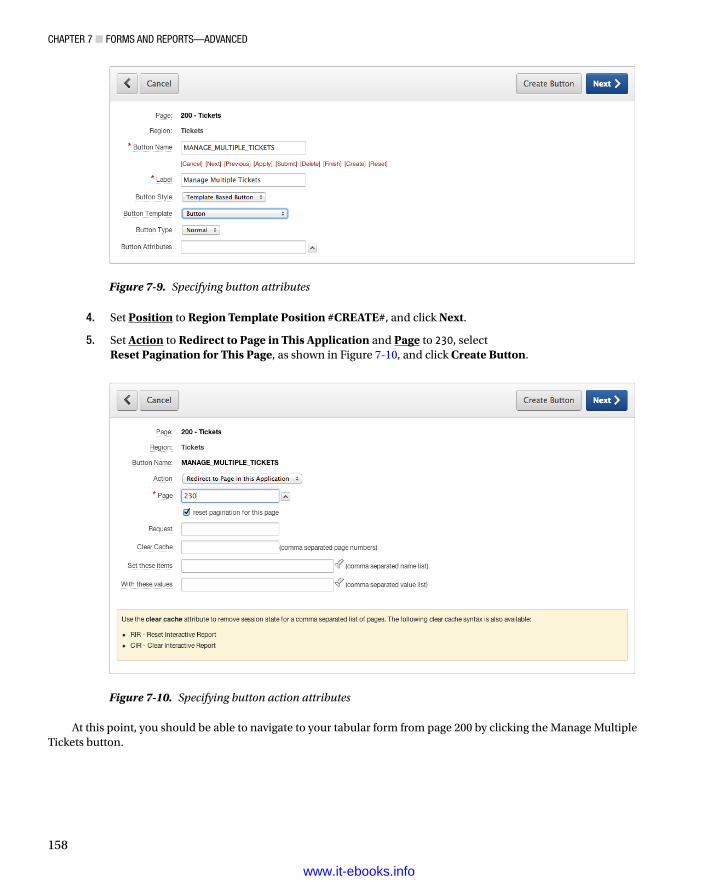
Chapter 7 ■ Forms and reports—advanCed
158
4. Set Position to Region Template Position #CREATE#, and click Next.
5. Set Action to Redirect to Page in This Application and Page to 230, select Reset Pagination for This Page, as shown in Figure 7-10, and click Create Button.
Figure 7-9. Specifying button attributes
Figure 7-10. Specifying button action attributes
At this point, you should be able to navigate to your tabular form from page 200 by clicking the Manage Multiple Tickets button.
www.it-ebooks.info
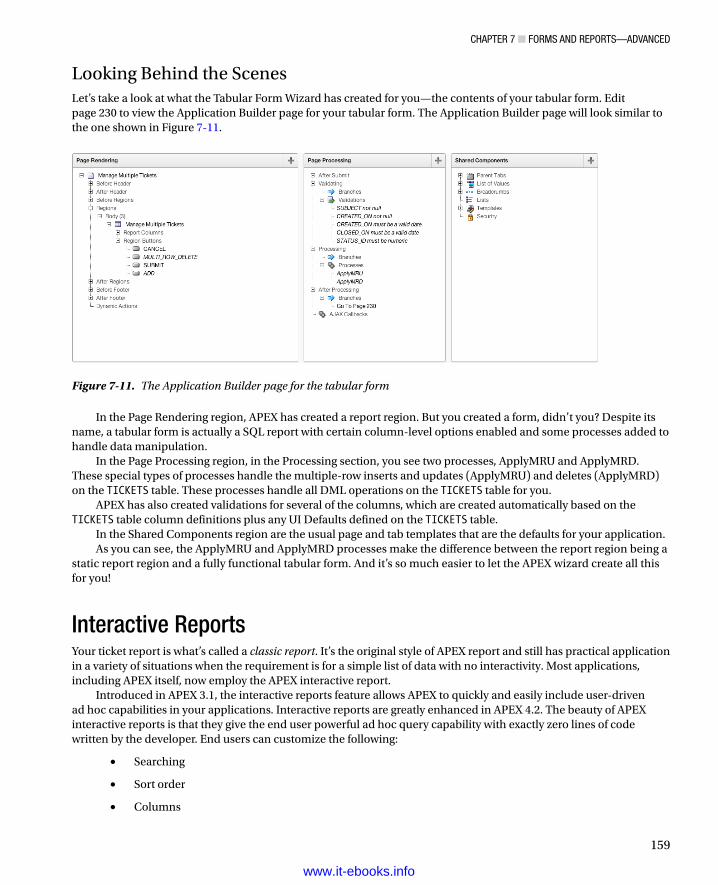
Chapter 7 ■ Forms and reports—advanCed
159
Looking Behind the ScenesLet’s take a look at what the Tabular Form Wizard has created for you—the contents of your tabular form. Edit page 230 to view the Application Builder page for your tabular form. The Application Builder page will look similar to the one shown in Figure 7-11.
Figure 7-11. The Application Builder page for the tabular form
In the Page Rendering region, APEX has created a report region. But you created a form, didn’t you? Despite its name, a tabular form is actually a SQL report with certain column-level options enabled and some processes added to handle data manipulation.
In the Page Processing region, in the Processing section, you see two processes, ApplyMRU and ApplyMRD. These special types of processes handle the multiple-row inserts and updates (ApplyMRU) and deletes (ApplyMRD) on the TICKETS table. These processes handle all DML operations on the TICKETS table for you.
APEX has also created validations for several of the columns, which are created automatically based on the TICKETS table column definitions plus any UI Defaults defined on the TICKETS table.
In the Shared Components region are the usual page and tab templates that are the defaults for your application.As you can see, the ApplyMRU and ApplyMRD processes make the difference between the report region being a
static report region and a fully functional tabular form. And it’s so much easier to let the APEX wizard create all this for you!
Interactive ReportsYour ticket report is what’s called a classic report. It’s the original style of APEX report and still has practical application in a variety of situations when the requirement is for a simple list of data with no interactivity. Most applications, including APEX itself, now employ the APEX interactive report.
Introduced in APEX 3.1, the interactive reports feature allows APEX to quickly and easily include user-driven ad hoc capabilities in your applications. Interactive reports are greatly enhanced in APEX 4.2. The beauty of APEX interactive reports is that they give the end user powerful ad hoc query capability with exactly zero lines of code written by the developer. End users can customize the following:
Searching•
Sort order•
Columns•
www.it-ebooks.info
Chapter 7 ■ Forms and reports—advanCed
160
Breaking•
Highlighting•
Computations•
Aggregations•
Charts•
Group by•
Flashback time•
Saved reports•
Subscription (e-mail notification)•
Interactive reports are technically nothing more than a report type. The Create Report Wizard steps are similar, and you expend the same effort in building an interactive report as for a classic report.
Classic reports can be easily converted to interactive reports. There is no way to revert from an interactive report to a classic report. (But why would you want to?) The end-user features and overall value of interactive reports are best illustrated with an example, so let’s add an interactive report to your application.
Creating an Interactive ReportInteractive reports require nothing more than a SQL query. APEX handles the rest. You start by creating a new page, tab, and interactive report all at once on a view of your Help Desk data. Begin as follows:
1. Run any page in the application.
2. Click Create on the Developer toolbar.
3. Select New Page, and click Next.
4. Select Report, and click Next.
5. Select Interactive Report, and click Next.
6. Enter 300 for Page Number and Analysis for Page Name and Region Name, and set Region Template to Region Without Buttons and Titles.
7. Set Breadcrumb to Breadcrumb, and when the page refreshes, click Next. See Figure 7-12.
www.it-ebooks.info
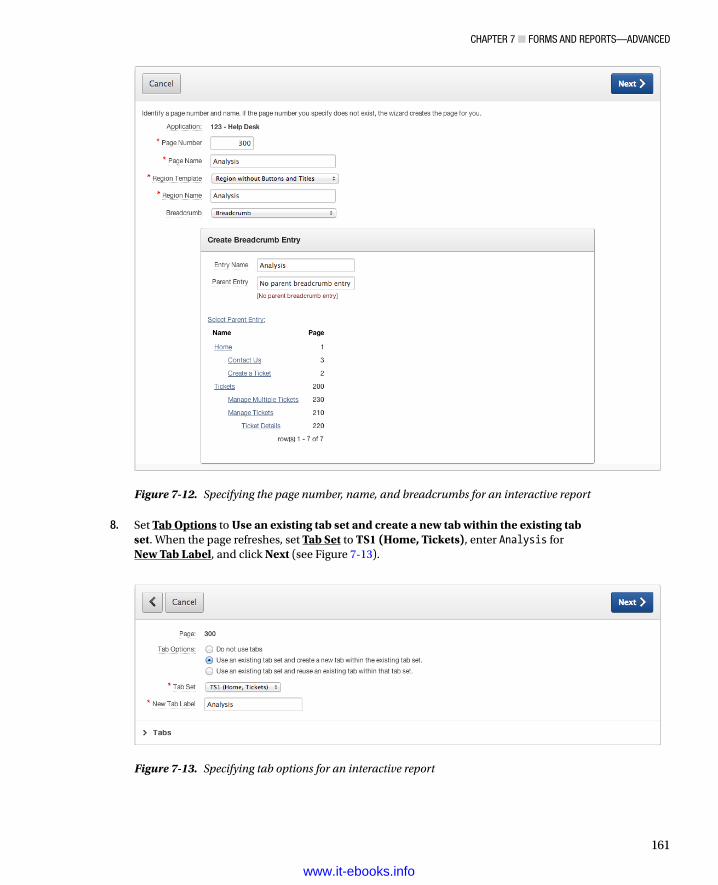
Chapter 7 ■ Forms and reports—advanCed
161
8. Set Tab Options to Use an existing tab set and create a new tab within the existing tab set. When the page refreshes, set Tab Set to TS1 (Home, Tickets), enter Analysis for New Tab Label, and click Next (see Figure 7-13).
Figure 7-12. Specifying the page number, name, and breadcrumbs for an interactive report
Figure 7-13. Specifying tab options for an interactive report
www.it-ebooks.info
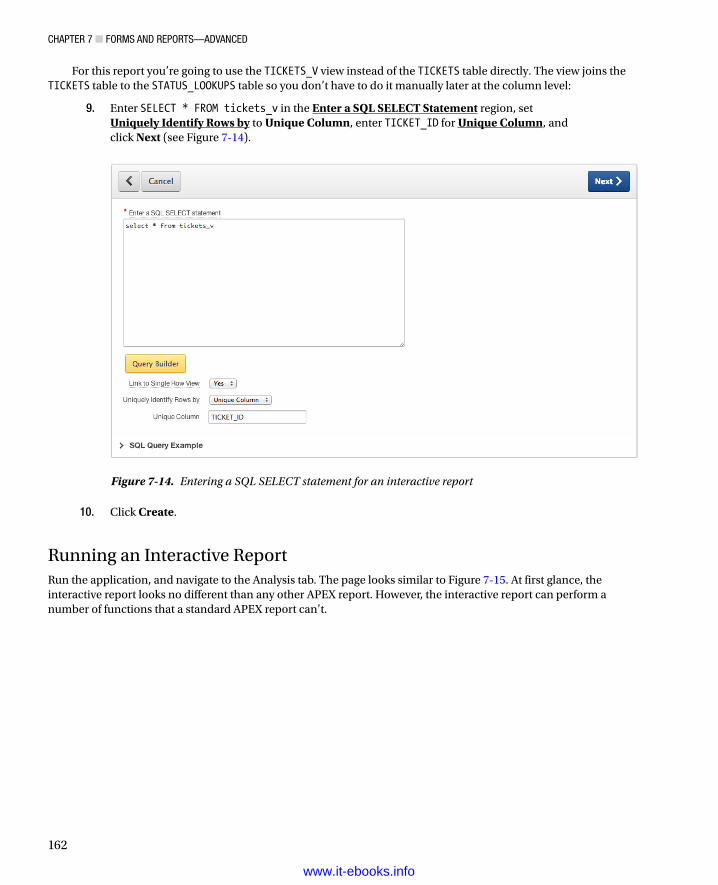
Chapter 7 ■ Forms and reports—advanCed
162
For this report you’re going to use the TICKETS_V view instead of the TICKETS table directly. The view joins the TICKETS table to the STATUS_LOOKUPS table so you don’t have to do it manually later at the column level:
9. Enter SELECT * FROM tickets_v in the Enter a SQL SELECT Statement region, set Uniquely Identify Rows by to Unique Column, enter TICKET_ID for Unique Column, and click Next (see Figure 7-14).
Figure 7-14. Entering a SQL SELECT statement for an interactive report
10. Click Create.
Running an Interactive ReportRun the application, and navigate to the Analysis tab. The page looks similar to Figure 7-15. At first glance, the interactive report looks no different than any other APEX report. However, the interactive report can perform a number of functions that a standard APEX report can’t.
www.it-ebooks.info
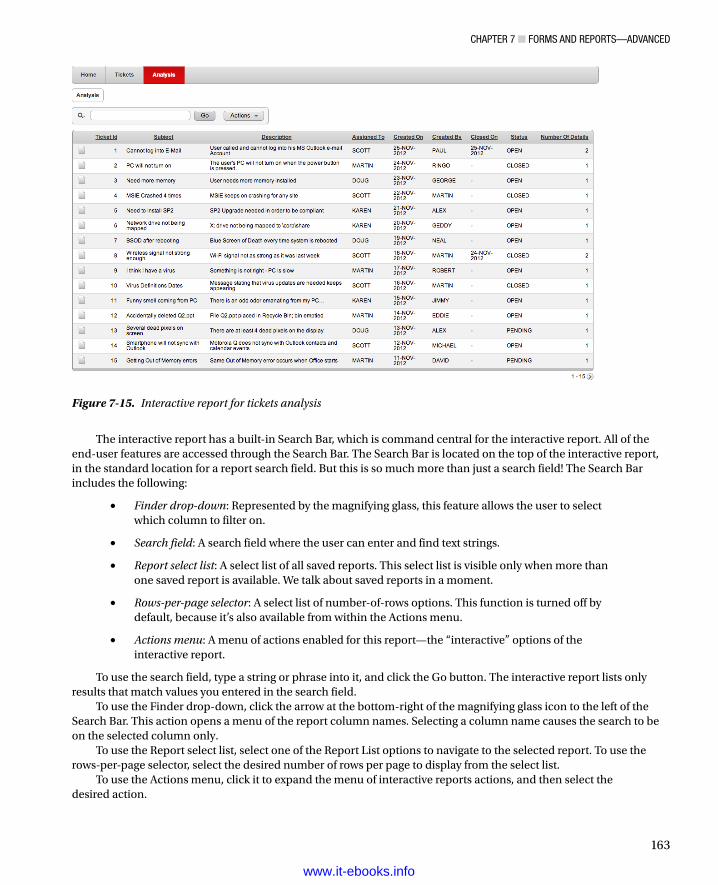
Chapter 7 ■ Forms and reports—advanCed
163
The interactive report has a built-in Search Bar, which is command central for the interactive report. All of the end-user features are accessed through the Search Bar. The Search Bar is located on the top of the interactive report, in the standard location for a report search field. But this is so much more than just a search field! The Search Bar includes the following:
• Finder drop-down: Represented by the magnifying glass, this feature allows the user to select which column to filter on.
• Search field: A search field where the user can enter and find text strings.
• Report select list: A select list of all saved reports. This select list is visible only when more than one saved report is available. We talk about saved reports in a moment.
• Rows-per-page selector: A select list of number-of-rows options. This function is turned off by default, because it’s also available from within the Actions menu.
• Actions menu: A menu of actions enabled for this report—the “interactive” options of the interactive report.
To use the search field, type a string or phrase into it, and click the Go button. The interactive report lists only results that match values you entered in the search field.
To use the Finder drop-down, click the arrow at the bottom-right of the magnifying glass icon to the left of the Search Bar. This action opens a menu of the report column names. Selecting a column name causes the search to be on the selected column only.
To use the Report select list, select one of the Report List options to navigate to the selected report. To use the rows-per-page selector, select the desired number of rows per page to display from the select list.
To use the Actions menu, click it to expand the menu of interactive reports actions, and then select the desired action.
Figure 7-15. Interactive report for tickets analysis
www.it-ebooks.info
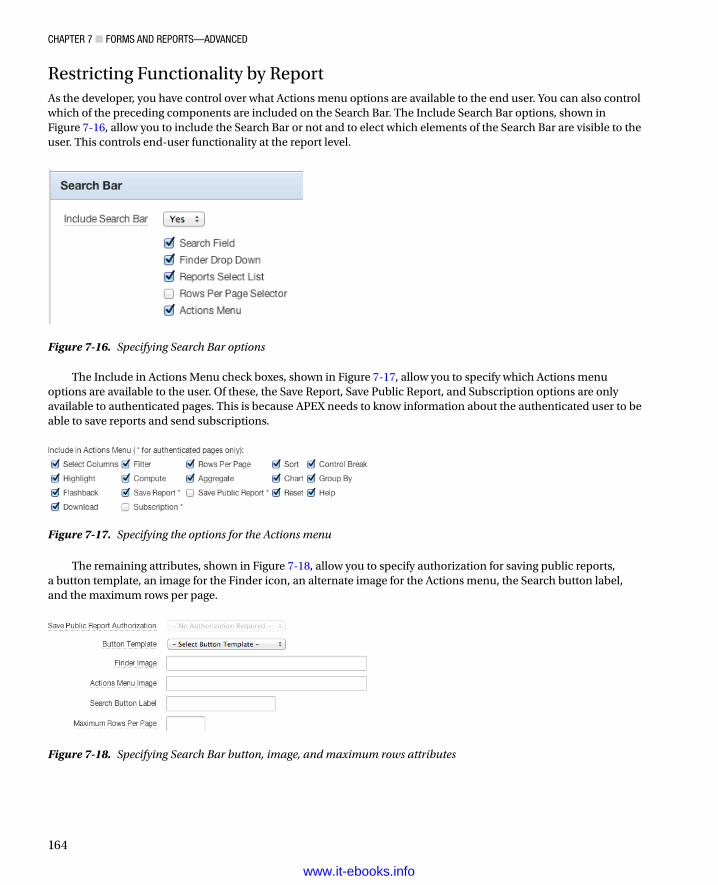
Chapter 7 ■ Forms and reports—advanCed
164
Restricting Functionality by ReportAs the developer, you have control over what Actions menu options are available to the end user. You can also control which of the preceding components are included on the Search Bar. The Include Search Bar options, shown in Figure 7-16, allow you to include the Search Bar or not and to elect which elements of the Search Bar are visible to the user. This controls end-user functionality at the report level.
Figure 7-16. Specifying Search Bar options
Figure 7-17. Specifying the options for the Actions menu
Figure 7-18. Specifying Search Bar button, image, and maximum rows attributes
The Include in Actions Menu check boxes, shown in Figure 7-17, allow you to specify which Actions menu options are available to the user. Of these, the Save Report, Save Public Report, and Subscription options are only available to authenticated pages. This is because APEX needs to know information about the authenticated user to be able to save reports and send subscriptions.
The remaining attributes, shown in Figure 7-18, allow you to specify authorization for saving public reports, a button template, an image for the Finder icon, an alternate image for the Actions menu, the Search button label, and the maximum rows per page.
www.it-ebooks.info
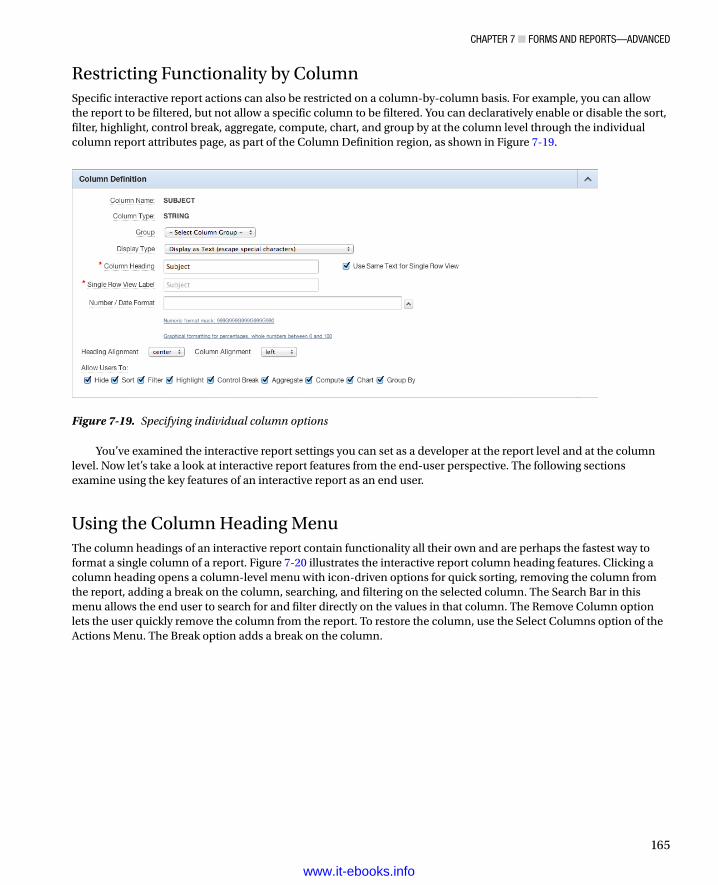
Chapter 7 ■ Forms and reports—advanCed
165
Restricting Functionality by ColumnSpecific interactive report actions can also be restricted on a column-by-column basis. For example, you can allow the report to be filtered, but not allow a specific column to be filtered. You can declaratively enable or disable the sort, filter, highlight, control break, aggregate, compute, chart, and group by at the column level through the individual column report attributes page, as part of the Column Definition region, as shown in Figure 7-19.
Figure 7-19. Specifying individual column options
You’ve examined the interactive report settings you can set as a developer at the report level and at the column level. Now let’s take a look at interactive report features from the end-user perspective. The following sections examine using the key features of an interactive report as an end user.
Using the Column Heading MenuThe column headings of an interactive report contain functionality all their own and are perhaps the fastest way to format a single column of a report. Figure 7-20 illustrates the interactive report column heading features. Clicking a column heading opens a column-level menu with icon-driven options for quick sorting, removing the column from the report, adding a break on the column, searching, and filtering on the selected column. The Search Bar in this menu allows the end user to search for and filter directly on the values in that column. The Remove Column option lets the user quickly remove the column from the report. To restore the column, use the Select Columns option of the Actions Menu. The Break option adds a break on the column.
www.it-ebooks.info
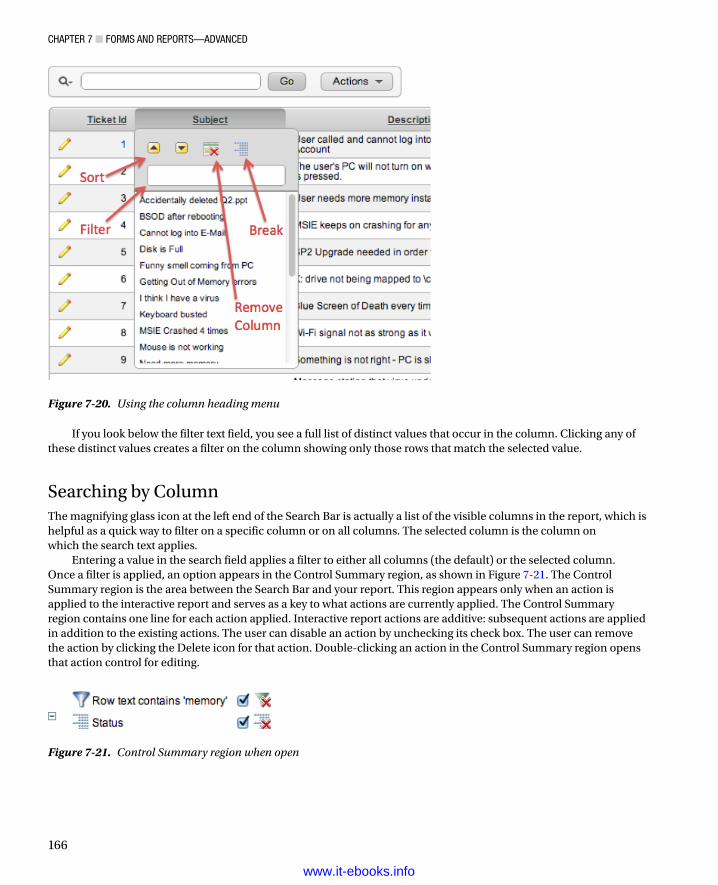
Chapter 7 ■ Forms and reports—advanCed
166
If you look below the filter text field, you see a full list of distinct values that occur in the column. Clicking any of these distinct values creates a filter on the column showing only those rows that match the selected value.
Searching by ColumnThe magnifying glass icon at the left end of the Search Bar is actually a list of the visible columns in the report, which is helpful as a quick way to filter on a specific column or on all columns. The selected column is the column on which the search text applies.
Entering a value in the search field applies a filter to either all columns (the default) or the selected column. Once a filter is applied, an option appears in the Control Summary region, as shown in Figure 7-21. The Control Summary region is the area between the Search Bar and your report. This region appears only when an action is applied to the interactive report and serves as a key to what actions are currently applied. The Control Summary region contains one line for each action applied. Interactive report actions are additive: subsequent actions are applied in addition to the existing actions. The user can disable an action by unchecking its check box. The user can remove the action by clicking the Delete icon for that action. Double-clicking an action in the Control Summary region opens that action control for editing.
Figure 7-21. Control Summary region when open
Figure 7-20. Using the column heading menu
www.it-ebooks.info
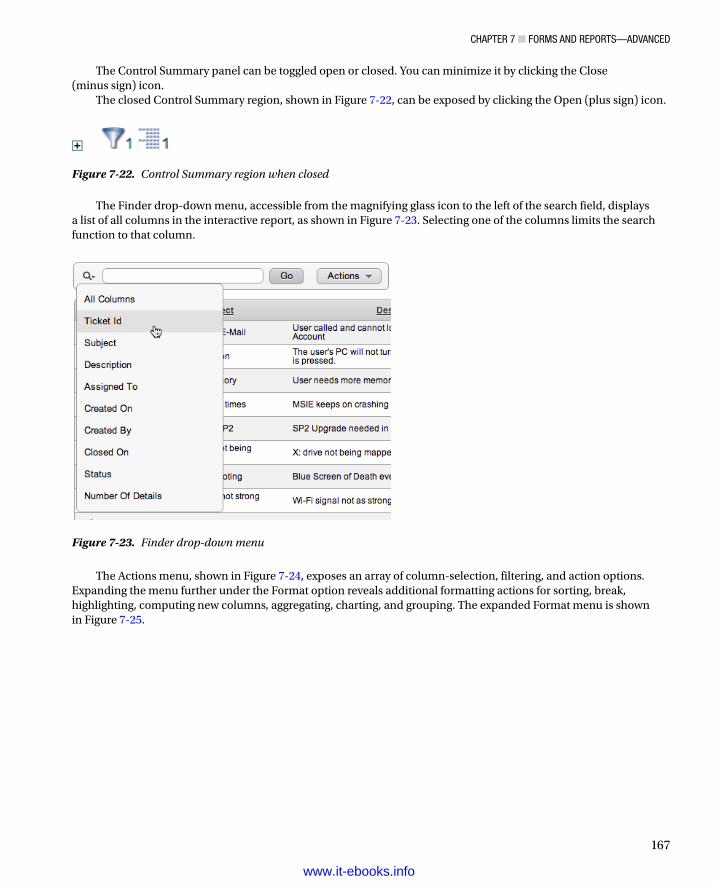
Chapter 7 ■ Forms and reports—advanCed
167
The Control Summary panel can be toggled open or closed. You can minimize it by clicking the Close (minus sign) icon.
The closed Control Summary region, shown in Figure 7-22, can be exposed by clicking the Open (plus sign) icon.
Figure 7-22. Control Summary region when closed
Figure 7-23. Finder drop-down menu
The Finder drop-down menu, accessible from the magnifying glass icon to the left of the search field, displays a list of all columns in the interactive report, as shown in Figure 7-23. Selecting one of the columns limits the search function to that column.
The Actions menu, shown in Figure 7-24, exposes an array of column-selection, filtering, and action options. Expanding the menu further under the Format option reveals additional formatting actions for sorting, break, highlighting, computing new columns, aggregating, charting, and grouping. The expanded Format menu is shown in Figure 7-25.
www.it-ebooks.info
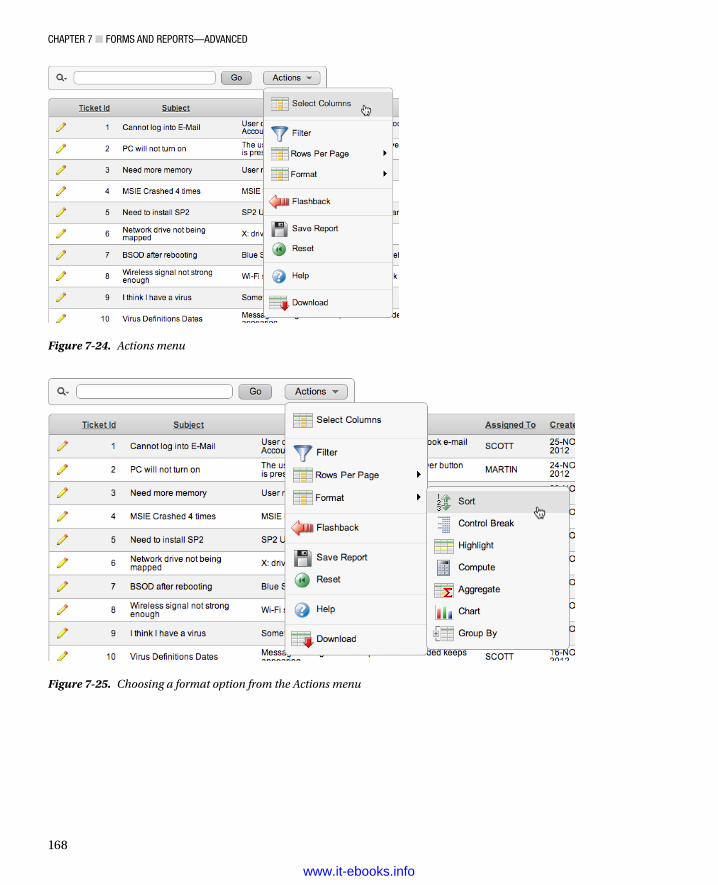
Chapter 7 ■ Forms and reports—advanCed
168
Figure 7-24. Actions menu
Figure 7-25. Choosing a format option from the Actions menu
www.it-ebooks.info
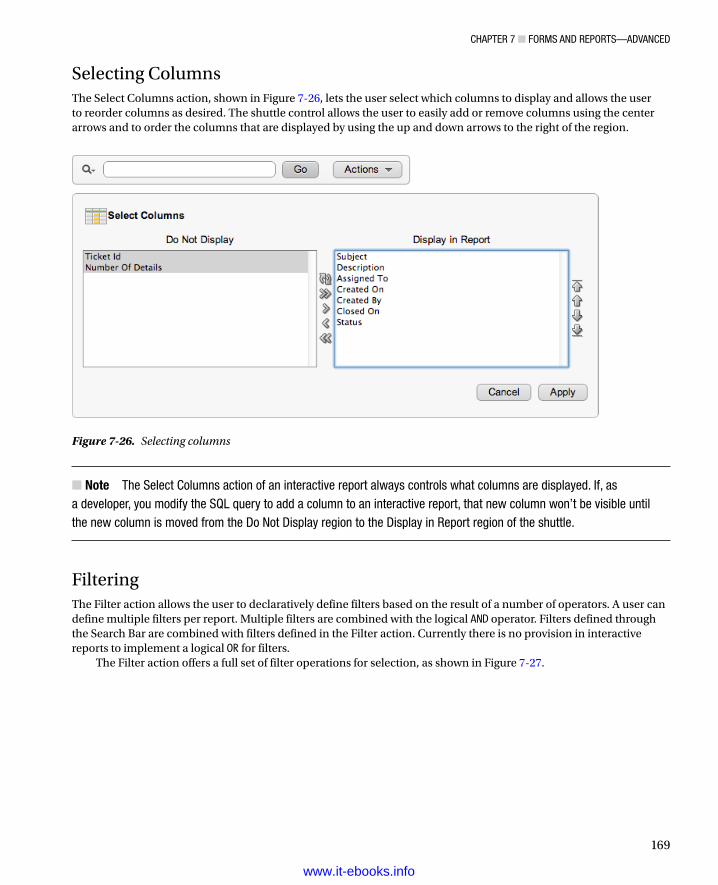
Chapter 7 ■ Forms and reports—advanCed
169
Note ■ the select Columns action of an interactive report always controls what columns are displayed. If, as a developer, you modify the sQL query to add a column to an interactive report, that new column won’t be visible until the new column is moved from the do not display region to the display in report region of the shuttle.
FilteringThe Filter action allows the user to declaratively define filters based on the result of a number of operators. A user can define multiple filters per report. Multiple filters are combined with the logical AND operator. Filters defined through the Search Bar are combined with filters defined in the Filter action. Currently there is no provision in interactive reports to implement a logical OR for filters.
The Filter action offers a full set of filter operations for selection, as shown in Figure 7-27.
Selecting ColumnsThe Select Columns action, shown in Figure 7-26, lets the user select which columns to display and allows the user to reorder columns as desired. The shuttle control allows the user to easily add or remove columns using the center arrows and to order the columns that are displayed by using the up and down arrows to the right of the region.
Figure 7-26. Selecting columns
www.it-ebooks.info
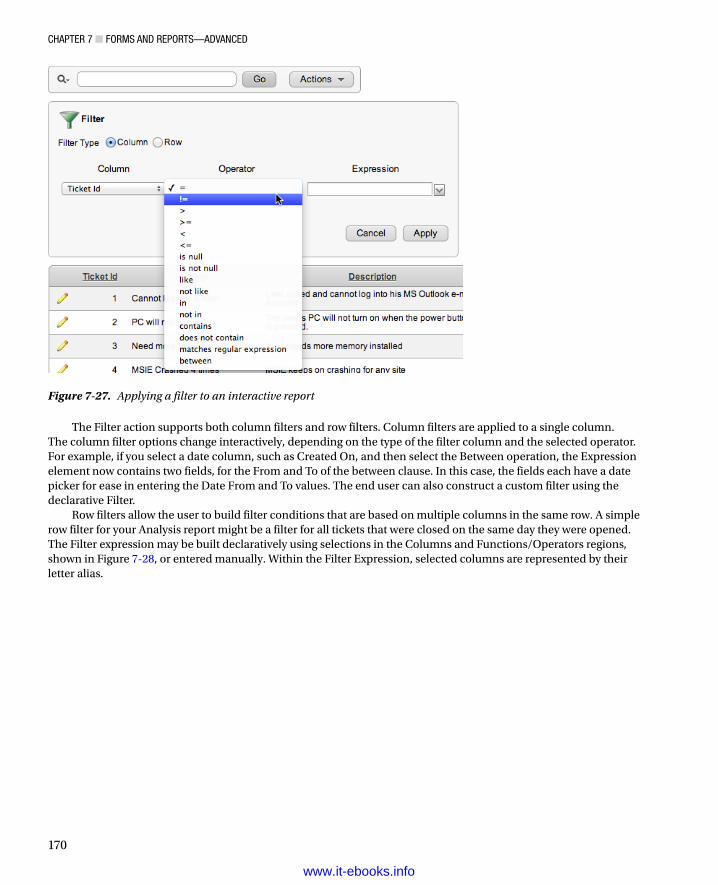
Chapter 7 ■ Forms and reports—advanCed
170
The Filter action supports both column filters and row filters. Column filters are applied to a single column. The column filter options change interactively, depending on the type of the filter column and the selected operator. For example, if you select a date column, such as Created On, and then select the Between operation, the Expression element now contains two fields, for the From and To of the between clause. In this case, the fields each have a date picker for ease in entering the Date From and To values. The end user can also construct a custom filter using the declarative Filter.
Row filters allow the user to build filter conditions that are based on multiple columns in the same row. A simple row filter for your Analysis report might be a filter for all tickets that were closed on the same day they were opened. The Filter expression may be built declaratively using selections in the Columns and Functions/Operators regions, shown in Figure 7-28, or entered manually. Within the Filter Expression, selected columns are represented by their letter alias.
Figure 7-27. Applying a filter to an interactive report
www.it-ebooks.info
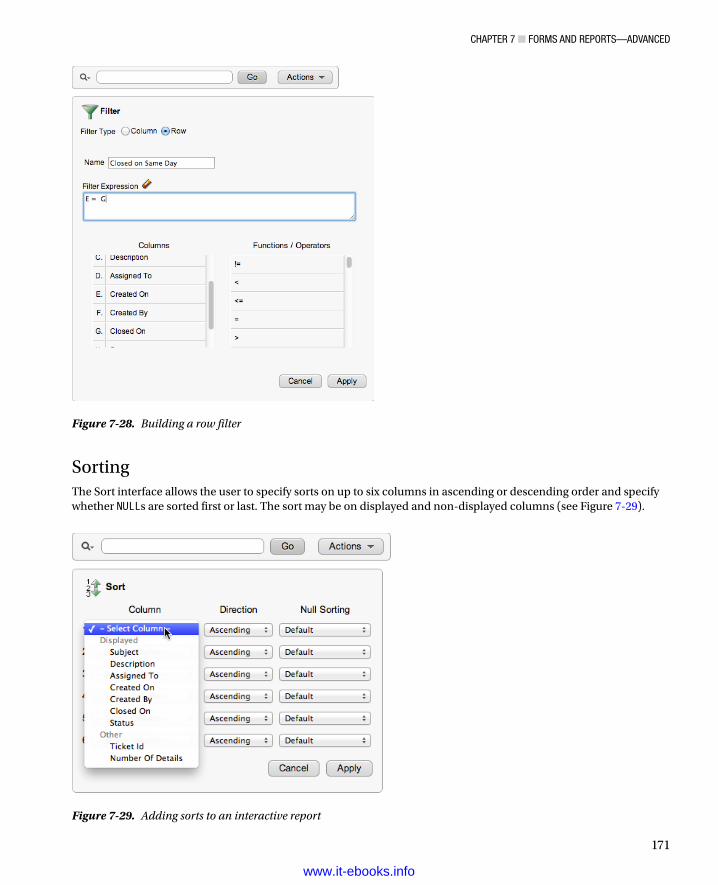
Chapter 7 ■ Forms and reports—advanCed
171
SortingThe Sort interface allows the user to specify sorts on up to six columns in ascending or descending order and specify whether NULLs are sorted first or last. The sort may be on displayed and non-displayed columns (see Figure 7-29).
Figure 7-28. Building a row filter
Figure 7-29. Adding sorts to an interactive report
www.it-ebooks.info

Chapter 7 ■ Forms and reports—advanCed
172
Adding BreaksThe Control Break action allows the user to define break formatting on up to six columns. The user specifies the break column and whether the break is disabled or enabled. APEX automatically applies the declared break formats to the report. Note that break columns appear in the Control Summary as separate entries, letting the user enable, disable, or remove break columns individually. Figure 7-30 shows the Analysis report with breaks applied on the Assigned To and Status columns.
Figure 7-30. Interactive report with control breaks applied
HighlightingThe Highlight action allows the user to find matching data and highlight it by row or column, specifying the background and text colors for the highlight. The Highlight action interface is shown in Figure 7-31.
www.it-ebooks.info
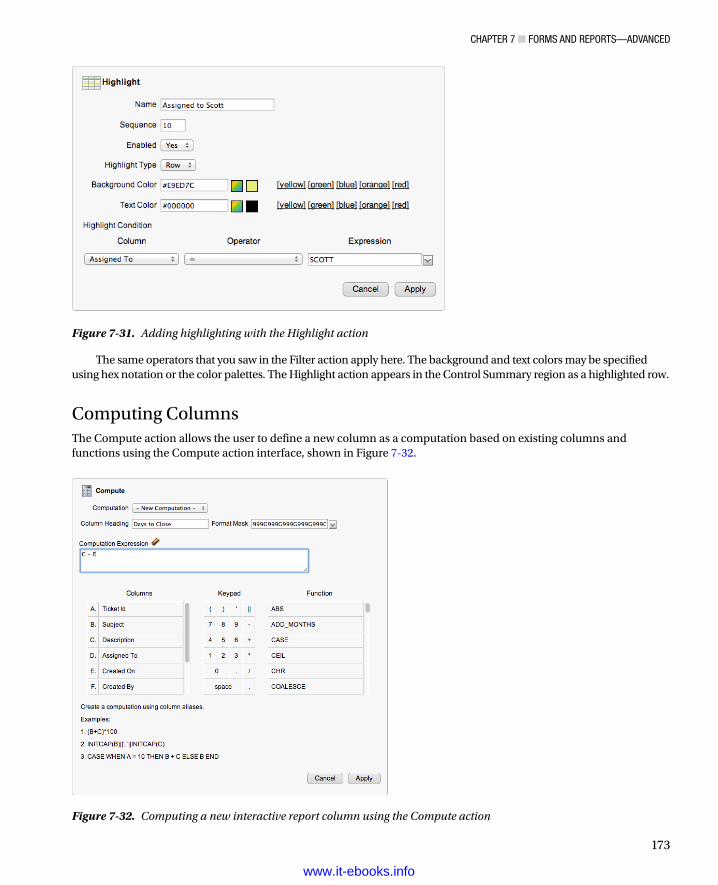
Chapter 7 ■ Forms and reports—advanCed
173
The same operators that you saw in the Filter action apply here. The background and text colors may be specified using hex notation or the color palettes. The Highlight action appears in the Control Summary region as a highlighted row.
Computing ColumnsThe Compute action allows the user to define a new column as a computation based on existing columns and functions using the Compute action interface, shown in Figure 7-32.
Figure 7-31. Adding highlighting with the Highlight action
Figure 7-32. Computing a new interactive report column using the Compute action
www.it-ebooks.info
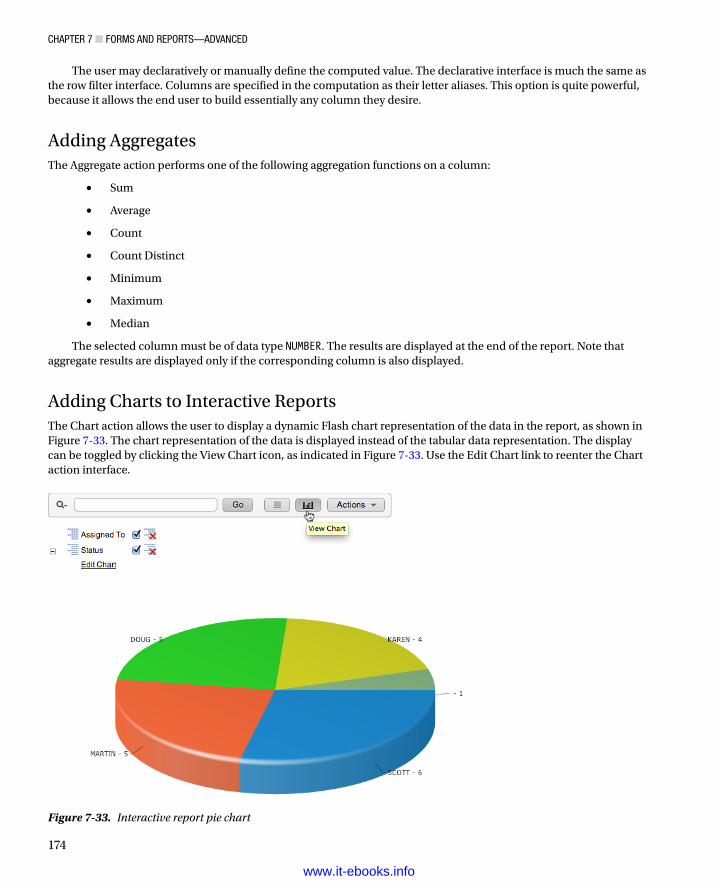
Chapter 7 ■ Forms and reports—advanCed
174
The user may declaratively or manually define the computed value. The declarative interface is much the same as the row filter interface. Columns are specified in the computation as their letter aliases. This option is quite powerful, because it allows the end user to build essentially any column they desire.
Adding AggregatesThe Aggregate action performs one of the following aggregation functions on a column:
Sum•
Average•
Count•
Count Distinct•
Minimum•
Maximum•
Median•
The selected column must be of data type NUMBER. The results are displayed at the end of the report. Note that aggregate results are displayed only if the corresponding column is also displayed.
Adding Charts to Interactive ReportsThe Chart action allows the user to display a dynamic Flash chart representation of the data in the report, as shown in Figure 7-33. The chart representation of the data is displayed instead of the tabular data representation. The display can be toggled by clicking the View Chart icon, as indicated in Figure 7-33. Use the Edit Chart link to reenter the Chart action interface.
Figure 7-33. Interactive report pie chart
www.it-ebooks.info
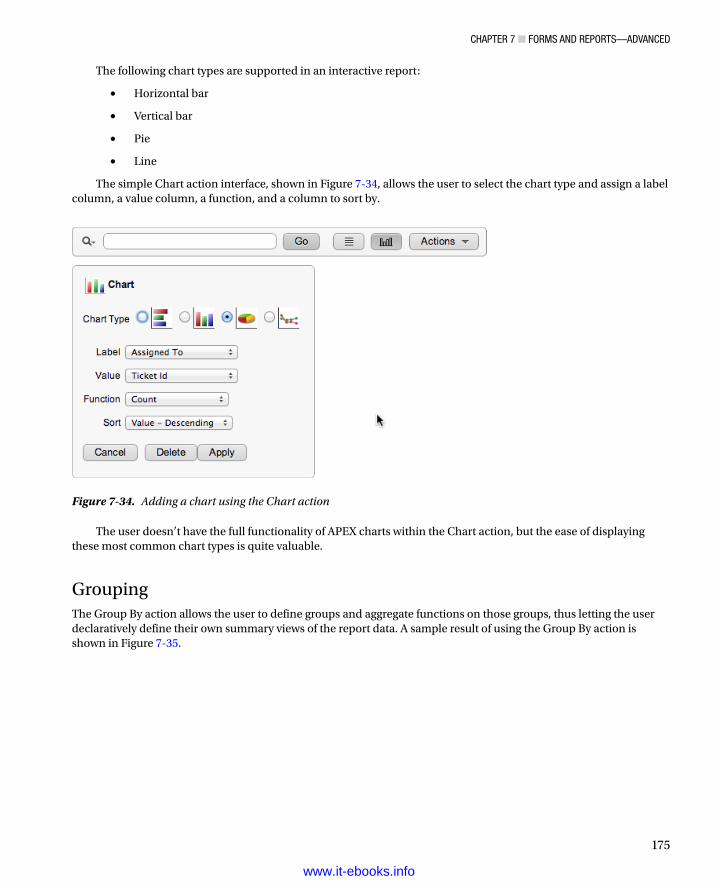
Chapter 7 ■ Forms and reports—advanCed
175
The following chart types are supported in an interactive report:
Horizontal bar•
Vertical bar•
Pie•
Line•
The simple Chart action interface, shown in Figure 7-34, allows the user to select the chart type and assign a label column, a value column, a function, and a column to sort by.
Figure 7-34. Adding a chart using the Chart action
The user doesn’t have the full functionality of APEX charts within the Chart action, but the ease of displaying these most common chart types is quite valuable.
GroupingThe Group By action allows the user to define groups and aggregate functions on those groups, thus letting the user declaratively define their own summary views of the report data. A sample result of using the Group By action is shown in Figure 7-35.
www.it-ebooks.info
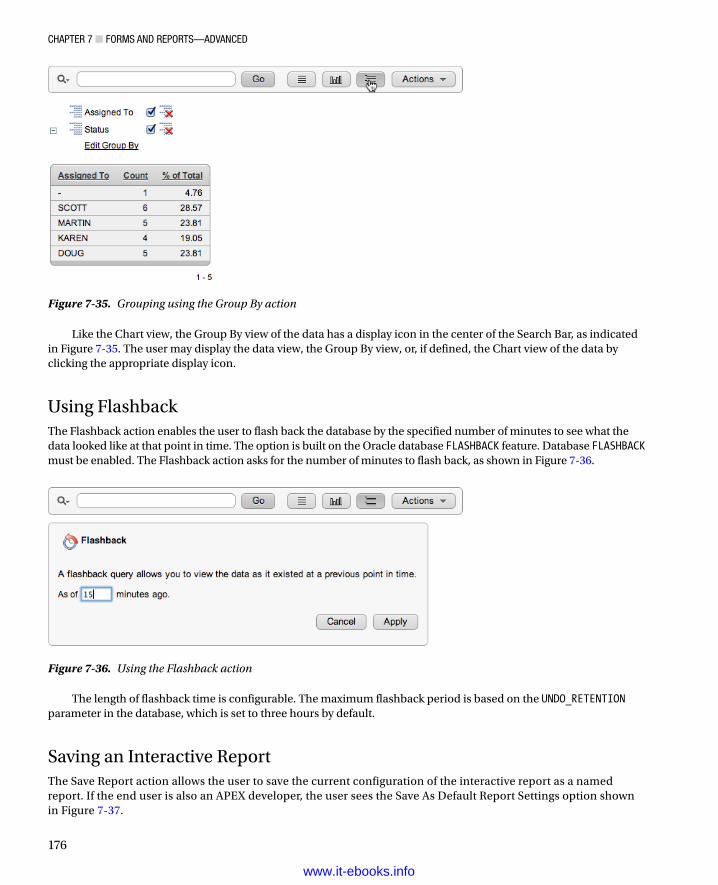
Chapter 7 ■ Forms and reports—advanCed
176
Like the Chart view, the Group By view of the data has a display icon in the center of the Search Bar, as indicated in Figure 7-35. The user may display the data view, the Group By view, or, if defined, the Chart view of the data by clicking the appropriate display icon.
Using FlashbackThe Flashback action enables the user to flash back the database by the specified number of minutes to see what the data looked like at that point in time. The option is built on the Oracle database FLASHBACK feature. Database FLASHBACK must be enabled. The Flashback action asks for the number of minutes to flash back, as shown in Figure 7-36.
Figure 7-35. Grouping using the Group By action
Figure 7-36. Using the Flashback action
The length of flashback time is configurable. The maximum flashback period is based on the UNDO_RETENTION parameter in the database, which is set to three hours by default.
Saving an Interactive ReportThe Save Report action allows the user to save the current configuration of the interactive report as a named report. If the end user is also an APEX developer, the user sees the Save As Default Report Settings option shown in Figure 7-37.
www.it-ebooks.info
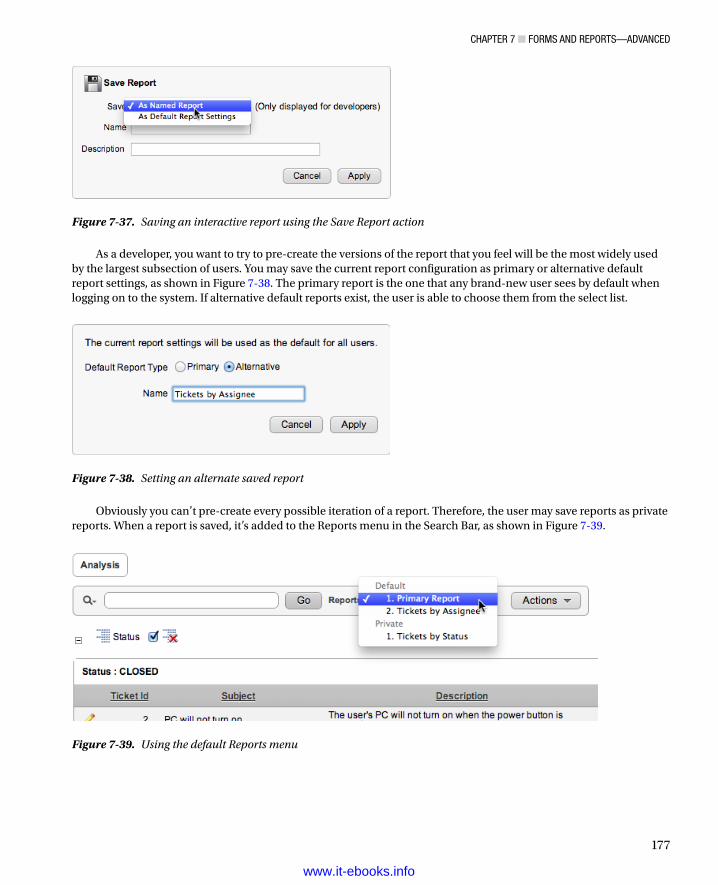
Chapter 7 ■ Forms and reports—advanCed
177
As a developer, you want to try to pre-create the versions of the report that you feel will be the most widely used by the largest subsection of users. You may save the current report configuration as primary or alternative default report settings, as shown in Figure 7-38. The primary report is the one that any brand-new user sees by default when logging on to the system. If alternative default reports exist, the user is able to choose them from the select list.
Figure 7-37. Saving an interactive report using the Save Report action
Figure 7-38. Setting an alternate saved report
Obviously you can’t pre-create every possible iteration of a report. Therefore, the user may save reports as private reports. When a report is saved, it’s added to the Reports menu in the Search Bar, as shown in Figure 7-39.
Figure 7-39. Using the default Reports menu
www.it-ebooks.info
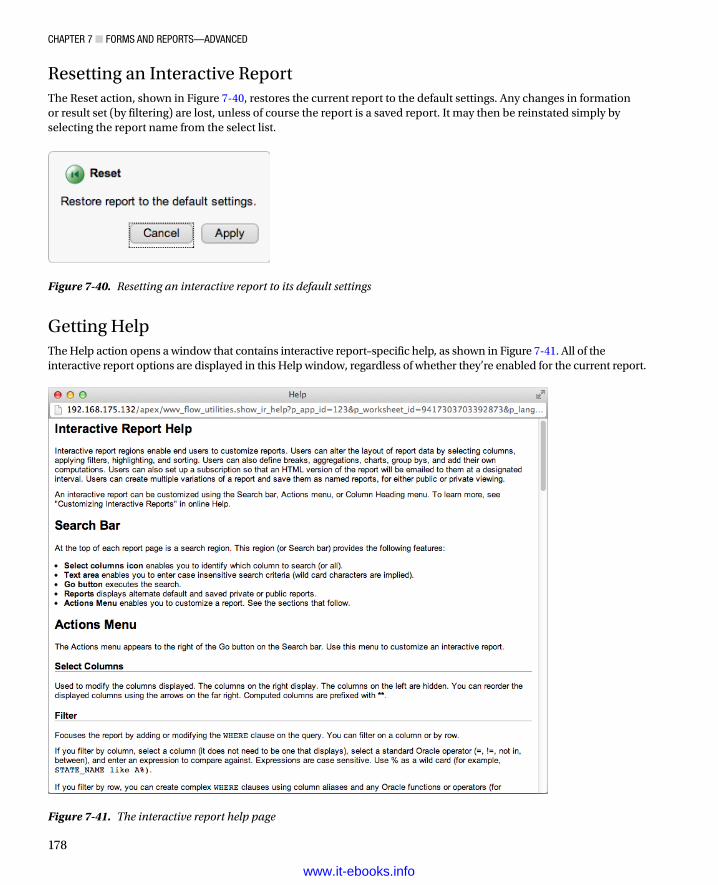
Chapter 7 ■ Forms and reports—advanCed
178
Resetting an Interactive ReportThe Reset action, shown in Figure 7-40, restores the current report to the default settings. Any changes in formation or result set (by filtering) are lost, unless of course the report is a saved report. It may then be reinstated simply by selecting the report name from the select list.
Figure 7-40. Resetting an interactive report to its default settings
Getting HelpThe Help action opens a window that contains interactive report–specific help, as shown in Figure 7-41. All of the interactive report options are displayed in this Help window, regardless of whether they’re enabled for the current report.
Figure 7-41. The interactive report help page
www.it-ebooks.info
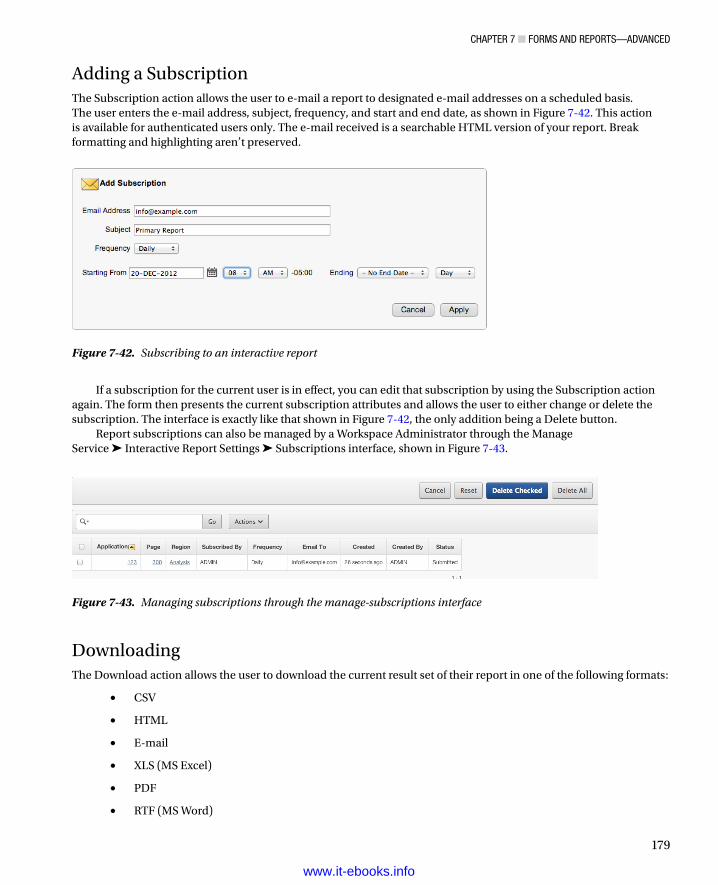
Chapter 7 ■ Forms and reports—advanCed
179
Adding a SubscriptionThe Subscription action allows the user to e-mail a report to designated e-mail addresses on a scheduled basis. The user enters the e-mail address, subject, frequency, and start and end date, as shown in Figure 7-42. This action is available for authenticated users only. The e-mail received is a searchable HTML version of your report. Break formatting and highlighting aren’t preserved.
Figure 7-42. Subscribing to an interactive report
If a subscription for the current user is in effect, you can edit that subscription by using the Subscription action again. The form then presents the current subscription attributes and allows the user to either change or delete the subscription. The interface is exactly like that shown in Figure 7-42, the only addition being a Delete button.
Report subscriptions can also be managed by a Workspace Administrator through the Manage Service ➤ Interactive Report Settings ➤ Subscriptions interface, shown in Figure 7-43.
Figure 7-43. Managing subscriptions through the manage-subscriptions interface
DownloadingThe Download action allows the user to download the current result set of their report in one of the following formats:
CSV•
HTML•
E-mail•
XLS (MS Excel)•
PDF•
RTF (MS Word)•
www.it-ebooks.info
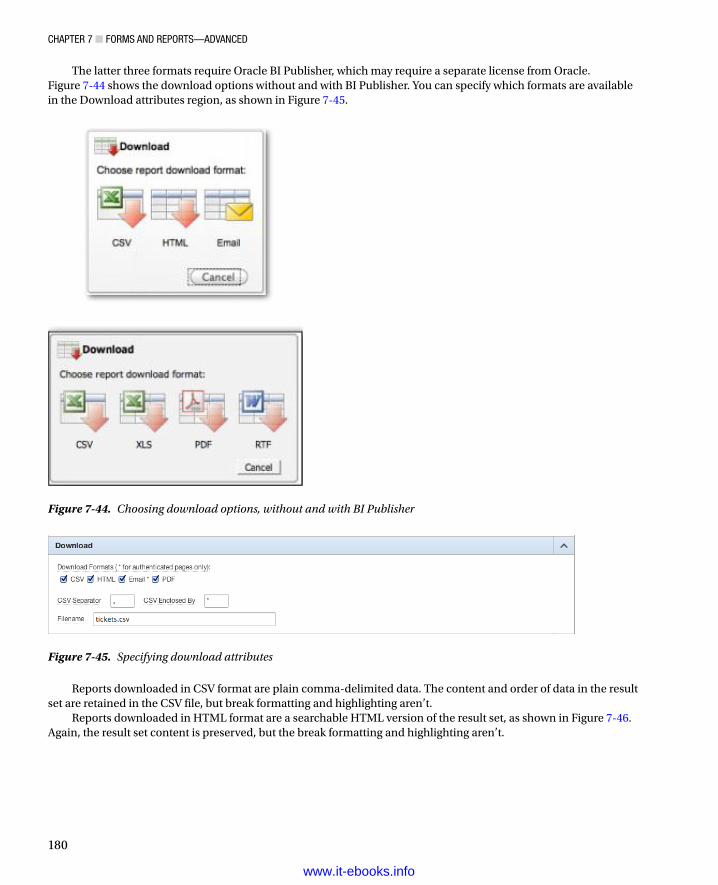
Chapter 7 ■ Forms and reports—advanCed
180
The latter three formats require Oracle BI Publisher, which may require a separate license from Oracle. Figure 7-44 shows the download options without and with BI Publisher. You can specify which formats are available in the Download attributes region, as shown in Figure 7-45.
Figure 7-44. Choosing download options, without and with BI Publisher
Figure 7-45. Specifying download attributes
Reports downloaded in CSV format are plain comma-delimited data. The content and order of data in the result set are retained in the CSV file, but break formatting and highlighting aren’t.
Reports downloaded in HTML format are a searchable HTML version of the result set, as shown in Figure 7-46. Again, the result set content is preserved, but the break formatting and highlighting aren’t.
www.it-ebooks.info
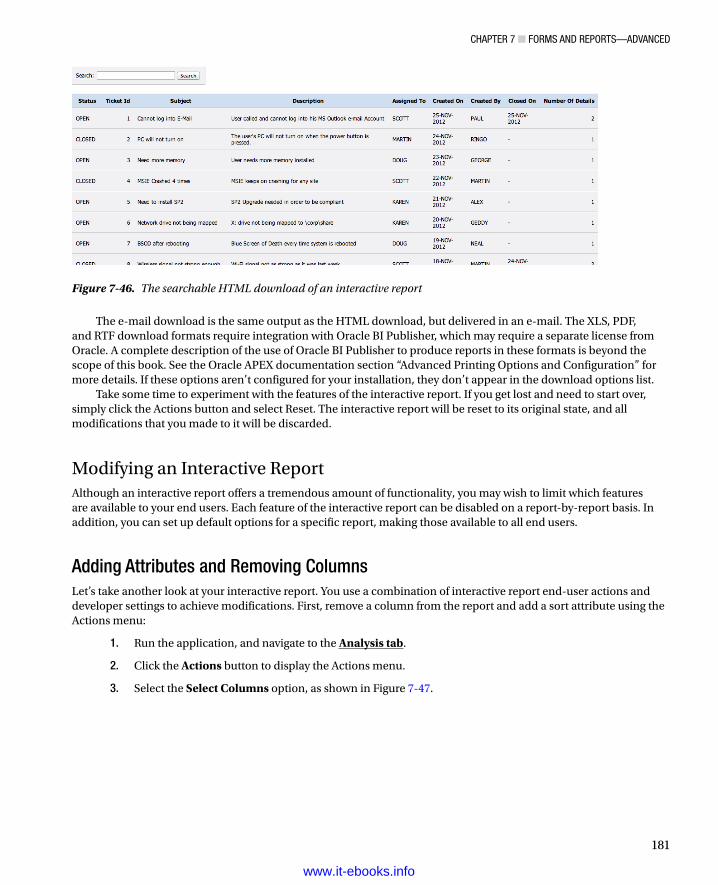
Chapter 7 ■ Forms and reports—advanCed
181
The e-mail download is the same output as the HTML download, but delivered in an e-mail. The XLS, PDF, and RTF download formats require integration with Oracle BI Publisher, which may require a separate license from Oracle. A complete description of the use of Oracle BI Publisher to produce reports in these formats is beyond the scope of this book. See the Oracle APEX documentation section “Advanced Printing Options and Configuration” for more details. If these options aren’t configured for your installation, they don’t appear in the download options list.
Take some time to experiment with the features of the interactive report. If you get lost and need to start over, simply click the Actions button and select Reset. The interactive report will be reset to its original state, and all modifications that you made to it will be discarded.
Modifying an Interactive ReportAlthough an interactive report offers a tremendous amount of functionality, you may wish to limit which features are available to your end users. Each feature of the interactive report can be disabled on a report-by-report basis. In addition, you can set up default options for a specific report, making those available to all end users.
Adding Attributes and Removing ColumnsLet’s take another look at your interactive report. You use a combination of interactive report end-user actions and developer settings to achieve modifications. First, remove a column from the report and add a sort attribute using the Actions menu:
1. Run the application, and navigate to the Analysis tab.
2. Click the Actions button to display the Actions menu.
3. Select the Select Columns option, as shown in Figure 7-47.
Figure 7-46. The searchable HTML download of an interactive report
www.it-ebooks.info
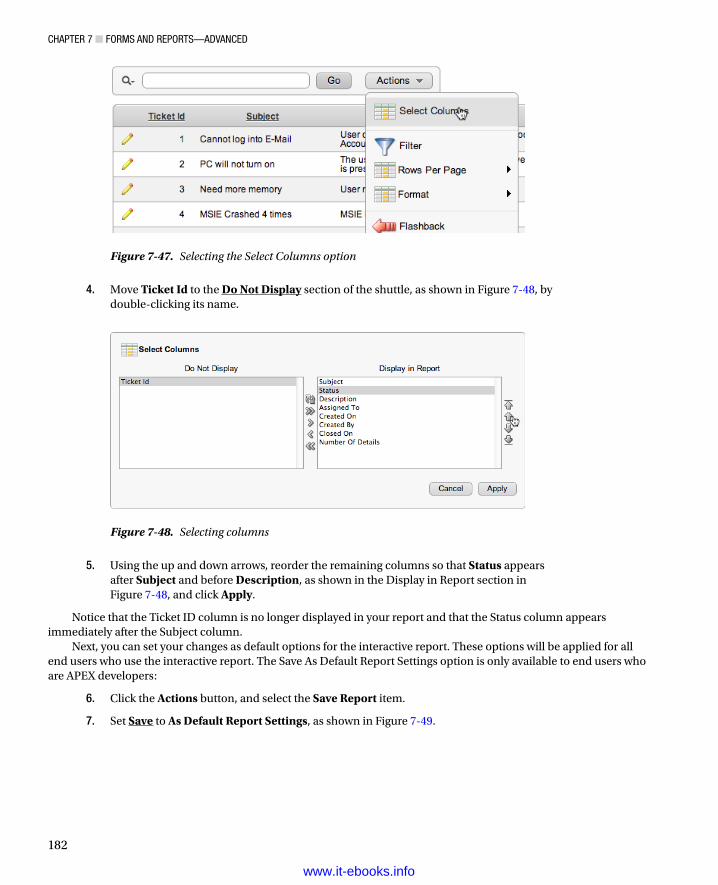
Chapter 7 ■ Forms and reports—advanCed
182
4. Move Ticket Id to the Do Not Display section of the shuttle, as shown in Figure 7-48, by double-clicking its name.
Figure 7-48. Selecting columns
Figure 7-47. Selecting the Select Columns option
5. Using the up and down arrows, reorder the remaining columns so that Status appears after Subject and before Description, as shown in the Display in Report section in Figure 7-48, and click Apply.
Notice that the Ticket ID column is no longer displayed in your report and that the Status column appears immediately after the Subject column.
Next, you can set your changes as default options for the interactive report. These options will be applied for all end users who use the interactive report. The Save As Default Report Settings option is only available to end users who are APEX developers:
6. Click the Actions button, and select the Save Report item.
7. Set Save to As Default Report Settings, as shown in Figure 7-49.
www.it-ebooks.info
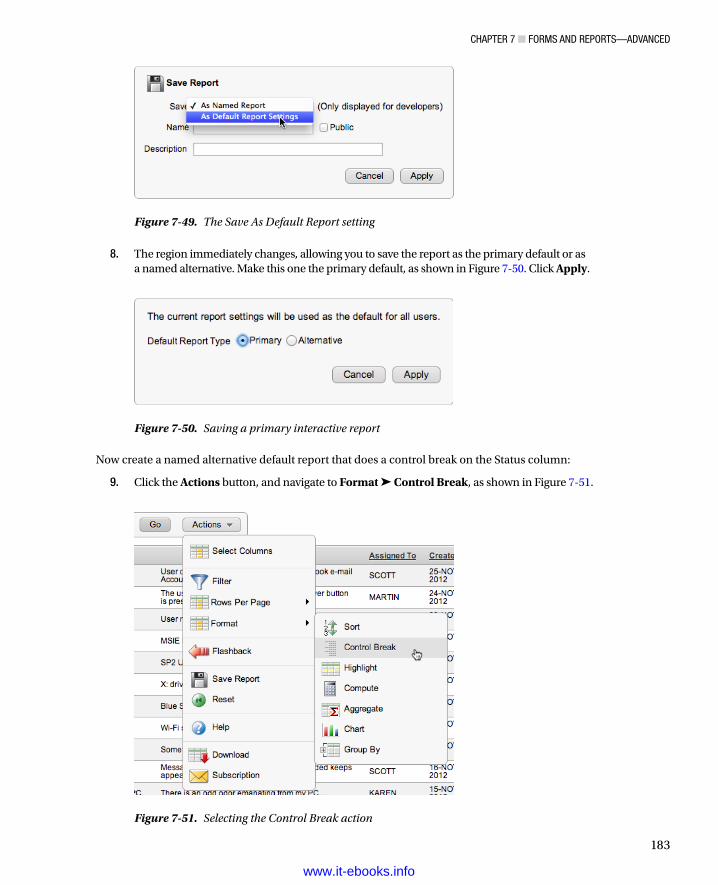
Chapter 7 ■ Forms and reports—advanCed
183
8. The region immediately changes, allowing you to save the report as the primary default or as a named alternative. Make this one the primary default, as shown in Figure 7-50. Click Apply.
Figure 7-49. The Save As Default Report setting
Figure 7-50. Saving a primary interactive report
Now create a named alternative default report that does a control break on the Status column:
9. Click the Actions button, and navigate to Format ➤ Control Break, as shown in Figure 7-51.
Figure 7-51. Selecting the Control Break action
www.it-ebooks.info
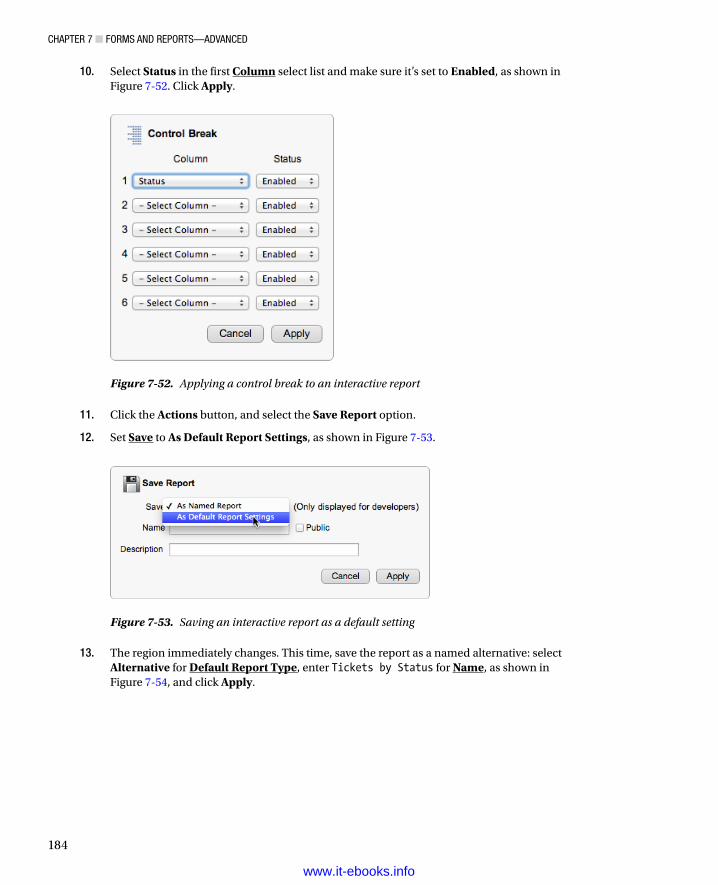
Chapter 7 ■ Forms and reports—advanCed
184
10. Select Status in the first Column select list and make sure it’s set to Enabled, as shown in Figure 7-52. Click Apply.
Figure 7-52. Applying a control break to an interactive report
Figure 7-53. Saving an interactive report as a default setting
11. Click the Actions button, and select the Save Report option.
12. Set Save to As Default Report Settings, as shown in Figure 7-53.
13. The region immediately changes. This time, save the report as a named alternative: select Alternative for Default Report Type, enter Tickets by Status for Name, as shown in Figure 7-54, and click Apply.
www.it-ebooks.info
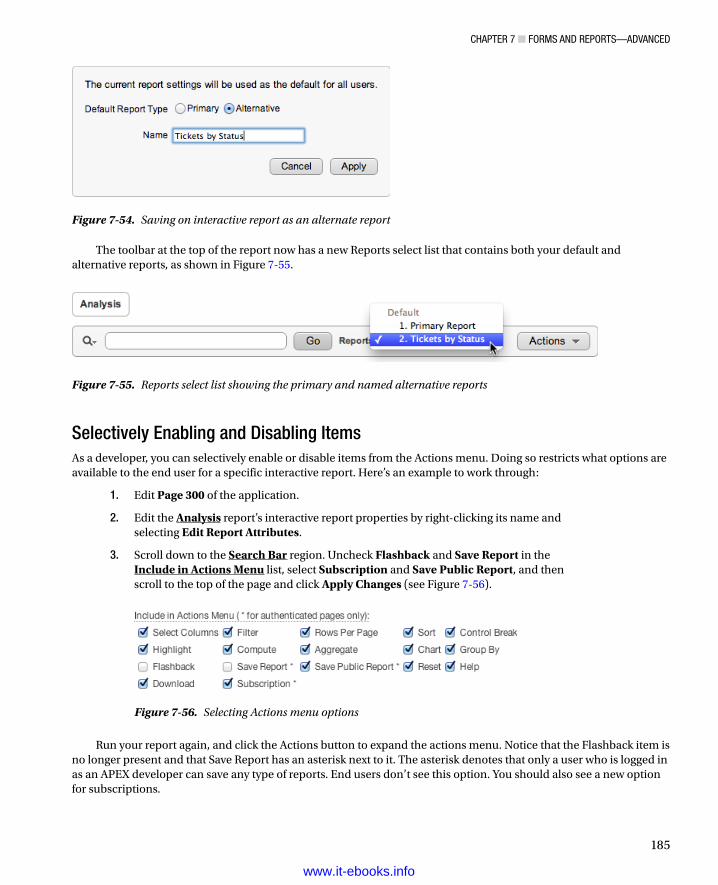
Chapter 7 ■ Forms and reports—advanCed
185
The toolbar at the top of the report now has a new Reports select list that contains both your default and alternative reports, as shown in Figure 7-55.
Figure 7-54. Saving on interactive report as an alternate report
Figure 7-55. Reports select list showing the primary and named alternative reports
Selectively Enabling and Disabling ItemsAs a developer, you can selectively enable or disable items from the Actions menu. Doing so restricts what options are available to the end user for a specific interactive report. Here’s an example to work through:
1. Edit Page 300 of the application.
2. Edit the Analysis report’s interactive report properties by right-clicking its name and selecting Edit Report Attributes.
3. Scroll down to the Search Bar region. Uncheck Flashback and Save Report in the Include in Actions Menu list, select Subscription and Save Public Report, and then scroll to the top of the page and click Apply Changes (see Figure 7-56).
Figure 7-56. Selecting Actions menu options
Run your report again, and click the Actions button to expand the actions menu. Notice that the Flashback item is no longer present and that Save Report has an asterisk next to it. The asterisk denotes that only a user who is logged in as an APEX developer can save any type of reports. End users don’t see this option. You should also see a new option for subscriptions.
www.it-ebooks.info
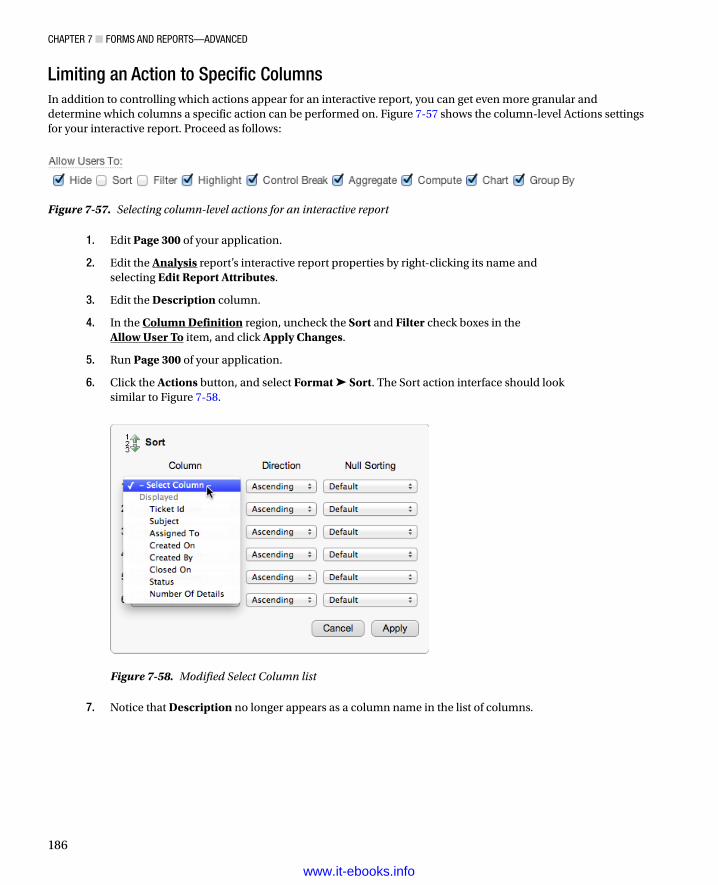
Chapter 7 ■ Forms and reports—advanCed
186
Limiting an Action to Specific ColumnsIn addition to controlling which actions appear for an interactive report, you can get even more granular and determine which columns a specific action can be performed on. Figure 7-57 shows the column-level Actions settings for your interactive report. Proceed as follows:
Figure 7-57. Selecting column-level actions for an interactive report
1. Edit Page 300 of your application.
2. Edit the Analysis report’s interactive report properties by right-clicking its name and selecting Edit Report Attributes.
3. Edit the Description column.
4. In the Column Definition region, uncheck the Sort and Filter check boxes in the Allow User To item, and click Apply Changes.
5. Run Page 300 of your application.
6. Click the Actions button, and select Format ➤ Sort. The Sort action interface should look similar to Figure 7-58.
Figure 7-58. Modified Select Column list
7. Notice that Description no longer appears as a column name in the list of columns.
www.it-ebooks.info
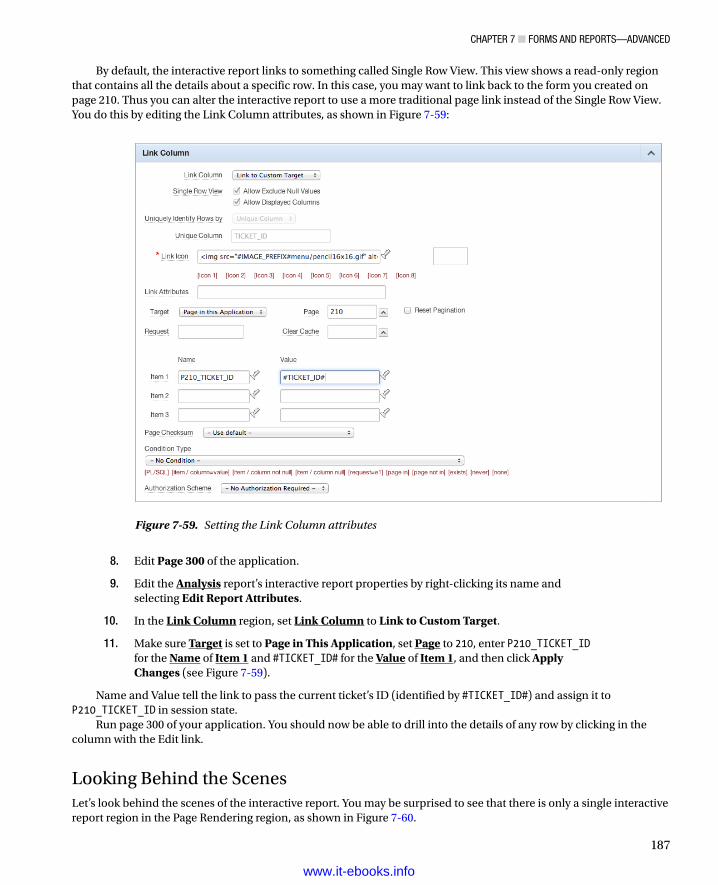
Chapter 7 ■ Forms and reports—advanCed
187
By default, the interactive report links to something called Single Row View. This view shows a read-only region that contains all the details about a specific row. In this case, you may want to link back to the form you created on page 210. Thus you can alter the interactive report to use a more traditional page link instead of the Single Row View. You do this by editing the Link Column attributes, as shown in Figure 7-59:
8. Edit Page 300 of the application.
9. Edit the Analysis report’s interactive report properties by right-clicking its name and selecting Edit Report Attributes.
10. In the Link Column region, set Link Column to Link to Custom Target.
11. Make sure Target is set to Page in This Application, set Page to 210, enter P210_TICKET_ID for the Name of Item 1 and #TICKET_ID# for the Value of Item 1, and then click Apply Changes (see Figure 7-59).
Name and Value tell the link to pass the current ticket’s ID (identified by #TICKET_ID#) and assign it to P210_TICKET_ID in session state.
Run page 300 of your application. You should now be able to drill into the details of any row by clicking in the column with the Edit link.
Looking Behind the ScenesLet’s look behind the scenes of the interactive report. You may be surprised to see that there is only a single interactive report region in the Page Rendering region, as shown in Figure 7-60.
Figure 7-59. Setting the Link Column attributes
www.it-ebooks.info
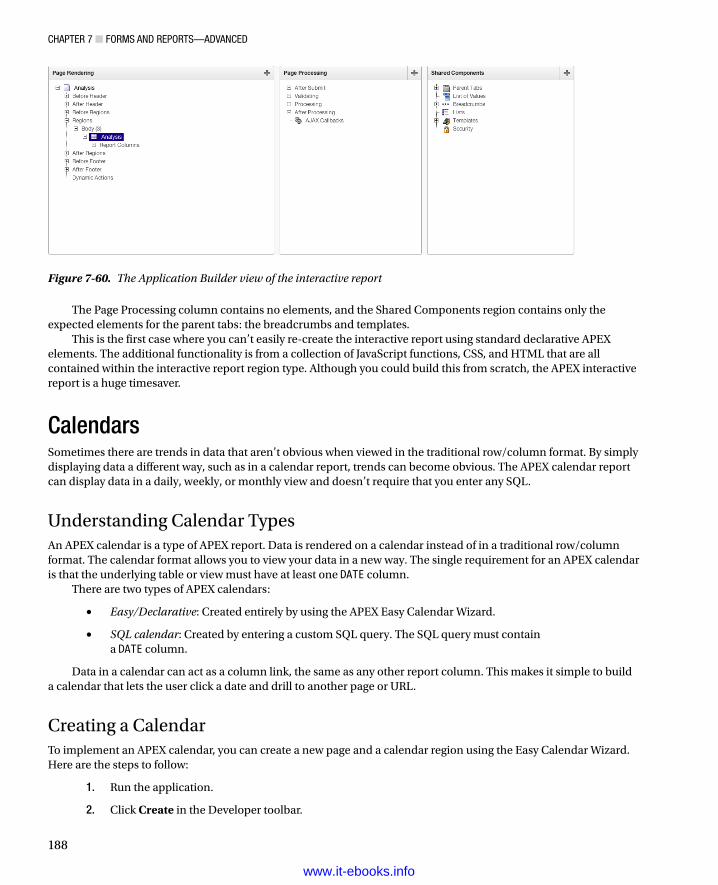
Chapter 7 ■ Forms and reports—advanCed
188
The Page Processing column contains no elements, and the Shared Components region contains only the expected elements for the parent tabs: the breadcrumbs and templates.
This is the first case where you can’t easily re-create the interactive report using standard declarative APEX elements. The additional functionality is from a collection of JavaScript functions, CSS, and HTML that are all contained within the interactive report region type. Although you could build this from scratch, the APEX interactive report is a huge timesaver.
CalendarsSometimes there are trends in data that aren’t obvious when viewed in the traditional row/column format. By simply displaying data a different way, such as in a calendar report, trends can become obvious. The APEX calendar report can display data in a daily, weekly, or monthly view and doesn’t require that you enter any SQL.
Understanding Calendar TypesAn APEX calendar is a type of APEX report. Data is rendered on a calendar instead of in a traditional row/column format. The calendar format allows you to view your data in a new way. The single requirement for an APEX calendar is that the underlying table or view must have at least one DATE column.
There are two types of APEX calendars:
• Easy/Declarative: Created entirely by using the APEX Easy Calendar Wizard.
• SQL calendar: Created by entering a custom SQL query. The SQL query must contain a DATE column.
Data in a calendar can act as a column link, the same as any other report column. This makes it simple to build a calendar that lets the user click a date and drill to another page or URL.
Creating a CalendarTo implement an APEX calendar, you can create a new page and a calendar region using the Easy Calendar Wizard. Here are the steps to follow:
1. Run the application.
2. Click Create in the Developer toolbar.
Figure 7-60. The Application Builder view of the interactive report
www.it-ebooks.info
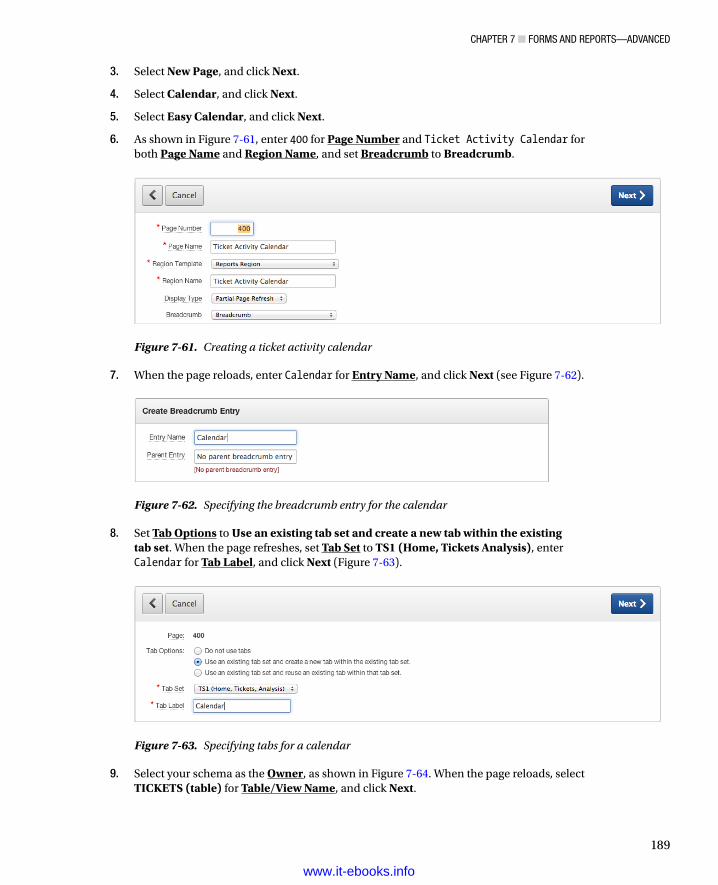
Chapter 7 ■ Forms and reports—advanCed
189
3. Select New Page, and click Next.
4. Select Calendar, and click Next.
5. Select Easy Calendar, and click Next.
6. As shown in Figure 7-61, enter 400 for Page Number and Ticket Activity Calendar for both Page Name and Region Name, and set Breadcrumb to Breadcrumb.
Figure 7-61. Creating a ticket activity calendar
Figure 7-62. Specifying the breadcrumb entry for the calendar
7. When the page reloads, enter Calendar for Entry Name, and click Next (see Figure 7-62).
8. Set Tab Options to Use an existing tab set and create a new tab within the existing tab set. When the page refreshes, set Tab Set to TS1 (Home, Tickets Analysis), enter Calendar for Tab Label, and click Next (Figure 7-63).
Figure 7-63. Specifying tabs for a calendar
9. Select your schema as the Owner, as shown in Figure 7-64. When the page reloads, select TICKETS (table) for Table/View Name, and click Next.
www.it-ebooks.info
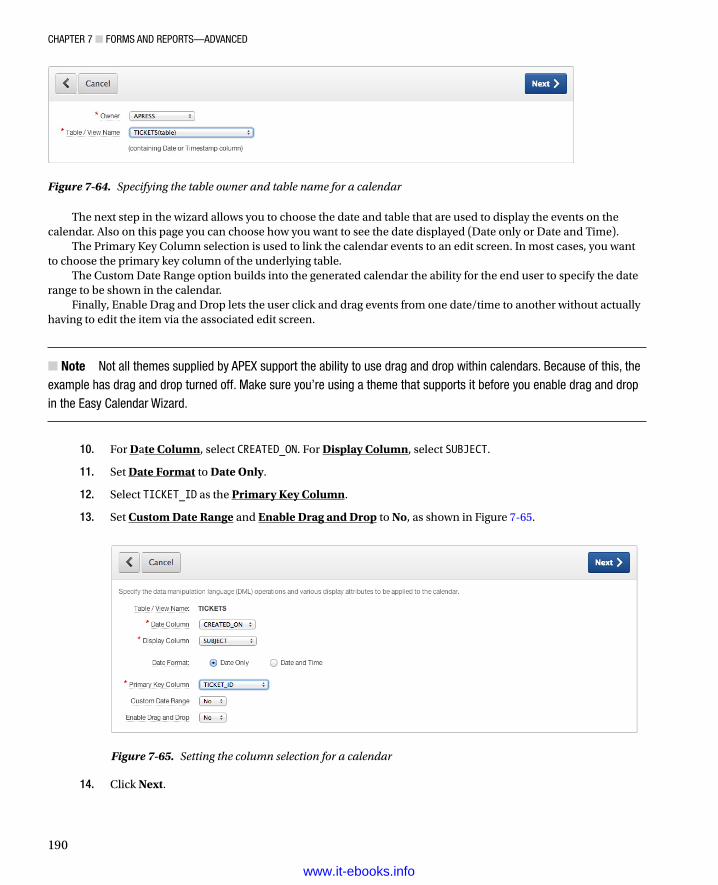
Chapter 7 ■ Forms and reports—advanCed
190
Figure 7-64. Specifying the table owner and table name for a calendar
Figure 7-65. Setting the column selection for a calendar
The next step in the wizard allows you to choose the date and table that are used to display the events on the calendar. Also on this page you can choose how you want to see the date displayed (Date only or Date and Time).
The Primary Key Column selection is used to link the calendar events to an edit screen. In most cases, you want to choose the primary key column of the underlying table.
The Custom Date Range option builds into the generated calendar the ability for the end user to specify the date range to be shown in the calendar.
Finally, Enable Drag and Drop lets the user click and drag events from one date/time to another without actually having to edit the item via the associated edit screen.
Note ■ not all themes supplied by apeX support the ability to use drag and drop within calendars. Because of this, the example has drag and drop turned off. make sure you’re using a theme that supports it before you enable drag and drop in the easy Calendar Wizard.
10. For Date Column, select CREATED_ON. For Display Column, select SUBJECT.
11. Set Date Format to Date Only.
12. Select TICKET_ID as the Primary Key Column.
13. Set Custom Date Range and Enable Drag and Drop to No, as shown in Figure 7-65.
14. Click Next.
www.it-ebooks.info
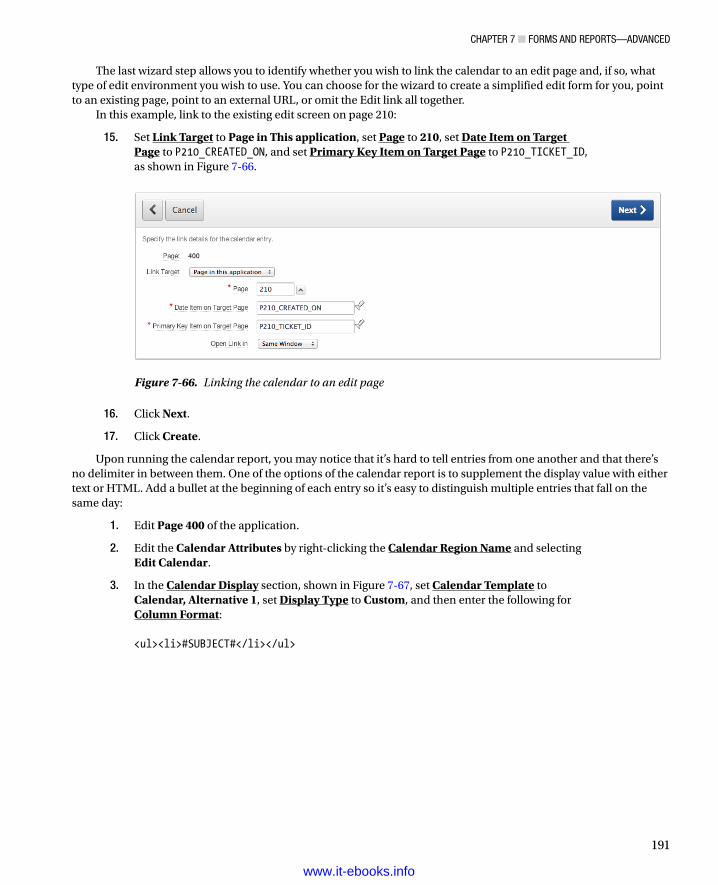
Chapter 7 ■ Forms and reports—advanCed
191
The last wizard step allows you to identify whether you wish to link the calendar to an edit page and, if so, what type of edit environment you wish to use. You can choose for the wizard to create a simplified edit form for you, point to an existing page, point to an external URL, or omit the Edit link all together.
In this example, link to the existing edit screen on page 210:
15. Set Link Target to Page in This application, set Page to 210, set Date Item on Target Page to P210_CREATED_ON, and set Primary Key Item on Target Page to P210_TICKET_ID, as shown in Figure 7-66.
Figure 7-66. Linking the calendar to an edit page
16. Click Next.
17. Click Create.
Upon running the calendar report, you may notice that it’s hard to tell entries from one another and that there’s no delimiter in between them. One of the options of the calendar report is to supplement the display value with either text or HTML. Add a bullet at the beginning of each entry so it’s easy to distinguish multiple entries that fall on the same day:
1. Edit Page 400 of the application.
2. Edit the Calendar Attributes by right-clicking the Calendar Region Name and selecting Edit Calendar.
3. In the Calendar Display section, shown in Figure 7-67, set Calendar Template to Calendar, Alternative 1, set Display Type to Custom, and then enter the following for Column Format: <ul><li>#SUBJECT#</li></ul>
www.it-ebooks.info
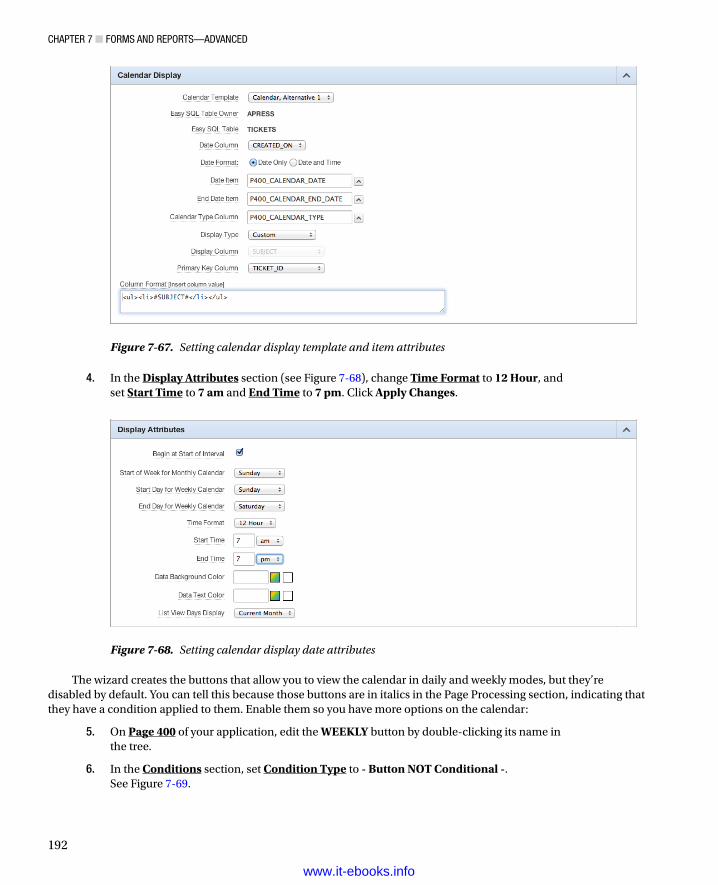
Chapter 7 ■ Forms and reports—advanCed
192
4. In the Display Attributes section (see Figure 7-68), change Time Format to 12 Hour, and set Start Time to 7 am and End Time to 7 pm. Click Apply Changes.
Figure 7-67. Setting calendar display template and item attributes
Figure 7-68. Setting calendar display date attributes
The wizard creates the buttons that allow you to view the calendar in daily and weekly modes, but they’re disabled by default. You can tell this because those buttons are in italics in the Page Processing section, indicating that they have a condition applied to them. Enable them so you have more options on the calendar:
5. On Page 400 of your application, edit the WEEKLY button by double-clicking its name in the tree.
6. In the Conditions section, set Condition Type to - Button NOT Conditional -. See Figure 7-69.
www.it-ebooks.info
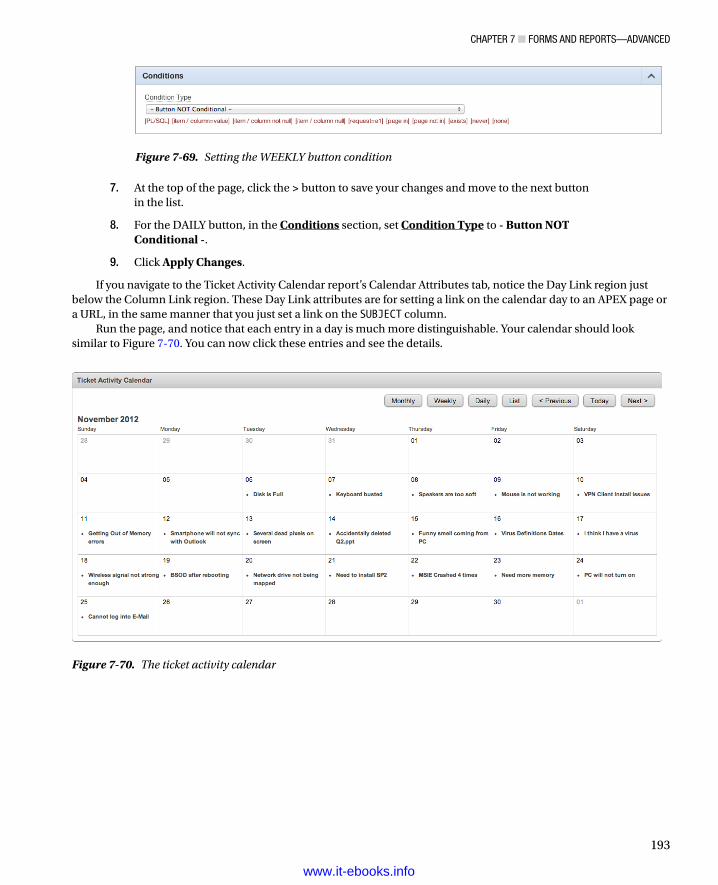
Chapter 7 ■ Forms and reports—advanCed
193
7. At the top of the page, click the > button to save your changes and move to the next button in the list.
8. For the DAILY button, in the Conditions section, set Condition Type to - Button NOT Conditional -.
9. Click Apply Changes.
If you navigate to the Ticket Activity Calendar report’s Calendar Attributes tab, notice the Day Link region just below the Column Link region. These Day Link attributes are for setting a link on the calendar day to an APEX page or a URL, in the same manner that you just set a link on the SUBJECT column.
Run the page, and notice that each entry in a day is much more distinguishable. Your calendar should look similar to Figure 7-70. You can now click these entries and see the details.
Figure 7-69. Setting the WEEKLY button condition
Figure 7-70. The ticket activity calendar
www.it-ebooks.info
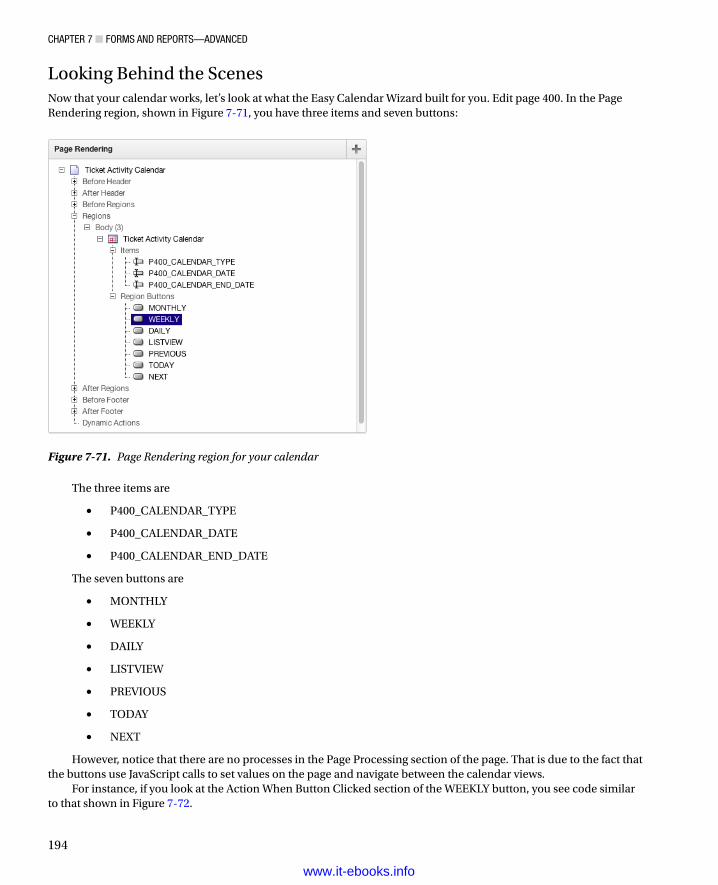
Chapter 7 ■ Forms and reports—advanCed
194
The three items are
P400_CALENDAR_TYPE•
P400_CALENDAR_DATE•
P400_CALENDAR_END_DATE•
The seven buttons are
MONTHLY•
WEEKLY•
DAILY•
LISTVIEW•
PREVIOUS•
TODAY•
NEXT•
However, notice that there are no processes in the Page Processing section of the page. That is due to the fact that the buttons use JavaScript calls to set values on the page and navigate between the calendar views.
For instance, if you look at the Action When Button Clicked section of the WEEKLY button, you see code similar to that shown in Figure 7-72.
Figure 7-71. Page Rendering region for your calendar
Looking Behind the ScenesNow that your calendar works, let’s look at what the Easy Calendar Wizard built for you. Edit page 400. In the Page Rendering region, shown in Figure 7-71, you have three items and seven buttons:
www.it-ebooks.info
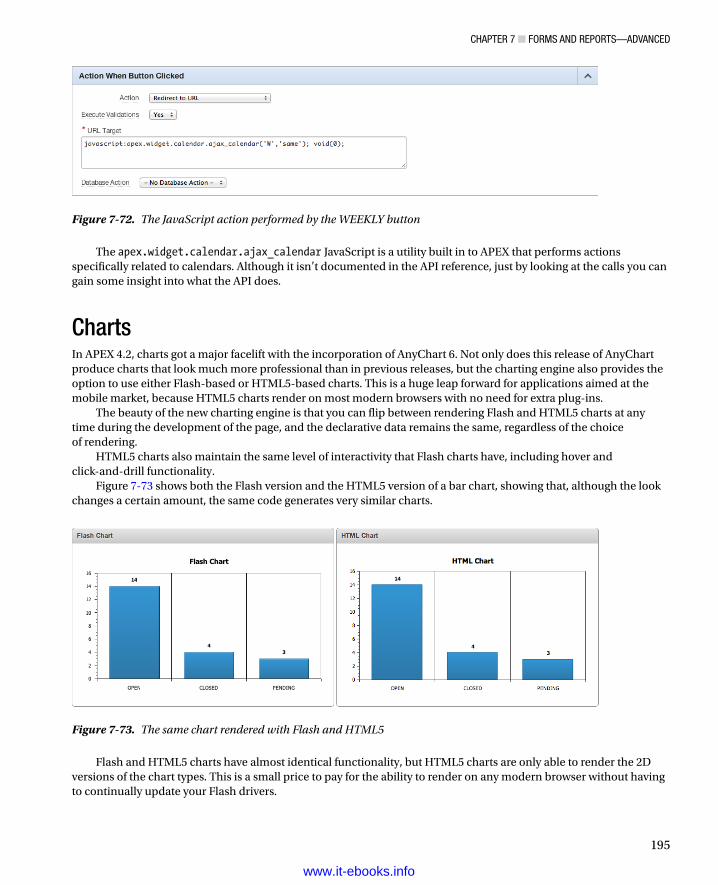
Chapter 7 ■ Forms and reports—advanCed
195
The apex.widget.calendar.ajax_calendar JavaScript is a utility built in to APEX that performs actions specifically related to calendars. Although it isn’t documented in the API reference, just by looking at the calls you can gain some insight into what the API does.
ChartsIn APEX 4.2, charts got a major facelift with the incorporation of AnyChart 6. Not only does this release of AnyChart produce charts that look much more professional than in previous releases, but the charting engine also provides the option to use either Flash-based or HTML5-based charts. This is a huge leap forward for applications aimed at the mobile market, because HTML5 charts render on most modern browsers with no need for extra plug-ins.
The beauty of the new charting engine is that you can flip between rendering Flash and HTML5 charts at any time during the development of the page, and the declarative data remains the same, regardless of the choice of rendering.
HTML5 charts also maintain the same level of interactivity that Flash charts have, including hover and click-and-drill functionality.
Figure 7-73 shows both the Flash version and the HTML5 version of a bar chart, showing that, although the look changes a certain amount, the same code generates very similar charts.
Figure 7-72. The JavaScript action performed by the WEEKLY button
Figure 7-73. The same chart rendered with Flash and HTML5
Flash and HTML5 charts have almost identical functionality, but HTML5 charts are only able to render the 2D versions of the chart types. This is a small price to pay for the ability to render on any modern browser without having to continually update your Flash drivers.
www.it-ebooks.info
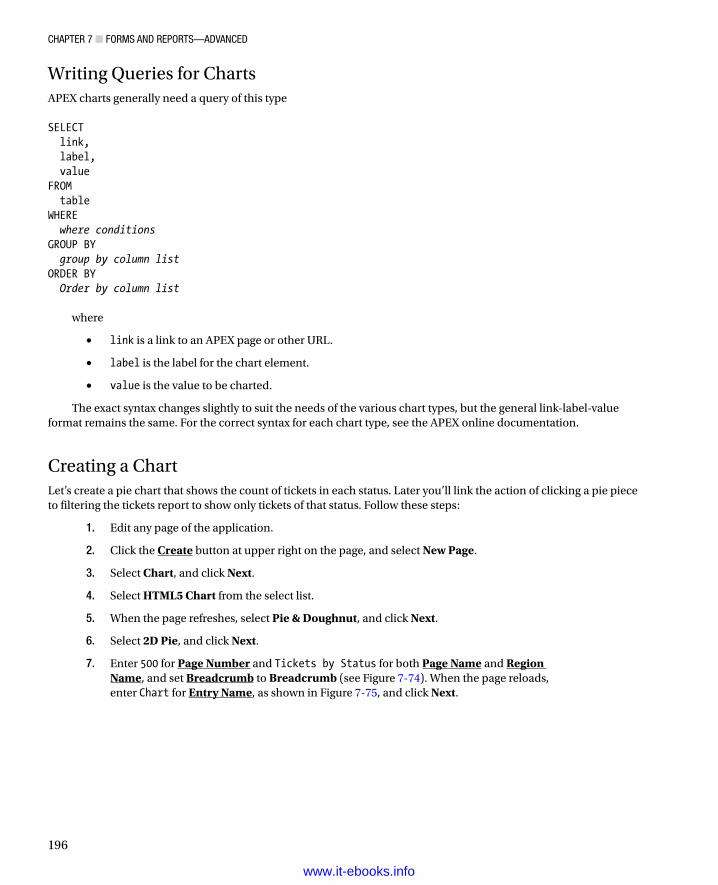
Chapter 7 ■ Forms and reports—advanCed
196
Writing Queries for ChartsAPEX charts generally need a query of this type SELECT link, label, valueFROM tableWHERE where conditionsGROUP BY group by column listORDER BY Order by column list
where
• link is a link to an APEX page or other URL.
• label is the label for the chart element.
• value is the value to be charted.
The exact syntax changes slightly to suit the needs of the various chart types, but the general link-label-value format remains the same. For the correct syntax for each chart type, see the APEX online documentation.
Creating a ChartLet’s create a pie chart that shows the count of tickets in each status. Later you’ll link the action of clicking a pie piece to filtering the tickets report to show only tickets of that status. Follow these steps:
1. Edit any page of the application.
2. Click the Create button at upper right on the page, and select New Page.
3. Select Chart, and click Next.
4. Select HTML5 Chart from the select list.
5. When the page refreshes, select Pie & Doughnut, and click Next.
6. Select 2D Pie, and click Next.
7. Enter 500 for Page Number and Tickets by Status for both Page Name and Region Name, and set Breadcrumb to Breadcrumb (see Figure 7-74). When the page reloads, enter Chart for Entry Name, as shown in Figure 7-75, and click Next.
www.it-ebooks.info
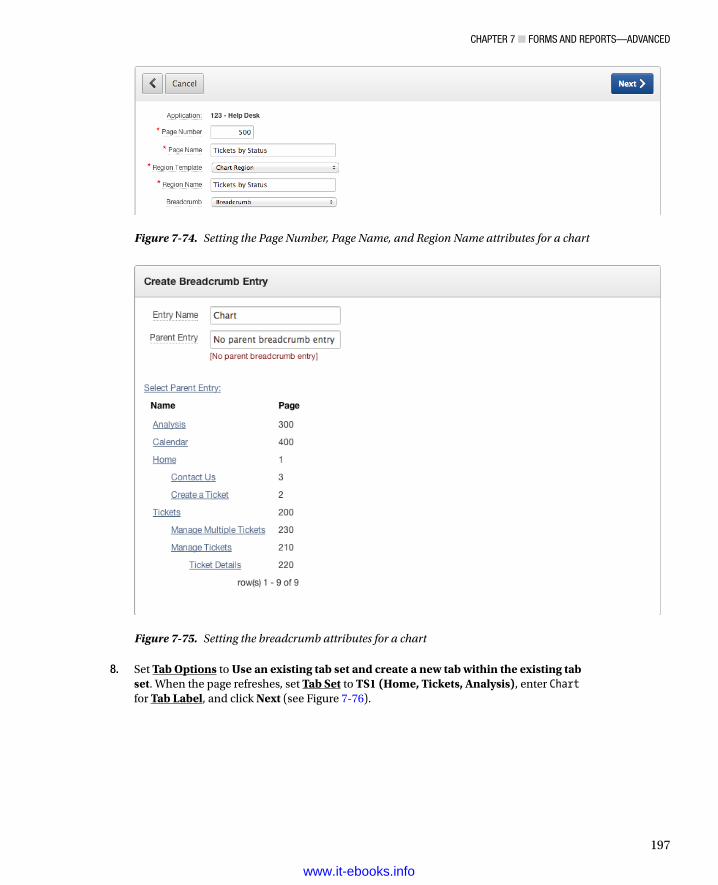
Chapter 7 ■ Forms and reports—advanCed
197
8. Set Tab Options to Use an existing tab set and create a new tab within the existing tab set. When the page refreshes, set Tab Set to TS1 (Home, Tickets, Analysis), enter Chart for Tab Label, and click Next (see Figure 7-76).
Figure 7-74. Setting the Page Number, Page Name, and Region Name attributes for a chart
Figure 7-75. Setting the breadcrumb attributes for a chart
www.it-ebooks.info
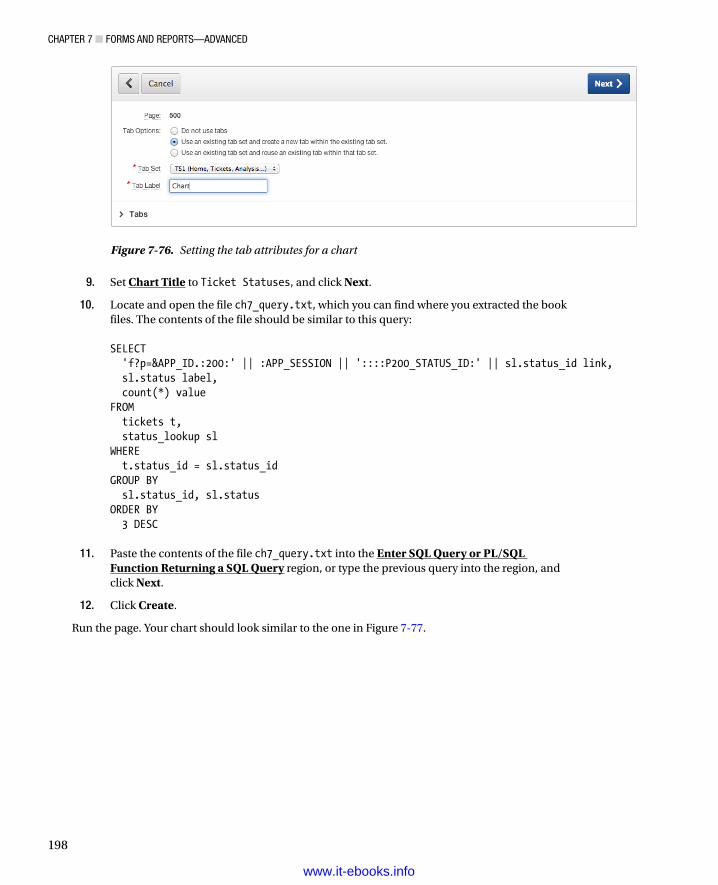
Chapter 7 ■ Forms and reports—advanCed
198
9. Set Chart Title to Ticket Statuses, and click Next.
10. Locate and open the file ch7_query.txt, which you can find where you extracted the book files. The contents of the file should be similar to this query: SELECT 'f?p=&APP_ID.:200:' || :APP_SESSION || '::::P200_STATUS_ID:' || sl.status_id link, sl.status label, count(*) valueFROM tickets t, status_lookup slWHERE t.status_id = sl.status_idGROUP BY sl.status_id, sl.statusORDER BY 3 DESC
11. Paste the contents of the file ch7_query.txt into the Enter SQL Query or PL/SQL Function Returning a SQL Query region, or type the previous query into the region, and click Next.
12. Click Create.
Run the page. Your chart should look similar to the one in Figure 7-77.
Figure 7-76. Setting the tab attributes for a chart
www.it-ebooks.info
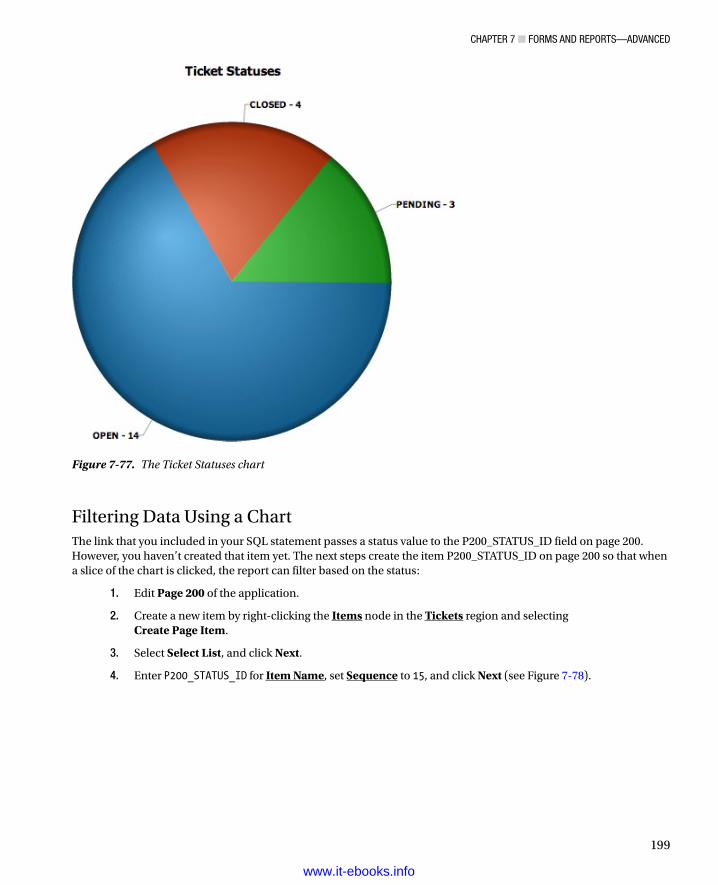
Chapter 7 ■ Forms and reports—advanCed
199
Filtering Data Using a ChartThe link that you included in your SQL statement passes a status value to the P200_STATUS_ID field on page 200. However, you haven’t created that item yet. The next steps create the item P200_STATUS_ID on page 200 so that when a slice of the chart is clicked, the report can filter based on the status:
1. Edit Page 200 of the application.
2. Create a new item by right-clicking the Items node in the Tickets region and selecting Create Page Item.
3. Select Select List, and click Next.
4. Enter P200_STATUS_ID for Item Name, set Sequence to 15, and click Next (see Figure 7-78).
Figure 7-77. The Ticket Statuses chart
www.it-ebooks.info
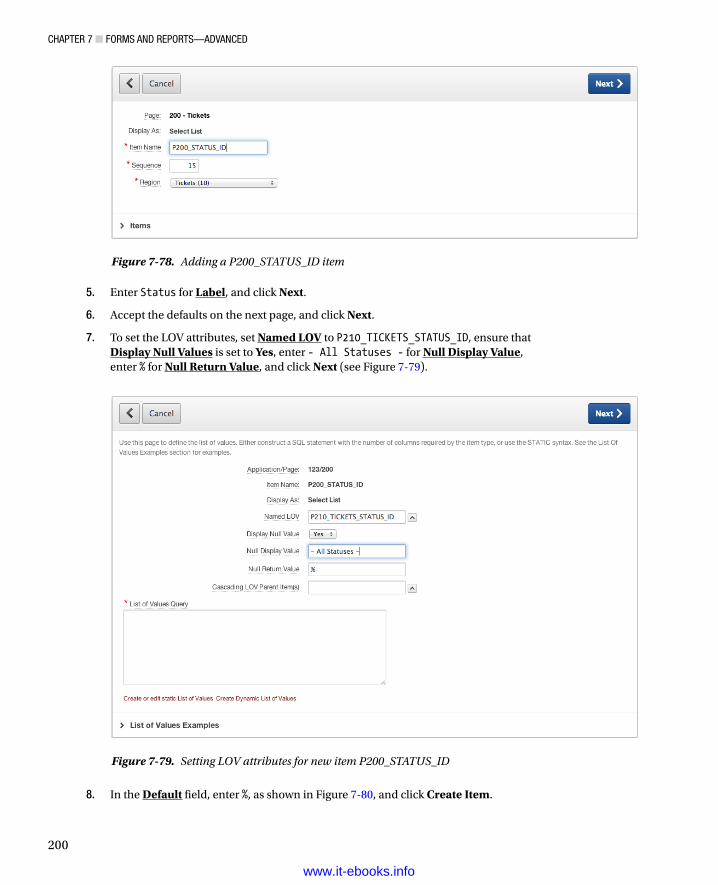
Chapter 7 ■ Forms and reports—advanCed
200
5. Enter Status for Label, and click Next.
6. Accept the defaults on the next page, and click Next.
7. To set the LOV attributes, set Named LOV to P210_TICKETS_STATUS_ID, ensure that Display Null Values is set to Yes, enter - All Statuses - for Null Display Value, enter % for Null Return Value, and click Next (see Figure 7-79).
Figure 7-78. Adding a P200_STATUS_ID item
Figure 7-79. Setting LOV attributes for new item P200_STATUS_ID
8. In the Default field, enter %, as shown in Figure 7-80, and click Create Item.
www.it-ebooks.info
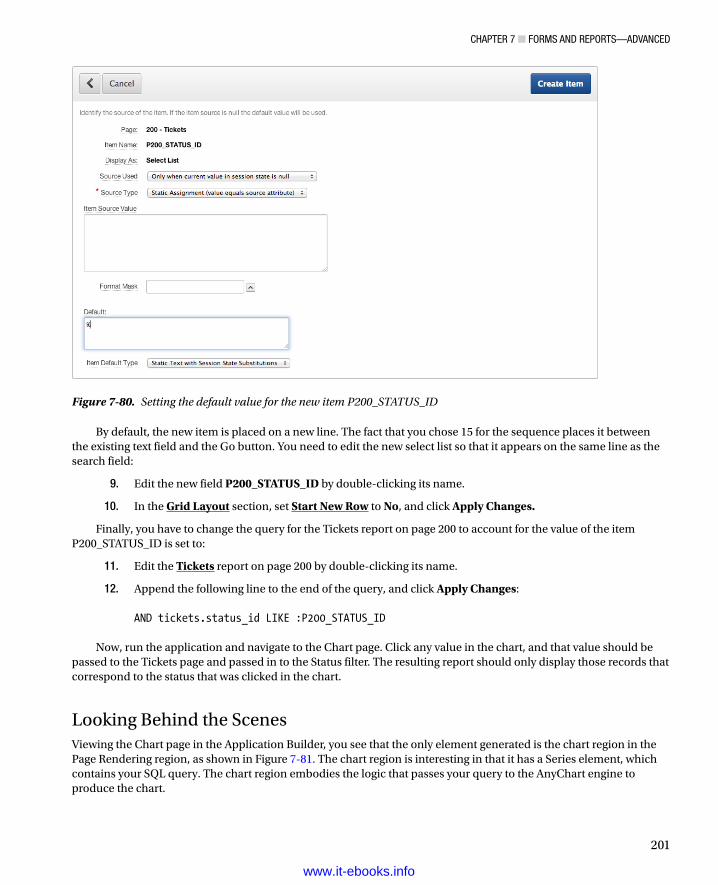
Chapter 7 ■ Forms and reports—advanCed
201
By default, the new item is placed on a new line. The fact that you chose 15 for the sequence places it between the existing text field and the Go button. You need to edit the new select list so that it appears on the same line as the search field:
9. Edit the new field P200_STATUS_ID by double-clicking its name.
10. In the Grid Layout section, set Start New Row to No, and click Apply Changes.
Finally, you have to change the query for the Tickets report on page 200 to account for the value of the item P200_STATUS_ID is set to:
11. Edit the Tickets report on page 200 by double-clicking its name.
12. Append the following line to the end of the query, and click Apply Changes: AND tickets.status_id LIKE :P200_STATUS_ID
Now, run the application and navigate to the Chart page. Click any value in the chart, and that value should be passed to the Tickets page and passed in to the Status filter. The resulting report should only display those records that correspond to the status that was clicked in the chart.
Looking Behind the ScenesViewing the Chart page in the Application Builder, you see that the only element generated is the chart region in the Page Rendering region, as shown in Figure 7-81. The chart region is interesting in that it has a Series element, which contains your SQL query. The chart region embodies the logic that passes your query to the AnyChart engine to produce the chart.
Figure 7-80. Setting the default value for the new item P200_STATUS_ID
www.it-ebooks.info
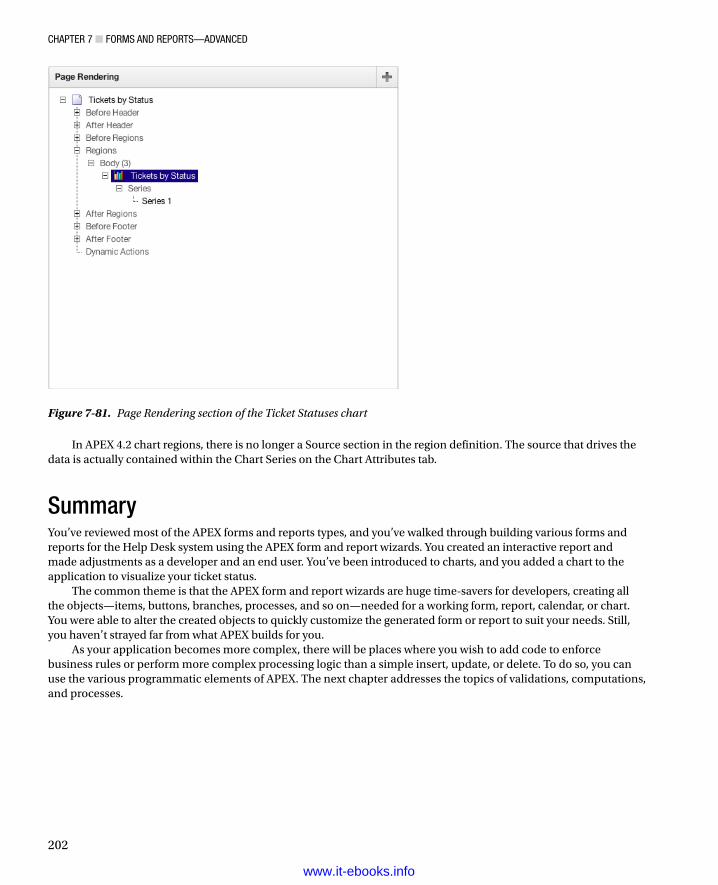
Chapter 7 ■ Forms and reports—advanCed
202
In APEX 4.2 chart regions, there is no longer a Source section in the region definition. The source that drives the data is actually contained within the Chart Series on the Chart Attributes tab.
SummaryYou’ve reviewed most of the APEX forms and reports types, and you’ve walked through building various forms and reports for the Help Desk system using the APEX form and report wizards. You created an interactive report and made adjustments as a developer and an end user. You’ve been introduced to charts, and you added a chart to the application to visualize your ticket status.
The common theme is that the APEX form and report wizards are huge time-savers for developers, creating all the objects—items, buttons, branches, processes, and so on—needed for a working form, report, calendar, or chart. You were able to alter the created objects to quickly customize the generated form or report to suit your needs. Still, you haven’t strayed far from what APEX builds for you.
As your application becomes more complex, there will be places where you wish to add code to enforce business rules or perform more complex processing logic than a simple insert, update, or delete. To do so, you can use the various programmatic elements of APEX. The next chapter addresses the topics of validations, computations, and processes.
Figure 7-81. Page Rendering section of the Ticket Statuses chart
www.it-ebooks.info

203
Chapter 8
Programmatic Elements
This chapter covers the programmatic elements that can provide both simple and complex features to the APEX framework. APEX provides simple declarative features with wizards to guide you. Because of its integration with the database, APEX can also use the full power of the PL/SQL engine inside the Oracle database. Now, with the implementation of APEX 4, even JavaScript interactivity has been made declarative and extendable in the framework.
ConditionsThroughout the building of the Help Desk application, there are times when you want to take advantage of the conditional logic available with APEX components. Rather than try to understand every type of condition (there are 60 in the list of condition types), you should focus mainly on grasping the concept of a condition.
The condition feature provides a place where logic can turn on or off the particular piece of APEX technology. Before action is taken to display or execute a particular APEX component, the condition applied to that component is evaluated for a TRUE or positive result.
The logic options available to develop a condition are very broad. The condition type defines the particular mechanics used to evaluate the condition using parameters as appropriate. Simple page-item comparisons are the easiest to explain. For example, a process may only need to be run if a particular page item has a value. In the case of sending an e-mail, an attempt to send a message should be made only if an e-mail address is given. From that simple start, conditions can become as complex as you need them to be. In advanced cases, conditions can also include browser and web server options.
Take time to review the condition types that are available and become familiar with their usage. It isn’t as important to understand the technical implementation or syntax of each item as much as what options make up a single condition. This familiarity will be helpful when you start defining APEX components and understanding considerations for a flexible and modular application design.
Required ValuesRequiring a value is a common need, and APEX 4.0 and above supports required values through what is essentially a NOT NULL flag at the page-item level. You don’t need to create a full-blown validation (discussed next) to make an item required. You simply make a choice from a drop-down list.
Continuing the Help Desk application, let’s implement a Value Required validation on the Subject field:
1. Edit Page 210 of the application.
2. Edit the P210_DESCR page item.
www.it-ebooks.info
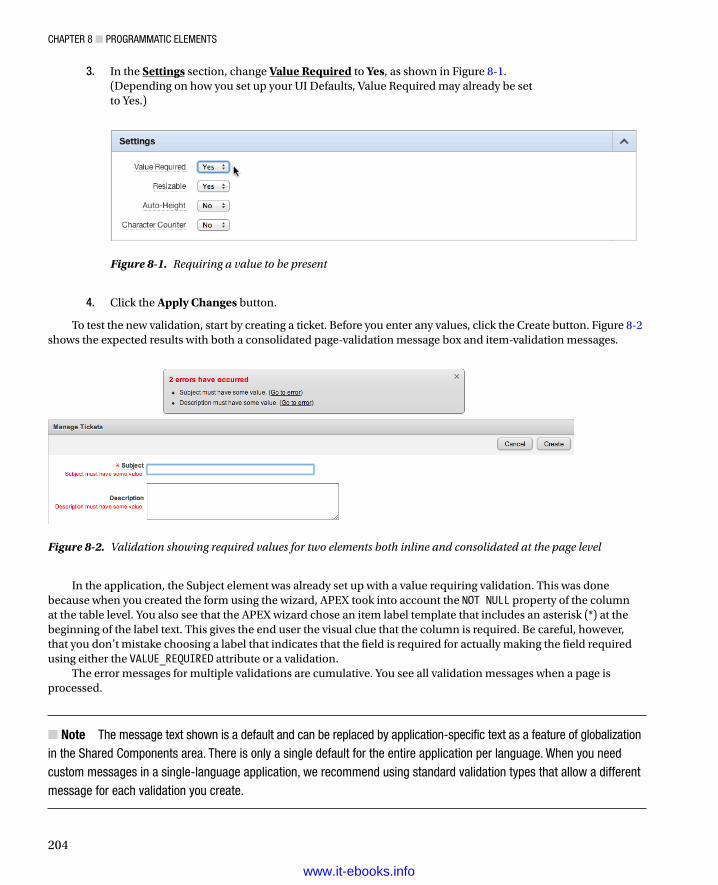
Chapter 8 ■ programmatiC elements
204
3. In the Settings section, change Value Required to Yes, as shown in Figure 8-1. (Depending on how you set up your UI Defaults, Value Required may already be set to Yes.)
4. Click the Apply Changes button.
To test the new validation, start by creating a ticket. Before you enter any values, click the Create button. Figure 8-2 shows the expected results with both a consolidated page-validation message box and item-validation messages.
In the application, the Subject element was already set up with a value requiring validation. This was done because when you created the form using the wizard, APEX took into account the NOT NULL property of the column at the table level. You also see that the APEX wizard chose an item label template that includes an asterisk (*) at the beginning of the label text. This gives the end user the visual clue that the column is required. Be careful, however, that you don’t mistake choosing a label that indicates that the field is required for actually making the field required using either the VALUE_REQUIRED attribute or a validation.
The error messages for multiple validations are cumulative. You see all validation messages when a page is processed.
Note ■ the message text shown is a default and can be replaced by application-specific text as a feature of globalization in the shared Components area. there is only a single default for the entire application per language. When you need custom messages in a single-language application, we recommend using standard validation types that allow a different message for each validation you create.
Figure 8-1. Requiring a value to be present
Figure 8-2. Validation showing required values for two elements both inline and consolidated at the page level
www.it-ebooks.info
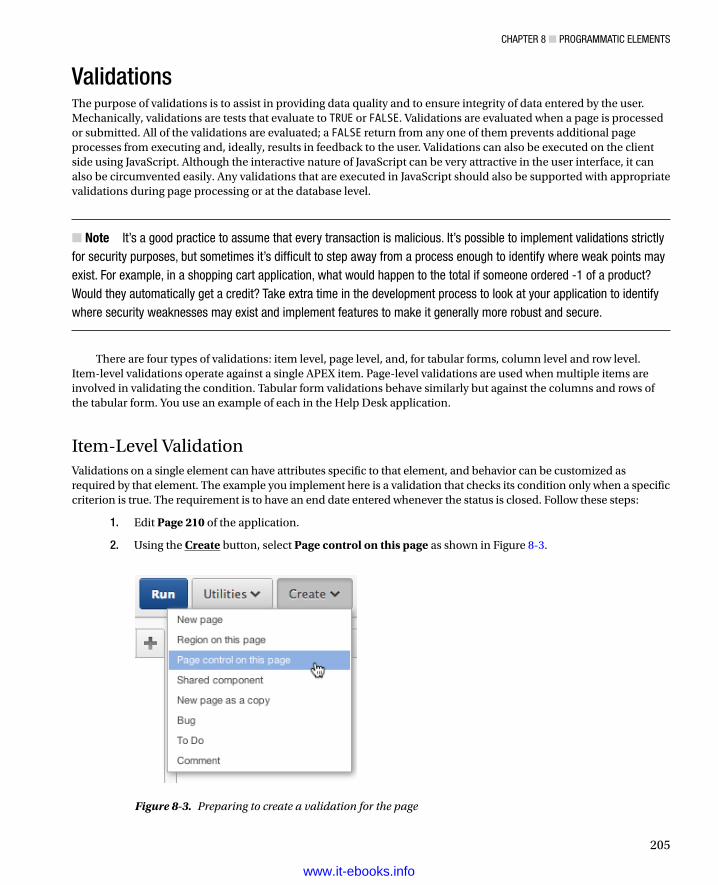
Chapter 8 ■ programmatiC elements
205
ValidationsThe purpose of validations is to assist in providing data quality and to ensure integrity of data entered by the user. Mechanically, validations are tests that evaluate to TRUE or FALSE. Validations are evaluated when a page is processed or submitted. All of the validations are evaluated; a FALSE return from any one of them prevents additional page processes from executing and, ideally, results in feedback to the user. Validations can also be executed on the client side using JavaScript. Although the interactive nature of JavaScript can be very attractive in the user interface, it can also be circumvented easily. Any validations that are executed in JavaScript should also be supported with appropriate validations during page processing or at the database level.
Note ■ it’s a good practice to assume that every transaction is malicious. it’s possible to implement validations strictly for security purposes, but sometimes it’s difficult to step away from a process enough to identify where weak points may exist. For example, in a shopping cart application, what would happen to the total if someone ordered -1 of a product? Would they automatically get a credit? take extra time in the development process to look at your application to identify where security weaknesses may exist and implement features to make it generally more robust and secure.
There are four types of validations: item level, page level, and, for tabular forms, column level and row level. Item-level validations operate against a single APEX item. Page-level validations are used when multiple items are involved in validating the condition. Tabular form validations behave similarly but against the columns and rows of the tabular form. You use an example of each in the Help Desk application.
Item-Level ValidationValidations on a single element can have attributes specific to that element, and behavior can be customized as required by that element. The example you implement here is a validation that checks its condition only when a specific criterion is true. The requirement is to have an end date entered whenever the status is closed. Follow these steps:
1. Edit Page 210 of the application.
2. Using the Create button, select Page control on this page as shown in Figure 8-3.
Figure 8-3. Preparing to create a validation for the page
www.it-ebooks.info
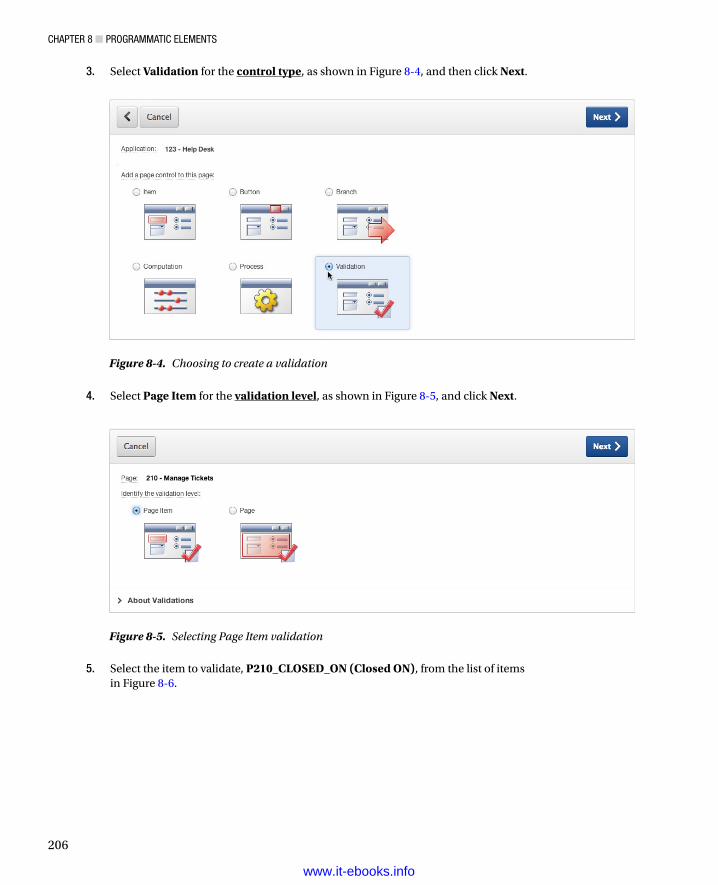
Chapter 8 ■ programmatiC elements
206
3. Select Validation for the control type, as shown in Figure 8-4, and then click Next.
Figure 8-4. Choosing to create a validation
Figure 8-5. Selecting Page Item validation
4. Select Page Item for the validation level, as shown in Figure 8-5, and click Next.
5. Select the item to validate, P210_CLOSED_ON (Closed ON), from the list of items in Figure 8-6.
www.it-ebooks.info
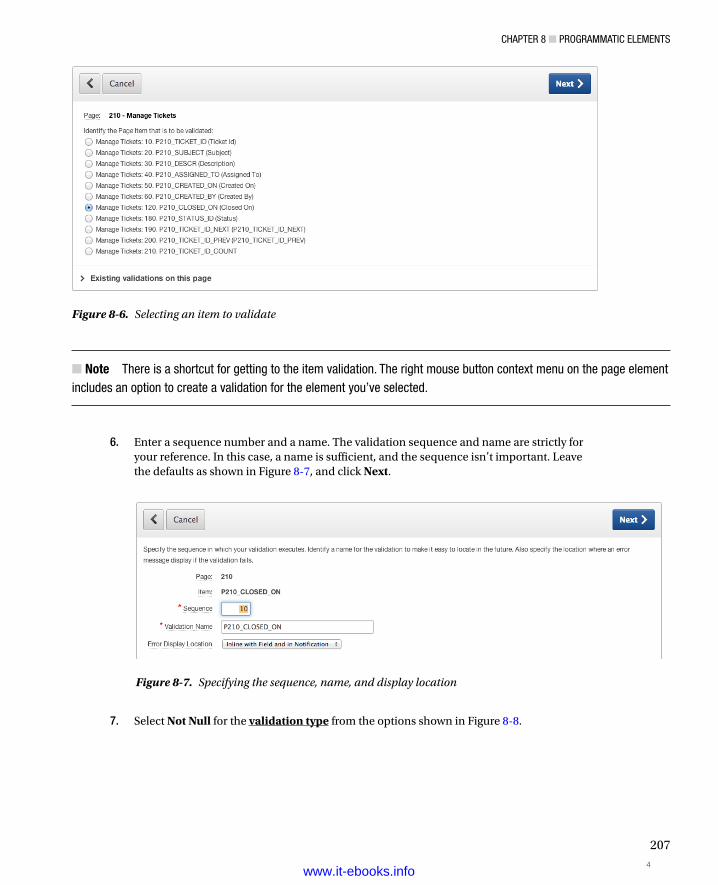
Chapter 8 ■ programmatiC elements
207
Note ■ there is a shortcut for getting to the item validation. the right mouse button context menu on the page element includes an option to create a validation for the element you’ve selected.
6. Enter a sequence number and a name. The validation sequence and name are strictly for your reference. In this case, a name is sufficient, and the sequence isn’t important. Leave the defaults as shown in Figure 8-7, and click Next.
7. Select Not Null for the validation type from the options shown in Figure 8-8.
Figure 8-6. Selecting an item to validate
Figure 8-7. Specifying the sequence, name, and display location
4www.it-ebooks.info
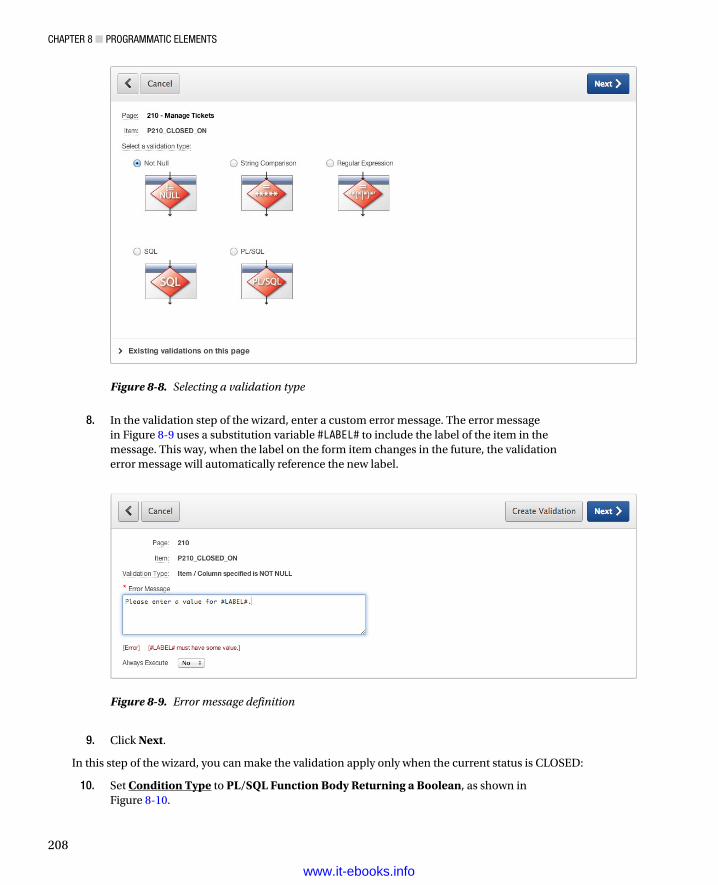
Chapter 8 ■ programmatiC elements
208
8. In the validation step of the wizard, enter a custom error message. The error message in Figure 8-9 uses a substitution variable #LABEL# to include the label of the item in the message. This way, when the label on the form item changes in the future, the validation error message will automatically reference the new label.
9. Click Next.
In this step of the wizard, you can make the validation apply only when the current status is CLOSED:
10. Set Condition Type to PL/SQL Function Body Returning a Boolean, as shown in Figure 8-10.
Figure 8-8. Selecting a validation type
Figure 8-9. Error message definition
www.it-ebooks.info
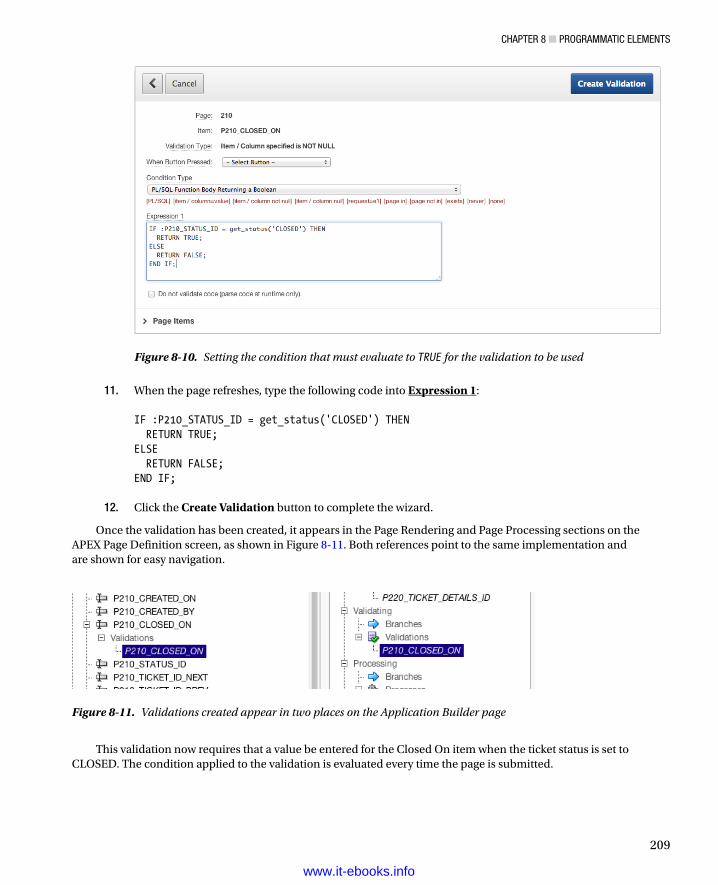
Chapter 8 ■ programmatiC elements
209
11. When the page refreshes, type the following code into Expression 1: IF :P210_STATUS_ID = get_status('CLOSED') THEN RETURN TRUE;ELSE RETURN FALSE;END IF;
12. Click the Create Validation button to complete the wizard.
Once the validation has been created, it appears in the Page Rendering and Page Processing sections on the APEX Page Definition screen, as shown in Figure 8-11. Both references point to the same implementation and are shown for easy navigation.
Figure 8-10. Setting the condition that must evaluate to TRUE for the validation to be used
Figure 8-11. Validations created appear in two places on the Application Builder page
This validation now requires that a value be entered for the Closed On item when the ticket status is set to CLOSED. The condition applied to the validation is evaluated every time the page is submitted.
www.it-ebooks.info
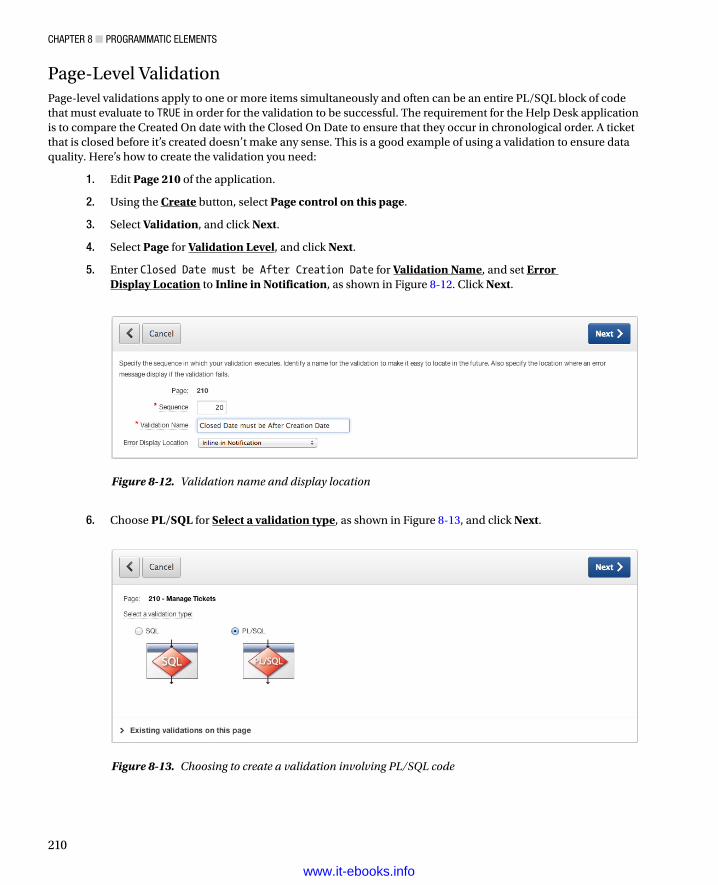
Chapter 8 ■ programmatiC elements
210
Page-Level ValidationPage-level validations apply to one or more items simultaneously and often can be an entire PL/SQL block of code that must evaluate to TRUE in order for the validation to be successful. The requirement for the Help Desk application is to compare the Created On date with the Closed On Date to ensure that they occur in chronological order. A ticket that is closed before it’s created doesn’t make any sense. This is a good example of using a validation to ensure data quality. Here’s how to create the validation you need:
1. Edit Page 210 of the application.
2. Using the Create button, select Page control on this page.
3. Select Validation, and click Next.
4. Select Page for Validation Level, and click Next.
5. Enter Closed Date must be After Creation Date for Validation Name, and set Error Display Location to Inline in Notification, as shown in Figure 8-12. Click Next.
6. Choose PL/SQL for Select a validation type, as shown in Figure 8-13, and click Next.
Figure 8-12. Validation name and display location
Figure 8-13. Choosing to create a validation involving PL/SQL code
www.it-ebooks.info
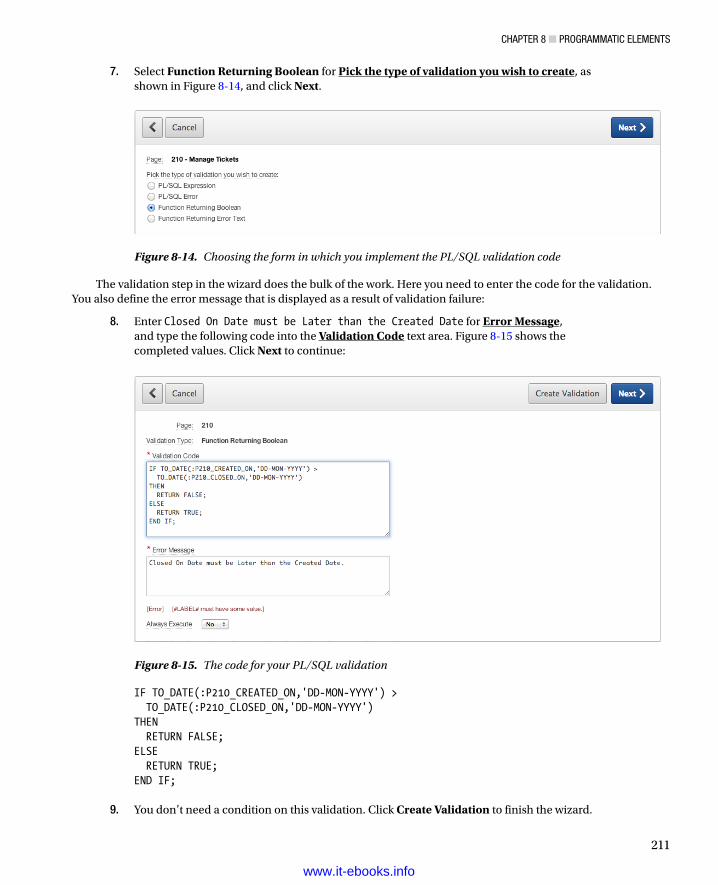
Chapter 8 ■ programmatiC elements
211
7. Select Function Returning Boolean for Pick the type of validation you wish to create, as shown in Figure 8-14, and click Next.
Figure 8-14. Choosing the form in which you implement the PL/SQL validation code
Figure 8-15. The code for your PL/SQL validation
The validation step in the wizard does the bulk of the work. Here you need to enter the code for the validation. You also define the error message that is displayed as a result of validation failure:
8. Enter Closed On Date must be Later than the Created Date for Error Message, and type the following code into the Validation Code text area. Figure 8-15 shows the completed values. Click Next to continue:
IF TO_DATE(:P210_CREATED_ON,'DD-MON-YYYY') > TO_DATE(:P210_CLOSED_ON,'DD-MON-YYYY')THEN RETURN FALSE;ELSE RETURN TRUE;END IF;
9. You don’t need a condition on this validation. Click Create Validation to finish the wizard.
www.it-ebooks.info
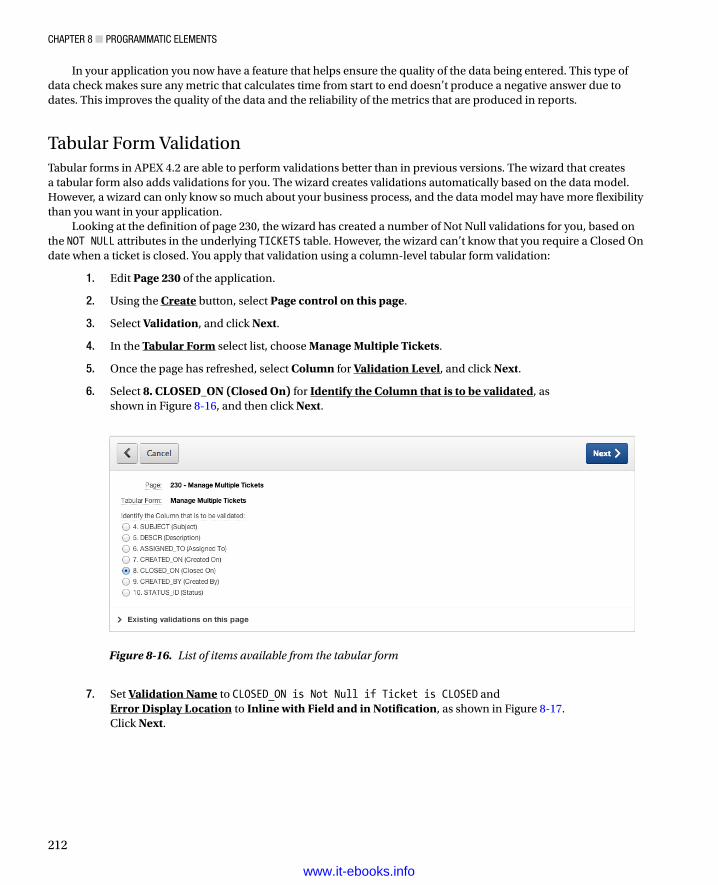
Chapter 8 ■ programmatiC elements
212
In your application you now have a feature that helps ensure the quality of the data being entered. This type of data check makes sure any metric that calculates time from start to end doesn’t produce a negative answer due to dates. This improves the quality of the data and the reliability of the metrics that are produced in reports.
Tabular Form ValidationTabular forms in APEX 4.2 are able to perform validations better than in previous versions. The wizard that creates a tabular form also adds validations for you. The wizard creates validations automatically based on the data model. However, a wizard can only know so much about your business process, and the data model may have more flexibility than you want in your application.
Looking at the definition of page 230, the wizard has created a number of Not Null validations for you, based on the NOT NULL attributes in the underlying TICKETS table. However, the wizard can’t know that you require a Closed On date when a ticket is closed. You apply that validation using a column-level tabular form validation:
1. Edit Page 230 of the application.
2. Using the Create button, select Page control on this page.
3. Select Validation, and click Next.
4. In the Tabular Form select list, choose Manage Multiple Tickets.
5. Once the page has refreshed, select Column for Validation Level, and click Next.
6. Select 8. CLOSED_ON (Closed On) for Identify the Column that is to be validated, as shown in Figure 8-16, and then click Next.
7. Set Validation Name to CLOSED_ON is Not Null if Ticket is CLOSED and Error Display Location to Inline with Field and in Notification, as shown in Figure 8-17. Click Next.
Figure 8-16. List of items available from the tabular form
www.it-ebooks.info
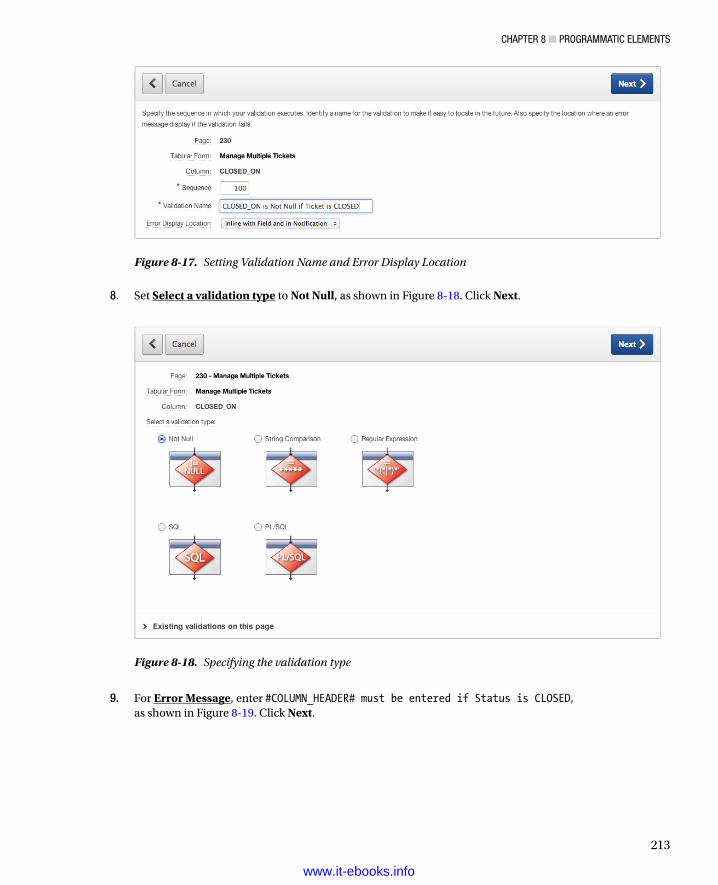
Chapter 8 ■ programmatiC elements
213
8. Set Select a validation type to Not Null, as shown in Figure 8-18. Click Next.
9. For Error Message, enter #COLUMN_HEADER# must be entered if Status is CLOSED, as shown in Figure 8-19. Click Next.
Figure 8-17. Setting Validation Name and Error Display Location
Figure 8-18. Specifying the validation type
www.it-ebooks.info
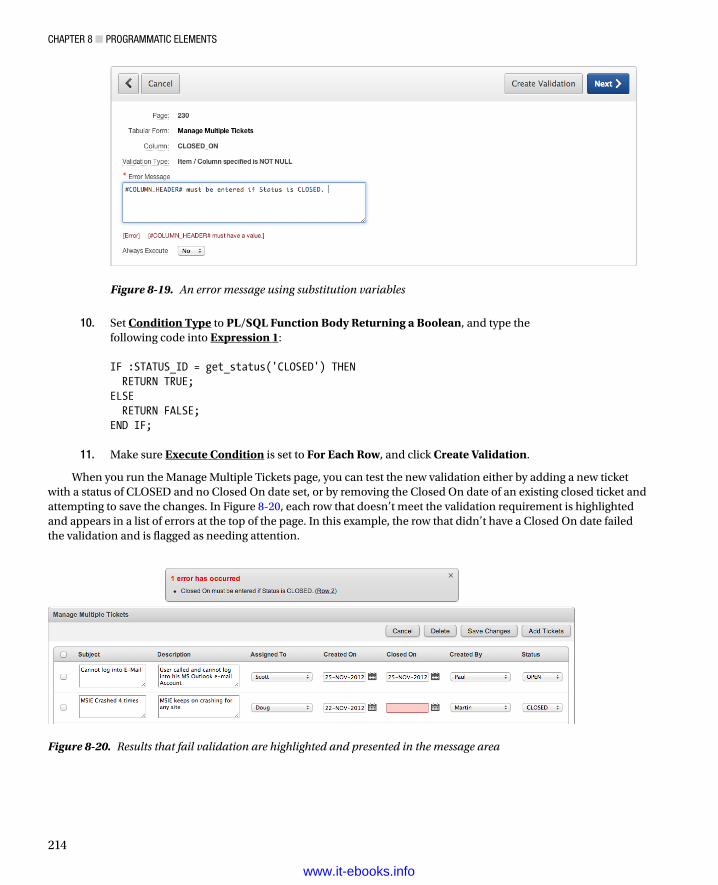
Chapter 8 ■ programmatiC elements
214
10. Set Condition Type to PL/SQL Function Body Returning a Boolean, and type the following code into Expression 1: IF :STATUS_ID = get_status('CLOSED') THEN RETURN TRUE;ELSE RETURN FALSE;END IF;
11. Make sure Execute Condition is set to For Each Row, and click Create Validation.
When you run the Manage Multiple Tickets page, you can test the new validation either by adding a new ticket with a status of CLOSED and no Closed On date set, or by removing the Closed On date of an existing closed ticket and attempting to save the changes. In Figure 8-20, each row that doesn’t meet the validation requirement is highlighted and appears in a list of errors at the top of the page. In this example, the row that didn’t have a Closed On date failed the validation and is flagged as needing attention.
Figure 8-20. Results that fail validation are highlighted and presented in the message area
Figure 8-19. An error message using substitution variables
www.it-ebooks.info
Chapter 8 ■ programmatiC elements
215
Note ■ By default, these validations are only executed for new or changed rows. You can change this behavior by setting the execution scope of the validation, located in the Conditions section.
The Create Validation wizard also allows the creation of row-level validations on tabular forms. These validations are run once for each row being processed by the tabular form. At this level, you could easily create a validation, similar to the one created for page 210, that checked to see if the Closed On date was after the Created On date.
As an exercise to see how much you’ve learned, see if you can implement that validation at the row level of the tabular form on page 230.
ComputationsThe APEX computation is analogous to a PL/SQL function. The intent is to act on an item in the application by setting the value using a variety of methods. This allows information to be derived rather than just stored in the data tables. Computations can be implemented when a page is rendered or after a page is submitted back to the server, depending on the needs of the application. Computations can act on any item available within an application. Items that can be set include items on the current page, items on another page, and even application-level items.
There is also a type of computation that can be used at the application level. It’s available in an application’s shared components. This type of computation has additional options for execution points including a computation point called On New Instance that executes when a new session (or instance) is given to a user when they log in.
ExecutionIt’s important to understand when a computation is executed relative to when a value is shown on a page and to when other values are available to the computation. When using the value of an item in a computation, the current session state for that item is the value that is used. A computation sets an item value in session state, and any processing (computations, validations, or processes) that uses that item after it has been set sees the results of that computation. When a page is rendered, it shows what is in the session state for that item at the time it’s shown on the page. The computation point is the setting that determines when the computation is executed.
On the page definition screen, several computation points are shown in the page tree. You can adjust the computation point by clicking and dragging the computation in the tree to a different computation point, or by editing the computation and changing the values for the sequence and computation point directly. The sequence only orders the computations within a given computation point. In general, the page renders and processes as shown on the page definition screen, starting at the top and going down the list to the bottom. There are only minor exceptions, such as dynamic actions and AJAX callbacks, which have variable points of execution.
TypesComputations have much of the same flexibility as other APEX components. They can be complex or simple, with the full capabilities of the Oracle Database to support them. The types of computations are as follows:
• Static Assignment: Simple static text value
• PL/SQL Function Body: PL/SQL function syntax with a RETURN statement
• SQL Query (Return Single Value): Any SQL statement as long as it returns a single row and a single column
• SQL Query (Return Colon Separated Values): SQL used for multiselect items
www.it-ebooks.info
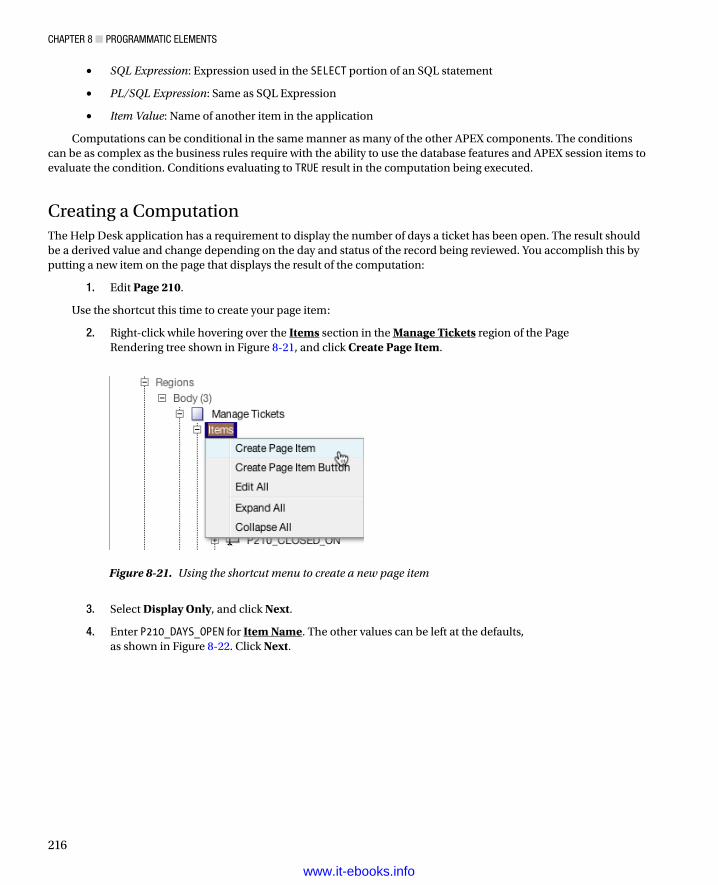
Chapter 8 ■ programmatiC elements
216
• SQL Expression: Expression used in the SELECT portion of an SQL statement
• PL/SQL Expression: Same as SQL Expression
• Item Value: Name of another item in the application
Computations can be conditional in the same manner as many of the other APEX components. The conditions can be as complex as the business rules require with the ability to use the database features and APEX session items to evaluate the condition. Conditions evaluating to TRUE result in the computation being executed.
Creating a ComputationThe Help Desk application has a requirement to display the number of days a ticket has been open. The result should be a derived value and change depending on the day and status of the record being reviewed. You accomplish this by putting a new item on the page that displays the result of the computation:
1. Edit Page 210.
Use the shortcut this time to create your page item:
2. Right-click while hovering over the Items section in the Manage Tickets region of the Page Rendering tree shown in Figure 8-21, and click Create Page Item.
3. Select Display Only, and click Next.
4. Enter P210_DAYS_OPEN for Item Name. The other values can be left at the defaults, as shown in Figure 8-22. Click Next.
Figure 8-21. Using the shortcut menu to create a new page item
www.it-ebooks.info
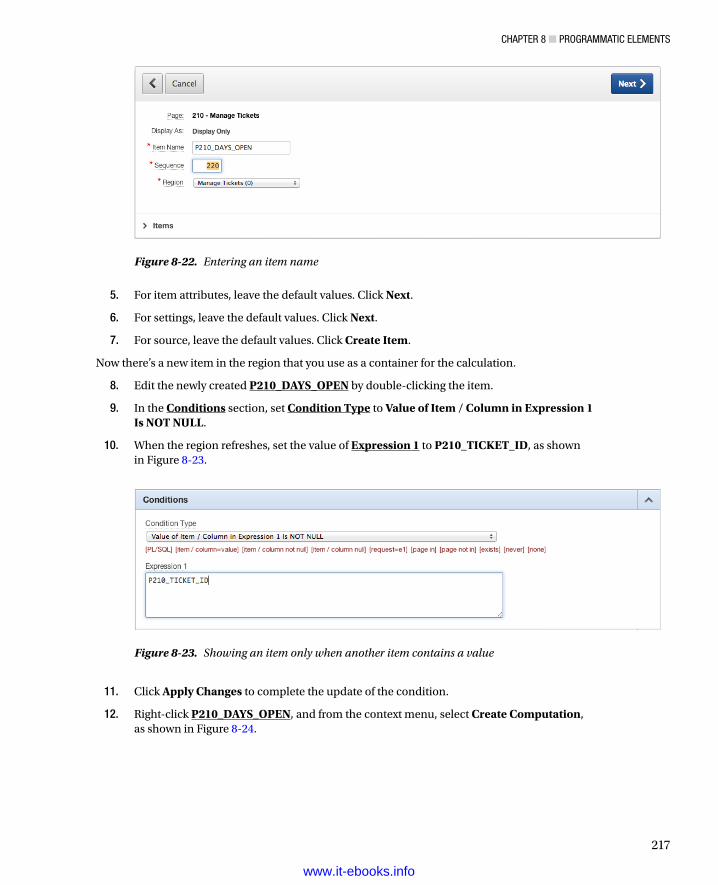
Chapter 8 ■ programmatiC elements
217
5. For item attributes, leave the default values. Click Next.
6. For settings, leave the default values. Click Next.
7. For source, leave the default values. Click Create Item.
Now there’s a new item in the region that you use as a container for the calculation.
8. Edit the newly created P210_DAYS_OPEN by double-clicking the item.
9. In the Conditions section, set Condition Type to Value of Item / Column in Expression 1 Is NOT NULL.
10. When the region refreshes, set the value of Expression 1 to P210_TICKET_ID, as shown in Figure 8-23.
11. Click Apply Changes to complete the update of the condition.
12. Right-click P210_DAYS_OPEN, and from the context menu, select Create Computation, as shown in Figure 8-24.
Figure 8-22. Entering an item name
Figure 8-23. Showing an item only when another item contains a value
www.it-ebooks.info
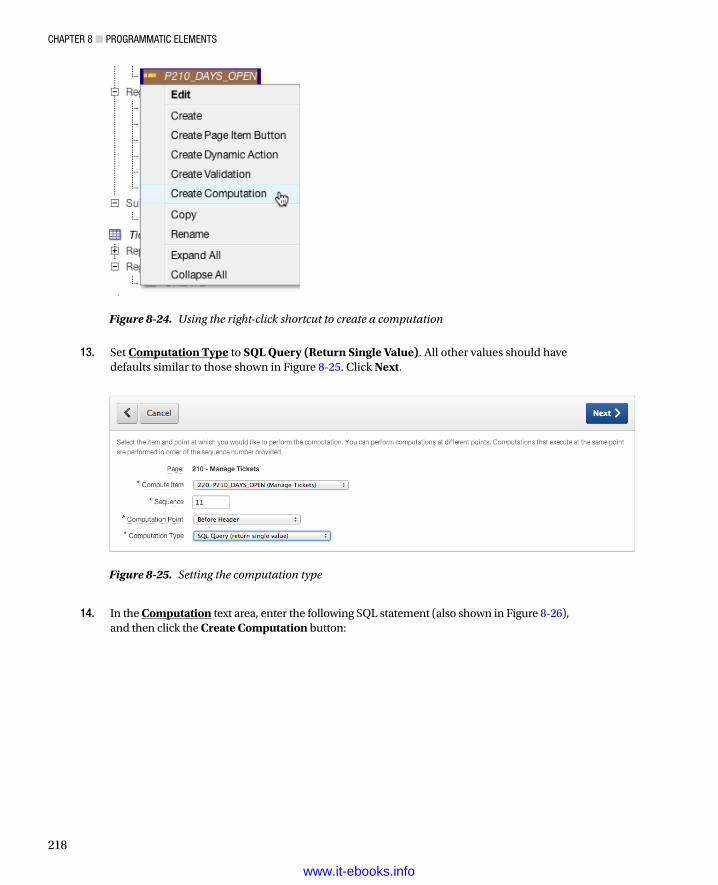
Chapter 8 ■ programmatiC elements
218
13. Set Computation Type to SQL Query (Return Single Value). All other values should have defaults similar to those shown in Figure 8-25. Click Next.
14. In the Computation text area, enter the following SQL statement (also shown in Figure 8-26), and then click the Create Computation button:
Figure 8-24. Using the right-click shortcut to create a computation
Figure 8-25. Setting the computation type
www.it-ebooks.info
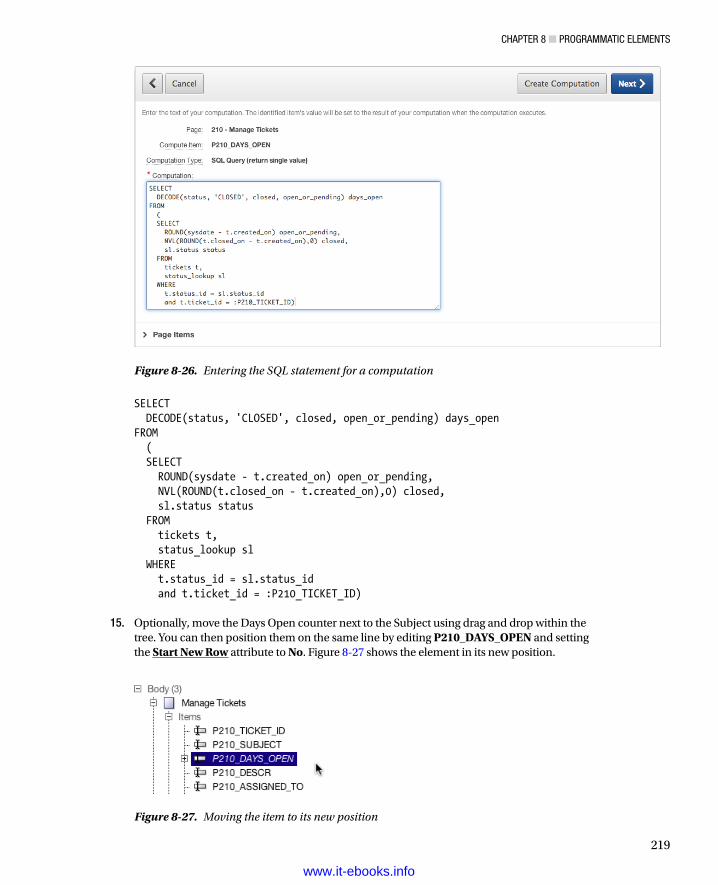
Chapter 8 ■ programmatiC elements
219
SELECT DECODE(status, 'CLOSED', closed, open_or_pending) days_openFROM ( SELECT ROUND(sysdate - t.created_on) open_or_pending, NVL(ROUND(t.closed_on - t.created_on),0) closed, sl.status status FROM tickets t, status_lookup sl WHERE t.status_id = sl.status_id and t.ticket_id = :P210_TICKET_ID)
15. Optionally, move the Days Open counter next to the Subject using drag and drop within the tree. You can then position them on the same line by editing P210_DAYS_OPEN and setting the Start New Row attribute to No. Figure 8-27 shows the element in its new position.
Figure 8-26. Entering the SQL statement for a computation
Figure 8-27. Moving the item to its new position
www.it-ebooks.info
Chapter 8 ■ programmatiC elements
220
To see the results of adding the new item, run the application and navigate to the Tickets report (page 200). Click one of the Edit icons to bring up the single record view (page 210). You should now see the result of the computation as a number of days. When starting the process of creating a new ticket, the field isn’t displayed because the condition prevents the field from showing.
ProcessesIf computations are analogous to database functions, then processes are analogous to database procedures. A process is a container for a unit of logic.
Processes are arguably the most complex part of APEX, because they’re the construct used to deal with data processing in the database as well as references to APIs such as those used to send e-mail and perform any other business logic required in the application. When dealing with data forms, the APEX wizard creates built-in processes that manage the reading and writing of data from the form. Those types of built-in processes are called data-manipulation processes.
Processes, similar to computations, can occur during both page rendering and page processing. In the Page Definition screen, the processing locations are identified by the gear icons. Processes support the APEX conditions feature, which allows processes to be written as individual logic units with conditions determining whether the logic is needed.
Execution PointsProcess execution points are the same as for computations. The most commonly used execution points for processes are On Submit - After Computations and Validations and On Demand - Run This Process When Requested by AJAX, because as these points support button-press activities and dynamic actions. The full list is as follows:
On New Instance - (New Session)•
On Load - Before Header•
On Load - After Header•
On Load - Before Regions•
On Load - After Regions•
On Load - Before Footer•
On Load - After Footer•
On Submit - Before Computations and Validations•
On Submit - After Computations and Validations•
On Demand - Run This Process When Requested by AJAX•
Processes can be defined at the individual page level or at the application level as part of the shared components. Functionally, page processes and application processes behave the same. The difference is where business logic is contained. For processes that need to run on all pages, you can define an application process. Also, just as with regions, you can use Global Pages to define processes that run on every page, but only for page rendering.
www.it-ebooks.info
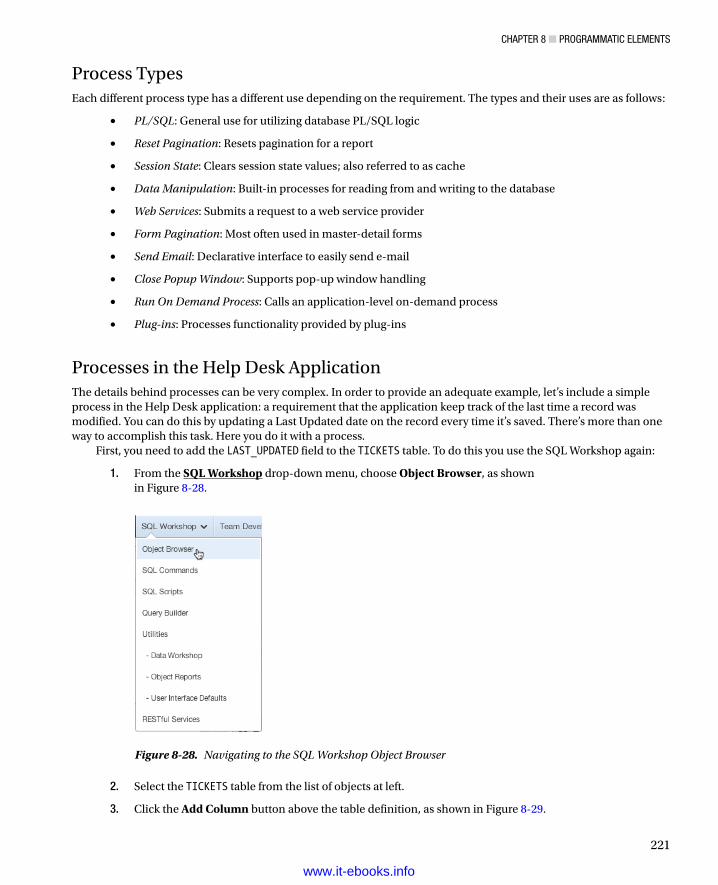
Chapter 8 ■ programmatiC elements
221
Process TypesEach different process type has a different use depending on the requirement. The types and their uses are as follows:
• PL/SQL: General use for utilizing database PL/SQL logic
• Reset Pagination: Resets pagination for a report
• Session State: Clears session state values; also referred to as cache
• Data Manipulation: Built-in processes for reading from and writing to the database
• Web Services: Submits a request to a web service provider
• Form Pagination: Most often used in master-detail forms
• Send Email: Declarative interface to easily send e-mail
• Close Popup Window: Supports pop-up window handling
• Run On Demand Process: Calls an application-level on-demand process
• Plug-ins: Processes functionality provided by plug-ins
Processes in the Help Desk ApplicationThe details behind processes can be very complex. In order to provide an adequate example, let’s include a simple process in the Help Desk application: a requirement that the application keep track of the last time a record was modified. You can do this by updating a Last Updated date on the record every time it’s saved. There’s more than one way to accomplish this task. Here you do it with a process.
First, you need to add the LAST_UPDATED field to the TICKETS table. To do this you use the SQL Workshop again:
1. From the SQL Workshop drop-down menu, choose Object Browser, as shown in Figure 8-28.
Figure 8-28. Navigating to the SQL Workshop Object Browser
2. Select the TICKETS table from the list of objects at left.
3. Click the Add Column button above the table definition, as shown in Figure 8-29.
www.it-ebooks.info
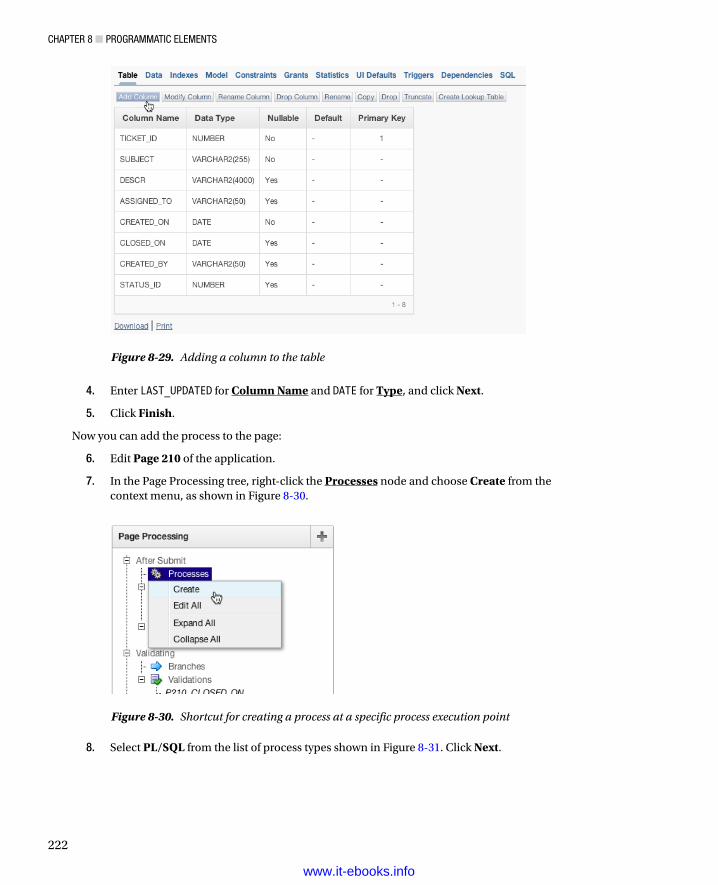
Chapter 8 ■ programmatiC elements
222
4. Enter LAST_UPDATED for Column Name and DATE for Type, and click Next.
5. Click Finish.
Now you can add the process to the page:
6. Edit Page 210 of the application.
7. In the Page Processing tree, right-click the Processes node and choose Create from the context menu, as shown in Figure 8-30.
Figure 8-29. Adding a column to the table
Figure 8-30. Shortcut for creating a process at a specific process execution point
8. Select PL/SQL from the list of process types shown in Figure 8-31. Click Next.
www.it-ebooks.info
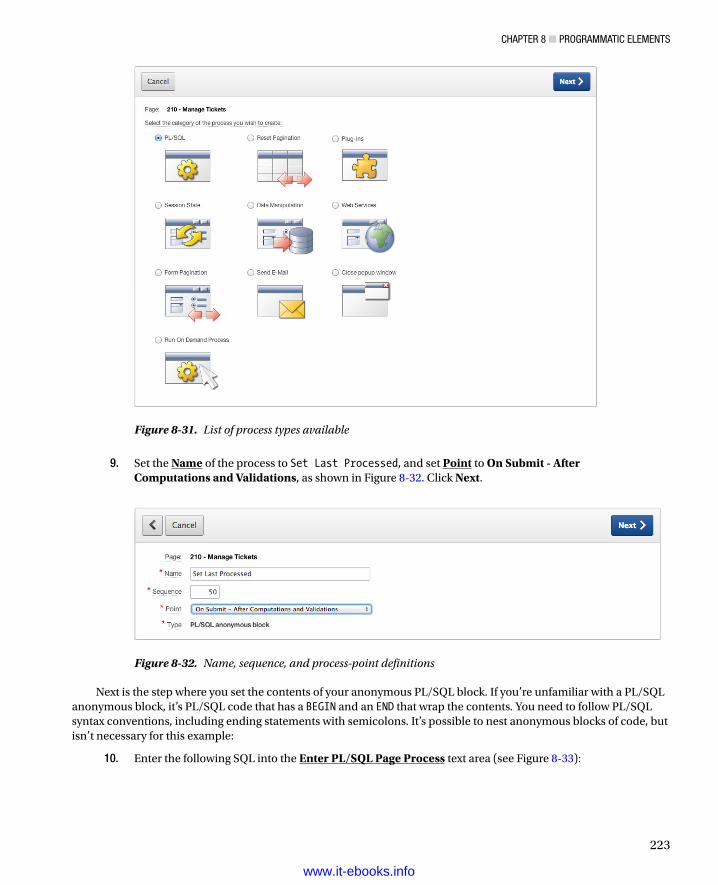
Chapter 8 ■ programmatiC elements
223
9. Set the Name of the process to Set Last Processed, and set Point to On Submit - After Computations and Validations, as shown in Figure 8-32. Click Next.
Figure 8-31. List of process types available
Figure 8-32. Name, sequence, and process-point definitions
Next is the step where you set the contents of your anonymous PL/SQL block. If you’re unfamiliar with a PL/SQL anonymous block, it’s PL/SQL code that has a BEGIN and an END that wrap the contents. You need to follow PL/SQL syntax conventions, including ending statements with semicolons. It’s possible to nest anonymous blocks of code, but isn’t necessary for this example:
10. Enter the following SQL into the Enter PL/SQL Page Process text area (see Figure 8-33):
www.it-ebooks.info

Chapter 8 ■ programmatiC elements
224
UPDATE tickets SET last_updated = sysdate WHERE ticket_id = :P210_TICKET_ID;
11. Click the Next button, being careful not to click Create Process, because you still want to apply a condition to this process.
12. Leave both the Success and Error messages empty. These messages will appear at the top of a page as feedback to the user after the process completes. Your requirements don’t call for you to notify the user that the Last Updated date was changed. Click Next again, being careful not to click Create Process.
13. In the condition section, change When Button Pressed to SAVE (Apply Changes), as shown in Figure 8-34. Finally, you may click the Create Process button.
Figure 8-33. Click the Next button
Figure 8-34. Setting the condition of the process to work only when the Save button is clicked
www.it-ebooks.info
Chapter 8 ■ programmatiC elements
225
At this point, the process has been created. Currently you don’t show the Last Updated date in the summary report. In order to see the value on the report, you need to add the LAST_UPDATED column to the query from which the report draws data. That report resides on page 200 of your application:
1. Edit Page 200.
2. Edit the Tickets region by double-clicking the region’s name in the tree.
3. Add the LAST_UPDATED date to the Region Source of the report, as in the following SQL. Click Apply Changes when you’re finished: SELECT "TICKETS"."TICKET_ID" "TICKET_ID", "TICKETS"."SUBJECT" "SUBJECT", "TICKETS"."DESCR" "DESCR", "TICKETS"."ASSIGNED_TO" "ASSIGNED_TO", "TICKETS"."CREATED_ON" "CREATED_ON", "TICKETS"."CLOSED_ON" "CLOSED_ON", "TICKETS"."CREATED_BY" "CREATED_BY", "STATUS_LOOKUP"."STATUS" "STATUS", "TICKETS"."LAST_UPDATED" "LAST_UPDATED"FROM "STATUS_LOOKUP", "TICKETS"WHERE "STATUS_LOOKUP"."STATUS_ID" = "TICKETS"."STATUS_ID"and upper(subject) like'%' || upper(:P200_SEARCH) || '%'and tickets.status_id like :P200_STATUS_ID
To test and review the change, run the application and navigate to the Tickets report. Edit any ticket, and click the Apply Changes button. You should now see a value for Last Updated indicating the current day.
This is a quick example of how you can use a process to apply form-based logic. When the form is used to make changes, a brief piece of PL/SQL makes a record change automatically. Packages, procedures, and APIs all can be reached using processes similar to this one.
PL/SQL RegionsThe PL/SQL region type is effectively an open container for PL/SQL with the additional option to generate output. You can use Oracle Web Application (OWA) Toolkit procedures such as htp.p to generate the output. References to APEX items can be made using bind variable syntax (for example, :P1_ITEM_NAME), the v function (for example, v('P1_ITEM_NAME')), or the substitution string syntax (for example, &P1_ITEM_NAME.) to support the logic contained in the region.
PL/SQL regions differ from process regions in that PL/SQL regions are executed only during page rendering whereas processes can run on both page processing and page rendering. PL/SQL regions have the advantage of being able to generate content directly on the page. A use case for this type of output is the need for a complex report format that is beyond the ability of a standard report template. In that case, a PL/SQL package that generates the needed HTML output can be written and called by a PL/SQL region.
www.it-ebooks.info

Chapter 8 ■ programmatiC elements
226
In the Help Desk application, you want to make the home page a bit more useful by adding a quick summary of the number of tickets an individual has open. This is applicable only if someone is logged in. So if they aren’t logged in, a simple greeting message will suffice. You can accomplish the task of adding the summary by adding a PL/SQL region with some logic to output the appropriate message:
1. Edit Page 1.
2. Edit the APEX Issue Tracker region by double-clicking its name in the tree.
Currently this region is a standard HTML region, emitting exactly the HTML code you enter into it. You want to make it dynamic, so switch it to use PL/SQL:
3. In the Identification section, change Type to PL/SQL (anonymous block), as shown in Figure 8-35.
4. Enter the following code for the Region Source, replacing the static HTML that was there, and then click Apply Changes: DECLARE l_count NUMBER; l_status_id NUMBER := get_status('OPEN');BEGINIF :APP_USER != 'nobody' THEN SELECT count(*) INTO l_count FROM tickets WHERE assigned_to = :APP_USER AND status_id = l_status_id; htp.p('<h1>Welcome to the APEX Issue Tracking System, ' || :APP_USER || '</h1>' || 'You have ' || l_count || ' Open tickets.<br />' || 'Select an option from the list'); ELSE htp.p('<h1>Welcome to the APEX Issue Tracking System</h1>' || 'Select an option from the list');END IF; END;
Figure 8-35. Creating a PL/SQL region
www.it-ebooks.info
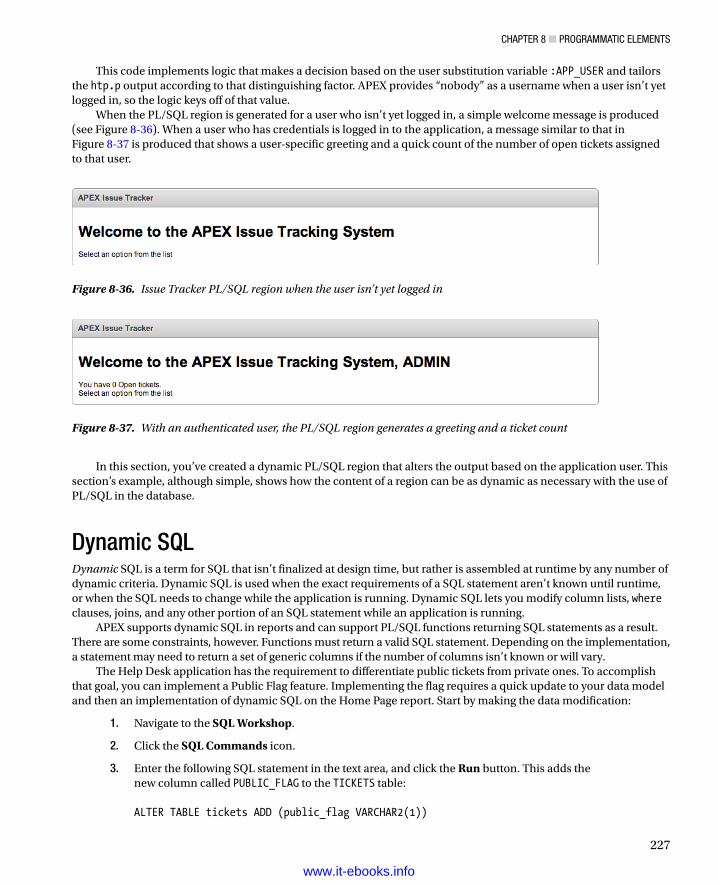
Chapter 8 ■ programmatiC elements
227
This code implements logic that makes a decision based on the user substitution variable :APP_USER and tailors the htp.p output according to that distinguishing factor. APEX provides “nobody” as a username when a user isn’t yet logged in, so the logic keys off of that value.
When the PL/SQL region is generated for a user who isn’t yet logged in, a simple welcome message is produced (see Figure 8-36). When a user who has credentials is logged in to the application, a message similar to that in Figure 8-37 is produced that shows a user-specific greeting and a quick count of the number of open tickets assigned to that user.
In this section, you’ve created a dynamic PL/SQL region that alters the output based on the application user. This section’s example, although simple, shows how the content of a region can be as dynamic as necessary with the use of PL/SQL in the database.
Dynamic SQLDynamic SQL is a term for SQL that isn’t finalized at design time, but rather is assembled at runtime by any number of dynamic criteria. Dynamic SQL is used when the exact requirements of a SQL statement aren’t known until runtime, or when the SQL needs to change while the application is running. Dynamic SQL lets you modify column lists, where clauses, joins, and any other portion of an SQL statement while an application is running.
APEX supports dynamic SQL in reports and can support PL/SQL functions returning SQL statements as a result. There are some constraints, however. Functions must return a valid SQL statement. Depending on the implementation, a statement may need to return a set of generic columns if the number of columns isn’t known or will vary.
The Help Desk application has the requirement to differentiate public tickets from private ones. To accomplish that goal, you can implement a Public Flag feature. Implementing the flag requires a quick update to your data model and then an implementation of dynamic SQL on the Home Page report. Start by making the data modification:
1. Navigate to the SQL Workshop.
2. Click the SQL Commands icon.
3. Enter the following SQL statement in the text area, and click the Run button. This adds the new column called PUBLIC_FLAG to the TICKETS table:
ALTER TABLE tickets ADD (public_flag VARCHAR2(1))
Figure 8-36. Issue Tracker PL/SQL region when the user isn’t yet logged in
Figure 8-37. With an authenticated user, the PL/SQL region generates a greeting and a ticket count
www.it-ebooks.info
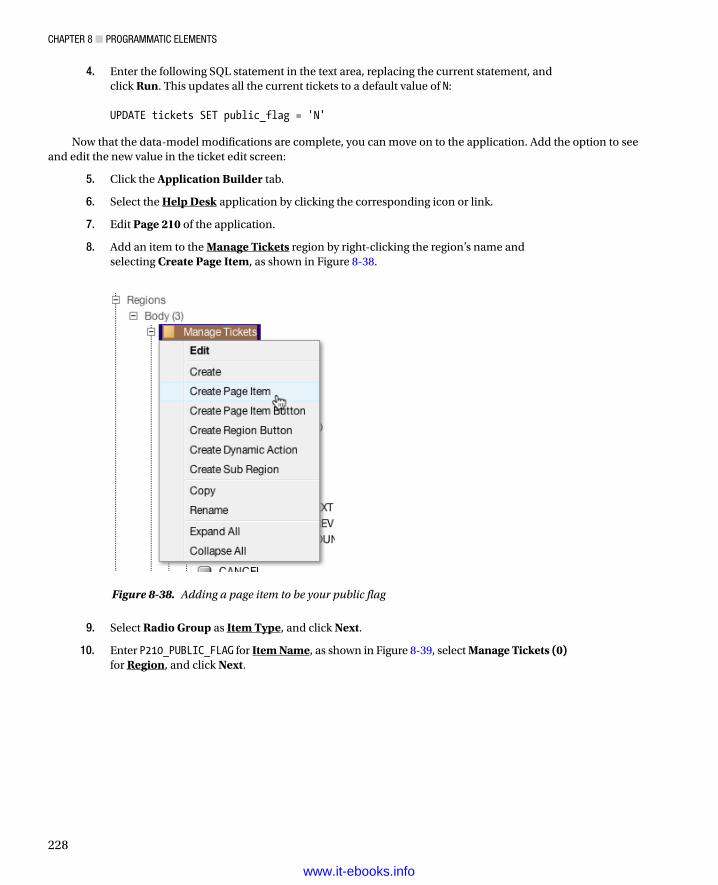
Chapter 8 ■ programmatiC elements
228
4. Enter the following SQL statement in the text area, replacing the current statement, and click Run. This updates all the current tickets to a default value of N:
UPDATE tickets SET public_flag = 'N'
Now that the data-model modifications are complete, you can move on to the application. Add the option to see and edit the new value in the ticket edit screen:
5. Click the Application Builder tab.
6. Select the Help Desk application by clicking the corresponding icon or link.
7. Edit Page 210 of the application.
8. Add an item to the Manage Tickets region by right-clicking the region’s name and selecting Create Page Item, as shown in Figure 8-38.
9. Select Radio Group as Item Type, and click Next.
10. Enter P210_PUBLIC_FLAG for Item Name, as shown in Figure 8-39, select Manage Tickets (0) for Region, and click Next.
Figure 8-38. Adding a page item to be your public flag
www.it-ebooks.info
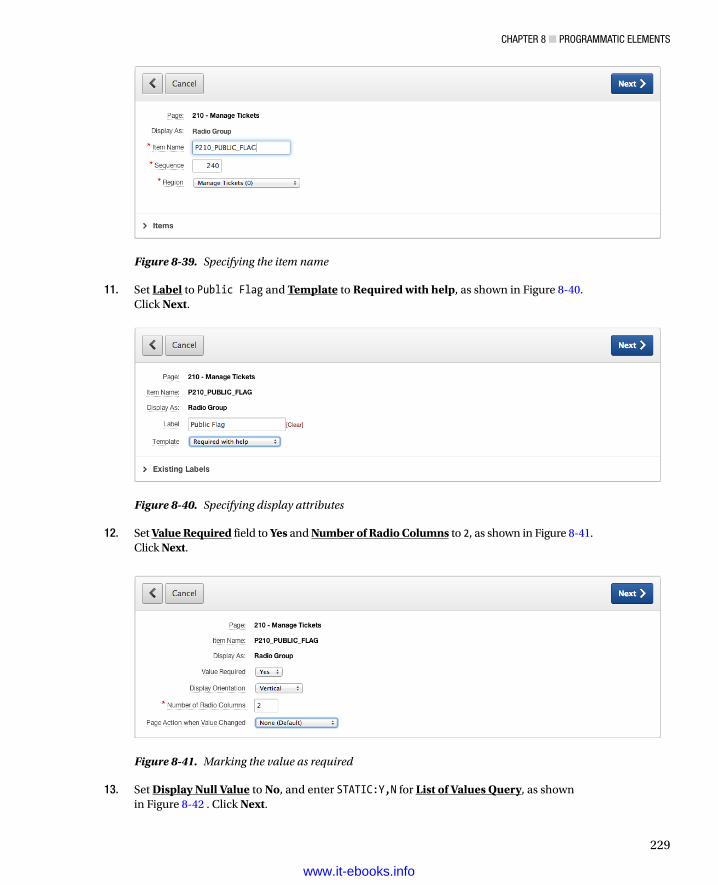
Chapter 8 ■ programmatiC elements
229
11. Set Label to Public Flag and Template to Required with help, as shown in Figure 8-40. Click Next.
Figure 8-39. Specifying the item name
Figure 8-40. Specifying display attributes
Figure 8-41. Marking the value as required
12. Set Value Required field to Yes and Number of Radio Columns to 2, as shown in Figure 8-41. Click Next.
13. Set Display Null Value to No, and enter STATIC:Y,N for List of Values Query, as shown in Figure 8-42 . Click Next.
www.it-ebooks.info
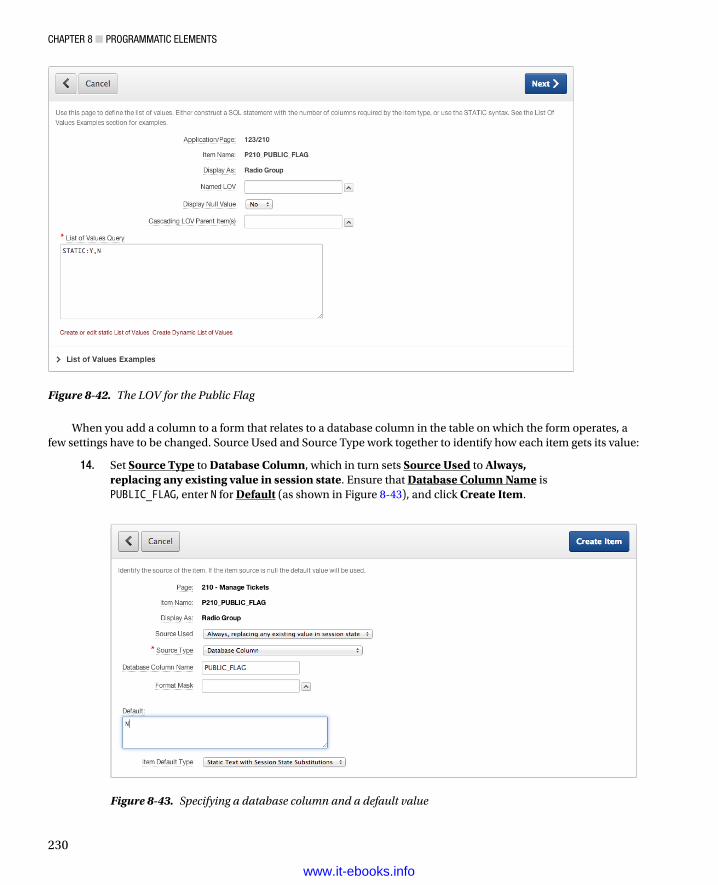
Chapter 8 ■ programmatiC elements
230
When you add a column to a form that relates to a database column in the table on which the form operates, a few settings have to be changed. Source Used and Source Type work together to identify how each item gets its value:
14. Set Source Type to Database Column, which in turn sets Source Used to Always, replacing any existing value in session state. Ensure that Database Column Name is PUBLIC_FLAG, enter N for Default (as shown in Figure 8-43), and click Create Item.
Figure 8-42. The LOV for the Public Flag
Figure 8-43. Specifying a database column and a default value
www.it-ebooks.info
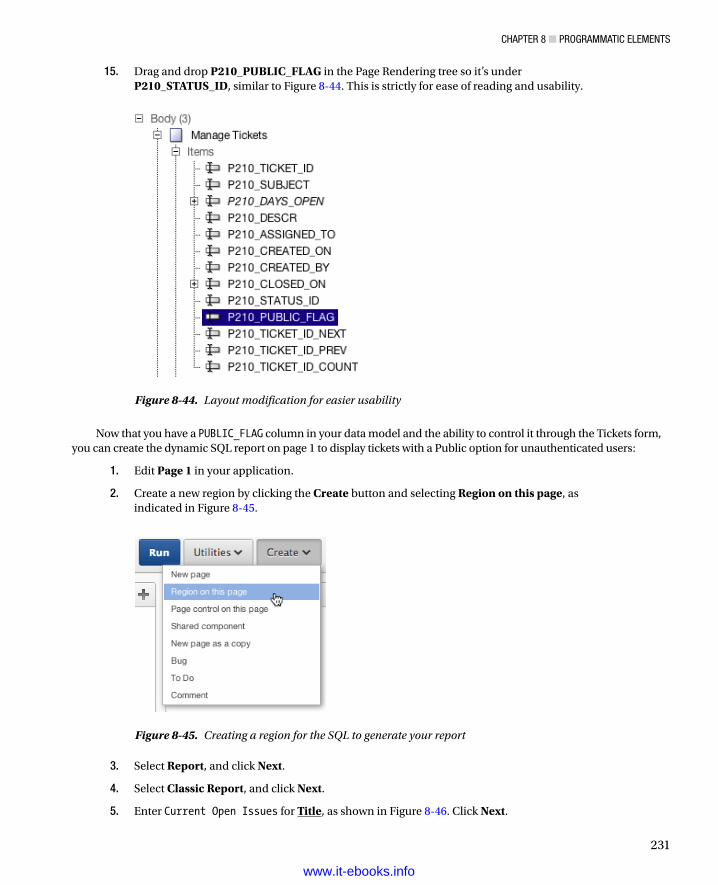
Chapter 8 ■ programmatiC elements
231
15. Drag and drop P210_PUBLIC_FLAG in the Page Rendering tree so it’s under P210_STATUS_ID, similar to Figure 8-44. This is strictly for ease of reading and usability.
Now that you have a PUBLIC_FLAG column in your data model and the ability to control it through the Tickets form, you can create the dynamic SQL report on page 1 to display tickets with a Public option for unauthenticated users:
1. Edit Page 1 in your application.
2. Create a new region by clicking the Create button and selecting Region on this page, as indicated in Figure 8-45.
3. Select Report, and click Next.
4. Select Classic Report, and click Next.
5. Enter Current Open Issues for Title, as shown in Figure 8-46. Click Next.
Figure 8-44. Layout modification for easier usability
Figure 8-45. Creating a region for the SQL to generate your report
www.it-ebooks.info
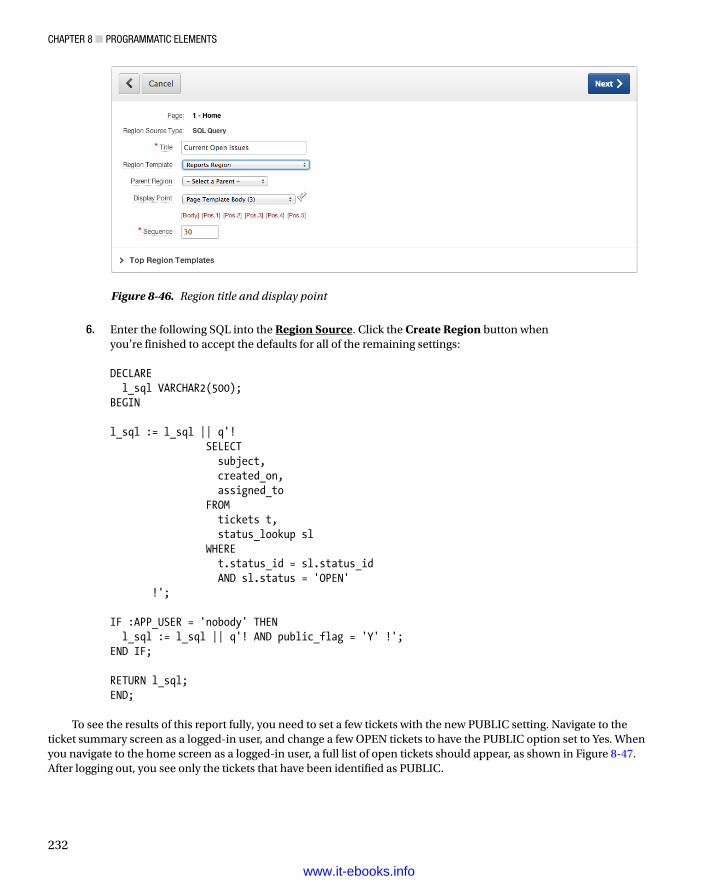
Chapter 8 ■ programmatiC elements
232
6. Enter the following SQL into the Region Source. Click the Create Region button when you’re finished to accept the defaults for all of the remaining settings: DECLARE l_sql VARCHAR2(500);BEGIN l_sql := l_sql || q'! SELECT subject, created_on, assigned_to FROM tickets t, status_lookup sl WHERE t.status_id = sl.status_id AND sl.status = 'OPEN' !'; IF :APP_USER = 'nobody' THEN l_sql := l_sql || q'! AND public_flag = 'Y' !';END IF; RETURN l_sql;END;
To see the results of this report fully, you need to set a few tickets with the new PUBLIC setting. Navigate to the ticket summary screen as a logged-in user, and change a few OPEN tickets to have the PUBLIC option set to Yes. When you navigate to the home screen as a logged-in user, a full list of open tickets should appear, as shown in Figure 8-47. After logging out, you see only the tickets that have been identified as PUBLIC.
Figure 8-46. Region title and display point
www.it-ebooks.info
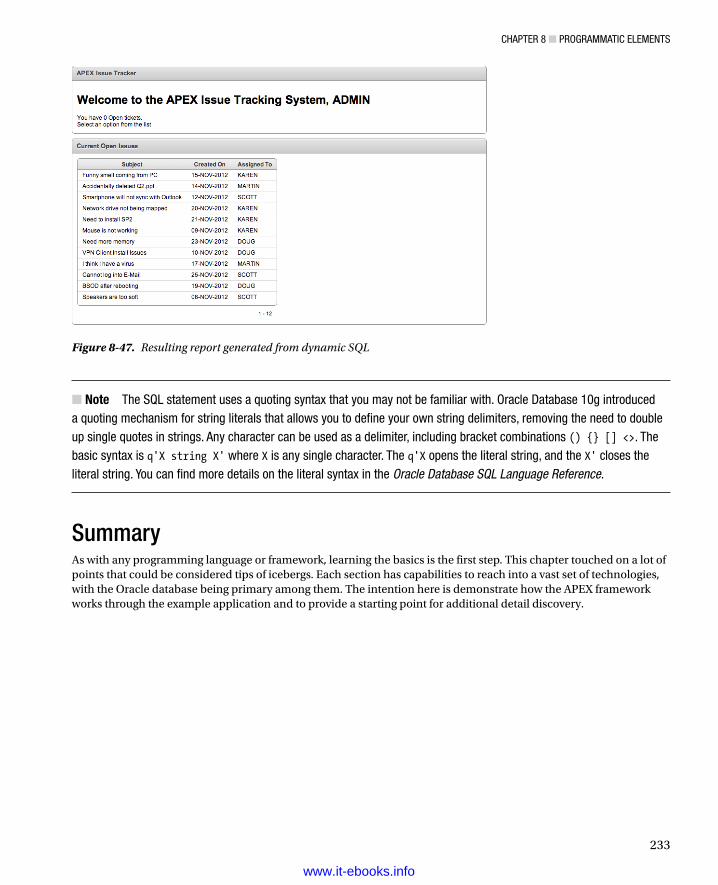
Chapter 8 ■ programmatiC elements
233
Note■ the sQl statement uses a quoting syntax that you may not be familiar with. oracle Database 10g introduced a quoting mechanism for string literals that allows you to define your own string delimiters, removing the need to double up single quotes in strings. any character can be used as a delimiter, including bracket combinations () {} [] <>. the basic syntax is q'X string X' where X is any single character. the q'X opens the literal string, and the X' closes the literal string. You can find more details on the literal syntax in the Oracle Database SQL Language Reference.
SummaryAs with any programming language or framework, learning the basics is the first step. This chapter touched on a lot of points that could be considered tips of icebergs. Each section has capabilities to reach into a vast set of technologies, with the Oracle database being primary among them. The intention here is demonstrate how the APEX framework works through the example application and to provide a starting point for additional detail discovery.
Figure 8-47. Resulting report generated from dynamic SQL
www.it-ebooks.info
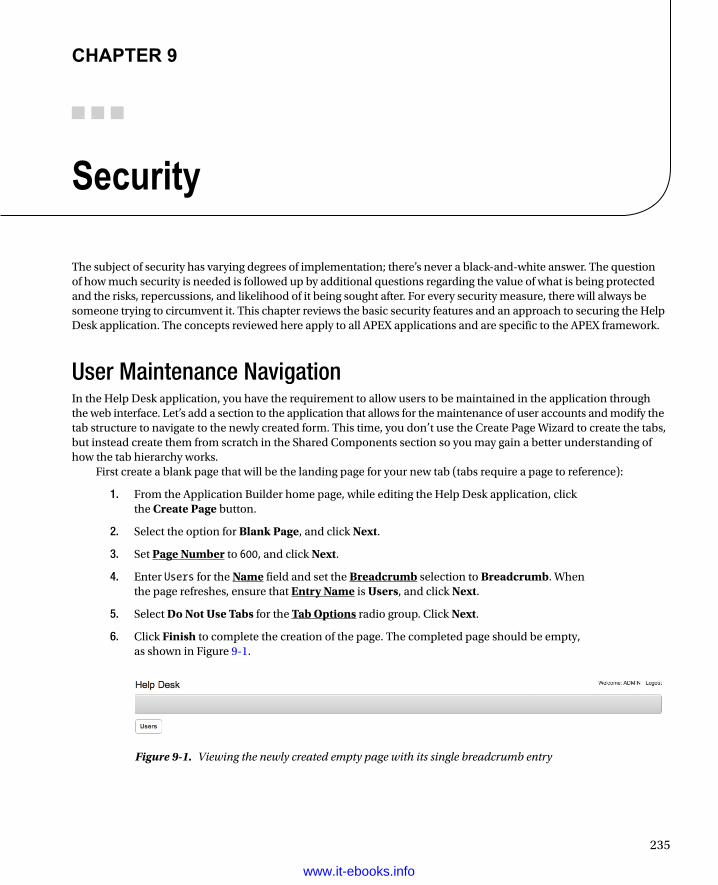
235
Chapter 9
Security
The subject of security has varying degrees of implementation; there’s never a black-and-white answer. The question of how much security is needed is followed up by additional questions regarding the value of what is being protected and the risks, repercussions, and likelihood of it being sought after. For every security measure, there will always be someone trying to circumvent it. This chapter reviews the basic security features and an approach to securing the Help Desk application. The concepts reviewed here apply to all APEX applications and are specific to the APEX framework.
User Maintenance NavigationIn the Help Desk application, you have the requirement to allow users to be maintained in the application through the web interface. Let’s add a section to the application that allows for the maintenance of user accounts and modify the tab structure to navigate to the newly created form. This time, you don’t use the Create Page Wizard to create the tabs, but instead create them from scratch in the Shared Components section so you may gain a better understanding of how the tab hierarchy works.
First create a blank page that will be the landing page for your new tab (tabs require a page to reference):
1. From the Application Builder home page, while editing the Help Desk application, click the Create Page button.
2. Select the option for Blank Page, and click Next.
3. Set Page Number to 600, and click Next.
4. Enter Users for the Name field and set the Breadcrumb selection to Breadcrumb. When the page refreshes, ensure that Entry Name is Users, and click Next.
5. Select Do Not Use Tabs for the Tab Options radio group. Click Next.
6. Click Finish to complete the creation of the page. The completed page should be empty, as shown in Figure 9-1.
Figure 9-1. Viewing the newly created empty page with its single breadcrumb entry
www.it-ebooks.info
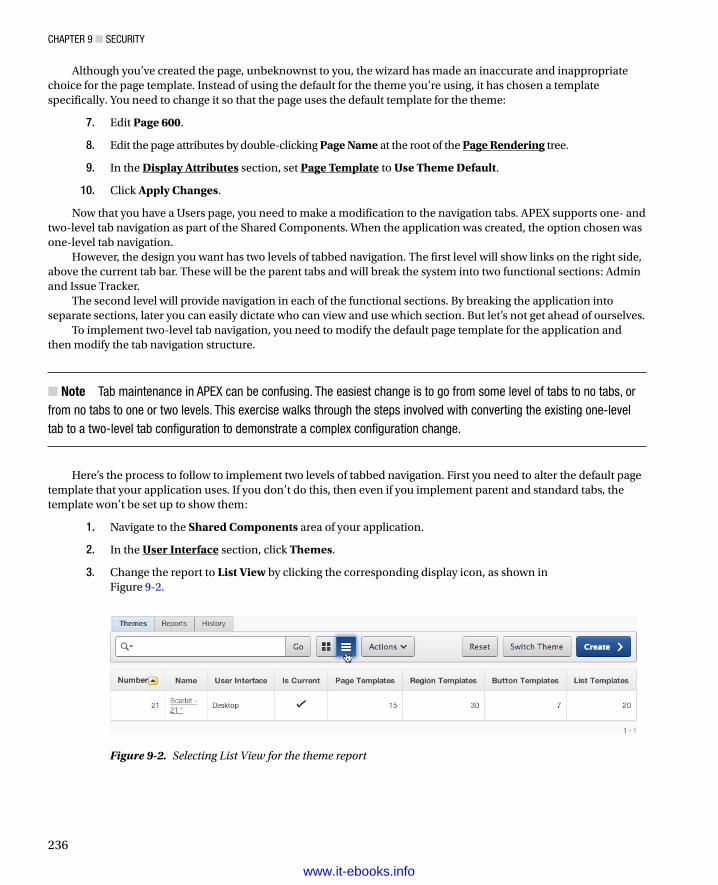
Chapter 9 ■ SeCurity
236
Although you’ve created the page, unbeknownst to you, the wizard has made an inaccurate and inappropriate choice for the page template. Instead of using the default for the theme you’re using, it has chosen a template specifically. You need to change it so that the page uses the default template for the theme:
7. Edit Page 600.
8. Edit the page attributes by double-clicking Page Name at the root of the Page Rendering tree.
9. In the Display Attributes section, set Page Template to Use Theme Default.
10. Click Apply Changes.
Now that you have a Users page, you need to make a modification to the navigation tabs. APEX supports one- and two-level tab navigation as part of the Shared Components. When the application was created, the option chosen was one-level tab navigation.
However, the design you want has two levels of tabbed navigation. The first level will show links on the right side, above the current tab bar. These will be the parent tabs and will break the system into two functional sections: Admin and Issue Tracker.
The second level will provide navigation in each of the functional sections. By breaking the application into separate sections, later you can easily dictate who can view and use which section. But let’s not get ahead of ourselves.
To implement two-level tab navigation, you need to modify the default page template for the application and then modify the tab navigation structure.
Note ■ tab maintenance in apeX can be confusing. the easiest change is to go from some level of tabs to no tabs, or from no tabs to one or two levels. this exercise walks through the steps involved with converting the existing one-level tab to a two-level tab configuration to demonstrate a complex configuration change.
Here’s the process to follow to implement two levels of tabbed navigation. First you need to alter the default page template that your application uses. If you don’t do this, then even if you implement parent and standard tabs, the template won’t be set up to show them:
1. Navigate to the Shared Components area of your application.
2. In the User Interface section, click Themes.
3. Change the report to List View by clicking the corresponding display icon, as shown in Figure 9-2.
Figure 9-2. Selecting List View for the theme report
www.it-ebooks.info
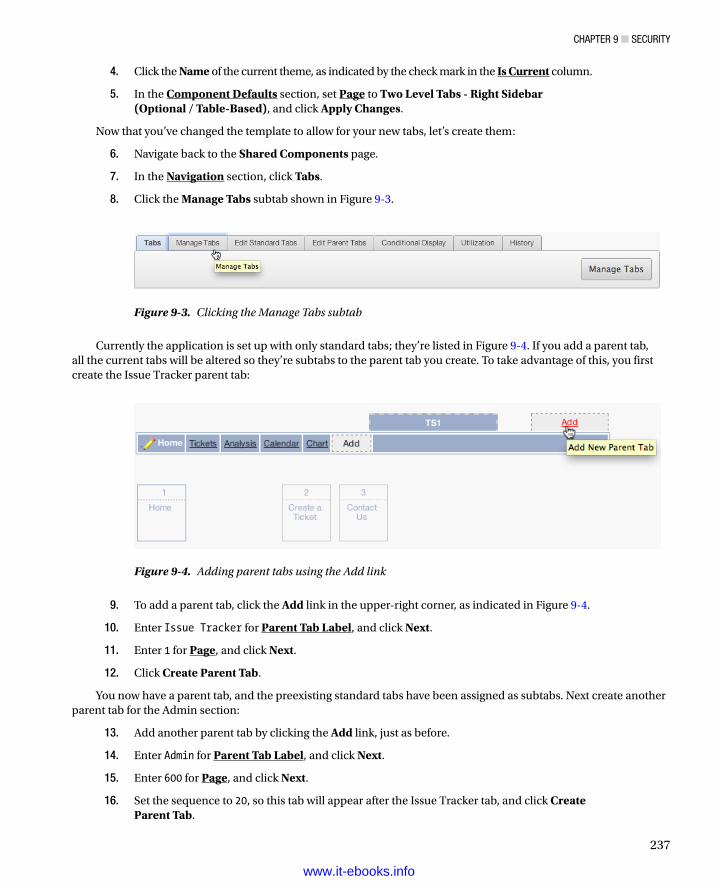
Chapter 9 ■ SeCurity
237
4. Click the Name of the current theme, as indicated by the check mark in the Is Current column.
5. In the Component Defaults section, set Page to Two Level Tabs - Right Sidebar (Optional / Table-Based), and click Apply Changes.
Now that you’ve changed the template to allow for your new tabs, let’s create them:
6. Navigate back to the Shared Components page.
7. In the Navigation section, click Tabs.
8. Click the Manage Tabs subtab shown in Figure 9-3.
Figure 9-3. Clicking the Manage Tabs subtab
Figure 9-4. Adding parent tabs using the Add link
Currently the application is set up with only standard tabs; they’re listed in Figure 9-4. If you add a parent tab, all the current tabs will be altered so they’re subtabs to the parent tab you create. To take advantage of this, you first create the Issue Tracker parent tab:
9. To add a parent tab, click the Add link in the upper-right corner, as indicated in Figure 9-4.
10. Enter Issue Tracker for Parent Tab Label, and click Next.
11. Enter 1 for Page, and click Next.
12. Click Create Parent Tab.
You now have a parent tab, and the preexisting standard tabs have been assigned as subtabs. Next create another parent tab for the Admin section:
13. Add another parent tab by clicking the Add link, just as before.
14. Enter Admin for Parent Tab Label, and click Next.
15. Enter 600 for Page, and click Next.
16. Set the sequence to 20, so this tab will appear after the Issue Tracker tab, and click Create Parent Tab.
www.it-ebooks.info
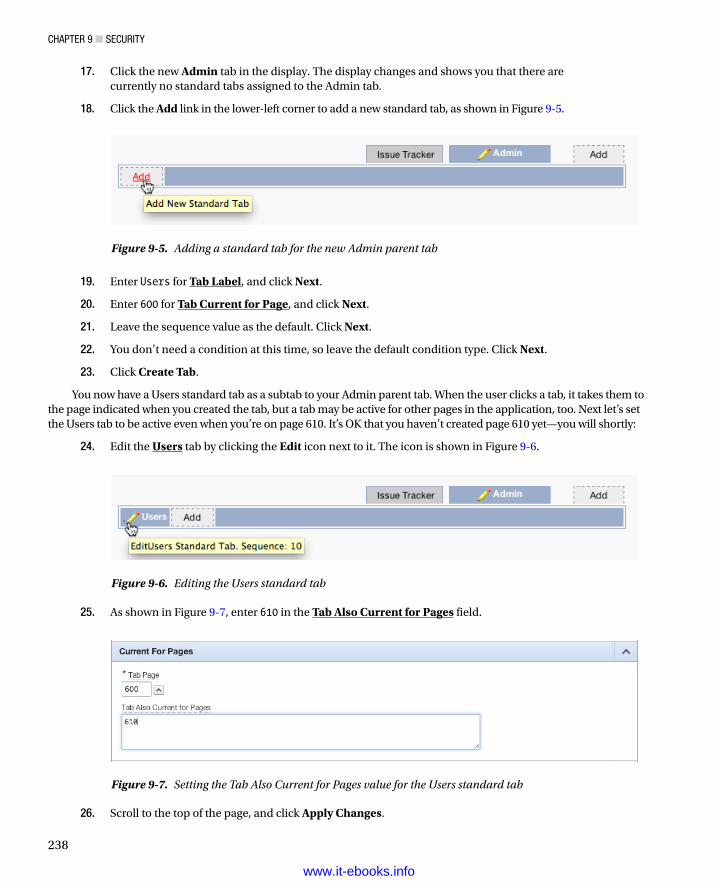
Chapter 9 ■ SeCurity
238
17. Click the new Admin tab in the display. The display changes and shows you that there are currently no standard tabs assigned to the Admin tab.
18. Click the Add link in the lower-left corner to add a new standard tab, as shown in Figure 9-5.
Figure 9-5. Adding a standard tab for the new Admin parent tab
Figure 9-6. Editing the Users standard tab
Figure 9-7. Setting the Tab Also Current for Pages value for the Users standard tab
19. Enter Users for Tab Label, and click Next.
20. Enter 600 for Tab Current for Page, and click Next.
21. Leave the sequence value as the default. Click Next.
22. You don’t need a condition at this time, so leave the default condition type. Click Next.
23. Click Create Tab.
You now have a Users standard tab as a subtab to your Admin parent tab. When the user clicks a tab, it takes them to the page indicated when you created the tab, but a tab may be active for other pages in the application, too. Next let’s set the Users tab to be active even when you’re on page 610. It’s OK that you haven’t created page 610 yet—you will shortly:
24. Edit the Users tab by clicking the Edit icon next to it. The icon is shown in Figure 9-6.
25. As shown in Figure 9-7, enter 610 in the Tab Also Current for Pages field.
26. Scroll to the top of the page, and click Apply Changes.
www.it-ebooks.info
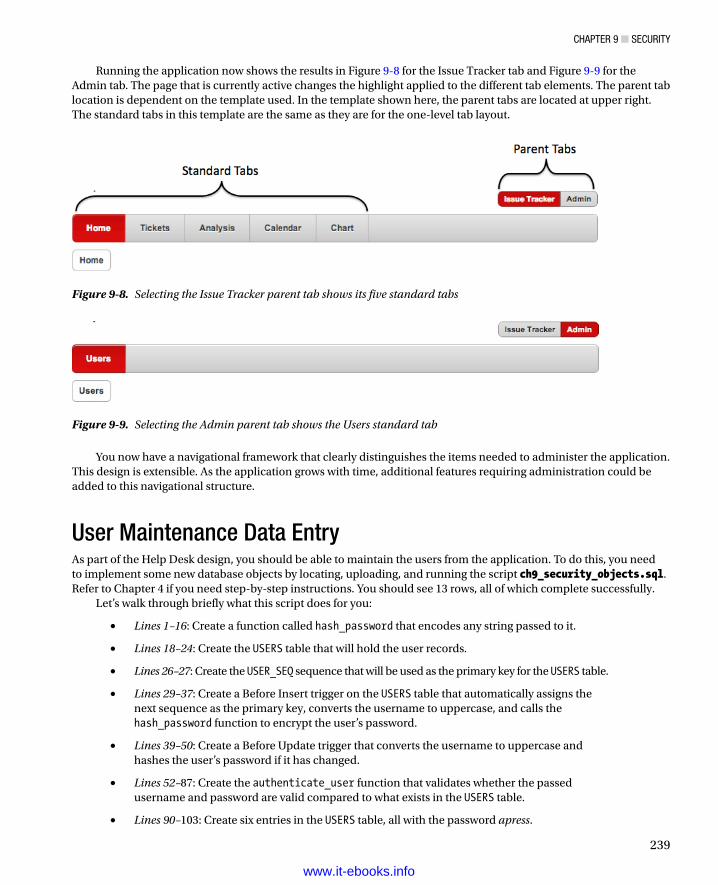
Chapter 9 ■ SeCurity
239
Running the application now shows the results in Figure 9-8 for the Issue Tracker tab and Figure 9-9 for the Admin tab. The page that is currently active changes the highlight applied to the different tab elements. The parent tab location is dependent on the template used. In the template shown here, the parent tabs are located at upper right. The standard tabs in this template are the same as they are for the one-level tab layout.
Figure 9-8. Selecting the Issue Tracker parent tab shows its five standard tabs
You now have a navigational framework that clearly distinguishes the items needed to administer the application. This design is extensible. As the application grows with time, additional features requiring administration could be added to this navigational structure.
User Maintenance Data EntryAs part of the Help Desk design, you should be able to maintain the users from the application. To do this, you need to implement some new database objects by locating, uploading, and running the script ch9_security_objects.sql. Refer to Chapter 4 if you need step-by-step instructions. You should see 13 rows, all of which complete successfully.
Let’s walk through briefly what this script does for you:
• Lines 1–16: Create a function called hash_password that encodes any string passed to it.
• Lines 18–24: Create the USERS table that will hold the user records.
• Lines 26–27: Create the USER_SEQ sequence that will be used as the primary key for the USERS table.
• Lines 29–37: Create a Before Insert trigger on the USERS table that automatically assigns the next sequence as the primary key, converts the username to uppercase, and calls the hash_password function to encrypt the user’s password.
• Lines 39–50: Create a Before Update trigger that converts the username to uppercase and hashes the user’s password if it has changed.
• Lines 52–87: Create the authenticate_user function that validates whether the passed username and password are valid compared to what exists in the USERS table.
• Lines 90–103: Create six entries in the USERS table, all with the password apress.
Figure 9-9. Selecting the Admin parent tab shows the Users standard tab
www.it-ebooks.info
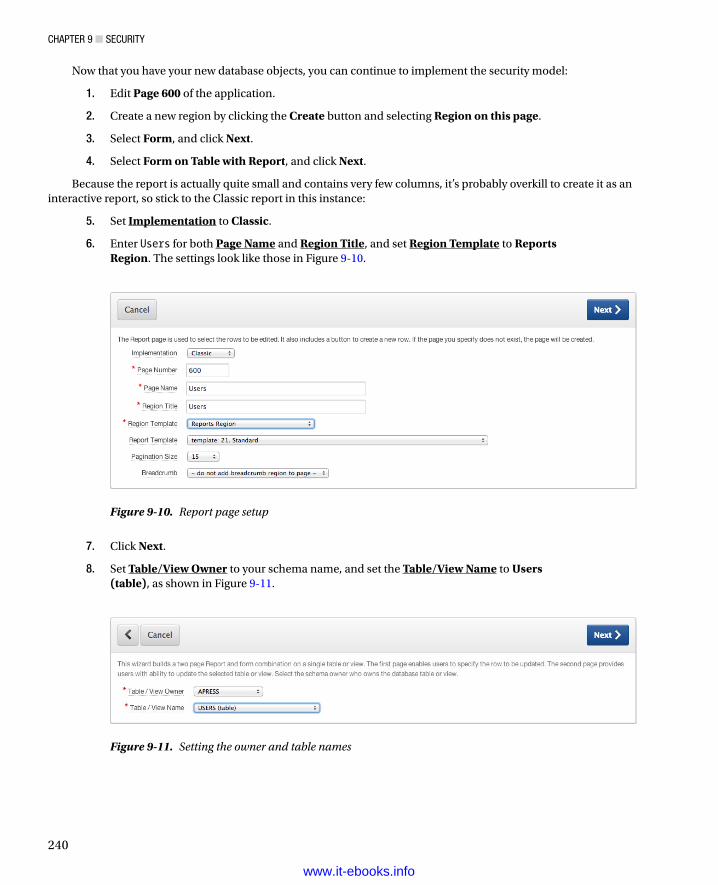
Chapter 9 ■ SeCurity
240
Now that you have your new database objects, you can continue to implement the security model:
1. Edit Page 600 of the application.
2. Create a new region by clicking the Create button and selecting Region on this page.
3. Select Form, and click Next.
4. Select Form on Table with Report, and click Next.
Because the report is actually quite small and contains very few columns, it’s probably overkill to create it as an interactive report, so stick to the Classic report in this instance:
5. Set Implementation to Classic.
6. Enter Users for both Page Name and Region Title, and set Region Template to Reports Region. The settings look like those in Figure 9-10.
Figure 9-10. Report page setup
Figure 9-11. Setting the owner and table names
7. Click Next.
8. Set Table/View Owner to your schema name, and set the Table/View Name to Users (table), as shown in Figure 9-11.
www.it-ebooks.info
Chapter 9 ■ SeCurity
241
9. Click Next.
10. Select USER_ID and USER_NAME as the columns to be displayed in the report. Remove the PASSWORD column using the shuttle buttons, and then click Next.
11. Select any Edit link image, and click Next.
12. Enter 610 for Page Number and Manage Users for Page Name and Region Title, as shown in Figure 9-12. Click Next.
Figure 9-12. Defining the name of the Manage Users form
13. Set Primary Key Type to Select Primary Key Column(s), and, when the page refreshes, select USER_ID for Primary Key Column 1. Click Next.
14. Select Existing Trigger for Primary Key Source, and click Next.
15. Select USER_NAME and PASSWORD as the columns to be editable on the form, as shown in Figure 9-13, and click Next.
Figure 9-13. Select USER_NAME and PASSWORD as fields to be seen in the form
www.it-ebooks.info
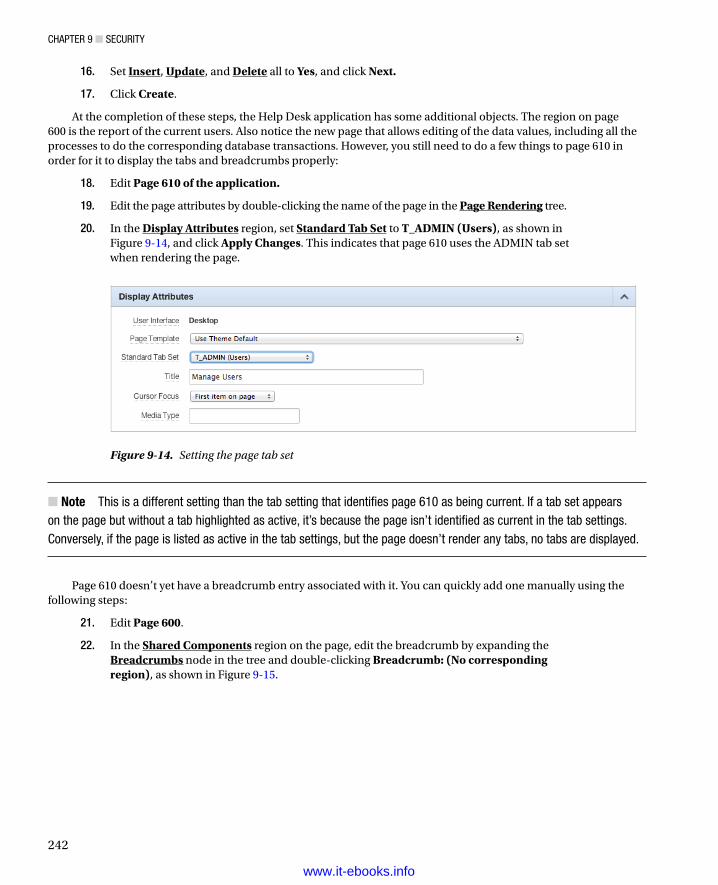
Chapter 9 ■ SeCurity
242
16. Set Insert, Update, and Delete all to Yes, and click Next.
17. Click Create.
At the completion of these steps, the Help Desk application has some additional objects. The region on page 600 is the report of the current users. Also notice the new page that allows editing of the data values, including all the processes to do the corresponding database transactions. However, you still need to do a few things to page 610 in order for it to display the tabs and breadcrumbs properly:
18. Edit Page 610 of the application.
19. Edit the page attributes by double-clicking the name of the page in the Page Rendering tree.
20. In the Display Attributes region, set Standard Tab Set to T_ADMIN (Users), as shown in Figure 9-14, and click Apply Changes. This indicates that page 610 uses the ADMIN tab set when rendering the page.
Figure 9-14. Setting the page tab set
Note ■ this is a different setting than the tab setting that identifies page 610 as being current. if a tab set appears on the page but without a tab highlighted as active, it’s because the page isn’t identified as current in the tab settings. Conversely, if the page is listed as active in the tab settings, but the page doesn’t render any tabs, no tabs are displayed.
Page 610 doesn’t yet have a breadcrumb entry associated with it. You can quickly add one manually using the following steps:
21. Edit Page 600.
22. In the Shared Components region on the page, edit the breadcrumb by expanding the Breadcrumbs node in the tree and double-clicking Breadcrumb: (No corresponding region), as shown in Figure 9-15.
www.it-ebooks.info
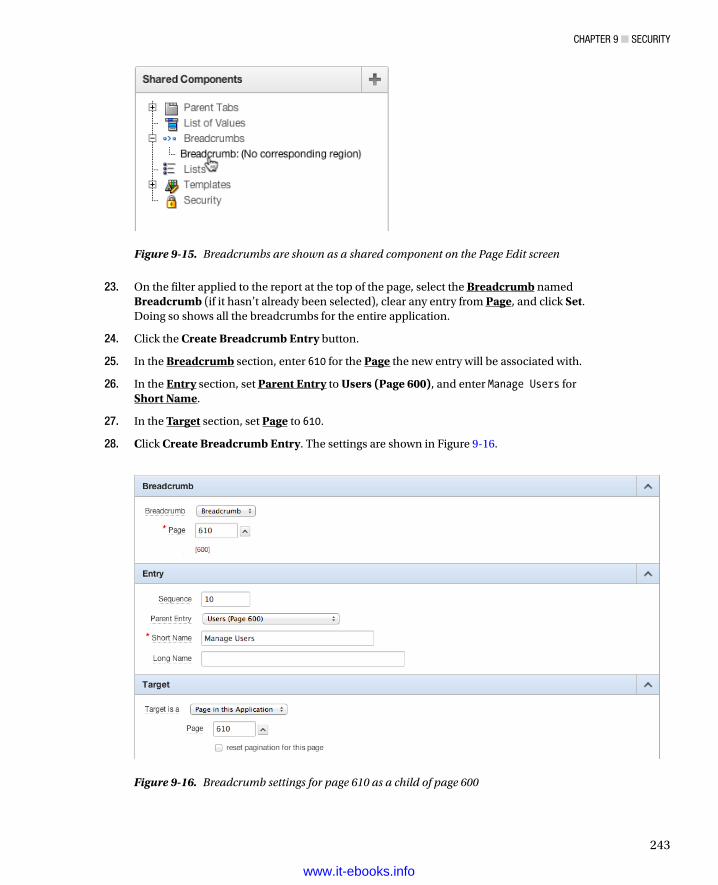
Chapter 9 ■ SeCurity
243
23. On the filter applied to the report at the top of the page, select the Breadcrumb named Breadcrumb (if it hasn’t already been selected), clear any entry from Page, and click Set. Doing so shows all the breadcrumbs for the entire application.
24. Click the Create Breadcrumb Entry button.
25. In the Breadcrumb section, enter 610 for the Page the new entry will be associated with.
26. In the Entry section, set Parent Entry to Users (Page 600), and enter Manage Users for Short Name.
27. In the Target section, set Page to 610.
28. Click Create Breadcrumb Entry. The settings are shown in Figure 9-16.
Figure 9-15. Breadcrumbs are shown as a shared component on the Page Edit screen
Figure 9-16. Breadcrumb settings for page 610 as a child of page 600
www.it-ebooks.info
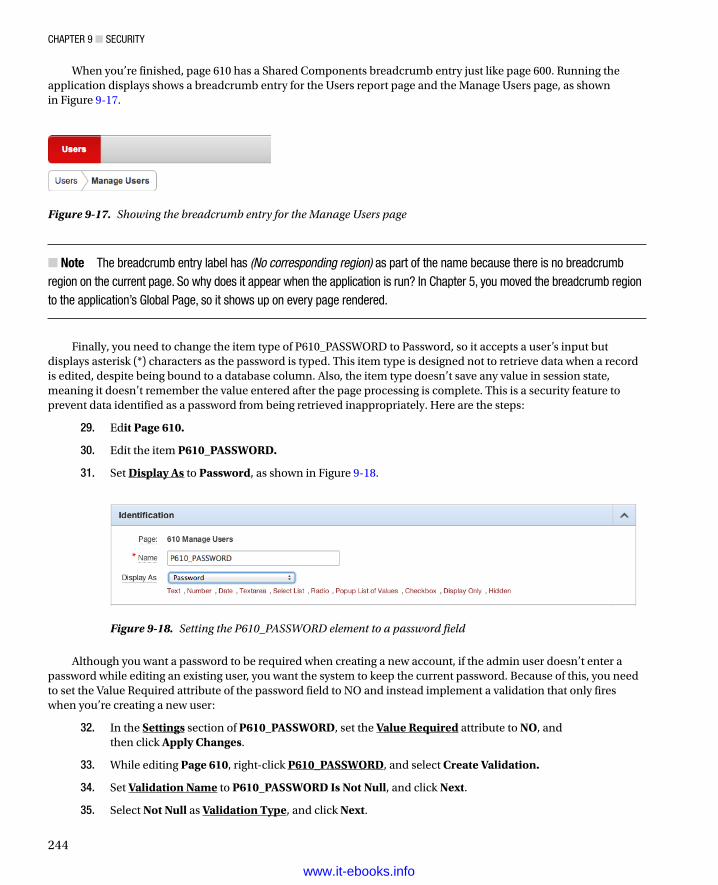
Chapter 9 ■ SeCurity
244
When you’re finished, page 610 has a Shared Components breadcrumb entry just like page 600. Running the application displays shows a breadcrumb entry for the Users report page and the Manage Users page, as shown in Figure 9-17.
Figure 9-17. Showing the breadcrumb entry for the Manage Users page
Figure 9-18. Setting the P610_PASSWORD element to a password field
Note■ the breadcrumb entry label has (No corresponding region) as part of the name because there is no breadcrumb region on the current page. So why does it appear when the application is run? in Chapter 5, you moved the breadcrumb region to the application’s Global page, so it shows up on every page rendered.
Finally, you need to change the item type of P610_PASSWORD to Password, so it accepts a user’s input but displays asterisk (*) characters as the password is typed. This item type is designed not to retrieve data when a record is edited, despite being bound to a database column. Also, the item type doesn’t save any value in session state, meaning it doesn’t remember the value entered after the page processing is complete. This is a security feature to prevent data identified as a password from being retrieved inappropriately. Here are the steps:
29. Edit Page 610.
30. Edit the item P610_PASSWORD.
31. Set Display As to Password, as shown in Figure 9-18.
Although you want a password to be required when creating a new account, if the admin user doesn’t enter a password while editing an existing user, you want the system to keep the current password. Because of this, you need to set the Value Required attribute of the password field to NO and instead implement a validation that only fires when you’re creating a new user:
32. In the Settings section of P610_PASSWORD, set the Value Required attribute to NO, andthen click Apply Changes.
33. While editing Page 610, right-click P610_PASSWORD, and select Create Validation.
34. Set Validation Name to P610_PASSWORD Is Not Null, and click Next.
35. Select Not Null as Validation Type, and click Next.
www.it-ebooks.info
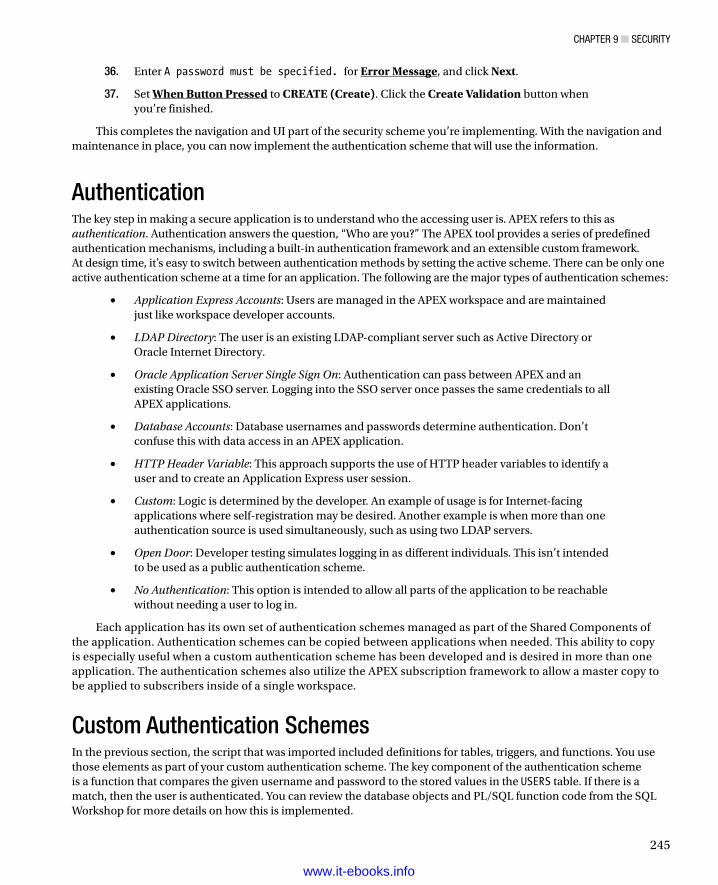
Chapter 9 ■ SeCurity
245
36. Enter A password must be specified. for Error Message, and click Next.
37. Set When Button Pressed to CREATE (Create). Click the Create Validation button when you’re finished.
This completes the navigation and UI part of the security scheme you’re implementing. With the navigation and maintenance in place, you can now implement the authentication scheme that will use the information.
AuthenticationThe key step in making a secure application is to understand who the accessing user is. APEX refers to this as authentication. Authentication answers the question, “Who are you?” The APEX tool provides a series of predefined authentication mechanisms, including a built-in authentication framework and an extensible custom framework. At design time, it’s easy to switch between authentication methods by setting the active scheme. There can be only one active authentication scheme at a time for an application. The following are the major types of authentication schemes:
• Application Express Accounts: Users are managed in the APEX workspace and are maintained just like workspace developer accounts.
• LDAP Directory: The user is an existing LDAP-compliant server such as Active Directory or Oracle Internet Directory.
• Oracle Application Server Single Sign On: Authentication can pass between APEX and an existing Oracle SSO server. Logging into the SSO server once passes the same credentials to all APEX applications.
• Database Accounts: Database usernames and passwords determine authentication. Don’t confuse this with data access in an APEX application.
• HTTP Header Variable: This approach supports the use of HTTP header variables to identify a user and to create an Application Express user session.
• Custom: Logic is determined by the developer. An example of usage is for Internet-facing applications where self-registration may be desired. Another example is when more than one authentication source is used simultaneously, such as using two LDAP servers.
• Open Door: Developer testing simulates logging in as different individuals. This isn’t intended to be used as a public authentication scheme.
• No Authentication: This option is intended to allow all parts of the application to be reachable without needing a user to log in.
Each application has its own set of authentication schemes managed as part of the Shared Components of the application. Authentication schemes can be copied between applications when needed. This ability to copy is especially useful when a custom authentication scheme has been developed and is desired in more than one application. The authentication schemes also utilize the APEX subscription framework to allow a master copy to be applied to subscribers inside of a single workspace.
Custom Authentication SchemesIn the previous section, the script that was imported included definitions for tables, triggers, and functions. You use those elements as part of your custom authentication scheme. The key component of the authentication scheme is a function that compares the given username and password to the stored values in the USERS table. If there is a match, then the user is authenticated. You can review the database objects and PL/SQL function code from the SQL Workshop for more details on how this is implemented.
www.it-ebooks.info
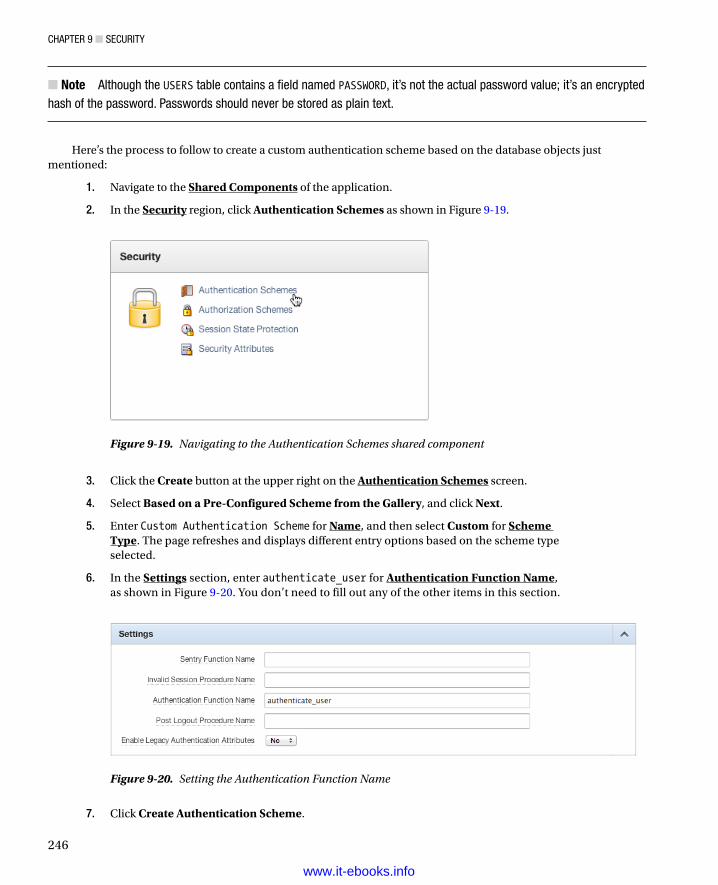
Chapter 9 ■ SeCurity
246
Note ■ although the USERS table contains a field named PASSWORD, it’s not the actual password value; it’s an encrypted hash of the password. passwords should never be stored as plain text.
Here’s the process to follow to create a custom authentication scheme based on the database objects just mentioned:
1. Navigate to the Shared Components of the application.
2. In the Security region, click Authentication Schemes as shown in Figure 9-19.
Figure 9-19. Navigating to the Authentication Schemes shared component
Figure 9-20. Setting the Authentication Function Name
3. Click the Create button at the upper right on the Authentication Schemes screen.
4. Select Based on a Pre-Configured Scheme from the Gallery, and click Next.
5. Enter Custom Authentication Scheme for Name, and then select Custom for Scheme Type. The page refreshes and displays different entry options based on the scheme type selected.
6. In the Settings section, enter authenticate_user for Authentication Function Name, as shown in Figure 9-20. You don’t need to fill out any of the other items in this section.
7. Click Create Authentication Scheme.
www.it-ebooks.info
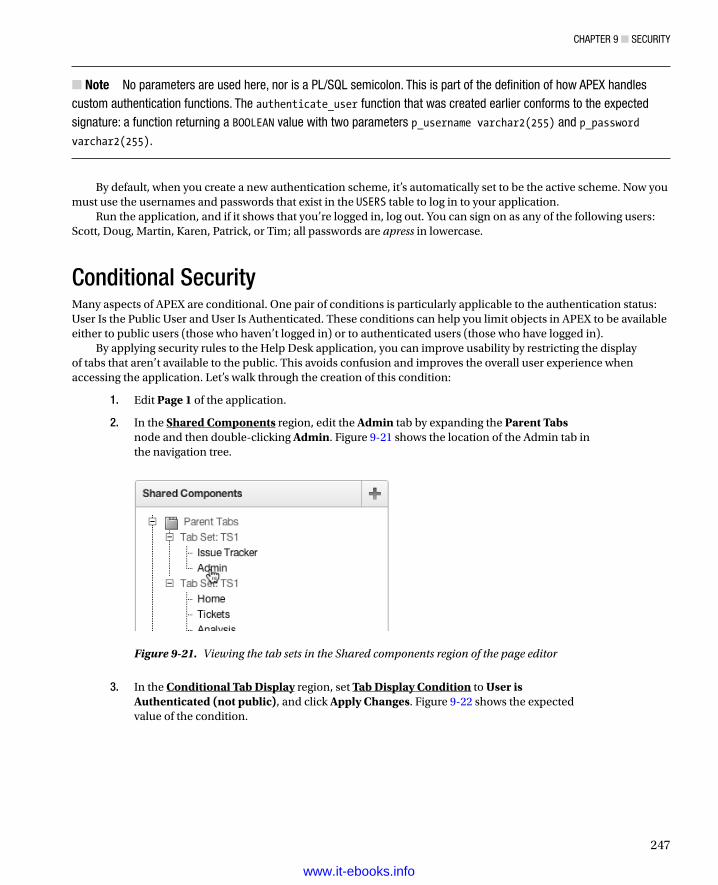
Chapter 9 ■ SeCurity
247
Note ■ No parameters are used here, nor is a pL/SQL semicolon. this is part of the definition of how apeX handles custom authentication functions. the authenticate_user function that was created earlier conforms to the expected signature: a function returning a BOOLEAN value with two parameters p_username varchar2(255) and p_password varchar2(255).
By default, when you create a new authentication scheme, it’s automatically set to be the active scheme. Now you must use the usernames and passwords that exist in the USERS table to log in to your application.
Run the application, and if it shows that you’re logged in, log out. You can sign on as any of the following users: Scott, Doug, Martin, Karen, Patrick, or Tim; all passwords are apress in lowercase.
Conditional SecurityMany aspects of APEX are conditional. One pair of conditions is particularly applicable to the authentication status: User Is the Public User and User Is Authenticated. These conditions can help you limit objects in APEX to be available either to public users (those who haven’t logged in) or to authenticated users (those who have logged in).
By applying security rules to the Help Desk application, you can improve usability by restricting the display of tabs that aren’t available to the public. This avoids confusion and improves the overall user experience when accessing the application. Let’s walk through the creation of this condition:
1. Edit Page 1 of the application.
2. In the Shared Components region, edit the Admin tab by expanding the Parent Tabs node and then double-clicking Admin. Figure 9-21 shows the location of the Admin tab in the navigation tree.
Figure 9-21. Viewing the tab sets in the Shared components region of the page editor
3. In the Conditional Tab Display region, set Tab Display Condition to User is Authenticated (not public), and click Apply Changes. Figure 9-22 shows the expected value of the condition.
www.it-ebooks.info
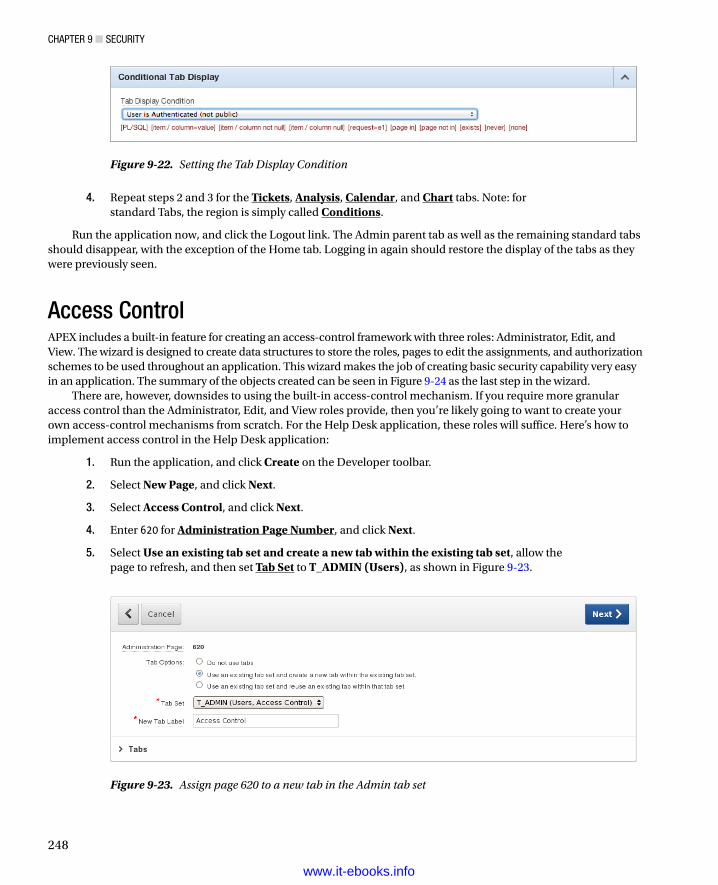
Chapter 9 ■ SeCurity
248
4. Repeat steps 2 and 3 for the Tickets, Analysis, Calendar, and Chart tabs. Note: for standard Tabs, the region is simply called Conditions.
Run the application now, and click the Logout link. The Admin parent tab as well as the remaining standard tabs should disappear, with the exception of the Home tab. Logging in again should restore the display of the tabs as they were previously seen.
Access ControlAPEX includes a built-in feature for creating an access-control framework with three roles: Administrator, Edit, and View. The wizard is designed to create data structures to store the roles, pages to edit the assignments, and authorization schemes to be used throughout an application. This wizard makes the job of creating basic security capability very easy in an application. The summary of the objects created can be seen in Figure 9-24 as the last step in the wizard.
There are, however, downsides to using the built-in access-control mechanism. If you require more granular access control than the Administrator, Edit, and View roles provide, then you’re likely going to want to create your own access-control mechanisms from scratch. For the Help Desk application, these roles will suffice. Here’s how to implement access control in the Help Desk application:
1. Run the application, and click Create on the Developer toolbar.
2. Select New Page, and click Next.
3. Select Access Control, and click Next.
4. Enter 620 for Administration Page Number, and click Next.
5. Select Use an existing tab set and create a new tab within the existing tab set, allow the page to refresh, and then set Tab Set to T_ADMIN (Users), as shown in Figure 9-23.
Figure 9-22. Setting the Tab Display Condition
Figure 9-23. Assign page 620 to a new tab in the Admin tab set
www.it-ebooks.info
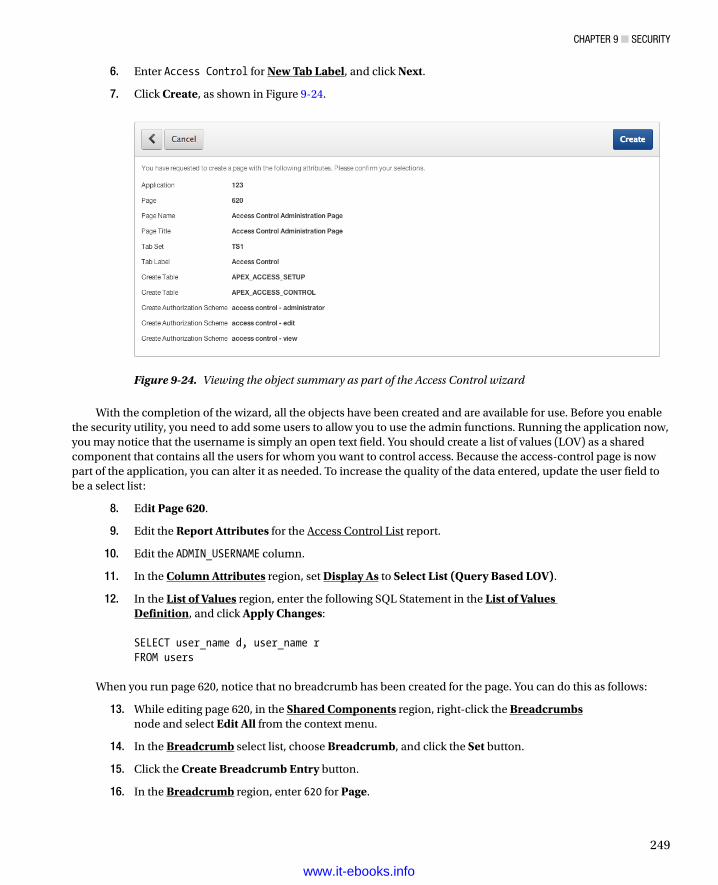
Chapter 9 ■ SeCurity
249
6. Enter Access Control for New Tab Label, and click Next.
7. Click Create, as shown in Figure 9-24.
Figure 9-24. Viewing the object summary as part of the Access Control wizard
With the completion of the wizard, all the objects have been created and are available for use. Before you enable the security utility, you need to add some users to allow you to use the admin functions. Running the application now, you may notice that the username is simply an open text field. You should create a list of values (LOV) as a shared component that contains all the users for whom you want to control access. Because the access-control page is now part of the application, you can alter it as needed. To increase the quality of the data entered, update the user field to be a select list:
8. Edit Page 620.
9. Edit the Report Attributes for the Access Control List report.
10. Edit the ADMIN_USERNAME column.
11. In the Column Attributes region, set Display As to Select List (Query Based LOV).
12. In the List of Values region, enter the following SQL Statement in the List of Values Definition, and click Apply Changes:
SELECT user_name d, user_name rFROM users
When you run page 620, notice that no breadcrumb has been created for the page. You can do this as follows:
13. While editing page 620, in the Shared Components region, right-click the Breadcrumbs node and select Edit All from the context menu.
14. In the Breadcrumb select list, choose Breadcrumb, and click the Set button.
15. Click the Create Breadcrumb Entry button.
16. In the Breadcrumb region, enter 620 for Page.
www.it-ebooks.info
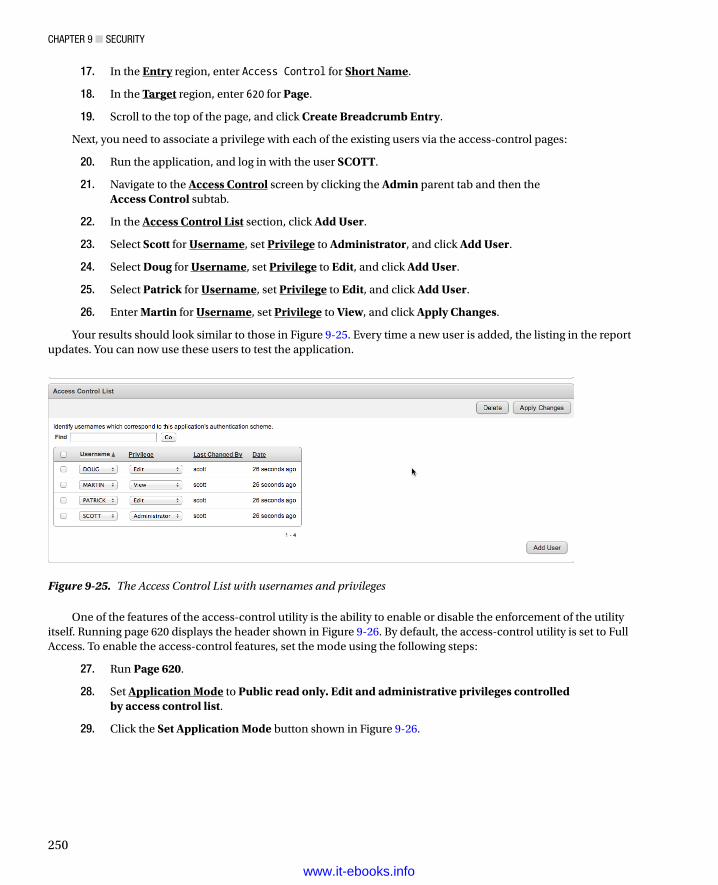
Chapter 9 ■ SeCurity
250
17. In the Entry region, enter Access Control for Short Name.
18. In the Target region, enter 620 for Page.
19. Scroll to the top of the page, and click Create Breadcrumb Entry.
Next, you need to associate a privilege with each of the existing users via the access-control pages:
20. Run the application, and log in with the user SCOTT.
21. Navigate to the Access Control screen by clicking the Admin parent tab and then the Access Control subtab.
22. In the Access Control List section, click Add User.
23. Select Scott for Username, set Privilege to Administrator, and click Add User.
24. Select Doug for Username, set Privilege to Edit, and click Add User.
25. Select Patrick for Username, set Privilege to Edit, and click Add User.
26. Enter Martin for Username, set Privilege to View, and click Apply Changes.
Your results should look similar to those in Figure 9-25. Every time a new user is added, the listing in the report updates. You can now use these users to test the application.
Figure 9-25. The Access Control List with usernames and privileges
One of the features of the access-control utility is the ability to enable or disable the enforcement of the utility itself. Running page 620 displays the header shown in Figure 9-26. By default, the access-control utility is set to Full Access. To enable the access-control features, set the mode using the following steps:
27. Run Page 620.
28. Set Application Mode to Public read only. Edit and administrative privileges controlled by access control list.
29. Click the Set Application Mode button shown in Figure 9-26.
www.it-ebooks.info
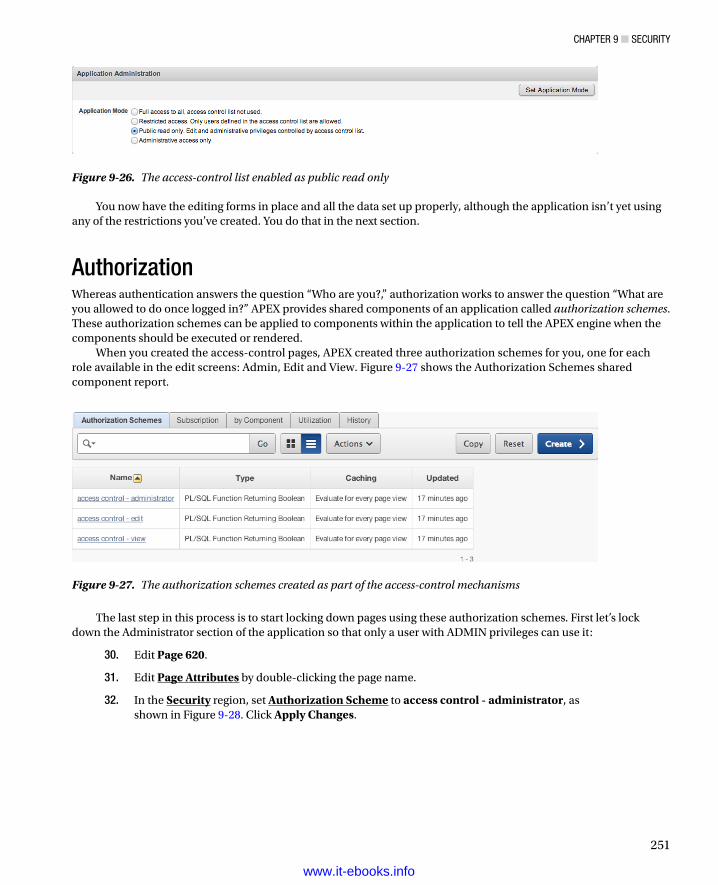
Chapter 9 ■ SeCurity
251
You now have the editing forms in place and all the data set up properly, although the application isn’t yet using any of the restrictions you’ve created. You do that in the next section.
AuthorizationWhereas authentication answers the question “Who are you?,” authorization works to answer the question “What are you allowed to do once logged in?” APEX provides shared components of an application called authorization schemes. These authorization schemes can be applied to components within the application to tell the APEX engine when the components should be executed or rendered.
When you created the access-control pages, APEX created three authorization schemes for you, one for each role available in the edit screens: Admin, Edit and View. Figure 9-27 shows the Authorization Schemes shared component report.
Figure 9-26. The access-control list enabled as public read only
Figure 9-27. The authorization schemes created as part of the access-control mechanisms
The last step in this process is to start locking down pages using these authorization schemes. First let’s lock down the Administrator section of the application so that only a user with ADMIN privileges can use it:
30. Edit Page 620.
31. Edit Page Attributes by double-clicking the page name.
32. In the Security region, set Authorization Scheme to access control - administrator, as shown in Figure 9-28. Click Apply Changes.
www.it-ebooks.info
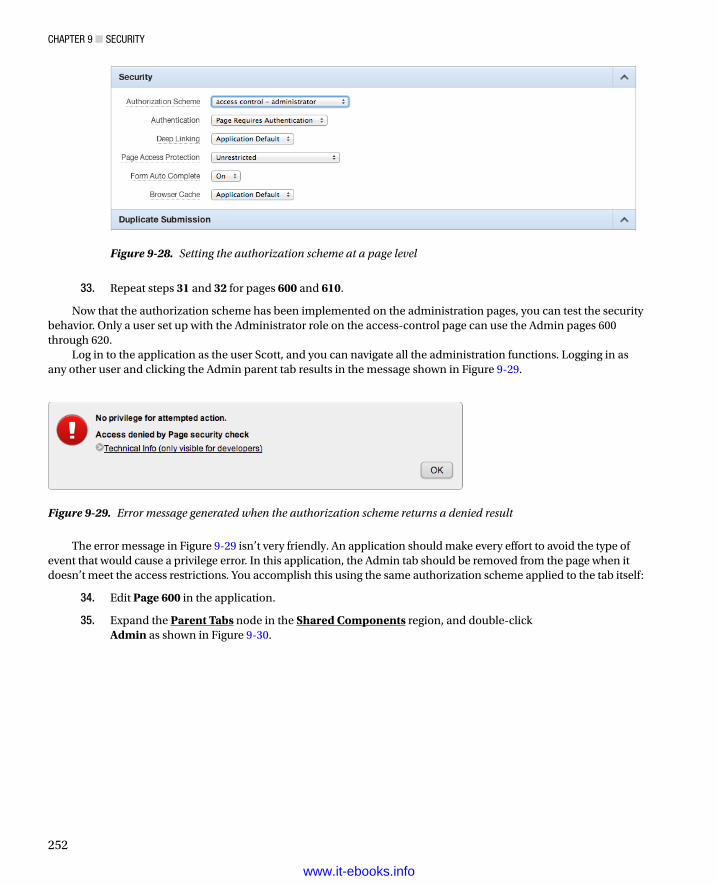
Chapter 9 ■ SeCurity
252
33. Repeat steps 31 and 32 for pages 600 and 610.
Now that the authorization scheme has been implemented on the administration pages, you can test the security behavior. Only a user set up with the Administrator role on the access-control page can use the Admin pages 600 through 620.
Log in to the application as the user Scott, and you can navigate all the administration functions. Logging in as any other user and clicking the Admin parent tab results in the message shown in Figure 9-29.
Figure 9-29. Error message generated when the authorization scheme returns a denied result
Figure 9-28. Setting the authorization scheme at a page level
The error message in Figure 9-29 isn’t very friendly. An application should make every effort to avoid the type of event that would cause a privilege error. In this application, the Admin tab should be removed from the page when it doesn’t meet the access restrictions. You accomplish this using the same authorization scheme applied to the tab itself:
34. Edit Page 600 in the application.
35. Expand the Parent Tabs node in the Shared Components region, and double-click Admin as shown in Figure 9-30.
www.it-ebooks.info
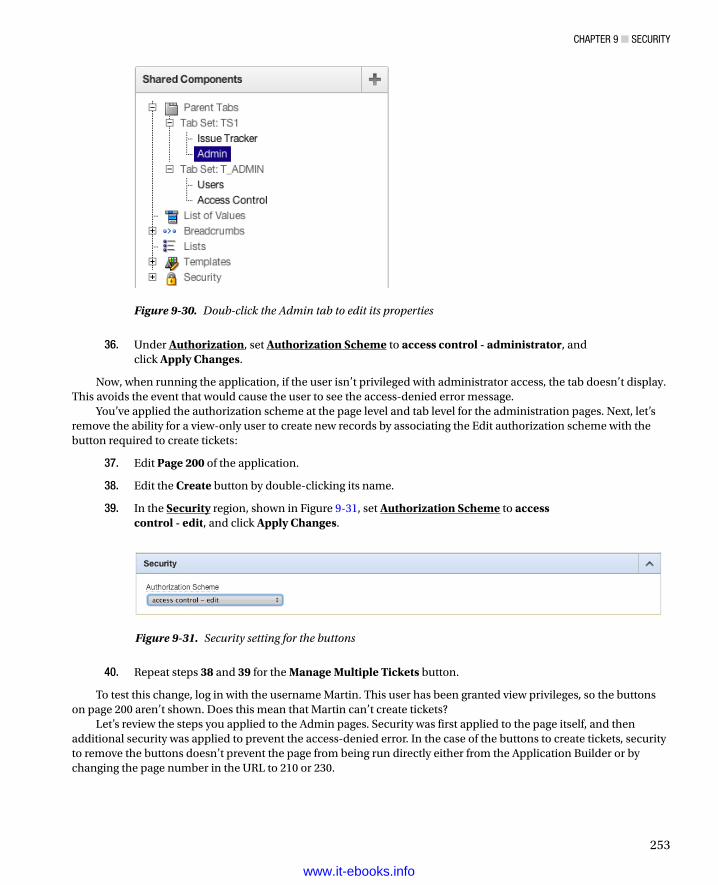
Chapter 9 ■ SeCurity
253
36. Under Authorization, set Authorization Scheme to access control - administrator, and click Apply Changes.
Now, when running the application, if the user isn’t privileged with administrator access, the tab doesn’t display. This avoids the event that would cause the user to see the access-denied error message.
You’ve applied the authorization scheme at the page level and tab level for the administration pages. Next, let’s remove the ability for a view-only user to create new records by associating the Edit authorization scheme with the button required to create tickets:
37. Edit Page 200 of the application.
38. Edit the Create button by double-clicking its name.
39. In the Security region, shown in Figure 9-31, set Authorization Scheme to access control - edit, and click Apply Changes.
Figure 9-30. Doub-click the Admin tab to edit its properties
Figure 9-31. Security setting for the buttons
40. Repeat steps 38 and 39 for the Manage Multiple Tickets button.
To test this change, log in with the username Martin. This user has been granted view privileges, so the buttons on page 200 aren’t shown. Does this mean that Martin can’t create tickets?
Let’s review the steps you applied to the Admin pages. Security was first applied to the page itself, and then additional security was applied to prevent the access-denied error. In the case of the buttons to create tickets, security to remove the buttons doesn’t prevent the page from being run directly either from the Application Builder or by changing the page number in the URL to 210 or 230.
www.it-ebooks.info
Chapter 9 ■ SeCurity
254
Important■ removing or hiding a button, a tab, or another link doesn’t secure the target it was pointing at; it only helps reduce errors seen by users on components that are already secure.
The design for the Help Desk application has the Manage Multiple Tickets page only available to users with edit privileges, so the entire page is secured at the edit level. The single-record view of a ticket continues to be visible to all authenticated users, but without the buttons related to record manipulation:
41. Edit Page 210 of the application.
42. Edit the Create button in the Manage Tickets region by double-clicking its name.
43. In the Security region, set Authorization Scheme to access control - edit, and click Apply Changes.
44. Repeat steps 42 and 43 for the Delete and Save buttons as well as the second Create button located in the Ticket Details region.
45. Edit Page 220 of the application.
46. Edit the Create button by double-clicking its name.
47. In the Security region, set Authorization Scheme to access control - edit, and click Apply Changes.
48. Repeat steps 46 and 47 for the Delete and Save buttons.
49. Edit Page 230 of the application.
50. Edit the page attributes by double-clicking the page name.
51. In the Security region, set Authorization Scheme to access control - edit, and click Apply Changes.
Review the application now with different users. Notice how the user Martin can still navigate from the Tickets report to view the details of the ticket, but there are no buttons to modify the records in the database. Even though the form elements are editable, they aren’t written back to the database without the proper form submission.
Read-Only ItemsNormally, users can edit the contents of an item in APEX. There are instances where you want to prohibit them from doing so, but you don’t want to hide the item entirely. At the conclusion of the previous step, the user Martin doesn’t have the ability to save edits of the ticket information even though the form allows Martin to change the contents of the form items.
To assist in preventing changes, each item in APEX has a read-only attribute that you can set programmatically. The approach is similar to how item conditions are managed. Because the read-only attribute can’t use an authorization scheme directly, you can use the APEX API APEX_UTIL.PUBLIC_CHECK_AUTHORIZATION to determine whether a user has the rights to edit the data. This API takes a parameter of the authorization scheme name and runs the verification returning a Boolean result that can be used in PL/SQL logic.
Here are the steps to use the read-only attribute and the API just discussed:
1. Navigate to and edit the items indicated in Table 9-1 by double-clicking the item name on the respective page.
www.it-ebooks.info
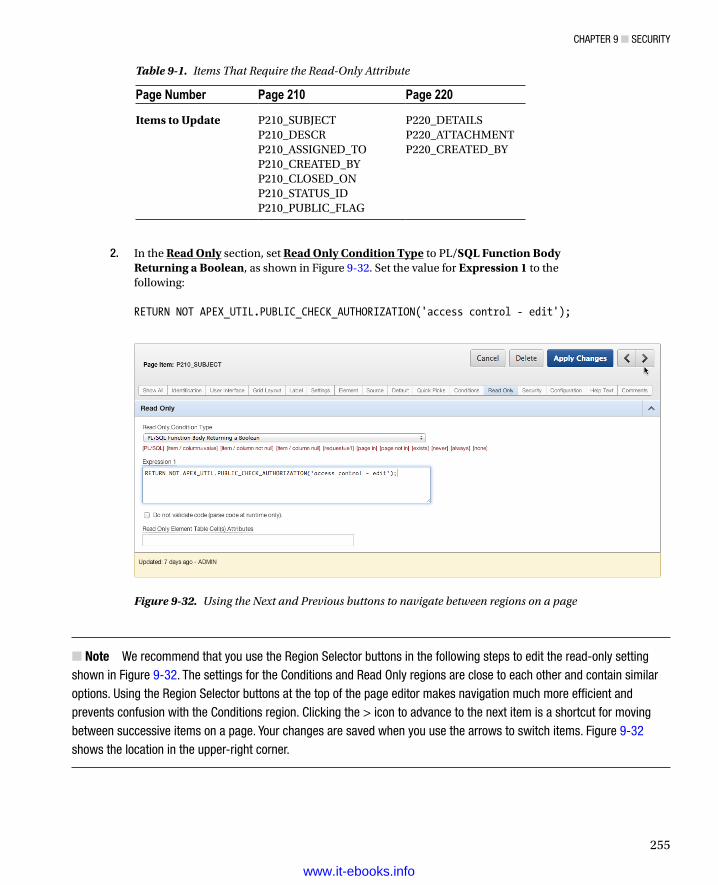
Chapter 9 ■ SeCurity
255
2. In the Read Only section, set Read Only Condition Type to PL/SQL Function Body Returning a Boolean, as shown in Figure 9-32. Set the value for Expression 1 to the following:
RETURN NOT APEX_UTIL.PUBLIC_CHECK_AUTHORIZATION('access control - edit');
Table 9-1. Items That Require the Read-Only Attribute
Page Number Page 210 Page 220
Items to Update P210_SUBJECTP210_DESCRP210_ASSIGNED_TOP210_CREATED_BYP210_CLOSED_ONP210_STATUS_IDP210_PUBLIC_FLAG
P220_DETAILSP220_ATTACHMENTP220_CREATED_BY
Figure 9-32. Using the Next and Previous buttons to navigate between regions on a page
Note ■ We recommend that you use the region Selector buttons in the following steps to edit the read-only setting shown in Figure 9-32. the settings for the Conditions and read Only regions are close to each other and contain similar options. using the region Selector buttons at the top of the page editor makes navigation much more efficient and prevents confusion with the Conditions region. Clicking the > icon to advance to the next item is a shortcut for moving between successive items on a page. your changes are saved when you use the arrows to switch items. Figure 9-32 shows the location in the upper-right corner.
www.it-ebooks.info
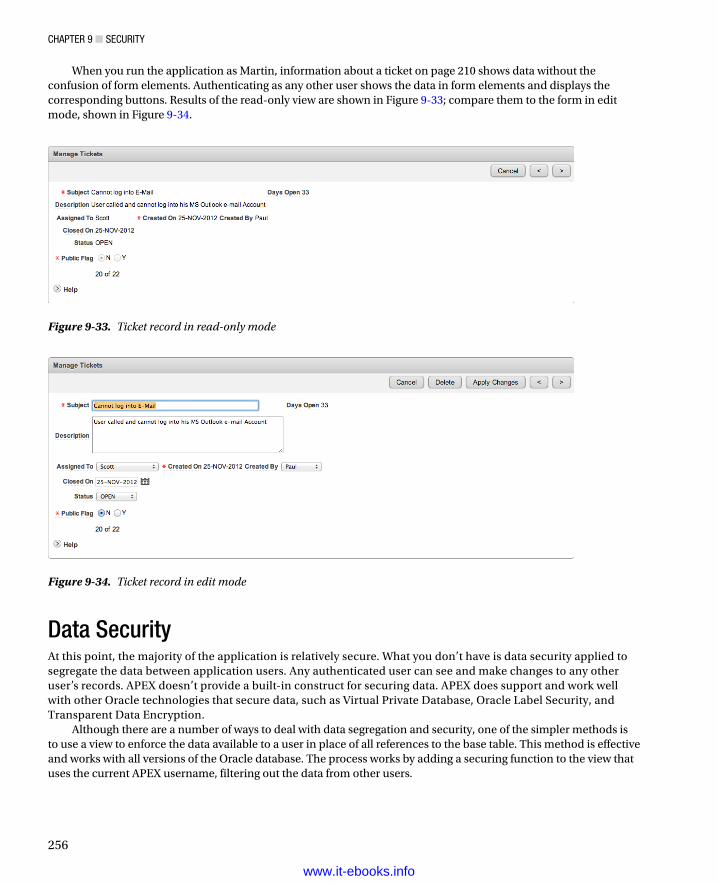
Chapter 9 ■ SeCurity
256
When you run the application as Martin, information about a ticket on page 210 shows data without the confusion of form elements. Authenticating as any other user shows the data in form elements and displays the corresponding buttons. Results of the read-only view are shown in Figure 9-33; compare them to the form in edit mode, shown in Figure 9-34.
Figure 9-34. Ticket record in edit mode
Figure 9-33. Ticket record in read-only mode
Data SecurityAt this point, the majority of the application is relatively secure. What you don’t have is data security applied to segregate the data between application users. Any authenticated user can see and make changes to any other user’s records. APEX doesn’t provide a built-in construct for securing data. APEX does support and work well with other Oracle technologies that secure data, such as Virtual Private Database, Oracle Label Security, and Transparent Data Encryption.
Although there are a number of ways to deal with data segregation and security, one of the simpler methods is to use a view to enforce the data available to a user in place of all references to the base table. This method is effective and works with all versions of the Oracle database. The process works by adding a securing function to the view that uses the current APEX username, filtering out the data from other users.
www.it-ebooks.info
Chapter 9 ■ SeCurity
257
To implement this data security, you run a script that creates a new view named TICKET_SECURE_V and then re-create the other two views, TICKET_ACTIVITY_V and TICKET_V, so they point to the secured view rather than the TICKETS table directly. Then you make modifications to the other key components of the pages that access ticket data to also use the new secure views. Here are the steps:
1. Locate, upload, and run the script ch9_data_security_script.sql. Refer to Chapter 4 if you need step-by-step instructions. You should see three rows in the results report, all of which complete successfully.
2. Once the script completes, run the application and navigate to the Analysis page. You should notice that only tickets or ticket details that are assigned to the user you’re logged in as appear.
Next, make changes to the source of several other pages so they reference the new secure objects you just created:
3. Edit Page 200 of the application.
4. Edit the Tickets report by double-clicking it.
5. Locate and open the file ch9_report_p200.txt, and copy its contents into Region Source, replacing everything that is there. Click Apply Changes.
6. Run Page 200, and notice that you can only see the tickets that are assigned to the current user.
You need to make a similar change on the Manage Multiple Tickets page:
7. Edit Page 230 of the application.
8. Edit the Manage Multiple Tickets report by double-clicking it.
9. Locate and open the file ch9_report_p230.txt, and copy its contents into Region Source, replacing everything that is there. Click Apply Changes.
10. Run Page 230, and notice that you can only see the tickets that are assigned to the current user.
Next, modify the Calendar report:
11. Edit Page 400 of the application.
12. Right-click Ticket Activity Calendar, and click Edit Calendar.
13. In the Tasks region on the right side of the page, click Convert to SQL Based Calendar. Figure 9-35 shows the location of the link. Clicking the link generates a confirmation message and remains on the same page.
www.it-ebooks.info
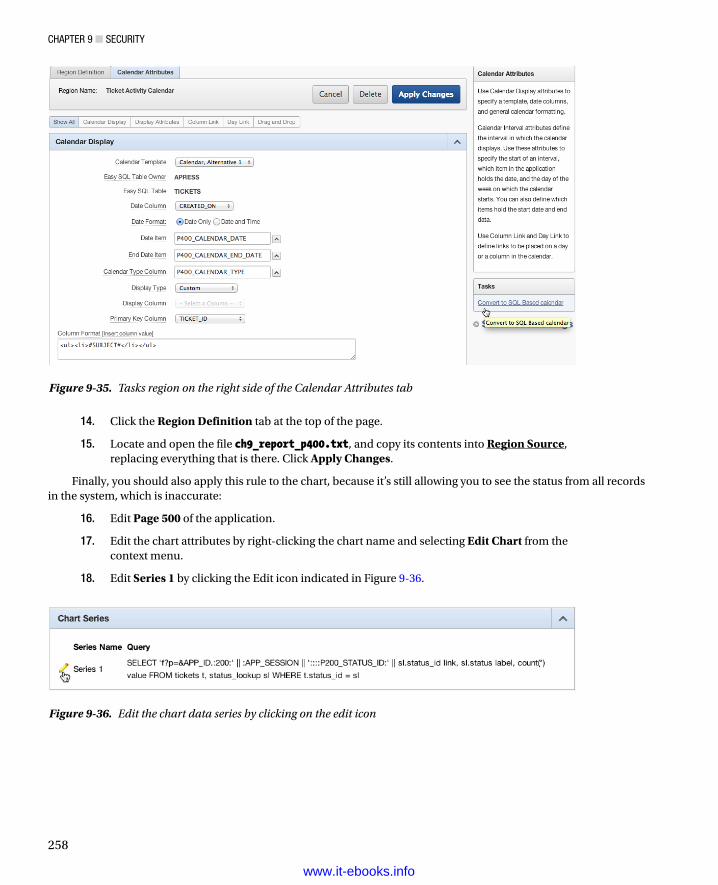
Chapter 9 ■ SeCurity
258
14. Click the Region Definition tab at the top of the page.
15. Locate and open the file ch9_report_p400.txt, and copy its contents into Region Source, replacing everything that is there. Click Apply Changes.
Finally, you should also apply this rule to the chart, because it’s still allowing you to see the status from all records in the system, which is inaccurate:
16. Edit Page 500 of the application.
17. Edit the chart attributes by right-clicking the chart name and selecting Edit Chart from the context menu.
18. Edit Series 1 by clicking the Edit icon indicated in Figure 9-36.
Figure 9-36. Edit the chart data series by clicking on the edit icon
Figure 9-35. Tasks region on the right side of the Calendar Attributes tab
www.it-ebooks.info
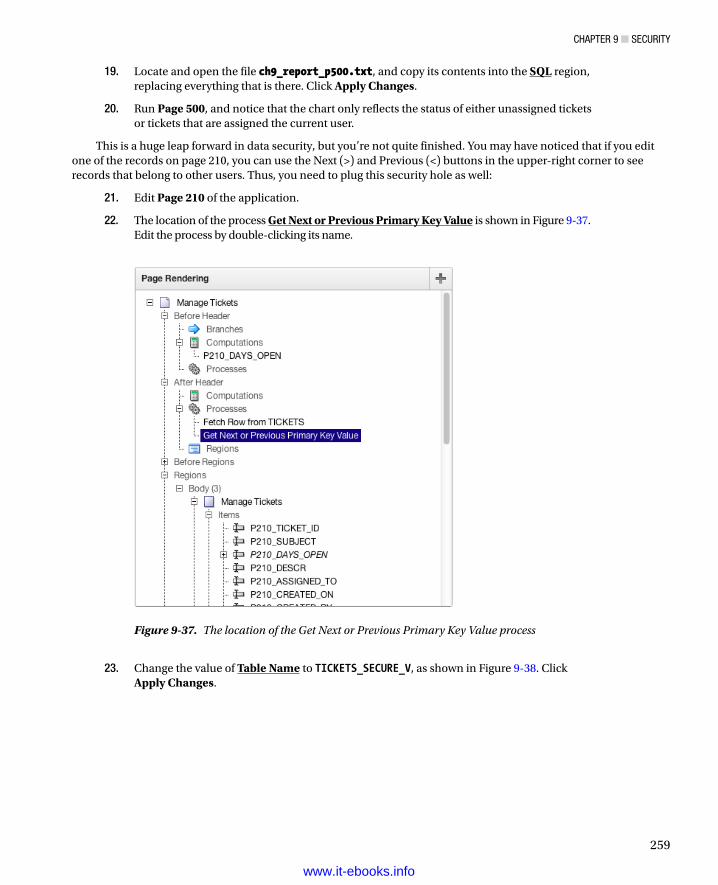
Chapter 9 ■ SeCurity
259
19. Locate and open the file ch9_report_p500.txt, and copy its contents into the SQL region, replacing everything that is there. Click Apply Changes.
20. Run Page 500, and notice that the chart only reflects the status of either unassigned tickets or tickets that are assigned the current user.
This is a huge leap forward in data security, but you’re not quite finished. You may have noticed that if you edit one of the records on page 210, you can use the Next (>) and Previous (<) buttons in the upper-right corner to see records that belong to other users. Thus, you need to plug this security hole as well:
21. Edit Page 210 of the application.
22. The location of the process Get Next or Previous Primary Key Value is shown in Figure 9-37. Edit the process by double-clicking its name.
Figure 9-37. The location of the Get Next or Previous Primary Key Value process
23. Change the value of Table Name to TICKETS_SECURE_V, as shown in Figure 9-38. Click Apply Changes.
www.it-ebooks.info
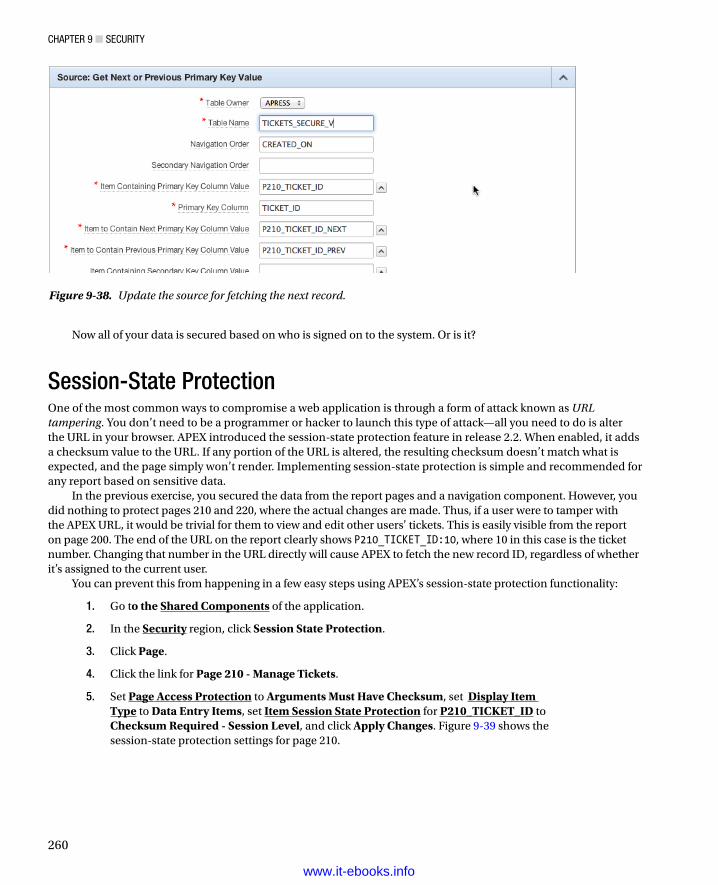
Chapter 9 ■ SeCurity
260
Now all of your data is secured based on who is signed on to the system. Or is it?
Session-State ProtectionOne of the most common ways to compromise a web application is through a form of attack known as URL tampering. You don’t need to be a programmer or hacker to launch this type of attack—all you need to do is alter the URL in your browser. APEX introduced the session-state protection feature in release 2.2. When enabled, it adds a checksum value to the URL. If any portion of the URL is altered, the resulting checksum doesn’t match what is expected, and the page simply won’t render. Implementing session-state protection is simple and recommended for any report based on sensitive data.
In the previous exercise, you secured the data from the report pages and a navigation component. However, you did nothing to protect pages 210 and 220, where the actual changes are made. Thus, if a user were to tamper with the APEX URL, it would be trivial for them to view and edit other users’ tickets. This is easily visible from the report on page 200. The end of the URL on the report clearly shows P210_TICKET_ID:10, where 10 in this case is the ticket number. Changing that number in the URL directly will cause APEX to fetch the new record ID, regardless of whether it’s assigned to the current user.
You can prevent this from happening in a few easy steps using APEX’s session-state protection functionality:
1. Go to the Shared Components of the application.
2. In the Security region, click Session State Protection.
3. Click Page.
4. Click the link for Page 210 - Manage Tickets.
5. Set Page Access Protection to Arguments Must Have Checksum, set Display Item Type to Data Entry Items, set Item Session State Protection for P210_TICKET_ID to Checksum Required - Session Level, and click Apply Changes. Figure 9-39 shows the session-state protection settings for page 210.
Figure 9-38. Update the source for fetching the next record.
www.it-ebooks.info
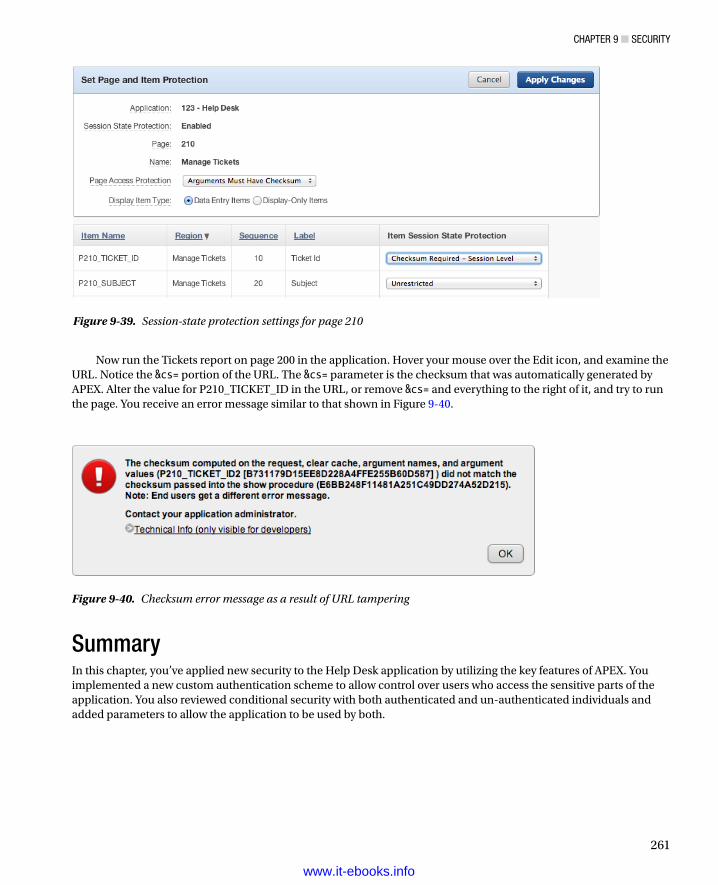
Chapter 9 ■ SeCurity
261
Now run the Tickets report on page 200 in the application. Hover your mouse over the Edit icon, and examine the URL. Notice the &cs= portion of the URL. The &cs= parameter is the checksum that was automatically generated by APEX. Alter the value for P210_TICKET_ID in the URL, or remove &cs= and everything to the right of it, and try to run the page. You receive an error message similar to that shown in Figure 9-40.
Figure 9-40. Checksum error message as a result of URL tampering
Figure 9-39. Session-state protection settings for page 210
SummaryIn this chapter, you’ve applied new security to the Help Desk application by utilizing the key features of APEX. You implemented a new custom authentication scheme to allow control over users who access the sensitive parts of the application. You also reviewed conditional security with both authenticated and un-authenticated individuals and added parameters to allow the application to be used by both.
www.it-ebooks.info
263
Chapter 10
Application Bundling and Deployment
The concept of application bundling and deployment is something developers should consider from the beginning when designing an application. In the case of APEX, built-in facilities help make the job easier. When it comes to application deployment, there are various ways to accomplish the same end goal, and no two IT organizations do it exactly the same. This chapter discusses the tools APEX provides to help you bundle and deploy applications and how to use them in a very APEX-centric way.
Note ■ Your organization may already have a standardized way to achieve many of the things being introduced in this chapter. Before implementing any of these methods, check and make sure you’re not reinventing the wheel.
Identifying Application ComponentsYour APEX application consists of more than just the application export itself. There are underlying database objects, images, Cascading Style Sheets (CSS), and JavaScripts. And these components may or may not be stored on the same server as APEX, let alone stored in the APEX metadata repository. In essence, you need to know how to assemble everything it would take to instantiate your application from scratch. Therefore, it’s important to understand all the components that make up your application, where they’re stored, and how to bundle them in a way that makes migration easier.
You can break the various components into roughly four main groups:
• External files: Your application may access files that don’t reside in the APEX repository. For instance, your company may have a common set of CSS and image files that are used by several web sites to maintain a standard look and feel.
• Database objects: These include all the tables, views, PL/SQL objects, and any other database objects used by your application. Most of the time, these reside in your application’s “parse as” schema.
• APEX-based files: These are files that have been uploaded into the Files section of an application’s supporting objects. They may include images, CSS, JavaScript, static files, and so on, and are stored in the APEX repository.
• APEX application export: This is the core of the APEX application, containing the pages, regions, items, validations, and so on.
When it comes time to deploy an application, each of these types of files needs to be treated a bit differently. The following sections address each file type and how to obtain the most recent version for migration to an alternate platform. Later, the chapter discusses using the Supporting Object feature of APEX to bundle the appropriate items into the application export.
www.it-ebooks.info
Chapter 10 ■ appliCation Bundling and deploYment
264
External FilesAs mentioned previously, external files exist outside of the APEX metadata repository and usually outside the Oracle database. In the majority of cases, these files are placed in a directory structure on the application server that provides the HTTP services for APEX. Usually they’re placed in a directory under the document root (docroot) of the domain that is servicing APEX requests. Because they exist outside of APEX, they can’t rightly be included in the supporting objects of an application, so need to be handled separately from the other file types.
You need to keep careful track of what files your application uses and whether those files have changed during the development of your application. Another area of concern is whether other applications, APEX or otherwise, use these same files.
For instance, version 1 of your application may reference a JavaScript file that is stored on the application server. During the development of version 2 of the application, you may have made changes to that file that need to be moved from the development server to QA or production. But what if your colleague is working on another application that uses the same JavaScript file? You must be very careful about what you change, and how you deploy it, so as not to inadvertently affect other systems.
When migrating these files from a development to a QA or production environment, you likely need to work with the people who are in charge of maintaining the application-server tier. They probably have a process in place for planning the migration from one tier to another.
If you’re working on your own and are the sole person in charge of the file migration, it’s good to get into the habit of maintaining a backup copy of the files you’re replacing, just in case something goes wrong. You can do this simply by renaming the file currently in use to include some type of identifier for the version. Including the date in the filename works well for this. In Linux, the command looks something like this: mv my_old_file.js my_old_file_2013_02_17_12_37.js
If you’re using a source code control system and are tagging the file versions that are moved to production, you may not need to take this extra step.
The key is making sure you can recover from any issues that may arise from overwriting a file. There’s nothing worse than bringing a system to its knees with no easy way to get back to the previous state.
Database ObjectsIt may seem that database objects should be straightforward, considering that they exist in Oracle and the SQL code for their definition can be re-created relatively easily. And for a brand-new application, this assumption is fairly accurate.
However, the minute an application goes live, if you need to change the table structure, you can’t simply replace the underlying tables with new versions. The users have probably entered or manipulated data in the system, and it’s your job to make sure that when new versions of the system are rolled out, the integrity of the data is maintained.
New ApplicationsWhen you’re deploying a brand-new application, a couple of tools can help you generate the scripts for the underlying database objects. The Utilities menu in the APEX SQL Workshop contains a Generate DDL tool, which does exactly what its name implies. If you run it against your application’s “parse as” schema, it allows you to generate a SQL script containing the underlying database objects.
As shown in Figure 10-1, the wizard asks which of the available schemas you’d like to use as the basis for the generated script.
www.it-ebooks.info
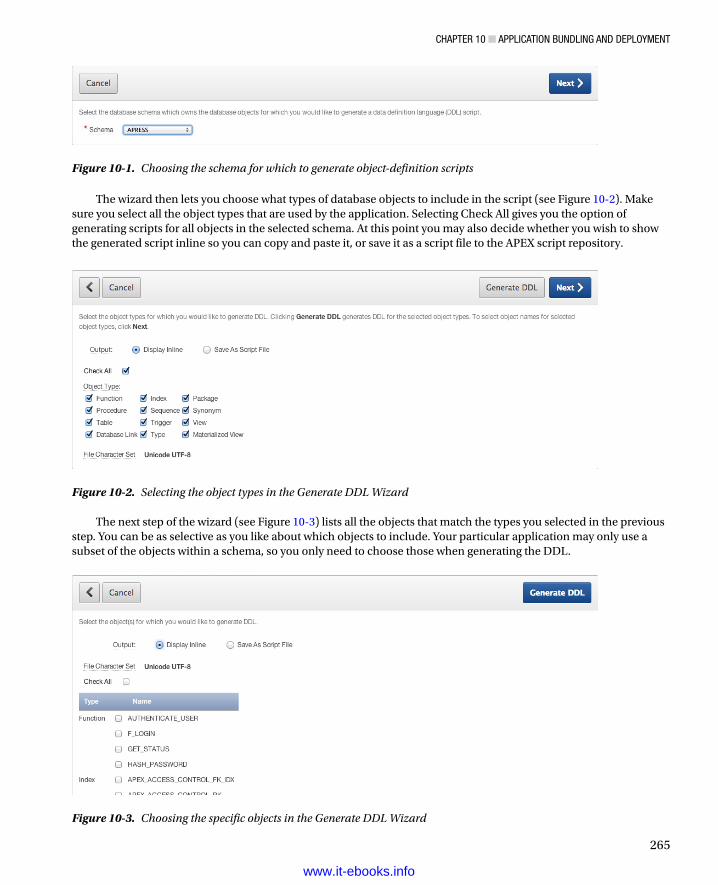
Chapter 10 ■ appliCation Bundling and deploYment
265
The wizard then lets you choose what types of database objects to include in the script (see Figure 10-2). Make sure you select all the object types that are used by the application. Selecting Check All gives you the option of generating scripts for all objects in the selected schema. At this point you may also decide whether you wish to show the generated script inline so you can copy and paste it, or save it as a script file to the APEX script repository.
Figure 10-1. Choosing the schema for which to generate object-definition scripts
Figure 10-2. Selecting the object types in the Generate DDL Wizard
The next step of the wizard (see Figure 10-3) lists all the objects that match the types you selected in the previous step. You can be as selective as you like about which objects to include. Your particular application may only use a subset of the objects within a schema, so you only need to choose those when generating the DDL.
Figure 10-3. Choosing the specific objects in the Generate DDL Wizard
www.it-ebooks.info
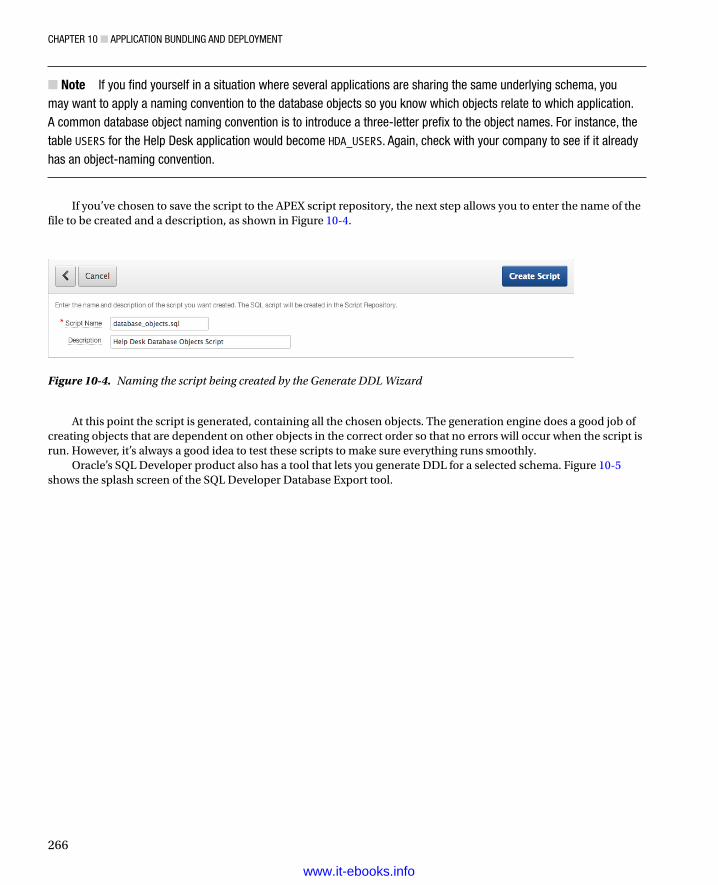
Chapter 10 ■ appliCation Bundling and deploYment
266
Note ■ if you find yourself in a situation where several applications are sharing the same underlying schema, you may want to apply a naming convention to the database objects so you know which objects relate to which application. a common database object naming convention is to introduce a three-letter prefix to the object names. For instance, the table USERS for the help desk application would become HDA_USERS. again, check with your company to see if it already has an object-naming convention.
If you’ve chosen to save the script to the APEX script repository, the next step allows you to enter the name of the file to be created and a description, as shown in Figure 10-4.
Figure 10-4. Naming the script being created by the Generate DDL Wizard
At this point the script is generated, containing all the chosen objects. The generation engine does a good job of creating objects that are dependent on other objects in the correct order so that no errors will occur when the script is run. However, it’s always a good idea to test these scripts to make sure everything runs smoothly.
Oracle’s SQL Developer product also has a tool that lets you generate DDL for a selected schema. Figure 10-5 shows the splash screen of the SQL Developer Database Export tool.
www.it-ebooks.info

Chapter 10 ■ appliCation Bundling and deploYment
267
This tool is very similar to the APEX wizard, but it gives you more control over the format and contents of the output, including whether to include schema names, storage clauses, grants, and so on. Another benefit of SQL Developer is the ability to export the data that exists in the tables. This comes in very handy for seed data that is needed for the system to function properly.
Whether you choose to use the APEX-based tool or SQL Developer, generating the object-creation scripts for a new system is straightforward.
Existing ApplicationsFor applications that have already been released into a production environment, the process can be much more complex. You need to take into account the version that is in production and how the underlying database structure may differ from the version you’ve created in development and are ready to deploy.
Luckily there are tools available to help identify the differences between two schemas. These tools can also generate the necessary DDL scripts to implement the differences.
However, the unfortunate truth is, although the APEX SQL Workshop utilities do include a schema-compare tool, it has some severe limitations. For one, both schemas that are being compared must be available from the same workspace. This isn’t possible if your production schema exists on a separate server, as it often does. The second limitation is that the APEX-based comparison tool identifies the objects that are different, but it doesn’t say how they’re different, nor does it generate the DDL that would be required to synch up the schemas.
Figure 10-5. The first screen of the SQL Developer Database Export tool
www.it-ebooks.info
Chapter 10 ■ appliCation Bundling and deploYment
268
For this type of functionality, you have to rely on external programs or scripts. The following list mentions a number of options, all of which can generate the scripts required to synchronize the production environment’s database objects structure with the changes you may have introduced in development:
• SQL Developer: Oracle’s own product can run a full schema comparison between two separate schemas on separate servers and generate a script that synchronizes one schema with another. Older versions of this tool suffered from some problems, but as of SQL Developer version 3.2 the comparison engine has been significantly upgraded and the generated scripts are solid.
• Oracle Enterprise Manager: If you have the Change Management Pack and Oracle Enterprise Manager (OEM), then you can compare schemas and generate a synchronization script. However, developers are very rarely given access to OEM because it’s more of a database administration tool and would potentially give developers access to several sensitive utilities they’d rather us not have access to.
• Schema Compare for Oracle: Red Gate Software has taken its extensive experience in creating tools for the SQL Server market and turned its attention to the Oracle database market. The result is a tool that allows you to compare, view, and generate synchronization scripts between two Oracle schemas. This is probably the best third-party tool on the market, but the one downside is that it only runs on Windows.
• TOAD for Oracle: TOAD(which originally stood for Tool for Oracle Application Development) is a tool written and distributed by Dell’s software division (formally Quest Software). Although it can do a lot more, the schema-comparison tool that’s available as part of the DB Admin module is quite sophisticated and will generate very clean and accurate scripts.
Whichever tool you use, the output is a script that, when run against the production environment, executes the required DDL to alter the underlying database objects and bring them in line with what was created in your development environment.
However, none of these tools take into account the data that may reside in the tables that are being altered. Be very careful before you implement any of the generated upgrade scripts, understand what they may do to the underlying data, and mitigate any risks of data loss or corruption.
This subject is huge and is beyond the scope of this book. There is no automated solution to the problem of data migration between versions. More often than not, it boils down to handwritten scripts and heavy testing.
APEX-Based FilesAPEX provides the ability for developers to upload static files into the APEX metadata repository as part of an application’s shared components. Figure 10-6 shows the Files section of the shared components page. The three types of files that are supported are CSS, images, and static files. Let’s talk about each of these file types.
www.it-ebooks.info
Chapter 10 ■ appliCation Bundling and deploYment
269
Cascading Style Sheets provide a way to manage and control the look and feel of a web page without having to change its structure. Used properly, a CSS file separates the definition of a web page’s visual attributes such as color, margins, and fonts from the structure of the HTML document. APEX includes numerous themes that contain templates that reference their own CSS. If you decide to create your own theme or templates, you may want to implement your own look and feel using CSS.
The Cascading Style Sheets area of the shared components is where you upload the CSS files you wish to use with your application. Any file uploaded to the CSS area is available to any application in the workspace.
Application Express images are divided into two classifications: workspace images and application images. Workspace images are available to all applications in the workspace into which they’re uploaded. Application images are available only to the application to which they’re assigned when uploaded.
Images that are uploaded as shared components will likely be ones that you reference throughout your application. They may represent portions of your theme, such as images for tabs or buttons; or they may represent icons that you use to show status or that, when clicked, allow end users to edit rows of data.
One key differentiation to make is that the images uploaded to this area should not be directly related to the application’s data. Things such as product images, images of employees, and the like should be stored in the application’s “parse as” schema alongside the data to which the image is related.
Static files are used for pretty much anything else. For instance, you may have a user’s guide associated with your application and want to make it available for users to download. You could upload that to the Static Files area and reference it via a URL in your application. Another use might be for JavaScript files that you want to bundle with your application. You can reference uploaded JavaScripts either from the page templates in a theme or directly from the definition of a page.
Even though the APEX-based files are considered shared components, and the images may even be tied to a specific application, they aren’t included in the application export. You need to export these items separately from the application. The good news is that the APEX Export Wizard you use to export these files is the same one you use to export an application. Simply click the Files tab in the Export Wizard (as shown in Figure 10-7), and you’re presented with a dialog that lets you export each of the three file types.
Figure 10-6. The Files section of an application’s shared components
Figure 10-7. Selecting the Files tab of the Export Wizard
www.it-ebooks.info
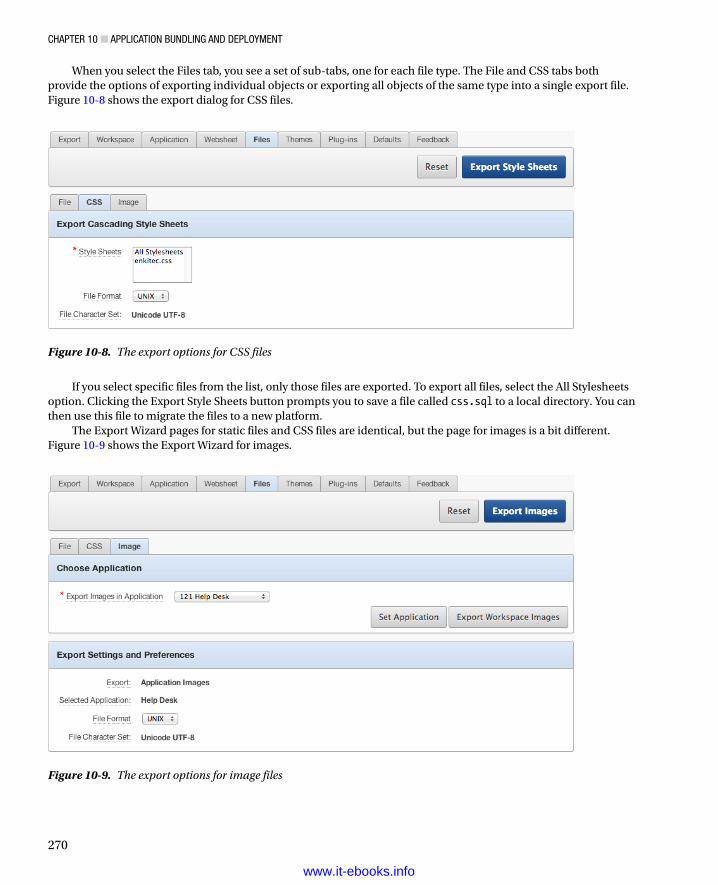
Chapter 10 ■ appliCation Bundling and deploYment
270
When you select the Files tab, you see a set of sub-tabs, one for each file type. The File and CSS tabs both provide the options of exporting individual objects or exporting all objects of the same type into a single export file. Figure 10-8 shows the export dialog for CSS files.
Figure 10-8. The export options for CSS files
If you select specific files from the list, only those files are exported. To export all files, select the All Stylesheets option. Clicking the Export Style Sheets button prompts you to save a file called css.sql to a local directory. You can then use this file to migrate the files to a new platform.
The Export Wizard pages for static files and CSS files are identical, but the page for images is a bit different. Figure 10-9 shows the Export Wizard for images.
Figure 10-9. The export options for image files
www.it-ebooks.info
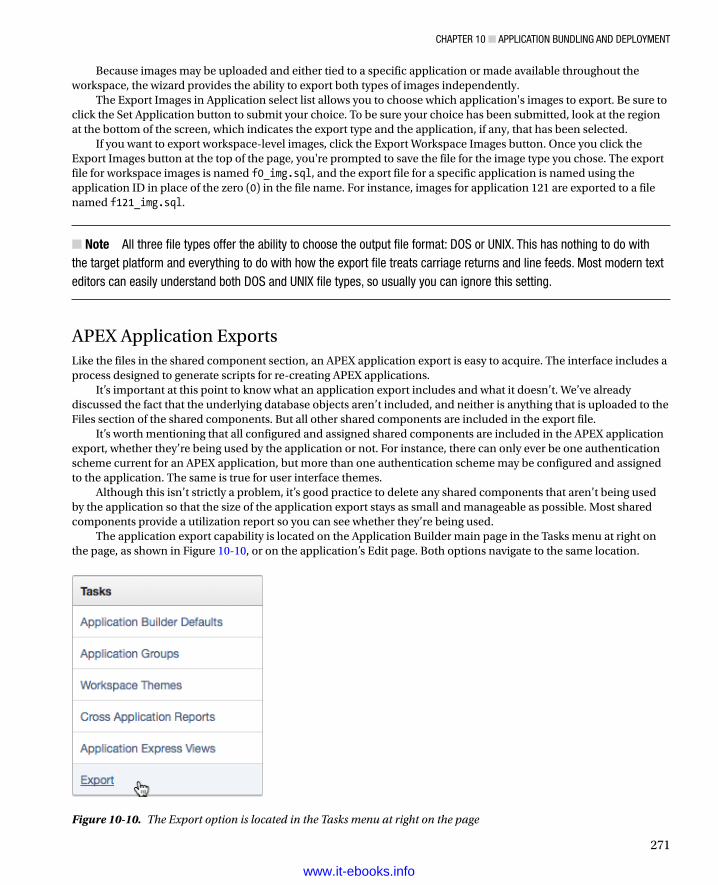
Chapter 10 ■ appliCation Bundling and deploYment
271
Because images may be uploaded and either tied to a specific application or made available throughout the workspace, the wizard provides the ability to export both types of images independently.
The Export Images in Application select list allows you to choose which application's images to export. Be sure to click the Set Application button to submit your choice. To be sure your choice has been submitted, look at the region at the bottom of the screen, which indicates the export type and the application, if any, that has been selected.
If you want to export workspace-level images, click the Export Workspace Images button. Once you click the Export Images button at the top of the page, you're prompted to save the file for the image type you chose. The export file for workspace images is named f0_img.sql, and the export file for a specific application is named using the application ID in place of the zero (0) in the file name. For instance, images for application 121 are exported to a file named f121_img.sql.
Note ■ all three file types offer the ability to choose the output file format: doS or uniX. this has nothing to do with the target platform and everything to do with how the export file treats carriage returns and line feeds. most modern text editors can easily understand both doS and uniX file types, so usually you can ignore this setting.
APEX Application ExportsLike the files in the shared component section, an APEX application export is easy to acquire. The interface includes a process designed to generate scripts for re-creating APEX applications.
It’s important at this point to know what an application export includes and what it doesn’t. We’ve already discussed the fact that the underlying database objects aren’t included, and neither is anything that is uploaded to the Files section of the shared components. But all other shared components are included in the export file.
It’s worth mentioning that all configured and assigned shared components are included in the APEX application export, whether they’re being used by the application or not. For instance, there can only ever be one authentication scheme current for an APEX application, but more than one authentication scheme may be configured and assigned to the application. The same is true for user interface themes.
Although this isn’t strictly a problem, it’s good practice to delete any shared components that aren’t being used by the application so that the size of the application export stays as small and manageable as possible. Most shared components provide a utilization report so you can see whether they’re being used.
The application export capability is located on the Application Builder main page in the Tasks menu at right on the page, as shown in Figure 10-10, or on the application’s Edit page. Both options navigate to the same location.
Figure 10-10. The Export option is located in the Tasks menu at right on the page
www.it-ebooks.info
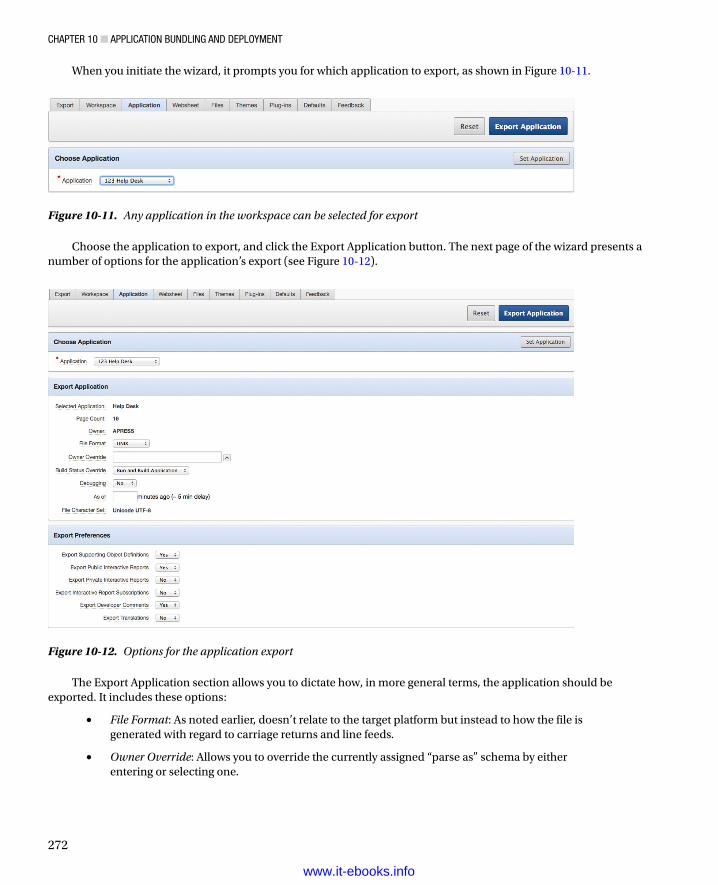
Chapter 10 ■ appliCation Bundling and deploYment
272
When you initiate the wizard, it prompts you for which application to export, as shown in Figure 10-11.
Figure 10-11. Any application in the workspace can be selected for export
Choose the application to export, and click the Export Application button. The next page of the wizard presents a number of options for the application’s export (see Figure 10-12).
Figure 10-12. Options for the application export
The Export Application section allows you to dictate how, in more general terms, the application should be exported. It includes these options:
• File Format: As noted earlier, doesn’t relate to the target platform but instead to how the file is generated with regard to carriage returns and line feeds.
• Owner Override: Allows you to override the currently assigned “parse as” schema by either entering or selecting one.
www.it-ebooks.info
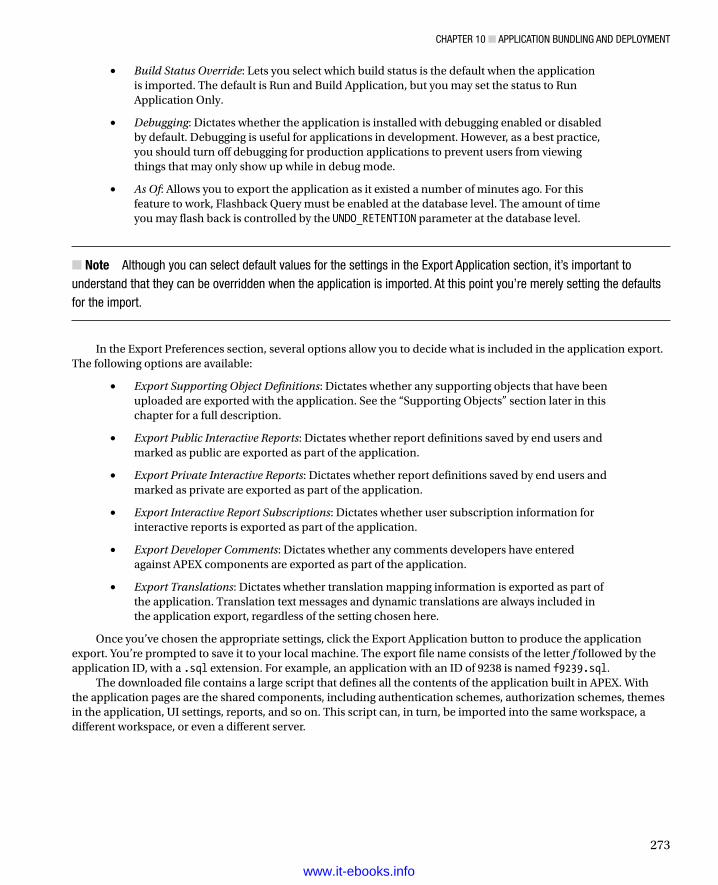
Chapter 10 ■ appliCation Bundling and deploYment
273
• Build Status Override: Lets you select which build status is the default when the application is imported. The default is Run and Build Application, but you may set the status to Run Application Only.
• Debugging: Dictates whether the application is installed with debugging enabled or disabled by default. Debugging is useful for applications in development. However, as a best practice, you should turn off debugging for production applications to prevent users from viewing things that may only show up while in debug mode.
• As Of: Allows you to export the application as it existed a number of minutes ago. For this feature to work, Flashback Query must be enabled at the database level. The amount of time you may flash back is controlled by the UNDO_RETENTION parameter at the database level.
Note ■ although you can select default values for the settings in the export application section, it’s important to understand that they can be overridden when the application is imported. at this point you’re merely setting the defaults for the import.
In the Export Preferences section, several options allow you to decide what is included in the application export. The following options are available:
• Export Supporting Object Definitions: Dictates whether any supporting objects that have been uploaded are exported with the application. See the “Supporting Objects” section later in this chapter for a full description.
• Export Public Interactive Reports: Dictates whether report definitions saved by end users and marked as public are exported as part of the application.
• Export Private Interactive Reports: Dictates whether report definitions saved by end users and marked as private are exported as part of the application.
• Export Interactive Report Subscriptions: Dictates whether user subscription information for interactive reports is exported as part of the application.
• Export Developer Comments: Dictates whether any comments developers have entered against APEX components are exported as part of the application.
• Export Translations: Dictates whether translation mapping information is exported as part of the application. Translation text messages and dynamic translations are always included in the application export, regardless of the setting chosen here.
Once you’ve chosen the appropriate settings, click the Export Application button to produce the application export. You’re prompted to save it to your local machine. The export file name consists of the letter f followed by the application ID, with a .sql extension. For example, an application with an ID of 9238 is named f9239.sql.
The downloaded file contains a large script that defines all the contents of the application built in APEX. With the application pages are the shared components, including authentication schemes, authorization schemes, themes in the application, UI settings, reports, and so on. This script can, in turn, be imported into the same workspace, a different workspace, or even a different server.
www.it-ebooks.info
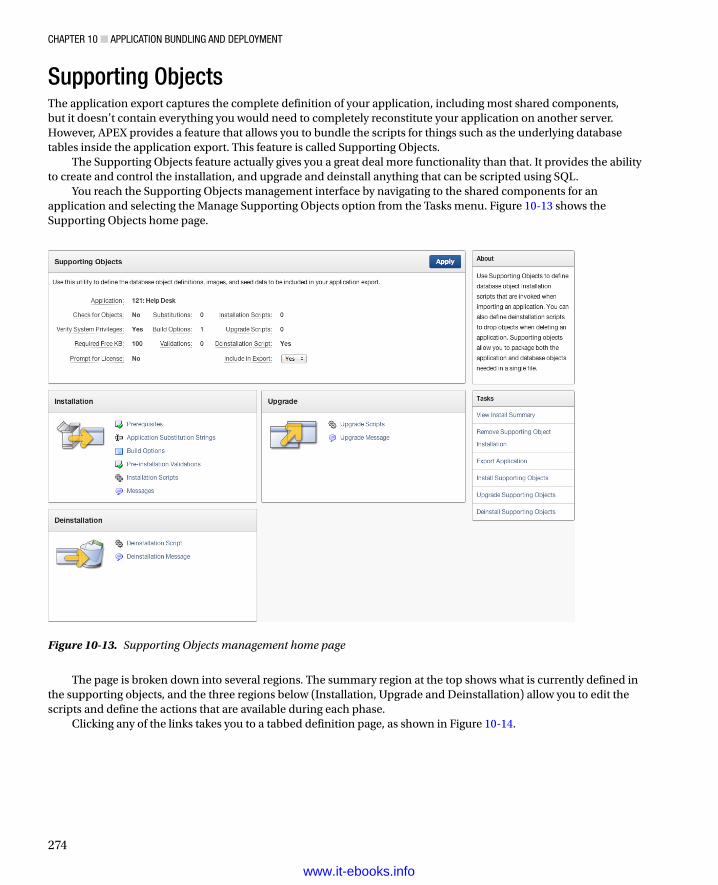
Chapter 10 ■ appliCation Bundling and deploYment
274
Supporting ObjectsThe application export captures the complete definition of your application, including most shared components, but it doesn’t contain everything you would need to completely reconstitute your application on another server. However, APEX provides a feature that allows you to bundle the scripts for things such as the underlying database tables inside the application export. This feature is called Supporting Objects.
The Supporting Objects feature actually gives you a great deal more functionality than that. It provides the ability to create and control the installation, and upgrade and deinstall anything that can be scripted using SQL.
You reach the Supporting Objects management interface by navigating to the shared components for an application and selecting the Manage Supporting Objects option from the Tasks menu. Figure 10-13 shows the Supporting Objects home page.
Figure 10-13. Supporting Objects management home page
The page is broken down into several regions. The summary region at the top shows what is currently defined in the supporting objects, and the three regions below (Installation, Upgrade and Deinstallation) allow you to edit the scripts and define the actions that are available during each phase.
Clicking any of the links takes you to a tabbed definition page, as shown in Figure 10-14.
www.it-ebooks.info
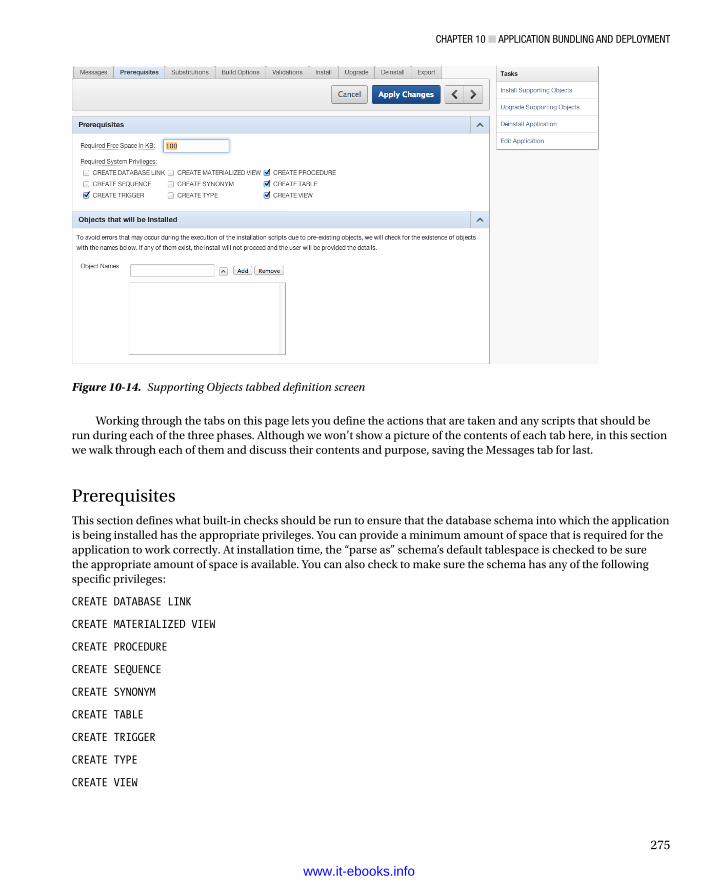
Chapter 10 ■ appliCation Bundling and deploYment
275
Working through the tabs on this page lets you define the actions that are taken and any scripts that should be run during each of the three phases. Although we won’t show a picture of the contents of each tab here, in this section we walk through each of them and discuss their contents and purpose, saving the Messages tab for last.
PrerequisitesThis section defines what built-in checks should be run to ensure that the database schema into which the application is being installed has the appropriate privileges. You can provide a minimum amount of space that is required for the application to work correctly. At installation time, the “parse as” schema’s default tablespace is checked to be sure the appropriate amount of space is available. You can also check to make sure the schema has any of the following specific privileges:
CREATE DATABASE LINK
CREATE MATERIALIZED VIEW
CREATE PROCEDURE
CREATE SEQUENCE
CREATE SYNONYM
CREATE TABLE
CREATE TRIGGER
CREATE TYPE
CREATE VIEW
Figure 10-14. Supporting Objects tabbed definition screen
www.it-ebooks.info
Chapter 10 ■ appliCation Bundling and deploYment
276
The bottom region of the page allows you to list all objects that will be created by the supporting object-installation scripts. At installation time, if any of the listed objects already exist, the install won’t proceed, because there could be a clash. The user installing the application is given the details of which objects are found to already exist.
This section may seem a bit limiting in its scope, but the Validation section, discussed later, allows for more free-form prerequisite checks.
SubstitutionsThis section provides the ability to allow the installing user to define the value for application-level substitution strings at install time. Although substitution strings are meant to be used like static variables, you may not always know what the value of these strings should be prior to installation. From this interface you can choose which substitution variables you want to let the installing user define, and what the prompt for each variable should be.
Substitution variables aren’t used very often, so this feature is also unlikely to be used. However, it’s good to know that it’s there if you need it.
Build OptionsWe spoke about build options and the fact that they can be used to exclude or hide assigned functionality. This section allows you to select whether build options you’ve defined are available to the installing user. By selecting a build option, the user will be prompted whether they wish to include or exclude the functionality associated with the build option.
Most of the time, when moving applications to production, you want to exclude all build options.
ValidationsThis section lets you define any number of pre-installation validations to be run. These validations are similar to normal page validation and allow full control over whether the application installation can proceed. You may have as many validations as you wish, and the validations may be conditional as well.
If any validation fails, the installation is halted, and the user is presented with the error message(s) defined in the failing validation(s).
InstallThis is the core of supporting objects and where you define what scripts to run and in what order to install all the objects your applications need to work properly. Here you can create and manage scripts that install database objects, workspace or application images, CSS files, static files, and so on. Depending on the type of scripts you’re including, you may be able to create them in different ways.
When it comes to scripts that create the underlying database objects, you’ve probably used a tool such as SQL Developer or the SQL Workshop’s Generate DDL tool to generate a script to a file.
You can choose to either upload a pre-created script or create the script from scratch. You do so via the Create Script Wizard shown in Figure 10-15.
www.it-ebooks.info
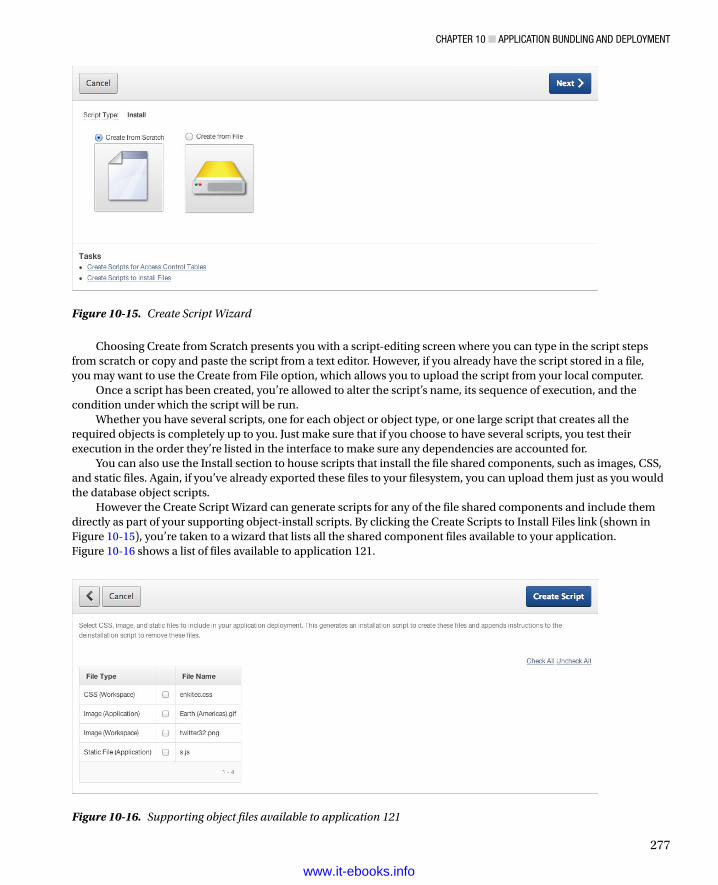
Chapter 10 ■ appliCation Bundling and deploYment
277
Choosing Create from Scratch presents you with a script-editing screen where you can type in the script steps from scratch or copy and paste the script from a text editor. However, if you already have the script stored in a file, you may want to use the Create from File option, which allows you to upload the script from your local computer.
Once a script has been created, you’re allowed to alter the script’s name, its sequence of execution, and the condition under which the script will be run.
Whether you have several scripts, one for each object or object type, or one large script that creates all the required objects is completely up to you. Just make sure that if you choose to have several scripts, you test their execution in the order they’re listed in the interface to make sure any dependencies are accounted for.
You can also use the Install section to house scripts that install the file shared components, such as images, CSS, and static files. Again, if you’ve already exported these files to your filesystem, you can upload them just as you would the database object scripts.
However the Create Script Wizard can generate scripts for any of the file shared components and include them directly as part of your supporting object-install scripts. By clicking the Create Scripts to Install Files link (shown in Figure 10-15), you’re taken to a wizard that lists all the shared component files available to your application. Figure 10-16 shows a list of files available to application 121.
Figure 10-15. Create Script Wizard
Figure 10-16. Supporting object files available to application 121
www.it-ebooks.info
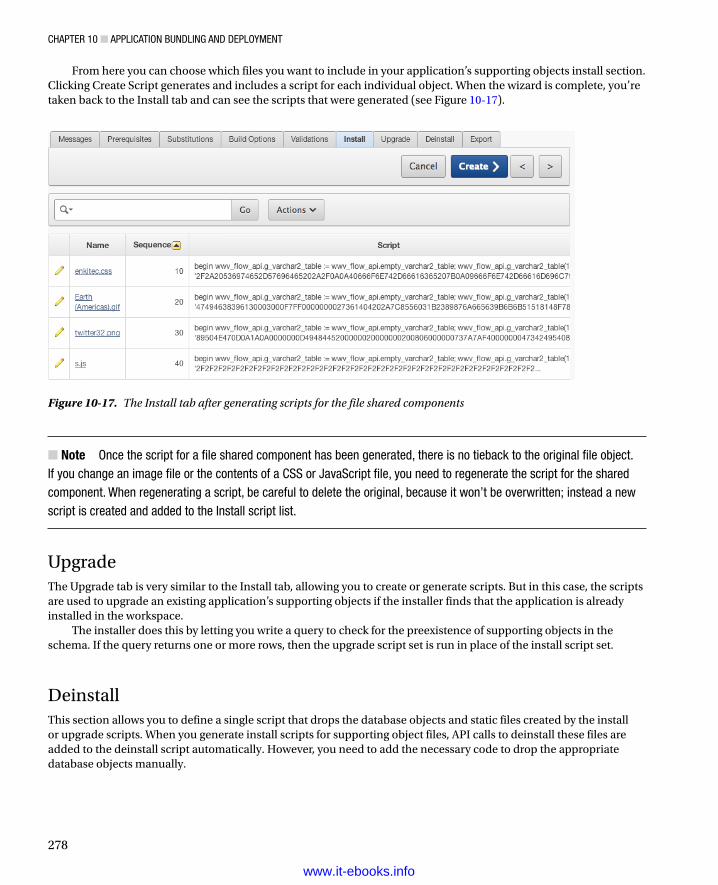
Chapter 10 ■ appliCation Bundling and deploYment
278
From here you can choose which files you want to include in your application’s supporting objects install section. Clicking Create Script generates and includes a script for each individual object. When the wizard is complete, you’re taken back to the Install tab and can see the scripts that were generated (see Figure 10-17).
Figure 10-17. The Install tab after generating scripts for the file shared components
Note ■ once the script for a file shared component has been generated, there is no tieback to the original file object. if you change an image file or the contents of a CSS or JavaScript file, you need to regenerate the script for the shared component. When regenerating a script, be careful to delete the original, because it won’t be overwritten; instead a new script is created and added to the install script list.
UpgradeThe Upgrade tab is very similar to the Install tab, allowing you to create or generate scripts. But in this case, the scripts are used to upgrade an existing application’s supporting objects if the installer finds that the application is already installed in the workspace.
The installer does this by letting you write a query to check for the preexistence of supporting objects in the schema. If the query returns one or more rows, then the upgrade script set is run in place of the install script set.
DeinstallThis section allows you to define a single script that drops the database objects and static files created by the install or upgrade scripts. When you generate install scripts for supporting object files, API calls to deinstall these files are added to the deinstall script automatically. However, you need to add the necessary code to drop the appropriate database objects manually.
www.it-ebooks.info
Chapter 10 ■ appliCation Bundling and deploYment
279
ExportThe Export tab simply lets you set the default for whether the supporting objects are included when you export the application. This option is also available on the Supporting Objects main screen.
MessagesThe Messages page gives you control over the verbiage presented to the installing user during the install of the application. The section text that you can edit is as follows:
• Welcome: After successfully importing and installing an application definition, the installation wizard prompts the user to install supporting objects for the application. This message introduces the application and describes the actions of the installation scripts.
• License: If the use of this application requires the user to accept a license, enter the license text here. The user is prompted to accept the message before installing supporting objects. If there is no text for the license, this step is skipped in the install wizard.
• Application Substitutions: Introduces the application-substitution prompts. It should probably state that these values aren’t easily changed and to be sure of their values before entering them. If there are no application-substitution variables to be entered, this message doesn’t display.
• Build Options: Introduces the build options that may be available for the user to select. If no build options are available, the step is skipped and the message doesn’t display.
• Validations: Introduces the validations that will be performed prior to installing the supporting objects. If there are no validations, the step is skipped and the message doesn’t display.
• Confirmation: Displayed just prior to the installation scripts being run and the configuration options being applied.
• Post Installation Success: Shown after the application’s supporting objects have been installed successfully with no errors.
• Post Installation Failure: Shown after the application’s supporting object scripts have run, but only if errors were generated. The user can view the errors that occurred.
• Upgrade Welcome Message: Provides a message informing the user that the installer has detected preexisting supporting objects and that the Upgrade Wizard will now be run.
• Upgrade Confirmation Message: Presents a message prior to running the upgrade scripts to allow the user to choose whether to continue.
• Upgrade Success Message: Shown after the supporting objects upgrade script is run successfully with no errors.
• Upgrade Failure Message: Shown after the supporting objects upgrade script is run, but only if errors were generated. The user can view errors that occurred.
• Deinstallation Message: Presented just prior to running the supporting objects deinstallation script.
• Post-Deinstall message: Presented just after running the supporting objects deinstallation script.
www.it-ebooks.info
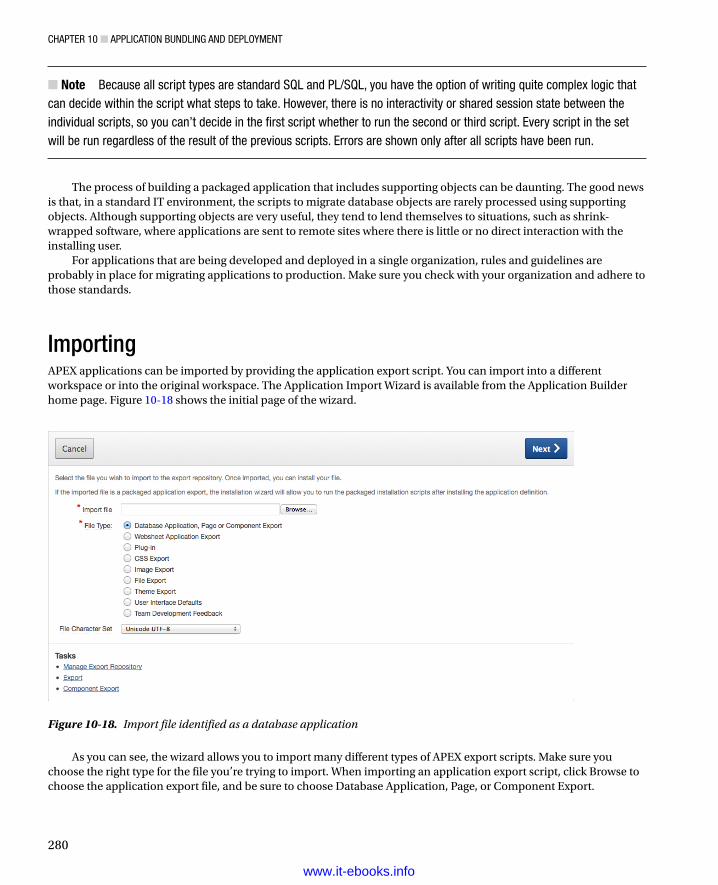
Chapter 10 ■ appliCation Bundling and deploYment
280
Note ■ Because all script types are standard SQl and pl/SQl, you have the option of writing quite complex logic that can decide within the script what steps to take. however, there is no interactivity or shared session state between the individual scripts, so you can’t decide in the first script whether to run the second or third script. every script in the set will be run regardless of the result of the previous scripts. errors are shown only after all scripts have been run.
The process of building a packaged application that includes supporting objects can be daunting. The good news is that, in a standard IT environment, the scripts to migrate database objects are rarely processed using supporting objects. Although supporting objects are very useful, they tend to lend themselves to situations, such as shrink-wrapped software, where applications are sent to remote sites where there is little or no direct interaction with the installing user.
For applications that are being developed and deployed in a single organization, rules and guidelines are probably in place for migrating applications to production. Make sure you check with your organization and adhere to those standards.
ImportingAPEX applications can be imported by providing the application export script. You can import into a different workspace or into the original workspace. The Application Import Wizard is available from the Application Builder home page. Figure 10-18 shows the initial page of the wizard.
Figure 10-18. Import file identified as a database application
As you can see, the wizard allows you to import many different types of APEX export scripts. Make sure you choose the right type for the file you’re trying to import. When importing an application export script, click Browse to choose the application export file, and be sure to choose Database Application, Page, or Component Export.
www.it-ebooks.info
Chapter 10 ■ appliCation Bundling and deploYment
281
The page in Figure 10-19 indicates that the application export file has been uploaded from your computer to the server. Remember that the application file is a script. Although it has been uploaded at this stage, it hasn’t yet been run; therefore the application isn’t installed.
Figure 10-19. File upload success. Continue to install the application
Clicking the Next button initiates the steps to install the application into the current workspace. APEX prompts for a few key pieces of information, as shown in Figure 10-20.
Figure 10-20. Installing the application into the workspace
At this point, choose the parsing schema and the build status, and decide how to treat the application ID. The parsing schema can be any of the database schemas associated with the workspace. The build status lets the application be set to a runtime mode, which is useful for production environments; the default allows run and build (or edit) mode. The final option pertains to the application ID values; the default option is to assign a new application ID when installed, which lets the same application exist in the workspace multiple times—each time under a different ID.
www.it-ebooks.info
Chapter 10 ■ appliCation Bundling and deploYment
282
If you choose to reuse the application ID from the export file or change the application ID to one of your choosing, APEX checks to see if an application with that ID already exists. If an application with that ID does exist in the same workspace, you’re prompted as to whether you wish to replace the application currently assigned to that application ID with the one you’re importing. If an application with the selected ID exists but is in a different workspace, you’re prohibited from using that application ID. This protects you from accidentally overwriting applications in other workspaces.
If the application has supporting objects, the next screen asks whether you want to install those supporting objects. It also gives you the option of previewing the supporting object scripts that will be run.
To continue installing the supporting objects, select the Yes radio button and click the Next button. The wizard then walks through all the steps that were set up when you created the supporting objects. It performs any prerequisite checks and validations and decides whether to run the install or upgrade scripts. The user is presented with any choices and options related to substitution strings and build options.
Finally, you’re asked to confirm the installation (or upgrade) of the supporting objects. Continuing with the wizard runs the appropriate scripts. If there were errors during the scripts, the errors are presented to you to view. If there weren’t any errors, you’re given the opportunity to see the install summary or edit or run the application. Figure 10-21 shows the final page of a successful import.
Figure 10-21. Successful installation of an application
SummaryAs you’ve seen, APEX has a robust, built-in migration capability. The export and import tools are easy to use and very functional. The additional ability to construct installation scripts to manage the database side of an application goes a long way toward being able to deploy self-standing applications in one process. But remember that some files may need to be migrated manually because they don’t fall into the realm of what APEX can handle via supporting objects.
www.it-ebooks.info
283
Chapter 11
Understanding Websheets
Websheets were a new marquee feature of APEX 4.0 and deliver end-user control over both web content and structure. In the early days of APEX, when it was still known as Project Marvel and later HTML DB, some people thought that end users could use APEX to develop their own applications. Although this was true for simple spreadsheet-like applications, most end users weren’t comfortable building web applications that needed an underlying normalized database together with snippets of SQL, PL/SQL, and JavaScript. Websheets now fulfill the early promise of end-user development for web content like blogs, wikis, and very simple business applications. Websheets give end users this power without forcing them to learn how to normalize a database and write code. Everything in websheets, except a few optional advanced features, is declarative.
Websheets have been designed so that they’re easy to use. However, like all computer tools, there is an associated learning curve. That’s the bad news. The good news is that the learning curve is very shallow. The tool relies heavily on wizards that lead you intuitively through the content-creation processes.
This chapter outlines the underlying structure of websheets, describes the navigation style, and highlights some of the handy features that will make you productive. This chapter concentrates on what websheets can do; Chapter 12 concentrates on how websheets are built by leading you through some step-by-step scenarios. After reading this chapter and working through the next chapter, you can quickly create professional looking web content.
Note ■ As you read this chapter, you may find yourself wondering how to create some of what is discussed. Not to worry. The examples in the next chapter provide an in-depth look at the major tasks involved in creating a websheet. This chapter provides the background that will enable you to follow along with and fully understand the upcoming examples.
Websheet StructureThe fundamental building blocks of a websheet (see Figure 11-1) are simple to envision. A websheet is a container for web pages. The web pages, in turn, are containers for sections. A section, which is similar to a region in an APEX database application, contains your content. Annotations are used to enhance the content and the search functionality.
www.it-ebooks.info
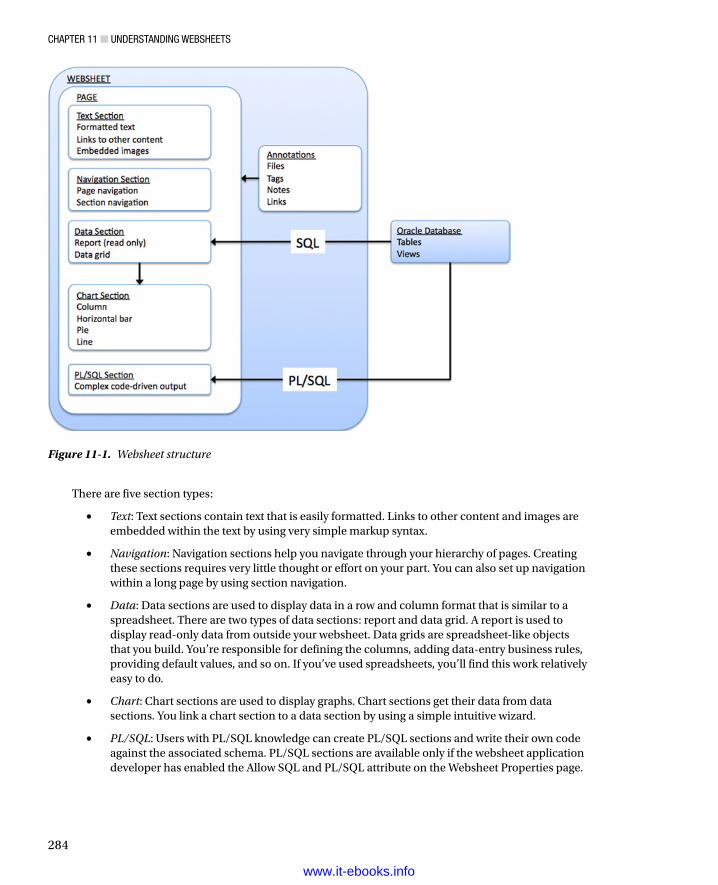
ChApTer 11 ■ UNdersTANdiNg WebsheeTs
284
There are five section types:
• Text: Text sections contain text that is easily formatted. Links to other content and images are embedded within the text by using very simple markup syntax.
• Navigation: Navigation sections help you navigate through your hierarchy of pages. Creating these sections requires very little thought or effort on your part. You can also set up navigation within a long page by using section navigation.
• Data: Data sections are used to display data in a row and column format that is similar to a spreadsheet. There are two types of data sections: report and data grid. A report is used to display read-only data from outside your websheet. Data grids are spreadsheet-like objects that you build. You’re responsible for defining the columns, adding data-entry business rules, providing default values, and so on. If you’ve used spreadsheets, you’ll find this work relatively easy to do.
• Chart: Chart sections are used to display graphs. Chart sections get their data from data sections. You link a chart section to a data section by using a simple intuitive wizard.
• PL/SQL: Users with PL/SQL knowledge can create PL/SQL sections and write their own code against the associated schema. PL/SQL sections are available only if the websheet application developer has enabled the Allow SQL and PL/SQL attribute on the Websheet Properties page.
Figure 11-1. Websheet structure
www.it-ebooks.info
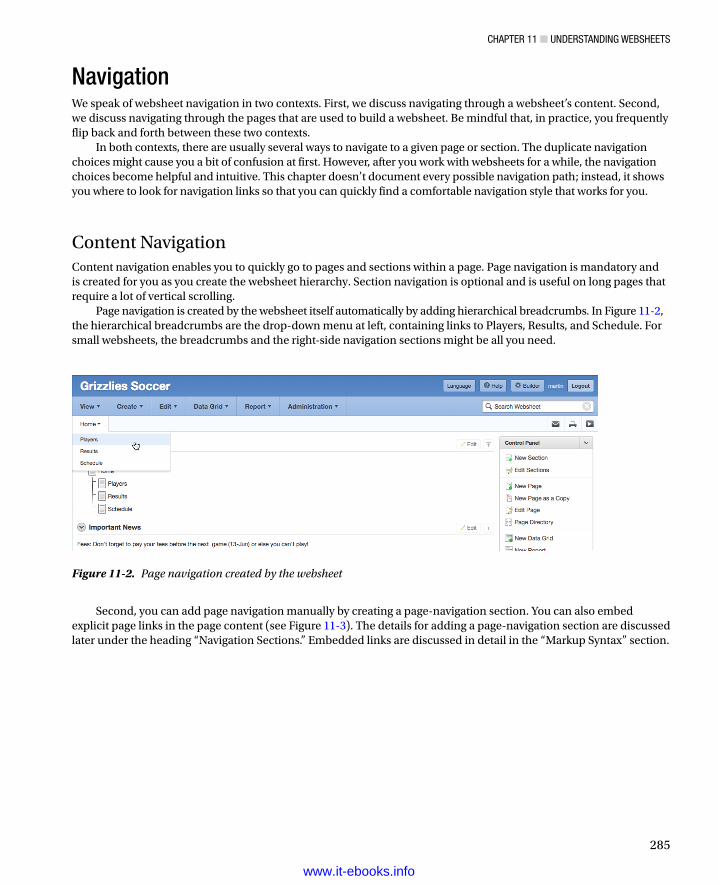
ChApTer 11 ■ UNdersTANdiNg WebsheeTs
285
NavigationWe speak of websheet navigation in two contexts. First, we discuss navigating through a websheet’s content. Second, we discuss navigating through the pages that are used to build a websheet. Be mindful that, in practice, you frequently flip back and forth between these two contexts.
In both contexts, there are usually several ways to navigate to a given page or section. The duplicate navigation choices might cause you a bit of confusion at first. However, after you work with websheets for a while, the navigation choices become helpful and intuitive. This chapter doesn’t document every possible navigation path; instead, it shows you where to look for navigation links so that you can quickly find a comfortable navigation style that works for you.
Content NavigationContent navigation enables you to quickly go to pages and sections within a page. Page navigation is mandatory and is created for you as you create the websheet hierarchy. Section navigation is optional and is useful on long pages that require a lot of vertical scrolling.
Page navigation is created by the websheet itself automatically by adding hierarchical breadcrumbs. In Figure 11-2, the hierarchical breadcrumbs are the drop-down menu at left, containing links to Players, Results, and Schedule. For small websheets, the breadcrumbs and the right-side navigation sections might be all you need.
Figure 11-2. Page navigation created by the websheet
Second, you can add page navigation manually by creating a page-navigation section. You can also embed explicit page links in the page content (see Figure 11-3). The details for adding a page-navigation section are discussed later under the heading “Navigation Sections.” Embedded links are discussed in detail in the “Markup Syntax” section.
www.it-ebooks.info
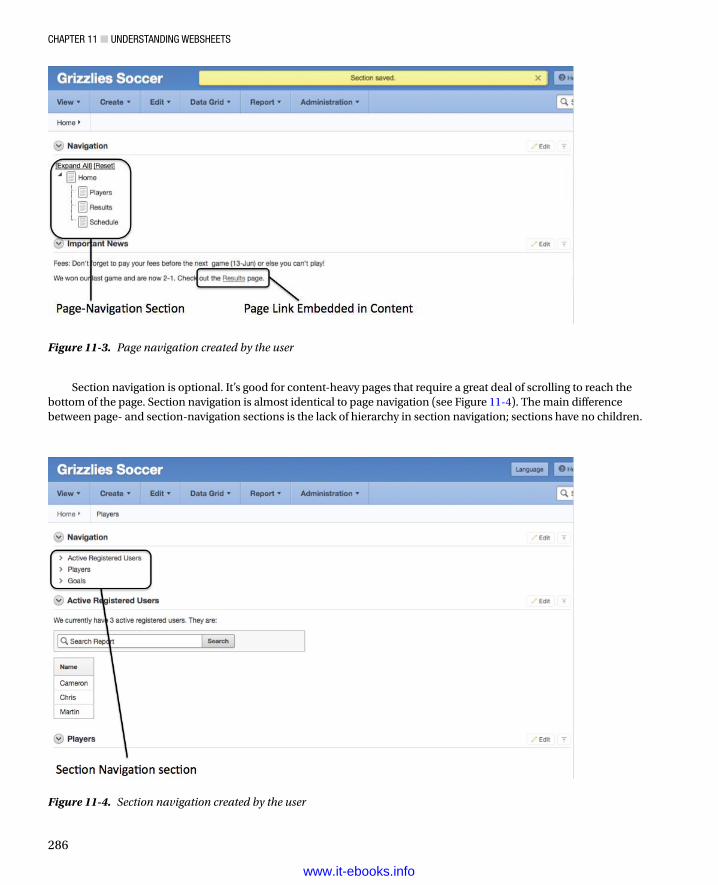
ChApTer 11 ■ UNdersTANdiNg WebsheeTs
286
Section navigation is optional. It’s good for content-heavy pages that require a great deal of scrolling to reach the bottom of the page. Section navigation is almost identical to page navigation (see Figure 11-4). The main difference between page- and section-navigation sections is the lack of hierarchy in section navigation; sections have no children.
Figure 11-3. Page navigation created by the user
Figure 11-4. Section navigation created by the user
www.it-ebooks.info
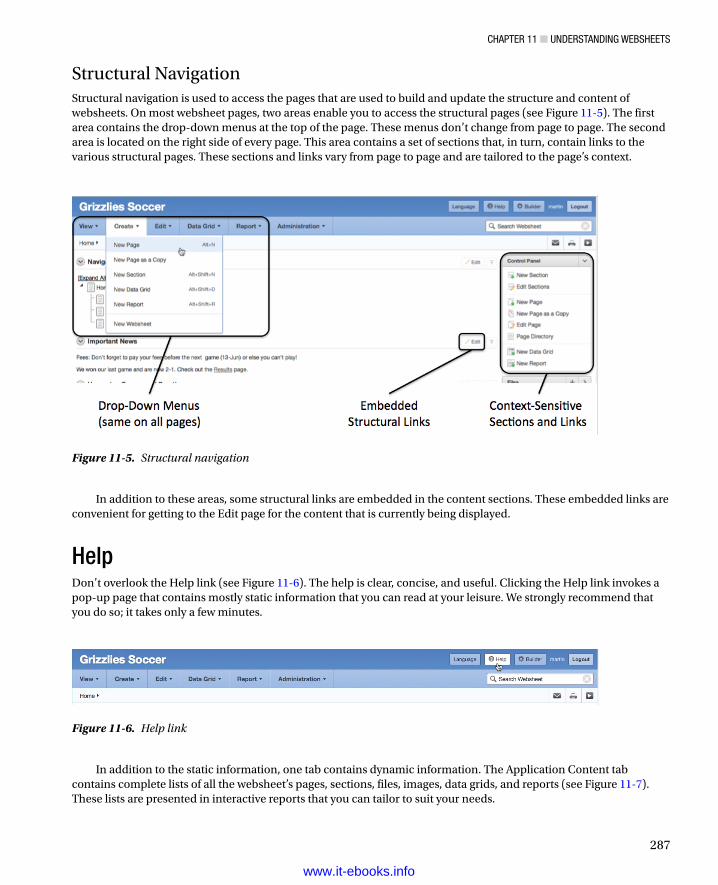
ChApTer 11 ■ UNdersTANdiNg WebsheeTs
287
Structural NavigationStructural navigation is used to access the pages that are used to build and update the structure and content of websheets. On most websheet pages, two areas enable you to access the structural pages (see Figure 11-5). The first area contains the drop-down menus at the top of the page. These menus don’t change from page to page. The second area is located on the right side of every page. This area contains a set of sections that, in turn, contain links to the various structural pages. These sections and links vary from page to page and are tailored to the page’s context.
Figure 11-5. Structural navigation
In addition to these areas, some structural links are embedded in the content sections. These embedded links are convenient for getting to the Edit page for the content that is currently being displayed.
HelpDon’t overlook the Help link (see Figure 11-6). The help is clear, concise, and useful. Clicking the Help link invokes a pop-up page that contains mostly static information that you can read at your leisure. We strongly recommend that you do so; it takes only a few minutes.
Figure 11-6. Help link
In addition to the static information, one tab contains dynamic information. The Application Content tab contains complete lists of all the websheet’s pages, sections, files, images, data grids, and reports (see Figure 11-7). These lists are presented in interactive reports that you can tailor to suit your needs.
www.it-ebooks.info
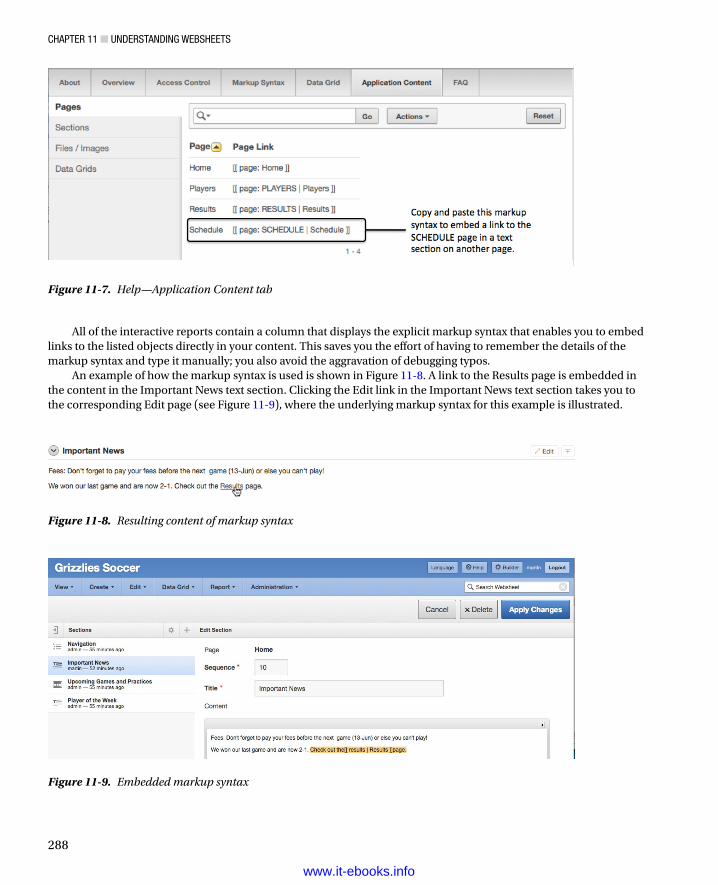
ChApTer 11 ■ UNdersTANdiNg WebsheeTs
288
All of the interactive reports contain a column that displays the explicit markup syntax that enables you to embed links to the listed objects directly in your content. This saves you the effort of having to remember the details of the markup syntax and type it manually; you also avoid the aggravation of debugging typos.
An example of how the markup syntax is used is shown in Figure 11-8. A link to the Results page is embedded in the content in the Important News text section. Clicking the Edit link in the Important News text section takes you to the corresponding Edit page (see Figure 11-9), where the underlying markup syntax for this example is illustrated.
Figure 11-7. Help—Application Content tab
Figure 11-8. Resulting content of markup syntax
Figure 11-9. Embedded markup syntax
www.it-ebooks.info
ChApTer 11 ■ UNdersTANdiNg WebsheeTs
289
Markup SyntaxThe markup syntax that is used to embed links in your web content looks a bit like a computer language. End users might find the syntax a bit intimidating; however, the syntax structure is simple, forgiving, and well documented on the Help page: [[ LINK_TYPE: LINK_TARGET | LINK_NAME ]]
The opening and closing delimiters are two square brackets that are easy to read. LINK_TYPE is a keyword with a trailing colon. The available LINK_TYPEs are described in Table 11-1.
Table 11-1. LINK-TYPEs and Descriptions
page: Links to a page in the websheet
section: Links to a section in the websheet
url: and popupurl: Link to a URL
file: Downloads the target file to the user’s computer
image: Displays an image on the page in a text section
data grid: or datagrid Links to a data grid’s Edit page
report: Links to a read-only report page
sql: Displays the result of a SQL statement in a grid
sqlvalue: Displays a single value from a SQL statement
LINK_TARGET specifies the object that is displayed when you click the link. For a page link, LINK_TARGET is the page alias. For a file, LINK_TARGET is the file name or alias. The only exception to this pattern is the sql: LINK_TYPE. The sql: LINK_TYPE’s LINK_TARGET isn’t a link; it’s a SQL statement that returns data in rows and columns. The SQL data is automatically displayed when the page is displayed. The sql: syntax is also referred to as SQL tags, and this feature must be turned on by an administrator in the application properties area. This is covered later in the “Reports: Setup” section.
A vertical bar character separates LINK_TARGET and LINK_NAME. The only fussy part of the syntax is the single spaces that must precede and follow the vertical bar.
LINK_NAME contains the text that is embedded in the page’s content. The user clicks this text to follow the link. There are two exceptions to this pattern. First, the image LINK_NAME is optional and can be replaced by HTML markup. For example, you can use HTML markup to resize the image. Second, the sql: LINK_TYPE has no LINK_NAME. LINK_NAME isn’t required because the SQL data itself is automatically embedded in the page content.
The markup syntax is forgiving. It’s case insensitive, and the websheet code makes several friendly assumptions. For example, if you omit LINK_TYPE, the websheet scans its metadata for LINK_TARGET. If an exact match is found, the websheet assumes that this is the target for which you were looking. In other words, you can be a bit sloppy with the syntax and still get the correct result.
swww.it-ebooks.info
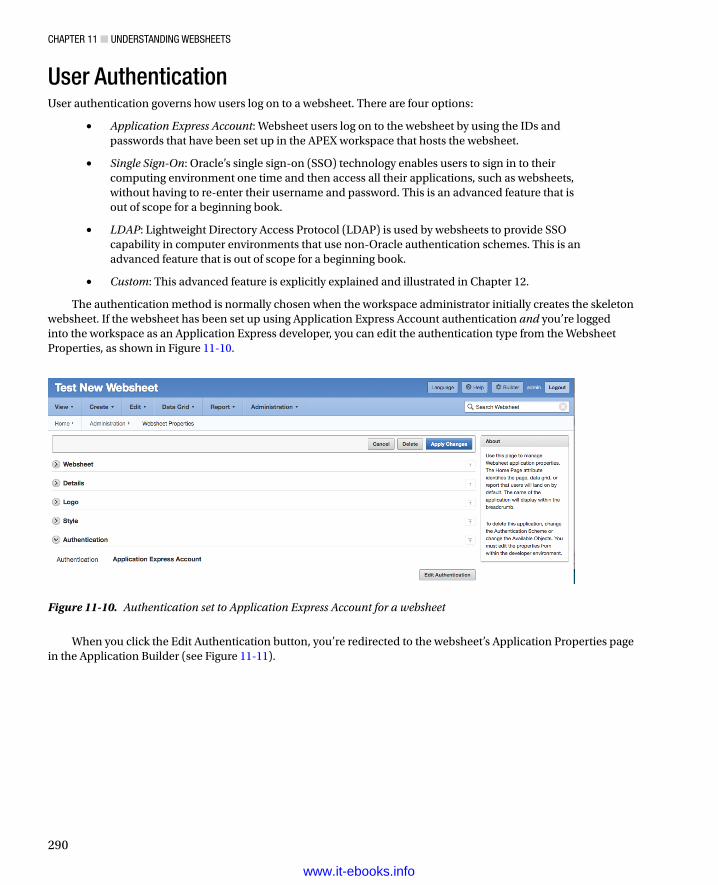
ChApTer 11 ■ UNdersTANdiNg WebsheeTs
290
User AuthenticationUser authentication governs how users log on to a websheet. There are four options:
• Application Express Account: Websheet users log on to the websheet by using the IDs and passwords that have been set up in the APEX workspace that hosts the websheet.
• Single Sign-On: Oracle’s single sign-on (SSO) technology enables users to sign in to their computing environment one time and then access all their applications, such as websheets, without having to re-enter their username and password. This is an advanced feature that is out of scope for a beginning book.
• LDAP: Lightweight Directory Access Protocol (LDAP) is used by websheets to provide SSO capability in computer environments that use non-Oracle authentication schemes. This is an advanced feature that is out of scope for a beginning book.
• Custom: This advanced feature is explicitly explained and illustrated in Chapter 12.
The authentication method is normally chosen when the workspace administrator initially creates the skeleton websheet. If the websheet has been set up using Application Express Account authentication and you’re logged into the workspace as an Application Express developer, you can edit the authentication type from the Websheet Properties, as shown in Figure 11-10.
Figure 11-10. Authentication set to Application Express Account for a websheet
When you click the Edit Authentication button, you’re redirected to the websheet’s Application Properties page in the Application Builder (see Figure 11-11).
www.it-ebooks.info
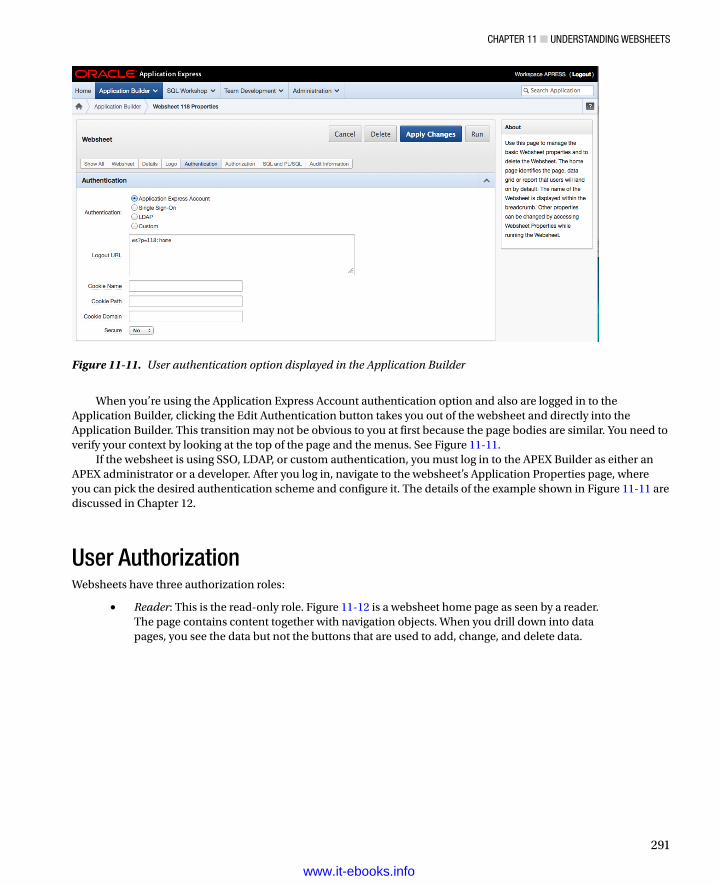
ChApTer 11 ■ UNdersTANdiNg WebsheeTs
291
Figure 11-11. User authentication option displayed in the Application Builder
When you’re using the Application Express Account authentication option and also are logged in to the Application Builder, clicking the Edit Authentication button takes you out of the websheet and directly into the Application Builder. This transition may not be obvious to you at first because the page bodies are similar. You need to verify your context by looking at the top of the page and the menus. See Figure 11-11.
If the websheet is using SSO, LDAP, or custom authentication, you must log in to the APEX Builder as either an APEX administrator or a developer. After you log in, navigate to the websheet’s Application Properties page, where you can pick the desired authentication scheme and configure it. The details of the example shown in Figure 11-11 are discussed in Chapter 12.
User AuthorizationWebsheets have three authorization roles:
• Reader: This is the read-only role. Figure 11-12 is a websheet home page as seen by a reader. The page contains content together with navigation objects. When you drill down into data pages, you see the data but not the buttons that are used to add, change, and delete data.
www.it-ebooks.info
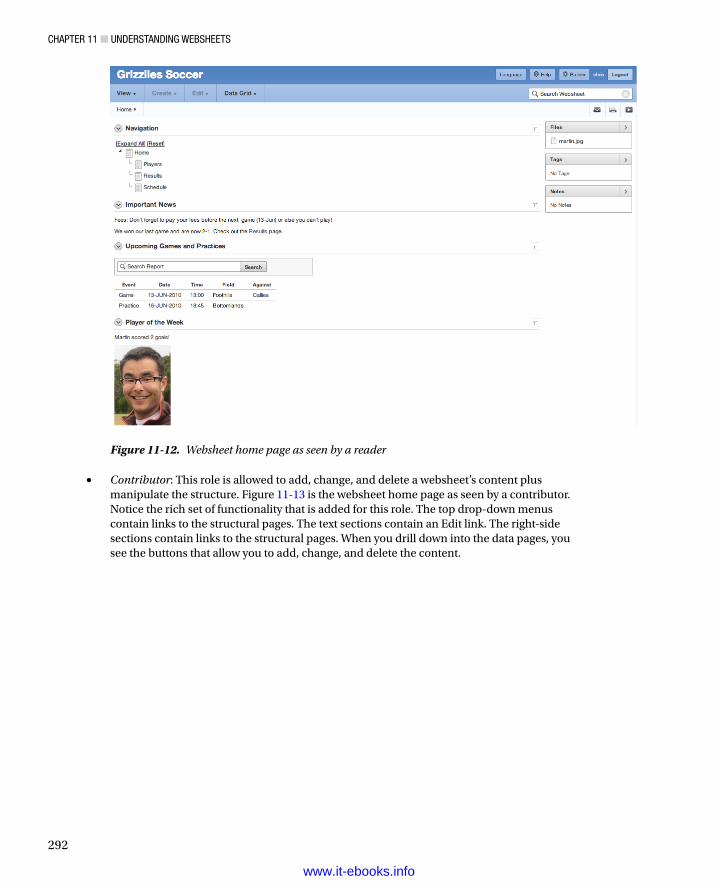
ChApTer 11 ■ UNdersTANdiNg WebsheeTs
292
Figure 11-12. Websheet home page as seen by a reader
• Contributor: This role is allowed to add, change, and delete a websheet’s content plus manipulate the structure. Figure 11-13 is the websheet home page as seen by a contributor. Notice the rich set of functionality that is added for this role. The top drop-down menus contain links to the structural pages. The text sections contain an Edit link. The right-side sections contain links to the structural pages. When you drill down into the data pages, you see the buttons that allow you to add, change, and delete the content.
www.it-ebooks.info

ChApTer 11 ■ UNdersTANdiNg WebsheeTs
293
Figure 11-13. Websheet home page as seen by a contributor
Figure 11-14. Websheet home page as seen by an administrator
• Administrator: This role creates and deletes websheets. It’s responsible for maintaining a websheet’s global properties and maintains the list of users who can access the websheet. Figure 11-14 is the administrator’s view of the websheet home page. The only addition to the contributor’s view is the Administration drop-down menu at the top of the page.
www.it-ebooks.info
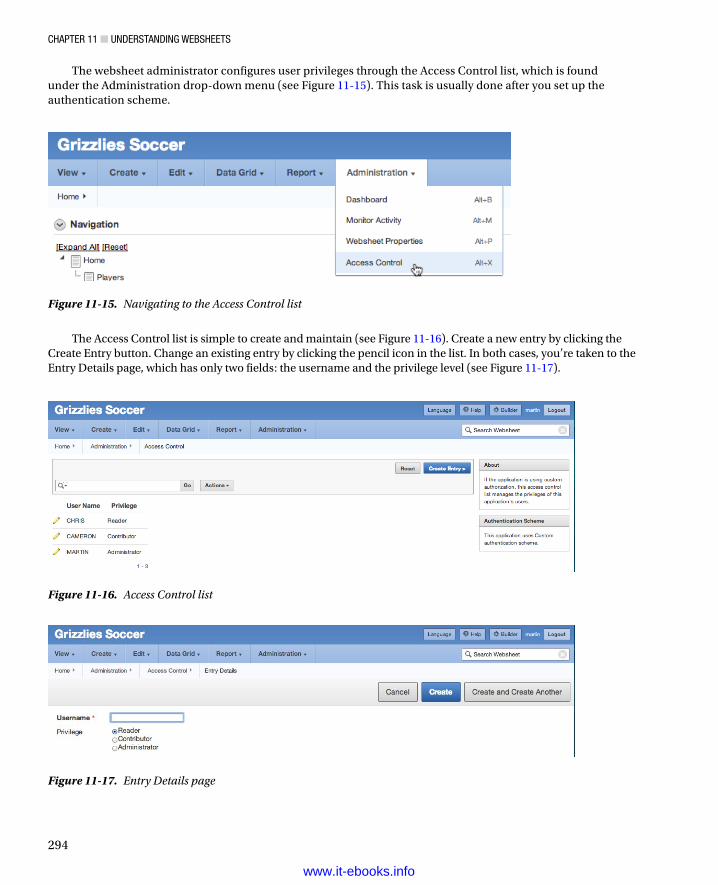
ChApTer 11 ■ UNdersTANdiNg WebsheeTs
294
Figure 11-15. Navigating to the Access Control list
The websheet administrator configures user privileges through the Access Control list, which is found under the Administration drop-down menu (see Figure 11-15). This task is usually done after you set up the authentication scheme.
Figure 11-16. Access Control list
Figure 11-17. Entry Details page
The Access Control list is simple to create and maintain (see Figure 11-16). Create a new entry by clicking the Create Entry button. Change an existing entry by clicking the pencil icon in the list. In both cases, you’re taken to the Entry Details page, which has only two fields: the username and the privilege level (see Figure 11-17).
www.it-ebooks.info
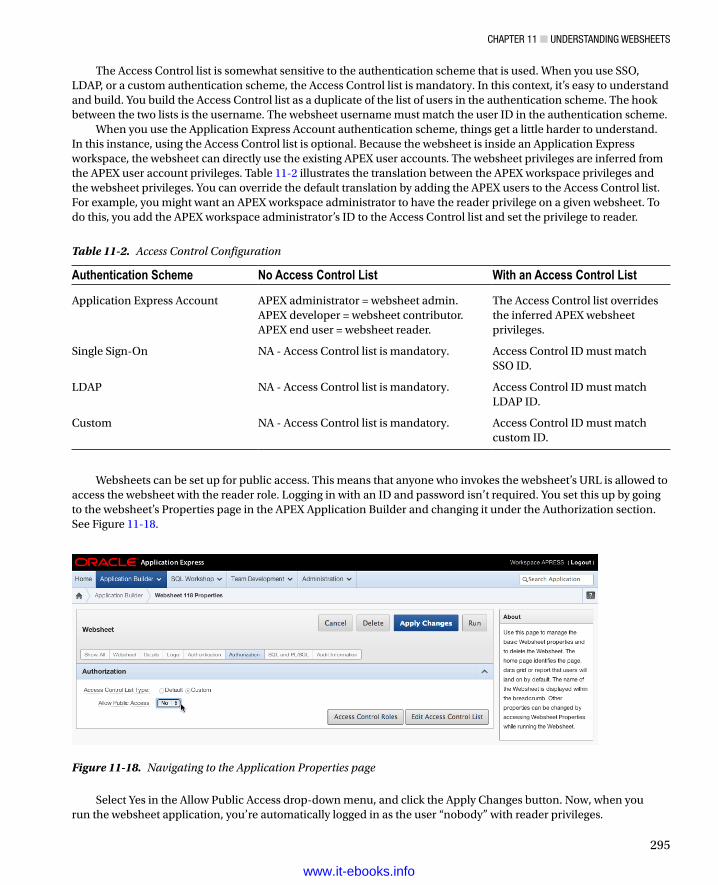
ChApTer 11 ■ UNdersTANdiNg WebsheeTs
295
The Access Control list is somewhat sensitive to the authentication scheme that is used. When you use SSO, LDAP, or a custom authentication scheme, the Access Control list is mandatory. In this context, it’s easy to understand and build. You build the Access Control list as a duplicate of the list of users in the authentication scheme. The hook between the two lists is the username. The websheet username must match the user ID in the authentication scheme.
When you use the Application Express Account authentication scheme, things get a little harder to understand. In this instance, using the Access Control list is optional. Because the websheet is inside an Application Express workspace, the websheet can directly use the existing APEX user accounts. The websheet privileges are inferred from the APEX user account privileges. Table 11-2 illustrates the translation between the APEX workspace privileges and the websheet privileges. You can override the default translation by adding the APEX users to the Access Control list. For example, you might want an APEX workspace administrator to have the reader privilege on a given websheet. To do this, you add the APEX workspace administrator’s ID to the Access Control list and set the privilege to reader.
Figure 11-18. Navigating to the Application Properties page
Websheets can be set up for public access. This means that anyone who invokes the websheet’s URL is allowed to access the websheet with the reader role. Logging in with an ID and password isn’t required. You set this up by going to the websheet’s Properties page in the APEX Application Builder and changing it under the Authorization section. See Figure 11-18.
Select Yes in the Allow Public Access drop-down menu, and click the Apply Changes button. Now, when you run the websheet application, you’re automatically logged in as the user “nobody” with reader privileges.
Table 11-2. Access Control Configuration
Authentication Scheme No Access Control List With an Access Control List
Application Express Account APEX administrator = websheet admin.APEX developer = websheet contributor.APEX end user = websheet reader.
The Access Control list overrides the inferred APEX websheet privileges.
Single Sign-On NA - Access Control list is mandatory. Access Control ID must match SSO ID.
LDAP NA - Access Control list is mandatory. Access Control ID must match LDAP ID.
Custom NA - Access Control list is mandatory. Access Control ID must match custom ID.
www.it-ebooks.info
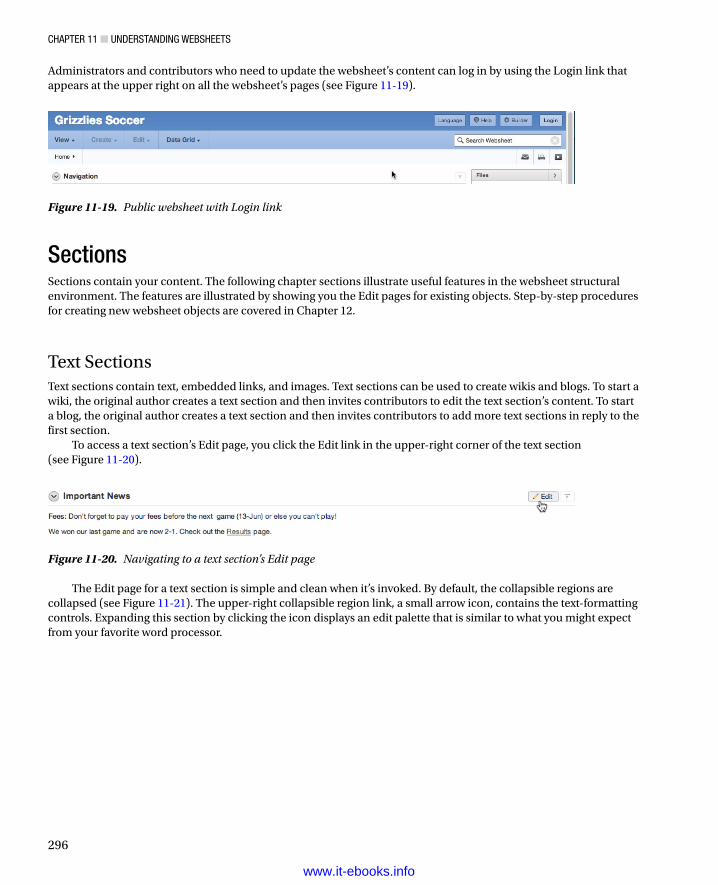
ChApTer 11 ■ UNdersTANdiNg WebsheeTs
296
Administrators and contributors who need to update the websheet’s content can log in by using the Login link that appears at the upper right on all the websheet’s pages (see Figure 11-19).
Figure 11-20. Navigating to a text section’s Edit page
SectionsSections contain your content. The following chapter sections illustrate useful features in the websheet structural environment. The features are illustrated by showing you the Edit pages for existing objects. Step-by-step procedures for creating new websheet objects are covered in Chapter 12.
Text SectionsText sections contain text, embedded links, and images. Text sections can be used to create wikis and blogs. To start a wiki, the original author creates a text section and then invites contributors to edit the text section’s content. To start a blog, the original author creates a text section and then invites contributors to add more text sections in reply to the first section.
To access a text section’s Edit page, you click the Edit link in the upper-right corner of the text section (see Figure 11-20).
The Edit page for a text section is simple and clean when it’s invoked. By default, the collapsible regions are collapsed (see Figure 11-21). The upper-right collapsible region link, a small arrow icon, contains the text-formatting controls. Expanding this section by clicking the icon displays an edit palette that is similar to what you might expect from your favorite word processor.
Figure 11-19. Public websheet with Login link
www.it-ebooks.info
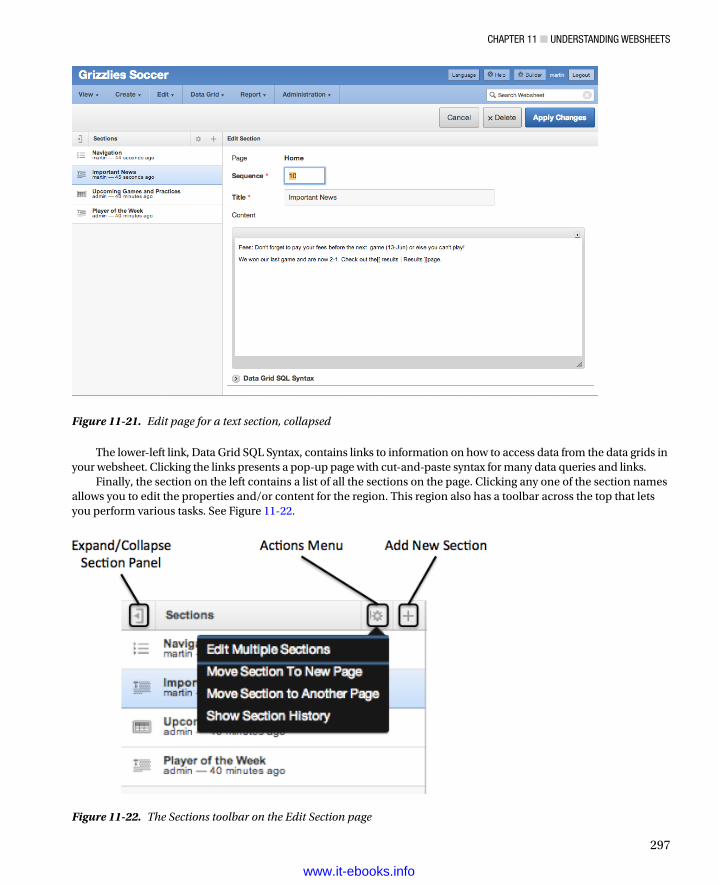
ChApTer 11 ■ UNdersTANdiNg WebsheeTs
297
Figure 11-21. Edit page for a text section, collapsed
Figure 11-22. The Sections toolbar on the Edit Section page
The lower-left link, Data Grid SQL Syntax, contains links to information on how to access data from the data grids in your websheet. Clicking the links presents a pop-up page with cut-and-paste syntax for many data queries and links.
Finally, the section on the left contains a list of all the sections on the page. Clicking any one of the section names allows you to edit the properties and/or content for the region. This region also has a toolbar across the top that lets you perform various tasks. See Figure 11-22.
www.it-ebooks.info
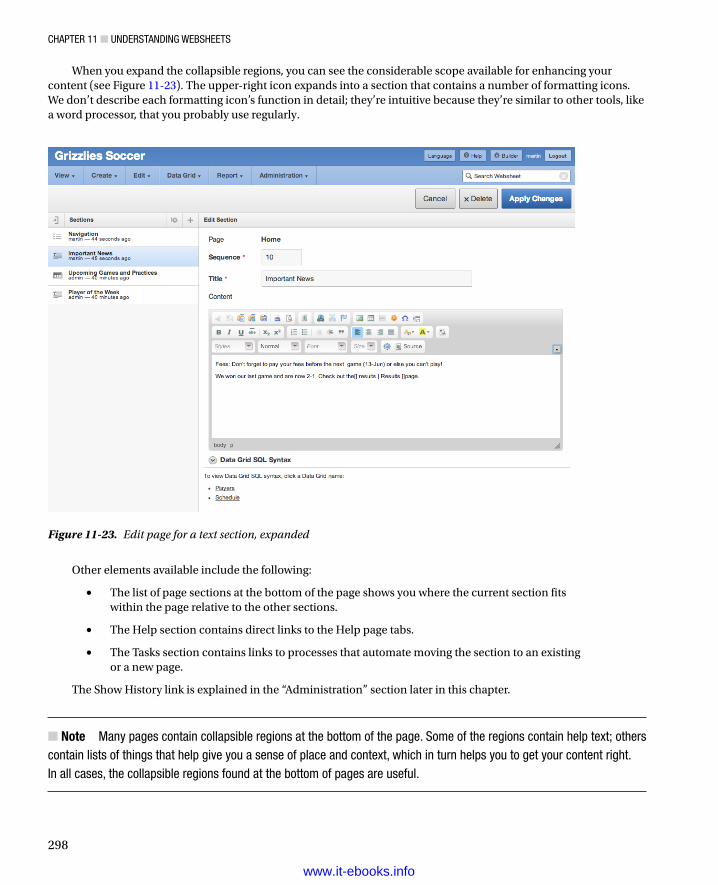
ChApTer 11 ■ UNdersTANdiNg WebsheeTs
298
When you expand the collapsible regions, you can see the considerable scope available for enhancing your content (see Figure 11-23). The upper-right icon expands into a section that contains a number of formatting icons. We don’t describe each formatting icon’s function in detail; they’re intuitive because they’re similar to other tools, like a word processor, that you probably use regularly.
Figure 11-23. Edit page for a text section, expanded
Other elements available include the following:
The list of page sections at the bottom of the page shows you where the current section fits •within the page relative to the other sections.
The Help section contains direct links to the Help page tabs.•
The Tasks section contains links to processes that automate moving the section to an existing •or a new page.
The Show History link is explained in the “Administration” section later in this chapter.
Note ■ Many pages contain collapsible regions at the bottom of the page. some of the regions contain help text; others contain lists of things that help give you a sense of place and context, which in turn helps you to get your content right. in all cases, the collapsible regions found at the bottom of pages are useful.
www.it-ebooks.info
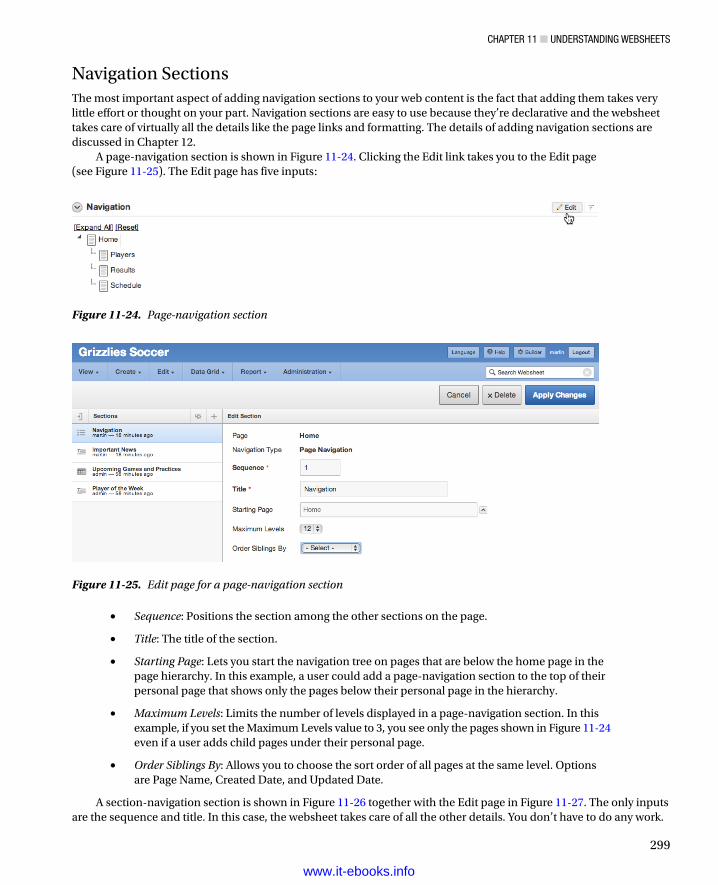
ChApTer 11 ■ UNdersTANdiNg WebsheeTs
299
Figure 11-24. Page-navigation section
Figure 11-25. Edit page for a page-navigation section
Navigation SectionsThe most important aspect of adding navigation sections to your web content is the fact that adding them takes very little effort or thought on your part. Navigation sections are easy to use because they’re declarative and the websheet takes care of virtually all the details like the page links and formatting. The details of adding navigation sections are discussed in Chapter 12.
A page-navigation section is shown in Figure 11-24. Clicking the Edit link takes you to the Edit page (see Figure 11-25). The Edit page has five inputs:
• Sequence: Positions the section among the other sections on the page.
• Title: The title of the section.
• Starting Page: Lets you start the navigation tree on pages that are below the home page in the page hierarchy. In this example, a user could add a page-navigation section to the top of their personal page that shows only the pages below their personal page in the hierarchy.
• Maximum Levels: Limits the number of levels displayed in a page-navigation section. In this example, if you set the Maximum Levels value to 3, you see only the pages shown in Figure 11-24 even if a user adds child pages under their personal page.
• Order Siblings By: Allows you to choose the sort order of all pages at the same level. Options are Page Name, Created Date, and Updated Date.
A section-navigation section is shown in Figure 11-26 together with the Edit page in Figure 11-27. The only inputs are the sequence and title. In this case, the websheet takes care of all the other details. You don’t have to do any work.
www.it-ebooks.info
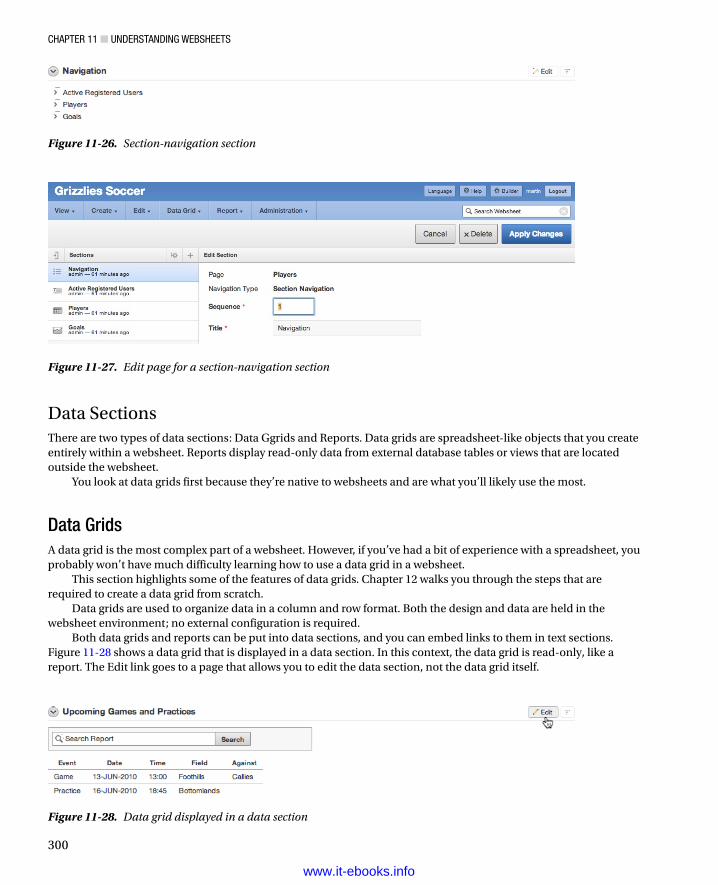
ChApTer 11 ■ UNdersTANdiNg WebsheeTs
300
Figure 11-28. Data grid displayed in a data section
Data SectionsThere are two types of data sections: Data Ggrids and Reports. Data grids are spreadsheet-like objects that you create entirely within a websheet. Reports display read-only data from external database tables or views that are located outside the websheet.
You look at data grids first because they’re native to websheets and are what you’ll likely use the most.
Data GridsA data grid is the most complex part of a websheet. However, if you’ve had a bit of experience with a spreadsheet, you probably won’t have much difficulty learning how to use a data grid in a websheet.
This section highlights some of the features of data grids. Chapter 12 walks you through the steps that are required to create a data grid from scratch.
Data grids are used to organize data in a column and row format. Both the design and data are held in the websheet environment; no external configuration is required.
Both data grids and reports can be put into data sections, and you can embed links to them in text sections. Figure 11-28 shows a data grid that is displayed in a data section. In this context, the data grid is read-only, like a report. The Edit link goes to a page that allows you to edit the data section, not the data grid itself.
Figure 11-26. Section-navigation section
Figure 11-27. Edit page for a section-navigation section
www.it-ebooks.info
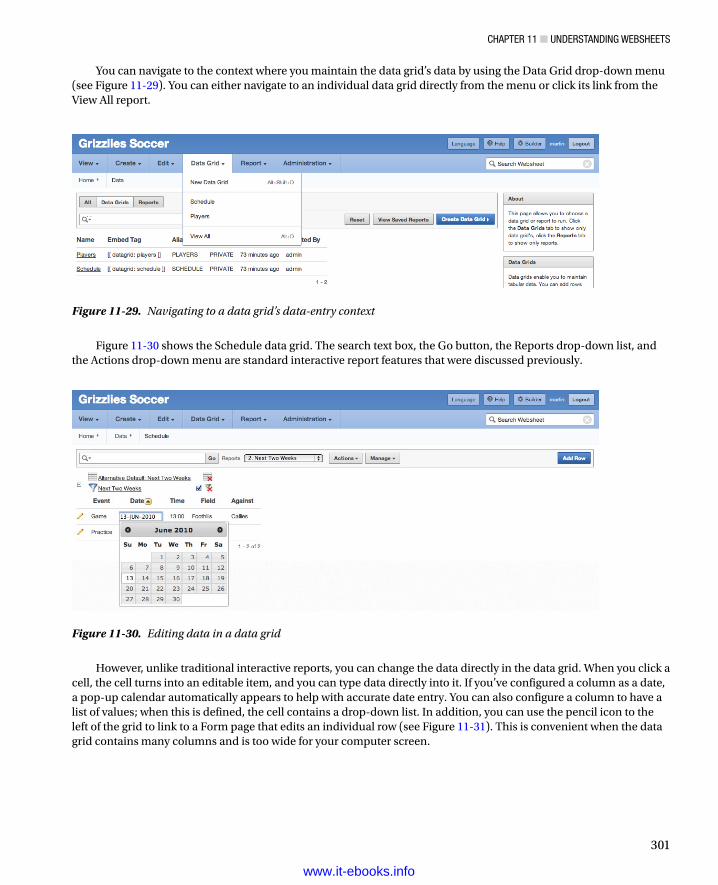
ChApTer 11 ■ UNdersTANdiNg WebsheeTs
301
Figure 11-29. Navigating to a data grid’s data-entry context
You can navigate to the context where you maintain the data grid’s data by using the Data Grid drop-down menu (see Figure 11-29). You can either navigate to an individual data grid directly from the menu or click its link from the View All report.
Figure 11-30. Editing data in a data grid
Figure 11-30 shows the Schedule data grid. The search text box, the Go button, the Reports drop-down list, and the Actions drop-down menu are standard interactive report features that were discussed previously.
However, unlike traditional interactive reports, you can change the data directly in the data grid. When you click a cell, the cell turns into an editable item, and you can type data directly into it. If you’ve configured a column as a date, a pop-up calendar automatically appears to help with accurate date entry. You can also configure a column to have a list of values; when this is defined, the cell contains a drop-down list. In addition, you can use the pencil icon to the left of the grid to link to a Form page that edits an individual row (see Figure 11-31). This is convenient when the data grid contains many columns and is too wide for your computer screen.
www.it-ebooks.info
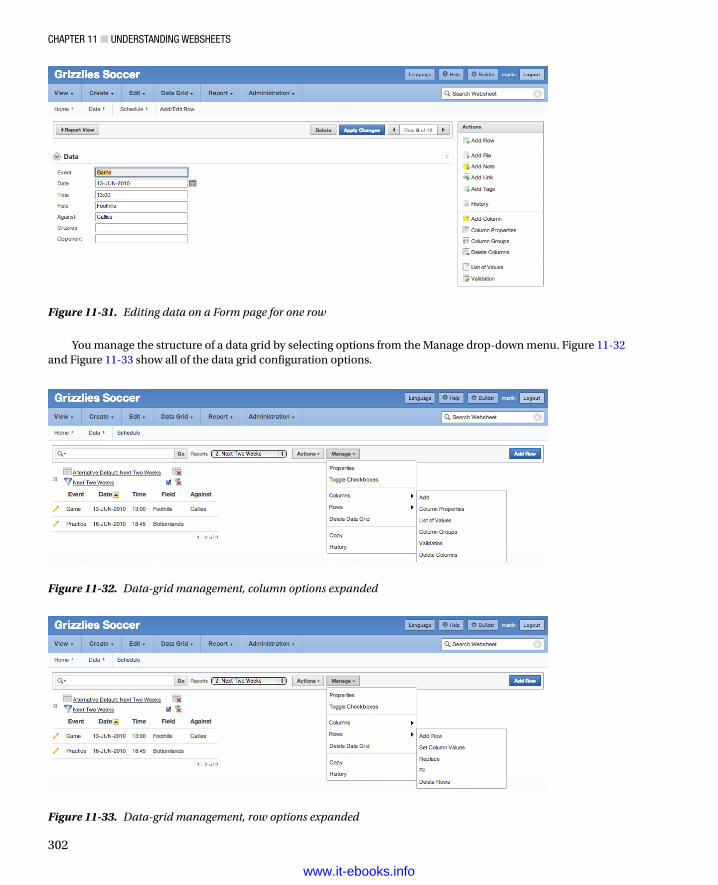
ChApTer 11 ■ UNdersTANdiNg WebsheeTs
302
Figure 11-32. Data-grid management, column options expanded
Figure 11-33. Data-grid management, row options expanded
You manage the structure of a data grid by selecting options from the Manage drop-down menu. Figure 11-32 and Figure 11-33 show all of the data grid configuration options.
Figure 11-31. Editing data on a Form page for one row
www.it-ebooks.info
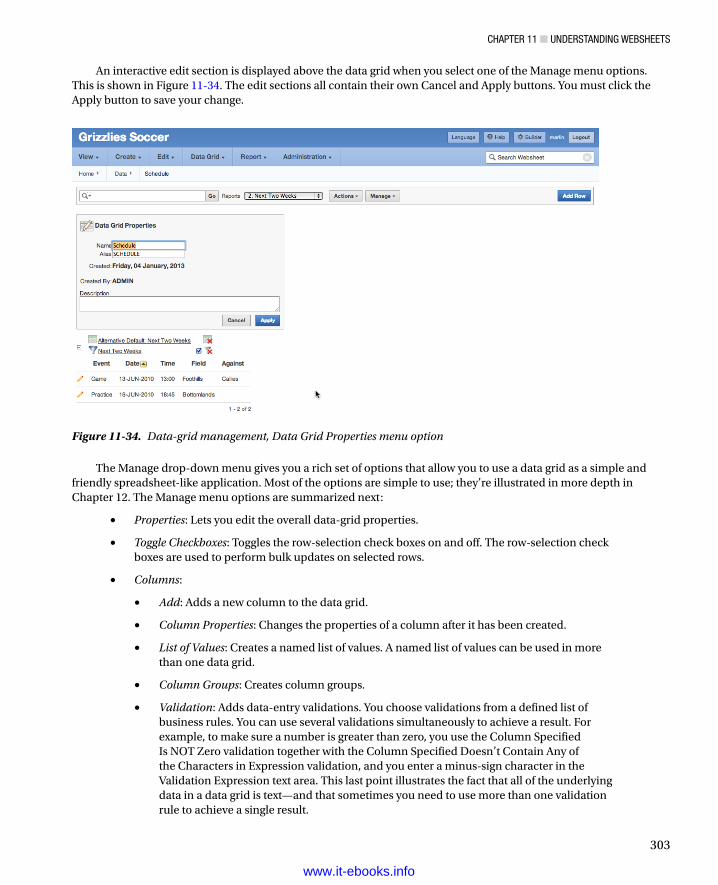
ChApTer 11 ■ UNdersTANdiNg WebsheeTs
303
An interactive edit section is displayed above the data grid when you select one of the Manage menu options. This is shown in Figure 11-34. The edit sections all contain their own Cancel and Apply buttons. You must click the Apply button to save your change.
Figure 11-34. Data-grid management, Data Grid Properties menu option
The Manage drop-down menu gives you a rich set of options that allow you to use a data grid as a simple and friendly spreadsheet-like application. Most of the options are simple to use; they’re illustrated in more depth in Chapter 12. The Manage menu options are summarized next:
• Properties: Lets you edit the overall data-grid properties.
• Toggle Checkboxes: Toggles the row-selection check boxes on and off. The row-selection check boxes are used to perform bulk updates on selected rows.
• Columns:
• Add: Adds a new column to the data grid.
• Column Properties: Changes the properties of a column after it has been created.
• List of Values: Creates a named list of values. A named list of values can be used in more than one data grid.
• Column Groups: Creates column groups.
• Validation: Adds data-entry validations. You choose validations from a defined list of business rules. You can use several validations simultaneously to achieve a result. For example, to make sure a number is greater than zero, you use the Column Specified Is NOT Zero validation together with the Column Specified Doesn’t Contain Any of the Characters in Expression validation, and you enter a minus-sign character in the Validation Expression text area. This last point illustrates the fact that all of the underlying data in a data grid is text—and that sometimes you need to use more than one validation rule to achieve a single result.
www.it-ebooks.info

ChApTer 11 ■ UNdersTANdiNg WebsheeTs
304
• Delete Columns: Deletes one or more columns.
• Rows:
• Add Row: Displays the data-entry page, where you can enter new data.
• Set Column Values: Enters data into many rows in a single column. A value can be set for All Rows, Selected Rows, or Empty Rows.
• Replace: A find-and-replace feature that is similar to text editors and word processors. It can be applied to All Rows or Selected Rows.
• Fill: Fills a column’s null cells with the value found above them.
• Delete Rows: Deletes rows from the data grid. This is done for All Rows, Selected Rows, or Rows with Empty Columns.
• Delete Data Grid: Deletes the data grid from the websheet.
• Copy: Makes a copy of the data grid.
• History: An audit trail for the data.
Reports: SetupThe Report feature and the related SQL Tags feature require a small amount of setup by the administrator before contributors can use them. You start the setup process by navigating to the APEX Application Builder and editing the websheet’s properties. In the SQL and PL/SQL section (see Figure 11-35), set Allow SQL and PL/SQL to Yes. After you do this, click the Add Object button to display the page shown in Figure 11-36. This page enables you to create a list of suggested objects. The list of suggested objects is an optional convenience that automatically creates a drop-down list of database objects together with helpful comments.
Figure 11-35. Websheet report and SQL tag setup
www.it-ebooks.info
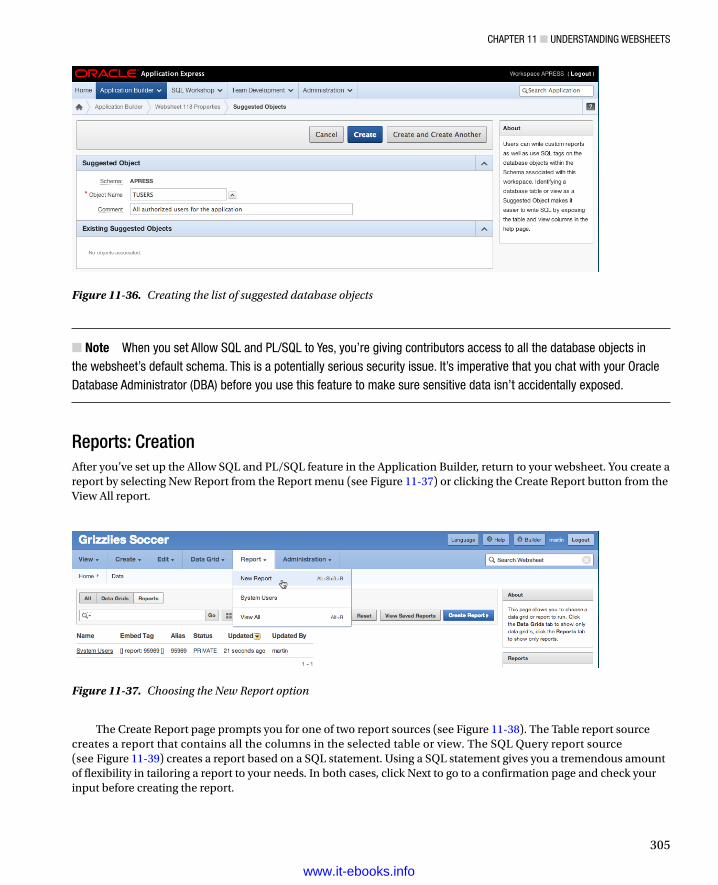
ChApTer 11 ■ UNdersTANdiNg WebsheeTs
305
Note■ When you set Allow sQL and pL/sQL to Yes, you’re giving contributors access to all the database objects in the websheet’s default schema. This is a potentially serious security issue. it’s imperative that you chat with your Oracle database Administrator (dbA) before you use this feature to make sure sensitive data isn’t accidentally exposed.
Reports: CreationAfter you’ve set up the Allow SQL and PL/SQL feature in the Application Builder, return to your websheet. You create a report by selecting New Report from the Report menu (see Figure 11-37) or clicking the Create Report button from the View All report.
Figure 11-36. Creating the list of suggested database objects
Figure 11-37. Choosing the New Report option
The Create Report page prompts you for one of two report sources (see Figure 11-38). The Table report source creates a report that contains all the columns in the selected table or view. The SQL Query report source (see Figure 11-39) creates a report based on a SQL statement. Using a SQL statement gives you a tremendous amount of flexibility in tailoring a report to your needs. In both cases, click Next to go to a confirmation page and check your input before creating the report.
www.it-ebooks.info

ChApTer 11 ■ UNdersTANdiNg WebsheeTs
306
Figure 11-38. Creating a report based on a table or view
Figure 11-39. Creating a report based on a SQL statement
Reports: Accessing the DataUsers want, of course, to see the report data. Report data is exposed in three ways:
• Navigate to a report: Figure 11-40 shows you where to find the list of reports under the Report drop-down menu. Clicking the report’s Name link in the menu takes you to the Report Data page. Figure 11-41 shows the Authorized System Users report in this example.
www.it-ebooks.info
ChApTer 11 ■ UNdersTANdiNg WebsheeTs
307
• Embed a link to the report in a text section: The list of reports in Figure 11-40 contains an Embed Tag column. This column contains the markup syntax that you need to add a link to the report in a text section. You copy and paste the markup syntax into the text section to add a link that takes you to the Authorized System Users report shown in Figure 11-41.
• Create a data section: Creating a data section based on a report is easy. A wizard walks you through the steps. You first navigate to the page that will contain your report and click one of the New Section links in either the drop-down menu or the Control Panel at right on the page (see Figure 11-42). This starts the Create Section Wizard. Select the Data icon on the first page, and click Next (see Figure 11-43). Now, link the data section to its data source (see Figure 11-44). In this example, you’re linking the data section to the Authorized System Users report. This page allows you to link your data section to any data grid or report that you’ve previously created. Click Next, which takes you to the confirmation page. When you click the Create button on the confirmation page, you find yourself back on the content page, and your report is displayed in the new data section (see Figure 11-45).
Figure 11-40. Navigating to a report
Figure 11-41. Report data page
www.it-ebooks.info
ChApTer 11 ■ UNdersTANdiNg WebsheeTs
308
Figure 11-42. New Section link
Figure 11-43. New Section Wizard: choosing a section type
Figure 11-44. New Section Wizard: data source
www.it-ebooks.info

ChApTer 11 ■ UNdersTANdiNg WebsheeTs
309
Chart SectionsChart sections are an easy way to add graphics to your content. First you must create a report or data grid that contains at least one numeric column. Second, you run the Create Chart Wizard. The wizard links the report or data grid to the chart and sets up the axis labels. The details and visual result of this simple process are covered Chapter 12.
AnnotationsAnnotations are used to add additional content to your pages and individual rows in data grids. There are four types of annotations:
• Files: Two types of files can be uploaded into your websheet. Image files are displayed within text sections. Other file formats, such as PDFs, can be uploaded to a websheet and then downloaded to the end user’s computer. In both cases, you use markup syntax to achieve the result.
• Tags: Tags are free-form text words that are attached to content to enhance the websheet’s Search feature.
• Notes: Notes are like sticky notes. When you add a note, it appears in a section on the right side of the page.
• Links: Links allow users to navigate to any valid URL. Annotation links are associated with rows in a data grid; they can’t be associated with a page. To add a link to a page, you use markup syntax, not an annotation.
Figure 11-46 shows the Annotation section that appears on a websheet page. Clicking the various links allows you to add, change, and delete annotations.
Figure 11-45. Data section containing a report
www.it-ebooks.info
ChApTer 11 ■ UNdersTANdiNg WebsheeTs
310
AdministrationWebsheets, like any blog or wiki, should be reviewed periodically by a moderator who has been given the administrator role. This allows the moderator to view the Dashboard and Monitor Activity pages (see Figure 11-47). These pages and the underlying reports give the moderator the tools to see which pages are the most and least popular, how long it takes to render a page, who is using the websheet, and many other parameters that help the moderator make sure the websheet is working optimally.
Figure 11-46. Annotation section at lower right on a page
Figure 11-47. Navigating to the Dashboard and Monitor Activity pages
As you work through Chapter 12, notice the links that are labeled History. These History links are placed throughout the websheet’s structural navigation areas. They take you to context-sensitive report pages that contain comprehensive audit trails of websheet changes. Contributors, when they know their changes are audited, will make an effort to hold their contributions to a high standard.
SummaryThis chapter has given you a good look at websheets so that you can now use them in innovative and creative ways. Chapter 12 complements this chapter by working through, on a step-by-step basis, the construction of a websheet from the ground up.
www.it-ebooks.info
311
Chapter 12
A Websheet Example
The previous chapter covered many of the different features in websheets. In this chapter, you use these features to build an application from scratch.
The example application manages a corporate soccer team. Currently, the player roster and schedules are maintained in spreadsheets. When the schedule is updated, the spreadsheet is e-mailed to all the players. As you can imagine, it would be very frustrating to manage a team this way.
A websheet is a good way to manage the soccer team because websheets can be built with minimal developer or DBA assistance. All the files, along with a copy of the final application, can be found in the example download described in the introduction to this book.
SetupIn order to highlight the capability of websheets to interact with objects in your database, let’s create some database objects that are referenced throughout the chapter. These objects simulate an existing users table and login function for your organization:
1. Run the following code, which is included in the example download as a script named ch12_database_objects.sql, in SQL*Plus or directly in APEX using the SQL workshop: -- Create Users TableCREATE TABLE tusers ( user_id NUMBER (5, 0) PRIMARY KEY, user_name VARCHAR2 (10) NOT NULL UNIQUE, password VARCHAR2 (10) NOT NULL, active_flag VARCHAR2 (1) NOT NULL); -- Create sequence for IDsCREATE SEQUENCE sn_users; -- Create Users-- Note: You should not store passwords in clear text.-- This was done for demonstration purposes.INSERT INTO tusers ( user_id, user_name, password, active_flag) VALUES (sn_users.NEXTVAL, 'martin', 'martin', 'Y'); INSERT INTO tusers ( user_id, user_name, password, active_flag) VALUES (sn_users.NEXTVAL, 'chris', 'chris', 'Y');
www.it-ebooks.info
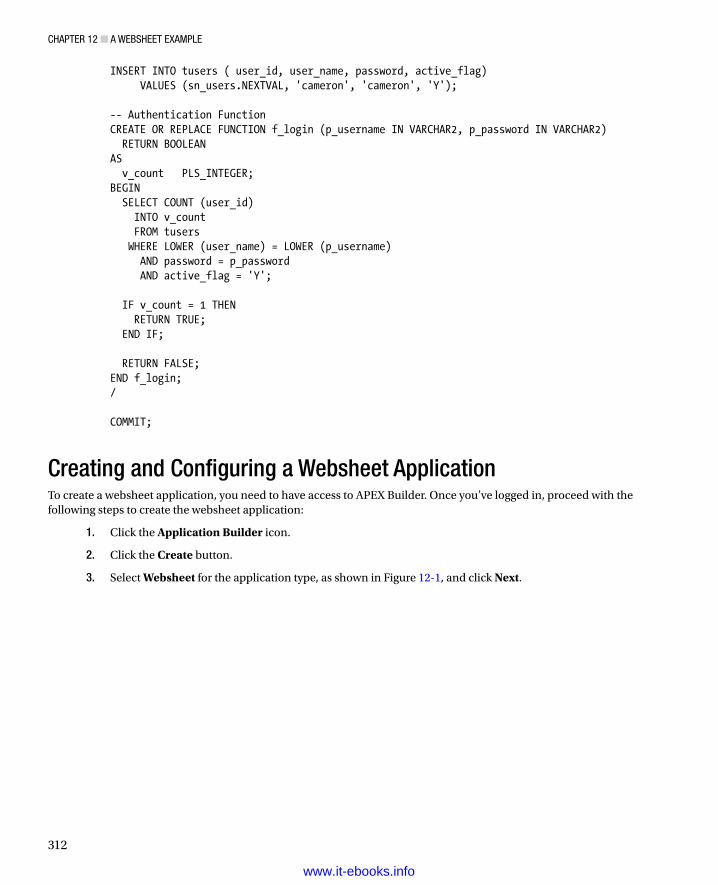
Chapter 12 ■ a Websheet example
312
INSERT INTO tusers ( user_id, user_name, password, active_flag) VALUES (sn_users.NEXTVAL, 'cameron', 'cameron', 'Y'); -- Authentication FunctionCREATE OR REPLACE FUNCTION f_login (p_username IN VARCHAR2, p_password IN VARCHAR2) RETURN BOOLEANAS v_count PLS_INTEGER;BEGIN SELECT COUNT (user_id) INTO v_count FROM tusers WHERE LOWER (user_name) = LOWER (p_username) AND password = p_password AND active_flag = 'Y'; IF v_count = 1 THEN RETURN TRUE; END IF; RETURN FALSE;END f_login;/ COMMIT;
Creating and Configuring a Websheet ApplicationTo create a websheet application, you need to have access to APEX Builder. Once you’ve logged in, proceed with the following steps to create the websheet application:
1. Click the Application Builder icon.
2. Click the Create button.
3. Select Websheet for the application type, as shown in Figure 12-1, and click Next.
www.it-ebooks.info
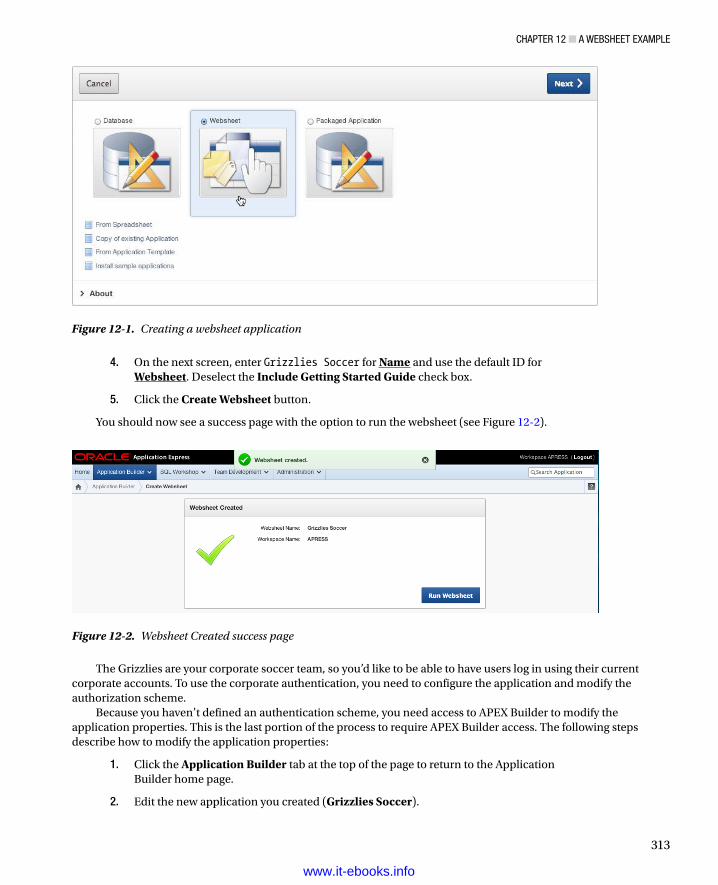
Chapter 12 ■ a Websheet example
313
4. On the next screen, enter Grizzlies Soccer for Name and use the default ID for Websheet. Deselect the Include Getting Started Guide check box.
5. Click the Create Websheet button.
You should now see a success page with the option to run the websheet (see Figure 12-2).
Figure 12-1. Creating a websheet application
Figure 12-2. Websheet Created success page
The Grizzlies are your corporate soccer team, so you’d like to be able to have users log in using their current corporate accounts. To use the corporate authentication, you need to configure the application and modify the authorization scheme.
Because you haven’t defined an authentication scheme, you need access to APEX Builder to modify the application properties. This is the last portion of the process to require APEX Builder access. The following steps describe how to modify the application properties:
1. Click the Application Builder tab at the top of the page to return to the Application Builder home page.
2. Edit the new application you created (Grizzlies Soccer).
www.it-ebooks.info
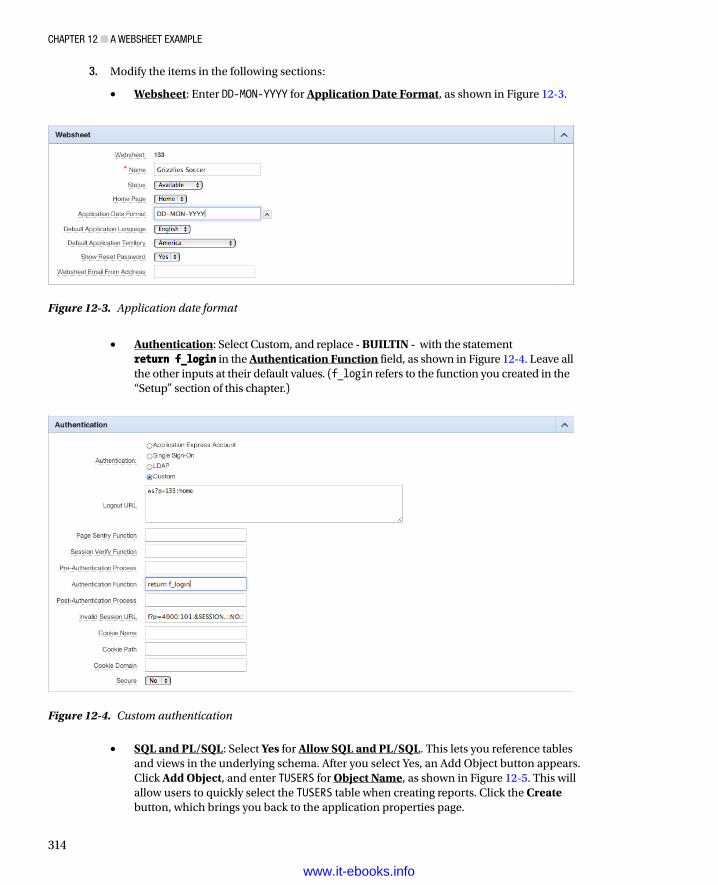
Chapter 12 ■ a Websheet example
314
3. Modify the items in the following sections:
• Websheet: Enter DD-MON-YYYY for Application Date Format, as shown in Figure 12-3.
Figure 12-3. Application date format
• Authentication: Select Custom, and replace - BUILTIN - with the statement return f_login in the Authentication Function field, as shown in Figure 12-4. Leave all the other inputs at their default values. (f_login refers to the function you created in the “Setup” section of this chapter.)
Figure 12-4. Custom authentication
• SQL and PL/SQL: Select Yes for Allow SQL and PL/SQL. This lets you reference tables and views in the underlying schema. After you select Yes, an Add Object button appears. Click Add Object, and enter TUSERS for Object Name, as shown in Figure 12-5. This will allow users to quickly select the TUSERS table when creating reports. Click the Create button, which brings you back to the application properties page.
www.it-ebooks.info
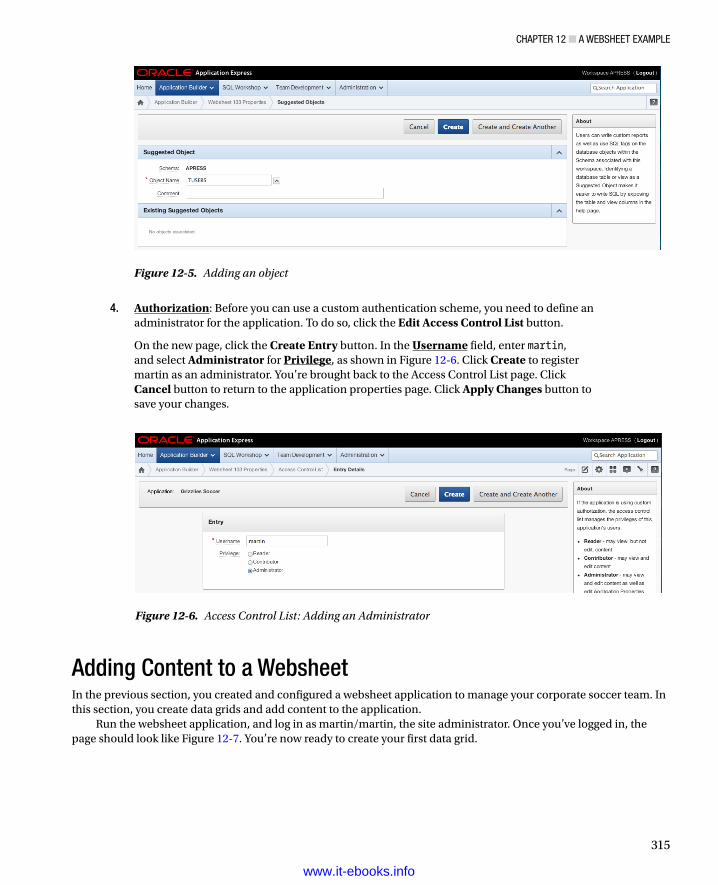
Chapter 12 ■ a Websheet example
315
4. Authorization: Before you can use a custom authentication scheme, you need to define an administrator for the application. To do so, click the Edit Access Control List button.
On the new page, click the Create Entry button. In the Username field, enter martin, and select Administrator for Privilege, as shown in Figure 12-6. Click Create to register martin as an administrator. You’re brought back to the Access Control List page. Click Cancel button to return to the application properties page. Click Apply Changes button to save your changes.
Figure 12-5. Adding an object
Figure 12-6. Access Control List: Adding an Administrator
Adding Content to a WebsheetIn the previous section, you created and configured a websheet application to manage your corporate soccer team. In this section, you create data grids and add content to the application.
Run the websheet application, and log in as martin/martin, the site administrator. Once you’ve logged in, the page should look like Figure 12-7. You’re now ready to create your first data grid.
www.it-ebooks.info
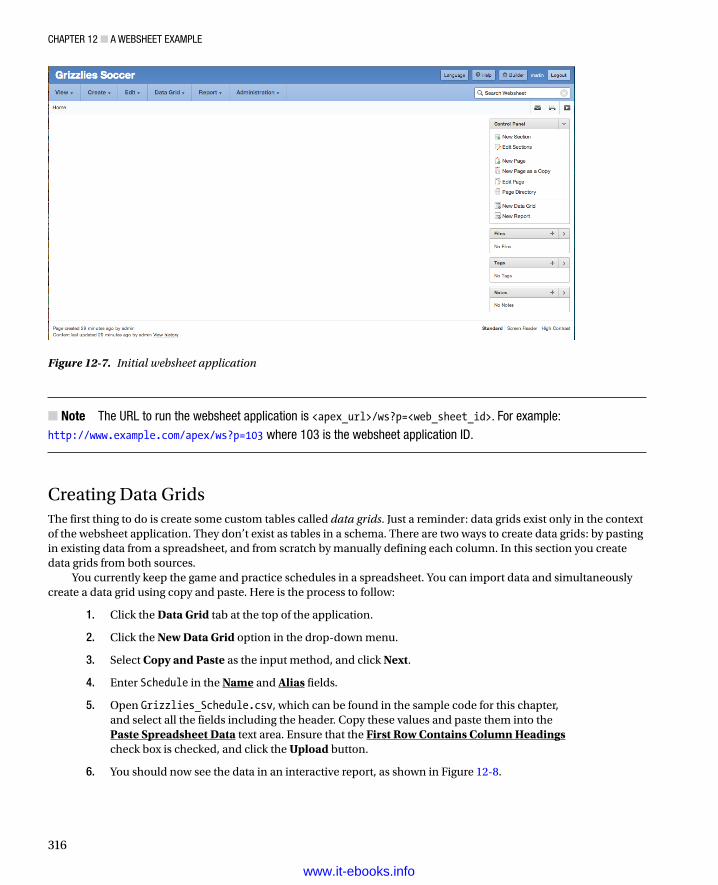
Chapter 12 ■ a Websheet example
316
Note ■ the Url to run the websheet application is <apex_url>/ws?p=<web_sheet_id>. For example: http://www.example.com/apex/ws?p=103 where 103 is the websheet application ID.
Creating Data GridsThe first thing to do is create some custom tables called data grids. Just a reminder: data grids exist only in the context of the websheet application. They don’t exist as tables in a schema. There are two ways to create data grids: by pasting in existing data from a spreadsheet, and from scratch by manually defining each column. In this section you create data grids from both sources.
You currently keep the game and practice schedules in a spreadsheet. You can import data and simultaneously create a data grid using copy and paste. Here is the process to follow:
1. Click the Data Grid tab at the top of the application.
2. Click the New Data Grid option in the drop-down menu.
3. Select Copy and Paste as the input method, and click Next.
4. Enter Schedule in the Name and Alias fields.
5. Open Grizzlies_Schedule.csv, which can be found in the sample code for this chapter, and select all the fields including the header. Copy these values and paste them into the Paste Spreadsheet Data text area. Ensure that the First Row Contains Column Headings check box is checked, and click the Upload button.
6. You should now see the data in an interactive report, as shown in Figure 12-8.
Figure 12-7. Initial websheet application
www.it-ebooks.info
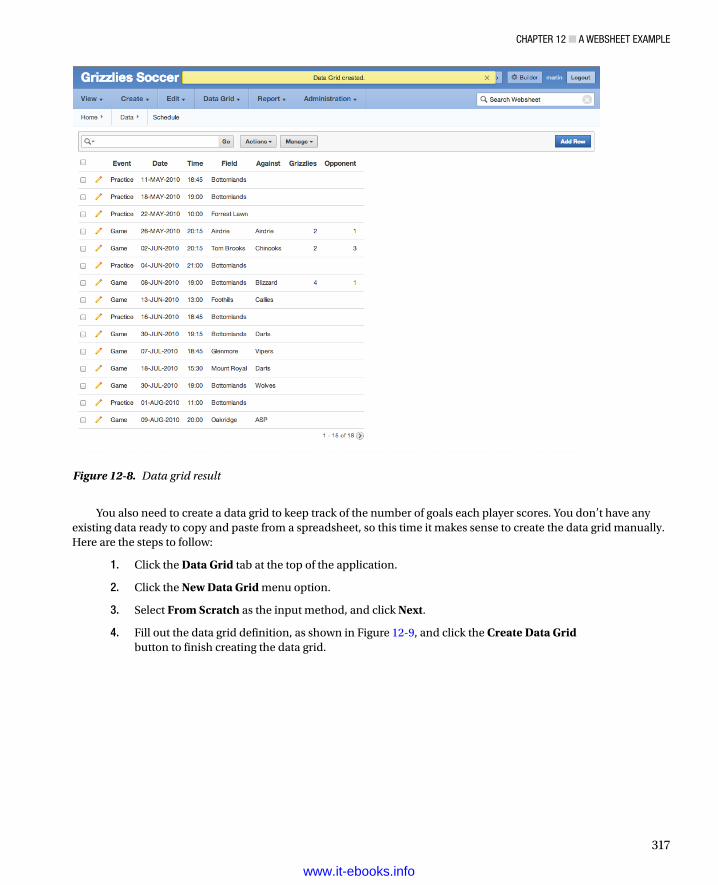
Chapter 12 ■ a Websheet example
317
You also need to create a data grid to keep track of the number of goals each player scores. You don’t have any existing data ready to copy and paste from a spreadsheet, so this time it makes sense to create the data grid manually. Here are the steps to follow:
1. Click the Data Grid tab at the top of the application.
2. Click the New Data Grid menu option.
3. Select From Scratch as the input method, and click Next.
4. Fill out the data grid definition, as shown in Figure 12-9, and click the Create Data Grid button to finish creating the data grid.
Figure 12-8. Data grid result
www.it-ebooks.info
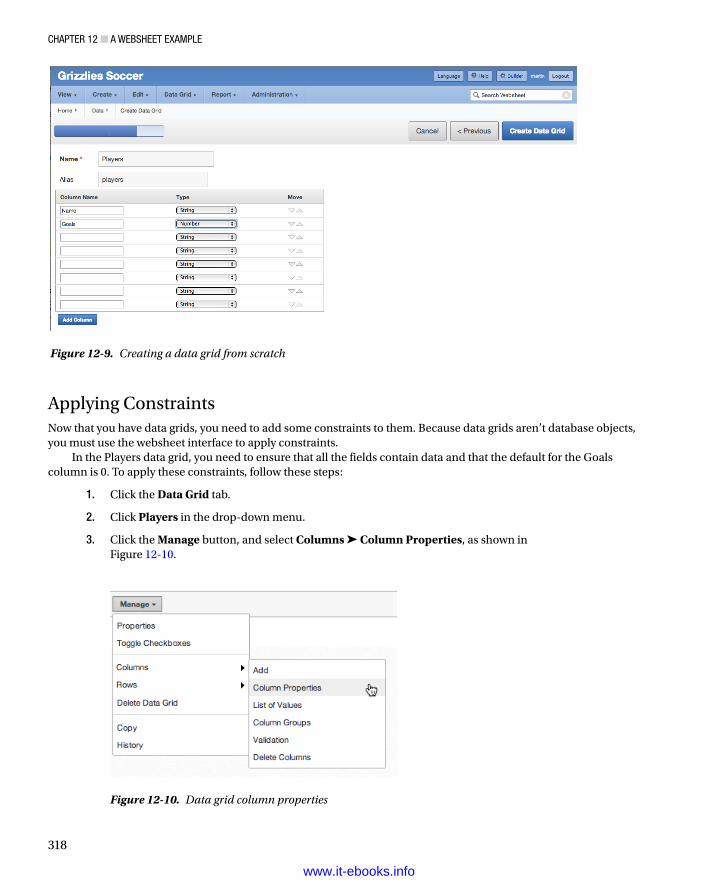
Chapter 12 ■ a Websheet example
318
Applying ConstraintsNow that you have data grids, you need to add some constraints to them. Because data grids aren’t database objects, you must use the websheet interface to apply constraints.
In the Players data grid, you need to ensure that all the fields contain data and that the default for the Goals column is 0. To apply these constraints, follow these steps:
1. Click the Data Grid tab.
2. Click Players in the drop-down menu.
3. Click the Manage button, and select Columns ➤ Column Properties, as shown in Figure 12-10.
Figure 12-9. Creating a data grid from scratch
Figure 12-10. Data grid column properties
www.it-ebooks.info
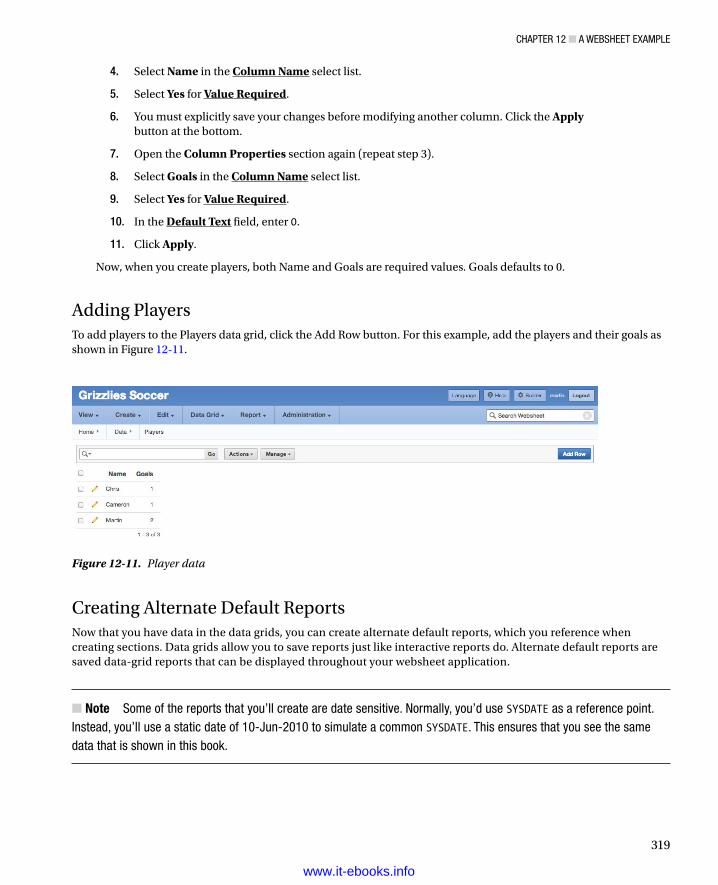
Chapter 12 ■ a Websheet example
319
4. Select Name in the Column Name select list.
5. Select Yes for Value Required.
6. You must explicitly save your changes before modifying another column. Click the Apply button at the bottom.
7. Open the Column Properties section again (repeat step 3).
8. Select Goals in the Column Name select list.
9. Select Yes for Value Required.
10. In the Default Text field, enter 0.
11. Click Apply.
Now, when you create players, both Name and Goals are required values. Goals defaults to 0.
Adding PlayersTo add players to the Players data grid, click the Add Row button. For this example, add the players and their goals as shown in Figure 12-11.
Figure 12-11. Player data
Creating Alternate Default ReportsNow that you have data in the data grids, you can create alternate default reports, which you reference when creating sections. Data grids allow you to save reports just like interactive reports do. Alternate default reports are saved data-grid reports that can be displayed throughout your websheet application.
Note ■ some of the reports that you’ll create are date sensitive. Normally, you’d use SYSDATE as a reference point. Instead, you’ll use a static date of 10-Jun-2010 to simulate a common SYSDATE. this ensures that you see the same data that is shown in this book.
www.it-ebooks.info
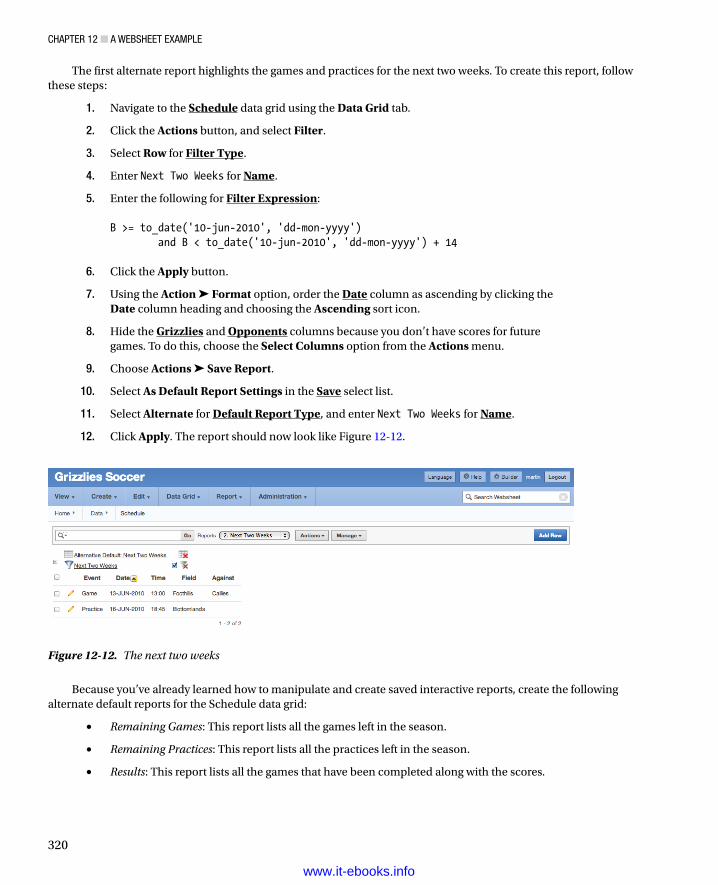
Chapter 12 ■ a Websheet example
320
The first alternate report highlights the games and practices for the next two weeks. To create this report, follow these steps:
1. Navigate to the Schedule data grid using the Data Grid tab.
2. Click the Actions button, and select Filter.
3. Select Row for Filter Type.
4. Enter Next Two Weeks for Name.
5. Enter the following for Filter Expression: B >= to_date('10-jun-2010', 'dd-mon-yyyy') and B < to_date('10-jun-2010', 'dd-mon-yyyy') + 14
6. Click the Apply button.
7. Using the Action ➤ Format option, order the Date column as ascending by clicking the Date column heading and choosing the Ascending sort icon.
8. Hide the Grizzlies and Opponents columns because you don’t have scores for future games. To do this, choose the Select Columns option from the Actions menu.
9. Choose Actions ➤ Save Report.
10. Select As Default Report Settings in the Save select list.
11. Select Alternate for Default Report Type, and enter Next Two Weeks for Name.
12. Click Apply. The report should now look like Figure 12-12.
Figure 12-12. The next two weeks
Because you’ve already learned how to manipulate and create saved interactive reports, create the following alternate default reports for the Schedule data grid:
• Remaining Games: This report lists all the games left in the season.
• Remaining Practices: This report lists all the practices left in the season.
• Results: This report lists all the games that have been completed along with the scores.
www.it-ebooks.info
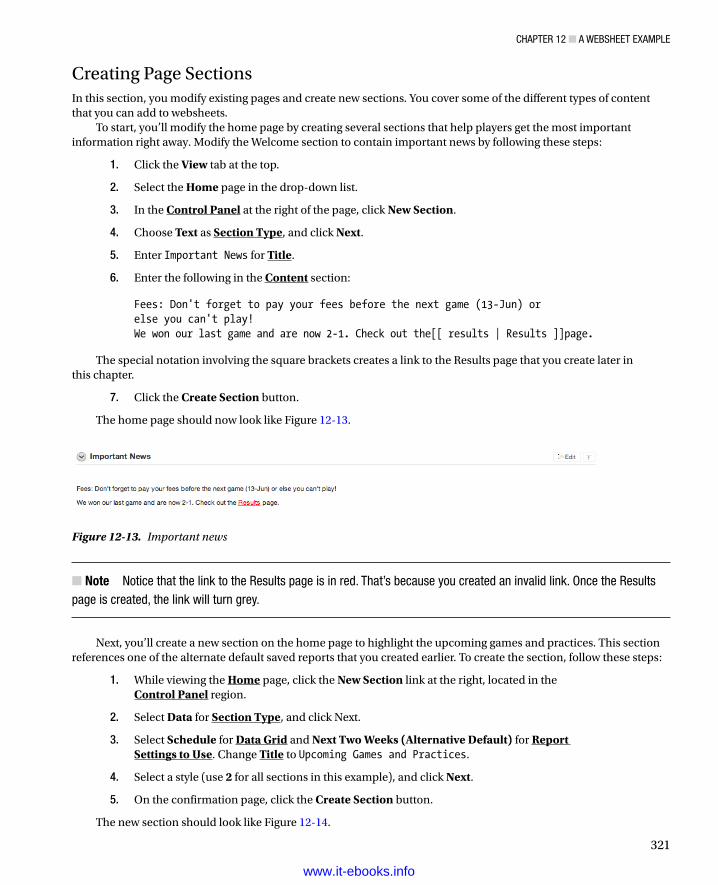
Chapter 12 ■ a Websheet example
321
Creating Page SectionsIn this section, you modify existing pages and create new sections. You cover some of the different types of content that you can add to websheets.
To start, you’ll modify the home page by creating several sections that help players get the most important information right away. Modify the Welcome section to contain important news by following these steps:
1. Click the View tab at the top.
2. Select the Home page in the drop-down list.
3. In the Control Panel at the right of the page, click New Section.
4. Choose Text as Section Type, and click Next.
5. Enter Important News for Title.
6. Enter the following in the Content section: Fees: Don't forget to pay your fees before the next game (13-Jun) or else you can't play!We won our last game and are now 2-1. Check out the[[ results | Results ]]page.
The special notation involving the square brackets creates a link to the Results page that you create later in this chapter.
7. Click the Create Section button.
The home page should now look like Figure 12-13.
Figure 12-13. Important news
Note ■ Notice that the link to the results page is in red. that’s because you created an invalid link. Once the results page is created, the link will turn grey.
Next, you’ll create a new section on the home page to highlight the upcoming games and practices. This section references one of the alternate default saved reports that you created earlier. To create the section, follow these steps:
1. While viewing the Home page, click the New Section link at the right, located in the Control Panel region.
2. Select Data for Section Type, and click Next.
3. Select Schedule for Data Grid and Next Two Weeks (Alternative Default) for Report Settings to Use. Change Title to Upcoming Games and Practices.
4. Select a style (use 2 for all sections in this example), and click Next.
5. On the confirmation page, click the Create Section button.
The new section should look like Figure 12-14.
www.it-ebooks.info
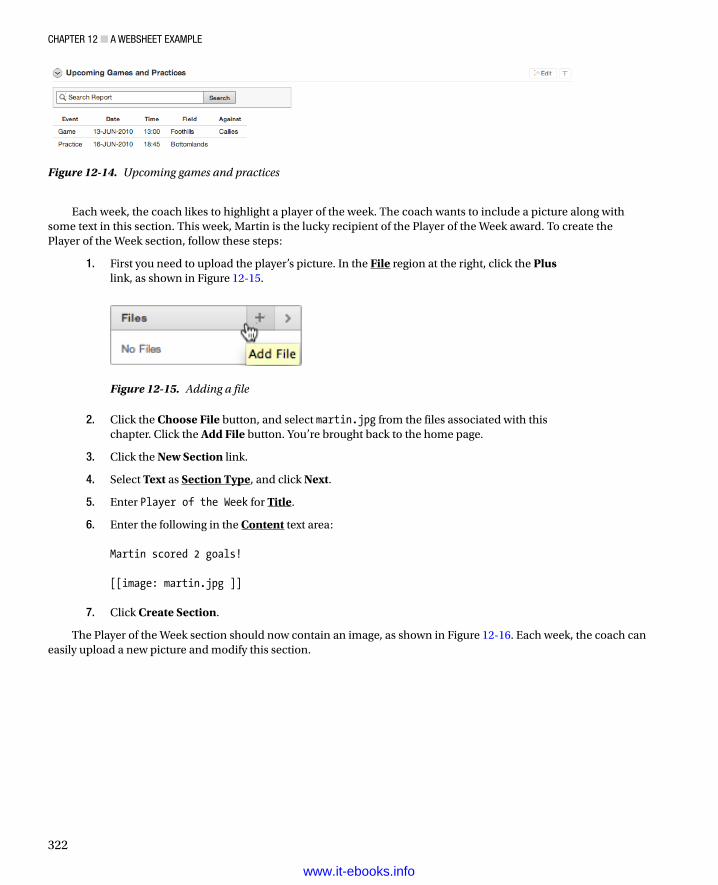
Chapter 12 ■ a Websheet example
322
Each week, the coach likes to highlight a player of the week. The coach wants to include a picture along with some text in this section. This week, Martin is the lucky recipient of the Player of the Week award. To create the Player of the Week section, follow these steps:
1. First you need to upload the player’s picture. In the File region at the right, click the Plus link, as shown in Figure 12-15.
Figure 12-14. Upcoming games and practices
Figure 12-15. Adding a file
2. Click the Choose File button, and select martin.jpg from the files associated with this chapter. Click the Add File button. You’re brought back to the home page.
3. Click the New Section link.
4. Select Text as Section Type, and click Next.
5. Enter Player of the Week for Title.
6. Enter the following in the Content text area: Martin scored 2 goals! [[image: martin.jpg ]]
7. Click Create Section.
The Player of the Week section should now contain an image, as shown in Figure 12-16. Each week, the coach can easily upload a new picture and modify this section.
www.it-ebooks.info
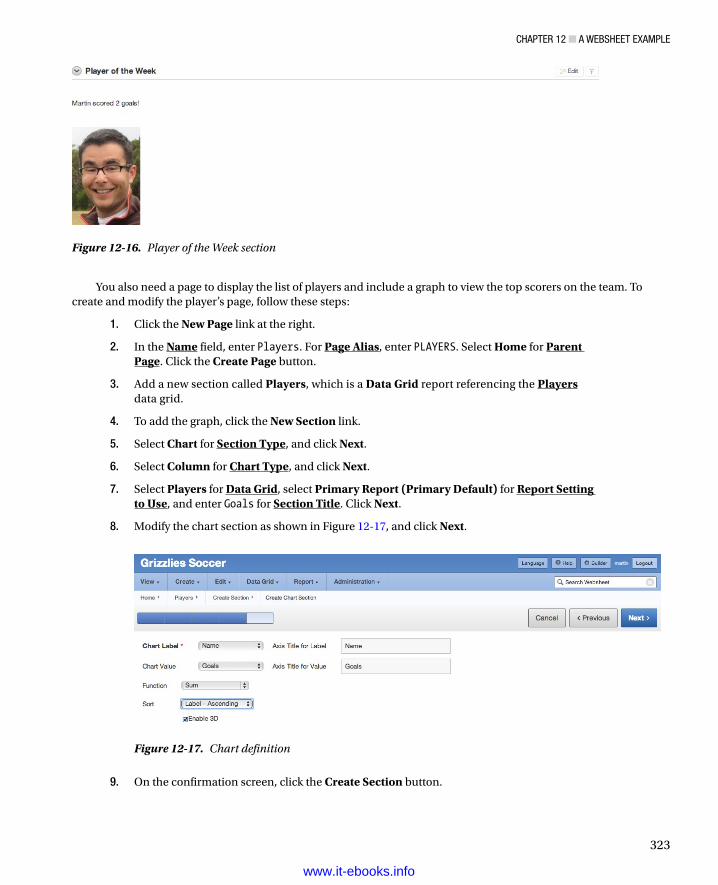
Chapter 12 ■ a Websheet example
323
You also need a page to display the list of players and include a graph to view the top scorers on the team. To create and modify the player’s page, follow these steps:
1. Click the New Page link at the right.
2. In the Name field, enter Players. For Page Alias, enter PLAYERS. Select Home for Parent Page. Click the Create Page button.
3. Add a new section called Players, which is a Data Grid report referencing the Players data grid.
4. To add the graph, click the New Section link.
5. Select Chart for Section Type, and click Next.
6. Select Column for Chart Type, and click Next.
7. Select Players for Data Grid, select Primary Report (Primary Default) for Report Setting to Use, and enter Goals for Section Title. Click Next.
8. Modify the chart section as shown in Figure 12-17, and click Next.
Figure 12-16. Player of the Week section
Figure 12-17. Chart definition
9. On the confirmation screen, click the Create Section button.
www.it-ebooks.info
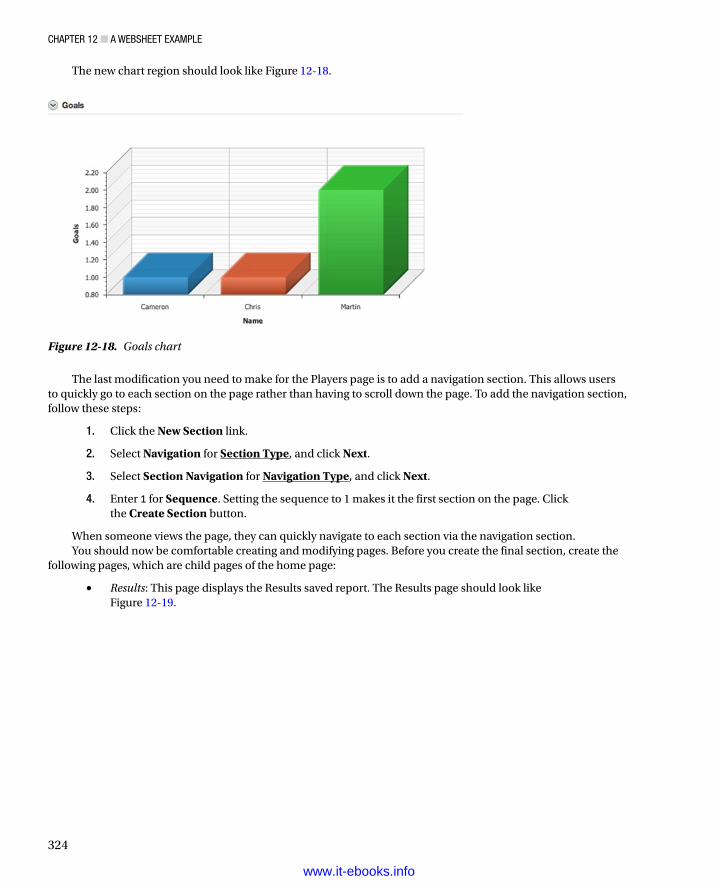
Chapter 12 ■ a Websheet example
324
The new chart region should look like Figure 12-18.
Figure 12-18. Goals chart
The last modification you need to make for the Players page is to add a navigation section. This allows users to quickly go to each section on the page rather than having to scroll down the page. To add the navigation section, follow these steps:
1. Click the New Section link.
2. Select Navigation for Section Type, and click Next.
3. Select Section Navigation for Navigation Type, and click Next.
4. Enter 1 for Sequence. Setting the sequence to 1 makes it the first section on the page. Click the Create Section button.
When someone views the page, they can quickly navigate to each section via the navigation section.You should now be comfortable creating and modifying pages. Before you create the final section, create the
following pages, which are child pages of the home page:
• Results: This page displays the Results saved report. The Results page should look like Figure 12-19.
www.it-ebooks.info
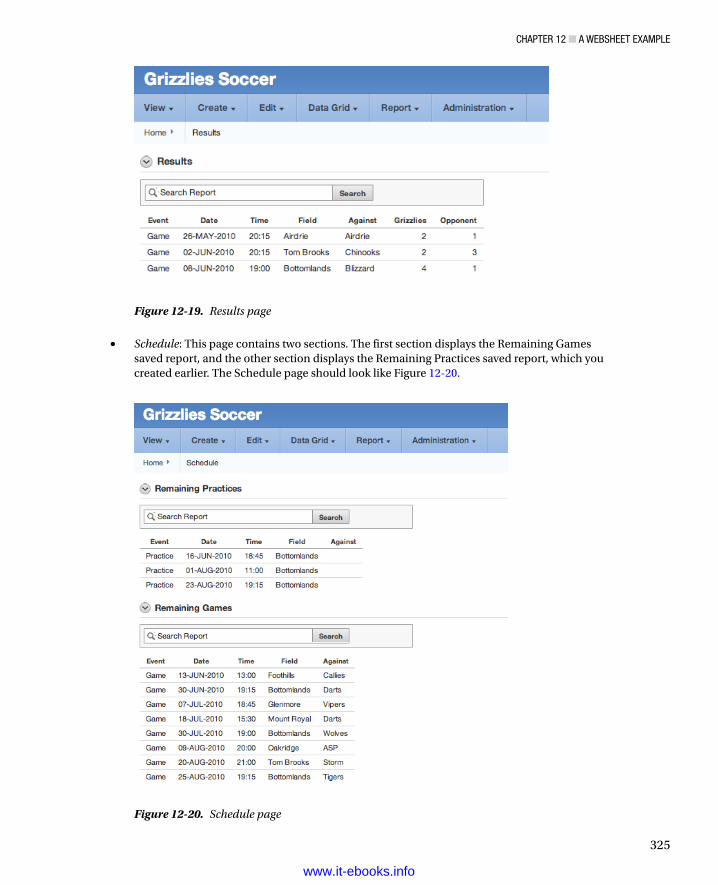
Chapter 12 ■ a Websheet example
325
• Schedule: This page contains two sections. The first section displays the Remaining Games saved report, and the other section displays the Remaining Practices saved report, which you created earlier. The Schedule page should look like Figure 12-20.
Figure 12-19. Results page
Figure 12-20. Schedule page
www.it-ebooks.info

Chapter 12 ■ a Websheet example
326
The next section you create provides a list of all the pages, along with links to the pages. To create this navigation section, follow these steps:
1. Go to the Home page.
2. Click the New Section link.
3. Select Navigation for Section Type, and click Next.
4. Select Page Navigation for Navigation Type, and click Next.
5. If you want to, modify Title and set Sequence to 1, and then click the Create Section button.
The new section should look like Figure 12-21.
Figure 12-21. Page navigation
SQL TagsWebsheets allow administrators and contributors to query tables and views in the schema. They can create reports that are similar to data grids, except they’re read-only. They can also include query results called SQL tags directly in sections.
On the Players page, let’s add a section to display the number of registered users who have access to the application, and include a SQL tag in the section. To create the section, follow these steps:
1. Go to the Players page.
2. Click the New Section link.
3. Select Text for Section Type, and click Next.
4. Set Sequence to 5 and Title to Active Registered Users.
5. Enter the following text in the Content section, and click the Create Section button: We currently have[[sqlvalue: select count(*) from tusers where active_flag = 'Y' ]]active registered users. They are: [[sql: select initcap(user_name) "Name" from tusers order by user_name ]]
The new section should look like Figure 12-22. Notice the select count query in the first line of the preceding code. That query generates the value 3 shown as the number of active users in the figure. Similarly, the second select statement in the preceding code generates the list of player names.
www.it-ebooks.info
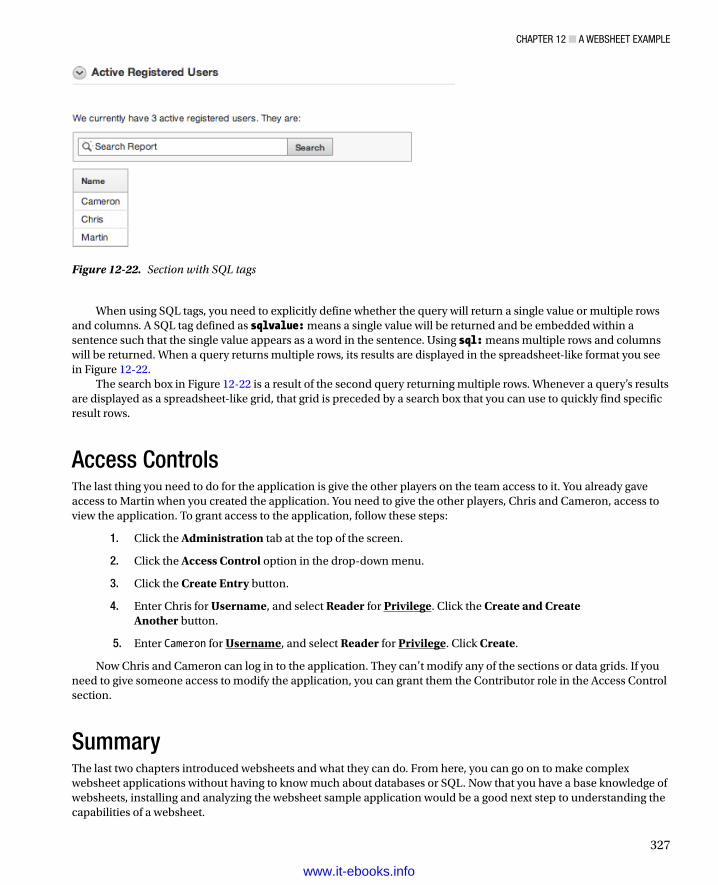
Chapter 12 ■ a Websheet example
327
When using SQL tags, you need to explicitly define whether the query will return a single value or multiple rows and columns. A SQL tag defined as sqlvalue: means a single value will be returned and be embedded within a sentence such that the single value appears as a word in the sentence. Using sql: means multiple rows and columns will be returned. When a query returns multiple rows, its results are displayed in the spreadsheet-like format you see in Figure 12-22.
The search box in Figure 12-22 is a result of the second query returning multiple rows. Whenever a query’s results are displayed as a spreadsheet-like grid, that grid is preceded by a search box that you can use to quickly find specific result rows.
Access ControlsThe last thing you need to do for the application is give the other players on the team access to it. You already gave access to Martin when you created the application. You need to give the other players, Chris and Cameron, access to view the application. To grant access to the application, follow these steps:
1. Click the Administration tab at the top of the screen.
2. Click the Access Control option in the drop-down menu.
3. Click the Create Entry button.
4. Enter Chris for Username, and select Reader for Privilege. Click the Create and Create Another button.
5. Enter Cameron for Username, and select Reader for Privilege. Click Create.
Now Chris and Cameron can log in to the application. They can’t modify any of the sections or data grids. If you need to give someone access to modify the application, you can grant them the Contributor role in the Access Control section.
SummaryThe last two chapters introduced websheets and what they can do. From here, you can go on to make complex websheet applications without having to know much about databases or SQL. Now that you have a base knowledge of websheets, installing and analyzing the websheet sample application would be a good next step to understanding the capabilities of a websheet.
Figure 12-22. Section with SQL tags
www.it-ebooks.info
329
Chapter 13
Extended Developer Tools
While developing the sample application in the previous chapters, you saw many features in the APEX development tool. This chapter highlights advanced development features in APEX that weren’t covered in the previous chapters. These features—or tools, as we prefer to call them—may help when you’re developing large applications in a corporate environment.
Note ■ This chapter assumes that you’re comfortable with APEX and understand the fundamentals. If you’re still not comfortable developing an APEX application, we strongly recommend that you revisit the examples from Chapters 5 through 9 in order to become more at ease with APEX and its development environment.
Page LocksWhen developing in larger teams, development conflicts occur. A development conflict is when two developers are working on the same object at the same time and overwrite each other’s changes.
Note ■ For the remainder of this chapter, references to APEX objects imply page items, regions, lists, pages, and so on.
Conventional web development tools, such as ASP, PHP, and JSP, contain multiple files that each represent a page or a set of functions in the web application. When developing with these tools, it’s common practice to use a source-control tool, such as Subversion, to manage all the changes. Source-control tools can easily manage development conflicts between multiple developers, because they’re isolated to a single file.
APEX is different than the scripting languages just mentioned because developers don’t work with files. All the information is stored in tables in the database. When you create an export of an application, you get a single SQL file that load the metadata for the application into these tables. Because APEX stores its content in the database, you can’t use traditional source-control tools to manage conflicts when developing in teams with multiple developers.
APEX ConflictsTo demonstrate a development conflict in APEX, imagine that you have two developers, Mina and Natalie, working on the same page in an application. If they’re both adding and modifying page components at the same time, the page may not behave as expected for either of them.
APEX prevents developers from modifying the same object at the same time by performing optimistic locking. Table 13-1 shows the sequence of events that occurs as the two developers edit the same object. You can see at the end how APEX prevents Natalie from overwriting the changes made by Mina.
www.it-ebooks.info
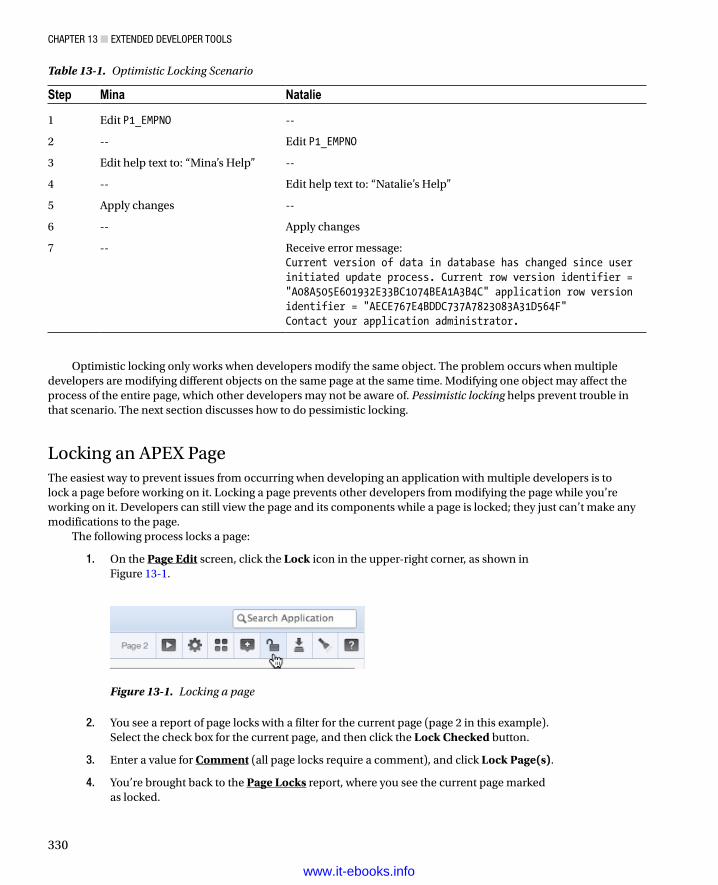
ChAPTEr 13 ■ EXTEndEd dEvEloPEr Tools
330
Optimistic locking only works when developers modify the same object. The problem occurs when multiple developers are modifying different objects on the same page at the same time. Modifying one object may affect the process of the entire page, which other developers may not be aware of. Pessimistic locking helps prevent trouble in that scenario. The next section discusses how to do pessimistic locking.
Locking an APEX PageThe easiest way to prevent issues from occurring when developing an application with multiple developers is to lock a page before working on it. Locking a page prevents other developers from modifying the page while you’re working on it. Developers can still view the page and its components while a page is locked; they just can’t make any modifications to the page.
The following process locks a page:
1. On the Page Edit screen, click the Lock icon in the upper-right corner, as shown in Figure 13-1.
Figure 13-1. Locking a page
Table 13-1. Optimistic Locking Scenario
Step Mina Natalie
1 Edit P1_EMPNO --
2 -- Edit P1_EMPNO
3 Edit help text to: “Mina’s Help” --
4 -- Edit help text to: “Natalie’s Help”
5 Apply changes --
6 -- Apply changes
7 -- Receive error message:Current version of data in database has changed since user initiated update process. Current row version identifier = "A08A505E601932E33BC1074BEA1A3B4C" application row version identifier = "AECE767E4BDDC737A7823083A31D564F"Contact your application administrator.
2. You see a report of page locks with a filter for the current page (page 2 in this example). Select the check box for the current page, and then click the Lock Checked button.
3. Enter a value for Comment (all page locks require a comment), and click Lock Page(s).
4. You’re brought back to the Page Locks report, where you see the current page marked as locked.
www.it-ebooks.info

ChAPTEr 13 ■ EXTEndEd dEvEloPEr Tools
331
Entering meaningful page-lock comments is important because a history of page locks is maintained. If you use a case-management tool, it’s smart to reference the case number that you’re working on when locking a page.
If another developer views a locked page, they see a notification message and that the lock icon is locked, signaling that the page can’t be modified. Figure 13-2 shows an example of a locked page. The page-lock comment is displayed above the Page Render region.
Figure 13-2. Locked page
Unlocking a PageOnly APEX administrators, workspace administrators, and the developer who locked a page can unlock it. If you’re the developer who locked a page, the following process demonstrates how to unlock it:
1. Go to the locked page (page 2 from the previous example), and click the Lock icon in the upper-right corner.
2. You see a report of page locks with a filter for your current page. Select the check box for the current page, and then click the Unlock Checked button.
3. You’re brought back to the Page Locks report page. You should see a confirmation message that the page was unlocked.
Administering Page LocksDevelopers may want to see all the pages that are locked, or they may want to lock/unlock multiple pages at the same time. APEX provides tools to handle multiple page-lock requests. To view the Page Locks report, go to Utilities ➤ Cross Page Utilities ➤ Page Locks, as shown in Figure 13-3.
www.it-ebooks.info
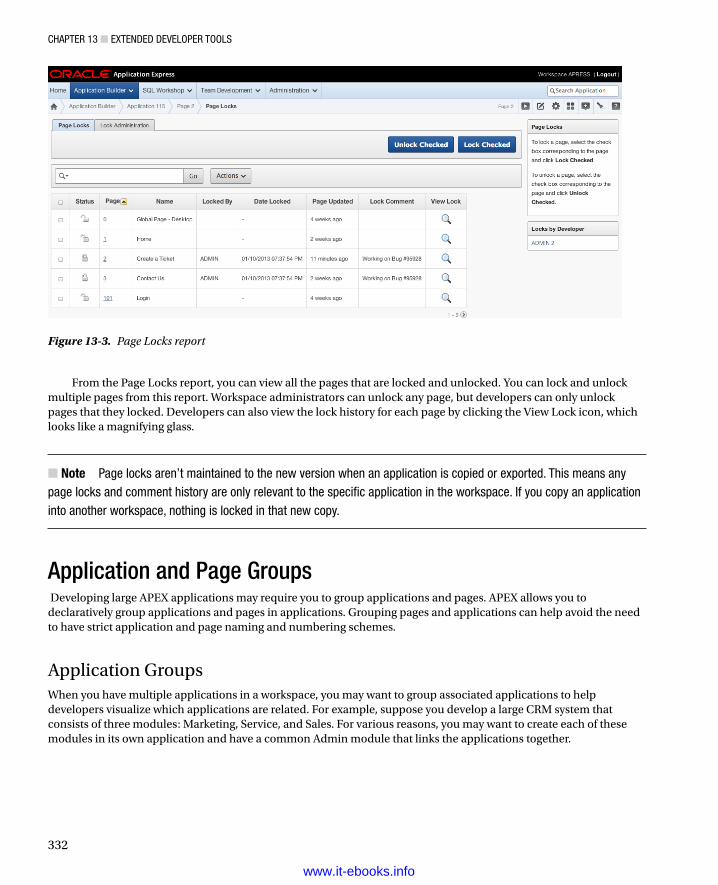
ChAPTEr 13 ■ EXTEndEd dEvEloPEr Tools
332
From the Page Locks report, you can view all the pages that are locked and unlocked. You can lock and unlock multiple pages from this report. Workspace administrators can unlock any page, but developers can only unlock pages that they locked. Developers can also view the lock history for each page by clicking the View Lock icon, which looks like a magnifying glass.
Note ■ Page locks aren’t maintained to the new version when an application is copied or exported. This means any page locks and comment history are only relevant to the specific application in the workspace. If you copy an application into another workspace, nothing is locked in that new copy.
Application and Page Groups Developing large APEX applications may require you to group applications and pages. APEX allows you to declaratively group applications and pages in applications. Grouping pages and applications can help avoid the need to have strict application and page naming and numbering schemes.
Application GroupsWhen you have multiple applications in a workspace, you may want to group associated applications to help developers visualize which applications are related. For example, suppose you develop a large CRM system that consists of three modules: Marketing, Service, and Sales. For various reasons, you may want to create each of these modules in its own application and have a common Admin module that links the applications together.
Figure 13-3. Page Locks report
www.it-ebooks.info

ChAPTEr 13 ■ EXTEndEd dEvEloPEr Tools
333
If your workspace contains other suites of applications, developers may get confused about which suite of applications they’re working on. To resolve this issue, you can create application groups. Here is the process to create an application group:
1. Go to Home ➤ Application Builder.
2. Click Application Groups at the right, in the Tasks region.
3. Click the Create button.
4. Enter Name and Description values for the group. In this example, use CRM. Click Create.
The following steps demonstrate how to add individual applications to an application group:
1. On the Application Groups page, click the Manage Unassigned link at the right in the Tasks region.
2. Select the group in the New Group select list, and then choose the applications by selecting the check boxes. Click the Assign Checked button, as shown in Figure 13-4.
Figure 13-4. Assigning application groups
3. Go to the Application Builder main page, and view the applications in a report format. You can view the list of applications along with their application group, as shown in Figure 13-5.
www.it-ebooks.info
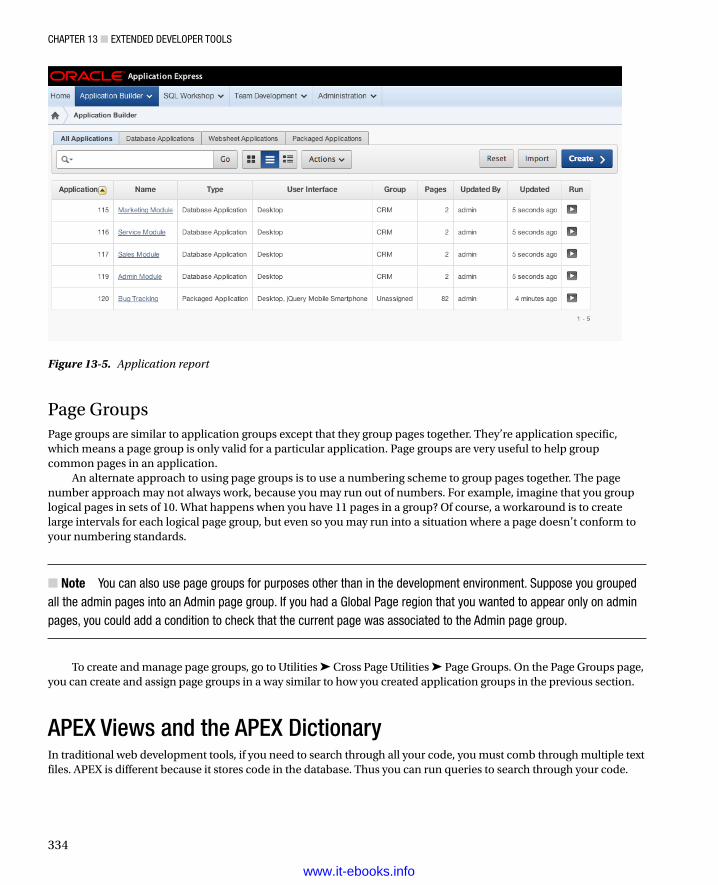
ChAPTEr 13 ■ EXTEndEd dEvEloPEr Tools
334
Page GroupsPage groups are similar to application groups except that they group pages together. They’re application specific, which means a page group is only valid for a particular application. Page groups are very useful to help group common pages in an application.
An alternate approach to using page groups is to use a numbering scheme to group pages together. The page number approach may not always work, because you may run out of numbers. For example, imagine that you group logical pages in sets of 10. What happens when you have 11 pages in a group? Of course, a workaround is to create large intervals for each logical page group, but even so you may run into a situation where a page doesn’t conform to your numbering standards.
Note ■ You can also use page groups for purposes other than in the development environment. suppose you grouped all the admin pages into an Admin page group. If you had a Global Page region that you wanted to appear only on admin pages, you could add a condition to check that the current page was associated to the Admin page group.
To create and manage page groups, go to Utilities ➤ Cross Page Utilities ➤ Page Groups. On the Page Groups page, you can create and assign page groups in a way similar to how you created application groups in the previous section.
APEX Views and the APEX DictionaryIn traditional web development tools, if you need to search through all your code, you must comb through multiple text files. APEX is different because it stores code in the database. Thus you can run queries to search through your code.
Figure 13-5. Application report
www.it-ebooks.info
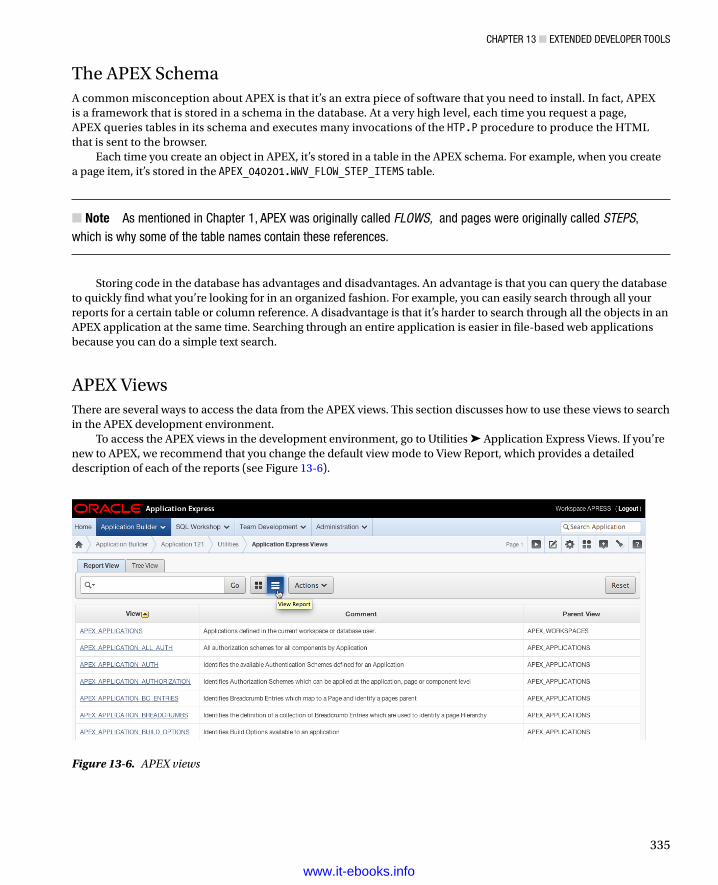
ChAPTEr 13 ■ EXTEndEd dEvEloPEr Tools
335
The APEX SchemaA common misconception about APEX is that it’s an extra piece of software that you need to install. In fact, APEX is a framework that is stored in a schema in the database. At a very high level, each time you request a page, APEX queries tables in its schema and executes many invocations of the HTP.P procedure to produce the HTML that is sent to the browser.
Each time you create an object in APEX, it’s stored in a table in the APEX schema. For example, when you create a page item, it’s stored in the APEX_040201.WWV_FLOW_STEP_ITEMS table.
Note ■ As mentioned in Chapter 1, APEX was originally called FLOWS, and pages were originally called STEPS, which is why some of the table names contain these references.
Storing code in the database has advantages and disadvantages. An advantage is that you can query the database to quickly find what you’re looking for in an organized fashion. For example, you can easily search through all your reports for a certain table or column reference. A disadvantage is that it’s harder to search through all the objects in an APEX application at the same time. Searching through an entire application is easier in file-based web applications because you can do a simple text search.
APEX ViewsThere are several ways to access the data from the APEX views. This section discusses how to use these views to search in the APEX development environment.
To access the APEX views in the development environment, go to Utilities ➤ Application Express Views. If you’re new to APEX, we recommend that you change the default view mode to View Report, which provides a detailed description of each of the reports (see Figure 13-6).
Figure 13-6. APEX views
www.it-ebooks.info
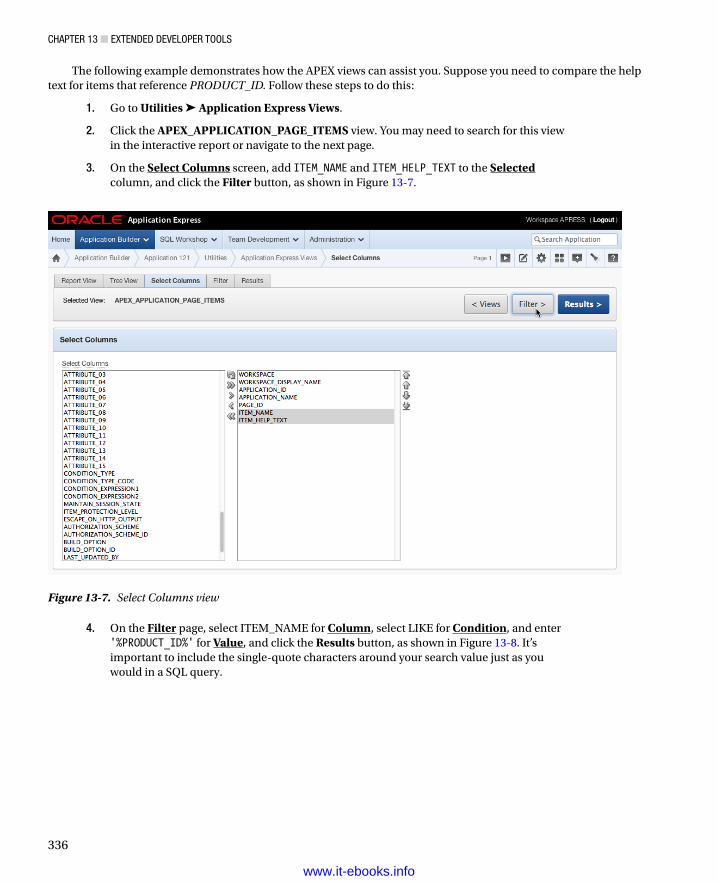
ChAPTEr 13 ■ EXTEndEd dEvEloPEr Tools
336
The following example demonstrates how the APEX views can assist you. Suppose you need to compare the help text for items that reference PRODUCT_ID. Follow these steps to do this:
1. Go to Utilities ➤ Application Express Views.
2. Click the APEX_APPLICATION_PAGE_ITEMS view. You may need to search for this view in the interactive report or navigate to the next page.
3. On the Select Columns screen, add ITEM_NAME and ITEM_HELP_TEXT to the Selectedcolumn, and click the Filter button, as shown in Figure 13-7.
Figure 13-7. Select Columns view
4. On the Filter page, select ITEM_NAME for Column, select LIKE for Condition, and enter '%PRODUCT_ID%' for Value, and click the Results button, as shown in Figure 13-8. It’s important to include the single-quote characters around your search value just as you would in a SQL query.
www.it-ebooks.info
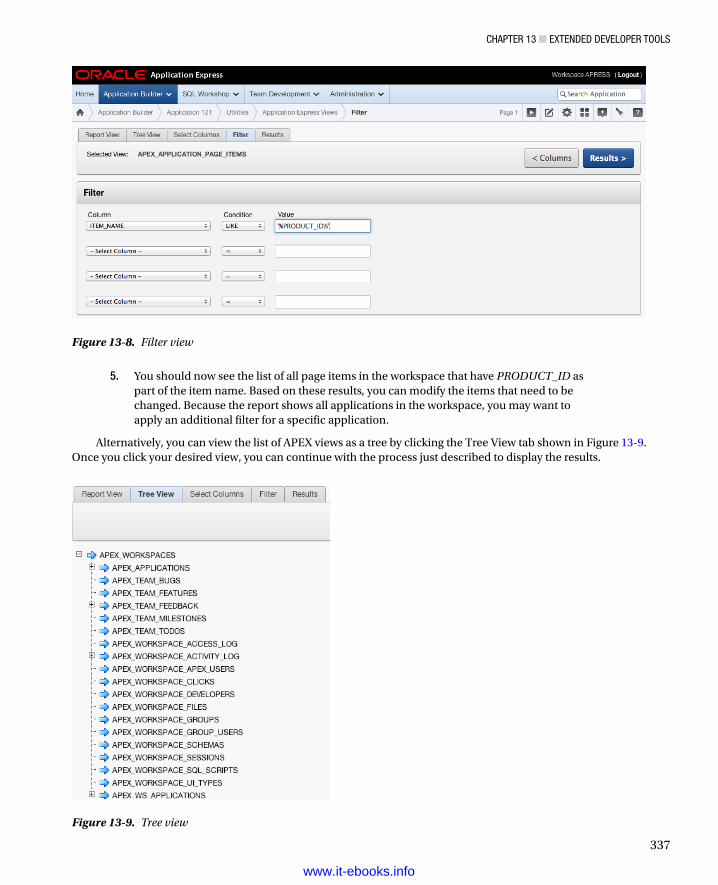
ChAPTEr 13 ■ EXTEndEd dEvEloPEr Tools
337
5. You should now see the list of all page items in the workspace that have PRODUCT_ID as part of the item name. Based on these results, you can modify the items that need to be changed. Because the report shows all applications in the workspace, you may want to apply an additional filter for a specific application.
Alternatively, you can view the list of APEX views as a tree by clicking the Tree View tab shown in Figure 13-9. Once you click your desired view, you can continue with the process just described to display the results.
Figure 13-8. Filter view
Figure 13-9. Tree view
www.it-ebooks.info
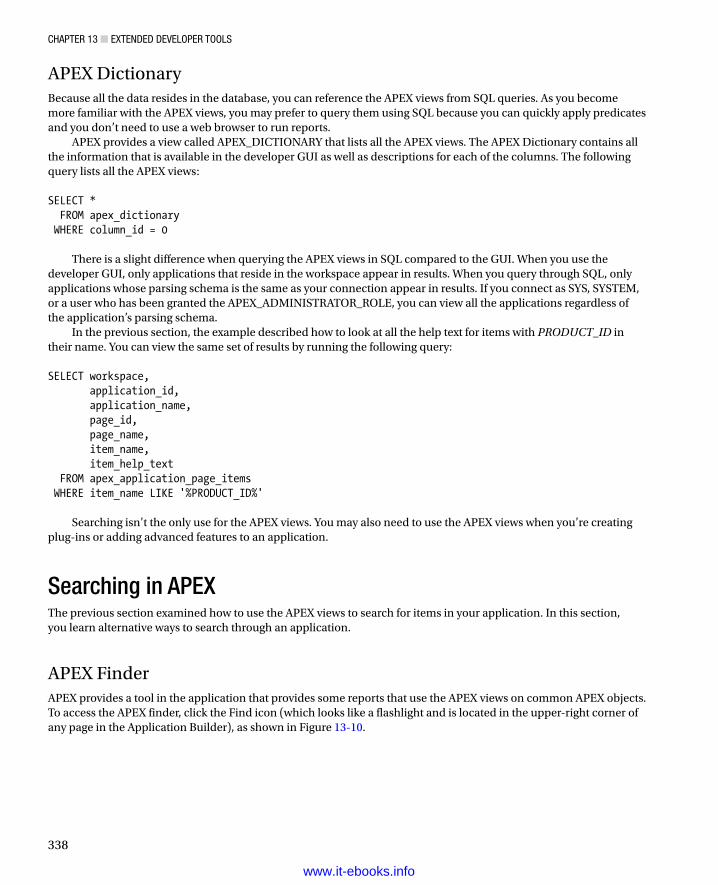
ChAPTEr 13 ■ EXTEndEd dEvEloPEr Tools
338
APEX DictionaryBecause all the data resides in the database, you can reference the APEX views from SQL queries. As you become more familiar with the APEX views, you may prefer to query them using SQL because you can quickly apply predicates and you don’t need to use a web browser to run reports.
APEX provides a view called APEX_DICTIONARY that lists all the APEX views. The APEX Dictionary contains all the information that is available in the developer GUI as well as descriptions for each of the columns. The following query lists all the APEX views: SELECT * FROM apex_dictionary WHERE column_id = 0
There is a slight difference when querying the APEX views in SQL compared to the GUI. When you use the developer GUI, only applications that reside in the workspace appear in results. When you query through SQL, only applications whose parsing schema is the same as your connection appear in results. If you connect as SYS, SYSTEM, or a user who has been granted the APEX_ADMINISTRATOR_ROLE, you can view all the applications regardless of the application’s parsing schema.
In the previous section, the example described how to look at all the help text for items with PRODUCT_ID in their name. You can view the same set of results by running the following query: SELECT workspace, application_id, application_name, page_id, page_name, item_name, item_help_text FROM apex_application_page_items WHERE item_name LIKE '%PRODUCT_ID%'
Searching isn’t the only use for the APEX views. You may also need to use the APEX views when you’re creating plug-ins or adding advanced features to an application.
Searching in APEXThe previous section examined how to use the APEX views to search for items in your application. In this section, you learn alternative ways to search through an application.
APEX FinderAPEX provides a tool in the application that provides some reports that use the APEX views on common APEX objects. To access the APEX finder, click the Find icon (which looks like a flashlight and is located in the upper-right corner of any page in the Application Builder), as shown in Figure 13-10.
www.it-ebooks.info
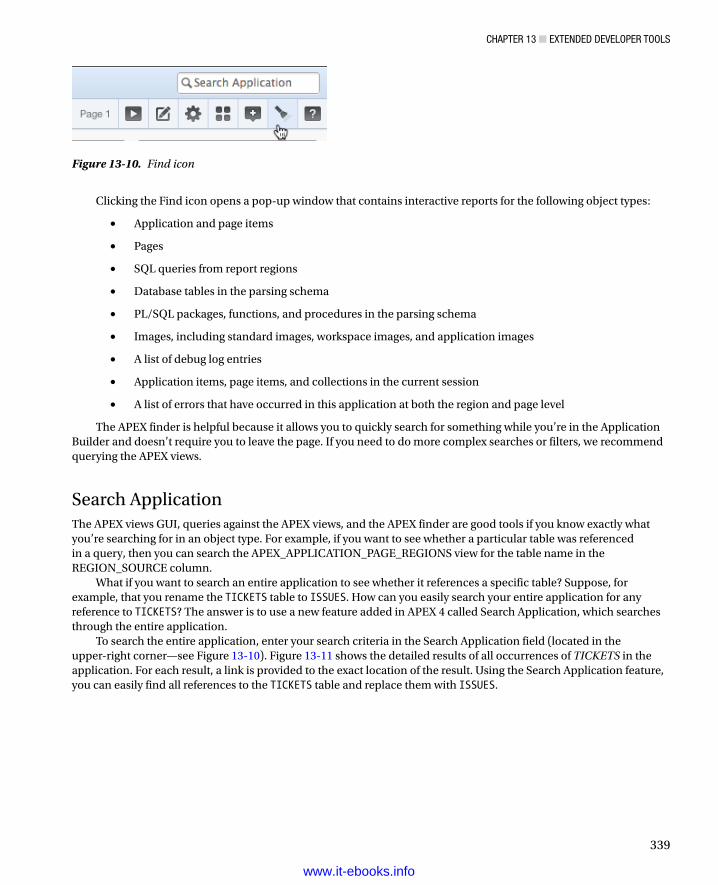
ChAPTEr 13 ■ EXTEndEd dEvEloPEr Tools
339
Clicking the Find icon opens a pop-up window that contains interactive reports for the following object types:
Application and page items•
Pages•
SQL queries from report regions•
Database tables in the parsing schema•
PL/SQL packages, functions, and procedures in the parsing schema•
Images, including standard images, workspace images, and application images•
A list of debug log entries•
Application items, page items, and collections in the current session•
A list of errors that have occurred in this application at both the region and page level•
The APEX finder is helpful because it allows you to quickly search for something while you’re in the Application Builder and doesn’t require you to leave the page. If you need to do more complex searches or filters, we recommend querying the APEX views.
Search ApplicationThe APEX views GUI, queries against the APEX views, and the APEX finder are good tools if you know exactly what you’re searching for in an object type. For example, if you want to see whether a particular table was referenced in a query, then you can search the APEX_APPLICATION_PAGE_REGIONS view for the table name in the REGION_SOURCE column.
What if you want to search an entire application to see whether it references a specific table? Suppose, for example, that you rename the TICKETS table to ISSUES. How can you easily search your entire application for any reference to TICKETS? The answer is to use a new feature added in APEX 4 called Search Application, which searches through the entire application.
To search the entire application, enter your search criteria in the Search Application field (located in the upper-right corner—see Figure 13-10). Figure 13-11 shows the detailed results of all occurrences of TICKETS in the application. For each result, a link is provided to the exact location of the result. Using the Search Application feature, you can easily find all references to the TICKETS table and replace them with ISSUES.
Figure 13-10. Find icon
www.it-ebooks.info
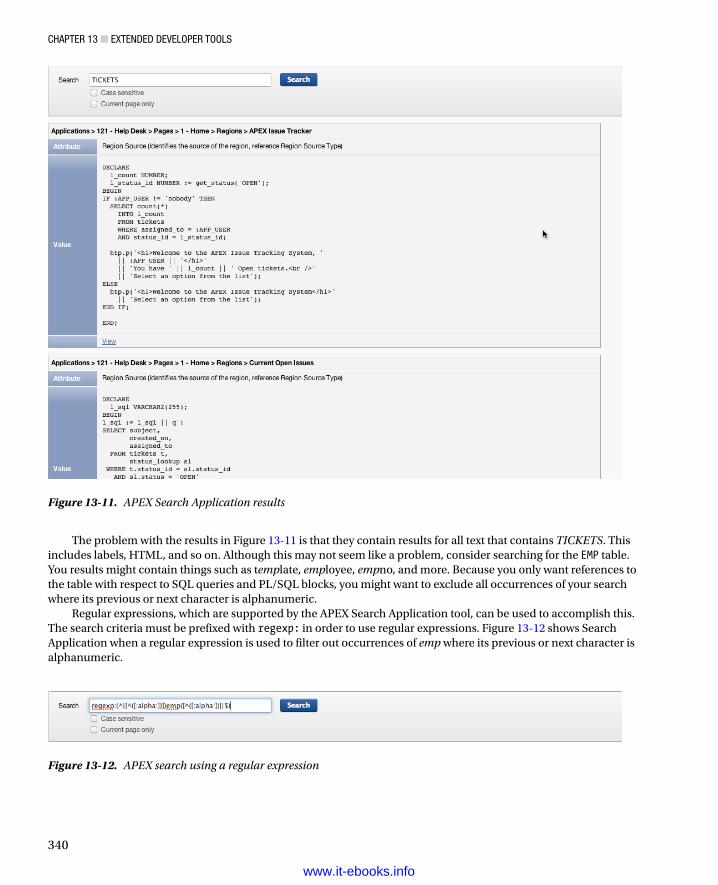
ChAPTEr 13 ■ EXTEndEd dEvEloPEr Tools
340
Figure 13-11. APEX Search Application results
Figure 13-12. APEX search using a regular expression
The problem with the results in Figure 13-11 is that they contain results for all text that contains TICKETS. This includes labels, HTML, and so on. Although this may not seem like a problem, consider searching for the EMP table. You results might contain things such as template, employee, empno, and more. Because you only want references to the table with respect to SQL queries and PL/SQL blocks, you might want to exclude all occurrences of your search where its previous or next character is alphanumeric.
Regular expressions, which are supported by the APEX Search Application tool, can be used to accomplish this. The search criteria must be prefixed with regexp: in order to use regular expressions. Figure 13-12 shows Search Application when a regular expression is used to filter out occurrences of emp where its previous or next character is alphanumeric.
www.it-ebooks.info
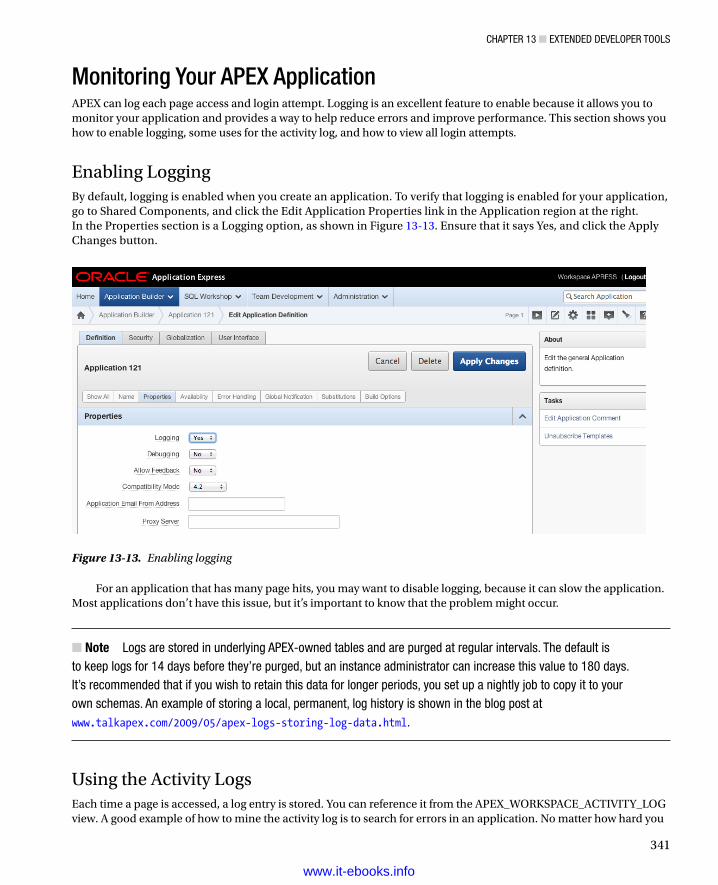
ChAPTEr 13 ■ EXTEndEd dEvEloPEr Tools
341
Monitoring Your APEX ApplicationAPEX can log each page access and login attempt. Logging is an excellent feature to enable because it allows you to monitor your application and provides a way to help reduce errors and improve performance. This section shows you how to enable logging, some uses for the activity log, and how to view all login attempts.
Enabling LoggingBy default, logging is enabled when you create an application. To verify that logging is enabled for your application, go to Shared Components, and click the Edit Application Properties link in the Application region at the right. In the Properties section is a Logging option, as shown in Figure 13-13. Ensure that it says Yes, and click the Apply Changes button.
Figure 13-13. Enabling logging
For an application that has many page hits, you may want to disable logging, because it can slow the application. Most applications don’t have this issue, but it’s important to know that the problem might occur.
Note ■ logs are stored in underlying APEX-owned tables and are purged at regular intervals. The default is to keep logs for 14 days before they’re purged, but an instance administrator can increase this value to 180 days. It’s recommended that if you wish to retain this data for longer periods, you set up a nightly job to copy it to your own schemas. An example of storing a local, permanent, log history is shown in the blog post at www.talkapex.com/2009/05/apex-logs-storing-log-data.html.
Using the Activity LogsEach time a page is accessed, a log entry is stored. You can reference it from the APEX_WORKSPACE_ACTIVITY_LOG view. A good example of how to mine the activity log is to search for errors in an application. No matter how hard you
www.it-ebooks.info
ChAPTEr 13 ■ EXTEndEd dEvEloPEr Tools
342
try, unhandled errors occur. Instead of waiting for users to report these errors (assuming that they even report errors), you can take a proactive approach. The following query identifies when an error occurs at the page or region level: SELECT * FROM apex_workspace_activity_log WHERE error_message IS NOT NULL
Once an application has been running for a while, you may notice that some pages are accessed more often than others and some pages aren’t performing as desired. The following queries identify these two cases: -- Find most accessed pages SELECT application_id, application_name, page_id, page_name, SUM (page_id) page_hit_count FROM apex_workspace_activity_logGROUP BY application_id, application_name, page_id, page_nameORDER BY SUM (page_id) DESC -- Find slowest pages-- Note: This depends on how you calculate slow SELECT application_id, application_name, page_id, page_name, ROUND (AVG (elapsed_time), 5) avg_elapsed_time, SUM (page_id) page_hit_count, MEDIAN (elapsed_time) median_elapsed_time FROM apex_workspace_activity_logGROUP BY application_id, application_name, page_id, page_nameORDER BY 5 DESC
By identifying the most-accessed pages, you can focus your attention on trying to speed them up. Slow pages may require tuning, but if they’re accessed infrequently, you may not need to spend a lot of time on them.
Here are some other examples of uses for the activity log:
• Top browsers: If you build your application to support Firefox and IE and then find that half your users are using Chrome, you may want to invest some time ensuring that your application supports Chrome.
• The time frame when people are using your application: This gives you an idea of the best time for maintenance and upgrades. You can also derive the peak usage times.
• Search criteria in interactive reports: If there is a consistent search pattern, perhaps you need a better report or preset filters.
www.it-ebooks.info
ChAPTEr 13 ■ EXTEndEd dEvEloPEr Tools
343
Login AttemptsThe APEX_WORKSPACE_ACCESS_LOG stores all the login attempts to your APEX applications. The access log can be extremely useful when you’re debugging user-authentication issues.
An example of utilizing the access log is to monitor invalid login attempts. When a user attempts to log in with invalid credentials, it’s not recommended that you display the exact reason why their login attempt failed. You don’t want to tell the user the exact reason because it could reveal valuable information, such as whether the user exists. It may still be important for your operations team to know why a user wasn’t able to log in, in case they need to resolve the issue. Because all login attempts are stored in the access log, for a failed login attempt you can see exactly why a user wasn’t able to log in.
Note ■ If you create your own authentication process, you should use the APEX_UTIl.sET_AUThEnTICATIon_rEsUlT and APEX_UTIl.sET_CUsToM_AUTh_sTATUs procedures to ensure that you populate the access log with meaningful messages. For more information on these authentication procedures, please read the APEX API documentation.
APEX AdvisorThe APEX Advisor is a tool that executes predefined checks against an application. These validations can help reduce errors in your application before it’s tested or goes into production.
Note ■ Prior to APEX 4, the APEX Advisor was an open source project developed by Patrick Wolf. during the development of APEX 4.0, Patrick joined the APEX team at oracle and included the Advisor as a built-in tool. The open source version of the APEX Advisor is available at http://essentials.oracleapex.info/.
To use the Advisor, go to Utilities ➤ Advisor. Figure 13-14 shows all the checks you can perform. Hovering over each validation displays a brief description of the validation. You have the option to restrict the pages that the Advisor reviews by defining a comma-delimited list of pages to search for in the Check Pages region located at the bottom of the page. Once you select the checks to perform, click the Perform Check button. The results page provides a list of detailed issues that the Advisor finds plus links to each of the objects.
www.it-ebooks.info
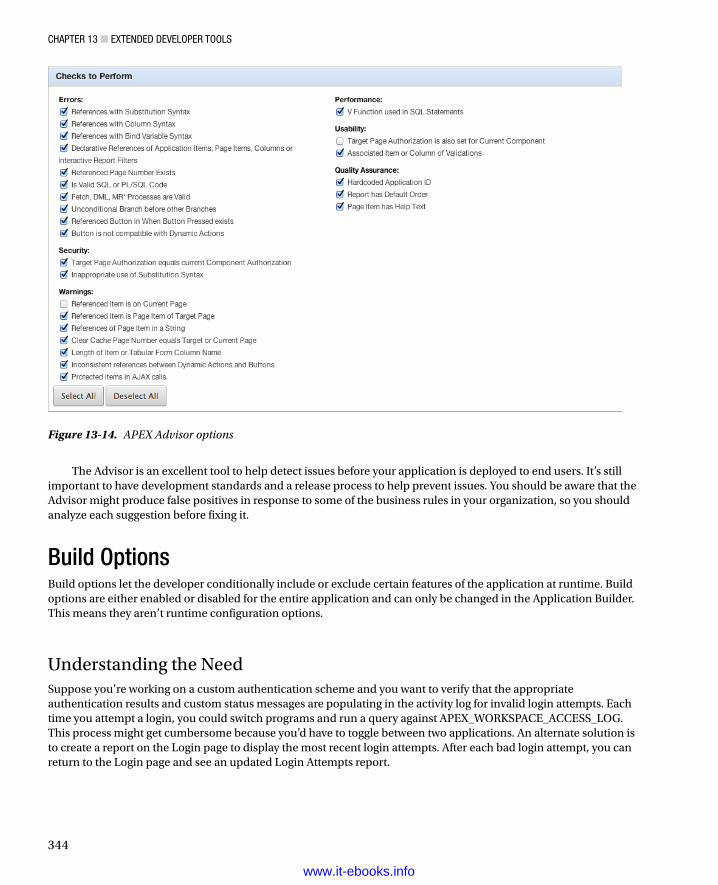
ChAPTEr 13 ■ EXTEndEd dEvEloPEr Tools
344
The Advisor is an excellent tool to help detect issues before your application is deployed to end users. It’s still important to have development standards and a release process to help prevent issues. You should be aware that the Advisor might produce false positives in response to some of the business rules in your organization, so you should analyze each suggestion before fixing it.
Build OptionsBuild options let the developer conditionally include or exclude certain features of the application at runtime. Build options are either enabled or disabled for the entire application and can only be changed in the Application Builder. This means they aren’t runtime configuration options.
Understanding the NeedSuppose you’re working on a custom authentication scheme and you want to verify that the appropriate authentication results and custom status messages are populating in the activity log for invalid login attempts. Each time you attempt a login, you could switch programs and run a query against APEX_WORKSPACE_ACCESS_LOG. This process might get cumbersome because you’d have to toggle between two applications. An alternate solution is to create a report on the Login page to display the most recent login attempts. After each bad login attempt, you can return to the Login page and see an updated Login Attempts report.
Figure 13-14. APEX Advisor options
www.it-ebooks.info
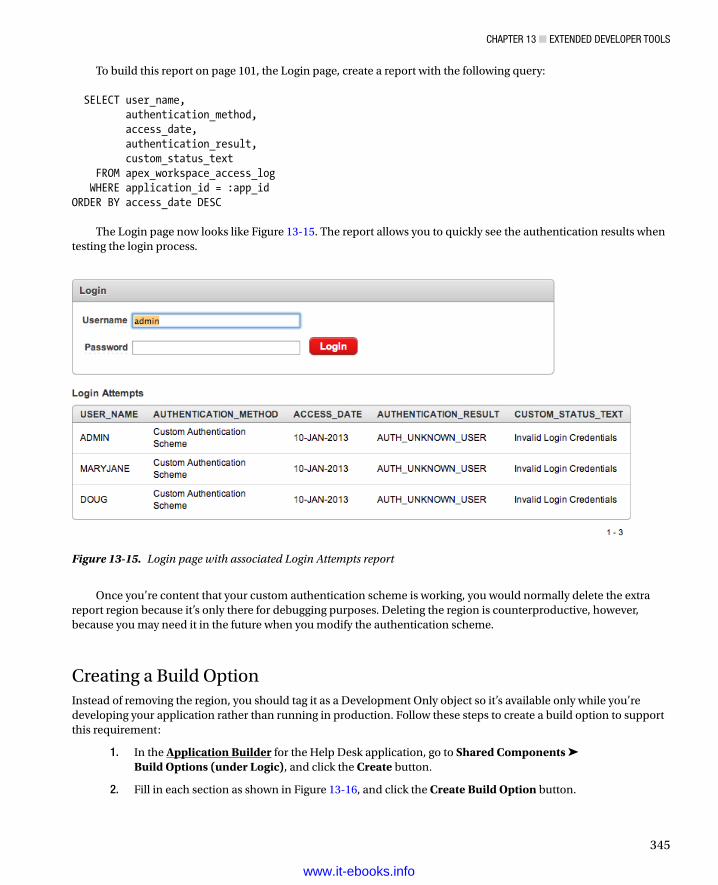
ChAPTEr 13 ■ EXTEndEd dEvEloPEr Tools
345
To build this report on page 101, the Login page, create a report with the following query: SELECT user_name, authentication_method, access_date, authentication_result, custom_status_text FROM apex_workspace_access_log WHERE application_id = :app_idORDER BY access_date DESC
The Login page now looks like Figure 13-15. The report allows you to quickly see the authentication results when testing the login process.
Figure 13-15. Login page with associated Login Attempts report
Once you’re content that your custom authentication scheme is working, you would normally delete the extra report region because it’s only there for debugging purposes. Deleting the region is counterproductive, however, because you may need it in the future when you modify the authentication scheme.
Creating a Build OptionInstead of removing the region, you should tag it as a Development Only object so it’s available only while you’re developing your application rather than running in production. Follow these steps to create a build option to support this requirement:
1. In the Application Builder for the Help Desk application, go to Shared Components ➤ Build Options (under Logic), and click the Create button.
2. Fill in each section as shown in Figure 13-16, and click the Create Build Option button.
www.it-ebooks.info
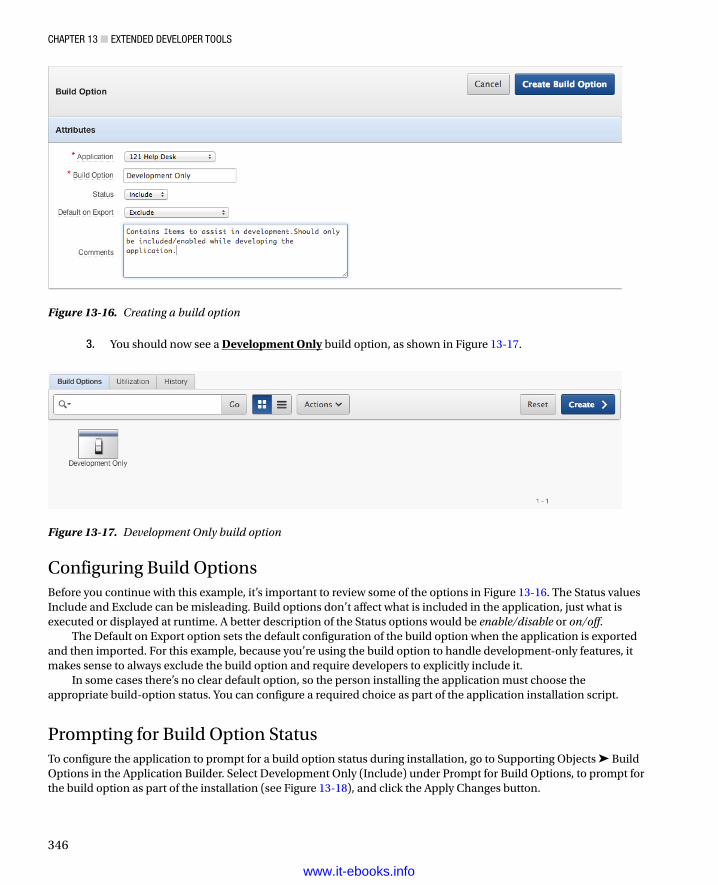
ChAPTEr 13 ■ EXTEndEd dEvEloPEr Tools
346
3. You should now see a Development Only build option, as shown in Figure 13-17.
Figure 13-17. Development Only build option
Figure 13-16. Creating a build option
Configuring Build OptionsBefore you continue with this example, it’s important to review some of the options in Figure 13-16. The Status values Include and Exclude can be misleading. Build options don’t affect what is included in the application, just what is executed or displayed at runtime. A better description of the Status options would be enable/disable or on/off.
The Default on Export option sets the default configuration of the build option when the application is exported and then imported. For this example, because you’re using the build option to handle development-only features, it makes sense to always exclude the build option and require developers to explicitly include it.
In some cases there’s no clear default option, so the person installing the application must choose the appropriate build-option status. You can configure a required choice as part of the application installation script.
Prompting for Build Option StatusTo configure the application to prompt for a build option status during installation, go to Supporting Objects ➤ Build Options in the Application Builder. Select Development Only (Include) under Prompt for Build Options, to prompt for the build option as part of the installation (see Figure 13-18), and click the Apply Changes button.
www.it-ebooks.info
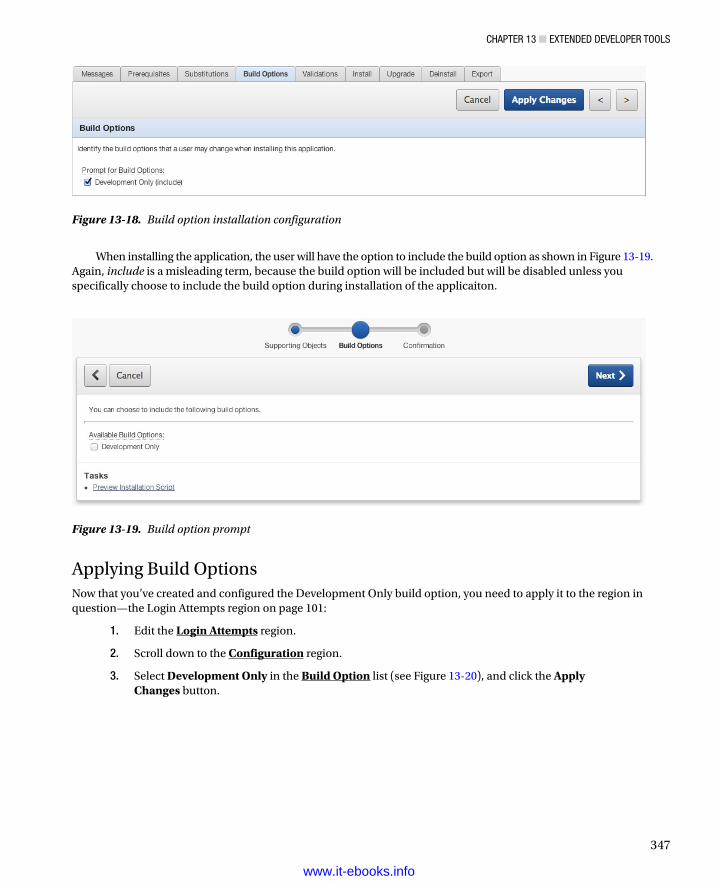
ChAPTEr 13 ■ EXTEndEd dEvEloPEr Tools
347
When installing the application, the user will have the option to include the build option as shown in Figure 13-19. Again, include is a misleading term, because the build option will be included but will be disabled unless you specifically choose to include the build option during installation of the applicaiton.
Figure 13-18. Build option installation configuration
Figure 13-19. Build option prompt
Applying Build OptionsNow that you’ve created and configured the Development Only build option, you need to apply it to the region in question—the Login Attempts region on page 101:
1. Edit the Login Attempts region.
2. Scroll down to the Configuration region.
3. Select Development Only in the Build Option list (see Figure 13-20), and click the Apply Changes button.
www.it-ebooks.info
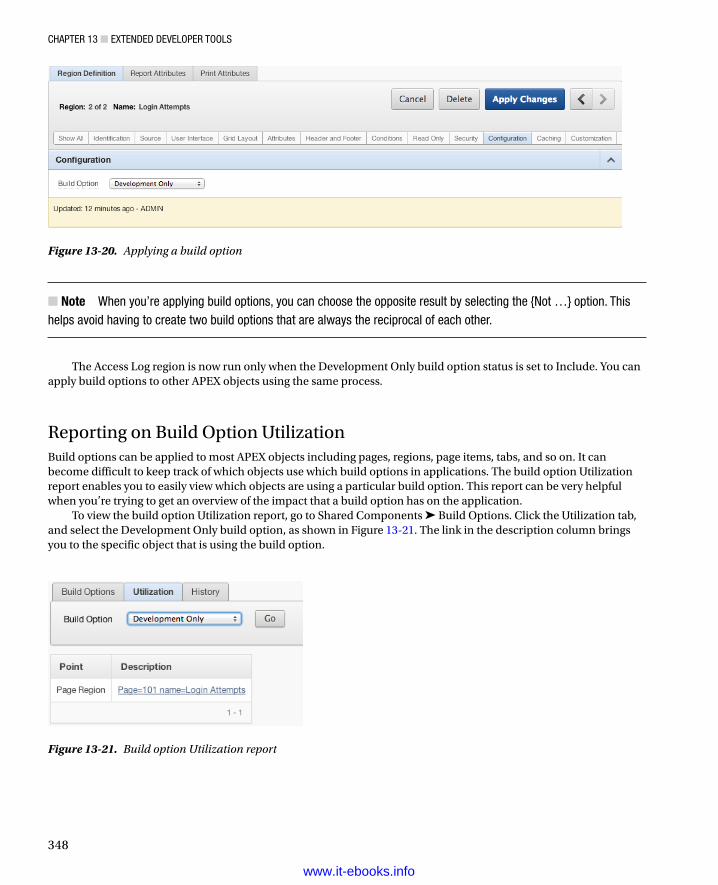
ChAPTEr 13 ■ EXTEndEd dEvEloPEr Tools
348
Note ■ When you’re applying build options, you can choose the opposite result by selecting the {not …} option. This helps avoid having to create two build options that are always the reciprocal of each other.
The Access Log region is now run only when the Development Only build option status is set to Include. You can apply build options to other APEX objects using the same process.
Reporting on Build Option UtilizationBuild options can be applied to most APEX objects including pages, regions, page items, tabs, and so on. It can become difficult to keep track of which objects use which build options in applications. The build option Utilization report enables you to easily view which objects are using a particular build option. This report can be very helpful when you’re trying to get an overview of the impact that a build option has on the application.
To view the build option Utilization report, go to Shared Components ➤ Build Options. Click the Utilization tab, and select the Development Only build option, as shown in Figure 13-21. The link in the description column brings you to the specific object that is using the build option.
Figure 13-20. Applying a build option
Figure 13-21. Build option Utilization report
www.it-ebooks.info
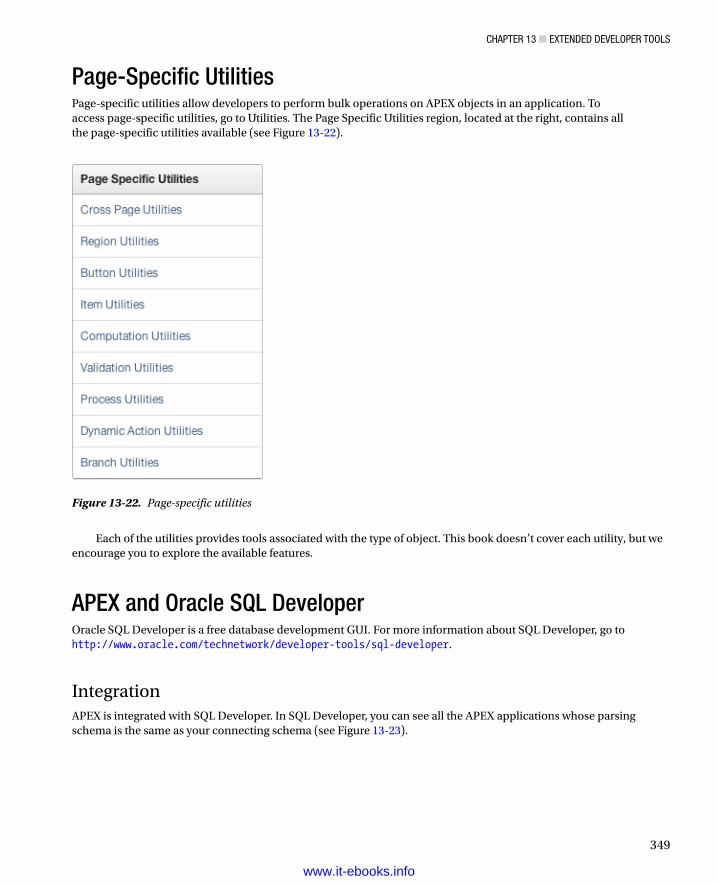
ChAPTEr 13 ■ EXTEndEd dEvEloPEr Tools
349
Page-Specific UtilitiesPage-specific utilities allow developers to perform bulk operations on APEX objects in an application. To access page-specific utilities, go to Utilities. The Page Specific Utilities region, located at the right, contains all the page-specific utilities available (see Figure 13-22).
Figure 13-22. Page-specific utilities
Each of the utilities provides tools associated with the type of object. This book doesn’t cover each utility, but we encourage you to explore the available features.
APEX and Oracle SQL DeveloperOracle SQL Developer is a free database development GUI. For more information about SQL Developer, go to http://www.oracle.com/technetwork/developer-tools/sql-developer.
IntegrationAPEX is integrated with SQL Developer. In SQL Developer, you can see all the APEX applications whose parsing schema is the same as your connecting schema (see Figure 13-23).
www.it-ebooks.info
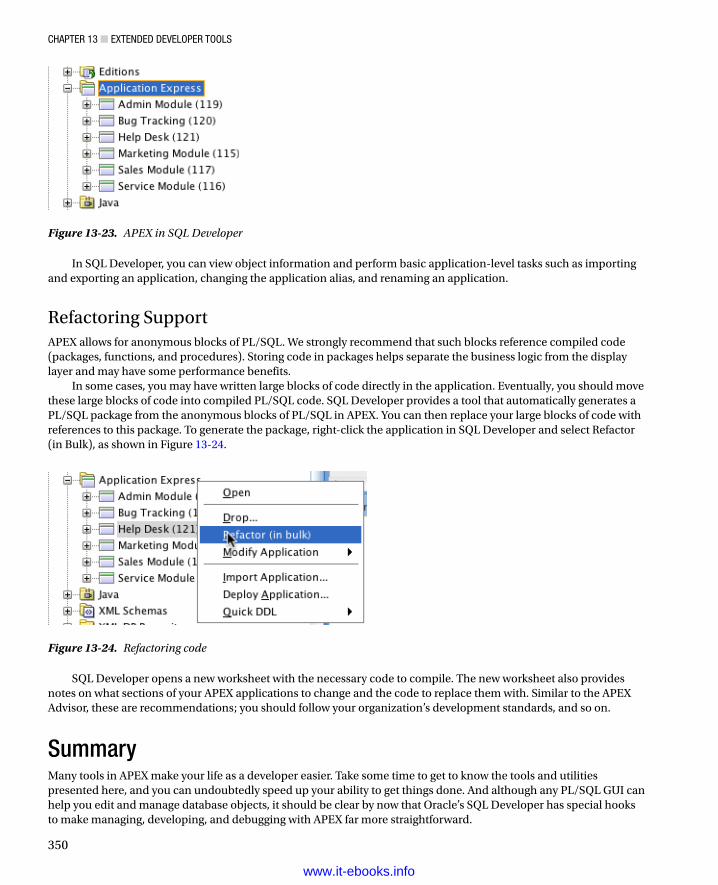
ChAPTEr 13 ■ EXTEndEd dEvEloPEr Tools
350
In SQL Developer, you can view object information and perform basic application-level tasks such as importing and exporting an application, changing the application alias, and renaming an application.
Refactoring SupportAPEX allows for anonymous blocks of PL/SQL. We strongly recommend that such blocks reference compiled code (packages, functions, and procedures). Storing code in packages helps separate the business logic from the display layer and may have some performance benefits.
In some cases, you may have written large blocks of code directly in the application. Eventually, you should move these large blocks of code into compiled PL/SQL code. SQL Developer provides a tool that automatically generates a PL/SQL package from the anonymous blocks of PL/SQL in APEX. You can then replace your large blocks of code with references to this package. To generate the package, right-click the application in SQL Developer and select Refactor (in Bulk), as shown in Figure 13-24.
Figure 13-23. APEX in SQL Developer
Figure 13-24. Refactoring code
SQL Developer opens a new worksheet with the necessary code to compile. The new worksheet also provides notes on what sections of your APEX applications to change and the code to replace them with. Similar to the APEX Advisor, these are recommendations; you should follow your organization’s development standards, and so on.
SummaryMany tools in APEX make your life as a developer easier. Take some time to get to know the tools and utilities presented here, and you can undoubtedly speed up your ability to get things done. And although any PL/SQL GUI can help you edit and manage database objects, it should be clear by now that Oracle’s SQL Developer has special hooks to make managing, developing, and debugging with APEX far more straightforward.
www.it-ebooks.info
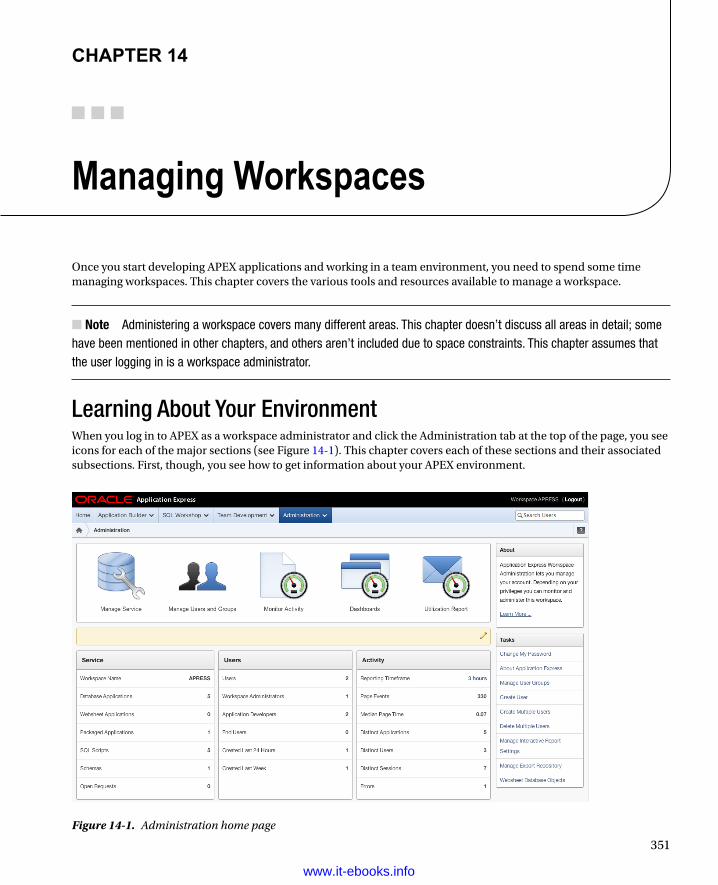
351
Chapter 14
Managing Workspaces
Once you start developing APEX applications and working in a team environment, you need to spend some time managing workspaces. This chapter covers the various tools and resources available to manage a workspace.
Note ■ Administering a workspace covers many different areas. This chapter doesn’t discuss all areas in detail; some have been mentioned in other chapters, and others aren’t included due to space constraints. This chapter assumes that the user logging in is a workspace administrator.
Learning About Your EnvironmentWhen you log in to APEX as a workspace administrator and click the Administration tab at the top of the page, you see icons for each of the major sections (see Figure 14-1). This chapter covers each of these sections and their associated subsections. First, though, you see how to get information about your APEX environment.
Figure 14-1. Administration home page
www.it-ebooks.info
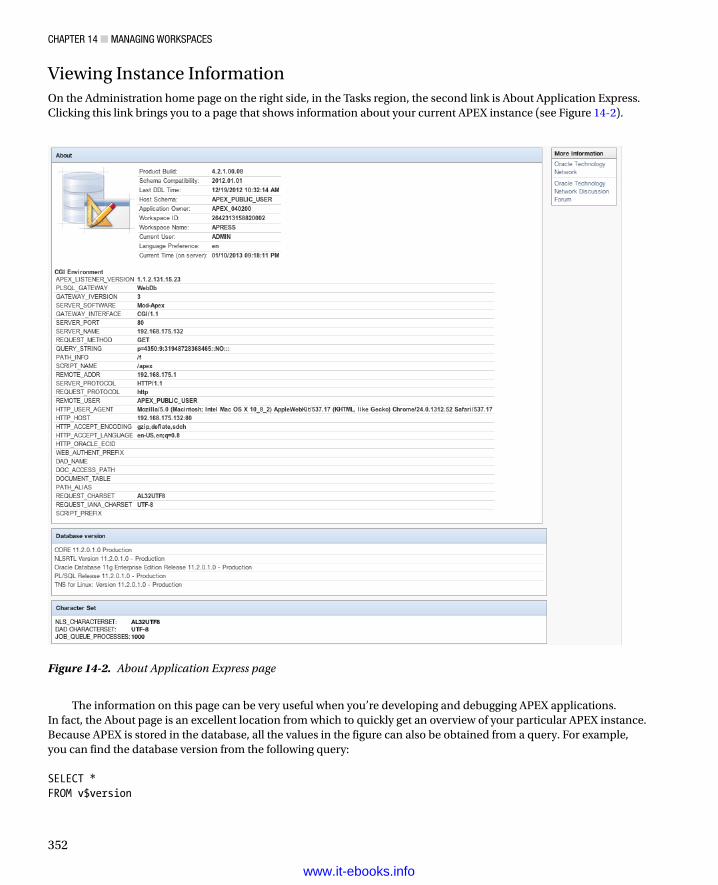
ChApTer 14 ■ MAnAging WorkspACes
352
Viewing Instance InformationOn the Administration home page on the right side, in the Tasks region, the second link is About Application Express. Clicking this link brings you to a page that shows information about your current APEX instance (see Figure 14-2).
Figure 14-2. About Application Express page
The information on this page can be very useful when you’re developing and debugging APEX applications. In fact, the About page is an excellent location from which to quickly get an overview of your particular APEX instance. Because APEX is stored in the database, all the values in the figure can also be obtained from a query. For example, you can find the database version from the following query: SELECT *FROM v$version
www.it-ebooks.info
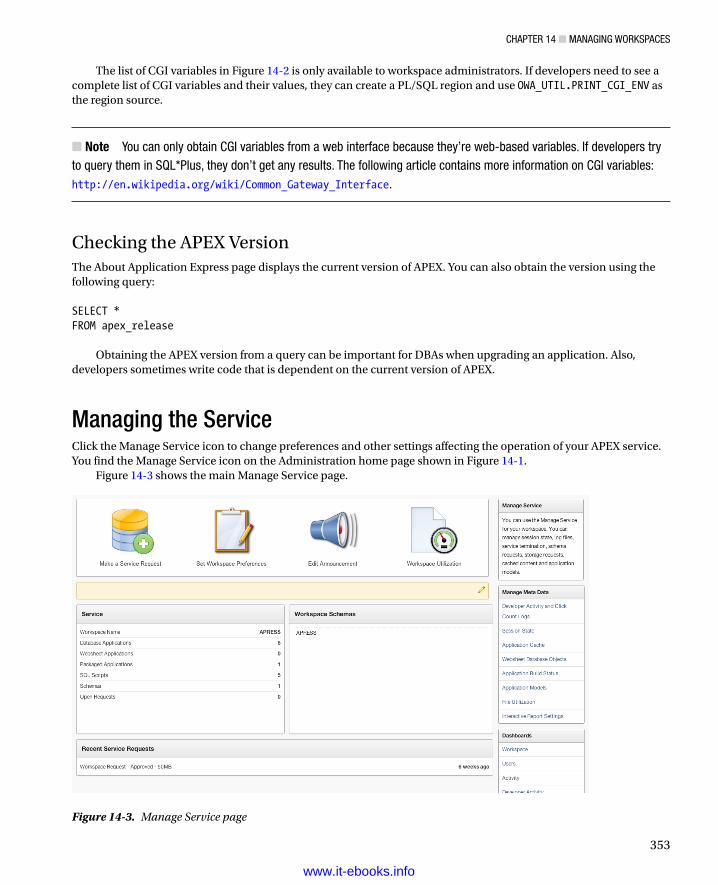
ChApTer 14 ■ MAnAging WorkspACes
353
The list of CGI variables in Figure 14-2 is only available to workspace administrators. If developers need to see a complete list of CGI variables and their values, they can create a PL/SQL region and use OWA_UTIL.PRINT_CGI_ENV as the region source.
Note ■ You can only obtain Cgi variables from a web interface because they’re web-based variables. if developers try to query them in sQL*plus, they don’t get any results. The following article contains more information on Cgi variables: http://en.wikipedia.org/wiki/Common_Gateway_Interface.
Checking the APEX VersionThe About Application Express page displays the current version of APEX. You can also obtain the version using the following query: SELECT *FROM apex_release
Obtaining the APEX version from a query can be important for DBAs when upgrading an application. Also, developers sometimes write code that is dependent on the current version of APEX.
Managing the ServiceClick the Manage Service icon to change preferences and other settings affecting the operation of your APEX service. You find the Manage Service icon on the Administration home page shown in Figure 14-1.
Figure 14-3 shows the main Manage Service page.
Figure 14-3. Manage Service page
www.it-ebooks.info
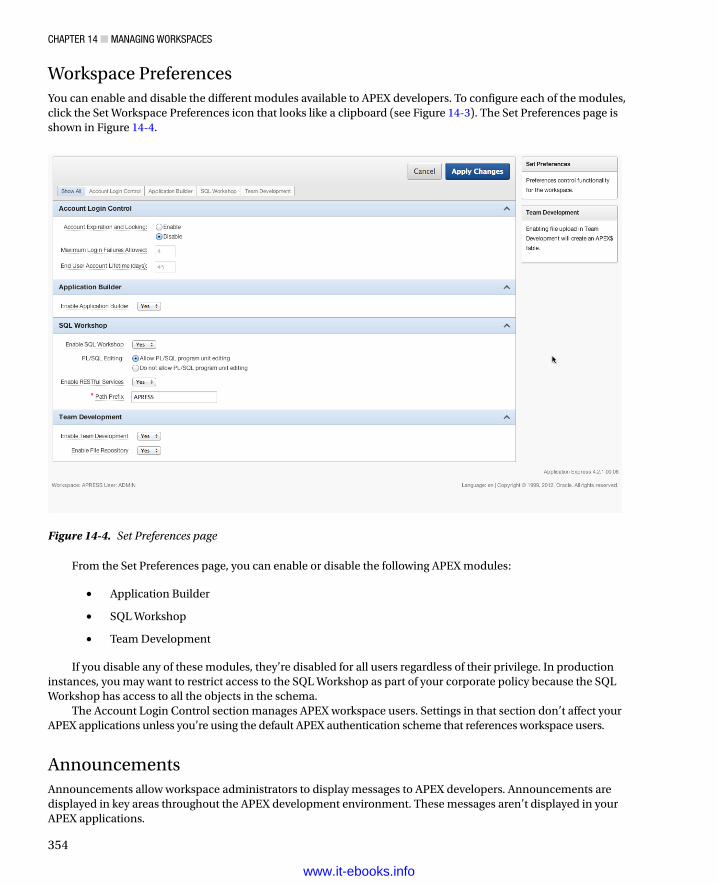
ChApTer 14 ■ MAnAging WorkspACes
354
Workspace PreferencesYou can enable and disable the different modules available to APEX developers. To configure each of the modules, click the Set Workspace Preferences icon that looks like a clipboard (see Figure 14-3). The Set Preferences page is shown in Figure 14-4.
Figure 14-4. Set Preferences page
From the Set Preferences page, you can enable or disable the following APEX modules:
Application Builder•
SQL Workshop•
Team Development•
If you disable any of these modules, they’re disabled for all users regardless of their privilege. In production instances, you may want to restrict access to the SQL Workshop as part of your corporate policy because the SQL Workshop has access to all the objects in the schema.
The Account Login Control section manages APEX workspace users. Settings in that section don’t affect your APEX applications unless you’re using the default APEX authentication scheme that references workspace users.
AnnouncementsAnnouncements allow workspace administrators to display messages to APEX developers. Announcements are displayed in key areas throughout the APEX development environment. These messages aren’t displayed in your APEX applications.
www.it-ebooks.info
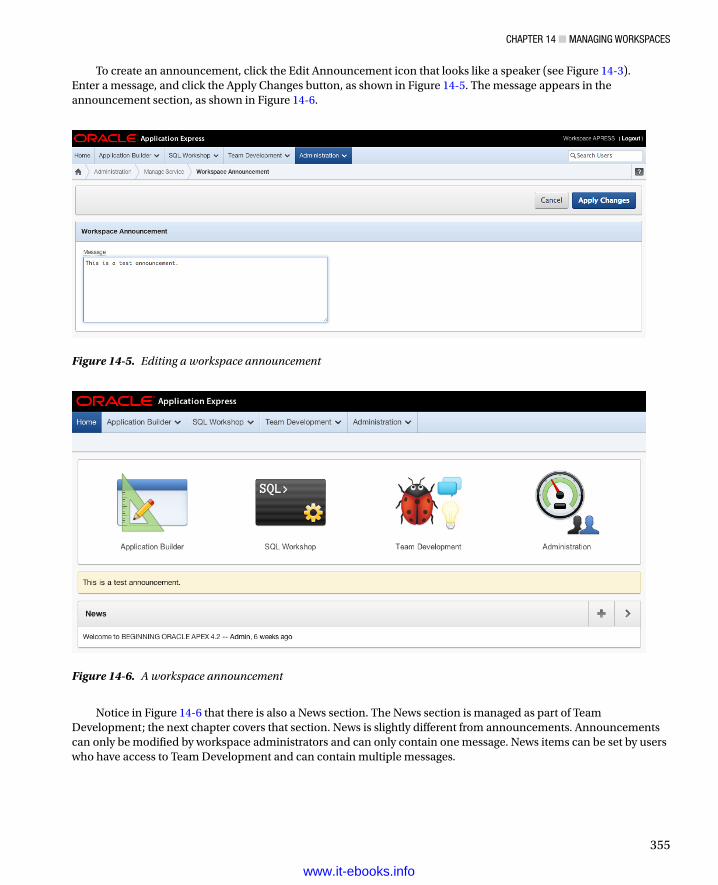
ChApTer 14 ■ MAnAging WorkspACes
355
To create an announcement, click the Edit Announcement icon that looks like a speaker (see Figure 14-3). Enter a message, and click the Apply Changes button, as shown in Figure 14-5. The message appears in the announcement section, as shown in Figure 14-6.
Figure 14-5. Editing a workspace announcement
Figure 14-6. A workspace announcement
Notice in Figure 14-6 that there is also a News section. The News section is managed as part of Team Development; the next chapter covers that section. News is slightly different from announcements. Announcements can only be modified by workspace administrators and can only contain one message. News items can be set by users who have access to Team Development and can contain multiple messages.
www.it-ebooks.info
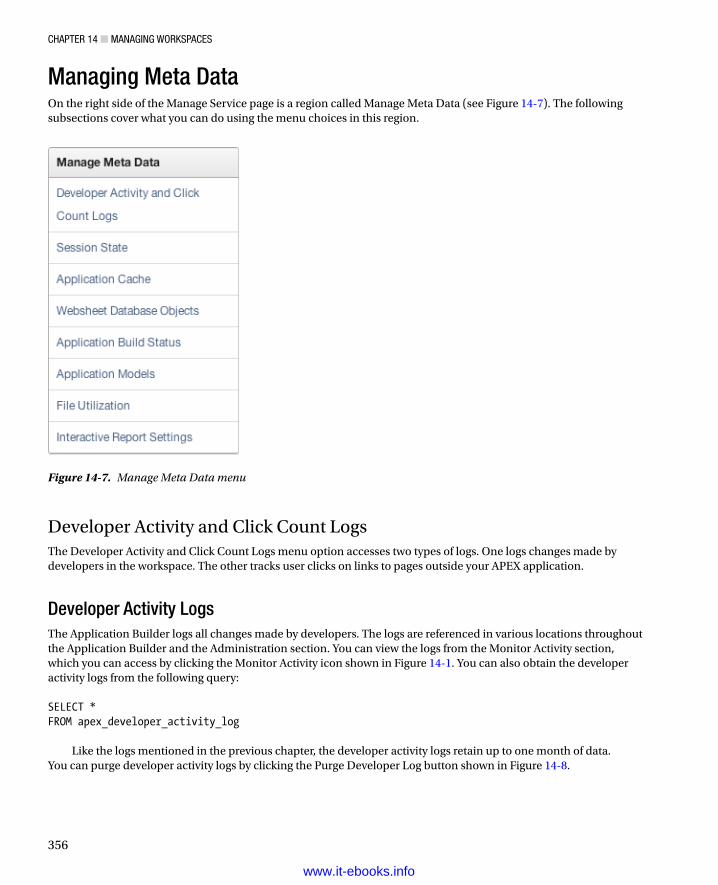
ChApTer 14 ■ MAnAging WorkspACes
356
Managing Meta DataOn the right side of the Manage Service page is a region called Manage Meta Data (see Figure 14-7). The following subsections cover what you can do using the menu choices in this region.
Figure 14-7. Manage Meta Data menu
Developer Activity and Click Count LogsThe Developer Activity and Click Count Logs menu option accesses two types of logs. One logs changes made by developers in the workspace. The other tracks user clicks on links to pages outside your APEX application.
Developer Activity LogsThe Application Builder logs all changes made by developers. The logs are referenced in various locations throughout the Application Builder and the Administration section. You can view the logs from the Monitor Activity section, which you can access by clicking the Monitor Activity icon shown in Figure 14-1. You can also obtain the developer activity logs from the following query:
SELECT *FROM apex_developer_activity_log
Like the logs mentioned in the previous chapter, the developer activity logs retain up to one month of data. You can purge developer activity logs by clicking the Purge Developer Log button shown in Figure 14-8.
www.it-ebooks.info
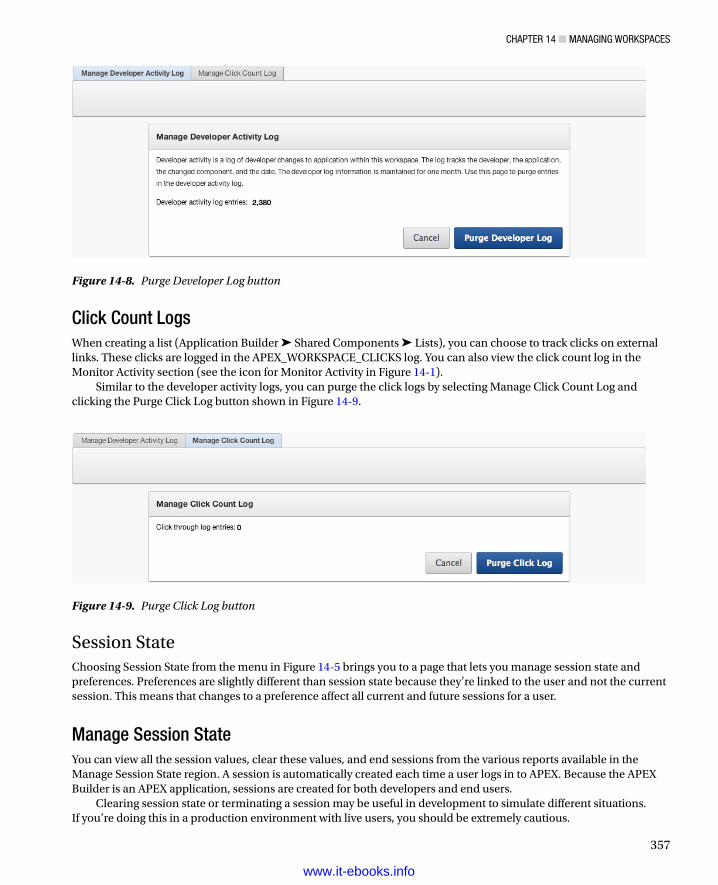
ChApTer 14 ■ MAnAging WorkspACes
357
Click Count LogsWhen creating a list (Application Builder ➤ Shared Components ➤ Lists), you can choose to track clicks on external links. These clicks are logged in the APEX_WORKSPACE_CLICKS log. You can also view the click count log in the Monitor Activity section (see the icon for Monitor Activity in Figure 14-1).
Similar to the developer activity logs, you can purge the click logs by selecting Manage Click Count Log and clicking the Purge Click Log button shown in Figure 14-9.
Figure 14-8. Purge Developer Log button
Figure 14-9. Purge Click Log button
Session StateChoosing Session State from the menu in Figure 14-5 brings you to a page that lets you manage session state and preferences. Preferences are slightly different than session state because they’re linked to the user and not the current session. This means that changes to a preference affect all current and future sessions for a user.
Manage Session StateYou can view all the session values, clear these values, and end sessions from the various reports available in the Manage Session State region. A session is automatically created each time a user logs in to APEX. Because the APEX Builder is an APEX application, sessions are created for both developers and end users.
Clearing session state or terminating a session may be useful in development to simulate different situations. If you’re doing this in a production environment with live users, you should be extremely cautious.
www.it-ebooks.info
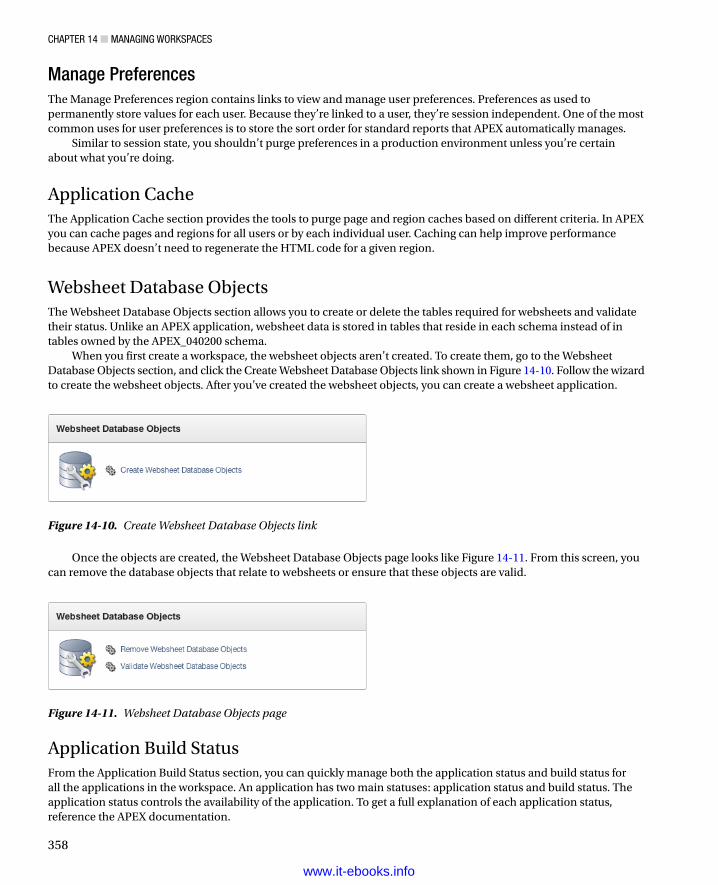
ChApTer 14 ■ MAnAging WorkspACes
358
Manage PreferencesThe Manage Preferences region contains links to view and manage user preferences. Preferences as used to permanently store values for each user. Because they’re linked to a user, they’re session independent. One of the most common uses for user preferences is to store the sort order for standard reports that APEX automatically manages.
Similar to session state, you shouldn’t purge preferences in a production environment unless you’re certain about what you’re doing.
Application CacheThe Application Cache section provides the tools to purge page and region caches based on different criteria. In APEX you can cache pages and regions for all users or by each individual user. Caching can help improve performance because APEX doesn’t need to regenerate the HTML code for a given region.
Websheet Database ObjectsThe Websheet Database Objects section allows you to create or delete the tables required for websheets and validate their status. Unlike an APEX application, websheet data is stored in tables that reside in each schema instead of in tables owned by the APEX_040200 schema.
When you first create a workspace, the websheet objects aren’t created. To create them, go to the Websheet Database Objects section, and click the Create Websheet Database Objects link shown in Figure 14-10. Follow the wizard to create the websheet objects. After you’ve created the websheet objects, you can create a websheet application.
Figure 14-10. Create Websheet Database Objects link
Once the objects are created, the Websheet Database Objects page looks like Figure 14-11. From this screen, you can remove the database objects that relate to websheets or ensure that these objects are valid.
Figure 14-11. Websheet Database Objects page
Application Build StatusFrom the Application Build Status section, you can quickly manage both the application status and build status for all the applications in the workspace. An application has two main statuses: application status and build status. The application status controls the availability of the application. To get a full explanation of each application status, reference the APEX documentation.
www.it-ebooks.info
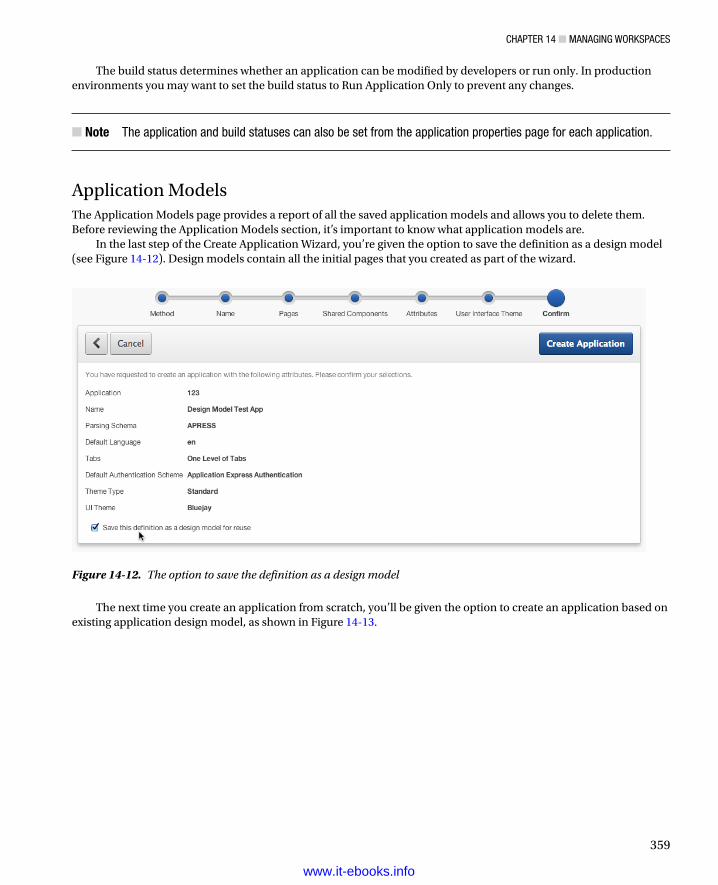
ChApTer 14 ■ MAnAging WorkspACes
359
The build status determines whether an application can be modified by developers or run only. In production environments you may want to set the build status to Run Application Only to prevent any changes.
Note ■ The application and build statuses can also be set from the application properties page for each application.
Application ModelsThe Application Models page provides a report of all the saved application models and allows you to delete them. Before reviewing the Application Models section, it’s important to know what application models are.
In the last step of the Create Application Wizard, you’re given the option to save the definition as a design model (see Figure 14-12). Design models contain all the initial pages that you created as part of the wizard.
Figure 14-12. The option to save the definition as a design model
The next time you create an application from scratch, you’ll be given the option to create an application based on existing application design model, as shown in Figure 14-13.
www.it-ebooks.info
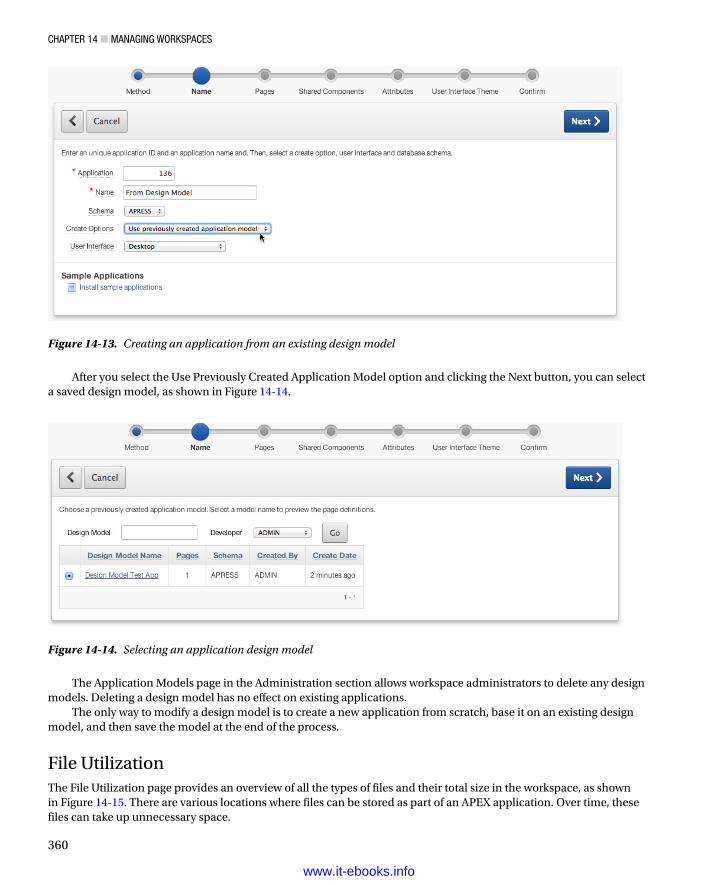
ChApTer 14 ■ MAnAging WorkspACes
360
After you select the Use Previously Created Application Model option and clicking the Next button, you can select a saved design model, as shown in Figure 14-14.
Figure 14-14. Selecting an application design model
Figure 14-13. Creating an application from an existing design model
The Application Models page in the Administration section allows workspace administrators to delete any design models. Deleting a design model has no effect on existing applications.
The only way to modify a design model is to create a new application from scratch, base it on an existing design model, and then save the model at the end of the process.
File UtilizationThe File Utilization page provides an overview of all the types of files and their total size in the workspace, as shown in Figure 14-15. There are various locations where files can be stored as part of an APEX application. Over time, these files can take up unnecessary space.
www.it-ebooks.info
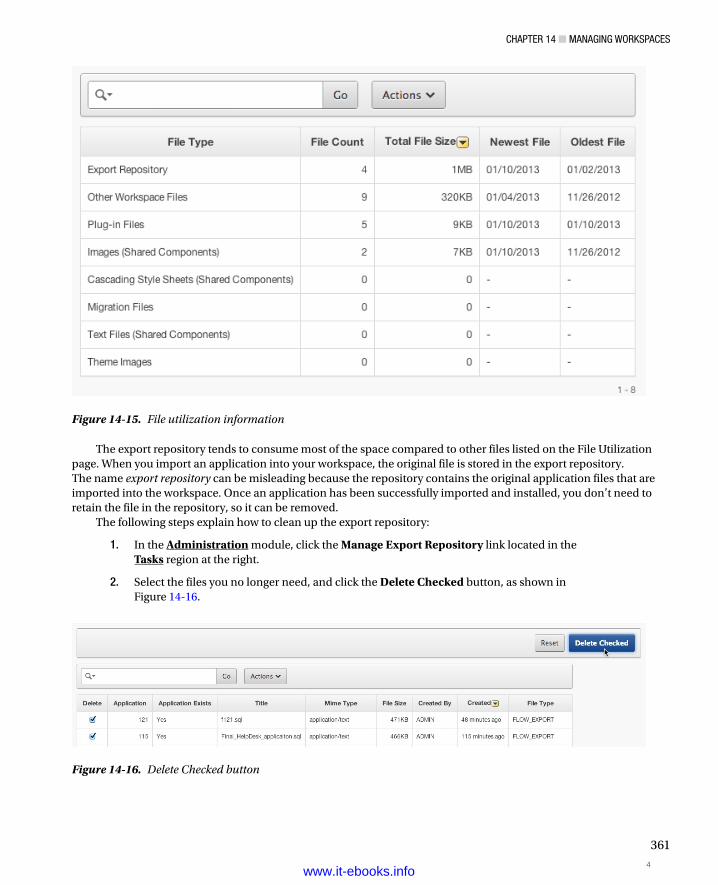
ChApTer 14 ■ MAnAging WorkspACes
361
The export repository tends to consume most of the space compared to other files listed on the File Utilization page. When you import an application into your workspace, the original file is stored in the export repository. The name export repository can be misleading because the repository contains the original application files that are imported into the workspace. Once an application has been successfully imported and installed, you don’t need to retain the file in the repository, so it can be removed.
The following steps explain how to clean up the export repository:
1. In the Administration module, click the Manage Export Repository link located in the Tasks region at the right.
2. Select the files you no longer need, and click the Delete Checked button, as shown in Figure 14-16.
Figure 14-15. File utilization information
Figure 14-16. Delete Checked button
4www.it-ebooks.info
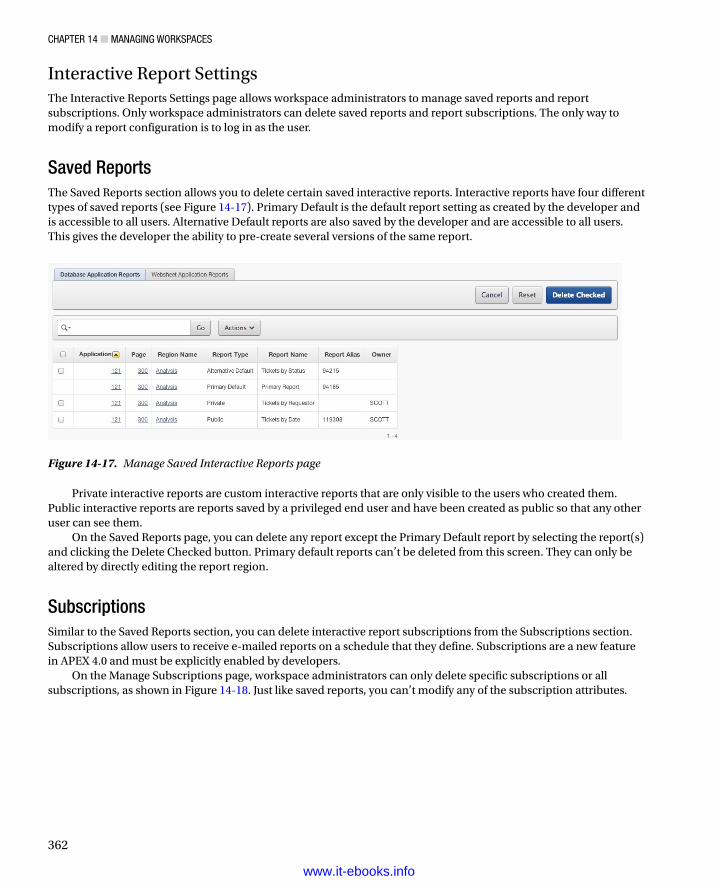
ChApTer 14 ■ MAnAging WorkspACes
362
Interactive Report SettingsThe Interactive Reports Settings page allows workspace administrators to manage saved reports and report subscriptions. Only workspace administrators can delete saved reports and report subscriptions. The only way to modify a report configuration is to log in as the user.
Saved ReportsThe Saved Reports section allows you to delete certain saved interactive reports. Interactive reports have four different types of saved reports (see Figure 14-17). Primary Default is the default report setting as created by the developer and is accessible to all users. Alternative Default reports are also saved by the developer and are accessible to all users. This gives the developer the ability to pre-create several versions of the same report.
Figure 14-17. Manage Saved Interactive Reports page
Private interactive reports are custom interactive reports that are only visible to the users who created them. Public interactive reports are reports saved by a privileged end user and have been created as public so that any other user can see them.
On the Saved Reports page, you can delete any report except the Primary Default report by selecting the report(s) and clicking the Delete Checked button. Primary default reports can’t be deleted from this screen. They can only be altered by directly editing the report region.
SubscriptionsSimilar to the Saved Reports section, you can delete interactive report subscriptions from the Subscriptions section. Subscriptions allow users to receive e-mailed reports on a schedule that they define. Subscriptions are a new feature in APEX 4.0 and must be explicitly enabled by developers.
On the Manage Subscriptions page, workspace administrators can only delete specific subscriptions or all subscriptions, as shown in Figure 14-18. Just like saved reports, you can’t modify any of the subscription attributes.
www.it-ebooks.info
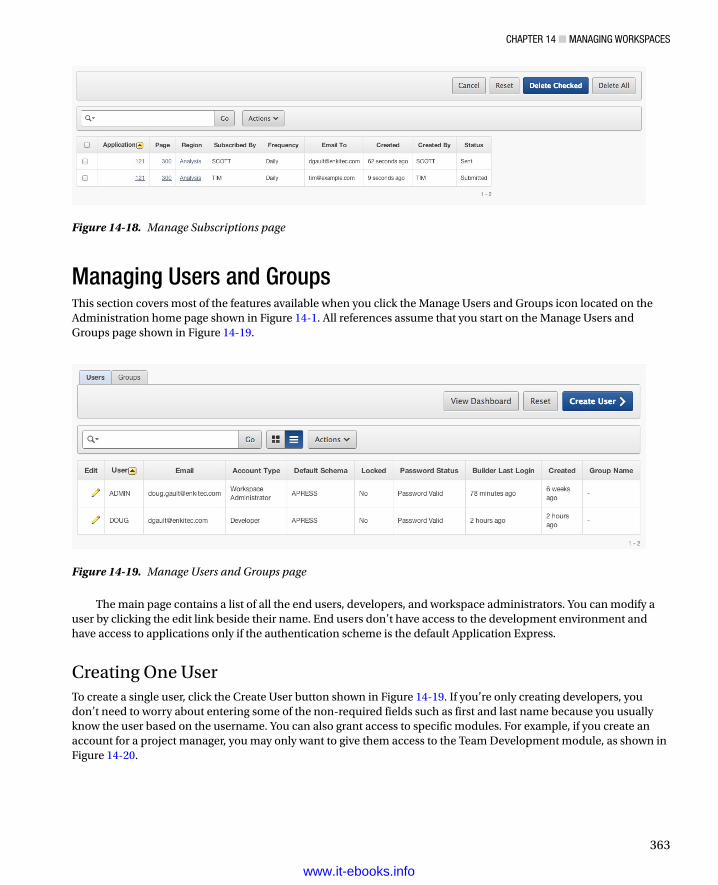
ChApTer 14 ■ MAnAging WorkspACes
363
Managing Users and GroupsThis section covers most of the features available when you click the Manage Users and Groups icon located on the Administration home page shown in Figure 14-1. All references assume that you start on the Manage Users and Groups page shown in Figure 14-19.
Figure 14-18. Manage Subscriptions page
Figure 14-19. Manage Users and Groups page
The main page contains a list of all the end users, developers, and workspace administrators. You can modify a user by clicking the edit link beside their name. End users don’t have access to the development environment and have access to applications only if the authentication scheme is the default Application Express.
Creating One UserTo create a single user, click the Create User button shown in Figure 14-19. If you’re only creating developers, you don’t need to worry about entering some of the non-required fields such as first and last name because you usually know the user based on the username. You can also grant access to specific modules. For example, if you create an account for a project manager, you may only want to give them access to the Team Development module, as shown in Figure 14-20.
www.it-ebooks.info
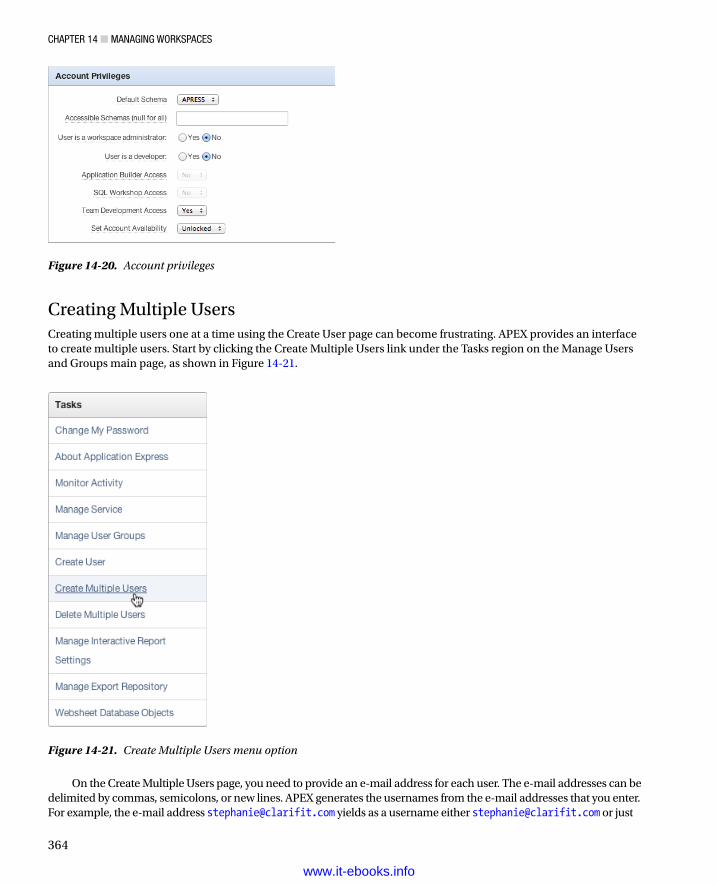
ChApTer 14 ■ MAnAging WorkspACes
364
Creating Multiple UsersCreating multiple users one at a time using the Create User page can become frustrating. APEX provides an interface to create multiple users. Start by clicking the Create Multiple Users link under the Tasks region on the Manage Users and Groups main page, as shown in Figure 14-21.
Figure 14-20. Account privileges
Figure 14-21. Create Multiple Users menu option
On the Create Multiple Users page, you need to provide an e-mail address for each user. The e-mail addresses can be delimited by commas, semicolons, or new lines. APEX generates the usernames from the e-mail addresses that you enter. For example, the e-mail address [email protected] yields as a username either [email protected] or just
www.it-ebooks.info
ChApTer 14 ■ MAnAging WorkspACes
365
plain stephanie. You can specify whether you wish each e-mail address to translate directly into a username, or whether you want the usernames to exclude the @domain suffixes. Figure 14-22 shows the radio button set for the latter option.
Figure 14-22. Create Multiple Users page
If your usernames don’t correspond to your corporate e-mail addresses, you can enter e-mail addresses with invalid domains and select the option to omit the suffixes. For example, enter the e-mail address [email protected] when you just want a user named jonathan. Then select the option to exclude the @domain portion of the e-mail address.
The password that you enter is the same for all the users. When they log in to the workspace, they will be required to change it.
After you enter all the information on the Create Multiple Users page, click the Next button to go to the confirmation page shown in Figure 14-23. If everything is correct, click the Create Valid Users button.
rwww.it-ebooks.info
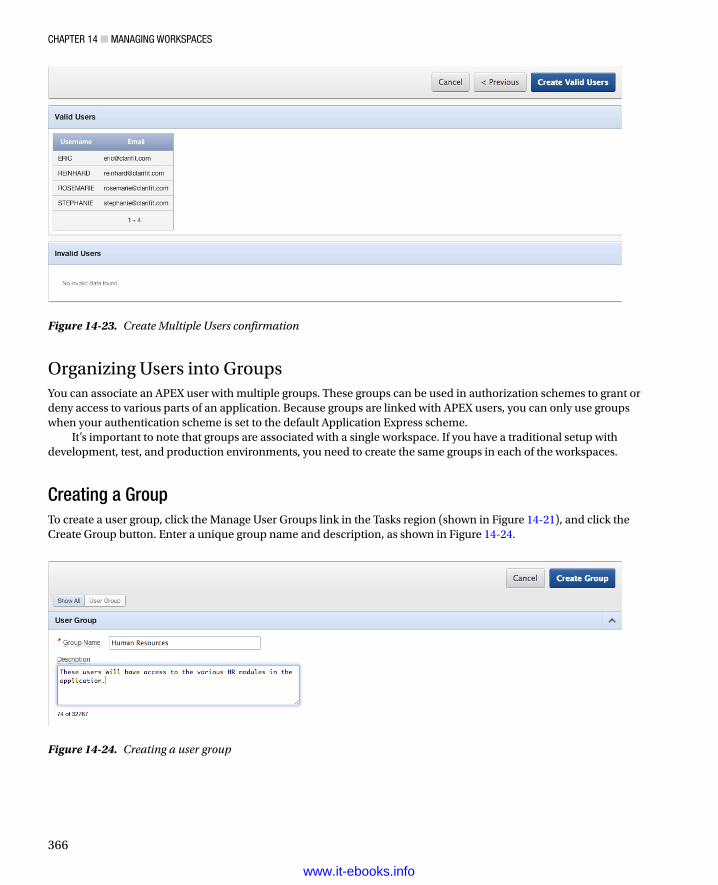
ChApTer 14 ■ MAnAging WorkspACes
366
Organizing Users into GroupsYou can associate an APEX user with multiple groups. These groups can be used in authorization schemes to grant or deny access to various parts of an application. Because groups are linked with APEX users, you can only use groups when your authentication scheme is set to the default Application Express scheme.
It’s important to note that groups are associated with a single workspace. If you have a traditional setup with development, test, and production environments, you need to create the same groups in each of the workspaces.
Creating a GroupTo create a user group, click the Manage User Groups link in the Tasks region (shown in Figure 14-21), and click the Create Group button. Enter a unique group name and description, as shown in Figure 14-24.
Figure 14-24. Creating a user group
Figure 14-23. Create Multiple Users confirmation
www.it-ebooks.info
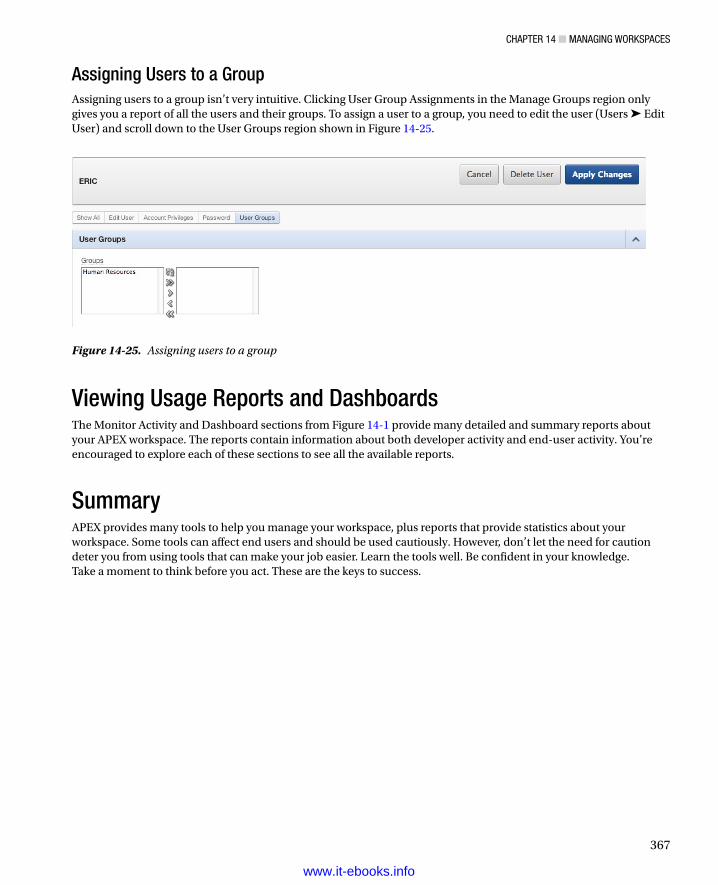
ChApTer 14 ■ MAnAging WorkspACes
367
Assigning Users to a GroupAssigning users to a group isn’t very intuitive. Clicking User Group Assignments in the Manage Groups region only gives you a report of all the users and their groups. To assign a user to a group, you need to edit the user (Users ➤ Edit User) and scroll down to the User Groups region shown in Figure 14-25.
Figure 14-25. Assigning users to a group
Viewing Usage Reports and DashboardsThe Monitor Activity and Dashboard sections from Figure 14-1 provide many detailed and summary reports about your APEX workspace. The reports contain information about both developer activity and end-user activity. You’re encouraged to explore each of these sections to see all the available reports.
SummaryAPEX provides many tools to help you manage your workspace, plus reports that provide statistics about your workspace. Some tools can affect end users and should be used cautiously. However, don’t let the need for caution deter you from using tools that can make your job easier. Learn the tools well. Be confident in your knowledge. Take a moment to think before you act. These are the keys to success.
www.it-ebooks.info
369
Chapter 15
Team Development
Team Development is an excellent tool for managing APEX software development. Team Development is embedded within the APEX development environment, allowing you to manage your APEX projects with tools that you and your team use every day, like interactive reports. This eliminates the need for an external project-management tool. Team Development’s simple, extensible, and flexible architecture is ideal for managing projects of any size. Its simplicity lends itself to small projects where you want to minimize your project-management overhead. Its extensibility scales well, allowing you to manage large projects by using its rich set of attributes to construct a sophisticated work breakdown structure (WBS). Its flexibility lets you adapt it to your organization’s software development culture.
APEX and Team Development are both well suited to work with agile software development methodologies. APEX’s Rapid Application Development (RAD) architecture allows the team to rapidly deliver regularly scheduled releases to the business testers and end users. Team Development’s feedback mechanism efficiently channels end-user issues back to the development team so that appropriate changes can be included in the following releases and easily documented. Team Development makes APEX, which is already an efficient development platform, even more efficient.
The primary purpose of this chapter is to highlight how Team Development works. A secondary purpose is to illustrate how agile software development practices can be used with Team Development to deliver quality software while meeting your cost and schedule constraints. By the end of the chapter, you should have a good understanding of what is in Team Development and some ideas about how you integrate it into your team’s development culture.
Team Development was added to APEX in version 4.0. The APEX team has used a version of Team Development while developing APEX, even before it was released as an APEX module. This design philosophy of using the tool to build the tool is a key reason why Team Development and APEX are practical and easy-to-use tools.
Team Development OverviewTeam Development consists of features, milestones, to-dos, bugs, and feedback. These modules are complemented by a small number of utilities called Team Actions that are used to manage the Team Development environment. The entity-relationship diagram (ERD) illustrates the relationships between the main entities (see Figure 15-1).
www.it-ebooks.info
Chapter 15 ■ team Development
370
The Team Development entities are contained within a single workspace. When you’re managing several applications simultaneously within a workspace, you and your teams can easily filter Team Development’s data by using the tool’s interactive reports. That way, each stakeholder sees only the work that is of immediate interest for the tasks at hand.
Features describe the big picture. At a high level, they describe and track progress for the major pieces of functionality that your client has requested. Attributes like owner, start date, due date, summary description, priority, status, and so on are easily tracked. In addition, you can optionally track the status of individual components such as the user interface, testing, documentation, globalization, security, and accessibility. The self-join that is associated with features allows you to further subdivide a feature into child features as development progresses and the design becomes more refined. The high-level nature of features makes them an ideal source for management status reports.
Milestones are the high-level scheduling component of Team Development. They can be used to track major and minor releases of an application. Don’t confuse milestones with the due dates that are associated with features and to-dos. For example, a milestone could be the scheduled date for a product release, but a feature that is included in the release might be due well in advance of the milestone date. If you use an agile software-development strategy, milestones are well suited to define the time boxes or sprints.
FOLLOWUPFOLLOWUP_IDFEEDBACK_ID
# .
FOLLOWUP_IDAPPLICATION_IDLOGGED_AS_FEATURE_DLOGGED_AS_TO_DO_IDLOGGED_AS_BUG_ID
# .
FEATURE_ID# .
MILESTONE_ID# .
TO_DO_ID# .
BUG_ID# .
APPLICATION_IDPARENT_FEATURE_ID
FEATURE_ID
PARENT_TO_DO_IDMILESTONE_ID MILESTONE_ID
APPLICATION_ID
FEEDBACK
FEATURES
MILESTONES
APPLICATIONS
TO_DOS
BUGS
APPLICATION_IDTARGET_MILESTONE_IDRELATED_FEATURE_IDRELATED_TO_DO_ID
APPLICATION_ID# .
Figure 15-1. A simplified entity relationship diagram of Team Development
www.it-ebooks.info
Chapter 15 ■ team Development
371
To-dos are used to assign detailed work to individuals or teams. Due dates, time estimates, and so on are tracked. Like features, to-dos have a self-join capability that allows you to subdivide them as more information becomes known during the development process. This is handy when a single to-do requires effort from more than one team.
When a defect is found, it’s reported as a bug. Bugs have their own lifecycle that includes a rich set of attributes such as description, resolution, release, assignee, context, and date information. When you find a bug that turns out to be a design flaw, Team Development allows you to link the bug to multiple features, milestones, and to-dos, because the bug fix might require an extended time that spans a number of product releases.
Feedback is one of the main sweet spots of Team Development. The feedback mechanism can be installed in an application in a matter of minutes and gives the entire team an efficient and elegant communication channel for comments, suggestions, issues, defect reports, and responses. Once installed in an application, the feedback mechanism is promoted with the application from the development environment to the test environment and on to the production environment. Feedback data and the related responses are copied back and forth between the various environments via the APEX import/export facility. This keeps the developers, testers, and end users in close touch with each other. Another key feature of the feedback mechanism is that it automatically records all the critical “under the hood” data that end users know nothing about. The application context, environment variables, and, most important, the session state are all captured. This data is invaluable when you’re diagnosing an issue.
At first glance, the Team Development entities seem to contain a large number of attributes. So, do you have to enter all these attributes in order to use Team Development? No. To get the most out of Team Development, you and your team must plan how you’re going to use Team Development with a view to effectively managing the software-development process with minimum effort. You can pick a small subset of Team Development’s attributes that fit your software-development culture and key in only that subset of the data. Interactive reports can easily be customized to display only the data that is important to you.
Team Development InterfaceThe Team Development interface is consistent with the overall APEX development interface. It makes extensive use of dashboards to quickly give you an idea of how your teams are progressing. Drilling into the details to view and update the data is fairly straightforward and intuitive. APEX developers will have no trouble navigating within the tool or customizing interactive reports. Managers, testers, and business analysts will also be able to use Team Development after a short training session.
APEX Home PageThe APEX home page (see Figure 15-2) clearly indicates how important Team Development is to the APEX team. The APEX team could have easily put Team Development under a minor link somewhere on the home page. Instead, Team Development has been promoted into a marquee module that is on an equal footing with Application Builder, SQL Workshop, and Administration.
www.it-ebooks.info
Chapter 15 ■ team Development
372
The APEX home page highlights the easy and convenient navigation. The News region, which is a feature of Team Development, contains two links (Add and Edit) that enable quick changes to the region without having to drill down into subpages. The Team Development tasks region at right on the page shows high-level information about Team Development. Look for similar links throughout the Team Development interface; they’re very handy.
Team Development Home PageThe Team Development home page (see Figure 15-3) serves two purposes. First, it contains links to all the detailed entity regions; and second, it shows you a dashboard for each entity. You also see links to Team Actions, which are discussed near the end of the chapter in the section “Team Actions.”
Figure 15-2. APEX home page
www.it-ebooks.info
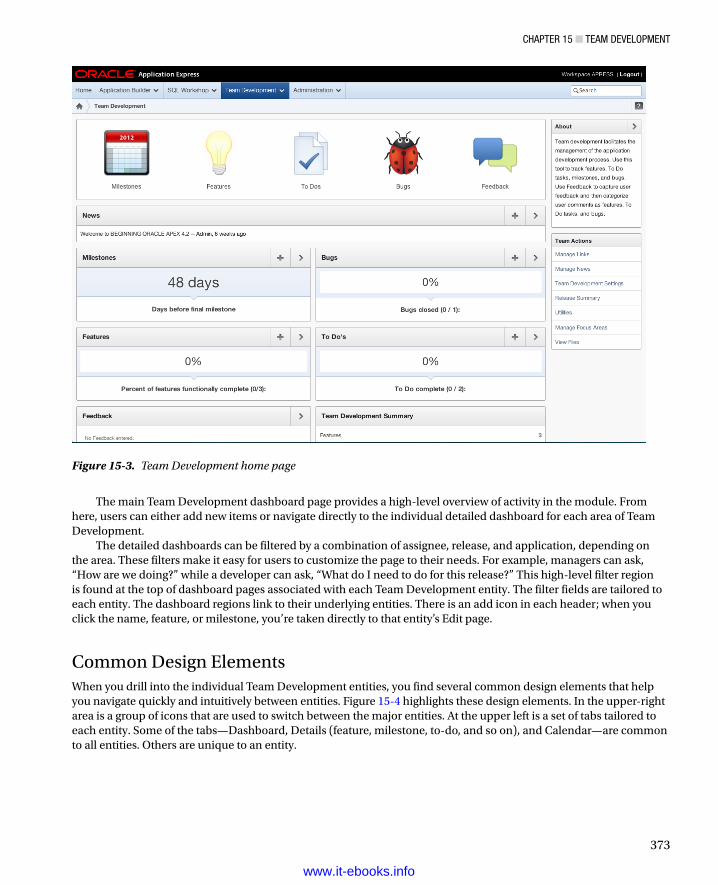
Chapter 15 ■ team Development
373
The main Team Development dashboard page provides a high-level overview of activity in the module. From here, users can either add new items or navigate directly to the individual detailed dashboard for each area of Team Development.
The detailed dashboards can be filtered by a combination of assignee, release, and application, depending on the area. These filters make it easy for users to customize the page to their needs. For example, managers can ask, “How are we doing?” while a developer can ask, “What do I need to do for this release?” This high-level filter region is found at the top of dashboard pages associated with each Team Development entity. The filter fields are tailored to each entity. The dashboard regions link to their underlying entities. There is an add icon in each header; when you click the name, feature, or milestone, you’re taken directly to that entity’s Edit page.
Common Design ElementsWhen you drill into the individual Team Development entities, you find several common design elements that help you navigate quickly and intuitively between entities. Figure 15-4 highlights these design elements. In the upper-right area is a group of icons that are used to switch between the major entities. At the upper left is a set of tabs tailored to each entity. Some of the tabs—Dashboard, Details (feature, milestone, to-do, and so on), and Calendar—are common to all entities. Others are unique to an entity.
Figure 15-3. Team Development home page
www.it-ebooks.info
Chapter 15 ■ team Development
374
When you’re on a tab that has an equivalent in the other entities, clicking one of the upper-right navigation icons takes you to that equivalent page. For example, when you’re looking at the Calendar tab and you click the Milestone icon, you’re taken directly to the milestone’s Calendar tab. When you’re on a tab that has no corresponding equivalent in the other entities, the upper-right navigation icons aren’t displayed.
All of the dashboard pages contain a filter region that is tailored to the entity. The filter’s select list contains entries for only the entities that are tracked by Team Development. For example, if there is an application that doesn’t have any features associated with it, that application doesn’t appear in the select list.
Many of the individual dashboard regions contain links that take you to the entity’s Details page and automatically set the filters on the Details page’s interactive report so you see only the entity records that are related to the dashboard item you selected. This navigation strategy, once you get used to it, is extremely convenient.
Drilldown FunctionalityThe Calendar tabs (see Figure 15-5) display links to individual entity records based on the entity record’s due date. Clicking the Calendar link takes you directly to the Edit page for the selected entity record. Clicking the Cancel button on the Edit page returns you to the calendar.
Figure 15-4. GUI design elements that are common to all entities
www.it-ebooks.info
Chapter 15 ■ team Development
375
Some of the entity tabs display their data graphically (see Figure 15-6). Clicking a graphic pie slice automatically takes you to the entity’s Details page and sets the interactive report to show only the data selected on the graph.
Figure 15-5. Calendar with links to an Edit page
Figure 15-6. Graphic data summary
www.it-ebooks.info
Chapter 15 ■ team Development
376
TaggingA powerful organizational attribute called tags is associated with all entities. A tag is a free-form text input that enables you to group records by a keyword. This is handy because some record groupings don’t fit into the neat and tidy relational data model. For example, you might want to be able to find all features that contain a shuttle item across all applications. By adding the tag “shuttle” to these features, you can use the interactive report search field to find all records that contain the tag of “shuttle.” All dashboard pages contain a region that displays the tag strings defined in their respective entity. This lets you quickly find and correct typos so the free-form tags can be kept accurate.
GettING paSt the INItIaL DISCOMFOrt
at first, team Development’s organization, layout, and navigation might appear a bit strange and non-intuitive. We certainly struggled with it at first. our initial perception was probably due to our previous experience with project-management tools that use pages with a work breakdown structure on the left and a Gantt chart on the right.
our initial discomfort with team Development was similar to our first experiences with apeX. like many experienced developers, we came from development environments in which screen widgets are listed on the left and dragged onto a screen, and in which the X-Y coordinates are set together with a widget’s height and width, all at pixel-level precision.
When we first used apeX, most of us took a while to get used to how apeX built pages. after a few tries, we all learned to love the product. We believe the same will be true for you with team Development. after a bit of experience, you’ll find that the interactive reports are, in fact, a practical alternative to Gantt charts, especially in an agile software development environment in which the time boxes are short and the lists in the interactive reports are correspondingly small.
FeaturesFeatures describe an application from a high-level perspective. They’re used at the beginning of a development project to define the scope well enough that budgetary estimates can be made of cost, schedule, and resource requirements. Once the project is approved and work begins, child features are added to describe, control, and track progress in more detail. Features are the heart of management status reports.
The Features Details page contains a number of tabs. The Dashboard, Calendar, Focus Areas, and Owners tabs aren’t discussed here because they or their equivalents are common to all entities and their characteristics were mentioned earlier. The Features, History, and Progress Log tabs are highlighted next.
Features TabThe Features tab (see Figure 15-7) contains an interactive report that, in turn, links to the Edit page for individual feature records. Because the data grid is an interactive report, each user can tailor it to their needs. You can choose your columns from approximately 50 attributes, sort to your taste, and even group related records together. Interactive reports are discussed in detail in Chapter 6.
www.it-ebooks.info
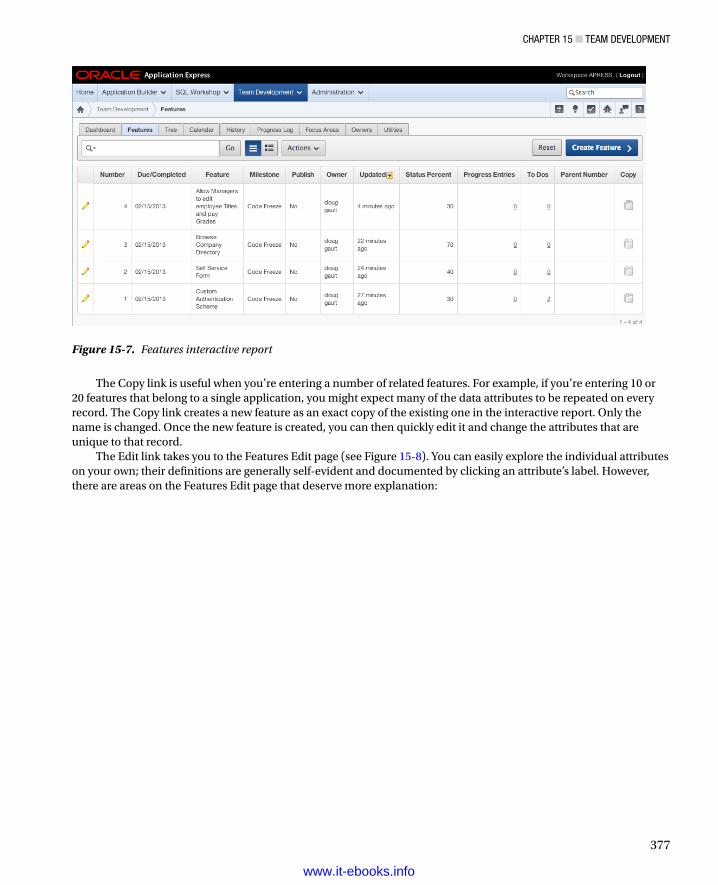
Chapter 15 ■ team Development
377
The Copy link is useful when you’re entering a number of related features. For example, if you’re entering 10 or 20 features that belong to a single application, you might expect many of the data attributes to be repeated on every record. The Copy link creates a new feature as an exact copy of the existing one in the interactive report. Only the name is changed. Once the new feature is created, you can then quickly edit it and change the attributes that are unique to that record.
The Edit link takes you to the Features Edit page (see Figure 15-8). You can easily explore the individual attributes on your own; their definitions are generally self-evident and documented by clicking an attribute’s label. However, there are areas on the Features Edit page that deserve more explanation:
Figure 15-7. Features interactive report
www.it-ebooks.info
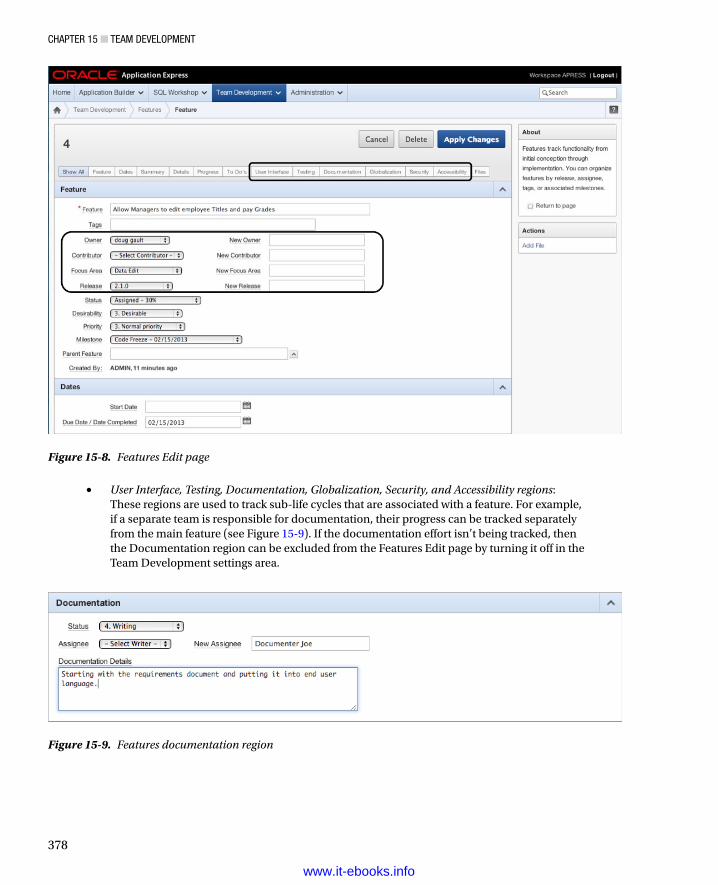
Chapter 15 ■ team Development
378
Figure 15-9. Features documentation region
Figure 15-8. Features Edit page
• User Interface, Testing, Documentation, Globalization, Security, and Accessibility regions: These regions are used to track sub-life cycles that are associated with a feature. For example, if a separate team is responsible for documentation, their progress can be tracked separately from the main feature (see Figure 15-9). If the documentation effort isn’t being tracked, then the Documentation region can be excluded from the Features Edit page by turning it off in the Team Development settings area.
www.it-ebooks.info
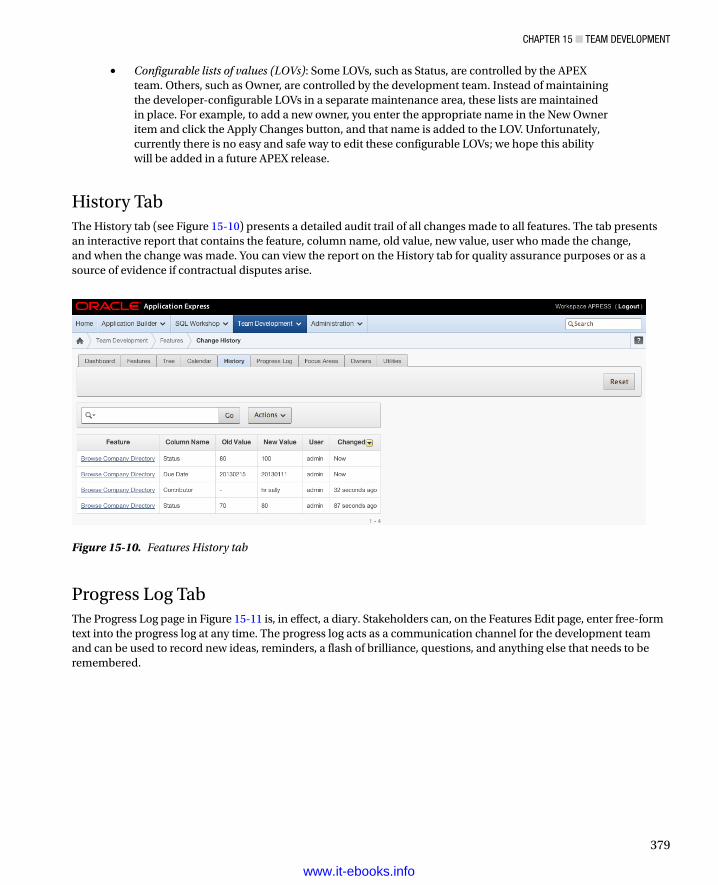
Chapter 15 ■ team Development
379
• Configurable lists of values (LOVs): Some LOVs, such as Status, are controlled by the APEX team. Others, such as Owner, are controlled by the development team. Instead of maintaining the developer-configurable LOVs in a separate maintenance area, these lists are maintained in place. For example, to add a new owner, you enter the appropriate name in the New Owner item and click the Apply Changes button, and that name is added to the LOV. Unfortunately, currently there is no easy and safe way to edit these configurable LOVs; we hope this ability will be added in a future APEX release.
History TabThe History tab (see Figure 15-10) presents a detailed audit trail of all changes made to all features. The tab presents an interactive report that contains the feature, column name, old value, new value, user who made the change, and when the change was made. You can view the report on the History tab for quality assurance purposes or as a source of evidence if contractual disputes arise.
Figure 15-10. Features History tab
Progress Log TabThe Progress Log page in Figure 15-11 is, in effect, a diary. Stakeholders can, on the Features Edit page, enter free-form text into the progress log at any time. The progress log acts as a communication channel for the development team and can be used to record new ideas, reminders, a flash of brilliance, questions, and anything else that needs to be remembered.
www.it-ebooks.info
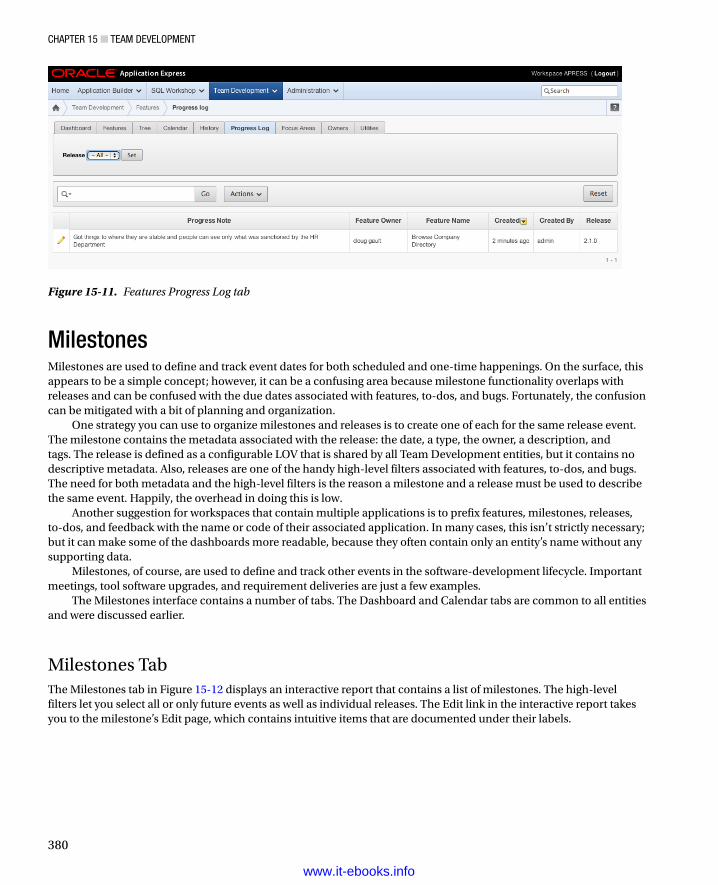
Chapter 15 ■ team Development
380
MilestonesMilestones are used to define and track event dates for both scheduled and one-time happenings. On the surface, this appears to be a simple concept; however, it can be a confusing area because milestone functionality overlaps with releases and can be confused with the due dates associated with features, to-dos, and bugs. Fortunately, the confusion can be mitigated with a bit of planning and organization.
One strategy you can use to organize milestones and releases is to create one of each for the same release event. The milestone contains the metadata associated with the release: the date, a type, the owner, a description, and tags. The release is defined as a configurable LOV that is shared by all Team Development entities, but it contains no descriptive metadata. Also, releases are one of the handy high-level filters associated with features, to-dos, and bugs. The need for both metadata and the high-level filters is the reason a milestone and a release must be used to describe the same event. Happily, the overhead in doing this is low.
Another suggestion for workspaces that contain multiple applications is to prefix features, milestones, releases, to-dos, and feedback with the name or code of their associated application. In many cases, this isn’t strictly necessary; but it can make some of the dashboards more readable, because they often contain only an entity’s name without any supporting data.
Milestones, of course, are used to define and track other events in the software-development lifecycle. Important meetings, tool software upgrades, and requirement deliveries are just a few examples.
The Milestones interface contains a number of tabs. The Dashboard and Calendar tabs are common to all entities and were discussed earlier.
Milestones TabThe Milestones tab in Figure 15-12 displays an interactive report that contains a list of milestones. The high-level filters let you select all or only future events as well as individual releases. The Edit link in the interactive report takes you to the milestone’s Edit page, which contains intuitive items that are documented under their labels.
Figure 15-11. Features Progress Log tab
www.it-ebooks.info
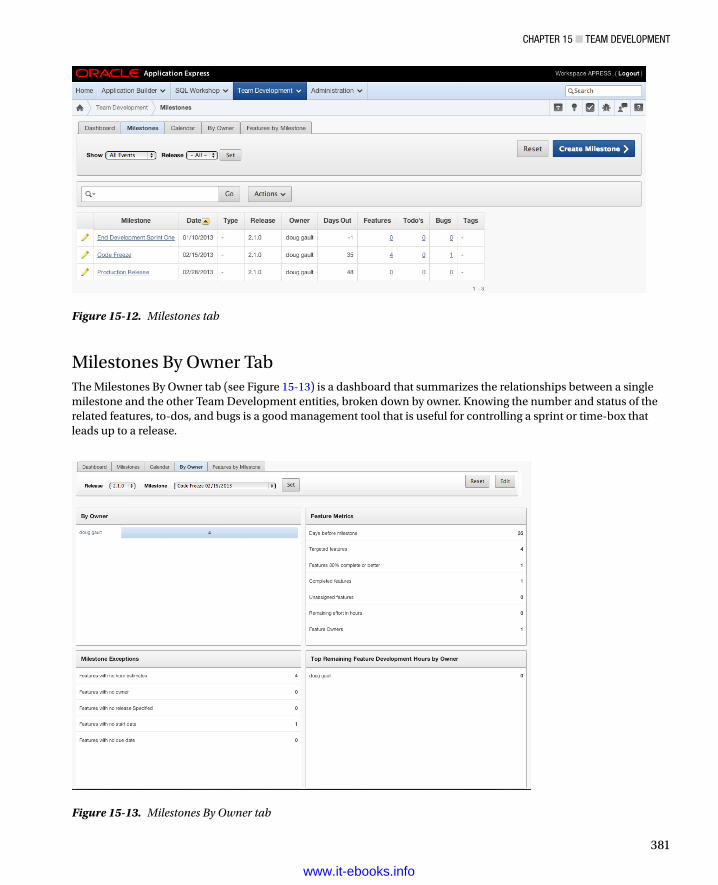
Chapter 15 ■ team Development
381
Milestones By Owner TabThe Milestones By Owner tab (see Figure 15-13) is a dashboard that summarizes the relationships between a single milestone and the other Team Development entities, broken down by owner. Knowing the number and status of the related features, to-dos, and bugs is a good management tool that is useful for controlling a sprint or time-box that leads up to a release.
Figure 15-12. Milestones tab
Figure 15-13. Milestones By Owner tab
www.it-ebooks.info

Chapter 15 ■ team Development
382
Features by Milestone TabThe Features by Milestone tab (see Figure 15-14) contains an interactive report that, in detail, illustrates the relationship between milestones and the features associated with the milestone. This is mainly a management report.
Figure 15-14. Features by Milestone tab
To-Do ItemsTo-do items are the workhorses of Team Development. Team Development uses the term to-do as a noun. A to-do is a specific task that is assigned to an individual or team along with a due date. In simple terms, a to-do describes the what, who, and when of the task at hand.
To-dos can be subdivided into many child and grandchild tasks. This process of decomposition can be done to the point of diminishing returns. A rule of thumb is that the number of subtask levels should be appropriate for effectively controlling the tasks at hand. What is appropriate is, of course, a function of your team’s culture. Also, in an agile software development shop, the subtask levels tend to remain shallow due to the daily face-to-face communication between team members.
There are four tabs in the To Dos module: Dashboard, To Dos, Calendar, and Progress log. You’ll find working with these tabs to be easy and intuitive.
A handy navigation feature links the development environment directly to the To Dos module. When a to-do has its context set to both an application and a specific page number within that application, a count of to-dos appears on the page’s Development screen (see Figure 15-15). In the upper-right corner are counts of to-dos, bugs, feedback, and comments. When you click the to-do count, the link takes you directly to the To Dos Report page that has the interactive report filters set to list only the open to-dos associated with the Development page (see Figure 15-16). The developer can then quickly select one of the to-dos, see what needs to be done, and return to the Development page to complete the to-do task. This efficient navigation strategy also applies to bugs and feedback.
www.it-ebooks.info
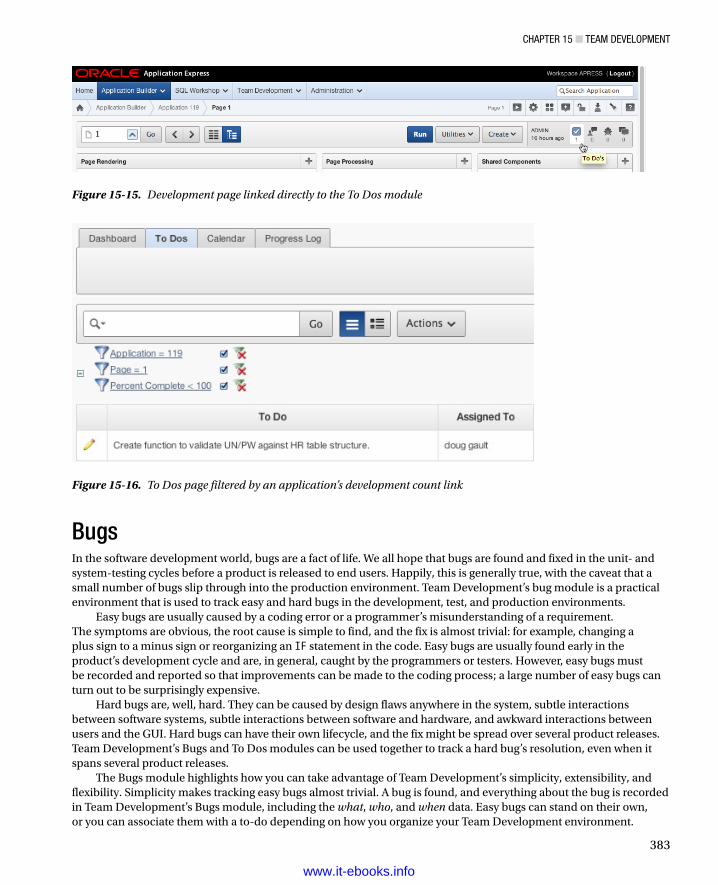
Chapter 15 ■ team Development
383
BugsIn the software development world, bugs are a fact of life. We all hope that bugs are found and fixed in the unit- and system-testing cycles before a product is released to end users. Happily, this is generally true, with the caveat that a small number of bugs slip through into the production environment. Team Development’s bug module is a practical environment that is used to track easy and hard bugs in the development, test, and production environments.
Easy bugs are usually caused by a coding error or a programmer’s misunderstanding of a requirement. The symptoms are obvious, the root cause is simple to find, and the fix is almost trivial: for example, changing a plus sign to a minus sign or reorganizing an IF statement in the code. Easy bugs are usually found early in the product’s development cycle and are, in general, caught by the programmers or testers. However, easy bugs must be recorded and reported so that improvements can be made to the coding process; a large number of easy bugs can turn out to be surprisingly expensive.
Hard bugs are, well, hard. They can be caused by design flaws anywhere in the system, subtle interactions between software systems, subtle interactions between software and hardware, and awkward interactions between users and the GUI. Hard bugs can have their own lifecycle, and the fix might be spread over several product releases. Team Development’s Bugs and To Dos modules can be used together to track a hard bug’s resolution, even when it spans several product releases.
The Bugs module highlights how you can take advantage of Team Development’s simplicity, extensibility, and flexibility. Simplicity makes tracking easy bugs almost trivial. A bug is found, and everything about the bug is recorded in Team Development’s Bugs module, including the what, who, and when data. Easy bugs can stand on their own, or you can associate them with a to-do depending on how you organize your Team Development environment.
Figure 15-15. Development page linked directly to the To Dos module
Figure 15-16. To Dos page filtered by an application’s development count link
www.it-ebooks.info
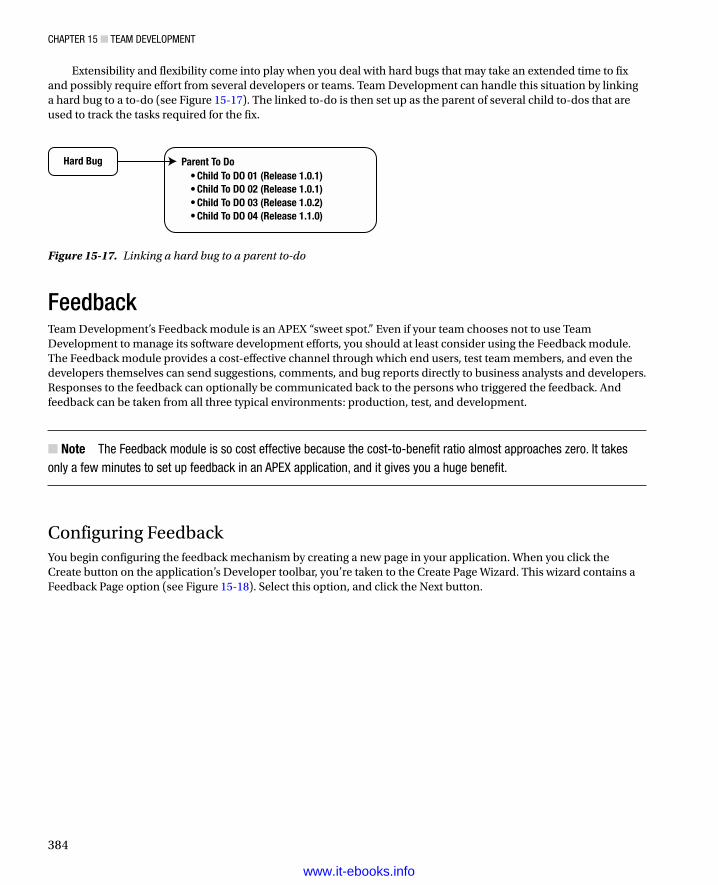
Chapter 15 ■ team Development
384
Extensibility and flexibility come into play when you deal with hard bugs that may take an extended time to fix and possibly require effort from several developers or teams. Team Development can handle this situation by linking a hard bug to a to-do (see Figure 15-17). The linked to-do is then set up as the parent of several child to-dos that are used to track the tasks required for the fix.
FeedbackTeam Development’s Feedback module is an APEX “sweet spot.” Even if your team chooses not to use Team Development to manage its software development efforts, you should at least consider using the Feedback module. The Feedback module provides a cost-effective channel through which end users, test team members, and even the developers themselves can send suggestions, comments, and bug reports directly to business analysts and developers. Responses to the feedback can optionally be communicated back to the persons who triggered the feedback. And feedback can be taken from all three typical environments: production, test, and development.
Note ■ the Feedback module is so cost effective because the cost-to-benefit ratio almost approaches zero. It takes only a few minutes to set up feedback in an apeX application, and it gives you a huge benefit.
Configuring FeedbackYou begin configuring the feedback mechanism by creating a new page in your application. When you click the Create button on the application’s Developer toolbar, you’re taken to the Create Page Wizard. This wizard contains a Feedback Page option (see Figure 15-18). Select this option, and click the Next button.
Hard Bug Parent To DoChild To DO 01 (Release 1.0.1)Child To DO 02 (Release 1.0.1)Child To DO 03 (Release 1.0.2)Child To DO 04 (Release 1.1.0)
Figure 15-17. Linking a hard bug to a parent to-do
www.it-ebooks.info
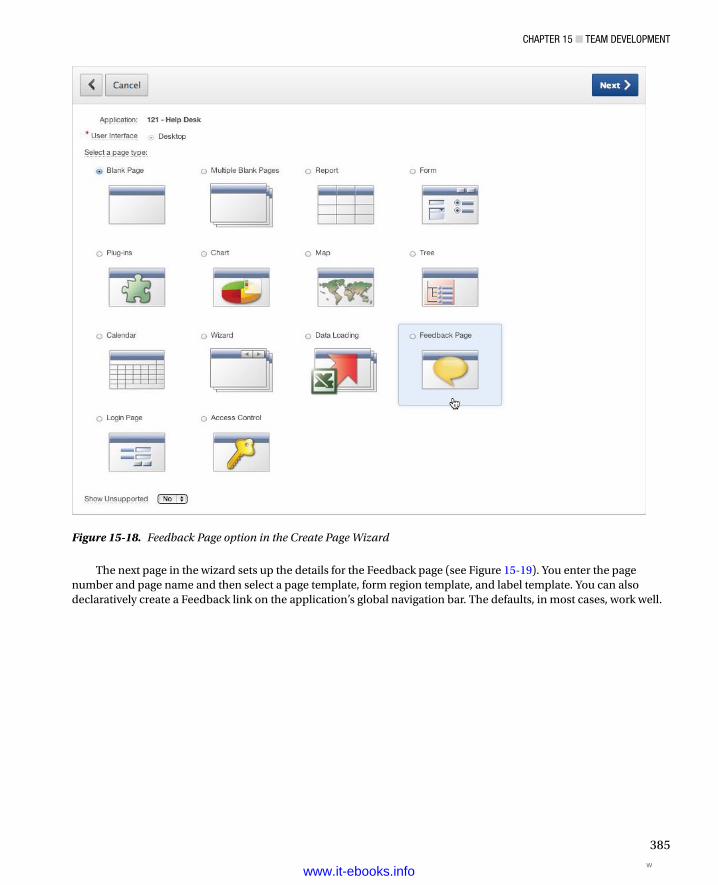
Chapter 15 ■ team Development
385
Figure 15-18. Feedback Page option in the Create Page Wizard
The next page in the wizard sets up the details for the Feedback page (see Figure 15-19). You enter the page number and page name and then select a page template, form region template, and label template. You can also declaratively create a Feedback link on the application’s global navigation bar. The defaults, in most cases, work well.
wwww.it-ebooks.info
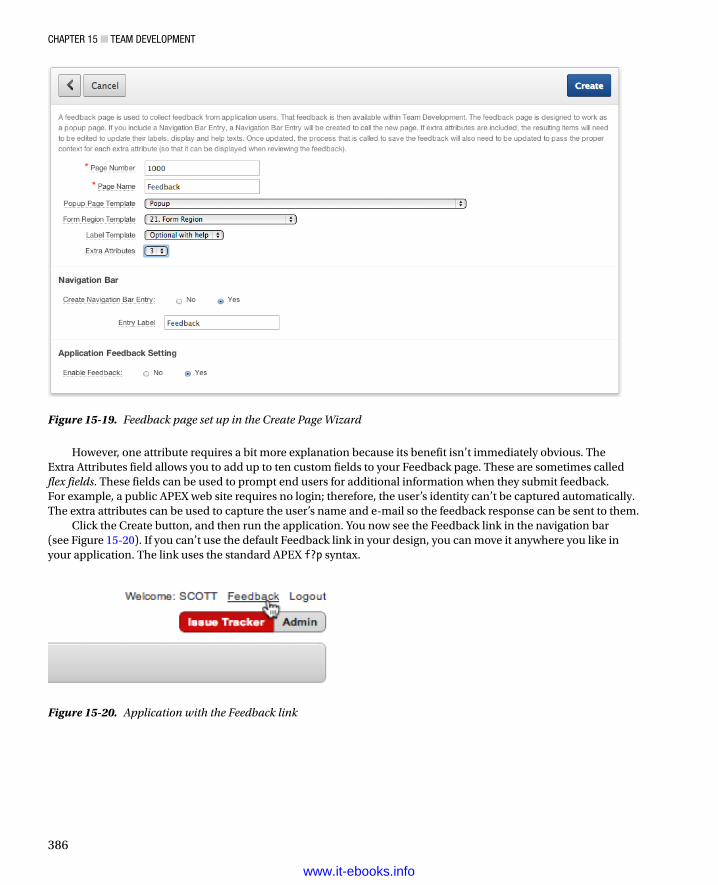
Chapter 15 ■ team Development
386
However, one attribute requires a bit more explanation because its benefit isn’t immediately obvious. The Extra Attributes field allows you to add up to ten custom fields to your Feedback page. These are sometimes called flex fields. These fields can be used to prompt end users for additional information when they submit feedback. For example, a public APEX web site requires no login; therefore, the user’s identity can’t be captured automatically. The extra attributes can be used to capture the user’s name and e-mail so the feedback response can be sent to them.
Click the Create button, and then run the application. You now see the Feedback link in the navigation bar (see Figure 15-20). If you can’t use the default Feedback link in your design, you can move it anywhere you like in your application. The link uses the standard APEX f?p syntax.
Figure 15-19. Feedback page set up in the Create Page Wizard
Figure 15-20. Application with the Feedback link
www.it-ebooks.info
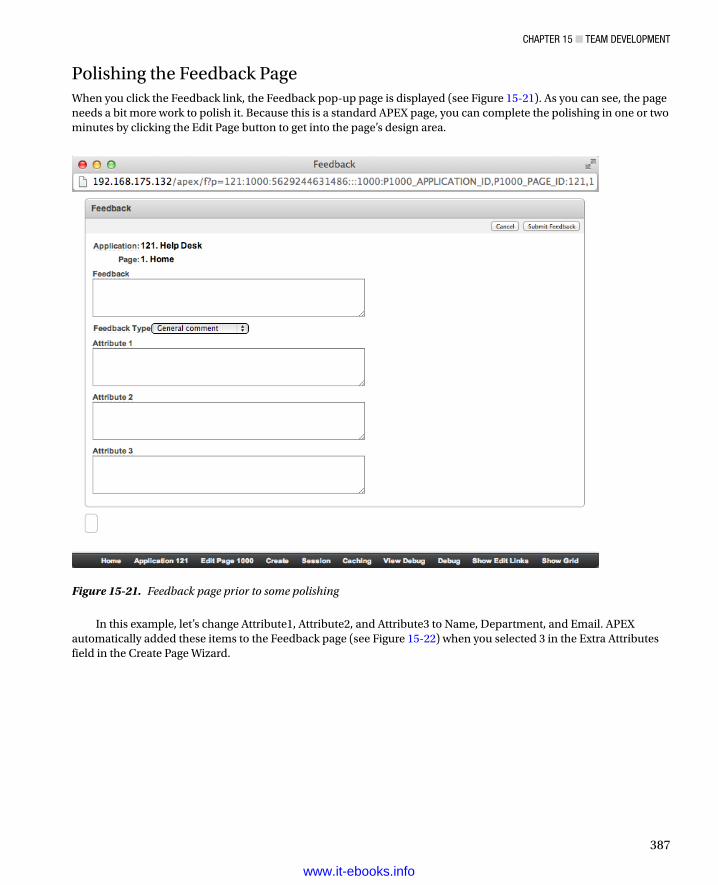
Chapter 15 ■ team Development
387
In this example, let’s change Attribute1, Attribute2, and Attribute3 to Name, Department, and Email. APEX automatically added these items to the Feedback page (see Figure 15-22) when you selected 3 in the Extra Attributes field in the Create Page Wizard.
Figure 15-21. Feedback page prior to some polishing
Polishing the Feedback PageWhen you click the Feedback link, the Feedback pop-up page is displayed (see Figure 15-21). As you can see, the page needs a bit more work to polish it. Because this is a standard APEX page, you can complete the polishing in one or two minutes by clicking the Edit Page button to get into the page’s design area.
www.it-ebooks.info

Chapter 15 ■ team Development
388
Configuring the extra attributes is a two-step process. First, rename the items so they describe the data, change the item types from Text area to an item type that is appropriate for the data, and rename the label to something meaningful to the end users (see Figure 15-23).
Figure 15-22. Extra attributes on the Feedback page
Figure 15-23. Reconfiguring extra attributes
www.it-ebooks.info
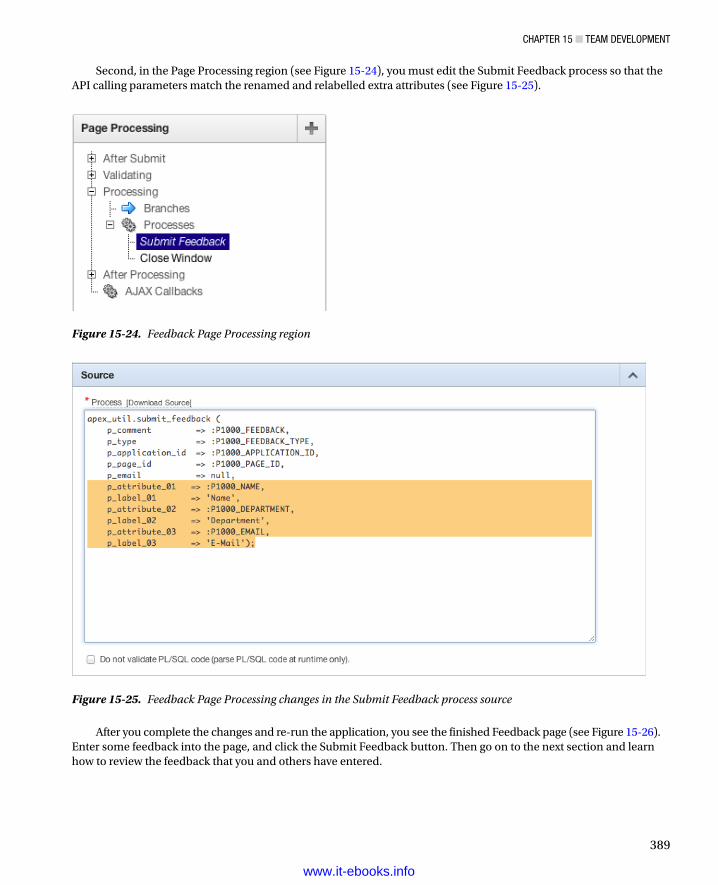
Chapter 15 ■ team Development
389
Figure 15-24. Feedback Page Processing region
Figure 15-25. Feedback Page Processing changes in the Submit Feedback process source
Second, in the Page Processing region (see Figure 15-24), you must edit the Submit Feedback process so that the API calling parameters match the renamed and relabelled extra attributes (see Figure 15-25).
After you complete the changes and re-run the application, you see the finished Feedback page (see Figure 15-26). Enter some feedback into the page, and click the Submit Feedback button. Then go on to the next section and learn how to review the feedback that you and others have entered.
www.it-ebooks.info
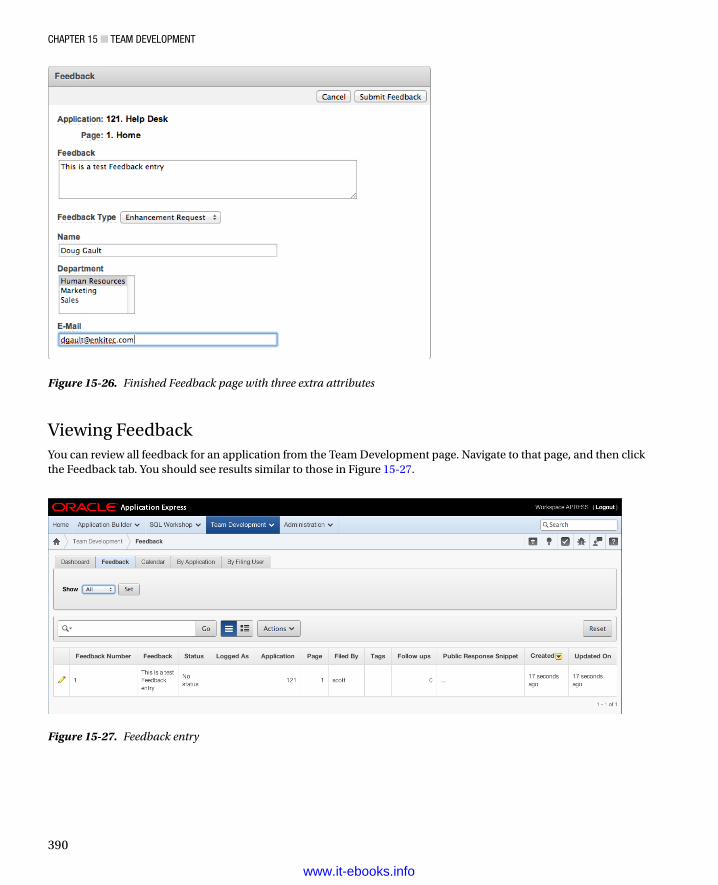
Chapter 15 ■ team Development
390
Viewing FeedbackYou can review all feedback for an application from the Team Development page. Navigate to that page, and then click the Feedback tab. You should see results similar to those in Figure 15-27.
Figure 15-26. Finished Feedback page with three extra attributes
Figure 15-27. Feedback entry
www.it-ebooks.info
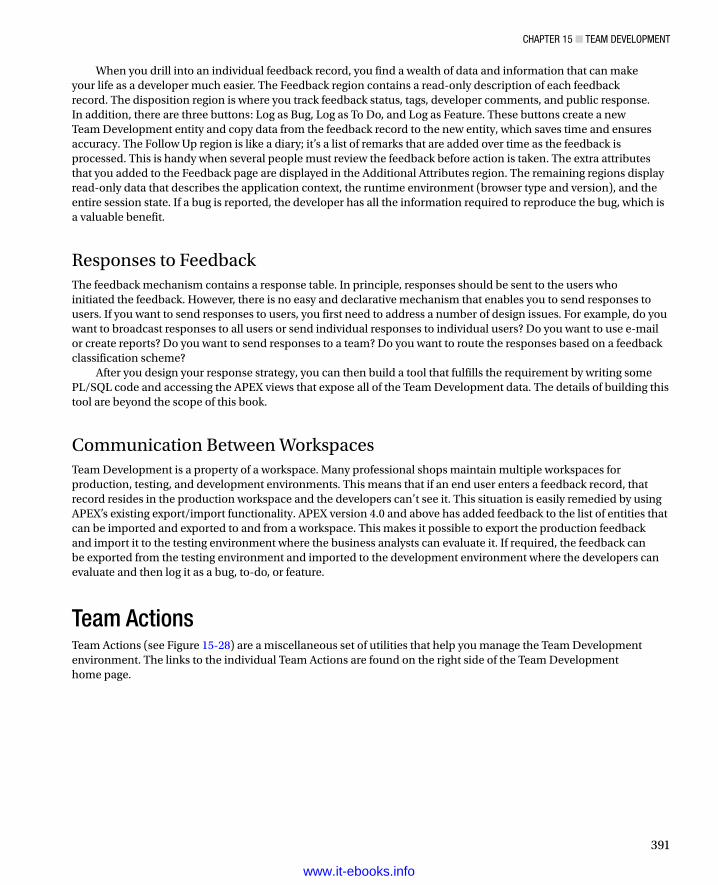
Chapter 15 ■ team Development
391
When you drill into an individual feedback record, you find a wealth of data and information that can make your life as a developer much easier. The Feedback region contains a read-only description of each feedback record. The disposition region is where you track feedback status, tags, developer comments, and public response. In addition, there are three buttons: Log as Bug, Log as To Do, and Log as Feature. These buttons create a new Team Development entity and copy data from the feedback record to the new entity, which saves time and ensures accuracy. The Follow Up region is like a diary; it’s a list of remarks that are added over time as the feedback is processed. This is handy when several people must review the feedback before action is taken. The extra attributes that you added to the Feedback page are displayed in the Additional Attributes region. The remaining regions display read-only data that describes the application context, the runtime environment (browser type and version), and the entire session state. If a bug is reported, the developer has all the information required to reproduce the bug, which is a valuable benefit.
Responses to FeedbackThe feedback mechanism contains a response table. In principle, responses should be sent to the users who initiated the feedback. However, there is no easy and declarative mechanism that enables you to send responses to users. If you want to send responses to users, you first need to address a number of design issues. For example, do you want to broadcast responses to all users or send individual responses to individual users? Do you want to use e-mail or create reports? Do you want to send responses to a team? Do you want to route the responses based on a feedback classification scheme?
After you design your response strategy, you can then build a tool that fulfills the requirement by writing some PL/SQL code and accessing the APEX views that expose all of the Team Development data. The details of building this tool are beyond the scope of this book.
Communication Between WorkspacesTeam Development is a property of a workspace. Many professional shops maintain multiple workspaces for production, testing, and development environments. This means that if an end user enters a feedback record, that record resides in the production workspace and the developers can’t see it. This situation is easily remedied by using APEX’s existing export/import functionality. APEX version 4.0 and above has added feedback to the list of entities that can be imported and exported to and from a workspace. This makes it possible to export the production feedback and import it to the testing environment where the business analysts can evaluate it. If required, the feedback can be exported from the testing environment and imported to the development environment where the developers can evaluate and then log it as a bug, to-do, or feature.
Team ActionsTeam Actions (see Figure 15-28) are a miscellaneous set of utilities that help you manage the Team Development environment. The links to the individual Team Actions are found on the right side of the Team Development home page.
www.it-ebooks.info
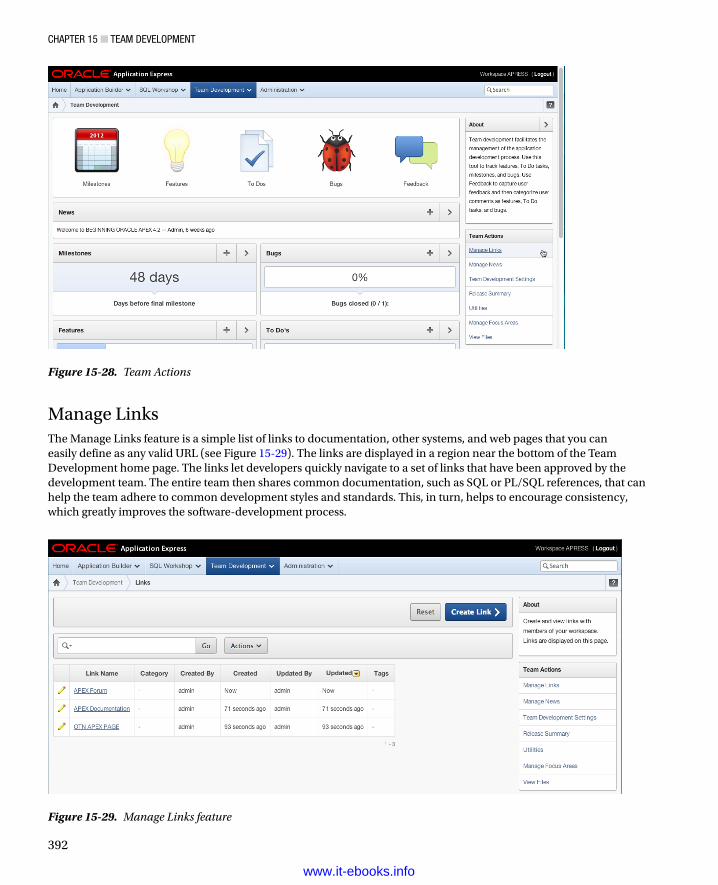
Chapter 15 ■ team Development
392
Manage LinksThe Manage Links feature is a simple list of links to documentation, other systems, and web pages that you can easily define as any valid URL (see Figure 15-29). The links are displayed in a region near the bottom of the Team Development home page. The links let developers quickly navigate to a set of links that have been approved by the development team. The entire team then shares common documentation, such as SQL or PL/SQL references, that can help the team adhere to common development styles and standards. This, in turn, helps to encourage consistency, which greatly improves the software-development process.
Figure 15-28. Team Actions
Figure 15-29. Manage Links feature
www.it-ebooks.info
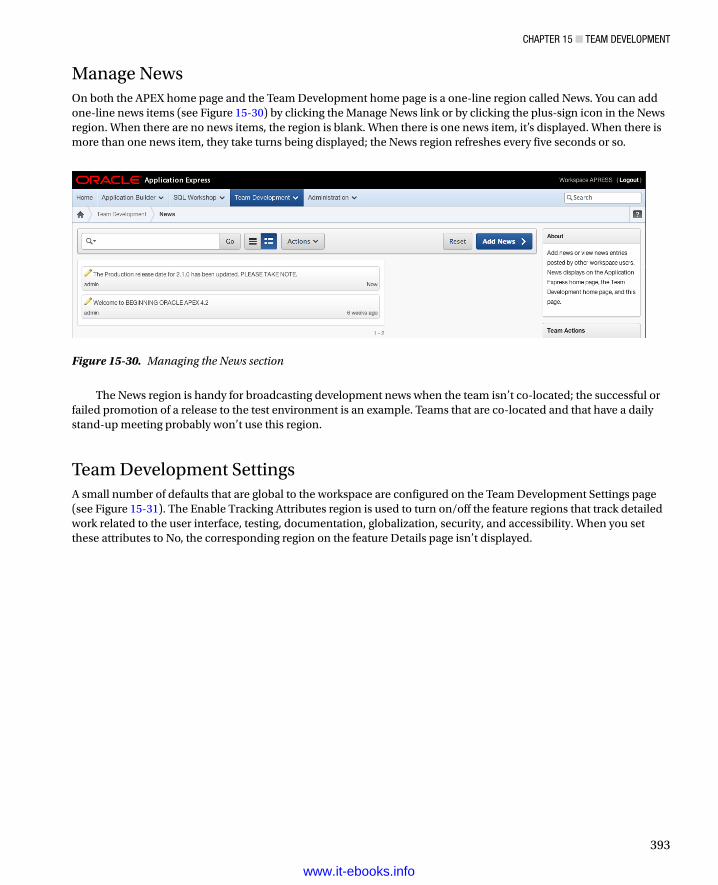
Chapter 15 ■ team Development
393
Manage NewsOn both the APEX home page and the Team Development home page is a one-line region called News. You can add one-line news items (see Figure 15-30) by clicking the Manage News link or by clicking the plus-sign icon in the News region. When there are no news items, the region is blank. When there is one news item, it’s displayed. When there is more than one news item, they take turns being displayed; the News region refreshes every five seconds or so.
Figure 15-30. Managing the News section
The News region is handy for broadcasting development news when the team isn’t co-located; the successful or failed promotion of a release to the test environment is an example. Teams that are co-located and that have a daily stand-up meeting probably won’t use this region.
Team Development SettingsA small number of defaults that are global to the workspace are configured on the Team Development Settings page (see Figure 15-31). The Enable Tracking Attributes region is used to turn on/off the feature regions that track detailed work related to the user interface, testing, documentation, globalization, security, and accessibility. When you set these attributes to No, the corresponding region on the feature Details page isn’t displayed.
www.it-ebooks.info
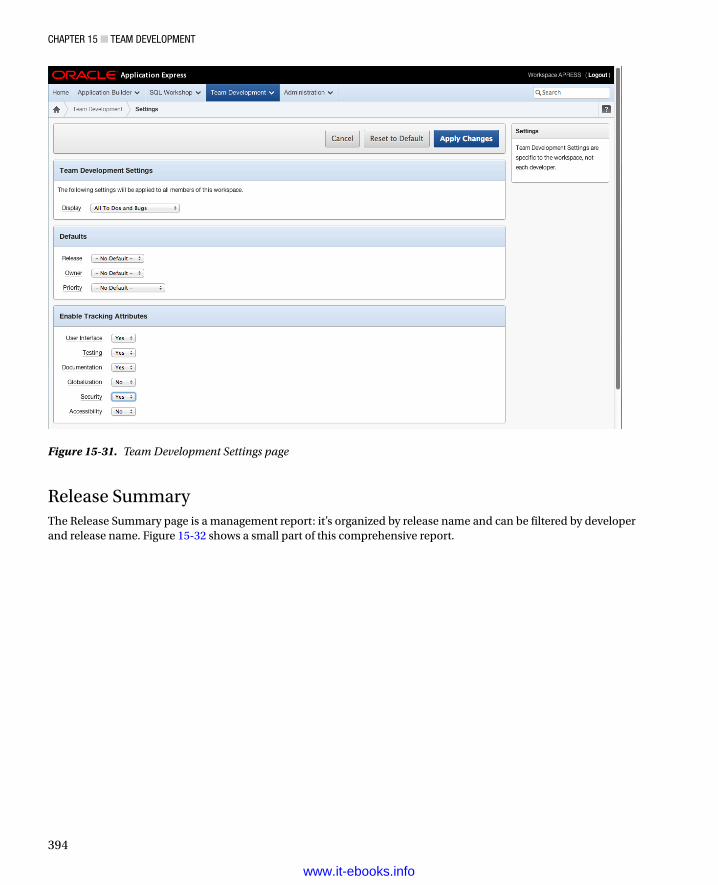
Chapter 15 ■ team Development
394
Release SummaryThe Release Summary page is a management report: it’s organized by release name and can be filtered by developer and release name. Figure 15-32 shows a small part of this comprehensive report.
Figure 15-31. Team Development Settings page
www.it-ebooks.info
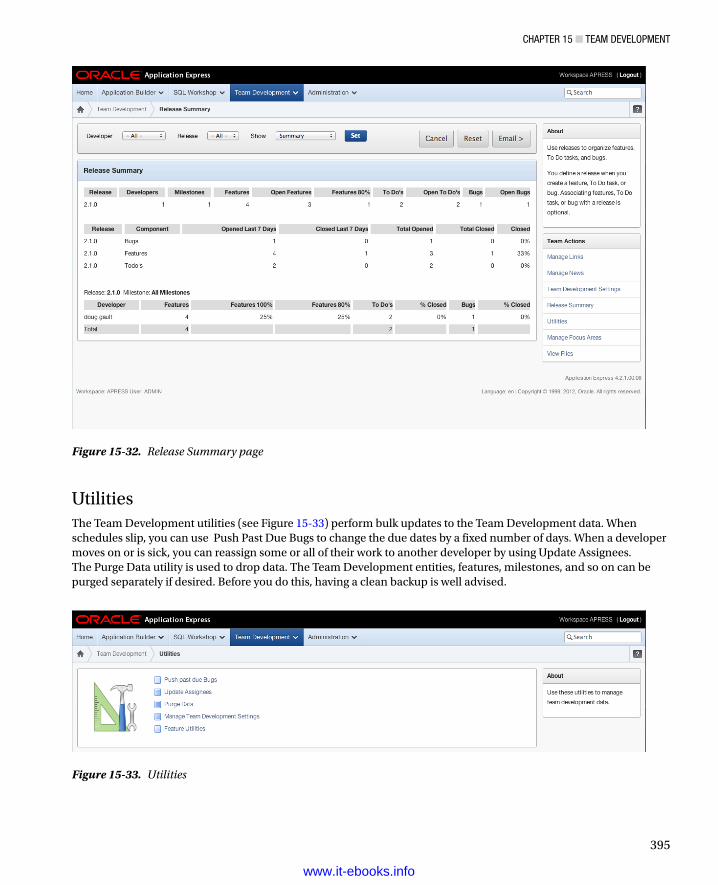
Chapter 15 ■ team Development
395
Figure 15-33. Utilities
Figure 15-32. Release Summary page
UtilitiesThe Team Development utilities (see Figure 15-33) perform bulk updates to the Team Development data. When schedules slip, you can use Push Past Due Bugs to change the due dates by a fixed number of days. When a developer moves on or is sick, you can reassign some or all of their work to another developer by using Update Assignees. The Purge Data utility is used to drop data. The Team Development entities, features, milestones, and so on can be purged separately if desired. Before you do this, having a clean backup is well advised.
www.it-ebooks.info
Chapter 15 ■ team Development
396
User Roles for Team DevelopmentAccess to Team Development is useful for stakeholders both inside and outside the development team. The team lead and senior developers should have access to Team Development. Access by junior developers depends on the team’s culture and trust level. Interested stakeholders who are outside the development team could include the project manager, test team, and the business analysts.
Access to the APEX development environment is controlled in the APEX Administration area under the Manage Users and Groups menu. This area maintains the list of APEX users, dictating what level of access the user has (see Figure 15-34). An outside stakeholder is set up without administrator and developer privileges; however, the Team Development Access field is set to Yes. When they log in to the APEX development environment, they see only the Team Development area and nothing else. There is only one problem at this time with this scenario: outside stakeholders can’t see the applications in the Application drop-down lists. We hope this will be fixed in an upcoming patch.
Figure 15-34. Account Privileges for a project manager, tester, or business analyst
SummaryTeam Development is a software-development tool that has been tailored to work in the APEX development environment. The five main entities (features, milestones, to-dos, bugs, and feedback) work together in a framework that is simple, extensible, and flexible. Teams that embrace agile software development methodologies will find APEX’s Team Development tool to be a comfortable fit with their culture.
www.it-ebooks.info
397
Chapter 16
Dynamic Actions
One of the most exciting features introduced with APEX 4.0 was dynamic actions, which provide the ability to declaratively define complex client-side behavior such as validations, highlighting, alerts, setting page values, and so on, without the need to hand-code large amounts of JavaScript.
Dynamic actions have been significantly extended in APEX 4.2, providing more flexibility and functionality declaratively. This helps the developer break away from the traditional server-side scripting model by executing the dynamic-action logic on the browser instead of incurring a round trip to the server.
Dynamic actions are event-driven just as manually written JavaScript would be. But APEX uses the declarative information provided to generate the required JavaScript code, which is then implemented at runtime. This chapter examines and implements a number of different dynamic actions so you can get a feel for what they can achieve.
Dynamic Action BenefitsOne of the major advantages of using declarative dynamic actions as opposed to hand-coded JavaScript is that dynamic actions understand and can take advantage of APEX core objects such as regions and items, allowing easy reference and manipulation. Another benefit of using declarative logic is that, when you choose to upgrade to the next release of APEX when it comes out, the framework around dynamic actions will ensure that any code generated will be compatible with the new version of APEX.
But beyond the base benefits of the declarative nature of APEX, dynamic actions let you code very complex client-side actions without having to learn a whole new technology to do so. In fact, it’s likely that you could code upward of 80% of everything you need to do with nothing more than the Dynamic Action Wizard and SQL and PL/SQL.
However, because JavaScript is the de facto standard for coding browser interactivity, it’s also likely that at some point you’ll be forced to learn a bit about JavaScript. Learning JavaScript is beyond the scope of this book. After all, you bought this book to learn APEX. But if you do want to learn more about JavaScript, Apress has a number of excellent books on the topic.
Breaking Down Dynamic ActionsPrior to APEX 4.2, dynamic actions were split into two categories: Standard and Advanced. The only real difference between these two categories was what the related wizard let you achieve. Under the covers, both dynamic action types were identical; and once you left the wizard, all options were available to you. APEX 4.2 has done away with this artificial separation and now provides only one wizard to create dynamic actions.
The definition of a dynamic action can be broken down into the following components:
Identification: Defines the name of the dynamic action and its execution sequence.
When: Defines when the action will be fired. You can choose the event, the object or objects that will participate in causing the action to fire, and any condition that applies to the event.
www.it-ebooks.info
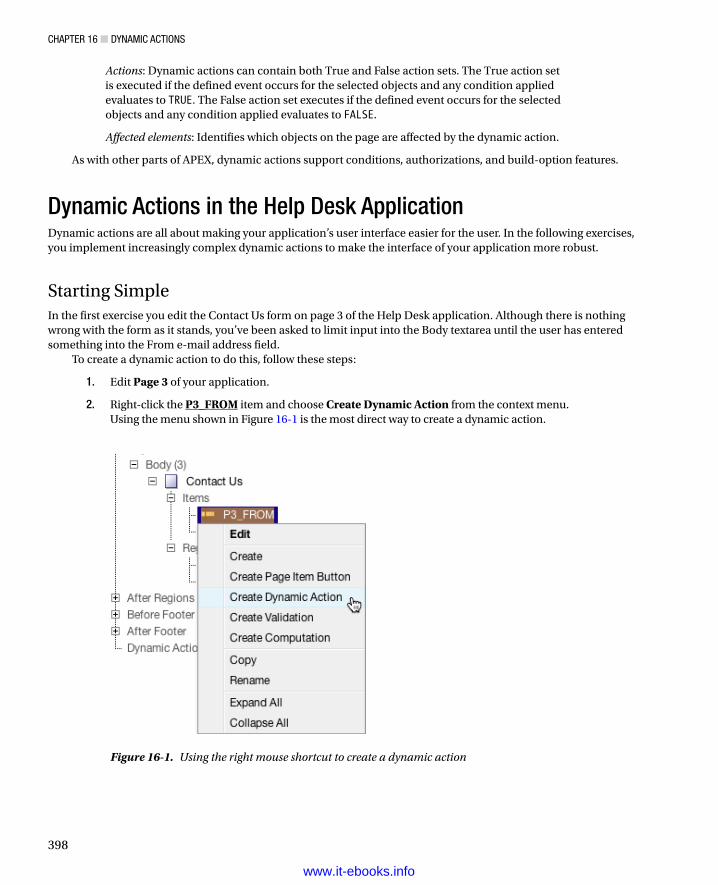
Chapter 16 ■ DynamiC aCtions
398
Actions: Dynamic actions can contain both True and False action sets. The True action set is executed if the defined event occurs for the selected objects and any condition applied evaluates to TRUE. The False action set executes if the defined event occurs for the selected objects and any condition applied evaluates to FALSE.
Affected elements: Identifies which objects on the page are affected by the dynamic action.
As with other parts of APEX, dynamic actions support conditions, authorizations, and build-option features.
Dynamic Actions in the Help Desk ApplicationDynamic actions are all about making your application’s user interface easier for the user. In the following exercises, you implement increasingly complex dynamic actions to make the interface of your application more robust.
Starting SimpleIn the first exercise you edit the Contact Us form on page 3 of the Help Desk application. Although there is nothing wrong with the form as it stands, you’ve been asked to limit input into the Body textarea until the user has entered something into the From e-mail address field.
To create a dynamic action to do this, follow these steps:
1. Edit Page 3 of your application.
2. Right-click the P3_FROM item and choose Create Dynamic Action from the context menu. Using the menu shown in Figure 16-1 is the most direct way to create a dynamic action.
Figure 16-1. Using the right mouse shortcut to create a dynamic action
www.it-ebooks.info
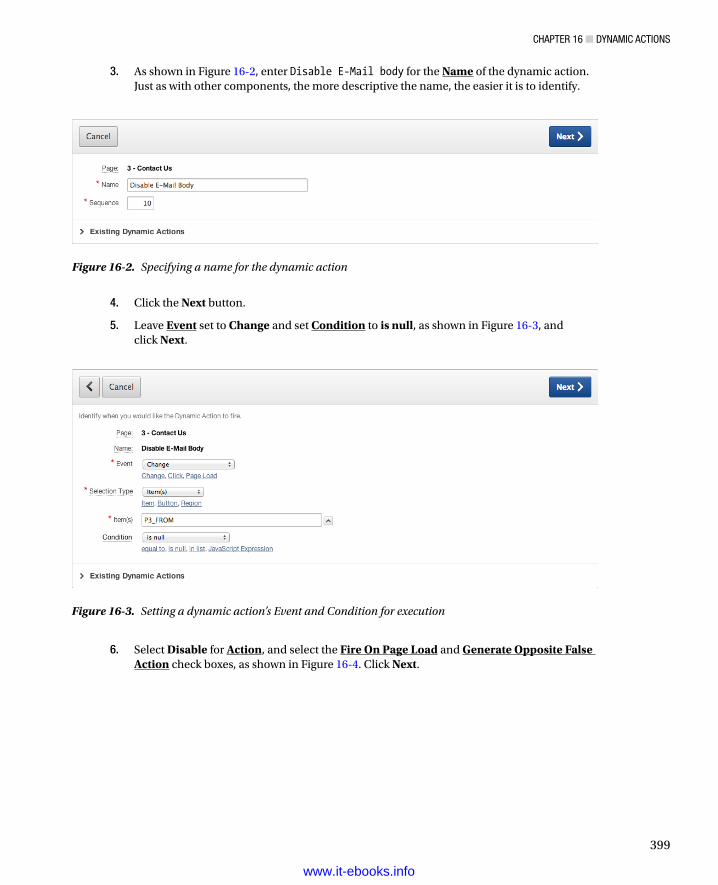
Chapter 16 ■ DynamiC aCtions
399
3. As shown in Figure 16-2, enter Disable E-Mail body for the Name of the dynamic action. Just as with other components, the more descriptive the name, the easier it is to identify.
Figure 16-2. Specifying a name for the dynamic action
4. Click the Next button.
5. Leave Event set to Change and set Condition to is null, as shown in Figure 16-3, and click Next.
Figure 16-3. Setting a dynamic action’s Event and Condition for execution
6. Select Disable for Action, and select the Fire On Page Load and Generate Opposite False Action check boxes, as shown in Figure 16-4. Click Next.
www.it-ebooks.info
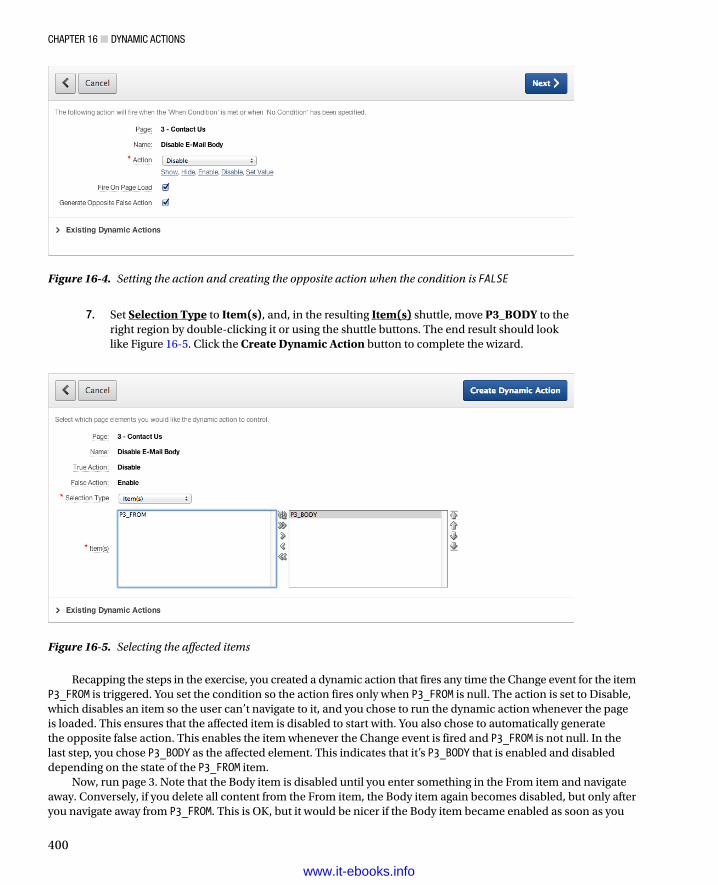
Chapter 16 ■ DynamiC aCtions
400
7. Set Selection Type to Item(s), and, in the resulting Item(s) shuttle, move P3_BODY to the right region by double-clicking it or using the shuttle buttons. The end result should look like Figure 16-5. Click the Create Dynamic Action button to complete the wizard.
Figure 16-4. Setting the action and creating the opposite action when the condition is FALSE
Figure 16-5. Selecting the affected items
Recapping the steps in the exercise, you created a dynamic action that fires any time the Change event for the item P3_FROM is triggered. You set the condition so the action fires only when P3_FROM is null. The action is set to Disable, which disables an item so the user can’t navigate to it, and you chose to run the dynamic action whenever the page is loaded. This ensures that the affected item is disabled to start with. You also chose to automatically generate the opposite false action. This enables the item whenever the Change event is fired and P3_FROM is not null. In the last step, you chose P3_BODY as the affected element. This indicates that it’s P3_BODY that is enabled and disabled depending on the state of the P3_FROM item.
Now, run page 3. Note that the Body item is disabled until you enter something in the From item and navigate away. Conversely, if you delete all content from the From item, the Body item again becomes disabled, but only after you navigate away from P3_FROM. This is OK, but it would be nicer if the Body item became enabled as soon as you
www.it-ebooks.info
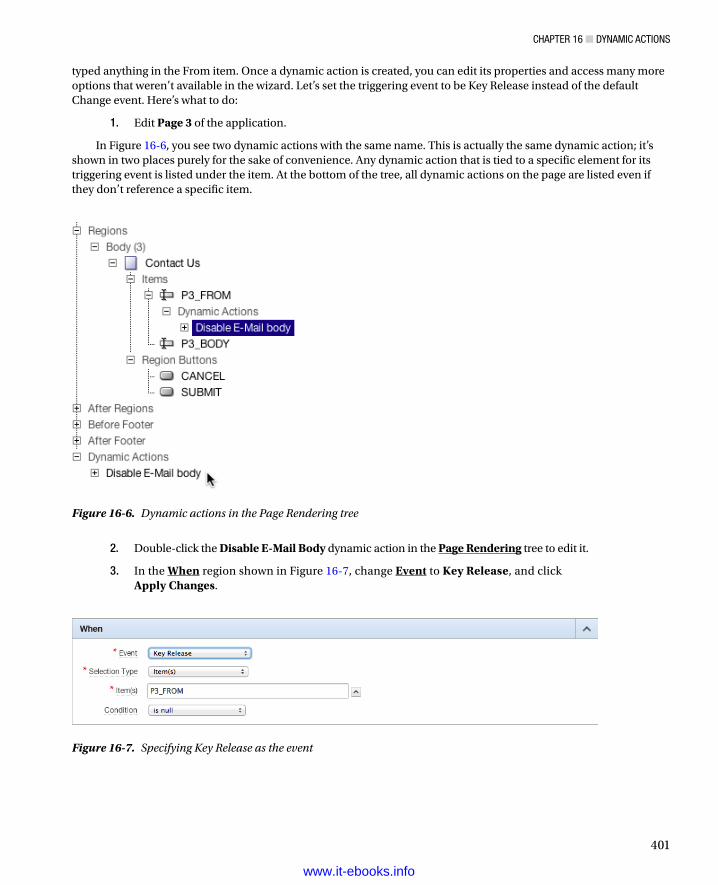
Chapter 16 ■ DynamiC aCtions
401
typed anything in the From item. Once a dynamic action is created, you can edit its properties and access many more options that weren’t available in the wizard. Let’s set the triggering event to be Key Release instead of the default Change event. Here’s what to do:
1. Edit Page 3 of the application.
In Figure 16-6, you see two dynamic actions with the same name. This is actually the same dynamic action; it’s shown in two places purely for the sake of convenience. Any dynamic action that is tied to a specific element for its triggering event is listed under the item. At the bottom of the tree, all dynamic actions on the page are listed even if they don’t reference a specific item.
Figure 16-6. Dynamic actions in the Page Rendering tree
2. Double-click the Disable E-Mail Body dynamic action in the Page Rendering tree to edit it.
3. In the When region shown in Figure 16-7, change Event to Key Release, and click Apply Changes.
Figure 16-7. Specifying Key Release as the event
www.it-ebooks.info
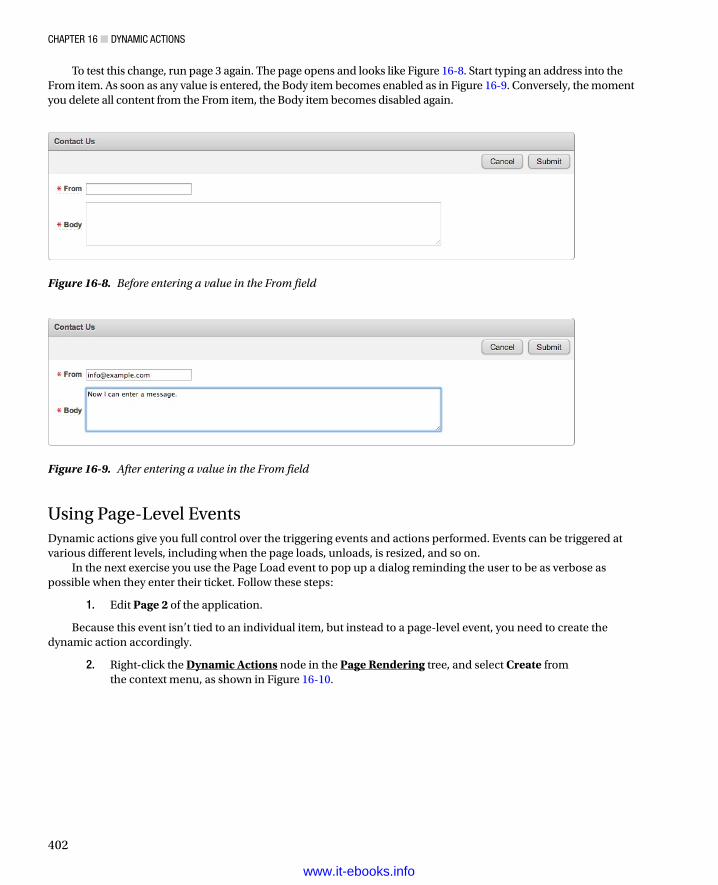
Chapter 16 ■ DynamiC aCtions
402
Using Page-Level EventsDynamic actions give you full control over the triggering events and actions performed. Events can be triggered at various different levels, including when the page loads, unloads, is resized, and so on.
In the next exercise you use the Page Load event to pop up a dialog reminding the user to be as verbose as possible when they enter their ticket. Follow these steps:
1. Edit Page 2 of the application.
Because this event isn’t tied to an individual item, but instead to a page-level event, you need to create the dynamic action accordingly.
2. Right-click the Dynamic Actions node in the Page Rendering tree, and select Create from the context menu, as shown in Figure 16-10.
Figure 16-8. Before entering a value in the From field
To test this change, run page 3 again. The page opens and looks like Figure 16-8. Start typing an address into the From item. As soon as any value is entered, the Body item becomes enabled as in Figure 16-9. Conversely, the moment you delete all content from the From item, the Body item becomes disabled again.
Figure 16-9. After entering a value in the From field
www.it-ebooks.info
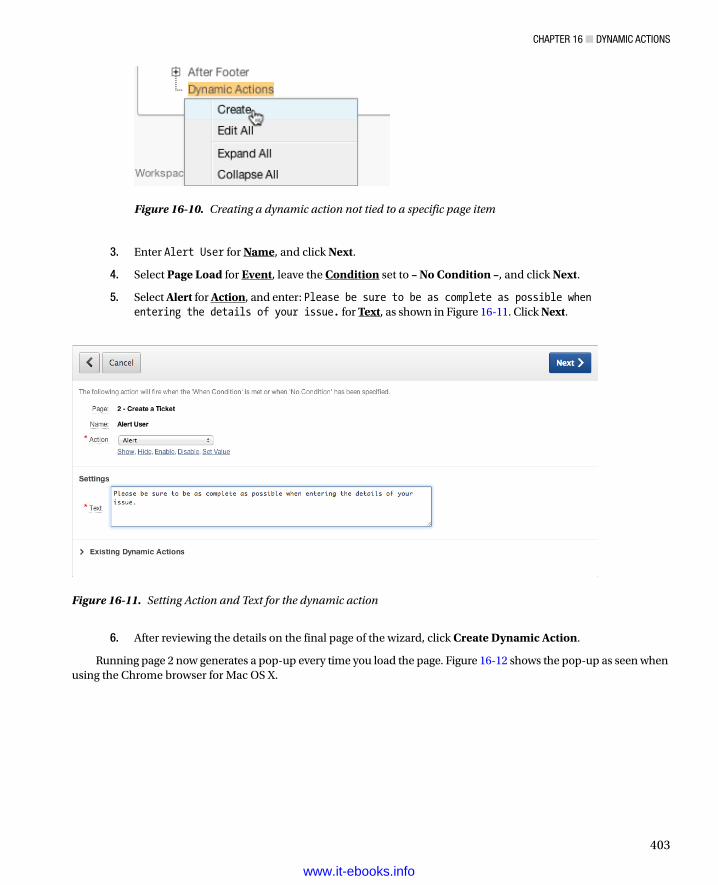
Chapter 16 ■ DynamiC aCtions
403
3. Enter Alert User for Name, and click Next.
4. Select Page Load for Event, leave the Condition set to – No Condition –, and click Next.
5. Select Alert for Action, and enter: Please be sure to be as complete as possible when entering the details of your issue. for Text, as shown in Figure 16-11. Click Next.
Figure 16-10. Creating a dynamic action not tied to a specific page item
Figure 16-11. Setting Action and Text for the dynamic action
6. After reviewing the details on the final page of the wizard, click Create Dynamic Action.
Running page 2 now generates a pop-up every time you load the page. Figure 16-12 shows the pop-up as seen when using the Chrome browser for Mac OS X.
www.it-ebooks.info
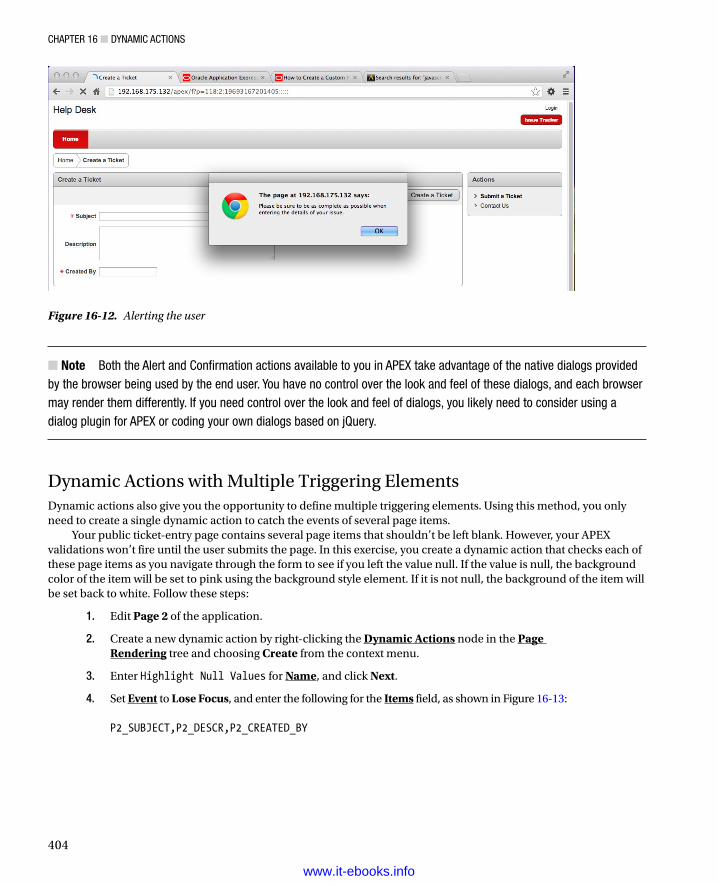
Chapter 16 ■ DynamiC aCtions
404
Note ■ Both the alert and Confirmation actions available to you in apeX take advantage of the native dialogs provided by the browser being used by the end user. you have no control over the look and feel of these dialogs, and each browser may render them differently. if you need control over the look and feel of dialogs, you likely need to consider using a dialog plugin for apeX or coding your own dialogs based on jQuery.
Dynamic Actions with Multiple Triggering ElementsDynamic actions also give you the opportunity to define multiple triggering elements. Using this method, you only need to create a single dynamic action to catch the events of several page items.
Your public ticket-entry page contains several page items that shouldn’t be left blank. However, your APEX validations won’t fire until the user submits the page. In this exercise, you create a dynamic action that checks each of these page items as you navigate through the form to see if you left the value null. If the value is null, the background color of the item will be set to pink using the background style element. If it is not null, the background of the item will be set back to white. Follow these steps:
1. Edit Page 2 of the application.
2. Create a new dynamic action by right-clicking the Dynamic Actions node in the Page Rendering tree and choosing Create from the context menu.
3. Enter Highlight Null Values for Name, and click Next.
4. Set Event to Lose Focus, and enter the following for the Items field, as shown in Figure 16-13: P2_SUBJECT,P2_DESCR,P2_CREATED_BY
Figure 16-12. Alerting the user
www.it-ebooks.info

Chapter 16 ■ DynamiC aCtions
405
5. Set Condition to is null, and click Next.
6. Set Action to Set Style, and deselect Fire On Page Load.
7. In the Settings region, enter background for Style Name and pink for Value, and click Next.
8. Set False Action to Set Style, and deselect Fire On Page Load.
9. In the Settings region, enter background for Style Name and white for Value, and click Next.
10. Set Selection Type to Triggering Element, and click Create Dynamic Action.
By entering a comma-separated list of page items, you indicate that the Lose Focus event should fire when the user navigates away from any of these items. When the dynamic action fires, it checks to see if that item is null and sets it to the appropriate color. The dynamic action knows which item’s background color to set by referencing the triggering element for the affected element.
Run page 2 of the Help Desk application, and tab through each field, leaving them all blank. You should notice that as you leave a blank field, it immediately turns pink. If you go back and enter text into a pink field and then navigate away, the background is set to white.
Note ■ Depending on the browser you’re using, you may see that after the pop-up message is dismissed, the subject field turns pink. this has to do with the order of precedence some browsers give to Javascript events. Certain browsers place the cursor in the initial page item prior to raising the PageLoad event. once the PageLoad event fires, the subject field loses focus, and the LoseFocus event fires. When you have multiple dynamic actions on a page, which you often will, you need to make sure they don’t adversely affect one another.
Dynamic Actions Using PL/SQLDynamic actions are architected to be an extensible framework, giving the developer full control over coding complex actions that might not be available in a purely declarative environment. In the spirit of UI usability, you should help
Figure 16-13. Creating a dynamic action with multiple triggering elements
www.it-ebooks.info
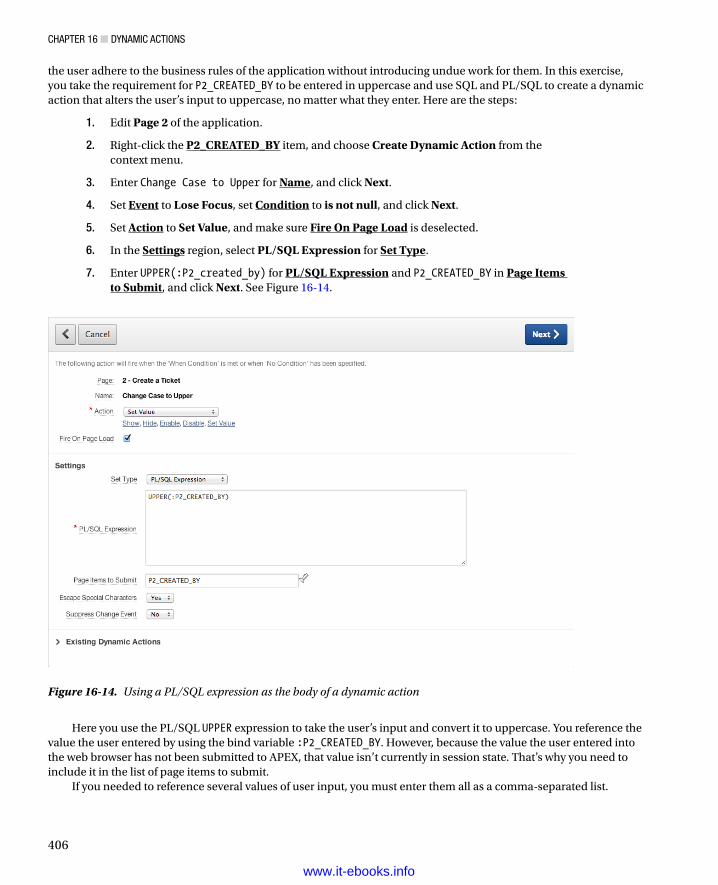
Chapter 16 ■ DynamiC aCtions
406
the user adhere to the business rules of the application without introducing undue work for them. In this exercise, you take the requirement for P2_CREATED_BY to be entered in uppercase and use SQL and PL/SQL to create a dynamic action that alters the user’s input to uppercase, no matter what they enter. Here are the steps:
1. Edit Page 2 of the application.
2. Right-click the P2_CREATED_BY item, and choose Create Dynamic Action from the context menu.
3. Enter Change Case to Upper for Name, and click Next.
4. Set Event to Lose Focus, set Condition to is not null, and click Next.
5. Set Action to Set Value, and make sure Fire On Page Load is deselected.
6. In the Settings region, select PL/SQL Expression for Set Type.
7. Enter UPPER(:P2_created_by) for PL/SQL Expression and P2_CREATED_BY in Page Items to Submit, and click Next. See Figure 16-14.
Figure 16-14. Using a PL/SQL expression as the body of a dynamic action
Here you use the PL/SQL UPPER expression to take the user’s input and convert it to uppercase. You reference the value the user entered by using the bind variable :P2_CREATED_BY. However, because the value the user entered into the web browser has not been submitted to APEX, that value isn’t currently in session state. That’s why you need to include it in the list of page items to submit.
If you needed to reference several values of user input, you must enter them all as a comma-separated list.
www.it-ebooks.info
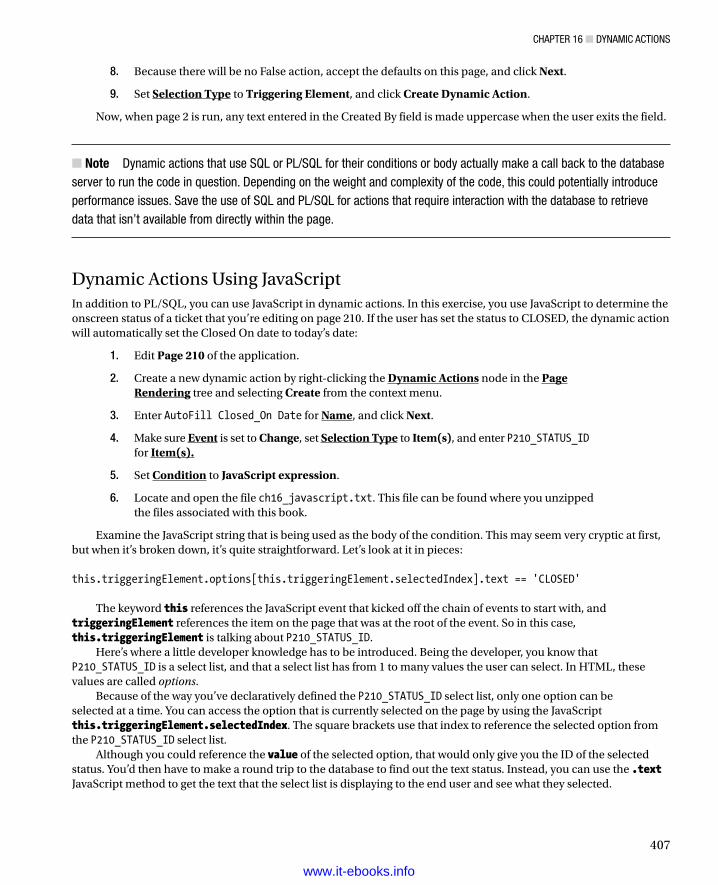
Chapter 16 ■ DynamiC aCtions
407
8. Because there will be no False action, accept the defaults on this page, and click Next.
9. Set Selection Type to Triggering Element, and click Create Dynamic Action.
Now, when page 2 is run, any text entered in the Created By field is made uppercase when the user exits the field.
Note■ Dynamic actions that use sQL or pL/sQL for their conditions or body actually make a call back to the database server to run the code in question. Depending on the weight and complexity of the code, this could potentially introduce performance issues. save the use of sQL and pL/sQL for actions that require interaction with the database to retrieve data that isn’t available from directly within the page.
Dynamic Actions Using JavaScriptIn addition to PL/SQL, you can use JavaScript in dynamic actions. In this exercise, you use JavaScript to determine the onscreen status of a ticket that you’re editing on page 210. If the user has set the status to CLOSED, the dynamic action will automatically set the Closed On date to today’s date:
1. Edit Page 210 of the application.
2. Create a new dynamic action by right-clicking the Dynamic Actions node in the Page Rendering tree and selecting Create from the context menu.
3. Enter AutoFill Closed_On Date for Name, and click Next.
4. Make sure Event is set to Change, set Selection Type to Item(s), and enter P210_STATUS_ID for Item(s).
5. Set Condition to JavaScript expression.
6. Locate and open the file ch16_javascript.txt. This file can be found where you unzipped the files associated with this book.
Examine the JavaScript string that is being used as the body of the condition. This may seem very cryptic at first, but when it’s broken down, it’s quite straightforward. Let’s look at it in pieces:
this.triggeringElement.options[this.triggeringElement.selectedIndex].text == 'CLOSED'
The keyword this references the JavaScript event that kicked off the chain of events to start with, and triggeringElement references the item on the page that was at the root of the event. So in this case, this.triggeringElement is talking about P210_STATUS_ID.
Here’s where a little developer knowledge has to be introduced. Being the developer, you know that P210_STATUS_ID is a select list, and that a select list has from 1 to many values the user can select. In HTML, these values are called options.
Because of the way you’ve declaratively defined the P210_STATUS_ID select list, only one option can be selected at a time. You can access the option that is currently selected on the page by using the JavaScript this.triggeringElement.selectedIndex. The square brackets use that index to reference the selected option from the P210_STATUS_ID select list.
Although you could reference the value of the selected option, that would only give you the ID of the selected status. You’d then have to make a round trip to the database to find out the text status. Instead, you can use the .textJavaScript method to get the text that the select list is displaying to the end user and see what they selected.
www.it-ebooks.info

Chapter 16 ■ DynamiC aCtions
408
Once you have that, you can then compare it to the value you’re looking for, which is CLOSED.
7. Copy the contents of the file into Value, as shown in Figure 16-15, and click Next.
Figure 16-15. Using JavaScript for the condition text of a dynamic action
8. Set Action to Set Value, and deselect Fire On Page Load.
9. Set Set Type to PL/SQL Expression, enter SYSDATE for PL/SQL Expression, and click Next. See Figure 16-16.
www.it-ebooks.info

Chapter 16 ■ DynamiC aCtions
409
Although you want the CLOSED_ON date to be set when you choose a status of CLOSED, you want anything that is currently entered in the CLOSED_ON date to be removed if you choose any status but CLOSED. So you use the false action of the dynamic action to do this.
10. Set False Action to Set Value, and deselect Fire On Page Load.
11. Set Set Type to PL/SQL Expression, and enter NULL for PL/SQL Expression, as shown in Figure 16-17. Click Next.
Figure 16-16. Setting the value of a field using PL/SQL in the body of a dynamic action
www.it-ebooks.info
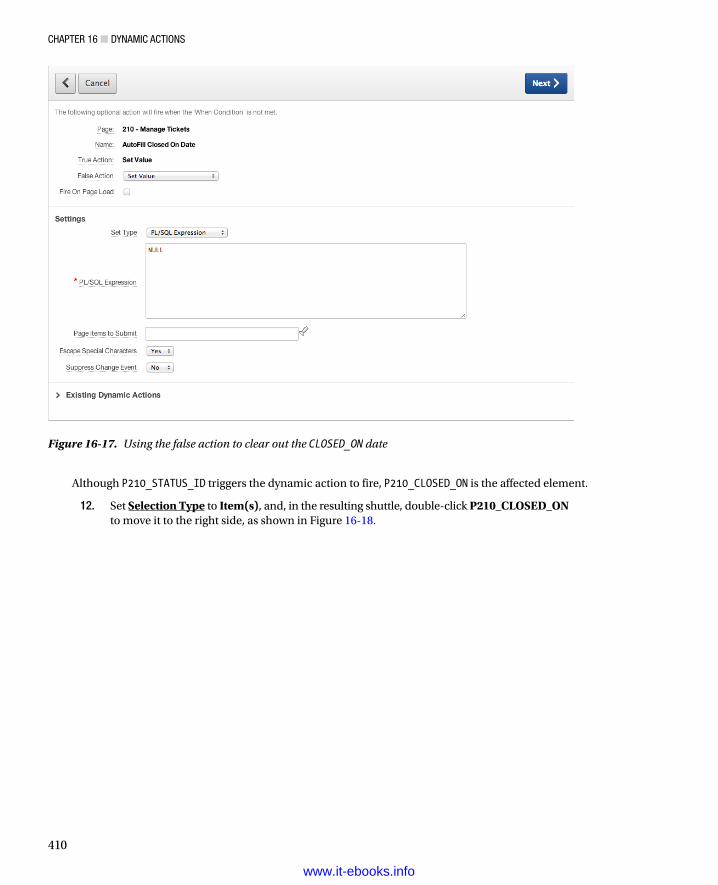
Chapter 16 ■ DynamiC aCtions
410
Although P210_STATUS_ID triggers the dynamic action to fire, P210_CLOSED_ON is the affected element.
12. Set Selection Type to Item(s), and, in the resulting shuttle, double-click P210_CLOSED_ON to move it to the right side, as shown in Figure 16-18.
Figure 16-17. Using the false action to clear out the CLOSED_ON date
www.it-ebooks.info

Chapter 16 ■ DynamiC aCtions
411
13. Click Create Dynamic Action.
Run your application, and edit any ticket using page 210. Change the status to CLOSED and then back again to any other status. You see the value for the Closed On date being set and cleared according to the value you choose for the select list.
SummaryDynamic actions have many uses and are extremely flexible. However, you must make sure that multiple dynamic actions on the same page don’t interfere with each other. Also, because dynamic actions run as JavaScript in the browser, try to do as much as you can declaratively, or with JavaScript, without resorting to SQL or PL/SQL. This reduces the number of calls to the database server and avoids potential performance bottlenecks.
It’s probably inevitable that you’ll be required to learn at least a little JavaScript to achieve more complex results. JavaScript syntax isn’t hard to learn, and it can be a useful addition to your skillset as a web application developer.
Figure 16-18. Selecting P210_CLOSED_ON as the affected element
www.it-ebooks.info
413
Index
n AAPEX 4.2
access, 4advantage, 1ancient history, 2declarative tool, 1future, 3history, 2–3PL/SQL program units, 1RAD development tools and platforms, 1SQL developer, 5web browser, 5
APEX 4.2 modulesapplication builder
application home page, 16–17home page, 15–16
hierarchical menu structure, 11home page
drop-down menus, 13news scroller, 14–15window, 13
sections, 12SQL workshop
administration and team development, 28commands interface, 19–20home page, 17–18object browser, 18–19query builder, 23–27scripts interface, 20–23utilities, 27–28
APEX-dynamic actionsaction-when, 397affected elements, 398benefits, 397help desk application, 403, 408
action creation, 398affected elements, 411affected items, 400
change event, 400–401event actions, 399execution condition, 399expression PL/SQL as the body, 406false action, 410FALSE condition activities, 400from field, 402item, action not tied, 403JavaScript, 407key release specification, 401multiple triggering elements, 404–405naming the action, 399options, HTML, 407page level events, 402page rendering tree, 401PL/SQL, 405this.triggeringElement, 407triggeringElement, 407user alerts, 404value set to field, PL/SQL, 409
identification breakdown, 397sets (true and false), 398
Application bundlingcomponents identification, 263
APEX application exports, 271APEX-files, 268build status override, 273Cascading Style Sheets, 269CSS file export options, 270debugging, 273developer comments, 273export application button, 272export wizard, 269external files, 264file format, 272groups, 263image file export options, 270interactive report subscription, 273objects of database (see Database objects)
www.it-ebooks.info
■ Index
414
owner override, 272present applications, 267private interactive report, 273public interactive report, 273supporting object definition, 273task menu export, 271translations, 273UNDO_RETENTION, 273
importapplication install, 281database application, 280installation success, application, 282workspace, application installation, 281
objects supportingapplication of files, 277deinstall, 278export, 279home page, management, 274install, 276messages, 279options for build, 276prerequisites, 275script wizard, 277scripts, install tab, 278substitutions, 276tabbed definition, 275upgrade, 278validations, 276
Application deployment. See Application bundlingApplication wizard. See also Navigation bar entries
APEX home page, 55application-level attributes
authentication method, 62globalization options, 63–64tab options, 63
breadcrumb entriesdetailed entries, 82main screen, 82page-creation wizard, 82
breadcrumb regionsapplication builder, 78context menu, 79copy operation, 80delete button, 81destination page, 79–80migration, 81–82page-rendering hierarchy, 78redundant regions, 80–81
create button, 56database and websheet applications, 58global page
creation, 77desktop interface, 77master page, 76
HTMLdisplay attributes, 69–70help desk application, 68home page, 69regions, 68static HTML region, 71subtypes, 68text displays, 70
list regionsapplication page, 89conditional display option, 89display attributes, 88home page, 87region actions creation, 88selection, 88
listsconfirmation screen, 84–85creation, 84LOVs, 83maintenance screen, 83parent list entry, 85process, 83second list entry, 86–87target definition, 85–86values, 85
lists of valuesdynamic list, 93–94item-level (static options), 92static list, 92–93types, 91–92
public pagesauthentication, 72page attributes, 72steps, 71
sample and packagelist, 57manage button, 58run, remove and manage
buttons, 57–58types, 56
scratchadd page section, 61–62application-level
attributes, 62–64layout pages, 61–62login prompt, 67multiple pages, 61name selection, 59–60process, 59process completion, 66, 68resulting pages, 66shared components, 62theme selection, 65–66
shortcut, 56spreadsheet application, 59
Application bundling (cont.)
www.it-ebooks.info
■ Index
415
template positionscurrent page template, 91flashlight, 90steps, 90
n BBusiness logic vs. user interface logic, 33
n CCalendar. See also Reports
creationbreadcrumb entry, 189column selection, 190condition section, 193date attributes, 192edit page, 191multiple entries, 191page reloads, 189steps, 188table/view name, 189tab options, 189template and item attributes, 192ticket activity, 193
scenesitems and buttons, 194JavaScript action, 194page rendering region, 194
types, 188Charts. See also Reports
creationbreadcrumb attributes, 197page number, page name and
region name attributes, 196steps, 196tab attributes, 198ticket statuses, 199
filtersdefault value, 201LOV, 200P200_STATUS_ID item, 200status, 199
flash and HTML5, 195queries, 196scenes, 201–202
Content navigationpage links, 285–286page navigation, 285second navigation, 286
Content, Websheetsconstraints, 318–319data grids
creation, 317–318custom table, 316
process, 316result, 316–317
default reports, 319–320initial application, 315page sections
chart definition, 323creation and modification, 323file region, 322final section, 324games and practices, 321goals chart, 324home page creation, 321important news, 321links, 326navigation section, 324page navigation, 326results page, 325schedule page, 325week section, 322
players, 319SQL tags, 326–327
n D, EDatabase objects
APEX-files, 268Cascading Style Sheets, 269component’s section, 269CSS file export options, 270DDL Wizard, 265definition scripts, 265export wizard, 269image export options, 270naming the script, 266Oracle Enterprise Manager, 268present applications, 267Schema compares, 268SQL developer, 268SQL developer database export tool, 267Tools for Oracle Application Development
(TOAD), 268Development architecture, APEX
modulesadministration and team
development, 28application builder, 15–17hierarchical menu structure, 13home page, 13–15sections, 11SQL workshop, 17–28
overview, 7workspaces
APEX user, 8applications, pages, regions and items, 8–9final word, 11
www.it-ebooks.info
■ Index
416
logical makeup, 7SaaS, 7schemas, applications and
workspaces, 9–10use of, 7
Development toolsadvisor, 343–344application groups, 332
assign button, 333process, 332report, 334steps, 333
build optionsapply, 347–348configuration, 346creation, 345development, 346login page, 345needs, 344prompt status, 346–347report, 348
dictionary, 338finder
find icon, 338object types, 339
monitoringactivity logs, 342enabling logging, 341login attempts, 343
Oracle SQL developer-APEXintegration, 349refactoring code, 350
page groups, 334page locks
administration, 331–332conflicts, 329locks, 330–331multiple files, 329optimistic locking, 329–330unlocks, 331
page-specific utilities, 349schema, 335search application
regular expression, 340results, 339–340views, 339
viewscolumns, 336filter, 337home page, 335reference PRODUCT_ID, 336tree, 337
Dynamic actions. See APEX-dynamic actionsDynamic SQL, 227
n F, GForms (APEX). See also Tabular forms
declarative BLOBscolumn attributes, 151feature, 148number/date format field, 150query, 150reading data, 149report, 149setting region, 149TICKET_DETAILS table, 149upload, 150
fields mandatorydetails, 107validation creation, 106values, 107
griddescription text, 144item alignment, 143manage tickets form, 144
help text regionapplication utilities home page, 147creation, 146edit region, 146seeding item help, 148
interface, 97item layout
default value, 138HTML form element, 139methods, 137pop-up, 138read-only condition, 138
itemsbind variables, 129built-in items, 129page vs. application items, 128
label templates modificationdefault value, 106display attributes, 105steps, 104user interface, 104
LOVsattributes, 141field placement, 141layout form, 142manage tickets form, 143select-list items, 140table cells, 142whitespace, 142
master-detail cleanupchanges, 145default date, 145items, 144LOV controls, 146
Development architecture, APEX (cont.)
www.it-ebooks.info

■ Index
417
read-only condition type, 145sort columns, 144
multiple itemclick and drag tree option, 139fields, 140page rendering tree, 140row, 139
objects, 97procedure
arguments, 112branching options, 112breadcrumb parent entry, 111help desk application, 110modification, 112page, region and button names, 111scenes, 113–114stored procedure, 110
scenescomponents region, 109elements, 109form details, 108page rendering region, 109
session stateAPEX communication, 125database communication, 125database connections, 125set and retrieving session state, 126stateless system, 124view, 126–127
tablebutton display, 102–103cancel button, 102column selection, 102creation, 99page, region and breadcrumb information, 100primary-key population option, 101run process, 103–104schema and table name, 99steps, 99submit and cancel process, 103tab options, 100–101
types, 98URL syntax
elements, 130examples and explains, 130parameters, 130
wizard options, 97
n HHelp Desk application
computationcreation, 215–216execution, 215types, 215
conditions, 203dynamic SQL, 227PL/SQL regions, 226processes, 220required values, 203validations (see Validations)
HTML5. See also Chartsdisplay attributes, 69–70help desk application, 68home page, 69regions, 68static HTML region, 71subtypes, 68text displays, 70
n I, J, KIdentify system requirements
broken system, 30clean slate, 29database design
concrete nouns, 31TICKET attributes, 31TICKET-DETAIL attributes, 32USER attributes, 31
definition, 30help-desk systems, 29system design-APEX
business logic vs. user interface logic, 33database objects, 32, 34primary keys and APEX, 33table definition and user interface defaults, 32
theory to practice, 34–35Interactive report. See also Reports
aggregate action, 174attributes and removing columns
actions menu, 181control break action, 183primary default, 183reports select list, 185save option, 182select columns option, 181–182status, 184
break action, 172charts
action interface, 175pie chart, 174types, 175
column heading menu, 165compute columns, 173–174creation
page number, name and breadcrumbs, 160SQL query, 160SQL SELECT statement, 162tab options, 161
www.it-ebooks.info
■ Index
418
download actionattributes, 180formats, 179Oracle BI publisher, 180searchable HTML download, 180
enable and disable items, 185end-user functionality
action menu, 164image, search bar button and maximum
rows attributes, 164search bar options, 164
feature, 159filters
building row, 170operations, 169
flashback, 176groups and aggregate functions, 175–176help options, 178highlight action, 172limitations
column-level actions, 186link column attributes, 187select column list, 186
reset action, 178restricting function, 165running
search bar, 163tickets analysis, 162
save report actionalternate save option, 177default reports menu, 177save option, 176
scenes, 187–188search column
action menu, 167close (control summary panel), 167finder drop-down menu, 167format option, 167open (control summary panel), 166
select columns, 169sorts, 171subscription, 179
n LLightweight Directory Access Protocol (LDAP), 290Lists of values (LOVs)
attributes, 140dynamic list
attributes, 94interface options, 93scratch, 94SQL query, 95static types, 94
field placement, 141item-level (static options), 92layout form, 142manage tickets form, 143select-list items, 140static list, 92–93table cells, 142types, 91–92whitespace, 142
n MMaster detail report and form. See also
Forms (APEX), Reportsbreadcrumb entry, 117detail table, 116master page, 114–115modification
column attributes, 119column format options, 121date format mask, 120details form, 123–124edit report attributes, 118–119export options, 120join conditions, 122–123manage tickets form, 123–124remove and replace, 121selection, 122steps, 118tickets reports, 123
navigation options, 116page attributes, 117tab options, 118
Meta data, Workspacesapplication cache, 358build status, 358click count logs, 357developer activity logs, 356file utilization
delete checked button, 361export repository, 361information, 360
interactive report setsaved reports, 362subscription attributes, 362
main menu, 356manage preferences, 358models
application from creation, 359design model, 359selection, 360
session state, 357websheet database objects, 358
Modules. See APEX 4.2 modules
Interactive report. See also Reports (cont.)
www.it-ebooks.info
■ Index
419
n NNavigation bar entries
application builder, 73condition type, 75–76creation, 74entry creation, 74icons, 73login and logout buttons, 76settings, 74–75shared components screen, 73target page, 75
n OOracle Application Express (APEX). See APEX 4.2Oracle Web Application (OWA)
Toolkit, 225
n P, QPL/SQL region type, 225Programmatic Elements, 203
computations, 215creation, 216executions, 215types, 215
conditions, 203logic option, 203review, 203
dynamic SQL, 227PL/SQL regions, 225processes, 220
data-manipulation processes, 220execution points, 220in Help Desk Application, 221types and uses, 221
required values, 203validations, 205
item-level, 205page-level, 210tabular forms, 212
n RRapid application development (RAD), 369.
See also APEX 4.2Reports. See Forms (APEX)
field creation, 131function (Go button), 132master-detail forms-scenes
components, 135details form, 136page rendering region, 136
P200_SEARCH filter, 132
reset paginationcomponents, 134process options, 133result set, 133search function, 133subject column, 133
scenescolumn attributes, 135search filter, 134
search value, 131
n SSections
chart sections, 309data grids
column options (data-grid management), 302
data-entry context, 301data section, 300edit data, 301features, 300form page (edit data), 301–302manage menu options, 303–304menu options (data-grid
management), 303row options (data-grid management), 302
data sectionschart section, 309data grids, 300–303reports-creation, 305–306reports-data access, 306–308reports-setup, 304–305
navigation sectionsedit page, 299edit page/page-navigation section, 299inputs, 299page-navigation section, 299section-navigation section, 299–300
reports-creationreport option, 305SQL statement, 305–306table/view, 305–306
reports-data accessdata section, 307, 309data source, 307–308navigation, 306report data page, 307section link, 307–308section types, 307–308text section, 307types, 306
reports-setupdatabase objects, 304–305SQL tag setup, 304
www.it-ebooks.info
■ Index
420
text sectionsdata queries and links, 297edit page, 296elements, 298history link, 298sections toolbar, 297
Securityaccess control, 248authentication, 245
Application Express Accounts, 245Custom, 245custom authentication scheme, 245Database Accounts, 245HTTP Header Variable, 245LDAP Directory, 245No Authentication, 245Open Door, 245Oracle Application Server Single Sign On, 245
authorization, 251conditional security, 247data security, 256read-only attributes, 254session-state protection, 260user maintenance
data entry, 239navigation, 235
Single sign-on (SSO), 290SQL workshop
data workshop utilitycopy and paste, 44database, 44data load and unload methods, 43data text box, 45loading data, 46mapping data columns, 45object browser, 46spreadsheet data, 43–44table name, 44XML data transport format, 43
lookup tabledefinitions and data, 47SQL syntax link, 48–49STATUS column, 48table wizard, 47
Object Browserconstraints definition step, 39–40create table wizard, 40foreign key, 42navigation, 37–38primary key (table), 38–39step-by-step instructions, 37table and columns, 38table wizard (foreign-key), 42TICKET_DETAILS table, 41trigger, 41
SQL scripts tool (load and run)background and run now, 50detail view, 51icon-based quick menu, 49report footer, 51schema objects, 49SQL*PLUS-syntax, 49summary view, 50–51view results icon, 50.zip file, 49
user interface defaultsattribute dictionary, 52points, 52properties, 52table definition, 52–54table dictionary, 52
Structural navigation, 287
n TTabular forms
creationbreadcrumb entry, 155button labels and branching, 155column selection, 154page and region attributes, 155properties, 153updatable columns, 154
element type, 153modifications
button action attributes, 158button attributes, 158column attributes, 156LOV, 157report, 156
scenes, 159Team development
bugs, 383–384features tab
documentation region, 379edit link page, 377interactive report, 376
feedbackapplication links, 386benefit, 384communication, 391configuration, 384, 386environments, 384extra attributes, 387, 389page prior, 387polishing, 387, 389processing region, 389reconfiguring extra attributes, 388responses, 391submit process source, 389views, 390–391
Sections (cont.)
www.it-ebooks.info

■ Index
421
history tab, 379interface
APEX-home page, 371–372calendar links, 375common design elements, 373–374drilldown functionality, 374–375graphic data summary, 375initial discomfort, 376tagging, 376team development-home page, 372–373
milestonesby owner tab, 381define and track event dates, 380features, 382strategy, 380tab, 380
overviewentity relationship diagram, 369–370features, 370feedback, 371milestones, 370to-dos, 371
progress log page, 379RAD, 369roles, 396team actions
home page, 391links feature, 392manage news, 393release summary page, 394setting page, 393utilities, 395
to-do itemscount link, 382–383description, 382development page link, 382module, 382
work breakdown structure, 369Tools for Oracle Application
Development (TOAD), 268
n UURL tampering, 260User interface defaults
attribute dictionary, 52points, 52properties, 52table definition
column names, 54database schema, 52overview, 53–54synchronization wizard, 53table-level and column-level attributes, 54table list, 53
utilities page, 52view/edit, 53
table dictionary, 52User maintenance data entry, 239
breadcrumbs, 243manage users form, 241P610_PASSWORD element, 244page tab set, 242report page setup, 240setting the owner and table names, 240USER_NAME and PASSWORD
selection, 241User maintenance navigation, 235
adding parent tabs, 237adding standard tabs, 238Admin and Issue Tracker, 236, 239edit users tab, 238empty page creation, 235list view selection, 236subtab, 237two-level tab navigation, 236
n VValidations
item-levelApplication Builder Page, 209creation, 206error message definition, 208evaluation, 209item selection, 207page selection, 206sequence and name specification, 207validation type, 208
page-levelname and display location, 210PL/SQL code, 210–211
tabular formscolumn-level, 212fail validations, 214items list, 212name and error display location, 213substitution variables, 214validation type, 213
n W, X, Y, ZWebsheets. See also Sections
access controls, 327administration, 310annotations, 309application express account, 290authorization
access control list, 294administrator, 293
www.it-ebooks.info
■ Index
422
application properties page, 295configuration, 295contributor, 292–293entry details page, 294login link, 296navigation-access control list, 294reader, 291roles, 291
chart sections, 284content
constraints, 318–319data grids, 316–318default reports, 319–320initial application, 315page sections, 321–324, 326players, 319SQL tags, 326–327
creation and configurationaccess control list page, 315application builder icon, 312application type, 312–313custom authentication, 314date format, 314object adding, 314–315properties, 313success page, 313
custom, 290data sections, 284help link application
application content tab, 288embedded markup syntax, 288markup syntax, 288static information, 287
HTML DB, 283
LDAP, 290markup syntax
LINK_TARGET and LINK_NAME, 289LINK-TYPEs and descriptions, 289
navigation section, 284content, 285–286contexts, 285structural navigation, 287
PL/SQL sections, 284Project Marvel, 283setup, 311SSO, 290structure of, 284text sections, 284user authentication
application express account, 290builder, 291options, 290
Workspaces. See also Meta data, Workspaces
environmentadministration tab, 351instance information, 352–353version, 353
manage serviceannouncements, 354–355icon, 353preferences icon, 354
manage users and groupsassignments, 367group creation, 366icon, 363multiple user creation, 364–365single user creation, 363
reports and dashboards, 367
Websheets. See also Sections (cont.)
www.it-ebooks.info
Beginning Oracle Application Express 4.2
Doug GaultKaren CannellPatrick CimoliniMartin D’SouzaTimothy St. Hilaire
www.it-ebooks.info
Beginning Oracle Application Express 4.2
Copyright © 2013 by Doug Gault, Karen Cannell, Patrick Cimolini, Martin D’Souza, Timothy St. Hilaire
This work is subject to copyright. All rights are reserved by the Publisher, whether the whole or part of the material is concerned, specifically the rights of translation, reprinting, reuse of illustrations, recitation, broadcasting, reproduction on microfilms or in any other physical way, and transmission or information storage and retrieval, electronic adaptation, computer software, or by similar or dissimilar methodology now known or hereafter developed. Exempted from this legal reservation are brief excerpts in connection with reviews or scholarly analysis or material supplied specifically for the purpose of being entered and executed on a computer system, for exclusive use by the purchaser of the work. Duplication of this publication or parts thereof is permitted only under the provisions of the Copyright Law of the Publisher’s location, in its current version, and permission for use must always be obtained from Springer. Permissions for use may be obtained through RightsLink at the Copyright Clearance Center. Violations are liable to prosecution under the respective Copyright Law.
ISBN-13 (pbk): 978-1-4302-5734-9
ISBN-13 (electronic): 978-1-4302-5735-6
Trademarked names, logos, and images may appear in this book. Rather than use a trademark symbol with every occurrence of a trademarked name, logo, or image we use the names, logos, and images only in an editorial fashion and to the benefit of the trademark owner, with no intention of infringement of the trademark.
The use in this publication of trade names, trademarks, service marks, and similar terms, even if they are not identified as such, is not to be taken as an expression of opinion as to whether or not they are subject to proprietary rights.
While the advice and information in this book are believed to be true and accurate at the date of publication, neither the authors nor the editors nor the publisher can accept any legal responsibility for any errors or omissions that may be made. The publisher makes no warranty, express or implied, with respect to the material contained herein.
President and Publisher: Paul ManningLead Editor: Jonathan GennickTechnical Reviewer: Warren CappsEditorial Board: Steve Anglin, Mark Beckner, Ewan Buckingham, Gary Cornell, Louise Corrigan, Morgan Ertel,
Jonathan Gennick, Jonathan Hassell, Robert Hutchinson, Michelle Lowman, James Markham, Matthew Moodie, Jeff Olson, Jeffrey Pepper, Douglas Pundick, Ben Renow-Clarke, Dominic Shakeshaft, Gwenan Spearing, Matt Wade, Tom Welsh
Coordinating Editor: Christine RickettsCopy Editor: Tiffany TaylorCompositor: SPi GlobalIndexer: SPi GlobalArtist: SPi GlobalCover Designer: Anna Ishchenko
Distributed to the book trade worldwide by Springer Science+Business Media New York, 233 Spring Street, 6th Floor, New York, NY 10013. Phone 1-800-SPRINGER, fax (201) 348-4505, e-mail [email protected], or visit www.springeronline.com. Apress Media, LLC is a California LLC and the sole member (owner) is Springer Science + Business Media Finance Inc (SSBM Finance Inc). SSBM Finance Inc is a Delaware corporation.
For information on translations, please e-mail [email protected], or visit www.apress.com.
Apress and friends of ED books may be purchased in bulk for academic, corporate, or promotional use. eBook versions and licenses are also available for most titles. For more information, reference our Special Bulk Sales–eBook Licensing web page at www.apress.com/bulk-sales.
Any source code or other supplementary materials referenced by the author in this text is available to readers at www.apress.com. For detailed information about how to locate your book’s source code, go to www.apress.com/source-code/.
www.it-ebooks.info
To those in search of knowledge and better understanding I dedicate this effort. Hopefully, as your skills grow, you too will continue to share the wealth.
—Doug Gault
To Gary and Kali, who tolerate my brain on APEX.
—Karen Cannell
I would like to dedicate this book to all those who have worked in computer technology and taken the time to share their experiences and knowledge.
Only by teaching each other do we truly grow.
—Tim St. Hilaire
www.it-ebooks.info
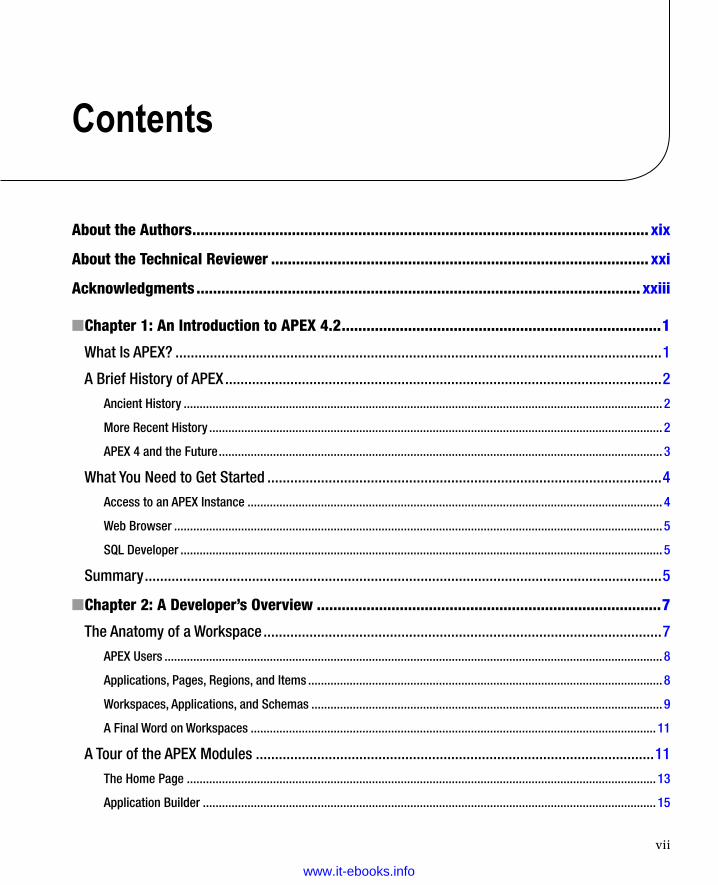
vii
Contents
About the Authors �������������������������������������������������������������������������������������������������������������� xix
About the Technical Reviewer ������������������������������������������������������������������������������������������� xxi
Acknowledgments ����������������������������������������������������������������������������������������������������������� xxiii
Chapter 1: An Introduction to APEX 4�2 ■ �����������������������������������������������������������������������������1
What Is APEX? �������������������������������������������������������������������������������������������������������������������������������1
A Brief History of APEX ������������������������������������������������������������������������������������������������������������������2
Ancient History ������������������������������������������������������������������������������������������������������������������������������������������������������ 2
More Recent History ���������������������������������������������������������������������������������������������������������������������������������������������� 2
APEX 4 and the Future ������������������������������������������������������������������������������������������������������������������������������������������� 3
What You Need to Get Started �������������������������������������������������������������������������������������������������������4
Access to an APEX Instance ���������������������������������������������������������������������������������������������������������������������������������� 4
Web Browser ��������������������������������������������������������������������������������������������������������������������������������������������������������� 5
SQL Developer ������������������������������������������������������������������������������������������������������������������������������������������������������� 5
Summary ���������������������������������������������������������������������������������������������������������������������������������������5
Chapter 2: A Developer’s Overview ■ �����������������������������������������������������������������������������������7
The Anatomy of a Workspace ��������������������������������������������������������������������������������������������������������7
APEX Users ������������������������������������������������������������������������������������������������������������������������������������������������������������ 8
Applications, Pages, Regions, and Items ��������������������������������������������������������������������������������������������������������������� 8
Workspaces, Applications, and Schemas �������������������������������������������������������������������������������������������������������������� 9
A Final Word on Workspaces ������������������������������������������������������������������������������������������������������������������������������� 11
A Tour of the APEX Modules ��������������������������������������������������������������������������������������������������������11
The Home Page ��������������������������������������������������������������������������������������������������������������������������������������������������� 13
Application Builder ���������������������������������������������������������������������������������������������������������������������������������������������� 15
www.it-ebooks.info
■ Contents
viii
SQL Workshop ����������������������������������������������������������������������������������������������������������������������������������������������������� 17
Administration and Team Development ��������������������������������������������������������������������������������������������������������������� 28
Summary �������������������������������������������������������������������������������������������������������������������������������������28
Chapter 3: Identifying the Problem and Designing the Solution ■ ��������������������������������������29
Identifying System Requirements �����������������������������������������������������������������������������������������������29
Never a Clean Slate ��������������������������������������������������������������������������������������������������������������������������������������������� 29
A Broken System ������������������������������������������������������������������������������������������������������������������������������������������������� 30
How Do You Fix Things? ��������������������������������������������������������������������������������������������������������������������������������������� 30
System Design with APEX in Mind ����������������������������������������������������������������������������������������������32
Table Definition and User Interface Defaults ������������������������������������������������������������������������������������������������������� 32
APEX and Primary Keys ��������������������������������������������������������������������������������������������������������������������������������������� 33
Business Logic vs� User Interface Logic �������������������������������������������������������������������������������������������������������������� 33
Placement of Database Objects ��������������������������������������������������������������������������������������������������������������������������� 34
Translating Theory to Practice �����������������������������������������������������������������������������������������������������34
Summary �������������������������������������������������������������������������������������������������������������������������������������35
Chapter 4: SQL Workshop ■ ������������������������������������������������������������������������������������������������37
Creating Objects with the Object Browser ����������������������������������������������������������������������������������37
Loading Data with the Data Workshop Utility ������������������������������������������������������������������������������43
Creating a Lookup Table ��������������������������������������������������������������������������������������������������������������47
Loading and Running SQL Scripts �����������������������������������������������������������������������������������������������49
User Interface Defaults ����������������������������������������������������������������������������������������������������������������51
Understanding User Interface Defaults ���������������������������������������������������������������������������������������������������������������� 52
Defining UI Defaults for Tables ���������������������������������������������������������������������������������������������������������������������������� 52
Summary �������������������������������������������������������������������������������������������������������������������������������������54
Chapter 5: Applications and Navigation ■ ��������������������������������������������������������������������������55
The Create Application Wizard �����������������������������������������������������������������������������������������������������55
Sample and Packaged Applications �������������������������������������������������������������������������������������������������������������������� 56
Websheet Applications ���������������������������������������������������������������������������������������������������������������������������������������� 58
Database Applications from Spreadsheets ���������������������������������������������������������������������������������������������������������� 59
Database Applications from Scratch ������������������������������������������������������������������������������������������������������������������� 59
www.it-ebooks.info
■ Contents
ix
HTML Regions �����������������������������������������������������������������������������������������������������������������������������68
Public Pages ��������������������������������������������������������������������������������������������������������������������������������71
Navigation Bar Entries �����������������������������������������������������������������������������������������������������������������73
Global Pages ��������������������������������������������������������������������������������������������������������������������������������76
Breadcrumb Regions �������������������������������������������������������������������������������������������������������������������78
Breadcrumb Entries ��������������������������������������������������������������������������������������������������������������������82
Lists ���������������������������������������������������������������������������������������������������������������������������������������������83
List Regions ���������������������������������������������������������������������������������������������������������������������������������87
Template Positions ����������������������������������������������������������������������������������������������������������������������90
Lists of Values �����������������������������������������������������������������������������������������������������������������������������91
Static List of Values ��������������������������������������������������������������������������������������������������������������������������������������������� 92
Dynamic List of Values����������������������������������������������������������������������������������������������������������������������������������������� 93
Summary �������������������������������������������������������������������������������������������������������������������������������������95
Chapter 6: Forms and Reports—The Basics ■ ��������������������������������������������������������������������97
APEX Forms ���������������������������������������������������������������������������������������������������������������������������������97
Form on a Table ���������������������������������������������������������������������������������������������������������������������������99
Creating a Form on a Table ���������������������������������������������������������������������������������������������������������������������������������� 99
Modifying a Form on a Table ����������������������������������������������������������������������������������������������������������������������������� 104
Looking Behind the Scenes ������������������������������������������������������������������������������������������������������������������������������� 108
Form on a Procedure �����������������������������������������������������������������������������������������������������������������110
Creating a Form on a Procedure ������������������������������������������������������������������������������������������������������������������������ 110
Modifying a Form on a Procedure ��������������������������������������������������������������������������������������������������������������������� 112
Looking Behind the Scenes ������������������������������������������������������������������������������������������������������������������������������� 113
Master-Detail Report and Form �������������������������������������������������������������������������������������������������114
Creating a Master-Detail Report and Form �������������������������������������������������������������������������������������������������������� 114
Modifying a Master-Detail Report ���������������������������������������������������������������������������������������������������������������������� 118
Session State ����������������������������������������������������������������������������������������������������������������������������124
Understanding Session State ���������������������������������������������������������������������������������������������������������������������������� 125
Sharing Database Connections �������������������������������������������������������������������������������������������������������������������������� 125
www.it-ebooks.info
■ Contents
x
Setting and Retrieving Session State ���������������������������������������������������������������������������������������������������������������� 126
Viewing Session State ��������������������������������������������������������������������������������������������������������������������������������������� 126
APEX Items ��������������������������������������������������������������������������������������������������������������������������������128
Page vs� Application Items��������������������������������������������������������������������������������������������������������������������������������� 128
The Importance of Bind Variables ���������������������������������������������������������������������������������������������������������������������� 129
Built-In Items ����������������������������������������������������������������������������������������������������������������������������������������������������� 129
APEX URL Syntax �����������������������������������������������������������������������������������������������������������������������130
Searchable APEX Reports ����������������������������������������������������������������������������������������������������������131
Creating a Searchable APEX Report������������������������������������������������������������������������������������������������������������������� 131
Adding Reset Pagination������������������������������������������������������������������������������������������������������������������������������������ 133
Looking Behind the Scenes—APEX Report ������������������������������������������������������������������������������������������������������� 134
Looking Behind the Scenes—APEX Master-Detail Forms ��������������������������������������������������������������������������������� 135
More on APEX Forms �����������������������������������������������������������������������������������������������������������������137
Item Layout �������������������������������������������������������������������������������������������������������������������������������������������������������� 137
Placing Multiple Items in the Same Row ����������������������������������������������������������������������������������������������������������� 139
Implementing LOVs �������������������������������������������������������������������������������������������������������������������������������������������� 140
Starting a New Grid ������������������������������������������������������������������������������������������������������������������������������������������� 143
Master-Detail Cleanup ��������������������������������������������������������������������������������������������������������������������������������������� 144
APEX Help ����������������������������������������������������������������������������������������������������������������������������������146
Adding a Help Text Region ��������������������������������������������������������������������������������������������������������������������������������� 146
Seeding Help Text ���������������������������������������������������������������������������������������������������������������������������������������������� 147
Declarative BLOBs ���������������������������������������������������������������������������������������������������������������������148
Summary �����������������������������������������������������������������������������������������������������������������������������������151
Chapter 7: Forms and Reports—Advanced ■ �������������������������������������������������������������������153
Tabular Forms ���������������������������������������������������������������������������������������������������������������������������153
Creating a Tabular Form ������������������������������������������������������������������������������������������������������������������������������������ 153
Modifying a Tabular Form ���������������������������������������������������������������������������������������������������������������������������������� 156
Looking Behind the Scenes ������������������������������������������������������������������������������������������������������������������������������� 159
Interactive Reports ��������������������������������������������������������������������������������������������������������������������159
Creating an Interactive Report ��������������������������������������������������������������������������������������������������������������������������� 160
Running an Interactive Report ��������������������������������������������������������������������������������������������������������������������������� 162
www.it-ebooks.info
■ Contents
xi
Restricting Functionality by Report ������������������������������������������������������������������������������������������������������������������� 164
Restricting Functionality by Column ������������������������������������������������������������������������������������������������������������������ 165
Using the Column Heading Menu ���������������������������������������������������������������������������������������������������������������������� 165
Searching by Column ����������������������������������������������������������������������������������������������������������������������������������������� 166
Selecting Columns ��������������������������������������������������������������������������������������������������������������������������������������������� 169
Filtering ������������������������������������������������������������������������������������������������������������������������������������������������������������� 169
Sorting ��������������������������������������������������������������������������������������������������������������������������������������������������������������� 171
Adding Breaks ��������������������������������������������������������������������������������������������������������������������������������������������������� 172
Highlighting ������������������������������������������������������������������������������������������������������������������������������������������������������� 172
Computing Columns ������������������������������������������������������������������������������������������������������������������������������������������ 173
Adding Aggregates �������������������������������������������������������������������������������������������������������������������������������������������� 174
Adding Charts to Interactive Reports ����������������������������������������������������������������������������������������������������������������� 174
Grouping ������������������������������������������������������������������������������������������������������������������������������������������������������������ 175
Using Flashback ������������������������������������������������������������������������������������������������������������������������������������������������ 176
Saving an Interactive Report ����������������������������������������������������������������������������������������������������������������������������� 176
Resetting an Interactive Report ������������������������������������������������������������������������������������������������������������������������� 178
Getting Help ������������������������������������������������������������������������������������������������������������������������������������������������������� 178
Adding a Subscription ��������������������������������������������������������������������������������������������������������������������������������������� 179
Downloading ������������������������������������������������������������������������������������������������������������������������������������������������������ 179
Modifying an Interactive Report ������������������������������������������������������������������������������������������������������������������������ 181
Looking Behind the Scenes ������������������������������������������������������������������������������������������������������������������������������� 187
Calendars ����������������������������������������������������������������������������������������������������������������������������������188
Understanding Calendar Types �������������������������������������������������������������������������������������������������������������������������� 188
Creating a Calendar ������������������������������������������������������������������������������������������������������������������������������������������� 188
Looking Behind the Scenes ������������������������������������������������������������������������������������������������������������������������������� 194
Charts ����������������������������������������������������������������������������������������������������������������������������������������195
Writing Queries for Charts ��������������������������������������������������������������������������������������������������������������������������������� 196
Creating a Chart ������������������������������������������������������������������������������������������������������������������������������������������������� 196
Filtering Data Using a Chart ������������������������������������������������������������������������������������������������������������������������������� 199
Looking Behind the Scenes ������������������������������������������������������������������������������������������������������������������������������� 201
Summary �����������������������������������������������������������������������������������������������������������������������������������202
www.it-ebooks.info
■ Contents
xii
Chapter 8: Programmatic Elements ■ ������������������������������������������������������������������������������203
Conditions ���������������������������������������������������������������������������������������������������������������������������������203
Required Values �������������������������������������������������������������������������������������������������������������������������203
Validations ���������������������������������������������������������������������������������������������������������������������������������205
Item-Level Validation ����������������������������������������������������������������������������������������������������������������������������������������� 205
Page-Level Validation ���������������������������������������������������������������������������������������������������������������������������������������� 210
Tabular Form Validation ������������������������������������������������������������������������������������������������������������������������������������� 212
Computations ����������������������������������������������������������������������������������������������������������������������������215
Execution ����������������������������������������������������������������������������������������������������������������������������������������������������������� 215
Types ����������������������������������������������������������������������������������������������������������������������������������������������������������������� 215
Creating a Computation ������������������������������������������������������������������������������������������������������������������������������������� 216
Processes ����������������������������������������������������������������������������������������������������������������������������������220
Execution Points ������������������������������������������������������������������������������������������������������������������������������������������������ 220
Process Types ���������������������������������������������������������������������������������������������������������������������������������������������������� 221
Processes in the Help Desk Application ������������������������������������������������������������������������������������������������������������ 221
PL/SQL Regions �������������������������������������������������������������������������������������������������������������������������225
Dynamic SQL �����������������������������������������������������������������������������������������������������������������������������227
Summary �����������������������������������������������������������������������������������������������������������������������������������233
Chapter 9: Security ■ ��������������������������������������������������������������������������������������������������������235
User Maintenance Navigation ���������������������������������������������������������������������������������������������������235
User Maintenance Data Entry ����������������������������������������������������������������������������������������������������239
Authentication ���������������������������������������������������������������������������������������������������������������������������245
Custom Authentication Schemes ����������������������������������������������������������������������������������������������245
Conditional Security ������������������������������������������������������������������������������������������������������������������247
Access Control ��������������������������������������������������������������������������������������������������������������������������248
Authorization �����������������������������������������������������������������������������������������������������������������������������251
Read-Only Items ������������������������������������������������������������������������������������������������������������������������254
Data Security �����������������������������������������������������������������������������������������������������������������������������256
Session-State Protection �����������������������������������������������������������������������������������������������������������260
Summary �����������������������������������������������������������������������������������������������������������������������������������261
www.it-ebooks.info
■ Contents
xiii
Chapter 10: Application Bundling and Deployment ■ �������������������������������������������������������263
Identifying Application Components ������������������������������������������������������������������������������������������263
External Files ����������������������������������������������������������������������������������������������������������������������������������������������������� 264
Database Objects ����������������������������������������������������������������������������������������������������������������������������������������������� 264
APEX-Based Files ���������������������������������������������������������������������������������������������������������������������������������������������� 268
APEX Application Exports ����������������������������������������������������������������������������������������������������������������������������������� 271
Supporting Objects ��������������������������������������������������������������������������������������������������������������������274
Prerequisites������������������������������������������������������������������������������������������������������������������������������������������������������ 275
Substitutions ������������������������������������������������������������������������������������������������������������������������������������������������������ 276
Build Options ����������������������������������������������������������������������������������������������������������������������������������������������������� 276
Validations ��������������������������������������������������������������������������������������������������������������������������������������������������������� 276
Install ����������������������������������������������������������������������������������������������������������������������������������������������������������������� 276
Upgrade ������������������������������������������������������������������������������������������������������������������������������������������������������������� 278
Deinstall ������������������������������������������������������������������������������������������������������������������������������������������������������������� 278
Export ���������������������������������������������������������������������������������������������������������������������������������������������������������������� 279
Messages ���������������������������������������������������������������������������������������������������������������������������������������������������������� 279
Importing �����������������������������������������������������������������������������������������������������������������������������������280
Summary �����������������������������������������������������������������������������������������������������������������������������������282
Chapter 11: Understanding Websheets ■ �������������������������������������������������������������������������283
Websheet Structure �������������������������������������������������������������������������������������������������������������������283
Navigation ���������������������������������������������������������������������������������������������������������������������������������285
Content Navigation �������������������������������������������������������������������������������������������������������������������������������������������� 285
Structural Navigation ����������������������������������������������������������������������������������������������������������������������������������������� 287
Help �������������������������������������������������������������������������������������������������������������������������������������������287
Markup Syntax ��������������������������������������������������������������������������������������������������������������������������289
User Authentication �������������������������������������������������������������������������������������������������������������������290
User Authorization ���������������������������������������������������������������������������������������������������������������������291
Sections�������������������������������������������������������������������������������������������������������������������������������������296
Text Sections ����������������������������������������������������������������������������������������������������������������������������������������������������� 296
Navigation Sections ������������������������������������������������������������������������������������������������������������������������������������������� 299
www.it-ebooks.info
■ Contents
xiv
Data Sections ���������������������������������������������������������������������������������������������������������������������������������������������������� 300
Chart Sections ��������������������������������������������������������������������������������������������������������������������������������������������������� 309
Annotations �������������������������������������������������������������������������������������������������������������������������������309
Administration ���������������������������������������������������������������������������������������������������������������������������310
Summary �����������������������������������������������������������������������������������������������������������������������������������310
Chapter 12: A Websheet Example ■ ����������������������������������������������������������������������������������311
Setup �����������������������������������������������������������������������������������������������������������������������������������������311
Creating and Configuring a Websheet Application ��������������������������������������������������������������������312
Adding Content to a Websheet ��������������������������������������������������������������������������������������������������315
Creating Data Grids �������������������������������������������������������������������������������������������������������������������������������������������� 316
Applying Constraints ������������������������������������������������������������������������������������������������������������������������������������������ 318
Adding Players ��������������������������������������������������������������������������������������������������������������������������������������������������� 319
Creating Alternate Default Reports �������������������������������������������������������������������������������������������������������������������� 319
Creating Page Sections ������������������������������������������������������������������������������������������������������������������������������������� 321
SQL Tags ������������������������������������������������������������������������������������������������������������������������������������������������������������ 326
Access Controls �������������������������������������������������������������������������������������������������������������������������327
Summary �����������������������������������������������������������������������������������������������������������������������������������327
Chapter 13: Extended Developer Tools ■ ��������������������������������������������������������������������������329
Page Locks ��������������������������������������������������������������������������������������������������������������������������������329
APEX Conflicts ��������������������������������������������������������������������������������������������������������������������������������������������������� 329
Locking an APEX Page ��������������������������������������������������������������������������������������������������������������������������������������� 330
Unlocking a Page ����������������������������������������������������������������������������������������������������������������������������������������������� 331
Administering Page Locks ��������������������������������������������������������������������������������������������������������������������������������� 331
Application and Page Groups ����������������������������������������������������������������������������������������������������332
Application Groups �������������������������������������������������������������������������������������������������������������������������������������������� 332
Page Groups ������������������������������������������������������������������������������������������������������������������������������������������������������ 334
APEX Views and the APEX Dictionary ����������������������������������������������������������������������������������������334
The APEX Schema ���������������������������������������������������������������������������������������������������������������������������������������������� 335
APEX Views �������������������������������������������������������������������������������������������������������������������������������������������������������� 335
APEX Dictionary ������������������������������������������������������������������������������������������������������������������������������������������������� 338
www.it-ebooks.info
■ Contents
xv
Searching in APEX ���������������������������������������������������������������������������������������������������������������������338
APEX Finder ������������������������������������������������������������������������������������������������������������������������������������������������������� 338
Search Application ��������������������������������������������������������������������������������������������������������������������������������������������� 339
Monitoring Your APEX Application ���������������������������������������������������������������������������������������������341
Enabling Logging ����������������������������������������������������������������������������������������������������������������������������������������������� 341
Using the Activity Logs �������������������������������������������������������������������������������������������������������������������������������������� 341
Login Attempts ��������������������������������������������������������������������������������������������������������������������������������������������������� 343
APEX Advisor �����������������������������������������������������������������������������������������������������������������������������343
Build Options �����������������������������������������������������������������������������������������������������������������������������344
Understanding the Need ������������������������������������������������������������������������������������������������������������������������������������ 344
Creating a Build Option �������������������������������������������������������������������������������������������������������������������������������������� 345
Configuring Build Options ���������������������������������������������������������������������������������������������������������������������������������� 346
Prompting for Build Option Status ��������������������������������������������������������������������������������������������������������������������� 346
Applying Build Options��������������������������������������������������������������������������������������������������������������������������������������� 347
Reporting on Build Option Utilization ����������������������������������������������������������������������������������������������������������������� 348
Page-Specific Utilities ���������������������������������������������������������������������������������������������������������������349
APEX and Oracle SQL Developer �����������������������������������������������������������������������������������������������349
Integration ��������������������������������������������������������������������������������������������������������������������������������������������������������� 349
Refactoring Support������������������������������������������������������������������������������������������������������������������������������������������� 350
Summary �����������������������������������������������������������������������������������������������������������������������������������350
Chapter 14: Managing Workspaces ■ �������������������������������������������������������������������������������351
Learning About Your Environment ���������������������������������������������������������������������������������������������351
Viewing Instance Information ���������������������������������������������������������������������������������������������������������������������������� 352
Checking the APEX Version �������������������������������������������������������������������������������������������������������������������������������� 353
Managing the Service ���������������������������������������������������������������������������������������������������������������353
Workspace Preferences ������������������������������������������������������������������������������������������������������������������������������������� 354
Announcements ������������������������������������������������������������������������������������������������������������������������������������������������� 354
Managing Meta Data �����������������������������������������������������������������������������������������������������������������356
Developer Activity and Click Count Logs ����������������������������������������������������������������������������������������������������������� 356
Session State ����������������������������������������������������������������������������������������������������������������������������������������������������� 357
Application Cache ���������������������������������������������������������������������������������������������������������������������������������������������� 358
www.it-ebooks.info
■ Contents
xvi
Websheet Database Objects ������������������������������������������������������������������������������������������������������������������������������ 358
Application Build Status ������������������������������������������������������������������������������������������������������������������������������������ 358
Application Models �������������������������������������������������������������������������������������������������������������������������������������������� 359
File Utilization ���������������������������������������������������������������������������������������������������������������������������������������������������� 360
Interactive Report Settings �������������������������������������������������������������������������������������������������������������������������������� 362
Managing Users and Groups �����������������������������������������������������������������������������������������������������363
Creating One User ���������������������������������������������������������������������������������������������������������������������������������������������� 363
Creating Multiple Users ������������������������������������������������������������������������������������������������������������������������������������� 364
Organizing Users into Groups ���������������������������������������������������������������������������������������������������������������������������� 366
Viewing Usage Reports and Dashboards ����������������������������������������������������������������������������������367
Summary �����������������������������������������������������������������������������������������������������������������������������������367
Chapter 15: Team Development ■ �������������������������������������������������������������������������������������369
Team Development Overview ����������������������������������������������������������������������������������������������������369
Team Development Interface ����������������������������������������������������������������������������������������������������371
APEX Home Page ����������������������������������������������������������������������������������������������������������������������������������������������� 371
Team Development Home Page ������������������������������������������������������������������������������������������������������������������������� 372
Common Design Elements ��������������������������������������������������������������������������������������������������������������������������������� 373
Drilldown Functionality �������������������������������������������������������������������������������������������������������������������������������������� 374
Tagging �������������������������������������������������������������������������������������������������������������������������������������������������������������� 376
Features ������������������������������������������������������������������������������������������������������������������������������������376
Features Tab ������������������������������������������������������������������������������������������������������������������������������������������������������ 376
History Tab ��������������������������������������������������������������������������������������������������������������������������������������������������������� 379
Progress Log Tab ����������������������������������������������������������������������������������������������������������������������������������������������� 379
Milestones ���������������������������������������������������������������������������������������������������������������������������������380
Milestones Tab ��������������������������������������������������������������������������������������������������������������������������������������������������� 380
Milestones By Owner Tab ���������������������������������������������������������������������������������������������������������������������������������� 381
Features by Milestone Tab ��������������������������������������������������������������������������������������������������������������������������������� 382
To-Do Items �������������������������������������������������������������������������������������������������������������������������������382
Bugs ������������������������������������������������������������������������������������������������������������������������������������������383
www.it-ebooks.info
■ Contents
xvii
Feedback �����������������������������������������������������������������������������������������������������������������������������������384
Configuring Feedback ���������������������������������������������������������������������������������������������������������������������������������������� 384
Polishing the Feedback Page ���������������������������������������������������������������������������������������������������������������������������� 387
Viewing Feedback ��������������������������������������������������������������������������������������������������������������������������������������������� 390
Responses to Feedback ������������������������������������������������������������������������������������������������������������������������������������� 391
Communication Between Workspaces �������������������������������������������������������������������������������������������������������������� 391
Team Actions �����������������������������������������������������������������������������������������������������������������������������391
Manage Links ���������������������������������������������������������������������������������������������������������������������������������������������������� 392
Manage News ���������������������������������������������������������������������������������������������������������������������������������������������������� 393
Team Development Settings ������������������������������������������������������������������������������������������������������������������������������ 393
Release Summary ��������������������������������������������������������������������������������������������������������������������������������������������� 394
Utilities ��������������������������������������������������������������������������������������������������������������������������������������������������������������� 395
User Roles for Team Development ��������������������������������������������������������������������������������������������396
Summary �����������������������������������������������������������������������������������������������������������������������������������396
Chapter 16: Dynamic Actions ■ ����������������������������������������������������������������������������������������397
Dynamic Action Benefits �����������������������������������������������������������������������������������������������������������397
Breaking Down Dynamic Actions ����������������������������������������������������������������������������������������������397
Dynamic Actions in the Help Desk Application ��������������������������������������������������������������������������398
Starting Simple �������������������������������������������������������������������������������������������������������������������������������������������������� 398
Using Page-Level Events ����������������������������������������������������������������������������������������������������������������������������������� 402
Dynamic Actions with Multiple Triggering Elements ����������������������������������������������������������������������������������������� 404
Dynamic Actions Using PL/SQL �������������������������������������������������������������������������������������������������������������������������� 405
Dynamic Actions Using JavaScript �������������������������������������������������������������������������������������������������������������������� 407
Summary �����������������������������������������������������������������������������������������������������������������������������������411
Index ���������������������������������������������������������������������������������������������������������������������������������413
www.it-ebooks.info

xix
About the Authors
Doug Gault is the APEX Practice Director at Enkitec, an Oracle Platinum partner founded in 2004 which provides consulting, education and products based around Oracle Technology.
He has been working with Oracle since 1988, starting with version 5.1B, SQL*Forms 2.0, and RPT/RPF. He has focused his career on Oracle’s development technologies, spending the majority of that time dedicated to web-based technologies including the OWA Web Toolkit, PL/SQL Server Pages, WebDB, Oracle Portal and more recently HTML-DB and APEX.
His many years of Oracle experience have taken him all over the world to participate in some truly ground-breaking projects. Doug has presented and participated in roundtable discussions at a number of conferences including Oracle OpenWorld, UKOUG, and ODTUG’s APEXposed & Kaleidoscope conferences. He holds an Associate’s Degree in Computer Science and an honorary Master’s Degree from The School of Hard Knocks, believing there is no replacement for hard-earned experience.
Doug is an Oracle Ace and can be found on Twitter as @dgault_apex and on his blog douggault.blogspot.com. You can contact Doug at [email protected].
Karen Cannell is president of TH Technology, a small consulting firm providing Oracle technology services, focusing on Application Express. A Mechanical Engineer by degree (one of them), she has analyzed, designed, developed, converted, upgraded, enhanced and otherwise worked on legacy and commercial database applications for over 25 years, concentrating on Oracle technologies since 1994. She has worked with Application Express since it’s Web DB and HTMLDB beginnings, and continues to leverage the Oracle suite of tools to build quality web applications for clients in government, medical, and engineering industries. Karen can be contacted at [email protected].
www.it-ebooks.info

xx
■ About the Authors
Patrick Cimolini, P.Eng., PMP, is a principal with Patrick International APEX Consulting, a consultancy that specializes in Project Management and Software Development services for Oracle Application Express (APEX) projects. His formal training in engineering, business administration, and project management is complemented by thirty years of experience that has evolved through mainframe, client/server, and web platforms. Patrick has enjoyed attending the Oracle Development Tools User Group (ODTUG) conferences where he has been a regular presenter. His industrial areas of expertise include mining, consulting, and government service.
His Oracle experience dates back to the early 1990s.
Martin Giffy D’Souza is a Co-Founder and CTO at ClariFit, a consulting firm and custom solutions provider that specializes in APEX and PL/SQL development. His experience in the technology industry has been focused on developing database-centric web applications using the Oracle APEX technology stack.
In addition to his day job Martin is the author of the popular blog www.TalkApex.com <http://www.talkapex.com/>, a designated Oracle ACE Director, and has co-authored and authored various APEX books. He has also presented at numerous international conferences such as APEXposed, COUG, and ODTUG Kscope, for which he won the Presenter of the Year award in 2011.
Martin holds a Computer Engineering degree from Queen’s University in Kingston, Ontario, Canada. You can contact Martin at [email protected].
Tim St. Hilaire has been working with Oracle as a developer, integrator, and architect since 1999. His most recent focus is on the Oracle Application Express (APEX) tool set and integration opportunities available both internal and external to the Oracle database. From his time at a large aerospace and defense company, St. Hilaire succeeded on enabling process improvement through technology implementation. His efforts continue at Enkitec with a focus on commercial product development. Sharing his experiences with others is both a hobby and a passion. Tim can be reached at [email protected] or at @sthilaire on twitter.
www.it-ebooks.info
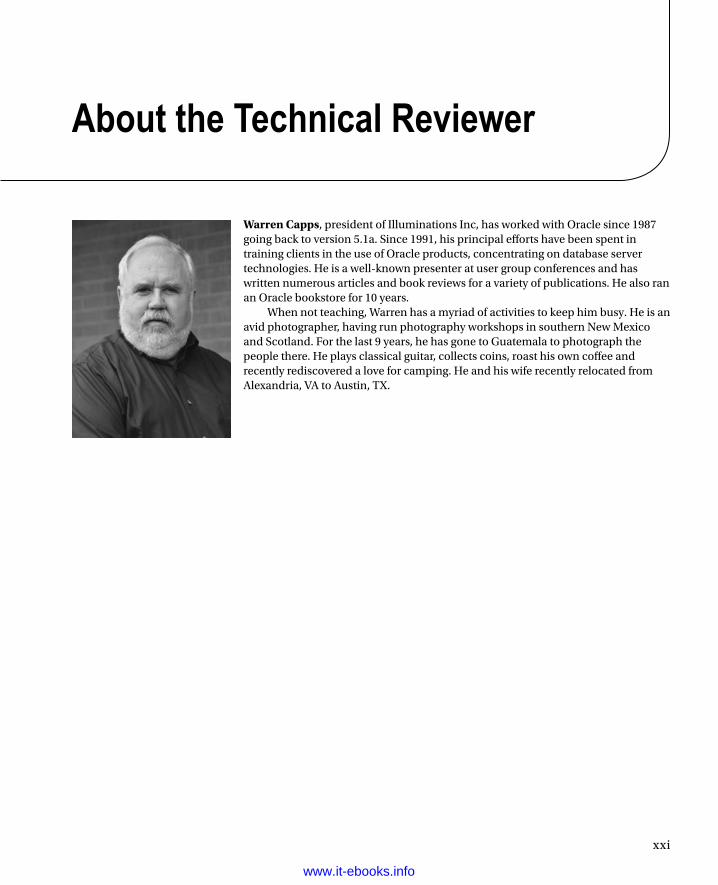
xxi
About the Technical Reviewer
Warren Capps, president of Illuminations Inc, has worked with Oracle since 1987 going back to version 5.1a. Since 1991, his principal efforts have been spent in training clients in the use of Oracle products, concentrating on database server technologies. He is a well-known presenter at user group conferences and has written numerous articles and book reviews for a variety of publications. He also ran an Oracle bookstore for 10 years.
When not teaching, Warren has a myriad of activities to keep him busy. He is an avid photographer, having run photography workshops in southern New Mexico and Scotland. For the last 9 years, he has gone to Guatemala to photograph the people there. He plays classical guitar, collects coins, roast his own coffee and recently rediscovered a love for camping. He and his wife recently relocated from Alexandria, VA to Austin, TX.
www.it-ebooks.info

xxiii
Acknowledgments
First, my heart-felt thanks to all of my co-authors. If not for them, this book may never have come to be. The opportunity to work with such a talented and distinguished group of individuals has been a pleasure.
I’d also like to thank a few people by name. Kerry Osborne and Gary Goodman for providing me with an immense amount of mentorship and encouragement over the years, even after having left their employ. Cary Millsap for his friendship and helping to solidify in my mind how to think objectively about technology and to use proof to find the truth. And last but not least, partner in crime, Scott Spendolini, for his all-around support before, during, and after the book. Without these people, I wouldn’t be where I am today.
—Doug Gault
Many thanks to Doug Gault and Apress for including me in this project. It has been an uplifting and enriching experience. A big thank you goes to April Bending, my wife, who supported and encouraged me to take on the challenge.
—Patrick Cimolini
I would like to thank the other authors of this book: Doug Gault, Karen Cannell, Patrick Cimolini, and Tim St. Hilaire. It has been a great journey writing this book with you and I truly feel that we have achieved our goal as a team.
I would like to thank the entire APEX community for all the help and guidance over the past several years. I’ve learned a lot from all the excellent articles, blogs, and forum posts. I hope that this book will help other developers who are starting out with APEX.
I’d also like to thank Cameron Mahbubian and Chris Hritzuk for their never-ending support over the years.Finally I’d like to thank my family for their constant encouragement: my parents for providing me with
opportunities to succeed, without which I would not be where I am today, and my partner Stephanie for being understanding and putting up with my many late nights of sitting in front of the computer.
—Martin Giffy D’Souza
I would like to thank my wife for her support and understanding during this project. I have a newfound respect for her work as a writer and the challenges posed by the elusive word.
—Tim St. Hilaire
www.it-ebooks.info