beginning c for arduino
TRANSCRIPT

Technology in AcTion™
harness the processing power of the microcontroller and learn how to control your own electronic devices with Beginning C for Arduino.
Written for individuals who have no prior experience with microcontrollers or programming, this book teaches you tried and true coding practices that will help you become a fearless tinkerer.
led by an engaging, expert programmer, with more than 25 years of university teaching experience, you’ll discover how to use the c program-ming language to control the Arduino (Atmel) family of microcontrollers as well as Arduino-compatible boards. each step of the way, a simple, inexpensive, hardware experiment demonstrates the language in action. This provides you with a deep understanding of what the code is doing and how it is done.
With Beginning C for Arduino, you’ll learn how to:
• Use the syntax of the c programming language as defined for the Arduino • Design, code, and debug programs that drive Arduino microcontrollers • extend the functionality of c by creating your own library routines• Detect, isolate, and fix program bugs • implement multiple solutions for any given programming problem• integrate low-cost, off-the-shelf, hardware shields into your own projects
Beginning C for Arduino blends a software and hardware learning experi-ence into a single, enjoyable endeavor. it offers you an engaging, take-at-your-own-pace way to learn the fundamental programming concepts that will fuel your future creations.
Beginning C for Arduino Learn C Programming for the Arduino and Compatible Microcontrollers
www.apress.com
US $39.99
Shelve in Computer Hardware/General
User level: Beginning-Intermediate
SOURCE CODE ONLINE
Purdum
Ph.D. Jack Purdum
Also available:
Beginning C for ArduinoLearn C Programming for the Arduino and Compatible Microcontrollers
Take complete control of your Arduino with the power of C
Beginning C for Arduino

Beginning C for Arduino
n n n
Jack Purdum

ii
Beginning C for Arduino
Copyright © 2012 by Jack Purdum
All rights reserved. No part of this work may be reproduced or transmitted in any form or by any means, electronic or mechanical, including photocopying, recording, or by any information storage or retrieval system, without the prior written permission of the copyright owner and the publisher.
ISBN-13 (pbk): 978-1-4302-4776-0
ISBN-13 (electronic): 978-1-4302-4777-7
Trademarked names, logos, and images may appear in this book. Rather than use a trademark symbol with every occurrence of a trademarked name, logo, or image we use the names, logos, and images only in an editorial fashion and to the benefit of the trademark owner, with no intention of infringement of the trademark. The use in this publication of trade names, trademarks, service marks, and similar terms, even if they are not identified as such, is not to be taken as an expression of opinion as to whether or not they are subject to proprietary rights.
President and Publisher: Paul ManningLead Editor: Michelle LowmanDevelopmental Editor: Matthew MoodieTechnical Reviewer: Brad LevyEditorial Board: Steve Anglin, Mark Beckner, Ewan Buckingham, Gary Cornell, Louise Corrigan, Morgan
Ertel, Jonathan Gennick, Jonathan Hassell, Robert Hutchinson, Michelle Lowman, James Markham, Matthew Moodie, Jeff Olson, Jeffrey Pepper, Douglas Pundick, Ben Renow-Clarke, Dominic Shakeshaft, Gwenan Spearing, Matt Wade, Tom Welsh
Coordinating Editor: Katie SullivanCopy Editor: Mary BehrCompositor: Bytheway Publishing ServicesIndexer: SPi GlobalArtist: SPi GlobalCover Designer: Anna Ishchenko
Distributed to the book trade worldwide by Springer Science+Business Media, LLC., 233 Spring Street, 6th Floor, New York, NY 10013. Phone 1-800-SPRINGER, fax (201) 348-4505, e-mail [email protected], or visit www.springeronline.com.
For information on translations, please e-mail [email protected], or visit www.apress.com.
Apress and friends of ED books may be purchased in bulk for academic, corporate, or promotional use. eBook versions and licenses are also available for most titles. For more information, reference our Special Bulk Sales–eBook Licensing web page at http://www.apress.com/bulk-sales.
The information in this book is distributed on an “as is” basis, without warranty. Although every precaution has been taken in the preparation of this work, neither the author(s) nor Apress shall have any liability to any person or entity with respect to any loss or damage caused or alleged to be caused directly or indirectly by the information contained in this work.
Any source code or other supplementary materials referenced by the author in this text is available to readers at www.apress.com. For detailed information about how to locate your book’s source code, go to http://www.apress.com/source-code/.

iii
To Jane for her unwavering support during this project.

iv
Contents at a Glance
About the Author ................................................................................................................xiii About the Technical Reviewer ............................................................................................xiv Acknowledgments ...............................................................................................................xv Introduction ........................................................................................................................xvi Chapter 1: Introduction .........................................................................................................1 Chapter 2: Arduino C ...........................................................................................................21 Chapter 3: Arduino C Data Types ........................................................................................37 Chapter 4: Decision Making in C .........................................................................................55 Chapter 5: Program Loops in C ...........................................................................................77 Chapter 6: Functions in C ....................................................................................................91 Chapter 7: Storage Classes and Scope .............................................................................113 Chapter 8: Introduction to Pointers ..................................................................................131 Chapter 9: Using Pointers Effectively ...............................................................................151 Chapter 10: Structures, Unions, and Data Storage ...........................................................171 Chapter 11: The C Preprocessor and Bitwise Operations ................................................197 Chapter 12: Arduino Libraries ...........................................................................................211 Appendix A: Suppliers and Sources..................................................................................231 Appendix B: Electronic Components for Experiments .....................................................237 Answers to Exercises ........................................................................................................241 Index ..................................................................................................................................257

v
Contents
About the Author ................................................................................................................xiii About the Technical Reviewer ............................................................................................xiv Acknowledgments ...............................................................................................................xv Introduction ........................................................................................................................xvi Chapter 1: Introduction .........................................................................................................1
Assumptions About You ..........................................................................................................2What You Need .......................................................................................................................3
An Atmel-Based Microcontroller Card ............................................................................................................3
Breadboard .....................................................................................................................................................5
Miscellaneous Parts .......................................................................................................................................6
Verifying the Software ............................................................................................................6Verifying the Hardware ...........................................................................................................8
Attaching the USB Cable .................................................................................................................................8
Selecting Your mc Board in the Integrated Development Environment ...........................................................9
Port Selection ...............................................................................................................................................10
Loading and Running Your First Program ............................................................................13The Blink Program .......................................................................................................................................14
Running the Blink Program Code ..................................................................................................................16
Compiling the Blink Program Code ...............................................................................................................17
Uploading the Blink Program .......................................................................................................................18
Summary ..............................................................................................................................20 Chapter 2: Arduino C ...........................................................................................................21
The Building Blocks of All Programming Languages ............................................................21Expressions ..................................................................................................................................................21

■ contents
vi
Statements ...................................................................................................................................................23
Statement Blocks .........................................................................................................................................24
Function Blocks ............................................................................................................................................25
The Five Program Steps .......................................................................................................261. Initialization Step ......................................................................................................................................26
2. Input Step .................................................................................................................................................26
3. Process Step .............................................................................................................................................26
4. Output Step ...............................................................................................................................................27
5. Termination Step .......................................................................................................................................27
The Purpose of the Five Program Steps .......................................................................................................27
A Revisit to the Blink Program ..............................................................................................28Program Comments ......................................................................................................................................29
Data Definition ..............................................................................................................................................30
The setup() Function ....................................................................................................................................32
The loop() Function ......................................................................................................................................34
Summary ..............................................................................................................................35Exercises ..............................................................................................................................36
Chapter 3: Arduino C Data Types ........................................................................................37Keywords in C ...............................................................................................................................................38
Variable Names in C .....................................................................................................................................38
The boolean Data Type .........................................................................................................39The char Data Type ...............................................................................................................39
Binary Data ...................................................................................................................................................39
The char Data Type and Character Sets ........................................................................................................40
Generating a Table of ASCII Characters ........................................................................................................41
The byte Data Type ...............................................................................................................42The int Data Type ..................................................................................................................43The word Data Type ..............................................................................................................43The long Data type ...............................................................................................................43The float and double Data Types ..........................................................................................43
Floating Point Precision ................................................................................................................................44
The string Data Type .............................................................................................................44String Data Type ...................................................................................................................45The void Data Type ...............................................................................................................46The array Data Type ..............................................................................................................47

vii
■ contents
Defining versus Declaring Variables .....................................................................................47Symbol Tables ...............................................................................................................................................47
lvalues and rvalues .......................................................................................................................................48
The Bucket Analogy ......................................................................................................................................50
Using the cast Operator ........................................................................................................52Summary ..............................................................................................................................53Exercises ..............................................................................................................................54
Chapter 4: Decision Making in C .........................................................................................55Relational Operators .............................................................................................................55The if Statement ...................................................................................................................56A Modified Blink Program .....................................................................................................58
The Circuit ....................................................................................................................................................59
The Program Code ........................................................................................................................................60
Software Modifications to the Alternate Blink Program ................................................... 61The if-else Statement ...........................................................................................................62Cascading if Statements ......................................................................................................63The Increment and Decrement Operators ............................................................................65
Two Types of Increment Operator (++) .........................................................................................................65
Two Flavors of the Decrement Operator (--) .................................................................................................66
Precedence of Operators ..............................................................................................................................66
The switch Statement ..........................................................................................................67The goto Statement .............................................................................................................68Getting Rid of Magic Numbers .............................................................................................68The C Preprocessor ............................................................................................................. 68Heads or Tails .......................................................................................................................71
Initialization Step ..........................................................................................................................................71
Input Step .....................................................................................................................................................71
Process Step .................................................................................................................................................71
Output Step ...................................................................................................................................................71
Termination Step ..........................................................................................................................................72
Something to Think About ....................................................................................................74Summary ..............................................................................................................................75Exercises ..............................................................................................................................76

■ contents
viii
Chapter 5: Program Loops in C ...........................................................................................77The Characteristics of Well-Behaved Loops .........................................................................77
Condition 1: Variable Initialization .................................................................................................................77
Condition 2: Loop Control Test .....................................................................................................................78
Condition 3: Changing the Loop Control Variable’s State .............................................................................78
Using a for Loop ...................................................................................................................78The while Loop .....................................................................................................................80The do-while Loop ................................................................................................................81The break and continue Keywords .......................................................................................82
The break Statement ...................................................................................................................................82
The continue Statement ...............................................................................................................................83
A Complete Code Example ...................................................................................................84Step 1. Initialization ......................................................................................................................................85
Step 2. Input .................................................................................................................................................85
Step 3. Process ............................................................................................................................................85
Step 4. Output ...............................................................................................................................................85
Step 5. Termination .......................................................................................................................................85
Listing 5-1 is Sorta Dumb Code ....................................................................................................................87
Loops and Coding Style ........................................................................................................88Summary ..............................................................................................................................89Exercises ..............................................................................................................................90
Chapter 6: Functions in C ....................................................................................................91The Anatomy of a Function ..................................................................................................92
Function Type Specifier ................................................................................................................................92
Function Name .............................................................................................................................................92
Function Arguments .....................................................................................................................................93
Function Body ...............................................................................................................................................94
Function Signature ......................................................................................................................................95
What Makes a “Good” Function ...........................................................................................96Functions Use Task-Oriented Names ............................................................................................................96
The Function Should Be Cohesive ................................................................................................................96
Functions Should Avoid Coupling .................................................................................................................97
Writing Your Own Functions .................................................................................................97Function Design Considerations ...................................................................................................................98
Argument List ...............................................................................................................................................99

ix
■ contents
Function Body ...............................................................................................................................................99
Logical Operators ...............................................................................................................100Logical AND Operator (&&) ..........................................................................................................................100
Logical OR (||) ..............................................................................................................................................101
Logical NOT (!) ............................................................................................................................................101
Writing Your Function .........................................................................................................102The IsLeapYear() Function and Coding Style ..............................................................................................103
Arguments versus Parameters ...................................................................................................................103
Why Use a Specific Function Style? ...........................................................................................................104
Leap Year Calculation Program .........................................................................................104Passing Data Into and Back From a Function .....................................................................107
Pass by Value ..............................................................................................................................................108
Summary ............................................................................................................................110Exercises ............................................................................................................................111
Chapter 7: Storage Classes and Scope .............................................................................113Hiding Your Program Data ..................................................................................................113Statement Block Scope ......................................................................................................113Local Scope ........................................................................................................................116
Name Collisions and Scope ........................................................................................................................117
Global Scope .......................................................................................................................119Global Scope and Name Conflicts ...............................................................................................................121
Scope and Storage Classes ................................................................................................121The auto Storage Class ...............................................................................................................................121
The register Storage Class .........................................................................................................................121
The static Storage Class .............................................................................................................................122
The extern Storage Class ............................................................................................................................122
The volatile keyword ..........................................................................................................127Summary ............................................................................................................................128Exercises ............................................................................................................................129
Chapter 8: Introduction to Pointers ..................................................................................131Defining a Pointer ...............................................................................................................131
Pointer Name ..............................................................................................................................................131
Asterisk ......................................................................................................................................................132
Pointer Type Specifiers and Pointer Scalars ...............................................................................................132
Using a Pointer ...................................................................................................................136

■ contents
x
The Indirection Operator (*) ........................................................................................................................137
Using Indirection .........................................................................................................................................137
Summary of Pointer Rules ..................................................................................................141Why Are Pointers Useful? ...................................................................................................141Pointers and Arrays ............................................................................................................145
The Importance of Scalars ..........................................................................................................................148
Summary ............................................................................................................................149Exercises ............................................................................................................................150
Chapter 9: Using Pointers Effectively ...............................................................................151Relational Operations and Test for Equality Using Pointers ................................................151
Pointer Comparisons Must be Between Pointers to the Same Data ...........................................................152
Pointer Arithmetic ...............................................................................................................152Constant lvalues .........................................................................................................................................156
Two-Dimensional Arrays .....................................................................................................157A Small Improvement .................................................................................................................................159
How Many Dimensions? .............................................................................................................................160
Two-Dimensional Arrays and Pointers ................................................................................160Treating the Two-Dimensional Array of chars as a String ...........................................................................162
Pointers to Functions ..........................................................................................................162Arrays of Pointers to Functions ..................................................................................................................164
enum Data Type ..........................................................................................................................................164
The Right-Left Rule.............................................................................................................168Summary ............................................................................................................................169Exercises ............................................................................................................................170
Chapter 10: Structures, Unions, and Data Storage ...........................................................171Structures ...........................................................................................................................171
Declaring a Structure ..................................................................................................................................172
Defining a Structure ..................................................................................................................................173
Accessing Structure Members ...................................................................................................................174
Returning a Structure from a Function Call ................................................................................................176
Using Structure Pointers .............................................................................................................................178
Initializing a Structure ...............................................................................................................................181
Arrays of Structures ....................................................................................................................................181
Unions ................................................................................................................................182EEPROM Memory ................................................................................................................183

xi
■ contents
Using EEPROM ............................................................................................................................................184
Data Logging ......................................................................................................................184Other Storage Alternatives .................................................................................................191Shields . ...........................................................................................................................................................191
Other Uses for Secure Digital Storage . ...........................................................................................................193
Summary . ..........................................................................................................................195Exercises ................................................................................................................................196 Chapter 11: The C Preprocessor and Bitwise Operations ................................................197
Preprocessor Directives . ...................................................................................................197#undef . ...........................................................................................................................................................199
#line . ...............................................................................................................................................................200
#if, Conditional Directives . ..............................................................................................................................200
#include . .........................................................................................................................................................202
Parameterized Macros . .....................................................................................................202Bitwise Operators ............................................................................................................................................203
Bitwise Shift Operators . ..................................................................................................................................205
Using Different Bases for Integer Constants ...................................................................................................207
Parameterized Macros...continued . ................................................................................................................207
Summary . ..........................................................................................................................208Exercises ................................................................................................................................209 Chapter 12: Arduino Libraries ...........................................................................................211
Libraries . ...........................................................................................................................211Arduino Libraries .............................................................................................................................................211
Other Libraries . ...............................................................................................................................................218
Writing Your Own Library . ..................................................................................................220The Library Header File ...................................................................................................................................221
The Library Code File (Dates.cpp) . ..................................................................................................................222
Setting the Arduino IDE to Use Your Library . .....................................................................224A Sample Program Using the Dates Library .......................................................................225
Adding the Easter Program to the IDE ..................................................................................................................227
The keywords.txt File ...........................................................................................................................................227
Keyword Coloring (theme.txt) ...............................................................................................................................227
Summary ................................................................................................................................229Exercises ............................................................................................................................230

■ contents
xii
Appendix A: Suppliers and Sources..................................................................................231Suppliers ...........................................................................................................................231
Seeedino Studio ..........................................................................................................................................231
Diligent Inc .................................................................................................................................................232
OSEPP .........................................................................................................................................................233
Tinyos Electronics .......................................................................................................................................233
Cooking Hacks ............................................................................................................................................234
Sources ..............................................................................................................................235Software .....................................................................................................................................................236
Appendix B: Electronic Components for Experiments .....................................................237Microcontroller Board .........................................................................................................237Solderless Breadboard .......................................................................................................237Electronic Components.......................................................................................................237Online Component Purchases ............................................................................................238Experiment! ........................................................................................................................239
Answers to Exercises ........................................................................................................241Chapter 2 ............................................................................................................................241Chapter 3 ............................................................................................................................242Chapter 4 ............................................................................................................................244Chapter 5 ............................................................................................................................246Chapter 6 ............................................................................................................................248Chapter 7 ............................................................................................................................249Chapter 8 ............................................................................................................................250Chapter 9 ............................................................................................................................251Chapter 10 ..........................................................................................................................252Chapter 11 ..........................................................................................................................254Chapter 12 ..........................................................................................................................255
Index ..................................................................................................................................257

xiii
About the Author
Jack Purdum is a retired professor from Purdue University’s College of Technology. Dr. Purdum has authored 17 programming and computer-related textbooks and has been involved with university-level teaching for more than 25 years. He continues to contribute to magazines and journals and has been a frequent speaker at various professional conferences. He was the founder and CEO of Ecosoft, Inc., a company that specialized in compilers and other programming tools for the PC. He continues to be actively engaged in onsite training and instruction in Object-Oriented Programming analysis and design. Dr. Purdum has developed numerous teaching methodologies (e.g., The Right-Left Rule, The Bucket Analogy, The Five Programming Steps, Sideways Refinement) and code benchmarks (Dhampstone) and has been recognized for his teaching endeavors over the
years. He received his BA from Muskingum College and his MA and PhD degrees from The Ohio State University.

xiv
About the Technical Reviewer
Brad Levy is a practitioner with more than 30 years of experience in software and hardware design. He has developed embedded systems for energy management, solar, and avionics test equipment. He also developed weather stations and real-time weather presentation software for Weather Metrics, a company he co-founded. He has worked on office automation, graphics software, system libraries, and device drivers for multiple platforms as well as programming for large scientific simulations. Brad has been working with the C language since its early days, having also worked with C’s predecessor, the B language, at the University of Kansas.
Brad also has experience with APL, Fortran, Pascal, C++, JavaScript, PHP, Python, and assembler language for many different processors, old and new, large and small. He has done compiler, linker, and run-time library development and wrote a multitasking operating system for an embedded system. He has developed systems communicating over everything from direct connections,
conventional and cellular phone networks, and satellite links as well as the Internet. Brad is currently working on some Arduino-based projects for energy management and model railroad control and in interactive art piece utilizing the Raspberry Pi platform.
Brad’s technical interests also include user interface design, library sciences, the future of books and information, Web design, photography, graphics design, font design, and audio equipment design. He is a long-time member of the Association for Computing Machinery. His website is www.bradlevy.com.

xv
Acknowledgments
No one writes a book in isolation. Without even knowing it, people present ideas for teaching examples, better ways to get a point across, provide feedback on what works and what doesn’t. Many friends who are not programmers often provide the best feedback when I try to explain a complex programming topic to them. Without even knowing it, they help hone my teaching methods. I must thank some of these people specifically: Jane Holcer, Katie Mohr, John Purdum, Joe and Bev Kack, John Strack, and Mike Edwards. A special note of thanks to the technical editor, Brad Levy, who provided valuable insight on a number of chip and other hardware details. I also appreciate the participation of the vendors mentioned in Appendix A for their contributions, both in terms of hardware and also software and support. In addition, I would like to thank Brigid Duffy, Michelle Lowman, Kim Burton, and all of the many people at Apress who all helped make this a better book.

xvi
Introduction
I can remember buying my first electronic calculator. I was teaching a graduate level statistics course and I had to have a calculator with a square root function. Back in the late 1960s, that was a pretty high-end requirement for a calculator. I managed to purchase one at the “educational discount price” of $149.95! Now, I look down at my desk at an ATmega2560 that is half the size for less than a quarter of the cost and think of all the possibilities built into that piece of hardware. I am amazed by what has happened to everything from toasters to car engines. Who-da-thunk-it 40 years ago?
I am coming to the microcontroller world from a different direction than many people who have a similar interest. My primary area of expertise has been software engineering. However, I have always loved electronics and maintain my amateur radio license, which I got more than 50 years ago. Yet, all the potential processing power that is built into the Atmel family of microcontrollers is dormant unless some form of software unleashes that power. Indeed, artfully craft the two areas of hardware and software together and you really have something exciting.
The purpose of this text is to teach you the C programming language. To those whose eyes just glazed over while muttering: “Just what we need...another C programming text, “ I hope to convince you that this book is different. First, many texts seem to relegate programming to the back seat, concentrating instead on the hardware aspects of the microcontroller development process. Indeed, after reading some microcontroller books, you come away with the feeling that software in general, and programming specifically, is an evil that one must simply endure. That is, the “really good stuff” is all in the hardware. Yet, great hardware running on so-so software is bound by a worst case reality of a so-so result. Crafting good software can be every bit as rewarding as a well-engineered piece of hardware.
A second reason why this book is different is my teaching experience. I had an employee who was one of the most gifted programmers I ever met. One summer I assigned an intern to him, and, within a week, the intern quit in tears, saying he was impossible to work with, let alone learn anything from. Just because you are a good programmer or engineer does not automatically make you a good teacher. Not until you have seen 150 pairs of eyes staring at you like a deer in the headlights can you appreciate that what you thought was obvious really isn’t. Trial and error over 25 years has helped me develop teaching techniques that lift students over the most likely stumbling blocks.

xvii
n INTRODUCTION
Finally, teaching does not have to be dry or boring. I have tried to make this text read as though you and I are talking face-to-face about programming. Although you are the final judge, I hope you come away with an enjoyment for programming that I have. Programming can be a most enjoyable pasttime.
Assumptions About YouFirst, I am going to assume that you do not have to master C programming by next week. It is not that the tools you need are not present in this book. Rather, I find far too often that students who read a programming text do not take the time to actually type in the code and try it for themselves. If you take this approach, then you will actually slow down the learning process. It is too easy to read the narrative and tell yourself, “Yeah, I got that,” and move on to the next topic. You only earn the right to pat yourself on the back after you have typed in a sample program, debugged and tested it, and have it working as designed can you take your bow.
Second, to maximize your learning experience, you need to have the hardware necessary to test your code. I have tried to minimize the amount of hardware you need (see Appendix B for the required hardware and Appendix A for some suggested vendors) to try the various programs in this book. At a minimum, you need an Atmel-family microcontroller board, a breadboard, a few LEDs, and some wire. That is all you need. However, chances are the reason you are reading this book in the first place is likely because you have some idea for a project lurking in your mind’s eye. Great! Buy some of your hardware needs and try to devise short programs that might test part of your overall design. Learning with a purpose is always a good thing.
Finally, take your time to enjoy what you are reading. Stopping and thinking up your own little programs will be infinitely more rewarding to you than any program I may suggest. You simply cannot just read about programming—you must jump in, make mistakes, send a few LEDs to a untimely death, and learn from your mistakes. At the end of each chapter are a few questions for you to ask yourself. I did not write those to kill off a few extra trees. They are there to make you think about what you have read in the chapter. Take the time to answer them yourself before reading my answer. The great thing about software is that there are so many different ways to accomplish the same task.
ResourcesThere are many places where you can go for additional help should you need it. There is a surprisingly robust body of literature about all aspects of the Arduino environment, both hardware and software. An Internet search on almost any topic prefaced with the word “Arduino” is going to yield you something useful. Apress has some excellent hardware design books, all of which can expand to your knowledge base.
Appendix A has some suggestions about where to purchase various hardware components. If you are hung up on a particular problem, try posting your question on one of the many Arduino forums that are available on the Internet (e.g., http://arduino.cc/forum/). Your local high school physics instructor may also have some ideas for local areas of help.
Finally, if you do build some hardware device or piece of software that you feel is pretty unique, share it with others via one of the forums. The Arduino IDE and all of the associated programming tools are Open Source code, which means that for the most part, it was contributed to you free of charge by the efforts of others. It would be great if you can give a little something back in return.
Okay...enough of this. Let’s start digging into C and get things rolling…

1
■ ■ ■
chapter 1
Introduction
There is one primary goal for this book: to teach you how to use the C programming language to control the Atmel family of microcontrollers. Given that there are probably a bazillion C programming books available to you, why should you choose this one? Good question, and there’s no single answer. However, we can give you some facts that might help your decision: This book is specifically written for the Arduino family of microcontroller boards using the Atmel family of microcontroller chips. As such, the book is couched in the framework of the Integrated Development Environment (IDE) that is available as a free Internet download from Atmel. This means you will not have to buy additional programming tools to learn C. The implementation of C provided with the IDE is not a full American National Standards Institute (ANSI) implementation of the C programming language. This implementation, which I will henceforth call Arduino C, is a robust subset of ANSI C, and, as such, we are free to skip over those elements of the C language that are not available to you. Although this makes the amount of details to learn a bit smaller, it also means that some features found in ANSI C have to be “worked around.”
Even in light of these first two considerations, there are still probably dozens of books that cover Arduino C. So, why choose this book over the dozens that remain available to you?
First, this is a programming book and that is where the emphasis will be. True, we will have some small hardware projects to exercise your code, but the real purpose of the projects is to test your understanding of C—not the hardware. Once you have mastered C, Apress has a family of books that are centered on the Arduino microcontroller that you may use to extend your hardware expertise.
Second, I will take you “under the hood” of the C language so you gain a much deeper understanding of what the code is doing and how it is done. This knowledge is especially useful in a programming environment where you have only a few pico-acres of memory available to you. There are those who say you really don’t have to understand a language with any real detail to use it. To reinforce their argument, I have often heard the comment: “You don’t have to know how to build a car to drive one.” True, but if your car breaks down 200 miles north of Yellowknife, NWT, I’ll bet you’d wish you had a better understanding of the details that make a car tick. The same is true for programming. The better your understanding what is going on with the language, the quicker you will be able to detect, isolate, and fix program bugs. Also, there are often multiple solutions possible for any given programming problem. A little depth of understanding frequently yields a more efficient and unbreakable, yet elegant, solution.
chapter 1 ■ IntroductIon
2
Third, since I first began using C in 1977, I have gained a lot of commercial programming experience with C that just might come in handy. My software company produced C compilers and other development tools for the early PCs. Also, I wrote my first C programming text more than 30 years ago. Still, the biggest advantage that has some worth to you is my teaching experience. Honestly, there are likely thousands of programmers who can code circles around me. Indeed, one of my employees was such a person. However, to be a good author, it matters little how good you are as a programmer or an engineer if you cannot convey that experience to others. I have more than 30 years of university-level teaching experience, and I know where you are most likely to stumble in our upcoming journey. The bad news is that you will stumble along the way. The good news is that there have been thousands before you who have stumbled on exactly the same concepts and I have managed to develop effective teaching methods to overcome most (or all?) of them. I think you will find the book’s style both engaging and informative.
Finally, I genuinely enjoy programming with the C language. Of all the different languages I have used since I first began programming in the late 1960s, C remains my favorite. It is a concise, yet powerful, language well suited for microcontroller work. I think you’re going to like it, too.
This chapter details what you need to use this book effectively, including some comments about the expectations I have about you. You will learn about some of the features that different Arduino-compatible boards have, their approximate cost, and where they can be purchased. (Details about some suppliers can be found in Appendix A.) Some suggestions are also made about some additional hardware items you may wish to purchase. The chapter then tells you where and how to download and install the IDE for the Arduino IDE. The chapter closes out with a short C program that tests that the IDE installation went as expected. When you finish reading this chapter, you will have a good understanding of what you need to use this book effectively.
Assumptions About YouClearly, I’m targeting this book for a specific reader. In so doing, I have made certain assumptions about that reader: I assume the reader knows absolutely nothing about C or programming in general. In fact, I hope you don’t know anything. That way, you can start with a clean slate. Often, someone who knows some programming aspects brings along a lot of bad habits or ill-conceived practices that need to be “unlearned.” Starting off with no programming experience is, in this case, a very good thing.
I assume you know nothing about electronics. Admittedly, there are some hardware concepts used throughout the book, but you will be taught what you need to know to make things function properly. If you want to gain a deeper understanding of the electronics, I’d suggest finishing this text and then buying one of the other Apress books that targets your specific hardware area of interest.
I assume you will do the exercises. This means you need to invest in a microcontroller and some additional components. I’ve made every attempt to keep these component costs as inexpensive as possible while still demonstrating the point at hand. Appendix A presents a list of vendors from whom you can buy various components at reasonable cost. Failing that, almost all of the components can be bought from a local Radio Shack outlet. Appendix B presents a list of the miscellaneous hardware components you will need to complete all of the projects in this book. Obviously, some of these components can be ignored if certain projects are not attempted.
I assume you don’t have to know C by this weekend. That is, I assume you will do the exercises and take the time to study and understand the code in the examples. Learning C is a building process whereby the concepts learned in the current chapter become a foundation for subsequent chapters. A crumbly understanding of the concepts of one chapter will likely cause a collapse of that understanding in later chapters. Take your time, pause and think about what you’re reading, and do the exercises. If you try to take shortcuts and bypass the exercises, then your depth of knowledge will be less than it would be otherwise. Take your time and enjoy the ride.

3
chapter 1 ■ IntroductIon
What You NeedIn addition to this book, there are several things you will need, plus some things you should have, but could live without. Consider the components and factors discussed in the following sections.
An Atmel-Based Microcontroller CardYou will need to have access to an Atmel microcontroller card. (Let’s use “µc” for “microcontroller” from now on.) Atmel produces a wide variety of controllers, but you should consider purchasing an Arduino board based on one of those listed in Table 1-1. So, how do you decide which one to purchase? It really depends on what you want to do with the µc. If all you want to do is blink an LED or control a toaster, then one of the least expensive boards listed in the table probably will do just fine. If you are setting up some kind of experiment that must sample several dozen sensors every second, then you will probably want to use a µc that has a lot of digital I/O pins. If your application is going to have a lot of program code associated with it, then obviously you should pick one with more Flash memory. (Note that 2K–8K of Flash memory is eaten up by the bootloader, which allows you to communicate with the outside world, so plan accordingly.)
Most µc boards are shipped with the required USB (A to B) cable. If your board did not include one, then you can steal your printer cable and use it until you can find a replacement. Again, look online for these and you should be able to buy one for less than a few dollars.
Memory With regard to memory, you will want to consider the following:
• Flash – The programs you will develop using this book are written on your PC. When you have the program code to a point where you think it is ready to test, you upload that program code to the µc board. The program code is stored in the card’s flash memory. This memory is nonvolatile, which means that even if you disconnect the board from its power source, the contents of the flash memory remain intact. It is probably obvious that it is the flash memory size that will likely limit your program size. As mentioned above, 2K to 8K of flash memory is used for the software that allows you to communicate with the outside world, including your PC.
• SRAM – Simply stated, the Static Random Access Memory (SRAM) is where your program variables (data) get stored during program execution. Data in SRAM are usually lost when power is removed from the controller board. We will have more to say about this in later chapters, but for now, the amount of SRAM probably won’t be a real issue for most programs.
• EEPROM – Electrically Erasable Programmable Read Only Memory (EEPROM) is an area of nonvolatile memory where one often stores data that need to be retrievable even after power to the board has been removed, then restored. Unlike the data values stored in SRAM, which are lost when power is lost, data values stored in EEPROM survive power removal. Because of this, EEPROM memory is often used to store configuration or other types of information that are needed when the system powers up. Again, we will have more to say about this type of memory later in the book.
So, should it be the memory or I/O pins that dictate your mc choice? Again, it depends on what you hope to do with the mc, but for most readers, the amount of Flash memory will likely be the most

chapter 1 ■ IntroductIon
4
There is also a slightly smaller board called the Nano that has similar specs as the Atmel328 board with some minor differences (e.g., no power jack like you see near the upper-left corner of both boards in Figure 1-1).
important limitation. Given that, buy the card with the most Flash memory that your pocketbook allows. Table 1.1 shows some of the compatible boards that you may want to consider for use with this book.
Table 1-1. Atmel microcontrollers commonly used in Arduino boards.
Micro controllerFlash memory (bytes) SRAM(bytes)
EEPROM (bytes)
Clock speed
Digital I/O Pins
Analog input pins Voltage
ATmega168 16K 1K 512 16Mhz 14 6 5v
ATmega328 32K 2K 1K 16Mhz 14 6 5v
ATmega1280 128K 8K 4K 16Mhz 54 16 5v
ATmega2560 256K 8K 4K 16Mhz 54 16 5v
SizeThe physical size of the mc card may also be important to you, depending on your planned application. As you might expect, larger available memory and more I/O pins dictates a larger footprint for the card. Figure 1-1 shows two of the popular mc boards and the relative sizes when compared to a playing card.
Figure 1-1. Sizes of two different Arduino boards, one based on the ATmega1280 (left) and one based on the ATmega328 (right) relative to a standard playing card.

5
chapter 1 ■ IntroductIon
CostAs you would expect, a mc with more memory and I/O pins cost a little more, For example, some ATmega328-based boards can be purchased for under $20 and the one based on the ATmega1280 for under $30. Appendix A presents a list of suppliers that you may wish to consider. Note that there are numerous clones for each of the Arduino family available. As a general rule, buy the “biggest” you can comfortably afford. Hardware projects are often subject to “feature creep” where more and more functionality is requested as the project goes forward. “Buying bigger than you need” is often a good idea if you can afford it.
BreadboardA breadboard is used to prototype electronic projects. By using special jumper wires that plug into the holes on the breadboard, it is easier to create and modify an electronic circuit. The hardware elements found in this text are not a central feature. Indeed, I have tried to simplify the hardware requirements as much as possible. Still, a breadboard is a useful addition to your tool chest and you should consider investing in one. Figure 1-2 shows a typical breadboard. I like this type of breadboard because it has two sets of power feeds and four banks of tie points. (The one shown has 2,800 tie points—the little “holes” where you can insert wires.) You will also need some jumper wires to connect the tie points. I purchased the breadboard shown in the figure with 150 jumper wires for less than $20. There are smaller, less expensive breadboards available.
Figure 1-2. A typical breadboard.

chapter 1 ■ IntroductIon
6
If your breadboard doesn’t come with jumpwires, then make sure you purchase some—you’ll need them!
Miscellaneous PartsEvery attempt has been made to minimize the number of electronic parts you will need to complete an exercise. In many cases, we will reuse components between exercises. Appendix B presents a list of the parts that you will need to complete all of the exercises found in this book. With some judicious shopping on eBay, you can probably buy all of the components for less than $15 (excluding the mc board). While you are at it, you might look for some “rubber feet” that can be stuck to the bottom of your board. That way, if you slide the board across a table, it won't scratch it. I won't even mention what can happen if you slide a naked board across a table that has a paperclip on it.
Although you could read this book without buying anything else, not having the minimal components and a compatible ATmega-based board would seriously dilute the learning experience. You really should have the electronic components available to you. You might also find out if your community has a local Amateur Radio (i.e., ham radio) club. Club members are always willing to offer advice about where you can find various electronic components at reasonable cost. Your local community college or university is another possible source of information, as might be the local teacher of the high school physics class. Indeed, when I taught at Butler University, the Physics department opened its lab on Saturday mornings to people who had an interest in learning electronics. To his credit, Dr. Marshal Dixon was the instructor who ran the program free of charge. Perhaps your community has a similar program. It doesn’t hurt to check. With a little effort and a few dollars, you should be able to buy what you need.
Verifying the SoftwareA mc without software is like a bicycle without handlebars. Like any other computer, a mc needs program instructions for it to do something useful. Arduino has provided all the software tools you need to write program code as a free download from their website. The remainder of this section discusses downloading, installing, and testing the software you need.
Start your Internet browser and go to:
http://arduino.cc/en/Main/Software
There you will find the Arduino software download choices for Windows, Mac OS X, and Linux. Click on the link that applies to your development environment. Because I use the Windows operating system for program development, the file that was downloaded was named arduino-1.0.1-windows.zip. You should see something similar to that shown in Figure 1-3.

7
chapter 1 ■ IntroductIon
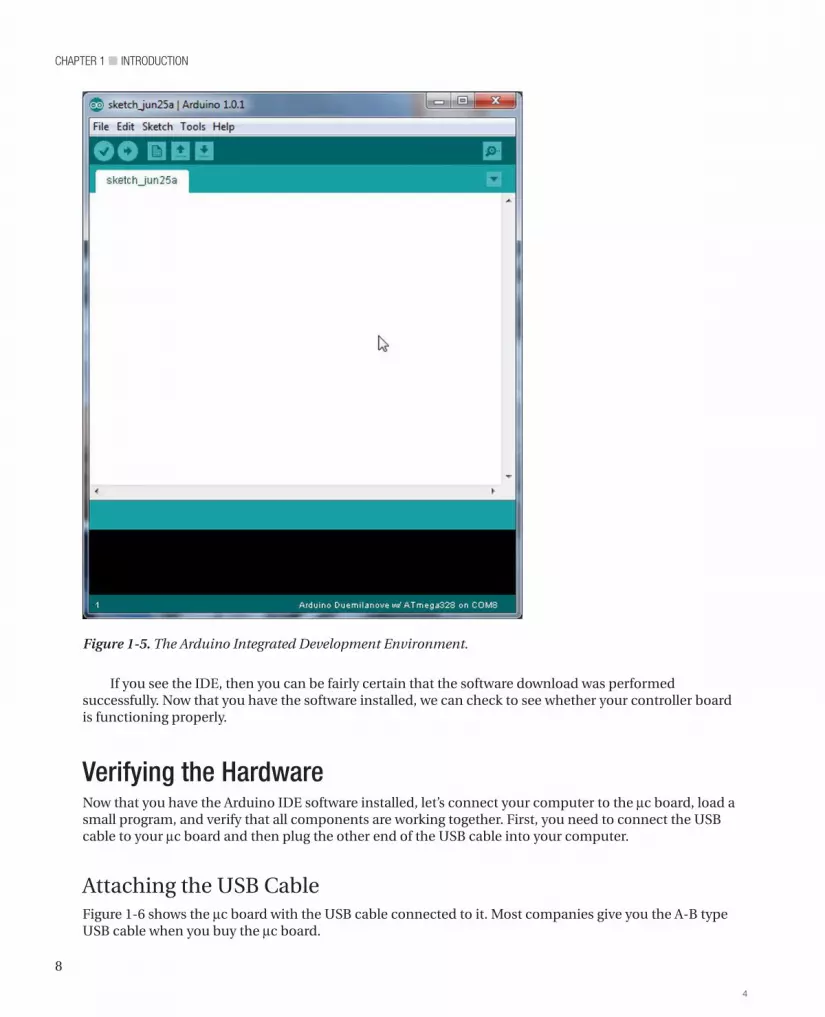
Within a few seconds, you should see the IDE for the Arduino. It should look similar to that shown in Figure 1-5.
After you have downloaded the software, extract the zip file to a directory of your choice. You should see something similar to that shown in Figure 1-3. I named my directory Arduino1.0.1. Inside the directory, double-click on the arduino.exe file. In a few moments, you may see a warning similar to that shown in Figure 1-4. You should click “Run” to install the Arduino software.
Figure 1-3. Extracting the Arduino programming tools.
Figure 1-4. Security warning.
chapter 1 ■ IntroductIon
8
If you see the IDE, then you can be fairly certain that the software download was performed successfully. Now that you have the software installed, we can check to see whether your controller board is functioning properly.
Verifying the HardwareNow that you have the Arduino IDE software installed, let’s connect your computer to the mc board, load a small program, and verify that all components are working together. First, you need to connect the USB cable to your mc board and then plug the other end of the USB cable into your computer.
Attaching the USB CableFigure 1-6 shows the mc board with the USB cable connected to it. Most companies give you the A-B type USB cable when you buy the mc board.
Figure 1-5. The Arduino Integrated Development Environment.
4

9
chapter 1 ■ IntroductIon
As you no doubt have figured out, the unattached end of the USB cable should be plugged into a USB port connector on your computer. The minute you connect the USB cable to your powered-up computer, power is applied to the mc board and an LED will light on the mc board. Obviously, the USB connection is supplying the voltage necessary to drive the mc board. The USB 2.0 specs suggest that the cable must supply between 4.4 and 5.25 volts at a maximum current of 500 mA. This is not a lot of power. However, most mc boards also provide a small power jack (the black barrel-like thing located on the upper-left corner of the board in Figure 1-6) where a “wall wart” with greater power can be plugged into the power jack to drive the system. None of our projects require more current than can be provided by the USB connection. (If you are using a USB hub, then make sure the hub provides 500 mA to each port.)
Selecting Your mc Board in the Integrated Development EnvironmentThe Arduino IDE supports a variety of different mc boards. Therefore, you must tell the IDE which board you will be using for writing your program code. Figure 1-7 shows the menu sequence (Tools Boards) that you use to select your mc board. In this example, I have selected the Arduino Diecimila or Duemilanove w/ ATmega168 menu choice.
Figure 1-6. The mc board with USB cable attached.

chapter 1 ■ IntroductIon
10
You should select the menu choice that matches the mc board you will be using. If you change mc boards at some future date, then simply come back to this menu and reselect the board to which you are changing.
Port SelectionThe IDE does a pretty good job of automatically figuring out which USB port you have selected to power and communicate with the mc board. To determine which port is being used, simply use the Tools Serial Port menu sequence, as shown in Figure1-8. For my particular setup, COM port 8 is being used to communicate with the mc board.
Figure 1-7. Selecting your mc board.

11
chapter 1 ■ IntroductIon
If you are having difficulty determining which port should be used, then you can use the Windows Control Panel to examine which ports are assigned to what. For example, using Windows 7, the first step is to select the Device Manager option from the Control Panel list, as shown in Figure 1-9.
If you cannot find the device drivers or if you are having problems configuring the port selection, then the solution consists of the following steps:
1. Select Control Panel Devices and Printers.
2. The Devices and Printers screen is broken into horizontal panes. The first has icons for Devices (those that fit certain predefined categories). The second pane has icons for installed Printers and Faxes. The third pane lists Unspecified devices. The Arduino Uno showed up in the third pane as an Unknown Device.
3. Double-click the Unknown Device icon.
4. In the resulting Unknown Device Properties dialog, select the Hardware tab, then click the Properties button.
Figure 1-8. Port selection.

chapter 1 ■ IntroductIon
12
5. On the General tab of the new dialog that pops up (“Unknown device Properties”), click Change Settings.
6. Click Update Driver.
7. Choose Browse my computer for driver software.
8. In the dialog that pops up, browse to the drivers subdirectory of the directory that you extracted the Arduino 1.0.1 software into, and click Next.
9. You will get a Windows security warning that the drivers are not signed. Choose “Install anyway.”
10. You should get a message that Windows has updated the driver.
11. The port should now show up in the list of serial ports when you select Tools Serial Port in the Arduino IDE.
Figure 1-9. Selecting the Device Manager from the Control Panel.
After the Device Manager loads, you can look at the port devices by clicking on the small triangle next to the Ports list. This is shown in Figure 1-10. As you can see in the figure, the USB Serial Port has been assigned to the COM port 8. This is exactly what you saw in Figure 1-8.

13
chapter 1 ■ IntroductIon
Now that you are reasonably certain that the software and hardware seem to be connected and working properly, let’s load a small program into the IDE and see whether we can run it.
Loading and Running Your First Program The Arduino IDE has gone through numerous revisions over the years. The current version is the first to carry the “Arduino1” moniker, suggesting that the IDE software is now consider stable. Earlier versions of the IDE generated a default secondary file name of “pde,” which reflected that the source files (also called “sketches”) were written under the Processing Development Environment (pde). With the latest release, the default secondary file name has been changed to “ino.” The change was made so there wouldn’t be conflicts with the source files that were created with earlier versions of the IDE. (Thus far, I have not found out why “ino” was selected. So, I’m just going to assume that it is because it squares with the last three letters in Arduino.) The latest version of the IDE can read the earlier “pde” files but resaves them as “ino” files by default.
What we need to do now is load and run an “ino” project file to see that everything is working properly. Although we could write a short program from scratch, I really don’t want to do that yet. We simply don’t have enough information under our belt at this junction to make much of a learning experience from the process.
Rather than writing our own program, we will load and run a sample program that is included as part of the IDE download.
Figure 1-10. Finding port assignment.

chapter 1 ■ IntroductIon
14
The Blink Program Probably every programming book written for the Arduino family has a short program that blinks an LED. For that reason, the IDE download includes that program in the Examples subdirectory that is designed to blink an LED. Figure 1-11 shows you how to locate that program.
Figure 1-11. Locating the Blink program.
As you can see in Figure 1-11, the Blink program file is located by following the directory path of:
Arduino1.0.1\examples\01.Basics\Blink
Because you likely installed your download at a different base directory than I did, the path shown here should be “tacked onto” the directory you chose. For example, if you created a directory named LearningC and installed the IDE there, your directory would look like:
LearningC\Arduino1.0.1\examples\01.Basics\Blink
Once you know where the files reside, use the File Open menu sequence to navigate to the Blinkfolder. Open the Blink folder and select the Blink.ino file. This can be seen in Figure 1-12. Once the source code file is load, a new copy of the IDE with the source code is presented to you.

15
chapter 1 ■ IntroductIon
The new IDE that contains the program code should look similar to Figure 1-13. We’re going to ignore the actual program code for now, because our real interest at this moment is simply to see whether the program can be run. You will be able to understand the code soon enough. For now, however, let’s get to the good stuff.
Figure 1-12. Loading the Blink.ino source code file.

chapter 1 ■ IntroductIon
16
Running the Blink Program CodeThe program code that appears in Source Code Window in Figure 1-13 is written in the C programming language. (Hopefully, that’s not a surprise to you.) The Source Code Window is the area with a white background in the figure and has a white “tab” at the top with the name of the program “Blink” written on it. The Source Code Window is used to enter and edit the code that you want the program to execute. The program code is presented in a more-or-less readable format that looks a little bit like normal English narrative. The computer, however, is as dumb as a box of rocks when it comes to understanding English. Indeed, the computer only understands two things: (1) on or (2) off—hence the term “binary computer.” These two states (on and off) are represented by a 1 for an On state and a 0 for an Off state. Simply stated, by stringing these 1s and 0s together in a very specific sequence, we can make the computer do what we wish.
Back in the early days of PC programming, some computers (e.g., the MITS Altair) actually had switches that were flipped on or off, and, when the sequence formed a computer instruction you wanted to perform, you pressed a button and that sequence of 1s and 0s (i.e., Ons and Offs) was deposited into computer memory. Hours later, you might have a program that said “Hi” on the computer screen. Programming a computer back then was a very laborious and error-prone process. In fact, you could often
Figure 1-13. The IDE after loading the Blink program code..

17
chapter 1 ■ IntroductIon
figure out who was a computer programmer by looking for “binary blisters” on their fingers. (Experienced programmers had binary callouses.)
Luckily, things have changed. Now we have a program, called a compiler, which translates the English-like C language program instructions into the proper 1s and 0s sequences for us. The Arduino IDE has a compiler built into it that does the translation work for us. Because the Blink program was written by someone else and is included in the software IDE download, we can feel pretty safe that there are no errors in the sample program. We’ll have a lot to say about finding and fixing program errors later on. For now, however, we’ll assume the program is error-free and ready to compile.
Compiling the Blink Program CodeFigure 1-14 shows the toolbar line near the top of the IDE. The left-most button (the one with the checkmark) on the toolbar is used to compile the program that is currently displayed in the Source Code Window of the IDE. After you have loaded the program code for the Blink program, you can click on the Compile button and the IDE examines the code for errors and, finding none, compiles the program.
Figure 1-14. Toolbar with function breakout.
If no errors are found, then you will see a message similar to that shown in Figure 1-15 near the bottom of the screen. If you look at the message at the bottom of the figure, then you will see it says that the “Binary sketch size” is 1,084 bytes. What this means is that the compiled Blink program used up 1,084 bytes of memory to generate the necessary sequence of 1s and 0s to accomplish the task the program is designed to do. It also tells us that there are about 14,336 bytes of (unused) memory still available to us.

chapter 1 ■ IntroductIon
18
Figure 1-15. Compile successful message.
Wait a minute! I’m using a ATmega168, which has 16K (or 16,384) bytes of flash memory. Well, 16,384 minus 1,084 should be 15,300 bytes—not 14,336 bytes. What happened to the extra 964 bytes? Recall from our discussion of Table 1-1 that some of the flash memory is used for the bootloader software. As a result, not all of the flash memory is available for our program code. Although the software documentation says that 2K of memory is used for the bootloader, which really means that it won’t use more than 2K of flash memory.
Uploading the Blink Program After you have compiled the program, it is still sitting in your PC’s memory, not the µc. Therefore, you need to click the Upload button (see Figure 1-14) to move the compiled program instructions from your PC’s memory to the flash memory on your µc board. (This is also known as the Verify button, but that seems to
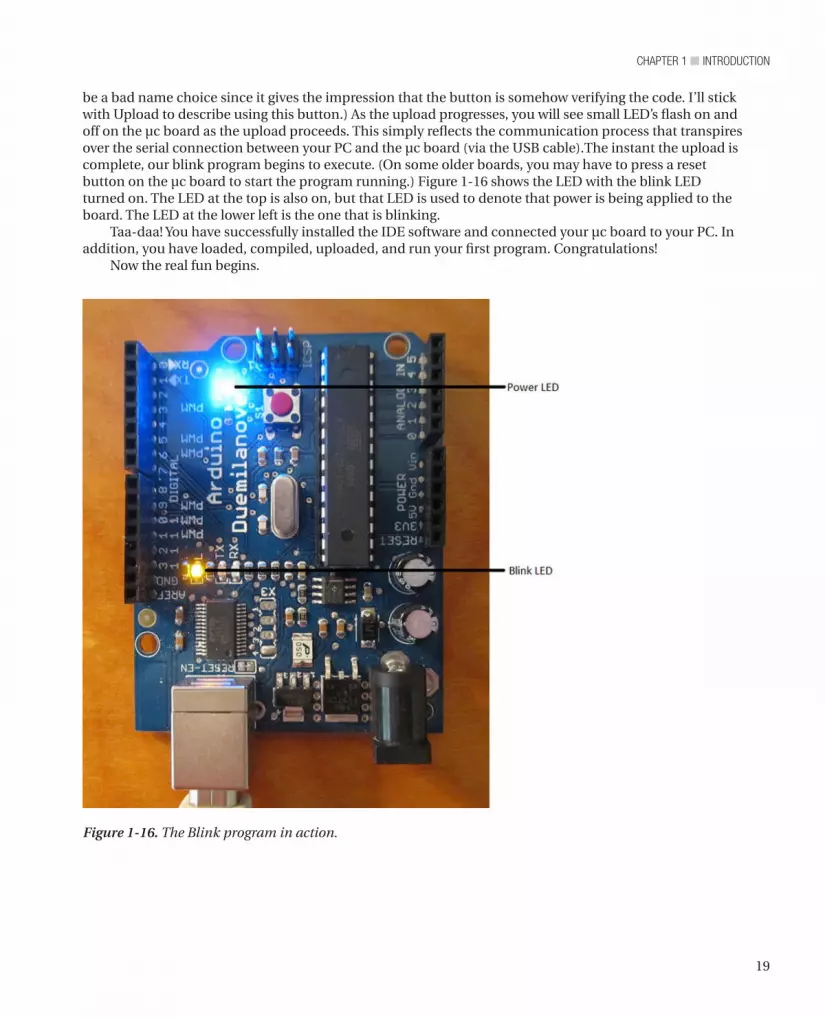
19
chapter 1 ■ IntroductIon
Figure 1-16. The Blink program in action.
be a bad name choice since it gives the impression that the button is somehow verifying the code. I’ll stick with Upload to describe using this button.) As the upload progresses, you will see small LED’s flash on and off on the µc board as the upload proceeds. This simply reflects the communication process that transpires over the serial connection between your PC and the µc board (via the USB cable).The instant the upload is complete, our blink program begins to execute. (On some older boards, you may have to press a reset button on the µc board to start the program running.) Figure 1-16 shows the LED with the blink LED turned on. The LED at the top is also on, but that LED is used to denote that power is being applied to the board. The LED at the lower left is the one that is blinking.
Taa-daa! You have successfully installed the IDE software and connected your µc board to your PC. In addition, you have loaded, compiled, uploaded, and run your first program. Congratulations!
Now the real fun begins.

chapter 1 ■ IntroductIon
20
SummaryIn this chapter you learned about the Arduino development environment and some of the board choices you can use that support the Atmel chip family. Some of the hardware details about the boards were discussed to help you decide which board to use while you learn about programming the board using Arduino C. You then downloaded the Arduino development environment and installed the IDE. As a check on the IDE installation, you loaded the sample Blink program from the examples supplied with the IDE, compiled, and downloaded it to the board to verify that everything was installed correctly. You are now ready to start learning Arduino C.
21
■ ■ ■
chapter 2
Arduino C
The C programming language began its march to become formally defined by the American National Standard Institute (ANSI) with the formation of the X3J11 committee in 1983. The committee’s work was completed and the standard passed in 1989. Since then, the language is often referred to an “ANSI C”. The standard is also recognized by the International Organization for Standardization (ISO), too, so sometimes you will hear it referred to as “ISO C”. For all practical purposes, ANSI C and ISO C are the same. In a world that is overly hung up on political correctness, you will also hear both versions called “standard C.”
The C you are about to learn is not standard C. Rather, you will be learning a robust subset of standard C. A few standard C features are missing. But the absence of those features is not a crippling blow by any means. You will soon discover that the subset version of standard C, which we will call Arduino C, is more than able to perform just about any task you can throw at it. The missing features can easily be worked around, albeit sometimes in a less elegant manner.
So, with that caveat in mind, let’s start learning Arduino C.
The Building Blocks of All Programming LanguagesAll programming languages, from Ada to ZPL, are built from four basic elements:
1. Expressions
2. Statements
3. Statement blocks
4. Function blocks
The last element, function blocks, may be called different names in different languages, such as “methods” in C++, C#, and Java; “procedures” in Pascal; “subroutines” in Basic or Fortran; or perhaps some more exotic name in lesser-known languages. Regardless of their name, function blocks tend to be blocks of code designed to address some narrowly-defined task. Programs are little more than arrangements of these elements in a way that solves a problem.
ExpressionsAn expression is created by combining operands and operators. Simply stated, an operand is typically a piece of data that is acted on by an operator. An operator is often a mathematical or logical action that is performed on one or more operands. For example:

chapter 2 ■ arduino c
22
a + b m – 3000 g < d
are examples of expressions. In the first example, the operands a and b are added (the + operator) together in a math operation. In the second example, the numeric constant 3000 (an operand) is subtracted (the – operator) from the operand named m. In the last example, operand g is compared to operand d to determine whether g is less than (the < operator) d. In this last example, a relational operator (i.e., the “less than” operator, or <) is used instead of a math operator. In all three examples, the two operands are used in conjunction with a single operator to form an expression. The first example is an addition expression, the second is a subtraction expression, and the last example is a relational expression.
In each of these expressions, there are two operands and one operator. That’s why you will often hear such expressions referred to as expressions that use a binary operator. Binary operators (e.g., +, –, and <) always use two operands. Another important thing to keep in mind is that any expression will ultimately resolve to a value. (There are also unary operators that have only one operand and ternary operators that require three operands.) However, the binary operators are the most common in C.
Expressions can be combined. For example, suppose A = 1, B = 2, and C = 3. You can write a complex expression as:
A + B + C
Because all expressions resolve to a value, you can resolve the first expression A + B,which you can simplify to:
1 + 2 + C
Because the first expression is now pure numbers, you can resolve the first expression to the value 3. You can then resolve the complex expression to:
3 + C
Note what happened here. You took a complex expression with two operators and three operands and resolved one of the expressions (i.e., A + B) to 3. However, in the process, you reduced the complex expression to a single expression, 3 + C. Now you can resolve the remaining expression to:
3 + C 3 + 3 6
and the complex expression with two subexpressions is now resolved to a single value, 6. Often you will hear this process of simplifying a complex expression called factoring an expression or resolving an expression.
What about the relational expression g < d? Suppose g = 5 and d = 4, then:
g < d 5 < 4 false
The expression resolves to false because 5 is greater than 4, not less than 4.You might be thinking: “Wait a second! You just said that all expressions resolve to a value. “False” isn’t
a value, it’s a word.” True, but in programming languages, logic true and logic false expressions do resolve to a value. In most languages, logic true resolves to a non-zero value (e.g., –1), and logic false is zero. Relational expressions are designed to resolve to a logic true or false state, so they ultimately do resolve to a value that can be used in a program.

23
chapter 2 ■ arduino c
StatementsA statement is a complete C instruction for the computer. All C statements end with a semicolon (;). The following are examples of C statements:
i = 50; a = b + c; m = d / 2;.
In the first example, the equal sign (=) is called the assignment operator and is used to “assign” the value on the right side of the equal sign to the operand on the left side of the assignment operator. Therefore, in the first statement, the value 50 is assigned to variable i. Note how this first statement example is nothing more than an expression using the assignment operator with a semicolon at the end of the line. The operands are 50 and variable i.
So, what is a variable? Simply stated, as variable is nothing more than a location in memory that has been assigned a name. You will read much more about variables in Chapter 3.
In the second statement, you have a complex expression with a semicolon at the end. In this example, the value to assign into variable a is not yet known, so you must resolve the expression b + c first to get a value. If b = 4 and c = 5, then we can resolve the complex expression to
a = b + c a = 4 + 5 a = 9
The last expression assigns the value 9 into variable a. By adding a semicolon at the end of the line, the expression becomes a statement that causes variable a to change its value to 9. Remember in Chapter 1 we told you the C compiler is responsible for changing the English-like syntax of C into the 1s and 0s the mc understands? Well, it is the semicolon that makes the C compiler finish whatever task the statement wants to be done. If you have a complex statement like:
x = a + b – c + g + h + k;
then the compiler must resolve all of the intermediate expressions (i.e., a + b, c + g, h + k) before it can determine what new value to assign into x. It is the semicolon at the end of the statement that tells the compiler it has all the intermediate information it needs to resolve the statement.
n Note The first kind of programming mistake you will likely make is forgetting to place a semicolon at the end of a statement. Because the semicolon is a statement terminator, each statement must end with a semicolon. Without the semicolon, the compiler would not know when it has the information necessary to process the statement.
Operator PrecedenceSuppose you have the following statement comprised of several expressions:
j = 5 + k * 2;
where k = 3 and the asterisk (*) is the multiplication operator. Does j equal 16 (i.e., 8 x 2 = 16) or does it equal 11 (i.e., 5 + 6 = 11)? The statement appears ambiguous because we aren’t sure about the order in which the complex expression is resolved. Which is it:
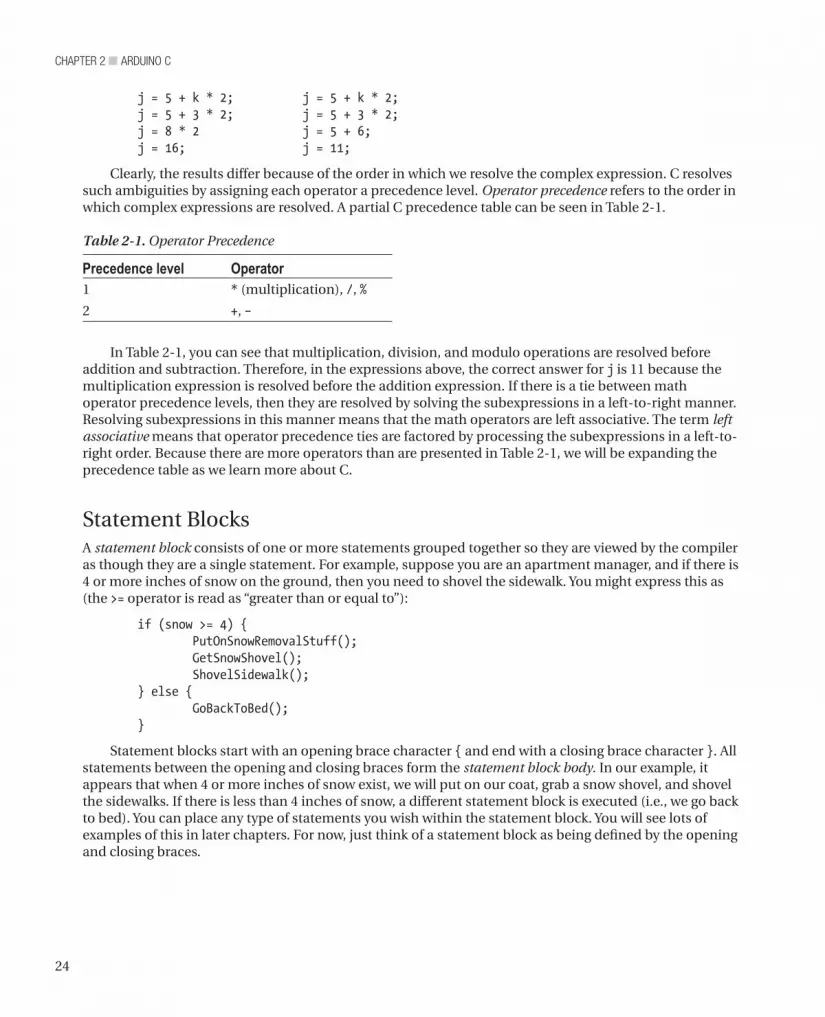
chapter 2 ■ arduino c
24
j = 5 + k * 2; j = 5 + k * 2;j = 5 + 3 * 2; j = 5 + 3 * 2;j = 8 * 2 j = 5 + 6;j = 16; j = 11;
Clearly, the results differ because of the order in which we resolve the complex expression. C resolves such ambiguities by assigning each operator a precedence level. Operator precedence refers to the order in which complex expressions are resolved. A partial C precedence table can be seen in Table 2-1.
Table 2-1. Operator Precedence
Precedence level Operator1 * (multiplication), /, %
2 +, –
In Table 2-1, you can see that multiplication, division, and modulo operations are resolved before addition and subtraction. Therefore, in the expressions above, the correct answer for j is 11 because the multiplication expression is resolved before the addition expression. If there is a tie between math operator precedence levels, then they are resolved by solving the subexpressions in a left-to-right manner. Resolving subexpressions in this manner means that the math operators are left associative. The term left associative means that operator precedence ties are factored by processing the subexpressions in a left-to-right order. Because there are more operators than are presented in Table 2-1, we will be expanding the precedence table as we learn more about C.
Statement BlocksA statement block consists of one or more statements grouped together so they are viewed by the compiler as though they are a single statement. For example, suppose you are an apartment manager, and if there is 4 or more inches of snow on the ground, then you need to shovel the sidewalk. You might express this as (the >= operator is read as “greater than or equal to”):
if (snow >= 4) {PutOnSnowRemovalStuff();GetSnowShovel();ShovelSidewalk();
} else { GoBackToBed();}
Statement blocks start with an opening brace character { and end with a closing brace character }. All statements between the opening and closing braces form the statement block body. In our example, it appears that when 4 or more inches of snow exist, we will put on our coat, grab a snow shovel, and shovel the sidewalks. If there is less than 4 inches of snow, a different statement block is executed (i.e., we go back to bed). You can place any type of statements you wish within the statement block. You will see lots of examples of this in later chapters. For now, just think of a statement block as being defined by the opening and closing braces.

25
chapter 2 ■ arduino c
Function BlocksA function block is a block of code that is designed to accomplish a single task. Although you may not be aware of it, you actually used a function block in the previous section. That is, PutOnSnowRemovalStuff() is a function that is designed to have you put on your coat. The actual code might look like:
void PutOnSnowRemovalStuff(void) { if (NotDressed) { PutOnClothes(); PutOnShoes(); } GoToCloset(); PutOnBoots(); PutOnCoat(); PutOnGloves(); PutOnHat();}
In this example, the function block also starts with an opening brace { and ends with a closing braces }. However, function blocks are usually written to create “black boxes” in which the details of how we are doing something are buried in the function. You might be thinking of writing the code to control a robot that will require sensors to sense whatever lies ahead. You might write a TurnRight() function that turns your robot 90 degrees to the right. This probably involves turning one of the wheels, perhaps applying a greater voltage to a stepper motor to cause the front two wheels to turn to the right. However, perhaps at a later time you decide to change your robot from four wheels to three wheels. Now you don’t need to turn two wheels; only one needs to turn. By hiding the details of what has to be done to turn your robot to the right in the TurnRight() black box, you only need to change the program code in that one place, rather than in a whole bunch of places where a right turn might be needed. By writing a TurnRight()function, you can avoid duplicating all of the statements that are in the TurnRight() function each time a right turn is called for in the program.
Another example might help. Suppose you are writing an application that inputs a phone number from a keypad. Your application requires home, cell, and work phone numbers. To make sure a valid phone number was entered, you need to check that it fits the 1-123-456-7890 format. Now you could duplicate the format checking program code three times in the program, or you could write a CheckPhoneFormat() function and simply call it three times. Let’s see...write, test, and debug the code three times, or write a function and test and debug it once. Kinda seems like a no-brainer to me. Also, using functions means that you will be using less memory resources by not duplicating the code.
If you think of a computer program as a sequence of smaller tasks, function blocks are used to delimit the code for each of those smaller tasks. As you will soon find out, the Arduino programming environment has hundreds, if not thousands, of prewritten function blocks that you can use in your own programs. This means you don’t have to reinvent the wheel each time a common programming task steps in front of you. You just grab one of the existing function blocks from the library of prewritten function blocks and stick it into your program. Life is good and often easier because you can stand on the shoulders of programmers who have previously contributed to a C programming library that you can use!
Every program you can think of is built from the four basic parts discussed in this section. Indeed, the rest of this book is nothing more than showing you how to use these simple parts in an effective way to solve a particular programming problem. Ah...but therein lies the problem. There are an infinite number of ways to combine these elements into a computer program, and some will work and others won’t. In fact, even if you get your program to work does not mean there is not a different (better?) way to accomplish the same task. For example, suppose you want to sort a group of numbers into a list, going from the smallest to the largest number in the group. There are dozens of ways to sort a list of numbers into ascending order, each with its own advantages and disadvantages. In fact, you will find that your range of choices increases

chapter 2 ■ arduino c
26
as you learn more about programming in general. Even something as simple as scanning a sequence of text looking for a particular pattern can be done many different ways (e.g., Brute Force vs. Boyer-Moore algorithms). The more programming knowledge and experience you gain, the more you will be able to craft an elegant solution to a programming problem. After all, if the only tool you have is a hammer, it shouldn’t be too surprising that all your problems look like a nail.
Further, as the complexity of a given task increases, so do the ways in which you can solve the problem. If someone came to you and asked you to write a fire alarm system for a hotel, there are probably a bazillion different ways to accomplish that task. Now the question is: Where do you start? That’s the topic of the next section.
The Five Program StepsEvery program you can think of can be reduced to five basic program elements, or steps. When you first start to design a program, you should think of that program in terms of the following Five Program Steps.
1. Initialization StepThe purpose of the Initialization Step is to establish the environment in which the program will run. For example, if you have ever used Excel, Word, or similar programs, the File command frequently has a list of the most recently used files. Internet browsers allow you to define a home page. A print program often has a default printer. A database program often establishes a default network connection. In all of these cases, data are fetched from somewhere (i.e., a data file, memory, EEPROM, the registry) and are used to establish some baseline environment in which the program is to run.
Simply stated, the Initialization Step does whatever background preparation must be done before the program can begin execution to solve its primary task.
2. Input StepAlmost every computer program has a task that is designed to take some existing state of information, process it in some way, and show the new state of that information. If you are writing a fire alarm system, then you take the information provided by the fire sensors, interpret their current state and, if there is a fire, do something about it. If the sensor shows no fire, then perhaps a second set of sensors is read and the process is repeated. Indeed, your program may do nothing for decades but take new readings every few seconds and determine whether some remedial action is necessary. Alas, the day may come when a fire is sensed and remedial actions are taken. Still, the entire process depends on inputting fresh data from the sensors in a timely fashion.
The Input Step is the sequence of program statements that are necessary to acquire the information needed to solve the task at hand.
3. Process StepContinuing with our fire alarm program, once the input from the sensors is received, some body of code must be responsible for determining whether the sensors are detecting a fire. In other words, the voltage (i.e., temperature) must be read (input) and then interpreted (i.e., the data processed) to determine the current state of the sensors. In a desktop application, perhaps the data input is the price and quantity of some item purchased by a customer. The Process Step may perform the task of determining the total cost to the consumer.

27
chapter 2 ■ arduino c
Note that a program may have multiple Process Steps. For example, with our consumer, there may be a process to determine the sales tax due on the purchase. In this case, the process of determining the total cost of the order becomes an input to the process that calculates the sales tax due. The sales and tax due could be the inputs to yet another process (e.g., consumer billing, updating a database).
In all cases, however, the Process Step is responsible for taking a set of inputs and processing it to get a new set of data.
4. Output StepAfter the Process Step has finished its work, the new value is typically output on some display device. In our consumer sales example, we might now display the total amount the consumer owes us. The Output Step, however, isn’t limited to simply displaying the new data. Quite often, the new data are saved or passed along to some other program. For example, a program may accumulate the sales figures throughout the day and then update a database at night so some other program can generate a sales report for management to review the next morning. In our fire alarm example, the Output Step may cause an LED for a particular sensor to continue to display a green color under normal conditions. If a fire is sensed, perhaps the LED displays red, so whomever is in charge can see what area of the building is on fire.
The Output Step is responsible for using the results of the Process Step. This utilization could be as simple as displaying the new data on a display device or passing that new value on to some other program.
5. Termination StepThe Termination Step has the responsibility of “cleaning up” after the program is finished performing its task. In desktop applications, it is common for the Termination Step to perform the Initialization Step “in reverse.” That is, if the program keeps track of the most recent data files that were used, then the Termination Step must update that list of files. If the Initialization Step opens a database or printer connection, then the Termination Step should close that connection down so unused resources are available to the system.
Many mc applications, however, are not designed to terminate. A fire alarm system is likely designed to continue running forever, as long as things are “normal.” Even then, however, there may still be a Termination Process that is followed. For example, if the fire alarm system has a component failure, then the Termination Process may try to identify the failed component before the system shuts down for repairs. Perhaps the Termination Process deactivates the alarm system before a maintenance shutdown.
Simply stated, the Termination Process should allow for a graceful termination of the currently running program.
The Purpose of the Five Program StepsI can’t even begin to guess how many times I have given an in-class coding problem only to have the students say: “I don’t even know where to start.” Well, clearly they weren’t paying attention, because that is the purpose of the Five Program Steps—to serve as a starting point for designing a program. There is a tremendous urge to just start banging out source code the minute the programming task is defined.
Big mistake. Even a one- or two-sentence statement for each of the steps is probably enough to get you started on
the design and coding of a given program. An algorithm is nothing more than a formal statement of how a given set of inputs are manipulated to produce a desired result. An algorithm is like a recipe or a set of blueprints: They describe what you need to do to reach a desired goal or endpoint. And so it is with programming: The Five Program Steps can be used to formulate a plan for solving a give programming

chapter 2 ■ arduino c
28
problem. Although algorithms are more closely tied to Steps 2 and 3 (i.e., Input and Processing), the Five Program Steps should help you formulate an algorithm to solve whatever task is at hand.
Fight the urge to “look busy” by just hacking away at the keyboard without a program design based on the Five Program Steps. Creating a program design may seem like too much work, but trust me, you will save a ton of time in the long run. (Where did the phrase “a ton of time” come from? Is time a resting place for Higgs-boson particles? Alas, I digress...)
A Revisit to the Blink ProgramListing 2-1 shows the program code that you loaded and ran to blink an LED in the last chapter. Let’s look at this program in terms of our Five Program Steps. First of all, Listing 2-1 is the source code for the blink program. Source code refers to the series of C language statements that constitute the program. It is the source code that the C compiler parses (i.e., reads and checks for syntax and semantic errors) and ultimately translates into binary code (i.e., the 1s and 0s ) that the mc understands. Almost all of the source code is built up from C language statements, but not all.
n Note The programs you write using the Arduino C and its IDE are also called “sketches” in the Arduino literature. However, I will use the term “program” rather than sketches.
Listing 2-1. The Blink Source Code
/* Blink Turns on an LED on for 1 second, then off for 1 second, repeatedly. This example code is in the public domain. */ // Pin 13 has an LED connected on most Arduino boards.// give it a name:int led = 13;
// the setup routine runs once when you press reset:void setup() { // initialize the digital pin as an output. pinMode(led, OUTPUT); }
// the loop routine runs over and over again forever:void loop() { digitalWrite(led, HIGH); // turn the LED on (HIGH is the voltage level) delay(1000); // wait for a second digitalWrite(led, LOW); // turn the LED off by making the voltage LOW delay(1000); // wait for a second}

29
chapter 2 ■ arduino c
Program CommentsThe first couple of lines in the program are:
/* Blink Turns on an LED on for 1 second, then off for 1 second, repeatedly. This example code is in the public domain. */ // Pin 13 has an LED connected on most Arduino boards.// give it a name:
If you look closely at the two lines immediately above, you will see that none of the lines ends with a semicolon. That is, none of the lines forms a C program statement because all program C statements must end with a semicolon. If that is the case, what are they and why are they part of the source code?
The lines above are called comment lines. Comment lines are used to document what is going on in a program for whomever may be reading the code. There are two basic types of comments: (1) single-line and (2) multiline comments.
Single-Line CommentsSingle-line comments begin with a pair of slash (//) characters. There can be no spaces between the two slashes. (Otherwise the compiler might think it was looking at the division operator.) Upon seeing the two slash characters, the compiler knows that what follows from the two slashes to the end of the current line is a program comment and does not need to be compiled. As such, comments that begin with // must appear on the same line as the two slash characters. If you fold a comment to the next line without the leading slashes, then it will be seen as a syntax error by the compiler.
Again, an example of this type of comment is:
// Pin 13 has an LED connected on most Arduino boards.// give it a name:
Multiline CommentsMultiline comments begin with a slash-asterisk pair (/*) and end with an asterisk-slash pair (*/). There are no spaces between the two characters pairs. Everything in between these two character pairs is treated as a comment and is ignored by the compiler. Unlike single line comments, multiline comments can span multiple lines. You can see an example of a multiline comment at the top of Listing 2-1.
Note that you could write the multi-line comment at the top of Listing 2-1 as:
// Blink // Turns on an LED on for 1 second, then off for 1 second, repeatedly. // This example code is in the public domain.
and the program would behave exactly the same. However, multiline comments are useful for long comments that span multiple lines because they take fewer keystrokes to implement. The compiler could care less which you use. The important thing to remember is that comments invoke no penalty in terms of memory space or the performance of the program, so there is no reason not to use them as needed.

chapter 2 ■ arduino c
30
Well, what does “as needed” mean? Fair question. Comments should be used any time you wish to document what a program is doing or about to do. Reading code isn’t always easy and it might be hard for the reader to figure out what’s going on in a particular section of code. In such cases, a comment may make it easier for someone to decipher what the code is supposed to do. For example, if you have a black box function that implements some really scary mathematical equation, then you might add a comment to explain what is going on. If the function is really complex, then it is not uncommon to put a multiline reference comment into the code that has a book and page number (or perhaps an Internet URL address) where the reader can go for further information.
At first blush, it may seem that comments are directed to someone other than the person who actually wrote the code. Frequently, that is true, especially if you write code in a commercial environment with other programmers who may have to work with your code. However, even if you are the only person who will ever see the code, you would be amazed how a piece of code that was so easy to understand this morning may as well be written in Sanskrit six months from now. Comments should be used to help the person reading the code—whomever that may be.
So, the question still remains: When do you add comments to a program? Too few comments often makes the code difficult to understand. There are simply not enough comments to be helpful to your understanding of the code. However, too many comments can have the same effect because they “get in the way” of understanding the code. Comments are clutter if they don’t contribute any real benefit to understanding the code.
There are no hard-and-fast rules for commenting the program source code. My preference is to put a multiline comment before most function blocks or any line (or lines) of code that does something unusual or “tricky.” For example,
x = y / 2.0; x = y * .5; // Divide the number in half
Either statement produces the same result for floating point numbers. However, the second form is slightly faster because division is the slowest math operation you can use. The comment simply jogs the reader’s mind as to what is being done. (Normally you would not do this anyway. It would only be noticeable if the calculation was being done thousands of times in a big program loop.)
Data DefinitionThe next line in the program is:
int led = 13;
I am going to defer the full explanation of this statement until the next chapter. However, we can say that the statement defines an integer data type variable with the name led. The assignment operator also tells us that the program initializes the value of led to 13. This means that our program now has an integer variable named led with the numeric value 13. The (extremely) important details about this seemingly simple statement are covered in Chapter 3.
The silk screen letters and numbers on the board make it easy to locate pin number 13 on the mc board, as you can see in Figure 2-1. The newer mc boards have an onboard LED that blinks when the Blink program is run. You can see the location in Figure 2-1 for the board I am using. However, you can also wire an external LED to pin 13, and the same Blink program will pulse the external LED as well. (Some boards may not have an onboard LED.)

31
chapter 2 ■ arduino c
A prototype breadboard to pulse an external LED is shown in Figure 2-2. In Figure 2.2, the light-colored wire from I/O pin 13 runs to the breadboard, where it is tied to the anode of the LED. The cathode is tied to a 470 ohm resistor so the voltage does not exceed the LED voltage rating. The resistor is then tied to the ground (GND) connection on the Arduino board using a dark-colored wire. With this setup, both the onboard and external LED will pulse when the Blink program is run.
Figure 2-1. Locating pin 13 on a typical Arduino board.

chapter 2 ■ arduino c
32
We won’t say anything more about the circuitry at this point. I just wanted you to see that the Blink program can pulse an external LED via its I/O pin as well as the onboard LED.
The setup() Function The next several lines of code are reproduced here:
// the setup routine runs once when you press reset:void setup() { // initialize the digital pin as an output. pinMode(led, OUTPUT); }
The code presents a short comment telling the reader that the setup() function is called once when you reset the program. This is a characteristic of all Arduino C programs. Every program you write will have a setup() function in it. Indeed, setup() marks the starting point for all Arduino C programs. Where Standard C always starts program execution with a function named main(), it is setup() that marks the program’s starting point in Arduino C.
Because setup() is the starting point for all Arduino C programs, it also becomes the Initialization Step in our Five Program Steps. The purpose of the setup() function is to establish the environment in which your program will run. In this case, the Initialization Step does nothing more than define pin 13 (the value of which is stored in led) of the digital I/O pins on the mc board to the output mode. It establishes this mode by calling a prewritten function named pinMode() and passing the information that the function needs to perform its job as arguments to the function. That is, pinMode() evidently needs to know two
Figure 2-2. Using an external LED for the Blink program.
33
chapter 2 ■ arduino c
things that exist outside its “black box” world to perform its task: (1) which pin does the programmer wish to set, and( 2) does the programmer want it to function as an input or output pin? The first argument to pinMode() is the pin to be set. In this program, the programmer wants to set the led pin (i.e., pin 13). The second argument of pinMode() states the mode for the pin. In this program, the programmer wants the pin to work as an output pin. That is, we want to use the output from the pin to control other things rather than input values from the outside world via the pin.
n Note You will often read the phrase “calling a function” as well as “returning from the function” or even “return to the caller.” These are common idioms used by programmers and have a specific interpretation. Think of a function as a black box with front and back doors. Think of yourself as the person who marches through the program, causing each program statement to execute. The term “calling a function” means that anytime a “function is called,” you put on a backpack, stuff it with any information this function may want, and then set off to “call on the function.” The door to the black box opens and you walk in and start executing whatever instructions are contained in the black box. If the black box needs information from the outside world, it takes that information from your backpack before it begins its task. The black box then does its thing and, upon completing its task, it may (or may not) put some new information in your backpack. It then ushers you to the back door and sends you back to the point immediately following the program point that caused you to visit the black box in the first place. This process of going back to that precise program point is called “returning to the caller” or “returning from the function.” Therefore, calling a function is nothing more than a journey to some set of prewritten program statements that are designed to accomplish a specific task. Once that task is complete, program control returns to the statement immediately following the function call.
So what is the second argument named OUTPUT all about, and where is it defined in the program? OUTPUT is a symbolic constant and can be thought of as a variable name that is embedded within the compiler. A symbolic constant is a name that is tied to a specific data value. There is a programming convention where symbolic constants are written in uppercase letters. Because C is case sensitive, you could define a variable named output, and the compiler knows that it is a different variable that its own symbolic constant named OUTPUT.
Why use symbolic constants? Simply stated, it makes the program code easier to read. Which would you rather read in a program:
pinMode(led, OUTPUT);
or
pinMode(led, 1);?
There are other reasons for using symbolic constants, and we will explain those in later chapters. For now, however, simply think of symbolic constants as a series of uppercase letters that are tied to some predefined value.
It is important for you to remember that the setup() function is only called once when the program first begins execution. This is why we can refer to setup() as the Initialization Step in our program. If you wish to call setup() a second time, then you would have to press the reset button on the mc board. The reset button halts the current execution of the program and restarts it by calling setup(). The setup() function is automatically called (on most newer Arduino boards) each time you upload a new version of the program code from your PC to the mc board.

chapter 2 ■ arduino c
34
The loop() Function After the setup() function completes its work, every Arduino C program automatically calls the loop()function. Stated differently, when the Initialization Step (Step 1) is completed via the function call to setup(), we are ready for Step 2, the Input Step. The code for the loop() function is reproduced below:
// the loop routine runs over and over again forever:void loop() { digitalWrite(led, HIGH); // turn the LED on (HIGH is the voltage level) delay(1000); // wait for a second digitalWrite(led, LOW); // turn the LED off by making the voltage LOW delay(1000); // wait for a second}
Inside the loop() function, the program calls a prewritten function named digitalWrite(led, HIGH), passing in two arguments to the digitalWrite() function: (1) the I/O pin number to write to (i.e., as stored in variable led) and (2) the state we wish to place the I/O pin into (HIGH in this case). Once again, HIGH is a symbolic constant held within the compiler and is interpreted to mean we want to turn the pin on, which supplies a voltage to the led I/O pin. This voltage then turns on the LED.
Note the purposes the digitalWrite() function serves. First, it tells the function: (1) which I/O pin to change and (2) what state to place the I/O pin in. Once the function receives these two pieces of information (via your backpack!), it places the LED in the desired state. In this case, the function turns the LED on. In other words, passing in the two pieces of information to digitalWrite() serves as the Input Step (Step 2) of our Five Program Steps. digitalWrite() also serves as part of the Processing Step (Step 3) because it takes the input data from the Input Step and changes the state of the LED according to the inputs it just received. Given these inputs, the LED is turned on at this point. That is, the LED “displays” light.
The delay(1000) function call causes the program’s execution to pause for 1000 milliseconds (or 1 second). Because the LED is turned on, this has the effect of letting us observe the LED with illumination. If the call to delay() function was left out of the program, then the LED would be turned on for such a short period of time that our eye would not even be able to tell it was ever on. In an operational sense, therefore, the delay() function call serves as an extension of the Display Step (Step 4) of our Five Program Steps by letting us observe the current state of the LED.
As you probably guessed, the next call to digitalWrite(led, LOW) and its subsequent call to the delay(1000) function turns the LED off for 1 second. This is still part of the Process and Display steps. Turning the LED off is just as much a display process as turning it on.
Once the delay(1000) function is finished, the closing brace of the loop() function is read. However, because loop() establishes what is called a program loop, program execution returns back to the first statement in loop() and performs a second pass through the loop starting with digitalWrite(led, HIGH)again. This turns the LED back on. This sequence repeats until power is removed from the circuit, which means the LED simply sits there and blinks until the power is removed from the mc board or a component fails.
Because the program is designed to loop forever, there really is no Termination Step (Step 5). Most microcontroller programs are written to chug along until they are stopped by some outside force (e.g., losing power). There are exceptions to this generalization, but they are relatively rare.

35
chapter 2 ■ arduino c
SummaryIn this chapter you learned how to build program statements from operands and operators. You then saw how that statements can be enlarged to statement a function blocks, ultimately leading to a complete program. You also learned the Five Program Steps and how they can be used to help design a program. Finally, we applied these concepts to a dissection of the Blink program from Chapter 1. With these preliminaries behind us, we can move on to learn about the various types of data you can use in your programs.

chapter 2 ■ arduino c
36
Exercises1. Name the building blocks of a programming language.
2. What is a binary operator?
3. Why is an understanding of operator precedence important in an expression?
4. Which of the Five Program Steps is least likely to appear in your programs and why?
5. What is the purpose of the /* and */ character pairs?

37
■ ■ ■
chapter 3
Arduino C Data Types
Arduino C supports most of ANSI C’s data types with a few notable exceptions. Also, there’s a little hanky-panky going on with floating point numbers, but it shouldn’t be a problem as long as you are aware of what’s going on “under the hood.”
As mentioned in Chapter 2, a variable is little more than a chunk of memory that has been given a name. When you define a variable, you must also tell the compiler what type of data is to be associated with that variable. The data type of the variable is important because it determines how many bytes of memory are dedicated to that variable, and what kind of data can be stored in the variable. As you will learn later in this chapter, there are two basic types of data: value types and reference types. If the variable is defined as a value type, then there is a very specific range of values possible, too.A list of the basic value data types is presented in Table 3-1.
Table 3-1. Arduino C Value Data Types
Type Byte length Range of valuesboolean 1 Limited to logic true and false
char 1 Range: –128 to +127
unsigned char 1 Range: 0 to 255
byte 1 Range: 0 to 255
int 2 Range: –32,768 to 32,767
unsigned int 2 Range: 0 to 65,535
word 2 Range: 0 to 65,535
long 4 Range: –2,147,483,648 to 2,147,483,647
unsigned long 4 Range: 0 to 4,294,967,295
float 4 Range: –3.4028235E+38 to 3.4028235E+38
double 4 Range: –3.4028235E+38 to 3.4028235E+38
string ? A null ('\0') terminated reference type data build from a character array
String ? An reference data type object
array ? A sequence of a value type that is referenced by a single variable name

chapter 3 ■ arduino c data types
38
Type Byte length Range of valuesvoid 0 A descriptor used with functions as a return type when
the function does not return a value.
Keywords in CEach of the types shown in Table 3-1 (i.e., boolean, char, int, etc.) are keywords in C. A keyword is any word that has special meaning to the C compiler. Because keywords are reserved for the compiler’s use, you cannot use them for your own variable or function names. If you do, the compiler will flag it as an error. If the compiler didn’t flag such errors, then the compiler would be confused as to which use of the keywords to use in any given situation.
Variable Names in CIf you can’t use keywords for variable or function names, then what can you use? There are three general rules for naming variables or functions in C: Valid variable names may contain:
1. Characters a through z and A through Z
2. The underscore character (_)
3. Digit characters 0 through 9, provided they are not used as the first character in the name.
Just about everything else is not acceptable, including C keywords. That also means that punctuation, and other special non-printing characters are not allowed either. Valid variable names might include:
jane Jane ohm ampere voltmoney day1 Week50 _system XfXf
Using the same rules, the following would not be valid names:
^carat 4July -negative @URL%percent not-Good This&That what?
Given these limits, how does one create a “good” variable name? As a general rule, I like variable names that are long enough to give me a clue as to what they do in a program but short enough that I don’t get tired of typing their name. Another convention a lot of programmers used is a variant of what’s called camel notation. Using this notation, variable names begin with a lowercase letter with each subword capitalized. Examples using this style might be:
myFriend togglePrinter reloadEmptyPaperTray closeDriveDoor
I think this style makes it easy to read the variable names. C could care less which style you use. However, keep in mind that it is unlikely that you will write perfect (error-free) code every time you write a program. Using variable names that make sense and are easy to read makes debugging just that much easier. (Keep in mind that C is case sensitive, which means that myData and MyData are two different variables.)
With that in mind, let’s examine the common data types available for use in your C programs.

39
chapter 3 ■ arduino c data types
The boolean Data TypeThe boolean data type is limited to two values or states: true or false. These two values are constants that are defined within the compiler and are the only two values a boolean variable can assume. Therefore, the following is a valid definition for a boolean variable:
boolean mySwitch = false;
which is probably going to be used to store the state of a switch (e.g., it is true that the switch is on). However, you may also see code like the following fragment:
boolean switchState;// some more program statementsswitchState = ReadSwitchState(whichSwitch);if (switchState) { TurnSwitchOff(whichSwitch);} else { TurnSwitchOn(whichSwitch);}
Although we don’t cover the if statement until the next chapter, you can probably figure out what is going on here. The ReadSwitchState() function returns a boolean value that is true if the switch is on or false if the switch is off and acts accordingly. You should use the boolean data type only when the variable reflects a logic state of either true or false. You really don’t need to know the actual values the compiler assigns to the two states, although you can think of false as being zero (i.e., switchState = 0), and true as being non-zero (i.e., switchState != 0).
The char Data TypeThe char data type is used to store a single character as an 8-bit quantity. This includes both the signed and unsigned char data type. In all Arduino C data types, if the sign bit (the highest bit in the data type) is 1, then the interpretation is that the value is negative. In unsigned data types, there is no sign bit. As a result, unsigned numbers have a maximum value that is about twice as large as a signed number. The following section explains the binary numbering system is greater detail.
Binary DataBecause digital computers only understand two states, on (1) and off (0), they use a binary (base 2) numbering system. Alas, you and I grew up with the base 10 numbering system so base 2 seems a bit strange at first. However, it is not hard to understand a base 2 number.
Consider Table 3-2. You can think of a bit as a small piece of data that can assume only two values: 1 (on) or 2) off (0), which is consistent with the binary nature of digital computers. Most Central Processing Unit (CPU) group bits together into a single entity called a byte. Each byte is comprised of 8 bits. Most programming languages start counting things with the number 0 rather than 1. Therefore, the bits in a byte begin with bit 0 and end with bit 7. Because the “high” bit for an 8-bit byte is bit 7, that is used as the “sign bit.” If bit 7 is turned on for a char data type, for example, then the number will be interpreted as a negative value. If you add up all the values “to the right” of bit 7 (i.e., 64 through 1), then you will find that they total to 127. If you look at the range for a char data type in Table 3-1, then you will see the highest value is 127. If bit 7 is turned on for a char, then the interpretation is that this is a negative number, so the value becomes -128. This should help you understand how the ranges are set for the different data types. For an unsigned
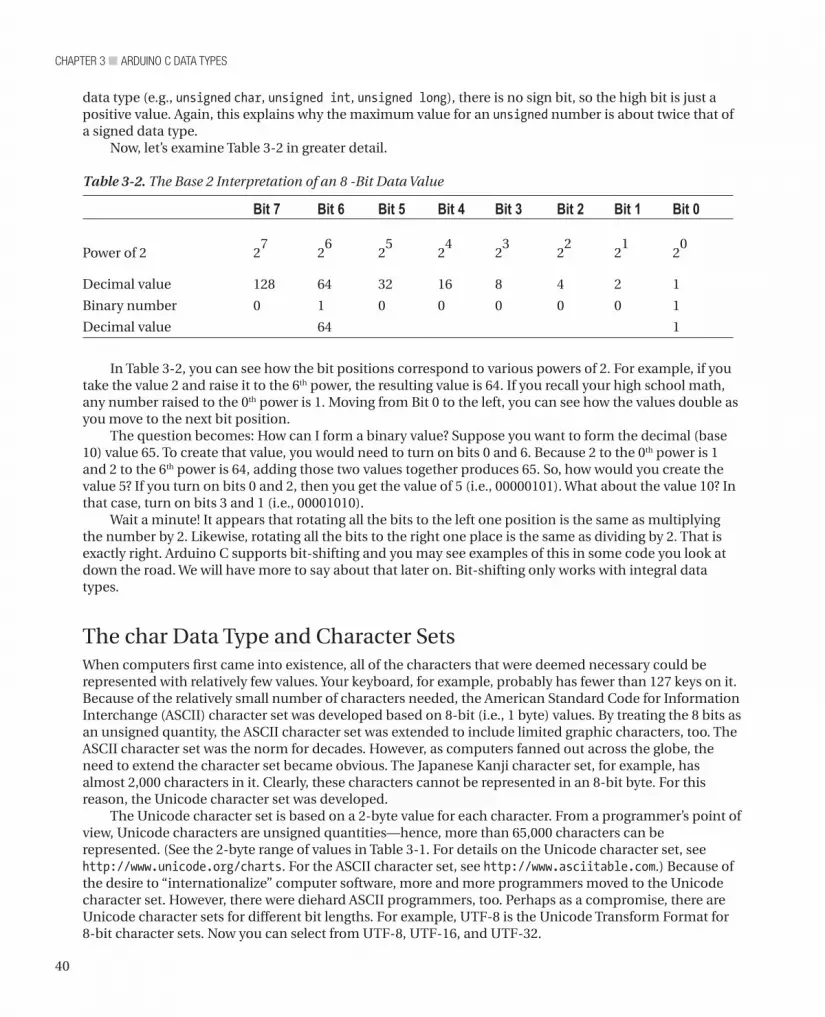
chapter 3 ■ arduino c data types
40
data type (e.g., unsigned char, unsigned int, unsigned long), there is no sign bit, so the high bit is just a positive value. Again, this explains why the maximum value for an unsigned number is about twice that of a signed data type.
Now, let’s examine Table 3-2 in greater detail.
Table 3-2. The Base 2 Interpretation of an 8 -Bit Data Value
Bit 7 Bit 6 Bit 5 Bit 4 Bit 3 Bit 2 Bit 1 Bit 0
Power of 2 27
26
25
24
23
22
21
20
Decimal value 128 64 32 16 8 4 2 1
Binary number 0 1 0 0 0 0 0 1
Decimal value 64 1
In Table 3-2, you can see how the bit positions correspond to various powers of 2. For example, if you take the value 2 and raise it to the 6th power, the resulting value is 64. If you recall your high school math, any number raised to the 0th power is 1. Moving from Bit 0 to the left, you can see how the values double as you move to the next bit position.
The question becomes: How can I form a binary value? Suppose you want to form the decimal (base 10) value 65. To create that value, you would need to turn on bits 0 and 6. Because 2 to the 0th power is 1 and 2 to the 6th power is 64, adding those two values together produces 65. So, how would you create the value 5? If you turn on bits 0 and 2, then you get the value of 5 (i.e., 00000101). What about the value 10? In that case, turn on bits 3 and 1 (i.e., 00001010).
Wait a minute! It appears that rotating all the bits to the left one position is the same as multiplying the number by 2. Likewise, rotating all the bits to the right one place is the same as dividing by 2. That is exactly right. Arduino C supports bit-shifting and you may see examples of this in some code you look at down the road. We will have more to say about that later on. Bit-shifting only works with integral data types.
The char Data Type and Character SetsWhen computers first came into existence, all of the characters that were deemed necessary could be represented with relatively few values. Your keyboard, for example, probably has fewer than 127 keys on it. Because of the relatively small number of characters needed, the American Standard Code for Information Interchange (ASCII) character set was developed based on 8-bit (i.e., 1 byte) values. By treating the 8 bits as an unsigned quantity, the ASCII character set was extended to include limited graphic characters, too. The ASCII character set was the norm for decades. However, as computers fanned out across the globe, the need to extend the character set became obvious. The Japanese Kanji character set, for example, has almost 2,000 characters in it. Clearly, these characters cannot be represented in an 8-bit byte. For this reason, the Unicode character set was developed.
The Unicode character set is based on a 2-byte value for each character. From a programmer’s point of view, Unicode characters are unsigned quantities—hence, more than 65,000 characters can be represented. (See the 2-byte range of values in Table 3-1. For details on the Unicode character set, see http://www.unicode.org/charts. For the ASCII character set, see http://www.asciitable.com.) Because of the desire to “internationalize” computer software, more and more programmers moved to the Unicode character set. However, there were diehard ASCII programmers, too. Perhaps as a compromise, there are Unicode character sets for different bit lengths. For example, UTF-8 is the Unicode Transform Format for 8-bit character sets. Now you can select from UTF-8, UTF-16, and UTF-32.

41
chapter 3 ■ arduino c data types
We will stick with the ASCII (1-byte) character set in this book. If you need Unicode in your software, you can cobble it together using Arduino C. However, we will leave that as an exercise for you, if you are interested.
Generating a Table of ASCII CharactersOne of the sample programs included with the Arduino C IDE is one that can generate a table of the ASCII character set. You can see the menu sequence to follow in Figure 3-1. The File Examples 04. Com-munication ASCIITable menu sequence loads the source code for the program. Compile and upload the program as you did in Chapter 1 by pressing the Compile and Upload buttons (i.e., the Check and Arrow keys just under the File menu option). Now select the Tools Serial Monitor menu choice or simultaneously press the Control, Shift, and M keys at the same time. This loads the Serial Monitor so you can see the data being sent back to your PC.
Once again, we won’t go through the code because we don’t have enough under our belt yet to make it worthwhile. (You will write your first program in the next chapter.) For now, the ASCIITable.ino program will at least allow you to see the ASCII characters displayed as characters, decimal (base 10), hexadecimal (base 16), octal (base 8), and binary (base 2) numbers.
Figure 3-1. Loading the ASCII Table sample program.

chapter 3 ■ arduino c data types
42
Figure 3-2 presents part of the output from the ASCIITable program. By examining the output from the program, you can see the relationship between the different numbering systems.
Figure 3-2. Part of the ASCII character set.
If you look at the extreme left edge of Figure 3-2 about halfway down, you will see the character ‘A.’ If you wanted to create a variable and initialize it to the value for the letter ‘A,’ then you could use:
char c = 'A';
After the compiler processes this statement, variable c would contain the letter ‘A.’ Note that character constants that are used in an assignment statement are surrounded by single quotation marks. If you read the ‘A’ line, then you can see that the numeric value 65 represents the letter ‘A.’ This means that when you touch the Shift key and the letter A on your keyboard, the value 65 is transmitted to your computer. If you prefer to think in base 16 numbers, then the value 41 is sent (i.e., 16 * 4 + 1 = 65). In base 8, the value is 101 (i.e., 8 * 8 + 0 + 1 = 65), or binary (see Table 3-1). However, because computers only understand 0s and 1s, the computer actually receives the character ‘A’ coming from the keyboard as the binary value 01000001.
The byte Data TypeThe byte data type is also an 8-bit value, but there is no sign bit, so its range is almost twice that of a char. (Can you explain why an unsigned char has the same range as a byte? Think about it.) You may use the byte data type to store any value between 0 and 255. If you ever find yourself in a situation where you are running out of memory for data storage, then changing the data from an int data type to a byte might save the day.
The most commonly used 8-bit data type is the char. However, byte is available when you need it.

43
chapter 3 ■ arduino c data types
The int Data TypeThe int data type is an integer value in C and is a signed quantity. Because an int is a signed quantity, an int can assume either positive or negative whole numbers. (See Table 3-1.)
Fractional values are not allowed for any integer data types. If a math operation with integer values yields a fractional value (e.g., 5 / 4), then that fractional value is truncated and only the whole number is retained (i.e., the result is 1, not 1.25).
In Arduino C, an int data type is a 16-bit value, as shown in Table 3-1. In some other languages (e.g., Java, C#, C++), an int is usually a 32-bit (4 byte) entity. If you have programmed before in some of these other languages, then you need to be aware that an int in Arduino C has a smaller numeric range than it carries in other programming languages. (Often, the actual bit size of an int data type is the bit size of the registers in the host mc.)
Because you can also have unsigned int data types, you can increase the upper limit of positive values by almost a factor of two. However, the price of this greater range is that unsigned data types cannot store negative values. The int data type is used more frequently than the unsigned int data type in most programs.
The word Data TypeAs you can see in Table 3-1, the word data type has the same storage requirements and range of values as an unsigned int. Given that is the case, why even have a word data type when an unsigned int could be used instead? The term word is actually more associated with assembly language programming and reflects the largest group of bits that can be handled by the CPU with a single instruction. Although there is no hard-and-fast rule about using the word data type, you tend to see it used most often as a variable that is involved with bit manipulations or when hexadecimal (base 16) numbers are being used rather than decimal (base-10) numbers. We will study bit manipulations in a later chapter. For the moment, you can think of the word data type as being similar to an unsigned int but used to suggest low-level data manipulations.
The long Data typeBecause the long data type uses 32 bits (4 bytes), it has an approximate range of values of between plus or minus 2 billion. Like the other data types discussed so far, the long data type is also an integer data type and, as such, cannot be used to represent fractional values. However, because there are 231 possible values (the 32nd bit is the sign bit again), the range of values is very large. As a general rule, if you are certain that all possible data values for a program fall within the range of an int, using an int is a better choice than a long if for no other reason than the memory requirements for a long. Also, the Atmel family of mc that we are using here all use 8-bit (1-byte) registers. Therefore, shuffling 2 bytes of data for an int will usually be faster than moving 4 bytes of data for a long. Although the performance hit for a long may not be noticeable, with the exception of where you are spinning through a tight loop of values, it is still worth keeping the data type tradeoffs in mind.
The float and double Data TypesArduino C does allow floating point numbers. That is, you can have data values in your program that use fractional values. In fact, if you look at the Arduino.h header file (usually located at arduino-1.0.1\

chapter 3 ■ arduino c data types
44
hardware\arduino\cores\arduino), then you will find symbolic constants defined for PI, TWO-PI, and so forth. In that file, PI is defined as:
#define PI 3.1415926535897932384626433832795
so you could define a float as:
float pi = PI;
and the compiler will substitute the number 3.1415926535897932384626433832795 for PI and assign that value into pi. (Recall that C is case-sensitive, so pi and PI are viewed as different entities in C.) The range of values for a float is roughly plus or minus 3.4 to the 38th power. That’s a big number: A value with up to 38 digits. Each float requires 4 bytes of storage space.
In most languages, a double data type has twice the storage requirements as a float (i.e., 8 rather than 4 bytes). As such, the range of values is much larger (often some value to the 308th power). However, Arduino C makes no distinction between a float and a double. Both data types are treated equally in Arduino C.
Floating Point PrecisionThe precision of a number refers to the number of significant digits you can expect for that number. In Arduino C, the highest precision you can expect for a floating point value is seven digits of precision. What this means is that although you can represent a floating point number with 38 digits, only the first seven are significant. The remaining 31 digits are the computer’s best guess as to what the digits should be. Given that fact, it seems misleading that PI is defined the way it is. For all practical purposes, it could be defined as:
#define PI 3.141592
and forget the rest of the digits because the computer won’t be able to represent those digits in any math operation with greater precision that six or seven digits. However, if you are just going to display pi and not manipulate it in any way, then PI gives you that constant with considerable precision.
The string Data TypeA string is a sequence of ASCII characters treated as a single entity. In other words, it is a string of characters. The string data type may be implemented several different ways. The first we shall discuss is to define the string as a character array. An array is nothing more than a grouping of one or more elements of a data type and have those elements all sharing a common name. (We will cover arrays in detail in Chapter 5.) In this case, you can define a string as:
char myString[15];
which allocates enough space for a string with 14 characters in it. Why 14 characters and not 15? The reason is because C needs to append a null character (‘\0’) to the
end of the character array. The compiler uses this null byte to mark the end of the string. Therefore, any string variable is limited to the number that appears within the brackets minus 1. In our example, we have set aside enough memory for 15 characters. Because one of those must be used by the string termination byte (i.e., the null character, ‘\0’), we can only use 14 characters for the actual string data.Arduino C is smart enough to know when to add the null termination byte. For example, all of the following are valid ways to define and initialize a string variable using a character array.
char name[] = "Jane";char name[5] = "Jane";

45
chapter 3 ■ arduino c data types
char name[100] = "Jane";
In the first example, the compiler figures out how many bytes of storage are needed. Because the name Jane has 4 characters, it will set aside 5 bytes of storage to make sure there is enough for the name plus the null termination character. The second form simply has the code determine the 5 bytes that are needed. The last form reserves a hundred bytes of storage, where the first four contain the characters for “Jane” and the fifth character is the null character (\0) that terminates the string. This last form would allow you to expand name up to 99 characters in length at some other point in the program if needed. (You know why it is 99 characters.)
You can also initialize a string on a character-by-character basis if you wish. In that case, surround each character with a single quote mark, each character separated from the next by a comma. (Single quote marks are used to denote a single character constant. Double quotes are used for a sequence of characters, as seen above.) For example:
char name[] = { 'J', 'a', 'n', 'e', '\0'};char name[5] = { 'J', 'a', 'n', 'e', '\0'};char name[] = { 'J', 'a', 'n', 'e'};char name[5] = { 'J', 'a', 'n', 'e'};
Notice that the compiler is smart enough to know the null termination character must be added although you don’t explicitly write it in. Also notice that when you initialize a character array on a character basis, the initialization list starts with an opening brace ({) and terminates the list with a closing brace (}). The characters within the list are surrounded by single quotation marks, each separated from the other by a comma.
String Data TypeThe String data type is different than the string data type (note the uppercase letter S for this data type.) This data type is actually built up from the string data type but is treated as an object rather than a simple character array. What this means is that you have a lot of built-in functionality with the String data type that you would have to code yourself with the string data type. For example, suppose you have a sequence of characters that you read from a sensor into a string variable named myData. Further suppose you need to convert them all to uppercase letters. With the string data type, you would have to write the code to do that conversion.
If you defined myData as a String object, then you could write the conversion simply as:
myData = myData.ToUpperCase();
and you are done! The reason this works is because within the String object is a function (also called a method) that contains the code to do the conversion for you. You simply define the variable as:
String myData = String(100);
which defines a String named myData with enough space for 99 characters. To use a built-in function, follow the variable name with a period (called the dot operator) followed by the function you wish to call. For example,
myData = myData.ToLowerCase();
Such functionality is common with programming languages like C++, C#, and Java that support the Object Oriented Programming (OOP) paradigm. Although Arduino C is not an OOP language, it is nice to see some OOP features being added to the language. Table 3-3 shows some of the built-in functions that are available when you use String objects.
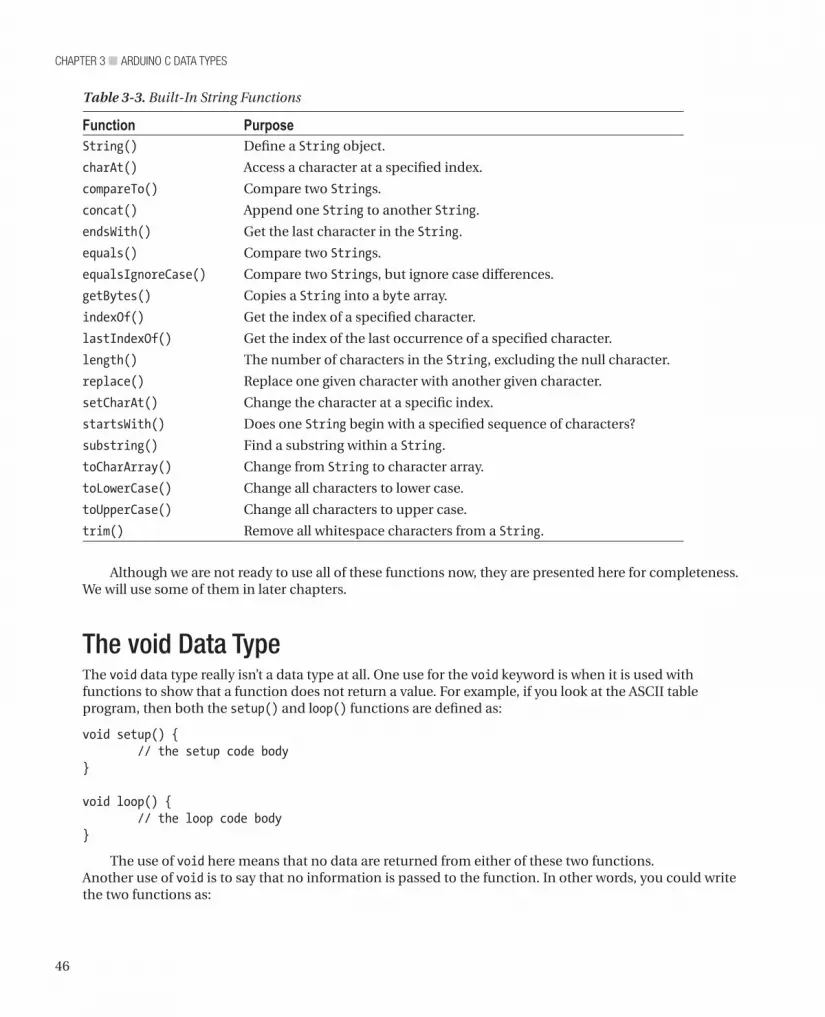
chapter 3 ■ arduino c data types
46
Table 3-3. Built-In String Functions
Function PurposeString() Define a String object.
charAt() Access a character at a specified index.
compareTo() Compare two Strings.
concat() Append one String to another String.
endsWith() Get the last character in the String.
equals() Compare two Strings.
equalsIgnoreCase() Compare two Strings, but ignore case differences.
getBytes() Copies a String into a byte array.
indexOf() Get the index of a specified character.
lastIndexOf() Get the index of the last occurrence of a specified character.
length() The number of characters in the String, excluding the null character.
replace() Replace one given character with another given character.
setCharAt() Change the character at a specific index.
startsWith() Does one String begin with a specified sequence of characters?
substring() Find a substring within a String.
toCharArray() Change from String to character array.
toLowerCase() Change all characters to lower case.
toUpperCase() Change all characters to upper case.
trim() Remove all whitespace characters from a String.
Although we are not ready to use all of these functions now, they are presented here for completeness. We will use some of them in later chapters.
The void Data TypeThe void data type really isn’t a data type at all. One use for the void keyword is when it is used with functions to show that a function does not return a value. For example, if you look at the ASCII table program, then both the setup() and loop() functions are defined as:
void setup() { // the setup code body}
void loop() { // the loop code body}
The use of void here means that no data are returned from either of these two functions. Another use of void is to say that no information is passed to the function. In other words, you could write the two functions as:

47
chapter 3 ■ arduino c data types
void setup(void) { // the setup code body}
void loop(void) { // the loop code body}
and the program would compile and run exactly as before. Most programmers who use Arduino C do not use the keyword void between the opening and closing parentheses of a function. Personally, I like the use of void in this context, as it serves to confirm that no information is being passed into the black box from the outside world. I will admit, however, that I am likely a crowd of one in using this convention.
The array Data TypeVirtually all of the basic data types support arrays of those types. We have already seen examples of character arrays. The following statements show some other array definitions:
int myData[15];long yourWorkDay[7];float temp[200];
Each of these statements defines an array of a specific type. We will postpone the details about arrays until we have our discussion about C pointers in Chapter 8. If we need any specifics before that chapter, we will be sure to point them out.
Defining versus Declaring VariablesMost programmers use the terms “define” and “declare” as if they were the same. They are not! If you learn anything in this book, it will be that defining a variable and declaring a variable are entirely different animals. To illustrate this difference, let’s take a simple definition of an integer variable named val:
int val;
Although this may seem like an innocuous statement, there is a lot of stuff going on behind your back. Let’s walk through what is actually going on. Although I have taken a few liberties to make things easier to understand, the basics described here are essentially what actually happens.
First, when the compiler sees this statement, the first thing it does is check the statement for syntax errors. If it finds one, then you get one of those ugly orange error messages displayed at the bottom of the compiler window. However, because the statement is correct, the compiler then moves to the next phase of the compile process.
Symbol TablesThe next step causes the compiler to scan its symbol table to determine whether val has already been defined in the program. Table 3-4 shows a simplified symbol table. (My software company produced C compilers, and our symbol table had just less than two dozen columns in the table. The ellipsis character, (…), is used to denote the added complexity one would actually find in a real symbol table.)
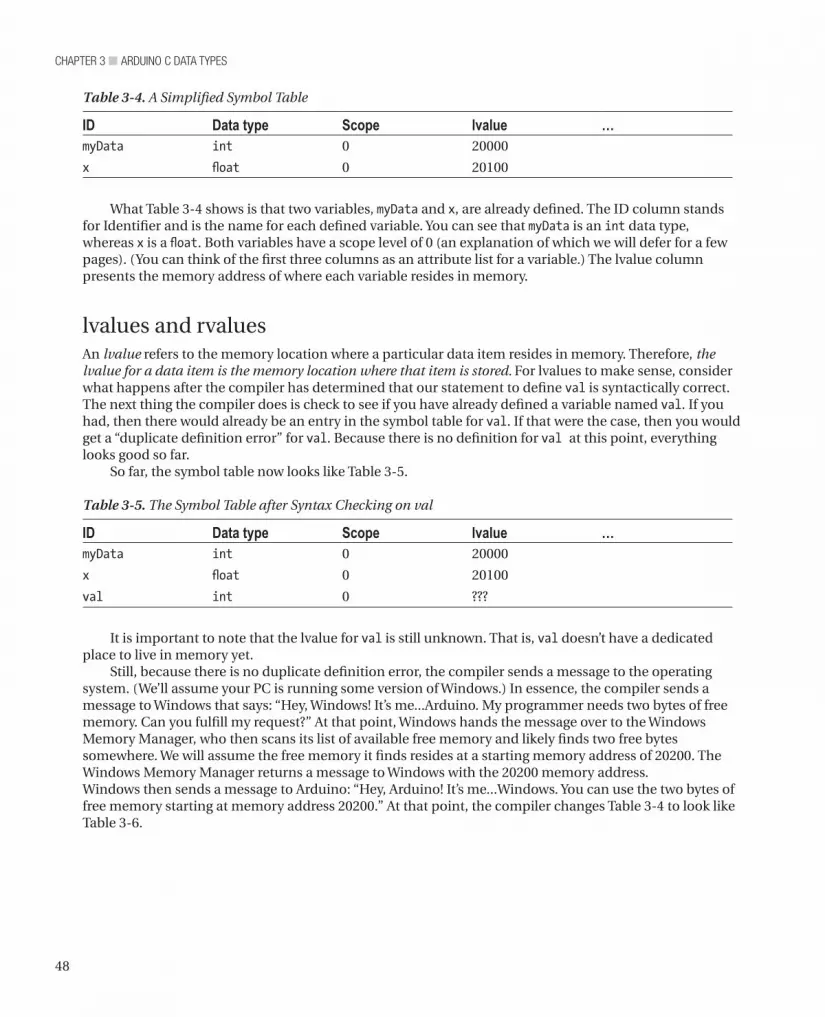
chapter 3 ■ arduino c data types
48
Table 3-4. A Simplified Symbol Table
ID Data type Scope lvalue …myData int 0 20000
x float 0 20100
What Table 3-4 shows is that two variables, myData and x, are already defined. The ID column stands for Identifier and is the name for each defined variable. You can see that myData is an int data type, whereas x is a float. Both variables have a scope level of 0 (an explanation of which we will defer for a few pages). (You can think of the first three columns as an attribute list for a variable.) The lvalue column presents the memory address of where each variable resides in memory.
lvalues and rvaluesAn lvalue refers to the memory location where a particular data item resides in memory. Therefore, the lvalue for a data item is the memory location where that item is stored. For lvalues to make sense, consider what happens after the compiler has determined that our statement to define val is syntactically correct. The next thing the compiler does is check to see if you have already defined a variable named val. If you had, then there would already be an entry in the symbol table for val. If that were the case, then you would get a “duplicate definition error” for val. Because there is no definition for val at this point, everything looks good so far.
So far, the symbol table now looks like Table 3-5.
Table 3-5. The Symbol Table after Syntax Checking on val
ID Data type Scope lvalue …myData int 0 20000
x float 0 20100
val int 0 ???
It is important to note that the lvalue for val is still unknown. That is, val doesn’t have a dedicated place to live in memory yet.
Still, because there is no duplicate definition error, the compiler sends a message to the operating system. (We’ll assume your PC is running some version of Windows.) In essence, the compiler sends a message to Windows that says: “Hey, Windows! It’s me...Arduino. My programmer needs two bytes of free memory. Can you fulfill my request?” At that point, Windows hands the message over to the Windows Memory Manager, who then scans its list of available free memory and likely finds two free bytes somewhere. We will assume the free memory it finds resides at a starting memory address of 20200. The Windows Memory Manager returns a message to Windows with the 20200 memory address. Windows then sends a message to Arduino: “Hey, Arduino! It’s me...Windows. You can use the two bytes of free memory starting at memory address 20200.” At that point, the compiler changes Table 3-4 to look like Table 3-6.

49
chapter 3 ■ arduino c data types
Table 3-6. The Symbol Table after Adding New Variable val
ID Data type Scope lvalue …myData int 0 20000
x float 0 20100
val int 0 20200
Note what has happened here. We now have a memory address where the new variable val lives. You have defined variable val because it has a known memory address, or lvalue. Therefore:
• A data item is defined if and only if it has a known lvalue in the symbol table
• A data item is declared if it exists in the symbol table, but does not have an assigned lvalue
You will see an example of a data declaration later in the book. For now, however, keep in mind that a data definition means you can locate a variable using its lvalue. A data declaration is nothing more than an attribute list for a data item. That is, data declarations for a data item tell you its ID, its type, and its scope level, but it does not exist in memory. Data declarations are mainly used for type-checking purposes.
We can depict the lvalue with a simple diagram, as shown in Figure 3-3. Figure 3-3 reflects the state of the symbol table as seen in Table 3-6. That it, val has been defined because it has a known lvalue and, therefore, exists in memory. (lvalue comes from the old assembly language programming days and stood for “location value,” or a reference to where a data item was stored in memory. Some students found it easier to remember “left value” because the lvalue forms the “left leg” of Figure 3-3.)
val
20200 ?
lvalue rvalue
Figure 3-3. An lvalue-rvalue diagram.
Notice that we have the rvalue marked with a question mark. The reason is because the rvalue is used to denote what is actually stored at the lvalue’s memory location. The rvalue is what is stored at a data item’s lvalue, or its memory location. Because C is not required to initialize a non-static data item’s rvalue to zero or any other particular value when it is defined, you should always assume that a data item contains whatever random bit pattern may exist at its lvalue until a value has explicitly been assigned into the data item. Because of this fact, we show the rvalue for val as a question mark: it contains whatever junk happens to be at its lvalue. (rvalue is also a hangover from assembly language programming days and stood for “register value.” Again, some students think of it as “right value” because it forms the “right leg” in Figure 3-3.)
Suppose you want to assign the value 10 into val. The statement to do that is:
val = 10;

chapter 3 ■ arduino c data types
50
Again, this is a simple statement involving a single expression and the binary assignment operator. However, stop and think about what the compiler has to do to process the statement.
1. First, the compiler must check the statement for syntax errors. No problem there.
2. Next, the compiler must go to its symbol table to see if a variable named val exists. Again, everything looks fine because val is in the symbol table.
3. Next it makes sure val has a valid lvalue (memory address), which it does (i.e., memory address 20200). If the lvalue column was empty (all rows in the lvalue column in the symbol table are initialized to null when the table is created because null is never a valid memory address) the compiler would know this is a data declaration, and the variable is not yet defined. It should be clear that a variable that is not defined cannot have a value assigned into it. However, because val has a valid memory address, the compiler can process the assignment statement.
4. To process the assignment statement, the compiler goes to the data item’s lvalue in memory and copies the value on the right-hand side of the assignment statement (i.e., 10) into the 2 bytes of memory at the lvalue memory location. This means that the rvalue is changed to 10. This is shown in Figure 3-4. If you could look at memory locations 20200 and 20201, then you would see: 00001010 00000000. (Most PCs store the low byte first and the high byte second. The end result is the same: the value 10 is stored at the lvalue 20200.)
val
20200 10
lvalue rvalue
Figure 3-4. The lvalue-rvalue diagram after processing the assignment statement.
Note that any time your program needs to use the data stored in val, it must do a symbol table look-up to find val’s lvalue, go to that memory address, and fetch “int bytes” of data (each int is 2 bytes) from that memory location. (I have taken some liberties here, because the actual processing takes place on your mc board, not the PC, and the storage locations are known at runtime. Still, the simplification presented here should help you understand how variables and memory relate in a program.)
The Bucket AnalogyUnderstanding lvalues and rvalues is so important to a true understanding of C that I developed the Bucket Analogy to make it easy to remember the details about lvalues and rvalues. Suppose you have a bunch of different sized buckets lying around. Each bucket is just big enough to hold a specific number of bytes of data. Some buckets can only hold 1 byte of data, whereas others can hold 2 bytes. Still others can hold 4 bytes, and so on. Using Table 3-1, you can see that a 1-byte bucket could hold a byte, char, unsigned

51
chapter 3 ■ arduino c data types
char, or boolean data item. A 2-byte bucket could be used to hold an int, unsigned int, or a word. A 4-byte bucket could be used for a long, unsigned long, float, or double. Let’s further assume you have a whole room filled with these various sized buckets.
Now consider the following program statements:
int val;val = 10;
which are the same statements we discussed earlier. The first statement fills in the symbol table information as we discussed earlier. However, in the Bucket Analogy, the first statement can be thought of as determining the size of the bucket (a 2-byte bucket) and where to place that bucket in memory.
The second statement means that we go to val’s bucket located at memory address 20200 and pour 2 bytes of data into the bucket with the data arranged in such a pattern as to form the value 10. This can be seen in Figure 3-5. The figure also shows a 1-byte bucket stored at memory location 20000 with a minus sign character store in it. The bucket stored at memory address 20000 is only half as big as the bucket used to store val.
20200
memory
20000
10
Figure 3.5. The Bucket Analogy for val.
The Bucket Analogy provides the following three conclusions:
• The size of a bucket depends on the data type being stored.
• Where the bucket is stored in memory is the data item’s lvalue.
• The contents of the bucket is the data item’s rvalue.
Any time you use a variable in your programs, you are probably locating a specific bucket using its lvalue and using the contents of that bucket (i.e., its rvalue) in some expression.
It should also be clear that the last statement in this code fragment uses lvalues and rvalues:
int val = 10;int sum;
sum = val;
In the last statement, the compiler goes to the symbol table and finds the lvalue for val. It then uses the memory address (val’s lvalue) to fetch val’s 2-byte bucket. It then looks up sum’s lvalue, goes to that memory address, and fetches its bucket. Now that both operands are available, the assignment operator causes the compiler to pour the contents of val’s bucket into sum’s bucket. This process, therefore, replaces whatever may have been in sum’s bucket with the contents of val’s bucket.

chapter 3 ■ arduino c data types
52
There is an important lesson here: All simple assignment statements move the contents of the bucket on the right side of the assignment operator into the bucket of the operand on the left side of the assignment operator. It should also be obvious that all simple assignment statement move the right operand’s rvalue into the left operand’s rvalue. Think in terms of rvalues and lvalues and you will develop a robust understanding of C.
Using the cast OperatorConsider the following statements:
int val;long bigVal = 100000;
val = bigVal;
The first two statements create buckets for val and bigVal and place them somewhere in memory. As part of its definition, bigVal also initializes its rvalue to 100000. Now consider what happens in the last statement:
val = bigVal;
Simply stated, this statement grabs the bigVal bucket and tries to pour 4 bytes of data into a 2-byte bucket. Not good. Doing this runs the risk of losing 2 bytes of information because val’s bucket is too small to hold all of bigVal’s data. While 100000 is a numeric value that is easily handled by a long data type, you can see from Table 3-1 that the value is much too big to store in val. Two bytes of valuable information are going to dribble onto the floor. Even worse, the Arduino C compiler does not even complain about the assignment. As a result, val now contains some bogus value that will likely cause you problems in your program later on. Clearly, this was just a bad design by the programmer who should have known that 100000 won’t fit into an int.
However, suppose bigVal was initialized to 20 rather than 100000. Now the value can be stored in an int. Of course, the compiler still won’t complain, especially now that the value is small enough to fit in both data types. Even so, 2 bytes of data are going to be slopped on the floor during the assignment. Truth be told, this is an error in the compiler. Try a similar assignment with other language compilers and you will get an error message. So, what is the proper way to fix this so any compiler won’t complain?The fix is to use the cast operator. A cast is used to coerce one data type into another data type. If we want to fix our bigVal assignment when its value is 20, then we can use the cast in the following manner:
val = (int) bigVal;
The cast operator above is (int). To use a cast, simply place the data type you want between the opening and closing parentheses. The data type of the cast operator (i.e., int) must match the data type that is to receive the results of the cast (val in an int). That is, if you are assigning a value into an int, then the cast must also be an int. The cast operator must be placed immediately in front of the data item that is to be cast into the new data type. In this example, the (int) cast must appear immediately before bigVal.
Suppose later in the program code we see something like:
bigVal = val;
Does this need a cast? Technically, no, it does not. The reason a cast is not needed in this example is because you are trying to pour the contents of a 2-byte bucket into a 4-byte bucket. Because the receiving bucket is bigger than the sending bucket, there is no risk of spilling data on the floor. I have not found any compiler that complains about this type of mismatched data assignment, although the code is implicitly

53
chapter 3 ■ arduino c data types
changing an int to a long. In other words, the compiler is casting the data without telling you about it. This is called a silent cast because there is no indication that the cast is taking place.
I hate silent casts.The reason I hate silent casts is because these almost always come back at some point in the program
to bite you in the butt. As a result, you should ALWAYS use a cast when you use an assignment statement between two different data types. You should rewrite the statement above as:
bigVal = (long) val;
If nothing else, this documents that you really did want to force the data of an int into a long.The Arduino compiler doesn’t complain about either noisy or silent casts, which is a bug for the
“noisy” cast. To be on the safe side, always use the cast operator when performing an assignment expression involving two different data types. It will save you time in the long run and your instructor will be impressed that you truly understand what is going on with such expressions.
SummaryYou have covered a lot of important concepts in this chapter, and I implore you not to read further until you understand completely the concepts presented in this chapter. One of the major tripping points for C students is the concept of pointers. (Pointers are an advanced topic and are not covered until Chapter 8.) However, if you really do understand lvalues, rvalues, and the Bucket Analogy, then you will sail through the concept of pointers. The benefits associated with really understanding the concepts in this chapter are not limited to just pointers. Many other programming concepts are also based on a good understanding of these concepts. Invest the time to learn these concepts now. It will pay huge benefits later.

chapter 3 ■ arduino c data types
54
Exercises1. Which of the following variable names are good and which would draw a syntax
error?
bigFeet your Feet switch 12Meters_SystemVal -Negative NoGood realGood
2. How do you pronounce the word char as in char c;?
3. Suppose you have a char variable. Write the binary values for 32, 72, 111, 128.
4. Suppose you are at a cocktail party and someone asks you what precision means in Arduino C. What is your answer?
5. What’s the difference between the string and String data types?
6. What is an lvalue? What is an rvalue?
7. Relate lvalues and rvalues to the Bucket Analogy.
8. What is wrong with the following statements, and how do you fix it?
int val;double x = 1000.0;
val = x;

55
■ ■ ■
chapter 4
Decision Making in C
The real power of a mc is its ability to read data and take action(s) based on that data. Stated differently, a mc has the ability to make decisions based on the information provided to it. In this chapter, you will learn the various expressions that enable your program to make decisions based on the state of some set of data.
Relational OperatorsAs you might guess, a decision is often based on comparing the state of two or more pieces of data. You make such decisions all the time, probably without thinking much about the process that is involved in making the decision. The phone rings and you get up to answer it. Implicitly, you make a decision whether to answer the call or not. Further, that decision involved comparing the expected benefits from answering the call (e.g., it might be someone you want to talk with) versus the expected costs of not answering the call (i.e., I may miss out on talking to someone important). Some decisions are better than others. Indeed, the definition of a dilemma is when you have two or more choices and they are all bad.
Table 4-1 presents the relational operators available to you in Arduino C. All of the operators in the table are binary operators and require two operands.
Table 4-1. Relational Operators
Operator Interpretation> Greater than
>= Greater than or equal to
< Less than
<= Less than or equal to
== Equal to
!= Not equal to
The result of all relational operations is either logic true (non-zero) or logic false (zero). For example:
5 > 4 // Logic true5 < 4 // logic false5 == 4 // logic false5 != 4 // logic true
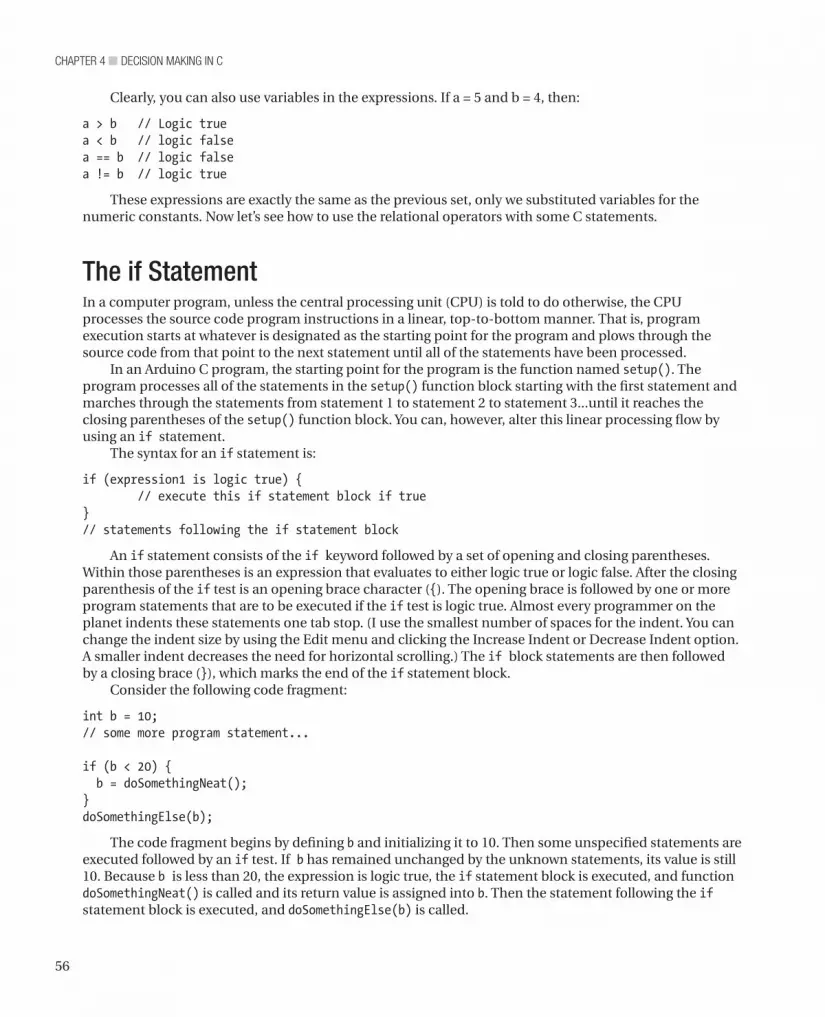
chapter 4 ■ Decision Making in c
56
Clearly, you can also use variables in the expressions. If a = 5 and b = 4, then:
a > b // Logic truea < b // logic falsea == b // logic falsea != b // logic true
These expressions are exactly the same as the previous set, only we substituted variables for the numeric constants. Now let’s see how to use the relational operators with some C statements.
The if StatementIn a computer program, unless the central processing unit (CPU) is told to do otherwise, the CPU processes the source code program instructions in a linear, top-to-bottom manner. That is, program execution starts at whatever is designated as the starting point for the program and plows through the source code from that point to the next statement until all of the statements have been processed.
In an Arduino C program, the starting point for the program is the function named setup(). The program processes all of the statements in the setup() function block starting with the first statement and marches through the statements from statement 1 to statement 2 to statement 3...until it reaches the closing parentheses of the setup() function block. You can, however, alter this linear processing flow by using an if statement.
The syntax for an if statement is:
if (expression1 is logic true) { // execute this if statement block if true}// statements following the if statement block
An if statement consists of the if keyword followed by a set of opening and closing parentheses. Within those parentheses is an expression that evaluates to either logic true or logic false. After the closing parenthesis of the if test is an opening brace character ({). The opening brace is followed by one or more program statements that are to be executed if the if test is logic true. Almost every programmer on the planet indents these statements one tab stop. (I use the smallest number of spaces for the indent. You can change the indent size by using the Edit menu and clicking the Increase Indent or Decrease Indent option. A smaller indent decreases the need for horizontal scrolling.) The if block statements are then followed by a closing brace (}), which marks the end of the if statement block.
Consider the following code fragment:
int b = 10;// some more program statement...
if (b < 20) { b = doSomethingNeat();}doSomethingElse(b);
The code fragment begins by defining b and initializing it to 10. Then some unspecified statements are executed followed by an if test. If b has remained unchanged by the unknown statements, its value is still 10. Because b is less than 20, the expression is logic true, the if statement block is executed, and function doSomethingNeat() is called and its return value is assigned into b. Then the statement following the if statement block is executed, and doSomethingElse(b) is called.
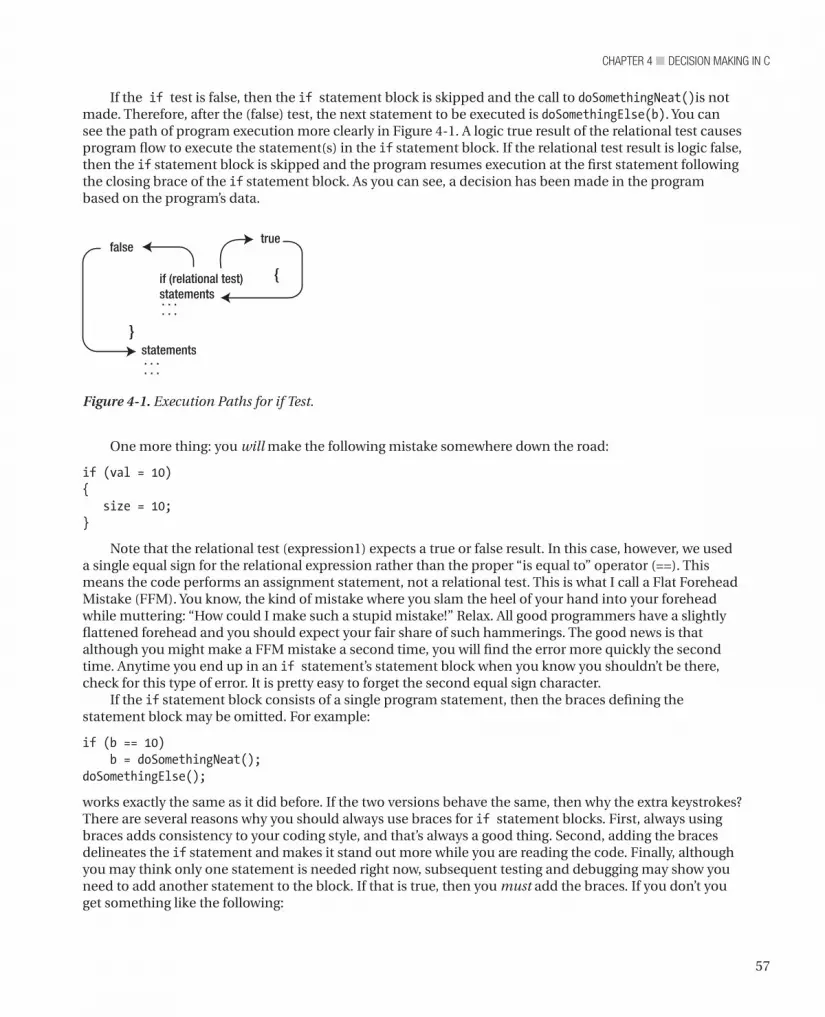
57
chapter 4 ■ Decision Making in c
One more thing: you will make the following mistake somewhere down the road:
if (val = 10){ size = 10;}
Note that the relational test (expression1) expects a true or false result. In this case, however, we used a single equal sign for the relational expression rather than the proper “is equal to” operator (==). This means the code performs an assignment statement, not a relational test. This is what I call a Flat Forehead Mistake (FFM). You know, the kind of mistake where you slam the heel of your hand into your forehead while muttering: “How could I make such a stupid mistake!” Relax. All good programmers have a slightly flattened forehead and you should expect your fair share of such hammerings. The good news is that although you might make a FFM mistake a second time, you will find the error more quickly the second time. Anytime you end up in an if statement’s statement block when you know you shouldn’t be there, check for this type of error. It is pretty easy to forget the second equal sign character.
If the if statement block consists of a single program statement, then the braces defining the statement block may be omitted. For example:
if (b == 10) b = doSomethingNeat();doSomethingElse();
works exactly the same as it did before. If the two versions behave the same, then why the extra keystrokes? There are several reasons why you should always use braces for if statement blocks. First, always using braces adds consistency to your coding style, and that’s always a good thing. Second, adding the braces delineates the if statement and makes it stand out more while you are reading the code. Finally, although you may think only one statement is needed right now, subsequent testing and debugging may show you need to add another statement to the block. If that is true, then you must add the braces. If you don’t you get something like the following:
If the if test is false, then the if statement block is skipped and the call to doSomethingNeat()is not made. Therefore, after the (false) test, the next statement to be executed is doSomethingElse(b). You can see the path of program execution more clearly in Figure 4-1. A logic true result of the relational test causes program flow to execute the statement(s) in the if statement block. If the relational test result is logic false, then the if statement block is skipped and the program resumes execution at the first statement following the closing brace of the if statement block. As you can see, a decision has been made in the program based on the program’s data.
false
. . .
. . .
. . .
. . .
}
{
true
if (relational test)statements
statements
Figure 4-1. Execution Paths for if Test.

chapter 4 ■ Decision Making in c
58
if (b == 10) b = doSomethingNeat(); doBackupNow();doSomethingElse();
Although the programmer wanted to call both doSomethingNeat() and doBackupNow() only when b equals 10, the way the code is written the call to doBackupNow() is always called, because what the programmer actually has written is:
if (b == 10) { b = doSomethingNeat();}doBackupNow();doSomethingElse();
Always remember that, without braces, the if statement block default to a single statement being controlled by the if test.
A Modified Blink ProgramLet’s write a program that uses Blink as its starting point but makes some modifications to it. The program is going to use two external LEDs, two resistors, and a few breadboard jumper wires. The circuit is designed to light one of the LEDs for 1 second (just like the original Blink program) and then turn it off and turn the other LED on. The circuit is shown in Figure 4-2.
Figure 4-2. An Alternating LED Blink Program.

59
chapter 4 ■ Decision Making in c
The CircuitThe circuit involved connecting one wire from I/O pin 13 on the Arduino to a resistor. The other end of the resistor is connected to the anode (long) leg of the LED. The cathode end of the LED is connected to the Arduino ground (GND) pin. The second LED uses essentially the same type of connections, only it is connected to I/O pin 12.
So, what should the value be for each of the resistors? It really depends on the specific LEDs you are using. The maximum load on an Arduino I/O pin should never exceed 20 milliamperes (ma). The max current rating on my LEDs is 5 ma, so they fall well within the I/O pin rating. Ohms Law states that Volts equals Amps x Ohms. You can rearrange the terms and state
Resistance = Volts / Amps
Because the Arduino board operates with 5 volts and the maximum amperage is 20 milliamps (or 0.020 amps), the resistance value turns out to be 250 ohms. (These calculations do not take into account the forward voltage of the LED, which results in less current. This errs on the safe side for the LED.) However, that resistance is running the Arduino I/O pin at its maximum current rating, which may not be such a great idea. As a result, I increased my resistor values to 470 ohms. You can always start with a higher resistance value and see what works. Decreasing the resistance value will increase the brightness of the LED. Drop the resistance too far and the LED will do its imitation of a Super Nova, thus creating a small void in the universe...not good. Increase the resistance too far and it will not appear to light. Obviously, it makes more sense to err on the high side. For most LEDs, resistor values between 470 and 1000 ohm will work just fine. Figure 4-3 shows how my breadboard looked when I finished. (Hey...neatness counted in the third grade, not here.) The schematic for the circuit is shown in Figure 4-4.
Figure 4-3. The Alternate Blink Program. (Arduino Duemilanove board courtesy of TinyOS.)

chapter 4 ■ Decision Making in c
60
The Program CodeNow let’s look at the program code. Listing 4-1 presents the source code for our Alternate Blink program.
Listing 4-1. Alternating Blink Code
/* Alternate Blink Turns on one LED on for 1 second while the other is off, then reverses the LEDs for 1 second, repeatedly. */ // Pin 13 has an LED connected on most Arduino boards.// give it a name:int led1 = 13;
The polarity of the LED does matter, as you can see in the circuit diagram of Figure 4-4. Although there are exceptions, the negative (cathode) terminal for most LEDs is shorter than the anode and usually has a flat edge on the plastic lens just above the cathode. The good news is that even if you do get the leads reversed, the worst thing that (usually) happens is that the LED does not light.
Figure 4-4. The Schematic for the Alternate Blink program.
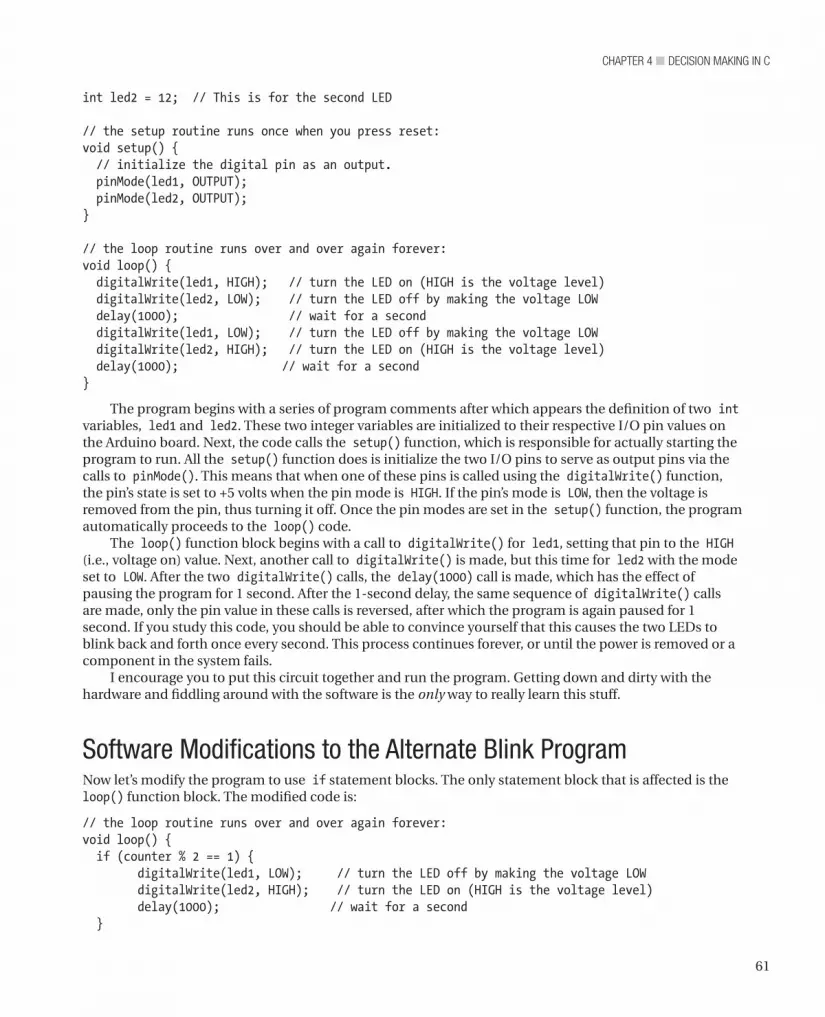
61
chapter 4 ■ Decision Making in c
int led2 = 12; // This is for the second LED
// the setup routine runs once when you press reset:void setup() { // initialize the digital pin as an output. pinMode(led1, OUTPUT); pinMode(led2, OUTPUT);}
// the loop routine runs over and over again forever:void loop() { digitalWrite(led1, HIGH); // turn the LED on (HIGH is the voltage level) digitalWrite(led2, LOW); // turn the LED off by making the voltage LOW delay(1000); // wait for a second digitalWrite(led1, LOW); // turn the LED off by making the voltage LOW digitalWrite(led2, HIGH); // turn the LED on (HIGH is the voltage level) delay(1000); // wait for a second}
The program begins with a series of program comments after which appears the definition of two int variables, led1 and led2. These two integer variables are initialized to their respective I/O pin values on the Arduino board. Next, the code calls the setup() function, which is responsible for actually starting the program to run. All the setup() function does is initialize the two I/O pins to serve as output pins via the calls to pinMode(). This means that when one of these pins is called using the digitalWrite() function, the pin’s state is set to +5 volts when the pin mode is HIGH. If the pin’s mode is LOW, then the voltage is removed from the pin, thus turning it off. Once the pin modes are set in the setup() function, the program automatically proceeds to the loop() code.
The loop() function block begins with a call to digitalWrite() for led1, setting that pin to the HIGH (i.e., voltage on) value. Next, another call to digitalWrite() is made, but this time for led2 with the mode set to LOW. After the two digitalWrite() calls, the delay(1000) call is made, which has the effect of pausing the program for 1 second. After the 1-second delay, the same sequence of digitalWrite() calls are made, only the pin value in these calls is reversed, after which the program is again paused for 1 second. If you study this code, you should be able to convince yourself that this causes the two LEDs to blink back and forth once every second. This process continues forever, or until the power is removed or a component in the system fails.
I encourage you to put this circuit together and run the program. Getting down and dirty with the hardware and fiddling around with the software is the only way to really learn this stuff.
Software Modifications to the Alternate Blink Program Now let’s modify the program to use if statement blocks. The only statement block that is affected is the loop() function block. The modified code is:
// the loop routine runs over and over again forever:void loop() { if (counter % 2 == 1) { digitalWrite(led1, LOW); // turn the LED off by making the voltage LOW digitalWrite(led2, HIGH); // turn the LED on (HIGH is the voltage level) delay(1000); // wait for a second }

chapter 4 ■ Decision Making in c
62
if (counter % 2 == 0) { digitalWrite(led1, HIGH); // turn the LED on (HIGH is the voltage level) digitalWrite(led2, LOW); // turn the LED off by making the voltage LOW delay(1000); // wait for a second } counter = counter + 1;}
where the new variable, counter, is a long data type that is initialized to 0 and defined just after the data definitions for led1 and led2. (You can load the Blink source code using the File Examples Basics Blink from the IDE. You can then examine the complete source code file.) Let’s look at the code.
The expression
counter % 2
takes the current value of counter and performs a modulus 2 operation on it. Because a modulo operation returns the remainder after division, any number modulo 2 is the same as asking whether the number is odd or even. Consider:
1 % 2 = 12 % 2 = 03 % 2 = 14 % 2 = 05 % 2 = 1
and so on. Because counter is incremented by 1 (counter = counter + 1) each time we pass through the loop, the modulo test has the effect of toggling the LEDs. The end result is that the program performs pretty much exactly as it did before.
Alas, the modified code is a good example of RDC—Really Dumb Code. Let’s see why.
The if-else StatementC provides another form of the simple if statement called the if-else statement. The syntax for the if-else statement is:
if (expression evaluates to logic true) { // perform this statement block if logic true} else { // perform this statement block otherwise}
As you can see, the first statement block following the if test is executed if, and only if, the relational test is logic true. Otherwise, the else statement block is executed.
The if-else allows us to simply our loop code somewhat:
void loop() { if (counter % 2 == 1) { digitalWrite(led1, LOW); // turn the LED off by making the voltage LOW digitalWrite(led2, HIGH); // turn the LED on (HIGH is the voltage level) } else { digitalWrite(led1, HIGH); // turn the LED on (HIGH is the voltage level) digitalWrite(led2, LOW); // turn the LED off by making the voltage LOW }

63
chapter 4 ■ Decision Making in c
delay(1000); // wait for a second counter = counter + 1;}
Note how we were able to get rid of one delay() call by using the if-else statement and requires only one test expression. This code is an example of SDC—Sorta Dumb Code. We can simplify the code a little bit more, as shown below:
void loop() { if (counter % 2 == 1) { led1 = 13; led2 = 12; } else { led1 = 12; led2 = 13; } digitalWrite(led1, HIGH); // turn the LED on (HIGH is the voltage level) digitalWrite(led2, LOW); // turn the LED on (HIGH is the voltage level) delay(1000); // wait for a second counter = counter + 1;}
In this case, we simply reverse the LED I/O pins based on the if test and then make the call to digitalWrite(). The program, of course, still behaves as before.
There are several lessons to be learned here. First, a simple if test is good enough to make the program work, but an if-else actually is more efficient. Second, the if-else statements can be reworked to make it easier to read and understand. This second lesson leads to a third lesson: There’s more than one way to skin a cat. Just because you have a program working doesn’t mean it is the most efficient way to write the code. When you are dealing with relatively small amounts of memory, even small adjustments to the code may mean the difference between having the program run or running out of memory.
If this code was turned in for a programming assignment, I would give the person a C. That is, it is average code that works and is what I would expect from everyone in the class. We will explore how to elevate that grade later in the chapter.
Cascading if StatementsOften a program requires specific actions to be taken when a specific value for a variable is read. For example, you might have a variable named myDay that can assume the values 1 (Sunday) through 7 (Saturday). The code might look like this:
int myDay;// Some code that determines what day it is...if (myDay == 1) { doSundayStuff();}
if (myDay == 2) { doMondayStuff();}
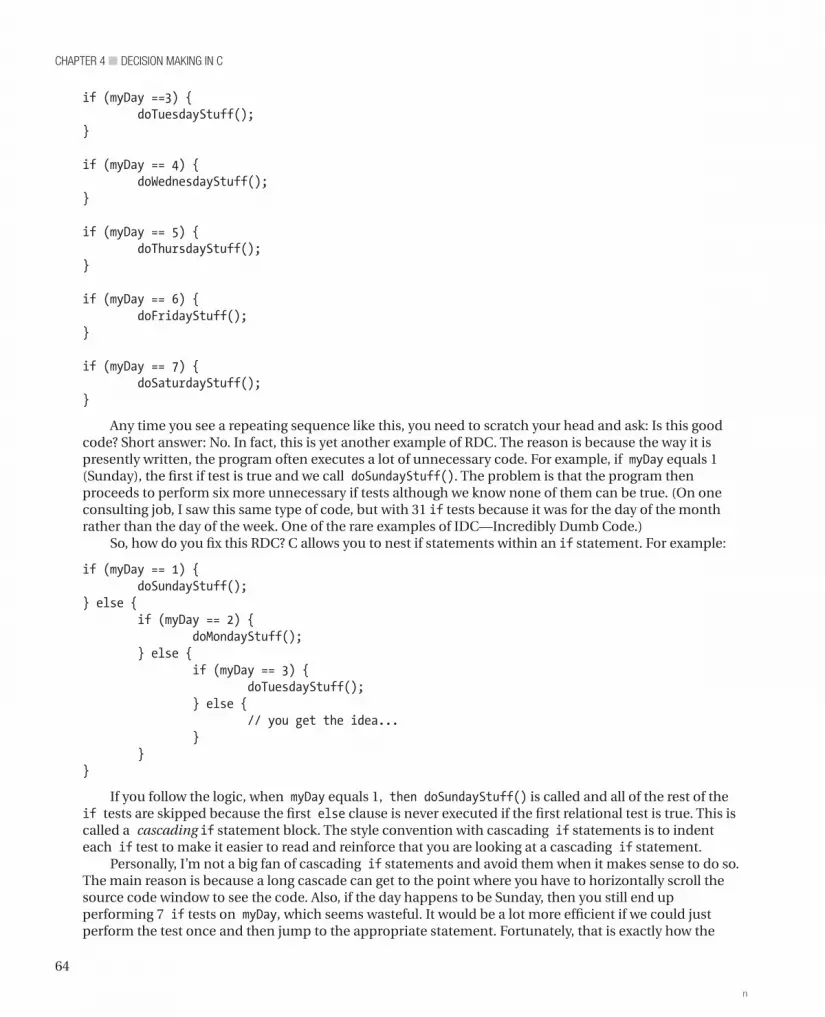
chapter 4 ■ Decision Making in c
64
if (myDay ==3) {doTuesdayStuff();
}
if (myDay == 4) {doWednesdayStuff();
}
if (myDay == 5) {doThursdayStuff();
}
if (myDay == 6) {doFridayStuff();
}
if (myDay == 7) {doSaturdayStuff();
}
Any time you see a repeating sequence like this, you need to scratch your head and ask: Is this good code? Short answer: No. In fact, this is yet another example of RDC. The reason is because the way it is presently written, the program often executes a lot of unnecessary code. For example, if myDay equals 1 (Sunday), the first if test is true and we call doSundayStuff(). The problem is that the program then proceeds to perform six more unnecessary if tests although we know none of them can be true. (On one consulting job, I saw this same type of code, but with 31 if tests because it was for the day of the month rather than the day of the week. One of the rare examples of IDC—Incredibly Dumb Code.)
So, how do you fix this RDC? C allows you to nest if statements within an if statement. For example:
if (myDay == 1) {doSundayStuff();
} else {if (myDay == 2) {
doMondayStuff();} else {
if (myDay == 3) { doTuesdayStuff();
} else {// you get the idea...
}}
}
If you follow the logic, when myDay equals 1, then doSundayStuff() is called and all of the rest of the if tests are skipped because the first else clause is never executed if the first relational test is true. This is called a cascading if statement block. The style convention with cascading if statements is to indent each if test to make it easier to read and reinforce that you are looking at a cascading if statement.
Personally, I’m not a big fan of cascading if statements and avoid them when it makes sense to do so. The main reason is because a long cascade can get to the point where you have to horizontally scroll the source code window to see the code. Also, if the day happens to be Sunday, then you still end up performing 7 if tests on myDay, which seems wasteful. It would be a lot more efficient if we could just perform the test once and then jump to the appropriate statement. Fortunately, that is exactly how the
n
65
chapter 4 ■ Decision Making in c
switch statement works. However, before we discuss the switch statement, let’s consider an easier way to increment or decrement a variable.
The Increment and Decrement OperatorsIn our discussion of the loop() function, the last line in the code fragment was:
counter = counter + 1;
This statement simply takes the rvalue of counter, increments it by 1, and assigns the new value back into the rvalue of counter. In other words, the statement is an increment operation. This is such a common operation that C includes a special operator called the increment operator that is designed specifically to increment a variable.
Two Types of Increment Operator (++)There are two flavors for the increment operator:
• pre-increment
• post-increment
The pre-increment operator is written:
++counter; // pre-increment
The interpretation is that the rvalue of the variable (counter) is fetched, its value incremented and then used in whatever expression in which it happens to appear.
The post-increment operator is written:
counter++; // post-increment
In this case, the rvalue of the variable (counter) is fetched and used in the expression and then incremented. Notice that the ++ symbol appears after the variable name with the post-increment operator and before the variable name in the pre-increment operator.
You are probably wondering: What is the difference? Consider the following code fragment:
int c = 5;int k;
k = ++c; // pre-increment, k == 6, c == 6
What is the value of k? Because this is a pre-increment operator, the rvalue of c (5) is fetched, its rvalue is then incremented to 6, and then the value is assigned into the rvalue of k. So k is now equal to 6.
Now consider if the last statement was written:
k = c++; // post-increment, k == 5, c == 6
In this instance, the rvalue of c (5) is fetched, that rvalue is then assigned into k, and then variable c is incremented. In this case, k equals 5, not 6 as before, but c is still equal to 6.
The rule is simple: A pre-increment operator increments the rvalue before it is used in an expression, whereas a post-increment uses the rvalue in the expression and then increments the rvalue. Keep this distinction buried in your mind because if you don’t, then a bug is going to bite you in the butt down the road, and the forest-for-the-trees problem makes it hard to see this kind of bug.

chapter 4 ■ Decision Making in c
66
Two Flavors of the Decrement Operator (--)As you might guess, the decrement operator (--) is similar to the increment operator but is used to decrease the rvalue of a variable by 1. That is,
counter = counter – 1;
could be written
counter--;
Because the decrement operator appears after the variable name, it is a post-decrement operation. Using the same values as above, the statement
k = --c;
causes the rvalue of c to be fetched, its rvalue decremented to 4, and that value is then assigned into k, leaving both variables c and k with the value of 4.
The post-decrement operator:
k = c--;
causes the rvalue of c to be fetched and its rvalue (5) assigned into k, and then its rvalue is decremented. As a result, k equals 5 but c equals 4.
Because the increment and decrement operators are unary operators (i.e., the only require one operand), when used by themselves in a statement, as in:
c++;++k;
you are free to use either the pre- or post-increment or decrement operator.
Precedence of OperatorsBecause we have added several new operators, let’s update our precedence table. In fact, we are going to add all of the C operators although we haven’t studied all of them. Table 4-2 shows the complete list of precedence operators.
Table 4-2. Precedence of Operators
Level Operators1 () [] → . (dot)
2 ! ~ ++ - - + (unary) - (unary) * (indirection) & (address of) (cast) sizeof
3 * (multiplication) / %
4 + (binary) - (binary)
5 << >>
6 < <= > >=
7 == !=
8 & (bitwise AND)
9 ^
10 |

67
chapter 4 ■ Decision Making in c
11 &&
12 ||
13 ?:
14 = += - = *= /= %= &= ^= |= <<= >>=
Although this looks like a lot to memorize...it is! Therefore, I would suggest that you write this page number on the inside of the back cover page of this book because you will be referring to this page often as you start writing your own programs. With a little practice, you will find yourself using the table less and less. For now, however, you may want to stick this page number inside the back cover page for easy reference. (We will introduce the rest of the operators as we progress through the text.)
The switch StatementThe switch statement has the following syntax:
switch (expression1) { // opening brace for switch statement block case 1: // statements to execute when expression1 is 1 break; case 2: // statements to execute when expression1 is 2 break; case 3: // statements to execute when expression1 is 3 break; // more case statements as needed default: // statements to execute if expression1 doesn't have a "case value" break;} // close brace for switch statement block// This is the next statement after the switch
Using the myDay example from the nested if discussion above, each case statement block would correspond to a day of the week. The last case statement block would then be for case 7. If expression1 somehow had a value other than 1 through 7, then the default statement block is executed, perhaps issuing some kind of error message or condition (e.g., a red LED turns on). In other words, if a value for expression1 does not match any case value, then the default statement block is executed. You can think of the default statement block as a catch-all for any value that doesn’t have a corresponding case value for its statement block.
The expression1 must evaluate to an integral data type. That is, expression1 could be a byte, char, int, or long (including their unsigned counterparts)—it cannot be a floating point type (float or double) nor can it be a reference data type (e.g., string or String). Although Arduino C also accepts a boolean data type for expression1, that seems suspect to me, and I wouldn’t suggest using it. After all, a boolean is either true or false, so an if-else statement block would work.
Note that braces are not used to delineate a case statement block. Within the switch statement, case statement blocks begin with the colon character and extend through the break statement.
So, where does program control go once it processes a break statement? A break statement causes program control to jump to the first statement following the closing brace of the switch statement. In the

chapter 4 ■ Decision Making in c
68
syntax guide above, control is sent to whatever statement happens to be where // This is the next statement after the switch appears in the source code.
If you forget the break statement for a given case, then program execution falls through to the next case statement. This can be a potential source of errors in your programs. However, there are also times when two case values may need to execute the same program statements. In those situations, the “case fall through” can actually simplify the code. Just make sure your design matches what the code does.
I like the switch statement because, even following normal coding style conventions, it is pretty rare that you have to scroll the source code window horizontally. Also, because both the switch and break statements actually result in assembly language JUMP instructions, there are no redundant if tests being performed like there are with a cascading if statement block. Although there are situations where a cascading if may have to be used, the switch is almost always a better choice.
The goto Statement The goto statement can also be used to direct program control to some point in the program other than the next statement. However, teaching you how to use the goto statement is the same as teaching you how to grow warts on your kids. Using a goto in your code is ugly and reflects bad coding style. If you really want to learn about the goto statement, then someone else will have to teach you.
Getting Rid of Magic NumbersNow let’s see how you can raise your grade for the modified Blink program. If you look back to Listing 4-1, then you will find the statements:
int led1 = 13;int led2 = 12; // This is for the second LED
If you were a beginning mc programmer, then would the numbers 13 and 12 make any sense to you? I don’t think so. As a result, I call these magic numbers because they are constants in the program that have no apparent meaning in and of themselves.
What if I changed the code to:
#define IOPIN13 13#define IOPIN12 12int led1 = IOPIN13;int led2 = IOPIN12; // This is for the second LED
Now the data definitions as least give me some idea of what the numeric values 12 and 13 mean in the program, plus I think it makes the purpose of led1 and led2 a little more clear.
The C PreprocessorWhen the compiler takes over and starts compiling your program code, you can think of it actually making two passes through the code. On the first pass, the compiler looks for directives that it must process before it can actually start compiling your program code. These directives are called preprocessor directives because they must be “preprocessed” before the compiler can do its thing. Arduino C does not support all of the Standard C preprocessor directives. Table 4-3 presents the preprocessor directives for Arduino C. (Also note that I discovered that some directives seem to work, but they are not specified in the reference notes. See below.)
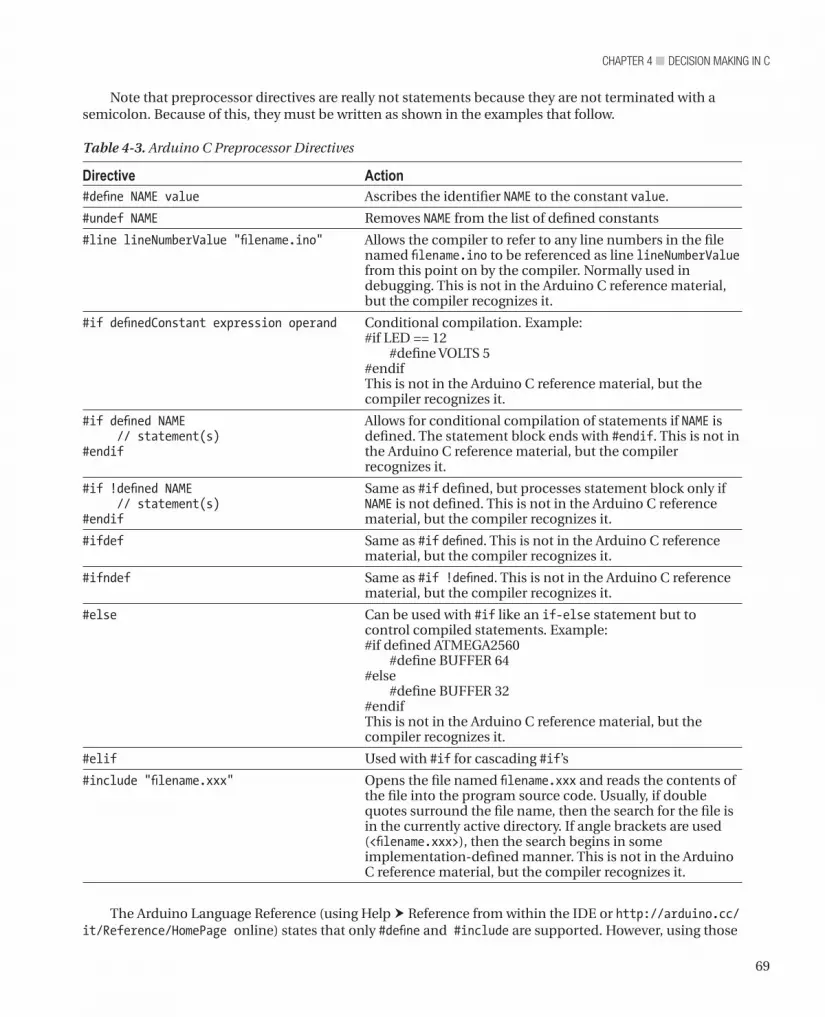
69
chapter 4 ■ Decision Making in c
Note that preprocessor directives are really not statements because they are not terminated with a semicolon. Because of this, they must be written as shown in the examples that follow.
Table 4-3. Arduino C Preprocessor Directives
Directive Action#define NAME value Ascribes the identifier NAME to the constant value.
#undef NAME Removes NAME from the list of defined constants
#line lineNumberValue "filename.ino" Allows the compiler to refer to any line numbers in the file named filename.ino to be referenced as line lineNumberValue from this point on by the compiler. Normally used in debugging. This is not in the Arduino C reference material, but the compiler recognizes it.
#if definedConstant expression operand Conditional compilation. Example:#if LED == 12 #define VOLTS 5#endifThis is not in the Arduino C reference material, but the compiler recognizes it.
#if defined NAME // statement(s)#endif
Allows for conditional compilation of statements if NAME is defined. The statement block ends with #endif. This is not in the Arduino C reference material, but the compiler recognizes it.
#if !defined NAME // statement(s)#endif
Same as #if defined, but processes statement block only if NAME is not defined. This is not in the Arduino C reference material, but the compiler recognizes it.
#ifdef Same as #if defined. This is not in the Arduino C reference material, but the compiler recognizes it.
#ifndef Same as #if !defined. This is not in the Arduino C reference material, but the compiler recognizes it.
#else Can be used with #if like an if-else statement but to control compiled statements. Example:#if defined ATMEGA2560 #define BUFFER 64 #else #define BUFFER 32#endifThis is not in the Arduino C reference material, but the compiler recognizes it.
#elif Used with #if for cascading #if’s
#include "filename.xxx" Opens the file named filename.xxx and reads the contents of the file into the program source code. Usually, if double quotes surround the file name, then the search for the file is in the currently active directory. If angle brackets are used (<filename.xxx>), then the search begins in some implementation-defined manner. This is not in the Arduino C reference material, but the compiler recognizes it.
The Arduino Language Reference (using Help Reference from within the IDE or http://arduino.cc/it/Reference/HomePage online) states that only #define and #include are supported. However, using those

chapter 4 ■ Decision Making in c
70
preprocessor directives presented in Table 4-3 did not draw compilation errors with the Arduino 1.0 compiler. This raises the question: Is it safe to use the other preprocessor directives? The short answer is “No.” With the exception of the #if directives and its variants, you really aren’t giving up a lot. However, because the Arduino IDE is derived from the Open Source code family, chances are the compiler is a derivative of the Gnu C compiler, which is rock solid. Therefore, if you must use one of the “unsupported” preprocessor directives, then go ahead. If you later find out that your project all of a sudden starts burning everyone’s toast, then you may want to reexamine things.
The important thing here is to notice that the #define preprocessor directive gives you a way to define a constant in a more meaningful way. So what? Well, let’s see another benefit that #define brings to the party. Suppose you have the following in your program code:
int minCarFine = 125;int minTruckFine = 125;int minMotorcycleFine = 125;
Now suppose your state legislature passes a law such that the minimum truck fine is now $150. There is a terrific temptation to do a global search for 125 and replace with 150. This is a train wreck waiting to happen. For example, if your code has a constant 8125, then it would be changed to 8150 with a global search and replace—probably not what you intended to do.
Suppose instead you wrote:
#define MINCARFINE 125#define MINTRUCKFINE 125#define MINCYCLEFINE 125
int minCarFine = MINCARFINE;int minTruckFine = MINTRUCKFINE;int minMotorcycleFine = MINCYCLEFINE;
The first good thing is the magic numbers are gone from the source code. Second, the code is actually easier to read than before. Third, if the politicians do change the fine, I can go to one spot in the program, make the following change:
#define MINTRUCKFINE 150
and recompile the program and all the instances where the truck fine is used are correctly changed to the new value. No error-prone search and replace. The compiler does all the work for you. Good stuff.
One more thing about preprocessor directives that you need to keep in mind is that any #define is a textual substitution in the source code...nothing else. As such, all #defines are a typeless data declaration: they do not have an lvalue in the symbol table nor is their data type checked. Indeed, once the preprocessor pass in finished, none of the #define’s exist anymore. They have all been substituted with their appropriate constant. Therefore, if you do something silly like:
#define VALUE 3.333// some codeint myValue = VALUE; //Oops!
The last statement is trying to place a floating point number into an int. Clearly, this is probably not what the programmer intended, but the Arduino C compiler doesn’t complain. The compiler simply truncates VALUE to 3 for myValue.
71
chapter 4 ■ Decision Making in c
Heads or TailsLet’s write a program that uses our current two LED breadboard circuit to simulate tossing a coin. To do this, let’s begin the exercise by using the Five Program Steps for our design.
Initialization StepRecall that the Initialization Step is used to establish the environment in which we want the program to run. Because we wish to use our two LEDs from the previous program, we need to initialize the I/O pins that control the LEDs. We also know that we need to generate a series of random numbers for use in the program. Where’s that going to come from?
Any time you need a value or an object for use in a program, the first thing you should do is determine whether someone else has already created code for that object. The first place to check is the Arduino Language Reference. Sure enough, it appears that there is a random number generator available. Upon inspection, we see a function named randomSeed() as well as random(). Further reading tells us that random() produces a series of pseudo-random numbers.
Pseudo-random numbers? This means that although the distribution of the series of numbers is randomly distributed, you will get the identical values each time you use random(). Although this can be great while debugging a program, it is clearly not what we want when we are finished testing the program. Reading the randomSeed() documentation, we find out that we can “seed” the random number generator with a unique value at the outset and random() then generates a unique set of random numbers for that seed value. Therefore, it seems appropriate that we use randomSeed() in the Initialization Step.
We also need some working variables to store various values in the program.
Input StepIn this step we need to gather all of the data necessary to solve the task at hand. The only data that the program uses is the random number produced by the random number generator.
Process StepOur program needs to inspect the random number value and determine whether it is a heads or a tails. The random number generator produces numeric values—not heads or tails. Also, the type of data that are returned from the random number generator is a long. Because there is no “heads” or “tails” data type, we need to invent our own. Because a coin toss has a binary result (i.e., there are only two states possible: heads or tails), we can view the random number as an odd or even result. Any number modulo 2 yields either 1 or 0 as the result, depending on whether the number is odd or even. Perfect! We will treat odd numbers as a head and even numbers as a tail.
Output StepAs it turns out, the Output (or Display) Step is the most complicated step. The process is not difficult, just busy. Our goal is to light one LED when the number is odd (i.e., a head) and the other LED when the number is even (i.e., a tail.) It would seem, therefore, that we should turn both LEDs off for a second or so and then turn the appropriate LED on for a few seconds based on the random number that was generated. Then we should repeat the process over and over.

chapter 4 ■ Decision Making in c
72
Termination StepBecause we aren’t doing anything fancy and the program is designed to run forever (or until the power is removed or something fails), there is no Termination Step. (We will show you how to force a program to end later in the chapter.)
Now, load the IDE and write the code before you look at the code presented below in Listing 4-2. You will learn twice as much doing it yourself than you will looking at my code. Plus, you may have a better way to write the code. Give it a try.
Listing 4-2. The HeadsOrTails code
/* Heads or Tails Turns on an LED which represents head or tails. The LED remains on for about 3 seconds and the cycle repeats. Dr. Purdum, July 12, 2012 */ // define the pins to be used.// give it a name:
#define HEADIOPIN 13 // Which I/O pins are we using?#define TAILIOPIN 12
#define PAUSE 3000 // How long to delay?#define REST 2000
int head = HEADIOPIN;int tail = TAILIOPIN;long randomNumber = 0L; // Use the "L" to tell compiler it's a long data type, not an int.
// the setup routine runs once when you press reset:void setup() { // initialize each of the digital pins as an output. pinMode(head, OUTPUT); pinMode(tail, OUTPUT); randomSeed(analogRead(0)); // This seeds the random number generator}
// the loop routine runs over and over again forever:void loop() { randomNumber = generateRandomNumber(); digitalWrite(head, LOW); // Turn both LEDs off digitalWrite(tail, LOW); delay(PAUSE - REST); // Let them see both are off for a time slice if (randomNumber % 2 == 1) { // Treat odd numbers as a head digitalWrite(head, HIGH); } else { digitalWrite(tail, HIGH); // Even numbers are a tail } delay(PAUSE); // Pause for 3 seconds

73
chapter 4 ■ Decision Making in c
}
long generateRandomNumber(){ return random(0, 1000000); // Generate random numbers between 0 and one million}
We begin the program with a series of #defines and data definitions:
#define HEADIOPIN 13#define TAILIOPIN 12#define PAUSE 3000#define REST 2000
int head = HEADIOPIN ;int tail = TAILIOPIN;long randomNumber = 0L;
Note that the #defines remove many of the magic numbers in the program and make the code more readable. If we want to change the pause between coin tosses, then all we need do is change the #define and recompile the program. (Of course, you have to upload the compiled code to the mc again, too.)
Next, we run the setup() code:
void setup() { // initialize each of the digital pins as an output. pinMode(head, OUTPUT); pinMode(tail, OUTPUT); randomSeed(analogRead(0)); // This seeds the random number generator}
These statements simply establish the I/O pins and their modes for use in the program. The last function call seeds the random number generator using the value returned by a call to analogRead(0) as the seed value. You can read the complete documentation for the analogRead() function online at the reference URL mentioned earlier or directly from the IDE (Help Reference). However, basically, the function reads the voltage on pin 0 and maps it to a value between 0 and 1023. Whatever that value, it is used to seed the random number generator. Having done that, we are ready for the Input and Process Steps as presented in the loop() function. Figure 4-5 shows the program running using the same breadboard but a different mc board.
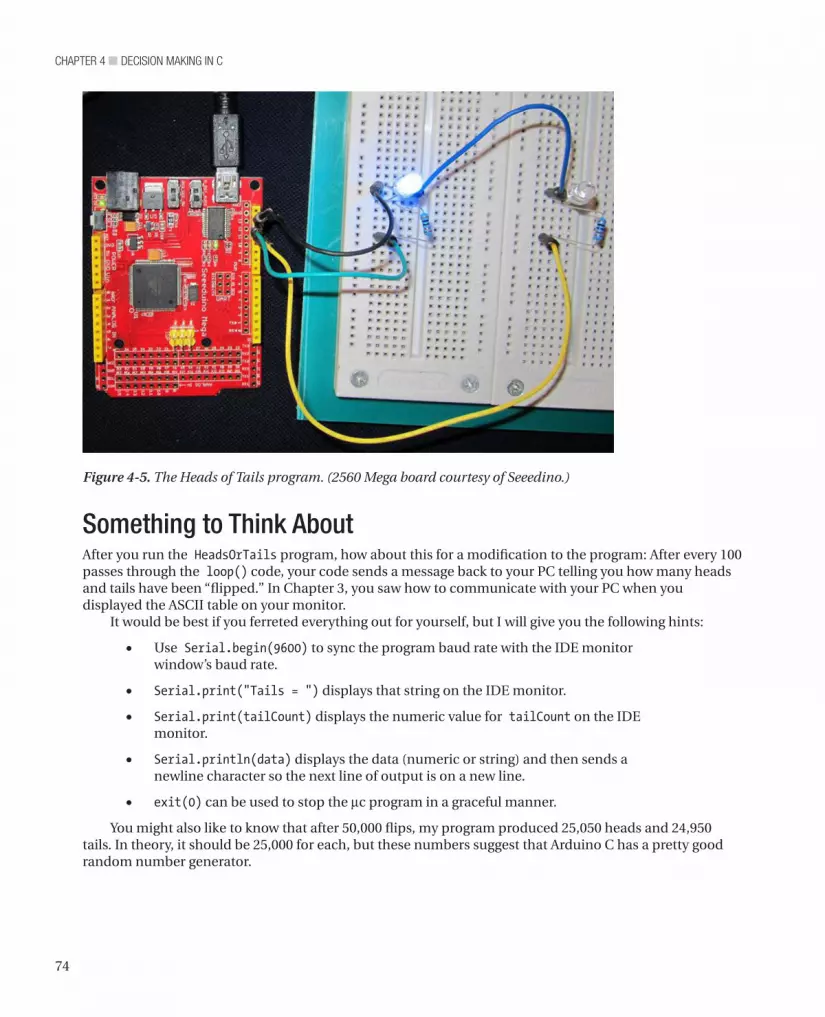
chapter 4 ■ Decision Making in c
74
Figure 4-5. The Heads of Tails program. (2560 Mega board courtesy of Seeedino.)
Something to Think AboutAfter you run the HeadsOrTails program, how about this for a modification to the program: After every 100 passes through the loop() code, your code sends a message back to your PC telling you how many heads and tails have been “flipped.” In Chapter 3, you saw how to communicate with your PC when you displayed the ASCII table on your monitor.
It would be best if you ferreted everything out for yourself, but I will give you the following hints:
• Use Serial.begin(9600) to sync the program baud rate with the IDE monitor window’s baud rate.
• Serial.print("Tails = ") displays that string on the IDE monitor.
• Serial.print(tailCount) displays the numeric value for tailCount on the IDE monitor.
• Serial.println(data) displays the data (numeric or string) and then sends a newline character so the next line of output is on a new line.
• exit(0) can be used to stop the mc program in a graceful manner.
You might also like to know that after 50,000 flips, my program produced 25,050 heads and 24,950 tails. In theory, it should be 25,000 for each, but these numbers suggest that Arduino C has a pretty good random number generator.

75
chapter 4 ■ Decision Making in c
SummaryIn this chapter, you learned various ways to make a decision in your program code. Each method has its own advantages and disadvantages. With experience, you will get a feel for which decision test is the best for the task at hand. You also learned a number of style conventions (e.g., using braces even when a single if statement may not require it). Style considerations may seem silly to you at the moment, but if you work in a commercial environment (or plan to do so), then coding style becomes very important when a different set of eyes has to view your code. Pick a style and use it consistently. It will make your code easier to read and debug. Finally, we showed you how you can use some of the preprocessor directives to (1) make your code easier to read and debug by removing magic numbers from your code, and (2) make changing constants at some point in the future less error-prone.
chapter 4 ■ Decision Making in c
76
Exercises1. What is wrong with the following code?
if (random()){ x = 50;}
2. Are there any errors in the following code?
if (j = k){ doStuff();} else { doOtherStuff();}
3. What happens when you run an LED without a resistor in the circuit?
4. Modify the HeadsOrTails program so that it reports back to your PC how many heads and tails were sensed during a given number of “coin tosses.”

77
■ ■ ■
chapter 5
Program Loops in C
One of the things computers can do more efficiently than humans is repetitive tasks. People get bored and, when that happens, their attention drifts and errors in the task at hand creep in. Computers never get bored, so they are great at performing repetitive tasks. Unless a mc loses power or a component fails, they will loop forever, unless instructed to do otherwise.
In this chapter, you will learn:
• What makes a “good” program loop
• How to use a for loop
• How to use the while statement
• How to use a do-while statement and its differences
• Infinite loops
• The break and continue keywords
You have already used program loops in every program that we have discussed. In this chapter, however, we will flesh out the details of program loops.
The Characteristics of Well-Behaved LoopsMost program loops are written to terminate at some point. However, other loops, like the loop() function you have seen in all of our programs, are written to run forever. Indeed, to stop most mc programs requires removing power from the board, uploading a new program, or pressing the reset button on the board to stop the current program from running.
In the sections that follow, we will forget about the loop() function and its infinite execution sequence. Rather, we want to look at loops that you control with your own code. With that in mind, let’s examine the three conditions that constitute a well-behaved program loop.
Condition 1: Variable InitializationAs used here, a loop is simply the execution of one or more program statements, and upon reaching the last statement of the sequence, the program goes back to the first statement and repeats the execution sequence. A well-behaved loop always initializes one or more variables to a known program state before the loop statements begin execution. Usually, the value of one variable is used to control the number of

chapter 5 ■ program Loops in c
78
iterations that are made through the statement loop. The initialization condition often involves setting the control variable to 0. This places the loop control variable in a known state. That is, its rvalue is a known quantity.
Some programmers “know” that a specific compiler initializes the rvalue of the variable to zero (or null, if it is a reference type variable). However, there is nothing in the ANSI C standard that requires the compiler to initialize all variables to 0 or null. Indeed, even null can be redefined by the compiler vendor to whatever makes sense for their particular processor. As a result, the best assumption you can make about the rvalue of a freshly-defined variable is that it contains whatever random bit pattern (i.e., junk) happened to exist at that particular variable’s lvalue. Assuming a variable is initialized automatically to some known state is just not a good programming habit.
Condition 2: Loop Control Test The second condition of a well-behaved loop is that a test is performed to determine whether another iteration through the loop statements is needed. Usually, this test involves a relational operator and the loop control variable. The outcome of the relational test determines if another pass is made through the statements controlled by the loop.
Condition 3: Changing the Loop Control Variable’s State After each pass through the loop, the expression controlling the loop must change state. If the control variable did not change state during the processing of the loop statements, the loop will execute forever. That is, the outcome of the test in Condition 2 would never change, which means the loop would run forever. Loops that run forever are called infinite loops. Recall that the loop() function is designed to do just that—run forever. However, that may not be the case for the code you are writing inside the loop() function.
With these three conditions in mind, let’s examine the for loop control structure.
Using a for LoopThe general syntax structure of a for loop is as follows:
for (expression1; expression2; expression3) {// for loop statement body}// the first statement following the for loop structure
The for loop consists of the for keyword, followed by an opening parenthesis. After the opening parenthesis come three expressions, each of which is separated from the other by a semicolon. The third expression is followed by a closing parenthesis, which is immediately followed by an opening brace. After the opening brace, there is one or more program statements that are to be controlled by the for loop. These program statements are often referred to as the body of the for loop. After the statements in the body, there is a closing brace, which marks the end of the for loop structure.
In the loop structure, expression1 usually initializes the variable that controls the loop. However, because expression1 can have a comma-separated list of subexpressions, we can’t say expression1 always initializes a loop control variable. (You will see an example of this in the next paragraph.) expression2 performs some form of logical test to determine if another pass through the loop body is warranted. expression3 is usually responsible for changing the state of the loop control variable but is not required to do so. (In fact, you could move expression3 into the loop body if you wanted to, but that’s not the conventional style.) Figure 5-1 shows the program flow of the for loop.

79
chapter 5 ■ program Loops in c
In Figure 5-1, the program begins with the definition of variable k, followed (perhaps) by some additional statements. Then the for loop is entered. First, expression1, or k = 0, is processed. Because that expression is followed by a semicolon, expression1 is a complete statement. Note that expression1 can have a comma-delimited list of subexpressions. For example, you may see something like:
for (k = 0, j = 1; k < 1000; k++) {
where j is initialized to 1 as part of expression1. You can also move the definition and initialization into expression1, as in:
for (int k = 0; k < 1000; k++) {
Note that, in this example, variable k is defined and initialized as part of expression1. I’m not a big fan of either of these two variants because I tend to believe that simple is better. Also, if the definition of k is part of expression1, that variable is removed from the symbol table when the closing brace of the for loop is reached. If you need to use k after the loop finishes, defining the variable as part of expression1 is simply not going to work.
Once expression1 is processed, control passes to expression2, or k < 1000 in Figure 5-1. (Note that program control does not return to expression1 again as part of the for statement block...it is done for the day.) What happens next depends on the outcome of expression2. If expression2 evaluates to logic true, then control is passed to the loop body statements of the loop, or point 3 in Figure 5-1. If expression2 is true and after the statements in the loop body are processed, then control is passed to expression3 where k++ is processed (point 4 in Figure 5-1.) After incrementing k, control is passed to exression2 again (point 2 in Figure 5-1). If expression2 evaluates to logic false, then the for loop ends and control passes to the first statement following the closing brace of the for loop statement block.
Usually, expression3 is used to change the state of the variable that controls the loop iterations, variable k in our example. You can have a comma-delimited list of subexpressions, as in:
for (k = 0; k < 1000; k++, j--) {
Once again, I’m not a big fan of complex expressions in the for loop expressions. Personally, I’d push the decrement of j back into the loop body’s statement block. I don’t have a strong theoretical argument for this predilection—it’s just the way I do things.
After expression3 is processed, control passes back to expression2 to test whether another pass through the loop should be made. The path now taken again depends on the outcome of the evaluation of expression2. If the expression evaluates to logic true, then the loop body statements are executed again. If the statement evaluates to logic false, then the for loop ends and control is sent to the first statement following the closing brace of the for statement block.
falsetrue
int k ;...
1
3
2 4
for (k = 0 ; k < 1000 ; k++) {
Do Something Cool (k);}
Figure 5-1. The Program Flow Using a for Loop.

chapter 5 ■ program Loops in c
80
When to Use a for LoopC provides you with several loop flavors, so how do you know which one to select? For the moment, let’s just make a simple generalization: If you know how many passes are to be made through the loop, then a for loop is usually a good choice.
Another thing you will like about for loops is that all three conditions for a well-behaved loop can be found within the parentheses of the for loop. expression1 usually is used to initialize the variable that controls the loop. expression2 usually involves a test that results in logic true or false, which determines whether another pass should be made through the loop. Finally, expression3 usually changes the state of the loop control variable. The syntax structure of the for loop makes room for all of the expressions to be in one place, almost forcing you to write a well-behaved loop. We will have more to say about this topic after all loop structures have been discussed.
The while LoopThe second type of loop structure you will examine is the while loop. The syntax of the while loop is:
while (expression2) {// Statements in the loop body} // End of while statement block
Notice that only expression2, the expression that tests whether another pass through the loop statement body is needed, appears as an integral part of the loop structure’s syntax. Obviously, you can still write a well-behaved while loop; it is just that the syntax structure does not really confront you with the three conditions the way the for loop syntax structure does. Indeed, any for loop can easily be written as a while loop.
Let’s rewrite the for loop above as a while loop:
int k;// some additional statementsk = 0; // This is expression1while (k < 1000) { // This is expression2DoSomethingCool();k++; // This is expression3} // End of the while loop
Notice the placement of the well-behaved loop expressions.
• The first condition of a well-behaved loop states that the loop control variable must be initialized to some known state. With a while loop, this initialization steps must be done before you enter the while loop because it is not part of the loop syntax itself. This is why we have the statement k = 0 just before entering the while loop.
• The second condition of a well-behaved loop is that some form of logical test must be performed on whatever variable controls the loop (i.e., k). The while loop does have expression2 as part of its syntax structure, as can be seen by the expression that appears within the parentheses that follow the while keyword. The expression k < 1000 in our example is expression2 for a well-behaved loop.
• The third condition of a well-behaved loop is that the state of the variable controlling the loop must change. There is nothing that is integral to the while loop syntax that forces you to write, or even think about, expression3. You must supply some statement within the statements of the loop body that changes the state of whatever variable controls the while loop. In our example, the statement k++ becomes expression3.
81
chapter 5 ■ program Loops in c
You should be able to convince yourself that the example while loop presented above is functionally equivalent to the code depicted in Figure 5-1 using the for loop structure. The only real difference between for and while loops is that the syntax structure of a while loop is a little less “in-your-face” about the expressions necessary to write a well-behaved loop. If you tuck that fact away in the back of your mind, then you will have fewer FFM experiences.
When to Use a while LoopIf you can write a while loop pretty much the same as a for loop, then which one should you use? Indeed, if they are functionally the same, why even have a while loop? That’s sorta like asking why have both a tack hammer and a sledge hammer in your arsenal of tools. Whereas you could drive tacks with a sledge hammer, the tack hammer makes it a little easier. The same is true with loops: One may be better-suited to a specific job than another. Although there are few hard-and-fast rules in programming, we can offer a few guidelines for your loop choice decision. As a general rule, if you must perform a task a specific number of times, a for loop is often the preferred choice. For example, suppose you are writing a piece of software that must cycle through all of the lights in the building at the end of each business day and turn off any lights that are still on. If there are, say, 1,500 lights in the building, then you know your program code must visit each of those lights to perform its task. Because the task must be performed a known number of times, most programmers would probably write the code using a for loop.
Now suppose you are writing a program that must search through an inventory list of 10,000 parts, looking for a specific part number. When that part number is found, you want to exit the loop and use the information associated with the part for some additional purpose (e.g., filling an invoice). In this case, you don’t want to necessarily visit all 10,000 parts records; you want to quit the search once you have found the part for which you are looking. Most programmers code such tasks as a while loop. The main reason is that although there may be a known maximum number of items to examine (i.e., expression2), once you find what you are looking for, you bail out of the loop—you do not visit every item.
The do-while LoopThe third type of loop structure is the do-while loop. The syntax is:
do { // Loop body statements} while (expression2);
As with the while loop, only the second condition (expression2) is an integral part of the loop structure. It is your responsibility to supply the missing two expressions. Also, although this form of loop structure is similar to a while loop, it has one major difference: with a do-while loop, you are guaranteed that the loop body statements are executed at least one time. Consider the following code fragment:
int k = 1001;while (k < 1000) { DoSomethingCool(k); k++;}
When program control first enters the while loop, the test on k fails because k was initialized to 1001. Because expression2 is logic false, the loop body statement to call DoSomethingCool() is never executed. (You could write a for loop that initializes k to 1001 and get the same result, right?) Now let’s rewrite the code as a do-while loop:

chapter 5 ■ program Loops in c
82
int k = 1001; do {DoSomethingCool(k); k++;} while (k < 1000);
In this case, the call to DoSomethingCool() is made although k is initialized (expression1) to the same value as in the while loop fragment. Therefore, the same conditions for expression1 cause different results depending on whether you use a while or a do-while loop structure. The difference is because expression2 performs its test at the bottom of the loop after the statements in the loop body have been executed at least one time. The moral of the story: It is possible to never execute the statements in the loop body with either the while or for loops structures. However, you are guaranteed that at least one pass through the loop body statements is made with a do-while loop. You will likely find that you use the do-while loop variant much less than the other two loop structures.
The break and continue KeywordsThe break and continue statements are often used within loops structures. Simply stated, a break statement sends program control to the statement that immediately follows the closing brace of the loop body. (In a do-while, control is sent to the first statement following the while statement.) The continue statement immediately sends program control to the test conditions of the loop (i.e., expression2) for this pass through the loop. That is, any statements contained in the loop following the continue statement are ignored when the continue statement executes.
The break Statement An example may help you see how the break statement works. Suppose you have a situation where you monitor the temperature of 200 vats filled with chemicals. When you find one that has reached a specified temperature, you exit the loop and call a method that adds another ingredient to the vat. How might you code such an algorithm? Consider the following code fragment:
#define MAXVATCOUNT 200#define GOALTEMPERATURE 160// Some statements...int vatTemperature;int counter = 0;loop() { while (counter < MAXVATCOUNT) { vatTemperature = ReadVatTemp(counter); if (vatTemperature == GOALTEMPERATURE) { break; } counter++; if (counter == MAXVATCOUNT) counter = 0; } AddChemicals(counter); if (counter < MAXVATCOUNT) { counter++; } else { counter = 0; // Just in case this is the last vat

83
chapter 5 ■ program Loops in c
}}
Now walk through the code, concentrating on the while loop. Because counter is initialized to 0, the while test is true (counter is less than or equal to 200) so the code calls ReadVatTermp(counter), which reads the temperature for vat number 0. That temperature is then assigned into vatTemperature. Let’s assume that the temperature is 150 degrees. The if test will fail, causing counter to be incremented by 1 (counter now equals 1). The program then uses an if statement to test whether counter is less than MAXVATCOUNT. Because the outcome of the if test is false (i.e., counter is not greater than MAXVATCOUNT), control is passed back to the while loop test expression2 (i.e., counter <= MAXVATCOUNT). Because counter is still less than MAXVATCOUNT, the process repeats.
Let’s suppose the first 50 vats don’t have the required temperature. However, vat number 51 returns a temperature that is equal to GOALTEMPERATURE. Because the two temperatures are equal, the break statement is executed. Because a break statement causes program control to be transferred to the first statement following the closing brace of the loop structure, AddChemicals(counter) is called and the chemicals are added to vat number 51 (the value stored in counter). The code must then increment counter (otherwise we might “double-add” chemicals to the same vat. We assume that the vat has enough time before the loop revisits the vat for the reaction to have changed the temperature.). Because these statements are contained within the Arduino C loop() function, program control is transferred back to the top of the loop body, and the while statement is again tested using the new value for counter.
It should be clear that the break statement is used to exit a loop before the test in expression2 would terminate the loop. It should also be pointed out that the break statement only breaks out of the loop containing the break statement. If you are using nested loops, then it may take multiple break statements to completely exit all loops.
The continue StatementCan you rewrite the break code example above to use a continue statement? Consider:
#define MAXVATCOUNT 200#define GOALTEMPERATURE 160// Some statements...int vatTemperature;int counter = 0;loop() { while (counter <= MAXVATCOUNT) { vatTemperature = ReadVatTemp(counter); if (vatTemperature != GOALTEMPERATURE) { // Big difference here... counter++; if (counter > MAXVATCOUNT) counter = 0; continue; } AddChemicals(counter); if (counter < MAXVATCOUNT) { counter++; } else { counter = 0; // Just in case this is the last vat } }}
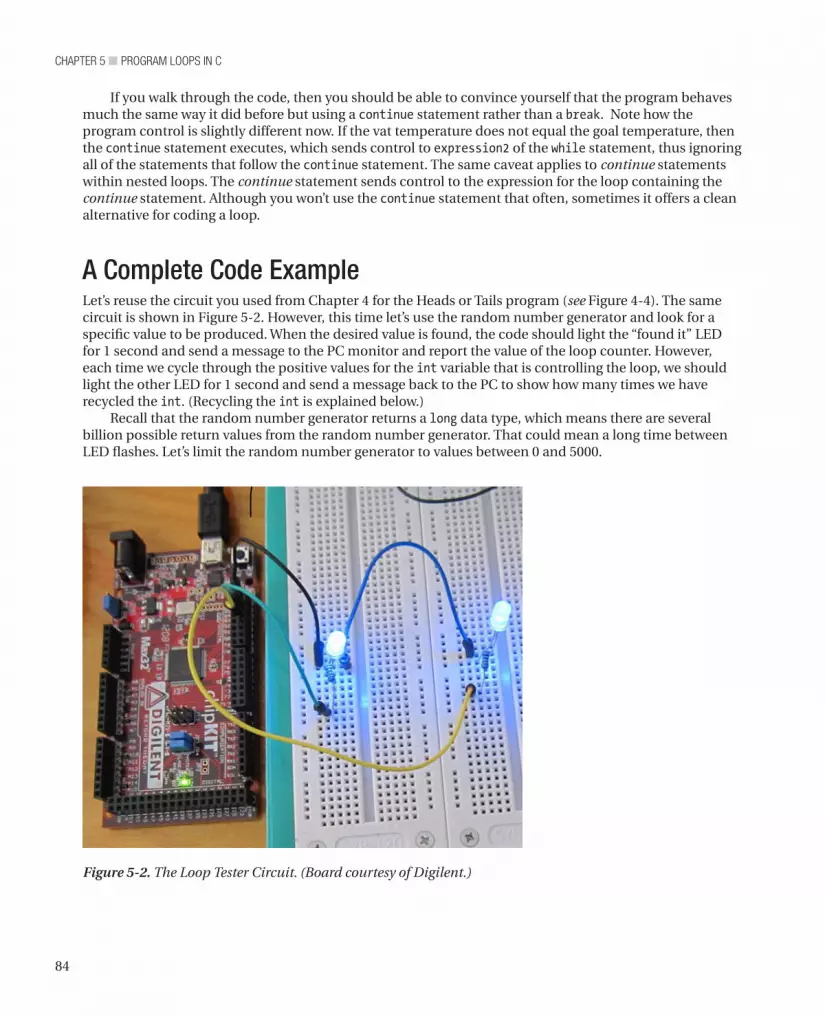
chapter 5 ■ program Loops in c
84
If you walk through the code, then you should be able to convince yourself that the program behaves much the same way it did before but using a continue statement rather than a break. Note how the program control is slightly different now. If the vat temperature does not equal the goal temperature, then the continue statement executes, which sends control to expression2 of the while statement, thus ignoring all of the statements that follow the continue statement. The same caveat applies to continue statements within nested loops. The continue statement sends control to the expression for the loop containing the continue statement. Although you won’t use the continue statement that often, sometimes it offers a clean alternative for coding a loop.
A Complete Code ExampleLet’s reuse the circuit you used from Chapter 4 for the Heads or Tails program (see Figure 4-4). The same circuit is shown in Figure 5-2. However, this time let’s use the random number generator and look for a specific value to be produced. When the desired value is found, the code should light the “found it” LED for 1 second and send a message to the PC monitor and report the value of the loop counter. However, each time we cycle through the positive values for the int variable that is controlling the loop, we should light the other LED for 1 second and send a message back to the PC to show how many times we have recycled the int. (Recycling the int is explained below.)
Recall that the random number generator returns a long data type, which means there are several billion possible return values from the random number generator. That could mean a long time between LED flashes. Let’s limit the random number generator to values between 0 and 5000.
Figure 5-2. The Loop Tester Circuit. (Board courtesy of Digilent.)

85
chapter 5 ■ program Loops in c
Given the information above, how should you start coding the solution? You start with the Five Program Steps.
Step 1. InitializationWe need to set up the I/O pins, the baud rate for the serial communication back to the PC, establish a target numeric value, define our working variables, and seed the random number generator.
Step 2. InputThe input process is fairly simple: it is the value returned from a call to the random number generator.
Step 3. Process In this case, all we need do is check to determine whether the data from the random number generator is equal to our target value. If the value is equal to our target value, then we need to prepare to turn on the “found it” LED. We also need to increment our pass counter variable and determine whether it is still positive. If not, then we need to get ready to flash the recycle LED.
Step 4. OutputIf a match was found, then we need to turn on the “found it” LED for 1 second. We also need to output a message to the PC with the current value of the counter variable. If the counter variable went negative, then we need to turn on the recycle LED for 1 second and send a message to the host PC.
Step 5. TerminationLet’s put in a termination condition. If the recycle LED has “flipped” five times, then let’s shut the program down. The serial monitor will tell us when the program ends.
You should try to write the code yourself at this point. You have enough knowledge under your belt to get the job done. It would be a cop-out to just read the code in Listing 5-1 and move on. You will learn much more if you try to write the code first.
Listing 5-1. Random Number Match
// define the pins to be used. #define MAX 5000L #define MIN 0L #define TARGETVALUE 2500L #define MAXRECYCLES 5 #define FOUNDITIOPIN 13 #define RECYCLEIOPIN 12 #define PAUSE 1000 int foundIt = FOUNDITIOPIN; int recycle = RECYCLEIOPIN;

chapter 5 ■ program Loops in c
86
long targetValue = TARGETVALUE; long randomNumber; int recycleCounter = 0; int counter = 0; // the setup routine runs once when you press reset: void setup() { // initialize each of the digital pins as an output. Serial.begin(9600); pinMode(foundIt, OUTPUT); pinMode(recycle, OUTPUT); randomSeed(analogRead(0)); // This seeds the random number generator } // the loop routine runs over and over again forever: void loop() { while (counter != -1) { // Check for negative values randomNumber = generateRandomNumber(); if (randomNumber == TARGETVALUE) { Serial.print("Counter = "); Serial.print(counter, DEC); Serial.print(" recycleCounter = "); Serial.println(recycleCounter, DEC); digitalWrite(foundIt, HIGH); delay(PAUSE); digitalWrite(foundIt, LOW); } counter++; if (counter < 0) { // We've overflowed an int counter = 0; recycleCounter++; Serial.print("recycleCounter = "); Serial.println(recycleCounter, DEC); digitalWrite(recycle, HIGH); delay(PAUSE); digitalWrite(recycle, LOW); } if (recycleCounter == MAXRECYCLES) exit(0); // End program } } long generateRandomNumber() { return random(MIN, MAX); // Generate random numbers between 0 and one million }

87
chapter 5 ■ program Loops in c
You should feel fairly comfortable when looking at the code. The setup() function initializes the baud rate for communicating with the host PC. The I/O pins are set and the random number generator is seeded. Inside the loop() function, the while loop tests to determine whether counter is negative; counter is an int, so if the current value is 32,767 and it is incremented, then the value “rolls over” because the high bit (or the sign bit) changes to a 1, which is interpreted as a negative number. This is what is meant by “recycling the int.”
Because counter is initialized to 0 when the program starts, the first while test is logic true and we enter the loop statement body. The code then calls the random number generator and checks the value against the target value. If they match, then an appropriate message is sent to the PC over the serial link and the “found it” LED is lit for a second. If no match is found, then counter is incremented. The if test then checks to determine whether counter “rolled over” to a negative value. If it did, then counter is reset to 0, the recycleCounter is incremented, a message is sent to the PC, and the recycle LED is lit for a second.
Finally, the code then checks to determine whether the recycleCounter equals the maximum number of recycles we wish to run (i.e., equal to MAXRECYCLES). If so, then the call to exit() terminates the program.
Listing 5-1 is Sorta Dumb CodeThe code in Listing 5-1 is SDC for several reasons, although it does perform as designed. First, look closely at the code and ask yourself whether the while test will ever have a chance to see a negative value for counter. The answer is No. The reason the while statement will never see a negative value is because we check for that possibility within the while loop code itself and change it to 0 if it is negative. Therefore, you might as well replace the while test with
while (true) {
which sets up an infinite loop for the while test. This is a truer statement than the phony test Listing 5-1 uses. (If something is always true, then why waste the resources to test it?) The fact that we have created an infinite loop won’t be a problem because we use exit() to terminate the program anyway. Think about it. Second, any time you see a repeating code pattern, try to think of ways to simplify it. In our case, the statements:
digitalWrite(foundIt, HIGH);delay(PAUSE);digitalWrite(foundIt, LOW);anddigitalWrite(recycle, HIGH);delay(PAUSE);digitalWrite(recycle, LOW);
are almost the same. Why not replace these statements with
ToggleLED(foundIt, PAUSE);
and
ToggleLED(recycle, PAUSE);
and write the new function:
void ToggleLED(int whichLED, int howLong) { digitalWrite(whichLED, HIGH); delay(howLong); digitalWrite(whichLED, LOW);}
chapter 5 ■ program Loops in c
88
Although these are minor changes, they do remove some clutter from the loop body and make it a little easier to read. (A more detailed discussion of writing functions is presented in Chapter 6. However, the function discussed here is a pretty simple improvement to identify and a simple function to write.) The process of simplifying or “cleaning up” the code is called refactoring. Although refactoring in this case may save a few bytes of memory and add the time overhead of a function call, these impacts are quite small. Is it worth it? To me, yes, it is. Anytime I can do anything that makes the code easier to read with little or no performance or resource penalty, I make the change. Sometimes I feel that in the rush to get something to work, I cobble the code together with bailing wire and chewing gum. Refactoring simply allows me to go back and reexamine the code so I can remove the bailing wire and chewing gum. Indeed, just thinking about future code refactoring will make you a better programmer as you write the code.
Loops and Coding StyleThe question of coding style relative to program loops really boils down to a few simple questions. First, if a loop only controls a single statement, then braces are not necessary to mark the start and end of the loop statement body. So the question becomes one that we first asked when you studied if statements: If the braces are not necessary, then should I bother using them? Yes...next question. Okay, rather than a flippant answer, the reason is because, more often than not, you will end up adding one or more statements to the loop statement body, thus forcing you to add the braces anyway. You may as well put them there from the get-go. Also, always using braces adds consistency to your code, and that is almost always a good thing.
The second question is: Should I place the opening brace of the loop statement body on the same line as the loop keyword (e.g., for, while), or should I drop it down to the next line. That is, should you use:
for (k = 0; k < 1000; k++) {orfor (k = 0; k < 1000; k++) {
Actually, I prefer to leave the opening brace on the same line as the loop keyword because that lets me see one more line of source code without having to scroll the display. However, some IDEs, like Visual Studio, default to placing the brace on the next line below the first letter of the loop keyword. If you work in a corporate environment, then you may not have a choice and have to use the style dictated by the shop. If you do have a choice, then whatever style you select, use it consistently.
Third, I don’t think I have ever seen a competent programmer who does not indent the statements within the loop body one tab stop. This is one of those situations where, if you see someone jump off a bridge, then you should follow suit and jump off, too. Always indent the statement within a loop (and if and switch statements, too!). It makes them stand out and easier to read.
Finally, sometimes you read code where there is a very long loop body with a ton of statements within the loop body. In those cases, you might see something like:
while (k < MAXCOUNT) { // a bunch of loops statements} // End: while (k < MAXCOUNT)
The intent of the comment at the end of the closing loop brace is to help find where the loop statements start and end. I rarely do this, but perhaps I should. However, if you place the cursor immediately after the closing brace of the loop, then the Arduino IDE “boxes” the matching opening brace up at the top of the loop. Because of this and although the comment is laudable, I usually don’t bother adding such comments.

89
chapter 5 ■ program Loops in c
SummaryBecause of the way Arduino C uses the loop() function in all its programs, you have been using loops since you ran your very first program. However, this chapter has introduced you to program loops in a more formal way plus making you aware that there are several different loop structures. You should now be comfortable using for, while, and do-while loops in your programs. You should also understand what the necessary and sufficient conditions are for a well-behaved program loop.
Take some time to invent a few loop programs of your own. If you can tie the code to a circuit, then so much the better. You will always learn more if you try to create your own code.

chapter 5 ■ program Loops in c
90
Exercises1. In the following code fragment:
int k;for (k = 0; k < 1000; k++) { k = DoSomethingCool(k);}
What happens if the function DoSomethingCool() ends up decrementing k before it passes the value back to the for loop statement body?
2. What happens in the following code fragment?
#define EVER ;; // Just two semicolons...
// Some statements
for (EVER) { // Do some statements here } // The rest of the program
3. Suppose you want to find a part that has the numeric ID number 1000 out of an inventory that has 500,000 items. Although all part numbers are present in the inventory list, they are not necessarily in sorted order. (That is, you can’t assume that part number 1000 is the 1000th item in the inventory list.) Write a code fragment for the loop to look for the part number.
4. In the most general terms possible, when would you use the various loop structures?
5. What is refactoring?
6. Which loop coding style do you prefer and why?

91
■ ■ ■
chapter 6
Functions in C
You already know what a function is, but let’s give it a formal definition. A function is a body of code designed to solve a particular task. You should think of a function as a black box, the contents of which are unknown to you. All you care about is that it addresses some task to be accomplished in your program. Hundreds of functions are available for you to use in various function libraries. A function library is simply a collection of functions that share a common area of interest (e.g., the Math and Time functions in Arduino C.) Functions make your life easier because you can stand on the shoulders of those who came before you. You can use their code rather than writing, testing, and debugging the code yourself.
In this chapter you will learn:
• The various components that make up a C function
• What function arguments are
• What function parameters are
• How data are passed between your program and a function Which design considerations are important when designing a function
• What pass-by-value means
• What the program stack is and how it is used with functions
• What a function signature is
• What an overloaded function is
There is a lot of information packed into this chapter. Take your time and think about what you are reading...functions are a basic building block of all C programs.
The backbone of C is its robust library of functions. In fact, C is one of the few languages that doesn’t have any I/O capability built into the language. ANSI C only has 32 keywords; Arduino C has slightly less. Contrast those keyword counts with a language like Visual Basic with more than 170 keywords, and you may wonder how you can do anything with C. Actually, C purposely was designed to be a crisp language with a minimal number of keywords. Rather than bloat the language with a high keyword count, C pushes many standard language tasks off into its standard function library. The neat part about this approach is that you are not constrained by the way that the language does things. If you don’t like the way the existing library routines do things, then you are free to write your own replacement. Later in this chapter, we will write a replacement for the standard library routine that determines whether a specified year is a leap year. Although I may think my IsLeapYear() function is better than yours, you are free to disagree and write
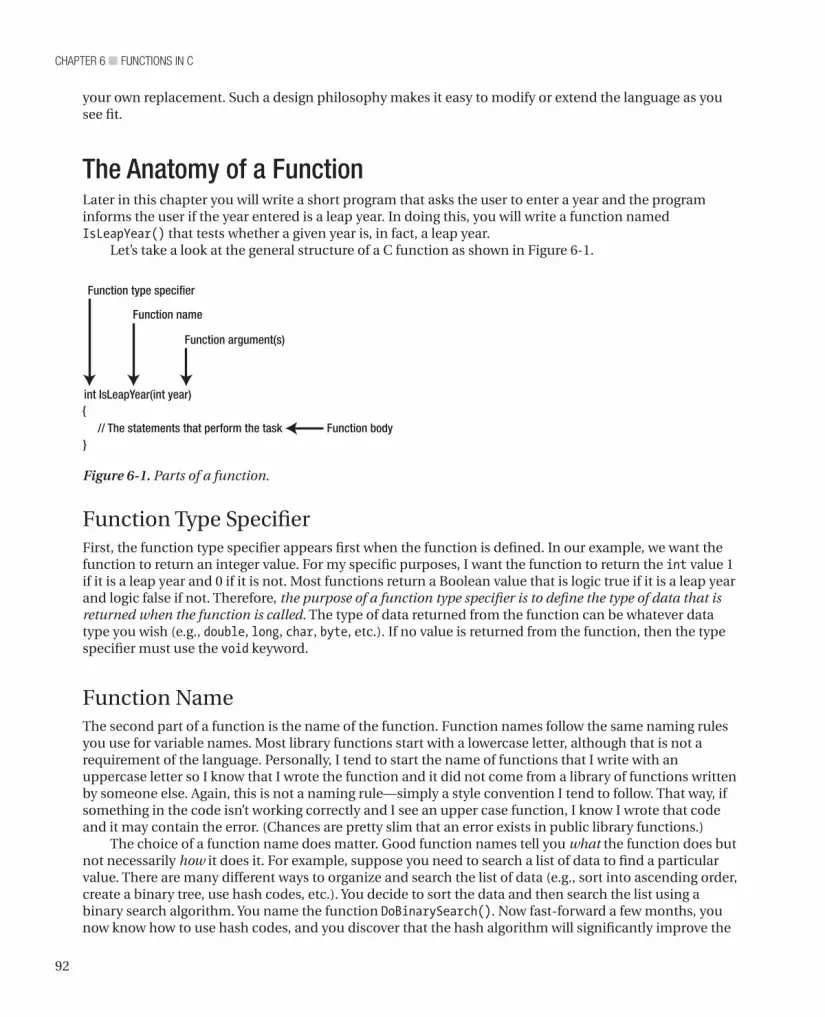
chapter 6 ■ Functions in c
92
Function Type SpecifierFirst, the function type specifier appears first when the function is defined. In our example, we want the function to return an integer value. For my specific purposes, I want the function to return the int value 1 if it is a leap year and 0 if it is not. Most functions return a Boolean value that is logic true if it is a leap year and logic false if not. Therefore, the purpose of a function type specifier is to define the type of data that is returned when the function is called. The type of data returned from the function can be whatever data type you wish (e.g., double, long, char, byte, etc.). If no value is returned from the function, then the type specifier must use the void keyword.
Function NameThe second part of a function is the name of the function. Function names follow the same naming rules you use for variable names. Most library functions start with a lowercase letter, although that is not a requirement of the language. Personally, I tend to start the name of functions that I write with an uppercase letter so I know that I wrote the function and it did not come from a library of functions written by someone else. Again, this is not a naming rule—simply a style convention I tend to follow. That way, if something in the code isn’t working correctly and I see an upper case function, I know I wrote that code and it may contain the error. (Chances are pretty slim that an error exists in public library functions.)
The choice of a function name does matter. Good function names tell you what the function does but not necessarily how it does it. For example, suppose you need to search a list of data to find a particular value. There are many different ways to organize and search the list of data (e.g., sort into ascending order, create a binary tree, use hash codes, etc.). You decide to sort the data and then search the list using a binary search algorithm. You name the function DoBinarySearch(). Now fast-forward a few months, you now know how to use hash codes, and you discover that the hash algorithm will significantly improve the
your own replacement. Such a design philosophy makes it easy to modify or extend the language as you see fit.
The Anatomy of a Function Later in this chapter you will write a short program that asks the user to enter a year and the program informs the user if the year entered is a leap year. In doing this, you will write a function named IsLeapYear() that tests whether a given year is, in fact, a leap year.
Let’s take a look at the general structure of a C function as shown in Figure 6-1.
Function type specifier
Function name
Function argument(s)
int IsLeapYear(int year){
// The statements that perform the task Function body}
Figure 6-1. Parts of a function.

93
chapter 6 ■ Functions in c
performance of your program. You write the function and name it DoHashSearch(). Now you have to go back through your source code and change all instances of DoBinarySearch() to DoHashSearch(). True, you could just change the code in the DoBinarySearch() to implement the hash code algorithm, but that seems a little deceptive. Also, if someone else has to look at your code, they read it expecting to find a binary search algorithm and end up scratching their head because they are reading a hash code algorithm.
A better name for the function would be FindListItem(). The reason it is a better name is because it tells the user of the function what the function does, rather than how it is done. If you decide to implement a different algorithm at some later date, then you can do so with a clear conscience because the function name says nothing about how things are done. A function should be a black box in that it tells you what it does but provides no details on its implementation.
Some of you are saying: “But major language and compiler vendors do have functions named ShellSort(), QuickSort(), and other algorithm-specific names.” True, but you want your functions to be task-specific, rather than algorithm-specific. If you are working with a language that offers you a choice, great! However, I would still write my own function, as in:
int FindListItem(int list[], int target){ ShellSort(list); // Sort the data return FindItem(list, target); // Find the item}
In this case, you have wrapped the details of how the sort is done in a function that says what is to be done. If you decide later that some other algorithm works better, then it is very easy to make the change.
Function ArgumentsAfter the function name comes an opening parenthesis followed by zero or more function arguments. Function arguments are used to pass data to the function that it may need to perform its task. Multiple function arguments are delineated with commas between arguments. You often hear programmers refer to function arguments as an argument list. The argument list ends with a closing parenthesis.As mentioned before, you can think of a function as a black box with a front door, back door, and no windows. (What goes on inside the black box stays inside the black box...no peeking as to its implementation.) Program control enters the front door carrying a backpack with any data in it that the function needs to perform its task. The contents of the backpack are the function arguments. Some functions, like the setup() and loop() functions you have seen in every program, do not need outside help to do their thing. In these cases, the function has a void argument list and the backpack is empty. (Indeed, you can write the word void as the argument list for both setup() and loop(), recompile the program, and the compiler is completely happy with the changes.)
After the function does its thing, you emerge from the back door with the backpack. The content of the backpack is the data produced by the function. The type of data is dictated by the type specifier for the function. If the backpack is empty, then the type specifier for the function is void. If, for example, the backpack contains a floating point number when control exits the back door, the function type specifier for that function must be either float or double, depending on the type of data the programmer who wrote the function decides is needed.For example, consider:
int buyNails;int nailsPerFoot;int numberOfFeet;// some more code...buyNails = NailsNeeded(nailsPerFoot, numberOfFeet);

chapter 6 ■ Functions in c
94
The NailsNeeded() function has two arguments, nailsPerFoot and numberOfFeet. In this example, the backpack is stuffed with the value of these two int rvalues and control is sent to the NailsNeeded()function. Once inside the function’s front door, program code removes the two ints, does some form of calculation, places a count of the nails needed as an int into the backpack, and sends control back to the caller. Upon return from the function, the content of the backpack is then dumped into the variable named buyNails. Stated differently, the content of the backpack becomes the rvalue of buyNails. One of the advantages of function arguments is that the compiler can check to ensure that you are passing the correct type of data to the function. For example, if you tried to make the call to the standard library function named bit() using:
bit(2.33);
then the compiler complains because it knows that the argument to the function cannot be a floating point number. Catching this kind of mismatch between the type of data being sent to a function and the data type that the function expects is one form of type checking. The compiler also performs type checking on the value returned from a function...sort of. You could write:
int val = pow(10000, 2); //WRONG!
and the compiler does not complain. However, this code is wrong on two levels. First, pow() returns a floating point number and the code is trying to jam a 4-byte float into an int. Second, the numeric value computed by pow() in this example would overflow the maximum value an int can hold. (INT_MAX is a #define’d constant for the maximum value of an int. You can use this constant in your code for range checking.) The lesson here is that the Arduino C compiler performs some type checking, but some errors can slip through the cracks. If a function is returning bogus values, then make sure you are passing data to the function that is consistent with its argument list. Also, make sure that the return value matches the variable type you are using to hold the return value.
You can get more help from the compiler when tracking down bugs of this nature. Go to the File Preferences menu option and check the box that tells the compiler to issue “verbose” messages during compilation. These verbose messages often are helpful when tracking down some types of program errors. When the verbose mode is turned on, you will also get processing messages (displayed with white lettering) that simply detail normal compile processes, and the list can be quite long and scroll out of view. However, compiler warnings are displayed in orange lettering and you can scroll back through the messages and read those that are of interest to you.
Function BodyThe function body begins with the opening brace (“{“) that follows the closing parenthesis of the argument list and extends to the closing brace (“}”) of the function. All of the statements between these two characters comprise the function body.
If the function type specifier is anything other than void, then at least one of the statements in the function body must contain the keyword return. For example:
int VolumeOfCube(int width, int length, int height){ int volume; volume = width * length * height; return volume;}
In this example, the function type specifier is an int, so the function must have a return statement in it. If you forgot the statement:
95
chapter 6 ■ Functions in c
return volume;
then the compiler should issue an error message. You can think of the return statement as an instruction telling the compiler what to put back into the backpack. If the function type specifier is void, then there is no need to place anything in the backpack. Otherwise, there needs to be a return statement telling the compiler what data type to put in the backpack and return back to the caller.Note that experienced C programmers tend to make their code as short as possible. As a result, programmers often would write the code as:
int VolumeOfCube(int width, int length, int height){ return width * length * height;}
which removes the temporary variable volume.Unfortunately, the Arduino C compiler lets you get a little lazy about return values. For example, if you
wrote:
int myFunction(int a){ int temp = a;}
Then the compiler should complain that you are not returning a value from the function although you used the int type specifier. Alas, unless you have the verbose compiler messages turned on, the compiler is mute about this error. This can be nettlesome if you did something like:
int number = myFunction(10);
because some kind of indeterminate junk is going to be assigned into number. Debugging this type of error can be frustrating because the code looks so simple and you are getting no debugging hints from the compiler. Just keep in mind: When the compiler seems to be executing code that isn’t there...it isn’t. The compiler is doing exactly what you told it to do. It is just not being very helpful in telling you what you meant to do is not what it is doing.
Function Signature Sometimes you may hear the term function signature when discussing functions. A function signature is comprised of everything following the type specifier through the closing parenthesis of the argument list. For example, for the VolumeOfCube() function, the function signature is:
VolumeOfCube(int width, int length, int height)
In other words, a function signature tells you the name of the function and the data it expects to be passed to it as arguments.So what?
The function signatures are important because you can have more than one function with the same name. For example, the random() function that you used in Chapter 4 was used in the following manner:
random(0, 1000000);
However, if you look up the documentation for the random() function (http://arduino.cc/en/Reference/Random), you will find:

chapter 6 ■ Functions in c
96
random(max)random(min, max)
If the two functions have the same name, how does the compiler know which one to use? The compiler has no problem making that decision because the function signatures are different. Because we called the function using two arguments, the compiler knows to use the function definition that has an argument list that uses two arguments.
Overloaded FunctionsAnytime a function has two or more different signatures, it is called an overloaded function. (Technically, the C programming language does not allow overloaded functions, whereas C++ does. Because the Arduino C compiler is built on the Gnu C++ compiler, Arduino C does permit overloaded functions. This is a good thing!) Often, two signatures are used when a default value doesn’t solve the task at hand. For example, we could have used:
random(1000000);
because the default starting value for the random number generator is 0. However, if you wanted to simulate throwing a pair of dice, the lowest possible value is 2 (i.e., snakeyes), so you would use:
random(2,13);
Note that the max argument for the random() function is an exclusive value, so the correct number for a pair of dice is 13, not 12.
Overloaded functions add a degree of consistency (i.e., using the same name) in a programming situation where there is a small nuance of difference in what the function needs to perform its task. We will have more to say about overloaded functions in later chapters.
What Makes a “Good” Function We have already touched on some of the things that are part of a good function definition, but let’s consider those conditions in a little more depth.
Functions Use Task-Oriented NamesA good function name is a description of what the function does. Usually, a function is designed to solve some particular problem or task. If so, the function name should reflect what the function does. Often the function name is action-oriented, such as GetThis(), DoThat(), SetBit(), ReadIOBit(), and so forth. Such names reflect the nature of the task at hand, not how that task is accomplished.
As mentioned earlier, function names should reflect what is to be done, rather than how it is done. The exception is when you are writing a function that specifies the way something must be done (e.g., BubbleSort(), ShellSort(), CreateLinkList(), etc.). Using task-oriented function names makes it easier to change the underlying algorithm without breaking existing code.
The Function Should Be CohesiveA cohesive function is a function that is designed to accomplish a single task. Chances are, if you can’t explain to someone what a function does in two sentences or less, then the function is too complicated

97
chapter 6 ■ Functions in c
and is not cohesive. In such cases, redesign the function and break it into smaller tasks and make each of those smaller tasks a function.
Students often want to build a Swiss Army knife function—a function that is designed to address multiple tasks at once and, inevitably, doing none of them well. Which would you rather use to cut down a tree: a Swiss Army knife or a chain saw? Although a Swiss Army knife has multiple uses, including a small three inch saw, I would much rather use a chain saw to cut down a tree: specific task, specific tool.
Also, Swiss Army knife functions are likely more complicated than they need to be and, as a result, are more error prone. Another shortcoming of the Swiss Army knife function is that its task list is so specific it can rarely be reused in other programs. By breaking the tasks down, you increase the odds that you can reuse that function in another program.
How do you know when a function lacks cohesion? First, the two-sentence rule is a good start in deciding whether the function attempts to do too much. Another tip-off is when you see an argument list with three or more arguments. Usually, a single-task function does not need all that much help in terms of data from the outside world. When you see a long argument list, you should step back and ask yourself whether the function is cohesive.
Functions Should Avoid CouplingCoupling refers to the need for one function to depend on the results of another function to perform its task. For example, earlier we mentioned a function named FindListItem() and suggested:
int FindListItem(int list[], int target){ ShellSort(list); // Sort the data return FindItem(list, target); // Find the item}
This is really not a good function because it has two tasks:
1. Sorting the data
2. Finding the item in the sorted list
It would be better to remove the ShellSort() function call out of the FindListItem() function, and move the FindItem() function code into the FindListItem() function body. You could then toss the FindItem() function away. The FindListItem() is no longer coupled to (or depends on) the ShellSort() function to perform its task. The function is also more cohesive now because it no longer is required to perform two tasks.
There are situations where you cannot totally avoid some level of coupling. If your program has to write to a data file, you need to open the file first. If you are reading a sensor, then there may be a sequence of tasks that must be performed in a specific order for the sensor to do its job. For example, if you need to read a line of text from a data file, then it is better to have separate Open(), Read(), and Close() functions than to bury the Open() and Close() functions within a Read() function. That way, you can still have a cohesive function with minimal coupling. Also, you can probably reuse Open(), Read(), and Close() in other programs.
Writing Your Own FunctionsWhat is the first step you should do when writing your own functions? The first step should be to determine whether someone else has already written the function. A good place to start your search is http://arduino.cc/it/Reference/Libraries. A Google search may also be a productive area of

chapter 6 ■ Functions in c
98
investigation. If you purchase a shield or some other hardware specific board, then you should also determine whether their website hosts source code from their customers. Many do, and some of the code is very good. The lesson is: Don’t write code if you don’t have to.
Assuming you can’t find an existing function that fulfills your needs, then it is time to consider designing your own function. For this example, you are going to design and write a function that determines whether a given year is a leap year or not. For the existing libraries I could find, their leap year function returns a Boolean value of true if it is a leap year or false if it is not a leap year. Although I could make do with those existing functions, it does not behave the way I want to use it. (We’ll set the function design goals in a few moments.) So, let’s make a small trip to the drawing board.
Function Design ConsiderationsClearly, you need to design the function to accomplish a single (cohesive) task. Figure 6-1 provides a useful roadmap for starting our design. Let’s examine the pieces of Figure 6-1 from a design perspective.
Function Type SpecifierFirst, what data type do we want the function to return? Although the leap year function for most language libraries (C, Java, C++, Visual Basic, C#) return a Boolean, we want ours to return an int. Why an int data type for the return value rather than a Boolean? The reason is because the most common use for a leap year calculation is to determine how many days there are in February for a given year. Perhaps the day makes a difference in a billing cycle, interest payment, or some other calculation. Whatever the reason, if you use a “standard” leap year calculation, then you need code that looks something like the following:
// some code...int daysInFeb;
if (IsLeapYear(year) == true) daysInFeb = 29;else daysInFeb = 28;
This code is SDC, so we might refactor it by initializing daysInFeb and remove the else clause:
// some code...int daysInFeb = 28;
if (IsLeapYear(year) == true) daysInFeb = 29;
The problem is that we still need the if statement to set the proper number of days in February. However, if you write the function to return 1 (as an int) if it is a leap year or 0 otherwise, then you can write:
// some code...int daysInFeb = 28 + IsLeapYear(year);
Given what we want the function to accomplish, this is a good design for your solution. As a general rule, less code is good code as long as its intent remains clear.
99
chapter 6 ■ Functions in c
show-off code
I just saw the following C statement:
i=(i<<3) + (i<<1) + (*string - '0');
Essentially, this takes an ASCII digit code and multiplies it by 10. Although this is clever code, I would fire the guy who wrote it if he worked for me because it is “show-off code.” Writing code like this is difficult for other programmers to decipher and just is not worth the hassle.
Function NameYou have already settled on a name. IsLeapYear() suggests that the function is going to address the task of finding out whether a given year is a leap year. Will this cause a function name collision (i.e., two functions with the same name) in your code? After all, this name is used in some other libraries, and the function signature is the same. Even if you do happen to include a library with the same function name, then the compiler gives precedence to the function whose source code is being compiled. Because you are supplying the source code for the function, name collision is not a problem.
Argument ListOur function does need data from the “outside world” to accomplish its task. Specifically, the backpack needs to have an int data type that specifies the year stuffed into it before we call the function. Again, visualizing a function as a black box with a single entry and exit point is a good mental picture for the way a function should work. That is, after you write this function, handing the function to another programmer for use of your function should prompt only three questions from them:
• What task does this function perform?
• What data do I need to send to the function?
• What data do I get back from it?
If you have done your design work well, the function name answers the first question, the argument list answers the second question, and the function type specifier answers the third question. When the day is done, a programmer could care less how you write the code inside the function as long as it accomplishes the task at hand with reasonable efficiency.
Function BodyThe function body begins with the opening brace, followed by the statements that are necessary to accomplish the task at hand, followed by a closing brace. Because our type specifier returns an int, you immediately know that one of the statements must use the return keyword to send a value back from the function.
If you think about it, the function argument list corresponds to the Input Step of the Five Program Steps you learned in Chapter 2. The function body reflects the Process Step because it contains the statements necessary to solve the task. Now you need an algorithm that tells you how to determine whether a year is a leap year.
You can Google leap year and find the algorithm for the leap year calculation. An algorithm is simply a step-by-step set of instructions for solving a problem. The leap year algorithm states:

chapter 6 ■ Functions in c
100
If the year can be evenly divided by 4, but not by 100, it is a leap year. The exception occurs if the year is evenly divisible by 400, it is a leap year.
Although you could write the code using a couple of nested if statements, C provides a less messy way of writing the code. To implement this algorithm, let’s take a small detour and learn about the logical operators C provides to you and how you can use them.
Logical OperatorsLogical operators allow you to combine logical expressions. The logical operators are presented in Table 6-1.
Table 6-1. Logical Operators
Type Meaning Example&& Logical AND X && Y
|| Logical OR X || Y
! Logical NOT !X
The best way to illustrate the use of the logical operators is to first consider how they relate to a concept known as a truth table. Truth tables show all of the possible outcomes of a logical test using two expressions.
Logical AND Operator (&&)The AND operator is formed by placing two ‘&’ characters back-to-back with no space between them (&&). Consider the truth table for the logical AND operator as shown in Table 6-2.
Table 6-2. Logical AND (&&)
Expression1 Expression2 Expression1 && Expression2TRUE TRUE TRUE
TRUE FALSE FALSE
FALSE TRUE FALSE
FALSE FALSE FALSE
Suppose you have variables k and j and k equals 2 and j equals 3, then the statement:
if (k == 2 && j == 3)
finds expression1 is true and expression2 is also true. Looking in Table 6-2, you can see that the result of the && operation within the if statement must therefore be true. However, using the same values for k and j, the following statement:
if (k == 9 && j == 3)
results in expression1 being false (k is not equal to 9), which corresponds to the third row in Table 6-2 (i.e., False-True for the expressions) yielding a false condition for controlling the outcome of the if statement.

101
chapter 6 ■ Functions in c
As you can see from Table 6-2, a logical AND operation only yields a logic true result when both expressions are true. All other combinations are logic false.
In complex expressions, you may have multiple logical operators being used. (You will write one later in this chapter.) If that is the case, then you also need to know where the logical operators fit in with respect to operator precedence. Table 4-2 from Chapter 4 (the page number of which you wrote on the back cover of this book, right?) shows that the logical AND and OR operators have precedence levels of 10 and 11 in Table 4-2, respectively. As you can see from Table 6-1, the NOT operator is a unary operator, and from Table 4-2 we can see it has a relatively high precedence level of 2. You can use the precedence table to resolve complex statements.
Logical OR (||)The logical OR operator is formed by placing two vertical bar ‘|’ (also called pipe) characters back-to-back with no space between them (||). The truth table for the logical OR operator is shown in Table 6-3.
Table 6-3. Logical OR (||)
Expression1 Expression2 Expression1 || Expression2TRUE TRUE TRUE
TRUE FALSE TRUE
FALSE TRUE TRUE
FALSE FALSE FALSE
Once again, suppose you have variables k and j and k equals 2 and j equals 3, then the OR expression in the following:
if (k == 2 || j == 3)
is logic true. However, it is also true that
if (k == 9 || j == 3)
results in logic true for the OR expression when it was logic false for the AND operator. A logic OR is only false when both expressions are false. As long as at least one expression is true, the outcome is true. In fact, if the first evaluated expression in an OR statement is logic true, then the code will not even bother evaluating the next part of the OR statement. This is called short-circuit expression evaluation and allows the compiler to perform a small code optimization.
Logical NOT (!)The logical NOT operator is the exclamation point (!). Because the logical NOT operator is a unary operator, its truth table is a little simpler, as shown in Table 6-4.
Table 6-4. Logical NOT (!)
Expression1 ! Expression1TRUE FALSE
FALSE TRUE

chapter 6 ■ Functions in c
102
As you can see in Table 6-4, all the NOT operator does is invert the logic of the expression. For example, suppose k equals 2 again. Then:
if (! k == 2)
is logic false. Because expression1 is true (k does equal 2), Table 6-4 shows that the result of the logical NOT operator is logic false. I surround the expression in a NOT operation with parentheses, as in:
if (! (k == 2) )
because the test for equality operator (==) has a lower precedence than the NOT operator. Also, the parentheses make the intent of the expression more clear.
Writing Your FunctionNow that you understand the logical operators, let’s write the body of our function. Repeating our leap year algorithm:
If the year can be evenly divided by 4, but not by 100, it is a leap year. The exception occurs if the year is evenly divisible by 400; then it is a leap year.
Let’s break this down part-by-part.First, the statement, “If the year can be evenly divided by 4” means that dividing the year by 4 should
not produce a remainder after division. This is precisely what the modulo operator (%) is intended for—it returns the remainder after integer division. You can write this element of the algorithm as the logical expression:
(year % 4 == 0)
Second, the statement, “but not by 100” is actually saying, “but the year is not evenly divisible by 100.” Again, the modulo operator (%) is designed for this type of operation, so you can write the expression as:
(year % 100 != 0)
Taken together, if both of these expressions are true, the year is a leap year. Therefore, you can write the two expressions as:
(year % 4 == 0) && (year % 100 != 0)
If these two expressions are true, then it is a leap year. This complex expression corresponds to the first row in Table 6-2. You are not done, however, because of the “exception” stated in the algorithm. The third expression is, “The exception occurs if the year is evenly divisible by 400, it is a leap year.” You can write this expression as:
(year % 400 == 0)
The algorithm states that, regardless of the other two expressions, if this expression is true, then it is a leap year. Therefore, if the complex expression:
(year % 4 == 0) && (year % 100 != 0)
is true, or if the simple expression
(year % 400 == 0)

103
chapter 6 ■ Functions in c
is true, then the year is a leap year. Clearly, this is a situation where the OR operator is needed for the exception. Now that you have broken the algorithm down into its component expressions, you can write the test on year to determine whether the year is a leap year. The complete if test becomes:
if (year % 4 == 0 && year % 100 != 0 || year % 400 == 0) { return 1; // It is a leap year} else { return 0; // not a leap year}
If you read the if expression above, you literally end up restating the leap year algorithm. Now let’s take all the pieces-parts and fit them into a function.
The IsLeapYear() Function and Coding StyleNo doubt you can take things from here and finish writing the leap year function. However, let me suggest that the coding style you use does make a difference. Although there are no coding style “rules” for functions, the function style shown in Listing 6-1 has served me well over the years.
Listing 6-1. The IsLeapYear() Function
/*****Purpose: Determine if a given year is a leap yearParameters:int year The year to test
Return value:int 1 if the year is a leap year, 0 otherwise*****/int IsLeapYear(int year){ if (year % 4 == 0 && year % 100 != 0 || year % 400 == 0) { return 1; // It is a leap year } else { return 0; // not a leap year }}
This style leads into the documentation for the function using a multiline opening comment sequence of characters (/*) followed by four more asterisks. The next line defines the task that this particular function is supposed to address. The next statement (or statements if the function has more parameters) tells the nature of the data that are being passed into the function. If you enter the black box with an empty backpack, then you should still have a parameters section. In that case, however, you just specify void for the parameter list.
Arguments versus ParametersNote that I specifically use the term parameters here but arguments elsewhere. When you call the IsLeapYear() function, you determine which variable has its value sent to the function. You might, for example, have an array of integer values, each of which represents a year. You may decide that year[3] has its value passed into the IsLeapYear() function. That is, you get to decide which argument gets passed (e.g., IsLeapYear(year[3])).

chapter 6 ■ Functions in c
104
Now look at things from the IsLeapYear() perspective. It has no choice about the data: the value to be used is “dictated” to it...that value is handed to the function (in a backpack shoved through the front door!), and it has no choice in the matter. Therefore, think of an argument as a choice that the programmer makes as to the value that gets sent to the function. Think of a parameter as a value that is forced onto the function code—there is no choice.
After the parameter list comes the Return value element of the function documentation. Clearly, the value returned from the function is dictated by the function type specifier. However, the documentation should state the interpretation of that value. In our case, a value of 1 means the year passed to the function is a leap year, and 0 means the year is not a leap year.
Following the return value comes a series of four asterisks and a closing multiline comment character pair, *****/. This sequence is used to delineate the end of the function documentation comment. The next line is the beginning of the function definition and starts with the function type specifier (int) and is followed by the function signature (IsLeapYear(int year)). The next line is the opening brace of the function body, followed by the statement(s) that comprise the function body, followed by the closing brace of the function body.
Why Use a Specific Function Style?Once again, C could care less about the coding style you use, so why use this style? I owned a software company that produced C programming tools for almost 20 years, and I insisted that every function a programmer wrote followed this style...exactly. If I found code that didn’t use this style, then that programmer had to buy lunch on Friday for all the other programmers. It didn’t take long for new programmers to learn the coding style rules.
The reason for following these coding style rules was because it lent itself to creating a self-documenting programmer’s manual. Early in the company’s history, I wrote a program that would search through all of the C source code files looking for the /***** character sequence. Once that sequence was found, I knew that everything from that point until the program read the *****/ character sequence was the documentation comment for that function. The program then copied the complete comment plus the line following the ending comment sequence (i.e., the function type specifier and signature) into a simple text file. The program also wrote the source file name (e.g., date.c) and the line number where the function started in the source file.
After all the source files were read, the program sorted the functions by name and printed out the text file. The resulting printout then contained a complete list of all the functions that were available in the function library arranged in alphabetical order, including the source file name and line number.Had a consistent style not been used by the programmers, this type of manual would be much more difficult to produce and the process would have been less automated. Also, using a consistent style makes it easier for programmers to read each other’s code. Even if you are just writing code for yourself, a consistent style will still make it easier for you to read your own code, especially 6 months down the road. Whatever style you end up using, make sure you use it consistently. It will make life easier for you in the long run.
Leap Year Calculation Program The code in Listing 6-2 presents a complete program designed to take input from the user and determine whether the year entered is a leap year. The setup() function simply establishes the communications rate and initializes the serial buffer. You can think of the serial buffer as a small (128 byte) section of memory devoted to storing data from the serial port.

105
chapter 6 ■ Functions in c
In the loop() function, the call to the Serial.available() function returns the number of data bytes that are currently in the serial buffer. If any data are available, several working variables are defined, and the program calls ReadLine().
Listing 6-2. Leap Year Program
/** Program: find out is the user typed in a leap year. The code assumes the user is not an idiot and only types in numbers that are a valid year. Author: Dr. Purdum, Aug. 7, 2012**/
void setup(){ Serial.begin(9600);}
void loop(){ if (Serial.available() > 0) { int bufferCount; int year; char myData[20];
bufferCount = ReadLine(myData); year = atoi(myData); // Convert to int Serial.print("Year: "); Serial.print(year); if (IsLeapYear(year)) { Serial.print(" is "); } else { Serial.print(" is not "); } Serial.println("a leap year"); }}
/***** Purpose: Determine if a given year is a leap year Parameters: int yr The year to test Return value: int 1 if the year is a leap year, 0 otherwise*****/int IsLeapYear(int yr){ if (yr % 4 == 0 && yr % 100 != 0 || yr % 400 == 0) { return 1; // It is a leap year } else {

chapter 6 ■ Functions in c
106
return 0; // not a leap year }}
/***** Purpose: Read data from serial port until a newline character is read ('\n') Parameters: char str[] character array that will be treated as a nul-terminated string Return value: int the number of characters read for the string CAUTION: This method will sit here forever if no input is read from the serial port and no newline character is entered.****/int ReadLine(char str[]){ char c; int index = 0; while (true) { if (Serial.available() > 0) { c = Serial.read(); if (c != '\n') { str[index++] = c; } else { str[index] = '\0'; // null termination character break; } } } return index;}
The code for the ReadLine() appears near the bottom of Listing 6-2. Although the ReadLine() code has some SDC elements in it, it is good enough for our purposes here. (See the Review Questions and Exercises at the end of the chapter.) The code uses an infinite while loop to wait for a character to appear in the serial buffer. When that happens, the character is read into variable c via the call to Serial.read(). (Notice how library functions use a lowercase letter for the start of the function name, whereas my functions all start with an uppercase letter. Most Arduino libraries use the objected oriented syntax of an uppercase class name (e.g., Serial) followed by a lowercase function name (e.g., read()) with a dot operator separating the two names.) If that character is not a newline character ('\n', which is C’s abbreviation for pressing the Enter key), then that character is assigned into the character array that was passed into the function (str). Variable index dictates where the character is placed in the array and a post-increment prepares index for the next character.
If a newline character is read, then that character is not placed into the character array. Rather, the newline character is replaced with a null character ('\0') and placed into the array. Recall from Chapter 4 that the null character is used to terminate character strings in C. Therefore, the character array can now be treated as a string variable by the rest of the program.
At this point, index holds the number of characters in the string (the null is not counted in the string length). The character count stored in index is returned to the caller in case they need to use it in some way. This is why the type specifier for the ReadLine() function is an int.

107
chapter 6 ■ Functions in c
Upon return from ReadLine(), the code calls the standard library routine atoi() (ASCII to integer) to convert the contents of the string variable to an integer variable named year. The call to IsLeapYear() then determines whether the year is a leap year.
Figure 6-2 shows what the serial monitor looks like as the program runs. You can activate the serial monitor using the Tools Serial Monitor menu sequence or by using the Ctrl-Shift-M key sequence.
Figure 6-2. Using the Serial Monitor.
To activate the program, place the cursor in the textbox at the top of the serial monitor dialog box and type in the year to test. Click on the Send button to transfer the data to the serial buffer on the mc board. The call to IsLeapYear() then causes the appropriate message to be sent back to the PC, as shown in Figure 6-2. (Make sure you see the Newline choice in the dropdown listbox at the bottom of the monitor.)
There are a few things going on in the program that we will defer until the next chapter. However, it is important that you understand the mechanism the function uses to pass data into and back from a function.
Passing Data Into and Back From a FunctionUnderstanding how data are passed back and forth between a function and the main program is important. What follows is a simplified description of how things work when functions have arguments being passed into them and values being passed back from them. Although I have taken a few liberties, the concepts are true.
Consider the following line from Listing 6-2.
if (IsLeapYear(year)) {
In this example, the function call to IsLeapYear() becomes expression1 for the if statement. Let’s see how this works.
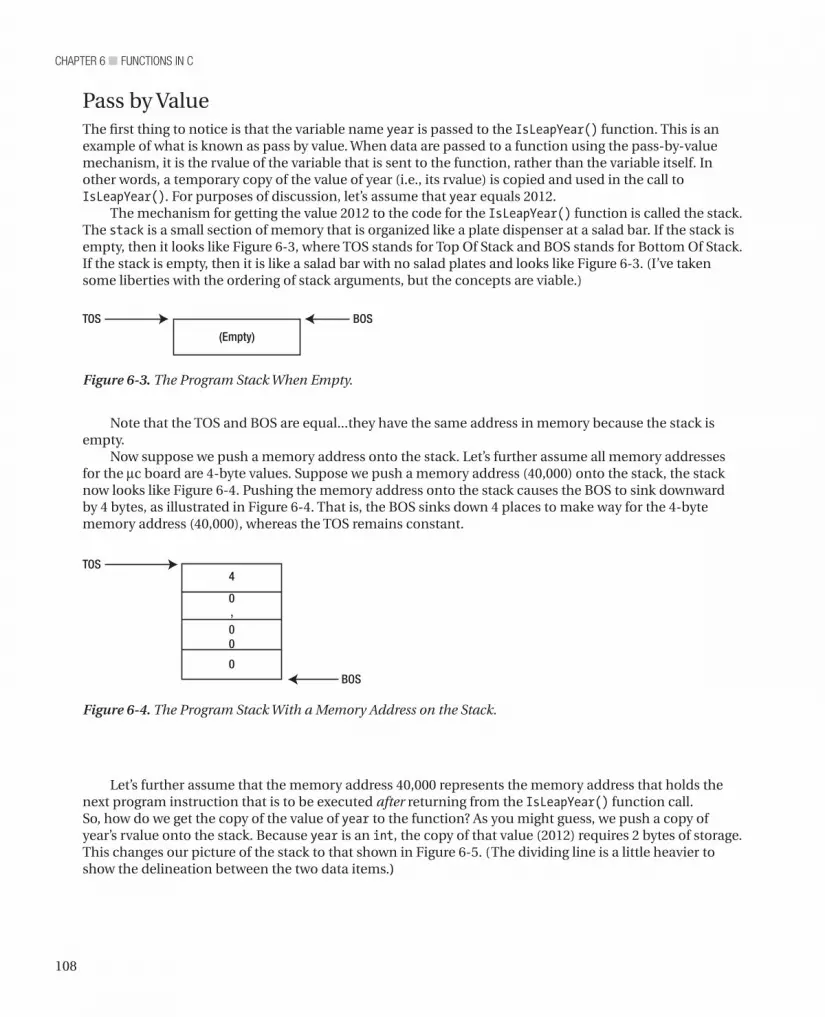
chapter 6 ■ Functions in c
108
Pass by ValueThe first thing to notice is that the variable name year is passed to the IsLeapYear() function. This is an example of what is known as pass by value. When data are passed to a function using the pass-by-value mechanism, it is the rvalue of the variable that is sent to the function, rather than the variable itself. In other words, a temporary copy of the value of year (i.e., its rvalue) is copied and used in the call to IsLeapYear(). For purposes of discussion, let’s assume that year equals 2012.
The mechanism for getting the value 2012 to the code for the IsLeapYear() function is called the stack. The stack is a small section of memory that is organized like a plate dispenser at a salad bar. If the stack is empty, then it looks like Figure 6-3, where TOS stands for Top Of Stack and BOS stands for Bottom Of Stack. If the stack is empty, then it is like a salad bar with no salad plates and looks like Figure 6-3. (I’ve taken some liberties with the ordering of stack arguments, but the concepts are viable.)
(Empty)
TOS BOS
Figure 6-3. The Program Stack When Empty.
Note that the TOS and BOS are equal...they have the same address in memory because the stack is empty.
Now suppose we push a memory address onto the stack. Let’s further assume all memory addresses for the mc board are 4-byte values. Suppose we push a memory address (40,000) onto the stack, the stack now looks like Figure 6-4. Pushing the memory address onto the stack causes the BOS to sink downward by 4 bytes, as illustrated in Figure 6-4. That is, the BOS sinks down 4 places to make way for the 4-byte memory address (40,000), whereas the TOS remains constant.
4
0
00
0
,
TOS
BOS
Figure 6-4. The Program Stack With a Memory Address on the Stack.
Let’s further assume that the memory address 40,000 represents the memory address that holds the next program instruction that is to be executed after returning from the IsLeapYear() function call.So, how do we get the copy of the value of year to the function? As you might guess, we push a copy of year’s rvalue onto the stack. Because year is an int, the copy of that value (2012) requires 2 bytes of storage. This changes our picture of the stack to that shown in Figure 6-5. (The dividing line is a little heavier to show the delineation between the two data items.)

109
chapter 6 ■ Functions in c
When the stack reaches this state, the program transfers control to the IsLeapYear() function code. (The compiler knows exactly where to jump in memory to start executing the function code. That is, IsLeapYear() has an lvalue just like every other data object in the program.) You can think of the stack as the backpack that shows up with data from the outside world.
The signature for IsLeapYear() tells the function code how the data from the outside world are packed into the backpack. That is:
int IsLeapYear(int yr)
causes the code to first look for the int data that is stored on the stack. It knows an int is on the stack because the parameter list (int yr) tells it what has been placed on the stack. Because each int requires 2 bytes of storage, the code goes to the memory address held at the TOS, grabs 2 bytes of data (i.e., 2012), and copies them into the rvalue for the temporary variable yr. After the assignment of 2012 into yr takes place, the TOS is adjusted to reflect that 2 bytes that have been popped off the stack. Like the salad bar plates, the TOS pops up to reflect that two plates that have been removed. This means the stack once again looks like Figure 6-4.
Now the function’s statement body code is executed. Because 2012 is a leap year, the outcome of the if statement is that the function must return the value 1 to the caller. To do that, the code pops off the next 4 bytes from the stack, which is the return address where the program is to resume execution after the call to IsLeapYear() is completed (i.e., memory address 40,000). That memory address is popped off into the program instruction pointer. You can think of the program instruction pointer as a program director that tells the program where to find the instruction for the next program statement. Once 40,000 is popped off into the instruction pointer, the code places the 2-byte return value on the stack. Now the stack looks like Figure 6-6.
20
12
400
00
0
,
TOS
BOS
Figure 6-5. The Program Stack After Pushing on the Value of year.
0TOS
BOS1
Figure 6-6. The Stack After the Return Value is Pushed onto the Stack.
Because the year 2012 is a leap year, the value 1 is pushed onto the stack. The function’s type specifier tells us that the return value is an int, so 2 bytes of stack space are required. In other words, the backpack now holds the value 1 inside of it stored as an int.

chapter 6 ■ Functions in c
110
Because the instruction pointer holds the memory location of where the next program instruction resides, the program branches back to the statement:
if (IsLeapYear(year)) {
However, because the code is now executing the instruction after the call to IsLeapYear(), the statement appears as though it is written as:
if (1) {
The reason the code appears this way is because the call to IsLeapYear() has been completed, and the return value (i.e., 1) has been determined by the function’s statement block code. The IsLeapYear() function’s type specifier tells us that an int is sitting on the stack (i.e., is in the backpack). That is, the contents of the backpack have been popped off the stack as an int and become expression1 for the if statement. Because a non-zero value is interpreted as logic true, the program sends a message back to the PC over the serial link and informs the user that 2012 is a leap year.
Although all of this pushing and popping data onto and off the stack may seem like an H-bomb to kill an ant, it is important that you understand how data are passed to and returned back from a function call. It is also important to note that it is a copy of year’s rvalue in the loop() function that is sent to IsLeapYear(), not its lvalue. This is what is meant by pass by value. Because IsLeapYear() has no clue where year is stored in memory, there is no way that IsLeapYear() can change the rvalue of year itself. Pass by value means that only the rvalue of an argument is sent to a function, rather than its lvalue. And as long as the lvalue remains unknown to IsLeapYear(), there is no way that the function can accidentally change the value of year back in loop(). Pass by value is a mechanism (i.e., encapsulation) that attempts to protect the original data from contamination by outside agents.
SummaryThis chapter discussed many different aspects of designing, writing, and using function in your programs. Functions are important because they are the building blocks of all C programs. By following the design and construction techniques discussed in this chapter, subsequent program development should become easier as you gain experience and reuse functions from previous projects. When it comes to writing functions in C, investing a little design time now can pay huge benefits down the road. Again, take your time and let the information in this chapter sink in well. Life gets easier if you do.

111
chapter 6 ■ Functions in c
Exercises1. What is a function?
2. If you had to guess, what is the most common mistake beginning programmers make when writing a C function?
3. What is a function signature?
4. What does function overloading mean?
5. What is a function type specifier?
6. Can a function return more than one value?
7. Name three things you should strive for when writing your own functions.
8. The ReadLine() function was said to be SDC. Why and what would you do to improve it?

113
■ ■ ■
chapter 7
Storage Classes and Scope
This chapter examines the various ways that data are made available to your programs. The concepts presented in this chapter are important because inadvertent access to a program’s data is a frequent source of program bugs. As a general rule, you want to restrict the access to a piece of data as much as possible. That way, inadvertent changes to the data are less likely, resulting in programs that have fewer bugs.
Hiding Your Program DataWhat’s the big deal about hiding data in a program? After all, if you hide the data “completely,” nothing could ever change the data and the state of the program would never change, rendering the program pretty much useless. On the other hand, giving free access to the data by every element in the program makes it very difficult to determine who changed what. As a result, when a bogus value shows up, you don’t know where to look or who to blame. That is, debugging a program becomes more difficult. Therefore, the issue becomes one of balance: You restrict access to the data as much as possible while still letting those program elements that need access to the data have that access. The process of restricting access to data is called encapsulation. As I have said before, you encapsulate the data for the same reason Medieval kings kept their daughters in the castle tower—to keep people from messing around with them.
Given that encapsulation is desirable, what are your options for restricting access to the data? Surprisingly, there are quite a few options available to you. Most of these options are based upon the concept of scope. The scope of a data object refers to its visibility and lifetime in a program. The understanding of scope becomes clear when discussed by example.
Statement Block ScopePerhaps the most restrictive level of scope is the statement block scope level. Consider the following code fragment:
if (x < MAXVAL) { int temp;

chapter 7 ■ Storage claSSeS and Scope
114
temp = x * 100;}
Note how the variable named temp is defined within the if statement block. From the program’s point of view, temp comes into existence the instant it becomes defined. That is, temp begins its existence when the closing semicolon of the int temp; statement is read. The next statement simply multiplies whatever x is by 100 and shoves it into temp. So far, nothing is done with the result stored in temp. Let’s write a complete program so we can see how statement block scope works. Consider Listing 7-1.
Listing 7-1. Statement Block Scope Program
/** Program: Demonstrate the concept of statement block scope Author: Dr. Purdum, Aug. 9, 2012**/#define MAXVAL 1000
int k = 0;
void setup(){ Serial.begin(9600);}
void loop(){ int x = 5; if (x < MAXVAL) { int temp;
temp = x * 100; } Serial.print("The value of temp is: "); Serial.println(temp); if (k++ > 10) exit(0);}
If you try to compile and run this code, then the compiler issues the following error message:
LocalScopeProgram.cpp: In function 'void loop()': LocalScopeProgram:22: error: 'temp' was not declared in this scope
What is the problem? As the error message points out, line 22 is the offending line, and is the statement:
Serial.print(temp);

115
chapter 7 ■ Storage claSSeS and Scope
In Figure 7-1, the shaded area defines the statement block scope for variable temp and extends from the end of the statement that defines temp to the closing brace of the if statement block. Variable temp may be used anywhere within the shaded area because it is “in scope.” Anywhere outside that shaded area, however, variable temp doesn’t even exist. Outside the shared area in Figure 7-1, variable temp is no longer in the symbol table...it is out of scope...it is invisible...it is dead. As such, trying to use temp several lines after it has gone out of scope must draw an error message from the compiler—which it did.
Why Use Statement Block Scope?Given that variable temp is in scope for such a short time, why use it?
• First, in a code example that is as trivial as this one, there is no reason to use local scope, which defines a variable for the whole of a function (see the next section for more on this). However, if the statement block is more complex, then local scope does afford protection from the programmer trying to use that variable outside of its statement block.
• Second, once a variable goes out of scope, it should free up any resources tied to that variable, hence increasing the amount of available memory. Although this could be important given the limited amount of memory of most mc boards, experimentation done by the author suggests that the storage used by the variable is not immediately reclaimed when the variable goes out of scope. In other words, block scope variables do not appear to be more memory efficient than other scope levels.
The error message tells you that temp is “not declared in this scope.” Stated differently, temp is “out of scope.” What does this mean?
The problem is that you have defined temp to have statement block scope. Statement block scope means that the data item exists from the point of its definition to the end of the statement block in which it is defined. This means that temp “lives” or is “usable” from the point of its definition to the closing brace of the if statement block. Once the closing brace of the if statement is reached, temp is removed from the symbol table: temp is dead and no longer lives...it is “out of scope.” Figure 7-1 shows what the local scope for temp looks like.
Figure 7-1. Statement block scope for temp.

chapter 7 ■ Storage claSSeS and Scope
116
A variable with local scope has visibility and life that extends from its point of definition to the closing brace of the function in which it is defined. In Figure 7-2, variable x is in scope from its definition to the closing brace of the loop() function. This means that any program statements within the shaded area of Figure 7-2 have access to variable x. Anything outside the shaded area knows nothing about x.
Local scoped variables are quite common in C programs. Local scope offers some degree of encapsulation, but is not so restrictive as to render the variable useless. (Statement block scope is so restrictive that it finds limited use. It would likely be more popular if it truly always saved memory resources.) As you learned in Chapter 6, functions are task-oriented pieces of code, and local variables work in concert to solve a particular task. When their work is done (i.e., the function block code has executed), the variables within that function cease to exist as far as the rest of the program is concerned.
What would happen if you moved the definition of x as shown in the code fragment below? (Note how we have
void loop(){ if (x < MAXVAL) { int temp;
temp = x * 100; }
if (k++ > 10) exit(0);
int x = 5;}
moved the definition of x to the bottom of the function. We also removed the offending print statements so the previous error seen using Listing 7-1 disappears.) When you try to compile this variation of Listing 7-1, the compiler issues the following error message:
Local ScopeA variable that has local scope has life and visibility from the point of its definition to the end of the function in which it is defined. The shaded are in Figure 7-2 illustrates local scope for variable x.
Figure 7-2. Local Scope for variable x.

117
chapter 7 ■ Storage claSSeS and Scope
LocalScopeProgram.cpp: In function 'void loop()': LocalScopeProgram:17: error: 'x' was not declared in this scope
What went wrong? The problem is that variable x doesn’t come into scope until it is defined at the bottom of the loop() function. However, the program code attempts to access x before its definition takes place. This is one reason that most programmers place the data definitions used within a function immediately after the opening brace for the function body.
Name Collisions and ScopeWhat happens if you define a variable named x in loop() but also have a variable named x in setup()? Won’t the two variables “collide” because they have the same name? There is no name collision because the x in loop() is visible only within loop(), just as the x defined in setup() is only visible within the function in which it is defined. In fact, if you had the following code fragment in your program:
if (x < MAXVAL) { int temp;
temp = x * 100; } int temp;
the second definition of temp does not generate a duplicate definition error because the temp defined within the if statement block has died before the second definition of temp takes place.
To drive the idea home that local scope is different than statement block scope, make the changes shown below to Listing 7-1.
void loop(){ int x = 5; if (x < MAXVAL) { int temp;
temp = x * 100; Serial.print("The lvalue for temp is: "); Serial.println((long) &temp); } int temp; Serial.print("The lvalue for 2nd temp is: "); Serial.println((long) &temp); if (k++ > 10) { Serial.flush(); exit(0); }}

chapter 7 ■ Storage claSSeS and Scope
118
If you look closely, you can see that the memory address for the temp defined with (if) statement block scope is 2292 but the temp defined with local scope is stored at memory address 2294. Clearly, variables with different lvalues are not the same variable even if they do share the same name. Because they are different variables, name collisions are not a problem because they exist at different scope levels.
If two variables share the same name at the same scope level, then you will get an error message. For example, if you modified the code to:
void loop(){ int x = 5; int temp; // definition of temp local scope if (x < MAXVAL) { int temp; // definition of temp statement block scope
temp = x * 100; Serial.print("The lvalue for temp is: "); Serial.println((long) &temp);
The statement:
Serial.println((long) &temp);
uses the “address of” operator (&), which causes the code to display the lvalue of a variable, rather than its rvalue. (You will learn about the address of operator in Chapter 8.) If you run the program, the serial monitor should look similar to Figure 7-3.
Figure 7-3. The lvalues for temp.

119
chapter 7 ■ Storage claSSeS and Scope
} int temp; // oh-oh...definition of temp local scope...again Serial.print("The lvalue for 2nd temp is: "); Serial.println((long) &temp); if (k++ > 10) { Serial.flush(); exit(0); }}
The compiler issues the following error message:
LocalScopeProgram.cpp: In function 'void loop()': LocalScopeProgram:30: error: redeclaration of 'int temp' LocalScopeProgram:21: error: 'int temp' previously declared here
Because you now have two definitions of temp at the same scope level (i.e., local scope within the same function), the compiler must issue an error message.
Global ScopeFrom time-to-time, you need a variable that is accessible by all functions within the program. If you have a piece of data that must be available everywhere in the program, then that variable should be defined with global scope. A variable has global scope if it is defined outside of a function block. Look at Listing 7-1. Near the top of the listing, you can see variable k defined as:
int k;
Note that k is defined outside of the setup() and loop() function blocks. In this case, the scope for variable k extends from its point of definition to the end of the file. The global scope for k is the shaded area in Figure 7-4. This means that any statement that appears after the definition of k has access to k; k is “globally” accessible to all functions and statement blocks within the source file.

chapter 7 ■ Storage claSSeS and Scope
120
The good news is that you now have a variable that all of the functions in the file can access. This makes it easy to pass values from one function to another. The bad news is that you now have a variable that all of the functions in the file can access. That is, we have thrown the idea of encapsulation out the window because everything in the source file has access to k. This is kind of like locking the princess in the castle keep and then handing out copies of her room key to every knight in the realm. Every element (knight) in the program can mess around with k (Princess Kay). If something goes amiss with k, then it is now more difficult to determine the cause of the problem because access to k is no longer restricted.
Obviously, there is a tradeoff here. Do you use more restrictive definitions (i.e., use statement or function block scope) to protect your variables or do you use global definitions to make it easier to share data between functions? The answer: It depends. If you have a variable named port defined in loop() and you have written a function named SetPort() that needs access to port, then you could move the definition of port outside of loop() and make it have global scope. That is not ideal because of the data contamination “thingie” we just pointed out.
However, alternatives exist. The obvious alternative is to keep the definition of port inside loop() but pass port as a function argument to SetPort(). Now SetPort(port) can use the value of port and still afford it some level of protection. If something strange now happens to port, then at least you have a reduced number of places where port went south.
Figure 7-4. Global Scope for variable k.
121
chapter 7 ■ Storage claSSeS and Scope
Global Scope and Name ConflictsAgain using Listing 7-1 as a point of discussion, suppose you define a variable named k inside the loop() function. Because the global scope of k includes loop() (see Figure 7-4), won’t the two variables have a name collision?
Nope.The reason is because the syntax rules for C state that the variable with the most restrictive scope level
prevails in situations where they are both in scope. In our example, because the k defined within loop() has a more restrictive scope level than the k with global scope, the local scope variable prevails over the global scope k when execution is taking place within loop(). If you were silly enough to define yet another k variable within the if statement block, then that k would prevail when the program is executing the if statement block although the other two k variables are in scope.
Scope and Storage ClassesArduino C recognizes four storage classes: auto, register, static, and extern. All four are keywords in Arduino C and cannot be used as variable names. If you try to define variables named:
int register; // Bad names...int auto;
then the compiler issues an error message:
error: declaration does not declare anything
Clearly, the compiler does recognize both as keywords and will not let you use them as a variable name.
The auto Storage ClassThe auto storage class is the default storage class for variables with local scope. You can also define auto variables with block scope:
for (auto int k; k < MAXVAL; k++)
and the compiler accepts the syntax without error. The actual impact of using an auto storage class in Arduino C appears to make no difference to the generated code and, therefore, relegates itself to a documentation feature. The author has not seen the auto keyword used in published code, although there may be some examples. (No doubt someone will write an article now that uses the auto keyword!)
The register Storage ClassThe register storage class is used to inform the compiler that the data item should be stored in a (chip) register rather than in memory. The idea is that such a data definition would optimize the generated code for speed by keeping the variable in a register. The use of the keyword register is a suggestion to the code generator—not an edict. That is, the code generator makes the final decision about the fate of a variable defined with the register storage class. The syntax is:
register int myVal;

chapter 7 ■ Storage claSSeS and Scope
122
The compiler makes heavy use of its register set anyway, so it seems unlikely that using the register storage class in a data definition makes much difference. (If you are really into this kind of thing, look at the documentation for the avr-objdump.exe program in the Tools directory for dumping object files and allowing you to inspect the generated code. Using that tool is beyond the scope of this book.)
The static Storage ClassAs you know, variables with local scope die when you exit the function in which they are defined. This means that each time the function is called, a new set of local variables is created. This also means that any values for the local variables in the function from the previous execution of the function’s code are lost.
There are, however, situations where it would be nice if you could preserve the value of a variable between function calls. For example, you might like to maintain a count of the number of times a particular function is executed. That goal is not possible with variables defined with the default (auto) storage class because they are recreated each time the function is called. Obviously, one solution is to move the variable of interest out of the function and define it with global scope. Although this solves the lost-value problem, you are exposing the variable to the room key issues of data privacy. The static storage class solves this problem in a more elegant way.
Consider the following code fragment:
int MyCounter(){ static int counter = 0; // do some stuff... return ++counter;}
Using the static storage class specifier causes the compiler to generate code that preserves the value of counter between function calls to MyCounter(). First, the data definition of counter is not executed each time the function is called. In fact, counter is not generated using the stack mechanism you studied in Chapter 6. Rather, counter is created when the program begins execution and is allocated in such a way (i.e., in a piece of memory devoted to global-type data storage called the heap) that its value is maintained throughout the program’s execution. The compiler takes care of these details for you. The end result, however, is that you have a variable that can maintain its value between function calls without exposing it outside of the function in which it is defined.
If you need to set the starting value to something other than 0, then the data definition should specify that value. For example, if you need the starting value to be 10, then the definition must be:
static int counter = 10;
You can only set the starting value for a static variable at its point of definition. By default, static variables are initialized to 0. Although that may seem to make the statement above that initializes the counter to 0 unnecessary, you should never assume compiler behavior if you don’t have to. It almost never pays to be lazy. Explicitly initialize the variable yourself.
The extern Storage ClassSometimes a project gets to the point where it makes sense to split the source code into two or more source code files. Perhaps you split the files such that those functions that are concerned with the Input Step are in one source file, whereas functions dealing with the Process Step are in another source file. It may even make sense to have a third source code file for the Display Step. Such file splitting can be nettlesome, however, if the “pre-split” source file uses global data.

123
chapter 7 ■ Storage claSSeS and Scope
For example, you may have a variable named myPort defined as a global like:
// some code stuffint myPort;
void setup() { // some setup code}
void loop() { // some loopy code}
Things work great until you decide to split the files. Splitting the source file can be a problem if both files need to access myPort. If you define myPort in both source files, then they will not have the same variable (i.e., they will have different lvalues). Not good.
Let’s use the Leap Year program from Chapter 6 but put the Leap year function source code in a second source file. Let’s also use myPort in the two files, although it really isn’t used in the code.
Creating a Second Source Code FileThe first thing we need to do is create a file to hold the second source code file (i.e., our leap year code). To create a place for the split file, move to the small triangle icon just above the scroll bar on the right-hand side of the IDE and right click the icon. Your display should look similar to Figure 7-5.
Figure 7-5. Adding a second source file to a sketch.

chapter 7 ■ Storage claSSeS and Scope
124
Now click on the New Tab menu option, which causes the display to change to that shown in Figure 7-6.
Figure 7-6. Naming the new source file.
Note that we named the second source code file IsLeapYear.cpp. (The file extension “cpp” is associated with the C++ C compiler that actually handles the compiler tasks. You may also use “.c”, “.h”, or even ignore the file extension.) When you click the OK button, the display looks like Figure 7-7. Note that the original and new source code tabs are shown above the Source Window.
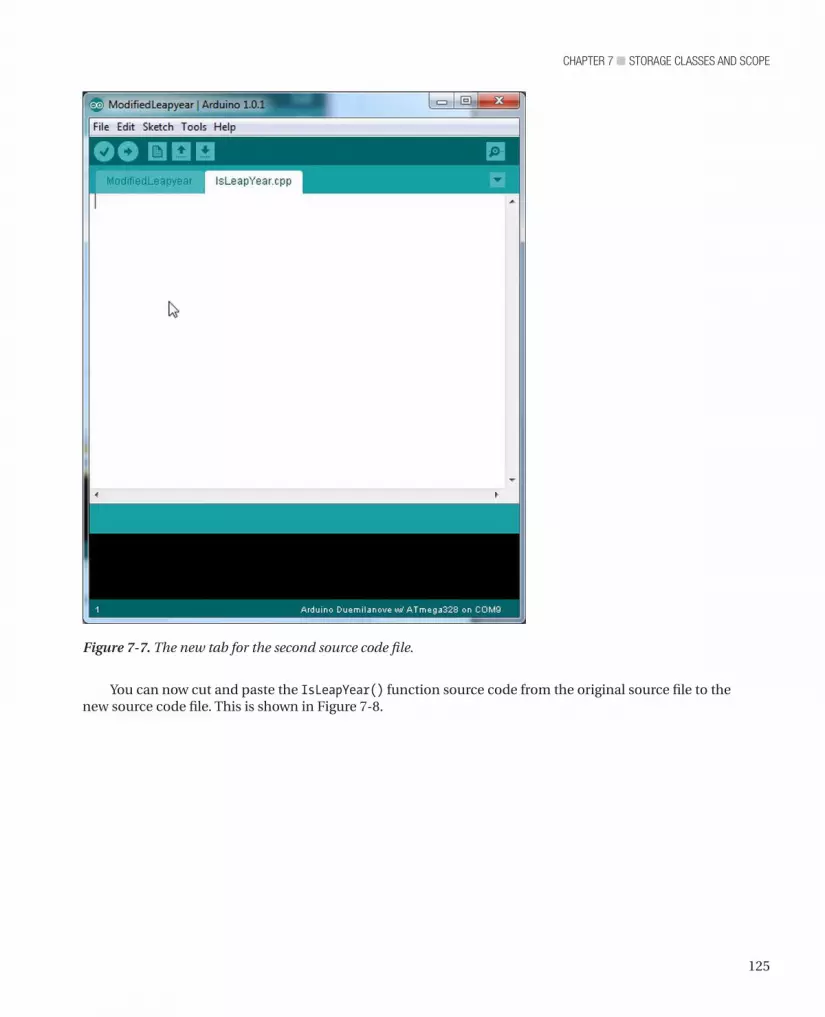
125
chapter 7 ■ Storage claSSeS and Scope
You can now cut and paste the IsLeapYear() function source code from the original source file to the new source code file. This is shown in Figure 7-8.
Figure 7-7. The new tab for the second source code file.
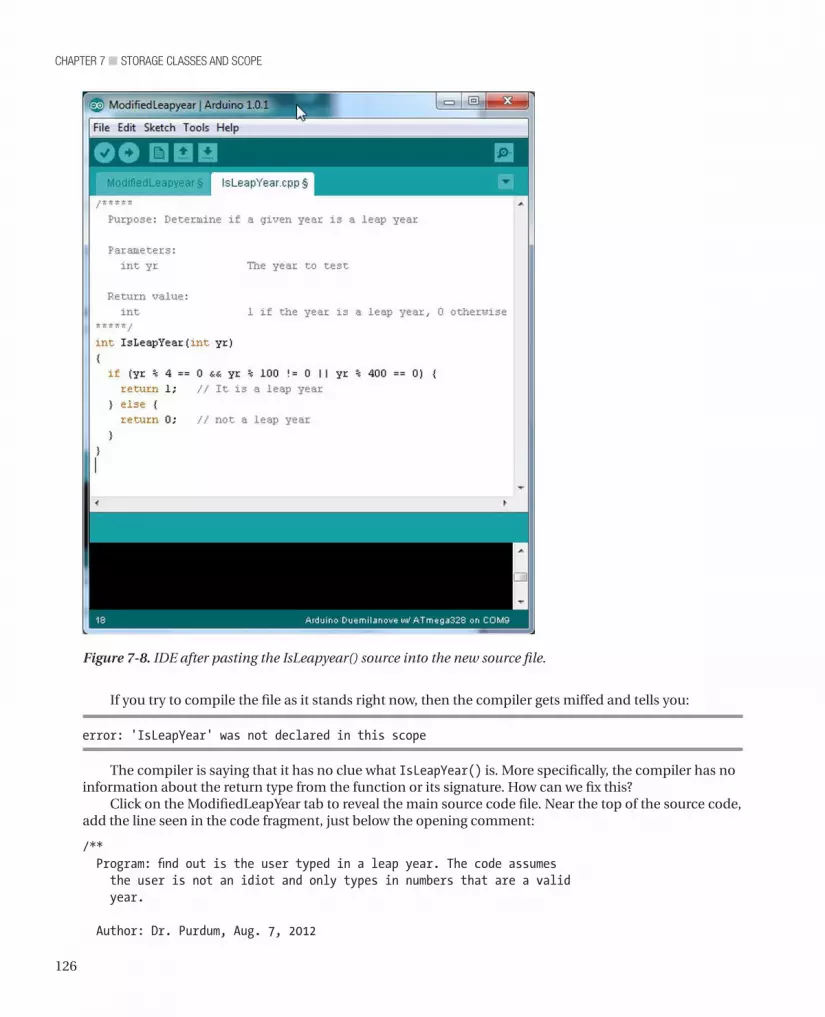
chapter 7 ■ Storage claSSeS and Scope
126
If you try to compile the file as it stands right now, then the compiler gets miffed and tells you:
error: 'IsLeapYear' was not declared in this scope
The compiler is saying that it has no clue what IsLeapYear() is. More specifically, the compiler has no information about the return type from the function or its signature. How can we fix this?
Click on the ModifiedLeapYear tab to reveal the main source code file. Near the top of the source code, add the line seen in the code fragment, just below the opening comment:
/** Program: find out is the user typed in a leap year. The code assumes the user is not an idiot and only types in numbers that are a valid year. Author: Dr. Purdum, Aug. 7, 2012
Figure 7-8. IDE after pasting the IsLeapyear() source into the new source file.
127
chapter 7 ■ Storage claSSeS and Scope
**/int IsLeapYear(int yr); // This is a function prototype for IsLeapYear()
void setup(){ Serial.begin(9600);}// rest of code...
Note the line:int IsLeapYear(int yr); // This is a function prototype for IsLeapYear()
This statement is a function prototype. A function prototype is a data declaration that tells the compiler the specifics it needs to know to use the function in the current source file. More specifically, a function prototype allows the compiler to create an attribute list for the data object and stuff it into the symbol table. However, because the actual code for the data object IsLeapyear() is in another file, it cannot fill in the lvalue for the object. This means a function prototype is a data declaration—not a data definition.
Back in Chapter 4 we pointed out that many programmers use the terms “define” and “declare” as though they are synonyms. They are wrong. Each has a very specific meaning. A data declaration is simply an attribute list for a variable...no memory is allocated for a data declaration. This means a data declaration has an empty lvalue column in the symbol table. A function prototype does say: “Okay, compiler, I don’t know where this data object is going to end up in memory (lvalue = ?), but here’s enough information for you to use the object in this file.” When all of the source files have been compiled and the pieces are all pulled together (this is the job of a programming tool called the linker), only then does IsLeapYear() have a known lvalue.
Okay, so where does myPort come in? When the source code was a single file, we defined myPort as a variable with global scope. Now suppose something in the second source file needs to use myPort. Because myPort is defined in the first file, the second file knows nothing about it. How can we fix this so we can access myPort in the second source file? Easy. Just let the compiler create an attribute list for myPort just like a function prototype does for functions.
To give the compiler the ability to create an attribute list in the second source file, add the following line to the top of the second file:
extern int myPort;
The extern access specifier simply tells the compiler: “Hey. myPort is not defined in this file. However, this statement does allow you to create an attribute list for myPort so you can use it in this file.” You can now use myPort in the second source file although it is defined in the first file. In a real sense, therefore, the extern keyword serves the same purpose for variables as a function prototype does for functions. That is, extern allows you to create a data declaration for a variable that is defined in some other file.
Once you have made these changes, you can compile and run the program. You will find that it functions exactly as it did in Chapter 6, only now the source code is split across two source files.
The volatile keywordAlthough rarely used, we should mention the volatile keyword at this point. The volatile keyword is a variable qualifier rather than a storage class or access specifier. The syntax for using it is:
volatile int lastTestValue;
volatile is a directive to the compiler that says this particular variable must be loaded from memory any time the code references it. Often, when code is using a variable, that variable’s rvalue is already in an Atmel temporary register so there is no need to reload it again from memory. This results in a small

chapter 7 ■ Storage claSSeS and Scope
128
performance boost because a trip to memory to reload the value is bypassed. Optimizing compilers do this kind of thing all the time.
Although this optimization is a good thing most of the time, there are times when the value stored in memory can get out of sync with the value held in a register. This kind of problem is most likely to occur when interrupt service routines are being used in the code. By using the volatile qualifier, you are telling the compiler to refetch the variable’s rvalue anytime the program uses the variable. This decreases the chance that the rvalue for the variable is out of sync.
SummaryYou have covered a lot of ground in this chapter. The concept of scope is more important than many programmers realize because it has the potential for making your programs easier to read and debug. You should also appreciate what function prototypes bring to the party, especially when you split source code files. As you begin writing nontrivial programs, it makes sense to split the source code into different files. If nothing else, it makes scrolling through a source file a little quicker than it might be otherwise. Hopefully, this chapter also makes it clear that there is a very real difference between the terms “define” and “declare.”
I encourage you to create a program of your own that has two (or more) source files and use the extern keyword to communicate data between the two files. The only way to learn this stuff is to jump in the mud and start slogging around in it.

129
chapter 7 ■ Storage claSSeS and Scope
Exercises1. What are the scope levels in C?
2. Why is it usually a good thing to avoid using the global storage class?
3. What are the C storage classes?
4. Suppose integer variable myDay is globally defined in one file, but you need to access it in a different source file. What do you need to do to have access to myDay?
5. What is the default scope level for a function?
6. What is the default storage class for a function.
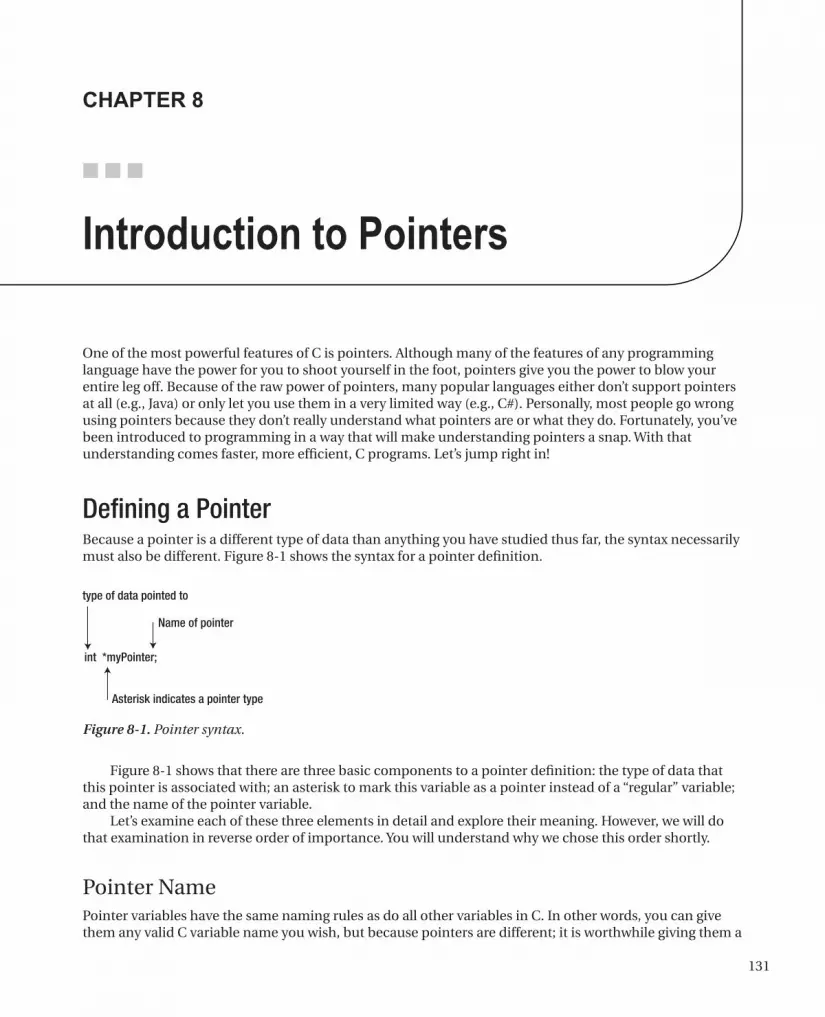
131
■ ■ ■
chapter 8
Introduction to Pointers
One of the most powerful features of C is pointers. Although many of the features of any programming language have the power for you to shoot yourself in the foot, pointers give you the power to blow your entire leg off. Because of the raw power of pointers, many popular languages either don’t support pointers at all (e.g., Java) or only let you use them in a very limited way (e.g., C#). Personally, most people go wrong using pointers because they don’t really understand what pointers are or what they do. Fortunately, you’ve been introduced to programming in a way that will make understanding pointers a snap. With that understanding comes faster, more efficient, C programs. Let’s jump right in!
Defining a PointerBecause a pointer is a different type of data than anything you have studied thus far, the syntax necessarily must also be different. Figure 8-1 shows the syntax for a pointer definition.
type of data pointed to
Name of pointer
int *myPointer;
Asterisk indicates a pointer type
Figure 8-1. Pointer syntax.
Figure 8-1 shows that there are three basic components to a pointer definition: the type of data that this pointer is associated with; an asterisk to mark this variable as a pointer instead of a “regular” variable; and the name of the pointer variable.
Let’s examine each of these three elements in detail and explore their meaning. However, we will do that examination in reverse order of importance. You will understand why we chose this order shortly.
Pointer NamePointer variables have the same naming rules as do all other variables in C. In other words, you can give them any valid C variable name you wish, but because pointers are different; it is worthwhile giving them a
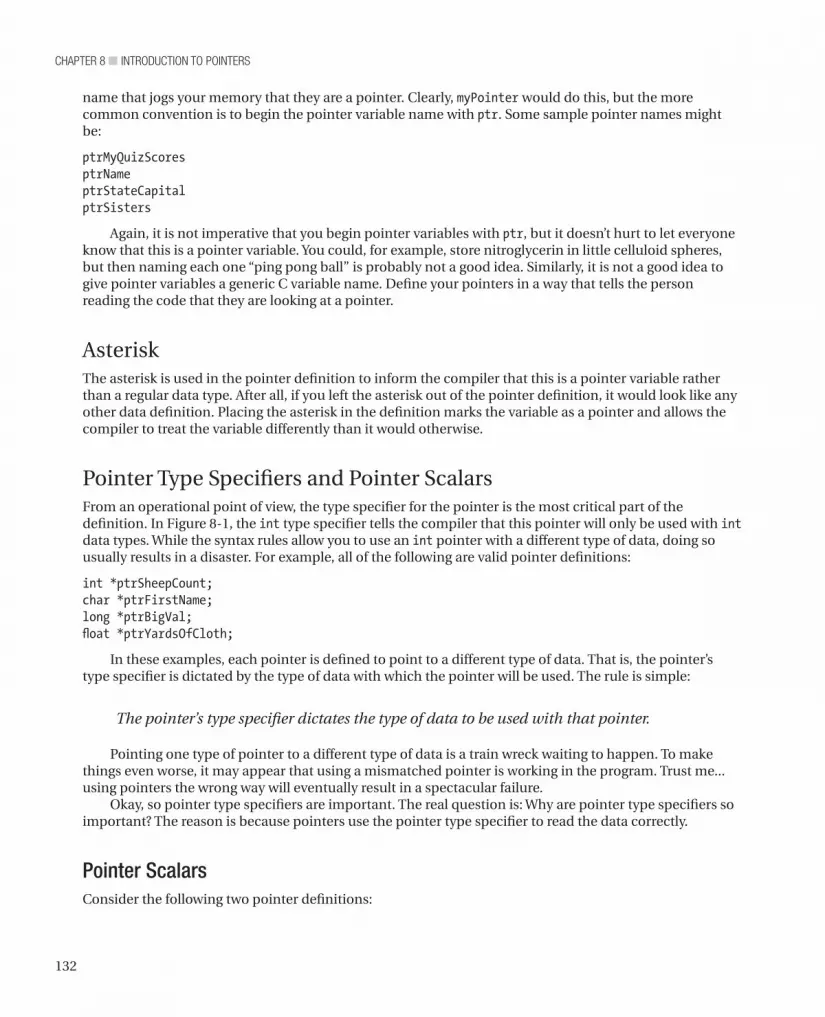
chapter 8 ■ IntroductIon to poInters
132
name that jogs your memory that they are a pointer. Clearly, myPointer would do this, but the more common convention is to begin the pointer variable name with ptr. Some sample pointer names might be:
ptrMyQuizScoresptrNameptrStateCapitalptrSisters
Again, it is not imperative that you begin pointer variables with ptr, but it doesn’t hurt to let everyone know that this is a pointer variable. You could, for example, store nitroglycerin in little celluloid spheres, but then naming each one “ping pong ball” is probably not a good idea. Similarly, it is not a good idea to give pointer variables a generic C variable name. Define your pointers in a way that tells the person reading the code that they are looking at a pointer.
Asterisk The asterisk is used in the pointer definition to inform the compiler that this is a pointer variable rather than a regular data type. After all, if you left the asterisk out of the pointer definition, it would look like any other data definition. Placing the asterisk in the definition marks the variable as a pointer and allows the compiler to treat the variable differently than it would otherwise.
Pointer Type Specifiers and Pointer ScalarsFrom an operational point of view, the type specifier for the pointer is the most critical part of the definition. In Figure 8-1, the int type specifier tells the compiler that this pointer will only be used with int data types. While the syntax rules allow you to use an int pointer with a different type of data, doing so usually results in a disaster. For example, all of the following are valid pointer definitions:
int *ptrSheepCount;char *ptrFirstName;long *ptrBigVal;float *ptrYardsOfCloth;
In these examples, each pointer is defined to point to a different type of data. That is, the pointer’s type specifier is dictated by the type of data with which the pointer will be used. The rule is simple:
The pointer’s type specifier dictates the type of data to be used with that pointer.
Pointing one type of pointer to a different type of data is a train wreck waiting to happen. To make things even worse, it may appear that using a mismatched pointer is working in the program. Trust me...using pointers the wrong way will eventually result in a spectacular failure.
Okay, so pointer type specifiers are important. The real question is: Why are pointer type specifiers so important? The reason is because pointers use the pointer type specifier to read the data correctly.
Pointer ScalarsConsider the following two pointer definitions:

133
chapter 8 ■ IntroductIon to poInters
Arduino Memory Types
The Arduino family of mc boards has three types of memory associated with them. The first is program (or flash) memory and it is in this section of memory into which your programs are loaded. This program memory is nonvolatile. That is, when power is removed from the board, your program memory remains intact. The second type of memory is Static Random Access Memory (SRAM). The data that you use in your program is stored in SRAM memory. SRAM memory is volatile memory, which means that once power is removed from the board, the content of this section of memory is lost. The last type of memory is Electrically Erasable Programmable Read-Only Memory (EEPROM). EEPROM memory is also nonvolatile, which means that it can also retain its values even when power is removed. However, accessing EEPROM memory is much slower than flash memory and can only be recycled reliably about 100,000 times. Because of these limitations, EEPROM is normally used to store program configuration data (i.e., data that does not change often). For example, if your program has an Initialization Step that has to use some data to initialize a bunch of sensors or other objects, EEPROM would be a good place to store those values.
As you learned in Chapter 7, as your program runs, variables come into scope and go out of scope depending on what the code requires. These variables are stored in SRAM, which you can think of as being organized like the stack we discussed in Chapter 7. Because the amount of SRAM is less than 65K (i.e., the maximum value for a 2-byte unsigned integer), it only takes 2 bytes to store a memory address for the program’s data. Unlike a PC that may have gigabytes of memory and, hence, must use 4-byte memory addresses, your mc board can use 2-byte pointers because of the relatively small amount of SRAM available. (There are chips available that can address larger memory sizes and, hence, use 4-byte pointers.)
This is why each pointer variable requires the same amount of storage, regardless of the pointer’s type specifier: all pointer variables hold exactly the same type of data—a memory address. Stated differently, all
char *ptrLetter;int *ptrNumber;
Both of these statements define a pointer variable, but the type specifiers for each pointer tell you that they are to be used with different data types. When the compiler sees these two definitions, it places the two definitions in the symbol table and allocates memory for each. When the compiler finishes, memory might look something like Figure 8-2. If you look carefully at Figure 8-2, then you can see that each pointer is shown using 2 bytes of storage. That’s odd. Whenever we defined data types before, a char data type used 1 byte and an int used 2 bytes. Yet, the pointer definition shows that each pointer requires the same amount of storage: 2 bytes. Why?
2 K
ptr Letter
OK
SRAM
ptr Number
2292 2294
......
Figure 8-2. Memory map after pointer definitions.
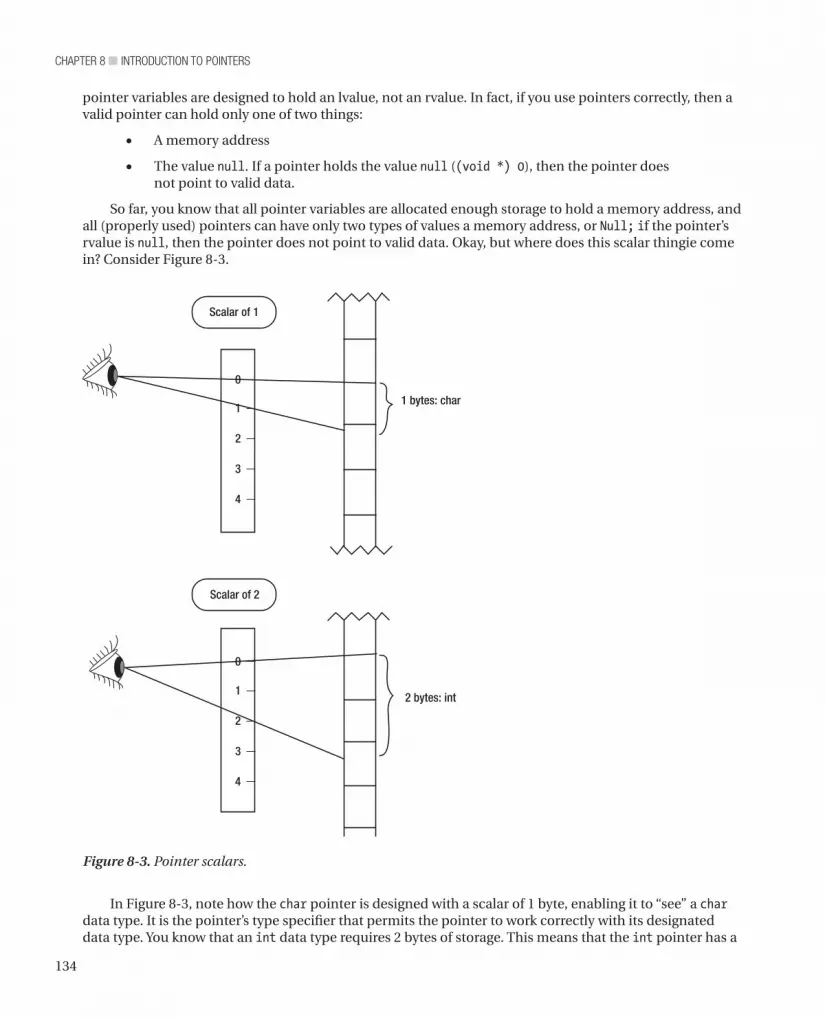
chapter 8 ■ IntroductIon to poInters
134
In Figure 8-3, note how the char pointer is designed with a scalar of 1 byte, enabling it to “see” a char data type. It is the pointer’s type specifier that permits the pointer to work correctly with its designated data type. You know that an int data type requires 2 bytes of storage. This means that the int pointer has a
pointer variables are designed to hold an lvalue, not an rvalue. In fact, if you use pointers correctly, then a valid pointer can hold only one of two things:
• A memory address
• The value null. If a pointer holds the value null ((void *) 0), then the pointer does not point to valid data.
So far, you know that all pointer variables are allocated enough storage to hold a memory address, and all (properly used) pointers can have only two types of values a memory address, or Null; if the pointer’s rvalue is null, then the pointer does not point to valid data. Okay, but where does this scalar thingie come in? Consider Figure 8-3.
0
Scalar of 1
Scalar of 2
2 bytes: int
1 bytes: char1
2
3
4
0
1
2
3
4
Figure 8-3. Pointer scalars.
135
chapter 8 ■ IntroductIon to poInters
scalar of 2 bytes so it can “see” an int data type correctly. If you define a pointer using the long type specifier, its scalar would be 4 bytes. If you look back at Table 3-1, the middle column of that table (i.e., Byte length) tells you the scalars for the different data types. You can conclude, therefore, that the scalar value for a specific pointer is equal to the number of bytes required to store that data type in memory. In all cases, however, the pointer still only requires 2 bytes for storage.
A valid question you might be asking yourself at this point is: What do pointers bring to the table to make them worthwhile? Before we can answer that question completely, you need to understand how to initialize a pointer.
Pointer InitializationThe instant after you define a pointer, you should think of it as being unusable. That is, after the compiler processes the following statement:
int *ptrNumber;
you have an int pointer that has a garbage rvalue. Suppose the compiler ends up placing the pointer at memory address 2294 (see Figure 8-2). All you can count on is that ptrNumber has a lvalue of 2294 and its rvalue is whatever pattern of bits just happened to exist for those 2 bytes beginning at memory location 2294. That is, the rvalue of ptrNumber is garbage. If you are worried about the random junk the pointer contains, you could define and initialize the pointer as part of its definition, as in:
int *ptrNumber = NULL;
This makes it clear that the pointer does not point to valid data.
C Header Files
If you wish to define a pointer and initialize it to null using the symbolic constant NULL, then you need to add the following statement at the top of the source code file:
#include <stdio.h>
This statement says: “Look in the default header file directory for a header file named stdio.h (i.e., the standard I/O header file where the .h denotes that it is a header file). Read the contents of that header file and treat it as thought what you find there is part of this program.” The default header file directory for the Arduino compiler is wherever you installed your Arduino IDE followed by the path name:
hardware\tools\avr\avr\include
Because stdio.h is a simple text file, you can open it with any text editor and see what is contained in the file. Rather than forcing you to remember the correct path name to the standard header files, C allows you to use the angle brackets (< >) around the header file name to cause the compiler to look in the standard header file directory for the header file.
As you write more complex programs, you may find it useful to write your own header files. If that is the case, then you would use double quotation marks around the header file name, as in:
#include "myheaderfile.h"
This causes the compiler to look in the directory where you are storing the source code for the program you are writing for the header file.
If you look in the stdio.h header file (or any of the other header files stored in the include directory), then you are going to see some pretty cool, albeit intimidating, code. A complete understanding of all that you find there is beyond the scope of this book. However, if you are really interested, simply copy the

chapter 8 ■ IntroductIon to poInters
136
statement of interest into the Google search engine and read what the sources have to say. For example, the author copied the following line from the stdio.h header file:
#define feof(s) ((s)->flags & __SEOF)
into Google and was rewarded with more than 17,000 hits. If you really want to know what is going on with this #define, then just start reading the search results.
Using a PointerNow that you know how to define a pointer and what its scalar is used for, let’s actually try to use a pointer. First, suppose you have the following three statements in a program:
int a;int b = 5;a = b;
The last statement actually does more work than you may think. Simplifying the compile process a bit, the statement says: “go to b’s lvalue and copy the rvalue you find there (i.e., 5). Now go to the symbol table and look up a’s lvalue. Go to a’s lvalue and copy the rvalue of b into the rvalue for a.” Simply stated, most (non-pointer) assignment statements simply copy the rvalue of one variable into the rvalue of another variable.
Not so for pointer assignments.Recall that a pointer should only hold a memory address or null. This means that pointer variables
don’t hold rvalues. Any pointer that is useful must hold a memory address. So how do we assign a memory address into a pointer. Simple! You use the address of operator. The address of operator (&) says that you wish to use the lvalue of the variable, not its rvalue. Suppose you have the following code fragment in a program:
int number = 5;int *ptrNumber;
Let’s further assume that number has an lvalue of 2200 and the lvalue for ptrNumber is 2294. (Like in Figure 8-2.) You initialized number with an rvalue of 5, but you didn’t initialize ptrNumber, so it contains garbage at this point in the program. Now, let’s add another statement:
int number = 5;int *ptrNumber;
ptrNumber = &number;
The purpose of the address of operator (&) is to tell the compiler: “Don’t do the standard rvalue-to-rvalue assignment in this assignment. Instead, take the address of number (2200) and copy it into the rvalue for ptrNumber.” Read the previous sentence about 10 times and think about what it is saying.
First, ptrNumber now has an rvalue that holds the memory address (lvalue) of number. This is exactly what ptrNumber should hold: The memory address, or lvalue, of the int variable named number. This relationship can be seen in Figure 8-4. Notice that after the pointer assignment takes place, the address of operator caused the lvalue of number to be copied into the rvalue of ptrNumber. That is, ptrNumber now “points to” number. Think about what this means. Because ptrNumber now knows the memory address where number lives in memory, ptrNumber has full access to number’s data (i.e., its rvalue). If ptrNumber has the right scalar value, which it does (ptrNumber is an int pointer and now points to the int named number), then you can use ptrNumber to change the rvalue of number!

137
chapter 8 ■ IntroductIon to poInters
The Indirection Operator (*)If you wish to use a pointer to change the rvalue of the variable it points to, then you use the indirection operator. The syntax is:
*variableID = expression1;
For example:
*ptrNumber = 10;
The indirection operator is the asterisk. (Although the indirection operator is the same as the multiplication operator, the compiler knows which operation to perform from the context in which each operator is used.) You can verbalize the statement above as: “Get the rvalue of ptrNumber (2200), go to that memory address, and copy the value 10 into int bytes of memory at that address.” Notice the importance of the pointer’s type specifier. It tells the compiler to convert the number 10 into int bytes of data (i.e., 2 bytes) and then copy those bytes into memory address 2200. The result after the statement is finished is that number now equals 10. You have “indirectly” changed the value of number using a pointer variable.
Imagine the kind of mischief that might result if you defined ptrNumber to be a char pointer rather than an int pointer. In that case, the assignment statement using the indirection operator would convert the value 10 into a 1-byte value and assign it into memory address for number. The value for number would now only be “half-right” because the second byte of number would contain whatever random junk just happened to be in memory at that address. The lesson is simple: Don’t mix apples and oranges. If you want to use indirection to change an int, then you must use a pointer with the int type specifier. Otherwise, all bets are off and you are on your own when it comes to debugging your program. (Actually, the Arduino compiler does a pretty good job of catching this type of error and issues an error message telling you it cannot convert one type of pointer into another type of pointer. It is even better, however, if you don’t get caught doing this kind of thing in the first place!)
Using IndirectionLet’s write a short program that shows the use of pointers. The source code appears in Listing 8-1.
Listing 8-1. A Simple Pointer Program
/* Purpose: Simple program to demonstrate using a pointer Dr. Purdum, August 13, 2012 */#include <stdio.h>int counter = 0;void setup() {
2294 2200
points to
ptr Number Number
2200 5
Figure 8-4. The rvalues and lvalues for ptrNumber and number.

chapter 8 ■ IntroductIon to poInters
138
// So we can communicate with the PC Serial.begin(9600); }
void loop() { int number = 5; int *ptrNumber;
Serial.print("The lvalue for ptrNumber is: "); Serial.print((long) &ptrNumber, DEC); Serial.print(" and the rvalue is "); Serial.println((long) ptrNumber, DEC);
//=== Put new statements here! Serial.print("The lvalue for number is: "); Serial.print((long) &number, DEC); Serial.print(" and has an rvalue of "); Serial.println((int) number, DEC); counter++; if (counter > 10) { Serial.flush(); exit(0); }}
The code in Listing 8-1 simply displays information about ptrNumber and number on your PC using the serial link. Figure 8-5 shows the program output when I ran the program on my PC. For my machine, it shows that ptrNumber is stored at memory address 2292 and has an rvalue of 25344. The 25344 is the result of the random bits that happen to be stored in the 2 bytes starting at memory address 2292. If you had defined ptrNumber using the syntax:
int *ptrNumber = NULL;
then the rvalue of ptrNumber would be displayed as 0. Note the “junk” rvalue of 8123 for variable number.

139
chapter 8 ■ IntroductIon to poInters
Now let’s add two new statements to the program shown in Listing 8-1 and rerun it. The statements are:
ptrNumber = &number; *ptrNumber = 10;
You should place these statements in Listing 8-1 where you find the comment:
//=== Put new statements here!
Now recompile, upload, and run the new version of the program. Figure 8-6 shows the results. Notice that the rvalue of number now displays as 10 rather than 5. The reason is because the first of the two new statements initializes ptrNumber to point to number using the address of operator. Next, you used the indirection operator to assign the value of 10 into number.
Figure 8-5. Sample run of simple pointer program.
Figure 8-6. Using indirection to change number’s rvalue.

chapter 8 ■ IntroductIon to poInters
140
The program presented in Listing 8-1 makes 10 passes through the for loop before ending via the call to exit(0). The call to Serial.flush() is usually necessary because of the way serial communications are performed with the PC. The Serial.print() calls actually write data to a small buffer section of memory. When that buffer fills up, the data in the buffer are sent (i.e., “flushed”) to the PC over the serial data link. This is more efficient than sending the data byte by byte. However, when we end the program, it is quite possible that the buffer still holds some information that has not yet been sent to the PC. The call to Serial.flush() ensures all of the data has been sent.
You can also use a pointer variable in an assignment too. For example, add a new data definition for variable k near the top of the loop() function:
int k;
Now add the following new lines of code immediately after the last two lines you just added, so it looks like:
ptrNumber = &number; *ptrNumber = 10; k = *ptrNumber;
and add some code so you can see the value of k after the new statements:
Serial.print("The rvalue for k is: "); Serial.println(k, DEC);
When you run this version of the program, the output looks like that shown in Figure 8-7. Notice that the code uses indirection to assign the value 10 into variable k. As before, the indirection operator (*) instructs the code to go to the address pointed to by ptrNumber (the lvalue of number), fetch int bytes of data (i.e., 2 bytes holding the value 10), and copy those 2 bytes into the rvalue of k. As a result, the rvalue for both number and k are the same.
Figure 8-7. Using the indirection operator in an assignment statement.

141
chapter 8 ■ IntroductIon to poInters
Summary of Pointer RulesLet’s take a moment and restate the various rules you need to follow when using pointers:
• A pointer variable must be defined using an asterisk in the definition, such as:
int *ptr;
which defines a pointer that will be used with an int variable.
• The scale of the pointer is determined at the time the pointer variable is defined. The pointer’s type specifier determines the scalar. The scalar is used to determine how many bytes are to be manipulated by the pointer.
• A pointer never points to anything useful until it is initialized. The address of operator is used to initialize a pointer with the lvalue of what is being pointed to:
ptr = &myVariable;
• The address of operator (&) causes the lvalue of the variable (myVariable) to be fetched and that value is then assigned to the rvalue of the pointer variable (ptr).
• After a pointer is initialized, you can use indirection to change the rvalue of the variable being pointed to. Therefore, the statements:
int myVariable;int *ptr;ptr = &myVariable;*ptr = 10;
have the effect of assigning the value 10 into myVariable using the indirection operator (*) and ptr. You can also read the value being pointed to using the indirection operator, as in the statement:
Serial.print(*ptr);
This statement would print out the value 10 on the serial display device.
Why Are Pointers Useful?In Chapter 6 you saw that functions cannot change the value of an argument passed to it because function arguments are pass-by-value data items. That is, copies of the arguments are passed to the function, rather than the arguments themselves.
However, what if you want the function to change the argument? This is often the case when you need to change two or more values in the function code. True, you can return one value from the function, but you want the function to change more than one value. No problem—use a pointer.
For example, suppose you have a temperature sensor that reads the temperature every hour and records the value in an array named temps[]. At the end of the day, you want to read the 24 values and record the minimum and maximum temperatures for the day. Something like the following code fragment would do the job. The source code is found in Listing 8-2.

chapter 8 ■ IntroductIon to poInters
142
Listing 8-2. Minimum and Maximum Temperature Program
/* Purpose: find the minimum and maximum values of an array of data values Dr. Purdum, August 13, 2012 */#include <stdio.h>#define READINGSPERDAY 24#define VERYHIGHTEMPERATURE 200#define VERYLOWTEMPERATURE -200
int todaysReadings[] = {62, 64, 65, 68, 70, 70, 71, 72, 74, 75, 76, 78, 79, 79, 78, 73, 70, 70, 69, 68, 64, 63, 61, 59};void setup() { // So we can communicate with the PC Serial.begin(9600); }
void loop() { int lowTemp; int hiTemp; int retVal;
Serial.println("=== Before function call:"); Serial.print("The lvalue for lowTemp is: "); Serial.print((long) &lowTemp, DEC); Serial.print(" and the rvalue is "); Serial.println((long) lowTemp, DEC); Serial.print("The lvalue for hiTemp is: "); Serial.print((long) &hiTemp, DEC); Serial.print(" and the rvalue is "); Serial.println((long) hiTemp, DEC); retVal = CalculateMinMax(todaysReadings, &lowTemp, &hiTemp); Serial.println("=== After the function call:"); Serial.print("The lvalue for lowTemp is: "); Serial.print((long) &lowTemp, DEC); Serial.print(" and the rvalue is "); Serial.println((long) lowTemp, DEC); Serial.print("The lvalue for hiTemp is: "); Serial.print((long) &hiTemp, DEC); Serial.print(" and the rvalue is "); Serial.println((long) hiTemp, DEC); Serial.println("\n");
Serial.flush(); // Make sure all the data is sent... exit(0);
}/***** Purpose: Get the daily temperature reading (READINGSPERDAY) and

143
chapter 8 ■ IntroductIon to poInters
set the minimum and maximum temperatures for the day. Parameter list: int temps[] the array of temperatures int *minTemp pointer to the minimum temperature value int *maxTemp pointer to the maximum temperature value
Return value: int the number of readings processed*****/int CalculateMinMax(int temps[], int *minTemp, int *maxTemp){ int j; *minTemp = VERYHIGHTEMPERATURE ; // Make the min temp ridiculously high *maxTemp = -VERYLOWTEMPERATURE; // Make the max temp ridiculously low for (j = 0; j < READINGSPERDAY; j++) { if (temp[j] >= *maxTemp) { *maxTemp = temp[j]; } if (temp[j] <= *minTemp) { *minTemp = temps[j]; } } return j;}
The CalculateMinMax() function has three parameters:
• An int array of temperature readings
• Two int pointers that store the minimum and maximum temperatures for the data passed to the function.
Now note how the function is called from within the loop() function:
retVal = CalculateMinMax(temps, &lowTemp, &hiTemp);
The first argument is the temps[] array that holds the 24 temperature reading. It is important to note that when you use an array name “by itself” (no array brackets after it), you are referencing the lvalue of the array. This is because arrays are reference types rather than value types. In fact, you can write the function declaration for CalculateMinMax() as either the way it is shown in Listing 8-2:
int CalculateMinMax(int temps[], int *minTemp, int *maxTemp)
or
int CalculateMinMax(int *temps, int *minTemp, int *maxTemp)
The interpretation of either signature is the same to the compiler. The reason is because the call to CalculateMinMax() uses the name of the array, which evaluates to the lvalue of the array.
Going back to the function call to CalculateMinMax() in loop(), notice that the next two arguments after temps[] are the int variables minTemp and maxTemp. Because you want the function to permanently change these values within the function, the function needs to know where these variables live in memory. This means you must send the lvalue for both variables to the CalculateMinMax() function. Passing the lvalue instead of the rvalue changes the default argument behavior for a variable from pass-by-value to

chapter 8 ■ IntroductIon to poInters
144
pass-by-reference. Placing the address of operator (&) before the variable names switches the two variables from pass-by-value to pass-by-reference.
If you think about it, the call in loop():
retVal = CalculateMinMax(temps, &lowTemp, &hiTemp);
has the effect of making the function signature to behave as though it were written:
int CalculateMinMax(int temps[], int *minTemp = &lowTemp, int *maxTemp = &hiTemp)
Breaking out the last two parameters from the signature should look familiar:
int *minTemp = &lowTemp;int *maxTemp = &hiTemp;
These two statements are the syntax you would use to initialize two pointers to the lowTemp and hiTemp variables back in loop(). In other words, pass-by-reference using the address of operator (&) back in loop() has exactly the same effect as initializing the two parameters in CalculateMinMax() as pointers to int variables. Figure 8-8 shows a sample run of the code in Listing 8-2.
In Figure 8-8, you can see that the lvalue for lowTemp is 2276 and hiTemp is 2278. (Why are the lvalues 2 bytes apart? Answer: Because lvalues for ints use 2 bytes of storage.) You can also see that the rvalues for the two variables are strange because they reflect whatever random bit pattern existed at those memory addresses when the program began execution. After the call to CalculateMinMax(), you can see their lvalues are still the same, but the temperatures have been assigned to the proper variables by the function. Clearly, this means you were able to change the variables back in loop() using pointer indirection even though both variables are out of scope within CalculateMinMax(). This would not be possible without using pointers.
Figure 8-8. Sample run of the MinMaxTemperature program.
The program shows another advantage of pointers. Recall that using an array name by itself as a function argument is the same as passing the lvalue for that array to the function. Suppose the array of temperatures was for 10 days rather than 1 day. If the compiler could not simply pass the array name, then it would have to use the stack mechanism discussed in Chapter 7 and push 240 values onto the stack, thus consuming 480 bytes of stack space. Also, those same 480 bytes would have to be popped back off the stack

145
chapter 8 ■ IntroductIon to poInters
by the code in the function. These pushing and popping instructions take time. By using call-by-reference, you can use arrays as if they were pointers and save both time and memory in the process.
Pointers and ArraysAs you may have guessed, there is an intimate relationship between pointers and arrays. Listing 8-3 shows a simple program that displays the content of a character array.
Listing 8-3. Display Character Array
/* Purpose: Display a character array using array indexes Dr. Purdum, August 14, 2012 */ void setup() { // So we can communicate with the PC Serial.begin(9600); }
void loop() { char greet[6]; int i; greet[0] = 'H'; // Initialize the array with some characters greet[1] = 'e'; greet[2] = 'l'; greet[3] = 'l'; greet[4] = 'o'; greet[5] = '\0'; for (i = 0; i < 5; i++) { Serial.print(greet[i]); } Serial.flush(); // Make sure all the data is sent... exit(0);}
When you run this program, the output is simply “Hello”. To that, you used the array indexes to march through the character string. Now change the statement in the for loop to:
Serial.print(*(greet + i));
compile, upload, and run the program. What happens to the output? Absolutely nothing. The program still displays “Hello”. Now try changing the same statement to:
Serial.print(*(greet + i * sizeof(char)));
Does the output change? No, it is still the same. The reason is because both variations make use of the fact that using an array name by itself is the same as using the lvalue of the array. Consider Figure 8-9.

chapter 8 ■ IntroductIon to poInters
146
Assume that the greet array is stored starting with memory address 2200 (i.e., its lvalue is 2200). Now look at the statement:
Serial.print(*(greet + i));
On the first pass through the loop, because i is 0, the statement resolves to:
Serial.print(*(greet + 0));Serial.print(*(2200 + 0));Serial.print(*(2200));
The indirection operator simply says to go to memory address 2200 and fetch the character found there. This is the letter ‘H.’ On the next pass through the for loop, the statement resolves to:
Serial.print(*(greet + 1));Serial.print(*(2200 + 1));Serial.print(*(2201));
and the indirection operator fetches the ‘e.’ The process repeats until the loop ends, at which time the word “Hello” is on the display.
The second variation of the statement is:
Serial.print(*(greet + i * sizeof(char)));
The sizeof() operator returns the number of bytes required to store the data type enclosed by its parentheses. From Table 3-1 you know that a char requires 1 byte for storage in memory. Therefore, the statement resolves to:
Serial.print(*(greet + i * 1));Serial.print(*(greet + 0 * 1));Serial.print(*(2200 + 0));Serial.print(*(2200));
and the ‘H’ is displayed. For the second pass, the statement resolves to:
Serial.print(*(greet + i * 1));Serial.print(*(greet + 1 * 1));Serial.print(*(2200 + 1));Serial.print(*(2201));
and the ‘e’ is displayed. You should be able to figure out the rest of the sequence. This exercise should convince you that using the array name greet is the same as the lvalue of the
greet[] array. Now add the following pointer definition to loop() and change the for statement as shown in the following code fragment:
void loop() { char greet[6]; char *ptr; int i;
Figure 8-9. The greet[] array in memory.
2201 2203 2205
H e l l o ‘\0’
2200 2202 2204

147
chapter 8 ■ IntroductIon to poInters
greet[0] = 'H'; greet[1] = 'e'; greet[2] = 'l'; greet[3] = 'l'; greet[4] = 'o'; greet[5] = '\0'; ptr = greet; // Initialize the pointer for (i = 0; i < 5; i++) { Serial.print(*ptr++); }
Serial.flush(); // Make sure all the data is sent... exit(0);()}
Once again, the program behaves exactly as before. The statement:
ptr = greet;
takes the lvalue of greet and places it into the rvalue of ptr. To the compiler, the name of an array is the same as the lvalue of the array, so you do not need to use the address of operator. (In fact, if you did try to use the address of operator, then the compiler issues an error message.) The statement essentially does exactly the same thing as shown in Figure 8-4. It initializes ptr to point to the greet[] array. In the for loop, the statement:
Serial.print(*ptr++);
uses the indirection operator (*) to fetch the content of ptr and display it. Because ptr equals 2200, the letter ‘H’ is displayed. Because you used a post increment operator on ptr, on the next pass through the loop, the indirection is performed on memory address 2201, and the ‘e’ is displayed. As you can see, all three variations of the program produce the same results. You can also post decrement a pointer using the statement:
Serial.print(*ptr--);
However, pointer decrements “back up” the pointer by scalar bytes for each decrement operation. Unless you keep track of this correctly, you could back up too far and all bets are off as to what you might be pointing.
What would happen if you got rid of the for loop completely and just used the statement:Serial.print(greet);
Once again, the program works exactly the same as before. The reason is because now we are treating the character array as a string data type. By terminating the sequence of characters with the null termination characters (‘\0’) as you did when the string was initialized, you can treat the character array as a string. That is, the Serial.print() function gets the lvalue of the greet[] array but can process it as though it is a string because of the null termination character. If you forget to add the null character to the greet[], no problem. The Serial.print() function will just keep spinning through memory displaying whatever junk it finds until it reads a byte with the value 0. Comment out the last initialization byte and give it a try. My program only displayed about 3 bytes of junk before it stopped printing. Your results may be different.
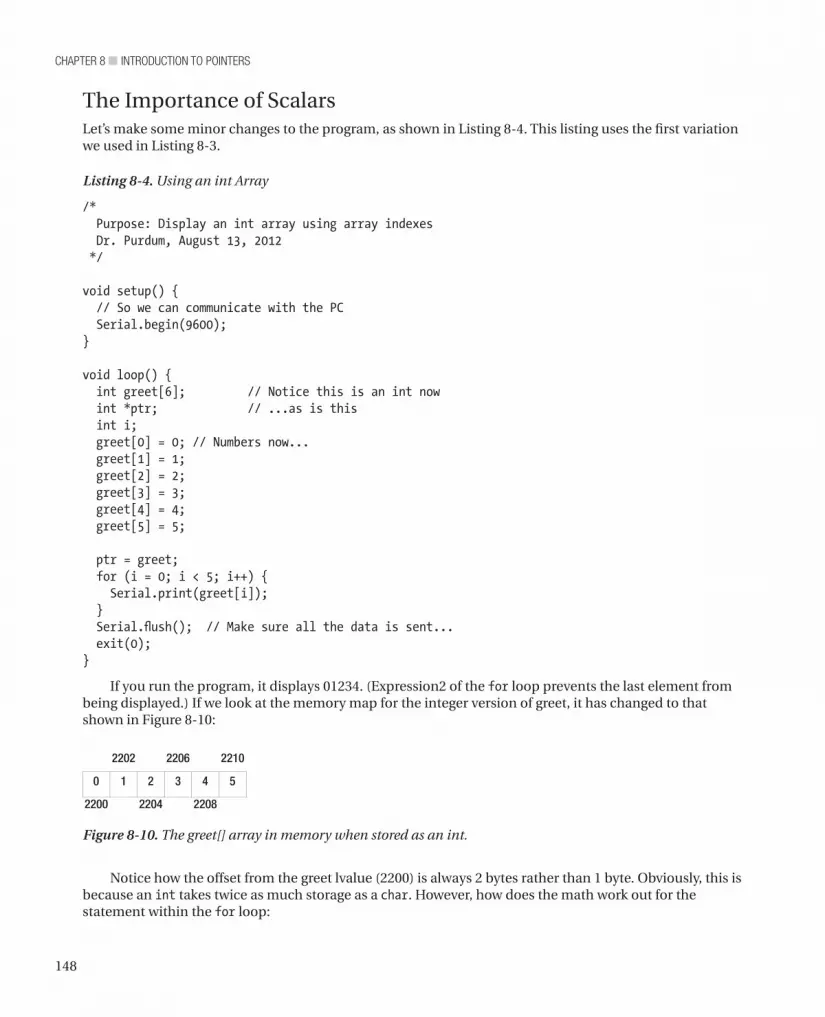
chapter 8 ■ IntroductIon to poInters
148
The Importance of ScalarsLet’s make some minor changes to the program, as shown in Listing 8-4. This listing uses the first variation we used in Listing 8-3.
Listing 8-4. Using an int Array
/* Purpose: Display an int array using array indexes Dr. Purdum, August 13, 2012 */ void setup() { // So we can communicate with the PC Serial.begin(9600); }
void loop() { int greet[6]; // Notice this is an int now int *ptr; // ...as is this int i; greet[0] = 0; // Numbers now... greet[1] = 1; greet[2] = 2; greet[3] = 3; greet[4] = 4; greet[5] = 5; ptr = greet; for (i = 0; i < 5; i++) { Serial.print(greet[i]); } Serial.flush(); // Make sure all the data is sent... exit(0);}
If you run the program, it displays 01234. (Expression2 of the for loop prevents the last element from being displayed.) If we look at the memory map for the integer version of greet, it has changed to that shown in Figure 8-10:
Figure 8-10. The greet[] array in memory when stored as an int.
Notice how the offset from the greet lvalue (2200) is always 2 bytes rather than 1 byte. Obviously, this is because an int takes twice as much storage as a char. However, how does the math work out for the statement within the for loop:
2202 2206 2210
0 1 2 3 4 5
2200 2204 2208

149
chapter 8 ■ IntroductIon to poInters
Serial.print(greet[i]);This seems like it should resolve as:
Serial.print(greet[i]); Serial.print(greet + i); Serial.print(2200 + 0); Serial.print(2200);
which does align with the first number in the array. But, what happens on the next pass when i = 1?
Serial.print(greet[i]); Serial.print(greet + 1); Serial.print(2200 + 1); Serial.print(2201);
This is not the lvalue for the second value in the array. What went wrong? Actually, nothing went wrong, because that is not how the compiler does the math. Any time the
compiler calculates an offset from an array’s lvalue, it scales the offset by the scalar for the data type. To prove this, try the second variation you tried above but for an int.
Serial.print(*(greet + i * sizeof(int)));Serial.print(*(greet + i * 2);Serial.print(*(2200 + 1 * 2);Serial.print(*(2202);
This works just fine, because 2202 is the lvalue for the second element of the array. If you try the pointer version using the statement:
Serial.print(*ptr++);
it also works just fine because all pointer math is also scaled to fit the underlying data type. In this case, any increment increases the offset by 2 because each int requires 2 bytes of memory. You can alter the data type use in the program and you will find the compiler always scales the operators to fit the data being manipulated. It is nice you do not have to keep track of such details.
SummaryIn this chapter you learned the hardest topic C can throw at you: pointers. You learned what pointers are and how to use the address of and indirection operators to manipulate pointer data. You also learned how pointers are useful in overcoming local scope limitations when you want the function to permanently change a function argument. You learned that pointers have a close relationship to the array data types. The sample programs in this chapter demonstrated that there are various ways to use pointers, but they are functionally equivalent.
There are a lot of new concepts in this chapter, and you must master them before reading the next chapter. The next chapter adds more details about pointers and has a little more complexity. As such, it makes sense for you to spend enough time in this chapter before progressing to the next chapter. If you can do the exercises without error, then you are ready to move on.

chapter 8 ■ IntroductIon to poInters
150
Exercises1. What is a pointer?
2. What does a pointer enable the programmer to do that might not be possible otherwise?
3. What does the address of operator do? Give an example.
4. What is the indirection operator (*) and what is its purpose? Give an example of how it might be used.
5. What is a pointer scalar and why is it important?
6. Suppose you needed to pass the value of the fifth element of an int array named values to a function named func(). How would you write the code?
7. Suppose you want func() to change the value of the fifth element of the values array. How would you write the code?
151
■ ■ ■
chapter 9
Using Pointers Effectively
This chapter is a continuation of Chapter 8. In that chapter, you learned what a pointer is and how to manipulate them in expressions. In this chapter, you will learn:
• Valid pointer operations
• Pointer arithmetic
• Using pointers to functions
• The Right-Left Rule for deciphering complex data definitions
• Why using pointers can lead to more efficient code
When you have finished this chapter, you should be quite comfortable using pointers in your code.
Relational Operations and Test for Equality Using PointersSome C expressions make sense with almost any data type...with the exception of pointers. A partial reason this is true is because a pointer can only have two types of rvalues: a memory address or NULL. Any other data is going to result in an error of some form. Because the rvalue for pointers is thus constrained, some operators simply don’t make sense with pointers. Relational tests (e.g., >=, <=, > and <) on pointers are acceptable only when both operands are pointers. Therefore,
if (ptr1 < ptr2) {…}
is acceptable, but
if(ptr1 > 10) {…}
is not. The second form is unacceptable because the relational test is against a constant, rather than a pointer. You can use a cast to dispel the error message you get when using constants in pointer relational tests, but that is almost never a good idea. It is not a good idea because testing against an actual numerical address almost never makes sense; this is because an lvalue is not known until run time.

chapter 9 ■ Using pointers effectively
152
Pointer Comparisons Must be Between Pointers to the Same DataYou should not perform relational operations on two pointers if they do not point to the same data object. If you think about it, such comparisons simply don’t make sense. (An exception is checking a pointer to see whether it is null.) The problem, however, is that the Arduino C compiler does not catch this type of error. Consider the following code fragment:
char *ptr1;char *ptr2;char array[50];char name[10];
ptr1 = array;ptr2 = name;if (ptr1 > ptr2) { // Some RDC...}
The if test on the pointers is nonsense and should be flagged as an error because you are comparing two pointers that point to different data objects. The Arduino C compiler, however, lets this code slide by. This can make debugging a pointer problem more difficult than it should be.
Pointer ArithmeticSome forms of pointer arithmetic are allowed, others are not. Confusing the two is simply asking the train to leave the rails. You performed pointer arithmetic in Chapter 8 but probably didn’t think much about it. Now, let’s dig in and look closely at what happens when you use pointers in your code. Consider the code in Listing 9-1.
Listing 9-1. Using Pointers
/* Purpose: Illustrate pointer arithmetic Dr. Purdum, August 20, 2012 */#include <string.h>void setup() { Serial.begin(9600); }
void loop() { char buffer[50]; char *ptr; int i; int length; strcpy(buffer, "When in the course of human events"); ptr = buffer; length = strlen(buffer); Serial.print("The lvalue for ptr is: ");

153
chapter 9 ■ Using pointers effectively
Serial.print((unsigned int)&ptr); Serial.print(" and the rvalue is "); Serial.println((unsigned int)ptr); while (*ptr) { Serial.print(*ptr++); }
Serial.flush(); // Make sure all the data is sent... exit(0);
}
The first thing to notice is that we are including a header file named string.h. If you read that file with a text editor, then you will find all kinds of functions designed to manipulate both strings and memory. Most of the function declarations you find in that header file are part of the System V Standard C Library that has been around for decades. If you are interested in learning more about any given library function (e.g., memcmp), then Google the function name and you will get more than enough information about the function. (A memcmp() search turned up more than 600,000 hits!) As stated before, search the libraries before writing your own functions. There is a good chance what you need has already been written.
One of the function declarations you will find in the string.h header file is:
extern char *strcpy(char *, const char *);
which copies the characters pointed to by the constant character pointer that is the second parameter into the character array pointed to by the first parameter. (When used in this context, const means that the function should not alter the data pointed to by the second parameter. Because strcpy() knows the lvalue of the second parameter, it could alter its contents. The const qualifier tells the compiler not to let that happen.) Therefore, the statement:
strcpy(buffer, "When in the course of human events");
simply copies the quotation into buffer. The statement:
ptr = buffer;
simply initializes ptr to point to buffer. That is, it copies the lvalue of buffer into the rvalue of ptr. Remember: An array name by itself is the lvalue of the array. Think about what has been said thus far until you are sure you understand what the last two sentences mean.
When you compile, upload, and run the program, the output looks similar to that shown in Figure 9-1.
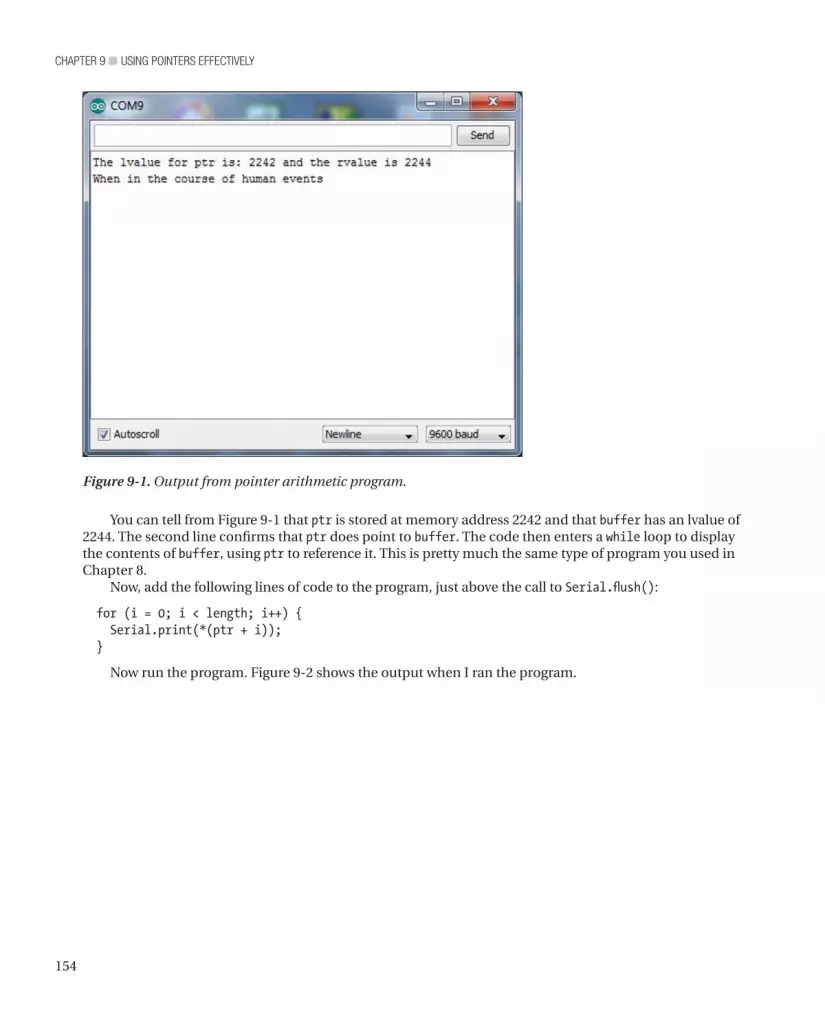
chapter 9 ■ Using pointers effectively
154
You can tell from Figure 9-1 that ptr is stored at memory address 2242 and that buffer has an lvalue of 2244. The second line confirms that ptr does point to buffer. The code then enters a while loop to display the contents of buffer, using ptr to reference it. This is pretty much the same type of program you used in Chapter 8.
Now, add the following lines of code to the program, just above the call to Serial.flush():
for (i = 0; i < length; i++) { Serial.print(*(ptr + i)); }
Now run the program. Figure 9-2 shows the output when I ran the program.
Figure 9-1. Output from pointer arithmetic program.
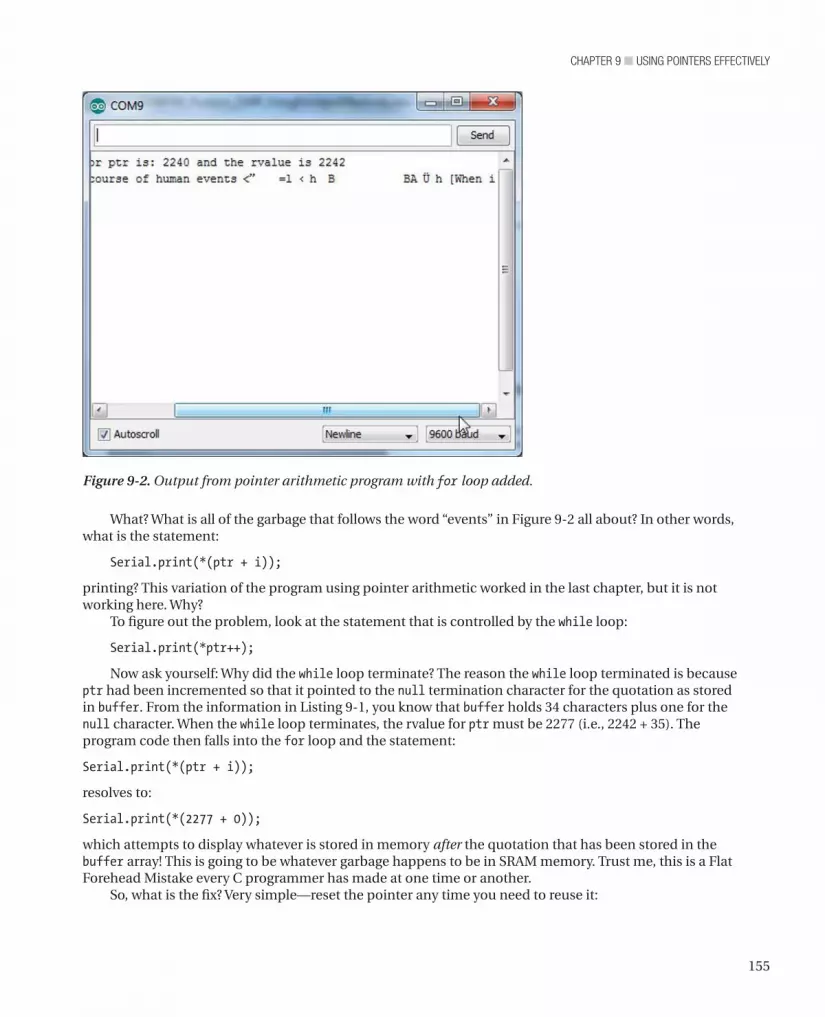
155
chapter 9 ■ Using pointers effectively
What? What is all of the garbage that follows the word “events” in Figure 9-2 all about? In other words, what is the statement:
Serial.print(*(ptr + i));
printing? This variation of the program using pointer arithmetic worked in the last chapter, but it is not working here. Why?
To figure out the problem, look at the statement that is controlled by the while loop:
Serial.print(*ptr++);
Now ask yourself: Why did the while loop terminate? The reason the while loop terminated is because ptr had been incremented so that it pointed to the null termination character for the quotation as stored in buffer. From the information in Listing 9-1, you know that buffer holds 34 characters plus one for the null character. When the while loop terminates, the rvalue for ptr must be 2277 (i.e., 2242 + 35). The program code then falls into the for loop and the statement:
Serial.print(*(ptr + i));
resolves to:
Serial.print(*(2277 + 0));
which attempts to display whatever is stored in memory after the quotation that has been stored in the buffer array! This is going to be whatever garbage happens to be in SRAM memory. Trust me, this is a Flat Forehead Mistake every C programmer has made at one time or another.
So, what is the fix? Very simple—reset the pointer any time you need to reuse it:
Figure 9-2. Output from pointer arithmetic program with for loop added.

chapter 9 ■ Using pointers effectively
156
Always remember: When you increment a pointer, it does not automatically reset itself.The statement controlled by the for loop:
Serial.print(*(ptr + i));
shows how addition is one form of pointer arithmetic that is allowed. You learned in Chapter 8 that all pointer arithmetic is scaled to fit the data being pointed to. In this example, the scalar for a char data type is 1 byte, so each pass through the loop adds 1 to the rvalue of ptr and the code marches through the quotation. If ptr were pointing to int data, then the expression:
(ptr + i)
in the Serial.print() statement would add 2 to ptr on each pass because the scalar for an int is 2 bytes. Therefore, the arithmetic operation of pointer addition is permissible and is automatically scaled for the type of data being used.
Constant lvaluesYou saw statements in Listing 9-1 that manipulated the pointer, as in:
ptr = buffer;
ptr = buffer; // Reset the pointer back to buffer[0]...Serial.println(""); // So the output prints on a new line
and run it again. Now the output (as shown in Figure 9-3) is as expected.
Figure 9-3. Program output after resetting ptr.

157
chapter 9 ■ Using pointers effectively
and also the sub-expression:
ptr + i;
and both are perfectly acceptable expressions. The first statement simply initializes the pointer to point to buffer, whereas the second statement increments (adds one scalar unit) to the pointer.
Now, using the variable named buffer from Listing 9-1, what happens when you try compiling the statement:
buffer = buffer + 1;
The compiler gets a little cranky and issues an error message. Why? Think about it. You know that when an array name appears in a program statement by itself, it resolves to the lvalue of the array. This statement, therefore, is attempting to change the lvalue by adding one to it. If the compiler allowed you to change the lvalue, then there would be no way to find where that variable is stored in memory. Therefore, the compiler must issue an error message when any statement attempts to change the lvalue of a variable.
Two-Dimensional ArraysTwo-dimensional arrays are often used in programming to present tabular data. You might, for example, have a fire alarm system with 10 sensors per floor in a three-story building. You could organize those sensors as:
int myFireSensors[3][10];
which could be used to store the current state of each sensor on all three floors. Obviously, you could also write the array as:
int myFireSensors[10][3];
Most programmers think of the organization for two-dimensional arrays in a row-column format, so this latter definition is “ten rows of sensors by three columns of floors.” Which of the two forms is better? It doesn’t matter. Pick one that makes sense to you and use it.
Let’s write a short program that uses a two-dimensional array of characters. Although you could write the program as a simple array of strings, you will organize the data as chars instead. Listing 9-2 presents the code.
Listing 9-2. Using a Two-Dimensional Array of chars
/* Purpose: To illustrate the relationship between two-dimensional arrays and pointers. Dr. Purdum, August 21, 2012 */#define DAYSINWEEK 7#define CHARSINDAY 10
static char days[DAYSINWEEK][CHARSINDAY] = {"Sunday", "Monday", "Tuesday","Wednesday", "Thursday", "Friday", "Saturday"};
void setup() {
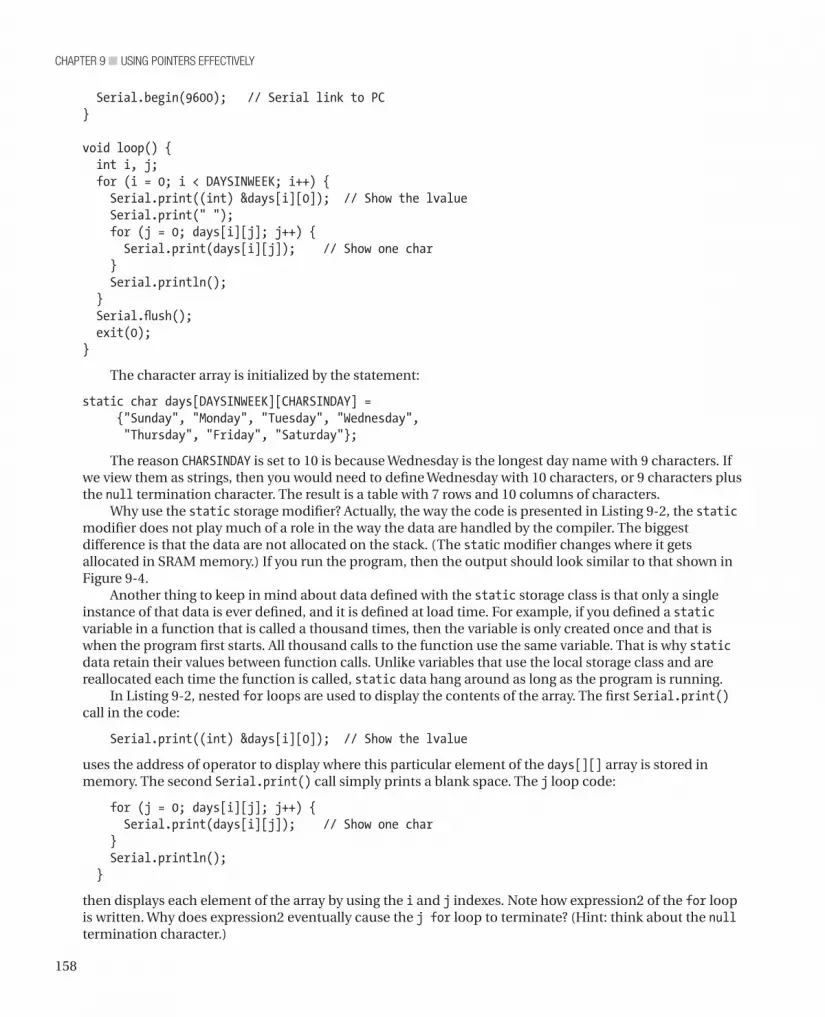
chapter 9 ■ Using pointers effectively
158
Serial.begin(9600); // Serial link to PC}
void loop() { int i, j; for (i = 0; i < DAYSINWEEK; i++) { Serial.print((int) &days[i][0]); // Show the lvalue Serial.print(" "); for (j = 0; days[i][j]; j++) { Serial.print(days[i][j]); // Show one char } Serial.println(); } Serial.flush(); exit(0); }
The character array is initialized by the statement:
static char days[DAYSINWEEK][CHARSINDAY] = {"Sunday", "Monday", "Tuesday", "Wednesday", "Thursday", "Friday", "Saturday"};
The reason CHARSINDAY is set to 10 is because Wednesday is the longest day name with 9 characters. If we view them as strings, then you would need to define Wednesday with 10 characters, or 9 characters plus the null termination character. The result is a table with 7 rows and 10 columns of characters.
Why use the static storage modifier? Actually, the way the code is presented in Listing 9-2, the static modifier does not play much of a role in the way the data are handled by the compiler. The biggest difference is that the data are not allocated on the stack. (The static modifier changes where it gets allocated in SRAM memory.) If you run the program, then the output should look similar to that shown in Figure 9-4.
Another thing to keep in mind about data defined with the static storage class is that only a single instance of that data is ever defined, and it is defined at load time. For example, if you defined a static variable in a function that is called a thousand times, then the variable is only created once and that is when the program first starts. All thousand calls to the function use the same variable. That is why static data retain their values between function calls. Unlike variables that use the local storage class and are reallocated each time the function is called, static data hang around as long as the program is running.
In Listing 9-2, nested for loops are used to display the contents of the array. The first Serial.print() call in the code:
Serial.print((int) &days[i][0]); // Show the lvalue
uses the address of operator to display where this particular element of the days[][] array is stored in memory. The second Serial.print() call simply prints a blank space. The j loop code:
for (j = 0; days[i][j]; j++) { Serial.print(days[i][j]); // Show one char } Serial.println(); }
then displays each element of the array by using the i and j indexes. Note how expression2 of the for loop is written. Why does expression2 eventually cause the j for loop to terminate? (Hint: think about the null termination character.)

159
chapter 9 ■ Using pointers effectively
A Small ImprovementAlthough the code in Listing 9-2 works as designed, you can make a minor change and get slightly better code. The improvement involves moving the days[][] array from its current global access location outside of any function to inside the loop() function. This move changes the access from global to local access, which affords the data an improved degree of privacy because nothing outside of loop() now has access to the array.
You might be thinking: “Wait a minute! In Chapter 7 you stated that local variables are allocated on the stack in SRAM. Doesn’t this ‘improvement’ increase the risk of running out of SRAM while the program runs?” To answer this question, move the definition of days[][] into the loop() function and recompile and run the program. What do you see?
Moving the days[][] array has no effect on the output of the program. Especially note that the lvalues do not change. How is that possible now that days[][] is a local variable? The reason was just explained a few paragraphs ago. There is no change because data defined with the static storage specifier are always defined in a reserved section of SRAM. This second version of the program is better because you have restricted the access to the array by outside agents yet have not chewed up any more of the limited SRAM space. It is also important to recall that, unlike local variables, each pass through the loop() statement body does not cause the days[][] array to be reallocated on each pass. The static specifier assures you that the allocation only occurs once.
If you look closely at Figure 9-4, you will notice that the lvalue for each row is exactly 10 bytes more than the previous element. Obviously, the rows are stored “back-to-back” in memory. Also notice that the lvalues have relatively low memory addresses compared to the lvalues in Figure 9-3. Why? This is because the variables in Figure 9-3 were allocated off the stack, whereas the lvalues for the days[][] array has the static storage class and is not allocated off the stack.
Figure 9-4. Two-dimensional program run.

chapter 9 ■ Using pointers effectively
160
How Many Dimensions?Our sample program uses a two-dimensional array. Each dimension is called a rank so Listing 9-2 uses a rank 2 array. So, how many ranks does Arduino C allow you to use? Well...how many do you need? You might use a rank 3 array if you are doing 3D graphics, storing the coordinates for x, y, and z. If you are writing a game where those graphics change in relation to time, then you might use a rank 4 array. I have tried to think of a rank 5 example, and all I get is a headache. Although I thought the ANSI X3J11 spec stated a maximum rank of 256, I cannot find that limitation in print. I do know that the Arduino can compile a rank 5 array. I can’t think of any reason to go beyond that. If you need more, then write the code and try to compile it. If it compiles, then you should send me a copy of the code—I need a good example of a rank N program.
Two-Dimensional Arrays and PointersCan you rewrite the code in Listing 9-2 to use pointers? Sure, but it takes a little more thought. The modified code appears in Listing 9-3.
Listing 9-3. Modified Two-Dimensional Array Program to Use Pointers
/* Purpose: To illustrate the relationship between two-dimensional arrays and pointers. Dr. Purdum, August 21, 2012 */#define DAYSINWEEK 7#define CHARSINDAY 10
void setup() { Serial.begin(9600); // Serial link to PC}
void loop() { static char days[DAYSINWEEK][CHARSINDAY] = {"Sunday", "Monday", "Tuesday","Wednesday", "Thursday", "Friday", "Saturday"}; int i, j; char *ptr, *base; base = days[0]; // Different for N-rank arrays where N > 1 for (i = 0; i < DAYSINWEEK; i++) { ptr = base + (i * CHARSINDAY); Serial.print((int) ptr); // Show the lvalue Serial.print(" "); for (j = 0; *ptr; j++) { Serial.print(*ptr++); // Show one char } Serial.println(); } Serial.flush();

161
chapter 9 ■ Using pointers effectively
exit(0); }
The first thing to notice is that there are two char pointer variables now, ptr and base. In the code, ptr is used to march through the character array, whereas base is used to keep track of where the array begins in memory. Recall from the previous program that when you ran the program back-to-back without resetting the pointer, random garbage ended up being displayed. The base pointer is used in Listing 9-3 to prevent the same problem.
The next difference is how the base character pointer is initialized to point to the array. The statement:
base = days[0];
is necessary because this is a rank 2 array. A one-dimensional array resolves to a pointer to char, so the name of the array is the lvalue for the array. However, with two-dimensional arrays, you have a pointer to an array, rather than a pointer to a pointer. For that reason, you need to show “rank - 1” array brackets. That is, if you have a rank 3 array, then you would need to use: array[0][0] in the pointer initialization. You could force the syntax using a cast, but that seems to be an artificial way to do it.
Inside the for loop controlled by variable i, the statement:
ptr = base + (i * CHARSINDAY);
initializes ptr to point to the element of the array that you wish to display next. Looking at Figure 9-4, the days[][] array starts at memory address 258. Because you initialized base to point to the starting address of the first element of the array, base equals 258. So, on the first pass through the i loop, the expression resolves to:
ptr = base + (i * CHARSINDAY); ptr = 258 + (0 * 10); ptr = 258 + 0; ptr = 258;
which is exactly what we want. On the second pass through the i loop, ptr resolves to:
ptr = base + (i * CHARSINDAY); ptr = 258 + (1 * 10); ptr = 258 + 10; ptr = 268;
which agrees with the value displayed in Figure 9-4. You should be able to convince yourself that each pass through the i loop results in an lvalue for ptr that is 10 bytes larger than the previous value—exactly as expected. Note that the base pointer is never changed. That is because all of the calculations are indexed from the beginning of the array.
Inside the for loop controlled by variable j, the statement:
Serial.print(*ptr++); // Show one char
simply causes the code to march through the array, displaying each character until the null termination character is read. When ptr has been incremented to the null termination character, expression2 of the for loop terminates (the loop code interprets the null as a logic false condition), and the j loop ends. An end-of-line character is displayed so the next display line appears on a new line. The program then increments variable i, and the next pass through the i loop is made.

chapter 9 ■ Using pointers effectively
162
Treating the Two-Dimensional Array of chars as a StringIf you just want to print out the contents of the array as strings, then you can simplify the program even more. Remove the two for loops and replace them with the following single loop:
for (i = 0; i < DAYSINWEEK; i++) { Serial.println(days[i]); }
If you compile and run this modified version of the program, then the days of the week are displayed. How does that work? The operation of the program becomes clear when you realize (using the lvalues from Figure 9-4) where the starting bytes are located. That is, days[0][0] marks the ‘S’ in “Sunday”:
days[0][0] = "Sunday"; // lvalue = 258days[1][0] = "Monday" // lvalue = 268days[2][0] = "Tuesday"; // lvalue = 278// more elements...
Therefore, each time variable i is incremented by 1, the compiler adds an offset to the base index of the array name (258) that is equal to the size of the second element size for the array (i.e., 10) times its scalar size. For a character array, the scalar is 1, so the offset is always 10. This is why the lvalue that is used to display the string is always 10 larger than the previous address.
What if the array is defined as:
float myData[5][10];
What is the scalar for each increment of i in:
for (i = 0; i < 5; i++) { Serial.println(myData[i]); }
Because the scalar for a float is 4, each increment on i advances the lvalue address by 40:
40 = sizeof(float) * second element size40 = 4 * 1040 = 40
As an exercise, you could change the code in Listing 9-3 to work with the float data type and display the lvalues to verify this conclusion is correct.
Pointers to FunctionsYou can call a function via a pointer in C. As you will see, this can be very useful when a set of known tasks must be performed based on specific values. But first, let’s see how to use a pointer to a function. Listing 9-4 shows the code for using a pointer to a function.
Listing 9-4. Using a Pointer to Function
/* Purpose: Show how to use a pointer to function Dr. Purdum, August 21, 2012 */

163
chapter 9 ■ Using pointers effectively
void setup() { Serial.begin(9600); // Serial link to PC}
void loop() { int number = 50; int (*funcPtr)(int n); // This defines a pointer to function funcPtr = DisplayValue; // This copies the lvalue of DisplayValue number = (*funcPtr)(number); Serial.print("After return from function, number = "); Serial.println(number); Serial.flush(); exit(0);}
int DisplayValue(int val){ Serial.print("In function, val = "); Serial.println(val); return val * val;}
Parts of Listing 9-4 look a little strange at first, but they do make sense. The first strange statement is:
int (*funcPtr)(int n); // This defines a pointer to function
In the section titled The Right-Left Rule later in this chapter, you will learn a shortcut for deciphering complex data definitions. For now, however, this line simple states: “funcPtr is a pointer to a function which has a single int argument (n) and returns an int data type.” If the function did not have an argument, then the declaration would change to:
int (*funcPtr)(); // This defines a pointer to function with no arguments
If the function takes two float arguments but doesn’t return a value, then the declaration becomes:
void (*funcPtr)(float arg1, float arg2); // This defines a pointer to void function
As you can see, the type specifier for the function pointer is dictated by the function’s return value. The name of the pointer, funcPtr, is preceded by the indirection operator so the compiler knows a pointer is being defined. The surrounding parentheses mark the pointer as a pointer to function. The second set of parentheses groups the argument list for the function that will be pointed to.
You have probably already figured out the next statement:
funcPtr = DisplayValue; // This copies the lvalue of DisplayValue
This statement copies the lvalue of the function into funcPtr. Just as a variable has an address where it resides in memory (i.e., its lvalue), so, too, does a function.
The next statement:
number = (*funcPtr)(number)
calls the DisplayValue() function by using funcPtr, passing the value of number to the function. The function itself does little else than display the current value of the value passed to it. The function does, however, square the number and send it back to the caller as the return value for the function call. The return value is then displayed to show that the number was, in fact, squared by the function. Figure 9-5

chapter 9 ■ Using pointers effectively
164
shows a sample run of the program. As you can see in the figure, the number is squared during the function call and that value is returned to the caller.
Figure 9-5. Sample run of pointer to function program.
Arrays of Pointers to FunctionsArrays of pointers to function may sound complicated, but it really isn’t. Indeed, arrays of function pointers is a very useful and efficient way to perform certain tasks. For example, suppose you have three processes that might be used depending on the value returned from some other function call. Perhaps the function reads the temperature of a vat of candy. If the return value indicates the temperature is too low, then a function to continue heating the candy is called. If the return value is too high, another function turns off the heat but continues to stir the candy so it will cool. When the temperature is “just right,” a third function is called that routes the candy to a series of molds. Listing 9-5 shows how you might simulate this process.
enum Data TypeNear the top of Listing 9-5 is a new data structure called an enum (i.e., enumerated) data type. The enum syntax is:
enum NameOfEnum {enumMember List};
The NameOfEnum is the name (or tag) you wish to use for the enumeration and it follows the normal variable naming rules. The enumMemberList is a comma-separated list of the enumerated values you wish to use. By default, the list is assigned values starting with 0 and is incremented by 1 for each member. For example,
enum days {SUNDAY, MONDAY, TUESDAY, WEDNESDAY, THURSDAY, FRIDAY, SATURDAY};

165
chapter 9 ■ Using pointers effectively
would associate 0 with SUNDAY, 1 for MONDAY, and 6 for SATURDAY. You can override the default numbering by using explicit assignments, such as:
enum speeds {RESIDENTIAL = 35, STATEROAD = 55, FEDERALHIGHWAY = 70};
The member list names do not have to be in caps, but it is often done this way to reflect that the values are treated as constants in the program.
It is important to note that the statements above are enum data declarations, rather than enum definitions. To define an enumerated variable, you may use either of the following syntax forms:
enum days myDay;enum speeds {RESIDENTIAL = 35, STATEROAD = 55, FEDERALHIGHWAY = 70} mySpeed;
The first statement assumes that an enum for days already has been declared in the code and defines an enum variable named myDay. The second form combines the declaration of the enum with the definition of a speeds enum named mySpeed. Use whichever style you wish, but use it consistently.
If you have this nagging sensation that enums seem to be the same as using a #define, you are almost right, but not quite. A #define is a textual substitution done during the preprocessor pass by the compiler. If you could look at the source code after the preprocessor pass, then the tag associated with the #define is no longer present in the source code, only its associated value is present. As a result, there is no evidence of the #define in the symbol table either. That is, there is no traceable lvalue.
The enum is different in that it does create a variable that you can track in the program. This can make debugging easier using enums than if #defines are used. Also, some people are more comfortable with enums because it uses a more familiar syntax that ends with a semicolon statement termination character.
In Listing 9-5, an enum is used in conjunction with the candy vat temperatures. That is, whichAction can only assume the enumerated values of 0 (TOOCOLD), 1 (TOOHOT), or 2 (JUSTRIGHT). The code uses whichAction to index into the array of function pointers.
n Note The technical reviewer pointed out that it might be useful to have WhichOperation() return an enum instead of an int; however, with that change, the compiler issued an error message. The error and a work around can be found at http://arduino.cc/forum/index.php/topic,109584.0.html. While a good idea, we’ll keep things simple for the time being.
Listing 9-5. Program Using an Array of Pointers to Functions
/* Purpose: illustrate how you can use an array of pointers to functions. Dr. Purdum, 8/22/2012*/enum temperatures {TOOCOLD, TOOHOT, JUSTRIGHT};enum temperatures whichAction;
const int COLD = 235;const int HOT = 260;
void setup() { Serial.begin(9600); // Serial link to PC randomSeed(analogRead(0)); // Seed random number generator

chapter 9 ■ Using pointers effectively
166
}
void loop() { static void (*funcPtr[])() = {TurnUpTemp, TurnDownTemp, PourCandy}; static int iterations = 0; int temp;
temp = ReadVatTemp(); whichAction = (enum temperatures) WhichOperation(temp); (*funcPtr[whichAction])(); if (iterations++ > 10) { Serial.println("==================="); Serial.flush(); exit(0); }}
/***** Purpose: return a value that determines whether to turn up heat, turn down heat, or if vat is ready. Pourable candy is between 235 and 260. Parameter list: int temp the current vat temperature Return value: int 0 = temp too cold, 1 = temp too high, 2 = just right*****/
int WhichOperation(int temp){ Serial.print("temp is "); Serial.print(temp); if (temp < COLD) { return TOOCOLD; } else { if (temp > HOT) { return TOOHOT; } else return JUSTRIGHT; }}
/***** Purpose: simulate reading a vat's temperature. Values are constrained between 100 and 325 degrees Parameter list: void Return value: int the temperature*****/int ReadVatTemp(){ return random(100, 325);

167
chapter 9 ■ Using pointers effectively
}
void TurnUpTemp(){ Serial.println(" in TurnUpTemp()");}
void TurnDownTemp(){ Serial.println(" in TurnDownTemp()");}
void PourCandy(){ Serial.println(" in PourCandy()");}
The setup() function establishes a serial link to the PC, and the random number generator is seeded. Inside the loop() function, the statement:
static void (*funcPtr[])() = {TurnUpTemp, TurnDownTemp, PourCandy};
is the heart of the program. This statement creates and initializes an array named funcPtr that is an array of pointers to functions.
As stated earlier, just like any other variable that is defined in a program, each function has an lvalue that marks where that function resides in memory. If something causes program control to branch to that memory location for the next program instruction, then it is exactly the same as calling that function. In this particular example, funcPtr[0] holds the lvalue for the TurnUpTemp() function, funcPtr[1] holds the lvalue for the TurnDownTemp() function, and funcPtr[2] holds the lvalue for the PourCandy() function. As you can see in Listing 9-5, each of these functions simply displays a message saying that particular function was executed. This allows you to see which functions are visited as the program executes. Such “empty” functions are called stubs and are a commonly used technique during the program development process. Figure 9-6 shows a sample run of the program.
Figure 9-6. Sample run of the array of pointers to functions program.

chapter 9 ■ Using pointers effectively
168
The heart of the program centers on the following three statements:
temp = ReadVatTemp();whichAction = (enum temperatures) WhichOperation(temp);(*funcPtr[whichAction])();
The first statement calls the ReadVatTemp() function. We have coded the function to return a random number between 100 and 350 degrees. (Actually, almost any candy that has a temperature of 350 degrees is pretty much a block of carbon by then.) The random number is then returned from the function call and assigned into temp.
The second statement takes the value of temp and passes it to WhichOperation() to determine whether the temperature is too low, too high, or just right for pouring the candy into molds. The return value is then cast into the enum variable whichAction to determine which function should be called.
The third statement then calls the appropriate function by using whichAction as an index into the funcPtr[] array. Program control is then transferred to that function, which, in turn, displays its associated message. The dashed line is used to separate sets of runs should you press the mc board’s reset button.
Arrays of pointers to functions takes a little getting used to but offers an elegant solution to many programming problems that involve calling specific functions depending on a certain value. Years ago I saw a C implementation of the game Monopoly where each square on the board was associated with a particular function. Those functions were organized as an array of pointers to functions, which greatly simplified the coding for the game. Pointers to function is particularly useful with automated process control situations. Keep the pointer-to-function concept tucked away in the back of your mind. Often it is the perfect solution to a given programming task.
The Right-Left RuleWhat went through your mind when you first saw the statement:
static void (*funcPtr[])() = {TurnUpTemp, TurnDownTemp, PourCandy};?
Statements like this are called complex data definitions because they involve more than a simple data type specifier and a variable name. Let’s take this definition, remove the storage specifier, the initializer code that appears between the brackets, and just concentrate on what is left:
void (*funcPtr[3]) ();
(I used 3 for the array size because that is the number of functions we wanted to use in Listing 9-5.) The question is: What does this definition do? Alternatively, how can you verbalize this definition? Actually, it is pretty simple when you use the Right-Left Rule I developed more than 30 years ago.
The Right-Left Rule says that you first locate the identifier in the definition (e.g., funcPtr) and then you spiral your way out of the definition in a right-to-left fashion. Figure 9-7 shows the steps to follow to verbalize the definition. Step 1 says to find the name of the data item. In Figure 9-7, you can see the name is funcPtr. Thus far, you can say: “funcPtr is a...”
Now, look to the immediate right of the identifier. What you see is “[3]” in the data definition. Because you know that a bracket (“[“) introduces an array of some sort and that any number specifies the size of the array, you can now say: “funcPtr is an array of 3...”
To find out what the array type is, you have to look to the left of the identifier to find out what the array is. As shown in Figure 9-7, Step 2 moves you to the left where you find an asterisk. Because an asterisk in a data definition is used with pointers, you can now say: “funcPtr is an array of 3 pointers to...”

169
chapter 9 ■ Using pointers effectively
To determine what the pointers point to, you need to move to the right again and see what is the next attribute in the data definition. What you actually see is the closing parenthesis. However, that is simply used to group the attributes surrounding the identifier. Because everything within the parentheses is already “used up,” you must move to the right to find the next attribute. As shown in Step 3 in Figure 9-7, you see a set of parentheses. In data definitions, parentheses are used to mark the signature of a function. Therefore, you can now say: “funcPtr is an array of 3 pointers to functions...”
However, all function definitions must have a type specifier that tells what the function returns. To determine what the functions return, we need to move to the left in the data definition, as shown in Step 4 of Figure 9-7. You can now say: “funcPtr is an array of 3 pointers to functions returning void”.
If you look back to the right in the data definition after Step 4, you see that there are no other attributes left for this data definition. Therefore, you can tell your friends that “funcPtr is an array of 3 pointers to functions that return void.” You’re done. Although people at cocktail parties don’t seem too impressed by this skill, it will serve you well when you are trying to read someone else’s complex code.
SummaryPointers are one of the most powerful features in the C language. Alas, pointers are also one of the most difficult concepts for beginning programmers to understand. Still, pointers offer you so much flexibility that they are well worth the effort it takes to master them. You should spend whatever time it takes to feel comfortable with the concepts presented in this chapter. The effort will pay back huge dividends in your programming endeavors.
Figure 9-7. Using the Right-Left Rule.
13
2
4
void (*funcPtr[3]) ( );

chapter 9 ■ Using pointers effectively
170
Exercises1. In Listing 9-1, if I change ptr from a character pointer to an int pointer in the
initialization statement and write:
ptr = (int *) buffer;
and then run the program, what would you expect the output to look like and why?
2. Why are pointer scalars important?
3. When can you use two pointers in an arithmetic expression?
4. If you define a pointer to a function, what is the rvalue of a properly initialized pointer to function?
5. What is the purpose of the Right-Left Rule?
6. Unwind and verbalize the following data definitions:
int *ptr1[10];int (*ptr2)[10];int (*(*ptr3())[10])();int (*ptr4(int))();
171
■ ■ ■
chapter 10
Structures, Unions, and Data Storage
This chapter takes a little deeper look at some of your options for storing data and in serial input/output (I/O) operations. You will also learn some new data structures that are available to you and how they can be used to your advantage in your programs. More specifically, in this chapter you learn about:
• The struct keyword
• The union keyword
• How to use EEPROM memory in your programs
• Other data storage options
As you saw in Table 1-1, µc boards have limited amounts of memory available to you. We have talked about flash and SRAM memory in previous chapters, but we haven’t had too much to say about EEPROM memory. In this chapter, you will learn how to use EEPROM memory in your programs. However, before we dive into that topic, you need to take a little detour and learn about the struct keyword. After that, you will use a structure as an organizational object for storing data in EEPROM.
StructuresNot too long ago, I was involved in a project that required storing information about people/companies who performed services for homes. The project was in Florida, and it was mainly for people who lived in Florida on a part-time basis. The project required storing a service company’s ID number, name, password, and phone number. (Actually, more data were required, but this is good enough for our purposes.) From a data point of view, such disparate data pose a number of problems, not the least of which is how you “tie together” such differing data elements. You could define the data something like:
int serviceID;char serviceName[20];char servicePW[10];long servicePhone;
c

chapter 10 ■ StructureS, unionS, and data Storage
172
The declaration begins with the keyword struct as the data type specifier followed by the name, or structure tag, of the structure. A structure tag identifies the structure that is being declared. Structure tags follow the same naming rules as any other C variable. The structure tag is followed by an opening brace, followed by one or more variable definitions. Collectively, these variable definitions are called the members of the structure. After the list of structure members, there is a closing brace and then a semicolon. In our service example, the structure tag is servicePeople and it has four members. Therefore, the information stored in ID, Name, PW, and Phone are “tied together” under an umbrella named servicePeople.
In this case, we try to link the data together by using the word “service” in the names of the data. Although better than nothing, such an approach does not really “tie” the data together and allow us to manipulate it as an integrated unit of data.
The problem of grouping dissimilar data items together is solved in C by using a structure. A structure organizes different data items so they may be referenced by a single name. A structure normally holds two or more data items, usually of differing data types.
Declaring a StructureAn example will help you to see how a structure is declared in C. Sticking with our service people example, you might declare the associated structure as follows:
struct servicePeople { int ID; char Name[20]; char PW[10]; long Phone;};
Note that the statements above form a data declaration for a structure named servicePeople, but does not define a structure variable. The General syntax for a structure is:
struct structureTag { StructureMemberList;};
This syntax can be seen in Figure 10-1.
Figure 10-1. The syntax for a structure declaration.
Type Specifier Structure Tag
struct servicePeople {
int ID;
Char Name [20];
Char PW [10];
long Phone;
};
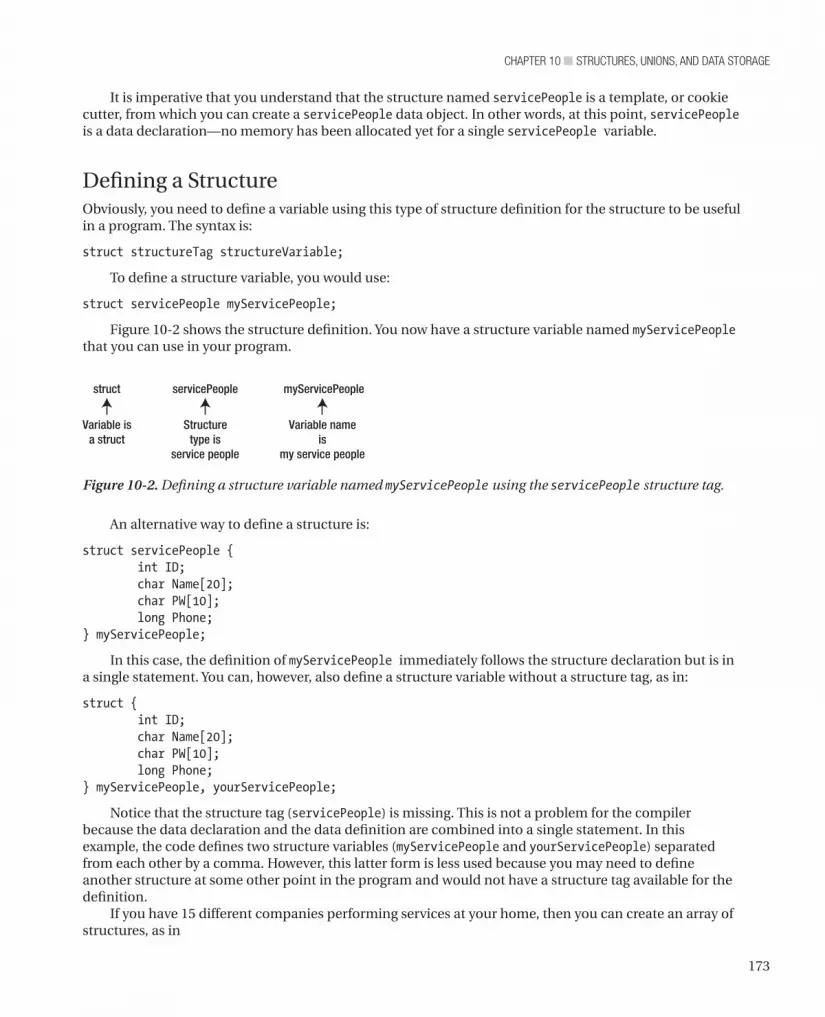
173
chapter 10 ■ StructureS, unionS, and data Storage
An alternative way to define a structure is:
struct servicePeople { int ID; char Name[20]; char PW[10]; long Phone;} myServicePeople;
In this case, the definition of myServicePeople immediately follows the structure declaration but is in a single statement. You can, however, also define a structure variable without a structure tag, as in:
struct { int ID; char Name[20]; char PW[10]; long Phone;} myServicePeople, yourServicePeople;
Notice that the structure tag (servicePeople) is missing. This is not a problem for the compiler because the data declaration and the data definition are combined into a single statement. In this example, the code defines two structure variables (myServicePeople and yourServicePeople) separated from each other by a comma. However, this latter form is less used because you may need to define another structure at some other point in the program and would not have a structure tag available for the definition.
If you have 15 different companies performing services at your home, then you can create an array of structures, as in
It is imperative that you understand that the structure named servicePeople is a template, or cookie cutter, from which you can create a servicePeople data object. In other words, at this point, servicePeople is a data declaration—no memory has been allocated yet for a single servicePeople variable.
Defining a Structure Obviously, you need to define a variable using this type of structure definition for the structure to be useful in a program. The syntax is:
struct structureTag structureVariable;
To define a structure variable, you would use:
struct servicePeople myServicePeople;
Figure 10-2 shows the structure definition. You now have a structure variable named myServicePeople that you can use in your program.
Figure 10-2. Defining a structure variable named myServicePeople using the servicePeople structure tag.
struct
Variable isa struct
Structuretype is
service people
Variable nameis
my service people
servicePeople myServicePeople

chapter 10 ■ StructureS, unionS, and data Storage
174
struct servicePeople myServicePeople[15];
As you know, arrays are groupings of data that share the exact same data attribute. However, structures allow you to have arrays that may contain many different types of data in their member lists, thus creating a more complex data structure. This has lead one of my colleagues to say that structures allow you to create “arrays for adults.” Indeed, structures are similar to the object-oriented programming concept known as a class. The major difference, however, is that a class can also have functions (methods) defined within the class. Still, you will find that structures do provide a convenient way to organize dissimilar groups of data.
Accessing Structure MembersNow that you have a lot of your structure members tucked neatly away inside a structure, how do you access their data? Suppose you wish to retrieve the ID of a service person. If the data are stored in a structure variable named myServicePeople, the statement is:
clientID = myServicePeople.ID; // Retrieving structure data
In this example, the ID associated with the service person is copied into clientID. Obviously, it is a two-way street, so you could store a person’s identification number in the structure, as in:
myServicePeople.ID = clientID; // Setting structure data
The Dot OperatorNotice a period separates the structure name from the member’s variable name. The period is called the dot operator and is used to denote accessing a member of the structure.
It may be useful for you to visualize a structure as a black box with a name on it. The name on the black box is the structure variable’s name, like myServicePeople. Hidden inside the black box are the members of that structure. You cannot “see” those members because they are hidden from view by the black box structure itself. However, there is a door in the black box. Think of the dot operator as the key that opens the door into the black box. Once you use the key (i.e., the dot operator), you have access to the members in the black box. Once inside the structure, all you need to do is specify the member you wish to use.
As shown earlier, if you are using the dot operator on the right side of the assignment operator, as in:
clientID = myServicePeople.ID; // Retrieving structure data
then you are using the dot operator to fetch the data of a particular member of the structure (i.e., ID) and then copy that data into the variable on the left side of the assignment operator (i.e., clientID). This also means that the state of the myServicePeople structure is unchanged after the statement is executed.
However, if the dot operator appears on the left side of the assignment operator, as in:
myServicePeople.ID = clientID; // Setting structure data
then the rvalue of clientID is copied into member ID’s rvalue of myServicePeople structure. Therefore, the state of myServicePeople is changed by the assignment statement.
Let’s write a short program that uses structures and the dot operator. The code is shown in Listing 10-1.

175
chapter 10 ■ StructureS, unionS, and data Storage
Listing 10-1. Using the dot Operator
/* Purpose: To show the use of the dot operator Dr. Purdum, Aug. 25, 2012*/
struct servicePeople { int ID; char Name[20]; char PW[10]; long Phone;} myServicePeople, yourServicePeople;void setup() { Serial.begin(9600); Serial.print("myServicePeople lvalue: "); Serial.print((int) &myServicePeople); Serial.print(" yourServicePeople lvalue: "); Serial.println((int) &yourServicePeople); yourServicePeople.ID = 205; Serial.print("myServicePeople.ID rvalue: "); Serial.print(myServicePeople.ID); Serial.print(" yourServicePeople.ID rvalue: "); Serial.println(yourServicePeople.ID); myServicePeople = yourServicePeople; Serial.println("After assignment:"); Serial.print("myServicePeople.ID rvalue: "); Serial.print(myServicePeople.ID); Serial.print(" yourServicePeople.ID rvalue: "); Serial.println(yourServicePeople.ID); Serial.print("A servicePerson structure takes "); Serial.print(sizeof(servicePeople)); Serial.println(" bytes of storage.");}
void loop(){
}
The code doesn’t do much other than define two servicePeople structure variables named myServicePeople and yourServicePeople. The program uses several Serial.print() function calls to present information about the structure variables. If you look closely at Figure 10-3, you can see that myServicePeople is stored at memory address 456 and yourServicePeople has an lvalue of 492. Hmm...2 bytes for ID, 20 bytes for Name, 10 bytes for PW, and 4 bytes for Phone equals 36 (= 2 + 20 + 10 + 4). You can verify this by looking at the last line in Figure 10-3. Clearly, the lvalue for myServicePeople plus the structure storage requirement of 36 bytes equals the lvalue for yourServicePeople (492 = 456 + 36). Therefore, we know these two structure variables are stored back-to-back in flash memory.
The second line in Figure 10-3 shows that myServicePeople.ID has a value of 0, whereas yourServicePeople.ID has the value of 205. This is exactly as it should be because the value 205 was assigned into the ID member of yourServicePeople.

chapter 10 ■ StructureS, unionS, and data Storage
176
The code shows that although you could perform an assignment statement for each member of the two structures, it is much easier to simply copy the entire structure with an assignment statement.
Returning a Structure from a Function CallSuppose you wish to return a structure from a function call. How is that done? Listing 10-2 is almost identical to Listing 10-1 with the exception of the lines marked with comments:
Listing 10-2. Modified dot Operator Example
/* Purpose: To show the use of the dot operator Dr. Purdum, Aug. 25, 2012*/
The statement:
myServicePeople = yourServicePeople;
copies the contents of the yourServicePeople variable into myServicePeople. Because the compiler knows that each servicePeople variable uses 36 bytes of memory for storage, the compiler simply copies 36 bytes of data starting at memory address 492 (the lvalue of yourServicePeople) to memory address 456 (the lvalue of myServicePeople). As a result, the two structure variables now have the same rvalues for each of its members. The program displays the rvalues for the ID members for both variables on the next line of output. The last line in Figure 10-3 confirms that each structure variable requires 36 bytes of storage.
Figure 10-3. Program output from Listing 10-1.

177
chapter 10 ■ StructureS, unionS, and data Storage
struct servicePeople { int ID; char Name[20]; char PW[10]; long Phone;} myServicePeople, yourServicePeople;struct servicePeople SetPhoneNumber(struct servicePeople temp); // Newvoid setup() { Serial.begin(9600); Serial.print("myServicePeople lvalue: "); Serial.print((int) &myServicePeople); Serial.print(" yourServicePeople lvalue: "); Serial.println((int) &yourServicePeople); yourServicePeople.ID = 205; Serial.print("myServicePeople.ID rvalue: "); Serial.print(myServicePeople.ID); Serial.print(" yourServicePeople.ID rvalue: "); Serial.println(yourServicePeople.ID); myServicePeople = EmptyFunction(yourServicePeople); // Changed Serial.println("After assignment:"); Serial.print("myServicePeople.ID rvalue: "); Serial.print(myServicePeople.ID); Serial.print(" yourServicePeople.ID rvalue: "); Serial.println(yourServicePeople.ID); Serial.print("A servicePerson structure takes "); Serial.print(sizeof(servicePeople)); Serial.println(" bytes of storage."); Serial.print("myServicePeople.Phone rvalue: "); // New Serial.print(myServicePeople.Phone); // New } void loop(){
}// All lines below are newstruct servicePeople SetPhoneNumber(struct servicePeople temp){ temp.Phone = 2345678; return temp;}
The first new line is a function declaration at the top of the program. This is necessary for the compiler to know what SetPhoneNumber() takes for parameters and what its return value is. That is, the statement is a function (prototype) declaration that can be used for type checking. The next new line appears toward the middle of the listing and is marked by the comment “Changed”. In this statement:
myServicePeople = SetPhoneNumber(yourServicePeople); // Changed
the variable yourServicePeople is passed to the function. As you can see in Listing 10-2, the code for the new function sets the phone number for temp to 2345678. The code returns temp to the caller, which assigns the value of the structure into myServicePeople. The two new statements at the bottom of the setup() loop display the new phone number that has been copied into myServicePeople.Phone. Indeed, every member of the myServicePeople variable is the same as the myServicePeople variable...sort of.

chapter 10 ■ StructureS, unionS, and data Storage
178
After the call to SetPhoneNumber(), you can see from the print statements that myServicePeople.Phone has been changed. But what about yourServicePeople.Phone? If you add a few more print statements, then you will discover that yourServicePeople.Phone is 0. Why is that?
Unless told to do otherwise, any value type that is passed to a function has a copy of that variable sent to the function, rather than the lvalue of the variable. Because a copy is sent, there is no way for the function to permanently alter the rvalue of the variable being passed. This conclusion holds for structures, too.
Structures can also be used to simplify passing arguments to functions. For example, perhaps a function needs to use the data stored in four sensors to decide whether to add a chemical to a vat. The signature for the function might be:
int AddChemical(int sensor1, int sensor2, int sensor3, int sensor4);
Rather, you could define a structure:
struct sensors { int sensor1; int sensor2; int sensor3; int sensor4} vatSensors;
and then call the function using:
AddChemical(vatSensors);
This makes the function call a little less wordy. Also, if you later discover that some additional parameter needs to be added to the function call, it is pretty easy to change the structure declaration to add the new parameter. All of the calls to the function remain unchanged.
What if you want the function to permanently change the value of yourServicePeople.Phone? That is the subject of the next section.
Using Structure PointersThe old Kernighan and Ritchie (K&R) version of C did not allow you to pass a structure to a function like you did in the last example. K&R C forced you to use a pointer to the structure when passing structures to functions. That limitation was removed with the adoption of the ANSI C standard (X3J11). When you passed the structure to the SetPhoneNumber() function in Listing 10-2, you used 38 bytes of stack space (36 for the structure and 2 for the return address) to do it. If you used a pointer, then you could perform the same operation using only 4 bytes of stack space (2 for the pointer and 2 for the return address) and you could remove the assignment statement upon return from the function. Listing 10-3 is the same as Listing 10-2, except structure pointers are used.
Listing 10-3. Using a Pointer to Structure
/* Purpose: To show the use of pointers to structures Dr. Purdum, Aug. 25, 2012*/
struct servicePeople { int ID;

179
chapter 10 ■ StructureS, unionS, and data Storage
char Name[20]; char PW[10]; long Phone;} myServicePeople, yourServicePeople;void SetPhoneNumber(struct servicePeople *temp); // New signature declarationvoid setup() { Serial.begin(9600); Serial.print("myServicePeople lvalue: "); Serial.print((int) &myServicePeople); Serial.print(" yourServicePeople lvalue: "); Serial.println((int) &yourServicePeople); yourServicePeople.ID = 205; Serial.print("myServicePeople.ID rvalue: "); Serial.print(myServicePeople.ID); Serial.print(" yourServicePeople.ID rvalue: "); Serial.println(yourServicePeople.ID); SetPhoneNumber(&myServicePeople); // Pass the lvalue Serial.println("After assignment:"); Serial.print("myServicePeople.ID rvalue: "); Serial.print(myServicePeople.ID); Serial.print(" yourServicePeople.ID rvalue: "); Serial.println(yourServicePeople.ID); Serial.print("A servicePerson structure takes "); Serial.print(sizeof(servicePeople)); Serial.println(" bytes of storage."); Serial.print("myServicePeople.Phone rvalue: "); // New Serial.println(myServicePeople.Phone); // New Serial.print("yourServicePeople.Phone rvalue: "); Serial.println(yourServicePeople.Phone); } void loop(){
}
// Lines below are changedvoid SetPhoneNumber(struct servicePeople *temp){ (*temp).Phone = 2345678;}
Figure 10-5 shows a sample run of the program.

chapter 10 ■ StructureS, unionS, and data Storage
180
There are a few minor changes between Listing 10-2 and 10-3. First, near the top of the listing the declaration for the SetPhoneNumber() is changed to reflect that the function now returns nothing (void) and that a pointer to structure is the parameter. Second, about midway in the listing you can see the call to the function has been changed to:
SetPhoneNumber(&myServicePeople); // Pass the lvalue
In the previous version, the return from the SetPhoneNumber() function call assigned the structure into myServicePeople. The code is now using a pointer to a structure as the argument, so you use the address of operator (&) to pass the lvalue of myServicePeople to the function instead. Because the function now has direct access to the memory location of myServicePeople, there is no need to return a structure from the function call and make the assignment into myServicePeople as there was in Listing 10-2.
The parameter passed to SetPhoneNumber() has been changed to a pointer:
void SetPhoneNumber(struct servicePeople *temp)
which means that temp is a pointer to the myServicePeople structure. The statement:
(*temp).Phone = 2345678;
looks a little strange and needs some explanation. Because the dot operator has a higher precedence level than the indirection operator, you need to surround the indirection operator on temp with parentheses. The parentheses cause the compiler to fetch the lvalue of the Phone member of the structure and assign 2345678 into that address. This means that the statement changes the rvalue of Phone to 2345678. This is exactly what you want to do.
If you didn’t use the parentheses to surround temp:
*temp.Phone = 2345678; // Wrong!
Figure 10-5. Using pointer to structure.

181
chapter 10 ■ StructureS, unionS, and data Storage
would instruct the compiler to fetch the rvalue of Phone and use it as an lvalue. Because the rvalue of Phone is 0, this would try to write 2345678 at memory address 0. This is another train wreck waiting to happen because Listing 10-5 tells you that the myServicePeople structure resides at memory address 520. A little quick math suggests that the Phone member of the structure can be found at memory address 552, not 0. Using an rvalue as an lvalue and writing data to an unknown memory address is almost never a good idea. Fortunately, the compiler catches this error if you tried to misuse the temp pointer.
The syntax used to access a structure member via a pointer is so common in C that a special operator was developed to simplify the statement from:
(*temp).Phone = 2345678;
to use the dereference operator (->) instead:
temp->Phone =2345678;
The result is the same as the earlier version that used the parentheses and asterisk to change the phone number. You will likely see this shorter version more often.
Initializing a Structure If you wish, you can initialize a structure at its point of definition, as in:
servicePeople myServicePeople = { 101, // ID number "Kack's Lawn Service", // Company name "Clowder", // Password 2345678, // Phone number},
The initialize value for each member is separated from the next by the comma operator. The statements above would cause the myServicePeople to be initialized with the values shown. Note that this form of initialization requires that the values align with the member definitions.
n Tip By the way, while I was writing this section, I cut and paste the definition above form my word processing program into the Arduino IDE editor and compiled the program. I got an error message stating: “error: stray ‘\’ in program.” I’d be embarrassed to tell you how long it took me to overcome this forest-for-the-trees problem. As it turns out, if you paste quote marks from a text editor into the Arduino IDE source code window, it keeps the “left-leaning” and “right-leaning” double quote marks. However, if you erase those quotation marks and redo them inside the Arduino editor, the double quote marks are replaced with “vertical” quote marks and the quoted string changes color from black to light blue. The program then compiled without error. It was one of those old-dog-new-tricks thingies ultimately leading to a flat forehead moment...
Arrays of StructuresAs you might guess, real life likely would have more than one service company attending to a home. It is not uncommon to have a pool company, a lawn company, a landscape company, and an “indoor” service company pay visits to a home. Clearly, an array of structures would be useful, as each element of the array could hold one service company.

chapter 10 ■ StructureS, unionS, and data Storage
182
Assuming the code has already declared the servicePeople structure, you could define an array of servicePeople as:
struct servicePeople myCompanies[10];
This would define an array named myCompanies[] that is capable of storing the necessary data for 10 servicePeople companies. If you want to assign the ID number 222 to the fifth company in the array, the statement
myCompanies[4].ID = 222;
would change the rvalue of ID for the fifth person in the myCompanies[] array. (Arrays are zero-based, right?)
After the array is defined, you can use regular assignment statements to set the values for the different elements of the array. However, if you wanted to initialize part of the array when it is defined, you might use:
struct servicePeople myCompanies[10] = { {1, "This is a dummy","admin", 5555555}, {101, "Kacks Lawn Service", "Clowder", 2345678}};
This code would initialize the first two elements of the array. (Strictly speaking, the struct keyword is not required in the statement above because the structure tag servicePeople identifies the structure. However, the keyword does document that the code is using a structure.) The remainder of the array would have zero or null values stored for the rvalues of their members.
UnionsA union is a small chunk of memory that is set aside to hold differing data types. A union acts like a small buffer that is capable of holding a pre-defined type of data. For example, suppose you have a program that reads data from a series of different sensors. Some sensors return a char, others an int, whereas some return a float data type. Clearly, you could define temporary working variables, such as:
char tempChar;int tempInt;float tempFloat;
and then assign the sensor readings into the appropriate variable. This approach uses 8 bytes of memory. You could also use the following union:
union { char tempChar; int tempInt; float tempFloat;} sensorReading;
You can also use a union tag in much the same manner that you did with structures. You could use:
union sensorSystem { char tempChar; int tempInt; float tempFloat;};

183
chapter 10 ■ StructureS, unionS, and data Storage
sensorSystem sensorReading;
which uses the union tag name sensorSystem to define sensorReading. The union defined as sensorReading is big enough to hold any one of the three sensor types, but only
one at a time. In other words, you can place a float into the union and then read it back using the code:
float currentFloatSensorReading = 51.25;sensorReading.tempFloat = currentFloatSensorReading; // move data into the union// some more code...currentFloatSensorReading = sensorReading.tempFloat; // get the data back from the union
Note how the dot operator is used to reference the appropriate union member. The dot operator works much the same as it did for structures. If you wish to read an int from the union, then the statement might be:
currentIntSensorReading = sensorReading.tempInt;
The advantage of a union is that you can move different types of data into and out of a single union variable. Also, the union only uses 4 bytes of memory, whereas the discrete variables would use 8 bytes of memory. (A union is always allocated just enough memory to hold the largest data item that is a member of the union. If the union were to hold a servicePerson structure discussed earlier, the union would use 36 bytes of memory. That is still less than the memory required if discrete variables were used.) That’s the good news.
The bad news is that it is your responsibility to keep track of what is currently in the union. If you place a float into the union and then access the union using the int member as shown below
sensorReading.tempFloat = 55.33;// some code...int myInt = sensorReading.tempInt;
then you are going to end up with “half a float” in myInt although you think you have accessed an int. Usually such foot-shooting code is fairly easy to debug, but nonetheless, the danger still exists. Some programmers define a set of enums to reflect which data type is currently in the union to avoid such confusion. Just remember, apples in, oranges out almost always leads to unwanted surprises when you are using unions.
EEPROM MemoryIn the previous sections of this chapter, you have discussed how to organize service company data into a struct. You then learned how to store that data in an array of structures. However, it doesn’t do a whole lot of good if the company data disappear each time the power is removed from the mc board, either on purpose or by accident. In this section, you will learn one way to persist the data even if power is lost.
As you learned from Table 1-1, each Atmel-compatible mc board has a specific amount of flash, SRAM, and EEPROM memory available. Both the flash and EEPROM memory are non-volatile, which means those types of memory do not lose their data when power is removed. You have also learned that data with global scope are allocated in SRAM memory with any initialize values copied from flash memory to SRAM.
The bad news is that global data can be contaminated more easily than data with a more restrictive scope level (e.g., local scope). Because every element in the program has access to global data, it can be difficult to isolate the section of code that is contaminating the data. If you move the data inside a function body, then scope is now limited, but the data are now allocated on the stack. Because there is less SRAM than flash memory and because SRAM is volatile memory, the array is not persisted when power is lost. One way to address this problem is to start using EEPROM memory.

chapter 10 ■ StructureS, unionS, and data Storage
184
Up to this point, our sample programs have not used EEPROM memory. It is not that we have avoided the stash of EEPROM memory. Rather, our programs have been so simple that we have never impinged on the memory limits so there was no need to use it. Also, we have kind of avoided using it because EEPROM memory is relatively slow.
Usually, EEPROM memory is used to store configuration data. The configuration data could be anything from terminal baud rates for I/O communications to data that are required to initialize program sensors. As we pointed out before, EEPROM has a finite number of erase/write cycles in which the EEPROM can reliably erase and write data. Although a million such cycles may be possible, most developers assume EEPROM develops a mind of its own after approximately 100,000 cycles. Although that may sound like a lot of cycles, if you update a variable that is stored in EEPROM once every second, then the program runs the chance of getting flaky in less than 2 days. Still, if the data are rarely changed, as is likely the case with our servicePerson array, EEPROM memory may be a viable alternative.
Using EEPROMThe Arduino IDE comes with an EEPROM library, which you can find in the Libraries directory where you installed your Arduino software. You should spend a little time reading up on the EEPROM library and its example code.
Data LoggingIn the following discussion, our comments are directed to the “on-board” EEPROM and not any external EEPROM that may be sitting on a shield or other external device. EEPROM memory is not an optimal choice for data logging for several reasons. First, because EEPROM is fairly slow, it may not be able to keep up with whatever device is feeding it data. Second, data logging is usually a sequential process. This means maintaining a pointer to where the next byte of logged data is to be written. If this pointer is maintained in the EEPROM memory space, it can become unreliable because it may need to be updated (i.e., an erase/write cycle) fairly frequently. Also, the amount of EEPROM data is usually quite limited and there just may not be enough storage to be useful. Finally, EEPROM memory behaves like a ring buffer. That is, if your board has 512 bytes of EEPROM and you try to write to address 512 in EEPROM memory, then it simply “wraps around” to EEPROM address 0 and writes the data. (The valid EEPROM addresses are 0 through 511, right?) Clearly, if you need whatever was stored at address 0, you have a problem. Because of these limitations, data logging programs frequently use an external device for storage of logging data.
For the moment, however, assume you have a limited data set to preserve and you think EEPROM might be a good place to store it for now. Let’s see how that might work. Rather than presenting a single long code listing, we are going to break it down so we can keep the relevant code visible while discussing that code. Also, the example is contrived because we start out with the data stored in SRAM memory and then move it to EEPROM memory. Clearly, this doesn’t help solve a memory limitation problem. However, the example does show you a number of things you need to address when you use EEPROM memory.
Our design is to save the information on 10 service companies. We want to keep information in the servicePeople structure but store it in EEPROM. Listing 10-4 shows the global data definitions and declarations, the setup() loop code.
The first statement in Listing 10-4 is a #include preprocessor directive to read in the EEPROM.h header file. This file contains information the compiler needs to properly work with the EEPROM library. The #define DEBUG preprocessor directive is used to toggle debug print statements into and out of the code. You can see examples of this in the setup() loop. For example, the statements:

185
chapter 10 ■ StructureS, unionS, and data Storage
#ifdef DEBUG Serial.print("EepromMax = "); Serial.println(eepromMax);#endif
cause the Serial.print() statements to appear in the program only if DEBUG is defined for the program. Because the code does have a #define DEBUG 1 preprocessor directive at the top of Listing 10-4, the print statements are compiled into the program. If you comment out the #define DEBUG 1 directive, then DEBUG is no longer defined and the Serial.print() statements are omitted from the program. Such code is commonly called scaffold code, because it is “toggled out” of the program after debugging is completed, much like scaffolding is removed once a building is finished.
Listing 10-4. The setup() loop Code
/* Purpose: To write data to EEPROM memory. Dr. Purdum, Aug. 27, 2012 */#include <EEPROM.h>#define DEBUG 1 // We want to see debug print statements // Comment out these lines to avoid seeing print statementsconst int MAXPEOPLE = 10;struct servicePeople { // Structure definition for servicePeople int ID; char Name[20]; char PW[10]; long Phone;};
union servicePeopleUnion { // A union definition for myUnion int testID; struct servicePeople testServicePeople;} myUnion;servicePeople myPeople[MAXPEOPLE] = { // company data for testing {0, "This is a dummy","admin",5555555}, {101,"Kack Lawn Service","Clowder",2345678}, {222,"Jane's Plants","Noah",4202513}, {333,"Terrys Pool Service","Billings",4301832}};// function declarations:void DataDump(struct servicePeople temp);int FindEepromTop();int ReadIntFlag();void ReadOneRecord(int index);void WriteFirstRecord();
int loopCounter = 0; // Number of passes to make through loopint initFlag = 0; // Has the EEPROM been initialized?struct servicePeople temp; // A temporary structure

chapter 10 ■ StructureS, unionS, and data Storage
186
void setup(){ int eepromMax; int i; Serial.begin(9600); eepromMax = FindEepromTop(); // How much EEPROM?#ifdef DEBUG Serial.print("EepromMax = "); Serial.println(eepromMax);#endif initFlag = ReadIntFlag(); // Initialized?#ifdef DEBUG Serial.print(" flag = "); Serial.println(initFlag);#endif for (i = 0; i < MAXPEOPLE; i++) { WriteOneRecord(i); }}
Next, the code defines a constant integer named MAXPEOPLE that is used to set the limit for the number of companies you will allow. You could use a #define instead, but this gives you an actual variable to work with if you wish. That is followed by a structure declaration for servicePeople and a union with a union tag of servicePeopleUnion. Although we don’t really make much use of this union, it will at least let you see how a union is used.
The code then defines a myPeople[] array of servicePeople and initializes the array with four records. The first record is bogus. The sole purpose of this element of the array is to determine whether the array has been copied into EEPROM memory. If the ID member is 0, that means the array has not yet been copied into EEPROM memory. Actually, it is a good idea to copy the array into EEPROM regardless, because the code is within the setup() loop and, hence, is actually part of the Initialization Step anyway. In fact, you could use the other three members of this element of the array for other purposes, as long as you are consistent with the data type of the member.
After the array is initialized, several function declarations are presented, followed by definitions for several global variables. The code then finds the setup() loop. The first thing done is to find the maximum amount of EEPROM memory that is available for the board. True, you know what this is for your board, but what if you change boards later? Listing 10-5 presents the code for the FindEepromTop(). The code takes advantage of the fact that the amount of available EEPROM memory is held in an Arduino symbolic constant named E2END and represents the largest valid address in EEPROM memory for the board being used. Adding 1 to that value returns the amount of EEPROM available.
Listing 10-5. Source Code for FindEepromTop()
/***** Purpose: Find out how much EEPROM this board has. I Parameter list: void Return value: int the EEPROM size Free to use: econjack *****/
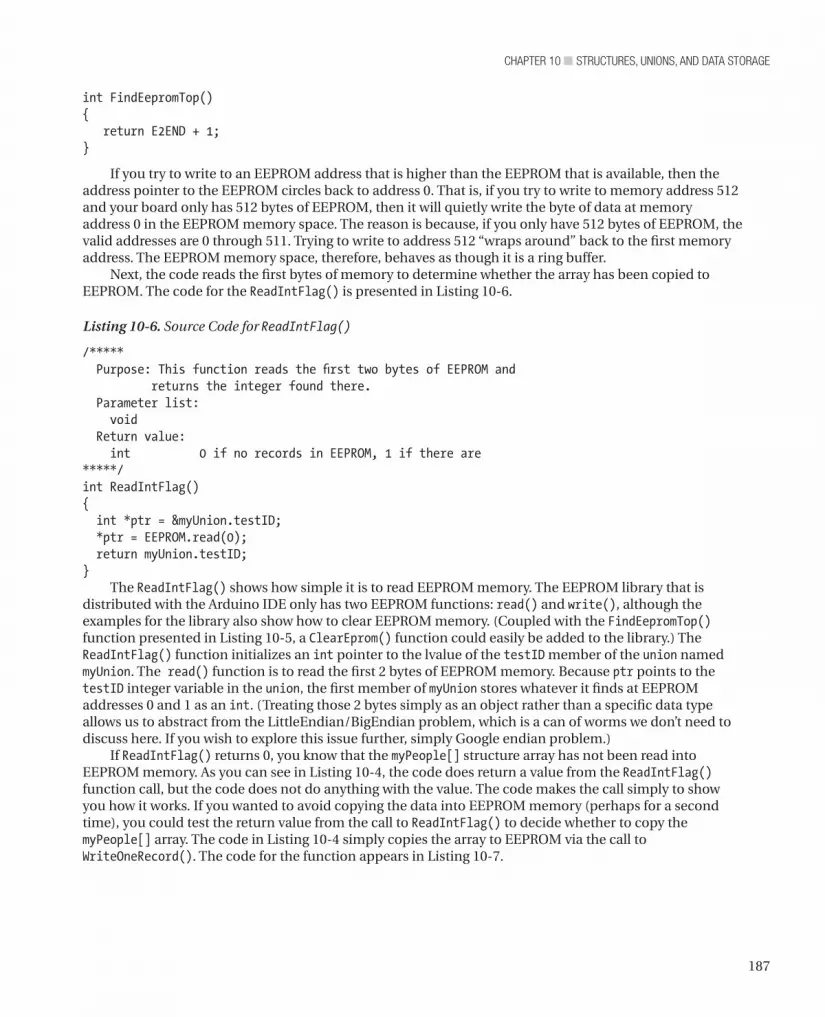
187
chapter 10 ■ StructureS, unionS, and data Storage
int FindEepromTop(){ return E2END + 1;}
If you try to write to an EEPROM address that is higher than the EEPROM that is available, then the address pointer to the EEPROM circles back to address 0. That is, if you try to write to memory address 512 and your board only has 512 bytes of EEPROM, then it will quietly write the byte of data at memory address 0 in the EEPROM memory space. The reason is because, if you only have 512 bytes of EEPROM, the valid addresses are 0 through 511. Trying to write to address 512 “wraps around” back to the first memory address. The EEPROM memory space, therefore, behaves as though it is a ring buffer.
Next, the code reads the first bytes of memory to determine whether the array has been copied to EEPROM. The code for the ReadIntFlag() is presented in Listing 10-6.
Listing 10-6. Source Code for ReadIntFlag()
/***** Purpose: This function reads the first two bytes of EEPROM and returns the integer found there. Parameter list: void Return value: int 0 if no records in EEPROM, 1 if there are*****/int ReadIntFlag(){ int *ptr = &myUnion.testID; *ptr = EEPROM.read(0); return myUnion.testID;}
The ReadIntFlag() shows how simple it is to read EEPROM memory. The EEPROM library that is distributed with the Arduino IDE only has two EEPROM functions: read() and write(), although the examples for the library also show how to clear EEPROM memory. (Coupled with the FindEepromTop() function presented in Listing 10-5, a ClearEprom() function could easily be added to the library.) The ReadIntFlag() function initializes an int pointer to the lvalue of the testID member of the union named myUnion. The read() function is to read the first 2 bytes of EEPROM memory. Because ptr points to the testID integer variable in the union, the first member of myUnion stores whatever it finds at EEPROM addresses 0 and 1 as an int. (Treating those 2 bytes simply as an object rather than a specific data type allows us to abstract from the LittleEndian/BigEndian problem, which is a can of worms we don’t need to discuss here. If you wish to explore this issue further, simply Google endian problem.)
If ReadIntFlag() returns 0, you know that the myPeople[] structure array has not been read into EEPROM memory. As you can see in Listing 10-4, the code does return a value from the ReadIntFlag() function call, but the code does not do anything with the value. The code makes the call simply to show you how it works. If you wanted to avoid copying the data into EEPROM memory (perhaps for a second time), you could test the return value from the call to ReadIntFlag() to decide whether to copy the myPeople[] array. The code in Listing 10-4 simply copies the array to EEPROM via the call to WriteOneRecord(). The code for the function appears in Listing 10-7.
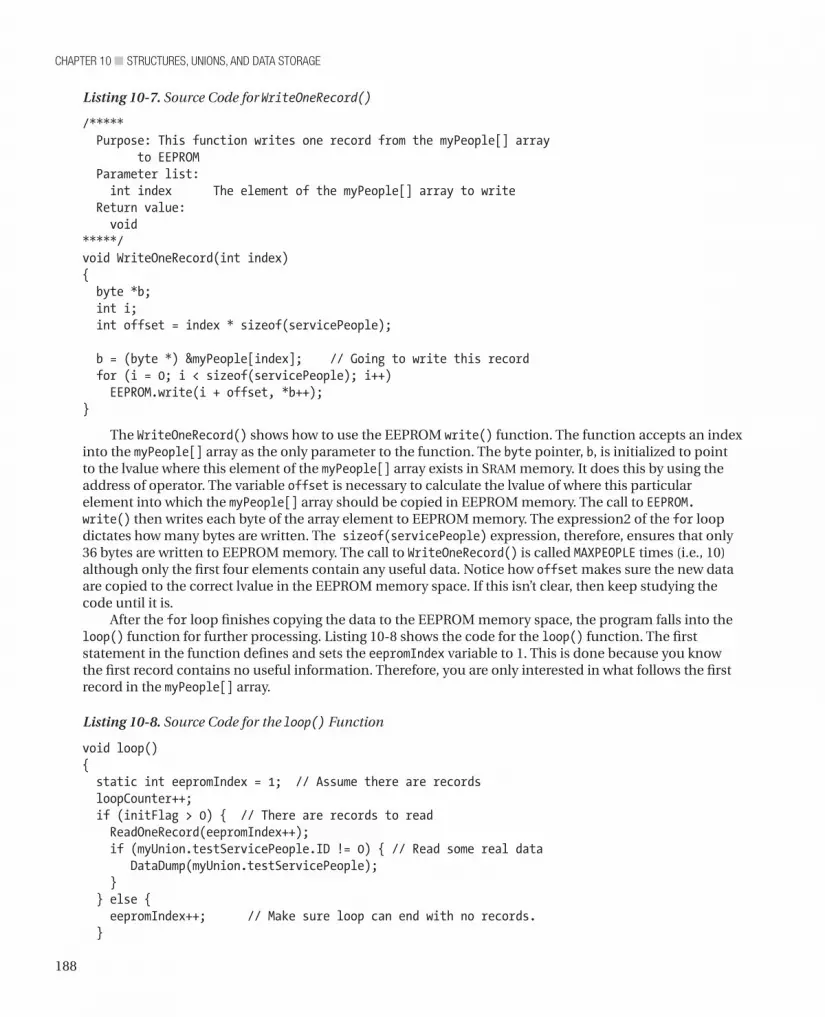
chapter 10 ■ StructureS, unionS, and data Storage
188
Listing 10-7. Source Code for WriteOneRecord()
/***** Purpose: This function writes one record from the myPeople[] array to EEPROM Parameter list: int index The element of the myPeople[] array to write Return value: void*****/void WriteOneRecord(int index){ byte *b; int i; int offset = index * sizeof(servicePeople); b = (byte *) &myPeople[index]; // Going to write this record for (i = 0; i < sizeof(servicePeople); i++) EEPROM.write(i + offset, *b++);}
The WriteOneRecord() shows how to use the EEPROM write() function. The function accepts an index into the myPeople[] array as the only parameter to the function. The byte pointer, b, is initialized to point to the lvalue where this element of the myPeople[] array exists in SRAM memory. It does this by using the address of operator. The variable offset is necessary to calculate the lvalue of where this particular element into which the myPeople[] array should be copied in EEPROM memory. The call to EEPROM.write() then writes each byte of the array element to EEPROM memory. The expression2 of the for loop dictates how many bytes are written. The sizeof(servicePeople) expression, therefore, ensures that only 36 bytes are written to EEPROM memory. The call to WriteOneRecord() is called MAXPEOPLE times (i.e., 10) although only the first four elements contain any useful data. Notice how offset makes sure the new data are copied to the correct lvalue in the EEPROM memory space. If this isn’t clear, then keep studying the code until it is.
After the for loop finishes copying the data to the EEPROM memory space, the program falls into the loop() function for further processing. Listing 10-8 shows the code for the loop() function. The first statement in the function defines and sets the eepromIndex variable to 1. This is done because you know the first record contains no useful information. Therefore, you are only interested in what follows the first record in the myPeople[] array.
Listing 10-8. Source Code for the loop() Function
void loop(){ static int eepromIndex = 1; // Assume there are records loopCounter++; if (initFlag > 0) { // There are records to read ReadOneRecord(eepromIndex++); if (myUnion.testServicePeople.ID != 0) { // Read some real data DataDump(myUnion.testServicePeople); } } else { eepromIndex++; // Make sure loop can end with no records. }

189
chapter 10 ■ StructureS, unionS, and data Storage
#ifdef DEBUG Serial.println("==========");#endif if (eepromIndex == MAXPEOPLE) { TerminationStep(); }}
There is not a whole lot going on in the loop() function. The variable initFlag tests to determine whether the data have been copied to the EEPROM memory space. Because this is the case, the program calls ReadOneRecord(eepromIndex) to read a record from EEPROM. The code for ReadOneRecord() is presented in Listing 10-9.
Listing 10-9. Source Code for ReadOneRecord()
/***** Purpose: This function reads one servicePerson record from EEPROM Parameter list: int index The element of the myPerson[] array to read from EEPROM Return value: void *****/void ReadOneRecord(int index){ byte *bPtr; int i; int offset; offset = index * sizeof(servicePeople); // must offset from 0 in EEPROM bPtr = (byte *) &myUnion.testServicePeople; // where to place the data read for (i = 0; i < sizeof(temp); i++) { // Loop through the bytes... *bPtr = EEPROM.read(offset + i); bPtr++; }}
The code is very similar to Listing 10-7, only this time you are reading, rather than writing, the data. Variable offset is necessary to place the byte pointer, bPtr, at the correct lvalue in the EEPROM memory space. Once bPtr is properly set, the code reads sizeof(servicePerson) bytes of data (36 bytes) from EEPROM into the union myUnion. Obviously, we want these data to be copied into the servicePeople structure of the union, which is why bPtr is set to the address of myUnion.testServicePeople. Notice how offset is used so the proper data are read.
Upon return from the call to ReadOneRecord(), the code checks to see if the myUnion.testServicePeople.ID is non-zero. If that is true, then the DataDump() function is called and...
Whoa! Back up the boat...Why are there two dot operators in the statement:
if (myUnion.testServicePeople.ID != 0) { // Read some real data

chapter 10 ■ StructureS, unionS, and data Storage
190
Why not? This statement is a little like one of those Chinese box-within-a-box-within-a-box thingies. As you know, a union is a data structure that is like a black box that needs a key (dot operator) to “get inside” the union data structure. So, you pull that key out and open the union door and walk in. What do you see? You see an int named testID and another black box named testServicePeople. You also know you need a different key (another dot operator) to get inside the testServicePeople structure. Therefore, to do anything useful with the contents of the testServicePeople structure means you need two sets of keys (dot operators) to get to the data that are obscured by two black boxes. This is why there are two dot operators—you need to get inside both the myUnion and testServicePeople data structures to look at the structure member named ID.
There is no practical limit as to how many “boxes-within-boxes” levels can be used in a statement. Many years ago I worked with a (poorly designed) database structure that required 13 dot operations to get to the data I needed. Although this is an extreme (RDC) case, you should not go into cardiac arrest when you see a bunch of dot operators in a statement. Simply keep the black box concept in mind and pay attention to what you are entering with each key (dot operator) and you should have no difficulty figuring things out.
Eventually, the DataDump() function is called to display the data that were just read. Listing 10-10 presents the code.
Listing 10-10. Source Code for DataDump()
/***** Purpose: Sends the data stored in parameter to the serial monitor Parameter list: struct servicePeople temp // The data to be displayed Return value: void *****/void DataDump(struct servicePeople temp){ Serial.println(); Serial.print("ID = "); Serial.print(temp.ID); Serial.print(" Name = "); Serial.println(temp.Name); Serial.print(" PW = "); Serial.print(temp.PW); Serial.print(" Phone = "); Serial.println(temp.Phone);}
As you can see, all the DataDump() function does is send the contents of the myUnion.testServicePeople structure that was just read from EEPROM memory. In a real application, the myPeople[] data would be used for some form of additional processing rather than just dumping to the serial device. Still, the program does show how to use EEPROM memory to store data that need non-volatile storage. A sample run of the program can be seen in Figure 10-7.
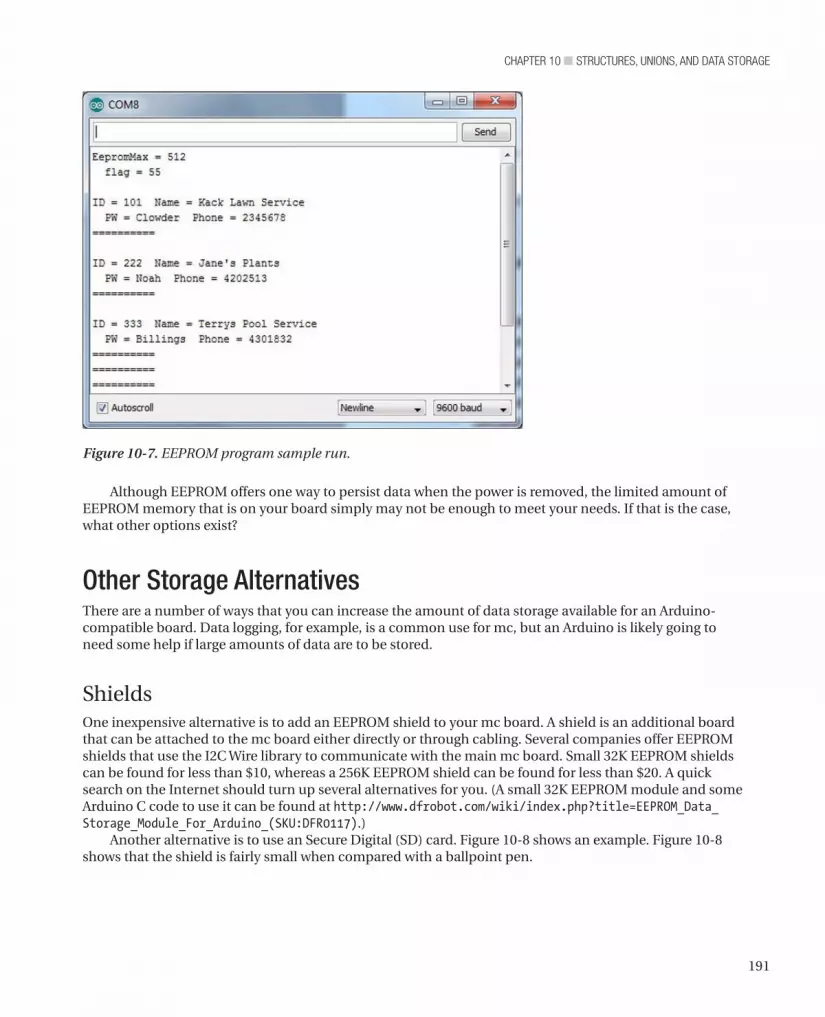
191
chapter 10 ■ StructureS, unionS, and data Storage
Although EEPROM offers one way to persist data when the power is removed, the limited amount of EEPROM memory that is on your board simply may not be enough to meet your needs. If that is the case, what other options exist?
Other Storage AlternativesThere are a number of ways that you can increase the amount of data storage available for an Arduino-compatible board. Data logging, for example, is a common use for mc, but an Arduino is likely going to need some help if large amounts of data are to be stored.
ShieldsOne inexpensive alternative is to add an EEPROM shield to your mc board. A shield is an additional board that can be attached to the mc board either directly or through cabling. Several companies offer EEPROM shields that use the I2C Wire library to communicate with the main mc board. Small 32K EEPROM shields can be found for less than $10, whereas a 256K EEPROM shield can be found for less than $20. A quick search on the Internet should turn up several alternatives for you. (A small 32K EEPROM module and some Arduino C code to use it can be found at http://www.dfrobot.com/wiki/index.php?title=EEPROM_Data_Storage_Module_For_Arduino_(SKU:DFR0117).)
Another alternative is to use an Secure Digital (SD) card. Figure 10-8 shows an example. Figure 10-8 shows that the shield is fairly small when compared with a ballpoint pen.
Figure 10-7. EEPROM program sample run.

chapter 10 ■ StructureS, unionS, and data Storage
192
Figure 10-9 shows the same SD card inserted into the shield and the shield “stacked” onto an Arduino mc board.
Figure 10-8. An SD card and shield.
Figure 10-9. Stacked SD shield and board. (Shield and mc board courtesy of Seeed Studio.)

193
chapter 10 ■ StructureS, unionS, and data Storage
The stacking is made easy by vendors supplying Arduino-compatible boards where the pins align properly with the mc board. Figure 10-10 shows the pins for the SD shield shown in Figure 10-9 but from the underside of the shield.
Figure 10-10. Pins for SD shield. (Photo courtesy of Seeed Studio.)
Note that the pins on the SD shield pass through the board to the headers directly above the pins. This allows another shield to be stacked onto this shield. This makes increasing the functionality of a mc board quite easy.
The use of an SD shield increases the amount of storage available to the system significantly—into the gigabyte range. The board shown in Figures 10-8 and 10-9 supports both SD and Micro SD cards and has UART, I2C, and SPI interfaces for increased flexibility. The vendor also has a format program (FAT 16 or FAT32) and sample code that can be downloaded. Despite this feature set, the shield sells for less than $15. Because the SD storage medium is easily removed, subsequent processing of the data can be done on a regular PC if needed.
Other Uses for Secure Digital StorageThere are probably hundreds of projects you can think of that would benefit from additional storage. Although additional EEPROM is one way to go, the addition of an SD shield offers the flexibility of removable storage. Figure 10-11 shows a GPS shield installed on a mc board. The wire with a “caramel” attached to it is the GPS antenna.

chapter 10 ■ StructureS, unionS, and data Storage
194
It is possible to piggyback an SD shield and the GPS shield, add a 9V battery, and then record the GPS data as you drive around town. Figure 10-12 shows the output using the Libelium software. (The library for the Arduino 1.0 IDE is not yet available, so this software was compiled with the 22 Arduino IDE. The new Libelium library will likely be available by the time you read this.)
Figure 10-11. A GPS shield. (GPS shield courtesy of Libelium.)
Figure 10-12. Data from GPS shield viewed over a serial link.

195
chapter 10 ■ StructureS, unionS, and data Storage
However, you can also use the TinyGPS library (http://arduiniana.org/libraries/TinyGPS/) with the Arduino 1.0 IDE. Figure 10-13 shows the output from that software.
Depending on the GPS sampling rate you select and write to the SD card, you can actually plot on a street map where you have been while recording the GPS data. If you ever wondered where your teenage son really was when he borrowed the family car, this might be your answer! A quick search on the Internet will likely produce lots of ideas for Arduino shields, including the GPS shield shown here. (More than 10,000 YouTube videos pop up when you search “GPS tracking.”)
SummaryIn this chapter you learned how to organize dissimilar data using the struct keyword. You also saw how a union may be used as a small buffer space in your programs and how it may save you a few bytes of memory. You learned how to read and write to EEPROM. Although EEPROM memory has some disadvantages, like relatively slow access and limited lifetime, it is an effective way of storing configuration data or data that are not likely to change often. Finally, you saw how shields can be used to extend the functionality of a mc board, both in terms of storage (e.g., an SD shield) or features (e.g., a GPS shield). Always keep in mind that anytime you find yourself wishing the mc board had more of something (like memory) or you wish it could do that (some additional feature), do a little Internet searching and chances are you will find a shield that can help solve your problem.
Figure 10-13. GPS data using TinyGPS library.
z
chapter 10 ■ StructureS, unionS, and data Storage
196
Exercises1. In Listing 10-2, it was asserted that yourServicePeople.Phone was unchanged
after the function call. Is this true? Prove it.
2. When discussing the section on arrays of structures, you saw the definition:
3. The code in Listing 10-4 calls WriteOneRecord() 10 times although there are only 4 elements in the array that contain useful data. How could you avoid the redundant calls?
4. The phone number displayed in Figure 10-7 is pretty lame. How would you spiff it up?
5. What is a shield?

197
■ ■ ■
chapter 11
The C Preprocessor and Bitwise Operations
In Chapter 4, Table 4-3 presented a list of the C preprocessor directives supported by Arduino C. In this chapter, we want to extend that discussion as well as cover a few additional details that should prove useful to you. In this chapter, you will learn about:
• The function of the C preprocessor
• The parameterized macros
• Bitwise operators
• The Standard C header files
Preprocessor DirectivesThe ANSI C specification details the duties of the C preprocessor. It is the function of the C preprocessor to process the defined directives supported by the C compiler. Table 4-2 lists the preprocessor directives that Arduino C can translate. In the previous sentence, the word “translate” is not a typo, as that is exactly what the preprocessor does—it translates the directives you have written into your code with whatever you have designated to be the replacement. For example, consider the following preprocessor directive:
#define FIRESENSOR 145
which might appear at the top of your source code file. Now further suppose that you later write the line:
if (currentSensor == FIRESENSOR) { //...some code here to do something with the fire sensor state }
The if statement above is what you see when you examine your source code. One of the first things the compiler does when you hit the compile button is run the C preprocessor. Conceptually, you can think of the C preprocessor pass as performing a global Search-and-Replace using all of the preprocessor directives you have written in your source code file. When the preprocessor finds the if statement above, it substitutes the value 145 every time it finds FIRESENSOR in your source code. When the preprocessor has finished, the if statement is transformed and the compiler sees your source code as though you wrote the if statement as:
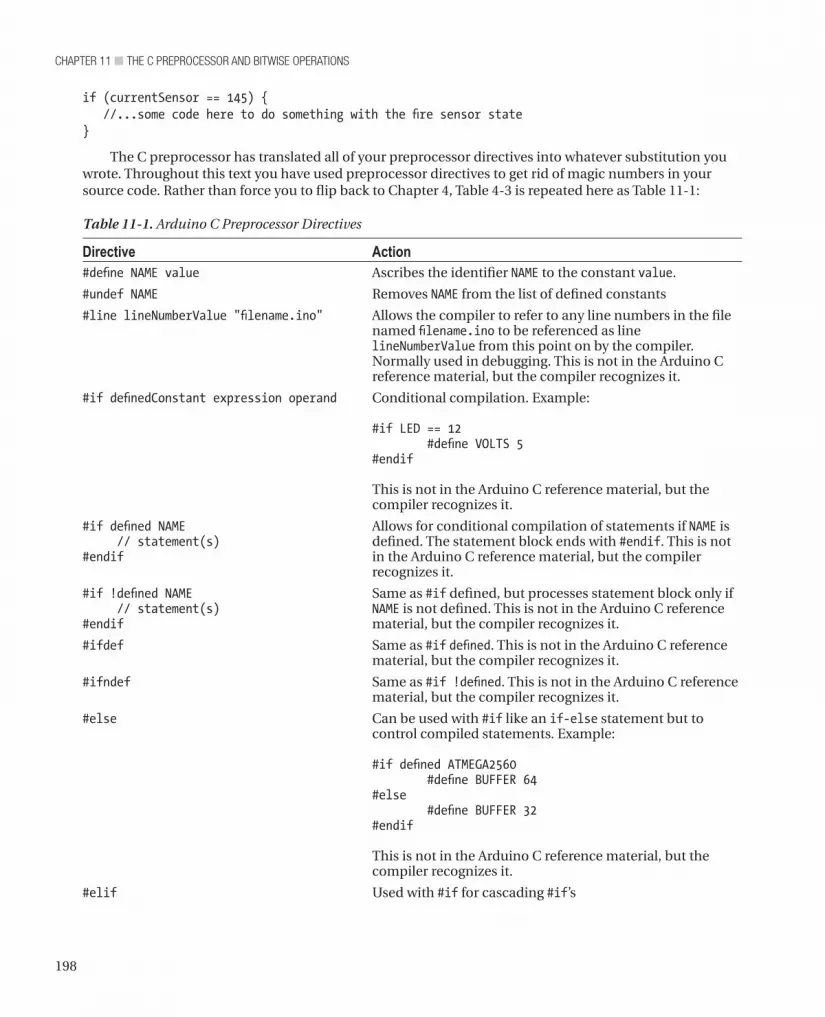
chapter 11 ■ the c preprocessor and Bitwise operations
198
if (currentSensor == 145) { //...some code here to do something with the fire sensor state }
The C preprocessor has translated all of your preprocessor directives into whatever substitution you wrote. Throughout this text you have used preprocessor directives to get rid of magic numbers in your source code. Rather than force you to flip back to Chapter 4, Table 4-3 is repeated here as Table 11-1:
Table 11-1. Arduino C Preprocessor Directives
Directive Action#define NAME value Ascribes the identifier NAME to the constant value.
#undef NAME Removes NAME from the list of defined constants
#line lineNumberValue "filename.ino" Allows the compiler to refer to any line numbers in the file named filename.ino to be referenced as line lineNumberValue from this point on by the compiler. Normally used in debugging. This is not in the Arduino C reference material, but the compiler recognizes it.
#if definedConstant expression operand Conditional compilation. Example:
#if LED == 12 #define VOLTS 5#endif
This is not in the Arduino C reference material, but the compiler recognizes it.
#if defined NAME // statement(s)#endif
Allows for conditional compilation of statements if NAME is defined. The statement block ends with #endif. This is not in the Arduino C reference material, but the compiler recognizes it.
#if !defined NAME // statement(s)#endif
Same as #if defined, but processes statement block only if NAME is not defined. This is not in the Arduino C reference material, but the compiler recognizes it.
#ifdef Same as #if defined. This is not in the Arduino C reference material, but the compiler recognizes it.
#ifndef Same as #if !defined. This is not in the Arduino C reference material, but the compiler recognizes it.
#else Can be used with #if like an if-else statement but to control compiled statements. Example:
#if defined ATMEGA2560 #define BUFFER 64 #else #define BUFFER 32#endif
This is not in the Arduino C reference material, but the compiler recognizes it.
#elif Used with #if for cascading #if’s
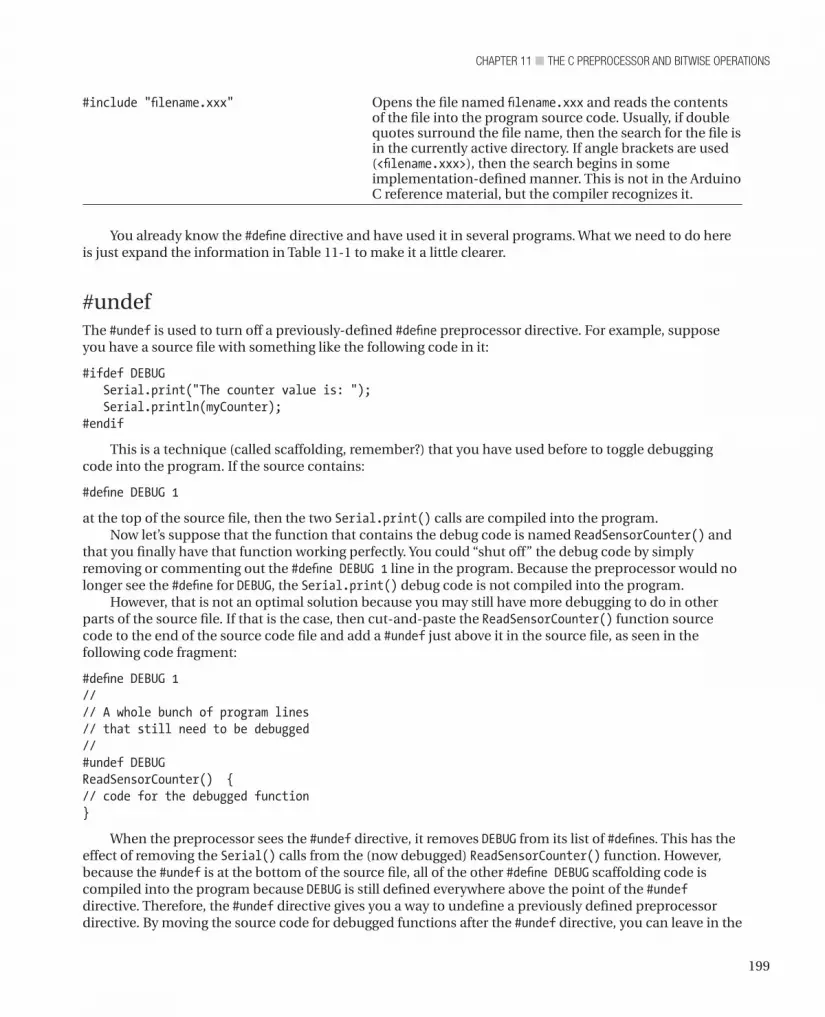
199
chapter 11 ■ the c preprocessor and Bitwise operations
#include "filename.xxx" Opens the file named filename.xxx and reads the contents of the file into the program source code. Usually, if double quotes surround the file name, then the search for the file is in the currently active directory. If angle brackets are used (<filename.xxx>), then the search begins in some implementation-defined manner. This is not in the Arduino C reference material, but the compiler recognizes it.
You already know the #define directive and have used it in several programs. What we need to do here is just expand the information in Table 11-1 to make it a little clearer.
#undefThe #undef is used to turn off a previously-defined #define preprocessor directive. For example, suppose you have a source file with something like the following code in it:
#ifdef DEBUG Serial.print("The counter value is: "); Serial.println(myCounter);#endif
This is a technique (called scaffolding, remember?) that you have used before to toggle debugging code into the program. If the source contains:
#define DEBUG 1
at the top of the source file, then the two Serial.print() calls are compiled into the program. Now let’s suppose that the function that contains the debug code is named ReadSensorCounter() and
that you finally have that function working perfectly. You could “shut off” the debug code by simply removing or commenting out the #define DEBUG 1 line in the program. Because the preprocessor would no longer see the #define for DEBUG, the Serial.print() debug code is not compiled into the program.
However, that is not an optimal solution because you may still have more debugging to do in other parts of the source file. If that is the case, then cut-and-paste the ReadSensorCounter() function source code to the end of the source code file and add a #undef just above it in the source file, as seen in the following code fragment:
#define DEBUG 1//// A whole bunch of program lines// that still need to be debugged//#undef DEBUGReadSensorCounter() {// code for the debugged function}
When the preprocessor sees the #undef directive, it removes DEBUG from its list of #defines. This has the effect of removing the Serial() calls from the (now debugged) ReadSensorCounter() function. However, because the #undef is at the bottom of the source file, all of the other #define DEBUG scaffolding code is compiled into the program because DEBUG is still defined everywhere above the point of the #undef directive. Therefore, the #undef directive gives you a way to undefine a previously defined preprocessor directive. By moving the source code for debugged functions after the #undef directive, you can leave in the

chapter 11 ■ the c preprocessor and Bitwise operations
200
scaffolding code you still need with undebugged code without cluttering up the debug statements with Serial() output statements from code that already works.
If something happens down the road and the ReadSensorCounter() function starts acting up again, then just remove the #undef and the Serial() statements are automatically recompiled back into the program the next time you hit the compile button. By using the #undef directive, you don’t have to retype in the Serial() statements into the code again. Although the #undef can be used for other purposes, toggling scaffold code into and out of a program is a fairly common use.
#lineThe #line directive is used most often while debugging a program. The syntax is:
#line lineNumberValue "filename.ino"
where lineNumberValue is the line number you want to the compiler to use from that point on in the source code file name filename.ino. Therefore:
#line 100 "C:\Temp\myCode.ino"
tells the compiler to reference the next line number as line 100 for the source file name myCode.ino. This directive is useful when your program reads in one or more header files. For example, suppose your source file begins with:
#include <stdio.h>
and your program has an error on line 10. If file stdio.h has 22 lines in it and your program finds an error at source code line 10, then the error message will say the error is at line 32. This can get confusing, especially if the compiler isn’t very adept at counting source code lines when include files are used. Fortunately, the Arduino compiler does a good job of counting lines. In fact, it does not count the lines in header files.
As an experiment, however, try placing the #line directive in one of your programs and change the file name to the file you are working on. You will see that the line number does change according to the line number you specify in the #line directive.
#if, Conditional DirectivesThere are a number of conditional directives, and they are very similar, so we can discuss them as a group. First, the expression:
#if definedConstant expression operand// Statement(s)#endif
might be written as:
#if BOARD == ATMEGA168 #define MAXEEPROM 1024#endif
In this example, if BOARD is defined as ATMEGA168, then MAXEEPROM is set to 1024. The #endif directive is necessary to complete the directive for the compiler. You can have multiple statements controlled by the conditional directive.
The directive

201
chapter 11 ■ the c preprocessor and Bitwise operations
#if defined BOARD
might be used as:
#if defined BOARD #define MAXEEPROM 1024#endif
In this case, however, it does not matter how BOARD is defined, MAXEEPROM is set to 1024 as long as there is a #define for BOARD.
The directive
#if !defined expression
is the negative of the previous directive. That is:
#if !defined BOARD #define MAXEEPROM 1024#endif
This says that if BOARD has not been #defined in the program, then MAXEEPROM gets set to 1024. This directive can also be written using the #ifndef in the same manner:
#ifndef BOARD #define MAXEEPROM 1024#endif
The result is exactly as before: If BOARD has not been #defined in the program, then MAXEEPROM is set to 1024.
#else, #endifAll of the conditional preprocessor directives must end with a #endif directive. However, you can have an if-else type of directive by using #else:
#ifdef BOARD #define MAXEEPROM 1024#else #define MAXEEPROM 512#endif
In this case, if BOARD is defined, then MAXEEPROM is set to 1024, otherwise it is set to 512. This gives you a little more flexibility for setting MAXEEPROM.
Finally, you can also use #elif to form a cascading if statement, as in:
#if BOARD == ATMEGA168 #define MAXEEPROM 512#elif BOARD == ATMEGA2560 #define MAXEEPROM 4096#else #define MAXEEPROM 1024#endif
The #elif simplifies the code from what it would be if the directive was not used.

chapter 11 ■ the c preprocessor and Bitwise operations
202
#includeThe #include directive is used to read in header files into your program. As a general rule, header files do not contain executable code. That is, you should not use header files to define functions that you wish to use in your programs. (The exception is parameterized macros that can act like code definitions. More on that in the next section.) You have used the #include directive before, but we never fully discussed what it does. Simply stated, the #include directive:
#include <stdio.h>
causes the compiler to read the stdio.h header file into your program as though its contents are part of your program’s source code. Surrounding the file name with angle brackets (<>) causes the compiler to look in a compiler-specific directory for the header file. With the Arduino IDE, the compiler looks in the \hardware\tools\avr\avr\include directory for the file. If you replace the brackets with double quotation marks (#include "myheader.h"), then the compiler looks in the current working directory for the include file. Include files are a convenient place to store #defines or other preprocessor information that is specific to the source file being compiled. It is also common to find function declarations (also called function prototypes) in header files.
You may wish to spend some time examining the standard header files supplied with the compiler, as there are a number of function declarations and parameterized macros that should prove very useful to you. Table 11-2 presents some of the “don’t miss” header files.
Table 11-2. Standard C Header Files
Header file name Descriptionstdio.h Standard I/O header file with macro for file redirection and most file I/O
stdlib.h Memory allocation functions, string conversions, value-to-ASCII conversions
string.h A host of memory and string processing declarations
math.h Math declarations, symbolic constants (e.g., pi), transcendental function declarations.
ctype.h Character processing declarations (e.g., isalpha())
It would be well worth your time to browse these files, as you are sure to find some nuggets that you will use in your programs.
Parameterized MacrosIf you look in the stdio.h header file, there is some pretty scary stuff, like:
#define feof(s) ((s)->flags & __SEOF)
You already understand what the #define means, but what does all the rest of the line say? Recall what a #define does to the source code—it causes a textual replacement to occur in the source file. So, if you wrote a source line:
int myEndOfFile = feof(fileStream);
then that line would look like:
int myEndOfFile = ((fileStream)->flags & 0x0020)
when the preprocessor pass finished because __SEOF was also #defined to be:

203
chapter 11 ■ the c preprocessor and Bitwise operations
#define __SEOF 0x0020 /* found EOF */
in the stdio.h header file. To understand what all of this means, you need to understand bitwise operators.
Bitwise OperatorsArduino C provides you with four bitwise logic operators: AND, OR, XOR, and NOT. The first three operators are binary operators and, hence, require two operands in the expression. The bitwise NOT operator is a unary operator and uses only a single operand. Bitwise operations can only be performed on integer data (i.e., no floating point data). As the name suggests, bitwise operations work on individual bits and do not treat those bits as a (32-, 16-, or 8-bit) unit or number. It is not uncommon to find the bitwise operators being used in conjunction with various external hardware devices to extract information from the device. Some examples of each will help you to understand how bitwise operators work.
Bitwise ANDThe bitwise AND operator is a single ampersand (&) and performs a binary AND between the corresponding bits of the two operands. The result of the bitwise operation is such that the resultant bit is 1 if, and only if, both operand bits are 1. For example, suppose you have an external sensor that sends you information over a serial link to the mc board. To save time, the sensor packs two pieces of information into each byte. Assume the low nibble (4 bits is called a nibble, just like 8 bits are called a byte) contains the sensor’s data, and the high nibble contains the sensor number that generated the data.
In code, the bitwise AND might look like:
byte a = 10; // 00001010byte b = 6; // 00000110byte c = a & b; // 00000010 = c
Note that a result bit has a value of 1 only when both operand bits are 1.In Table 3-2, you saw how the bits contained in a byte are interpreted. Suppose the device sent the
byte:
00110101
to your code. How would you determine what the data are and which sensor sent it? Simple! You would use the bitwise AND operator. The hardware specs tell you the low 4 bits hold the data and the high four bits hold the sensor number that sent the data. We can separate the data using bitwise “masks” to extract the information. Because a bitwise AND sets a result bit if, and only if, the bit position of the data and of the mask are both 1, you find that:
00111010 // The sensor data--operand100001111 // The low nibble mask--operand200001010 // Bitwise AND result using the two operands
The low 4 bits in the mask are all set to 1s because we need to know the data held in all four low bits. The right-most bit in the data is a logic 0 but the low bit of the mask is a 1. Because a bitwise AND only has a bit value of 1 when both operand bits are 1, the low bit of the result is 0. The second bit is 1 in the data stream (operand1) but still 1 in the mask. A bitwise 1 with 1 always results in 1, so the result is 1 for the second bit. The third bit in the serial data byte (operand1) is 0, whereas the mask (operand2) is 1. Therefore, the result is 0. The fourth bit is 1 in the data and 1 in the mask, so the result is 1. Because we do not care about the high nibble when looking for the data, the rest of the mask is all 0s. If you look at Table

chapter 11 ■ the c preprocessor and Bitwise operations
204
3-2, a byte with the binary value of 00001010 has a decimal value of 10. You now know that the data value sent from the sensor is 10.
So, which sensor sent the data? The device documentation says that the sensor number is held in the four high bits. To determine this, you redefine the mask to look at the high four bits:
00111010 // The data11110000 // The high nibble mask00110000 // Bitwise AND result
If you only look at the high four bits (i.e., 0011), then you can see that this would represent sensor number 3 of the device. (You will see in a moment exactly how to extract this information.)
As you can see, bitwise AND is often used to strip away unused bits from data so you can extract the information that you need.
Bitwise ORA bitwise OR operation employs the single vertical bar (|, or “pipe”) operator and is used to set a bit when either operand bit has a value of 1. Only when both operand bits are 0 is the resultant bit 0. In code, a bitwise OR fragment might be written as:
byte a = 10; // 00001010byte b = 6; // 00000110byte c = a | b; // 00001110
Note that a result bit has a value of 1 when either or both of the operand bits is a 1. Contrast this with the bitwise AND above.
Quite often a bitwise OR is used to set a bit when communicating with an external device. For example, perhaps the device has a communication register where a 1 in bit position 3 means it is okay for the device to send a byte to the controller board. Perhaps the device documentation says that the communication register OR’s the communication byte in the communication register. In that case, you want to send a byte to the register with bit 3 set:
00000100 // Communication byte to device to set bit 3 (operand1)00000000 // Look for a communication byte (operand2)00000100 // Bitwise OR result
As a result, the device knows that it is okay to send a byte of data back to the mc board. The bitwise OR is often used to read/set register bits. From the above you can draw a generalization that bitwise AND operations are often used to strip data apart, whereas bitwise OR is often used to combine data fields.
Bitwise Exclusive OR (XOR)The bitwise exclusive OR, also known as XOR, uses the carat operator (^). An XOR operation results in 1 only when the two operands are different, and 0 when they are the same. Using our code fragment:
byte a = 10; // 00001010byte b = 6; // 00000110byte c = a ^ b; // 00001100
Note that a result bit has a value of 1 only when both operand bits are different. What is interesting about an XOR operation is that if you call variable b the XOR mask and XOR the
result of the code fragment above (variable c) with the same mask:

205
chapter 11 ■ the c preprocessor and Bitwise operations
byte a = 12; // 0000110 – the result from first XORbyte b = 6; // 00000110 – the XOR maskbyte c = a ^ b; // 00001010 – the result; the original value
the result is the original value for variable a. Because XOR operations have this effect on the data, you will often find XOR operations done on pixel data to invert an image. XOR’ing a second time restores the original image.
Bitwise NOT (~)The bitwise NOT operator uses the tilde character (~) as its operator. A bitwise NOT operation simply “flips the bits” of its argument. That is, all 0 bits become 1s and all 1 bits become 0s. For example:
byte a = 1; // 00000001byte c = ~a ; // 11111110
Therefore, the bitwise NOT on the decimal value 1 results in a value of 254. The byte data type is an unsigned data type, so only positive values are possible (0 - 255).
This can cause some interesting problems if you use signed data with a NOT operator. For example:
int a = 1; // 00000000 00000001int c = ~a ; // 11111111 11111110
which sets the sign bit, resulting in a value of -32,766 and not 65,534. Because of the interpretation of the sign bit, most bitwise NOT operations are done on unsigned data.
Bitwise Shift OperatorsC allows you to shift bits of an operand. There are two types of bit shifts: (1) a right shift, which uses the >> operator, and (2) a left shift, which uses the << operator. The shift operators are binary operators using the following syntax:
result = valueToShift << numberOfPositionToShift // left shift
and
result = valueToShift >> numberOfPositionToShift // right shift
Let’s take a look at each of these operators.
Bitwise Shift Left (<<)The shift left bitwise operator simply shifts the bits to the left N bit positions, where N is the number of positions to shift the bits. For example:
byte a = 5; // 000000101byte result = a << 1; // 000001010 = result
In this example, the bits are shifted left by one position. This changes the value of a from 5 to 10. This behavior leads to an interesting fact: rotating the bits one position to the left multiplies the
original value by 2. The statement
byte result = a << 2; // 000010100 = result

chapter 11 ■ the c preprocessor and Bitwise operations
206
shifted the bits two positions to the left. If you convert the binary value for result, you will find that resultnow equals 20. Because each position doubles the value, two positions causes a multiplier of 4 (i.e., 2 * 2 = 4), which yields a final value of 20 (i.e., 5 * 4 = 20). If you shifted the bits three positions, then result is 40 (i.e., 5 * 2 * 2 * 2).
There is a caveat to this rotating-doubling fact: the top-most bit of each rotation “falls off the end.” That is, any bit in the high bit position is lost when the shift left takes place. Therefore, if you shifted any byte of data eight positions to the left, then the value will be 0 because you “over-shifted” all of the data in the byte into oblivion.
Bitwise Shift Right (>>)A bitwise shift right is just the opposition of a bitwise left shift. With a right shift, each bit moves one position to the right. Any data in the lowest bit also “falls off the end.” For example:
byte a = 10; // 000001010byte result = a >> 1; // 000000101 = result
As you would expect, a rotation right by one bit position has the effect of dividing by two. However, if we take the result of 5 above and shift it one more position to the right:
byte a = 10; // 000000101byte result = a >> 1; // 000000010 = result
which produces as result of 2. This is also a divide-by-2 operation, but the lowest bit is lost in the shift so the result is 2, rather than 2.5. This is as it should be because integer division cannot have a fractional value.
Bit shifting is an extremely fast operation at the register level. That is, multiply and divide operations take many assembly-level instructions to arrive at a result. However, shifting the contents of a register is a single instruction. For that reason, some optimizing compilers look for “powers of 2” math operations on integer data and do shifts instead.
One More ExampleRecall from our discussion in the section on the bitwise AND operator that we talked about a device with sensors that returned data to the mc board. Specifically,
00111010 // The data
The data returned from the device was 00111010. The high 4 bits was the sensor number of the device that sent the data, and the low 4 bits is the data value from the sensor. So, how can you extract the data and sensor number? Consider the following code fragment:
byte sensorByte = ReadDevice(); // sensorByte equals 00111010 after the callbyte sensorData = sensorByte & 15; // 15 = 00001111 byte sensorNumber = sensorByte >> 4; // 00110101 >> 4 = 00000011
If you work through the statements, then you will find that sensorData now equals 10, which is the value of the lowest 4 bits (1010). Bit shifting the data byte four positions to the right has the effect of “throwing away” the lowest data nibble, leaving a binary result of 00000011, or a value of 3. Therefore, you now know that sensor number three returned a data value of 10. This “bit packing” lets you transmit two pieces of information in a single byte rather than using two separate function calls to read the device.
It should be noted that bitwise AND and OR have compound equivalents. That is, the statements:

207
chapter 11 ■ the c preprocessor and Bitwise operations
int a = 5;// Some codea = a & 10;// Some more codea = a | 3;
may also be written as:
int a = 5;// Some codea &= 10;// Some more codea |= 3;
Personally, I think the compound versions take a bit more thinking when you read them in code versus the simple use of the operators. Still, you have the option if you wish to exercise it.
Using Different Bases for Integer Constants Sometimes it is easier to understand what a statement means if a different numbering system is used. For example, you could rewrite the sensor data extraction statement above as:
byte sensorData = sensorByte & B00001111;
which expresses the constant as a binary value. (Note the ‘B’ before the binary representation of 8-bit data.) Likewise, the same statement could be expression in hexadecimal as:
byte sensorData = sensorByte & 0x0F;
Many programmers who write code for mc’s are comfortable with hex because it is so often used with assembly language programming. You can also express constants using the octal (base 8) numbering system if you wish. (You should use zero-Oh notation when using octal, as in 0O123, so the compiler is clear you wish to use octal. The leading zero-Oh is unfortunate because zeroes and Ohs look very much the same.)
Whatever numbering system you decide to use with your integer constants, you should be consistent when using them.
Parameterized Macros...continuedAll of the discussion about the bitwise operators was triggered because of a parameterized macro that appears in the stdio.h header file. (The macro name feof() comes from filestream end-of-file, which is used to sense the end of a file.) The macro was:
#define feof(s) ((s)->flags & __SEOF)
In that discussion, you also saw that __SEOF was #defined as the hex constant 0x20. Therefore, the expression expanded to:
int myEndOfFile = ((fileStream)->flags & 0x0020);
which you now know can be rewritten as:
int myEndOfFile = ((fileStream)->flags & B00100000);
chapter 11 ■ the c preprocessor and Bitwise operations
208
If you read the comment in the stdio.h header file, you will discover that the purpose of this statement is to mask off the end-of-file bit to see if the end of file (EOF) has been read. The statement uses a pointer to read the value of the flags variable and then masks off the sixth bit to determine whether EOF was read.
Why use a parameterized macro? The reason is because macros generate in-line code, thus saving the overhead of a function call. If the macro is found in a tight loop, then the time saving could be noticeable.
SummaryIn this chapter we added a little more detail to the preprocessor directives that are available to you. You also learned about parameterized macros as they are sometimes found in various header files. Also, you learned how to use the bitwise operators. Understanding how bitwise operators work is often needed when communicating with external devices over some form of data link.

209
chapter 11 ■ the c preprocessor and Bitwise operations
Exercises1. Write a preprocessor directive that sets pin 14 to OUTPUT if the development
system is using Windows to host the compiler or to INPUT under any other host system.
2. Suppose you have written some macro that you want to include in your program. They are currently stored in a file named myheader.h. How would you write the statement to include the header file?
3. If you have an integer value k and wish to multiply it by 2 and assign the result into variable j, then what statement would you use?
4. What types of data would you consider using for bitwise operations?
5. An external device returns data in the lowest 6 bits of a data byte. The top 2 bits can be ignored. How would you write the code to extract the data?
6. If you perform a bit shift operation that shifts bits “off the end,” where do those bits go?

211
■ ■ ■
chapter 12
Arduino Libraries
In Chapter 11, Table 11-1 presented a number of standard C header files that are available for use in your programs. Most of these header files are used in conjunction with their associated Standard C library and the functions they hold. A C library is nothing more than a group of (often related) functions that have been pre-compiled into what is called a library file. Conceptually, you can think of a library file as being organized like a book. At the front of the file is an index of each function in the library, followed by an offset that tells where the code for that function can be found. One of the beautiful things about C is that you are not bound to a set of built-in routines for doing things like math, I/O, or other commonly performed tasks. If you do not like the way something is done by a function in a library, then you are free to write your own function. In this chapter we want to point out the library routines that are routinely shipped with the Arduino C compiler. In this chapter, you will learn
• The definition of a library
• Which libraries are standard with the Arduino C compiler
• How to create your own library
Let’s dig right in and expand your knowledge about C libraries.
LibrariesIt is useful to divide the libraries that you have available to you into two groups:
• Libraries that form the Arduino libraries and are distributed as part of the Arduino IDE
• All other libraries
Let’s start with the Arduino libraries.
Arduino LibrariesTo obtain information about the Arduino libraries, click the Help menu option in the Arduino IDE, then select the Reference option. In a moment, you will see a page similar to that shown in Figure 12-1. If you look closely in the figure, you will see the cursor sitting on the Libraries link near the top of the page. Click on the Libraries link.

chapter 12 ■ arduino Libraries
212
After clicking on the Libraries link, you will see a page similar to that shown in Figure 12-2. The libraries that are visible in Figure 12-2 are the libraries that are provided and supported by the Arduino IDE. You will often hear these libraries referred to as the Arduino core libraries. In addition, there are a number of libraries that have been contributed to the Arduino support team and have been judged useful enough to be included in the libraries distributed with the Arduino IDE. These libraries are normally referred to as Arduino contributed libraries. What follows is a brief description of each of these two library groupings.
Figure 12-1. The Arduino Reference Page

213
chapter 12 ■ arduino Libraries
The Arduino Core LibrariesTable 12-1 presents a list of the Arduino core libraries. These are libraries that are supported directly by Arduino C support group. It serves no real purpose to rewrite the documentation for each of these libraries.
Table 12-1. Arduino Core Libraries
Library name DescriptionEEPROM Functions to read and write to EEPROM memory
Ethernet Functions for using Arduino compatible Ethernet Shields
Firmata Functions for communicating with external devices using a standard serial protocol
LiquidCrystal Functions used in conjunction with LCD displays
SD Functions for reading and writing data to Secure Digital cards
Servo Functions to control servo motors
SPI Functions for communicating with Serial Peripheral Interface Bus devices
SoftwareSerial Functions for serial communications using any digital pins
Figure 12-2. Arduino Libraries

chapter 12 ■ arduino Libraries
214
You can read up on these libraries yourself using the Arduino documentation as the need arises. However, that being said, there are some things that can pose some stumbling blocks along the way. For example, there are a number of Arduino-compatible shields (peripheral boards that plug into the Arduino mc boards) that use these core library routines. For example, I have used the SD shield and was lucky in that it worked on the first try. Another programmer friend of mine used the same identical shield but with a different SD card, and he couldn't even format the card. When I gave him my SD card, his code worked perfectly. The long and the short is that some SD cards simply do not work in some SD shields. The question then becomes: How do you find out which cards work and which don't? Indeed, how can you avoid common stumbling blocks that may arise when using these contributed libraries?
Using the Forums
The first stopping point you should visit at the outset of any new project is http://arduino.cc/forum/. This forum covers a multitude of Arduino topics, as can be seen by the partial listing in Figure 12-3. You will find discussions on everything from using the Arduino to suggestions for improving the Arduino itself. This is a real time-saver, and you should consult it anytime you begin a new project. Many times I have found hints, tips, and suggestions that potentially saved me hours of research and trial-and-error time. Also, you will discover tips on hardware interfacing issues, like the SD card problem mentioned above, and how to resolve them. The Forum should always be visited before you buy any interface device or shield. I am positive the visit will save you time and money.
Figure 12-3. Arduino Forum page
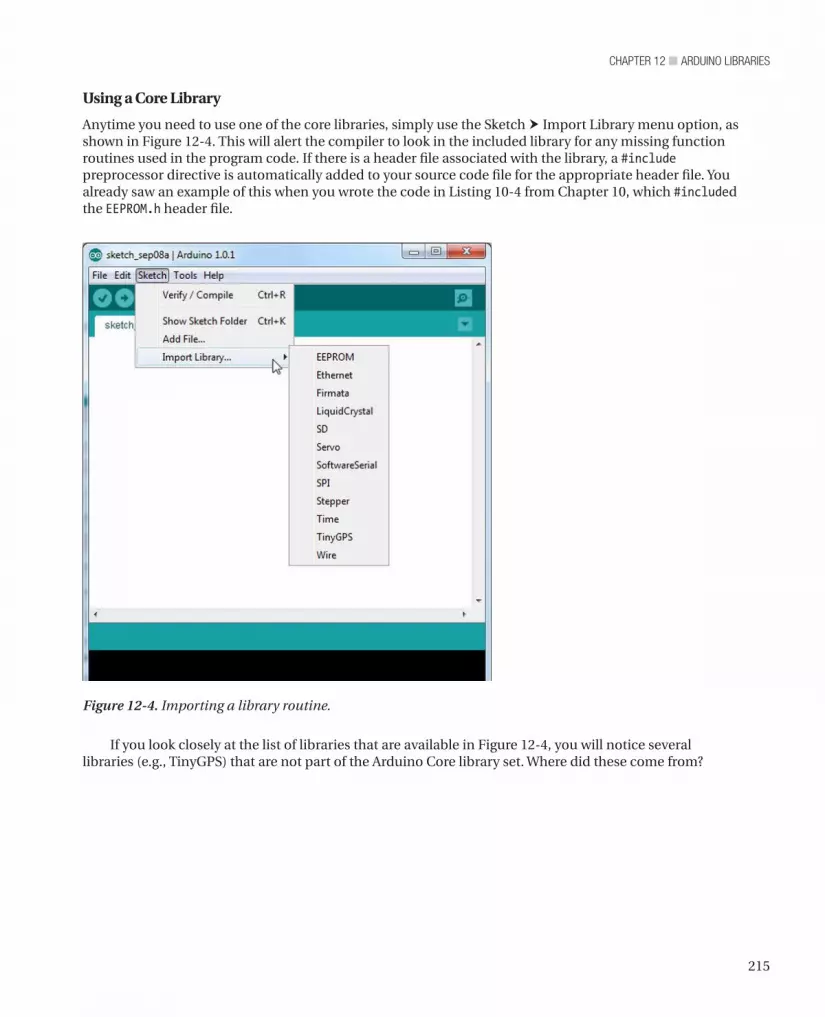
215
chapter 12 ■ arduino Libraries
If you look closely at the list of libraries that are available in Figure 12-4, you will notice several libraries (e.g., TinyGPS) that are not part of the Arduino Core library set. Where did these come from?
Using a Core Library
Anytime you need to use one of the core libraries, simply use the Sketch Import Library menu option, as shown in Figure 12-4. This will alert the compiler to look in the included library for any missing function routines used in the program code. If there is a header file associated with the library, a #include preprocessor directive is automatically added to your source code file for the appropriate header file. You already saw an example of this when you wrote the code in Listing 10-4 from Chapter 10, which #included the EEPROM.h header file.
Figure 12-4. Importing a library routine.

chapter 12 ■ arduino Libraries
216
Click on that link and you are taken to the linked page; if you scroll down to about mid-page, then you are shown a Download and Installation section, as seen in Figure 12-6. If you click on that link, then you can download the new Tone library.
Contributed LibrariesIf you reload the Libraries page depicted in Figure 12-2, then you will see a large number of contributed libraries. For example, one of the libraries is called Tone. If you click on the Tone link, then you are directed to the page shown in Figure 12-5. If you look closely at Figure 12-5, then you will see a note stating: The Arduino Tone Library is no longer maintained here. Please go here:” after which is another link to the Tone library.
Figure 12-5. The Tone page.

217
chapter 12 ■ arduino Libraries
If you click on that link, you can download the Tone library. The download shows you the dialog shown in Figure 12-7. Note that the file is named Arduino-Library-Tone.zip. Click the Save button and the file is downloaded.
Figure 12-6. The link page for the Tone library.
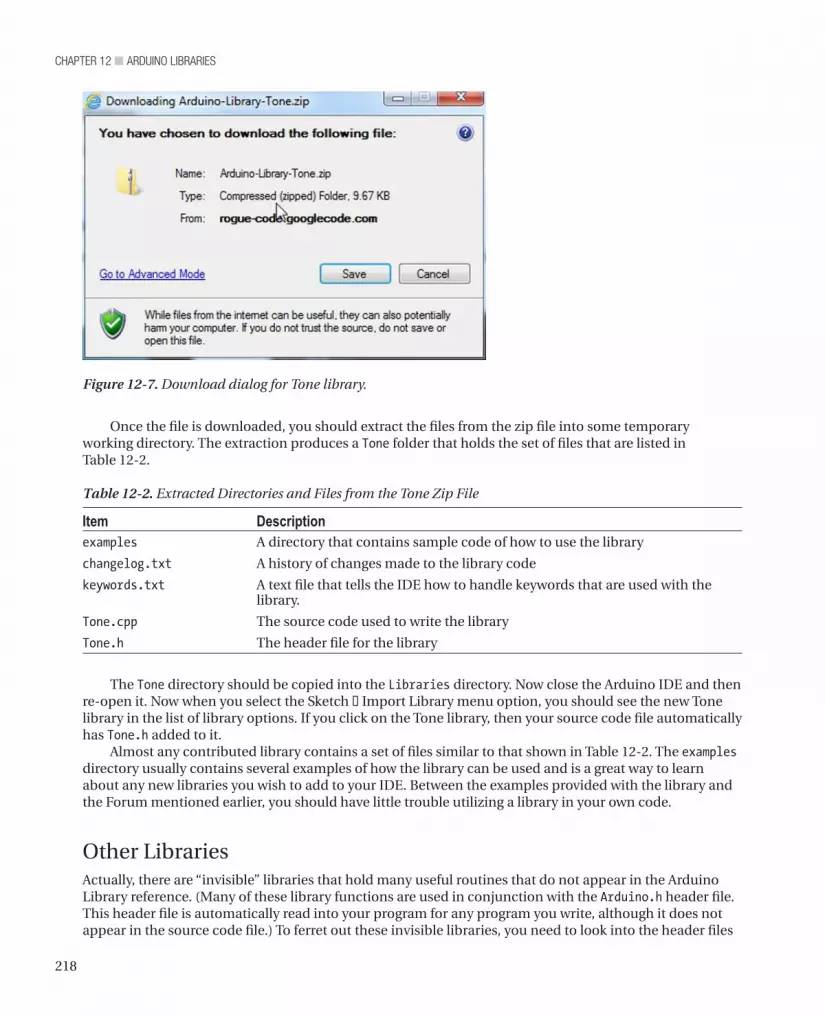
chapter 12 ■ arduino Libraries
218
Once the file is downloaded, you should extract the files from the zip file into some temporary working directory. The extraction produces a Tone folder that holds the set of files that are listed in Table 12-2.
Table 12-2. Extracted Directories and Files from the Tone Zip File
Item Descriptionexamples A directory that contains sample code of how to use the library
changelog.txt A history of changes made to the library code
keywords.txt A text file that tells the IDE how to handle keywords that are used with the library.
Tone.cpp The source code used to write the library
Tone.h The header file for the library
The Tone directory should be copied into the Libraries directory. Now close the Arduino IDE and then re-open it. Now when you select the Sketch † Import Library menu option, you should see the new Tone library in the list of library options. If you click on the Tone library, then your source code file automatically has Tone.h added to it.
Almost any contributed library contains a set of files similar to that shown in Table 12-2. The examples directory usually contains several examples of how the library can be used and is a great way to learn about any new libraries you wish to add to your IDE. Between the examples provided with the library and the Forum mentioned earlier, you should have little trouble utilizing a library in your own code.
Other LibrariesActually, there are “invisible” libraries that hold many useful routines that do not appear in the Arduino Library reference. (Many of these library functions are used in conjunction with the Arduino.h header file. This header file is automatically read into your program for any program you write, although it does not appear in the source code file.) To ferret out these invisible libraries, you need to look into the header files
Figure 12-7. Download dialog for Tone library.

219
chapter 12 ■ arduino Libraries
that were presented in Table 11-2. Most of these header files are tied to the System V Standard C library files. Listing 12-1 is a partial listing of the code from string.h header file. Almost everything you see in Listing 12-1 is a function declaration for library functions that you can use in your program.
Listing 12-1. The string.h header file (partial listing)
extern void *memccpy(void *, const void *, int, size_t);extern void *memchr(const void *, int, size_t) __ATTR_PURE__;extern int memcmp(const void *, const void *, size_t) __ATTR_PURE__;extern void *memcpy(void *, const void *, size_t);extern void *memmem(const void *, size_t, const void *, size_t) __ATTR_PURE__;extern void *memmove(void *, const void *, size_t);extern void *memrchr(const void *, int, size_t) __ATTR_PURE__;extern void *memset(void *, int, size_t);extern char *strcat(char *, const char *);extern char *strchr(const char *, int) __ATTR_PURE__;extern char *strchrnul(const char *, int) __ATTR_PURE__;extern int strcmp(const char *, const char *) __ATTR_PURE__;extern char *strcpy(char *, const char *);extern int strcasecmp(const char *, const char *) __ATTR_PURE__;extern char *strcasestr(const char *, const char *) __ATTR_PURE__;extern size_t strcspn(const char *__s, const char *__reject) __ATTR_PURE__;extern char *strdup(const char *s1);extern size_t strlcat(char *, const char *, size_t);extern size_t strlcpy(char *, const char *, size_t);extern size_t strlen(const char *) __ATTR_PURE__;extern char *strlwr(char *);extern char *strncat(char *, const char *, size_t);extern int strncmp(const char *, const char *, size_t) __ATTR_PURE__;extern char *strncpy(char *, const char *, size_t);extern int strncasecmp(const char *, const char *, size_t) __ATTR_PURE__;extern size_t strnlen(const char *, size_t) __ATTR_PURE__;extern char *strpbrk(const char *__s, const char *__accept) __ATTR_PURE__;extern char *strrchr(const char *, int) __ATTR_PURE__;extern char *strrev(char *);extern char *strsep(char **, const char *);extern size_t strspn(const char *__s, const char *__accept) __ATTR_PURE__;extern char *strstr(const char *, const char *) __ATTR_PURE__;extern char *strtok(char *, const char *);extern char *strtok_r(char *, const char *, char **);extern char *strupr(char *);
For example, consider the entry:
extern void *memcpy(void *, const void *, size_t);
I typed this into Google and found a reference to the Linux manual for the library documentation (http://www.kernel.org/doc/man-pages/online/pages/man3/memcpy.3.html), which is always a good C Standard Library source. The description for the memcpy() function reads:
The memcpy() function copies n bytes from memory area src to memory area dest. The memory areas must not overlap. Use memmove(3) if the memory areas do overlap.

chapter 12 ■ arduino Libraries
220
Using the function declaration in conjunction with the Linux description, you should be able to figure out what memcpy() does. The System V Standard library wording when describing functions is to use src for the source object of a copy and dest as the destination object of the copy. The second parameter in the declaration uses the const void * attribute list, which says it must be the source of what is being copied. This is true because of the keyword const, which means the function cannot change whatever is being pointed to. It would not make sense for this parameter to be a const if the purpose was to copy something into it. The const keyword would prevent the copy from taking place. Therefore, the first parameter (void *) must be the destination of the copy.
The term void * is used to denote a “typeless” data type pointer in a function declaration. In other words, memcpy() does no type checking during the copy process...it assumes you know what you are doing and the pointers all point to valid data!
The size_t keyword is defined in the cplusplus.com reference as:
size_t corresponds to the integral data type returned by the language operator sizeof and is defined in the <cstring> header file (among others) as an unsigned integral type.
This third parameter in the function declaration, therefore, is n in the memcpy() description, which tells how many bytes are to be copied. Voila! You now know about a very efficient standard library routine that does fast memory copies.
You should spend a little time looking at all the header files presented in Table 10-1 plus any others you may find interesting in the include directory. There are a lot of good information nuggets contained in those header files. You’d be surprised how useful the strtok() function is, even though its name seems a bit strange.
Writing Your Own LibraryThe day will come when you have developed a group of functions that you would like to make available as a library. As you know, placing functions in a library is a convenient way to capture the functionality of a routine without having the source code directly available in your program. In this section, you will learn how easy it is to create your own libraries.
Normally, a library contains more than one function, but there is nothing to prevent you from creating a library with just one function. For purposes of example, let’s take the code from Listing 6-1 (repeated below as part of Listing 12-3) that calculates whether a given year is a leap year or not; we will convert this into a library so we can use it in other programs. Although most standard library routines return the Boolean value true or false as the return value for a leap year function, for reasons I mentioned in Chapter 6, my leap year returns either 1 or 0. If you do not like this, then you are free to change it.
Listing 12-3 also contains code to calculate the day on which Easter falls for a given year. (The specific day and month for Easter depends on the lunar calendar so the date varies from year-to-year.) There are a number of “magic numbers” in the GetEaster() function that are dictated by the way lunar dates are manipulated. I have slept since I understood what these magic numbers are, so I have left them in “as is.” The curious readers can research this themselves.
Before we discuss Listing 12-3, however, it makes more sense to discuss the header file used in the listing.
n Note Because the Arduino IDE is set up to recognize .ino files, it is often easier to write the header and source code files using a simple text editor like Notepad. You can then move the necessary files to a folder in the Libraries directory after you have tested the files with a sample program.

221
chapter 12 ■ arduino Libraries
The Library Header FilePerhaps the best place to start is with the header file associated with the library. Listing 12-2 presents the necessary format for creating the header file. The very first thing you need to do is decide on a name for your library. Obviously, you do not want to cause a conflict with existing libraries, so review those libraries that are in the Libraries directory and make up a different name for your library. We will use Dates for our library name.
The format that you must use for the header file is more or less etched in stone. Because of this format inflexibility, you should model any libraries you create closely to what is described here. First, most libraries start with a comment that tells the name and purpose of the library. That is followed by a #ifndef preprocessor directive. This is a bit of defensive coding that prevents someone from “double-including” the header file information. Note that the matching #endif is at the very bottom of Listing 12-2. Whatever you use for the #ifndef name, you do not want it to collide with any other likely #ifndefs. Usually, it is safe to use the library name followed by an “_h”, as in:
#ifndef Dates_h
Now things get a little strange because the rest of the file uses C++ language syntax, not just C syntax. The Arduino compiler is capable of compiling C++ code, and this is the nature of this latest version of the Arduino IDE. There is no way to do justice to the C++ language here. Personally, I am a huge fan of object-oriented programming (OOP), but that is another story. Although we cannot delve into OOP here, you already know enough to get things to work in your new library.
Listing 12-2. The Dates.h Header File
/* Dates.h - Library for finding is a year is a leap year and the date for Easter for a given year. Created by: Jack Purdum, Sept. 10, 2012 Released into the public domain.*/#ifndef Dates_h #define Dates_h
#include “Arduino.h” // Not needed for our code, but often included class Dates { public: #define ASCIIZERO 48 // character for 0 in ASCII
struct easter { int month; int day; int year; int leap; char easterStr[11]; }; struct easter myEaster; // Function prototypes: int IsLeapYear(int year); void GetEaster(Dates *myEaster);
chapter 12 ■ arduino Libraries
222
};#endif
The first thing you need to do is tell the compiler that you are going to compile some information into something called a class. A class is nothing more than a template for something (i.e., an object) you are going to use in your program. Whatever properties or functions (a.k.a., methods) you place in the class are accessed using the dot operator in much the same way you did with a structure. In fact, a class is much like a structure, only a class is also allowed to have functions defined within it. The syntax is:
class YourLibraryName {public: // Things you want the outside world to know aboutprivate: // The things you want to use but not make available to others};
In our library, we do not have any private elements of the class so you can leave the private keyword out of the header file. The public elements of the class are those data items you do want the outside world to be able to use. The first thing I have placed in the public section of the class is a #define for the ASCII character 0. As you know, when you touch the “0” (zero) key on your keyboard, an ASCII code is sent to the operating system. In this case, the code is the numeric value 48. We are using ASCIIZERO as a symbolic constant to get rid of the magic number 48.
Next, we define a structure with the tag easter that holds the members that are used by the Dates library. Most of the members are int data types, but the last member, easterStr[], is designed to hold a string presentation of a date in the MM/DD/YYYY format. One variable named myEaster is defined as a type easter structure. The structure variable is the only property (i.e., public data item) of this class. Near the bottom of the class are two function prototypes for the functions (usually called methods in C++) that you want to make available to users of your library. These prototypes allow the compiler to perform type checking on the functions when they are used in a program. Because this completes our library (and, hence, the class definition), there is a closing brace and semicolon for the class declaration and the closing #endif for the #ifndef preprocessor directive. That is all that is necessary for the Dates.h header file. Note that there is no “executable” code in a header file.
The GetEaster() function is passed a pointer to an easter structure. It is assumed that the year member of the structure has been filled in prior to the call to GetEaster(). A pointer to the structure is passed so the function can fill in the month and day for Easter. The function also fills in easterStr[], which is a MM/DD/YYYY representation of the date for Easter. Because easterStr[] is null terminated, it may be used as a string upon return from the function.
The Library Code File (Dates.cpp)The Dates.cpp is a C++ file (hence the .cpp secondary file name) that contains the necessary code to make your library functional (see Listing 12-3). The first line of the source file contains a preprocessor directive to #include the Arduino.h header file. (In earlier versions of the compiler, this was called Wprogram.h.) This header file grants access to the standard data types and constants used by the Arduino C compiler. As mentioned before, this header file is automatically added to all of your programs but is not added automatically for library source files; you must add it yourself. Immediately after is a #include for the header file you just defined, Dates.h. After the include files, the actual code for the library functions is written.
The source code for IsLeapYear() begins with a comment of the same form that you have used when you wrote previous functions. The line:
int Dates::IsLeapYear(int year)

223
chapter 12 ■ arduino Libraries
looks a little strange because of the scope resolution operator (::) used in C++. Simply stated, this operator makes sure that if any name conflicts arise with other functions, it finds that IsLeapYear() is associated with the Dates library. Any C++ book can give you more details about the scope resolution operator if you are interested. The actual code for IsLeapYear() has already been discussed in Chapter 6.
Listing 12-3. The Dates.cpp Source Code
#include "Arduino.h"#include "Dates.h"
/***** Purpose: Determine if a given year is a leap year. Algorithm taken from C Programmer's Toolkit, Jack Purdum, Que Corp., 1993, p.258.
Parameters: int year The year to test
Return value: int 1 if the year is a leap year, 0 otherwise*****/int Dates::IsLeapYear(int year){ if (year % 4 == 0 && year % 100 != 0 || year % 400 == 0) { return 1; // It is a leap year } else { return 0; // not a leap year }}
/***** Purpose: Determine the date for Easter for a given year. Algorithm taken from Beginning Object Oriented Programming with C#, Jack Purdum, Wrox, 2012.
Parameters: struct easter *myData Pointer to an easter structure
Return value: void CAUTION: This function assumes that the year member of the structure holds the year being tested upon entry. *****/
void Dates::GetEaster(Dates *myData){ // This is line 44 int offset; int leap; int day; int temp1, temp2, total;

chapter 12 ■ arduino Libraries
224
myData->myEaster.easterStr[0] = '0'; // Always a '0' myData->myEaster.easterStr[2] = '/'; // Always a '/' myData->myEaster.easterStr[3] = '0'; // Assume day is less than 10 myData->myEaster.easterStr[10] = '\0'; // null char for End of string offset = myData->myEaster.year % 19; leap = myData->myEaster.year % 4; day = myData->myEaster.year % 7; temp1 = (19 * offset + 24) % 30; temp2 = (2 * leap + 4 * day + 6 * temp1 + 5) % 7; total = (22 + temp1 + temp2); if (total > 31) { myData->myEaster.easterStr[1] = '4'; // Must be in April myData->myEaster.month = 4; // Save the month day = total - 31; } else { myData->myEaster.easterStr[1] = '3'; // Must be in March myData->myEaster.month = 3; // Save the month day = total; } myData->myEaster.day = day; // Save the day if (day < 10) { // One day char or two? myData->myEaster.easterStr[4] = (char) (day + ASCIIZERO); } else { itoa(day, myData->myEaster.easterStr + 3, 10); // Convert day to ASCII and... } myData->myEaster.easterStr[5] = '/'; // Always a '/' and overwrites null from itoa() itoa(myData->myEaster.year, myData->myEaster.easterStr + 6, 10); // Convert year to ASCII...}
The remainder of the source code deals with determining the day of Easter for a given year. Note that the user of this library function is expected to pass in a pointer to a Dates object. The code then fills in the members of the structure contained in the Dates class with the appropriate values. If a pointer was not used, then there would be no way to return all of the required values to the caller. By using a pointer, you can fill in the day, month, and a string representation of the Easter date (easterStr[]) in the function.
Setting the Arduino IDE to Use Your LibrarySo far, you have two source code files for your library:
• The Dates.h header file
• The Dates.cpp library source code file
You can move these two files into a folder you created and named Dates in the Libraries directory of the Arduino IDE. Figure 12-8 shows how this directory might look on your system. Note how we have a Dates folder near the top of the directory. If you opened that directory, then you would find the Dates.h and Dates.cpp files.

225
chapter 12 ■ arduino Libraries
With those files in place in the Libraries directory, close the Arduino IDE and then reopen it. This action will register the new Dates files with the IDE.
A Sample Program Using the Dates LibraryListing 12-4 presents the code to exercise your new library. The program begins with a #include <Dates.h> directive. You can type this line in yourself, or you can also use the Sketch Import Library Dates menu selection, which would automatically add the #include <Dates.h> to your source code file for you. The program then defines a Dates object named myDates for you to use in the program. The setup() call simply establishes a serial link so you can see the output produced by the program.
Listing 12-4. A Program to Test the Dates Library Routine
#include <Dates.h>
Dates myDates;
void setup() { Serial.begin(9600);}
void loop() { int i; for (i = 2000; i < 2013; i++) { Serial.print(i); Serial.print(" is ");
Figure 12-8. The Libraries directory of the Arduino IDE.

chapter 12 ■ arduino Libraries
226
if (myDates.IsLeapYear(i) == 0) Serial.print("not "); Serial.print("a leap year and Easter is on "); myDates.myEaster.year = i; myDates.GetEaster(&myDates); Serial.print(myDates.myEaster.easterStr); Serial.print(" "); Serial.print(myDates.myEaster.month); Serial.print(" "); Serial.print(myDates.myEaster.day); Serial.print(" "); Serial.println(myDates.myEaster.year); } Serial.flush(); exit(0);}
The code inside the loop() function uses a for loop to print out the leap year and Easter data for the years 2000 through 2012. Note how the library routines are called using the dot operator. That is:
myDates.IsLeapYear(i)
says, “Go to the myDates object, insert your key (the dot operator), enter into the black box and call the IsLeapYear() function passing in the year via variable i.” The call to GetEaster() works much the same, only we pass the lvalue of myDates. This allows us to use indirection via the pointer to permanently change the state of the members of the myDates object. You can tell that these values are permanently changed by the way they are referenced in the Serial.print() calls. A sample run of the program can be seen in Figure 12-9.
Figure 12-9. Sample run of the Easter dates program.
2

227
chapter 12 ■ arduino Libraries
Adding the Easter Program to the IDEIf you look in any of the other libraries in the Libraries directory shown in Figure 12-8, you will see a folder named examples. The purpose of this directory is to provide the programmer with one or more examples of how to use the library. You should create a directory named examples below the Dates library folder and move the program found in Listing 12-4 into that directory. Your Dates directory should look like Figure 12-10, and the program from Listing 12-4 should be located in the examples directory.
Whoa! Where did the keywords.txt file come from? That is the subject of the next section.
The keywords.txt FileThe Arduino IDE lets you add keywords for syntax highlighting if you wish to do so. For the Dates library, the keywords.txt file contains the following lines:
Dates KEYWORD1IsLeapYear KEYWORD2GetEaster KEYWORD2
Note that the format for the keywords.txt file is pretty fussy. That is, in the first line, Dates is immediately followed by a Tab space, then KEYWORD1. This change causes the class name Dates to appear in the color reserved for KEYWORD1 keywords in your source code files. Using the entries shown here, the word Dates, for example, takes on the same color as for, which, else, and so forth.
The next two lines cause the functions defined in the Dates library to have coloring as defined by KEYWORD2. As before, a Tab space must separate the function name from the KEYWORD2 constant. When you view your source code, the words IsLeapYear and GetEaster take on the same color as any class methods you may use. The two function names, for example, will now have the same color as print in Serial.print().
For the keywords.txt file to take effect, you need to close and reopen the Arduino IDE.
Keyword Coloring (theme.txt)Some of the colors that the Arduino IDE uses in its editor are difficult for me to see. I don’t know if the reason is some degree of color blindness or simply eyes that are getting worn out from too much use. Whatever the reason, I started digging around to see whether I could change the default color scheme.If you look in the lib\theme directory just below where the Arduino EXE file is located (the exact location depends on where you installed your compiler), then you will find a file named theme.txt. This file holds the definitions for the colors used in the text editor of the IDE. If you are going to play around with the colors, it is a good idea to save a back-up copy of the original file. I used Notepad.exe to make the changes. If you have the IDE open, then you should close it before making the changes suggested below.
Figure 12-10. The Dates directory.
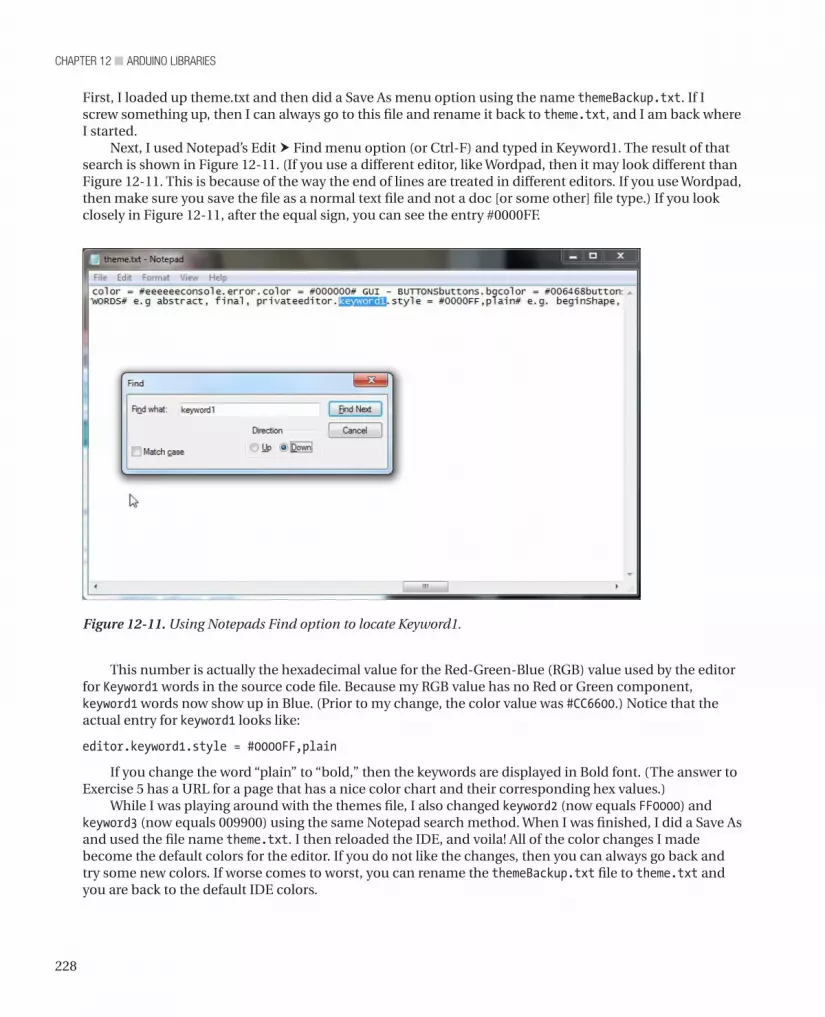
chapter 12 ■ arduino Libraries
228
First, I loaded up theme.txt and then did a Save As menu option using the name themeBackup.txt. If I screw something up, then I can always go to this file and rename it back to theme.txt, and I am back where I started.
Next, I used Notepad’s Edit Find menu option (or Ctrl-F) and typed in Keyword1. The result of that search is shown in Figure 12-11. (If you use a different editor, like Wordpad, then it may look different than Figure 12-11. This is because of the way the end of lines are treated in different editors. If you use Wordpad, then make sure you save the file as a normal text file and not a doc [or some other] file type.) If you look closely in Figure 12-11, after the equal sign, you can see the entry #0000FF.
Figure 12-11. Using Notepads Find option to locate Keyword1.
This number is actually the hexadecimal value for the Red-Green-Blue (RGB) value used by the editor for Keyword1 words in the source code file. Because my RGB value has no Red or Green component, keyword1 words now show up in Blue. (Prior to my change, the color value was #CC6600.) Notice that the actual entry for keyword1 looks like:
editor.keyword1.style = #0000FF,plain
If you change the word “plain” to “bold,” then the keywords are displayed in Bold font. (The answer to Exercise 5 has a URL for a page that has a nice color chart and their corresponding hex values.)
While I was playing around with the themes file, I also changed keyword2 (now equals FF0000) and keyword3 (now equals 009900) using the same Notepad search method. When I was finished, I did a Save As and used the file name theme.txt. I then reloaded the IDE, and voila! All of the color changes I made become the default colors for the editor. If you do not like the changes, then you can always go back and try some new colors. If worse comes to worst, you can rename the themeBackup.txt file to theme.txt and you are back to the default IDE colors.

229
chapter 12 ■ arduino Libraries
SummaryThe goal of this chapter was to make you feel comfortable using the non-default libraries that are shipped with the Arduino IDE. You should understand what the standard, core, and contributed libraries are from an operational standpoint. You should also understand the part that header files play in conjunction with library files. Indeed, you should spend some time looking through all of the header files available to you. The string.h is just one example of the treasures you will find in the header files. Also, you should be comfortable creating your own libraries and adding them to the Arduino IDE. Finally, you learned how to use the keywords.txt and theme.txt files to alter the way the editor visually presents keywords in your source code.
chapter 12 ■ arduino Libraries
230
Exercises1. If you were trying to explain the concept of libraries to someone who was just
learning about programming, how would you explain it in one sentence?
2. What is a core library?
3. What is a contributed library?
4. What does strncpy() do?
5. Suppose you wish to change some of the colors as stored in the theme.txt file, but you don’t know what the RGB hex values are. How can you decipher the color codes?
6. Where should you place a library you have written that you want to make permanently available to the IDE?

231
■ ■ ■
appendix a
Suppliers and Sources
This appendix presents information about where you can go for further information of some of the many Arduino compatible boards, sensors, and other peripheral devices.
Suppliers
Seeedino Studiohttp://www.seeedstudio.com
Suppliers of many reasonably priced mc boards and shields. I evaluated their Seeedino Mega 2560 and SD shield. Their 2560 Mega board has one of the smallest footprints I have seen for this board (see Figure 4-5). I have also purchased several of their other shields, and everything has been of very high quality and performed as advertised. They also supply a robotic kit that has everything you need to build a robot (see Figure A-1):
Figure A-1. The Makeblock robotic kit.

appendix a ■ SupplierS and SourceS
232
These are extremely high-quality, machined parts that should produce a rugged and durable system.
Diligent Inc http://www.digilentinc.com
The Max32 board (see Figure A-2) takes advantage of the powerful PIC32MX795F512 microcontroller. This microcontroller features a 32-bit MIPS processor core running at 80Mhz (quite a bit faster than the Atmel clock speed), 512K of flash program memory, and 128K of SRAM data memory.
Figure A-2. The Diligent ChipKit Max32.
In addition, a USB 2 OTG controller, 10/100 Ethernet MAC, and dual CAN controllers that can be accessed via add-on I/O shields and 83 I/O lines. There is a modified IDE that is an Arduino IDE lookalike and is available for Windows, Mac, and Linux. (The board supports all three.) The modified IDE can be downloaded free at:
https://github.com/chipKIT32/chipKIT32-MAX/downloads
I tried several of my sketches and all ran without modification on the ChipKit Max32. However, the compiler has some differences...all of them good! For example, an int data type for this board uses 4 bytes of storage and a double is 8 bytes, versus 2 and 4 for most Atmel boards. Depending on your app, this could be a real plus in terms of range and precision. If you need a bunch of I/O lines and a very fast processor, this is a great choice and clearly worth investigating. I also found the placement of the reset button very convenient.

233
appendix a ■ SupplierS and SourceS
Tinyos Electronicshttp://tinyosshop.com
This company supplied an ATmega328 compatible board, which can be seen in Figure A-4. As you can see relative to the pen cap in the photo, this is one of the smallest boards I received, but it ran all of my sketches perfectly. The board is well constructed and reasonably priced. Also note that the chip is removable. This means you could load software onto the board, remove the chip, and place in a bare-bones board with only a chip and a few other components if you wanted to do so. They also sell a wide variety of shields, sensors, and other products for the Arduino boards. I used this board a lot while writing this book, mainly because of its size.
OSEPPhttp://osepp.com
The company offers a number of Arduino-compatible boards and sensors. The board I ordered was the OSEPP Mega 2560 R3 Plus, as seen in Figure A-3. The board is well constructed and is designed to easily attach external devices and sensors. (Notice the mini-USB connector on the left edge of the board plus the Molex connector in the top left corner for connecting to Osepp sensors and I2C devices.) This series features 256K of flash memory, 8K of SRAM, 4K EEPROM, 54 digital I/O pins, and 16 analog pins.
Figure A-3. OSEPP Mega 2560 R3 Plus.

appendix a ■ SupplierS and SourceS
234
Cooking Hackshttp://www.cooking-hacks.com
This company supplied the GPS module that was mentioned in Chapter 10. The module is shown in Figure A-5.
Figure A-4. TOSduino Duemilanove. Note the small footprint!
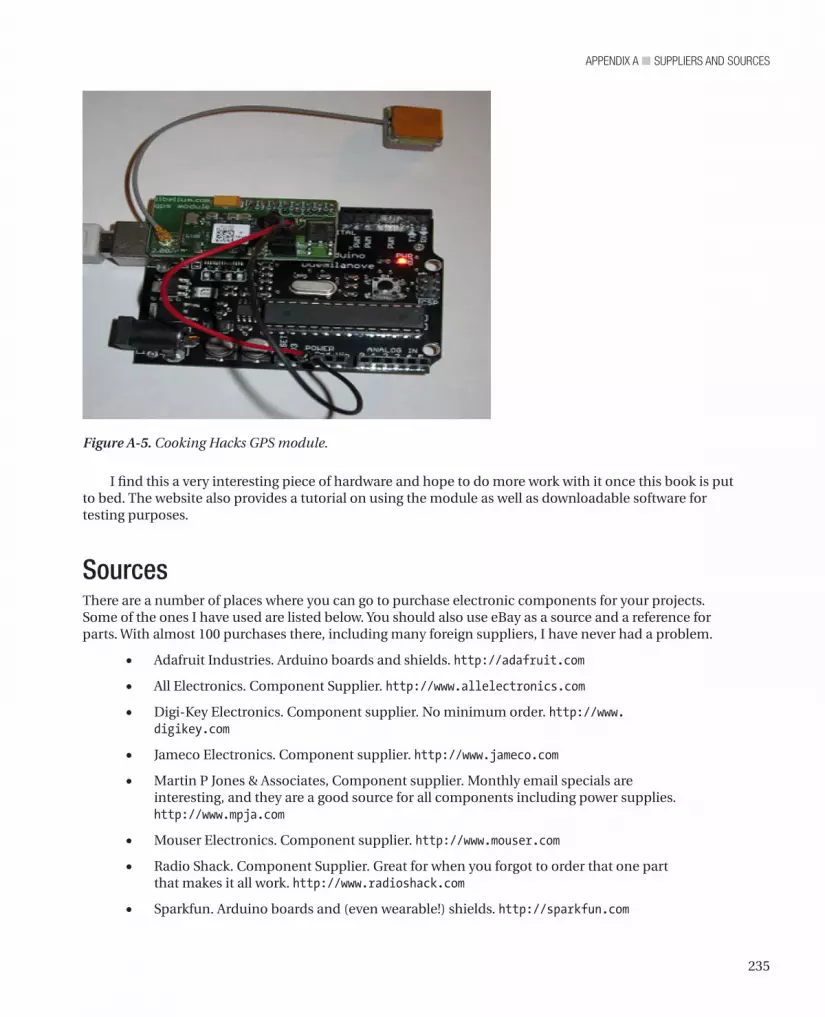
235
appendix a ■ SupplierS and SourceS
I find this a very interesting piece of hardware and hope to do more work with it once this book is put to bed. The website also provides a tutorial on using the module as well as downloadable software for testing purposes.
SourcesThere are a number of places where you can go to purchase electronic components for your projects. Some of the ones I have used are listed below. You should also use eBay as a source and a reference for parts. With almost 100 purchases there, including many foreign suppliers, I have never had a problem.
• Adafruit Industries. Arduino boards and shields. http://adafruit.com
• All Electronics. Component Supplier. http://www.allelectronics.com
• Digi-Key Electronics. Component supplier. No minimum order. http://www.digikey.com
• Jameco Electronics. Component supplier. http://www.jameco.com
• Martin P Jones & Associates, Component supplier. Monthly email specials are interesting, and they are a good source for all components including power supplies. http://www.mpja.com
• Mouser Electronics. Component supplier. http://www.mouser.com
• Radio Shack. Component Supplier. Great for when you forgot to order that one part that makes it all work. http://www.radioshack.com
• Sparkfun. Arduino boards and (even wearable!) shields. http://sparkfun.com
Figure A-5. Cooking Hacks GPS module.

appendix a ■ SupplierS and SourceS
236
SoftwareUnfortunately, VisualMicro’s software debugger for the Arduino only came to my attention just a few days before the final page proofs were set. As most programmers know, the weakest link in writing code using the Arduino IDE is the lack of useful debugging tools. As it stands, Serial.Print() function calls are often used to observe values as a program executes. Not any more.
The Arduino debugger from VisualMicro is actually a program add-in for Microsoft’s Visual Studio. The Visual Studio debugger is full featured with various debug windows, breakpoints, and single-stepping features. As you can see in the figures, the Arduino is completely integrated into the Visual Studio IDE. The first figure shows the ability to open an Arduino project from within Visual Studio while the second shows how there are combo boxes for the Arduino boards and COM port selection.
The current version of the product is free and can be downloaded from:
http://visualmicro.codeplex.com/
At the present time, the add-in works with Visual Studio 2012, 2010, and 2008 and Arduino 1.x. It does not work with the Express version of Visual Studio at the time this is being written. However, the web site does list several ways to obtain the Professional version of Visual Studio at little or no cost. If you plan on doing any serious projects, you must check this software out.

237
■ ■ ■
appendix B
Electronic Components for Experiments
In this appendix, you are given a short list of the components you need to implement the experiments mentioned in this book. Chapter 1 also discusses what you need. The major items are repeated here, plus a few other thoughts you may want to consider.
Microcontroller BoardNo big surprise here. You probably already have a board. If not, Appendix A presents some board options you should consider, as I have used all of the boards mentioned there and any one of them would be a good choice. So, which should you choose? It depends. For the most part, I rarely have run out of flash memory or SRAM. There are times when I bumped into the EEPROM limit, but not all that often. For some projects, I used a 2560 board because of the larger number of I/O pins. In certain situations, more pins is a better solution than multiplexing. Again, it depends on your needs. You should be able to purchase a low-end Arduino-compatible board for less than $15. You can find an ATmega2560 board for around $20. Personally, I start all projects with the least expensive board and “move up” if the project demands it.
Solderless BreadboardThis is a necessity if you plan to do any experimentation. I like the board shown in Figure 1-2 because it is large enough to hold a lot of components but small enough to fit easily on my work desk. You should be able to buy a breadboard with more than 2000 tie-points for less than $20. In most cases, you will find deals that even throw in a bunch of jumperwires, too.
Electronic ComponentsThis is a catch-all category that includes LEDs, jumperwires, resistors, and so forth. Keep in mind that the power supplied by the Arduino I/O pins is very limited. As a result, I created a small “power supply” (see Figure B-1) that uses an LM7805 to provide 5 volts at currents of about 1 ampere. There is a connector seen near the top right edge of the board that accepts input from a 9v “wall wart” capable of supplying up to 1.5 amps of current. I bought a lot of 10 LM7805 voltage regulators on eBay for less than $2.50, including

Appendix B ■ electronic components for experiments
238
For the simple circuits described in this book, all you will need is a few LEDs and some resistors. All of the components used in this book can be purchased locally at your favorite parts supplier. If you need to save every penny, check online to see if your area has a local amateur (i.e., “ham”) radio club. They sometimes have flea markets that are a great source for inexpensive electronic components. If you have a local college or university nearby, check if they have an engineering or physics department. They may have ideas for finding local parts. If those avenues fail, then there is always online purchasing.
Online Component PurchasesI am often asked whether I feel confident in purchasing electronic items and components online. Definitely, yes. I have purchased items from the suppliers mentioned in Appendix A online and have never had a problem. Quite honestly, I always check eBay to get an idea of the market price for any item I do not use on a regular basis. If nothing else, eBay makes it easy to find out the price of things.
Perhaps the second most frequent question I get asked is my experience using eBay to purchase items online. I know that I have made more than 100 purchases on eBay for various items. Of those purchases, I have never had one bad experience, especially in the electronics/component purchases I have made. Do I buy from China? Absolutely. Although I have made “bulk” purchases (e.g., 100 resistors or capacitors) from domestic suppliers, I have also made bulk purchases from China without problem. Although it is nice to be able to drive to my local Radio Shack and buy that odd part I didn’t have at home, when I needed 125 blue LEDs for a 5 x 5 x 5 LED cube project, I shopped around. Not too long ago, I purchase 150 LEDs with dropping resistors for less than $10. True, it took about 8 days to get them, but they were postage paid and were exactly what I ordered.
shipping. My guess is that with the perf board, the two electrolytic capacitors, resistor, and LED that I have less than $1 tied up in the board. There are two pins at the left edge or the board that supply 5 volts. The mini board is plugged into my breadboard when I feel I need more power than the I/O pins can provide.
Figure B-1. A small voltage regulator circuit.

239
Appendix B ■ electronic components for experiments
Where you buy your components is up to you. If I was a bazillionaire, then I probably would just pay whatever the price is to have the item(s) tomorrow. Alas, unless you people start buying thousands of copies of this book, I will still need to shop around for a good price. After a while, you will find a few suppliers that you are happy with and you will tend to use them over and over.
Experiment!Finally, I would hope you enjoy experimenting even if you do not consider yourself an expert. True, electrical circuits can be harmful so you do need to be careful, especially with 120 volt circuits. Even a wall wart supplying 5 volts and low current deserves respect. Still, I would hope you are willing to try things on your own. I have smoked my share of resistors and sent more than one LED to supernova heaven, but I learned things during the process. My interest in electronics started before I got my amateur radio license in 1954, and it has never waned since. I hope you find your microcontroller projects just as much fun as I have mine.
Experiment and enjoy!

241
■ ■ ■
Answers to Exercises
Chapter 21. Name the building blocks of a programming language.
Operands, operators, expressions , statements, statement blocks, function blocks
2. What is a binary operator?
A binary operator is an operator that requires two operands to create an expression.
3. Why is an understanding of operator precedence important in an expression?
Operator precedence dictates the order in which subexpressions are evaluated in complex statements. Without this understanding it is possible that a complex statement will not have the subexpressions evaluated in the order you wish, leading to erroneous results.
4. Which of the Five Program Steps is least likely to appear in your programs and why?
The Termination Step. The reason is because many mc programs are designed to run forever and may never reach a termination point unless power is removed or a component fails.
5. What is the purpose of the /* and */ character pairs?
This sequence of characters marks the start and end of a multiline comment in a program. They are also useful in “commenting out” a chunk of code during program testing and debugging.

■ Answers to exercises
242
Chapter 31. Which of the following variable names are good and which would draw a syntax
error?
bigFeet your Feet switch 12Meters _SystemVal -Negative NoGood realGood
Answer: your Feet is not valid because it has a space character in its name. switch is not good because it is a C keyword. 12Meters is not good because it starts with a digit character. -Negative is not good because it starts with a math operator. All the rest are acceptable.
2. How do you pronounce the word char as in char c;?
Probably not the most important question to ask, but one I still do get asked. Some pronounce it like “char,” as in charcoal or to char a steak. Others pronounce it as “care,” as is caretaker. There is no right or wrong answer. It just depends on whether you identify with something that is burnt and ugly or someone who lovingly takes care of puppies. I will let you guess which I prefer.
3. Suppose you have a char variable. Write the binary values for 32, 72, 111, 128.
Here are the answers:
32 = 0010000072 = 01001000 111 = 01101111 128 = ?
You can’t represent 128 with a signed char because the max value is 127. If you set the high bit, then the interpretation is the value -1, not 128.
4. Suppose you are at a cocktail party and someone asks you what precision means in Arduino C. What is your answer?
Precision refers to the number of significant digits a number has. In Arduino C, the numeric range for floating point numbers is fairly large—up to 38 digits. However, only the first 6 (sometimes 7, but don’t count on it) digits are significant. All the remaining digits are the computer’s best guess as to their value.
5. What’s the difference between the string and String data types?
The string data type is made up of nothing more than an array of char data types. The String data type subsumes the string data type but adds a number of functions that can be used with the String data type (e.g., see Table 3-3). It is not too much of a stretch to think of the String data type as a shell, or wrapper, function that encompasses string but also has other function defined within it. (String gets very close to OOP methods.) The good news is the added functionality that String brings to the party. The bad news is that the extra functionality means more memory is chewed up when you use String.

243
■ Answers to exercises
6. What is an lvalue? What is an rvalue?
An lvalue is a location in memory where a data item resides. An rvalue is the value of that data item.
7. Relate lvalues and rvalues to the Bucket Analogy.
Think of the bucket as something that can hold data. The size of the bucket depends on the number of bytes of data the bucket needs to hold (e.g., 1 byte for a char, 2 bytes for an int, 4 bytes for a float, etc.). When you define a variable, as in:
int k = 25;
the int determines you need a 2-byte bucket, the lvalue is where you place the bucket in computer memory, and the rvalue tells us the value we see when we peek into the bucket (i.e., 25).
8. What is wrong with the following statements, and how do you fix it?
int val;double x = 1000.0;
val = x;
The last statement is an assignment statement, so you are taking the rvlaue of x and copying it into the rvalue of val. Using the Bucket Analogy, you are pouring the contents of a 4-byte bucket into a 2-byte bucket, so the potential exists for losing data. You fix this by using a cast operator, as in:
val = (int) x;
The cast has the effect of skimming off 2 bytes of “unused” water and just assigning the meaningful data (i.e., 1000) into val. Alas, it is up to you to know the max value the int can hold before the “skimming” process starts throwing the kids out with the bath water.
Keep in mind that the Arduino compiler does allow silent casts, and these are almost never a good idea. As a rule: Always use a cast when you use the assignment operator with differing data types.

■ Answers to exercises
244
Chapter 41. What is wrong with the following code?
if (random()){ x = 50;}
The random() function returns a random number as a long data type. The if statement expects the value between the parentheses (expression1) to be a Boolean value, true or false, but the value is a long. This is a semantic error. That is, the code is syntactically correct, but the expression is used in the wrong context. The compiler should at least give a warning here, but it does not. Moral: Just because the compiler lets you get away with something doesn’t always mean it is right.
2. Are there any errors in the following code?
if (j = k){ doStuff();} else { doOtherStuff();}
Rather than using the test for equality in the if test expression, a single equal sign is used. This will not draw an error message from the compiler because, again, the syntax is correct. However, the programmer likely wanted to perform a test between variables j and k, not an assignment.
3. What happens when you run an LED without a resistor in the circuit?
You may get lucky and nothing happens. However, if you are using an LED with a max current rating of less than 20 ma, then you could burn out the LED. If the current rating for the LED is greater than 20 ma, then you could burn out the mc board. Either way, the odds of something good happening are stacked against you. Moral of the story: Use an LED with a resistor.
4. Modify the HeadsOrTails program so that it reports back to your PC how many heads and tails were sensed during a given number of “coin tosses.”
The code appears below:
/* Heads or Tails Turns on an LED which represents head or tails. The LED remains on for about 3 seconds and the cycle repeats. Dr. Purdum, July 12, 2012 */ // define the pins to be used.
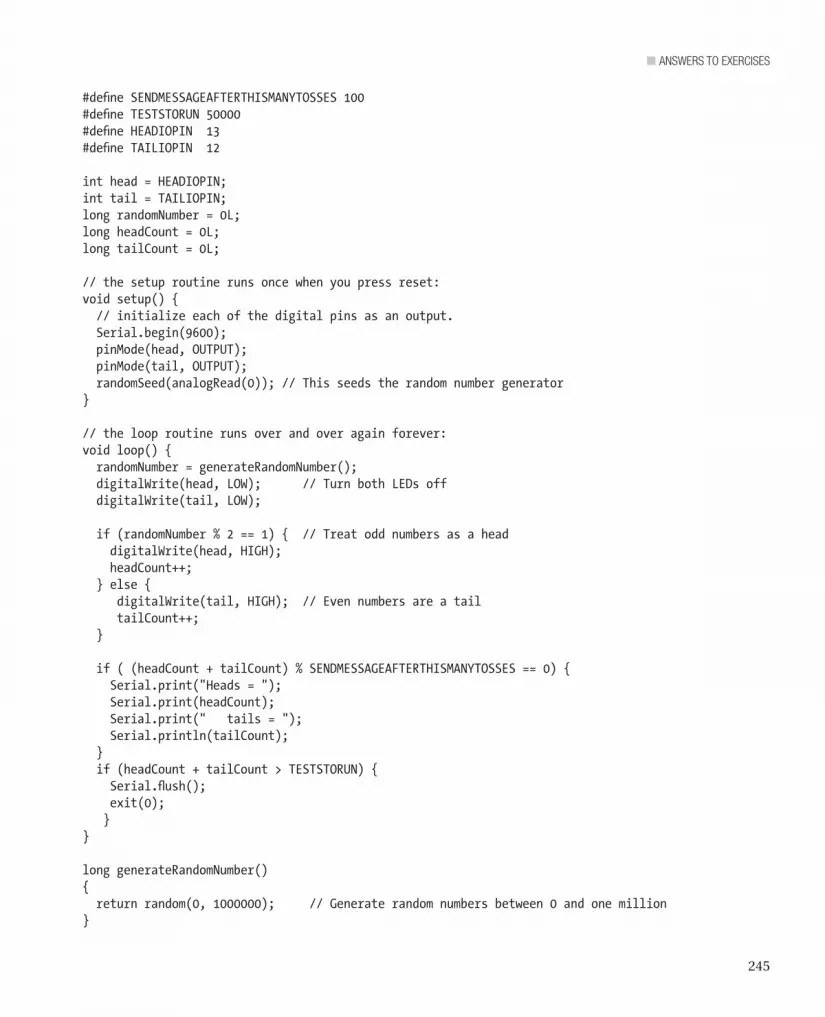
245
■ Answers to exercises
#define SENDMESSAGEAFTERTHISMANYTOSSES 100#define TESTSTORUN 50000#define HEADIOPIN 13#define TAILIOPIN 12
int head = HEADIOPIN;int tail = TAILIOPIN;long randomNumber = 0L;long headCount = 0L;long tailCount = 0L;
// the setup routine runs once when you press reset:void setup() { // initialize each of the digital pins as an output. Serial.begin(9600); pinMode(head, OUTPUT); pinMode(tail, OUTPUT); randomSeed(analogRead(0)); // This seeds the random number generator}
// the loop routine runs over and over again forever:void loop() { randomNumber = generateRandomNumber(); digitalWrite(head, LOW); // Turn both LEDs off digitalWrite(tail, LOW);
if (randomNumber % 2 == 1) { // Treat odd numbers as a head digitalWrite(head, HIGH); headCount++; } else { digitalWrite(tail, HIGH); // Even numbers are a tail tailCount++; } if ( (headCount + tailCount) % SENDMESSAGEAFTERTHISMANYTOSSES == 0) { Serial.print("Heads = "); Serial.print(headCount); Serial.print(" tails = "); Serial.println(tailCount); } if (headCount + tailCount > TESTSTORUN) { Serial.flush(); exit(0); }}
long generateRandomNumber(){ return random(0, 1000000); // Generate random numbers between 0 and one million}

■ Answers to exercises
246
There are a few things worth noting. In the setup() loop, the code calls the Serial.begin() function to set the baud rate for communication between the mc and your PC. If they are not the same, then the serial communication will be out of sync and the output will look garbled. Near the lower-right corner of the serial monitor (press Ctrl-Shift-M after the program starts) you will see a dropdown box with various baud rates. Make sure the value you see matches the argument you pass to Serial.begin().
The call to random() produces a new random number that the code then tests to determine whether it corresponds to a head or tail. The appropriate counter is incremented and then a summary message may be sent back to the PC if SENDMESSAGEAFTERTHISMANYTOSSES tosses have been made. You should be able to prove to yourself that the message is only sent when the specified number of trials (e.g., tosses % 100 == 0) have been made. Otherwise, most of the execution time would be sent sending messages to the PC. Serial.print() is use to display the data on the PC. Serial.println() also displays information on the PC but sends a newline character after the data is displayed. The newline character has the effect of moving the cursor to the beginning of the next line. If the program has simulated more than TESTSTORUN coin tosses, then the call to the exit() function terminates the program. If you wish to run the program again, then you can press the reset button on the mc board to restart the program. Finally, notice the use of #define’s to get rid of magic numbers in the program.
Chapter 51. In the following code fragment:
int k;for (k = 0; k < 1000; k++) { k = DoSomethingCool(k);}
What happens if the function DoSomethingCool() ends up decrementing k before it passes the value back to the for loop statement body?
If the function decrements k, then on the first pass the value assigned into k by DoSomethingCool() is -1. That value is then passed to expression3 (k++), which increments k to 0. Control then passes to expression2, which checks to see if k is less than 1000. Because k is now 0 again, the call to DoSomethingCool() is called again, which assigns -1 into k...again. Clearly, this ends up in an infinite loop.
2. What happens in the following code fragment?
#define EVER ;; // Just two semicolons... // Some statements for (EVER) { // Do some statements here } // The rest of the program
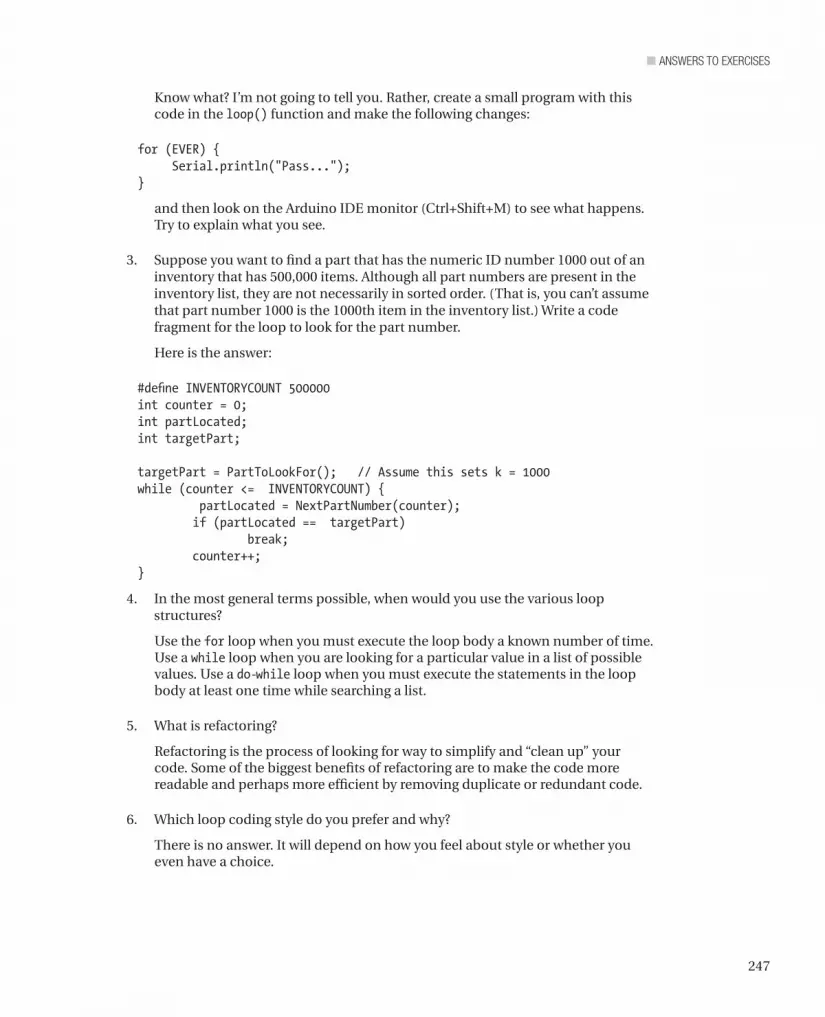
247
■ Answers to exercises
Know what? I’m not going to tell you. Rather, create a small program with this code in the loop() function and make the following changes:
for (EVER) { Serial.println("Pass..."); }
and then look on the Arduino IDE monitor (Ctrl+Shift+M) to see what happens. Try to explain what you see.
3. Suppose you want to find a part that has the numeric ID number 1000 out of an inventory that has 500,000 items. Although all part numbers are present in the inventory list, they are not necessarily in sorted order. (That is, you can’t assume that part number 1000 is the 1000th item in the inventory list.) Write a code fragment for the loop to look for the part number.
Here is the answer:
#define INVENTORYCOUNT 500000 int counter = 0; int partLocated; int targetPart;
targetPart = PartToLookFor(); // Assume this sets k = 1000 while (counter <= INVENTORYCOUNT) { partLocated = NextPartNumber(counter); if (partLocated == targetPart) break; counter++; }
4. In the most general terms possible, when would you use the various loop structures?
Use the for loop when you must execute the loop body a known number of time. Use a while loop when you are looking for a particular value in a list of possible values. Use a do-while loop when you must execute the statements in the loop body at least one time while searching a list.
5. What is refactoring?
Refactoring is the process of looking for way to simplify and “clean up” your code. Some of the biggest benefits of refactoring are to make the code more readable and perhaps more efficient by removing duplicate or redundant code.
6. Which loop coding style do you prefer and why?
There is no answer. It will depend on how you feel about style or whether you even have a choice.
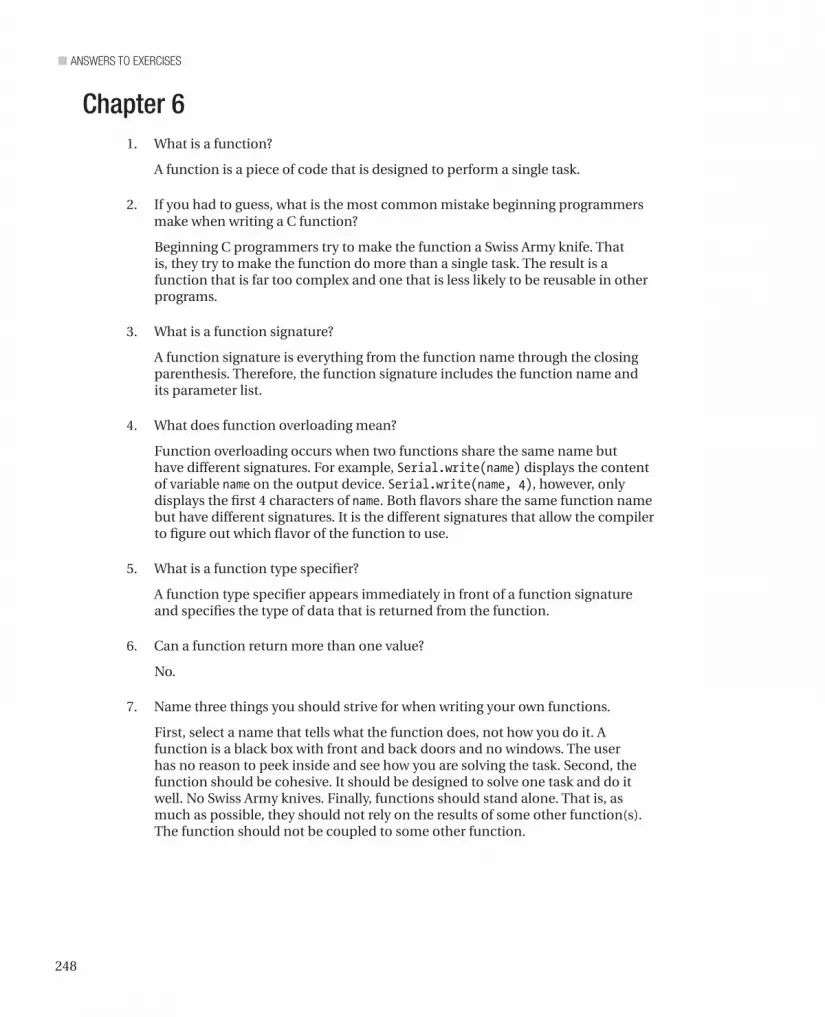
■ Answers to exercises
248
Chapter 61. What is a function?
A function is a piece of code that is designed to perform a single task.
2. If you had to guess, what is the most common mistake beginning programmers make when writing a C function?
Beginning C programmers try to make the function a Swiss Army knife. That is, they try to make the function do more than a single task. The result is a function that is far too complex and one that is less likely to be reusable in other programs.
3. What is a function signature?
A function signature is everything from the function name through the closing parenthesis. Therefore, the function signature includes the function name and its parameter list.
4. What does function overloading mean?
Function overloading occurs when two functions share the same name but have different signatures. For example, Serial.write(name) displays the content of variable name on the output device. Serial.write(name, 4), however, only displays the first 4 characters of name. Both flavors share the same function name but have different signatures. It is the different signatures that allow the compiler to figure out which flavor of the function to use.
5. What is a function type specifier?
A function type specifier appears immediately in front of a function signature and specifies the type of data that is returned from the function.
6. Can a function return more than one value?
No.
7. Name three things you should strive for when writing your own functions.
First, select a name that tells what the function does, not how you do it. A function is a black box with front and back doors and no windows. The user has no reason to peek inside and see how you are solving the task. Second, the function should be cohesive. It should be designed to solve one task and do it well. No Swiss Army knives. Finally, functions should stand alone. That is, as much as possible, they should not rely on the results of some other function(s). The function should not be coupled to some other function.
249
■ Answers to exercises
8. The ReadLine() function was said to be SDC. Why and what would you do to improve it?
Perhaps the biggest flaw is that there is no check on the return value from atoi(). The atoi() function is designed to return an integer value by parsing the string that was passed to it. The problem is the user could type in a non-digit character and atoi() fails, but there nothing in ReadLine() to account for this. atoi() is designed to return 0 if it fails or the predefined constants INT_MAX or INT_MIN if the value is out of range for an int. Although still not bulletproof, an improvement might be:
if (year == 0 || year == INT_MAX || year == INT_MIN) {Serial.print("Input error: non-numeric data entered. Aborting program"); Serial.flush(); exit(0);}
Chapter 71. What are the scope levels in C?
Answer: There are three scope levels in C: statement block, local, and global.
2. Why is it usually a good thing to avoid using the global storage class?
Answer: The global storage class means that the data item is exposed for use to every data object in the file from its point of definition to the end of the file. This is bad because it makes it more difficult to determine where erroneous values creep in when the variable has an improper test value.
3. What are the C storage classes?
Answer: The storage classes are: auto, register, static, and extern.
4. Suppose integer variable myDay is globally defined in one file, but you need to access it in a different source file. What do you need to do to have access to myDay?
Answer: You need to have a variable declaration for myDay in source files where it is not defined. You do this by using the statement:
extern int myDay;
5. What is the default scope level for a function?
Answer: All functions in C have global scope.
6. What is the default storage class for a function.
Answer: extern. Think about it.

■ Answers to exercises
250
Chapter 81. What is a pointer?
A pointer is a variable that, once initialized, holds the lvalue of another variable. Both the pointer and the matching variable must have the same type specifier.
2. What does a pointer enable the programmer to do that might not be possible otherwise?
Pointers allow functions to have direct access to data that would otherwise be out of scope. That is, pointers allow arguments to be passed by reference, thus giving a function the ability to permanently alter a variable. Pointers also allow arrays to be passed to functions in a more memory-efficient manner than pass-by-value would permit.
3. What does the address of operator do? Give an example.
The address of operator (&) gives the code access to the lvalue of a data item. It is normally used to initialize a pointer. A typical use might be:
int val; int *ptr;
ptr = &val;
Variable ptr now holds the lvalue of val and can change it through the process of indirection.
4. What is the indirection operator (*) and what is its purpose? Give an example of how it might be used.
The indirection operator is used to access the rvalue of a variable. To be used properly, the pointer must be initialized to point to the variable. For example:
int val; int *ptr; ptr = &val; *ptr = 10;
The code fragment above uses indirection via ptr to change val to 10.
5. What is a pointer scalar and why is it important?
A pointer scalar refers to the byte magnitude by which pointer operations are scaled. For example, if a pointer to char is incremented, then the offset from the lvalue is increased by 1 because that is the size of a pointer scalar for a char data type. However, if a pointer to long is incremented, the offset is adjusted by 4 because each long uses 4 bytes of storage.
6. Suppose you needed to pass the value of the fifth element of an int array named values to a function named func(). How would you write the code?

251
■ Answers to exercises
func(values[4]);
The offset is 4 because of the N – 1 Rule for arrays. Bear in mind that this syntax is pass-by-value. That is, you are sending a copy of the value of the values[] array element to the function.
7. Suppose you want func() to change the value of the fifth element of the values array. How would you write the code?
func(&values[4]);
This is a pass-by-reference call because the lvalue for the fifth element of the array is sent to the function. Note that the function simply assumes if has a pointer to an array:
void func(int *ptr); // Function declaration for func() assuming an int array.
Chapter 91. In Listing 9-1, if I change ptr from a character pointer to an int pointer in the
initialization statement and write: ptr = (int *) buffer;
and then run the program, what would you expect the output to look like and why?
The output becomes:
We ntecus fhmneet
plus a bunch of garbage. (Actually, casting to an int pointer would just show numeric values, rather than characters.) The reason is because the scalar for an int is twice as big as the scalar for a char, so every other letter in the quotation is printed. However, the while loop “skips over” the null termination character and displays junk until a null (zero) is finally read.
2. Why are pointer scalars important?
Any pointer manipulation needs to know the type of data to which it points so it can adjust the operation to fit the data. Incrementing a pointer, for example, must advance the pointer value by the scalar size of the object being pointed to, or disaster results.
3. When can you use two pointers in an arithmetic expression?
Pointer arithmetic only makes sense when the pointers point to the same object.
4. If you define a pointer to a function, what is the rvalue of a properly initialized pointer to function?
Just like any other pointer variable, it must hold an lvalue. In this case, it is the lvalue of where the function resides in memory.
■ Answers to exercises
252
5. What is the purpose of the Right-Left Rule?
The purpose of the Right-Left Rule is to allow you to decipher complex data definitions.
6. Unwind and verbalize the following data definitions:
int *ptr1[10];int (*ptr2)[10];int (*(*ptr3())[10])();int (*ptr4(int))();
ptr1 is an array of 10 pointers to int.
ptr2 is a pointer to an array of 10 ints.
ptr3 is a function returning a pointer to an array of 10 pointers to functions that return ints.
ptr4 is a function that takes an int argument and returns a pointer to a function that returns an int.
Chapter 101. In Listing 10-2, it was asserted that yourServicePeople.Phone was unchanged
after the function call. Is this true? Prove it.
Add these lines to the bottom of the setup() loop:
Serial.println(); Serial.print("yourServicePeople.Phone rvalue: "); Serial.println(yourServicePeople.Phone);
and recompile, upload, and run the program. You will see that the phone number member of yourServicePeople.Phone is unchanged and still has the value 0.
2. When discussing the section on arrays of structures, you saw the definition:
struct servicePeople myCompanies[10] = { {1, "This is a dummy","admin", 5555555}, {101, "Kacks Lawn Service", "Clowder", 2345678}};
Clearly, the Name member of the first element in this array suggests the data are garbage. Why would someone “throw away” this first element?

253
■ Answers to exercises
You could use this first element to maintain a count of the number of valid elements in the array. In other words, the ID member of the first element of the array has the value 1 stored in it. This means that there is 1 company currently filled in for the array, although the array is capable of holding 10 elements. You could access the data for the last valid data element using:
int index;int validCompanyID;index = myCompanies[0].ID;validCompanyID = myCompanies[index].ID;
You can simplify this considerably by using:
int validCompanyID;validCompanyID = myCompanies[myCompanies[0].ID].ID;
Think about it. You could also use this information to prevent a loop from reading garbage data.
3. The code in Listing 10-4 calls WriteOneRecord() 10 times although there are only 4 elements in the array that contain useful data. How could you avoid the redundant calls?
When the myPeople[] array is defined, 360 bytes of data (36 * MAXPEOPLE) are allocated to the array. Only the first 144 bytes (4 * 36) of the array contain information. Because this global data structure is defined with global scope, any uninitialized elements of the array are filled with 0s. However, uninitialized EEPROM data are set to 0xFF (or -1 decimal). Therefore, you could modify the for loop in setup() to:
i = 0; while (myPeople[i].ID != -1) { WriteOneRecord(i++); // Copy to EEPROM }
4. The phone number displayed in Figure 10-7 is pretty lame. How would you spiff it up?
If you add #include <stdlib.h> at the top of the program (so the program knows about the long-to-ASCII, ltoa(), function) and then add the following code to the top of the DataDump() function:
char t[10]; char buffer[10]; ltoa(temp.Phone, t, 10); // make long a char array strcpy(buffer, t); buffer[3] = '-'; strncpy(&buffer[4], &t[3], 5);

■ Answers to exercises
254
and then change the last Serial.println() to Serial.println(buffer), then the program displays the phone number with a hyphen between the exchange and the number (e.g., 234-5678). You should be able to figure out what the code does now.
5. What is a shield?
In terms of Arduino boards, shields are small boards that can often be piggyback directly onto the mc board. Each shield is designed to meet some specific need (i.e., more memory) or add a new feature (i.e., read GPS data). Most shields are surprisingly affordable.
Chapter 111. Write a preprocessor directive that sets pin 14 to OUTPUT if the development
system is using Windows to host the compiler or to INPUT under any other host system.
#define WINDOWS 1 // Some code... int pin14;
#ifdef WINDOWS pin14 = OUPUT; #else pin14 = INPUT; #endif
2. Suppose you have written some macro that you want to include in your program. They are currently stored in a file named myheader.h. How would you write the statement to include the header file?
The statement would be:
#include "myheader.h"
You would use the double quote marks rather than the angle brackets (<>) because the header is likely to be found in your development directory.
3. If you have an integer value k and wish to multiply it by 2 and assign the result into variable j, then what statement would you use?
j = k * 2;
Just because you know how to shift bits does not mean that is the way you should do a simple multiply. If your code is doing something in a really tight loop and you want to see if bit shifting makes a difference, then go ahead and experiment. However, if you do the multiplication with bit shifts, then make sure you put a comment in the code to explain what you are doing.
255
■ Answers to exercises
4. What types of data would you consider using for bitwise operations?
You would use byte, unsigned int, and unsigned long data types. You would likely want to use unsigned data types so there is no interpretation problems involving the sign bit.
5. An external device returns data in the lowest 6 bits of a data byte. The top 2 bits can be ignored. How would you write the code to extract the data?
byte myData = deviceByte & B00111111;
You could also write the statement as:
byte myData = deviceByte & 63; // Decimalbyte myData = deviceByte & 0x3F // Hex byte myData = deviceByte & 0O77; // Octal—with a leading zero-oh"
Your actual choice depends on what you think is easiest to read or perhaps some policy where you work dictates the format.
6. If you perform a bit shift operation that shifts bits “off the end,” where do those bits go?
I don’t know either.
Chapter 121. If you were trying to explain the concept of libraries to someone who was just
learning about programming, how would you explain it in one sentence?
A library is a collection of prewritten functions that you can use in your own programs.
2. What is a core library?
Core libraries are those libraries that the compiler routinely uses when compiling programs. For example, the Arduino.h header file is automatically included in your source code for all programs that you write. This header file enables the compiler to draw from various libraries. There are also a number of contributed libraries that are automatically installed.
3. What is a contributed library?
These are libraries that have been supplied by users of the Arduino system. Because Arduino is an open-source project, users are encouraged to share whatever code they develop. Contributed libraries are one result of this code sharing.

■ Answers to exercises
256
4. What does strncpy() do?
I am not going to tell you. It comes from the string.h header file, so it is a routine stored away in a library, and hence, you can use it in your programs. The easiest way to answer this question is to Google the function.
5. Suppose you wish to change some of the colors as stored in the theme.txt file, but you don’t know what the RGB hex values are. How can you decipher the color codes?
Once again, go to the web and start looking. That is what I did and I found the following link, which makes it easy to pick a color you like:
http://www.2createawebsite.com/build/hex-color-chart-grid.html
6. Where should you place a library you have written that you want to make permanently available to the IDE?
You should place your library in the Libraries directory and it should have a directory structure as follows:
Libraries YourLibraryName examples YourLibraryName.h YourLibraryName.cpp
keywords.txt and examples contains the source code for at least one example of how to use your library.

257
■ ■ ■
Index
n aAdafruit industries, 235Alternate Blink program
program code, 60software modifications, 61
American National Standard Institute (ANSI), 21Arduino C program
blink (see Blink program)building blocks
Ada to ZPL, 21C statement, 23expressions, 21function blocks, 25statement block body, 24
cast operator, 52data types
array, 37, 47boolean, 37, 39built-in string functions, 46byte, 37, 42char (see Char data type)float and double, 37, 43int, 37, 43keywords, 38long, 37, 43string, 37, 44unsigned char, 37unsigned int, 37unsigned long, 37variable names in C, 38void, 38, 46word, 37, 43
define vs. declare variables
bucket analogy, 50lvalues and rvalues, 48symbol tables, 47
initialization step, 26input step, 26output step, 27process step, 26setup() function, 56standard C, 21termination step, 27
Arduino language reference, 69Arduino library
Arduino core libraries, 212, 213list, 213SD card, 214
Arduino IDEdirectory, 224, 225source code files, 224
code fileDates.cpp source code, 223, 224IsLeapYear () function, 222Wprogram.h, 222
contributed libraries, 216–218forum, 214header file
creation, 221dates.h header file, 221, 222function prototypes, 222#ifndef dates_h, 221
leap year calculation, 220library file, 211missing function routine, 215placing function, 220reference option, 211, 212, 218

■ INDEX
258
Arduino library (cont.)sample program
Dates library routine, 225, 226Dates object named myDates, 225Easter dates program, 226Easter program, 227keyword coloring, 227keywords.txt file, 227loop () function, 226
second parameter, 220size_t keyword, 220string.h header file, 219
Array data type, 47Auto storage class, 121
n BBitwise logic operator
AND, 203code fragment, 206exclusive OR (XOR), 204NOT, 205numbering system, 207OR operation, 204shift operator
shift left (<<), 205shift right (>>), 206
Blink programcomment lines, 29data definition, 30decision making
alternating blink code, 60circuit, 59digitalWrite(), 61LEDs, 58loop() function block, 61
loop() function, 34multiline comments, 29setup() function, 32single-line comments, 29source code, 28
Boolean data type, 37, 39Break statement, 82Byte data type, 42
n cC functions
anatomyarguments, 93avoid coupling, 97body, 94
cohesive, 96function type specifier, 92name, 92parts, 92signature, 95task-oriented names, 96
leap year calculation program, 104logical operators (see Logical operators)passing data, 107writing
argument list, 99body, 99design considerations, 98name, 99
Char data type, 37ASCII characters, 41binary data, 39character sets, 40signed and unsigned, 39
C library. See Arduino libraryContinue statement, 83Cooking Hacks GPS module, 234C preprocessor
directivesArduino C, 198, 199defined, 197#else and #endif, 201FIRESENSOR, 197#if, conditional, 200, 201#include, 202#line, 200standard C header files, 202translation, 197#undef, 199, 200
parameterized macrosbitwise operators (see Bitwise logic
operators)#define, 202in-line code, 208studio.h header file, 208
C programming languageassumptions, 2Atmel-Based microcontroller card
cost, 5memory, 3size, 4
Blink programbinary sketch size, 17, 18IDE, 16location, 14source code file, 15

259
■ INDEX
source code window, 16toolbar, 17uploading, 18
breadboard, 5, 6decision making (see Decision making)hardware verification
µc board, 9port selection, 10USB cable attachment, 8, 9
program loops (see Program loops)software verification
Arduino integrated development environment, 8
Arduino programming tools extraction, 7security warning, 7
n dData storage
arrays of structures, 181data logging
DataDump(), 190#define DEBUG, 184FindEepromTop(), 186#include preprocessor, 184loop() Function, 188MAXPEOPLE, 186ReadIntFlag(), 187ReadOneRecord(), 189Serial.print() statements, 185setup() loop Code, 185, 186WriteOneRecord(), 188
EEPROM Memory, 183function call
AddChemical(vatSensors)\;, 178modified dot Operator, 176, 177myServicePeople, 177SetPhoneNumber(), 177
secure digital storageGPS shield, 194TinyGPS library, GPS data, 195
shieldsArduino c board, 192Pins for, SD shield, 193Secure Digital (SD) card, 191stacking, 193
structure initialization, 181structure pointers
myServicePeople structure, 180rvalue, 181sample run, 179
SetPhoneNumber() function, 178, 180structures
declaration, 172definition, 173Dot Operator (see Dot Operator)
unionsadvantage of, 183definitions, 182dot operator, 183sensor readings, 182
Decision makingBlink program (see Blink program)cascading if statements, 63C preprocessor, 68decrement operator (--), 66goto statement, 68heads/tails
initialization step, 71input step, 71output step, 71process step, 71termination step, 72
if-else Statement, 62if Statement
Arduino C program, 56closing brace (}), 56doBackupNow(), 58doSomethingElse(b), 57doSomethingNeat(), 57, 58execution paths, 57FFM, 57if keyword, 56logic true, 56setup() function, 56, 57
increment operator (++), 65magic numbers, 68precedence operators, 66relational operators, 55, 56switch statement, 67
Diligent ChipKit Max32, 232Diligent Inc., 232DoSomethingCool(), 82Dot operator
clientID = myServicePeople.ID\;// Retrieving structure data, 174
code, 174myServicePeople, 174myServicePeople.ID = clientID\;// Setting
structure data, 174myServicePeople = yourServicePeople, 176program output, 176

Dot operator (cont.)servicePeople structure, 175
Do-while loop, 81
n eElectrically Erasable Programmable Read Only
Memory (EEPROM), 3, 133Electronic components
catch-all category, 237experiment, 239microcontroller board, 237online component purchasing, 238solderless breadboard, 237voltage regulator circuit, 238
Encapsulation, 113enum data type
definitions, 165funcPtr[0], 167(*funcPtr[whichAction])()\;, 168NameOfEnum, 164sample run, 167temp = ReadVatTemp()\;, 168whichAction = (enum temperatures)
WhichOperation(temp)\;, 168Extern storage classes
pre-split source file, 122second source code file
addition, 123attribute list, 127IsLeapYear.cpp, 124IsLeapYear() function, 125ModifiedLeapYear tab, 126prototype funtion, 127
n fFindListItem(), 97Flat Forehead Mistake (FFM), 57Float and double data types, 37, 43Function blocks, 25
n G, hgoto statement, 68
n iif-else Statement, 62int data type, 37, 43
n J, KJameco electronics, 235
n LLogical operator
AND operator (&&), 100NOT (!) operator, 101OR (||), 101writing
arguments vs parameters, 103IsLeapYear() Function and Coding Style, 103leap year algorithm, 102
Long data type, 37, 43Loop() Function, 34
n MMakeblock robotic kit, 231myDay, 63
n nNailsNeeded() function, 94Nibble, 203
n oOperator precedence, 23OSEPP Mega 2560 R3 Plus, 233Overloaded functions, 96
n p, QPointers
advantage of, 144arithmetic
Constant lvalues, 156const qualifier, 153output, 154resetting ptr, 156rvalue, 153string.h, 153void loop(), 152
arraysdisplay character array, 145greet[] array, 146loop(), 146, 147output, 145Serial.print(greet)\;, 147serial.print(*ptr++)\;, 147sizeof(), 146
CalculateMinMax() function, 143definition
asterisk, 132data type, 131

261
■ INDEX
naming rules, 131Pointer Initialization, 135pointer scalars (see Pointers scalars)pointer type specifier, 132
functionsenum data type (see enum data type)int DisplayValue(int val), 163number = (*funcPtr)(number), 163void loop(), 163void setup(), 163
function signature, 144indirection
assignment statement, 140ptrNumber, 138rvalue, 139sample run of, 139source code, 137, 138
Indirection Operator (*), 137int number = 5, 136int *ptrNumber, 136Minimum and Maximum Temperature
Program, 142–144ptrNumber = &number, 136relational operations and test for equality, 151Right-Left Rule, 168rvalues and lvalues, 137scalars
greet[] array, 148int Array, 148
temps[] array, 143two-dimensional arrays
base = days[0], 161chars, 157, 158CHARSINDAY, 158days[][] array, 159#define DAYSINWEEK 7, 160int myFireSensors[3][10], 157lvalue, 159ptr and base, 161rank, 160Serial.print(), 158static storage class, 158String, 162termination character, 161void loop(), 160void setup(), 160
Pointers initializationC Header Files, 135define feof(s) ((s)->flags & __SEOF, 136#include \, 135#include <stdio.h>, 135
int *ptrNumber, 135Pointers scalars
Arduino Memory Typesdata—a memory address, 133Electrically Erasable Programmable Read-
Only Memory (EEPROM), 133Null, 134
char *ptrLetter, 133int *ptrNumber, 133memory map, 133
Program loopsbreak statement, 82code
initialization, 85input, 85loop tester circuit, 84output, 85process, 85SDC, 87termination, 85
coding style, 88continue statement, 83do-while loop, 81loop() function
loop control structure, 78loop control test, 78variable initialization, 77
syntax structure, 78while Loop, 80
Pseudo-random numbers, 71
n rRadio Shack, 235Random number match, 85Refactoring, 88Register storage class, 121Relational operators, 55, 56
n sScope
defintion, 113global scope, 119local scope
C programs, 116definition, 116loop() function, 117name collisions, 117variable x, 116
statement block scope, 113Seedino Studio, 231

■ INDEX
262
Setup() Function, 32ShellSort() function, 97Sorta Dumb Code (SDC), 87Sparkfun, 235standard C, 21Statement blocks, 24Statement block scope, 113Static random access memory (SRAM), 3Static storage class, 122Storage classes
auto, 121extern (see Extern storage classes)register, 121static, 122
string data type, 44Switch statement, 67
n tTinyos electronics, 233, 234Tone library, 217, 218Tone page, 216
n UUnsigned char data type, 37
n VVoid data type, 46Volatile keyword, 127VolumeOfCube() function, 95
n w, x, Y, ZWhile Loop, 80Word data type, 37, 43