application manual 2016/17
TRANSCRIPT
APPLICATION MANUAL 2016/17


3
85 HOTFIX APPLICATION86 Product Overview86 Machines and Tools88 Suppliers89 Application97 Useful Information100 Quick Assistance101 Swarovski Hotfix Selector
111 SEWING, EMBROIDERY, AND HAND APPLICATION
112 Product Overview112 Machines and Tools115 Suppliers116 Application123 Useful Information124 Quick Assistance
127 MECHANICAL APPLICATION128 Product Overview128 Machines and Tools141 Suppliers148 Application158 Useful Information159 Quick Assistance
161 CARE INSTRUCTIONS162 Textile Care Instructions165 General Care Instructions166 Laws, Regulations, Norms, and Standards166 Warning Notices
11 GENERAL INFORMATION12 Application Manual12 Application Online13 Application Services16 General Product Information23 Swarovski Products and Suitable Application
Techniques
25 SOLDERING, PLATING, AND STONE SETTING26 Product Overview26 Machines and Tools27 Suppliers28 Application36 Directions for Jewelry Manufacturing38 Quick Assistance
41 GLUING42 Product Overview42 Machines and Tools45 Suppliers47 Application59 Overview of the Application Processes60 Product-specific Application Instructions65 Useful Information68 Quick Assistance
71 CERALUN72 Product Overview73 Machines and Tools75 Suppliers76 Application81 Useful Information82 Quick Assistance
CONTENTS
4
Swarovski is the premium brand for the finest crystal
embellishments since 1895. It is recognized for its
innovative excellence and its collaborations with
top-class designers and brands in the fashion, jewelry,
accessories, interior design, and lighting industries
across the globe.
Available in myriad colors, effects, shapes, and sizes,
crystals from Swarovski offer designers a fabulous
palette of inspiration, and are produced according to
the innovative, lead-free* Advanced Crystal standard.
Born out of a passion for detail and high-precision
cutting, these precious ingredients impart refined
glamour to everything they embellish. They can be
recognized by the ‘Crystals from Swarovski’ seal, which
serves as a certificate of authenticity that identifies
products made with genuine Swarovski crystals.
A family-owned company for more than 100 years,
with values rooted in integrity, respect, and excellence,
Swarovski is noted as much for its ethics in business as
for its contemporary artistry and innovative flair.
SWAROVSKI.COM/PROFESSIONAL
* Crystal glass and all other materials containing 0.009% lead or less.
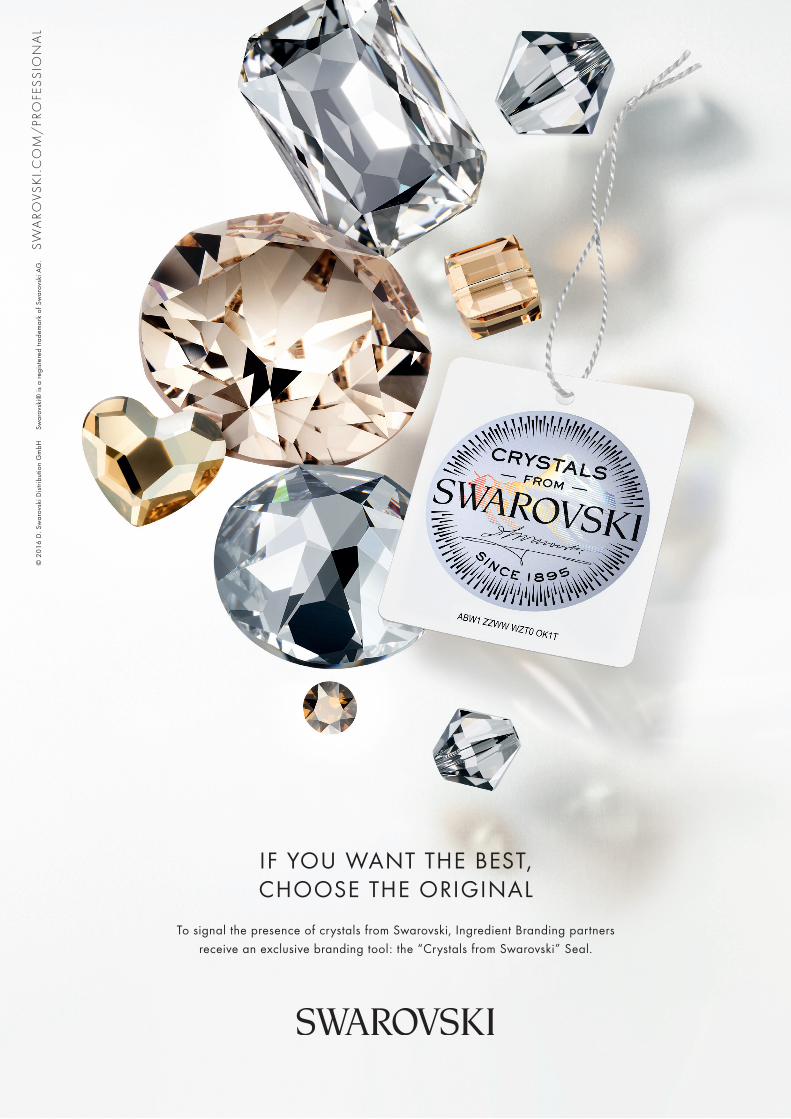
IF YOU WANT THE BEST, CHOOSE THE ORIGINAL
To signal the presence of crystals from Swarovski, Ingredient Branding partners receive an exclusive branding tool: the “Crystals from Swarovski” Seal.
© 2
016
D. S
war
ovsk
i Dist
ribut
ion
Gm
bH
Sw
arov
ski®
is a
regi
ster
ed tr
adem
ark
of S
war
ovsk
i AG
. SW
ARO
VSK
I.CO
M/
PRO
FESS
ION
AL
6
© 2
016
D. S
war
ovsk
i Dist
ribut
ion
Gm
bH
Sw
arov
ski®
is a
regi
ster
ed tr
adem
ark
of S
war
ovsk
i AG
. SW
ARO
VSK
I.CO
M/C
OLL
ECTI
ON
APP
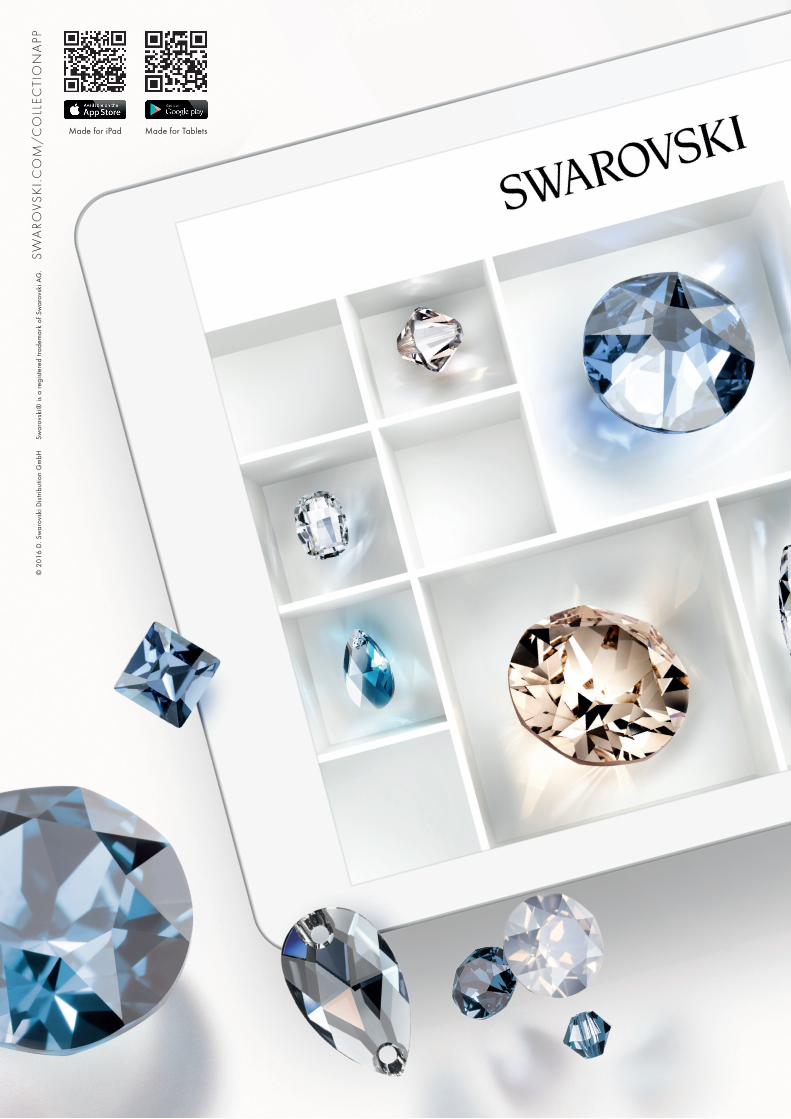
INSPIRATION IS ONLY AN APP AWAYWherever you are, whatever you’re looking for, search over 15,000 loose elements and
200,000 forward-integrated elements with Swarovski’s inspirational new Crystal Collection App. Online or offline, stay app-to-date with the latest innovations and find popular classics –
it’s easy to install, easy to browse, easy to use.
Made for iPad Made for Tablets

7
© 2
016
D. S
war
ovsk
i Dist
ribut
ion
Gm
bH
Sw
arov
ski®
is a
regi
ster
ed tr
adem
ark
of S
war
ovsk
i AG
. SW
ARO
VSK
I.CO
M/C
OLL
ECTI
ON
APP
INSPIRATION IS ONLY AN APP AWAYWherever you are, whatever you’re looking for, search over 15,000 loose elements and
200,000 forward-integrated elements with Swarovski’s inspirational new Crystal Collection App. Online or offline, stay app-to-date with the latest innovations and find popular classics –
it’s easy to install, easy to browse, easy to use.
Made for iPad Made for Tablets

8
TO PREDICT THE FUTURE, WE INVENTED IT.
Stay ahead with our Advanced Crystal. It is lead-free* and helps you to reach full compliance with current laws and regulations.
*Crystal glass and all other materials containing 0.009 % lead or less.
© 2
016
D. S
war
ovsk
i Dist
ribut
ion
Gm
bH
Sw
arov
ski®
is a
regi
ster
ed tr
adem
ark
of S
war
ovsk
i AG
. SW
ARO
VSK
I.CO
M/
PRO
FESS
ION
AL
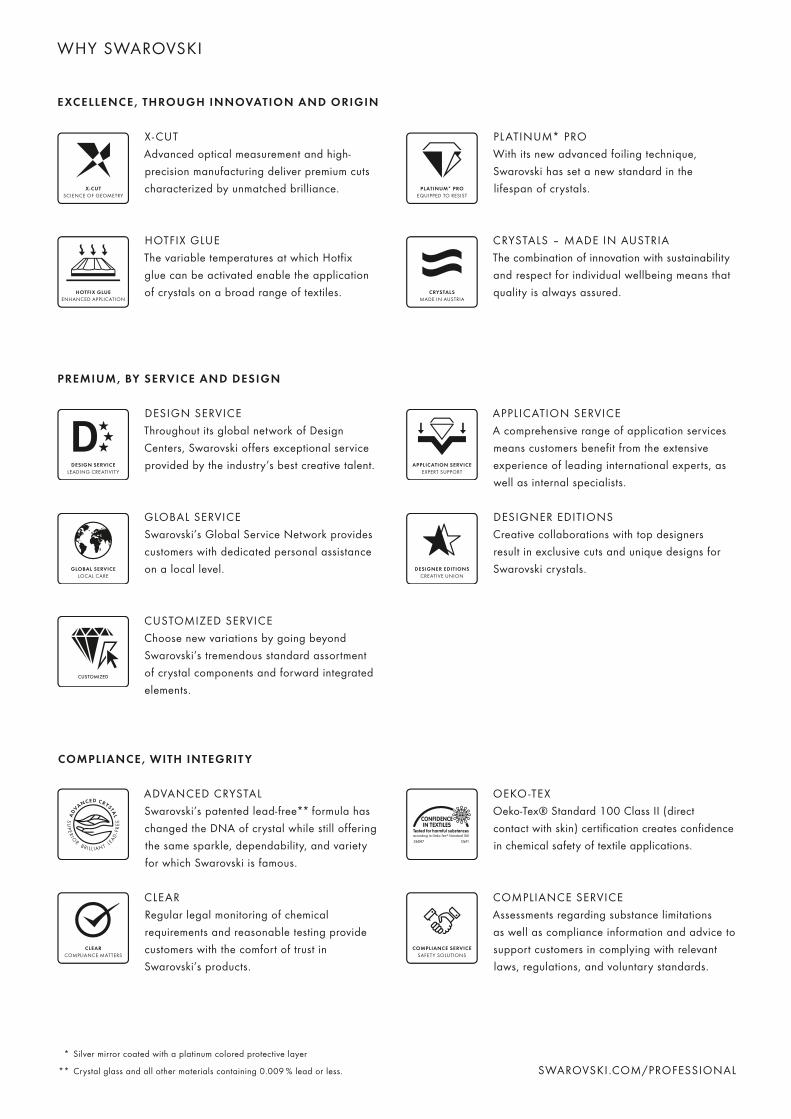
WHY SWAROVSKI
* Silver mirror coated with a platinum colored protective layer
** Crystal glass and all other materials containing 0.009 % lead or less.
EXCELLENCE, THROUGH INNOVATION AND ORIGIN
X - CUTAdvanced optical measurement and high-precision manufacturing deliver premium cuts characterized by unmatched brilliance.
PL ATINUM* PROWith its new advanced foiling technique, Swarovski has set a new standard in the lifespan of crystals.
HOTFIX GLUEThe variable temperatures at which Hotfix glue can be activated enable the application of crystals on a broad range of textiles.
CRYSTALS – MADE IN AUSTRIAThe combination of innovation with sustainability and respect for individual wellbeing means that quality is always assured.
PREMIUM, BY SERVICE AND DESIGN
DESIGN SERVICEThroughout its global network of Design Centers, Swarovski offers exceptional service provided by the industry’s best creative talent.
APPLICATION SERVICEA comprehensive range of application services means customers benefit from the extensive experience of leading international experts, as well as internal specialists.
GLOBAL SERVICESwarovski’s Global Service Network provides customers with dedicated personal assistance on a local level.
CUSTOMIZED SERVICEChoose new variations by going beyond Swarovski’s tremendous standard assortment of crystal components and forward integrated elements.
DESIGNER EDITIONSCreative collaborations with top designers result in exclusive cuts and unique designs for Swarovski crystals.
COMPLIANCE SERVICEAssessments regarding substance limitations as well as compliance information and advice to support customers in complying with relevantlaws, regulations, and voluntary standards.
COMPLIANCE, WITH INTEGRIT Y
ADVANCED CRYSTALSwarovski’s patented lead-free** formula has changed the DNA of crystal while still offering the same sparkle, dependability, and variety for which Swarovski is famous.
OEKO -TEXOeko-Tex® Standard 100 Class II (direct contact with skin) certification creates confidence in chemical safety of textile applications.
CLEARRegular legal monitoring of chemical requirements and reasonable testing provide customers with the comfort of trust in Swarovski’s products.
SWAROVSKI .COM/PROFESSIONAL
9
WHY SWAROVSKI
* Silver mirror coated with a platinum colored protective layer
** Crystal glass and all other materials containing 0.009 % lead or less.
EXCELLENCE, THROUGH INNOVATION AND ORIGIN
X - CUTAdvanced optical measurement and high-precision manufacturing deliver premium cuts characterized by unmatched brilliance.
PL ATINUM* PROWith its new advanced foiling technique, Swarovski has set a new standard in the lifespan of crystals.
HOTFIX GLUEThe variable temperatures at which Hotfix glue can be activated enable the application of crystals on a broad range of textiles.
CRYSTALS – MADE IN AUSTRIAThe combination of innovation with sustainability and respect for individual wellbeing means that quality is always assured.
PREMIUM, BY SERVICE AND DESIGN
DESIGN SERVICEThroughout its global network of Design Centers, Swarovski offers exceptional service provided by the industry’s best creative talent.
APPLICATION SERVICEA comprehensive range of application services means customers benefit from the extensive experience of leading international experts, as well as internal specialists.
GLOBAL SERVICESwarovski’s Global Service Network provides customers with dedicated personal assistance on a local level.
CUSTOMIZED SERVICEChoose new variations by going beyond Swarovski’s tremendous standard assortment of crystal components and forward integrated elements.
DESIGNER EDITIONSCreative collaborations with top designers result in exclusive cuts and unique designs for Swarovski crystals.
COMPLIANCE SERVICEAssessments regarding substance limitations as well as compliance information and advice to support customers in complying with relevantlaws, regulations, and voluntary standards.
COMPLIANCE, WITH INTEGRIT Y
ADVANCED CRYSTALSwarovski’s patented lead-free** formula has changed the DNA of crystal while still offering the same sparkle, dependability, and variety for which Swarovski is famous.
OEKO -TEXOeko-Tex® Standard 100 Class II (direct contact with skin) certification creates confidence in chemical safety of textile applications.
CLEARRegular legal monitoring of chemical requirements and reasonable testing provide customers with the comfort of trust in Swarovski’s products.
SWAROVSKI .COM/PROFESSIONAL

GENERAL INFORMATION
Swarovski offers a comprehensive range of services, tailored to customers’ requirements, for the application
of Swarovski products.
12 General Information
GEN
ERAL
INFO
RMAT
ION APPLICATION MANUAL
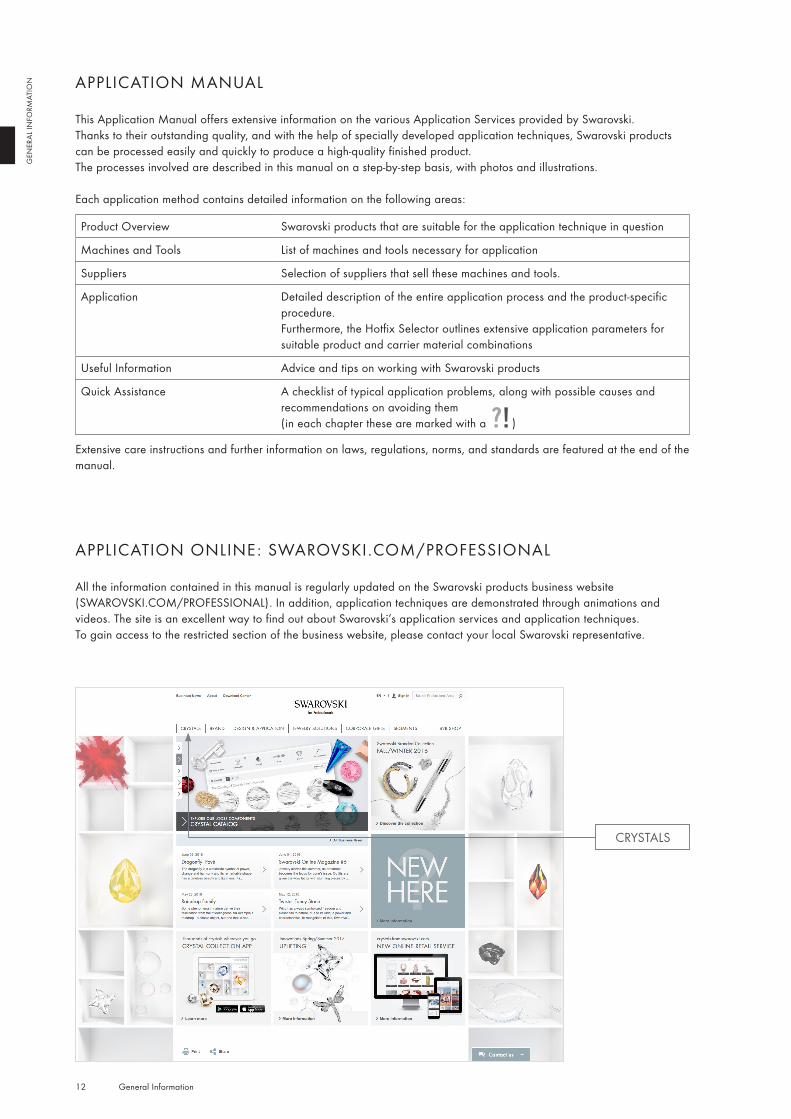
This Application Manual offers extensive information on the various Application Services provided by Swarovski.Thanks to their outstanding quality, and with the help of specially developed application techniques, Swarovski products can be processed easily and quickly to produce a high-quality finished product. The processes involved are described in this manual on a step-by-step basis, with photos and illustrations.
Each application method contains detailed information on the following areas:
Product Overview Swarovski products that are suitable for the application technique in question
Machines and Tools List of machines and tools necessary for application
Suppliers Selection of suppliers that sell these machines and tools.
Application Detailed description of the entire application process and the product-specific procedure.Furthermore, the Hotfix Selector outlines extensive application parameters for suitable product and carrier material combinations
Useful Information Advice and tips on working with Swarovski products
Quick Assistance A checklist of typical application problems, along with possible causes and recommendations on avoiding them (in each chapter these are marked with a )
Extensive care instructions and further information on laws, regulations, norms, and standards are featured at the end of the manual.
APPLICATION ONLINE : SWAROVSKI.COM/PROFESSIONAL
All the information contained in this manual is regularly updated on the Swarovski products business website (SWAROVSKI.COM/PROFESSIONAL). In addition, application techniques are demonstrated through animations and videos. The site is an excellent way to find out about Swarovski’s application services and application techniques.To gain access to the restricted section of the business website, please contact your local Swarovski representative.
CRYSTALS
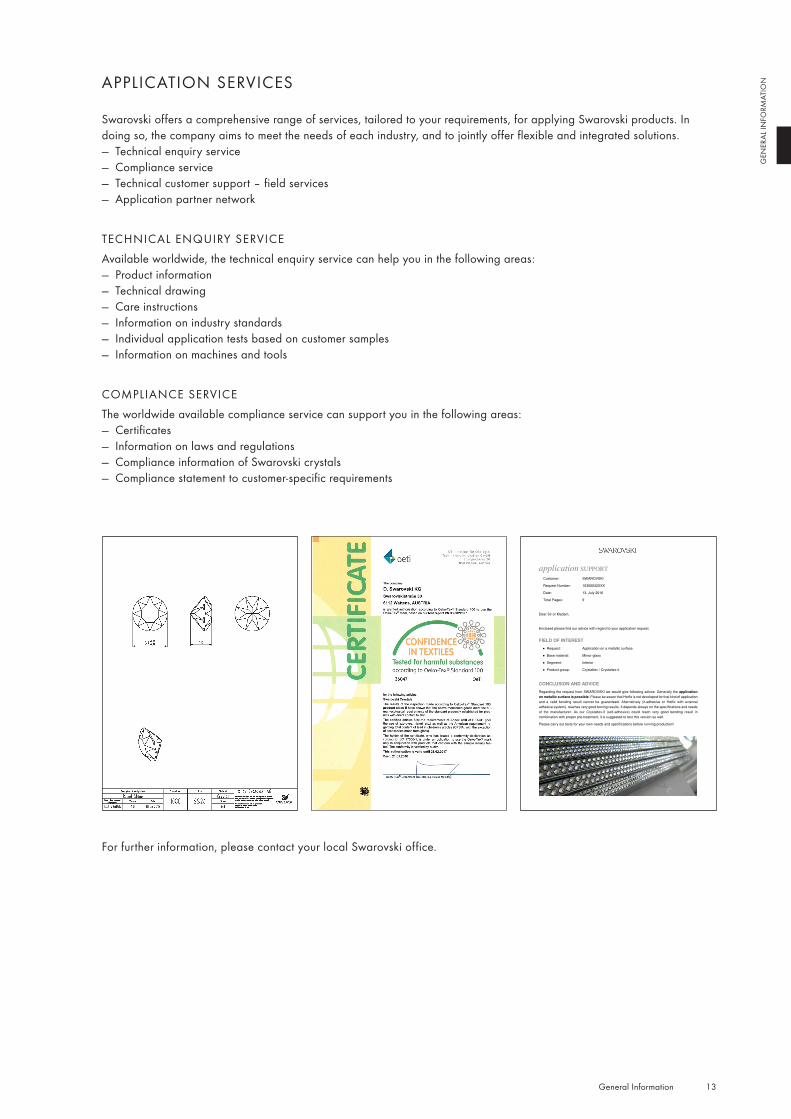
1
application SUPPORT
Customer: SWAROVSKI
Request Number: 10300032XXX
Date: 13. July 2016
Total Pages: 9
Dear Sir or Madam,
Enclosed please find our advice with regard to your application request.
FIELD OF INTEREST
● Request: Application on a metallic surface
● Base material: Mirror-glass
● Segment: Interior
● Product group: Crystaltex / Crystaltex-it
CONCLUSION AND ADVICE
Regarding the request from SWAROVSKI we would give following advice. Generally the application
on metallic surface is possible. Please be aware that Hotfix is not developed for that kind of application
and a valid bonding result cannot be guaranteed. Alternatively (it-adhesive or Hotfix with external
adhesive system), reaches very good boning results. It depends always on the specifications and needs
of the manufacturer. As our Crystaltex-it (self-adhesive) could reach very good bonding result in
combination with proper pre-treatment, it is suggested to test this version as well.
Please carry out tests for your own needs and specifications before running production!
13 General Information
GEN
ERAL
INFO
RMAT
IONAPPLICATION SERVICES
Swarovski offers a comprehensive range of services, tailored to your requirements, for applying Swarovski products. In doing so, the company aims to meet the needs of each industry, and to jointly offer flexible and integrated solutions.
— Technical enquiry service — Compliance service — Technical customer support – field services — Application partner network
TECHNICAL ENQUIRY SERVICEAvailable worldwide, the technical enquiry service can help you in the following areas:
— Product information — Technical drawing — Care instructions — Information on industry standards — Individual application tests based on customer samples — Information on machines and tools
COMPLIANCE SERVICEThe worldwide available compliance service can support you in the following areas:
— Certificates — Information on laws and regulations — Compliance information of Swarovski crystals — Compliance statement to customer-specific requirements
For further information, please contact your local Swarovski office.
14 General Information
GEN
ERAL
INFO
RMAT
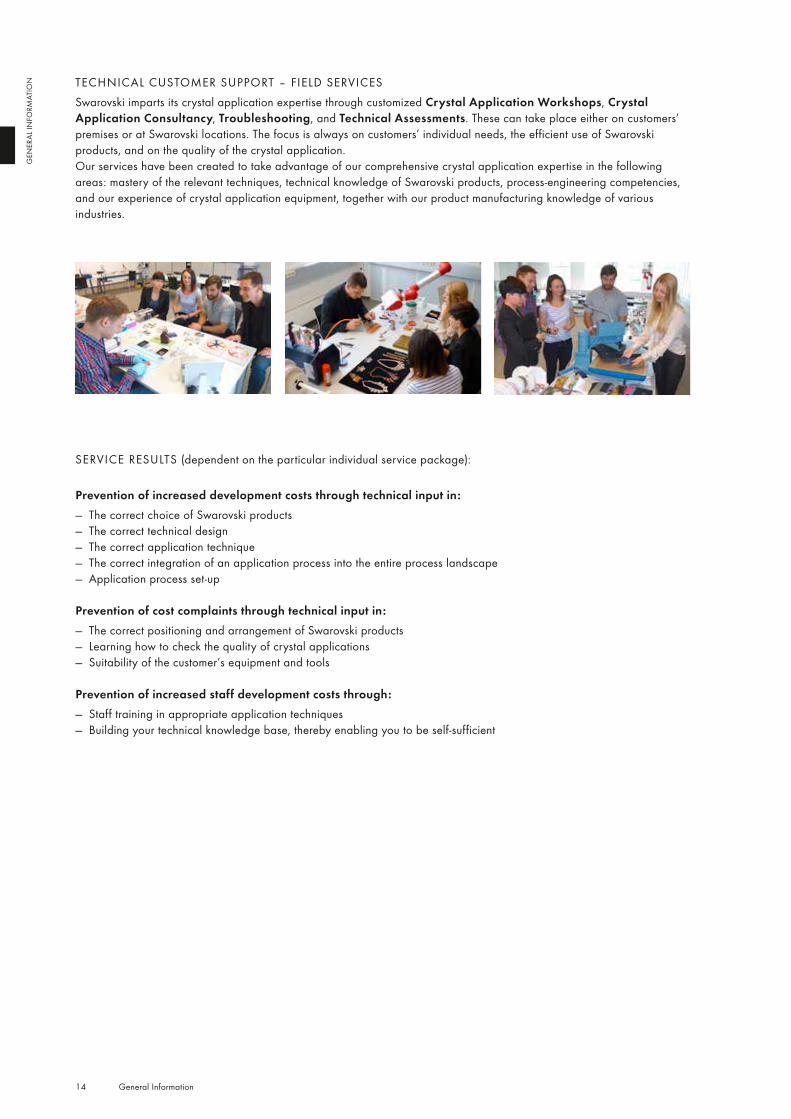
ION TECHNICAL CUSTOMER SUPPORT – FIELD SERVICES
Swarovski imparts its crystal application expertise through customized Crystal Application Workshops, Crystal Application Consultancy, Troubleshooting, and Technical Assessments. These can take place either on customers’ premises or at Swarovski locations. The focus is always on customers’ individual needs, the efficient use of Swarovski products, and on the quality of the crystal application.Our services have been created to take advantage of our comprehensive crystal application expertise in the following areas: mastery of the relevant techniques, technical knowledge of Swarovski products, process-engineering competencies, and our experience of crystal application equipment, together with our product manufacturing knowledge of various industries.
SERVICE RESULTS (dependent on the particular individual service package):
Prevention of increased development costs through technical input in: — The correct choice of Swarovski products — The correct technical design — The correct application technique — The correct integration of an application process into the entire process landscape — Application process set-up
Prevention of cost complaints through technical input in: — The correct positioning and arrangement of Swarovski products — Learning how to check the quality of crystal applications — Suitability of the customer’s equipment and tools
Prevention of increased staff development costs through: — Staff training in appropriate application techniques — Building your technical knowledge base, thereby enabling you to be self-sufficient
15 General Information
GEN
ERAL
INFO
RMAT
IONAPPLICATION PARTNER NET WORK
As a company with a global sales network and deep understanding of the market, Swarovski has comprehensive knowledge of various application companies and their services from around the world.Based on this knowledge, Swarovski has developed a global application partner network. These partners offer a wide range of technical and product-related services, as well as tailored production solutions. In order to qualify and to get access to the application partner network, certain criteria with regard to application techniques, know-how as well as product assortment need to be fulfilled by the application partners.
Application partners can assist you with a variety of application techniques, such as gluing, Hotfix application, sewing, embroidery, and mechanical application. In addition, many partners can carry out technically complex solutions, such as Flat Back Leather and the automated, mechanical application of Rivets. The services offered by our partners range from product and design consultancy, to prototyping and carrying out production, and make up a key component of our customer focus.Should you require a professional partner to assist you in applying items such as Flat Backs onto interior, Transfer Motifs onto T-shirts, Rivets onto belts, or Plastic Trimmings onto jeans, the “Application Partner Platform” or your local Swarovski office can offer guidance.
APPLICATION PARTNER PL ATFORM (APP)The Application Partner Platform enables you to find the right application partner swiftly and easily, wherever in the world production may be taking place. Through a tailored “search function”, you can send out a specific, detailed request (e.g. searching for a specific country, an application technique, or products) to select partners around the world.
The platform is made up of two core areas – “Find a Partner” and “Become a Partner”:
— Find a Partner Using the search function, this area enables you to locate the best application partner for your application work. You are immediately provided with a list of application partners, which you can download and save. If you use the search function for a specific enquiry regarding an application service, you receive detailed information from the application partners contacted.
— Become a Partner If you are interested in becoming an application partner yourself, the “Become a Partner” section contains key information on the requirements and an application form to complete. Your local Swarovski office will then contact you as soon as possible.
Access to the Application Partner Platform: Part of the “Application Partner Platform” is located in the restricted area of the business website SWAROVSKI.COM/PROFESSIONAL. Under “Design & Application” “Application & Manufacturing” you will find access to the Application Partner Platform.For access to the restricted area of the business website and for further information, please contact your local Swarovski office or register online on the business website.
16 General Information
GEN
ERAL
INFO
RMAT
ION
Round StonesRound Stones are loose crystal elements. Most of them are pointed on the reverse side, making them easy to apply in either metal claw settings or pre-set cavities in die-cast metal alloys. The assortment features a wide variety of different cuts, the most innovative one is the XIRIUS Chaton.
Fancy Stones & Settings
Fancy Stones are offered in numerous shapes ranging from classical gemstone-inspired cuts to progressive trend cuts. They come in a huge assortment of different sizes and colors. Showing either a faceted or flat reverse side, Fancy Stones can be glued into pre-cast cavities or used in metal settings. Their precision-cut facets ensure the highest brilliance and endow design ideas with a unique sparkle.
Beads
Beads offer the highest standard available on the market. The high-quality precision cutting and the clear through-hole achieve high brilliance and clarity. Rounded hole edges reduce the wear on thread and increase the durability of designs. The assortment is divided into classic, romantic, and progressive shape characteristics. They are available in the latest fashion colors, effects, and cuts.
BeCharmed & Pavé
The BeCharmed assortment, from Beads, Crystal Pearls, Pavé, and Rondelles, to Stoppers and Pavé Balls in a brilliant array of colors and effects, offers unlimited combination possibilities. All products of this unique line feature a high-quality stainless steel part with Swarovski branding and a 4.5 mm-diameter hole, which is the standard size for existing charm concepts, making BeCharmed pieces ideal collectibles.
Crystal PearlsCrystal Pearls are perfect replicas of genuine pearls. They are made of a unique crystal core covered with an innovative pearl coating, which features a flawless, silky smooth, rounded surface. They are available in a variety of shapes, sizes, and colors and are delivered loosely threaded or, if desired, also knotted.
Pendants
Pendants have timeless elegance and are available in a large range of classical and avant-garde cuts and shapes, as well as in many colors and effects. Pendants offer a whole range of design possibilities for different segments thanks to their easy application, with the hole on top requiring only a jump ring/pinch bail with a chain or cord.
Flat Backs No HotfixFlat Backs No Hotfix are loose crystal elements backed with platinum foiling for extra brilliance and protection. These Flat Backs are easy to apply to a variety of carrier materials using standard one- or two-component glues. They are available in a multitude of sizes, colors, shapes, and cuts.
Flat Backs Hotfix
Flat Backs Hotfix are loose crystal elements with a flat reverse side that has been pre-coated with a heat-sensitive glue. These Flat Backs can be easily applied to a large range of textile carrier materials using heat to produce a durable and long-lasting crystal effect. Flat Backs Hotfix are available in a multitude of colors, shapes, and cuts.
Sew-on Articles
Sew-on Articles are loose crystals that can be easily sewn (either by hand, or with a standard domestic or industrial embroidery sewing machine) onto any type of textile or accessory. Sew-on Articles come in two- or three-hole varieties, including round, oval, and triangle holes for use in a wide range of decorative applications for fine embroidery or even jewelry. Lochrosen are crystals with just one hole. Sew-on Articles have rounded edges on the hole entry and exit areas to guarantee thread protection.
Self-adhesive Elements
Self-adhesive Elements such as Crystal-it Infinity, Crystal Fabric-it, Crystaltex-it or Crystal Fine Rocks-it are eye-catching and innovative products that come ready-to-apply. They are pressure-sensitive and self-adhesive. When applied to paper and solid surfaces, they can create elegant, romantic, or sporty designs.
Transfers
Transfers are ideal for Hotfix application on all kinds of textiles. They are available in a large range of motifs and numbers of rows, which are made up of different articles from the Flat Back Hotfix assortment. Featuring designs from the in-house design team, they can comprise XIRIUS and XILION Roses, or Creation Stones, as well as Cabochons.
Synthetics
These versatile products open up a multitude of creative design possibilities through their numerous application techniques. They combine elegant crystals from Swarovski that can be applied using Hotfix technology with synthetic carrier materials. They are ideal for use in the textile, interior design, jewelry, and accessories segments.
Plastic TrimmingsPlastic Trimmings are plastic carrier materials with integrated crystals. These multi-functional products can either be hand- or machine-sewn or glued onto various surfaces. The range of bandings not only offers a color selection of chatons, but also a variety of casing colors.
Buttons & FastenersCrystal Buttons can be used in exactly the same way as standard buttons. The assortment of available buttons ranges from those for shirts, blouses, jackets, and coats, to buttons for denim and accessories. They are suitable for hand and mechanical application.
GENERAL PRODUCT INFORMATION
This list offers an overview of Swarovski products that are suitable for the application methods described. Product categories/descriptions are based on the 2016 Collection.
17 General Information
GEN
ERAL
INFO
RMAT
ION
Metal Trimmings
Metal Trimmings are forward-integrated metal products. They can be sewn by hand or machine and mechanically applied onto different fabrics or other materials. Metal Trimmings are bestsellers among the textile, shoe, and accessories segments because their wide range of application possibilities ensures that they can be used in a multitude of different ways.
Crystal MeshCrystal Mesh is a flexible metal mesh carrier with integrated loose crystals. The product is available in a wide range of colors and casings, either as a Hotfix version, which can be applied using heat, or as a No Hotfix version that can be hand- or machine-sewn.
Cupchains & Findings
These products are metal chains and findings that can integrate either Round or Fancy Stones into any creative design. They can be divided into seven sub-categories: Single Stone Settings, Cupchains and Brass Components, Multi Stone Settings, Channels, Metal Buttons, Rondelles, and Linked Findings. Each of these groupings is available in a wide variety of shapes, sizes, colors, and platings.
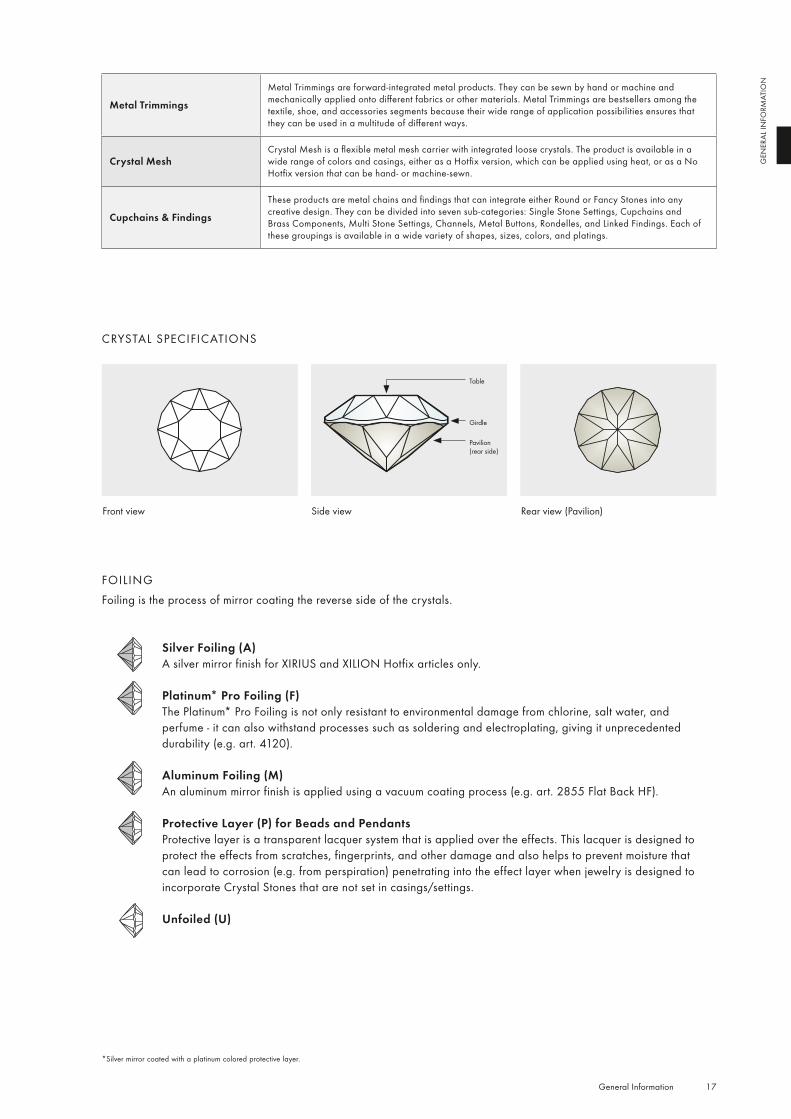
CRYSTAL SPECIFICATIONS
Side viewFront view Rear view (Pavilion)
Table
Girdle
Pavilion (rear side)
FOILINGFoiling is the process of mirror coating the reverse side of the crystals.
Silver Foiling (A)A silver mirror finish for XIRIUS and XILION Hotfix articles only.
Platinum* Pro Foiling (F)The Platinum* Pro Foiling is not only resistant to environmental damage from chlorine, salt water, and perfume - it can also withstand processes such as soldering and electroplating, giving it unprecedented durability (e.g. art. 4120).
Aluminum Foiling (M)An aluminum mirror finish is applied using a vacuum coating process (e.g. art. 2855 Flat Back HF).
Protective Layer (P) for Beads and PendantsProtective layer is a transparent lacquer system that is applied over the effects. This lacquer is designed to protect the effects from scratches, fingerprints, and other damage and also helps to prevent moisture that can lead to corrosion (e.g. from perspiration) penetrating into the effect layer when jewelry is designed to incorporate Crystal Stones that are not set in casings/settings.
Unfoiled (U)
*Silver mirror coated with a platinum colored protective layer.
18 General Information
GEN
ERAL
INFO
RMAT
ION EFFECTS
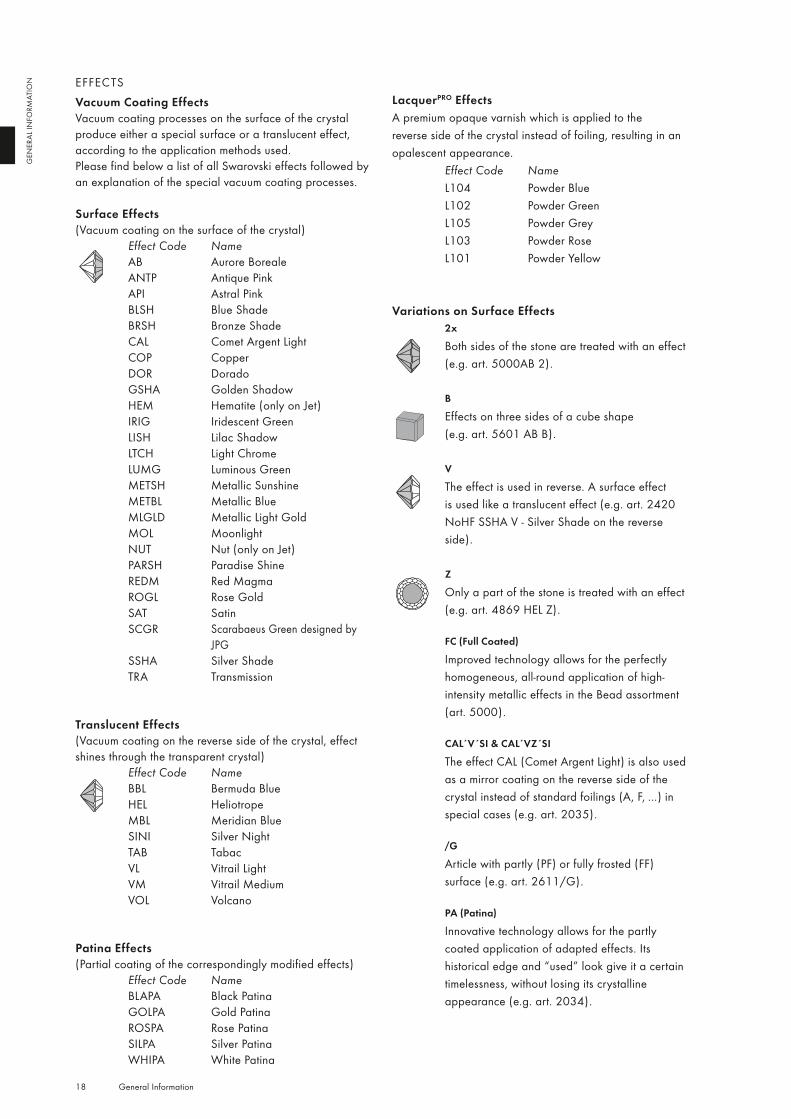
Vacuum Coating EffectsVacuum coating processes on the surface of the crystal produce either a special surface or a translucent effect, according to the application methods used. Please find below a list of all Swarovski effects followed by an explanation of the special vacuum coating processes.
Surface Effects (Vacuum coating on the surface of the crystal)
Effect Code NameAB Aurore BorealeANTP Antique PinkAPI Astral PinkBLSH Blue ShadeBRSH Bronze ShadeCAL Comet Argent LightCOP CopperDOR DoradoGSHA Golden ShadowHEM Hematite (only on Jet)IRIG Iridescent GreenLISH Lilac ShadowLTCH Light ChromeLUMG Luminous GreenMETSH Metallic SunshineMETBL Metallic BlueMLGLD Metallic Light GoldMOL MoonlightNUT Nut (only on Jet)PARSH Paradise ShineREDM Red MagmaROGL Rose GoldSAT SatinSCGR Scarabaeus Green designed by JPGSSHA Silver ShadeTRA Transmission
Translucent Effects(Vacuum coating on the reverse side of the crystal, effect shines through the transparent crystal)
Effect Code NameBBL Bermuda BlueHEL HeliotropeMBL Meridian BlueSINI Silver NightTAB TabacVL Vitrail LightVM Vitrail MediumVOL Volcano
Patina Effects(Partial coating of the correspondingly modified effects)
Effect Code NameBLAPA Black PatinaGOLPA Gold PatinaROSPA Rose PatinaSILPA Silver PatinaWHIPA White Patina
LacquerPRO EffectsA premium opaque varnish which is applied to the reverse side of the crystal instead of foiling, resulting in an opalescent appearance.
Effect Code NameL104 Powder BlueL102 Powder GreenL105 Powder GreyL103 Powder RoseL101 Powder Yellow
Variations on Surface Effects2x
Both sides of the stone are treated with an effect (e.g. art. 5000AB 2).
B
Effects on three sides of a cube shape (e.g. art. 5601 AB B).
V
The effect is used in reverse. A surface effect is used like a translucent effect (e.g. art. 2420 NoHF SSHA V - Silver Shade on the reverse side).
Z
Only a part of the stone is treated with an effect (e.g. art. 4869 HEL Z).
FC (Full Coated)
Improved technology allows for the perfectly homogeneous, all-round application of high-intensity metallic effects in the Bead assortment (art. 5000).
CAL V´SI & CAL VZ´SI
The effect CAL (Comet Argent Light) is also used as a mirror coating on the reverse side of the crystal instead of standard foilings (A, F, ...) in special cases (e.g. art. 2035).
/G
Article with partly (PF) or fully frosted (FF) surface (e.g. art. 2611/G).
PA (Patina)
Innovative technology allows for the partly coated application of adapted effects. Its historical edge and “used” look give it a certain timelessness, without losing its crystalline appearance (e.g. art. 2034).
19 General Information
GEN
ERAL
INFO
RMAT
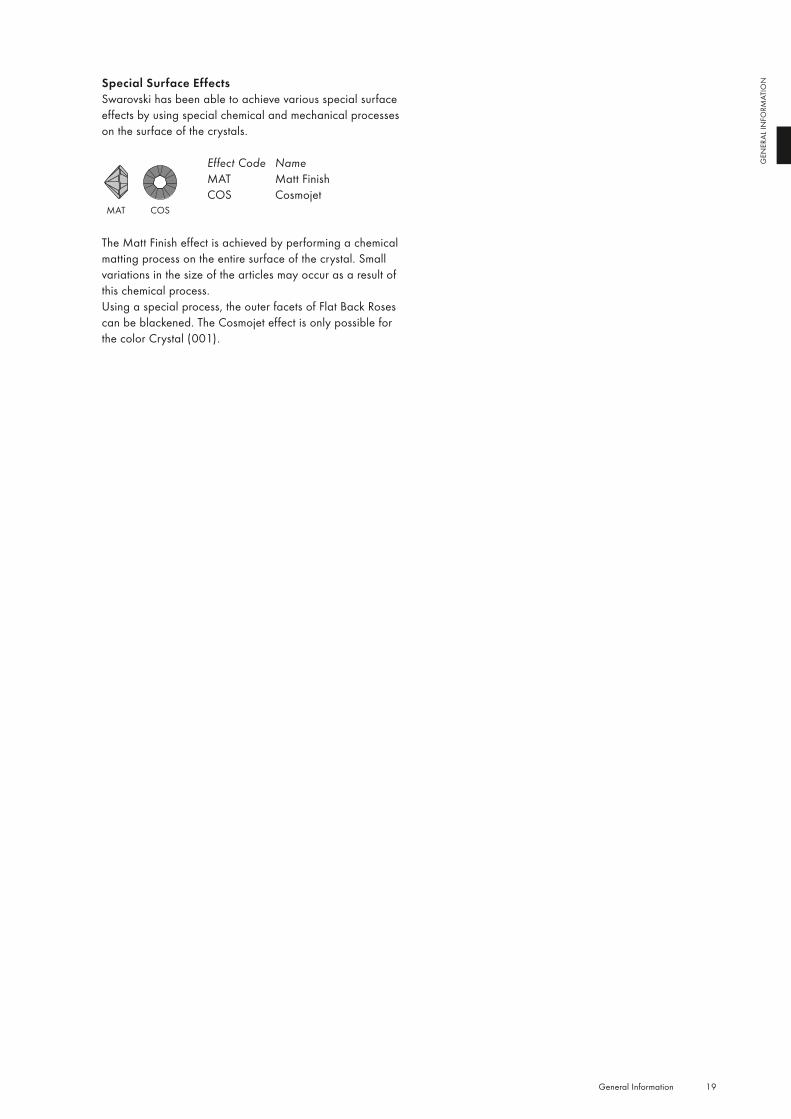
IONSpecial Surface Effects
Swarovski has been able to achieve various special surface effects by using special chemical and mechanical processes on the surface of the crystals.
Effect Code NameMAT Matt FinishCOS Cosmojet
The Matt Finish effect is achieved by performing a chemical matting process on the entire surface of the crystal. Small variations in the size of the articles may occur as a result of this chemical process. Using a special process, the outer facets of Flat Back Roses can be blackened. The Cosmojet effect is only possible for the color Crystal (001).
MAT COS
Crystal001
White Opal234
Light Silk261
Silk391
Light Peach362
Rose Water Opal395
Vintage Rose319
Blush Rose257
Light Rose223
Rose Peach262
Padparadscha542
Indian Pink289
Light Siam227
Indian Siam1
327
Rose209
Fuchsia502
Ruby501
Siam208
Burgundy515
Amethyst204
Cyclamen Opal398
Purple Velvet277
Tanzanite539
Violet371
Light Amethyst212
Smoky Mauve265
Provence Lavender283
Light Sapphire211
Light Azore361
Aquamarine202
Air Blue Opal285
Sapphire206
Capri Blue243
Dark Indigo288
Montana207
Turquoise267
Light Turquoise263
Blue Zircon229
Indicolite379
Indian Sapphire217
Denim Blue266
Black Diamond215
Pacific Opal390
Chrysolite238
Peridot214
Erinite360
Fern Green291
Emerald205
Olivine228
Greige284
Light Grey Opal383
Light Colorado Topaz246
Jonquil213
Yellow Opal231
Light Topaz226
Sunflower292
Topaz203
Tangerine259
Light Smoked Topaz221
Smoked Topaz220
Smoky Quartz225
Graphite253
Jet280
Crystal Silver Shade001 SSHA
Crystal Moonlight001 MOL
Crystal Aurore Boreale001 AB
Crystal Luminous Green*001 LUMG
Crystal Golden Shadow001 GSHA
Crystal Metallic Sunshine*001 METSH
Crystal Rose Gold*001 ROGL
Crystal Astral Pink001 API
Crystal Antique Pink*001 ANTP
Crystal Vitrail Light**001 VL
Crystal Paradise Shine001 PARSH
Crystal Vitrail Medium**001 VM
Crystal Lilac Shadow001 LISH
Crystal Bermuda Blue**001 BBL
Crystal Metallic Blue*001 METBL
Crystal Blue Shade*001 BLSH
Crystal Scarabaeus Green*/***001 SCGR
Crystal Rainbow Dark*001 RABDK
Crystal Iridescent Green*001 IRIG
Crystal Dorado*001 DOR
Crystal Metallic Light Gold*001 MLGLD
Crystal Bronze Shade*001 BRSH
Crystal Light Chrome*001 LTCH
Crystal Comet Argent Light*001 CAL
Crystal Silver Night**001 SINI
Jet Hematite*280 HEM
Crystal Ivory Cream*001 L106S
Crystal Powder Yellow*001 L101
Crystal Powder Rose*001 L103
Crystal Royal Red*001 L107S
Crystal Dark Red*001 L108S
Crystal Powder Blue*001 L104
Crystal Royal Blue*001 L110S
Crystal Powder Green*001 L102
Crystal Royal Green*001 L109S
Crystal Powder Grey*001 L105
Crystal Dark Grey*001 L111S
Crystal White Patina001 WHIPA
Crystal Rose Patina*001 ROSPA
Crystal Silver Patina*001 SILPA
Crystal Gold Patina*001 GOLPA
Crystal Black Patina*001 BLAPA
20 General Information
GEN
ERAL
INFO
RMAT
ION
For details on available colors and effects for each article within the product groups, please see the product matrix of the respective item in the Collection 2016.For color and effect samples, please see the corresponding color chart.
Classic Colors/Effects: This color range offers a wide choice of traditional Swarovski crystal colors and effects.
Exclusive Colors/Effects: This color range is offered exclusively by Swarovski.
The plating resistance of effects is tested according to Swarovski’s plating guidelines (SWAROVSKI.COM/PROFESSIONAL). Customers are advised to carry out their own tests if customers’ plating parameters diverge from Swarovski plating guidelines.
* Crystals are not resistant to plating and similar processing. ** Crystals are resistant to plating only if they are F-foiled. *** designed by Jean Paul Gaultier. 1 The color Indian Siam is available only for a specific size range. Please refer to the
current Collection.
Colors and effects can appear different when illuminated with different light sources. Swarovski uses standard light source D50 for color decision and comparison. Slight changes in shades are unavoidable. Colors may vary according to cut and foiling.
The composition of Advanced Crystal is compliant with regulatory industry norms and laws regarding the restriction or prohibition of certain substances in the most relevant segments of our customers. Please note that the compliance of the crystal colors Citrine, Fireopal, Hyacinth, Light Siam, Siam and Yellow Opal vary to certain industry regulations. Those regulations are indicated with an (*) in the compliance overview. Indian Siam (option to Lt. Siam) and Tangerine (option to Sun) conform to all CLEAR-lists.
For further information please visit swarovski.com/professional
© 2016 D. Swarovski Distribution GmbH
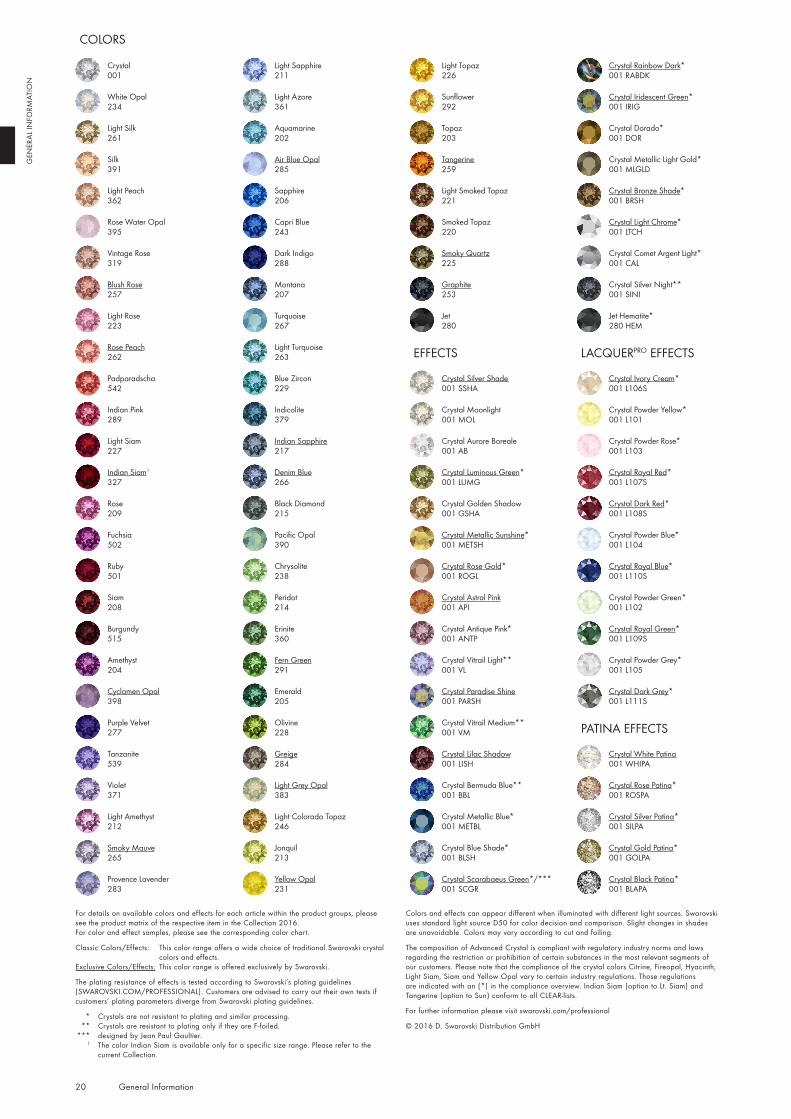
COLORS
EFFECTS LACQUERPRO EFFECTS
PATINA EFFECTS
21 General Information
GEN
ERAL
INFO
RMAT
ION
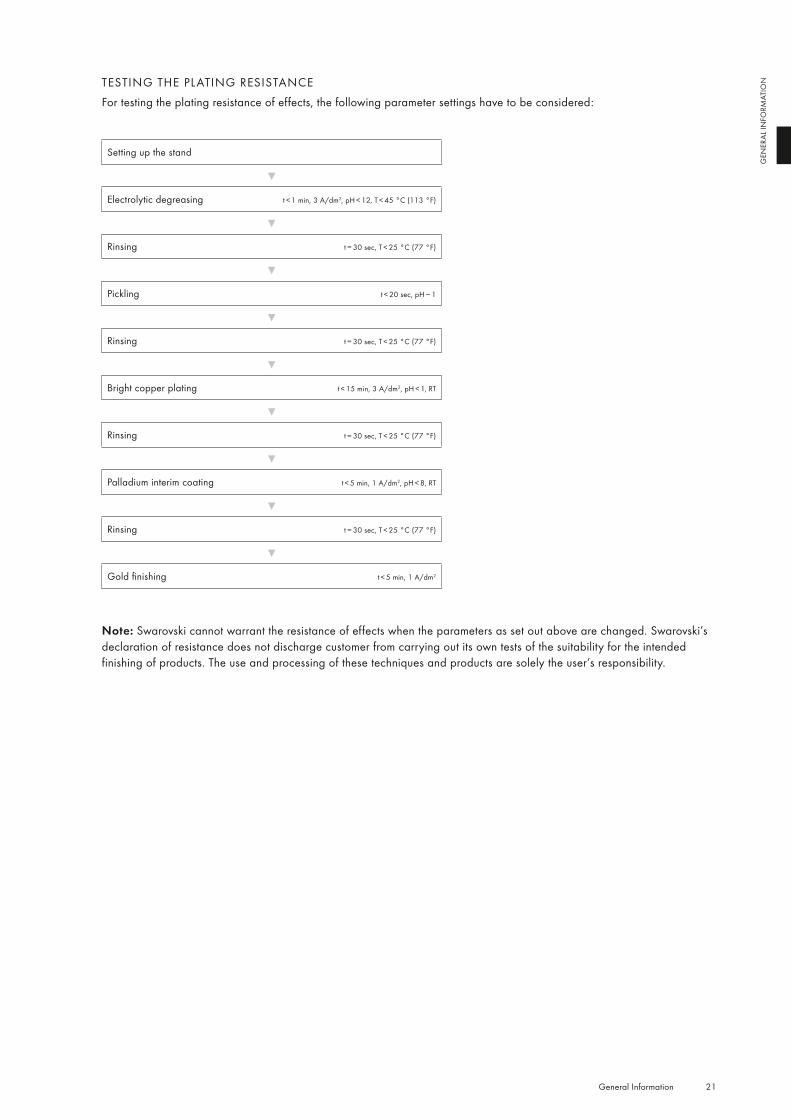
Setting up the stand
▼
Electrolytic degreasing t < 1 min, 3 A/dm2, pH < 12, T < 45 °C (113 °F)
▼
Rinsing t = 30 sec, T < 25 °C (77 °F)
▼
Pickling t < 20 sec, pH ∼ 1
▼
Rinsing t = 30 sec, T < 25 °C (77 °F)
▼
Bright copper plating t < 15 min, 3 A/dm2, pH < 1, RT
▼
Rinsing t = 30 sec, T < 25 °C (77 °F)
▼
Palladium interim coating t < 5 min, 1 A/dm2, pH < 8, RT
▼
Rinsing t = 30 sec, T < 25 °C (77 °F)
▼
Gold finishing t < 5 min, 1 A/dm2
Note: Swarovski cannot warrant the resistance of effects when the parameters as set out above are changed. Swarovski’s declaration of resistance does not discharge customer from carrying out its own tests of the suitability for the intended finishing of products. The use and processing of these techniques and products are solely the user’s responsibility.
TESTING THE PL ATING RESISTANCEFor testing the plating resistance of effects, the following parameter settings have to be considered:
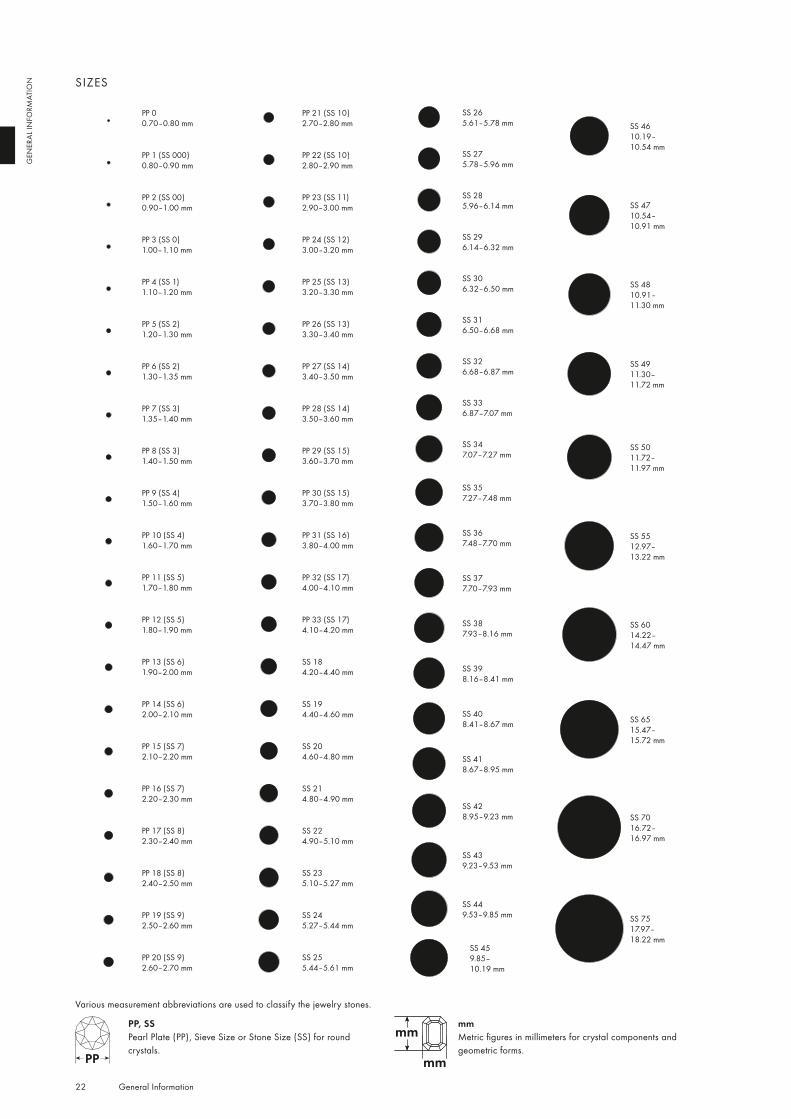
PP 00.70–0.80 mm
PP 1 (SS 000)0.80–0.90 mm
PP 2 (SS 00)0.90–1.00 mm
PP 3 (SS 0)1.00–1.10 mm
PP 4 (SS 1)1.10–1.20 mm
PP 5 (SS 2)1.20–1.30 mm
PP 6 (SS 2)1.30–1.35 mm
PP 7 (SS 3)1.35–1.40 mm
PP 8 (SS 3)1.40–1.50 mm
PP 9 (SS 4)1.50–1.60 mm
PP 10 (SS 4) 1.60–1.70 mm
PP 11 (SS 5)1.70–1.80 mm
PP 12 (SS 5)1.80–1.90 mm
PP 13 (SS 6)1.90–2.00 mm
PP 14 (SS 6)2.00–2.10 mm
PP 15 (SS 7)2.10–2.20 mm
PP 16 (SS 7)2.20–2.30 mm
PP 17 (SS 8)2.30–2.40 mm
PP 18 (SS 8)2.40–2.50 mm
PP 19 (SS 9)2.50–2.60 mm
PP 20 (SS 9)2.60–2.70 mm
PP 21 (SS 10)2.70–2.80 mm
PP 22 (SS 10)2.80–2.90 mm
PP 23 (SS 11)2.90–3.00 mm
PP 24 (SS 12)3.00–3.20 mm
PP 25 (SS 13)3.20–3.30 mm
PP 26 (SS 13)3.30–3.40 mm
PP 27 (SS 14)3.40–3.50 mm
PP 28 (SS 14)3.50–3.60 mm
PP 29 (SS 15)3.60–3.70 mm
PP 30 (SS 15)3.70–3.80 mm
PP 31 (SS 16)3.80–4.00 mm
PP 32 (SS 17)4.00–4.10 mm
PP 33 (SS 17)4.10–4.20 mm
SS 184.20–4.40 mm
SS 194.40–4.60 mm
SS 204.60–4.80 mm
SS 214.80–4.90 mm
SS 224.90–5.10 mm
SS 235.10–5.27 mm
SS 245.27–5.44 mm
SS 255.44–5.61 mm
SS 265.61–5.78 mm
SS 275.78–5.96 mm
SS 285.96–6.14 mm
SS 296.14–6.32 mm
SS 306.32–6.50 mm
SS 316.50–6.68 mm
SS 326.68–6.87 mm
SS 336.87–7.07 mm
SS 347.07–7.27 mm
SS 357.27–7.48 mm
SS 367.48–7.70 mm
SS 377.70–7.93 mm
SS 387.93–8.16 mm
SS 398.16–8.41 mm
SS 408.41–8.67 mm
SS 418.67–8.95 mm
SS 428.95–9.23 mm
SS 439.23–9.53 mm
SS 449.53–9.85 mm
SS 459.85– 10.19 mm
SS 4610.19– 10.54 mm
SS 4710.54– 10.91 mm
SS 4810.91–11.30 mm
SS 4911.30–11.72 mm
SS 5011.72–11.97 mm
SS 5512.97–13.22 mm
SS 6014.22–14.47 mm
SS 6515.47–15.72 mm
SS 7016.72–16.97 mm
SS 7517.97–18.22 mm
22 General Information
GEN
ERAL
INFO
RMAT
ION
Various measurement abbreviations are used to classify the jewelry stones.
SIZES
PP, SSPearl Plate (PP), Sieve Size or Stone Size (SS) for round crystals.
mmMetric figures in millimeters for crystal components and geometric forms.

23 General Information
GEN
ERAL
INFO
RMAT
IONSWAROVSKI PRODUCTS AND SUITABLE APPLICATION TECHNIQUES
Sold
erin
g
Plat
ing
Setti
ng
Glu
ing
Hot
fix
App
licat
ion
Sew
ing
Embr
oide
ry
Han
d A
pplic
atio
n
Mec
hani
cal
App
licat
ion
Cera
lun
Round Stones
Fancy Stones & Settings
Fancy Stones
Settings* 1
Beads 1
BeCharmed & Pavé
BeCharmed Beads & Pavé Balls5 1 BeCharmed Rondelles, Charms & Pavé Pendants 1
Crystal Pearls 1
Pendants 1
Flat Backs No Hotfix
Flat Backs Hotfix
XILION Rose & XIRIUS Rose
Framed Flat Backs
Creation Stones
Creation Stones Plus
Cabochons & Framed Cabochons
Sew-on ArticlesSew-on Stones
Lochrose
Self-adhesive Elements
Transfers
XILION Transfers & XIRIUS Transfers Creation Transfers, Crystal Diamond Transfers
Creation Transfers Plus
Mezzo Transfers
Mezzo Transfers with Cabochons
Synthetics
Crystal Fabric Crystal Rocks, Crystal Fine Rocks & Crystal Ultrafine Rocks
Graphic Fabric & Graphic (Fine) Rocks
Crystal Medley
Crystaltex 2
Plastic Trimmings Basic Bandings 3
Buttons & Fasteners
Crystal Buttons
Buttons with Plastic Shank
Snap Fasteners & Decorative Buttons
XIRIUS Flat Back Snap Fasteners
Jeans Buttons
Buttons with Metal Shank
Metal Trimmings
Chaton & Flat Back Bandings / Motifs
Spike Bandings 1
Rivets (Square, Star & Spike)
Roses & Chaton Montées 1
Rose Pins & Rhombus Pins
Crystal Studs
Crystal Mesh 4
Cupchains & Findings
* Settings with hole: suitable for soldering, plating, sewing, hand application; Settings without hole: suitable for soldering and plating.1 These products are not suitable for sewing with a sewing machine 2 Not suitable for Crystaltex Chaton Bandings 3 Art. 50 002, 50 003, and 50 004 (single-row) 4 Crystal Fine Mesh is not suitable for sewing with a sewing machine 5 Wash only with similar colors

SOLDERING, PLATING, AND STONE SETTING
Swarovski offers an ideal product selection for soldering, allowing for simple and problem-free production of state-of-the-art jewelry pieces and accessories. Further techniques such as plating and
stone setting complement the comprehensive and diverse application options offered by Swarovski.

26 Application techniques
SOLD
ERIN
G, P
LATI
NG
, AN
D ST
ON
E SE
TTIN
G
MACHINES AND TOOLS
The following machines and tools can be used for soldering Swarovski crystals:
PRODUCT OVERVIEW
The following products are suitable for soldering, plating, and stone setting:
SOLDERING PLATING STONE SETTING
Round Stones
Fancy Stones
Settings * *
Flat Backs No Hotfix
Cupchains & Findings * *
* It is recommended to use the unplated versions (Z).
Micro soldering kit Propane gas burner Blow torch
Solder pasteSolder paste containing flux must be applied at exactly the right spot to create a clean solder joint.
Solder wireIt is recommended that solder wire with a flux core is used, which guarantees an even flow of solder.
Solder pelletsSolder pellets should be placed in an acid flux before being used. This ensures that the solder will flow correctly.
Soldering molds J-board, express cement
Polishing machine
27 Application techniques
SOLD
ERIN
G, P
LATI
NG
, AN
D ST
ON
E SE
TTIN
G
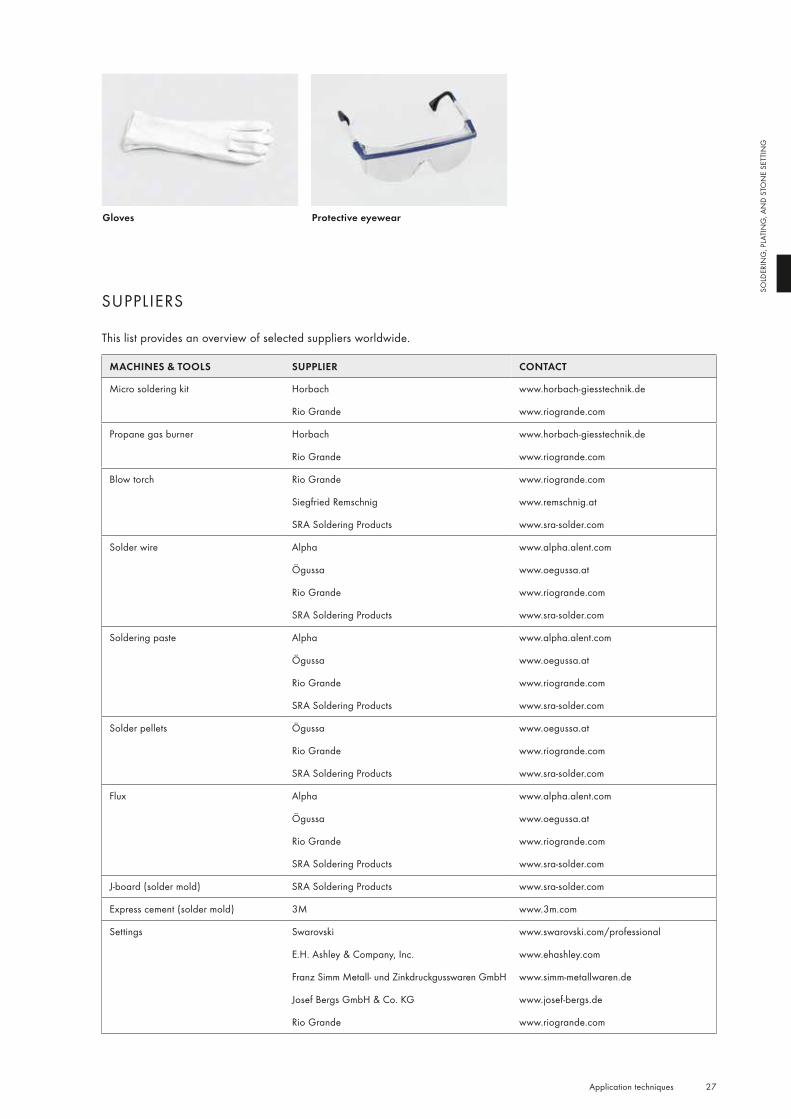
Gloves Protective eyewear
SUPPLIERS
This list provides an overview of selected suppliers worldwide.
MACHINES & TOOLS SUPPLIER CONTACT
Micro soldering kit Horbach www.horbach-giesstechnik.de
Rio Grande www.riogrande.com
Propane gas burner Horbach www.horbach-giesstechnik.de
Rio Grande www.riogrande.com
Blow torch Rio Grande www.riogrande.com
Siegfried Remschnig www.remschnig.at
SRA Soldering Products www.sra-solder.com
Solder wire Alpha www.alpha.alent.com
Ögussa www.oegussa.at
Rio Grande www.riogrande.com
SRA Soldering Products www.sra-solder.com
Soldering paste Alpha www.alpha.alent.com
Ögussa www.oegussa.at
Rio Grande www.riogrande.com
SRA Soldering Products www.sra-solder.com
Solder pellets Ögussa www.oegussa.at
Rio Grande www.riogrande.com
SRA Soldering Products www.sra-solder.com
Flux Alpha www.alpha.alent.com
Ögussa www.oegussa.at
Rio Grande www.riogrande.com
SRA Soldering Products www.sra-solder.com
J-board (solder mold) SRA Soldering Products www.sra-solder.com
Express cement (solder mold) 3M www.3m.com
Settings Swarovski www.swarovski.com/professional
E.H. Ashley & Company, Inc. www.ehashley.com
Franz Simm Metall- und Zinkdruckgusswaren GmbH www.simm-metallwaren.de
Josef Bergs GmbH & Co. KG www.josef-bergs.de
Rio Grande www.riogrande.com
28 Application techniques
SOLD
ERIN
G, P
LATI
NG
, AN
D ST
ON
E SE
TTIN
G
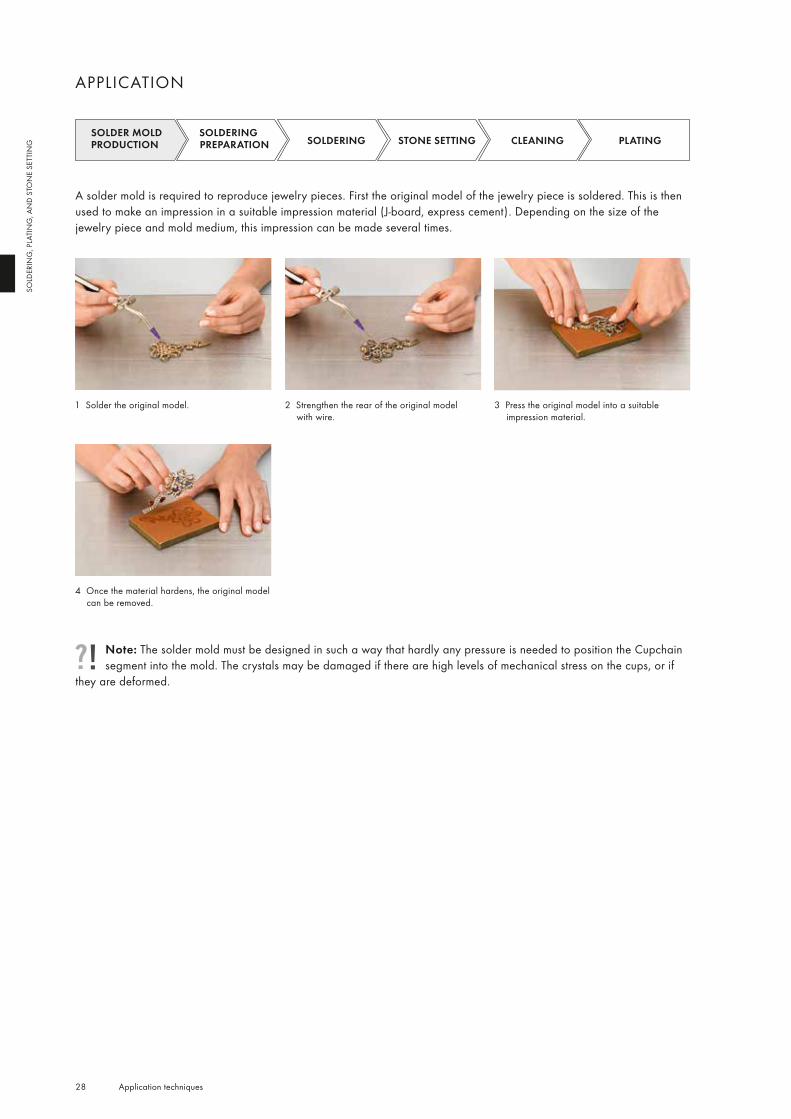
APPLICATION
A solder mold is required to reproduce jewelry pieces. First the original model of the jewelry piece is soldered. This is then used to make an impression in a suitable impression material (J-board, express cement). Depending on the size of the jewelry piece and mold medium, this impression can be made several times.
SOLDER MOLD PRODUCTION
SOLDERING PREPARATION SOLDERING STONE SETTING CLEANING PLATING
2 Strengthen the rear of the original model with wire.
1 Solder the original model. 3 Press the original model into a suitable impression material.
4 Once the material hardens, the original model can be removed.
Note: The solder mold must be designed in such a way that hardly any pressure is needed to position the Cupchain segment into the mold. The crystals may be damaged if there are high levels of mechanical stress on the cups, or if
they are deformed.
29 Application techniques
SOLD
ERIN
G, P
LATI
NG
, AN
D ST
ON
E SE
TTIN
G
SOLDER MOLD PRODUCTION
SOLDERING PREPARATION SOLDERING STONE SETTING CLEANING PLATING
SOLDER MOLD PRODUCTION
SOLDERING PREPARATION SOLDERING STONE SETTING CLEANING PLATING
Materials and tools should be clean, and particularly free of any grease, to ensure proper application. When soldering and plating, adequate ventilation is essential. In addition, it is recommended that protective clothing,
protective eyewear and protective gloves are worn in line with the manufacturer’s safety information sheets. Wearing protective gloves also prevents tools from getting dirty.
SELECTING THE OPTIMUM SOLDER AND FLUXWhen selecting solder, the working temperatures and flow characteristics are particularly important. Solder is available from various manufacturers in wire form, with or without a flux core, as a paste and as pellets.
Only soldering alloys with a working temperature up to 280 °C (536 °F) should be used for soldering Cupchains. The higher the working temperature of the solder material used, the more precise workmanship and exact
temperature control are necessary to avoid damaging the crystal and the foiling.
When soldering Cupchains, solder wire with a flux core is more suitable. If solder pellets are being processed, or the wire used does not have a flux core, the flux should be adapted according to the solder manufacturer’s instructions, while any corrosive effects on the foiling should be checked via pre-testing. These effects should be assessed after plating, as damage done during soldering is often only visible at this point.
For soldering Cupchains we suggest using one of the following lead-free solder wires:
NAME COMPOSITION MELTING RANGE SUPPLIER
Envirosafe 96.5% Sn, 3.45% Cu,1% Sb, 0.05% Ag
215 – 220 °C419 – 428 °F
www.sra-solder.com
Silox 227 99% Sn, 1% Cu 227 °C440 °F
www.oegussa.at
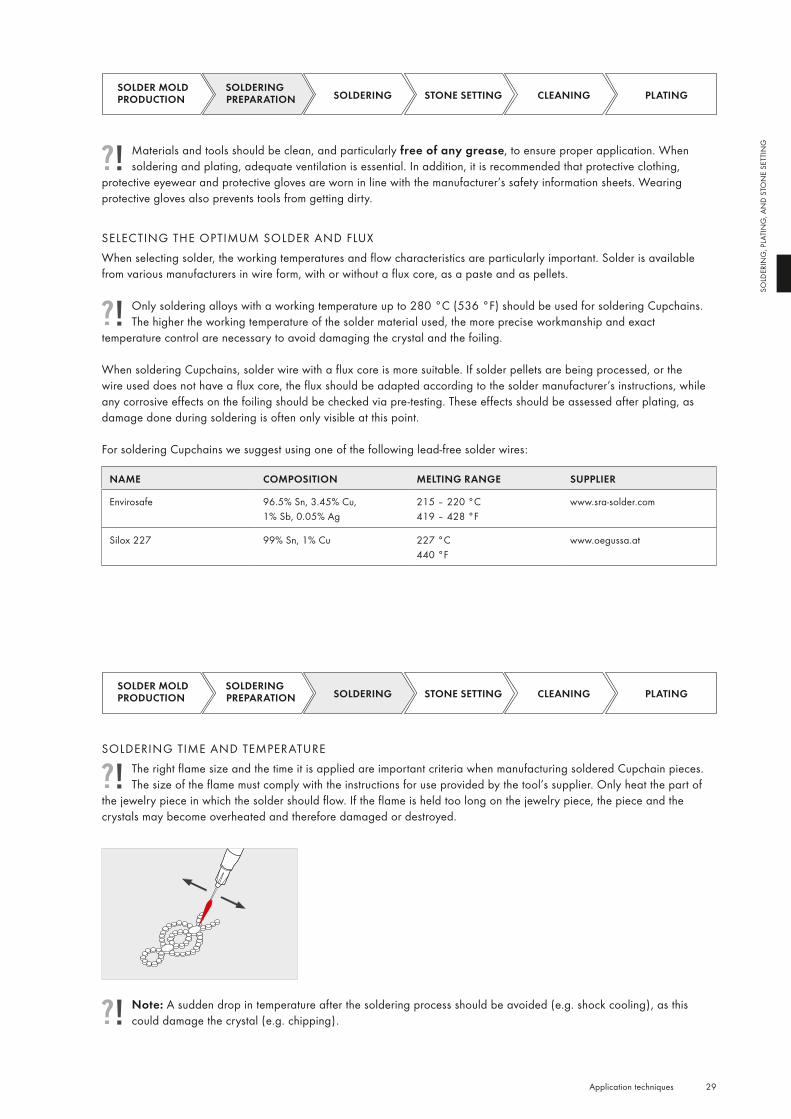
SOLDERING TIME AND TEMPERATUREThe right flame size and the time it is applied are important criteria when manufacturing soldered Cupchain pieces. The size of the flame must comply with the instructions for use provided by the tool’s supplier. Only heat the part of
the jewelry piece in which the solder should flow. If the flame is held too long on the jewelry piece, the piece and the crystals may become overheated and therefore damaged or destroyed.
Note: A sudden drop in temperature after the soldering process should be avoided (e.g. shock cooling), as this could damage the crystal (e.g. chipping).
> 0.
2 m
m
0.05
– 0
.2 m
m
30 Application techniques
SOLD
ERIN
G, P
LATI
NG
, AN
D ST
ON
E SE
TTIN
G
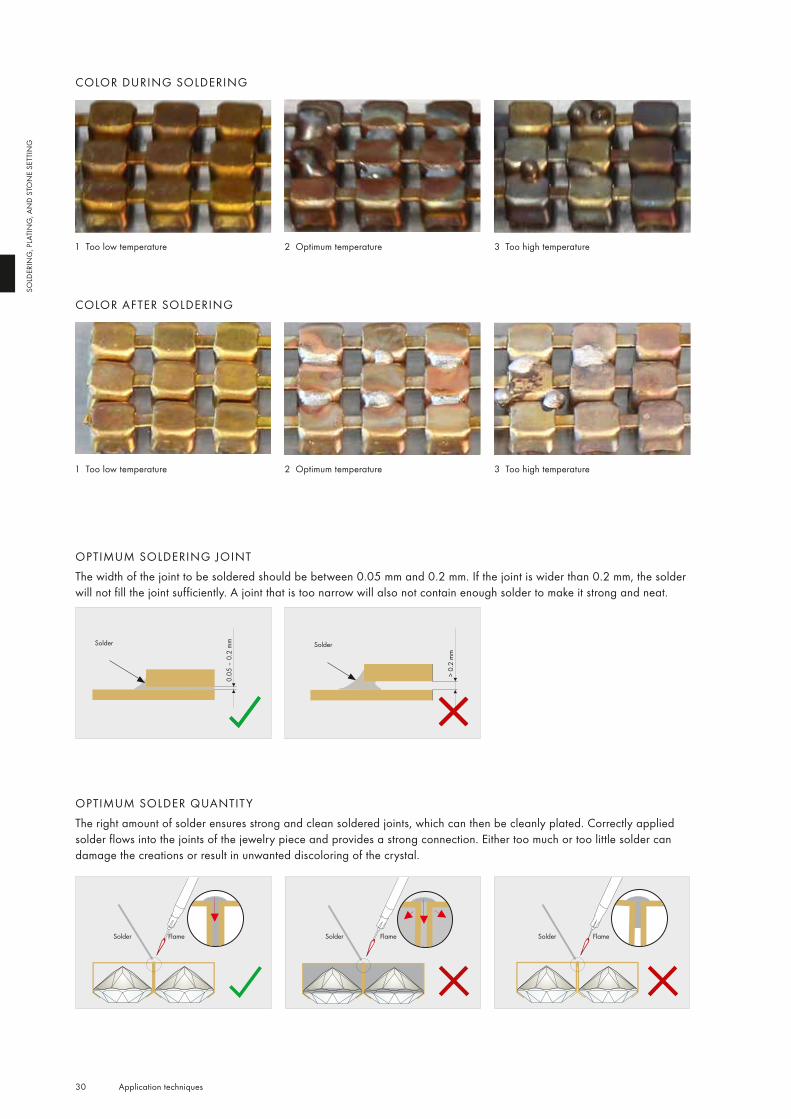
COLOR DURING SOLDERING
1 Too low temperature 2 Optimum temperature 3 Too high temperature
COLOR AFTER SOLDERING
OPTIMUM SOLDERING JOINTThe width of the joint to be soldered should be between 0.05 mm and 0.2 mm. If the joint is wider than 0.2 mm, the solder will not fill the joint sufficiently. A joint that is too narrow will also not contain enough solder to make it strong and neat.
1 Too low temperature 2 Optimum temperature 3 Too high temperature
OPTIMUM SOLDER QUANTIT YThe right amount of solder ensures strong and clean soldered joints, which can then be cleanly plated. Correctly applied solder flows into the joints of the jewelry piece and provides a strong connection. Either too much or too little solder can damage the creations or result in unwanted discoloring of the crystal.
SolderSolder
Solder Flame Solder Flame Solder Flame
31 Application techniques
SOLD
ERIN
G, P
LATI
NG
, AN
D ST
ON
E SE
TTIN
G
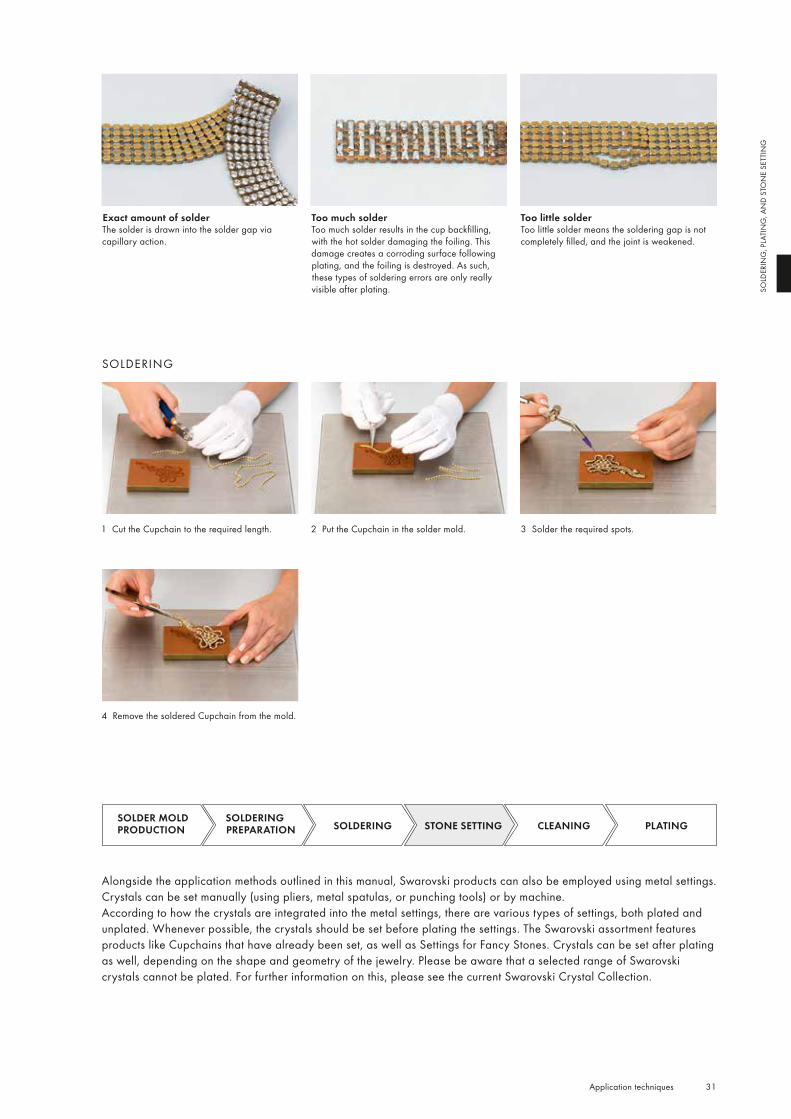
Exact amount of solderThe solder is drawn into the solder gap via capillary action.
Too much solderToo much solder results in the cup backfilling, with the hot solder damaging the foiling. This damage creates a corroding surface following plating, and the foiling is destroyed. As such, these types of soldering errors are only really visible after plating.
Too little solderToo little solder means the soldering gap is not completely filled, and the joint is weakened.
1 Cut the Cupchain to the required length. 2 Put the Cupchain in the solder mold. 3 Solder the required spots.
SOLDERING
4 Remove the soldered Cupchain from the mold.
Alongside the application methods outlined in this manual, Swarovski products can also be employed using metal settings. Crystals can be set manually (using pliers, metal spatulas, or punching tools) or by machine.According to how the crystals are integrated into the metal settings, there are various types of settings, both plated and unplated. Whenever possible, the crystals should be set before plating the settings. The Swarovski assortment features products like Cupchains that have already been set, as well as Settings for Fancy Stones. Crystals can be set after plating as well, depending on the shape and geometry of the jewelry. Please be aware that a selected range of Swarovski crystals cannot be plated. For further information on this, please see the current Swarovski Crystal Collection.
SOLDER MOLD PRODUCTION
SOLDERING PREPARATION SOLDERING STONE SETTING CLEANING PLATING
32 Application techniques
SOLD
ERIN
G, P
LATI
NG
, AN
D ST
ON
E SE
TTIN
G
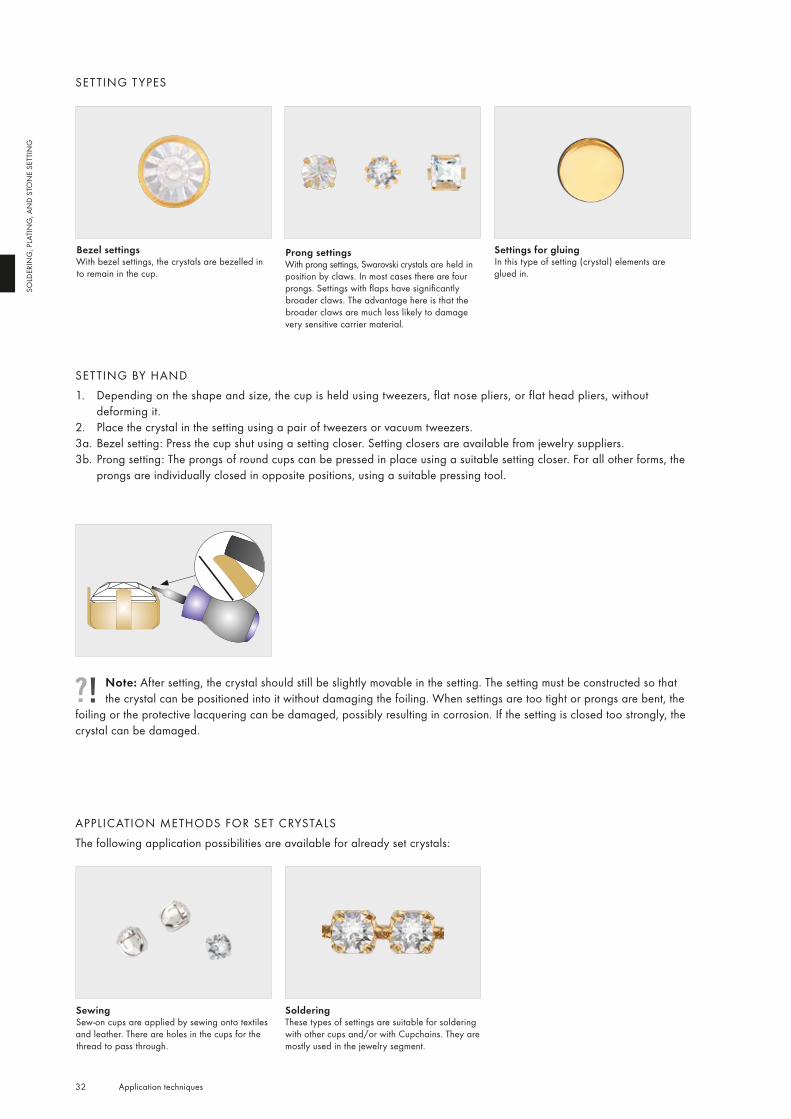
SETTING T YPES
Prong settingsWith prong settings, Swarovski crystals are held in position by claws. In most cases there are four prongs. Settings with flaps have significantly broader claws. The advantage here is that the broader claws are much less likely to damage very sensitive carrier material.
Bezel settingsWith bezel settings, the crystals are bezelled in to remain in the cup.
Settings for gluingIn this type of setting (crystal) elements are glued in.
SETTING BY HAND1. Depending on the shape and size, the cup is held using tweezers, flat nose pliers, or flat head pliers, without
deforming it. 2. Place the crystal in the setting using a pair of tweezers or vacuum tweezers.3a. Bezel setting: Press the cup shut using a setting closer. Setting closers are available from jewelry suppliers.3b. Prong setting: The prongs of round cups can be pressed in place using a suitable setting closer. For all other forms, the
prongs are individually closed in opposite positions, using a suitable pressing tool.
Soldering These types of settings are suitable for soldering with other cups and/or with Cupchains. They are mostly used in the jewelry segment.
Sewing Sew-on cups are applied by sewing onto textiles and leather. There are holes in the cups for the thread to pass through.
APPLICATION METHODS FOR SET CRYSTALSThe following application possibilities are available for already set crystals:
Note: After setting, the crystal should still be slightly movable in the setting. The setting must be constructed so that the crystal can be positioned into it without damaging the foiling. When settings are too tight or prongs are bent, the
foiling or the protective lacquering can be damaged, possibly resulting in corrosion. If the setting is closed too strongly, the crystal can be damaged.
33 Application techniques
SOLD
ERIN
G, P
LATI
NG
, AN
D ST
ON
E SE
TTIN
G
Mechanical applicationWith this special type of setting, the set crystal is applied onto the textile using claws. For more information please consult the corresponding chapter.
Threading Settings that can be used as a pendant have an eyelet at the top, to which a chain can be attached. Settings with two eyelets can be attached to other elements.
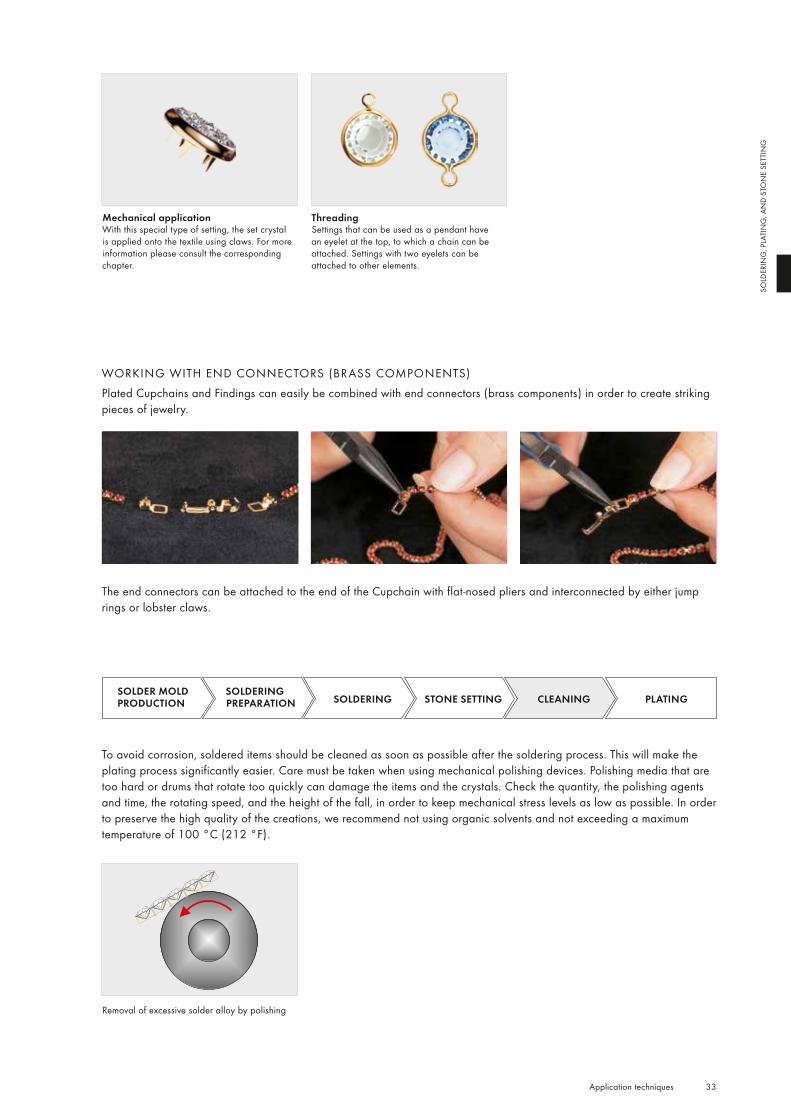
WORKING WITH END CONNECTORS (BRASS COMPONENTS)Plated Cupchains and Findings can easily be combined with end connectors (brass components) in order to create striking pieces of jewelry.
To avoid corrosion, soldered items should be cleaned as soon as possible after the soldering process. This will make the plating process significantly easier. Care must be taken when using mechanical polishing devices. Polishing media that are too hard or drums that rotate too quickly can damage the items and the crystals. Check the quantity, the polishing agents and time, the rotating speed, and the height of the fall, in order to keep mechanical stress levels as low as possible. In order to preserve the high quality of the creations, we recommend not using organic solvents and not exceeding a maximum temperature of 100 °C (212 °F).
SOLDER MOLD PRODUCTION
SOLDERING PREPARATION SOLDERING STONE SETTING CLEANING PLATING
Removal of excessive solder alloy by polishing
The end connectors can be attached to the end of the Cupchain with flat-nosed pliers and interconnected by either jump rings or lobster claws.
34 Application techniques
SOLD
ERIN
G, P
LATI
NG
, AN
D ST
ON
E SE
TTIN
G
SOLDER MOLD PRODUCTION
SOLDERING PREPARATION SOLDERING STONE SETTING CLEANING PLATING
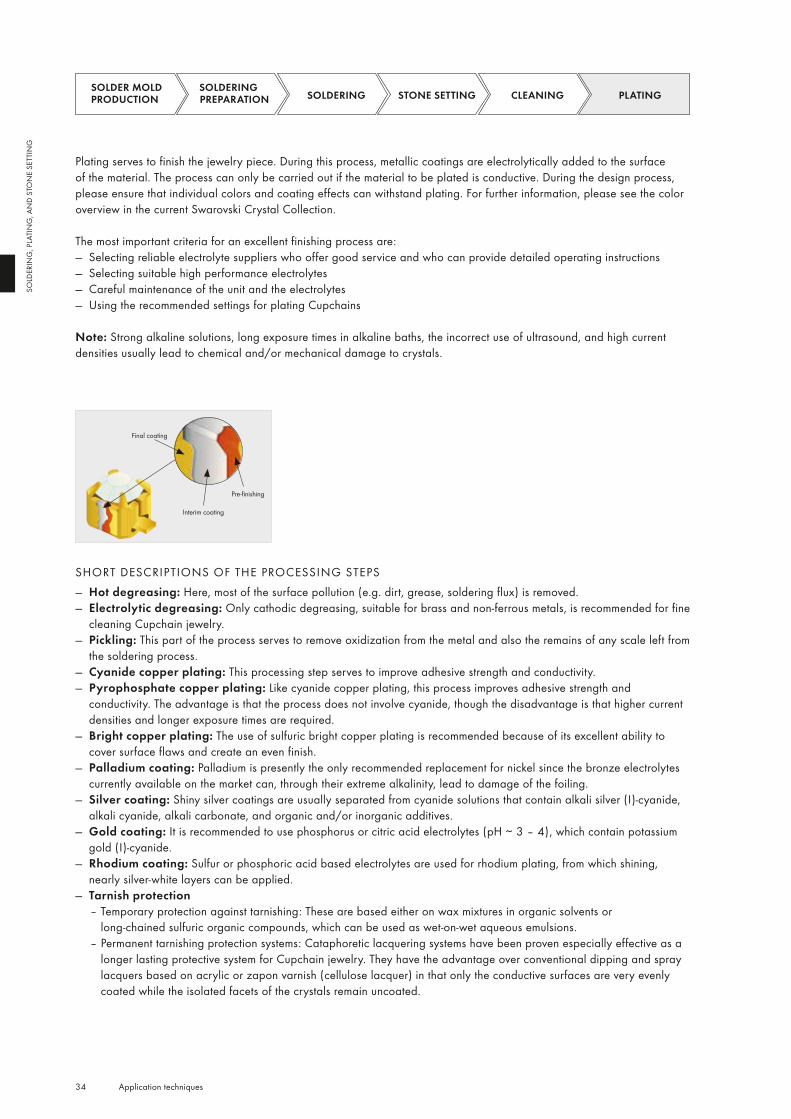
Plating serves to finish the jewelry piece. During this process, metallic coatings are electrolytically added to the surface of the material. The process can only be carried out if the material to be plated is conductive. During the design process, please ensure that individual colors and coating effects can withstand plating. For further information, please see the color overview in the current Swarovski Crystal Collection.
The most important criteria for an excellent finishing process are: — Selecting reliable electrolyte suppliers who offer good service and who can provide detailed operating instructions — Selecting suitable high performance electrolytes — Careful maintenance of the unit and the electrolytes — Using the recommended settings for plating Cupchains
Note: Strong alkaline solutions, long exposure times in alkaline baths, the incorrect use of ultrasound, and high current densities usually lead to chemical and/or mechanical damage to crystals.
SHORT DESCRIPTIONS OF THE PROCESSING STEPS — Hot degreasing: Here, most of the surface pollution (e.g. dirt, grease, soldering flux) is removed. — Electrolytic degreasing: Only cathodic degreasing, suitable for brass and non-ferrous metals, is recommended for fine
cleaning Cupchain jewelry. — Pickling: This part of the process serves to remove oxidization from the metal and also the remains of any scale left from
the soldering process. — Cyanide copper plating: This processing step serves to improve adhesive strength and conductivity. — Pyrophosphate copper plating: Like cyanide copper plating, this process improves adhesive strength and
conductivity. The advantage is that the process does not involve cyanide, though the disadvantage is that higher current densities and longer exposure times are required.
— Bright copper plating: The use of sulfuric bright copper plating is recommended because of its excellent ability to cover surface flaws and create an even finish.
— Palladium coating: Palladium is presently the only recommended replacement for nickel since the bronze electrolytes currently available on the market can, through their extreme alkalinity, lead to damage of the foiling.
— Silver coating: Shiny silver coatings are usually separated from cyanide solutions that contain alkali silver (I)-cyanide, alkali cyanide, alkali carbonate, and organic and/or inorganic additives.
— Gold coating: It is recommended to use phosphorus or citric acid electrolytes (pH ∼ 3 – 4), which contain potassium gold (I)-cyanide.
— Rhodium coating: Sulfur or phosphoric acid based electrolytes are used for rhodium plating, from which shining, nearly silver-white layers can be applied.
— Tarnish protection – Temporary protection against tarnishing: These are based either on wax mixtures in organic solvents or
long-chained sulfuric organic compounds, which can be used as wet-on-wet aqueous emulsions. – Permanent tarnishing protection systems: Cataphoretic lacquering systems have been proven especially effective as a
longer lasting protective system for Cupchain jewelry. They have the advantage over conventional dipping and spray lacquers based on acrylic or zapon varnish (cellulose lacquer) in that only the conductive surfaces are very evenly coated while the isolated facets of the crystals remain uncoated.
Pre-finishing
Interim coating
Final coating
35 Application techniques
SOLD
ERIN
G, P
LATI
NG
, AN
D ST
ON
E SE
TTIN
G
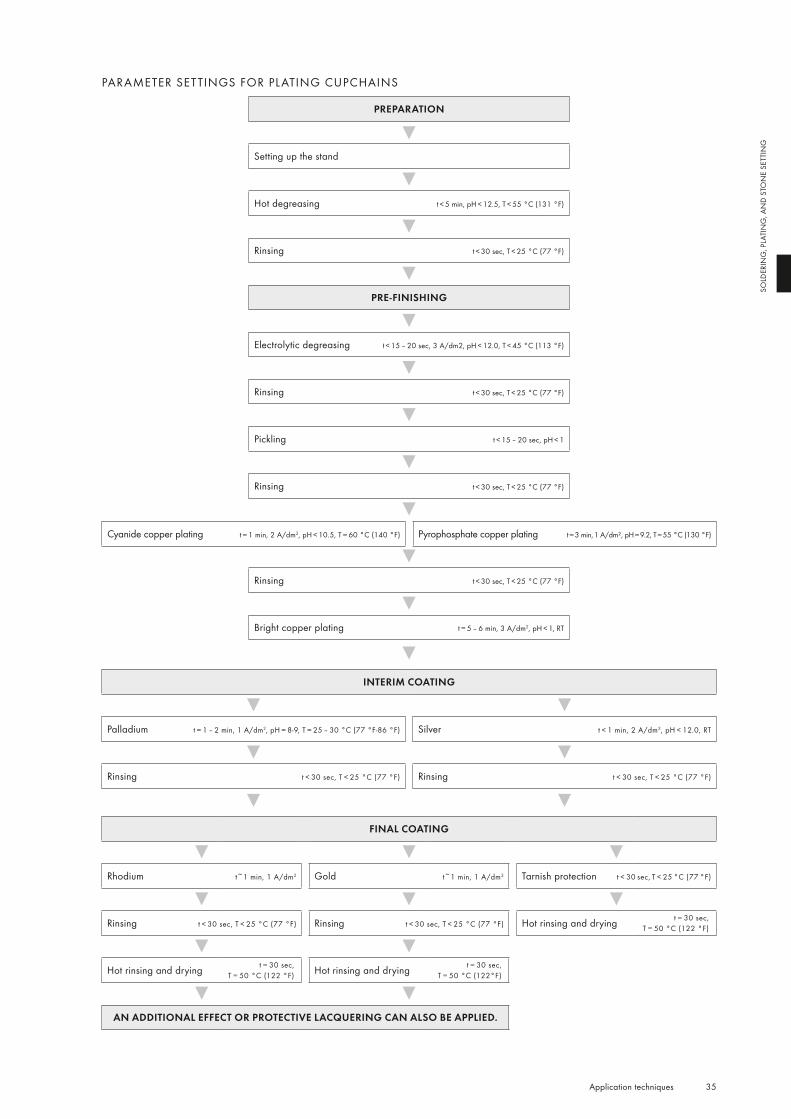
PARAMETER SETTINGS FOR PL ATING CUPCHAINS
PREPARATION
▼Setting up the stand
▼Hot degreasing t < 5 min, pH < 12.5, T < 55 °C (131 °F)
▼Rinsing t < 30 sec, T < 25 °C (77 °F)
▼PRE-FINISHING
▼Electrolytic degreasing t < 15 – 20 sec, 3 A/dm2, pH < 12.0, T < 45 °C (113 °F)
▼Rinsing t < 30 sec, T < 25 °C (77 °F)
▼Pickling t < 15 – 20 sec, pH < 1
▼Rinsing t < 30 sec, T < 25 °C (77 °F)
▼
▼Rinsing t < 30 sec, T < 25 °C (77 °F)
▼Bright copper plating t = 5 – 6 min, 3 A/dm2, pH < 1, RT
▼
INTERIM COATING
▼ ▼Palladium t = 1 – 2 min, 1 A/dm2, pH = 8-9, T = 25 – 30 °C (77 °F-86 °F) Silver t < 1 min, 2 A/dm2, pH < 12.0, RT
▼ ▼Rinsing t < 30 sec, T < 25 °C (77 °F) Rinsing t < 30 sec, T < 25 °C (77 °F)
▼ ▼
FINAL COATING
▼ ▼ ▼Rhodium t~1 min, 1 A/dm2 Gold t~1 min, 1 A/dm2 Tarnish protection t < 30 sec, T < 25 °C (77 °F)
▼ ▼ ▼Rinsing t < 30 sec, T < 25 °C (77 °F) Rinsing t < 30 sec, T < 25 °C (77 °F) Hot rinsing and drying t = 30 sec,
T = 50 °C (122 °F)
▼ ▼Hot rinsing and drying t = 30 sec,
T = 50 °C (122 °F) Hot rinsing and drying t = 30 sec, T = 50 °C (122°F)
▼ ▼AN ADDITIONAL EFFECT OR PROTECTIVE LACQUERING CAN ALSO BE APPLIED.
Cyanide copper plating t = 1 min, 2 A/dm2, pH < 10.5, T = 60 °C (140 °F) Pyrophosphate copper plating t = 3 min, 1 A/dm², pH = 9.2, T = 55 °C (130 °F)
36 Application techniques
SOLD
ERIN
G, P
LATI
NG
, AN
D ST
ON
E SE
TTIN
G
DIRECTIONS FOR JEWELRY MANUFACTURING
This section offers a brief overview of the ways in which Swarovski products can be integrated into jewelry design software, and a summary of the two most important production techniques for jewelry: rubber mold and lost wax.
JEWELRY DESIGN SOFT WARELeading software manufacturers offer special programs with three-dimensional display possibilities for the design of jewelry and accessories. These 3D-design programs feature a whole range of functions that simplify and support the design process and therefore also the entire production process.Special software solutions that have integrated a range of digitally processed Swarovski crystals in their programs are already available (www.3design.com). These can be simply and quickly integrated into any design, thus allowing the designer to work with Swarovski crystals right from the beginning of the design phase.
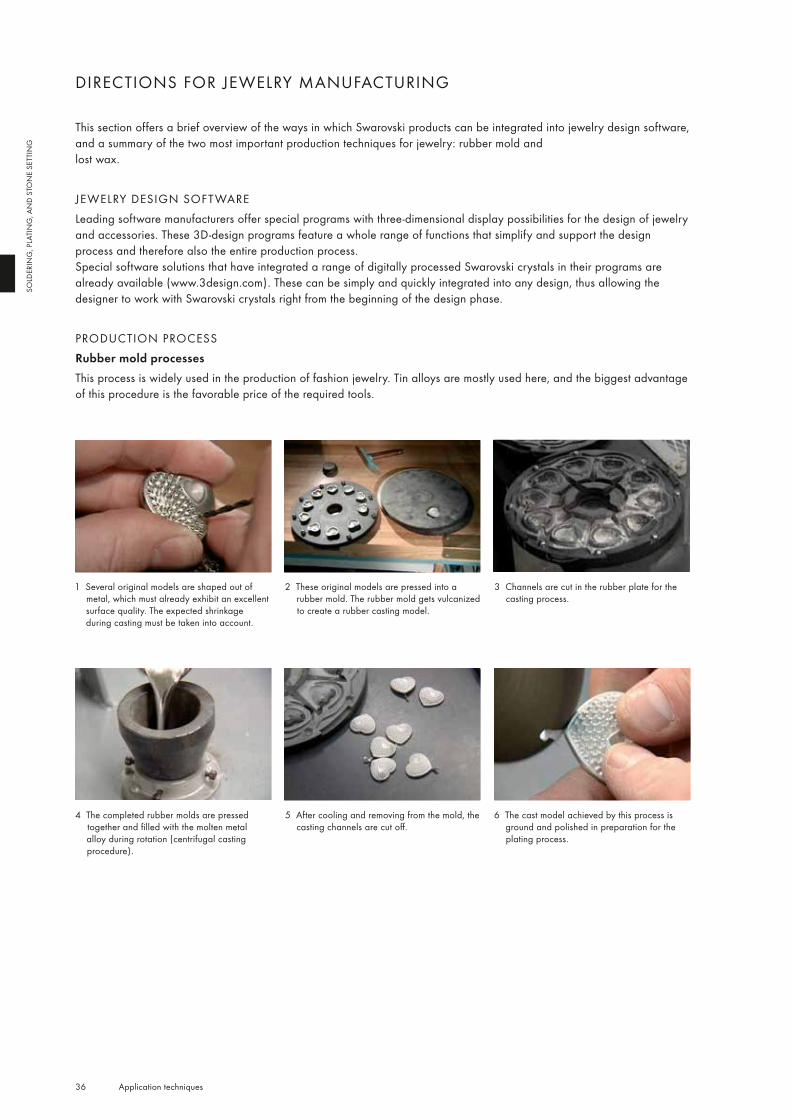
PRODUCTION PROCESSRubber mold processesThis process is widely used in the production of fashion jewelry. Tin alloys are mostly used here, and the biggest advantage of this procedure is the favorable price of the required tools.
1 Several original models are shaped out of metal, which must already exhibit an excellent surface quality. The expected shrinkage during casting must be taken into account.
2 These original models are pressed into a rubber mold. The rubber mold gets vulcanized to create a rubber casting model.
3 Channels are cut in the rubber plate for the casting process.
4 The completed rubber molds are pressed together and filled with the molten metal alloy during rotation (centrifugal casting procedure).
5 After cooling and removing from the mold, the casting channels are cut off.
6 The cast model achieved by this process is ground and polished in preparation for the plating process.
37 Application techniques
SOLD
ERIN
G, P
LATI
NG
, AN
D ST
ON
E SE
TTIN
G
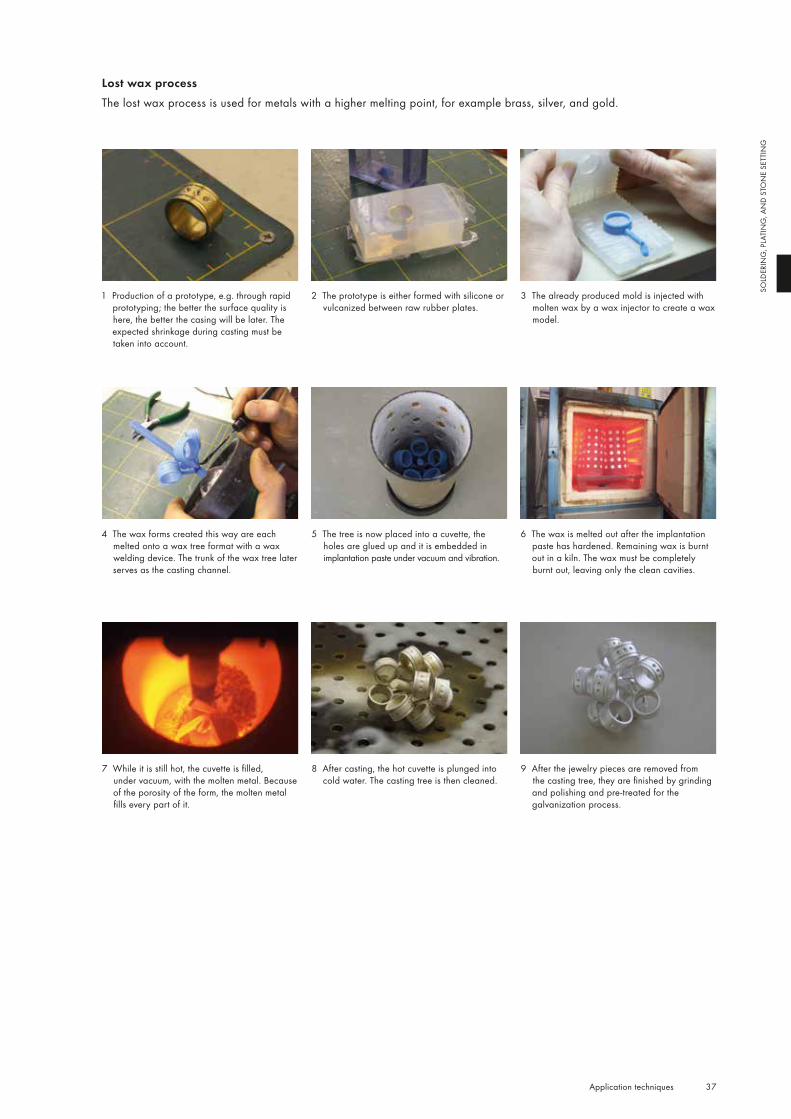
Lost wax processThe lost wax process is used for metals with a higher melting point, for example brass, silver, and gold.
1 Production of a prototype, e.g. through rapid prototyping; the better the surface quality is here, the better the casing will be later. The expected shrinkage during casting must be taken into account.
2 The prototype is either formed with silicone or vulcanized between raw rubber plates.
3 The already produced mold is injected with molten wax by a wax injector to create a wax model.
4 The wax forms created this way are each melted onto a wax tree format with a wax welding device. The trunk of the wax tree later serves as the casting channel.
5 The tree is now placed into a cuvette, the holes are glued up and it is embedded in implantation paste under vacuum and vibration.
6 The wax is melted out after the implantation paste has hardened. Remaining wax is burnt out in a kiln. The wax must be completely burnt out, leaving only the clean cavities.
7 While it is still hot, the cuvette is filled, under vacuum, with the molten metal. Because of the porosity of the form, the molten metal fills every part of it.
8 After casting, the hot cuvette is plunged into cold water. The casting tree is then cleaned.
9 After the jewelry pieces are removed from the casting tree, they are finished by grinding and polishing and pre-treated for the galvanization process.
38 Application techniques
SOLD
ERIN
G, P
LATI
NG
, AN
D ST
ON
E SE
TTIN
G
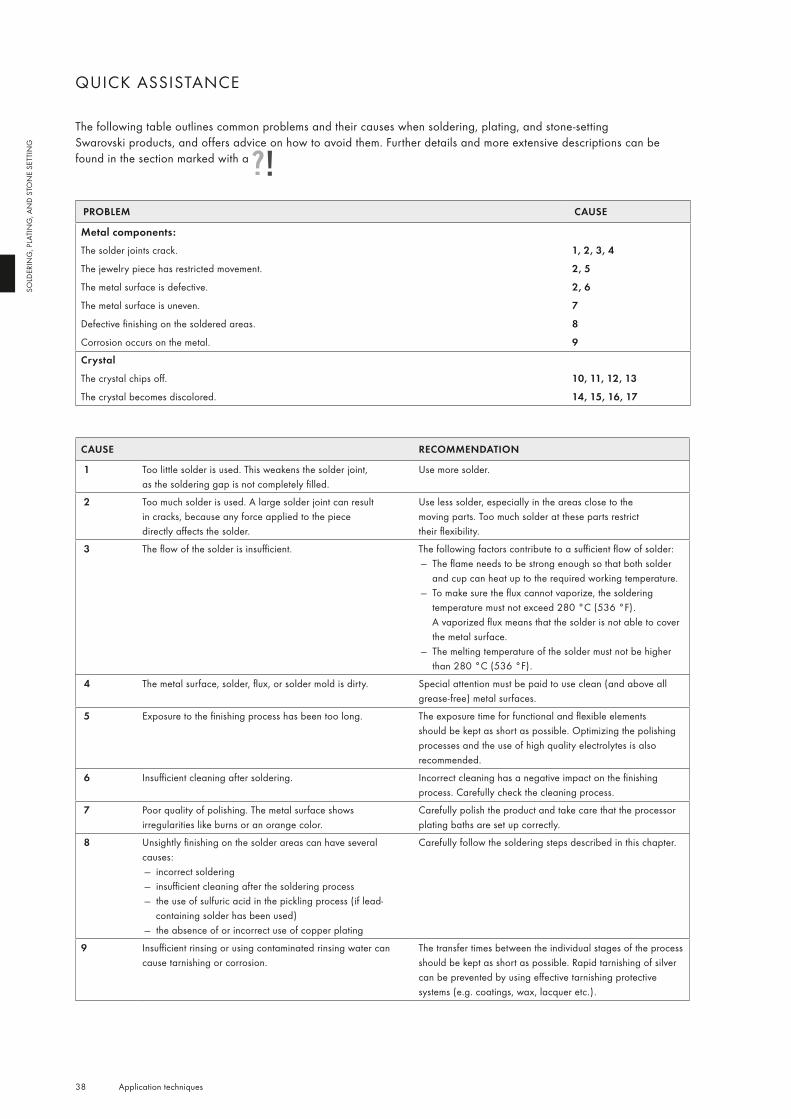
PROBLEM CAUSE
Metal components:The solder joints crack.
The jewelry piece has restricted movement.
The metal surface is defective.
The metal surface is uneven.
Defective finishing on the soldered areas.
Corrosion occurs on the metal.
1, 2, 3, 4
2, 5
2, 6
7
8
9
Crystal
The crystal chips off.
The crystal becomes discolored.
10, 11, 12, 13
14, 15, 16, 17
CAUSE RECOMMENDATION
1 Too little solder is used. This weakens the solder joint, as the soldering gap is not completely filled.
Use more solder.
2 Too much solder is used. A large solder joint can result in cracks, because any force applied to the piece directly affects the solder.
Use less solder, especially in the areas close to the moving parts. Too much solder at these parts restrict their flexibility.
3 The flow of the solder is insufficient. The following factors contribute to a sufficient flow of solder: — The flame needs to be strong enough so that both solder and cup can heat up to the required working temperature.
— To make sure the flux cannot vaporize, the soldering temperature must not exceed 280 °C (536 °F). A vaporized flux means that the solder is not able to cover the metal surface.
— The melting temperature of the solder must not be higher than 280 °C (536 °F).
4 The metal surface, solder, flux, or solder mold is dirty. Special attention must be paid to use clean (and above all grease-free) metal surfaces.
5 Exposure to the finishing process has been too long. The exposure time for functional and flexible elements should be kept as short as possible. Optimizing the polishing processes and the use of high quality electrolytes is also recommended.
6 Insufficient cleaning after soldering. Incorrect cleaning has a negative impact on the finishing process. Carefully check the cleaning process.
7 Poor quality of polishing. The metal surface shows irregularities like burns or an orange color.
Carefully polish the product and take care that the processor plating baths are set up correctly.
8 Unsightly finishing on the solder areas can have several causes:
— incorrect soldering — insufficient cleaning after the soldering process — the use of sulfuric acid in the pickling process (if lead-containing solder has been used)
— the absence of or incorrect use of copper plating
Carefully follow the soldering steps described in this chapter.
9 Insufficient rinsing or using contaminated rinsing water can cause tarnishing or corrosion.
The transfer times between the individual stages of the process should be kept as short as possible. Rapid tarnishing of silver can be prevented by using effective tarnishing protective systems (e.g. coatings, wax, lacquer etc.).
QUICK ASSISTANCE
The following table outlines common problems and their causes when soldering, plating, and stone-setting Swarovski products, and offers advice on how to avoid them. Further details and more extensive descriptions can be found in the section marked with a
39 Application techniques
SOLD
ERIN
G, P
LATI
NG
, AN
D ST
ON
E SE
TTIN
G
CAUSE RECOMMENDATION
10 Poor quality of solder mold. The solder mold must be designed in such a way that hardly any pressure is needed to position the Cupchain segment into the mold. The crystals may be damaged if there are high levels of mechanical stress on the cups, or if the cups are deformed.
11 Thermal shock during the soldering or cooling process can cause tension in the crystals.
Avoid extreme differences in temperature during and after the soldering and cooling process.
12 When using polishing drums, the surface of the crystals can be damaged through hard polishing components in the rotating machine.
Mechanical stress levels should be kept as low as possible. Check the quantity of articles used, the polishing agents and time, as well as the rotating speed and the height of the fall.
13 Using barrel plating can damage crystals in heavy or sharp Cupchains due to the Cupchains‘ size or shape.
In general it is recommended that Cupchain jewelry should be finished on a plating rack. If using a barrel plating, choose the best type of drum and optimize the rotation and the fall height. When the drum is between the different stages of the finishing process and contains no liquid, the items being plated inside the drum may damage each other.
14 The soldering temperature is too high. If the soldering flame is too strong or the soldering times are too long, there is the danger to overheat the solder joints. This can damage the crystals. It can be helpful using a solder that melts at a lower temperature. For more details see the temperature information on page 29 – 30.
15 Too much solder is in the cups. This can damage the crystals‘ foiling and subsequently leads to discoloring.
To make sure the right amount of solder is used, remove one crystal from the cup. If there is any solder left in the cup, reduce the amount of solder. This can be achieved by using a solder wire with a maximum diameter of 1 mm or by reducing the time the solder is in contact with the cups.
16 Incorrect cleaning with ultrasonic can damage the foiling of the crystals.
Take care not to use the ultrasonic too intensively or for too long time.
17 Faults occured during the finishing process. Check the alkalinity, current density, exposure times, and temperatures of the plating baths used. Further mistakes could be incorrect rinsing and post processing techniques.

GLUING
Swarovski products can be glued to a wide range of materials in a variety of application areas.
The greatest quality is ensured by following the entire application process.

90° 95°
42 Application techniques
GLU
ING
PRODUCT OVERVIEW
The following products are suitable for gluing:
GLUING
Round Stones
Fancy Stones
Flat Backs No Hotfix
Self-adhesive Elements
Synthetics
Plastic Trimmings: Basic Bandings *
Metal Trimmings: Chaton & Flat Back Bandings/Motifs, Spike Bandings
Crystal Mesh
* Plastic Trimmings made of PE or PP are not suitable for gluing.
MACHINES AND TOOLS
The following machines and tools can be used for the various processes involved in gluing Swarovski products:
CNC milling machine Hand drillBox column drill
Twist drill 90°/ NC drill 90° for XILION Chatons
Twist drill 95°/NC drill 95°for XIRIUS Chatons
Milling cutter

43 Application techniques
GLU
ING
Isopropyl alcohol/AcetoneTest Pen (art. 9030/000) Blow torch
Plasma cleanerCorona
Precision balance Gloves Protective eyewear
Dispensing robot Fluid dispenser Dispensing gun
Dispensing syringes with dispensing tips Mixing Nozzle (art. 9030/126)
Cou
rtesy
of I
&J F
isnar
, Inc
.
44 Application techniques
GLU
ING
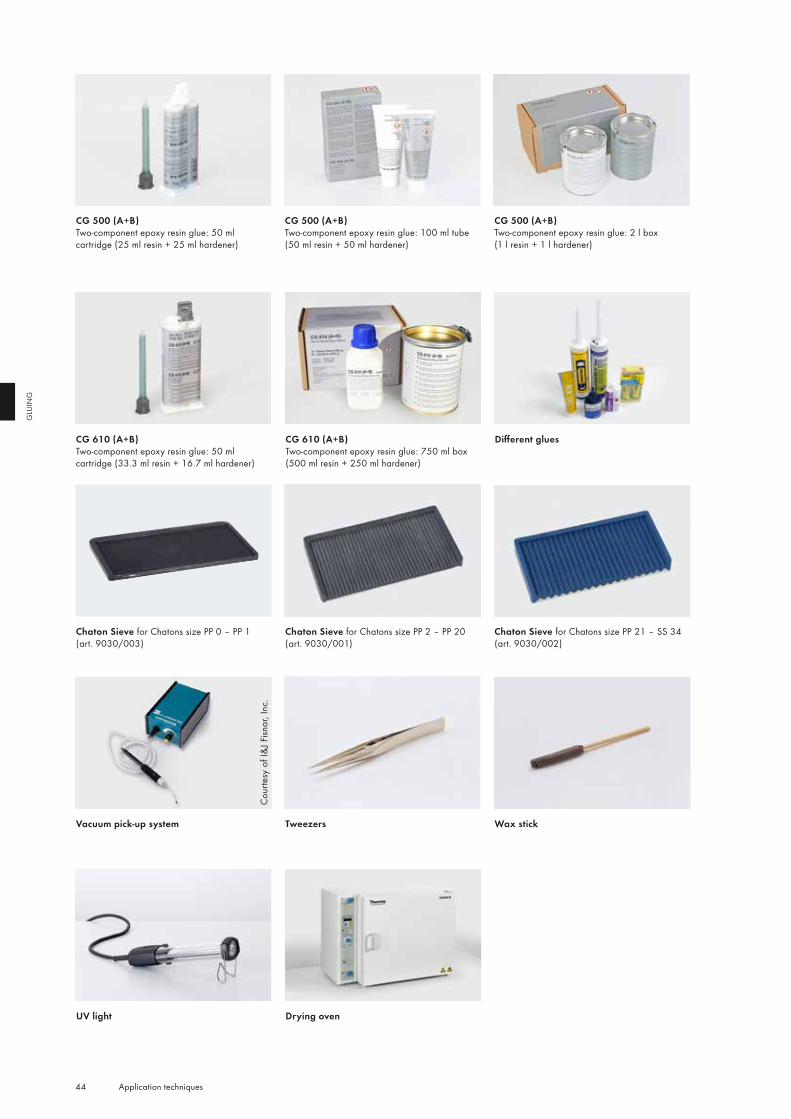
CG 500 (A+B) Two-component epoxy resin glue: 2 l box (1 l resin + 1 l hardener)
CG 500 (A+B) Two-component epoxy resin glue: 100 ml tube (50 ml resin + 50 ml hardener)
CG 500 (A+B)Two-component epoxy resin glue: 50 ml cartridge (25 ml resin + 25 ml hardener)
Different glues
Chaton Sieve for Chatons size PP 2 – PP 20 (art. 9030/001)
Chaton Sieve for Chatons size PP 21 – SS 34 (art. 9030/002)
Wax stickTweezersVacuum pick-up system
UV light Drying oven
Cou
rtesy
of I
&J F
isnar
, Inc
.
CG 610 (A+B) Two-component epoxy resin glue: 50 ml cartridge (33.3 ml resin + 16.7 ml hardener)
CG 610 (A+B) Two-component epoxy resin glue: 750 ml box (500 ml resin + 250 ml hardener)
Chaton Sieve for Chatons size PP 0 – PP 1 (art. 9030/003)
45 Application techniques
GLU
ING
SUPPLIERS
This list provides an overview of selected suppliers worldwide.
MACHINES & TOOLS SUPPLIER CONTACT
90°/95° NC drill/milling cutter Dixi Holding SA www.dixi.ch
Hahn & Kolb GmbH www.hahn-kolb.de
Hoffmann GmbH www.hoffmann-group.com
Reich Präzisionswerkzeuge www.reich.at
Wedco www.wedco.at
Test Pen Swarovski: art. 9030/000 www.swarovski.com/professional
Fluid dispenser (with/without vacuum suction)
Epoxy & Equipment Technology Pte Ltd www.eet.com.sg
Hottemp (M) Sdn. Bhd. www.hottemp.com.my
I & J Fisnar, Inc. www.fisnar.com
PT. SKT International www.sktisolution.com
Vieweg GmbH www.dosieren.de
Mixing Nozzle for CG 500 (A+B) and CG 610 (A+B) (10 pcs.)
Swarovski: art. 9030/126 www.swarovski.com/professional
CG 500 (A+B)Two-component epoxy resin glue
Swarovski:
art. 9030, CG 500 (A+B) 50 ml cartridge,
America, Asia, Europe
www.swarovski.com/professional
art. 9030, CG 500 (A+B) 100 ml tube, America,
Asia, Europe
art. 9030, CG 500 (A+B) 2 l box, America, Asia,
Europe
CG 610 (A+B)Two-component epoxy resin glue
Swarovski:
art. 9030, CG 610 (A+B) 50 ml cartridge,
America, Asia, Europe
www.swarovski.com/professional
art. 9030, CG 610 (A+B) 750 ml box, America,
Asia, Europe
Araldite® adhesives Huntsman International LLC. www.huntsman.com/advanced_materials
3M™ Scotch-Weld™ adhesives 3M www.3m.com
DELO adhesives DELO Industrial Adhesives www.delo.de
ELASTOSIL® adhesives / MS Clear HS Wacker Chemie AG www.wacker.com
LOCTITE® adhesives Henkel Ltd. www.loctite.com
Hobby Line Schmuckstein Kleber C. KREUL GmbH & Co KG www.c-kreul.com
CHRISANNE glues CHRISANNE Ltd www.chrisanne.com
Bostik 1475 Bostik SA www.bostik.com
UHU plus endfest 300 UHU GmbH & Co KG www.uhu.com
Tile glues / joint sealers PCI Augsburg GmbH www.pci-augsburg.de
KERAKOLL Spa www.kerakoll.com
ARDEX GmbH www.ardex.com
46 Application techniques
GLU
ING
MACHINES & TOOLS SUPPLIER CONTACT
Chaton Sieve Swarovski: www.swarovski.com/professional
For Chatons size PP 0 – PP 1: art. 9030/003
For Chatons size PP 2 – PP 20: art. 9030/001
For Chatons size PP 21 – SS 34: art. 9030/002
Vacuum pick-up system Epoxy & Equipment Technology Pte Ltd www.eet.com.sg
I & J Fisnar, Inc. www.fisnar.com
Vieweg GmbH www.dosieren.de
Pick-up stick Crystal Ninja www.crystalkatana.com
UV light DELO Industrial Adhesives www.delo.de
Dr. Hönle AG www.hoenle.de
Heraeus Holding GmbH www.heraeus.com
Herbert Waldmann GmbH & Co. KG www.waldmann.com
Drying oven Heraeus Holding GmbH www.heraeus.com
VWR International, LLC. www.vwr.com

47 Application techniques
GLU
ING
APPLICATION
When gluing Swarovski crystals, optimal results are obtained by coordinating the entire application process. Following the application steps in the right order is very important. Experience has shown that the most common reasons for crystals becoming detached are inappropriate areas of application, poorly produced cavities, unsuitable gluing systems, and insufficient quantities of glue. Product-specific application instructions are detailed later in this section.
CAVITY PRODUCTION CHECKING SURFACE
TENSION AND PRE-TREATMENT
CHOICE OF GLUEDOSAGE AND
SETTING POST-CLEANING
AND CURING
Many Swarovski crystals require cavities in order to be applied to materials. A properly produced cavity in combination with a suitable gluing system ensures a stylish, long-lasting application. The cavity makes it easy to glue properly and ensures higher protection of the crystal against mechanical and chemical stress.There are several different production methods and cavity types. Always take into consideration the requirements and base material of the finished product when choosing the appropriate cavity, pre-treatment method, and kind of glue.
PRODUCTION METHODS — Drilling is when materials are machined using a power drill and drilling tool. — Milling is when materials are machined using a milling machine and milling cutter. Milling machines can be fitted with
appropriate tools depending on the materials, e.g. for working with metal and plastic, wood, or natural stone. Modern CNC machining centers offer the greatest precision and can be used to produce cavities of every shape necessary. Please note that when machining natural stone, ceramic, or glass, for example, special diamond-tipped tools must be used.
— Water jet cutting allows materials to be separated via a high-pressure jet of water. Economic reasons make water jet cutting machines ideal for certain crystal shapes that are integrated into flat materials. Please note that only end-to-end cavities can be produced in this way. In addition, materials that swell through water cannot be worked with. Absorbent materials must be fully dried before gluing the crystal.
— Casting: To reproduce cavities, particularly in the jewelry sector, the cavities can be made when the metal component is cast. When following this process, the cavities must be cut into the original model. To prevent the bottom of the cavity being rounded off, which would result in the crystal sitting too high, it is recommended that an additional indentation is made when producing the original model.
Further instructions on jewelry production can be found on page 36.
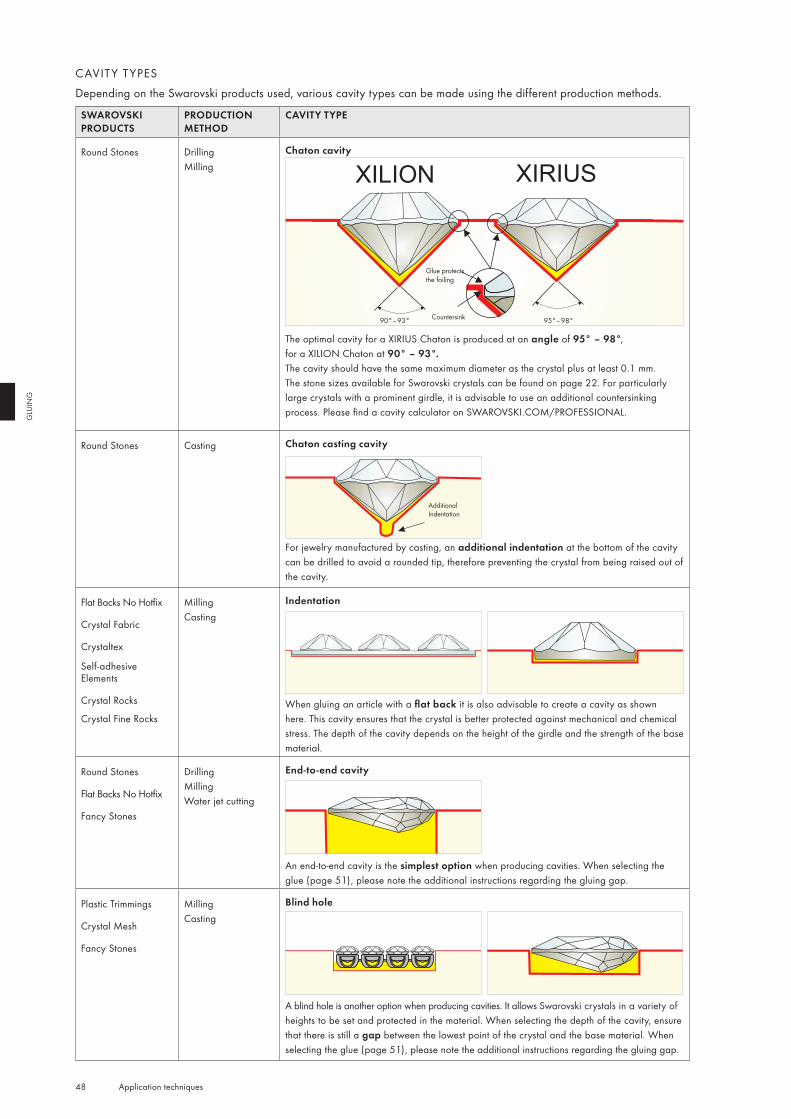
XIRIUSXILION
90°–93° 95°–98°
48 Application techniques
GLU
ING
SWAROVSKI PRODUCTS
PRODUCTION METHOD
CAVITY TYPE
Round Stones DrillingMilling
Chaton cavity
The optimal cavity for a XIRIUS Chaton is produced at an angle of 95° – 98°, for a XILION Chaton at 90° – 93°. The cavity should have the same maximum diameter as the crystal plus at least 0.1 mm. The stone sizes available for Swarovski crystals can be found on page 22. For particularly large crystals with a prominent girdle, it is advisable to use an additional countersinking process. Please find a cavity calculator on SWAROVSKI.COM/PROFESSIONAL.
Round Stones Casting Chaton casting cavity
For jewelry manufactured by casting, an additional indentation at the bottom of the cavity can be drilled to avoid a rounded tip, therefore preventing the crystal from being raised out of the cavity.
Flat Backs No Hotfix
Crystal Fabric
Crystaltex
Self-adhesive Elements
Crystal Rocks
Crystal Fine Rocks
MillingCasting
Indentation
When gluing an article with a flat back it is also advisable to create a cavity as shown here. This cavity ensures that the crystal is better protected against mechanical and chemical stress. The depth of the cavity depends on the height of the girdle and the strength of the base material.
Round Stones
Flat Backs No Hotfix
Fancy Stones
DrillingMillingWater jet cutting
End-to-end cavity
An end-to-end cavity is the simplest option when producing cavities. When selecting the glue (page 51), please note the additional instructions regarding the gluing gap.
Plastic Trimmings
Crystal Mesh
Fancy Stones
MillingCasting
Blind hole
A blind hole is another option when producing cavities. It allows Swarovski crystals in a variety of heights to be set and protected in the material. When selecting the depth of the cavity, ensure that there is still a gap between the lowest point of the crystal and the base material. When selecting the glue (page 51), please note the additional instructions regarding the gluing gap.
CAVIT Y T YPESDepending on the Swarovski products used, various cavity types can be made using the different production methods.
Glue protectsthe foiling
Countersink
AdditionalIndentation
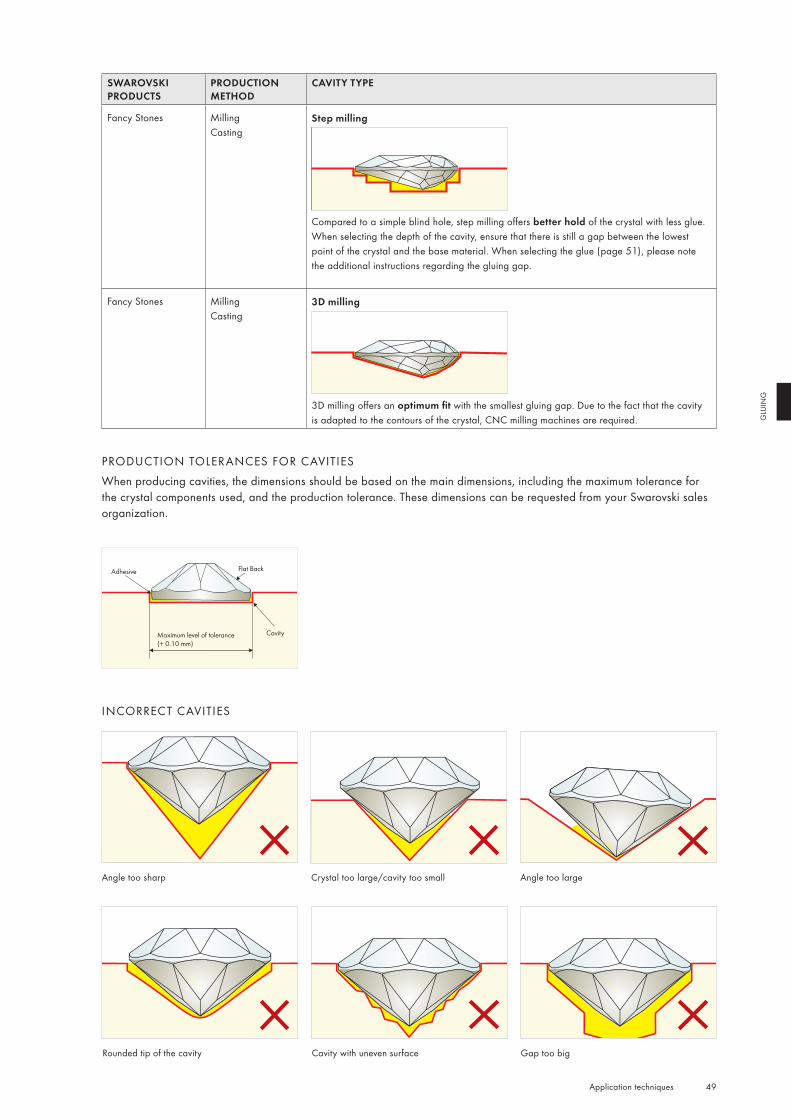
49 Application techniques
GLU
ING
SWAROVSKI PRODUCTS
PRODUCTION METHOD
CAVITY TYPE
Fancy Stones MillingCasting
Step milling
Compared to a simple blind hole, step milling offers better hold of the crystal with less glue. When selecting the depth of the cavity, ensure that there is still a gap between the lowest point of the crystal and the base material. When selecting the glue (page 51), please note the additional instructions regarding the gluing gap.
Fancy Stones MillingCasting
3D milling
3D milling offers an optimum fit with the smallest gluing gap. Due to the fact that the cavity is adapted to the contours of the crystal, CNC milling machines are required.
PRODUCTION TOLERANCES FOR CAVITIESWhen producing cavities, the dimensions should be based on the main dimensions, including the maximum tolerance for the crystal components used, and the production tolerance. These dimensions can be requested from your Swarovski sales organization.
Adhesive Flat Back
CavityMaximum level of tolerance (+ 0.10 mm)
INCORRECT CAVITIES
Angle too sharp Crystal too large/cavity too small Angle too large
Gap too bigCavity with uneven surfaceRounded tip of the cavity
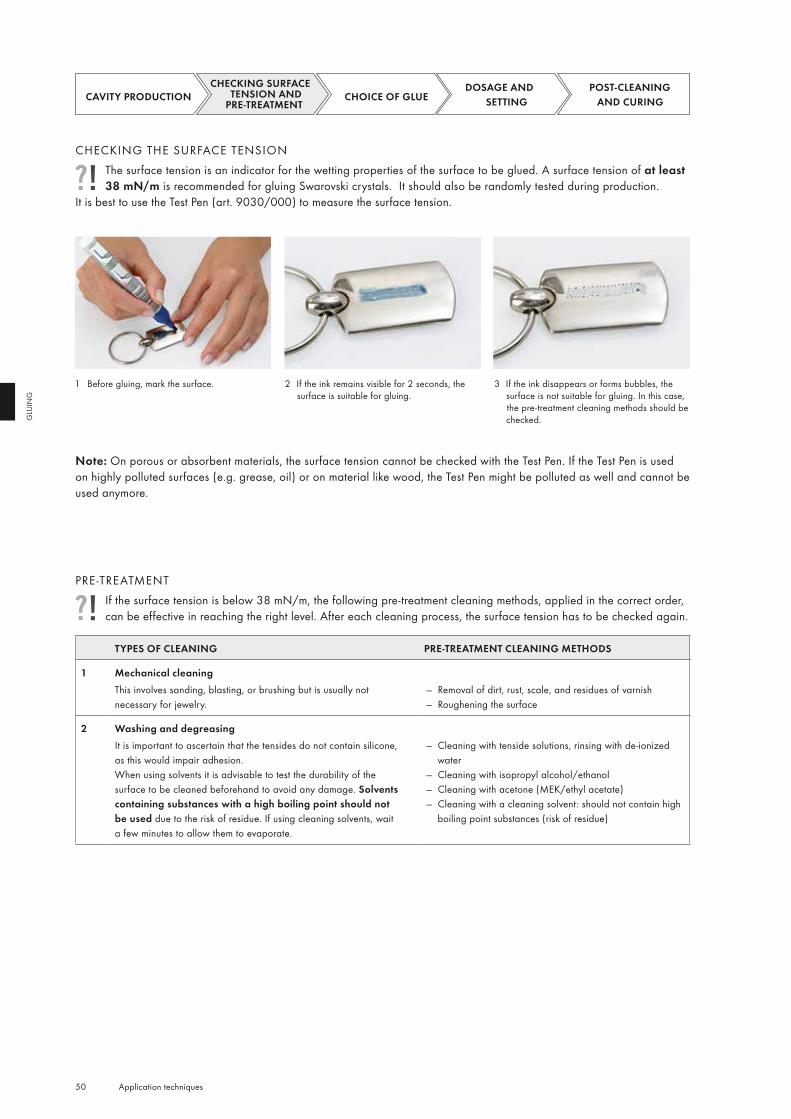
50 Application techniques
GLU
ING
CHECKING THE SURFACE TENSIONThe surface tension is an indicator for the wetting properties of the surface to be glued. A surface tension of at least 38 mN/m is recommended for gluing Swarovski crystals. It should also be randomly tested during production.
It is best to use the Test Pen (art. 9030/000) to measure the surface tension.
CAVITY PRODUCTION CHECKING SURFACE
TENSION AND PRE-TREATMENT
CHOICE OF GLUEDOSAGE AND
SETTING POST-CLEANING
AND CURING
1 Before gluing, mark the surface. 2 If the ink remains visible for 2 seconds, the surface is suitable for gluing.
3 If the ink disappears or forms bubbles, the surface is not suitable for gluing. In this case, the pre-treatment cleaning methods should be checked.
TYPES OF CLEANING PRE-TREATMENT CLEANING METHODS
1 Mechanical cleaningThis involves sanding, blasting, or brushing but is usually not necessary for jewelry.
— Removal of dirt, rust, scale, and residues of varnish — Roughening the surface
2 Washing and degreasingIt is important to ascertain that the tensides do not contain silicone, as this would impair adhesion.When using solvents it is advisable to test the durability of the surface to be cleaned beforehand to avoid any damage. Solvents containing substances with a high boiling point should not be used due to the risk of residue. If using cleaning solvents, wait a few minutes to allow them to evaporate.
— Cleaning with tenside solutions, rinsing with de-ionized water
— Cleaning with isopropyl alcohol/ethanol — Cleaning with acetone (MEK/ethyl acetate) — Cleaning with a cleaning solvent: should not contain high boiling point substances (risk of residue)
Note: On porous or absorbent materials, the surface tension cannot be checked with the Test Pen. If the Test Pen is used on highly polluted surfaces (e.g. grease, oil) or on material like wood, the Test Pen might be polluted as well and cannot be used anymore.
PRE -TREATMENTIf the surface tension is below 38 mN/m, the following pre-treatment cleaning methods, applied in the correct order, can be effective in reaching the right level. After each cleaning process, the surface tension has to be checked again.
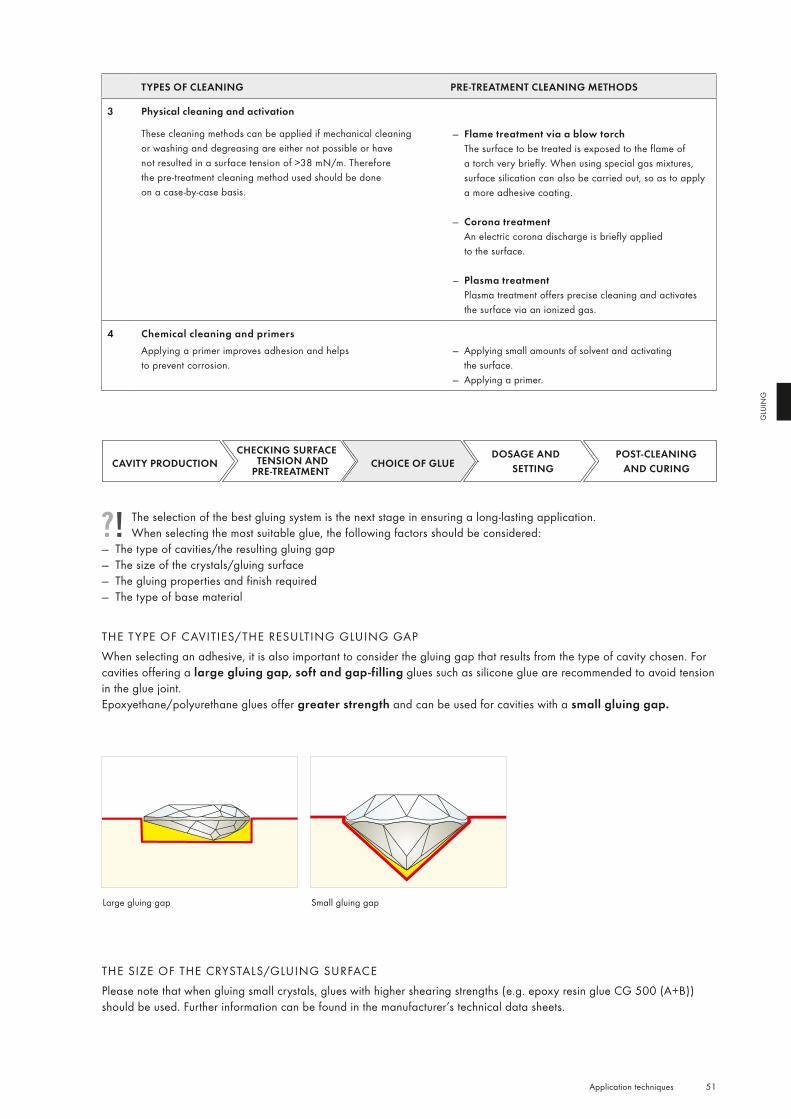
51 Application techniques
GLU
ING
TYPES OF CLEANING PRE-TREATMENT CLEANING METHODS
3 Physical cleaning and activation
These cleaning methods can be applied if mechanical cleaning or washing and degreasing are either not possible or have not resulted in a surface tension of >38 mN/m. Therefore the pre-treatment cleaning method used should be done on a case-by-case basis.
— Flame treatment via a blow torch The surface to be treated is exposed to the flame of a torch very briefly. When using special gas mixtures, surface silication can also be carried out, so as to apply a more adhesive coating.
— Corona treatment An electric corona discharge is briefly applied to the surface.
— Plasma treatment Plasma treatment offers precise cleaning and activates the surface via an ionized gas.
4 Chemical cleaning and primersApplying a primer improves adhesion and helps to prevent corrosion.
— Applying small amounts of solvent and activating the surface.
— Applying a primer.
The selection of the best gluing system is the next stage in ensuring a long-lasting application. When selecting the most suitable glue, the following factors should be considered:
— The type of cavities/the resulting gluing gap — The size of the crystals/gluing surface — The gluing properties and finish required — The type of base material
THE T YPE OF CAVITIES/THE RESULTING GLUING GAPWhen selecting an adhesive, it is also important to consider the gluing gap that results from the type of cavity chosen. For cavities offering a large gluing gap, soft and gap-filling glues such as silicone glue are recommended to avoid tension in the glue joint. Epoxyethane/polyurethane glues offer greater strength and can be used for cavities with a small gluing gap.
CAVITY PRODUCTION CHECKING SURFACE
TENSION AND PRE-TREATMENT
CHOICE OF GLUEDOSAGE AND
SETTING POST-CLEANING
AND CURING
Large gluing gap Small gluing gap
THE SIZE OF THE CRYSTALS/GLUING SURFACEPlease note that when gluing small crystals, glues with higher shearing strengths (e.g. epoxy resin glue CG 500 (A+B)) should be used. Further information can be found in the manufacturer’s technical data sheets.
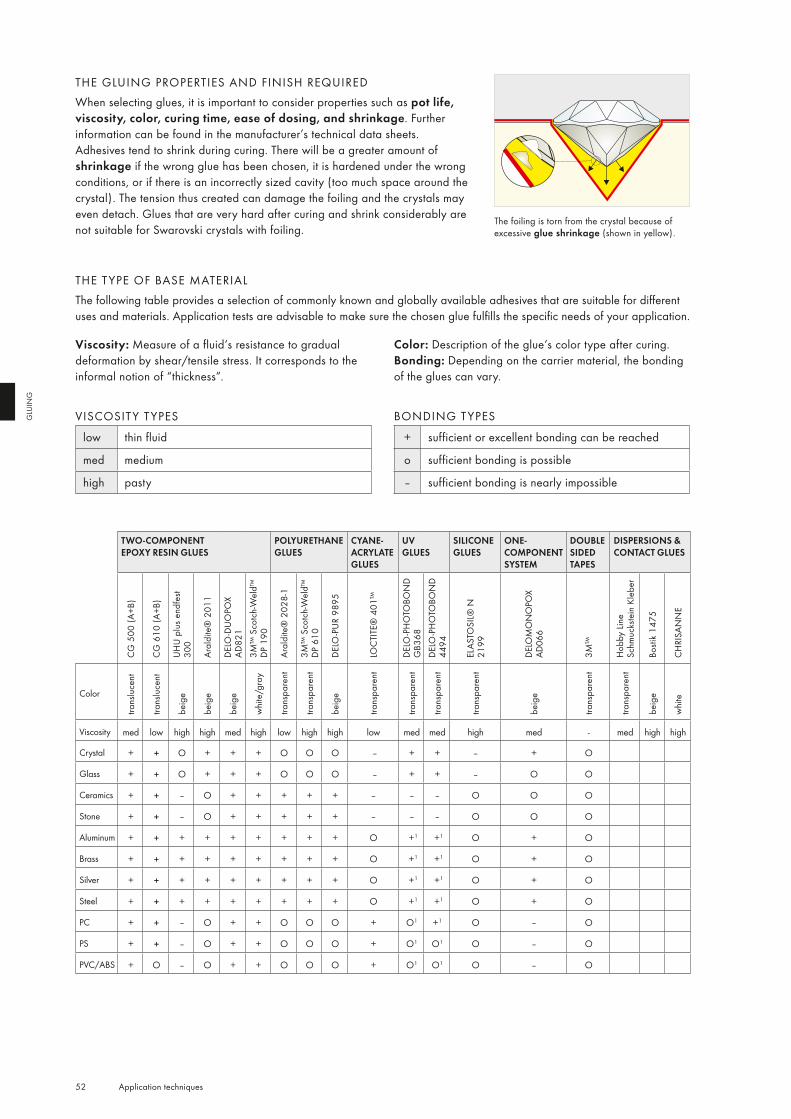
52 Application techniques
GLU
ING
THE GLUING PROPERTIES AND FINISH REQUIREDWhen selecting glues, it is important to consider properties such as pot life, viscosity, color, curing time, ease of dosing, and shrinkage. Further information can be found in the manufacturer’s technical data sheets. Adhesives tend to shrink during curing. There will be a greater amount of shrinkage if the wrong glue has been chosen, it is hardened under the wrong conditions, or if there is an incorrectly sized cavity (too much space around the crystal). The tension thus created can damage the foiling and the crystals may even detach. Glues that are very hard after curing and shrink considerably are not suitable for Swarovski crystals with foiling.
THE T YPE OF BASE MATERIALThe following table provides a selection of commonly known and globally available adhesives that are suitable for different uses and materials. Application tests are advisable to make sure the chosen glue fulfills the specific needs of your application.
Viscosity: Measure of a fluid‘s resistance to gradual deformation by shear/tensile stress. It corresponds to the informal notion of “thickness”.
VISCOSIT Y T YPES
low thin fluid
med medium
high pasty
Color: Description of the glue‘s color type after curing.Bonding: Depending on the carrier material, the bonding of the glues can vary.
BONDING T YPES
+ sufficient or excellent bonding can be reached
o sufficient bonding is possible
– sufficient bonding is nearly impossible
The foiling is torn from the crystal because of excessive glue shrinkage (shown in yellow).
TWO-COMPONENT EPOXY RESIN GLUES
POLYURETHANE GLUES
CYANE-ACRYLATE GLUES
UV GLUES
SILICONE GLUES
ONE-COMPONENT SYSTEM
DOUBLE SIDED TAPES
DISPERSIONS & CONTACT GLUES
CG
500
(A+B
)
CG
610
(A+B
)
UH
U p
lus
endf
est
300
Aral
dite
® 2
011
DEL
O-D
UO
POX
AD82
13M
™ S
cotc
h-W
eld™
D
P 19
0
Aral
dite
® 2
028-
1
3M™
Sco
tch-
Wel
d™
DP
610
DEL
O-P
UR
9895
LOC
TITE
® 4
01™
DEL
O-P
HO
TOBO
ND
GB3
68D
ELO
-PH
OTO
BON
D 44
94
ELAS
TOSI
L® N
21
99
DELO
MO
NO
POX
AD06
6
3M™
Hob
by L
ine
Sc
hmuc
kste
in K
lebe
r
Bosti
k 14
75
CH
RISA
NN
E
Color
trans
luce
nt
trans
luce
nt
beig
e
beig
e
beig
e
whi
te/g
ray
trans
pare
nt
trans
pare
nt
beig
e
trans
pare
nt
trans
pare
nt
trans
pare
nt
trans
pare
nt
beig
e
trans
pare
nt
trans
pare
nt
beig
e
whi
te
Viscosity med low high high med high low high high low med med high med - med high high
Crystal + + O + + + O O O – + + – + O
Glass + + O + + + O O O – + + – O O
Ceramics + + – O + + + + + – – – O O O
Stone + + – O + + + + + – – – O O O
Aluminum + + + + + + + + + O +1 +1 O + O
Brass + + + + + + + + + O +1 +1 O + O
Silver + + + + + + + + + O +1 +1 O + O
Steel + + + + + + + + + O +1 +1 O + O
PC + + – O + + O O O + O1 +1 O – O
PS + + – O + + O O O + O1 O1 O – O
PVC/ABS + O – O + + O O O + O1 O1 O – O
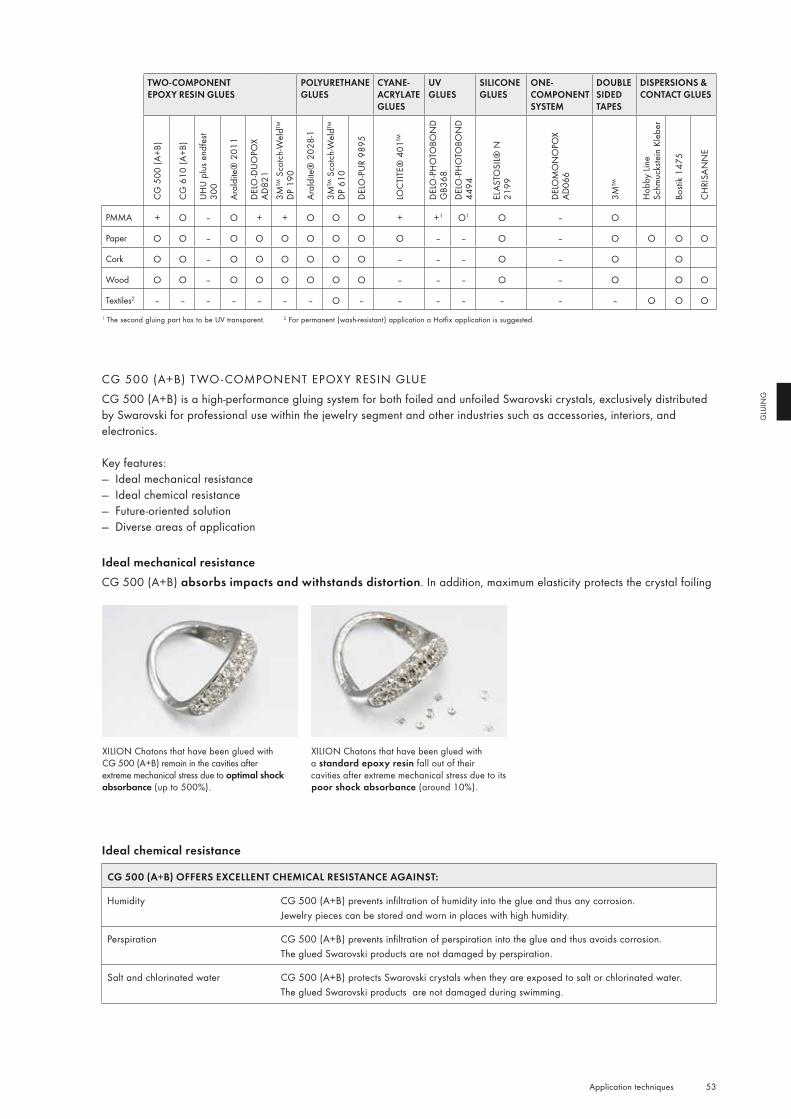
53 Application techniques
GLU
ING
CG 500 (A+B) T WO - COMPONENT EPOXY RESIN GLUECG 500 (A+B) is a high-performance gluing system for both foiled and unfoiled Swarovski crystals, exclusively distributed by Swarovski for professional use within the jewelry segment and other industries such as accessories, interiors, and electronics.
Key features: — Ideal mechanical resistance — Ideal chemical resistance — Future-oriented solution — Diverse areas of application
Ideal mechanical resistanceCG 500 (A+B) absorbs impacts and withstands distortion. In addition, maximum elasticity protects the crystal foiling
XILION Chatons that have been glued with CG 500 (A+B) remain in the cavities after extreme mechanical stress due to optimal shock absorbance (up to 500%).
XILION Chatons that have been glued with a standard epoxy resin fall out of their cavities after extreme mechanical stress due to its poor shock absorbance (around 10%).
Ideal chemical resistance
CG 500 (A+B) OFFERS EXCELLENT CHEMICAL RESISTANCE AGAINST:
Humidity CG 500 (A+B) prevents infiltration of humidity into the glue and thus any corrosion.Jewelry pieces can be stored and worn in places with high humidity.
Perspiration CG 500 (A+B) prevents infiltration of perspiration into the glue and thus avoids corrosion.The glued Swarovski products are not damaged by perspiration.
Salt and chlorinated water CG 500 (A+B) protects Swarovski crystals when they are exposed to salt or chlorinated water. The glued Swarovski products are not damaged during swimming.
TWO-COMPONENT EPOXY RESIN GLUES
POLYURETHANE GLUES
CYANE-ACRYLATE GLUES
UV GLUES
SILICONE GLUES
ONE-COMPONENT SYSTEM
DOUBLE SIDED TAPES
DISPERSIONS & CONTACT GLUES
CG
500
(A+B
)
CG
610
(A+B
)
UH
U p
lus
endf
est
300
Aral
dite
® 2
011
DEL
O-D
UO
POX
AD82
13M
™ S
cotc
h-W
eld™
D
P 19
0
Aral
dite
® 2
028-
1
3M™
Sco
tch-
Wel
d™
DP
610
DEL
O-P
UR
9895
LOC
TITE
® 4
01™
DEL
O-P
HO
TOBO
ND
GB3
68D
ELO
-PH
OTO
BON
D 44
94
ELAS
TOSI
L® N
21
99
DELO
MO
NO
POX
AD06
6
3M™
Hob
by L
ine
Sc
hmuc
kste
in K
lebe
r
Bosti
k 14
75
CH
RISA
NN
E
PMMA + O – O + + O O O + +1 O1 O – O
Paper O O – O O O O O O O – – O – O O O O
Cork O O – O O O O O O – – – O – O O
Wood O O – O O O O O O – – – O – O O O
Textiles2 – – – – – – – O – – – – – – – O O O1 The second gluing part has to be UV transparent. 2 For permanent (wash-resistant) application a Hotfix application is suggested.
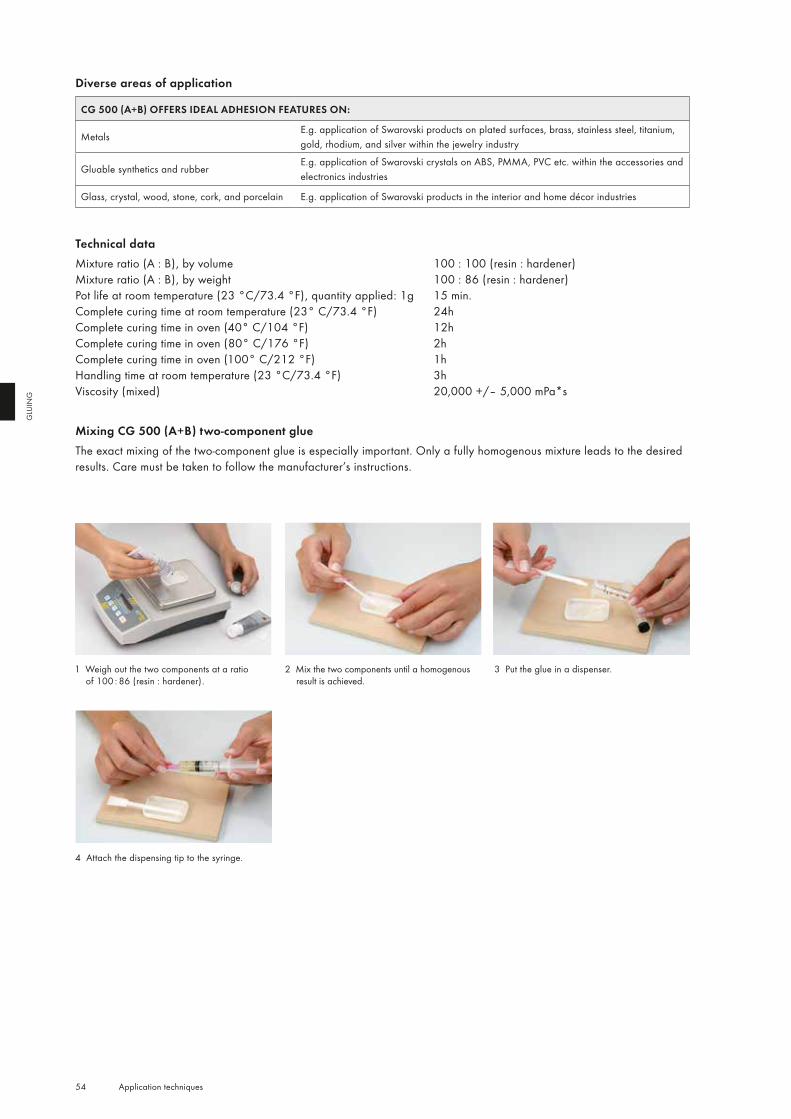
54 Application techniques
GLU
ING
Technical dataMixture ratio (A : B), by volume 100 : 100 (resin : hardener)Mixture ratio (A : B), by weight 100 : 86 (resin : hardener)Pot life at room temperature (23 °C/73.4 °F), quantity applied: 1g 15 min.Complete curing time at room temperature (23° C/73.4 °F) 24hComplete curing time in oven (40° C/104 °F) 12hComplete curing time in oven (80° C/176 °F) 2hComplete curing time in oven (100° C/212 °F) 1hHandling time at room temperature (23 °C/73.4 °F) 3hViscosity (mixed) 20,000 +/– 5,000 mPa*s
Mixing CG 500 (A+B) two-component glueThe exact mixing of the two-component glue is especially important. Only a fully homogenous mixture leads to the desired results. Care must be taken to follow the manufacturer’s instructions.
Diverse areas of application
CG 500 (A+B) OFFERS IDEAL ADHESION FEATURES ON:
MetalsE.g. application of Swarovski products on plated surfaces, brass, stainless steel, titanium, gold, rhodium, and silver within the jewelry industry
Gluable synthetics and rubberE.g. application of Swarovski crystals on ABS, PMMA, PVC etc. within the accessories and electronics industries
Glass, crystal, wood, stone, cork, and porcelain E.g. application of Swarovski products in the interior and home décor industries
1 Weigh out the two components at a ratio of 100 : 86 (resin : hardener).
2 Mix the two components until a homogenous result is achieved.
3 Put the glue in a dispenser.
4 Attach the dispensing tip to the syringe.
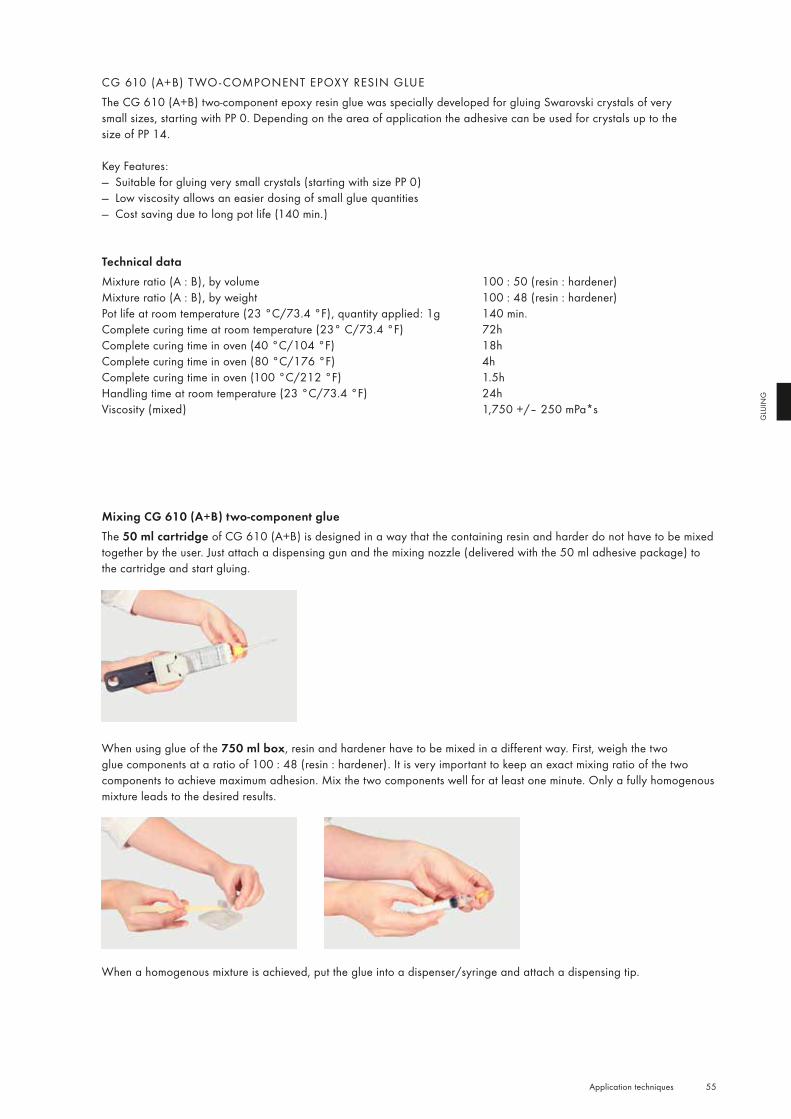
55 Application techniques
GLU
ING
CG 610 (A+B) T WO - COMPONENT EPOXY RESIN GLUEThe CG 610 (A+B) two-component epoxy resin glue was specially developed for gluing Swarovski crystals of very small sizes, starting with PP 0. Depending on the area of application the adhesive can be used for crystals up to the size of PP 14.
Key Features: — Suitable for gluing very small crystals (starting with size PP 0) — Low viscosity allows an easier dosing of small glue quantities — Cost saving due to long pot life (140 min.)
Technical dataMixture ratio (A : B), by volume 100 : 50 (resin : hardener)Mixture ratio (A : B), by weight 100 : 48 (resin : hardener)Pot life at room temperature (23 °C/73.4 °F), quantity applied: 1g 140 min.Complete curing time at room temperature (23° C/73.4 °F) 72hComplete curing time in oven (40 °C/104 °F) 18hComplete curing time in oven (80 °C/176 °F) 4hComplete curing time in oven (100 °C/212 °F) 1.5hHandling time at room temperature (23 °C/73.4 °F) 24hViscosity (mixed) 1,750 +/– 250 mPa*s
Mixing CG 610 (A+B) two-component glueThe 50 ml cartridge of CG 610 (A+B) is designed in a way that the containing resin and harder do not have to be mixed together by the user. Just attach a dispensing gun and the mixing nozzle (delivered with the 50 ml adhesive package) to the cartridge and start gluing.
When using glue of the 750 ml box, resin and hardener have to be mixed in a different way. First, weigh the two glue components at a ratio of 100 : 48 (resin : hardener). It is very important to keep an exact mixing ratio of the two components to achieve maximum adhesion. Mix the two components well for at least one minute. Only a fully homogenous mixture leads to the desired results.
When a homogenous mixture is achieved, put the glue into a dispenser/syringe and attach a dispensing tip.
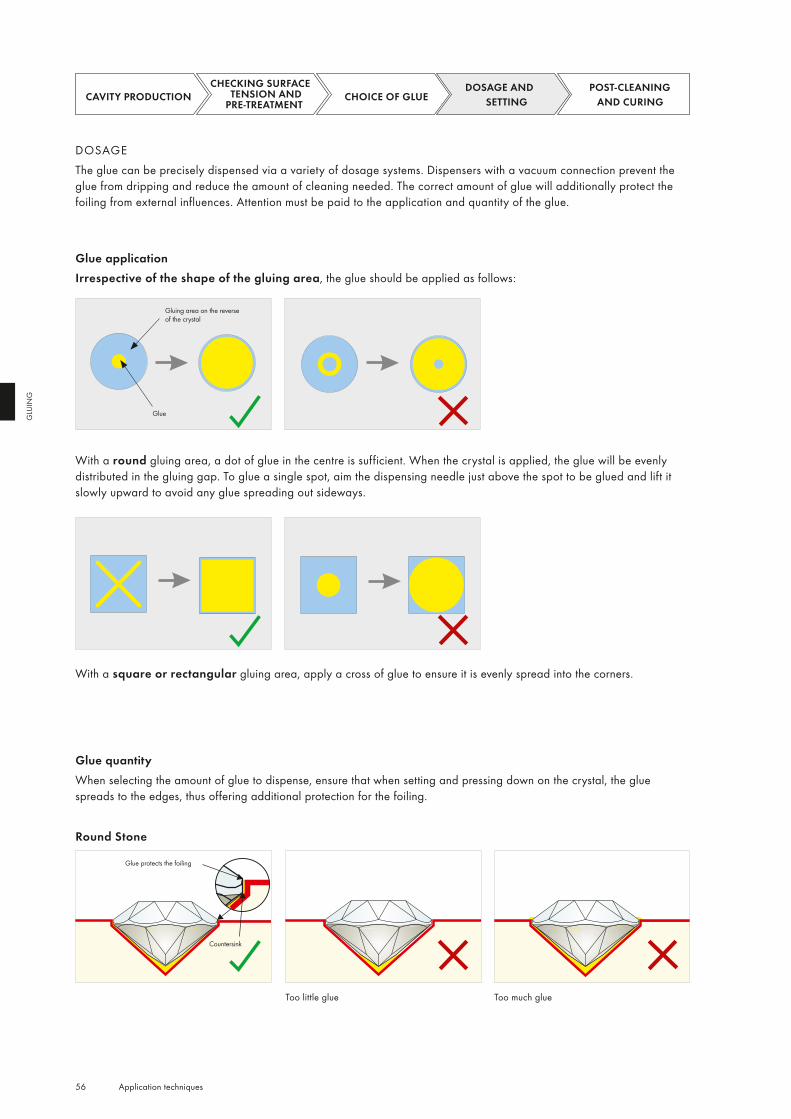
56 Application techniques
GLU
ING
DOSAGEThe glue can be precisely dispensed via a variety of dosage systems. Dispensers with a vacuum connection prevent the glue from dripping and reduce the amount of cleaning needed. The correct amount of glue will additionally protect the foiling from external influences. Attention must be paid to the application and quantity of the glue.
Glue applicationIrrespective of the shape of the gluing area, the glue should be applied as follows:
Gluing area on the reverse of the crystal
Glue
With a round gluing area, a dot of glue in the centre is sufficient. When the crystal is applied, the glue will be evenly distributed in the gluing gap. To glue a single spot, aim the dispensing needle just above the spot to be glued and lift it slowly upward to avoid any glue spreading out sideways.
With a square or rectangular gluing area, apply a cross of glue to ensure it is evenly spread into the corners.
Glue quantityWhen selecting the amount of glue to dispense, ensure that when setting and pressing down on the crystal, the glue spreads to the edges, thus offering additional protection for the foiling.
Round Stone
Countersink
Glue protects the foiling
Too much glueToo little glue
CAVITY PRODUCTION CHECKING SURFACE
TENSION AND PRE-TREATMENT
CHOICE OF GLUEDOSAGE AND
SETTING POST-CLEANING
AND CURING

57 Application techniques
GLU
ING
Fancy Stone
Too little glue Too much glue
Glue discharge
Glue does not fill the gluing gap
Glue protects the foiling
Half Hole PendantTwo different types of adhesive can be used to affix the single Half Hole Pendant to the metal cap: UV glue and two-component epoxy resin glue. If using UV glue, the crystal must be permeable to UV light. This applies for the following Half Hole Pendant colors and effects: Crystal, Crystal AB, and Amethyst. Best results in internal tests were achieved using the UV glue DELO-PHOTOBOND GB 368.Please note that some crystal colors absorb UV light and are thus unsuitable for use with UV glues: Siam, Smoky Quartz, and Jet. In this case using epoxy resin glue is suggested. In internal tests, the best bond was achieved using CG 500 (A+B). As colors and effects not explicitly mentioned may provide variable results, in these cases it is recommended to perform application tests with UV glue or to choose the option of gluing with epoxy resin glue. For further information about commonly known and globally available glues and their adhesion on metal, please check the overview of glues at the beginning of the chapter “Choice of Glue”.
1 To achieve precise and consistent results, it is suggested to use a dosage system. Choose a dispensing tip with a diameter smaller than 1 mm and put a dot of glue into the pendant’s hole. The amount of glue used depends on the type of adhesive and its curing behavior; performing application tests is therefore recommended.
2 After setting the metal cap into the hole, the glue should be evenly distributed in the gluing gap and spread over the edges to also affix the metal part on top of the crystal. Remove excess glue before it is hardening, e.g. with a cotton wipe soaked in isopropyl alcohol.
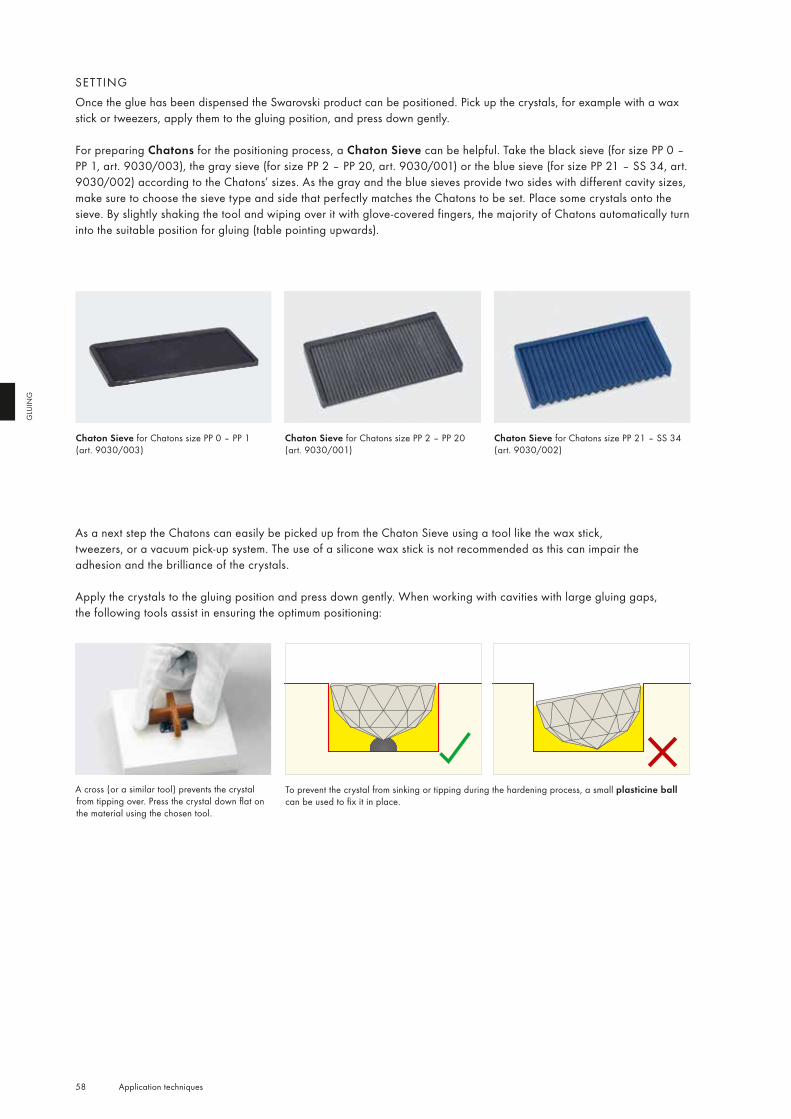
58 Application techniques
GLU
ING
SETTINGOnce the glue has been dispensed the Swarovski product can be positioned. Pick up the crystals, for example with a wax stick or tweezers, apply them to the gluing position, and press down gently.
For preparing Chatons for the positioning process, a Chaton Sieve can be helpful. Take the black sieve (for size PP 0 – PP 1, art. 9030/003), the gray sieve (for size PP 2 – PP 20, art. 9030/001) or the blue sieve (for size PP 21 – SS 34, art. 9030/002) according to the Chatons’ sizes. As the gray and the blue sieves provide two sides with different cavity sizes, make sure to choose the sieve type and side that perfectly matches the Chatons to be set. Place some crystals onto the sieve. By slightly shaking the tool and wiping over it with glove-covered fingers, the majority of Chatons automatically turn into the suitable position for gluing (table pointing upwards).
As a next step the Chatons can easily be picked up from the Chaton Sieve using a tool like the wax stick, tweezers, or a vacuum pick-up system. The use of a silicone wax stick is not recommended as this can impair the adhesion and the brilliance of the crystals.
Apply the crystals to the gluing position and press down gently. When working with cavities with large gluing gaps, the following tools assist in ensuring the optimum positioning:
To prevent the crystal from sinking or tipping during the hardening process, a small plasticine ball can be used to fix it in place.
A cross (or a similar tool) prevents the crystal from tipping over. Press the crystal down flat on the material using the chosen tool.
Chaton Sieve for Chatons size PP 2 – PP 20 (art. 9030/001)
Chaton Sieve for Chatons size PP 21 – SS 34 (art. 9030/002)
Chaton Sieve for Chatons size PP 0 – PP 1 (art. 9030/003)
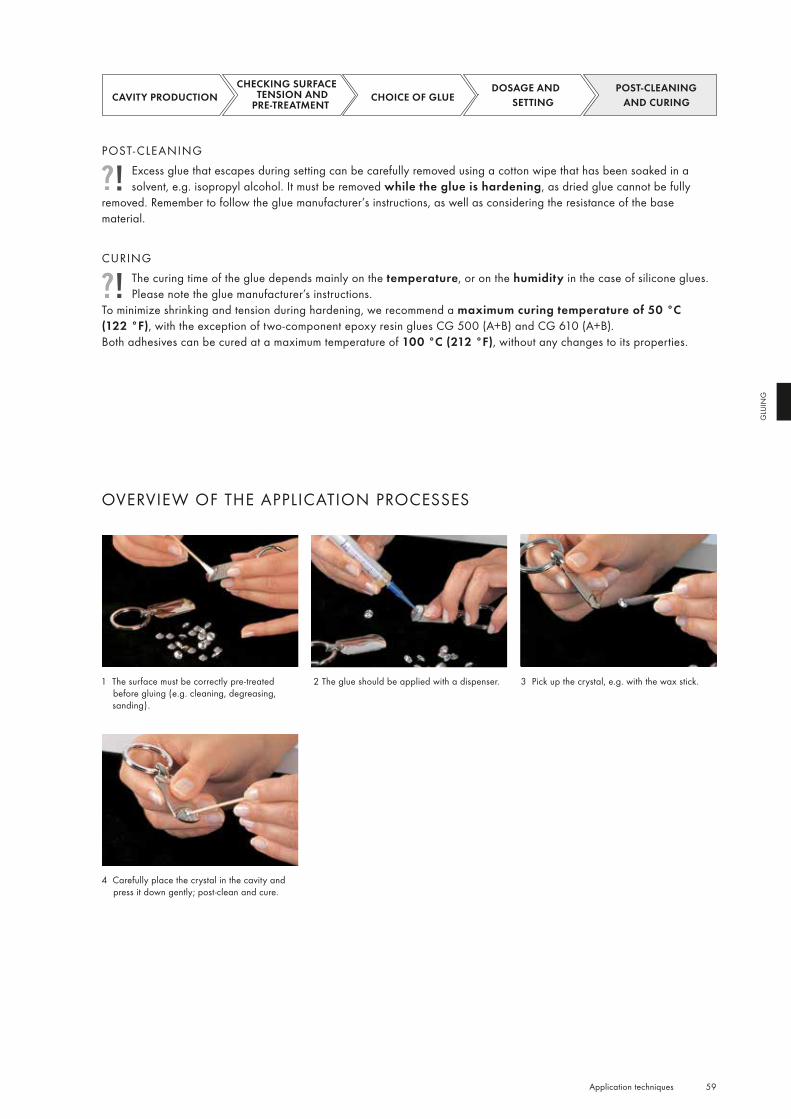
59 Application techniques
GLU
ING
POST- CLEANINGExcess glue that escapes during setting can be carefully removed using a cotton wipe that has been soaked in a solvent, e.g. isopropyl alcohol. It must be removed while the glue is hardening, as dried glue cannot be fully
removed. Remember to follow the glue manufacturer’s instructions, as well as considering the resistance of the base material.
CURINGThe curing time of the glue depends mainly on the temperature, or on the humidity in the case of silicone glues. Please note the glue manufacturer’s instructions.
To minimize shrinking and tension during hardening, we recommend a maximum curing temperature of 50 °C (122 °F), with the exception of two-component epoxy resin glues CG 500 (A+B) and CG 610 (A+B). Both adhesives can be cured at a maximum temperature of 100 °C (212 °F), without any changes to its properties.
OVERVIEW OF THE APPLICATION PROCESSES
CAVITY PRODUCTION CHECKING SURFACE
TENSION AND PRE-TREATMENT
CHOICE OF GLUEDOSAGE AND
SETTING POST-CLEANING
AND CURING
1 The surface must be correctly pre-treated before gluing (e.g. cleaning, degreasing, sanding).
2 The glue should be applied with a dispenser. 3 Pick up the crystal, e.g. with the wax stick.
4 Carefully place the crystal in the cavity and press it down gently; post-clean and cure.
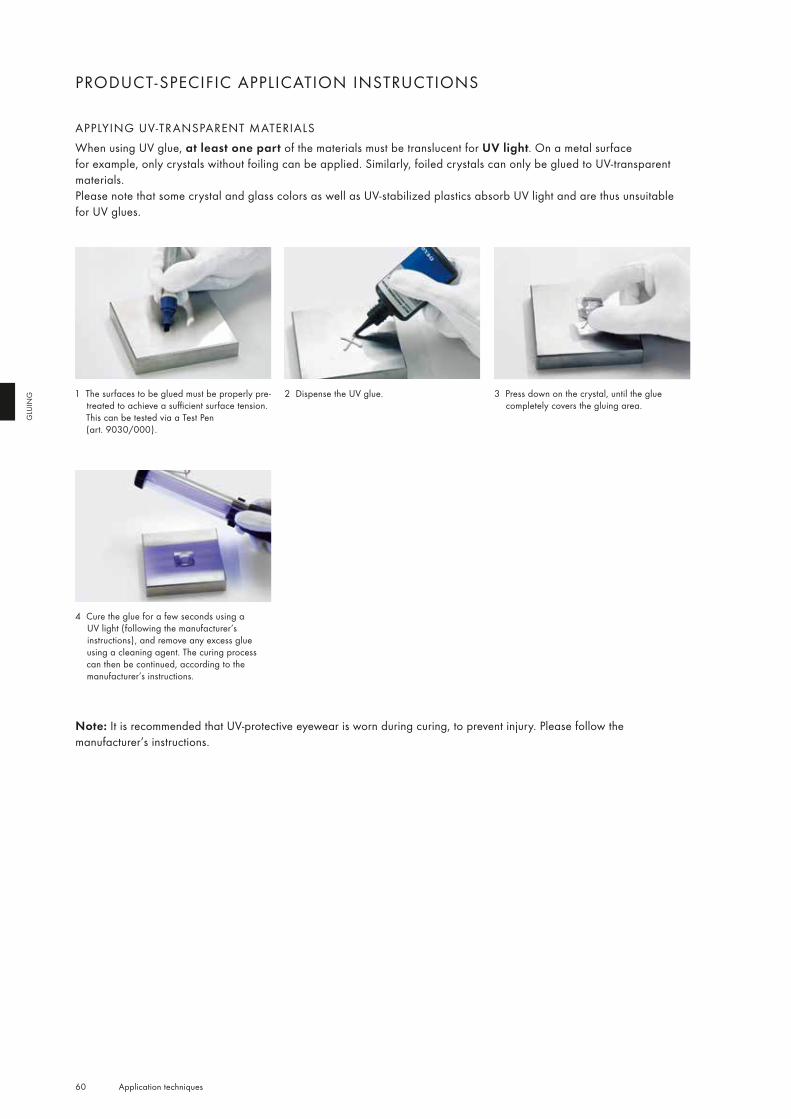
60 Application techniques
GLU
ING
PRODUCT-SPECIFIC APPLICATION INSTRUCTIONS
APPLYING UV-TRANSPARENT MATERIALS When using UV glue, at least one part of the materials must be translucent for UV light. On a metal surface for example, only crystals without foiling can be applied. Similarly, foiled crystals can only be glued to UV-transparent materials. Please note that some crystal and glass colors as well as UV-stabilized plastics absorb UV light and are thus unsuitable for UV glues.
1 The surfaces to be glued must be properly pre-treated to achieve a sufficient surface tension. This can be tested via a Test Pen (art. 9030/000).
2 Dispense the UV glue. 3 Press down on the crystal, until the glue completely covers the gluing area.
4 Cure the glue for a few seconds using a UV light (following the manufacturer’s instructions), and remove any excess glue using a cleaning agent. The curing process can then be continued, according to the manufacturer’s instructions.
Note: It is recommended that UV-protective eyewear is worn during curing, to prevent injury. Please follow the manufacturer’s instructions.
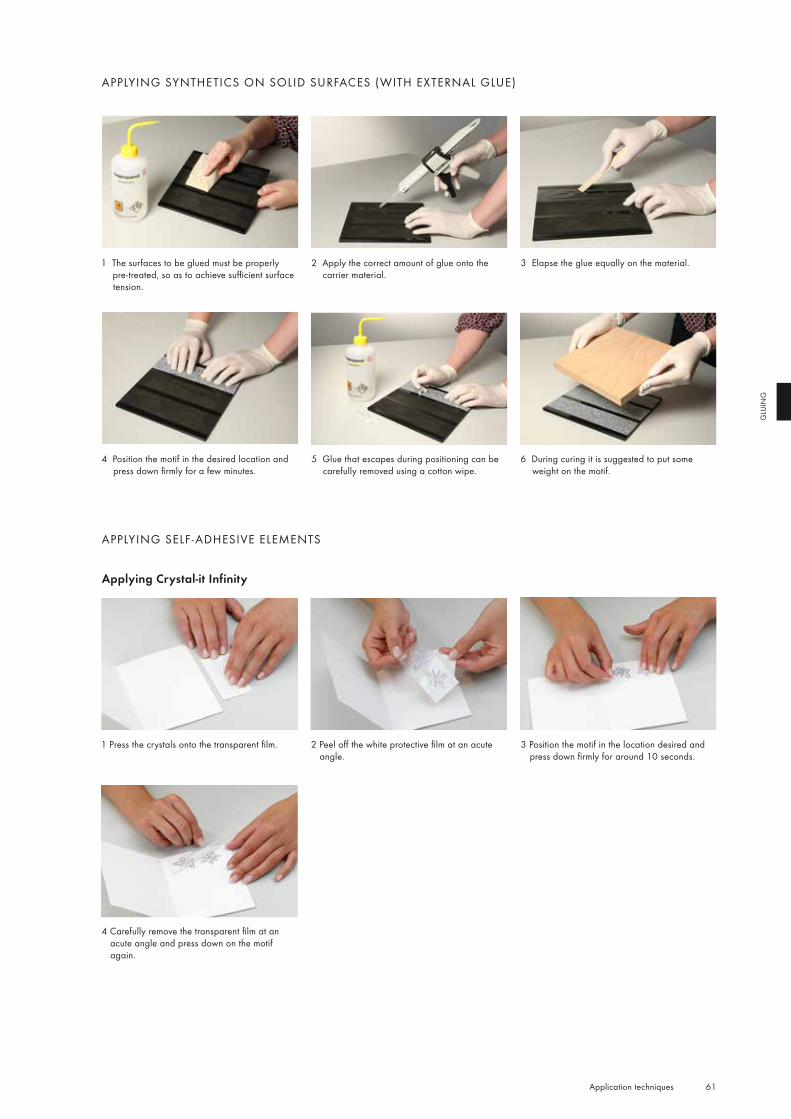
61 Application techniques
GLU
ING
APPLYING SYNTHETICS ON SOLID SURFACES (WITH EXTERNAL GLUE)
1 Press the crystals onto the transparent film. 2 Peel off the white protective film at an acute angle.
3 Position the motif in the location desired and press down firmly for around 10 seconds.
1 The surfaces to be glued must be properly pre-treated, so as to achieve sufficient surface tension.
2 Apply the correct amount of glue onto the carrier material.
3 Elapse the glue equally on the material.
APPLYING SELF -ADHESIVE ELEMENTS
Applying Crystal-it Infinity
4 Carefully remove the transparent film at an acute angle and press down on the motif again.
4 Position the motif in the desired location and press down firmly for a few minutes.
5 Glue that escapes during positioning can be carefully removed using a cotton wipe.
6 During curing it is suggested to put some weight on the motif.
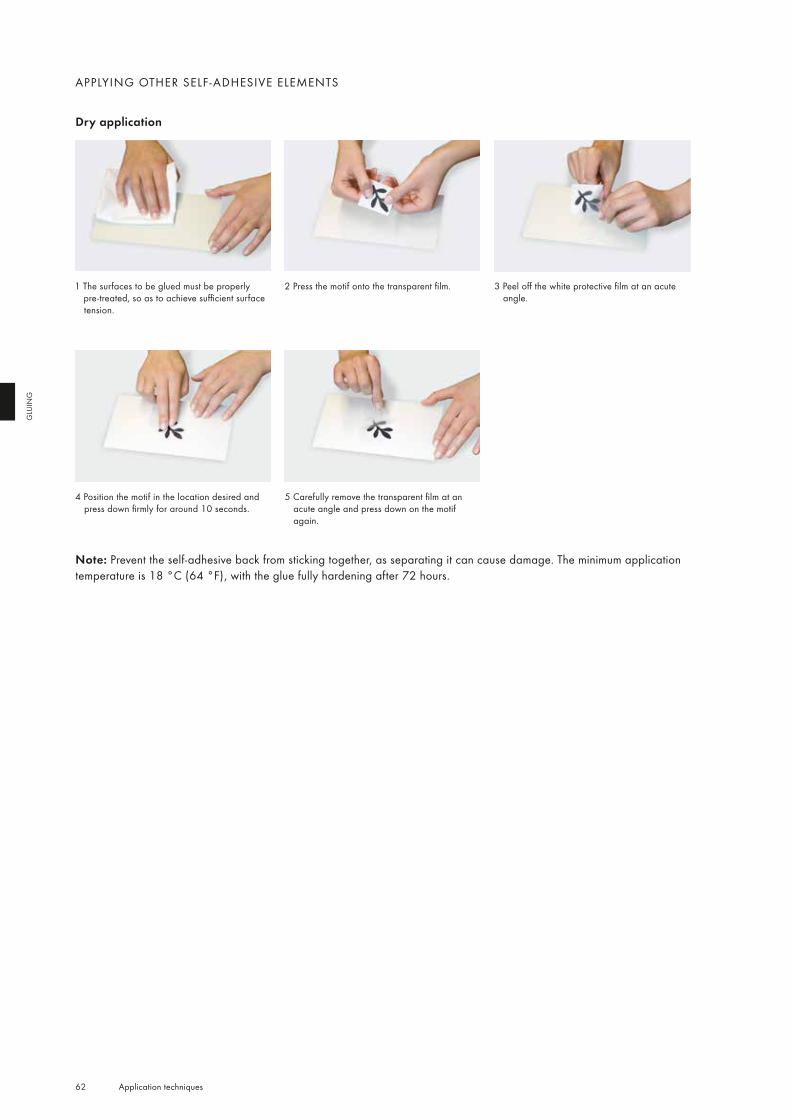
62 Application techniques
GLU
ING
APPLYING OTHER SELF -ADHESIVE ELEMENTS
Dry application
1 The surfaces to be glued must be properly pre-treated, so as to achieve sufficient surface tension.
2 Press the motif onto the transparent film. 3 Peel off the white protective film at an acute angle.
4 Position the motif in the location desired and press down firmly for around 10 seconds.
5 Carefully remove the transparent film at an acute angle and press down on the motif again.
Note: Prevent the self-adhesive back from sticking together, as separating it can cause damage. The minimum application temperature is 18 °C (64 °F), with the glue fully hardening after 72 hours.
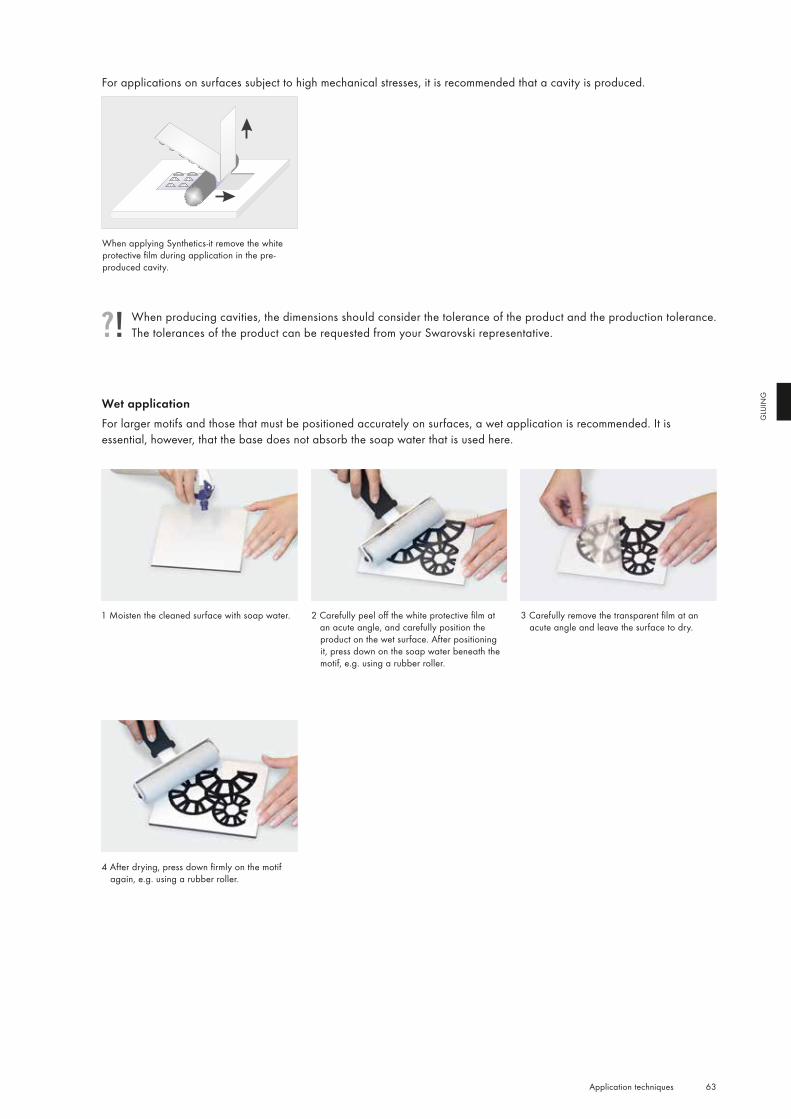
63 Application techniques
GLU
ING
For applications on surfaces subject to high mechanical stresses, it is recommended that a cavity is produced.
When applying Synthetics-it remove the white protective film during application in the pre-produced cavity.
When producing cavities, the dimensions should consider the tolerance of the product and the production tolerance. The tolerances of the product can be requested from your Swarovski representative.
Wet applicationFor larger motifs and those that must be positioned accurately on surfaces, a wet application is recommended. It is essential, however, that the base does not absorb the soap water that is used here.
1 Moisten the cleaned surface with soap water. 2 Carefully peel off the white protective film at an acute angle, and carefully position the product on the wet surface. After positioning it, press down on the soap water beneath the motif, e.g. using a rubber roller.
3 Carefully remove the transparent film at an acute angle and leave the surface to dry.
4 After drying, press down firmly on the motif again, e.g. using a rubber roller.
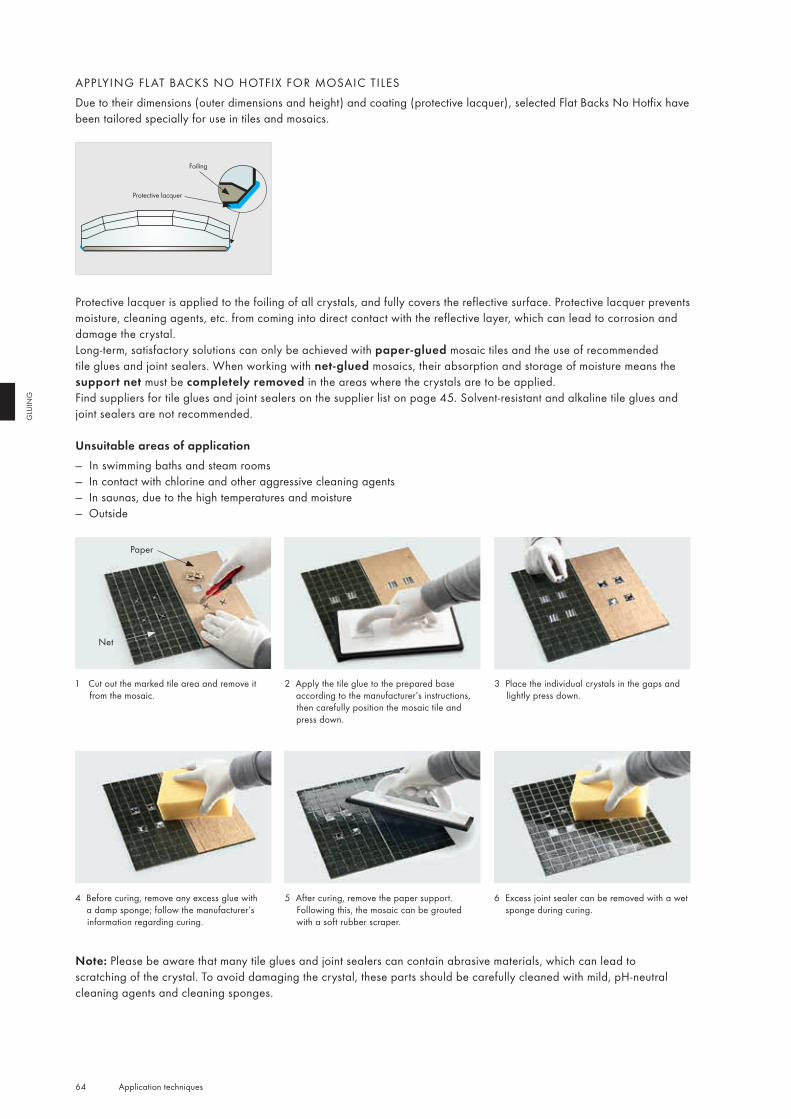
64 Application techniques
GLU
ING
APPLYING FL AT BACKS NO HOTFIX FOR MOSAIC TILESDue to their dimensions (outer dimensions and height) and coating (protective lacquer), selected Flat Backs No Hotfix have been tailored specially for use in tiles and mosaics.
Protective lacquer
Foiling
Protective lacquer is applied to the foiling of all crystals, and fully covers the reflective surface. Protective lacquer prevents moisture, cleaning agents, etc. from coming into direct contact with the reflective layer, which can lead to corrosion and damage the crystal.Long-term, satisfactory solutions can only be achieved with paper-glued mosaic tiles and the use of recommended tile glues and joint sealers. When working with net-glued mosaics, their absorption and storage of moisture means the support net must be completely removed in the areas where the crystals are to be applied.Find suppliers for tile glues and joint sealers on the supplier list on page 45. Solvent-resistant and alkaline tile glues and joint sealers are not recommended.
Unsuitable areas of application — In swimming baths and steam rooms — In contact with chlorine and other aggressive cleaning agents — In saunas, due to the high temperatures and moisture — Outside
Paper
Net
1 Cut out the marked tile area and remove it from the mosaic.
2 Apply the tile glue to the prepared base according to the manufacturer’s instructions, then carefully position the mosaic tile and press down.
3 Place the individual crystals in the gaps and lightly press down.
4 Before curing, remove any excess glue with a damp sponge; follow the manufacturer’s information regarding curing.
5 After curing, remove the paper support. Following this, the mosaic can be grouted with a soft rubber scraper.
6 Excess joint sealer can be removed with a wet sponge during curing.
Note: Please be aware that many tile glues and joint sealers can contain abrasive materials, which can lead to scratching of the crystal. To avoid damaging the crystal, these parts should be carefully cleaned with mild, pH-neutral cleaning agents and cleaning sponges.
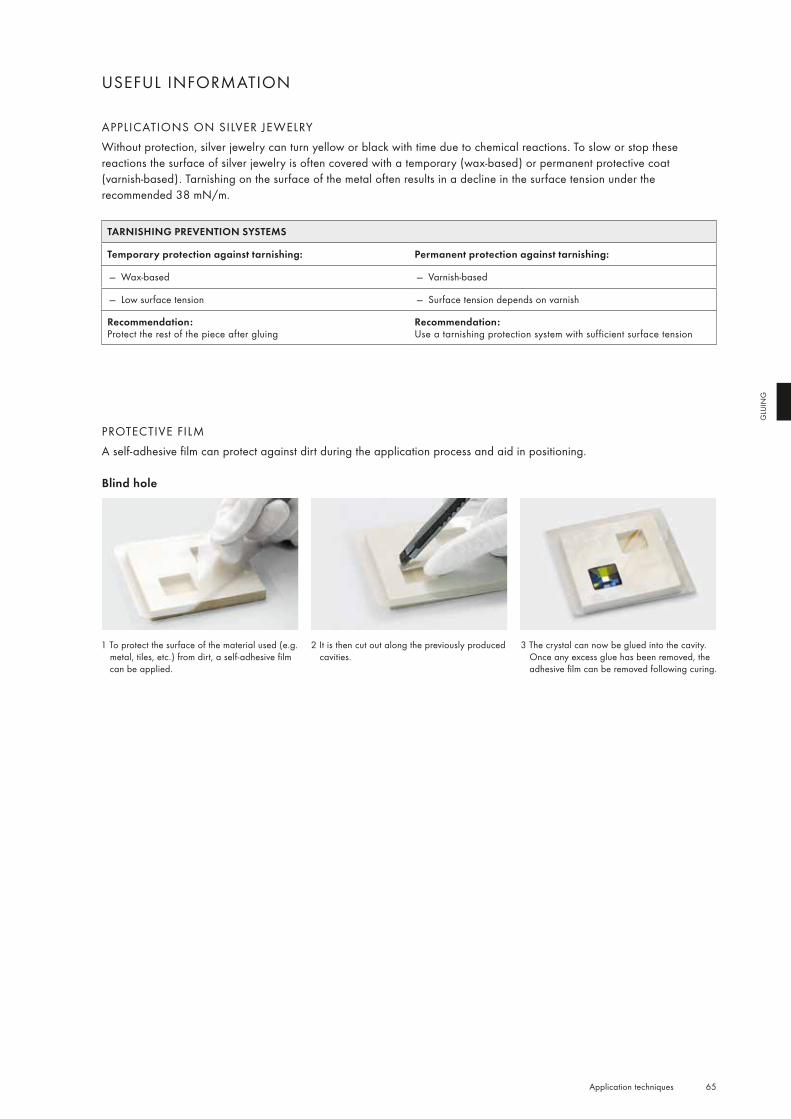
65 Application techniques
GLU
ING
USEFUL INFORMATION
1 To protect the surface of the material used (e.g. metal, tiles, etc.) from dirt, a self-adhesive film can be applied.
2 It is then cut out along the previously produced cavities.
3 The crystal can now be glued into the cavity. Once any excess glue has been removed, the adhesive film can be removed following curing.
APPLICATIONS ON SILVER JEWELRYWithout protection, silver jewelry can turn yellow or black with time due to chemical reactions. To slow or stop these reactions the surface of silver jewelry is often covered with a temporary (wax-based) or permanent protective coat (varnish-based). Tarnishing on the surface of the metal often results in a decline in the surface tension under the recommended 38 mN/m.
TARNISHING PREVENTION SYSTEMS
Temporary protection against tarnishing: Permanent protection against tarnishing:
— Wax-based — Varnish-based
— Low surface tension — Surface tension depends on varnish
Recommendation: Protect the rest of the piece after gluing
Recommendation: Use a tarnishing protection system with sufficient surface tension
PROTECTIVE FILMA self-adhesive film can protect against dirt during the application process and aid in positioning.
Blind hole
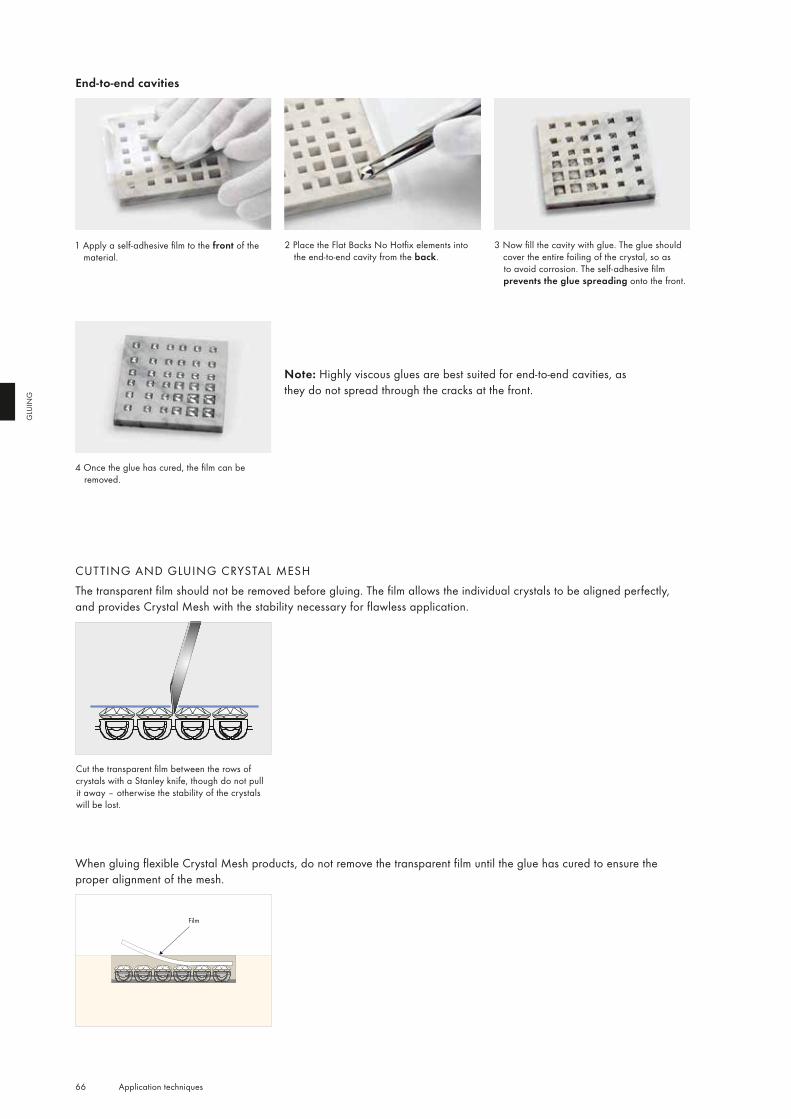
66 Application techniques
GLU
ING
End-to-end cavities
1 Apply a self-adhesive film to the front of the material.
2 Place the Flat Backs No Hotfix elements into the end-to-end cavity from the back.
3 Now fill the cavity with glue. The glue should cover the entire foiling of the crystal, so as to avoid corrosion. The self-adhesive film prevents the glue spreading onto the front.
4 Once the glue has cured, the film can be removed.
CUTTING AND GLUING CRYSTAL MESHThe transparent film should not be removed before gluing. The film allows the individual crystals to be aligned perfectly, and provides Crystal Mesh with the stability necessary for flawless application.
When gluing flexible Crystal Mesh products, do not remove the transparent film until the glue has cured to ensure the proper alignment of the mesh.
Note: Highly viscous glues are best suited for end-to-end cavities, as they do not spread through the cracks at the front.
Cut the transparent film between the rows of crystals with a Stanley knife, though do not pull it away – otherwise the stability of the crystals will be lost.
Film
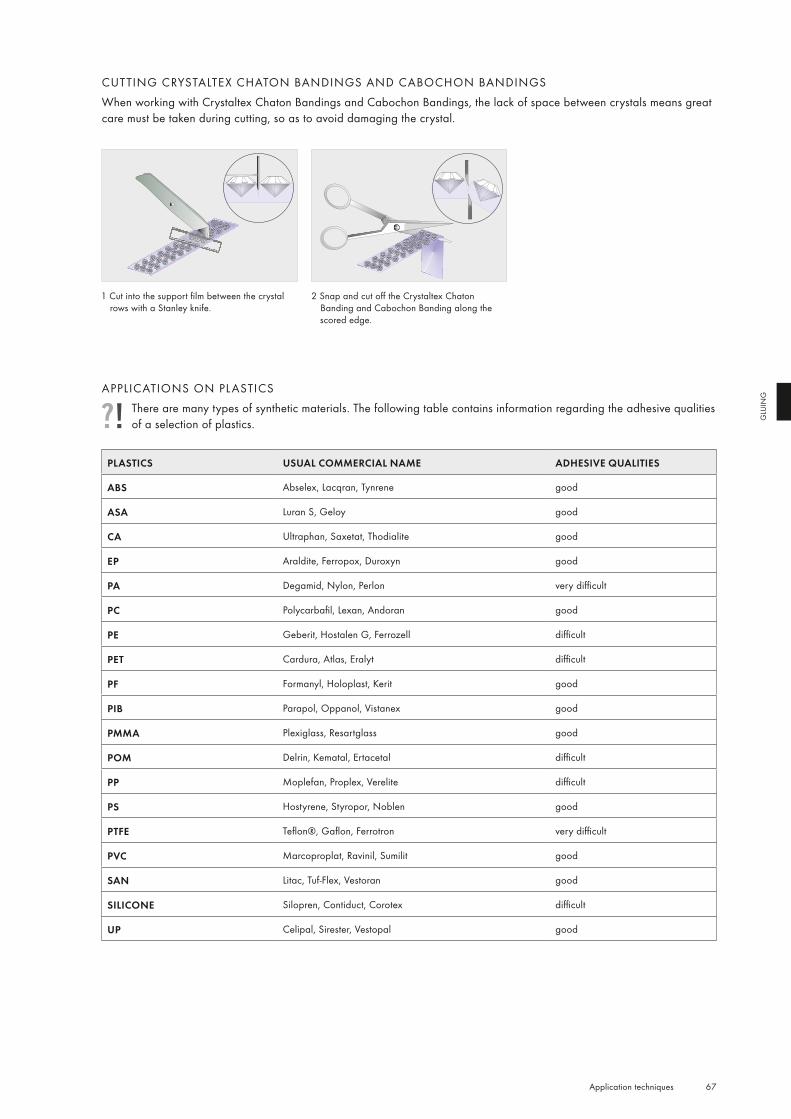
67 Application techniques
GLU
ING
CUTTING CRYSTALTEX CHATON BANDINGS AND CABOCHON BANDINGSWhen working with Crystaltex Chaton Bandings and Cabochon Bandings, the lack of space between crystals means great care must be taken during cutting, so as to avoid damaging the crystal.
1 Cut into the support film between the crystal rows with a Stanley knife.
2 Snap and cut off the Crystaltex Chaton Banding and Cabochon Banding along the scored edge.
APPLICATIONS ON PL ASTICSThere are many types of synthetic materials. The following table contains information regarding the adhesive qualities of a selection of plastics.
PLASTICS USUAL COMMERCIAL NAME ADHESIVE QUALITIES
ABS Abselex, Lacqran, Tynrene good
ASA Luran S, Geloy good
CA Ultraphan, Saxetat, Thodialite good
EP Araldite, Ferropox, Duroxyn good
PA Degamid, Nylon, Perlon very difficult
PC Polycarbafil, Lexan, Andoran good
PE Geberit, Hostalen G, Ferrozell difficult
PET Cardura, Atlas, Eralyt difficult
PF Formanyl, Holoplast, Kerit good
PIB Parapol, Oppanol, Vistanex good
PMMA Plexiglass, Resartglass good
POM Delrin, Kematal, Ertacetal difficult
PP Moplefan, Proplex, Verelite difficult
PS Hostyrene, Styropor, Noblen good
PTFE Teflon®, Gaflon, Ferrotron very difficult
PVC Marcoproplat, Ravinil, Sumilit good
SAN Litac, Tuf-Flex, Vestoran good
SILICONE Silopren, Contiduct, Corotex difficult
UP Celipal, Sirester, Vestopal good
68 Application techniques
GLU
ING
The following table outlines common problems and causes when gluing Swarovski crystals, and offers advice on how to avoid them. Further details and more extensive descriptions can be found in the section marked with a
PROBLEM CAUSE
The crystal has become discolored:
The crystal is matt or yellowed.
The crystal seems black and dull compared to the surrounding crystals.
The crystal has been plated.
1, 2
3
4
The crystal has detached from the cavity without the foiling:
The crystal has become discolored.
The crystal has detached with the mirror coating but without the platinum foiling or the glue.
5, 6
7, 8, 9
The crystal has detached from the cavity with the foiling:
Glue is attached to the crystal.
No glue is attached to the crystal anymore.
10, 11, 12, 13, 14
15, 16, 17
Excess glue:
Before hardening.
After hardening.
2
18
CAUSE RECOMMENDATION
1 Glue residues have not been completely removed and have been smeared over the crystal.
Use a suitable dispenser to apply exactly the right amount of glue. Dispensers with a vacuum connection prevent the glue from dripping and reduce the amount of cleaning needed.
2 Too much glue was used. Be sure to use the exact recommended dosage and to carefully remove any excess glue, e.g. using acetone or isopropyl alcohol.
3 The axis of the cavity was already off-center in the original model or the cavity was not drilled straight in the unfinished casting.
Use a special bit when drilling the original model. This offers more precise control of the direction and depth of the drilling.
4 The jewelry was only plated after the crystals had been glued to it.
It is recommended to complete the plating before gluing the crystals.
5 A gluing gap that has not been completely filled is causing corrosion.
Make sure the exact dosage of glue is used.
6 Tensile stresses are reducing the adhesion of the mirror coating. Oxygen is penetrating between the stones and the mirroring and causing oxidization.
Use glue that is more elastic and that does not shrink as much.
7 An incorrect glue system was used. Carry out tests with other glue systems.
8 Incorrect proportions of resin and hardener were used. Follow the glue manufacturer’s mixing instructions.
9 Cleaning agents have affected the glue and/or the protective coating.
Use less solvent or a different type of solvent.
10 Residues of polishing agent were not completely removed before plating.
Double check the type of cleaning process used.
11 A varnished piece of jewelry has not been correctly pre-treated before gluing.
Improve the adhesion of the glue, e.g. with low-pressure plasma treatment or flame treatment if necessary.
12 Too little glue was used. Make sure the exact dosage of glue is used.
13 The cavity has the wrong shape after plating. Re-work the original model to improve the cavity shape.
QUICK ASSISTANCE

69 Application techniques
GLU
ING
CAUSE RECOMMENDATION
14 Electrolyte residues have not been completely removed. Double check the type of cleaning process used.
15 The specified processing time was exceeded and as a result the glue has already hardened.
Reduce the processing time.
16 Too little glue was used. Make sure the exact dosage of glue is used.
17 General glue problems. Follow the manufacturer’s instructions. Check the conditions under which the glue is stored. Excess solvent could have corroded the glue and/or the foiling.
18 The jewelry piece was put under stress before the glue had hardened.
Make sure the glue has hardened, for example before transporting the jewelry.

CERALUN
Ceralun is a high-performance, two-component ceramic epoxy composite especially developed
for the application of Swarovski products.
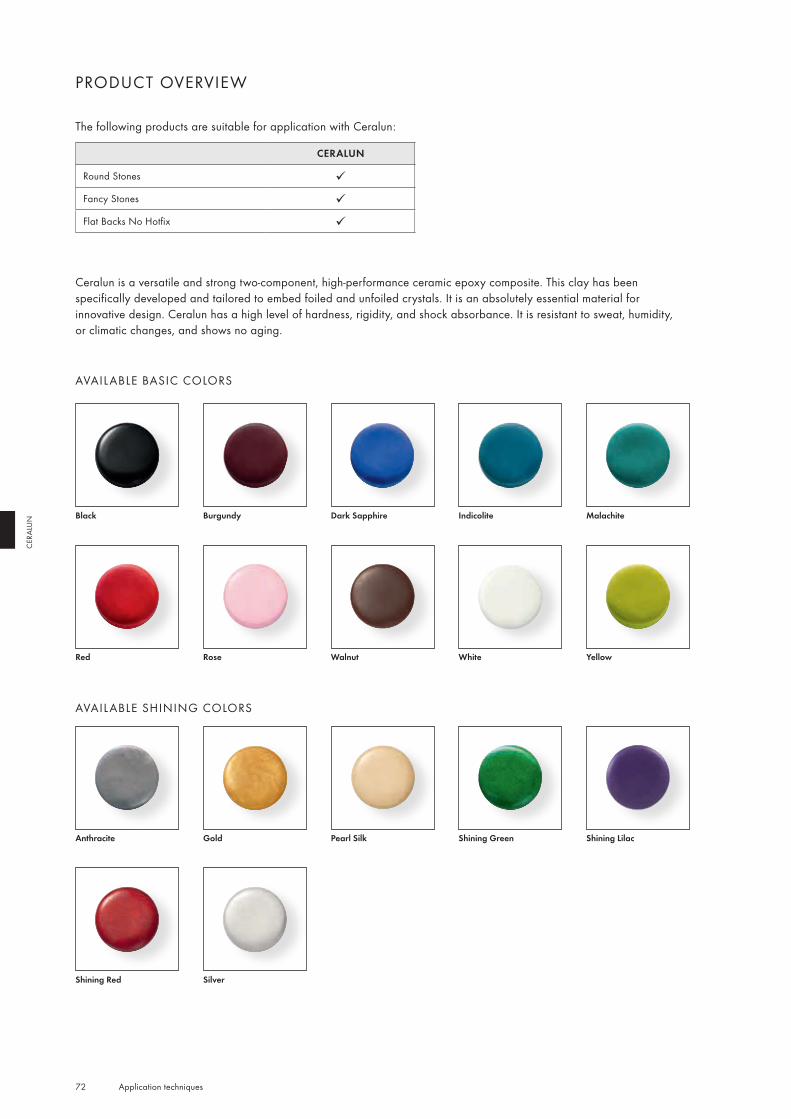
72 Application techniques
CER
ALU
N
Ceralun is a versatile and strong two-component, high-performance ceramic epoxy composite. This clay has been specifically developed and tailored to embed foiled and unfoiled crystals. It is an absolutely essential material for innovative design. Ceralun has a high level of hardness, rigidity, and shock absorbance. It is resistant to sweat, humidity, or climatic changes, and shows no aging.
PRODUCT OVERVIEW
The following products are suitable for application with Ceralun:
CERALUN
Round Stones
Fancy Stones
Flat Backs No Hotfix
AVAIL ABLE SHINING COLORS
AVAIL ABLE BASIC COLORS
White
Black
Rose Walnut
Malachite
Red
Indicolite
Yellow
Burgundy Dark Sapphire
Gold
SilverShining Red
Pearl Silk Shining Green Shining LilacAnthracite
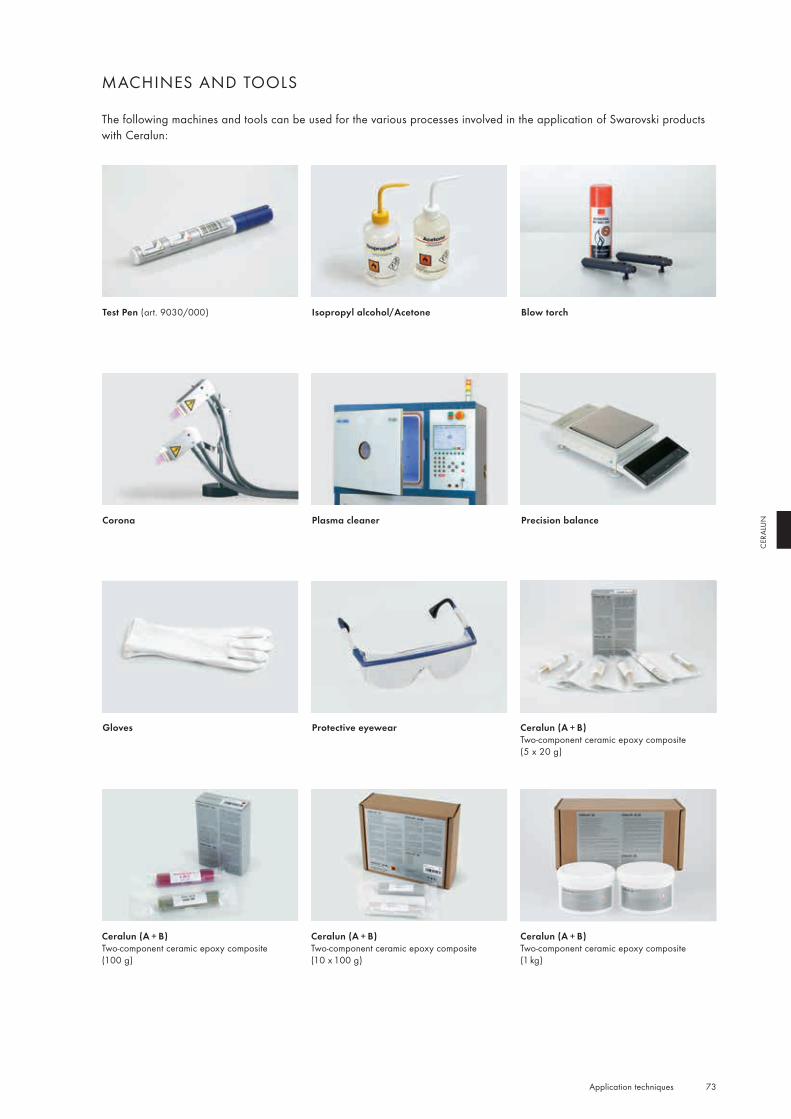
73 Application techniques
CER
ALU
N
MACHINES AND TOOLS
The following machines and tools can be used for the various processes involved in the application of Swarovski products with Ceralun:
Isopropyl alcohol/AcetoneTest Pen (art. 9030/000) Blow torch
Plasma cleanerCorona Precision balance
Gloves Protective eyewear Ceralun (A + B)Two-component ceramic epoxy composite(5 x 20 g)
Ceralun (A + B)Two-component ceramic epoxy composite (100 g)
Ceralun (A + B)Two-component ceramic epoxy composite (10 x 100 g)
Ceralun (A + B)Two-component ceramic epoxy composite(1 kg)
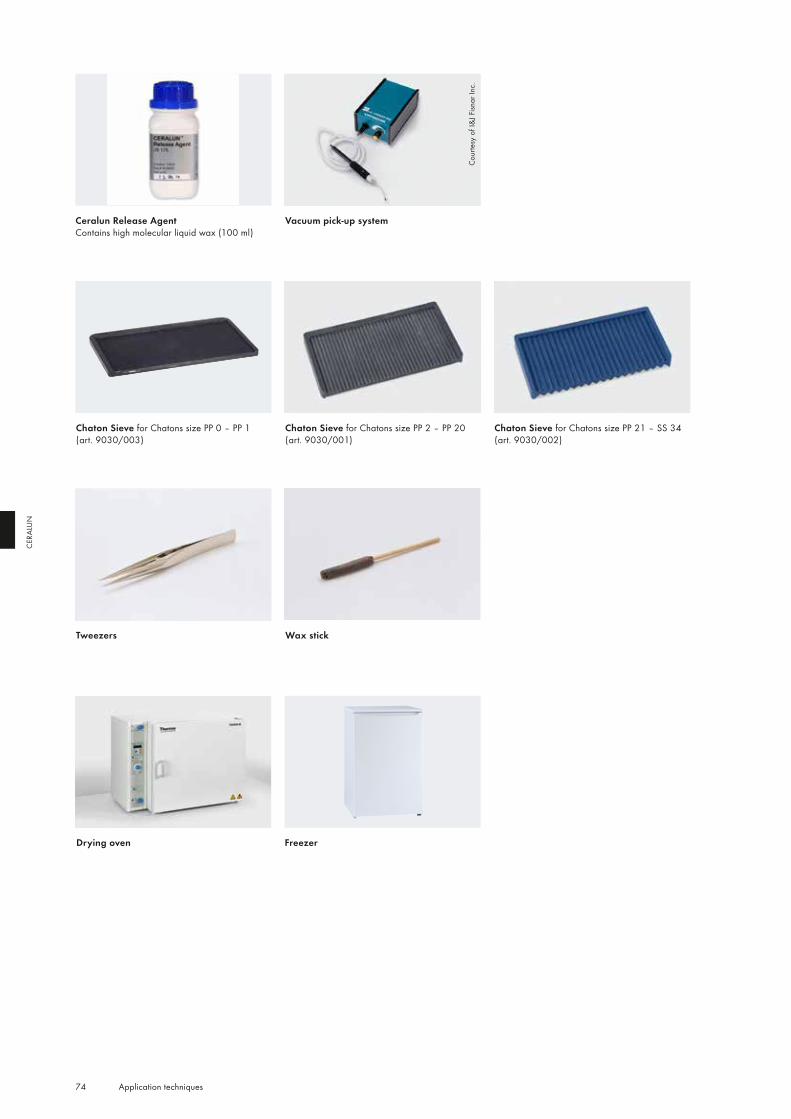
74 Application techniques
CER
ALU
N
Vacuum pick-up systemCeralun Release AgentContains high molecular liquid wax (100 ml)
Cou
rtesy
of I
&J F
isnar
Inc.
Wax stickTweezers
Drying oven Freezer
Chaton Sieve for Chatons size PP 2 – PP 20 (art. 9030/001)
Chaton Sieve for Chatons size PP 21 – SS 34 (art. 9030/002)
Chaton Sieve for Chatons size PP 0 – PP 1 (art. 9030/003)
75 Application techniques
CER
ALU
N
SUPPLIERS
This list provides an overview of selected suppliers worldwide.
MACHINES & TOOLS SUPPLIER CONTACT
Test Pen Swarovski: art. 9030/000 www.swarovski.com/professional
Ceralun Basic Colors Swarovski:
art. 9020, 5 x 20 g, Asia, Europe/Americaart. 9020, 100 g, Asia, Europe/Americaart. 9020, 10 x 100 g, Asia, Europe/Americaart. 9020, 1 kg, Asia, Europe/America
Black (A+B), Burgundy (A+B), Dark Sapphire (A+B), Indicolite (A+B), Malachite (A+B), Red (A+B), Rose (A+B), Walnut (A+B), White (A+B), Yellow (A+B)
www.swarovski.com/professional
Ceralun Shining Colors Swarovski:
art. 9020, 5 x 20 g, Asia, Europe/Americaart. 9020, 100 g, Asia, Europe/Americaart. 9020, 10 x 100 g, Asia, Europe/Americaart. 9020, 1 kg, Asia, Europe/America
Anthracite (A+B), Gold (A+B), Pearl Silk (A+B), Shining Green (A+B), Shining Lilac (A+B), Shining Red (A+B), Silver (A+B)
www.swarovski.com/professional
Ceralun Release Agent Swarovski: art. 9020 (100 ml)
www.swarovski.com/professional
Vacuum pick-up system I & J Fisnar, Inc.
Epoxy & Equipment Technology PTE., Ltd.
Hottemp (M) Sdn. Bhd.
PT. SKT International
www.fisnar.com
www.eetdispensing.com
www.hottemp.com.my
www.sktisolution.com
Chaton Sieve Swarovski:
For Chatons size PP 0 – PP 1: art. 9030/003
For Chatons size PP 2 – PP 20: art. 9030/001
For Chatons size PP 21 – SS 34: art. 9030/002
www.swarovski.com/professional
Pick-up stick Crystal Ninja, LLC www.crystalkatana.com
Drying oven Heraeus Holding GmbH
VWR International, LLC
www.heraeus.com
www.vwr.com
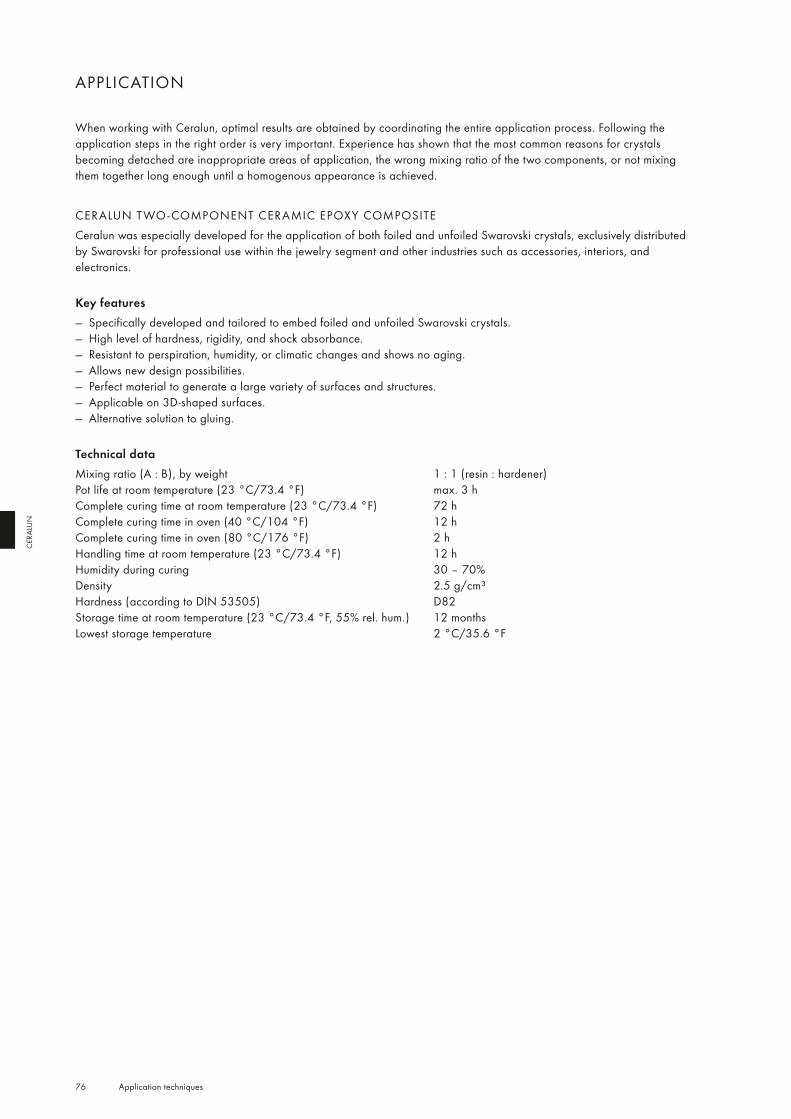
76 Application techniques
CER
ALU
N
APPLICATION
When working with Ceralun, optimal results are obtained by coordinating the entire application process. Following the application steps in the right order is very important. Experience has shown that the most common reasons for crystals becoming detached are inappropriate areas of application, the wrong mixing ratio of the two components, or not mixing them together long enough until a homogenous appearance is achieved.
CERALUN T WO - COMPONENT CERAMIC EPOXY COMPOSITECeralun was especially developed for the application of both foiled and unfoiled Swarovski crystals, exclusively distributed by Swarovski for professional use within the jewelry segment and other industries such as accessories, interiors, and electronics.
Key features — Specifically developed and tailored to embed foiled and unfoiled Swarovski crystals. — High level of hardness, rigidity, and shock absorbance. — Resistant to perspiration, humidity, or climatic changes and shows no aging. — Allows new design possibilities. — Perfect material to generate a large variety of surfaces and structures. — Applicable on 3D-shaped surfaces. — Alternative solution to gluing.
Technical dataMixing ratio (A : B), by weight 1 : 1 (resin : hardener)Pot life at room temperature (23 °C/73.4 °F) max. 3 hComplete curing time at room temperature (23 °C/73.4 °F) 72 hComplete curing time in oven (40 °C/104 °F) 12 hComplete curing time in oven (80 °C/176 °F) 2 hHandling time at room temperature (23 °C/73.4 °F) 12 hHumidity during curing 30 – 70%Density 2.5 g/cm³Hardness (according to DIN 53505) D82Storage time at room temperature (23 °C/73.4 °F, 55% rel. hum.) 12 monthsLowest storage temperature 2 °C/35.6 °F
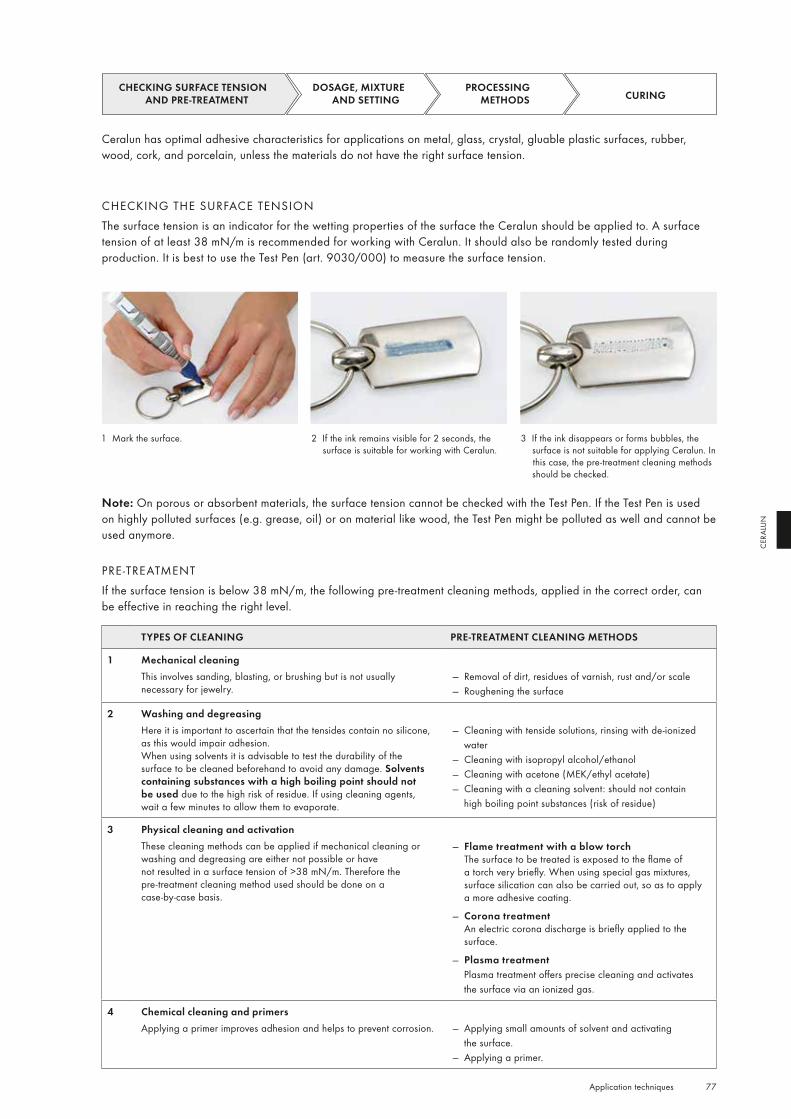
77 Application techniques
CER
ALU
N
CHECKING THE SURFACE TENSIONThe surface tension is an indicator for the wetting properties of the surface the Ceralun should be applied to. A surface tension of at least 38 mN/m is recommended for working with Ceralun. It should also be randomly tested during production. It is best to use the Test Pen (art. 9030/000) to measure the surface tension.
Ceralun has optimal adhesive characteristics for applications on metal, glass, crystal, gluable plastic surfaces, rubber, wood, cork, and porcelain, unless the materials do not have the right surface tension.
CHECKING SURFACE TENSION AND PRE-TREATMENT
DOSAGE, MIXTURE AND SETTING
PROCESSING METHODS CURING
1 Mark the surface. 2 If the ink remains visible for 2 seconds, the surface is suitable for working with Ceralun.
3 If the ink disappears or forms bubbles, the surface is not suitable for applying Ceralun. In this case, the pre-treatment cleaning methods should be checked.
Note: On porous or absorbent materials, the surface tension cannot be checked with the Test Pen. If the Test Pen is used on highly polluted surfaces (e.g. grease, oil) or on material like wood, the Test Pen might be polluted as well and cannot be used anymore.
PRE -TREATMENTIf the surface tension is below 38 mN/m, the following pre-treatment cleaning methods, applied in the correct order, can be effective in reaching the right level.
TYPES OF CLEANING PRE-TREATMENT CLEANING METHODS
1 Mechanical cleaningThis involves sanding, blasting, or brushing but is not usually necessary for jewelry.
— Removal of dirt, residues of varnish, rust and/or scale — Roughening the surface
2 Washing and degreasingHere it is important to ascertain that the tensides contain no silicone, as this would impair adhesion.When using solvents it is advisable to test the durability of the surface to be cleaned beforehand to avoid any damage. Solvents containing substances with a high boiling point should not be used due to the high risk of residue. If using cleaning agents, wait a few minutes to allow them to evaporate.
— Cleaning with tenside solutions, rinsing with de-ionized water
— Cleaning with isopropyl alcohol/ethanol — Cleaning with acetone (MEK/ethyl acetate) — Cleaning with a cleaning solvent: should not contain high boiling point substances (risk of residue)
3 Physical cleaning and activationThese cleaning methods can be applied if mechanical cleaning or washing and degreasing are either not possible or have not resulted in a surface tension of >38 mN/m. Therefore the pre-treatment cleaning method used should be done on a case-by-case basis.
— Flame treatment with a blow torch The surface to be treated is exposed to the flame of a torch very briefly. When using special gas mixtures, surface silication can also be carried out, so as to apply a more adhesive coating.
— Corona treatment An electric corona discharge is briefly applied to the surface.
— Plasma treatment Plasma treatment offers precise cleaning and activates the surface via an ionized gas.
4 Chemical cleaning and primersApplying a primer improves adhesion and helps to prevent corrosion. — Applying small amounts of solvent and activating
the surface. — Applying a primer.
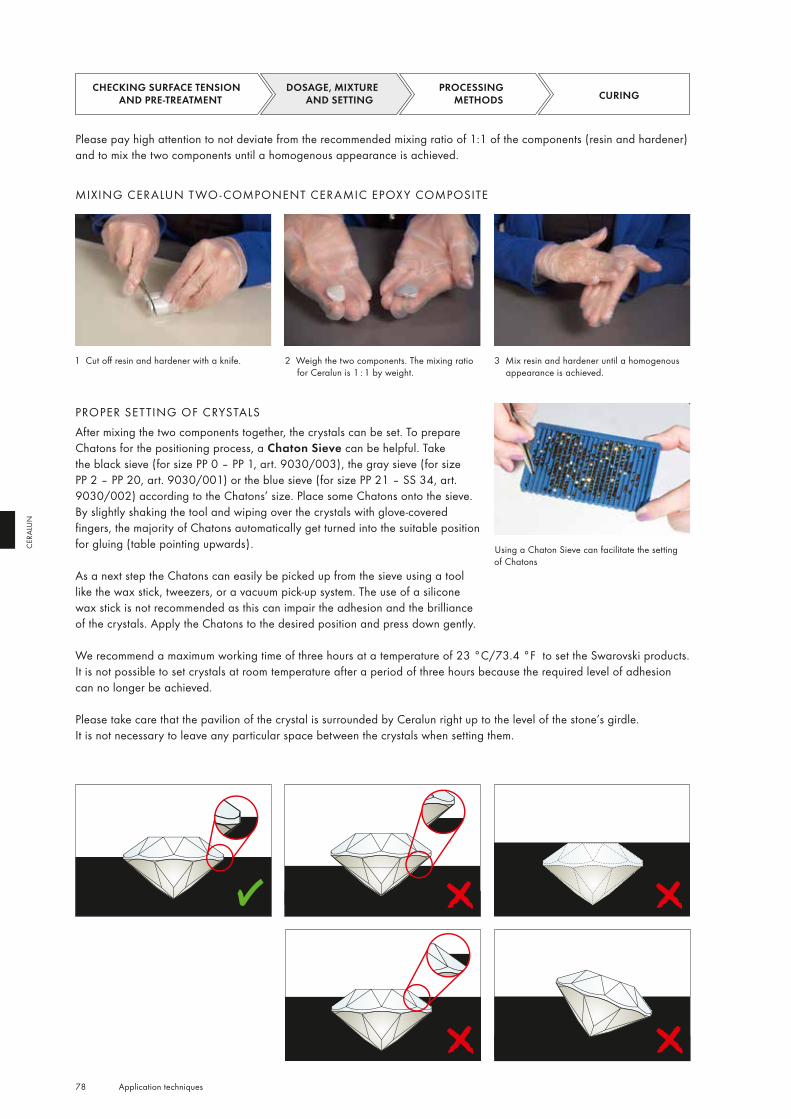
78 Application techniques
CER
ALU
N
PROPER SETTING OF CRYSTALSAfter mixing the two components together, the crystals can be set. To prepare Chatons for the positioning process, a Chaton Sieve can be helpful. Take the black sieve (for size PP 0 – PP 1, art. 9030/003), the gray sieve (for size PP 2 – PP 20, art. 9030/001) or the blue sieve (for size PP 21 – SS 34, art. 9030/002) according to the Chatons’ size. Place some Chatons onto the sieve. By slightly shaking the tool and wiping over the crystals with glove-covered fingers, the majority of Chatons automatically get turned into the suitable position for gluing (table pointing upwards).
As a next step the Chatons can easily be picked up from the sieve using a tool like the wax stick, tweezers, or a vacuum pick-up system. The use of a silicone wax stick is not recommended as this can impair the adhesion and the brilliance of the crystals. Apply the Chatons to the desired position and press down gently.
We recommend a maximum working time of three hours at a temperature of 23 °C/73.4 °F to set the Swarovski products. It is not possible to set crystals at room temperature after a period of three hours because the required level of adhesion can no longer be achieved.
Please take care that the pavilion of the crystal is surrounded by Ceralun right up to the level of the stone’s girdle.It is not necessary to leave any particular space between the crystals when setting them.
Please pay high attention to not deviate from the recommended mixing ratio of 1:1 of the components (resin and hardener) and to mix the two components until a homogenous appearance is achieved.
MIXING CERALUN T WO - COMPONENT CERAMIC EPOXY COMPOSITE
CHECKING SURFACE TENSION AND PRE-TREATMENT
1 Cut off resin and hardener with a knife. 2 Weigh the two components. The mixing ratio for Ceralun is 1 : 1 by weight.
3 Mix resin and hardener until a homogenous appearance is achieved.
DOSAGE, MIXTURE AND SETTING
PROCESSING METHODS CURING
Using a Chaton Sieve can facilitate the setting of Chatons
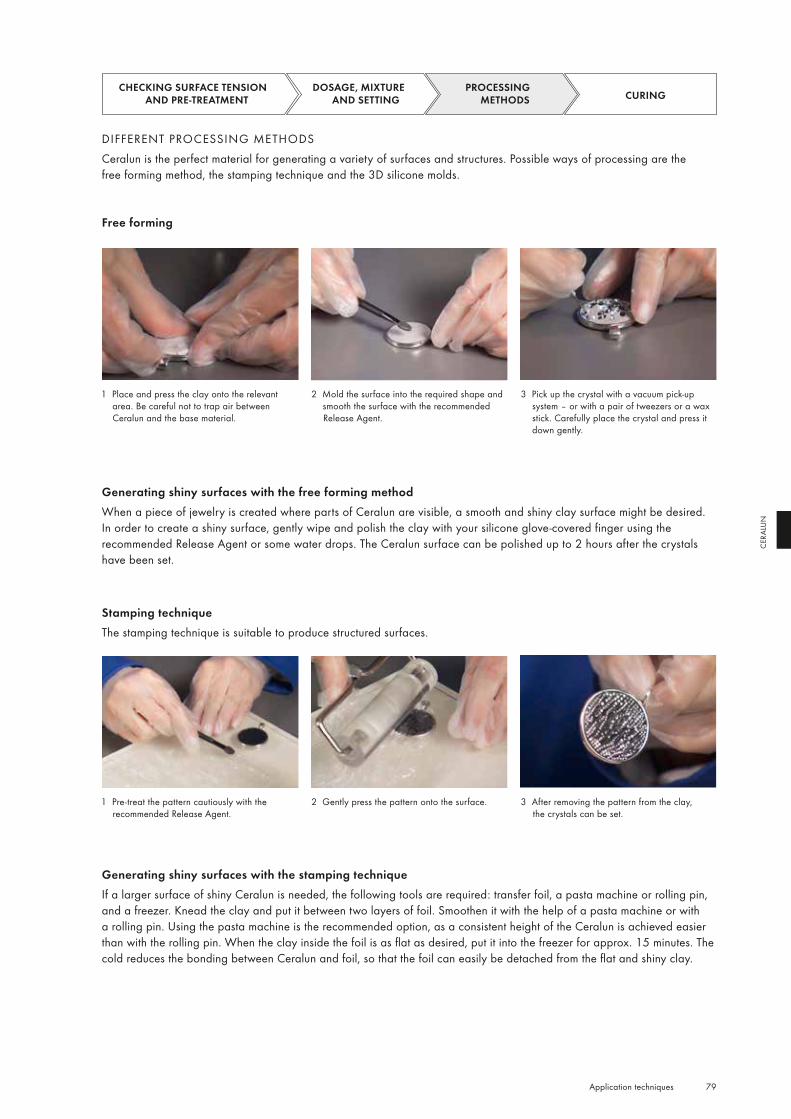
79 Application techniques
CER
ALU
N
DIFFERENT PROCESSING METHODSCeralun is the perfect material for generating a variety of surfaces and structures. Possible ways of processing are the free forming method, the stamping technique and the 3D silicone molds.
Free forming
CHECKING SURFACE TENSION AND PRE-TREATMENT
DOSAGE, MIXTURE AND SETTING
PROCESSING METHODS CURING
1 Place and press the clay onto the relevant area. Be careful not to trap air between Ceralun and the base material.
2 Mold the surface into the required shape and smooth the surface with the recommended Release Agent.
3 Pick up the crystal with a vacuum pick-up system – or with a pair of tweezers or a wax stick. Carefully place the crystal and press it down gently.
Generating shiny surfaces with the free forming methodWhen a piece of jewelry is created where parts of Ceralun are visible, a smooth and shiny clay surface might be desired. In order to create a shiny surface, gently wipe and polish the clay with your silicone glove-covered finger using the recommended Release Agent or some water drops. The Ceralun surface can be polished up to 2 hours after the crystals have been set.
Stamping techniqueThe stamping technique is suitable to produce structured surfaces.
1 Pre-treat the pattern cautiously with the recommended Release Agent.
2 Gently press the pattern onto the surface. 3 After removing the pattern from the clay, the crystals can be set.
Generating shiny surfaces with the stamping techniqueIf a larger surface of shiny Ceralun is needed, the following tools are required: transfer foil, a pasta machine or rolling pin, and a freezer. Knead the clay and put it between two layers of foil. Smoothen it with the help of a pasta machine or with a rolling pin. Using the pasta machine is the recommended option, as a consistent height of the Ceralun is achieved easier than with the rolling pin. When the clay inside the foil is as flat as desired, put it into the freezer for approx. 15 minutes. The cold reduces the bonding between Ceralun and foil, so that the foil can easily be detached from the flat and shiny clay.
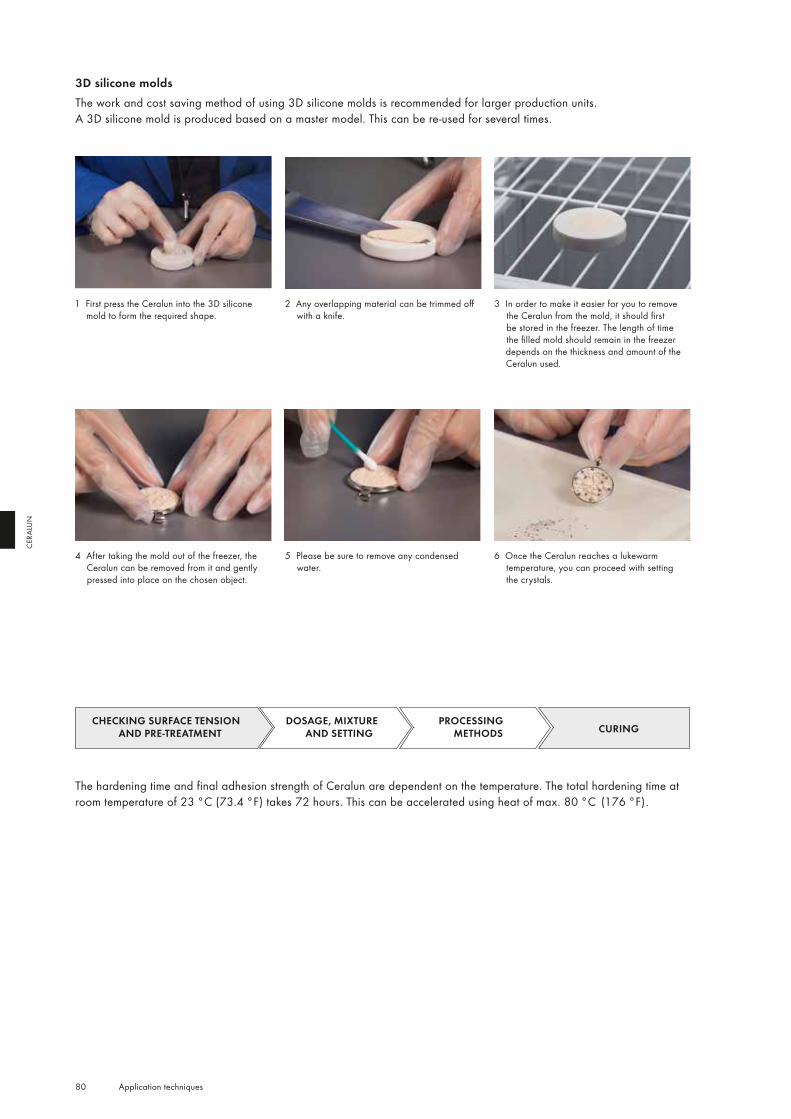
80 Application techniques
CER
ALU
N
3D silicone moldsThe work and cost saving method of using 3D silicone molds is recommended for larger production units. A 3D silicone mold is produced based on a master model. This can be re-used for several times.
1 First press the Ceralun into the 3D silicone mold to form the required shape.
2 Any overlapping material can be trimmed off with a knife.
3 In order to make it easier for you to remove the Ceralun from the mold, it should first be stored in the freezer. The length of time the filled mold should remain in the freezer depends on the thickness and amount of the Ceralun used.
The hardening time and final adhesion strength of Ceralun are dependent on the temperature. The total hardening time at room temperature of 23 °C (73.4 °F) takes 72 hours. This can be accelerated using heat of max. 80 °C (176 °F).
4 After taking the mold out of the freezer, the Ceralun can be removed from it and gently pressed into place on the chosen object.
5 Please be sure to remove any condensed water.
6 Once the Ceralun reaches a lukewarm temperature, you can proceed with setting the crystals.
CHECKING SURFACE TENSION AND PRE-TREATMENT
DOSAGE, MIXTURE AND SETTING
PROCESSING METHODS CURING
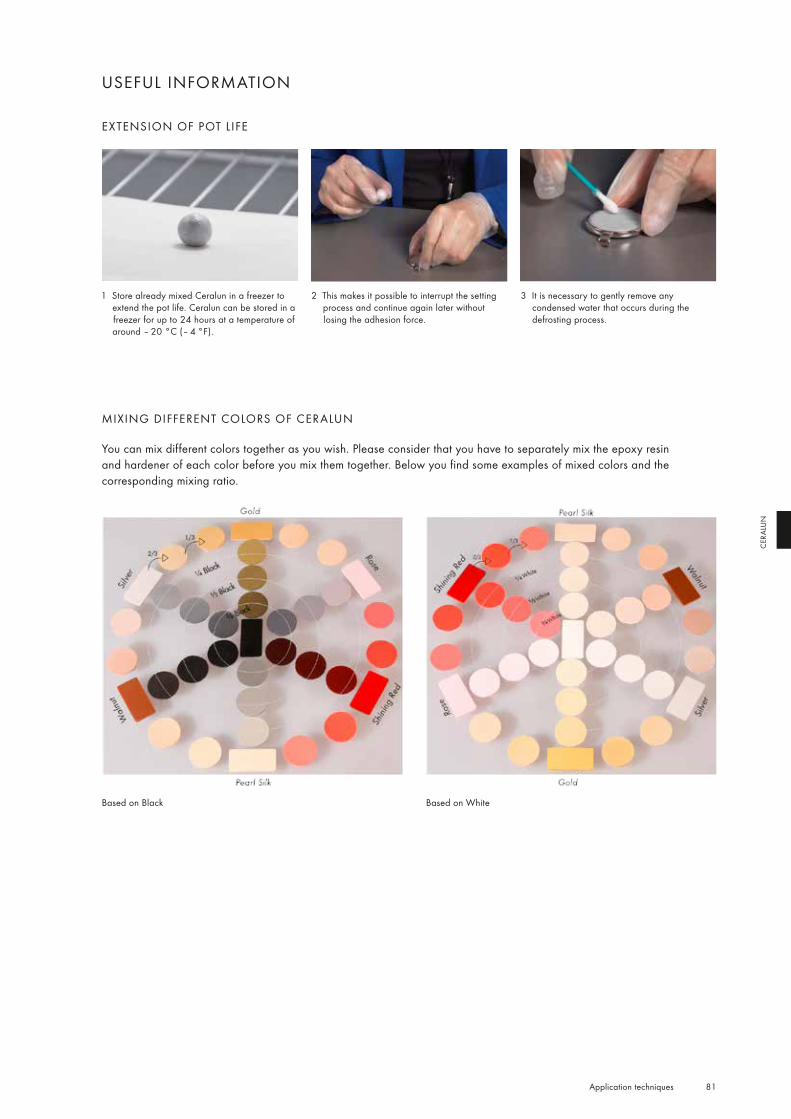
81 Application techniques
CER
ALU
N
USEFUL INFORMATION
EXTENSION OF POT LIFE
1 Store already mixed Ceralun in a freezer to extend the pot life. Ceralun can be stored in a freezer for up to 24 hours at a temperature of around – 20 °C (– 4 °F).
2 This makes it possible to interrupt the setting process and continue again later without losing the adhesion force.
3 It is necessary to gently remove any condensed water that occurs during the defrosting process.
MIXING DIFFERENT COLORS OF CERALUN
You can mix different colors together as you wish. Please consider that you have to separately mix the epoxy resin and hardener of each color before you mix them together. Below you find some examples of mixed colors and the corresponding mixing ratio.
Based on Black Based on White
82 Application techniques
CER
ALU
N
PROBLEM CAUSE
Ceralun does not cure. 1, 2, 6
Ceralun is not bonding with the base material. 1, 2, 3, 6
Crystals fall off. 1, 2, 4, 5, 6
Ceralun cannot be removed from the silicone mold. 7, 8
Using the stamping technique, Ceralun cannot be removed from the surface pattern. 7
Ceralun appears foggy/cloudy after curing. 5, 6, 7
QUICK ASSISTANCE
CAUSE RECOMMENDATION
1 An error has occurred during the calculation of the right mixing ratio between the two components (resin/hardener).
Do not deviate from the recommended mixing ratio of the components (resin/hardener), 1 : 1.
2 Resin and hardener have not been mixed until a homogenous appearance was achieved.
Be sure to use the exact recommended dosage and to carefully remove any excess Ceralun, e.g. using acetone or isopropyl alcohol.
3 The base material is not suitable for using Ceralun or it has been incorrectly pre-cleaned.
Check the surface tension. If the surface tension is below 38 mN/m, carry out pre-treatment cleaning methods.
4 The specified processing time was exceeded and as a result Ceralun has already hardened.
Reduce the processing time to a maximum of two hours at a temperature of 23 °C (73.4 °F)
5 If stored in the freezer, condensed water can occur during the defrosting process.
Take care to gently remove any condensed water that occurs during the defrosting process.
6 Ceralun has been stored for too much time in the freezer. Make sure not to exceed the recommended time of 24 hours when Ceralun is stored in a freezer at a temperature of around – 20 °C (– 4 °F).
7 No or not enough Release Agent has been used. The Release Agent is a useful tool to be able to remove Ceralun from any surface. Carefully dose the used amount of Release Agent.
8 Ceralun has not been stored in a freezer or has been stored for too little time.
Storing Ceralun in a freezer makes it easier for you to remove it from the mold.

83 Application techniques
CER
ALU
N

HOTFIX APPLICATION
The Swarovski product assortment includes a wide range of Hotfix products. These can be applied simply, quickly and securely.
Hotfix technology is ideal for application in the fields of textiles, interior décor and accessories.
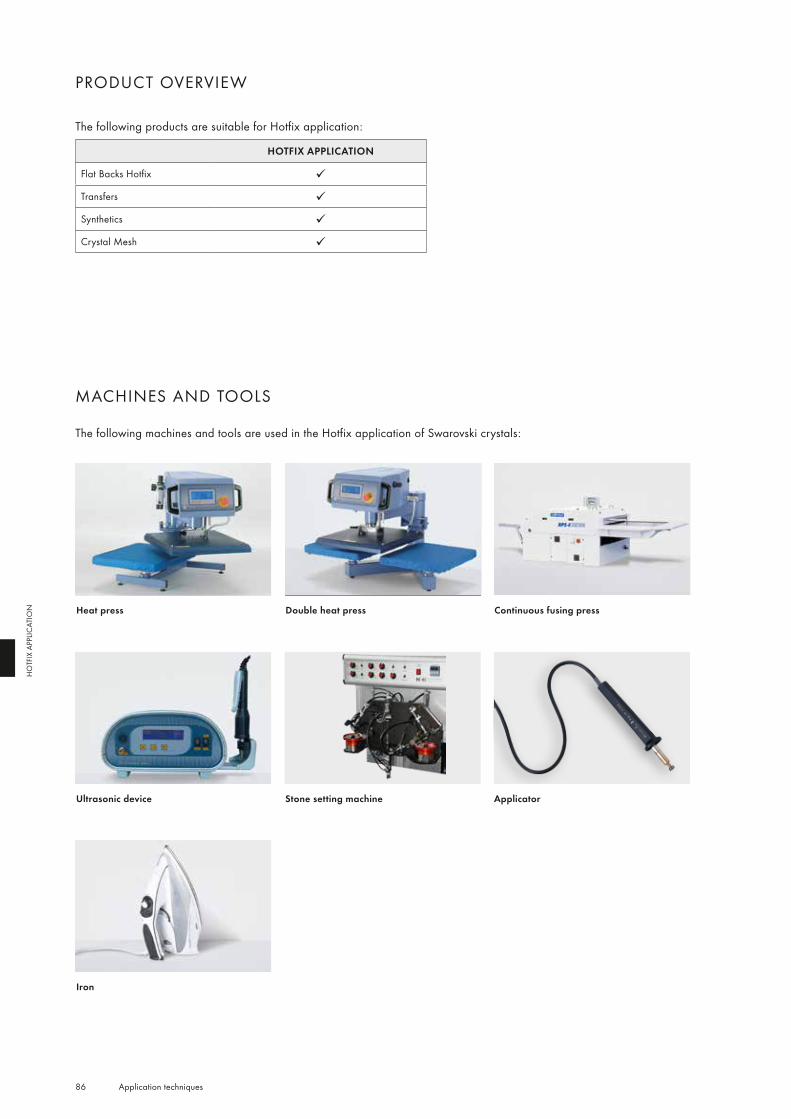
86 Application techniques
HO
TFIX
APP
LICAT
ION
PRODUCT OVERVIEW
MACHINES AND TOOLS
The following machines and tools are used in the Hotfix application of Swarovski crystals:
The following products are suitable for Hotfix application:
HOTFIX APPLICATION
Flat Backs Hotfix
Transfers
Synthetics
Crystal Mesh
Heat press Double heat press Continuous fusing press
Ultrasonic device Stone setting machine Applicator
Iron
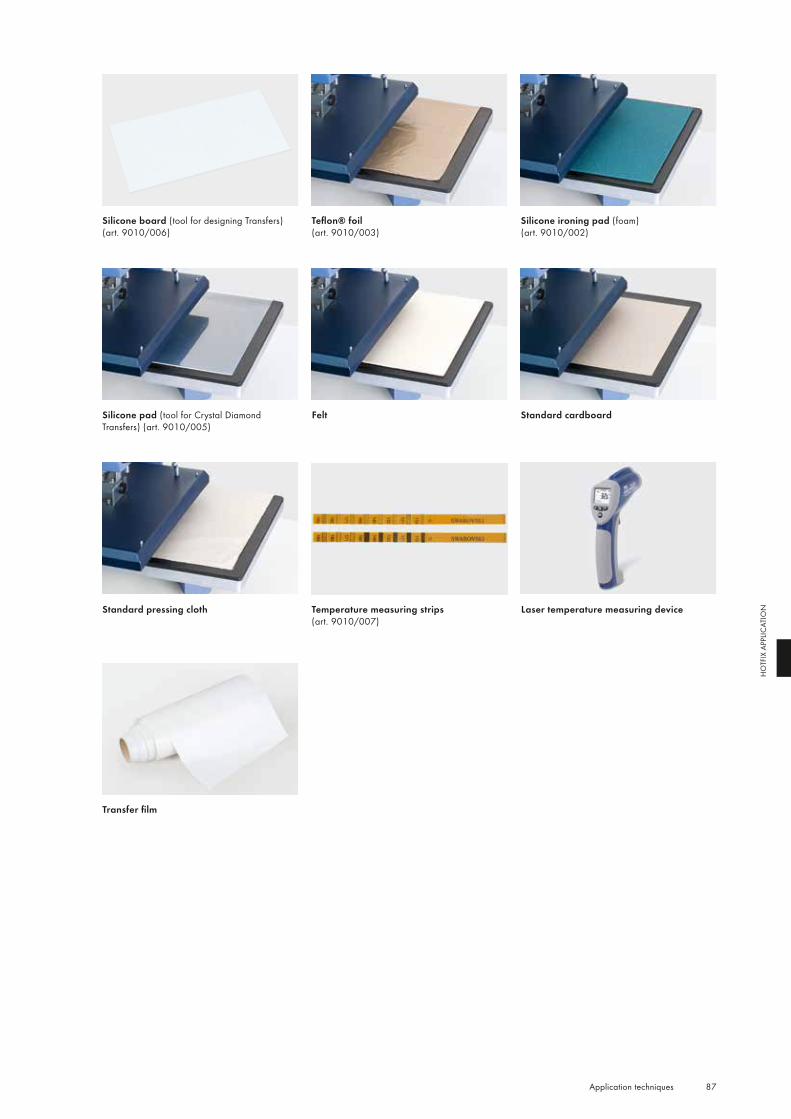
87 Application techniques
HO
TFIX
APP
LICAT
ION
Teflon® foil(art. 9010/003)
Silicone ironing pad (foam) (art. 9010/002)
Silicone pad (tool for Crystal Diamond Transfers) (art. 9010/005)
Transfer film
Temperature measuring strips(art. 9010/007)
Laser temperature measuring device
Standard cardboard
Standard pressing cloth
Felt
Silicone board (tool for designing Transfers) (art. 9010/006)
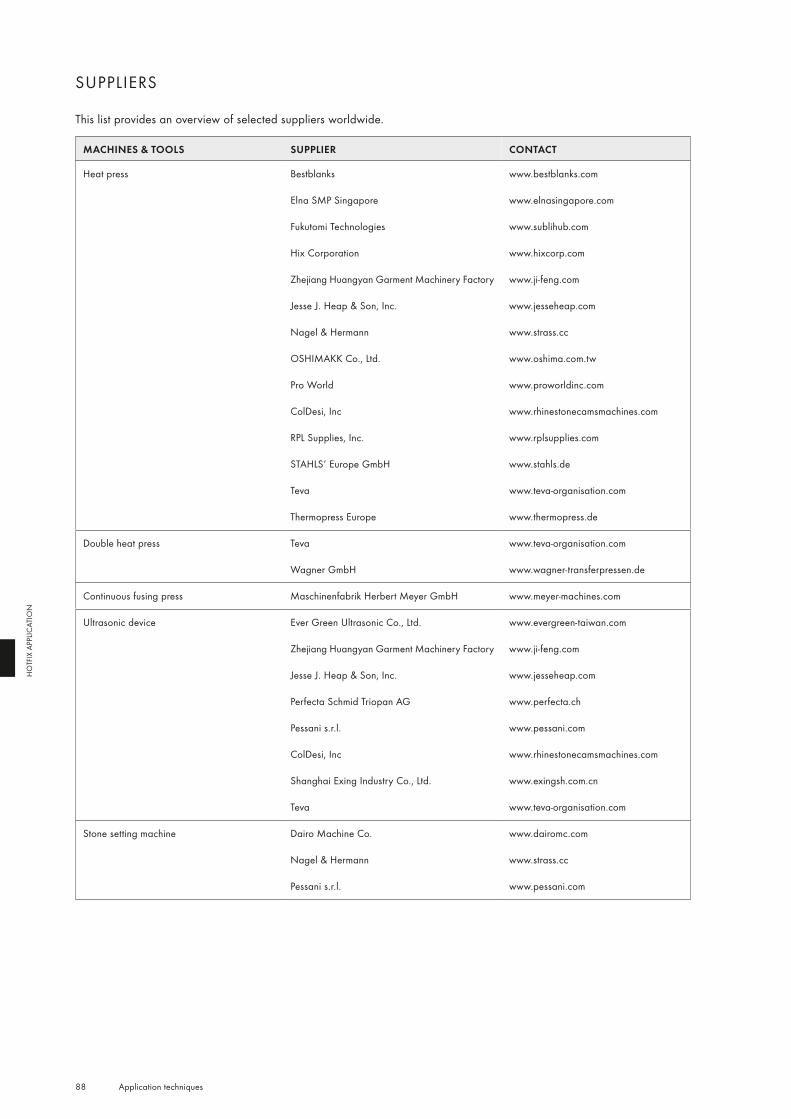
88 Application techniques
HO
TFIX
APP
LICAT
ION
SUPPLIERS
This list provides an overview of selected suppliers worldwide.
MACHINES & TOOLS SUPPLIER CONTACT
Heat press Bestblanks www.bestblanks.com
Elna SMP Singapore www.elnasingapore.com
Fukutomi Technologies www.sublihub.com
Hix Corporation www.hixcorp.com
Zhejiang Huangyan Garment Machinery Factory www.ji-feng.com
Jesse J. Heap & Son, Inc. www.jesseheap.com
Nagel & Hermann www.strass.cc
OSHIMAKK Co., Ltd. www.oshima.com.tw
Pro World www.proworldinc.com
ColDesi, Inc www.rhinestonecamsmachines.com
RPL Supplies, Inc. www.rplsupplies.com
STAHLS‘ Europe GmbH www.stahls.de
Teva www.teva-organisation.com
Thermopress Europe www.thermopress.de
Double heat press Teva www.teva-organisation.com
Wagner GmbH www.wagner-transferpressen.de
Continuous fusing press Maschinenfabrik Herbert Meyer GmbH www.meyer-machines.com
Ultrasonic device Ever Green Ultrasonic Co., Ltd. www.evergreen-taiwan.com
Zhejiang Huangyan Garment Machinery Factory www.ji-feng.com
Jesse J. Heap & Son, Inc. www.jesseheap.com
Perfecta Schmid Triopan AG www.perfecta.ch
Pessani s.r.l. www.pessani.com
ColDesi, Inc www.rhinestonecamsmachines.com
Shanghai Exing Industry Co., Ltd. www.exingsh.com.cn
Teva www.teva-organisation.com
Stone setting machine Dairo Machine Co. www.dairomc.com
Nagel & Hermann www.strass.cc
Pessani s.r.l. www.pessani.com
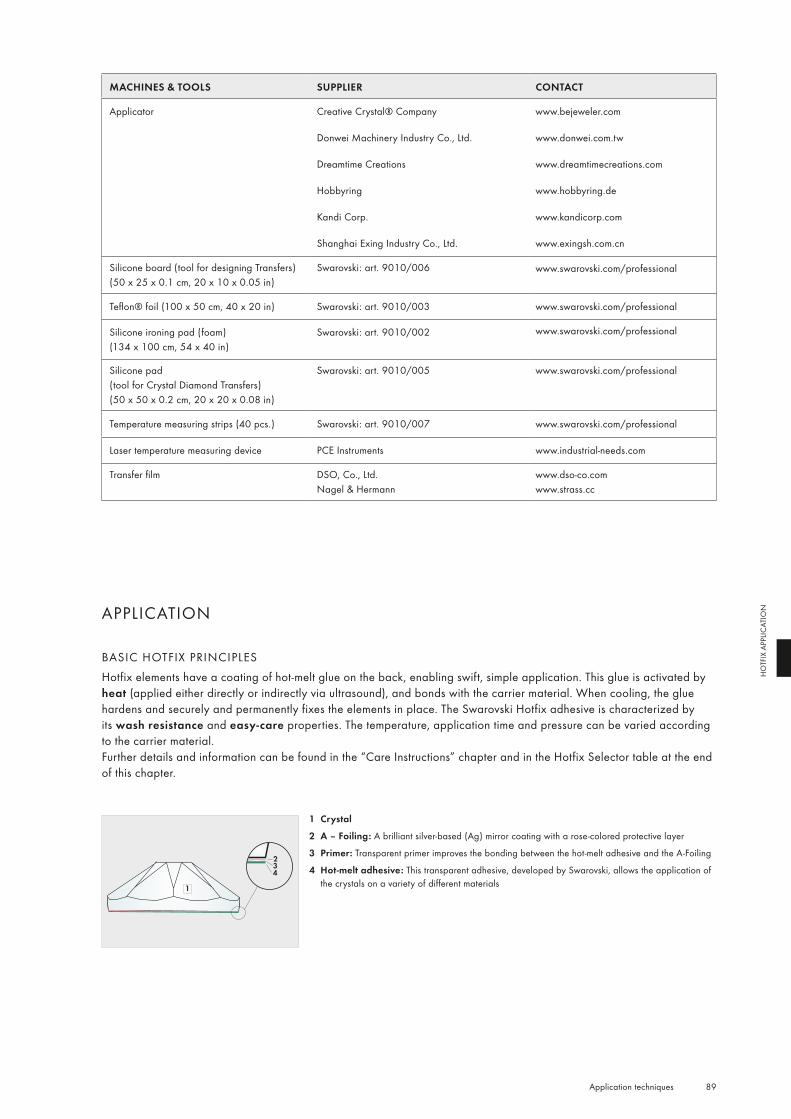
1
234
89 Application techniques
HO
TFIX
APP
LICAT
ION
MACHINES & TOOLS SUPPLIER CONTACT
Applicator Creative Crystal® Company www.bejeweler.com
Donwei Machinery Industry Co., Ltd. www.donwei.com.tw
Dreamtime Creations www.dreamtimecreations.com
Hobbyring www.hobbyring.de
Kandi Corp. www.kandicorp.com
Shanghai Exing Industry Co., Ltd. www.exingsh.com.cn
Silicone board (tool for designing Transfers) (50 x 25 x 0.1 cm, 20 x 10 x 0.05 in)
Swarovski: art. 9010/006 www.swarovski.com/professional
Teflon® foil (100 x 50 cm, 40 x 20 in) Swarovski: art. 9010/003 www.swarovski.com/professional
Silicone ironing pad (foam) (134 x 100 cm, 54 x 40 in)
Swarovski: art. 9010/002 www.swarovski.com/professional
Silicone pad (tool for Crystal Diamond Transfers) (50 x 50 x 0.2 cm, 20 x 20 x 0.08 in)
Swarovski: art. 9010/005 www.swarovski.com/professional
Temperature measuring strips (40 pcs.) Swarovski: art. 9010/007 www.swarovski.com/professional
Laser temperature measuring device PCE Instruments www.industrial-needs.com
Transfer film DSO, Co., Ltd.Nagel & Hermann
www.dso-co.com www.strass.cc
APPLICATION
BASIC HOTFIX PRINCIPLESHotfix elements have a coating of hot-melt glue on the back, enabling swift, simple application. This glue is activated by heat (applied either directly or indirectly via ultrasound), and bonds with the carrier material. When cooling, the glue hardens and securely and permanently fixes the elements in place. The Swarovski Hotfix adhesive is characterized by its wash resistance and easy-care properties. The temperature, application time and pressure can be varied according to the carrier material. Further details and information can be found in the “Care Instructions” chapter and in the Hotfix Selector table at the end of this chapter.
1 Crystal
2 A – Foiling: A brilliant silver-based (Ag) mirror coating with a rose-colored protective layer
3 Primer: Transparent primer improves the bonding between the hot-melt adhesive and the A-Foiling
4 Hot-melt adhesive: This transparent adhesive, developed by Swarovski, allows the application of the crystals on a variety of different materials
90 Application techniques
HO
TFIX
APP
LICAT
ION
Before beginning the application process, you should always check whether the carrier material is suitable for Hotfix application. Please check the following criteria:
— Heat resistance (min. 120 °C/250 °F) — Resistance against pressure — Application area of the product — Suitability of surface properties and absorbency
CHECKING ABSORBENCY VIA THE WATER DROP TESTThe water drop test is a quick and easy way to get an initial idea of the absorbency of the carrier material. Apply a couple of water drops onto the carrier material. If the material quickly absorbs the drops, it offers good absorbency. If the water pearls off the carrier material, or if it takes a long time to be absorbed, the material offers insufficient absorbency. This can impair the effectiveness of Hotfix application.
MATERIAL CHECK PREPARATION APPLICATION FINISHING
Some textiles and special finishes are unsuitable for Hotfix application, due to a lack of absorbency.
This is a list of unsuitable carrier materials and finishes: — Very tightly woven textiles — Very thin fabrics, e.g. tulle — Smooth leather and smooth imitation leather — Hydrophobic or water-repellent treatments (silicone, synthetic resin as a waterproofing agent) — Teflon® coatings — Stain-resistant treatments — Easy-to-care treatments — Fluorocarbon finishes — Softening agents — Select dyes (dyes with metal pigments) — Enzymatic treatments
It can sometimes be helpful to wash the carrier material before application, in order to remove any unsuitable finishes (particularly softening agents), and thus improve absorbency.
Good absorbencyDrops are absorbed
Insufficient absorbency Drops pearl off
91 Application techniques
HO
TFIX
APP
LICAT
ION
Generally, the following parameters are most important when carrying out Hotfix applications of Swarovski products, depending on the consistency of the base material:
— Temperature — Pressure — Application time — Application side
A detailed summary of all application parameters can be found in the Hotfix Selector table at the end of this chapter.
TEMPERATURESwarovski Hotfix adhesive is activated within a temperature range of 120 °C to 170 °C (250 °F to 340 °F). A suitable application temperature can be selected from this range according to the carrier material and its sensitivity
to heat.With heat presses, the temperature selected on the display does not always reflect the actual temperature on the surface of the press. Often, the temperature can be distributed unevenly, or one heat plate may be defective.It is therefore recommended to regularly check the temperature with a laser measuring device or temperature measuring strips at various points on the heating surface, to ensure the temperature is distributed evenly across it. Checks should be carried out regularly (once per week), particularly during production.
MATERIAL CHECK PREPARATION APPLICATION FINISHING
Uneven heat distribution in the central area of the heat press
Test with temperature measuring strips(art. 9010/007)
PRESSUREThe pressure setting depends on the Hotfix elements to be applied, the carrier material, and the technical equipment (machines, etc.) available.
Too much pressure can cause the adhesive to be spread out and can also affect the surface of the carrier material. Too little pressure, however, can result in a weak and insufficient bond between the crystal and the carrier material. In general, the pressure should be applied directly to the crystal product (e.g. Flat Backs Hotfix, Transfers, Crystal Mesh). It is therefore necessary to check if there are any buttons, zippers or other raised parts surrounding them. Always use a compensating pad to even out the surface.
Support surface of the heat press
Carrier material
Hot area of the heat press
When applying Swarovski crystals of different heights, a compensating pad should always be used. Silicone foam, foam rubber or felt can be used here.
Jeans pocket
Teflon® film
Compensating pad
= 120 °C (250 °F)
= 100 °C (212 °F)
160 162
156 150
170
160 162
156 150
170
92 Application techniques
HO
TFIX
APP
LICAT
ION
Teflon® film
Carrier material
Adhesive
Height compensation
Heated plate of the heat press
The parallel plane of the heat pressTake care to apply pressure evenly when using a heat press with a scissor mechanism. The upper plate of the heat press must be completely horizontal in order to effectively and evenly distribute pressure and temperature.
Height compensation with different Hotfix elements
Heat press
Paper strips
Application from the back Application from the front
Checks should always be carried out to make sure the plates are parallel. This can be done by placing paper test strips into the press and closing it with the least possible pressure. After this, if it takes the same force to pull out each strip, the plates are parallel.
APPLICATION TIMEIn general, the application time should be sufficient to allow the hot-melt glue to be fully activated, and then to penetrate the carrier material. The application time necessarily depends on the Hotfix elements, the temperature selected, the machine used, the carrier material and the application side.A detailed summary can be found in the Hotfix Selector table at the end of this chapter. Please note that the times stated are intended as a guideline. When adapting them to your application, it is recommended to carry out tests on the original material.
APPLICATION SIDEHotfix elements can usually be applied from the front and the back. A shorter application time can be achieved with thinner fabrics by applying crystals from the back, as the heat reaches the adhesive through the carrier material
faster, activating it immediately.
Rear (reverse) side of fabric is exposed to heat Front (right) side of fabric is exposed to heat
Heated plate of the heat press
Support surface of the heat press
Carrier material
Teflon® film
Teflon® film
93 Application techniques
HO
TFIX
APP
LICAT
ION
Selecting the optimum application side
Note that the shape and size (causing irregular temperature penetration) of many items (e.g. Crystaltex Cabochons, Creation Transfers Plus) will only allow an application from the back. Further information can be found in the
Hotfix Selector table at the end of this chapter.
When applying Hotfix products on thick or multi-layered fabrics (such as seams) the application side selected should be the one that allows the heat to be transferred to the hot-melt adhesive quickest. This ensures fast, optimum activation.
Certain Swarovski products can only be applied from the back.
DEFINING THE OPTIMUM APPLICATION PARAMETERSAdhesive has been successfully activated when, using a magnifying glass, it is possible to see a thin edge of glue formed around the crystal. On thin fabrics, the optimum application parameters are chosen when the glue will have
lightly penetrated through the fabric and is lightly visible at the reverse.
When parameters have been incorrectly selected, such as an extreme application temperature, pressure, or application time, significant amounts of glue can spread out.When the application temperature or pressure is too low, or the application time too short, the adhesive cannot be sufficiently activated, leading to problems with adhesion.
Optimum application result Huge excess of glue – too much pressure exerted with heat press
Huge excess of glue – heat press temperature too high, or applied too long
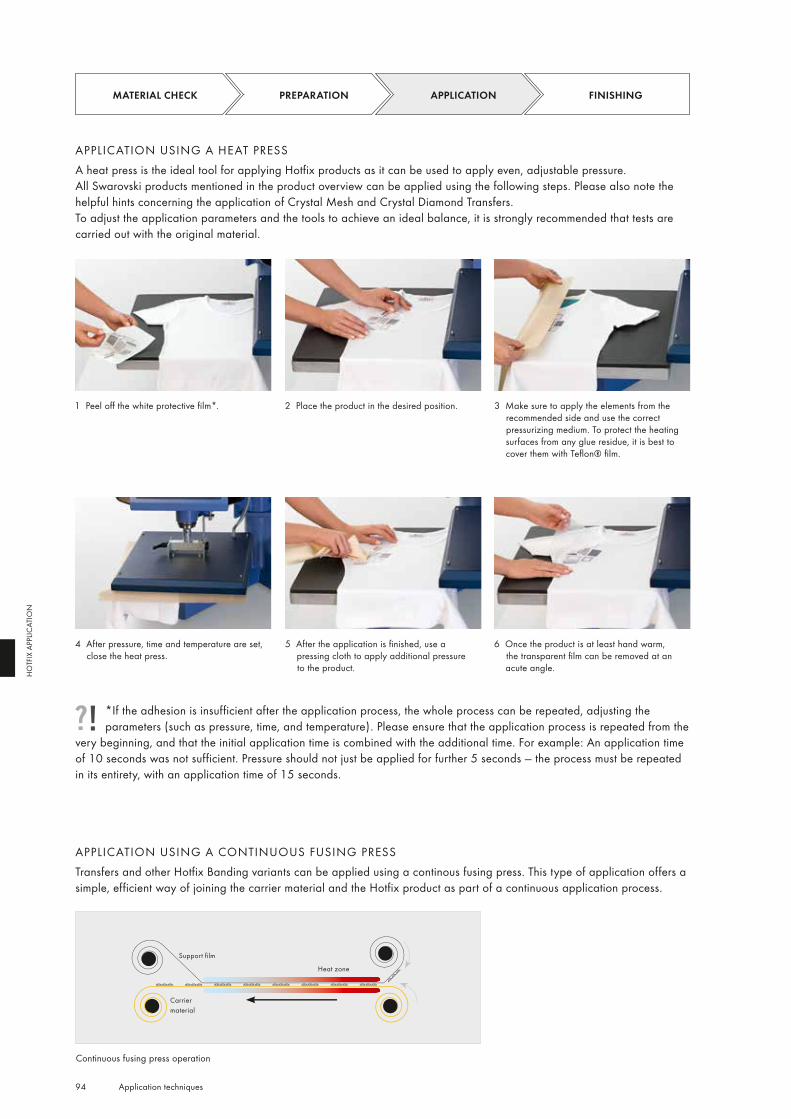
94 Application techniques
HO
TFIX
APP
LICAT
ION
APPLICATION USING A HEAT PRESSA heat press is the ideal tool for applying Hotfix products as it can be used to apply even, adjustable pressure. All Swarovski products mentioned in the product overview can be applied using the following steps. Please also note the helpful hints concerning the application of Crystal Mesh and Crystal Diamond Transfers. To adjust the application parameters and the tools to achieve an ideal balance, it is strongly recommended that tests are carried out with the original material.
MATERIAL CHECK PREPARATION
1 Peel off the white protective film*. 2 Place the product in the desired position. 3 Make sure to apply the elements from the recommended side and use the correct pressurizing medium. To protect the heating surfaces from any glue residue, it is best to cover them with Teflon® film.
4 After pressure, time and temperature are set, close the heat press.
5 After the application is finished, use a pressing cloth to apply additional pressure to the product.
6 Once the product is at least hand warm, the transparent film can be removed at an acute angle.
*If the adhesion is insufficient after the application process, the whole process can be repeated, adjusting the parameters (such as pressure, time, and temperature). Please ensure that the application process is repeated from the
very beginning, and that the initial application time is combined with the additional time. For example: An application time of 10 seconds was not sufficient. Pressure should not just be applied for further 5 seconds — the process must be repeated in its entirety, with an application time of 15 seconds.
APPLICATION USING A CONTINUOUS FUSING PRESSTransfers and other Hotfix Banding variants can be applied using a continous fusing press. This type of application offers a simple, efficient way of joining the carrier material and the Hotfix product as part of a continuous application process.
Continuous fusing press operation
Support film
Carriermaterial
Heat zone
APPLICATION FINISHING
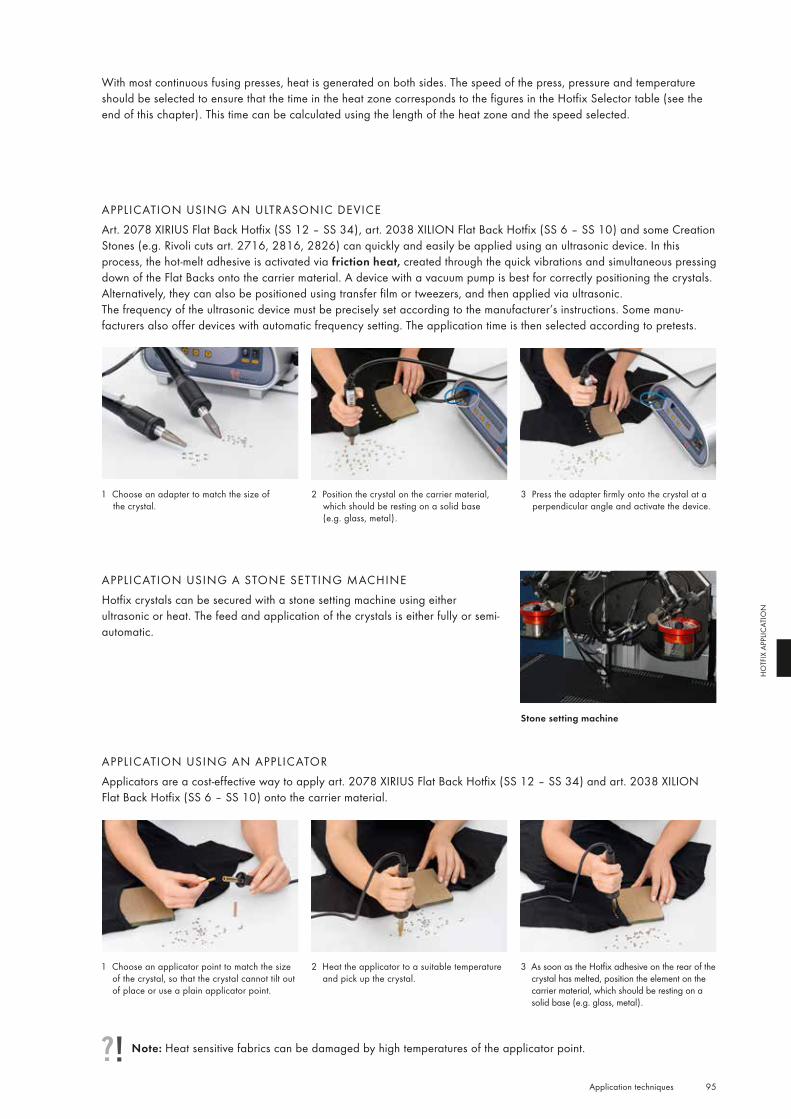
95 Application techniques
HO
TFIX
APP
LICAT
ION
With most continuous fusing presses, heat is generated on both sides. The speed of the press, pressure and temperature should be selected to ensure that the time in the heat zone corresponds to the figures in the Hotfix Selector table (see the end of this chapter). This time can be calculated using the length of the heat zone and the speed selected.
APPLICATION USING AN ULTRASONIC DEVICEArt. 2078 XIRIUS Flat Back Hotfix (SS 12 – SS 34), art. 2038 XILION Flat Back Hotfix (SS 6 – SS 10) and some Creation Stones (e.g. Rivoli cuts art. 2716, 2816, 2826) can quickly and easily be applied using an ultrasonic device. In this process, the hot-melt adhesive is activated via friction heat, created through the quick vibrations and simultaneous pressing down of the Flat Backs onto the carrier material. A device with a vacuum pump is best for correctly positioning the crystals. Alternatively, they can also be positioned using transfer film or tweezers, and then applied via ultrasonic.The frequency of the ultrasonic device must be precisely set according to the manufacturer’s instructions. Some manu-facturers also offer devices with automatic frequency setting. The application time is then selected according to pretests.
1 Choose an adapter to match the size of the crystal.
2 Position the crystal on the carrier material, which should be resting on a solid base (e.g. glass, metal).
3 Press the adapter firmly onto the crystal at a perpendicular angle and activate the device.
APPLICATION USING A STONE SETTING MACHINEHotfix crystals can be secured with a stone setting machine using either ultrasonic or heat. The feed and application of the crystals is either fully or semi-automatic.
APPLICATION USING AN APPLICATORApplicators are a cost-effective way to apply art. 2078 XIRIUS Flat Back Hotfix (SS 12 – SS 34) and art. 2038 XILION Flat Back Hotfix (SS 6 – SS 10) onto the carrier material.
Stone setting machine
1 Choose an applicator point to match the size of the crystal, so that the crystal cannot tilt out of place or use a plain applicator point.
2 Heat the applicator to a suitable temperature and pick up the crystal.
3 As soon as the Hotfix adhesive on the rear of the crystal has melted, position the element on the carrier material, which should be resting on a solid base (e.g. glass, metal).
Note: Heat sensitive fabrics can be damaged by high temperatures of the applicator point.
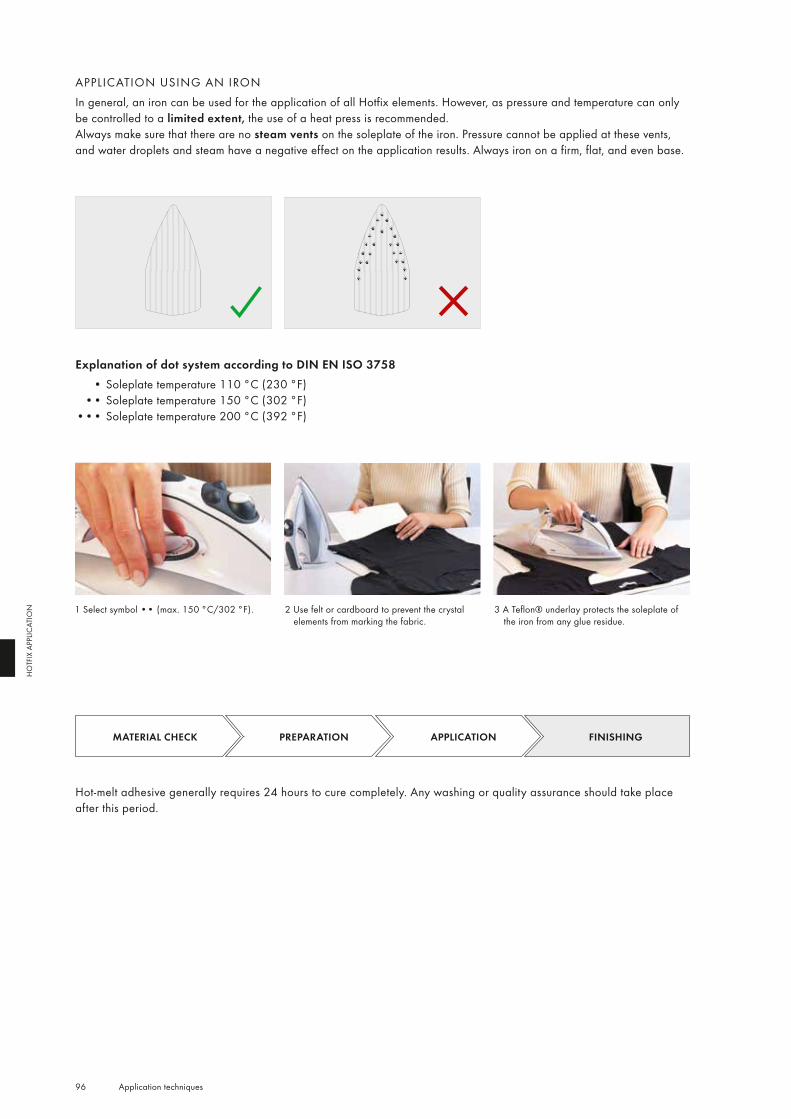
96 Application techniques
HO
TFIX
APP
LICAT
ION
APPLICATION USING AN IRONIn general, an iron can be used for the application of all Hotfix elements. However, as pressure and temperature can only be controlled to a limited extent, the use of a heat press is recommended.Always make sure that there are no steam vents on the soleplate of the iron. Pressure cannot be applied at these vents, and water droplets and steam have a negative effect on the application results. Always iron on a firm, flat, and even base.
Explanation of dot system according to DIN EN ISO 3758 • Soleplate temperature 110 °C (230 °F) •• Soleplate temperature 150 °C (302 °F) ••• Soleplate temperature 200 °C (392 °F)
1 Select symbol •• (max. 150 °C/302 °F). 2 Use felt or cardboard to prevent the crystal elements from marking the fabric.
3 A Teflon® underlay protects the soleplate of the iron from any glue residue.
Hot-melt adhesive generally requires 24 hours to cure completely. Any washing or quality assurance should take place after this period.
MATERIAL CHECK PREPARATION APPLICATION FINISHING
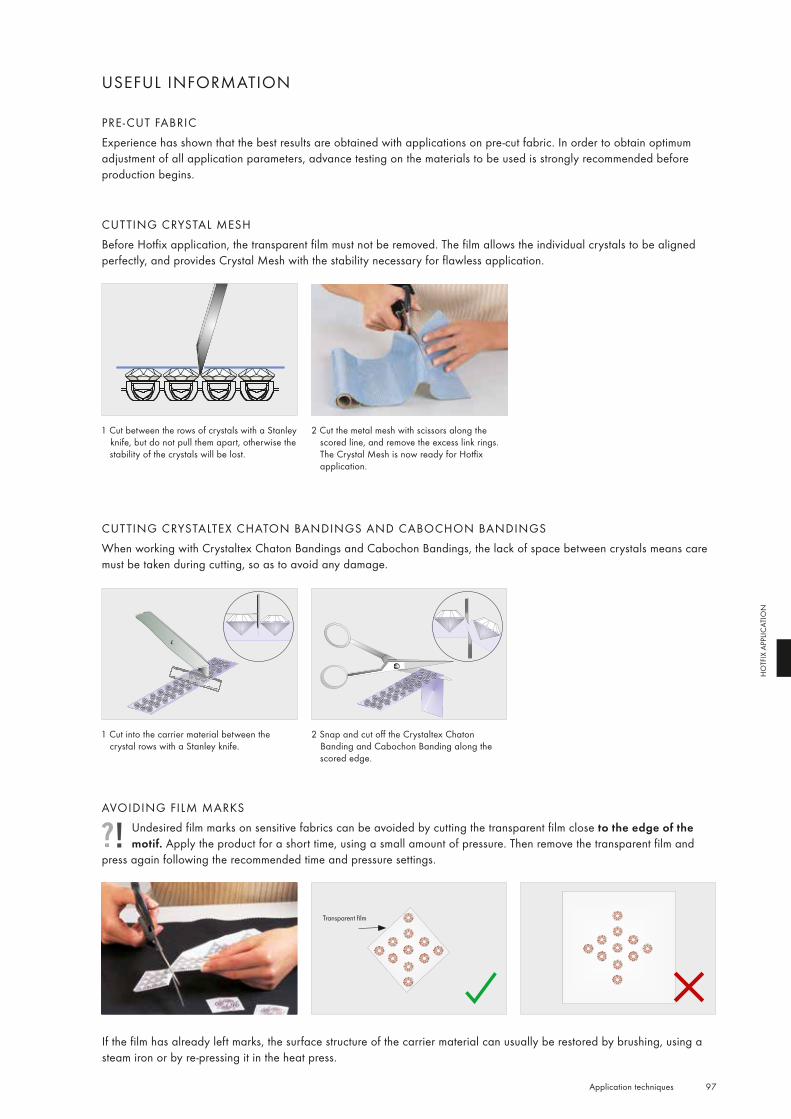
97 Application techniques
HO
TFIX
APP
LICAT
ION
USEFUL INFORMATION
CUTTING CRYSTAL MESHBefore Hotfix application, the transparent film must not be removed. The film allows the individual crystals to be aligned perfectly, and provides Crystal Mesh with the stability necessary for flawless application.
PRE - CUT FABRICExperience has shown that the best results are obtained with applications on pre-cut fabric. In order to obtain optimum adjustment of all application parameters, advance testing on the materials to be used is strongly recommended before production begins.
1 Cut between the rows of crystals with a Stanley knife, but do not pull them apart, otherwise the stability of the crystals will be lost.
2 Cut the metal mesh with scissors along the scored line, and remove the excess link rings. The Crystal Mesh is now ready for Hotfix application.
CUTTING CRYSTALTEX CHATON BANDINGS AND CABOCHON BANDINGSWhen working with Crystaltex Chaton Bandings and Cabochon Bandings, the lack of space between crystals means care must be taken during cutting, so as to avoid any damage.
1 Cut into the carrier material between the crystal rows with a Stanley knife.
2 Snap and cut off the Crystaltex Chaton Banding and Cabochon Banding along the scored edge.
AVOIDING FILM MARKSUndesired film marks on sensitive fabrics can be avoided by cutting the transparent film close to the edge of the motif. Apply the product for a short time, using a small amount of pressure. Then remove the transparent film and
press again following the recommended time and pressure settings.
If the film has already left marks, the surface structure of the carrier material can usually be restored by brushing, using a steam iron or by re-pressing it in the heat press.
Transparent film
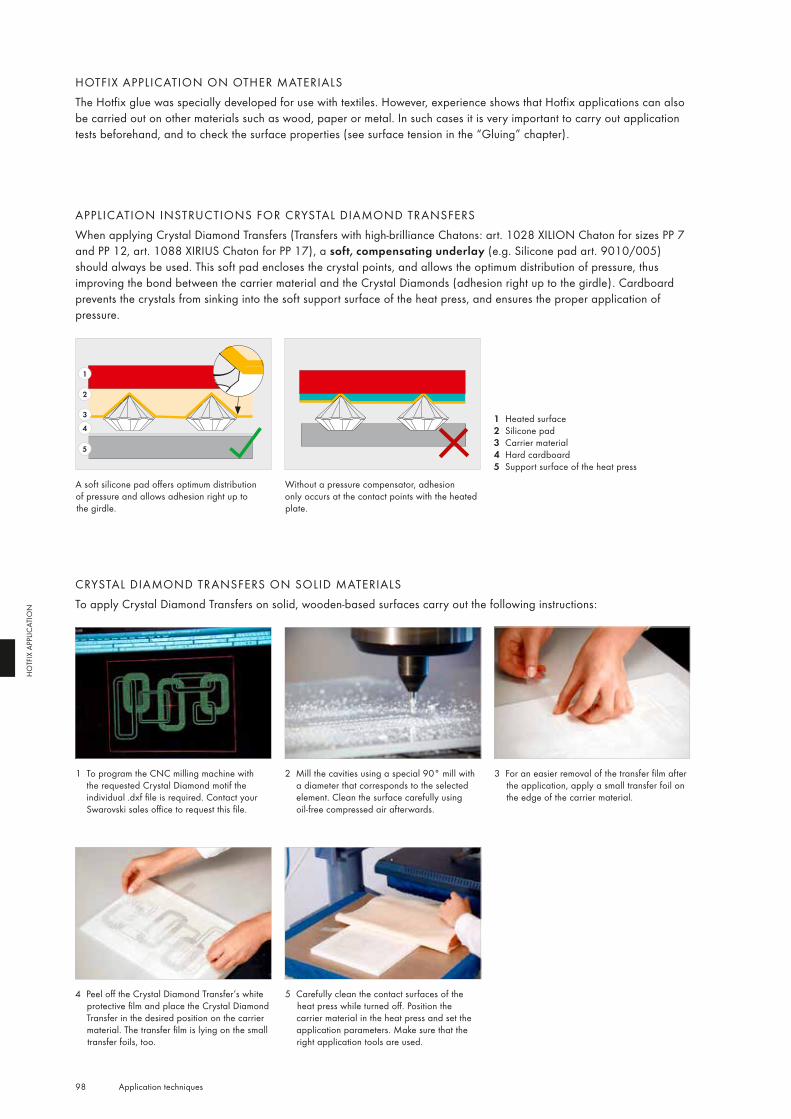
1
2
3
4
5
98 Application techniques
HO
TFIX
APP
LICAT
ION
HOTFIX APPLICATION ON OTHER MATERIALSThe Hotfix glue was specially developed for use with textiles. However, experience shows that Hotfix applications can also be carried out on other materials such as wood, paper or metal. In such cases it is very important to carry out application tests beforehand, and to check the surface properties (see surface tension in the “Gluing” chapter).
APPLICATION INSTRUCTIONS FOR CRYSTAL DIAMOND TRANSFERSWhen applying Crystal Diamond Transfers (Transfers with high-brilliance Chatons: art. 1028 XILION Chaton for sizes PP 7 and PP 12, art. 1088 XIRIUS Chaton for PP 17), a soft, compensating underlay (e.g. Silicone pad art. 9010/005) should always be used. This soft pad encloses the crystal points, and allows the optimum distribution of pressure, thus improving the bond between the carrier material and the Crystal Diamonds (adhesion right up to the girdle). Cardboard prevents the crystals from sinking into the soft support surface of the heat press, and ensures the proper application of pressure.
Without a pressure compensator, adhesion only occurs at the contact points with the heated plate.
A soft silicone pad offers optimum distribution of pressure and allows adhesion right up to the girdle.
1 Heated surface2 Silicone pad3 Carrier material4 Hard cardboard5 Support surface of the heat press
CRYSTAL DIAMOND TRANSFERS ON SOLID MATERIALSTo apply Crystal Diamond Transfers on solid, wooden-based surfaces carry out the following instructions:
1 To program the CNC milling machine with the requested Crystal Diamond motif the individual .dxf file is required. Contact your Swarovski sales office to request this file.
2 Mill the cavities using a special 90° mill with a diameter that corresponds to the selected element. Clean the surface carefully using oil-free compressed air afterwards.
3 For an easier removal of the transfer film after the application, apply a small transfer foil on the edge of the carrier material.
5 Carefully clean the contact surfaces of the heat press while turned off. Position the carrier material in the heat press and set the application parameters. Make sure that the right application tools are used.
4 Peel off the Crystal Diamond Transfer’s white protective film and place the Crystal Diamond Transfer in the desired position on the carrier material. The transfer film is lying on the small transfer foils, too.
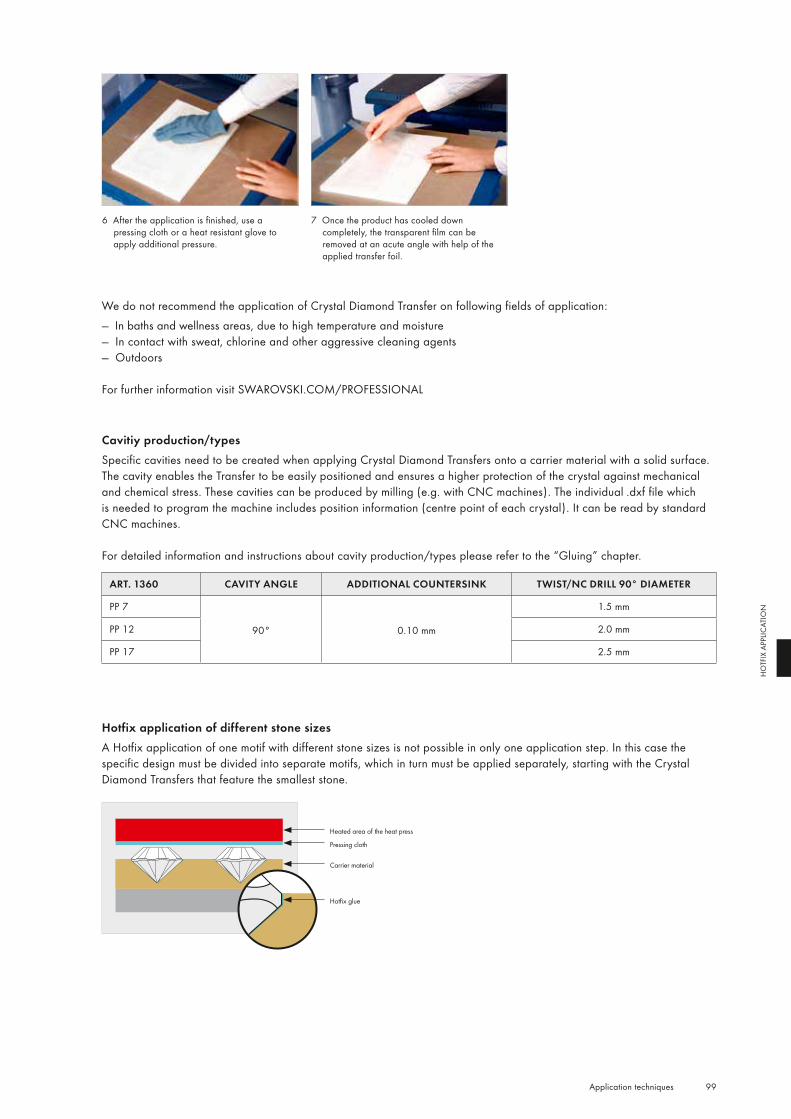
99 Application techniques
HO
TFIX
APP
LICAT
ION
Cavitiy production/typesSpecific cavities need to be created when applying Crystal Diamond Transfers onto a carrier material with a solid surface. The cavity enables the Transfer to be easily positioned and ensures a higher protection of the crystal against mechanical and chemical stress. These cavities can be produced by milling (e.g. with CNC machines). The individual .dxf file which is needed to program the machine includes position information (centre point of each crystal). It can be read by standard CNC machines.
For detailed information and instructions about cavity production/types please refer to the “Gluing” chapter.
ART. 1360 CAVITY ANGLE ADDITIONAL COUNTERSINK TWIST/NC DRILL 90° DIAMETER
PP 7
90° 0.10 mm
1.5 mm
PP 12 2.0 mm
PP 17 2.5 mm
We do not recommend the application of Crystal Diamond Transfer on following fields of application: — In baths and wellness areas, due to high temperature and moisture — In contact with sweat, chlorine and other aggressive cleaning agents — Outdoors
For further information visit SWAROVSKI.COM/PROFESSIONAL
6 After the application is finished, use a pressing cloth or a heat resistant glove to apply additional pressure.
7 Once the product has cooled down completely, the transparent film can be removed at an acute angle with help of the applied transfer foil.
Hotfix application of different stone sizesA Hotfix application of one motif with different stone sizes is not possible in only one application step. In this case the specific design must be divided into separate motifs, which in turn must be applied separately, starting with the Crystal Diamond Transfers that feature the smallest stone.
Heated area of the heat press
Pressing cloth
Carrier material
Hotfix glue
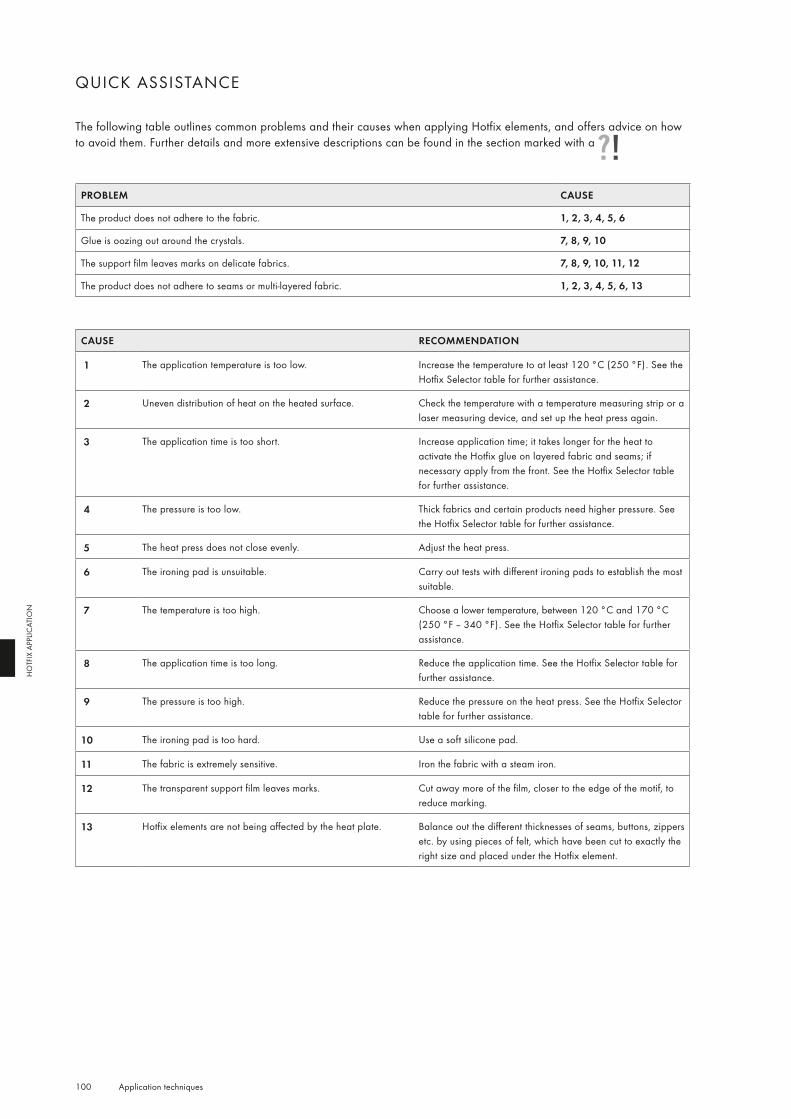
100 Application techniques
HO
TFIX
APP
LICAT
ION
QUICK ASSISTANCE
The following table outlines common problems and their causes when applying Hotfix elements, and offers advice on how to avoid them. Further details and more extensive descriptions can be found in the section marked with a
PROBLEM CAUSE
The product does not adhere to the fabric. 1, 2, 3, 4, 5, 6
Glue is oozing out around the crystals. 7, 8, 9, 10
The support film leaves marks on delicate fabrics. 7, 8, 9, 10, 11, 12
The product does not adhere to seams or multi-layered fabric. 1, 2, 3, 4, 5, 6, 13
CAUSE RECOMMENDATION
1 The application temperature is too low. Increase the temperature to at least 120 °C (250 °F). See the Hotfix Selector table for further assistance.
2 Uneven distribution of heat on the heated surface. Check the temperature with a temperature measuring strip or a laser measuring device, and set up the heat press again.
3 The application time is too short. Increase application time; it takes longer for the heat to activate the Hotfix glue on layered fabric and seams; if necessary apply from the front. See the Hotfix Selector table for further assistance.
4 The pressure is too low. Thick fabrics and certain products need higher pressure. See the Hotfix Selector table for further assistance.
5 The heat press does not close evenly. Adjust the heat press.
6 The ironing pad is unsuitable. Carry out tests with different ironing pads to establish the most suitable.
7 The temperature is too high. Choose a lower temperature, between 120 °C and 170 °C (250 °F – 340 °F). See the Hotfix Selector table for further assistance.
8 The application time is too long. Reduce the application time. See the Hotfix Selector table for further assistance.
9 The pressure is too high. Reduce the pressure on the heat press. See the Hotfix Selector table for further assistance.
10 The ironing pad is too hard. Use a soft silicone pad.
11 The fabric is extremely sensitive. Iron the fabric with a steam iron.
12 The transparent support film leaves marks. Cut away more of the film, closer to the edge of the motif, to reduce marking.
13 Hotfix elements are not being affected by the heat plate. Balance out the different thicknesses of seams, buttons, zippers etc. by using pieces of felt, which have been cut to exactly the right size and placed under the Hotfix element.
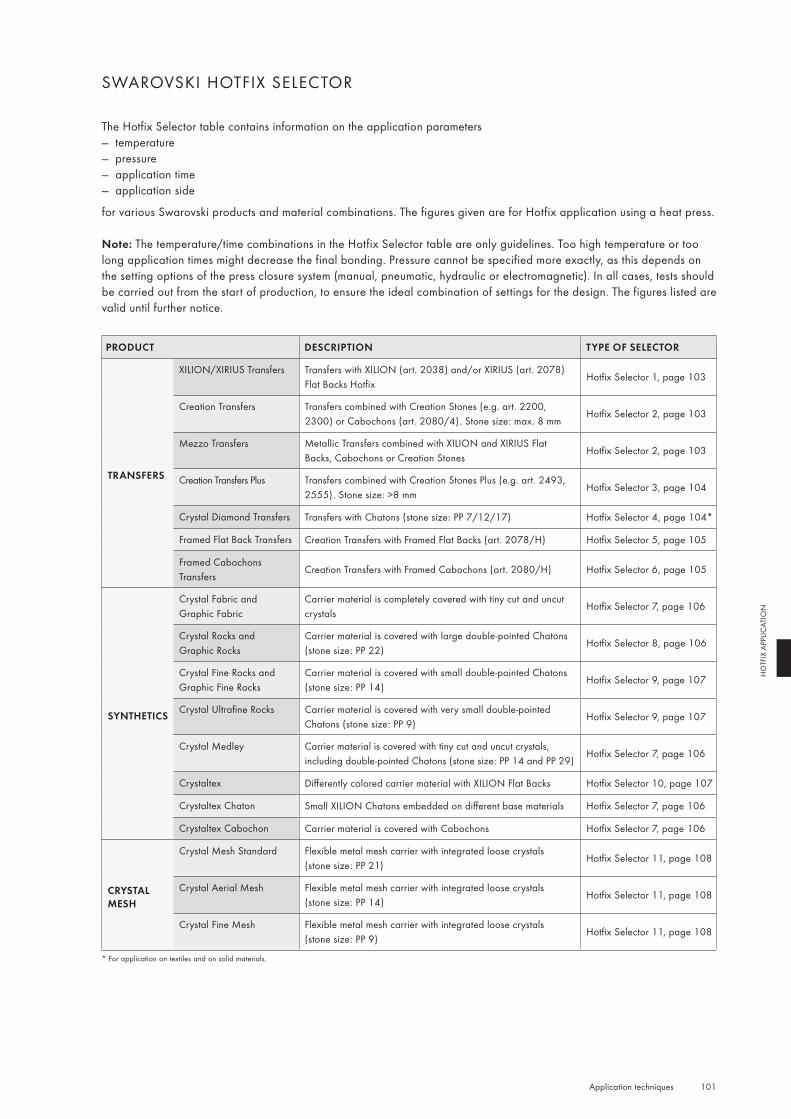
101 Application techniques
HO
TFIX
APP
LICAT
ION
SWAROVSKI HOTFIX SELECTOR
The Hotfix Selector table contains information on the application parameters — temperature — pressure — application time — application side
for various Swarovski products and material combinations. The figures given are for Hotfix application using a heat press.
Note: The temperature/time combinations in the Hotfix Selector table are only guidelines. Too high temperature or too long application times might decrease the final bonding. Pressure cannot be specified more exactly, as this depends on the setting options of the press closure system (manual, pneumatic, hydraulic or electromagnetic). In all cases, tests should be carried out from the start of production, to ensure the ideal combination of settings for the design. The figures listed are valid until further notice.
PRODUCT DESCRIPTION TYPE OF SELECTOR
TRANSFERS
XILION/XIRIUS Transfers Transfers with XILION (art. 2038) and/or XIRIUS (art. 2078) Flat Backs Hotfix
Hotfix Selector 1, page 103
Creation Transfers Transfers combined with Creation Stones (e.g. art. 2200, 2300) or Cabochons (art. 2080/4). Stone size: max. 8 mm
Hotfix Selector 2, page 103
Mezzo Transfers Metallic Transfers combined with XILION and XIRIUS Flat Backs, Cabochons or Creation Stones
Hotfix Selector 2, page 103
Creation Transfers Plus Transfers combined with Creation Stones Plus (e.g. art. 2493, 2555). Stone size: >8 mm
Hotfix Selector 3, page 104
Crystal Diamond Transfers Transfers with Chatons (stone size: PP 7/12/17) Hotfix Selector 4, page 104*
Framed Flat Back Transfers Creation Transfers with Framed Flat Backs (art. 2078/H) Hotfix Selector 5, page 105
Framed Cabochons Transfers
Creation Transfers with Framed Cabochons (art. 2080/H) Hotfix Selector 6, page 105
SYNTHETICS
Crystal Fabric and Graphic Fabric
Carrier material is completely covered with tiny cut and uncut crystals
Hotfix Selector 7, page 106
Crystal Rocks and Graphic Rocks
Carrier material is covered with large double-pointed Chatons (stone size: PP 22)
Hotfix Selector 8, page 106
Crystal Fine Rocks and Graphic Fine Rocks
Carrier material is covered with small double-pointed Chatons (stone size: PP 14)
Hotfix Selector 9, page 107
Crystal Ultrafine Rocks Carrier material is covered with very small double-pointed Chatons (stone size: PP 9)
Hotfix Selector 9, page 107
Crystal Medley Carrier material is covered with tiny cut and uncut crystals, including double-pointed Chatons (stone size: PP 14 and PP 29)
Hotfix Selector 7, page 106
Crystaltex Differently colored carrier material with XILION Flat Backs Hotfix Selector 10, page 107
Crystaltex Chaton Small XILION Chatons embedded on different base materials Hotfix Selector 7, page 106
Crystaltex Cabochon Carrier material is covered with Cabochons Hotfix Selector 7, page 106
CRYSTAL MESH
Crystal Mesh Standard Flexible metal mesh carrier with integrated loose crystals (stone size: PP 21)
Hotfix Selector 11, page 108
Crystal Aerial Mesh Flexible metal mesh carrier with integrated loose crystals (stone size: PP 14)
Hotfix Selector 11, page 108
Crystal Fine Mesh Flexible metal mesh carrier with integrated loose crystals (stone size: PP 9)
Hotfix Selector 11, page 108
* For application on textiles and on solid materials.

102 Application techniques
HO
TFIX
APP
LICAT
ION
As most Swarovski products can be applied from the front or back, the Hotfix Selector table features the application parameters for both sides. Extensive information on optimum application, depending on the production process and the application type (e.g. on trouser pockets), is available.
Front: The front (right side) of the fabric is exposed to the heat press.
Back: The back (reverse) of the fabric is exposed to the heat press.
The temperature settings selected depend on the heat resistance of the carrier material, and should be judged by the customer. The higher the temperature, the less time is required to activate the Hotfix adhesive (see table/chart). The application time depends primarily on the textile used and its thickness.
TOOLS FOR HOTFIX APPLICATIONTeflon® foil (100 x 50 cm, 40 x 20 in, art. 9010/003) Silicone ironing pad (foam) (134 x 100 cm, 54 x 40 in, art. 9010/002) Silicone pad (50 x 50 x 0.2 cm, 20 x 20 x 0.08 in, art. 9010/005) FeltStandard pressing cloth (cotton) Standard cardboard Transfer film (www.dso-co.com, www.strass.cc)
FABRIC CATEGORY FABRIC EXAMPLE MATERIAL WEIGHT
Reference fabric Cotton/polyester blend 35% cotton, 65% polyester 210 g/m²
Natural fibers
Batiste, Vichy fabric, cotton jersey, interlock, linen fabrics, etc.
Cotton, linen 100 – 200 g/m²
Silk fabrics, toile, etc. Silk 100 – 200 g/m²
Jeans, denim, cord, velvet, damask, gabardine, sweatshirt fabrics, etc.
Cotton 300 – 400 g/m²
Cloth, tweed, bouclé, loden, boiled wool, felt, knitted fabrics, etc.
Wool 300 – 400 g/m²
Cellulose and synthetic fibers
Viscose, satin, organza, chiffon, taffeta, tulle, lace, etc.
Viscose, acetate, triacetate, polyester, polyamide, polyacrylics and various fiber blends
20 – 120 g/m²
LYCRA®, neoprene, etc. 150 – 250 g/m²
Pile fabricsArtificial leather, alcantara, suede, fleece, artificial fur, plush, toweling, etc.
Cottons, various fiber blends 200 – 350 g/m²
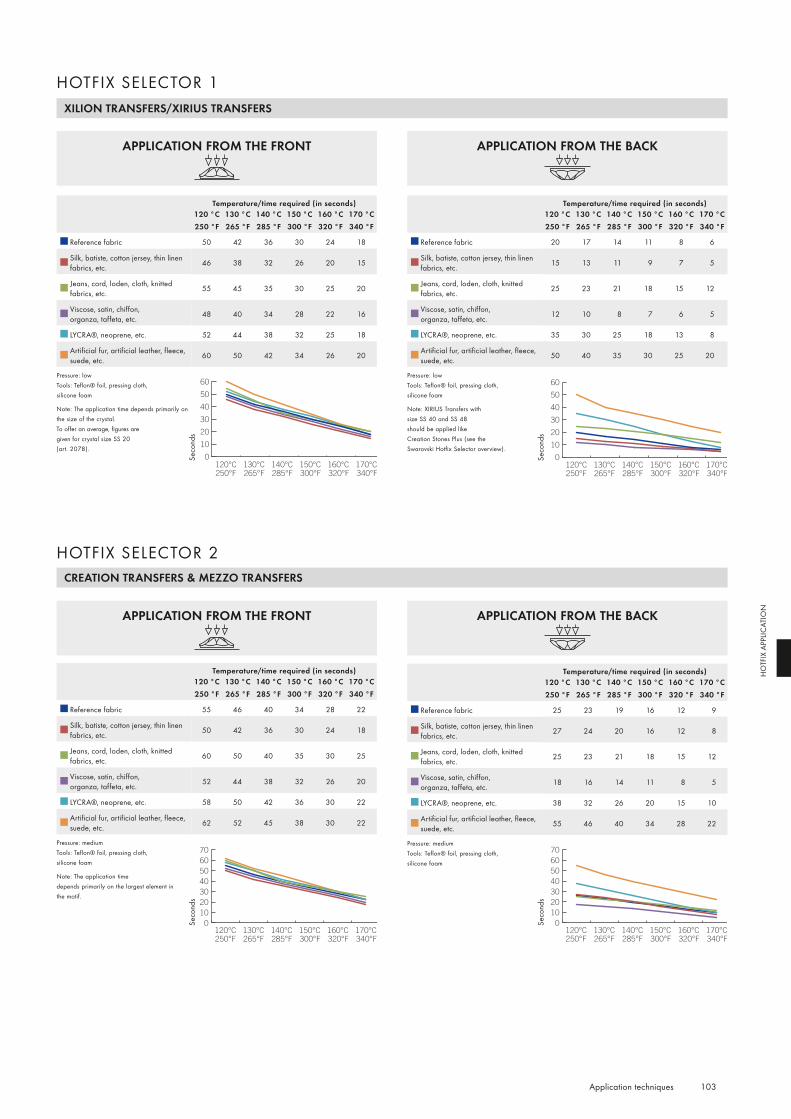
Creation Transfers usw. (vorgeschl.) Creation Transfers usw. (alternativ)
340°F320°F300°F285°F265°F250°F
010203040506070
010203040506070
170°C160°C150°C140°C130°C120°C340°F320°F300°F285°F265°F250°F170°C160°C150°C140°C130°C120°C
Creation Transfers usw. (vorgeschl.) Creation Transfers usw. (alternativ)
340°F320°F300°F285°F265°F250°F
010203040506070
010203040506070
170°C160°C150°C140°C130°C120°C340°F320°F300°F285°F265°F250°F170°C160°C150°C140°C130°C120°C
Xilion Transfers (vorgeschl.) Xilion Transfers (alternativ)
0
10
20
30
40
50
60
0
10
20
30
40
50
60
340°F320°F300°F285°F265°F250°F170°C160°C150°C140°C130°C120°C
340°F320°F300°F285°F265°F250°F170°C160°C150°C140°C130°C120°C
Xilion Transfers (vorgeschl.) Xilion Transfers (alternativ)
0
10
20
30
40
50
60
0
10
20
30
40
50
60
340°F320°F300°F285°F265°F250°F170°C160°C150°C140°C130°C120°C
340°F320°F300°F285°F265°F250°F170°C160°C150°C140°C130°C120°C
103 Application techniques
HO
TFIX
APP
LICAT
ION
HOTFIX SELECTOR 1
Seco
nds
Seco
nds
Seco
nds
Seco
nds
Temperature/time required (in seconds)120 °C 130 °C 140 °C 150 °C 160 °C 170 °C250 °F 265 °F 285 °F 300 °F 320 °F 340 °F
Reference fabric 20 17 14 11 8 6
Silk, batiste, cotton jersey, thin linen fabrics, etc. 15 13 11 9 7 5
Jeans, cord, loden, cloth, knitted fabrics, etc. 25 23 21 18 15 12
Viscose, satin, chiffon, organza, taffeta, etc. 12 10 8 7 6 5
LYCRA®, neoprene, etc. 35 30 25 18 13 8
Artificial fur, artificial leather, fleece, suede, etc. 50 40 35 30 25 20
Pressure: low Tools: Teflon® foil, pressing cloth, silicone foam
Note: XIRIUS Transfers with size SS 40 and SS 48 should be applied like Creation Stones Plus (see the Swarovski Hotfix Selector overview).
Temperature/time required (in seconds)120 °C 130 °C 140 °C 150 °C 160 °C 170 °C250 °F 265 °F 285 °F 300 °F 320 °F 340 °F
Reference fabric 50 42 36 30 24 18
Silk, batiste, cotton jersey, thin linen fabrics, etc. 46 38 32 26 20 15
Jeans, cord, loden, cloth, knitted fabrics, etc. 55 45 35 30 25 20
Viscose, satin, chiffon, organza, taffeta, etc. 48 40 34 28 22 16
LYCRA®, neoprene, etc. 52 44 38 32 25 18
Artificial fur, artificial leather, fleece, suede, etc. 60 50 42 34 26 20
Pressure: low Tools: Teflon® foil, pressing cloth, silicone foam
Note: The application time depends primarily on the size of the crystal. To offer an average, figures are given for crystal size SS 20 (art. 2078).
Temperature/time required (in seconds)120 °C 130 °C 140 °C 150 °C 160 °C 170 °C250 °F 265 °F 285 °F 300 °F 320 °F 340 °F
Reference fabric 25 23 19 16 12 9
Silk, batiste, cotton jersey, thin linen fabrics, etc. 27 24 20 16 12 8
Jeans, cord, loden, cloth, knitted fabrics, etc. 25 23 21 18 15 12
Viscose, satin, chiffon, organza, taffeta, etc. 18 16 14 11 8 5
LYCRA®, neoprene, etc. 38 32 26 20 15 10
Artificial fur, artificial leather, fleece, suede, etc. 55 46 40 34 28 22
Pressure: medium Tools: Teflon® foil, pressing cloth, silicone foam
Temperature/time required (in seconds)120 °C 130 °C 140 °C 150 °C 160 °C 170 °C250 °F 265 °F 285 °F 300 °F 320 °F 340 °F
Reference fabric 55 46 40 34 28 22
Silk, batiste, cotton jersey, thin linen fabrics, etc. 50 42 36 30 24 18
Jeans, cord, loden, cloth, knitted fabrics, etc. 60 50 40 35 30 25
Viscose, satin, chiffon, organza, taffeta, etc. 52 44 38 32 26 20
LYCRA®, neoprene, etc. 58 50 42 36 30 22
Artificial fur, artificial leather, fleece, suede, etc. 62 52 45 38 30 22
Pressure: medium Tools: Teflon® foil, pressing cloth, silicone foam
Note: The application time depends primarily on the largest element in the motif.
APPLICATION FROM THE BACKAPPLICATION FROM THE FRONT
APPLICATION FROM THE BACKAPPLICATION FROM THE FRONT
HOTFIX SELECTOR 2
XILION TRANSFERS/XIRIUS TRANSFERS
CREATION TRANSFERS & MEZZO TRANSFERS

Creation Transfers PLUS (vorgeschl.)
0
10
20
30
40
50
340°F320°F300°F285°F265°F250°F170°C160°C150°C140°C130°C120°C
Diamond Transfers (vorgeschl.) Diamond Transfers (alternativ)
0
20
40
60
80
100
120
0
20
40
60
80
100
120
340°F320°F300°F285°F265°F250°F170°C160°C150°C140°C130°C120°C
340°F320°F300°F285°F265°F250°F170°C160°C150°C140°C130°C120°C
Diamond Transfers (vorgeschl.) Diamond Transfers (alternativ)
0
20
40
60
80
100
120
0
20
40
60
80
100
120
340°F320°F300°F285°F265°F250°F170°C160°C150°C140°C130°C120°C
340°F320°F300°F285°F265°F250°F170°C160°C150°C140°C130°C120°C
104 Application techniques
HO
TFIX
APP
LICAT
ION
Temperature/time required (in seconds)120 °C 130 °C 140 °C 150 °C 160 °C 170 °C250 °F 265 °F 285 °F 300 °F 320 °F 340 °F
Reference fabric – – 110 50 30 25
Silk, batiste, cotton jersey, thin linen fabrics, etc. – – 120 60 40 35
Jeans, cord, loden, cloth, knitted fabrics, etc. – – 110 55 35 30
Viscose, satin, chiffon, organza, taffeta, etc. – – – – – –
LYCRA®, neoprene, etc. – – 90 40 20 15
Artificial fur, artificial leather, fleece, suede, etc. – – 100 55 35 25
Pressure: high Tools: Teflon® foil, pressing cloth, cardboard, preheated silicone pad
Note: Crystal Diamond Transfers are best suited to soft, voluminous fabrics.
Temperature/time required (in seconds)110 °C 120 °C 130 °C 140 °C 150 °C 160 °C 170 °C230 °F 250 °F 265 °F 285 °F 300 °F 320 °F 340 °F
Reference fabric – – – 80 60 45 35
Silk, batiste, cotton jersey, thin linen fabrics, etc. – – – 65 50 40 30
Jeans, cord, loden, cloth, knitted fabrics, etc. – – – 65 48 35 28
Viscose, satin, chiffon, organza, taffeta, etc. – – – – – – –
LYCRA®, neoprene, etc. – – – 50 40 30 20
Artificial fur, artificial lea-ther, fleece, suede, etc. – – – 55 42 32 22
Medium density fiberboard (MDF) 120 – – – – – –
Veneered wood fiberboard 120 – – – – – –
Laminated wood fiberboard (HPL) 120 – – – – – –
Solid hardwood 120 – – – – – –
Pressure: high Tools: Teflon® foil, pressing cloth, cardboard, preheated silicone pad
Note: Crystal Diamond Transfers are best suited to soft, voluminous fabrics.
Temperature/time required (in seconds)120 °C 130 °C 140 °C 150 °C 160 °C 170 °C250 °F 265 °F 285 °F 300 °F 320 °F 340 °F
Reference fabric 35 35 30 25 18 12
Silk, batiste, cotton jersey, thin linen fabrics, etc. 30 28 25 20 15 10
Jeans, cord, loden, cloth, knitted fabrics, etc. 40 38 32 28 22 16
Viscose, satin, chiffon, organza, taffeta, etc. 28 25 22 18 12 10
LYCRA®, neoprene, etc. 38 35 30 25 18 12
Artificial fur, artificial leather, fleece, suede, etc. 50 40 35 30 25 20
Pressure: medium Tools: Teflon® foil, pressing cloth
Seco
nds
Seco
nds
Seco
nds
HOTFIX SELECTOR 3
HOTFIX SELECTOR 4
APPLICATION FROM THE BACKAPPLICATION FROM THE FRONT
APPLICATION FROM THE BACKAPPLICATION FROM THE FRONT
CREATION TRANSFERS PLUS
CRYSTAL DIAMOND TRANSFERS
These items are NOT suitable for application from the front!
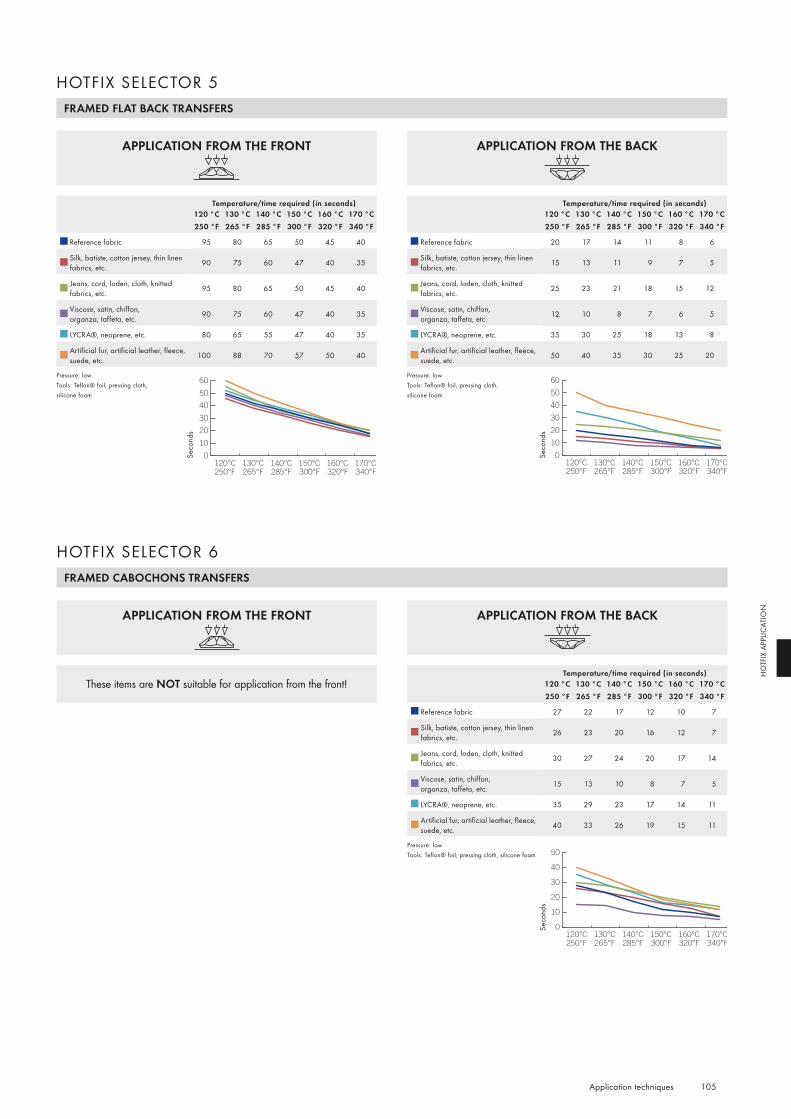
Xilion Transfers (vorgeschl.) Xilion Transfers (alternativ)
0
10
20
30
40
50
60
0
10
20
30
40
50
60
340°F320°F300°F285°F265°F250°F170°C160°C150°C140°C130°C120°C
340°F320°F300°F285°F265°F250°F170°C160°C150°C140°C130°C120°C
Xilion Transfers (vorgeschl.) Xilion Transfers (alternativ)
0
10
20
30
40
50
60
0
10
20
30
40
50
60
340°F320°F300°F285°F265°F250°F170°C160°C150°C140°C130°C120°C
340°F320°F300°F285°F265°F250°F170°C160°C150°C140°C130°C120°C
Framed Cabochons
0
10
20
30
40
50
340°F320°F300°F285°F265°F250°F170°C160°C150°C140°C130°C120°C
105 Application techniques
HO
TFIX
APP
LICAT
ION
Temperature/time required (in seconds)120 °C 130 °C 140 °C 150 °C 160 °C 170 °C250 °F 265 °F 285 °F 300 °F 320 °F 340 °F
Reference fabric 95 80 65 50 45 40
Silk, batiste, cotton jersey, thin linen fabrics, etc. 90 75 60 47 40 35
Jeans, cord, loden, cloth, knitted fabrics, etc. 95 80 65 50 45 40
Viscose, satin, chiffon, organza, taffeta, etc. 90 75 60 47 40 35
LYCRA®, neoprene, etc. 80 65 55 47 40 35
Artificial fur, artificial leather, fleece, suede, etc. 100 88 70 57 50 40
Pressure: low Tools: Teflon® foil, pressing cloth, silicone foam
Temperature/time required (in seconds)120 °C 130 °C 140 °C 150 °C 160 °C 170 °C250 °F 265 °F 285 °F 300 °F 320 °F 340 °F
Reference fabric 20 17 14 11 8 6
Silk, batiste, cotton jersey, thin linen fabrics, etc. 15 13 11 9 7 5
Jeans, cord, loden, cloth, knitted fabrics, etc. 25 23 21 18 15 12
Viscose, satin, chiffon, organza, taffeta, etc. 12 10 8 7 6 5
LYCRA®, neoprene, etc. 35 30 25 18 13 8
Artificial fur, artificial leather, fleece, suede, etc. 50 40 35 30 25 20
Pressure: low Tools: Teflon® foil, pressing cloth, silicone foam
Seco
nds
Seco
nds
APPLICATION FROM THE BACKAPPLICATION FROM THE FRONT
HOTFIX SELECTOR 5 FRAMED FLAT BACK TRANSFERS
Temperature/time required (in seconds)120 °C 130 °C 140 °C 150 °C 160 °C 170 °C250 °F 265 °F 285 °F 300 °F 320 °F 340 °F
Reference fabric 27 22 17 12 10 7
Silk, batiste, cotton jersey, thin linen fabrics, etc. 26 23 20 16 12 7
Jeans, cord, loden, cloth, knitted fabrics, etc. 30 27 24 20 17 14
Viscose, satin, chiffon, organza, taffeta, etc. 15 13 10 8 7 5
LYCRA®, neoprene, etc. 35 29 23 17 14 11
Artificial fur, artificial leather, fleece, suede, etc. 40 33 26 19 15 11
Pressure: low Tools: Teflon® foil, pressing cloth, silicone foam
Seco
nds
HOTFIX SELECTOR 6
APPLICATION FROM THE BACKAPPLICATION FROM THE FRONT
FRAMED CABOCHONS TRANSFERS
These items are NOT suitable for application from the front!
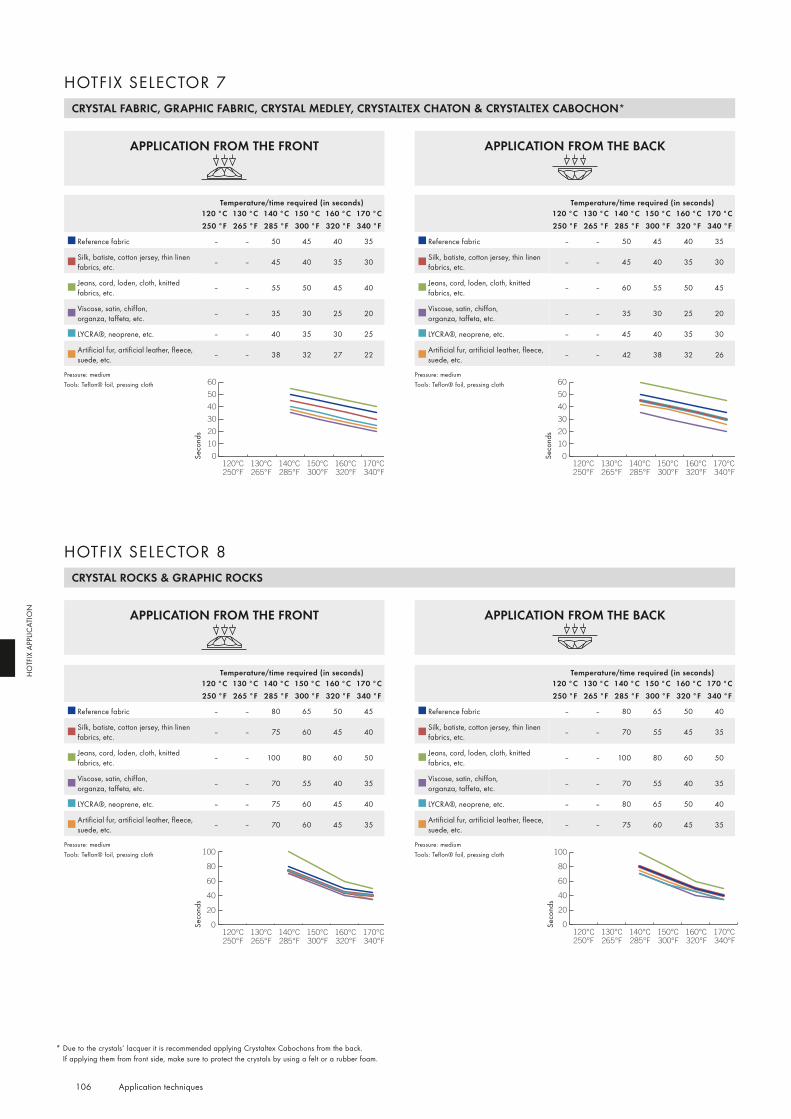
Crystal Rocks (vorgeschl.) Crystal Rocks (alternativ)
0
20
40
60
80
100
0
20
40
60
80
100
340°F320°F300°F285°F265°F250°F170°C160°C150°C140°C130°C120°C
340°F320°F300°F285°F265°F250°F170°C160°C150°C140°C130°C120°C
Crystal Rocks (vorgeschl.) Crystal Rocks (alternativ)
0
20
40
60
80
100
0
20
40
60
80
100
340°F320°F300°F285°F265°F250°F170°C160°C150°C140°C130°C120°C
340°F320°F300°F285°F265°F250°F170°C160°C150°C140°C130°C120°C
Crystaltex Fabric usw. (vorgeschl.) Crystaltex Fabric usw. (alternativ)
0
10
20
30
40
50
60
0
10
20
30
40
50
60
340°F320°F300°F285°F265°F250°F170°C160°C150°C140°C130°C120°C
340°F320°F300°F285°F265°F250°F170°C160°C150°C140°C130°C120°C
Crystaltex Fabric usw. (vorgeschl.) Crystaltex Fabric usw. (alternativ)
0
10
20
30
40
50
60
0
10
20
30
40
50
60
340°F320°F300°F285°F265°F250°F170°C160°C150°C140°C130°C120°C
340°F320°F300°F285°F265°F250°F170°C160°C150°C140°C130°C120°C
106 Application techniques
HO
TFIX
APP
LICAT
ION
Temperature/time required (in seconds)120 °C 130 °C 140 °C 150 °C 160 °C 170 °C250 °F 265 °F 285 °F 300 °F 320 °F 340 °F
Reference fabric – – 80 65 50 45
Silk, batiste, cotton jersey, thin linen fabrics, etc. – – 75 60 45 40
Jeans, cord, loden, cloth, knitted fabrics, etc. – – 100 80 60 50
Viscose, satin, chiffon, organza, taffeta, etc. – – 70 55 40 35
LYCRA®, neoprene, etc. – – 75 60 45 40
Artificial fur, artificial leather, fleece, suede, etc. – – 70 60 45 35
Pressure: medium Tools: Teflon® foil, pressing cloth
Temperature/time required (in seconds)120 °C 130 °C 140 °C 150 °C 160 °C 170 °C250 °F 265 °F 285 °F 300 °F 320 °F 340 °F
Reference fabric – – 80 65 50 40
Silk, batiste, cotton jersey, thin linen fabrics, etc. – – 70 55 45 35
Jeans, cord, loden, cloth, knitted fabrics, etc. – – 100 80 60 50
Viscose, satin, chiffon, organza, taffeta, etc. – – 70 55 40 35
LYCRA®, neoprene, etc. – – 80 65 50 40
Artificial fur, artificial leather, fleece, suede, etc. – – 75 60 45 35
Pressure: medium Tools: Teflon® foil, pressing cloth
Seco
nds
Seco
nds
APPLICATION FROM THE BACKAPPLICATION FROM THE FRONT
HOTFIX SELECTOR 8 CRYSTAL ROCKS & GRAPHIC ROCKS
Temperature/time required (in seconds)120 °C 130 °C 140 °C 150 °C 160 °C 170 °C250 °F 265 °F 285 °F 300 °F 320 °F 340 °F
Reference fabric – – 50 45 40 35
Silk, batiste, cotton jersey, thin linen fabrics, etc. – – 45 40 35 30
Jeans, cord, loden, cloth, knitted fabrics, etc. – – 55 50 45 40
Viscose, satin, chiffon, organza, taffeta, etc. – – 35 30 25 20
LYCRA®, neoprene, etc. – – 40 35 30 25
Artificial fur, artificial leather, fleece, suede, etc. – – 38 32 27 22
Pressure: medium Tools: Teflon® foil, pressing cloth
Temperature/time required (in seconds)120 °C 130 °C 140 °C 150 °C 160 °C 170 °C250 °F 265 °F 285 °F 300 °F 320 °F 340 °F
Reference fabric – – 50 45 40 35
Silk, batiste, cotton jersey, thin linen fabrics, etc. – – 45 40 35 30
Jeans, cord, loden, cloth, knitted fabrics, etc. – – 60 55 50 45
Viscose, satin, chiffon, organza, taffeta, etc. – – 35 30 25 20
LYCRA®, neoprene, etc. – – 45 40 35 30
Artificial fur, artificial leather, fleece, suede, etc. – – 42 38 32 26
Pressure: medium Tools: Teflon® foil, pressing cloth
Seco
nds
Seco
nds
HOTFIX SELECTOR 7
* Due to the crystals‘ lacquer it is recommended applying Crystaltex Cabochons from the back. If applying them from front side, make sure to protect the crystals by using a felt or a rubber foam.
APPLICATION FROM THE BACKAPPLICATION FROM THE FRONT
CRYSTAL FABRIC, GRAPHIC FABRIC, CRYSTAL MEDLEY, CRYSTALTEX CHATON & CRYSTALTEX CABOCHON*
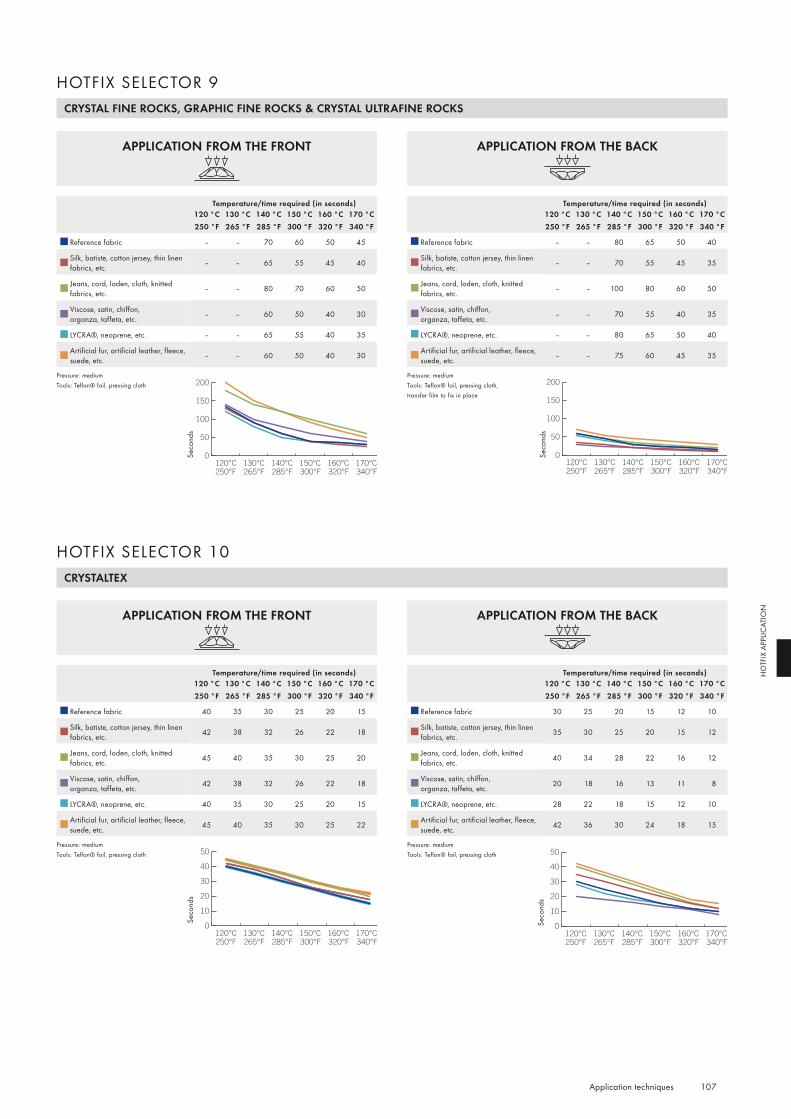
Crystal Mesh (vorgeschl.) Crystal Mesh (alternativ)
0
50
100
150
200
0
50
100
150
200
340°F320°F300°F285°F265°F250°F170°C160°C150°C140°C130°C120°C
340°F320°F300°F285°F265°F250°F170°C160°C150°C140°C130°C120°C
Crystal Mesh (vorgeschl.) Crystal Mesh (alternativ)
0
50
100
150
200
0
50
100
150
200
340°F320°F300°F285°F265°F250°F170°C160°C150°C140°C130°C120°C
340°F320°F300°F285°F265°F250°F170°C160°C150°C140°C130°C120°C
Crystaltex Bandings usw. (vorgeschl.) Crystaltex Bandings usw. (alternativ)
0
10
20
30
40
50
0
10
20
30
40
50
340°F320°F300°F285°F265°F250°F170°C160°C150°C140°C130°C120°C
340°F320°F300°F285°F265°F250°F170°C160°C150°C140°C130°C120°C
Crystaltex Bandings usw. (vorgeschl.) Crystaltex Bandings usw. (alternativ)
0
10
20
30
40
50
0
10
20
30
40
50
340°F320°F300°F285°F265°F250°F170°C160°C150°C140°C130°C120°C
340°F320°F300°F285°F265°F250°F170°C160°C150°C140°C130°C120°C
107 Application techniques
HO
TFIX
APP
LICAT
ION
Temperature/time required (in seconds)120 °C 130 °C 140 °C 150 °C 160 °C 170 °C250 °F 265 °F 285 °F 300 °F 320 °F 340 °F
Reference fabric – – 70 60 50 45
Silk, batiste, cotton jersey, thin linen fabrics, etc. – – 65 55 45 40
Jeans, cord, loden, cloth, knitted fabrics, etc. – – 80 70 60 50
Viscose, satin, chiffon, organza, taffeta, etc. – – 60 50 40 30
LYCRA®, neoprene, etc. – – 65 55 40 35
Artificial fur, artificial leather, fleece, suede, etc. – – 60 50 40 30
Pressure: medium Tools: Teflon® foil, pressing cloth
Temperature/time required (in seconds)120 °C 130 °C 140 °C 150 °C 160 °C 170 °C250 °F 265 °F 285 °F 300 °F 320 °F 340 °F
Reference fabric – – 80 65 50 40
Silk, batiste, cotton jersey, thin linen fabrics, etc. – – 70 55 45 35
Jeans, cord, loden, cloth, knitted fabrics, etc. – – 100 80 60 50
Viscose, satin, chiffon, organza, taffeta, etc. – – 70 55 40 35
LYCRA®, neoprene, etc. – – 80 65 50 40
Artificial fur, artificial leather, fleece, suede, etc. – – 75 60 45 35
Pressure: medium Tools: Teflon® foil, pressing cloth, transfer film to fix in place
Seco
nds
Seco
nds
APPLICATION FROM THE BACKAPPLICATION FROM THE FRONT
HOTFIX SELECTOR 9 CRYSTAL FINE ROCKS, GRAPHIC FINE ROCKS & CRYSTAL ULTRAFINE ROCKS
Temperature/time required (in seconds)120 °C 130 °C 140 °C 150 °C 160 °C 170 °C250 °F 265 °F 285 °F 300 °F 320 °F 340 °F
Reference fabric 40 35 30 25 20 15
Silk, batiste, cotton jersey, thin linen fabrics, etc. 42 38 32 26 22 18
Jeans, cord, loden, cloth, knitted fabrics, etc. 45 40 35 30 25 20
Viscose, satin, chiffon, organza, taffeta, etc. 42 38 32 26 22 18
LYCRA®, neoprene, etc. 40 35 30 25 20 15
Artificial fur, artificial leather, fleece, suede, etc. 45 40 35 30 25 22
Pressure: medium Tools: Teflon® foil, pressing cloth
Temperature/time required (in seconds)120 °C 130 °C 140 °C 150 °C 160 °C 170 °C250 °F 265 °F 285 °F 300 °F 320 °F 340 °F
Reference fabric 30 25 20 15 12 10
Silk, batiste, cotton jersey, thin linen fabrics, etc. 35 30 25 20 15 12
Jeans, cord, loden, cloth, knitted fabrics, etc. 40 34 28 22 16 12
Viscose, satin, chiffon, organza, taffeta, etc. 20 18 16 13 11 8
LYCRA®, neoprene, etc. 28 22 18 15 12 10
Artificial fur, artificial leather, fleece, suede, etc. 42 36 30 24 18 15
Pressure: medium Tools: Teflon® foil, pressing cloth
Seco
nds
Seco
nds
HOTFIX SELECTOR 10
APPLICATION FROM THE BACKAPPLICATION FROM THE FRONT
CRYSTALTEX
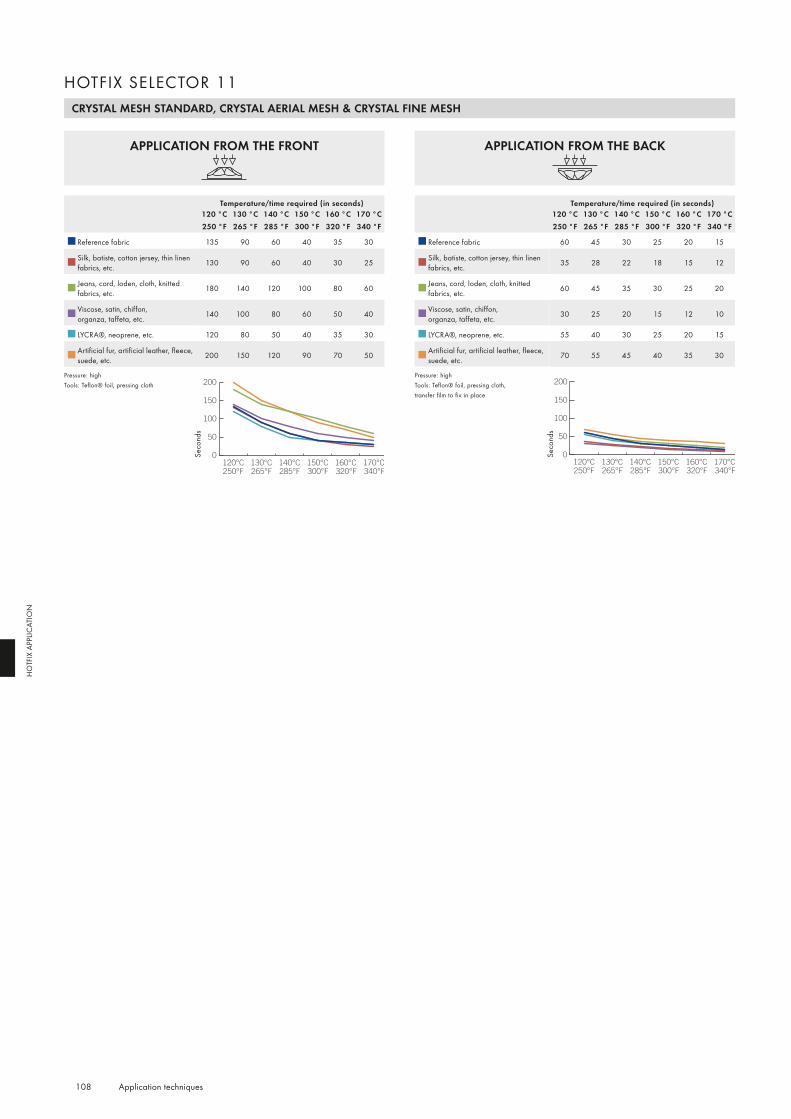
Crystal Mesh (vorgeschl.) Crystal Mesh (alternativ)
0
50
100
150
200
0
50
100
150
200
340°F320°F300°F285°F265°F250°F170°C160°C150°C140°C130°C120°C
340°F320°F300°F285°F265°F250°F170°C160°C150°C140°C130°C120°C
Crystal Mesh (vorgeschl.) Crystal Mesh (alternativ)
0
50
100
150
200
0
50
100
150
200
340°F320°F300°F285°F265°F250°F170°C160°C150°C140°C130°C120°C
340°F320°F300°F285°F265°F250°F170°C160°C150°C140°C130°C120°C
108 Application techniques
HO
TFIX
APP
LICAT
ION
CRYSTAL MESH STANDARD, CRYSTAL AERIAL MESH & CRYSTAL FINE MESH
Temperature/time required (in seconds)120 °C 130 °C 140 °C 150 °C 160 °C 170 °C250 °F 265 °F 285 °F 300 °F 320 °F 340 °F
Reference fabric 135 90 60 40 35 30
Silk, batiste, cotton jersey, thin linen fabrics, etc. 130 90 60 40 30 25
Jeans, cord, loden, cloth, knitted fabrics, etc. 180 140 120 100 80 60
Viscose, satin, chiffon, organza, taffeta, etc. 140 100 80 60 50 40
LYCRA®, neoprene, etc. 120 80 50 40 35 30
Artificial fur, artificial leather, fleece, suede, etc. 200 150 120 90 70 50
Pressure: high Tools: Teflon® foil, pressing cloth
Temperature/time required (in seconds)120 °C 130 °C 140 °C 150 °C 160 °C 170 °C250 °F 265 °F 285 °F 300 °F 320 °F 340 °F
Reference fabric 60 45 30 25 20 15
Silk, batiste, cotton jersey, thin linen fabrics, etc. 35 28 22 18 15 12
Jeans, cord, loden, cloth, knitted fabrics, etc. 60 45 35 30 25 20
Viscose, satin, chiffon, organza, taffeta, etc. 30 25 20 15 12 10
LYCRA®, neoprene, etc. 55 40 30 25 20 15
Artificial fur, artificial leather, fleece, suede, etc. 70 55 45 40 35 30
Pressure: high Tools: Teflon® foil, pressing cloth, transfer film to fix in place
Seco
nds
Seco
nds
APPLICATION FROM THE BACKAPPLICATION FROM THE FRONT
HOTFIX SELECTOR 11

109 Application techniques
HO
TFIX
APP
LICAT
ION

SEWING, EMBROIDERY, AND HAND APPLICATION
There are many Swarovski products that are suitable for sewing and embroidering. These products can be easily applied either
by hand, or with standard domestic or industrial sewing and embroidery machines. Swarovski also offers an ideal selection of
products for a variety of creative techniques by hand.

112 Application techniques
SEW
ING
, EM
BRO
IDER
Y AN
D H
AND
APPL
ICAT
ION
PRODUCT OVERVIEW
MACHINES AND TOOLS
The following machines and tools can be used for sewing and embroidering Swarovski products:
An industrial sewing machine is suitable for most sewing applications. However, a machine with a zigzag stitching program is necessary for some Swarovski products.
A button sewer can also be used for the application of some Swarovski Buttons.
A household sewing machine offers a range of stitch types such as straight stitch, zigzag stitch and a program for sewing on buttons, and is therefore well suited to applying Swarovski products.
The following products are suitable for sewing (by hand or machine), embroidery or hand application (e.g. beading):
SEWING EMBROIDERY HAND APPLICATION TECHNIQUES
Settings 1
Beads 1
BeCharmed & Pavé 1
Crystal Pearls 1
Pendants 1
Sew-on Articles 2
Synthetics: Crystaltex 3
Plastic Trimmings 4 5
Crystal Buttons & Buttons with Plastic / Metal Shank
Metal Trimmings: Chaton & Flat Back Bandings
Metal Trimmings: Spike Bandings 1
Metal Trimmings: Roses & Chaton Montées 1
Crystal Mesh 6
Cupchains & Findings
1 These products should be sewn by hand.2 Lochrose art. 31293 Not suitable for Crystaltex Chaton Bandings 4 Art. 50 002, 50 003 and 50 004 (single-row)5 Mini Rondelles6 Crystal Fine Mesh has a very tight structure and should therefore be sewn by hand.
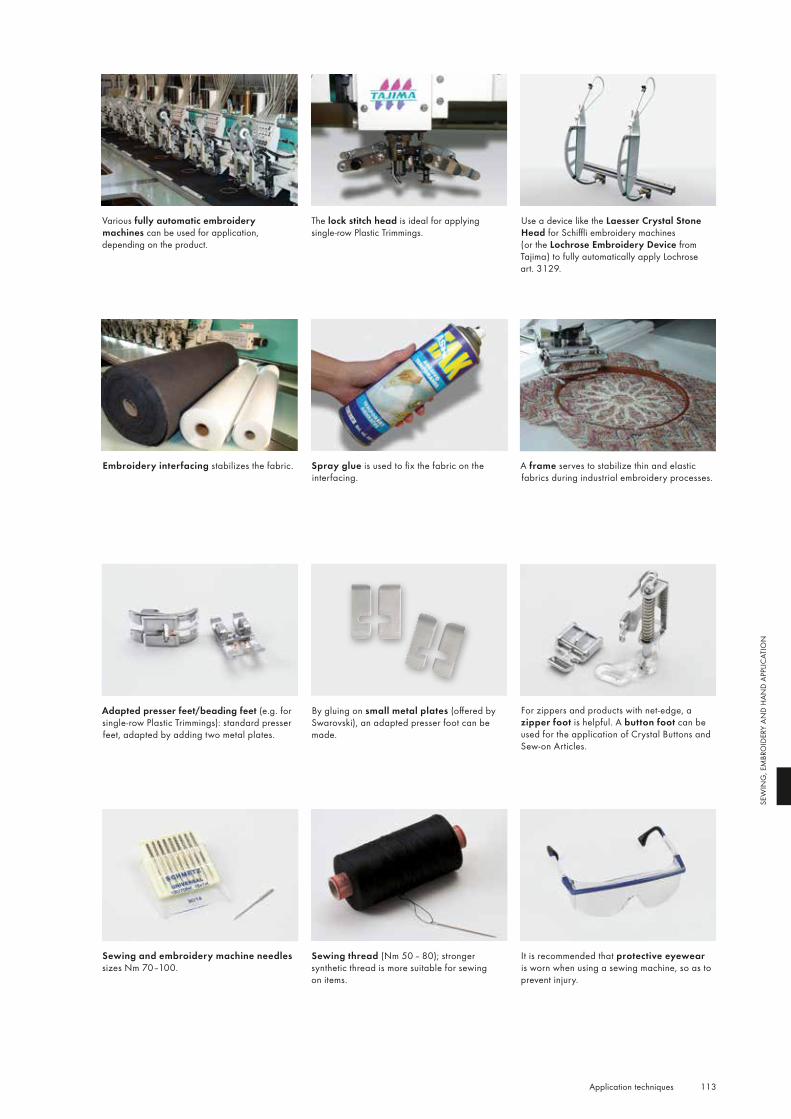
113 Application techniques
SEW
ING
, EM
BRO
IDER
Y AN
D H
AND
APPL
ICAT
ION
Various fully automatic embroidery machines can be used for application, depending on the product.
The lock stitch head is ideal for applying single-row Plastic Trimmings.
Use a device like the Laesser Crystal Stone Head for Schiffli embroidery machines (or the Lochrose Embroidery Device from Tajima) to fully automatically apply Lochrose art. 3129.
Embroidery interfacing stabilizes the fabric. Spray glue is used to fix the fabric on the interfacing.
A frame serves to stabilize thin and elastic fabrics during industrial embroidery processes.
For zippers and products with net-edge, a zipper foot is helpful. A button foot can be used for the application of Crystal Buttons and Sew-on Articles.
Adapted presser feet/beading feet (e.g. for single-row Plastic Trimmings): standard presser feet, adapted by adding two metal plates.
By gluing on small metal plates (offered by Swarovski), an adapted presser foot can be made.
Sewing and embroidery machine needles sizes Nm 70–100.
It is recommended that protective eyewear is worn when using a sewing machine, so as to prevent injury.
Sewing thread (Nm 50 – 80); stronger synthetic thread is more suitable for sewing on items.
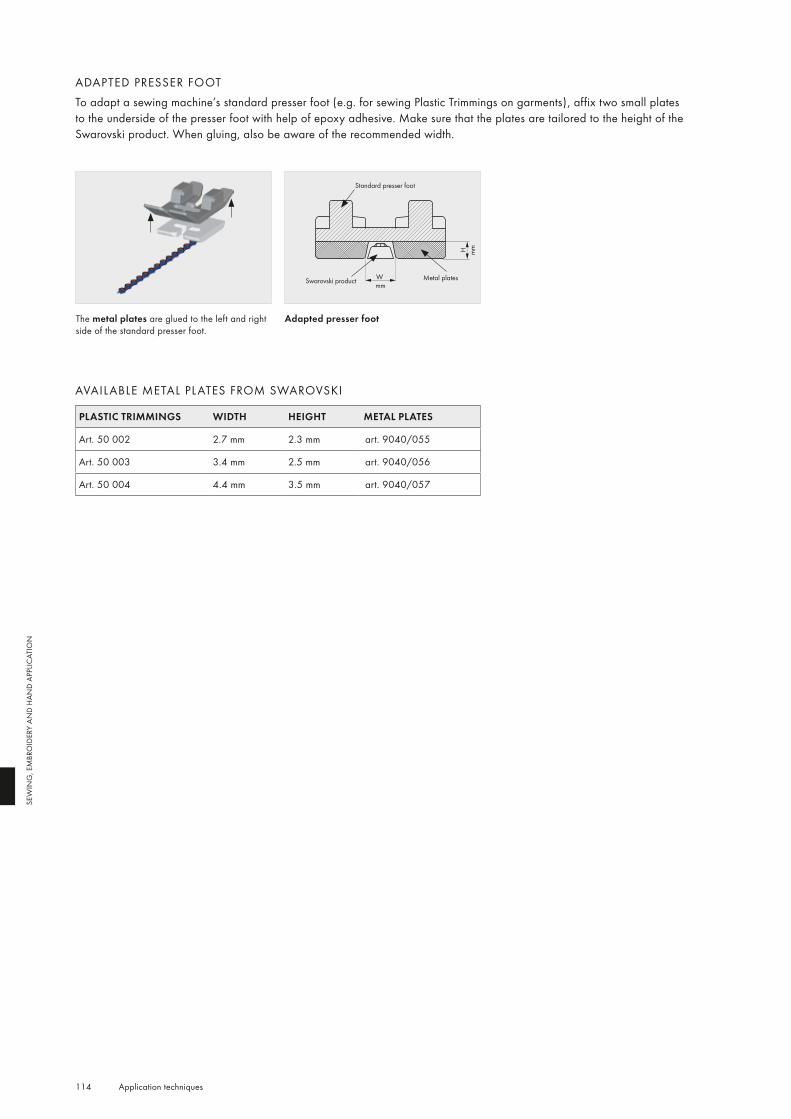
114 Application techniques
SEW
ING
, EM
BRO
IDER
Y AN
D H
AND
APPL
ICAT
ION
ADAPTED PRESSER FOOTTo adapt a sewing machine’s standard presser foot (e.g. for sewing Plastic Trimmings on garments), affix two small plates to the underside of the presser foot with help of epoxy adhesive. Make sure that the plates are tailored to the height of the Swarovski product. When gluing, also be aware of the recommended width.
PLASTIC TRIMMINGS WIDTH HEIGHT METAL PLATES
Art. 50 002 2.7 mm 2.3 mm art. 9040/055
Art. 50 003 3.4 mm 2.5 mm art. 9040/056
Art. 50 004 4.4 mm 3.5 mm art. 9040/057
The metal plates are glued to the left and right side of the standard presser foot.
Adapted presser foot
AVAIL ABLE METAL PL ATES FROM SWAROVSKI
Standard presser foot
Wmm
Swarovski product
H mm
Metal plates
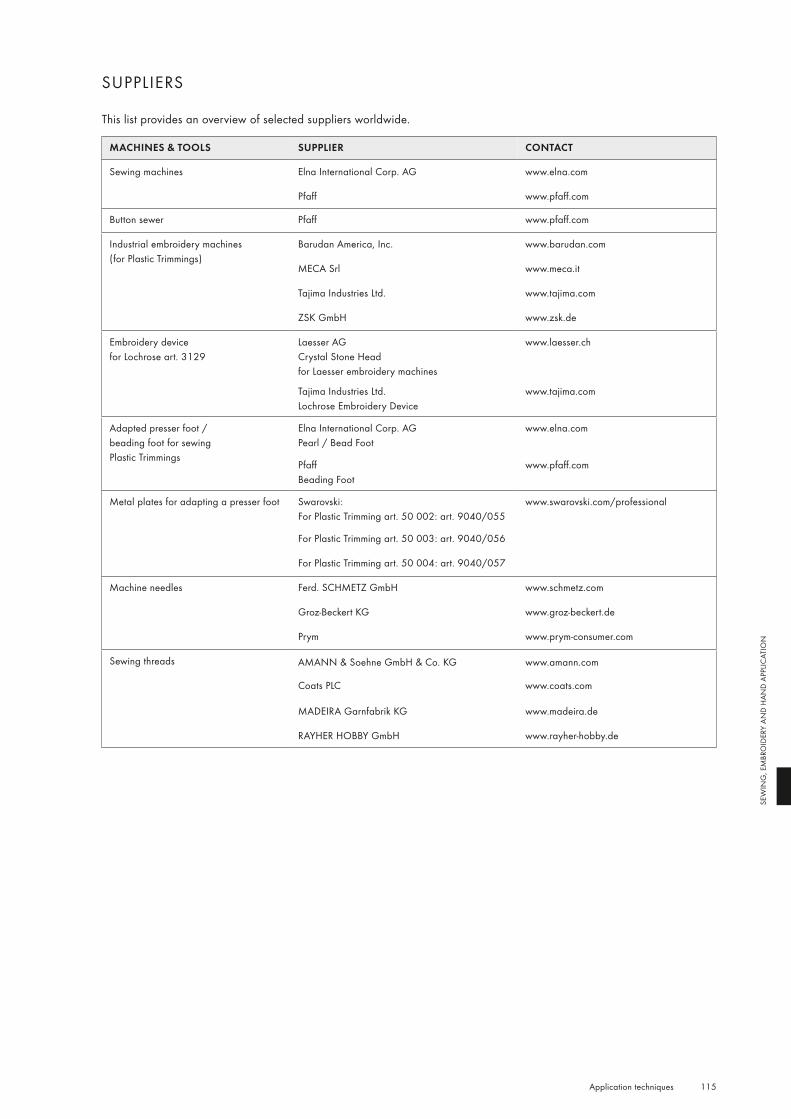
115 Application techniques
SEW
ING
, EM
BRO
IDER
Y AN
D H
AND
APPL
ICAT
ION
SUPPLIERS
This list provides an overview of selected suppliers worldwide.
MACHINES & TOOLS SUPPLIER CONTACT
Sewing machines Elna International Corp. AG www.elna.com
Pfaff www.pfaff.com
Button sewer Pfaff www.pfaff.com
Industrial embroidery machines (for Plastic Trimmings)
Barudan America, Inc. www.barudan.com
MECA Srl www.meca.it
Tajima Industries Ltd. www.tajima.com
ZSK GmbH www.zsk.de
Embroidery device for Lochrose art. 3129
Laesser AGCrystal Stone Head for Laesser embroidery machines
Tajima Industries Ltd.Lochrose Embroidery Device
www.laesser.ch
www.tajima.com
Adapted presser foot / beading foot for sewing Plastic Trimmings
Elna International Corp. AG Pearl / Bead Foot
www.elna.com
PfaffBeading Foot
www.pfaff.com
Metal plates for adapting a presser foot Swarovski:For Plastic Trimming art. 50 002: art. 9040/055
www.swarovski.com/professional
For Plastic Trimming art. 50 003: art. 9040/056
For Plastic Trimming art. 50 004: art. 9040/057
Machine needles Ferd. SCHMETZ GmbH www.schmetz.com
Groz-Beckert KG www.groz-beckert.de
Prym www.prym-consumer.com
Sewing threads AMANN & Soehne GmbH & Co. KG www.amann.com
Coats PLC www.coats.com
MADEIRA Garnfabrik KG www.madeira.de
RAYHER HOBBY GmbH www.rayher-hobby.de
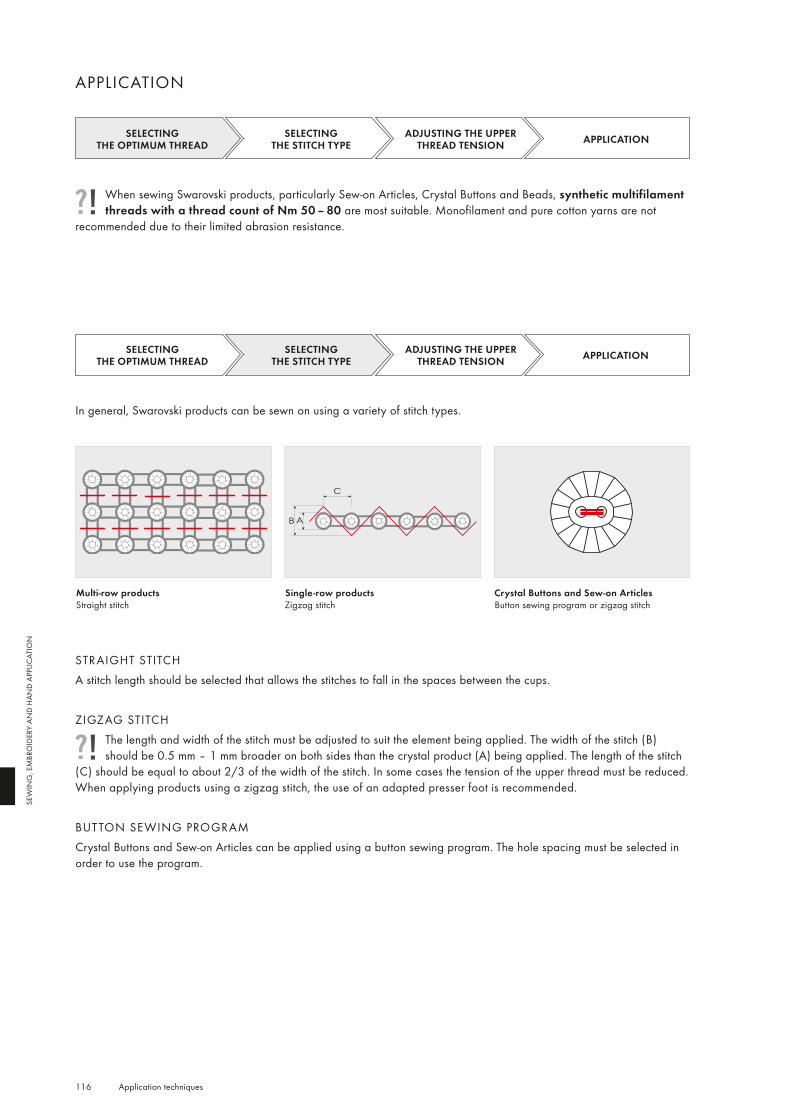
AB
C
116 Application techniques
SEW
ING
, EM
BRO
IDER
Y AN
D H
AND
APPL
ICAT
ION
APPLICATION
SELECTING THE OPTIMUM THREAD
SELECTING THE STITCH TYPE
ADJUSTING THE UPPER THREAD TENSION APPLICATION
When sewing Swarovski products, particularly Sew-on Articles, Crystal Buttons and Beads, synthetic multifilament threads with a thread count of Nm 50 – 80 are most suitable. Monofilament and pure cotton yarns are not
recommended due to their limited abrasion resistance.
In general, Swarovski products can be sewn on using a variety of stitch types.
SELECTING THE OPTIMUM THREAD
SELECTING THE STITCH TYPE
ADJUSTING THE UPPER THREAD TENSION APPLICATION
STRAIGHT STITCHA stitch length should be selected that allows the stitches to fall in the spaces between the cups.
ZIGZAG STITCHThe length and width of the stitch must be adjusted to suit the element being applied. The width of the stitch (B) should be 0.5 mm – 1 mm broader on both sides than the crystal product (A) being applied. The length of the stitch
(C) should be equal to about 2/3 of the width of the stitch. In some cases the tension of the upper thread must be reduced.When applying products using a zigzag stitch, the use of an adapted presser foot is recommended.
BUTTON SEWING PROGRAMCrystal Buttons and Sew-on Articles can be applied using a button sewing program. The hole spacing must be selected in order to use the program.
Crystal Buttons and Sew-on ArticlesButton sewing program or zigzag stitch
Multi-row productsStraight stitch
Single-row productsZigzag stitch
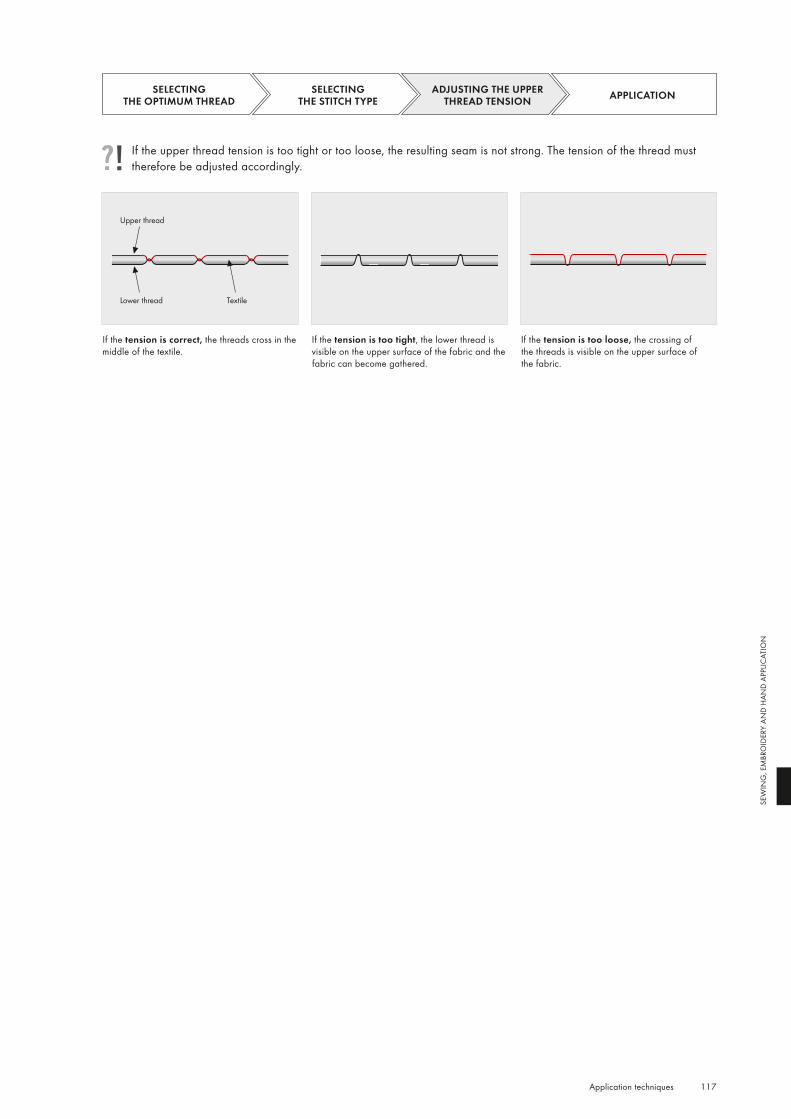
117 Application techniques
SEW
ING
, EM
BRO
IDER
Y AN
D H
AND
APPL
ICAT
ION
If the upper thread tension is too tight or too loose, the resulting seam is not strong. The tension of the thread must therefore be adjusted accordingly.
SELECTING THE OPTIMUM THREAD
SELECTING THE STITCH TYPE
ADJUSTING THE UPPER THREAD TENSION APPLICATION
If the tension is too loose, the crossing of the threads is visible on the upper surface of the fabric.
If the tension is too tight, the lower thread is visible on the upper surface of the fabric and the fabric can become gathered.
If the tension is correct, the threads cross in the middle of the textile.
Upper thread
Lower thread Textile
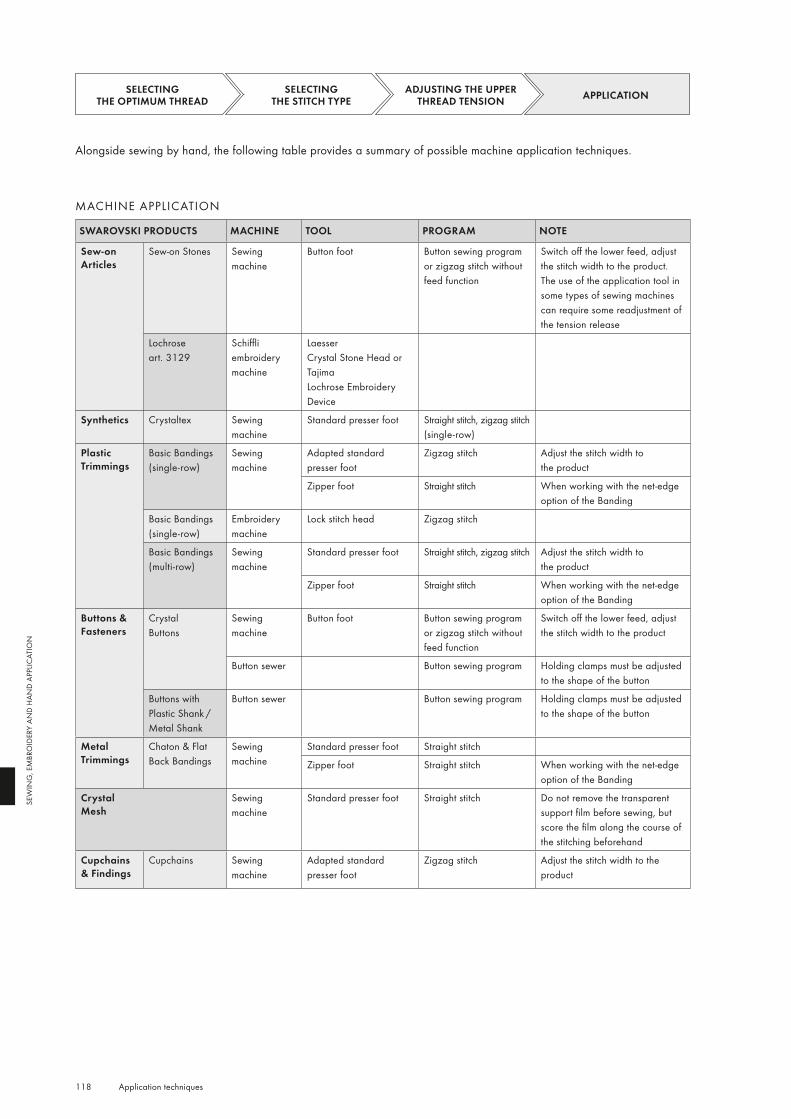
118 Application techniques
SEW
ING
, EM
BRO
IDER
Y AN
D H
AND
APPL
ICAT
ION
MACHINE APPLICATION
SWAROVSKI PRODUCTS MACHINE TOOL PROGRAM NOTE
Sew-on Articles
Sew-on Stones Sewing machine
Button foot Button sewing program or zigzag stitch without feed function
Switch off the lower feed, adjust the stitch width to the product. The use of the application tool in some types of sewing machines can require some readjustment of the tension release
Lochrose art. 3129
Schiffli embroidery machine
Laesser Crystal Stone Head orTajima Lochrose Embroidery Device
Synthetics Crystaltex Sewing machine
Standard presser foot Straight stitch, zigzag stitch (single-row)
Plastic Trimmings
Basic Bandings (single-row)
Sewing machine
Adapted standard presser foot
Zigzag stitch Adjust the stitch width to the product
Zipper foot Straight stitch When working with the net-edge option of the Banding
Basic Bandings (single-row)
Embroidery machine
Lock stitch head Zigzag stitch
Basic Bandings (multi-row)
Sewing machine
Standard presser foot Straight stitch, zigzag stitch Adjust the stitch width to the product
Zipper foot Straight stitch When working with the net-edge option of the Banding
Buttons & Fasteners
Crystal Buttons
Sewing machine
Button foot Button sewing program or zigzag stitch without feed function
Switch off the lower feed, adjust the stitch width to the product
Button sewer Button sewing program Holding clamps must be adjusted to the shape of the button
Buttons with Plastic Shank / Metal Shank
Button sewer Button sewing program Holding clamps must be adjusted to the shape of the button
Metal Trimmings
Chaton & Flat Back Bandings
Sewing machine
Standard presser foot Straight stitch
Zipper foot Straight stitch When working with the net-edge option of the Banding
Crystal Mesh
Sewing machine
Standard presser foot Straight stitch Do not remove the transparent support film before sewing, but score the film along the course of the stitching beforehand
Cupchains & Findings
Cupchains Sewing machine
Adapted standard presser foot
Zigzag stitch Adjust the stitch width to the product
Alongside sewing by hand, the following table provides a summary of possible machine application techniques.
SELECTING THE OPTIMUM THREAD
SELECTING THE STITCH TYPE
ADJUSTING THE UPPER THREAD TENSION APPLICATION
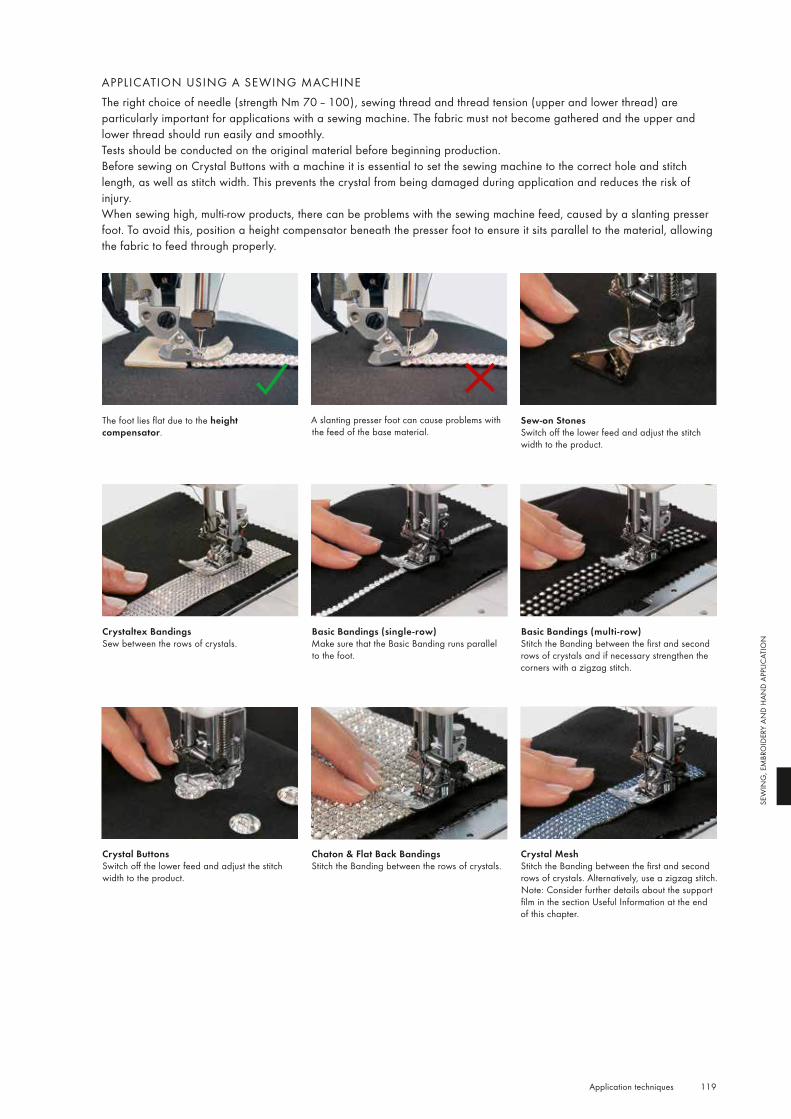
119 Application techniques
SEW
ING
, EM
BRO
IDER
Y AN
D H
AND
APPL
ICAT
ION
APPLICATION USING A SEWING MACHINEThe right choice of needle (strength Nm 70 – 100), sewing thread and thread tension (upper and lower thread) are particularly important for applications with a sewing machine. The fabric must not become gathered and the upper and lower thread should run easily and smoothly.Tests should be conducted on the original material before beginning production.Before sewing on Crystal Buttons with a machine it is essential to set the sewing machine to the correct hole and stitch length, as well as stitch width. This prevents the crystal from being damaged during application and reduces the risk of injury.When sewing high, multi-row products, there can be problems with the sewing machine feed, caused by a slanting presser foot. To avoid this, position a height compensator beneath the presser foot to ensure it sits parallel to the material, allowing the fabric to feed through properly.
Sew-on StonesSwitch off the lower feed and adjust the stitch width to the product.
The foot lies flat due to the height compensator.
A slanting presser foot can cause problems with the feed of the base material.
Crystaltex BandingsSew between the rows of crystals.
Basic Bandings (single-row)Make sure that the Basic Banding runs parallel to the foot.
Basic Bandings (multi-row)Stitch the Banding between the first and second rows of crystals and if necessary strengthen the corners with a zigzag stitch.
Crystal ButtonsSwitch off the lower feed and adjust the stitch width to the product.
Crystal MeshStitch the Banding between the first and second rows of crystals. Alternatively, use a zigzag stitch. Note: Consider further details about the support film in the section Useful Information at the end of this chapter.
Chaton & Flat Back BandingsStitch the Banding between the rows of crystals.
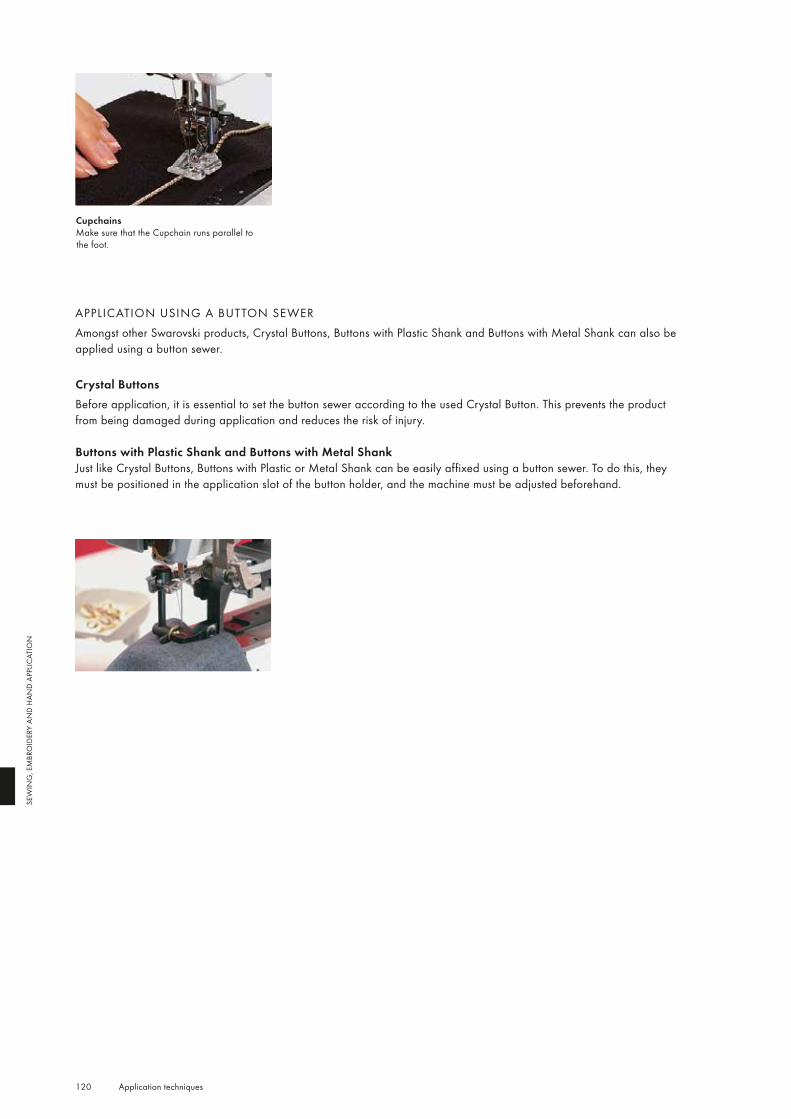
120 Application techniques
SEW
ING
, EM
BRO
IDER
Y AN
D H
AND
APPL
ICAT
ION
CupchainsMake sure that the Cupchain runs parallel to the foot.
APPLICATION USING A BUTTON SEWERAmongst other Swarovski products, Crystal Buttons, Buttons with Plastic Shank and Buttons with Metal Shank can also be applied using a button sewer.
Crystal ButtonsBefore application, it is essential to set the button sewer according to the used Crystal Button. This prevents the product from being damaged during application and reduces the risk of injury.
Buttons with Plastic Shank and Buttons with Metal ShankJust like Crystal Buttons, Buttons with Plastic or Metal Shank can be easily affixed using a button sewer. To do this, they must be positioned in the application slot of the button holder, and the machine must be adjusted beforehand.
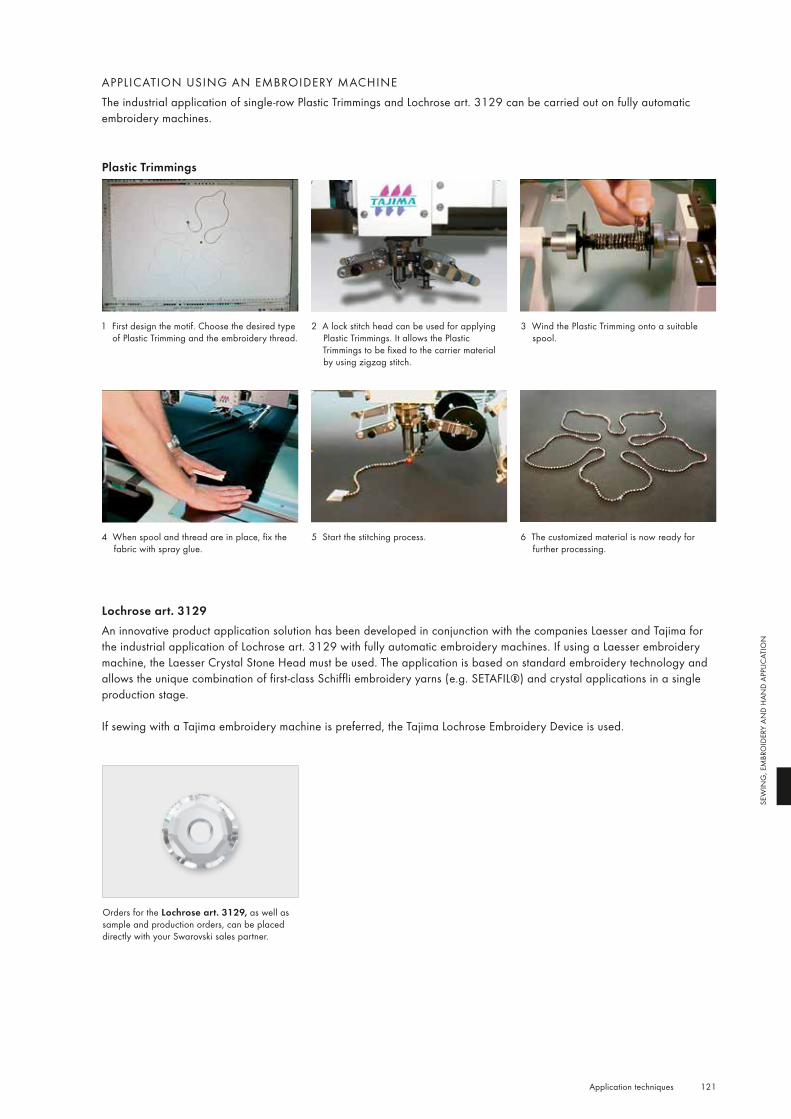
121 Application techniques
SEW
ING
, EM
BRO
IDER
Y AN
D H
AND
APPL
ICAT
ION
APPLICATION USING AN EMBROIDERY MACHINEThe industrial application of single-row Plastic Trimmings and Lochrose art. 3129 can be carried out on fully automatic embroidery machines.
Plastic Trimmings
1 First design the motif. Choose the desired type of Plastic Trimming and the embroidery thread.
2 A lock stitch head can be used for applying Plastic Trimmings. It allows the Plastic Trimmings to be fixed to the carrier material by using zigzag stitch.
3 Wind the Plastic Trimming onto a suitable spool.
4 When spool and thread are in place, fix the fabric with spray glue.
5 Start the stitching process. 6 The customized material is now ready for further processing.
Lochrose art. 3129An innovative product application solution has been developed in conjunction with the companies Laesser and Tajima for the industrial application of Lochrose art. 3129 with fully automatic embroidery machines. If using a Laesser embroidery machine, the Laesser Crystal Stone Head must be used. The application is based on standard embroidery technology and allows the unique combination of first-class Schiffli embroidery yarns (e.g. SETAFIL®) and crystal applications in a single production stage.
If sewing with a Tajima embroidery machine is preferred, the Tajima Lochrose Embroidery Device is used.
Orders for the Lochrose art. 3129, as well as sample and production orders, can be placed directly with your Swarovski sales partner.
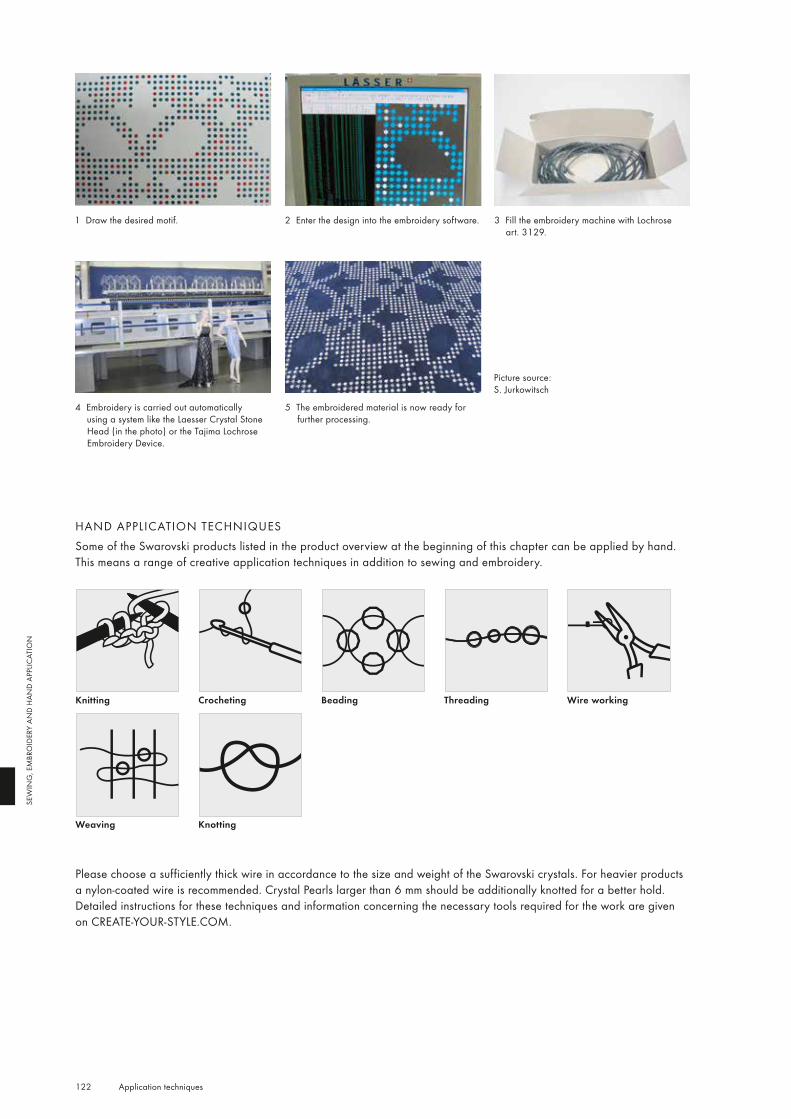
Knitting Crocheting Beading Threading Wire working
Weaving Knotting
122 Application techniques
SEW
ING
, EM
BRO
IDER
Y AN
D H
AND
APPL
ICAT
ION
1 Draw the desired motif. 2 Enter the design into the embroidery software. 3 Fill the embroidery machine with Lochrose art. 3129.
4 Embroidery is carried out automatically using a system like the Laesser Crystal Stone Head (in the photo) or the Tajima Lochrose Embroidery Device.
5 The embroidered material is now ready for further processing.
Picture source: S. Jurkowitsch
HAND APPLICATION TECHNIQUESSome of the Swarovski products listed in the product overview at the beginning of this chapter can be applied by hand. This means a range of creative application techniques in addition to sewing and embroidery.
Knitting Crocheting Beading Threading Wire working
Weaving Knotting
Please choose a sufficiently thick wire in accordance to the size and weight of the Swarovski crystals. For heavier products a nylon-coated wire is recommended. Crystal Pearls larger than 6 mm should be additionally knotted for a better hold.Detailed instructions for these techniques and information concerning the necessary tools required for the work are given on CREATE-YOUR-STYLE.COM.
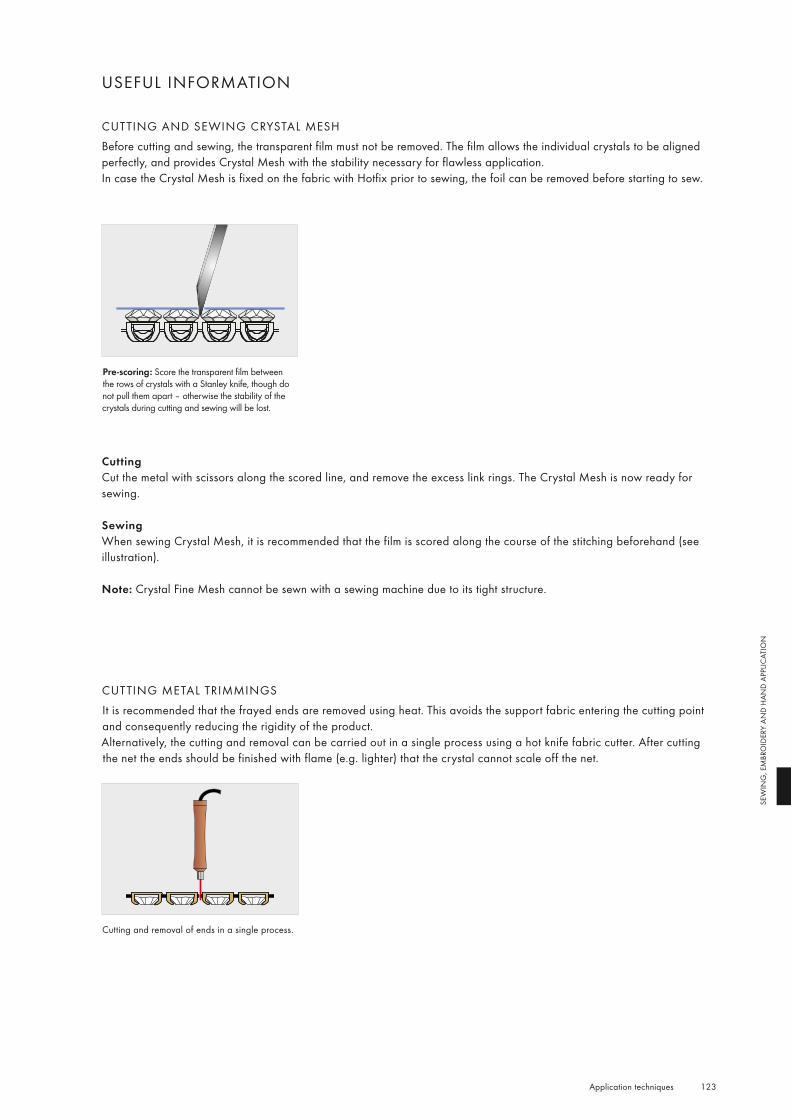
123 Application techniques
SEW
ING
, EM
BRO
IDER
Y AN
D H
AND
APPL
ICAT
ION
USEFUL INFORMATION
CUTTING AND SEWING CRYSTAL MESHBefore cutting and sewing, the transparent film must not be removed. The film allows the individual crystals to be aligned perfectly, and provides Crystal Mesh with the stability necessary for flawless application.In case the Crystal Mesh is fixed on the fabric with Hotfix prior to sewing, the foil can be removed before starting to sew.
CuttingCut the metal with scissors along the scored line, and remove the excess link rings. The Crystal Mesh is now ready for sewing.
SewingWhen sewing Crystal Mesh, it is recommended that the film is scored along the course of the stitching beforehand (see illustration).
Note: Crystal Fine Mesh cannot be sewn with a sewing machine due to its tight structure.
Pre-scoring: Score the transparent film between the rows of crystals with a Stanley knife, though do not pull them apart – otherwise the stability of the crystals during cutting and sewing will be lost.
Cutting and removal of ends in a single process.
CUTTING METAL TRIMMINGSIt is recommended that the frayed ends are removed using heat. This avoids the support fabric entering the cutting point and consequently reducing the rigidity of the product.Alternatively, the cutting and removal can be carried out in a single process using a hot knife fabric cutter. After cutting the net the ends should be finished with flame (e.g. lighter) that the crystal cannot scale off the net.
124 Application techniques
SEW
ING
, EM
BRO
IDER
Y AN
D H
AND
APPL
ICAT
ION
QUICK ASSISTANCE
The following table outlines common problems and their causes when sewing, and offers advice on how to avoid them. Further details and more extensive descriptions can be found in the section marked with a
PROBLEM CAUSE
Product or fabric is not fed through correctly. 1, 2, 3
The machine misses out stitches. 4, 5, 6, 7
The thread breaks. 4, 6, 8, 9
The needle breaks. 10, 11, 12, 13
The crystals break out of the cups. 14
CAUSE RECOMMENDATION
1 The foot pressure may be too low. Increase the foot pressure according to the instructions.
2 There may be dust between the feeder teeth. Clean the feeder teeth.
3 Upper feed is faulty. Replace the upper feed.
4 The needle may be bent or damaged. Replace the needle.
5 The needle is not fitted correctly. The needle must be pushed right up to the top.
6 The machine may be threaded wrongly. Rethread the machine.
7 The tension of the threads may be incorrect. Check the thread tension.
8 There may be knots in the thread or it may be too thin. Check the thread for faults and if necessary, change it.
9 The components that form the stitches may be damaged. Have the sewing machine checked by a specialist.
10 The wrong needle may have been chosen.Choose a needle that has the correct size for the carrier material.
11 The bobbin may not be fitted correctly. Check the bobbin case.
12 The needle is too thick and gets stuck in the product. Use a thinner needle.
13 The needle hits the crystal.Sew more slowly and feed the product through the machine carefully.
14 The needle damages the cup.Check the length of the stitch and the thickness of the needle.

125 Application techniques
SEW
ING
, EM
BRO
IDER
Y AN
D H
AND
APPL
ICAT
ION


MECHANICAL APPLICATION
Many Swarovski products, such as Snap Fasteners, Rivets, and Rose Pins can be applied manually or mechanically, using either semi- or fully-automated machines. This simple application technique is used
primarily in the textile and accessories fields.

128 Application techniques
MEC
HAN
ICAL
APP
LICAT
ION
PRODUCT OVERVIEW
MACHINES AND TOOLS
The following machines and tools can be used for the mechanical application of Swarovski products:
The fly press (art. 9040/019, with mounting board) represents an easy way to mechanically apply the products.
Some Swarovski products can be applied using a semi- or fully-automatic attaching machine (e.g. Rose Pins). In this process, the feed on the machine must be adjusted to the product being processed.
Vacuum pump with silicone hose allows Rivets and Pins to be easily held in place for the fly press (art. 9040/022).
It is recommended that protective eyewear is worn during mechanical application, to prevent injury.
For application of Crystal Rose Pins a mold/press can be used (patented by Gruppo Meccaniche Luciani). Please be advised that Swarovski does not provide the tools.
The following products are suitable for mechanical application:
BUTTONS & FASTENERS MECHANICAL APPLICATION
Snap Fasteners, Decorative Buttons and XIRIUS Flat Back Snap Fasteners
Jeans Buttons
METAL TRIMMINGS MECHANICAL APPLICATION
Rivets, Square Rivets, Star Rivets and Spike Rivets
Rose Pins and Rhombus Pins
Crystal Studs
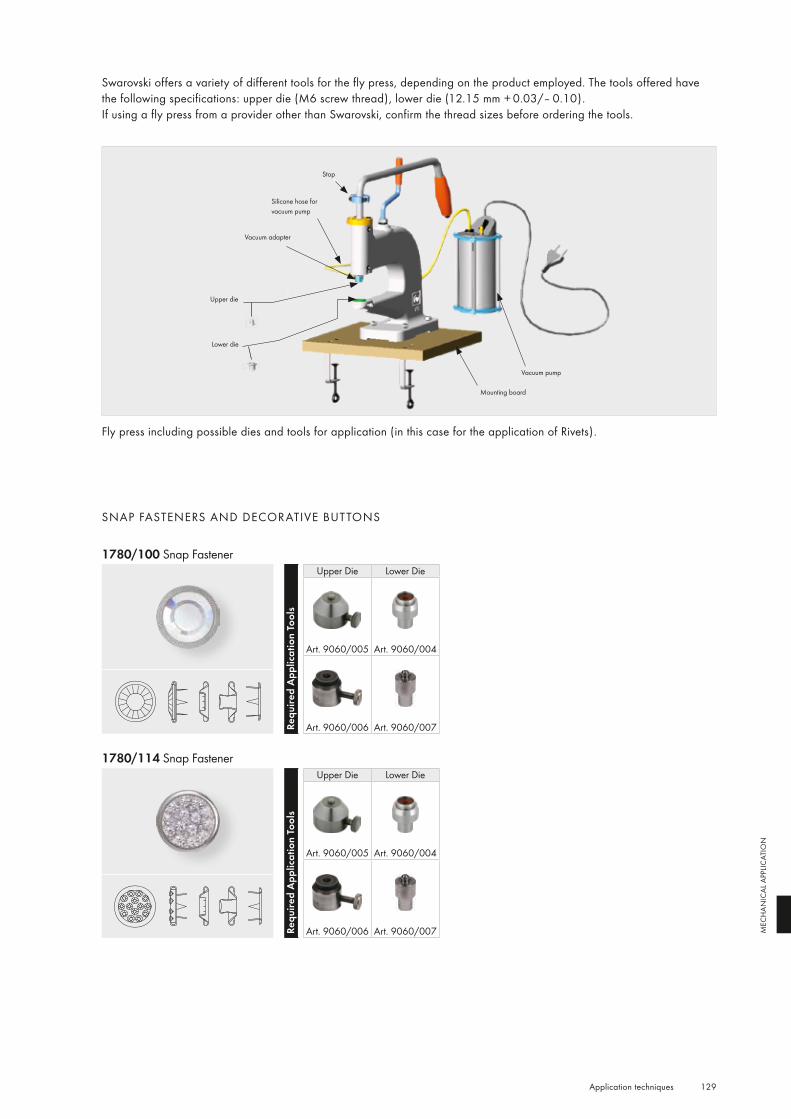
129 Application techniques
MEC
HAN
ICAL
APP
LICAT
ION
Swarovski offers a variety of different tools for the fly press, depending on the product employed. The tools offered have the following specifications: upper die (M6 screw thread), lower die (12.15 mm + 0.03/– 0.10).If using a fly press from a provider other than Swarovski, confirm the thread sizes before ordering the tools.
Vacuum pump
Vacuum adapter
Silicone hose for vacuum pump
Stop
Lower die
Upper die
Mounting board
Fly press including possible dies and tools for application (in this case for the application of Rivets).
SNAP FASTENERS AND DECORATIVE BUTTONS
1780/100 Snap Fastener
Requ
ired
App
licat
ion
Tool
s
Upper Die Lower Die
Art. 9060/005 Art. 9060/004
Art. 9060/006 Art. 9060/007
1780/114 Snap Fastener
Requ
ired
App
licat
ion
Tool
s
Upper Die Lower Die
Art. 9060/005 Art. 9060/004
Art. 9060/006 Art. 9060/007
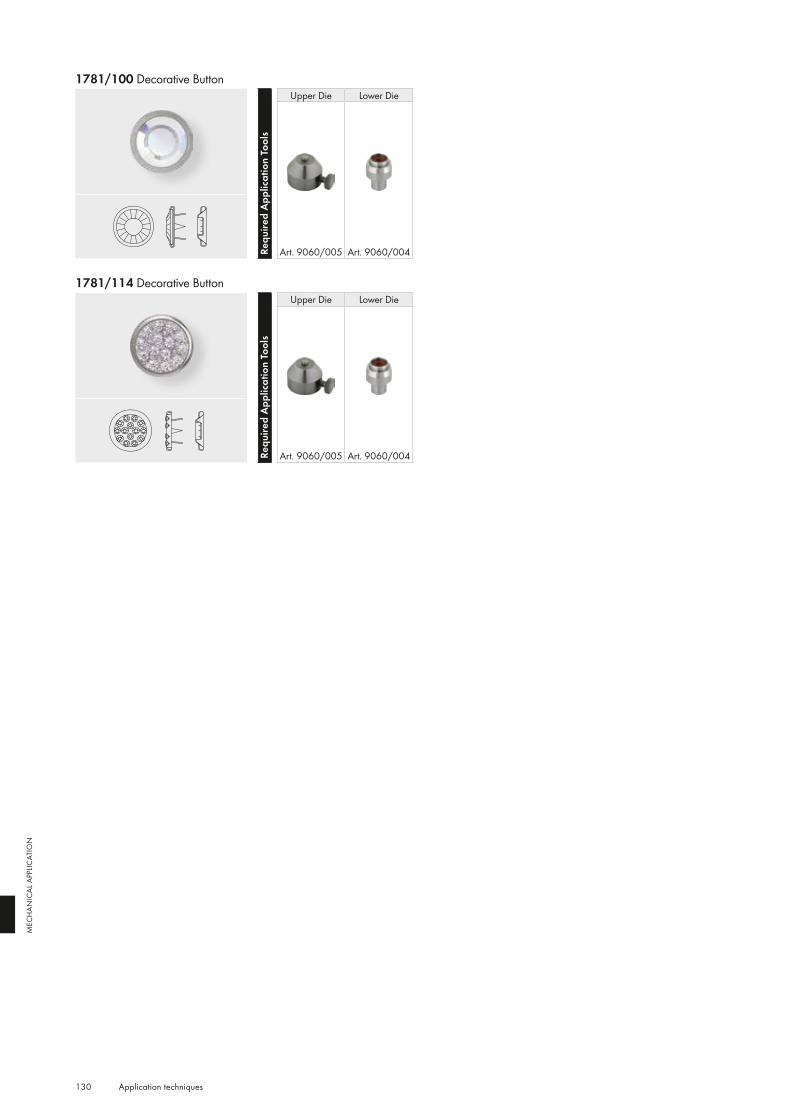
130 Application techniques
MEC
HAN
ICAL
APP
LICAT
ION
1781/100 Decorative Button
Requ
ired
App
licat
ion
Tool
s
Upper Die Lower Die
Art. 9060/005 Art. 9060/004
1781/114 Decorative ButtonRe
quire
d A
pplic
atio
n To
ols
Upper Die Lower Die
Art. 9060/005 Art. 9060/004
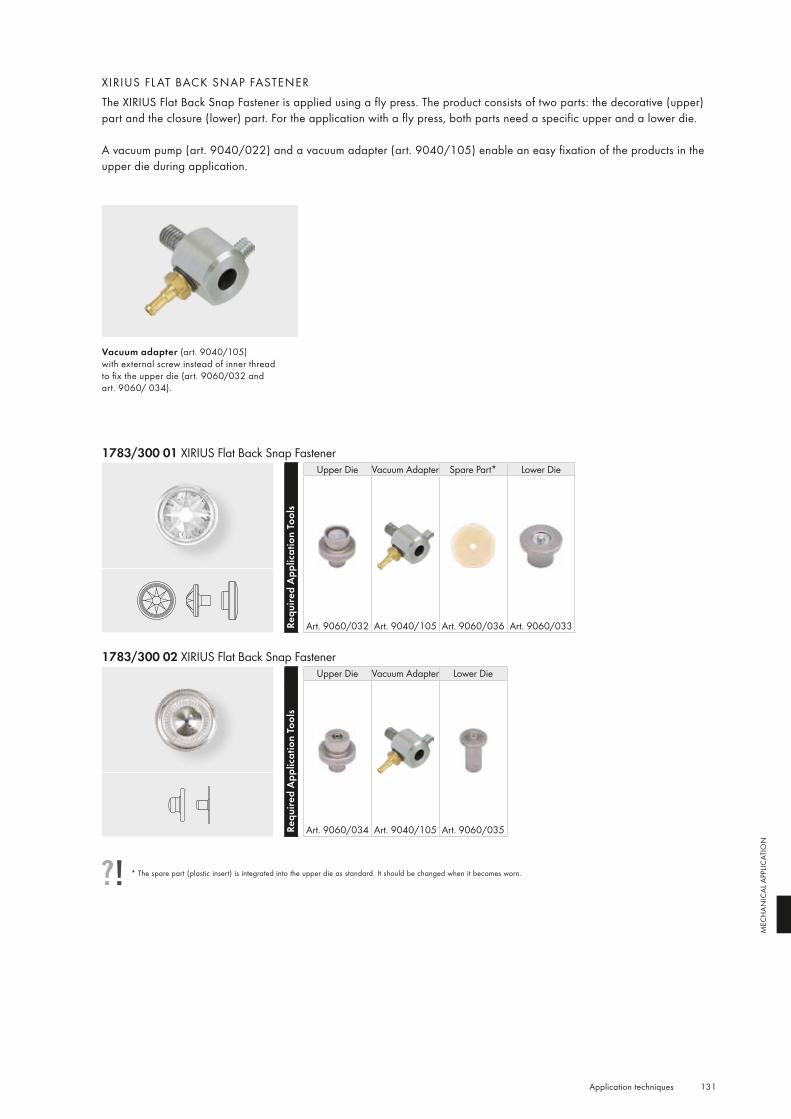
131 Application techniques
MEC
HAN
ICAL
APP
LICAT
ION
XIRIUS FL AT BACK SNAP FASTENERThe XIRIUS Flat Back Snap Fastener is applied using a fly press. The product consists of two parts: the decorative (upper) part and the closure (lower) part. For the application with a fly press, both parts need a specific upper and a lower die.
A vacuum pump (art. 9040/022) and a vacuum adapter (art. 9040/105) enable an easy fixation of the products in the upper die during application.
Vacuum adapter (art. 9040/105) with external screw instead of inner thread to fix the upper die (art. 9060/032 and art. 9060/ 034).
* The spare part (plastic insert) is integrated into the upper die as standard. It should be changed when it becomes worn.
1783/300 01 XIRIUS Flat Back Snap Fastener
Requ
ired
App
licat
ion
Tool
s
Upper Die Vacuum Adapter Spare Part* Lower Die
Art. 9060/032 Art. 9040/105 Art. 9060/036 Art. 9060/033
1783/300 02 XIRIUS Flat Back Snap Fastener
Requ
ired
App
licat
ion
Tool
s
Upper Die Vacuum Adapter Lower Die
Art. 9060/034 Art. 9040/105 Art. 9060/035
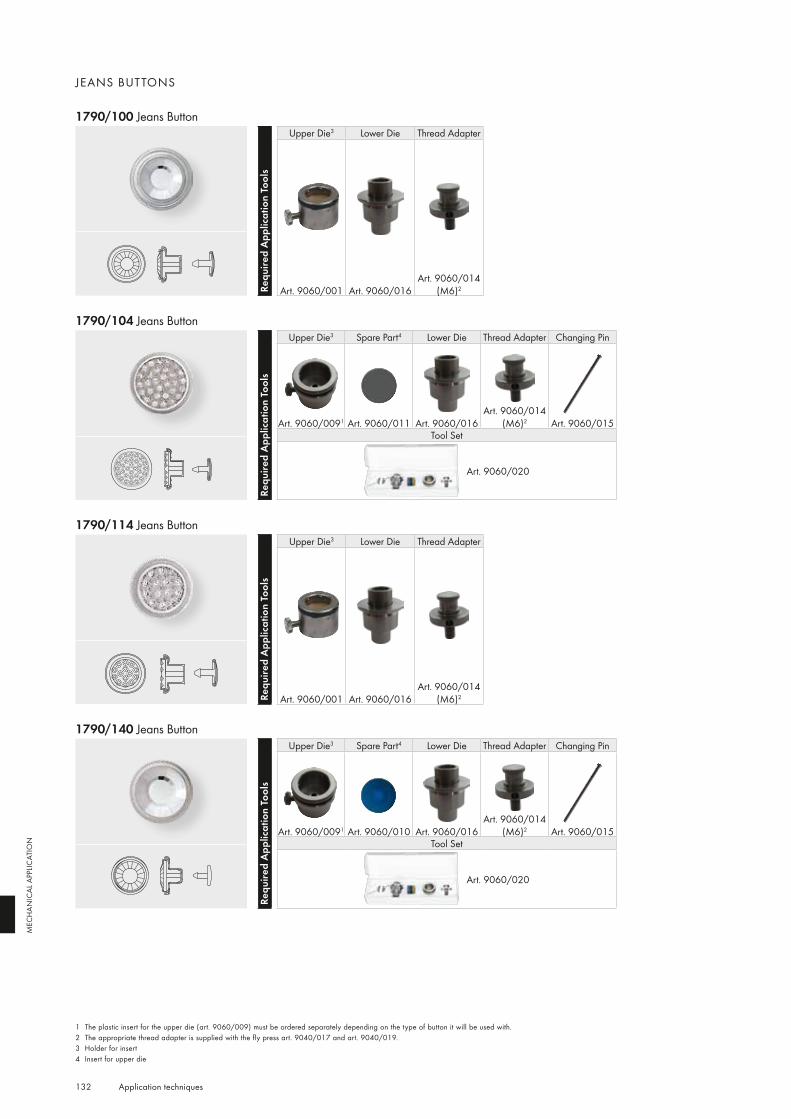
132
Application techniques
MEC
HAN
ICAL
APP
LICAT
ION
JEANS BUTTONS
1790/100 Jeans Button
Requ
ired
App
licat
ion
Tool
s
Upper Die3 Lower Die Thread Adapter
Art. 9060/001 Art. 9060/016Art. 9060/014
(M6)2
1790/104 Jeans Button
Requ
ired
App
licat
ion
Tool
s
Upper Die3 Spare Part4 Lower Die Thread Adapter Changing Pin
Art. 9060/0091 Art. 9060/011 Art. 9060/016Art. 9060/014
(M6)2 Art. 9060/015Tool Set
Art. 9060/020
1790/114 Jeans Button
Requ
ired
App
licat
ion
Tool
s
Upper Die3 Lower Die Thread Adapter
Art. 9060/001 Art. 9060/016Art. 9060/014
(M6)2
1790/140 Jeans Button
Requ
ired
App
licat
ion
Tool
s
Upper Die3 Spare Part4 Lower Die Thread Adapter Changing Pin
Art. 9060/0091 Art. 9060/010 Art. 9060/016Art. 9060/014
(M6)2 Art. 9060/015Tool Set
Art. 9060/020
1 The plastic insert for the upper die (art. 9060/009) must be ordered separately depending on the type of button it will be used with.2 The appropriate thread adapter is supplied with the fly press art. 9040/017 and art. 9040/019.3 Holder for insert4 Insert for upper die
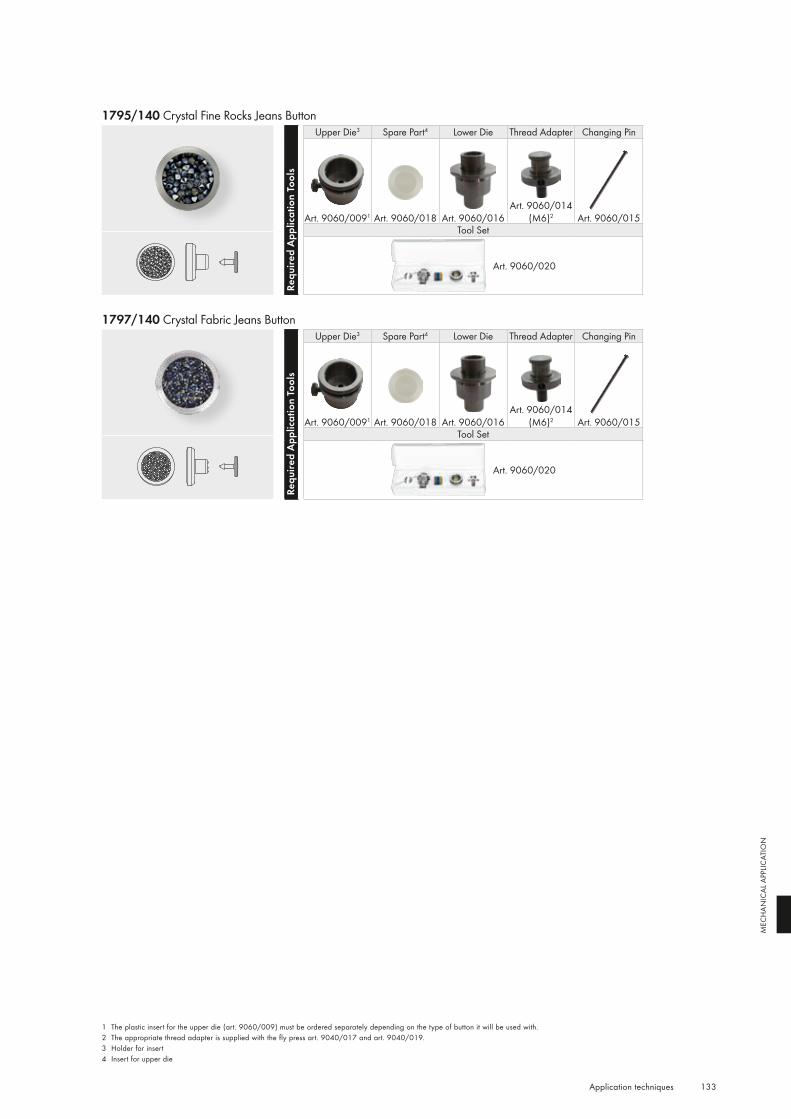
133
Application techniques
MEC
HAN
ICAL
APP
LICAT
ION
1 The plastic insert for the upper die (art. 9060/009) must be ordered separately depending on the type of button it will be used with.2 The appropriate thread adapter is supplied with the fly press art. 9040/017 and art. 9040/019.3 Holder for insert4 Insert for upper die
1795/140 Crystal Fine Rocks Jeans Button
Requ
ired
App
licat
ion
Tool
s
Upper Die3 Spare Part4 Lower Die Thread Adapter Changing Pin
Art. 9060/0091 Art. 9060/018 Art. 9060/016Art. 9060/014
(M6)2 Art. 9060/015Tool Set
Art. 9060/020
1797/140 Crystal Fabric Jeans Button
Requ
ired
App
licat
ion
Tool
s
Upper Die3 Spare Part4 Lower Die Thread Adapter Changing Pin
Art. 9060/0091 Art. 9060/018 Art. 9060/016Art. 9060/014
(M6)2 Art. 9060/015Tool Set
Art. 9060/020

134 Application techniques
MEC
HAN
ICAL
APP
LICAT
ION
RIVETSRivets can be applied to various materials with or without Back Parts. The correct die combination must be chosen accordingly. Please ensure that the recommended fabric strengths, listed in the “Application” subsection, are
followed. A vacuum pump and adapter allow Rivets to be easily picked up and applied. Upper dies are thus available with different thread strengths. When using the Swarovski vacuum adapter, dies with an M8 thread are required. Alternatively, dies with M6 threads are available for presses from other manufacturers, or when not using a vacuum adapter.
Requ
ired
App
licat
ion
Tool
s
Upper Die Vacuum Adapter Spare Part for Upper Die
(insert)*
Lower Die for application with
Back Part:
Lower Die for application with
Back Part:
Lower Die for application
without Back Part for Rivet
casing color 088 Stainless
Steel
Lower Die for application
without Back Part for Rivet casing color 081 Gold
082 Silver086 Gun Metal093 Rose Gold53 007 53 009
Art. 9070/010 Art. 9070/012 Art. 9070/011 Art. 9040/015
53 000
Art. 9040/005 M8 Art. 9040/023
Art. 9040/008Art. 9040/014
M6 –SS 18
53 001
Art. 9070/005 M8 Art. 9040/023
Art. 9070/008Art. 9070/009
M6 –SS 29
53 002
Art. 9040/005 M8 Art. 9040/023
Art. 9040/008Art. 9040/014
M6 –SS 18 (short shank)
53 005
Art. 9040/064 M8 Art. 9040/023
Art. 9040/062Art. 9040/063
M6 –SS 34
53 006
Art. 9040/067 M8 Art. 9040/023
Art. 9040/065Art. 9040/066
M6 –SS 39
53 008
Art. 9040/083 M8 Art. 9040/023
Art. 9040/084Art. 9040/085
M6 –PP 24
* The spare part (plastic insert) is incorporated into the upper die as standard. It should be changed when it becomes worn.
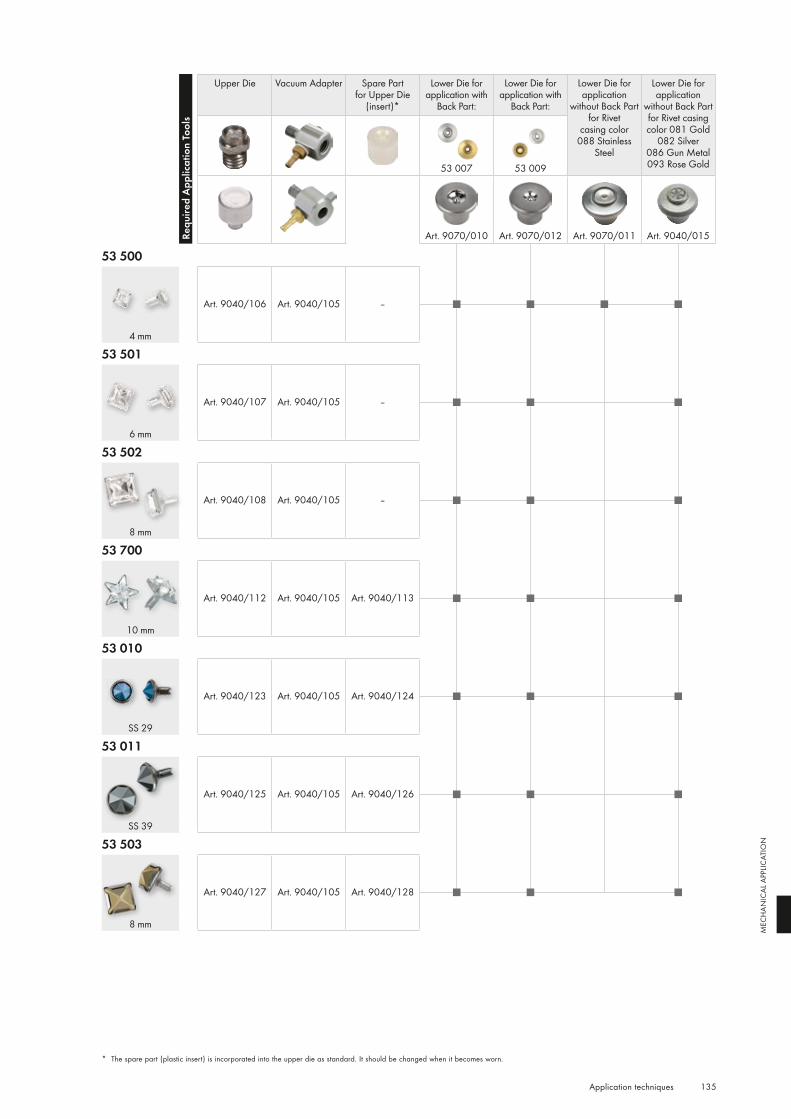
135 Application techniques
MEC
HAN
ICAL
APP
LICAT
ION
Requ
ired
App
licat
ion
Tool
s
Upper Die Vacuum Adapter Spare Part for Upper Die
(insert)*
Lower Die for application with
Back Part:
Lower Die for application with
Back Part:
Lower Die for application
without Back Part for Rivet
casing color 088 Stainless
Steel
Lower Die for application
without Back Part for Rivet casing color 081 Gold
082 Silver086 Gun Metal093 Rose Gold53 007 53 009
Art. 9070/010 Art. 9070/012 Art. 9070/011 Art. 9040/015
53 500
Art. 9040/106 Art. 9040/105 –
4 mm
53 501
Art. 9040/107 Art. 9040/105 –
6 mm
53 502
Art. 9040/108 Art. 9040/105 –
8 mm
53 700
Art. 9040/112 Art. 9040/105 Art. 9040/113
10 mm
53 010
Art. 9040/123 Art. 9040/105 Art. 9040/124
SS 29
53 011
Art. 9040/125 Art. 9040/105 Art. 9040/126
SS 39
53 503
Art. 9040/127 Art. 9040/105 Art. 9040/128
8 mm
* The spare part (plastic insert) is incorporated into the upper die as standard. It should be changed when it becomes worn.
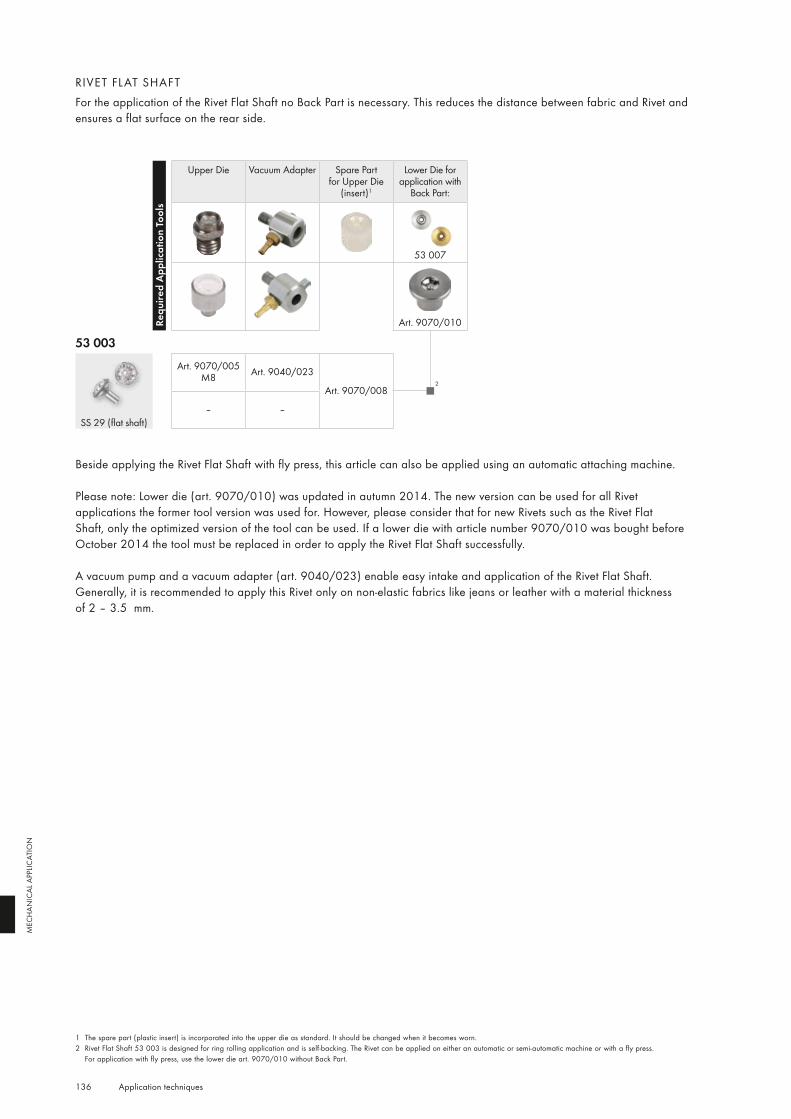
136
2
Application techniques
MEC
HAN
ICAL
APP
LICAT
ION
RIVET FL AT SHAFTFor the application of the Rivet Flat Shaft no Back Part is necessary. This reduces the distance between fabric and Rivet and ensures a flat surface on the rear side.
Requ
ired
App
licat
ion
Tool
sUpper Die Vacuum Adapter Spare Part
for Upper Die (insert)1
Lower Die for application with
Back Part:
53 007
Art. 9070/010
53 003
Art. 9070/005 M8 Art. 9040/023
Art. 9070/008
– –SS 29 (flat shaft)
1 The spare part (plastic insert) is incorporated into the upper die as standard. It should be changed when it becomes worn.2 Rivet Flat Shaft 53 003 is designed for ring rolling application and is self-backing. The Rivet can be applied on either an automatic or semi-automatic machine or with a fly press.
For application with fly press, use the lower die art. 9070/010 without Back Part.
Beside applying the Rivet Flat Shaft with fly press, this article can also be applied using an automatic attaching machine.
Please note: Lower die (art. 9070/010) was updated in autumn 2014. The new version can be used for all Rivet applications the former tool version was used for. However, please consider that for new Rivets such as the Rivet Flat Shaft, only the optimized version of the tool can be used. If a lower die with article number 9070/010 was bought before October 2014 the tool must be replaced in order to apply the Rivet Flat Shaft successfully.
A vacuum pump and a vacuum adapter (art. 9040/023) enable easy intake and application of the Rivet Flat Shaft. Generally, it is recommended to apply this Rivet only on non-elastic fabrics like jeans or leather with a material thickness of 2 – 3.5 mm.
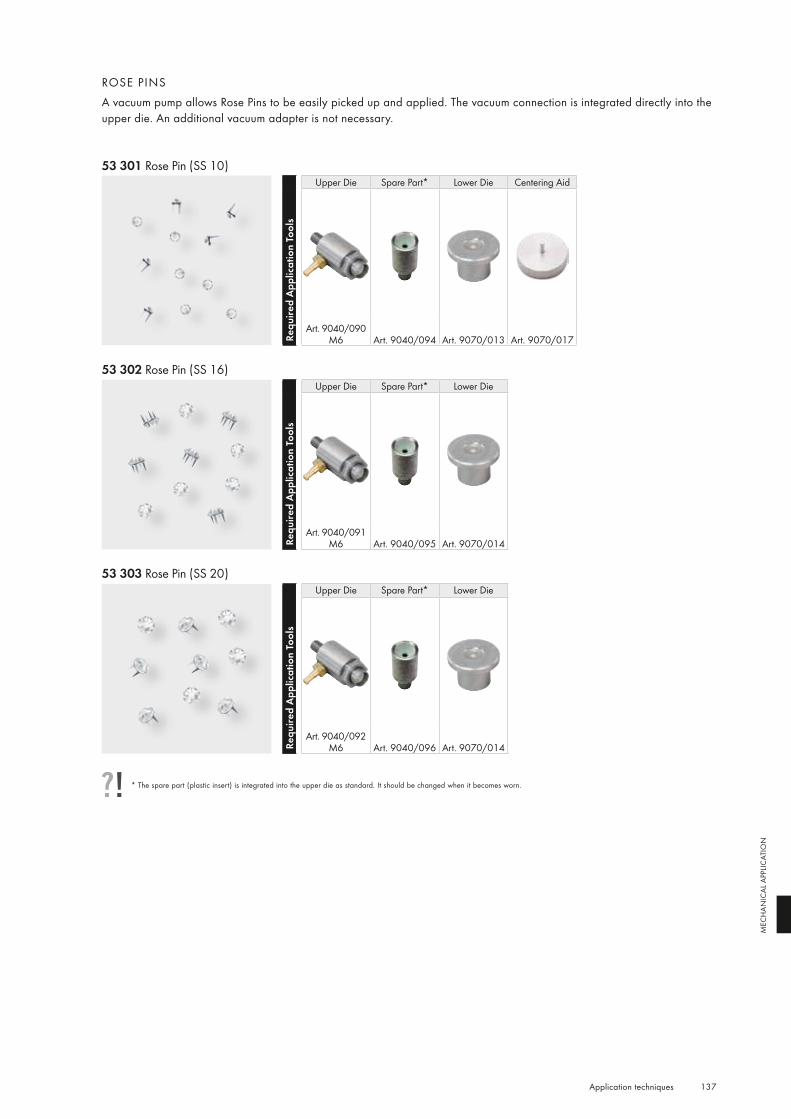
137 Application techniques
MEC
HAN
ICAL
APP
LICAT
ION
53 301 Rose Pin (SS 10)
Requ
ired
App
licat
ion
Tool
s
Upper Die Spare Part* Lower Die Centering Aid
Art. 9040/090 M6 Art. 9040/094 Art. 9070/013 Art. 9070/017
53 302 Rose Pin (SS 16)
Requ
ired
App
licat
ion
Tool
s
Upper Die Spare Part* Lower Die
Art. 9040/091 M6 Art. 9040/095 Art. 9070/014
53 303 Rose Pin (SS 20)
Requ
ired
App
licat
ion
Tool
s
Upper Die Spare Part* Lower Die
Art. 9040/092 M6 Art. 9040/096 Art. 9070/014
ROSE PINSA vacuum pump allows Rose Pins to be easily picked up and applied. The vacuum connection is integrated directly into the upper die. An additional vacuum adapter is not necessary.
* The spare part (plastic insert) is integrated into the upper die as standard. It should be changed when it becomes worn.

138 Application techniques
MEC
HAN
ICAL
APP
LICAT
ION
53 304 Rose Pin (SS 34)
Requ
ired
App
licat
ion
Tool
s
Upper Die Spare Part* Lower Die
Art. 9040/093 M6 Art. 9040/097 Art. 9070/016
The centering aid (art. 9070/017) for Rose Pin 53 301 allows the product to be easily positioned in the upper die.
* The spare part (plastic insert) is integrated into the upper die as standard. It should be changed when it becomes worn.
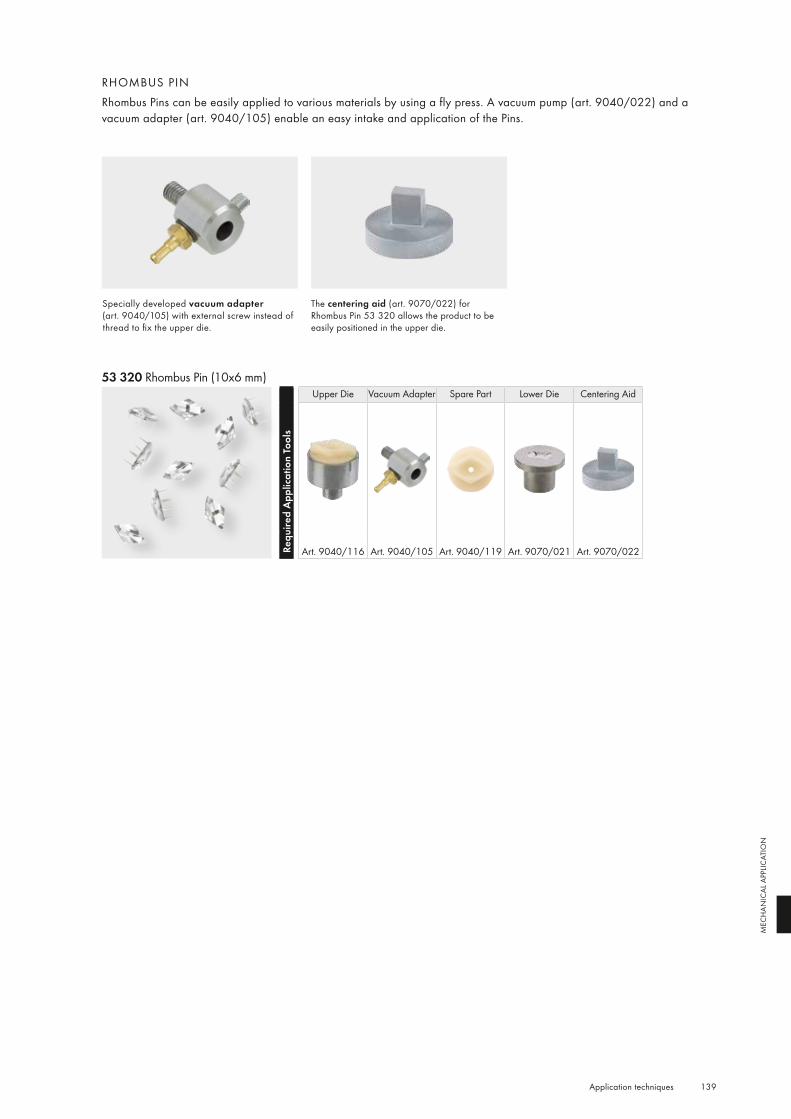
139 Application techniques
MEC
HAN
ICAL
APP
LICAT
ION
RHOMBUS PIN Rhombus Pins can be easily applied to various materials by using a fly press. A vacuum pump (art. 9040/022) and a vacuum adapter (art. 9040/105) enable an easy intake and application of the Pins.
Specially developed vacuum adapter (art. 9040/105) with external screw instead of thread to fix the upper die.
The centering aid (art. 9070/022) for Rhombus Pin 53 320 allows the product to be easily positioned in the upper die.
53 320 Rhombus Pin (10x6 mm)
Requ
ired
App
licat
ion
Tool
s
Upper Die Vacuum Adapter Spare Part Lower Die Centering Aid
Art. 9040/116 Art. 9040/105 Art. 9040/119 Art. 9070/021 Art. 9070/022

140 Application techniques
MEC
HAN
ICAL
APP
LICAT
ION
CRYSTAL STUDSA vacuum pump enables an easy intake and application of Crystal Studs. In the upper die the vacuum adapter is already integrated. Therefore, an additional adapter is not needed.
The buttonhole punching tool (art. 9040/122) can be used to create the buttonhole.
53 730 Crystal Stud (PP 24 long shaft)
Requ
ired
App
licat
ion
Tool
s
Upper Die Lower Die ButtonholePunching Tool
Art. 9040/120 M6 Art. 9040/121 Art. 9040/122
53 731 Crystal Stud (PP 24 short shaft)
Requ
ired
App
licat
ion
Tool
s
Upper Die Lower Die ButtonholePunching Tool
Art. 9040/120 M6 Art. 9040/121 Art. 9040/122
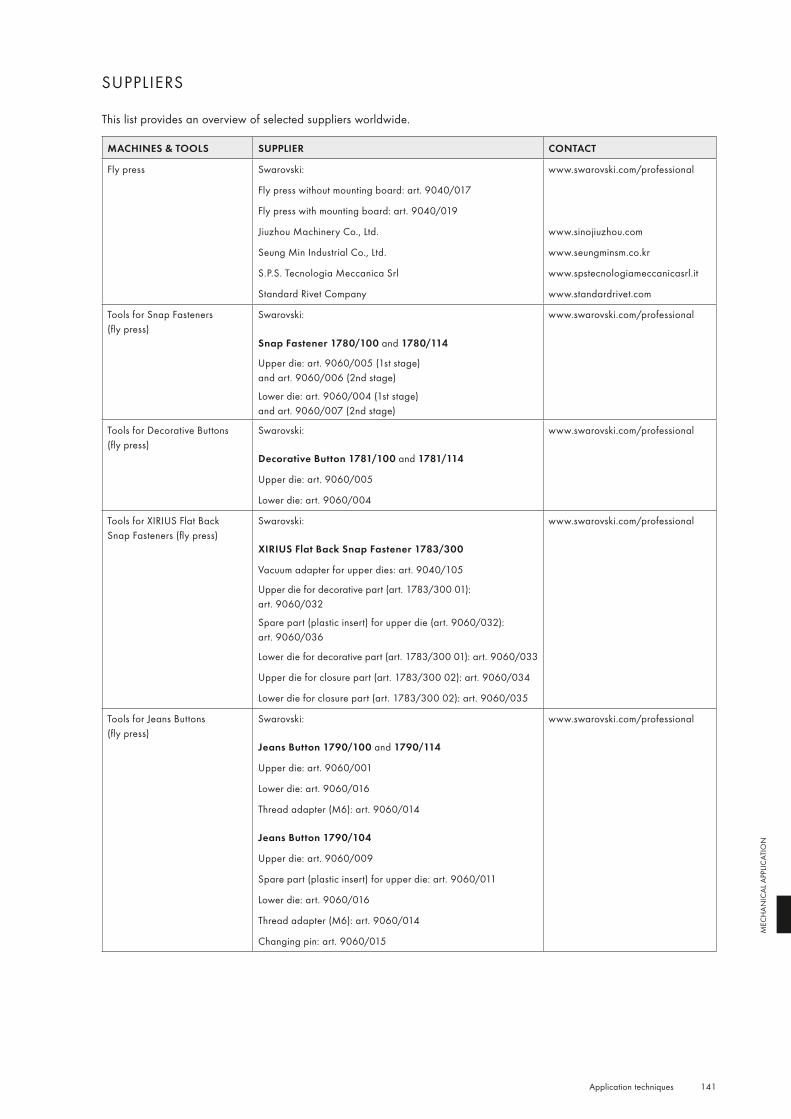
141 Application techniques
MEC
HAN
ICAL
APP
LICAT
ION
SUPPLIERS
This list provides an overview of selected suppliers worldwide.
MACHINES & TOOLS SUPPLIER CONTACT
Fly press Swarovski: www.swarovski.com/professional
Fly press without mounting board: art. 9040/017
Fly press with mounting board: art. 9040/019
Jiuzhou Machinery Co., Ltd. www.sinojiuzhou.com
Seung Min Industrial Co., Ltd. www.seungminsm.co.kr
S.P.S. Tecnologia Meccanica Srl www.spstecnologiameccanicasrl.it
Standard Rivet Company www.standardrivet.com
Tools for Snap Fasteners (fly press)
Swarovski: www.swarovski.com/professional
Snap Fastener 1780/100 and 1780/114
Upper die: art. 9060/005 (1st stage) and art. 9060/006 (2nd stage)
Lower die: art. 9060/004 (1st stage) and art. 9060/007 (2nd stage)
Tools for Decorative Buttons (fly press)
Swarovski: www.swarovski.com/professional
Decorative Button 1781/100 and 1781/114
Upper die: art. 9060/005
Lower die: art. 9060/004
Tools for XIRIUS Flat Back Snap Fasteners (fly press)
Swarovski: www.swarovski.com/professional
XIRIUS Flat Back Snap Fastener 1783/300
Vacuum adapter for upper dies: art. 9040/105
Upper die for decorative part (art. 1783/300 01): art. 9060/032
Spare part (plastic insert) for upper die (art. 9060/032): art. 9060/036
Lower die for decorative part (art. 1783/300 01): art. 9060/033
Upper die for closure part (art. 1783/300 02): art. 9060/034
Lower die for closure part (art. 1783/300 02): art. 9060/035
Tools for Jeans Buttons (fly press)
Swarovski: www.swarovski.com/professional
Jeans Button 1790/100 and 1790/114
Upper die: art. 9060/001
Lower die: art. 9060/016
Thread adapter (M6): art. 9060/014
Jeans Button 1790/104
Upper die: art. 9060/009
Spare part (plastic insert) for upper die: art. 9060/011
Lower die: art. 9060/016
Thread adapter (M6): art. 9060/014
Changing pin: art. 9060/015
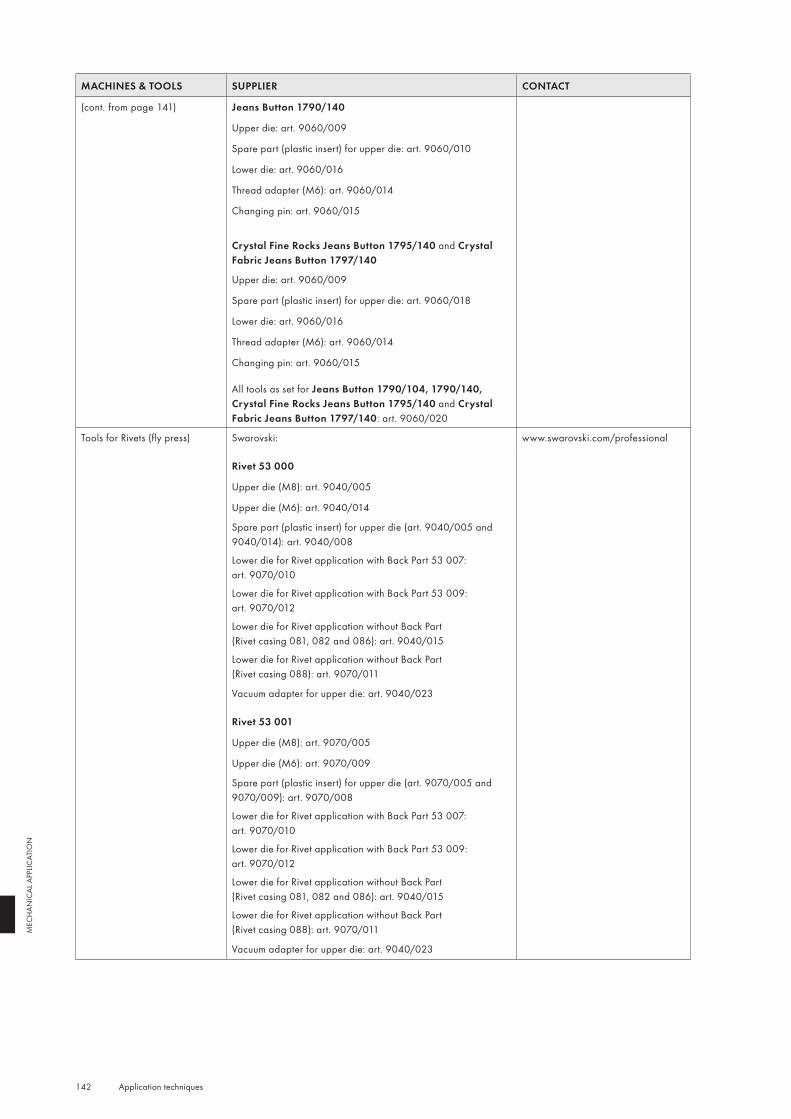
142 Application techniques
MEC
HAN
ICAL
APP
LICAT
ION
MACHINES & TOOLS SUPPLIER CONTACT
(cont. from page 141) Jeans Button 1790/140
Upper die: art. 9060/009
Spare part (plastic insert) for upper die: art. 9060/010
Lower die: art. 9060/016
Thread adapter (M6): art. 9060/014
Changing pin: art. 9060/015
Crystal Fine Rocks Jeans Button 1795/140 and Crystal Fabric Jeans Button 1797/140
Upper die: art. 9060/009
Spare part (plastic insert) for upper die: art. 9060/018
Lower die: art. 9060/016
Thread adapter (M6): art. 9060/014
Changing pin: art. 9060/015
All tools as set for Jeans Button 1790/104, 1790/140, Crystal Fine Rocks Jeans Button 1795/140 and Crystal Fabric Jeans Button 1797/140: art. 9060/020
Tools for Rivets (fly press) Swarovski: www.swarovski.com/professional
Rivet 53 000
Upper die (M8): art. 9040/005
Upper die (M6): art. 9040/014
Spare part (plastic insert) for upper die (art. 9040/005 and 9040/014): art. 9040/008
Lower die for Rivet application with Back Part 53 007: art. 9070/010
Lower die for Rivet application with Back Part 53 009: art. 9070/012
Lower die for Rivet application without Back Part (Rivet casing 081, 082 and 086): art. 9040/015
Lower die for Rivet application without Back Part (Rivet casing 088): art. 9070/011
Vacuum adapter for upper die: art. 9040/023
Rivet 53 001
Upper die (M8): art. 9070/005
Upper die (M6): art. 9070/009
Spare part (plastic insert) for upper die (art. 9070/005 and 9070/009): art. 9070/008
Lower die for Rivet application with Back Part 53 007: art. 9070/010
Lower die for Rivet application with Back Part 53 009: art. 9070/012
Lower die for Rivet application without Back Part (Rivet casing 081, 082 and 086): art. 9040/015
Lower die for Rivet application without Back Part (Rivet casing 088): art. 9070/011
Vacuum adapter for upper die: art. 9040/023

143 Application techniques
MEC
HAN
ICAL
APP
LICAT
ION
MACHINES & TOOLS SUPPLIER CONTACT
Rivet 53 002
Upper die (M8): art. 9040/005
Upper die (M6): art. 9040/014
Spare part (plastic insert) for upper die (art. 9040/005 and 9040/014): art. 9040/008
Lower die for Rivet application without Back Part (Rivet casing 081, 082 and 086): art. 9040/015
Vacuum adapter for upper die: art. 9040/023
Rivet 53 005
Upper die (M8): art. 9040/064
Upper die (M6): art. 9040/063
Spare part (plastic insert) for upper die (art. 9040/064 and 9040/063): art. 9040/062
Lower die for Rivet application with Back Part 53 007: art. 9070/010
Lower die for Rivet application with Back Part 53 009: art. 9070/012
Lower die for Rivet application without Back Part (Rivet casing 081, 082 and 086): art. 9040/015
Lower die for Rivet application without Back Part (Rivet casing 088): art. 9070/011
Vacuum adapter for upper die: art. 9040/023
Rivet 53 006
Upper die (M8): art. 9040/067
Upper die (M6): art. 9040/066
Spare part (plastic insert) for upper die (art. 9040/067 and 9040/066): art. 9040/065
Lower die for Rivet application with Back Part 53 007: art. 9070/010
Lower die for Rivet application with Back Part 53 009: art. 9070/012
Lower die for Rivet application without Back Part (Rivet casing 081, 082 and 086): art. 9040/015
Lower die for Rivet application without Back Part (Rivet casing 088): art. 9070/011
Vacuum adapter for upper die: art. 9040/023
Rivet 53 008
Upper die (M8): art. 9040/083
Upper die (M6): art. 9040/085
Spare part (plastic insert) for upper die (art. 9040/083 and 9040/085): art. 9040/084
Lower die for Rivet application with Back Part 53 009: art. 9070/012
Lower die for Rivet application without Back Part (Rivet casing 088): art. 9070/011
Vacuum adapter for upper die: art. 9040/023
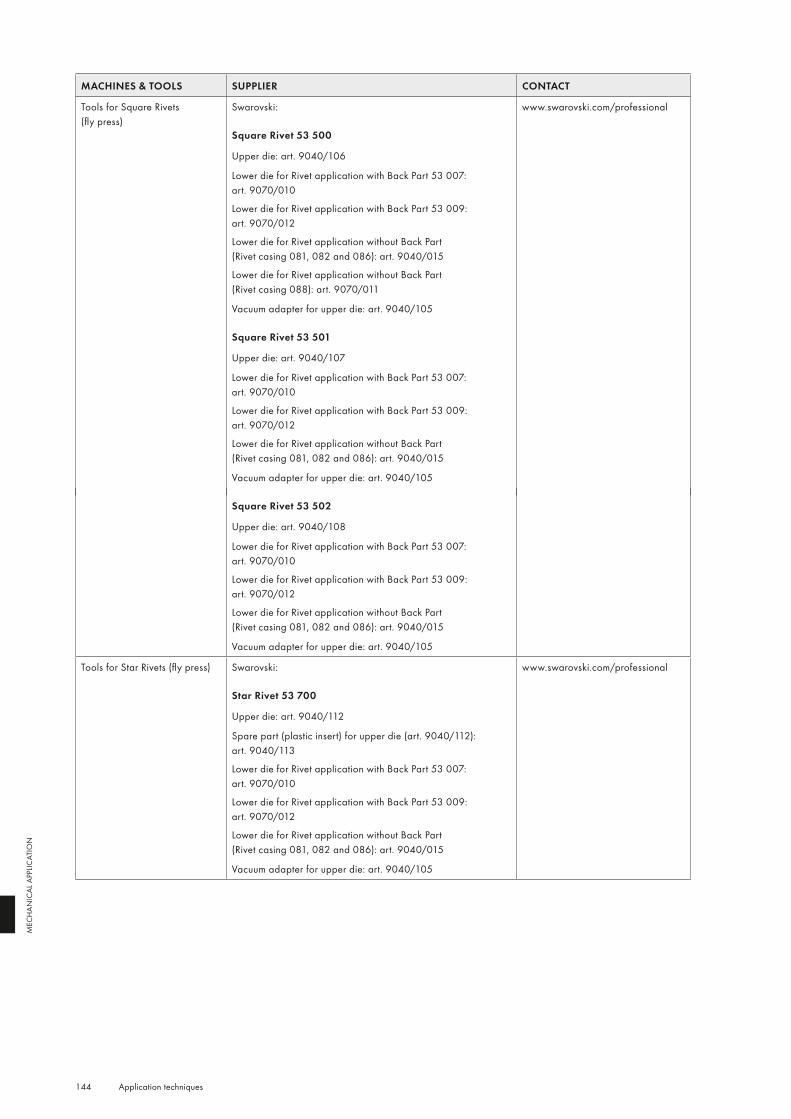
144 Application techniques
MEC
HAN
ICAL
APP
LICAT
ION
MACHINES & TOOLS SUPPLIER CONTACT
Tools for Square Rivets (fly press)
Swarovski: www.swarovski.com/professional
Square Rivet 53 500
Upper die: art. 9040/106
Lower die for Rivet application with Back Part 53 007: art. 9070/010
Lower die for Rivet application with Back Part 53 009: art. 9070/012
Lower die for Rivet application without Back Part (Rivet casing 081, 082 and 086): art. 9040/015
Lower die for Rivet application without Back Part (Rivet casing 088): art. 9070/011
Vacuum adapter for upper die: art. 9040/105
Square Rivet 53 501
Upper die: art. 9040/107
Lower die for Rivet application with Back Part 53 007: art. 9070/010
Lower die for Rivet application with Back Part 53 009: art. 9070/012
Lower die for Rivet application without Back Part (Rivet casing 081, 082 and 086): art. 9040/015
Vacuum adapter for upper die: art. 9040/105
Square Rivet 53 502
Upper die: art. 9040/108
Lower die for Rivet application with Back Part 53 007: art. 9070/010
Lower die for Rivet application with Back Part 53 009: art. 9070/012
Lower die for Rivet application without Back Part (Rivet casing 081, 082 and 086): art. 9040/015
Vacuum adapter for upper die: art. 9040/105
Tools for Star Rivets (fly press) Swarovski: www.swarovski.com/professional
Star Rivet 53 700
Upper die: art. 9040/112
Spare part (plastic insert) for upper die (art. 9040/112): art. 9040/113
Lower die for Rivet application with Back Part 53 007: art. 9070/010
Lower die for Rivet application with Back Part 53 009: art. 9070/012
Lower die for Rivet application without Back Part (Rivet casing 081, 082 and 086): art. 9040/015
Vacuum adapter for upper die: art. 9040/105
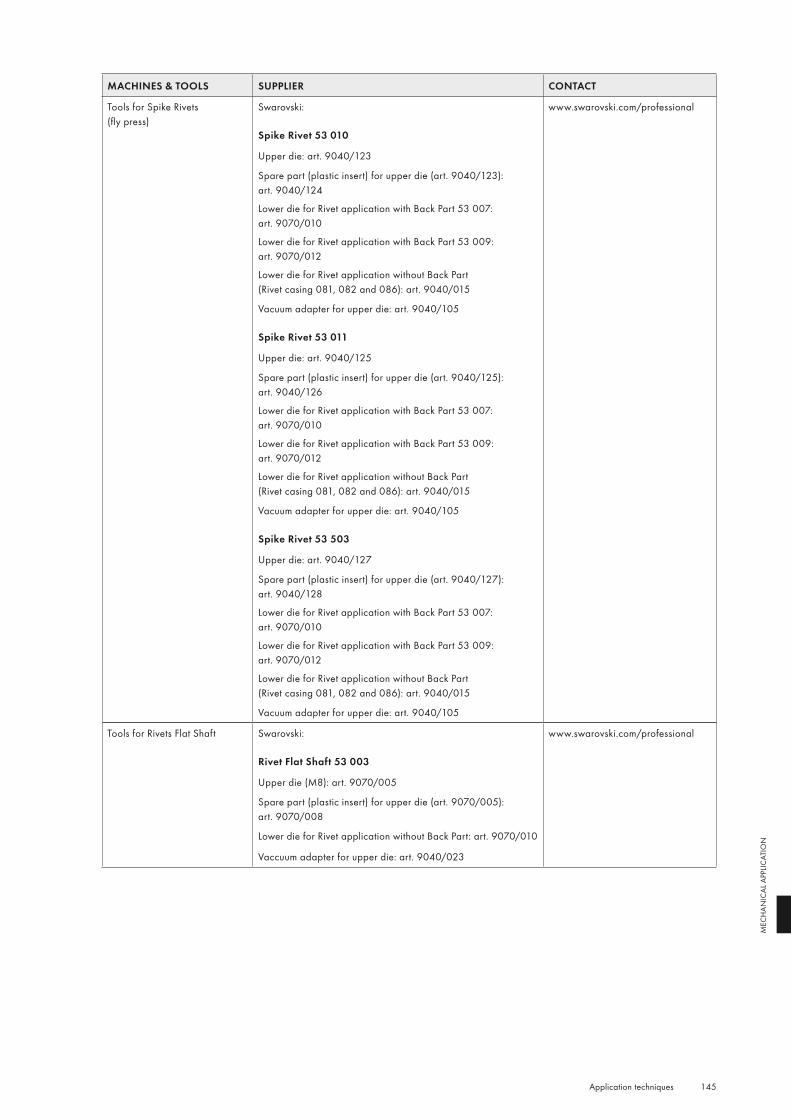
145 Application techniques
MEC
HAN
ICAL
APP
LICAT
ION
MACHINES & TOOLS SUPPLIER CONTACT
Tools for Spike Rivets (fly press)
Swarovski: www.swarovski.com/professional
Spike Rivet 53 010
Upper die: art. 9040/123
Spare part (plastic insert) for upper die (art. 9040/123): art. 9040/124
Lower die for Rivet application with Back Part 53 007: art. 9070/010
Lower die for Rivet application with Back Part 53 009: art. 9070/012
Lower die for Rivet application without Back Part (Rivet casing 081, 082 and 086): art. 9040/015
Vacuum adapter for upper die: art. 9040/105
Spike Rivet 53 011
Upper die: art. 9040/125
Spare part (plastic insert) for upper die (art. 9040/125): art. 9040/126
Lower die for Rivet application with Back Part 53 007: art. 9070/010
Lower die for Rivet application with Back Part 53 009: art. 9070/012
Lower die for Rivet application without Back Part (Rivet casing 081, 082 and 086): art. 9040/015
Vacuum adapter for upper die: art. 9040/105
Spike Rivet 53 503
Upper die: art. 9040/127
Spare part (plastic insert) for upper die (art. 9040/127): art. 9040/128
Lower die for Rivet application with Back Part 53 007: art. 9070/010
Lower die for Rivet application with Back Part 53 009: art. 9070/012
Lower die for Rivet application without Back Part (Rivet casing 081, 082 and 086): art. 9040/015
Vacuum adapter for upper die: art. 9040/105
Tools for Rivets Flat Shaft Swarovski: www.swarovski.com/professional
Rivet Flat Shaft 53 003
Upper die (M8): art. 9070/005
Spare part (plastic insert) for upper die (art. 9070/005): art. 9070/008
Lower die for Rivet application without Back Part: art. 9070/010
Vaccuum adapter for upper die: art. 9040/023
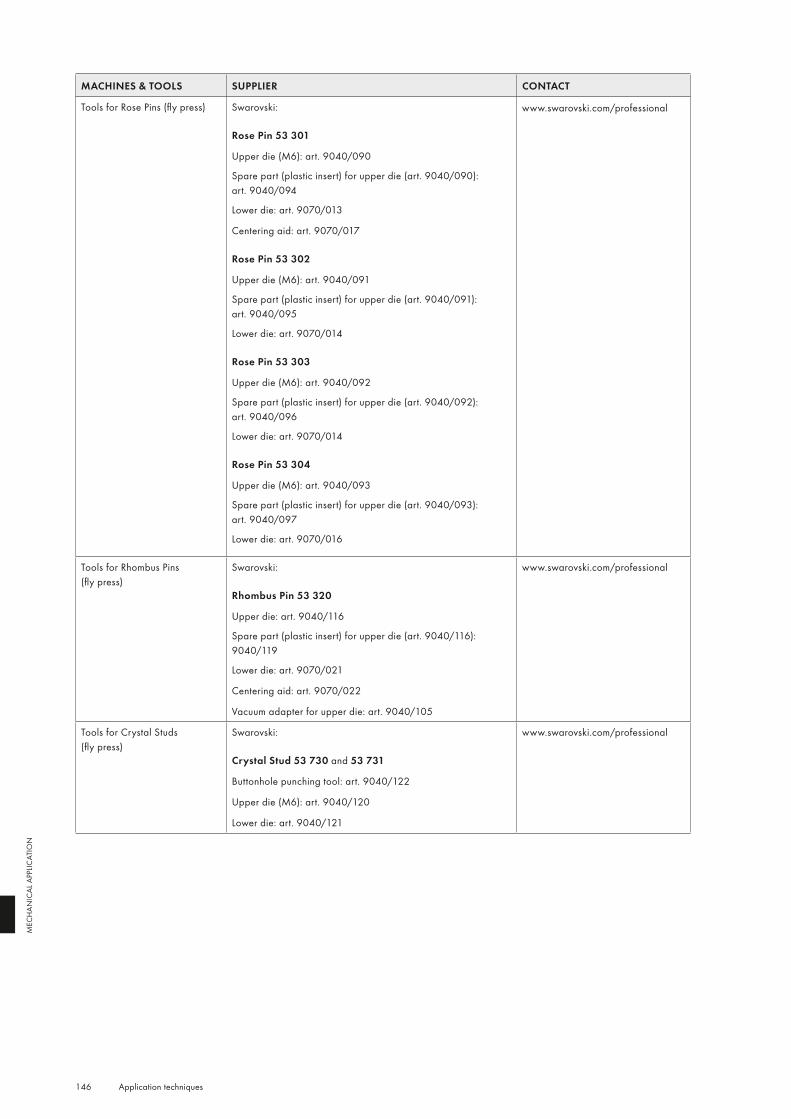
146 Application techniques
MEC
HAN
ICAL
APP
LICAT
ION
MACHINES & TOOLS SUPPLIER CONTACT
Tools for Rose Pins (fly press) Swarovski: www.swarovski.com/professional
Rose Pin 53 301
Upper die (M6): art. 9040/090
Spare part (plastic insert) for upper die (art. 9040/090): art. 9040/094
Lower die: art. 9070/013
Centering aid: art. 9070/017
Rose Pin 53 302
Upper die (M6): art. 9040/091
Spare part (plastic insert) for upper die (art. 9040/091): art. 9040/095
Lower die: art. 9070/014
Rose Pin 53 303
Upper die (M6): art. 9040/092
Spare part (plastic insert) for upper die (art. 9040/092): art. 9040/096
Lower die: art. 9070/014
Rose Pin 53 304
Upper die (M6): art. 9040/093
Spare part (plastic insert) for upper die (art. 9040/093): art. 9040/097
Lower die: art. 9070/016
Tools for Rhombus Pins (fly press)
Swarovski: www.swarovski.com/professional
Rhombus Pin 53 320
Upper die: art. 9040/116
Spare part (plastic insert) for upper die (art. 9040/116): 9040/119
Lower die: art. 9070/021
Centering aid: art. 9070/022
Vacuum adapter for upper die: art. 9040/105
Tools for Crystal Studs (fly press)
Swarovski: www.swarovski.com/professional
Crystal Stud 53 730 and 53 731
Buttonhole punching tool: art. 9040/122
Upper die (M6): art. 9040/120
Lower die: art. 9040/121

147 Application techniques
MEC
HAN
ICAL
APP
LICAT
ION
MACHINES & TOOLS SUPPLIER CONTACT
Vacuum pump with silicone hose
Swarovski: art. 9040/022 www.swarovski.com/professional
Automatic attaching machine Jiuzhou Machinery Co., Ltd. www.sinojiuzhou.com
Prym Fashion GmbH www.prym-fashion.com
Seung Min Industrial Co., Ltd. www.seungminsm.co.kr
S.P.S. Tecnologia Meccanica Srl www.spstecnologiameccanicasrl.it
Rose Pin press/mold Gruppo Meccaniche Luciani Srl www.gruppomeccanicheluciani.com
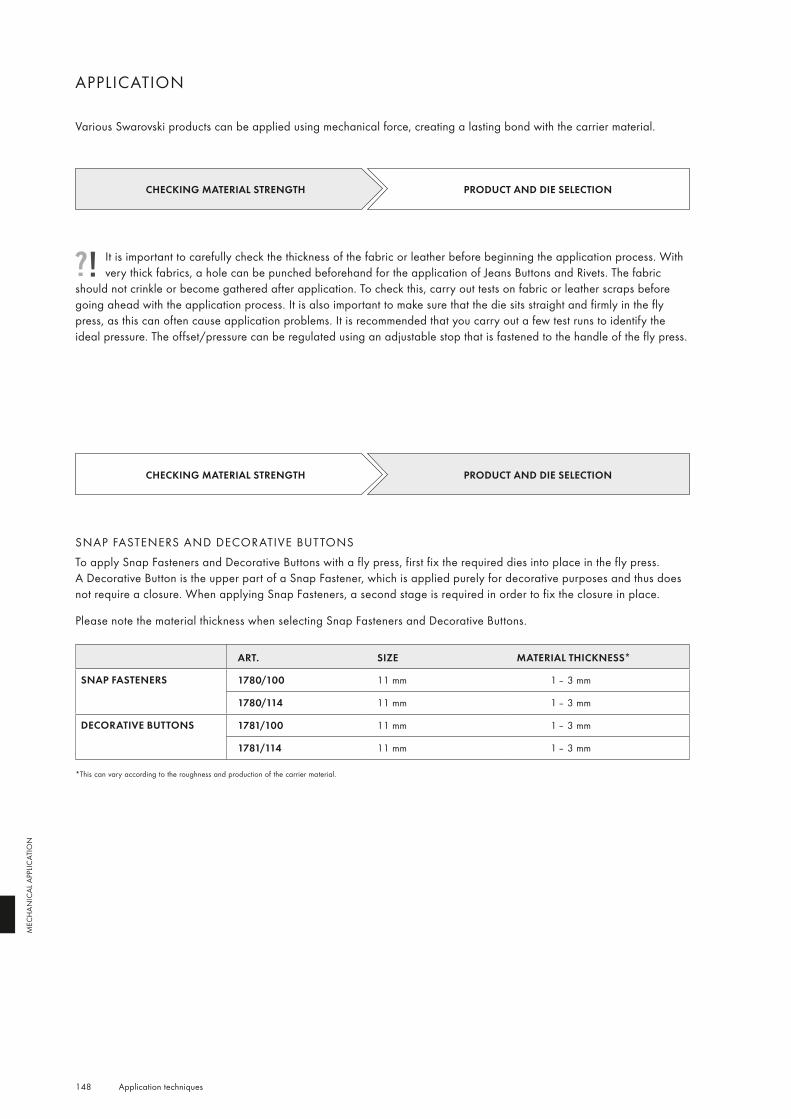
148 Application techniques
MEC
HAN
ICAL
APP
LICAT
ION
APPLICATION
Various Swarovski products can be applied using mechanical force, creating a lasting bond with the carrier material.
CHECKING MATERIAL STRENGTH PRODUCT AND DIE SELECTION
It is important to carefully check the thickness of the fabric or leather before beginning the application process. With very thick fabrics, a hole can be punched beforehand for the application of Jeans Buttons and Rivets. The fabric
should not crinkle or become gathered after application. To check this, carry out tests on fabric or leather scraps before going ahead with the application process. It is also important to make sure that the die sits straight and firmly in the fly press, as this can often cause application problems. It is recommended that you carry out a few test runs to identify the ideal pressure. The offset/pressure can be regulated using an adjustable stop that is fastened to the handle of the fly press.
CHECKING MATERIAL STRENGTH PRODUCT AND DIE SELECTION
SNAP FASTENERS AND DECORATIVE BUTTONS To apply Snap Fasteners and Decorative Buttons with a fly press, first fix the required dies into place in the fly press. A Decorative Button is the upper part of a Snap Fastener, which is applied purely for decorative purposes and thus does not require a closure. When applying Snap Fasteners, a second stage is required in order to fix the closure in place.
Please note the material thickness when selecting Snap Fasteners and Decorative Buttons.
ART. SIZE MATERIAL THICKNESS*
SNAP FASTENERS 1780/100 11 mm 1 – 3 mm
1780/114 11 mm 1 – 3 mm
DECORATIVE BUTTONS 1781/100 11 mm 1 – 3 mm
1781/114 11 mm 1 – 3 mm
*This can vary according to the roughness and production of the carrier material.
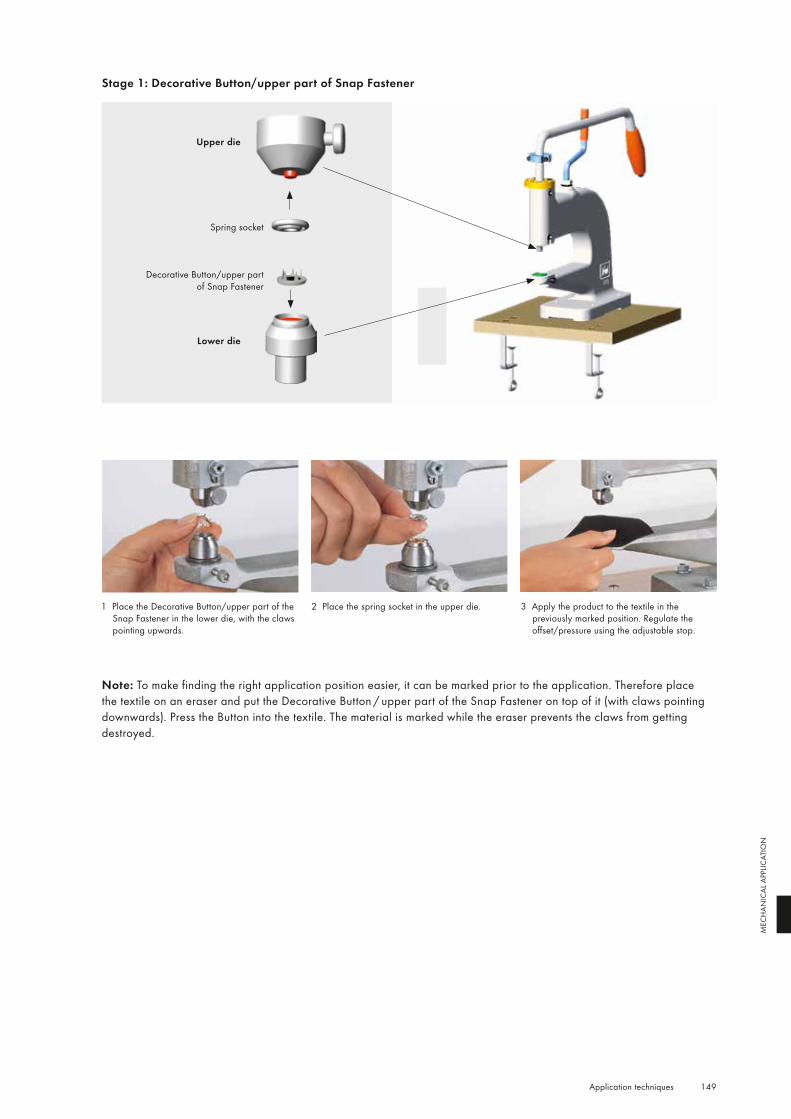
149 Application techniques
MEC
HAN
ICAL
APP
LICAT
ION
Stage 1: Decorative Button/upper part of Snap Fastener
Upper die
Lower die
Decorative Button/upper part of Snap Fastener
Spring socket
1 Place the Decorative Button/upper part of the Snap Fastener in the lower die, with the claws pointing upwards.
2 Place the spring socket in the upper die. 3 Apply the product to the textile in the previously marked position. Regulate the offset/pressure using the adjustable stop.
Note: To make finding the right application position easier, it can be marked prior to the application. Therefore place the textile on an eraser and put the Decorative Button / upper part of the Snap Fastener on top of it (with claws pointing downwards). Press the Button into the textile. The material is marked while the eraser prevents the claws from getting destroyed.
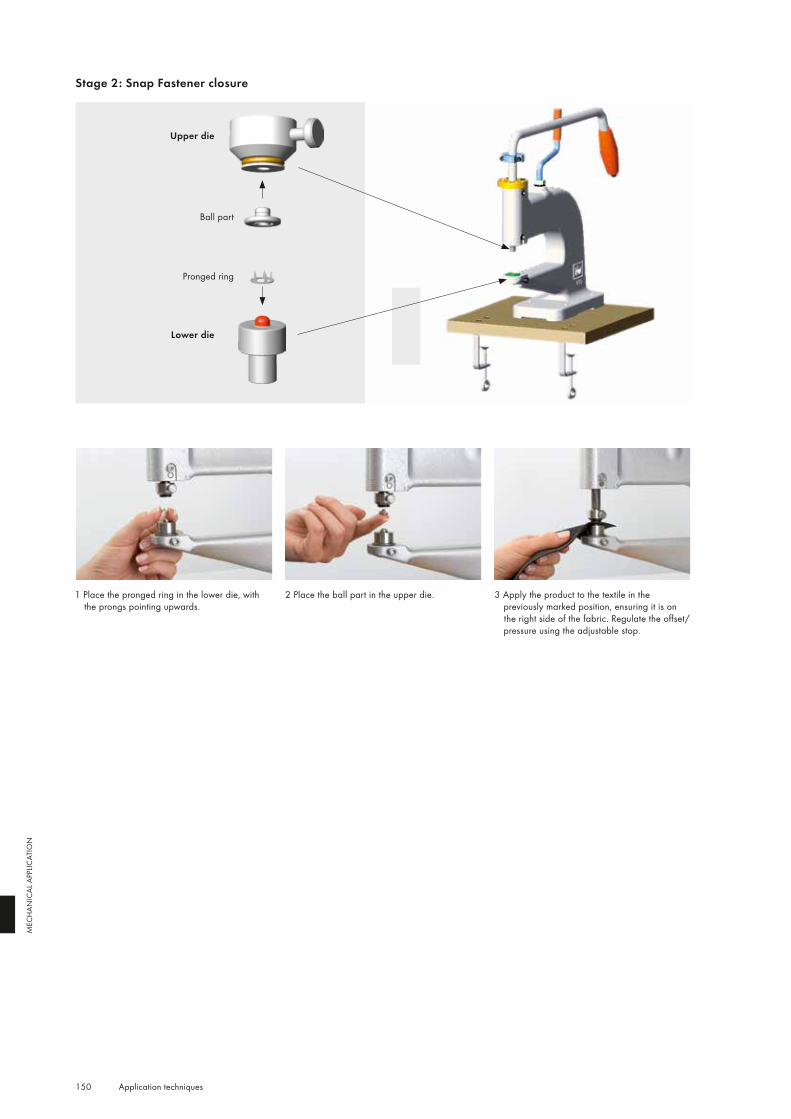
150 Application techniques
MEC
HAN
ICAL
APP
LICAT
ION
Stage 2: Snap Fastener closure
Upper die
Lower die
Pronged ring
Ball part
1 Place the pronged ring in the lower die, with the prongs pointing upwards.
2 Place the ball part in the upper die. 3 Apply the product to the textile in the previously marked position, ensuring it is on the right side of the fabric. Regulate the offset/pressure using the adjustable stop.
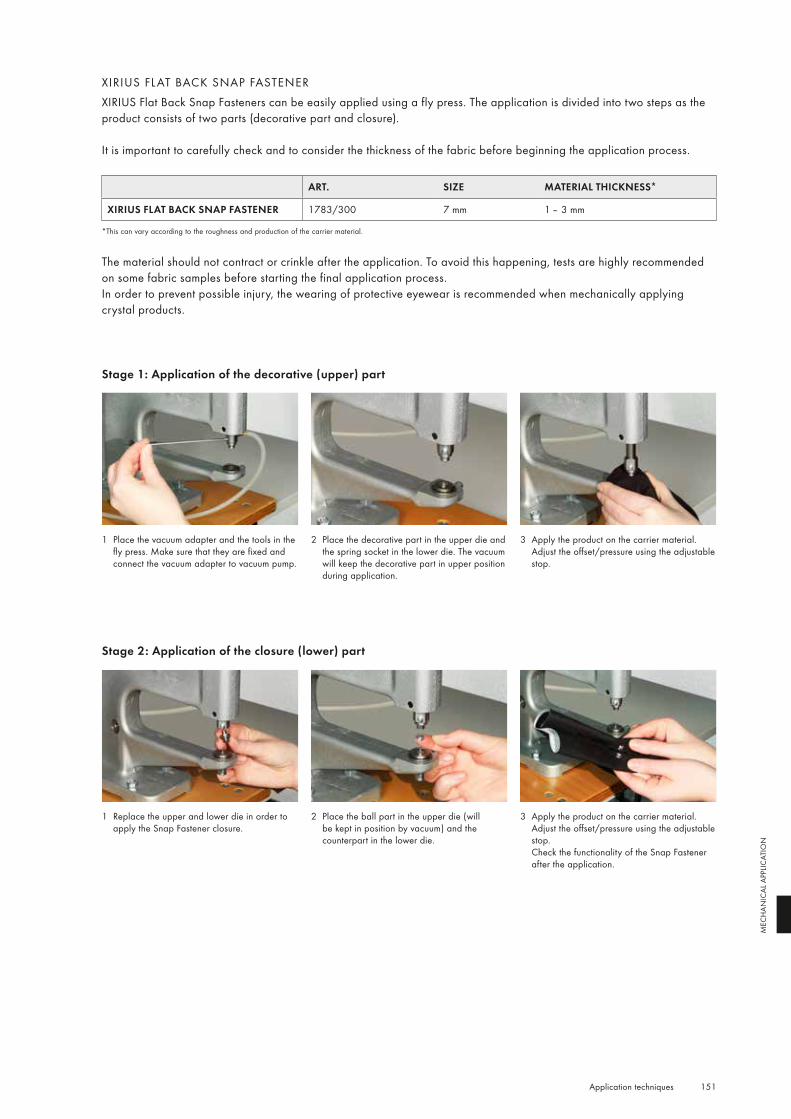
151 Application techniques
MEC
HAN
ICAL
APP
LICAT
ION
XIRIUS FL AT BACK SNAP FASTENER XIRIUS Flat Back Snap Fasteners can be easily applied using a fly press. The application is divided into two steps as the product consists of two parts (decorative part and closure).
It is important to carefully check and to consider the thickness of the fabric before beginning the application process.
ART. SIZE MATERIAL THICKNESS*
XIRIUS FLAT BACK SNAP FASTENER 1783/300 7 mm 1 – 3 mm
*This can vary according to the roughness and production of the carrier material.
The material should not contract or crinkle after the application. To avoid this happening, tests are highly recommended on some fabric samples before starting the final application process.In order to prevent possible injury, the wearing of protective eyewear is recommended when mechanically applying crystal products.
Stage 1: Application of the decorative (upper) part
1 Place the vacuum adapter and the tools in the fly press. Make sure that they are fixed and connect the vacuum adapter to vacuum pump.
2 Place the decorative part in the upper die and the spring socket in the lower die. The vacuum will keep the decorative part in upper position during application.
3 Apply the product on the carrier material. Adjust the offset/pressure using the adjustable stop.
Stage 2: Application of the closure (lower) part
1 Replace the upper and lower die in order to apply the Snap Fastener closure.
2 Place the ball part in the upper die (will be kept in position by vacuum) and the counterpart in the lower die.
3 Apply the product on the carrier material. Adjust the offset/pressure using the adjustable stop.
Check the functionality of the Snap Fastener after the application.
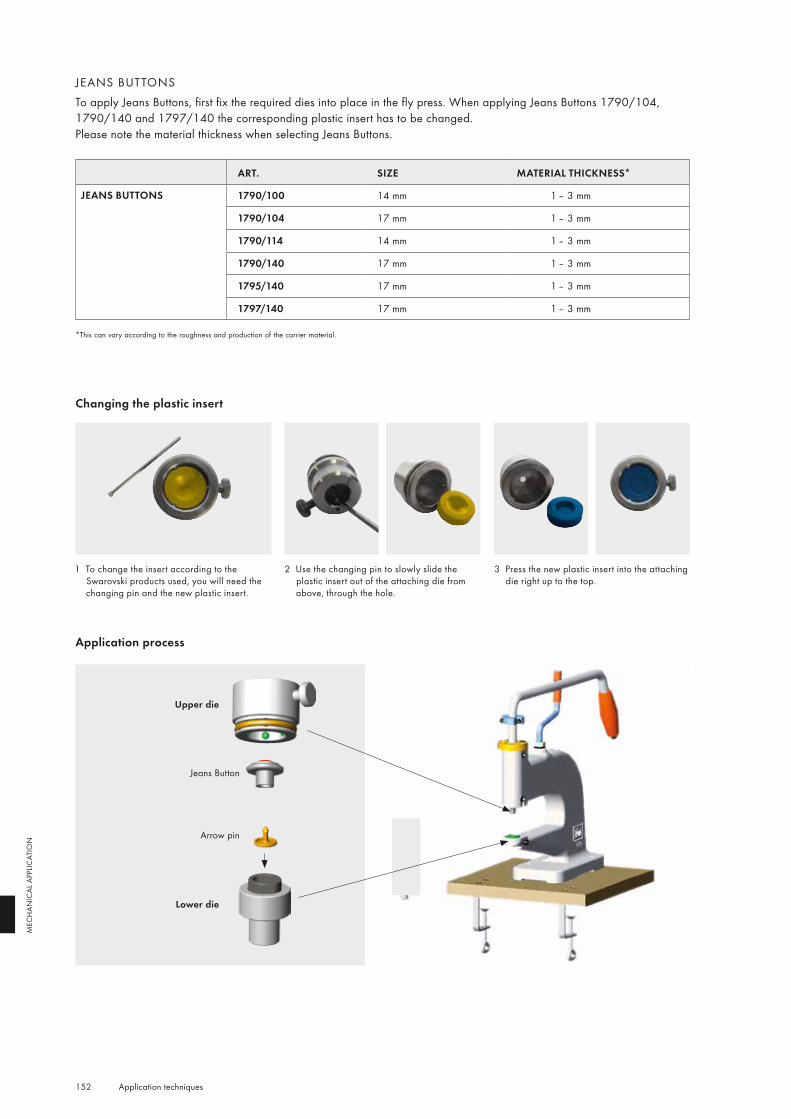
152 Application techniques
MEC
HAN
ICAL
APP
LICAT
ION
JEANS BUTTONSTo apply Jeans Buttons, first fix the required dies into place in the fly press. When applying Jeans Buttons 1790/104, 1790/140 and 1797/140 the corresponding plastic insert has to be changed.Please note the material thickness when selecting Jeans Buttons.
ART. SIZE MATERIAL THICKNESS*
JEANS BUTTONS 1790/100 14 mm 1 – 3 mm
1790/104 17 mm 1 – 3 mm
1790/114 14 mm 1 – 3 mm
1790/140 17 mm 1 – 3 mm
1795/140 17 mm 1 – 3 mm
1797/140 17 mm 1 – 3 mm
*This can vary according to the roughness and production of the carrier material.
1 To change the insert according to the Swarovski products used, you will need the changing pin and the new plastic insert.
2 Use the changing pin to slowly slide the plastic insert out of the attaching die from above, through the hole.
3 Press the new plastic insert into the attaching die right up to the top.
Changing the plastic insert
Application process
Upper die
Lower die
Arrow pin
Jeans Button
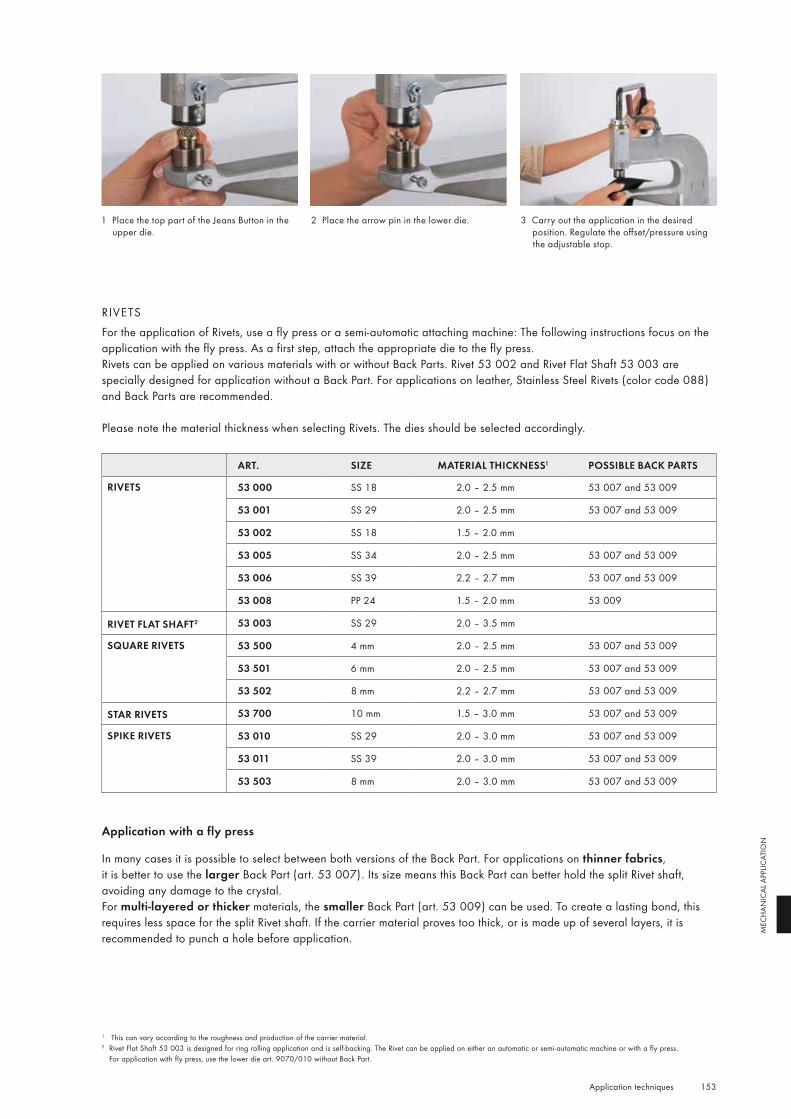
153 Application techniques
MEC
HAN
ICAL
APP
LICAT
ION
RIVETSFor the application of Rivets, use a fly press or a semi-automatic attaching machine: The following instructions focus on the application with the fly press. As a first step, attach the appropriate die to the fly press. Rivets can be applied on various materials with or without Back Parts. Rivet 53 002 and Rivet Flat Shaft 53 003 are specially designed for application without a Back Part. For applications on leather, Stainless Steel Rivets (color code 088) and Back Parts are recommended.
Please note the material thickness when selecting Rivets. The dies should be selected accordingly.
ART. SIZE MATERIAL THICKNESS1 POSSIBLE BACK PARTS
RIVETS 53 000 SS 18 2.0 – 2.5 mm 53 007 and 53 009
53 001 SS 29 2.0 – 2.5 mm 53 007 and 53 009
53 002 SS 18 1.5 – 2.0 mm
53 005 SS 34 2.0 – 2.5 mm 53 007 and 53 009
53 006 SS 39 2.2 – 2.7 mm 53 007 and 53 009
53 008 PP 24 1.5 – 2.0 mm 53 009
RIVET FLAT SHAFT2 53 003 SS 29 2.0 – 3.5 mm
SQUARE RIVETS 53 500 4 mm 2.0 – 2.5 mm 53 007 and 53 009
53 501 6 mm 2.0 – 2.5 mm 53 007 and 53 009
53 502 8 mm 2.2 – 2.7 mm 53 007 and 53 009
STAR RIVETS 53 700 10 mm 1.5 – 3.0 mm 53 007 and 53 009
SPIKE RIVETS 53 010 SS 29 2.0 – 3.0 mm 53 007 and 53 009
53 011 SS 39 2.0 – 3.0 mm 53 007 and 53 009
53 503 8 mm 2.0 – 3.0 mm 53 007 and 53 009
Application with a fly press
In many cases it is possible to select between both versions of the Back Part. For applications on thinner fabrics, it is better to use the larger Back Part (art. 53 007). Its size means this Back Part can better hold the split Rivet shaft, avoiding any damage to the crystal. For multi-layered or thicker materials, the smaller Back Part (art. 53 009) can be used. To create a lasting bond, this requires less space for the split Rivet shaft. If the carrier material proves too thick, or is made up of several layers, it is recommended to punch a hole before application.
1 This can vary according to the roughness and production of the carrier material.2 Rivet Flat Shaft 53 003 is designed for ring rolling application and is self-backing. The Rivet can be applied on either an automatic or semi-automatic machine or with a fly press.
For application with fly press, use the lower die art. 9070/010 without Back Part.
1 Place the top part of the Jeans Button in the upper die.
2 Place the arrow pin in the lower die. 3 Carry out the application in the desired position. Regulate the offset/pressure using the adjustable stop.
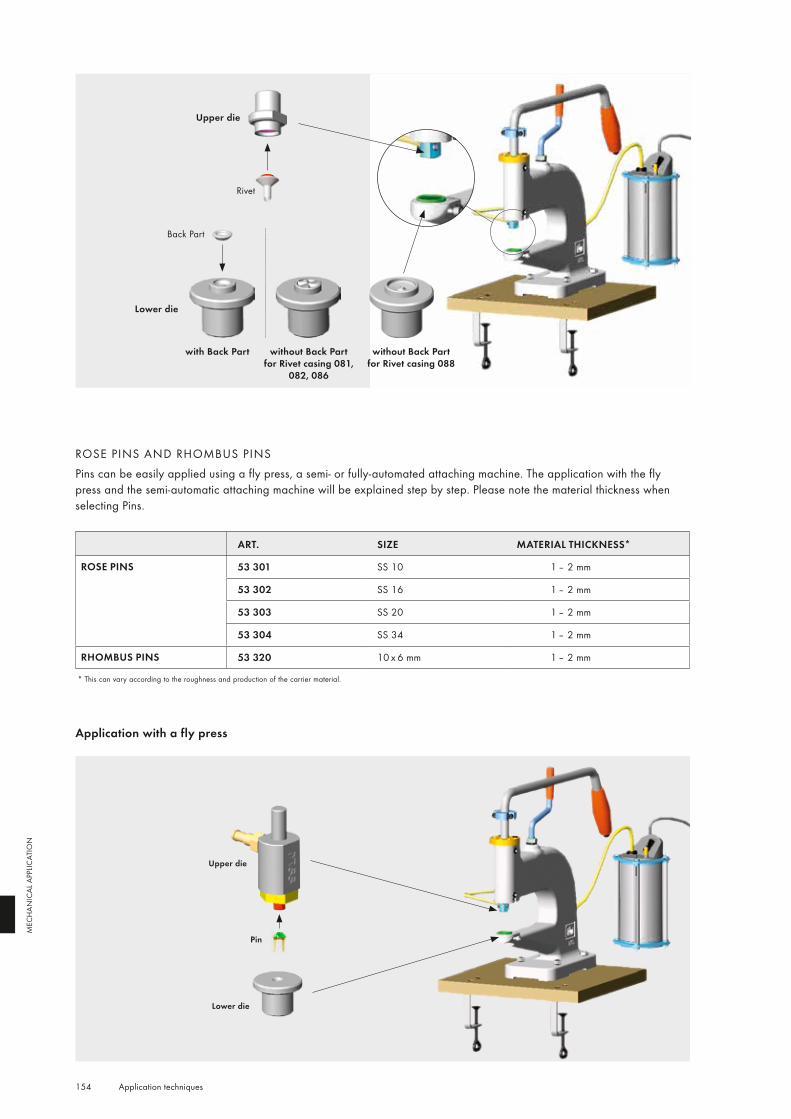
154 Application techniques
MEC
HAN
ICAL
APP
LICAT
ION
ROSE PINS AND RHOMBUS PINSPins can be easily applied using a fly press, a semi- or fully-automated attaching machine. The application with the fly press and the semi-automatic attaching machine will be explained step by step. Please note the material thickness when selecting Pins.
ART. SIZE MATERIAL THICKNESS*
ROSE PINS 53 301 SS 10 1 – 2 mm
53 302 SS 16 1 – 2 mm
53 303 SS 20 1 – 2 mm
53 304 SS 34 1 – 2 mm
RHOMBUS PINS 53 320 10 x 6 mm 1 – 2 mm
* This can vary according to the roughness and production of the carrier material.
Application with a fly press
Upper die
Rivet
Back Part
Lower die
with Back Part without Back Part for Rivet casing 081,
082, 086
without Back Partfor Rivet casing 088
Upper die
Pin
Lower die
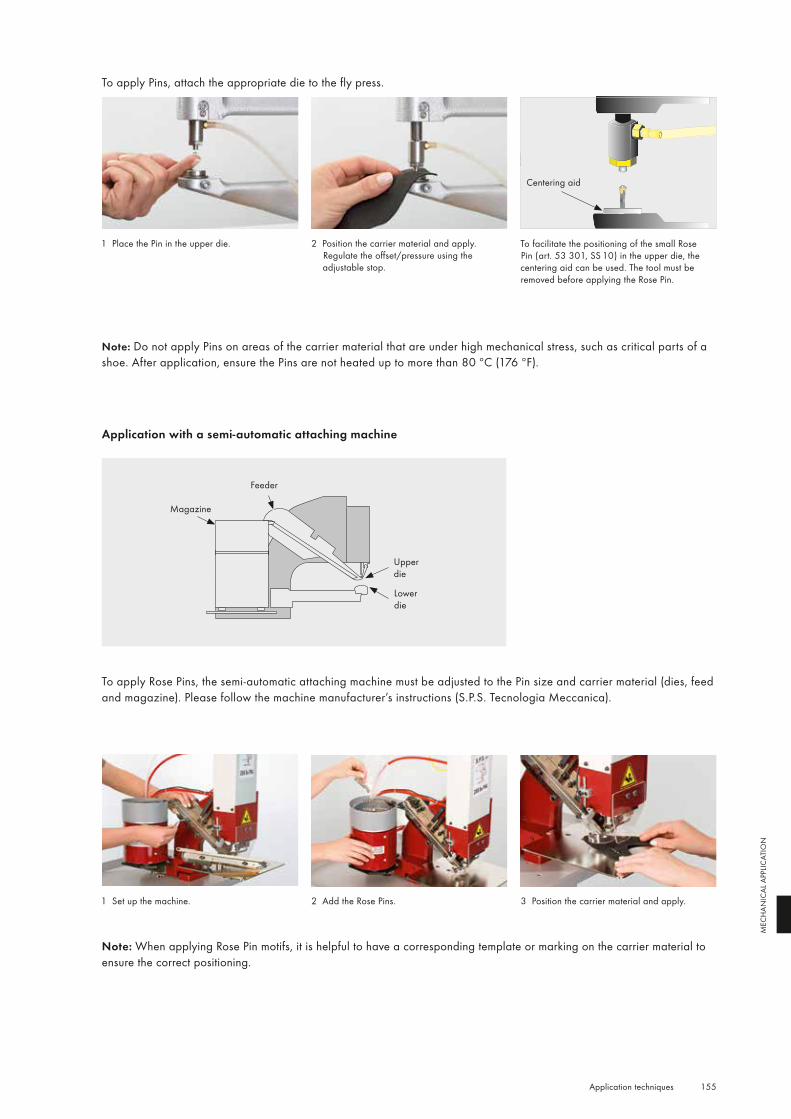
155 Application techniques
MEC
HAN
ICAL
APP
LICAT
ION
Application with a semi-automatic attaching machine
Magazine
Lower die
Upper die
Feeder
To apply Rose Pins, the semi-automatic attaching machine must be adjusted to the Pin size and carrier material (dies, feed and magazine). Please follow the machine manufacturer’s instructions (S.P.S. Tecnologia Meccanica).
1 Set up the machine. 2 Add the Rose Pins. 3 Position the carrier material and apply.
Note: When applying Rose Pin motifs, it is helpful to have a corresponding template or marking on the carrier material to ensure the correct positioning.
Note: Do not apply Pins on areas of the carrier material that are under high mechanical stress, such as critical parts of a shoe. After application, ensure the Pins are not heated up to more than 80 ºC (176 ºF).
To apply Pins, attach the appropriate die to the fly press.
1 Place the Pin in the upper die. 2 Position the carrier material and apply. Regulate the offset/pressure using the adjustable stop.
To facilitate the positioning of the small Rose Pin (art. 53 301, SS 10) in the upper die, the centering aid can be used. The tool must be removed before applying the Rose Pin.
Centering aid
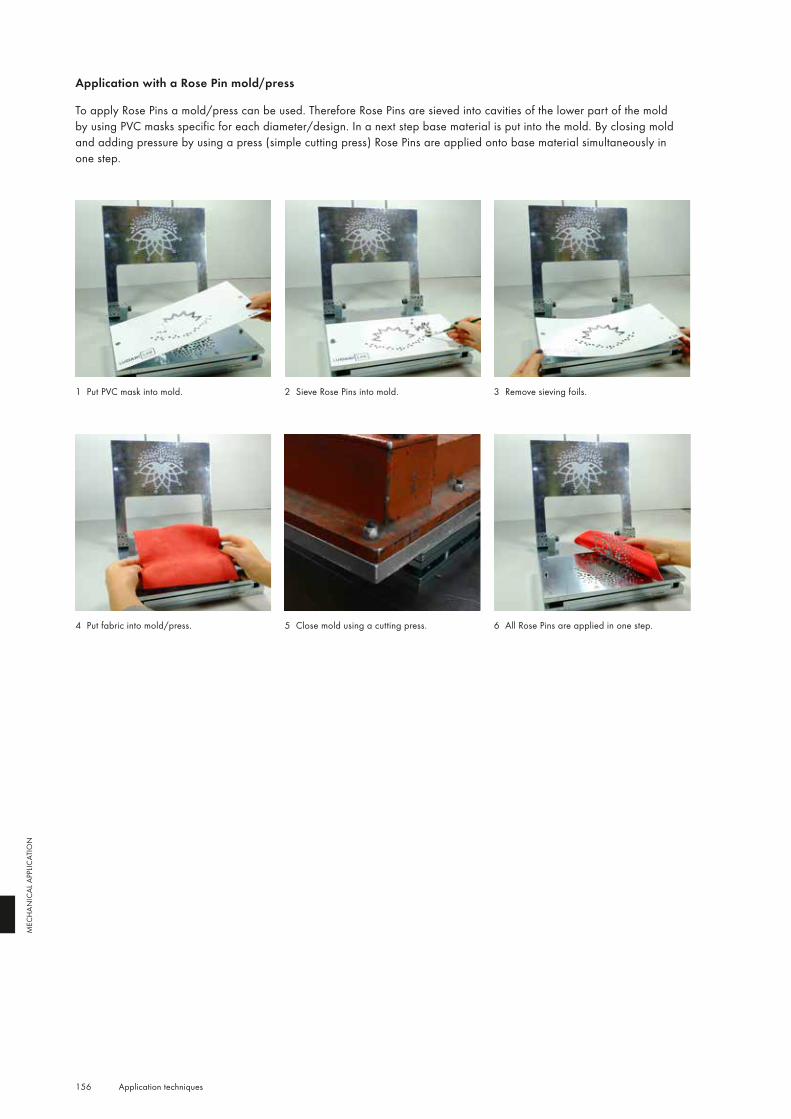
156 Application techniques
MEC
HAN
ICAL
APP
LICAT
ION
1 Put PVC mask into mold. 2 Sieve Rose Pins into mold. 3 Remove sieving foils.
4 Put fabric into mold/press. 5 Close mold using a cutting press. 6 All Rose Pins are applied in one step.
Application with a Rose Pin mold/press
To apply Rose Pins a mold/press can be used. Therefore Rose Pins are sieved into cavities of the lower part of the mold by using PVC masks specific for each diameter/design. In a next step base material is put into the mold. By closing mold and adding pressure by using a press (simple cutting press) Rose Pins are applied onto base material simultaneously in one step.
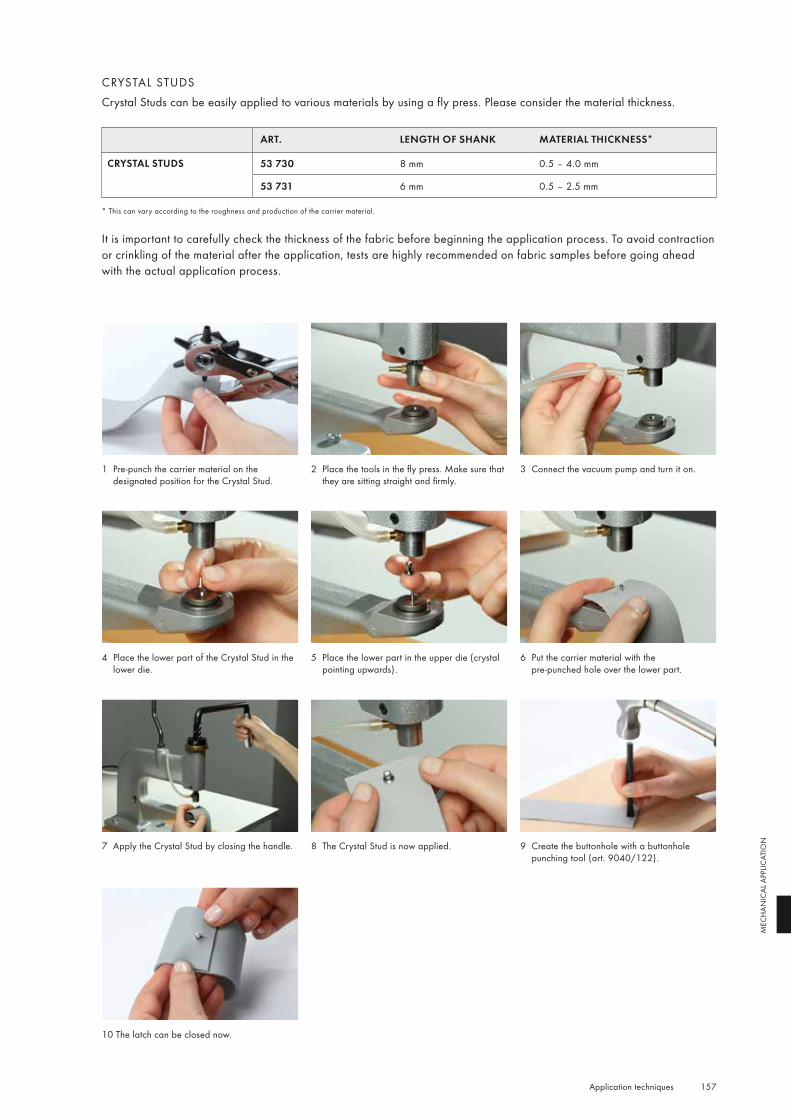
157 Application techniques
MEC
HAN
ICAL
APP
LICAT
ION
CRYSTAL STUDSCrystal Studs can be easily applied to various materials by using a fly press. Please consider the material thickness.
ART. LENGTH OF SHANK MATERIAL THICKNESS*
CRYSTAL STUDS 53 730 8 mm 0.5 – 4.0 mm
53 731 6 mm 0.5 – 2.5 mm * This can vary according to the roughness and production of the carrier material.
It is important to carefully check the thickness of the fabric before beginning the application process. To avoid contraction or crinkling of the material after the application, tests are highly recommended on fabric samples before going ahead with the actual application process.
1 Pre-punch the carrier material on the designated position for the Crystal Stud.
2 Place the tools in the fly press. Make sure that they are sitting straight and firmly.
3 Connect the vacuum pump and turn it on.
10 The latch can be closed now.
4 Place the lower part of the Crystal Stud in the lower die.
5 Place the lower part in the upper die (crystal pointing upwards).
6 Put the carrier material with the pre-punched hole over the lower part.
7 Apply the Crystal Stud by closing the handle. 8 The Crystal Stud is now applied. 9 Create the buttonhole with a buttonhole punching tool (art. 9040/122).
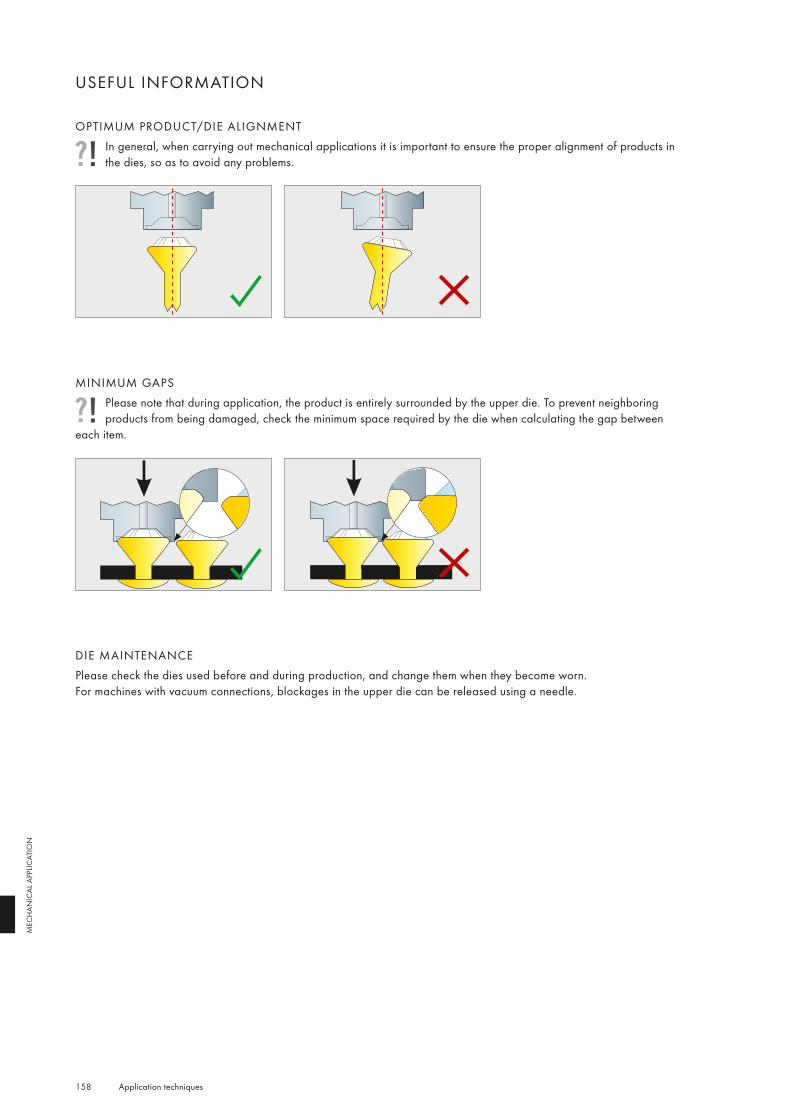
158 Application techniques
MEC
HAN
ICAL
APP
LICAT
ION
USEFUL INFORMATION
MINIMUM GAPSPlease note that during application, the product is entirely surrounded by the upper die. To prevent neighboring products from being damaged, check the minimum space required by the die when calculating the gap between
each item.
DIE MAINTENANCEPlease check the dies used before and during production, and change them when they become worn. For machines with vacuum connections, blockages in the upper die can be released using a needle.
OPTIMUM PRODUCT/DIE ALIGNMENTIn general, when carrying out mechanical applications it is important to ensure the proper alignment of products in the dies, so as to avoid any problems.
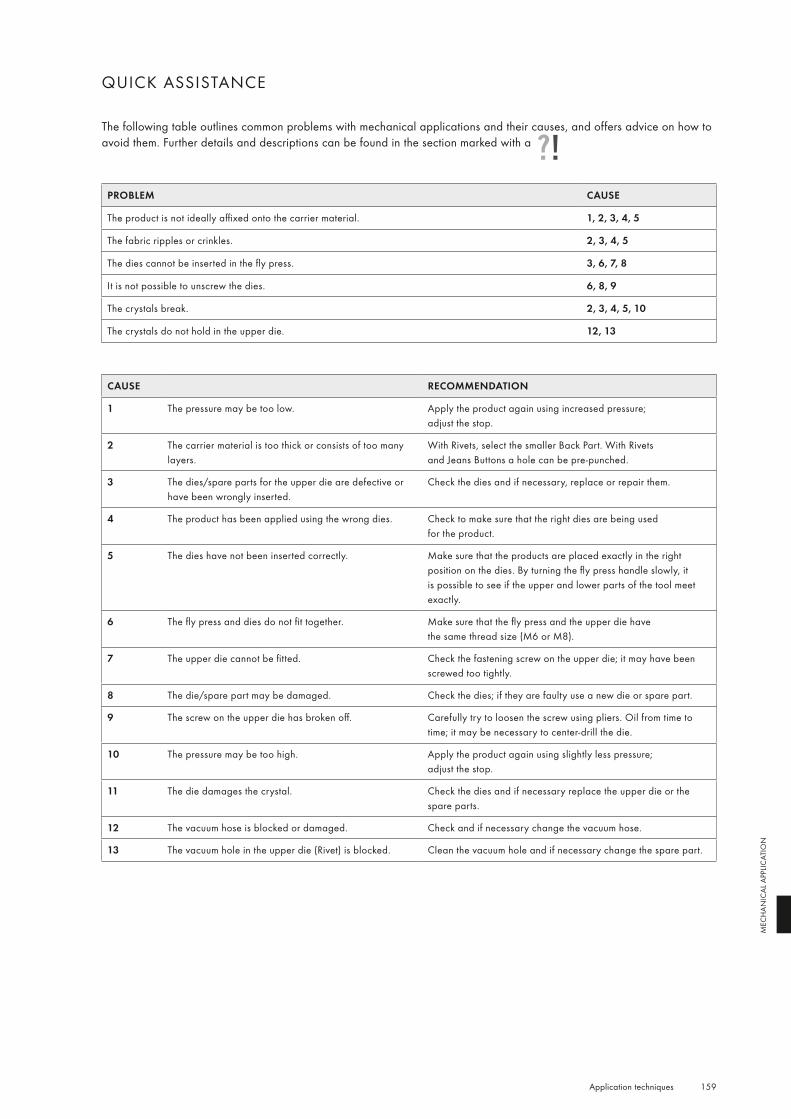
159 Application techniques
MEC
HAN
ICAL
APP
LICAT
ION
QUICK ASSISTANCE
The following table outlines common problems with mechanical applications and their causes, and offers advice on how to avoid them. Further details and descriptions can be found in the section marked with a
PROBLEM CAUSE
The product is not ideally affixed onto the carrier material. 1, 2, 3, 4, 5
The fabric ripples or crinkles. 2, 3, 4, 5
The dies cannot be inserted in the fly press. 3, 6, 7, 8
It is not possible to unscrew the dies. 6, 8, 9
The crystals break. 2, 3, 4, 5, 10
The crystals do not hold in the upper die. 12, 13
CAUSE RECOMMENDATION
1 The pressure may be too low. Apply the product again using increased pressure; adjust the stop.
2 The carrier material is too thick or consists of too many layers.
With Rivets, select the smaller Back Part. With Rivets and Jeans Buttons a hole can be pre-punched.
3 The dies/spare parts for the upper die are defective or have been wrongly inserted.
Check the dies and if necessary, replace or repair them.
4 The product has been applied using the wrong dies. Check to make sure that the right dies are being used for the product.
5 The dies have not been inserted correctly. Make sure that the products are placed exactly in the right position on the dies. By turning the fly press handle slowly, it is possible to see if the upper and lower parts of the tool meet exactly.
6 The fly press and dies do not fit together. Make sure that the fly press and the upper die have the same thread size (M6 or M8).
7 The upper die cannot be fitted. Check the fastening screw on the upper die; it may have been screwed too tightly.
8 The die/spare part may be damaged. Check the dies; if they are faulty use a new die or spare part.
9 The screw on the upper die has broken off. Carefully try to loosen the screw using pliers. Oil from time to time; it may be necessary to center-drill the die.
10 The pressure may be too high. Apply the product again using slightly less pressure; adjust the stop.
11 The die damages the crystal. Check the dies and if necessary replace the upper die or the spare parts.
12 The vacuum hose is blocked or damaged. Check and if necessary change the vacuum hose.
13 The vacuum hole in the upper die (Rivet) is blocked. Clean the vacuum hole and if necessary change the spare part.

CARE INSTRUCTIONS
To ensure the highest quality and longest- lasting applications of Swarovski products, proper care is essential. The Swarovski
Hotfix adhesive is characterized by its wash resistance and easy-care properties.
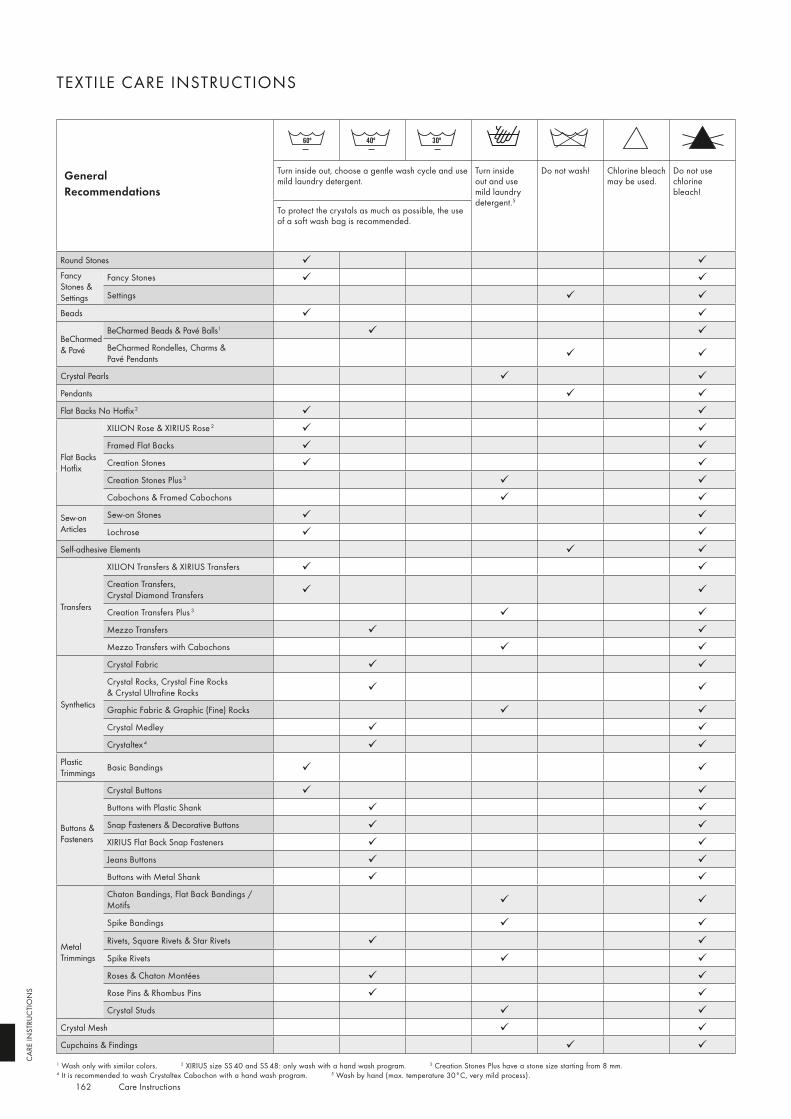
162
CAR
E IN
STRU
CTI
ON
S
TEXTILE CARE INSTRUCTIONS TEXTILE CARE INSTRUCTIONS
Care Instructions
GeneralRecommendations
Turn inside out, choose a gentle wash cycle and use mild laundry detergent.
Turn inside out and use mild laundry detergent.5
Do not wash! Chlorine bleach may be used.
Do not use chlorine bleach!
Turn inside out and dry at reduced temperature.
Do not tumble dry! Iron inside out using a silk/polyester/ viscose setting.
Iron inside out using a wool setting.
Do not iron!
To protect the crystals as much as possible, the use of a soft wash bag is recommended.
Ironing the textile inside out and using a pressing cloth is recommended.
Round Stones Round Stones Fancy Stones & Settings
Fancy Stones Fancy Stones & Settings
Fancy Stones
Settings Settings
Beads Beads
BeCharmed & Pavé
BeCharmed Beads & Pavé Balls1 BeCharmed & Pavé
BeCharmed Beads & Pavé Balls1 BeCharmed Rondelles, Charms & Pavé Pendants
BeCharmed Rondelles, Charms & Pavé Pendants
Crystal Pearls Crystal Pearls Pendants Pendants Flat Backs No Hotfix2 Flat Backs No Hotfix2
Flat Backs Hotfix
XILION Rose & XIRIUS Rose 2
Flat Backs Hotfix
XILION Rose & XIRIUS Rose 2 Framed Flat Backs Framed Flat Backs Creation Stones Creation Stones Creation Stones Plus 3 Creation Stones Plus 3 Cabochons & Framed Cabochons Cabochons & Framed Cabochons
Sew-on Articles
Sew-on Stones Sew-on Articles
Sew-on Stones Lochrose Lochrose
Self-adhesive Elements Self-adhesive Elements
Transfers
XILION Transfers & XIRIUS Transfers
Transfers
XILION Transfers & XIRIUS Transfers Creation Transfers, Crystal Diamond Transfers
Creation Transfers, Crystal Diamond Transfers
Creation Transfers Plus 3 Creation Transfers Plus 3 Mezzo Transfers Mezzo Transfers Mezzo Transfers with Cabochons Mezzo Transfers with Cabochons
Synthetics
Crystal Fabric
Synthetics
Crystal Fabric Crystal Rocks, Crystal Fine Rocks & Crystal Ultrafine Rocks
Crystal Rocks, Crystal Fine Rocks & Crystal Ultrafine Rocks
Graphic Fabric & Graphic (Fine) Rocks Graphic Fabric & Graphic (Fine) Rocks Crystal Medley Crystal Medley Crystaltex 4 Crystaltex 4
Plastic Trimmings Basic Bandings
Plastic Trimmings Basic Bandings
Buttons & Fasteners
Crystal Buttons
Buttons & Fasteners
Crystal Buttons Buttons with Plastic Shank Buttons with Plastic Shank Snap Fasteners & Decorative Buttons Snap Fasteners & Decorative Buttons XIRIUS Flat Back Snap Fasteners XIRIUS Flat Back Snap Fasteners Jeans Buttons Jeans Buttons Buttons with Metal Shank Buttons with Metal Shank
Metal Trimmings
Chaton Bandings, Flat Back Bandings / Motifs
Metal Trimmings
Chaton Bandings, Flat Back Bandings / Motifs
Spike Bandings Spike Bandings
Rivets, Square Rivets & Star Rivets Rivets, Square Rivets & Star Rivets Spike Rivets Spike Rivets Roses & Chaton Montées Roses & Chaton Montées Rose Pins & Rhombus Pins Rose Pins & Rhombus Pins Crystal Studs Crystal Studs
Crystal Mesh Crystal Mesh Cupchains & Findings Cupchains & Findings
1 Wash only with similar colors. 2 XIRIUS size SS 40 and SS 48: only wash with a hand wash program. 3 Creation Stones Plus have a stone size starting from 8 mm.4 It is recommended to wash Crystaltex Cabochon with a hand wash program. 5 Wash by hand (max. temperature 30°C, very mild process).

163
CAR
E IN
STRU
CTI
ON
S
TEXTILE CARE INSTRUCTIONS TEXTILE CARE INSTRUCTIONS
GeneralRecommendations
Turn inside out, choose a gentle wash cycle and use mild laundry detergent.
Turn inside out and use mild laundry detergent.5
Do not wash! Chlorine bleach may be used.
Do not use chlorine bleach!
Turn inside out and dry at reduced temperature.
Do not tumble dry! Iron inside out using a silk/polyester/ viscose setting.
Iron inside out using a wool setting.
Do not iron!
To protect the crystals as much as possible, the use of a soft wash bag is recommended.
Ironing the textile inside out and using a pressing cloth is recommended.
Round Stones Round Stones Fancy Stones & Settings
Fancy Stones Fancy Stones & Settings
Fancy Stones
Settings Settings
Beads Beads
BeCharmed & Pavé
BeCharmed Beads & Pavé Balls1 BeCharmed & Pavé
BeCharmed Beads & Pavé Balls1 BeCharmed Rondelles, Charms & Pavé Pendants
BeCharmed Rondelles, Charms & Pavé Pendants
Crystal Pearls Crystal Pearls Pendants Pendants Flat Backs No Hotfix2 Flat Backs No Hotfix2
Flat Backs Hotfix
XILION Rose & XIRIUS Rose 2
Flat Backs Hotfix
XILION Rose & XIRIUS Rose 2 Framed Flat Backs Framed Flat Backs Creation Stones Creation Stones Creation Stones Plus 3 Creation Stones Plus 3 Cabochons & Framed Cabochons Cabochons & Framed Cabochons
Sew-on Articles
Sew-on Stones Sew-on Articles
Sew-on Stones Lochrose Lochrose
Self-adhesive Elements Self-adhesive Elements
Transfers
XILION Transfers & XIRIUS Transfers
Transfers
XILION Transfers & XIRIUS Transfers Creation Transfers, Crystal Diamond Transfers
Creation Transfers, Crystal Diamond Transfers
Creation Transfers Plus 3 Creation Transfers Plus 3 Mezzo Transfers Mezzo Transfers Mezzo Transfers with Cabochons Mezzo Transfers with Cabochons
Synthetics
Crystal Fabric
Synthetics
Crystal Fabric Crystal Rocks, Crystal Fine Rocks & Crystal Ultrafine Rocks
Crystal Rocks, Crystal Fine Rocks & Crystal Ultrafine Rocks
Graphic Fabric & Graphic (Fine) Rocks Graphic Fabric & Graphic (Fine) Rocks Crystal Medley Crystal Medley Crystaltex 4 Crystaltex 4
Plastic Trimmings Basic Bandings
Plastic Trimmings Basic Bandings
Buttons & Fasteners
Crystal Buttons
Buttons & Fasteners
Crystal Buttons Buttons with Plastic Shank Buttons with Plastic Shank Snap Fasteners & Decorative Buttons Snap Fasteners & Decorative Buttons XIRIUS Flat Back Snap Fasteners XIRIUS Flat Back Snap Fasteners Jeans Buttons Jeans Buttons Buttons with Metal Shank Buttons with Metal Shank
Metal Trimmings
Chaton Bandings, Flat Back Bandings / Motifs
Metal Trimmings
Chaton Bandings, Flat Back Bandings / Motifs
Spike Bandings Spike Bandings
Rivets, Square Rivets & Star Rivets Rivets, Square Rivets & Star Rivets Spike Rivets Spike Rivets Roses & Chaton Montées Roses & Chaton Montées Rose Pins & Rhombus Pins Rose Pins & Rhombus Pins Crystal Studs Crystal Studs
Crystal Mesh Crystal Mesh Cupchains & Findings Cupchains & Findings
1 Wash only with similar colors. 2 XIRIUS size SS 40 and SS 48: only wash with a hand wash program. 3 Creation Stones Plus have a stone size starting from 8 mm.4 It is recommended to wash Crystaltex Cabochon with a hand wash program. 5 Wash by hand (max. temperature 30°C, very mild process).
Care Instructions
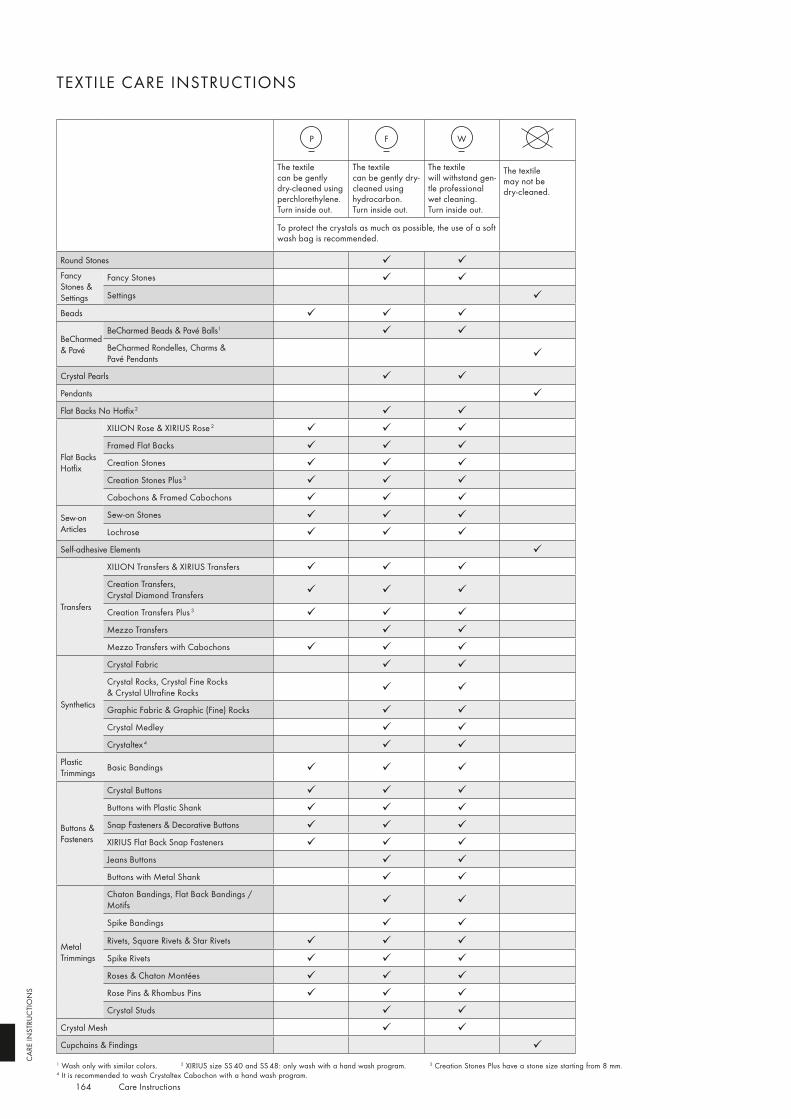
164 Care Instructions
CAR
E IN
STRU
CTI
ON
S
PP PF PW P
The textile can be gently dry-cleaned using perchlor ethylene. Turn inside out.
The textile can be gently dry-cleaned using hydro carbon. Turn inside out.
The textile will withstand gen-tle pro fessional wet cleaning. Turn inside out.
The textile may not be dry-cleaned.
To protect the crystals as much as possible, the use of a soft wash bag is recommended.
Round Stones Fancy Stones & Settings
Fancy Stones
Settings
Beads
BeCharmed & Pavé
BeCharmed Beads & Pavé Balls1 BeCharmed Rondelles, Charms & Pavé Pendants
Crystal Pearls Pendants Flat Backs No Hotfix2
Flat Backs Hotfix
XILION Rose & XIRIUS Rose 2 Framed Flat Backs Creation Stones Creation Stones Plus 3 Cabochons & Framed Cabochons
Sew-on Articles
Sew-on Stones Lochrose
Self-adhesive Elements
Transfers
XILION Transfers & XIRIUS Transfers Creation Transfers, Crystal Diamond Transfers
Creation Transfers Plus 3 Mezzo Transfers Mezzo Transfers with Cabochons
Synthetics
Crystal Fabric Crystal Rocks, Crystal Fine Rocks & Crystal Ultrafine Rocks
Graphic Fabric & Graphic (Fine) Rocks Crystal Medley Crystaltex 4
Plastic Trimmings Basic Bandings
Buttons & Fasteners
Crystal Buttons Buttons with Plastic Shank Snap Fasteners & Decorative Buttons XIRIUS Flat Back Snap Fasteners Jeans Buttons Buttons with Metal Shank
Metal Trimmings
Chaton Bandings, Flat Back Bandings / Motifs
Spike Bandings
Rivets, Square Rivets & Star Rivets Spike Rivets Roses & Chaton Montées Rose Pins & Rhombus Pins Crystal Studs
Crystal Mesh Cupchains & Findings
1 Wash only with similar colors. 2 XIRIUS size SS 40 and SS 48: only wash with a hand wash program. 3 Creation Stones Plus have a stone size starting from 8 mm.4 It is recommended to wash Crystaltex Cabochon with a hand wash program.
TEXTILE CARE INSTRUCTIONS
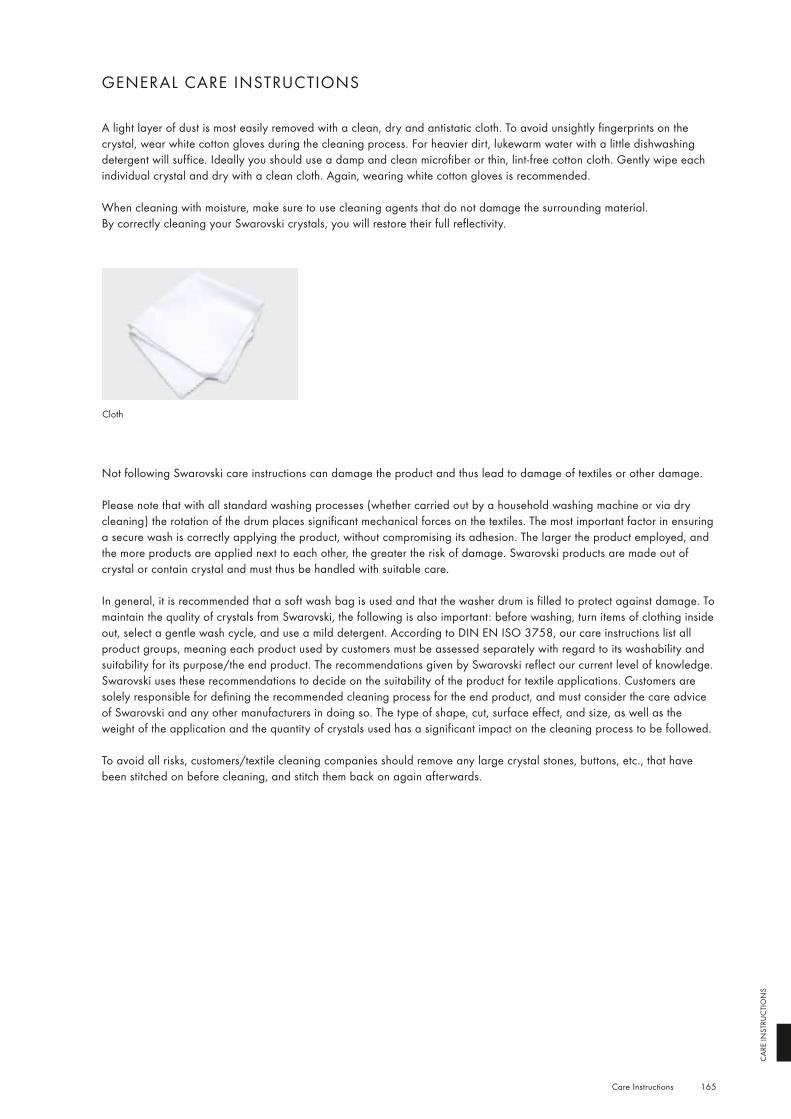
165 Care Instructions
CAR
E IN
STRU
CTI
ON
S
A light layer of dust is most easily removed with a clean, dry and antistatic cloth. To avoid unsightly fingerprints on the crystal, wear white cotton gloves during the cleaning process. For heavier dirt, lukewarm water with a little dishwashing detergent will suffice. Ideally you should use a damp and clean microfiber or thin, lint-free cotton cloth. Gently wipe each individual crystal and dry with a clean cloth. Again, wearing white cotton gloves is recommended.
When cleaning with moisture, make sure to use cleaning agents that do not damage the surrounding material. By correctly cleaning your Swarovski crystals, you will restore their full reflectivity.
GENERAL CARE INSTRUCTIONS
Cloth
Not following Swarovski care instructions can damage the product and thus lead to damage of textiles or other damage.
Please note that with all standard washing processes (whether carried out by a household washing machine or via dry cleaning) the rotation of the drum places significant mechanical forces on the textiles. The most important factor in ensuring a secure wash is correctly applying the product, without compromising its adhesion. The larger the product employed, and the more products are applied next to each other, the greater the risk of damage. Swarovski products are made out of crystal or contain crystal and must thus be handled with suitable care.
In general, it is recommended that a soft wash bag is used and that the washer drum is filled to protect against damage. To maintain the quality of crystals from Swarovski, the following is also important: before washing, turn items of clothing inside out, select a gentle wash cycle, and use a mild detergent. According to DIN EN ISO 3758, our care instructions list all product groups, meaning each product used by customers must be assessed separately with regard to its washability and suitability for its purpose/the end product. The recommendations given by Swarovski reflect our current level of knowledge. Swarovski uses these recommendations to decide on the suitability of the product for textile applications. Customers are solely responsible for defining the recommended cleaning process for the end product, and must consider the care advice of Swarovski and any other manufacturers in doing so. The type of shape, cut, surface effect, and size, as well as the weight of the application and the quantity of crystals used has a significant impact on the cleaning process to be followed.
To avoid all risks, customers/textile cleaning companies should remove any large crystal stones, buttons, etc., that have been stitched on before cleaning, and stitch them back on again afterwards.
166 Care Instructions
CAR
E IN
STRU
CTI
ON
S
LAWS, REGULATIONS, NORMS & STANDARDS
The composition of loose and forward-integrated crystals in the Advanced Crystal standard is compliant with regulatory industry norms and laws regarding the restriction or prohibition of certain
substances for finished products in the most relevant segments of our customers‘ business.
WARNING NOTICES
General Warning Loose crystals may present a small parts hazard to young children, particularly children under three years old. Depending on the size of the crystal and any attached material (such as glue, fabric, etc.), children may choke on, inhale, swallow, or insert the crystal into their noses. Magnetic products with crystal applications pose a particular risk of serious intestinal injury if ingested. The application techniques as stated in the Application Manual do not guarantee that crystals will not come loose. For each application, the manufacturer must determine whether the product meets the relevant requirements related to small parts hazards and assess any risk it may pose to small children. Failure to follow Swarovski‘s care instructions may result in damage to the crystal, which could pose a risk of laceration or other harm.
Warning for Magnetic ProductsLoose crystals may present a small parts hazard to young children, particularly children under three years old. Magnetic products with crystal applications pose a particular risk of serious intestinal injuries if ingested. For each application of magnetic crystal products, the manufacturer must determine whether the product meets relevant requirements related to small parts hazards and assess any risk it may pose to small children.
Warning for TablewareThe application of loose crystals to tableware presents a potential risk of aspiration, choking, swallowing, or tooth damage should crystals become loose. To reduce this risk, crystals should never be applied to any surface of tableware likely to come in contact with food or the mouth, and crystals should never be placed on any tableware intended for use by children. Tableware with crystals intended for decorative use only should be marked as such. To avoid dishwasher damage, tableware decorated with crystals should be washed by hand. The application techniques or suggestions in this manual do not guarantee that crystals will
not come loose. For each application, the manufacturer must determine whether the product meets relevant requirements related to small parts hazards or use in food contact items and assess any risk it may pose to users. The use of crystals (which may contain restricted substances deemed hazardous under local laws) and adhesives on tableware is subject to legal restrictions in specific countries. The customer is fully responsible for complying with these country-specific provisions and shall defend, indemnify, and hold Swarovski harmless from any and all third-party claims based on product liability or otherwise relating to uses of Swarovski products, and waives all its own claims against Swarovski.
Unsuitable ApplicationsCrystals from Swarovski are intended for use in the fields of fashion, jewelry, accessories, textile products, and for interior décor. Due to their physical properties, crystals from Swarovski are unsuitable for other uses (e.g. gluing onto teeth, using on or near mucous membranes, and other unsafe uses). The customer shall defend, indemnify, and hold Swarovski harmless from any and all third-party claims based on product liability or otherwise relating to uses of Swarovski products purchased by the customer, and waives all its own claims.
Responsibility of UserAny oral, written, or test-based advice that Swarovski provides regarding techniques for the application of its products are recommendations based on Swarovski’s current knowledge and the information provided by its suppliers. Such advice does not discharge the customer from carrying out its own tests of techniques it proposes to use and their suitability for the intended application. The application, use, and processing of these techniques and products are solely the user’s responsibility.

167

Sys.No. 5300459
Content is subject to change without notice.Errors and misprints excepted. Please note, the actual products may deviate from the pictures in color and effect.D. Swarovski Distribution GmbH, Swarovskistrasse 30, 6112 Wattens, Austria
© 2016 D. Swarovski Distribution GmbH. All rights reserved. Partial or total publication, transmission, copy or other duplication of texts, graphics, pictures etc. which are to be found in this publication is forbidden without special consent by D. Swarovski Distribution GmbH.Swarovski® is a registered trademark of Swarovski AG.
Please visit our website for contact information: SWAROVSKI.COM/PROFESSIONAL